Fix: An Error Occurred While Updating Counter-Strike

Some Counter-Strike players have stated that An error occurred while updating Counter-Strike error message pops up when they select to play the game via Steam.

The game doesn’t update, and players can’t launch Counter-Strike: Global Offensive.

Does that error message sound familiar? If so, some of the resolutions below might fix it.

How can I fix Counter-Strike update errors?

1. Select an alternative download region

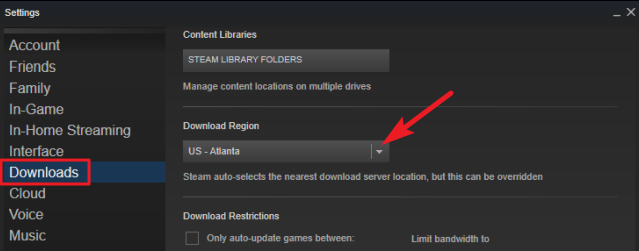
  1. Right-click Steam’s system tray icon and select Settings, in order to select an alternative download region in Steam.
  2. Click Downloads on the left of the Settings window.
  3. Select an alternative region on the Download Region drop-down menu.
  4. Press the OK button to close the window.
  5. Restart Steam after changing the download region.

2. Clear Steam’s Download Cache

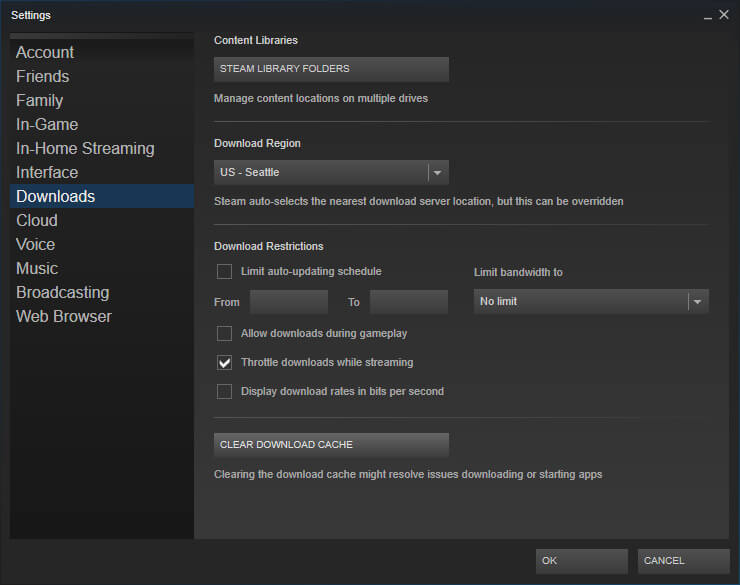
  1. Select Steam, then Settings on Steam’s left client menu.
  2. Select Downloads on the Settings window.
  3. Press the Clear Download Cache button.
  4. Click OK to confirm.
  5. Thereafter, log in to Steam again.

Steam includes a Clear Download Cache option that can fix download issues or games that don’t start. So, that option might come in handy for fixing the An error occurred while updating counter strike global offensive (invalid app configuration) error.

3. Run Steam as Administrator

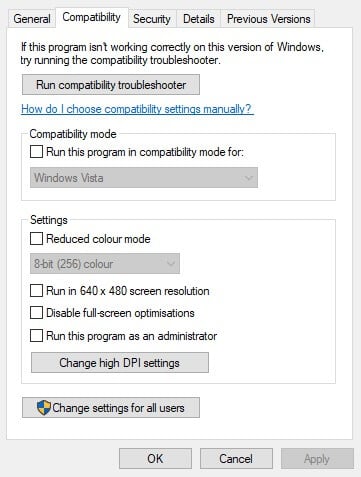
  1. Right-click Steam.exe within the software’s folder and select Properties.
  2. Select the Compatibility tab shown directly below.
  3. Click the Run this program as administrator check box.
  4. Select the Apply button.
  5. Select the OK option.

4. Turn off the Windows firewall

  1. Click on the Type here to search button on the taskbar to open Cortana.
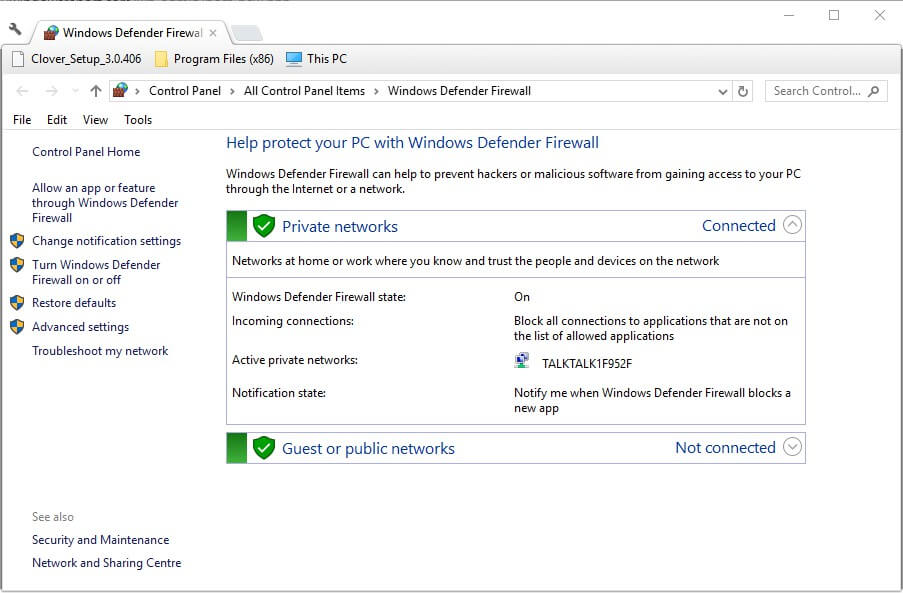
  2. Enter firewall in the search box, and select to open Windows Defender Firewall.
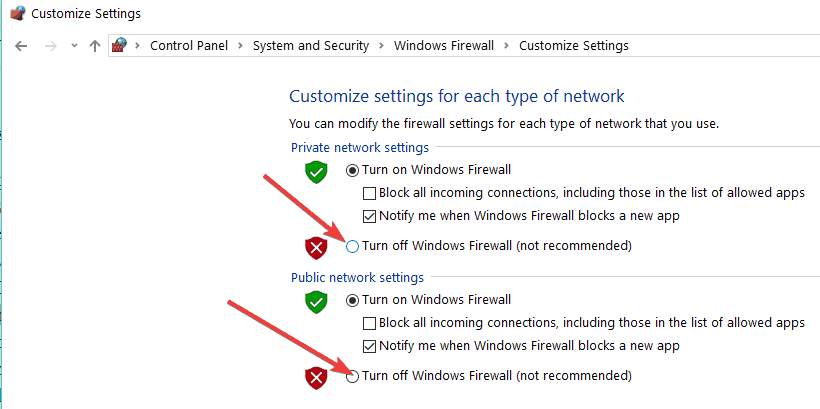
  3. Click Turn Windows Defender Firewall on or off to open the options shown directly below.
  4. Select the Turn off Windows Defender Firewall options.
  5. Click the OK button.

Some Steam users have stated that turning off the Windows Defender Firewall fixed the An error occurred while updating Counter-Strike error for them. So, the error message is often due to the firewall blocking Steam. Users can turn off the firewall in Windows 10.

5. Turn off third-party antivirus software

  1. Open Run with the Windows key + R hotkey.
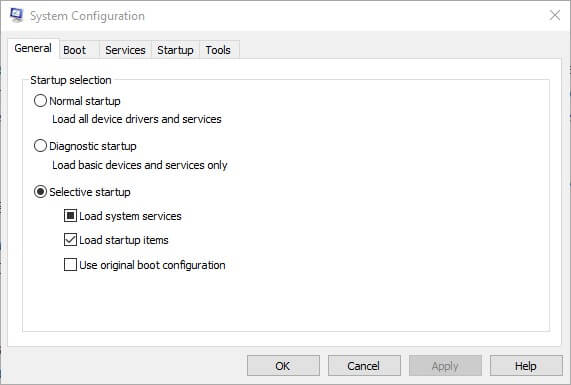
  2. Then open the System Configuration window by entering ‘msconfig’ in Run and clicking OK.
  3. Select the Selective startup radio button.
  4. Uncheck the Load startup items check box.
  5. Select the Load system services and Use original boot configuration check boxes.
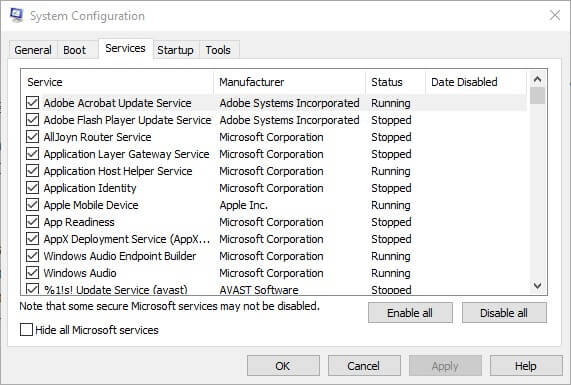
  6. Click the Services tab shown directly below.
  7. Select the Hide all Microsoft services option first.
  8. Then click the Disable all button to uncheck all the third-party services check boxes.
  9. Select the Apply option to confirm the new settings.
  10. Then click OK to close the window.
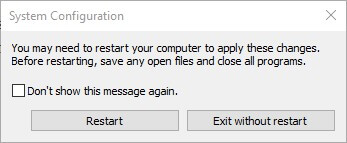
  11. Press the Restart button on the dialog box window that opens.
  12. Open Steam and launch Counter-Strike again. If the game updates and starts, then you probably need to get rid of the antivirus software.

The An error occurred while updating Counter-Strike error can also be due to third-party antivirus software, which include firewalls. Steam users have fixed the issue by uninstalling antivirus utilities.

At the very least, some players might need to disable their antivirus software by right-clicking the utilities system tray icons and selecting a disable or turn off setting.

If that isn’t enough, try clean booting Windows. That will remove third-party antivirus utilities, and other software, from the startup.

6. Delete the Appcache folder

  1. Close the Steam client software if it’s open.
  2. Open File Explorer.
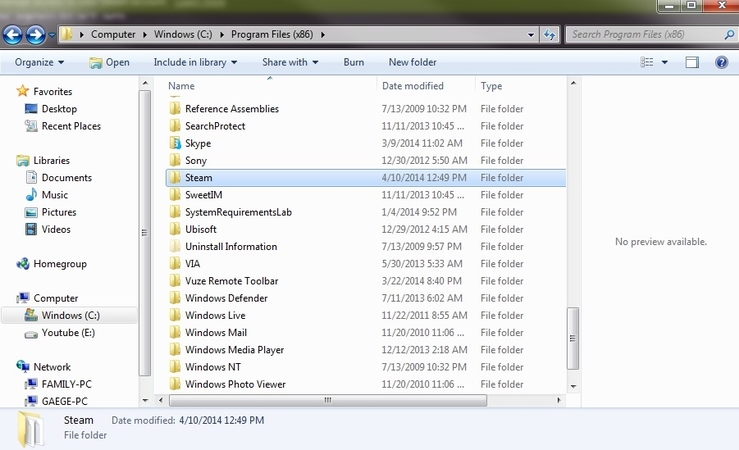
  3. Open the Steam folder, that has the following File Explorer path: C:Program FilesSteam or C:Program Files(x86)Steam.
  4. Select the appcache subfolder and press the Delete button to erase it.

Those are a few of the resolutions that have fixed the An error occurred while updating Counter-Strike for most Steam users. You can also set up a Steam Support account to send a support ticket.

We’d like to hear more from you on this subject, so drop us a comment in the comment section below.

How to fix Steam’s Invalid Depot Configuration error

Some users have posted about an Invalid Depot Configuration error on Steam’s forum. That error arises when users try to install or update a game through Steam.

As a consequence, users can’t install or update Steam games when that issue arises. These are some of the fixes for the Invalid Depot Configuration error.

How can I fix the Invalid Depot Config steam error?

1. Update Steam

check if the game is properly installed

First, check for Steam updates. Open the Steam window, and then click File. Select Check for Steam Client Updates to update the software if required.

If your update gets stuck, follow the simple solutions from this guide to solve the problem easily.


2. Delete almost all files in Steam’s folder

  1. Some users have fixed the Invalid Depot Configuration error by clearing most of the Steam folder. To do that, open File Explorer with the Windows key + E keyboard shortcut.
  2. Open the Steam folder in File Explorer. The default path for Steam will usually be something like this: C:Program FilesSteam
  3. Select to delete all files in the Steam folder with the exception of Steam.exe and the Steamapps and Userdata subfolders.
  4. Press the Delete button to erase the selected files.
    Delete button Steam Invalid Depot Configuration Error
  5. Restart Windows after clearing the Steam folder.

3. Opt out of the Beta program for Steam

  1. Steam beta users have said they’ve fixed the issue by opting out of the beta program. To do that, open the Steam client software.
  2. Click the Steam menu at the top left of the software’s window.
  3. Select Settings on the menu.
  4. Click the Change button for beta participation on the Account tab.
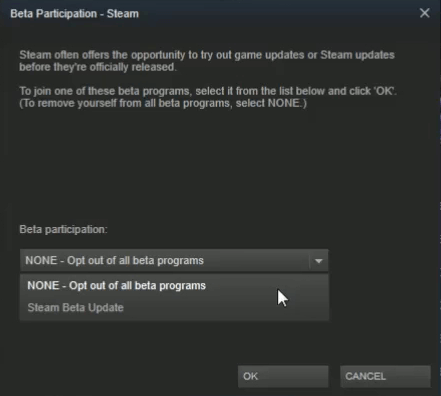
  5. Select the Opt out of all beta programs option on the Beta participation drop-down menu.

4. Enter the Flushconfig command in Run

flushconfig command Steam Invalid Depot Configuration Error

Steam users have also confirmed that the flushconfig command can fix the Invalid Depot Configuration error.

Open Run by pressing the Windows button (left of Alt key) and R. Then input steam://flushconfig in Run, and press the OK button.


5. Erase MountedDepots configuration

  1. First, make sure Steam is fully closed.
  2. Then open the SteamApps subfolder within the Steam folder in File Explorer.
  3. Right-click the appmanifest_[gameid].acf file, select Open with, and then choose a text editor (such as Notepad) to open it with.
  4. Delete all the numbers listed under the MountedDepots section.
  5. Select the File and click on Save options.
  6. Thereafter, Steam will set up a corrected MountedDepots configuration when launched.

Erasing MountedDepots configuration within the appmanifest_[gameid].acf file is another resolution Steam users have fixed the Invalid Depot Configuration error with.


6. Reinstall the Steam Software

  1. As a final resolution, try fully reinstalling Steam with the latest version. To preserve game installations, move the Steamapps folder out of the Steam folder before uninstalling the gaming client.
  2. Open the Run utility by pressing Windows key + R.
  3. Enter appwiz.cpl and click the OK button.The uninstaller window Steam Invalid Depot Configuration Error
  4. Then select Steam, and click the Change/Remove option.
  5. Go through the uninstall instructions to remove Steam.
  6. Restart Windows before reinstalling Steam.
  7. Click Install Steam on the software’s download page to get the latest version.
  8. Open Steam’s setup wizard to add the game client to Windows.
  9. Thereafter, users can move the Steamapps folder back into the Steam folder.

Those are confirmed resolutions that have fixed the Invalid Depot Configuration error for Steam users. With that error fixed, you can then install and update games through Steam.

If you have any other questions or suggestions, don’t hesitate to leave them in the comments section below.

MediaCom Packet Loss: What Is It and How to Fix It

MediaCom is a communication company that delivers Internet, TV, phone, and cable services to its customers.

Just a heads-up, we’ll focus solely on the Internet part.

As with any other ISP, MediaCom customers may experience various technical issues, such as packet loss, from time to time.

Packet loss is a common phenomenon regardless of location, and it can be triggered by many factors.

In this guide, we’ll teach you more about packet loss, what can cause it, and how to fix it effectively as a MediaCom customer.

What is packet loss?

We can’t stress this enough: packet loss is not a MediaCom-specific issue. It can happen everywhere as long as you have an Internet connection.

To put it simply, packet loss occurs whenever packets of data get lost along the way and never reach their destination.

That destination could be either you or a remote server you’re sending/receiving information to/from.

As a result, you may experience various annoying issues, such as:

  • An unresponsive connection
  • Stuttering during VoIP calls
  • Jitter
  • Sluggish video streaming
  • Unplayable online games
  • Unresponsive menus in games
  • Rubberbanding (still talking about games)

What causes packet loss?

Unfortunately, several things can cause packet loss, whether you’re a MediaCom customer or not.

  • Network congestion (this is the most common reason)
  • Poor ISP traffic management (causes network congestion)
  • Not maintaining your connection properly
  • Using Wi-Fi instead of a wired connection
  • Cheap Internet plan (not enough bandwidth)
  • Obsolete hardware (including routers, cables)
  • Router running on an older firmware version
  • Out-of-date drivers on your system
  • ISP throttling your bandwidth

With these potential causes in mind, it’s not difficult to see why packet loss isn’t exactly easy to spot and troubleshoot.

As you can see, some of these factors are directly your ISP’s (MediaCom) responsibility, while others are up for you to handle.

How can I fix MediaCom packet loss?

Use a VPN

  1. Download and install ExpressVPN.
  2. Launch the VPN client and log in to your account.
  3. Connect to a fast server (nearby servers are usually the fastest).
  4. Check if your packet loss issue persists.

More often than not, using a VPN can curb packet loss without too much effort. You fire it up and connect it to a server; moments later, you can see the improvements.

However, there’s also a solid chance that this fix won’t work as intended.

Remember when we said that some of the leading causes of packet loss are directly tied to your ISP (MediaCom)?

A VPN can take care of those by re-routing your connection through a secure, well-maintained, unrestricted tunnel. Therefore, if the issue occurs on your side, a VPN could only worsen things.

The same goes if the remote server (e.g., streaming server, game server) has technical difficulties and discards packets.

The main reason why we recommend ExpressVPN is that it has a huge network of thousands of servers.

Thus, even if you’ve picked a server that doesn’t seem to work well, you can simply choose another one. You have plenty of elbow room.

Check out ExpressVPN’s main features:

ExpressVPN

If you’re struggling with this MediaCom issue, I suggest you try ExpressVPN to solve it right away.
Free Trial Visit Website

Flush your DNS

It’s not a given, but sometimes flushing your DNS can improve your connection’s well-being.

Much like many other types of data, your system can cache DNS information, and these data build-ups can have a negative impact on your connection.

For that reason, flushing your DNS could really improve your connection, especially if you have never done it before, or didn’t do it in a long time.

Here’s how you can flush your DNS on your Windows 10 PC:

  1. Launch a CMD instance with Administrator rights
  2. Type the following commands, one by one, each followed by the Enter key:
    • ipconfig /flushdns
    • ipconfig /registerdns
    • ipconfig /release
    • ipconfig /renew
    • netsh winsock reset
  3. Restart your PC

After your PC restarts, check if your packet loss issue still persists.

Troubleshoot your connection

A well-maintained connection is less prone to experience technical issues such as packet loss.

For that reason, we’ve prepared a brief list of things you can do to make sure your connection is in top shape.

  • Restart your computer, your router, and your modem
  • Check if your router is running on the latest firmware version
  • Update all drivers on your system, especially network adapter drivers
  • Try to disable your VPN temporarily
  • Check if your security software (e.g. firewall, antivirus) restricts the service where you experience packet loss
  • Disable your firewall/antivirus temporarily
  • Upgrade your MediaCom Internet plan if you can (especially if your plan has insufficient bandwidth)
  • Force-stop any bandwidth-hungry app or service on your PC
  • Switch your wireless router’s broadcast channel
  • Always use a wired connection instead of Wi-Fi, if possible (Wi-Fi packet loss happens more frequently)
  • Try to avoid peak hours to bypass network congestion (or use a VPN)
  • Call MediaCom and ask them if they can look into the issue if you keep experiencing it
  • Make sure your cables aren’t damaged at all and replace them if necessary
  • Upgrade your cables if they’re outdated/obsolete (e.g. CAT5 to CAT6)

Although these suggestions may not get you rid of packet loss 100%, they can surely help you keep it to a minimum.

Note that most of our suggestions aim at your end of the connection, which MediaCom might not be responsible for.

For example, an old, chewed-out Ethernet cable could definitely mean packet loss, and MediaCom wouldn’t be to blame.

With that in mind, try as many of our suggestions as you can before blaming your ISP for your packet loss situation.

Conclusion

To wrap it up, if you’re a MediaCom customer and are experiencing packet loss, there are many things you can try to alleviate the situation.

Although using a VPN can usually take care of this problem, it will only work if the issue is caused by MediaCom (e.g. throttling, improper traffic management).

However, there’s a good chance that there’s something wrong on your side of the connection, and that’s when you should try troubleshooting the issue manually.

Roaming Profile not Syncing? 3 Quick Ways to Fix it

PC errors will appear sooner or later, and one error that users reported is the roaming profile not synching or Your roaming profile was not completely synchronized.

This isn’t a serious issue and can be easily fixed, so follow this guide to see how to fix this problem once and for all.

How can I fix the roaming profile not syncing issue?

1. Install the latest updates

  1. Press the Windows key + I to open the Settings app.
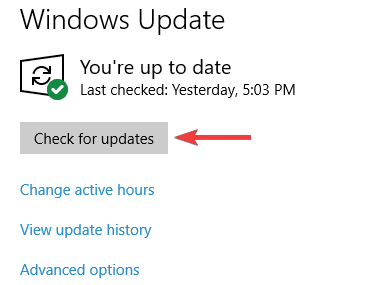
  2. Navigate to the Update & Security section and click the Check for updates button.
    windows update your roaming profile was not completely synchronized

Once the latest updates are installed, your roaming profile isn’t synchronized completely with the server error on Windows 10 will be fixed.

2. Export the ExcludeProfileDirs key from the registry

  1. Use a PC that has the latest version of Windows 10 installed.
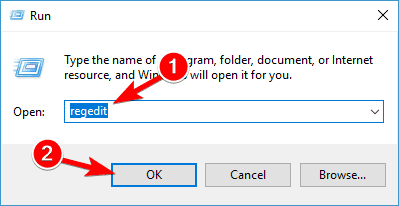
  2. Press Windows key + R and enter regedit. Press Enter or click OK.
    regedit your roaming profile was not completely synchronized
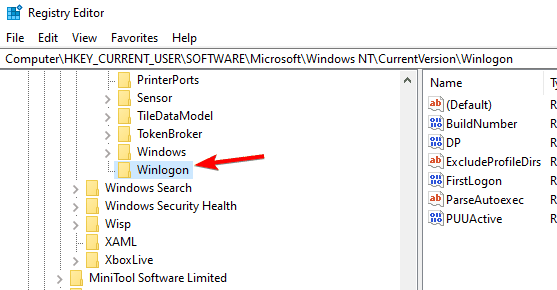
  3. Navigate to the following key in the registry: HKEY_CURRENT_USER\SOFTWARE\Microsoft\Windows NT\CurrentVersion\Winlogon
    winlogon your roaming profile was not completely synchronized
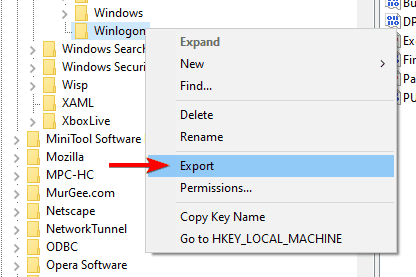
  4. Right-click the Winlogon key and choose Export.
    export winlogon key
  5. Save the file to the desired location.
  6. Copy the file to the affected PC and double-click it.
  7. When a prompt appears, click on Yes.

After doing that, the problem should be resolved. Keep in mind that for this process to work, you need a PC with Windows 10 version that is newer than the one on the affected PC.

3. Modify the Group Policy settings

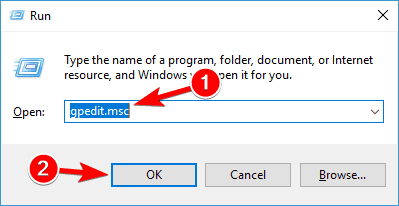
  1. Press Windows key + R and enter gpedit.msc. Press Enter or click OK.
    gpedit.msc Your roaming profile was not completely synchronized
  2. Now navigate to the path below in the left pane: User Configuration > Administrative Templates > System > User Profiles
  3. Double-click on Exclude directories in roaming profile.
    user profiles group policy your roaming profile was not completely synchronized
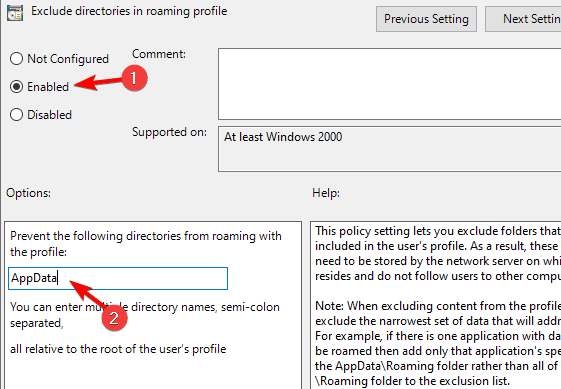
  4. Select Enabled.
  5. Type AppData in the Prevent the following directories from roaming with the profile field. Press Apply and OK to save changes.
    exclude directories your roaming profile was not completely synchronized

After doing that, the problem should be resolved.

Your roaming profile not syncing error can cause certain issues, but the best way to deal with it is to update Windows 10 or use any of our other solutions.

Finally, if your Windows 11 sync settings is not working, check our detailed guide to fix it.

FIX: NordVPN background process not running (6 solutions)

NordVPN is one of the biggest names in the VPN industry. But it’s still prone to errors, like any other piece of software.

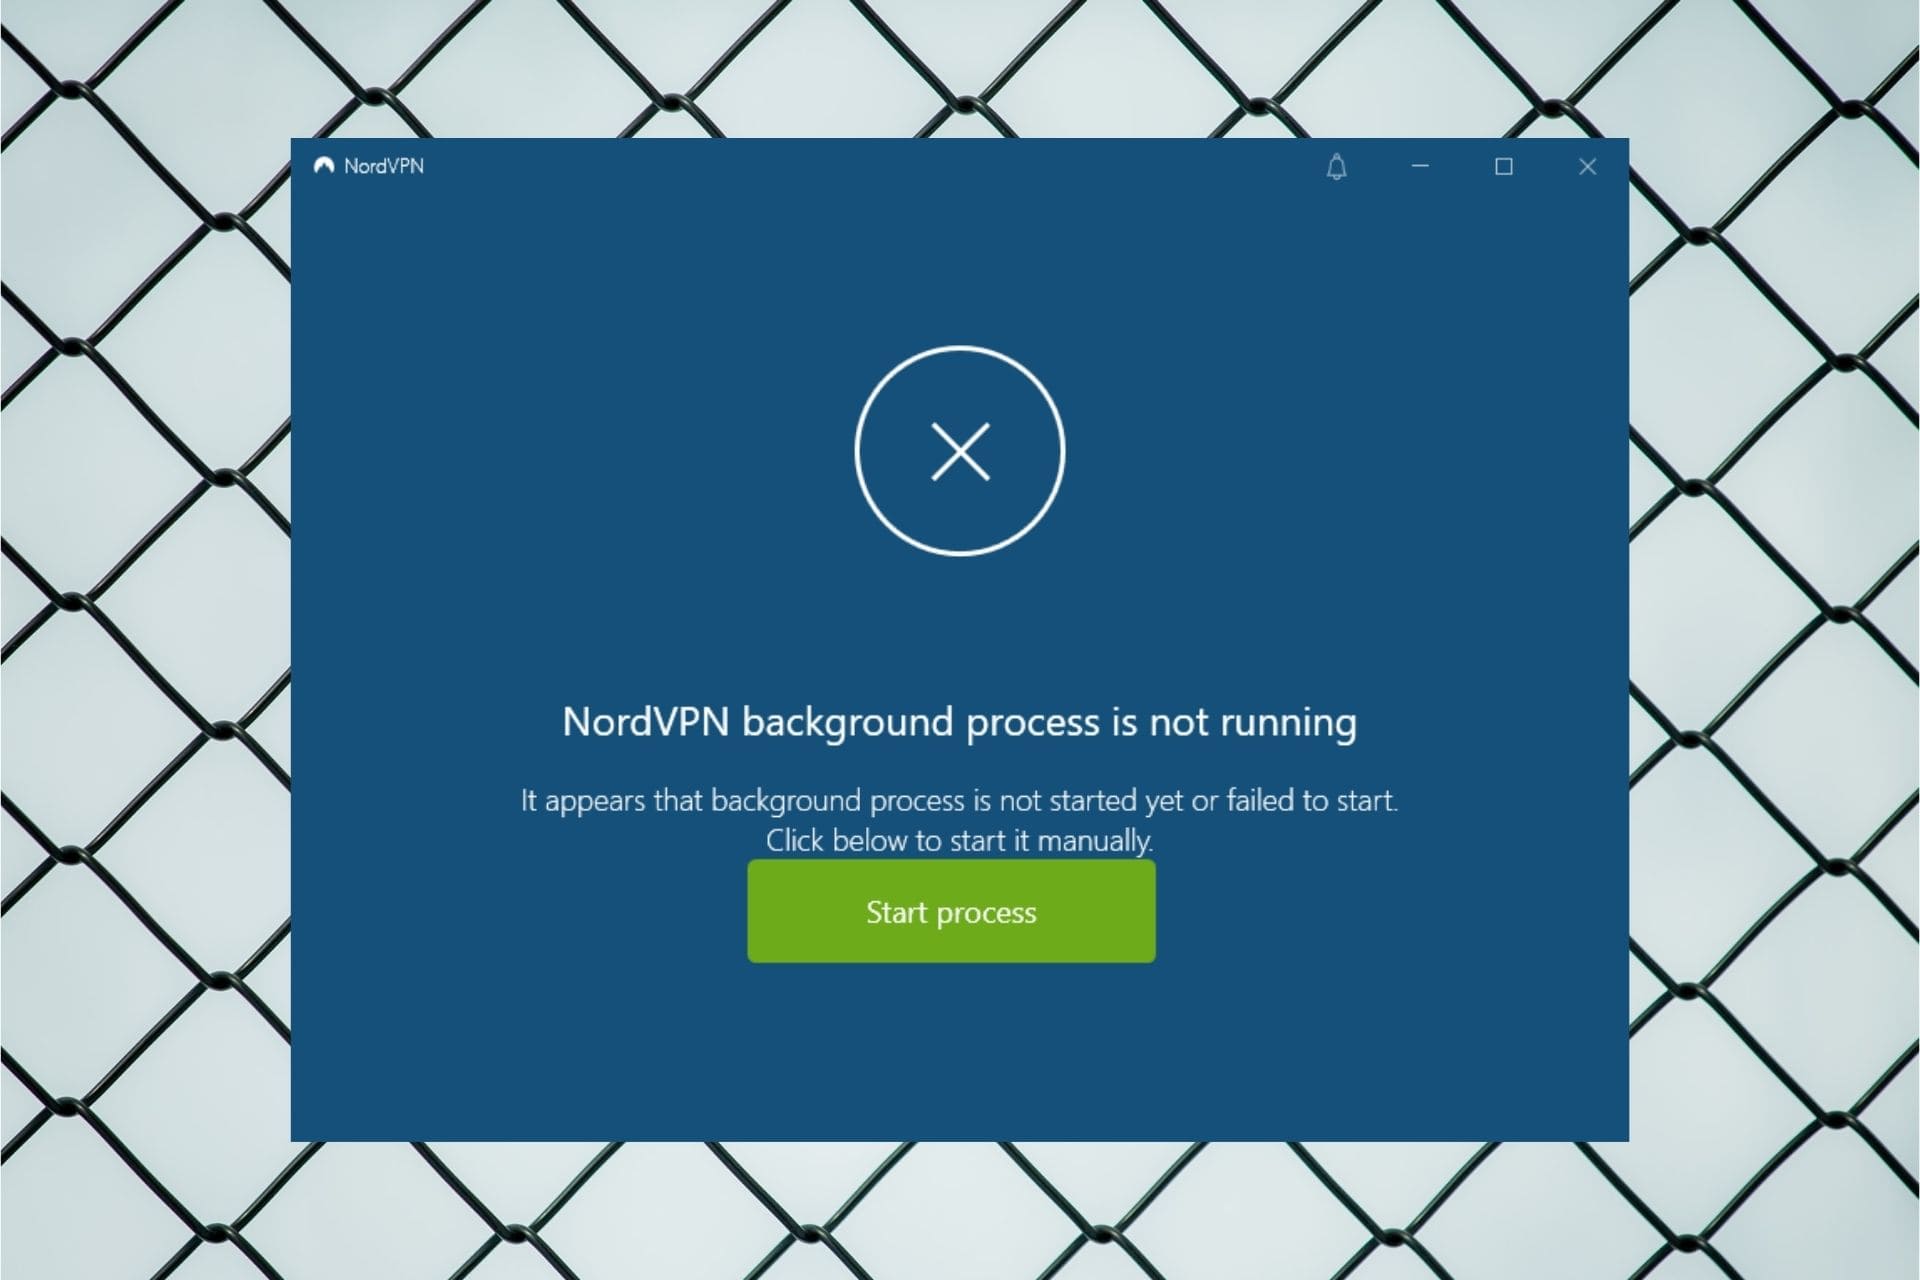
For instance, many NordVPN users report that the background process is not running on their Windows computer.

It usually happens because NordVPN fails to start at every system boot automatically, although the autostart option was enabled by the user.

If you’re looking for an easy fix to this problem, we’re here to help.

How do I fix NordVPN background process not running?

Clear the NordVPN application cache

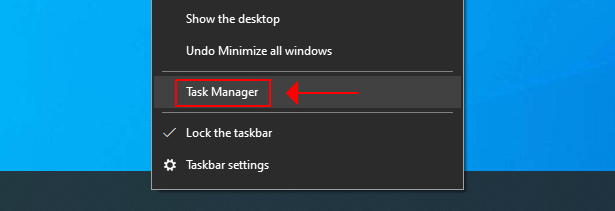
  1. Right-click the taskbar and select Task Manageraccess Task Manager from the taskbar
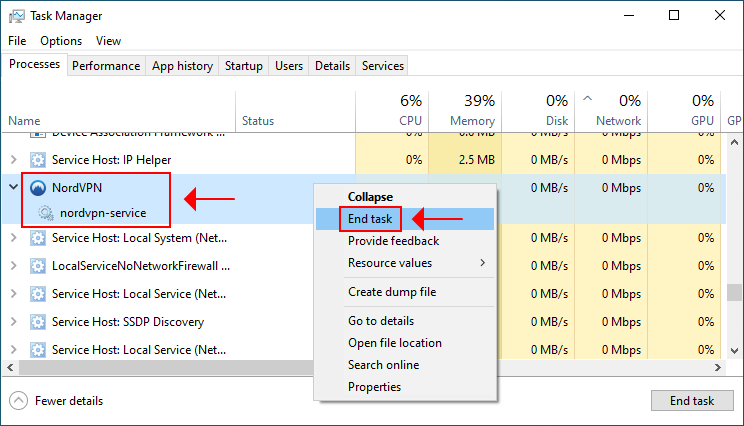
  2. Find and select nordvpn-service.exe, then click End taskend the NordVPN task
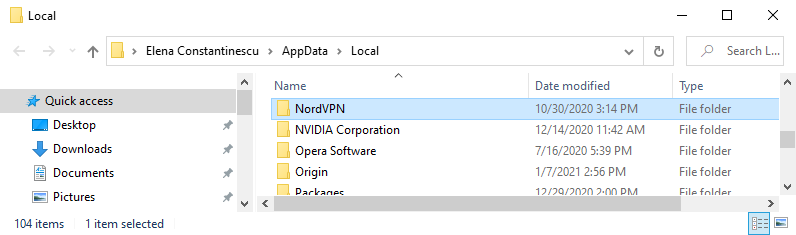
  3. Exit Task Manager, press Ctrl + R, type %localappdata%, and press Enterrun the localappdata command
  4. Locate the NordVPN folder in your file browser and delete it to remove the app cachedelete the NordVPN app folder
  5. Launch the NordVPN app

If you still see the NordVPN background process is not running message, click Start process.

Normally, you should only do this once because NordVPN should automatically start the background process on every Windows boot (unless you end the task again from Task Manager).

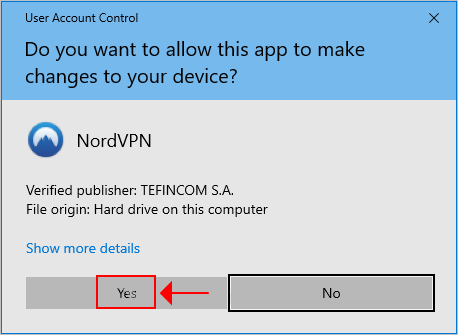
Allow NordVPN in User Account Control (UAC)

allow NordVPN in UAC

To use NordVPN, you need administrator rights. Furthermore, you must allow access to NordVPN in User Account Control (unless it’s disabled on your computer, which is not recommended). Otherwise, the app’s background process will fail to start.

Find out how to easily manage UAC settings on Windows 10.

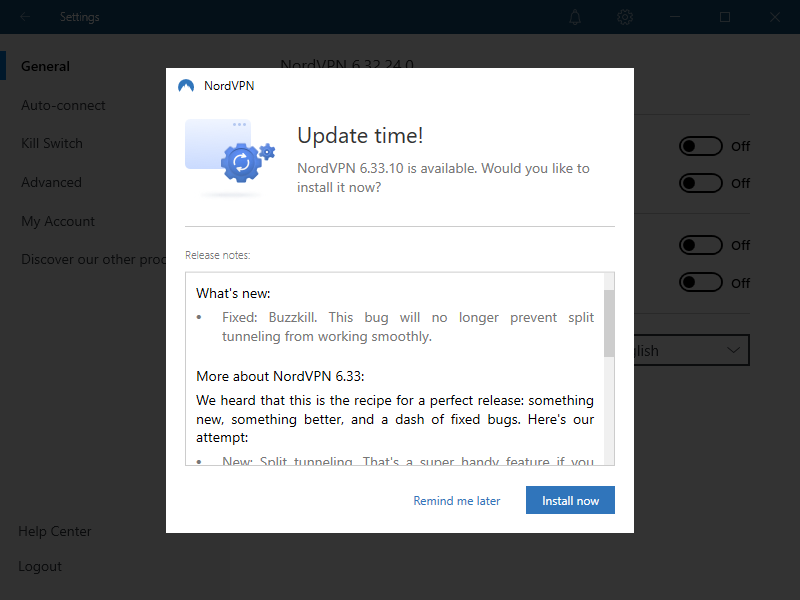
Update NordVPN

update NordVPN

If there are any pending updates, make sure to allow them and update the NordVPN to the newest version.

This way, you can take advantage of new features, improvements and bug fixes, even if there was something wrong with the background process startup.

Reinstall NordVPN

  1. Right-click the Windows 10 Start button and select Apps and Featuresaccess Apps and Features in Windows 10
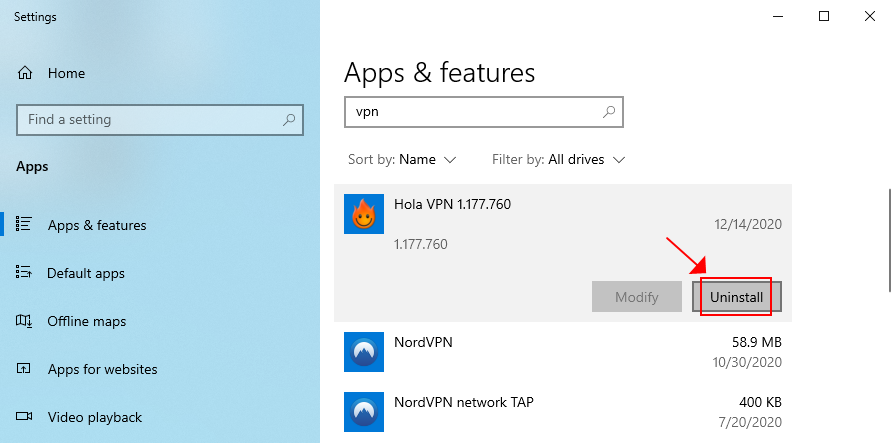
  2. Find and select NordVPN in the Apps & features listuninstall NordVPN
  3. Click Uninstall and then again to confirm
  4. Follow the on-screen instructions to remove NordVPN from your PC
  5. Download the latest NordVPN app for Windows 10
  6. Install the tool and log in with your premium credentials

Reinstalling the NordVPN app should fix any software-related issues, including TAP driver errors which might prevent the background process from running properly.

Remove other VPNs apps from your PC

If you have other VPN applications installed on your Windows 10 PC, it could lead to software conflicts that stop NordVPN from running properly.

It’s not enough to end the processes of other VPNs. Make sure to completely remove from from your Windows 10 laptop, desktop or tablet and keep only NordVPN.

Switch VPN providers

PIA

If you can’t get NordVPN to work on your computer no matter what you try, consider switching VPN providers.

It shouldn’t be a problem if you purchased NordVPN in the past month since you can take advantage of the 30-day money-back guarantee.

We recommend using Private Internet Access. It’s a super-intuitive VPN service that permits 10 simultaneous connections, unlike NordVPN which allows only 6.

You can set up PIA on all popular devices, including Windows, Android, Mac, iOS, Linux, and routers.

Moreover, PIA unblocks Netflix US, HBO Max, Peacock, and other streaming services. It has exclusive DNS, split tunneling, native port forwarding, a kill switch, as well as support for the OpenVPN and WireGuard protocols.

What else you should know about PIA:

  • No logs or leaks
  • 24/7 live chat support
  • 30-day money-back guarantee (no free trial)
  • Pay with a credit card, PayPal, or crypto
Private Internet Access

Private Internet Access

Instead of dealing with various NordVPN issues, switch to PIA for a smooth experience.
Check priceBuy it now

Conclusion

To summarize, if the NordVPN background process is not running properly on your device, make sure to clear the app cache and restart NordVPN.

Keep in mind that you must allow the app to connect to the Internet from the User Account Control.

You can also try updating NordVPN to the latest version, reinstalling it, and removing any other VPN apps you have on your PC to eliminate TAP driver conflicts and other software issues.

However, if everything fails, it’s time to consider ditching NordVPN and moving to another VPN provider. And we can’t think of a better solution than Private Internet Access (buy here).

Did you manage to get NordVPN’s process running in the background? What solution did you use? Let us know in the comment section below.

[Fixed] Nvidia in-game overlay not working / won’t turn on

The GPU manufacturer, Nvidia also offers some excellent software utilities with its GeForce Experience tool. The In-game overlay feature allows you to access some shortcuts without leaving the game. However, several users have reported the Nvidia in-game overlay not working issues lately.

This issue can occur due to a missing multimedia package for Windows 10 on your computer. However, in some instances, the issue can also occur due to a corrupt or missing graphics driver.

If you are also troubled by this error, here are a few troubleshooting steps to help you resolve the Nvidia in-game overlay not working issue on Windows 10.

How do I fix my Nvidia game overlay not working problem?

1. Update GPU driver with Outbyte Driver Updater

Outbyte Driver Updater automatically update drivers

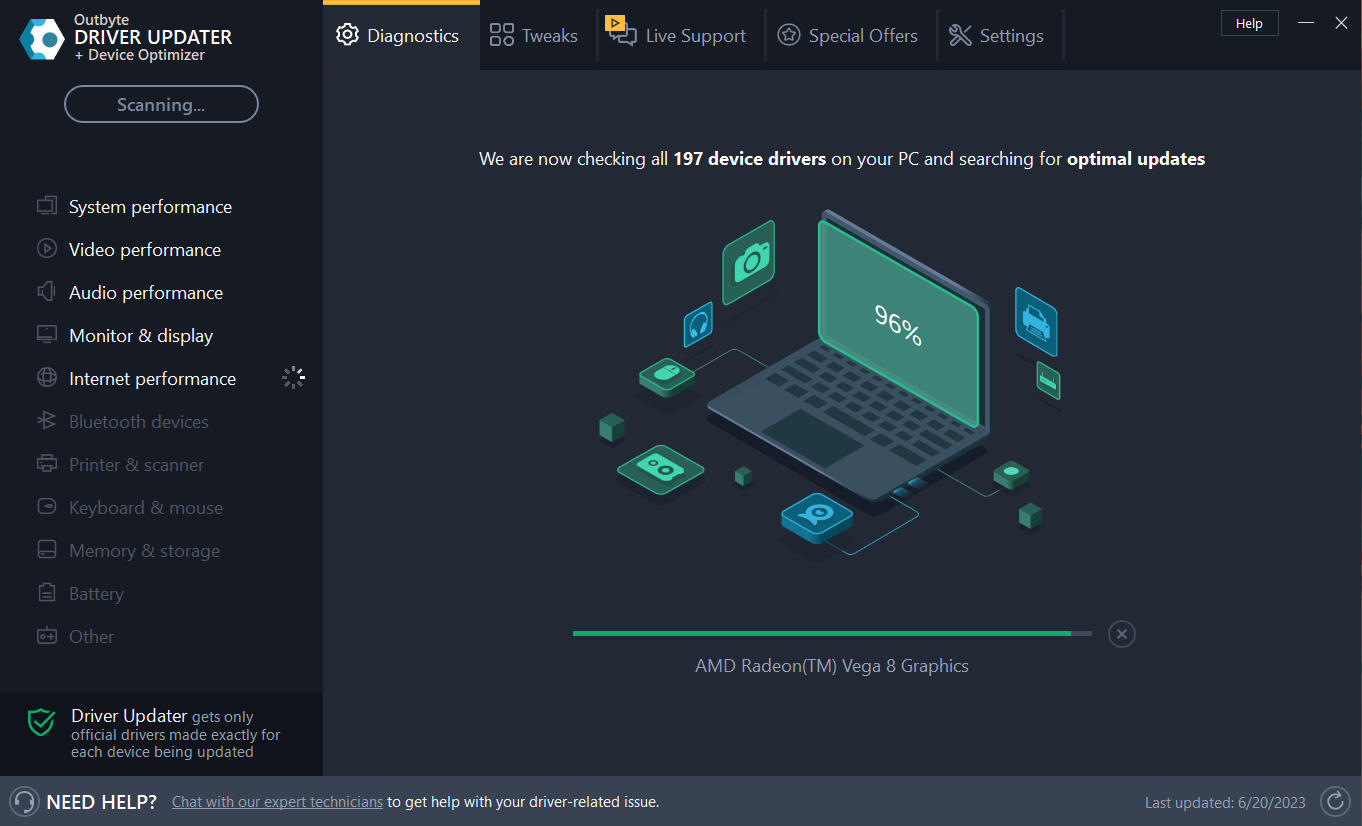
If the Nvidia GeForce Experience in-game overlay is not working, try updating your graphics and display driver using Outbyte Driver Updater.

Outbyte Driver Updater is a popular driver updating utility for Windows computers. Using the tool, you can update all your drives with one click, enjoy better gaming performance and access a vast database of over 18 Million drivers.

Upon installation, the tool scans the system for missing and outdated drivers. You can choose to update a single or multiple drivers at once. You can manage all the downloads using the built-in download manager.

Key features of Outbyte Driver Updater:

  • Updates all the system drivers with one click 
  • Huge driver database of over 18 million files 
  • Built-in download manage 
  • Driver backup and schedule manager
Outbyte Driver Updater

Outbyte Driver Updater

Quickly and efficiently resolve the dreaded Nvidia overlay issue with this amazing software.
Check priceVisit website

2. Install the Media feature pack for Windows 10 N

Nvidia in-game overlay not working
  1. Go to the Microsoft Download Center. 
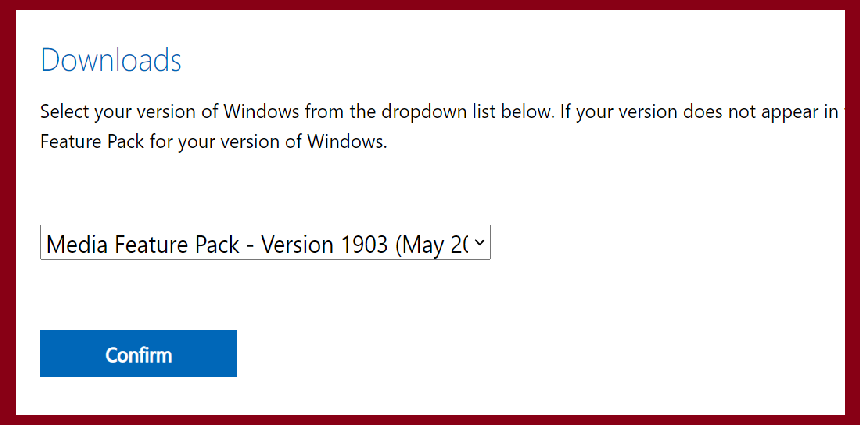
  2. Under Downloads, click the drop-down menu and select the most recent edition of Media Feature Pack.
  3. Click on Confirm to download the file.
  4. Depending on your Windows edition, click on the 32-bit Download / 64-bit Download button.
  5. Run the downloaded installer and follow on-screen instructions to install the app.
  6. Make sure to restart your PC after Media Feature Pack is installed.
  7. Launch Nvidia GeForce Experience and check for any improvements.

If the Nvidia GeForce Experience overlay doesn’t turn on, this could be due to your system missing the Media Feature Pack for the Windows N version. It provides media players and related technologies on your computer.


3. Reinstall Nvidia GeForce Experience 

Nvidia in-game overlay not working
  1. Press the Windows key + R to open Run.
  2. Type control and click OK to open the Control Panel.
  3. Go to Programs, and click Programs and Features.
  4. Select Nvidia GeForce Experience from the list of installed apps.
  5. Click on Uninstall. Click Yes if prompted by UAC.
  6. Follow on-screen instructions to remove the app.
  7. Download the latest Nvidia GeForce Experience app.
  8. Run the installer and proceed with the installation.
  9. Reboot the PC after the installation is complete.

Nvidia GeForce Experience offers tons of features. You can capture and share videos, take screenshots, and live-stream your gameplay.

However, if the Nvidia game filter won’t turn, it can be due to a buggy driver or corrupted files. 

Try installing the latest Nvidia Geforce Experience version to fix any issues with the in-game overlay app when playing games.

If the problem persists, use DDU to clean install the Nvidia graphics driver.


4. Clean install Nvidia graphics driver 

Nvidia in-game overlay not working
  1. Download and run the Display Driver Uninstaller. 
  2. When the Display Driver Uninstaller launches, click on Select device Type and select GPU.
  3. Next, click Select Device and select Nvidia.
  4. Click the Clean and restart button.

DDU will uninstall GeForce Experience and other Nvidia drivers and restart the computer. After the restart, download GeForce Experience and install the app.

If you can’t turn on in-game overlay GeForce Experience, it could be due to a glitch in the app. Reinstalling the app after uninstalling the app using DDU can fix the problem.


The Nvidia in-game overlay not working issue can occur due to several reasons including corrupted driver files and missing Microsoft Windows package. Follow all the steps in this article one by one to fix the issue.

The Microsoft Store on Xbox consoles can now display supported languages for games

Microsoft may have redesigned its Microsoft Store on Xbox consoles last fall, bringing some speed improvements along the way, but there’s still some room for improvements. Gamers in non-anglocentric markets have been complaining for quite some time that the store listing don’t mention the supported languages for games, but Microsoft seems to have finally listened.

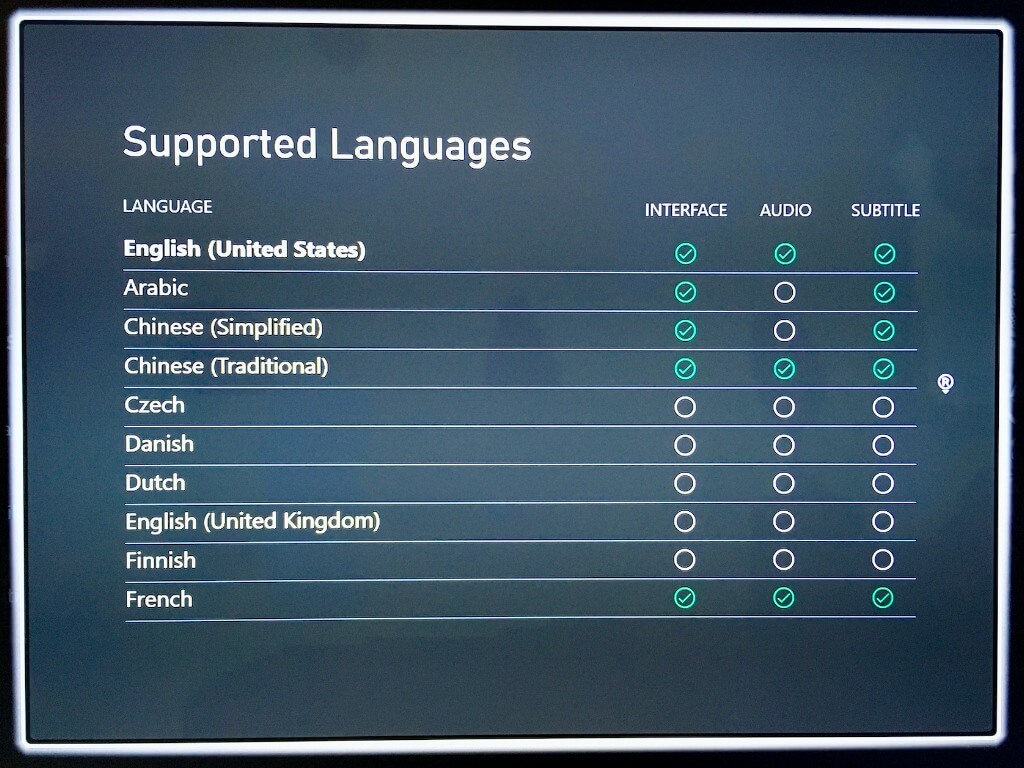
Indeed, some Xbox gamers have noticed that the store listings for some games now include information about supported languages (via Windows Central). Microsoft’s internal studio The Coalition seems to be leading the way, as Gears 5 and Gears Tactics are two Xbox Game Studios titles games that currently provide this information on the Microsoft Store.

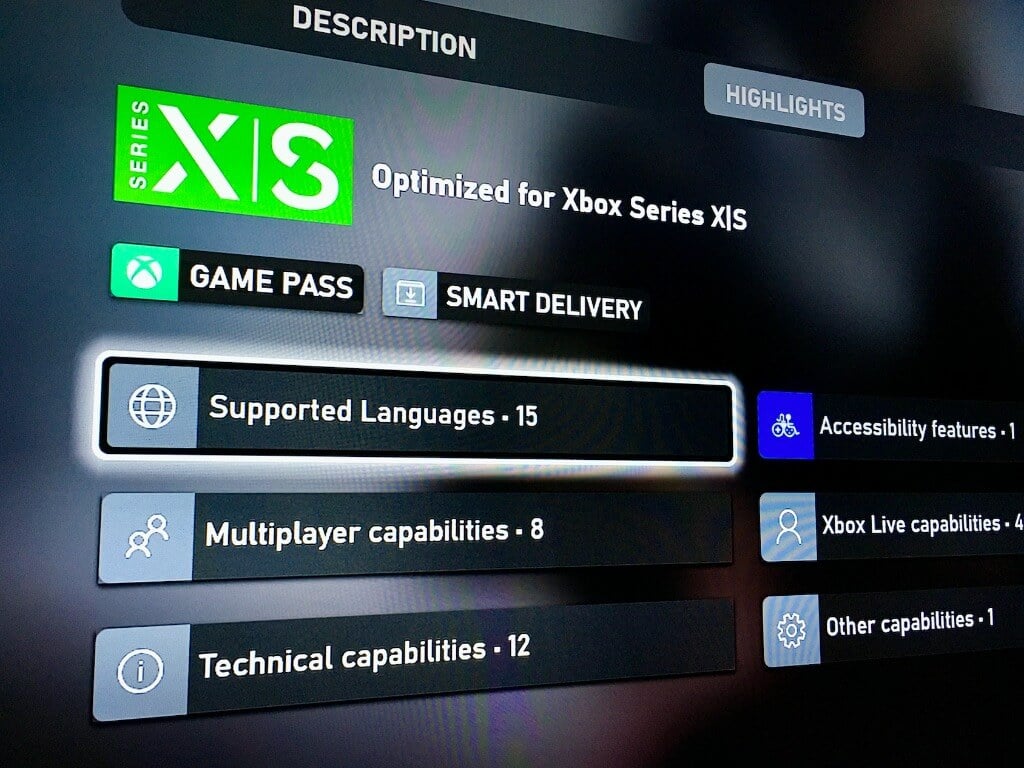
To check if other store listings mention supported languages, you’ll need to scroll down to the details section, press the RB button to go to highlights, and then a “Supported Languages” item may or may not appear below. When the information is available, a pop up will reveal supported languages for the game’s interface, audio, and subtitles.

Supported Languages On Xbox Store

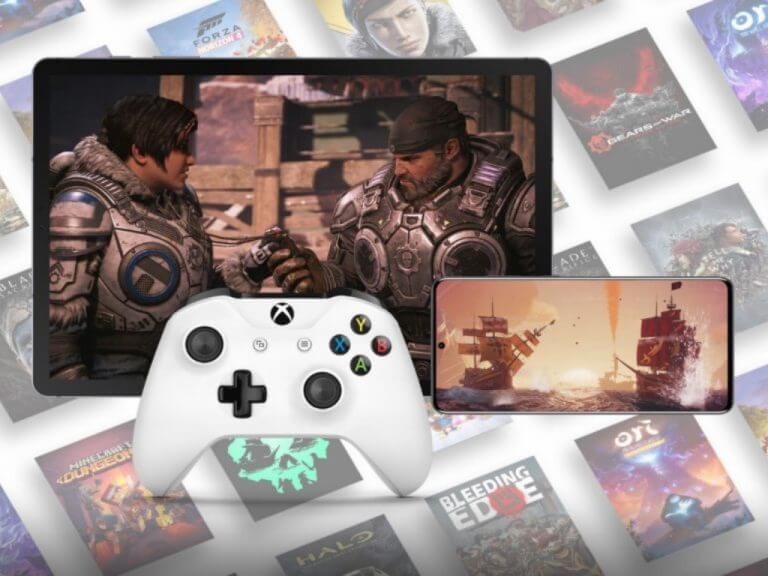
It remains to be seen if more games will add this information going forward, but it’s good to see some improvements on the localization front. With Microsoft aiming to reach 2 billion gamers with Xbox Cloud Gaming, it’s going to be very important for the Microsoft Store to be as exhaustive as possible.

FIX: The service to detect this status is disabled

Computer errors will appear sooner or later on your Windows 10 PC, and if that happens, you should know how to deal with them.

Users reported The service to detect this status is disabled error message on Windows 10, and today we’re going to show you how to fix it.

Here are some similar problems that can be resolved with the same solutions as The service to detect this status is disabled error:

  • The dependency service or group failed to – Users experiencing this error are unable to connect to the internet on any available network.
  • Network list service-disabled – It’s possible for crucial network services to get disabled somehow. We’ll discuss this phenomenon down below.
  • Error 1068 – Another error message that prevents users from connecting to the internet. If you get this error message, you can still use the solutions listed below to resolve the problem.

What can I do if the service to detect this status is disabled?

Table of contents: 

  1. Use Component Services tool
  2. Check if necessary services are running
  3. Run the SFC scanner
  4. Run the Network Troubleshooter
  5. Run DISM

1. Use Component Services tool

If you’re getting The service to detect this status is disabled error on your Windows 10 PC, you might be able to fix it by using the Component Services tool. To do that, follow these steps:

  1. Press Windows Key + R and enter dcomcnfg.
  2. Click OK or press Enter.
    the-service-to-detect-this-status-is-disabled-dcomcnfg-1
  3. Component Services window will now start.
  4. In the left pane navigate to Component Services select My Computer and go to DCOM Config. If you see any notifications, just click on Yes.
    the-service-to-detect-this-status-is-disabled-dcomcnfg-2
  5. In the right pane locate netprofm. Right click it and choose Properties.
    the-service-to-detect-this-status-is-disabled-dcomcnfg-3
  6. Go to Security tab and select Customize in Launch and Activation Permissions section.
  7. Click the Edit button.
  8. Click Add and enter LOCAL SERVICE as object names. Click OK.
  9. In Permissions for LOCAL SERVICE select Allow for Local Launch and Local Activation settings. Click OK to save changes.

Use a third party software

The service to detect this status is disabled error message can be related to the Windows Defender Firewall, so it is a good idea to disable it and use third-party antivirus software.

We recommend you get a reliable antivirus with a high detection rate, as it is essential to find and remove threats as soon as possible.

Thankfully, the market nowadays offers plenty of good options that do not consume too many system resources, so you can keep your antivirus running at all times, thus staying permanently protected.

Features to look for when picking your antivirus include multi-layered protection, parental controls, a powerful firewall, online privacy protection, and offline support.

2. Check if necessary services are running

According to users, this error is related to their network connection, and according to them, in order to fix the problem you need to check if necessary services are running.

If the necessary services are stopped, you need to enable them by following these steps:

  1. Press Windows Key + R and enter services.msc. Now click OK or press Enter.
    the-service-to-detect-this-status-is-disabled-services-1
  2. When Services window opens, look for DNS Client and DHCP Client services.
    the-service-to-detect-this-status-is-disabled-services-2
  3. Double click the service and check if the Service status is set to Running. In addition, be sure to set Startup type to Automatic. Click Apply and OK.
    the-service-to-detect-this-status-is-disabled-services-3
  4. Make sure that both DNS Client and DHCP Client are running and are set to Automatic startup. After that, close Services window and check if the problem is resolved.

Some users are also suggesting to check the following services: Network Connections, Network List Service, Network Location Awareness and Network Store Interface Service.

To fix this problem, you need to ensure that all these services are started. As for Startup Type, you need to set Startup Type to Automatic for all services except Network Connections. As for Network Connections, set its Startup Type to Manual and save changes.

After making the changes, check if the problem is resolved.

3. Run the SFC scanner

If none of the previous two solutions worked for you, we’re going to turn to troubleshooters. The first troubleshooting tool we’re going to try is the SFC scanner.

The SFC scanner is a command-line tool that can resolve various issues in Windows 10. Hopefully, it’ll be helpful here, as well.

Here’s how to run the SFC scan in Windows 10:

  1. o to Search, type cmd, and open the Command Prompt as Administrator.
  2. Type in the following command and press Enter: sfc/scannowthe dependency service or group failed to start
  3. Wait for the process to finish (it will take some time).
  4. Restart your computer.

4. Run the Network Troubleshooter

If you’re running at least Windows 10 Creators Update (version 1704), you have a dedicated troubleshooting tool at your service. You can use this troubleshooter to resolve various problems.

Hopefully, it’ll come in handy with this one, as well. Here’s how to run the Windows 10 Troubleshooter:

  1. Go to the Settings app.
  2. Head over to Updates & Security and select Troubleshoot.
  3. Now, click Internet Connections, and go to Run the troubleshooter.network list service windows 10
  4. Follow further instructions, and let the wizard finish the process.
  5. Restart your computer.

5. Run DISM

And finally, the last troubleshooting tool we’re going to try is DISM. Deployment Image Servicing and Management (DISM) deploys the system image ll over again, resolving potential problems on the way.

So, if none of the previous solutions got the job done, you can try with DISM. Here’s how to run DISM in Windows 10:

  1. Type cmd in the Windows search bar, right-click on the Command Prompt and run it as an administrator.
  2. In the command line, copy paste these lines one by one and press Enter after each:
    • DISM /online /Cleanup-Image / ScanHealthnetwork list service disabled
    • DISM /Online /Cleanup-Image /RestoreHealth
  3. Wait until the procedure ends (it might take up to 10 minutes).
  4. Restart your PC.

The service to detect this status is disabled is an annoying error, but you can easily fix it by enabling the necessary services. If that doesn’t work, feel free to try any other solution from this article.

Microsoft Edge Canary makes downloads accessible right from the toolbar

Microsoft Edge Insiders on the Canary channel can now test a new flyout menu that will allow users to access their downloads directly from the toolbar. The improved toolbar experience was first spotted by a Reddit user Leopeva, and it’s apparently available for all Insiders on the Edge Canary channel.

Currently, when Microsoft Edge users click the download option available in the three-dots menu, the browser opens the downloads on a dedicated downloads page. Thanks to the new toolbar experience, Edge Insiders can now add the downloads button to the toolbar that makes it possible to pause and resume a download without having to go to the full page.

Slide Anything shortcode error: A valid ID has not been provided

In addition, the flyout menu includes a submenu that provides quick access to some download management tools. Users can manage downloads, access download settings, clear all downloads history, and hide the downloads button from the toolbar in that menu.

To enable the feature, head over to the three-dots menu, right-click on the “Downloads,” and select the “Show in toolbar option” from the list. Just like with the favorites menu, history, and Collections bar, users can pin the downloads flyout in a pane alongside the browser.

Microsoft continues to update the Edge Canary channel with new features and capabilities, and the company has recently added a search icon for PDFs. Microsoft Edge will also soon be updated with a new Smart Copy option, PDF improvements, and more.

Top 5 tips and tricks to get the most out of Teams on mobile

From chats to channels, and even documents and files, there’s definitely a lot to do in Teams on mobile during the work-from-home life. That’s why, in our latest entry to the Microsoft Teams series, we’ll give you our top-5-tips and tricks to get the most out of Teams on iOS and Android.

Tip 1: Use Cortana

Corana Ios Teams Setup


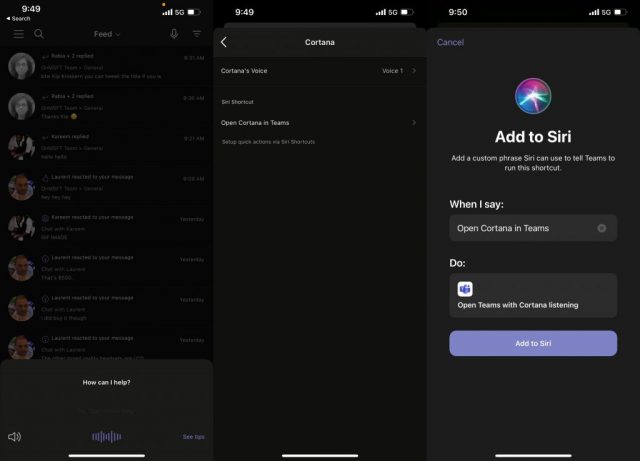
Our first tip is one of the most simple. While you’re already likely tapping and swiping your way through Teams, did you know that Teams on iOS and Android have support for Cortana? With Cortana in Teams, you can use the virtual assistant to call people, join meetings, check your calendar, send chats, look for files, and even change settings. No tapping or swiping necessary.

To use Cortana, just head to your feed or your chats, and then tap the microphone icon at the top of the screen. We have a guide that explains how you can get the most out of Cortana on Teams.

Tip 2: Join meetings across mobile and desktop

Teams Transfer Meeting Ios

Our next tip is another easy one — joining meetings across devices. Want to start a meeting on your PC or Mac, and then transfer it to your phone? Or how about vice versa? If you’re on your phone already and want your meeting on your laptop or desktop, simply log into teams on that device, you should then see a banner at the top of Teams. Click the purple join button to join. Then follow the instructions on your screen.

If you’re on your PC and want to transfer to your phone, you should see a banner on the top of the Teams app on your phone. It will say In progress with the meeting name. You’ll want to click the Join button. Then, follow the instructions on the screen.

Tip 3: Try a personal account in Teams

Since you’re already using Teams for work and spending a lot of time on your phone with it, why not also use it personally, too? Thanks to some recent changes, it’s now possible to log in with a personal account on Teams on iOS and Android. This allows you to use Teams a bit like WhatsApp or Facebook Messenger. As we covered when we went hands-on with the experience, this makes Teams a great way to not only chat with coworkers but friends, too. You can enjoy things like location sharing, a dashboard with a safe to save files, upload files, and a lot more.

Tip 4: Edit your navigation buttons

Teams Re Order Buttons

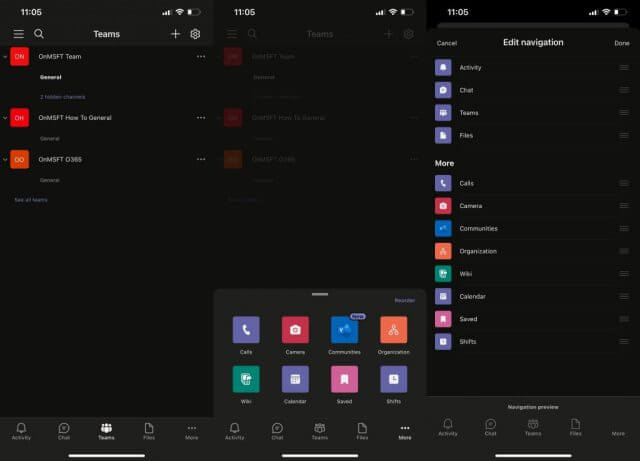
Using some of the features in Teams like Calendar, Shifts, Wiki, Calls, or more? You can actually tweak your experience in Teams to suit your needs and give you faster access to the features you use most. Simply tap the . . . more button at the bottom of the screen. Then, choose Reorder. From there, you can drag and drop the functions of Teams you want to appear in the navigation bar. It’s a great way to avoid having to click the . . . more button each time you want to use something in Teams. Just be aware that there is still a 4 button limit.

Tip 5: Save space with Teams

Screen Shot 2021 01 11 At 10.37.40 Am

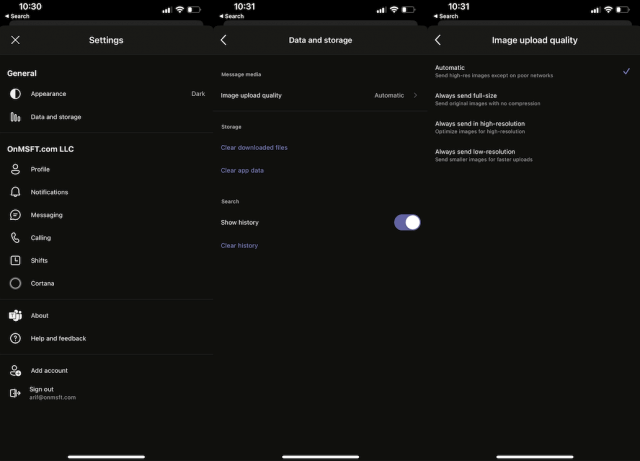
Is your phone low on storage? Well, Teams on iOS and Android has a feature that will help you cut back its footprint a bit. Simply head into the settings menu, and then head to Data and storage. From there, you can change the quality of the images you receive. You also can clear your downloaded files, and clear the cache, if Teams is running slow, too.

Check our our other tips and tricks!

These are just our top five picks for getting the most out of Teams on mobile. We have other tips and tricks, too. We looked at the top 5 ways to customize Teams, the top 5 settins you need to change, and top 5 tips for setting up Teams. Check out our Microsoft 365 hub for more Teams news and information.

Disable Adobe Acrotray.exe from Startup [Safe guide]

Adobe Acrobat is a popular PDF viewer that allows you to view, create, edit and manage PDF files on your computer.

When installed, users will see an AcroTray component that will automatically run with every restart without the need for the app. But, how do you disable Adobe acrotray.exe from Startup?

AcroTray is an Adobe Acrobat extension that is used to convert PDF files to different formats. However, this utility can be annoying as it can make your PC slow, consume system resources and most of the time running for no reason.

In this article, we show you a few ways to disable Adobe acrotray.exe from startup with ease. So, let’s get started.

How do I disable Adobe AcroTray.exe from Startup?

1. Disable from Task Manager

Disable Adobe Acrotray.exe Startup
  1. Press the Windows key + R.
  2. Type taskmgr and click OK to open it.
  3. In the Task Manager window, open the Startup tab.
  4. Scroll through the startups and select AcroTray.
  5. Right-click on AcroTray and select Disable.

Once you have disabled AcroTray.exe from the startup tab, kill the AcroTray running process from the Task Manager as well.

Disable Adobe Acrotray.exe Startup
  1. Open Task Manager.
  2. In the Process tab, locate AcroTray.exe process.
  3. Select and then click on the End button.
  4. Once ended, the AcroTray app icon will be removed from the System Tray as well.

That’s it. You have successfully disabled the AcroTray app from the Task Manager. Restart your PC to see if the AcroTray popup is disabled.

Similarly, if you’re dealing with another background process affecting system resources, learn how to disable CCXProcess.exe.


2. Remove using AutoTurns

Disable Adobe Acrotray.exe Startup
  1. Download Autoruns from Microsoft.
  2. Extract the downloaded file using WinZip.
  3. Open the Extracted folder. Then right-click on the Autoruns64.exe file.
  4. Select Run as Administrator.
  5. In the AutoRuns window, search for Acrobat Assistant in the Everything tab.
  6. If it is checked, uncheck the box beside Acrobat Assitant.
  7. Close AutoRuns and resart your computer.

AutoRuns is a Microsoft utility that allows you to control startup programs in Windows startup. You can use Autoruns if the first method of removing Acrotray using Task Manager did not work.


3. Disable using Windows Services

Disable Adobe Acrotray.exe Startup
  1. Press the Windows key + R.
  2. Type services.msc and click OK.
  3. Search for Adobe Acrobat Update, right-click on it and select Properties.
  4. Click the Startup type drop-down menu and select Manual.
  5. Click Apply and OK to save the changes.
  6. Next, find Adobe Genuine Software Integrity service, right-click, and select Properties.
  7. Set Startup Type to Manual.
  8. Click Apply and OK to save the changes.

Once you have modified both the services, close Windows Service window, restart your computer and check for any improvements.

In this method, we changed some of the Adobe services that are set to run automatically during startup. Making the services to run manually will resolve the issue.


The AcroTray Assistant has more cons than pros. It can not only slow down your computer but also take up a lot of system resources for no real work. In this guide, we have shown you how you can disable Adobe AcroTray.exe from Startup.

To learn more about this software, don’t miss our what is AcroTray guide for more information.

Most of the time, you should successfully disable the process from Task Manager. However, if the issue persists, try to disable the service from Windows Service or use the AutoRuns utility.

Microsoft Teams now lets users add shared Channel calendars

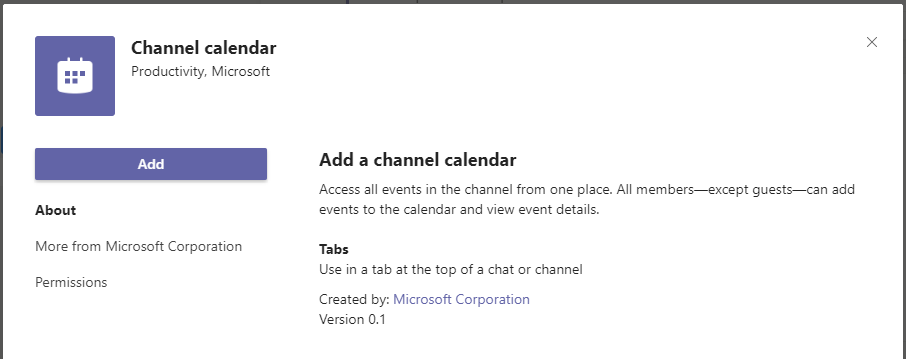
Microsoft has started rolling out a new Channel calendar app for its Teams desktop client that should make it easier to synchronize with colleagues. The improved calendar experience is rolling out gradually, and it should hit general availability by the end of this month.

With this feature, users will be able to add a shared calendar as a tab to each Teams channel to make it available for all Team members. They will be able to see scheduled channel meetings and events in a calendar grid view. Microsoft Teams will automatically send a notification to the channel as soon as any user schedules a new meeting. It will appear in the activity feed, and users will be notified if they haven’t turned off the notifications.

To add the calendar app, you will need to click the new tab+ icon at the top of the channel. In the “Add a tab” window, find and add Channel calendar from the list of available apps. Finally, assign a name and click the “Add” button to add it to the Teams channel.

Indeed, the new calendar experience has been one of the popular requests by Teams users, which received around 20,000 votes on the UserVoice forum. It should help to prevent miscommunications among colleagues. While the feature is currently rolling out to commercial tenants, it’s also coming to GCC customers next month.

Microsoft unveils Pulse Red variant of its new Xbox Wireless Controller

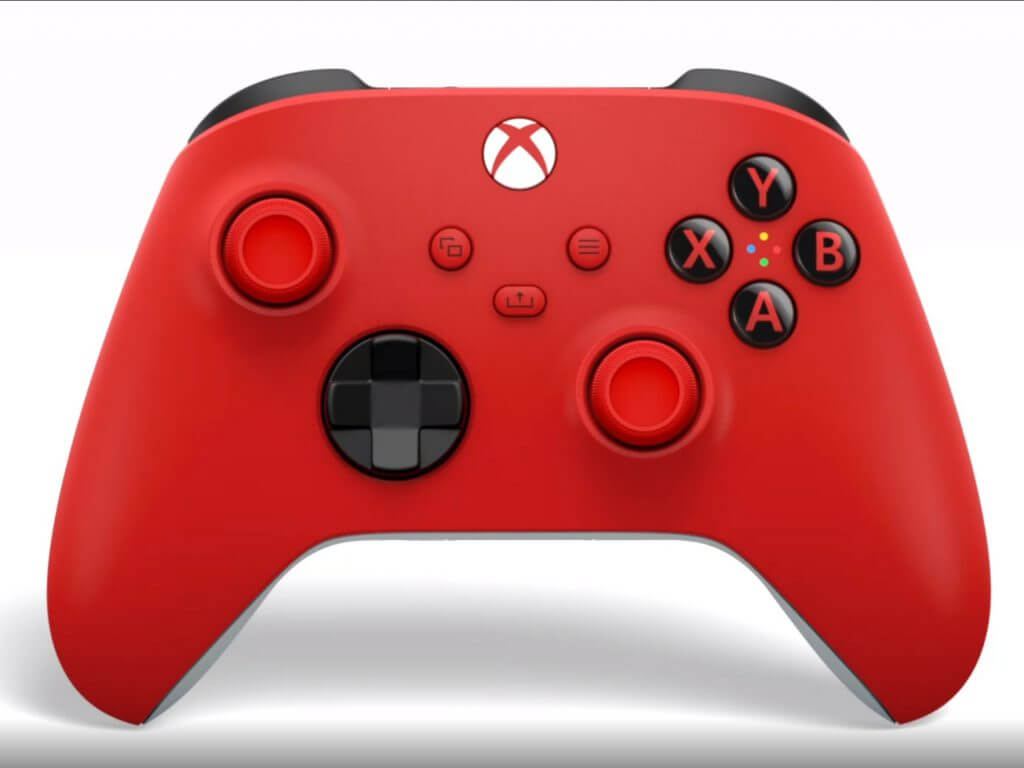
There’s a new Xbox Series X|S controller coming soon. Microsoft announced the new Pulse Red Xbox Wireless Controller on Xbox Wire and the new controller will be available “in most Xbox markets” on February 9, 2021 for $64.99. In China, the Pulse Red controller will be available starting tomorrow, January 12, 2021.

Microsoft will include a 14-day free trial of Xbox Game Pass Ultimate in “select markets.” The Pulse Red Xbox Wireless Controller controller has all of the same controller features introduced with the launch of the Xbox Series X|S, including a USB-C port and a dedicated Share button. The Pulse Red color variant joins the other three color options currently available for the Xbox Series X|S; Carbon Black, Robot White, and Shock Blue.

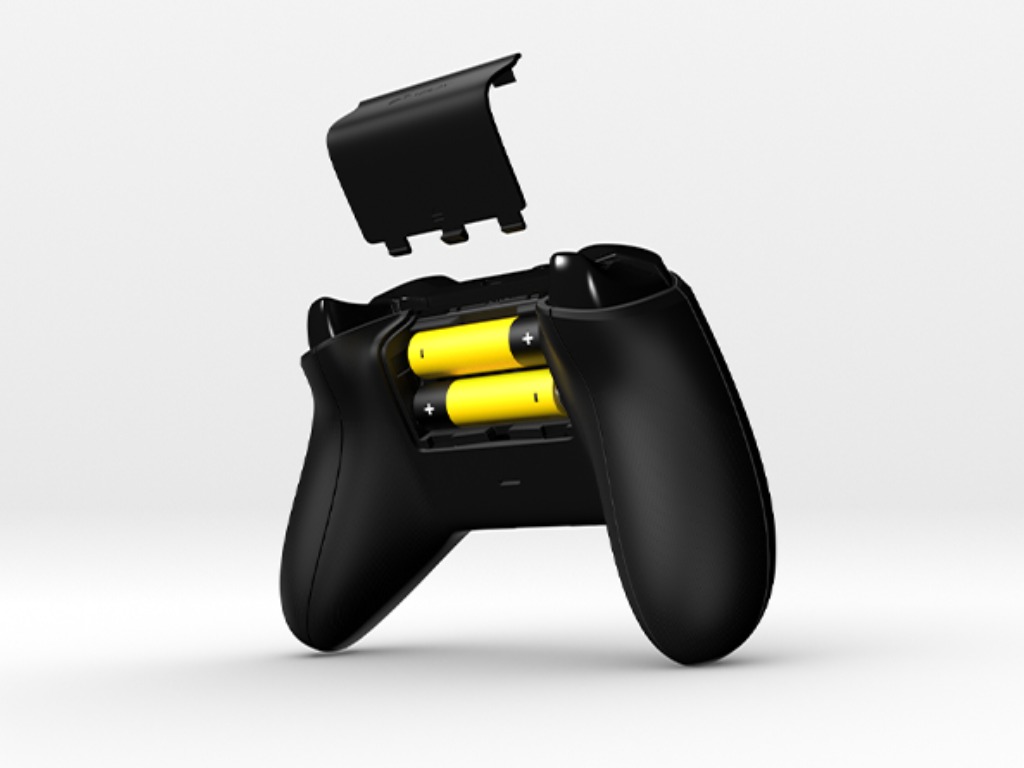
Microsoft’s Xbox One controllers offer a wide selection of color options and even the option to customize your own with the Xbox Design Lab. From the looks of Xbox Design Lab website, the option to customize the colors of the new Xbox Series X|S controllers may be coming in the near future. As reported earlier, Microsoft is working on fixing connection issues with the new Xbox Series X|S controllers and be sure to check out the real reason Microsoft keeps shipping Xbox controllers with AA batteries.

Escape From Monkey Island on Windows 10: 3 Ways to Run It

Escape from Monkey Island is an adventure game released by LucasArts in 2000. Fourth in the Monkey Island series and the first to use 3D graphics, the game was popular amongst the community. And many are now looking for ways to play Escape From Monkey Island on Windows 10.

While playing old games on Windows has long been tricky, there are ways you can do it. Sometimes, using a gaming client or, in other instances, modifying the app/PC settings. But the bottom line is that it’s possible, and we have listed all the ways to play Monkey Island 4 on Windows 10.

Does Monkey Island work on Windows 10?

Yes, Monkey Island works on Windows 10, but you must check the installer setup. The older 16-bit app installers don’t work on the 64-bit version of Windows, and many users got the same combination.

Luckily, the gaming community has, of late, been active and has made available the compatible installer. So, users can finally run Monkey Island on Windows 10 or any iteration of the OS, for that matter, including Windows 11.

How do I play Escape from Monkey Island on Windows 10?

1. Download the game from Steam

  1. Go to Steam’s official website, and download the gaming client.steam
  2. Once done, run the setup, and follow the on-screen instructions to complete the installation.steam to play escape from monkey island windows 10
  3. Register on the gaming platform using valid credentials.
  4. Now, search for Escape from Monkey Island, and complete the purchase. It’s a paid title but doesn’t cost much.Escape from Monkey Island
  5. Once the purchase is complete, the download should start, and Escape from Monkey Island should now appear in the Steam Library.
  6. Right-click on the game, and select Play from the context menu.play escape from monkey island in Windows

That’s it! This is the easiest way to proceed with Escape from Monkey Island download and play the game.

2. Download from a third-party source

Tip icon Tip
The website offering the game appears reliable, but we recommend you scan it using an effective antivirus and only proceed with the installation. Also, you will need the Escape from Monkey Island CD with the tool.
  1. Head to the third-party website and download the setup for Escape from Monkey Island.setup
  2. Once downloaded, run the setup, and provide the necessary permissions to run it.
  3. Proceed to the window where it asks you to insert the Escape from Monkey Island CD, and then click on Install.install
  4. Wait for the process to complete, and you should then be able to play the game.

Using the setup is another effective way to play Escape from Monkey Island on Windows 10, the only drawback being that you will need the original game CD. If you don’t have it, the Steam option should work perfectly well.

3. Run the game in compatibility mode

  1. Right-click on the Escape from Monkey Island launcher/shortcut, and select Properties from the context menu.
  2. Navigate to the Compatibility tab, tick the checkbox for Run this program in compatibility mode for, and select Windows XP from the dropdown menu.compatibility mode to run escape from monkey island windows 10
  3. Once done, click on Apply and OK to save the changes.save changes

This method works only when you already have Escape from Monkey Island installed on Windows 10. In case you don’t, first download it using any of the two methods listed previously.

If you can work with the lower-resolution gameplay, Escape from Monkey Island has plenty to offer on Windows 10.

Also, before you leave, check the best tips and tricks to optimize Windows for gaming and get the best performance.

For any queries or to share more options, drop a comment below.

Microsoft launches Surface Pro 7 Plus for Enterprise and Education customers

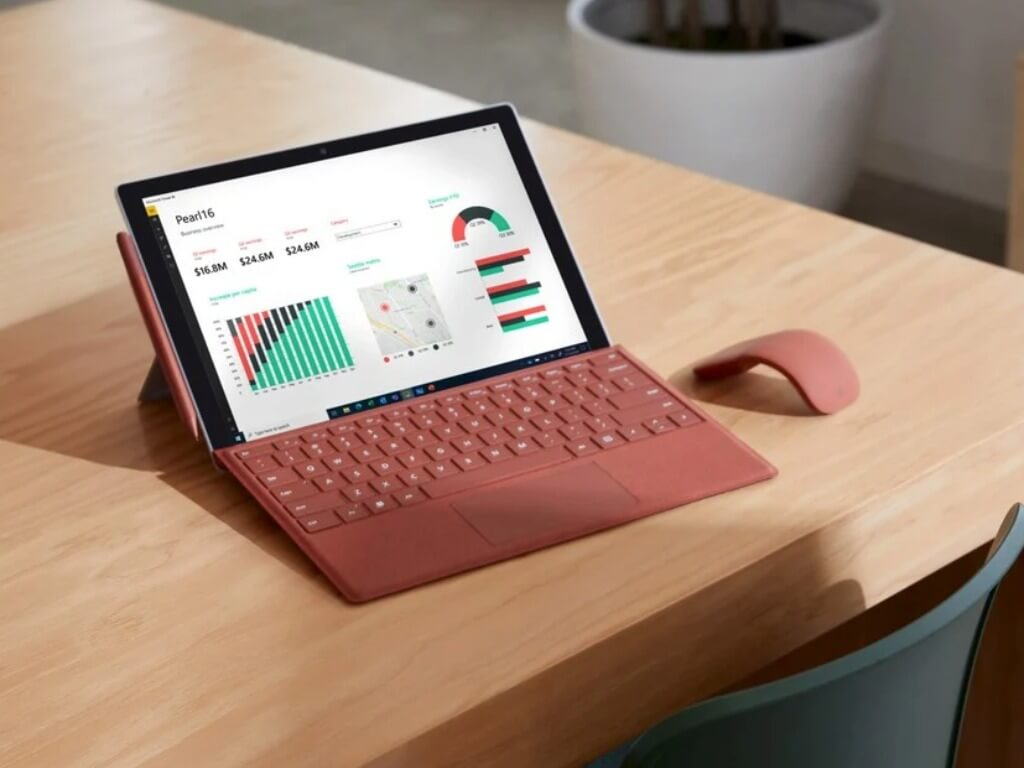
Microsoft has announced this morning a new version of its Surface Pro 7 tablet for Enterprise and Education customers named the Surface Pro 7 Plus. This new model keeps the familiar Surface Pro 7 design with the new USB-C port that was added last year, but adds Intel’s 11th Gen core processors under the hood, a removable SSD M.2 SSD just like on the Surface Pro X or Surface Laptop 3, as well as a bigger internal battery that should provide up to 15 hours of battery life.

The $899 base model will come with an Intel Core i3 processor, 8GB of RAM, and 128GB of storage. The Core i5 model with the same amount of RAM and storage will start at $999 ($899 for Education), and the Core i7 variants will start at $1,599 for the model with 16GB of RAM and 256GB of storage. Microsoft will also offer three Core i5 models with an optional LTE Modem, starting at $1,149. These LTE models replace the microSD car reader under the built-in stand with a nano SIM tray, but otherwise it’s the same selection of ports (1 USB-A port, 1 USB-C, 1 Surface Connect port, and a headphone hack).

Even though Microsoft isn’t calling this new model the Surface Pro 8, this new Surface Pro 7 Plus brings some significant changes under the hood. “We changed the inside quite substantially,” explained Robin Seiler, corporate vice president of program management for devices at Microsoft, in an interview with The Verge. “It actually required us to flip the internals in order for us to put the SSD here, so when we did that we also updated the TDM (Thermal Design Model) to create more space for a larger battery size.”

The Surface Pro 7 Plus will be available for Enterprise and Education customers starting January 15 in the US, Canada, Australia, New Zealand, the UK, and other European countries. Microsoft isn’t saying if the Surface Pro 7 Plus will eventually be available for consumers as well, though Seiler told The Verge that “this is simply an extension of a commercially-focused line.”

Fix: Xbox One Wireless Controller doesn’t Work

Gamers can use Xbox One controllers to enrich their gaming experience on their PCs. Using a console controller for PC games is a great way to make your gameplay more interesting and immersive.

However, since the Xbox One is not built specifically for PC gaming, users may have trouble getting it to work on their Windows OS. So, if your Xbox One controller is not working on PC, you will want to try the fixes below.

This problem is complex, so we also have another guide to fix the Xbox One controller if it doesn’t get recognized in Windows 10.

Speaking of Xbox controllers, if you use an Xbox 360 controller and can’t get it to work, we also have a dedicated troubleshooting guide for this problem.

Follow the steps in the respective article to fix the Xbox One controller if it’s not working on your PC.

What can I do if the Xbox One controller doesn’t work on PC?

1. Make sure you set up your Xbox One controller correctly

For Windows users, usually, all you need to do is plug connect your Xbox One controller to your PC through a micro USB cable. Windows 10 will automatically download the drivers for the controller.

You also do not have to worry about installing the drivers, as Windows will do that also. However, if Windows is not automatically installing your drivers, you must update them manually.

The following fix will show you how to update drivers for Xbox One controllers.

2. Update drivers for Xbox One controller

2.1 Update drivers manually

  1. Press the Windows key + R together at the same time on your keyboard and type in devmgmt.msc.
  2. This should open the Device Manager, which will look like the picture below.
  3. Locate a section labeled Microsoft Xbox One Controller.
  4. Expand the section, then right-click on the subsection with the same label.
  5. A list should appear as you right-click. Click on Update Driver Software. 
  6. Choose the option that will automatically update your driver software.

Out-of-date drivers is probably the most common cause of this issue. Fortunately, it is easy enough to update your drivers by using the steps above.

You can of course alternatively browse your computer for driver software if you know what you are doing. This option can ensure you have the correct update. However, usually, the automatic update will work perfectly fine.

2.2 Update the drivers automatically

Manually updating drivers is fine, but it takes time, a little bit of skill, and you need to repeat the process for every driver. A more speedier solution is a dedicated solution like Outbyte Driver Updater.

It’s straightforward to use, and it can update or fix your drivers in one swift action.

First, you need to download and install Outbyte Driver Updater. It will only take a moment; after that, the software will automatically scan your system for any driver problems.

After a few seconds, you will get a list of the potential drivers and problems, and you will be left with a simple choice: whether you update all of them in a single action or you do that for each driver.

For the latter, you will need to check their corresponding boxes and press their Update buttons. The process is simple and intuitive, so you won’t have any problems.

Outbyte Driver Updater

With Outbyte Driver Updater, you will be able to update all your drivers, not only the one for your Xbox controller in only a few seconds.
Free Trial Download now

3. Change faulty hardware

This may seem like a no-brainer, but it is astonishing how many users forget that their hardware could be causing connectivity issues. If you are unsure whether or not your cable or controller is working, then you can bring it to a computer store to get it tested.

Also, try unplugging and plugging it back in. You’d be surprised how many times that can work.

If you are using wireless controllers, you will want to check if the batteries need changing or recharging. Also, if you can, try using a different Xbox One controller. This can help you identify whether or not the problem has to do with your controller.

If you get to the conclusion that you need a new one, we can help you with this awesome list with the best gaming gear.

4. Using the troubleshooting feature

  1. Type troubleshooting in the Search box and click on the Troubleshoot settings feature from the results.
  2. Locate the section called Hardware and Devices.
  3. Click on Run the troubleshoot under that section. Windows will then automatically scan your hardware for any possible malfunctions and errors.

5. Reinstall while disabling antivirus programs

  1. Turn off both Windows Firewall and any antivirus programs you may have on.
  2. Delete your drivers.
  3. Restart your computer.
  4. Install the drivers again.
  5. Turn your antivirus programs back on.

When users install the drivers of the Xbox One controllers on their PCs, sometimes the firewall and antivirus applications on that computer can prevent the drivers from being installed correctly.

Furthermore, even though Xbox One is from Microsoft, the firewall of Windows may not recognize the device as trustworthy. The fix above is meant to solve issues related to antivirus applications.

There could be multiple reasons why your Xbox One controller is not working on pc. So, naturally, there will be more than one way to fix this issue. Let us know which solution worked for you.

FIX: PS4 Remote Play won’t work on Windows 10/11

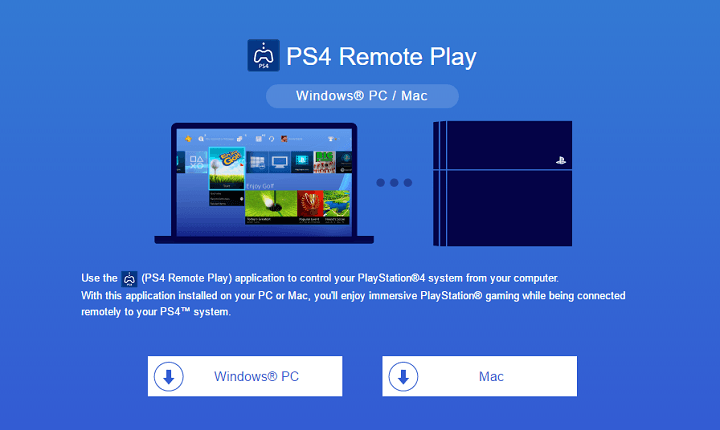
PS4 Remote Play is a convenient way of casting and remotely-playing your PlayStation 4 games on a PC that you can easily install if you follow the right steps.

However, as that’s the case with any other service, issues are possible. It could be anything, from connection issues to sound problems.

So in this article, we’re going to explore some of the most common PS4 Remote Play issues, and offer appropriate solutions, that will (hopefully) allow you to seamlessly integrate your console with your PC once again.


How do I fix PS4 Remote Play issues on Windows 10?

1. PS4 Remote Play connection issues

1.1. Register Manually

  1. Open PS4 Remote Play.PS4 Remote Play won't work windows 10
  2. Click Register Manually at the left bottom corner.
  3. You’ll be prompted to enter a code. Go back to your PlayStation 4, and head over to Settings > Remote Play Connection Settings.
  4. Select Add Device, and the codes will appear on the screen. Write down the codes.
  5. Back to Remote Play, enter the codes, and click Register.

1.2. Update controller drivers

  1. Press Windows + X
  2. Select the Device Manager
  3. Go to Sound, video and game controllers
  4. Right-click on your PS4 controller and choose Update driver

Alternatively, you can do it automatically with a third-party tool called Outbyte Driver Updater. which will not only update your older drivers, it will also find the ones that are missing entirely from your PC, and repair the ones that are broken.

All you need to do is simply download the tool, and launch it. This will trigger an initial system scan that will detect all of your outdated, broken, or missing drivers.

With your permission, it will then proceed to download and install all the right ones without you having to provide any further input.

Once Outbyte Driver Updater is done, simply restart your PC to apply the changes.

Outbyte Driver Updater

Outbyte Driver Updater

Update your controller’s drivers so that you can finally enjoy gaming in peace with Outbyte Driver Updater!
Check priceVisit website

1.3. Check your Internet connection

  1. Use a browser to check whether your bandwidth isn’t to slow.
  2. Reboot your router or modem and your PC.PS4 Remote Play won't work windows 10
  3. Use a wired instead of wireless connection.

Looking for the best software to show FPS when streaming PS4 games on Windows 10? Here they are!


2. PS4 Remote Play performance issues

  1. On your PS4, go to Settings > Video Quality for Remote Play.
  2. Set Resolution: Standard (540p) or Low (360p).
  3. Set Frame Rate: Standard.PS4 Remote Play won't work windows 10

3. PS4 Remote Play audio issues

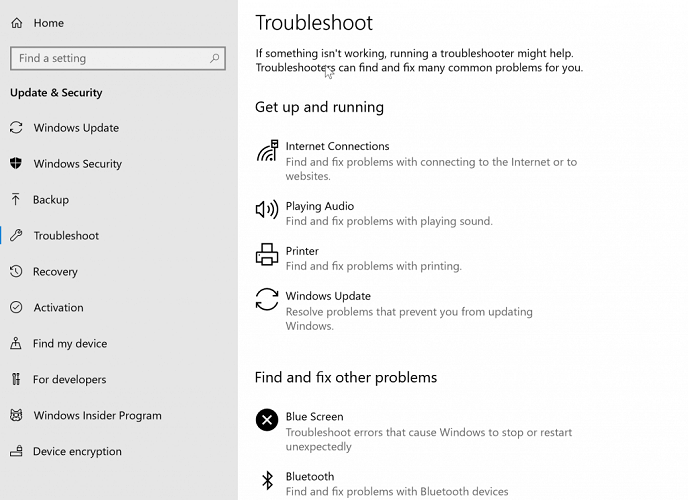
  1. Open the Settings app and go to Update & Security section.
  2. Select Troubleshoot from the menu on the left.
  3. Select Playing Audio from the right pane and click Run the troubleshooter.Play Audio troubleshooter PS4 Remote Play won't work windows 10
  4. Follow the instructions on the screen to complete the troubleshooter.

4. Can’t open Remote Play

  1. Right-click the PS4 Remote Play, and go to Properties.
  2. Head over to the Compatibility tab.
  3. Check Run this program in compatibility mode for:compatibility mode PS4 Remote Play won't work windows 10
  4. Choose a different operating system.
  5. Save changes.

That’s about it, we hope at least one of these solutions helped you resolve the PS4 Remote Play audio driver issues. If you have any comments, questions or suggestions, just let us know in the comments down below.

[wl_navigator]

Microsoft news recap: Minecraft Earth shutting down, Xbox head wants Cloud Gaming games to support separate purchases, and more

Microsoft news recap is a weekly feature highlighting the top Microsoft news stories of the past week. Sit back, grab some coffee, and enjoy the read!

Nintendo execs “laughed” at Microsoft’s attempt to acquire the company 21 years ago

Untold stories of Microsoft’s venture into console gaming have come to light, including details of companies it attempted to acquire back in the day. One of those companies was Nintendo, but execs at Nintendo reportedly “laughed” at Microsoft attempting to purchase the company.

Mario Microsoft Logo

Microsoft to open a new Sales Headquarters office in Washington DC area

Construction work is set to begin in the summer on a new Sales Headquarters for Microsoft in the Washington DC area.

Microsoft Sign Campus

Minecraft Earth will shut down in June 2021

Microsoft’s attempt at an AR-based Minecraft game, Minecraft Earth, will shut down in June 2021. With more people spending time indoors as a result of the COVID-19 pandemic, people aren’t going outdoors to play Minecraft Earth, and therefore Mojang has decided to divert resources to more valuable projects.

Xbox head Phil Spencer wants to make Cloud Gaming (Project xCloud) games available for purchase without a subscription

Microsoft’s cloud game streaming service, Xbox Cloud Gaming (Project xCloud), is currently only accessible if you have an Xbox Game Pass Ultimate subscription. Now, Xbox head Phil Spencer has said that he is wanting to make it so people can buy Xbox games and stream them via Cloud Gaming, similar to Google’s Stadia approach.

Cloud Gaming Project Xcloud

That’s it for this week. We’ll be back next week with more Microsoft news.

5 best VPNs for Kraken to exchange Bitcoin securely

Kraken is a popular US-based Bitcoin and cryptocurrency exchange platform.

Fortunately, the fact that it’s US-based doesn’t mean that you can’t access it from anywhere else in the world.

Yes, there are a few restrictions in place, which we’ll briefly mention below, but that’s not why we’re here.

As with any other online financial service, it’s best to stay secure and private when you access Kraken.

Currently, the best way to protect both your privacy and security is by using a VPN.

What are the best VPNS for Kraken in 2021?

Private Internet Access

Private Internet Access is a great VPN that can protect your online privacy regardless of your activity.

Whether you shop for plane tickets, try to watch a show on Netflix, or exchange cryptocurrency on Kraken, PIA is up for the job.

It also has additional features such as private DNS servers, a VPN kill switch, and a component that blocks ads and malware domains.

You can explore more than 22,000 high-speed servers from all around the world, Military-grade encryption to prevent traffic monitoring, and unblock various geo-restricted services.

More PIA features:

  • Zero-logging policy to protect your personal data
  • Supports OpenVPN and WireGuard protocols
  • Accepts credit card, crypto, and PayPal payment
  • 24/7 live chat support
  • 30-day money-back guarantee (no free trial)
Private Internet Access

Private Internet Access

Use this reliable VPN service to keep your Bitcoin transactions safe on Kraken.
Check priceBuy it now

NordVPN

use NordVPN for work

NordVPN is one of the best VPNs on the market, as it offers speed, security, and reliability in the same product.

It boasts military-grade 256-bit encryption to protect you against traffic monitoring, which makes it perfect for Kraken enthusiasts.

NordVPN lets you use its product on up to 6 devices at the same time.

You can connect to over 5,500 high-speed servers located in 59 countries all around the world. It’s an awesome VPN for cryptocurrency.

Additionally, it features an effective kill switch that cuts your Internet access in case no VPN connection is detected.

More NordVPN features:

  • Supports all popular devices
  • Double VPN, Onion over VPN, and obfuscated servers
  • CyberSec feature that blocks ads and malware hosts
  • 24/7 live chat support
  • 30-day money-back guarantee
  • No free trial
NordVPN

NordVPN

Amp up your online privacy and security by turning to this super-secure VPN when using Kraken.
Check priceBuy it now

Surfshark

use Surfshark for personal use

If you’re not only looking for a VPN solution to secure your Kraken transactions but also to protect the privacy of your entire family, check out Surfshark.

It allows you to set it up on any number of devices using the same account. And you can use the WireGuard and OpenVPN protocols with up to 256-bit military-grade encryption.

Surfshark supports more than 3,200 VPN servers in 65 countries. It runs private DNS on each VPN server.

More Surfshark features:

  • A built-in malware blocker called CleanWeb
  • Kill switch and multi-hop VPN connections
  • Split tunneling and obfuscation mode (Camouflage)
  • A no-logging privacy policy
  • 24/7 live chat and email support
  • 30-day money-back guarantee
  • 7-day free trial for Android and iOS
Surfshark

Surfshark

Secure your network connection when trading on Kraken and also protect your entire family with this reliable VPN.
Check priceBuy it now

CyberGhost VPN

CyberGhost

CyberGhost VPN is an excellent all-around VPN service that can offer you peace of mind while using Kraken, as well as speed and reliability.

It boasts great security and privacy features, as it supports WireGuard and OpenVPN protocols. You can also use this VPN for Binance.

Furthermore, this VPN service offers you private DNS servers, a VPN kill switch, and more than 6,700 servers (and counting).

Last, but not least, CyberGhost VPN is one of the few VPN services that offer free trials.

You can use CyberGhost VPN for free for 1 day on Windows, and 7 days on Android and iOS.

More CyberGhost VPN features:

  • Supports a wide range of devices
  • Allows up to 7 simultaneous connections
  • Doesn’t keep user activity logs
  • 24/7 live chat support
  • More than 6,700 servers worldwide
  • 45-day money-back guarantee
  • Free trial for Windows (1 day) and Android, iOS (7 days) users
CyberGhost VPN

CyberGhost VPN

Take advantage of the 1-day free trial for Windows PC to use this speedy VPN for your Kraken activities.
Check priceBuy it now

Conclusion

ZenMate VPN

ZenMate

ZenMate VPN is a great choice for a VPN tool if you plan on registering a Kraken account and trading cryptocurrency.

It provides you with a great array of security features that can keep your privacy and connection safe.

This VPN service provides you with a large network of fast servers in more than 78 locations. It’s a great VPN for Bitcoin trading.

Last, but not least, you can install ZenMate VPN on as many devices as you like.

More ZenMate VPN features:

  • Strict no-logging policy
  • Supports a wide range of devices
  • Lets you install and use it on unlimited devices (unlimited connections)
  • Fast servers in more than 78 locations worldwide
  • Free ZenMate VPN browser extension
  • Comes with a 7-day free trial
  • 30-day money-back guarantee
ZenMate VPN

ZenMate VPN

Install this handy VPN on all your devices to conveniently access Kraken out of your pocket.
Check priceBuy it now

To sum up, if you’re looking for a simple and secure way to perform crypto transactions on Kraken, we recommend using any of the 5 VPN services above.

If you can’t make up your mind about a particular VPN, we suggest Private Internet Access (buy here) since you can use it for anything.

Come back to this page and leave us your impression about your chosen VPN in the comment section below.

Microsoft Forms now lets respondents get a copy of their responses

Microsoft has released an important update for Microsoft Forms, the company’s popular online survey creator tool. The Microsoft 365 roadmap indicates that Microsoft Forms now supports email receipt and response download options.

With this update, Form designers will be able to turn on two new notification options for respondents. First of all, users will receive confirmation emails to all respondents within their organization, containing a link that will allow them to print a copy of their responses. To use this feature, designers need to turn on the “Allow receipt of responses after submission” option in the form settings.

Thank you

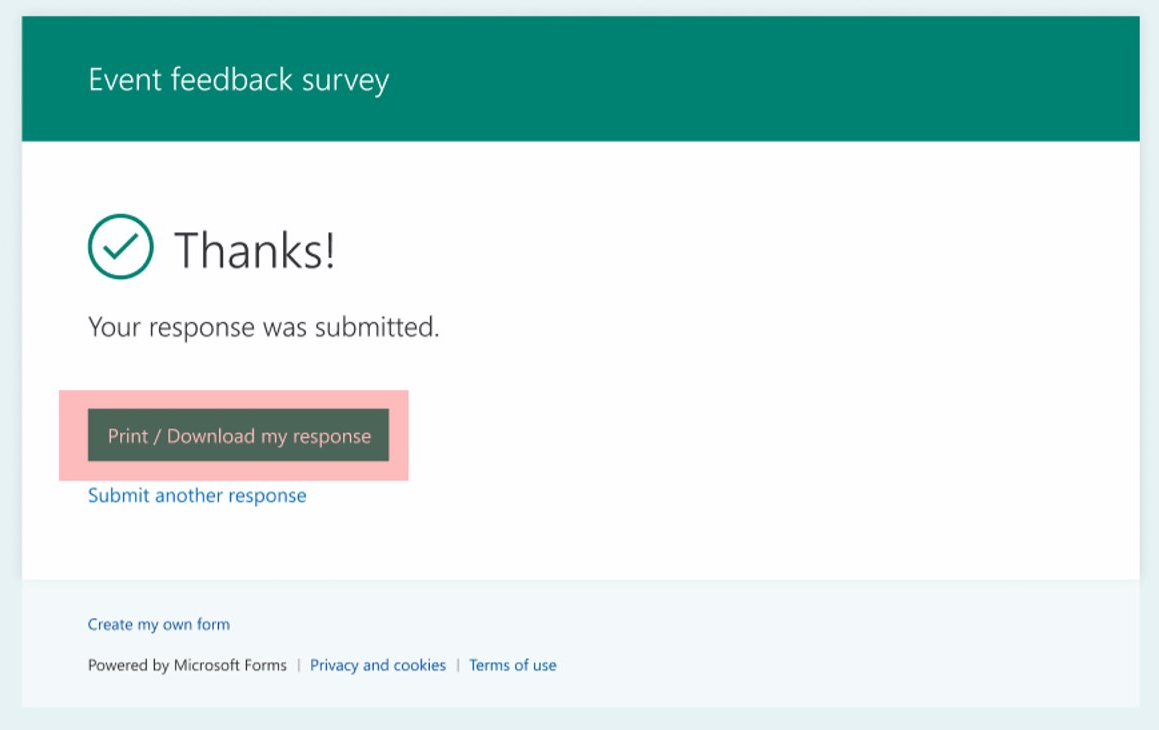
With the confirmation emails enabled, Microsoft Forms will also let all respondents download or print their responses on the “Thank you” page after submission. These options will be available for everyone within and outside of the organization.

Last month, Microsoft Forms also received support for collecting responses from specific users or security groups. The new option is turned off by default, and the Form owner will have to enable it manually in the “Send to Collect Responses” dropdown menu.

Fix: Virgin Media WiFi Connected but no Internet Access

Virgin Media is a UK-based broadband ISP that has experienced some issues with its Wi-Fi service from time to time. During specific periods of the year when online networks become very busy, internet blackouts cause Virgin Media customers to lose connectivity.

Here are a few potential fixes for Virgin Media Wi-Fi connections.

How to fix Virgin Media WiFi connected but no internet access?

1. Update your drivers automatically

Rely on high-quality software like Outbyte Driver Updater if you don’t want to miss an update ever again and enjoy smooth gaming activities at all times.

With this great tool, you can scan your system at a fantastic speed and get a detailed report of what drivers are outdated. You have over 18 million driver files that you can download for your PC to be running like new.

You don’t need to remind yourself to update your drivers because the schedule manager feature is in charge of notifying you about any new patches.

Another essential characteristic that you’ll definitely enjoy is that you can backup your drivers in a compressed zip file.

⇒ Get Outbyte Driver Updater

2. Check Virgin Media Service Status

Virgin Media confirmed the issues about Windows 10 PCs losing their Virgin Wi-Fi connections in December 2016. The issue arose after a Windows update and has something to do with PCs not detecting address systems.

As such, check the Virgin Media service status to find out if there are any known issues about connectivity in your region. (You can click here to open the Virgin Media service status page.)

3. Use a VPN

Another option that is likely to help you access any content is to use a virtual private network service. It will change your IP address and protect your identity.

In consequence, your ISP will not be able to place any restrictions on your traffic.

On top of that, a VPN will let you stream your favorite content across the globe, allowing you to surpass geo-restrictions.

Just make sure to get a VPN with many servers and global coverage. Another thing to look for is a good privacy policy and extra security features such as a killswitch.

4. Open the Virgin Media Page at Downdetector

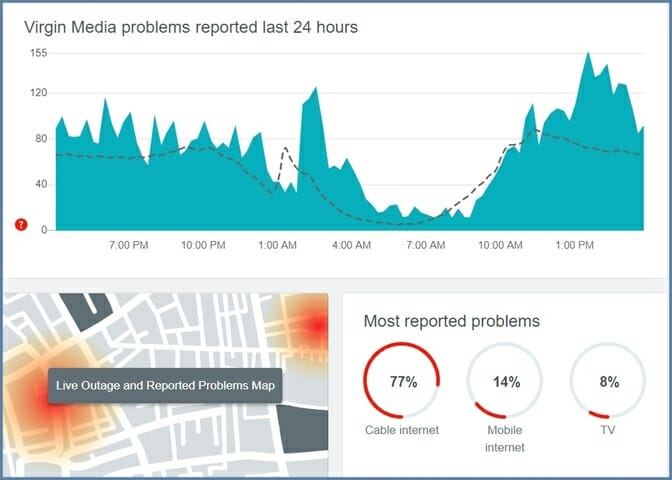
Downdetector is another good site to check for Virgin Media Wi-Fi issues. This is a website that provides real-time overviews for outages for ISPs and other web services. Click here to open the Virgin Media page on that site.

Even though Virgin was supposed to have fixed its Wi-Fi service by mid-January, its Downdetector page currently highlights that the Virgin Media ISP still has notable internet connection outages.

It also highlights that those in London, Birmingham, Manchester, and York will probably find their connections down. If you’re in one of the red regions, consider contacting Virgin Media customer support for further details about when your Wi-Fi connection will be restored.

5. Restart Your Hardware

You can also try a few fixes yourself. One of the more basic fixes is to restart all your hardware, including restarting both your PC and Virgin Media Hub by switching off the router and then waiting a few minutes to turn it back on. Then, open your browser in Windows again to see if the connection is fixed.

6. Change the Wi-Fi Router Channel

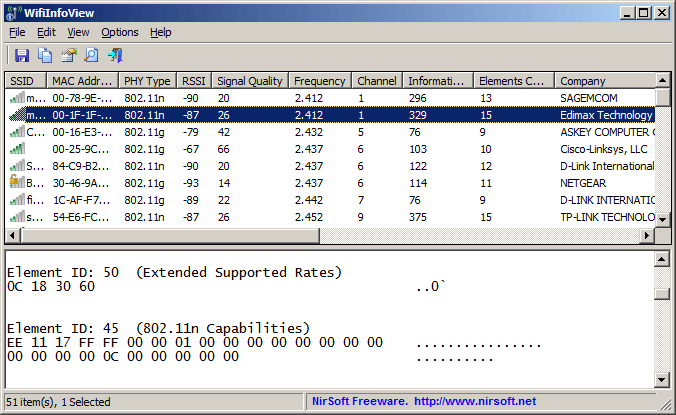
  1. Open this page on the NirSoft website and click Download WifiInfoView to add WifiInfoView to Windows.
  2. Switch your router to a channel that other networks aren’t using so much.
  3. Open the Command Prompt by pressing the Win key + X hotkey and selecting Command Prompt from the menu.
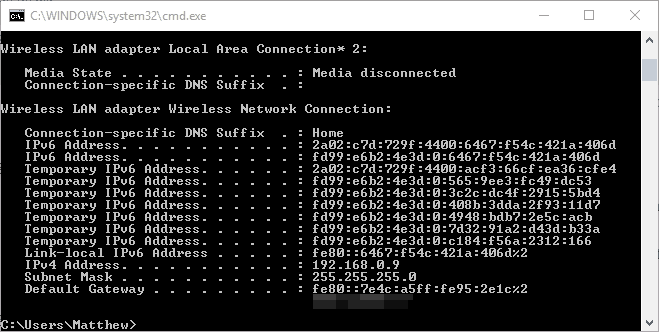
  4. Enter ipconfig into the Command Prompt and press Return. The Command Prompt will list connection details as below.
  5. Copy your Default Gateway number listed in Command Prompt by clicking Ctrl + C. 
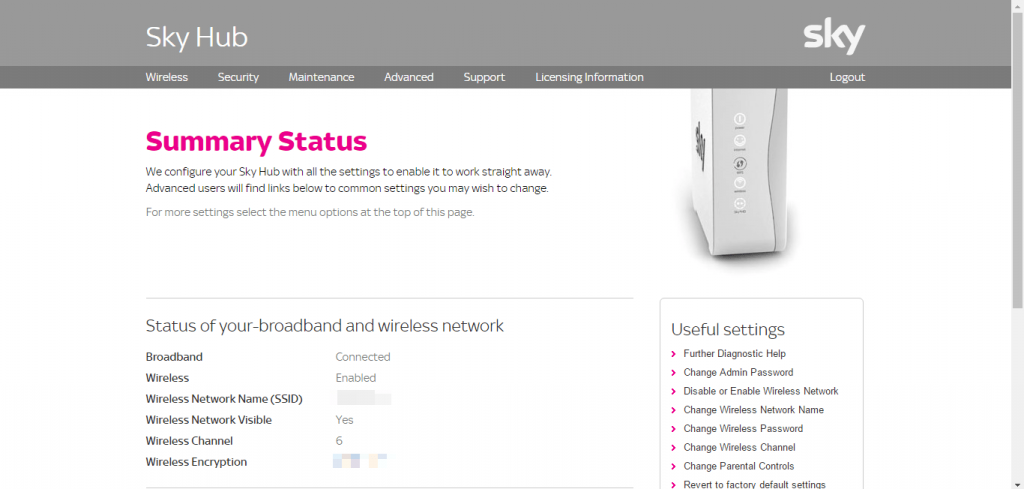
  6. Paste Default Gateway number into the URL browser bar and then press Return. That will open your router page as below, which tells you which wireless channel you’re on.
  7. Click Wireless on that page and enter the required authentication.
  8. Select a Basic Wireless Settings tab that includes a Standard Channel drop-down menu.
  9. Click that drop-down menu to choose an alternative router channel from there.

Other wireless networks sharing the same channel as yours can interfere with your signal, so changing the Wi-Fi router channel might fix the Virgin Media connection. This is how you can switch your Virgin Media Wi-Fi router channel.

7. Run the Internet Connections Troubleshooter

  1. Enter troubleshooter into the Cortana search box and select Troubleshooting.
  2. Select Network and Internet to open a list of troubleshooters.
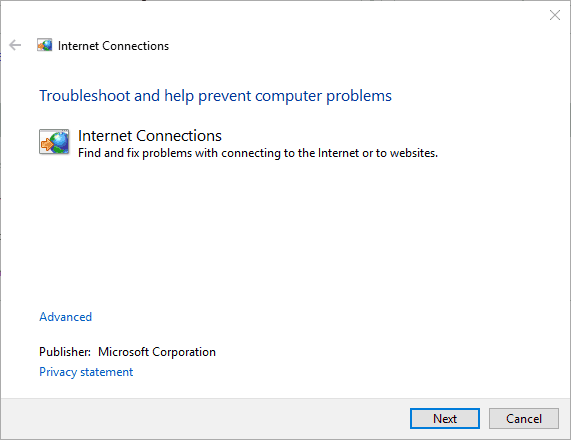
  3. Then select Internet Connections to open the window shown below.
  4. When you press the Next button, the troubleshooter might fix your VM Wi-Fi connection.

Whenever it happens, you notice that even though Virgin Media WiFi is connected, you still have no internet access; you should try one of the solutions we presented in this article.

You can trust that at least one will fix your issue, and your internet connection will be established as soon as possible. Don’t forget to also access Virgin Media’s Help and Support pages.

If you want to update the Virgin Media Hub 3 firmware, the highlighted link will provide the information needed.

We want to hear more from you on this subject, so leave us a comment in the section below.

Windows 10X may be one of Microsoft’s biggest bets this year

2021 is shaping up to be an exciting year for Microsoft with the launch of Windows 10X, a new Windows-based OS that will should make its debut on Chromebook-like devices later this Spring. Windows 10X was initially expected to ship first on dual-screen PCs like Microsoft’s Surface Neo, but this device has now been delayed after Panos Panay, the new head of both Windows client and hardware announced a new focus on single-screen devices for Windows 10X last year.

“With Windows 10X, we designed for flexibility, and that flexibility has enabled us to pivot our focus toward single-screen Windows 10X devices that leverage the power of the cloud to help our customers work, learn and play in new ways. These single-screen devices will be the first expression of Windows 10X that we deliver to our customers, and we will continue to look for the right moment, in conjunction with our OEM partners, to bring dual-screen devices to market,” Panay wrote back in May 2020.

Microsoft has remained pretty quiet about Windows 10X since then, but the company is still testing the new OS internally. However, we learned a bit more information about Windows 10X through reports from Windows Central’s Zac Bowden and ZDNet’s Mary Jo Foley, who painted Windows 10X as Microsoft’s take on Chrome OS. At launch, the OS will reportedly focus on web apps, with the ability for customers to stream Win32 apps until these legacy apps can run securely in containers.

The Chromebooks threat

If it took years for Chrome OS and Chromebooks to be taken seriously, and Microsoft itself ran a series of ads (the infamous “Scroogled” campaign) to mock these devices during the Ballmer era. It was pretty easy to dismiss Chrome OS as a glorified web browser back in the day, but Chromebooks now supports Android apps, Linux apps, as well as virtualized Windows apps thanks to Parallels Desktop for Chromebook Enterprise.

Chromebooks have continued to enjoy real momentum in the US Education market, and despite Microsoft trying new things like Windows 10 in S Mode, Chromebooks remain cheaper and easier to manage for schools. That’s why Microsoft is now repurposing Windows 10X as a Chrome OS alternative, meaning a lightweight version of Windows that can ship on low cost devices that are easy to manage for IT Pros.

That’s a stark departure from the initial Windows 10X presentation we saw when the Microsoft unveiled its Surface Neo back in 2019, though the company still isn’t saying explicitly that Windows 10X is for Chromebook-like devices. Again, the company has remained pretty quiet about Windows 10X since Panos Panay last mentioned it in May, but make no mistake, Windows 10X could be one of Microsoft’s biggest bets this year.

Moving away from legacy Windows components

We all remember the flashy presentation of Windows 10X on the Surface Neo, when the OS looked like something designed from the ground up for dual screen devices. Microsoft followed up by releasing a Windows 10X emulator in early 2020, and our own Cody went hands-on with it.

Windows 10X is based on Windows Core OS, a new modular version of Windows 10 stripped from all the legacy Windows components that have no reason to exist on new form factors. Windows Core OS already powers Microsoft’s HoloLens 2 headset, and Windows 10X is going to be a new expression of it for mobile PCs.

With this new OS, Microsoft will abandon various legacy components such as the Control Panel or the Windows File Explorer, making the OS lighter and easier to update over time. Microsoft is aiming to eliminate everything that can make using a Windows 10 PC cumbersome, and get rid of all the annoyances that Google highlighted in an excellent ad for Chromebooks years ago. This ad was pretty much Google’s version of the “It just works” line from the late Steve Jobs.

Windows 10X will be quite different from Windows 10 on ARM, which is Windows 10 as we know it running on PCs with ARM processors. As it turned out, these PCs are not easier to use than regular Intel-based PCs, it’s actually quite the contrary due to the persisting compatibility issues with legacy Windows apps and drivers. Windows 10X also won’t be able to run legacy Win32 apps natively at launch, though Microsoft is working on a new container technology to make these apps run securely on Windows 10X devices.

If the first Windows 10X mobile devices are expected to use Intel processors instead of ARM-based chips, the OS should run better on low-cost hardware compared to regular Windows 10 thanks to the absence of legacy components. The OS will also be secure by default, just like Chrome OS, and Microsoft has also streamlined the process of installing OS updates, something that Windows users have been complaining about for years.

Enterprise first, Consumers next?

After seeing the flop of Windows RT and Windows 10 in S mode, it’s safe to say that many enthusiasts are wondering if Windows 10X could be another ill-fated initiative from Microsoft. The “Windows 10X” name itself maybe confusing as even though this is going to be a Windows based OS, Windows 10X users won’t be able to install their favorite Windows apps from the get-go.

However, Microsoft may avoid another Windows RT debacle as the first Windows 10X devices will apparently target enterprise/education users interested in a Chrome OS alternative that supports Azure AD accounts. According to Windows Central’s Zac Bowden, Windows 10X devices for consumers will come at a later point.

It’s still unclear if Microsoft will allow Windows Insiders to test Windows 10X and share their feedback on it ahead of its release. Again, the OS will make its debut on new devices for Enterprise and Education customers, and it’s likely not something that Windows enthusiasts will be able to install on their machines. However, some Windows 10X features such as the redesigned Action Center and File Explorer could eventually make their way to the regular Windows 10, which is also expected to receive a big design update codenamed “Sun Valley” later this year.

There’s probably some room on the market for a Chrome OS alternative from Microsoft, though Google has a clear head start with the first Chromebooks being released 10 years ago. Do you think Windows 10X could be too little to late, like Windows Phone was on the smartphone market? Let us know in the comments below.

FIX: Origin cloud sync error

A wide number of Origin users have encountered an Error syncing cloud storage data, whenever they try to access their savegames.

This error syncing cloud storage data has caused a lot of anger and frustration, as some users believed they have lost their entire set of save game data.

Here is what one user had to say about this issue on the EA Answers forums:

It seems saves are not saved either from Origin. Today I received a warning that my local and cloud saves were out of date. I, the user, had to choose which one was valid so I picked the most recent saves. The end result is I lost over 2 hours of gaming. And it seems that the local saves that I could have chosen for are now overwritten.  Can anyone acknowledge this? Or is there any hope?

Read on to find out our solutions to this annoying error message.


What can I do to fix the Origin Error syncing cloud storage data?

1. Use the Restore Save option inside Origin

  1. Open your Origin application.
  2. Click My Games and choose the game that you’re having issues with.
  3. Click View game details, select Cloud Storage and click on Restore Save.
  4. This will allow you to restore any saved games that were mistakenly removed by the error.

2. Clear your Origin cache folders

  1. Press the Win+R keys, then type %ProgramData%/Origin and press OK.
  2. Delete all files and folders but DO NOT delete the LocalContent folder.
  3. Open the Run dialog again by pressing Win+R keys and type %AppData% and press Enter.
  4. Delete the Origin folder found at that location.
  5. Navigate to the AppData, open Local folder and delete the Origin folder found there.
  6. Restart your PC.

Note: To be able to try this method out optimally, please make sure that all Origin software has been closed. To make sure that’s the case, open Task Manager and end these two tasks: Origin.exe, and OriginWebHelperService.exe. 


You can’t sync your data with the cloud? Follow these methods


3. Restart your modem and router


A good number of users have reported good results from trying this method.

Depending on the specific type of modem and router you’re using, the exact steps to follow for this method will vary. Make sure to restart both devices, and then check to see if the issue persists.


4. Update your video card drivers

Check your graphics card
  1. Press Win+X keys on your keyboard and select Device Manager from the menu that appears.
  2. Inside the Device Manager search for the Display adapter section and choose your video card from the drop-down list.
  3. Right-click the device and click on Update driver.
  4. Select Search automatically for updated driver software.
  5. Follow the on-screen instructions to complete the setup.
  6. Restart your PC and try to see if the issue is resolved.

In today’s fix article we found out what are the best methods to try and fix the Origin error syncing Cloud storage data.

We hope that the methods presented in this list have proven helpful for your specific situation.

Please feel free to let us know if you managed to solve the issue by using the comment section below.

Fix: That Didn’t Go As Planned Error in Origin

A wide number of Origin users have seen the error That didn’t go as planned. Origin encountered an issue loading this page starting to appear randomly.

Here is what one user had to say about this issue on the EA Answers forums:

Well, that didn’t go as planned. Origin encountered an issue loading this page. Please try reloading it – if that doesn’t work, restart the client or try again later. Please help me !

In today’s fix article we will discuss the best methods to apply to sort this issue out and get back to playing your favorite games in no time. Read on to find out how to do it.

How do I fix the That didn’t go as planned error in Origin?

1. Clear registry entries using a specialized tool

Registries are not something one should try to fix manually unless they are very skilled with such data files, and since not everyone is an IT technician, it is best to leave these things to dedicated third-party software.

2. Make sure your Origin software can run normally

  1. Click on Cortana search box and type in Windows Defender Security Center -> open it.Windows security - origin error that didn't go as planned
  2. Select Firewall & network protection.
  3. Click the link named Allow an app through firewall.
  4. Click on the Change settings button.
  5. Scroll down and select Origin from the list (or click Allow another app button if you can’t find it)
  6. Make sure that Origin has both Private and Public access by ticking the respective boxes.
  7. Press Ok to save the settings.

It is imperative that your Firewall or Antivirus software is not blocking access to your Origin application.

The steps to whitelist Origin will vary depending on the antivirus software you’re using, but if you utilize the Windows Defender Firewall, you can follow the steps mentioned above.

3. Delete Origin cache files

  1. Click the Cortana search box -> type folder.
  2. Select the first result from the top called File Explorer Options.File explorer options - Origin error that didn't go as planned
  3. Click the View tab inside the newly opened window.
  4. Scroll down and under the Hidden files and folders section -> tick the box next to Show hidden files, folders, and drives.
  5. Press Ok.

To delete Origin cache files:

  1. Navigate to C:Program Data and delete the Origin folder.
  2. Delete the Origin folder found at the location C:Users<username>AppDataLocal
  3. Also, delete the Origin folder from this location on your hard-drive: C:Users <username> AppDataRoaming

In order to be able to delete the Origin cache files, you will need to make hidden folders in Windows 10 visible. 

Note: The <username> entry in the paths above is your PC’s user name.

In today’s fix article, we explored the best methods to fix the That didn’t go as planned error message inside Origin.

We hope that this guide managed to get you back to playing games normally.

Facing other challenges, such as issues with Array.prototype.map() and arrow functions? Get insights and solutions in our guide on solving problems with Array.prototype.map() and arrow functions.

If it did, please feel free to let us know if this guide helped you solve your issue by simply using the comment section found below.

Battlefield 5 packet loss: How to fix it? [3 tested methods]

Battlefield V is a popular first-person shooter game that many players from all around the world enjoy.

Despite its name, Battlefield V (also called Battlefield 5) is the sixteenth installment in the Battlefield series.

Although it was released more than 2 years ago, in November 2018, players still enjoy it.

So far so good, but occasionally, players may experience connectivity issues.

By far, packet loss in Battlefield 5 is one of the worst things you can encounter as an online player.

But don’t fret; this guide will help you understand the phenomenon better, as well as troubleshoot and fix it with ease.

What causes packet loss in Battlefield 5?

Truth be told, there are a lot of things that could trigger a packet loss episode, regardless of where you encounter it.

To make sure we’re on the same page, packet loss happens when data packets never make it to their destination, whether it’s you or the game server.

As a result, you may experience rubberbanding, unresponsive menus, VoIP interruptions, or even game crashes.

The bad news is that packet loss can be triggered by just about anything that’s not right with your connection.

Check out some examples of things that can cause packet loss:

  • Network congestion (one of the most common causes, by far)
  • Lack of regular connection maintenance
  • Improper ISP traffic management (which leads to network congestion)
  • Using Wi-Fi instead of an Ethernet (wired) connection
  • ISP bandwidth throttling
  • Cheap Internet subscription plan (not enough bandwidth)
  • Battlefield 5 server-side issues
  • Your router may be obsolete or running on an outdated firmware version
  • Outdated drivers on your system
  • Low-quality hardware components (including Ethernet cables)
  • Firewall/antivirus blocking or restricting Battlefield 5

Keep in mind that these are just a few things that could cause packet loss in Battlefield 5.

That’s precisely the reason why packet loss can be such a pain to troubleshoot and fix without significant effort.

How can I fix packet loss in Battlefield 5?

VPN

  1. Buy a VPN subscription plan (we recommend PIA)
  2. Download the VPN installer
  3. Install the VPN client on your PC
  4. Launch the VPN application
  5. Log in to your account
  6. Connect to a nearby server (they are usually faster)
  7. Launch Battlefield 5
  8. Check if you’re still experiencing packet loss

As we mentioned in the previous section of our guide, network congestion is among the most frequent causes of packet loss.

Using a VPN can bypass network congestion by simply re-routing your connection through a secure tunnel.

The same goes for if your ISP is throttling your connection. Using a VPN will re-route your connection, away from your ISP’s restrictions.

However, keep in mind that a VPN won’t solve Battlefield 5 packet loss if the issue is on your side or if the game server has issues.

Private Internet Access is an excellent VPN service that features more than 22,000 high-speed servers.

That way, if you connect to an overcrowded server that’s not quite fast, you can simply connect to another one that might work better.

Check out a brief list of PIA’s main features:

  • Has over 22,000 fast servers in its network
  • Doesn’t log anything you do online (zero-logging)
  • Comes with military-grade 256-bit encryption
  • Includes an effective VPN kill switch
  • Provides you with a private DNS service
  • Can block ads and malware-ridden hosts (PIA MACE)
  • Helps you unblock various geo-restricted content

Private Internet Access

Experiencing packet loss while playing Battlefield 5? Private Internet Access could come in handy.
Check price Buy it now

Flush your DNS

  1. On your Windows PC, launch CMD with Administrator rights
  2. Type the following commands, one by one, followed by the Enter key:
    • ipconfig /flushdns
    • ipconfig /registerdns
    • ipconfig /release
    • ipconfig /renew
    • netsh winsock reset
  3. Restart your PC

After your PC restarts, simply launch Battlefield 5 once more and connect to your favorite server.

You may notice that the packet loss issue is no longer there.

Sometimes, cached data build-ups can cause all sorts of connectivity issues. Simply removing this data can restore your connection’s functionality.

In this case, you simply release old DNS data on your PC and renew it by running the commands above.

Manual troubleshooting

Manual troubleshooting

  • Restart Battlefield 5
  • Reboot your PC
  • Restart your modem and/or router
  • Change your region by using a VPN
  • Wait for the issue to pass by itself (works great against server-side problems)
  • Make sure you close any bandwidth-consuming apps or services
  • Check that your cables aren’t damaged and replace them if necessary
  • Update your router’s firmware to its latest version
  • Upgrade your Ethernet cables to a higher category (i.e. from CAT 5 to CAT 6)
  • Update your system drivers, especially network adapter drivers
  • Try using a wired connection instead of Wi-Fi (Wi-Fi packet loss happens more frequently)
  • Avoid peak hours to bypass network congestion (or use a VPN)
  • Check if your firewall/antivirus doesn’t restrict or block Battlefield 5 in any way
  • Upgrade your Internet plan if possible (applies if you have limited bandwidth)
  • Contact your ISP and ask them if they can do anything about your packet loss
  • Switch the channel your wireless router broadcasts on
  • Check if the server you’re playing on doesn’t have any technical issues

Although these are quite a few suggested fixes, they’re not guaranteed to fix packet loss 100% of the time.

In fact, these suggestions apply not only to Battlefield 5 but to every situation where you may encounter packet loss or other connectivity issues.

A well-maintained connection is less likely to encounter connectivity issues, including packet loss.

Our recommendation is that you try as many suggestions from the list above as you can, especially if you haven’t performed any maintenance work on your network for a while now.

Conclusion

All things considered, Battlefield 5 packet loss can be a troublesome issue, but that doesn’t mean that you can’t solve it.

Clearly, if the problem’s on your side, you’ll need to do some light maintenance on your connection.

You can even eliminate packet loss if your ISP throttles your connection by using a VPN. VPNs also work great against network congestion, which is a common cause of packet loss.

However, if the problem is caused by the game server, there’s little you can do about it except wait it out, or contact Battlefield 5’s support team and let them know about it.

Did our guide help you solve your Battlefield 5 packet loss issue? Tell us how you managed to get rid of packet loss in the comments section below:

Fix: An Unexpected Error Has Occurred in Origin

Some users noticed an unexpected error in Origin while trying to download a game. This issue seems to affect all the downloadable content on Origin, and it has caused users a lot of frustration.

Dealing with this issue is not that hard, as you will see in this article. The troubleshooting methods are presented, starting with the least invasive one.

This ensures that the most efficient method for your situation will be used to fix the issue without exposing your system to unnecessary risks. Read on to find out more.

How do I fix the Origin unexpected error?

1. Whitelist the Origin app in your firewall

  1. Open Windows Defender.
  2. Click on Firewall & network protection.
  3. Select Allow an app through firewall then Change settings.allow an app through firewall - origin unexpected error has occured
  4. Select Origin from the list.
  5. Allow both Private and Public for this app by ticking the boxes.
  6. Save the modifications by clicking the OK button.

We used Windows Defender in this example. However, the process is mostly the same in any antivirus firewall program you use.

This method can also help you with similar issues like Origin Error Code 20.403; read this guide to know more.

2. Run Origin with administrator privileges


In order to try this, right-click the Origin launcher and select Run as administrator. Check to see if this fixes the issue.

If it doesn’t, try the next method.

3. Enable Safe Mode Downloading

  1. Open Origin.
  2. Click the Origin button and select Application Settings.
  3. Inside the Diagnostics tab, enable Safe Mode Downloading.

4. Delete the Origin temporary files

  1. Press Ctrl+Alt+Del to run the Task Manager.
  2. Search for Origin.exe and OriginWebHelperService.exe in the list.
  3. Click End task for both.
  4. Press Win+R keys to open Run.
  5. Type in %ProgramData%/Origin then hit Enter.run window with command - origin unexpected error has occurred
  6. Delete all the files and folders inside it except for the LocalContent folder.
  7. Open Run again, type %AppData%, and press Enter.
  8. Inside the folder that opens, delete the Origin folder.
  9. Click on the AppData from the link, open Local folder and delete Origin.
  10. Restart PC.

5. Uninstall and reinstall Origin

  1. Press Win+X keys, and select Apps and features.Apps and features - origin unexpected error has occurred
  2. Search for Origin in the list and click Uninstall.
  3. Download the latest Origin app and install it on your PC.

6. Perform a Clean boot of your PC

  1. Click on Cortana search, type msconfig, and press Enter.
  2. Click on Services.
  3. Tick the box next to Hide all Microsoft services.
  4. Click the Disable all button.msconfig - origin unexpected error has occurred
  5. Click the Startup tab -> disable all apps.
  6. Restart your PC and activate each of the applications one by one to identify which is causing the issue (After you found the issue, repeat the steps in this method and activate all apps).

We hope this guide managed to help you solve the unexpected error has occurred message in Origin.

Please let us know if any of these methods worked for you or if you have any suggestions on this topic by using the comment section below.

Black Ops 4 Packet Loss: 3 Ways to Fix it

Call of Duty: Black Ops 4 is still played, however, many reported Black Ops 4 packet loss, so in this guide we’ll show you ways to fix it.

What causes packet loss in Black Ops 4?

Issues with the network or your ISP can cause this problem. Using a Wi-Fi connection or outdated drivers can also be a problem.

How can I fix packet loss in Black Ops 4?

1. VPN

  1. Buy a VPN subscription plan (we recommend Private Internet Access)
  2. Download the VPN installer on your PC
  3. Install the VPN client and launch it
  4. Log in to your VPN account
  5. Connect to a fast server (nearby servers are usually the fastest)
  6. Launch Black Ops 4 once more
  7. Check if you still experience packet loss

After installing a VPN, be sure to check Black Ops ping and make sure that it’s low.

Private Internet Access

Private Internet Access

Encountering packet loss issues in Black Ops 4? Private Internet Access could definitely come in handy.
Check price Visit website

2. Flush your DNS

  1. Launch a CMD instance with Administrator rights
  2. Run the following commands, one by one:
    • ipconfig /flushdns
    • ipconfig /registerdns
    • ipconfig /release
    • ipconfig /renew
    • netsh winsock reset
  3. Restart your PC

It’s common that cached data build-ups can affect a system’s connectivity and cause issues such as packet loss.

The same thing could happen with Black Ops 4, since it requires a stable Internet connection in order to run as intended.

Therefore, you could try flushing your DNS using the steps described above.

This process should clear any faulty DNS records on your system and maybe even solve your Black Ops 4 packet loss issue.

3. Troubleshoot the issue manually

  • Reboot your computer
  • Restart your modem and/or router
  • Check your cables for damage and replace them if necessary
  • Upgrade your cables to a higher category (i.e. CAT 5 to CAT 6)
  • Restart the game
  • Use a VPN to change regions
  • Close any background bandwidth-hungry apps and services
  • Update your router’s firmware to the latest version
  • Make sure your system drivers are up-to-date
  • Call your ISP and ask them if they can look into the matter (if you notice it keeps occurring)
  • Contact Activision’s support team and ask if there’s any technical issue with the servers
  • Avoid peak hours if you suspect network congestion (or use a VPN)
  • Check that your firewall/antivirus isn’t restricting Black Ops 4 in any way
  • Always use a wired connection instead of Wi-Fi, if possible (Wi-Fi packet loss occurs more frequently)
  • Change your wireless router’s broadcast channel
  • Upgrade your Internet plan if it’s a cheap one with limited bandwidth

Although these troubleshooting suggestions might not eliminate packet loss 100%, they could definitely improve the quality of your connection.

Packet loss can also occur as a result of poor connection maintenance, so you might get lucky.

With that in mind, we recommend you try as many of our manual troubleshooting suggestions as you can.

All things considered, packet loss is, unfortunately, a common issue among Black Ops 4, but it can be fixed.

Although a VPN is one of the most effective ways to fix packet loss, keep in mind that it might not work all the time.

Did our guide help you eliminate packet loss in Black Ops 4? Tell us all about it in the comments section below.

Microsoft Lists adds support for undo and redo commands

In November, we reported that Microsoft Lists would soon allow users to use undo and redo commands to recover information. Today, Norm Young, a Microsoft MVP, took to Twitter to note that the feature is now live in the new Lists app.

Microsoft has released two important changes as a part of this update. First of all, the company has added the ability to perform undo and redo operations while editing lists from the grid view. This should make it easier to recover previously entered information or simply retract unwanted changes made in their lists.

In addition to this, Microsoft Lists has also picked up support for the following keyboard shortcuts on both Windows and Mac devices:

  • Undo for Windows: Control + Z
  • Redo for Windows: Control + Y AND Control + Shift + Z
  • Undo for Mac OS: Command + Z
  • Redo for Mac OS: Command + Shift + Z

According to Microsoft, Lists users will be able to use these commands in the Lists experience in Microsoft Teams, and the Lists app available in Microsoft 365 and SharePoint. In case you missed it, Microsoft Lists for iOS is also dropping its preview tag later this month.

Here’s why Microsoft keeps shipping Xbox controllers with AA batteries

If Microsoft recently launched a slightly redesigned Xbox Wireless Controller alongside its next-gen Xbox Series X|S consoles, one thing that didn’t change is the inclusion of two AA replaceable batteries. The Redmond giant has been using AA batteries in its Xbox controller for many years while the competition has moved to rechargeable batteries, though the Xbox Elite Series 2 controller includes a built-in non-removable rechargeable battery.

Over the years, a regular point of criticism from Xbox fans has been that Microsoft should provide rechargeable batteries for free with its Xbox controllers instead of the included AA batteries that will only last for 10 hours or so. As of today, the company is selling its own $24.99 Play and Charge kit that can recharge while you play or afterwards, but Xbox controllers also support rechargeable AA batteries as well as other battery packs from various third-party manufacturers.

While many Xbox players actually like the ability to use different types of batteries with Xbox controllers, it turns out that Microsoft has been in a longtime partnership with Duracell. Luke Anderson, marketing manager for Duracell in the UK discussed the deal between the two companies in an interview with Stealth Optional (via Video Games Chronicle) this week:

“There’s always been this partnership with Duracell and Xbox… It’s a constant agreement that Duracell and Microsoft have in place”.

He added: “[The deal is] for OEM to supply the battery product for the Xbox consoles and also the controllers’ battery. So that [deal is] going to go on for a while… it’s been going on for a while and I think it needs to go for a while [more].”

The inclusion of non-rechargeable AA batteries with every Xbox controller may not be exactly good for the environment, but the option to use rechargeable solutions is definitely nice. It’s also worth reminding that the new Xbox Series X|S controllers are compatible with Microsoft’s Xbox One Play and Charge kits, and they should also work with existing third-party charging accessories.

Do you regret Microsoft not including rechargeable batteries with Xbox controllers, or are you fine with the AA batteries that have been there for years? Sound off in the comments below.

Update 10:30 AM: In a statement shared with Eurogamer, a Microsoft spokesperson explained that shipping AA batteries with its Xbox controllers is all about giving consumers more choice. “We intentionally offer consumers choice in their battery solutions for our standard Xbox Wireless Controllers. This includes the use of AA batteries from any brand, the Xbox Rechargeable Battery, charging solutions from our partners, or a USB-C cable, which can power the controller when plugged in to the console or PC,” the spokesperson said.

Fix Common Steam Errors on Windows 10/11 in a Few Easy Steps

Steam is one of the biggest distribution platforms that allows gamers to buy games and play them with their friends. This platform allows millions of users to play together.

But sometimes, certain errors with Steam can appear, and today we will show you how to fix Steam errors on Windows 10.

How can I fix Steam errors on Windows 10?

What can I do when getting Could not connect to Steam network error?

1. Delete all files from the Steam folder

  1. Go to the Steam installation directory. By default, it should be C:Program FilesSteam, but it could be different on your computer.
  2. After you enter Steam’s directory, delete all files and folders except the steamapps folder and Steam.exe.
  3. After that, click Steam.exe and wait for Steam to download and install again.

If you encounter Could not connect to Steam network error, you should be able to fix it by removing all files from Steam’s installation directory. To do that, follow the above steps.

By not deleting the steamapps folder all your games will remain on your PC, so you won’t have to download them again.

2. Enter Steam in Offline mode

When you get this error message, you’ll usually have the option to start Steam in Offline mode. To fix this problem start Steam in Offline mode, go to Steam tab, choose Go Online option, and this problem should be fixed.

How long can Steam stay in Offline mode? We’re talking about an extended time frame if there are no Steam client updates involved. So, expect it to stay in Offline mode for up to five days.

3. Change the Internet security settings

  1. Press Windows Key + S, enter Internet options, and select Internet Options from the results.
  2. Go to the Security tab and select the Local intranet option. Lower the security level for this zone to Low.
  3. Click on Trusted sites and lower the security level to Low.
  4. Click Apply and OK to save changes.

Users reported that this problem can be fixed by changing their Internet options. According to them, after changing security settings Could not connect to Steam network error was resolved.

After lowering your security settings to low, the issue with Steam should be resolved. Although this method can fix this error, keep in mind that lowering your security settings poses a slight security risk.

4. End all running Steam processes

  1. Close Steam.
  2. Open Task Manager by pressing Ctrl + Shift + Esc.
  3. Locate all running Steam processes and end them.
  4. Close Task Manager and try to start Steam again.

Sometimes, this problem can be fixed simply by ending all Steam processes. According to users, after closing all running Steam processes and restarting Steam the issue was resolved. To do that, complete the above procedure.

5. Disable/restart your antivirus

According to users, your antivirus software can sometimes interfere with Steam and cause the Could not connect to Steam network error to appear. To fix this problem, you need to disable your antivirus temporarily.

If that doesn’t work, you might have to uninstall your antivirus and check if that helps temporarily. Users reported issues with Norton and AVG antivirus.

Even so, keep in mind that almost any third-party antivirus can cause this problem, so be sure to try disabling all installed antivirus programs. You may check out this list with the best uninstaller software you can use right now.

6. Delete the ClientRegistry.blob file

  1. Go to the Steam installation directory.
  2. Locate ClientRegistry.blob file and delete it. You might have several ClientRegistry.blob files with different names, so delete them all.

After deleting the problematic file, the issue should be completely resolved.

Sometimes ClientRegistry.blob file can interfere with Steam and cause this error to appear, but you should be able to fix it simply by deleting the ClientRegistry.blob file.

7. Check your firewall settings

  1. Start PeerBlock and click on List Manager then select Add.
  2. Enter Steam in the description field.
  3. Click Add URL and enter https://list.iblocklist.com/?list=steam.
  4. Select Allow and click OK.

This error can appear due to a third-party firewall, but you can easily fix this problem by adding Steam to the list of allowed programs.

Users reported issues with a software called PeerBlock, but after allowing Steam to run in PeerBlock, the issue was completely resolved. To do that, complete the above procedure.

Alternatively, you can start PeerBlock and Steam. Go to PeerBlock and look for Valve entry, right-click on all Valve entries and select Allow Permanently.

Close Steam completely. You’re probably wondering: How do I close Steam client? You can do that from Task Manager if you want. Just press Ctrl + Alt + Delete to open the Windows Security, then select Task Manager.

After adding Steam to the list of exclusions, try to start it again. Although PeerBlock is the common cause of this problem, keep in mind that other third-party firewall tools can also cause this issue.

Be sure to add Steam to the allowed list, but if that doesn’t work, try disabling your firewall.

8. Use the -tcp parameter

  1. Locate Steam shortcut, right-click it, and choose Properties.
  2. Go to the Shortcut tab and in Target field add -tcp after the quotes.
  3. Click Apply and OK to save the changes.

Users reported that they managed to fix Could not connect to Steam network error simply using -tcp parameter. You may try doing the same. After adding -tcp parameter, try to start Steam again.

9. Change your registry

  1. Press Windows key + R keyboard shortcut and enter regedit.
  2. When Registry Editor opens, in the left pane navigate to the following path: HKEY_CURRENT_USERSoftwareValveSteam
  3. In the right pane double click the AlreadyRetriedOfflineMode DWORD to open its properties.
  4. Change the Value data from 0 to 1 and click OK to save changes.
  5. Try to start Steam again.

According to users, you can fix this error by changing a few values in your registry. Editing your registry can lead to system stability issues, therefore it’s always a good idea to create a backup of your registry just in case.

10. Run Steam as administrator

Few users claim that they fixed this issue simply by running Steam as an administrator. To do that, simply locate Steam’s shortcut or .exe file, right-click it and choose Run as administrator from the menu.

11. Disable and enable your network connection

  1. Press Windows Key + X to open Win + X menu and choose Network Connections.
  2. After Network Connections window opens, locate your network connection, right click it and choose Disable from the menu.
  3. After a couple of seconds, right-click your network connection again and choose Enable from the menu.

Alternatively, you can simply unplug your Ethernet cable, wait for a few seconds, and reconnect the cable.

Few users reported that they managed to fix this problem simply by enabling and disabling their network connection.

12. Run flushconfig command

  1. Press Windows Key + R to open the Run dialog.
  2. When Run dialog opens, enter steam://flushconfig and press Enter or click OK.
  3. Follow instructions on the screen to complete the process.

According to users, you can fix Could not connect to Steam network and the Steam 102 error simply by running flushconfig command. This command will reset Steam’s configuration, and in order to run it you need to follow these instructions.

If that doesn’t work, you might have to try reinstalling Steam.

How can I fix Steam error An error occurred while updating (corrupt download)?

1. Try using a different network

According to users, they managed to fix this problem by connecting to a different network and trying to download the same game again. If you’re on a Wi-Fi network, you can switch to a different wireless network to fix this problem.

But if you’re connected via an Ethernet cable, you might have to switch to a different router.

2. Clear Steam download cache

  1. Open Steam and click on Steam > Settings.
  2. When Settings menu opens, go to Downloads tab and click the Clear Download Cache button.
    After clearing the download cache, click OK and restart Steam.
  3. When Steam starts try to download the game again.

Clearing the download cache can sometimes fix problems with corrupt downloads, and to clear your download cache, you need to follow these steps.

3. Change the download region

  1. Open Steam and go to Steam and select Settings.
  2. Go to Downloads tab, and in the Download Region section choose a different download server. For best performances use the server that is closest to your location.
  3. After you’re done, click OK to save changes.

Sometimes An error occurred while updating can appear if your download server is busy or if it has any issues.

The simplest way to fix this problem is to change your download server. This is pretty easy to do, and you just need to follow the above steps.

4. Make sure that steamapps folder isn’t set to Read-only

  1. Open Steam installation directory.
  2. Locate steamapps folder, right-click it, and choose Properties.
  3. In Attributes section make sure that Read-only (Only applies to files in folder) option isn’t checked.
  4. Click Apply and OK to save changes.

Steamapps folder is the default download location for your games, and if this folder is set to Read-only, you might encounter corrupt download error message. To fix this problem, you need to follow these steps:

5. Close unnecessary applications

Few users reported that this issue was caused by background applications, and after closing these applications the issue was resolved.

According to users, there wasn’t enough memory for Steam to run, and after closing applications such as Fruit Ninja and Xbox Smartglass the error was resolved.

6. Rollback / update the WLAN driver

  1. Press Windows Key + X and select Device Manager.
  2. Locate your wireless adapter and double-click it.
  3. Go to the Driver tab and click the Roll Back Driver button.
  4. Optional: If Roll Back Driver option isn’t available, click the Uninstall button.

You might get An error occurred while updating in Steam if you have any problems with your wireless adapter drivers.

Although it’s usually better to keep your drivers up to date, several users reported that this issue was fixed after rolling back their wireless adapter driver to the older version. To roll back a driver, perform the above procedure.

After rolling back the driver, restart your PC and check if the problem is resolved. If you choose the Uninstall option, the default driver will be installed after you restart your PC.

Several users reported that updating your WLAN driver can also fix this problem, therefore, we strongly suggest that you visit your wireless adapter manufacturer’s website and download the latest drivers for your device.

After installing the latest drivers check if the issue is resolved.

7. Verify the game cache

  1. Start Steam.
  2. Go to your Library and right-click the game that is giving you this error. Choose Properties.
  3. Go to Local Files tab and click on Verify integrity of game cache.
  4. The verification process will now start. Wait for it to complete.
  5. After the verification is completed, check if the problem is resolved.

If you’re getting a rrupted download error, you might want to verify the cache of the game that you’re trying to download. To do that, follow these steps.

8. Uninstall Skype

Few users reported that Skype can cause these types of errors to appear, therefore in order to fix the problem you’ll have to uninstall Skype.

According to users, this error appears even if Skype isn’t running in the background, but after uninstalling Skype the issue was resolved.

Before uninstalling Skype, you can try to update both Skype and Steam and check if that fixes the problem.

9. Disable your antivirus

  1. Press Windows Key + I to open the Settings app.
  2. Navigate to the Update & Security section and go to Windows Defender tab.
  3. Disable Real-time protection and Cloud-based Protection.
  4. After disabling Windows Defender, check if the problem is resolved.

Your antivirus can often interfere with Steam and cause An error occurred while updating message to appear. The simplest way to fix this problem is to disable your antivirus software until the download is completed.

Although third-party antivirus tools usually have issues with Steam, users reported that Windows Defender can also cause this error to appear.

To fix this problem, you need to manually turn off Windows Defender by following these steps. Remember that you can disable Windows Defender only if you don’t have any third-party antivirus software installed.

Some users are also suggesting to uninstall your third-party antivirus tool, so you might want to try that as well.

10. Close Razer Synapse

To fix this problem, you have to completely close Razer Synapse. To do that, close the application and then press Ctrl + Shift + Esc to open Task Manager. Select Razer Synapse process and click End Task.

After ending this process, you should be able to download and update games without any problems.

How can I fix Steam error code 53?

1. Disable your antivirus

Antivirus programs can interfere with Steam and cause Steam error Code 53 to appear, but you should be able to fix this problem after disabling your antivirus.

Users reported problems with McAfee, and according to them, after disabling Real-time scanning in McAfee the problem was completely resolved. Bear in mind that you can use this method with other antivirus tools as well.

2. Make sure that you have Visual C++ Redistributables installed

Many games rely on Visual C++ Redistributables to run properly, and if you don’t have these tools installed, you might get Steam error Code 53. To fix this problem, install the necessary tools.

You can find these tools in game’s installation directory under _CommonRedistvcredist folder. If you can’t find them on your PC, you can download them from Microsoft’s website.

3. Install the games on your SSD

Few users reported fixing this problem simply by installing their games to SSD. For some unknown reason, the games wouldn’t run from a hard drive, but after installing them to the SSD, the issue was resolved.

4. Reformat your hard drive

  1. Go to My Computer and right click the drive that you want to reformat.
    steam-errors-format-1
  2. Set File System to NTFS and click the Start button.
    steam-errors-format-2
  3. Wait for the process to complete.

Users reported that they had this error while trying to run games from an exFAT hard drive. It seems that Steam has issues with exFAT partitions, and to fix this problem, you might have to reformat your partition to NTFS.

Reformatting your partition will delete all your files from that partition; therefore, be sure to back them up. To reformat a drive, follow the above procedure.

Once again, we must mention that this process will remove all your files from the selected partition; therefore, be sure to back them up before you format.

How can I fix Steam error code 41?

Reinstall the problematic game

Users reported this issue while trying to start a specific game on Steam. To fix error Code 41, you need to reinstall the problematic game, and the issue should be resolved.

In addition to reinstalling the game, users are also suggesting to disable your antivirus software. You can also fix this problem simply by verifying the game cache.

We explained how to verify the game cache in one of our previous solutions, so be sure to check it out.


What can I do when getting Steam error Could not connect Steam service?

1. Uncheck the Remember me option

When starting Steam you’ll be asked to enter your username and password, and it seems that this error occurs if you check the Remember me option while starting Steam.

Few users reported that this error was fixed after unchecking this option, so be sure to try it. If that doesn’t work, delete all files except steamapps folder and Steam.exe from Steam installation directory and try to run Steam again.

2. Remove/move user data folder or localconfig.vdf file

To fix this problem, users are suggesting to remove or move userdata folder. You can find this folder in Steam installation directory. Simply move or remove this folder and check if the problem is resolved.

If the problem still persists, open Steam installation directory, go to config folder, and move or remove localconfig.vdf file. After that, try to start Steam again.

3. Delete the appcache folder

According to users, you can fix this problem by removing the appcache folder. We don’t know why this folder causes this problem, but you can fix it simply by removing it.

To do that, go to Steam installation directory and delete appcache folder from it.

4. Remove or update Advanced System Care

Could not connect Steam service error can appear due to tools such as Advanced System Care. Users reported that this application interferes with Steam.

In order to fix this problem, you’ll need to remove this application from your PC. In addition, you might want to update this application and check if that resolves the problem.

5. Run netsh command

  1. Press Windows Key + X and select Command Prompt (Admin).
  2. When Command Prompt starts enter netsh int ip reset and press Enter to run it.

One way to fix this problem is to run netsh command. To do that, follow the above steps. After netsh command is executed, try to run Steam again.

How can I fix Steam Disk write error?

1. Check your hard drive

  1. Open My Computer and right click the hard drive partition that has Steam installed on it. Choose Properties from the menu.
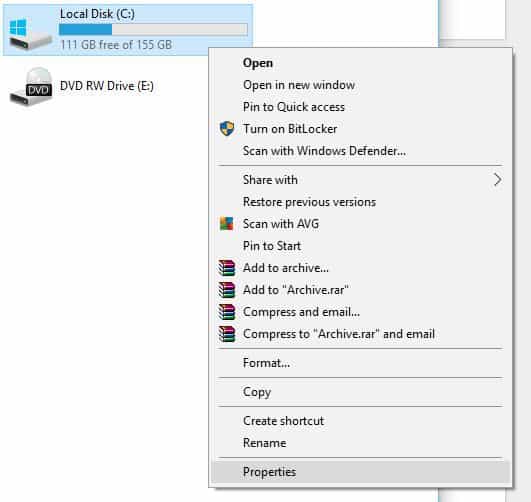
    steam-errors-check-1
  2. Go to Tools tab and click the Check button in Error checking section. Keep in mind that you might have to restart your PC in order to check your hard drive.
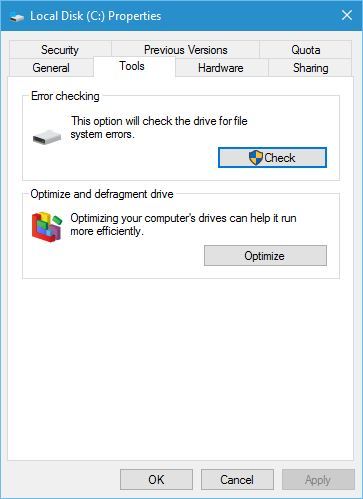
    steam-errors-check-2

This error can appear if your hard drive has issues, and one of the easiest ways to fix this problem is to scan your hard drive for errors. To do that, follow the above steps.


2. Check the game cache

Sometimes Disk write error can appear if certain game files are corrupt, but you can fix this error simply by checking the game cache.

We already explained how to check game cache in one of our previous solutions, so be sure to check it out.


3. Move your Steam installation

  1. Go to Steam installation directory and remove all files except Steam.exe, Userdata and SteamApps folders.
  2. Move those files to a different location.
  3. After the files are moved, double click the Steam.exe and install Steam again.

To fix Disk write error, you might have to move your Steam installation to a different folder or to a different hard drive partition. To do that, follow these steps.


4. Delete files from steamapps/common folder

Users reported that this error can occur due to certain files in your steamapps/common folder. Open Steam installation directory and go to steamapps/common folder.

You should see a white page file that has the same name as the game you’re trying to download. Delete this file and try to run your game from Steam library again.


5. Make sure that your Steam installation folder isn’t set as Read-only

This problem can occur if your Steam installation folder is set to Read-only, therefore in order to fix this problem go to Program Files, locate your Steam folder, and open its properties.

Make sure that Read-only option isn’t checked. In addition, you can also try running Steam.exe as administrator.


6. Delete the steammanifest files

One way to fix this problem is to remove steammanifest files from your PC. To do that open Steam installation directory and go to steamapps folder.

You should see several steammanifest files available. Delete them and check if the issue is resolved.

7. Be sure that your user account has the necessary privileges

  1. Locate Steam directory. By default it should be in C:Program Files.
  2. Right-click Steam folder and choose Properties.
    steam-errors-properties-1
  3. Go to the Security tab and click the Edit button.
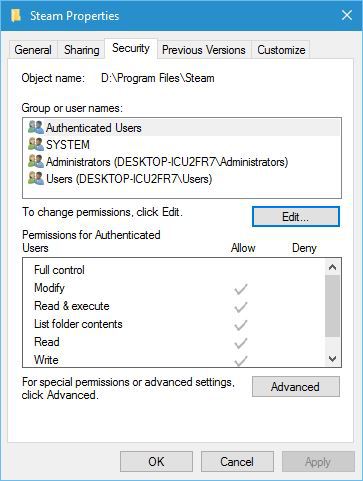
    steam-errors-properties-2
  4. If your user name is not on the list, click the Add button to add it.
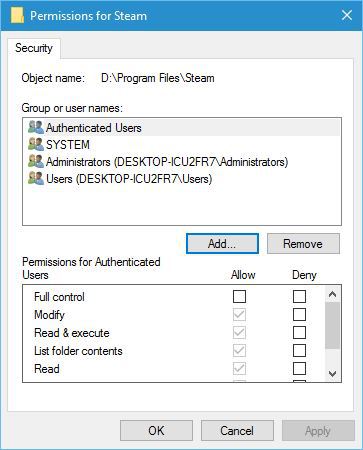
    steam-errors-properties-3
  5. In the Enter the object names to select enter your user name and click Check Names. If your user name is correct, click the OK button.
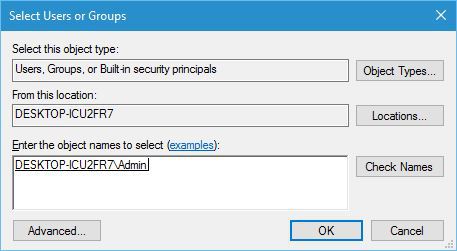
    steam-errors-properties-4
  6. Select your user name in Group or user names section and check Full control in the Allow column. Click Apply and OK to save changes.
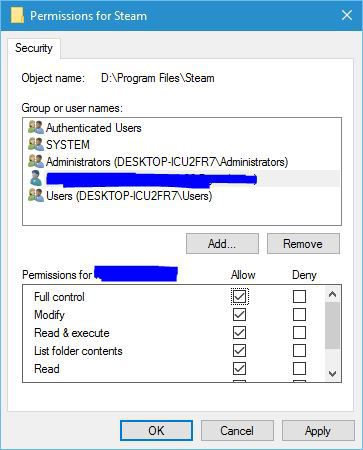
    steam-errors-properties-5

Disk write errors can occur if your user account doesn’t have the necessary privileges over the Steam folder. To change that, follow these steps:

8. Delete the downloading folder

Several users reported that they managed to fix this problem by removing the downloading folder. To do that, go to your Steam directory and go to the SteamApps folder.

Locate the downloading folder and remove it. After removing this folder, check if the error is resolved.


How can I fix Steam error Failed to load overlay localization file?

1. Delete files from Steam folder

According to users, you can fix this problem simply by removing specific files from your Steam folder. The files that you need to remove are ClientRegistry.blob, steamclient.dll and SteamUI.dll.

After removing these files, restart Steam and it will download the missing files and fix the problem.

2. Add -clientbeta client_candidate

  1. Right-click Steam shortcut and choose Properties.
  2. Go to Shortcut tab and in the Target field add -clientbeta client_candidate after the quotes.
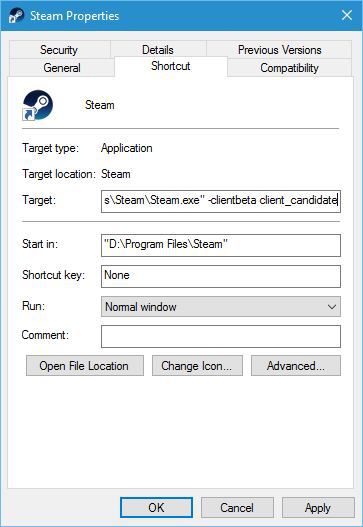
    steam-errors-param-1
  3. Click Apply and OK to save changes.

According to users, you can fix Failed to load overlay localization file error simply by adding -clientbeta client_candidate parameter. To do that, follow these steps.

3. Reinstall Steam

Few users are suggesting that you can fix this problem by reinstalling Steam. This might not be the fastest solution, but few users reported that reinstalling Steam fixed the problem for them, so be sure to try it out.

4. Delete the cached folder

One way to fix Failed to load overlay localization file error is to remove the cached folder. To delete this folder, you need to open Steam installation directory and go to the Steam folder.

Inside the steam folder, you should see the cached folder. Delete it and try to start Steam again.

These are some of the common errors that you can encounter. Speaking of which, many users reported Steam disk write error, but we tackled this issue in its own guide.

We also have an entire article dedicated to Steam error code E20, so don’t miss it for more information.

Steam errors can prevent you from playing your favorite games, but we hope that you managed to fix Steam errors on your Windows 10 PC by using some of our solutions.

Paint 3D Won’t Open: 4 Ways to Get It to Work Again

Paint 3D is one of Windows 10’s built-in apps with which you can add 3D shapes and effects to images. However, many reported that Paint 3D won’t open.

Many also reported that Paint 3D crashes after opening, but we covered that in a different guide. Today we’re going to focus on fixing the issues with opening the app.

Why is Paint 3D not working?

  • Temporary glitches with the app can prevent the application from starting.
  • Sometimes its cache or settings might get corrupted, thus causing the problem.
  • Damaged installation can also cause this and many other problems to appear.

What can I do if Paint 3D is not opening?

1. Open the Windows Store Apps troubleshooter

  1. Click the Type here to search button on the taskbar to open Cortana’s search box.
  2. Enter the keyword troubleshooter in the search box.
  3. Then you can click Troubleshoot to open the Settings app’s troubleshooter list shown directly below.
  4. Select Windows Store Apps and click Run the troubleshooter to open the window in the snapshot directly below.
  5. The troubleshooter might then provide a few potential fixes. Press the Next button to go through its suggested resolutions.

The Windows Store Apps troubleshooter can fix numerous error messages for apps that aren’t working. Thus, that troubleshooter might provide a fix for Paint 3D’s 0x803F8001 error.

Troubleshooters don’t always fix things, but they’re worth noting when an error message pops up.

2. Reset the Paint 3D app

  1. Open Cortana’s search box via the taskbar.
  2. Type apps, then click on Apps & features to open the window shown directly below.
  3. Scroll down to and select Paint 3D.
  4. Click Advanced options to open further settings for Paint 3D.
  5. Press the Reset button, and click Reset again, to delete the app’s data.

Resetting apps resets their data. So the Reset button can often fix apps that aren’t working. That option is always worth a shot when an app doesn’t start.

After resetting the app, check if Paint 3D still won’t open.

3. Reinstall Paint 3D

  1. Right-click the Start button and select Run to open that accessory’s window.
  2. Enter this path in Run’s text box and press the OK button: %LOCALAPPDATA%\Packages\Microsoft.MSPaint_8wekyb3d8bbwe\LocalState
  3. Select the Projects folder in File Explorer, and press the Copy to button.
  4. Select a folder to copy the Projects folder to.
  5. To uninstall Paint 3D, open the Run accessory again.
  6. Then enter PowerShell and press the OK button.
  7. Enter the following command and press Enter to uninstall Paint 3D: Get-AppxPackage Microsoft.MSPaint | Remove-AppxPackage
  8. Press the Get button on this Microsoft page to reinstall Paint 3D.

Some Paint 3D users have confirmed that reinstalling the app fixed the 0x803F8001 error for them. Note that reinstalling the app will also erase your Paint 3D Projects folder.

So back up the Projects folder if there’s anything there, you need to keep. This is how you can back up the Projects folder and then reinstall Paint 3D.

4. Clear the Microsoft Store cache

  1. Press Windows key + R and enter wsreset.exe.
  2. Press Enter.
  3. Wait for the process to finish.

Those fixes will help if Paint 3D won’t open on your PC. Sadly, this isn’t the only issue, and many reported that Paint 3D is not saving images.

If you have suggestions or comments, let them out in the open in our comments section below because they might also help other users.

How to Fix Windows When It Keeps Changing Keyboard Language

Many users reported that Windows 10 changes keyboard language on its own. If you’re experiencing the same problem, read this guide to learn why it occurs and how you can quickly fix it.

This might happen when the Input Language is programmed to be maintained per app or per window through an API that changes the input locale to a different or default keyboard layout is enabled for the user. Here’s how to fix it:

How to fix a keyboard that automatically changes language

Note icon NOTE
Press CTRL+SHIFT to quickly switch to another language.

1. Set a different input method

  1. Type control panel in the Search box and select the app from results.
  2. Select Clock, language and region.
  3. Click on Advanced settings.
  4. Under the Switching input methods section, put a checkmark for Let me set a different input method for each app windows.
  5. Click on Save and see if the problem persists.

2. Make the keyboard layout as default

  1. Click Start and select Settings.
  2. Choose Change PC settings.
  3. Click on Time and language, then select Region and Language.
  4. Select the language that you want to see Windows in.
  5. Click Set as primary. The Will be display language after next sign-in message will appear under the language.
  6. Click Set as primary to move the language to the top. If it can become your Windows display language, the Will be display language after next sign-in will appear under the language.
  7. Sign out and then sign back in.

Note: When you change your primary language, your keyboard layout may change. When signing back into Windows, use the right keyboard layout for entering your password. Otherwise, you might not sign in.

You can also change your keyboard layout on the sign-in screen by clicking the language abbreviation button.

Your keyboard freezes as soon as you sign-in? Don’t worry, we’ve got the right solution for you.

3. Choose only one input language and keyboard layout

  1. Click Start and choose Settings.
  2. Click Time and Language.
    Empty task manager/Task manager is empty/Nothing shows up in task manager
  3. Go to Region and Language and select Advanced Keyboard settings.
  4. Under Override for different input methods, select from the drop-down menu the language you want to use.
  5. Close the window.

4. Disable keyboard actions

  1. Click Start and select Control Panel.
  2. Click Clock, Language, and Region.
  3. Select Language and click on Advanced Settings.
    advanced keyboard language settings
  4. Click on Switching input methods and select Change language bar hotkeys.
  5. Select the Change key sequence.
    Change language bar hotkeys windows 10
  6. Click Switch keyboard layout.
  7. Click Not Assigned.

By default, pressing CTRL+SHIFT or ALT+SHIFT will cycle through any keyboard layouts you may have mapped and it is possible to do this by mistake.

If you keep pressing any of these combinations, you can go back to the correct setting.

5. Use Registry Editor to disable the keyboard layout toggle hotkeys

  1. Right-click Start and select Run.

  2. Type regedit.
  3. Navigate to the following path: HKCU\Keyboard LayoutToggle” /v “Layout Hotkey” /d 3

You might also want to use:

reg add "HKCU\Keyboard LayoutToggle" /v "Language Hotkey" /d 3reg add "HKCU\Keyboard LayoutToggle" /v "Hotkey" /d 3

And for new users, try this (in an elevated Command prompt):

reg load HKEY_USER\Stemp "%USERPROFILE%..DefaultNTUSER.DAT"reg add "HKEY_USERStempKeyboard LayoutToggle" /v "Layout Hotkey" /d 3reg unload HKEY_USERStemp

If you can’t access the Registry Editor, don’t panic because we’ve got a perfectly good guide on fixing this issue.

6. Change the region settings

  1. Go to Control Panel.
  2. Click on Clock, Language, and Region.
  3. Select Region.
  4. Click on the Location
  5. Under Home location, select Japan so that it won’t add any English keyboard layout.
  6. Click Apply, and then OK.
  7. Restart your computer.

7. Change registry settings through policy or login script

  1. Right-click Start and select Run.
  2. Type regedit and press Enter.
  3. Find this key to disable auto-detect keyboard layout: [HKEY_LOCAL_MACHINE\SYSTEM\CurrentControlSet\Control\Keyboard Layout]
    “IgnoreRemoteKeyboardLayout”=dword:00000001
  4. To hide the language bar, use this key: [HKEY_CURRENT_USER\Software\Microsoft\CTF\LangBar]
    “ShowStatus”=dword:00000003

    hide language bar windows 10 registry
  5. Exit registry editor once you’re done

If you can’t edit your registry, follow the steps in this dedicated guide and learn how you can do it like a pro.

Other unusual keyboard issues you can troubleshoot with similar methods include your keyboard automatically typing on its own, making clicking noises but not typing, producing constant beeping sounds, typing backward, refusing to register double letters, or even typing the wrong characters.

Were you able to resolve the Windows 10 switches keyboard language on its own error using any of these solutions? Let us know in the comments section below.

As always, leave there any other suggestions or questions you may have and we’ll check them out.

Fix: Sorry, we’re Having Trouble with the Home Location Hulu

Hulu is an awesome streaming media platform where you can watch popular movies and TV shows, along with Hulu Originals and live television.

Unfortunately, many Hulu users report the Sorry, we’re having trouble loading your home location error.

It prevents them from using Hulu on their computer, smartphone, or smart TV. If you’re one of them, here’s what you need to do to eliminate the home network issue.

How do I repair the Sorry, we’re having trouble loading your home location error on Hulu?

1. Check your home network settings on Hulu

  1. Select a device that you will use to watch Hulu
  2. Make sure your device is supported by Hulu
  3. Connect the device to your home network (Wi-Fi or wired)
  4. Using that device, visit your Hulu account page
  5. Locate the Privacy and Settings section
  6. Click Set or Change Home

It’s impossible to set your home network on Hulu while connected to a mobile network (e.g. 3G/4G data plan) or shared Wi-Fi networks (e.g. public hotspots).

You can change your home network up to 4 times within 12 months. Otherwise, you’ll be locked out of your account and keep getting the we can’t verify your email address error message.

2. Connect to your home network

the WiFi symbol

Your device must be connected to the same home network you registered on Hulu.

For instance, if you’re visiting a friend and want to watch Hulu together using your personal account, it’s technically possible to switch your home network.

But then you have to switch it back to yours. It totals to three home network changes out of the four permitted during one year, so it’s probably not worth it.

If you’re home, however, ensure your device isn’t accidentally connected to another network outside of your home (e.g. a neighbor’s, your mobile data plan).

For example, if your smartphone is connected to both Wi-Fi and data, disable the data plan to eliminate any network connectivity conflicts.

3. Disable your VPN or proxy

don't use free VPN

Hulu is able to identify your home network by your IP address. If you have a VPN or proxy server enabled on your desktop, laptop or tablet, turn it off before attempting to connect to Hulu.

If you have previously installed a VPN client on your router, you have also to deactivate it.

4. Use a VPN with split tunneling for desktop

If you’re living in a country with Hulu access but wish to continue using a VPN for online privacy, get a VPN that supports split tunneling mode.

It allows you to redirect network traffic to the VPN and to the public Internet at the same time.

When it comes to Hulu, you can divert your web browser to the public Internet. And you can use another browser for securely navigating the web through the VPN.

enable PIA split tunneling for Google Chrome
  1. Sign up for PIA VPN subscription.
  2. Download and install the VPN client for desktop
  3. Launch PIA and access the Settings area
  4. Go to Network and enable Split Tunnel
  5. Click Add Application
  6. Select a web browser that you will use to watch Hulu

From this point on, your web browser will not connect to the VPN. But you can use any other web browser and software applications, including torrenting clients.

We recommend Private Internet Access because it has not only split tunneling mode but also other cool features.

More about PIA:

  • Kill switch and exclusive DNS
  • Unblock Netflix US, Peacock, HBO Max, and others
  • No logs or leaks
  • 24/7 live chat support
  • 30-day money-back guarantee (no free trial)
  • Pay with a credit card, PayPal, crypto

Private Internet Access

Set up split tunneling in PIA to protect your online privacy while watching Hulu.
Check price Visit Website

5. Contact your ISP

If you set your home location on the Hulu account page and then switched Internet service providers, you have a new IP address.

There’s nothing else you can do besides registering a new home network on Hulu.

However, if you have a dynamic IP address, it regularly changes, resulting in the Sorry, we’re having trouble loading your home location error on Hulu.

Sometimes, it’s possible to set a static IP on a Windows PC. Otherwise, contact your ISP to see about using a static IP address.

To recap, you can fix the Sorry, we’re having trouble with your home location error on Hulu by connecting to the home network you registered with the streaming service.

You must also disable any VPN, proxy, or similar tool that changes your IP address, as well as contact your ISP if you have a dynamic IP address to request a static IP.

If you’re a privacy-concerned user uncomfortable with disabling their VPN for any reason, get a VPN service that supports split tunneling mode.

How to open CFG files on Windows 10 computers

A CFG file is a configuration file that stores settings and configuration information for programs. CFG is used by developers when writing different programs. There are various CFG files that store data in various formats.

These CFG files are often named config.cfg, with it containing a variable and value per line. Text editors are needed to read or edit CFG files most especially in Windows 10.

Windows Report has compiled some of the best software which can open CFG files in Windows 10 PC.


How can I open CFG files in Windows 10?

File Viewer Plus 4

File Viewer Plus is one of the best tools that helps you to open, edit, and even convert over 400 file formats.

It features an intuitive interface where you can quickly search through your files and view file previews directly in the file browser. Also, for quicker access, you can save file locations.

What makes this software better than other similar tools, is that it can open less common file formats. So, if you have unknown files on your computer, try to open them with File Viewer Plus.

File Viewer Plus 4

File Viewer Plus 4

Open and edit your .CFG files with the best universal file opener software.
Check priceVisit website

Microsoft Notepad

Microsoft Notepad is a popular text editor used by hundreds of millions worldwide. Although it is primarily used for basic coding by developers, Notepad consists of a simple text editor that is available to all Windows operating systems.

The tool allows you to wrap your text while choosing the font, size style, and text. In addition, Notepad supports CFG file formats and over fifteen different text encoding formats. 

Although Notepad is limited to basic formatting features you can still view, edit, and modify CFG source code files. This makes Notepad a simple yet powerful text editor to open CFG files in Windows 10.

Meanwhile, Notepad is already built into Windows 10, hence, you can use it to open CFG files by default.


Microsoft WordPad

Another Microsoft tool for opening CFG files in Windows 10 is WordPad. Microsoft WordPad is a text editor tool that combines features from Microsoft Word and Microsoft Notepad.

It is more of a hybrid text editor with many features than Notepad but fewer capabilities than Microsoft Word.

WordPad enables diverse formatting options where you customize the fonts, line spacing, and text format in your text document. You can also embed links and objects such as shapes and images into your text documents.

The tool also offers advanced options for sending your documents via email through Outlook. WordPad supports CFG files and more file formats than Notepad like .docx format.

If you intend to open CFG files in Windows 10, WordPad is a handy tool to use. Besides, WordPad doesn’t require many graphic details and comes in handy as an advanced option to the popular Microsoft Notepad.


Notepad++

open aspx file

Notepad++ is a text-based editor that has many similar features to Microsoft Notepad. This tool is very popular among web developers as it gives extra code editing features than Notepad.

The editing tool uses a drag and drop function while providing a tabbed document interface.

Since the program is used mainly for source code editing, it supports many popular programming languages such as Java, HTML, and C++.

If you intend to modify and edit program CFG files, Notepad++ gives extra functionality and flexibility. Also, it supports plugins which can be added to CFG files for added functionality.

Besides, being a powerful text editor that excels in coding and supports multiple file formats, Notepad++ is an excellent tool to open CFG files on Windows 10 PC.

⇒ Download Notepad++


NoteTab

NoteTab is a text editor developed by Swiss tech company Fookes Software. The award-winning app is known for its unique Html editor and versatile text editor.

This tool has unique features such as its Search and replace option which allows you to modify the selection of text, a whole document or even unopened files on your drive. The text editor comes with a unique clipboard which contains snippets which can be inserted into your document location.

In addition, NoteTab can also be used to open CFG files. It supports CFG file-formats whereby you can modify your files and edit contents.  It also supports other formats like HTML and CSS and is an excellent tool for coding.

NoteTab is not free to download but there is a 30 day trial period.

⇒ Get NoteTab


PSPad

PSPad is a free handy text editor tool available on Windows OS most especially Windows 10.  This editor allows you to make basic editing of source files with simple drag and drop interface.

PSPad enables diverse text formatting features with its inbuilt code editor making it ideal for programming.

PSPad supports CFG format files and allows for viewing and modification of CFG format files. Hence, you can use PSPad to open CFG files.

Moreover, this tool also supports formats like HTML and CSS and has a converter that converts file formats.

⇒ Download PSPad


Apache OpenOffice

Apache OpenOffice is a popularly used office suite similar to Microsoft office suite. The suite has a writer which is a word processor with lots of advanced features to that of a notepad.

Apache OpenOffice Writer supports many formats such as .doc, .docx, and most especially CFG files. In addition, OpenOffice Writer allows you to perform diverse functions such as text and spell check as well as formatting documents.

The program gives a standard layout with many formatting samples available for you to use. OpenOffice Writer can open CFG files and other popular text formats such as DOCX, RTF, TXT and HTML.

OpenOffice Writer is a good word processor and gives a good option when working with CFG files in Windows 10.

⇒ Download Apache Open Office


In conclusion, there are other software out there that can open CFG format files, but the software we mentioned in the guide provide more features and simplicity in modifying CFG files.

Do you know of any other ways not listed here on how to open CFG files in Windows 10? Share with us in the comments section below.

How to watch The Office without Netflix [Quick Guide]

It’s a sad moment that we had to live a few days back when The Office was removed from Netflix. This time for good.

But what if we told you that it’s possible to watch The Office without Netflix?

Now we know what you’re thinking, but our method involves absolutely zero sketchy behaviour.

The Office didn’t just vanish from the face of the Earth over night. In fact, it just switched streaming services.

How can I watch The Office without Netflix?

Use NBC’s Peacock

  1. Head over to NBC’s Peacock website
  2. Purchase a Peacock subscription
  3. Search for The Office in Peacock’s library
  4. Enjoy watching The Office without Netflix

Peacock is a cheaper alternative to Netflix, as its most expensive subscription can be purchased for only $9.99.

NBC’s streaming service also offers a $4.99 subscription.

It gives you access to the same library of content as the $9.99 subscription, but it also has ads.

Furthermore, Peacock provides its customers with a free tier. However, you can only watch the first two seasons of The Office using the free tier.

If you sign up for a premium subscription (with ads or ad-free, doesn’t matter), you’ll get access to the full nine seasons of the show plus unreleased extras.

Is Peacock not available in your country?

Unfortunately, Peacock is not available for just about anyone, so you might have to use a VPN to access it.

If you encounter the This service is unavailable in your region error, follow these steps to access Peacock from anywhere in the world:

watch The Office on Peacock with PIA VPN
  1. Purchase a premium VPN subscription (we recommend PIA)
  2. Download and install the VPN client on your PC
  3. Launch the VPN client
  4. Log in to your account
  5. Connect to a US server
  6. Head over to Peacock’s website
  7. Register an account
  8. Enjoy streaming on Peacock without geo-restrictions

Although you might have some luck using a free VPN to access Peacock, it’s not a long-term solution. It will likely get detected and blocked by the streaming service soon (it’s the same case for Netflix, BBC iPlayer, Hulu, and others).

Instead, we suggest investing in a paid VPN service that won’t let you down, like Private Internet Access. As the screenshot above demonstrates, PIA successfully unblocks Peacock and bypasses the This service is unavailable to your region error.

You can also use PIA to watch Netflix US anywhere in the world, HBO Max if it’s not available to your region, and other streaming services.

More about PIA:

  • Exclusive DNS servers
  • A zero-logging privacy policy
  • No IP leaks
  • 24/7 live chat support
  • 30-day money-back guarantee
  • Pay with PayPal, credit card, crypto
Private Internet Access

Private Internet Access

Need a VPN that can unblock Peacock and help you watch The Office? Count on PIA!
Check priceBuy it now

Buy a DVD box set

DVD banner

If you’re not a fan of paying monthly subscription to online services, or you’re just the old-school type of cool, you can buy a DVD box set.

The good part is that you can find them almost everywhere since The Office is a quite popular TV show.

The only things you need to enjoy these DVDs are a DVD player (obviously) and a TV screen. And maybe some popcorn.

Conclusion

All in all, if you’re sad that The Office has been removed from Netflix, cheer up. You can still watch it on Peacock.

You might have to use a VPN, but then again, The Office wasn’t available for non-US Netflix subscribers to begin with.

Peacock is cheaper and also lets you view the first two seasons for free, provided that you’re a US resident.

Last, but not least, if you’re simply not into streaming services, you can just buy the DVD box set and get it over with.

How to open EML files in Windows 10/11 [Best Tools]

Are you wondering what an EML file is? And maybe how to open EML files on your Windows 10 PC? Read on as this guide highlights the best software available to open this file format.

EML file is an email file format used to save email messages received from Microsoft Outlook and other email client programs.

It can also be used to store information which is then sent as an email attachment.

How can I open EML files in Windows 10?

File Viewer Plus 4

If you cannot open important .eml files on Windows 10, you can always use third-party solutions.
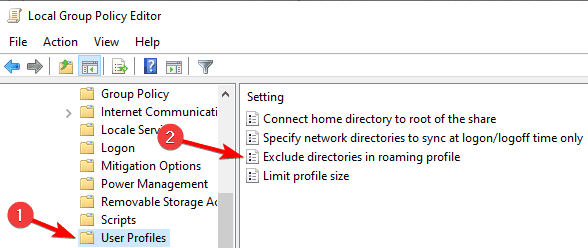
We recommend FileViewer Plus 4, a universal file viewer for Windows that can open and display over 300 different file types: video, audio, image, text, email, photo editor, etc.

As one of the best tools that we have tested, it will open all email file types and will keep your work secure.

In some rare cases, if FileViewer cannot display the native view of the file, you can use the Text and Hex views to inspect the file contents.

These views let you see inside the file, providing valuable information, especially for unknown file types.

You can even search for content stored in the file. As it is not the case for the .eml file type, you can try it right away.

File Viewer Plus4

File Viewer Plus4

Open hundreds of file format with this fantastic tool, including EML files. Get the best deal now!
Check priceVisit website

Mozilla SeaMonkey

Mozilla SeaMonkey is a web-based open source suite package which includes an email client, internet browser, and other applications.
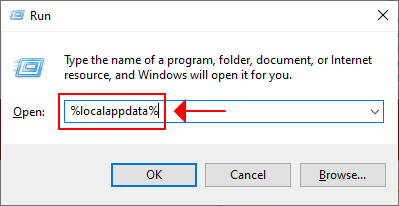
The email client allows management of multiple email accounts, address book, and filters incoming messages to your email. 

SeaMonkey allows for added functionality with the HTML editor which supports CSS and the web browser which has an add blocker and a nice user interface.

In addition, this program supports EML files and enables you to open EML files, view, edit, and modify the files. The files can then be exported to another email through the email client program.
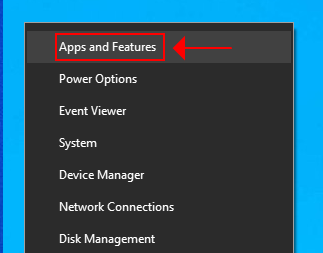
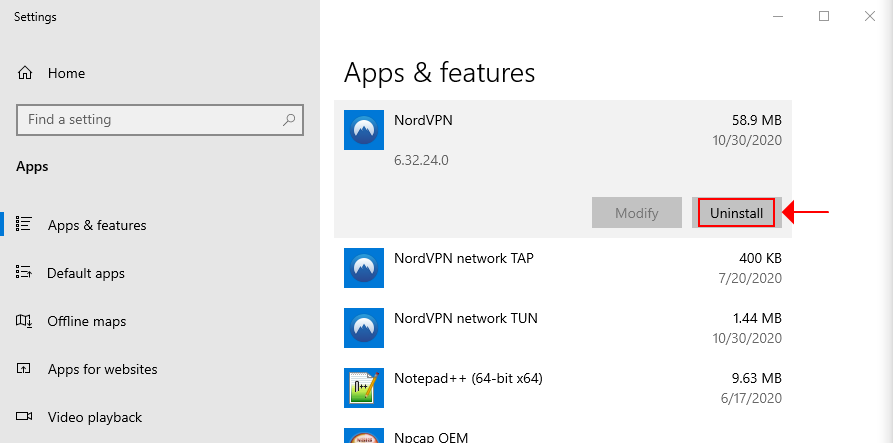
Meanwhile, SeaMonkey is a handy internet suite to have on Windows 10 PC as you can customize your web browsing, emailing, and other features.

⇒ Download Mozilla SeaMonkey


Novell GroupWise is an email client software that allows you to manage your email, schedule, and data management tasks.

However, the software has been rebranded as Micro Focus GroupWise and offers numerous features that make it highly rated.

In addition, GroupWise enables users to store email attachments in Filr, rather than sending them through other formats which makes it easy to access and modify. You can also save your email as PDF or convert your email messages to PDF and other formats.

Furthermore, GroupWise supports email formats such as EML, with this program you can open EML files, modify and convert them to other file formats such as PDF or FIR.

GroupWise is a good Email client for small business owners albeit it has fewer features than many of its rivals.

⇒ Download Novell GroupWise


Encryptomatic Message Viewer is a lightweight program is used to view email files or Outlook messages.

This program is simple yet powerful as it enables you to view any text file format. The program is easy to install with a simple interface which makes it easy to access messages with a single click.

You can extract messages and save them to your disk drive directly from your email by right-clicking on the attachment after which you drag and drop the file to your system.

In addition, this program supports many file formats such as msg, eml, and winmail. EML files are very easy to access and view on the program.  You can edit the information contained in the file and save on your disk drive easily.

Furthermore, Message Viewer is a simple but amazing program to have as an alternative to other similar viewer programs.

⇒ Download Encryptomatic Message Viewer


Microsoft Outlook is the most used email client on Windows. The program comes attached as part of the Microsoft suite package but can be purchased individually.

The program keeps track of your schedule and uses filters and commands to set task and intuitively sort out your schedule. The email manager helps to filter your emails and integrate multiple contacts into a single column view where you can access the contacts full information.

You can easily sync your outlook information to your phone this comes handy if you want to keep tabs on your schedule and email anytime.

In addition, the program supports EML file formats as this is the default file formats in which emails are saved, you can import EML files, edit, modify and save or export the file.

Moreover, Microsoft Outlook is the industry standard software email and information client for windows and is a must-have if you want to open EML files in Windows 10 OS.

⇒ Download Microsoft Outlook


Mozilla Thunderbird is an email and news feed client program, developed by Mozilla and is available to download for free.

Thunderbird is widely used as an alternative to outlook as it allows you to create and manage multiple accounts. The program also supports POP3, IMAP and Microsoft Exchange servers.

Thunderbird automatically filters through your email and messages helping you organize your email in order of preferences.

Furthermore, the program supports EML file format and allows you to view and modify the information contained in the file.

There are also add-ons that can be downloaded to increase the functionality of the program and thunderbird gives a wide range of plugins for free.

⇒ Download Mozilla Thunderbird

The programs we mentioned above can be used to open EML files in Windows 10.

While some are free like Thunderbird from Mozilla, others like Microsoft Outlook gives great value for money.

You can also utilize File Explorer as an alternative but your options are limited unlike the software listed in this post.

Share your experience with us in opening EML files in Windows 10. Feel free to comment below.