7 Best Windows 10/11 LTE Laptops To Buy [2026 Guide]

A fresh trend is building up among Windows 10 users. More and more users are looking for LTE laptops to use with a data plan. LTE laptops allow users to get a faster connection without necessarily using a tethering route.

The only problem is that finding the right Windows 10 LTE laptop is not an easy task — such laptop models are rather few and far between.

For this reason, in this article, we’re going to list the best Windows 10 LTE laptops currently available on the market.


What are the best Windows 10 LTE laptops?

Acer Swift 7

  • 14-inch Full HD IPS touchscreen display
  • Thinnest laptop on the market today
  • Ultra-fast and ultra-powerful
  • Sturdy metallic design
  • One-touch login
  • Speakers are not very loud

Topping off our list is an ultra-slim laptop from Acer called the Acer Swift 7.

Acer advertises this laptop as being the thinnest and most ultra-portable laptop on the planet, and by the looks of the design, we couldn’t agree more.

However, looks can be deceiving since this laptop isn’t all among looking sharp, but it’s about acting sharp as well, and that is what you will get thanks to the 7th generation Intel Core i7 processor.

The build of the laptop is also focused on durability thanks to the metallic frame, so you know this technological wonder was made to last.


Microsoft Surface Go

  • One of the smallest Surface models
  • Great for daily work activities
  • High-resolution touchscreen
  • Incredibly lightweight
  • Long battery life
  • May have some software issues

The Microsoft Surface has become a staple in the world of LTE laptops, to the point where the model is almost synonymous with it.

However, what makes this particular model special is that it is one of the smallest ones in the family yet, and somehow it manages to maintain the same processing power and capabilities.

With such a petite design, this laptop is excellent for day-to-day activities and even work, especially if it involves simple tasks like browsing or running Office programs.

Lastly, for all its small frame, this laptop has an incredibly long battery life, of up to 8 and a half hours, allowing you to take it anywhere, and even work on the go.


HP Envy x2

  • Easy conversion between laptop and tablet mode
  • Sleek design and screen adjustments
  • Magnetic hinge for better positioning
  • Incredible 22-hour battery life
  • Incredibly sleek design
  • The processor could be a bit more powerful

The HP Envy x2 is a staple of technological advance and what it means to be productive, and in many ways, it seems more like a tablet rather than an actual laptop.

It comes with built-in 4G LTE, so you always stay connected to the Internet, with or without Wi-Fi.

More so, the battery life on this device is off the charts, reaching a staggering 19 hours with video playback, so binge-watching your favorite TV show will not be a problem, even on the go.

Elegance is not ignored either, thanks to the magnetic hinge design that allows better control and a sleeker design of your viewing experience, while the laptop mode makes it worthy of a work laptop as well.


ASUS VivoBook 15

  • Feels like it was made for long writing sessions
  • 10th Gen Intel Core i5-1035G1 CPU
  • Quite affordable given the specs
  • 15.6 inch Full HD display
  • Weighs only 3.5 pounds
  • Has no optical drive

When it comes to elegance and design, few manage to create models as beautiful and yet powerful and useful as ASES, and the VivoBook series is a testament to that.

The screen is a 4-way NanoEdge bezel display with a stunning 88% screen-to-body ratio, allowing stunning video and photo viewing experiences.

It moves and works fast thanks to the 10th Gen Intel Core i5-1035G1 CPU, and gamers might find its backlit keyboard particularly appealing.

Connecting devices to this sleek PC will not be a problem, since it also features USB 3.2 Type-C, USB 3.2 Type-A, USB 2.0, and HDMI; Gigabit Wi-Fi 5 (802.11ac) ports and support.


Lenovo Chromebook Flex 5

  • Great connectivity via Intel Wi-Fi 6 and Bluetooth 5.0
  • Easy access to content thanks to Google account
  • Narrow bezels minimize distractions
  • Lightweight design
  • Flexible design
  • Not as powerful as the other entries

If you want to know what flexibility really is when it comes to technology, then the Lenovo Chromebook Flex 5 is the right LTE laptop for you, since converting and positioning this model has never been easier.

This allows you to benefit from both the high-sensitivity touchscreen, as well as the keyboard, depending on what you need most for any given situation.

Of course, this sleek device isn’t just about looks, it is a combination of performance, connectivity, and entertainment enabled by 10th generation InteI Core processors.

Lastly, being a Chromebook has its perks, since you can use your Google account to easily access personal files stored on the cloud from any location on the planet.


Surface Pro LTE

Microsoft also launched a new Surface Pro model that supports LTE. This device is the perfect mobile computer — you can take it anywhere and benefit from the full capabilities of a regular computer.

Thanks to its integrated cellular connectivity, you can connect to the Internet even when there is no Wi-Fi network or hotspot available.

Ultra-portability is one of the words that best describe the Surface Pro LTE. Its 12.3-inch touchscreen display has a 3:2 aspect ratio and the device weighs only two pounds.

The Surface Pro LTE is powered by a 7th-Gen Intel Core CPU for maximum performance and comes equipped with a built-in modem that supports 20 bands of LTE service.

It is worth mentioning that LTE functionality is available only on Surface Pro i5/256GB SSD/8GB with LTE Advanced. LTE availability varies by market, so the best approach is to check with your service provider for more details.

⇒ Get it now


Lenovo Thinkpad X1 Carbon

According to Lenovo, the ThinkPad X1 Carbon is the world’s lightest 14″ business laptop, weighing just 2.6 lbs (1.18 kg).

At only 0.65 inches (16.5 mm) thin, the ThinkPad X1 Carbon is the right choice if you’re looking for a highly portable device.

This laptop is also extremely reliable and strong. It’s constructed with satellite-grade carbon fiber and passed nearly a dozen separate military-grade tests—all under extreme conditions.

It can literally deal with everything you throw at it.

The ThinkPad X1 Carbon is equipped with 4G LTE-A. Moreover, you can go unplugged for a whole day, as the battery lasts up to 10 hours.

The device comes equipped with Windows 10 Pro and up to 6th generation Intel i7-6600U with vPro. Also, conference calls and video chats are a snap thanks to the integrated speakers with Dolby Audio, and an HD webcam.

⇒ Get it now


There you go, we hope this list helped you to decide what LTE-ready laptop to buy.

If you’ve used other LTE laptops that you think should be included on this list, use the comment section below to tell us more about your experience.

This specific deal is part of our bigger selection of the best laptop deals you can find. You might also want to check out our dedicated Black Friday hub for tech deals.

Windows 10 news recap: October 2020 Update starts rolling out, Meet Now button available in optional patch, and more

Welcome back to our Windows 10 news recap, where we go over the top stories of the past week in the world of Microsoft’s flagship operating system.

Developers can now release Chromium-based PWAs on the Windows 10 Microsoft Store

Chromium-based Progressive Web Apps (PWAs) can now be listed on the Microsoft Store on Windows 10.

Microsoft starts rolling out the Windows 10 October 2020 Update

This week saw the Windows 10 October 2020 Update begin rolling out. The update is rolling out gradually, but some PCs with Conexant audio drivers will not be able to upgrade at this time.

Windows 10 versions 1909 and 1903 get Meet Now button in the Taskbar with new optional patch

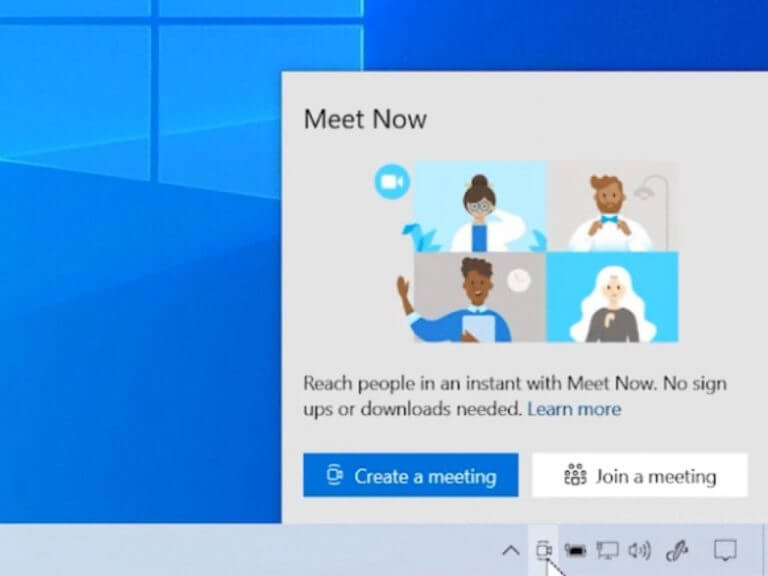
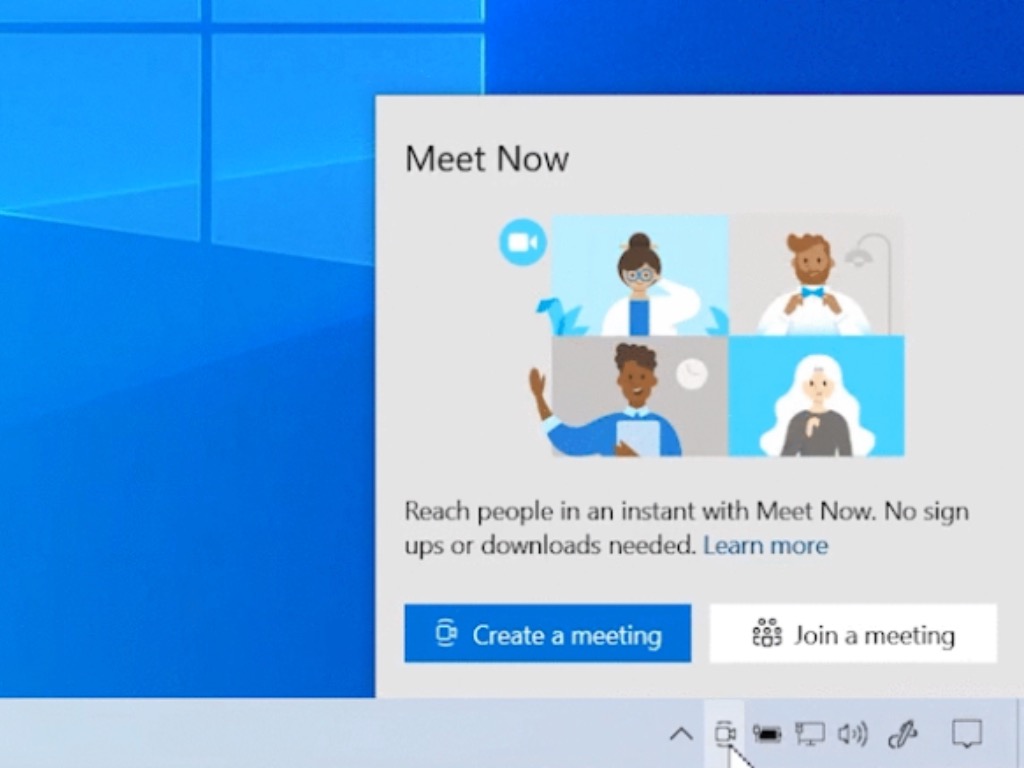
A new optional patch is available for Windows 10 versions 1909 and 1903, which adds a Meet Now button to the Taskbar, as part of bringing the button to older Windows 10 versions. This button makes it easier to start Skype meetings.

Skype Meet Now Button In Windows 10 Build 20221

That’s it for this week. We’ll be back next week with more Windows 10 news.

5 Best Android Emulators for Low-End PCs [2026]

Let’s explore the best Android emulator for low-end PCs that have the least requirements but peak performance. The truth is, emulators can be resource hogging, but we find a few options that are viable for older PCs.

Check them out.

Which Android emulator is best for low-end PCs?

  • Minimum System Requirements:
    • OS: Windows XP SP3 / Win7 / Win8 / Win8.1 / Win10 / Win11
    • Processor: Intel or AMD Dual Core CPU
    • RAM: 2GB
    • HDD: 36GB of free disk space
    • Graphics: DirectX 11 / Graphics driver with OpenGL 2.0

Even if your computer or laptop does not hold a lot of hard disk space and impressive processing power LDPLayer will work seamlessly. It offers key mapping controls and a UI that’s the same as your mobile’s.

Great LDPlayer key features you’re about to enjoy:

  • Custom Control to play with keyboard and mouse
  • High compatibility with the latest games
  • Multiple Instances to play more than one game at a time
  • Macros/Scripts to manage games automatically
  • No fees to worry about
LDPlayer

LDPlayer

Transform your low-end PC into an Android gaming platform with LDPlayer. Countless hours of fun are waiting for you!
Check price Visit website

BlueStacks – easy to use and resourceful emulator for Android

bluestacks interface

  • Minimum System Requirements:
    • OS: Microsoft Windows 7 and above
    • Processor: Intel or AMD Processor
    • RAM: At least 4GB
    • HDD: 5GB Free Disk Space
    • Graphics: Up-to-date graphics drivers from Microsoft or the chipset vendor

Beyond its very user-friendly interface, BlueStacks has an incredibly wide range of features.

You can customize how you control your games by using the key mapping feature to assign specific controls to your keyboard and it even works on gamepads.

Transfering files from your virtual device to your PC is also really easy. Plus, it supports screen recording.

BlueStacks

BlueStacks

Access Android apps and games quickly and hitch free, right from your Windows PC!
Check price Visit website

NoxPlayer – wide range of features and minimal resource usage

nox player interface
  • Minimum System Requirements:
    • OS: Windows XP (32/64bit) / Vista / 7 / 8 / 10
    • Processor: Dual-Core Processor
    • RAM: 1.5GB
    • HDD: 1.5GB Free Disk Space
    • Graphics: Supports Open GL 2.0 and above

NoxPlayer is one of the best software options for emulating Android games on your Windows PC because of its incredibly wide range of features and fast loading times.

It was designed for gaming, but you can also explore a wide range of Android apps using it.

Just like BlueStacks, you can set custom controls in Nox for both keyboards, touchscreen, and game controllers.

⇒ Get NoxPlayer

Droid4X – free Android emulator for older PCs

droid4x interface
  • Minimum System Requirements:
    • OS: Windows 7/8/10 (32-bit/64-bit)
    • Processor: Dual-Core AMD or Intel CPU
    • RAM: 1GB
    • HDD: 4GB Free Disk Space
    • Graphics: DirectX 9.0c compatible graphics

Droid4X is another lightweight and lag-free emulator software that can easily run on your low-end Windows PC.

You can play all Android games on a bigger screen, test and explore apps, watch movies, or listen to music.

Let’s explore some of its best features:

  • Touchscreen compatibility
  • It allows you to customize your controller or keyboard
  • Record video files or take snapshots of the virtual device screen
  • Download apps directly from the emulator and install them with one click
  • Custom controls of graphic settings
  • Free

⇒ Get Droid4x

Ko Player -lightweight Android emulator for legacy computers

koplayer interface

Minimum System Requirements:

  • OS: Windows 7/8/10
  • Processor: Dual-core AMD or Intel CPU
  • RAM: 2GB
  • HDD: 10GB Free Disk Space

Ko Player is another easy to use Android emulator software that allows you to easily play your favorite games on PC.

You can explore Ko Player’s great range of apps and games from their official store, or you can download apps and games directly from GooglePlay.

Let’s explore some of its best features:

  • OpenGL and hardware acceleration support
  • Can be used with multiple accounts
  • Can record your virtual Android device screen and share the gameplay footage
  • Gamepad and keyboard control customization
  • Great quality display on big screens
  • App Center – contains a wide range of apps and games

⇒ Get Ko Player

It is worth noting that the level of efficiency of each of the software presented above will vary according to your system’s configuration.

If you also run the new operating system on a newer PC, check out our rundown of the best Android emulators for Windows 11 and Windows 10. And if you want a non-intrusive experience, consider checking out the best Android emulators without ads.

We would love to know what is your favorite Android emulator for PC is that runs on low-spec systems. Feel free to let us know in the comments section below.

How to delete Win download files in Windows 10 [Full Guide]

Downloaded files can take up quite a bit of hard drive space. Users typically download software setup files, which accumulate in their Downloads folders. Windows Update also downloads superfluous files to a SoftwareDistribution folder, which wastes even more hard drive space.

Downloaded Windows Update files and software installers can waste many megabytes, and even gigabytes, of hard drive space. So, it’s worth deleting those download files every few months to free up HDD storage space.

How do I delete Windows download files?

1. Manually delete Windows Update download files

  1. Press the Windows and S keys at the same time.
  2. Input services in the search utility.
  3. Click Services to open that window.
    Services window how to delete win download files in windows 10
  4. Right-click the Windows Update service and select Stop.
  5. Open File Explorer by clicking its Windows 10 taskbar button.
  6. Next, enter this folder in File Explorer’s path bar: C:WindowsSoftwareDistributionDownload
  7. Then press the Enter key to open the Download folder shown directly below.
    SoftwareDistribution Download folder how to delete win download files in windows 10
  8. Press the Ctrl + A hotkey to select everything in that folder.
  9. Select the Home tab.
  10. Click the Delete button.
  11. If a File Access Denied window opens, select the Do this for all current items checkbox and click Continue.
  12. Restart the Windows Update service by right-clicking it on the Services window and selecting Start.

2. Enable Storage Sense to automatically delete files in the user Downloads folder

  1. Enter storage in Windows 10’s search box.
  2. Click Storage settings to open that tab in Settings.
    Storage tab how to delete win download files in windows 10
  3. Click Configure Storage Sense to open more options.
  4. Toggle Storage Sense On.
  5. Then select a suitable option on the Delete files in my Downloads folder if they haven’t been opened for more than drop-down menu.
    Configure Storage Sense how to delete win download files in windows 10
  6. Storage sense will automatically erase downloaded files as configured when HDD space is low. However, you can click Clean Now to do so immediately.

3. Delete files with a file eraser

BitRaser File Eraser is a disk clean-up utility for Windows 10 that thoroughly erases files. You can quickly delete Windows download files with Bitraser’s Erase List feature.

BitRaser supports 17 global data erasure algorithms. You can utilize it to fully erase general files, folders, partitions, software traces, system traces, and browser data beyond recovery.

This tool can save you a lot of time with its scheduling feature that you can use to set up regular wiping processes. On top of that, the software is able to erase files in bulk at high speed.

Other useful features of BitRaser

  • Enables users to schedule data erasure tasks
  • Provides certified data erasure reports
  • Wipes unused disk space
  • Generates log reports
  1. To erase Windows download files with that software, click the Home tab on the BitRaser File Eraser window.
  2. Click Add Erasure list on the left of the Home tab.
  3. Select the Add New List option.
  4. Then press the Add Folder button, and click the Browse option.
  5. Select the SoftwareDistribution Download subfolder at this path: C:WindowsSoftwareDistributionDownload
  6. Then click OK after selecting a folder.
  7. Select the Erase Subfolder option, but DO NOT select the Delete folder after erasing contents checkbox.
  8. Click OK to return to the Add Erasure list tab.
  9. Next, click the Save List option, enter a title in the list name box, and press the Save button.
  10. Select the erase list you just saved, and press the Erase Now button.

Note: Disable the Windows Update service before erasing Windows Update download files with BitRaser.

⇒ Get BitRaser

So, that’s how you can erase Windows download files in the SoftwareDistribution and Users download folders. By doing so, you’ll free up HDD space for software and user files.

What to do if your PUBG emulator is not working

PlayerUnknown’s Battlegrounds is the smash-hit battle royale blast ’em up that has taken multiplayer gaming by storm on Windows, Android, iOS, and consoles.

Tencent even launched an official Tencent Gaming Buddy PUBG emulator for Windows.

That emulator enables players to play the freely available PlayerUnknown’s Battlegrounds mobile on Windows with keyboard and mouse.

However, Tencent Gaming Buddy doesn’t always work. Some users have stated that PUBG gets stuck at 98 percent when loading in TGB.

Consequently, they can’t play PlayerUnknown’s Battlegrounds mobile with the emulator. These are a few resolutions that might fix Tencent Gaming Buddy stuck at 98 percent.

How to fix PUBG Tencent Gaming Buddy if it’s not working or installing?

  1. Play PUBG mobile with another Android emulator
  2. Turn off antivirus software
  3. Select Integrated Graphics for TGB
  4. Clear the TEMP folder
  5. Select an alternative rendering option

1. Play PUBG mobile with another Android emulator

Remember that the Tencent Gaming Buddy emulator isn’t the most stable option when it comes to gaming.

However, you can still play PUBG mobile with an alternative Android emulator until TGB comes out of beta. LDPlayer simply is one of the best emulators for PUBG and other similar Android games.

Well, you need to know from the start that it includes plenty of controller customization options. You can even connect a mouse and a keyboard for better control of the game you are playing.

Moreover, it can be downloaded for free and it is fully compatible with Windows 10, so you simply need to enable the hardware virtualization technology in the BIOS to run the software. 

LD Player

Isn’t your PUBG emulator working? Transform your computer into a gaming platform with LDPlayer!

2. Select Integrated Graphics for TGB

  1. Select the Change default graphics processor option to open the NVIDIA Control Panel.
  2. Click Manage 3D Settings on the left of the NVIDIA Control Panel window.
  3. Click the Program Settings tab.
  4. Select Tencent Gaming Buddy on the Select a program to customize the drop-down menu.
  5. Then select the Integrated graphics option on the preferred graphics processor drop-down menu.
  6. Press the Apply button.

Some Tencent Gaming Buddy users with NVIDIA graphics cards have confirmed that selecting the Integrated graphics option fixes the emulator so that it loads PUBG.

Users can select that option on the NVIDIA Control Panel by right-clicking the desktop and selecting Run with the graphics processor.

3. Clear the TEMP Folder

  1. Open the Win + X menu by pressing the Windows key + X keyboard shortcut.
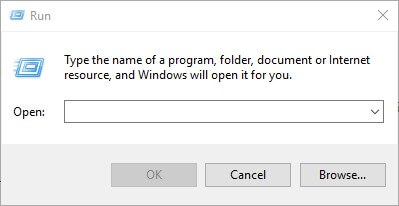
  2. Click Run to open the window shown directly below.
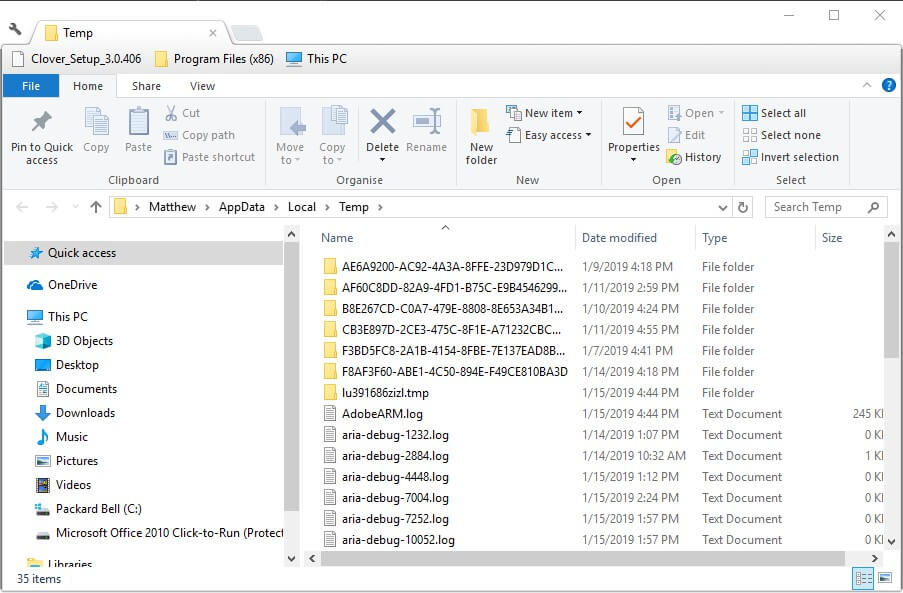
  3. Then enter %Temp% in Run, and click the OK button.
  4. Thereafter, press the Ctrl + A button on everything in the Temp folder.
  5. Press the Delete button to erase the selected files.

Clearing the TEMP folder is another resolution that some users have fixed TGB with.

Erasing files in the TEMP folder will also delete a TxGameDownload subfolder. This is how users can erase the TEMP folder in Windows 10.

4. Turn off antivirus software

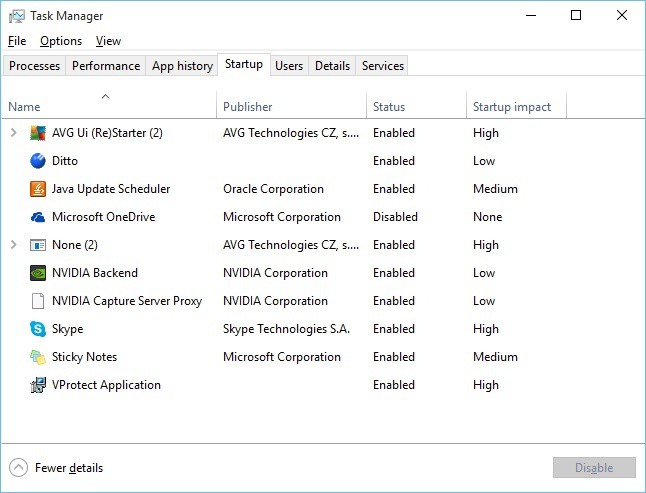
  1. Right-click the taskbar to select Task Manager.
  2. Select the Start-up tab on the Task Manager window.
  3. Select the antivirus utility on the Start-up tab, and then press the Disable button.
  4. Restart Windows after removing the antivirus utility from the startup. Then launch Tencent Gaming Buddy to play PUBG.

The Tencent Gaming Buddy PUGB emulator not working can be due to antivirus software. Some antivirus software might identify the TGB emulator as malware, which is otherwise a false positive.

As such, turning an antivirus utility off by right-clicking its system tray icon and selecting a disable or turn-off option might fix the PUBG emulator.

Sometimes, however, it isn’t always entirely enough just to turn off the antivirus shield.

If so, try removing the antivirus software from the system startup so that it isn’t running when you launch Tencent Gaming Buddy. Simply use the above steps in that regard.

Another option is to use a different antivirus solution. Usually, antiviruses don’t interfere with your system and offer complete protection against all emerging threats.

5. Select an alternative rendering option

PUBG might not load in Tencent Gaming Buddy when users utilize the emulator with an incompatible game engine setting selected.

As such, selecting an alternative rendering option in TGB might fix the emulator. To do that, click the menu button at the top right of TGB’s window to select Settings > Engine.

Then users can select four alternative OpenGL and DirectX options. If you’re not sure what to select, try selecting all the options.

Users will need to select one of the three alternative options and relaunch the emulator three times.

As you’ve seen above, there are a few simple things to do when Tencent Gaming Buddy is not installed. You can also consider applying them when facing the following issues:

  • PUBG emulator not working – If that’s your issue as well, make sure to turn off the antivirus software. It could be too intrusive and it interferes with the emulator itself.
  • Tencent Gaming Buddy install is not responding – When bothered by this issue, don’t hesitate to consider another Android emulator.
  • Tencent Gaming Buddy not working – Have you heard of LDPlayer? Give it a go and you’ll see that playing an Android game on your PC can be really engaging and error-free.
  • Tencent Gaming Buddy error report – In case of receiving an error report, the quickest tip involves resetting it.
  • PUBG emulator not working after update – If you want to solve this issue, consider clearing the TEMP folder as soon as possible.

WhatFontIs Review: What is it And is it Safe to Use

When it comes to finding fonts, WhatFontIs is one of the most popular choices. However, many are wondering if WhatFontIs is safe to use.

Today, we’re going to take a closer look at this service, see what it does, and check how safe it actually is.

What can WhatFontIs do for you?

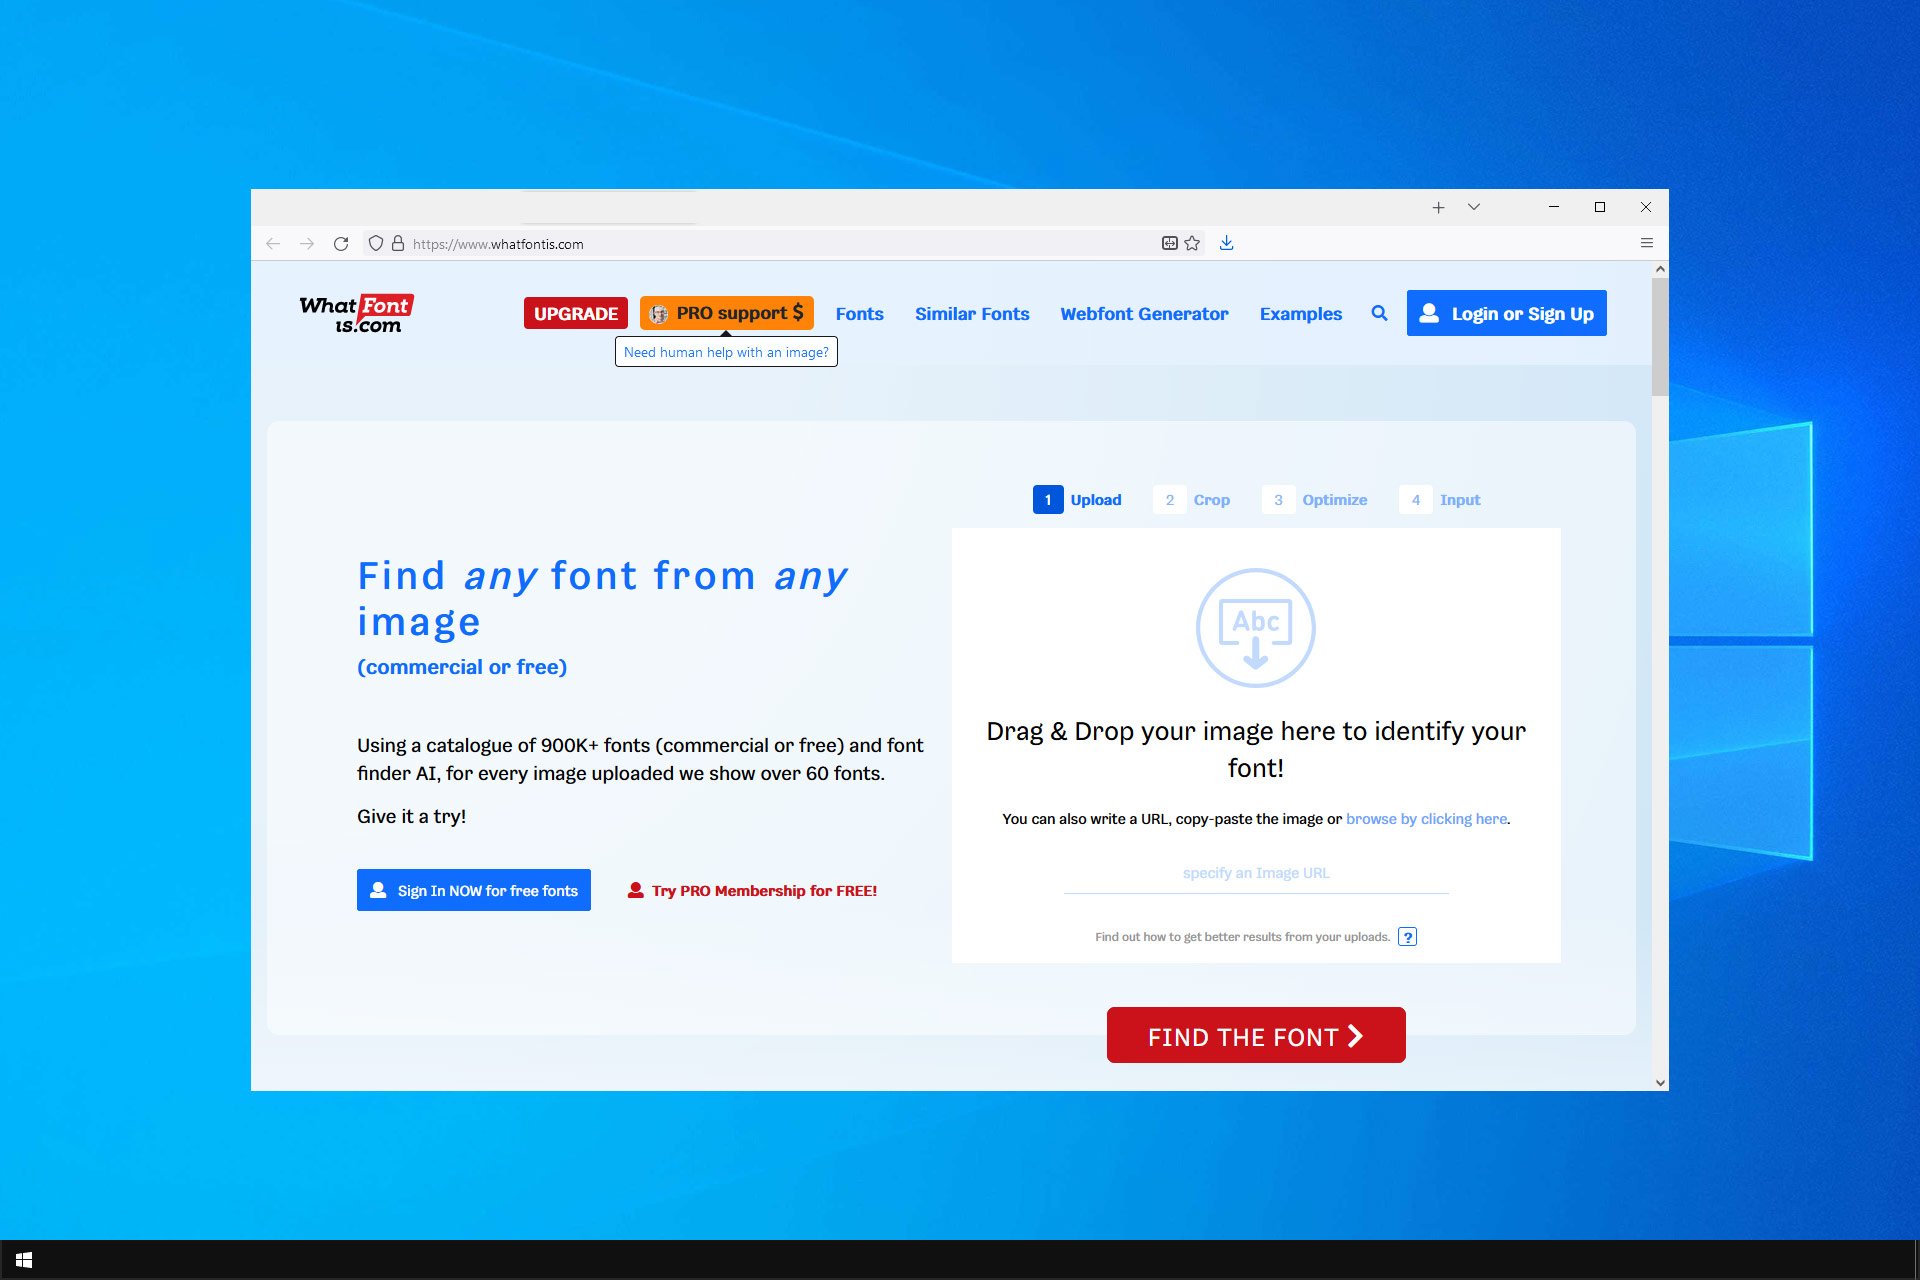
  • It can identify fonts from an uploaded image using AI.
  • Using the database of over 900K+ fonts, it will find your font.
  • In case your font isn’t found, you’ll get a choice of 60 other similar fonts.

How do I use WhatFontIs?

Upload the image using your browser

  1. Firstly, register on WhatFontIs with Facebook or Google.
  2. You may now drag and drop the desired image here, upload a file containing a sample of the font, upload a simple screenshot, or upload the URL of the site using the font.drag and drop
  3. Highlight or draw a new crop box to select only the part of the image with the font you want to identify.
  4. You may now adapt the Contrast and Brightness to make the text more visible, use rotation to align it horizontally and draw lines to split the letters, if necessary. Optimize
  5. Check every image on the right side in order to input the characters accordingly.
  6. Up next, you’ll get a generous list of the closest matching fonts to the one in your image in less than 10 seconds. Just pick out the best match in the results.font options

As you can see, WhatFontIs includes an intuitive website to search for typefaces. However, there’s also a Google Chrome browser extension that you can install in order to easily right-click on any image and send it to the identifying process.

This tool knows all about how time-consuming it can be to find high-quality fonts manually, so it literally does the searching in your place.

Is WhatFontIs safe?

Yes, WhatFontIs is a safe service, and it’s often recommended in the design community as a reliable source, so feel free to use it without any fear.

Should I become a Premium WhatFontIs member?

The premium membership offers the following:

  • Custom text preview that lets you find fonts more easily.
  • Advanced font search with improved accuracy.
  • Suggestions from Google Fonts as a free alternative.
  • No ads.
  • Font filtering by price and foundry.

If you’re planning to use this service on a regular basis, then you might want to consider investing in a premium subscription.

⇒ Get WhatFontIs

Bottom line, with WhatFontIs, you’ll be able to identify typefaces you’ve seen elsewhere and need to use in your projects.

In case you’re working with PDF files, we have a great guide on how to identify font in PDF, so be sure to check it out.

Let us know in the comments area below if WhatFontIs helped you efficiently create stunning designs where fonts work together to create the desired visual impact.

Phishing attack hits thousands of Microsoft Teams users

The researchers at Abnormal Security released a report about a recent phishing attempt targeting up to 50,000 Microsoft Teams clients.

This adds to the statistics that showed increased numbers in this type of cyber-attacks that affected companies in online payment businesses, social media, or productivity services in today’s context of teleworking or homeschooling.

Considering that Microsoft Teams is the most popular business communication service presently, with over 75 million users reported in spring 2020, it becoming a target for such attacks comes as no surprise.

How does the phishing scam work on Microsft Teams accounts?

phishing attack in ms teams

According to the report, the attackers impersonated an acquaintance of the recipient sending out an email with a subject line resembling an instant messaging notification, announcing new activity on the platform.

This way, the attackers emailed between 15,000 and 50,000 Teams members, trying to catch their attention and make them hit the Reply in Teams button.

The body of the email included what appeared to be an instant messenger box linked to a particular workgroup, a request, and the Reply in Teams button.

Clicking on any of these led to a fake Microsoft login page. The phishing page asked the recipient to enter their email and password.

In case the recipient went along with the request, the attackers could get their credentials or any personal information stored on the respective account.

How can I avoid falling for phishing scams?

Such phishing scams include all the ingredients that make users vulnerable: branded URL, personalized salutation message, convincing design.

If one doesn’t pay too much attention to the source of such messages, the second most reliable way to prevent scams is using powerful software such as Bitdefender that protects against phishing attempts.

Bitdefender efficiently filters all incoming email messages, as well as all websites that pose as trustworthy asking for personal information, by blocking them before they can reach the user.

Bitdefender Antivirus Plus

Bitdefender Antivirus Plus

Protect your online activity from any type of cyber-attacks with this top-rated threat-detection software.
Free trial Visit website

We truly hope that now you are now better informed on how such attacks work and that you’ll be prepared in case of a phishing attempt on your own device.

Your feedback on this topic is welcome; use the comments section below.

[wl_navigator]

Microsoft releases Windows 10 cumulative update for Dev Channel Insiders to test servicing pipeline

Microsoft has just released the cumulative update build 20241.1005 (KB4589464) for Dev channel Insiders, which follows the release of the build 20241 on Wednesday. Today’s cumulative update includes no new features as the Windows Insider team is only flighting it to test its servicing pipeline.

The main new feature in this week’s build 20241 is theme-aware splash screen for UWP apps. This only rolling out to a subset of Dev Channels Insiders for now, and only 14 apps currently support theme-aware splash screens including Settings, the Microsoft Store, and Snip & Sketch. The build 20241 also brought minor changes for the Optimize Drives page in the Settings app, plus a long list of quality fixes.

We’re now getting used to seeing new Insider builds ship to Dev Channel Insiders on Wednesdays, and we hope next week will be no exception. Microsoft keeps dropping minor new features every week for now, but things may change soon as the next Windows 10 update (21H1) is expected to be more significant than the freshly-released October 2020 Update.

Emulator for PUBG: 6 Best to Use in 2026

PUBG (PlayerUnknown’s Battleground) is a popular online shooter game played by millions of gamers every day. The game has evolved over the years with a streamlined mobile version.

Hence, the mobile version is highly rated by many as it gives almost similar features to the PC version.

Since the controls are fitted into a small screen, some unintended actions such as firing your weapon while adjusting the player’s position may occur.

Another disadvantage is the game massively drains your phone battery. It would definitely be better if you could simulate the mobile gameplay on a better device such as your Windows PC.

This is possible if you use an emulator, there are several emulators available for Android.

Word of warning before using a PUBG Mobile emulator

Many of these emulators come with limitations and may not be compatible with some games and apps. This means that you may experience some technical issues after installing them.

In most cases, we’re talking about emulator launch issues, black screen issues, game freezes, and so on. Proceed at your own risk.

Also, don’t forget to update your Windows computer, disable GPU  and CPU hogging apps and program, and clean boot your computer. These quick tips will help you to reduce the chances of encountering game bugs.

Which are the best Android emulators for PUBG mobile?

LDPlayer

Identifying the very best emulators for PUBG mobile that you can use on PC isn’t an easy task. However, LDPlayer clearly is a top choice.

This Android emulator for Windows 11 easily recreates the Android OS that you love and lets you enjoy it on top of Windows. Even if you’re a PUBG fan, do note that you can open several games simultaneously.

Since LDPlayer supports a variety of high-performance mobile games that you can play on a computer, it might come a day when you’ll like to try something different as well.

Moreover, it offers several built-in tools that are extremely beneficial to game players, including APK support, keymapping, and custom control to connect keyboard and mouse as per your choosing.

Key features that LDPlayer brings to the table:

  • Intuitive UI for all users
  • Multi-functional design
  • Excellent keyboard mapping controls
  • Multi-instance sync
  • Updates on a monthly basis
  • No fees are required to install this emulator

”LDPlayer”

”LDPlayer”

”Transform
”Download”
&aff_sub2=Native” current_url=”true” button_text=”Visit website” image=”https://windowsreport.com/wp-content/uploads/2020/10/LDPlayer_logo-210×160.png”]

BlueStacks

Bluestacks

BlueStacks is a popular Android emulator with millions of users. However, there have been a lot of complaints about recent releases despite this it gives quality and reliable service.

The emulator is developed for easy access mimicking the interface of an Android tablet.

Meanwhile, this emulator for PUGB Mobile comes in both free and paid versions. Although, the free version is ridden with ads you get an ad-free experience with the premium version.

Bluestacks would run your PUBG Mobile game smoothly. You can also use the option of the gamepad as it enables the integration of different gamepad features.

In addition, you can also download apps and games or install standalone APK files. The emulator has one of the largest compatibility with games and applications.

Lastly, BlueStacks is an excellent emulator that gives you an edge to run a large number of games most especially PUGB.

BlueStacks

BlueStacks

That’s a great emulator for PUBG mobile. It is compatible with Windows OS, so do give it a try!
Download Visit website

NoxPlayer

NoxPlayer

This is one of the best emulators for PUGB Mobile available right now. This software enables you to load apps downloaded outside the Play Store on your PC.

You can enjoy PUBG gameplay using your PC gamepad. The emulator also enables you to map out keys or buttons to perform Android functions.

In addition, this software utilizes the stock version of Android which is developed mainly for gaming. This is to be expected as many people use emulators for gaming.

You can also install various apps as well. The emulator is free to use which is cool.

There are also many extra features such as screenshot and video recording options. These features can be found from the toolbar at the right end of the window.

Hence, NoxPlayer6 is a recommended emulator to use for PUBG Mobile as you get fast gameplay and gamepad features.

Runner Up
nox player logo
  • Windows compatible
  • Supports gamepad/keyboard
  • x86 and AMD compatible

Memu

Memu emulatorMemu Emulator is one of the few new emulators that have managed to become popular. The emulator is popular for its wide features that make gameplay easy on PC.

The emulator can enable virtualization for your PC and it also gives great performance for integrated and dedicated graphics.

In addition, Memu has a great deal of keyboard mapping features that can be customized for your PUBG Mobile gaming needs.

The emulator enables the installation of APK files from the Play Store or copying the APK app or games on the emulator window.

Also, there are other extended features on the Memu emulator making it a good choice for PUGB gamers.

⇒ Download Memu now

Tencent Gaming Buddy

Tencent BuddyThis is one of the best emulators for PUBG Mobile on Windows PCs. This emulator is specially developed for PUBG Mobile.

According to Tencent-PUGB game publisher, the emulator was developed as a result of complaints by gamers concerning touchscreen controls on mobile devices.

Meanwhile, Tencent Buddy enables you to play PUBG on your PC with controls fully optimized to improve gameplay.

The main benefit of this emulator is that PUBG controls are properly mapped on to your keypad and mouse.

You can pick from among various layout which is best for you. Also, you can switch from keyboard control to mouse control easily.

In addition, this software utilizes great system resources; however, you get quality gameplay framerate with excellent graphics.

Hence, you may need to lower your graphics settings when using the emulator on low-end computers.

Tencent Gaming Buddy is an excellent emulator as it gives specific attention to PUBG mobile with excellent features.

⇒ Download Tencent Gaming Buddy now

Apowersoft Android Recorder

Apowersoft Android RecorderApowersoft Android Recorder is a software that cast/stream your Android screen to your PC. Hence, you can stream your screen activities on your PC in real-time.

This is good for PUBG as you would have a better gaming experience unlike other emulators, where there are issues running PUGB smoothly.

Also, there are features like screenshot and screen recorder; this enables you to take screenshots and also record your gameplay on your Windows PC.

⇒ Download Apowersoft Android Recorder now

Conclusively, the emulators we mentioned above are applicable for PUGB Mobile gameplay. As you can see, answering the question What is the best PUBG Mobile emulator? is not an easy task.

All the emulators listed above come with their specific strong points. For example, if you own a low-end computer, you should install Tencent.

However, keep in mind that won’t be the fastest possible emulation experience.

On the other hand, if you want to enjoy a lag-free PUBG Mobile experience, you should install LDPlayer.

We would love to get feedback from you on which emulator you use for your PUBG needs. Feel free to comment below.

[wl_navigator]

Xbox head Phil Spencer discusses TV streaming sticks and new Xbox Game Pass tiers

After a year of beta testing, Microsoft officially launched its cloud gaming service (Project xCloud) on Android devices last month, making it free for all Xbox Game Pass Ultimate members. Xbox cloud gaming remains in beta in its 22 launch markets, but Microsoft is already planning to bring it more platforms beyond Android.

In the near future, Windows 10 PCs, iOS devices, and Samsung Smart TVs should support Xbox cloud gaming, but Xbox head Phil Spencer recently discussed the opportunity for Microsoft to launch its own Xbox streaming sticks as well. Spencer’s complete interview with Stratechery is behind a paywall, but The Verge shared the most interesting bits earlier today.

“I think you’re going to see lower priced hardware as part of our ecosystem when you think about streaming sticks and other things that somebody might want to just go plug into their TV and go play via xCloud,” Spencer said in the interview. “You could imagine us even having something that we just included in the Game Pass subscription that gave you an ability to stream xCloud games to your television and buying the controller.”

The idea of an Xbox streaming stick isn’t exactly new, and we first heard about it four years ago ahead of the launch of the Xbox One S. We later learned that Microsoft ultimately decided to cancel the streaming stick codenamed “Project Hobart,” though this was two years before Microsoft announced its “Project xCloud” game streaming service.

Spencer hinted that Microsoft could include an Xbox streaming stick with Xbox Game Pass subscriptions, and Google did something quite similar with its Stadia Founder’s Edition bundles that coupled a Stadia Pro subscription with Chromecast streaming sticks. In the same interview, the head of Xbox actually mentioned the possibility of a new “Xbox Game Pass Platinum” tier that would include access to new Xbox hardware.

If Microsoft is really launching its own streaming sticks, it would be interesting to see what kind of software the new devices would run. However, it may just be easier to continue working with partners to bring Xbox cloud gaming to more platforms including smart TVs, as well the Android-based Amazon Fire TV sticks and Google’s different Chromecast devices.

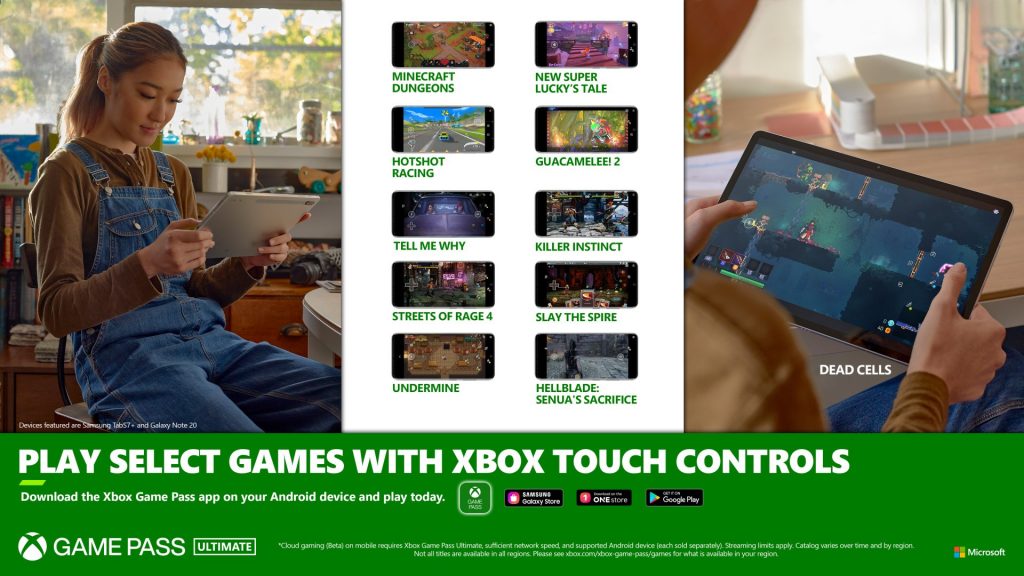
Microsoft did something quite singular by launching Xbox cloud gaming first on Android devices, while both Google Stadia and Amazon Luna are also available on TVs and PCs via a web browser. However, the company opted for the right business model by making cloud gaming a free Xbox Game Ultimate perk, with new games supporting cloud gaming every month. Over 100 Xbox Game Pass games are currently playable on Android devices, and 11 of them are now playable with touch controls.

There’s a new media remote for the Xbox Series X console though your old one will work fine

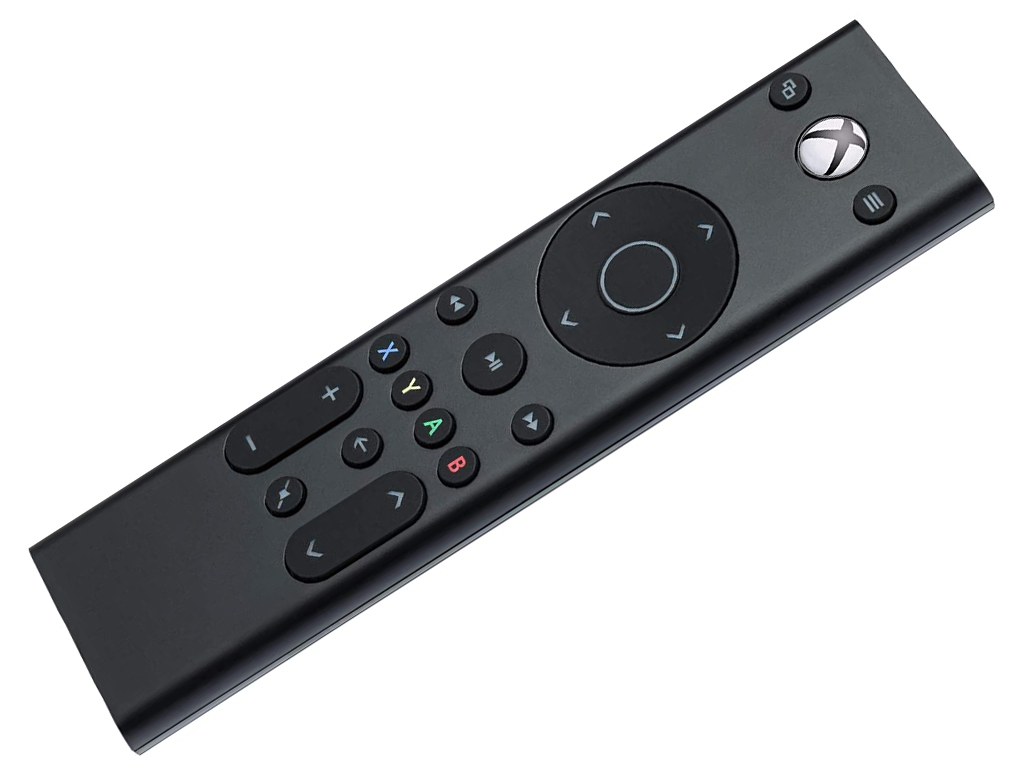
PDP is releasing a new media remote (via WC) for Microsoft’s upcoming Xbox Series X and Xbox Series S video game consoles and it’s now available to pre-order from Amazon and other retailers.

The new PDP Media Remote for Xbox is set for release on November 5th and will work with both the current Xbox One generation of consoles and the next gen Xbox Series X and S. It can be used to power on or off an Xbox, control volume, navigate media apps such as Netflix and Disney+, and control media playback.

The remote is also officially licenced by Microsoft and features motion-activated backlit buttons.

While this new remote’s design is pretty cool, it’s worth mentioning that current Xbox One media remotes will also work with the Xbox Series X and S so there’s no need to upgrade if you already have one.

Microsoft’s Larry Hyrb today confirmed via Twitter that both the Series X and S have IR receivers so the current accessories should work fine. “Xbox One Media Remotes will continue to work with Xbox Series X|S as part of our commitment that you can bring your existing accessories forward with you,” Hyrb said in his tweet.

This news should please quite a few Xbox One console owners who enjoy using the remote though it may frustrate Kinect fans once they find out that Microsoft added an IR receiver to the next gen consoles to support the media remote though wouldn’t add support for the Xbox One Kinect sensor which just needs a USB port (with the adapter), something the Xbox Series X and S each have two of.

Do you use the Xbox media remote? Will you buy this new one? Are you frustrated with the lack of Kinect support? Share your thoughts with the community in the comments below and then follow us on Pinterest and Twitter for more Xbox gaming news.

Microsoft Forms survey and quiz tool is now free to use for all users

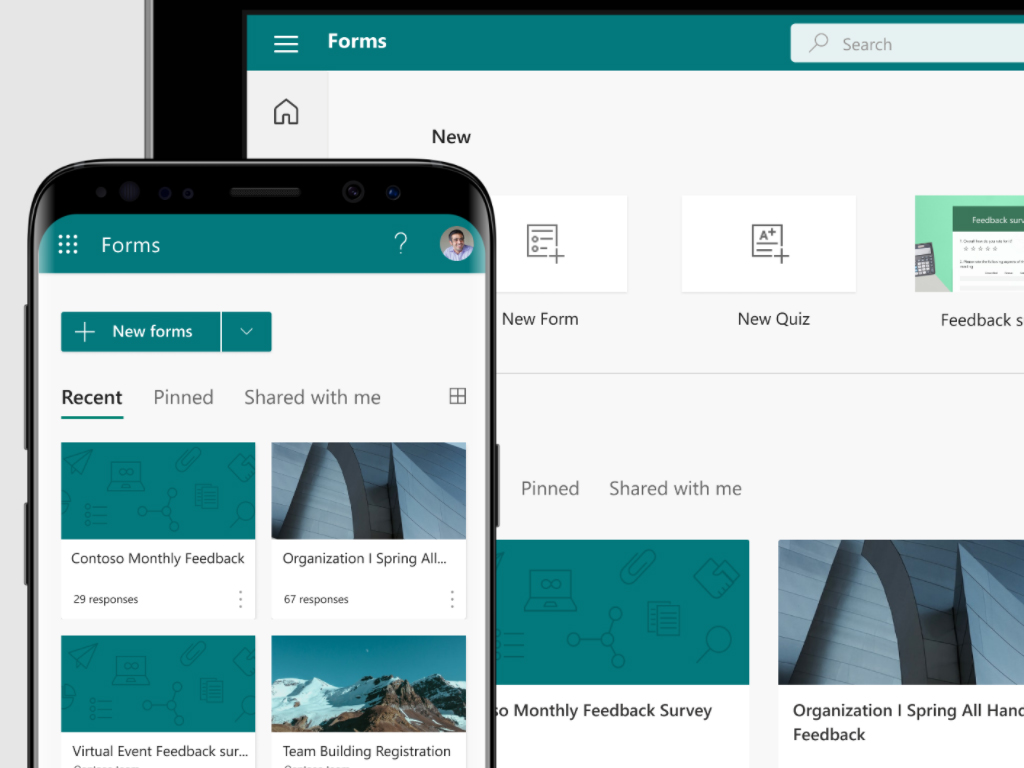
Microsoft’s relatively new survey and quiz-creation tool, Microsoft Forms, officially launched today and is now available to use either on the web or via an Office mobile app.

Anyone can use Microsoft Forms though a Microsoft account is required for the creation of quizzes and surveys. The tool is free to use though Microsoft 365 Personal and Microsoft 365 Family subscribers are provided with more design templates and can increase the number of respondents that can complete their creations.

Interested in creating a quiz or survey with Microsoft Forms? You can do so via the Microsoft Forms website here. Here’s one I threw together in less than a minute.

Have you created a Microsoft Forms survey or quiz? Let us know what you thought of the service in the comments below and then follow us on Twitter and Pinterest for more Microsoft news.

Microsoft Flight Simulator game code hints at possible Xbox Series X VR support

References to a possible upcoming Xbox VR service have been spotted in the code for the Windows PC version of Microsoft Flight Simulator.

The code was first spotted by a Flight Simulator forum user by the name of Cygnifick and was subsequentially confirmed by WC. The code in question contains references to PC_VR and Scarlett_VR, the former obviously referring to the confirmed upcoming support for VR on the Windows version and the latter strongly suggesting potential VR support for an Xbox console, likely the Xbox Series X.

The Scarlett codename had previously been used to refer to both the Xbox Series X and Xbox Series S consoles while they were in development so the connection is very strong. What’s unknown is whether Scarlett VR could be an Xbox-branded virtual reality accessory or service along the lines of Sony’s PlayStation VR or maybe just added support for a Windows Mixed Reality headset.

It’s also possible that this is just something that Microsoft is experimenting with and has no plans to take any further. If Microsoft was planning to bring VR to Xbox consoles, Microsoft Flight Simulator really would be the killer app to launch alongside it.

Microsoft’s Phil Spencer spoke about VR on the Xbox Series X as recently as February this year. He confirmed that there were currently no plans for VR on Xbox at the time though said that that could change if more gamers began demanding it.

Would you like to see virtual reality support come to the Xbox Series X or other future Xbox consoles? Let us know why or why not in the comments below and then follow us on Pinterest and Twitter for more Xbox gaming news.

Bluetooth L2CAP interface has a driver problem [Solved]

Users are getting the error message Reinstall device driver:  There is a problem with the driver for Bluetooth L2CAP Interface. Reinstalling the driver might fix this problem.

Unfortunately, if the L2CAP driver has become faulty then certainly the entire system trustworthiness is also jeopardized which makes fixing the issue a priority.

In this article, we will take a closer look at how you can solve this error and we recommend that you follow our recommendation in the same order as we have listed them.

How can I fix the L2CAP interface driver problem?

1. Use a third party software

If you get a Bluetooth L2CAP Interface driver error, then checking and installing the correct drivers is essential.

Using a dedicated software that will do this automatically would be recommended, as it will avoid installing the wrong ones.

There are many versions of Bluetooth Interface drivers out there, and it’s important to make sure the appropriate one is being downloaded.

With a professional driver updater, you will download the correct driver which will avoid any permanent damage to your device by downloading and installing the wrong driver version.

2. Update the driver manually

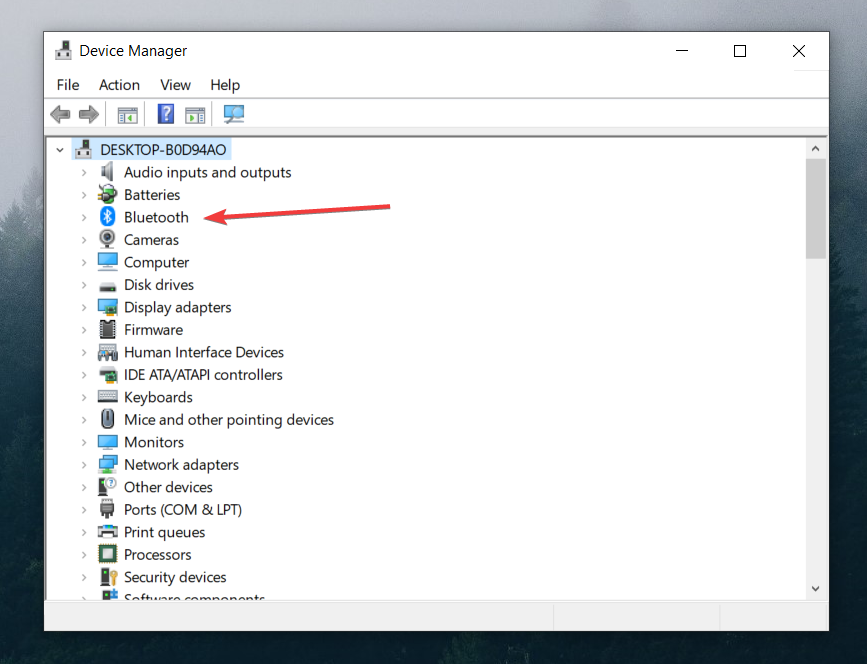
  1. Go to Device Manager and select the Bluetooth driver.
  2. Right-click on the Bluetooth driver and select Uninstall.
  3. Next, go to View and select Check for hardware changes to install the latest Bluetooth driver.

3. Run the Bluetooth troubleshooter

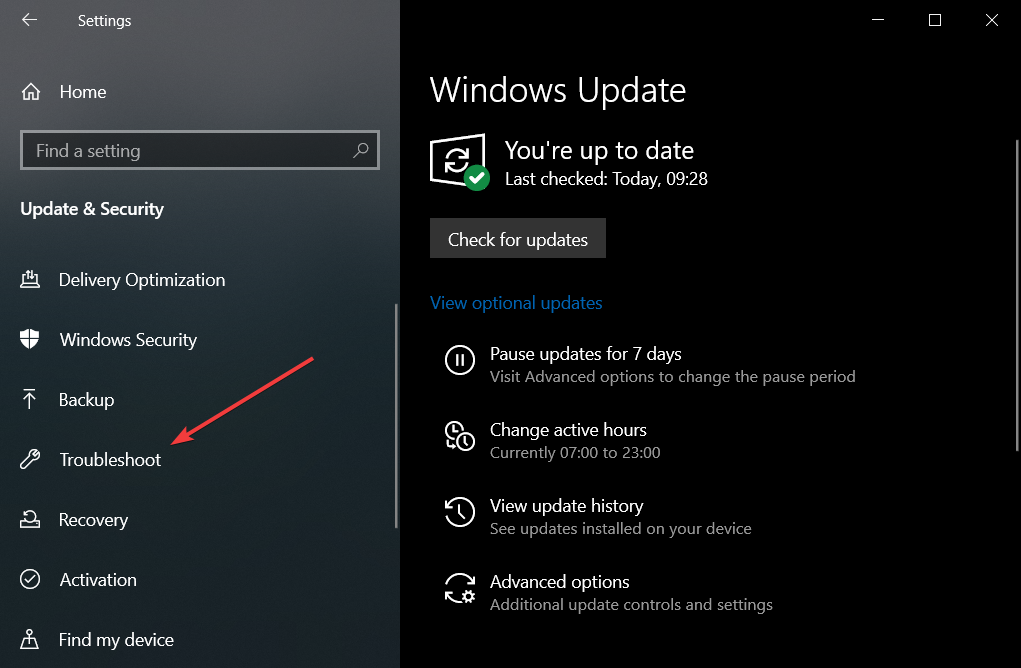
  1. Go to Start and select Settings.
  2. Next, select the Troubleshoot option.
  3. In the Fix and find other problems section select Bluetooth.
  4. Click on Bluetooth and select the Run the troubleshooter option.

4. Run the Windows Update Troubleshooter

  1. Go to Start and select Settings.
  2. Next, select the Troubleshoot option.
  3. In the Get up and running section select Windows Update.
  4. Click on Windows Update and select the Run the troubleshooter option.

Note: If everything is working with your Bluetooth device and you have updated it, you can run an Update Troubleshooter.

Microsoft delivers new drivers through Update almost every day, and if your Update service doesn’t work properly, you’ll be unable to receive a driver update for your Bluetooth device.

There you have it. We hope that one of the solutions listed above helped you solve the Bluetooth L2CAP Interface problem.

As you could see, the issue can be solved very easily by updating either the Bluetooth driver or updating your Windows.

If you have additional suggestions or recommendations, please let us know in the comments section below.

[wl_navigator]

VDI vs VPN: Which one is better & main differences

If you’re not exactly new with using PCs and, most importantly, networking techniques, you might’ve heard about VPN and VDI. Granted, VDI is not as popular as a VPN, but it’s still pretty well-known, especially for teleworkers.

In our guide, we’ll help you understand the main differences between these remote access technologies, as well as decide which one is better for your current needs.

What is a VPN?

A VPN, short for Virtual Private Network, is a technology that helps you connect to a specific network remotely if you have Internet access. Most VPNs enforce security measures, so as to prevent unauthorized connections to the network.

Once you’ve established a connection, you’re basically inside the physical network without actually being there.

You can access various network resources, such as files, and even devices by using a VPN connection.

VPN could also refer to the popular anonymization tool, which is used to keep your connection secure and identity private while you’re online.

You just run the VPN client, connect to a server, and that’s it. The VPN encrypts your traffic and routes it through its secure network of servers.

There’s a common confusion between corporate VPNs and consumer-grade VPNs (such as Private Internet Access), but in this article, we’re only going to focus on the former.

What is VDI?

Virtual Desktop Infrastructure (VDI) is a technology that can grant you access to a virtual desktop through a centralized server. VDI users are granted access to identical applications, managed by a system administrator.

Therefore, using a VDI is like having a dedicated server that hosts several virtual machines. Each hosted machine can be configurated separately by its owner (who reserved the machine).

VDI Virtual Desktop Infrastructure

It’s widely different than a VPN, which only grants you access to the network it’s configured on. A VDI also allocates resources to you, aside from the fact that you can access the corporate network through the virtual desktop you’ve been assigned.

How are VPNs and VDIs different?

While using a VPN, you establish a secure connection through a pre-configured server. Depending on the system you’re using, you may or may not need additional software to establish the secure VPN tunnel. Windows 10 has built-in VPN support, for instance.

VDI, on the other hand, provides you with a customizable virtual station that runs independently from other virtual machines on the same server. Having dedicated resources for each machine can greatly boost security and performance, but it also costs more.

Is VDI better than VPN?

Depending on your needs, you may consider one service or the other. However, you can’t really compare the two on a fair basis, since they’re different types of service (apples and oranges).

While VDI excels, a VPN might not do so good, and the other way around. For instance, setting up a VDI may take a long time, whereas deploying and configuring a corporate VPN server can be done in less than a day.

Furthermore, setting up and maintaining a VDI is significantly more expensive than a VPN.

As far as security goes, a VDI can be more secure than a VPN if configured properly. You can restrict VDIs from allowing data leaks outside the corporate network, whereas VPNs can only protect tunneled data.

Employees can copy company data (depending on permissions and privileges) on their local PC. Thus, it’s easy to see how a careless (or rogue) employee, can easily leak this sensitive information (with or without will) long after disconnecting from the VPN.

Performance-wise, VPNs are somewhat limited, since they highly depend on the client device and connection quality. If you’re using an old device and your connection is not exactly fast, your VPN connection might be awful to work with.

VDIs, on the other hand, are allocated separate resources, and only depend on bandwidth usage. As far as processing power goes, VDIs clearly have the upper hand.

To put it shortly:

  • VDI is significantly more expensive to deploy than a VPN
  • VPNs can facilitate data leaks if clients are not careful enough
  • VDIs are generally faster than VPNs
  • It would be easier to deploy security patches to VDIs than to VPN devices on the network
  • VPNs highly depend on client hardware, whereas VDIs use dedicated resources on the server
  • A VPN can be slower than a VDI since it depends on both client hardware and connection quality
  • It is easier and less expensive to maintain a VPN server
  • With VDIs, applications and data remain on the virtual machines
  • Using a VDI requires no complicated configuration, as it can be accessed even through your web browser
  • VDI runs on a broad variety of devices, whereas VPNs may have certain compatibility issues

Final thoughts on VDI vs VPN

All things considered, VDIs and VPNs are both great technologies that can come in handy especially if you’re a remote worker, or if you have remote-working employees.

Each service type has its strength and weaknesses, so it’s crucial to understand what sets them apart before making your choice.

However, VDIs are generally more fit for big companies that can afford the investment, whereas VPNs cater more to the needs of small enterprises.

[wl_navigator]

New Windows 10 20H2 build for Insiders brings Meet Now button to the Taskbar

Windows Insiders on the Release Preview ring can download a new patch for the Windows 10 October 2020 Update. This is the 20H2 Build 19042.608 (KB4580364), which will also roll out to Windows Insiders on the Beta ring later today.

The only feature in this new build is the new Meet Now button in the Taskbar, which will let users quickly set up a video meeting on Skype. This Meet Now button should roll out to all users with next month’s Patch Tuesday, and Microsoft is also bringing it to Windows 10 versions 1909 and 1903.

The 20H2 build 19042.608 also brings various bug fixes, and you can find the full list of changes and quality updates below:

  • Earlier this year we introduced Meet Now in Skype. Meet Now makes it easy to connect with anyone in as little as two clicks for free and each call can last up to 24 hours. Today, we’re excited to share that we will be extending this capability in Windows 10 by bringing Meet Now right to the taskbar. In the coming weeks, you will be able to easily set up a video call and reach friends and family in an instant by clicking the Meet Now icon in the taskbar notification area. No sign ups or downloads needed.
  • We fixed an issue with using Group Policy Preferences to configure the homepage in Internet Explorer.
  • We gave administrators the ability to use a Group Policy to enable Save Target As for users in Microsoft Edge IE Mode.
  • We fixed an issue with untrusted URL navigations from Internet Explorer 11 by opening them in Microsoft Defender Application Guard using Microsoft Edge.
  • We fixed an issue that occurs when using the full suite of developer tools in Microsoft Edge for remote debugging on a Windows 10 device.
  • We fixed an issue that displays nothing on the screen for five minutes or more during the Remote Desktop Protocol (RDP) session.
  • We fixed an issue that prevents certain Windows Virtual Desktop (WVD) users from searching for files using File Explorer.
  • We fixed an issue that causes a device to stop responding after you have been using a pen for several hours.
  • We fixed an issue that causes an application to stop responding temporarily, which causes extra z-order operations that affect the Topmost property of a window.
  • We fixed an issue that might cause DDE apps to stop working.
  • We fixed an issue that causes the ImmGetCompositionString() function to return the full-width Hiragana when using the Microsoft Input Method Editor (IME) for Japanese instead of returning the half-width Katakana.
  • We fixed an issue that occurs when you first sign in to an account or unlock an existing user session using Remote Desktop Services (RDS). If you enter an incorrect password, the current keyboard layout changes unexpectedly to the system default keyboard layout. This keyboard layout change might cause additional attempts to sign in to fail or lead to account lockouts in domains with low account lockout thresholds.
  • We fixed an issue that displays the incorrect CPU frequency for certain processors.
  • We fixed a performance issue that occurs when PowerShell reads the registry to check if the ScriptBlockLogging registry key is in the registry.
  • We fixed an issue that randomly changes the time offset of the time format returned by the command exe OS Get localdatetime/ value.
  • We fixed an issue that prevents Microsoft User Experience Virtualization (UE-V) from assigning the Microsoft Outlook Signatures.
  • We fixed an issue that prevents Hybrid Azure Active Directory joined devices from updating portal information when a device name or Windows version changes.
  • We fixed an issue that might prevent the Smart Cards for Windows service from starting.
  • We added a new Microsoft Event Tracing for Windows (ETW) provider named “Microsoft-Antimalware-UacScan”. This ETW provider reports the details of the context for each User Account Control (UAC) request in the ETW provider manifest.
  • We fixed an issue with virtual private network (VPN) connections that use Secured Password (EAP-MSCHAP v2) for authentication and have enabled the “Automatically use my Windows logon user name and password” property. When you connect to this type of VPN, an authentication dialog box incorrectly prompts for your credentials.

  • We now display Recovery Partitions in the diskpart utility.
  • We fixed an issue that causes stop error 0xd1 in sys. This issue occurs when moving certain arrays from one cluster node to another.
  • We fixed an issue that causes the IAutomaticUpdatesResults::get_LastInstallationSuccessDate method to return 1601/01/01 when there are no active updates.
  • We added support for the Transport Layer Security (TLS) 1.1 and 1.2 protocols when connecting to SQL Server using the data providers in Windows Defender Application Control (WDAC).
  • We fixed an issue with SQL Server that might cause performance issues if you configure a Linked Server provider to load out-of-process.
  • We fixed an issue that might degrade Windows performance and prevent the LanmanServer service from starting when third-party software uses LanmanServer custom file system controls (FSCTL).
  • We fixed an issue with deduplication that causes long wait times on Resilient File System (ReFS) Cluster Shared Volumes (CSV).
  • We fixed an issue that might prevent some applications from behaving correctly. This occurs when you publish them as Remote Application Integrated Locally (RAIL) applications using Remote Desktop Services (RDS) and change the docking for an AppBar
  • We fixed an issue with a deadlock in the Transmission Control Protocol/Internet Protocol (TCPIP) driver that causes the operating system to stop working or stop responding.
  • We fixed an issue that causes the Routing and Remote Access Service (RRAS) to stop responding for new connections. However, RRAS continues working for existing connections.
  • We fixed an issue that causes the RRAS administrator Microsoft Management Console (MMC) to stop responding randomly when you are performing administrative tasks or at startup.
  • We fixed an issue with starting Windows Subsystem for Linux 2 (WSL2) on ARM64 devices that occurs after installing KB4579311.

Microsoft started rolling out the Windows 10 October 2020 Update on Tuesday, but not all Windows 10 users will be able to immediately download it from Windows Update. It’s still possible to install the Windows Update manually, and joining the Release Preview ring is one of them. You can learn more about the other methods on our dedicated post.

How to change region code on DVD [Windows 10 & Mac]

Movie DVDs have regional codes assigned to them. Those region codes block users from playing film discs with DVD players that don’t have matching codes. A wrong region error message will pop up on your PC when you try playing a DVD with a disc drive that doesn’t match its region code.

There are six geographical region codes for continents and more specific countries. For example, region code 6 is for China. So, your DVD player will need to be configured for region 6 to play discs with China’s regional code.

You can change the region codes for DVD drive players on both Windows and Mac PCs. However, you can only change disc drive regional codes on five occasions.

How do I change the DVD region in Windows 10 and Mac?

1. Use WinX DVD Ripper

WinX DVD Ripper is software that effectively enables users to change protected DVDs to a region 0 for region-free playback by ripping their content to various video file formats. Thus, this is software that can decrypt regional encryption blocks on DVDs.

WinX DVD Ripper is highly-rated software for ripping DVD content as it incorporates level-3 hardware acceleration for faster disc ripping to a wide variety of output formats. You can utilize it to rip videos from DVDs for PC, mobile phone, tablet, Xbox, PSP, and HDTV output formats.

In addition, it includes video-editing options for trimming and cropping clips. In this way, you have more control of your DVD content and specific regions of your disc.

With this helpful tool, users can as well add subtitles to videos. That means every time you need to translate or just add a subtitle in your movies, you’re a click away.

Lastly, it’s worth mentioning that it supports all types of DVDs (MP4, HEVC, MKV) and enables 1:1 disc to ISO image cloning.

Follow these steps to change the DVD region settings

  1. To remove a regional DVD code with WinX DVD Ripper, insert a regionally coded disc into your DVD drive.
  2. Open the WinX DVD Ripper software.
  3. Click Disc at the top left of the WinX DVD Ripper window.
  4. Select your source DVD, and click the OK option.
    Select source window How to change region code on dvd
  5. Click General Profiles on the left of the Output Profile window.
    Output Profile window How to change region code on dvd
  6. Select the MP4 Video or an alternative format option (depending on your OS).
  7. Next, click OK to continue.
  8. Press the Browse button to choose an output folder for the ripped video.
  9. Press the Run button to rip the video from its disc. Then you can watch the ripped region-free output video in a media player.

2. Use the OS built-in tools

Windows

  1. Right-click Windows 10’s Start menu button and select the Device Manager option.
  2. Double-click DVD/CD-Rom drives to open that category.
  3. Double-click your DVD drive to open the window in the snapshot directly below.
    General tab How to change region code on dvd
  4. Select the DVD Region tab shown directly below.
    DVD Region tab How to change region code on dvd
  5. Select a country on the DVD Region tab. The New Region box will display the regional code for your selection.
  6. Click OK to confirm your selection.

Mac

  1. Insert a DVD with regional code into your Mac’s disc drive. The Drive Region window below will open if the inserted DVD has a different code to your disc drive.
    Drive Region window How to change region code on dvd
  2. Then select the matching region for your DVD code with the Change drive region option.
  3. Press the Set Drive region button.

Note: When you’ve changed the disc drive’s region a maximum number of five times, DVDs with incompatible regional codes will be automatically ejected after inserting.

So, that’s how you can change your DVD drive’s region code to play discs from five alternative regions. When you’ve changed your disc drive’s region code five times, you’ll need software like WinX DVD Ripper to bypass regional codes for DVDs.

How to remove MindSpark adware from Chrome [Windows 10]

MindSpark is an annoying adware that interferes with your regular user experience.

This software often hijacks your browser, directing you to various websites in order to fuel their advertising revenue.

Usually, MindSpark installs on your computer alongside free software. Actually, many popular download websites use this method, bundling MindSpark within the custom installer. In this manner, MindSpark is installed during the software setup process.

MindSpark modifies the default browser settings, altering the search settings. It can also change your browser’s loading time and behavior so as to block competing software.

Other unwanted effects may include: your homepage changes,  new tab settings are added, untrustworthy websites keep popping up, pop-up, pop-under, and in-text ads invade your browser, etc.

To regain control over your browser, follow the steps listed below.

How do I remove Mindspark in Chrome?

1.Use Bitdefender

remove Mindspark

Bitdefender detects and removes not just adware that’s interfering with your user experience, but any kind of unwanted malicious attack.

The tool identifies annoying adware installed on your PC, removing any unwanted apps, hijacker programs, toolbars, or browser add-ons.

Bitdefender first scans your computer for adware and then marks suspicious apps for removal.

The tool conveniently includes an optimization feature, as well, that you can use to boost your device’s performance by freeing up space and decluttering your system.

If you don’t want to go with the full device protection solution, Bitdefender also has a dedicated Adware Removal Tool that you can purchase from Bitdefender’s website. 

Bitdefender Antivirus Plus

Bitdefender Antivirus Plus

Adware can affect your browsing experience, but with Bitdefender you're safe from any type of online attacks.
Free trial Visit website

2. Use Malwarebytes 

how do i remove Mindspark


Malwarebytes is a handy free tool that removes adware, potentially unwanted programs, browser hijackers, and other similar invaders.

The tool also removes obnoxious programs, improving PC performance.

Malwarebytes has a really light footprint, it doesn’t require much space to install and is very silent, running in the background.

Most importantly, Malwarebytes is compatible with Windows versions, starting  Windows 7 SP1 and higher.

The basic version of Malwarebytes is free and offers unparalleled malware detection rates. Nevertheless, for real-time protection, you have to go for the premium product version.

Similar to the previous solution, Malwarebytes also has a dedicated anti-adware tool  – AdwCleaner – that you can download for free from the official website, in case you only want a one-time solution.

Malwarebytes

Malwarebytes

Choose Malwarebytes to benefit from real-time efficient protection against the most deceiving adware.
Free trial Visit website

3. Use SpyHunter

spyhunter adware removal


SpyHunter is a useful malware detection software that isolates spyware, trojans, rootkits, ransomware, keyloggers, and other similar malicious codes.

SpyHunter offers an additional scanning option, allowing you to custom-tailor the tool to fit your needs. The software scans all the apps, programs, and files stored on your computer and then lists the malware and adware detected.

The exclusions feature allows you to block SpyHunter from scanning certain programs.

There is one important downside when using SpyHunter: the free version of the tool only detects malware.

In order to remove malware and adware, you need to buy the software. There is no doubt that SpyHunter does a wonderful job of removing untrustworthy software from your computer, but you can do that using free tools.

⇒ Download SpyHunter


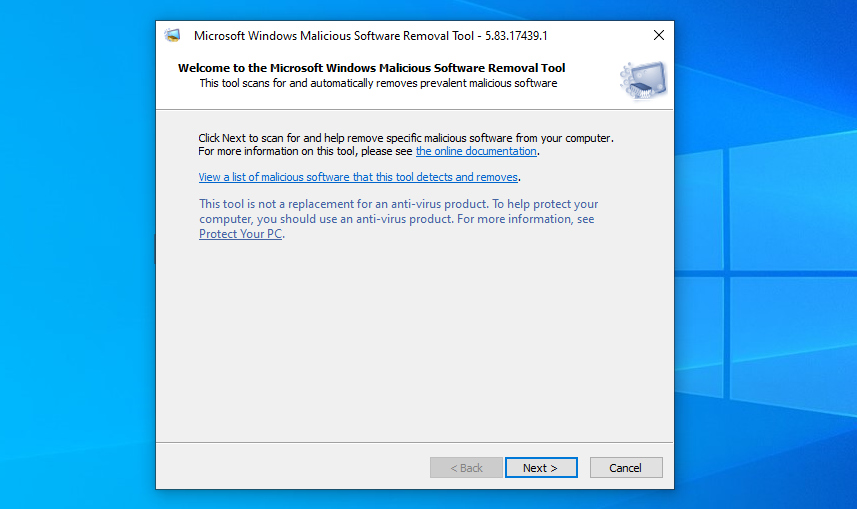
4. Use Microsoft’s Malicious Software Removal Tool

malicious software removal tool

Microsoft offers Windows users a dedicated Malicious Software Removal Tool (MSRT) to keep computers free from malware.

Microsoft’s malware removal tool detects and removes malware, including adware, reversing the changes made by untrustworthy software.

After the tool has scanned your computer and removed threats, it displays a report that lists the threats.

Microsoft rolls out the MSRT on a monthly basis through Windows Update. You can also download the standalone tool from Microsoft’s website.

We also have a guide on how to deal with Waisheph Chrome malware, so don’t miss it if you’re having additional problems.

Have you used other adware removal tools that you think we should add to this list? Let us know in the comments below.

How to zip multiple folders into separate files [Full guide]

Sending large files over email has gotten a saving boat with all the zipping and compressing tools out there.

Now it’s easier than ever to ensure that your message will reach the recipient without loosing hours on end trying to send each file separately.

Sometimes, due to organizational requests or any other reasons, you may need to zip multiple folders into separate ones.

It does sound like a tedious process and a bit time consuming but it does not have to be.

In this article, we will show you some really easy ways to do this, so keep on reading.

How can I zip multiple folders into separate files?

1. Give WinZip a try

There are several tools out there that will allow you to zip multiple folders into separate files and using the best one for your needs is key.

We have tested them all and based on the results and the features it comes with, we would like to recommend you give WinZip a try.

Splitting large files should not take a lot of time and with this tool, it will be easier than ever.

WinZip allows you to split zip files in just a few seconds without having to do complex steps.

Steps to zip folders into multiple files:

  1. Open Winzip.
  2. From the WinZip file pane select the file you want to split.
  3. Next, click Add to Zip and make sure to select the Split option.
  4. Indicate where you want your zip files to be saved.

As you can see above, there are four easy steps to follow in order to split zip folders into multiple ones.

WinZip though, does do more than just split files. It comes with other great file management features such as zipping and unzipping or repairing Zip files.

If you are concerned about privacy, know that with WinZip you can easily password protect all your files and folders without having to worry about data leaks.

In case you need to compress images or videos without loosing quality, then again, this is your best tool to choose.

All in all this amazing tool comes with features that will help you manage your files easily.

WinZip

WinZip

Split, archive, unzip, store and share all your major files format with this amazing software. Get the best deal now!
Free trial Visit website

2. Use Command Prompt

  1. Make sure that all the files or folders you want to be zipped are moved into a single location.
  2. Create a new text file named zipall.cmd.
  3. Copy inside the cmd file the following information and run it: for /d %%X in (*) do "%ProgramFiles%7-Zip7z.exe" a "%%X.zip" "%%X"

With this command your files should be zipped into separate files.

There you have it, these are the steps you need to make in order to zip multiple files into different folders.

As you can see, you can do it manually, which could be a bit more time consuming or you can anytime choose to use a dedicated tool and have the job done within seconds

You can also package files into a standalone executable for easier sharing, and you can learn how to do that in this guide on creating a self extracting archive.

In the comments section below you can tell us which one you found the easiest.

[wl_navigator]

How to use the Alt+Tab shortcut after Windows 20H2 update

One of the novelties that Microsoft introduced along with the Windows 10 October 2020 update is a new functionality for the Alt+Tab shortcut.

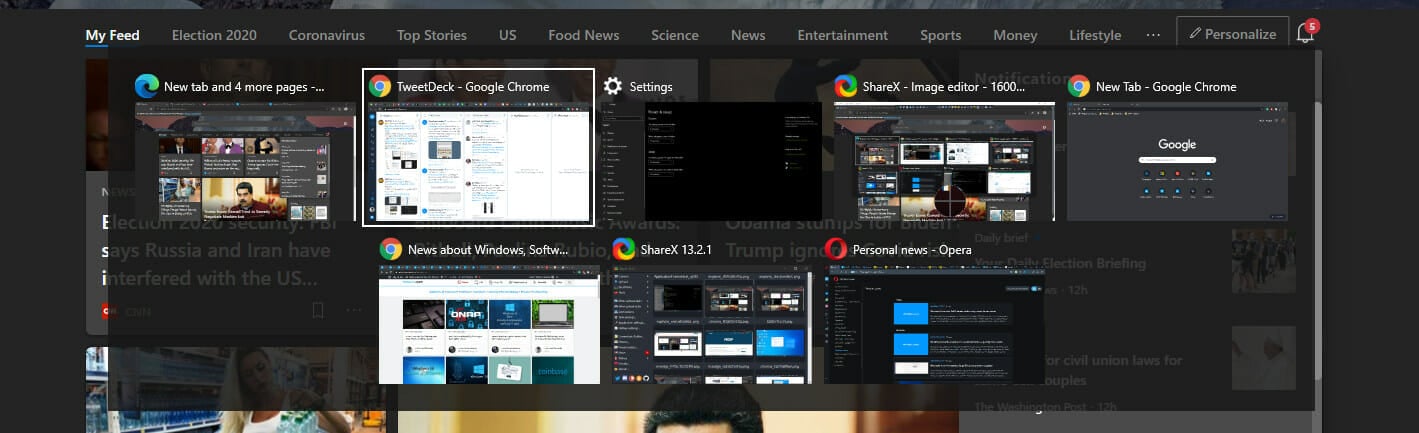
Namely, if until now the Alt+Tab hotkey allowed you to switch between multiple running apps or tasks, starting version 20H2 the multitasking panel will also include your open Edge tabs.

According to Microsoft, much of what has been implemented in this update was as per users’ feedback. However, the users are now confused about the mentioned multitasking feature.

Or, as one user puts it on the official Microsoft Edge forum:

My problem is Edge appear so many tabs when I press Alt+Tab.

Luckily, there’s also a little trick that you can use to customize the Alt+Tab hotkey behavior after this update.

How can I see only a few tabs when using the Alt+Tab shortcut?

switch tabs desktop
  1. Open the Windows settings.
  2. Choose System.
  3. In the left pane, go to Multitasking.
  4. Look for the option that says Pressing Alt+Tab shows… and open the drop-down menu.user alt tab after windows update
  5. Here, choose from one of the options:
  • Open windows and all tabs in Edge
  • Open windows and 5 most recent tabs in Edge
  • Open windows and 3 most recent tabs in Edge
  • Open windows only.

And this should do the trick and limit the number of tabs you see when using the Alt+Tab shortcut.


Alt+Tab shortcut not working at all in Windows? Here are 7 handy solutions.


Mind that apart from this kind of confusion after installing the latest Windows 10 update, a lot of users reported various issues.

On this note, you might find useful our exhaustive article that tackles some of the blockers reported on the forums so far as well as useful fixes.

What’s your take on the updates that Microsoft has implemented in version 20h2? Tell us in the comments section.

[wl_navigator]

You’ll need a Microsoft account to play Minecraft: Java Edition

When it comes to voxel games, few have left their mark in a more profound way than Minecraft, and it is still going strong today, which is the best-selling game of all times as of the writing of this article.

Fans of the game are probably familiar with the fact that the game exists in two versions:

  • Minecraft: Java Edition
  • Minecraft for Windows 10

Well, ever since Mojang was bought by Microsoft, many changes have come to the game, and it seems a new one will be landing next year that will improve security.


Minecraft: Java Edition will be played only via Microsoft accounts

Up until now, playing Minecraft: Java Edition still required you to log in with the account you purchased the game on, the only difference was that that account could be of any kind, such as Yahoo or Gmail.

However, according to a post on the Minecraft forums, this will all change by next year since Microsoft accounts will now be mandatory in order to play the game.


All players now need to migrate to a Microsoft account

Apparently, this change was done to benefit the player, since Mojang stated that Microsoft offered more features compared to any other type of account:

  • Increased security for your account with two-factor authentication. In other words, it’s harder for someone to access your account without your permission.   
  • All your PC Minecraft games will be connected to the same account. Currently, that’s Minecraft and Minecraft Dungeons, but who knows what we’ll do next?   
  • Improved parental controls to help keep kids safe when playing online.   
  • Chat and invitation blocking.  

The migration will be as seamless as possible

The good news is that the migration itself will be the only change that players will actually feel, since all mods will still be functional, they will be able to keep their skins, and even their usernames.

On the other hand, Mojang also wanted to underline the fact that the transition is mandatory, and there won’t be any workarounds to the process.

The bright side to all of this is that Microsoft is preparing a small prize for those that go through the migration in the form of an in-game cape that they can use.

However, since Minecraft: Java Edition is played by so many players (~30 million), the transition will not be done in one single move.

Instead, it will be done in batches, and everyone that owns the game will get detailed instructions on how to migrate to a Microsoft account once their turn is up.


What’s your take on this change to one of the world’s most popular video games? 

Let us know what you think by leaving us your thoughts in the comments section below.

[wl_navigator]

Developers can now release Chromium-based PWAs on the Windows 10 Microsoft Store

After replacing its legacy Edge browser with a new Chromium-based version this year, Microsoft is now allowing app developers to submit Chromium-based Progressive Web Apps (PWAs) to the Windows 10 Microsoft Store. The PWABuilder team has just announced the preview release of the new Edge PWA platform, providing developers a straightforward way to package Chromium-based PWAs for the Microsoft Store.

Microsoft started welcoming PWAs to the Windows 10 Microsoft Store two years ago, and at some point the company experimented with crawling and indexing quality PWAs from the Web to automatically list them in the Microsoft Store. This plan never really took off and quality PWAs remain a rarity on the Store, with Twitter being one of the rare exceptions.

By embracing the Chromium open source project, Chromium-based PWAs can leverage new Web Standards APIs to make PWAs behave even more like native apps. These PWAs will still run in their own window without the browser UI, appear in the Start Menu, in the taskbar (if you want to), as well as the Apps & Features section of the Settings app.

One of the advantages of the transition to Chromium is that PWAs available in the Microsoft Store will be automatically updated via Microsoft Edge. this is a key advantage for PWAs over Electron or Webview based apps, as there is nothing the developer needs to do for their PWA to be running on an up-to-date version of Edge”, explained Justin Willis, Program Manager on the PAX Web team.

In this first preview release of the new Edge PWA platform, some features that were supported for EdgeHTML PWAs are currently missing. The list includes Live Tiles support and splash screens, and the PWABuilder team isn’t confirming yet if they will be added later. “We will keep the community updated as we continue to iterate on the preview,” Willis wrote.

To get started with the new PWABuilder preview, you’ll just need to visit pwabuilder.com where you can submit the URL of your PWA. The online tool will then analyze your PWA and then package it so you can submit it to the Microsoft Store or other app stores. It remains to be seen if the Microsoft Store will soon get many more quality PWAs, but Microsoft is now making it really easy for developers to have a presence on its app store.

Former Windows chief Terry Myerson announces Truveta, his new healthcare data company

Terry Myerson, former Microsoft’s Windows and Devices chief, announced his new healthcare company “Truveta” today. Myerson says that he has launched this new initiative to drive innovation and develop new patient-care therapies.

“Today is an exciting day as we begin our journey as Truveta. Our inspiration is our vision – Saving Lives with Data. As the COVID-19 pandemic continues to impact our world, loved ones, and daily lives, the opportunity to apply data in the development of breakthrough health solutions has never been clearer. We will pursue this vision in close collaboration with health systems, life science researchers, physicians, and others in the health community. We are energized by our compassionate vision and humbled by the complexity ahead,” said Myerson.

Thanks to his candid post on Truveta blog, we get a bit of insight into what his audience can expect to see him doing next in the healthcare industry. Myerson noted that the amount of health data had grown dramatically over the last few years. Due to the COVID-19 pandemic, the healthcare industry is expected to generate around 2,314 exabytes of new data in 2020. However, the data is currently unstructured and inaccessible for insights across diagnosis, treatments, geographies, or demographics.

With this new company, Myerson aims to develop solutions for generating insights to improve diagnoses and patient care. He also added that his team plans to collect feedback from the health care industry to guide their efforts. Right now, Myerson is rapidly building a team, and there’re several open positions for job seekers. If you are interested, feel to check out the official website to learn more.

How to Fix Error 42127 Cab Archive is Corrupted the Easy Way

When installing a new app or working on your computer, randomly, you may come across the 42127 cab archive is corrupted error. This error occurs when the system fails to access the files of the application you are trying to run.

Now, the aforementioned error can occur due to two reasons. The first is your Antivirus, suspecting the files are malicious and blocking them to protect your system.

In other instances, it can be a virus that has corrupted the cab archive required by the application.

If you are also experiencing this error, here are some troubleshooting steps to help you resolve the 42127 cab archive corrupted error in Windows.

How can I fix error 42127?

1. Check for broken Windows update

42127 cab archive corrupted

If you notice the error when scanning with your Antivirus, the error can be triggered due to a broken Windows update. You may not have to take any action provided you can verify that the CAB file is valid.

To check the digital signature of the CAB file, right-click on the file and select Properties. No further action is required if you are sure the file is legit.

However, if the file is suspicious, delete the file to be on the safer side. Manually navigate to the specified directory and delete the file to fix the error. Run your Antivirus again to see if the error is resolved.

2. Check for malware issues

Sometimes, an error can occur when installing an application on your computer. Apart from failing to install, you may also notice some system functionalities, like the Internet not working.

In this case, you may have system file corruption or malware changing the cab files, blocking the use.

To identify the problem, you can scan your computer using Windows Defender, but we recommend you use a third-party tool for better and more accurate results.

Luckily, the antivirus market has plenty of worthwhile anti-malware software. Make sure to use a tool like ESET HOME Security Essential that leaves no weak points and has multi-layered protection.

This software is constantly updated as threats are constantly emerging, and you want to ensure that your security system keeps up.

After you decide to install it, run a full PC scan. Remove any threats found and reboot your PC. See if the error persists.

If interested, read this guide to explore .cab files and how to install them.

⇒ Get ESET HOME Security Essential

3. Restore PC with Restore Point

antivirus errors
  1. Press the Windows key, type Restore, click on Create a Restore Point.
  2. Click the System Restore button in the System Properties window.
  3. Click Next.
    42127 cab archive corrupted
  4. Select the most recent restore point and click Next.
  5. Read the description and click Finish.
  6. System Restore needs to restart your computer to apply changes. Make sure you have saved all the open files and close programs.

After the PC is restored to the earlier point, check if the error is resolved. The System Restore point does not delete files stored on your computer. However, it may uninstall or reinstall some apps depending on when the Restore Point was created.


4. Clean install Windows

Roll back to the previous version of Windows

42127 cab archive corrupted
  1. Press the Windows key + I.
  2. Click on Update & Security.
  3. Open the Recovery tab from the left pane.
  4. Click the Get Started button under the Go back to the previous version of Windows 10 section.
  5. If the button is greyed out, it means the option is no longer available.

If you are unable to fix the error, you may have to clean install Windows 10. You can get a clean install of Windows 10 with the Refresh Tool as well.

The 42127 cab archive is corrupted error is triggered due to missing or corrupted cab archives of the app you are trying to install. You can fix the error by deleting the archives. Scan the system with your antivirus software to look for any malware infection.

Microsoft Teams new Meetings experience adds full screen support and meeting options

Microsoft Teams has recently received a new update on the desktop that includes two new features that should help to improve productivity at work. These features were spotted by Tero Niemi, a User Adoption Consultant who focuses on Microsoft Teams.

First and foremost, the app now allows Teams users to enable the Full screen mode in the new meetings experience. The “Full screen” option is available in the More actions menu (…), as shown in the featured image. Once clicked, the meeting window should fill up the whole screen. As a result, the app will automatically hide the title bar on the top and task bar on the bottom of the window.

Additionally, beginning with this new update, Teams meeting organizers can now view and manage meeting options directly in the new meeting experience. This new meeting options panel supplements the current meeting options webpage, and it brings the ability for organizers to open meeting options as a sidebar during the meeting.

In the Teams meeting window, click the More actions menu (…) to access the Meeting options. The new experience makes it faster and easier to control settings such as who can present, allow attendees to unmute, and more.

It is worth noting that both features are currently available in the Teams desktop app with the new meeting experience. Classrooms and Webinars can have a large number of people, and at times it’s hard to manage meeting options while the meeting is in full swing.

This change has been made based on user feedback, and it’s good to see Microsoft is now focusing on shipping updates for Teams at a much faster pace. Additional improvements are also on their way to Microsoft Teams, and more information is available on our dedicated Teams Hub.

Edge gets new “axe” accessibility tester extension from Deque Systems

Accessibility, the ability for people with “visual, auditory, motor, speech or cognitive disabilities and their various assistive technologies” to interact with websites, is a too often overlooked area of web development. There are a number of tools to help devs make sure their sites are accessible, and now one of the best of them is available as an extension for the Microsoft Edge browser.

Deque Systems makes axe, a tool that installs in a browser’s developer console (axe is already available to Chrome and Firefox), and can then analyze a web page for accessibility issues, providing a list of issues that could hinder accessibility.

A blog post on Deque System’s web page announced the new Edge Extension today, noting that over 135,000 people each week use the extensions, and promises “zero false positives,” concentrating their tests on problems that can accurately be detected via automation.

“The axe extension helps developers catch over 50 percent of accessibility problems while coding, dramatically reducing the time and cost of manual accessibility testing,” says Dylan Barrell, Chief Technology Officer at Deque Systems. Now development teams using Chrome, Firefox or Edge can easily check for accessibility defects right from the browser.”

We’ll be using the axe extension to identify and correct accessibility concerns, and running the tool shows that we have some work to do, including making sure to label page content with landmarks, provide unique title attributes, and improve color contrast. It’s something that we, like most small (and some large) developers overlook, but can place unintended barriers by not following some simple rules.

You can install the axe extension for Edge from the Microsoft Store and try it out for yourself, just open the F12 developer tools on a page you want to check, navigate to the “axe” tab, and click Analyze.

Android users can now play 10 new Xbox Cloud Gaming titles using touch controls

Last month, Microsoft allowed Xbox Game Pass Ultimate subscribers to play over 100 games from the catalog on Android devices via Project xCloud, which the company now calls “Cloud Gaming.” You need an Xbox Wireless controller or third-party controllers to play Xbox games on Android phones or tablets, though Microsoft is working hard to add touch controls for games in the catalog.

Minecraft Dungeons was the only game that supported touch controls on Android at launch, but 10 new Xbox Game Pass games are getting touch controls starting today. The list includes Dead Cells, Guacamelee! 2, Hellblade: Senua’s Sacrifice, Hotshot Racing, Killer Instinct, New Super Lucky’s Tale; Slay The Spire, Streets of Rage 4, Tell Me Why, and UnderMine.

Cloud gaming Touch Controls

“Touch controls have been one of the top-requested features for cloud gaming, so to build this collection we worked closely with players and game designers to create a familiar experience, and support a level of play that you’re used to with a physical controller. For each title that uses Xbox touch controls we’ve worked to create an experience designed specifically for that game on mobile devices,” explained Catherine Gluckstein, GM & Head of Product, Project xCloud.

Microsoft plans to bring touch controls to more Game Pass titles available on Android over time, and it’s good to see that each game can have customized buttons that don’t necessarily reflect the different buttons on the Xbox Wireless Controller. Google’s competing Stadia cloud gaming service also added touch controls support earlier this year, though the company simply started by adding all buttons from the Stadia controller on smartphone screens.

Best Mini DV To MP4 Converter [2026 Guide]

Not many people use camcorders nowadays, but if you’re still using one, you might want to convert MiniDV to MP4 and store your recordings in a digital format.

This isn’t hard as you think, as long as you have a proper tool for the job, and in today’s article, we’re going to show you the best software to convert MiniDV to MP4.

What is the best software to convert MiniDV to MP4?

WinX HD Video Converter Deluxe

If you need to convert MiniDV to MP4, then you might want to consider using WinX HD Video Converter Deluxe. What makes this software stand out from the rest is the support for a wide array of formats and devices.

Regarding the supported devices, the software works with action cameras, drones, DSLRs, mirrorless cameras, camcorders, surveillance cameras, computers, tablets, and smartphones.

In terms of supported formats, WinX HD Video Converter Deluxe supports over 370+ input formats and over 420+ output formats, allowing you to easily convert any file type to MP4.

It’s worth mentioning that the software also supports basic video editing, allowing you to cut, crop, merge the videos, or adjust their volume levels. You can also add or correct subtitles if needed.

WinX HD Video Converter Deluxe is a great tool for file conversion, and it should be able to handle almost any file type with ease.

WinX HD Video Converter Deluxe features:

  • Support for over 370+ input and over 420+ output formats
  • Basic video editing features
  • Supports a wide array of different devices
  • Ability to download online videos
  • Uses Level 3 hardware acceleration for conversion
WinX HD Video Converter Deluxe

WinX HD Video Converter Deluxe

If you need to convert MiniDV to MP4 or to any other 420 output formats, WinX HD Video Converter Deluxe is the right tool for you.
Free trial Visit website

Any Video Converter

Converting MiniDV to MP4 is simple especially if you’re using tools such as Any Video Converter. Speaking of supported formats, the software can work with over 200 different video formats.

It’s worth mentioning that this software offers 30 times faster speed compared to other multimedia converters. Another feature that is worth mentioning is hardware acceleration.

Any Video Converter supports NVIDIA NVENC, AMD AMF, and Intel QSV hardware acceleration allowing you to get maximum performance while converting your files.

If needed, you can also convert DVDs and CDs to digital format, and there’s also support for HEVC codec out of the box.

Any Video Converter Ultimate offers great features, and it’s a perfect choice if you need to convert MiniDV or any other multimedia format.

Any Video Converter Ultimate features:

  • Support for over 200 video formats
  • Video editing feature
  • Ability to download online videos
  • 30x faster file conversion
  • Screen recording
Any Video Converter

Any Video Converter

Any Video Converter is a powerful video conversion software that can convert MiniDV to MP4 30x faster than other tools.
Free trial Visit website

Movavi Video Converter

Movavi Video Converter supports over 180 formats, and it can easily convert MiniDV to MP4 or any other multimedia format.

According to the developers, thanks to the SuperSpeed technology, the software is up to 70 times faster than other tools on the market. Of course, the hardware acceleration feature is available as well.

The software supports NVIDIA NVENC, NVDEC, Intel HD Graphics, and AMD hardware acceleration, and there’s also full support for multicore processors for maximum performance.

If you’re looking to transfer files to other devices, you’ll be pleased to hear that the software has over 200 presets for all popular devices such as smartphones, TVs, consoles, etc.

Movavi Video Converter is a great multimedia converter, and if you need to convert MiniDV files, be sure to try it out.

Movavi Video Converter features:

  • Support for over 180 formats
  • Hardware acceleration and multiprocessor support
  • Presets for over 200 devices
  • Simple to use interface

Movavi Video Converter

Movavi Video Converter lets you convert MiniDV to MP4 or one of many other supported formats.
Free Trial Visit Website

Prism Video Converter Software

Another great tool that can convert MiniDV to MP4 with ease is Prism Video Converter Software. Regarding the number of supported formats, the software works with more than 130 file types.

The application works with individual files, but it also supports batch conversion, allowing you to convert multiple files simultaneously. If needed, you can also convert videos from an ISO file using this tool.

Prism Video Converter Software supports basic video editing, allowing you to add video effects or trim and split your videos with ease.

As for conversion, you can easily adjust the compression rate as well as the encoder. If needed, you can change the resolution and frame rate of the output file with just a couple of clicks.

Prism Video Converter Software is incredibly simple to use, and if you’re looking for a simple but powerful file converter, be sure to try it out.

Prism Video Converter Software features:

  • Lightning-fast conversion
  • Batch conversion
  • Support for more than 130 file types
  • DVD converter
  • Basic video editing

=> Download Prism Video Converter Software

Audials One

Audials One might not be a standard multimedia converter, but it can still convert MiniDV to MP4 with ease. The software works with over 100 file formats, but it also has various presets for a wide array of devices.

The application also has support for lyrics, albums covers, and ID3 tags, allowing you to organize your music collection with ease. Of course, the software allows you to edit tags on multiple files simultaneously.

The software also allows you to record audio, and it supports recording from various online streams. Of course, all major formats are supported in 320kbps quality.

It’s worth mentioning that video recording is also supported, and the process relies on your graphics card, so you’ll get video recordings in the best possible quality.

Audials One is first and foremost a multimedia recording app, but it does offer a multimedia conversion feature, so you might want to try it out.

Audials One features:

  • Ability to record online video and music
  • Built-in file converter
  • Incredibly simple to use
  • Music tagging and organizing
  • Advanced multimedia management

=> Download Audials One

Converting MiniDV to MP4 is simple as long as you have the proper tools, and we hope that our guide has helped you pick the right software for this task.

[wl_navigator]

4 Ways to Fix Your GIMP Eraser When It’s Not Working

GIMP is a great freeware alternative to Photoshop, and although it doesn’t have certain features, it’s still one of the best image editors on the market.

This occurring issue on your editing software can be very unpleasant when you need to erase any elements on your picture or composition.

In any case, the good news is that you can fix the error with the eraser in GIMP with a few changes to your settings.

Many users reported that the GIMP eraser is not working for them. This can be a problem, and in today’s article, we’re going to show you how to fix that once and for all.

How do I erase to transparency in GIMP?

If you need to edit your photos frequently and erase certain sections, you must learn the way to erase to transparency.

The first step would be to check the color channels on your image. Basically, you have three colors on the software that will color the image if you don’t set an alpha channel.

Using an alpha channel will help to remove the image pixels and achieve transparency with your eraser tool.

More exactly this fourth channel is a transparency layer that removes color pixels and replaces them with transparency.

Why is my eraser not working in GIMP?

What to do if GIMP eraser is not fully erasing?

If GIMP Is not fully erasing, it’s advised that you check your eraser settings and make sure that the opacity of the eraser is set to 100.

In case that doesn’t work, be sure to try one of the solutions below.

1. Add an alpha channel

  1. Select the layer whose contents you want to erase.
  2. Right-click the layer and choose Add Alpha Channel.
    add alpha channel gimp eraser not working
  3. After doing that, try to erase the content again.

This solution is pretty simple, and it can help you if the GIMP eraser is not erasing to transparent.

2. Check the layer and eraser settings

  1. Make sure that the proper layer is selected.
     layers gimp eraser not working
  2. Check the layer and make sure it’s not locked for editing. For the layer to be completely unlocked, all of these three icons need to be deselected.
    lock layer gimp eraser not working
  3. Make sure that you don’t have an area selected on your layer. Press Shift + Ctrl + A to deselect everything.
  4. Check eraser opacity, size, and hardness. Also, make sure that the Anti erase option is disabled.
    eraser settings gimp eraser not working

These are just some general guidelines, but they might be helpful if GIMP eraser is not working with the alpha channel.

3. Reset the eraser tool to default settings

  1. Select the eraser tool in GIMP.
  2. Now click the Reset to default values icon.
    reset eraser gimp eraser not working

After doing that, the eraser settings will be restored to the default and the problem should be resolved. Keep in mind that this solution works only if the problem was caused by modifying the eraser settings.

4. Restart GIMP

  1. Close GIMP completely.
  2. Now, wait for a couple of moments.
  3. Start GIMP again.

Several users reported that certain glitches prevented them from using the eraser in GIMP, but after restarting the software, the problem was resolved for good.

If your want to learn more about GIMP, you can use a dedicated GIMP article.

Do you have additional problems with the software? Our PC Software Hub has all the fixes that you need.

An eraser is a pretty important tool in GIMP, and if the eraser is not working for you, hopefully, one of these solutions should help you fix the problem.

File Shrinking Software: 8 Best to Use in 2026

Shrinking file size is a great method to use less storage space on your PC. A compressed file keeps the same quality as the original one, but the unneeded data in the file is removed.

By compressing files, you’ll be able to store more files in your available storage space. Another benefit that comes as a result of compressing data involves bandwidth and transfer speed.

There are many file shrinking programs out there, and you might find it difficult to choose one.

This is why we created a list of the best file compression tools that will surely make your work easier and more efficient.

What are the best file-shrinking tools for Windows 10?

WinZip

Our first recommendation would be WinZip – an extremely popular file encryption and compression tool.

This software is useful to share, compress and backup files.

Additionally, you can also use WinZip for other file management operations such as finding, opening, editing, or moving files stored on PCs, networks, or cloud services.

The tool comes fully integrated with Dropbox, G-Suite, or OneDrive.

Some of the key features of WinZip are:

  • File compression & file merge
  • Data Backup
  • Cloud support
  • Data protection
  • PDF conversion & watermarking

”WinZip”

”WinZip”

”Compress,
”Free
&aff_sub2=Native” current_url=”true” button_text=”Get it now” image=”https://windowsreport.com/wp-content/uploads/2017/11/WinZip-button-210×160.png”]

WinRAR

This archiver is quite a powerful tool that allows you to create, control and manage archive files.

The program supports RAR and ZIP 2.0 archives, algorithms optimized for text, graphics, audio, 32-bit, and 64-bit Intel executable compression.

You can manage archives straight from Windows Explorer due to the shell integration.

The tool also features the drag-and-drop facility and cascaded context menus.

More of the main advantages this tool brings:

  • Wizards for beginners; command-line interface for the most advanced users.
  • A compression ratio of 10% to 50% over the standard methods.
  • Multivolume and self-extracting archives options.
  • Valuable extra tools including scan, convert, hardware test, and benchmark.
  • Lock, test, repair, or recover physically damaged archives or volumes.
WinRAR

WinRAR

Compress, encrypt, package and backup your most important documents with this efficient tool.

7-Zip

There is nothing to complain about this file shrinking tool as it works very reliably and will not cause any crashes or performance issues.

This program creates files up to 40% smaller than those of more common zipping techniques.

Some of the most important features of 7Zip are:

  • 7z-compression format with LZMA compression
  • Supported formats for packing are ZIP, GZIP, BZIP2, and TAR; unpacking formats are RAR, CAB, ARJ, LZH, CHM, Z, CPIO, RPM, and DEB.
  • Self-extracting capability for 7z format.
  • Integration with Windows Shell.
  • Powerful File Manager.
  • Plugin for FAR Manager.
  • Localizations for 59 languages.

⇒ Download 7Zip

PKZIP

These days, everyone stores data in the cloud in order to access all of their files remotely.

But not everyone likes this option or is willing to pay for cloud storage.

You can now compress files by up to 98% with PKZIP. This tool allows you to save valuable storage space and also to perform transfers easier.

Check out its most important features:

  • Compress and encrypt files straight from Microsoft Office using SecureZIP.
  • Support for AES or 3DES strong encryption.
  • Integration with Microsoft Outlook as well, and automatic encryption of any email or attachment.
  • Option to forward encrypted emails without the need to download and resave files.
  • The Professional edition features high-security support; Outlook integration; and command line integration.

⇒ Download PKZIP

FILEminimizer PDF by Balesio

best file shrinking tools

With the help of this tool, you will be able to compress your existing PDF files and documents by 40-75% and to preserve their original visual quality as well.

The tool will not create a zip or a RAR archive, and there will be no unzipping needed.

The optimized PDF files will be much smaller, and they’ll turn out perfect for sharing online and via email. You also have the opportunity to compress more PDF files at once with the help of the batch process.

More key features of the program:

  • Optimize pictures, graphics, objects and internal PDF structure.
  • Edit, view and change it without the need to unzip.
  • Search and find all PDF files via the integrated search assistant.

⇒ Download FILEminimizer PDF

ZipGenius

zipgenius

In case you have a cluttered hard disk, purchasing additional storage is not always the best solution, even if the larger hard drives are becoming more affordable these days.

ZipGenius is perfect for Windows, and it’s a freeware as well.

Some of the most important features:

  • It handles over 20 compressed archive types.
  • User-friendly, especially for novices.
  • Multi-language support.
  • Five different compression levels.
  • Full customization and integration in Windows Explorer.
  • Self-extracting exe files, complete with custom setup launch and icon.
  • Extra features such as encryption, scanner support, backup features, statistics, a download time calculator, disk spanning, file export and more.

⇒ Download ZipGenius

PeaZip Portable

best file shrinking software

PeaZip Portable is the perfect package in case you want to use a free file archiver and compressing tool without having to modify your system.

The tool is perfect when you prefer natively portable software as a replacement for installable programs.

You can also take it with you on a USB stick. The program is also ideal in case you want to try it without having to install anything on your system. All you have to do is extract and use it and delete its folder when you decide to remove the app. It’s that simple!

Other essential features:

  • Compress to 7Z, ARC, BZ2, GZ, *PAQ, PEA, QUAD/BALZ, TAR, UPX, WIM, XZ, ZIP format.
  • Read (open, view, extract) 150+ archive types.
  • Support for a vast array of advanced file and archive management features (search, bookmarks, thumbnail viewer, verify the hash, find duplicate files, file converter).
  • Strong encryption (AES, Serpent, Twofish), two-factor authentication, encrypted password manager, secure data delete.

⇒ Download PeaZip

BitZipper

In case you need help opening ZIP and RAR files, this compression tool targeted at Windows will enable you to open 47 different compression and encoding formats extremely easy.

Check out the key features of this compression program below:

  • Open a multitude of compressed files like ZIP, ZIPX, and RAR.
  • Built-in file viewer for viewing pictures and text files.
  • Protect data with strong AES 256-bit encryption.
  • Bulk file extraction using the Batch Tool.
  • Compatiblity with Windows XP, Vista, 7, 8 and Server editions.

⇒ Download BitZipper

These were the top file shrinking tools for Windows that we picked for you. They may come in handy when you want to reclaim space but can’t shrink a volume with unmovable files.

Check them all out and stick with the one that fits your data compression needs best.

[wl_navigator]

Is your USB 3.0 transfer speed slow? Fix it with 6 methods

Some users have said that their Windows 10 USB 3.0 transfer speeds are very slow for the USB 3.0 drives they’re utilizing.

Here is what one user stated in a Microsoft forum post:

Since updating to Windows 10, regardless of which stick I use… I get very slow transfer rates compared to when I was on Windows 7.

To fix slow USB 3.0 transfer speeds, check out these potential resolutions.

How can I fix a slow USB 3.0 transfer speed?

1. Update the USB drive driver

Let us tell you the first thing that you should do when your USB 3.0 transfer speed is slow. You should definitely try updating the USB 3.0 stick’s driver.

As you can already guess, driver updates are as important as Windows updates. To make that happen with ease, simply document and consider updating driver tools.

This offers you a convenient method to immediately update your USB 3.0 stick’s driver or all outdated drivers at once.

Plus, if you need to update specific drivers rapidly, you can do this and renew outdated drivers in a few clicks. Hence, to achieve that you only have to use the best update drivers software on your Windows 10 PC.

2. Reinstall your USB 3.0 controller driver

  1. At first, right-click the Start button in Windows 10 and select Device Manager.
  2. Next, click Universal Serial Bus controllers to open the window shown directly below.
    Device Manager usb 3.0 transfer speed slow
  3. Right-click your USB 3.0 controller and select Uninstall device.
  4. Then restart Windows 10, which should automatically reinstall the driver for the USB 3.0 controller.
  5. Alternatively, you can click the Scan for hardware changes option in Device Manager to reinstall drivers.

One confirmed resolution is to reinstall your USB 3.0 controller driver. To do so, simply complete the above procedure.

3. Turn off Windows Security

  1. At first, press the Windows+ S hotkeys.
  2. Input Windows Security as the search keyword in the text box.
  3. Click Windows Security to open that app’s window.
    The Real-time protection setting usb 3.0 transfer speed slow
  4. Click the shield button on the left of Windows Security.
  5. Click Manage Settings to open the options shown directly below.
  6. Turn off the Real-time and Cloud-delivered protection options there.

Some users have said they’ve fixed slow USB 3.0 file transfer rates by disabling Windows Security. Check the above steps in order to do that as well.

4. Select the Better Performance option for your USB drive

  1. First of all, insert the USB stick into one of your PC’s USB 3.0 slot.
  2. Open the Device Manager window.
  3. Double-click the Disk drives category.
  4. Right-click your listed USB 3.0 stick to select Properties.
  5. Select the Policies tab shown directly below.
    Policies tab usb 3.0 transfer speed slow
  6. Select the Better Performance option there.
  7. Press the OK button.

Users can boost their USB 3.0 drives’ transfer speeds by selecting the Better Performance option. To do that, simply complete the above procedure.

5. Clean boot Windows

  1. Open Run by pressing the Windows key + R at the same time.
  2. Input msconfig in the Open box, and click the OK option.
  3. Click Selective Startup on the General tab.
    MSConfig window usb 3.0 transfer speed slow
  4. Deselect the Load startup items check box.
  5. Select the Load system services and Use original boot configuration settings.
  6. On the Services tab, select the Hide all Microsoft services check box.
    The Services tab usb 3.0 transfer speed slow
  7. Click Disable all to deselect the third-party services listed.
  8. Click the Apply and OK options.
  9. Next, click Restart on the dialog box window that opens.

You can also try clean-booting Windows to ensure that no third-party software (such as antivirus utilities) can slow down the USB transfer speeds.

Need more info on how to access MsConfig in Windows 10? Check out this detailed guide.

6. Convert a FAT32 USB drive to NTFS

  1. Plug your USB drive into the laptop or desktop.
  2. As converting a USB stick to NTFS will erase all the drive’s content, you should back up files on the USB stick before doing so.
  3. Next, open the Run accessory.
  4. Input cmd in Run’s Open box, and press Ctrl + Shift + Enter to open an elevated Command Prompt.
    Command Prompt usb 3.0 transfer speed slow
  5. Enter this command in the Prompt’s window: X: /fs:ntfs. Replace X with your actual USB drive letter.

Changing the file system of the USB stick to NTFS can also speed up its data transfer speed. Refer to the above procedure in that regard.

Those are some of the ways you can fix slow data transfer speeds for a USB 3.0 drive. Some of the above resolutions should also fix USB 2.0 drives’ file transfer speeds.

Which one worked in your case? Don’t hesitate to let us know by using the comments section below.

Latest Windows update comes with lots of pro features

As Windows October Update rolls out to PCs all over the world, we sneak-peeked at some of its features, and they don’t fail to deliver. Aside from features that cater to regular Windows PC users, Microsoft also reserved a bunch of perks for IT professionals.

Some of these pro-oriented features include MDM, Windows Autopilot, but also some security-related goodies. It seems like Windows 10 20H2 promises to be a release we’re all going to enjoy, regardless of PC operating skills or professional expertise.

Deployment and security updates ahead

Windows Autopilot receives many enhancements

Windows Autopilot is a bundle of technologies used to pre-configure new devices and get them ready for productive usage. This feature is predominantly used for repurposing old devices, but also reset or recover them.

The feature has been around for a while now, and is constantly being perfected by the Microsoft team.

The Windows October update (20H2) sees it enhanced with the following perks:

  • HoloLens integration
    • HoloLens 2 are already commercial-ready and feature support for various services, including MDM, BitLocker, Azure AD, MDM, and Windows Store/Update for Business. Windows Autopilot makes setting up HoloLens easier by bringing a self-deployment module to the table.
  • Co-management driven Autopilot
    • You can now set co-management policies during the deployment phase of Autopilot, so as to ensure easier and more efficient workload management.
  • Task sequences and ESP
    • Now it’s possible to use task sequences within Windows Autopilot. This enhancement lets you make the most of the Configuration manager, and even recycle sequences for easy device configuration. Furthermore, task sequences can block desktop access until they complete by integrating into the ESP (Enrollment Status Page).
  • Deployment reporting enhancements
    • Lets you monitor Autopilot deployment status in the admin center of Microsoft Endpoint Manager. Later on, you might even get to see app installation status, ESP duration, and policy status.

Security updates: an important part of 20H2

Windows‘ October Update encompasses some important IT pro-reserved security updates, including more biometric sign-on options. More specifically, the enhancements implemented virtualization-based security features in Windows Hello, in regards to certain face and fingerprint sensors.

This feature aims to isolate, and secure biometric authentication data from end-users.

One of the other security enhancements seen by Windows October Update is related to Microsoft Defender, which now supports the Office suite. This means you can now open and view suspicious Office documents in safe environments (similar to how sandboxes work).

The isolated environment will protect your PC from any malware component that might be embedded in the suspicious document.

Chromium-based Edge and simplified deployment

The 20H2 version of Windows 10 introduces Chromium-based Edge web browser for both regular users and IT pros. This means easier synchronization, compatibility over various operating systems, and a faster web browsing experience.

Furthermore, Windows October Update brings easier deployment to the table by means of combining LCUs and SSUs into single cumulative monthly updates. The update can be accessed from Windows Server Update Services or via the Microsoft Catalog.

If you’re curious about the Windows October update everyone talks about, check out our guide on how to download and install it easily.


What do you think about the new IT Pro-oriented features of the new Windows October Update? Share your thoughts with us below, in the comments section.

[wl_navigator]

FIX: Dragon Age Inquisition crashes on launch

Dragon Age Inquisition is a highly-rated RPG for Windows. That game is not immune from software hiccups, however, as it also crashes for some players when launched.

Numerous players have posted on EA’s forum about how DA Inquisition crashes when they start the game. This is how you can fix Dragon Age crashing on launch.

How can I fix Dragon Age Inquisition crash on startup issues?

1. Update your graphics card driver

The first thing you should try is to check if your graphics card driver needs updating. In most cases, that’s the core of the issue, so don’t skip this essential step.

In order to get the correct answer and properly update the driver, don’t hesitate to give a try to Outbyte Driver Updater.

That’s the ultimate tool for the task. You simply need to download and install it, then rest assured that Outbyte Driver Updater will solve this issue.

Just make sure to choose only the graphics card driver to update or do so for all out-of-date device drivers at once.

Outbyte Driver Updater updating drivers

After the procedure is complete, remember that Outbyte Driver Updater has a database of 18 million driver files, so you’ll definitely find it useful in the near future as well.

Outbyte Driver Updater

Keep your drivers up to date and keep playing with Outbyte Driver Updater.
Free Trial Download now

2. Turn off your third-party antivirus utility

One of the most widely confirmed fixes for Dragon Age crashing when launched is to disable any third-party antivirus software.

Numerous DA Inquisition players have said that disabling AVAST and AVG antivirus utilities (or adding the game to their exceptions lists) resolved the issue for them.

You can turn off third-party antivirus software by right-clicking their system tray icons to select a disable shield setting of some kind.

Select to disable the antivirus utility until restart, and then try launching Dragon Age again.

The Avast antivirus utility's context menu dragon age inquisition crashes on launch

3. Clean boot Windows

  1. At first, press the Windows + R hotkeys.
  2. Then, input msconfig in the Open text box, and click the OK option.
    MSConfig window dragon age inquisition crashes on launch
  3. Click the Selective startup radio button on the General tab if it’s not selected.
  4. Deselect the Load startup items check box.
  5. Select the Load system services and Use original boot configuration options if they’re not selected.
  6. Select the Hide all Microsoft services check box shown in the shot directly below.
    The Services tab dragon age inquisition crashes on launch
  7. Click the Disable all button.
  8. Press the Apply button.
  9. Click OK to exit the MSConfig window.
  10. Press the Restart button on the dialog box that opens.

Other third-party software tools, such as Razer Cortex and TeamViewer, are also confirmed to conflict with Dragon Age. To ensure that there aren’t any conflicting programs, complete the above steps.


Need more details on how to access MsConfig in Windows 10? Follow the steps from this dedicated guide.


4. Turn off Origin’s in-game menus

  1. Open Origin’s window, and log in if you need to.
  2. Click the Origin menu to select Application Settings.
  3. Select the Origin In-Game tab.
  4. Then toggle the Enable Origin In-Game option off if required.
    Origin In-Game setting dragon age inquisition crashes on launch

Players who got Dragon Age from Origin should also try to disable the game client’s in-game menus to fix DA Inquisition.

This was confirmed to work, so take a closer look at the above steps if you’re one of them as well.


5. Uninstall the 3D Vision driver

  1. Open the Run accessory’s window.
  2. Type appwiz.cpl in Run and click OK to open Windows’ uninstaller applet.
    Windows uninstaller dragon age inquisition crashes on launch
  3. Then select NVIDIA 3D Vision Driver on the software list.
  4. Click Uninstall and Yes to remove 3D Vision.
  5. Restart your desktop or laptop after uninstalling NVIDIA 3D Vision.

Some users have reputedly fixed Dragon Age crashing by uninstalling the NVIDIA 3D Vision driver. This could also be your case, so feel free to refer to the above procedure.


6. Select Origin’s Repair option

Origin also includes a Repair option that can fix games not starting. Right-click Dragon Age in Origin’s My Game Library to select the Repair option for it. Our video below shows you how to select that option.

Those are some of the confirmed resolutions that players have fixed Dragon Age startup crashing with. In addition, reinstalling Dragon Age might also be worth a shot if the above resolutions aren’t enough.

Let us know which of these solutions worked for you as well in the comments area below.


[wl_navigator]

How to delete Win setup files in Windows 10 [Safe Guide]

You may have noticed that after updating to Windows 10, in the drive folder you can find a Windows.old folder.

Many users have reported that the files do occupy too much disk space and this can become an inconvenience in time.

Can I delete Windows 10 setup files?

Yes, you can, and this guide will provide the advantages of doing so, and also the step-by-step information on how to do it.

There are a few reasons why having the old Win setup files is a good idea:

  • You can restore the operating system in case anything goes wrong during the update.
  • If you are not happy with the new system you can easily revert to the old one.

In case none of the above seem good enough reasons for you to keep the old setup folder, then you can just as easily delete it.

There are a few easy steps that you can do in order to complete this action efciently, and it this article we will give you more details.

How can I delete Win setup files in Windows 10?

1. Give CCleaner a try

In order to remove efficiently unwanted files from your device, you can either delete them manually or use a dedicated tool.

After we tested the available software out there, we would like to recommend that you try CCleaner.

This amazing tool has won some prestigious prizes and it’s really fast allowing you to clean your device in just a few minutes.
it comes with advanced features, that will free up space on your PC, clear your online tracks including the browsing history and cache in order to speed up your system.

Additionally, it will remove all superfluous or corrupted files on your device that occupy the hard drive space.

Your confidentiality could not be more protected with this tool, since it will delete all your browsing history in order to ensure it remains intact.

Nevertheless is always a great idea to have an antivirus installed on your device as well, to be entirely assured that there could be no leaks in regard to your data.

The patented registry cleaner will eliminate useless entries while you can also run a complete PC Health Check.

Therefore, this trusted registry cleaner will optimize your system by removing faulty files in a few moments.

⇒ Get CCleaner

2. Delete the Win setup from the Settings

  1. Pressing the Win + I key to open the Settings window.
  2. Next, select the System option.
  3. Shift to the Storage option in the left sidebar.
  4. Go to the Local storage and click on This PC (C:).
  5. Under Storage usage choose the Temporary files option.
  6. Go to Remove temporary files and click on Previous version of Windows.
  7. Click on the Remove files button and wait for it to finish.

3. Use Command Prompt

  1. In the Search bar type cmd.
  2. Right-click on command prompt and select Run as administrator.
  3. Type the following command and press enter:

RD /S /Q %SystemDrive%windows.old

Make sure that you keep your device open and wait for the command to complete.

This command should delete all the Win setup file without leaving any trace of its existance.

With this last step we conclude our list of steps to make.

As you can see deleting the Win setup file once you decided there is no use in keeping it, can be done fairly easily.

You can use a dedicated tool and simply wait for the process to complete by its own while also benefiting of the additional amazing features of the software.

Or, you can manually delete the files either from the Settings or by simply entering the above command in the command prompt.

Whichever one you choose, it will do the work just fine.

Please feel free to let us know if your issue was solved by any of these troubleshooting steps. You can send us a message by using the comment section below.

Windows 10 20H2 brings more security and new Edge features

As expected for some time now, Microsoft announced yesterday that they have started rolling out the Windows 10 October 2020 update (also known as version 20H2 or v2009) for all users.

Until now, the updates have been available only for the users in the Insider program.

Many of these updates are requested features from you to help make your experience on Windows even better, as the announcement puts it.

The unrolling process will most probably take several weeks to ensure a smooth update for everybody.

What’s new in Windows 10 20H2?

1. Shortcuts and Price comparison feature in Edge

Microsoft’s Edge will come as the default browser with this latest update. Until now, Windows 10 included a legacy version that would have been updated further on.

New features or improvements to this browser will be released every 6 weeks from now on.

To add to the user experience, you will be able to switch between browser tabs and running tasks at the same time, using the Alt + Tab shortcut. It’s the same shortcut now used to navigate only between desktop apps and programs that you’re currently using.

In preparation for the holiday season, Microsoft encourages the use of the handy Collections feature to which a Price comparison was added, for easier decision-making when shopping online.

2. New Start and Taskbar design

Once you install the Windows 20H2 version, you’ll notice a slight change in the color design of the Start menu, to enhance the icons and improve visibility in both light and dark mode.

Similarly, the Taskbar will be more customizable, to appeal to the users’ needs.

3. Increased security for companies

The 20H2 update will bring stronger app protection for companies only. Namely, the Windows Defender Application Guard will secure against possible external attacks not just websites opened in Edge, but also the Office suite apps.

4. Custom display refresh rate

refresh display rate

Starting version 20H2, users can change the refresh rate of their displays, using the Advanced display setings.

Keep in mind that the quicker an image refreshes on the screen, the better the viewing experience. A slower refresh rate might cause flickering, eye strain, and headaches.

To customize the refresh rate, once you have the October 2020 update:

  1. Open Settings and choose System.
  2. Stay in the Display menu and scroll down to Advanced display settings.
  3. Choose the display (if applicable).
  4. Open the Refresh rate drop-down menu and choose a new value.

The entire list of the improvements that come with the October 2020 update are included in the official Microsoft announcement.

The Windows 10 October 2020 update is available for users with devices running Windows 10, versions 1903, and higher. We offer a full installation guide to make sure you get the update right.

As it always happens with Windows 10 updates sooner or later, some things might go wrong. Be prepared beforehand with our guide for the most common October update issues reported so far.

Do you find these changes useful? Leave us a comment in the section below.

[wl_navigator]

How to fix Windows 10’s October Update 20H2 issues

The Windows 10 October 2020 Update (version 20H2) is finally available for users of compatible devices running Windows 10, versions 1903, and higher.

This new update comes with some new features including the improved Alt + Tab experience, the latest version of the new Microsoft Edge, more secure biometric sign-on, and more, yet a few issues are part of the package as well.

They include driver issues, receiving a stop error with a blue screen, problems during or after updating devices with Conexant ISST audio drivers, issues when using Microsoft IME for Japanese or Chinese languages, and more.

Rest assured that you’re about to find out what your next steps should be in case of encountering any of the previously mentioned Windows 10 problems.

How do I fix common Windows 10 20H2 issues?

1. Windows can’t verify the publisher of a driver software

When installing a third-party driver, as Microsoft reveals, you may encounter the following error message: Windows can’t verify the publisher of this driver software.

Installing drivers wasn’t an issue before, yet things have changed as a result of deploying this Windows 10 October 2020 Update.

Windows will require the validity of DER encoded PKCS#7 content in catalog files. They must be signed per section 11.6 of describing DER-encoding for SET OF members in X.690.

How do I unblock third-party drivers in Windows 10?

Getting the Windows can’t verify the publisher of this driver software or No signature was present in the subject messages is no joy.

If you happen to encounter one of these errors while attempting to install a third-party driver, you are advised to ask the driver vendor or device manufacturer for a correctly signed and updated driver.

If you want to speed up the process, rest assured that we can help you out. Well, you could install Outbyte Driver Updater and update those drivers with ease.

More precisely, simply download, install, and launch the tool. Outbyte Driver Updater will perform a thorough scan of your system and identify all your out-of-date drivers.

Then, it will reveal the results, so you may immediately install them within the program itself.

You’ve seen that Outbyte Driver Updater makes updating drivers simple. However, you should also keep in mind that it creates a restore point before installing a driver in the event something goes wrong.

Outbyte Driver Updater

Keep drivers up to date for a smooth running operating system.
Free Trial Download now

2. Windows key doesn’t function in games

Gamers have identified a bug related to the latest Windows 10 October Update as well. Here’s what one of them says:

With the new windows update whenever I’m in game If I hit the windows key nothing will happen, I can alt tab but can’t hit the windows key

How can I solve Windows key issues in games?

In order to quickly return to gaming, simply press the Ctrl+Esc keyboard shortcut to bring up the Windows menu. That’s should do the trick, at least until the glitch is solved.


Windows key or button not working? Count on us to solve the issue right away!


3. Stop errors with a blue screen for Conexant or Synaptics audio devices

Synaptics

Synaptics and Microsoft have also discovered severe incompatibility issues with a few versions of drivers for Conexant or Synaptics audio devices.

If that’s your case as well, you most likely know all about the annoying stop error with a blue screen during or after updating to Windows 10 version 20H2.

How do I prevent getting a stop error with a blue screen?

While Microsoft and Synaptics are working together on a resolution, their current recommendation is to not manually update using the Update now button or the Media Creation Tool.

They already applied a compatibility hold on Windows 10 devices with affected Conexant or Synaptics audio drivers installed from getting the update.

4. The update takes too long to complete

This isn’t one of those Windows 10 updates that are supposed to take hours downloading and installing itself correctly on your PC.

Updating should take between 5 and 20 minutes, assuming that you own a modern PC with solid-state storage.

However, that’s not the case for some users. Here’s what one of them claims:

The update was sitting at 19% for about 45 minutes and then went to 21% for another 45 and that’s where it has been since then. Does the update usually take this long?

How can I speed up the Windows 10 October Update?

Firstly, you should make room for the update, so feel free to use one of these great tools to delete junk files. If this makes no difference, run the Windows Update Troubleshooter to get further answers.

5. Errors and various issues related to Conexant ISST audio drivers

Conexant ISST audio drivers

Compatibility issues have also been confirmed for certain versions of Conexant ISST audio drivers. Owners of Windows 10 devices with affected drivers might receive an error.

Others describe experiencing all sorts of issues while installing the update or after the device has updated.

How do I solve issues related to Conexant ISST audio drivers?

An update is already in the cards for an upcoming release, as Microsoft reveals:

Microsoft and Synaptics are working on a resolution and will provide an update in an upcoming release.

Until then, since it’s a driver problem, you should install the latest version from the manufacturer support website using their instructions.

If you cannot find a new version, you could check with your device manufacturer (OEM) to see if an updated driver is available or simply use Outbyte Driver Updater to correct the issue, as described above.

6. Input issues on Microsoft IME for Japanese and Chinese

input issues on Microsoft IME

After the Windows 10 October 2020 Update installation process, you might experience issues as a user of the Microsoft IME for Japanese or Chinese languages.

Input may not work properly all the time, you may not be able to input text at all, and the examples continue.

How can I solve Input issues on Microsoft IME for Japanese/Chinese?

  1. Select Start, type Settings, and select it.
  2. Up next, type IME settings into the search box within Settings.
  3. Select the IME settings that are appropriate to your language, for example, Japanese IME Settings.
  4. Then, select General.
  5. Finally, turn on Use previous version of Microsoft IME.

If you happen to need extra guidance on how to install the Windows 10 October 2020 update, check out this detailed guide.

Have you already encountered one of these errors when or after updating to Windows 10 version 20H2? Let us know in the comments area below.

[wl_navigator]