True gamers will surely agree with what we are about to say right now. It’s not just the graphics that make a game what it actually is, as sound plays a major role in every experience.
And the truer the sound, the better you immerse yourself in the world of your hero. Sound fidelity has come far these last years, considering that stereo systems and headphones are so sensitive nowadays.
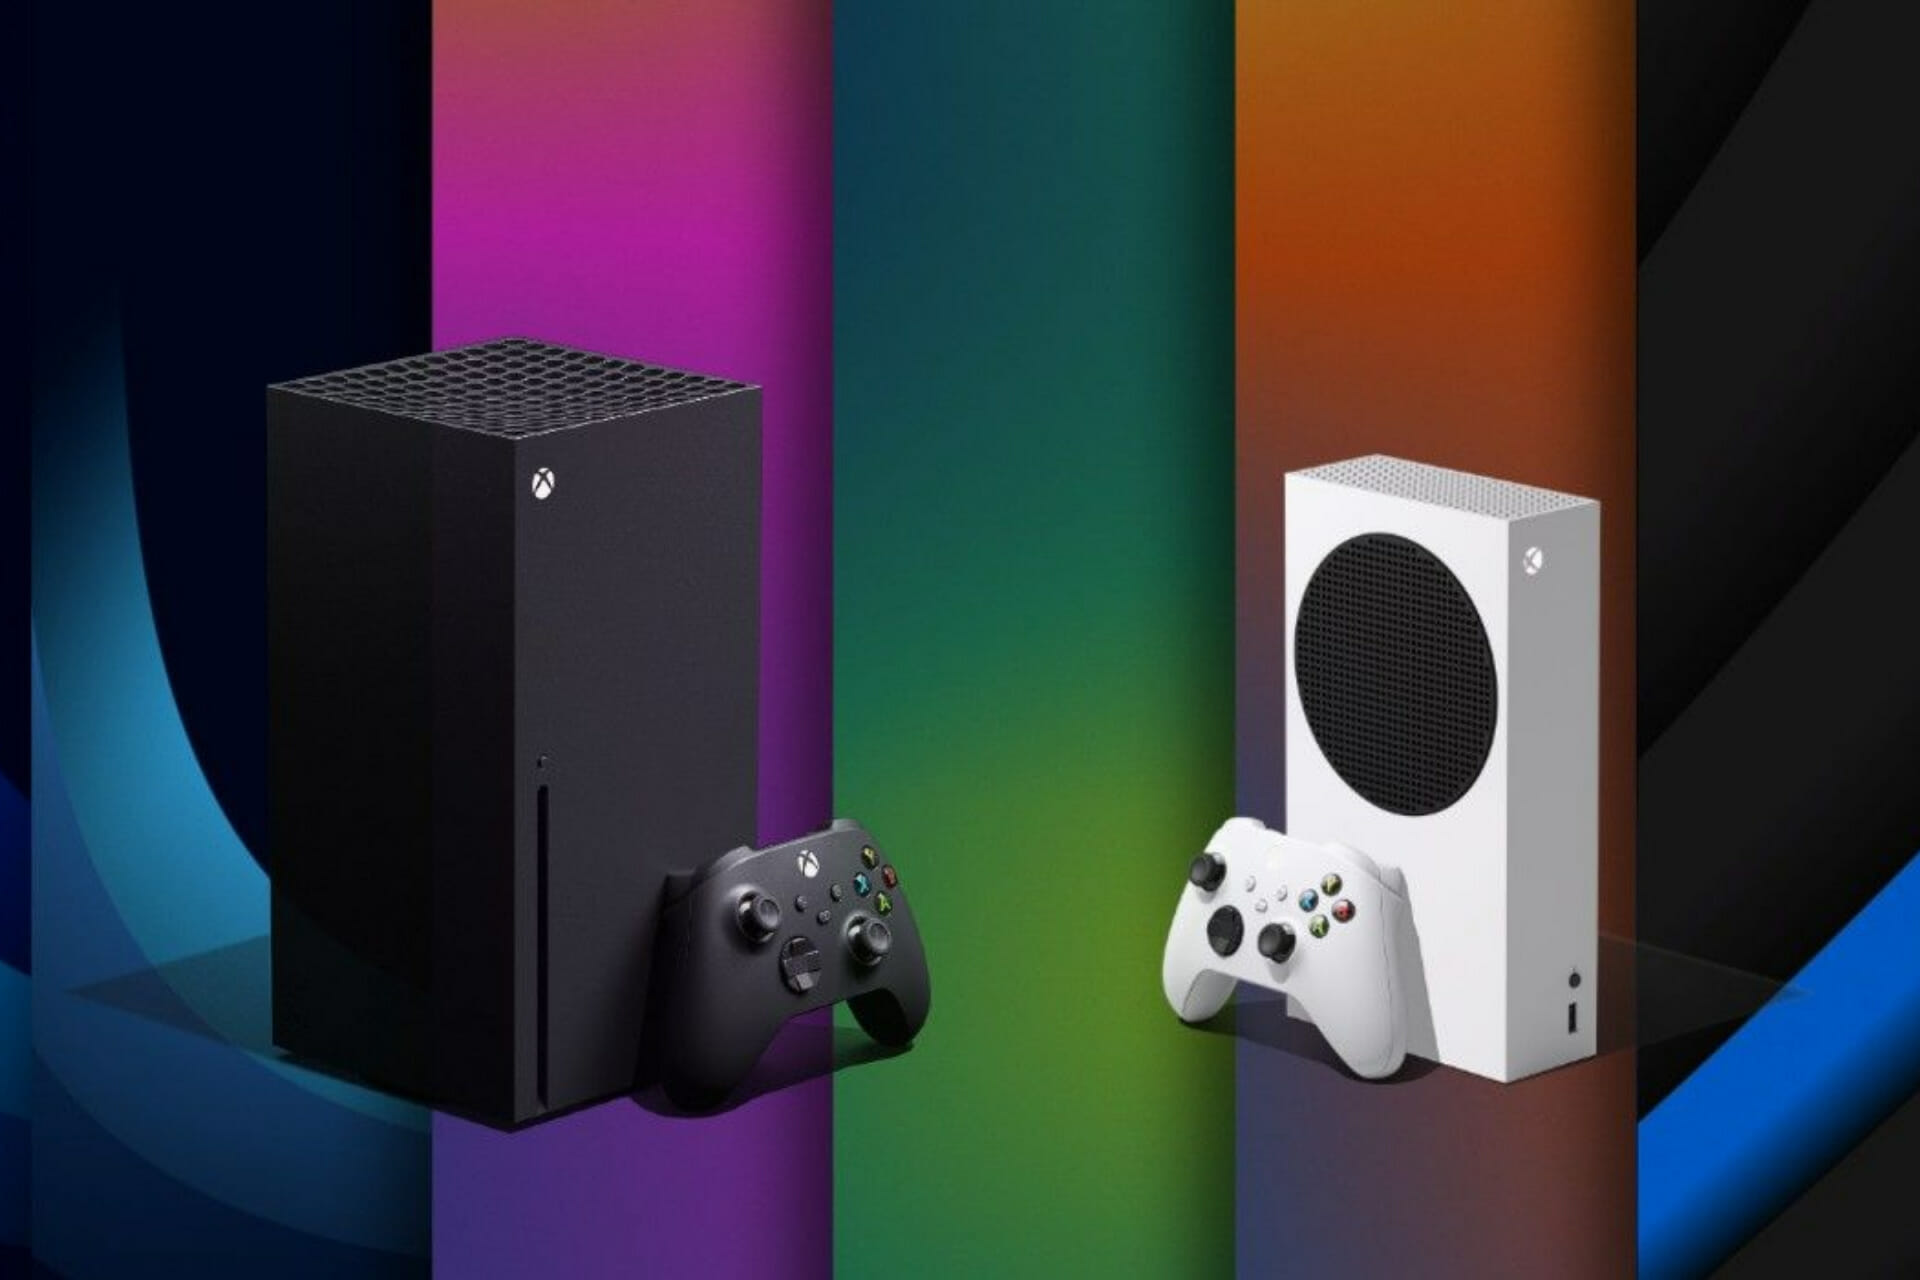
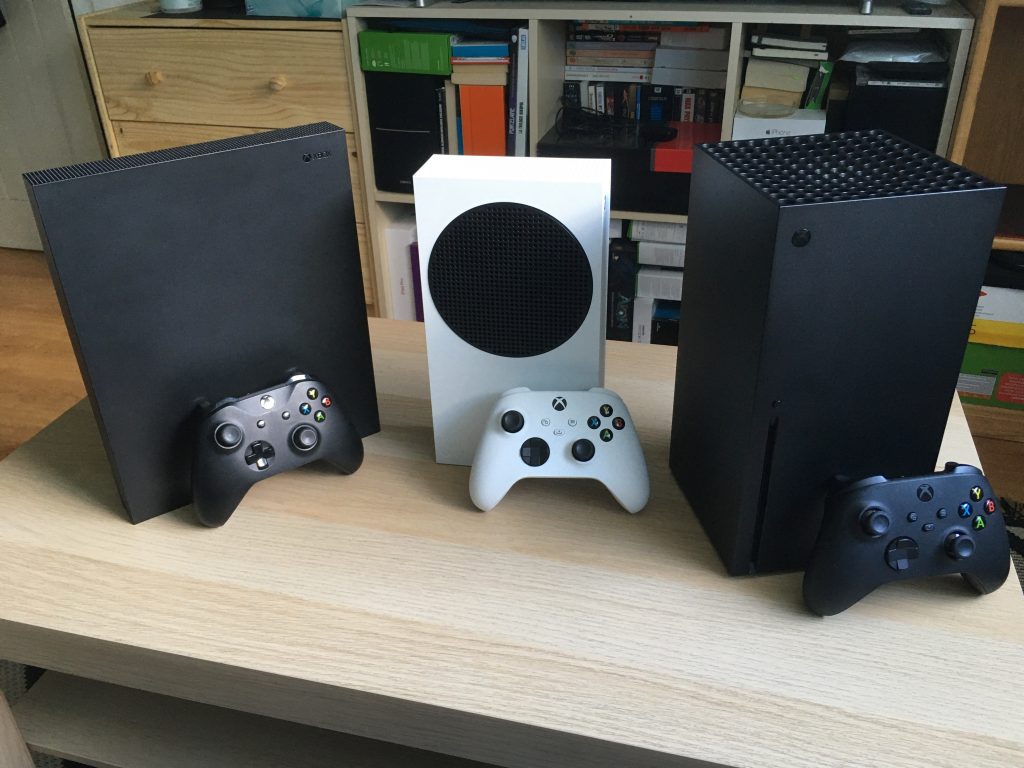
That being said, Xbox Series X|S owners will soon be able to enjoy a new update that lets them preview how their audio setup will behave when gaming.
Better customize audio settings on your Series X/S console
Xbox Insiders in the Alpha, Alpha Skip Ahead, and Beta rings can now preview a new audio setup screen that lets users scroll through and test a variety of different options.
Among these options are regular stereo uncompressed, 5.1 uncompressed, and Dolby Atmos for home theater, so you can maximize your gaming experience.
A sound pattern will play along with an animation to show which speaker in your setup is active, allowing you to make any necessary adjustments.
Hey Xbox Insiders! Alpha, Alpha Skip Ahead and Beta rings now have a new audio setup screen that will let you preview how different HDMI output modes will behave with your audio setup before you select one. Here's a little video tour of the feature, courtesy of @Adamkonig! pic.twitter.com/cmPqmPspTw
On the off chance you were among the people struggling to determine the difference between each audio setup, or simply want to ensure that your speakers are placed in the correct position, this is certainly a handy feature to have.
It goes without saying that you’ll need a compatible receiver to take advantage of some of these options, so don’t expect DTS: X for home theater to work if you don’t have a license or compatible setup that supports DTS: X.
This isn’t the first audio upgrade to the Xbox Series X and Xbox Series S that we’ve seen, and console users will know exactly what we’re talking about.
The Redmond tech giant recently rolled out a feature that automatically mutes your TV speakers whenever you connect a headset.
Also, important noting is that this feature only supports three types of spatial audio: Windows Sonic, Dolby Atmos, and DTS: X.
Is this a feature that you were waiting for on your new generation Xbox console? Let us know in the comments section below.
This is one of the most used live streaming video platforms, but it seems like some users encounter the Twitch error, which makes them unable to join a call in Twitch. It can be a pretty annoying error, but it can be easily fixed.
The developers at Twitch Interactive managed to solve the problem after people have continued to report it.
In this article, we will explore a few steps you should consider to make sure the issues are not local, in the case this error occurs again.
Before getting into the main subject, let’s take a look at some causes that can explain why it can appear while using the app.
Why am I unable to join a call in Twitch?
Wrong privileges – If you’re unable to join a call on Twitch, it might be possible that you’ve tried to access it with the wrong privileges. Thus, you’re gonna have to make sure that you run the app with the administrator ones. Keep on reading and discover how to easily do it.
Hardware acceleration-related problems – Twitch hardware acceleration is also known as hardware rendering. Its main purpose is to use PC hardware more efficiently than in software running on a general purpose. It aims to decrease latency and increase throughput. Yet, the opposite result may occur. Then, you may need to run Twitch without GPU hardware acceleration.
Antivirus or similar software is blocking the app – Many Windows users have gone through it. While launching an app or game, Windows Firewall or any other antivirus software might block specific features.
Fortunately, we’ve compiled a list of solutions that will solve our presented issue, in any of the above situations.
What can I do if I’m unable to join a call in Twitch?
1. Run Twitch with administrator privileges
Navigate to your desktop, and find the Twitch executable.
Right-click on it, and select Run as administrator.
2. Toggle software rendering option
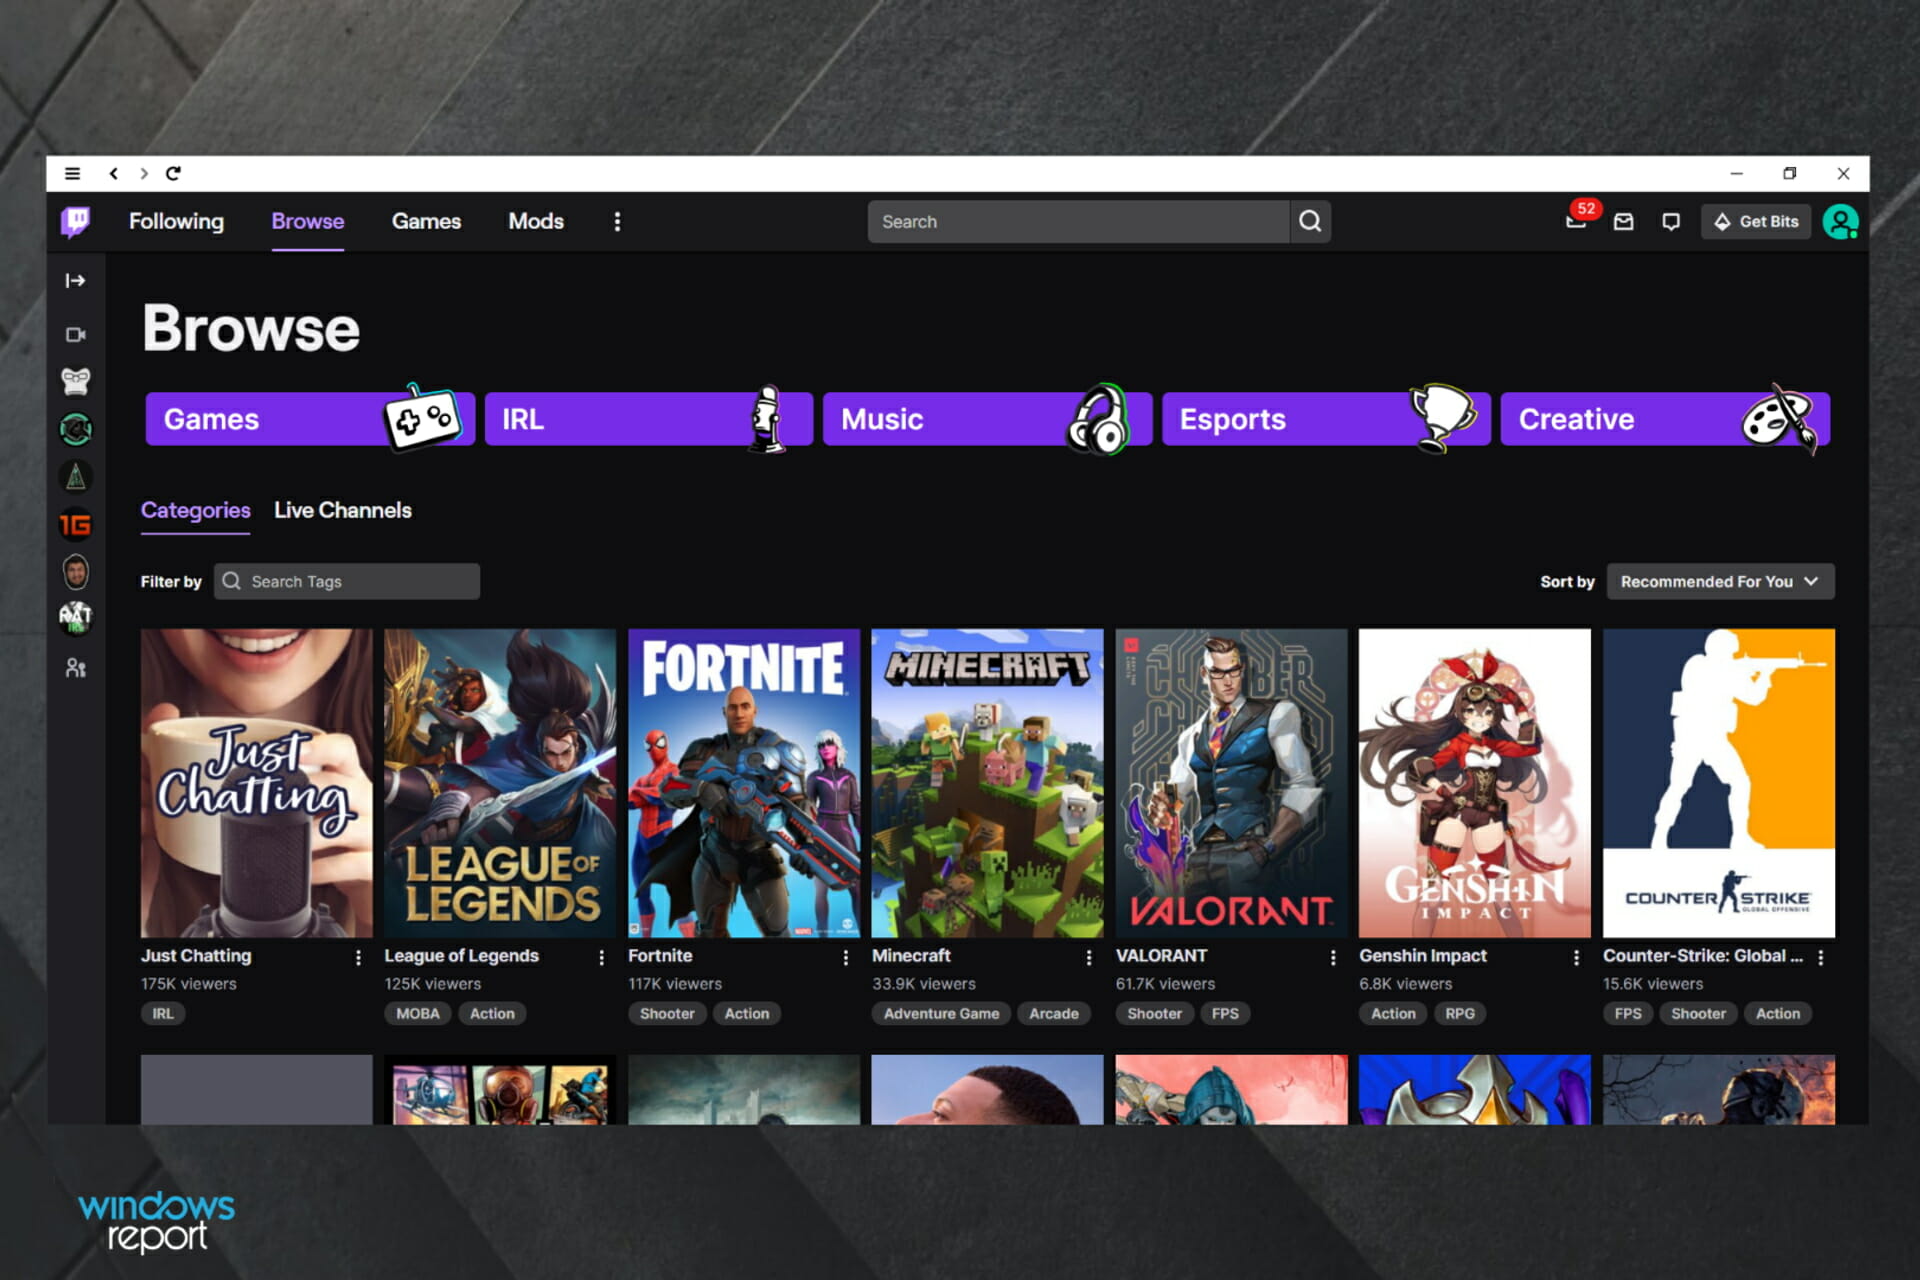
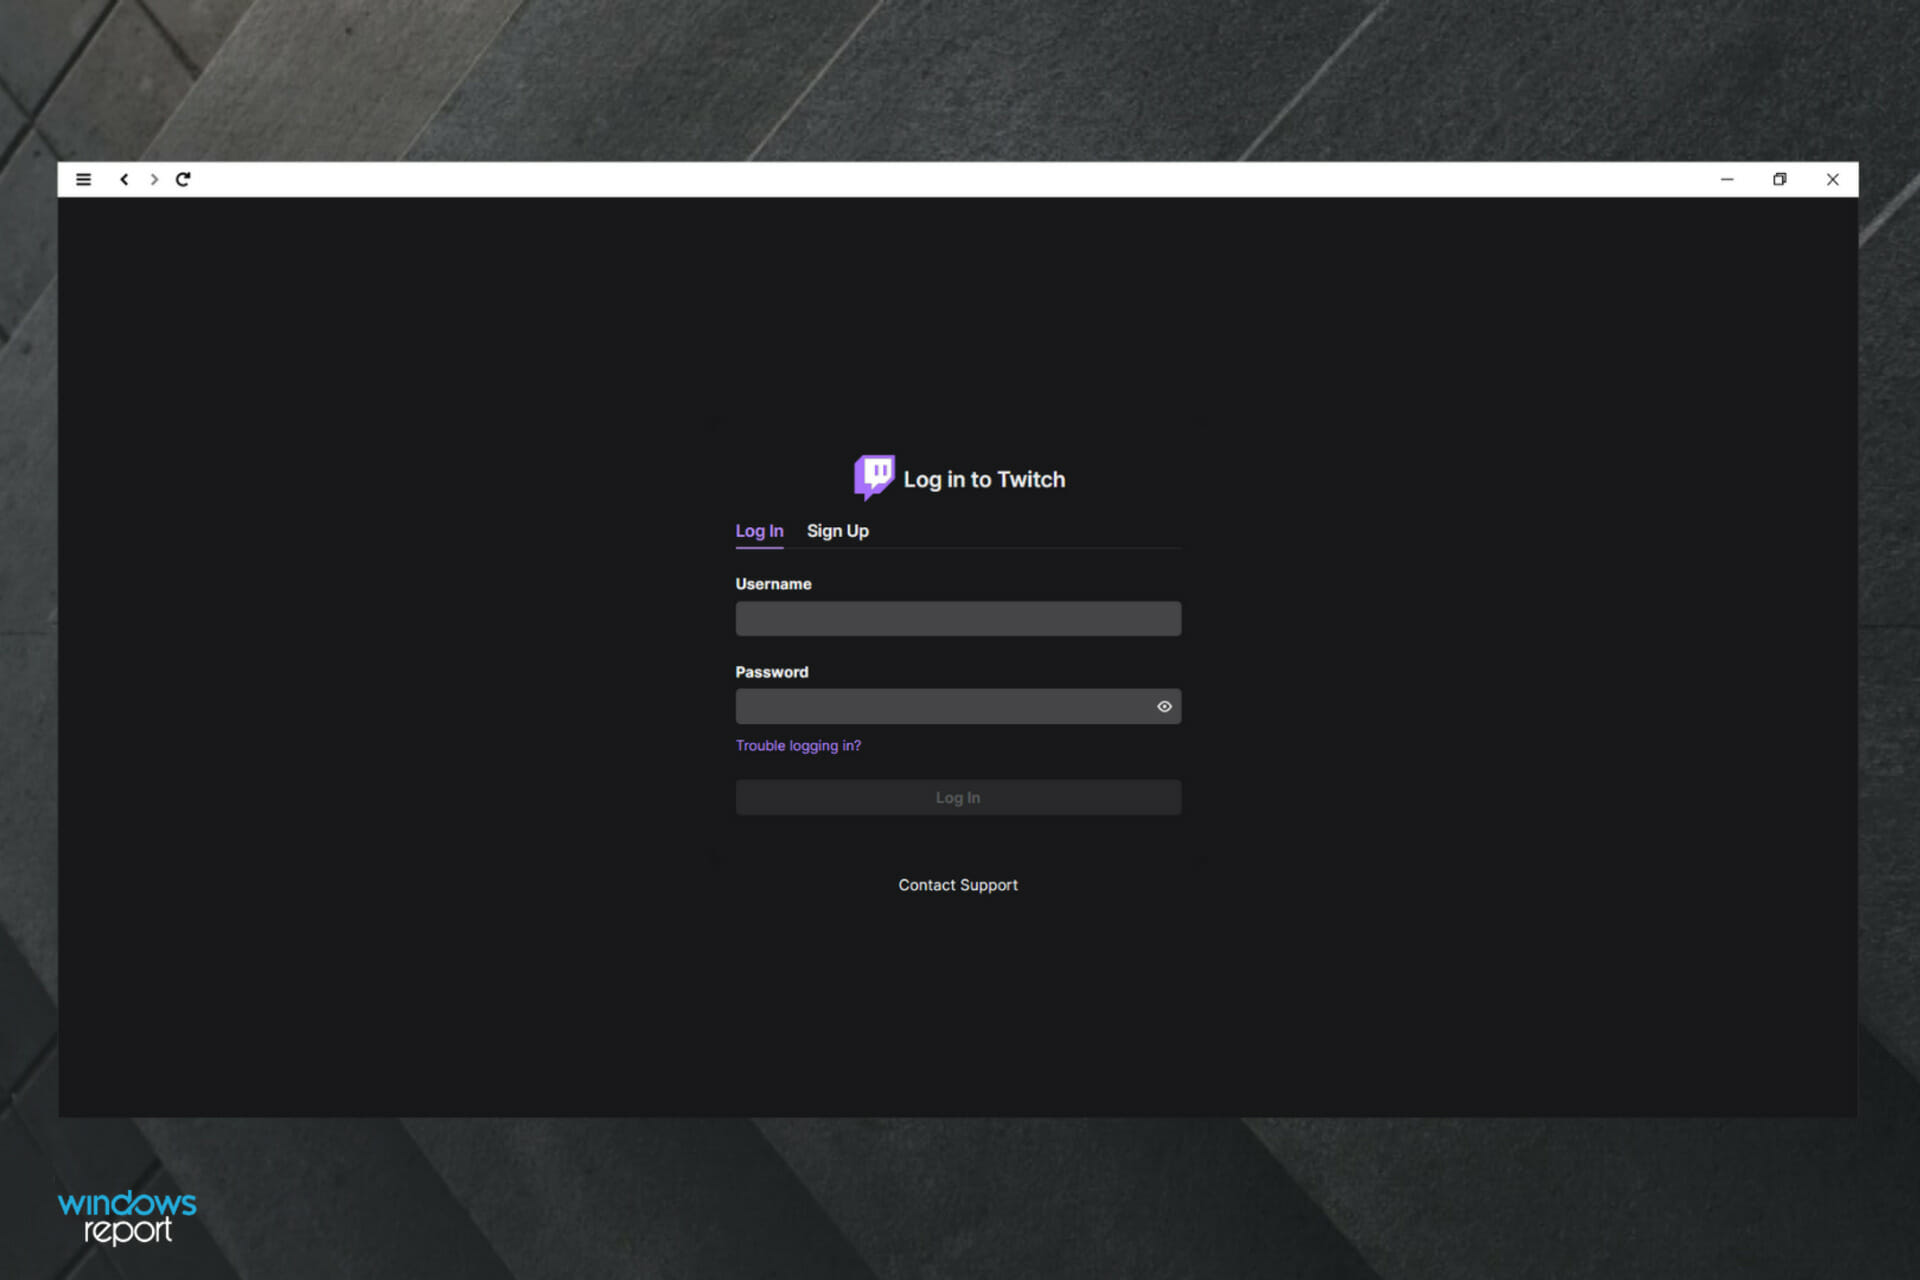
Hit the Windows key, type Twitch, then open the app.
Make sure you’re logged in with the account you want to join the call.
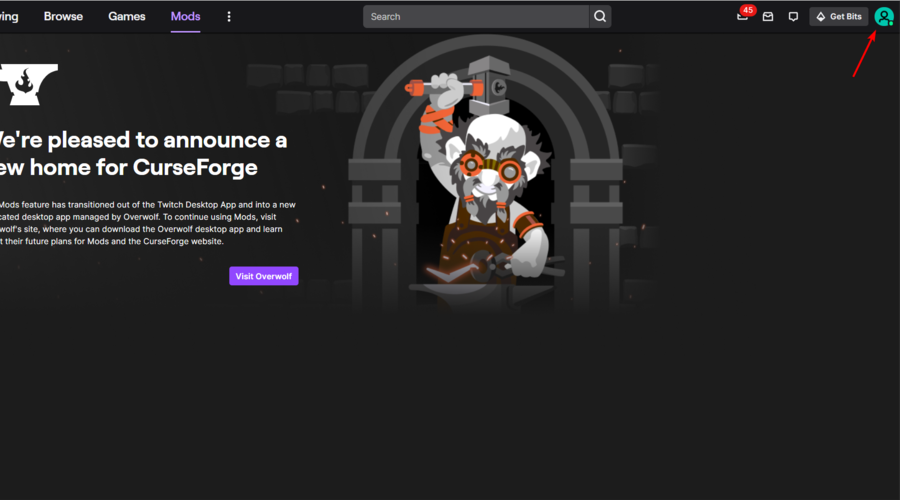
Click on your profile image, from the upper-right corner of the window.
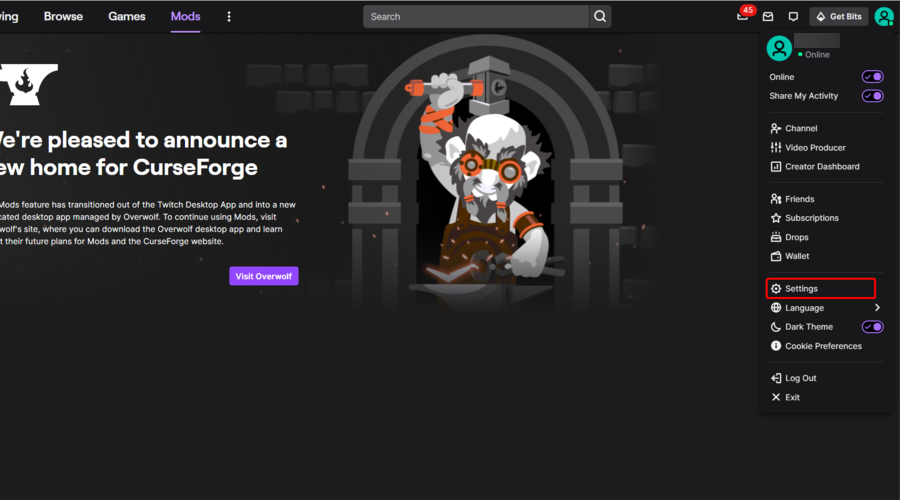
Navigate to Settings.
Stay on the General tab, then toggle the Software Rendering Mode option.
3. Make sure your antivirus is not blocking the app
3.1 Windows Defender
Use the following keyboard shortcut to open the search box: Windows + S.
Type Firewall, then open the first shown result.
Inside the Windows Defender Firewall check to see if there are any rules set up for Twitch in both the Inbound and Outbound tabs by scrolling through the list to the right.
In the case you find Twitch in those lists, make sure to set all Inbound rules to allow connections.
Your antivirus or firewall can sometimes block Twitch. Thus, you’re going to be unable to join a call in this app.
3.2 Antivirus software
Depending on which software you use to protect your computer from viruses, you will need to check if it is blocking any connections for Twitch. Toggle all settings to Allow to resolve the issue. Alternatively, you can disable it to fix this issue.
Thus, we have a better alternative named TotalAVEssential which offers advanced malware protection and security tools for improved digital privacy.
There you go, these are several quick solutions that might help you with the Twitch error, which makes you unable to join a call. Feel free to try them all and let us know in the comments section if these solutions worked for you.
Twitch is one of the biggest online streaming platforms. Hundreds, if not thousands of streamers try entertaining millions of viewers on a daily basis.
It is valued both by streamers and viewers, letting users quickly get started with new channels and also keep track of their subscriptions. Twitch is also very much focused on letting users build and maintain strong communities within their niches.
Streamers can broadcast gameplay using different devices: computers, consoles, mobile phones, or tablets. However, it seems like some of them encountered an issue when trying to broadcast through Xbox One and the error message says like this:
Your account is restricted from broadcasting – you must be an adult to broadcast using Xbox One – Check your account settings for any content restrictions Error Code: 0x20B31181
In an attempt to fix Twitch error 0x20B31181 on Xbox, we compiled this list of quick solutions. Before discovering them step-by-step, let’s take a look at some reasons that explain why this error can appear.
Why does the Twitch error 0x20B31181 on Xbox?
Problems related to the Internet connection – In this case, you’ll only have to check your Internet connection and properly set it up. You’re going to discover how to do it later in this guide.
Profile presence is set on Off – It seems like our presented error might occur due to some incompatible profile presence settings. To normally run Twitch with Xbox, you’ll have to make sure your profile presence is set On.
Privacy and Online Safety settings – In some cases, these ones were blocking the users’ actions. Thus, you’ll have to allow some related options.
Temporary bugs – Like any other software, both Twitch and Xbox may run intro trouble. In this situation, the best thing to do is reconnecting your accounts.
Twitch saved data are blocking the process you want to perform – There might also be some elements that limit your activity, so it is recommended to clear them.
How can I fix the Twitch error 0x20b31181 on Xbox?
1. Check your Internet connection
1.1 Through Xbox Settings
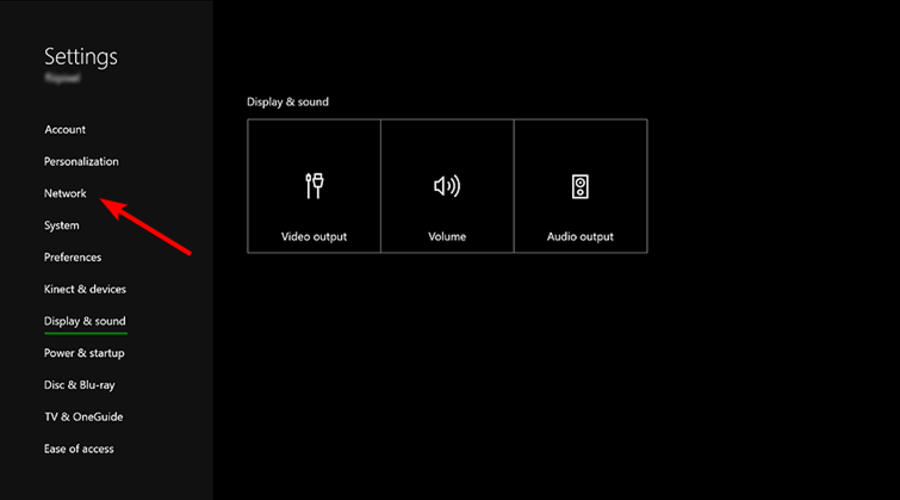
Press the Xbox button, then open Settings.
Navigate to Network.
Go to Network settings.
Select Test network connection.
Analyze the results and see if you have decent download/upload speed and ping.
1.2 Set up your Internet connection properly
Use a wired connection instead of Wi-Fi
Contact your internet provider if you notice abnormal internet activity.
2. Change your profile presence to Online
Press the Xbox button, then select your gamerpic
Select My profile.
Now, choose to Appear online.
3. Change Privacy and Online Safety settings
Press the Xbox button, then open Settings
Go to Privacy and Online Safety.
Set Broadcast gameplay to Allow.
Set Share content made using Kinect to Allow.
4. Reconnect accounts
4.1 Unlink your accounts
Press the Xbox button, then open Settings
Go to Account.
Choose UNLINK [your gamertag]
4.2 Perform a Power cycle to the Xbox One
Turn off the console from the Xbox Power button of the console
Leave the console off for about 10 seconds
Turn the console back on.
Link your Twitch account back to the Xbox account
5. Delete Twitch saved data
Press the Xbox button, then select Home
Go to My games & apps.
Press the Menu button on Twitch, then choose to Manage app.
Under Saved data on the right, choose the appropriate gamertag.
Press the Menu button.
Select Delete saved data
Alternatively, you can choose Uninstall and then reinstall the Twitch app back.
What other Twitch error codes can I encounter on Xbox?
Twitch app error code 995f9a12 – This one a common problem it it seems like in most cases it appears after making some changes like replacing the display name or deactivating the twitch account.
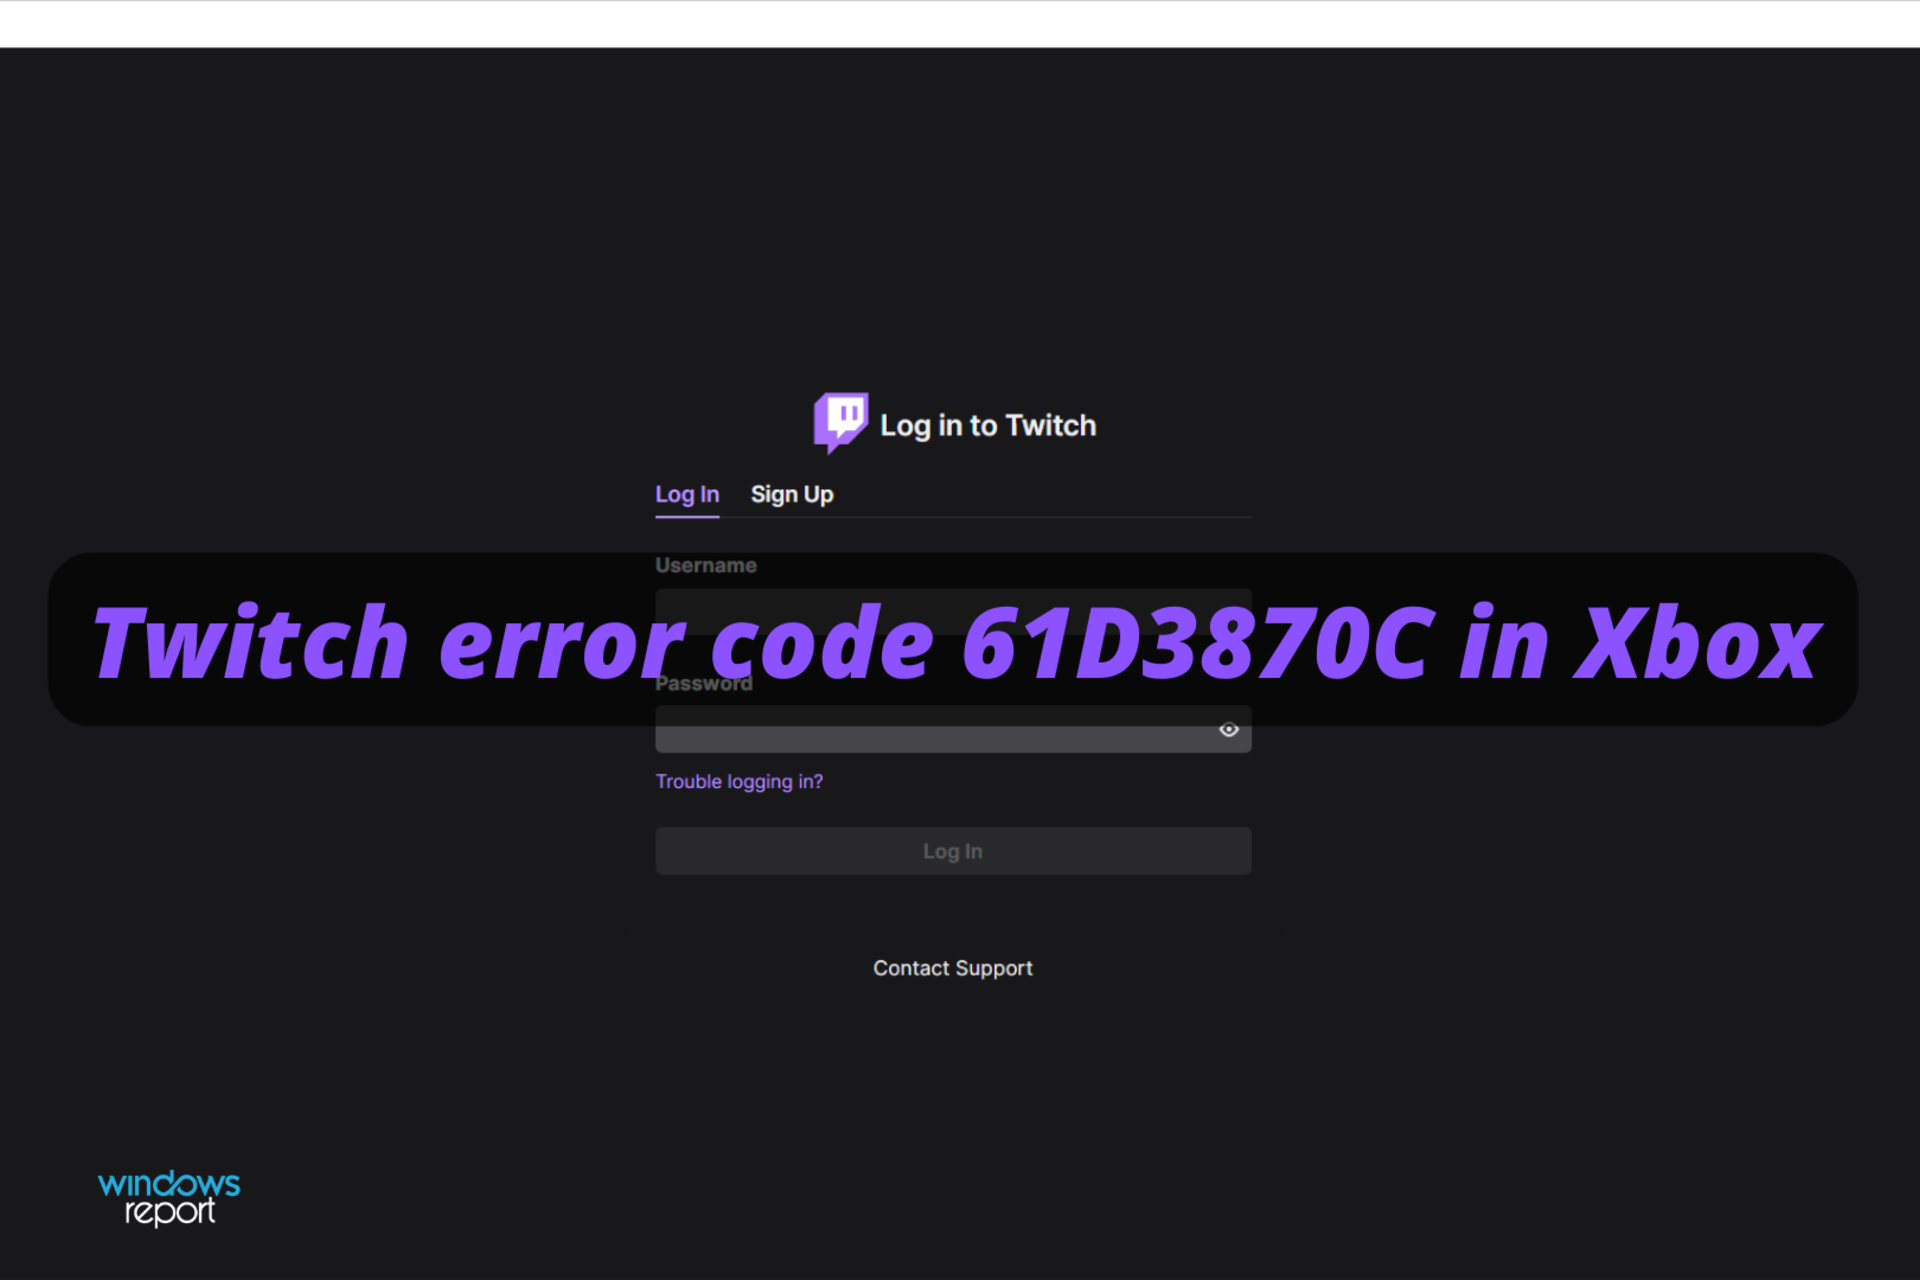
Twitch error code 61d3870c in Xbox – If you’ll ever face this one, you have to know that you’ll get the following message: SOMETHING WENT WRONG. We’re so sorry; something unexpected happened. 61D3870C.
We hope that our guide helped you to fix the Twitch broadcasting issue on your Xbox One. If you liked this article, leave a comment in the comment section below.
Great news from Microsoft today, as SwiftKey has just received another update on both Android and iOS, one that brings some exciting new features to the table.
One of the features that were highly requested and have now hit live, allows Android users to search emoji using as many as 139 languages in the SwiftKey keyboard app, including Persian, Romanian, Thai, and Turkish.
Also, after installing this latest update, SwiftKey users on Android can type in Awadhi, East Frisian, Garhwali, Hmar, and Saraiki.
New multi lingual features added to SwiftKey
Besides the features we already described at the beginning of the article, Microsoft also added Intelligent Nudge, which automatically detects a task and asks users whether they want to add it to Microsoft To Do.
For Android users, this SwiftKey update brings the build to 7.9.6.8, and adds the following, according to the official release notes:
Emoji search is now available to 139 languages including Persian, Polish, Romanian, Thai and Turkish. View the full list here: https://aka.ms/sk-android-emoji-search
You can now type in Awadhi, East Frisian, Garhwali, Hmar and Saraiki.
We’ve added the Intelligent Nudge, which automatically detects a task and prompts users to add it to To Do.
Therefore, the new interface is a lot more user-friendly and offers a wide variety of dialects to choose from, so keep that in mind next time you use it.
What about iOS users?
You’ll be pleased to know that iOS users weren’t left out and they also received an update for their version of Microsoft’s SwiftKey.
This latest update takes the version of the app to 2.9.2 and includes no other new features except for the ability to search emoji in many new languages. The full official changelog is given below.
Emoji search is now available for most languages in SwiftKey Toolbar to find your emoji easier!
Either way, there are new features to enjoy and explore, in many different languages. Excited about the new SwiftKey changes? Share your thoughts with us in the comments section below.
Some users reported that the Twitch app gives the error code 995f9a12 on Xbox One and it seems to be pretty annoying. If you’re also facing it, make sure you verify this guide completely.
The Xbox Twitch app allows you to stream contents live from your console to your Twitch viewers.
However, some users reported encountering the Twitch app error code 995f9a12 on Xbox One. It seems to be pretty common, and this is how people describe it:
Been streaming on xbox one with the Twitch app and alls been good. Recently changed my display name, and now on the xbox app i get this message when trying to broadcast: “something went wrong. We’re so sorry; something unexpected happened. 995F9A12”
If you are also troubled by this error, here are a couple of troubleshooting tips to help you fix the Twitch app on Xbox one gives error code 995f9a12.
When does the Twitch app error code 995f9a12 appear on Xbox?
It seems like this issue occurs after making some changes like replacing the display name or deactivating the twitch account.
However, there might be some other reasons that explain it, such as a server or app-related problems or temporary bugs.
To discover the best options to get rid of this error, make sure you keep on reading.
How can I fix the Twitch app error code 995f9a12 on Xbox?
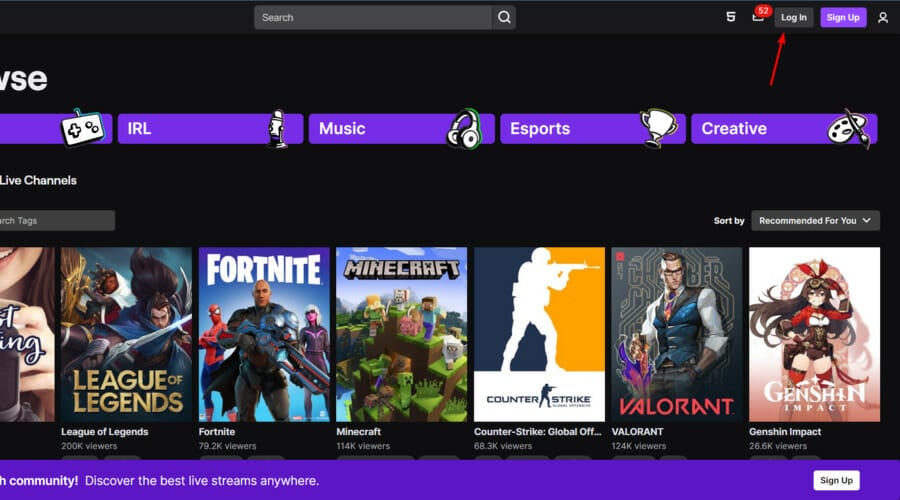
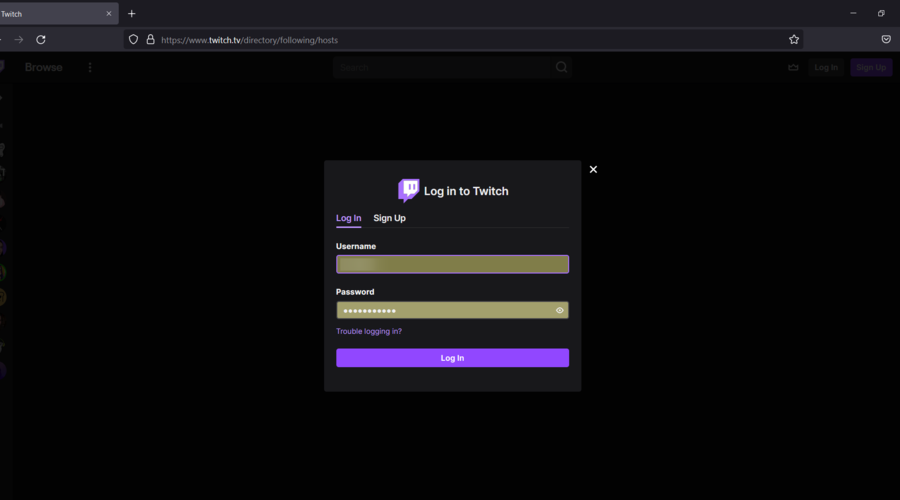
If you’re not logged in, click on the Log in button, from the upper-right corner of the window.
Now, enter you Twitch credentials, then click on Log in.
Click on your profile image.
Navigate to Settings.
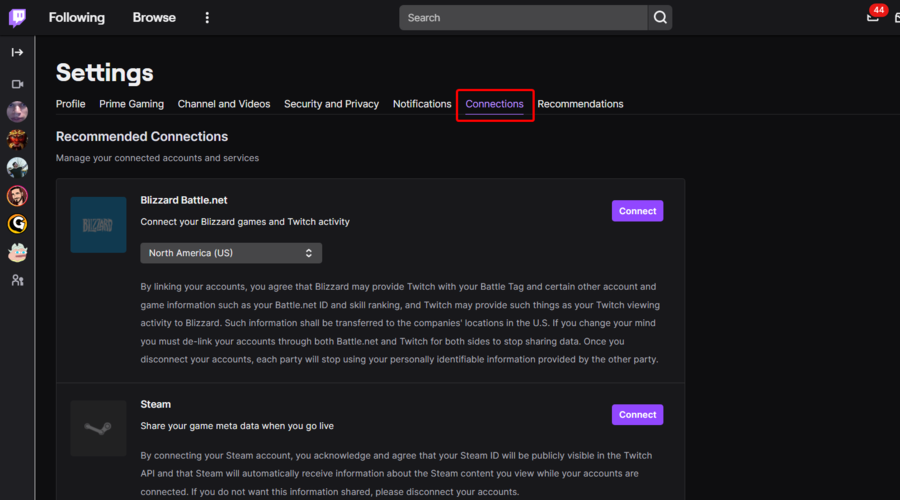
Open the Connections tab.
Find Xbox and click on Remove/Unlink.
On your Xbox, launch the Twitch app and click on Sign in.
You will get a 6 digit sign-in code. Enter it and login.
Now you should be able to login to your Xbox Twitch app without any error.
This is the most recommended fix for the Twitch app error code 995f9a12 as it proved to be extremely efficient in several worldwide cases.
2. Reset Xbox Alternate MAC Address
Press the Xbox button on your Controller.
Go to System tab, then select Settings.
From the left window pane, navigate to Network.
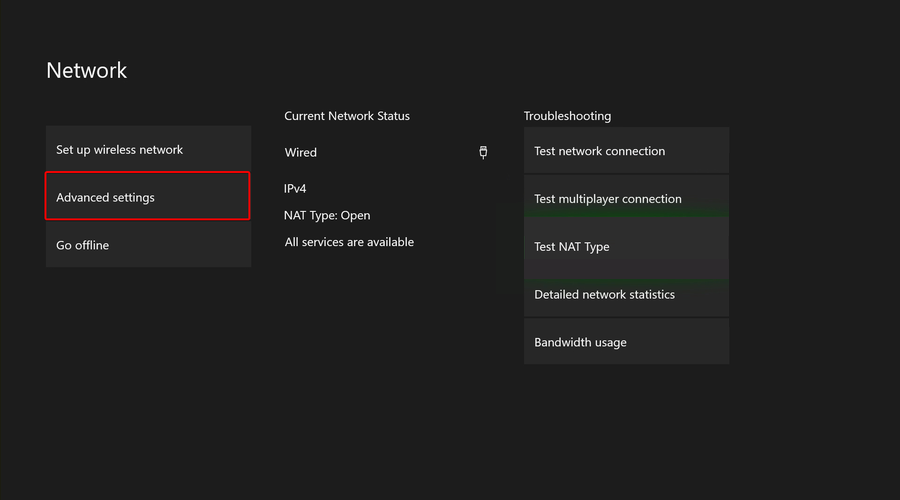
Select Network Settings.
Now select Advanced Settings.
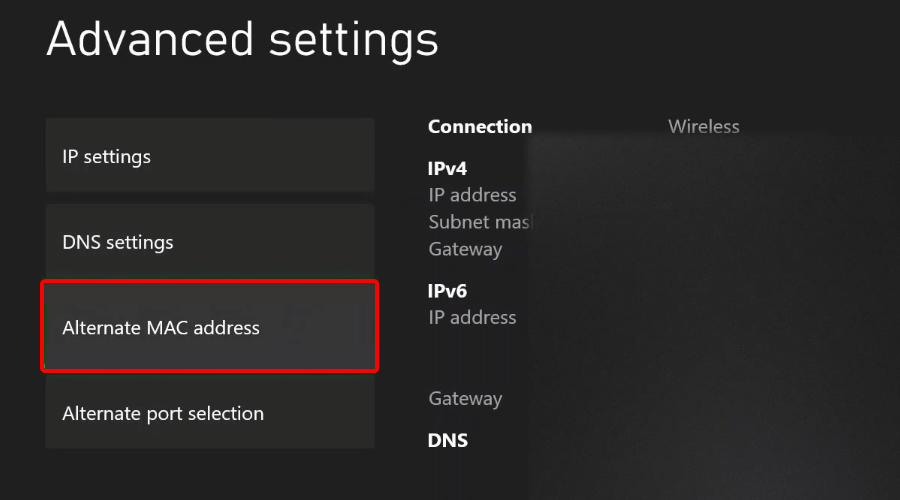
Click on Alternate MAC Address.
Select the Clear button.
Click on Restart to restart the Xbox console and check for any improvements.
If you had used alternate MAC address to deal with network issues in the past, it can create issues in the future as well. Resetting the alternative MAC Address can help you resolve this Twitch error.
3. Leave a Comment on Live Stream
As strange as it may sound, users have reported that trying to leave a comment on Live stream has helped them resolve the error.
So, access any random live stream from your Xbox Console and try to leave a comment. If you get an error code, try again a few more times.
Now go back to the Home screen of Twitch app and check if you can sign in again and if the Twitch Xbox one error code 995f9a12 is resolved.
If you’re not logged in, click on the Log in button, from the upper-right corner of the window.
Now, enter you Twitch credentials, then click on Log in.
Click on your profile image.
Navigate to Settings.
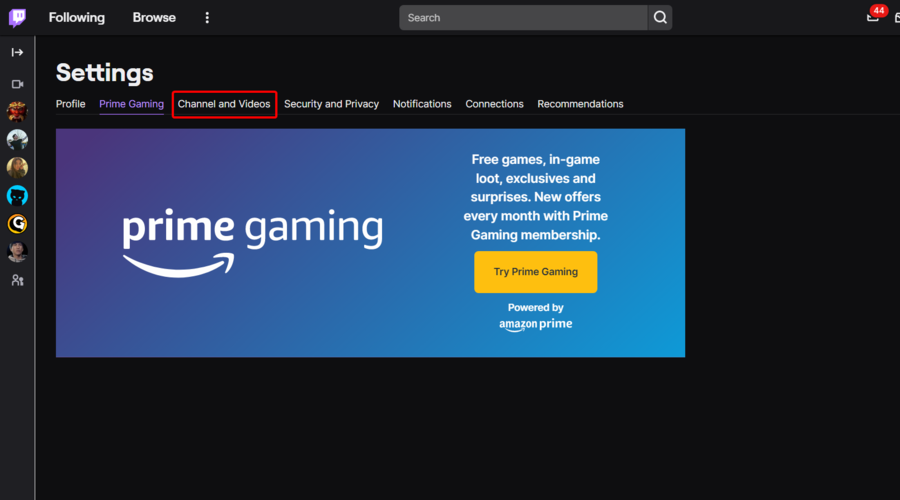
Click on the Channel and Videos tab.
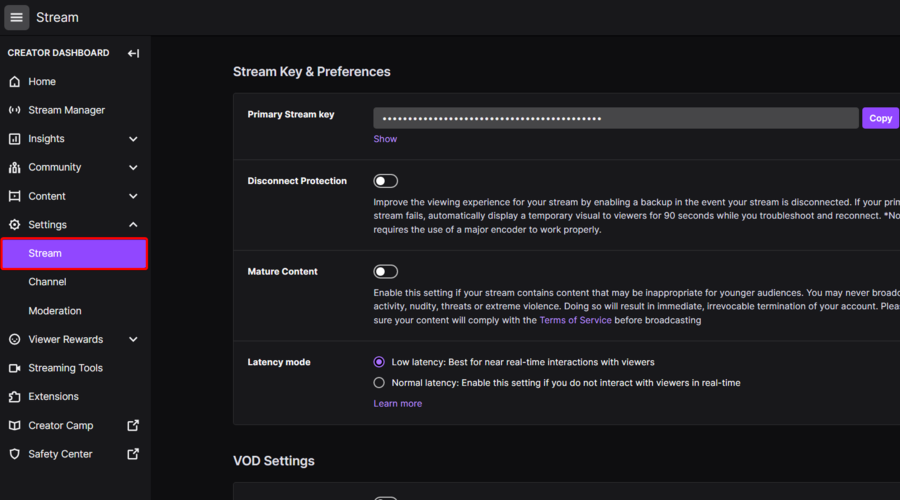
From the left window pane, navigate to Stream.
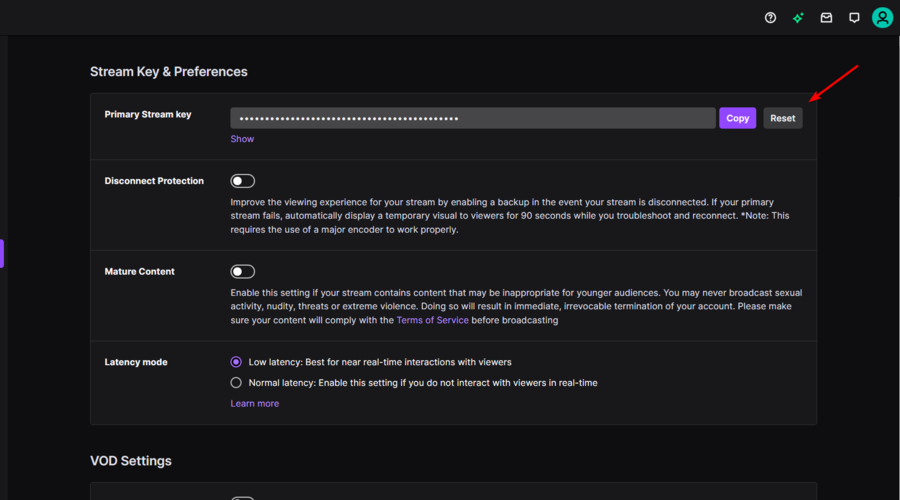
Now, from the right window pane, look at the Primary Stream key section, then click on the Reset button.
Wait for a few minutes for the key to reset.
Now go back to the Xbox and launch the Twitch app. Try to sign and check if the issue is resolved.
If the issue persists, try to uninstall and reinstall the Twitch Xbox app. This should resolve any issues occurring due to app file corruption.
What other Twitch error codes can I encounter when using Xbox?
Unfortunately, our presented problem is not the only one that might appear while running Twitch. Because it is always important to prevent or quickly fix such errors, make sure you check the following list:
Twitch error 0x20b31181 on Xbox – This one will notified you by broadcasting restrictions. In these terms, keep in mind that you must be an adult to broadcast using Xbox One.
Twitch error code 61d3870c in Xbox – If you’ll ever face this issue, you’ll get a message that says SOMETHING WENT WRONG. We’re so sorry; something unexpected happened. 61D3870C.
So, these are the best solutions to try if the Twitch app gives error code 995f9a12 on Xbox One.
Because your opinion is important to us, feel free to let us know which one worked the best for you, by leaving a comment in the section below.
Using a VPN is the best way to ensure that your online activities aren’t monitored. As you most likely know, your traffic is routed through an encrypted tunnel to a server fully controlled by the VPN provider.
Since the traffic is exiting the VPN server, your computer shows up as having the IP address of the said server, masking your location and keeping you safe from prying eyes and snooping Wi-Fi hotspots.
Moreover, a powerful VPN can help you enjoy streaming media or bypass geographic restrictions on your favorite website.
If you want to make the best choice, don’t hesitate to take a closer look at NordVPN. You’ve come to the right place for that.
What is NordVPN?
Developed by Tefincom & Co., S.A., NordVPN is a feature-rich VPN provider that offers a robust collection of advanced client-side features, a slick interface, and unmatched security and encryption.
Transparency and innovation are both essential concepts when it comes to NordVPN. This VPN service excels at helping the VPN industry follow its course and mature robustly through expert knowledge while serving over 14 million users worldwide.
That’s possible thanks to a network of 5500 servers in no less than 59 countries, and the numbers are growing.
The server list has recently expanded, and that’s good news for a VPN’s speed as long as more servers lead to less crowding.
As for the wide variety of locations, this works in your favor as well. There’s simply a higher chance you’ll find one nearby.
How to use NordVPN?
There are various ways to connect to a NordVPN server. In fact, you can always do so with just a couple of clicks:
Make a choice by using the map
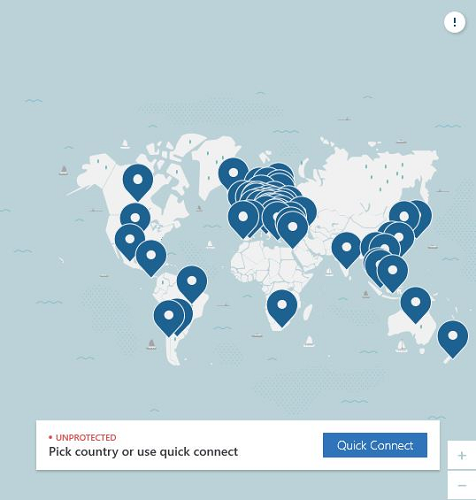
The quickest way to connect to a server is by using the map with all locations marked. All these countries include NordVPN servers, so make a choice right away by clicking on a location.
If necessary, move the map around by dragging it with your mouse button.
2. Pick a server from the list of countries
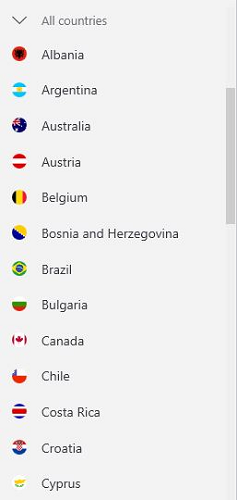
If using the map isn’t your cup of tea, don’t hesitate to click on Countries in the top-left part of the interface.
You may now choose the desired country by simply clicking on its respective entry.
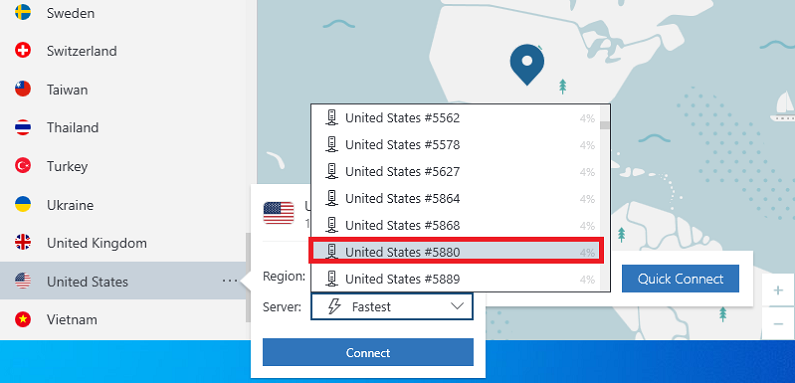
3. Select a server within the desired country
You can use also use the attributes of a country of your choice as a filtered measure. They provide you with the following information: Region and Server.
4. Auto-connect on Wi-Fi
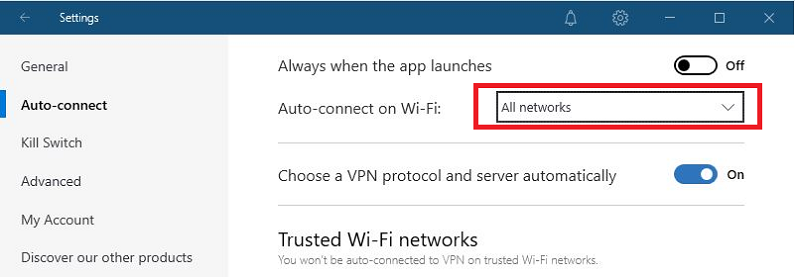
In order to go one step further and skip the hassle of manually deciding on a country or a specific server, click Settings in the upper-left part of the app.
You simply need to look for the Auto-connect on Wi-Fi option and toggle the switch On.
5. Obfuscated servers (OpenVPN)
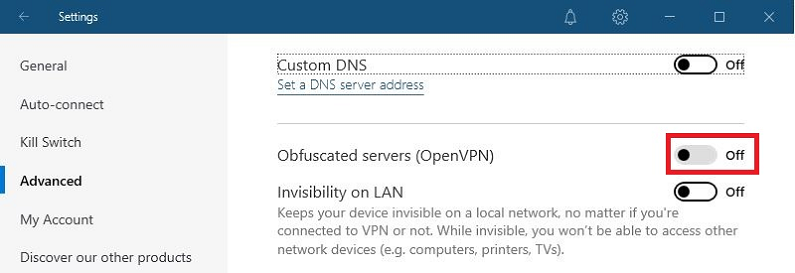
NordVPN’s obfuscated servers use special algorithms to appear that you perform regular Internet browsing activities with no VPN involved.
They are ideal for countries with restricted access, so feel free to go to Settings and locate the Obfuscated servers option.
Turn it on and click the On button in the upper part of the window to connect to an obfuscated NordVPN server.
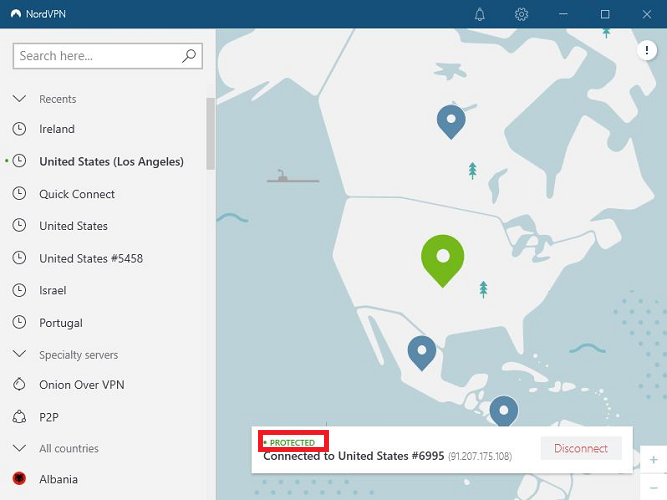
After successfully connecting to a server, the bar at the top of the page should say that your status is Protected.
At this point, your IP address cannot be tracked back to your identity and actual location. However, do note that your connection safety depends on the password you use.
As with all other online accounts, using a strong, unique password is extremely important.
How fast is NordVPN?
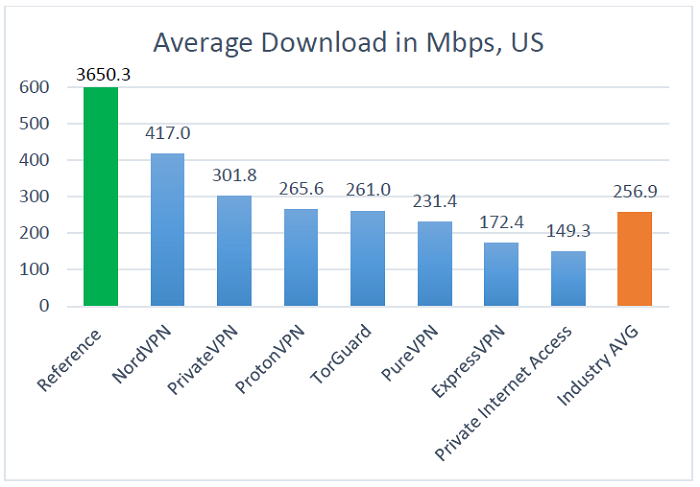
Let’s continue with the obvious question: is NordVPN fast? In September 2020, AV-TEST performed a thorough investigation of some popular VPN solutions, and we’d like to tell you more about their results.
The chart representing the measured download performances in the US reveals that NordVPN is above the rest of the products, outperforming the second-placed VPN by over a quarter of the download speed.
The average download speed in Mbps in the US for local VPN connections compared to the unencrypted connection and industry average
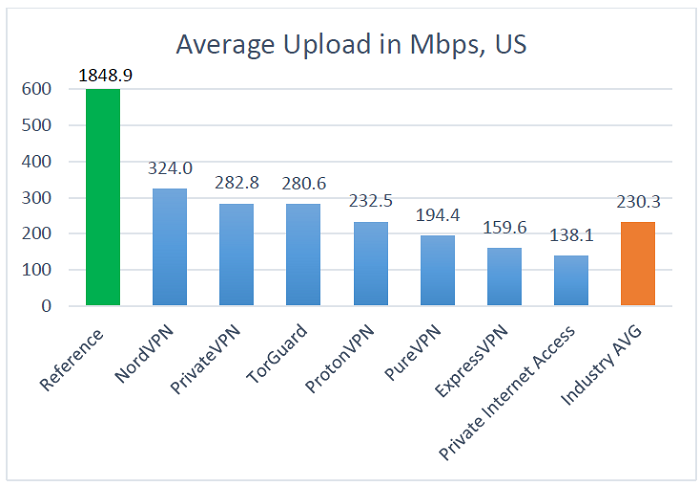
Regarding the average US upload speed, NordVPN is again leading with approx. 320 Mbps, showing that NordVPN indeed provides the fastest VPN product in the market.
The average upload speed in Mbps in the US for local VPN connections compared to the unencrypted connection and industry average
That’s possible thanks to the WireGuard-based protocol NordLynx, a technology that delivers incredibly fast downloads and near-instant connection times without compromising your privacy.
All these make NordVPN the ideal choice for Netflix watchers worldwide. Just make sure to use the servers closest to your current location, and you’ll also find this VPN’s speeds both consistent and reliable.
Therefore, yes, NordVPN is fast and recommended for streaming, torrenting, as well as normal browsing.
Is NordVPN safe?
You need to know from the start that NordVPN is a no-log service, therefore it will never track or share your private information when you’re connected to one of the VPN’s servers.
NordVPN takes the no-logs policy extremely seriously. They recently had PWC Switzerland audit them, and it turned into a new validation that this service never puts users at risk.
At the moment, NordVPN utilizes the following VPN protocols:
OpenVPN – that’s a popular and extremely versatile protocol that can be used on both TCP and UDP ports; since it’s open-source, its code has been scrutinized for vulnerabilities
IKEv2/IPsec – all users’ details are kept protected since this protocol employs strong cryptographic algorithms and keys
WireGuard/NordLynx – that’s the latest protocol in the VPN industry; it’s free, open-source, and surprisingly fast
Moreover, NordVPN uses AES with 256-bit keys recommended by the NSA for securing classified data. So, NordVPN isn’t just our recommendation as the most reliable and modern VPN service, but we also rank it as being one that takes your privacy seriously.
After the passage of a new national security law affecting Hong Kong, let us remind you that countless VPNs announced their intention to remove their server presence from the city.
This wasn’t the case with NordVPN. Once again, the company addressed the problem with the utmost responsibility.
All NordVPN servers are either diskless or encrypted, so the users’ privacy is guaranteed even in the event of an unfortunate physical takeover.
No less important, to increase security, NordVPN has started running its first collocated servers, which are owned and maintained exclusively by NordVPN.
These servers from Finland are just a glimpse of what’s to come. This practice of housing privately-owned servers will continue, and more of NordVPN’s servers will be under their ownership by the end of 2020.
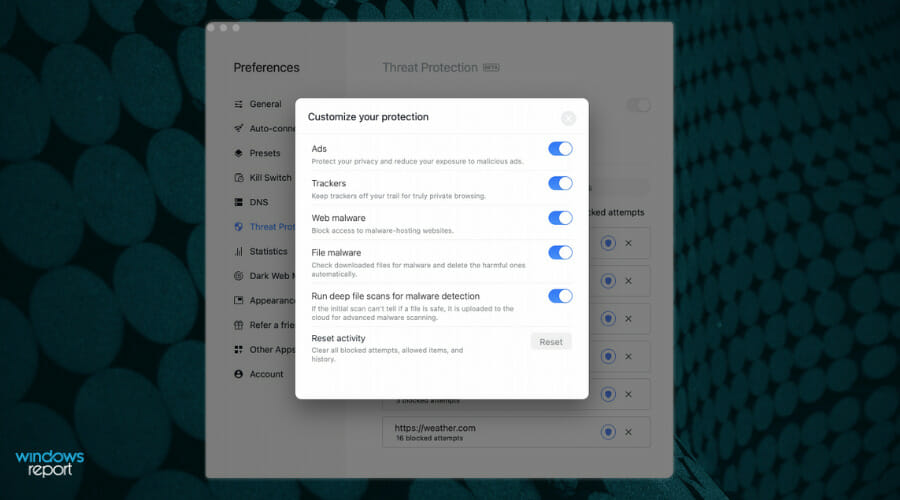
One key feature of NordVPN is Threat Protection, which you can enable from the program’s Settings menu.
While it is optional, do consider that this feature is an advanced technology solution that can play a huge role in ensuring secure access to the network.
Threat Protection can keep you safe from cyber threats since it compares websites you’re browsing with known blacklists and will block your access if a threat is already confirmed.
Even more, your device won’t participate in DDoS attacks, even if malware has already begun to infect it. More precisely, it will eliminate connection and communication between the device you use and the control server of the botnet.
Finally, this feature is your chance to forget all about the annoying pop-ups and targeted ads that invade your screen.
Is NordVPN worth the price?
Users worldwide take advantage of the well-distributed NordVPN server fleet, strong privacy policy, and countless intuitive features. Chances are you look for these as well.
There are desktop applications for Windows, mac OS, and Linux waiting for you in French, German, and Spanish, along with mobile apps for Android and iOS.
NordVPN also provides customer support assistance – in German and French – to answer all your questions regarding general information about the included features, billing, and connectivity.
A single subscription lets you use six devices simultaneously, including your smart TV and router, making it a good value for a household with many members and personal devices.
And if you’re disappointed with the service or if it simply doesn’t work for you, do keep in mind that you have up to 30 days to get your money back. That’s why NordVPN is a great choice.
NordVPN
Staying safe from snooping Wi-Fi hotspots has never been easier. Claim the best NordVPN offer now!
That’s what NordVPN is all about – a service with the fastest speeds and strong security; a chance to enjoy a newer, better VPN experience. Are you ready for the change as well?
The Xbox 360 was home to a wealth of great games, many of which have gone on to become classics. The names Bioshock, Skyrim, and Red Dead Redemption are some of the ones that most readily come to mind when someone brings up the 360 (though none of these were exclusive to the system).
But there were so many other great games for Microsoft’s seventh generation effort that never really got the limelight they deserved, as so often happens in this hyper-saturated era of gaming in which it can be so hard for games to stand out. In all console generations it is inevitable that some more-than-worthy titles will fall by the wayside for one reason or another – whether it be a lack of/bad marketing, bad timing, or in some cases a game may just be ahead of its time.
Here we are going to have a look at some of the more underrated games that called the Xbox 360 home.
A sequel to American McGee’s Alice (American McGee is the name of a video game designer, in case you are wondering. Coincidentally, he is American) this game flew under the radar when it was released. It was an independently-developed action-adventure platform game with a serious dark side that explores the darkest recesses of protagonist Alice’s psyche. Despite not really taking full advantage of the 360’s capabilities, the game features some pretty impressive graphical artistry, especially in some of the “trippier” environments. In all it was a very solid game that never really got its due, though it does have a cult following these days that still yearns for an Alice 3.
(Backwards Compatible with Xbox One and Series X/S)
This was Final Fantasy creator Hironobu Sakaguchi’s first effort with his own Mistwalker Studios after leaving Square Enix. The game, an impressive jrpg with a design and mechanics traditional of that genre, was published by Microsoft Game Studios. It was much more than just a bone to throw jrpg-starved Xbox fans, however, with a deep storyline and dynamic characters, all of it complimented by some gorgeous visuals. While the sun had already set on the genre’s golden age by the time Lost Odyssey released, it remains a very worthwhile play for lovers of the Japanese style roleplaying experience.
All the games described here are playable on Series X/S in one fashion or another.
(Not backwards compatible. Available on Xbox One, Series X/S)
Child of Light was a highly acclaimed side scrolling action rpg with semi turn-based combat and jaw-dropping, hand painted watercolor graphics. Designed to be “a playable poem” in the words of the lead designer, the game’s character dialogue is in the form of lyrics. This along with the classic narrative of a heroic quest give the game an unmistakably storybook feel and aesthetic. It all made for quite a unique take on the genre at the time, and one that is still well worth playing today.
This game was inspired by the Chinese literary classic Journey to the West, though you would scarcely guess that judging from the game’s post-apocalyptical setting. Originally intended to be a CGI film, the action adventure title released in 2010 to general critical acclaim and commercial failure. It has since gone on to garner a cult following and is known today as one of the seventh generations’ biggest hidden gems, noted for its overall solid gameplay, gorgeous settings and visual design, and memorable story with cinematologist-guided scriptwriting.
So there are just a couple of the most underplayed Xbox 360 games. But really, there were so many more that are still worth discovering today. It was a great console generation overall, and the 360 especially earned a place in gaming memory with a slew of great games. Do yourself a favor and check some of them out sometime.
It’s possible that you’ll sense something or, more likely, hear something when you’re playing games on your computer or running a resource-intensive application like a virtual machine or a video editor. You may notice that the fans on your computer are spinning wildly, and this is very normal.
This is simply the way in which PCs respond to fluctuations in temperature. The fans assist in controlling the flow of air through the computer, which helps to prevent the graphics card and processor from overheating, which in turn aids to prevent performance throttling.
When you play games or watch videos, the GPU’s temperature will rise. It’s nothing to be concerned about because that’s exactly what the system is intended to do. If you notice that the temperature levels are higher than they generally are in other games, check your computer’s vents and fans.
Reduced graphical settings in games can also help to keep the thermal conditions under control, and may even result in a slight increase in frame rate. Follow along to learn how to check your GPU’s temperature and monitor it more closely, but first let’s see what the perfect temperature should be.
What is the optimal temperature for GPU?
We sometimes lose sight of how critical it is to keep our core hardware operating at optimal temperatures from time to time. It has the potential to assist your system in a variety of ways, ranging from improved performance to a longer operating life span.
Having said that, keeping your gear cool isn’t always straightforward – especially when you add in scenarios such as gaming and rising ambient temperatures, among other things.
As most people are well aware, gaming places a significant amount of additional strain on your computer’s components, particularly the CPU and graphics card. The majority of the time, this stress is converted directly into heat.
When gaming, your hardware must run at a faster rate in order to maintain the required performance levels for the game. As a result, your components naturally become significantly hotter.
It makes no difference whether you’re using an AMD or an Intel processor; the temperature threshold for each processor is significantly different. For gaming purposes nowadays, the recommended CPU temperature is 176°F (80°C), with an average temperature of 167°-176°F (75°-80°C).
CPUs, on the other hand, have the potential to become a little hotter in certain circumstances. Long gaming sessions, as well as overclocking, will result in somewhat higher average temperatures on average.
The normal GPU temperature range is between 65 and 85 degrees Celsius (149 and 185 degrees Fahrenheit). If its temperature exceeds the maximum value, for example, if it is around 100°C, you can attempt lowering the sustainable heat levels in accordance with the current temperature.
However, this will only work if you know what the current GPU temperature is. Overheating of the card can result in major hardware damage, so it is always advisable to keep an eye on the temperature when using it.
How can I check GPU’s temperature in Windows 11?
Use Task Manager
Press the CTRL + ALT + DELETE buttons on your keyboard simultaneously, then click on Task Manager to open it.
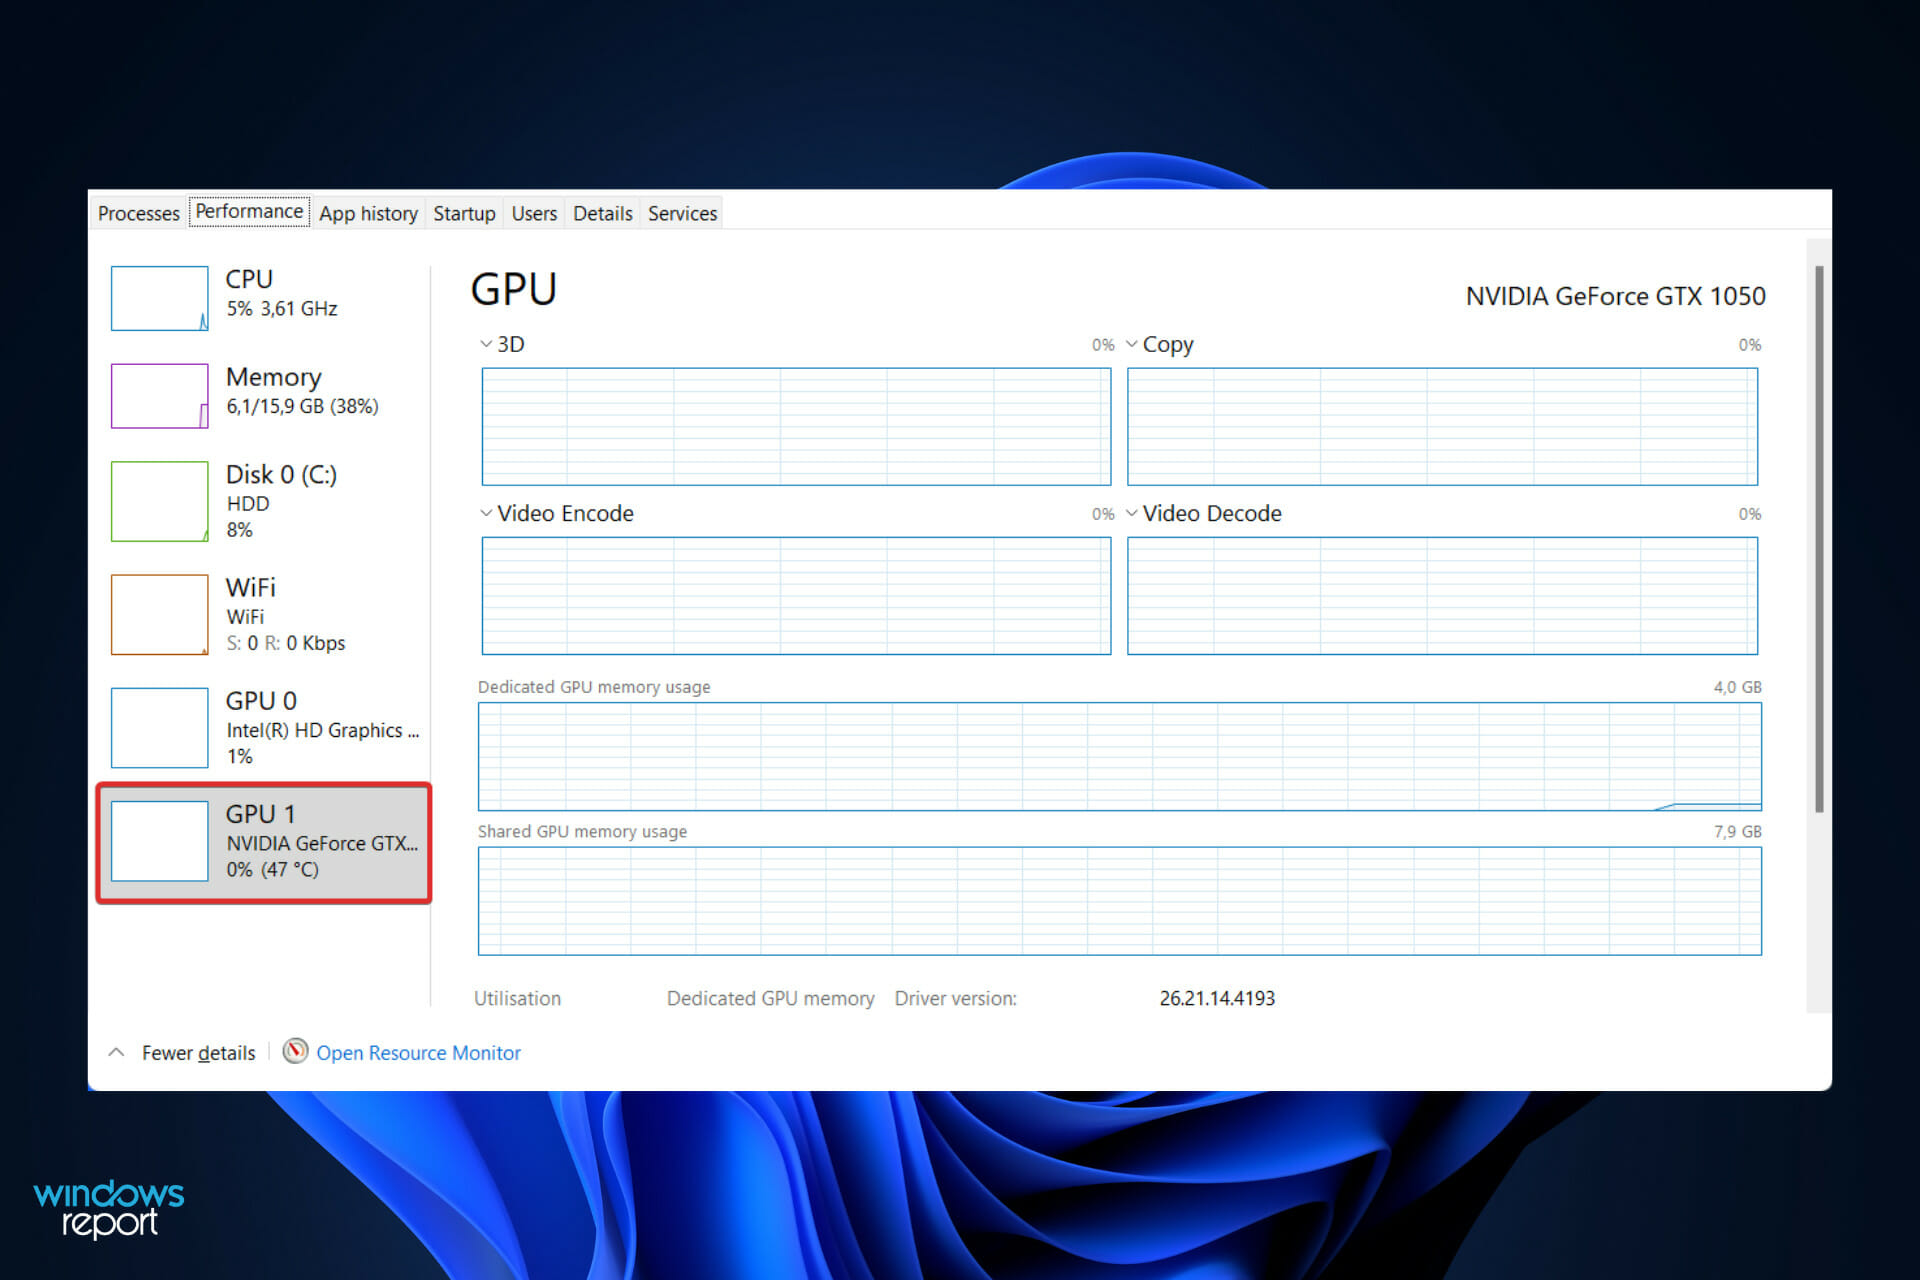
Now, navigate to the Performance tab and scroll down until you see the GPU panel in the left side. Under it you will be able to see its current temperature, also if you click on it, more details will be shown on the right.
For a full description of your system’s information including the temperatures of both your CPU and GPU, we recommend that you use a specialized tool such as Aida64’s products.
Which type of air-cooling should I use?
When it comes to gaming, it is nearly always preferable to purchase an aftermarket GPU with an open-air cooling architecture. In addition to ensuring lower temperatures throughout the board, this will physically boost the performance and lifespan of your gear.
Not to mention that they have a more attractive aesthetic appearance. If your case does not have the best airflow, we still prefer this design over a blower-style fan design because it is quieter.
A GPU with a completely new cooling architecture, on the other hand, is a significantly more expensive approach to accomplishing the same goal. In addition to providing cooler temperatures, open-air cooling will also provide a more peaceful overall experience.
Alternatively, if you want to perform a large number of CPU-intensive tasks (which will generate excessive heat), you can always get a blower fan GPU to exhaust some of the surplus heat out the back of your PC. With this type of cooling, you will notice a minor reduction in interior temperatures.
It’s also possible that a blower-style fan would be more appropriate for a smaller form factor PC construction. They are significantly smaller than open-air systems and will not smother the rest of your equipment. All contemporary graphics cards are equipped with intelligent fans.
These fans are typically turned off until the temperature reaches 86°F to 104°F (30°C to 40°C) or higher. This is the moment at which they will begin to operate at a predetermined speed (found in the preset profile). When the system is cool, this has a significant impact on noise output and power consumption.
And lastly, since you got the hang of checking your GPU’s temperature, you will definitely want to learn how to check your CPU’s temperature next. Don’t miss it out!
Let us know in the comments section below whether the article was helpful for you. Thanks for reading!
For a while now, Microsoft has been trying to create an enabling environment that complements the hybrid workplace. They had earlier shared their vision and highlighted the direction they wanted Teams to take, in an attempt to help clients transition to a new normal.
It now seems that they may be on the verge of achieving their goals, as one of the key updates, Front Row, is starting to roll out. It provides both single and dual display modes. The announcement was made on February 1. but the feature is rolling out now. They further highlighted that the feature will seamlessly enhance the meeting experience between in-the-room meeting users with those joining it virtually. (Via ZDNet)
The video gallery has been moved to the bottom of the screen, the change is set to enhance the meeting experience for attendees joining virtually, ultimately providing a more life-like experience.
According to a post on LinkedIn, the feature is a brainchild to both the Microsoft Global Workplace Service IT team and the Microsoft Teams product team. The post goes further to indicate that users do not need to have access to special peripherals to use the feature.
Moreover, Microsoft is still working on more features such as the segmented video layout. Front row is already available on Microsoft Teams, therefore, users are encouraged to download the app to fully explore the Front Row feature during work meetings.
Twitch is probably the world’s most popular video live streaming service. Used mostly for gamers, this platform has been a popular place for gamers to gather around and post tutorials, walkthroughs, and various gameplay videos.
Those of you familiar with Twitch is probably also aware of the platform’s way of handling donations.
Well, Twitch introduced a new element called gift cards that are designed to make great gifts for moderators, emote artists, and friends in chat.
What are Twitch gift cards and why would I use them?
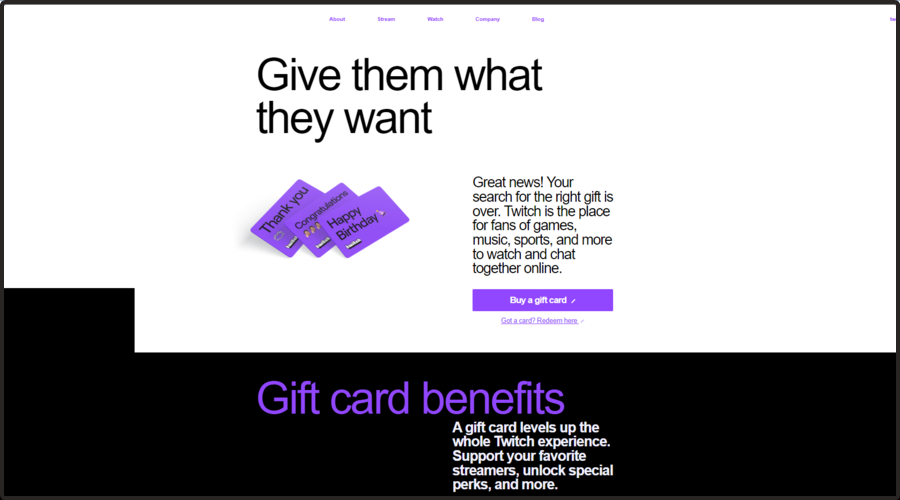
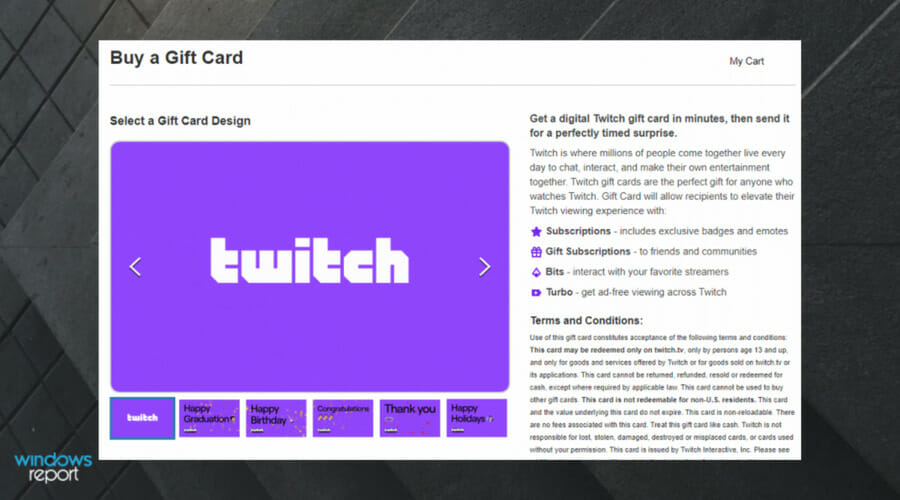
Digital gift cards are available online from the Twitch official website and are come in a range of different designs. They can be themed around events like birthdays, graduations, and more.
The guide below will show you exactly how you can buy and use one, and it is structured to be as easy to understand as possible.
Gift cards can be convenient and useful when you need to make purchases or want to give a gift to someone else.
How do I buy and use a Twitch gift cards?
First of all, make sure you already have an active Twitch account
If you don’t, create one before proceeding (if you don’t know how to do it, take a look at the end of this article).
Go to the Twitch gift card page to start browsing for the gift card you are interested in.
Select the card design.
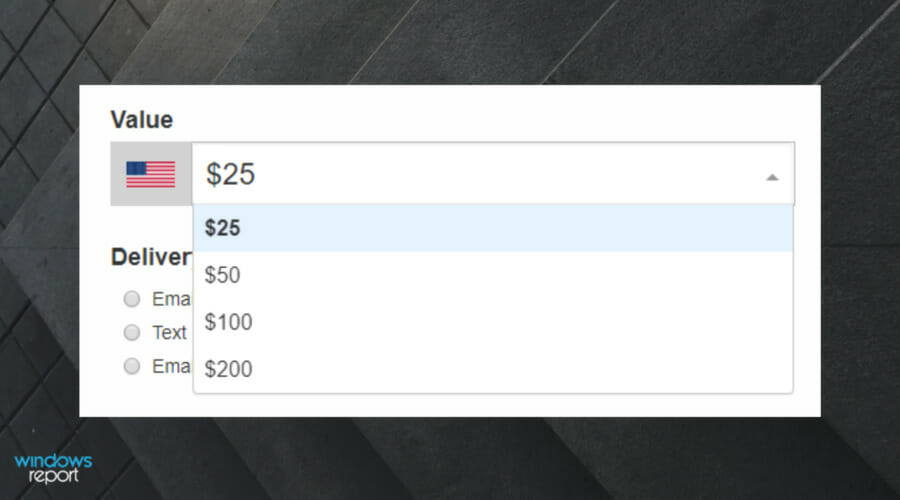
Select the value of the card:
Currently, the digital cards can be bought in $25, $50, $100, and $200 values
They can be redeemed and used for Bits, subs, and gift subs
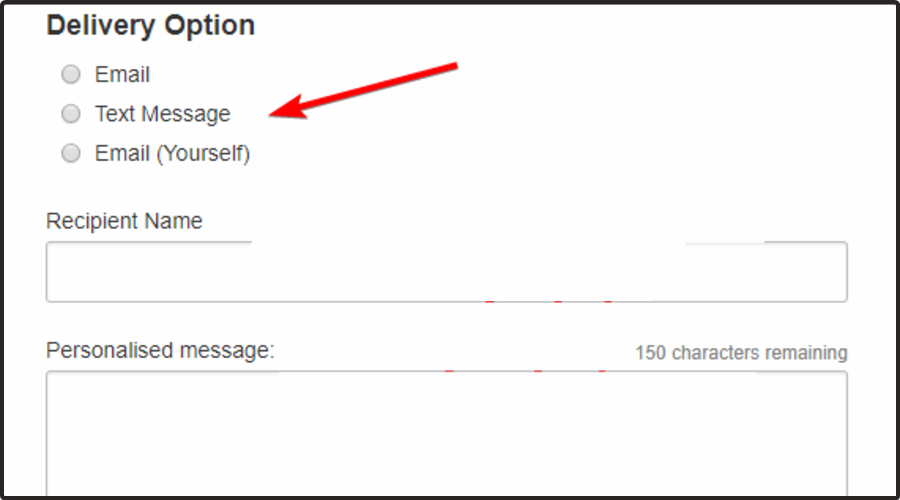
Choose a Delivery Option.
Next, you will need to input the following information:
The recipient’s name
A personalized message
A sender name
The send date
Click Add to Cart. Presuming that you have enough money on your Twitch account, the transaction should now be finished.
By following these steps you should now be able to acquire a Twitch gift card and send it to someone.
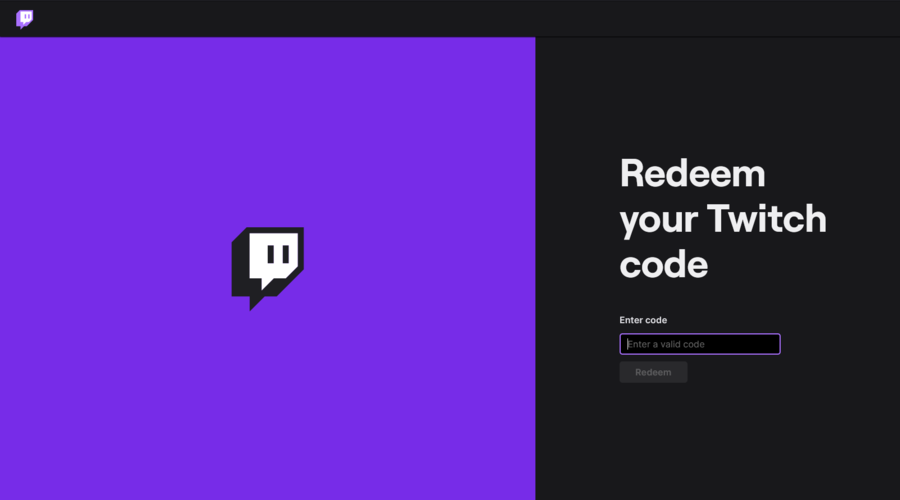
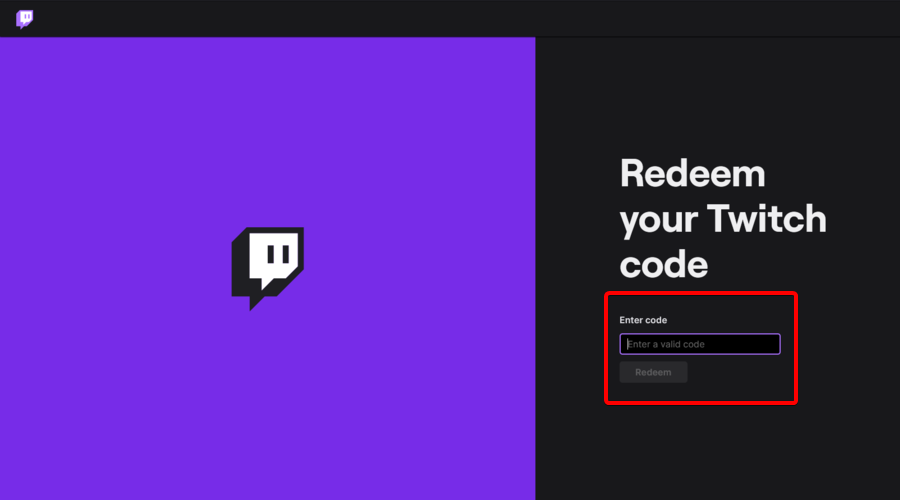
Type the code of your gift card right under Enter code.
Click on Redeem.
NOTE
To redeem a Twitch gift card, the recipient will need to be living in the US and will need to have a Twitch account.
Remember that once you redeem a card, you cannot use it anymore, and the full amount on the card is transferred to the recipient’s gift card balance in their Twitch Wallet.
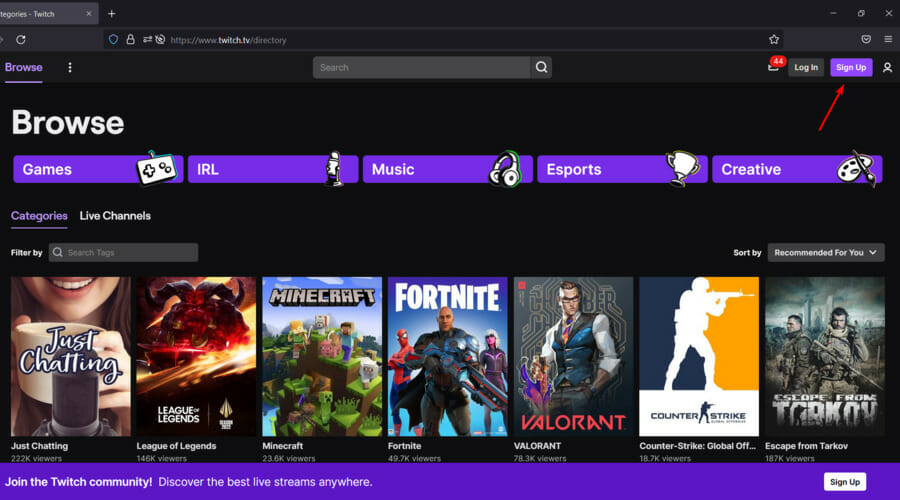
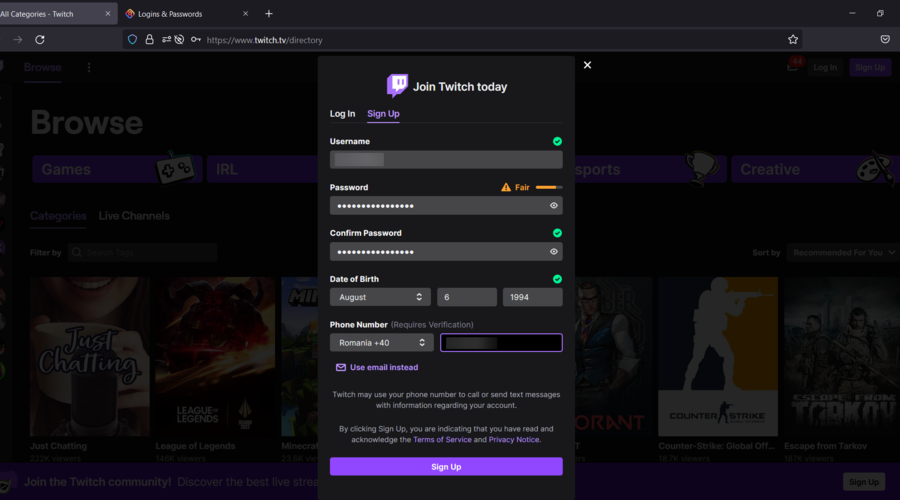
In the upper-right corner of the page, choose to Sign Up.
Now, enter the needed information, then click on Sign Up.
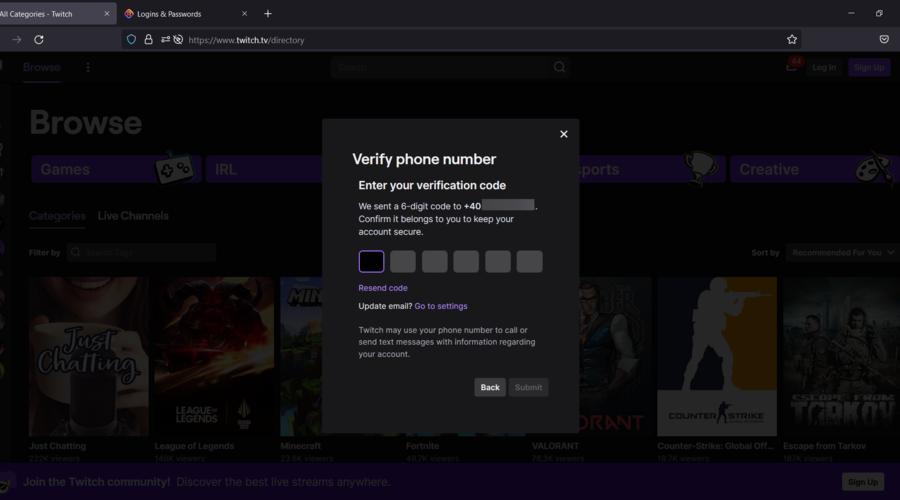
You’ll receive a code on your phone. Enter it in the gaps shown below.
Once it’s all set, click on Done.
Now, you have a Twitch account!
As mentioned before, to be able to buy a Twitch gift card, it is necessary to have already created an account. If you don’t know how to do it, make sure you follow the steps below.
By following the steps above, you should be able to now redeem any Twitch gift card that you receive.
Have you tried sending a Twitch gift card so far? Let us know what you think about this new feature by leaving us a message in the comments section below.
Twitch is one of the most popular video streaming platforms and the main tool for video game streamers.
While it works fine most of the time, you might sometimes encounter the Twitch error code 5000. As many users claimed this issue, it isn’t uncommon.
This error appears as a message notification while streaming, and it says the following:
5000: Content not available
If you are also troubled by this annoying problem, here are a couple of troubleshooting tips to help you resolve the issue.
Why does the Twitch error code 5000 appear in Chrome?
Before finding what are the best options to fix it, let’s see why the Twitch error code 500 can occur on your Chrome screen.
Cookies and Cache – For those of you who didn’t know, browsers like Chrome save some information from websites in its cache and cookies. In order to prevent any troubles, it is recommended to constantly clear them.
Extensions compatibility – Because the Twitch error code 5000 might occur due to a third-party extension conflict in Chrome, we suggest checking the compatibility.
DNS servers – It is important to flush a DNS cache for several reasons. The most common ones it that the cache may contain outdated information. So, even if you clear your browser history, the DNS cache will still have the old information.
What can I do to fix the Twitch error code 5000?
1. Clear Cookies and Cache
Press on the Windows key, type Chrome, then open the first result.
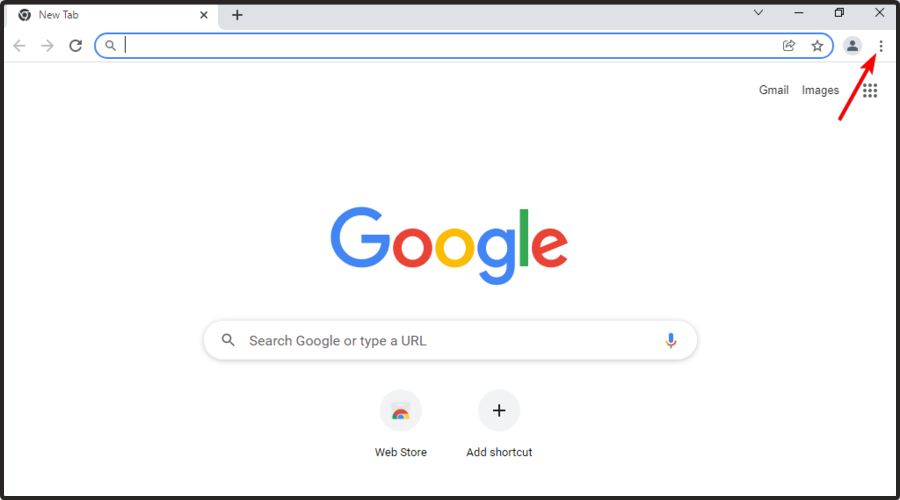
From the upper-right corner of the window, click on the 3-dots menu.
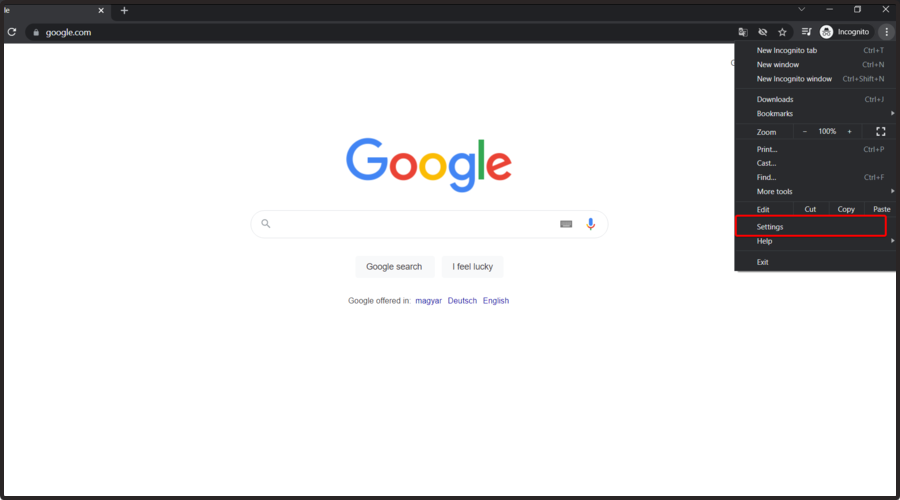
Navigate to Settings.
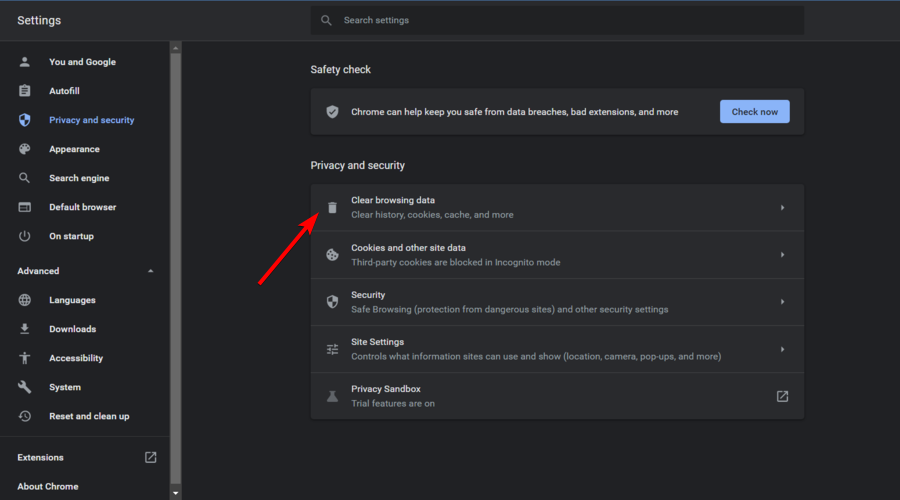
From the left window pane, select the Privacy and security section.
Click on the Clear browsing data option.
Select the time range, check the Cookies and other site data and Cached images and files options, then click on the Clear data button.
Close and relaunch Chrome browser. Try to stream the twitch video with 5000 error and check for any improvements.
Old and corrupted cached browser data can create issues with Twitch streaming resulting in Twitch error code 5000. However, users have reported that clearing the browser cache has helped them resolve the error. Follow the steps to clear the browser cache for Chrome.
2. Check Extension Compatibility
Press on the Windows key, type Chrome, then open the first result.
From the upper-right corner of the window, click on the 3-dots menu.
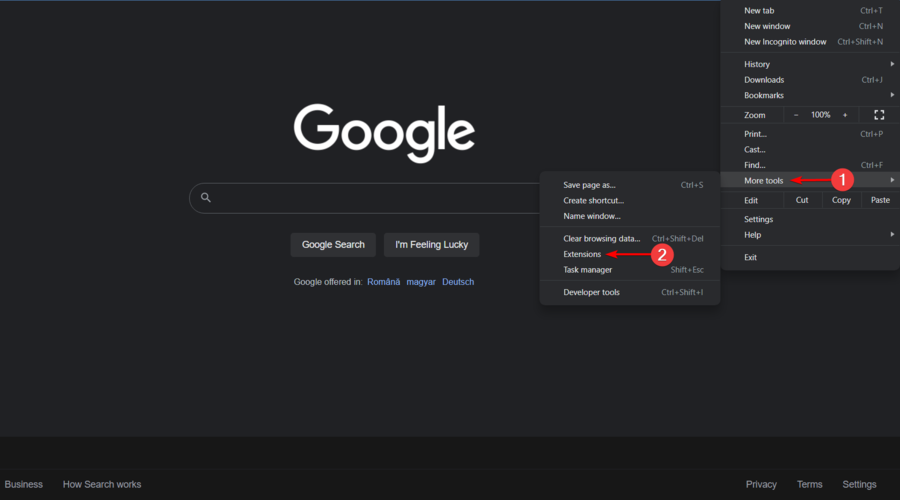
Now, hover, the mouse over More Tools, then click on Extensions.
From the list of extensions, disable all the extensions one by one, by turning Off the toggle button.
If you have the Ghostery extension installed, disable it as well. It is a known culprit behind the Twitch error content not available issue.
Now open Twitch again and try to play the video. If the video plays without any error, start enabling all the extensions one by one until you find the problematic extension.
The Twitch Error code 5000 can also occur due to a third-party extension conflict in Chrome. In this matter, you should check your Chrome browser for any plugin that may not be compatible with the Twitch service.
3. Flush the DNS
Use the following keyboard shortcut, then type cmd: Windows + S.
Right-click on the Command Prompt and select Run as Administrator.
In the Command Prompt, type the following command and press on the Enter key: ipconfig/flushdns
Close Command prompt.
Relaunch the Chrome browser.
Try to stream the Twitch video again and check for any improvements.
The Twitch error code 5000 is not the only one that might appear while running this streaming app. Unfortunately, there are many other related problems, but we’ve ensured to compile a list with the most popular ones.
Twitch error code 2000 – This issue is directly related to network problems, but it can be easily solved by following our dedicated solutions.
Twitch error 1000 – If you’ll ever face this error, keep in mind that you won’t be able to download videos from Twitch or play streams.
The Twitch error 4000 – This one might also be triggered by incompatible browser extensions or third-party cookies.
This is how you can fix the Twitch error code 5000 in the Chrome browser. If you encounter any additional questions, the comment list below would help you to share them with us.
Many may argue that the best way to play video games on your Windows 11 computer is using the classic mouse and keyboard due to how accurate you can get with the controls. But that requires learning a whole new setup and configuration.
Most people are used to playing their favorite games with a controller, and thanks to the flexibility of PCs nowadays, you use one on your computer. The PS5 DualSense is great because of its ergonomic design. It fits comfortably in your hands which is perfect for long gaming sessions.
The DualSense also has a lot of hidden features that everyone should know about, like checking your battery level. This is something the previous PS4 didn’t have and you’d have to wait until the battery was almost dead to know.
What should I know about connecting my PS5 controller?
As good as the DualSense controller is, there have been reports of the controller not connecting or being detected. The easiest way to solve this issue is by connecting the controller to your PC with a proper USB cable.
Some games have DualSense support natively. In those cases, all you have to do is plug in your controller and you’re good to go. But this raises other questions like what if you don’t own a USB cable or don’t want to use one? What about the games that don’t have native DualSense support?
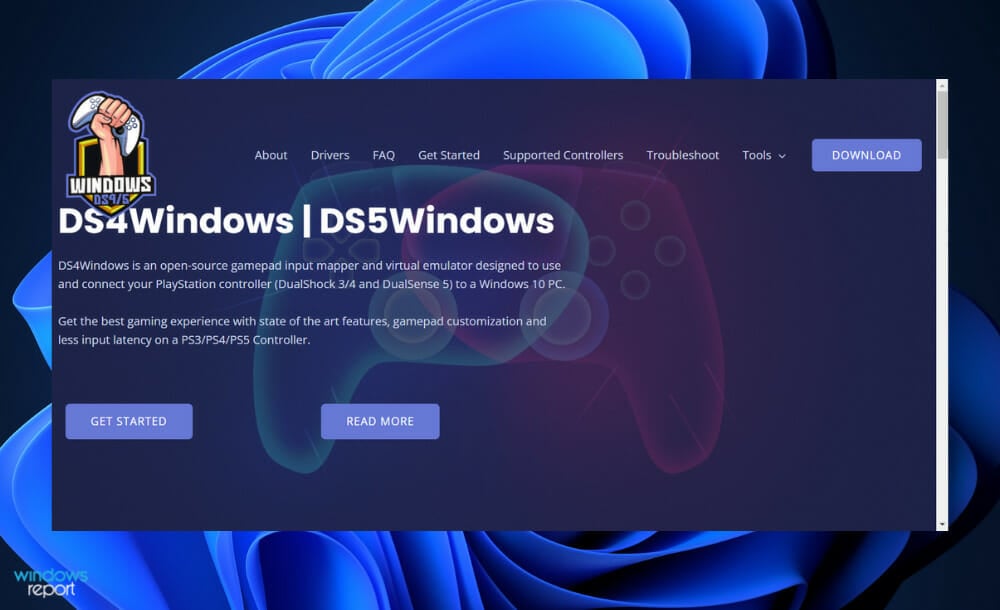
Well, this guide will show you three different ways to solve any detection problems with your PS5 controller. This includes connecting via Bluetooth and downloading DS4Windows. The latter is an app that allows you to use DualSense controllers on games that don’t support it.
It does this by emulating an Xbox controller (which has wider support) and tricking the game into thinking your DualSense is an Xbox device.
How can I solve detection problems for my PS5 controller?
1. Solving via Settings menu
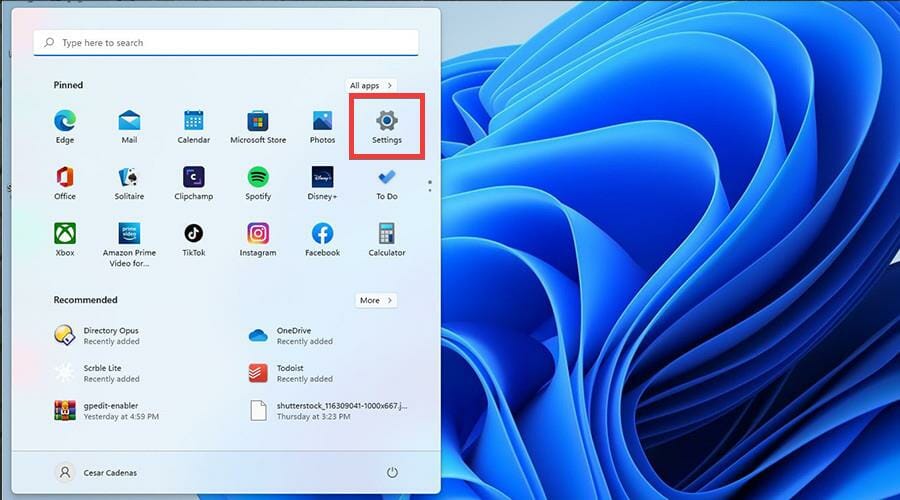
Click on the Start icon.
Click on Settings.
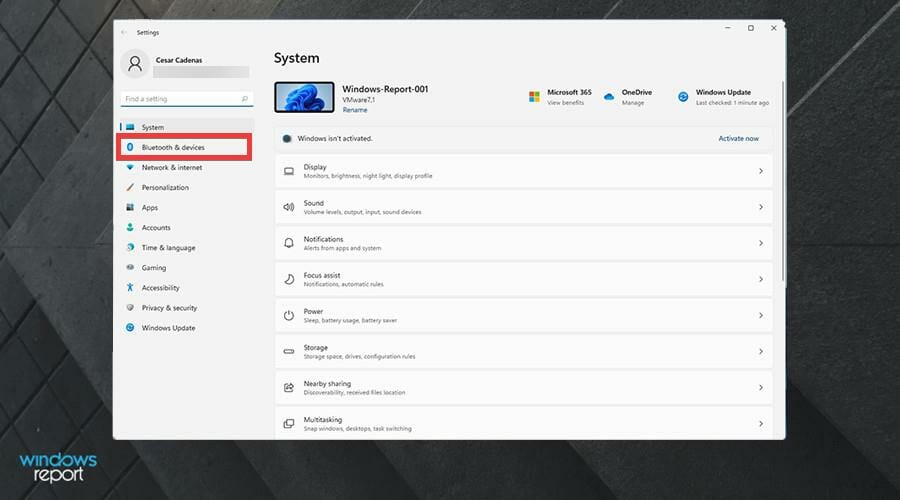
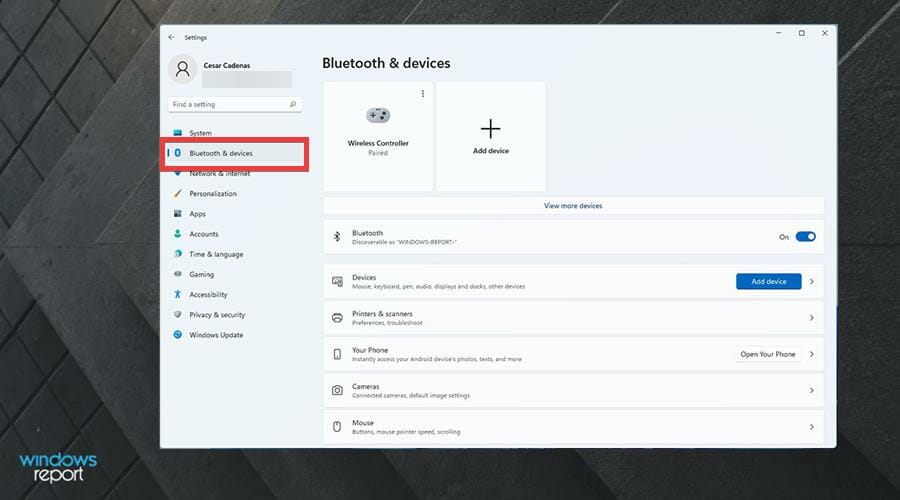
Click on Bluetooth & devices in the Settings menu.
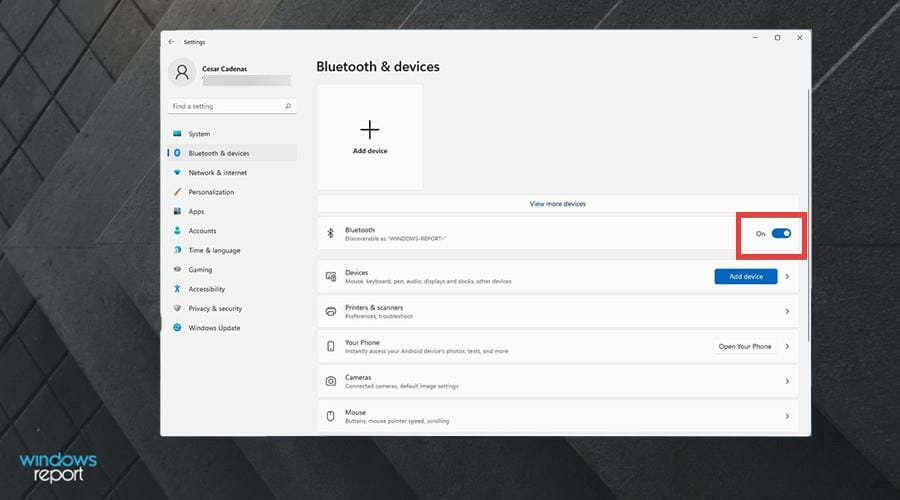
Check if Bluetooth is turned On. If not, click on the switch to turn it on.
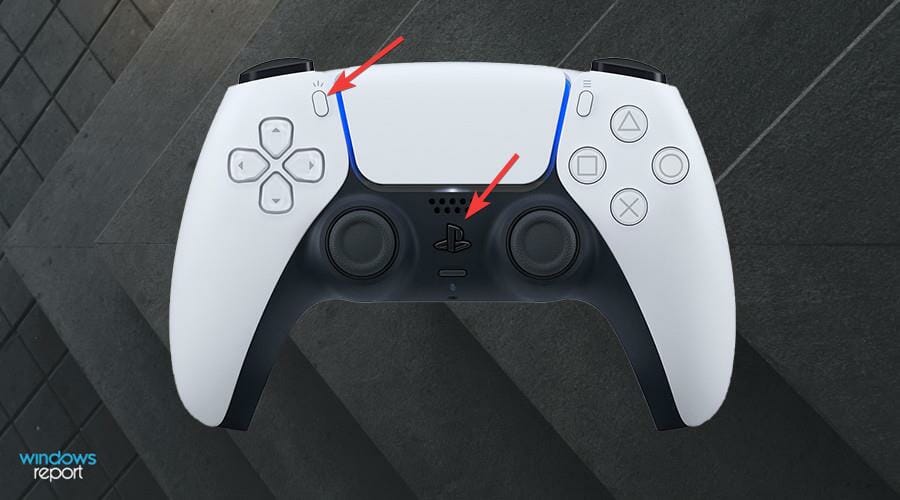
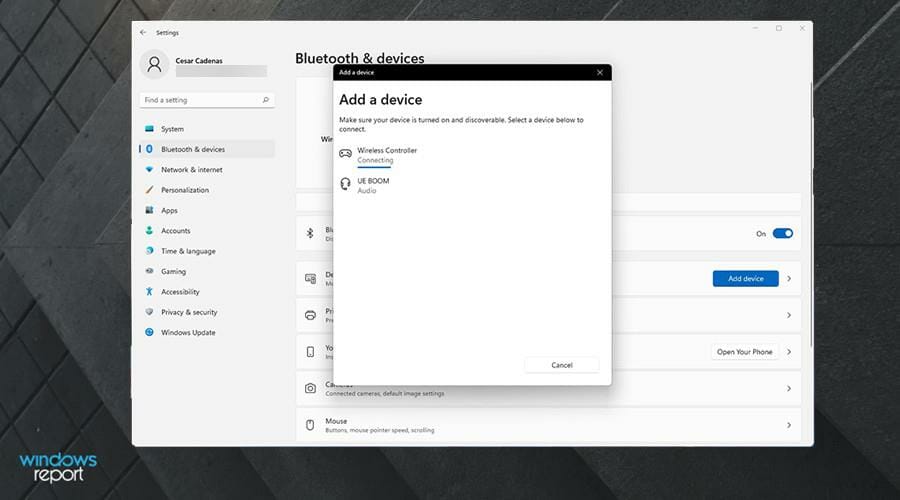
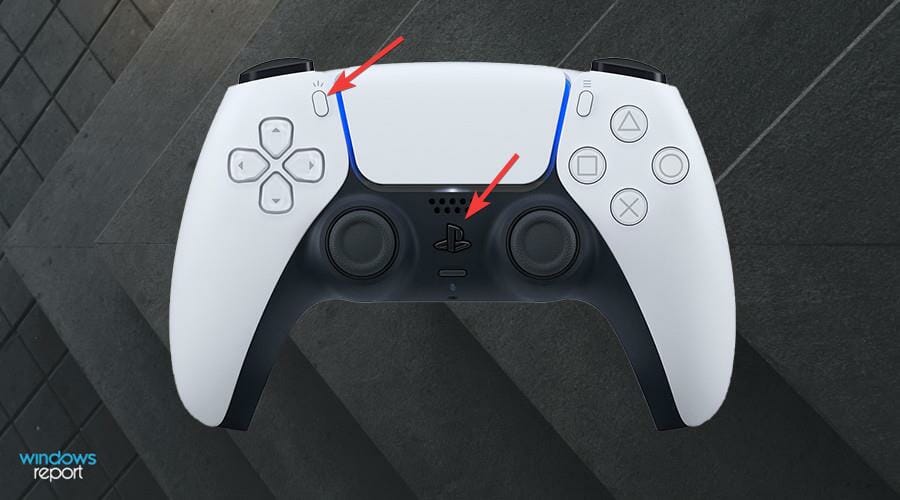
On your PS5 controller, press and hold the Share and PlayStation button until the light begins to flash to put it into pairing mode.
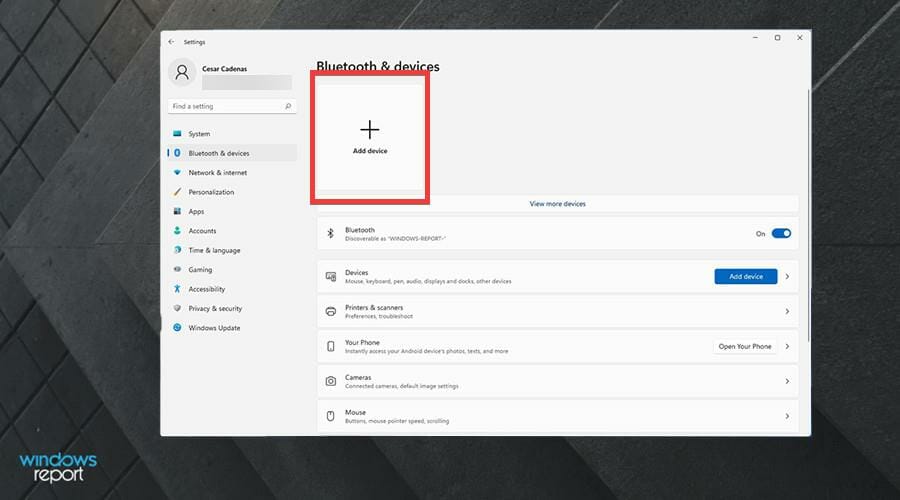
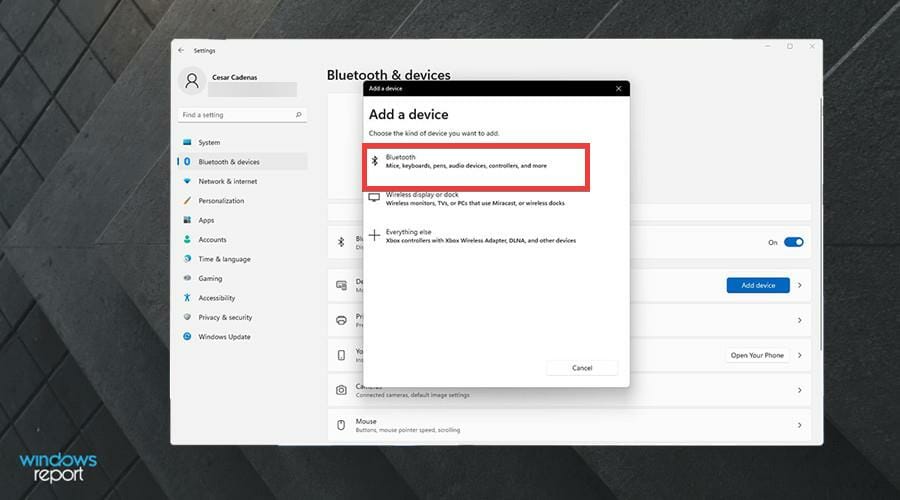
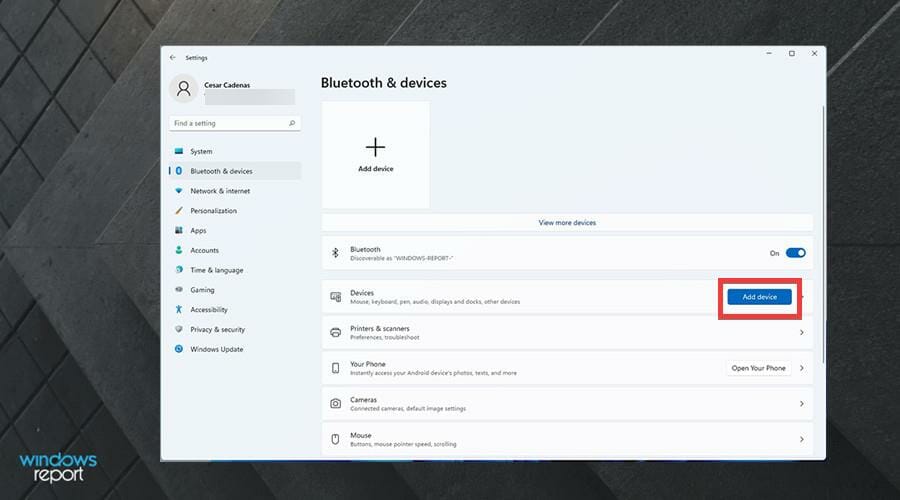
On your PC, click on the Add device button or the Add device window at the top.
Select Bluetooth to pair your PS5 controller.
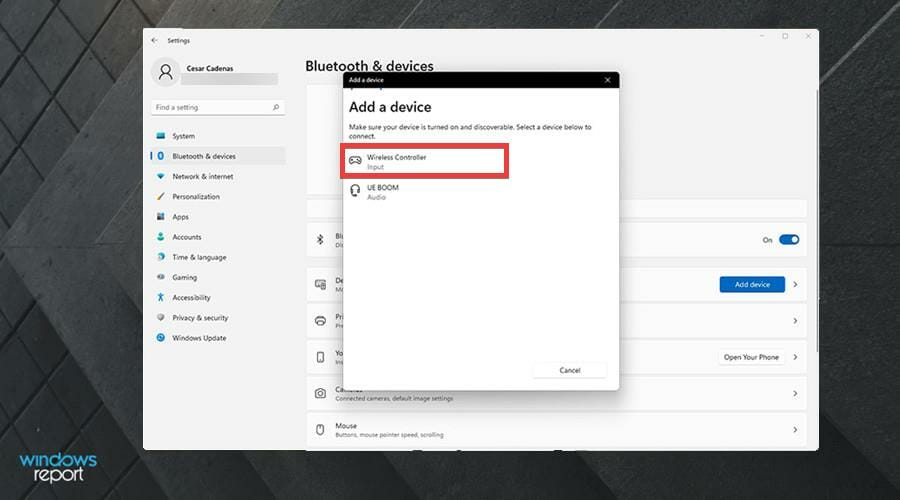
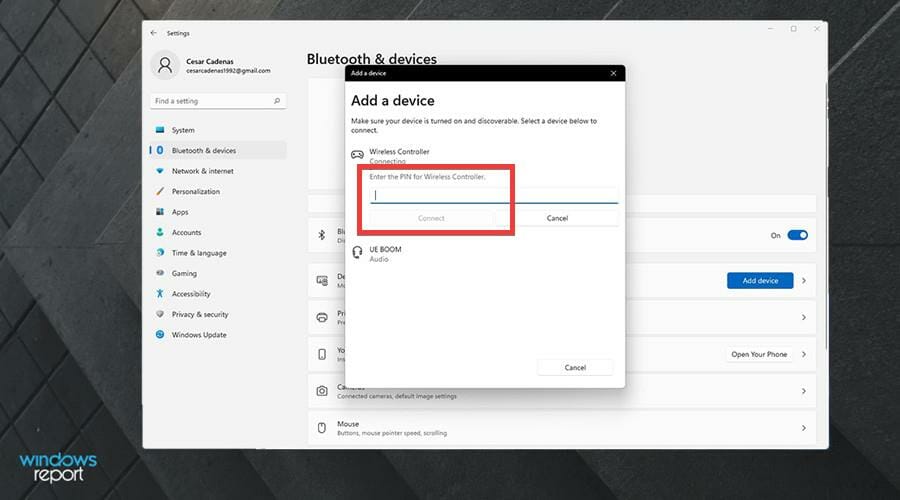
The DualSense will appear as Wireless Controller. Select the first option.
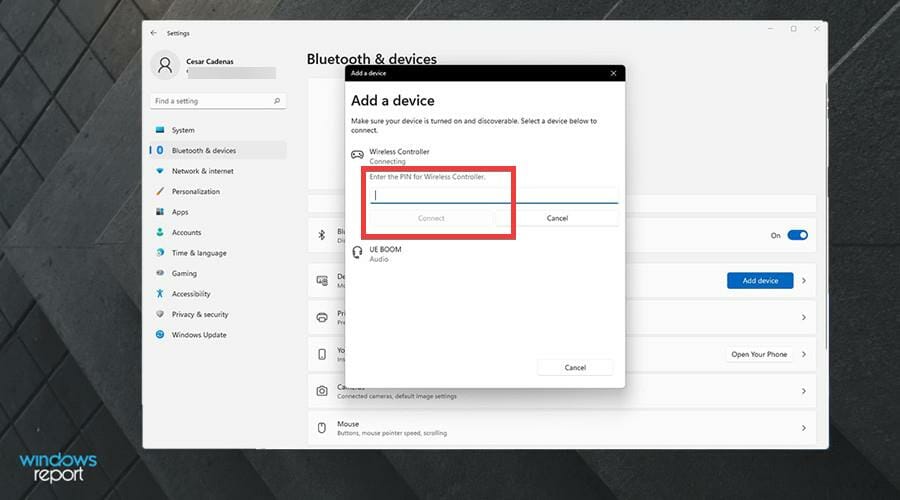
It may ask you to enter your computer’s PIN to connect.
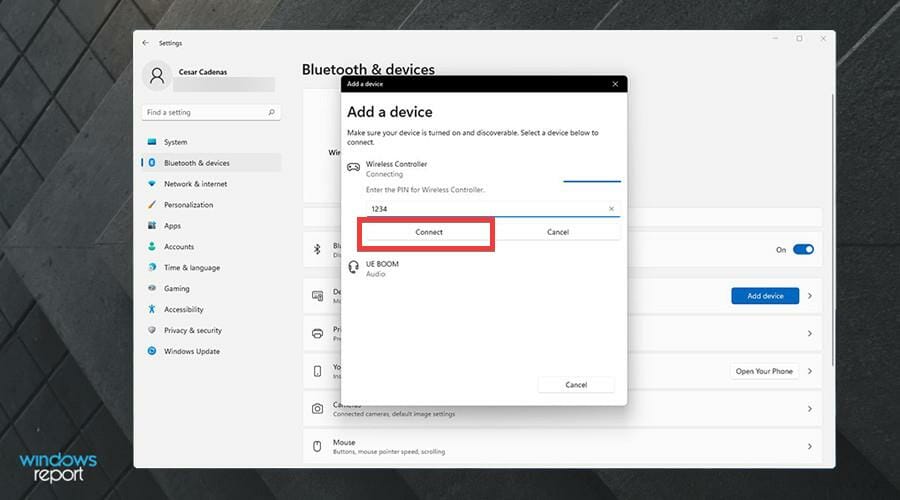
Enter your PIN and click Connect.
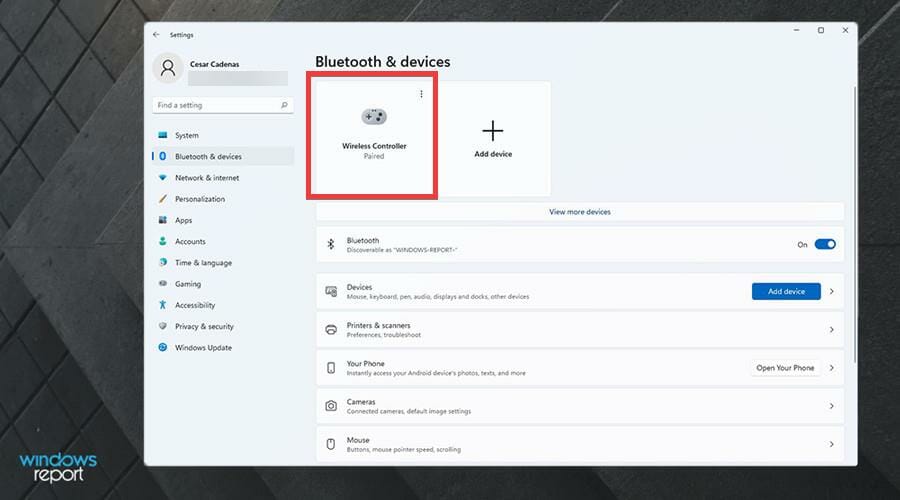
Wait for the pairing to complete.
Check your Settings menu to see if the controller has been paired.
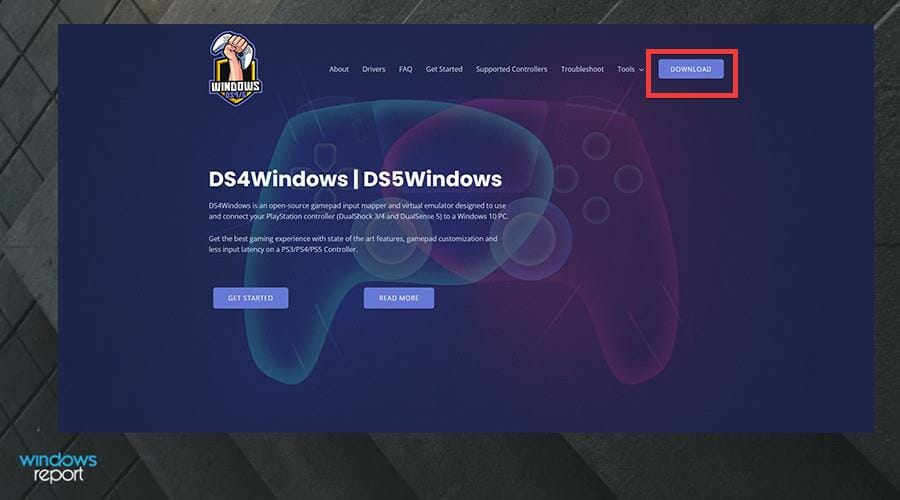
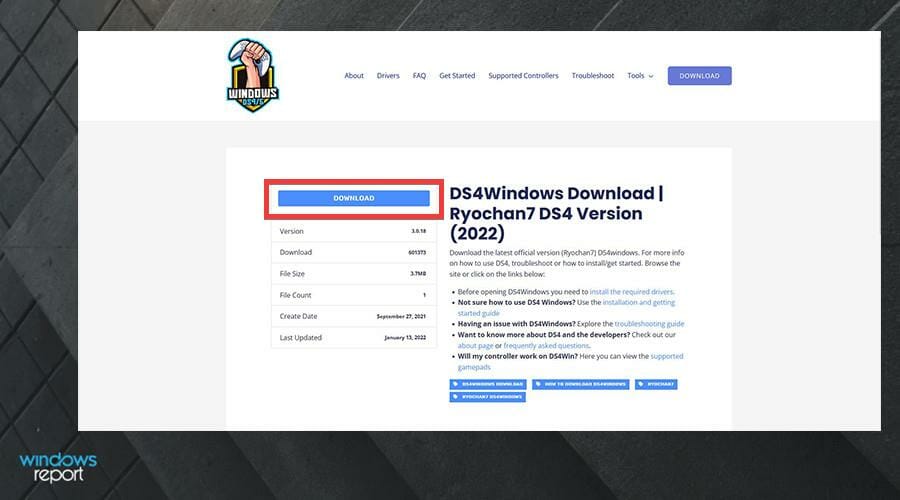
Click the Download button in the corner to download DS4Windows.
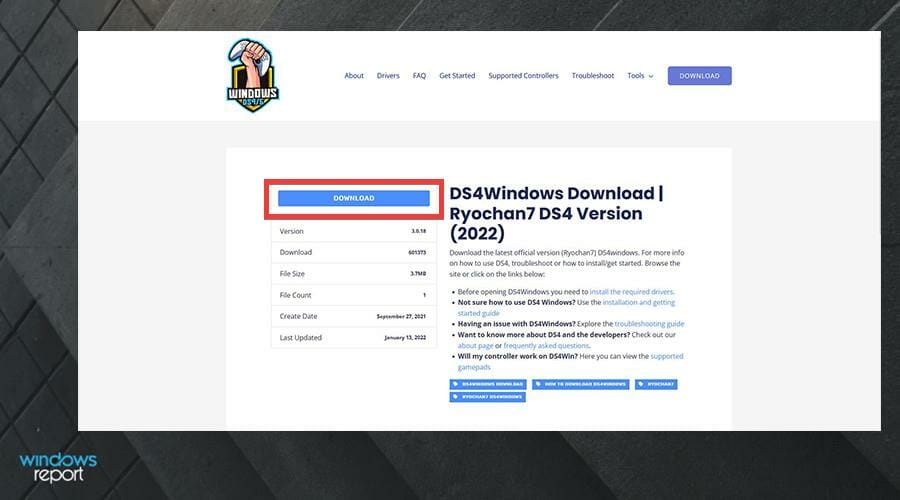
In the next window, click the blue Download button.
Click the Zip file that downloads.
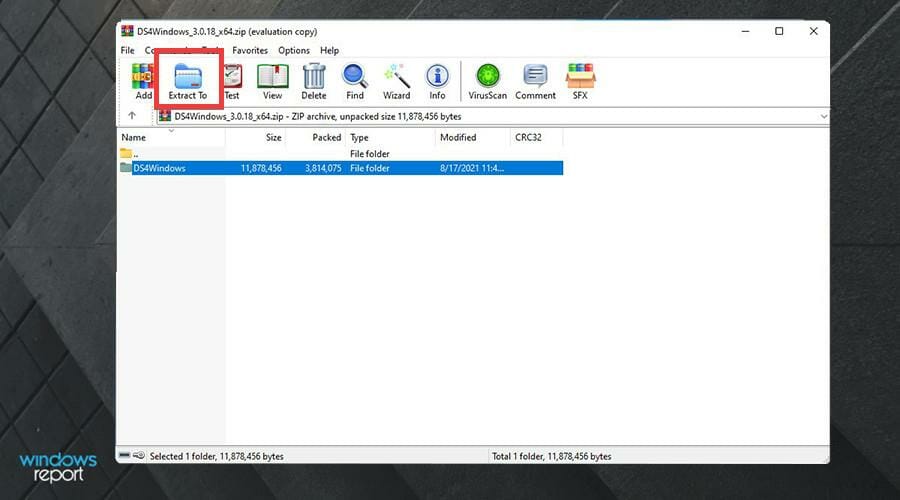
Highlight the file and click Extract.
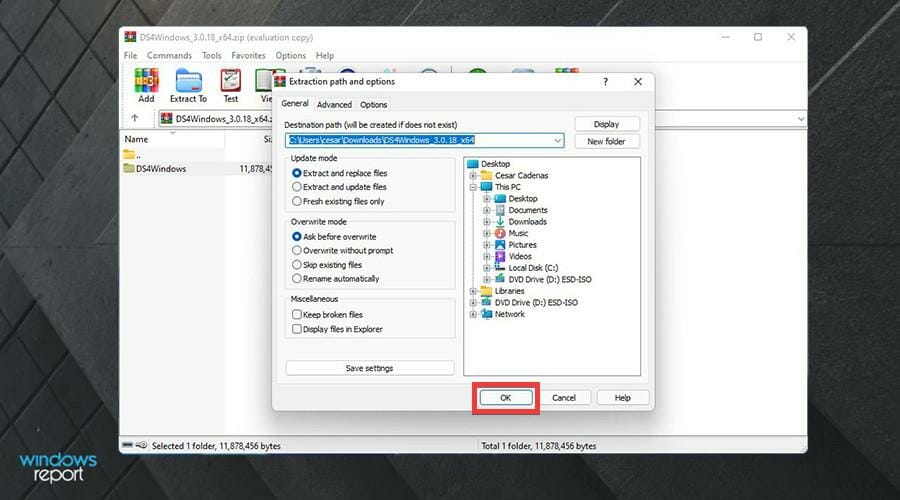
Choose a location to extract the file to. Then click OK.
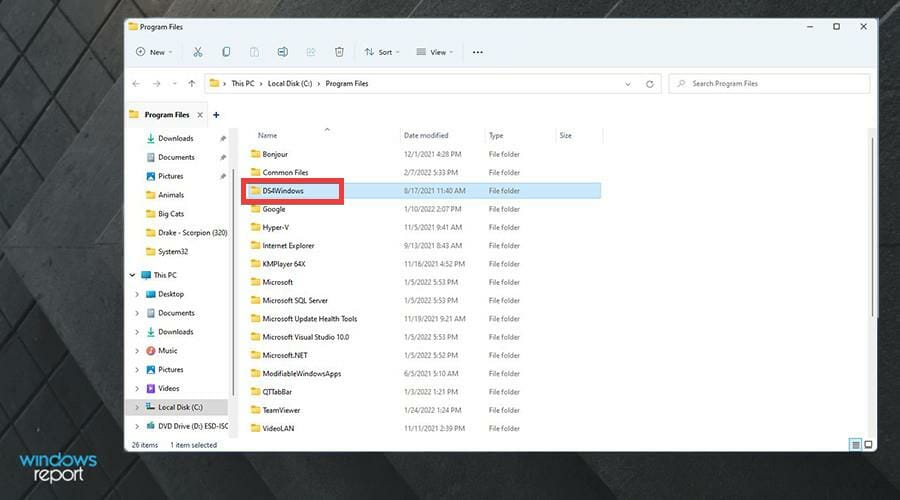
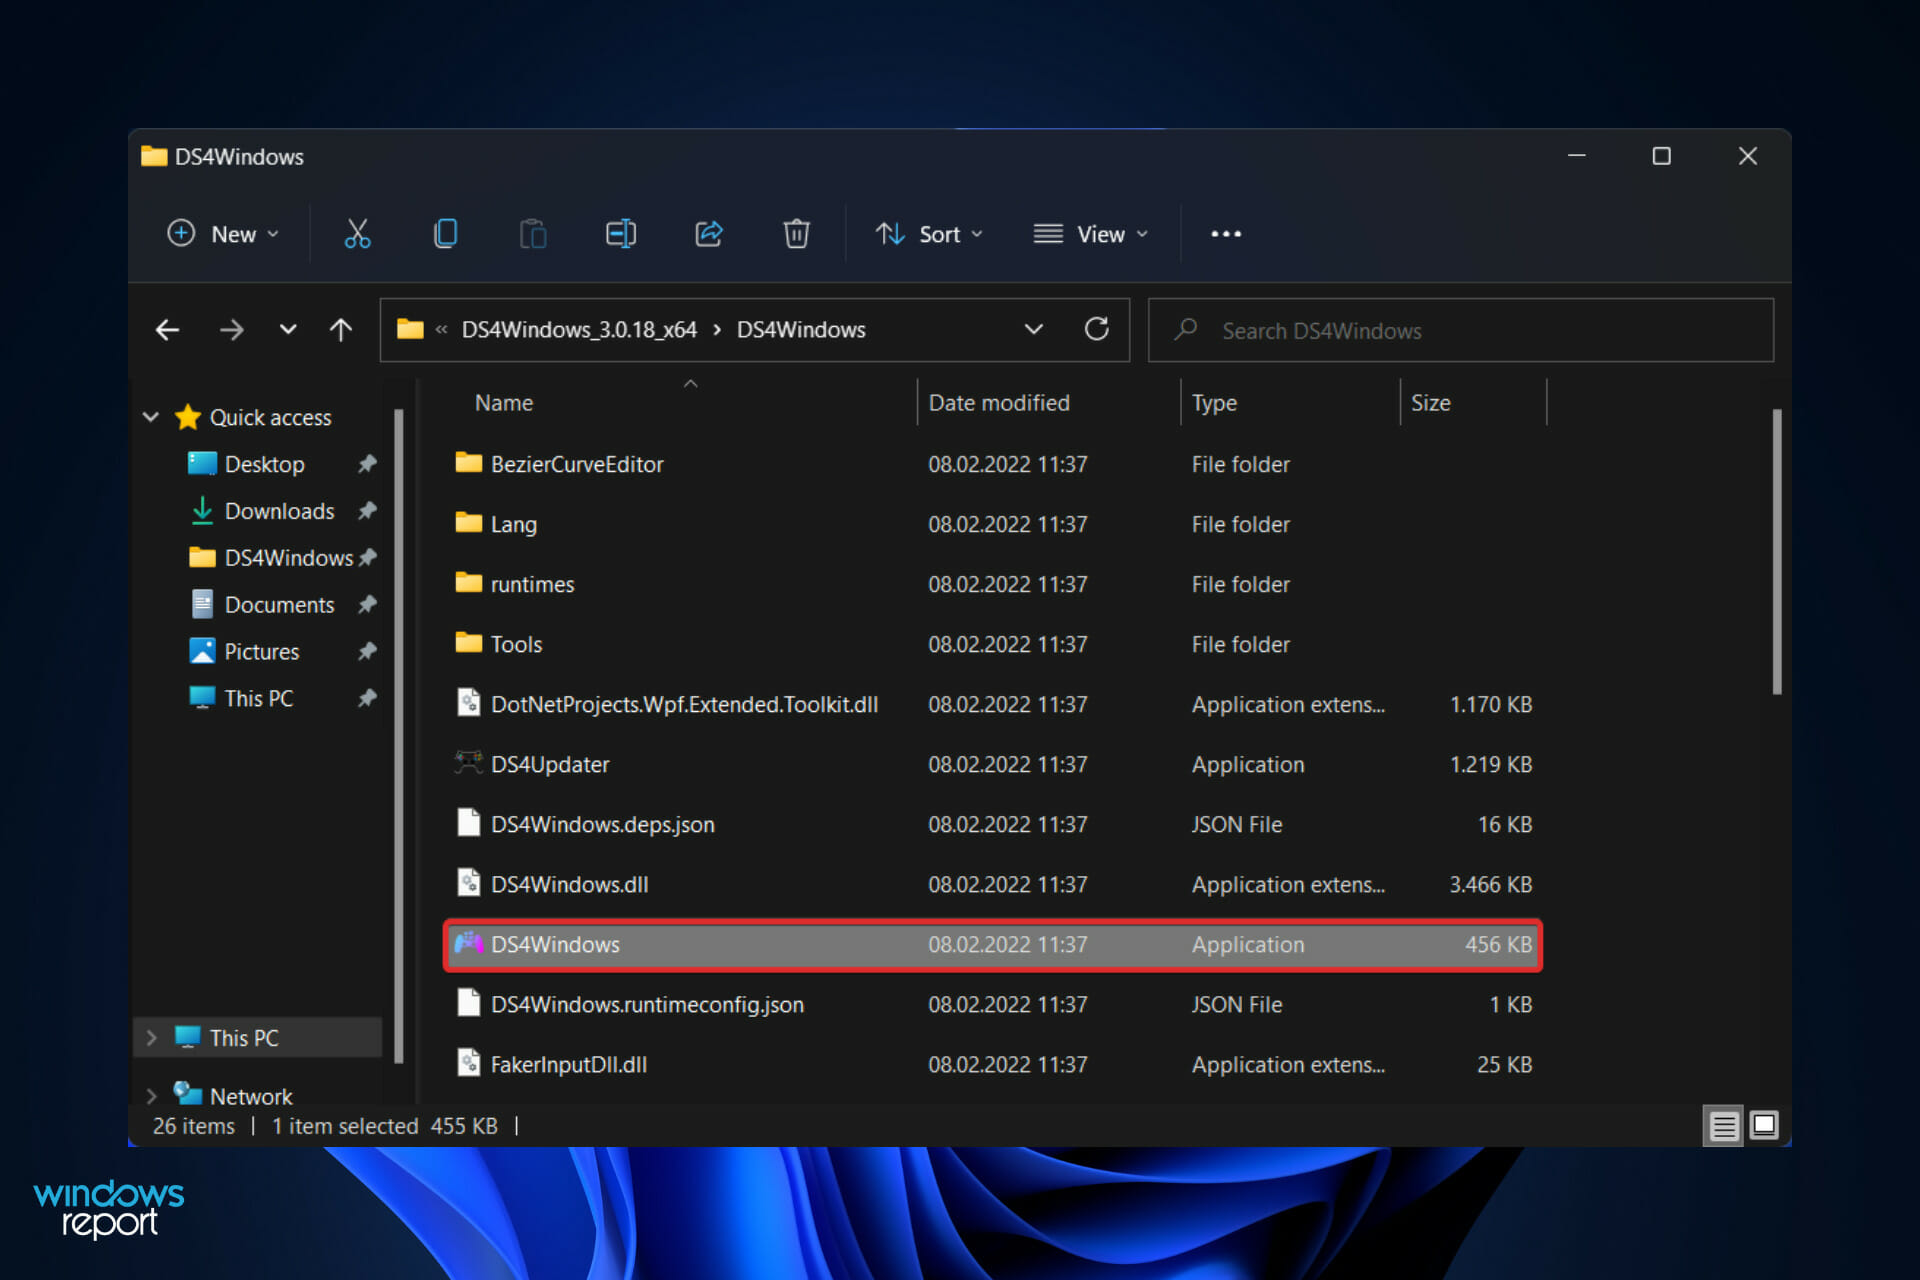
Go to where the file is located.
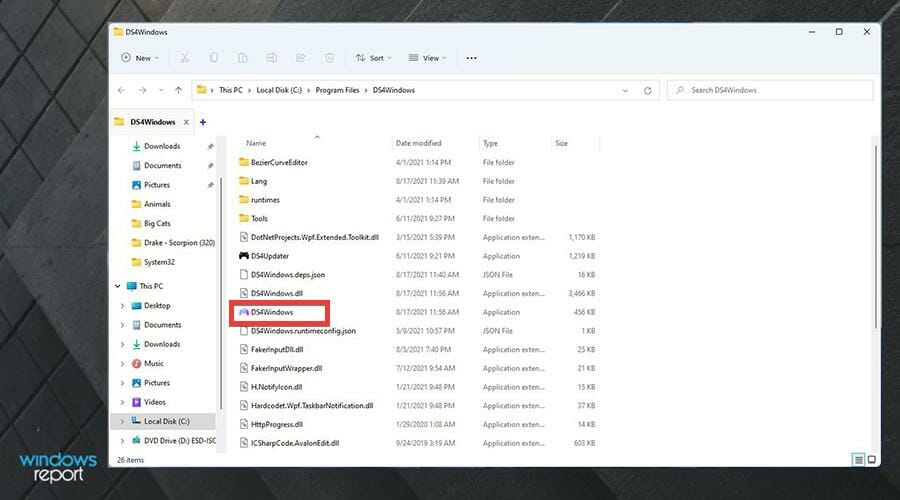
Double click DS4Windows to open the app.
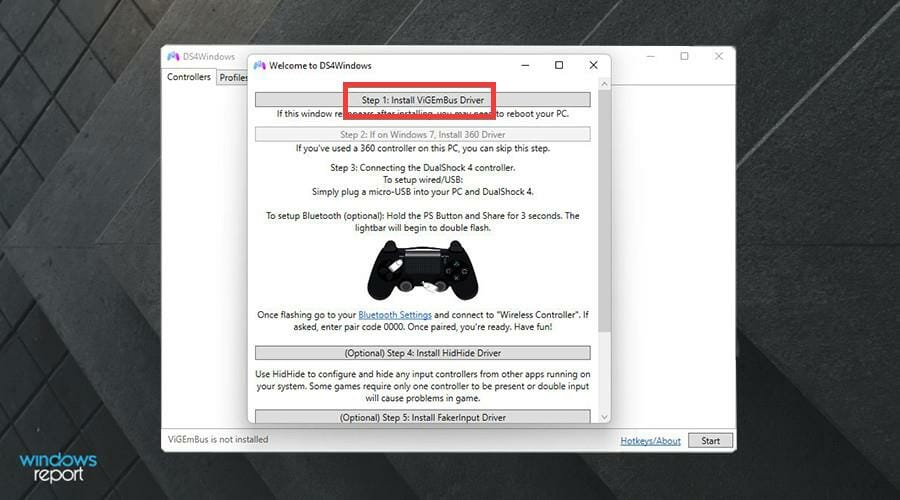
Click Install ViGEmBus Driver.
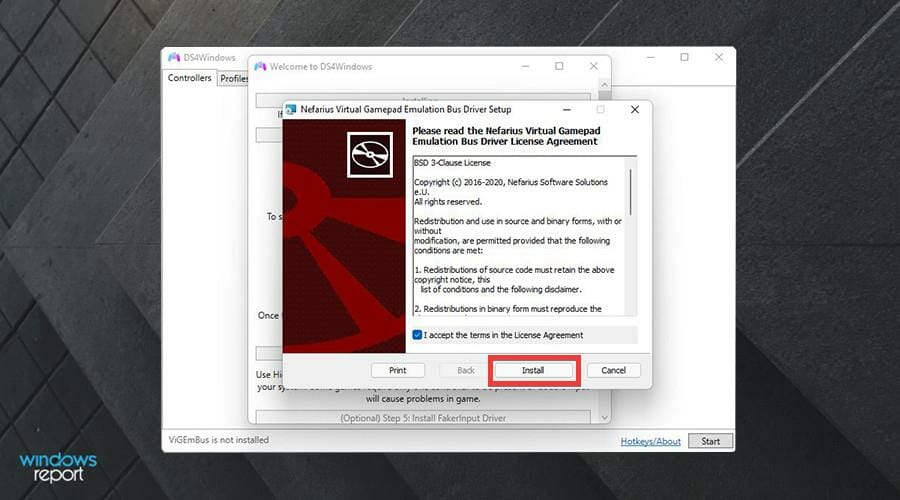
An installation wizard will appear. Accept the terms and then press Install.
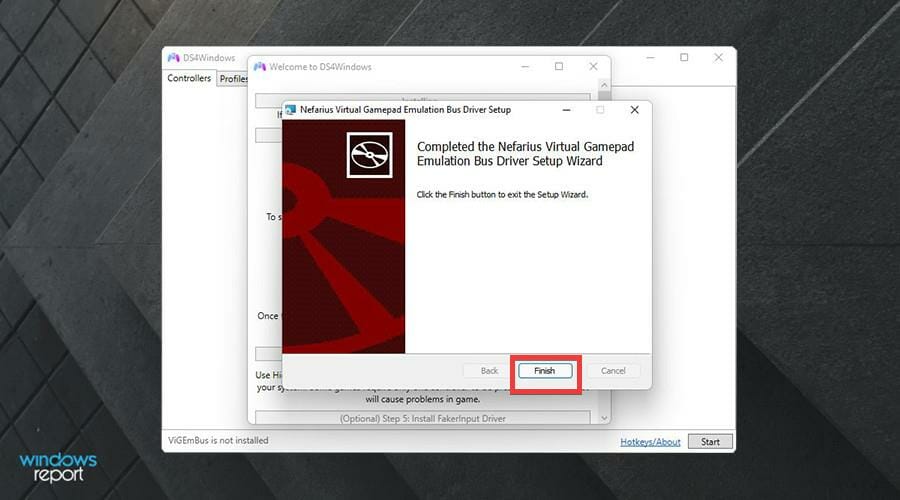
Click Finish.
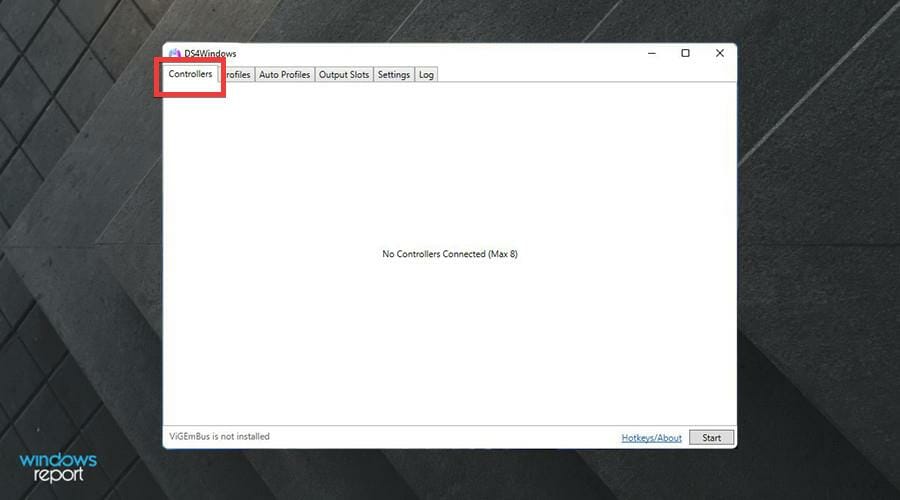
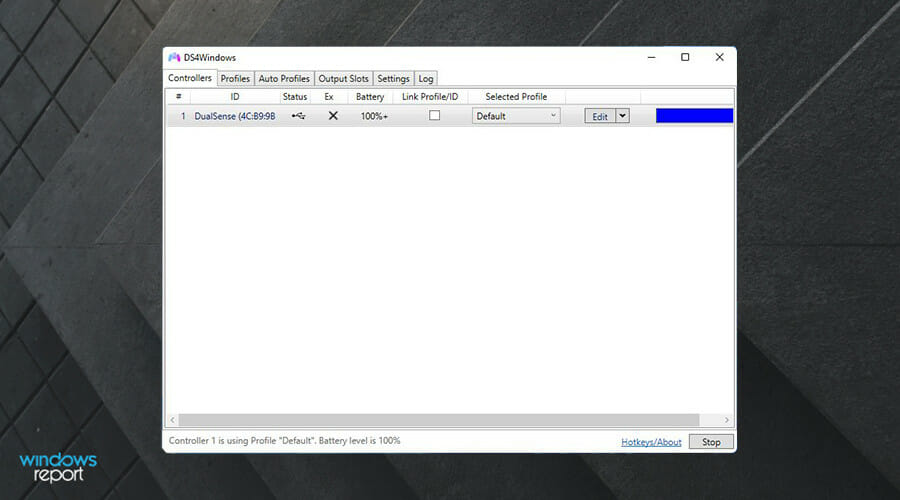
In DS4Windows, click on the Controllers tab. The controller should appear here, but as seen in this example, it doesn’t.
Ensure that your controller is on and connected to the PC. Start by going to the Bluetooth & devices section in the Settings menu.
As seen in this example, the DualSense is connected.
If it isn’t connected, click on Add device.
Press and hold the Share and PlayStation button on your controller. The light will start blinking indicating that its looking for a computer to pair up with.
On your PC, select Bluetooth and then Wireless Controller.
You may have to add your computer’s PIN to move forward.
After connecting, go back to DS4Windows.
You should be able to see your DualSense controller connected to DS4Windows.
If it doesn’t appear if you’re connected via Bluetooth, try using a USB cable and connect the controller to the PC.
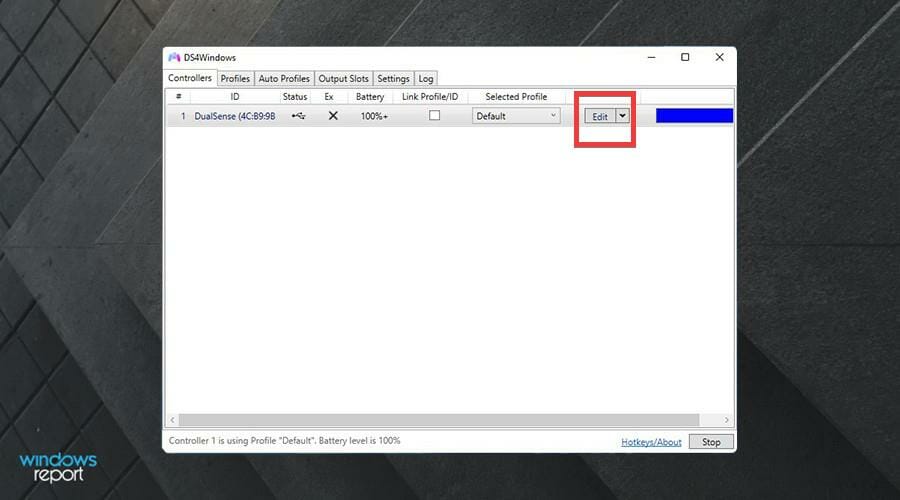
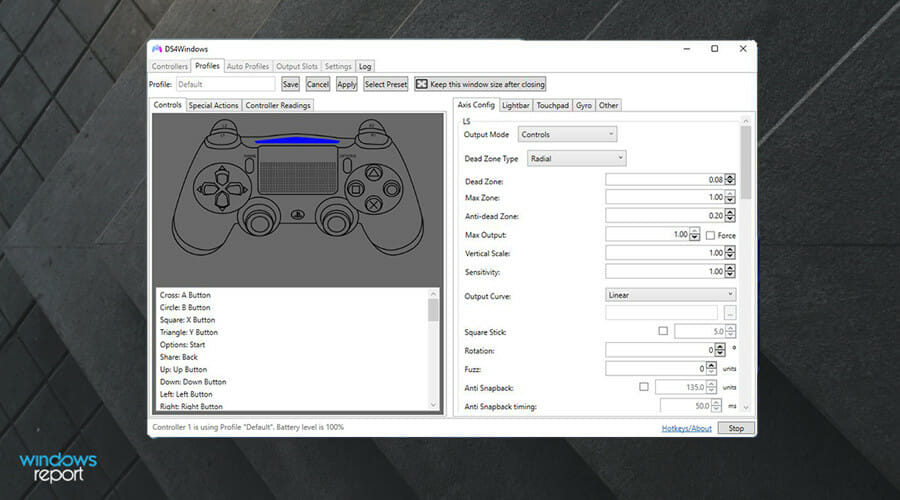
If you want to reconfigure the controller, click on Edit.
Here you can change things like the analog stick sensitivity, touchpad, internal gyroscope, and more.
3. Solving on Steam
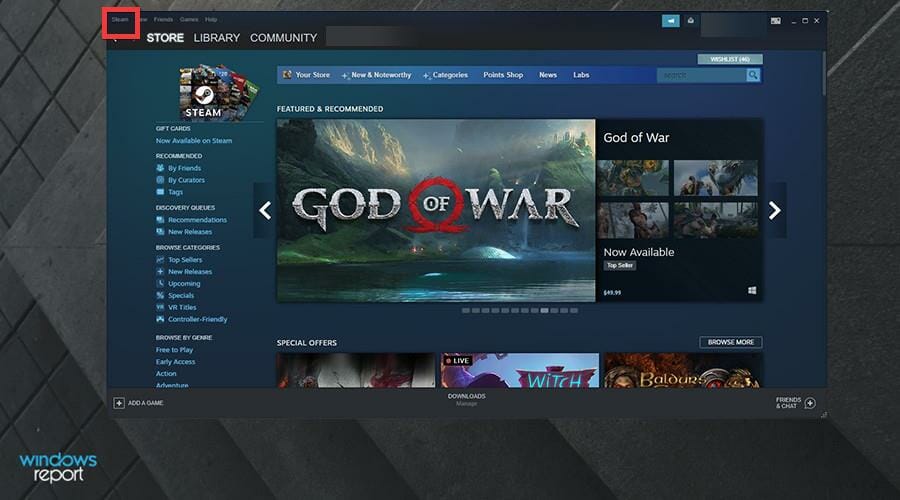
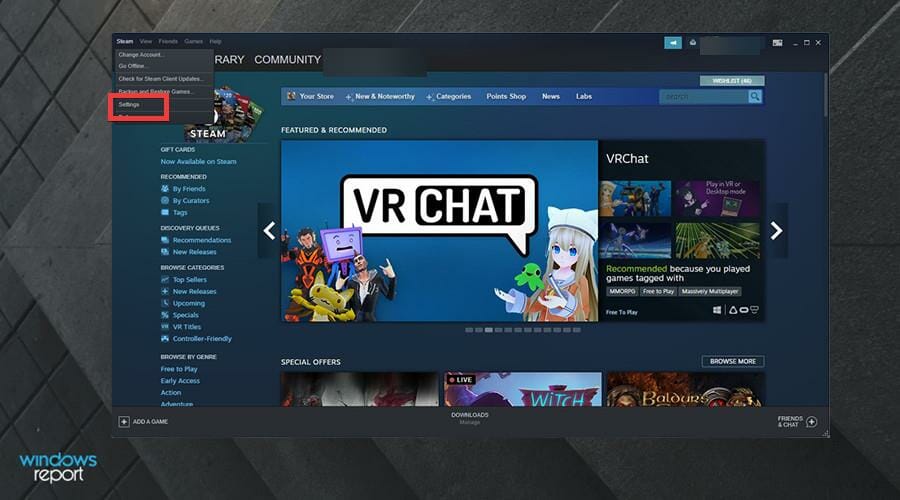
On Steam, click on the Steam entry in the upper left hand corner.
In the drop down menu, click Settings.
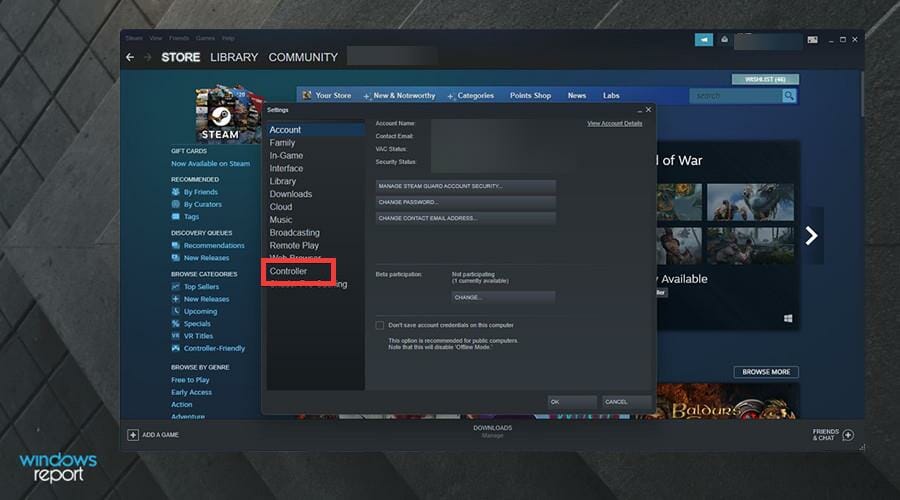
Click Controller in the sidebar.
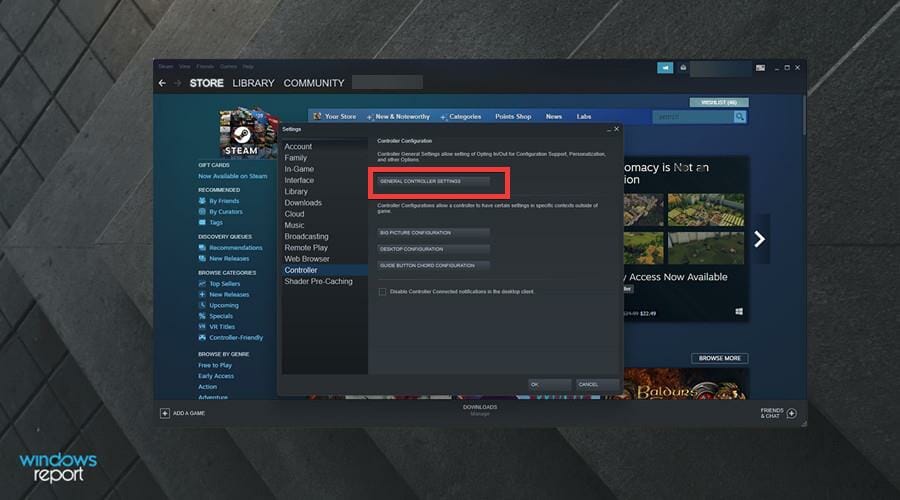
Click the GENERAL CONTROLLER SETTINGS button.
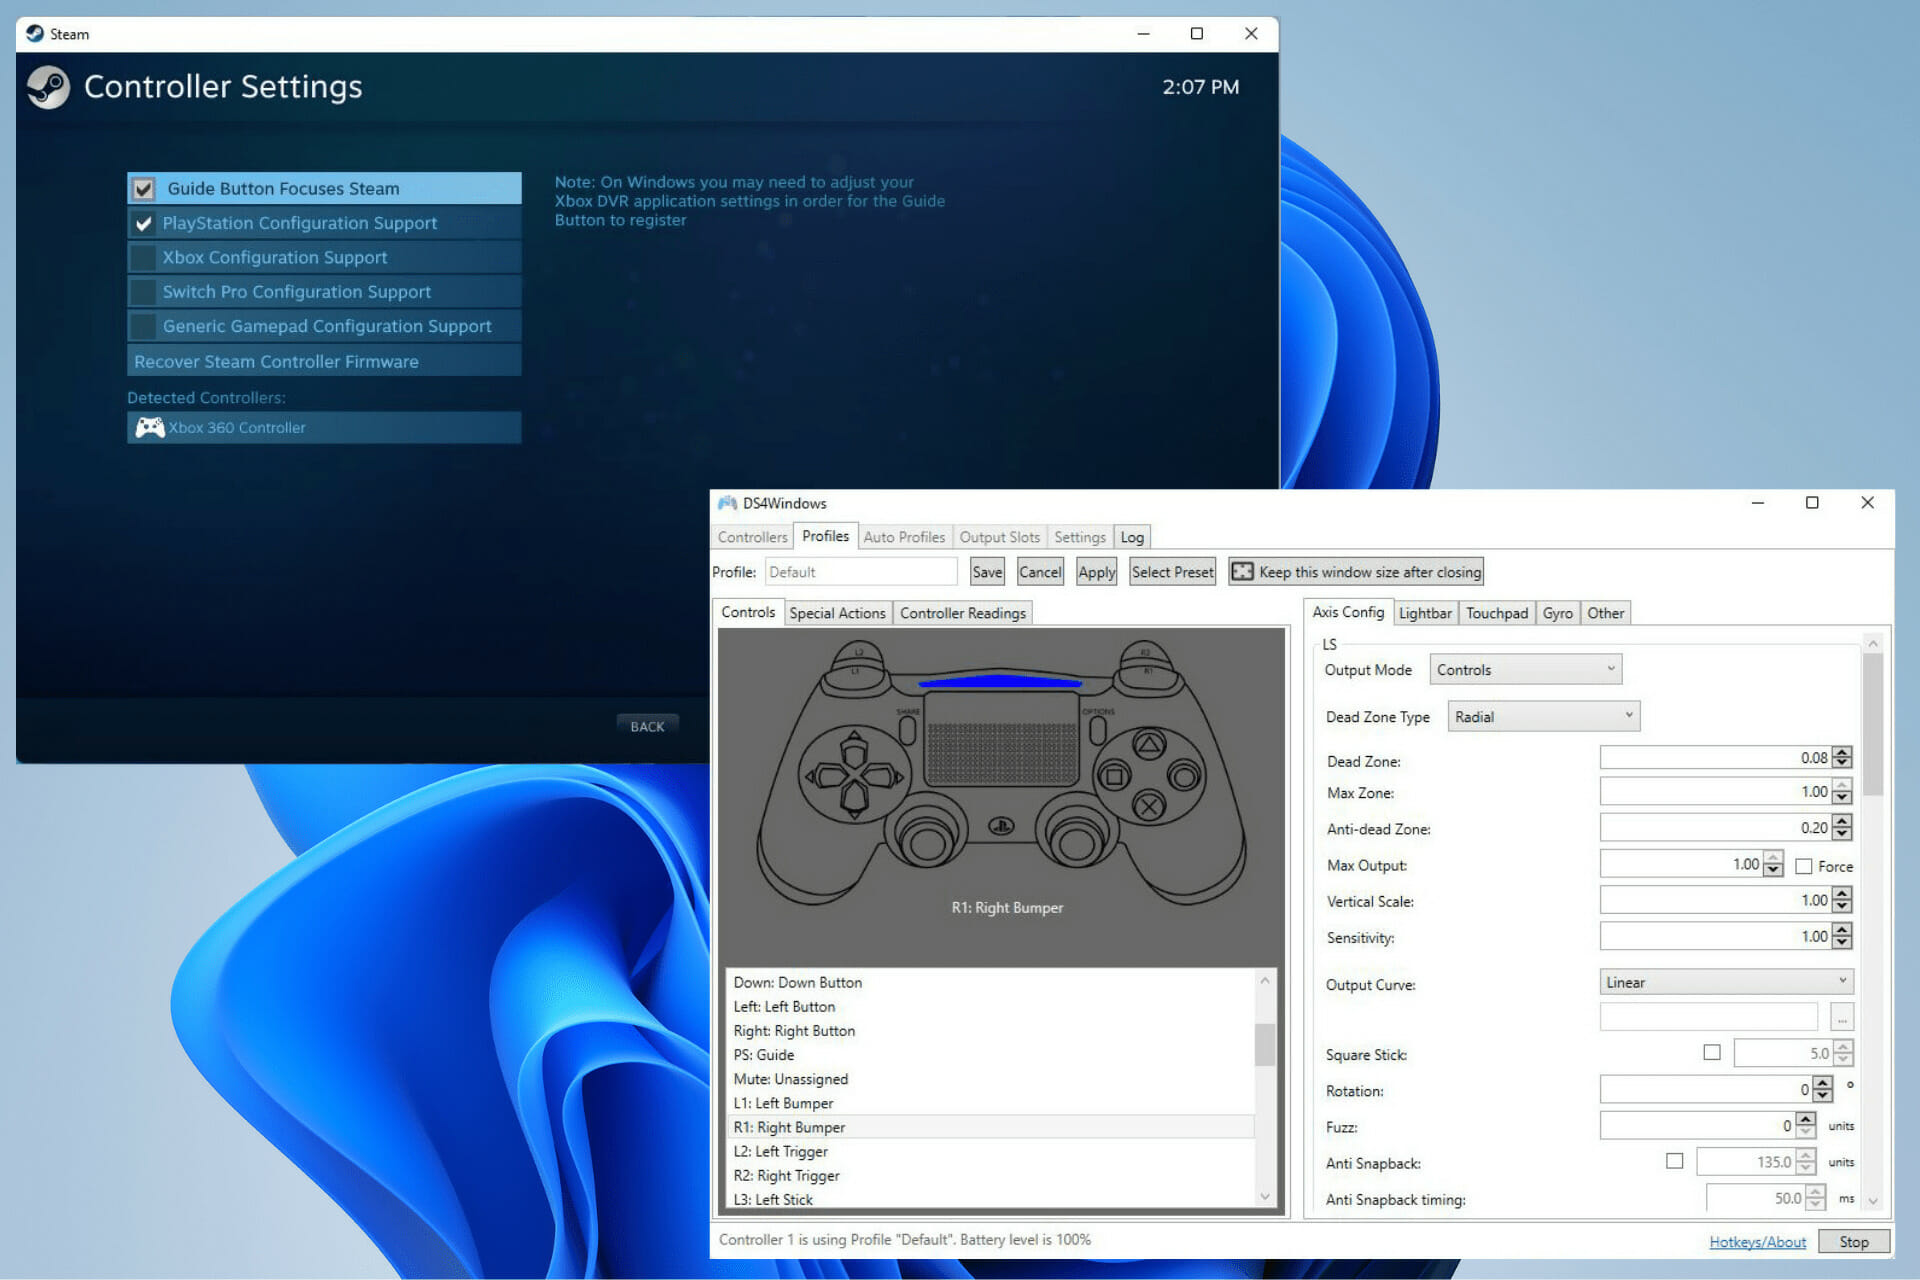
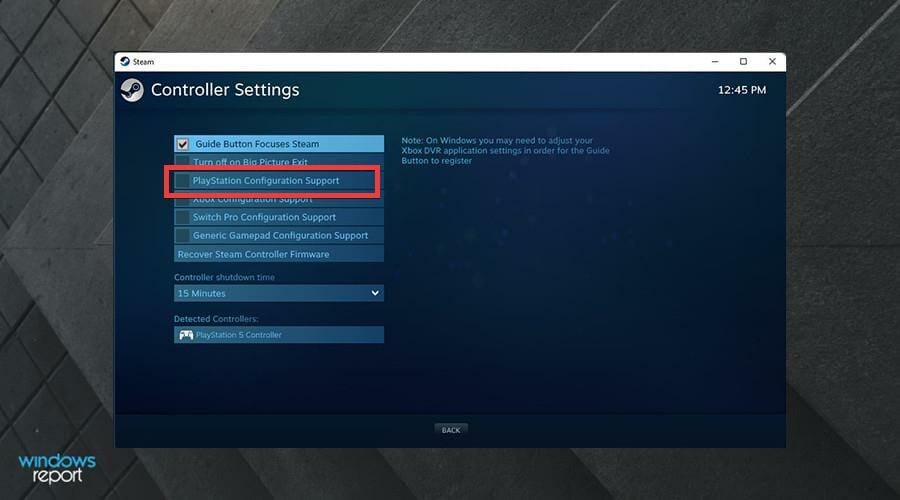
Check the box next to PlayStation Configuration Support in this new window.
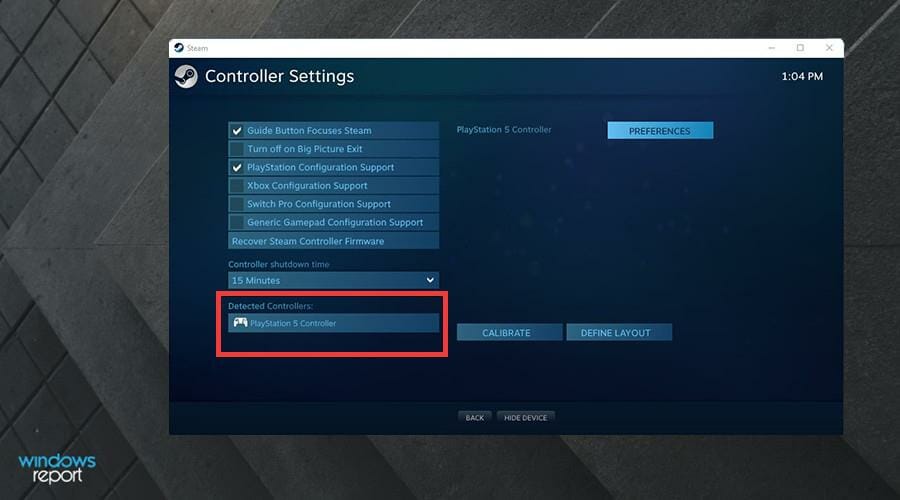
If a DualSense is connected, you will see PlayStation 5 Controller at the bottom of the window.
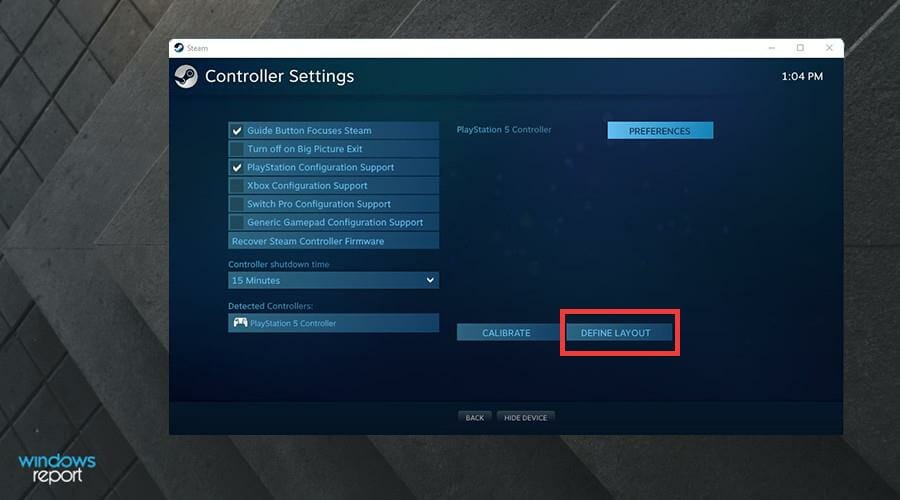
If you click on PlayStation 5 Controller, you will given option to change preferences, calibrate the controller, and change the button layout.
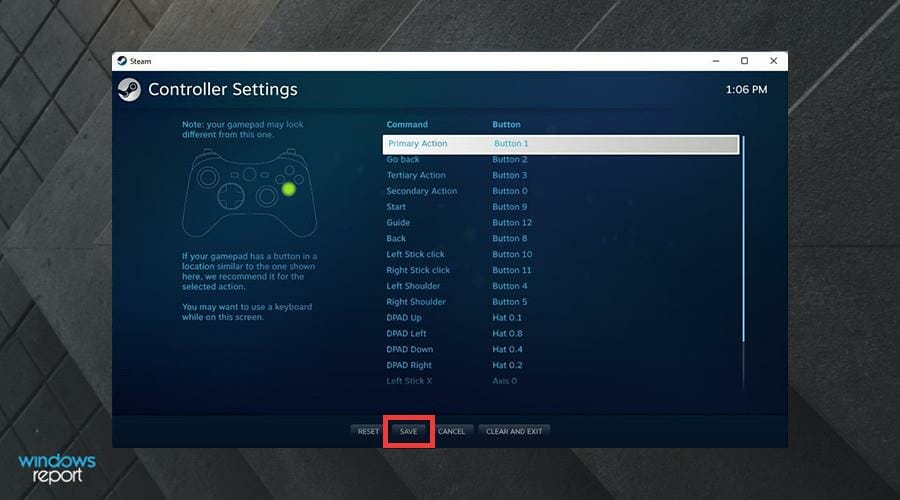
Clicking on Define Layout takes you to a new page where you can change the buttons.
Click Save at the bottom to keep the configuration.
Is there anything else I should know about Windows 11 and video games?
For Windows 11, Microsoft took a different approach towards video games. The company was much more heavy-handed and strict on developers during the Windows 10 era, but this time around, Microsoft is being much more hands-off. It wants developers to naturally come to the platform without coercion.
This can be seen when Microsoft announced that the new OS will support Android apps, including the mass of games available. This feature still hasn’t seen an official release, although it is available to people who signed up for Windows Insider. It’s unknown if and when Android apps will see wide release.
And if you’re a big gamer, you’ve no doubt have heard of Twitch. It’s the leading online platform for video game streams and set the foundation that other sites are trying to emulate. You may be interested in knowing which internet browser is the best one for Twitch.
All browsers have access to Twitch, but the website does require a fairly high amount of resources to stream without issue. And because of that, certain browsers are better than others.
Feel free to leave a comment below if you have any questions on other Windows 11 apps. Also, leave comments about guides that you’d like to see or information on other Windows 11 features or list guides like this.
The Windows Insider Dev Channel could soon get busy. According to Windows Central’s Zac Bowden, Microsoft is readying some big builds, which might bring back some of the missing features people have been complaining about, and even add new ones.
The news comes after a two-week pause in Windows Insider builds, and per Bowden’s sources, this pause was because Microsoft was busy adding new features and changes. You can expect a big jump in build numbers as a result, too, from the current 225xx to 250xx.
This means the return of Windows features like the ability to create app folders in the Start Menu, support for file dragging and dropping on the Taskbar. In addition, new blur effects could be on the way soon
Other new features coming to Windows Insiders include a “Snap Bar” feature and touch features for Start Menu and Quick Settings. Notable of that is the ability to drag up on from the bottom of the screen to get to Quick Settings or the Start Menu. Snap Bar, meanwhile, could “be another way of snapping multiple app windows to the built-in snapping grid system on Windows 11,” according to Bowden.
In other areas of visuals, Bowden believes Microsoft is even working to bring acrylic/blur effects in legacy title bars. This will best be seen in Win32 apps. This should help with the design consistency in Windows 11, which has been said is a goal for Microsoft this year.
So, when will everyone else expect these features? Well, look out for it in the next major Windows 11 release, for the second half of this year in “Sun Valley 2.” It definitely seems like it’ll be an exciting time to be a Windows Insider soon.
If you found that your Twitch app is not detecting your World of Warcraft addons after an upgrade or install, you came to the right place. A large number of users have dealt with the same situation recently.
The problem seems to vary, with some users saying that the issue doesn’t stop at the WoW addons and that it also includes the WoW game not being detected.
Here is what one user had to say about this issue:
Is there anyway I can get some help for this? My Twitch doesn’t find my WoW on my computer, and doesn’t recognize the file when I select it. I can’t update my addons and everything has gone very buggy since 8.1.5
This issue seems to affect users with different system configurations, and even though it allows you to run WoW, the addons are nowhere to be seen.
This has caused users a lot of frustration, but in today’s article, we will explore some of the best methods to deal with it.
What can I do if the Twitch app is not detecting WoW?
1. Make sure you selected the right profile
If addons are showing inside World of Warcraft but not inside your Twitch app, you will need to make sure that the right profile is selected inside the app.
To do so, you will need to check the addon section from the upper right side of your screen and choose the right profile from the drop-down menu.
2. Log out and log back in the Twitch app
Press on the Windows key, type Twitch, then open the first result, or you can simply navigate to the Twitch official page.
Look at the top-left corner of the window, then click on your profile image.
Choose to Log Out.
Wait a few minutes.
Now, open again the Twitch desktop client or go again to the Twitch official page.
From the upper-left corner of the window, click on the Log In button.
Enter your Twitch credentials, then click on Log In.
3. Delete the AddonGameInstance.json file
Hit the Windows key, type Twitch, then open the first result, or simply navigate to the Twitch web version.
Click on the 3 dots menu icon at the top of your screen.
Select Help.
In the opened page, scroll down, then click on About.
Inside the newly opened window -> click on the Client Folder button.
Twitch is a popular streaming platform for Xbox users as it allows you to stream live gameplay directly from the console. However, some users have reported a glitch with their Xbox Twitch app.
When you try to open the Twitch app and try to sign in you get twitch error code 61d3870c in Xbox. You can find similar issues reported by other users.
Is anyone else experiencing an error when trying to sign in to the Xbox One Twitch App? I keep getting an error: SOMETHING WENT WRONG. We’re so sorry; something unexpected happened. 61D3870C
Follow this troubleshooting guide to fix Twitch error code 61d3870c in Xbox.
Why does the Twitch error code 61d3870c appear on Xbox?
You should know that the Twitch error code 61d3870c appears due to several reasons that you can find in the list below:
Twitch server-related issues – Like any other platform or app, Twitch can run into different troubles and it’s not only about what you might do. In these terms, we strongly recommend checking the Twitch status, then other forums to establish whether or not the problem has a general impact.
Temporary bugs – These can occur randomly and without knowing it. The best thing to do is try to disconnect and then reconnect Xbox from your Twitch account.
VPN-related problems – Twitch doesn’t like VPN accounts that are suspicious and may terminate or suspend any account that uses those IP addresses. In this matter, you should check your VPN first.
DNS issues – DNS can affect gaming or streaming activities by blocking malicious websites. However, it seems like the wrong related settings can lead to the Twitch error code 61d3870c, so you might need to change them.
How can I fix the Twitch error code 61d3870c in Xbox?
1. Check for the issues at the Twitch End
At times, the error can occur if there are issues with the Twitch server. It might be down and/or the app can be down for maintenance or due to any other unforeseen reason. To easily check it, make sure you navigate to the Twitch status official page.
You can also check if any other users have reported similar problems. We strongly recommend accessing the Reddit Community or Twitch Forum.
In addition, you can verify other console forums and if the users of other consoles (like PlayStation) are also witnessing similar issues.
If the issue happens to be on a larger level, it could be a Twitch end-related problem, and you only can wait for it to be automatically solved.
Wait for a day or two before you take try any other troubleshooting guide in case the issue is at the developer’s end.
If everything seems to work in Twitch servers, make sure you keep on reading to discover other options to fix the Twitch error code 61d3870c in Xbox.
2. Disconnect Xbox from Twitch Account
If the issue persists, try to disconnect and reconnect your Xbox console from the Twitch account. Many users have reported that disconnecting their Console from the Twitch account has resolved the issue.
Now, disconnect your Xbox console from the connections page.
After disconnecting the console, reboot the Xbox console (optional).
Now try to connect your Xbox console to the Twitch account again and check if you get 6 digit code instead of the error code 61d3870c.
3. Check your VPN
Twitch platform doesn’t approve VPN accounts that are suspicious and may terminate or suspend any account that uses those IP addresses. If you are connected to Twitch using a VPN client on your Xbox console, turn off the VPN client and then try to connect to the Twitch app again.
If the issue persists, contact twitch’s support. Twitch support may ask for your provided identification proof to verify the account to see any suspicious activity, for security reasons.
The good news is that you may actually use a VPN with Twitch without any connection or security issues. Private Internet Access (PIA) is a VPN company in the United States that has the biggest server network, connecting 78 countries.
A big part of these modern servers is hosted in the United States. As a result, you’ll always be able to connect to and stream your favorite content on Twitch with a low ping server, with no suspicious activity detected.
4. Change DNS Settings
Another simple solution that has worked for other Xbox users with twitch error code 61d3870c is changing the DNS settings on their console. Here is how to do it.
From the Xbox One home screen, go to Settings.
Select Network.
Click on Advanced Settings.
Now select DNS Settings.
Click on Manual.
Change the Primary and Secondary DNS values with the following values: Primary DNS: 8.8.8.8 and Secondary DNS: 8.8.4.4
Save the changes.
Reboot the console and try to sign in to the Twitch account.
If nothing seems working try to reset the Xbox console to the factory default by keeping all the games and personal files.
What other Twitch error codes can I encounter in Xbox?
Of course, the Twitch error code 61d3870c in Xbox is not the only one that might occur. There are several other problems and to prevent them, make sure you check the following list:
Twitch error 0x20b31181 on Xbox – This one talks about restricting account from broadcasting. You’ll be notified that you must be an adult to broadcast using Xbox One, so checking your account settings for any content restrictions might solve it.
Twitch error code 995f9a12 on Xbox One – If it will ever happen to face this error code, keep in mind that something unexpected went wrong. To fix this annoying issue in a few minutes, take a look at some dedicated solutions.
These are the best options you can try to get rid of the Twitch error code 61d3870c in Xbox. As you can see, they are not complicated, so you can perform each step below without experience.
If you encounter any additional questions or curiosities, do not forget that you can leave a comment in the section below.
Are you facing Decentraland not working on Safari issue? This article will tell you why it happens and how to get rid of it.
The Virtual World game, Decentraland, runs only on the browser right now. It is also free to start. As a result, many users from many devices have begun exploring this metaverse platform.
However, Mac users who use Safari may find that this browser is not running the Decentraland well. Mainly, they notice that this browser takes a lot of time to load the game or Decentraland is not working on Safari at all.
Both of these problems are related. So, These have the same solutions. However, before taking steps to fix this problem, you also should know the things that act behind the scene.
Why may Decentraland not work with Safari?
Decentraland not working or stuck at loading in Safari
Safari is getting better with each new macOS update Apple has been releasing. Notably, this browser gained new features, looks, and performance improvements with the macOS Monterey.
Still, many platforms or browser-based games like Decentraland don’t work well with it because of having a different rendering engine with less user base. But, the followings are the main reasons behind Decentraland not working on the Safari problem.
Safari is not a recommended browser by this virtual world game publisher.
Third-party extensions are causing problems loading essential resources.
Misconfiguration in Safari preferences.
Whatever causes the problem with Decentraland, you can always solve it if you follow the proper steps.
How can I fix Decentraland not working on Safari?
1. Disable the Adblocker
Click on Safari in the macOS menu bar and go to Preferences.
Click on the Extensions tab.
Uncheck the Adblocking extensions.
This type of extension scans all requests and may block essential elements required to run Decentraland on Safari. So, you should disable any active Adblockers in Safari as the first step to fix this problem.
2. Disable All extensions
Not only the Adblocking extensions or addons, any other items that can use a lot of resources should be disabled. Because, In many cases, We found Decentraland doesn’t load because of having less available CPU and memory power.
3 Make sure third-party cookies are enabled
Go to Safari preferences like before.
Go to the Privacy tab.
Make sure Block all cookies is unchecked.
4. Close all other apps
If extreme memory usage occurs in Mac, you may not be able to run Decentraland on Safari due to lack of available memory.
Note that this virtual world game requires 8 GB RAM, 2 GB available graphics memory, and Core i3 2nd gen+ or latest Apple Silicon processors to run smoothly.
So, close all the apps except Safari when you want to play it.
5. Try it on a different computer
One of the downsides of the latest Apple Silicon-based Macs, notably the M1 Macbook Air or Pro, is these are not upgradable.
If you have the base model with having just 8 GB of Ram, Decentraland not working issue may occur along with various performance problems.
Though it should not happen as Mac handles RAM very decently and the built-in GPU performs well, the situation still may come for some reasons. In this case, there is no alternative to using the Metaverse on another computer with better specs.
6. Change the browser
If Decentraland doesn’t work on Safari at all, you should use an alternative browser. It will be a wise idea if you download Edge or Chrome, or Firefox.
Then, try to run Decentraland on that browser.
Why should you use Chromium or Firefox browsers for Decentraland?
For Mac or Windows, Decentraland officially recommends users try the game in Chromium or Firefox-based browsers. The reason is apparent. The game has not been coded by targeting Safari users.
Though you can continue using Safari for it, you have to expect any errors or optimization issues.
Not only this, the most recommended way to play Decentraland is with the MetaMask wallet. This crypto-wallet has extensions for Chrome, Edge, Firefox, brave, opera, etc. Unfortunately, there is no Safari extension.
Else, In our test, Safari uses a significant amount of RAM when users run browser-based games, especially in the M1 or other Apple Silicon Macs.
So, for a safe and best experience, we recommend avoiding Safari to explore this virtual world.
By the way, the methods mentioned above are the best ones to fix Decentraland not working on Safari problem. You can share in the comment box if you know any other working way.
Digital pre-orders are now open for Chrono Cross: The Radical Dreamers Edition on Microsoft’s Xbox One and Xbox Series X console families ahead of its April 4th release.
Chrono Cross: The Radical Dreamers Edition is a modern remaster of the classic 1999 PlayStation roleplaying game which was praised for its gameplay, score, and plot.
This new version of Chrono Cross boasts new HD models, higher quality music, improvements to combat, and various visual options that can be enabled or disabled on the fly.
Here’s the official list of improvements made in Chrono Cross: The Radical Dreamers Edition:
3D models converted to HD
Refined character illustrations
Higher-quality background music
Switch enemy encounters on or off
Background filter feature
Battle enhancement features to make combat easier
Auto-battle function
Switch between imitation pixel font and HD font
Change screen resolution
Are you a fan of the original Chrono Cross video game or will this be your first time playing it? Let us know in the comments below and then follow us on Twitter and Facebook for more Xbox news.
Those of you who use Google Chrome to browse the web probably aren’t surprised to find downloads in the bottom bar of your browser window.
However, as more and more users complained about the lack of transparency in this feature, Google decided to make a few changes.
If you’re using Google’s browser to download files, you’re probably aware that the downloads bar can get pretty annoying. The bar appears at the bottom of your screen whenever you start downloading something and stays there until the download is complete.
Google’s latest test release for Chrome Canary comes with a new feature that hides the downloads bar as soon as it becomes inactive.
In other words, once you start downloading something from the web and see a new item appear in the downloads bar, it will prompt you with two options: either keep it visible or hide it until your download is complete.
New feature
The improvement is simple, yet will likely improve the overall workflow of many users. When you download a file, the downloads icon will appear next to any other extension icons in your toolbar at the top-right side of the browser.
If you click on that icon, a menu will pop up with your most recent downloads. You can then click on an individual download for additional actions like opening the file, copying it to your clipboard, or opening the download folder.
The change in Chrome will replace the toolbar with a bubble that appears directly next to the downloaded file in the browser’s download shelf.
The bubble will expand when clicked to display your most recently downloaded files, enabling the same quick access that the current toolbar provides, as well as displaying the progression on any active downloads.
Downloads button
In an upcoming update, the button will change color and size to reflect the stage of download progress.
From the recent patch, the downloads button will change color and size in reflection of your download progress, with the icon changing from gray to blue while active.
Rather than changing color based on whether or not the download finished successfully, it now reflects the status of your download.
Google has also been working on moving alerts to the top right of your screen instead of the bottom right. This should help reduce distractions when downloading files, as well as make it easier for users with touchscreen devices to interact with these prompts.
The removal of what is known as the download shelf from the bottom of the Chrome browser seems to confirm Google’s plans both to remove the downloads bar from Chrome entirely and replace it with a more discreet bubble model that does not hog a section of your display.
To be clear, this feature has not been fully implemented and rolled out yet. However, it’s currently accessible via Chrome Canary, a beta version of Google’s popular web browser if you go into settings and toggle a specific flag for it.
Chrome’s popularity
While Microsoft Edge has many useful features and does not require a disproportionate amount of memory to function well, it is still lagging behind Chrome as the most widely used web browser.
Google’s Chrome browser has been taking inspiration from Edge lately, but Microsoft’s browser still has a small share of the overall market. It appears that Google is paying attention to this recent growth in Edge’s market share.
Microsoft Edge is currently having some growth, the reason could be the design of the downloads bar on Google Chrome takes up an unnecessary amount of screen space, with the entire bar appearing and condensing your browser window even if you’re only downloading a single image.
Google hasn’t shared much on when exactly this new interface is going to be rolled out to users, so we’ll just have to keep a lookout for it and hope that it comes sooner rather than later.
What is your experience with Chrome’s downloads? How would you like it to appear after upgrading? Please share your opinion in the comments section.
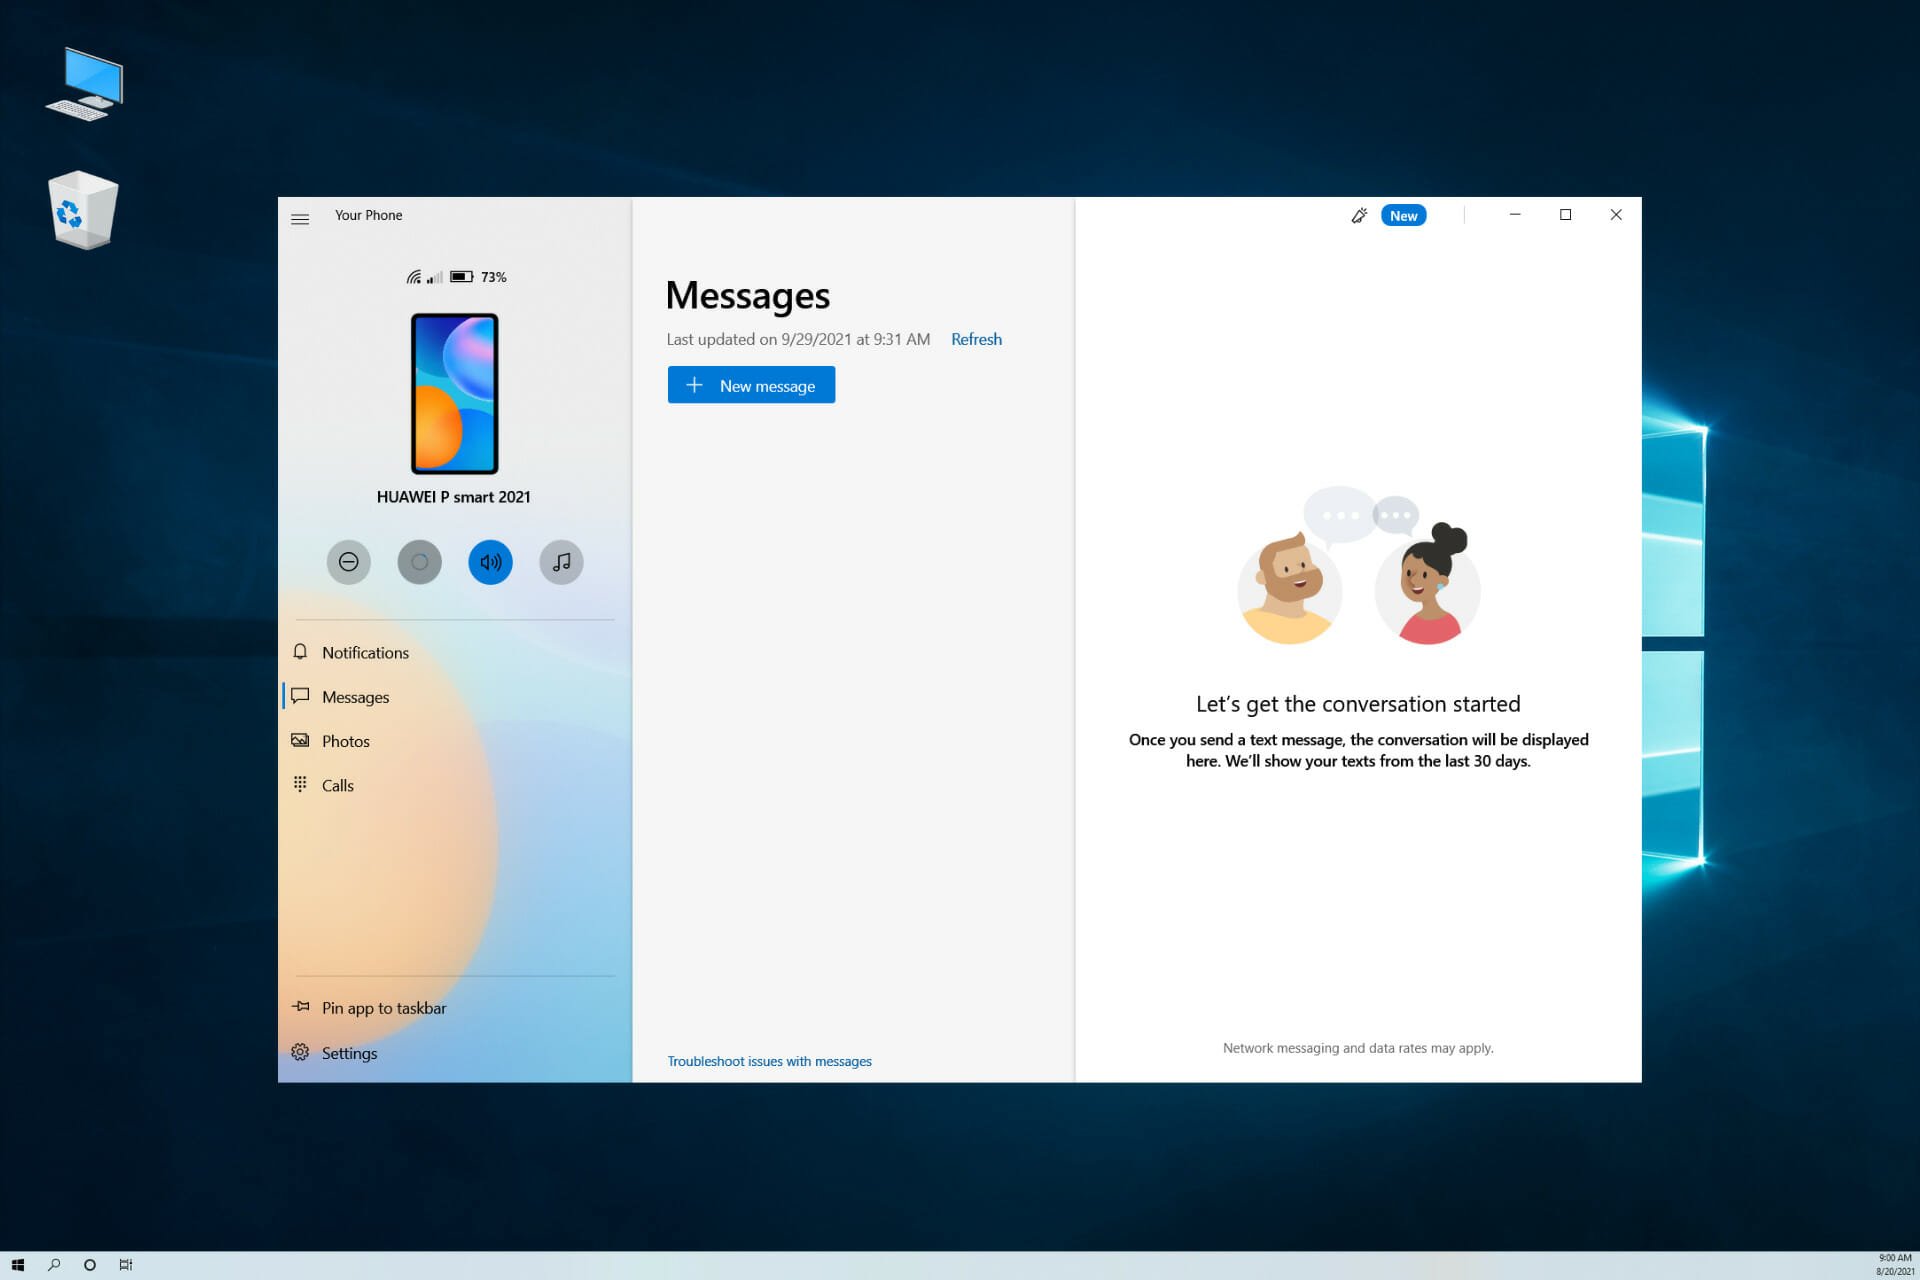
Microsoft is rolling out a new feature in its Your Phone app that lets Windows 11 users launch their most recently used applications on their Android devices.
The company is testing the new functionality, which doesn’t require any additional effort on the part of the user to set up, with Windows Insiders and it leverages the existing Apps capability already built into several select smartphones.
Your Phone allows users to mirror their Android phones directly to their PCs to respond to texts, notifications, and photos from their mobile devices. The app already lets users mirror multiple apps to a PC while they work on other tasks.
How it works
In Windows 11, the mouse cursor can be placed over the Your Phone icon in the notifications area of the taskbar to access the recent Apps feature.
The Android apps that users had most recently opened will also appear at the top of your Apps page inside Your Phone app. Clicking on an app will open it just as if it had been opened from the Apps feature within the Your Phone app.
With the new Recent Apps feature, your recently used Android apps will appear on the Your Apps page of the Your Phone app.
This change makes it easy to quickly access an app, making it possible for you to switch from your desktop to your mobile device
Microsoft plans to roll out this new Continuity feature to everyone over time and expects that everyone will have access within weeks.
Devices used
To take advantage of Microsoft’s new recent Apps feature, users must have a flagship Samsung Galaxy device that supports the exclusive link to Windows feature.
The new feature is currently only supported by select Samsung Galaxy devices that support the exclusive link to the Windows feature that can be accessed from the quick panel menu.
Link to Windows was developed by Microsoft and Samsung, and it allows users to sync their phone with their Windows 11 PC without using a USB cable.
Using the new Recent Apps feature, you can simply click on any of your recently used apps and it will open immediately within Your Phone.
If you don’t want to open an app, you can also just drag and drop files between your phone and PC by simply tapping and holding on to a file you want to transfer.
Apple’s handoff feature
Microsoft’s implementation is more sophisticated than Apple’s Handoff feature. It works with any app on all three platforms. Microsoft’s solution will open the native app that supports Handoff when it transitions from an iOS device to a Mac or vice versa.
This isn’t quite as handy as Apple’s solution since it doesn’t work with native iOS apps. You can only access apps on your Mac or Windows computer or through Chrome browsers on a Mac and Windows PC.
One nice thing about this new Continuity feature is that it works across multiple devices. If you pick up where you left off on one device, you can continue using that app on another device.
The big caveat here is that this new recent app feature only works with specific phones right now. Microsoft says support for more Android phones running will be added soon.
The Your Phone app will require an active internet connection and Bluetooth connection between your phone and PC to make this work.
The experience isn’t as seamless as Apple’s handoff feature where you could easily switch from one device to another without launching individual apps.
How do you feel about the recent apps on your phone app, will it be of help to you? Share your thoughts in the comment section.
The File in use error message usually appears when you try to delete a certain file while it’s being used by a different application or a user. This can be an annoying error, so today we’re going to show you how to fix it on Windows 10.
How do I fix the file in use error?
1. File in use error
1.1. Uninstall the problematic applications
Third-party applications can sometimes cause the File in use error to appear. Users reported that this problem occurred while working with ISO files. According to them, the cause of the problem was an application called Virtual Clone Drive.
After removing the Virtual Clone Drive, the error was resolved completely.
One way to instantly get rid of any kind of software from your PC is to go for a professional uninstaller.
While you have the option to remove anything from the Add or remove programs in Windows, we suggest you to use dedicated uninstaller software.
Removing from Windows will leave behind some files associated with the problematic application. This will prevent a future reinstallation and cause all sorts of issues.
Dedicated software can find and successfully remove all files related to the app you want to delete. They can also completely uninstall stubborn apps that can’t be removed using the Add or remove panel.
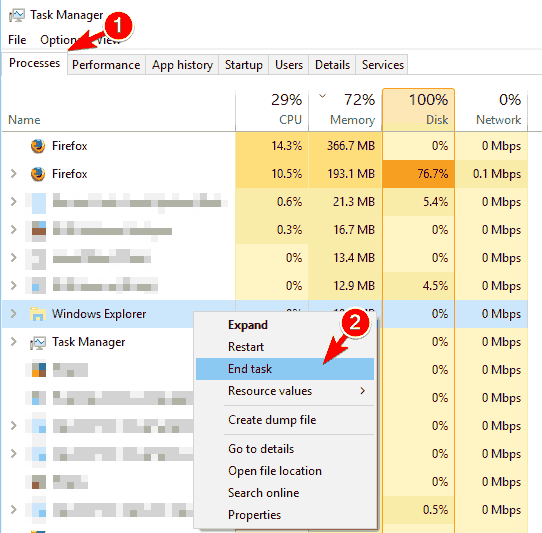
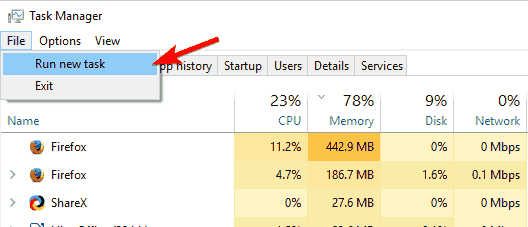
When Task Manager opens, navigate to Processes tab.
Locate Windows Explorer on the list, right click it and choose End Task.
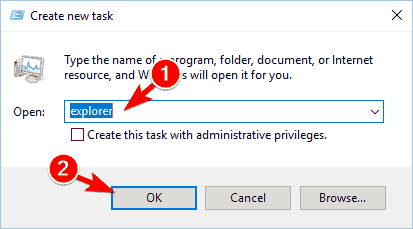
Once Windows Explorer closes, select File > Run a new task.
The Create new task window will now appear. Enter explorer and click OK to start Windows Explorer again.
If you’re getting the File in use error, it’s most likely that the file is being used by a different application. Sometimes, certain apps can use files in the background and cause this error to appear.
To fix the issue, be sure to close all running applications and try to delete the file. In addition, restart your PC and try to delete the file again.
If that doesn’t work, you might want to try moving all other files to a different folder. After doing that, try to delete the folder that has the problematic file in it. Lastly, you can try restarting File Explorer.
Once Windows Explorer starts, try to delete the file again. If that doesn’t work, you can try to terminate the process that’s related to the problematic file. For example, if you can’t delete a PDF file, try terminating your PDF application from Task Manager.
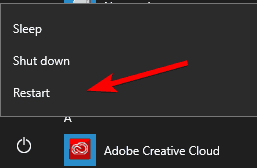
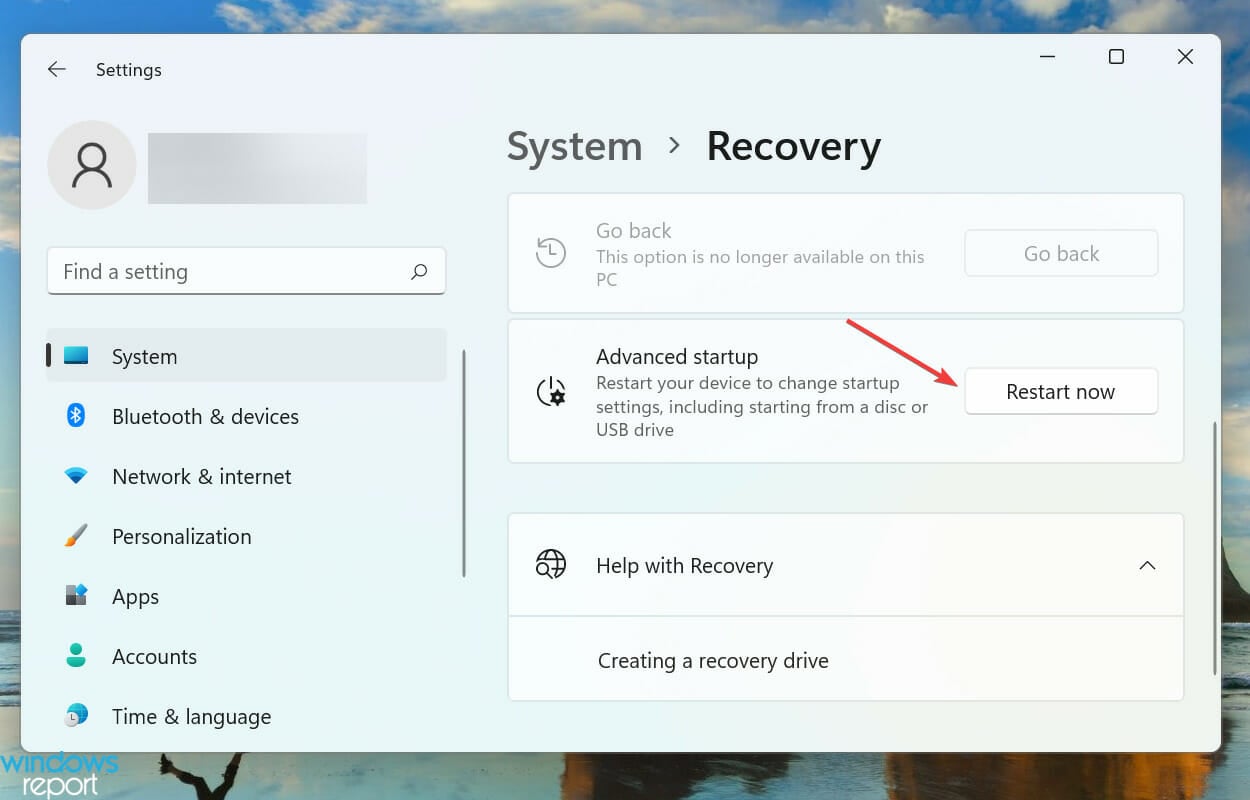
Now click on Power button. Hold the Shift key on your keyboard and choose the Restart option from the menu.
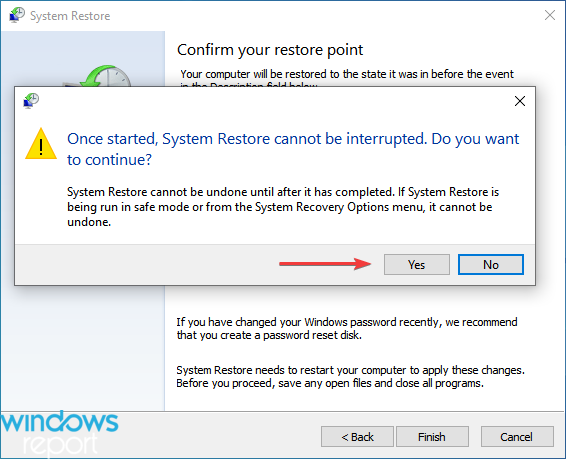
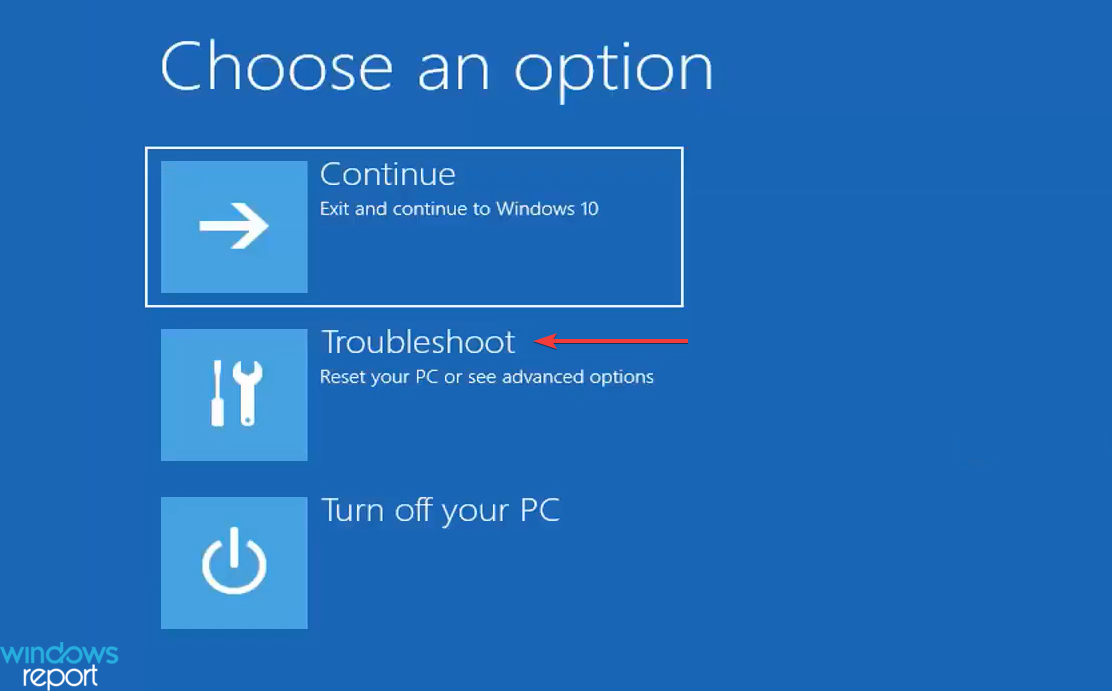
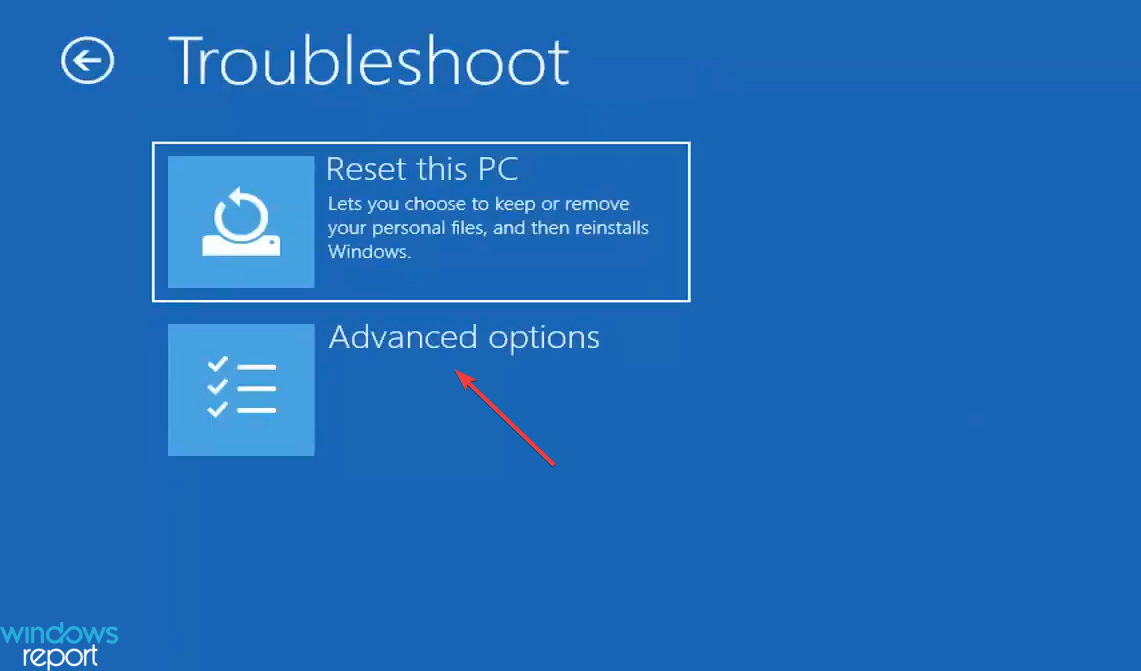
Once your PC restarts, you’ll see a list of options. Select Troubleshoot from the menu.
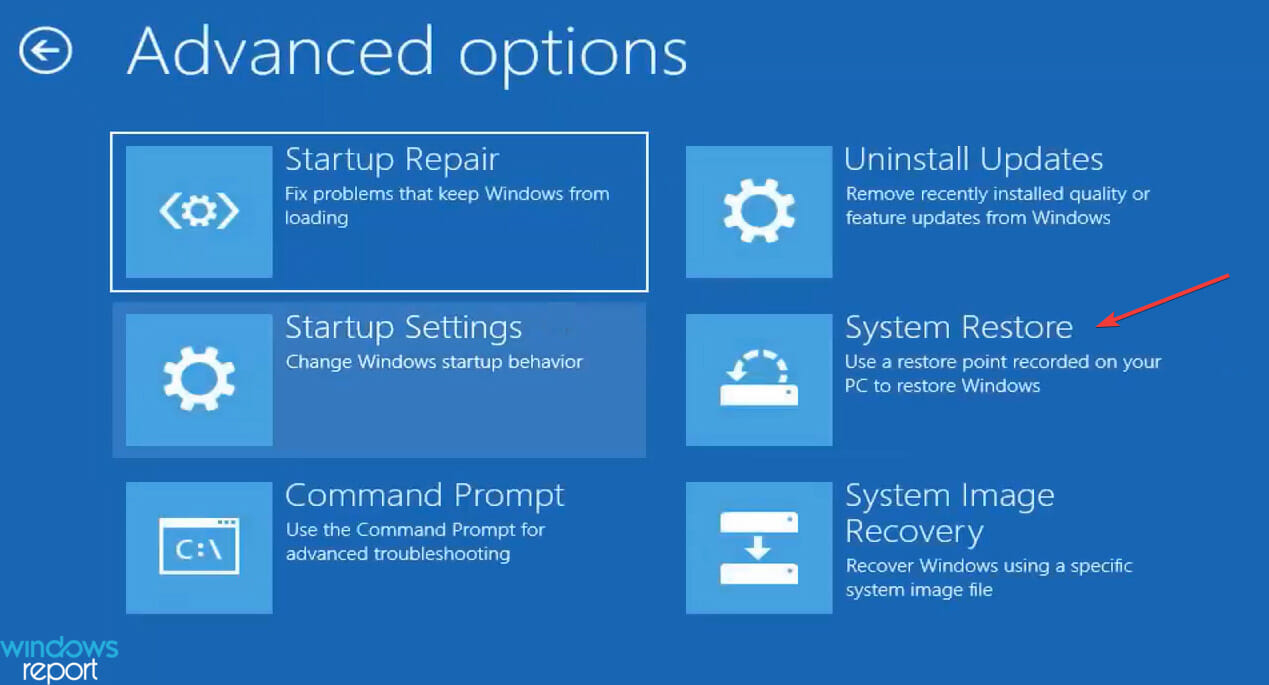
Select Advanced options > Startup Settings and click the Restart button.
A list of options will appear. Choose any version of Safe Mode by pressing the appropriate key.
If you can’t delete a file due to the File in use error, you might want to try removing it from Safe Mode. Once the Safe Mode starts, try to delete the file again.
1.4. Use Command Prompt
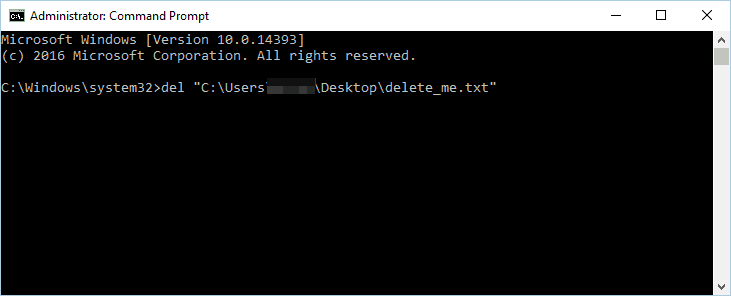
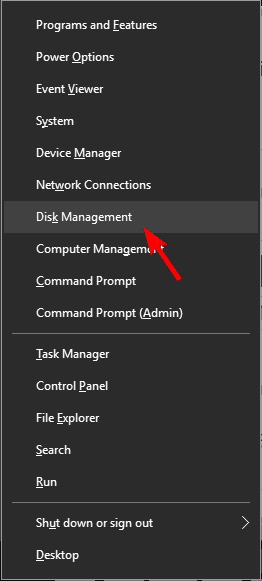
Open Command Prompt as administrator. To do that, press Windows Key + X to open Win + X menu and choose Command Prompt (Admin).
Once the Command Prompt opens, find the problematic file, hold the Shift key, and right-click it. Now choose Copy as path from the menu.
In Command Prompt, enter del and press Ctrl + V to paste the file path. Don’t run the command yet.
Use Task Manager to close Windows Explorer. We explained how to do that in Solution 1, so be sure to check it out. In order to successfully remove the file, it’s important not to restart Windows Explorer.
Switch back to Command Prompt and press Enter to run the command that you entered in Step 2.
After the command is executed, you can close Command Prompt and restart Windows Explorer
If you don’t want to rely on third-party solutions to fix this problem, you can use Command Prompt instead.
1.5. Change the file extension of the problematic file
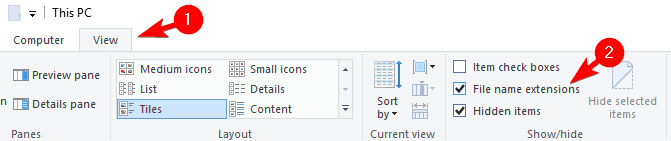
According to users, you might be able to fix this problem simply by changing the file extension of the problematic file. In order to do that, first you need to turn on the option to show file extensions. To do that, follow these steps:
Open File Explorer.
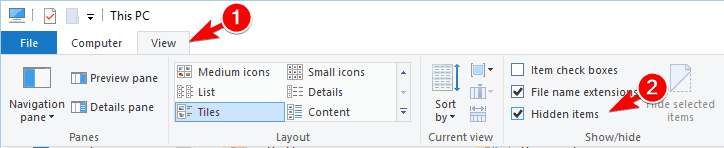
Click the View tab and check File name extensions option.
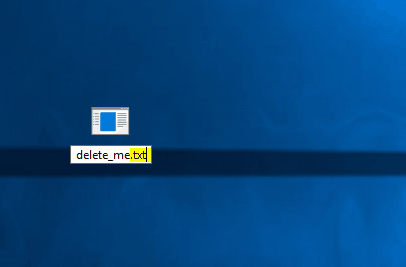
After doing that, you need to find the problematic file, select it and press F2 on your keyboard.
Change the file extension to .txt or any other extension.
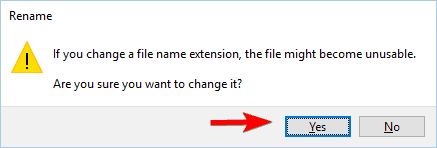
A warning message will appear. Click Yes.
After you change the file extension, try to delete the file again.
1.6. Switch to Details view
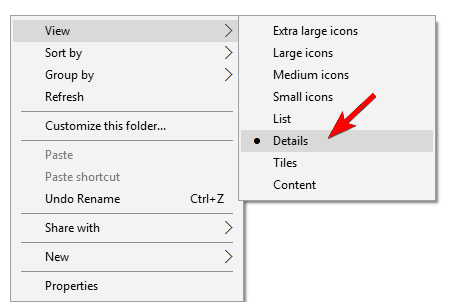
Open File Explorer and locate the problematic file.
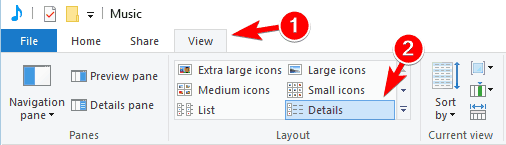
Right-click the empty space and choose View > Details.
Optional: You can do the same thing by navigating to the View tab and clicking on Details.
According to users, the File in use error can appear due to your thumbnails. Sometimes, Windows has issues unloading thumbnails, preventing you from deleting your files.
To fix the problem, you just have to switch to Details view in File Explorer and you should be able to delete the file.
After switching to Details view, all thumbnails will be disabled and you should be able to delete the file. Users suggest moving the file to Desktop and closing the File Explorer window.
By doing so, the preview pane won’t be available and you should be able to delete the problematic file with ease.
1.7. Disable thumbnail generation
Press Windows Key + R and enter gpedit.msc. Click OK or press Enter.
When the Group Policy Editor opens, navigate to User Configuration > Administrative Templates > Windows Components > File Explorer in the left pane.
In the right pane double click on Turn off caching of thumbnails in hidden thumbs.db files.
Select the Enabled option and clickApply and OK to save changes.
If you can’t access Group Policy Editor, you can disable thumbnail generation using Registry Editor. To do that, follow these steps:
Press Windows Key + R and enter regedit. Press Enter or click OK.
When the Registry Editor opens, navigate to HKEY_CURRENT_USERSOFTWAREPoliciesMicrosoftWindows key in the left pane.
Right-click the Windows key and choose New > Key. Enter Explorer as the name of the new key.
Navigate to the Explorer key and right-click the empty space in the right pane.
Choose New > DWORD (32-bit) Value. Enter DisableThumbsDBOnNetworkFolders as the name of the new DWORD.
Double-click newly created DisableThumbsDBOnNetworkFolders DWORD to open its properties.
Set Value data to 1 and click OK to save changes.
After you’re done, close Registry Editor and check if the problem is resolved.
If you’re having problems with this error, you might be able to fix it by disabling thumbnail generation. You can do that by using the Group Policy Editor. This solution applies to network drives, but it might work for your local drive as well.
Start the application. A list of active files will now appear.
Locate the problematic file on the list, right-click it and choose Kill Processes of Selected Files. By doing so, you’ll terminate processes that are associated with that file.
After doing that, try to delete the file again.
Another third-party application that can help you with this problem is OpenFilesView tools. The application is simple to use.
This is a simple application that allows you to close all processes related to a specific file. If the problematic file isn’t available on the list, you might have to try a different solution.
When the application opens, go to Find > Find Handle or DLL.
In the Handle or DLL substring field, enter the name of the problematic file and click the Search button.
A list of associated applications and DLLs should appear. Locate the application associated with the file, right-click it and choose the Close Handle option.
Several users reported that you might be able to fix the problem by using Process Explorer.
Keep in mind that you might have to repeat this process few times in order to close all related applications. We have to mention that Process Explorer is an advanced tool, so you might find it hard to use if you’re a novice user.
1.10. Make sure that file isn’t blocked
Right-click the problematic file and choose Properties from the menu.
Go to the General tab and click the Unblock button in Security section. Click OK and Apply to save changes.
Sometimes, the File in use error can appear if the file you’re trying to delete is blocked. Windows sometimes blocks downloaded files in order to protect you from malware. Although this feature can be useful, it can also prevent you from removing certain files.
After unblocking the file, try to delete it again. If you can’t find the Unblock button in the Properties window, it means that the file is already unblocked, so you should try a different solution.
1.11. Remove the virtual hard drive
Press Windows Key + X and choose Disk Management from the list.
The Disk Management tool will now appear. Locate your virtual hard drive, right-click it and choose Detach VHD.
A confirmation message will now appear. Click OK. After you detach the drive, it will disappear from Disk Management tool.
After doing that, close Disk Management and try to delete the .vhdx file again.
A few users reported that the File in use error appears while trying to remove a virtual hard drive .vhdx file. To fix this problem, you need to remove the virtual hard drive from your PC.
Keep in mind that this solution only applies when deleting virtual hard drive files. If you have this problem with any other type of file, you should try a different solution.
1.12. Use Resource Monitor
Press Windows Key + R and enter resmon. Press Enter or click OK.
When Resource Monitor starts, go to the CPU tab. Now, expand the Associated Handles section and in the Search Handles field, enter the name of the problematic file. A list of associated applications will now appear.
Right-click the associated application and choose End Process from the menu.
If you can’t delete a specific file, you might be able to solve the problem by using Resource Monitor, a Windows application that can give you a lot of information about open applications and files.
Keep in mind that sometimes you won’t be able to find the problematic file using Resource Monitor. If that happens, you might have to check each process one by one and check the list of all associated handles.
If you manage to find the folder that has the problematic file, you’ll be able to determine which application is using it. Resource Monitor is an advanced tool, so it might take you a while to get used to it especially if you’re a first time user.
2. How do I fix the File in use error in Excel?
2.1. Create a registry file and add it to your registry
Paste the following text: Windows Registry Editor Version 5.00 [HKEY_CURRENT_USERSoftwareMicrosoftWindowsCurrentVersionExplorerAdvanced] "ShowInfoTip"=dword:00000000[HKEY_CURRENT_USERSoftwareMicrosoftWindowsCurrentVersionExplorerModulesGlobalSettingsSizer]"PreviewPaneSizer"=hex:35,00,00,00,00,00,00,00,00,00,00,00,bd,02,00,00"ReadingPaneSizer"=hex:04,01,00,00,00,00,00,00,00,00,00,00,64,02,00,00
Go to File and click Save as.
Set Save as type to All Files. Enter fix.reg as the File name and click the Save button.
Close Notepad and locate the fix.reg file. Double-click it and choose Yes when the warning message appears.
According to users, you might be able to fix the File in use error while opening Excel files by creating a .reg file and adding it to your registry.
Keep in mind that this solution will modify your registry, therefore it’s advised to create a backup or System Restore point.
2.2. Disable the preview pane
Users claim you can fix this problem simply by disabling the preview pane in File Explorer. We already explained how to do that in one of our previous solutions, so be sure to check it out.
2.3. Check the file name
The File in use error can appear if the file name of your Excel document is too long. If the file name is too long, Excel can’t create the lock file.
To fix the issue, you need to locate your Excel file and shorten its name. After renaming the file, you should be able to access it without issues.
2.4. Delete the hidden lock file
Navigate to the folder where problematic Excel file is saved.
Click View and check the Hidden items option.
Locate the lock file. (It should have the same name as your Excel document.)
Delete the lock file.
Excel usually creates a temporary lock file alongside your Excel document. According to users, you simply have to locate and remove the lock file in order to fix this error.
After removing the lock file, you should be able to access your Excel document without any issues.
2.5. Check the personal.xlsb file
Navigate to C:Usersyour_usernameAppDataRoamingMicrosoftExcelXLSTART folder.
If this folder isn’t available, navigate to C:Usersyour_usernameAppDataLocalMicrosoftExcelXLSTART folder instead.
If you can’t find any of these folders, you’ll need to reveal hidden files. We already showed you how to do that in our previous solution, so be sure to check it out.
Keep in mind that personal.xlsb is a hidden file, so you’ll need to reveal hidden files in order to see it.
Once you locate personal.xlsb file, delete it if you don’t plan to use it.
Optional: If you need the personal.xlsb file, right-click it and choose Properties from the menu.
Navigate to General tab and check the Read-only option. Click Apply and OK to save changes.
According to users, the File in use error in Excel appears after adding macros to the personal.xlsb file. To fix the problem, you need to find and delete that file.
After doing that, you should be able to start Excel without any problems.
The File in use error is an annoying problem that will prevent you from accessing your files. If you have this error on your PC, be sure to try some of our solutions and let us know how it works out for you!
On every version of Windows you can assign a specific label to your hard drive partition so you can easily distinguish it from other hard drive partitions. However, Windows 10 users reported that they are getting Enter current volume label for drive C message, so let’s see what does this message means.
What does Enter current volume label for drive C mean?
As we previously mentioned, every storage device, such as your hard drive or USB flash drive, can have one label assigned to it. By default, every storage device has a drive letter, but you can also assign a label to a hard drive partition or to a USB flash drive.
This is extremely useful if you have several hard drive partitions available and you need to distinguish them easily. For example, you can name one of your partitionsBackup or Work and use it to only store your backup or work related files.
In addition to better organization of your files, using labels can also be helpful while making changes to your hard drive. For example, if you’re formatting your hard drive or making any major change to it, it will be a lot simpler to find the drive that you want to modify by using its label.
These are just a few examples of how to use labels, and if you didn’t use them before, you might want to start now.
While making certain changes to your hard drive you might get Enter current volume label for drive C message, and this means that you need to enter the correct label for the drive that you’re trying to modify.
There are several ways to find your label, and today we’re going to show you how to do it properly.
1. Use a third-party partition manager
If you need to better manage your partitions in order to increase work efficiency, or simply to avoid the issues then you will need a third-party partition manager.
While generally, you could do that with Windows’ built-in tools, they can only be done when resetting the PC, and they always involve formatting the driver completely.
Dedicated tools let you change the name of your partitions, convert them, add or remove storage space, and more. Most of these processes can be done without losing any data.
2. Check it from This PC
Open This PC.
List of all available drives will now appear. If you have a label assigned to your storage device, you should easily see it. In our case, SanDisk was the label assigned to our storage device.
If you want to modify your volume label, simply do the following:
Right click the drive that you want and choose Properties from the menu.
Go to General tab. First field should represent your label. If you want, you can easily change it and click Apply and OK to save changes.
You can easily assign any label to your storage device simply from This PC.
3. Use CommandPrompt
Press Windows Key + X to open Win + X menu and choose Command Prompt (Admin).
When Command Prompt opens enter F: and press Enter.
We used F: because that’s the letter of our storage device, but you’ll have to use the letter that represents your storage device.
After your current directory changes to F: drive, simply enter dir and press Enter to list the contents of that directory.
At the top you should see Volume in drive F is message that tells you the volume label of your storage device.
Optional: You can make this process even more simpler by entering the vol F: command as soon as the Command Prompt opens.
Be sure to replace F with the letter that matches your storage device.
If you need to find your volume label, you can use Command Prompt. Finding your volume label with Command Prompt might be a bit more complex, but in some cases, you might have to completely rely on Command Prompt and use it to make changes to your hard drive.
Now that you know how to find your disklabel, you should be able to fix the Enter current volume label for drive C message. According to users, you just need to enter your volume label when this problem occurs and press Enter.
If you don’t have a volume label assigned, you can simply leave it blank and press Enter. According to users, this error mostly occurs when you’re trying to convert FAT32 drive to NTFS drive using convert command in Command Prompt.
In some rare cases this message can appear if your volume label is corrupt, and if that’s the case, you might have to reformat that partition in order to fix this error.
Keep in mind that formatting your partition will delete all files from it, therefore be sure to create a backup. To format your partition using Command Prompt, do the following:
Open Command Prompt as administrator.
When Command Prompt opens, enter diskpart and press Enter.
Now you need to select your hard drive.
To do that, enter list disk and list of all available hard drives and storage devices will appear.
Judging by the size, locate the hard drive that you want to use and enter select disk x.
Replace x with the appropriate number.
Enter list partition to list all available partitions on that hard drive.
Enter select partition x to select an appropriate partition.
After that, enter format fs=ntfs quick label=your_label.
You can replace your_label with any label that you want to use for that partition.
Press Enter and the formatting process will now start.
We have to warn you that diskpart is an extremely powerful tool and almost all changes performed with this tool are irreversible, therefore use extra caution and make sure to double check everything before proceeding.
Another way of formatting your partition is to open This PC and use the format option. To do that, follow these steps:
Open This PC, locate the partition you want to format, right click it and choose Format from the menu.
Select the File system that you want to use, enter Volume label and press Start.
Once again, formatting will remove all files from a certain partition, so be sure to back them up before you proceed.
Enter current volume label for drive is usually not an error, and in most cases, you just need to find your volume label and enter it in order to proceed. If your volume label is corrupted for some reason, you might have to format your partition in order to fix this problem.
With the update bumping the latest Xbox OS version to 10.0.22000.3542, you can try out this new option to set custom backgrounds in a few simple steps after it is installed. First off, you can find any image you like in Microsoft Edge, move the browser pointer over that image, then press the Menu button, and choose Set as background.
This is the only notable new feature that Microsoft mentions in the changelogs, but a Twitter user also mentions that it tweaks the way Gamerscore might appear. Now, you might see a comma between the digits in your Gamerscore, making it easy to read.
After installing this update, you might have some issues with Xbox’s Quick Resume feature. Microsoft mentions this in the changelog, saying that when returning to a Quick Resume title, your controller might not respond. You can fix it by quitting and coming back to the game. Other known issues covering Controllers, Games, Guide, Home, and TV displays can be seen in Microsoft’s documentation.
This update should install automatically on most consoles. If you’re still having issues, though. you can force the upgrade by going to the Xbox Settings App, clicking System, and then Updates.
What is one of the most known places where people go to find their favorite software? If you guessed the Microsoft Store, then you are one hundred percent right.
However, lately, people haven’t really been that happy with the way it works, due to some bugs that were mostly fixed, and because of the lack of some of the popular apps.
Microsoft, on the other hand, is doing everything in its power, apparently, to make this a much more stable and useful experience for everyone involved.
New animated icons for the Microsoft Store
Recently, the Redmond tech company added another small yet effective touch to the Microsoft Store for Windows 11.
It animated, sort of, the icons on the left side of the Store window, so they react when you click on them. It’s not a big change, but it gives it more of a Windows 11 vibe.
This has been spotted by Windows Insiders that are currently testing the new OS on the Dev Channel, version Version 22202.1402.0.0.
Respondents to the Reddit post were both pleased with the new addition and displeased with the fact that Microsoft ignores obvious areas where the software actually needs serious work.
The new store is very cool but they should or actually MUST remove all the useless and fake apps from it if they want to be a quality store. I’d rather prefer to have 500000 real and good apps than 25000000 garbage.
Another complaint users have about the Windows 11 Store is the fact that it’s still sluggish and can’t compete with the old version.
Spanish users are also unhappy with some of the choices that the tech giant made for the application, specifically the name of one of the categories.
Even though this doesn’t seem like such a big deal to the naked eye, some people actually feel like the translation is not at all accurate and could use some work, considering that it’s an official Microsoft product.
All is not lost, however, as we are pretty sure that Microsoft will take the necessary steps to improve this experience as well.
These changes will soon roll out to the general public, once Insiders deem them bug-free and ready for worldwide usage.
They will most likely make their way into our PCs via a Windows Update, so look for them after you have downloaded and installed a brand new one.
Also, if you have an issue where the Store doesn’t work for you whatsoever, on both Windows 10 or 11, we can help you fix it, so make sure you check out our dedicated article.
This weekend’s Xbox Free Play Days event, running from midnight Thursday, February 10th through Sunday, the 13th, features quite a nice lineup. Microsoft has announced that the games will include Valkyria Revolution, PGA Tour 2K21, and Riders Republic.
If you’re curious, about these titles, we have your back. Valkyria Revolution is a 2017 action RPG with strategy elements and anime-inspired visuals. While it is technically part of the Valkyria Chronicles series, it has no narrative connection to it and is a standalone entry. PGA Tour 2K21 is, as you may be able to guess, a golf game. It is developed by 2K Sports and is essentially a continuation of The Golf Club franchise with the PGA license attached.
And last but certainly not least is Riders Republic. This is an adrenaline-charged action sports title with skiing, snowboarding, mountain biking, and wingsuit flying. It is billed as a massively multiplayer sports game, in which up to 64 players can compete against each other at a time.
If you didn’t already know, Xbox Free Play days is what it sounds like — a nice perk for Xbox Live Gold and Xbox Game Pass subscribers. During these events, players can try out great games for a few days at no cost, maybe even finding a new favorite in the process. The games can be downloaded on a console or PC via the Microsoft Store. Players can go on to purchase the game at discounted prices, too, which we’ve noted below.
PGA Tour 2K21: 75% off, Standard Edition now $15 instead of $60
Riders Republic: 50% off, Standard Edition now $30 instead of $30
This week’s impressive lineup further demonstrates the incredible value offered by Xbox Game Pass (and Xbox Live). The free Play Days are a wonderful way for gamers to try out games they otherwise would never give a second glance, but also it is a great way to try out popular games before making the purchase commitment.
Our today’s article will show you the best broadcasting software for Twitch, so make sure you read it completely!
Live streaming is the hottest trend and powerful streaming software makes the entire process a lot easier. A streaming software primarily helps you with mobility on a live streaming video platform.
It eliminates the need for hardware (like several monitors, wiring, or a huge encoding unit) and rather simplifies the process of just opening and shutting your laptop.
While there are umpteen live streaming platforms online, Twitch is leading the way. It’s known for its live or video-on-demand services.
Therefore, there’s an increasing demand for efficient streaming software that can record, encode, and publish content on Facebook or YouTube within Twitch.
Telestream is a champion streaming software that helps you to create, absorb, transcode, caption, analyze, convey, play and stream any video format, conveniently.
It offers a simple yet compelling interface that’s easy to use and manage. In this matter, do not worry if you’re a beginner.
At the same time, it ensures maximum and uninterrupted quality. The software offers different video solutions, one of which is for Live Streaming.
It allows you to stream from anywhere in the world. Whether you are a professional or a prosumer, Telestream offers a solution for live streaming with recording, encoding, and furnishing live video.
While there is quite a few live streaming software available in their product catalog, one of them is the Lightspeed Live Stream.
Among its major and common features are:
Business level streaming on multi-screens
Ensures that ad insertion is smooth and neat without the need for re-encoding
Wide choices in the way you encode your streams
HTTP Live Streaming (HLS), MPEG DASH, MP4, and CMAF packaging
Offers the facility of integrated scheduling, branding, or event triggering that help in supple broadcasting and channel distribution
From mobile phones or tablets to desktops, it has got all devices covered by creating and delivering live video content with ease, and at a reduced price.
Telestream
Try this complete solution to record, encode and live-stream your favorite Twitch content.
Wirecast is another great broadcasting software for Twitch and it is owned by Telestream. It is widely used, especially in educational establishments (schools, colleges, universities) across the globe.
It is also used by administrators and technology controllers to stream graduations, training, seminars, events, etc. If you’re a student, you can use this tool to learn broadcasting methods.
Houses of worship, live event production, sports streaming, television, radio, and news broadcasts, and digital marketing and social media are some of the other fields where Wirecast is used extensively.
Not only that with Wirecast you’ll stream and record at the same time, but you’ll be able to stream to social media channels like Facebook, Twitter, YouTube, Vimeo, etc.
In addition, it enables users to capture multiple IP sources or anything that’s on the PC screen.
Affordable and easy to use, Wirecast lets you start streaming in minutes on Twitch.
Some of its major features include:
Allows you to mix and switch video and audio shots in a single click easily
Lets you move, drag and resize sources and arrange them in any order to get the desired look
Endless resources like cameras, webcams, mic, and more
More than 100 integrated graphics and captions
Integrated curation and display for Twitter comments
Allows sports producers to replay, create scoreboards, and use clocks & timers
Offers support for ASIO, WASAPI, and CoreAudio based devices
Wirecast
Stream all the high-quality Twitch content you want from the comfort of your home or office.
1AVCenter from PCWinSoft Software lets users stream their desktop or webcam with a single click. It helps broadcast their videos with high-definition audio over the internet on a configured web page within your website.
Apart from being a live video streaming server, it’s also an RTMP stream broadcasting software. Users can stream from literally any video source available on their computer, for example, mic, webcam, or desktop to WMP or to other media servers like Wowza, Flash Media Server, etc.
The best part is, the app eliminates all concerns related to video and audio broadcasting. Moreover, users can schedule tasks, or even set the app to start with Windows.
Users can send files and links through email, upload files using FTP, file sharing module with the pro version, and do a lot more with 1avstreamer.
Check out these other amazing features:
Uses A.I. to examine hardware and create over 14 ready-to-be-executed jobs right out of the box
Ability to send files via e-mail or upload them through FTP
Sleeky user interface with capture window detach for better desktop management
Complete live video & audio streaming server
1 AVCenter
All-in-one tool for live video streaming, screen recording, audio capture & more.
Restream is an easy-to-use multistreaming server that allows users to stream from more platforms at once, including Twitch, Facebook, Twitter, LinkedIn, VK, Mixer & more.
The service is popular with both amateurs and professionals in domains like gaming, media, or politics. As such, it boasts 600 million users engaged daily or 8+ million monthly broadcasts.
Restream offers not just the streaming service, that allows you to reach a wider audience, but also analytics tools, chat options for all streaming platforms in the same console, or a streaming scheduler to keep your audience engaged at any hour.
These features are also worth to be mentioned:
Easy to stream to Twitch, Facebook, and YouTube
Track detailed analytics for multiple platforms on a single screen
You can upload your videos to our secured cloud, then schedule them to go live
Restream
Seamless multistreaming platform & audience engagement tool for 30+ social networks, Twitch included.
Why should I use broadcasting software for Twitch?
Video streaming software allows you to mix multiple camera sources and create a professional-looking HD broadcast.
In addition, you have to consider encoding, which is another major function of streaming software. What is great about most streaming software is that they help you produce those professional-grade live streams without much broadcasting experience.
Streaming your favorite shows and games is fun, but broadcasting the shows on Twitch using live streaming software is simply an out-of-the-world experience.
So, pick one from the above list, and get going with live streaming.
Amazon’s Twitch continues its expansion, competing with Google’s YouTube. Google’s service is top-rated, but now more and more users are looking somewhere else to switch camps.
In this guide, we’ll explore some useful information that will help you understand what it is all about with this Twitch Desktop app and how great it can be to use it.
Why should I download Twitch desktop app?
1. Twitch gains more ground
A while ago, Twitch was nothing more than a platform used by gamers to stream videos while playing their favorite games.
Players still use it for this purpose, but many people now use the platform for general interactions and vlogging. Twitch entered the desktop market thanks to a dedicated app.
2. Twitch Desktop App features
The desktop app provides access to all the features that Twitch users have known and loved so far, as well as many new exclusive tools. It includes memes, streams, and you can watch all your favorite VODs, clips, and live streams.
You also get the Twitch chat and the opportunity to support your favorite streamers with Bits and Subscriptions.
The app includes many features such as the Dark Mode, servers, voice and video calls, friend sync, and lots of mods for games. Also, the latest update even got extensions working.
Some users also seemed to be interested in how to activate Twitch dark mode in the browser. If you’re in the same boat, make sure you check our dedicated guide.
Look at the Twitch App for Windows option, then click on Download for Windows.
Choose where to save it.
Once it is downloaded, open the file and follow the on-screen instructions to install it.
Now, double-click on the desktop shortcut and access the app.
Enter your Twitch credentials to log in.
What are the best Twitch app features?
Dark Mode: now, everything you do on Twitch becomes more friendly with your eyes and you can late-night stream without any problems.
Friends: using the Twitch Desktop App’s Friend Sync, you can now find all your friends from across the creator-verse.
Twitch Desktop Apps’ servers: with these servers, communities have a place where they can hang out non-stop with text and voice rooms.
Mods and Addons: the app includes CurseForge which is a game mod community where thousands of mods and add-ons are shared for lots of games.
Voice and Video Calls: on Twitch web you can send private messages to your friends with Whispers, but in the desktop app, you can get more personal with voice and video calls.
This is how you can download and use the Twitch desktop app. We hope that our guide helped you with a better understanding of how this amazing platform works.
If you have any additional questions or curiosities, do not hesitate to use the comment section listed below.
Bits are virtual goods you can use on Twitch. With this currency, you can do various things on the streaming platform, such as sending Cheers.
While this is a great feature, quite a few users encountered a specific problem: Twitch bits are not showing up. Being unable to see (and use) Bits could be a major issue for some people. One user reported the following:
Hey guys – I recently got a 1000 bit donation last night on my stream. The weird thing is, the donation hasn’t appeared on my Twitch account yet. […] I actually have known the guy who donated all of that for a while now and consider him a friend. So it isn’t a fake donation, I just don’t know what to do or if my next step should be contacting Twitch Support.
So, the OP received Bits from a trustworthy user. Therefore, this can’t be a fake donation. Still, the 1.000 Bits don’t appear on Twitch.
Luckily, there are some explanations and solutions to this problem. Today we will show you what to do if the Twitch bits are not showing up.
What are Twitch bits?
By Twitch Bits we are referring to a currency donated to streamers by viewers. Usually, these are rewards to thank them for their work.
Basically, Bits are animated cheering emotes that you send in the chat. These are some of the most valuable ways to support your favorite streamers and broadcasters.
Accumulating over time (through purchasing or watching free online adverts), users are able to donate their Cheer Bits whilst watching live streams.
Now, let’s see what you can do if the Twitch bits are not showing up?
What can I do if Twitch bits are not showing up?
1. Wait a little bit longer
Bits may not appear immediately after a donation. So, you have to wait at least 24 hours for the transaction to take effect.
2. Check your revenues
Press on the Windows key, type Twitch, and open the app, or simply go to the Twitch official page.
First, make sure that you are logged in with your Twitch credentials. If not, enter them, then click on Log In.
To make sure you received the Bits, check out the Revenues tab.
How can I buy Twitch bits?
You can easily get bits from the Twitch app, by clicking on the Get Bits button.
Users usually buy Bits using Amazon Payments or PayPal. After registration with Twitch, you can add either option as a payment method and then purchase your Bits.
Keep in mind that they are available in 100, 500, 1000, 1500, 5000, 10000, and 25000 amounts. Each bit package corresponds to a cash amount that varies slightly, depending on exchange rates.
Bits are crucial for every serious Twitch user. Therefore, any issue affecting them is quite significant.
Still, things may not be as scary as they seem. Wait for a little longer and make sure you use the best browser (UR Browser, that is) for Twitch!
Did you find our article helpful? Let us know in the comments section below!
The voice typing feature is one of the most talked about in the latest iteration. Who wouldn’t want to use the voice input text rather than typing the same thing? But several users have reported that Windows 11 voice typing is not working.
The feature is not new, it was there in Windows 10 as well, though with a different name. But on Windows 11, it’s certainly a lot more advanced and offers high accuracy when translating from speech to text.
Apart from that, it will work anywhere on the system, whether you are performing a Google search, drafting a document, and we can use it even while writing this article.
So, read the following sections to find out all about the feature and the most relevant fixes in case Windows 11’s voice typing is not working.
How do I enable and use voice typing in Windows 11?
The process to enable voice typing in Windows 11 is simple, you just have to place the cursor in a text field, and hit Windows + H to launch the tool. But, that isn’t certainly all!
Using voice typing for performing a Google search
There are a lot of other things about the voice typing tool that a user must know in order to make the most of it. Also, you may need to reconfigure the default settings for the best experience, or set the tool to launch automatically whenever required.
What do I do if voice typing is not working in Windows 11?
1. Check the connections (for external microphones)
If you are using an external microphone, it’s likely that the connections are not in order. To fix that, remove the jack or USB, whichever your microphone uses, clean it and the port, and then reconnect it.
Once that’s done, check if the Windows 11 voice typing not working problem is eliminated.
In case it isn’t, connect the same microphone to another system, and verify if it works there. If it does, the problem lies with your computer, and executing the fixes below should fix it.
Press Windows + I to launch the Settings app, and select Privacy & security from the tabs listed in the navigation pane on the left.
Scroll down and select Microphone under App permissions.
Make sure the Microphone access toggle is enabled.
If the microphone doesn’t have the required permissions, you will encounter problems with voice typing. Simply making the required changes can get things working.
After providing the permission, check if the voice typing not working problem in Windows 11 is fixed
3. Choose the correct language for speech
Press Windows + I to launch the Settings app, and select Time & language tab from the ones listed in the navigation pane on the left.
Next, click on Speech on the right.
Now, select the desired option from the Choose the language you speak with your device dropdown menu, and tick the checkbox for Recognize non-native accents for this language option.
Click on the Get started button under Microphone, and follow the on-screen instructions to fix things.
4. Update Windows 11
Press Windows + I to launch the Settings app, and select the Windows Update tab from the navigation pane.
Click on the Check for updates button on the right to scan for a newer version of the OS.
If an update is listed after the scan, click on Download & install.
If you are facing the Windows 11 voice typing not working error due to a bug in the current version of the OS, installing an update would be the best fix. Whenever Microsoft identifies a bug in Windows, a patch for it is released in the subsequent versions.
5. Run the troubleshooter
Press Windows + I to launch the Settings app, and click on Troubleshoot on the right in the System tab.
Next, click on Other troubleshooters.
Locate the Recording Audio troubleshooter, and click on the Run button next to it.
Follow the on-screen instructions and choose the relevant option when prompted.
It’s always recommended to run a dedicated troubleshooter whenever you encounter an issue in Windows. Microsoft offers several of these to automatically diagnose and eliminate problems causing the system or connected devices to malfunction.
Once the troubleshooter is done running, check if the Windows 11 voice typing not working problem is eliminated. In case it persists, head to the next method.
6. Update the microphone driver
Press Windows + S to launch the Search menu, enter Device Manager in the text field at the top, and click on the relevant search result that appears.
Now, double-click on the Audio inputs and outputs entry to view the various devices under it.
Right-click on the malfunctioning microphone, and select Update driver from the context menu.
Finally, select Search automatically for drivers from the two options listed in the Update Drivers window.
The system will now scan for the best available drivers and install it for the the microphone.
If none of the fixes listed above have worked, it’s most likely the outdated microphone driver to blame. Outdated drivers are known to cause various problems, and after installing the update, you will notice considerably better performance.
But, the Device Manager method listed above only scans for the updates on the system. So, if you haven’t downloaded the latest version previously, the update wouldn’t go through, and it would tell you that the best available driver is already installed.
If that sounds like too much trouble, you can always rely on a third-party app. We recommend using a dedicated driver updating tool that will scan every source for the latest version, and keep all the installed drivers up-to-date.
What are the best speech to text software tools for Windows 11?
These tools offer a lot more features, and in some cases a higher accuracy and precision as well. When selecting any of the ones listed in our guide or even another, it’s imperative that you verify if the software is effective.
Accuracy is of prime importance here, because you certainly wouldn’t want to keep editing the text over and over again. It should be able to accurately transcribe what’s being spoken with no, or minimum, errors.
By now, you know all about voice typing tools, and the most effective methods to fix it, in case it is not working in Windows 11.
TikTok started as a mobile app available for Android and iOS, but nowadays it gained so much popularity that it has its own app on Windows PCs. To get TikTok, just open Microsoft Store or access if from the Microsoft Store website and download it. Find the complete instructions below.
How can I download and install the TikTok app on Windows?
Type Store in the taskbar and open the Microsoft Store.
In the top search bar, type TikTok and click on the App result.
Click on the Install button.
Wait for the download and install to complete.
From the same panel, select the Open button to launch the app.
Now you can start using Tiktok. You can watch videos right away, or setup an account/log-in.
If you’ve successfully installed TikTok but notice the camera doesn’t open or record properly, check this guide on fixing TikTok camera not working to troubleshoot recording issues on Windows devices.
This one is for all the Whiteboard and Surface users out there, directly from the Redmond-based tech giant itself.
Microsoft recently announced that it has revamped its Whiteboard collaboration application and that it will be coming to Surface Hub devices this month.
This new experience is designed to cater to hybrid workplace environments and will be rolling out to organizations over the next couple of weeks.
The revamped Whiteboard experience rolls out to Surface Hub
As we previously mentioned, companies with Surface Hub and Surface Hub 2S are about to receive this brand new experience through a Windows Update, as a part of phased rollout between February 14 and February 28.
And yes, this will directly integrate Whiteboard with your Teams app so that you can click on share your content to all the other participants in the call.
As far as layouts go, they will be optimized so that you can still see all participants. Another factor worth noting is that they will also have the ability to make changes to the Whiteboard.
Of course, this new feature will be compatible with PC, mobile, and web versions of Whiteboard, so you don’t have to worry about that either.
According to Microsoft, the standalone Whiteboard app will be automatically updated between February 28 and March 15.
Currently, it doesn’t have feature parity with other variants of the app, but you can have a look at the missing capabilities on the official page.
Between March 15 and April 15, the Whiteboard app will migrate from Azure to OneDrive for Business in terms of storage needs. This will enable some additional features, such as:
See who’s actively collaborating in real-time or who made the last edit.
See other people on the board and what they’re working on (using collaborative cursors).
Use familiar sharing features found in other Office products.
Point a laser to draw attention to something on the whiteboard.
View and restore previous versions of a whiteboard.
Recover deleted whiteboards from the Recycle Bin.
Although the updated Whiteboard app will use OneDrive for Business in most new whiteboards, if a whiteboard is shared through the Surface Hub instead of another participant in a call, it will temporarily use Azure for storage.
However, if this proves to be a problem for you, you can simply contact Microsoft Support to block this.
Excited about the changes coming to Whiteboard? Share your thoughts with us in the comments section below.
Microsoft has announced a digital event for February 24. The event, titled “What’s Next in Security from Microsoft,” is focused on cyber security and the latest security innovations across Microsoft and other platforms and clouds.
Confirmed for the event are Vasu Jakkal, Microsoft Corporate Vice President of Security, Compliance, and Identity, and other security experts. These folks will talk about the latest innovations that can reduce risks from cybersecurity issues. Jeff Pollard, Vice President, and Principal Analyst at Forrester, is also scheduled to speak at the event.
He will talk about the intelligence of the cloud and how it can be used to create innovative security solutions. For IT Admins, and anyone else attending the following topics will be discussed.
Update your security strategy with the latest market trends.
Protect your identities, apps, clouds, and endpoints with comprehensive solutions.
Eliminate blind spots with proactive threat hunting and extended detection and response (XDR).
Enforce least privilege access across your clouds.
Identify security gaps and protect your multicloud environments against threats.
Other than these speakers, Microsoft will also have a Q&A session in the chat, so your security questions can be answered. If you’re interested in attending, you can register now for free using a Microsoft Account.
Twitch browser extensions offer streamers the possibility to create live apps and most importantly, to interact with the stream.
The interaction can happen as a panel via a channel or on a chat, depending on your preferences.
The greater the extensions the more interactive will be the experiences you’ll be able to create. In these terms, you have to consider mini-games, leaderboards, live gear information, and more.
In this article, we’ve put together a list of the most impressive Twitch extensions, so read it completely. Before anything else, let’s see why it is important to use this kind of feature.
Why should I use the best Twitch browser extensions?
If you’re still not sure about why you should use Twitch browser extensions, verify the following information.
These features allow you to interact in a better way with audiences or other streamers. Extensions create a full experience, offering a way to give feedback to broadcasters.
In these terms, it is no longer a surprise that Twitch extensions provide extra functionality while streaming.
They are extremely easy to get. You can install them from a streamer’s Extension dashboard, configured as needed, and activated on the channel.
Now, let’s discover what are the best extensions you should try on Twitch.
What browser should I use for the best Twitch extensions?
Opera GX is a game-dedicated browser meaning that this browser comes with gaming services integrated already.
When using Opera GX you will see in the sidebar the Twitch integration, allowing you to see all the channels you follow and receive notifications instantly.
Whether you are an advanced Twitch user or just beginning, using an extension that will enhance your experience is important.
Do not forget to take a look at the most amazing features of Opera GX:
Built-in AdBlocker
Free VPN
Easy to use and user-friendly interface
What are the best browser extensions I can use with Twitch?
RedDead Series comes with more than just an amazing design but a complete package from where you can choose one of the three available packages.
You can select what you need in terms of available features, allowing you to create a channel that looks professional.
Moreover, if you are just a beginner in the Twitch streaming world, on the own3d.tv website you’ll find available more tutorials to help you get started.
With this extension, you’ll get animated stream overlays, stream alerts, stream intermission banners, and more.
Streamlabs puts at your disposal a system of extensions, such as Alert Box that makes monetization quite simple and helps you enhance your channel.
Once you enable alerts in Streamlabs, you’ll get animated clips while streaming, every time viewers engage with your channel.
With this one in all tool, you can earn loyalty points, request songs, enter giveaways, and play mini-games.
It allows your audience to open up a dialogue with you. Thus, if you’re a streamer, you can consider Alert Box as an opportunity to interact with your community and personally thank them anytime they support you.
All these are creative options that will make users come back again and again on your channel.
System restore is probably one of the quickest and simplest troubleshooting techniques employed by users facing an error. But oftentimes, things may not turn out as expected and the need to undo a system restore arises in Windows 11.
But, what if you lose critical applications after the restore, and it doesn’t even help eliminate the issue. Or say, you restore your computer to a point created a week ago in the hope that it would fix the problem, while it actually started a couple of weeks ago.
There are various such instances when you will need to undo system restore in Windows 11, and we have listed the ways to do it in the following sections.
How does a system restore work?
A system restore is a feature in Windows 11 that basically takes your computer back in time. This means that the configured settings and installed applications after the restore will be according to the state when the restore point was created.
The restore process wouldn’t affect the files stored on your computer. But, it might repair or replace some of the system files, but that’s nothing for you to worry about.
Here’s how it’s beneficial. Say you update a couple of applications, the OS and install a few driver updates, and the computer starts to throw errors soon after. Now, instead of uninstalling each of these updates manually, you can quickly perform a system restore.
The restore point plays a critical role here and it has to be created before the changes that lead to the error were first made. If that isn’t the case, the process wouldn’t be fruitful.
Now, you might be wondering if you can actually use the feature, in case you haven’t created a restore point manually. Yes, you can! With the right settings in place, Windows automatically creates a restore point before undergoing any major change.
If you go through the list of restore points on your system, you will find several of these that you never created.
Undoing a system restore in Windows 11 is as simple, and anyone who has ever performed a restore must know how to undo it as well. In the following section, we have listed both the ways you can do it.
How do I undo a system restore in Windows 11?
1. Via the System Properties
Press Windows + S to launch the Search menu, enter Create a restore point in the text field at the top, and click on the relevant search result that appears.
Next, click on the System Restore button.
Select the Undo System Restore option and click on Next at the bottom.
Verify the restore details and click on Finish.
Click Yes on the confirmation prompt that appears.
The restore process would restart right away, and the time taken depends on the changes to be made to the system. To undo the system restore in Windows 11, your computer will restart as was the case while restoring it earlier.
2. Via the Recovery Environment
Press Windows + I to launch the Settings app, and click on Recovery on the right in the System tab.
Click on the Restart now button next to Advanced startup.
When the system restarts and enters the Recovery Environment, choose Troubleshoot from the options.
Next, click on Advanced options.
Click on System Restore from the six options listed in the Advanced options screen.
Now, select your user account.
Enter the password for it and click on Continue.
Click on Next at the bottom.
Choose a restore point that says Undo under the Type column, and click Next.
Verify the restore details and click on Finish.
Click Yes in the confirmation prompt that pops up.
Wait for the restore process to complete.
This method to undo system restore in Windows 11 will certainly take more time, but in case you are unable to boot Windows after the previous restore, only this would work. Also, there are several ways you can access the recovery environment.
One of the simplest methods is to deliberately crash the Windows thrice during startup by pressing the power button as soon as the OS is about to boot. On the fourth attempt, your system will automatically enter the recovery environment.
Why can’t I undo the system restore in Windows 11?
There are cases when you wouldn’t be able to undo system restore in Windows 11, and we have listed them below:
You can’t undo the restore if the system restore was performed in the Safe Mode.
Also, this happens if the system restore was performed from the Recovery Environment.
By now, you know both the ways you can undo a system restore in Windows 11, and the reason if you are not able to. This would certainly make things a lot simpler. But, do make sure to not unnecessarily perform a restore with the idea that it can be undone later.
Many users that have tried to pair these two, noticed that Twitch could not verify the Minecraft version. It seems to be a pretty common error, so if you face it too, make sure you try out today’s listed solutions.
Even though the Minecraft or Twitch developers haven’t released any fixes for this specific error, users across the web have worked together to fix the issue.
If you are also troubled by this issue, here are a couple of troubleshooting tips to help you resolve this annoying error.
Why couldn’t Twitch verify the Minecraft version?
Wrong privileges – If Twitch couldn’t verify the Minecraft version, it is probably that you tried running the processes without the administrator privileges.
Software is blocking the access – In this case, you have to consider that your antivirus might limit certain action. we recommend temporary disable it, and try verifying again the Microsoft version.
What can I do if Twitch could not verify the Minecraft version?
Navigate to the installation folder of Minecraft on your PC.
Find the Minecraft.exe (or any other variations of this name), and right click on it.
Select Run as administrator.
NOTE
If you want to avoid doing this every time you want to run Minecraft as an administrator, you can follow the next steps:
Right-click on the Minecraft.exe, then select Properties.
Choose the Compatibility tab, then tick the box next toRun this program as an administrator, and click OK.
1.2 Twitch
Hit the Windows key, type Twitch, then right-click on the first result, and choose to Run as administrator.
Confirm the action by clicking on Yes.
2. Disable antivirus software
Some issues with Twitch have been reportedly caused by a conflict between different antivirus software and firewalls with the software.
If the first method didn’t solve the error, then try disabling both firewall and antivirus services for a limited amount of time, and then, try to open Twitch with Minecraft again.
Quickly after that, you may consider another antivirus to replace with and secure your PC accordingly. And if you are streaming online the most appropriate antivirus should support your system while gaming.
Hit the Windows key, type Twitch, then open the app.
From the upper-left corner of the window, click on your avatar.
Navigate to Settings.
Click on the Minecraft tab, scroll down to the option Launch Method.
Change the launcher from Native Launcher to Jar Launcher.
Try out whichever Java version you are using.
In case this doesn’t work, try updating your Java app.
Also try with a 64-bit version.
In this article, we explored some of the best methods to fix the errorTwitch could not verify the Minecraft version. Please make sure to follow the steps carefully.
We hope this guide helped you fix your issue, and that you started live-streaming Minecraft gameplay again. If you found this guide helpful, please feel free to let us know in the comments section below.
The use of a DualShock 4 or DualSense 5 controller with a Windows PC appears to be problematic in some situations, with the controller not connecting properly or possibly failing to connect at all.
Both the PS4 and PS5, on the other hand, are specifically developed and optimized for their respective consoles. Now, if you’re one of the unfortunate individuals who has encountered the DS4Windows not working issue on Windows 11, you may use this guide to fix the error.
Among PC gamers who use controllers, the DS4Windows application is one of the most popular options when it comes to getting them to function on Microsoft Windows.
If you attach your PlayStation controller to a Windows computer through USB or Bluetooth, there is a good risk that it will either not be identified or will not function properly. Follow along as we will show you how to troubleshoot the problem right after we see whether DS4Windows is safe or not.
Is DS4Windows safe?
DS4Windows is an open-source gamepad input mapper and virtual emulation program for the Windows operating system that is specifically designed to utilize and connect your PlayStation controller to your PC. It is free and open-source software.
It is completely safe to download and install the official program. However, it can be infected with adware or malware, and in rare cases, it might be infected with a virus, but there is a means to determine whether or not an application is an official one.
If you have downloaded the DS4Windows file from an unauthorized website or if you have installed it via a thumb drive or a pen drive, you should be cautious. Hackers can modify any application software from these sources to suit their needs and intentions.
Games and a variety of other applications can be run without the dswindows.exe file, but they will perform less smoothly. However, it is not recommended to include it in order to save space and avoid excessive memory utilization.
It is more necessary to have a well-performing system than it is to prioritize better gaming controls and movements. This application, in addition to providing a stronger gaming edge, consumes resources such as memory and hard drive space.
What can I do if DS4Windows is not working in Windows 11?
1. Update DS4Windows
Once you have installed the DS4 Windows on your computer, you would have a DS4Updater executable file in the installation folder. Locate this file and double click on it to execute it. It will automatically search for the updated version of the DS4 app and install it on your PC.
Otherwise you can visit the official website and re-download the software. It will install the latest version.
2. Check controller status
Right-click on the Start icon then click on Device Manager to open it.
Now expand the Human Interface Devices section and right-click on the HID-compliant game controller option then choose Enable device. In our case, we get the Disable device alternative since the card is already enabled.
3. Update Windows
Press the Windows key + I to open the Settings app, then click on Windows Update in the left panel.
If you have any new updates to download, click on the Install now button and wait for the process to finish, otherwise click on the Check for updates button.
It is possible that you are running an earlier version of Windows, and that this is causing the difficulty, which can be resolved by updating to the most recent version. The error will almost certainly be corrected in a subsequent upgrade to the software package.
4. Update drivers
Press the Windows key + I to open the Settings app, and click on Windows Update from the left panel followed by Advanced options on the right side.
Scroll down until you find the Additional options section then click on Optional updates.
Now click on the Driver Updates option then select all the driver updates you are presented and lastly click on the Download & install button.
Although Windows is normally responsible for driver updates, you can manually check for updates if you experience a problem. For automatic scans of outdated drivers, we strongly recommend a dedicated tool such as Outbyte Driver Updater.
Should I use DS4Windows with Steam?
Using the DualShock 4 PlayStation 4 controller on a PC isn’t for everyone, and we understand why. In contrast to keyboard gamers, you have chosen to live the analog life rather than submitting to the complicated hand positioning required by a mouse.
Although there are a variety of options available, the PlayStation 4 controller has quickly become one of the team’s favorite PC gaming accessories, not least because it feels amazing in your hands.
Despite keeping the classic shape of the DualShock controller, the new one features more modern joysticks and triggers that are better suited to modern shooters and action games than its predecessor – though it is not as exciting as the DualSense found on the PS 5.
With the official Steam support, getting your PS4 controller to function in Steam is a cinch thanks to the little amount of setup required. Just make sure to pair or connect in your controller before launching Steam or any in-games, or your controller may not be detected by the software.
If you experience any connection problems, simply shutting and reopening Steam should resolve the problem. Otherwise, try connecting your computer to a USB 2.0 port rather than a USB 3.0 one. DualShock 4s have a strange way of acting.
As soon as you have connected, navigate to the Steam settings menu (located in the top-left dropdown menu) to ensure that everything is running smoothly.
Valentine’s Day is just around the corner. If you need a pleasant reminder of how important it is to love and be loved, you can install one of the Valentine’s Day wallpapers.
There are many great resources for wallpapers but today we’re are going to show you our favorites.
So join us while we take a closer look at the best HD Valentine wallpapers that you can get for the upcoming holiday.
Does Windows have any Valentine’s Day wallpapers?
Windows comes with a very limited number of wallpapers, and by default, it doesn’t offer any Valentine’s Day wallpapers. However, you can always get your own from the web.
There are several great sources for these types of pictures, so keep reading to find out where and how to get them.
What are the best Valentine’s Day wallpaper resources?
DeskScapes is a great wallpaper software that allows you to browse through thousands of wallpapers online, and the app has a wide array of Valentine-themed wallpapers available.
Besides downloading, it lets you customize your wallpapers with various effects, and there are over 60 available to choose from.
You can also spice up your desktop by making it animated using both pictures and videos, allowing you to unleash your creativity and achieve some amazing results for this Valentine, so why not give it a try?
DeskScapes
Download hundreds of Valentine’s Day wallpapers and make them animated easily with DeskScapes software.
If you’re looking for Valentine’s Day wallpapers, you can easily get them using the Backgrounds Wallpapers HD+ app. The app is available on the Microsoft Store, and it can be downloaded easily.
Once you start an app, you’ll get access to thousands of available wallpapers, and to make the navigation easier, all of them are sorted into 12 different categories.
Of course, there’s a special Love category for Valentine, so you’ll surely find an HD Valentine wallpaper that meets your needs. Besides having a great choice of wallpapers, the software also will automatically change your wallpaper, so you’ll get a fresh one every day.
Backgrounds Wallpapers HD+
Get access to thousands of wallpapers, including special ones for Valentine with the Backgrounds Wallpapers HD+ app.
WebNeel offers you 30 beautiful Valentine’s Day wallpapers to download and set your desktop for this romantic day.
The wallpapers feature classic Valentine’s Day images, such as hearts and roses, as well as some funny cartoon-like images, blending love and childhood.
One such example is the wallpaper above: stylish, yet not too syrupy. You will find a lot of surprises there so you should definitely check it out.
If you need Cute Valentine’s Day wallpaper, then be sure to check WebNeel.
The Holiday Spot offers you over 70 Valentine’s Day wallpapers that will definitely embellish your desktop.
There are five formats you can choose from, and the wallpapers can adapt to widescreen, PC, laptop, iPad, and tablet sizes.
If you prefer wallpapers that depict couples, then this is the perfect resource for you. The best part is that you’ll find a link on top of the new wallpapers window for the wallpaper you choose.
You can click on that link, write your message, and send it to your loved ones. It will be a nice surprise that won’t be forgotten.
WallpaperAccess offers no less than high-resolution 80 wallpapers for Valentine’s Day that you can download in just a few seconds and set on your Windows 10 desktop.
All the wallpapers also have buttons for Facebook, Pinterest, and Twitter integration so you can share them right away with your special half attached with a set of meaningful words from the heart.
The website is a great choice if you need a Free Valentine’s Day wallpaper, so be sure to check it out.
WallpapersWide offers you a plethora of Valentine’s Day-themed wallpapers. There are over 300 wallpapers that you can choose from.
They show images of romantic sunsets, couples walking in the park, love messages as well as abstract art. We’re sure you’ll find plenty of wallpapers you’ll like.
There are tens of images formats that you can choose from, including desktop and mobile formats.
Is it better to use wallpaper apps or download the wallpapers manually?
Downloading wallpapers manually can be a bit tedious, especially if you don’t know where to look for them, so finding the perfect free Valentine’s Day wallpaper might be harder than you think.
On the other hand, dedicated apps, allow you to quickly find the wallpaper that you need, plus they often offer some advanced features, so they are usually a better choice.
So that was our selection with the best sources for Valentine’s Day wallpapers. Be sure to take your time and check each of our entries to find the best wallpaper for you.