Project xCloud is launching on Android on September 15 as part of Xbox Game Pass Ultimate

It’s official, Microsoft’s Project xCloud game streaming service will launch on September 15 in 22 markets. The service, which Microsoft will apparently market as “cloud gaming” instead of Project xCloud, will launch in beta for Xbox Game Pass Ultimate members, and only Android phones and tablets will be supported at launch. These mobile devices will be able to play over 100 Xbox Game Pass games, but Microsoft will share more details about the full catalog of games closer to launch.

“When cloud gaming launches as part of Xbox Game Pass Ultimate, players will have access to more than 100 high-quality games playable from the cloud, including Minecraft Dungeons, Destiny 2, Tell Me Why, Gears 5, Yakuza Kiwami 2, and more. And as we’ve committed to providing day-one access to new titles from Xbox Game Studios as part of Xbox Game Pass, it’s our intent to make those same games available in the cloud from the day they release,” explained Kareem Choudhry, CVP of Project xCloud.

The launch markets for cloud gaming in Xbox Game Pass Ultimate include Austria, Belgium, Canada, Czech Republic, Denmark, Finland, France, Germany, Hungary, Ireland, Italy, Netherlands, Norway, Poland, Portugal, Slovakia, Spain, South Korea, Sweden, Switzerland, the United Kingdom, and the United States. To use cloud gaming on September 15, Xbox Game Pass Ultimate members will need to download the Xbox Game Pass mobile app from the Google Play Store, the Samsung Galaxy Store, or the ONE Store.

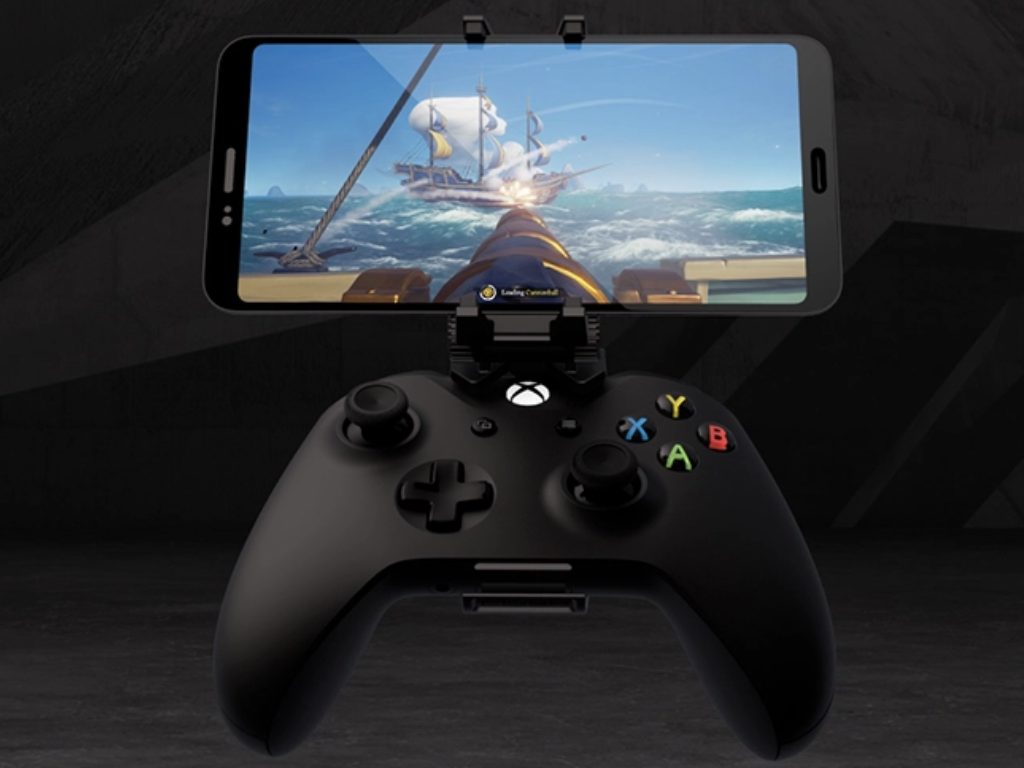
During the public preview, Microsoft required beta testers to use an Xbox wireless controller with Bluetooth or a PlayStation 4 controller. Both controllers will continue to be supported, but Razer, PowerA, 8BitDo, and Nacon are also creating new accessories specifically designed for Project xCloud. The list includes the 8BitDo SN30 Pro controller for Android devices, which is much smaller than Microsoft’s Xbox Wireless controller. The Razer Kishi Universal Mobile Gaming Controller for Android is another interesting alternative that can turn your smartphone into a Nintendo Switch-like gaming device.

Project xCloud Accessories

Microsoft is still working on touch controls for Project xCloud games, and the Game Stack team did a livestream yesterday to demo them on games like Gears 5 (via The Verge). Developers will be able to create custom layouts with buttons that are quite different from the familiar Xbox Wireless controller, but these adaptable touch controls likely won’t be better than using a dedicated mobile controller. Anyway, Project xCloud beta testers can already test touch controls on Hellblade: Senua’s Sacrifice, and Microsoft plans to add touch controls to more games later.

“More than 10 million Xbox Game Pass members are already discovering and playing great games on console and PC – and with the addition of cloud gaming, members can discover and try out new games on Android phones and tablets,” Kareem Choudhry said today. We still don’t know when Microsoft will make its cloud gaming technology available on other devices including Windows 10 PCs and iOS devices, but the upcoming Android launch will be an important milestone in the creation of a true Netflix-like streaming service for video games.

Digital pre-orders open for Project Cars 3 video game on Microsoft’s Xbox One consoles

Pre-orders are now live for the upcoming Project Cars 3 video game on Microsoft’s family of Xbox One consoles ahead of its August 28th release date.

Project Cars 3 is available in both a regular edition and a Deluxe Edition which comes with the main game, the season pass for future downloadable content, and three days of early access.

Here’s the official game description:

Own it all with Project CARS 3. Live every thrill of your journey from weekend warrior to racing legend as you race to earn, own & upgrade hundreds of precise handling, elite-brand cars. Individually tailored settings for every skill level, personalization options for every driver, customization for every car in your garage & every race condition the way you want in YOUR Ultimate Driver Journey.

Are you a fan of the Project Cars series and will you be buying Project Cars 3 for Xbox One? Let us know in the comments below and then follow us on Pinterest for more Xbox gaming content.


Xbox One and PC gamers won’t be able to play as Spider-Man in upcoming Marvel Avengers video game

Less than a week after the upcoming Marvel Avengers video game finally started garnering some positive buzz with the announcement of its betas and the reveal of Hawkeye, opinion on the title has once again soured dramatically among many gamers and critics after Sony confirmed that one of Marvel’s most-popular characters, Spider-Man, would be playable on PlayStation consoles only.

This means that, while Marvel Avengers will release on Microsoft’s family of Xbox One consoles and on PC via a variety of online stores, only those that own a PlayStation 4 console will gain access to Spider-Man. This doesn’t appear to be a timed exclusive deal either. Xbox and PC players will never get to play Spider-Man in their version of the game.

While Sony does maintain a lot of the rights when it comes to Spider-Man’s usage in a variety of media platforms, the character has frequently appeared in various video games on and PC and other consoles such as LEGO Marvel Superheroes, Marvel Ultimate Alliance 3, Disney Infinity, and Marvel vs Capcom: Infinite. Restricting Spider-Man to the PS4 version of Marvel’s Avengers is clearly a decision Sony made to help promote its PlayStation consoles, in particular its upcoming PS5 which launches later this year and will be competing directly with Microsoft’s Xbox Series X.

Console exclusive video game content isn’t a new marketing strategy and it’s often met with frustration by gamers who simply want all of the available content on their version of the game. Soulcalibur II is one of the more famous examples of a multi-platform games with platform exclusive characters. It included Zelda’s Link on the GameCube version, Spawn on the Xbox version, and Tekken’s Heihachi on the PlayStation 2 version. Thankfully, this practice was phased out over subsequent entries in the Soulcalibur franchise.

Another example would be Boba Fett in Disney Infinity 3.0 whose figure was sold with the PlayStation version months ahead of its individual release meaning that players on Xbox One and other platforms couldn’t play as the fan favorite bounty hunter at launch.

It’s unclear how this decision will affect sales. Those who own both an Xbox One and a PlayStation 4 will likely just buy the PlayStation version but the lack of Spider-Man on other platforms could frustrate gamers so much that they might skip the title completely.

Marvel Avengers is due out on September 4th with its closed and open beta periods set to run later this month.

Has the exclusivity of Spider-Man affected your decision to play Marvel Avengers? Has it convinced you to buy the PS4 version or even purchase a PS4 console? Share your thoughts with the community in the comments below and then follow us on Pinterest and Twitter for more Xbox gaming news.

Marvel's Avengers
Marvel's Avengers
Developer:
Crystal Dynamics
Price:
Free


Drivable cars are coming to Fortnite Battle Royale this week on Xbox One and other platforms

Drivable vehicles have been a feature that was promised since the initial trailer for Fortnite’s current season (Chapter 2 Season 3) but little had been said of them until today when a sudden promotion for what looks like a new car appearing in-game and on the official Fortnite social media channels.

The promotion features a drawing of a car called Whiplash which will apparently be added to the game in a new update rolling out sometime tomorrow across all supported platforms. The update is being labelled the Fortnite Joyride Update which, along with the car reveal, pretty much confirms that this is the drivable car update many had been waiting for.

Fortnite has introduced a variety of transportation mechanics over its numerous seasons ranging from hoverboards and mechs to helicopters and speedboats. They’re often a necessary part of surviving a match of Fortnite Battle Royale as they provide a convenient way to travel quickly from one part of the map to another when evading opponents and the growing storm.

While most players have unlocked all of Chapter 2 Season 3’s Battle Pass content by now, Fortnite is keeping players engaged over the remaining weeks with the sudden appearance of an Ancient Astronaut on the map, the reveal of a sunken city, and the lowering of water levels to add more solid ground to fight on.

It’s unclear what the end of the season will contain but many are expecting some sort of addition to Fortnite’s lore with more references to the astronaut and the rifts.

Do you play Fortnite and are you excited for the addition of drivable cars? Let us know in the comments below and then follow us on Pinterest and Twitter for more Xbox gaming news.

Fortnite
Fortnite
Developer:
Epic Games Inc.
Price:
Free


Fortnite - 1,000 V-Bucks

Can VPN hide MAC address? Is sharing your MAC dangerous?

We’re perfectly aware that VPNs can help you evade a lot of monitoring by cloaking your IP address, but can VPN hide your MAC address? Note that we’re talking about MAC, as in Media Access Control address, not the device.

If you already know what MAC is and how it can affect your online privacy, you can use the table of content controls on the left to skip the boring, technical stuff.

However, we promise to be short and deliver concise, down-to-earth details about this topic.

What is a MAC address?

A MAC address is similar to an IP address, because both are crucial when it comes to identification, but only to a certain degree. IP address is a more loose concept, where different devices can have the same IP address at some point in history.

MAC addresses, on the other hand, are device-bound and, as a result, unique. A MAC consists of six pairs of hexadecimal digits, which are either separated by colons or hyphens, or they’re not separated at all.

As opposed to MAC addresses, IPs (IPv4, that is) consist of four groups of digits, each group containing up to three digits. These groups are separated by a simple dot.

Compared to the uniqueness of MAC addresses, IPs come from finite number pools. To clarify things even more, there are exactly 4,294,967,296 IPv4 addresses.

However, it’s worth mentioning that even MAC addresses are finite. It’s only that their number is far higher than the amount of possible IPv4 addresses.

Since they’re 48-bit addresses, you can determine the amount of possible MAC addresses by solving 2 power 48. We’ll spoil the result for you. It’s 281,474,976,710,656. Yes, that’s almost 281 trillion and a half.

Can VPN hide MAC addresses?

To put it shortly, VPNs can’t spoof your MAC address, and doing so would be pointless. Masking your MAC address would only make sense if you want to protect yourself from other users on the same network.

More so, Windows has (or used to have) a built-in MAC address randomizer that would spoof your real MAC address in settings.

Alternatively, you could use one of the various MAC spoofing tools on the Internet, or look up a tutorial on how to change your MAC quickly and without messing everything up.

So we say it again: a VPN can’t hide your MAC address. Why? Because it would be pointless.

But, if you want to have an extra-layer of protection and benefit of other cool features of a VPN, we strongly recommend you to use a truly private VPN. Here are the benefits of using a VPN:

  • Advanced privacy protection
  • Secured applications, not just your web browser
  • Block unwanted connections
  • High grade encryption

⇒ Get Private Internet Access

Is giving out your MAC address dangerous?

Usually, someone else knowing your MAC address shouldn’t be much of a security threat. It’s far less dangerous than someone knowing your public IP address, for instance.

If someone were to have your public IP address, you could be targeted by a wide variety of attacks. The most common attack would be a DDOS since it doesn’t take much to achieve.

Or, if you’re unfortunate enough, you could be targeted by a more severe attack, which could escalate in the perpetrator gaining full remote access to your device and handle it in a broad variety of ways.

However, an attacker can’t do much by simply knowing your MAC address. Let’s say that it has the same level of threat as someone knowing your real name online.

If you still have doubts about the dangers of someone else knowing your MAC, let’s tell you what’s the worst that could happen.

1. Forcing a deauth attack

If you’re connected to a wireless network and the attacker is well aware of your MAC address, they could force you to deauthenticate from your network. And maybe even prevent you from reconnecting by using the same MAC address.

However, note that this can only work if the attacker is either physically near your WiFi network or on the same network as you. Thus, someone random on the Internet can’t do much by simply being aware of your MAC address.

2. Match your MAC with a vendor

Alright, that’s not exactly dangerous, but if you want to keep what kind of device you use on the hush, it’s best not to make your MAC address public.

There are a lot of tools and tables that you can use to identify the device type that’s using a certain MAC address. These tools are mostly used by confused users who don’t exactly know who made the components inside their system.

However, a MAC identification tool can also be used by an attacker that wants to target only specific devices on the network by matching their MAC address to a known database of devices.

3. Impersonating your router

If the attacker were in your proximity, they could replicate the MAC address of your router. This, in turn, could help facilitate a man-in-the-middle (MITM) attack.

In this type of attack, the attacker could make your current device believe it’s connected to your safe, regular router.

In fact, your PC could be connected to another device that the attacker cleverly disguised as your router by merely cloning the MAC address.

All your traffic would then pass through the attacker’s device and you’d have no idea. This is by far the most dangerous type of MAC-type attack.

However, as you’d expect, the attacker needs to be really close to your router or be relatively close and use a signal booster or some different signal amplification device.

Furthermore, your device might pick up two different access points, and one of them is likely to be insecure (without a password). Thus, it would be quite obvious that someone was trying to trick you.

4. Gaining MAC-based clearance on various systems

This one is a bit of a stretch, but it could happen just like any other attack. If you’re using some software that uses MAC-based identification to grant you access, someone else cloning your MAC address could be a real threat.

For instance, if you’re on a MAC-restricted network that uses no other type of identification. If someone were to replicate your MAC address, the network would give that user clearance.

And that’s about it. Although it seems like a lot of attacks, the fact that the perpetrator needs to be nearby is quite offputting and makes it both harder to achieve and a lot more obvious to the one that’s being attacked.

A VPN can’t hide your MAC address

To wrap things up nice and tidy, VPNs are generally not capable of hiding your MAC address. We say generally because we haven’t yet heard of one that can do that. We’re pretty confident they don’t exist, but we can’t take any chances.

However, even if a VPN lacks MAC spoofing capabilities, it’s not a big deal. Changing your MAC address could only protect you from users that are on the same network as you, or awfully close (physically) to your router.

For these situations, we strongly advise you to avoid public WiFi networks, use strong passwords for your personal home router, and try to avoid letting people settle too close to your router for obvious reasons.

Parallels Desktop to let you run Windows apps on Chromebooks

Windows is still the most popular desktop operating system to date, which is why developers have built tens of millions of applications for the OS.

Now, according to a plan that Chrome OS product manager Cyrus Mistry recently revealed to the Verge, you’ll soon be able to run your mission-critical Windows 10 apps on a Chromebook,

Windows 10 apps to run on Chromebooks, thanks to Parallels Desktop

Non-Windows PC systems are gaining popularity day by day despite the long-standing dominance of the personal computer OS from Microsoft. On top of that, enterprise and individual users are increasingly exploring alternative experiences on platforms like Chromebooks.

But there’s a major issue here. Just like other third-party applications, Windows apps don’t currently have native support in Chromebooks.

It’s why many of these users may hesitate to move to the lean, web-facing laptops from Google. There’s good news though—Windows apps are coming to Chromebooks, thanks to the Parallels Desktop virtual machine.

Mistry explains:

We want to make sure you have that option [for Windows apps] as well… so that every once in a while you’ll be able to get that when you need it, but we don’t want that to be the world you’re living in.

If you’re wondering how Google will pull that off, be assured that the Parallels VM will be safely loading the full copy of Windows along with Chrome OS and Android applications. As a result, you should be able to deploy your favorite Windows software on the platform without any complications.

Mistry also talked about Coherence, a feature that may let you deploy just the app you need instead of the entire Windows desktop.

In the future we’ll have other types of things where you don’t even have to run the whole Windows desktop, you’ll just run the app you need.

Have you ever needed to virtually deploy Windows 10 on a Chromebook? Let us know in the comments box below.

[wl_navigator]

Can VPN hide torrenting? Is it safe to torrent with a VPN?

One of the most pressing matters that burden the minds of VPN users is whether can VPN hide torrenting or not. Although torrenting is many times deemed as unlawful behavior, things are actually way different.

VPNs are amazing tools that can help you hide all sorts of traffic, including the one you generate while torrenting. However, there are a few things you must take into consideration before engaging in such activities.

What is torrenting?

Usually, downloading a file from the Internet happens as you’d guess. You make the request to the remote server, which generates a response and sends you the file if all conditions are met. Piece of cake.

However, with torrenting, things are a bit different. Instead of relying on a single remote server as standard downloads do, torrenting relies on other users who engage in this type of activity.

Torrenting makes use of P2P (peer-to-peer) and clients to allow you to participate. You fire up the client, load the torrent details either manually or using a torrent file, then wait for the download to complete.

Instead of receiving a single, larger file from a single server, torrenting lets you retrieve several parts of the file from various users, then the client reconstructs the original file by using the bits.

The reason behind this practice is that it takes a lot less time to download several smaller file chunks from multiple users than downloading a single, large file from a single server.

Once the downloads come to a stop, you begin seeding the files you downloaded. This means that other users will be able to fetch the files from you, as you did from them.

Is it legal to torrent?

From a legal standpoint, torrenting is somewhere in the gray area. Mostly because it’s been associated with piracy, due to the vast amount of tracker websites where pirated content was (and still is) shared via torrent.

However, generally speaking, torrenting is not illegal just because it’s a popular and efficient file-sharing technology. It’s like marking the Internet illegal just because a lot of shady stuff happens online.

For instance, many open-source (and not only) services facilitate torrent download links for their products. Downloading these, for instance, is perfectly legal.

Why hide torrenting traffic?

Well, for once, torrenting traffic is one of the easiest to spot types of traffic. An ISP could take one brief look at your log and determine that you’ve engaged in downloading/uploading files via torrent.

And even though there might be nothing to hide in the first place, it’s still quite unsettling that someone could have that level of clearance on your private online data.

Not to mention if your torrenting habits are a bit sketchy, or let’s say somewhere in a gray area.

So it would make perfect sense to take a shot at hiding your torrent data from your ISP (and others who might take an interest). As you’d expect, a VPN excels at hiding torrenting data. Much like any other type of traffic you pass.

Can VPN hide torrenting traffic?

Assuming that we’re on the same page concerning privacy protection with VPNs, let’s see if and how a VPN could hide your torrenting traffic from various third-parties.

What a VPN does is retrieve all of your traffic and routes it through a secure, encrypted tunnel. That way, everything coming from your PC can’t be seen by your ISP. This, of course, includes torrenting traffic.

However, you should take a few precautions before choosing a VPN that’s fit for torrenting.

1. Make sure the VPN has a kill switch

If you download something via torrent and you’re behind a VPN, that’s wonderful. However, know that a VPN connection might fail at any time, regardless of your activities.

Thus, it might decide to interrupt the connection while you’re streaming video, or reading your emails.

Private Internet Access

Private Internet Access

Looking for a torrent-friendly VPN? Check out PIA.
$2.85/mo. Buy it now

In the meantime, your PC will reconnect to your default, insecure connection. Thus, if you’re downloading files with a torrenting client, your identity and activity will be exposed.

What a kill switch does is prevent your PC from connecting to the Internet if no VPN is detected. That way, even if your connection drops while using a torrent, no traffic will leak.

If you want to try a kill switch-enabled VPN and don’t know where to look, you should check out Private Internet Access.

2. Check if the VPN allows torrenting

Many VPNs have no issue with you downloading files through torrent clients.

However, some of them are quite specific with their anti-torrenting policies, so you’ll need to make sure whether your VPN allows torrenting before purchasing a subscription.

Most of the time you’ll be able to find it casually mentioned in the Terms of Service documentation. Another strong indicator that your VPN is pro-torrenting is the availability of dedicated torrenting servers.

So, keep your eyes peeled and try not to upset your VPN provider if it doesn’t support torrenting usage. If you don’t know where to start, check out our best VPNs for torrenting recommendations.

VPN is able to hide torrenting traffic

All things considered, VPNs are quite reliable tools when it comes to hiding all kinds of traffic, including the type you generate by downloading and uploading via torrent clients.

However, you should still be cautious about what you do online. Even though a VPN can hide your activity from your ISP, the VPN provider has access to your torrenting traffic and might suspend your account if anything goes wrong.

Last, but not least, you should check if your VPN supports torrenting and if it has a kill switch. A kill switch can help you bypass torrent traffic leaks and you won’t get in trouble for torrenting on a non-supportive service.

[wl_navigator]

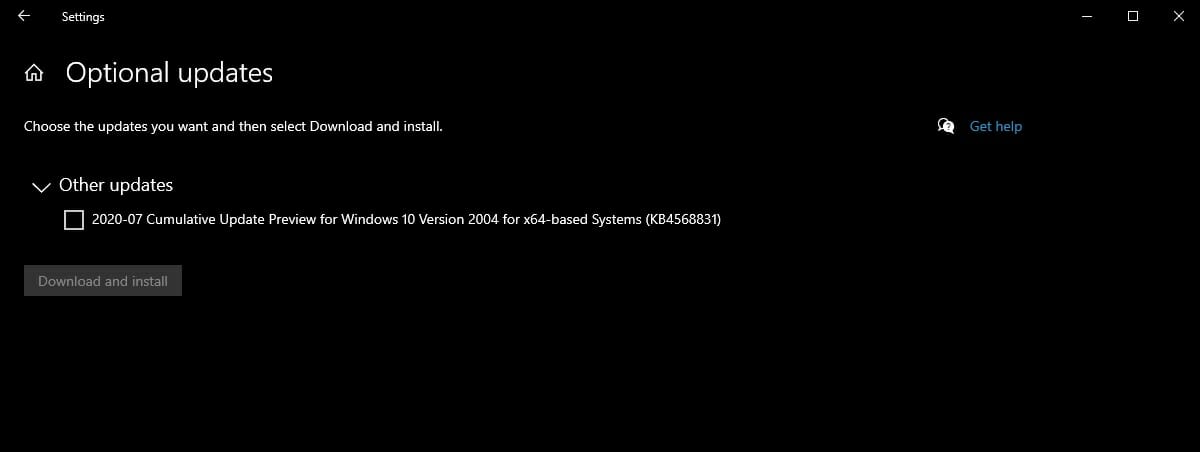
The new KB4568831 optional update hides 20H2 features

Microsoft announced a new cumulative update KB4568831 to Windows 10 version 2004 that is coming with a lot of fixes but also some hidden gems.

The guys from ghacks.net noticed that this optional preview update carries over some new features from Windows 10 2009 but they are hidden and dormant until you activate them.

We already created a guide for you on how to install the new 20H2 featured on your Windows 10 version 2004 so you can easily enjoy the new beautiful Start Menu and more.

What is new about the cumulative update KB4568831?

Windows 10 KB4568831 update

First of all, Microsoft disabled the RemotFX vGPU feature due to a security vulnerability related to  CVE-2020-1036 and KB4570006.

If you install this update and want to start a virtual machine with RemoteFX vGPU enabled, it will fail and you will receive an error message:

  • The virtual machine cannot be started because all the RemoteFX-capable GPUs are disabled in Hyper-V Manager.
  • The virtual machine cannot be started because the server has insufficient GPU resources.

And if you want to enable the RemoteFX vGPU again, you will receive a message saying that the adapter is not supported anymore.

The conclusion is either you stop using this adapter or you install this update and it will block it. Otherwise you will be vulnerable to attacks exploiting the CVE-2020-1036 vulnerability.

Other changes coming with cumulative update KB4568831

Other improvements coming with the new update range from fixing issues with the Magnifier stopping to work in Internet Explorer to issues preventing family safety features.

Another notable fix is for an issue with 4K high dynamic range (HDR) content being displayed darker when you configure certain non-HDR systems for HDR Streaming.

KB4568831 also fixes and an issue when using sharing functionality in Microsoft Office when you enable Conditional Access.

Read more about all the new fixes from the Microsoft’s announcement.

Are you going to enable the new Start Menu in Windows 10? Tell us if you encounter any problems is the COmments section below.

[wl_navigator]

Download Windows 10 KB4503286 to fix PC startup issues

It’s Patch Tuesday time and Microsoft released Windows 10 cumulative update KB4503286 to Windows 10 v1803 users. This update bumps the OS version to build 17134.829. 

Update KB4503286 brings important security updates and fixes some issues affecting various Windows components.

However, Microsoft mentioned that this patch brings a few issues of its own as well.

What improvements and fixes does KB4503286 bring?

1. IE11 bug fix

Microsoft fixed an important issue that was introduced with the previous releases. The bug occurred due to issues with the Default Search Provider and prevented Windows 10 users from opening Internet Explorer 11.

Speaking of browser issues, if you’re tired of such limitations, you can switch to a new, better, faster and overall more efficient browsing solution such as Opera One.

This privacy-focused browser can be the right choice for you. Having undertaken a complete overhaul, Opera One comes out looking crisp, neat, and elegant, delivering an intuitive and user-friendly interface with countless customization options.

You can, for instance, change its appearance from modes to themes, displayed sections, and more – until it perfectly reflects your style and matches your browsing needs down to the very last detail.

But it’s not all about looks. This is a feature-rich browser with the utmost concern for your privacy which delivers competitive functionalities aimed to facilitate users’ experience as much as possible.

By running Opera One, you will enjoy a full-scale in-built VPN tool to protect your online identity and unblock otherwise geo-restricted content and websites, uninterrupted and fast loading webpages browsing thanks to the integrated adblocker and many more.

Let’s quickly look at its key features:

  • Built-in VPN and Ad blocker
  • Battery saver mode and turbo mode
  • Native AI and modular AI-ready design
  • Workspaces and tab islands

Opera One

Bug-free browsing? You bet! Get a taste of faster, better, 100% private, and ad-free browsing with Opera One!
Free Download Visit website

2. Device startup issues fixed

KB4503286 resolves device startup issues in Windows 10. According to user reports, the bug-affected devices from Windows Deployment Services (WDS) server that used Variable Window Extension.

Microsoft says that the issue could lead to premature termination of a connection to the WDS server.

3. Bluetooth connection issues fixed

Thankfully, Microsoft addressed the security flaw in Windows 10 that blocked suspicious connections between Bluetooth devices and Windows 10.

4. General security updates

Microsoft released various security updates to fix issues affecting many Windows Components. T

he tech giant patched some vulnerabilities in the following components: Internet Explorer, Windows App Platform and Frameworks, Windows App Platform and Frameworks, Windows Authentication, Windows Virtualization, Windows Shell, Microsoft Edge, and more.

5. KB4503286 known issues

Thankfully, KB4503286 brings a single known issue to the table. Microsoft warns users their PCs may fail to perform some specific operations on folders and files.

The issue affects those folders and files that are stored on Cluster Shared Volume (CSV). You may encounter the following error code: STATUS_BAD_IMPERSONATION_LEVEL (0xC00000A5). 

Microsoft says that they are working to resolve the issue. However, the company suggested a temporary workaround as well. You can perform one of the following operations:

  • Perform the operation from a process that has administrator privilege.
  • Perform the operation from a node that doesn’t have CSV ownership.

You need to wait for the upcoming release to permanently fix this issue.

Did you encounter other KB4503286 issues? Let us know in the comments below.

How to install the new Start Menu on Windows 10 version 2004

The advantage of being a Windows Insider is that you get to experience features that will be implemented a lot later in a stable version.

The bad side is that the Insider builds come with potential bugs, actually, the whole point behind this being to fix them in time for a stable release.

Well, you can bypass the issues and go straight to the good stuff because we will tell you how to install some Windows 10 version 2009 (aka 20H2) on your Windows 10 version 2004.

How can I enable the new Start Menu in Windows 10 v2004?

The most important features from Windows 10 20H2 are the new beautiful Start Menu and the fact that you can use ALT + Tab in Microsoft Edge to switch between tabs.

Actually, the secret behind this transformation is that in fact, some of the features that are going to become permanent in Windows 10 2009 are already installed in Windows 10 version 2004.

First, you need to install the preview updates launched this week because the new features are part of that update.

How do I enable the new Windows 10 20H2 features?

  1. Open Registry editor by typing regedit in Windows Search and clicking on the result.Open registry editor
  2. Look for [HKEY_LOCAL_MACHINE\SYSTEM\CurrentControlSet\Control\FeatureManagement\Overrides\0\2093230218]
  3. Change EnabledState=dword:00000002
  4. Change EnabledStateOptions=dword:00000000

The experts from ghacks.net even created a file that you can use to make the necessary modifications without editing the Registry yourself.

You need to restart your computer for the changes to take effect. After the restart, you will see the nice new Start Menu.

[wl_navigator]

Fix: Browser Does Not Recognize any of the Video Formats

Your browser does not currently recognize any of the video formats available is a frequent YouTube error message.

Numerous Chrome, Vivaldi, and Firefox users have stated on forums that, the error message appears when they try to play YouTube videos.

It’s a little surprising that the above browsers don’t always play YouTube videos for some users as those are browsers that support most HTML5 video codecs.

If your browser is having a hard time playing YouTube videos due to video formats not being recognized?

Start by turning off the Switch to Flash Player feature and disabling any YouTube HTML5 Player extensions. That should resolve the problem in most cases, but if it doesn’t, you will need to reset your browser to default values or switch to a more reliable browser.

Learn more about how to follow through with these solutions below.

What can I do if my browser won’t recognize video formats?

  1. Use another browser
  2. Turn off the switch to flash player
  3. Reset the Browser
  4. Check the media.mediasource.enabled setting

1. Use another browser

How about a browser that doesn’t have issues with YouTube streaming? Opera One is a worthy alternative to all mainstream browsers for a variety of reasons.

Based on the Chromium project, Opera One has great privacy-oriented features and it takes fewer system resources than Google’s flagship browser and protects your online identity at all times.

Even though it supports Google Web Store extensions, those are not a necessity. The built-in Add-blocker and VPN are all you need in order to prevent trackers and cookies from grabbing your information.

In regards to video streaming, it works seamlessly on all platforms you can think of, starting with YouTube and Twitch.

But, don’t take our word for it, check it out and see for yourself. Plus, it comes with built-in AI, VPN and Ad blocker.

Opera One

Watch high-resolution YouTube videos with less connection issues.
Free Download Visit website

2. Turn off the switch to Flash Player

  1. Open Chrome’s primary menu.
  2. Click More tools and select Extensions.

  3. Next, enter Switch to Flash Player in the search box.
  4. Toggle the Switch to Flash Player extension off.
  5. Enter Disable YouTube HTML5 Player in the search box to locate that extension.
  6. Toggle that extension off, or click its Remove button.
  7. Restart Chrome.

3. Reset the Browser

  1. Enter Chrome://settings in the browser’s URL bar.
  2. Press the Enter key.
  3. Scroll down the Settings tab to click Advanced.Chrome Settings
  4. Scroll down to the Restore settings to their original defaults option.Reset Chrome to default settings
  5. Click the Restore settings to their original defaults option.
  6. Select the Reset settings option.

4. Check the media.mediasource.enabled setting

  1. Enter about:config in the <span id="urn:enhancement-64d17675-03f1-dc12-c88c-bd759c57f0f3" class="textannotation”>URL bar.
  2. <span id="urn:enhancement-64d17675-03f1-dc12-c88c-bd759c57f0f3" class="textannotation”>Press the Enter.
  3. Enter media.mediasource.enabled in the about:config’s pages search box.media.mediasource.enabled firefox flag
  4. Double-click media.mediasource.enabled to set to True.
  5. Restart the browser after enabling Media Source Extensions.
That’s how users can resolve the Your browser does not currently recognize any of the video formats available YouTube error.

As the error is usually appearing due to extensions, turning off all browsers extensions and add-ons is the most probable fix.

Bing is Microsoft’s next overhaul to change your office

You might think that Google Search is unbeatable and impossible to overthrow but Microsoft is not giving up the fight that easy.

Last month’s announcement with Bing Site Scan tool letting you set crawling speed raised some eyebrows but that’s merely a drop in the ocean, right?

Now, the giant from Redmond announced that they are implementing Microsoft Search in Bing and Microsoft 365 Apps for the enterprise.

That’s a big move because it brings Bing in the center of today’s virtual workplace, in the middle of Microsoft 365 users.
How will Bing and Microsoft Search influence work?

Microsoft explains in their announcement exactly what Microsoft Search in Bing is all about:

Microsoft Search in Bing enables your users to use the familiar browser address bar and search box to find workplace information more easily.

For example, documents, internal sites and business tools, people and org charts, and other relevant information from within your organization.

Microsoft Search in Bing searches across files, SharePoint sites, OneDrive content, Teams and Yammer conversations, and other shared data sources in your organization, as well as the web.

So, if you’re at work, using Bing, not only that you will roam the Internet but also the resources from your workplace through Microsoft Search.

Moreover, they are working on an optional Google Chrome extension to set Bing as the default search engine for Google Chrome and provide easier access to Microsoft Search.

After you install it, you will have an On/Off switch just in case you want to stop using Bing as the default search engine.

The extension will be limited to organizations that opt-in for it by electing a specific setting in the Microsoft Search section of the Microsoft 365 admin center.

Microsoft is rebranding Bing and changes its logo

After this announcement, several users, including the notorious @ALumia spotted a different name and icon for the Bing search service.

Some users see the name Microsoft Bing instead of just Bing and the icon has been changed from the stylized letter B to the Microsoft icon.

Microsoft Bing rebranding


After the Microsoft Search in Bing announcement, a Bing rebranding makes the best sense in the world and it’s a part of a big effort by the giant to create a strong Microsoft 365 virtual office.

What do you think about the latest Microsoft moves with Bing? Tell us all about it in the Comments section below.

[wl_navigator]

Microsoft Teams gets new Advanced Communications capabilities

Microsoft has just announced some new Advanced Communication Capabilities for Microsoft Teams. The new capabilities cover a wide range, all of which are designed to help companies take their communications “to the next level.”

The first set of these capabilities include the ability to scale Teams meetings to up to 20,000 participants. This will allow businesses to reach larger audiences during interactive meetings. However, they’ve also limited the size of interactive meetings to 1,000 participants, with a new shift to a “view only” mode after the limit is met.  Also included is a branded meeting lobby, and the ability to set up a compliance recording policy.

Microsoft says these new capabilities will be enabled with a new Advanced Communications Plan for Teams, that can be added to any Microsoft 365 or Office 365 paid subscription. A 60-day free trial is also available via the Teams Admin Center or the Microsoft Teams Website in mid-August. Licenses come in at $12 per user per month.

In addition, Microsoft detailed that they will extend support for Skype for Business (3PIP) phones beyond 2023, so businesses can continue to use these devices as they move to Teams. The company also plans on supporting core calling features on SIP phones from Cisco, Yealink, Polycom, and others with Teams. Support for SIP phones will be available in the first half of 2021.

Wrapping up the list of announcements is the introduction of a new line of Microsoft Teams phones with physical buttons, high-quality audio, and core calling features at affordable prices. These phones will come from AudioCodes, Poly, Yealink starting early 2021. Microsoft is also planning on introducing new USB peripherals and Teams phones that have dial pads and a “modern Teams user interface.”

How to block driver updates in Windows 10 [Quick Guide]

Everybody is talking about how you should update all your drivers right after you upgrade your system to Windows 10.

But, this doesn’t have to be the truth always, because some drivers just aren’t compatible with Windows 10.

In other words, certain software updates could prevent a certain piece of hardware from working.

In this article, I’m going to show you how to block further driver updates in Windows 10.

How can I stop automatic driver updates on Windows 10?

1. Use the Show or hide updates tool

  1. Access Microsoft’s website and download the troubleshooting tool.
  2. Run it and choose Hide updates, under Show or hide updates.
  3. Now check your driver to prevent any further automatic updates.

There was a lot of fuss when Microsoft decided to not let you control automatic updates in Windows 10 Home version.

Probably because a lot of people complained, Microsoft decided to release a troubleshooter which allows you to block automatic updates for Windows 10.

That troubleshooter still works in the full version of Windows 10, and it could be used to block automatic updates of drivers, as well.

By applying the above steps, this troubleshooter will make sure that your desired driver will stay at the current version forever.

So, if you use some older piece or hardware on a Windows 10 computer, you don’t have to worry that it will lose its functionality sometime in the future, because of the incompatible driver.

As I said, this tool doesn’t have to be used only for blocking driver updates, as it can block all other unwanted updates in Windows 10.

2. Use professional driver updater software

Using a professional tool that updates your drivers is a straightforward option. This type of program will update your drivers automatically, only when needed, and you can customize the settings to suit your needs.

3. Disable the update service

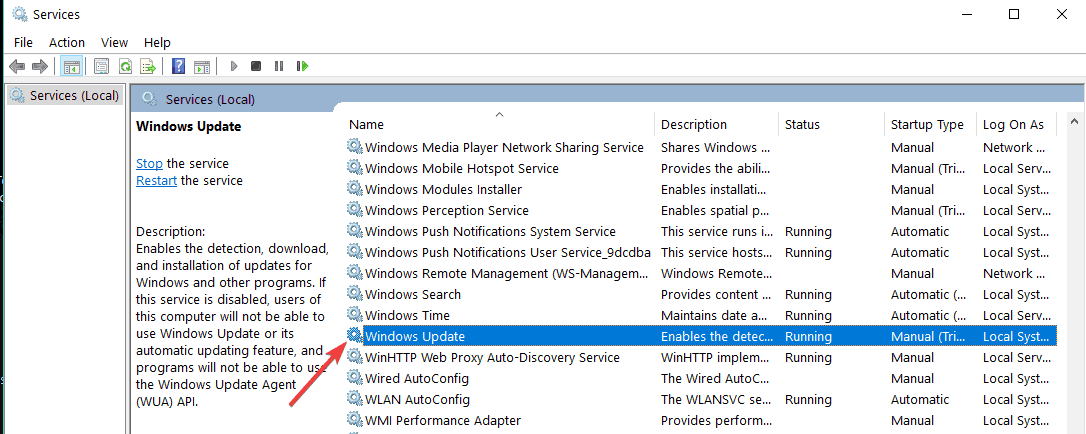
  1. Go to Start > type services.msc > hit Enter.
  2. Go to Windows Update service > double click on the service.stop windows update service
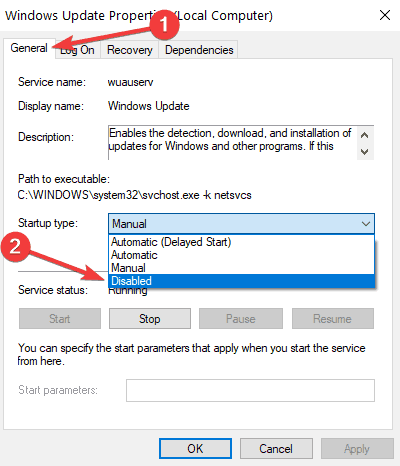
  3. Click on the General tab > go to Startup Type> select Disabled as shown in the screenshot below.disable windows update service
  4. Reboot your computer to stop any updates.

This method allows you to disable any updates. This includes OS updates, driver updates, software updates, and more.

4. Roll back drivers

  1. Go to Device Manager > right-click the problematic device > go to Properties.
  2. Select the Driver tab > select Roll Back Driver.
roll back display driver windows 10

If your computer already installed new driver updates, you can quickly uninstall them by rolling back drivers. Use this solution if the latest driver versions broke your machine.

And this is how you can disable automatic driver installation in Windows 10.

How do you feel about Microsoft’s decision to prevent you from controlling updates in Windows 10? Tell us your opinion in the comments.

The new Microsoft Teams Tasks app, explained

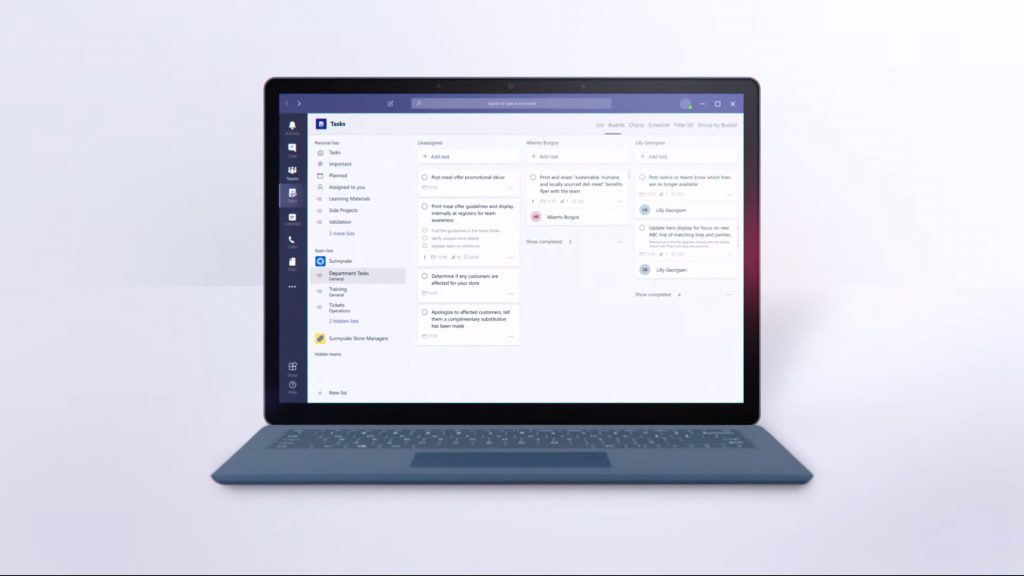
You might have recently heard about Tasks, one of the newest apps for Microsoft Teams. This new experience for Teams is a rebrand of the Microsoft Planner app in Teams, and plugs with the rest of Microsoft 365 and bring your content together in one central hub for Teamwork. There is a lot of ways that the Tasks app is similar to Planner, but it’s also quite different, too. Here’s a quick explainer, and everything you need to know about the new Tasks app.

When is the new Tasks app coming?

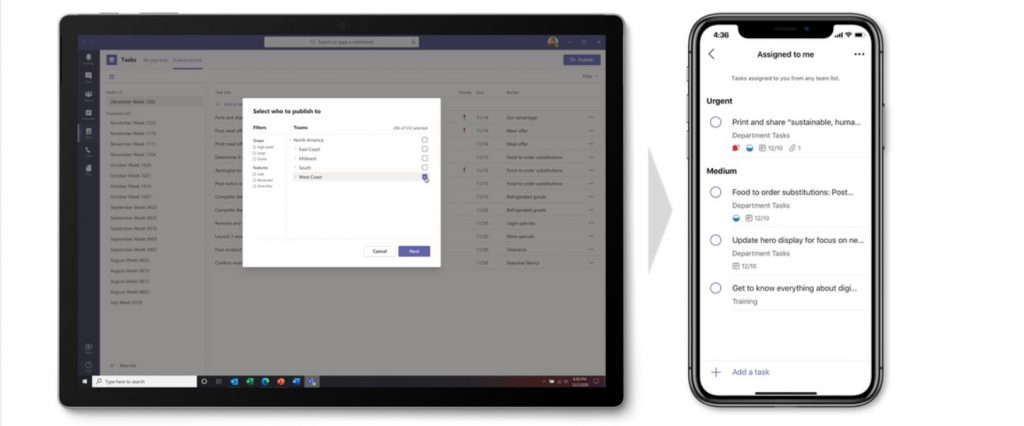
Tasks App Teams Mobile


We’ll start first with what’s most important: when is the new Task app coming? Well, despite an initial delay, Microsoft announced on July 28 that the new Tasks app in Teams is now slowly rolling out. It is a gradual rollout that will be continued through September of 2020, so this means not everyone will see it just yet.

It is also worth noting that though the Tasks app itself is a new experience, the name for it has not changed. Currently, Microsoft has a bit of a complicated rollout plan. As they continue to roll out the new Tasks experience in Teams desktop, the app name will initially remain as Planner, then change to Tasks by Planner and To Do, and then change to Tasks. That means that for now, you’ll still access the Tasks app from the Planner icon in Teams. Mobile users, though, will always see the app name as Tasks.

What are some features of the new Tasks app?

So, what makes Tasks different from the old Planner experience? Well, the Tasks app in Microsoft Teams is designed to bring together your personal and individual tasks from To Do and Outlook with your team Tasks from Planner. Microsoft believes that this combination can help you work more efficiently.

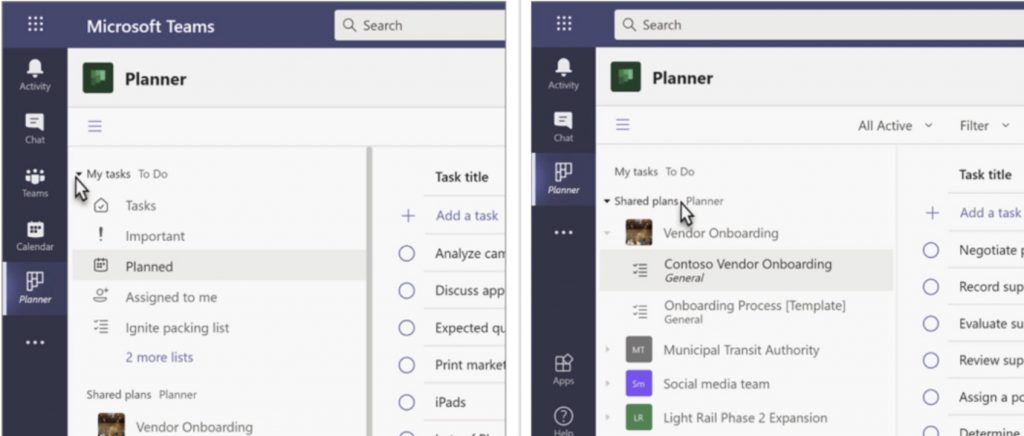
There are two core parts of the Tasks app. You’ll see that there are My Tasks, which make up the lists from your To Do app and tasks you’ve added in To Do and Outlook. You’ll also see Shared Plans, which include Planner plans that have been added to Teams.

Another feature of the Tasks app lets you add a plan to a Microsoft Teams Channel. Once added, you can see your plan in the context of the rest of your team conversations, files, and more. It works just like Planner on the web would, but isn’t new as this was previously possible in the old Planner app in Teams, too.

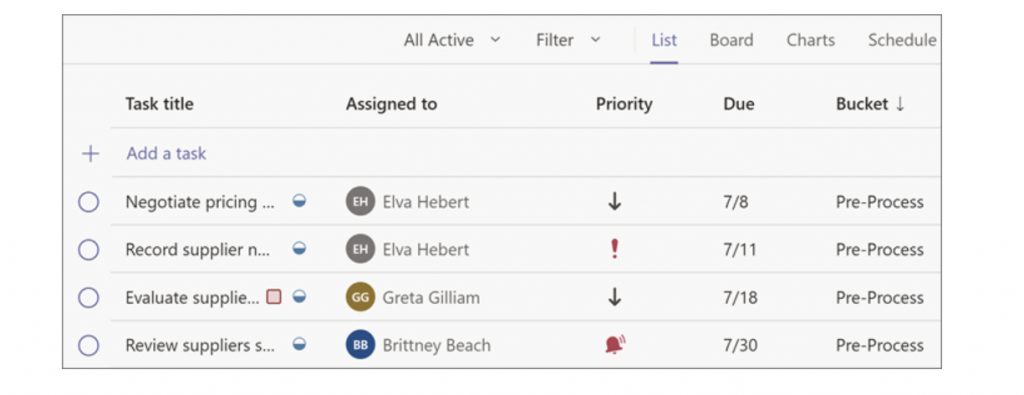
The newest feature coming with the Tasks app is what’s called a List view. With List view, the Tasks app displays tasks and information associated with them in rows and columns. This also allows you to change many tasks at once. This wasn’t possible in either To Do or Planner before. It also allows you to filter your tasks, which previously wasn’t possible in To Do. We will describe Lists View in a dedicated section later in this piece, as it is quite cool.

How do I use the new Tasks app?

Tasks App Microsoft Teams

Ok, so how do you use the new Tasks app? If enabled by your IT administrator, it’s quite easy. Simply head to the three-dot (. . . ) menu, and search for “Planner.” Once you find it, you can click it and drag it to your sidebar in Teams for easy access.

From there, you’ll see My Tasks, To Do, and Shared View. My Tasks will be a hub of all the Tasks that you’ve created or anything that has been assigned to you and all your tasks across Microsoft 365. When it comes to My Tasks, you should see them listed by Tasks, Important, Planned, Assigned, and Lists. Tasks is a list of tasks that you added in Outlook or in To Do. Important, meanwhile, includes all of the tasks in To Do that you’ve marked with a star. As for Planned, this includes tasks in To Do that have a due date. They will be listed by date so you can properly plan your time. Finally, Assigned to me includes all of the tasks in Planner that have been assigned to you. This, though, might only show up if you synced your Planner tasks to To Do. Microsoft has a help article that explains that you want to learn more.

319256e3 0d21 42c5 Bcfe 21706a825831

Keep in mind, that there are some caveats to this experience. My Tasks will not include My Day or Flagged email lists. You also won’t be able to see recurrence for your To Do tasks in the Tasks app, but the information is still attached to those tasks and can be seen in To Do in Outlook or To Do app. Some of the other limits of Tasks vs To Do can be seen in this Microsoft Article here.

That explained, there’s still a bit more left. We’ll now touch on the Shared Plans section of Tasks. From here, you’ll be shown Microsoft Planner plans that have been added to channels in Teams. There is a list view of teams and channels which can help you choose what you’re looking for. Shared Plans sync with Planner and will have the usual Board, Chat, and Schedule View as seen from Planner on the web and the old Planner app. You also can use the new Lists view here, too, as we describe in the next section.

There are some differences though. You can view a columned list in the Task app, but not on the Planner app. You can rename a plan in the Planner app, but not in the Task app. You can learn more about these differences at Microsoft here.

What’s the new Lists View in the Tasks app?

Microsoft-tasks-list-view

We’ve talked a lot about the Lists View in the Tasks app, so what’s so special about it? Well, with List view, you can edit multiple tasks at once, be it from To Do or Planner. You can best check this out by clicking the main Tasks icon from the My Tasks list.

Once you do that, you can change several tasks at the same time, and do a bulk edit. You can select a task by clicking or tapping on it, anywhere but on the complete circle. You can then press and hold the SHIFT key down and select multiple tasks that are consecutive. If the task is nonconsecutive, then all you need to do is press and hold the CTRL or CMD key. You’ll then want to choose Progress, Priority, or Due date from the list. You can also choose more options or delete the task, move the task, or see additional controls. Finally, you can enjoy some filter tools, too, which isn’t available directly in the To Do app.

Other features, and more

We’ve touched on the core features of the Tasks app, but there is a lot more that is possible with Tasks, too. Companies can create tasks at the corporate level and push the tasks to targeted Teams across their Firstline Workforce. There is also the ability to use Graph API and Power Automate integrations as well. This is all part of Microsoft’s new Tasks in Microsoft 365 effort, so there are definitely some new updates and features coming soon. Keep it tuned to our Microsoft 365 Hub for more news, and let us know if you like the new Tasks app by dropping us a comment below.

Microsoft details redesigned Microsoft Store on Xbox that will ship to select Xbox Insiders this week

Microsoft has just put the wraps off a redesigned Microsoft Store on Xbox that select Xbox Insiders will be able to try this week. We’re previously seen this new store in leaked pictures a couple of months ago, but the new design probably isn’t as important as the speed boost provided by the new experience.

“The new Microsoft Store on Xbox is more than twice as fast as before. It launches in under two seconds, and the browse performance is greatly improved – it’s faster than ever to load pages and find what you need, whether it’s checking out a sale price or watching HD trailers,” explained Cody Bird, Principal Program Manager, Xbox.

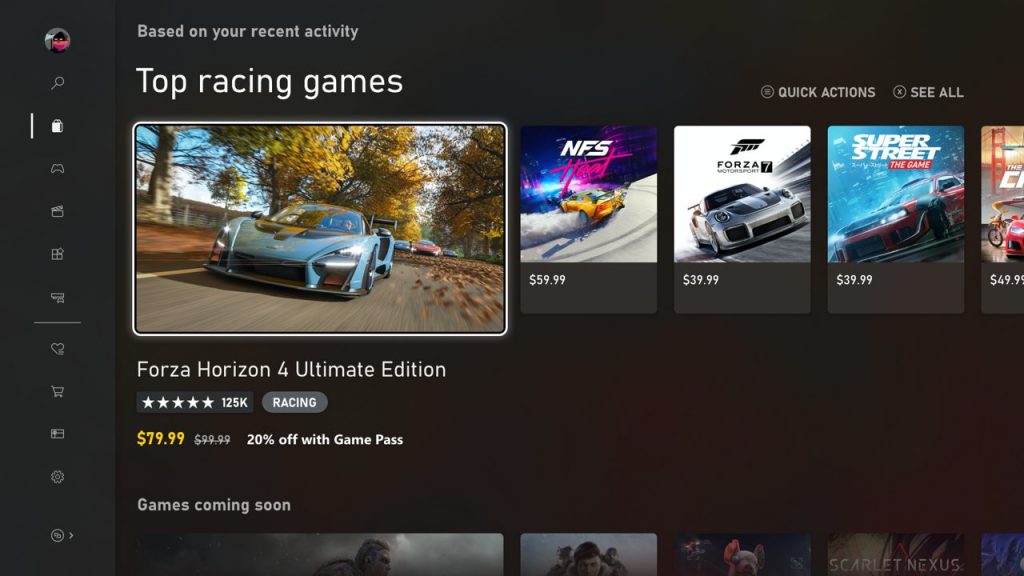
According to Bird, the Store experience on Xbox has been rebuilt from the ground up “to be faster, safer and easier to use than ever before.” The design language is consistent with the one found on the Xbox Game Bar and Xbox app for Windows 10, and the new Store should be easier to navigate with a left panel providing quick access to games, Movies & TV, hardware, your Wishlist, and your shopping cart.

Redesigned Microsoft Store on Xbox

The store listings now use color to better highlight discounts, and Microsoft has also rebuilt the search feature to add filters and the ability to view trailers inline while you search. The store will also automatically apply content filters for child accounts, and the store actually won’t be accessible without being logged in on the console. “Being signed in also helps you have a more personalized experience – you’ll see content that is more relevant for you,” explained Bird.

Another noteworthy update is the ability to view the price of Xbox 360 and OG Xbox games without having to tap the “View price” button first, and users will also be able to add these backwards compatible to their Wish List or shopping cart. You can see how this rebuilt Microsoft Store on Xbox works in the video below:

“We’ll be rolling this update out gradually, so if you’re an Xbox Insider, you may begin to see the new Microsoft Store on Xbox starting as early as August 5; the experience will be available for more Insiders over time before it rolls out to all users this fall,” Bird said today. Let us know what you think in this redesign in the comments below.

Microsoft confirms it will NEVER EVER remove IE from Windows 10

Internet Explorer is a browser that comes pre-installed on every Windows version, including Windows 10. Unfortunately, IE failed to impress Windows users who switched to third-party solutions for web browsing.

As you all know, the tech giant is now promoting a new browser: Chromium Edge.

As a matter of fact, Microsoft announced that a new feature called IE Mode would be part of the new browser very soon. This means that users will no longer have to use Internet Explorer separately. 

Will Microsoft remove Internet Explorer?

Recently, a team from Microsoft started a new conversation on Reddit and encouraged users to ask questions about the latest preview builds of Microsoft Edge.

Apparently, users are concerned about Microsoft completely removing IE11 from Windows 10. In fact, one Redditor directly asked Microsoft this question:

With the introduction of IE mode in edge, are there any plans to remove ie11 as a standalone browser in windows 10?

Internet Explorer users may be glad to learn that Microsoft has no plans to remove IE11 from Windows. The native Windows browser will be included in all the upcoming Windows 10 versions. That clearly means that Microsoft will continue to support IE11 forever and ever. 

IE11 will continue to be supported on the lifecycle of the OS – https://support.microsoft.com/en-us/help/17454/lifecycle-faq-internet-explorer . No plans to remove IE11. Thanks! 

Quick Tip:

However, if you ever get bored using IE, you can upgrade to a fast, reliable, and privacy-focused browser.

We recommend downloading and installing Opera One, a web browser built with the Chromium engine, just like Microsoft Edge and Google Chrome.

This tool blocks third-party trackers and cookies from accessing and selling your user data, all while providing you with lightning-fast browsing speeds. Also, it features a built-in AI.

Opera One

Enjoy an alternative to Internet Explorer and Microsoft Edge in the form of this lightning-fast web browser
Free Download Visit website

Instagram Story Stuck Uploading? 3 Ways to Fix it

Many users reported that their Instagram story is stuck uploading, and if this happens, they won’t be able to post any stories.

However, there’s a way to fix this issue, and this guide will help you do that.

How do I fix a stuck upload on Instagram?

Before you try anything, try switching to a different network, it might help with this issue.

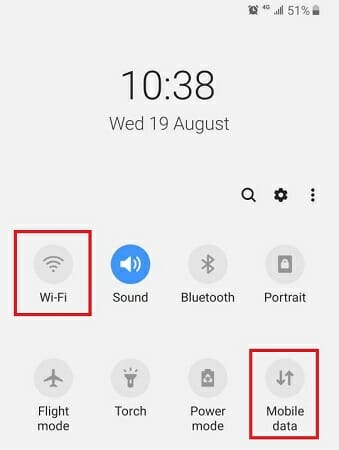
1. Disable mobile data/WiFi

Instagram story stuck on posting
  1. Pull down the notification drawer from the top.
  2. If you are using cellular data, turn off Mobile data.
  3. If you are using a WiFI, tap to turn off the WiFi connection.
  4. Press the recent apps/multitasking button on your phone.
  5. Swipe left/right/up to close the Instagram app.
  6. Relaunch the Instagram app and open the Stories section.
  7. There you should see a Try again message.
  8. Tap the three-dots next to it, and select Delete.

Needless to say, use the Save button if you don’t have the photo saved in your gallery. Make sure to turn off both WiFi and Cellular connection if you have both working.

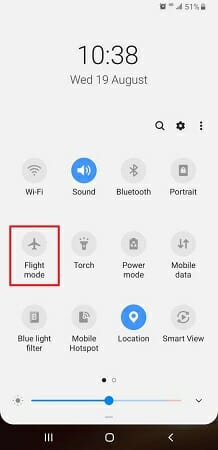
2.  Enable Airplane mode

Instagram story stuck on posting
  1. Pull the notification drawer from the top of your screen.
  2. Locate and tap on the Airplane mode.
  3. Enabling the Airplane mode will disable cellular connection as well as your WiFi and hotspot.
  4. Once you have it on Airplane mode, close the Instagram app.
  5. Open Instagram again and go to your stories section.
  6. Tap on three dots next to Try again.
  7. Select Delete.

3. Clear app data and cache

Instagram story stuck on posting
  1. Close the Instagram app if it is open.
  2. On your Android phone, tap on Settings.
  3. Tap on Apps / Application Manager.
  4. Search for and open the Instagram app.
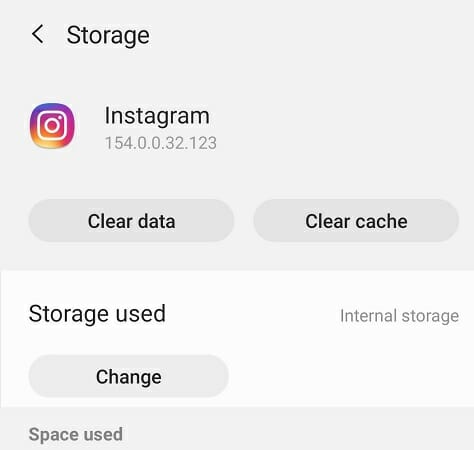
  5. Scroll down and tap on Storage.
  6. Tap on Clear cache.
  7. Next, tap on Clear Data. Confirm the action by tapping again on OK.

4. Update / Reinstall the app

Instagram story stuck on posting
  1. Open Play Store on your Android device or Apps Store on an iOS device.
  2. Search for and open Instagram.
  3. Tap on Update to install pending updates.

Reinstall on Android

Instagram stories failed to post
  1. Tap on Settings.
  2. Scroll down and open Apps.
  3. Search and open Instagram from the list of installed apps.
  4. Tap on Uninstall.
  5. Tap on Uninstall and then tap OK to confirm.
  6. Once the app is uninstalled, open Google Play Store.
  7. Search for Instagram and install the app.

Reinstall on iPhone

Instagram stories failed to post
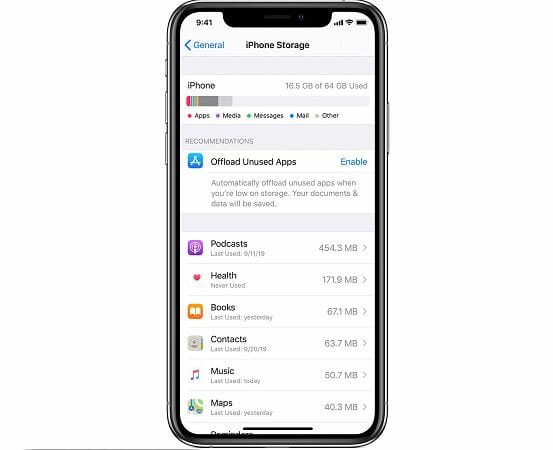
  1. Open Settings.
  2. Go to General.
  3. Select iPhone Storage.
  4. Tap on Instagram.
  5. Tap on Delete App.
  6. Once deleted, download and install the app again from the Apps Store.

If your Instagram story is stuck on posting, it could be due to a poor connecting issue or a temporary glitch. The above-listed steps should help you fix the issue in no time.

Further, you may experience sound issues on your Instagram so check out our detailed article on how to fix it.

This isn’t the only issue, many reported Something went wrong on Instagram as well as an Unknown network error on Instagram.

If you use Instagram along with other platforms, we have a guide on Instagram not posting or sharing to Facebook, so don’t miss it.

5 best VPNs for multiple devices (including 3 free VPNs)

Since you’re willing to pay for a premium VPN subscription, you’d better get your money’s worth. Especially if you plan to install the VPN on multiple devices and to share your VPN account with your family.

What you need is a VPN service that supports several device connections at the same time. That means you can watch Netflix on your smartphone while your laptop is securely downloading a torrent and your tablet is live-streaming a sports event. All while staying connected to the same account.

The best part about it is that each device can have a distinct configuration. One can be connected to a US VPN server, another to the UK, and so on.

However, it also depends on what operating systems and platforms are supported by the VPN provider. If the VPN only works on Windows, for example, you can’t install the native client on Android or iOS, too.

We did all the hard work and found the 5 best VPNs for multiple devices. We rated them by the number of supported connections and OS compatibility.

Which VPNs can be installed on multiple devices?

Private Internet Access – 10 connections

use Private Internet Access for multiple devices

Made by Kape Technologies, Private Internet Access (PIA) gives you the possibility to connect up to 10 devices using the same account. It’s more than enough for most families who want to set up a VPN on their personal smartphones, tablets, and laptops.

PIA has a pretty big network of VPN servers: more than 3,300 in 48 countries. It can protect your DNS queries and speed up your Internet connection with exclusive DNS servers. Plus, you can redirect the VPN connection through a secondary location using a Shadowsocks or SOCKS5 proxy server.

Other features featured in PIA are OpenVPN and WireGuard, static and dynamic IP addresses, split tunneling, a kill switch, ad and malware blocker for web browsers, and native port forwarding mode to help you host game servers through VPN for you and your friends.

What else you should know about PIA:

  • Windows, macOS, Linux, Android, iOS, Chrome, Firefox, Opera, Fire TV
  • No logs or leaks
  • 24/7 live chat support
  • 30-day money-back guarantee (no free trial)

Private Internet Access

Install this reliable VPN on up to 10 devices to protect your online privacy and security.
Check price Visit website

NordVPN – 6 connections

use NordVPN for multiple devices

Many VPN users are familiar with NordVPN since it has an excellent reputation in the VPN industry. Developed by Tefincom & Co., NordVPN is one of the most secure VPNs for multiple devices. It comes packed with a lot of awesome safety options, which can be partly found in Surfshark.

For instance, if you want to raise your privacy level, you can join the Tor anonymous network while staying connected to a NordVPN server. But you don’t have to separately download and install the Tor browser, as it’s normally necessary.

Instead, you can connect to NordVPN’s Onion-over-VPN servers since the app seamlessly integrates with Tor. NordVPN offers more than 5,100 VPN servers in 59 countries, second only to CyberGhost VPN.

You can watch streaming, use Smart DNS and OpenVPN, protect your browsing sessions with an ad and malware blocker, connect to obfuscated or double VPN servers, and activate an emergency kill switch.

What else you should know about NordVPN:

  • Android, Windows, macOS, iOS, Linux, Chrome, Firefox, Fire TV
  • No logs or leaks
  • 24/7 live chat support
  • 30-day money-back guarantee (no free trial)

NordVPN

Take advantage of ultimate security and install this VPN on up to 6 devices.
Check price Visit website

Surfshark – unlimited connections

use Surfshark for multiple devices

There’s nothing better than a no-limit VPN. Surfshark is the only VPN we know that supports an unlimited number of connections. That’s right, you can connect 10, 50, 100, or more devices using the same account to ensure VPN protection to all.

Made by Surfshark LTD, Surfshark lets you connect to more than 1,700 VPN servers spread across 63 countries. It protects every one of them with private DNS. Plus, it’s the most affordable VPN service on this list, especially if you choose a lengthy subscription plan.
Surfshark supports OpenVPN and WireGuard, obfuscated VPN servers, an ad and malware blocker, Shadowsocks proxy, multi-hop VPN connections, split-tunneling mode, and a kill switch.

What else you should know about Surfshark:

  • Windows, macOS, Linux, Android, iOS, Firefox, Chrome, Fire TV
  • No logs or leaks
  • 24/7 live chat and email support
  • 30-day money-back guarantee
  • 7-day free trial for Android and iOS

Surfshark

Protect the devices of your entire family using this budget-friendly VPN.
Check price Visit website

CyberGhost VPN – 7 connections

use CyberGhost VPN for multiple devices

Next in line is CyberGhost VPN, a service that a lot of users are familiar with, particularly since it’s the best free VPN for multiple devices. It’s a product owned by Kape Technologies, which can unblock all popular Netflix catalogs, along with other top streaming platforms.

Furthermore, CyberGhost VPN has the most extensive network of VPN servers on this list: over 6,500 in 89 countries. You can also use it to watch streaming content on your smart TV or gaming console by changing your DNS settings to the addresses provided by CyberGhost.

CyberGhost VPN comes with OpenVPN, DNS leak protection, an ad and malware blocker, a kill switch, and split-tunneling mode if you want to isolate VPN traffic from the rest of the Internet to access two networks at the same time.

What else you should know about CyberGhost VPN:

  • Windows, macOS, Linux, Chrome, Firefox, Fire TV
  • No logs or leaks
  • 24/7 live chat support
  • Up to 45-day money-back guarantee
  • 1-day free trial for Windows and macOS
  • 7-day free trial for Android and iOS

CyberGhost

Use the best free VPN for multiple devices to browse safely, download torrents anonymously, and unblock any streaming service.
Check price Visit website

ExpressVPN – 5 connections

use ExpressVPN for multiple devices

ExpressVPN is also a name known to numerous online users looking for security and privacy solutions. Created by Express VPN International LTD, this VPN service supports multiple devices and is easy to use. Plus, you can trust ExpressVPN with your data.

There are more than 3,000 VPN servers in 160 locations and 94 countries that you can freely explore on your desktop, laptop, tablet, or smartphone. ExpressVPN protects each of them by running an encrypted DNS that doesn’t store any details about your online activities.

ExpressVPN works in China, supports OpenVPN and IP leak protection, split-tunneling mode, a kill switch called Network Lock, and unblocks a few Netflix catalogs including Netflix US.

You can also use it to defeat ISP throttling, bypass government censorship, and set up DNS servers on smart TVs and gaming consoles.

What else you should know about ExpressVPN:

  • Mac, Windows, iOS, Android, Linux, Chrome, Firefox, Fire TV
  • No logs or leaks
  • 24/7 live chat support
  • 30-day money-back guarantee
  • 7-day free trial for iOS and Android

ExpressVPN

Gain total Internet freedom by installing this dependable VPN on up to 5 devices.
Check price Visit website

Those are the 5 best VPNs for multiple devices: you can install them on a wide range of platforms and operating systems, as well as share your VPN account with your family.

If you’re looking for more, consider installing your VPN at the router level so that all connected devices can take advantage of your VPN’s features. The upside is that you can share your VPN connection even with devices that don’t have native VPN support, such as Apple TV.

Moreover, it counts as a single simultaneous connection, so you don’t have to worry about going over the limit set by your VPN provider.

FIX: Windows 10/11 VPN shows unidentified public network

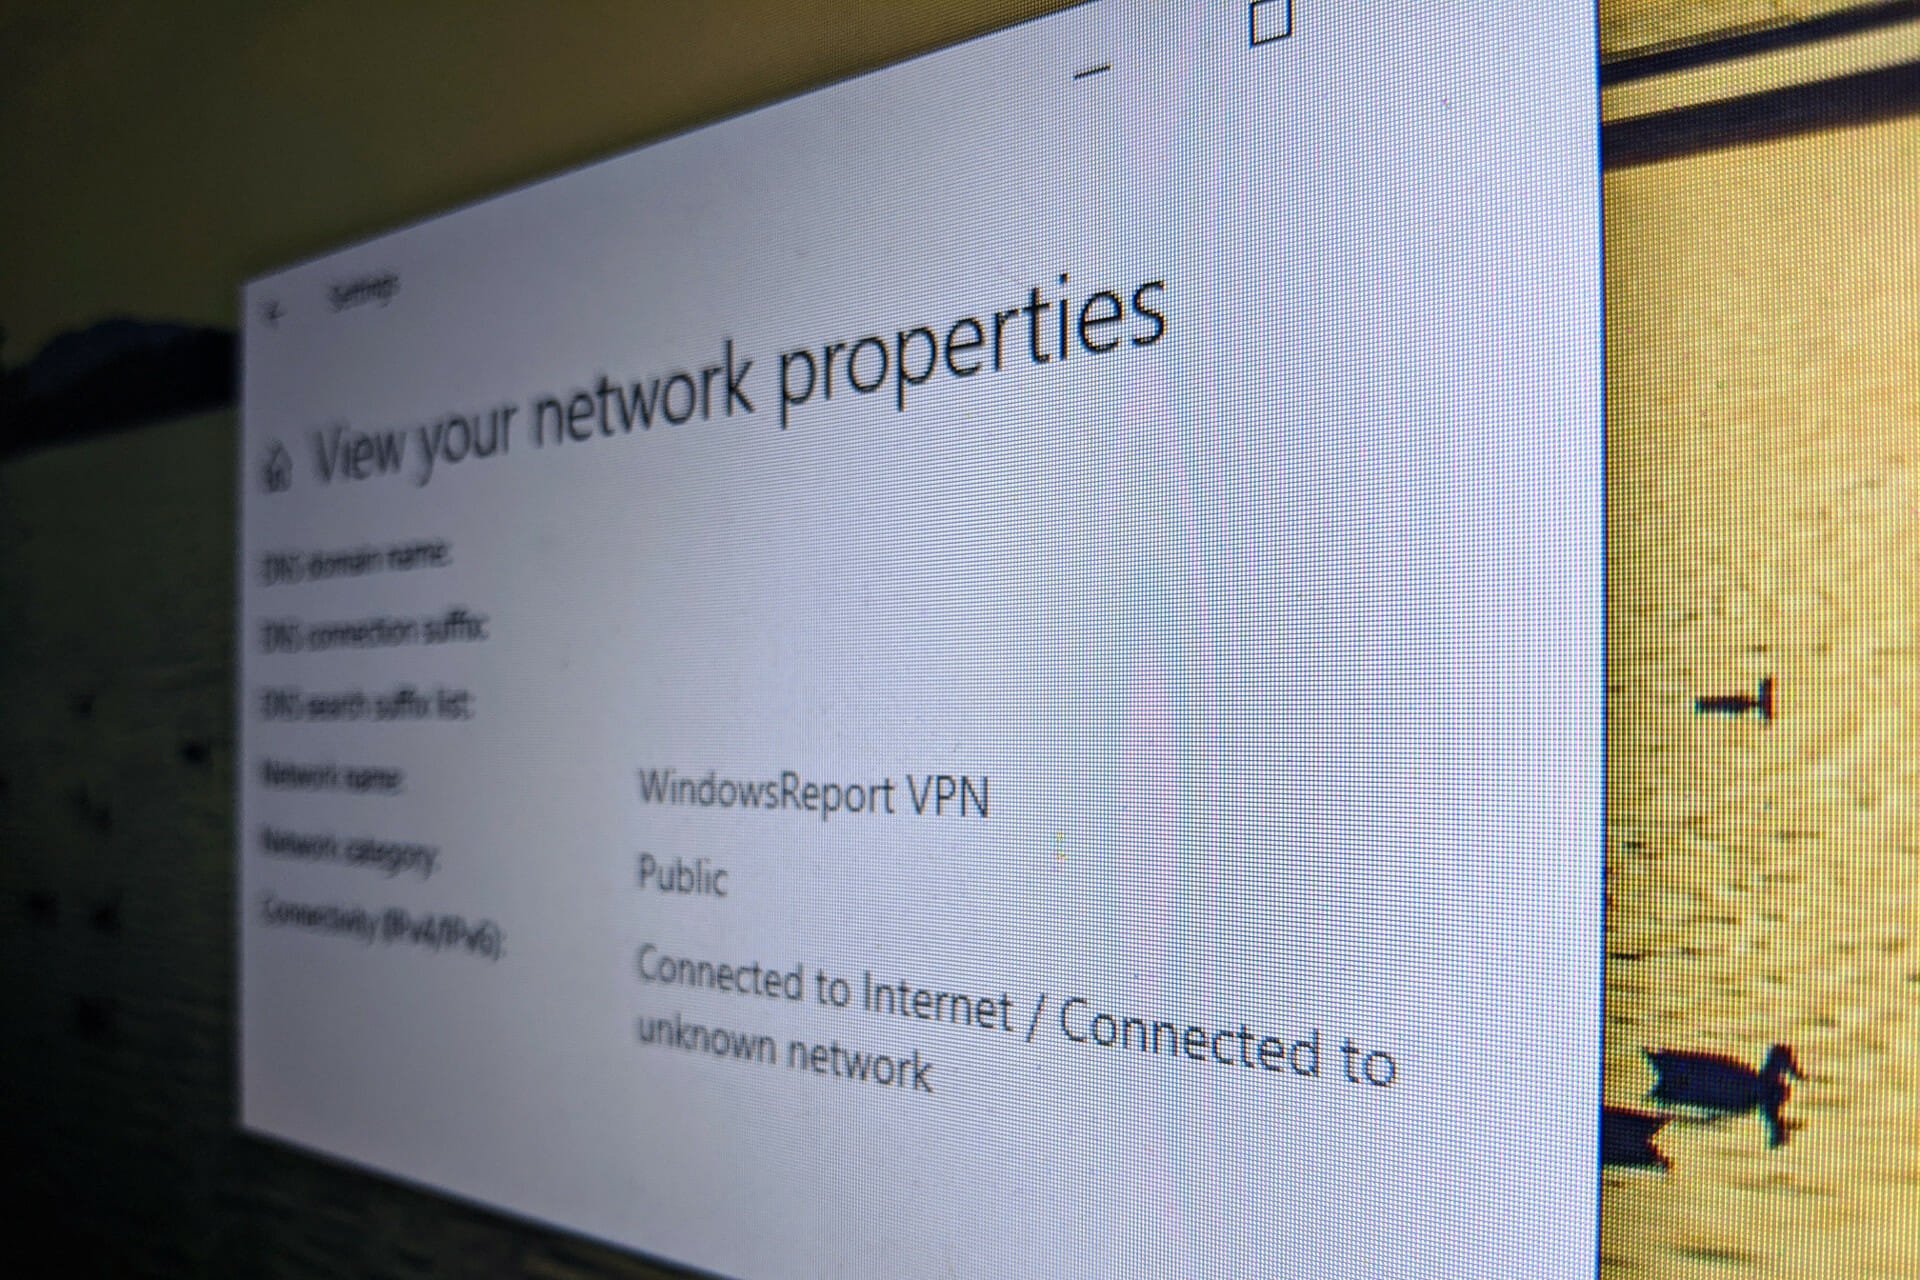
If your Windows 10 VPN connection shows an unidentified or unknown public network connection message, this means that the network it’s trying to connect with can’t be identified due to a connectivity issue or lack of identifiable characteristics.

In the second case, you don’t have to worry that your VPN isn’t working properly. And it doesn’t mean it’s leaking your IP address or compromising your security either.

It’s a Windows 10 error that can’t identify the network due to specifications it can’t translate. For example, if you have IPv6 enabled but your ISP doesn’t support IPv6, you might receive this message.

It’s only problematic when it points out a network issue. If that’s the case, check out our 9 quick-fixes below.

How do I prevent Windows 10 VPN from showing the unidentified or unknown public network message?

Check if Internet connects to an unidentified network

Windows 10 shows unidentified or unknown public network

  • Disconnect from the VPN.
  • Right-click the Start button and select Network Connections.
  • Click Network and Sharing Center or View your network properties.
  • Check if your Internet connection shows Unidentified network or Unknown network.

If the Unidentified network message on Windows 10 is caused by the Internet connection, you need to fix this. Afterward, check if the VPN connection is still displaying this error. If so, proceed to the following steps.

By the way, feel free to bookmark our Network Hub to troubleshoot any Internet connection issues.

Run the VPN client as admin

run Private Internet Access as administrator

  • Disconnect from the VPN.
  • Click the Start button and search for the VPN client.
  • Right-click its entry and select Run as administrator.

If you have a VPN desktop client installed on your PC, the error message could be caused due to lack of permissions. Make sure to run your VPN client as the administrator. Then you can check if it still shows the unidentified public network message on Windows 10.

A lot of Windows-related issues are caused by a lack of permissions. Visit our Admin Rights Hub to find out more.

Disable IPv6 connectivity

disable IPv6 on your router

  • Using a web browser, log in to your router admin page.
  • Sign in with your credentials*.
  • Locate the IPv6 section.
  • Turn off IPv6.
  • Save changes.
  • Right-click the Start button and go to Network Connections.
  • Click Change adapter options.
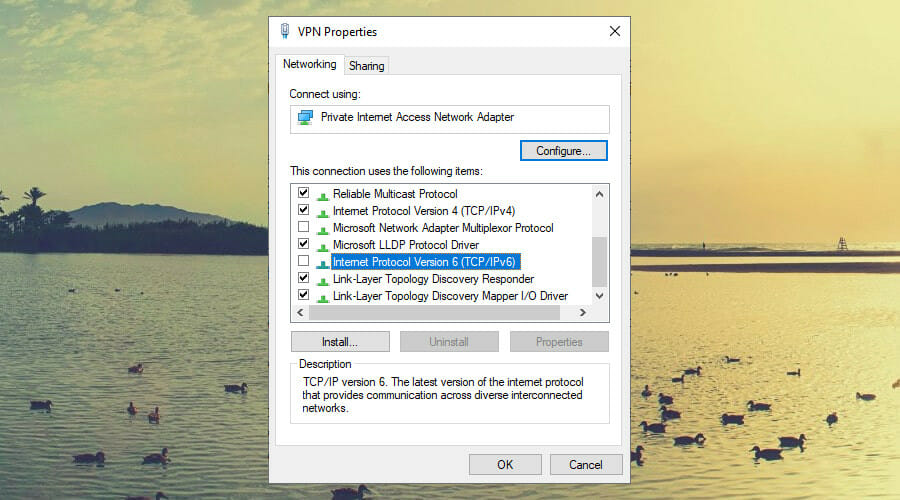
  • Right-click your VPN connection** and select Properties.disable IPv6 on your VPN connection
  • Locate and disable Internet Protocol Version 6 (TCP/IPv6).
  • Click OK.
  • Do the same for your Wi-Fi or Ethernet connection*** to disable IPv6.
  • Restart your computer.

*The default settings should be written on the back of the router.

**If you have multiple connections and don’t know which one belongs to your VPN client, keep an eye on the Network Connections window while connecting to the VPN to spot the one that becomes active.

***If Windows gets stuck after trying to confirm settings on Wi-Fi or Ethernet, force close the connection window and restart Windows Explorer from Task Manager.

If Windows 10 VPN shows unidentified public network but it’s still connected to the Internet, this shouldn’t affect you. However, if you don’t use IPv6 connectivity, it’s a good idea to turn it off everywhere (router, Ethernet, Wi-Fi, VPN).

If the error message is still displayed after deactivating IPv6, it might be your ISP’s fault, not yours. If this still bugs you, contact your ISP and ask for assistance.

Reinstall the TAP drivers

uninstall TAP drivers from Device Manager

  • Right-click the Start button and go to Device Manager.
  • Expand Network adapters.
  • Locate the TAP driver of your VPN client.
  • Right-click the TAP driver and select Uninstall device.
  • Leave Delete the driver software for this device unchecked.
  • Click Uninstall.
  • Launch your VPN client.
  • When it asks you to reinstall the TAP driver, allow it.
  • Or, if you have Private Internet Accessreinstall TAP drivers from the PIA help menu
    • Right-click the PIA icon in the systray and select Settings.
    • Go to Help.
    • Click Reinstall OpenVPN Network Adapter*.
    • If prompted by UAC (User Account Control), click Yes.

*If you use the WireGuard protocol instead of OpenVPN, then click Reinstall WireGuard Network Adapter.

You can also fix errors with the TAP-Windows Adapter V9 to resolve the problem with the unidentified public network over the virtual private network.

Uninstall extra VPNs and remove their TAP drivers

uninstall any unused VPNs

If you have more than one VPN client installed on your computer, this could result in conflicts because each VPN has its own TAP driver.

So, if two or more TAP drivers apply individual settings to Windows 10, it could be the reason why your VPN shows the unidentified public network message.

Make sure to uninstall all VPN apps except for the one you currently use. You can use the default Windows 10 uninstaller, but we recommend using third-party tools that also remove any software leftovers, including the associated TAP drivers.

Otherwise, you might have to visit Device Manager and manually remove any leftover TAP drivers.

Check for faulty IP addresses

obtain IP addresses automatically

  • Disconnect from the VPN.
  • Click the network icon in the systray.
  • Go to Network & Internet settings.
  • Click Change adapter options.
  • Right-click your VPN connection and go to Properties.
  • Double-click Internet Protocol Version 4 (TCP/IPv4).
  • In the General tab, select Obtain an IP address automatically.
  • Switch to the Alternate Configuration tab.
  • Select Automatic private IP address.

Your VPN client should automatically obtain the correct IP addresses for establishing the VPN connection (depending on which VPN server you connect to).

If you or someone else made any changes to the IPv4 settings before, it might be the reason why you keep seeing the unidentified public network message on Windows 10.

Learn more about why IPv4 doesn’t work on Windows to set the correct configuration.

Check for faulty DNS servers

set PIA DNS

  • If the VPN client has private DNS
    • Right-click PIA’s icon in the systray.
    • Go to Settings.
    • Switch to the Network tab.
    • Set Name Servers to PIA DNS.
  • Or, if the VPN client doesn’t have private DNSuse custom DNS servers
    • Click the network icon in the systray.
    • Go to Network & Internet settings.
    • Click Change adapter options.
    • Right-click the VPN connection.
    • Go to Properties.
    • Double-click Internet Protocol Version 4 (TCP/IPv4).
    • In the General tab, select Use the following DNS server addresses*.
    • Set Preferred DNS server to 8.8.8.8.
    • Set Alternate DNS server to 8.8.4.4.
    • Click OK.

*These DNS servers belong to Google. They can be used by anyone for free to optimize the Internet connection. You can also try Cloudflare with 1.1.1.1 (preferred) and 1.0.0.1 (alternate), as well as OpenDNS with 208.67.222.222 (preferred) and 208.67.220.220 (alternate).

If your VPN client has exclusive DNS servers as Private Internet Access, make sure to force it to use them instead of your default DNS servers, which are assigned by your ISP.

Otherwise, you can use free and public DNS servers like the ones above to make Windows 10 VPN stop showing the unidentified public network message. Don’t hesitate to also apply those DNS servers to your Ethernet or Wi-Fi connection.

Find out more about Windows 10 DNS and how to use it correctly.

Remove any faulty proxy servers

disable the PIA proxy

  • Right-click the PIA icon in the systray.
  • Go to Settings.
  • Switch to the Proxy tab.
  • Set Proxy to None.

If the proxy settings are not properly configured in the VPN client, this could cause an unknown network issue while staying connected to the VPN.

You should also check the Windows 10 proxy settings and make sure your Ethernet or Wi-Fi doesn’t have connectivity problems due to incorrect proxy setup. To check this, temporarily disable it and check the connection.

If your Windows 10 proxy won’t turn off, there are ways to get around this problem.

Add a line of code to the OVPN file

edit the OVPN file

  • Disconnect from the VPN.
  • Locate the OVPN file used by your OpenVPN client.
  • Open the OVPN file with a text editor like Notepad.
  • Add the following line at the end:route 0.0.0.0 0.0.0.0 vpn_gateway 500
  • Save the file and exit.
  • Connect to the VPN.

This solution works for OpenVPN client connections and makes a public unidentified network into a private identified network.

However, it doesn’t work if you attempt to modify the OVPN file of a VPN client. That’s because the VPN client auto-resets the OVPN file configuration to default on every connection.


Having trouble with OpenVPN on Windows 10? Check out our easy workarounds.


In conclusion, these 9 solutions should help you prevent your Windows 10 VPN from showing the unidentified public network message.

If your VPN connects but doesn’t work, there might be an underlying problem with your VPN client. In that case, we suggest ditching your old VPN and upgrading to a superior service like PIA.

PIA is the best VPN for Windows 10

We used Private Internet Access in all our examples above because it’s the best VPN for Windows 10. You can count it to create stable Internet connections without hampering your Internet speed. 

PIA is a product owned by Kape Technologies, with a large network of high-speed servers, private DNS, OpenVPN and WireGuard protocols, SOCKS5 and Shadowsocks proxy servers, port forwarding, a kill switch, an ad and malware blocker, static and dynamic IP addresses, and split-tunneling mode.

More about PIA:

Private Internet Access

Private Internet Access

Access blocked websites, defeat online censorship, unblock Netflix US, reduce your ping while gaming, and more.
$2.85/mo. Buy it now

[wl_navigator]

VPN not working on iPhone: How to fix it in 8 ways

VPNs are wonderful security/privacy tools that have found their way into our daily lives quite easily. They work great on a wide variety of devices, ranging from your ordinary desktop computer to gaming consoles or routers.

However, some devices might need VPNs more than others. For instance, have you considered that your phones might hold a lot more personal data than your PC or gaming console?

And doesn’t it make more sense to prioritize them whenever considering using a VPN? Sure it does.

Most VPNs work flawlessly regardless of where you install them. However, some of them might be a bit troublesome in certain environments.

For instance, has it ever happened to stumble upon a non-working VPN on your iPhone? If so, you’re in luck, because that’s exactly what we’re going to discuss in this article.

VPN doesn’t work on iPhone, what to do?

1. Try restarting your iPhone

If your VPN doesn’t seem to be working all of a sudden, restarting your iPhone might just do the trick and kickstart your VPN. This is, of course, the most overlooked fix, but also the one with the highest rate of success.

Depending on your iPhone model, restarting your device can be handled in a few different manners.

For instance, some devices have side buttons, which need to be pressed along with either one of the volume buttons, while others have top buttons.

We’re sure you’ve restarted your iPhone before, so go ahead and do it again. It might just work and restore your VPN’s functionality.

2. Restart the VPN app

Of course, restarting a VPN app on your iPhone is not the same as on your desktop PC. Hence, it needs to be tackled differently, but we’re here to teach you how to do it safely.

  1. Access the app switcher
    1. On newer models of iPhone, swipe up from the screen’s bottom and pause in the middle
    2. For older models, just double-tap the Home button
  2. Swipe until you see the VPN app
  3. Once visible, swipe up on the VPN app to force close it
  4. Launch it again
  5. Check if the problem still persists

Sometimes the app conflicts with the VPN configuration profile on your iPhone or simply de-syncs. Force-closing the app and relaunching it seems to solve the problem in some cases.

3. Make sure you have the latest VPN app version

If you’re using a VPN such as PIA, you should make sure that you have the latest version installed on your iPhone. Most apps update automatically, so you don’t have to worry about them.

However, in some cases, the automatic update might fail to apply, and your VPN might stop working on your iPhone. Thus, the situation begs for a manual check.

To solve this, simply open the App Store on your iPhone and tap Today (bottom of the screen). Tap your profile icon (top of the screen) and scroll down.

Click the Update All button, or simply click the button next to an app to only update that specific app.

4. Restart VPN connection

  1. Launch the VPN app you’re using
  2. Disconnect from the VPN server
  3. Re-establish the connection

Alternatively, you could choose another server. Like regular ones, VPN servers can also get overcrowded, and this might affect the whole userbase’s ability to use the service effectively.

Restarting the service might temporarily change your priority on the current server, and choosing a different server might be even better.

5. Reinstall the VPN

Although it’s often a stretch, reinstalling the VPN client might restore its functionality on your iPhone. A good reason for your VPN suddenly not working might be a failed update.

Thus, giving the VPN client a clean install might make it work once again. Just long-press the app icon, then tap the small X button in the icon’s upper-left corner to remove it.

Then head back to the App Store, locate it, and redeploy it on your device. Fingers crossed.

6. Force restart the VPN manually

  1. Unblock your iPhone
  2. Access the Settings app
  3. Locate the VPN button and flick it
  4. Now toggle it back on

Alternatively, you can access the VPN option in the General section of your iPhone’s configuration menu and restart it from there. If it doesn’t work, try disabling the VPN on-demand option and restart the connection.

7. Restart your router or mobile data

Your router/modem might be the reason why your VPN connection is on the fritz, so you can go ahead and give it a hearty restart. Restarting the modem/router can solve a lot of connectivity issues and conflicts between devices.

If you’re not using a wireless router to access the Internet, try restarting your mobile data (LTE) connection. Just head over to the Settings app, locate Cellular Data, then toggle it off and on again.

8. Try a different VPN service

If none of the fixes above worked, you could always try switching to a different VPN client. Private Internet Access, for instance, has a great, stable iPhone client and is highly rated on the App Store.

Private Internet Access

Private Internet Access

Need a stable VPN for your iPhone? Why not give PIA a try?
Check price Visit website

It enforces a zero-logging policy, offers you a huge collection of secure servers to connect to, and can block ads and trackers on your iPhone with its awesome PIA MACE feature.

VPNs usually work great on iPhones

All things considered, it’s worth mentioning that VPN services usually work great on iPhones. However, certain events might mess with your device’s stability and your VPN might be caught in the crossfire.

If that happens, just be patient and try all of our suggested fixes, one by one. We’re confident that you’ll find one that will restore your iPhone VPN’s functionality in no time.

Can VPN get you banned? Is VPN safe to use?

VPNs are excellent privacy tools that can help you bypass a lot of connectivity and censorship issues. Aside from their obvious role in safekeeping your privacy from various third-party agents, VPNs can also handle other issues.

For instance, you can use VPNs if you want to circumvent geoblocking.

More so, if you notice sudden slowdowns on your connection, it might be due to your ISP throttling your bandwidth. VPNs can help you curb packet loss and improve in-game ping without a hiccup.

However, flying off the radar can make you feel a bit rebellious. Thus, regular VPN users started to ponder whether it’s 100% safe to use a VPN?

Is it safe to use a VPN?

Essentially, there’s nothing wrong with using a VPN. Sure, some regions have banned non-government-approved VPNs, and in those certain regions, you must be more cautious.

But merely using a VPN isn’t unsafe. It’s your fundamental right, after all, to benefit from a private, secure, and censor-free connection. So, as long as you obey the laws and regulations of your country, you should be alright.

As far as government-approved VPNs go, you should look out for those. There’s a reason why the government approved only a select few services, and that’s because they’re easy to monitor.

Even if a VPN should safeguard your privacy, there are certain providers that have been coerced to install backdoors on their service.

Thus, even if you think your connection is private, your ISP (or any other party that has clearance) can easily see your online whereabouts.

Can VPN get you banned?

1. If you engage in unlawful behavior

This is unfortunately the most common situation. Users see the advertisements and believe that a VPN can help them get away with anything. So they download the product and begin the series of wrongdoings.

Piracy, hacking, accessing or distributing forbidden content, terrorism, you name it.

Truth be told, some really do get away with it, as most reputable VPNs enforce zero-logging policies, and don’t monitor their customers. This, in turn, may encourage unlawful behavior, while also boosting the trust of the provider at the same time.

However, you should know that VPN services have other means to monitor activity without tying it to a certain individual. So if you get caught on the wrong side of the law, your VPN might turn a blind eye, or things might go the other way.

Your account might be suspended indefinitely and you might be even banned from using a VPN.

2. If you’re in a VPN-restricted region

As we’ve said a bit earlier, not all regions in the world are keen on VPNs. Thus, to counter them, they’ve enforced strict laws against using non-government-approved services.

As a result, many trustworthy VPN services have been removed and/or banned from those areas, and people who are caught using them might even be sanctioned.

ExpressVPN, for instance, is not a government-approved VPN service in China. However, if you manage to create an account, purchase a subscription, and download the client, ExpressVPN still works great in China.

ExpressVPN

ExpressVPN

Want to bypass the Great Chinese Firewall? ExpressVPN still works in China.
$8.32/mo. Buy it now

On the downside, if you get caught using ExpressVPN in China, or get reported, you might get in trouble.

3. Getting the VPN’s IP blacklisted

There’s also the chance that you’ll upset a certain website or service while behind a VPN. In this case, your VPN-assigned IP address might get banned, and you won’t be able to use it anymore on that specific website.

For instance, you might try to use a DDOS attack on a website. The website picks up on your current IP address and blacklists it. If you’re using a VPN, the website will (most likely) block the IP address of the VPN server.

Subsequently, this might lead to two events:

  • Your wrongdoings will affect other users who share the same IP, making them unable to access the website that banned you
  • The VPN provider will figure out things and will ban you from using their service

Note that DOS and DDOS attacks are pretty much still illegal. You shouldn’t, under any circumstances, attempt to replicate the scenario mentioned above, unless you’re authorized, certified, and in a controlled environment.

Yes, you can still get banned with a VPN

Either way, you should steer away from unlawful behavior, even if you’re under the false impression that a VPN will shield you. While a VPN can successfully anonymize your connection, you shouldn’t use it for any wrongdoings.

Keep in mind that VPN providers can still see what websites you access or files you download.

If they choose to turn a blind eye on you downloading a pirated movie for once, it doesn’t mean will work every time, or that you’ll get away with just about anything.

[wl_navigator]

Office 365 may soon let you download ATP security reports

Office 365 ATP security reporting comes in handy when you need to assess the effectiveness of the security tool in protecting your computing assets and enterprise data against all manner of cyber threats.

It provides different types of security analytics and gives you a detailed view of detected and neutralized threats for a specific duration of time.

And now, according to an Office 365 Roadmap entry that Windows Report spotted recently, Microsoft is working on enabling the export of ATP security insights.

Ability to export Office 365 ATP reports rolling out soon

To view any ATP security report, you usually go to the Security & Compliance Center. But, in the foreseeable future, you may be able do more than just view insights on the reports dashboard.

Specifically, the platform may soon let you export and download many of the available Office 365 ATP reports. These include the Threat Protection Status report, which indicates the effectiveness of Office 365 ATP in sniffing out malware and phish.

In addition, the ability to export mail flow status reports is also in the works. The same applies to insights into spoof detections, URL protection, and the most notorious malware affecting your Office 365 system.

According to the Roadmap entry, these updates should be rolling out this month. However, Microsoft hasn’t confirmed that, at the moment, you can start downloading these security reports.

We’re adding the ability to export many of our security reports, including, but not limited to: Threat protection status report, mail flow status report, top malware, spoof detections, top senders and recipients, Office 365 ATP file types, URL protection report, and more.

In the meantime, Microsoft is also working on improving  security for its cloud-based productivity software suite in other areas, such as email and URL.

On a scale of 1 to 5, how would you rate the effectiveness of Office 365 ATP ? Kindly reach for the comments section below and let us know.

[wl_navigator]

New phishing scam steals Office 365 login credentials

It wasn’t a boring moment for attackers and scammers in luring Office 365 users.

Some phishing campaigns are using renewal warning messages, others are even trying to use the Office 365 voicemails to steal your data.

They even use calendar invites to break the increasingly work-from-home users accounts.

The newest threat is coming from a phishing campaign that attempts to steal Office 365 login credentials by trying to convince users to accept a new Terms of Use and Privacy Policy.

The phishing campaign targets secure email gateways (SEGs)

Cofense Phishing Defense Center (PDC) researchers who spotted this campaign describes the modus operandi of the phishing threat:

At first glance, the user will see This message was sent with High Importance. Again, the from address contains the word security and the subject talks about a Recent Policy Change, creating urgency to click and handle the matter immediately.

The email body talks about accepting the newly updated Terms of Use & Privacy Policy. Also, it notes how this new policy will affect personal data and discontinue all active services on the user’s account. Curious users will likely want to Learn More.

The attacker is using Google Ad Services to redirect users so this person or organization probably paid to have the URL go through an authorized source.

According to Cofense, this bypasses secure email gateways and exposes users to the phish.

If you click on either of the buttons presented, you are redirected to a duplicate of the real Microsoft page.

On that page, you will see a pop up of the privacy policy (taken from Microsoft’s website) and some logos that seem to be legitimate.

The next step is to be redirected again to a fake Microsoft login page. Needless to say that if you complete the credentials you will provide them to the phishing attacker.

Nothing sets a red flag since the next message on the screen ensures you that you have updated the terms and this time you are redirected to the legitimate Microsoft page, their Service Agreement.

How to stay safe? Make absolutely sure when clicking on unsolicited e-mails and links.

Have you been a victim of this phishing scam? Tell us all about it in the Comments section below.

[wl_navigator]

Browser intrusion prevention is malfunctioning [Symantec]

Many Windows users reported an issue when running the Symantec Endpoint Protection on their browsers.

The Symantec Endpoint Protection add-on shows this error message: Browser intrusion prevention is not functioning correctly.

This issue was reported to occur mostly after a software update and caused by incorrect user settings or system incompatibility. It’s also related mostly to Internet Explorer.

If you’re dealing with this browser intrusion issue, consider the following steps.

How to fix Browser Intrusion Prevention malfunctioning?

1. Try out something different

Microsoft’s Internet Explorer is, by all means, an outdated piece of software and, as such, it shouldn’t (if not necessary) be relied on.

Instead of Internet Explorer or other browsers, consider switching to Opera which allows you to do everything you can on IE, but with so much reliability and versatility, in a private and secure environment.

If you are in a dire need to use Internet Explorer features, you can add the IE Tab extension to simulate it on Opera.

Feature-wise, Opera is based on the Chromium open-source platform using the Blink layout engine, so it supports all Chrome extensions.

But, in comparison to Chrome, there’s no fear of privacy intrusion, thanks to its countless anti-tracking built-in tools.

Opera

If you are tired of the Browser intrusion prevention not functioning correctly error, Opera saves the day.

2. Change Group Policy settings

  1. Press the Windows logo key + R on your keyboard > type gpedit.msc in the Run box and hit Enter.
  2. Open the following location in the Local Group Policy Editor:
    User Configuration/Policies/Administrative Templates/Windows Components/Internet Explorer/Security Features/Add-on Management
  3. Remove CLSID {6D53EC84-6AAE-4787-AEEE-F4628F01010C}=1.GPU browser intrusion prevention is not functioning correctly
  4. Close the Local Group Policy Editor and restart your computer to see if it fixed the issue.

3. Disable the add-on

  1. Open Internet Explorer > select the Tools button > choose Manage add-ons.
  2. Under Show, select All add-ons > select Symantec Endpoint Protection.IE Add ons browser intrusion prevention is not functioning correctly
  3. Choose Disable > Close.
  4. Restart Internet Explorer and see if it fixed the issue.

4. Troubleshoot Symantec Endpoint Protection

  1. Type Command Prompt in the Windows search bar > click the first search result and choose Run as administrator.
  2. Type the following commands in the Command Prompt and press Enter after each: smc -stop and then smc -start.smc -stop browser intrusion prevention is not functioning correctly
  3. Download the SymDiag tool for Windows.
  4. Open SymDiag.exe and follow the instructions to fix the issue.

5. Update Windows

  1. Press the Start button > open Settings.
  2. Click Update & Security.
  3. Select Windows Update.
  4. Click Check for updates.windows update browser intrusion prevention is not functioning correctly
  5. If it finds any updates, let it complete the process and restart your computer.
  6. After rebooting your PC, check if updating Windows fixed the issue.

We hope that one of the above solutions helped you fix the issue you are facing. Whenever lacking the time to go through all these steps, rest assured that installing Opera Browser is a safe choice.

If you have any questions, leave a comment in the section below. We’d be glad to hear from you.

Microsoft’s new Battletoads game will be released on August 20 on Xbox One, PC, and Xbox Game Pass

Battletoads, Rare’s decades-old beat em’ up franchise, is coming back to life next month with a new game developed by Dlala Studios. It’s been quite some time since we last heard about this new game, but Microsoft has just revealed that it’s coming on August 20 on Xbox One, Windows 10, Steam, and Xbox Game Pass.

“It’s been quite a while — 26 years, in fact — but at long last, the Battletoads are ready to morph, leap and smash their way back into the limelight for an all-new adventure helmed by Dlala Studios and supported by series creator Rare, a partnership first teased during the Xbox E3 2018 Briefing,” wrote Adam Park, Head of Brand and Licensing at Rare.

This new Battletoads game will features familiar protagonists Zitz, Rash and Pimple, and it will support three players co-op. The vintage Battletoads games were notoriously difficult, and rest assured that this new game will come with different difficulty settings. As for the art style, Dlala Studios opted for hand-drawn graphics reminiscent of cartoons of the nineties.

The Steam page for Battletoads is now live, but you can’t pre-order the game yet. The Microsoft Store listing is still missing, and the Xbox Wire blog post curiously didn’t include pricing details for the game. However, it’s currently listed at $19.99 at GameStop. We’ll update this post with the Microsoft Store link once it goes live.

Best invitation makers for impossible to decline invites

Birthdays, weddings, graduation parties – there are several events in our lives to which we convey particularly high importance. If the occasion is special enough to deserve a dedicated event, why not go big and make everything about it special, starting with the invitations?

Sure, you can order premade ones, but you can instead add your own personal touch to make the invitations truly unique. It is possible to design stunning invitation cards that reflect your style and tell your unique story thanks to invitation makers.

Using an invitation maker takes customization to a whole new level by allowing you to control things like text font, text size, photo resizing, and the best thing is that they usually come packed with design templates to make your work easier with equally impressive effects.

Check out the best invitation makers we have selected for you and start planning your next jaw-dropping event in detail, starting with one-of-a-kind invitations to which people cannot say No.

Top 5 invitation makers to create one-of-a-kind invites

Adobe Photoshop

Adobe Photoshop

If you’re planning to design your own invitations, the best in business can be no other than the world’s best imaging and graphic design software.

From photo editing to digital painting and graphic design, Adobe Photoshop makes it easy for you to crop, remove objects, retouch, combine photos and play with color and effects to create stunning invitations cards that reflect your style with accuracy.

Let’s quickly go through its key features:

  • Lens Blur (blurring an object in the foreground has never been more natural and realistic)
  • Improved Content-Aware Fill (fill multiple areas of an image without leaving the window)
  • Object Selection tool (make fast and precise selections)
  • Improved Properties panel (more of the controls you need in a central location, plus convenient Quick Actions)
  • Modern presets (new gradients, patterns, swatches, layers, styles, and shapes)

Adobe Photoshop

Create stunning invitations by using the wide range of features contained in this amazingly powerful digital creation software.
Check price Visit website

Adobe Creative Cloud Express

Adobe Creative Cloud Express is wonderful design software that allows you to transform your ideas into stunning visuals, fast. This applies to invitation making, of course, and you can simply pick a photo, add text, and apply design filters to instantly make your card stand out.

No matter the occasion, Adobe Creative Cloud Express Post will help your craft the perfect invite with just a couple of clicks thanks to its intuitive and easy-to-use tools and a generous selection of professionally designed templates to kick-start your composition for any event.

In addition, you should know the free designing platform can offer practical tools like dynamic colorful texts, graphic elements, backgrounds, images and icons, and so on.

Let’s quickly go through its key features:

  • Create invites in minutes (no design expertise needed)
  • Instant download, share and ready for printing
  • Inspiration gallery, and blog (to stimulate your creativity and trigger your inspiration)
  • An impressive selection of professionally designed templates
  • Multi-platform (available on the web and on mobile for more flexibility)

Adobe Creative Cloud Express

Never worry about not having inspiration for creating one-of-a-kind invitations by using this tool’s enormous image database.
Check price Visit website

CorelDRAW Graphics Suite 2021

CorelDRAW Graphics Suite 2020

CorelDRAW makes invitation crafting as easy as a breeze with its comprehensive suite of professional graphic design software combining cutting-edge typography, page layout, font management, and photo editing tools.

The integrated Corel PHOTO-PAINT provides the most versatile shaping and drawing tools that allow you to add all the creative effects you want to your vector-based artwork and enjoy flawless publishing once your invite is all set.

Let’s quickly go through its key features:

  • Color, fills and transparencies (patterns, gradients, and mesh fills to color your invite as guided by your imagination)
  • Non-destructive editing (Block Shadow tool, Symmetry Drawing mode, Impact tool, Add Perspective)
  • Styles and style sets (manage styles and style sets to apply consistent formatting across multiple objects)
  • Unparalleled object control (hide, rename, search for objects, and change their stacking order)
  • Extensive file compatibility (compatible with over 100 graphics, publishing and image file formats)
CorelDRAW Graphics Suite

CorelDRAW Graphics Suite

This powerful software offers you all the tools you need to create great invitations, no matter if it's a formal or casual event.
Check price Visit website

Edraw Max by Wondershare

Edraw Max is actually a diagramming tool that can serve all of your purposes, including invitations design.

Packed with many basic drawing shapes and backgrounds as well as numerous invitation card samples, this software will serve as a wonderful assistant to design invitation cards.

Let’s quickly go through its key features:

  • Drag and drop interface (create invitation cards fast and easy)
  • Great selection of backgrounds and clip art to choose from
  • Free downloads and free trial available
  • Vector output in various formats
  • Integration with various programs for better collaboration

⇒ Get Edraw Max

Canva

Canva inivitation maker

Creating invitation cards in Canva is simple and intuitive.

With hundreds of free templates to choose from and easy-to-use tools, you can craft an invite as unique as your story and customize it accordingly from the very core to the last details including background, fonts, and color scheme.

Let’s quickly go through its key features:

  • Stock library of over 1 million photographs, graphics, and illustrations
  • 130 fresh fonts to choose from
  • Canva Print (will take care of your invitation cards from start to finish)
  • Publish your design as JPEG or PNG images, ready for uploading or emailing
  • Extensive range of online invitation templates

⇒ Get Canva

Generic invitation cards are meant to be quickly forgotten. Make sure yours has charmed the audience before the event starts by using an invitation maker.

If the occasion is special enough to deserve an event, then it certainly calls for special invitations as well so why not add your personal touch to tell your story?

Blend in all the custom details that reflect your unique style and send out those print-perfect invites that are sure to dazzle. Do share the results with us in the comments section below.

Can Samsung data migration change source disk? [Migration]

Using Samsung Data Migration to change source disk doesn’t work all the time. Migrations will work only if the conditions are right because the Samsung data migration tool has some limitations.

Further, you can only use selected Samsung SSD drive models as the destination drive. These limitations make users consider alternative disk cloning solutions.

Quick tip:

If you’re encountering the Samsung Data Migration wrong source disk error message, then it is safe to assume that you tried to change the disk source inside the application.

In order to resolve this issue and use a different disk source, you have to use an alternative utility.

One such software that offers even better features than Samsung Data Migration (SDM), is the powerful and versatile Ashampoo Backup.

Because of the limitations of the SDM software, you might not be able to use it at all, but Ashampoo Backup will do the job without any issues.

Ashampoo Backup Pro

Ashampoo Backup Pro

This amazing software allows you to backup your hard drive and easily migrate it with just a few clicks of the mouse, so don't hesitate to try it out!
Free trial Visit website

Read on to find out more details about how to use Ashampoo Backup, and also to get the answer to the your question.

How can I change the source disk with Samsung Data Migration?

1. Use Ashampoo Backup

Create a system rescue disk

samsung-data-migration-change-source-disk-create-rescue-disk-step-one

  1. Launch Ashampoo Backup.
  2. Click on the Rescue System tab on the left-hand panel.
  3. Choose your rescue medium.
  4. Select the USB Stick option.
  5. Connect your USB drive and click on this option.
  6. Check the option and hit the Next button to continue.
  7. Click on Yes on the popup. (if you don’t have the Windows Assessment and Deployment Kit (ADK) on your system, the program will now install it).
  8. Click OK to confirm the installation.
  9. Hit Yes to continue.
  10. Follow the on-screen guide to install ADK.
  11. Accept the agreement.
  12. Close the window

On completion, a Success screen will appear for the installation of ADK. You have successfully created a rescue disk from which you can boot your computer if your hard disk fails.


Back up your data and create a backup plan

samsung-data-migration-change-source-disk-backup-step

  1. Click Create a Backup Plan in the Get Started screen.
  2. Select the option labeled Local drive or network drive.
  3. Click Next to proceed.
  4. Specify the connected USB storage.
  5. Click on the Next button.
  6. Rename your backup plan and hit Next.
  7. Click on the Entire drives option and click Next again.
  8. Choose the location that holds the data you wish to back up and the Hidden system partition.
  9. Set a password, customize the compression settings, and specify how long you want to store backups.
  10. Optionally configure a backup schedule and what happens to missed backups among other features.
  11. Click on Start Backup Now.

You should now see a green shield graphic with a white tick inside it. This screen confirms that the backup is complete and your data is secure.

At this point, you’ve successfully backed up your data and created a backup plan. The next step is to restore the data.


2. Fix Samsung Data Migration

Prepare your PC

  1. Power off the computer.
  2. Disconnect every device connected to it.
  3. Turn on the system, and immediately the screen lights up, start pressing the BIOS entry key repeatedly.
  4. Navigate to the option to select a boot device.
  5. Choose the USB Storage Device option and hit Enter.
  6. Select your backup storage device type. Select the Local drive or network drive option and hit Next.
  7. Find your connected drive on the list on the next page. If you can’t, click on Refresh to update the list. Choose your device and click Next.

Use the backup created in the previous step

  1. Select the backup you previously created from the list, and click Next.
  2. Click on the Complete hard disks option, and choose Next.
  3. Assign backups by dragging a backup from the left side into the destination drive on the right.
  4. Click Yes to begin the restoration process.
  5. Wait to see the Restoration successful message.
  6. Disconnect the rescue USB drive and reboot your system.

Note: Check this guide if you’re not sure how to enter BIOS.

The answer to the question about the ability to change source disk for Samsung Data Migration is, unfortunately, that it can’t be done.

However, Ashampoo Backup Pro is an excellent alternative to the Samsung software. Even if you experience the Samsung data migration wrong source disk issue, you can still perform the migration.

[wl_navigator]

Keep Getting Redirected to Other Websites? Safe Solutions

Unknowingly, we can get ourselves in all kinds of problems online. However, stories about the grandeur of the Internet malice are not true.

If you’re, say, experiencing frequent jumps to other websites while browsing the Internet, this hardly means that your computer is infected by a virus.

However, the spectrum of malicious software covers all kinds of applications and extensions which can stop your current session and redirect you to God knows where.

We made sure to provide a detailed explanation in order to help you protect against these threats.

Table of contents

  1. Keep your PC safe and avoid automatic redirecting with Opera
  2. How to block adware pop-ups and remove browser hijackers

What can I do if my browser redirects to other sites?

1. Keep your PC safe and avoid automatic redirecting with Opera


The problem with automatic redirecting is that it affects browsers with limited protection. That is hardly the case with Opera.

Opera has probably the best balance between intuitive design, bulletproof safety, and remarkable privacy protection.

Also in the safety department, we have to mention cryptocurrency mining protection and the free, complete, and unlimited VPN service. 

The built-in Ad Blocker will take care of any unwanted distractions and that, in turn, will speed up loading times.

For the unaware, the VPN protects your privacy and identity by redirecting all your traffic through other safe sites.

Don’t take our word for it, download Opera now for free and convince yourself.

Usually, you can close the window or just go back to a previous website, but there are various schemes they apply to avoid that.

Firstly, the suspicious website usually opens in a new window and sometimes you’re not even aware. Or they redirect you directly to a new website swarming with ads.

The other option is almost certainly a browser hijacker’s deed. Browser hijackers are a piece of malicious software that infiltrates your Internet browser and takes control of some of its features.

They tend to replace the home page with a website usually crowded with ads.

Also, they might add an extension, usually a search bar of a kind. It can also spy on you and hunt the banking credentials to get a hold of your funds.

Even though this is rare, we still suggest avoiding typing passwords if you recognize the presence of a browser hijacker.

But, don’t worry. If you don’t click anywhere, they’re just a harmless piece of adware. Close the browser and let it be until we remove all threats.

Opera

Switch your browser to Opera as the smartest choice for enhanced security and practical app integrations.

2. How to block adware pop-ups and remove browser hijackers


Let’s start with the essential actions. You’ll need an antivirus, whether that’s a third-party antivirus or Windows-native Windows Defender.

In addition, you’ll have better success with clearing PUPs (Potentially Unwanted Programs) with a dedicated application, like Malwarebytes.

Uninstalling all suspicious applications is a must also. And, finally, once you’ve dealt with that, we suggest installing a browser extension that prevents pop-ups while browsing.

Ad-blockers will do the job most of the time.

Here’s how to scan your computer for malicious presence with Windows Defender:

  1. Open Windows Defender from the taskbar notification area.
  2. Choose Virus & threat protection.virus & threat protection
  3. Choose Scan options.virus & threat protection - scan options
  4. Select Windows Defender Offline Scan.
  5. Click Scan now.
  6. Your PC will restart and the scanning process will commence.

And this is how to use Malwarebytes:

  1. Download Malwarebytes
  2. Run the tool and click Scan Now.
  3. Wait until the tool scans your system and click Clean & Repair.
  4. Restart your PC.

After that, the only thing left is to pay attention when online. If you visit a site full of ads, don’t click around and, if possible, use adblocker as much as possible.

Make sure to tell us whether this was an informative read in the comments section below.

Ubisoft’s Hyper Scape free-to-play battle royale comes to Xbox One consoles in August

One of the latest battle royale video games to hit the scene in recent times, Hyper Scape, is set to launch on Microsoft’s family of Xbox One consoles in just over a week’s time on August 11th.

Hyper Scape was first announced earlier this month and almost immediately launched in open beta on PC. While its first trailer (which you can watch below) was met with numerous Ready Player One jokes on social media due to the game’s plot being almost identical to that of the hit movie and book, the game still managed to garner a lot of buzz very quickly due to a large number of planned promotions with large and small streamers on Twitch and special integration with the streaming service itself that allows viewers and players to unlock content while streaming Hyper Scape or watching someone else play.

The open beta is set to end on August 2nd with the official PC launch also planned for August 11th alongside Sony’s PS4 console. Hyper Scape’s first season will also launch on August 11th on all platforms and cross-play will be enabled which will allow players to transfer progress between devices.

“Season 1, titled “The First Principle,” will introduce new limited-time game modes, a new weapon and hack, new features for Crowncast (Hyper Scape’s interactive Twitch extension), and provide insight into the lore and universe of Hyper Scape,” Ubisoft’s Youssef Maguid explains. “Season 1 adds a new gun, the Dragonfly, and new hack, Magnet, for a total of 11 weapons and 11 hacks, each of which can be fused up to four times into increasingly powerful versions. The First Principle will also introduce new limited-time game modes, a new in-game Melee event (which makes all melee attacks instantly lethal), and both a free and premium 100-tier Battle Pass.”

Hyper Scape isn’t available to pre-download on Xbox One consoles just yet but we’ll make sure to post about it when it is.

What do you think about Hyper Scape? Does it interest you or are you a bit tired of the battle royale genre? Share your thoughts with the community in the comments below and then follow us on Pinterest, Twitter, and Facebook for more gaming news.

Two Point Hospital, Disintegration, and Rocket Arena are free to play on Xbox One this weekend

The three Xbox One video games, Two Point Hospital, Disintegration, and Rocket Arena, will be completely free to play on Microsoft’s family of Xbox One consoles for all Xbox Live Gold subscribers from now until Monday as part of this week’s Free Play Days campaign.

As with previous Free Play games, all of these titles will be able to be played, Xbox Achievements can be unlocked, and all game progress will save to the cloud for continuing at a later date. Each game has also received discounts ranging from 40 to 80% for a limited time to help encourage gamers to buy them outright after getting a taste during this special period.

Here’s the game trailer for each video game along with the links to their pages on the online Microsoft Store storefront for initiating their download on your Xbox One console.

Are you going to play Two Point Hospital, Disintegration, or Rocket Arena this weekend? Let us know which title you’ll be playing first in the comments below and then follow us on Pinterest and Twitter for more Xbox gaming news.

Two Point Hospital™
Two Point Hospital™
Developer:
SEGA Europe Ltd
Price:
Free


Disintegration
Disintegration
Developer:
Private Division
Price:
$9.89


Rocket Arena
Rocket Arena
Developer:
Electronic Arts
Price:
Free


Rocket Arena Mythic Edition

Not sufficient privileges for this resource or its parent

Sometimes while browsing you might encounter You do not have sufficient privileges for this resource or its parent to perform this action error. But worry not, we have a few solutions for you, so let’s begin.

How do I fix resource or parent privilege issues

1. Try a different browser

Sometimes your browser might be the problem, and if that’s the case, you might want to switch to a new browser. Opera is a Chromium-based browser that focuses on the security and privacy of its users.

The browser will inform you about any suspicious downloads or websites, and since it blocks tracking cookies, you should be able to access any website without problems.

It is extremely lightweight, can be greatly customized visually, and comes with optimizations for viewing streamed content and watching videos on YouTube.

Opera

Browse the Internet without worrying about compatibility or permission issues with this lightweight and extremely effective tool.

2. Reinstall your VPN software

  1. Open Control Panel and go to Programs and Features.
    programs and features You do not have sufficient privileges to perform this action
  2. Locate your VPN software and double-click it to remove it.
  3. Now install your VPN again.

If you’re having problems with your VPN, and you’re looking for a fast and reliable VPN, make sure to get a premium VPN with large server coverage.

We advise you to look for a VPN service that receives constant updates to keep up with the latest security requirements. You need to make sure your data is always protected.

Plus, for high performance, it is recommended to get a VPN with many servers and many server locations across the world. Along with that, a VPN that hides your IP increases security and removes the risk of getting ISP restrictions.

3. Clear your memory cache

  1. From your Start Menu, look for Disk Cleanup and open it.
    disk cleanup You do not have sufficient privileges for this resource or its parent to perform this action
  2. Select the drive you wish to have cleaned up, and select OK.
  3. Under the Files to delete section, select the files you wish to remove.
  4. Select OK.

4. Clear your browser data

  1. From your computer, open Chrome.
  2. At the top right, click More.
  3. Click More tools then click Clear browsing data.
    clear browsing data You do not have sufficient privileges for this resource or its parent to perform this action
  4. Select a time range. All time is usually is the best choice.
  5. Select the type of information you want to remove.
  6. Click Clear data.
  7. You’re all set.

5. Register your DNS

  1. Type cmd in your Start Menu, in order to open Command Prompt.
  2. Type ipconfig /registerdns, and then press Enter.
    reregiser DNS You do not have sufficient privileges for this resource
  3. After the operation has been completed, type in exit in Command Prompt, and then restart your machine.

6. Update drivers

  1. Open Device Manager.
    device manager You do not have sufficient privileges for this resource or its parent to perform this action
  2. Now expand the category with the hardware you want to update.
  3. Right-click the device, and select Update Driver.
    update driver You do not have sufficient privileges
  4. Click the Search automatically for updated driver software.
    search automatically for driver software You do not have sufficient privileges for this resource

There you go, several solutions that should help you fix You do not have sufficient privileges for this resource or its parent to perform this action error on your PC.

Tumblr Mass Post Editor: How to Mass Edit or Delete Posts

Tumblr’s Mass Post Editor is a powerful tool that simplifies the process of managing and editing multiple posts on your blog.

Many aren’t familiar with this feature, so in today’s guide, we will take a closer look at it and show you how to use it to manage your Tumblr blog better.

Does Tumblr still have Mass Post Editor?

Yes, this feature is still here and has the same functionality. However, it has been moved, and it’s now located in a different location.

How do I edit multiple posts on Tumblr?

1. Open Mass Editor

  1. Open Tumblr.
  2. In the left pane, click on Account and then select your blog.
     
  3. Lastly, in the right pane click on Mass Post Editor.

2. Delete a post on Tumblr

  1. To display posts starting from a specified month, click the Month button.
  2. Select the multiple posts you need to delete by clicking on them (use the Unselect button to deselect all posts).
  3. Press the Delete button.Delete option mass post editor tumblr
  4. Click the OK button to confirm.

3. Remove Tumblr post tags

  1. Select the posts you need to remove the tags from. Click the Edit tags button to open a list of tags that the selected posts include.Edit tags -
  2. Select the checkboxes for the tags you want to delete and click Remove tags button.Remove tags option

The tags will be deleted from the selected posts.

4. Add tags to multiple Tumblr posts

  1. Select the posts that you need to add new tags to. Press the Add tags button in the Mass Post Editor.Select Add tags
  2. Enter the tag that you want to add to the post, make sure you press space after every tag. Add tags
  3. Click the Add tags button to insert the entered tags.

5. Add new filtering options to the Mass Post Editor with the XKit extension

  1. Go to the Installing Xkit page.
  2. From the details listed, locate the browser link to add the extension to your browser. For demonstration, we are mentioning the steps with Google Chrome.Installing Xkit 1 Mass post editor tumblr
  3. Click Add to Chrome to download.Add to chrome Installing Xkit 2
  4. Now click Add extension to add it.Installing Xkit  -= Add extension 3
  5. Open your Tumblr dashboard page. An XKit notification will appear indicating Installation of XKit is complete. Click the Refresh page and start using XKit button.Refresh the dashboard - installing Xkit 4
  6. Click the new XKit button on Tumblr.Xkit icon
  7. On the XKit window, switch the Get Extensions tab.Installing Mass+
  8. Locate Mass+ and click the Install button.
  9. Once installed, open the Mass Post Editor again to check the new toolbar with numerous additional filtering options for you to select.

Can you mass-delete old Tumblr posts?

Yes, this is possible with Mass Post Editor. You must open the editor, select all posts, and click the Delete button. We explained this process in Solution 2, so don’t forget to check it out.

In conclusion, the Tumblr Mass Post Editor is a powerful tool that allows you to manage and edit multiple posts on your Tumblr blog quickly and efficiently. However, for advanced options, adding the XKit extension can help you more.

Following these steps, you can make bulk edits, reblog or delete posts in batches, and save valuable time when organizing your content.

If you face issues like images not loading on Tumblr, we recommend you check out this informative guide to find easy and quick solutions.

To learn more about this service, our guides on how to turn off Safe Mode in Tumblr and how to disable Best Stuff First on Tumblr should be able to help you.

Please feel free to give us any information, tips, and your experience with the subject in the comments section below.

Ads pop up when I unlock my Android phone [Quick Fix]

If ads pop up each time you unlock your phone, it’s likely due to adware you might have installed unintentionally. These small apps are designed to display ads on your device.

Typically, they’re harmless when it comes to data safety and security, but they may drain your battery and lead to overheating. Not to mention they’re extremely annoying.

Here’s how to get rid of them:

How can I stop ads from popping up on Android?

1. Verify that the issue is from a third-party app

  1. Press the Power button until you get the power options.
  2. Tap and hold the Restart option until you see a prompt asking if you want to reboot in safe mode.reboot android safe mode
  3. Confirm and restart your device.

At this point, your phone will reboot into the Android Safe Mode.

In Safe Mode, your phone boots with no third-party app. If you don’t see ad pop-ups on Android when you unlock your phone, it confirms that a downloaded app is serving the ads.

2. Uninstall the most recently downloaded app

Remember the moment the ad starts to pop up on Android when you unlock your phone? You probably downloaded a third-party app before that. If you do remember, then it’s easy to get rid of the ads.

Go to your home screen or the Settings page and uninstall the malicious app. Make sure you delete the app’s data off your phone after uninstalling it.

3. View recently used apps

  1. Close all the apps that are open on your phone.
  2. Lock and unlock the device and start using your phone as normal
  3. When the ad shows up, as usual, go to your recent apps.android recenet apps
  4. Note the app you see as a recent app.
  5. Uninstall the specific app.

4. Check the running services

  1. Go to the Settings app.
  2. Select System.
  3. Find the build and tap on it 7 times.
  4. Return to the System page.system settings android
  5. Tap on Developer options.
  6. Open Running services.
  7. Find any abnormal app.

On the Running services screen, you’ll view all the applications actively working on your phone, as well as their supporting services.

After determining the app that brought the adware, you must uninstall it. However, before you finally uninstall any suspected app, deactivate it to be sure.

You can avoid ads that pop up when you unlock your Android phone by only installing trusted apps from the Google Play Store and other trusted places.

iPhone is Not Sending Pictures: How to Fix it

iPhone is one of the most popular phone brands, but even great devices have certain issues. Speaking of which, many users reported that their iPhone is not sending pictures.

This isn’t the only issue, and many reported that they can’t access iPhone photos on PC, but that’s a topic for a different guide.

This can be a big problem, and in today’s article, we will show you how to fix this problem on your iPhone once and for all.

Why are pictures not sending on my iPhone?

  • SMS or MMS messaging might not be enabled properly on your device.
  • Glitches with your network settings can cause this issue to appear.
  • Issues with your network or provider can lead to problems such as this one.
  • In some rare cases, missing updates can cause this problem.

What can I do if my iPhone isn’t sending pictures?

1. Make sure that SMS and MMS messaging is enabled

  1. On your iPhone, go to the Settings.
  2. Now head over to the Messages section.
  3. Make sure that both Send as SMS and MMS Messaging options are enabled.
    MMS settings iphone not sending pictures

A few users suggest that turning off MMS Messaging somehow fixed this issue for them, so you might want to consider trying that out as well.

This method might be helpful if your iPhone isn’t sending pictures to Android, so be sure to try it out.

2. Reset network settings

  1. Go to Settings > General.
  2. Now select Reset > Reset Network Settings.
    reset network settings iphone not sending pictures
  3. After resetting network settings to the default, check if the problem is still there.

This is a pretty simple solution if iPhone is not sending pictures, so don’t hesitate to try it.

3. Make sure that your iOS is up to date

  1. Make sure that your device is connected to a power source and Wi-Fi.
  2. Go to Settings > General.
  3. Select Software Update.
    software update iphone not sending pictures
  4. Now tap on Download and Install.
  5. Follow the instructions on the screen to complete the update.

4. Check your network and restart your phone

  1. Make sure that your signal strength is good. This applies to both Wi-Fi and cellular.
  2. If you’re using cellular data, make sure that the cellular option is enabled.
  3. Try uploading the image as URL to image hosting websites and sending the link instead.
  4. Restart your iPhone.

Your network connection can be why your iPhone is not sending pictures, so be sure to check it.

5. Contact your provider

  1. Contact your mobile provider.
  2. Make sure with the provider that the MMS service is enabled for your account.
  3. Wait while the provider looks into the issue.

Several users claim that their iPhone wasn’t sending pictures to Android because the mobile provider didn’t enable MMS, but after contacting the support, the issue was resolved.

If the iPhone is not sending pictures, it’s possible that your messaging settings aren’t correct, so be sure to check that first.

In some cases, you can circumvent this issue if you choose to transfer photos from iPhone to PC, so you might want to consider that.

Also, ensure that your iOS is up to date because this could be a software bug. Lastly, contact your mobile provider and make sure that the issue isn’t at their end.