Microsoft Edge now supports an improved spellcheck experience

Microsoft has detailed today an improved spellcheck experience that recently made its way to Microsoft Edge version 83. The new feature is powered by what Microsoft calls Windows Spellcheck, and it replaces Edge’s existing spell checking experience by Hunspell.

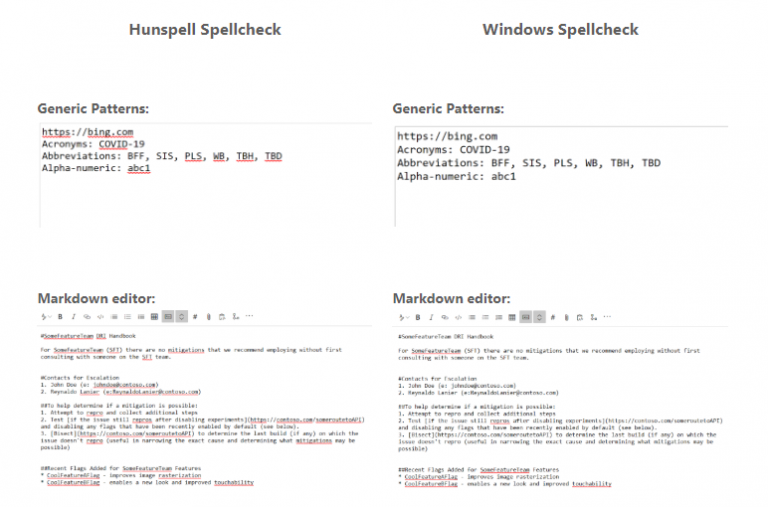
The new feature has been developed for all Chromium-based browsers and it is supported on Windows 8.1 and above. Microsoft explains that Windows Spellcheck comes with numerous benefits such as support for additional languages and dialects, a shared custom dictionary, as well as improved support for email addresses, acronyms, and URLs. Here’s a comparative analysis of Hunspell Spellcheck and Windows Spellcheck:

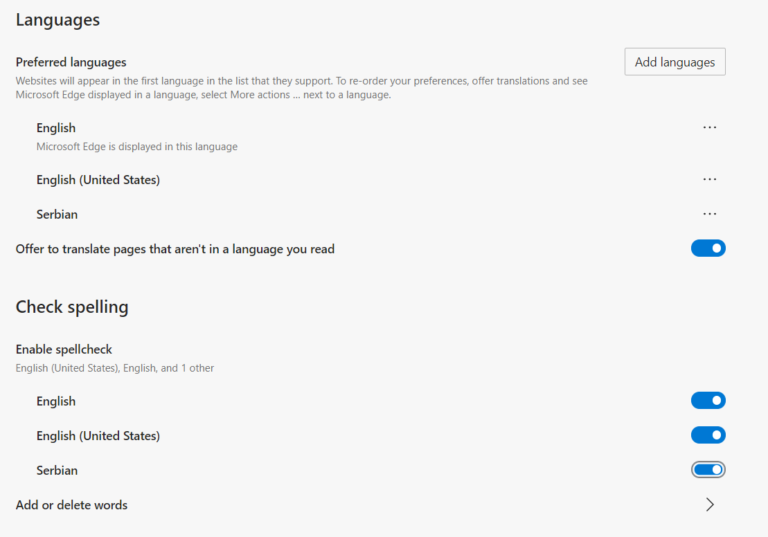
The improved spellcheck experience has been enabled by default in Microsoft Edge, and preferred language settings from Windows will be inherited automatically in your browser. You can navigate to the edge://settings/languages page in order to configure all the languages that will be spellchecked as you type. Moreover, you can install additional languages to spellcheck in Windows Settings by navigating to Time & Language > Language and selecting Add a preferred language.

spell check Microsoft Edge

It is worth noting that if the necessary language pack is not available or you have not installed it yet, Microsoft Edge will revert to the prior experience powered by Hunspell. Notably, the Windows Spellcheck integration has been developed in collaboration with Google to improve spell checking in all Chromium-based browsers.

Download And Install Windows 10 2020 May Update Today

Microsoft announced the availability of the Windows 10 May 2020 Update in April, through the Windows Insider Program, and that’s how we managed to keep you up to date with all the new features of Windows 10 version 2004. 

Now, it’s time for everybody to get the new Windows 10 May 2020 update.

How can I install Windows 10 May 2020 update?

To ensure you continue to have a reliable, productive experience with your Windows 10 devices, we are taking a measured and phased approach to how we offer the May Update, initially limiting availability to those devices running Windows 10, versions 1903 and 1909 who seek the update via Windows Update.

So if you don’t have either the 1903 and 1909 installed, you will see the update sooner than the ones who have older versions installed.

To check if you are eligible for an update, go to Settings, then click on Update & Security then, on the right pane, click on the Check for updates button under Windows Updates.

If you can see the Feature update to Windows 10, version 2004 you will be able to hit the Download and install button under it. 

It will take around 20 minutes and it will require a restart to complete. After it downloads, you will be prompted for the restart. You can either do the restart at that point or you can schedule it for a later moment.

If your system is approaching the end-of-life, the update will start automatically so that your computer remains protected and up-to-date with this latest release.

What can I do if I don’t see the update to Windows 10, version 2004?

According to Microsoft in an instructional video, you either have an older version than 1903 and you will have to wait for them to unlock the update for you or your computer has some compatibility issues with the new update.

You can also try to update to Windows 10 version 2004 by using the Update Assistant from the Microsoft page.

How can I fix error 0x80072f76?

A few users have reported the Windows update error 0x80072f76 when trying to perform the update.

The error code 0x80072F76 means that the Media Creation Tool doesn’t have permission to run.

To fix this problem, right-click on the Media Creation Tool.exe and press Properties. Then click on General and at the bottom, click on Unblock. Press Apply, then OK.

If you experience any other Windows 10 update errors, we can help you with our Windows Update Errors Hub.

Please leave us your thoughts in the comments section below about this Windows 10 May 2020 update.

[wl_navigator]

HP announces high-end Reverb G2 headset for Windows Mixed Reality and Steam VR

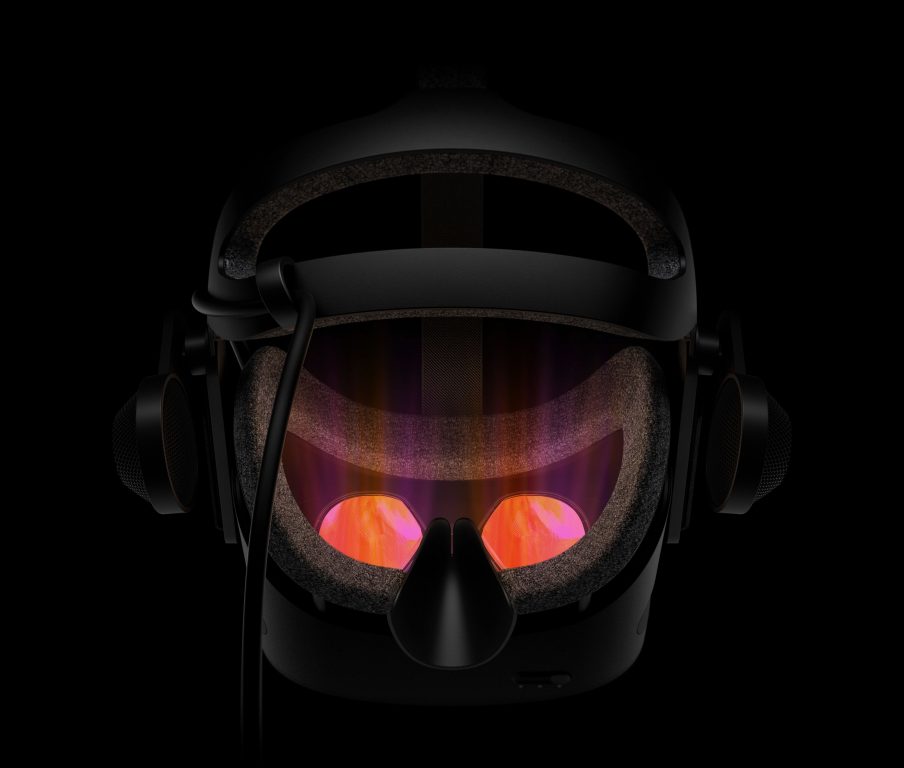
HP announced this morning the Reverb G2, a new high-end Mixed Reality headset designed in collaboration with Microsoft and Valve. This is the successor to the company’s original HP Reverb VR headset, which was announced back in March 2019.

HP may not be recognized as a pioneer in the VR, but the Reverb G2 should really help the company to be taken seriously in a market dominated by HTC and Oculus. “The HP Reverb G2 is the world’s highest resolution VR headset among major vendors, delivering cutting-edge optics, inside-out tracking, spatial 3D audio, natural gestures, long-wearing comfort, and plug and play support for Windows Mixed Reality and SteamVR”, HP said today.

The HP Reverb G2’s key features include dual 2160×2160 LCD panels screens providing a 114-degree field of view, revamped 10mm speakers supporting spatial audio, and the headset should also feel more comfortable thanks to an increased facemask cushion for better weight distribution. The screens can also be flipped to get back to the real world in a second.

HP also says that the Reverb G2’s four cameras are more precise and support 1.4X movement capture, and the company has also redesigned the two motion controllers to optimize the button layout. “With four cameras, the controller tracking feels even more like an extension of your hands, making the sense of immersion that much stronger,” HP said in the press release. The HP Reverb G2 will be available later this Fall with a $599 launch price, and pre-orders will be open on May 28 on HP.com, the Steam VR homepage, and other partners.

How to manage your data/storage and clean up Microsoft Teams on iOS, Android

Microsoft Teams isn’t just for Windows. You can use the app on your iOS or Android device too. But when you’re constantly sending over files, keeping chat logs, and using Teams on your device, it might start to occupy a lot of storage on your phone or tablet. In this guide, we’ll show you how to clean up Microsoft Teams and reclaim that lost storage space.

Getting to the data and storage menu

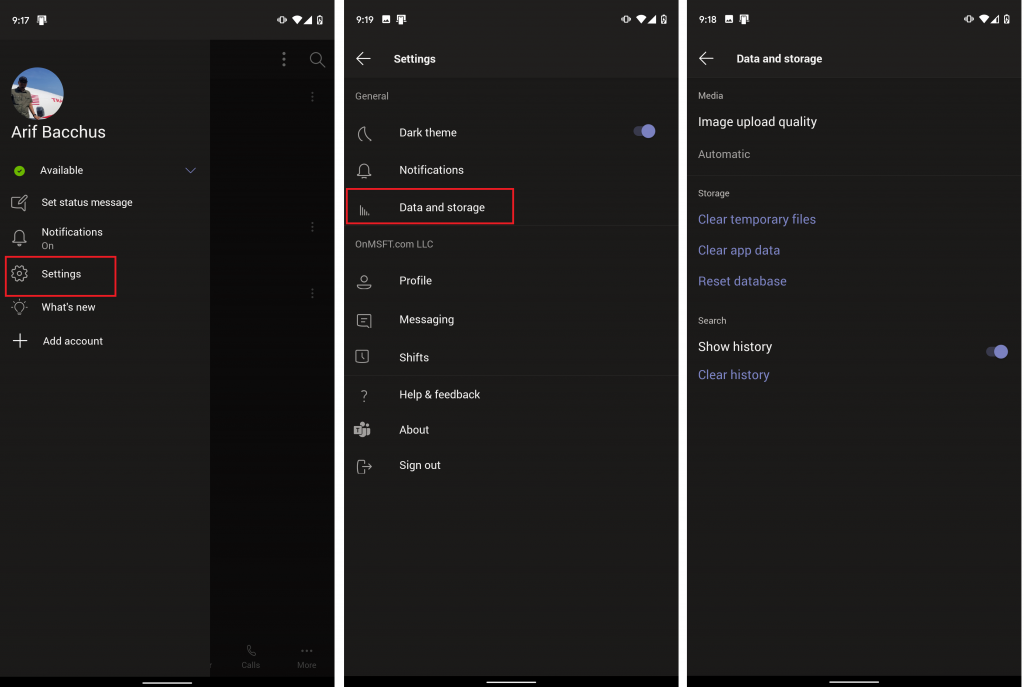
To clean up Teams on iOS and Android, you’ll need to visit the data and storage menu from within the app. To get there, you’ll need to tap on the hamburger menu at the top left corner of the screen. It looks like three horizontal lines pushed together. You’ll then see an option for Settings. Tap that, followed by Data and storage. Here’s where you’ll find the options we discuss in the next section.

Change upload quality, clean temporary files, and more

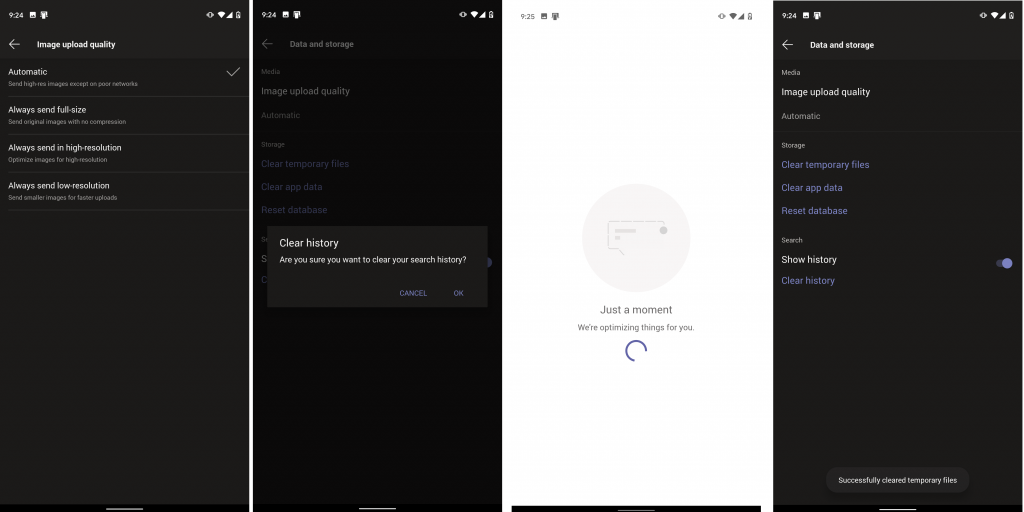
Once you’re in the data and storage menu, there’s a couple of things you can do to help clean up the Teams app. The first of these is image quality. From here, you can choose Automatic, Always send full-size, always send in high-resolution, or always send in low-resolution.

Automatic is the one to best choice because it will set Teams to send high-resolution images except on poor quality networks. In other cases, you might want to choose Always send low-resolution, if you’re on a network where data usage might be a concern. If you’re a photographer or don’t want images compressed, meanwhile, you should choose the other two options, for either full-size or high-resolution.

Other options available from the data and storage menu include options to clear temporary or downloaded files that Microsoft Teams might not need. You also can clear the app data to refresh the app or (only on Android) reset the database if some items are not loading properly. Finally, you can clear your search history, too, if too many items are showing up when you run a search.

Other things to check on Teams on iOS and Android

While we’ve focused on how you can manage your Teams data on iOS and Android, there’s a lot more you can do. You can check out settings for Dark theme, notifications, messaging, meetings, and more. With these notification options, you can turn off notifications while you’re active on desktop, turn on quiet hours. We’ll be diving into other aspects of Teams on mobile throughout this month so be sure to keep tuned to OnMSFT for more and check out our Teams hub for all the latest.

Developer claims Microsoft’s new Windows Package Manager has been heavily inspired by his own AppGet app

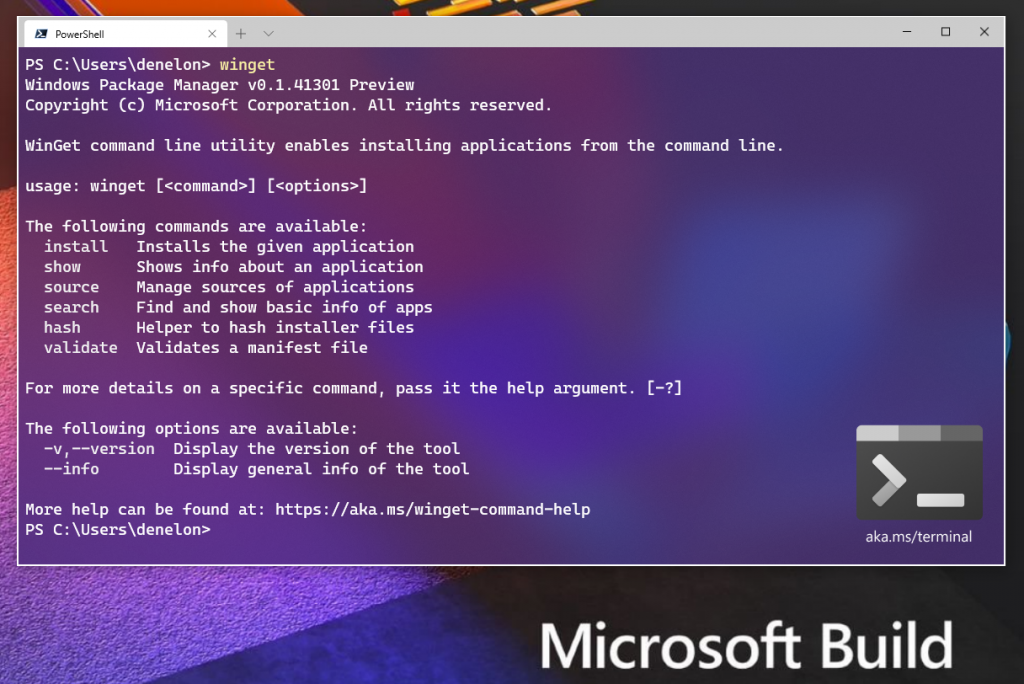
Microsoft unveiled a new open-source tool Windows Package Manager at Build 2020, also known as “Winget” at Build 2020 last week. The tool has been designed for power users and developers to make it easier for them to quickly search, view, and install commonly used developer tools.

However, according to Keivan Beigi, the developer of a package manager app named AppGet, Microsoft’s new Windows Package Manager has been heavily inspired by his own work. Beigi claims that Microsoft has copied the core operation of his package manager to build their own Winget.

The Canadian developer provided details of his several meeting sessions with a high-level manager at Microsoft, back in 2019. Microsoft directly approached the developer last summer and started discussing ideas to implement package managers in the Windows ecosystem. This discussion led to several job interviews where Microsoft offered him a role at Microsoft. Not only this, the Redmond giant even showed its interest in acquiring AppGet. Alongside this acquisition, the company wanted Beigi to oversee and improve software distribution while working on AppGet.

The developer never heard back from Microsoft after his last contact which took place in February this year. However, a day before the official announcement of Winget, Beigi received an email from Microsoft informing him that the software giant is going to announce its “own” Windows Package Manager at Build, held virtually this year. Microsoft told him that they would call out his work in their blog post, but only did so in a row with various other package managers.

Beigi says that he waited until the next day to see the functionality of this new package manager. Unfortunately, he was shocked to see that the “core mechanics, terminology, the manifest format and structure, even the package repository’s folder structure” was indeed inspired by his own package manager. The company didn’t bother to credit AppGet and just briefly mentioned it once in its blog post alongside other Windows package managers. The developer did readily admit that his work was open source and none of it was patented.

The disheartened Canadian developer has announced that he will stop developing AppGet, and it will now be shut down in the first week of August. In an email to The Verge, Beigi said that there is no point in competing with Winget and he was only looking for some recognition of his work from Microsoft.

“The announcement was especially bad given how little credit was given to AppGet compared to other projects,” Beigi said. “I think some attribution / credit would be fair but I don’t think it really matters what I’d like to happen”.

A Microsoft spokesperson said in a statement to The Verge that the company is currently investigating the matter. “We regret to hear about this candidate’s experience and are reviewing the circumstances internally,” Microsoft said today.

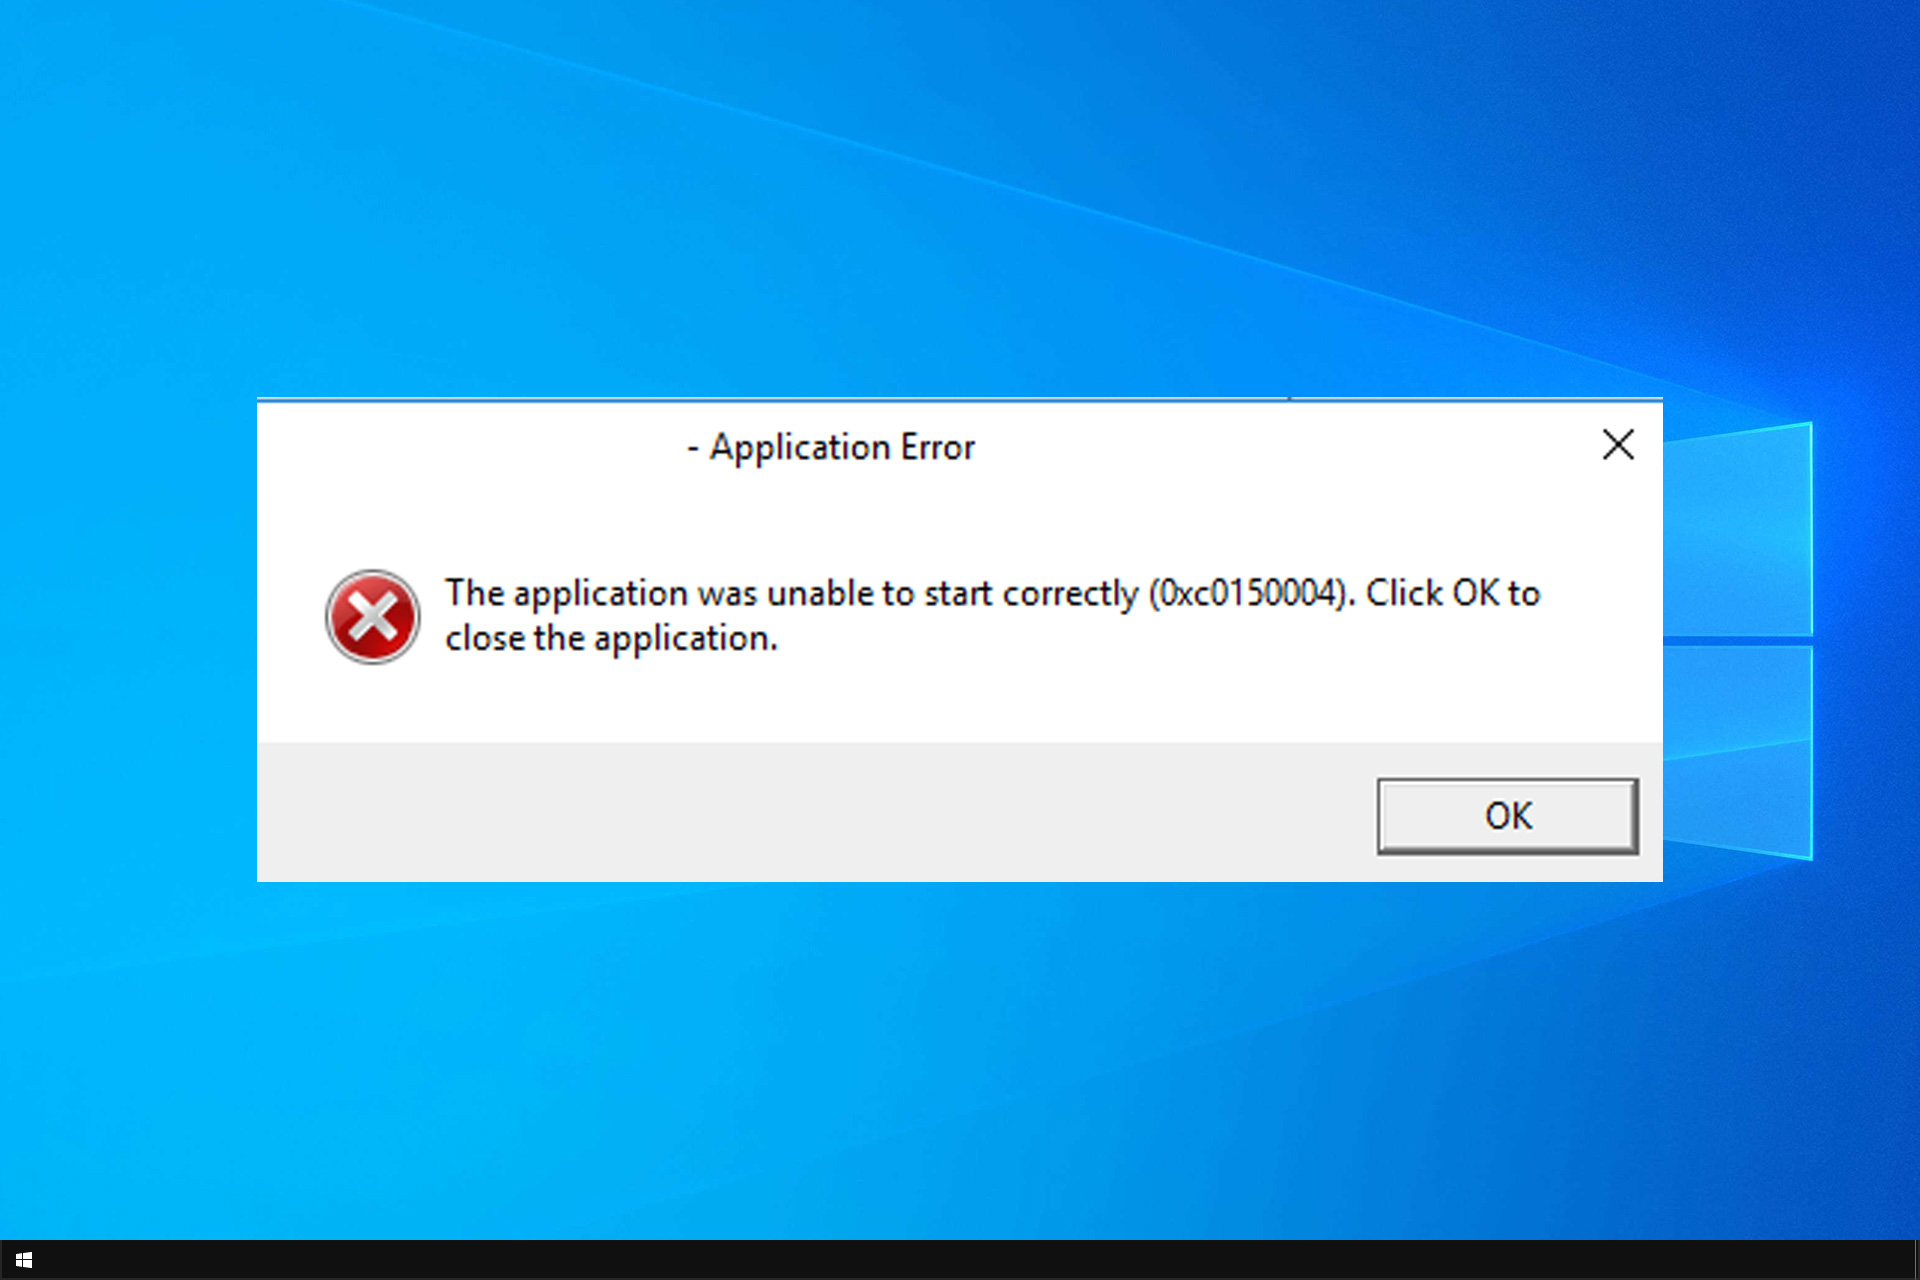
Application Error 0xc0150004: 5 Ways to Fix it

Many reported 0xc0150004 when trying to run specific apps on their PC. The app will ultimately prevent you from starting the desired app.

As you can see, this can be a significant problem, especially if you need that app for your work or school project, but there are ways to fix this issue.

What is an application error?

Application error usually occurs inside the application and causes it to crash or prevents it from launching. Error 0xc0150004, for example, is caused by the following:

  • Issues with Visual C++ Redistributables.
  • Antivirus protection can sometimes interfere with certain apps.
  • Bugs in your system can be responsible for this issue.
  • In some rare instances, third-party software can cause this problem.

How do I fix error 0xc0150004?

1. Disable antivirus real-time protection

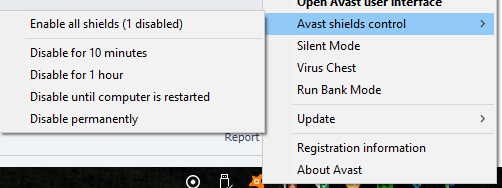
  1. Right-click on the Avast antivirus icon in the taskbar.
  2. Select Avast shiels control and select Disable for 10 minutes.
    application error 0xc0150004
  3. This will disable the antivirus temporarily.
  4. In the meantime, try launching the app or the installer causing the error.

Keep in mind that if you’re using a different antivirus software, these steps will differ slightly.

2. Use the DISM tool to repair Windows

  1. Press the Windows key.
  2. Type cmd, right-click on Command Prompt, and select Run as Administrator.
  3. In the Command Prompt window, type the following commands one by one and hit Enter to execute them:
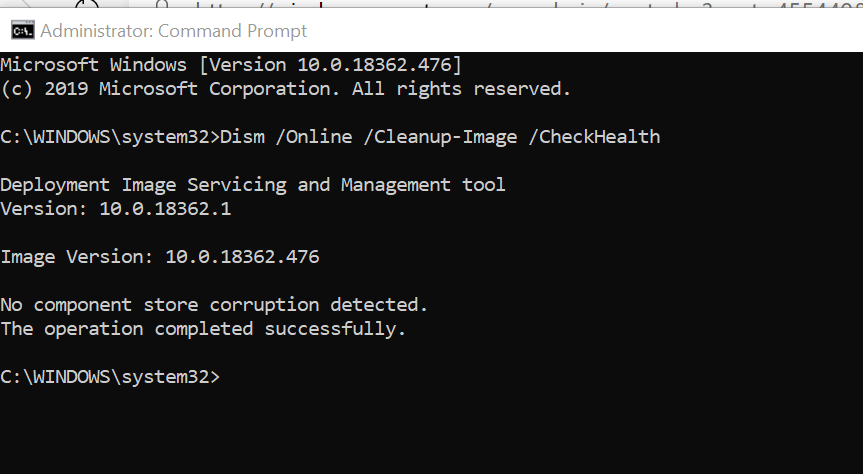
    Dism /Online /Cleanup-Image /CheckHealth
    Dism /Online /Cleanup-Image /ScanHealth
    Dism /Online /Cleanup-Image /RestoreHealth

    application error 0xc0150004
  4. Once executed, close the Command Prompt and run the setup that was causing the error. Check if the error is resolved.

If you want to avoid further errors, we recommend Windows repair tools that can automatically replace malfunctioning system parts with new versions from an extensive Windows files database.

Executing the DISM command to restore your Windows system image can also help you with other problems. We covered those problems in our Troubleshooting the Pbid.exe Application Error with Ease guide, so don’t miss it.

3. Perform a Clean boot

  1. Press Windows key + R to open Run, type msconfig.msc, and click OK.
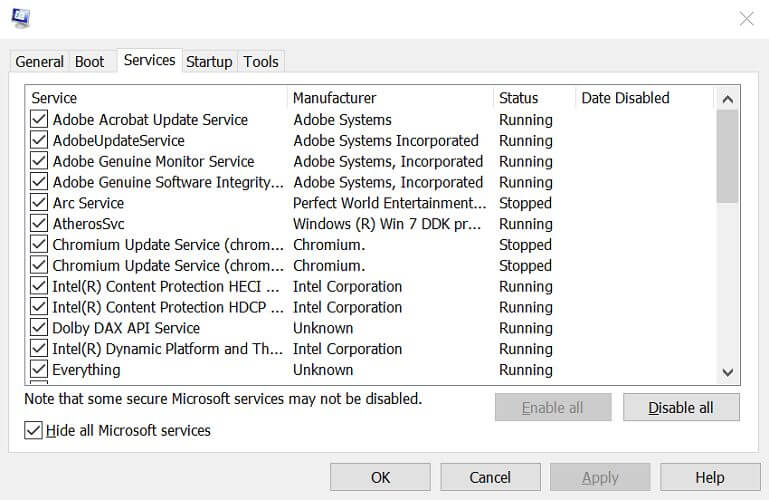
  2. In the System Configuration window, open the Services tab.
  3. Check the Hide all Microsoft services box and click Disable all button.
    application error 0xc0150004
  4. Click the to disable all the third-party services.
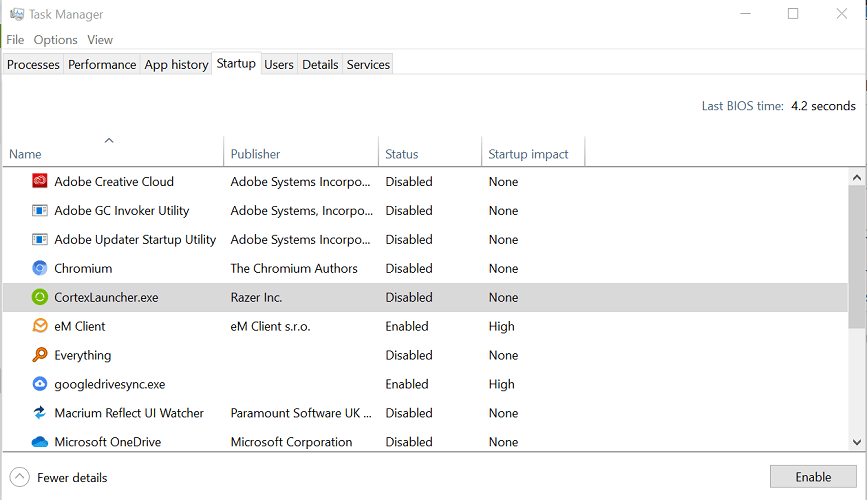
  5. Open the Startup tab and click on the Open Task Manager link.
  6. In Task Manager, open the Startup tab. Select the apps one by one and click the Disable button.
    Application start error
  7. In the System Configuration window, click Apply and OK to save the changes.
  8. When prompted for restart, click Restart now.
  9. After the system restarts, check if the error occurs while launching the app or installing new programs.

If the error does not occur in clean boot mode, you may have a third-party app creating issues with the installer or app launcher. Open Control Panel, and go through the list of installed apps.  Select the most recently installed app and uninstall it.

4. Install Windows updates

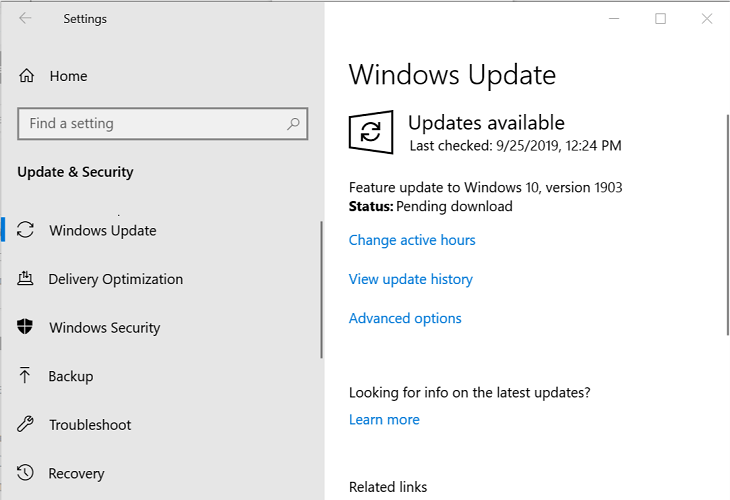
  1. Click on Start and select Settings.
  2. Go to Update and Security.
  3. Click Windows Updates.
  4. Check for any pending updates and install them.
    Application start error

5. Reinstall Visual C++ Redistributables

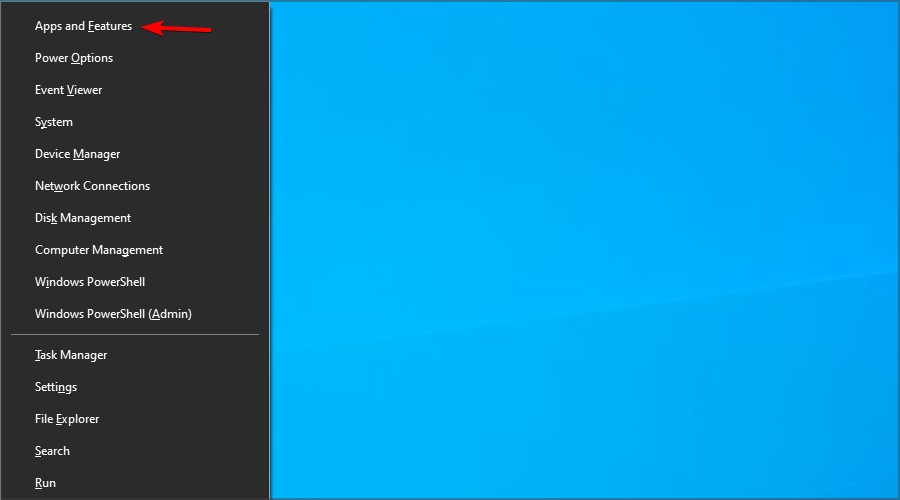
  1. Press Windows key + X and select Apps & features.
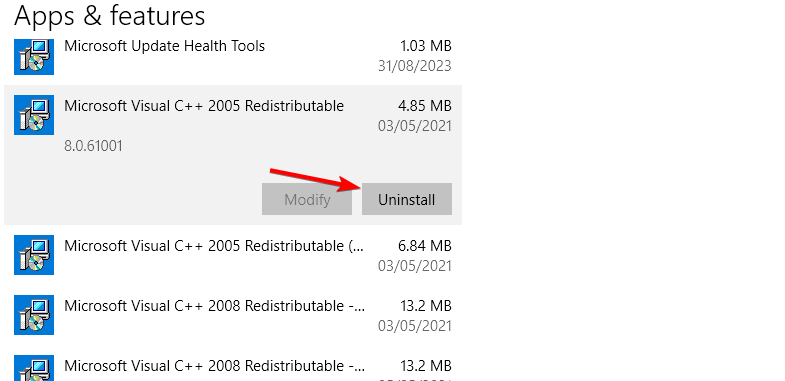
  2. Locate Visual Studio Redistributable, select it and click Uninstall.
  3. Repeat this for all installed Redistributables.
  4. Go to the Redistributables download page and download and install all packages.

The application error 0xc0150004 in Windows can be caused by your antivirus, third-party programs, or corrupted system files, but we hope our guide helped you fix it.

This isn’t the only error that you can encounter, and many reported error 0xc000012d as well as application error 0xc000003e, but we covered those in separate guides.

Did you find a different solution for this problem? If so, share it with us in the comments section.

FIX: Not responding due to a long-running script error

Sometimes, while scrolling a web page in Internet Explorer you may encounter the not responding due to a long-running script error. This is a common error and can occur due to generic glitch or if the script debugging is enabled.

Several users have reported similar errors in the Microsoft community forum:

       I keep getting the following message at the bottom of my internet screen ” xxxx.com is not responding due to a long-running script”. 

If you are also troubled by this error, here are a couple of troubleshooting tips to help you resolve the not responding due to a long-running script error in Windows.


How can I fix the not responding due to a long-running script error?

1. Run Windows Internet troubleshooter

not responding due to a long-running script

  1. Download the Windows Internet troubleshooter from here.
  2. Double-click on the downloaded file to run the troubleshooter.
  3. In the troubleshooter window, click Advanced.
  4. Check the box Apply repairs automatically.
  5. Click Next.
  6. The troubleshooter will scan the system for any issues with the web browser and apply the required fixes.
  7. Once the fixes are applied, close the troubleshooter and restart the computer.
  8. Check for any improvements by launching Internet Explorer again.

2. Disable the antivirus

not responding due to a long-running script

  1. If you are using a third-party antivirus, try disabling it temporarily.
  2. Avast antivirus users, right-click on the antivirus icon in the Taskbar.
  3. Go to Avast shiel control.
  4. Select Disable for 10 minutes.
  5. This will disable the antivirus for a few minutes before it starts the program again automatically.
  6. In the meantime, launch Internet Explorer and check if the error exists.

Several users have reported that disabling the antivirus has helped them resolve the issue. At times, the antivirus may block the connection or certain scripts from loading resulting in an error.

If the issue persists, you may have to uninstall the antivirus to see if that resolves the error. However, before uninstalling the antivirus, try disabling script debugging option in Internet Explorer.


3. Disable Script Debugging

not responding due to a long-running script

  1. Launch Internet Explorer.
  2. Click the gear icon on the top right corner.
  3. Select Internet Options.
  4. In the Internet Options window, open the Advanced tab.
  5. Under the Settings section, scroll down to Disable script debugging (Internet Explorer) under Browsing.
  6. Scroll down and uncheck the Display a notification about every script error box.
  7. Click Apply and OK to save the changes.
  8. Close Internet Explorer.
  9. Relaunch Internet Explorer and check if the issue is resolved.

The most common cause of not responding due to a long-running script error is if the script debugging option is disabled. And to prevent the browser from displaying error notifications, disable the display a notification about every script error option.

If the issue persists, you may have to uninstall and reinstall the antivirus to see if that helps you resolve the error. Make sure you reinstall the software and enable real-time protection to keep your computer safe.

Check issues with the web page

  1. If the issue is occurring with a specific web page the issue could with the website itself and not your web browser.
  2. Try opening the web page in any other web browser other than Internet Explorer and check if the error persists.
  3. If the error occurs on other web browsers, the issue is most likely with the web page.
  4. If you visit the web page more often, try contacting the administrator.

The not responding due to a long-running script error can occur due to multiple reasons including issues with the web browser as well the web page.

Follow all the steps in this article one by one to fix the problem. Do let us know which method helped you resolve the problem in the comments.

[wl_navigator]

Fix: Extension Is Incompatible with Driver Version Error

Most modern Windows computers come installed with Synaptic drivers for touchpads. However, while accessing the mouse setting the user may encounter Control Panel extension is incompatible with a driver version error.

Several users have reported similar errors: When I go to the control panel and access the mouse settings, it starts out with a box saying “control panel extension is incompatible with driver version).  Then it lets me into the dialogue to play with the mouse settings.

If you are also troubled by this error, here are a couple of troubleshooting tips to help you resolve the Control Panel extension is incompatible with driver version error in Windows.

How do I fix the Control Panel extension is incompatible with driver version error?

1. Update mouse driver

Control Panel extension is incompatible with driver version
  1. Press the Windows key on your keyboard.
  2. Type device and click on Device Manager.
  3. In Device Manager, expand Mice and other pointing devices.
  4. Right-click on your device and select Update Driver.
  5. Select Search automatically for updated driver software option.
  6. Wait for the Windows to scan and install any pending updates for the drivers.
  7. After the drivers are installed, restart the computer. Try accessing the mouse settings and check for any improvements.

Updating the Synaptic driver can help you resolve the issue if the error is occurring due to incompatible mouse drivers. If you are using a third-party mouse from a premium brand, check the manufacturer’s website for driver updates.

When handling drivers it is always a good idea to use a professional tool, such as Fortect Driver Updater. If your mouse driver is out of date, this tool will allow you to download an actualized copy in a matter of minutes.

2. Rename main.cpl

extension is incompatible with driver version
  1. Open File Explorer.
  2. Navigate to the following location:
    C:WindowsSystem32
  3. In the search bar type *.cpl.
  4. Locate main.cpl and rename it. You can rename it as oldmain.cpl etc.
  5. Once renamed, restart the computer.
  6. After the restart, try accessing the mouse settings and check for any improvements.

3. Reinstall Synaptics driver

mouse control panel error
  1. Press Windows Key + R to open Run.
  2. Type control and click OK.
  3. In Control Panel, go to Programs > Programs and Features.
  4. Select Synaptic driver from the list of installed programs.
  5. Click on Uninstall. Click Yes to confirm the action.
  6. Restart the computer.
  7. Download and install the latest version of Synaptics driver from the laptop manufacturer.
  8. Once installed, reinstall the computer and check for any improvements.

Reinstalling the Synaptics driver can fix any issues that may occur due to a corrupted driver.

If the issue persists, try to install the driver manually from the Control Panel.

Synaptic driver error
  1. Press Windows Key + R.
  2. Type control and click OK.
  3. In the Control Panel, type Mouse.
  4. Click on Change mouse settings.
  5. In the Mouse Properties window,  open the Hardware tab.
  6. Select your mouse from the list of devices and click the Properties button.
  7. Open the Driver tab.
  8. Click on the Update Driver button.
  9. Select Browse my computer for driver software option.
  10. Select the downloaded driver file and click Open.
  11. Windows will install the driver successfully.
  12. Restart the computer and check for any improvements.

What if the Update driver button is greyed out?

Control Panel extension is incompatible with driver version
  1. Press Windows Key + R, type devmgmt.msc and click OK.
  2. In Device Manager, expand Mice and other pointing devices.
  3. Right-click on your mouse and select Update driver.
  4. Select Browser my computer for driver software.
  5. Select the downloaded driver file and click Open.
  6. Restart the PC once the driver is successfully installed.

4. Run System File Checker tool

extension is incompatible with driver version
  1. Type cmd in the search bar.
  2. Right-click on Command Prompt and select Run as Administrator.
  3. In the Command Prompt window, type the following command and hit enter:
    sfc /scannow 
  4. The System File Checker will scan the system files and repair bad files if required.
  5. Restart the computer and check for any improvements.

The Control Panel extension is incompatible with driver version error that can occur due to a corrupted driver or incompatible hardware.

We covered a similar problem in our Resolve the ‘WebDriver Cannot be Resolved to a Type’ issue article, so be sure to visit it.

Follow all the steps in this article one by one to resolve the error.

Fix Netflix error codes -14, 2.101, 7.4 in a few easy steps

Netflix has grown in popularity exponentially in the last couple of years. Nobody is surprised about this fact, as we can observe people preferring to use streaming services like Netflix as opposed to watching TV normally.

The error codes -14, 2.101, and  7.4 are related errors from a very long list of Netflix error codes. These errors can appear for some uses when streaming Netflix movies. Here are what the error messages state:

  • Netflix says Sorry, we could not reach the Netflix service. (-14)
  • Netflix says There is a problem playing this title. (2.101)
  • Netflix says There is a problem playing the video. (7.4)

If you encounter any of these errors, check out the resolutions below.


1. Sign out of Netflix

  1. While in the Netflix app, tap the Menu button in the upper left corner / the More button in the lower right corner.
  2. Scroll down and select Sign Out.
  3. Confirm that you want to sign out.
  4. Once you have signed out, sign back in and try Netflix again.

2. Visit Netflix.com on a computer

  1. Using a computer on the same network as your device, go to netflix.com/clearcookies.
  2. Select Sign In, then enter your credentials to sign in to your account.
    • If you see the error NSEZ-403,  then there is currently a connection issue for your account to the Netflix service. You can try to stream again at a later time.
    • If you do not see NSEZ-403, continue troubleshooting below.

3. Clear the Netflix app data

  1.  From the Home screen on your device, navigate to Settings.
  2. Select General.
    • If you don’t see General, continue to the next step.
  3. Select Apps or Applications.
  4. Select Manage Applications, Application Manager, or Manage All Apps.
    • If you don’t see these selections, continue to the next step.
  5. Scroll down and select Netflix.
    • If you don’t see Netflix, check the Downloaded
  6. Select Storage.
    • If you don’t see Storage, continue to the next step
  7. Select Clear Data or Clear Storage, then OK.
  8. Try Netflix again.

4. Try a different internet connection

  1. Attempt to connect to a different Wi-Fi network in range of your device.
  2. Bring your device to a neighbor’s or friend’s house and attempt to stream.
  3. If you can access a cellular data network on your device, try using it to connect to Netflix. While we generally don’t advise streaming over a data network as a fix, it’s a good way to see if a home network configuration issue is what’s keeping you from streaming reliably.

If you’re able to stream using a different internet connection, we recommend checking with your network administrator or ISP provider.


5. Reinstall the Netflix app

  1. Open the Play Store app.
  2. Search for Netflix.
  3. Once in the Netflix app store page, select Uninstall.
    NOTE: Uninstalling the Netflix app will delete any titles you have downloaded to the device.
  4. Select OK to confirm.
  5. Once the uninstallation is complete, select Install.
  6. Once the installation is complete, select Open.
  7. Try Netflix again

We hope that the steps we described in this guide have managed to help you fix the dreaded -14, 2.101, and  7.4 error codes on Netflix.

If you want to get into contact with us, don’t hesitate to use the comment section below this article.

[wl_navigator]

Kodi: One or More Items Failed to Play – 5 Ways to Fix

If you encountered the One or more items failed to play or Kodi Playback failed errors, we got you. It may be caused by a corrupt cache, missing raw maintenance add-on, or even a glitch in the current version of the Kodi media player. Follow the instructions below to fix it in no time.

How do I fix the Kodi one or more items failed to play?

1. Clear Kodi app cache

Kodi one or more items failed to play
  1. Launch Kodi media player.
  2. Go to Settings.
  3. Click the Gear icon on the top left corner.
  4. Click on File Manager to open it.
  5. Double-click the Profile Directory tab.
  6. Open the Database directory.
  7. Right-click on the Addons.db file and select Delete.
  8. Once Deleted, relaunch the Kodi media player and check if the error is resolved.

Note that deleting the addons.db file will disable all the add-ons temporarily. Upon restart, the Kodi media player will automatically rebuild the deleted files for the proper functioning of add-ons.

2. Change compatibility settings

  1. From the Kodi home screen, click on Settings.
  2. Open File Manager.
  3. Click on Add Source.
  4. Enter the following URL and click OK: https://repo.ares-project.com/magic/
  5. Now go back to the home screen and click on Add-ons.
  6. Click the box icon on the top left corner.
  7. Click on Install from the Zip file.
  8. Locate the repository.aresproject.zip and double-click on it.
  9. Double-click on repository.aresproject.zip to install the add-on.
  10. Once installed, go back to the home screen.
  11. Click on Program Add-ons and open Ares Wizard.
  12. Click on Tweaks.
  13. Select Advanced Settings Wizard.
  14. Click Next to proceed.
  15. Click on General Settings and Apply settings option.
  16. Relaunch the Kodi app and check if the error is resolved.

3. Force update the add-on

Kodi Playback Failed
  1. Go to Settings.
  2. Open the File Manager.
  3. Locate the add-on that is causing the error.
  4. Open the Add-ons and Update the file.
  5. Try to force update the file even if it shows as up to date.
  6. Relaunch Kodi and check for any improvements.

4. Reinstall Kodi media player

Kodi Playback Failed
  1. Press Windows Key + R to open Run.
  2. Type control and click OK.
  3. Go to Programs > Programs and features.
  4. Select Kodi from the list of installed apps.
  5. Click on uninstall and click Yes to confirm.
  6. Once uninstalled, open the Kodi download page and download Kodi.
  7. Install the app and check for any improvements.

5. Install an older version of Kodi Media Player

  1. If the issue persists, try reinstalling the Kodi media player to see if that helps.
  2. Click Start and select Settings.
  3. Open Apps.
  4. Search for Kodi.
  5. Select the app and uninstall.
  6. Open the Kodi download page and download an older version of the Kodi player.
  7. Install the app and check for any improvements.

Now you know why you keep getting playback failed errors in Kodi and should be able to get rid of them. If you have any questions about this topic or were able to handle the issue in a different way, let us know in the comments below.

FIX: Oops! We couldn’t save that one error on Windows 10/11

Photos is the Windows 10’s default image-editing app, and even though a lot of people use that app for editing their images, the app isn’t immune to bugs. Some users have posted on the MS forum about a We couldn’t save that one error when they try to edit and save images in Photos. To quote one forum post:

I have many photo files that don’t seem to be editable by the windows Photos app. I own the file and have full permission on it, but when I edit the file and click Save I get a pop up that says, Oops! We couldn’t save that one.

In this guide, we will explore the best methods available to solve this issue once and for all. Read on to find out more.


How can I fix the We couldn’t save that one error?

1. Open the Windows Store Apps troubleshooter

  1. First, try running the Windows Store Apps troubleshooter, which can come in handy for fixing Windows 10 apps. Click the Type here to search button on the left side of the taskbar.
  2. Type troubleshooting in the search box that opens.
  3. Click Troubleshoot settings to open the window shown in the snapshot directly below.
    Troubleshoot tab oops we couldn't save that one windows 10
  4. Select the Windows Store Apps troubleshooter to click its Run the troubleshooter button.
  5. Click the Apply this fix option for any potential fixes the troubleshooter might provide.
  6. Restart Windows 10 after applying a troubleshooter fix.

2. Modify the folder permissions for the photo’s folder

  1. Check that you have full permissions for the folder which includes the image you can’t save. Open File Explorer (press the Windows key + E hotkey).
  2. Right-click the folder that includes the image Photos doesn’t save and select Properties.
  3. Select the Security tab in the snapshot directly below.
    Security tab oops we couldn't save that one windows 10
  4. Select your user account within the Group box.
  5. Click the Edit button.
  6. Then select the Full control checkbox if it’s not already selected.
  7. Click the OK button.

3. Reset the Photos app

  1. The Reset option could fix a corrupted Photos app. Input the keyword app in the Type here to search box.
  2. Click Apps & features to open the window shown directly below.
    Apps & features tab oops we couldn't save that one windows 10
  3. Select the Microsoft Photos app.
  4. Click Advanced options to open the Reset button shown directly below.
    Reset button oops we couldn't save that one windows 10
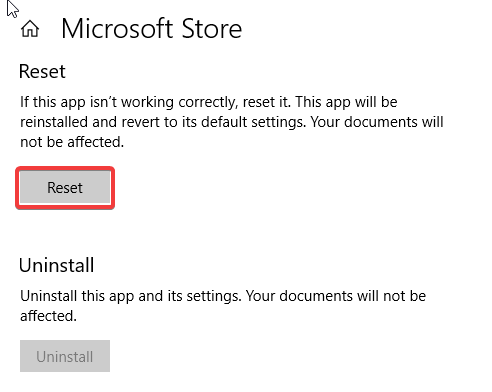
  5. Click Reset, which will open a dialog box. Then click Reset again on that dialog box.
  6. Note that there’s also a Repair option for Photos, which might fix the app without resetting data. You can try that option if Reset doesn’t fix the issue.

4. Save the image to an alternative format with Paint

  1. Some users have confirmed they’ve fixed the We couldn’t save that one error by saving the file to an alternative format in Paint. To do so, enter Paint in Windows 10’s search box.
  2. Click Paint to open it.
  3. Open the image that doesn’t save in Photos.
  4. Click File and Save As to open a file format submenu.
    Paint oops we couldn't save that one windows 10
  5. Select a different file format for the image to the one it’s currently saved as. If it’s a PNG image, select the JPEG format (or vice versa).
  6. Enter a title for the file in the Save As box.
  7. Click the Save button.
  8. Then try saving the same image in Photos again.

There’s a good chance the above resolutions will fix the We couldn’t save that one error. However, remember that there are plenty of alternatives to Photos.

If you still can’t fix the issue, try editing the same image with software like Irfanview or Paint.NET.

[wl_navigator]

Error Code 0xd0000189 on Xbox One? Try these 5 simple steps

The Error Code 0xd0000189 on Xbox One is a common error code that you may encounter while installing or launching games or apps. The error is usually caused due to issues with Xbox Live.

One user took to the Microsoft community forum to explain the issue:

None of my apps or blueray are working. Netflix and now tv. I’m getting error code 0xd0000189, but this error code doesn’t exist and can’t get any help.

If you are also troubled by this error, here are a couple of troubleshooting tips to help you resolve the Error Code 0xd0000189 on Xbox One with a step by step guide.

How do I fix Error Code 0xd0000189 on Xbox One?

1. Run the game in Offline mode

Error Code 0xd0000189 on Xbox One

  1. Press the Xbox button on the controller to open the guide menu.
  2. From the guide menu, go to Settings > System.
  3. Select Settings and then choose Network.
  4. From the Network menu, open Network settings.
  5. Select the Go offline option.
  6. This will put your Xbox One console in Offline Mode.
  7. Once in the Offline Mode, try installing or launching the game or app with the error and check for any improvements.

Changing the network type to Offline mode can help you bypass the issue related to the network and let you play the game without any issues.


How to increase your Xbox One’s download speeds


2. Check Xbox Live service status

Error Code 0xd0000189 on Xbox One

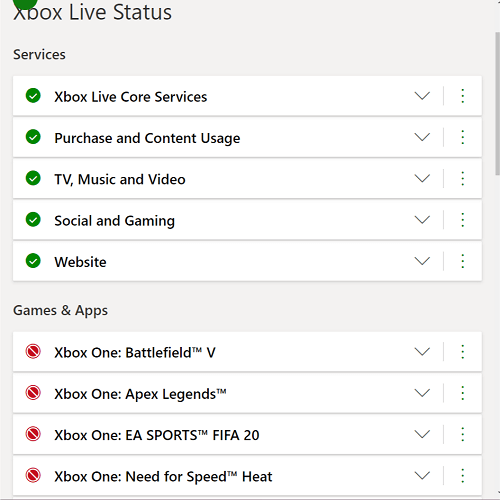
  1. The Error code 0xd0000189 on Xbox One can occur if Xbox Live service is facing outage issues.
  2. You can check the live status of the Xbox Live service for any outage issues.
  3. In the Xbox Live status page, go through both Services and Games & Apps section and see if there is an outage.
  4. Wait till Microsoft fixes the issue and updates the service page. You can get a service status update if you sign in with your Xbox account.

3. Perform a power cycle

Error Code 0xd0000189 on Xbox One

  1. Make sure the Xbox console is powered on.
  2. Press and hold the Xbox button on the console for about 20 seconds.
  3. Release the button once the console is powered off.
  4. Disconnect all the connected cables from the console.
  5. Wait for a few minutes and then connect the cables again.
  6. Press the Xbox button again to power on the console.
  7. Once the console is up and running, try launching the game to check if the error is resolved.

4.  Clean alternate MAC address

Error Code 0xd0000189 on Xbox One

  1. Press the Xbox button on your controller.
  2. Navigate to Settings and choose All Settings.
  3. Go to Settings and choose the Network tab.
  4. Select Network Settings.
  5. open Advanced settings option.
  6. Int eh Advanced Settings screen, choose Alternate MAC address.
  7. Under Alternate Wired  MAC address select the Clear option.
  8. Now try to launch the game and check for any improvements.

5.  Reset Xbox One

Xbox game error

  1. Press the Xbox button on the controller.
  2. Go to System > Settings.
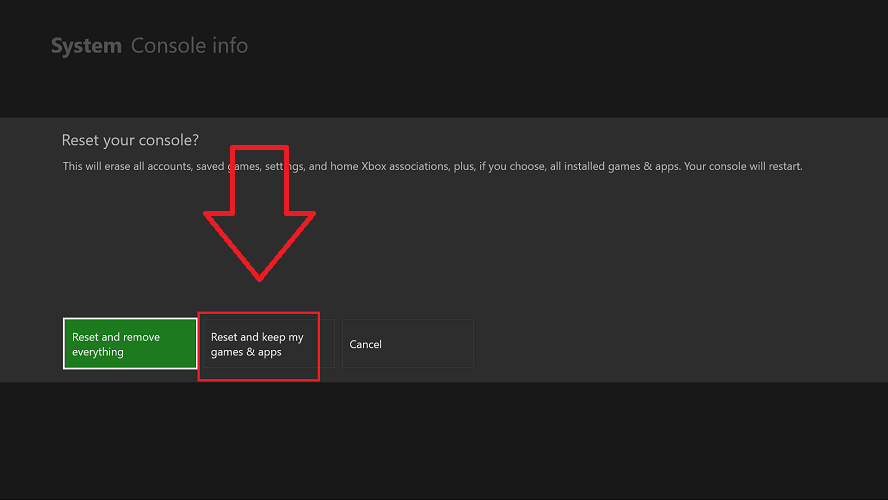
  3. Choose Console info and then select Reset Console.
  4. There are two ways to reset your Xbox One console.
    Reset and keep my games and apps – First select this option. It will reset the OS and delete potentially corrupted data without your game or apps.
    Reset and remove everything – Use this option as a last resort. Selecting this option will reset the Xbox One to factory default removing all the data stored in the console.
  5. Once the reset process is complete, try launching the game and check for any improvements.

The error code 0xd0000189 on Xbox One is a common error and usually resolves automatically when the Xbox Live services are fixed. However, if the issue persists, try other troubleshooting tips listed in this article.

For other like errors where the update is stuck, see how to fix it.

[wl_navigator]

Windows update error 0xc8000247? Fix it with these steps

Windows Automatic Update Service is responsible for downloading and installing new updates. However, this process can cause the Windows update error 0xc8000247 when Windows Update Service tries to search and install new updates.

This error can occur due to multiple reasons including Intel Matrix Storage driver creating conflict with the service. Fortunately, the error can be fixed by following the steps listed in this article.

If you are also troubled by this error, here are a couple of troubleshooting tips to help you resolve the Windows update error 0xc8000247 in Windows.


How do I fix the Windows update error 0xc8000247?

1. Uninstall Intel Matrix Storage driver

Windows update error 0xc8000247

Note: Do not follow these steps if Intel Matrix Storage driver acts a RAID controller at two or more hard drives.

  1. Press Windows Key + R to open Run.
  2. Type control and click OK to open the Control Panel.
  3. From Control Panel, go to Programs > Programs and Features.
  4. In the list of installed programs locate Intel Matrix Storage Driver.
  5. Select the program and click on Uninstall.
  6. Click Yes to confirm the action.
  7. Once uninstalled, restart the computer and check for any improvements.

Several users have reported that uninstalling the Intel Matrix Storage driver has helped resolve the error.

However, as mentioned earlier, the Intel Matrix Storage driver is crucial to keep your RAID functioning. Since it acts as RAID Controller, make sure you don’t follow these steps if the situation applies to you.


2. Run Windows Update troubleshooter

Windows update error 0xc8000247

  1. Click on Start and select Settings.
  2. Go to Update and Security.
  3. Select the Windows Update tab from the left pane.
  4. Scroll down and select Windows Update under Troubleshoot.
  5. Click the Run the Troubleshooter button.
  6. Follow on-screen instructions to scan the system for any update related issues.
  7. Apply the recommended fixes and close the troubleshooter.
  8. Try installing the update again and check for any improvements.

3. Update Intel Rapid Storage Technology driver

Windows update error 0xc8000247

  1. Go to Intel Drier and Software center.
  2. Download the latest version of the Intel Rapid Storage Technology driver.
  3. Alternatively, you can also download the Intel Driver Update Utility. It will automatically scan and recommend the latest available driver that you can install.
  4. Install the drivers and restart your computer. Check if updating the Intel Rapid Storage Technology driver helps resolve the issue.

4. Uninstall Norton antivirus

  1. If you have the trial version of Norton Antivirus installed, try uninstalling the software.
  2. Press Windows Key + R to open Run.
  3. Type control and click OK.
  4. Go to Programs > Programs and Features.
  5. Select Norton Antivirus and select Uninstall.
  6. Once uninstalled, download Norton Removal Tool and run it. It will remove any remaining traces of the antivirus and reboot the computer.
  7. Once done, run a manual check for Windows updates and check for any improvements.
  8. Install a different antivirus. Checkout Malwarebytes as it offers excellent protection.

The Windows update error 0xc8000247 can occur if you have an Intel Metrix Storage driver installed.

Apart from that a third-party antivirus and an incompatible Intel Rapid Technology driver can cause the error as well. Follow all the steps in this article one by one to fix the issue for good.

[wl_navigator]

Got the Error set user setting to driver failed? Fix it fast

If you are using a Lenovo laptop, you may encounter the set user setting to driver failed error. The error often occurs during boot but also displays at random intervals.

This error is related to the touchpad device on your laptop and can occur due to incompatible touchpad driver or incorrect driver installation.

If you are also troubled by this error, here are a couple of troubleshooting tips to help you resolve the set user settings to drier failed Windows 10 error.


How can I fix set user settings to driver failed error?

1. Rename apoint.exe file

set user settings to drier failed

  1. Open File Explorer.
  2. Navigate to the following location:
    C:Program Files (x86)
  3. Locate the Apoint2K folder and open it.
  4. Locate the apoint.exe file inside the Apoint2K folder.
  5. Right-click on the file and select Rename.
  6. Rename the folder as oldapoint.exe or something you like.
  7. Restart the computer and check if you encounter the error again.

What if you can’t find the folder?

set user settings to drier failed

  1. Wait for the error to appear again but don’t close the error.
  2. Open Task Manager.
  3. In the Process tab, go through the Apps section.
  4. Locate the Alps Pointing-device driver entry.
  5. Right-click on the process and select Open File Location.
  6. Once the folder opens, in the Task Manager, right-click on the process and select End Task.
  7. Rename the apoint.exe file and check for any improvements.

What if rename the file displays permission error?

set user settings to drier failed

  1. Right-click on the Apoint2K folder and select Properties.
  2. In the Properties window, open the Security tab.
  3. Click the Advanced button.
  4. In Advanced Security Settings window click the Change link next to ownership entry.
  5. In the Enter the object name to select window, type Everyone and click the Check Names button.
  6. Click OK to save the changes.
  7. In the Advanced Security Settings windows, click the Add button.
  8. Click the Select a principal button.
  9. Type Everyone and click Check Names.
  10. Click OK to save the changes.
  11. For Type, select Allow from the drop-down menu.
  12. In the Basic permissions window, check the Full Control box and click OK to save the changes.
  13. Close the properties window and check for improvements.

2. Reinstall touchpad drivers

set user settings to drier failed

  1. Press Windows Key + R.
  2. Type devmgmt.msc and click OK to open Device Manager.
  3. Expand Mice and other pointing devices section.
  4. Right-click on your touchpad device and Uninstall device. Click Yes to confirm the action.
  5. If you have Lenovo Vantage software installed, launch the app and scan for pending driver updates. Download and install any updates available for the touchpad.
  6. If not, in Device Manager, click Action and select Scan for hardware changes.
  7. Windows will scan for hardware changes and install basic Microsoft drivers for the touchpad.
  8. Close Device Manager and check for any improvements.

3. Disable Alps from service and startup

Disable Alps service

Windows driver failed

  1. Press Windows Key + R.
  2. Type services.msc and click OK to open Services.
  3. In the Services window, locate Alps SMBus Monitor Service on the list.
  4. Right-click on it and select Properties.
  5. Click the Stop button.
  6. Click the drop-down menu under Startup type, and select Disabled.
  7. Click OK to save the changes. Restart your computer and check if the error is resolved.

Disable Alps startup app

Windows driver failed

  1. Right-click on Taskbar and select Task Manager.
  2. Open the Startup tab.
  3. Locate the Alps Pointing Device app and select it.
  4. Click the Disable button to disable the app from startup services.

The set user settings to driver failed Windows 10 error occur due to driver conflict in the system. Follow all the steps in this article one by one and to resolve the error. Do let us know which method worked in the comments.

[wl_navigator]

Seeing the 0x87de0003 error on Xbox One? Fix it in 4 steps

After installing the Xbox firmware update, several users have reported the 0x87de0003 error on Xbox One. The error occurs when the user tries to launch an app or game and reads “Sorry, we were not able to start your game or app. Please try again. If you see this message again, please restart your console. (0x87de0003).

Other users have reported similar errors in the Microsoft community forum.

I was just done with work and thought to play a game of Destiny, when much to my dismay, I encountered the subject-line error.

If you are also troubled by this error, here are a couple of troubleshooting tips to help you resolve the 0x87de0003 Error on Xbox One.


How do I fix the 0x87de0003 error on Xbox One?

1. Check Xbox Live service status

Sorry, we were not able to start your game or app

  1. In some cases, the 0x87de0003 error can occur if the Xbox Live services are down due to temporary issues.
  2. The users can easily verify if any of the Xbox Live services are down by accessing the Xbox Live Status page.
  3. In the Xbox Live Status page, make sure you go through both the Services and My Apps and Games section.
  4. Any game titles facing outage will be marked with a red dot.
  5. In this case, the users can’t do anything but wait till the issue is fixed by Microsoft.
  6. Login to your account to get updates on the service status.

2. Check your modem/router for issues

Sorry, we were not able to start your game or app

  1. Press the dedicated restart button or the power button to perform a quick reset of your modem.
  2. If not, unplug the router from the power source and leave it idle for a few minutes to complete the reset the process.
  3. If restarting the modem did not fix the issue, try resetting the modem.

Reset the modem/router

  1. Locate the reset button on your modem at the back of the router/modem.
  2. Use any object with a tip and press and hold the Reset button for 10 seconds.
  3. The LEDs will start blinking intermittently once the reset process is complete.

Note that resetting the modem/router will restore the device to factory default, thus removing all the saved network settings. After the reset is complete, make sure you set up the router from scratch.


3. Perform a power cycle

  1. Make sure the Xbox is powered on.
  2. Press and hold the Xbox button on the console for 10 seconds until the console is completely shut down.
  3. Remove all the cables connected to the console, including the power cord from the wall outlet.
  4. Leave the console idle for a few minutes.
  5. Reconnect all the cables to the console and press the Xbox button again to power on the device.
  6. After the restart, try launching an app and check for any improvements.

4. Reset the console

0x87de0003 Error on Xbox One

  1. Press the Xbox button the controller.
  2. Select System and then choose Settings.
  3. Select System and then open Console Info.
  4. Under Console Info open Reset console option.
  5. Under Reset your console screen, you have multiple reset options:
    Reset and keep my games and apps – This option will reset the OS and remove and repair corrupted system files but keep all your games and other data.
    Reset and remove everything  – Use this option as a last resort. It will all the games and files from your console and restore it to factory default.
  6. Once the console is reset (using Reser and keep my games and apps) try launching the app again and check for any improvements.

The 0x87de0003 Error on Xbox One can get triggered due to multiple reasons. While the most common reason for this error is Xbox Live service outage, it can also occur due to other factors like corrupted system files and internet issues.

Follow all the steps in this article one by one and let us know which method helped you resolve the error in the comments.

[wl_navigator]

Seeing the 0x89234020 error on Xbox One? Fix it easily

When trying to connect to a friend’s chat or party during gaming sessions, you may encounter the 0x89234020 error on Xbox One. The issue can occur due to issues with closed NAT. However, it is also known to occur if the issue is with the ISP.

One user reported a similar error in the Microsoft community forum.

I am unable to connect to one specific friend in party chat and most games. Both NAT types are open, both have reset Mac Addresses, both have no issue connecting to other players, unless my one specific friend is already in the party or game. Any ideas?

If you are also troubled by this error, here are a couple of troubleshooting tips to help you resolve the 0x89234020 error on Xbox One.


How do I fix the 0x89234020 error on Xbox One?

1. Check if the NAT is closed

0x89234020 error on Xbox One

  1. Make sure that your Xbox One console is connected to the network.
  2. Open the default web browser and type the following address:
    192.168.0.1 or 192.168.1.1
  3. If the default does not work, check your router’s manual for the correct address to access the settings.
  4. Log in to the page with the user credentials. The default user credentials for the router is admin and 1234.
  5. Open the Advanced tab.
  6. Expand NAT Forwarding option.
  7. Make sure the UPnP option is enabled. The steps to access the UPnP setting can vary depending on the router manufacturer.
  8. Once the UPnP option is enabled, restart your router as well the console.
  9. Try connecting to the party again and check for any improvements.

Several users have reported that enabling the UPnP option has helped them resolve the issue. Enabling UPnP allows all applications and games to forward the ports automatically, thus resolving any connectivity issues.


Disney Plus is not downloading on Xbox One? Try this


2. Perform a power cycle

  1. Make sure the Xbox Console is powered on.
  2. Press and hold the Xbox button on the console for about 10 seconds.
  3. Release the button once the console is fully shutdown.
  4. Remove all the cables connected to the console including the power cord.
  5. Leave the console idle for a few minutes.
  6. Reconnect all the cables and the power cord to the wall outlet.
  7. Press the Xbox button on the console to turn it on.
  8. Once powered on, try joining the party and check for any improvements.

3. Restore your router to factory default

0x89234020 error on Xbox One

  1. Check your router’s back for a reset button or a small hole labeled as Reset.
  2. Press the button if available. If it’s a hole, use a sharp object with a tip, press and hold for at least 20 seconds.
  3. When the lights on the router blink, it means the router is successfully reset.

When you restore a router to factory default, all of the router settings are set to factory default thus removing any changes you may have made to the router.  Make sure you make appropriate changes once the router is reset.


4. Update your router’s firmware

Xbox One connection error

  1. Open your web browser and type in the default IP address to access the admin page.
  2. Enter the user credentials to log in.
  3. Locate the Firmware or Router Upgrade option.
  4. Check the current version of the firmware installed on your router.
  5. Navigate to your router manufacturer’s website and check for any pending updates.
  6. Make sure you download the update.
  7. From your router’s settings page, there should be a Browser or Choose File button.
  8. Select the downloaded firmware and click Open to install it.
  9. Once the router is updated, check for any improvements.

For more detailed instructions on how to update the router’s firmware, follow how to update your router’s firmware.


The 0x89234020 error on Xbox One usually occurs if there is an issue with NAT. However, follow all the steps in this article one by one to resolve the issue with your Xbox One console.

[wl_navigator]

Got the Windows 10/11 update error 0x80240061? Fix it fast

After clean installing Windows 10 you may encounter some driver-related errors due to incompatible drivers. One such error is Windows 10 update error 0x80240061.

This error can occur due to several reasons including incompatible drivers as well as issues with the Windows update. Similar issues are also reported in the Microsoft community forum.

After a clean install of Windows 10 – 1803 final version.
Update try to download driver for my Sound Blaster Audigy 2 and get the next error.
CREATIVE driver update for SB Audigy: Error 0x80240061

If you are also troubled by this error, here are a couple of troubleshooting tips to help you resolve the Windows 10 update error 0x80240061.

How do I fix Windows 10 update error 0x80240061?

1. Update Intel Management Engine Interface

Windows 10 update error 0x80240061
  1. Press Windows Key + R to open Run.
  2. Type devmgmt.msc and click OK to open Device Manager.
  3. In Device Manager, expand the System Devices option.
  4. Right-click on Intel Management Engine Interface and select Properties.
  5. Open the Driver tab.
  6. Click on the Update Driver button.
  7. Select Search automatically for updated driver software option.
  8. Wait for Windows to scan and install the updated version of the driver.
  9. Once installed close Device Manager and restart the computer. Check for any improvements.

Updating the Intel Management Engine Interface driver can help you resolve the issue if the error message displays the device to be causing the problem.

Manually update Intel Management Engine Interface driver

Windows 10 update error 0x80240061
  1. Download the latest version of the Intel Management Interface driver from the Intel website.
  2. After that, press Windows Key + R to open Run.
  3. Type devmgmgt.msc and click OK to open Device Manager.
  4. Expand the System Devices option.
  5. Right-click on Intel Management Engine Interface driver and select Update Driver.
  6. Select Browse my computer for driver software option.
  7. Locate and select the downloaded Intel driver and click Open.
  8. Install the driver and check for any improvements.

Besides, you have the option to update any driver from your PC using automatic support and proceed with updating or installing drivers correctly with Fortect Driver Updater.

2. Try alternate Intel driver for HP laptops

Windows 10 update error 0x80240061
  1. If the error is occurring on your HP laptop, try installing an alternate driver suggested in the HP forum.
  2. Download and install Intel Management Engine Interface Driver from here.
  3. Follow the previously listed steps to install the driver manually from Device Manager.
  4. Once installed, reboot the computer and check for any improvements.

3. Manually install drivers for your device

Windows update error
  1. If the error is caused when downloading an update for a peripheral device like a sound blaster, try updating the driver manually.
  2. You can download the latest version of the driver compatible with your device from the official website.
  3. For example, if you have a Sound Blaster from Creative you can download the latest version of the driver from the Creative support page.

4. Update the BIOS

Windows update error
  1. If the issue persists, try updating the BIOS.
  2. Depending on your motherboard manufacturer, you can perform the update process automatically from the BIOS interface.
  3. Alternatively, you can also use the BIOS flash tool to install the update.
  4. For laptop users, the BIOS updates are available on the laptop manufacturer’s official website.
  5. For desktop users, check your motherboard manufacturer’s website for any pending updates.

The Windows 10 update error 0x80240061 is caused by an incompatible driver and can be resolved by installing a newer version of the driver directly from Device Manager or through a manual process.

Follow all the steps in this article and let us know which method helped you resolve the issue in the comments.

Power BI has a new page view for Paginated Reports

Microsoft announced on the Power BI blog a new page view option for Paginated Reports in the Power BI service. With the new page view option, the paginated reports look more like a page when you view them in a browser.

Of course, you still have the option to change parameters, click on links in the reports, and so on.

How can I use the new page view option in Power BI?

  1. Click on the new View menu from your toolbar when you see a paginated report. 
  2. Change from the Default view to the Page View (Preview)how to open page view in PowerBI


After you change the view, your report will be displayed as a page in a browser. That will trigger opening it using the browser’s PDF rendering capability.

How can I change the layout of the report?

The layout of the report depends on the report size settings that were set by the author. You can change them if you select the Page Settings from the View menu.

Change the view settings
You will see a new window where you can set the page size and orientation to your liking.

Page View is supported in Google Chrome and Microsoft Edge browsers. Make sure that viewing PDFs in the browser is enabled. It’s the default setting for these browsers.

Page View isn’t supported in Internet Explorer and Safari, so the option is disabled. It also isn’t supported in browsers on mobile devices, or in the native Power BI mobile apps.

, adds Microsoft in the Power BI website.

Drop us a line in the comments to tell us how you feel about this new feature.

[wl_navigator]

Windows 10/11 Photos app not scrolling? Follow these steps

Windows 10 comes with the Photos app as its default photo viewer. However, some users have reported Windows 10 Photos app not scrolling issues after opening a photo from a folder.

Several users have reported similar issues in the Microsoft community forum.

I just got Windows 10, the default app associated with photos is Photos. Then I tried double clicking on a photo and can no longer go through all the other pictures in that same folder. I also cannot fin dthe WPV as an option. I tried the registry hack mentioned in other threads but that did not work.

If you are also troubled by this error, here are a couple of troubleshooting tips to help you resolve the Windows 10 Photos app not scrolling issue in no time.

How do I fix the Windows 10 Photos app not scrolling problem?

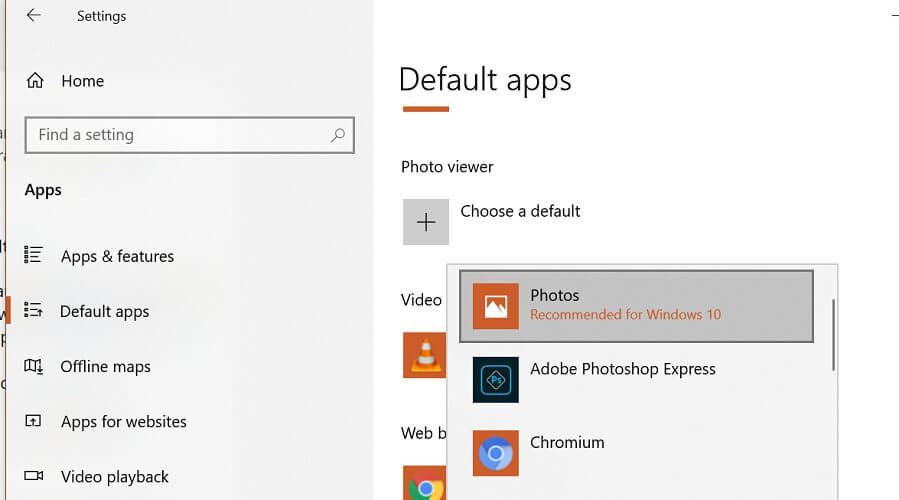
1. Set Photos app as the default

Windows 10 Photos app not scrolling
  1. Click Start and select Settings.
  2. Click on Apps.
  3. Select the Default Apps tab from the left pane.
  4. Scroll down to the Photo viewer.
  5. Click the Choose a default button.
  6. Select the Photos app from the list of installed apps.
  7. Close the Settings window.
  8. Open the pictures that you want to view and check if you are able to scroll through the pictures.

If the Photos app is not set as a default photo viewer the scrolling function may not work as the app is not set to view all the photos. Try setting the Photos app as default and check for any improvements.

2. Select and scroll the photos

Windows 10 Photos app not scrolling
  1. If the issue persists, you can select all the photos you want to scroll through and open them in the Photos app.
  2. Open the folder where your photos are saved.
  3. Select all the photos that you want to scroll through. You can press Ctrl + A to select all the photos inside a folder.
  4. Once selected, right-click on any of the photos and choose Open.
  5. The Photos app will display the selected picture. However, if you scroll through you can go forward and backward to view all the photos in the folder.

This is a workaround but works fine in case setting the Photos app as the default photo viewer did not resolve the issue.

3. Reset the Photos app

Windows 10 Photos app not scrolling
  1. Click Start and select Settings.
  2. Go to Apps.
  3. Search for Photos app in the search bar.
  4. Select the Photos app and click on Advanced Options.
  5. Scroll down to the Reset section.
  6. Click the Reset button.
  7. Click Yes to confirm the action.
  8. Close the Setting window and try opening the pictures again.

4. Re-register the Photos app

Windows 10 Photos app not scrolling
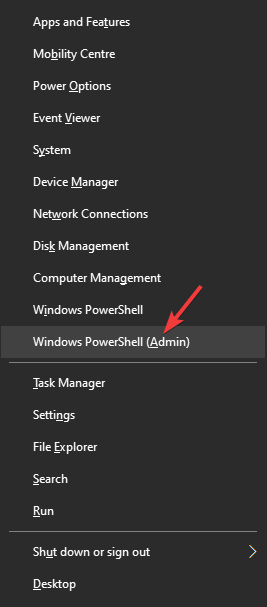
  1. Right-click on the Start button.
  2. Select Windows PowerShell (Admin). Click Yes if prompted by UAC (User Account Control).
  3. In the PowerShell window, enter the following command and hit enter to execute:
    Get-AppxPackage -allusers Microsoft.Windows.Photos | Foreach {Add-AppxPackage -DisableDevelopmentMode -Register “$($_.InstallLocation)AppXManifest.xml”}
  4. This will reregister the Photos app and fix any issues with the application.
  5. Open the photos and check if the scroll function is working again.

The Windows 10 Photos app not scrolling issue can occur due to a glitch with the Photos app or if the app is not set as default photo viewer in Windows.

Follow all the steps in this article and let us know which method helped you resolve the issue in the comments.

Microsoft sets up Windows 10 2004 support pages

Microsoft has created the first two Windows 10 2004 support pages. The much awaited OS or the May 2020 Update is arriving in general availability anytime today or tomorrow.

As you may know, Microsoft had finished up the design and development of the OS by December last year. But Windows 10 2004 has been receiving critical feature enhancements and bug fixes since.

Only insiders have been able to test the May 2020 Update experience so far, though that will change soon.

Two Windows 10 2004 support pages are now live

Microsoft will be listing any active issues with the latest operating system on one of the support pages. The OS has not launched yet, so if you head on over there, you will not see any listed bugs.

But you can always come back later and press CTRL + F to look up any specific issue with the May 2020 Update.

The other page will be featuring resolved Windows 10 issues. It also does not list any issues in the meantime.

Some remarkable features and improvements are coming with version 2004. Of these, one of the most anticipated is the new Cortana app. The chat-based smart assistant will be productivity-focused, unlike what it used to be before.

Also, when you update your PC with the latest OS, you will be able to use Windows Hello in your system’s safe mode. The biometric authentication feature will give you system access so you can troubleshoot any hardware.

We’ve compiled a longer list of useful features that the May 2020 Update is bringing. Be sure to check it out!

In other related news, a post by Twitter user THaarala shows the OS listed in the Microsoft Volume Licensing Service Center (VLSC). That appearance also reinforces expectations that Windows 10 version 2004 is coming out in a matter of hours.

VLSC is one of the channels on which volume license media is made available every time Microsoft releases a new version of Windows 10.

Are you looking forward to downloading Windows 10 version 2004? Feel free to share your thoughts or ask any questions via the comments section below.

[wl_navigator]

Seeing the Outlook error 0x80040201? Fix it fast in 3 steps

When sending an email to a recipient, the users have reported the Outlook error 0x80040201. This error can occur due to several reasons, including incorrect STMP settings, antivirus blocking the connection, or even Outlook add-ins.

Several users have reported similar issues in the Microsoft community forum:

Outlook would at first fail to send and then also not allow me to save my email (very frustrating). I eventually rebuilt the email and addressee list and sent again, receiving immediately an unknown send error 0x80040201

If you are also troubled by this error, here are a couple of troubleshooting tips to help you resolve the Outlook sending error 0x80040201.

How do I fix the Outlook error 0x80040201?

1. Check your antivirus program

Outlook sending error 0x80040201
  1. Begin with disabling third-party antivirus installed on your computer.
  2. Antivirus can often block connections sent by the Outlook client resulting in a network error.
  3. To disable the antivirus temporarily, do the following.
  4. Right-click on the Antivirus icon in the system tray and select Disable protection temporarily.
  5. Some antivirus like Avast allows you to disable protection for  4-20 minutes after which it will enable the protection again.
  6. Once disabled, launch Outlook and try sending an email.
  7. If the issue is resolved, add the Outlook client to the whitelist.
  8. Alternatively, look for an alternative antivirus solution that does not block the connection from legitimate apps.

2. Check for add-in issues

Outlook sending error 0x80040201
  1. Press Windows Key + R to open Run.
  2. Type the following and click OK:
    Outlook /safe
  3. The above command will launch the Outlook client in a safe mode.
  4. Once in the safe mode, try sending an email to a recipient and check if the error is resolved.

If the error does not occur in safe mode, you may have third-party add-ins creating issues with the client’s functionalities.

  1. Launch Outlook.
  2. Go to File and select Options.
  3. From the left pane, select the Add-in tab.
  4. Disable/remove all the third-party add-ins. Begin with uninstalling the most recently installed add-ins first.
  5. Once the add-ins are removed, relaunch the Outlook client and check for any improvements.

3. Clear the Autocomplete list

Outlook sending error 0x80040201
  1. Launch the Outlook client.
  2. Click File and select Options.
  3. Open the Mail tab from the left pane.
  4. Scroll down to Send Messages section.
  5. Click the Empty Auto-Complete List button.
  6. Click OK to save the changes.
  7. Now try to send an email and check for any improvements.

The Outlook sending error 0x80040201 can occur due to various reasons. However, most of the time, these minor issues cause the problem.

Follow all the steps listed in this article to fix the error and get your Outlook client functioning again.

Got the Microsoft Outlook error 0x800CCC1A? Try these steps

Previously we have covered multiple articles on Outlook errors that may pop-up when sending en email to a recipient. The Microsoft Outlook error code 0x800CCC1A is one such error as well.

As reported by the users in the Microsoft community forum, this error occurs when sending emails from the Outlook client:

I have outlook 2013 and use a yahoo email address and can receive email but cannot send it out. I have tried everything I have found on the internet to solve the problem but nothing works.

If you are also troubled by this error, here are a couple of troubleshooting tips to help you resolve the Microsoft Outlook error code 0x800CCC1A with ease.


How do I fix the Microsoft Outlook error code 0x800CCC1A?

1. Disable encrypted connection (SSL)

Microsoft Outlook error code 0x800CCC1A

  1. Launch Outlook.
  2. Click File.
  3. Click on Account Settings and select Account Settings.
  4. Select your email ID and click the Change button.
  5. Click More Settings.
  6. Open the Advanced tab.
  7. For Use the following type of encrypted connection, click the drop-down menu and select TLS if SSL is selected. If TLS is selected, choose SSL.
  8. Click OK to save the changes.
  9. Restart Outlook and check if it fixes the issue.

2. Disable Antivirus

Microsoft Outlook error code 0x800CCC1A

  1. If the issue persists, try disabling your antivirus temporarily.
  2. Third-party security programs installed on your system can cause an issue with the Outlook connection.
  3. Right-click on the antivirus icon from the system tray icon.
  4. Select Disable protection temporarily option.
  5. You can also launch the antivirus program and temporarily disable protection.
  6. Once disabled, try to send an email and check for any improvements.

3. Repair damaged profile

Microsoft Outlook error code 0x800CCC1A

  1. Open File Explorer.
  2. Navigate to the following location:
    C:Program Files (x86)Microsoft OfficeOffice 16
    or C:Program Files (x86)Microsoft OfficerootOffice16
  3. Inside the Office folder, search for scanpst.exe file.
  4. Double-click on the SCANPST.EXE.
  5. This will launch a Microsoft Outlook inbox repair tool.
  6. Click the Browser button and navigate to the following location:
    C:UsersusernameAppDataLocalMicrosoftOutlook
  7. Select the .ost file and click Open.
  8. Click the Repair button to begin the repairing process.
  9. Close the troubleshooter and check for any improvements.

4. Change IMAP and SMTP port

Microsoft Outlook error code 0x800CCC1A

  1. Launch Outlook.
  2. Click File > Account Settings > Account Settings.
  3. Select your profile and click Change.
  4. Click More Settings.
  5. Open the Advanced tab.
  6. For ‘Use the following type of encrypted connection‘ make sure SSL is selected.
  7. Change the port value for the following properties:
    IMAP to 993
    SMTP to 587
  8. Change the SMTP encryption type to STARTTLS.
  9. Click OK and then restart Outlook.
  10. Check if you can send an email and if the error is resolved.

The Microsoft Outlook error code 0x800CCC1A can occur due to various reasons including incorrect port, incorrect encryption type, corrupted Outlook profile, and third-party antivirus blocking connections.

Follow all the steps in this article and let us know which method helped you resolve the issue in the comments.

[wl_navigator]

Nvidia Screen Tearing on Windows 10: 6 Ways to Eliminate it

There are a series of display issues encountered by users on their PCs. One common problem is the Nvidia graphics card screen tearing issue on Windows 10.

This issue often occurs due to a discrepancy between a video’s refresh rate and the system’s graphic settings. Irrespective of the cause, this guide will walk you through the steps to fix it quickly.

Why am I getting Nvidia screen tearing on Windows 10?

Below are some of the potential causes of this Nvidia screen tearing issue on Windows 10:

  • Faulty or outdated driver: If your graphics driver is faulty or outdated, you will likely experience screen tearing on a Windows 10 desktop or laptop. The solution to this is to reinstall or update your driver.
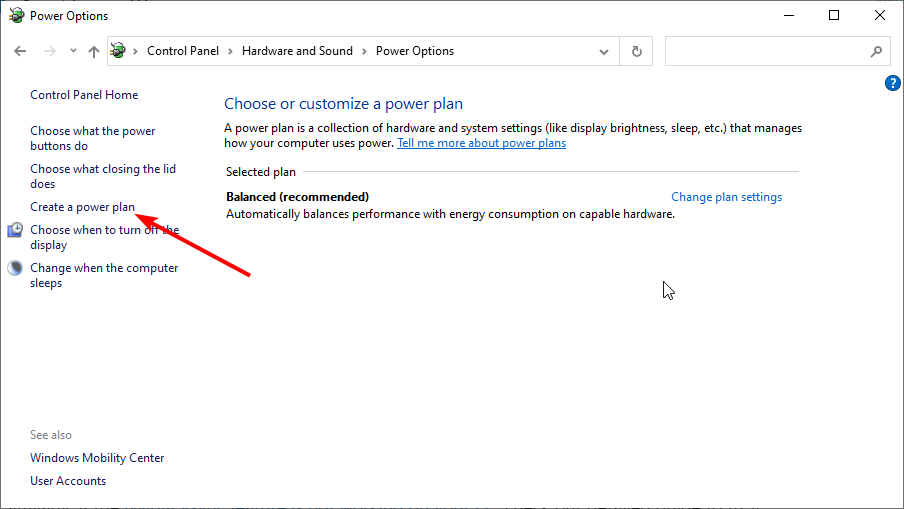
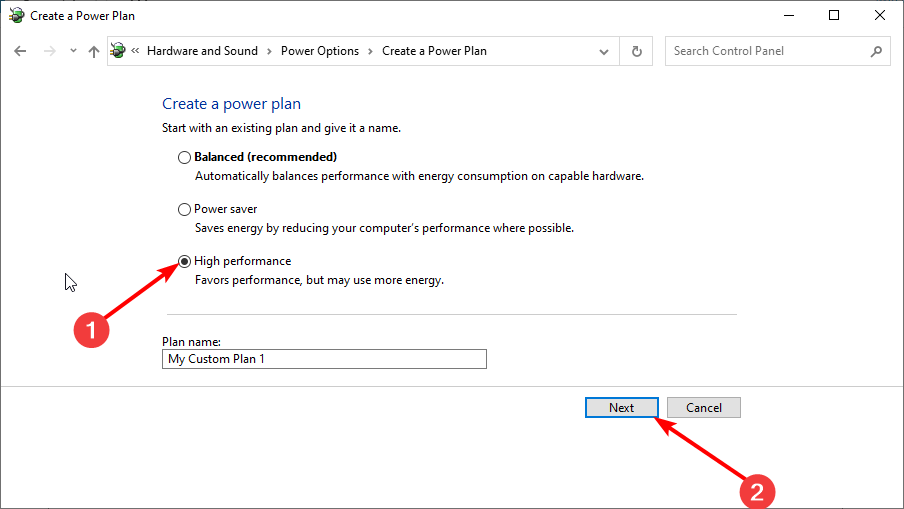
  • Low power settings: Sometimes, this issue might occur because you use the balanced power plan for intensive activities. To prevent this, you need to switch to a high-performance power plan.
  • Wrong display settings: In some cases, this issue can be due to incorrect display settings on your PC or in-game. You need to tweak the settings accordingly to solve the problem.

How can I fix the Nvidia screen tearing on Windows 10?

Below are some preliminary troubleshooting steps to try before exploring the sophisticated solutions in this section:

  • Use another browser
  • Turn off the frame limit in games

If the steps above do not work, you can now proceed to the fixes below:

1. Disable/ Enable Vsync

  1. Right-click on any space on your desktop and select NVIDIA Control Panel.
  2. Select the Manage 3D settings option under 3D settings.
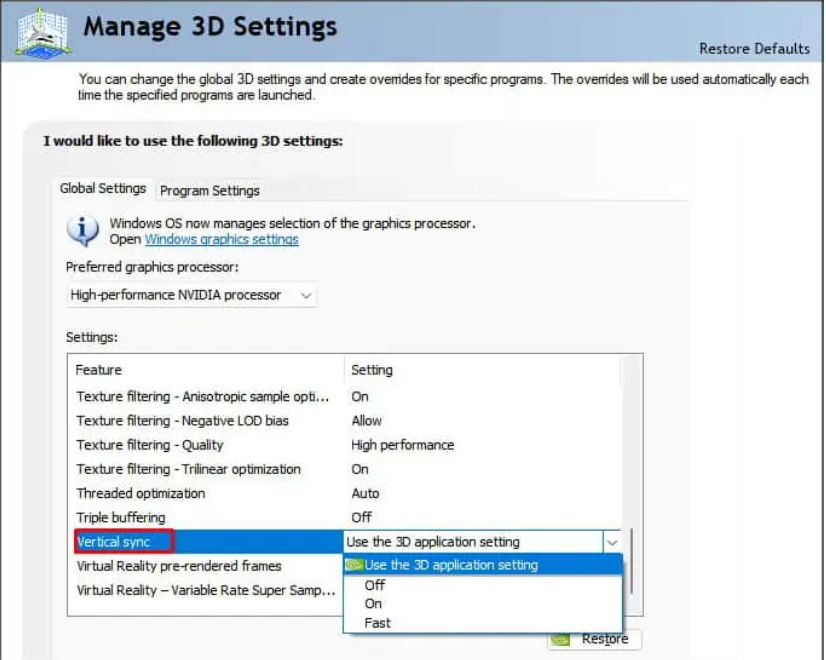
  3. Now, click Vertical Sync and choose the On option if it’s turned off and vice versa.
    vsync nvidia screen tearing windows 10

According to users, the Vertical Sync feature of the Nvidia graphics card can cause screen tearing issues. The quickest way to fix this is to disable the feature.

2. Change the display resolution

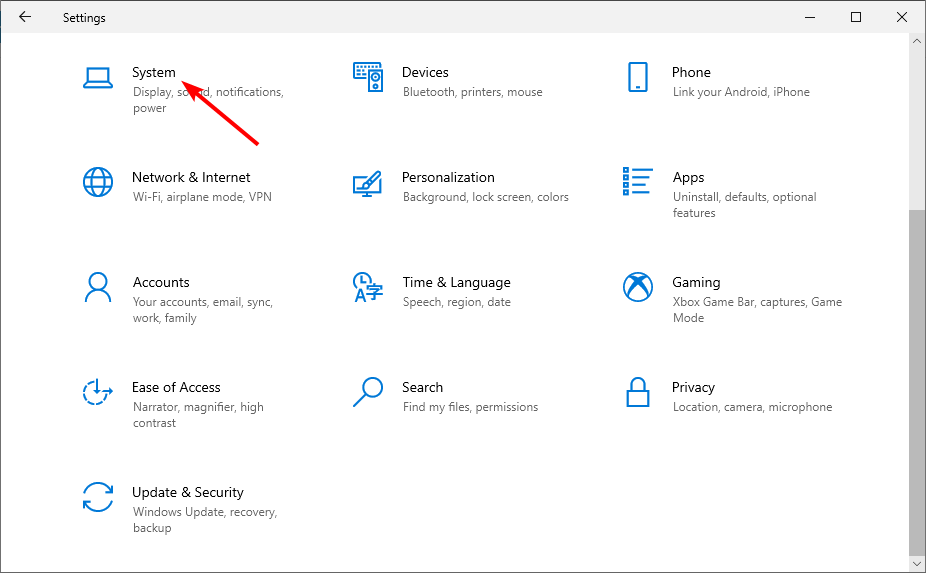
  1. Press the Windows key + I and select the System option.
    system
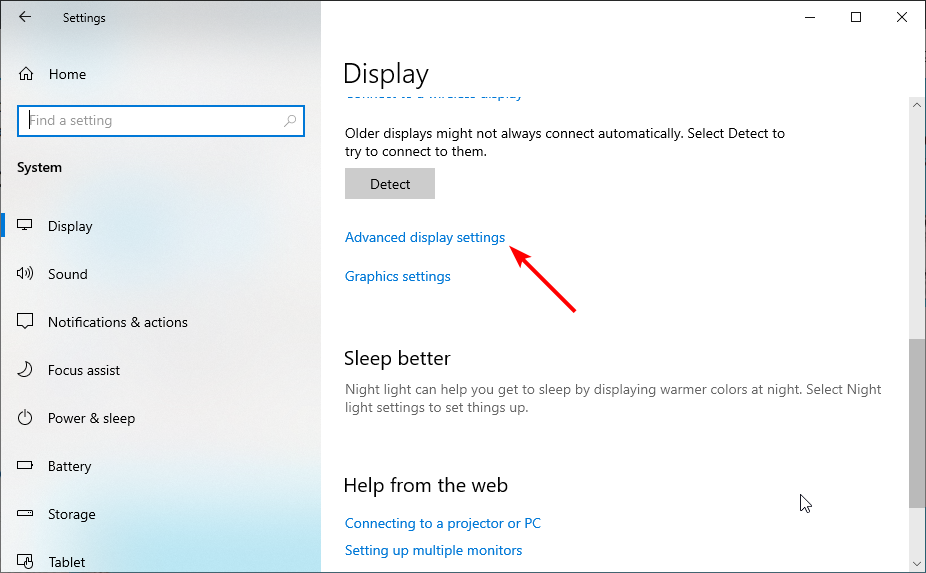
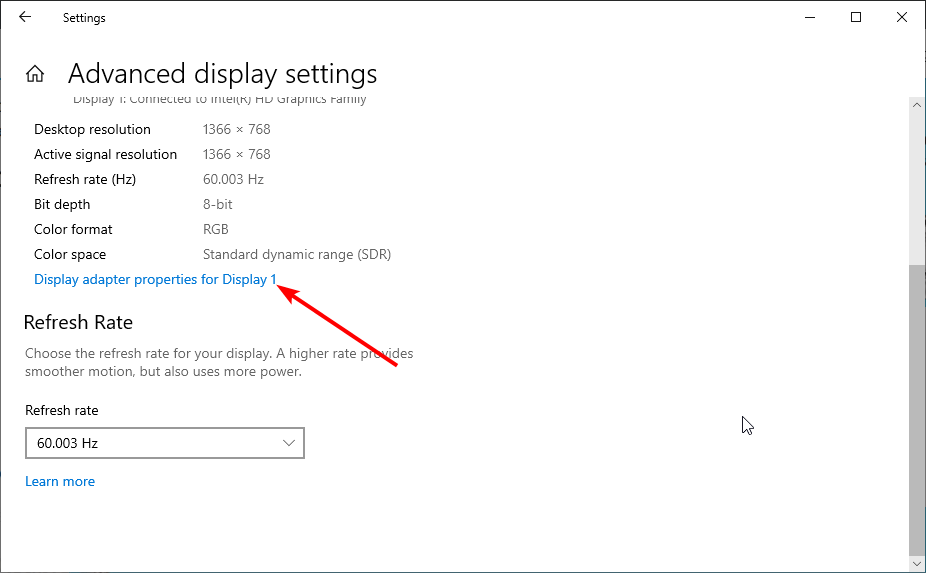
  2. Select Advanced display settings.
    advanced display nvidia screen tearing windows 10
  3. Now, click Display adapter properties for Display 1 to change your display settings.
    display adapter
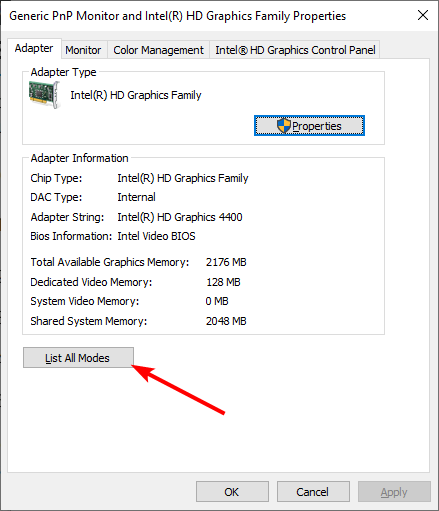
  4. Next, click the List all modes button in the new window.
    list all nvidia screen tearing windows 10
  5. Finally, choose a suitable resolution and restart your PC.

One of the prominent reasons for the Nvidia screen tearing issue on Windows 10 is the wrong resolution setting. However, with the steps above, you should be able to rectify that.

Note that you might need to try two or more resolutions to find the one that works best for you.

3. Disable smooth scrolling

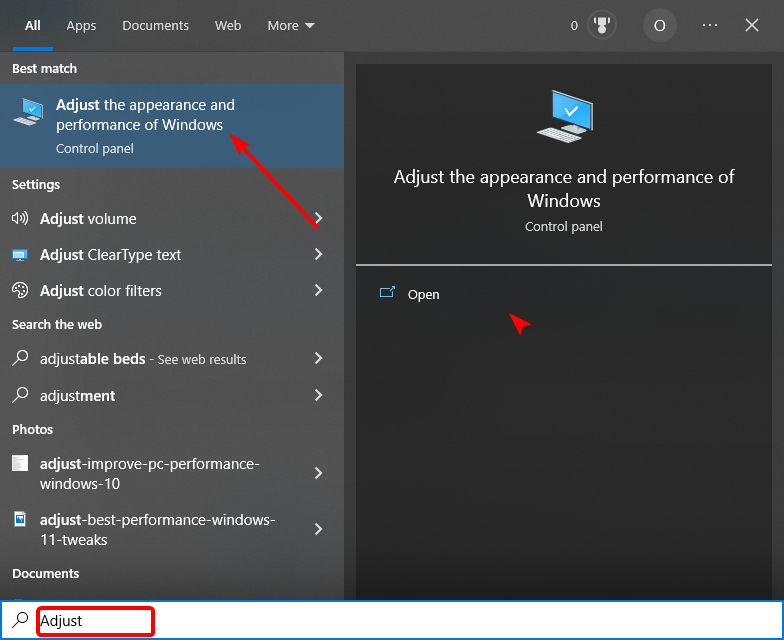
  1. Press the Windows key, type adjust, and choose Adjust appearance and performance of Windows.
    adjust
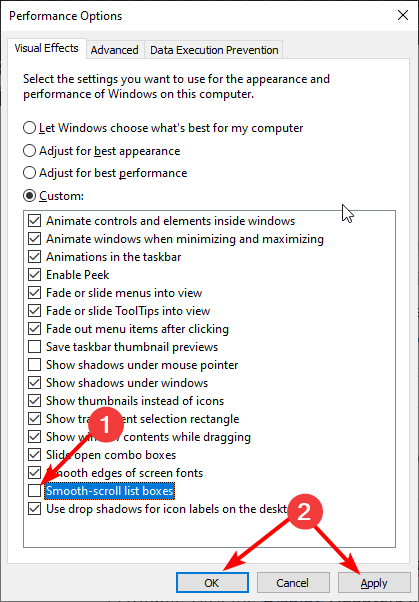
  2. Uncheck the box for Smooth-scroll list boxes.
  3. Finally, click the Apply button, followed by OK, and restart your PC.
    smooth

While the smooth scrolling feature is excellent, it is not essential. Hence, you can disable it, as some users complain that it is the cause of the Nvidia screen tearing issue on Windows 10.

4. Update/ reinstall your graphics driver

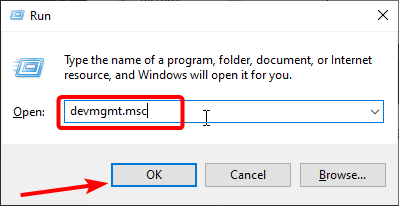
  1. Press the Windows key + R, type devmgmt.msc, and click OK.
    devmgmt nvidia screen tearing windows 10
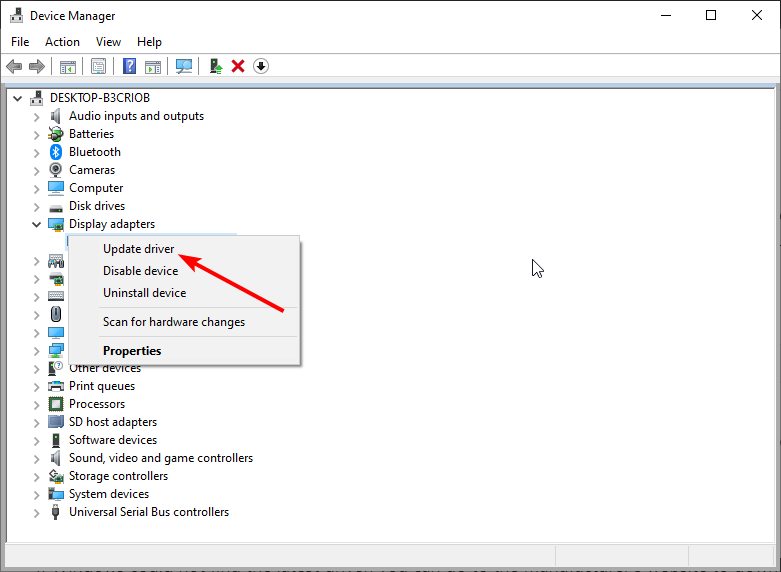
  2. Double-click the Display adapters option to expand it, and right-click your graphics card.
  3. Now, select the Update driver option.
    update driver
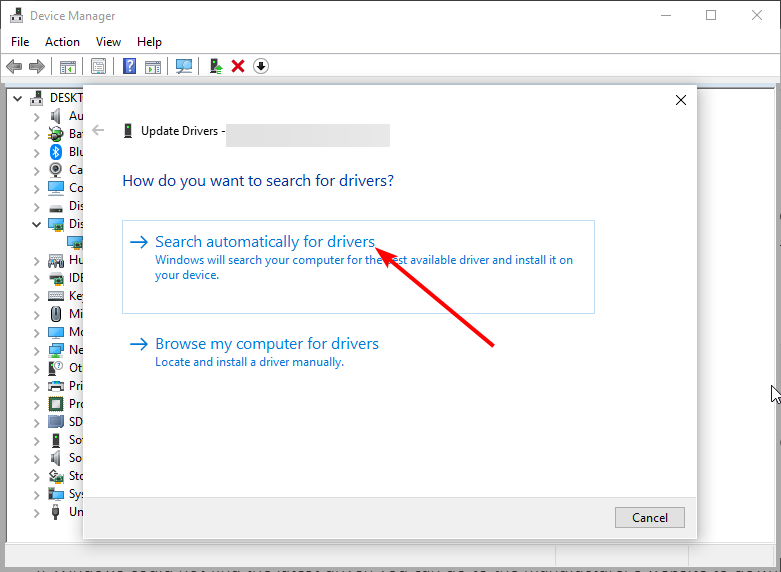
  4. Finally, select Search automatically for drivers and install any available update.
    search auto

If Windows cannot find the latest driver, you can go to the manufacturer’s website to download it. Should this not fix the issue, follow the steps below to reinstall your display driver:

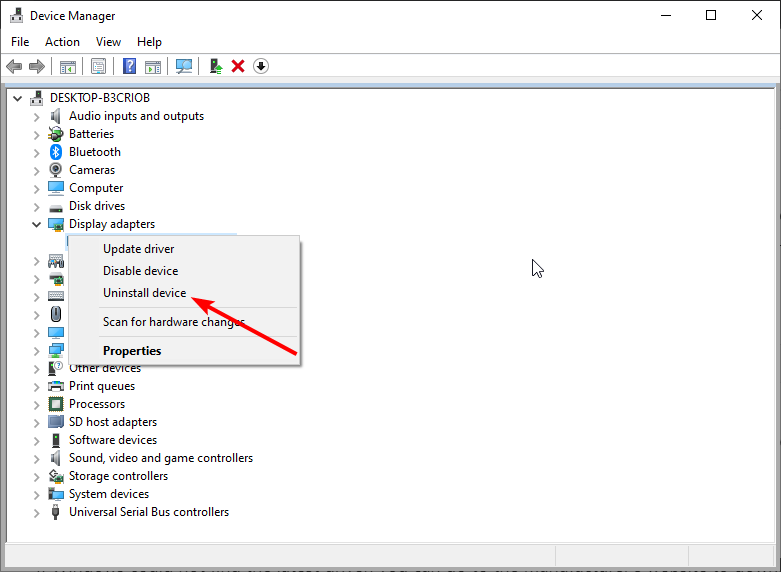
  1. Repeat steps 1 and 2 in the solution above.
  2. Select the Uninstall device option instead of the Update driver.
    uninstall device nvidia screen tearing windows 10
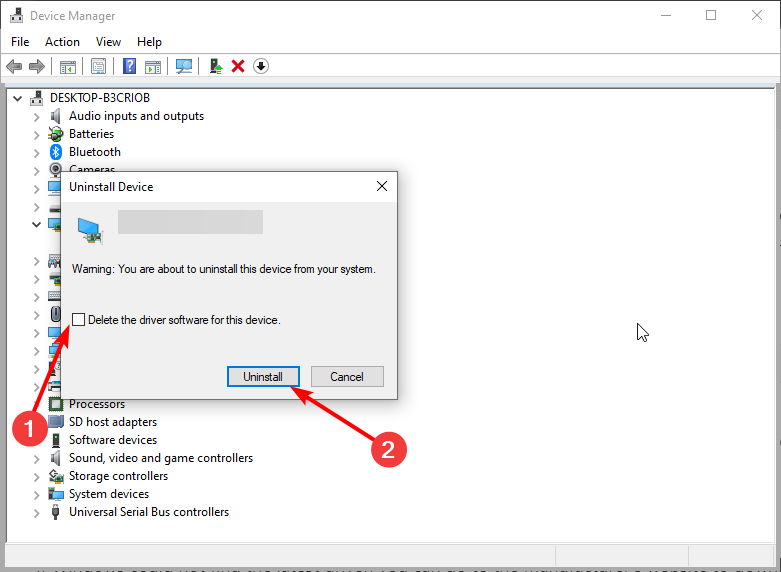
  3. Now, check the box Delete the driver software for this device and click the Uninstall button to confirm the action.
    uninstall button
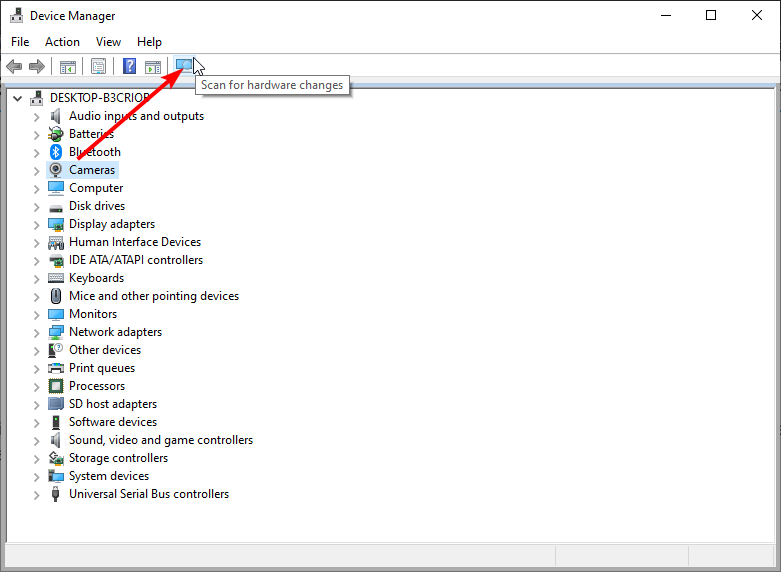
  4. Finally, restart your PC and click the Scan for hardware changes icon at the top.
    scan for

With this, you should be able to fix the Nvidia screen tearing issue on your Windows 10 PC. If you still have problems after restarting your PC, you can manually reinstall the driver from the manufacturer’s website.

However, to make things easier, we advise using a dedicated driver updater in Fortect Driver Updater to update and fix issues with your driver.

This tool automatically scans for outdated drivers and updates them before they can cause issues. Also, it repairs and replaces broken and missing drivers. With this, you can easily prevent problems like Nvidia screen tearing on Windows 10.

⇒ Get Fortect Driver Updater

5. Turning off Game Mode and Full-Screen Optimization

  1. Press the Windows key + I to open the Settings app and select Gaming.
    gaming
  2. Select Game Mode in the left pane.
  3. Now, toggle the switch under the Game Mode backward to disable it.
    game mode
  4. Restart your computer to see if the tearing is gone.

If you still face the Nvidia screen tearing on your Windows 10 PC, you can try disabling the full-screen optimizations.

  1. Right-click the game icon you are experiencing this issue on and select Properties.
  2. Click the Compatibility tab at the top.
  3. Finally, check Disable fullscreen optimizations and click the Apply button followed by OK.
    full screen nvidia screen tearing windows 10

After doing this, you should be able to fix the Nvidia screen tearing issue on Windows 10.

6. Switch to the high-performance plan

  1. Press the Windows key + R, type powercfg.cpl, and click OK.
    powercgf
  2. Click the Create a power plan in the left pane.
    create a  nvidia screen tearing windows 10
  3. Now, choose High performance and click the Next button.
    high performance
  4. Finally, click the Create button and restart your PC.
    create

Your PC has numerous power plans suitable for different activities. For example, if you use the Balanced power plan for intensive activities like gaming and streaming, you might experience the Nvidia screen tearing on Windows 10.

The solution to this is to switch to the High-performance plan.

These solutions should help you to fix your Nvidia screen tearing problems on Windows 10. Just make sure you follow the instructions carefully.

Similarly, if the Nvidia Vsync feature is not working on your PC, check our detailed guide to fix it.

Feel free to let us know which one worked for you by leaving us a message in the comments below.

22 New Features In Windows 10 Version 2004 From May 2020

We are hours away from a Windows 10 version 2004 rollout or how it was previously called, version 20H1. It seemed like a pretty long journey, and Insiders have witnessed every single new feature, culminating with the Windows Build 2020 event.

As we reached the imminent release, we propose to see some of the best features that come with the new Windows 10 version 2004.

Windows 10 version 2004 best improvements

First of all, let’s clear up what this 2004 means. Although it might be confusing, 2004 is not a year, and not even a consequent version number.

The first two digits, 20 come from the last two digits of the year (2020), and the last two digits, 04, come from the month it was issued. In this case, it might be a little confusing because Microsoft delayed the rollout from April to May.

To follow the example, the previous version was 1909 as it was issued in September 2019.

That being said, let’s go briefly through the new improvements:

1. Windows Hello in safe mode

Windows Hello settings

You will be able to launch Windows Hello in the diagnostic mode of Windows 10 2004. In other words, Microsoft is enabling you to use biometric authentication when you need to troubleshoot your computer in Safe Mode.

To use it, you will simply be able to configure Windows Hello PIN sign-in for safe mode. This way, you will be able to access your system’s diagnostic mode to troubleshoot your hardware without providing your password.

2. Reserved Storage is improved

Reserved storage status

Reserved Storage is a feature that arrived with the May 2019 Update and its role is to reserve a portion of the disk for future updates and drivers. 

In version 2004, it will be easier to manage the Reserved Storage because it will include DISM options. You will be able to disable it on your devices, and you will be able to check the status of the occupied storage using DISM.

3. New Cortana app

the new Cortana app

Version 2004 is also bringing a new Cortana app, but not all news is good about it. The assistant will lose some features that aren’t very work-focused like music, connected home, and third-party skills.

The new version will allow you to type or speak out requests to find people or files, or quickly create or queue up emails.

You are also able to use it to check out your calendar, set a reminder, or add entries to your lists in Microsoft To Do.

The end-goal for these changes is to finally transform Cortana into a full-fledged work assistant that will focus more on productivity, helping you quickly find the information you want across Microsoft 365.

4. WSL 2 for Linux integration

How to install WSL

WSL is a subsystem that allows Windows users to run native, unmodified Linux command-line tools and apps directly in Windows. 

Microsoft added that from 2006 but now it received a stable version, WLS 2, a lot faster, with full Linux kernel, which enables full system call compatibility. Moreover, the kernel will get updated through Windows Update, just like Windows.

5. Task Manager improvements

Task Manager has two new useful functions in Windows 10 version 2004.

For starters, in the Performance tab, if you have a dedicated GPU (I don’t!), you will also see its temperature right next to the usage percentage.

task manager improvements

The other improvement is that it will show the type of disk you have in the left pane and in the details below in the window.

6. Accessibility improvements

Cursor changes

Windows 10 version 2004 comes with a lot of accessibility improvements for people with vision problems.

You now have some new settings to make the cursor more visible, the Magnifier option now follows your mouse pointer, so that you don’t have look hard for it. The mouse pointer will now always be in the center of the display.

Also, they improved the Narrator and the Narrator inside Outlook.

We prepared a guide on how to use them if you need more information.

7. Language settings are a lot more clear

Windows language settings page

It’s not really a big update but the language settings page seems a lot more clear on the new version.

That’s because it includes many features among which there are links to the language and region settings, and also the Windows language, the regional format, and more important, the app language.

Of course, this is the page where you can install new languages.

8. Connect Bluetooth devices faster

how to add a Bluetooth game controller

In the new 2004 version, you can connect the devices directly from the notification you get when the Windows device detects the Bluetooth device. Moreover, the OS even tries to show a device name when it identifies it.

Also, Microsoft updated the text of the Add a Device dialog so the list of examples under Bluetooth includes controllers in Windows 10. 

We have a guide on how to pair your Bluetooth controller really fast.

9. Data usage in Network settings

Microsoft has redesigned the network connections settings page. Aside from the fact that it looks a lot better, you can now see data usage information.

And if you click on the Data Usage, you will land on a page where you can see which apps used the most data, and you will be able to set data limits for that network.

Network data usage

10. Mouse cursor speed

Mouse cursor speed settings

In the previous version, the cursor speed setting was set in the Control Panel. Now it’s placed more conveniently in the Mouse category from the Settings app.

You can easily find this page if you type mouse in the Windows Search window.

Other significant improvements and modifications found in the Windows 10 version 2004

  • Notepad improvements – the Find feature can find wrap-around text, and if you select text before opening the Find dialog, it will get it right into the search box with the selected automatically.
  • Windows Search improvements – Windows Search got into File Explorer and has a refreshed design. This means that you get search result suggestions as you type.
  • Windows Sandbox and virtual desktops – you can change certain settings such as enabling or disabling the vGPU, allowing network access because you can now use the configuration files with the Windows Sandbox. 
  • Optional features management –  it’s now possible to select multiple optional features and install them together, and you can see their status after installation.
  • Update and recovery settings – there are new controls for how much bandwidth you can use in a given situation. These settings can now use absolute numbers so you can precisely limit the bandwidth usage.
  • Resetting from the cloud –  you can reset your PC using a new image of Windows 10 downloaded from the cloud. 
  • SwiftKey in more languages – the intelligent prediction and autocorrection capabilities to the built-in Windows 10 keyboard is available in 38 new languages.
  • You have new kaomoji – more kaomoji have been added to the list.
  • XBOX game bar updates – Microsoft added a browser and a calculator inside.
  • Renaming the Virtual Desktops – Obviously, you can now rename your virtual desktops.
  • Restarting apps at sign-in – When turned on, Windows automatically saves your restartable apps when signing out, restarting, or shutting down Windows, and restarts them next time you sign in.
  • Create a quick event from the taskbar –  Click on the date and time at the lower right corner of the Taskbar to open the Calendar and pick your desired date and start typing. 

If we missed any new features, please let us know in the comments below. Also, what are your thoughts about the new version?

[wl_navigator]

FIX: Update Agent Installer Encountered Unrecoverable Error

Keeping your computer up to date is vital not only to make sure you have the latest operating system fixes and security improvements but also to have an environment that runs efficiently.

Usually, the latest updates are automatically installed when rebooting your computer. However, manual updates are sometimes necessary. Unfortunately, users have sometimes reported a message saying that the Windows update agent installer encountered an unrecoverable error.

This has occurred especially after forcing Windows to check for updates trying to fix the process, or after manually updating the Windows Update Agent.

The bottom line is, the error is a failure to correctly run one of its normal operations by a system or application component. There are several recommended solutions to fix this and we’re going to discuss them.

How do I fix Windows update agent installer error?

1. Use a dedicated repair tool

You can always use a specific software tool that quickly scans your computer to update, fix, and repair any corrupted or outdated drivers or apps.

We recommend Fortect Driver Updater, which helps detect and update outdated drivers efficiently. The scanning speed is just perfect to acquire your driver status in no time.

The software has a very straightforward UI. Just let it run a scan of your PC. Upon your approval, the tool with update and repair any outdated, damaged, or missing drivers on your PC.

It is safer to use dedicated tools because this way you completely remove the risk of permanently damaging your PC by installing a mismatched driver.

Fortect Driver Updater is light and can be set to automatically update and repair your drivers on a regular basis. You can let it run in the background and never worry about this issue again.

⇒ Get Fortect Driver Updater

2.Run the Windows Troubleshooterfix windows update with troubleshooter

  1. Open Settings > Update & Security.
  2. Click on Troubleshooter > go to Windows Update section.
  3. Click on Run the Troubleshooter.

This is the simplest method to allow Windows to detect the problems and also to fix them. If the problem is not complicated (missing or corrupted registry files, for example), the system will find resources to solve the issue with no other intervention.

Otherwise, the process will also tell you if additional steps are necessary.

3. Run the System File Checkerfix windows update agent

  1. In the search bar, type cmd from the keyboard.
  2. Launch it as an administrator.
  3. In the command prompt window, type in sfc /scannow and press Enter.

This process may take several minutes and should detect and repair any issues with the registry files or system references.

It is very likely that running this command will not fix the Windows Update Installer Agent error but at least the log files will show where the problem is. You can then move on to another solution.

Note: If, for whatever reason, you can’t run Command Prompt as an administrator, try these solutions.

4.Run the DISM image repair tool

  1. Open Command Prompt as in the previous step and run as administrator.
  2. One by one, enter the following commands:
  • DISM /Online /Cleanup-Image /CheckHealth
  • DISM /online /cleanup-image /scanhealth
  • DISM /online /cleanup-image /restorehealth

The system should again repair any faulty file it can find. However, many users mentioned that they were able to run the process, it repaired some files, but the Windows Update Installer Agent error was still not fixed.

In this case, you should move on to another solution.

5. Reset Windows components manually

  1. In the search bar, type Services > Run as administrator.
  2. Find the Background Intelligent Transfer Service.update windows agent manually
  3. Right-click and choose Start.
  4. Then, open Command Prompt as before.
  5. Type the following commands:
    • net stop bits (press Enter)
    • net stop wuauserv (press Enter)
  6. Then type the following and, again, press Enter:
    • Del "%ALLUSERSPROFILE%Application DataMicrosoftNetworkDownloaderqmgr*.dat"
  7. Type the following command and press Enter:
    • cd /d %windir%system32
  8. At this point, you have to re-register the BITS files and the Windows Update files. So type the following commands and press Enter after each one:
    • regsvr32.exe atl.dll

      regsvr32.exe urlmon.dll

      regsvr32.exe mshtml.dll

      regsvr32.exe shdocvw.dll

      regsvr32.exe browseui.dll

      regsvr32.exe jscript.dll

      regsvr32.exe vbscript.dll

      regsvr32.exe scrrun.dll

      regsvr32.exe msxml.dll

      regsvr32.exe msxml3.dll

      regsvr32.exe msxml6.dll

      regsvr32.exe actxprxy.dll

      regsvr32.exe softpub.dll

      regsvr32.exe wintrust.dll

      regsvr32.exe dssenh.dll

      regsvr32.exe rsaenh.dll

      regsvr32.exe gpkcsp.dll

      regsvr32.exe sccbase.dll

      regsvr32.exe slbcsp.dll

      regsvr32.exe cryptdlg.dll

      regsvr32.exe oleaut32.dll

      regsvr32.exe ole32.dll

      regsvr32.exe shell32.dll

      regsvr32.exe initpki.dll

      regsvr32.exe wuapi.dll

      regsvr32.exe wuaueng.dll

      regsvr32.exe wuaueng1.dll

      regsvr32.exe wucltui.dll

      regsvr32.exe wups.dll

      regsvr32.exe wups2.dll

      regsvr32.exe wuweb.dll

      regsvr32.exe qmgr.dll

      regsvr32.exe qmgrprxy.dll

      regsvr32.exe wucltux.dll

      regsvr32.exe muweb.dll

      regsvr32.exe wuwebv.dll
  9. Reset Winsock and press Enter:
    • netsh winsock reset
  10. Restart the BITS service and the Windows Update service:
  • net start bits
  • net start wuauserv

This is the default method to reset the Windows Update Agent and it should fix the problems. If it’s not helpful, there are a couple of other solutions that you can try.

6.Install a clean Windows image

  1. Gather your installation CD, product key, and anything necessary for a re-installation of the OS.
  2. Type Windows Security in the search bar > Open.windows update agent installer error
  3. Go to Device performance& health.
  4. Scroll to Fresh Start > Additional info.
  5. Click on the Fresh Start button and follow the process. Reboot the device after the process is finished.

Troubleshooting Windows errors is never fun, but we hope that you found this article helpful. If you found another successful solution, please share it with the community in the section below.

Got the Secure Connection Failed SSL Error? Fix It Easily

You may encounter security-related errors while accessing a secure page like your banking page. One such error is the secure connection failed SSL error.

Several Windows users have reported similar errors. Edge and Internet Explorer return INET_E_DOWNLOAD_FAILURE, and Firefox returns SSL_ERROR_BAD_MAC_ALERT. Some users have another PC with Windows 7 and experience no problems with it. Both PCs run the same virusscanner F-Secure and Malwarebytes.

If you are also troubled by this error, here are a couple of troubleshooting tips to help you resolve the secure connection failed SSL error in Windows.

How can I solve SSL_ERROR_BAD_MAC_ALERT error?

1. Check for safety filters

  1. This error can occur if your Internet Service Provider has enabled a safety filter.
  2. If you have enabled a safety filter through your ISP, ask them to disable it, or you can disable it by logging in to your ISP’s account control.
  3. If you don’t remember asking your ISP to enable a web filter, check your account control to see if it is enabled.
  4. Many ISPs, by default, enable safety filters during the installation.

Disable application filtering on your antivirus

  1. Antivirus comes with an application filter protocol setting.
  2. Check if your antivirus has application filter protocol enabled.
  3. Disable the feature in the settings and check for any improvements.
  4. While the NOD32 antivirus program includes an application protocol filter feature, other antiviruses may have different names for it.

Disabling protocol filtering in NOD32

SSL_ERROR_BAD_MAC_ALERT
  1. Launch ESET antivirus.
  2. Press F5 to launch Advanced Setup.
  3. Click on Web and Email option from the left pane.
  4. Click on SSL/TLS to expand it.
  5. Toggle the switch for – Enable SSL/TLS protocol filtering option to disable the feature.
  6. Click OK to save the changes.
  7. Now try accessing the web page that was showing the error. If you are able to access the web page without error, make sure you enable SSL/TLS protocol filtering again.

If disabling the application filter protocol did not help, try disabling the antivirus temporarily. Right-click the antivirus icon in the taskbar and select disable/turn off. Try accessing the webpage and check for any improvements.

2. Incorrect system time and date

secure connection failed SSL
  1. All web browsers use the certificate on a secure website to ensure that your information is being sent to the server in real time to protect the user from phishing attacks.
  2. So, an incorrect system date can cause the web browser to detect the website’s security certificate is expired or invalid, resulting in a failed SSL error for the secure connection.
  3. Make sure the system date and time are correct, and then try again.

3. Reinstall the web browser

Disable browser add-ons

secure connection failed SSL
  1. On Firefox, click Menu.
  2. Select Add-ons from the options. You can also access it by pressing Ctrl + Shift + A.
  3. Click on the Extensions icon from the left pane.
  4. Disable all the extensions one by one.
  5. Restart the browser and try accessing the web page.
  6. If the issue persists, you may have to reinstall the browser.

Uninstall the web browser

SSL_ERROR_BAD_MAC_ALERT
  1. Press Windows Key + R to open Run.
  2. Type control and click OK.
  3. From the Control Panel, go to Programs > Programs and Features.
  4. Select the web browser and click on Uninstall. Click Yes if asked to confirm the action. Wait for the browser to uninstall.
  5. After that, reinstall the latest version of the web browser and check if the error is resolved.

4. Go back to the previous version

SSL_ERROR_BAD_MAC_ALERT
  1. If the error started to occur after updating to the latest version of Windows OS, try going back to the previous version.
  2. Click on Start and select Settings.
  3. Click on Updates and Security.
  4. Select the Recovery tab.
  5. Under Go back to the previous version of Windows 10, click on Get Started.
  6. Follow on-screen instructions to install the previous version.

The Go back to the previous version of the Windows 10 option is only available for ten days since the update was installed. If the Get started button is greyed out, you must create a bootable drive using the earlier version Windows OS ISO file and then upgrade/fresh install using the bootable drive.

We hope this guide has proven useful in your situation. And if you are redirected to Google with a gws_rd=ssl extension, rest assured that solving this issue is also possible.

If you own a PS4 or PS5, we have a guide that will help out with resolving SSL communication issues on PlayStation consoles, so don’t miss it.

Don’t hesitate to share your experience with us using the comment section below.

Outlook Spaces, Microsoft’s new project management tool goes live on the web as “Project Moca”

Earlier this year, we learned that Microsoft was working on Outlook spaces, a new project management tool also known as Project Moca. With Outlook Spaces, Microsoft wants to allow users to organize content such as emails, documents, events, and search terms into workspaces.

Although Microsoft has yet to announce that Outlook Spaces is generally available, Twitter user Neil Kennedy first spotted that the new collaboration tool was live earlier today (via Windows Central). You can head over to this link to access Outlook Spaces, and the web app works with personal Microsoft accounts. You may need a Microsoft 365 subscription to access the service, as we got an “Under Construction” message with a Microsoft account without an active subscription.


Outlook Spaces allows you to create a customized plan from scratch, or you can use the built-in templates to create one. In addition, the web app lets you name your plans, add project-related keywords, drag your content into buckets, and add up to three people collaborating on that project.

Even though Microsoft’s Outlook Spaces/Project Moca is still a work in progress, it already looks quite similar to Microsoft Planner and Trello, two popular task management apps. However, it seems that Outlook Spaces will benefit from a direct integration in Outlook.com. If you’re able to access Outlook Spaces today, let us know what you think of it in the comments below.

Fast Startup in Windows 10 might prevent updates

Fast Startup is enabled by default in a clean Windows 10 installation. And it’s pretty useful because it helps your computer start up faster after a shutdown.

Actually, the Fast Startup feature makes your computer enter a hibernation state instead of fully shutting down. That makes your computer start so fast.

Fast Startup might prevent updates in Windows 10

The problem is that some patch installation from the Windows updates might require pending operations being processed during the next Windows startup. And that can only happen after a full shutdown.

If your computer doesn’t shut down completely, the pending operations won’t be processed, leaving you with an incomplete installation.

Because of the Fast Startup feature, a full shutdown only happens when you actually restart the computer or when another event causes it.

In environments managed by using Microsoft Endpoint Manager Configuration Manager (MEMCM), the installation of updates will also be affected by this behavior. There are plans to address this in a future Windows version

adds Microsoft on the Windows Support page.

How can I disable Fast Startup in Windows 10?

It’s not really necessary to disable the Fast Startup. As Microsoft suggests, you should only perform a restart.

However, if you still have problems with that, here’s how you can disable it in just a few steps:

  1. Press the Windows button or click Start, type Control Panel, and click on it from the results.
  2. Click on the Hardware and Sound category.Hardware and Sound category
  3. Now click on the Change what power buttons do from the Power Options.changing what power buttons do
  4. Next, click on the Change settings that are currently unavailable, then uncheck the Turn on fast startup (recommended) box.how to turn off fast startup

This should have solved the problem. Now try to get on with the updates again.

If you have any questions or other issues, don’t hesitate to leave us a comment below.

[wl_navigator]

Following Microsoft Teams, Skype adds 3×3 grid view in latest update

Microsoft is rolling out a new 3×3 video view for Skype video calls, and desktop users can now see the video feed of nine participants on their screens at a time (via Windows Central). This feature was first introduced in Microsoft Teams, and the 3×3 grid of video feeds is now exclusively available on Skype for Windows, Mac, and Linux. To turn the feature on during the meeting, click the Switch View button and select either 3×3 Grid view, Grid view or Speaker view from the menu.

In addition, Microsoft has also released support for moderated groups in this update. This particular feature has been requested by the education community since the beginning of the COVID-19 crisis. Teachers can now create moderated groups for Skype video calls where only select users can be defined as administrators to start video calls. Here’s how you can create a Moderated Group to control the flow of conversation in a classroom:

  • In Chat, select New Chat. 
  • Select New Moderated Group or Chat.
  • Give the group a name, then select the Next arrow.
  • Choose your contacts to add to the group. You can also search for contacts at the top of the screen.
  • Select Done to create your group when you’re finished adding contacts. Your new Moderated Group will appear in your chats.

Note: Any groups previously created with assigned roles (Admins/Users) have transitioned to Moderated Groups. In Moderated Groups, only Admins can start calls, including starting calls via the /golive chat command.

It should be kept in mind that when you create a new group, you are the Moderator/Admin by default and other members of that group are titled as Users or Members. If needed, you can use the available Skype chat commands to promote Users to the Admin role (so that they can start group calls), remove a participant from the group, and more.

Some other handy features included in this release are some new keyboard hotkeys for performing certain actions when the Skype window is minimized. There is also the ability to customize the list of message reactions, which would now appear in your preferred order. Finally, some usual fixes and stability improvements are also packed in this build. According to the official support page, Skype version 8.60 started rolling out on May 18, 2020, but the changelog was published this week. We invite you to check the official changelog for more details.

How to delete or archive a team in Microsoft Teams

In Microsoft Teams, a team is the center of your experience. People chat, share files and collaborate in one. Over time, though, a team might become redundant and perhaps no longer useful to your organization. Or, you might find that you might have created a wrong team by accident.

That’s when you might want to archive or delete a team in Microsoft Teams. If you’re an administrator, in this guide, we’ll show you how you can do that.

Archive vs delete

Before starting, we’ll explain the difference between archiving a team and deleting a team. Keep in mind that when you archive a team, all activity for that team will stop. It puts all of the data and files in a read-only mode, and members will still be able to search through and find the old conversations they need. However, no one will be able to start new conversations or reply to posts in a channel, add or remove channels, edit team settings, or add apps.

As an admin, though, you’ll still be able to add or remove members and update roles and you can still view all the team activity in standard and private channels, files, and chats. Archiving is a much less damaging process.

Deleting a team, meanwhile, is a bit more permanent. When you delete a team, team activity in standard and private channels (and associated site collections), files, and chats is also deleted. You can’t directly restore a team that has been deleted, so consider archiving a team instead of deleting it.

How to archive a team

Archiving a team in Microsoft Teams is a quick and easy process. In the Microsoft 365 Admin center, you’ll want to click Teams in the sidebar. This will redirect you to the Teams admin center. From there, you can click Teams in the sidebar, followed by Manage Teams. You can then archive the team by clicking on it in the list, and choosing the Archive option at the top. A dialogue box will appear, and you’ll want to confirm by clicking Archive once more.

Once archived, you can bring the Team back at a later point by going back to the Teams admin center. From there, you can select a team by clicking the name, and then selecting Unarchive. 

How to delete a team (or restore one)

Deleting a team is similar to archiving one. In the Microsoft 365 Admin center, click Teams in the sidebar once more. This will redirect you to the Teams admin center. From there, you can once more click Teams in the sidebar, followed by Manage Teams. Simply select the team name, and then select Delete. A confirmation message will appear. You can then select Delete again to permanently delete the team.

If you want to restore a deleted team, you’ll have up to 30 days to do so. As part of the process, you’ll actually have to restore the Office 365 group that’s associated with the team. Restoring the Office 365 group for a team will restore team content such as tabs, channels, and private channels and their associated site collections. To restore an Office 365 group, you’ll have to install the AzureADPreview module on Windows and then run a few prompts. We won’t get into those due to technicality, but you can find out more about it here.

Other tips and tricks

Over the past few months, we’ve been covering Teams extensively. Deleting or archiving a team is just our latest topic. We’ve covered things such as removing someone from a team, using the Shifts feature, creating scheduled meetings, and so much more. Our Teams news hub will have you covered, so feel free to check it out, and let us know how Teams is working for you by dropping us a comment below.

Fix the Windows boot error 0xc000000f in a few easy steps

If you are reading this then chances are that Windows boot error 0xc000000f has come into your life. That’s the bad part. The good part is that boot error 0xc00000f is solvable if you follow our guide.

Keep in mind that this guide relates chiefly to Windows 10, but some steps might work even in earlier builds.


How do I fix the Windows boot error 0xc000000f?

1. Unplug all peripherals

  1. Remove any external HDDs or SSDs
  2. Remove any memory card readers or USB thumb drives
  3. Unplug CD/DVD/BR drives
  4. Restart your PC
  5. If your PC boots without problems you can try replugging the peripherals one by one
  6. Restart your PC after each peripheral reconnection to identify the cause

2. Repair BOOTMGR using a bootable USB drive0xc000000f computer error

  1. Another way to solve error 0xc000000f is to create a bootable USB drive for Windows 10
  2. Select the option to boot from a USB drive
  3. Once the Windows Setup loads click Next
  4. Click the Repair your computer button
  5. Now go to Troubleshoot and select Startup Repair
  6. Restart your PC once the process is done

3. Check your data cablessolve boot error 0xc000000f so

  1. Unplug all the internal HDD cables and check them to see if they are damaged
  2. Replace them if damaged and reconnect the undamaged cables

4. Revert to previous BIOS settingsfix windows boot error 0xc000000f

  1. Open BIOS by following the instructions during the booting sequence
  2. Write down your current BIOS settings in case you’ll need to revert to them
  3. Restore factory settings in BIOS
  4. If that doesn’t fix boot error 0xc000000f, try to toggle through the SATA disk controller modes

If you want more info on how to access Bios on your Windows 10 PC, check out this handy guide.


Can’t access Bios on your Windows 10 PC? Don’t worry, we’ve got the right solution for you


5. Try a manual rebuild of the BCD data filewindows boot error 0xc000000f

  1. Follow steps 1 through 4 from Repair BOOTMGR using a bootable USB drive
  2. Now go to Troubleshoot and select Command Prompt
  3. Execute the following command by writing:
    bootrec /rebuildbcd
  4. And then press the Enter key
  5. If asked by the program to add the installation to the boot list press Y

If you’re having trouble accessing Command Prompt as an admin, then you better take a closer look at this guide.


If this guide has proven helpful in your situation don’t  hesitate to share your experience with us. You can do so by simply using the comment section below.

[wl_navigator]

Get three years of NordVPN protection for only $3.49/mo.

In case you haven’t heard of it, NordVPN is an excellent VPN security service that comes at a reasonable price, with the only possible drawback being that its founders are anonymous.

Aside from this, NordVPN is high-quality and effortless to use. Now, you can sign up at a fantastic price for the service so if you’re looking for a reliable VPN software, it’s time to act.

Enjoy three years of NordVPN at discounted price

NordVPN offer

It’s important to note that NordVPN usually charges $11.95 per month for its services. Now, you can save quite a few bucks with this Tefincom & Co., S.A. deal.

The three years offer involves paying $4.75 per month but to be able to enjoy it, you will have to pay for the entire period all at once.

NordVPN has verified that users who decide to sign up get to keep it only as long as they remain active subscribers.

NordVPN’s greatest features

get NordVPN

One of the coolest features that come along with NordVPN is that the service also gives you access to Netflix outside of the U.S.

There are a few VPNs on the market that claim to offer the exact features to their users, but none of these are available at $3.49/mo., that’s for sure.

Netflix is actively trying to stifle this kind of behavior, so there would be up and downtimes for U.S. Netflix access every now and then.

Moreover, this is by far the most secure VPN for cryptocurrency transactions. Keep in mind that it comes with a few specialized servers that some of you might find really useful.

Such servers include dedicated TOR servers, double VPN connections for enhanced protection, and P2P-friendly servers.

So, if you want to take advantage of NordVPN’s offer, make your decision to subscribe to the service.

NordVPN

NordVPN

Keep your browsing habits private with this amazing VPN, now at a discounted price for a limited time only!
$3.49/mo. Buy it now!

We recommend checking up the features of Cyberghost VPN and in comparison make an informed choice to enhance your internet security.

[wl_navigator]

Microsoft releases new Xbox Family Settings apps in preview on Android

Microsoft has quietly released a preview version of a new Xbox Family Settings app on the Google Play Store (via Android Police). The new Android app can be used by parents who have set up a Microsoft Family to see the Xbox gaming activity of their kids, and set screen time limits if necessary.

It’s already possible to manage your children’s activities directly in other places including the web, but this new Xbox Family Safety app will make all these features available on the go. It’s worth noting that Microsoft has also added the ability to set app and game limits and many other features on its separate Microsoft Family Safety app, which is also available in preview on Android.

At a time when more people are playing games at home due to the coronavirus outbreak, it’s good to see Microsoft give parents more ways to control what kids are allowed to do on Xbox consoles. If you want to check out this app, you can download it from the link below.

Xbox Family Settings

eM Client doesn’t download attachments? Here’s why

eM Client is a  popular email client for Windows users with a host of features on offer. However, some users have reported eM Client not downloading attachments issue in Windows.

By default, for IMAP account eM Client only downloads the headers of incoming messages and body content when the user opens the message. However, at times eM client may fail to download the attachments.

If you are also troubled by this issue, here are a couple of troubleshooting tips to help you resolve the eM Client not downloading attachments issue in Windows 10.


What do I do if eM Client doesn’t download attachments?

1. Download messages for offline use

eM Client not downloading attachments

  1. Launch eM Client.
  2. Click on Menu and select Tools > Accounts.
  3. In the Accounts window, open the IMAP tab.
  4. Scroll down to the Offline section.
  5. Check “Download messages for Offline use” option.
  6. Check “Include attachments and images” option.
  7. Click OK to save the changes.
  8. Relaunch eM Client and check for any improvements.

1.1 Check Default Actions for Attachments

eM Client not downloading attachments

  1. Click on Menu.
  2. Go to Tools > Settings.
  3. Select the Attachments tab.
  4. In the Default Actions for Attachments section, check if you find any unknown actions defined.
  5. Remove any unknown action.
  6. Click Apply > OK to save the changes.

Tired of eM Client? Check out this article for some great alternative email clients.


2. Download unsafe contents from the contact list

eM Client not downloading attachments

  1. Start eM Client.
  2. Click on Menu and select Tools.
  3. Click on Settings.
  4. From the left pane, click on the Mail tab to expand the options.
  5. Select the Privacy tab.
  6. Select ” Display unsafe content in messages from people in contact list” option.
  7. Click Apply > OK to save the changes.
  8. Restart eM Client and check for any improvements.

3. Check for updates

eM Client not downloading attachments

  1. If the issue persists, check if a new update is available for eM Client.
  2. Open eM Client and click Menu.
  3. Go to Help > Check for updates.
  4. eM Client will now scan for new updates. If available, download and install the updates.
  5. Relaunch eM Client and check for any improvements.

4. Run eM Client troubleshooter

em client attachment issue

  1. Press Windows Key + R to open Run.
  2. Type control and click OK to open Control Panel.
  3. In the Control Panel, go to Programs > Programs and Features.
  4. Select eM Client from the list of programs and click on Repair.
  5. Next, follow on-screen instructions to complete the troubleshooting process.
  6. Apply the recommended fixes and close the troubleshooter.
  7. Restart eM Client and check for any improvements.

The eM Client not downloading attachments issue can occur due to several reasons. To resolve the issue, enable offline and unsafe content options. If the issue persists, proceed with troubleshooting the email client.

If you know of any other solution for this eM Client issue, share it with the others by leaving a message in the comments section below.


[wl_navigator]