Fast Startup in Windows 10 might prevent updates

Fast Startup is enabled by default in a clean Windows 10 installation. And it’s pretty useful because it helps your computer start up faster after a shutdown.

Actually, the Fast Startup feature makes your computer enter a hibernation state instead of fully shutting down. That makes your computer start so fast.

Fast Startup might prevent updates in Windows 10

The problem is that some patch installation from the Windows updates might require pending operations being processed during the next Windows startup. And that can only happen after a full shutdown.

If your computer doesn’t shut down completely, the pending operations won’t be processed, leaving you with an incomplete installation.

Because of the Fast Startup feature, a full shutdown only happens when you actually restart the computer or when another event causes it.

In environments managed by using Microsoft Endpoint Manager Configuration Manager (MEMCM), the installation of updates will also be affected by this behavior. There are plans to address this in a future Windows version

adds Microsoft on the Windows Support page.

How can I disable Fast Startup in Windows 10?

It’s not really necessary to disable the Fast Startup. As Microsoft suggests, you should only perform a restart.

However, if you still have problems with that, here’s how you can disable it in just a few steps:

  1. Press the Windows button or click Start, type Control Panel, and click on it from the results.
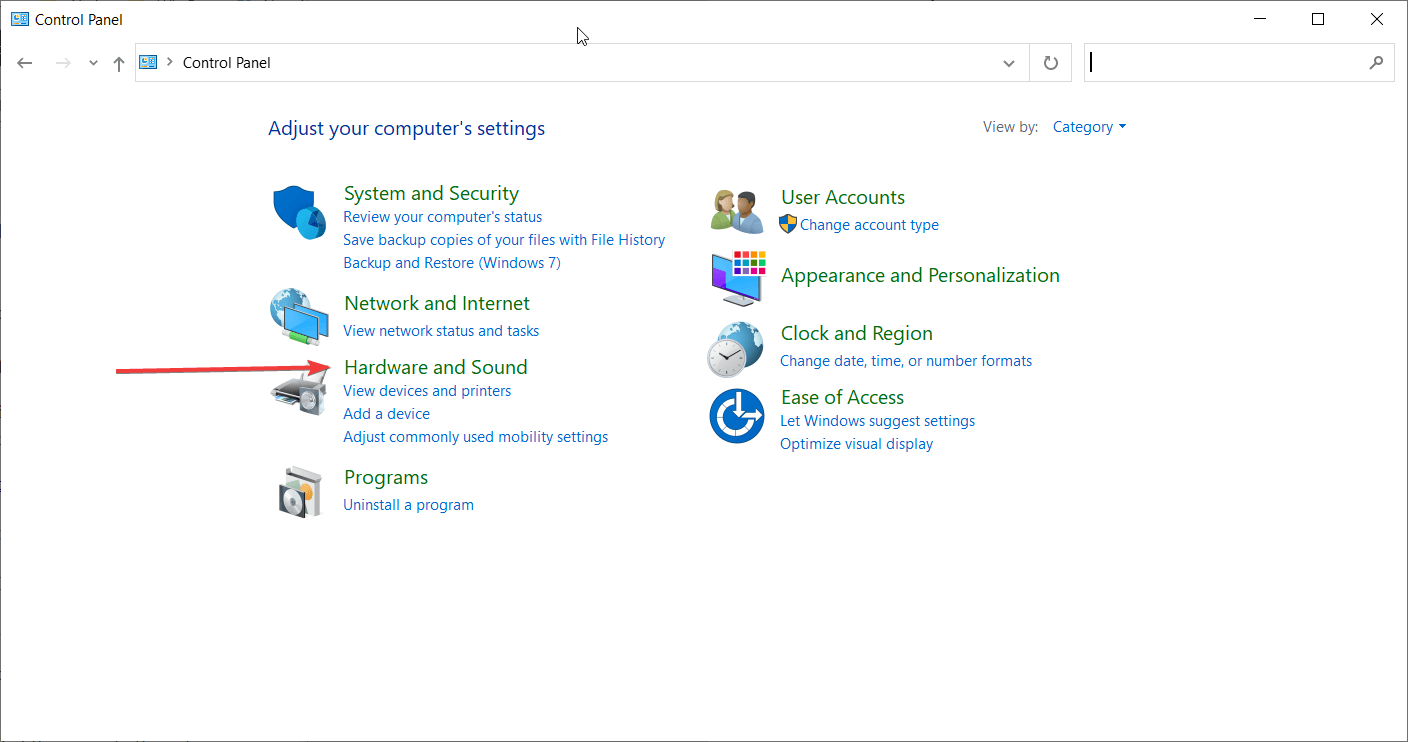
  2. Click on the Hardware and Sound category.Hardware and Sound category
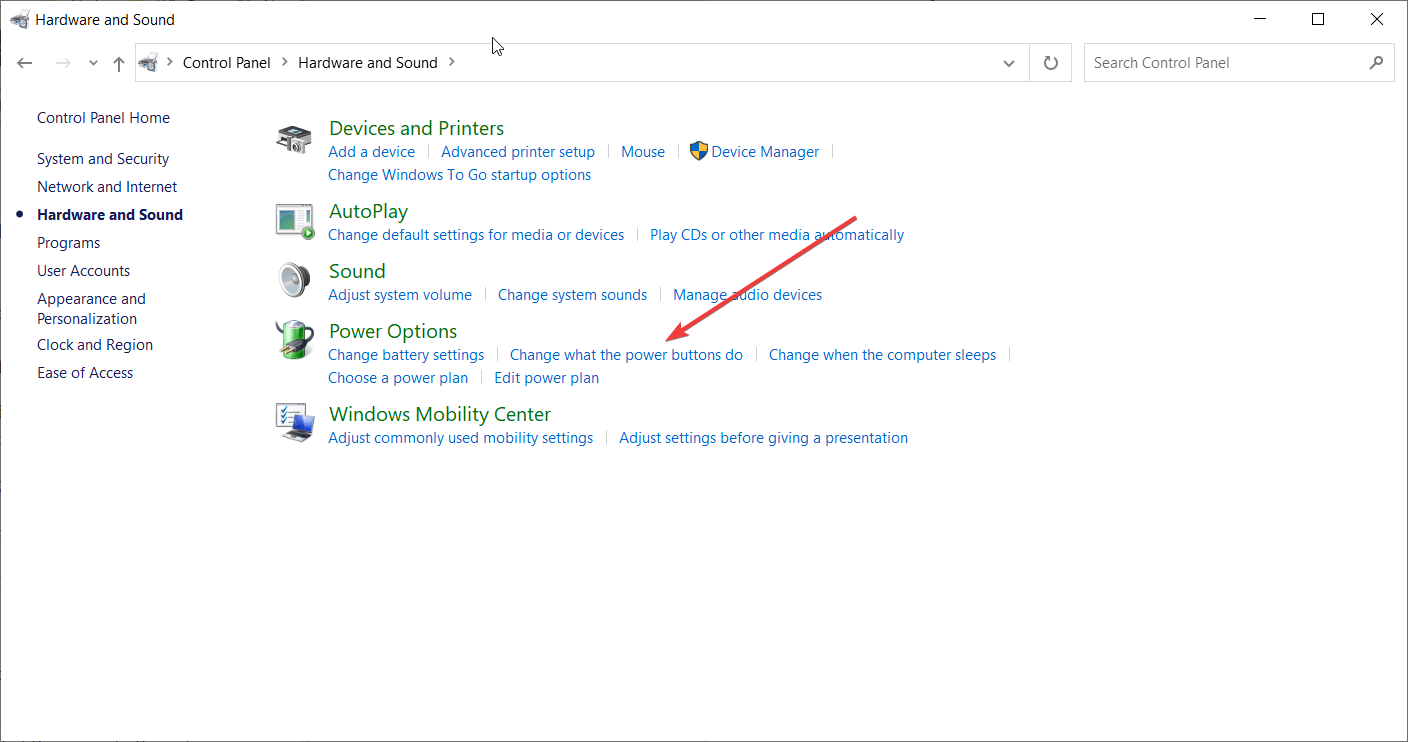
  3. Now click on the Change what power buttons do from the Power Options.changing what power buttons do
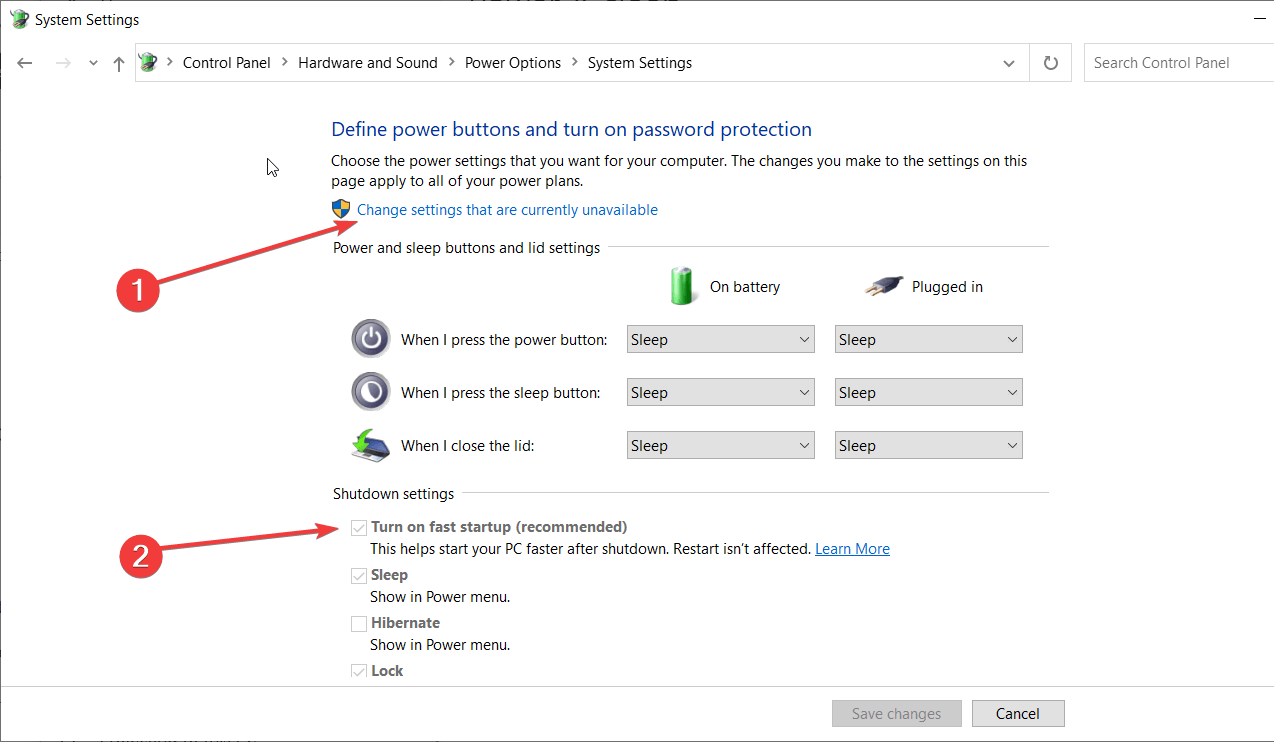
  4. Next, click on the Change settings that are currently unavailable, then uncheck the Turn on fast startup (recommended) box.how to turn off fast startup

This should have solved the problem. Now try to get on with the updates again.

If you have any questions or other issues, don’t hesitate to leave us a comment below.

[wl_navigator]

Following Microsoft Teams, Skype adds 3×3 grid view in latest update

Microsoft is rolling out a new 3×3 video view for Skype video calls, and desktop users can now see the video feed of nine participants on their screens at a time (via Windows Central). This feature was first introduced in Microsoft Teams, and the 3×3 grid of video feeds is now exclusively available on Skype for Windows, Mac, and Linux. To turn the feature on during the meeting, click the Switch View button and select either 3×3 Grid view, Grid view or Speaker view from the menu.

In addition, Microsoft has also released support for moderated groups in this update. This particular feature has been requested by the education community since the beginning of the COVID-19 crisis. Teachers can now create moderated groups for Skype video calls where only select users can be defined as administrators to start video calls. Here’s how you can create a Moderated Group to control the flow of conversation in a classroom:

  • In Chat, select New Chat. 
  • Select New Moderated Group or Chat.
  • Give the group a name, then select the Next arrow.
  • Choose your contacts to add to the group. You can also search for contacts at the top of the screen.
  • Select Done to create your group when you’re finished adding contacts. Your new Moderated Group will appear in your chats.

Note: Any groups previously created with assigned roles (Admins/Users) have transitioned to Moderated Groups. In Moderated Groups, only Admins can start calls, including starting calls via the /golive chat command.

It should be kept in mind that when you create a new group, you are the Moderator/Admin by default and other members of that group are titled as Users or Members. If needed, you can use the available Skype chat commands to promote Users to the Admin role (so that they can start group calls), remove a participant from the group, and more.

Some other handy features included in this release are some new keyboard hotkeys for performing certain actions when the Skype window is minimized. There is also the ability to customize the list of message reactions, which would now appear in your preferred order. Finally, some usual fixes and stability improvements are also packed in this build. According to the official support page, Skype version 8.60 started rolling out on May 18, 2020, but the changelog was published this week. We invite you to check the official changelog for more details.

How to delete or archive a team in Microsoft Teams

In Microsoft Teams, a team is the center of your experience. People chat, share files and collaborate in one. Over time, though, a team might become redundant and perhaps no longer useful to your organization. Or, you might find that you might have created a wrong team by accident.

That’s when you might want to archive or delete a team in Microsoft Teams. If you’re an administrator, in this guide, we’ll show you how you can do that.

Archive vs delete

Before starting, we’ll explain the difference between archiving a team and deleting a team. Keep in mind that when you archive a team, all activity for that team will stop. It puts all of the data and files in a read-only mode, and members will still be able to search through and find the old conversations they need. However, no one will be able to start new conversations or reply to posts in a channel, add or remove channels, edit team settings, or add apps.

As an admin, though, you’ll still be able to add or remove members and update roles and you can still view all the team activity in standard and private channels, files, and chats. Archiving is a much less damaging process.

Deleting a team, meanwhile, is a bit more permanent. When you delete a team, team activity in standard and private channels (and associated site collections), files, and chats is also deleted. You can’t directly restore a team that has been deleted, so consider archiving a team instead of deleting it.

How to archive a team

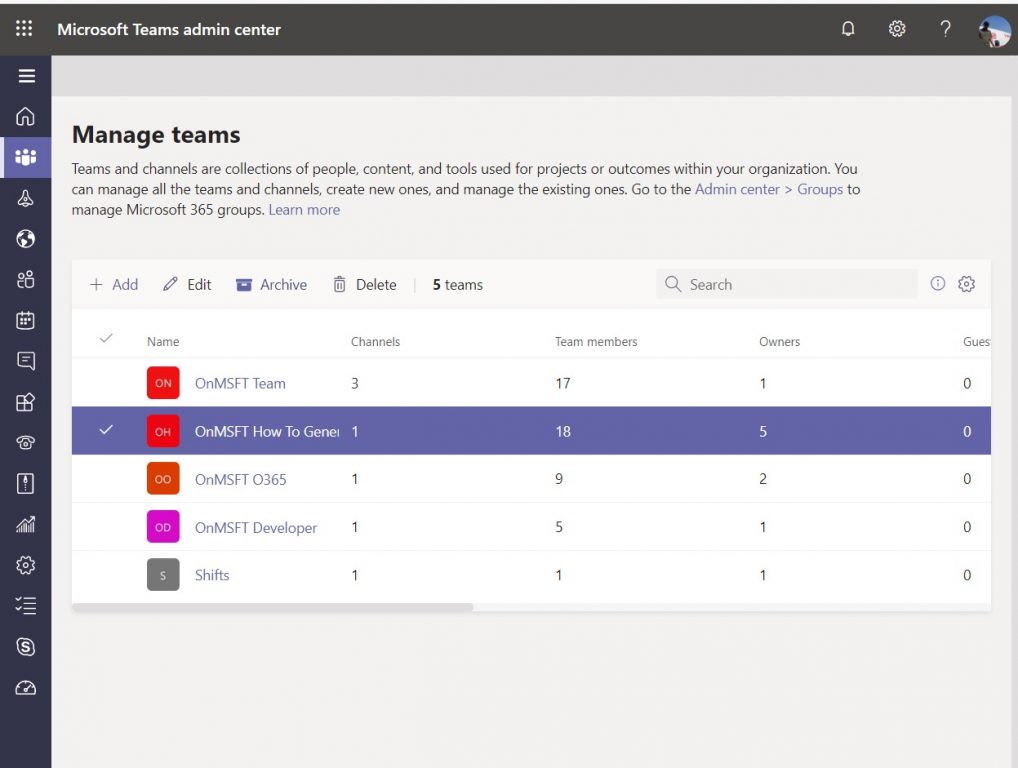
Archiving a team in Microsoft Teams is a quick and easy process. In the Microsoft 365 Admin center, you’ll want to click Teams in the sidebar. This will redirect you to the Teams admin center. From there, you can click Teams in the sidebar, followed by Manage Teams. You can then archive the team by clicking on it in the list, and choosing the Archive option at the top. A dialogue box will appear, and you’ll want to confirm by clicking Archive once more.

Once archived, you can bring the Team back at a later point by going back to the Teams admin center. From there, you can select a team by clicking the name, and then selecting Unarchive. 

How to delete a team (or restore one)

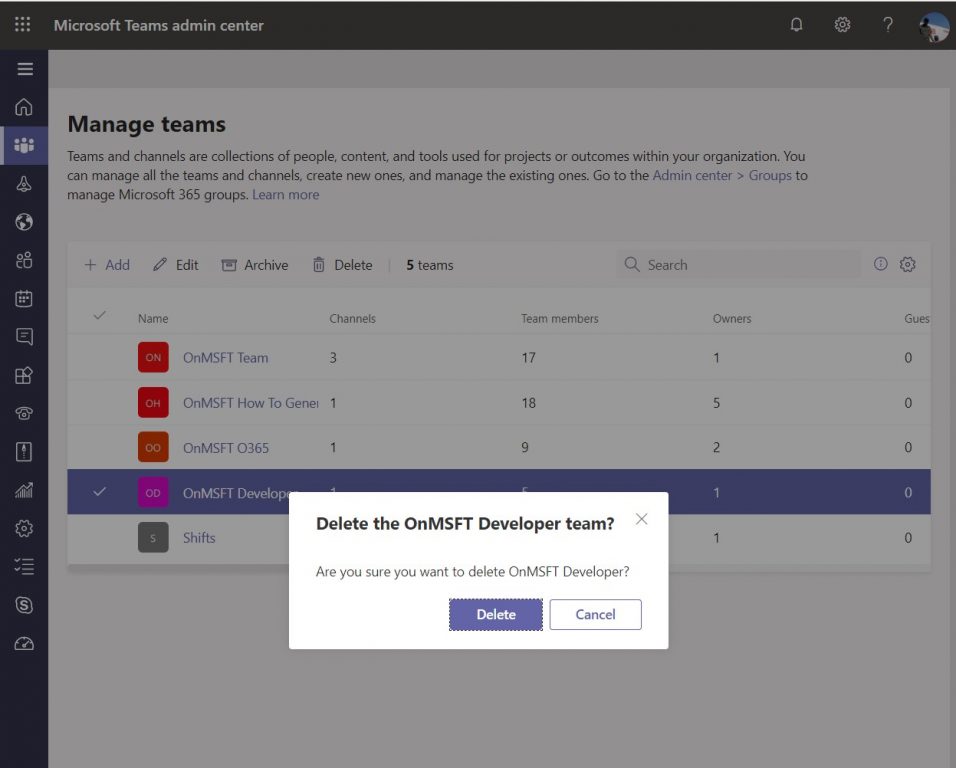
Deleting a team is similar to archiving one. In the Microsoft 365 Admin center, click Teams in the sidebar once more. This will redirect you to the Teams admin center. From there, you can once more click Teams in the sidebar, followed by Manage Teams. Simply select the team name, and then select Delete. A confirmation message will appear. You can then select Delete again to permanently delete the team.

If you want to restore a deleted team, you’ll have up to 30 days to do so. As part of the process, you’ll actually have to restore the Office 365 group that’s associated with the team. Restoring the Office 365 group for a team will restore team content such as tabs, channels, and private channels and their associated site collections. To restore an Office 365 group, you’ll have to install the AzureADPreview module on Windows and then run a few prompts. We won’t get into those due to technicality, but you can find out more about it here.

Other tips and tricks

Over the past few months, we’ve been covering Teams extensively. Deleting or archiving a team is just our latest topic. We’ve covered things such as removing someone from a team, using the Shifts feature, creating scheduled meetings, and so much more. Our Teams news hub will have you covered, so feel free to check it out, and let us know how Teams is working for you by dropping us a comment below.

Fix the Windows boot error 0xc000000f in a few easy steps

If you are reading this then chances are that Windows boot error 0xc000000f has come into your life. That’s the bad part. The good part is that boot error 0xc00000f is solvable if you follow our guide.

Keep in mind that this guide relates chiefly to Windows 10, but some steps might work even in earlier builds.


How do I fix the Windows boot error 0xc000000f?

1. Unplug all peripherals

  1. Remove any external HDDs or SSDs
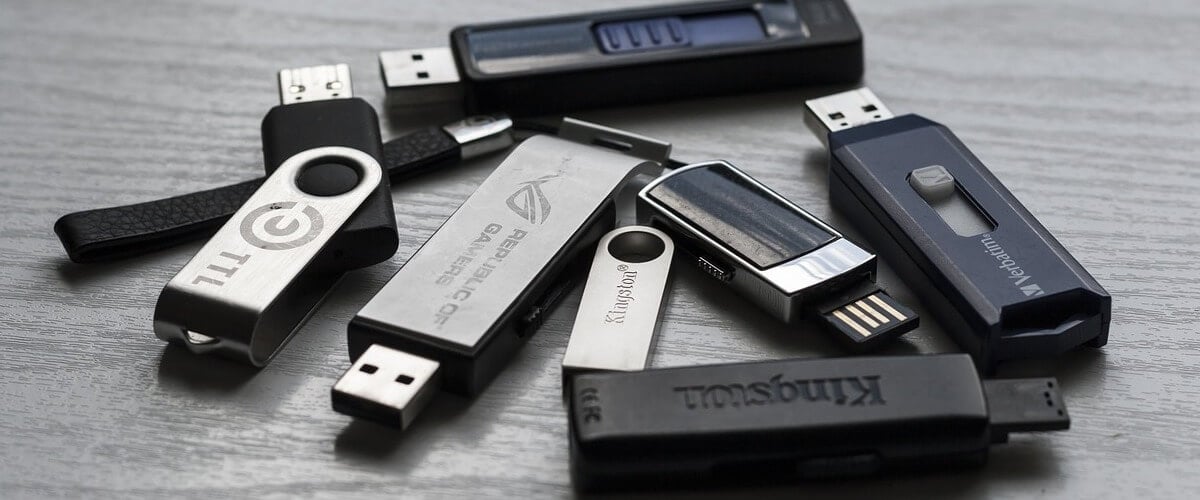
  2. Remove any memory card readers or USB thumb drives
  3. Unplug CD/DVD/BR drives
  4. Restart your PC
  5. If your PC boots without problems you can try replugging the peripherals one by one
  6. Restart your PC after each peripheral reconnection to identify the cause

2. Repair BOOTMGR using a bootable USB drive0xc000000f computer error

  1. Another way to solve error 0xc000000f is to create a bootable USB drive for Windows 10
  2. Select the option to boot from a USB drive
  3. Once the Windows Setup loads click Next
  4. Click the Repair your computer button
  5. Now go to Troubleshoot and select Startup Repair
  6. Restart your PC once the process is done

3. Check your data cablessolve boot error 0xc000000f so

  1. Unplug all the internal HDD cables and check them to see if they are damaged
  2. Replace them if damaged and reconnect the undamaged cables

4. Revert to previous BIOS settingsfix windows boot error 0xc000000f

  1. Open BIOS by following the instructions during the booting sequence
  2. Write down your current BIOS settings in case you’ll need to revert to them
  3. Restore factory settings in BIOS
  4. If that doesn’t fix boot error 0xc000000f, try to toggle through the SATA disk controller modes

If you want more info on how to access Bios on your Windows 10 PC, check out this handy guide.


Can’t access Bios on your Windows 10 PC? Don’t worry, we’ve got the right solution for you


5. Try a manual rebuild of the BCD data filewindows boot error 0xc000000f

  1. Follow steps 1 through 4 from Repair BOOTMGR using a bootable USB drive
  2. Now go to Troubleshoot and select Command Prompt
  3. Execute the following command by writing:
    bootrec /rebuildbcd
  4. And then press the Enter key
  5. If asked by the program to add the installation to the boot list press Y

If you’re having trouble accessing Command Prompt as an admin, then you better take a closer look at this guide.


If this guide has proven helpful in your situation don’t  hesitate to share your experience with us. You can do so by simply using the comment section below.

[wl_navigator]

Get three years of NordVPN protection for only $3.49/mo.

In case you haven’t heard of it, NordVPN is an excellent VPN security service that comes at a reasonable price, with the only possible drawback being that its founders are anonymous.

Aside from this, NordVPN is high-quality and effortless to use. Now, you can sign up at a fantastic price for the service so if you’re looking for a reliable VPN software, it’s time to act.

Enjoy three years of NordVPN at discounted price

NordVPN offer

It’s important to note that NordVPN usually charges $11.95 per month for its services. Now, you can save quite a few bucks with this Tefincom & Co., S.A. deal.

The three years offer involves paying $4.75 per month but to be able to enjoy it, you will have to pay for the entire period all at once.

NordVPN has verified that users who decide to sign up get to keep it only as long as they remain active subscribers.

NordVPN’s greatest features

get NordVPN

One of the coolest features that come along with NordVPN is that the service also gives you access to Netflix outside of the U.S.

There are a few VPNs on the market that claim to offer the exact features to their users, but none of these are available at $3.49/mo., that’s for sure.

Netflix is actively trying to stifle this kind of behavior, so there would be up and downtimes for U.S. Netflix access every now and then.

Moreover, this is by far the most secure VPN for cryptocurrency transactions. Keep in mind that it comes with a few specialized servers that some of you might find really useful.

Such servers include dedicated TOR servers, double VPN connections for enhanced protection, and P2P-friendly servers.

So, if you want to take advantage of NordVPN’s offer, make your decision to subscribe to the service.

NordVPN

NordVPN

Keep your browsing habits private with this amazing VPN, now at a discounted price for a limited time only!
$3.49/mo. Buy it now!

We recommend checking up the features of Cyberghost VPN and in comparison make an informed choice to enhance your internet security.

[wl_navigator]

Microsoft releases new Xbox Family Settings apps in preview on Android

Microsoft has quietly released a preview version of a new Xbox Family Settings app on the Google Play Store (via Android Police). The new Android app can be used by parents who have set up a Microsoft Family to see the Xbox gaming activity of their kids, and set screen time limits if necessary.

It’s already possible to manage your children’s activities directly in other places including the web, but this new Xbox Family Safety app will make all these features available on the go. It’s worth noting that Microsoft has also added the ability to set app and game limits and many other features on its separate Microsoft Family Safety app, which is also available in preview on Android.

At a time when more people are playing games at home due to the coronavirus outbreak, it’s good to see Microsoft give parents more ways to control what kids are allowed to do on Xbox consoles. If you want to check out this app, you can download it from the link below.

Xbox Family Settings

eM Client doesn’t download attachments? Here’s why

eM Client is a  popular email client for Windows users with a host of features on offer. However, some users have reported eM Client not downloading attachments issue in Windows.

By default, for IMAP account eM Client only downloads the headers of incoming messages and body content when the user opens the message. However, at times eM client may fail to download the attachments.

If you are also troubled by this issue, here are a couple of troubleshooting tips to help you resolve the eM Client not downloading attachments issue in Windows 10.


What do I do if eM Client doesn’t download attachments?

1. Download messages for offline use

eM Client not downloading attachments

  1. Launch eM Client.
  2. Click on Menu and select Tools > Accounts.
  3. In the Accounts window, open the IMAP tab.
  4. Scroll down to the Offline section.
  5. Check “Download messages for Offline use” option.
  6. Check “Include attachments and images” option.
  7. Click OK to save the changes.
  8. Relaunch eM Client and check for any improvements.

1.1 Check Default Actions for Attachments

eM Client not downloading attachments

  1. Click on Menu.
  2. Go to Tools > Settings.
  3. Select the Attachments tab.
  4. In the Default Actions for Attachments section, check if you find any unknown actions defined.
  5. Remove any unknown action.
  6. Click Apply > OK to save the changes.

Tired of eM Client? Check out this article for some great alternative email clients.


2. Download unsafe contents from the contact list

eM Client not downloading attachments

  1. Start eM Client.
  2. Click on Menu and select Tools.
  3. Click on Settings.
  4. From the left pane, click on the Mail tab to expand the options.
  5. Select the Privacy tab.
  6. Select ” Display unsafe content in messages from people in contact list” option.
  7. Click Apply > OK to save the changes.
  8. Restart eM Client and check for any improvements.

3. Check for updates

eM Client not downloading attachments

  1. If the issue persists, check if a new update is available for eM Client.
  2. Open eM Client and click Menu.
  3. Go to Help > Check for updates.
  4. eM Client will now scan for new updates. If available, download and install the updates.
  5. Relaunch eM Client and check for any improvements.

4. Run eM Client troubleshooter

em client attachment issue

  1. Press Windows Key + R to open Run.
  2. Type control and click OK to open Control Panel.
  3. In the Control Panel, go to Programs > Programs and Features.
  4. Select eM Client from the list of programs and click on Repair.
  5. Next, follow on-screen instructions to complete the troubleshooting process.
  6. Apply the recommended fixes and close the troubleshooter.
  7. Restart eM Client and check for any improvements.

The eM Client not downloading attachments issue can occur due to several reasons. To resolve the issue, enable offline and unsafe content options. If the issue persists, proceed with troubleshooting the email client.

If you know of any other solution for this eM Client issue, share it with the others by leaving a message in the comments section below.


[wl_navigator]

Hyper transport sync flood error? Try these solutions

When restarting your Windows computer, you may encounter Hyper Transport sync flood error. While the system boots successfully despite the error, the error causes the system to reset the date to factory default forcing the user to change it after every restart.

This error can occur due to a faulty CMOS battery, unstable overclocked processors, or insufficient power supply through the PSU.

If you are also troubled by the error, here are a couple of troubleshooting tips to help you resolve the Hyper transport sync flood error in Windows.


How can I fix the Hyper transport sync flood error?

1. Check for the faulty CMOS battery

Hyper transport sync flood

  1. If the date and time are reset after every restart, it is most likely caused by a faulty CMOS battery.
  2. Shutdown the computer completely and remove any power cord connected to the computer.
  3. Take a look at the motherboard and locate the CMOS battery. The battery looks like a regular wristwatch battery.
  4. Use a non-conductive screwdriver to remove the from the slot. Try cleaning the battery if it has accumulated dust.
  5. Wait for a few minutes. Insert the battery again and put it all back together.
  6. Restart the computer and check if the error is resolved.

The CMOS battery helps the system keep basic information like system date and time in its memory so that the user doesn’t have to set it again after every restart.


Dealing with a corrupt CMOS? Fix it in 4 easy steps


2. Check for BIOS issues

Hyper transport sync flood

  1. It is possible that your current BIOS version is causing the problem.
  2. Try updating the BIOS version and check if the resolves the error.
  3. To update the BIOS:
    Dekstop users – Check the official website of your motherboard manufacturer.
    Laptop users – Login to your laptop manufacturer’s website. The manufacturer lists BIOS updates in the download center.
  4. Download and install the latest version of BIOS and check if that resolves the issue.

Note that the process of flashing the newer version of BIOS can be different depending on the motherboard you are using. Refer to the instruction manual of your motherboard.


3. Disable overclocking

Hyper transport sync flood

  1. The sync flood error can also occur if the user has incorrectly overclocked the processor leaving the HT bus in a non-functional state.
  2. Several users have reported that reducing the overclocking frequencies has helped them resolve the issue.
  3. Try overclocking the processor or the GPU to recommended frequencies and check if the error is resolved.
  4. If the issue persists, restore the frequencies to factory default to see if that helps.
  5. After restoring the overclocked frequencies, try to restart the system a few times before proceeding with other steps.

4. Check your PSU

Windows Boot error

  1. If restoring or lowering the overclocked frequencies resolve the issue, it is possible that your PSU is underpowered to supply enough power to the processor to compensate for the extra frequencies achieved through overclocking.
  2. If your PSU is underpowered and if you want to overclock your processor, upgrade to a better PSU that can supply adequate power.
  3. Upgrading to a better PSU should help you resolve any issues occurring due to an overclocked CPU.

As discussed in the article, the Hyper transport sync flood error can occur due to a faulty CMOS battery or a glitchy BIOS version.

That said, it can also occur if you have overclocked your CPU with an underpowered PSU. Follow all the steps in this article and let us know which method helped you resolve the error in the comments.

[wl_navigator]

FIX: supr3hardenedwinrespawn VirtualBox error

After installing Oracle VirtualBox, you may encounter the error in supr3hardenedwinrespawn issue. This issue occurs when the user runs the virtual machine for the first time after installing the program.

The cause of this error is attributed to the missing the VBoxDrv.inf file that may have failed to install during installation due to permission issues.

If you are also troubled by this error, here are a couple of troubleshooting tips to help you resolve the error in supr3hardenedwinrespawn VirtualBox issue in Windows.


How can I fix the supr3hardenedwinrespawn error?

1. Install the VBoxDrV.inf file

error in supr3hardenedwinrespawn

  1. Open File Explorer and navigate to the following location:
    • C:Program FilesOracleVirtualBoxdriversvboxdrv
  2. You can copy-paste the above path in File Explorer as well.
  3. In the VBoxDrv folder, right-click on VBoxDrv.inf and run Install.
  4. The UAC will ask you to confirm the action. Click Yes to proceed with the installation.
  5. Next, press the Windows key.
  6. Type cmd, right-click on Command Prompt and select Run as Administrator.
  7. In the Command Prompt, type the following command and hit enter to execute:
    • sc start vboxdrv
  8. Once the command is successfully executed, close the Command Prompt window.
  9. Try running the Virtual Machine again and check for any improvements.

Reinstalling the missing file seems to have fixed the issue for many users. This driver may not have installed due to permission issues thus creating issues with the virtual machine.


Unable to access Wi-Fi on VirtualBox? Try these methods


2. Check for directory issues

error in supr3hardenedwinrespawn

  1. Press Windows Key + R to open Run.
  2. Type regedit and click OK to open Registry Editor.
  3. In Registry Editor, navigate to the following location:
    • HKEY_LOCAL_MACHINEsystemcurrentcontrolsetservicesvboxdrv
  4. From the right pane, right-click on Imagepath and select Modify.
  5. In the Value data field, check if the path looks like this:
    • C:Program FilesOracleVirtualBoxdriversvboxdrvVBoxDrv.sys
  6. If it has a different path, change the path to make it look like this:
    • C:Program FilesOracleVirtualBoxdriversvboxdrvVBoxDrv.sys
  7. Click OK to save the changes.
  8. Close the Registry Editor window.
  9. Open File Explorer again and navigate to the following location:
    • C:Program FilesOracleVirtualBoxdriversvboxdrv
  10. Right-click on VBoxDrv.ing and select Install.
  11. Press Windows Key + R to open Run.
  12. Type Cmd and press the Ctrl + Shift + Enter keys simultaneously to open elevated Command Prompt.
  13. In the Command Prompt enter the following command and hit enter:
    • sc start vboxdrv 
  14. Close the Command Prompt and check for any improvements.

Restart the Oracle VirtualBox program and check if the error in supr3hardenedwinrespawn is resolved.


3. Allocate more RAM to your virtual machine

error in supr3hardenedwinrespawn

  1. Launch Oracle VM VirtualBox Manager.
  2. right-click on your current virtual machine installation and select Remove.
  3. In the new dialog box, click the Remove Only button.
  4. Next, proceed to create a new configuration with the same image.
  5. However, when you reach the Base Memory part, make sure you allocate more RAM than the previous VM installation.
  6. Once the configuration is created, proceed to start the virtual machine and check for any improvements.

The error in supr3hardenedwinrespawn can occur due to insufficient RAM allocation for the virtual machine. Try allocating more memory to your new configuration and check for any improvements.


4. Enable virtualization in BIOS

Virtualbox error

  1. Restart your computer and press the F2/F4/F6/F8 or the Del key repeatedly to enter the initial startup screen. Different manufacturers have different setup keys.
  2. Now locate the Advanced tab. If you don’t have an Advanced tab, look for the Advanced Chipset Control or CPU configuration tab.
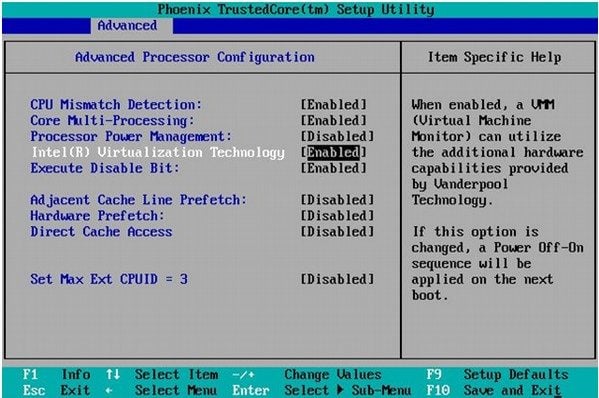
  3. If you are using the Intel processor, make sure Intel Virtualization Technology is enabled.
  4. In case you are using AMD processor, enable AMD-V and so on.
  5. After the virtualization technology is enabled, save the BIOS change and restart your system.
  6. After the system restarts, launch Oracle VirtualBox and check if the error in supr3hardenedwinrespawn is resolved.

5. Change Paravirtualization interface settings

Virtualbox error

  1. Launch Oracle VM VirtualBox Manager.
  2. Right-click on the virtual machines with the error and select Settings.
  3. Open the System tab from the left pane.
  4. From the right pane, access the Acceleration tab.
  5. Expand the Paravirtualiaztion interface menu and select the KVM option.
  6. Click OK to save the changes.
  7. Run the virtual machine and check for any improvements.

6. Reinstall VirtualBox

Virtualbox error

  1. Try installing the latest version of Oracle VirtualBox to resolve the error.
  2. Press Windows Key + R.
  3. Type control and click OK to open the Control Panel.
  4. Go to Programs > Programs and Features.
  5. Select VirtualBox from the list of installed applications.
  6. Click on Uninstall. Click Yes to confirm the action.
  7. Once uninstalled,  go to the VirtualBox download page.
  8. Download and install the latest version of the software.
  9. Reconfigure the machine and check for any improvements.

The VirtualBox error in supr3hardenedwinrespawn can occur due to multiple reasons thus making it difficult to diagnose the problem.

However, we have listed all the possible solutions to help you resolve the issue and get your VMs back online.


[wl_navigator]

Fix: Roku error code 003, 016, 020

Roku is an extremely useful device that allows you to easily watch your Netflix, Hulu, or Sling TV by using your own TV.

It can be extremely useful if you don’t want to carry your iPad or laptop with you whenever you go on a trip. You can simply pack the Roku box with you, and have access to your content no matter where you are on the planet.

Even though Roku is a very useful service, from time to time you might encounter some errors. None of these errors are worrying, but it’s always good to know how to bypass them.

In today’s guide, this is exactly what we will discuss. We will explore solutions for Roku error code 003, 016, and also 020.

Read on to find out more details about each of these errors.


How can I fix the Roku error code 003, 016, and 020?

Roku error code 003:

1. Update your Roku software

  1. Press the Home button 5 times.
  2. Press the Fast Forward button 3 times.
  3. Press the Rewind button 2 times.
  4. Press the Ok button.
  5. Check to see if the issue persists.

2. Make sure you use the Ethernet cable for Roku


Because one of the issues might be caused by a limited amount of WiFi traffic, it is recommended that you use an Ethernet cable for greater speeds. This can also help with the Roku error 014.30 when you’re unable to stream videos.


3. Restart your Roku device


For Roku, simply navigate to Settings, click on System, and then press the System Restart option.

If you’re using Roku TV, then navigate to Settings, choose System, open Power, and choose System Restart.


Roku error code 016


This error code is caused by your Roku not being able to access the network. To resolve this problem, you will need to make sure that your internet is working.

If your internet is activated but Roku still shows the same error code, then try checking your Internet login credentials, and restart your router. This should solve the error 016.

After performing these actions, see if the Roku error code 016 is gone. If it is not, consider contacting Roku support.


Roku error code 020


This error is caused by an HDCP (High-bandwidth Digital Content Protection) error and can happen if your Roku device is not compatible with the protection tech from your TV, and vice-versa. Follow these steps to resolve it:

  1. Disconnect the HDMI cable from both devices.
  2. Turn off the TV that you were using with Roku and disconnect the power cable.
  3. Disconnect the Roku power cable.
  4. Connect the HDMI cable to the Roku player.
  5. Reconnect the TV’s power cable and Roku player power cable.
  6. Turn on both the Roku player and the TV.

In this guide, we explored the best solutions for the Roku error code 003, 016, and also 020. We hope this guide has proven useful in your situation.

Feel free to share your experience with us by using the comment section found below.


[wl_navigator]

Windows 10 November 2019 Update is now on 36.4% of PCs surveyed by AdDuplex

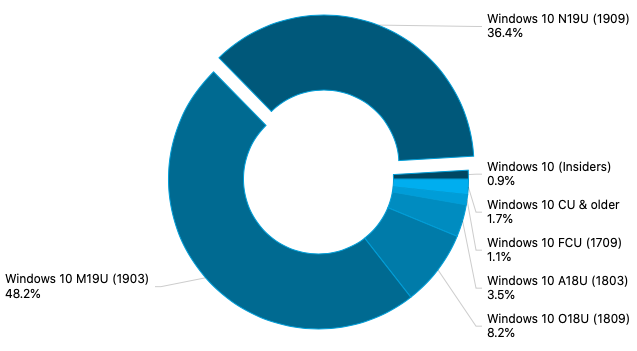
As Microsoft is now expected to release the Windows 10 May 2020 Update today, AdDuplex has published its latest Windows 10 survey based on the data from 90,000 PCs. In May, 36.4% of them were running the November 2019 Update (up 3% since last month), with the May 2019 Update still leading at 48.2%.

The ad network for Microsoft Store apps and games also published new data about the usage of Surface devices. Compared to previous data from January, the Surface Go has become the second most used Surface device (13.8%) after the Surface Pro 4 (16.55%). Other highlights include the Surface Laptop 3 (2.61%) now beating the Surface Laptop 2 (2.54%), while the brand new Surface Go 2 (1.02%) is already more popular than the ARM-based Surface Pro X (0.99%).

Keep in mind that this data on based on devices running apps using AdDuplex ads, so this may not necessarily be an accurate picture of the Windows 10 and Surface ecosystems. However, that’s pretty much the only interesting data we have since Microsoft doesn’t share specific details about the 1 billion devices now running Windows 10.

TunnelBear VPN Review: Great Privacy Solution for Windows 10

As its name suggests, TunnelBear VPN is as strong as a bear. This tool provides a secure and private connection to a less restricted Internet.

Imagine a bear breaking all the direction posts in a wood – that’s what TunnelBear does to your Internet footprints.

Thanks to this VPN software developed by McAfee, LLC, browsing is private from hackers, ISPs, and anyone monitoring the network.

You no longer have to worry about security issues when using public Wi-Fi and other untrusted networks.

TunnelBear doesn’t collect any information about you or how you use your Internet connection.

TunnelBear: the most intuitive VPN for privacy

You know that you can browse the Internet from 23 countries. There are plenty of other VPN providers who have a better spread of servers, that’s true, but they lack other essential privacy features.

try out TunnelBear

To be more precise, TunnelBear offers the following great features:

  • If the VPN connection is disrupted, all unsecured traffic is blocked until it’s safely reconnected
  • Launches at startup remain connected, and you don’t have to worry about re-connecting on restart
  • If you don’t know which country to connect to, you can use the closest tunnel for easy security
  • Connect to the fastest servers on Tunnelbear’s virtual private network
  • Knowledgebase with FAQ and dedicated support staff are always available
  • You can defeat VPN blocking with GhostBear. Your VPN connection will become less detectable to governments, businesses, and ISP
  • TunnelBear uses the strongest AES 256-bit encryption by default

The pricing is the following:

  • the 1-month package: $9.99/mo.
  • the 1-year package: $4.99/mo.
  • the 2-year package: $4.17/mo.

⇒ Get TunnelBear VPN

What do you think of TunnelBear VPN? Let us know your opinion by using the comments area below.

FIX: Windows video app can’t play error 0xc1010103

When playing or casting an MKV video file using the default Windows player, you may encounter the can’t play error 0xc1010103 Windows app error.

This error occurs when the user attempts to play the MKV file using the default player. It can happen if there is an issue with the temp folder or if the GPU driver is outdated.

If you are also troubled by this error, here are a couple of troubleshooting tips to help you resolve the video app can’t play error 0xc1010103 in Windows.

How do I fix the Windows video app can’t play error 0xc1010103?

1. Run Video Playback troubleshooter

can't play error 0xc1010103
  1. Click Start and select Settings.
  2. Go to Update and Securite.
  3. Click on Troubleshoot from the left pane.
  4. Scroll down to Video Playback.
  5. Click on Video Playback and then click on the Run the Troubleshooter button.
  6. The troubleshooter will scan the sytem for any issues with the player.
  7. Click on Continue with this troubleshooter option.
  8. Follow on-screen instructions and apply any recommended fixes.
  9. Close the troubleshooter and restart the computer.
  10. Try playing the video again and check for any improvements.

The built-in Video Playback troubleshooter can help you resolve issues with the video player. If the issue started to occur after installing the Windows update, this would fix any problems with the temporary folder.

2. Update the GPU driver

Windows video app can't play error 0xc1010103

Boot in Safe Mode

  1. Press Windows Key + R to open Run.
  2. Type msconfig.msc and click OK to open System Configuration.
  3. In the System, Configuration window, open the Boot tab.
  4. Under Boot options, check the Safe boot box.
  5. Click Apply and click OK to save the changes.
  6. When prompted to restart, click Restart now.

Update GPU driver

  1. As soon as the PC boots in Safe mode, do the following.
  2. Press Windows Key + R to open Run.
  3. Type devmgmgt.msc and click OK to open the Device Manager.
  4. In the Device Manager windows, expand Display Adapters.
  5. Right-click on the Display Adapter and select Uninstall device.
  6. If your PC has both integrated and a dedicated GPU, uninstall both the devices.
  7. Once the graphic drivers are uninstalled, close the Device Manager.
  8. Press Windows Key +R  to open Run.
  9. Type control and click OK.
  10. In the Control Panel, go to Programs > Programs and Features.
    Windows video app can't play error 0xc1010103
  11. Uninstall all the software related to your graphics processor including Intel Graphic Driver, NVIDIA PhysX System Software, etc.
  12. After the drivers are uninstalled, restart the computer.
  13. Download and install the latest version of graphic drivers from the official website for integrated graphics as well as dedicated GPU.
  14. After installing the graphic driver, restart the computer.
  15. Try playing the video with the error and check if the error is resolved.

Plus, if the steps above seem too complicated, you can choose to update all your drivers safely and manage each one accordingly with this driver software, Fortect Driver Updater.

The can’t play error 0xc1010103 usually occurs due to a glitch with the video player or if the graphic driver is corrupted.

By following the steps in this article, you can resolve the issue with ease. Do let us know which method helped you resolve the issue in the comments.

Fix Netflix errors 5009 and 16004 in a few easy steps

Error codes 5009, 16004 are two pretty common errors one from a very long list of Netflix error codes. These errors can arise for some uses when streaming Netflix movies. These two error messages state:

  • Netflix says Cannot play title. Please try again later. (5009)
  • Netflix says Could not connect (16004)

If you encounter any of these two errors, check out the resolutions below.


How can I resolve the Netflix errors 5009 and 16004?

Cannot play title. Please try again later. (5009)

 1. Restart your home network

restart home network

  1. Turn off your device.
  2. Unplug both your modem and router and wait 30 seconds.
  3. Plug in your modem and wait until no new indicator lights are blinking on.
  4. Connect your router and wait until no new indicator lights are blinking on.
  5. Turn on your device and try Netflix again.

NOTE: This solution is available for Apple TV users.

2. Ensure your network supports streaming

  1. If you are on a work, school, hotel, or hospital public Wi-Fi network then check with your network administrator to make sure streaming services such as Netflix are supported and not intentionally blocked.
  2. If you’re using a cellular data network or satellite internet: then if possible, try a different network. Cellular data and satellite internet connections often have slower connection speeds than cable internet or DSL.

3. Reinstall the Netflix app

netflix apple tv

  1. From your iPhone, iPad, or iPod touch home screen, press and hold the Netflix app until it shakes.
  2. Tap the X in the top left corner of the Netflix icon, then tap Delete. Once deleted, press the Home button to stop the shaking.
  3. Enter the App Store and search for Netflix.
  4. Select the free Netflix app from Netflix, Inc.
  5. Tap the cloud icon. You will need to enter your iTunes password to install the app.
  6. Once installed, tap the Netflix icon.
  7. Enter the email and password for your Netflix account and tap Sign In.
  8. Try Netflix again.

Make sure the issue isn’t being caused by an outdated version of the Netflix app by removing it from your iOS device and reinstalling it.

NOTE: Deleting the Netflix app will also delete any titles you have downloaded to the device. You may need your Apple ID and password to reinstall the app once it has been removed.

4. Try a different network

  1. Press the Home button on your device.
  2. Select Settings.
  3. Select Wi-Fi.
  4. Select a different network and connect to it.
    • If you are unable to use a different internet connection, contact your internet service provider for further assistance.
  5. Once you are connected, try Netflix again.

If using a different internet connection did resolve your issue, but the new connection isn’t your preferred network, we recommend contacting your internet service provider for further assistance.


Netflix says Could not connect (16004)

It typically points to a network connectivity issue that is preventing your device from connecting to your Cast-enabled device. Follow the troubleshooting steps for your device below to resolve the issue.

Chromecast

Chromecast network

If you are streaming from a cellular or satellite connection, your service may not support streaming, or may not meet the minimum streaming requirements. Please reach out to your service provider for further assistance.

Other Cast-enabled devices

If you are streaming from a cellular or satellite connection, your service may not support streaming, or may not meet the minimum streaming requirements. Please reach out to your service provider for further assistance.

If you have completed the steps above but are still having issues connecting to Netflix, contact your internet service provider.

They can help you determine whether your router is properly set up to communicate with the other devices on your home network.

  • Why is Netflix freezing or gets stuck loading?

If Netflix freezes or gets stuck loading, but the rest of your device remains functional, it typically points to information stored on your device that needs to be refreshed. A quick workaround is to exit Netflix and reboot your device.

  • Is Netflix available in my country?

Currently, Netflix is available in 190 different countries. Check out their website if your country is included on the list.


[wl_navigator]

Download TrackOFF VPN: Hide your digital fingerprint

Whether you know it or not, as long as you’re online, you’re littering the Internet with your tracks, so you need to protect your identity and data from miners and identity thieves.

These are often missed out on by antivirus software programs. You can tell that you are being tracked by the number of ads that follow you around the web on your Windows 10 PC.

This is more than a nuisance, but there’s a large and more invisible threat you’re not able to see – your identity and personal life are up for grabs.

What’s worse, with the increasing privacy breaches and ID fraud, there’s more risk that you have no idea about.

Modern tracking threats, aka digital fingerprinting, let data miners steal personal information about you, your web history, shopping habits, and more.

They know where your information is and they want it desperately.

Install TrackOFF VPN to protect your privacy
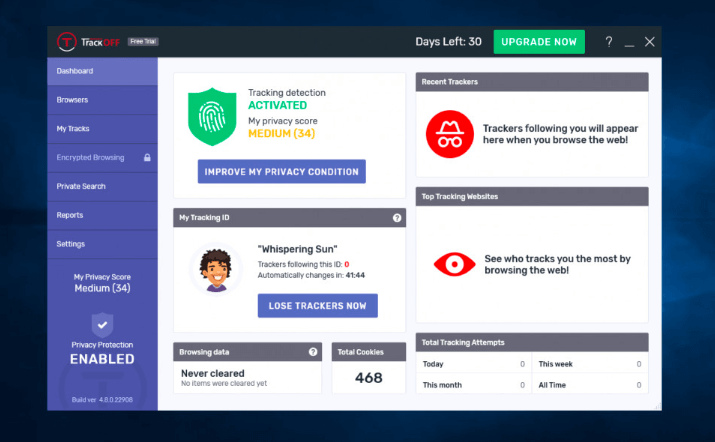
install TrackOFF VPN

If this is already scary for you, then you need to invest in TrackOFF – a privacy software that works alongside every major antivirus and is compatible with every major web browser.

It always lets you know about the newest threats as they arise. With TrackOFF VPN, you can even take a free online scan to see some of the tracks you leave behind.

That’s how you may be well prepared for the worst and enjoy the deserved peace of mind online.

Each time you visit websites, they download cookies to your browser or collect unique data on your device, and use this info to identify you next time you return to the site.

TrackOFF injects fake information into the data that makes up your digital fingerprint, so as to change what trackers and third-parties can see about you.

It also clears those hard-to-erase tracking cookies away from your browser. With TrackOFF Elite, you can enable VPN for a safe, secure, and strongly encrypted browsing experience.


Did you know that 20% of VPNs are leaking your IP address? Want something better?


Benefits of using TrackOFF

Once you install TrackOFF, you need to let it run in the background as it protects your privacy online.

The setup consists of installing an extension in your browser and setting up a Cookie Clearing schedule, and voila, you’re protected!

Some of its amazing benefits include:

  • Prevents online ID theft
  • Shields your Internet browsing history from prying eyes
  • Shows who’s trying to track you and stops them – a list of every website trying to scoop up your info
  • Masks your location revealed by your IP address, to marketers and advertisers
  • Schedules your browsing cleanings if you don’t have time to manually erase your browsing history
  • It helps you search privately, with DuckDuckGo, so you can perform searches with peace of mind that they’ll never be logged
  • Automatically syncs to your browsers and doesn’t degrade your browsing experience
  • It doesn’t store your data
  • It gives you peace of mind during and after your online banking sessions

How TrackOFF VPN works

TrackOFF has a dashboard that gives you a snapshot of the privacy threats that were prevented and statistics on how well you’re being protected.

It also has encrypted browsing that is simple to use with one click to encrypt your browsing and mask your location.

There’s a feature called My Tracks, which easily removes cookies and gets rid of targeted ads, you can also set a schedule, and TrackOFF will remove them for you.

TrackOFF also gives you a full list of tracking attempts blocked, or when your digital fingerprint was last changed.

You also get a privacy score to determine if your software is configured and runs properly, which is influenced by TrackOFF’s various privacy tools and settings.

It integrates seamlessly with your favorite browsers for fingerprint-based protection, and with one click, it clears your fingerprint data history.


TrackOFF software

There are two versions you can choose from with TrackOFF:

  1. TrackOFF Standard
  2. TrackOFF Elite

TrackOFF Standard

TrackOff VPN

With this option, you can see who is trying to track you and get instant notifications about the attempts, remove all browsing history and cookies, or set up scheduled maintenance.

You may also whitelist your favorite websites, and stop hackers and data miners from stealing your identity and life.

Great features include ID theft protection, detailed tracking reports, advanced cookie removal, and private search too.

TrackOFF standard is ideal for casual Internet users who sit at home surfing the web, shopping online, or checking the news and keeping up with social media.

It blocks targeted ads using the automated cookie clearing feature so the annoying ads won’t follow you again, but this doesn’t prevent all ads from appearing like an ad-blocker, just the creepy ads.

In this manner, you don’t have to install a separate ad-blocker extension on your default browser. This VPN solution has got you covered.

It works with Windows and you can install and use it on up to three different personal computers. Supported browsers include Internet Explorer, Chrome, Firefox, and Opera.

TrackOFF Elite

TrackOff VPN

This option is best for active Internet users who are daily checking emails, getting work done, doing taxes, surfing the web, chatting with friends on social media, reading the news, and posting online.

The goal is to keep the most sensitive details, such as your location, private from online trackers.

You can use it on public Wi-Fi networks as it keeps you safe and encrypted form hackers, hide your location.

Even more, you also get VPN data encryption which helps prevent others from logging what you’re doing form any location.

What makes the Elite version better than Standard is it allows you to use the web with military-grade encryption using our no-log VPN network.

Use VPN if you don’t want your ISP spying on you, use your laptop on the go, or don’t want your location exposed.

If you already have an antivirus, you can still use TrackOFF as it protects seemingly innocent websites, advertisers, businesses, and criminals from collecting information about you.

While some viruses might attempt to collect the same data or cause other types of destruction, antivirus doesn’t protect you from trackers and ID thieves waiting for you to merely browse your favorite websites.

It works with Windows, and you can install and use on up to three different personal computers, plus it supports Microsoft Edge, Internet Explorer, Chrome, Firefox, and Opera.

[wl_navigator]

Network security key mismatch? Fix it in 4 easy steps

After entering the password to connect to their secure wireless network, several users have reported the Possible network security key mismatch error.

This error is more common among the Windows 7 users. The cause of the error appears to be wrong security mode, third-party antivirus tools, and as well as issues with the wireless drivers.

If you are also troubled by this error, here are a couple of troubleshooting tips to help you resolve the possible network security key mismatch error in Windows.


How do I fix Possible network security key mismatch error?

1. Check your antivirus

not responding due to a long-running script

  1. Third-party antivirus is known to interfere with the wireless network resulting in the possible network security key mismatch error.
  2. If you have a third-party antivirus installed, try disabling it temporarily.
  3. You can disable the antivirus temporarily from the taskbar.
  4. Right-click on the antivirus icon in the taskbar and select disable temporarily.
  5. Some antivirus software allows you to disable protection for 10 or 15 minutes as well.
  6. Once the antivirus is disabled, try connecting to the wireless network again and check for any improvements.

Uninstall antivirus

Possible network security key mismatch

  1. If the issue resolves when the antivirus is disabled and tends to appear when enabled, try changing the antivirus.
  2. Press the Windows key and type control.
  3. Click on Control Panel.
  4. Go to Programs > Programs and Features.
  5. Select the antivirus from the list of installed apps and select Uninstall.
  6. Click Yes to confirm the action.
  7. Once uninstalled, download and install other antivirus solutions such as Malwarebytes.

2. Change the wireless network security type

Possible network security key mismatch

  1. Press Windows Key + R to open Run.
  2. Type control and click OK to open Control Panel.
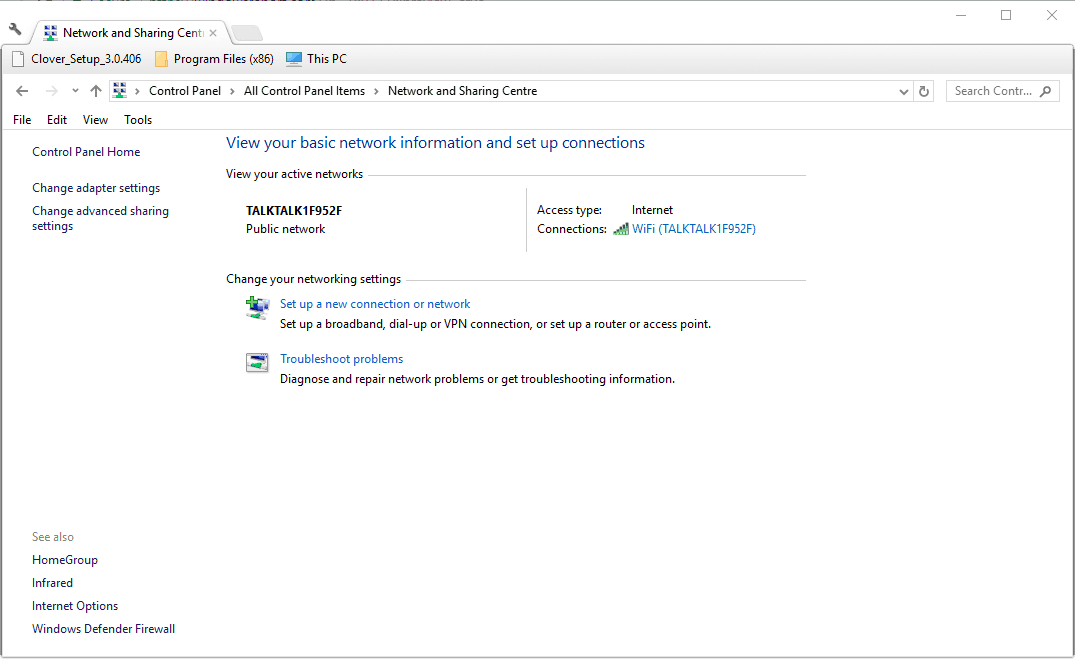
  3. Go to Network and Internet > Network and Sharing Centre.
  4. From the left pane, click on Manage wireless network option.
  5. Locate the problematic network and check the security type displayed in the info bar.
  6. Click the Remove button to forget the network.
  7. Click the Add button.
  8. Choose Manually create a network profile option from the next window.
  9. Windows 10 users, click on Setup a new connection or network option under Change your network settings. and then select Manually connect to a wireless network.
    Wireless key mismatch error
  10. Under Enter information for the wireless network, you want to add, enter the Network name.
  11. For Security type try changing from the one you noted in the previous steps.
  12.  Enter the security key.
  13. Check the Start this connection automatically box.
  14. Click Next.
  15. Check if you can connect to the network without any issues.

3. Reinstall wireless drivers

Possible network security key mismatch

  1. Press Windows Key + R to open Run.
  2. Type devmgmt.msc and click OK to open Device Manager.
  3. In the Device Manager window, expand Network Adapters.
  4. Locate your wireless network adapter and right-click on it.
  5. Select the Uninstall device. Click Yes to confirm the action.
  6. Once uninstalled, click Action.
  7. Select Scan for hardware changes option.
  8. Windows will scan for missing wireless drivers and install the compatible driver automatically.

4. Change your router’s security type

Possible network security key mismatch

  1.  Login to your router admin center using the IP address. You can find more details in the router’s instruction manual.
  2. Once signed in, locate and click on Wireless security settings.
  3. Change the Security Mode to something other than what is already selected.
  4. Click on Apply Changes to save the changes.
  5. Sign out of the router admin center and check for any improvements.

5. Release and renew IP address

Wireless key mismatch error

  1. Press Windows key + R to open Run.
  2. Type cmd and click OK to open Command Prompt.
  3. In the Command Prompt window, type the following command to release the IP address:
    ipconfig/release
  4. Next, enter the following command and hit enter to renew the IP address:
    ipconfig/renew
  5. Close the command prompt.
  6. Try connecting to your wireless network and check for any improvements.

The possible network security key mismatch error can be resolved by changing the security type. However, if the issue persists, check your antivirus and reinstall the network adapter. Do let us know which method helped you resolve the issue in the comments.

Apt-get command not found? Here’s how to fix that

macOS is a popular operating system, but being a UNIX-based operating system, macOS heavily relies on the Terminal for certain functions.

Speaking of the command line, many users reported apt-get command not found while using the terminal, and in today’s article we’ll try to fix that.


How do I fix apt-get not found message on macOS?

1. Use Homebrew instead

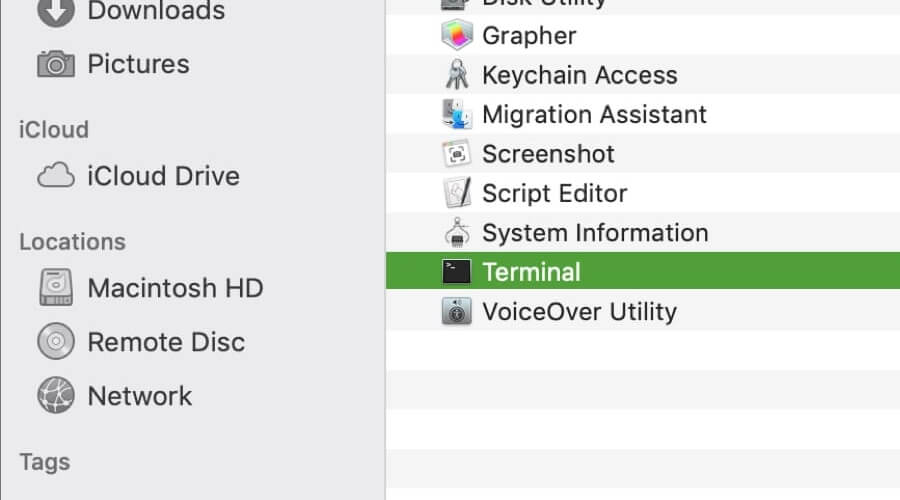
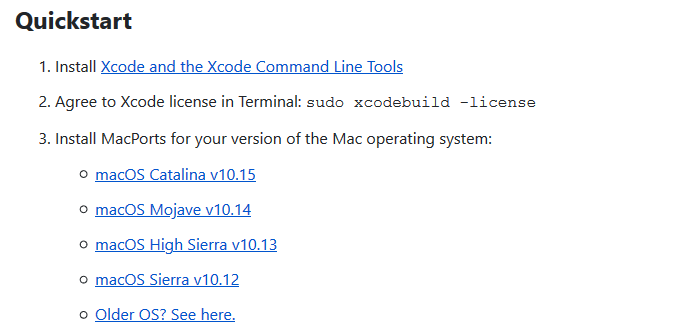
  1. Open Finder and go to the Utilities Now start the Terminal from there.
    terminal open apt-get command not found
  2. Run the following commands:
    • xcode-select –install
  3. After the command is executed successfully, run this command:
    • ruby -e “$(curl -fsSL https://raw.githubusercontent.com/Homebrew/install/master/install)”
  1. After the installation is finished, use the brew install package_name command to install the desired software.

The apt-get command is designed to work with Linux operating systems, most notably Debian, and it doesn’t work in macOS. As an alternative, you need to use the brew command instead.

Brew command isn’t available out of the box, but after installing the components from the above, it should start working on your macOS. It works as an alternative to apt-get and it should work with all of its packages.


2. Use MacPorts

  1. Open App Store from the Dock.
  2. Locate Xcode in the App Store and install it.
  3. Start the application and agree to the Terms of Service.
  4. Start Terminal.
  5. Run the following command:
    • xcode-select –install
  6. Go to the MacPorts website and download the version for your operating system.
    macports download apt-get command not found
  7. Once you install MacPorts, restart the Terminal and run the following command:
    • sudo port selfupdate
  8. After doing that, you can install packages by using the sudo port install package_name

Apt-get command not found message appears because the apt-get command doesn’t exist on macOS, but you should be able to circumvent this limitation by using one of our solutions.


Learn more about macOS

  • Can I use apt get on Mac?

No, macOS doesn’t support apt-get command. Instead, you can use Homebrew or MacPorts to achieve the same results.

  • What is the equivalent of APT get on Mac?

The equivalent of apt-get on Mac are brew install or sudo port install commands.

  • What is apt get on Mac?

Apt-get is a command that you can use in Terminal to install software packages. This command is available on Linux, but Mac has its own alternatives.

  • Is Homebrew safe?

Yes, Homebrew is perfectly safe to use. It’s advised to be cautious when using this tool and only install the packages that you trust.


 [wl_navigator]

Civ 5 Runtime Error: 5 Ways to Permanently Fix the Crash

The Civilization series has been around for years, and one of the most popular entries in the series is Civilization 5. However, some users are reporting a Civ 5 runtime error.

While this error can be due to various factors, it is not impossible to fix, as you will find in this guide.

Why won’t Civ 5 start anymore?

Listed below are some of the potential causes of the Civ 5 runtime error crash:

  • Disabled mods: If you have mods on your Civ 5 game, you need to check all the mods you are using before starting the game. Else, you will get this error message.
  • Corrupt cloud files: Sometimes, this problem can be due to faulty cloud files on your game. You need to delete the corrupt files to solve the problem.
  • Interference from antivirus or firewall: Your antivirus or firewall might be blocking your game, leading to the Civ 5 runtime error dx11. The solution to this is to disable your security software temporarily and probably switch to a more reliable antivirus app.

How can I fix Civ 5 Runtime error?

1. Check your game mods

If you’re running the game with mods, you will get the Civilization 5 runtime error when loading the saved game without the mods.

To fix it, enable all mods you used before and try again. In addition, try loading the game from the Mod Menu with all the required mods enabled. Many users reported that this worked for them, so be sure to try it.

2. Start Steam in Offline Mode

  1. Start Steam and go to Steam > Settings.
    steam settings civ 5 runtime error
  2. Choose the Accounts option in the left pane.
  3. Uncheck Don’t save account credentials on this computer option.
    accounts
  4. Open the Steam menu and select Go Offline.
    go offline civ 5 runtime error
  5. Now, click on RESTART IN OFFLINE MODE.
    restart
  6. Finally, restart Civilization 5.

This is a neat little workaround, and several users confirmed that it fixed the Civ 5 runtime error. So, be sure to try it out.

3. Rename the save folder

  1. Press the Windows key + E and navigate to the path below: C:\Users\<username>\Documents\My Games\Sid Meier’s Civilization 5\Saves\
  2. Now, copy the Saves folder on your Desktop, just in case.
  3. Next, rename the original Saves folder to something else.
  4. Then, finally, restart the game.

Sometimes, a corrupted folder in your game file can cause the Civ 5 runtime error. You need to rename this folder and allow your game to build another one.

4. Remove corrupted cloud files

  1. Launch Steam and navigate to Steam > Settings.
  2. Select the Cloud option.
  3. Uncheck the box for  Enable Steam Cloud synchronization for applications which support it.
    cloud civ 5 runtime error
  4. Now, select Steam > Go offline.
    civ 5 runtime error go offline
  5. Navigate to the path below and select your account folder: C:\Program Files (x86)\Steam\userdata
  6. Next, locate the 8930 directory and delete everything inside it.
  7. Now, launch your game, play a couple of turns, and save the game.
  8. Exit the game, close Steam, and go to folder 8930.
  9. Delete remotecache.vdf file.
    remote cache
  10. From here, launch Steam, go online, and enable Cloud sync.
  11. Finally, start Civ 5. You should receive a message about Cloud Sync Conflict. Select Upload to the Steam Cloud option.

After doing that, the Civ 5 runtime error should be resolved entirely.

5. Check your firewall

A few users reported that their firewall or antivirus caused the Civ 5 runtime error. Therefore, be sure to check your third-party security software.

Some users reported issues with Peerblock, but other firewalls can also cause this problem. So, ensure that Steam and Civilization 5 are allowed through your firewall and antivirus.

There you have it: everything you need to fix the Civ 5 run time error efficiently. You should now be able to play your game again, provided you follow the instructions in this guide carefully.

If Civ 5 is not launching at all on your PC, check our detailed guide to fix it effortlessly.

Feel free to let us know the solution that helped you fix this issue in the comments below.

Seeing the Glyph launcher error 2026? Fix it in just 4 steps

Trion Glyph is a popular digital games platform for PC gamers to manage their game titles. To use Glyph the users need to install the Glyph installer. At times, you may encounter Glyph launcher error 2025 when trying to install or launch the tool.

The error prevents the user from signing into their Glyph account as reported by the users in the Reddit Community.

Can never login always get connection timed our error #2025, also cant access trion website either always just times out and says to check my internet. Any know fixes out there would be greatly appreciated.

If you are also troubled by this error, here are a couple of troubleshooting tips to help you fix Glyph launcher error 2025 in Windows.


How do I fix Glyph launcher error 2025 sign-in issues?

1. Disable VPN connection

Glyph launcher error 2025


  1. Disable and disconnect any VPN client that is running on your computer.
  2. Some VPN clients may not be compatible with Glyph which may result in a connection error.
  3. So, launch your VPN from the taskbar and click on disconnect.

2. Check your Firewall settings

Glyph launcher error 2025

  1. Another reason for the Glypsh launcher error 2015 can be your firewall settings.
  2. If you have a third-party firewall installed, disabled it temporarily.
  3. To disable Windows Defender Firewall, do the following.
  4. Click on Start > Settings.
  5. Open Updates and Security.
  6. Click on Windows Security.
  7. Choose the “Firewall and network protection” option.
  8. Select the currently active network.
  9. Turn off  Windows Defender Firewall using the little toggle switch.
  10. Run the Glyph launcher and check if the error is resolved.

Make sure to enable Windows Defender Firewall once the error is resolved.


3. Add Glyph launcher to Firewall

Glyph launcher error 2025

  1. If disabling the Firewall helped you sign in to Glyph, you can try to add Glyph to the firewall.
  2. Press Windows Key + R to open Run.
  3. Type control and click OK.
  4. Click on System and Security.
  5. Click on Windows Defender Firewall.
  6. From the left pane, click on “Allow an app or feature through Windows Defender Firewall” option.
  7. Click on “Change Settings” in the Allowed apps window.
  8. Choose  “Allow another app” button.
  9. Click on the Browse button.
  10. Navigate to the Glyph installation folder and choose “Glyphclient“.
    C:Program Files (x86)Glyph
  11. Click on Open.
  12. Click Add.
  13. Check both “Private” and “Public” boxes.
  14. Click OK to save the changes.

Now the Glyph launcher should work even if the Windows Defender Firewall is enabled.


4. Reinstall Glyph

Glyph launcher error 2025

  1. As a last resort, try reinstalling Glyph. A fresh install can fix bugs or file corruption issues with the program.
  2. Type control in the search bar and click Control Panel.
  3. Go to Programs > Programs and Features.
  4. Select Glyph and click on Uninstall.
  5. Click on Yes to confirm the action.
  6. Once uninstalled, re-download the installer from the official website and install it.

The Glyph launcher error 2025 is a common occurrence that can be fixed by following the steps in this article. Reinstall or repair Glyph installation as the last resort to fix the error.

Do let us know which method helped you resolve the error in the comments.

[wl_navigator]
FIX: The address you typed is not valid Skype error

Skype for Business comes as a part of the Office 365 suite. Skype for business offers cost-effective collaboration tools for your business. However, while trying to sign in to Skype for Business, you may encounter The address you typed is not valid error.

Several users have reported similar issues in the Microsoft community when signing in to Skype for Business in Windows.

I just installed Office 365 for school use, I’m trying to sign into Skype For Business but it gives me an error every time.
I have tried using the Email I use for school and my personal email but both give the same error.

If you are also troubled by this error, here are a couple of troubleshooting tips to help you fix Skype for Business sign-in issues.


How do I fix the address you typed is not valid Skype for Business error?

1. Check the DNS records of the domain

address you typed is not valid Skype for Business

  1. Incorrect DNS records of the domain can trigger this address you typed is not valid error because Skype for Business is unable to contact the server due to missing or incorrect DNS records.
  2. To fix the issue, make sure you have added correct DNS records on your domain/hosting provider’s website.

Adding DNS records for the domain

  1. Microsoft has a detailed guide on how to add or create DNS records at any DNS hosting provider for Office 365.
  2. You can read more information on the same accessing creating DNS records for Office 365.
  3. The following guide covers, adding TCT or MX record along with CNAME records.

2. Check for pending updates

address you typed is not valid Skype for Business

  1. Previously for similar issues, Microsoft had released an update to fix the bug in Skype for Business.
  2. Check if Microsoft has released a hotfix for the app to fix this specific issue.
  3. Click on Start and select Settings.
  4. Go to Updates and Security.
  5. Click on Windows Updates.
  6. You should see all the pending updates. If none found, click on Check for updates now.
  7. Download and install the pending updates. Check for any improvements.

3. Remove Lync cache

address you typed is not valid Skype for Business

  1. If the issue persists, deleting the Lync cache folder can help you fix the error.
  2. Open File Explorer and navigate to the following location:
    %userprofile%[email protected]
  3. Delete the local user folder.

Clean the registry entry

Skype for Business error

  1. Press Windows Key + R to open Run.
  2. Type regedit and click OK to open the registry editor.
  3. In the registry editor, navigate to the following location:
    HKCUSoftwareMicrosoftOffice15.0Lync
  4. Delete the following key:
    [email protected]
  5. Close the Registry Editor and check if the error is resolved.

Delete Skype Sign-in information

address you typed is not valid Skype for Business

  1. Launch Skype for Business app.
  2. On the sign-in screen, click on the “Delete my sign-in info” option.
  3. Relaunch Skype for Business and try signing in.

4.  Reinstall Skype for Business

address you typed is not valid Skype for Business

  1. If the issue persists, you can try to reinstall the app to fix the issue. This should remove any corruption issues with the app.
  2. Press Windows Key + R to open Run.
  3. Type appwiz.cpl and click OK.
  4. Select Skype for Business and click on Uninstall.
  5. Restart the computer once uninstalled.
  6. Download and install Skype for Business again from the official website.

The Skype for Business error can be resolved by updating the DNS record, clearing Lync cache, or by deleting some registry entries.

Follow the steps in this article and let us know which method helped you resolve the issue in the comments.

[wl_navigator]

FIX: Thunderbird Gmail account could not be verified

Gmail is one of the most popular email service providers in the world. To protect the user identity of millions of users, Google uses a series of security measures. Several users have reported Gmail account could not be verified error when trying to login.

If you haven’t used your account for a few months or login using an unknown device, Google will ask you to verify the identity using one of the security options. At times, when trying to reset the password, you may encounter the Google can’t verify account error.

Follow this article to know how to fix Google can’t verify account error and gain access to your Gmail account.


How do I fix the Thunderbird Gmail account could not be verified error?

1. Use a known computer/device

Gmail account could not be verified error

  1. One of the reasons why Google may ask you to verify the account is if it detects an unknown device trying to access the Gmail account.
  2. If you are using a new device, try to login from a known computer or another device such as your smartphone.
  3. Once you have access to a known computer, visit the Google Account Recovery page.
  4. In the recovery page, you need to enter the email address or the phone number that is associated with your account.
  5. Click next and follow the on-screen instructions to recover your Google account.
  6. After recovering your account, try to login using the new device and check if you can log in without any error.

2. Disable VPN connection

Gmail account could not be verified error

  1. If you have a VPN client enabled, it may trigger a false alarm due to a change in access region, and Google may lock your account.
  2. In case, Google detects a login or recovery attempt from an unknown location (use of VPN changes your real location), it may temporarily block access.
  3. If you have a VPN client, make sure you disconnect it from the internet.
  4. After disconnecting the VPN, relaunch the web browser.
  5. Try Google account recovery and check if that helps.

3. Contact Google Account Recovery Specialist

Gmail account could not be verified error

  1. If you have tried all the ways to recover your Google account and the issue persists, use the Account Recovery Specialist page provided by Google.
  2. The Account Recovery team will review the submitted form for the information and will write back to the user directly.
  3. Go to Contact an Account Recovery Specialist page.
  4. Here you need to submit the information that is associated with your Google account. Make sure to fill the accurate information to receive a better reply.
  5. Use the name associated with your email, the email address, alternate email address to contact you, and link to your forum or twitter post if any.
  6. Enter other required details and click on Submit.

The Gmail account could not be verified error is there to protect the user from losing their account to unauthorized users.

However, at times the protective measures can become an issue for genuine users as well. Follow the steps in this article to fix Google can’t verify account error and regain access to your Google account.

[wl_navigator]

Got the Docker CLR Error 8000405 in Windows? Fix It Easily

When trying to install software or restart your computer, you may encounter the CLR error 8000405; the program will now terminate error in Windows.

This error can usually occur if multiple versions of the .NET framework are installed on the system simultaneously. While having more than one instance of the .NET framework may not be an issue for everyone, it can sometimes create compatibility issues, resulting in the following error.

If you are also troubled by this error, here are a couple of troubleshooting tips to help you resolve the CLR error 8000405; the program will now terminate error in Windows.

How do I fix the Docker CLR error 8000405 in Windows?

1. Run the program as admin

CLR error 8000405
  1. If the issue is with a third-party app, try running the programs as admin.
  2. Right-click on the program icon on the desktop and select Run as administrator.
  3. Alternatively, you can also run the program exe file from the installation directory if necessary. Here’s how to do it.
  4. Open File Explorer and navigate to the following location:
    C:Program Files (x86)
  5. Open the folder with your program’s name.
  6. Locate the .exe file.
  7. Right-click on the .exe file and select Run as Administrator.
  8. The program should start without any error now.

Does nothing happen when you click Run as administrator? Check this guide.

2. Run the program in compatibility mode

CLR error 8000405
  1. Open the File Explorer and navigate to the following location:
    C:Program Files (x86)
  2. Open the program folder with the error.
  3. Right-click on the .exe file and select Properties.
  4. Open the Compatibility tab.
  5. Under Compatibility mode, check the Run this program in compatibility mode for:
  6. Select the appropriate OS by clicking the drop-down menu.
  7. Click Apply and OK to save the changes.
  8. Launch the program again and check for any improvements.

Running the program in compatibility mode can help you resolve the issue if the program you are trying to run is incompatible with your Windows version. Windows will automatically try to run it in the compatibility mode once the option is selected.

3. Check for multiple instances of .NET framework

CLR error 8000405
  1. Press Windows Key + R to open Run.
  2. Type control and click OK.
  3. In the Control Panel, go to Programs > Programs and Features.
  4. Locate Microsoft .NET Framework installations.
  5. If there are multiple instances of .NET framework installed, right-click on the programs and select Uninstall.
  6. After uninstalling the framework, restart the computer to finish the uninstallation process.
  7. After the restart, download and install the latest version of the NET framework from the official website.
  8. Installing the latest version of the framework will eliminate the need to install multiple instances of frameworks on your computer.
  9. Once installed, restart the computer to apply all the changes.

In most of cases, the CLR error 8000405 error occurs if the user has multiple instances of .NET framework installed on their computer. Removing and reinstalling the .NET framework can help you resolve the issue.

The CLR error 8000405 is a common occurrence if the third party you are trying to launch does not have sufficient permission.

It may also occur if the program is incompatible with your Windows OS. However, in most of the cases, it is the multiple instances of the .NET framework that have resulted in the problem.

Follow all the steps in this article individually, and let us know which method helped you resolve the error in the comments.

We also have a guide on how to install Docker on Windows Server, so don’t miss it.

Reinstalling the latest version of .Net Framework can also help you fix other issues like CLR error 80004005; read this guide to learn more.

Fix “What Needs Your Attention” setup error

This error was very common during the Windows 10 version 1903 update from Microsoft. Initially, that OS version was available to the general public as a manual update. However, the update showed as an automatic download on the PC via Windows Update around June.

The Windows 10 May 2019 Update came with a new set of features and improvements like a new light theme, recommended troubleshooting can automatically fix common issues,  there was also a new updated Search experience, and many more features. Interested in a newer version such as May 2020 update? Check out the new features from Windows 10 version 2004.

Many users who tried to install the update encountered the error: What needs your attention: Your PC has a driver or service that isn’t ready for this version of Windows 10.

This error is pretty new and also vague, and it doesn’t mention the specific driver or service that isn’t ready for the update. Despite that, if you’re one of the first “lucky” ones to bump into this issue, we have some solutions for you.

Why is my PC not updating to Windows 10 version 1903? Your update doesn’t work because of the BattlEye folder. Delete it and this should solve the issue. If that doesn’t work, try to upgrade via a ISO image and unplug all the external media devices.

To do that, follow the steps below.

How to fix What needs your attention errors:

  1. Delete the BattlEye folder
  2. Upgrade using a ISO image and no internet
  3. Update your drivers
  4. Unplug all the external peripherals/media devices

Solution 1 – Delete the BattlEye folder

The most common fix is to delete the BattlEye folder. It seems like during the development of Windows 19H1 (aka 1903) there were some GSOD errors resulting in problems with a number of anti-cheat services, BattlEye being one of them.

Those problems spread around a bit and now are causing the What needs your attention error.

The solution is confirmed by many Windows 10 users and it’s pretty simple. You just have to go to C:Program Files (x86)Common Files, find the BattlEye folder and delete it.

After that, the problem should be gone.

Solution 2 – Upgrade using a ISO image and no internet

Along with BattlEye, iTunes and FutureMark could also cause this issue. And that’s not all, because Creative sound adapters and Realtek card readers seem to have the same result.

Some tech savvy users recommend to disconnect your internet and then install the upgrade via a Windows 10 version 1903 ISO image.

Solution 3 – Update your drivers

If the Windows Update failed, make sure you have all your drivers updated. There are two ways to deal with this.

Either go to Control Panel -> Device Manager and go through each device to check for updates and install where necessary or you can choose an automated option. Learn more ways to update drivers in Windows 10.

If you don’t want to waste time manually checking for updates, we recommend using Fortect Driver Updater

After installing it, you can press the big SCAN button to check for the status of your drivers. The scan will check against a real-time updated database of over 3.500.000 drivers.

It is a useful program for updating drivers on your computer. After installing the app, you only need to scan your machine. It will detect outdated drivers and request your permission to update them.

However, a program like Fortect Driver Updater not only downloads and installs drivers, but also manages them by troubleshooting, backing up, and restoring them.

It will automatically select and install the correct driver according to your Windows version. Once all your drivers are updated, you can try installing the Windows Update again and see if it works. If the error message still shows, go to the next solution as incompatible software might be the culprit.

⇒ Get Fortect Driver Updater

Solution 4 – Unplug all the external peripherals/media devices

It seems like another weird issue can trigger the error. If you have an SD card or a USB device plugged in when trying to install version 1903, it may determine inappropriate drive reassignment on Windows 10 computers.

We have to mention that in some cases this is not limited to removable drives and could also apply to internal ones.

To resolve the problem, remove all the external media (USB devices, SD cards, SD card readers, printers, scanners) and then restart the installation of version 1903.

Just to be sure, if you have multiple hard drives or SSD’s, unplug the ones that are not essential and keep only the one on which you install your upgrade. After the upgrade you can plug back in all your external devices.

Another step that you may take is to check the drivers to see if there are any new updates. If there are, install the latest driver updates and then try to do the upgrade.

There’s no need to rush the installation of Windows 10 version 1903 upgrade. But if you’re impatient and want to test out the new features, you can fix potential install issues with one of our solutions.

If you’re interested in solving other Windows 10 v1903 issues, check out our full guides:

Have you succeeded in installing Windows 10 May Update? Did you bump into the What needs your attention error or not? Leave the answers along any other questions in the comments section below.

How to create VPN shortcut in Windows 10

You can quickly connect to VPNs in Windows  7 and 8.1 by clicking the Network system tray icon. However, that’s not so much the case in Windows 10.

Clicking the Network icon opens the Settings app, from which you then have to select your VPN connection and press the Connect button.

Wouldn’t it be great to have a more direct VPN quick connect shortcut on the Windows 10 desktop? This is how you can add a VPN connection shortcut to the Windows 10 desktop.

How can I set VPN Quick Connect shortcuts in Windows 10?

  1. Add a VPN Shortcut to Desktop via the Control Panel
  2. Add a new VPN Shortcut to the Desktop via the Create Shortcut Window
  3. Add a VPN Batch File Shortcut to the Desktop
  4. Add VPNMyWay to Windows 10

1. Add a VPN Shortcut to Desktop via the Control Panel

  1. Firstly, you can add a VPN shortcut to the desktop from Network Connections in the Control Panel. To open the Control Panel, press the Win key + R keyboard shortcut and enter Control Panel in Run.
  2. Click Network and Sharing Center to open the options below.
  3. Click Change adapter settings to open Network Connections.
  4. Right-click the VPN connection listed there and select Create shortcut.
  5. A Shortcut dialog box window will then open requesting to add a shortcut to the desktop. Press the Yes button to confirm and add the VPN shortcut to your desktop.

2. Add a new VPN Shortcut to the Desktop via the Create Shortcut Window

  1. Alternatively, you can add a VPN shortcut to the desktop by selecting the Shortcut option on the desktop’s context menu. Right-click the desktop and select New > Shortcut to open the window directly below.
  2. Then enter rasphone -d VPN connection name in the location text box. Replace VPN connection name with your actual VPN connection name.
  3. Press the Next button, and then enter a title for the shortcut.
  4. Press the Finish button to close the Create Shortcut window.
  5. You can also add the shortcut for the VPN to the Start menu by right-clicking it and selecting Pin to Start.

3. Add a VPN Batch File Shortcut to the Desktop

  1. You can also set up a batch file that connects to your VPN and add that to the Windows desktop as a VPN shortcut. To set up a batch file, first press the Cortana button on the taskbar.
  2. Enter the keyword Notepad in the search box.
  3. Select to open Notepad.
  4. Now copy the text below with the Ctrl + C hotkey: @ echo off Ipconfig|find/I "myvpn" && rasdial myvpn /disconnect || rasdial myvpn
  5. Paste the text to Notepad by pressing the Ctrl + V hotkey.
  6. Delete myvpn from the batch file and replace it with the required VPN connection name. For example, if your VPN was ExpressVPN the batch file would be: @ echo off Ipconfig|find/I "ExpressVPN" && rasdial ExpressVPN /disconnect || rasdial ExpressVPN
  7. Click File > Save As to open the window shown directly below.
  8. Select All Files from the Save as type drop-down menu.
  9. Enter a file title for the batch file. It doesn’t matter what the file title is, but it must end with .bat.
  10. Click Desktop on the left of the Save As window to save the batch shortcut to the desktop.
  11. Press the Save button.
  12. Then you can click the batch shortcut to connect to VPN.

4. Add VPNMyWay to Windows 10

  1. Click the WPNMyWay1.6.zip on this page, press the Download button, and select Direct download to save the program’s ZIP.
  2. Open the program’s ZIP folder in File Explorer, and press the Extract all button.
  3. Press the Browse button to select a folder path to extract the ZIP to, and then click the Select Folder button.
  4. Press the Extract button to extract the ZIP to the selected path.
  5. Open the program’s setup window from the extracted folder to add VPNMyWay to Windows.
  6. You might also need to configure notification area settings. Enter Select which icons appear on the taskbar in Cortana’s search box to open the window directly below.
  7. Switch the VPNMyWay notification icon on if it’s off.
  8. Then you can click the VPNMyWay system tray icon in the snapshot below to connect to your VPN.

VPNMyWay is a small freeware program that adds a VPN connection shortcut to Windows 10.

It adds a connection icon to the system tray (or notification area) that you can click to connect or disconnect from your VPN. This is how you can add VPNMyWay to Windows 10.

So there are a few ways to add VPN quick connect shortcuts to Windows 10. With a VPN shortcut on the Windows 10 desktop, you can now connect to your VPN in just one or two clicks.

With so many options to choose from, it becomes hard to grasp the thought that they aren’t as secure as they claim to be.

[wl_navigator]

FIX: Minecraft failed to authenticate your connection

When trying to join a Minecraft server, you may encounter the failed to authenticate your connection error. As the error indicates, the users are unable to connect to the servers and play the game.

This error usually occurs when there is a glitch in the server or if the connection is not stable. For the game to work, the user must have a stable connection.

If you are also troubled by this error, here are a couple of troubleshooting tips to help you fix the failed to authenticate your connection error in Minecraft.

How do I fix the Minecraft failed to authenticate your connection error?

1. Perform a power cycle

  1. Power off the router by unplugging the power cable from the wall outlet.
  2. Locate the power button on the back of the router.
  3. Press and hold the power button for 30 seconds.
  4. Plug the router back in and press the power button to turn it on.
  5. Launch Minecraft and try connecting to the server. Check for any improvements.

Performing a power cycle can help you resolve the issue if the internet cache has built up corrupting the router. This can result in connection issues with the server. A quick power cycle can help you resolve the issue.

2. Force close the Minecraft launcher

failed to authenticate your connection
  1. Right-click on the taskbar and select the Task Manager option. Alternatively, you can also press Ctrl + Alt + Del to open the same.
  2. In the Task Manager window, click the Name tab to sort the services in that order.
  3. Right-click on the process related to Minecraft.
  4. Select End task.
  5. Once the process is closed, close the Task Manager.
  6. Wait for a few minutes and then relaunch Minecraft launcher.
  7. Try connecting to the server and check for any improvements.

Force restarting the process could help you resolve the issue if the program failed to launch all the files associated with it successfully.

3. Sign out and sign in

failed to authenticate your connection
  1. Launch Minecraft.
  2. Click on the username option and select Log Out.
  3. The launcher will log out of your account associated with the game.
  4. Click on Login and enter the Minecraft credentials to log in.
  5. Try connecting the server and check for any improvements.

4. Connect using Direct Connect

failed to authenticate your connection
  1. Launch the Minecraft launcher.
  2. Open the server list screen.
  3. Click the Direct Connect button.
  4. Assuming you are using Hypixel server, type stuck.hypixel.net.
  5. Click the Connect button.
  6. It may take a few minutes to establish the connection, so wait for the connection to establish.

At times, instead of connecting through the server list, you can use the Direct Connect feature to connect to the server.

The Minecraft failed to authenticate your connection error is a common occurrence with Hypixel Minecraft servers.

It can occur due to the server issues as well as an unstable network connection. Follow all the steps in this article to diagnose and fix the problem. Do let us know which method helped you resolve the issue in the comments.

SOLVED: VPN won’t work on Windows Server 2012

A VPN can be installed and configured on a Windows Server 2012 by running the Setup Anywhere Access wizard and selecting the VPN option.

When you choose to enable this option using the wizard, roles or features such as Remote Access, DirectAccess and VPN (RAS), IP and Domain Restrictions, IIS Management Scripts and Tools, Network Policy and Access Services Tools, and Windows Internal Database are installed on the server.

It is also possible to enable these roles and/or features from the Server Manager or PowerShell command-lets, but it is however recommended to enable it through the wizard itself.

Windows Server 2012 allows client machines to join their server without being in the company network through the Remote Domain Join feature.

So, if VPN is enabled on the server, you can connect a remote client to the local network via your VPN, and run the Connect wizard then join the remote client to the server – a simple and straightforward process.

It is important to note, however, that the Server 2012 automatically manages to route for the VPN, so Routing and Remote Access (RRAS) UI is hidden on the server to prevent tampering of these settings.

VPNs are also deployed such that there’s little need for manual configurations on the server or client.

If correct TCP ports are open on the firewall and sent to the server, and the VPN was enabled while running the wizard, the VPN should work instantly, with proper protocols selected.

Users of the Windows Server 2012 have reported concerns when their VPN is not working with server 2012, and this article looks at some of the common issues and their solutions.

What can I do if VPN won’t work on Windows Server 2012?

  1. Error 850
  2. Error 800
  3. Error 720

1. Error 850

  1. Go to your VPN’s settings on the Networking tab of the VPN connection, open the properties of IPv4, and click Advanced.
  2. Under Advanced TCP/IP settings, clear the checkbox for Use default gateway on remote network to ensure the network and Internet connection are running.

VPN not working server 2012

When this error displays, the message reads: The Extensible Authentication Protocol type required for authentication of the remote access connection is not installed on your computer.

If you set up the VPN connection manually, then you’ll get this error when VPN is not working with server 2012.

This error shows that none of the protocols have been selected in the VPN connection properties, so to fix this, you need to select Allow these protocols on the Security tab of the VPN connection.

Microsoft CHAP Version 2 (MS-CHAP v2) would be automatically selected if you click this option, then click OK to apply the changes.

If you get Internet or network resource access issues, you could be using the default gateway of the remote network. Use the steps detailed above to fix this in no time.

2. Error 800

  1. Ensure that 443 is allowed and sent to the Windows Server 2012 and that the correct SSL certificate is bound to the default website for the 443 port and the same with the SSTP port.
  2. If you want to know that port 443 is blocked, you need to check if you can browse RWA from outside, if you can then it is open, otherwise it is blocked.
  3. To verify certificates (RRAS and IIS), open the IIS Manager on Server Essentials, and click Open Bindings for the default website.
  4. Go to Site Bindings page and select the binding for port 443 with the blank hostname, and click Edit.VPN not working server 2012
  5. On Edit Site Binding page, click View.VPN not working server 2012
  6. On Certificate Windows, chose Details and make a note of the Thumbprint of the certificate.
  7. You can also use this PowerShell command to display the thumbprint of the certificate active on the default website:  Get-WebBinding | Where-Object {$_.bindinginformation -eq "*:443:"} | fl certificateHash
  8. Open Routing and Remote Access Management, right-click the server name, open its properties.VPN not working server 2012
  9. Click on the Security and click View next to the Certificate. You should have the same certificate thumbprint here as well.

Note: If this is a different certificate, change the certificate to match the one on the IIS. Otherwise, you may use this command to modify the thumbprint of this certificate for the Secure Socket Tunneling Protocol (SSTP) Service:

reg add HKEY_LOCAL_MACHINESYSTEMCurrentControlSetServicesSstpSvcParameters /v SHA1CertificateHash /t REG_BINARY /<thumbprint recorded from previous step> /f

This error displays as The remote connection was not made because the attempted VPN tunnels failed.

When this happens, the VPN server might be unreachable. If this connection is attempting to use an L2TP/IPsec tunnel, the security parameters required for IPsec negotiation might not be configured properly.

This connection failure could be because either 443 isn’t allowed on the firewall or there’s a certificate mismatch in the RRAS and IIS (default website).

To resolve this issue, pay attention to the guidelines above.

Once you ensure that the certificate on the Default Web Site and SSTP are the same, the problem should go away.

3. Error 720

  1. Open Routing and Remote Access console.
  2. Open the server Properties.VPN not working server 2012
  3. On the server properties, assign a valid static IPv4 address pool for the VPN clients, and exclude it from DHCP server scope.

Note: On certain occasions, it has been noted that the on-premise client would show connected to the hosted Windows Server 2012 R2 Essentials.

However there may not be any connectivity between the VPN client and the Server Essentials.

In such scenarios, check the events for RemoteAccess-MgmtClient and RemoteAccess-RemoteAccessServer on the Event Viewer.

VPN not working server 2012

This error displays as A connection to the remote computer could not be established. You might need to change the network settings for this connection.

If a VPN client is unable to obtain an IP address from the VPN server, then you may get Error 720 when the VPN is not working with server 2012.

In Server Essentials, usually, the DHCP is hosted on a different device.

Did any of these solutions help with the VPN not working server 2012 issue on your computer? Let us know by leaving a comment in the section below.

When this doesn’t happen, VPNs can be installed and configured. That’s what you can clearly do on Windows Server 2012.

  • Is Windows Server 2012 r2 still supported?

Yes, it’s still supported. The end-of-extended support date for Windows Server 2012 r2 is Oct. 10, 2023.

[wl_navigator]
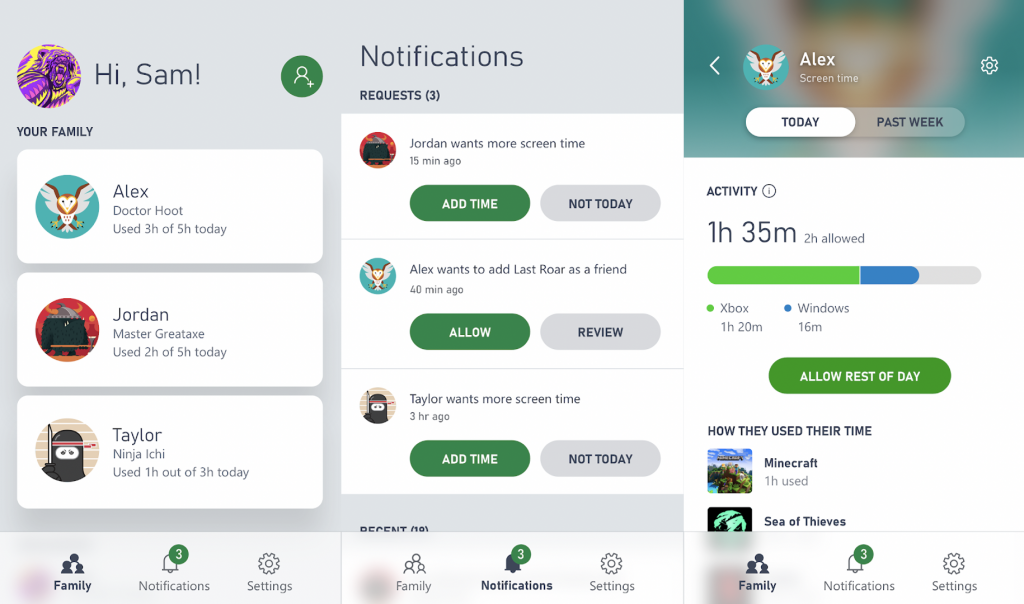
 

How to download and install CyberGhost VPN on Windows 10

As the late trends dictate, we’ll need to protect from privacy intrusion, creeping hackers, and geo-location restrictions.

For all of those, we recommend VPN solutions, or, to be precise CyberGhost VPN for Windows 10.

If there’s one thing in the tech world that took the focus in the past few months, that’s Internet privacy and security.

Data leaks, ransomware attacks, and net neutrality fuss created a lot of concerns for freedom-loving internet consumers.

We should’ve expected something like that, taking into account that the World Wide Web has become an essential part of modern civilization and thus a lucrative market for both legal and illegal business models.

You can choose any VPN solution and protect yourself to some extent. However, only the premium solutions come with enough features to cover all main concerns:

  • Privacy so you can surf and download anything anonymously
  • Wi-Fi network protection
  • Ways to avoid geo-restrictions
  • All VPN features for all devices, including handheld devices and PCs.

That’s what CyberGhost brings to the table, packed in a simple interface and for a fairly affordable price. So, today, we’ll show you how to download and install CyberGhost.

If you decided to take the VPN game to the top, make sure to check the steps we provided below.

How to download and install CyberGhost VPN in Windows 10

  1. Navigate to the official CyberGhost VPN site to download the Cyberghost desktop client.
  2. Run the installer in order to install the application on your PC.
  3. Choose the country of choice and select extra features.
  4. Click on the Start Anonymous Surfing and you’re good to go.download cyberghost windows 10

CyberGhost VPN is a full-premium subscription-based application. However, every new user gets a 45-day money-back guarantee which should be enough if you change your mind

We can argue that there are multiple free-to-use solutions out there, but if you tried them out, you’ll know how they slow down the connection and affect the overall experience.

You can navigate to IP Location Finder and check the current geo-location. After that, you can check the additional tools, or obtain the smartphone version of CyberGhost and browse anonymously while on the move.

With that, we can conclude this article. As a side note, we’re indeed partnered with CyberGhost, but it’s your choice and your choice only where to allocate your foundings.

What we can advise is to give it a try, check what’s so special about this individual VPN solution, and decide for yourself.

In addition, make sure to share your experience with this Kape Technologies solution in the comments section below.

Delivery failed to these recipients in Microsoft Exchange

Sometimes after sending an email, you may encounter the delivery has failed to these recipients or groups error while using the Exchange Server. The most common reason for this error that your email address is flagged as spam or it is no longer allowed to send messages outside of your organization. Contact your email admin for assistance.

As the error message indicates, it can occur if your account is flagged for sending spam or if it is blocked.

If you are also troubled by this error, here are a couple of troubleshooting tips to help you resolve the delivery has failed to these recipients or groups error in Windows.

How do I fix delivery has failed to these recipients or groups?

1. Check if the account is blocked

delivery has failed to these recipients or groups

  1. Open Exchange Admin Center.
  2. Click on Protection and select Action Center.
  3. Check if any of the users are blocked.
  4. Click on Unblock Account option in the description pane.
  5. Click Yes to confirm the action.
  6. Try sending the email and check if the error is resolved.

Microsoft may block the user account due to suspected outbound spam. If you are an administrator for the Office 365 account, you can unblock the account by following the steps above.


2. Check if your account is compromised

delivery has failed to these recipients or groups

  1. Begin with analyzing the email activity of the user account from the Reports section to identify the volume of the email sent.
  2. You may also need to perform detailed email log analysis via Messages Trace to understand the type of emails sent from the user’s account.
  3. After analyzing the account and going through the details you may able to check if your account is compromised or not.

What to do if the email account is compromised?

  1. Make sure you reset the password of the email account. Also, make sure the password is at least 8 characters long and secure.
  2. You may also want to scan the system with antivirus. Use Malwarebytes for deep scan and cleaning features.
  3. Download and install any pending Windows update. Make sure the automatic updates are enabled as well.
  4. Remove any auto forwarders or auto-replies set for the account. This will prevent any unauthorized access to the account.
  5. Disable email header spoofing, enable DKIM record from DNS Management.

3. Remove the original email address

delivery has failed to these recipients or groups

  1. If the error occurs while using the Dynamic Distribution List option, do the following.
  2. First, backup any email necessary.
  3. Make sure you remove the original email address/account.
  4. Add the user again in Exchange.
  5. Next, add the SMTP address to the users’ profile.
  6. Additionally, you can also select which account you want their outgoing email to be sent as.

4. Check for bad email habits

Exchange recipient error

  1. The error can occur if the users are using outlook contacts for the internal user whose addresses may have changed.
  2. It is also possible that the user is replying to an old email who’s recipient info has changed since.
  3. Make sure the users are not using an Outlook contacts group with bad info.
  4. If the issue persists, try testing from a web client for the GLA related issues.

The delivery has failed to these recipients or groups error in Outlook /Exchange can occur if the user account is blocked for suspected spam or if the user is following bad email practices.

Follow all the steps in this article and let us know which method helped you resolve the error in the comments.

[wl_navigator]

FIX: A name has not been set for this YouTube account

YouTube allows users to save videos for offline viewing at their convenience. However, some users have reported A name has not been set for this account YouTube error when trying to save a video.

Apart from saving the video, this error can also occur while uploading a video or even logging into your YouTube account. The error, as the message indicates, occurs if the user has not added a name to their account.

If you are also troubled by this error, here are a couple of troubleshooting tips to help you resolve the A name has not been set for this account YouTube error.


How do I fix A name has not been set for this account on YouTube?

1. Add an account name

A name has not been set for this account

  1. Go to the YouTube account page.
  2. Open the Personal Info tab.
  3. Under the Profile section, click on the Name option.
  4. In the name window, type your name and save it. Click Done to save the changes.
  5. Go back to the Personal Info tab.
  6. Click on the Nickname option.
  7. Enter a nickname for your account.
  8. Click on Done to add a nickname.

On your Phone

  1. Open the YouTube app on your smartphone.
  2. Tap on the channel name.
  3. It will ask you to set a new name for your account.
  4. Add a new name to your account and save the changes.
  5. Close and relaunch the YouTube app and check for any improvements.

If the issue persists, try to sign out and sign in again. At times, a simple logout can help you resolve the issues.


2. Check for service outage

A name has not been set for this account

  1. If changing the name does not resolve the issue, check for the service outage.
  2. Google announces any issues related to their products in the Product Forum.
  3. Check the Google Product Forum for any service outage announcements.
  4. Any service-related issues will be fixed automatically by the company, and you don’t need to take further steps on your end.

3. Reset cache and data

A name has not been set for this account

  1. If the issue is only occurring on your smartphone, try clearing the cache and data.
  2. Tap on Settings.
  3. Go to Apps and tap on Apps.
  4. Tap on Storage.
  5. Tap on the Clear Cache button.
  6. Once the button is greyed out, open the YouTube app , and check if the error is resolved.
  7. If the issue persists, open YouTube app Setting again.
  8. Tap on the Clear Data button.
  9. Confirm the action by tapping on Yes. Note that clearing the data will clear all the saved downloads from your app.
  10. Relaunch the YouTube app and check for any improvements.

The A name has not been set for this account YouTube error occurs if the YouTube account you are trying to access does not have an account name.

Follow the steps in this article to add a name to your account, and that should help you resolve the error.

[wl_navigator]

OneDrive Error 0x8004deb2: How to Fix it

Even though OneDrive is one of the best online sharing and storage applications, many reported OneDrive error 0x8004deb2 while using it.

This error is similar to OneDrive sign-in issue 0x8004e4be, so you might want to check that guide as well. Without further ado, let’s get started and see how to fix this error message.

What causes the 0x8004deb2 error in OneDrive?

  • Issues with Windows credentials can sometimes cause this error message.
  • OneDrive might be corrupted, thus causing this and other issues to appear.
  • Your registry isn’t properly configured, which can lead to this error.

How can I fix the error 0x8004deb2 error in OneDrive?

1. Try modifying the Windows 10 credentials settings

  1. Completely close any Microsoft Office applications that are running.
  2. Type control panel inside the Cortana search box and click the first option from the top of the results.
  3. Click the option User Accounts, select Credential Manager and then click Windows Credentials.Windows credentials - OneDrive 0x8004deb2
  4. Delete all the credentials found in that list
  5. Inside Cortana, search for regedit, and then right-click Registry Editor and choose Run as administrator.
  6. In the Registry Editor, for Office 2013, browse to: HKEY_CURRENT_USER\Software\Microsoft\Office\15.0\Common\Identity
  7. For Office 2016, browse to: HKEY_CURRENT_USER\Software\Microsoft\Office\16.0\Common\Identity
  8. If you can find any folder listed under Identities, delete them by right-clicking the entry.
  9. Try to see if this resolves the issue. If not, please try the next method.

2. Restart the OneDrive app

Closing the OneDrive app:

  1. Press the Win+X keys on your keyboard and select the Windows PowerShell(Admin) option.
  2. Run this command inside the PowerShell window: taskkill /f /im OneDrive.exeClosing OneDrive in PowerShell command - OneDrive error 0x8004deb2
  3. Wait for the process to be completed.

Open OneDrive again:

  1. Search for the OneDrive app by using the Cortana search box.
  2. Open the application by clicking on it.
  3. Log into your account and finish the setup of the app.

3. Remove OneDrive and then re-install it using PowerShell

To uninstall:

  1. Press the Win+X keys and click the option Windows PowerShell(Admin).
  2. Run the following command in PowerShell: taskkill /f /im OneDrive.exe
  3. Wait for the process  to complete, and then run the following commands (depending if you have a 64 or 32-bit version of Windows):
  4. For a 64-bit version: %systemroot%\SysWOW64\OneDriveSetup.exe /uninstall
  5. For a 32-bit version: %systemroot%\SysWOW32\OneDriveSetup.exe /uninstall

To re-install the application:

  1. Open PowerShell(Admin) again by using the steps we explained above.
  2. Type the required command inside the Command Prompt and run it by pressing Enter.Windows PowerShell command - OneDrive 0x8004deb2
  3. For 64-bit version: %systemroot%\SysWOW64\OneDriveSetup.exe
  4. For 32-bit  version: %systemroot%\SysWOW32\OneDriveSetup.exe

After the process is completed, it is recommended that you restart your PC so the clean-up process can remove the remaining system files as well.

4. Modify values inside Registry Editor

  1. Press the Win+R keys to open the Run dialog box.
  2. Type regedit and press Enter to run the command.
  3. Accept any UAC notifications that pop-up, confirming that you have administrator rights.
  4. Inside the Registry Editor window and navigate to the following location: HKEY_CURRENT_USER\ SOFTWARE\Microsoft\OneDriveRegistry editor folder - OneDrive 0x8004deb2
  5. Change the value of the EnableADAL entry from value 1 to 2.
  6. Restart the OneDrive app.

We hope that one of the solutions mentioned in this guide has helped you get rid of the OneDrive 0x8004deb2 error code.

Unfortunately, this isn’t the only error, and we already covered the 0x8004dec5 OneDrive error in one of our previous guides.

If you would like to contact us, or if you have any other suggestions, please use the comment section in this article to do so.

FIX: OneDrive for Business error 0x8004de90

We understand how important it is for you to be able to use all of the capabilities of the OneDrive Business application. A large number of users have reported on different online forums that they encounter the error code 0x8004de90.

As the error message suggests, OneDrive fails to identify the setup parameters that you set while going through the installation wizard. This can cause a lot of frustrations to users, especially if you encountered this error while working on a deadline.

Here is what one user had to say about this issue on the SpiceWorks forums:

I cannot access my OneDrive at all and I am one of the O365 admins. When I use the desktop app I receive an error stating “your OneDrive has not been setup” Error code: 0x80004de90.

We found some of the best method to apply if you find yourself in this situation. Please make sure to follow the steps presented in this guide carefully so no other issues may arise.


How can I fix the OneDrive Business 0x8004de90 error?

1. Close and re-launch OneDrive

To close it:

  1. Press the Win+X keys on your keyboard -> choose PowerShell(Admin) or Command Prompt(Admin) from the list.WinX menu PowerShell - OneDrive Business error 0x8004de90
  2. Inside the command prompt window -> type and run the following command: taskkill /f /im OneDrive.exe
  3. You can close the command window now.

To re-open it:

  1. Click the Start button -> search for OneDrive
  2. Choose the OneDrive desktop app from the list.
  3. Log into your account by using the same credentials for the Microsoft account that you’re using.
  4. Follow the on-screen instructions to complete the setup.

Encountered the Onedrive error code 0x80040c81/0x80040c82? Here’s a fix


2. Edit permission settings by using the SharePoint admin center

OneDrive logo - OneDrive business error 0x8004de90

Note: The settings that are going to be described in this method can only be applied by the Office 365 administrator. If you are not the admin, you will not have access to these settings.

  1. Inside the SharePoint admin center and click User profiles.
  2. Click the People section and Manage User Permissions.
  3. Add the specific user name, group, or users to the list.
  4. Scroll down to the Permissions section and check the box next to the option Create Personal Site.
  5. Click OK to apply the settings.
  6. Check to see if the issue is resolved by opening OneDrive again using the user name that had issues.

3. Reset the OneDrive app

Note: Before resetting the app, please be aware that taking this action will disconnect OneDrive and will affect your synced connections, but you won’t lose any files in the process.

  1. Press the Win+R keys on your keyboard to open the Run window.
  2. Enter the following command, and run it by pressing the Enter key:
    • %localappdata%MicrosoftOneDriveonedrive.exe /resetRun dialog box - OneDrive Business error 0x8004de90
  3. Click the Cortana search box -> type OneDrive -> re-open the application to see if the issue is fixed.

4. Uninstall and re-install OneDrive

To uninstall:

  1. Press Win+X keys on your keyboard -> click PowerShell(Admin).
  2. Inside the command prompt window -> type and run the following command: taskkill /f /im OneDrive.exeCommand in PowerShell - OneDrive error 0x8004de90
  3. Copy-paste and run the following commands, depending on the version of Windows you’re using.
    • For a 64-bit version: %systemroot%SysWOW64OneDriveSetup.exe /uninstall
    • For a 32-bit version: %systemroot%System32OneDriveSetup.exe /uninstall

To re-install:

  1. Re-open they PowerShell(Admin) window by following the first step of the uninstall process.
  2. Type the corresponding command inside the command prompt, and run it:
    • 64-bit version: %systemroot%SysWOW64OneDriveSetup.exe
    • 32-bit  version: %systemroot%System32OneDriveSetup.exe
  1. After the installation process is completed, please restart your computer.
  2. Try to see if the issue is resolved by re-opening the OneDrive app.

In this guide, we explored some of the best methods available online that could help you solve the 0x8004de90 error code inside OneDrive Business.

We presented the methods making sure to start with the least-invasive, and finishing with the most invasive options. This ensures that you won’t need to worry about file corruption or loss of data.

Please feel free to let us know if this guide has proven helpful in your situation. You can do so by using the comment section found below this article.


[wl_navigator]

Seeing the OneDrive authentication error? Try this fix

A number of users have reported that they encounter the message Authentication error: Something went wrong. Please try again when trying yo use the OneDrive app to share different elements.

There seem to be two scenarios in which this error message appears:

  • trying to share app data
  • trying to share OneDrive files and folders

Here is what one user had to say about this issue on the Microsoft forums:

I shared an app and people in my organization and  I can’t access it due to one-way authentication error. I need help

Because we understand how important it is for you to be able to share the data that you and your co-workers need, in today’s guide we will have a look at some of the most efficient methods to try in this situation.


How can I fix the Authentication error in One Drive?

Make sure users have permission to access the shared OneDrive folder

If you want to share the link using email:

  1. Log into your OneDrive account using the same credentials that were used when the connection between PowerApps and OneDrive was created.
  2. Select the folder that contains the file you want to share -> select Share.onedrive-share - OneDrive authentication error
  3. Inside the newly opened dialog box -> select Email.onedrive-email - OneDrive authentication error
  4. Add the specific email addresses that the app users will utilize to sign in to OneDrive.
  5. To change the permission levels, select the option Anyone with the link can edit.
  6. Select the options that you need in your circumstances (Allow editing, Set expiration date, Set password)OneDrive link settings - OneDrive authentication error
  7. Click Apply -> Share.

OneDrive shows you the athumbs.db error? Fix it once and for all


If you want to share the link using a text message or website:

  1. Navigate to the OneDrive website.
  2. Log in using the same credentials previously used.
  3. Pick the specific file or folder you want to share by clicking on the circle found next to the item/items.
  4. Select Share from the top of the page.Share button - OneDrive authentication error
  5. Click the option Anyone with the link can edit and choose the permission level (Allow editing, Set expiration date, Set password).
  6. Click Apply to finish settings up the link -> share it with your co-workers.

Note: When sharing folders with Edit permissions, the end-users will be able to add the shared folder to their own OneDrive. This allows them to have the folder at hand, and they can move items between folders. Another big advantage of using this method is that the users are allowed easy access offline, and the files also get synced automatically.


The two methods mentioned above should allow you to share your data, files, and folders using OneDrive without any issues.

If you find that you are one of the end-users, then recommend this article to the user that wants to initiate the sharing process.

If you had good results by using these methods, please feel free to share it with us by using the comment section found below this article.


[wl_navigator]

FIX: AT&T U-verse gateway authentication failure

While setting your new gateway or working with your existing gateway you may encounter Gateway authentication failure. please contact your service provider error.

This error can occur due to multiple reasons including not connecting the right cable in the ONT port as well as the user account not being properly provisioned for the new gateway.

If you are also troubled by this error, here are a couple of troubleshooting tips to help you resolve Gateway authentication failure, please contact your service provider error.


How do I fix Gateway authentication failure U-verse AT&T error?

1. Check the cable and ONT port

Gateway authentication failure U-verse

  1. The gateway authentication error can occur if you don’t have the right cable in the ONT port.
  2. Make sure you have the Ethernet cable connected to the right ONT port.
  3. If you are not sure about the ONT port, refer the user guide provided with the router/modem.
  4. Even if the cable is connected to the correct ONT port, make sure it is firmly connected.
  5. Sometimes, a loose connection also creates issues.
  6. Once connected, try to set up the gateway and check for any improvements.

2. Perform a power cycle

Gateway authentication failure U-verse

  1. Turn off the modem by turning off the power supply.
  2. Next, unplug the Ethernet cable from both ends.
  3. Wait for few minutes and leave the modem idle in the meantime.
  4. Reconnect the cables to the modem and turn it on.
  5. Try accessing the gateway again and check for improvements.

3. Reset the modem

U-verse authentication failure

  1. Press and hold the reset button located on the rear side of the modem for 35 seconds.
  2. When the lights start blinking, release the button.
  3. Make sure the Modem is turned on.
  4. Note that resetting the modem will also reset any settings saved in the device.
  5. Try accessing the gateway again and check for any improvements.

4. Check for an outage

U-verse authentication failure

  1. Go to MyATT page.
  2. Log in using your member ID and password.
  3. Click on the Fix it now! Support tools link under Help with my service section.
  4. A test will automatically run and scan for any issues with the gateway.
  5. Follow on-screen instructions to apply the recommended fixes.

If the issue persists, try contacting the service provider. The tech support can help you resolve the issue or offer you a replacement gateway if the issue cannot be resolved.

The Gateway authentication failure. please contact your service provider error can be usually resolved by resetting the modem. However, if the issue persists after trying all the troubleshooting tips, contacting the service provider is recommended.

[wl_navigator]

FIX: OneDrive for Business credentials needed error

If you encounter the Credentials needed error while trying to sync files to your OneDrive for Business app on your Windows 10 PC, you have to know you’re not the only one experiencing this issue.

A wide range of users have had to deal with the same problem, and because of that, we can find a big number of complaints on different online help forums.

Here is what one user had to say about this issue on the Microsoft Answers forums:

I seem to be having an OneDrive for Business credentials needed sync error. There is nowhere for me to enter any credentials to fix my sync error.I have tried the Repair Tool and it did nothing. The items that say they can’t sync keep changing as well, so I have multiple documents that won’t sync apparently.

Because it is extremely important to be able to use your OneDrive Business app properly, in today’s fix article we will explore some of the best methods to try out in this situation.

Please make sure to follow the steps presented in this guide closely to ensure that no other complications will arise.


How can I fix the OneDrive Business credentials error?

1. Download OneDrive for Business Next Generation Sync Client

Microsoft sync client - OneDrive Business credentials needed error

Because a large number of users have encountered one of the many variations of syncing errors inside OneDrive for Business, the developer team has released a new version of the Sync Client to tackle this issue.

In case that you’re using version 2013 or 2016 of the OneDrive for Business app, then you will need to download and install the newly developed OneDrive for Business Next Generation Sync Client.

Follow the steps presented in the Microsoft article to be able to set up your OneDrive easily.


2. Modify Windows 10 credentials settings

  1. Make sure to exit all Office applications running on your PC.
  2. Click the Cortana search box found in your taskbar -> type control panel -> click the first option available.
  3. Inside the Control Panel navigate to User Accounts, click Credential Manager, and select Windows Credentials.
  4. Remove all the credentials found in the list (this will remove your stored passwords).
  5. Click Cortana again and search for regedit, then right-click the Registry Editor entry, and choose Run as administrator.registry editor - OneDrive Business error credentials needed
  6. Inside the Registry Editor -> for Office 2013, browse to:
    • HKEY_CURRENT_USER/Software/Microsoft/Office/15.0/Common/Identity/Identities.
  7. For Office 2016, browse to:
    • HKEY_CURRENT_USER/Software/Microsoft/Office/16.0/Common/Identity/Identities.
  8. If you can find any folder listed under Identities, then delete them by right-clicking the entry.

Got the OneDrive SSL error no cypher overlap? Here’s how to fix it


3. Remove the OneDrive for Business cache files

Note: Before removing any cached files, please make sure to back up your data and also store any currently synced sites.

  1. Open Windows Explorer.
  2. Navigate to the following location:
    • C:Users/yourusername/AppData/Local/MicrosoftOffice15.0
      • The exact version number will vary depending on your setup.Appdata Microsoft - OneDrive Business credentials needed error
  3. Remove the OfficeFileCache file.

It is worth mentioning that if your own an OneDrive for Business account with 1TB of online storage, you will need at least 2GB of storage on your PCs hard-drive to be able to sync your files with no issues.


4. Create a report with the Microsoft Feedback Hub

If none of the methods we listed above didn’t manage to get you to sync your files normally, then it is recommended that you ask for official help from Microsoft. In order to do so properly, follow these steps:

  1. Set the Diagnostic and Usage Data option to Full by navigating to Settings -> Privacy -> Diagnostics and Feedback.Diagnostic data - OneDrive Business credentials needed error
  2. Press the Win+X keys -> choose Settings from the menu.
  3. Navigate to the Privacy tab -> choose Diagnostics and Feedback.
  4. Click on the Report a problem-button to create a new ticket.
  5. Explain the details of your problem.
  6. Click Next.
  7. Tick the Problem option -> select Customer Program -> Windows Community.
  8. Attach any available screenshots of your issue.
  9. Click Submit to send the report to Microsoft.

Note: If you’re worried about Microsoft gathering information about your PC usage without your consent, please reset the Diagnostic tool to Basic.


We hope that this guide has proven useful in your quest to sort out the problems created by the credentials needed error inside OneDrive for Business.

If you want to get into contact with us, please feel free to share any suggestions or opinions regarding this issue by using the comment section found below this guide.


[wl_navigator]

OneDrive Error Code 0x8004def5: Fix It With These 4 Methods

OneDrive is a reliable cloud storage service and often the first choice of most Windows users. But, many have, of late, reported seeing the OneDrive error code 0x8004def5 in Windows.

The problem could affect any of the OneDrive accounts. There are reports where a business OneDrive account worked while a personal one didn’t, or even vice-versa. So, let’s find out all about the problem and how to get things up and running.

What is error code 0x8004def5 in OneDrive?

The error appears when users try to sign in or access OneDrive, and prevents the connection from establishing. And it mostly has to do with a problem at the user’s end. Here are the primary reasons you may come across the OneDrive error code 0x8004def5:

  • Poor Internet connectivity: Slow Internet speed is a common reason users encounter the error, so your primary approach should be to verify this.
  • Corrupt system files: When your installation of the OS has corrupt system files, errors with OneDrive and other native applications are bound to appear.
  • Misconfigured network settings: A security software or some privacy measure over the ISP or router settings could also lead to OneDrive error code 0x8004def5.
  • OneDrive service is down: Though a rare occurrence, it’s likely that the OneDrive service is down, and in this case, things are automatically resolved within a few hours.

How can I fix OneDrive error code 0x8004def5?

Before we move forward, here are a few quick tips, tricks, and checks to perform:

  • Restart the computer.
  • Ensure OneDrive is available and configured on your PC.
  • Check the Internet speed, and if it’s unsatisfactory, fix the slow Internet speed in Windows.
  • Verify that the OneDrive service is running through the dedicated Microsoft Service Health page, or you could use a reliable service like Downdetector.
  • Install any pending Windows updates.
  • Disable the antivirus, firewall, or VPN, if either is configured and running.
  • Check your ISP or router settings, and ensure that Parental Control is disabled and OneDrive (https://www.onedrive.live.com/) is added to the list of exceptions.
  • Make sure you are signed in with a Microsoft account on the PC and not a local account.

If none work, head to the fixes listed next.

1. Run the DISM and SFC scan

  1. Press Windows + R to open Run, type cmd, and hit Ctrl + Shift + Enter.cmd
  2. Click Yes in the UAC prompt.
  3. Paste the following three commands individually, and hit Enter after each:DISM /Online /Cleanup-Image /CheckHealth DISM /Online /Cleanup-Image /ScanHealth DISM /Online /Cleanup-Image /RestoreHealth
  4. Once done, run the following command for the SFC scan:sfc /scannowsfc scan to fix onedrive error code 0x8004def5

If it’s the corrupt system files to blame for the OneDrive error code 0x8004def5, running the DISM tool and the SFC (System File Checker) scan should do the trick.

An even easier alternative for the above solution would be a specialized tool that can automatically repair corrupt files by locating healthy components as replacements.

2. Delete OneDrive cache

  1. Press Windows + E to open File Explorer, paste the following path in the address bar while replacing the Username with your current account name, and hit Enter:C:\Users\Username\AppData\Local\Microsoft\OneDrive\setup\logspath
  2. Locate the userTelemetryCache.otc and userTelemetryCache.otc.session files, select them and hit the Delete key.delete to fix onedrive error code 0x8004def5
  3. Choose the appropriate response if a confirmation prompt appears.

3. Whitelist OneDrive in Windows Firewall

  1. Press Windows + S to open Search, type Allow an app through Windows Firewall, and click on the relevant search result. allow an app to fix onedrive error code 0x8004def5
  2. Click on Change settings at the top.change settings
  3. Now, click on Allow another app.allow another app
  4. Click on Browse.browse
  5. Navigate the following path where Username is the current profile name in Windows:C:\Users\Username\AppData\Local\Microsoft\OneDrive
  6. Select the OneDrive.exe launcher, and click Open.add to fix onedrive error code 0x8004def5
  7. Click Add.add
  8. Now, make sure the Private and Public checkboxes next to OneDrive are ticked, and then click OK to save the changes.whitelist to fix Select the OneDrive.exe launcher, and click Open.

That’s it! If the firewall is blocking the program and triggering the OneDrive error code 0x8004def5, adding an exception for it will do the job.

4. Reinstall OneDrive

  1. Press Windows + I to open Settings, choose Apps from the navigation pane, and click on Installed apps on the right.installed apps
  2. Locate OneDrive, click on the ellipsis next to it, and click Uninstall.uninstall to fix onedrive error code 0x8004def5
  3. Again, choose Uninstall in the confirmation prompt.confirm
  4. Restart the computer for the changes to come into effect.
  5. Now, launch the Microsoft Store, search for OneDrive, and download the application.onedrive
  6. Once done, launch it, and follow the on-screen instructions to complete the configuration.

It could also be missing files or an improper initial installation to blame. In this case, reinstalling OneDrive should fix error code 0x8004def5.

Tip icon Tip
If nothing works, we recommend trying another cloud backup service for a flexible and error-free experience. The most well-known online backup service providers stake their names on keeping your data safe and secure during file transmission and online data storage.

After you have fixed the error, check some quick tips to boost Windows performance and make the OS faster than ever.

For any queries or to share a solution with us, comment below.