Office 365 now available from South Africa data centers

Earlier this year, Microsoft made some significant headway in bringing its Azure cloud solutions to regions in South Africa.

In March, Cape Town and Johannesburg became two South African locations newly imbued with Azure datacenters and the potential to host 112,000 new jobs over the next fours year, in large part due to that investment.

Just a mere five months later, Microsoft is already leveraging its presence in South Africa to provide another one of its cloud-based services in Office 365.

Office 365, delivered from local datacenters in South Africa, helps our customers enable the modern workplace and empower their employees with real-time collaboration and cloud-powered intelligence while maintaining security, compliance, and in-country customer data residency. The addition of South Africa as a new geography for Office 365 increases the options for secure, cloud productivity services combined with customer data residency in 16 geographies across the globe along with three additional geographies also announced.

To comply with regulatory requirements and avoid another lengthy court proceeding such as the Microsoft-Ireland case, the company plans to keep core customer data “store only in their data center geography (Geo)- in this case, the cloud datacenters within South Africa.”

Microsoft has also invested in its first African Development Center (ADC) in both Nairobi, Kenya and Lagos, Nigeria. The ADC is tasked with being the hotbed of world-class African talent creating solutions on a local and global scale.

KB4505903 brings a long list of bugs and errors for many users

Microsoft recently rolled out Windows 10 Cumulative Update KB4505903 for Windows 10 version 1903. Although the update resolved many of the problems that initially came the update, it also brings issues of its own.

The list of issues is so long that it was difficult to cover them all in a single article. In this post, we listed some of the most commen problems that you may encounter after installing KB4505903.

KB4505903 reported bugs

Audio shuttering bug

The Windows 10 update KB4505903 brings audio Shuttering with Ryzen 3000 processors. One Reddit user who managed to resolve the problem shared a quick workaround to get rid of this problem.

I had issues when I upgraded to Ryzen 3000. I wasn’t sure what it was, but it was happening every minute, sometimes 2-3 times per minute when audio was playing. I moved my pagefile to another drive and did some driver cleaning/updating along with updating Windows to 1903 and it solved it.

DPC latency issues

Microsoft fixed some DPC latency issues in the recent release. However, people reported that some of them still exist.

I’m still getting stuttering for audio and video. LatencyMon is showing high latency for dxgkrnl.sys and storport.sys. Didn’t fix anything related to latency as far as I can tell. Had to roll back. Previous versions of Windows works great. I used the ISO to do the update.

Windows Sandbox doesn’t work

Apparently, the recent release fixed Windows Sandbox issues only for some Windows 10 users. Someone explained that:

From OP’s changelog apparently the problem is still worked on and has not been addresed with this update. No idea why suddenly it works for me. But I am pretty sure that this update fixed it for me. I tested that sandbox was not working just before the update and was the first thing I launched after the update.

However, some people are still experiencing the same problem.

Mine does still not work…

Action center transparency bug

A previous release introduced Action center transparency issues in Windows 10. Unfortunately, Microsoft didn’t fix the issue in the recent release.

I can’t believe they don’t fix the action center transparency bug..omg..it is sooo annoying.

Driver compatibility and BSoD issues

Many people reported that their Bluetooth and Wifi are not working fine after installing KB4505903. Furthermore, some of them were also affected by BSoD bugs.

I rolled back from 1903 after a day of use. Unfortunately the update seems to play havoc with my wifi and bluetooth. And on my wife’s computer it caused the mouse to have intermittent problems like stuttering and a loss of accuracy. Edit: Also forgot how a driver hangup caused me to blue screen everytime I would restart the desktop.

Windows Update error

Some Windows 10 users reported that the update failed to install on their systems with the error code 0x800f0982. If you are one of those who are experiencing similar issues, you should follow this step-by-step guide to fix it.

Update stalls and long installation hours

Some recent reports suggest that many people had to wait for long hours to complete the installation process. Apparently, the update progress gets stuck at some point and the only solution is to go for a hard reset.

I have been installing this update for 14 hours now but its only at 21% i’m not sure what to do my pc has a ssd and all other updates have been quite fast i’m not sure if it will ever finish or if i should just give up and risk rebooting my pc.

Display problems

Microsoft claims to resolve the display issues in the latest release. However, the full-screen display is still not working correctly for many.

It fixed banding problem, but not fully. it’s a lot smoother but there are still some lines. The full screen display is not fixed yet And the high DPC latency is still not fixed (but now it reaches high numbers after a minute or more of testing)

Missing app bugs

Windows 10 users confirmed that KB4505903 brings missing apps bug. Many popular apps such as VLC, Spotify and Store disappeared after the installation of this update.

Anyone more have the missing apps bug back again with this update? Store, Spotify and VLC disappeared from my start menu after this update, and I need to restore them thought powershell.

Computer freezing issues

Apart from all the above-mentioned bugs, Redditors confirmed that the recent update causes freezing issues on the loading screen.

This update broke my pc (kind of). When I open any game, on any loading screen, the computer freezes and speakers make a noisy buzzing sound and I can do nothing but force shutdown.

Screen rotation issues

Finally, Windows 10 users are still experiencing problems while rotating the screen in night light mode.

Still having the problem when rotating the screen in night light mode, the screen will flash back to bright mode for a split second. Anyway to contact a representative here to take a look at this?

The list of issues does not end here and we are sure that you must be experiencing many other problems as well. Let us know in the comments section below.

RELATED ARTICLES YOU NEED TO CHECK OUT:

Download KB4505903 to fix initial Windows 10 May Update bugs

It’s the end of July and Microsoft is still busy addressing Windows 10 May Update problems.

Microsoft recently rolled out Windows 10 Cumulative Update KB4505903 to all users. This update increases the current version to build 18362.267.

KB4505903 brings plenty of bug fixes for Windows 10. The Big M addressed some major problems with the Bluetooth and Windows 10 display settings.

The recent release also resolved some issues with the Start menu and Windows Hello.

Windows 10 KB4505903 changelog

Windows Ink Workspace improvements

KB4505903 brings some major improvements for the Windows Ink Workspace. This update simplified the menu.

Secondly, it added direct integration with the Microsoft Whiteboard app. The changes are done to improve the collaboration experience.

Windows Hello face authentication bugs

Previously, Windows Hello face authentication was not working properly. Microsoft addressed the problem in this release.

Microsoft Edge bugs fixed

Many users reported that a bug prevented Microsoft Edge from correctly printing PDF documents in Microsoft Edge. The problem specifically affected those PDF documents that contained portrait and landscape pages. You need to install KB4505903 to resolve this issue.

If the PDF printing issues persist, check out these troubleshooting guides for additional solutions:

Colors display bug fix

Users also complained about an issue with the display colors when they tried to view images on 10-bit display panels. The latest Windows 10 cumulative update resolves the problem for the affected systems.

Display brightness issue resolved

Microsoft resolved an issue in the operating system that prevented Windows 10 users from changing the display brightness. This problem was caused by some graphics drivers when users resumed the system from Hibernation or Sleep. You should not encounter this problem after installing KB4505903.

Bluetooth bug fixed

A previous update introduced a problem in Windows 10 that prevented some devices from going into Sleep mode. Users encountered this problem when they opened some Bluetooth based applications. Thankfully, Microsoft has resolved this problem in the recent release.

Bluetooth audio quality problems fixed

The latest Windows 10 cumulative update addresses a bug that reduced the Bluetooth audio quality in some cases. People encountered this issue when they used some audio profiles for a long time.

Start menu problems resolved

Microsoft resolved the functionality issues with the Start menu in Windows 10. This problem affected only new users who sign in to Windows.

RELATED ARTICLES YOU NEED TO CHECK OUT:
Microsoft acquires data access management provider BlueTalon

Microsoft announced today the acquisition of BlueTalon, a leading provider of Unified Data Access Control for big data and new data initiatives. The company which has its headquarters in Redwood City, California, is now part of Microsoft’s Azure Data Governance group

BlueTalon was founded in 2013 and helped several Fortune 100 companies to eliminate security blind spots by giving them visibility and control over who has access to which data. The company’s data control solution currently works with various data systems such as Hadoop, RDBMS and big data environments

“The IP and talent acquired through BlueTalon brings a unique expertise at the apex of big data, security and governance,” said Rohan Kumar – Corporate Vice President, Azure Data. “This acquisition will enhance our ability to empower enterprises across industries to digitally transform while ensuring right use of data with centralized data governance at scale through Azure,” the exec added.

Accounts.google.com connection problem in Bluestacks [FIX]

Many Bluestacks users reported There was a problem connecting to accounts.google.com error message on their PC. While this problem can prevent you from using Google’s services, there’s a way to fix it, and in today’s article, we’ll show you how to do it.

What to do if Bluestacks can’t connect to accounts.google.com?

1. Change Graphics Mode to OpenGL or DirectX

switch to directX bluestacks There was a problem connecting to accounts.google.com

  1. Navigate to Bluestacks and click on the Settings option.
  2. Then, go to the Engine tab and change Graphics Mode to OpenGL or DirectX.
  3. Restart Bluestacks and see if the error persists.

2. Turn off Interception in your antivirus

bitdefender There was a problem connecting to accounts.google.com

Note: We’re going to show you how to disable this feature in Avast Antivirus, but if you use a different antivirus, the process should be slightly different.

  1. Navigate to Menu and click on Settings.
  2. Go to Components and click on Customize next to Web Shield.
  3. Untick the box to Turn off Interception of Security Connections.
  4. Click OK to save changes.

If disabling this feature didn’t solve the problem, perhaps switching to a different antivirus might help. Bitdefender is a reliable antivirus solution, and it won’t interfere with your other applications, so be sure to try it out.


Bitdefender Total Security is the most secure antivirus software, and here’s why


3. Turn on Virtualization

enable virtualization in bios There was a problem connecting to accounts.google.com

  1. Open the Settings app and go to Update & Security.
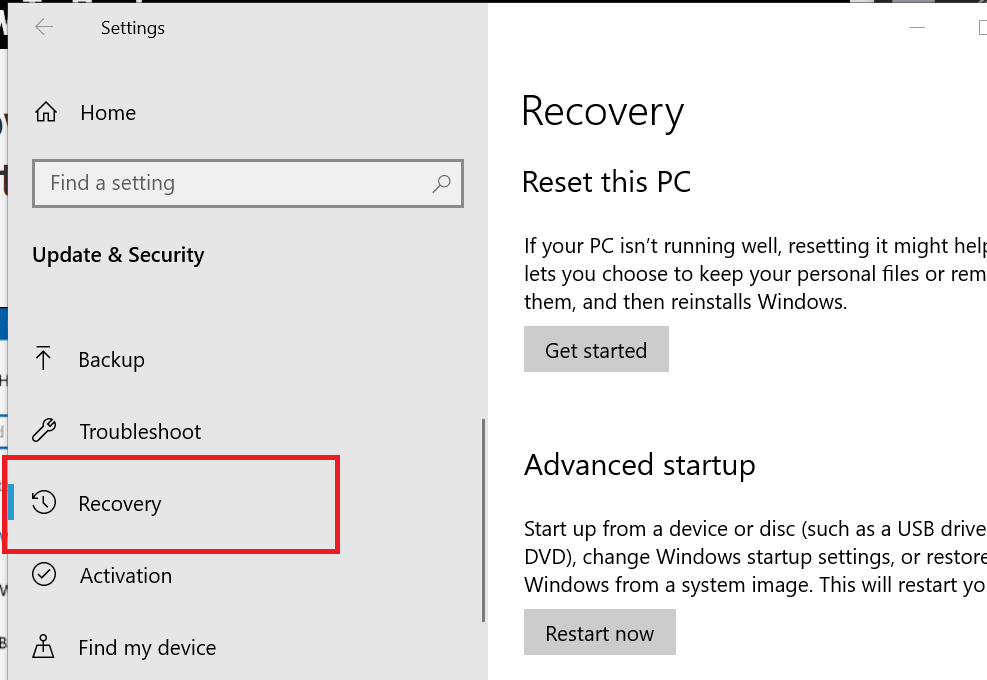
  2. In the left pane, select the Recovery tab.
  3. Under the Advanced section, select the Restart Now option and then click on Troubleshoot.
  4. Choose Advanced Options and then UEFI Firmware Settings.
  5. Click on Restart.
  6. Once you enter BIOS, look for Virtualization option and enable it.
  7. Save changes and check if the problem is still there.

4. Change DNS Settings

  1. Browse through your screen till you find your network icon at the right corner.
  2. Then, right-click on the Network icon and choose Open Network and Sharing Center.
    open network and sharing center There was a problem connecting bluestacks
  3. Click on Change adapter settings in the left pane.
    change adapter settings There was a problem connecting to accounts.google.com
  4. Find your network connection and right-click on it. Choose Properties.
    connection properties can't connect to accounts.google.com bluestacks
  5. Select TCP/IPv4 and click on Properties.
    Ethernet properties ipv4 properties There was a problem connecting to accounts.google.com
  6. Click on Use the following DNS server addresses. Set the following values:
    • Preferred DNS server: 8.8.8.8.
    • Alternate DNS server: 8.8.4.4.
  7. Click OK.
    internet protocol version 4 properties window There was a problem connecting to accounts.google.com

There you go, several quick and simple solutions that might help you fix There was a problem connecting to accounts.google.com error in Bluestacks. Feel free to try all of our solutions and let us know in the comments section which solution worked for you.

RELATED STORIES TO CHECK OUT:

What to do if your laptop adapter gets really hot [PRO TIP]

It is not at all unusual for laptop adapters to warm up. However, it is unusual for adapter chargers to become really hot, almost too hot to handle. Now, we might be looking at an obvious hardware problem, but there are ways to, at least temporary, mitigate adapter overheating.

Here are a few tips for cooling down laptop adapters you can try.

How can I stop laptop adapter from overheating?

1. Keep the Adapter Away From Radiators

First, make sure the laptop adapter is in a reasonably cool place. So, do not leave the adapter near warm radiators. Open the windows in the room that includes the laptop during warmer summer days. Users can also enhance the airflow around the charger by sliding some pencils beneath the adapter’s transformer box.

A laptop charger my laptop adapter gets really hot

2. Remove the Laptop’s Battery

The laptop’s battery can overheat its adapter charger. If the laptop has a removable battery, remove the battery from it. Then the adapter won’t charge the battery when it’s plugged into a laptop. If that greatly cools down the adapter, consider getting a new battery for the laptop.

laptop battery my laptop adapter gets really hot

3. Reduce PC Performance by Switching to Power Saver

  1. Selecting the most energy-efficient power plan might also cool down adapter chargers. To do so, open the search box in Win 10 with the Windows key + S hotkey.
  2. Input the keyword ‘Power Plan’ in the search box.
  3. Click on the Choose power plan option to open the window shown directly below.
  4. Select the Balanced option.Balanced option my laptop adapter gets really hot
  5. Next, double-click the battery icon in the system tray to open the slider below.
  6. Drag that slider to the far left to select Power saver mode.The battery slider my laptop adapter gets really hot

4. Periodically Unplug the Adapter

Most laptop batteries will last at least two to three hours when fully charged. So, users don’t need to have their laptops plugged in all the time. Therefore, users can unplug their adapter chargers every hour or so for about 15 minutes.

That will give the adapter a 15 minute cool off period every hour. However, the adapter will still be plugged in most of the time to keep the battery charged for those periods when the laptop isn’t plugged in.

5. Charge the Battery More Regularly

Some laptops have batteries that last longer than 10 hours, which reduces the necessity for adapter chargers when laptops are fully charged. Thus, users should charge their laptops more regularly when they’re not utilizing them. That will keep the laptop more fully charged when needed, which will minimize the requirement to plug-in the adapter charger with the laptop on.

So, there are a few ways users can cool down adapter chargers. However, consider replacing adapter chargers if they still get too hot. Some users might be able to claim replacements for adapter chargers if they’re still within their laptops’ warranty periods.

High CPU usage in Ableton Live [FIXED BY EXPERTS]

A great number of users have had issues with the high CPU usage of Ableton Live. This problem is not caused by any error, but by a large amount of data that Ableton processes during a session.

Some PCs are just not up to the task, and the available processing power is lower than needed. If you find yourself in this situation, do not despair. There are some proven methods to reduce the CPU requirements that Ableton Live has.

In this article, we will explore some of the best settings and tweaks you can apply to your version of Ableton Live. These methods will make the software run faster and will allow you to have an uninterrupted experience, without having to upgrade your system. Read on to find out how to do it.


How can I fix Ableton Live CPU overload?

1. Lower the Sample Rate settings

Ableton Live - High CPU usage Ableton

  1. Open Ableton -> select Preferences -> Audio.
  2. Click on the drop-down list under Sample Rate -> select a value of 44100 Hz or 48000 Hz.

Note: It is recommended that you modify the Sample Rate value before starting a new project, and not while working on an older project.


2. Increase the Buffer Size settings

Ableton Live 2 - High CPU usage Ableton

  1. Set Buffer Size to 128, 256, 512, 1024.
  2. Please note that the higher this value is, the higher the audio latency will be. You can set this setting to a value of your choice first, and then decide if you are bothered by the latency.

Need a reliable software to record audio? Here are our top picks!


3. Disable all inputs and outputs that you don’t use

Ableton Live 3 - High CPU usage Ableton

  1. Click on Preferences -> Settings -> Channel Config.
  2. Inside the settings window – open Input Config and Output Config.
  3. Disable the options and also the Mono input pair.

4. Enable Multicore/Multiprocessor support (applies to Ableton Live 9 only)

Ableton waves settings - High CPU usage Ableton

  1. Click on Preferences -> choose CPU.
  2. Toggle the button next to Multicore/Multiprocessor Support by clicking on it.

5. Prevent Windows from turning off USB devices

  1. Press Win+X keys on your keyboard -> select Device Manager.
  2. Expand the Universal Serial Bus controllers branch.
  3. Double-click on the USB Root Hub device and select the Power Management tab.
  4. Turn off the option Allow the computer to turn off this device to save power by unchecking the box.
    allow the computer to turn off this device High CPU usage ableton
  5. Press OK, and repeat this method for all USB Root Hubs on your PC.

In this article, we explored some of the best-proven methods to deal with high usage of CPU power by Ableton Live.

We hope this guide helped you solve your issue, and that you can use Ableton without any lag.

Please feel free to let us know if you managed to do this by using the comment section below.

READ ALSO:

Laptop Adapter Not Working: How to Fix it

Users expect the adapters to charge their laptops when plugged in. Yet, laptop adapters can stop charging the device. It’s not something that happens often, but users will need to get their laptop adapter fixed when these are not working.

When you lose a laptop adapter, or it’s not functioning, a universal adapter does help. Though, it’s not something we can rely on for long. So, here’s all you need to know when a wired or wireless laptop adapter is not working!

How do I fix an adapter that is not charging?

1. Plug the adapter into another power outlet

First, try plugging the adapter in within an alternative room. It might be the case that there’s a tripped fuse. Get rid of extension leads and plug the laptop adapter indirectly.

This especially helps when a laptop AC adapter is not working. And if the adapter starts working in another room, you know it’s not the peripheral to blame but the power outlet.

2. Make sure the charger is plugged into the right USB slot

Newer laptops come with a USB-C charger to charge the batteries. However, some USB-C slots on a laptop might also be for data transfer only. The adapter won’t charge the laptop if it’s plugged into a USB slot specifically for data transfer.

USB slot my laptop adapter is not working

Thus, some users might need to check that they’re connecting the adapter with the correct USB slot to charge the laptop. Check the laptop’s manual for further details on which USB port the adapter is to be connected to.

3. Check the Charger’s Cable

When the Dell laptop’s charging adapter is not working, users should check the charger’s cable for wear and tear. Verify if there are broken or loose connections at both ends of the cable.

USB cable my laptop adapter is not working

In case you spot any notable tearing on the adapter’s cable, that’s probably why it isn’t charging the laptop. Users will probably need to get a replacement adapter if there are loose connections.

4. Clean the jack

Some users might need to clean their adapters’ connector jacks. The connector jack might be clogged with dust and dirt. Many recommend cleaning the jack with a needle or something that will scrape out dust and other debris from the jack.

But a safer alternative is to use a can of compressed air. Point the can towards the jack and blow air into it. This will remove any dust or debris accumulation.

5. Remove the Battery

Some laptops include removable batteries that users can take out. Turn off the laptop and remove its battery if you can. Then plug the adapter into the laptop and turn it on.

Laptop battery my laptop adapter is not working

If users can utilize their laptops with just the adapter, there’s probably something up with the battery. So, get the battery examined by a professional; in most cases, a battery replacement is all it takes to fix things when the laptop adapter is not working.

That’s all! Users may or may not need new adapters when their current ones aren’t charging the laptops. If you opt for repair or replacement, check the laptop’s warranty and whether it covers the battery.

Before you leave, find some quick tips to increase the laptop’s charging rate.

For any queries or to share what worked for you, drop a comment below.

Microsoft Whiteboard Doesn’t Work [Quick Fix]

A number of users have reported that their Microsoft Whiteboard application doesn’t work anymore. This issue can cause you a lot of trouble, especially if you need to access the Whiteboard app of your company in Office 365.

Some users have reported that the app was working fine and suddenly stopped. Others say that they have trouble signing in. For these reasons, in today’s article, we will explore some of the best troubleshooting methods available.

What can I do if the Microsoft Whiteboard isn’t working?

1. Make sure the service is turned on

  1. Visit the Microsoft 365 Admin Center.
  2. Inside the home page, select Settings, and choose Services & add-ins.Services and add-ins Office 365 admin - Microsoft whiteboard doesn't work
  3. On the Services & add-ins page, scroll down and select Whiteboard.
  4. Inside the Whiteboard menu, toggle the button next to Turn Whiteboard on or off for your entire organization.
  5. Click Save.

If you are not your company’s IT Office 365 administrator, you can contact that person to perform the abovementioned steps.

2. Allow access to the Whiteboard app through your firewall

  1. Click on the Cortana search box and type in firewall.
    firewall in cortana search box - microsoft whiteboard doesn't work
  2. Select Windows Defender Firewall from the list.
  3. Select the option Allow an app or feature through Windows Defender Firewall.
  4. Search for Microsoft Whiteboard in the list and allow all connections.
  5. Save settings and exit the Control Panel.
  6. Check to see if the issue persists. If it does, follow the next method.

If you use Windows Defender Firewall, you can follow the steps exactly. If you’re using the firewall service from third-party antivirus software, you will need to change the settings there.

3. Remove your account and add it again

Another method that helped some users deal with this issue is to simply remove your corporate account from the application and then add it again.

4. Uninstall and re-install the app

  1. Press Windows + X keys -> select Apps & features.
    apps and features - Microsoft whiteboard doesn't work
  2. Find the app in the list and select Uninstall, then wait for the process to complete.
  3. Now, download Microsoft Whiteboard.
  4. Run and install it on your PC by following the on-screen instructions.

This article explored some of the best methods to deal with this issue. We hope you have solved the problem. You can also explore how to use Whiteboard in Teams for a seamless collaboration experience.

If Microsoft Whiteboard is not syncing, follow the steps in this detailed guide to fix it.

Please let us know if this guide helped you by using the comment section below.

Can’t access BIOS on Windows 7/10/11 [FIXED]

A number of users have complained that for some reason they can’t access BIOS on Windows 7 and Windows 10 operating systems. This seems to be a problem that arises on dual GPU PCs.

This issue can become extremely frustrating, especially if you are trying to change the boot sequence of your machine to run or install another OS.

Countless hours have been spent on forums trying to find a solution to this problem. In this article, we have gathered the entire range of information and compiled it into a step by step troubleshooting guide. This should allow you to fix or at least bypass this issue and get access to your computer’s BIOS.


What to do if I can’t enter BIOS on Windows 7/10?

Windows 7: Reset CMOS by removing BIOS battery

motherboard close-up - Can't access BIOS on win 7/win 10

Note: This method involves opening up your laptop/PC. Only try this method if you’re comfortable doing that. In the case that you don’t have the required experience, please visit an authorized PC repair shop (This method works on all operating systems but the latter option is recommended if you are using Windows 10).

If you have a laptop:

  1. Shut down laptop from the Start menu.
  2. Remove all USB and HDMI cables.
  3. Remove the external battery and unplug the device from the wall socket.
  4. You will usually find the BIOS battery inside a special enclosure, plugged into the motherboard by using a white connector.
  5. Unplug the white connector from the motherboard, and then plug it back in.
  6. Re-fit your laptop battery and start the laptop normally.
  7. Try to see if the issue is fixed.

Need to access BIOS quickly? Here’s how to do it properly on Windows 7/10!


If you have a desktop computer:

  1. Shut down your PC -> remove all USB and HDMI cables from the ports.
  2. Unplug the power cord from the back and remove the protecting casing.
  3. The specific location of your BIOS battery will vary depending on the model of motherboard you’re using.
  4. In order to locate it, you will need to look for a watch-like flat battery.
  5. Carefully remove your battery and wait for 15 minutes or so before inserting the battery.
  6. Start your PC like you normally would.

Windows 10:

  1. Press Win+X keys on your keyboard -> select Settings from the menu.
  2. Click Update & Security -> select Recovery ->Restart now -> Troubleshoot -> Advanced Options -> UEFI Firmware Settings -> Restart.Update and security - Can't access BIOS on Win7/Win10

This will effectively boot your PC into BIOS. Once there, please make sure that the first booting device is set to the Windows version you want to run.

In this article, we explored the most efficient way of gaining access to your PC‘s BIOS menu when you can’t access it normally. Please read the note added to the solutions to make sure you will not cause any other complications.

Feel free to let us know if this guide helped you solve your issue, by using the comment section below.

READ ALSO:

Microsoft news recap: Xbox One dashboard being redesigned, “Online” suffix being removed from web versions of Office apps, and more

Microsoft news recap is a weekly feature highlighting the top Microsoft news stories of the past week. Sit back, grab some coffee, and enjoy the read!

Microsoft Outlook app updates on Android with suggested reply feature

The Outlook app on Android can now suggest replies to emails. The app won’t suggest replies for every email, but when it does give suggestions, just tapping it will input the reply and then you can tap to send it.

Microsoft Outlook logo

Microsoft is once again redesigning the Xbox One dashboard

Two years after the last redesign of the Xbox One dashboard, Microsoft is once again working on a redesigned dashboard. The new dashboard will be released to all Xbox One users later this Fall.

Microsoft is dropping “Online” naming for web version of Office

The web versions of the Office apps are to lose the “Online” suffix. Microsoft’s online Office suite, such as Office Online, Word Online, etc, are all to be renamed.

Mixer video game streaming service to let all streamers earn money on the platform

In what is an unexpected move, Microsoft’s video streaming service, Mixer, will be allowing all users to access monetisation features, regardless of their account stats, such as number of followers. This distances itself from YouTube’s partnership requirements, and Mixer’s previous partnership requirements.

Mixer Double Rainbow Xbox Commercial

That’s it for this week. We’ll be back next week with more Microsoft news.

Problem Getting Printer Information From the System [FIXED]

If you’re unable to print due to Problem getting printer information from the system error, today we’re going to show you how to fix this problem once and for all.

How can I fix Obtaining printer information error?

1. Make sure that your printer is installed

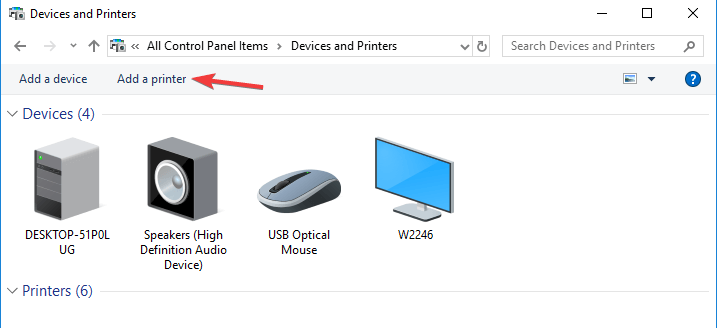
  1. Go to Control Panel > Printers.
  2. Now click Add Printer and follow the instructions on the screen to install your printer.
    add a printer problem getting printer information from the system

2. Make sure that your printer is working properly

  1. If your printer isn’t turned on, press the Power button to start it.
  2. Make sure that your printer isn’t jammed or out of paper.
  3. After ensuring that everything is in order with your printer, try to print again.

3. Select a default printer

  1. Open Control Panel and go to Devices and printers.
  2. Now select any printer, right-click it and choose Set as default printer.
    set as default printer problem getting printer information from the system
  3. Now try to print again. If the issue is still there, try changing the default printer again.

4. Connect network printer directly with Ethernet cable

  1. If you’re using a network printer, connect it directly to your router/modem with Ethernet cable.
  2. After doing that, check if the error is still there.

5. Change printer properties

  1. If you’re using network printer go to, Control Panel > Devices and printers.
  2. Locate your printer, right-click it and choose Properties.
  3. Change Port configuration to standard IPv4 instead of MAC address.
  4. Save changes and check if the problem is still there.

There you go, five simple solutions that might help you fix Problem getting printer information from the system error on your PC. If our solutions helped you fix the problem, feel free to let us know in the comments section below.

Excel to JSON File Converter Software: 4 Best in 2026

An Excel to JSON converter software changes the .xls file (or other format supported by Microsoft Excel) extension to .JSON file extension.

An XLS file is usually a spreadsheet created by Microsoft Excel. These files can store charts, formatting, and mathematical functions.

On the other hand, a JSON file is a lightweight, text-based document that stores simple data structures in JavaScript Object Notation (JSON) format.

So, these ones can be opened with a simple Notepad or Wordpad on a Windows 10 PC.

Still, converting an Excel file to a JSON file is another matter that requires software, which you can choose from the list below.

What are the best tools to convert Excel files into JSON files?

Altova MapForce

altova mapforce excel to json converter

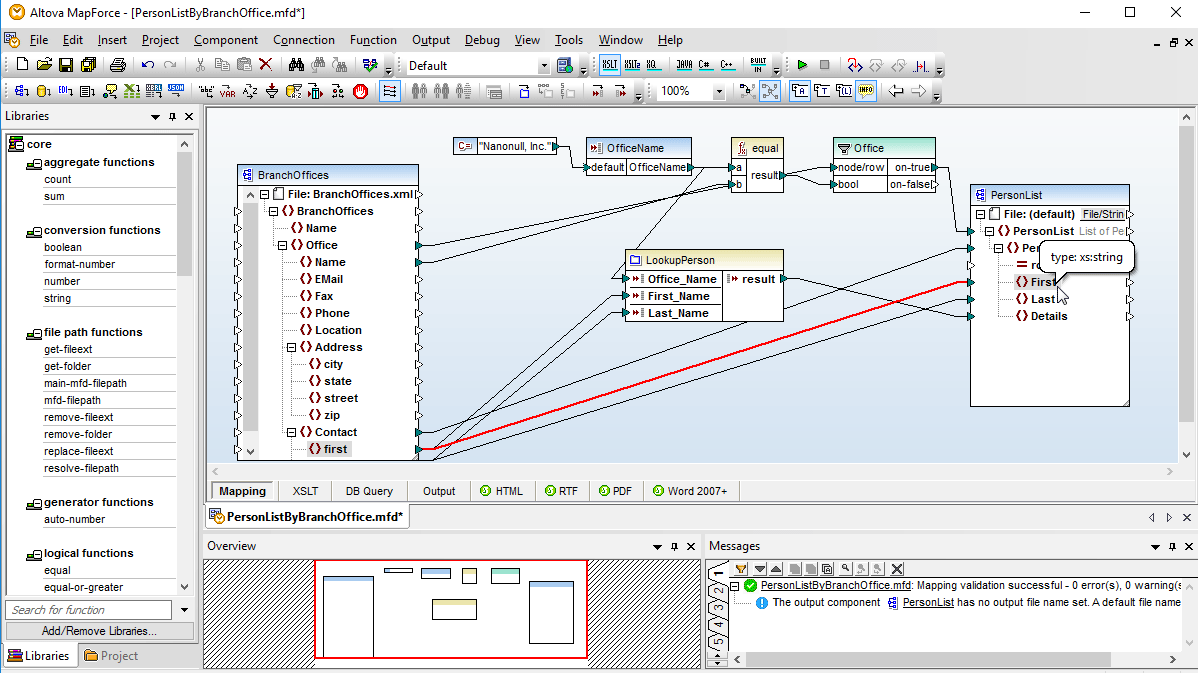
This software is both a data mapping and a conversion tool. It is easy to use by anyone, but it is still a powerful tool that allows the user to convert various data sets.

With Altova MapForce, you not only can convert XLS or XML to JSON files, but you can also do the opposite. Moreover, you can convert JSON to/from EDI, CSV, Google protocol buffers, various databases, and more.

As we said above, it is easy-to-use software. You drag and drop data across the program’s interface, and that’s it.  It’s also worth mentioning that the application supports advanced data processing.

The software supports JSON, JSON5, and JSON Schema, with an instant data conversion.

It doesn’t come free, but you can download a 30-day trial version.

White Town XLS to JSON Converter

white town XLS to JSON Converter excel to json file converter software

This straightforward software allows you to convert Excel files to JSON format.

Still, it has some interesting features, such as the ability to let you choose the format of JSON: Compact, Pretty Printed or a combination of both.

Also, the program supports .xls format, as well as the .xlsx format.

Because of its simplicity, this is a very popular product for those who transfer their data online, allowing them to do this quickly and easily.

Another useful feature for those users limited by time is the command line interface. You can run the program with the relevant parameters in a batch mode or from Windows scheduler, without interfering with it.

The software has a free version, but you can also buy a personal or business license.

Oxygen JSON Editor

oxygen excel to json converter excel to json file converter software

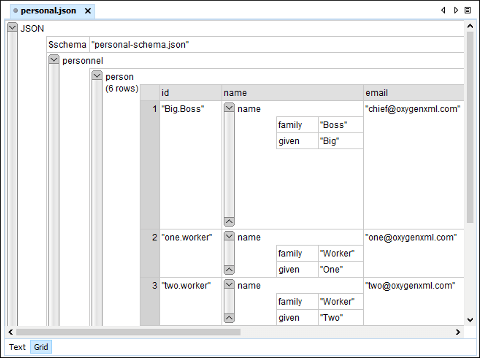
JSON editor from Oxygen is a more complex software than the simple converters described above.

With it, you can work with JSON documents, and it provides standard editing capabilities such as copy/paste, find/replace, undo/redo, and drag/drop.

Also, it has more complex features, like structure validation, content completion, format, and indent.

Still, it can be used for converting JSON documents to XML format, which can be used as Excel files.


Here are 4 ways to open Excel worksheets in separate windows at the same time


How it converts the formats is not as straightforward as those previously discussed. The program uses XSLT stylesheet templates for that.

This software is more for professionals and can be bought from the official website. It includes Academic, Personal, and Business versions, each with its own price.

WTSolutions Excel to JSON Converter

wtsolutions excel to json converter oxygen excel to json converter

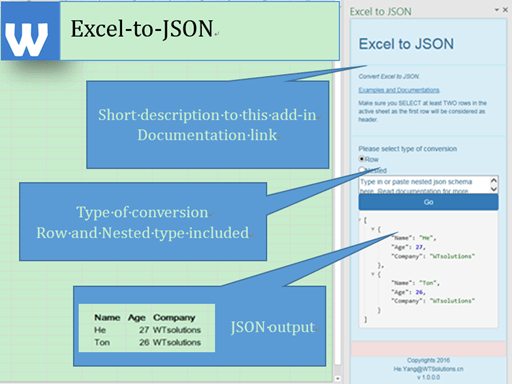
This is a very simple application that will help you convert Excel data to JSON format.

There are two types of conversion supported: row and nested.

In the row type of conversion, the first row is interpreted as the header, and the following rows will be considered data.

In the nested type of conversion, you can provide the program with a JSON schema, and the converter will do the rest of the work.

The program can also be an add-in for various versions of Microsoft Excel, such as Excel 2013 SP1+, Excel 2016+, Excel 2016 for Mac, and Excel Online.

When used like this, the program can send data over the Internet and read and modify your documents.

This software can be bought from Microsoft AppSource, or you can try a free trial.

Let us know your choice in the comments area below.

Office 365 Webmail injects your IP address in email headers

Do you know that when you use the webmail component of Office 365, you are also sending your IP address to other people?

That’s because the header your emails contains your IP address when you are using the web-based Outlook 365 service. Maybe Microsoft has a specific reason for automatically embedding the IP addresses.

However, the company has never informed Outlook 365 users about it. You should not ignore this issue because it is a major security and privacy risk for all of us.

Jason Lang recently identified this issues and shared the news on Twitter.

We can not say that it was an accidental leak from Microsoft. Obviously, Microsoft was deliberately injecting your IP address in the emails.


Looking for a tool to hide your IP address? Here are the best options for Windows 10.


IT administrators use the sender’s IP address to search for particular emails. The IP address helps them to recover a hacked account by tracing the location of the sender.

All of your emails that you are sending through https://outlook.office365.com have a header field called x-originating-ip.

By the look of things, Microsoft has been using this feature from the past few years. It is an old change that was already included in Outlook 365.

Twitter ser @pranq5t3r who replied to the initial tweet continued the discussion:

Probably also worth noting that this happens in email clients with a provider that doesn’t mask/strip IP. Google, for example, gives an internal IP when using them in a client. For providers that don’t, an add-on such as TorBirdy in Thunderbird can provide a similar effect.

Office 365 cretae new rule

It must be noted that Office 365 admins can disable this feature to remove the header in any way. They have the option to create a new rule in the Exchange admin center.

An alternative option is to mask your IP address by using a VPN tool. Otherwise, anyone can trace your location if you are using the web client to send e-mails.

LEARN HOW TO HIDE YOUR IP ADDRESS FROM THESE GUIDES:

Microsoft’s zombie Cortana app shuffles back into the spotlight with revamped UI and features

Despite Microsoft pulling its digital assistant service from most of its consumer-facing products over the last two years, it seems the company still has a soft spot for Cortana in Windows 10.

As of Windows 10 Insider preview build 18945, users are getting a taste of what’s expected to be the new Cortana experience on desktops.

Introducing a new Cortana experience for Windows 10

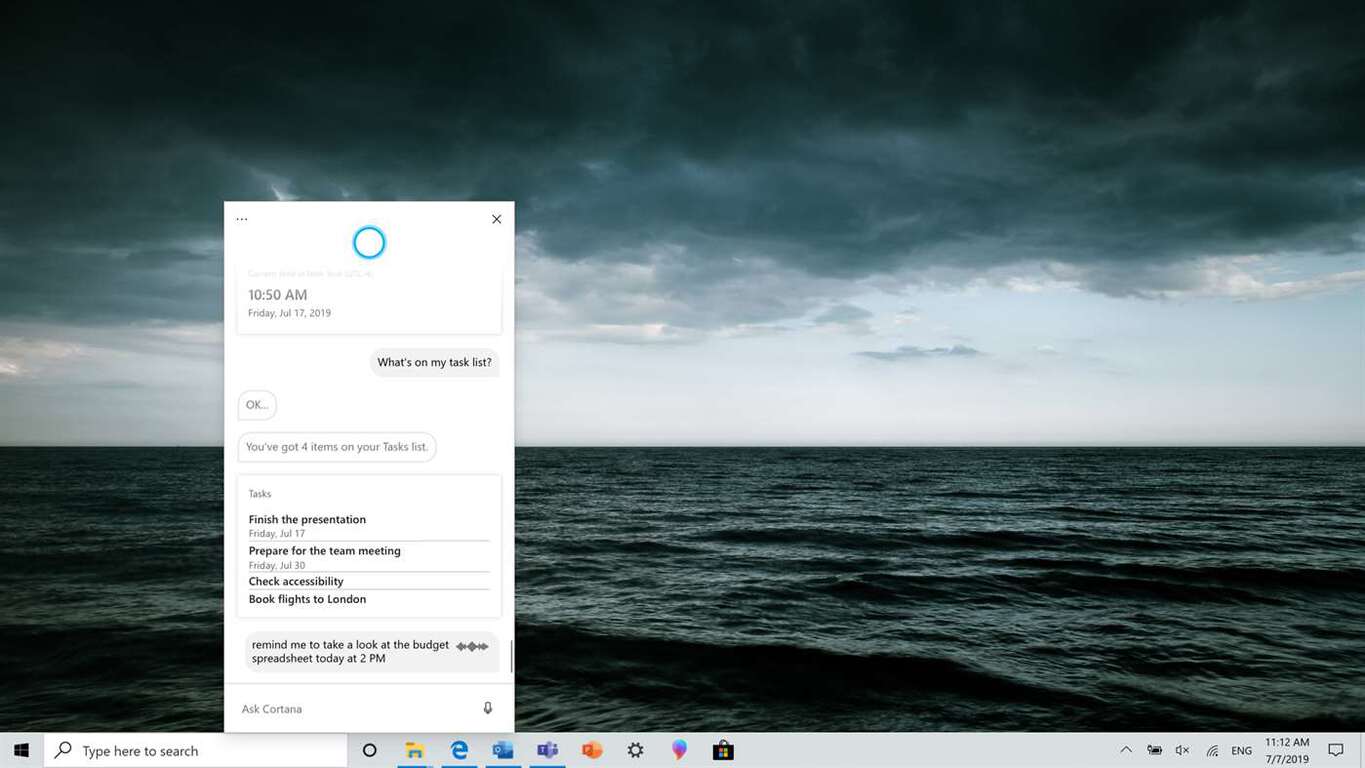
We are beginning to roll out a new Cortana experience for Windows 10 as a Beta to Windows Insiders in the U.S. This new experience features a brand-new chat-based UI that gives you the ability to type or speak natural language queries.

According to the release notes, the new Cortana experience will retain much of the functionality of the old service but also incorporate new features such as light and dark theme support, a minimized queries prompt and updated speech and language models for improved performance and reliability.

As this is a beta and seems to be a from-the-ground-up redesign, Microsoft notes that not all of the features from the original Cortana app will be present in this build.

Microsoft’s seemingly recommitting itself to Cortana amid a handful of recent confusing moves regarding its digital assistant strategy as a whole.

Earlier this week, Microsoft acknowledged it has plans to remove Cortana from its Xbox One platform, the company has also, over the past year, been promoting cloud service provider rival Amazon’s Alexa as a substitute on Windows 10 PCs with its OEM partners bundling software specifically designed to replace the company’s efforts.

What Happened?

While Cortana had been previously promoted as the connective cloud-based digital tissue between Microsoft’s now-defunct Windows Phone platform and Windows 10 and a vibrant competitor to Google Assistant and Apple’s Siri, the reality is that it quickly became a me-too product without nearly the amount of bells and whistles as its competition.

Part of Cortana’s shortcomings falls on Microsoft’s lack of focus and overall conceptualization of how it would compete in the smartphone market where it originally intended to leverage devices that were becoming more personal than Personal Computers.

Before the bottom fell out for Windows Phone, Microsoft had already placed a huge bet on Cortana being big enough to carry its desktop and even gaming based users as well and baked it into its desktop and Xbox operating system, however, without the necessary “personal” information its smartphones weren’t picking up, the Windows 10 Cortana experienced seemed gimped out of the gate and only got worse over time.

As with many consumer-facing products from Microsoft, a faint stench of death caught industry observers nose regarding’s Cortana’s long term viability and a continuous flow of “near-death” reports began to flood the news. During this time, Microsoft did its Cortana department no favors with executives continuously being cagey about how its digital assistant would keep up with the industry leader in Google and up and coming, Amazon Alexa.

Eventually, Microsoft read the writing on the wall and pivoted to nurfing Cortana’s scope and seemingly transitioned it into its new role as an updated version of its Office Clippy assistant. Consumer-facing features began slowly disappearing from the app and its overall presence reduced both visually and functional synergies.

In a seemingly shrewd business decision, Microsoft began to favor the assistant that was making headway with its users in Alexa as Amazon’s digital assistant devices began to proliferate in consumer spaces.

And now?

All of that leads back to Microsoft’s decision to revamp and test a new Cortana experience in its latest Insider preview build. Microsoft has been signaling, that while Cortana may not be seen in new product commercials or have a significant marketing budget behind its product development, the company does intend for it to have a place in its ecosystem and today’s beta app is just another sign that it plans to evolve the digital assistant.

While Microsoft does not have the same sort of mobile presence as Apple, Google or Samsung, it’s apps and services continue to make significant gains on smartphones that include a dedicated launcher for Android as well as its Cortana app for both iOS and Android. In the case of Android, the Cortana experience is practically baked into the launcher which acts as its own sort of OS flow for end users.

There may not be the same sort of fanfare around for Cortana as there was at its launch, Microsoft has reorganized and seemingly refocused its efforts to make it a worthwhile tool for more specific tasks. It will be interesting to see what old features come back into the beta development as well as new skills that show up over time.

Windows 10 20H1 build 18945 is now available with new Cortana Beta app, WSL 2 improvements

Following the accidental release of the internal Windows 10 build 18947 earlier this week, the Windows Insider team is ending this week on a more positive note by flighting the build 18945 today. This new 20H1 preview build introduces the new Cortana Beta app that was hidden in recent 20H1 builds, though be aware that it will only be available for Insiders in the US.

This new Cortana Beta app supports the conversational UI that’s already available on iOS and Android, though some features from the “old” Cortana are still missing for now. The app is still a work in progress, but decoupling Cortana from the OS will allow Microsoft to iterate faster on it.

The build 18945 also brings some improvements for the new Windows Subsystem for Linux, including the ability to connect connect to your WSL 2 Linux networking applications using localhost. The new File Explorer Search experience that debuted back in May with the build 18894 will also roll out to all Fast Ring Insiders, Microsoft said today.

Last but not least, those of you looking to try the new Phone screen feature in the Your Phone can now do so with more 9 new Android smartphones from Samsung. You can find the full list of what’s new in the build 18945 below.

What’s new in Build 18945

Introducing a new Cortana experience for Windows 10

We are beginning to roll out a new Cortana experience for Windows 10 as a Beta to Windows Insiders in the U.S. This new experience features a brand-new chat-based UI that gives you the ability to type or speak natural language queries.

Showing the new Cortana app – she’s just added something to the groceries list, and responds to the next question with what’s playing at the movies.

It supports most of the Cortana features people enjoy using on Windows, such as Bing answers, Assistant conversations, opening apps, managing lists, and setting reminders, alarms, and timers. And we’ve added some new features we think people will enjoy:

  • Cortana now supports both light and dark themes in Windows.
  • We have created a new, less intrusive screen for “Hey Cortana” queries so you can stay in the flow while you work.
  • We have updated Cortana with new speech and language models, and significantly improved performance – making it faster and more reliable than ever before.

Not all the features from the previous Cortana experience are available just yet. As a Beta, we plan to add more features over time with updates to Cortana from the Microsoft Store.

To get started, choose the Cortana icon on the taskbar next to the search box. You can also leverage the speed and convenience of voice with improved speech recognition by simply saying “Hey Cortana”*. You may need to sign-in with your account to get started.

*Note: This requires enabling this functionality in Settings > Voice activation privacy settings  – Talk to Cortana. 

If you’re an Insider in the U.S. and are not seeing the new experience, please be patient as we’re slowing rolling it out. Additional markets and languages will become available at a later date. You must be signed in to use Cortana. Historically, there were quite a few skills that could be used unauthenticated (Bing answers, open apps, Assistant conversations) but this is no longer the case. Only limited skills are currently supported in the new experience. Don’t worry we’ll be bringing back many skills over the coming months.

Windows Subsystem for Linux (WSL) Improvements: Added connecting via localhost to WSL 2 Linux apps from Windows and global WSL configuration options

You’ll now be able to connect to your WSL 2 Linux networking applications using localhost. For example, the image below shows starting a NodeJS server in a WSL 2 distro, and then connecting to it in the Edge Browser with localhost.

The Microsoft Edge browser connected to a NodeJS server running inside of a Windows Subsystem for Linux 2 distro.

Additionally, we’ve added global configuration options for WSL. These are options that will apply to each of your WSL distros. This also allows you to specify options that relate to the WSL 2 virtual machine (VM), as all your WSL 2 distros run inside of the same VM. The most exciting option that you’ll get access to in this build is being able to specify a custom Linux kernel!

For the full details on what’s new in this release, check out What’s new for WSL in Insiders Preview Build 18945 on the Windows command line blog.

Accessibility Improvements

Narrator now provides a more efficient reading experience when reading messages in Outlook or Windows Mail

When the message is opened, Scan Mode will turn on automatically. This allows the user to use their arrow keys to read the message in addition to all other Scan Mode hotkeys to jump through the text of the message.

Email messages like newsletters and marketing content are often formatted using tables to visually represent the look of the message. For a screen reader user, this information is not needed while reading the message. Narrator now recognizes some of these situations and will remove the information about the table to allow you to quickly move through the text contained in the message. This lets you to be much more efficient while reading these types of email messages.

Known issues

  • The cursor may not move to the location last read as Narrator auto-reads when an Outlook message is opened while in Scan Mode.
  • Narrator will start reading when replying to a message. Press the control key and move to the top of the message to write your reply.

Narrator’s Outlook folder reading has been enhanced for an optimal triaging experience

As you read through your emails in Outlook, such as the inbox, Narrator now reads the information more efficiently. Each line item now starts with the status of the email, such as unread, forwarded, etc., followed by the other columns, such as from, subject, etc. Column headers will be silenced and columns with no data or that have the default (expected value) will be silenced, such as normal importance or unflagged, etc. While in Outlook, headers can be turned back on by pressing Narrator + H which will toggle their reading on and off.

Text cursor indicator

Have you ever had an issue finding the text cursor in the middle of a large amount of text, during a presentation, or on the screen in an educational setting? The new Text cursor indicator will help you see and find the text cursor wherever you are at any time! Select from a range of sizes for the text cursor indicator and make it a color easy for you to see. Or, personalize the color of your text cursor indicator to your personal preference. In the Ease of Access settings, open the new Text cursor page, turn on the text cursor indicator, and never lose track of your text cursor ever again!

Text cursor setting page with the option to use it enabled. Off to the side, there’s an example of how it looks hovering over text in Notepad.

Known issues

  • Text cursor indicator color and size might not persist when you sign in. To work around that, simply turn off and turn on the “Use text cursor indicator” setting again.
  • Occasionally, you might see that the text cursor indicator stay on the screen or reappear after the app has been closed or the page contents have scrolled away.

Updated File Explorer search rolling out to all Insiders

Over the next few days, the new File Explorer search experience will be rolling out to all Insiders in the Fast ring! Thanks everyone who’s shared feedback so far and helped us to improve the experience. Please don’t hesitate to share any other comments – you can file feedback for this area under Files, Folders, and Storage > File Explorer in the Feedback Hub.

Showing the new dropdown that appears when you type in File Explorer’s search box.

Your Phone app – Expanding phone model support for Phone screen

We are continuing to expand support for Phone screen. Today, we’re excited to announce the feature availability for these devices:

  • Samsung Galaxy A6, Samsung Galaxy A7, Samsung Galaxy A9, Samsung Galaxy A10, Samsung Galaxy A20, Samsung Galaxy A30, Samsung Galaxy A50, Samsung Galaxy A70, and Samsung Galaxy S8 Active

If you have any of these devices, try out Phone screen and give us your feedback. We will continue to expand this list of devices over time.

As usual, this build also brings a list of bug fixes and general improvements, as well as a couple of known issues, and you can learn more details on our separate post. It’s nice to end the week with a new Windows 10 build, and we’re looking forward to seeing how this new Cortana Beta app will evolve over the coming weeks.

How to install the Scoop package manager in Windows 10

Scoop is a command-line package manager for Windows which makes it easier to install and use common programs and tools. Scoop includes support for a wide variety of Windows software, as well as favourites from the Unix world. It addresses many of the common painpoints with Windows’ software ecosystem, compared to the package manager models of Unix systems.

When using Scoop, you can download and install supported programs with a single command: “scoop install program,” where program is the name of the program. It’s similarly simple to update, uninstall and find software, avoiding longwinded trips to websites and the Windows Settings app.

Scoop

This guide will just scratch the surface of what’s possible with Scoop. We’ll show you how to install Scoop so you can add apps to your system with the command shown above. We’ll be publishing further guides over the coming weeks to help you understand the Scoop ecosystem.

The recommended way to install Scoop is by downloading and running the automated installer, which is distributed as a PowerShell script. Launch PowerShell and run the following command:

Set-ExecutionPolicy RemoteSigned -scope CurrentUser

(Warning: This allows the current user to run scripts which have originated from a remote source. Use with caution and read the notes on the Scoop website for further details.)

Scoop

Next, use the following command to download and install Scoop. You may also want to check the Scoop website to ensure you’re using the latest version of the command. If you’re worried about what the script does, you can read its source at get.scoop.sh.

iex (new-object net.webclient).downloadstring('https://get.scoop.sh')

Scoop should now install successfully. If you hit an error, ensure the PowerShell execution policy is properly set (see above) and consult the Scoop documentation.

Installing 7zip with Scoop

With Scoop installed, you can go ahead and use the tool to install software to your machine. One popular utility is the 7zip archive manager. With Scoop, you can install it by running “scoop install 7zip” from the Command Prompt. Scoop will automatically download and install the latest version of 7zip, including any dependencies it requires. You’ll find a shortcut to the program in the “Scoop Apps” folder in your Start menu.

Installing 7zip with Scoop

Scoop supports dozens of programs out-of-the-box and many more are available using third-party repositories (“buckets”). For more detailed guidance on using Scoop, we recommend reading the wiki. This includes a complete reference for all the commands which are available.

Scoop may seem complicated to setup but once running it makes program management extremely simple. It brings the best bits of Unix package management to the Windows desktop, avoiding the need to click through clunky, ad-riddled download sites and graphical installer prompts.

How to install and update Windows software with Scoop

Scoop is a simple command-line installer for Windows programs. In our previous guide, we showed you how to install Scoop and get up and running with its command line. In this post, we’ll provide a quick overview of Scoop’s main features so you can see how it helps with managing software installations on Windows.

Your usual installation procedure might look something like this: navigate to a download website, download the installer and click through the prompts, hopefully avoiding any ads which might try to distract you during the procedure. When the time comes to update the program, you’re probably going to have to repeat the entire sequence.

Installing and updating programs

Scoop supports many of the most popular Windows utilities. It streamlines the above process down to a single command: “scoop install program,” where program is the name of the program to install.

Scoop

You can easily check if app updates are available by running “scoop status.” If this shows any pending updates, run “scoop update” to automatically download them all.

Scoop status command

Software installation is reduced to a sequence of three easily memorisable commands. There’s no risk of clicking ads on suspect download sites and download links aren’t going to change or disappear.

Adding support for more programs

Out-of-the-box, Scoop comes preconfigured with support for a variety of open-source tools and utilities. Most are developer-centric, although some like 7zip may see more mainstream use.

Adding Scoop extras bucket

To install most popular software packages, you’ll need to add the “scoop-extras” bucket to Scoop. Buckets are repositories which contain Scoop package manifests, allowing the program to find and install additional software.

To add the extras bucket, run “scoop bucket add extras” from the Command Prompt. This adds support for dozens of popular programs, including Audacity, Chrome, Firefox, Skype, Slack and VLC. You can install any of them using the “scoop install” command.

Getting information about installed programs

You can run the “scoop list” command to get a summary of the programs you’ve installed. This may also be used with “scoop status” to check for outdated apps.

scoop list command

If you’re not sure which app you need, or you want to know whether something’s available in scoop, use “scoop search <query>” to search the buckets you’ve added to Scoop.

Searching for Google Chrome using scoop

After installing an update, it’s a good idea to run “scoop cleanup” which can remove old versions of apps. Similarly, “scoop checkup” checks program installations to ensure everything’s working properly – if you’re facing problems with a Scoop app, this may be able to resolve the issue.

Scoop

Finally, if you need a quick link to a program’s website, run “scoop home program” (where program is the program name) to immediately open its homepage in your browser.

Hopefully, you can now start to see how Scoop can simplify installing software on Windows. Although it is a terminal-based tool, Scoop’s core commands are easy to learn and considerably quicker to use than regular Windows program installers. There are many buckets available to add support for all kinds of software, so there’s a good chance many of the programs you use day-to-day can be installed with Scoop.

Microsoft and Rust vs C/C++: a developer’s perspective

C++ is an incredibly fast and efficient programming language. Its versatility knows no bounds and its maturity ensures support and reliability are second to none. Code developed in C++ is also extremely portable, all major operating systems support it. Many developers begin their coding journey with the language, and this is no coincidence. Being object-oriented means it does a very good job of teaching concepts like classes, inheritance, abstraction, encapsulation and polymorphism. Its concepts and syntax can be found in modern languages like C#, Java and Rust. It provides a great foundation that serves as a high speed on ramp to the more popular, easier to use and modern alternatives.

Now it’s not all rosy. C++ has a very steep learning curve and requires developers to apply best practices to the letter or risk ending up with unsafe and/or poor performing code. The small footprint of the standard library, while most times considered a benefit, also adds to the level of difficulty. This means successfully using C++ to create useful complex libraries and applications can be challenging. There is also very little offered in terms of memory management, developers must do this themselves. Novice programmers could end up with debugging nightmares as their lack of experience leads to memory corruption and other sticky situations.  This last point has lead many companies to explore fast performing, safe and equally powerful alternatives to C++. For today’s Microsoft that means Rust.

The majority of vulnerabilities fixed and with a CVE [Common Vulnerabilities and Exposures] assigned are caused by developers inadvertently inserting memory corruption bugs into their C and C++ code.

Gavin Thomas, Microsoft Security Response Center


Rust began as a personal project by a Mozilla employee named Graydon Hoare sometime in 2006. This ambitious project was in pre-release development for almost a decade, finally launching version 1.0 in May 2015. In what seems to be the blink of an eye it has stolen the hearts of hordes of developers going as far as being voted the most loved language  four years straight since 2016 in the Stack Overflow Developer Survey.

The hard work has definitely paid off. The end result is very efficient language which is characteristically object oriented. The fact that it was designed to be syntactically similar to C++ makes it very easy to approach. But unlike the aforementioned it was also designed to be memory safe while also employing a form of memory management without the explicit use of garbage collection.

The ugly truth is software development is very much a trial and error endeavor. With that said Rust has gone above and beyond to help us debug our code. The compiler produces extremely intuitive and user friendly error messages along with great direct linking to relevant documentation to aid with troubleshooting. This means if the problem is not evident, most times the answer is a click away. I’ve found myself rarely having to fire up my browser to look for solutions outside of what the Rust compiler offers in terms of explanation and documentation.

Rust does not have a garbage collector but most times still allocates and release memory for you. It’s also designed to be memory safe, unlike C++ which very easily lets you get into trouble with dangling pointers and data races. In contrast Rust employs concepts which help you prevent and avoid such issues.

There are many other factors which have steered me away from C++ and onto Rust. But to be honest it has nothing to do with all the great stuff we’ve just explored. I came to Rust on a journey that began with WebAssembly. What started with me looking for a more efficient alternative to JavaScript for the web turned into figuring out just how powerful Rust turns out to be. From its seamless interop…

Automatically generate binding code between Rust, WebAssembly, and JavaScript APIs. Take advantage of libraries like web-sys that provide pre-packaged bindings for the entire web platform.

–  Rust website


To how fast and predictable its performance is. Everything in our lives evolves. Our smartphones, our cars, our home appliances, our own bodies. C++ while still incredibly powerful, fast and versatile can only take us so far. There is no harm in exploring alternatives, especially one as exceptional and with as much promise as Rust.

What do you guys think? Have you or would you give Rust a try? Let us know your thoughts in the comments section below.


How to view Microsoft To-Do lists on the Windows 10 Start menu

Microsoft To-Do is a convenient app for quickly jotting down tasks and checking on your work items. However, there are still a few steps involved to launch the app, select the right list and review your tasks.

You can simplify the procedure by pinning your favourite lists straight to your Windows Start menu. Lists have fully-featured Live Tiles which show the latest tasks within the list.

Pinning a list live tile to Start in Microsoft To-Do

This is simple to setup but might be something you’ve overlooked. Launch To-Do and right-click any of the lists in the navigation menu (tap and hold on Windows 10 Mobile). From the menu which appears, click “Pin to Start.”

That’s it! Open the Start menu and you’ll see your new tile appear. After a few moments, it should update and display the latest tasks within your list. You can resize the tile by right-clicking it and exploring the options in the “Resize” sub-menu. Tap the tile to launch To-Do and immediately jump to the selected list. Earlier this week, Microsoft accidentally released a Windows 10 Insider build that contained a new look Start Menu without Live Tiles, so we’ll have to see how long they’re still around. For now, however, you can take full advantage of Live Tiles with Microsoft To-Do

Pinning a list live tile to Start in Microsoft To-Do

Live Tiles are available for all To-Do lists, including the My Day view and the app’s Smart Lists. The tiles allow you to check on your pending tasks without opening the app, using just the Windows 10 Start menu. They might be particularly helpful when using Windows 10 in tablet mode, or if you still have a Windows 10 Mobile device.

How to block facial recognition software on PC [FULL GUIDE]

In this day and age, the battle to block facial recognition software is more intense than ever. From the fight against third-party apps and companies that gather your data and sell it to the highest bidder, to protecting our right to express ourselves online without being censored.

The next level of privacy wars are soon to come as the newly released facial recognition software is starting to be implemented across the globe. China has already implemented this feature by using its massive surveillance system, Australia is testing it, and trials were conducted in London also.

Even though this situation might seem like a scene from George Orwell’s 1984 book, important discussions need to be carried about how we can protect ourselves.

Depending on how advanced the facial recognition software is, it usually works based on specific markers. These markers are applied by measuring the distance between your most prominent facial features – eyes, nose, mouth, head shape, etc.

In this article, we will explore some of the best options available that can help you fool facial recognition software. Read on to find out how.


How can I block facial recognition software?

1. Disable facial recognition on Facebook

  1. Log in to your Facebook account and go to Settings.
  2. Navigate to Face Recognition in the left pane.
  3. Set Do you want Facebook to be able to recognize you in photos in videos to No.
    disable facial recognition facebook block facial recognition software
  4. Save changes.

2. Use D-ID firewall

D-ID firewall block facial recognition software

One application that can block facial recognition software is D-ID. According to the developers, D-ID has a system that processes images automatically in order to prevent facial recognition software from recognizing you.

Although this firewall sounds incredible, it’s still in development, but you can request a demo if you want.


Block facial recognition software and protect your privacy with this firewall!


3. Use FaceShield

  1. Go to FaceShield website.
  2. Click on Upload now.
    faceshield block facial recognition software
  3. Select the image you want.
  4. Now choose the filter strength. Bear in mind that this filter will apply certain distortions to your image, so choose the filter strength carefully.

4. Other practical tips

sunglasses - block facial recognition software

  1. Wear sunglasses. This is the simplest trick, but it might block facial recognition software from recognizing you in public.
  2. Change your hairstyle. Keep changing your hairstyle frequently for the best results.
  3. Apply heavy makeup or wear face accessories.

As the world is constantly changing, having the required information in order to protect yourself from preying eyes becomes increasingly important.

In this article, we explored some of the best methods that allow you to fool facial recognition software. Please let us know if you have any other suggestions by using the comment section below.

READ ALSO:

System Fan 90B Error: 3 Ways to Fix HP Cooling Fan

HP laptop users complain about loud fan noise and display the System Fan (90B) error code. This can be a serious issue and cause hardware damage if you don’t address it.

In today’s guide, we will take a closer look at this problem and show you the best ways to fix it, so let’s get started.

What is an HP System Fan 90B issue?

This fan problem is usually due to dust buildup on your fans and vents. The issue can also appear due to problems with outdated BIOS.

How do I fix System Fan error 90B?

1. Clean the air vents and CPU fans

  1. After shutting down the computer, check the exterior vents and remove any dust buildup by blowing air through the open vents.
  2. Also, clean the CPU fans thoroughly and then put back the lid. Restart the PC and check if the problem is gone.HP laptop error code 90b
  3. If the issue persists, check if the CPU thermal paste has dried out. Remove the old thermal paste and reapply it. If you don’t know how to do it, seek professional help.
  4. Restart the PC and check if the error reoccurs.

2. Update BIOS

  1. Go to the HP Support Assistant page, and download HP Support Assistant software.
  2. Run the software and in the My Devices tab, find your computer and click on Updates.

  3. Now, click on Check for updates and messages to download the latest updates.
  4. If any update is found, check the BIOS update box and click on Download and Install.
  5. Close the Support Assistant once the update is installed. Reboot the system and check for any improvement.

For more information, check our how to use the HP Support Assistant guide.

3. Perform a hard reset

  1. To hard reset, the HP laptop, turn it off.
  2. Remove any external devices connected to your laptop. Also remove the power cord, if plugged in.
  3. Now press and hold the Power button on your laptop for 15 seconds to reset. Leave the laptop for about a minute or two.Hard Reset HP Laptop to fix 90b error
  4. Now plug in the power adapter to the wall socket and plug in the power cord to your laptop.
  5. Power on the computer and check for any improvements.

How to bypass CPU fan error?

  1. Keep pressing Del or F2 to enter BIOS.
  2. Go to Monitor and Q-Fan Configuration.
  3. Set CPU Fan Lower Speed Limit to Ignore.
  4. Save changes.

Keep in mind that disabling this feature can cause overheating and potential damage to your PC.

System fan 90B on an HP laptop is a fan issue; if it appears, you might experience loud fan noise. On the other hand, many reported that the laptop fan is constantly running.

If you’re having similar problems, we have a guide on what to do if your CPU fan is not spinning, so you might want to check it out.

Microsoft Teams to get channel cross posting and priority notifications

With 13 million daily active users, Microsoft Teams is clearly a big success for the tech gigant.

Teams integration with Office 365 is a big part of its rapid growth

A significant part of that success is its integration with Office 365. Not only that, but the continued efforts to expand and add new features had also played a big role in Teams’ rapid growth.

Among many new upcoming changes, a new feature was confirmed by Microsoft Teams’ twitter. It seems like posting a single message in multiple channels at the same time is coming to the workplace.

Coming soon to #MicrosoftTeams: Channel cross posting allows you to post a single message in multiple channels at the same time.

Although the new feature was confirmed, an ETA for channel cross posting wasn’t revealed.

Microsoft Teams might get a new set of features soon

Other features that might come to Microsoft Teams soon are priority notifications for important messages, support for reading receipts in chat, and more control to channel moderators over a channel’s content.

Teams is the fastest growing app in the Microsoft 365 universe and is besting its main rival, Slack, in terms of usage and adaptability.

Maybe it’s because of the frequent updates, or because of its integration with Office 365. Whatever the reason behind Teams’ success is, its market share is increasing rapidly.

How to enable the new Control Center UI in Windows Lite

As you all know, Microsoft accidentally pushed Windows 10 Build 18947 to all Insiders.

Some people didn’t get a chance to install the build as Microsoft quickly took it down. However, many Insiders managed to sneak-peak at the latest features.

This build brings a redesigned Start Menu. Recent reports suggest  Microsoft has revamped the Control Centre UI as well.

As a quick reminder, Microsoft unfolded a new Control Center design back in 2017. The concept was pretty interesting as it allowed you to quickly access the system settings.

It came with some toggle buttons similar to those you can find in the Windows 10 Action Center.

That Control Center is back

Many Windows Insiders reported that Control Center is back again in Windows 10. You can edit the Windows Registry to enable it.

You can try the hidden Control Center if you are currently running the Windows 10 Insider Build 18947.

https://twitter.com/WithinRafael/status/1154102131130920960

This time, Microsoft divided the Control Center into two separate parts Action Center and Quick Actions. You will see all the notifications in the Action Center.

However, you can use the Quick Actions panel to activate or deactivate different options such as Wi-Fi and Bluetooth. You can see a list of options by dragging the adjustable panel upwards.

You will now see all the new notifications slightly above the Control Center. The latest Control Center features a compact interface design. Microsoft is currently testing the new functionality and it may not work as expected.

However, the full functionality will be available once Windows 10 20H1 is available next year.

Steps to enable the new Control Center UI on Windows 10

This feature is currently available in Windows 10 Build 18947.

Follow these steps to enable the hidden Control Center on your system:

  1. Type regedit in the search bar and click Registry Editor from the list of results to open it.
  2. Navigate to the following path in the Registry Editor:
     HKEY_LOCAL_MACHINE\SOFTWARE\Microsoft\Windows\CurrentVersion\Control Center\UseLiteLayout
  3. Create a new DWORD and change its default value to 1.

Many people didn’t like the buggy update at all. That is why Microsoft is highly recommending all users to roll back to a previous stable build.

Generally, the rollback option is available to Windows 10 users for a period of 10 days.

Moreover, those who have not installed the update yet should delay the installation for 7 days. You will see that this build is no longer available in the Windows Update section.

RELATED ARTICLES YOU NEED TO CHECK OUT:

Your connection is not fast enough Plex error [QUICK FIX]

Even though Plex is a more-than-reliable Media Server solution for a plethora of devices, users are seeking for the solution of the awkward connection problem. It’s mainly present on Nvidia Shield and Fire TV and it can be quite a dealbreaker. Especially since it’s present for almost 3 years and still isn’t fully addressed. The error reads Your connection is not fast enough.

Now, the real problem lies in the fact that the affected users most certainly have a good connection and the server‘s hardware capabilities are mostly dealing with transcoding. The problem is either in the Shield or, more likely, an issue with Exoplayer 2 on Plex. Either way, we tried to give you some elementary troubleshooting steps. Until the problem is dealt with future updates.

How to fix Your connection is not fast enough error on Plex

1: Check the connection

  • Ensure that you are using a wired connection.your connection is not fast enough plex
  • Reboot all the devices — both server and Shield.
  • Make sure that the modem ports are open.
  • Check your connection speed.
  • Check the IP assignment.

Plex extension for Kodi works without issues. Get Kodi on Windows 10 and avoid this error.


2: Update the app or sideload the Test version

  1. Update the Plex app on your Nvidia Shield or Fire or downgrade to the Plex Android-based version 6.12. your connection is not fast enough plex
  2. Navigate to the Nvidia Shield official forum, here.
  3. Register your Shield serial number to gain access to the newest test firmware version.
  4. Install it and look for improvements.

3: Update Plex Media Server

  1. Log into the server web interface.
  2. Open Settings.your connection is not fast enough plex
  3. Select the Server tab.
  4. Install the latest version.
  5. Restart Plex Media Server.

In addition, Plex Support needs your logs in order to reproduce the error and fix it for good. So you can, if you have some time to spare, send them the logs. Check how to do it, here.

RELATED STORIES YOU SHOULD CHECK OUT:

How to rollback from Windows 10 build 18947 and avoid nasty bugs

Yesterday, Microsoft accidentally released an internal Windows 10 build to all Insiders. Unfortunately, this build had not yet been tested internally.

The chances of it triggering severe technical issues on your computer are very high. For this reason, the best approach is to simply roll back to a previous OS version.

In this quick guide, we’ll show you exactly what are the steps to follow in order to do that.

Steps to roll back from Windows 10 build 18947

  1. Go to  Start > select Settings
  2. Navigate to Update & Security > select Recovery
  3. Select Go back to the previous versions of Windows 10 > hit the Get Start button
  4. When asked why are you going back > select For Another Reason
  5. Under Tell us more, simply type the number of the problematic build. In this case, type 18947 and hit Next
  6. On the Check for updates screen > select No, thanks
  7. Continue to hit the Next button to continue
  8. On the final screen > select Go back to earlier build to initiate the rollback process.

You should rollback from this build as soon as possible, especially if you’re enrolled in the Slow or Preview Release Rings.

As Microsoft explains:

Affected users generally have ten days (10) after installing build 18947 to complete the rollback process before losing the ability to do so. If you have Storage Sense enabled, this time window may be reduced. We encourage affected users to complete this action as soon as possible to ensure they’re able to roll back successfully.

Have you experienced any severe bugs after installing Windows 10 build 18947? Let us know in the comments below.

Download OpenXR from Microsoft Store to write cross-platform VR code

Microsoft recently released OpenXR for Windows Mixed Reality (WMR) devices. You can now head over to the Microsoft Store to download it.

Khronos released OpenXR app to allow many users who want to run those applications that depend on OpenXR. Developers basically use OpenXR to develop virtual and augmented reality applications.

Now you can simply install the OpenXR app to run these apps on multiple OpenXR APIs platforms.

Windows watcher @WalkingCat was the first to announced the news on Twitter.

Moreover, the applications that you have developed with OpenXR will run Windows Mixed Reality headsets and holographic devices.

In other words, you just need to write the code once and then you can run it on various hardware platforms.

System requirements

You should be running Xbox One and Windows 10 version 17763.0 or higher to install OpenXR app on your system.

We hope that this app will be available on additional platforms very soon. Furthermore, the OpenXR app supports x64 and ARM64 based processor.

This release was not shocking for the Windows 10 users. Microsoft has always stressed on the importance of OpenXR.

A few months ago Alex Kipman, a Microsoft’s engineer, explained what Microsoft thinks about the future of OpenXR.

Microsoft believes that for mixed reality to thrive, it must be open for everyone: open stores, open browsers and open developer platforms. We’re dedicated to supporting the launch of OpenXR this year on Windows Mixed Reality and HoloLens 2…

The Khronos website clearly mentions that many big names in the industry including Oculus, Intel, Unity, AMD, and Valve currently support OpenXR.

Additionally, the number of platforms that support OpenXR is pretty notable. Some of these are Daydream, Oculus, and SteamVR.

You can now write portable code

Previously, developers had to write separate code for each platform. Microsoft wants to facilitate its users in this regard.

We can see that this approach will help developers to launch more games and apps. It would eventually result in a better future for Virtual and Augmented reality domain.

If you want to try out OpenXR app right now, you can simply download the app from Microsoft Store.

Do you think that it is really useful? Share your opinions and thoughts in the comments section below.

RELATED ARTICLES YOU NEED TO CHECK OUT:

Microsoft To-Do gets new rich entry bar feature in latest Insider update

Microsoft is continuing to revamp its note-taking experience across platforms with a new update to Microsoft To-Do rolling out to Fast Ring Insiders.

Today’s update introduces the “rich entry” bar which allows the modification of To-Do items inline with menus that pop up and drop down accordingly.

The rich entry bar is being tested out with Fast Ring Insiders at the moment and a senior software engineer at Microsoft is hinting that additional subtle UI elements may be incorporated before the new feature is rolled out to the masses.

How to Read FAT32 on Windows 10: All You Need to Know

FAT32 is a computer file system architecture used by storage devices. This standard appeared first on Windows 98, and it’s still used today. But many remain unaware of how to read FAT32 on Windows 10.

Since this system architecture is so popular, today, we’ll answer FAT32-related questions, such as whether Windows 10 can read FAT32 drives.

Can Windows 10 read FAT32?

Yes, FAT32 is still supported in Windows 10. If you have a flash drive formatted as a FAT32 device, it will work without any problems.

You can read it without any extra hassle on Windows 10. This ensures that users can easily read and access data on drives formatted for a previous OS iteration, delivering seamless compatibility.

Is FAT32 UEFI bootable?

FAT32 can be bootable; the UEFI system can’t boot from NTFS devices, only FAT32.

If you want to install a new version of Windows, you’ll need to format your flash drive as a FAT32 to boot from it.

Which is better, FAT32 or exFAT?

The key differences between FAT32 and exFAT

Here’s a quick comparison between FAT32 and exFAT.

FAT32:

  • One of the oldest file systems still in use.
  • The file size limit is set to 4GB.
  • Max size for FAT32 partitions is set to 8TB.
  • Fully compatible with other operating systems, including Linux and Mac. It also works perfectly with other hardware that supports reading USB flash drives.

exFAT:

  • Introduced in 2006.
  • Maximum volume size is 128PB.
  • The maximum file size is 16EB.
  • It can hold files that are larger than 4GB in size.
  • Compatible with Windows and macOS X, but it might require additional software to run on Linux.

Overall, exFAT doesn’t have the limitations of FAT32, most notably the file size limit, so it’s almost always a better choice. However, if you’re looking for better cross-system and hardware compatibility, FAT32 might be a better choice.

Is NTFS faster than FAT32?

According to users, there’s no speed difference between NTFS and FAT32. However, some benchmark results claim that NTFS is faster than FAT32.

As the end-user, you probably won’t notice much of a speed difference between the two.

How do I know if my USB is formatted to FAT32?

  1. Open This PC.
  2. Right-click the desired drive and choose Properties.
  3. Now in the General tab, look for the File system value to find the current file system.
    file system Can Windows 10 read FAT32

Can you install Windows on FAT32?

No, FAT32 is an older file system, and you can’t install an operating system. Since Windows Vista, you can only install an operating system to NTFS drives.

If you’re using FAT32, you must format it to NTFS to install an operating system.

There you go! These are some of the most common questions regarding the FAT32, so we hope you found this article helpful.

Before you leave, read our detailed comparison of FAT32 and NTFS and find out which is better. You can also check our guide on transforming exFAT to FAT32 format on Windows.

You can also explore a complete comparison of the major file systems in this guide on the differences between NTFS, FAT32, and exFAT, which highlights their strengths, limits, and ideal use cases.

For any queries or to share valuable information we missed, drop a comment below.

Play the Gears 5 Tech Test, Overwatch and more for free with Xbox Live Gold this weekend

Microsoft has just announced another Free Play Days event for Xbox Live Gold subscribers, with no less than four games to play starting today at 12:01 a.m. PDT through Sunday at 11:59 p.m. PDT. One of them is the second Gears 5 Multiplayer Tech Test, which follows a first session last week for Xbox Game Pass members and people who pre-ordered the game.

For those unfamiliar, Gears 5 is the next big Xbox Game Studios title shipping on Xbox One and Windows on September 10. As we’re nearing the end of this console generation, developer The Coalition may well have crafted another Unreal Engine 4 masterpiece as for the first time ever in the series, the Xbox One X version of Gears 5 will run in 4K at 60 FPS in all game modes including Campaign. If you didn’t check it out during the previous Tech Test, this new session includes the same multiplayer game modes including the new Boot Camp training experience.

In addition to the Gears 5 Tech Test, Xbox Live Gold members can also play the popular online shooter Overwatch this weekend, as well as Worms W.M.D and the fighting game Naruto to Boruto: Shinobi Striker. All three games are also on sale during this new Free Play Days event.

Gears 5 Tech Test
Gears 5 Tech Test
Developer:
Xbox Game Studios
Price:
Free


Overwatch® 2
Overwatch® 2
Price:
Free


Worms W.M.D
Worms W.M.D
Developer:
Team17 Digital Ltd
Price:
$5.99


How to communicate effectively with the Wiki tab in Microsoft Teams

If you’re already using Microsoft Teams, you’ve likely found it as a great way to efficiently keep in touch with people across your organization. But, did you know that there’s another way to communicate in Teams other than main channels, threads, and chats?

You might not notice it, but tucked away on the top bar of any given channel in Microsoft Teams is the Wiki tab. In this guide, we’ll talk a bit more about how you can use it as a smart editor to chat, edit, and collaborate on projects.

Adding a Wiki Tab

Similar to adding the YouTube app, you can create a Wiki Tab with the “Add a Tab” button in your channel. Once you do that, you can select “Wiki” from the tab gallery. You can then name your Wiki tab as you please, and get started with collaboration. There’s even an option to post to the channel so everyone can see your new Wiki.

Adding a Wiki in Teams

Writing in Wiki Tabs

Once you’ve added a Wiki tab, you can treat it similar to Microsoft Word, or even Notepad. You can write text, and enjoy formatting like bold, italics, and underlining. Keep in mind, that anything you write in the Wiki Tab will be available for everyone to see.

You can also add multiple documents to Wiki tabs for more effective communication. Each document on a WikiTab is called a page, and you can find different sections. As you add more pages and sections you can summon a table of contents with the hamburger menu on the right to help keep things organized. For convenience, you can even link to sections by clicking on “More options” and “Get link.”

Writing in Wiki in Teams

Collaborating in Wiki Tabs

Along with writing in Wiki Tabs, you can collaborate directly and get your coworker’s attention to keep things effective in several ways. The first is through @mentions. You can chat with someone about the page by “@’ them with their name. This is a cool way to get feedback on whatever is being worked on. When someone is “@” they’ll get notified in Teams, and taken directly to the Wiki once clicked.

You also can start chats directly from within Wiki Tabs. You can press on “Show section conversation” alongside the right of a section to start a chat about the Wiki. This is an excellent way to leave questions and comments on projects and get direct feedback from your teammates.

There are other ways to collaborate!

The Wiki Tab is just one way that you can collaborate with your coworkers and cohorts in Microsoft Teams. Other methods include sharing a OneNote notebook or even adding and integrating an app like Asana. Of course, we also have a collection of our own tips and tricks for Teams which you can check out to help boost your collaboration too.

Wunderlist doesn’t sync on Windows 10 [SIMPLE FIX]

Wunderlist is one of the best to-do list apps on the market, but many users reported that Wunderlist doesn’t sync on their PC. This can be a big problem, especially if you have multiple tasks that you need to keep track of across multiple devices.

Although this issue can be problematic, there is a way to fix it, and today we’re going to show you how to do it.

What to do if Wunderlist doesn’t sync on Windows 10?

1. Add tasks manually in Incognito mode

wunderlist website wunderlist doesn't sync

  1. Open your browser.
  2. Start browsing in Incognito mode and go to the Wunderlist’s website.
  3. Log in with your account credentials.
  4. Compare the tasks, and make sure that all tasks are available on your device.
  5. If not, you’ll need to add the tasks manually in your browser.
  6. Now click the Sync button in top right corner to sync the tasks.
  7. Now log out of Wunderlist on all your devices and log back in.
  8. Check if your tasks are synced properly.

Looking for a Wunderlist alternative? Here are the best to-do apps to use on Windows 10!


2. Use the web version or the browser extension

wunderlist extension download wunderlist website

  1. Go to Wunderlist website in your browser and check if all your tasks are available.
  2. If so, you can continue using the web version until the issue is resolved.
  3. Alternatively, you can download the browser extension and use it instead of the web version.

There you go, two simple solutions that might help you fix Wunderlist syncing problems on Windows 10. In most cases, you can fix the problem simply by syncing from the web app directly, but if that doesn’t work, we advise to use the official Wunderlist extension as a workaround or until Wunderlist developers don’t fix the issue.

RELATED STORIES TO CHECK OUT:

How to Use Windows Sandbox and VirtualBox VMs Simultaneously

Many users recently reported on various forums that they encountered issues when trying to use Windows Sandbox and VirtualBox VMs simultaneously.

The severity of this issue is further backed by the fact that many users consider that:

Some of us upgraded for one reason and one reason only – Windows Sandbox. However, as someone who uses VirtualBox on a daily basis for a literal plethora of reasons, this update was a nightmare until quite recently.

After much research involving several useful threads, they found a viable solution.

How can I use Windows Sandbox and VirtualBox VMs simultaneously on PC?

This solution is more of a workaround and is not backed by any official sources. and has the following steps:

  • Open cmd.exe with administrator rights
  • Type in the following command line:

bcdedit /copy {current} /d “Windows 10 – No Hyper-V”

This will create a new boot entry that is an exact copy of your active boot entry, but without Hyper-V.

  • Copy the GUID that was just issued you, and paste it somewhere safe, since losing it will just complicate things
  • Take the new GUID and paste it withing the following command line and execute it:

bcdedit /set {[NEW_GUID]} hypervisorlaunchtype off

  • Reboot your PC so that the changes can take effect

The difference now is that instead of just simply booting your Windows, you will enter the Windows Boot Manager.

  • You now have to choose the No-Hyper-V option.

This is how you can properly configure Windows Sandbox [EASY STEPS]


Reverting these changes

In case you want to revert the changes, the steps needed to be taken are a whole lot simpler:

  • Press the Windows Key + R
  • Type in msconfig in the search box
  • Proceed to the Boot Tab
  • Find the “No Hyper-V” boot entry, select it, and then click Delete.

This won’t delete the boot entry altogether, instead, it will make it so it no longer appears in the Windows Boot Manager as an option.

If this seems like too much work, you can just enable Windows Defender Sandbox and leave it at that.

Gears 5 error 0x80073CF3 blocks game download [FIXED]

The latest entry in the Gears of War series hit the gaming community on July with  a teaser trailer.

This trailer showcased the new mechanics introduced in Gears 5  and acted as an invitation for anyone interested to join the free Tech Test that took place over the course of several rounds.

If you are an active Game Pass subscriber, you can use the Game Pass library to download the game. 

The game is also available through the Microsoft Store, but some users reported encountering difficulties downloading it this way.

As far as users reported, the issue goes as follows:

So I’m trying to download the client for the Gears 5 beta/tech test but every time I start the install, I get this error 0x80073CF3 “The update failed”

Error 0x80073CF3 also known as Package failed update is commonly caused by incorrectly configured system settings or faulty entries in the Windows registry.

This is an error most commonly found when trying to perform Windows updates or when downloading Windows Store Apps. You can read more about it in this guide.

How to fix error 0x80073CF3 step-by-step

While not a guaranteed solution, you could try following these steps in order to potentially fix your problems:

  1. Clean up your Temporary Files as well as your Internet Cache and perform a system reboot.
  2. Disable or uninstall your Firewall and Antivirus software.
  3. Use the Microsoft’s Windows Update Troubleshooter to reset Windows Updates to their default settings
  4. Reset the Software Distribution Folder.
  5. Reset the Catroot folder to default settings.
  6. Boot in Clean Boot State and run Windows Update once again

Ultimately, if all else fails you could consider performing a full system reinstall which will most likely fix any issue.

The first round of the Gears 5 Tech Test started on July 19th and ended on July 22nd, and the next round is expected to start on July 26th.

Hopefully, if you follow these steps you will no longer encounter any similar issues and will be able to enjoy the Gears 5 early access before the official September release date.

For more articles regarding Gears 5, check out the following links:

Can’t see health bars in League of Legends [GAMER’S FIX]

League of Legends made the MOBA genre massively popular, but although it works seamlessly for so many users, this free-to-play title by Riot Games has its fair share of issues and bugs. One common bug seems to concern health bars and summoner names. Namely, some League of Legends players can’t see health bars.

Learn how to fix this with the steps below.

How to restore health bars in League of Legends

1: Check the Settings

  1. First of all, restart the game and reconnect. This resolved the problem for the majority of users, as there is, seemingly, a bug with the health bar.league of legends cant see health bars
  2. If that doesn’t help, navigate to Settings and ensure that Health bars are enabled.
  3. Enable them and restart the game to see improvements.

2: Reset Configuration

  1. Log into the game client with your credentials.
  2. Navigate to the installation folder, usually C: > Riot Games > League of Legends.
  3. Locate and delete the Config folder.config folder lol league of legends cant see health bars
  4. Start a practice game and, once the settings are saved, leave the game.
  5. Start the game again and the health bars should be back.

Learn how to significantly improve FPS in League of Legends now with some PRO tips!


3: Run Hextech Repair Tool

  1. Download Hextech Repair Tool, here.
  2. Select your Region and check the Force Repatch box.
  3. Click Start and wait for the troubleshooter to resolve the problem.hextech tool league of legends cant see health bars
  4. Start the game and look for improvements with the health bars.

4: Try playing in the Windowed mode

  1. The bug might occur if you are frequently using Alt+Tab to exit the game from the Full-Screen mode. That’s why, if you need to do something in the background, we suggest switching to the Windowed mode.league of legends cant see health bars
  2. To enable the Windowed mode, instead of Full-Screen or Borderless mode,  press ESC to bring the Settings.
  3. Choose the Video tab and, under the Window size, select Windowed mode.
  4. Exit Settings.

RELATED STORIES YOU SHOULD CHECK OUT:

Get ready to share resources with Wakelet app on Microsoft Teams

Microsoft finally announced the release of the Wakelet app. The Wakelet app is now available as an additional resource for the Microsoft Teams service. You can now save, organize and share online resources with the Wakelet app.

The integration of Wakelet within Microsoft Teams will help educators in many ways. Microsoft hopes to transform the classroom experience for both the students and the teachers.

The official blog post reads:

Wakelet is now available as an app within Microsoft Teams. To view a public or unlisted Wakelet collection in Teams, simply open a new tab and select the Wakelet app. Wakelet allows people to quickly and easily save, organize and share content from across the web. Educators around the world are using it to create collections of resources, newsletters, portfolios, for digital storytelling and much, much more!

Now the educators can use Wakelet Teams app to share STEM projects, Minecraft lesson ideas, SEL resources with departmental colleagues and students and other online resources.

It allows you to invite other faculty members to collaborate on shared resources. You can easily share ideas and resources required for a specific event or topic.


Check out these awesome education apps that you can use in the classroom.


Additionally, the app improves the learning process for the students. They can work together on assignments and projects by sharing study material with the rest of the class.

Educators can also use the new Wakelet Teams app with their classes. Why not invite your students to collaborate on a group collection and then add it to a tab in their Class Team to share it with the rest of the class? You could even create a reference collection of resources for students to access as part of their assignment or study unit.

Microsoft Teams has become a popular tool in the past few years. Microsoft wanted to compete with Slack with its release in 2016. Today, Microsoft Teams is ahead of Slack with more than 13 million active users.

RELATED POSTS: