Microsoft has announced that new features will be added to the Long Term Servicing Channel (LTSC) versions of Windows 11 LTSC Enterprise and IoT Enterprise 2024, released earlier this year. LTSC is a Windows version aimed at specialized systems like medical equipment.
The last LTSC release was based on Windows 10, so this is the first LTSC release of Windows 11. The new features being added to LTSC are:
Bluetooth LE (Low Energy) support.
Wi-Fi 7 support.
H.266 (HEVC) support.
Sudo for Windows allows command-line apps to run with system rights.
Dev Drive is used to store development tools separately from apps and data.
Improvements to the Windows LAPS (Local Admin Password Solution) policy allow organizations to manage LAPS from the cloud.
Automatic account management is needed for the more straightforward setup of new devices.
Image rollback detection to automatically recover devices from failed updates.
Pluton, Microsoft’s new security chip, for increased protection against physical attacks.
Rust, a safer programming language, and SHA-3 cryptography to protect against advanced threats.
Passkeys for secure, passwordless access to apps and websites.
Personal data encryption to protect sensitive information from unauthorized apps.
It’s worth noting that LTSC does not contain certain features, like the Microsoft Store or Microsoft Edge. LTSC is also not intended for typical PCs; Microsoft recommends that enterprise customers use LTSC only for specialized devices.
Last month, Microsoft said it would support the 2024 LTSC versions of Windows 11 for ten years, up from the seven years of updates that Windows 10 LTSC received.
If you’re getting the store_9224593_067be2186c614317 while trying to gift a game through the Steam store, don’t worry because you did nothing wrong. The complete message also reads Cannot read properties of undefined (reading ‘GetShowDebugFocusRing’). This is due to Steam’s server issues or maintenance time.
How do I fix the store_9224593_067be2186c614317 Steam error?
1. Check the Steam server status or wait it out
Unfortunately, the error store_9224593_067be2186c614317 in Steam has nothing to do with you or your device. The error code points out a problem with the Steam server. It’s either down or under maintenance.
To make sure that’s the case, check out the unofficial Steam server status page and look for the situation in your area or the one for the Steam Store.
If the services are down in your area, you can simply wait until the situation clears and try using the store again.
2. Use a VPN
Steam has servers all around the world and they can’t all be down at one time. If you’re really eager to gift that game, you may get a good VPN and select a different region than the one you are in now.
An excellent choice for this task is ExpressVPN. This software offers amazing connection speed and a very large number of servers you can use.
The VPN will change your IP and your device will appear as in a different part of the world so Steam will access another server that it’s not down or under maintenance.
Express VPN
Enjoy all your Steam games without restrictions and at top connectivity with this powerful solution.
If you run into an error, here’s our guide on what to do if the VPN is not working on Steam. In short, you will need to change the Steam Store country from the app’s settings.
You may also try using the mobile app to gift the game in Steam store. Apparently, Steam uses another server for that so many users have been able to bypass the store_9224593_067be2186c614317 error using the mobile app.
To conclude our guide, you can’t actually fix store_9224593_067be2186c614317 Steam error but you can wait it out, use the mobile Steam Store or use a VPN.
Hopefully, with our solutions you managed to get over the store_9224593_067be2186c614317 error and now you can use the Steam Store.
Discord and Telegram are currently the two most popular messaging platforms, but what’s the difference between them and which one should you use? Today we’re going to answer this question.
Discord vs Telegram, which one is better to use?
User interface
Discord’s interface is optimized for desktop PCs, and it lists all your servers in the sidebar on the left. In the same sidebar, there are buttons to explore or create a new server.
Right next to it is your channel or friends panel, allowing you to quickly switch to a specific channel on a server or switch to a different conversation with friends. And lastly, all your communication is on the right side of the application.
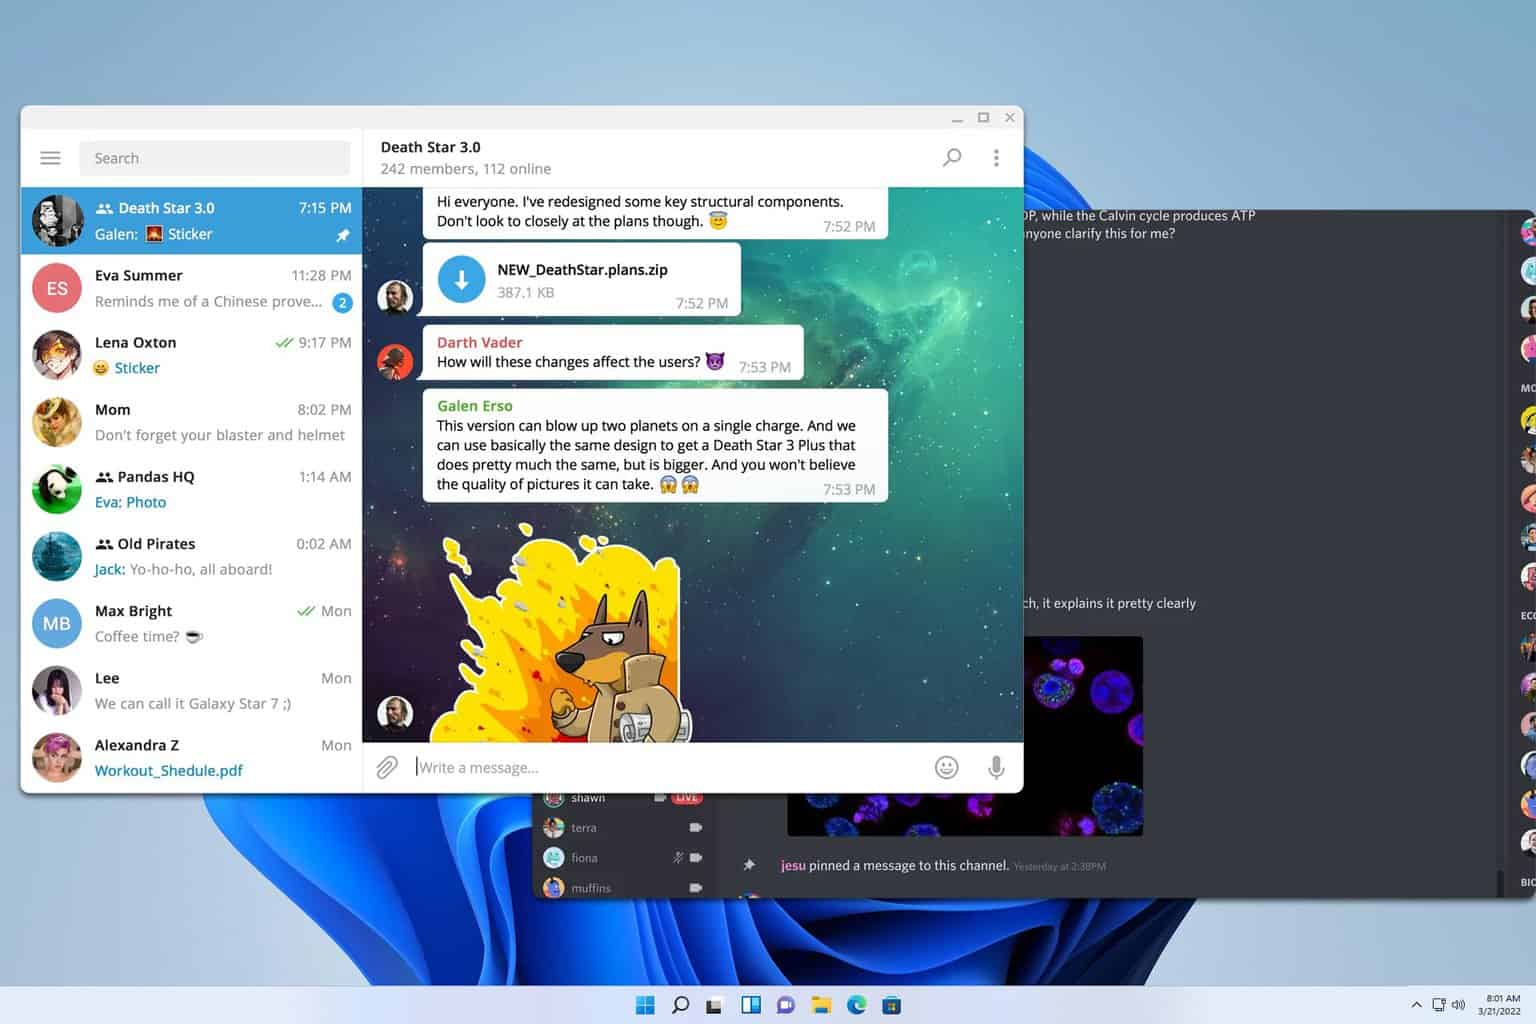
Telegram on the other hand has a simplistic interface with all your contacts in the left panel and chat in the right. The design is simple and similar to WhatsApp and other text messaging apps.
Discord’s interface offers access to all of its features, and sometimes it can feel a bit overwhelming, so we prefer the more minimalistic design of Telegram.
Features
Discord
Discord is built around online communities so it comes with an advanced ability to manage permissions and roles on each server. Speaking of which, it also supports large servers that can have thousands of users.
Speaking of servers, free users can join up to 100 servers and organize them into folders for quick and easy access. We also have to mention that servers offer various verification methods, so you can restrict users from joining your server unless they have a valid email or phone number.
The service also can screen share, and you can even clip the steams that are currently shared. Of course, thanks to the Discord Developer Portal, there are various bots and integrations you can use.
Telegram
Telegram on the other hand offers a different set of features, but similarly to Discord, it also offers channels, and you can also create groups that are similar to Discord servers.
We also have to mention integration and bots, so you can automate and enhance your channels with ease.
The service allows you to easily delete your message from all your contacts in the first 48 hours of sending a message. It also lets you schedule your messages and send them later. We also have to mention the ability to send silent messages that won’t trigger a notification.
If you want more privacy, there’s a Secret Chat feature that uses end-to-end encryption and isn’t stored on Telegram servers. The chat will also self-destruct, so it’s perfectly hidden.
And lastly, we have to mention the account self-destruct feature that will automatically delete your account if you don’t log in for a certain time thus keeping your privacy safe in case you lose your phone or access to the account.
Discord vs Telegram privacy & security features
One of the biggest complaints of Discord is the lack of end-to-end encryption for chats, and this means that your conversations can be read by third parties or Discord administrators.
On the other hand, Discord voice and video calls are fully encrypted by default. It’s worth mentioning that Discord doesn’t require a phone number to sign up, but some servers might require one if you want to join them.
As for Telegram, it has a similar problem with encryption, and only server-client encryption is available for chats. However, you can use full end-to-end encryption in the Secret Chat feature.
With regular chats, your messages are encrypted during sending, and stored on servers in encrypted format. However, Telegram hasn’t disclosed any user data so far, even after being pressured by various governments.
Is Telegram or Discord safer?
In terms of safety, we’d say that both services offer a similar level of protection. Telegram has better privacy features with its Secret Chat feature and the ability to remove your messages and account.
Why do people use Telegram instead of Discord?
The two apps have different functionalities, and Telegram is a better choice for one-on-one communication while Discord is better if you want to join multiple communities.
Telegram also offers slightly better privacy features than Discord, which makes it a better choice for some users.
Conclusion
When it comes to the Discord vs Telegram debate, it all depends on what you look for in a service. If you are looking for a service that has thousands of communities that you can join and switch between with ease, then Discord is the superior choice.
Discord also became a No. 1 platform for gamers, so if you’re a fan of online multiplayer, Discord is the obvious choice.
On the other hand, if you’re looking for a messaging app for one-on-one communication, then downloading Telegram is a better option. It offers advanced chat features and it allows you to schedule your messages, delete them, or even delete your entire account if you don’t log in for a while.
Secret Chat is also a welcome addition that allows you maximum privacy with end-to-end encryption that deletes your chat session after you’re done.
Speaking of Telegram, there’s a browser version called Telegram Web that might come in handy to some users.
If you still haven’t found the right software for you, feel free to check our guide on the best Discord alternatives for more information.
Microsoft is rolling out a new program called Copilot Labs, which will allow Copilot Pro users to test upcoming features before they launch to the public.
Copilot Labs is a response to early feedback from Copilot Pro users who wanted to help shape the direction of Copilot and get early access to features. The program will allow users to try experimental features and share their thoughts with Microsoft.
In the future, Copilot Labs will feature more experimental tools, including Copilot Skills, which will allow users to teach Copilot new abilities. In addition to Copilot Labs, Microsoft is launching a new feature called Copilot Vision for Copilot Pro users in the U.S. that assists you in finding information you’re looking at online.
In a blog post, Microsoft says Copilot Vision is accessible by clicking a Copilot icon in the Microsoft Edge toolbar. When you click, you can highlight a part of a webpage, and Copilot will analyze the selection and provide information. For example, if you highlight a paragraph of text on a Wikipedia page, Copilot can summarize the content, answer questions about it, and more.
You can see a preview of it in the video below:
Copilot Vision can also answer questions about images. If you select a photo of a landmark, for example, Copilot can help identify it, provide a brief overview, and more. If you highlight text in multiple languages, Copilot can translate it on the fly.
Microsoft uses machine learning to avoid returning false or misleading information and designed Copilot Vision with privacy in mind. Copilot Vision doesn’t store content, audio, images, or conversations with Copilot, and it’s blocked on sites with paywalls and sensitive content. Still, if we’re thinking about Windows Recall, this might not be enough to encourage users to use capability.
The Redmond-based tech giant is starting with a few hundred sites in the U.S., including Wikipedia, Yelp, Reddit, and others, and will expand Copilot Vision to other countries in the coming months.
Per the announcement, Copilot Labs is now available in preview. Copilot Vision has started rolling out to a subset of users in the U.S. If you’re a Copilot Pro subscriber, you can expect to see Copilot Vision in the coming weeks.
Copilot Labs will also allow users to try the Think Deeper feature, which allows Copilot to reason through more complex problems. Using the latest reasoning models, Think Deeper can help with anything from solving challenging math problems to weighing up the costs of managing home projects.
Think Deeper will roll out to a limited number of Copilot Pro users in the Americas, Asia, Europe, and Oceania.
At first glance, it is hard to choose between Microsoft Planner and Trello, because they appear similar. Both are online Kanban tools that will help you enhance task and project management. However, there are key differences between them that should be considered when making a choice.
Ultimately, the best option depends on your specific needs, preferences, and workflow, as there is no universal solution for productivity software. If you’re struggling to decide between Trello and Microsoft Planner, remember that there are many other excellent planner tools available.
Microsoft Planner vs Trello comparison
Let’s start with a first glance comparison to highlight the main differences between Microsoft Planner and Trello.
Microsoft Planner
Trello
Learning curve
If you’re used to Microsoft’s Office apps, everything will fall into place.
Modern UI, with plenty of way to customize.
Task management
Planner is better suited for large teams and complex projects because it comes with a more structured workflow.
Trello is more fitting for smaller organizations and smaller time-limited projects.
Collaboration
The integration with all the Microsoft 365 ecosystem make it great for collaboration but if you’re trying to add users outside your organization that won’t be a simple task.
Assigning tasks in Trello is not quite easy, but if you want, you can collaborate with anyone, even outside the organization. However, that might not be great for security.
Automation
Planner lacks automation tools, but its integration with Microsoft Power Automation will fix that problem right away.
The built-in automation in Trello is really easy to use even if you didn’t use anything like this before.
Integration
The integration of apps outside the Microsoft 365 ecosystem is limited to say the least.
It supports over 200 third-party integrations, including Zapier.
Pricing
Included in Microsoft 365 Stand alone from $10 to $55 for user/month.
Free forever plan or from $5 to $10 for user/month. Customizable plans for enterprises.
Read below to find our breakdown with the most important capabilities of the tools and the differences between them.
Trello is better adapted to the modern environments
From the start, you will notice that Trello is simply more fun to use. Dragging and dropping color coding, everything is easy to see in the planning board. You can customize the environment as much as you want and at some point, someone looking at your window might think you’re playing a management game.
If you’ve never seen a project management software, Trello comes with a lot of templates in many categories, so you almost never need to start from scratch. It also has an intuitive way to create boards and add tasks. Pressing Enter will just take you to the next logical step in making your lists quickly.
On the other hand, Planner is the office product you would expect from Microsoft. It doesn’t have too many customization options and you will not get so many templates. However, as we’ve highlighted in the table above, if you’ve ever worked with Microsoft Office products, you will definitely have a high learning curve with Planner as well.
The tool is very efficient and pretty easy to use, but its flexibility is not its strongest part. For instance, with Planner you can only add one checklist and 20 checkboxes for a task. It’s also not possible to tag team members inside comments. And, as we mentioned above, it’s very hard to add people that are not within your organization.
All these Planner drawbacks are not dealbreakers though because the Microsoft tool has other talents we’ll emphasize below.
Microsoft Planner is better with task management structuring
The main purpose of both Microsoft Planner and Trello is to manage tasks within a timeframe, assign tasks and monitor all those processes to get certain projects from start to completion in the most efficient way.
Of course, both do that seamlessly, but Microsoft Planner has a more organized and precise approach to the entire process.
Besides a Progress marker (Not started, In progress and Completed), in Planner you may also add priority levels to any task from low to urgent, which can definitely help you with the flow management of your project. Moreover, you can change priority at any time and move things forward if you feel you’re losing some traction with some tasks.
Also, integrating checklists within tasks, you will see exactly what is the status of a process.
Although Trello doesn’t have a priority tab or checklists, you can set up the important levels with color coding the tasks. You can also add Power-Ups to help you with that, but it implies using a third-party integration if you really need to.
Planner works best in Microsoft 365 environments
Larger organizations use Microsoft 365 for office and management and Planner is the more natural choice in this case. That is because Planner works flawlessly with Teams, and Office applications. Planner doesn’t have data management tools, but it can work directly with the data management tools from Microsoft.
You will have Gantt charts and dependencies, goal management and team workload tools right at your fingertips. Also, Planner allows the building of interconnected tasks and all that will help you see the bigger picture of any project.
In contrast, with Trello, you will need third-party integrations to achieve this. It is possible, because Trello supports over 200 app integrations to build your workflow. For instance, we have a guide on how to integrate Slack with Trello. However, you will have to try some of them and choose wisely which one really helps and which one may actually work against you.
So, although Trello comes with a lot of freedom and flexibility, in may not be your cup of tea in some aspects.
Microsoft Planner vs. Trello pricing
If you have already Microsoft 365, you get Planner for free. However, the free version is pretty limited in terms of features. It is more oriented to users, not to actual project managers. For a medium to large organization, you will actually need to buy a Planner Plan that starts from $10 for user/month. That will unlock project goals, backlogs and sprints, premium plan templates, reports, a Timeline (Gantt) view, task dependencies, customization and integration.
The Microsoft Planner plans go up to $55 if you need enterprise resource management and allocation, and portfolio management. So, Planner doesn’t actually come for free, although you have a one month free testing period.
Trello has a free forever plan which includes a lot of features. You can build unlimited cards and you can include up to 10 boards on a workspace. You also get unlimited Power-Ups per board and unlimited storage as long as you don’t exceed 10 MB/file. However, it limits you to 250 workspace command runs per month.
If you need to go up to 1,000 command runs, you will need at least the Standard plan which is $5 per user/month. The next step is the $10 Premium plan which has unlimited command runs and Atlassian Intelligence (AI) which is an AI bot to help you running the project.
The conclusion here is that Trello is more affordable, and you can even use it for free if you’re managing small projects and teams.
Which one should I choose, Microsoft Planner or Trello?
This really depends on your project and organization needs. However, we can see two major usage demands that will recommend Microsoft Planner or Trello:
Trello is perfect if:
You want a simple, cool interface
You are regularly working with people outside your organization
You’re managing a small organization and need a quick setup
You don’t have a big budget for project management
Both Microsoft Planner and Trello are great products with the same outcome: managing a project from start to finish. However, each one has slightly different approaches to the whole process and are fit for different needs.
While we recommend Planner for Windows environments and larger organizations, Trello can really be an excellent choice when you need more flexibility and work with outside collaborators. Both can be tested before buying so if you’re somewhere in the middle, we encourage you to do just that.
If you’re interested in finding the best collaboration tools, click the highlighted list for some great options.
Let us know in the comments below which one did you choose and why.
Microsoft has announced the next wave of AI features coming to Copilot+ PCs powered by Windows 11. Recall, Click to Do, improved Windows Search, super-resolution in Photos, generative fill and erase in Paint, and new Copilot+ PC Arm-enabled applications will start rolling out soon, with a phased rollout to select devices and markets beginning November 1.
Windows Recall is finally being released in November
Customers will now have the choice to save snapshots. If they do so, they will use Windows Hello to confirm their presence and securely unlock the Recall experience.
Recall will be available to Windows Insiders in a pre-release build in October, starting with Snapdragon-powered Copilot+ PCs. Customers who purchase an Intel or AMD Copilot+ PC will see Recall initially in the Windows Insider program beginning in November.
Click to Do
Microsoft is also releasing Click to Do, which is designed to simplify your workflow by placing an interactive overlay on your PC screen. This overlay enables suggested quick actions to appear over images or text, according to Microsoft.
At users’ requests, Click to Do connects them to tools and actions to accomplish tasks, like suggesting help with Visual Search with Bing, background blur or erasing objects in Photos, removing backgrounds with Paint, and more.
In a blog post, Microsoft says Click to Do is context-aware and accessible from any Copilot+ PC screen. It will be coming to Windows 11 24H2 in the following months.
Improved Windows Search that uses Natural Language
Microsoft says Improved Windows Search will be available on Copilot+ PCs powered by Snapdragon, Intel, and AMD chips. It will allow users to find files, including documents, settings, or photos, by describing them in their own words, with natural language. It works even when users are not connected to the Internet.
According to Microsoft, Improved Windows Search will be available first with File Explorer and then expand to Windows Search and Settings in the coming months.
Super Resolution in the Photos App
Super-resolution in Photos, also coming to Copilot+ PCs with Snapdragon, Intel, and AMD chips, uses on-device AI to enhance lower-resolution and older photos into high-quality images without degrading quality.
Generative fill-and-erase in Paint
Microsoft says new generative fill-and-erase features in Paint allow customers to edit and alter images with greater precision and creative freedom. You can remove unwanted or distracting elements in your image or add new ones using an adjustable brush, and Paint’s underlying diffusion-based model has been improved to deliver better results faster.
Finally, Microsoft has announced the availability of even more new Copilot+ PC Arm-enabled applications from top developers. Many of the most popular applications are already available for Windows on Arm, and more are landing every day.
What do you think about Microsoft’s new AI features? Are they necessary or not?
Microsoft has officially rolled out the Windows 11, version 24H2, also known as the Windows 11 2024 Update. The release will be available through various updates, including Windows Server Update Services (WSUS), Windows Update for Business, and more.
The 24H2 release will be supported for 36 months for enterprise and education users. That’s good news for IT professionals still working to update systems to the initial release of Windows 11, which will reach the end of support in 2025.
The 24H2 update includes virtually all the features introduced in Windows 11 since its initial release two years ago. That means new features like LAPS improvements, additional Copilot features such as Live Captions and Cocreator, SMB protocol changes, Wi-Fi 7 support, and more.
Here’s what else is new in the 2024 Update:
Personal Data Encryption (PDE): Known Windows folders (Documents, Desktop, and Pictures) can be protected using user-authenticated encryption.
App Control for Business (formerly Windows Defender Application Control): Microsoft has rebranded WDAC to App Control for Business. The idea is still the same: to protect your apps, devices, and data from malicious code.
Windows Protected Print Mode: The Windows-protected print mode eliminates the need for third-party software installers for printers to support the Morpia certification program.
Local Security Authority (LSA) Protection: This helps prevent threats from stealing secrets and credentials used for login.
Wi-Fi 7 Support: Adds support for the next-generation Wi-Fi 7 standard.
Bluetooth LE Audio Support: Windows now supports the Bluetooth LE Audio standard, which enables high-quality audio streaming to hearing aids and other assistive devices.
Wi-Fi Network Controls: Lets users manage which apps can access Wi-Fi networks on a device.
Rust in the Windows Kernel: Microsoft is adding support for the Rust programming language in the Windows kernel.
SHA-3 Support: Microsoft is adding support for the SHA-3 cryptographic hashing algorithm.
SMB Protocol Changes: The Windows 11 2024 Update introduces several changes to the SMB networking protocol, aimed at improving performance and security.
Windows LAPS Improvements: The 24H2 update includes new LAPS features that allow you to deny the retrieval of local administrator passwords until a device is connected to a network, set passwords to auto-expire, and more.
The 24H2 update also brings new management capabilities, an extended battery life feature, new File Explorer context menu actions, improved adaptive brightness, and more.
In addition to Windows 11, version 24H2, Microsoft is rolling out a Windows 11, version 24H2 Security Baseline for IT professionals, providing pre-configured settings for Windows security features that align with Microsoft’s best practices. Administrative Templates (.admx) for Windows 11, version 24H2, are also available for download, as are updated Group Policy settings reference spreadsheets. Microsoft has also released Remote Server Administration Tools (RSAT) for Windows 11, allowing IT admins to manage Windows Server roles and features from a Windows 11 device.
Finally, for organizations with special-purpose devices, Microsoft has released Windows 11 Enterprise LTSC 2024, the Long-Term Servicing Channel (LTSC) release of Windows 11, to volume licensing customers. Windows 11 IoT Enterprise LTSC 2024 is available through original equipment manufacturers (OEMs) or from Microsoft.
What IT Pros need to know about Windows 11 24H2
Windows 11, version 24H2, is available today through Windows Server Update Services (WSUS), Windows Update for Business, and Windows Autopatch. The update can also be downloaded from the Microsoft 365 admin center, Software Download Service, Visual Studio Subscriptions, and more.
Windows 11, version 24H2, is supported for 24 months in the Home and Pro editions. Several management tools, including the Windows 11 version 24H2 Security Baseline, .admx templates, Group Policy reference spreadsheets, and more, are being updated today to support the 24H2 release.
For enterprise users, Windows 11 Enterprise LTSC 2024 and Windows 11 IoT Enterprise LTSC 2024 are available today.
Microsoft is expanding the availability of Windows Autopatch, a service that takes over the management of OS and app updates for IT admins, to Australia, Canada, the U.K., and the U.S.
The Redmond-based tech giant is also updating its Windows onboarding kit, which provides materials for businesses to help end users get up to speed on Windows, for the 24H2 release.
The Windows 11, version 24H2 update is available to enterprise and education customers today, with the Windows 11, version 24H2 Security Baseline, Administrative Templates, and more rolling out this week.
You can download Windows 11 24H2 automatically through the operating system’s Windows Update panel. But if you prefer to install the update manually, go to the Microsoft download page and get it from there.
Using a VPN is one of the best ways to stay protected online. It encrypts your internet connection, masks your real IP address and location, and keeps the snoopers and censors at bay. Yet, there are still risks when browsing the web, which is why I tested the best Adblock VPNs to keep you safe.
These combine the anonymity of a VPN with the extra security of an ad blocker. Here’s everything you need to know:
The Basics
This isn’t just an adblock VPN review – all the VPNs featured include the attributes that make a VPN service high quality. That means no logs, impenetrable encryption, kill switches and leak prevention, and copious locations. They also split tunnel specific apps and sites you wish to encrypt or not.
However, if you’re going to use a VPN, why not kill two birds with one stone and block ads without using a separate adblock app?
10 Best Adblock VPNs
Top Deals
Snap up a deal now to get the most cost-effective Ad Blocker VPN:
The following 10 VPNs pass the test and offer both a comprehensive VPN and ad blocking experience.
1. Surfshark CleanWeb 2.0 – The Best VPN with Adblock
Surfshark has long been featured in my top VPN lists for a number of reasons and blocking ads is one of them.
Its CleanWeb ad blocker is available from the Starter Plan and above and it stops tracking cookies, popups, annoying banner ads, and even those pesky autoplay videos.
Now known as Clean Web 2.0, all you have to do is enable the extension for your favorite browser – be that Chrome, Edge, or Firefox. It also functions on Surfshark’s other apps, which is rare for most ad blockers.
Other standout features include blocking video ads on YouTube and simplifying webpage cookie consent by removing the popups.
Depending on your plan, Surfshark also prevents identity theft. Use the personal detail and masked email generators to stay anonymous on the Starter plan or get complete ID monitoring and alerts on the higher tiers.
Surfshark is an all-round exceptional VPN, offering more than 3,200 individual servers across 100+ different countries.
It’s also one of the few that supports unlimited devices, so your whole network and its users can stay protected at the same time.
Worried about bandwidth? Fear not, most servers support up to 10 Gbps, so you can game, stream, and torrent, without sacrificing internet speed.
Plans start from as little as $2.19/mo when you commit to 24 months upfront, with a nice 3 extra months for free.
Another household name on the VPN front is NordVPN. It provides a VPN ad blocker via its Threat Protection Pro service.
This blocks intrusive ads and web trackers that secretly collect information about you.
Its URL trimmer even removes tracking parameters from long URLs, making it harder for websites to follow you across the web.
Moreover, it’s now on the AI bandwagon, using AI and robust databases to prevent you from entering dangerous phishing websites.
Threat Protection also includes a malware scanner that monitors files you download, removing any that are infected.
As a VPN, Nord has all the key features, including over 6,000 fast servers in 100+ countries, and support for up to 10 devices.
This all includes obfuscation, Double VPN, and even a combination of the Tor Network and a VPN connection for superior encryption.
To get the full Threat Protection experience you must subscribe to its mid-range Plus plan for $3.99/mo when you commit to two years upfront. Basic ad blocking is also available on the Basic plan.
Its Ultimate Bundles also includes Identity Theft protection features.
Pros:
Basic VPN ad blocker on all plans
Multiple connection methods for tougher encryption
Up to 10 Gbps server network
Cons:
Full Threat Protection Pro requires Plus plan
Threat Protection Pro limited to Window and macOS
Nord VPN Threat Protection
Block intrusive ads and web trackers with this powerful solution.
CyberGhost’s VPN apps include a feature called Block Content that neutralizes ads, trackers, and malicious content.
It’s designed to filter out domains that deliver these, as well as malware. Many common types of online ads such as banner ads, pop-ups, and video ads will disappear during browsing sessions, providing a much smoother experience.
The feature is available on Windows, macOS, and Android, but not iOS, which isn’t uncommon due to the limitations of Apple’s mobile devices.
You’re never strapped for locations, as its 11,000 strong server network covers over 100 countries and supports 7 devices at once.
It also lets you select optimized servers for certain streaming networks, gaming, and torrenting.
CyberGhost’s Block Content feature is available on all its plans. Its cheapest plan works out at $2.19/mo when you subscribe for two years upfront, or you can opt for a non-committal $12.99/mo plan.
Pros:
VPN with ad blocker on all plans
Optimized servers for different activities
11,000 individual servers
Cons:
Expensive monthly plan
No identity theft features like Surshark or NordVPN
<strong>CyberGhost Block Content</strong>
Use powerful technologies in order to neutralize ads, trackers and malicious content.
NetShield is Proton VPN’s built-in ad-blocker. It offers two levels of protection for your online browsing.
Firstly, display ads, trackers, and malware are blocked to protect your privacy, security, and improve browsing speed.
NetShield further prevents your browser from loading resources from domains that host malicious software, spyware, or other harmful content, much like an antivirus.
Among its methods is DNS filtering, which removes the majority of ads and tracking scripts across all your VPN apps.
This includes:
Desktop: Windows, macOS, and Linux
Mobile: iOS, iPadOS, and all Android devices
The full Proton VPN Netshield is available on all its paid plans, though it is one of the few with a free forever plan that blocks some ads. This limits you to 11 counties and 288 servers.
For the full experience, the Swiss-based company offers a two-year €4.49 /month plan, as well as a more expensive yearly or monthly plan.
These unlock 6500+ servers in 110+ countries, with protection for up to 10 devices at once.
Features include double VPN, speed of up to 10 Gbps, and dedicated torrenting servers.
I particularly like that it shows its ad blocking performance and even the data saved from preventing ads loading.
Pros:
Netshield on all paid plans
Some ad blocking on free plan
VPN adblock across desktop and mobile
Cons:
Not the cheapest
Hit and miss streaming performance
Proton VPN Netshield
Improve security and block annoying ads in just a few minutes.
The comprehensive Threat Protection feature from IPVanish prevents tracking cookies, filters dangerous sites, and blocks ads in one swoop. This includes regular banners, video, and audio ads.
It uses regularly updated blocklists and smart DNS filtering to keep the most invasive ads from ruining your browsing experience.
Threat Protection can be easily turned on and off in the settings of its Windows, macOS, Android, and iOS apps. Surprisingly, I also had success filtering ads on Apple TV, which is possible because of its advanced DNS-based blocking.
IPVanish is also an excellent VPN by itself, offering over 2,400 fast servers in over 90 locations.
You get unlimited connections, so you and your family’s entire network is protected. Plus, bandwidth is never an issue thanks to speeds of up to 25 Gbps.
I was pleased to find a bunch of new plans, including a revamped Advanced suite. This not only blocks ads but offers 1TB of encrypted cloud storage, and a remote secure browser.
This operates in the cloud, isolating your browsing sessions from your device itself. In effect, it’s like running a firewall and antivirus, all through a VPN app.
The Advanced plan is just $4.49/mo when you subscribe for a year. Standard Threat Protection is also available on the Essential plan for $3.33/mo for a year’s commitment.
Pros:
Comprehensive VPN ad blocking on all plans
New secure browser and cloud storage
Use on unlimited devices
Cons:
Not the most intuitive app
Subject to US law despite no-logs policy
IPVanish Threat Protection
Employ powerful DNS blocking to filter out annoying ads.
6. PIA MACE – Best VPN for Blocking Phishing and Malware
Private Internet Access (PIA) utilizes DNS ad blocking via its MACE feature, which you can use on all of its plans.
MACE offers a complete solution, removing banner ads, popups, floating bars, and other annoying display ads.
I found it especially good at blocking dangerous sites, such as those with phishing scams, malware, and secret tracking. It achieves this through an ever-growing list of known advertising and malicious domains.
However, I could not get it to block in-video ads, and some others did slip through the net.
Nonetheless, it does have other unique VPN features that rank it above others. For example, you get a token-based dedicated IP address. This isn’t shared with other PIA users and makes it much less likely for sites and apps like Netflix or Steam to detect VPN usage, which is against their terms.
Furthermore, it allows you to use unlimited devices from one account, bolstered by its stable 10 Gbps server network.
PIA lets you select servers from 91 countries and has apps for Windows, macOS, Linux, iOS, Android, Smart TVs, and other devices.
If you’re willing to subscribe for three years, it works out at a cool $2.03/mo and you get another 3 months thrown in for free.
Pros:
MACE VPN ad blocker with all plans
Dedicated IP addresses
Use on unlimited devices
Cons:
Some ads still get through
Cheapest plan still requires 3-years upfront
PIA MACE
Enjoy increased protection by blocking dangerous sites with this powerful tool.
7. PrivadoVPN Control Tower – Best Streaming VPN with Ad Blocking
A relative newcomer to the VPN market, PrivadoVPN has quickly become a contender due to its affordable pricing and variety of features. You can currently get a two-year deal with 3 extra months for the equivalent of just $1.99/mo.
Its main focus is optimized streaming servers, so if you need to unblock an overseas content library, it’s a perfect choice.
If you’re looking to install an ad blocker, Privado’s Control Tower is built into the majority of its apps. Besides blocking the most intrusive ads and trackers, it blocks phishing and malware sites too.
The Control Tower also stands out from the crowd by offering parental controls on your children’s devices. You can filter adult content and restrict access to social media apps, which I haven’t seen elsewhere.
With unlimited devices and 10 simultaneous connections, you can protect the whole family and tailor the settings accordingly.
It’s lacking a bit in the locations department, catering to only 49 countries, but all the other important VPN features are there.
Moreover, it has apps for everything from Windows and macOS to iOS and Android, and Amazon Fire TV is protected too.
Strapped for cash or just want to try it out? You can use PrivadoVPN for free with 10GB of data usage a month. The good news? The VPN ad blocker is still included!
ExpressVPN is one of the most popular VPN providers, and for good reason. It has industry-leading leak prevention, fast servers, and its range of apps are some of the easiest to use.
It supports desktop, mobile, smart TVs and sticks, and even sells its own Aircove range of VPN protected routers.
ExpressVPN’s servers let you connect through more than 160 cities within 105 countries, so accessing geo-restricted content is never an issue.
There’s a lot to draw you in, and ad blocking is one feature worth considering. Especially when it works on Windows, macOS, Linux, iOS, and Android.
The feature uses an extensive range of blocklist databases to keep the most intrusive display ads at bay. However, you must use its proprietary Lightway protocol in the settings to turn it on.
That’s not an issue, as Lightway is benchmarked as one of the fastest VPN protocols on the market.
The drawback is its VPN ad blocker is limited compared to my other picks, preventing only some display ads. Only go with ExpressVPN if you don’t mind video and audio ads and prefer its other features as a trade-off.
Currently, ExpressVPN’s best plan is $8.33/mo when you commit to 12 months.
Pros:
VPN ad blocker on all plans
Blocks ads on all devices
Best VPN app interface on the market
Cons:
Expensive compared to the top picks
Only blocks display/banner ads, not video or audio
Express VPN Ad Blocker
Take control of your data and prevent leaks and intrusive ads with powerful software.
Bitdefender’s VPN ad blocker acts like a shield, blocking unwanted ads and trackers, so you can browse the internet more securely and with fewer distractions.
It halts banner ads, pop-ups, video ads, and other attention-grabbing advertisements. In addition to scripts that monitor your online activities, allowing advertisers to target you with personalized ads.
Furthermore, Bitdefender ad blocker doesn’t need to see the content of your browsing activity to work, further enhancing your privacy.
If you upgrade to its security suite, you are also safeguarded from malware, phishing, and cryptomining hacks.
As a VPN it only supports 50 or so countries, but speed and congestion is avoided by 4,000 individual servers.
I was successfully able to unblock several international streaming sites, including the US Hulu from the UK.
On its own, Bitdefender VPN is one of the more affordable choices, with a great $6.99 monthly plan. For a year, it equates to $2.92/mo.
Its security suite plans for Windows, macOS, iOS, and Android start from $71.99/yr. This adds the full anti-malware and crypto protection, among other security tools.
Pros:
Affordable VPN pricing
Security bundle prevents crypto hijacking
Unblocks streaming services
Cons:
Not the fastest VPN
Only 50 countries
BitDefender VPN Ad Blocker
Enjoy increased security and privacy from this renowned developer.
10. TotalAV Internet Security – Best Security Bundle with VPN Adblock
Finally, an honorable mention goes to TotalAV. Its suite of tools combines to be one of the best cybersecurity bundles on the market this year.
Individually, you can purchase TotalAV Antivirus, TotalAV Adblock, Total VPN, and TotalAV Internet Security. However, it is most cost effective to get everything under one roof with TotalAV Total Security.
This includes a competitive VPN, antivirus protection, computer maintenance tools, and a password manager, among other tools. You get practically everything you could need when using desktop and mobile devices and browsing the web.
TotalVPN offers 50 servers in 30 countries and is capable of bypassing geo-restricted content on your computer and iOS and Android mobile devices.
With the inclusion of Adblock, you can use your VPN alongside one of the most complete ad blockers available.
This thwarts all display, popups, and multimedia ads on all sites, whether news, social media, or streaming services.
Moreover, it automatically prevents pesky ‘allow notifications’ requests, tracking cookies, and browser fingerprinting.
TotalVPN by itself is very affordable with its current $29/yr (usually $99) price but lacks ad blocking.
TotalAV Total Security brings it altogether for $49/yr ($149 on renewal).
The best Adblock VPN for you depends on the level of protection you want and how you use your VPN. However, my picks had to meet the following criteria to be considered:
Ad-Blocking Effectiveness – Some ad blockers only target the easiest of ads and trackers. Others neutralize everything including phishing sites, malware, and video and audio ads. I chose a good range of solutions with some unique features like blocking YouTube video ads, stopping notification requests, stripping tracking parameters from URLs, and isolated browsing.
Ease of Use – VPNs with too many features or those that should be set by default can be overwhelming. I focused on VPNs with an intuitive interface, one click connect, and ad blocking settings that are easy to find and configure.
Speed and Performance – It’s no good blocking ads if the VPN itself has a laggy interface or performs slowly and cannot handle high bandwidth tasks. It’s best to avoid free VPNs and go for those with large server networks that handle between 1-10 Gbps of traffic. That means gaming, flawless streaming, and multiple users and devices on your account.
Cross Device Support – Ads aren’t only a problem on desktop, neither are unencrypted connections. A good adblock VPN should have apps for multiple computer operating systems and mobile devices, so you can stay protected on all your devices.
Extras – Ads aren’t the only thing that can put you at risk online. Look out for VPNs with extra security features like identity theft protection, or that come bundled with security and antivirus suites.
Pricing – VPNs can vary significantly in price, but you get the best deals by purchasing long-term subscriptions between 6 months to 3 years. I focused on providers that offer these deep discounts but also featured VPNs with lower monthly plans like Bitdefender. It’s always wise to take advantage of free tiers, free trials, and monthly plans before committing, so you can test the VPN yourself.
Summary
Many VPN providers now offer various forms of ad blocking, but for me, the best all-rounder is Surfshark. Its Clean Web 2.0 blocks everything, including video ads, and Surfshark One even tackles identity theft.
When you consider its two-year special offer and the fact that it’s a top tier VPN beyond ad blocking, it’s a no brainer.
NordVPN isn’t far behind, with unique features like URL tracker trimming and access to the Tor Network. Meanwhile, if you’re really on a budget the likes of Proton VPN and PrivadoVPN offer scaled-back free plans that still include VPN ad blocking.
Now you’ve seen my picks, what’s your favorite Adblock VPN? Let me know in the comments below!
Microsoft Word has been the go-to word processor for a while but Google Docs came in and has been shaking things up. So, is it time to switch to Google Docs or is Microsoft Word still good to go? We compare the two in this face-off.
Is Google Docs or Microsoft Word better?
Purpose – Consider what purpose your document serves. If it’s going to be shared and requires collaboration with editing and real-time tracking, you’ll want to go for an option that allows this without too much fuss.
Type of document – How complex is the document you are creating? If it requires extensive formatting, you’re better off going with an option with feature-rich options that will allow you to create this document.
Accessibility – Do you want to access and open your document on any device? Offline and online? If so, choose an option that has a higher compatibility rating with most devices and can be accessed both offline and online.
Subscription – Does your option have a subscription package? Can you afford the renewal charges for the package? You don’t want some of your documents to become inaccessible once your subscription lapses.
Storage backup – If anything goes wrong, can you recover your document? Do you know the Word autosave location? Consider where your documents will be stored and see if it is a viable option.
How does Microsoft Word compare to Google Docs?
1. Features
1.1 Microsoft Word
When it comes to features, Microsoft Word sets the pace with its robust and extensive feature list. From formatting to templates, you can be sure whether you want to create a basic document or complex one with advanced formatting, Word is your trusted tool.
Looking to create business cards or calendar templates, Microsoft Word can help you do it. Word also boasts an extensive library of templates for various documents so you don’t have to start from scratch when crafting a CV or writing a letter.
Google Docs works well and formats documents just as good as Microsoft Word. It has some basic formatting tools that are easy to master once you open a blank document. Most people love it for its flexibility because you don’t have to share documents and open them on other devices.
However, if you feel you need more, you can extend its functionality by installing some extensions but even then, they would not match up to Word. If you require advanced formatting, this may not be the tool for you.
2. Accessibility
2.1 Microsoft Word
Microsoft Word is accessible both online and offline. If you download Word on your desktop, you can use it without the Internet and save your work once done. You can then share the document via email for collaboration.
You will however need to turn on the track changes feature to keep track of any changes made and compare with the original. If you wish to get real-time updates, the Word online version can deliver this seamlessly.
2.2 Google Docs
As long as you have a Google account, you can open your Google doc from any device and pick up from where you left off on the last device.
You can still make changes once you enable the offline mode but the collaborators will only see the changes once the document is reconnected to the Internet and changes are synced.
Microsoft Word is part of the Microsoft office suite so you need to be subscribed to the Microsoft 365 subscription and download the package to use the desktop version. There’s a free trial version but once this period lapses, you’ll be unable to use the word processor or majority of the functions will be limited.
Word seamlessly integrates with apps in the Microsoft ecosystem so you can easily import data from your Excel sheet and schedule calendar meetings within. This integration enhances efficiency since you don’t have to jump from one app to the other when they’re all interconnected.
3.2 Google Docs
Google Docs comes free of charge. The only requirement is that you sign in using your Google account. If you’re not an active participant on the document, you can also view it anonymously provided its sharing settings have not been limited.
Google Docs integrates with the Google ecosystem so you can store your documents on your Google Drive, use text on your docs to present on Slides, and more other Google services for a seamless experience.
A summarized table can show how the two word processors compare to each other.
Feature
Microsoft Word
Google Docs
User Interface
Feature-rich with complex menus
Has a simple and clean interface
Accessibility
Available on both desktop and web
Available on web and offline
Features
Advanced tools with broad-based formatting
Basic features with support for add-ons
Collaboration
Available on web version but limited on the desktop version
Real-time collaboration with synced changes
File formats
Supports multiple document formats
Also supports multiple formats
Costand download
Requires subscription to the Microsoft 365 suite
Comes free with a Google account and doesn’t require download
Offline access
Can be accessed offline and remain fully functional with changes synced once connected to the Internet
Offline capabilities are limited and changes may not be saved without an Internet connection
The latest and most notable feature is the Microsoft Copilot for Word which leverages AI to help out create your documents so feel free to give it a spin.
What are the pros and cons of using Microsoft Word and Google Docs?
Microsoft Word
Pros
Extensive library of advanced features
Offline and online access
Multi-format file support
Cons
Requires a subscription depending on the number of users
Advanced features may be a bit complex to learn
Takes up storage space on your desktop
Google Docs
Pros
Free to use for anyone with a Google account
Cloud-based hence doesn’t need to be downloaded or installed
Available offline and online
Cons
Basic tools with fewer options for advanced formatting
If you feel that neither of these two meet your needs, we have another list of Word alternatives. You don’t have to feel stuck with only these two choices.
Having come to an end of this article, we’d love to get your feedback on both. For us, we use the two interchangeably depending on our needs and type of document at the time. How about you? Do you prefer one over the other? And if so, why? Let us know in the comment section below.
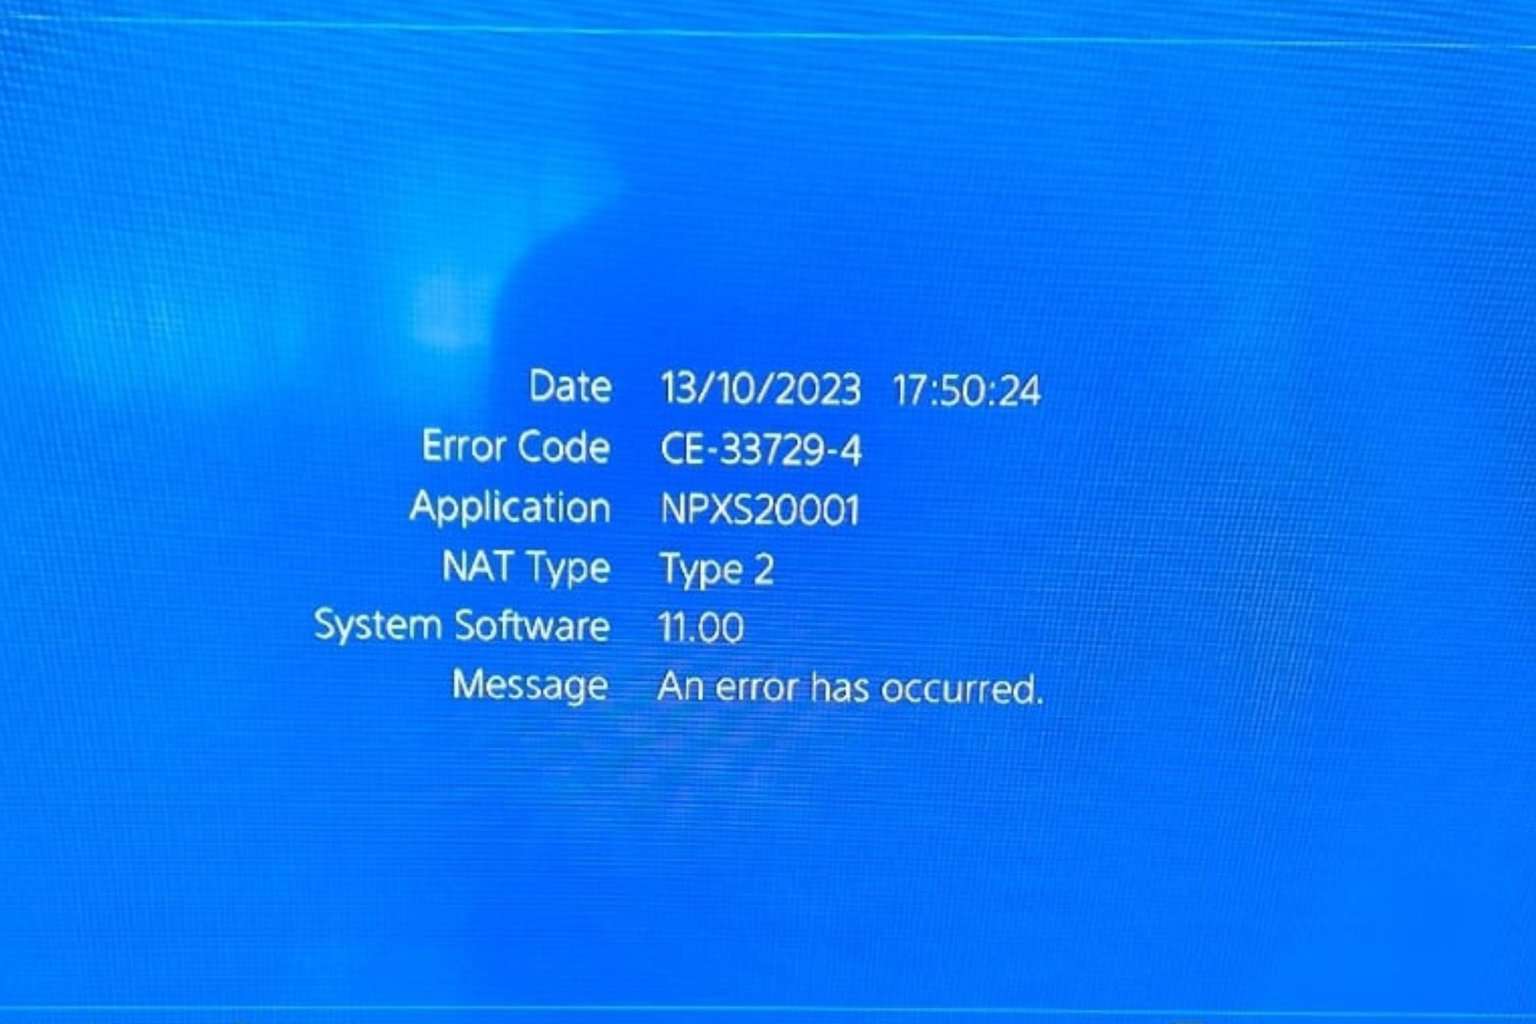
The CE-33729-4 error code may appear when you attempt to sign into your PS4 with no luck. Normally, you’ll get a message saying you cannot connect to your PlayStation network.
Oddly enough, other devices on the same network may not be affected by this network error so this is a unique error to your PS4. Normally, PS4 sign-in errors are triggered by server problems but if they’re unaffected, you’ll have to heck your local connection.
How can I fix the CE-33729-4 error code on my PlayStation?
1. Restart your PS4 console
Press the PS button on your controller and select the Power option.
Choose Restart PS4.
Once the console is rebooted, check if the error still shows up.
2. Test the console’s Internet connection
Select Settings from the console’s Home Menu.
Click on Network from the drop-down window.
Select Test Internet Connection and wait till the test completes.
Follow the on-screen instructions and check if the CE-33729-4 error persists.
3. Power cycle your router and re-enable the SSID broadcast
Switch off your router and disconnect it from its power source. This includes removing batteries if it uses any.
Wait a minute before hooking it up on power and switching it on again.
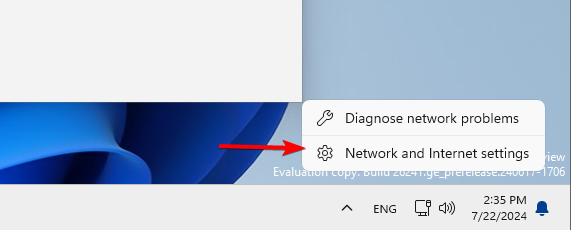
Right-click the network icon in your Taskbar and choose Network & Internet settings.
When the new window appears, click on Network and Sharing Center.
Network and Sharing Center window will now appear. Click on Set up a new connection or network.
Now select Manually connect to a wireless network and click Next.
Enter the required information such as Network name, Security type, and Security Key. Keep in mind that you need to enter the correct information or else you won’t be able to find and access your network.
Also, be sure to enable Connect even if the network is not broadcasting and Start this connection automatically options. Once you’re done, click Next to proceed.
Try connecting your PS4 with an ethernet cable this time around and see if it you can sign in.
4. Change DNS on the console
Go to Settings on the home screen.
Select Network.
Click Set Up Internet Connection.
Choose Wi-Fi or LAN Cable, depending on the option you are using.
Click Custom, choose Automatic for IP address settings, then choose Do Not Specify for DHCP host name.
On the DNS Settings screen, select Manual.
For Primary DNS, type 8.8.8.8, and for the Secondary DNS, type 8.8.4.4.
Download the update file from the PS4 System Software Update page.
Connect the USB flash drive on your computer and press Windows + E to open File Explorer.
Navigate to the USB drive, click New, then Folder from the drop-down menu, and name it PS4.
Double-click the PS4 folder to open it, then click New Folder, and name it UPDATE.
Double-click the UPDATE folder and copy & paste the file you downloaded in the first step in the folder. Ensure the name of the file is PS4UPDATE.PUP
Go to the system tray, right-click the pen, and choose to Eject it safely.
Now plug the USB drive into your PS4 console.
Press and hold the power button, and release it after you hear a second beep to start the PS4 in safe mode.
Connect the DualShock 4 controller to the console with its USB cable, and press its PS pairing button.
Choose System Software Update.
Select Update from USB Storage Device, then click OK.
Choose Next to continue and follow the on-screen instructions to complete the process.
6. Restore PlayStation 4 to factory default
Make sure to create a back up of your saved data in an external hard drive.
Next, go to Settings.
Select Initialization.
Choose Initialize PS4.
Follow on-screen instructions to restore your PS4 to factory default.
In the unfortunate case that none of the above solutions come to your aid for the CE-33729-4 error code, we recommend contacting PSN support for further assistance. It could be an isolated case with your PS4 especially if your IP address has been banned.
If you’ve violated the terms of service for using your PS4 or your router uses a dynamic IP that has been banned, you may not be able to sign in. You can check whether your IP has been banned and if so, try our recommended free and paid VPN to circumvent this issue.
Network errors on your PS4 are common so some may not even need your intervention. After a few moments, the issue may fix itself. Should you encounter a similar ce-33743-0 error code, feel free to check out our detailed fix guide.
That’s it for this article but do let us know if you tried other solutions not mentioned here but worked out for you in the comment section below.
The ci.dll file, related to the Code Integrity Module, is a critical system file in Windows. Often, when ci.dll is missing, corrupt, or not found, you may encounter a Blue Screen of Death (BSOD) Windows error!
As for the file itself, it is developed by Microsoft and works fine on a healthy PC. If you are facing issues due to ci.dll, it’s caused by the deletion of the DLL file, corrupted system files, malware infection, and conflicting third-party apps.
Before you start troubleshooting, restart the PC, install all pending Windows updates, and restore the DLL from the Recycle Bin if it was deleted by mistake. For most, this alone will fix the ci.dll error.
What can I do if ci.dll is missing or triggering a BSOD?
These are easy to use. Just let the tool run a scan, identify the corrupt or missing DLLs, and replace them with a new copy from its database.
2. Manually add ci.dll
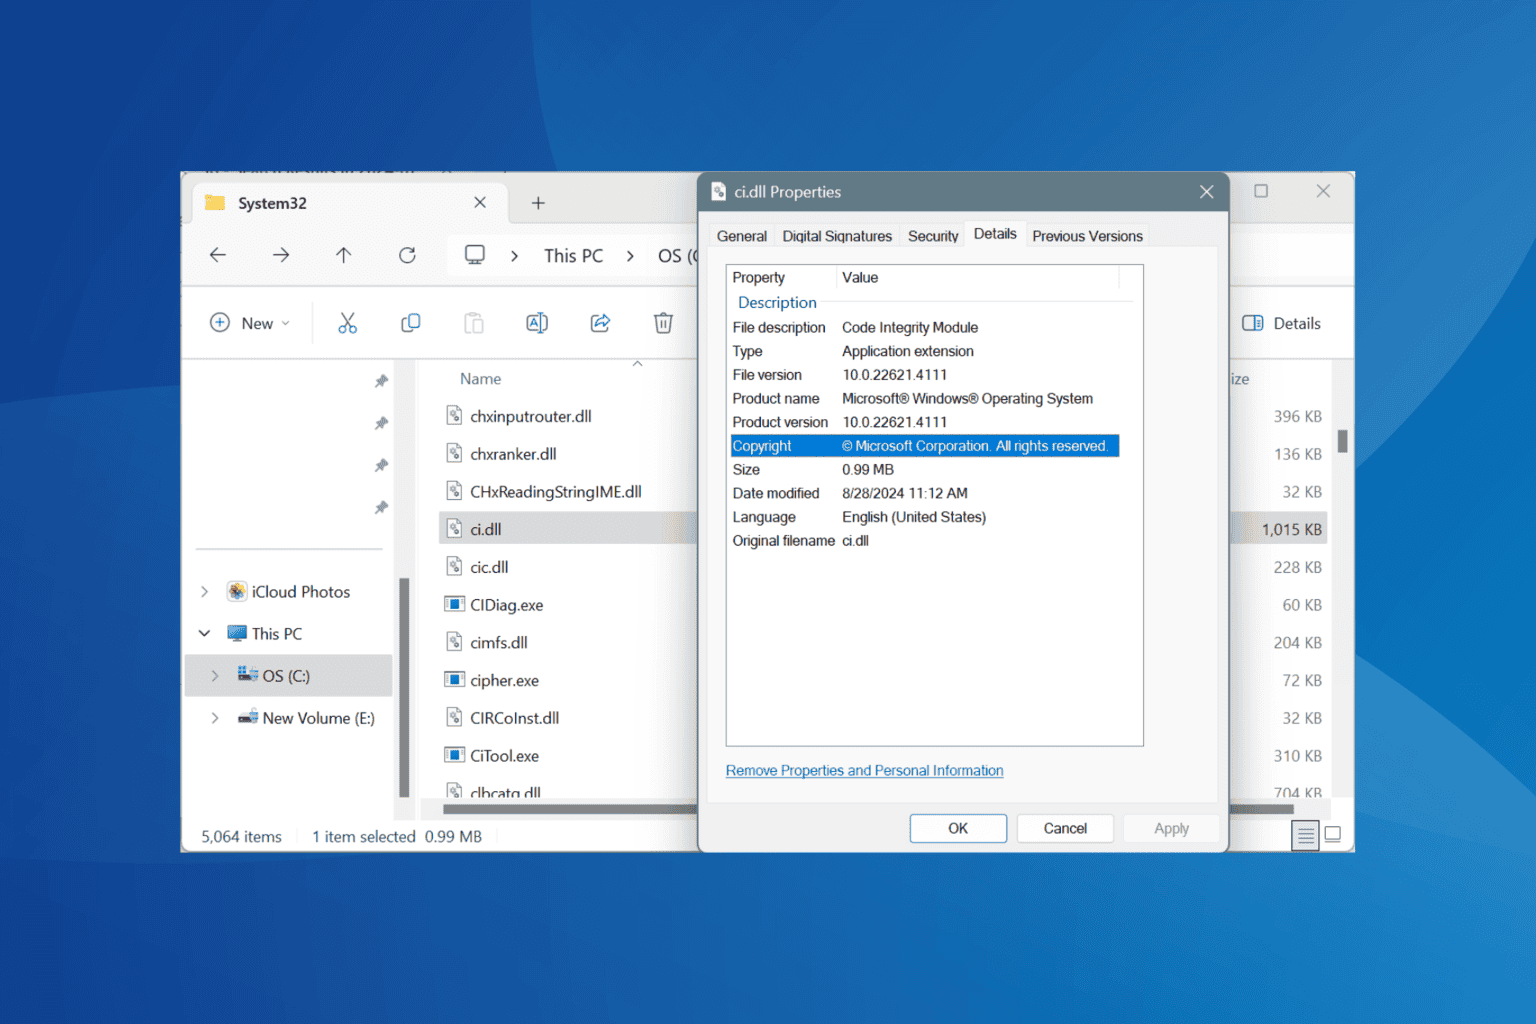
On the affected PC, head to the DLL’s location and check whether the file is available. On a healthy PC, ci.dll is stored in: C:\Windows\System32
ci.dll in the System32 folder
If the DLL is not found, transfer a copy of ci.dll to an external flash drive from another PC and then move it to the System32 folder on the affected device. Now, simply reboot the PC, and all DLL-related errors should be fixed!
3. Run the SFC and DISM scans
Press Windows + R to open Run, type cmd, and hit Ctrl + Shift + Enter.
Click Yes in the UAC prompt.
Paste the following DISM commands and hit Enter after each: DISM /Online /Cleanup-Image /CheckHealthDISM /Online /Cleanup-Image /ScanHealthDISM /Online /Cleanup-Image /RestoreHealth
Now, execute this command to run the SFC scan: sfc /scannow
Finally, restart the computer and check for improvements.
Press Windows + S to open Search, type Windows Security in the text field, and click on the relevant result.
Click on Virus & threat protection.
Click on Scan options.
Select the Full scan entry and click on Scan now.
The scan will take 15-45 minutes to complete.
In case Windows Security doesn’t detect any threats, I recommend using an effective antivirus solution to run advanced malware scans on the PC.
Remember, using an unreliable antivirus or having more than one security solution may also trigger conflicts, leading to the ci.dll failed error. So, limit it to either Windows Security or a single antivirus!
5. Uninstall recently downloaded apps
Press Windows + R to open Run, type appwiz.cpl in the text field, and hit Enter.
Select any recently added app(s) from the list, and click on Uninstall.
Follow the on-screen instructions to complete the process.
Finally, reboot the PC and check for improvements.
In case where a quick removal doesn’t work, use a dedicated Windows software uninstaller to delete any leftover files, app cache, and Registry entries.
6. Perform a system restore
Press Windows + S to open Search, type Create a restore point, and click on the relevant result.
Click the System Restore button.
Now, select the Choose a different restore point option, and click on Next.
Pick the oldest restore point from the list and click Next.
Verify the details, click Finish, and then confirm the system restore.
Once done, verify whether the ci.dll blue screen in Windows 11 is fixed.
7. Reinstall Windows
When nothing else works, the last option is to reinstall Windows. It will both download ci.dll as well as fix any BSODs.
Reinstalling Windows 11
To reinstall Windows 11 > connect a flash drive to another PC > go to Microsoft’s official website > download Windows’s Media Creation Tool > use it to create a bootable USB > then plug the flash drive into the affected PC > change the boot order to the flash drive > run the setup and install Windows.
After reinstalling Windows, you will find ci.dll in the System32 folder!
Although if blue screen errors keep appearing due to failed ci.dll, try the fixes more relevant to them. Here are the links to solutions for some BSODs caused by the DLL:
Windows 11 lets you check administrator rights for your account if you’re uncertain about its privileges.
Various routine and troubleshooting tasks require an administrator account. You might need to modify a work file located in the protected system directories, change network settings for better security, or even install fonts.
You can perform all these tasks with admin privileges, saving the back-and-forth communication with the IT support team. Also, you won’t get those annoying Administrator Access Denied pop-ups!
Here’s how to verify your status in just a few steps.
How To Check If You’re an Administrator on Windows 11
I covered seven different methods you can try:
Task Manager Tool
Bring up the Task Manager dialog box by pressing Ctrl + Shift + Esc.
Navigate to the Users menu in the left-side navigation panel.
Find your account name below the User column header.
If it’s an admin account, you’ll see the word Administrator in one of the columns to the right.
Settings App
Click on the Start menu button and type Settings.
The Settings System app will show up below the Best match section.
Click on that to open Settings.
Tap the Accounts menu in the left-side navigation panel.
Your currently logged-in account will show on the right side.
Below the name, you should see the type, like Administrator.
If you’re on another account and would like to know who is the admin, click on the Other Users card on the right-side menu.
The Settings app will load all the available ones.
Look for the Administrator tag below the account names.
Control Panel
Press Windows + S to launch Windows Search.
Type Control and click on the Control Panel icon.
You’ll see a list of tools there. Select the User Accounts option.
If it’s not there, click on the Category drop-down arrow near View by.
Select the Small icons option.
Now, access the User Accounts menu.
Click the Change your account type hyperlink.
If the currently selected account type is Administrator and the Change Account Type button is greyed out, you’re logged in as an admin.
If you wish to find out if there are other admin accounts on the PC, go back to the User Accounts screen.
Click on the Manage another account link.
Choose a different user from the list and access the Change the account type link.
Windows File Explorer
Open the File Explorer tool.
Right-click on the Windows 11 installation drive or the C: drive.
Click on Properties from the context menu.
Go to the Security tab on the Properties dialog box.
Find your user account in the Group or user names of the Security tab.
There might be two accounts with the same name. One will be for admin and the other is for standard users.
Select the one that says administrator along with your name.
Look for the checkmarks for the Permissions for Administrators table.
If everything is checked including the Full Control item, you’re using an admin account.
Computer Management Tool
Bring up the Windows Search by pressing the Windows + S keys.
Type Computer Management.
Click on the app that shows up below the Best match section, named Computer Management System.
Select the Local Users and Groups option on the left side navigation panel.
Now, double-click on the Groups menu on the right side to access a full list of items.
Right-click on Administrators and select Properties from the context menu.
The Administrators Properties dialog box will show.
If you find your user name in the Members table, you’re logged in using an administrator account.
Local Users and Groups Command
Press the Windows + R keys together to launch the Run command.
Type in lusrmgr.msc command inside the Open field and hit Enter.
The Local Users and Groups dialog box will open.
Double-click on the User directory in the left-side navigation panel.
A detailed list with all user accounts and profiles will open on the right side.
Double-click on the target user name and navigate to the Member Of tab.
If you see the Administrators member group inside this table, the selected account has admin privileges.
Windows Command Line Interfaces
Here are the Windows 11 check administrator methods that involve various command line interfaces and relevant commands:
Command Prompt
Open Command Prompt from the Start menu.
Copy and paste the following inside the console:
net user adite
The actual command is the net user. Anything after that should be your username.
Hit Enter.
CMD will list user account details.
Scroll down to the bottom and locate the Local Group Memberships item.
If you see Administrators next to it, your user account is an admin.
You can cycle through the same command by simply changing the user name at the end to find out if any other names hold admin rights or not.
PowerShell
Right-click on the Start menu icon and select Terminal from the context menu.
Enter the following Windows PowerShell script inside the terminal and hit Enter:
Change the user name in the Name code element before executing the script.
Use the following script if you’d like to list all the user accounts of the PC along with their account type information, like admin, standard, or guest:
# Get all local user accounts
$users = Get-WmiObject -Class Win32_UserAccount -Filter "LocalAccount=True"

# Define account types based on group membership
foreach ($user in $users) {
    $userType = ""

    # Check if the user is an administrator
    $isAdmin = Get-LocalGroupMember -Group "Administrators" | Where-Object { $_.Name -eq $user.Name }
    if ($isAdmin) {
        $userType = "Administrator"
    }

    # Check if the user is a guest
    $isGuest = Get-LocalGroupMember -Group "Guests" | Where-Object { $_.Name -eq $user.Name }
    if ($isGuest) {
        $userType = "Guest"
    }

    # If not admin or guest, assume standard user
    if (-not $userType) {
        $userType = "Standard"
    }

    # Output the user name and account type
    [PSCustomObject]@{
        'UserName' = $user.Name
        'AccountType' = $userType
    }
}
You might see the Paste Anyway pop up on PowerShell when you copy and paste the above script.
The script doesn’t require any manual editing. It’ll work on all Windows 11 and 10 PCs.
Summary
Did any of these Windows 11 check administrator methods work for you? Comment below to share your feedback and experience.
Today I put the top identity theft protection solutions to the test, so you can keep your personal data secure. But why is this so important?
What is Identity Theft?
Picture a scenario where you open your banking app, and your account is wiped clean. You ring the fraud line only to learn that credit has been applied for against your name. The worst thing? Your bank drags their heels because their records show it was you who made these transactions!
This is the result of identity theft. It’s not just fraud or stealing but when someone, on paper, has your entire identity to exploit.
While extreme, this example is not unusual. According to AARP, identity theft like this cost $43 billion in America last year.
It’s one of the most life destroying crimes. Not only does it cause financial hardship, but the emotional fallout can be devastating.
That’s why it’s paramount to safeguard all your personal information, especially bank accounts, identity documents, and the devices that hold such data.
Fortunately, there are a wide range of tools and products that can help. That’s why I got hands-on with all the leading solutions and narrowed down 8 of the best.
The Top 8 Identity Theft Protection Products
Read on to find out their key features and how you can protect yourself going forward.
When it comes to keeping an eye on your most important details, Surfshark Alert is my new go-to. It’s budget-friendly, easy to use, and can protect your entire family.
Alert is classified as a data breach detector which you can use effortlessly to monitor your email, credit card, and ID for breaches.
The recently updated tool (as of October 7th) now lets you check for free if your data is already on the regular or dark web. When you go premium, full monitoring allows you to:
Add your details for monitoring in just a few clicks.
Receive instant alerts if your email, credit card, or ID appears in a breached database.
Receive instructions on what to do to address a breach.
Monitor your, your family’s, and even business accounts without limits.
Check the severity of any breach involving your details.
View the precise details that were leaked, including passwords, IP addresses, and other linked information.
Stay updated on your account security with monthly, quarterly, or yearly data breach reports.
Use it on Windows, Android, macOS, iOS, Linux, and more.
Alert is part of the online security solution bundle Surfshark One, which costs as low as $2.69 per month when you commit to 24 months.
The bundle includes a VPN, antivirus software, a private search engine, and an email masking tool.
Surfshark also offers unlimited simultaneous connections, meaning you can protect your entire household with a VPN. This encrypts your internet connection and masks your real IP address and location.
Identity Guard is a service that helps you monitor your personal data from theft, including credit scores, bank accounts, and social security numbers.
It uses dark web databases, public records, and other sources to detect any unauthorized use of your info.
If suspicious activity is detected, such as a new loan application or a change in credit score, it sends you an alert, so you can take action.
It also provides support and assistance in restoring your identity, including contacting creditors and filing police reports.
What’s more, you get tools and resources to help prevent it happening to begin with. This includes a password manager, credit freeze assistance, an anti-phishing app, and a secure keyboard to prevent keylogging.
Identity Guard offers three service tiers – Value, Total, and Ultra – allowing customers to choose features based on their needs and budget for individual or family coverage.
While a comprehensive solution, it’s not the cheapest. Prices range from $7.50 to $25 per month for individuals and $12.50 to $33.33 for families.
Aura is another good option for those looking to improve their online security. It is a comprehensive digital security platform that aims to protect users from various online threats, including identity theft.
It scans the dark web for personal information and monitors activities such as using Social Security numbers and criminal records for signs of identity theft.
If you grant access, it can also monitor your bank and investment accounts, and credit reports for signs of fraud, new accounts, or credit inquiries.
Aura notifies you info is compromised in a data breach and is one of the few services to offer identity theft insurance, which can help cover the costs if your account providers won’t reimburse you.
Additionally, Aura’s plans include a VPN, email alias, password manager, and antivirus protection for up to 10 devices per adult.
The price of Aura’s plans ranges from $9.99 to $19.96 per month, depending on your requirements and budget.
LifeLock from Norton is an addition to its popular antivirus software, safeguarding your devices, personal information, and identity from breaches.
LifeLock offers different tiers of protection, with features like credit monitoring, financial account monitoring, and even identity theft insurance.
You can also benefit from social media and phone takeover monitoring, and it sends alerts if your info is found on the dark web.
It claims to monitor hundreds of millions of data points. True or not, it’s easy to use and almost immediately found an old email account of mine I knew had been breached.
LifeLock’s prices vary depending on your chosen plan, with options for monthly or yearly subscriptions.
Pricing starts at $11.99/mo for a standard plan and reaches $34.99/mo for Ultimate Plus. The latter offers a total of $3 million in insurance to cover lawyers, reimbursements, and personal expenses.
You can also buy it bundled with the Norton 360 suite.
Norton Lifelock
Increase your security and protect your online presence with this powerful solution from Norton.
IdentityForce is a good option for those deciding between LifeLock and Aura. It offers dark web monitoring and bank and credit card activity alerts. It’s especially beneficial for families — with plans priced at no more than $34.90 per month.
IdentityForce also provides alerts for investment accounts, monitors social media activities, and offers a password manager.
I especially like its customized plan model to help you protect your identity based on your unique needs and risk factors.
After signing up, you get a score that assesses your risk of identity theft that offers tailored recommendations for improving your security.
Its entry-level UltraSecure plans for individuals focus solely on identity theft protection.
For wider security coverage, it offers UltraSecure+Credit premium plans, which include credit monitoring services such as three-bureau monitoring, quarterly reports, and insurance.
PrivacyGuard has you covered for breaches of home addresses, phone numbers, email, bank accounts, and more.
It monitors credit files from all three major credit bureaus (Experian, Equifax, and TransUnion) and alerts you if any suspicious changes occur, such as new inquiries or accounts.
Alongside, they give you free access to monthly triple-bureau credit report agency VantageScore to give you a comprehensive view of your credit health yourself.
PrivacyGuard offers three tiers of protection, ranging from basic identity theft monitoring from $9.99/mo to more advanced credit monitoring and alerts up to $24.99/mo.
Several unique features make IdentityQ a good choice for Identity Theft Protection.
For example, if you lose your wallet, IdentityIQ can help you cancel and replace any important documents or cards on your behalf.
Furthermore, it uses a customizable model where you can add individual services based on your specific needs, rather than fixed plans and features.
IdentityIQ has all the standard features, such as SSN, bank account, credit report, and home address monitoring. It also scans the dark web to detect potential threats you can’t discover yourself.
Pricing starts from $9.99 a month and includes $1 million in insurance for reimbursing stolen funds through identity theft.
Honorable mention goes to MyIDCare, which is a bit more difficult to sign up to. It is part of the Office of Personnel Management and before you can access its protection you must have already been affected by a cyber incident.
Nonetheless, if that happens to be you and you get a notification letter and PIN code from OPM, it’s well worth accessing.
The comprehensive monitoring service safeguards your social security number, bank accounts, and credit cards, with official backing from the US government. Moreover, it offers identity theft insurance for up to $1 million.
It covers a broad range of known breach locations and its Cyberscan feature monitors the regular and dark web in real-time for any fraudulent activity using your personal information.
If any suspicious activity is detected, MyIDCare provides concierge services to help you navigate the identity recovery process.
The cost of MyIDCare depends on the circumstances of your enrollment. For those impacted by certain cyber incidents, such as the 2015 OPM data breach, it is completely free.
For others, plans range between $7.95 and $19.95 per month.
The best identity protection solution for you depends on your requirements, but I narrowed my search based on the following fundamentals:
Ease of Use – If it’s difficult to get the service up and running, it’s not worth the effort. All my picks require just a bit of information, such as your personal details and simple methods of linking accounts. They provide easy to navigate dashboards and tools that function automatically. You don’t want to have to check things manually.
Fast Alerts – When a data breach occurs, it’s no good if you don’t know about it, and fast. All these services will send you some form of notification immediately, often with advice and steps to prevent full blown identity theft.
Large Monitoring Scope – Your data can be breached and shared in endless ways. I chose platforms that are tapped into large databases and have the ability to scan the web for data dumps and your leaked details specifically. This includes the dark web when criminals thrive leaking and selling personal details.
Extra Security Features – Monitoring and alerting is one thing, but prevention is the best course of action. Look for protection that offers security now, not cleanup afterwards. Antivirus software, VPNs. Anti-phishing tools, password managers, and keylogging detection are just some of the ways to prevent identity theft.
Insurance – If the worst happens and your bank or the authorities don’t offer much help, insurance can help cover stolen funds, lawyers, correcting your credit report, and other costs, so identity theft doesn’t ruin you financially.
Credit Report Access – Many credit reporting agencies charge for full access to your own credit report, so any identity theft protection that lumps access in for free is a bonus. Even if they monitor your report themselves, it’s always wise to check your score regularly.
Security – If a service is going to have access to your accounts and personal info to protect you, they need to have their own stringent security measures. All of the above solutions do identity checks, use encryption when data is shared, and are reviewed positively in the security industry. Remember to never sign up to the latest fly by night app that promises protection but has minimal downloads, reviews, or online footprint.
Pricing – Protection against identity theft is supposed to prevent financial loss, not cost you a lot of money. I picked services that are reasonably priced, with a variety of options for those with different budgets.
The Final Word on the Best Identity Theft Protection
There are many great identity theft protection services. I personally prefer Surfshark Alert. Not only is it one of the most affordable but it comes with a VPN, antivirus, and other preventive measures to keep you safe online and safe from breaches.
Whether you choose to use one of my picks or something else, ensuring your personal information is as private as possible is crucial.
That means having strong passwords and always using 2FA for your accounts. Remember not to post personal information on social media, and regularly check your credit report for abnormalities.
Do you use an identity protection service, and which is your favorite? Let me know in the comments below!
The Sling TV error code 28-30 comes up while loading channels and was recently encountered by thousands worldwide across devices, be it on TV, mobile phones, or computers. The error message reads, We’re sorry! Looks like an unexpected error occurred. Please try again later [28-30].
The Sling error [28-30] appears due to server issues, misconfigured network settings, active VPNs or ad-blockers, corrupt app cache, or missing updates.
Before you start troubleshooting, restart the device throwing the error and make sure the content you are trying to watch is subscribed to and available in your region.
How can I fix Sling TV error code 28-30?
NOTE
The solutions below apply to all three devices: smart TVs, mobile phones, and PCs. Individual methods may be illustrated using different platforms, but the underlying concept works across all devices.
1. Check if Sling TV is down
When you get the Sling TV error code 28-30 on a smart TV, PC app, or mobile app, use a real-time monitoring service like Downdetector to check the server status.
If the problem is widespread, wait for up to 48 hours, and things should automatically be up and running!
2. Turn off active VPNs
For Apple TV users, the Sling error code 28-30 may appear while using a VPN or any software that reroutes the IP address.
So, you will have to check for these and disable them. Also, look through the router settings for any such configurations, and reset them.
3. Disable any ad-blockers
If you watch Sling TV through the official website, open the browser, click on the ellipsis near the top right, select Extensions, and then click on Manage extensions.
Now, look for any ad-blocked extension, and disable the toggle under it.
Finally, relaunch the browser and check for improvements.
4. Clear the app cache
On your TV, go to Settings, and then select Applications.
Now, choose the Manage Installed Applications entry.
Select Sling TV from the list.
First, choose Clear data and then Clear cache to delete all the app-related, non-critical files.
Finally, launch Sling TV, and you should be able to watch the channels.
While the steps listed here are to fix Sling TV error 28-30 on a smart TV, a similar approach will help on mobile phones and computers as well.
On Android devices, you can delete the cache through app storage settings. As for Apple’s iOS, there’s no dedicated option to clear the cache, so you will have to reinstall Sling.
5. Switch to Google’s DNS
Press Windows + R to open Run type ncpa.cpl in the text field, and hit Enter.
Right-click on the active network adapter, be it Ethernet or Wi-Fi, and select Properties.
Select Internet Protocol Version 4 (TCP/IPv4) from the list and click on Properties.
Now, choose the Use the following DNS server addresses option, and enter the following in the fields underneath:
Preferred DNS server: 8.8.8.8
Alternate DNS server: 8.8.4.4
Once done, tick the checkbox for Validate settings upon exit, and then click OK.
Finally, reboot the affected device, and verify whether Sling error 28-30 on PC is fixed.
You can change the DNS server on Android, iOS, and smart TV through the Network Settings. Also, while I have used Google’s Public DNS for its reliability, you can set the fastest DNS server near your for improved Internet speed.
6. Install all pending updates
An outdated Sling app or OS can also trigger error 28-30 across devices while watching channels. While the Sling app has compatibility issues with Windows, its app for other platforms runs fine. So, check and install for any pending updates, both for the OS and the Sling app!
For Windows users running the Sling TV app, I recommend watching your favourite shows and channels on the official Sling website.
7. Reinstall the Sling TV app
On your Android smartphone, go to Settings, and then select Apps.
After reinstalling Sling TV, you shouldn’t get the error code [28-30] anymore. Again, for Windows users, I recommend using Sling TV’s official website since app compatibility remains an issue for now.
In the past, Sling error [28-29] has also troubled users. It often appears alongside [28-30], triggered by the same underlying causes!
For any queries or to share which fix worked for you, drop a comment below.
Big news for SharePoint users: in the following months (December, to be more specific), Microsoft will bring Copilot to the platform with authoring capabilities.
According to the latest entry in the Microsoft 365 Roadmap, Authoring Copilot will arrive in SharePoint as a preview in December, followed by a rollout scheduled for January 2025.
Why should you be excited? Well, with Authoring Copilot, you can automatically use AI to gather your data to create new web pages in SharePoint.
Microsoft says the capability will use built-in templates or custom ones from your organization and aggregate them with existing documents to generate high-quality web pages.
And no, the Redmond-based tech giant says there is no risk in using this capability within your organization. Authoring Copilot in SharePoint will commit to data security and privacy policies.
Authoring Copilot in SharePoint combines the power of Large Language Models (LLMs), your data in the Microsoft Graph, and best practices to create engaging new web pages. It can utilize built-in templates or custom templates from your organization, along with existing documents as grounding data, to generate high-quality page content. All of this is achieved while upholding our commitment to data security and privacy in the enterprise.
Microsoft previously enhanced SharePoint with co-authoring abilities in July, but that capability didn’t focus on AI, instead it allowed multiple users to edit and author Pages and News within the platform.
Sometimes when trying to perform a certain action you might get The resource is being rate limited in Discord. This will prevent certain features from working, but let’s see how we can fix this issue.
What does the resource is being rate limited mean?
This means that you’ve performing certain actions on Discord too often and you’ve been temporarily prevented from doing them. This works as a protection against spammers, but sometimes it can affect regular users.
How do I fix The resource is being rate limited in Discord?
Before trying anything else, try waiting for a couple of minutes and then try again, as this is a temporary issue.
1. Restart your device and router
Firstly, try restarting your device.
If that doesn’t help, press the Power button on your router.
Wait for 30 seconds and press it again.
Lastly, wait for about a minute for the router to fully boot and check if the problem is gone.
2. Try using incognito mode
Click the Menu button and choose the New Incognito window.
Next, open the Discord page and try to log in.
Check if the problem is gone.
Alternatively, you can try using a different browser.
Next, click the network button in the system tray and choose your phone’s hotspot.
Enter the password.
Once connected, check if the problem is there.
How long does a rate limit last on Discord?
According to users, the rate limit can last usually up to an hour, but that might change depending on the action that caused it.
If you’re having a Discord rate limit ban, the best choice is to wait it out, since this is an antispam feature that is designed to prevent misuse of Discord.
Since its initial release three years ago, Windows 11 has faced criticism over the size of its taskbar. While Microsoft has made several changes to the taskbar in the meantime, including adding an option to display icons on the left side of the taskbar, the company hasn’t made it possible to reduce the size of taskbar icons.
However, with the upcoming release of Windows 11 24H2, it seems that Microsoft will finally address this complaint. In the latest Beta build of Windows 11 24H2, references to the “Show smaller taskbar icons” option appeared in the Settings app.
Popular insider @phantomofearth spotted the capability and shared a screenshot of the setting. It’s worth noting that it doesn’t work fully yet. While the icons become smaller, the taskbar itself remains the same height.
Windows 11 will be getting the option to show smaller taskbar buttons! Currently, only taskbar buttons themselves are made smaller – the taskbar itself can't be made smaller, this is still early though. (disabled by default, Beta 22635.4291)
In a follow-up tweet, @phantomofearth shared a command that enables the feature in the latest beta build of Windows 11 24H2. While the feature is disabled by default, users can make the icons smaller using the command below, provided the ViveTool app is installed.
vivetool /enable /id:29785184
“Windows 11 will be getting the option to show smaller taskbar buttons! Currently, only the taskbar buttons themselves are made smaller—the taskbar itself can’t be made smaller. This is still early, though.
— phantomofearth (@phantomofearth)
The discovery suggests that Microsoft is planning to release the feature shortly, though the company could scrap it if it isn’t satisfied with the implementation.
Microsoft is enhancing its Defender software to provide individuals with a safer online experience. In a blog post, the company introduced privacy protection and a virtual private network (VPN) feature for Microsoft Defender, which helps protect personal data when connecting to public Wi-Fi networks.
Public Wi-Fi networks are great because they’re free but can also be unsafe. They are convenient, but they can also be risky because anyone can connect to them. Hackers can use public Wi-Fi to spy on people and steal personal information, so security professionals recommend against connecting to public Wi-Fi without a VPN.
Microsoft Defender is designed to protect people from these kinds of threats. With Defender installed, your computer, phone, or tablet will alert you when you connect to an unsecured Wi-Fi network and recommend that you turn on privacy protection. You can also set Defender to automatically turn on privacy protection when you connect to a public network.
Microsoft introduced Defender’s privacy protection feature last year. Initially, it was available only on Windows, but Microsoft has since brought the feature to macOS, Android, and iOS, as well as to more countries. Similarly, Microsoft has expanded support for automatic Wi-Fi detection and notification to all platforms, including Windows, macOS, Android, and iOS.
In addition to detecting unsecured Wi-Fi networks, Defender can now identify suspicious Wi-Fi networks. When you connect to a suspicious Wi-Fi network, Defender will alert you and recommend turning on privacy protection. These alerts are powered by a new detection system that examines the characteristics of a Wi-Fi network to determine if it’s safe to connect.
Microsoft says the new features for protecting again the threats of public Wi-Fi in Defender are available starting today. If you’re a Defender user, you can update the Defender app on your device to get the latest capabilities.
If you’re not a Defender user, you can download the Defender app for free from the Google Play Store, Apple’s App Store, or the Microsoft Store.
The Discord hide text ability allows you to hide words with spoiler tags. It’s especially useful if you’re sharing spoilers and sensitive information, or want to add some mystery to your messages. I’ll show you how to do it below!
Hide Text on Discord Using Spoiler Tags
The built-in Discord spoiler tags allow users to reveal the hidden text only when they click on it. You can enable them in three ways:
Using Markdown Syntax
Follow the below steps:
Log in to Discord and go to the message field.
Wrap the text you want to hide between two vertical bars “||“. For example: ||This is a hidden message|| then tap Send or hit Enter.
Highlight the text you want to hide. You’ll see a few options. Tap the eye icon.
The selected text will now be hidden behind spoiler tags.
That’s it! Simple, right?
Overall, the Discord hide text feature is pretty easy to use. Whether you’re avoiding spoilers, sharing private details, or adding an element of surprise, spoiler tags give you control over what you want to reveal.
Microsoft announced it is rolling out Windows 11 Build 26100.1876 (KB5043178) to Insiders in the Release Preview Channel. The new build brings a host of features and improvements to Windows 11.
One of the most notable changes is a new “Sign out” option in the Start menu, making switching users easier. You can access the feature from the account manager by clicking the ellipsis (…) icon. The update also allows you to share local files directly from the search results in the taskbar.
The Delivery Optimization page in the Settings app now has a new design that matches the rest of Windows 11, and there’s a new energy recommendation to turn off high dynamic range (HDR) on devices with HDR displays.
Plus, when your device’s battery power is running low, a pop-up window will appear asking you to plug it in when Energy Saver is set to “Always On” and the battery level reaches 20%.
KB5043178 also includes attributions to credits.txt files for Rust open-source software (OSS) components, addressing a licensing issue some developers had noticed.
Microsoft says it’s also fixed a memory leak that might occur in combo boxes with input focus in input method editor (IME) apps and an issue preventing WebView2 apps from detecting input from Xbox 360 and Bluetooth controllers.
With this build, you can now manage your Copilot Pro subscription in Settings. The update also introduces a problem for users reliant on assistive technologies. Screen readers, such as the popular NonVisual Desktop Access app, fail to narrate all the screen content when certain apps are run with elevated privileges.
It’s worth noting that KB5043178 also includes a long list of other changes. Microsoft says it’s resolved an issue that could cause the “Scan now” button in Windows Security to stop working and improve the performance of the Windows Search indexer in the background.
There’s a fix for a bug that causes the mouse pointer to flicker when you move the cursor over the taskbar, and Microsoft says it’s improved the touchpad experience when scrolling and zooming in Microsoft Edge.
Microsoft hasn’t fixed a bug that causes the taskbar to display a network icon when you’re offline, but it says it’s working on a solution. The company also says it’s aware of an issue that can cause colors to display incorrectly on some monitors and is investigating.
In other news, the Windows Insider Program is finally back on track, with new builds for the Dev and Beta channels but no new ones for the Canary channel, prompting many on X to believe it could eventually be deprecated.
The QTMLClient.dll file, developed by Apple, is used by the Quicktime Player. When the DLL is not found, programs like QuickTime Player or RecBoot will stop working and throw an error that reads, The program can’t start because QTMLClient.dll is missing from your computer. Try reinstalling this program to fix the problem.
Although, you don’t have to reinstall the program just yet. The QTMLClient.dll missing error can also appear when the OS or the software can’t detect the DLL file or if it’s corrupted. Besides, malware infection has also been found to trigger DLL-related errors.
To start with, reboot the PC, download any pending Windows updates, uninstall recently added programs, and check the Recycle Bin for the DLL. For most, these basic checks should fix things!
What can I do when QTMLClient.dll is missing?
NOTE
I recommend against downloading the QTMLClient.dll file from third-party websites. These are not secure, and the downloaded file may be loaded with a malware or virus.
It will scan for any missing or corrupt DLLs and replace them with a cached copy stored on the PC, fixing all DLL-related errors.
2. Re-register the DLL
Press Windows + S to open Search, type Command Prompt in the text field, and then click on Run as administrator.
Click Yes in the UAC prompt.
Paste the following command and hit Enter to unregister the DLL: regsvr32 /u qtmlclient.dll
Now, execute this command to re-register QTMLClient.dll: regsvr32 /i qtmlclient.dll
Finally, reboot the PC and verify whether the error still appears.
3. Manually move the DLL to the affected program’s folder
If the DLL module fails to load during re-registration, you will have to manually move QTMLClient.dll to the relevant directories. For that, get a copy of the DLL for another PC, and then move it to the following folders: C:\Windows\System32C:\Program Files\Common Files\Apple\Apple Application Support
Also, it’s recommended to transfer a copy of the DLL to the folder where the affected program’s launcher (.exe file) is stored.
4. Reinstall the affected program
Press Windows + R to open Run, type appwiz.cpl in the text field, and hit Enter.
Select the program throwing the missing DLL error, and click on Uninstall.
Follow the on-screen instructions to complete the process and then reboot the PC.
Finally, reinstall the program from the official website or Microsoft Store.
If you had previously installed Quicktime Player, but it’s no longer on the PC, and other programs like RecBoot are throwing the missing QTMLClient.dll error, use a top-rated uninstaller software to delete all traces of Quicktime Player. This will remove any leftover files, app cache, and Registry entries!
5. Scan the PC for malware
Press Windows + S to open Search, type Windows Security, and click on the relevant result.
Click on Virus & threat protection.
Click on Scan options.
Select the Full scan entry and then click on Scan now.
Wait for the malware scan to complete. It may take 15-45 minutes.
If Windows Security can’t detect any threats, use a secure antivirus solution to identify and eliminate traces of malware on the PC.
By the time you are done with these steps, the QTMLClient.dll not found errors in Windows should be fixed.
There are a lot of reasons for the Discord Unable to accept invite error. The invitation link might have expired, there are server or local connection problems or you simply reached the 100 servers limit and can’t join another.
First, let’s eliminate the server and connection problems by checking the Discord server status page and checking other pages or speed of your connection. Also, try leaving a server you’re not using to clear the server limit problem.
What do I do if you’re unable to accept invite on Discord?
1. Reenter the invitation link
In Discord’s main page (browser or app versions), click the Plus icon from the left.
Enter or paste the invitation link, check if it’s accurate to the letter, then hit the Join Server button.
If this doesn’t work, ask the server admin for a new invite link and retry.
2. Clear the browser cache
If you’re using Discord in a web browser, clear your browser’s cache and cookies.
For Chrome: Go to Settings > Privacy and Security > Clear browsing data.
For Firefox: Go to Options > Privacy & Security > Cookies and Site Data > Clear Data.
If the Unable to accept invite error only shows up in your browser, the solution is to clear its cache. Of course, you can try another browser, or open the Discord app on Windows or mobile. Once you join a server on any of the Discord apps, you will see it on any platform.
3. Clear the Discord app cache (mobile version)
Open the Discord app and tap on the You tab on the bottom.
Go to Settings (cogwheel icon) at the top right corner.
Here, tap on the Advanced option from App Settings.
Toggle on Developer Mode, then go back and tap on Clear Caches below.
Close and reopen the app, then try to join the server again.
You may also try to open Discord in an incognito window of your browser. Also, if you’re using a VPN, try disabling or enabling it if it’s disabled and retry joining the server.
If you’re Unable to accept invite, this may be because you’ve been rate limited on Discord. That means you have spammed the same action, but our highlighted link will lead you to our complete guide to fix this problem.
Hopefully, by using our solutions you fixed the Discord Unable to accept invite error and now you’ve joined the server you wanted. Let us know in the comments below which method worked for you.
Microsoft has rolled out the latest Windows 11 Insider Preview Build 22635.4291 (KB5043166) to the Beta Channel. This version brings performance improvements and security updates that refine the Windows 11 experience before the public release.
One of the most notable changes inKB5043166 is the updated design of the Disconnect and Logoff dialogs in the Task Manager. The dialogs now support dark mode and text scaling, thus blending seamlessly with the rest of the OS UI.
Another change in this build affects the Performance section of the Task Manager. Listed disks are now labeled with their type (e.g., NVMe or SATA), which should help users better understand their PC’s storage configuration.
In the Settings app, Tailored Experiences is now called Personalized Offers in Windows OOBE. The new setting, found under Settings > Privacy & Security > Recommendations and Offers, gives users more control over the way Windows uses information about their devices to enhance the OS experience.
In addition to the above features, KB5043166 includes several bug fixes and performance improvements.
For example, Microsoft says it’s fixed an issue causing sporadic explorer.exe crashes when using Alt + Tab, an issue causing the Start menu’s All Apps list to break if you clicked or tapped on a letter, and an issue where Snipping Tool would unexpectedly close when attempting to paste a screen snippet into an app like Paint or Mail.
Several bug fixes are also included for Microsoft Edge, Microsoft Defender for Endpoint, and other apps and services.
As always, it’s worth noting that KB5043166 ships with several known issues. After installing the latest update, you might notice that there’s more spacing between items in the Start menu’s All Apps list than expected. And if you use Windows’ live captions feature, it might crash when you try to use it.
If Discord keybind not working in the game you won’t be able to communicate with your friends while gaming and this can ruin your gaming experience. Luckily, there are a few ways to fix this.
Why do Discord keybinds not work in games?
If you can’t use Discord keybinds in the game, it means that the game and Discord are using different privileges or that your hotkeys aren’t configured.
What can I do if Discord keybind is not working in the game?
1. Run Discord as an administrator
Completely close Discord.
Go to the system tray, in the bottom right corner and check if Discord is running. If it is, right-click and choose Quit Discord.
Locate the Discord shortcut, right-click and choose Run as administrator.
For this method to work, both the game and Discord need to run with the same privileges, either regular or administrator.
If the game runs with regular permissions, Discord doesn’t need to run in admin mode.
2. Configure your hotkeys
Open Discord.
Go to User Settings and select Keybinds.
Click on Add a Keybind.
Locate the desired function and set the new keybind.
Save changes.
Users reported that you don’t have to create a new keybind, instead, you can use the same ones, but you need to manually set them to use them.
If the Discord hotkeys are still not working in the game, you can try using the Game Overlay.
We hope that this guide helped you fix all your keybind issues. Speaking of which, many reported that Discord Push to Talk is not working, and we have a whole guide dedicated to it.
Windows 12 doesn’t exist yet, but a lot of designers started imagining how a Windows 12 wallpaper would look like. Whether you’re excited about a new OS version from Microsoft or you just want something new, here’s our outline of some of the best Windows 12 wallpapers.
Another minimalistic Windows 12 concept art comes from the artist Rav Ann, who envisioned a translucent logo over some wavy patterns.
You can download this wallpaper with a huge 7681×4321 pixels resolution, but it’s free only for personal use. If you want to use it commercially, you need to contact the artist.
The artist linkvegas12 posted this Windows 12 wallpaper concept art as abstract, but it’s also a minimalistic approach.
Again, we can notice the wave pattern and a small and simple Windows 12 logo in the center.
The wallpaper is free and you can save it at 1920×1080 pixels resolution but if you want to get the full resolution, you will have to create a free account on the DeviantArt website.
With the advent of Ai image generation tools, you may even use one of the bots out there to create stunning wallpapers. However, none of them can create 4K or 8K resolution images.
However, you can create a nice Windows 12 logo and use a image editing tool to piece it together with a fancy background. We created the image above exactly like that. We have generated a Windows 12 logo using DALL-E 3, removed the background using a background remover tool, then used Canva to apply a background.
It’s nothing that fancy, but it’s a proof of concept that if you want to, you can create your own Windows 12 wallpaper pretty quickly.
You may also be interested to read our guide about Windows 11 8K wallpapers and how to get them.
Tell us in the comments which one did you chose and why.
If you’re a Sling user, you might have experienced Sling error 28-29 on your device. This is a common problem that will prevent you from playing any content, so let’s see how we can fix it.
How can I fix Sling error 28-29?
Before we try more complex solutions be sure to try restarting the app or your streaming device and check if that solves the problem.
1. Update your Sling app
On the Fire TV home screen, go to Applications.
Locate the Sling TV app.
Look for the Update button and select it.
Choose Update App Now and wait for the process to finish.
These instructions are for Fire TV, but if you’re using a different streaming device the process will differ.
2. Disable ad blocker
In Chrome click the Menu icon and choose Extensions and then Manage Extensions.
Next, locate the adblock extension and click the switch next to it.
Check if the problem is resolved.
If you’re using a different device, ensure that your software or hardware ad blocker is disabled.
Sling error 28-29 can be troublesome to fix, but if you encounter it be sure to try these simple steps. If the issue persists, you might have to contact Sling support.
The CompPkgSup.dll file, developed by Microsoft, is used by a range of built-in and third-party applications, but it’s primarily limited to Windows Media Player and related media functions such as Microsoft DTV-DVD Video Decoder.
In the past, Windows updates were found to break CompPkgSup.dll, causing these functions to stop working. Also, third-party applications may corrupt the DLL due to repeated accessing attempts. Either way, you will have to get a fresh copy of the file, replace it, or eliminate conflicts!
What can I do if CompPkgSup.dll is missing or the Faulting Module Name?
Tip
Although several websites claim to host it, you shouldn’t download CompPkgSup.dll from the web as the files could be loaded with malware/adware.
1. Run a DLL repair tool
The easiest solution when CompPkgSup.dll is missing or not found is to use a top-rated DLL repair tool!
These check for any problematic DLLs on the PC and then replace the missing ones or install a fresh copy for the corrupted ones.
2. Manually replace CompPkgSup.dll
If you don’t want to use a third-party tool, there’s always the option to manually replace the DLL.
Just find a PC with a working version of the DLL > transfer a copy of it to a USB drive > then move CompPkgSup.dll to the affected computer. The CompPkgSup.dll file is stored in: C:\Windows\System32
CompPkgSup.dll in the System32 folder
So, you will have to head to the same location to both copy the file (another PC) and then move it (affected PC).
3. Install any pending Windows updates
Press Windows + I to open Settings, go to Windows Updates from the left pane, and then click on Check for updates.
If a newer version of the OS is available, click on Download & install.
Once done, reboot the PC and check for improvements.
Earlier, when KB4013429 broke the Windows Media Player, DVD Player, and third-party applications like CyberLink PowerDVD 17, the next update, KB4015438, got things back up and running.
At the time, the Event Viewer logs read, Faulting module name: CompPkgSup.DLL, version: 10.0.14393.953.
4. Uninstall the recent Windows update
Press Windows + I to open Settings, go to Windows Update from the navigation pane, and click on Update history.
Scroll down to the bottom and click on Uninstall updates.
Now, locate any recently downloaded update, and click on the Uninstall option next to it.
Again, click on Uninstall in the confirmation prompt.
Press Windows + S to open Search, type Command Prompt in the text field, and click on Run as administrator.
Click Yes in the UAC prompt.
Paste the following DISM commands individually and hit Enter after each: DISM /Online /Cleanup-Image /CheckHealthDISM /Online /Cleanup-Image /ScanHealthDISM /Online /Cleanup-Image /RestoreHealth
Next, run the SFC scan using this command: sfc /scannow
Press Windows + R to open Run, type appwiz.cpl in the text field, and hit Enter.
Select the affected program from the list, and click on Uninstall.
Follow the on-screen instructions to complete the process, and then restart the PC.
Finally, reinstall the application from an official source, say its website or Microsoft Store.
If a quick removal doesn’t do the trick, use an effective software uninstaller to completely wipe out any leftover files and Registry entries from the PC, and then proceed with the app installation.
Remember, the CompPkgSup.dll file shouldn’t ideally throw errors unless there’s a recent change or other misconfiguration, say a buggy Windows update. Now, in most cases, the problem will be widespread and reported across official channels. So, check those, and you should have things running in no time!
Starfield, Bethesda’s latest single-player role-playing video game, has just received its first expansion. Shattered Space is now available on Xbox Series X|S and PC.
Starfield: Shattered Space promises to be an enthralling standalone experience, taking players to the mysterious home planet of House Va’ruun. This faction, known for its dangerous reputation and violent history, becomes the center of an intriguing storyline as players follow a distress signal to uncover secrets and decide the future of House Va’ruun. It’s a narrative with potential, offering a deeper dive into the game’s lore.
The expansion, the first paid DLC for Starfield, is available for $29.99 on the Microsoft Store and Steam. It is also included at no extra cost in the game’s premium and constellation editions.
Bethesda recommends that players be at least level 35 before diving into the new content, though it’s not required. The “One Small Step” introductory mission in the base campaign needs to be completed before the game prompts players to start the expansion’s journey.
You can get Starfield: Shattered Space on Steam now.
Microsoft has received customer reports of devices restarting multiple times or becoming irresponsive with blue or green screens after trying to install the September 2024 non-security preview Windows update (KB5043145). According to the reports, some devices automatically open the Automatic Repair tool after repeated reboot attempts. This tool diagnoses and resolves common issues that might prevent your device from booting properly. In some cases, BitLocker recovery can also be triggered.
Microsoft says it’s investigating the issue and will provide an update once more information is available. The company urges affected users to raise an issue on Feedback Hub to help expedite its investigation.
If you have experienced this issue, please use Feedback Hub to file a report and provide more details. This information helps us expedite our investigation. See Send Feedback to Microsoft with the Feedback Hub app to learn how to use Feedback Hub. You can also visit Feedback Hub and search for “KB5043145” to upvote posts reflecting your issue.
UPDATE: Microsoft has provided users with a temporary solution. If your Windows 11 is affected by the issues caused by the KB5043145 installation, the Redmond-based tech giant says that the issues are resolved using Known Issue Rollback (KIR), which will take up to 24 hours to propagate automatically to consumer and non-managed business devices. Users are advised to restart their devices to apply the resolution faster.
For enterprise-managed devices managed by IT departments that have installed the affected update and encountered this issue, IT administrators can resolve it by installing and configuring the Group policy listed below. The special Group Policy can be found in Computer Configuration -> Administrative Templates -> <Group Policy name listed below>.
You can read Microsoft’s guide on how to fix it. Meanwhile, the company is working on a permanent solution that will be released with future updates.
A Discord grey screen can prevent you from accessing your chats and communities. This issue often arises due to problems with your graphics driver, stored cache files, or software compatibility. Fortunately, there are several effective ways to resolve it.
Before we begin, try out the quick fixes below:
Adjust your screen. Minimize then maximize the size of your screen by dragging its edges.
Update or restart the Discord app. Press Ctrl + Shift + Esc > Discord > End Task > Open Discord again, and it will check for updates automatically and install them.
Reinstall the Discord app. Press Windows + X > Apps & Features > Select Discord > Uninstall > Visit Discord website and install it.
Refresh the screen. Press Ctrl + R to refresh the window or F5 to refresh the entire screen.
If none of these work, check out the detailed solutions below.
3 Fixes for Discord Grey Screen
Here are the instructions:
Update Graphics Driver
Discord heavily relies on the GPU for rendering, and if the driver isn’t up-to-date, this can cause display issues like the grey screen. Follow the below steps to update it:
Expand the Display adapters, right-click your graphics card, and select Update driver.
Choose Search automatically for drivers. Windows will search for and install any available updates.
Restart your computer and check if the error persists.
Clear Discord Cache
Discord stores cache files to help the app load faster. However, corrupted or overloaded cache files can sometimes cause issues, including the grey screen. To clear them, do this:
Close Discord completely by right-clicking its icon in the system tray and selecting Quit Discord.
Press Windows + R to open the Run dialog box, type %appdata%/discord, and press Enter.
Find the Cache, Code Cache, and GPUCache folders, then delete the contents.
Restart your computer, relaunch Discord, and check if the issue was solved.
If clearing the cache doesn’t fully resolve the issue, check our complete guide on Discord app not working for more solutions.
Run Discord in Compatibility Mode
Discord might have compatibility issues with your operating system, particularly if you’re running an older version. Running it in compatibility mode can help:
Right-click the Discord shortcut or executable file and select Properties.
Click the Compatibility tab, check the box that says Run this program in compatibility mode for:, andselect a compatible operating system ( Windows 8 or Windows 7) from the drop-down menu.
Click Apply and then OK.
Relaunch the app.
Fixing the Discord grey screen issue is straightforward with the right troubleshooting steps. The solutions above will help you get back to enjoying Discord without any interruptions.
Remember when we told you that managers can use Outlook’s Work Hours and Location feature to determine whether you’re in the office?
Well, it seems that the Redmond-based tech giant is backtracking it and will enhance the Outlook feature to make it optional for users to display their work hours and location statuses.
According to a recent entry in the Microsoft 365 Roadmap, users can choose not to share any location information with other users in the organization.
Outlook’s Work Hours and Location will be updated to allow users to choose from ‘No location share’, ‘Only general location shared (Office or Remote)’, and ‘Detailed location shared (Building or desk location information)’.
The new status will be displayed on Work Hours and Location across Places, as well as Teams experiences.
This updates the work location sharing options to include the option of not sharing any location information to other users in the organization. The three supported location sharing options will now be “No location shared,” “Only general location shared (Office or Remote),” and “Detailed location shared (Building or desk location information).” The location sharing option will be respected when showing a user’s location information coming from Work Hours and Location across Outlook, Places, and Teams experiences. #newoutlookforwindows
This is good news, considering the original plan for Work Hours and Locations might have been too intrusive to begin with. While the feature is quite useful for office management, it could be bothering for those working remotely.
The enhancement is set to be rolled out in October.
Microsoft has rolled out a new version of its Edge web browser for beta testers on the beta channel. Version 130.0.2849.5 of Microsoft Edge is now available for Windows, macOS, and Linux.
This version of Microsoft Edge, one of the most significant ones in a while, includes several new features, feature updates, fixes, and policy updates.
With version 130.0.2849.5, Edge fully deprecates the Token Binding, which uses cryptographic certificates on both ends of the TLS connection to close the security gap of bearer tokens that may be lost or stolen. Token Binding is deprecated in Microsoft Edge version 130. Also, the AllowTokenBindingForUrls policy is now obsolete.
Edge on macOS now seamlessly opens links in Teams. When you set the default browser to Microsoft Edge and enable the feature, web links from the Teams desktop app are sent via chats, channels, calendars, and other entry points. These links seamlessly open automatically in the profile signed into the Teams app and skip the need to reauthenticate in the browser. This feature makes it faster and easier to access content.
Administrators can control the availability of this feature using the “Choose Which Browser Opens Web Links” Microsoft 365 policy.
Microsoft Edge is introducing three navigation improvements to Edge Settings to make finding browser settings more efficient. The Redmond-based tech giant isn’t changing the functionality of any setting, and all the settings stay on the same page as they are today but will be behind clickable sections.
Introduce quick access to the most used Settings actions on the first place users land when entering Edge Settings (the Profiles page). Clicking the button with the setting’s name navigates users directly to its location.
Introduce quick access to the most used actions on densely populated Settings pages (such as Privacy, Search and Services, Appearance, Cookies and site permissions, System, and Performance) to make them easier to navigate. Clicking the button with the setting’s name takes users directly to its location.
For these densely populated pages, each section of settings will be a clickable “table of contents” with descriptive subtexts. This helps users locate settings directly and avoid unnecessary scrolling.
Some users reported issues with bink2w32.dll while trying to launch certain games. This can be a problem since you won’t be able to run your game, but there are ways to fix this problem.
What does bink2w32.dll do?
This file is associated with the Bink Video codec, and if the file is missing, you won’t be able to decode and play any videos that are encoded using this codec.
What can I do if bink2w32.dll is missing?
Before we try anything else, try running the game that is giving you this error from the Steam Launcher and check if that helps.
1. Verify the integrity of the game cache
Open Steam and go to your Library.
Right-click the game that is giving you this error and choose Properties.
Next, go to the Installed Files tab and click on Verify integrity of game files.
Wait for the process to finish.
If the problem appears with a non-Steam game, try reinstalling it.
2. Copy the missing file
Look for bink2w32.dll on your PC. Other games might have it in their installation directory.
If not, check with your friends and ask them to share this file with you.
Once you find the file, copy it to the game’s installation directory.
You can also bink2w32.dll download, but not all online sources are safe and reliable, so if you choose to download the file online, ensure that it’s from a reliable source.
Bink2w32.dll usually appears if the installation is corrupted, or if you got the game from an unofficial source, so in most cases, it’s best to reinstall the game entirely.
While this article covers a 32-bit version of the file, we have another one that shows you what to do if bink2w64.dll is not found, so don’t miss it.
This isn’t the only error you can encounter, and many reported that binkw32.dll is missing. The same can happen with binkw64.dll, and we have covered what to do if binkw64.dll is missing on your PC.
Many readers have complained about getting an error message: Unable to find the Dsetup.DLL that caused the League of Legends launcher to crash.
The error occurs if the DLL file is corrupted or damaged. You can also see this problem if your device’s system files are missing. To begin with, restart your computer and ensure you have the latest Windows version installed.
How can I fix the Unable to Find Dsetup.DLL error?
1. Reinstall the affected app
Press Windows + I to open the Windows Settings app
Go to Apps, then click Installed apps.
Locate the app, click the three-dot icon, and select Uninstall.
Click the Uninstall button to confirm the action.
Now go to the official website of League of Legends, and click Download for Windows.
Once the .exe file is downloaded, double-click it to download and install League of Legends on your computer.
2. Use a third-party DLL fixer
Dsetup.DLL is a DLL file used by many apps, including Visual Studio 2010 and League of Legends. If it is missing or damaged, the apps will not launch or work properly. You can manually restore the DLL file by copying and pasting it from another computer; however, if not done correctly, this can cause more harm than good to your device. Therefore, it is recommended that you use the third-party DLL fixer tool to fix the problem.
These software are known to fix compatibility issues, which are significant issues that plague third-party DLL files and Windows PCs.
3. Perform a clean boot
Press Windows + R to open the Run console.
Type msconfig and click OK to open System Configuration.
On the System Configuration window, switch to the Services tab, place a checkmark next to Hide all Microsoft services, and click Disable all. This will ensure that no non-Microsoft service is mistakenly disabled.
Go to the Startup tab and click the Open Task Manager link.
On the Task Manager window, select each Enabled item and click Disable. Remember all the startup items you have disabled so that you can turn them back on later.
Close Task Manager.
On the System Configuration window, click Apply, then OK.
Click Restart to reboot your computer in clean boot on Windows.
4. Re-register the DLL file
Press the Windows key, type cmd in the search box, and click Run as administrator. Click Yes on the UAC prompt.
Copy & paste the following command to unregister the DLL file, then press Enter: regsvr32 /u DSETUP.DLL
Now, to re-register the file, type the following command and hit Enter: regsvr32 DSETUP.DLL
Press the Windows key, type cmd in the search box, and click Run as administrator.
Type the following command to repair or restore Windows system files, then hit Enter:sfc/scannow
Once the command is successfully complete, Copy the following commands one by one to restore Windows OS image files, and press Enter after every command to execute:
Wait for the command to be complete, then restart your computer to let the changes take effect.
6. Reinstall Visual C++ Redistributable for Visual Studio 2015
Press Windows + I to open the Settings app.
Navigate to Apps, then click Installed apps.
Locate Microsoft Visual C++ Redistributable, click the three-dot icon, and choose Uninstall.
Click the Uninstall option.
Click on this link to go to the Download Center to download the Microsoft Visual C++ Redistributable file.
Double-click the downloaded file to initiate the installation and follow the on-screen steps to complete the process.
7. Download the DLL file from a reliable website
NOTE
If you want to restore the DLL file manually, you should always download it from a reliable website like DLL-Files. Our experts at WindowsReport have tested & verified that the files on it are safe to use.
Go to the DLL-Files website, search Dsetup.DLL, choose an appropriate option, and click Download.
Double-click the downloaded folder to open, locate, and copy the .dll file.
Go to this path and paste the DLL file. Don’t forget to replace C with your system drive letter if it is not C for you: C:\Windows\System32 or C:\Windows\SysWOW64
Windows Server Insiders are in for a treat as Microsoft has announced the release of the new build of the upcoming Windows Server Long-Term Servicing Channel (LTSC) Preview.
This new build, specifically Build 26296, includes both the Desktop Experience and Server Core installation options for the Datacenter and Standard editions, the Annual Channel for Container Host, and the Azure Edition, which is only for VM evaluation.
The company notes that the new build comes with updated branding for the upcoming release, Windows Server 2025. As such, testers should refer to the Windows Server 2025 preview when reporting issues. The build will be made available automatically for those with Server Flighting enabled.
The new build introduces the Windows Server 2025 Security Baseline Preview, which allows testers to apply a range of recommended security settings for VM roles directly from the Windows Admin Center.
The security baseline includes over 350 settings organized across three categories: Domain Controller (DC), Member Server, and Workgroup Member.
Also new in Build 26296 is the ability for Windows Server 2025 preview customers to download and install Windows Admin Center from the Windows Server Desktop using the in-OS app.
There are a few known issues to be aware of, including one where the Sysprep tool, which generalizes a Windows installation for imaging, isn’t working correctly in the new build.
Additionally, the label for the latest flight may incorrectly reference Windows 11. However, when selected, Microsoft says the package installed is the Windows Server update.
Usually, when the Discord images are not loading, that is a DNS issue from your ISP. According to the developer, British Telecom, Xfinity are known to limit the Discord content for some users, but changing your DNS to 8.8.8.8 or 1.1.1.1, or using a VPN will fix this issue. Here’s what to do!
How do I fix Discord if it’s not showing images?
1. Check Discord servers and local connection
Before troubleshooting, check the Discord’s servers status to see if there are any issues on their part.
Also, restart your app and your PC and router to make sure your local connection is OK. A bonus tip would be to temporarily disable the firewall if you’re using a third-party tool. Sometimes, these can block your content showing on Discord.
2. Refresh the hosts file in Windows 11
Search for notepad, and then tap or click the Notepad icon.
Copy the following text, and then paste the text into the file:
# Copyright (c) 1993-2006 Microsoft Corp. # # This is a sample HOSTS file used by Microsoft TCP/IP for Windows. # # This file contains the mappings of IP addresses to host names. Each # entry should be kept on an individual line. The IP address should # be placed in the first column followed by the corresponding host name. # The IP address and the host name should be separated by at least one # space. # # Additionally, comments (such as these) may be inserted on individual # lines or following the machine name denoted by a ‘#’ symbol. # # For example: # # 102.54.94.97 rhino.acme.com # source server # 38.25.63.10 x.acme.com # x client host # localhost name resolution is handle within DNS itself. # 127.0.0.1 localhost # ::1 localhost
On the File menu, select Save as, and name the file hosts, then save the file to the desktop.
Close Notepad.
Press Win + R to open the Run console, type or paste %WinDir%\System32\Drivers\Etc, and press Enter.
Tap and hold or right-click the Hosts file, select Rename, and then rename the file as Hosts.old.
Copy or move the Hosts file that you created earlier from the desktop to the %WinDir%\System32\Drivers\Etc folder. If you are prompted to enter an administrator password, select Continue.
Refreshing the Hosts file worked for many users so you should try it if the Discord images are not showing. As a related tip, if you suspect that your PC is infected with virus or malware, the Hosts file is one of the first to check and see if it has unusual redirects to sites or IPs you know nothing about.
3. Change DNS settings
Click the Start button, type control panel and open the app from the results.
Go to Network and Sharing Center and click on Change adapter settings.
Right-click on your network connection and select Properties.
Select Internet Protocol Version 4 (TCP/IPv4) and click Properties.
Choose Use the following DNS server addresses and enter:
Preferred DNS server: 8.8.8.8
Alternate DNS server: 8.8.4.4
Click OK and restart your computer.
4. Clear the Discord cache
Press Win + R, type %appdata%, and press Enter.
Find the Discord folder and delete it.
Restart Discord and the app will create another cache folder.
5. Enable Link Previews
Open Discord, go to User Settings and click on Chat from the left.
Toggle the Show embeds and preview website links posted into chat to ON if it’s turned off.
Also, look for the When uploaded directly to Discord option and turn it to off so you can preview images larger than 10 MB.
Usually, after performing the second solution, you will fix Discord if the images are not loading.