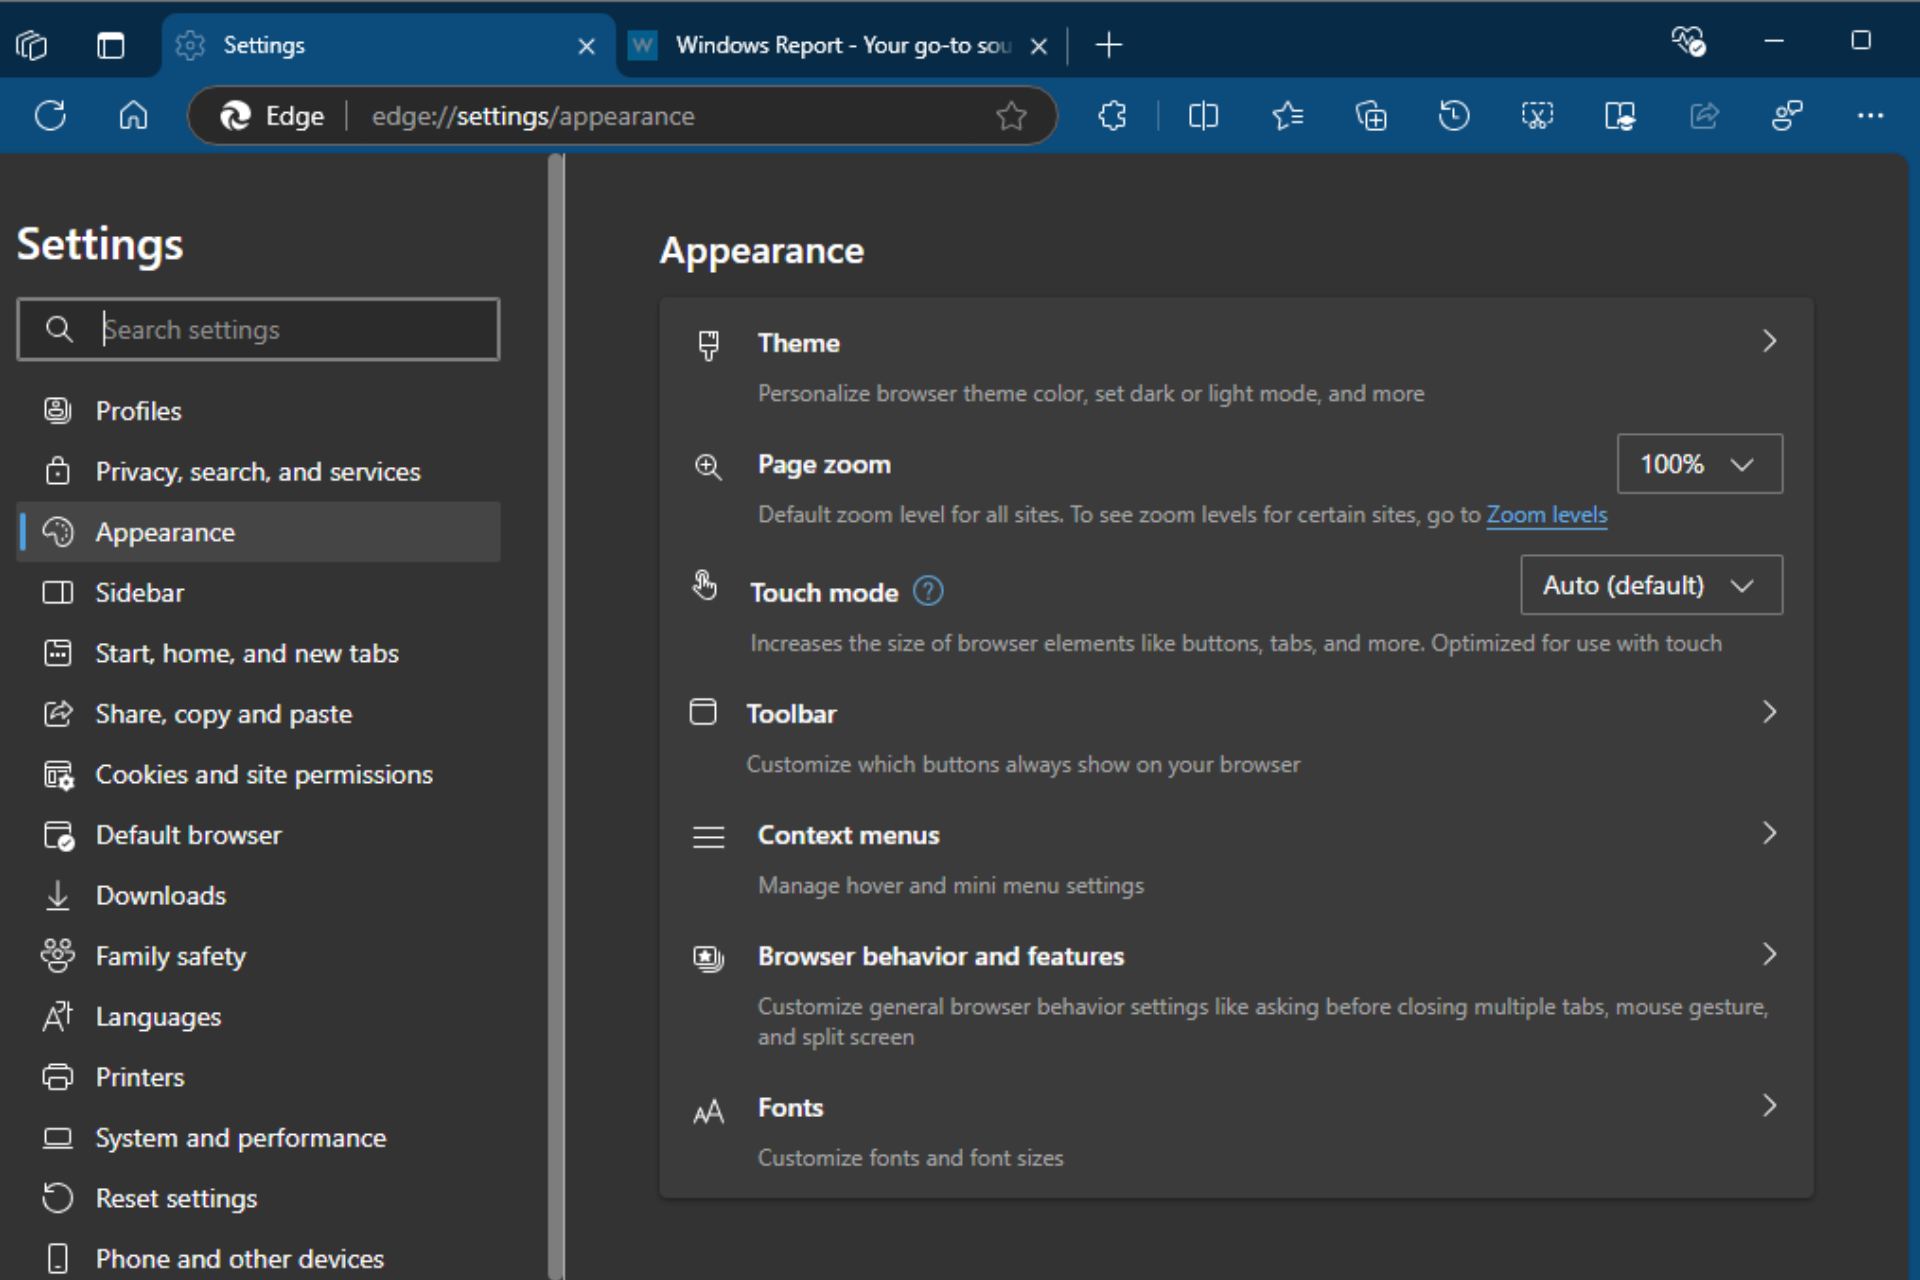
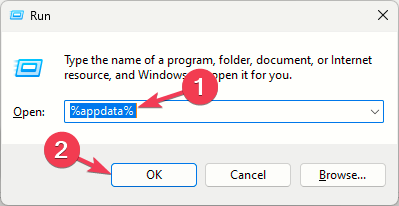
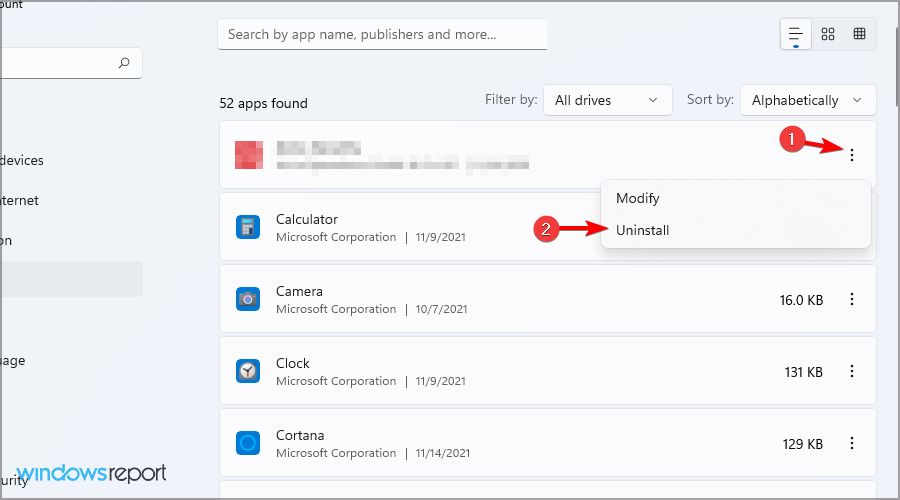
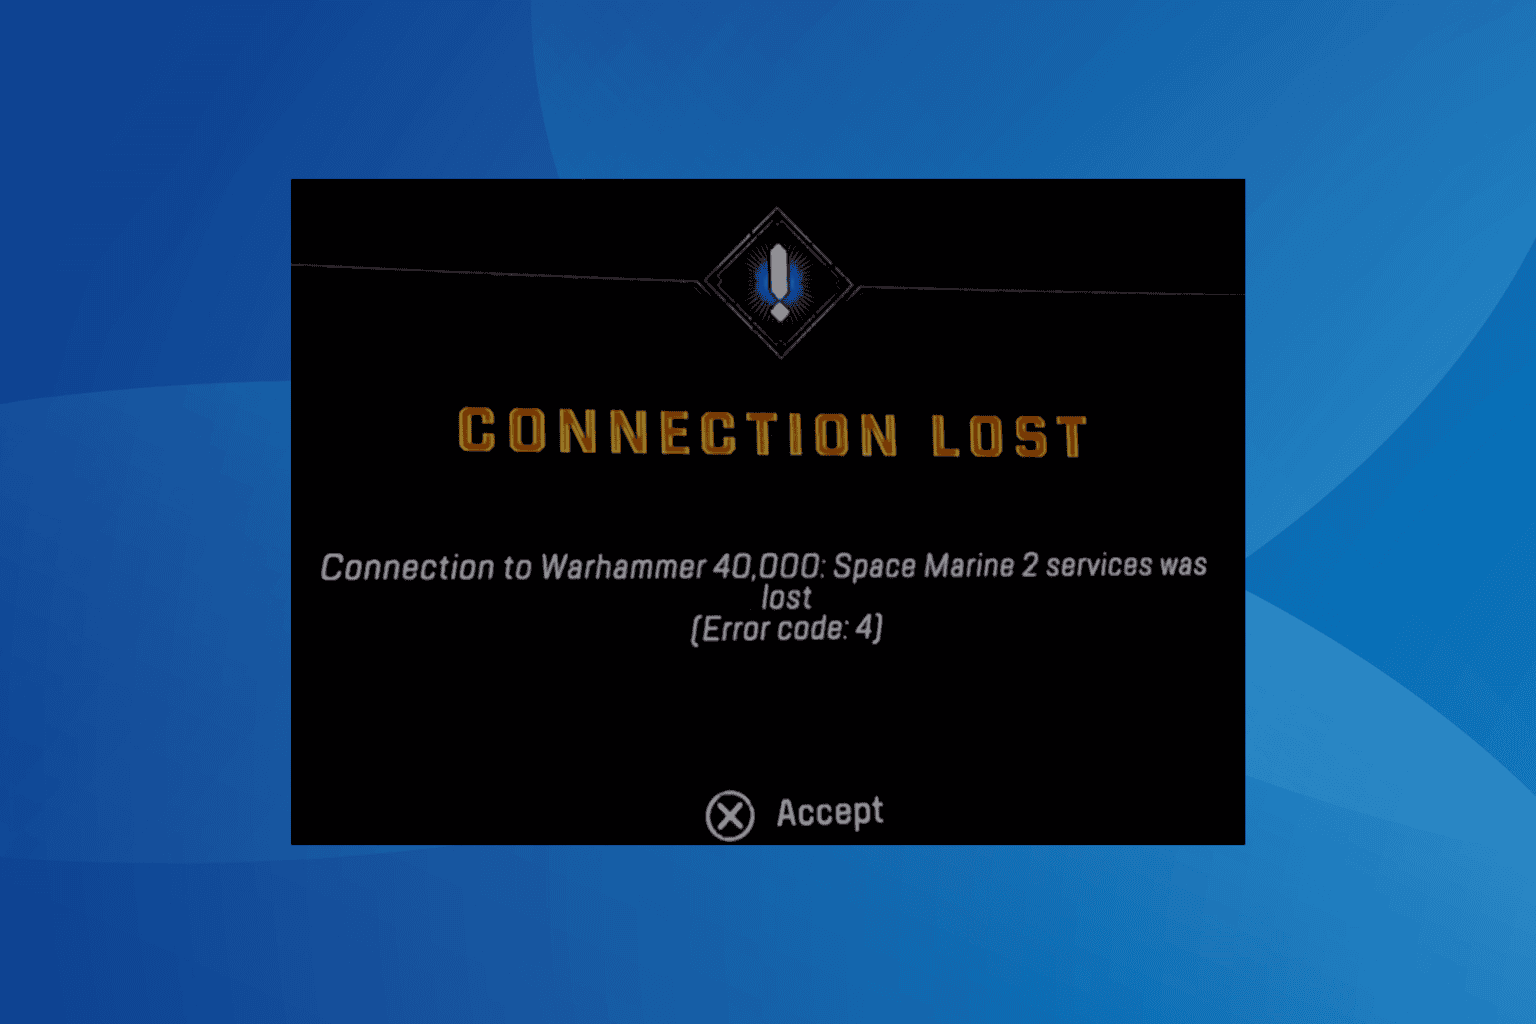
If YouTube is not working on Firefox, you won’t be able to watch any videos, and this can be a problem. Luckily, we have a couple of solutions that might help you fix this issue.
Why is YouTube not working properly on Firefox?
This is usually caused by problematic extensions, but sometimes your DNS over HTTPS settings can cause it as well.
What can I do if YouTube not working on Firefox?
1. Disable problematic extensions
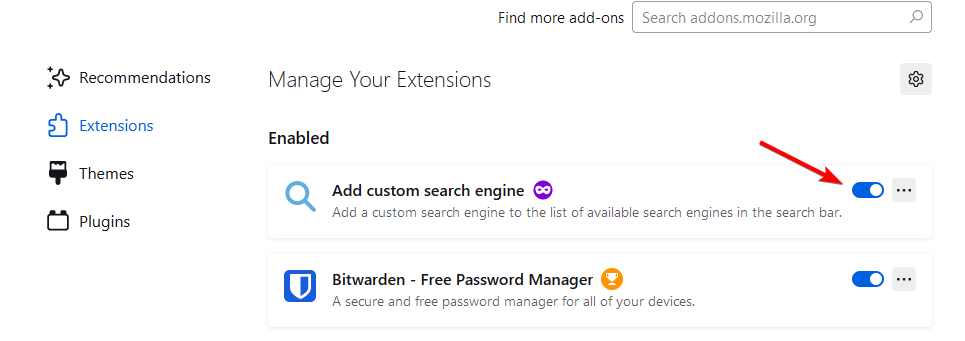
Click on the Menu button and choose Add-ons and themes.
Next, disable all extensions.
Restart your browser and check if the problem still appears.
If not, enable extensions one by one until you manage to find a culprit.
Many extensions can cause this problem, but users reported issues with Disable Autoplay for Youtube, AdBlocker Ultimate, CanvasBlocker, Disable JavaScript, HTTPS Everywhere, and Ghostery.
2. Change your DNS settings
Click the Menu icon and choose Settings.
Navigate to Privacy & Security. Locate Enable DNS over HTTPS using and enable Default protection.
Save changes.
3. Enable hardware acceleration and disable GPU decoding
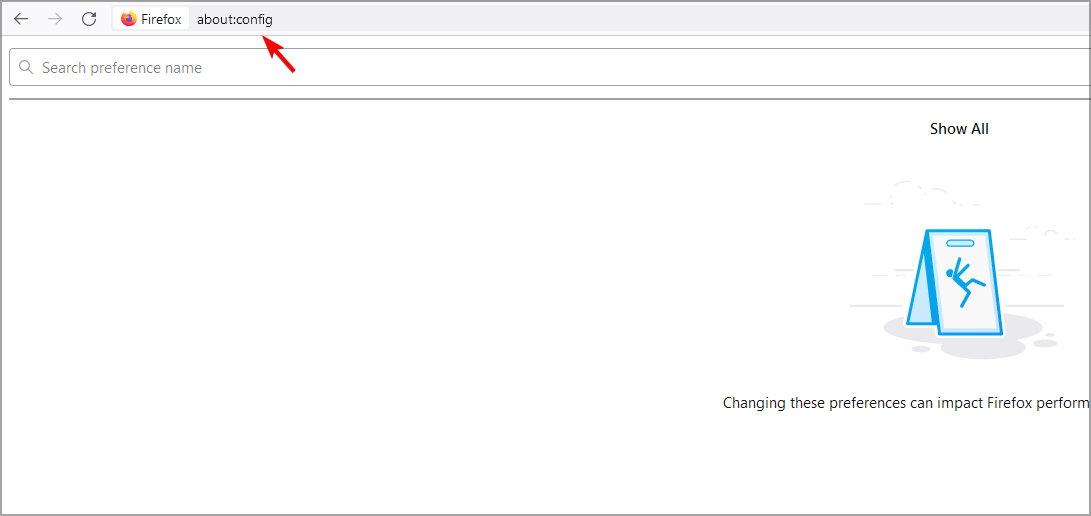
In the address bar, type about:config.
Search for media.hardware-video-decoding.enabled.
Click on true to set its value to false.
Open Firefox Settings.
Scroll down to the Performance area and make sure that Use recommended performancesettings is checked.
Open the extension and select Windows / Chrome or Android / Chrome.
Try to open YouTube again.
5. Refresh Firefox
Open Firefox and in the address bar enter about:support.
Next, click on Refresh Firefox.
Follow the instructions to complete the process.
Keep in mind that this will remove all your data from Firefox, so it would be best to back it up or sync it beforehand.
In most cases, if YouTube is not working or playing on Firefox, it’s due to installed extensions. This is one of the common YouTube Firefox glitches, but it can be easily resolved.
The popular Microsoft Rewards is part of the Xbox App on Mobile, and users frequently visit it for their daily quests and tasks. However, the section has recently gone missing, prompting many people to wonder if the Redmond-based tech giant has removed it from the app.
The Microsoft Rewards panel went missing on the Xbox app, both the console app and the mobile app. After many hours of being down, however, it came back. Apparently, this hasn’t been the first time the app has suffered such an error, leaving many users unable to complete their tasks.
Some users reported that they didn’t receive any points when they completed the tasks when the app was missing.
Yeah, lots of people have been posting about it being down. I played Jewel earlier, but it still did not give me the points despite clearing two screens. Then, it was all just gone from the app.
Apparently, the section disappears occasionally, which is Xbox’s fault; many users are already accustomed to it, and the best thing to do is avoid completing any tasks when Microsoft Rewards disappears on the Xbox App.
According to users, once it goes missing, it will disappear from all platforms, including Xbox, PC, and mobile.
There have been discussions about whether Microsoft Rewards is going away, but it’s less likely that the Redmond-based tech giant will ever abandon the program, as it’s one of the most popular right now.
With it, users can earn points, which they can use to purchase gift cards or renew Game Pass subscriptions. Even though completing daily tasks will earn users fewer points in 2024 than in 2023, the program is still going strong.
Many users have reported that AutoSave is not working on Microsoft Office programs like Excel, PowerPoint, and Word. The reasons for this issue could be corrupted files, conflicting add-ins, or a damaged Office app.
First, check the file in question to ensure it doesn’t have older file formats such as .xls, .doc, or .ppt, then proceed to detailed solutions.
How can I fix AutoSave not working in Excel?
1. Check if the AutoSave feature is enabled
Press the Windows key, type excel in the search bar, and click Open.
Go to File.
Click Options.
Click the Save section from the left pane on the Excel Options window.
Locate the Save AutoRecover information every—minute option, select it, and mention the time in minutes in the blank.
Locate and place a checkmark next to Keep the last AutoRecovered version if I close without saving box option.
You can also place a checkmark next to the AutoSave files stored in the Cloud by default in Excel.
Click OK to save the changes.
2. Use the Open and Repair option
On Excel, go to File, click Open, and then Browse.
From the following window, choose the file you have issues with.
Select the Open and Repair option from the Open drop-down menu and press Enter.
You will get a prompt with two options: Extract Data and Repair. Use Repair if you want to fix the corrupt Excel workbook. However, you can choose Extract Data to extract formulas and values from the sheet.
3. Resave the temp files
Press Windows + E to open the File Explorer window.
Navigate to this path after replacing <username> with the username of your account on your device : C:\Users\<username>\AppData\Roaming\Microsoft\Excel\
If you can’t find the unsaved files there, go to this path: C:\Users\AppData\Local\Microsoft\Office\UnsavedFiles
If you locate the Excel temp file, press F2 and rename it with an XLS file format to recover the Workbook.
4. Update the Excel app
Press the Windows key, type excel in the search bar, and click Open.
Go to File.
Click Account.
From the right pane, click Update options, and from the drop-down, click Update Now.
Press the Windows key, type excel in the search bar, and click Open.
Go to File.
Click Options.
Now select Addins.
Locate Manage, choose Excel Add-ins from the drop-down, and click Go.
Remove the checkmark next to all the Add-ins listed and click OK.
Conflicting add-ins can also cause issues like Excel files not opening on Windows 11; however, there could be other reasons too, here is a detailed guide for you.
6. Remove security features
Press the Windows key, type excel in the search bar, and click Open.
Go to File.
Select Info.
Click Protect Workbook, then select Encrypt with Password from the drop-down menu.
In the following window, remove password protection and save the changes.
Again, navigate to File > Info > Protect Workbook> Restrict Access and select Unrestricted Access.
7. Refresh data when opening the file (applicable if you have Table/Pivot Table in a file)
Choose the table or Pivot table and go to Table Tools Design.
Click Refresh and select Connection Properties from the context menu.
Now, remove the checkmark next to Refresh data when opening the file.
8. Repair/reinstall the Microsoft Office
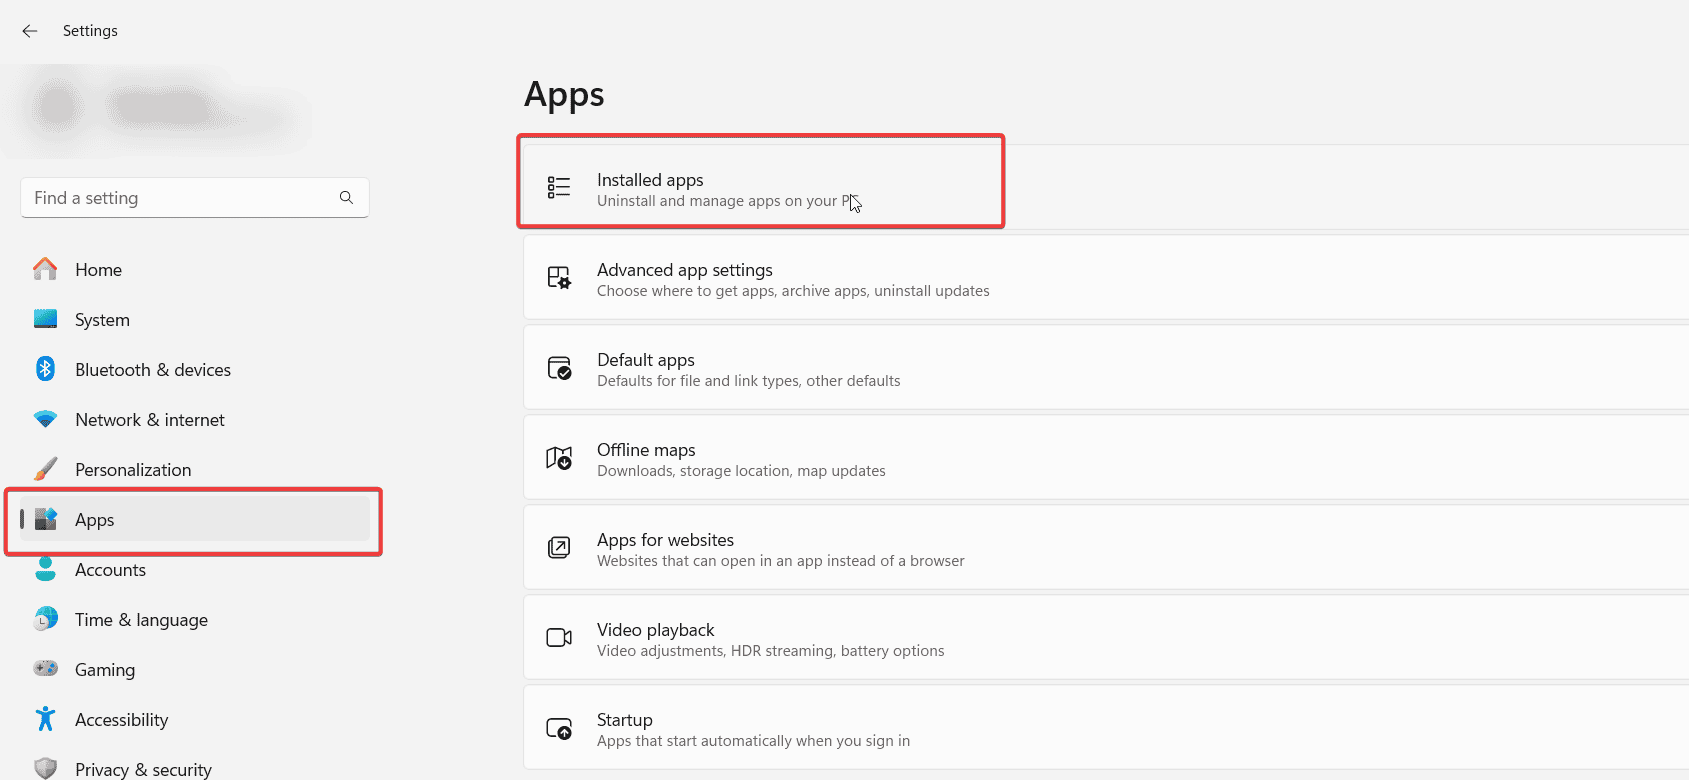
Press Windows + I to open the Windows Settings app.
Go to Apps, then click Installed apps.
Locate Microsoft Office, click the three-dot icon, and select Modify.
Click Yes on the UAC prompt.
From the pop-up window, select Quick Repair and then click the Repair button to initiate the process.
If this doesn’t help, you can reopen the Installed apps list, locate Microsoft Office, click the three-dot icon, and choose Uninstall.
Click the gear icon in the top-right corner of the page.
Select “Plans and upgrades” or “Options” from the dropdown menu.
In the Storage section, you’ll see your total storage, how much you’ve used, and how much is still available.
If storage is close to being used up, consider upgrading your plan or cleaning up your data, as it’s very possible the progress won’t save.
Clear Browser Cache
Open your browser.
Click the three dots in the top-right corner.
Go to More tools > Clear browsing data.
In the popup, set the Time range to “All time”.
Check “Cached images and files” (you can leave other options unchecked).
Click Clear data.
Corrupted browser data can stop Excel Online from saving. Make sure to clear it out to prevent it.
Also,try opening it in a private window or a different browser to rule out extension or browser issues. If that doesn’t work, download the file, make your changes offline, then re-upload it. It’s not ideal, but it will save your work.
This is how you can fix the AutoSave not working in Microsoft Excel issue; however, if you are dealing with corrupted files in Excel, we have a separate guide for you. You can also locate your autosave Excel files if you were not able to save them for some reason.
Microsoft released the KB5043064 patch for Windows 10 earlier this month as part of the Patch Tuesday updates. While the patch has essential security features, it also caused several bugs. Some users reported encountering the 0x800f0831 error code when installing the KB5043064.
I have attempted to install update KB5043064 for two days, but it fails with error code 0x800f0831
I am running Windows 10 Home Version 22H2 Installed 8/18/2024 OS Build 19045.4780 Windows Feature Experience Pack 1000.19060.1000.0
What can I do to install this update?
Unfortunately, KB5043064 is mandatory, and even if you encounter the 0x800f0831 error code, you must try to install it.
Fortunately, there are workarounds for this issue, and many users reported that these solutions worked and allowed them to install KB5043064 on Windows 11 safely.
Here’s what you can do.
Install KB5043064 by fixing the 0x800f0831 bug with a DISM scan
Open Command Prompt with admin rights.
Type in the following command: DISM /ONLINE /CLEANUP-IMAGE /RESTOREHEALTH
Let the scan proceed, reboot your PC, and try to install KB5043064 again.
Repair Windows 10 through the Media Creation Tool
Download the Media Creation Tool.
Accept the license agreement.
Click on the Upgrade this PC now button.
Wait for the repairing process to end, then try installing KB5043064 again.
You can also follow this comprehensive guide, which explains the step-by-step downloading of the Media Creation Tool.
These two fixes should be enough to get your Windows 10 fixed and ready to install the KB5043064, but it’s worth mentioning that the 0x800f0831 error code is quite common, and it has many ways to fix it, regardless of whether it happens on Windows 10 or 11.
Microsoft Teams will finally allow admins to name their Teams panels on Rooms Pro and Teams Shared Devices.
According to the latest entry in the Microsoft 365 Roadmap, admins can provide custom names for these panels, which will be displayed on the panel’s home screen, replacing the global address book name that appears in Outlook or Teams.
Admins can use the Teams Rooms Pro Management portal to assign a custom name to their Teams Rooms Pro or Teams Shared Device licensed panels. This new name displays on the panel’s home screen, replacing the global address book name that appears in Outlook or Teams.
However, this enhancement will only be released in December 2024. On the other hand, it will be generally available to every user.
The ERROR_FSFILTER_OP_COMPLETED_SUCCESSFULLY is not an error but an informational message, extending with this description 762 (0x2FA): A file system or file system filter driver has successfully completed an FsFilter operation. It doesn’t point out a problem or error that requires fixing; rather, it informs you that a file system filter driver has completed its task without problems.
How can I know more about ERROR_FSFILTER_OP_COMPLETED_SUCCESSFULLY ?
The ERROR_FSFILTER_OP_COMPLETED_SUCCESSFULLY is an information or a success message showing the file system or filter driver has successfully completed an FsFilter operation. To learn more about it, follow these steps:
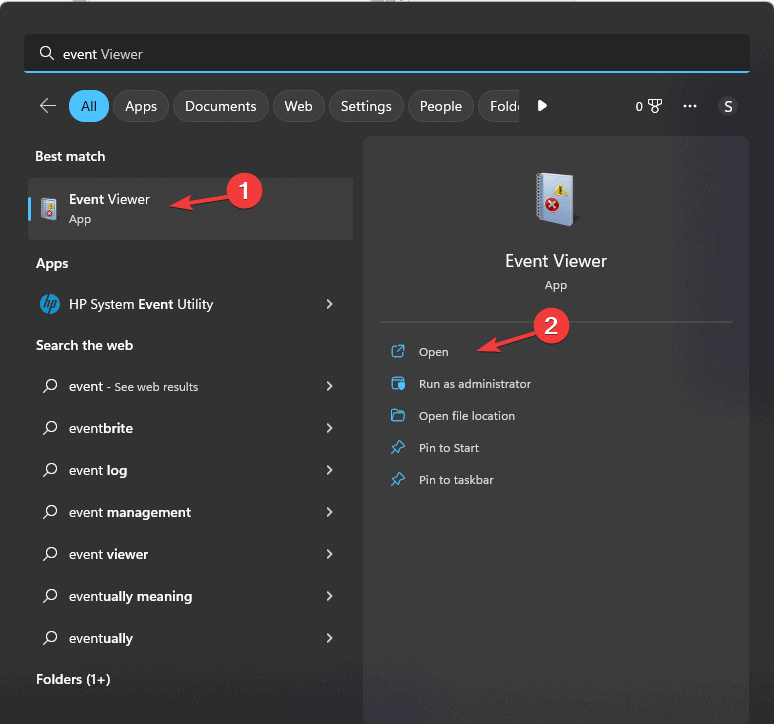
Press the Windows key, type event viewer in the search box, and click Open.
Click and expand the Windows Logs section on the left pane, and click System.
You will get entries related to system events; look for the ERROR_FSFILTER_OP_COMPLETED_SUCCESSFULLY event and read the information mentioned.
If you see the entry related to this event marked as Error or Critical, select it and choose Filter Current Log from the right pane.
In the following window, choose Event level as Error and Critical and click OK.
Now, check for any disk errors or hardware-related issues. If you see other messages indicating potential file system operation issues, read on!
How can I fix issues related to ERROR_FSFILTER_OP_COMPLETED_SUCCESSFULLY?
1. Verify the file system filter drivers
Press Windows + R to open the Run window.
Type devmgmt.msc and click OK to open the Device Manager window.
Now go to the Disk Drives or Storage Controllers category, then click it to expand.
The Intel RST VMD controller 467F in my HP computer is the file system filter driver. Once you find yours on the computer, right-click it and choose Properties from the context menu.
Go to the Driver tab and note the Driver Version and Driver Date. Also, check the Digital Signer to ensure a trusted source signs the driver.
To verify you are using the correct version of the driver, follow these steps:
Go to the official website of your device manufacturer. Here, we are taking HP’s official website, for example, as they are the manufacturer of my device.
Select your device, then enter the Product serial and product numbers.
Choose the operating system of your device and click Next.
You will get the list of drivers available for your device. Check if the version mentioned is the same as the one you noted.
If not, click Download to get the file. Double-click the downloaded file and follow the on-screen instructions to complete the process.
2. Reinstall the driver
Press Windows + R to open the Run window.
Type devmgmt.msc and click OK to open the Device Manager window.
Expand the Storage Controllers category, right-click the file system filter driver and choose Uninstall device.
Click Uninstall again to confirm the action.
To reinstall, go to Action and click Scan for hardware changes.
3. Run an SFC scan
Press the Windows key, type cmd in the search box, and click Run as administrator.
Copy & paste the following command to repair damaged or restore the missing system files and hit Enter: sfc /scannow
Wait for the command to complete, then reboot your PC to let the changes take effect.
4. Check for disk errors
Press the Windows key, type cmd in the search box, and click Run as administrator.
Copy & paste the following command to check for disk errors on your PC and hit Enter: chkdsk /f
You will get a prompt asking you to restart the computer and save all your work on your device. Type Y in the Command Prompt and press Enter.
Once the scan is complete, your system will boot into Windows, and the results will be displayed in the Command Prompt window.
If the errors are found and cannot be fixed, backup your data and consider replacing the drive if it shows other signs of failure, such as unusual noises, frequent crashes, corrupted files, and more.
5. Restore your PC to a previous version
Press the Windows key, type control panel in the search box, and click Open.
Select Large icons for View by and select Recovery.
Click Open System Restore.
Select Choose a different restore point on the System Restore window, then click Next.
On the next screen, choose the previous or oldest point from when your PC was working properly and click Next.
Click Finish to start the process.
Windows will restart and try to restore your PC to the selected version. This process may take some time, so don’t turn off your computer. Once your computer restarts, head to Settings, click Windows Update, and then Check for Updates. If an update is available, Click Download & Install to install the latest Windows updates.
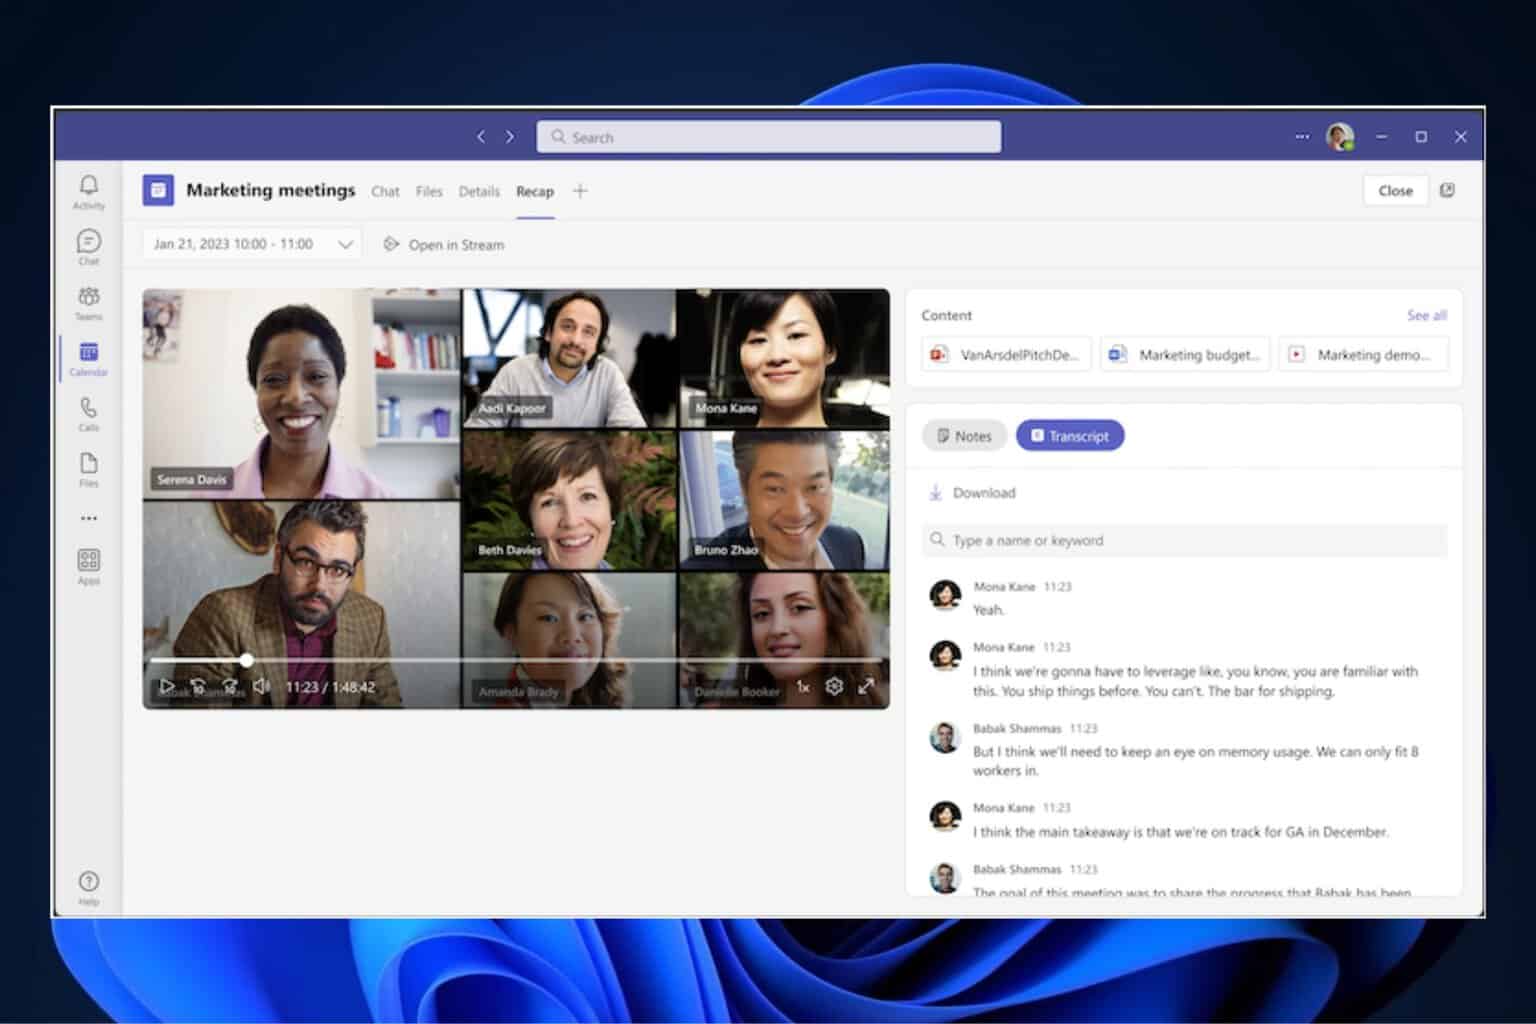
Thanks to a new enhancement set to be introduced to the platform later this year, Teams’ meeting recaps, live captions, and transcriptions can be entirely disabled.
According to an entry to the Microsoft 365 Roadmap, the Redmond-based tech giant will expand the existing ‘Turn off copying or forwarding of meeting chat’ option to include the capabilities mentioned above as well.
The option will turn into ‘Turn off copying and forwarding of meeting chat, live captions, and transcript’ in the meetings’ settings, and admins can disable it to forbid participants from copying the meeting chat, live captions, or any insights generated by the intelligent meeting recap.
Here’s what the entry says:
We are expanding the existing ‘Turn off copying or forwarding of meeting chat’ control for meeting organizers to include live captions, transcription, and meeting recap. With this change, meeting organizers with eligible licenses will see a control called ‘Turn off copying and forwarding of meeting chat, live captions, and transcript’ in the meeting options. When this control is enabled, meeting participants won’t be able to copy the meeting chat, live captions, live transcript, or any insights generated from intelligent meeting recap.
If you remember, last year, Microsoft Teams announced and released the AI-based Intelligent Meetings Recap capability, which allowed participants to quickly access a resume generated by AI based on the meeting that took place.
The resume includes the essential points of the meeting, a summary, recommended tasks and suggestions, and a timeframe for the conversation.
While disabling it is undoubtedly a pity for those seeking to access information more quickly; it’s also essential for security and privacy reasons. Participants in special or confidential meetings will not be able to access the information as easily.
PowerA has expanded its FUSION Line with two new controllers designed for gamers seeking an edge: the FUSION Pro Wireless Controller for Xbox Series X|S with Lumectra and the FUSION Pro 4 Wired Controller for Xbox Series X|S.
In a press release, the company says its first-ever FUSION Pro Wireless Controller for Xbox and PC provides an unparalleled gaming experience. It features stunning Ghost RGB LED lighting, intuitive customization options, pro-grade enhancements like Hall Effect thumbsticks and triggers, low-latency wireless connectivity, and four advanced mappable buttons.
Meanwhile, the FUSION Pro 4 Wired Controller offers a premium build with highly anticipated features such as Hall Effect thumbsticks and triggers and Dual Rumble Motors, all at a budget-friendly price.
Both controllers include the new patent-pending Quick-Twist adjustable-height thumbsticks, which allow gamers to adjust the height of either thumbstick with a simple twist. There is no need to manage removable parts.
The FUSION Pro Wireless Controller for Xbox Series X|S is available now from PowerA.com, Amazon, and major gaming accessory retailers. The FUSION Pro 4 Wired Controller will be available later this month for $69.99.
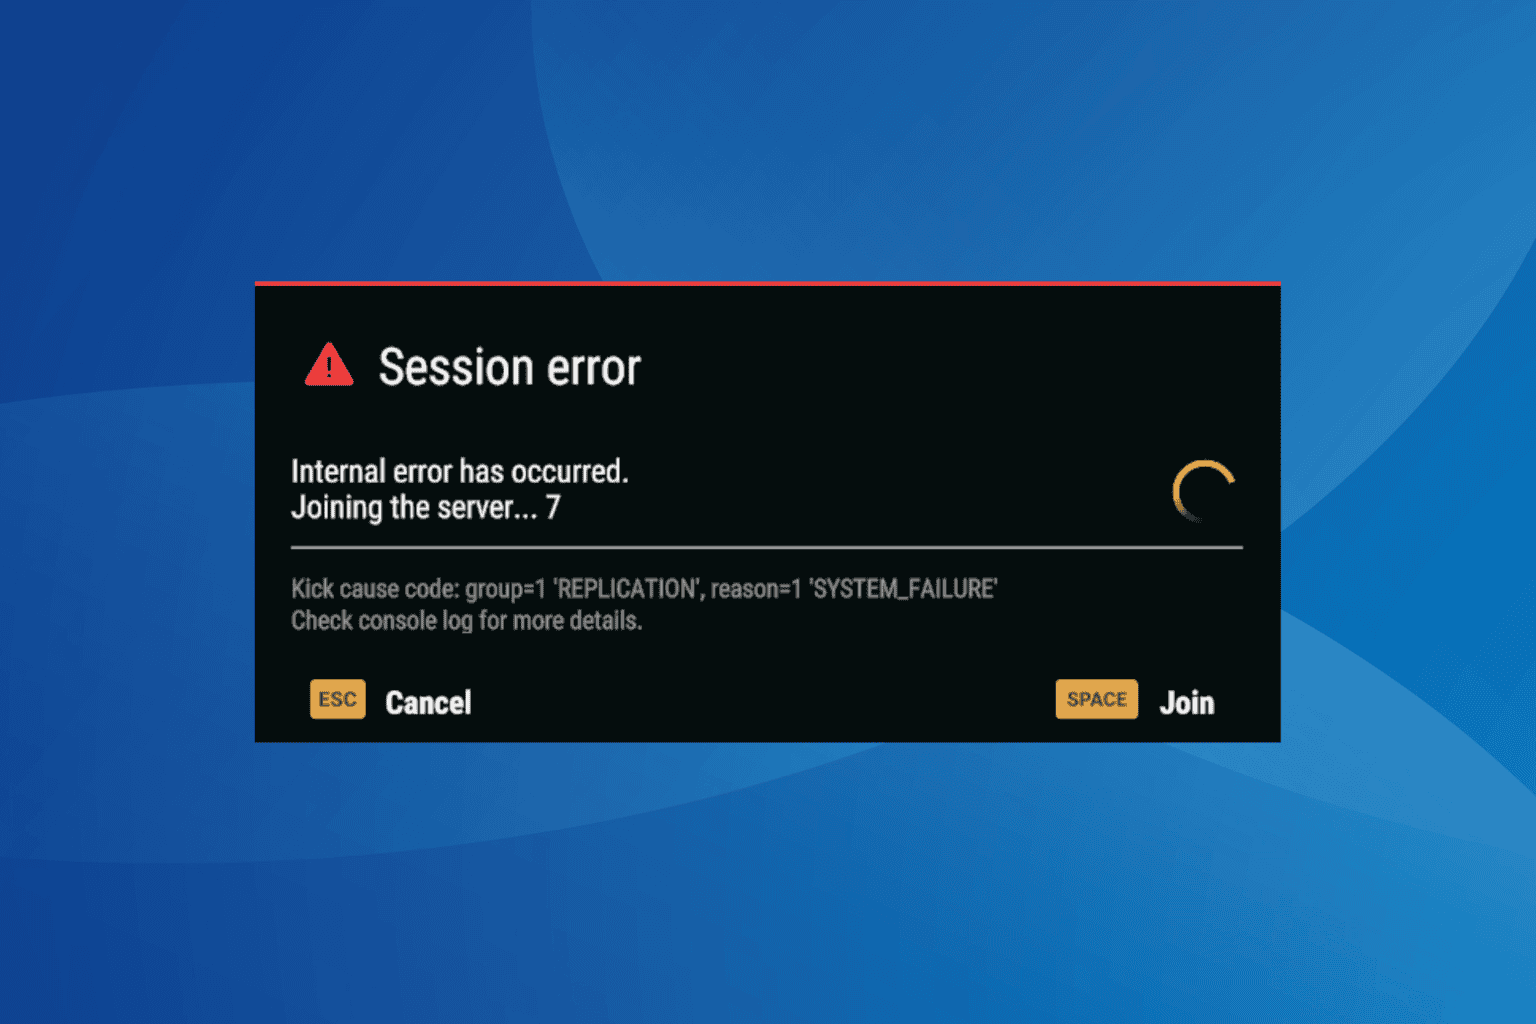
Often, when you try to join an Arma Reforger server, an Internal error has occurred message comes with, with Session error listed at the top. The reason stated in the error message says, Kick cause code: group=1 ‘REPLICATION’, reason=1 ‘SYSTEM_FAILURE’ Check console log for more details.
Causes for the Internal error include overloaded game servers, misconfigured network settings, conflicting mods, missing permissions, an outdated network driver, and an inactive BattlEye Service.
To fix things, try connecting to another server, disable any active VPNs, reboot the PC, and switch to Ethernet or mobile data via a hotspot. For most of you, these basic checks should fix Arma Reforger Internal Error on PC.
How can I fix Internal error has occurred in Arma Reforger?
Tip
While the solutions listed here are for a PC, equivalent steps will fix the Arma Reforger Internal Error on Xbox. Also, on the Xbox console, clear the accumulated cache and reset the network settings.
1. Use a VPN solution
The easiest fix for Arma Reforger Internal Error with multiplayer games is to use a top-rated VPN solution!
For example, a VPN like ExpressVPN will help bypass any localized or network-based issues, allowing you seamless access to the game’s servers.
This is a professional VPN service, with many servers you can choose from and very good connection speed which means you will be able to play Arma Reforger with no issues at all.
Right-click on the Arma Reforger launcher (.exe file), and select Properties.
Go to the Compatibility tab, and tick the checkbox for Run this program as an administrator.
Finally, click on Apply and OK to save the changes, then relaunch Arma Reforger and check for improvements.
3. Delete the installed mods/add-ons
In 3 out of 5 cases, it was the installed mods/add-ons to blame for the Internal error has occurred issue in Arma Reforger. Here you can follow two approaches:
Delete all the mods: Simply delete all the mods/add-ons before joining a server. Once in, you can reinstall them.
Identify the conflicting mod: Disable/uninstall all the mods, then enable them one at a time, and when the Internal error message reappears, the mod enabled last is triggering conflicts. You can now safely remove it.
4. Update the network drivers
Press Windows + X to open the Power User menu, and select Device Manager from the list of options.
Expand the Network adapters entry, right-click on the active adapter, and select Update driver.
Click on Search automatically for drivers and wait for Windows to install the best locally available version.
Finally, reboot the PC to apply the changes.
If you are getting the Arma Reforger Internal error on Windows due to issues with the network adapter, updating the network driver will do the trick!
Also, if Windows can’t automatically find a better version, head to the manufacturer’s website, search for the latest version, and then manually install the driver.
5. Set the BattlEye Service to automatic
Press Windows + R to open Run, type services.msc in the text field, and hit Enter.
Scroll down, right-click on the BattlEye Service entry, and select Properties.
Select Automatic from the Startup type dropdown menu, and if the service is not running, click on Start under Service status.
Finally, click on Apply and OK to save the changes, then relaunch Arma Forger and verify whether you are still receiving the Internal Error.
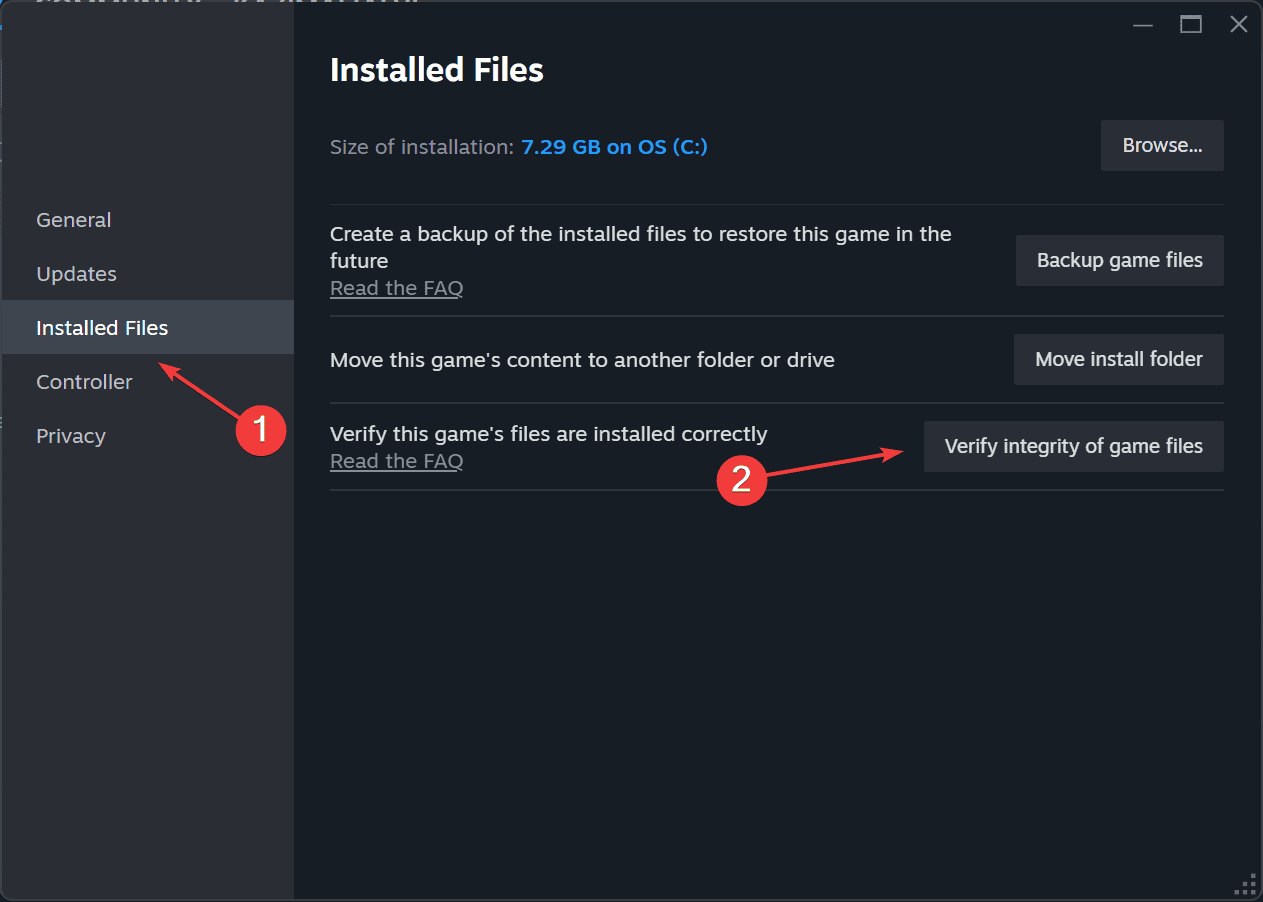
6. Verify the integrity of game files
Launch Steam, go to your game Library, right-click on Arma Reforger, and select Properties.
Go to the Installed Files tab, and click on Verify integrity of game files.
Finally, relaunch Arma Reforger and check for improvements.
7. Whitelist Arma Reforger in your firewall
Press Windows + S to open Search, type Allow an app through Windows Firewall, and click on the relevant result.
Click on Change settings.
Now, click on Allow another app at the bottom.
Click on Browse.
Head to the path where Arma Reforger’s launcher is stored, select it, and then click on Open.
Click on Add.
Now, make sure both the Private and Public checkboxes are ticked next to Arma Refoger’s launcher, and then click on OK to save the changes.
Finally, reboot the computer, then relaunch Arma Reforger, and you shouldn’t get the Internal error anymore.
If the firewall blocking is triggering Internal error in Arma Reforger, you will have to whitelist it in Windows Defender Firewall or any third-party firewall installed on the PC. Also, a few recommend opening up ports in the firewall, but you should avoid doing that, given the security implications!
Copilot Academy is an excellent tool for organizations because it provides insights about Copilot adoption within your organization, and it can gather feedback from your employees. Microsoft rolled it out for Viva customers earlier this year.
In our effort to enable more customers to upskill their Copilot capabilities, we are excited to announce the Microsoft Copilot Academy is now available to everyone with a Microsoft 365 Copilot license. This academy – curated by Microsoft experts – provides a comprehensive, structured learning experience designed to help users master the use of Copilot through hands-on learning activities and experiences.
The Microsoft Copilot Academy, accessible via Viva Learning, is available to users with an assigned base Microsoft 365 or Office 365 license and a Microsoft 365 Copilot license. The academy is accessible in the Viva Learning web app and the Viva Learning Teams app from the Academies dropdown navigation menu.
Microsoft Copilot Academy supports languages including English, French, German, Italian, Spanish, Portuguese, Japanese, and Chinese, and no registration or administrative action is required to start using the academy.
Additionally, the Redmond-based tech giant is set to release several features for Copilot Academy in the following months, such as the ability for admins to duplicate and customize It. This will allow admins to copy the default Copilot Academy, customize the content according to their needs (including removing and adding net-new content), and re-publish it to their organization as a customized academy.
Multi-layer structuring is another upcoming feature for the platform. The Copilot Academy can organize content and learning paths under multiple levels or tiers, allowing for greater control and structure in the Copilot Academy experience.
Below, you can see all the licences that have access to Copilot Academy:
SKU
Microsoft 365 E3
Office 365 E1
Microsoft 365 A3 – Unattended License for faculty
Microsoft 365 E5
Office 365 E2
Microsoft 365 A3 for faculty
Microsoft 365 E5 without Audio Conferencing
Office 365 E3
Microsoft 365 A5 for faculty
Microsoft 365 F1
Office 365 E5
Microsoft 365 A5 with Calling Minutes for Faculty
Microsoft 365 F3
Office 365 E5 without PSTN Conferencing
Microsoft 365 A5 without Audio Conferencing for faculty
Office 365 A1 for faculty
Office 365 Education E1 for Faculty
Microsoft 365 Business Basic
Office 365 A1 for faculty (for Device)
Office 365 Education E3 for Faculty
Microsoft 365 Business Basic – Prepaid Legacy
Office 365 A1 Plus for faculty
Office 365 Education for Homeschool for faculty
Microsoft 365 Business Premium
Office 365 A3 for faculty
Office 365 F2
Microsoft 365 Business Standard
Office 365 A5 for faculty
Office 365 F3
Microsoft 365 Business Standard – Prepaid Legacy
Office 365 A5 with Calling Minutes for Faculty
Office 365 G3
Office 365 A5 without Audio Conferencing for faculty
Are you using Copilot Dashboard or Academy? Let’s hear about your experience in the comments below.
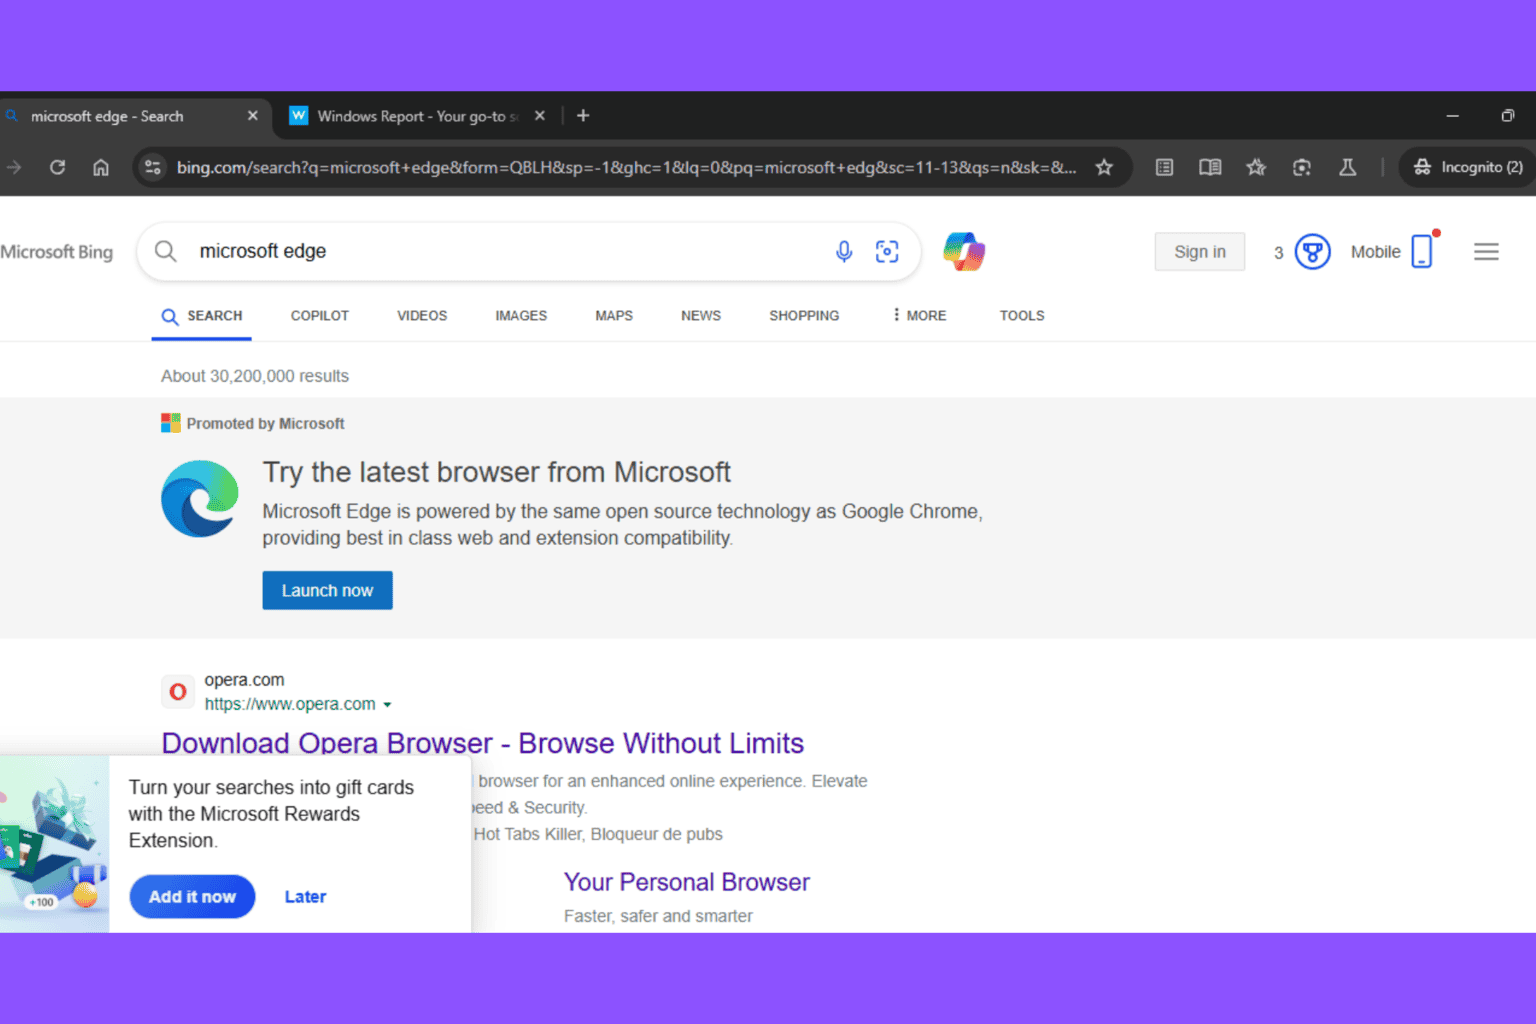
It seems there will be no end to Microsoft targeting Google Chrome users. Today, we noticed Bing was displaying ads for Microsoft Edge and Rewards Extension when searching for Microsoft Edge in Chrome incognito mode.
Microsoft owns Edge and Bing, while Google owns Chrome and Google Search. Google dominates the market in search engines and browsers, but Microsoft is catching up with Edge after switching to the Blink engine/Chromium.
You might have already known about Microsoft’s strong promotion of Edge when searching for Chrome on Bing. However, things seem to have gotten worse recently.
Bing shows Microsoft Edge and Reward Extension Ads in Chrome incognito Mode
Today, we noticed in Chrome Incognito mode that Microsoft Bing was showing Microsoft Edge promotions and prompting users to install the Microsoft Rewards extension, which allows you to turn your Bing searches into gift cards.
This is a serious privacy concern. Bing employing such practices raises questions about Microsoft’s commitment to user privacy.
Additionally, we noticed Edge’s private mode on Bing is also promoting Microsoft Edge when you search for Chrome.
Bing Promoting Microsoft Edge in Edge InPrivate Mode. Image Credit: WindowsReport.
While you might see Microsoft’s promotion of its products on Bing as a normal marketing tactic, targeting Chrome users in incognito mode significantly raises privacy concerns.
Incognito mode is designed to provide users a private browsing experience. The Microsoft Bing Search with Rewards extension, when enabled, can collect data about user browsing habits. This data can be used to personalize ads and potentially track user behavior. In incognito mode, users expect a higher level of privacy, and the promotion of the Rewards extension can compromise this expectation.
While Microsoft has a right to promote its services, it’s essential to do so in a way that respects user privacy. By actively promoting the Rewards extension and Microsoft Edge in Chrome incognito mode, Bing is crossing a line and potentially undermining user trust.
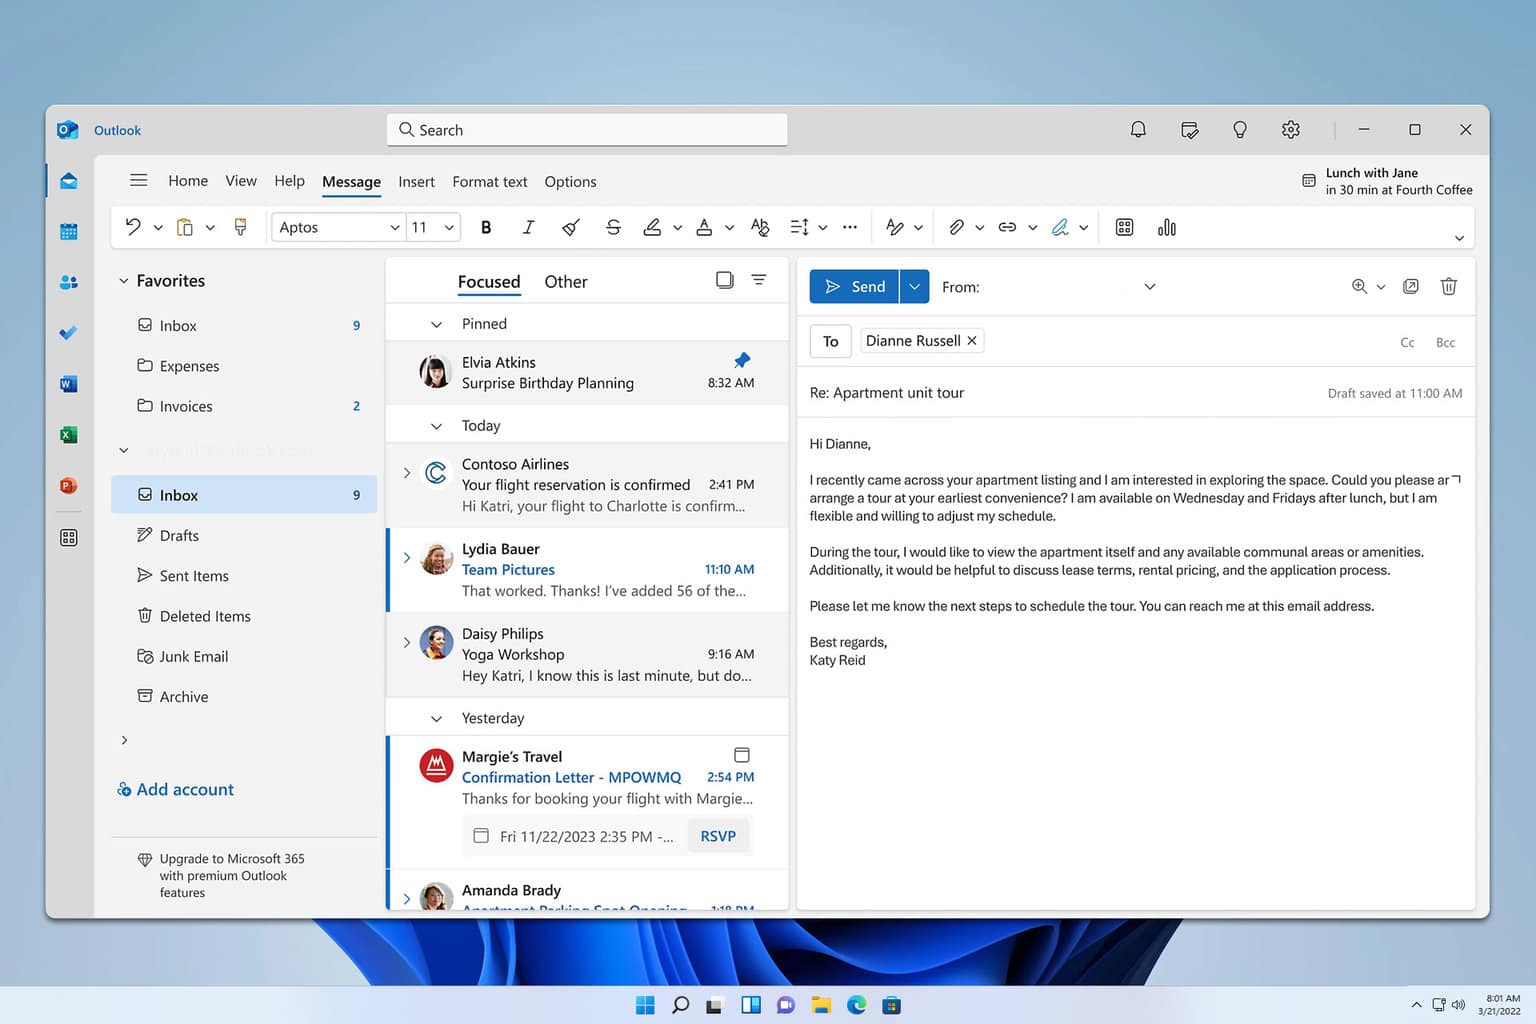
Outlook freezing when searching can be a real productivity killer. If you’re facing this issue, don’t worry—I’ve got some quick solutions to help you get back on track.
Why is Outlook not responding when searching?
This issue can appear due to installed add-ins or if your search index is out of date. A corrupted Outlook profile is also a common reason for this issue.
What can I do if Outlook is freezing when searching?
Before we start, make sure that both Windows and Outlook are up to date.
1. Start Outlook in Safe Mode
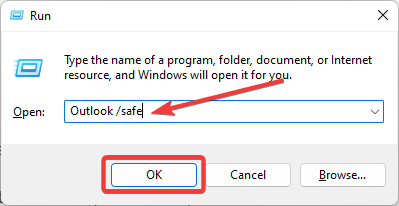
Press the Windows key + R to open the Run dialog.
Enter Outlook.exe /safe and press Enter.
If Outlook works fine in Safe Mode, go to File, then Options, and select Add-ins.
At the bottom, where it says Manage, select COM Add-ins and click Go.
Uncheck all add-ins and click OK. Restart Outlook normally.
Running Outlook in Safe Mode disables add-ins, which can help identify if they are causing the issue. Disabling problematic add-ins can resolve crashes.
2. Repair Outlook Data Files (PST/OST)
Make sure Outlook is not running.
Navigate to the location of ScanPST.exe, usually found in C:\Program Files (x86)\Microsoft Office\root\OfficeXX
Click Browse and select your PST or OST file to scan, usually found in C:\Users\[Your Username]\AppData\Local\Microsoft\Outlook
Click Start. If errors are found, you will be prompted to start the repair process.
Click the Repair button and wait for the process to complete.
This task can also be accomplished with the help of professional repair software. A tool like IOLO System Mechanic is able to quickly scan your computer and deploy the right fix for any issue it identifies.
IOLO System Mechanic
Scan your PC and repair corrupted files in a matter of moments with System Mechanic.
Click the Start button, type Control Panel, and press Enter.
Click on Mail (Microsoft Outlook).
Click Show Profiles and then Add to create a new profile.
Enter a name for the new profile and click OK.
Follow the prompts to set up your email account within the new profile.
Set the new profile as the default and start Outlook.
5. Repair Office
Click on the Start button, type Control Panel, and press Enter.
Click on Uninstall a program under Programs.
Right-click on your Microsoft Office installation and choose Change.
Select the Online Repair option and click Repair. Follow the on-screen instructions.
If this doesn’t work, you’ll have to go and reinstall Office from scratch.
By following these steps, you should be able to resolve the issue of Outlook freezing when searching. This isn’t the only issue with searching, many reported that Outlook search is not showing recent emails.
Experiencing lag while typing in Microsoft Teams can be incredibly frustrating, especially during important meetings or chats. Luckily, there are several quick solutions you can try to improve performance and reduce lag.
How do I stop Microsoft Teams from lagging when typing?
Before we try anything else, ensure that you have the latest version of Microsoft Teams installed. You can also try disabling unnecessary applications if your CPU or memory usage is high.
1. Disable GPU hardware acceleration
Open Microsoft Teams.
Click on your profile picture in the top-right corner.
Select Settings from the dropdown menu.
Go to the General tab.
Uncheck the box next to Disable GPU hardware acceleration.
Instead of reinstalling, sometimes you just need to clear your system files to fix this and many other problems and the fastest and simplest way to do that is with the Iolo System Mechanic.
Iolo System Mechanic
If you’re experiencing slowdowns on your PC, scan it with System Mechanic to remove any potential problems.
Seamless collaboration and communication are essential to maximizing efficacy and productivity, especially when businesses continue to adapt hybrid and remote work models. Therefore, tools like Microsoft Teams Rooms Pro are needed to help companies embrace hybrid meetings and collaboration. In this guide, we will discuss the features, benefits, and price plans of Microsoft Teams Rooms Pro to help you make an informed decision.
What is Microsoft Teams Rooms Pro?
Microsoft Teams Rooms integrates Microsoft Teams into meeting spaces and lets you join Teams meetings with basic video and audio equipment.
However, Microsoft has developed a new advanced meeting room solution, Microsoft Teams Rooms Pro. Together with the existing Teams Rooms feature, this brings advanced features such as enhanced audio and video quality, AI-powered functionalities, advanced management tools, and Teams Rooms Pro Management platform all in one license.
It is designed to improve the collaboration experience in conference rooms of all sizes, ensuring that each meeting is productive and engaging regardless of the participants’ location.
What features are available or coming to the Teams Rooms Pro?
1. Intelligent video and audio
Microsoft has combined high-quality audio and video from Microsoft Teams-certified devices to ensure every participant is seen and heard clearly. It now offers video layout options like front row, noise suppression, and bandwidth optimization. You also get features like remote PTZ controls, chat and Loop components, focused security, management, and hybrid optimization.
It also comes with advanced camera functions, which leverage AI to make remote participants feel like they are in the same room. This level of clarity reduces misunderstandings in a remote setup, ensuring productive and focused meetings.
2. Better engagement
With features like wirelessly sharing content, sending live reactions, and raising hands coming to Microsoft Teams Rooms Pro, remote attendees can easily establish their presence in a meeting.
Now, with the classic video grid layout, all the in-room participants will be aware of the conversation during the meeting to ensure no one misses everything.
3. Better monitoring, security and management
Microsoft Teams Rooms Pro has new AI-enhanced essential enterprise-grade management security and monitoring features to streamline meeting room operations.
Proactive monitoring, access control, remote configuration, automated alerts and diagnostics, device health signals, performance analytics, incident creation, and integration with popular IT service management (ITSM) help the IT teams ensure smooth operations and a better collaboration environment.
4. Powerful collaboration
Microsoft Teams Rooms Pro has advanced tools to make collaboration possible in every meeting. Microsoft Whiteboard provides a digital canvas for brainstorming and annotating ideas in real time and Microsoft Surface Hub 2S enhances the experience with a large interactive touchscreen that supports multi-user engagement.
Moreover, the intelligent capture of an analog whiteboard allows team members to share conventional whiteboard content during team meetings.
5. Simple to use
To simplify the meeting experience, Teams Rooms Pro comes with easy-to-navigate touchscreens and effortless meeting controls. This ensures the attendees are comfortable using the tool and reduces the need for extensive training.
Furthermore, Microsoft Teams Rooms Pro is designed to work seamlessly with Microsoft Teams, allowing you to schedule, join, and manage meetings right from the Teams interface. Features like one-touch join and meeting controls make managing meetings more effortless than ever.
6. AI-powered features
Teams Rooms Pro comes with real-time translation and meeting insights, which helps enhance the overall meeting experience. You can get automatic transcription and translation of spoken language and actionable insights to assist in better decision-making.
7. Flexible meeting room configuration
Whether you want a small huddle room or a large conference space, Teams Rooms Pro provides you with flexible configurations that fit your preferences. The system can adapt to various room sizes and layouts, catering to your growing business needs.
How can I get started with Microsoft Teams Rooms Pro?
Microsoft Teams Rooms Pro costs $40.00 per month, but you can use the trial version if you have a work or school account and a credit card.
To avail of the offer, visit the Microsoft Teams Rooms Pro website and click Try for free. Once the free trial is over, you will be charged the applicable subscription fee.
If you want to get Microsoft Teams Rooms Pro, ensure you hire a professional for easier implementation, integration with your existing Microsoft Teams environment, and optimization of meeting spaces.
What are your thoughts on this new advanced version of Microsoft Teams Rooms? Feel free to mention this in the comments section below.
Your Microsoft Surface pen is your trusted companion when you’re on your Surface device so you need to know how to charge it properly so that it never runs out of juice.
Charging it ensures your pen is performing at its best. A fully charged pen has precision and your productivity is enhanced because you’re able to take advantage of all its features and your workflow is not interrupted by a lagging pen.
How do I charge my Microsoft Surface Pen?
1.By using the Surface studio in the charging area
Locate the charging studio on your Surface device.
Check for the magnetic strip on your Surface pen and place it next to the charging studio. It should should snap immediately.
You should see an LED light indicating your pen is in charging mode.
2. By using the Surface keyboard
Locate the designated charging slot on your Surface keyboard.
Place your Microsoft Surface pen in the slot and ensure it is aligned.
You should see an LED light indicating your pen is in charging mode.
3. By using the pen charger
Examine your Microsoft Surface pen for a charging port. This will usually be a small opening either at the end or top of your pen.
Plug your pen charger to a power source and connect the other end to your pen. Only use recommended USB power cables.
You should see an LED light indicating your pen is in charging mode.
4. By using the Surface Pen Cover
Examine your Microsoft Surface pen for a magnetic strip.
On the pen cover, look for the corresponding magnetic area and snap it to your pen.
You should see an LED light indicating your pen is in charging mode.
If your Microsoft Surface pen uses a rechargeable battery, all you have to do is replace them with new ones. It should be indicated whether its battery is removeable. If so, hold the pen firmly, twist it until you hear a click sound to access the battery compartment and replace with the new one.
Ensure you’re using good quality batteries that won’t ruin your Surface pen. We have great recommendations for rechargeable batteries you can use. And to get the most out of your batteries, switch off the Surface pen whenever you’re not using it and keep it away from extreme temperatures.
Best practices for battery management
If your Surface pen is not working as it should by lagging or frequent freezing, it’s a sign that it needs to be recharged.
Conserve your Surface pen’s charge by switching it off when not in use. Also remember to remove your Surface pen once it is fully charged. The LED indicator should go off when done.
Set up notifications on your Surface device to get prompts when your Surface pen needs to be recharged.
Keep in mind that while all these methods can get your Surface pen charged, compatibility also matters. If the pen did not come with your Surface device, chances are that they won’t work together.
What is your preferred charging method for your Surface pen and why? Let us know in the comment section below.
Getting locked out of a multiplayer session while playing Space Marine 2 is no fun so if you spot the error code 140, you can’t join in the fun but there’s a way around it.
How do I fix the Space Marine 2 error code 140?
1. Sync time
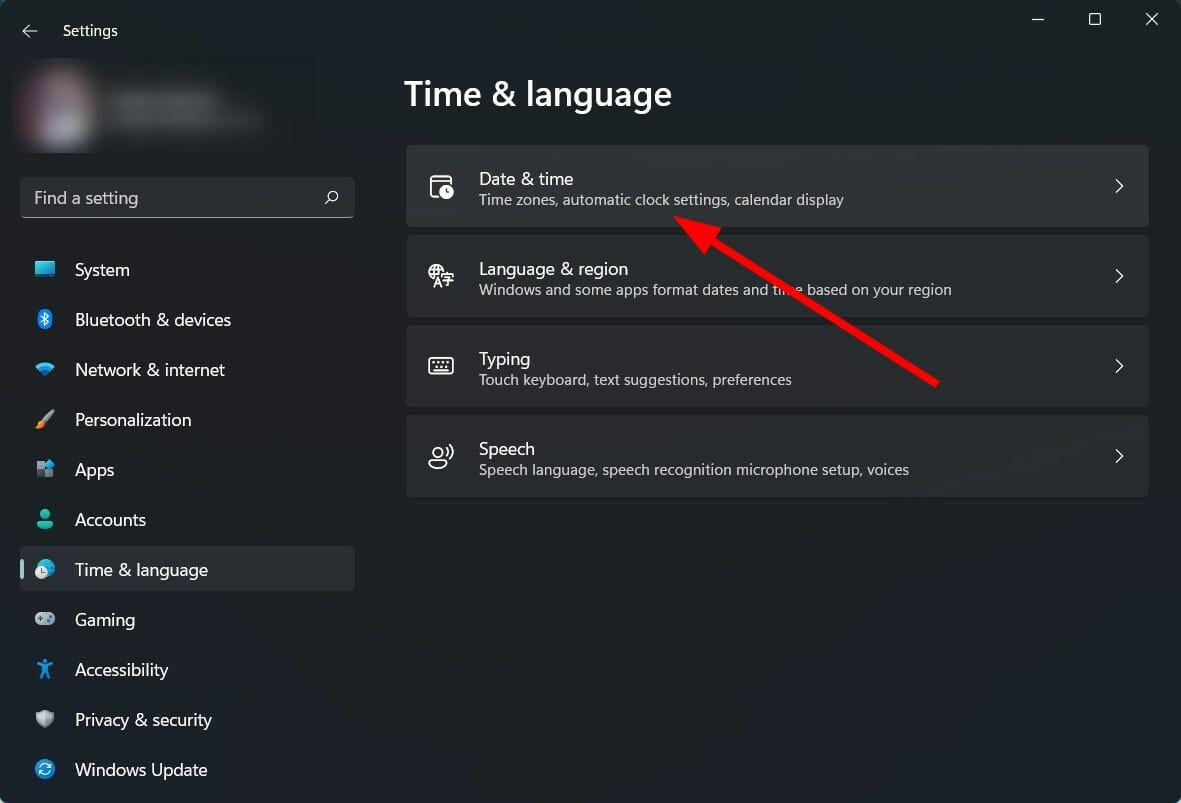
Press the Win + I buttons to open Settings.
Click on Time & language.
Select Date & time.
Scroll down and under Additional settings, hit the Sync now button.
The tick will appear confirming that your PC has updated and synced the time. Also ensure the set time zone automatically toggle is on.
2. Disable the Steam Overlay
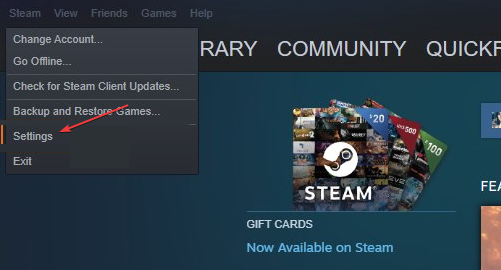
Left-click the Start button, type Steam in the search bar, and launch it.
Click the Steam tab and select Settings.
Hit on In-Game, then uncheck the box next to Enable the Steam Overlay while in-game.
Click OK to save your changes.
Restart the game client and check if the issue persists.
3. Verify the game files
Press the Windows key, then type epic and select Epic Launcher to launch it.
Go to Library, then click three dots next to Fortnite.
Select Manage from the context menu.
Next, locate the Verify File option, then click the Verify button. This will check and repair the corrupted or missing game files.
4. Reset TCP/IP
Press the Windows key, type cmd in the search bar, and click Open.
Type in the following commands and press Enter after each one: netsh winsock reset catalognetsh int ipv4 reset reset.lognetsh int ipv6 reset reset.log
Now restart your PC and see if the error is still there.
Head over to the Settings app using the Windows + I shortcut.
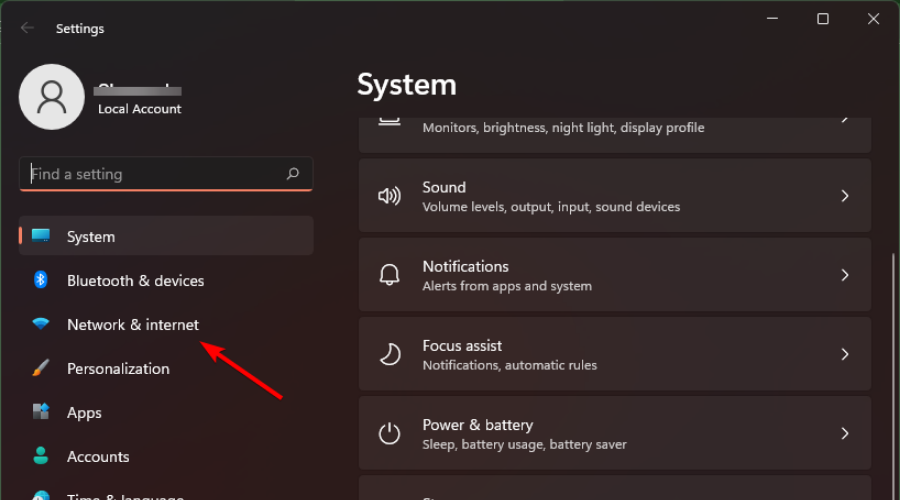
Select Network & internet from the left sidebar.
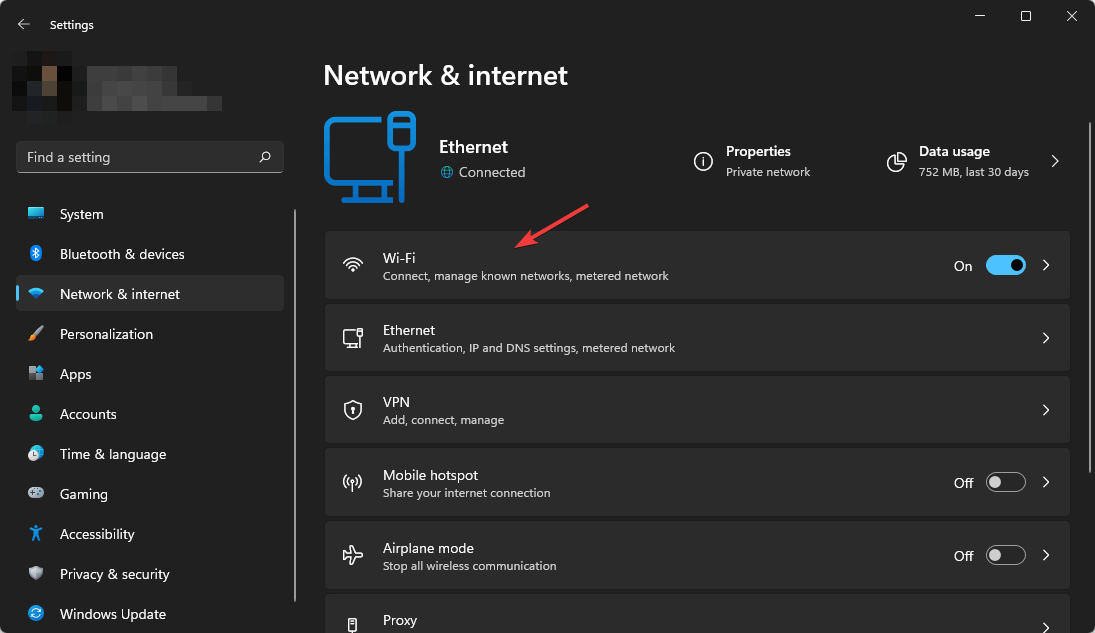
Next, choose Wi-Fi or Ethernet from the right section, depending on your internet connection.
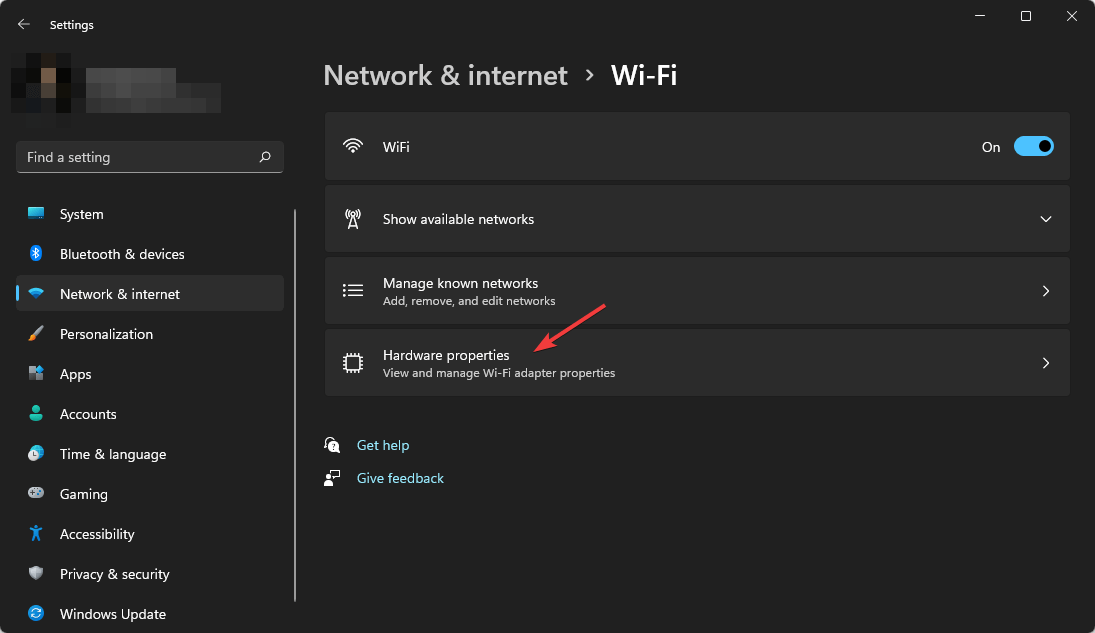
Scroll down and select Hardware properties.
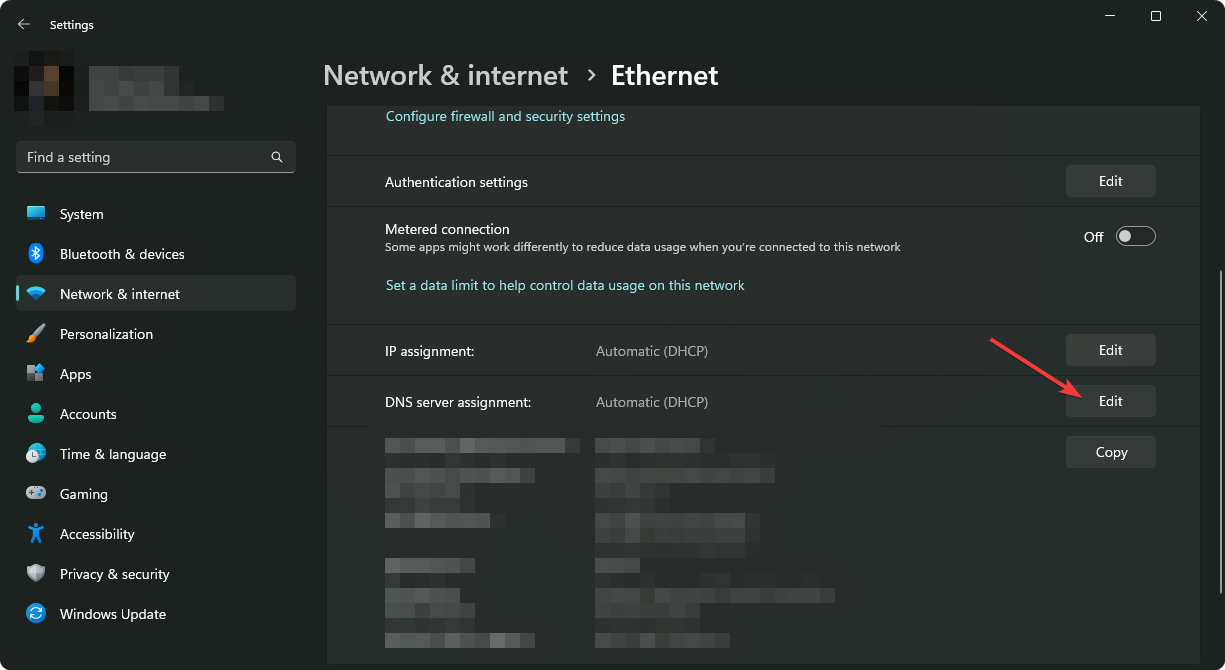
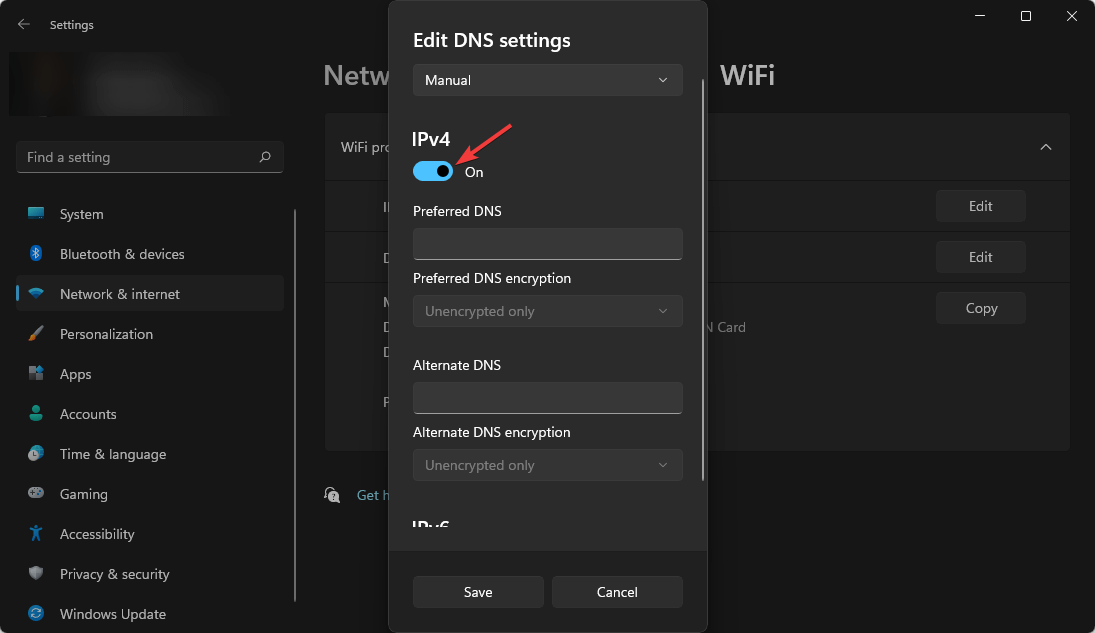
Locate the DNS server assignment setting and click the Edit button next to it.
This will open the Edit DNS settings popup. Here, expand the drop-down on the top and choose Manual instead of Automatic (DHCP).
Next, enable the toggle for either IPv4 or IPv6, based on the IP connection type.
Now provide the primary DNS server address in the Preferred DNS field followed by a secondary DNS server address in the Alternate DNS field. (For instance, 8.8.8.8 is the preferred DNS address, and 8.8.4.4 alternative DNS address for Google’s DNS server).
If you wish to enable the DNS over HTTPS feature to encrypt DNS requests, choose Encrypted only (DNS over HTTPS) for both Preferred DNS Encryption and Alternate DNS Encryption dropdowns.
Press the Save button once you are done with the changes.
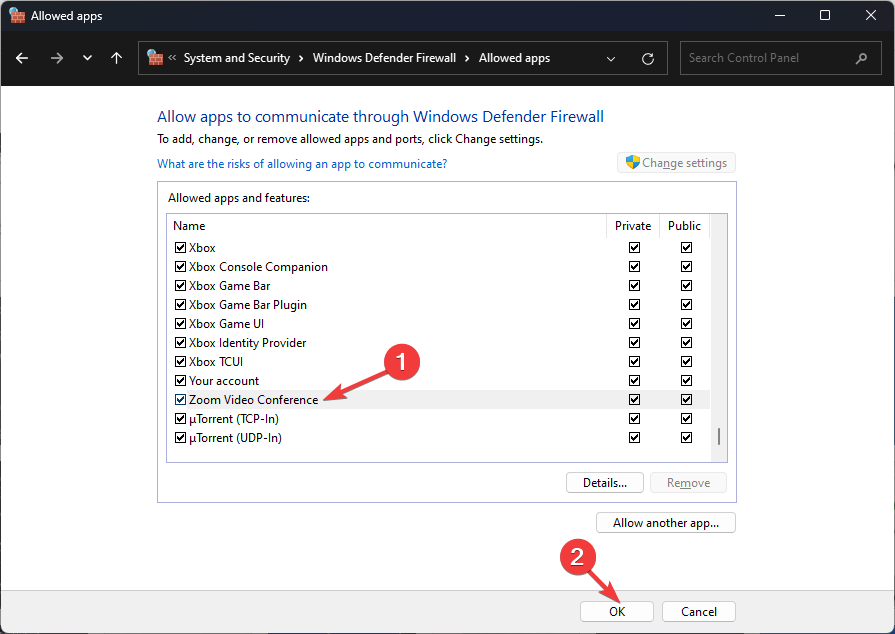
6. Add Space Marine to the Firewall exception list
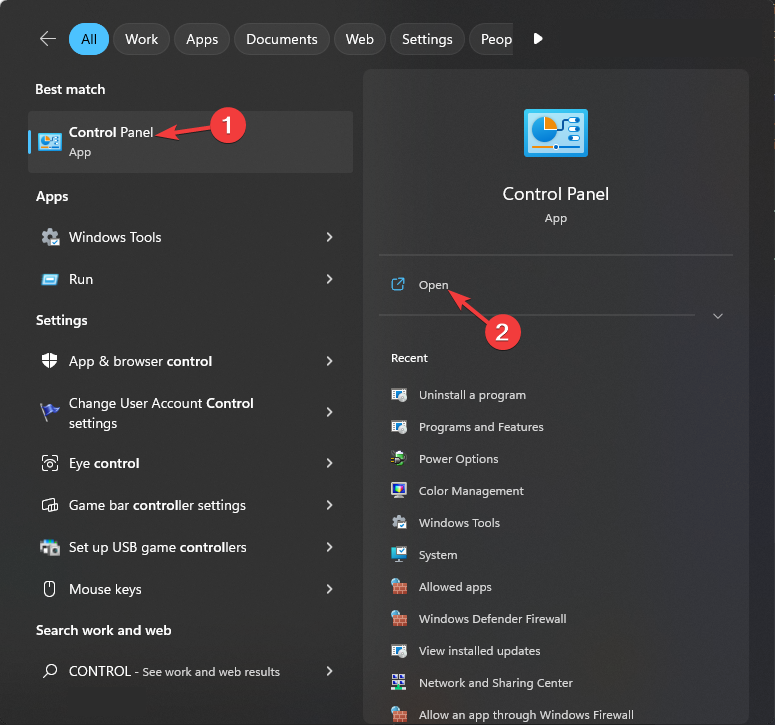
Press the Windows key, type control panel, and click Open.
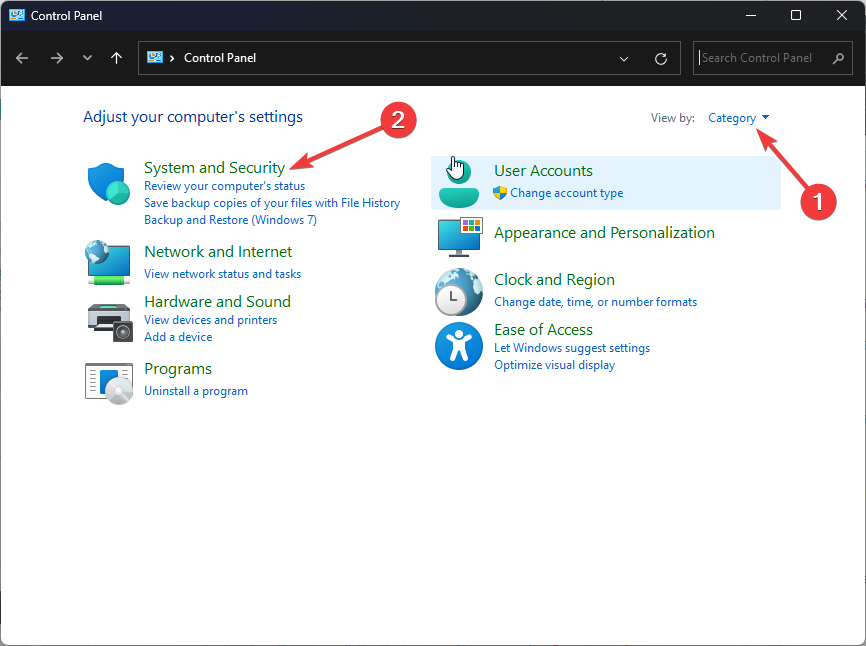
Select View by as Category and click System & Security.
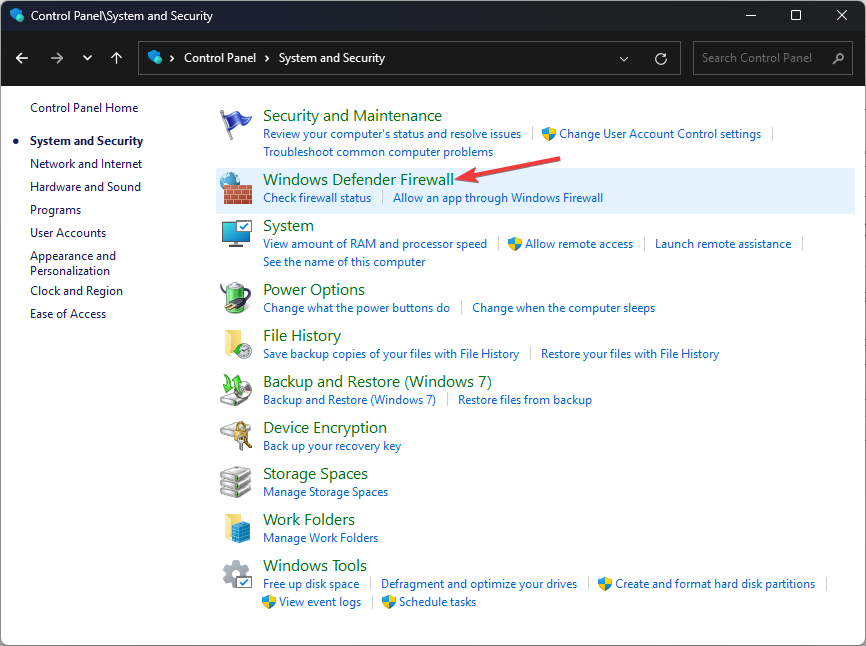
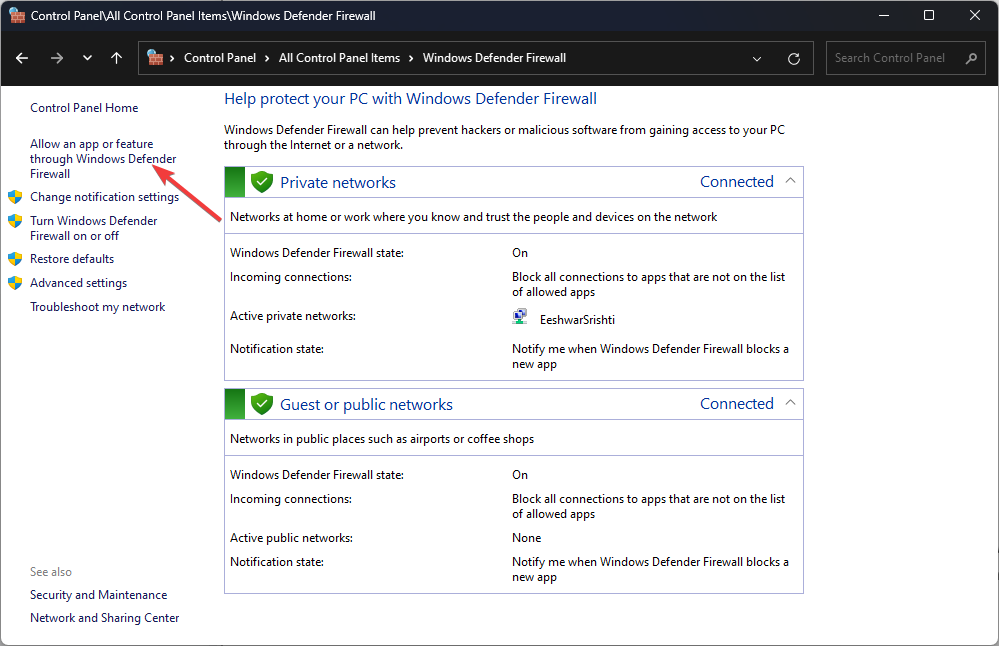
Click Windows Defender Firewall.
Now click Allow an app or feature through Windows Defender Firewall.
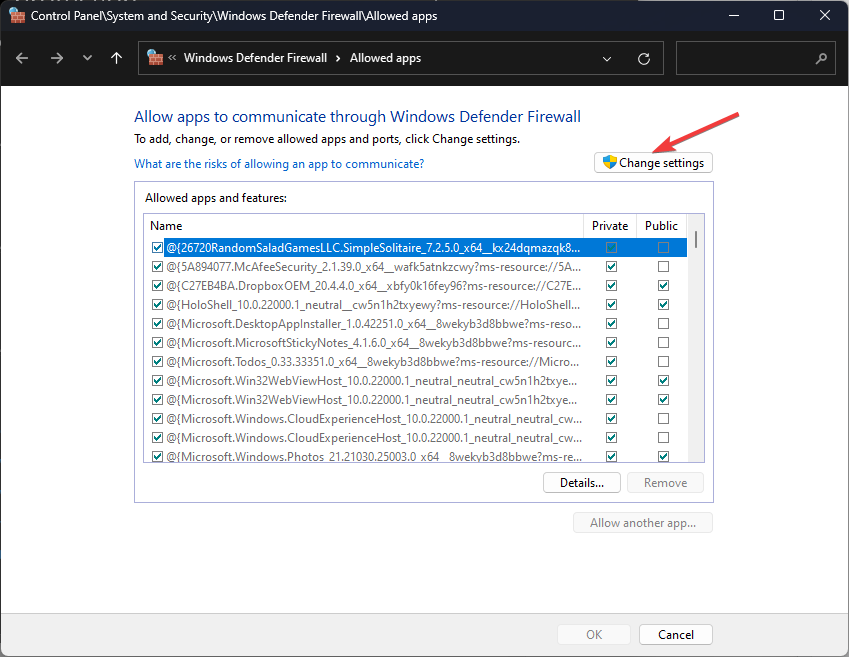
Click Change settings.
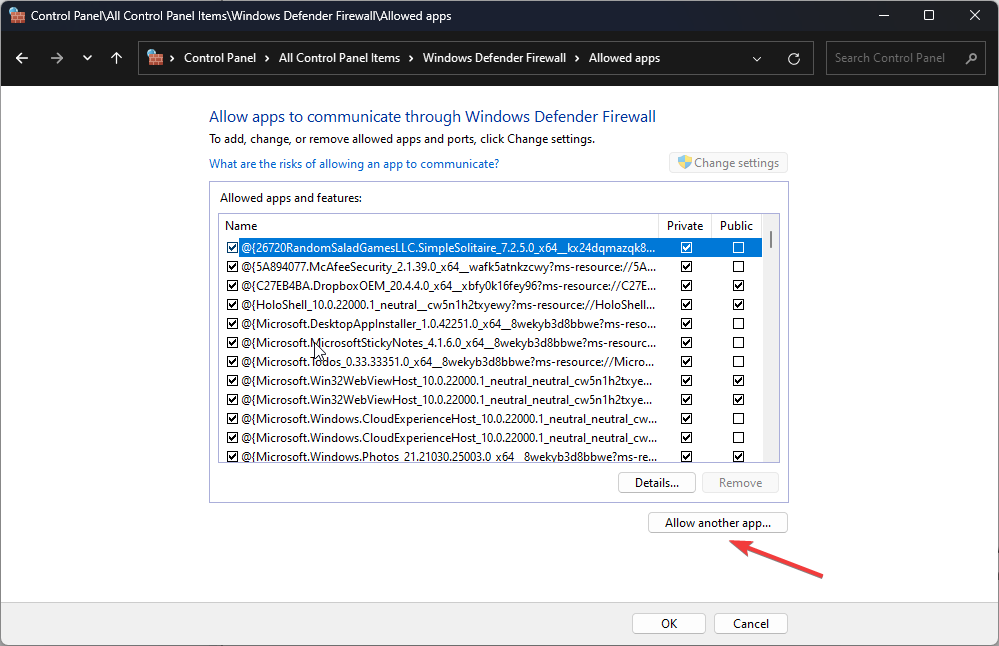
Select Allow another app.
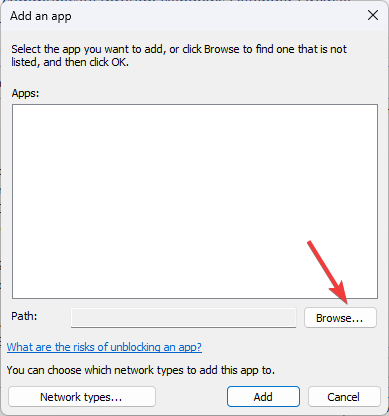
Click the Browse option and select Space Marine.
Next, click the Add option.
Make sure for the Private and Public options are select
Click OK to close the window.
7. Disable crossplay
7.1 PS5
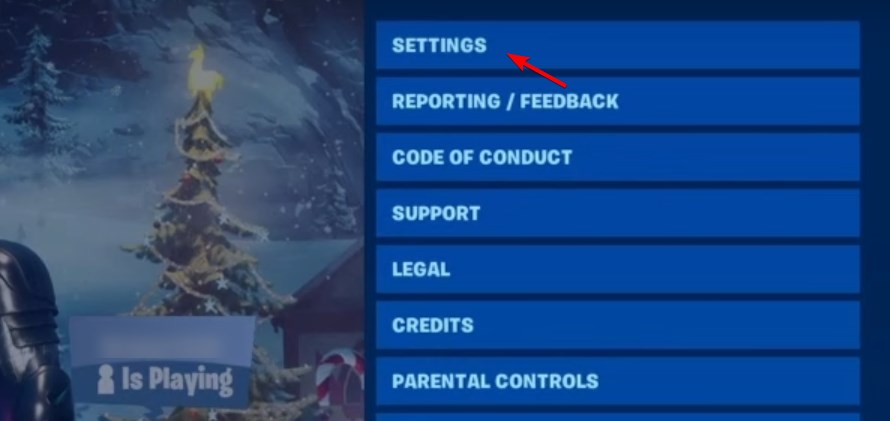
Open the Options menu and choose Settings.
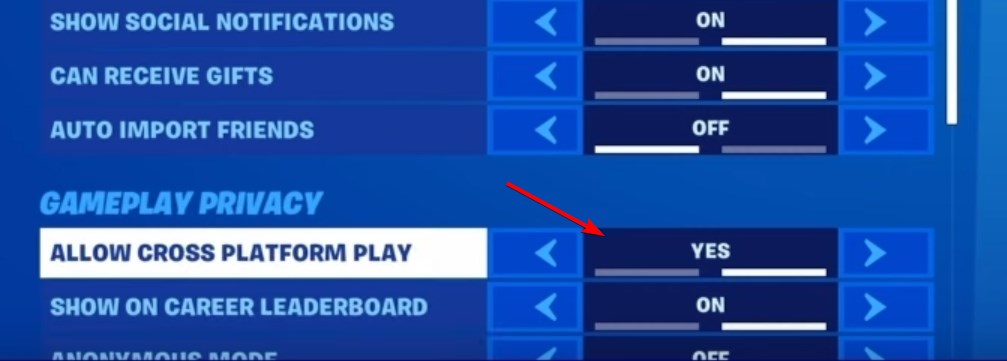
Locate Allow cross platform play and set it to No.
After making this change, try to matchmake again.
7.2 Xbox
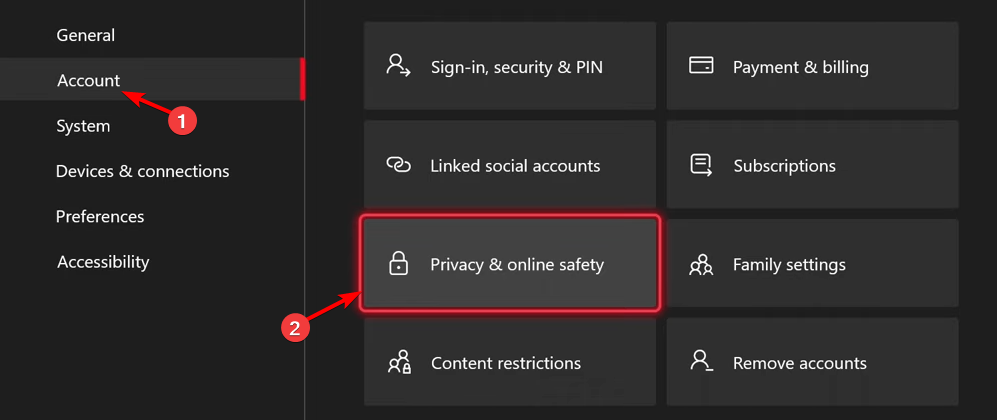
Press the Xbox button and go to Settings.
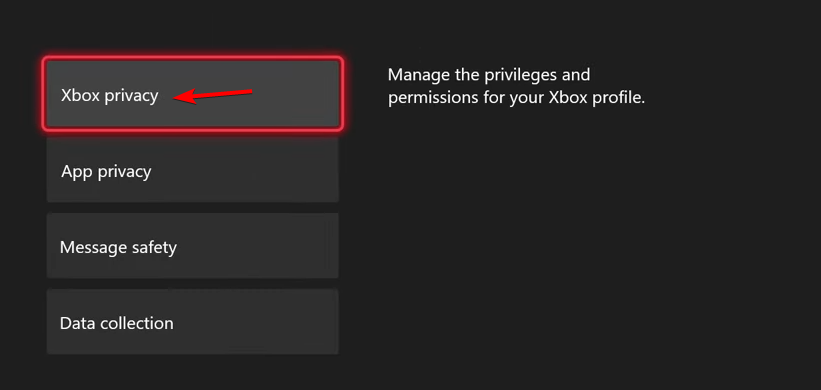
Navigate to Account and select Privacy & online safety.
Next, go to Xbox privacy.
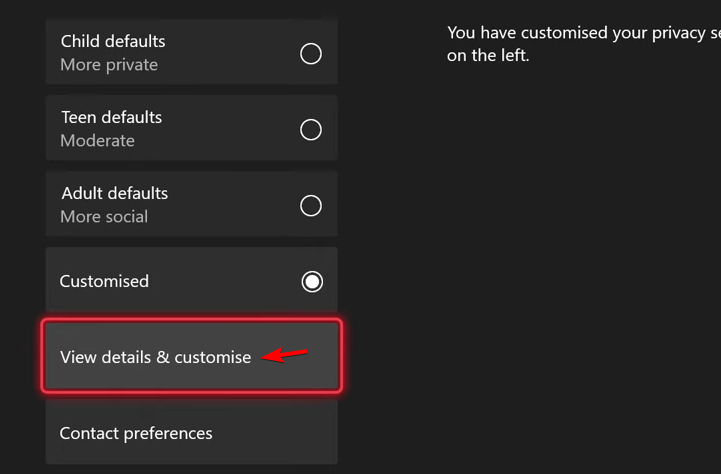
After that, select View details & customise.
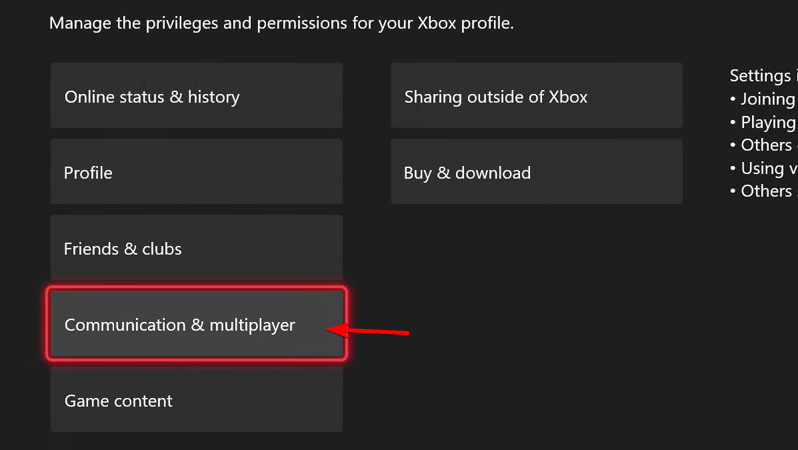
Head over to Communication & multiplayer.
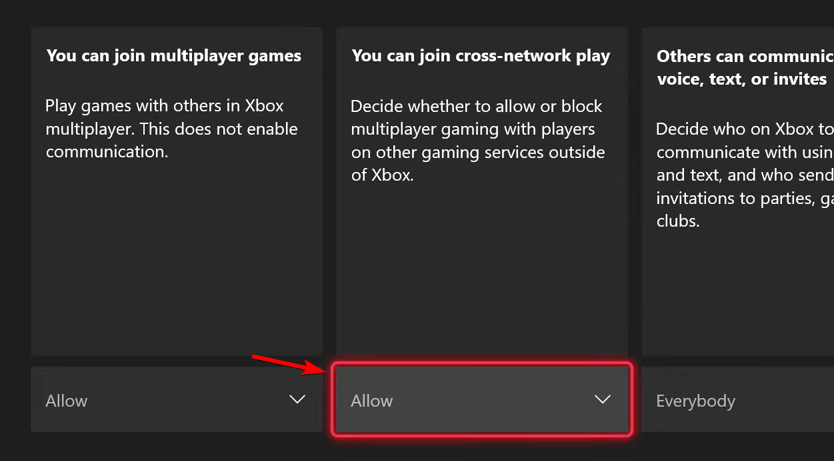
Set You can join cross-network play to Block.
Save changes, go back to the game, and test if it works.
8. Use a VPN
Press the Windows key and select Settings.
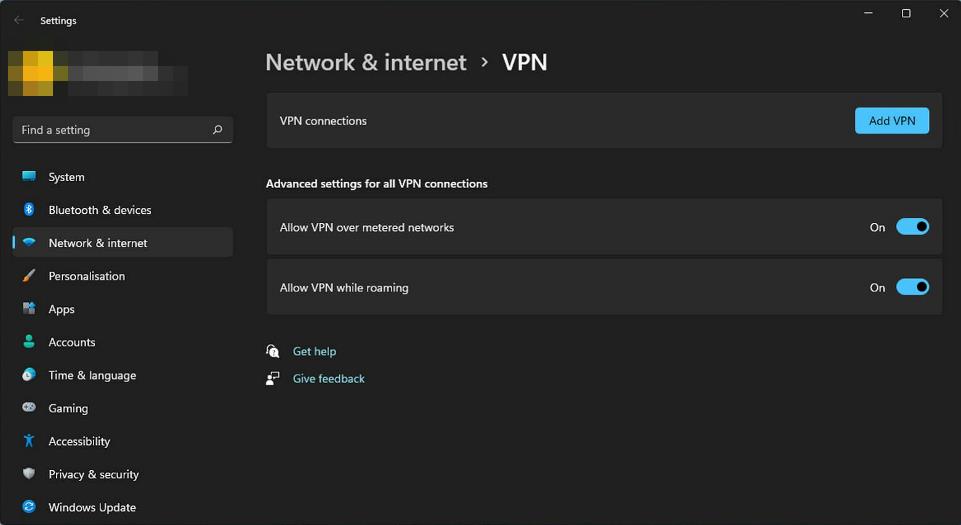
Next, select Network & internet and click on VPN in the right-side menu.
Click on Add VPN and follow the prompts to enable it.
Try logging in again and see if the issue persists.
Alternatively, you can employ the help of specialized VPN software, such as ExpressVPN. This tool can bypass any network restriction and offer you a smooth connection to any game server.
If you’ve tried all of the above and verified the server status is active, contact the Space Marine 2 customer care support. Unfortunately, this is not the only Space Marine network error you might encounter but lucky for you, we’ve addressed most of them.
Being locked out of joining a multiplayer game is more common than we’d like to admit as Fortnite diehards also reported error 6 where they were unable to join matchmaking. To prevent such issues, check whether it is your Xbox experiencing multiplayer issues.
That’s a wrap from us but do let us know if you’ve regained access and if so, which solution did it for you. Drop us a line below.
Many users want to know whether it’s possible to use iCloud passwords on Firefox on Windows, and the answer is yes, so in today’s guide, we’ll show you how to set it up.
Can you use iCloud passwords on Firefox?
Yes, this is possible, and all you need is a special third-party extension.
How can I use iCloud passwords on Firefox for Windows?
Yes, you can access them on both Edge and Chrome by downloading the extension from iCloud for Windows.
Is the iCloud password for Windows safe?
If you use official extensions for Chrome or Edge, they should be perfectly safe since they are developed by Apple.
Firefox doesn’t have an official extension, so you need to rely on third-party solutions. While these solutions might not be 100% secure, they are open-source projects so their code can be analyzed by the community for any suspicious activity.
Quick Assist is an inbuilt Windows remote assistance tool for receiving and providing technical or general help remotely. If you use Quick Assist often, you must know that you need to enter the app using administrator mode for troubleshooting purposes. In this guide, we will discuss different ways to access the app with elevated rights.
How can I access Quick Assist in administrator mode?
1. Using the Windows Search bar
Press the Windows key and type quick assist in the search box.
Select Quick Assist from the result and click Run as administrator.
You can also right-click Quick Assist and choose Run as administrator from the context menu.
2. Using the Task Manager
Press Ctrl + Shift +Esc to open Task Manager.
On the Task Manager window, locate and click Run new task.
In the Create new task window, type QuickAssist.exe and place a checkmark next to Create this task with administrative privileges, then click OK to launch Quick Assist in administrator mode.
3. Using a shortcut
Press Windows + R to open the Run dialog box.
Type in the path: shell:AppsFolder and click OK to open a window that contains apps installed from the Microsoft Store.
From the list of apps, look for Quick Assist. Right-click it and select Create a shortcut.
It will prompt you to create a shortcut on Desktop; click Yes to complete.
Once the shortcut is created, right-click it and select Run as administrator.
You can use any of these methods to launch Assist in administrator mode. Which method do you prefer, and how Quick Assist helps you troubleshoot issues? Share your thoughts with our readers in the comments section below.
Outlook will use Copilot to prioritize your emails. This means that high-priority emails in your inbox will be analyzed by the AI model and then summarized to provide a summary right when you open the email platform.
Microsoft announced this capability at the Copilot: Wave 2 event. It will automatically perform these tasks, so every time you open Outlook, you will be updated with the most important emails of the past or current day.
The Redmond-based tech giant says Copilot in Outlook can also be taught to remember specific topics, keywords, or people important to users, thus ensuring that those emails are marked as high priorities.
Prioritize my inbox by Copilot marks high priority mails in your inbox and provides a short summary of the mail’s importance in the message list and the reading pane. Mails can be sorted and filtered by Copilot’s priority. In Web and New Outlook for Windows, you can also choose to have Copilot mark low priority mails. #newoutlookforwindows
Microsoft plans to release a public preview of the capability in December 2024.
SharePoint will let admins compare their organization’s site with other sites for similar files, elements, and visuals by using AI. According to the entry to the Microsoft 365 Roadmap, this new capability will be previewed in October 2024, with a full rollout scheduled to happen the following month, in November 2024.
Admins will be able to use it to identify similar sites or study the competition, and the capability will provide them with a report that contains a percentage of how similar the sites are compared to the original.
The AI will also suggest recommendations and directions to follow in SharePoint to implement the same settings and policies to the original site and vice versa.
Secure sites by identifying sites with “similar files” and identifying different policies and settings. Admin now choose a site and compare the contents with ALL other sites. The report provides a percentage on how similar the contents of the sites are and then compares the settings. This helps admin to identify and administer same/similar settings and policies to similar sites all using the power of AI.
Interestingly, Microsoft doesn’t mention anything about Copilot, even though the capability is an AI-based one.
Speaking of the AI model, the week has already brought huge news for those using it. Microsoft introduced Copilot agents and Copilot pages, each with its own set of exciting capabilities.
For instance, Copilot agents can be built in-house and can be tailored to fit each company’s needs. On the other hand, Copilot pages will enhance collaboration and teamwork.
If you want to create a beautifully designed brochure, you don’t need to invest hours in it, you can use one of many available Microsoft Word brochure templates, but follow the steps from this guide.
Does Microsoft Word have a brochure template?
Yes, Microsoft Word does have brochure templates available, and you can easily download and start customizing them.
How can I use the Microsoft Word brochure template?
1. Use Word
Open Word and go to the New tab.
Type brochure in the search field and click the search icon.
After you download a brochure template, you can edit it as any other Word document using the available tools.
How do I make a pretty brochure in Word?
The fastest way to do that is by following the instructions from above and downloading a template. Alternatively, you can make yours from scratch, but it will take a bit more time.
As you can see, it’s pretty simple to get a flyer, pamphlet, or brochure template in Microsoft Word.
I’ve just installed KB5043076, and find that I’ve lost all network connectivity. My ethernet adapter shows good status and I have connected to wifi (which I typically don’t use at all), but seem to have lost all functioning network connectivity.
I also attempted to roll back the update through Windows Update -> Update history -> Uninstall updates but am left with “No internet access” on both the ethernet and wifi interfaces.
Any others seeing similar behaviors?
If you’ve installed KB5043076 and are experiencing Internet issues, you should know there is a workaround.
You’ll need to physically unplug your device from the network, remove the client profile from the Unifi OS, and reboot the network controller.
Your computer should be recognised again, and it can connect to the Internet.
Have you encountered this issue? Let us know if this solution worked for you.
Microsoft has made the Office LTSC 2024 release generally available as of September 16 for commercial and government volume customers. This release of Office is essentially a frozen-in-time version of Microsoft’s productivity suite for customers with specific scenarios that don’t require regular feature updates or cloud services.
In a blog post, Microsoft says Office LTSC 2024 includes a subset of features added to Microsoft 365 Apps over the past three years, such as dynamic charts and new array functions in Excel, enhancements to search and meeting creation in Outlook, and improved performance, security, and accessibility.
The company said that Office LTSC 2024 will be supported for five years under the Fixed Lifecycle Policy and can be deployed alongside Microsoft 365 Apps using a standard set of tools for organizations that need to manage hybrid environments.
Microsoft has published a series of resources to help customers get up and running with the new release, including a deployment guide and a plan comparison page that details the differences between Office LTSC 2024 and Microsoft 365 Apps for enterprise.
In addition to Office LTSC 2024, Microsoft is releasing new versions of Project LTSC and Visio LTSC for commercial and government customers today. The company says these new LTSC releases will be generally available to all customers on October 1.
While the release of Office LTSC 2024 doesn’t come as a huge surprise — the company previewed the software earlier this year — it’s worth noting that Microsoft has been urging customers to migrate to its cloud-based Microsoft 365 and Microsoft 365 Apps subscription offerings for years.
However, more than a few customers have yet to leap into a cloud subscription, and for their sake, Microsoft is still willing to churn out new versions of Office LTSC. The company said earlier this year that it’s working on Office LTSC releases for the next decade.
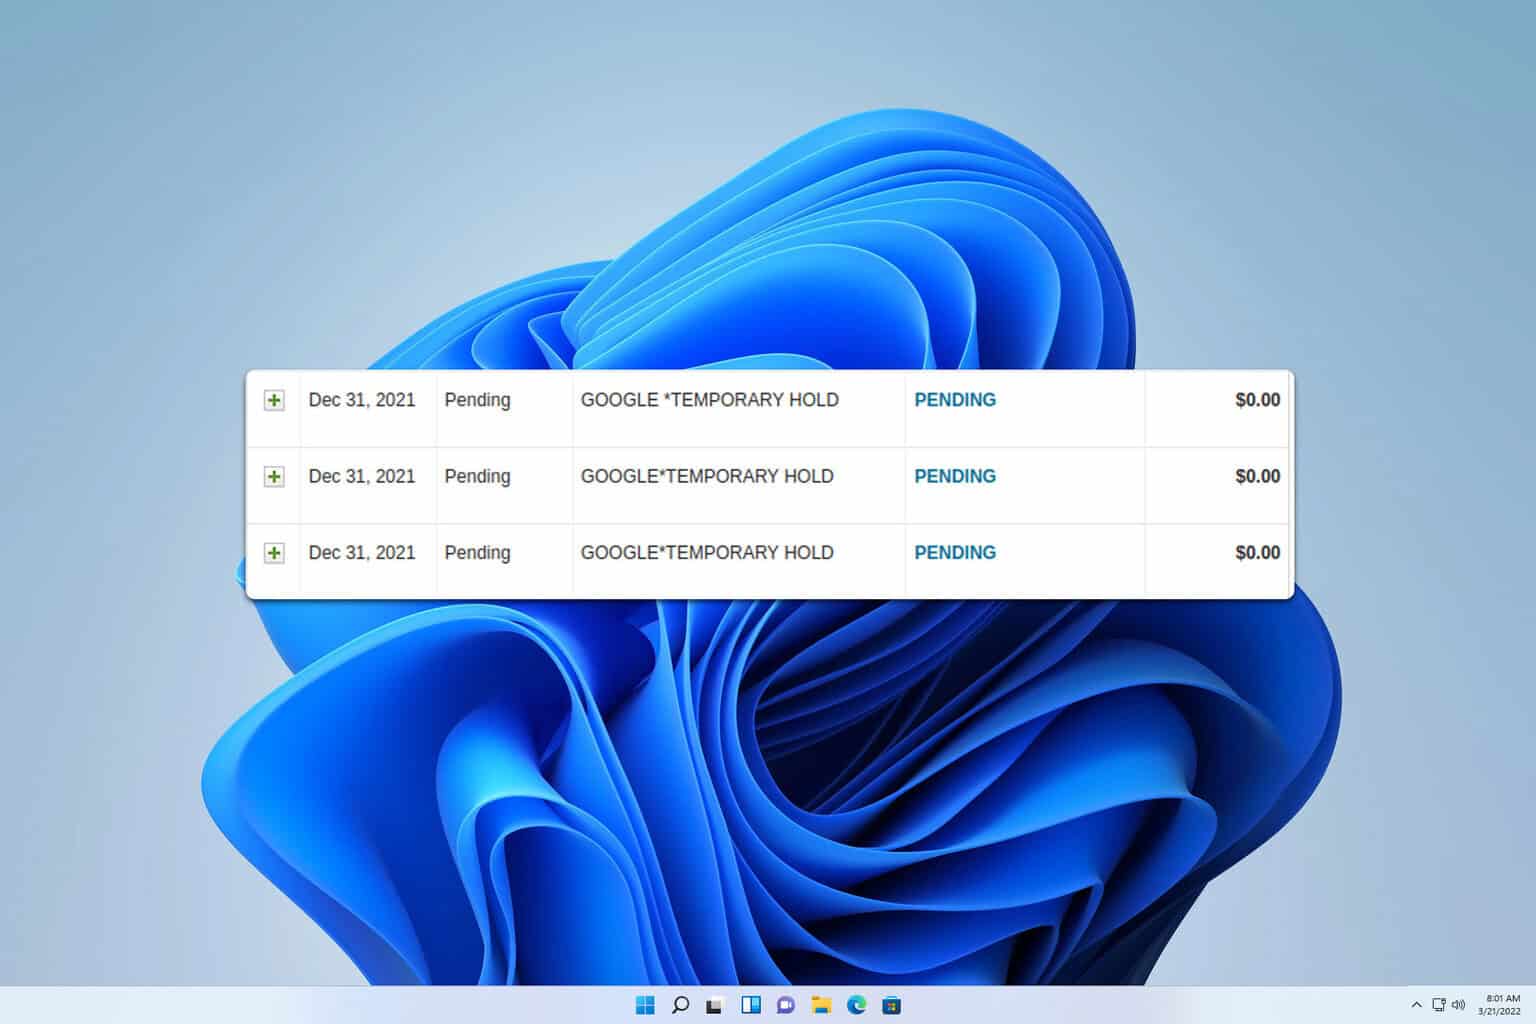
Many users reported a Google Chrome temp charge on their bank statements, and users are rightfully worried that this might be a scam or that their card might be compromised. If you’re one of those users, today we’ll explain to you what this is and why it appears.
What is Google Chrome temp charge?
What is the $1 temp charge on Google Chrome?
This temporary charge appears when you purchase through Google Chrome using the autofill feature. This is a pending charge that is used for card verification.
How do I remove Google temporary hold?
As stated earlier, this is a verification method for your card before a transaction. Once the transaction is completed, the hold will disappear.
How do I stop Google from charging my credit card?
There is no way to prevent Google from charging your credit card when buying Google services. The temporary hold is a safety feature and unless Google decides to disable it, you can’t avoid it.
How do I find out why Google is charging me?
Log in to your bank account.
Check your payments.
Payments that are from Google will have GOOGLE *(Service Name) as their name. You can find the list of all Google services that can charge you on this Google Pay page.
Pay close attention to the date of charges. If you don’t recognize them, contact Google for a refund.
As you can see, Google Chrome temp charge is a safety feature that verifies your card before making a purchase, and unless there’s a charge for a specific service that you don’t recognize, you shouldn’t be too alarmed about it.
The Python capabilities in Excel, released earlier this year (including a Python Editor within the platform) will be enhanced capabilities, as Microsoft announced Copilot in Excel with Python.
In a blog post, the Redmond-based tech giant says Copilot in Excel with Python is now in public preview. However, according to the latest entry in the Microsoft 365 Roadmap, it will start rolling out to users in November 2024.
With it, users will be able to use natural language to describe the actions they want to perform, and Copilot will automatically generate, explain, and insert Python code into the Excel spreadsheet.
Microsoft says the integration also unlocks powerful Python tools for visualizations, data cleaning, machine learning, and predictive analytics.
We’re announcing Copilot in Excel with Python, combining the power of Python—one of the world’s most popular programming languages for working with data—with Copilot in Excel. Now, anyone can work with Copilot to conduct advanced analysis like forecasting, risk analysis, machine learning, and visualizing complex data—all using natural language, no coding required. It’s like adding a skilled data analyst to the team. Copilot in Excel with Python is in public preview.
This has been a huge week for Copilot. On Monday, the Redmond-based tech giant announced Copilot Pages and Copilot agents, two new AI tools that can help companies thrive and enhance productivity worldwide.
Microsoft announced the launch of Copilot Pages, an AI-powered tool designed to help teams collaborate more effectively. The tool will initially be available to Microsoft 365 Copilot users but soon to all Microsoft 365 subscribers.
In a blog post, the tech giant says Copilot Pages are integrated into chats with AI, allowing users to turn suggestions from Copilot into a “persistent canvas” that they can edit and share with others.
Today we announced Copilot Pages, the first step in our new design system for knowledge work. Copilot Pages is a dynamic, persistent canvas in Copilot chat designed for multiplayer AI collaboration. With Pages, you can turn insightful Copilot responses into something durable with a side-by-side page that you can edit and, when ready, share with your team to collaborate.
When you receive a response you want to keep, you can click “Edit in Pages” to create a page with the response alongside your chat. You can continue chatting with Copilot in the same thread, and subsequent responses will also be added to the page.
Everything on the page is editable, and you can add a range of content types — like images, tables, and formatted text — by typing “/“ to bring up a menu.
You can share the page with others, and if your team has a Microsoft 365 Copilot license, you can view the page on the entire screen and chat with Copilot directly.
Microsoft says Copilot Pages are persistent, shareable, and highly collaborative. They can be edited and updated with new information and shared as a dynamic, collaborative element in your Teams chats and channels, Outlook emails and meetings, or in the Pages module in the Microsoft M365 app.
They start rolling out this week for Microsoft 365 Copilot customers.
In other news, this week has been huge for Copilot: the tech giant also announced the release of agents, custom AI models based on Copilot that can be tailored to fit any company’s needs and requests.
Microsoft has unveiled a new set of enterprise AI capabilities for its Microsoft 365 Copilot service. The company announced Copilot agents, a new feature in Microsoft Copilot Studio that lets users build, manage, and deploy AI agents to automate business processes.
Agents in Copilot Studio are designed to work with a business’s existing data and knowledge bases, whether in Microsoft 365, Azure, or third-party systems. Users can publish agents to Microsoft Teams, the web, or mobile apps, and agents can be shared across organizations.
Microsoft says it’s seen “incredible customer adoption” of Copilot Studio to date, pointing to over 50,000 organizations using the platform.
With the update to Copilot Studio, Copilot agents can now be published directly to Microsoft 365 Copilot. Agents appear in chat and search results in Microsoft 365 Copilot Business Chat, the Microsoft 365 app, and Microsoft Teams, and users can interact with agents via text or voice.
Microsoft is bringing a lighter-weight version of Copilot Studio to Microsoft 365 Copilot, the company’s conversational AI service for businesses. This version of the Copilot Studio interface will allow Microsoft 365 Copilot users to create agents from within Microsoft 365 Copilot Business Chat and SharePoint, with no coding or AI experience required.
The new, user-friendly Copilot Studio is available now in preview, and Microsoft says it will roll out to all customers over the coming weeks. Meanwhile, a store for agents created with Copilot Studio is now available to users in Microsoft 365 Copilot Business Chat, Teams, and the Microsoft 365 app, with access to the store controlled by IT admins.
Microsoft is also introducing a more sophisticated form of agent to Copilot Studio—autonomous agents. In preview, these agents can perform plans or tasks, learn from interactions with employees, and escalate to a human when necessary. Plus, Microsoft says that Copilot Studio users will soon be able to create agents that “ingest” data from knowledge sources, including databases and documents, rather than just knowledge in the form of prebuilt skills.
Microsoft Copilot Studio governance features are now generally available, while autonomous agents in preview are available to customers in the U.S. and Canada.
Microsoft is now rolling out Windows 10 22H2 Build 19045.4955, under KB5043131, to the Beta Channel and Release Preview Channel for Windows 10, version 22H2 Insiders. Both channels will receive identical builds, but Microsoft will experiment with new features not yet ready for all Windows 10 customers in the beta channel.
As you can see below, the update includes bug fixes for Windows Insiders in the Beta and Release Preview Channels.
KB5043131 fixed the Microsoft Entra single sign-on (SSO). This SSO notification, which the European Digital Markets Act (DMA) requires, pops up too frequently. This happens when you authenticate using a certificate.
The patch also fixed IE mode, as Microsoft Edge sometimes stopped responding when you used IE mode. The update updated COSA profiles for certain mobile operators, and it fixed a bug with Media playback, where playback of some media might stop when you use specific surround sound technology.
KB5043131 also fixes some File Explorer and Taskbar in Windows 10: Windows stops responding when you use apps like File Explorer and the Taskbar. Windows Update opt-in notifications now appear when you sign in.
It’s worth mentioning that KB5043131 is the first Insider build released in two weeks, which is quite unusual for the Windows Insider Program, which regularly releases weekly builds.
The Redmond-based tech giant decided earlier in the summer to resume Insider builds for Windows 10, an operating system with a little over a year left. However, if you plan to stay on it, just know you can officially extend it up to three years and unofficially up to 2030.
Incognito mode in Firefox can be rather useful, and if you want to quickly access it, today we’re going to tell you everything you need to know about the Firefox incognito shortcut.
How do I use the incognito shortcut in Firefox?
Is there a shortcut for Incognito?
Yes, there is, and you just need to press Ctrl + Shift + P to open the private browsing window in Firefox.
How do I create an incognito shortcut in Firefox?
Locate a Firefox shortcut on your Desktop. If you don’t have one, create it.
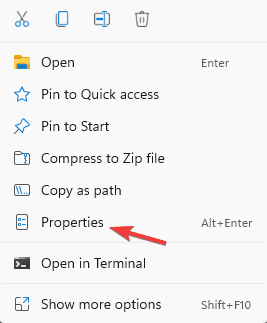
Next, right-click the shortcut and choose Properties.
Go to the Shortcut tab.
In the Target field add -private-window after quotes.
Save changes.
Now you can use this shortcut to always start Firefox in Private browsing mode.
Alternatively, you can always use the Firefox incognito hotkey for quick access.
How do I force incognito mode in Firefox?
Click the Menu icon and then select Settings.
Go to Privacy and Security and locate History.
Set Firefox willUse custom settings for history and check Always use a private browsing mode.
Restart your browser.
Once it restarts, Firefox won’t save your browsing history, cache, or logins, similar to the Private browsing mode.
As you can see, it is pretty simple to use or create your own Firefox incognito shortcut. If you want to learn more, we have a great guide on Chrome Incognito vs. Firefox private, so don’t miss it.
The ERROR_OUT_OF_STRUCTURES, also referred to as System Error 84, with error code 0x80070054, is usually encountered when running resource-intensive tasks. It’s seen with both built-in programs and third-party apps, including games, and the error message reads, 84 (0x54) Storage to process this request is not available. !
Causes for Error Out Of Structures include running low on resources, corrupt system files, malware infection, software conflicts, and memory leaks.
Before you begin troubleshooting, reboot the PC, install all pending Windows updates, and check the Event Viewer logs to identify the faulting components(s). If you find any, take the necessary measures.
How do I fix ERROR_OUT_OF_STRUCTURES error code 84?
1. Disable startup apps
Press Ctrl + Shift + Esc to open the Task Manager, and go to the Startup apps tab.
Individually select all non-critical apps that read Enabled under the Status column, and click on Disable.
Once done, reboot the PC and verify whether the ERROR_OUT_OF_STRUCTURES Windows error is fixed.
2. Repair the corrupted system files
Press Windows + S to open Search, type Command Prompt in the text field, and click on Run as administrator.
Click Yes in the UAC prompt.
Paste the following commands individually and hit Enter after each: DISM /Online /Cleanup-Image /CheckHealthDISM /Online /Cleanup-Image /ScanHealthDISM /Online /Cleanup-Image /RestoreHealth
Now, run this command for the SFC scan: sfc /scannow
Press Windows + S to open Search, type View advanced system settings, and click on the relevant result.
Click on Settings under Performance.
Go to the Advanced tab, and click on Change under Virtual memory.
Uncheck the Automatically manage paging file size for all drives option, select No paging file, and click on Set.
Choose Custom size and fill out the fields underneath using the following formula based on the available physical memory:
Initial size: 1.5 x Available Physical Memory x 1024
Maximum size: 3 x Available Physical Memory x 1024
For instance, if the physical RAM is 4 GB, the initial and maximum page file size become:
Initial size: 6144 (1.5 x 4 x 1024)
Maximum size: 12288 (3 x 4 x 1024)
Once done, click on Set and then on OK to save the changes.
If the PC is running low on resources, you can always increase the virtual memory, allowing Windows to free up the physical RAM and, subsequently, get rid of ERROR_OUT_OF_STRUCTURES.
4. Scan the PC for malware
Press Windows + S to open Search, type Windows Security in the text field, and click on the relevant result.
Click on Virus & threat protection.
Click on Scan options.
Select the Full scan entry and then click on Scan now.
Wait for the scan to complete. It usually takes between 15-30 minutes.
If Windows Security can’t detect any malware, I recommend using a top-rated antivirus solution to run advanced malware scans, eliminating even the most challenging threats.
5. Reinstall the affected program
Press Windows + R to open Run, type appwiz.cpl in the text field, and hit Enter.
Select the program that is throwing the system error, and click on Uninstall.
Follow the on-screen instructions to complete the process.
Reboot the PC, and then reinstall the application from an official source.
6. Check for memory leaks
If the PC is always running low on RAM and seems laggy, it could be a memory leak to blame. This also results in ERROR_OUT_OF_STRUCTURES!
So, to resolve the system error, you will have to first fix the memory leak in Windows. It’s usually caused by drivers, third-party programs, and malware.
7. Perform a system restore
Press Windows + R to open Run, type rstrui.exe in the text field, and hit Enter.
Select the Choose a different restore point option, and click on Next.
Pick a restore point created before the issue first appeared (or the oldest), and click on Next.
Verify the restore details and click on Finish to start the process.
Wait for the system restore to complete. It typically takes 15-45 minutes.
When nothing works, you can always perform a system restore to revert any recent misconfigurations in Windows. And if this, too, fails, the last option is to reinstall Windows. It will, in all likelihood, fix the ERROR_OUT_OF_STRUCTURES Windows system error!
For any queries or to share which solution worked for you, drop a comment below.
Safari is what Microsoft Edge is to Windows’ users so in the battle between a native browser and a dedicated browser, who wins in this Firefox vs Safari war? We laid out our findings now it’s up to you to pick your fighter.
Is it better to use Safari or Firefox?
Although both Firefox and Safari are cross platform browsers, their performance on each OS is not the same. For instance, Safari is built-in in iOS and mac devices hence optimized for that kind of hardware.
And while you can install Safari on Windows 11, the associated risks are far-reaching compared to the benefits. So, while each has its own benefits, you’ll have to consider the performance, compatibility, privacy and security as well as user experience when selecting your preferred browser.
Click the executable file to start the installation process.
Open the installation file previously downloaded, and click the Run button to start the installation.
Select the Next button on the Safari installer. It is possible to see the UAC (User Access Control) windows, so press the Yes button.
Accept the software agreement to continue with the installation, then click Next.
Select only the options you need and click Next.
Click on the Install button and wait for the process to finish.
Here you have it, Safari for Windows.
What are the differences between Firefox and Safari?
1. Privacy and security
Privacy and security is a major concern for users so which one are you safer with? Both browsers have strong privacy features, but if we’re concentrating on platforms, Firefox takes the crown.
Through its tracking protection feature, it blocks scripts from loading when you visit a site, which can make your browsing faster and more secure. You can also add another layer to secure your privacy by installing privacy extensions.
And while this is great for blocking unwanted ads, some elements on the page my not work properly.
Safari on the other hand also has a tracking feature and fingerprint protection which keeps off sites from from keeping up with your browsing habits and later come up with tailor-made ads. All these are great but only if you’re using Apple devices.
Windows users have to put up with a Safari version released over a decade ago that has since been deprecated.
You can still use it but it does not receive any updates so all these intelligent privacy and security features will not be available. in fact, your Windows device is at a higher security risk using Safari than Firefox.
2. Syncing
Syncing is a feature any power user will value because if you’re away from your desk, being able to log into any machine and access your bookmarks, history and extensions is undeniably a great convenience. Firefox, through Firefox Sync delivers this seamlessly.
The tip of the iceberg is it works on all devices. So whether you want to access your Firefox profile on a Windows or Apple device, you’re only a click away. Simply log into your Firefox profile and there, you have your library.
Apple through Safari also has syncing capabilities. iCloud is the main backup solution for these devices so you know when you log into your iPhone, you can still pick up from where you left on your Mac device.
With iCloud as the backup option, your data is encrypted so any unauthorized parties cannot access and steal your data.
Still, even with all the protection and privacy benefits, it fails because you cannot sync to a non-Apple device.
3. Performance and speed
When selecting a browser, nobody wants an extremely slow one that keeps crashing often. In the same breath, a resource-hogger is a no-no so which of the two will save your system resources while still offering you fast load time?
Safari has been built with efficient resource management in mind. If you’re browsing sites rich in multimedia content, you can rest assured that Apple will give you more watch time than Firefox.
Safari provides up to 1.5 hours of extra battery life when streaming videos but there’s a catch-only for Apple devices.
Firefox doesn’t exactly shine in the resource management department and its widely known as a memory-hogger but it has made significant progress.
Its quantum engine which is responsible for the visual representation when browsing has undergone several improvements making load times much faster and responsive.
Regular updates also tame the memory issue and is continuously focusing on maximizing performance while minimizing resource consumption.
Anyone will tell you that the naked browser isn’t as much fun as a customized browser. You get to decide what extensions to add, themes to select and many more. It may seem any browser allows you to tailor your preferences but not all browsers are customizable.
Lucky for you, Firefox excels in this area. You can customize your toolbar, change profile themes and add extensions, even from other browsers.
Unfortunately for Safari, customization is offered at the preserve of the developer. It is available but compared to Firefox, it’s like a drop in the ocean. You can change your theme, toolbar and interface but on a basic level. The options are greatly limited and may not match your preferences.
When it comes to the extension library, it is again limited. The extension library only contains basics so you only het what you need. If you’re looking to satisfy you wants, Firefox is where you’ll get juiced up.
5. User experience
The UI is something a lot of people struggle with because it’s how you interact with the browser. Every time you launch your browser, are you happy with the experience? How do you find navigating through the pages?
IF there’s any difficulty in these tasks, your user experience will be affected. Both Firefox and Safari offer a minimalistic design with basic features. It’s easy to navigate through the features without too many distractions.
For Firefox, you can easily change your interface to something you prefer. Playing with the themes can help you create a more appealing UI. Safari is stuck on the Apple design so unless you’re into basic and simple designs, this UI is what you’ll be stuck with.
Feature
Firefox
Safari
Cross platform
Windows, macOS, Linux, Android, iOS
macOS, iOS (Windows with limitations)
Speed
Fast with the Quantum engine
Fast on Apple devices
Resource management
Memory and CPU-hogger
Highly efficient and optimized with battery-saving capabilities
Customization Options
Extensive (themes, toolbar customization, user scripts)
Limited (themes, toolbar customization)
Syncing
Firefox Sync across all devices
iCloud Sync but only on Apple devices
Extensions
Wide extension support with a an extensive library
Limited extension support
Privacy features
Built-in Tracking Protection and Private Browsing
Intelligent Tracking
UI
Customizable and user-friendly
Limited customization options with basic design
Finally, when it comes to making a decision, your choice should be based on your ecosystem, needs and preferences. If you have an Apple device, it makes sense to use Safari to benefit from its integrated services.
For Windows users, Firefox will be better not only for its customization options but also its syncing capabilities.
Because there are so many browsers out there, this Firefox vs Safari cannot be conclusive on what you should settle for. And because we want you to make an informed decision, check out how Safari performs against Opera and Safari vs Opera GX.
That marks the end of our browser battle but we’d like you to keep the conversation going. Which browser do you think outperforms the other and why? Share your thoughts in the comment section below.
Recently we have reported Microsoft Edge will get a much better settings layout. Microsoft has officially mentioned this in the Microsoft 365 roadmap page and will roll out in October, next month. We have got hands on New Edge Settings in Canary, here is good, bad and what’s new about it.
To simplify settings navigation, Microsoft Edge is implementing three key improvements. The company claims it retained the existing settings structure but improved the accessibility with clickable sections.
The main settings page to feature shortcuts to frequently used actions. Densely populated pages like Privacy, Appearance, and System now offer quick access to their most common settings. Within these pages, sections can be expanded to reveal their sub-settings, similar to a table of contents.
In our testing, as you can see in the video and screenshots included in the article, Profiles, Sidebar, Start, home and new tabs, share, copy and Paste, Default browser, Downloads, Family Safety, Languages, Printers section settings, Reset Settings, Phone and other services, Accessibility and About Microsoft are untouched.
First look at new Microsoft Edge Settings layout: Easier navigation and quick access
As said by Microsoft in the Roadmap post, they made structural changes to Privacy, Search and Services, Appearance, System and Performance including Cookies and Site Permissions.
Privacy, Search, and Services include clickable sub-menus for Tracking Prevention, Clear browsing data, Privacy, Security, and Search and Connected experiences.
Microsoft Edge new Privacy, search and Services Settings. Image Credit:WindowsReport
Appearance Section changes bring Theme, Page Zoom, Touch mode, Toolbar, Context menus, Browser behavior and features, and Fonts optional sub-menus.
Microsoft Edge new Appearance Settings. Image credit:WindowsReport
Cookies and Site Data display Cookies and Site data and site Permissions with All sites, Recent Activity, and All permissions.
Microsoft Edge new Cookies and Site Permissions Settings. Image Credit:WindowsReport
System and Performance section will include System, Performance, and Developer tools sections. Clicking on each opens respective Settings.
Microsoft Edge new System and Performance Settings. Image Credit:WindowsReport
The restructured Edge Setting page may look nice but needs more clicks to reach respective options. Since, Microsoft confirmed they will roll out the new Settings layout in October, you need to accept and adapt to those changes whether you like them or not.
Microsoft released KB5043076 last week as part of the September 2024 Patch Tuesday updates for Windows 11. It’s a mandatory update. However, like any other Patch Tuesday update, this one has its fair share of issues.
Reportedly, Windows Update Standalone Installer will show KB5043076 up as installed, but the update history won’t show it that way, confusing many users.
Windows update keeps asking me to install 2024-09 Cumulative Update for Windows 11 Version 23H2 for x64-based Systems (KB5043076). I’ve tried three times and each time I get that “something didn’t go as planned” message. So now I went to the Windows Update Standalone Installer and ran the update from there. But when I do, it tells me that it’s already installed on the system! But it’s not (doesn’t show in update history either). How do I fix this?
Since the patch was only released last week, Microsoft hasn’t said anything about it yet, but there are some fixes you can try to solve the bug. To do so, install KB5043076 on your Windows 11.
1. Run Windows Update Troubleshooter
Go to Start > Settings > System > Troubleshoot > Other troubleshooter
Go to Windows Update > Run
Restart your device
After restarting your device, try to install KB5043076 on Windows 11 again by going to Start > Settings > Windows Update > Check for updates.
2. Fix Windows 11’s KB5043076 with Run
Open Run, and type: services.msc
Go to Background Intelligent Transfer Service
Click on Start on the Status panel, and then OK.
If the status is Running, right-click it, and then hit Restart.
You’ll have to scroll down to the same list and find Windows Update, and then repeat the same steps, as mentioned above.
3. Run an SFC and DISM scan
Open Command Prompt with admin rights.
Type in: DISM.exe /Online /Cleanup-image /Restorehealth
Let the scan proceed.
Then type in: sfc /scannow
After the process (it might take 10-30 minutes, depending on the device), restart your PC and try to download and install KB5043076 on your Windows 11 device.
4. Install KB5043076 in Windows 11 by resetting the Windows Update Components
Ultimately, you can also try to reset Windows Update Components, but this process is harder than the others and requires some technical knowledge to understand. Either way, if you want to try it, follow our comprehensive guide.
Let us know which of these solutions worked for you, and if you have any other recommendations, please share them below in the comments section.
OneDrive will be updated to display an item’s delete confirmation every time users are about to delete shared items. According to the latest entry in the Microsoft 365 Roadmap, the Redmond-based tech giant will be rolling out the new experience this month, and it won’t replace the existing mass delete experience.
Microsoft also says the new confirmations will only happen when files are deleted from File Explorer and when the user runs OneDrive without pausing.
We are shipping an items delete confirmation that will trigger when the user is about to delete shared items. This UI format will also replace the existing mass delete experience. These confirmations will occur when files are deleted from File Explorer when the user is running OneDrive and not paused.
This new capability is crucial because it can prevent accidental removal of essential files in Shared Documents. You’ll have to follow another step before removing them, which will prevent you from causing any accidents when managing such files.
In other news, OneDrive has been rated Teen on the ESRB Code, which is a bit weird, considering the rating system is only for video games.
Many reported Failed to get Minecraft access error transferring server while using third-party launchers, and this will prevent you from starting the game. However, a few solutions might help you fix this issue.
How can I fix Failed to get Minecraft access error transferring server?
Before we try anything else, try logging in to your Minecraft account on the official website. If possible, try using a hotspot or a different network. Few users reported that using a VPN can help, while others suggested that disabling a VPN helps.
1. Clear the metadata cache
Open Prism Launcher.
Now click the Help.
Select the option to clear the metadata cache.
Once cleared, log in again and check if the problem is gone.
2. Rename accounts.json file
Press the Windows key + R and type %appdata%. Click OK.
Next, navigate to the PrismLauncher folder.
Go to View in the menu bar, expand Show and select File name extensions.
Locate for accounts.json file. Rename it to accounts.bak.
Try to log in again.
If you’re unable to log in, change the accounts.bak back to accounts.json and try again.
3. Change your password
Log in to your Microsoft account on the Minecraft website.
Go to the Security tab.
Next, go to Two-Step Verification.
Click on Add a new way to sign in or verify.
Click on Enter Password and set a new password.
Lastly, try adding your Microsoft account to the launcher again.
The Warhammer 40,000: Space Marine 2 Error code 4 has become a common occurrence and prevents users from playing the newly released game, but there are few methods that can fix this problem.
How do I fix Space Marine 2 Error code 4?
Tip
Although the solutions listed below are for a Windows PC, equivalent measures will fix the Error code 4: Connection lost issue on any device, including Xbox and PS.
1. Sync the time
Press Windows + I to open Settings, go to Time & language from the left pane, and click on Date & time.
Click the Sync now button.
Once done, reboot the PC and then check for improvements.
Press Windows + R to open Run, type cmd, and hit Ctrl + Shift + Enter.
Click Yes in the UAC prompt.
Paste the following commands individually and hit Enter after reach: ipconfig /releaseipconfig /flushdnsipconfig /renewnetsh int ip resetnetsh winsock reset
Reboot the PC for the changes to come into effect.
For 3 out of 5 users, resetting the router did the trick when faced with Space Marine 2 Error code 4 on Xbox, PS, or PC. First, simply turn off the router, unplug it from the power source for a minute, then reconnect it and turn the router on.
If this doesn’t solve things, you will have to access the router’s interface/settings and reset the router to factory defaults.
7. Contact Space Marine 2’s support
When nothing else works, the last option is to contact Space Marine 2 support via the official website. You can also try some of the generic fixes listed there and check for improvements.
In my experience, the Space Marine 2 Error code 4 is usually a server-side problem, and any steps on your end will, in all likelihood, only temporarily resolve it. To completely eliminate the Connection Lost error, you will have to wait for a patch from the game’s developers.