IT admins will be able to block Copilot from making personal assessments about employees

Microsoft is set to introduce a new policy allowing IT admins to block Copilot from making personal assessments about people entirely in Teams meetings.

According to the latest entry to the Microsoft 365 Roadmap, the new policy will forbid Copilot to respond with outputs that might infer emotions, make evaluations, discuss personal traits, or use context to deduce answers.

When this policy is enabled, Copilot won’t be able to respond to users asking the AI models to evaluate people, and users cannot disable the policy. However, the policy is limited to Copilot in Teams meetings only.

Here’s what the entry says:

This policy enables IT admins to block Copilot responses that might infer emotions, make evaluations, discuss personal traits, and use context to deduce answers. When this setting is applied it restricts copilot’s ability to make inferences or evaluations about people or groups when prompted to do so by users. Users cannot disable this setting. The setting applies to Copilot in Teams meetings.

The policy will apply to all devices, from Teams on Desktop to iOS, Mac, and Android, and Microsoft will introduce it in October.

With it, the Redmond-based tech giant hopes to stop individuals from using Copilot in other ways to get work done. So you won’t be able to badmouth your coworkers with Copilot and expect the AI model to take your part. It won’t answer.

We may see how this policy works at the upcoming Microsoft 365: Copilot Wave 2, scheduled for next week.

What do you think about this new policy?

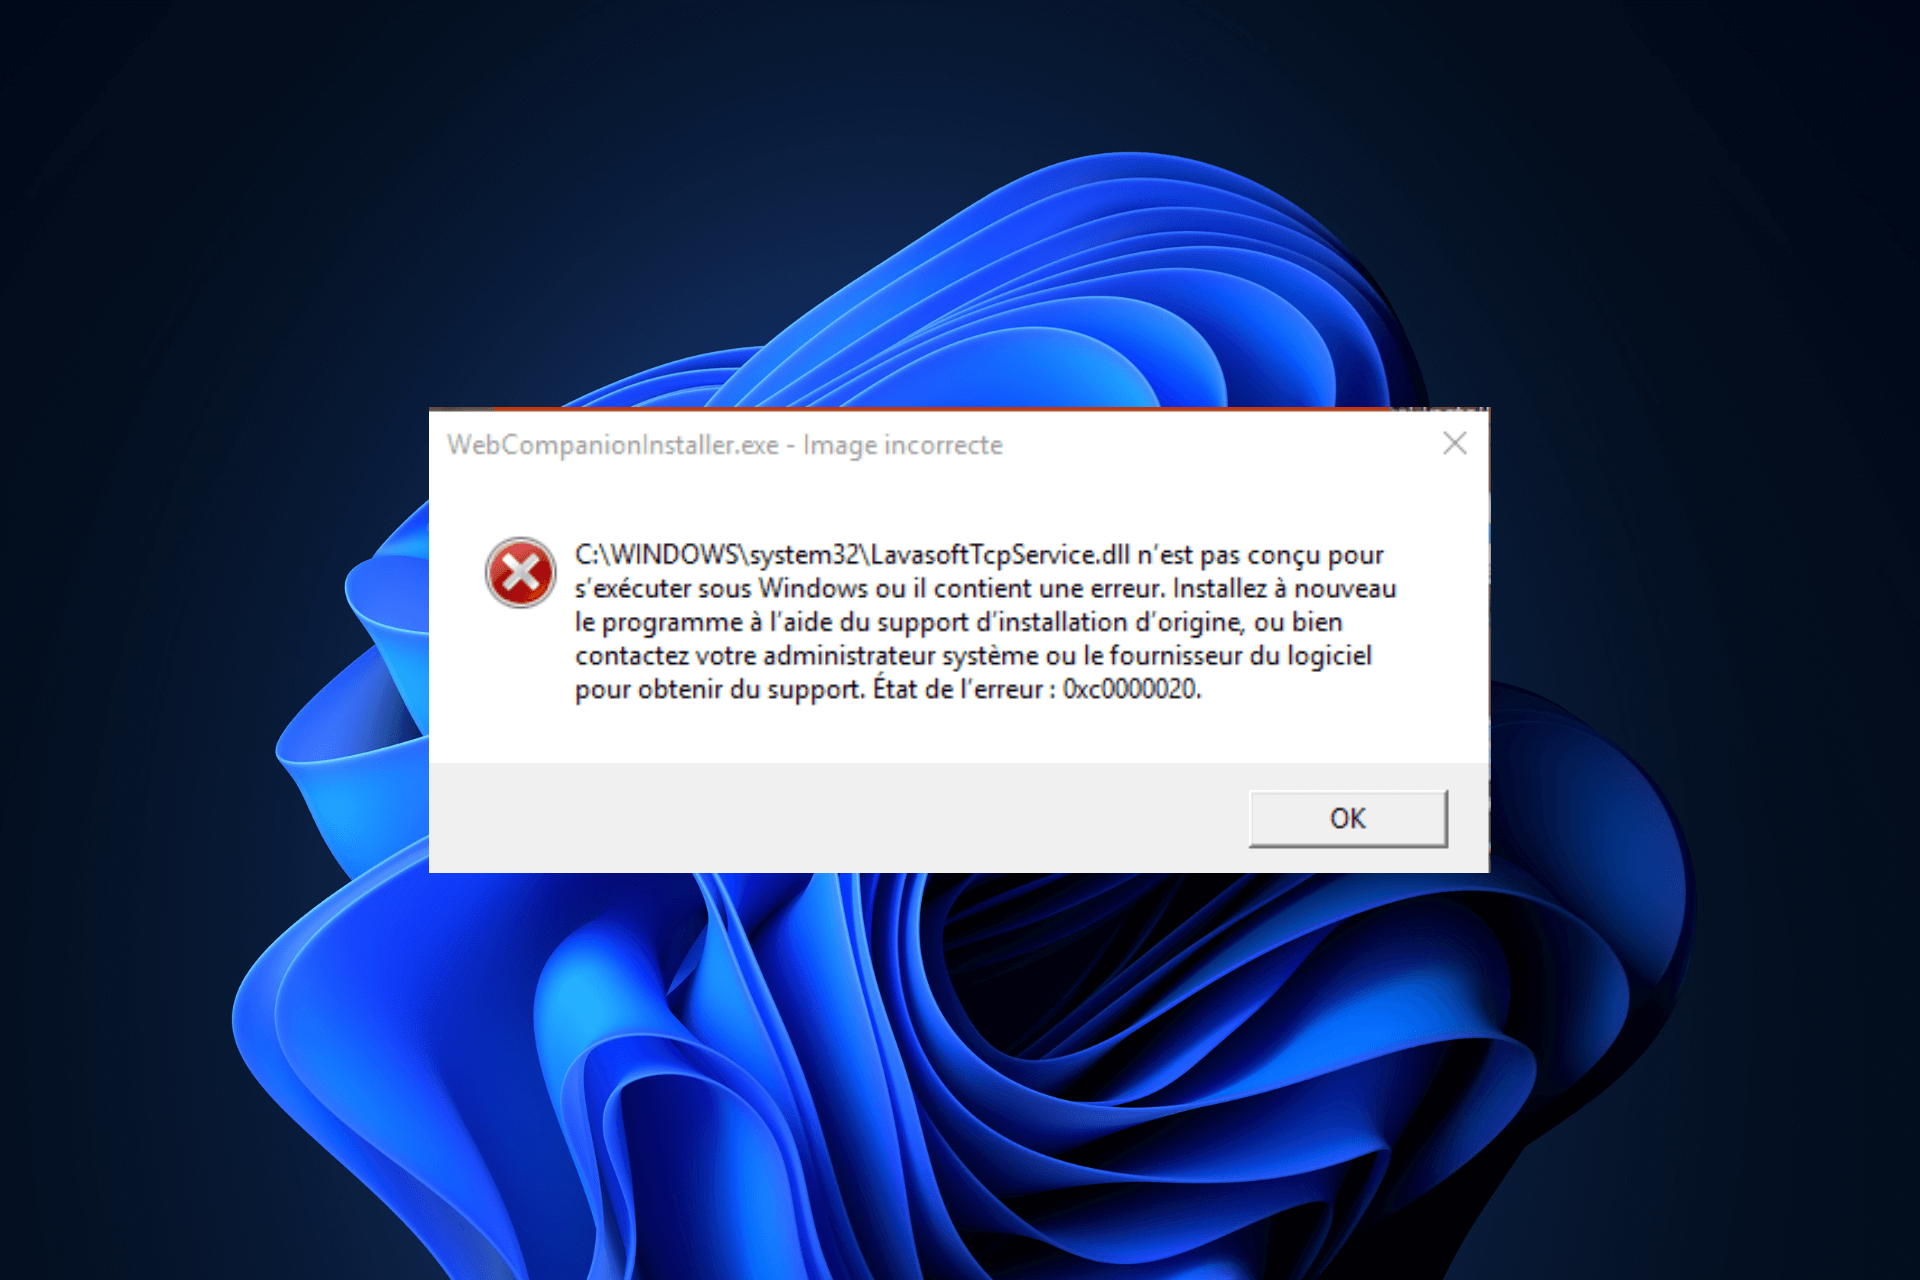
How To Get Rid Of LavasoftTCPService.DLL Error

Many of our readers have complained about getting an error due to LavasoftTCPService.dll, which has stopped them from launching apps like Steam.

This issue appears if the app is restricted by the Web Companion app by Lavasoft, if there is a conflict with the Windows Firewall, or if there are leftovers of the LavasoftTCPService.dll file.

How can I get rid of the LavasoftTCPService.DLL error?

1. Uninstall the Lavasoft Web Companion

  1. Press Ctrl + Shift + Esc to open the Task Manager app.End task - lavasofttcpservice.dll
  2. Go to the Processes tab, locate & select Lavasoft Web Companion, and click End task.
  3. Press Windows + I to open the Settings app.
  4. Go to Apps, then click Installed apps.Apps - Installed apps - lavasofttcpservice.dll
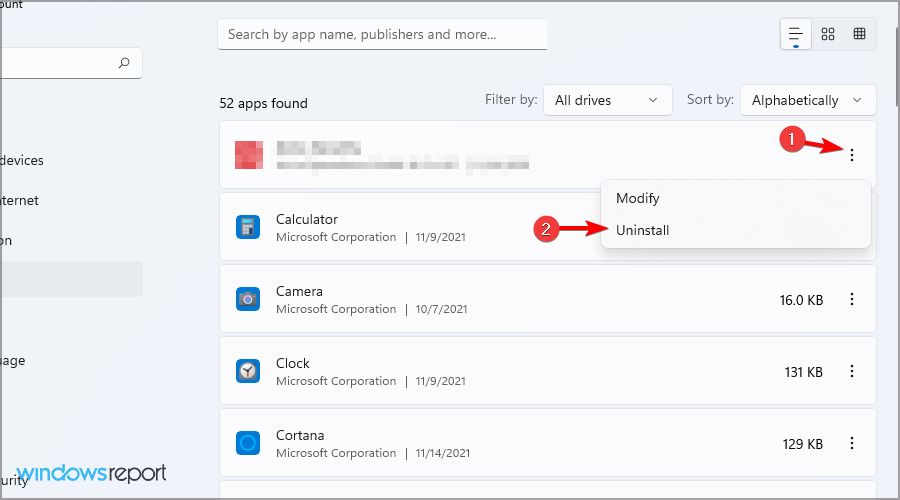
  5. Locate Web Companion, click the three-dot icon, and select Uninstall from the options.Uninstall (2) - lavasofttcpservice.dll 
  6. Click Uninstall again to confirm the action. Your PC may need to be rebooted to let the changes take effect.uninstall confirmation app

While on the Installed apps screen, look for unwanted apps and follow the same steps to uninstall them.

2. Remove the DLL file manually

  1. Press Windows + I to open the Settings app.
  2. Go to System, then click Recovery. System - Recovery Windows 11
  3. Locate Advanced startup and select Restart now.Recovery Advanced Startup - lavasofttcpservice.dll
  4. On the Choose an option screen, click Troubleshoot.Troubleshoot
  5. Select Advanced options.Troubleshoot WITH AO selected lavasofttcpservice.dll
  6. Click Startup Settings.Startup Settings
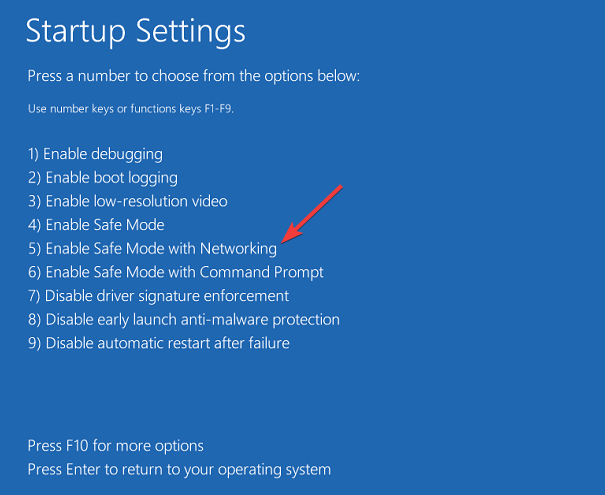
  7. On the next screen, press F5 to enter Safe Mode with Networking.Startup settings - lavasofttcpservice.dll
  8. Your computer will restart; once it starts up, press Windows + E to open Windows File Explorer.
  9. Navigate to this path: C:\WINDOWS\system32\ or C:\Windows\SysWOW64
  10. Look for LavasoftTCPService.dll and click the Delete icon.

Once done, restart your computer in normal mode using these steps and check if the issue reappears.

If you have any questions or suggestions about lavasofttcpservice.dll, feel free to mention them in the comments section below.

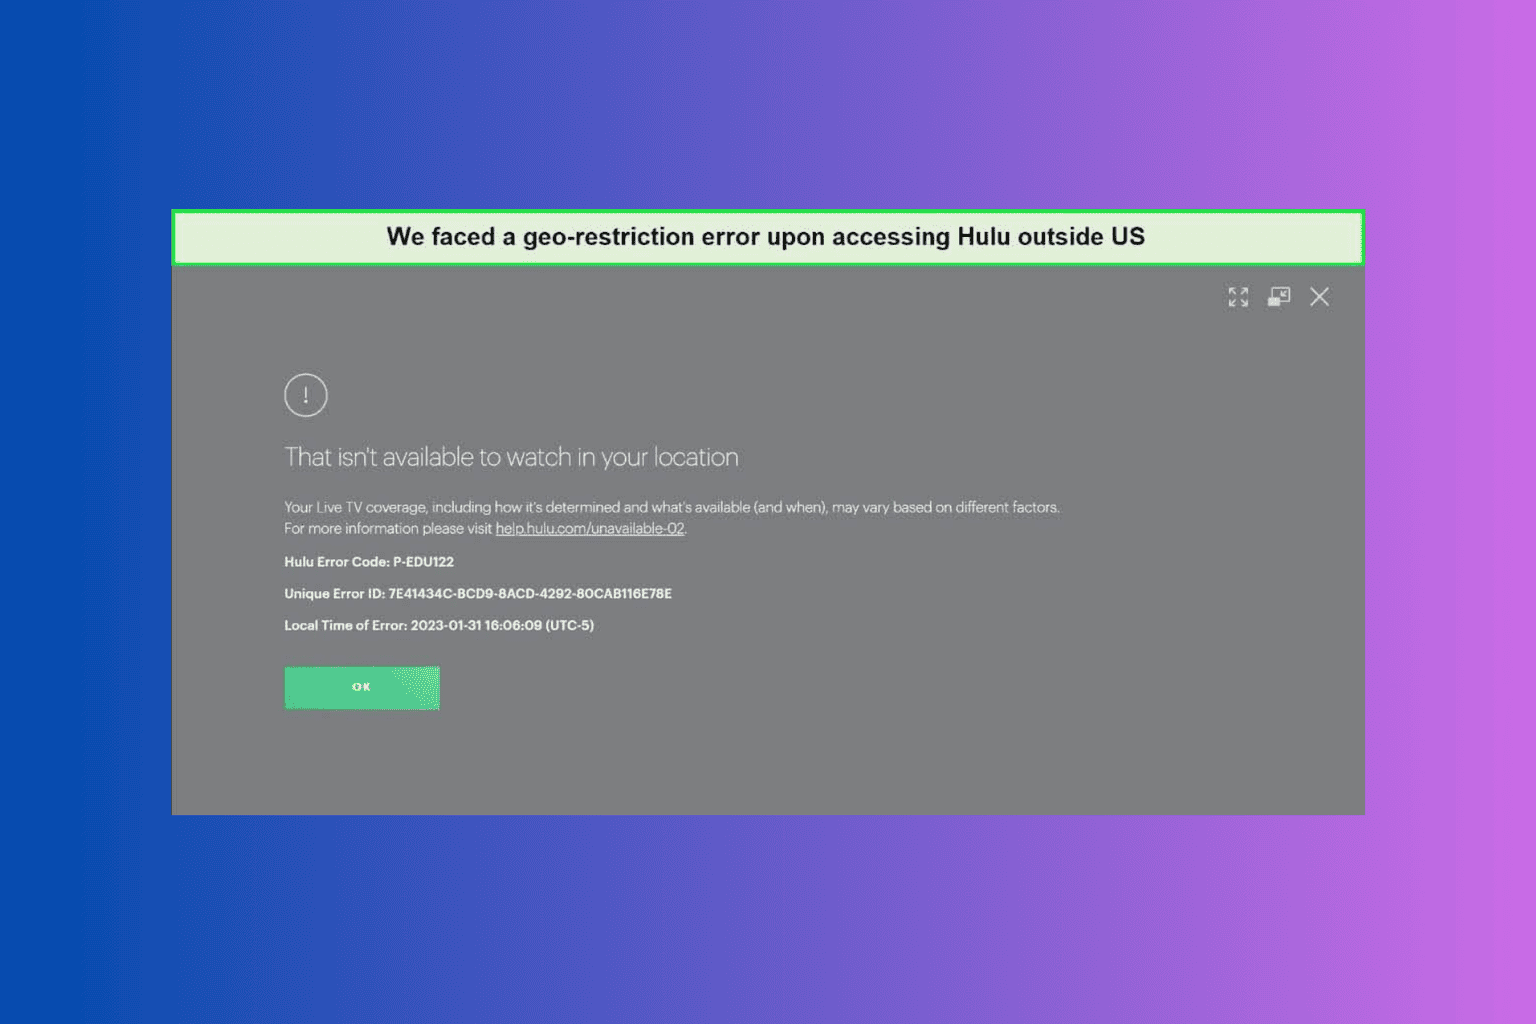
Easy Ways to Fix Hulu Error Code P-Edu122

Many users have complained about getting the error code P-Edu122 while launching Hulu. This could be due to a slow internet connection, server downtime, or a corrupted and old cache.

First, check your internet connection; if it is slow, switch to another connection. Then, restart your device and check the Hulu server status to ensure there isn’t downtime. You can also try signning in and out of your Hulu account.

How can I fix the Hulu error code P-Edu122?

1. Power cycle your router

  1. Remove the router’s power cord from the outlet.
  2. Wait for at least 30 seconds, then plug your router back in.
  3. Now, wait for all the panel lights on your router to turn green or yellow, depending on its brand.

2. Clear cache

2.1 Clear cache on your computer

  1. Press Windows + R to open the Run console.Cleanmgr Run command - hulu error code p-edu122
  2. Type cleanmgr and click OK to launch Disk Cleanup.
  3. On the Disk Cleanup: Drive Selection window, choose Windows (C:) from the drop-down and click OK. Choose the system drive letter if it is not C for you.DIsk C  - hulu error code p-edu122
  4. Click Clean up system files.Clean up - hulu error code p-edu122
  5. Choose Windows (C:) again from the Disk Cleanup: Drive Selection window.
  6. Once you have results, select all the items under Files to delete and click OK.Click OK
  7. On the confirmation pop-up, click Delete Files to proceed.Delete Files - hulu error code p-edu122

2.2 Clear browsing data (if you use Hulu on browser)

  1. Launch your preferred browser; here we use Google Chrome to demonstrate the steps.
  2. Go to the top right corner, click the three dot icon and select Settings. Settings CHrome 
  3. Click Privacy and security and choose Delete browsing data.Clear cache - hulu error code p-edu122
  4. On the next window, select All time for Time range and select Browsing history, Download history, Cookies and other site data, Site settings, & Hosted app data.
  5. Click Delete data. Close the browser and relaunch it and head to Hulu website to check if the issue occurs.Delete data - hulu error code p-edu122

If you still see the issue, try using another browser to access Hulu.

3. Check the payment method

  1. Open your preferred browser, head to Hulu, and log in to your Account page.
  2. Go to the Payment Information section.
  3. Now check the payment details and ensure there are no mistakes.

4. Reset DNS settings

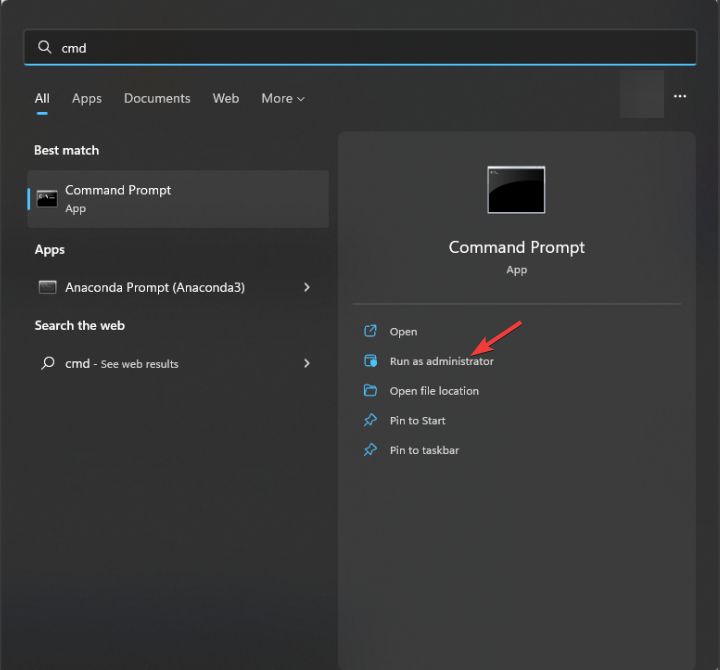
  1. Press the Windows key, type cmd in the search bar, and click Run as administrator.CMD elevated - hulu error code p-edu122
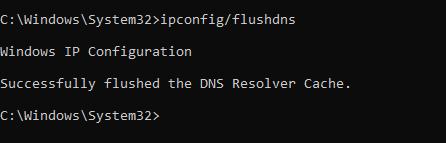
  2. On the command prompt window, copy & paste the following command and hit Enter:  ipconfig /flushdnsFlush DNS
  3. Once the command is executed, restart your computer.

5. Repair/Reset the app

  1. Press Windows + I to open the Settings app.
  2. Go to Apps, then click Installed apps.Apps - Installed apps - Easy Ways to Fix Hulu Error Code P-Edu122
  3. Locate Hulu, click the three dot icon and select Advanced options.advanced options -
  4. On the next page, locate Reset, then click the Repair button. This will repair the app and try to fix the issue.Repair - Apps - Installed apps - Easy Ways to Fix Hulu Error Code P-Edu122
  5. If this app is still not working, click the Reset button. This will remove all the app data so you might have to sign in to your account.Reset

5. Update/reinstall the app

  1. Press the Windows key, type store in the search bar and click Open.Microsoft Store - hulu error code p-edu122
  2. Go to Library, locate Hulu and check if any update is available. You can also click the Get updates on the download page to check.Library

If there is no update available, head to the steps to reinstall the app:

  1. Press Windows + I to open the Settings app.
  2. Go to Apps, then click Installed apps.Apps - Installed apps - Easy Ways to Fix Hulu Error Code P-Edu122
  3. Locate Hulu, click the three dot icon and select Uninstall.Uninstall - hulu error code p-edu122
  4. Click Uninstall to confirm the action.
  5. Launch Microsoft Store and type hulu in search bar, then select Hulu from the results, and click Install.Install - hulu error code p-edu122

If nothing has worked for you so far, contact Hulu support, explain the issue and steps taken so far to get further assistance.

You can also try changing the streaming device, trying a different network provider, or using a reliable VPN network. Another similar error; P-DEV323 may also occur so check out our article for a quick fix.

Do you think we miss a step that helped you fix the Hulu error code p-edu122? If so, please mention it in the comments section below. We will add it to the list.

Microsoft will splash Teams with an ad-like survey and feedback quiz

Microsoft Teams will be splashed with another ad-like survey asking users how likely they are to recommend Teams Rooms, with a score from 1 to 5, and provide additional feedback on Teams Rooms on Android devices.

According to the latest entry in the Microsoft 365 Roadmap, the new experience will debut in November 2024 and impact all platforms, from government-based customers to commercial customers to regular users.

Here’s what the entry says:

Users can rate how likely they are to recommend Microsoft Teams Rooms from 1 to 5 as well as provide additional comments on Teams Rooms on Android devices.

On the other hand, Microsoft Teams will also get a couple of really useful capabilities that could potentially transform the way the platform engages with users and admins. The first of them involves admins being able to designate an email address for receiving ‘Report a problem’ submissions from Android users. This capability should make it easier for admins to deal with an influx of reports.

Here’s what the entry says:

Admins can designate an email address for receiving ‘Report a problem’ submissions from users in Teams Rooms on Android. The email address can be set through device settings and the Teams admin center.

The second capability will let admins switch the screens of Teams Rooms on Android devices in dual display mode remotely without having to physically do so. According to the entry, which can be read below, the new option will be accessible in device settings and the Teams admin center.

Admins can switch the screens of Teams Rooms on Android devices in dual display mode remotely, correcting front-of-room display issues without physical support. The screen swap control is accessible in device settings and the Teams admin center.

All of these new capabilities are coming to Microsoft Teams in November, and they are set to update how admins moderate users on the platform. While the changes will undoubtedly enhance the experience of admin tasks on Teams, there might be too many updates.

Admins have complained that they cannot keep up with Microsoft’s dynamic pace of releasing updates.

What do you think about them?

5 Best 20000mAh Power Banks That You Can Buy

A power bank is a must-have if you’re away from an outlet or if you’re traveling, and in this guide, we’re going to show you the best 20000 mAh power bank that you can get.

What is the best 20000 mAh power bank to buy?

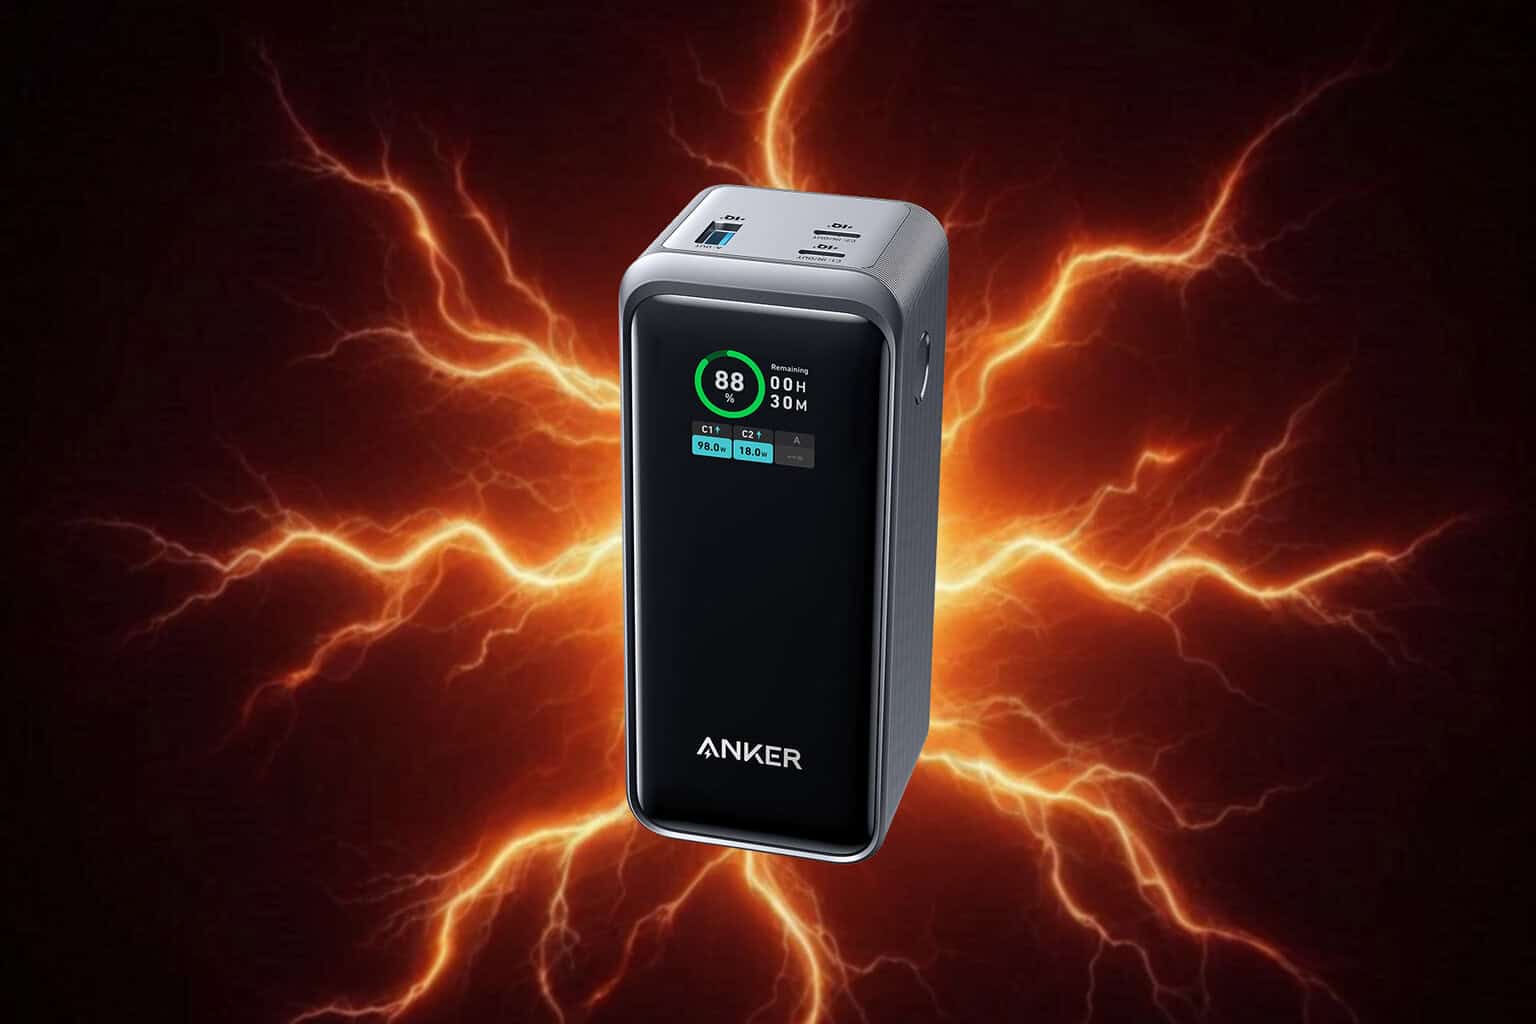
1. Anker Prime – Best overall

This power bank has 200W of total output, and it comes with two high-power USB-C ports and a single USB-A port. With it, you can charge two laptops simultaneously at 100W which is impressive.

The power bank supports rapid 100W rapid charging, and it will be fully charged in just 1 hour and 15 minutes. As for the size, this device measures 4.9 × 2.1 × 1.9 inches, so it will easily fit in any bag.

We also have to mention that there’s a smart digital display so you can see all important information such as the remaining battery, power input/output, and more.

Anker Prime is an amazing power bank and a perfect choice for users who want to quickly charge their devices.

  • 200W total output, 100W per USB-C port
  • 2x USB-C, 1x USB-A port
  • Fully recharges in 1 hour and 15 minutes
  • Comes with a smart display that shows input/output data
  • Price
  • Some users might find it a bit bulky

2. UGREEN Nexode Power Bank – Easy to use

This model comes with 20000 mAh capacity which is enough to charge iPhone 15 u to 2 times, iPad Pro 11 twice, and MacBook Air 13 once, and still have some charge left.

Regarding the output, this bank delivers 130W in total power. There are 3 ports available, two USB-C and a single USB-A. As for individual outputs, one USB-C delivers up to 100W while the other is limited to 30W. USB-A delivers up to 22.5W.

Regarding input, UGREEN Nexode Power Bank can handle up to 65W which will fully recharge the device in about 2 hours. Lastly, we have to mention the built-in display that will give you real-time information regarding battery level and power output.

  • 20000 mAh
  • 2x USB-C, 1x USB-A
  • Total output of 130W
  • 100W on USB-C, 30W on second USB-C, USB-A at 22.5W
  • 65W input, fully charged in 2 hours
  • Pricey

3. Baseus Blade HD – Slim design

Baseus Blade HD is a lightweight and only 0.7-inches thick power bank which makes it a perfect travelling companion. It offers 20000 mAh capacity, which will recharge your iPhone 15 Pro Max almost 3 times.

It has up to 100W output so it can recharge MacBook Pro 14 up to 50% in 30 minutes. It has 4 ports, two USB-C that provide 100W and two USB-A that offer up to 30W.

This model has support for PD 3.0 and PPS, and thanks to the 65W input you can fully charge it in just 1.5 hours if you have the right adapter.

We also have to mention the smooth and sleek design with rounded corners, and there’s also a display that gives you the remaining battery level as well as charging power information.

With its slim profile, sleek design, and 4 ports, Baseus Blade HD is a great choice for most users.

  • 20000 mAh
  • Up to 100W output
  • 65W max input
  • 2x USB-C, 2x USB-A
  • USB-C at 100W max, USB-A at 30W max
  • Some users find it hard or too large

4. Sharge Shargeek 140 – High power output

  • 20 000mAh
  • 140W total power output
  • Up to 100W output and 65W input on USB-C
  • USB-A up to 40W output
  • Built-in display
  • Just two ports
  • Expensive

This device comes with 20 000mAh capacity and in transparent case, which makes it stand out from all the other power banks on this list. Thanks to the large batter it will charge iPhone 150 Pro up to 4 times, iPad Pro up to 2 times, and MacBook Pro once.

This is possible thanks to the maximum 140W power output. A single port can deliver up to 100W which is enough to charge MacBook Pro up to 50% in just 40 minutes.

Regarding the ports, there is a USB-C port that can provide 100W output and 65W input. The USB-A can handle up to 40W max.

We also have to mention a built-in display that gives out real-time information, such as recharge time, remaining battery, output and input power at a glance.

Overall, Shargeek 140 offers great performance and unique design, so it’s worth checking out.

5. Anker Zolo – Comes with built-in cable

If you don’t like to carry cables, then Anker Zolo might be perfect for you. It comes with a built-in USB-C cable, so you won’t have to carry any cables with you.

There’s a single USB-C port and it’s used for both input and output. USB-C supports 30W output and 20W input. This allows it to charge iPhone 15 from 0 to 57% in just 30 minutes. Of course one USB-A port is also available.

The power bank comes with a built-in LCD, so you can monitor the battery level, and it takes about 5.25 hours with a 20W adapter to fully charge it.

  • Comes with a built-in USB-C cable
  • USB-C input/output port
  • 20W input and 30W output on USB-C port
  • Measures 4.72*2.90*1.24 in
  • Recharge can be slow

Is A 20000mAh power bank worth it?

Yes, a 20000mA power bank is a solid investment since it can recharge your phone about four times and tablet almost three times. Of course, these numbers can vary depending on the phone/tablet battery.

How many days can a 20000mAh power bank last?

This varies greatly from manufacturer but the battery should be able to last more than a week if not used. In theory, a power bank should hold a charge for a few months.

There you go, these are some of the best 20000 mAh power banks that you can use, but if you’re looking for more devices, we have a guide on the best portable chargers that you shouldn’t miss. Moreover, if you’re looking for the best power bank of 25000mAh, we can help you out.

If you’re an outdoors person, you might be interested in portable solar chargers instead.

ERROR_REDIR_PAUSED 0x00000048 [Solved]

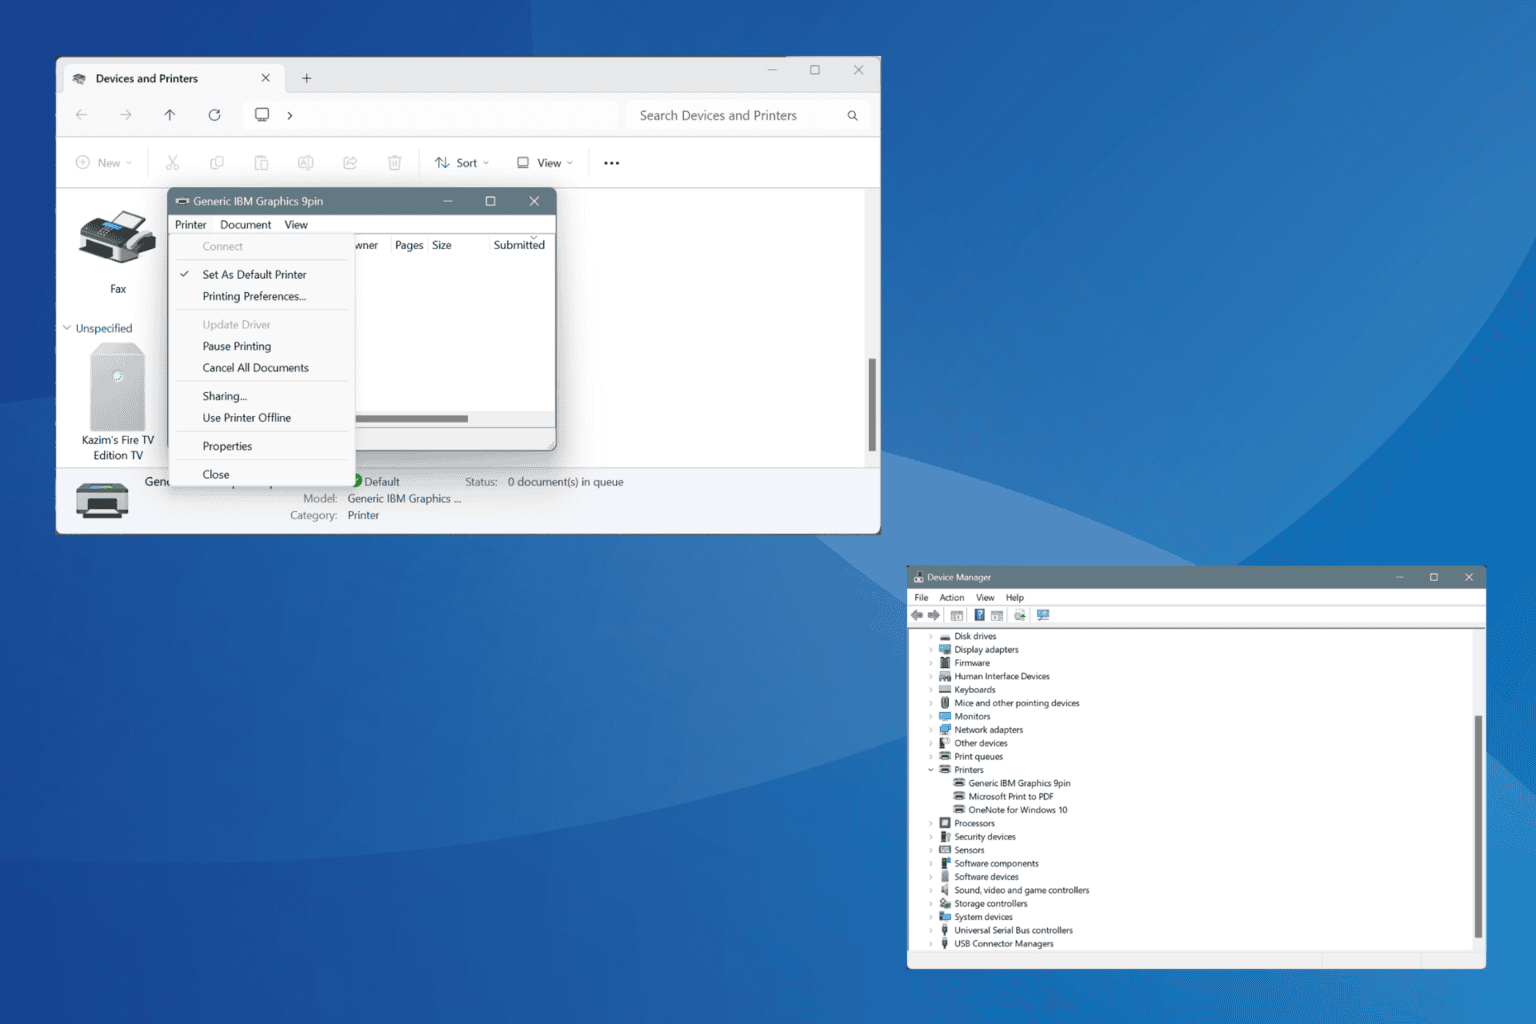
The ERROR_REDIR_PAUSED Win32 error, with code 72 (0x48), is encountered while printing, accessing a printer, performing disk operations, or when opening a document, say PDF. The error message reads, The specified printer or disk device has been paused.

The common causes for Error Redir Paused include corrupt/outdated printer or disk driver, issues with the print queue, misconfigured power settings, disabled disk or printer state, and corrupt system files.

Before you start troubleshooting, install all pending Windows updates, reboot the printer, and reconnect the printer/disk (whichever is throwing the error). For many, these basic checks should do the trick!

How can I fix ERROR_REDIR_PAUSED?

1. Clear the print queue

  1. Press Windows + S to open Search, type Command Prompt in the text field, and click on Run as administrator.command prompt
  2. Click Yes in the UAC prompt.
  3. Paste the following three commands individually and hit Enter after each: net stop spooler del %systemroot%\System32\spool\printers* /Q net start spoolerprint queue to fix ERROR_REDIR_PAUSED
  4. Once done, check for improvements.

The 72 (0x48) The specified printer or disk device has been paused message often appears when the print queue is stuck or corrupt. So, your primary approach should be to clear the print queue!

2. Reinstall the printer and disk drivers

  1. Press Windows + X to open the Power User menu, and select Device Manager.
  2. Expand the Printers entry, right-click on the affected printer, and select Uninstall device.uninstall printer driver to fix ERROR_REDIR_PAUSED
  3. Click on Uninstall in the confirmation prompt.confirm uninstall
  4. Similarly, if the 0x00000048 system error appears during a disk-related operation, reinstall the disk drivers under Disk drives.

3. Update the printer and disk drivers

  1. Press Windows + R to open Run, type devmgmt.msc in the text field, and hit Enter.
  2. Expand the Printers entry, right-click on the affected device underneath, and select Update driver.update printer driver to fix ERROR_REDIR_PAUSED
  3. Now, click on Search automatically for drivers and wait for Windows to install the best locally available version.automatic driver search
  4. Similarly, update the disk drive’s drivers, then restart the PC and check for improvements.

Outdated drivers are a common reason behind Win32 errors, and a quick fix is to update the disk’s driver or install the latest printer drivers, depending on the faulty module.

If Windows tells you that the best drivers are already installed, visit the manufacturer’s website, check the newest releases, and then manually install the latest drivers!

4. Reconfigure power management

  1. Press Windows + S to open Search, type Device Manager, and click on the relevant result.
  2. Expand the Universal Serial Bus controllers entry, right-click on the port to which the printer or external disk is connected, and select Properties.
  3. Go to the Power Management tab, untick the checkbox for Allow the computer to turn off this device to save power, and click OK to save the changes.reconfigure power management to fix ERROR_REDIR_PAUSED
  4. If you keep switching ports, disable the setting for each, reboot the PC and check for improvements.

5. Make sure the disk and printer are available

5.1 Disable pause printing

  1. Press Windows + I to open Settings, go to Bluetooth & devices from the left, and select Printers & scanners.printers & scanners
  2. Click on the affected printer from the list.
  3. Now, click on More devices and printers settings.more devices and printers settings
  4. Right-click on the affected printer, and select Properties.
  5. Click the Printer menu, and disable the Pause Printing option, if turned on.turn off to fix ERROR_REDIR_PAUSED

5.2 Set the disk to online

  1. Press Windows + R to open Run, type cmd, and hit Ctrl + Shift + Enter.command prompt
  2. Click Yes in the UAC prompt.
  3. Paste the following command and hit Enter: diskpart
  4. Run this command to view the available disks: list disk
  5. Execute this command while replacing X with the number assigned to the affected drive: select disk X
  6. Finally, paste this command and hit Enter to set the disk online: onlinedisk online to fix ERROR_REDIR_PAUSED

6. Repair the corrupt system files

  1. Press Windows + S to open Search, type Command Prompt, and click on Run as administrator.
  2. Click Yes in the UAC prompt.
  3. Paste the following DISM commands individually and hit Enter after each: DISM /Online /Cleanup-Image /CheckHealth DISM /Online /Cleanup-Image /ScanHealth DISM /Online /Cleanup-Image /RestoreHealth
  4. Next, run this SFC scan command: sfc /scannowsfc scan to fix ERROR_REDIR_PAUSED
  5. Finally, reboot the PC to apply the changes.

The 72 (0x48) ERROR_REDIR_PAUSED error is often caused by corrupted system files. In this case, running the SFC (System File Checker) and DISM (Deployment Image Servicing and Management) scans will replace all problematic protected system files with their cached copy!

7. Perform a system restore

  1. Press Windows + S to open Search, type Create a restore point, and click on the relevant result.
  2. Click the System Restore button.system restore to fix ERROR_REDIR_PAUSED
  3. Select the Choose a different restore point option, and click Next.choose another restore point
  4. Pick the oldest restore point from the list and click Next.oldest restore point
  5. Verify the restore details, and click on Finish to start the process.
  6. Wait for the system restore to complete. It usually takes 15-30 minutes.

If a system restore fails to resolve the ERROR_REDIR_PAUSED system error, you can always reinstall Windows. And in case this, too, doesn’t work, contact the printer or disk manufacturer and get it inspected for hardware faults.

Before you leave, learn how to defrag a disk and boost the PC’s performance!

For any queries or to share which fix worked for you, drop a comment below.

How to Fix ERROR_FAIL_I24 or Error 83 (0x53) Fail on INT 24

The ERROR_FAIL_I24 error, also known as Error 83, typically occurs when there is a failure on INT 24, often related to hardware issues, software conflicts, or corrupted system files. Here’s a step-by-step guide to fix this error.

How do I fix ERROR_FAIL_I24 (Error 83)?

1. Check the hardware connections and status

If possible, open the PC case and ensure all the hardware devices are properly connected and functioning. Run hardware diagnostics provided by your PC manufacturer to identify any potential hardware issues.

You may also check our list of the best hardware diagnostics tools instead. We also have a helpful guide on how to enable and run the Microsoft Support Diagnostic Tool (MSDT) to find any hardware issues.

If everything is fine with the hardware, you can move forward with the solutions below.

2. Update the device drivers

  1. Open Device Manager by pressing Win + X and selecting Device Manager.
  2. Expand each category and look for devices with a yellow exclamation mark.
  3. Right-click on the device and select Update driver.
  4. Choose Search automatically for drivers and follow the prompts.

You may also choose Uninstall device and restart your PC for Windows to install a new driver for that device. We also have a helpful guide on how to fix driver errors on Windows 11.

3. Run SFC and DISM scans

  1. Open Command Prompt as an administrator by typing cmd in the Start menu, right-clicking Command Prompt, and selecting Run as administrator.
  2. Type the following command and press Enter: sfc /scannow
  3. Wait for the scan to complete and follow any prompts to fix detected issues.
  4. Now, type the following commands one by one and press Enter after each:
    • DISM /Online /Cleanup-Image /CheckHealth
      DISM /Online /Cleanup-Image /ScanHealth
      DISM /Online /Cleanup-Image /RestoreHealth
  5. Wait for the process to finish and restart your PC.

4. Restore your system to a previous point in time

  1. Open the Run dialog by pressing Win + R, type rstrui, and press Enter.
  2. Click Next, then pick a restore point that is previous to the ERROR_FAIL_I24 event.
  3. Follow the prompts to restore your system and see if the error persists.

Just keep in mind that by restoring your system to a previous point, all the apps you installed until then will be uninstalled.

So, by performing all or some of the solutions above, you will be able to fix the ERROR_FAIL_I24 issue on your PC.

If you’re having the Error 83 on Disney+ or Error 83 on Fortnite, click on the highlighted links to fix the problem.

Let us know in the comments below if our solutions helped you fix the ERROR_FAIL_I24.

How to Keep the Windows 11 Hotspot Always on

For many users it has been a struggle to keep the Windows 11 mobile hotspot always on and not disconnect after a while. That is a normal behavior caused by the power settings, but we will show you how to fix it quickly below.

How do I keep the Windows 11 hotspot always on?

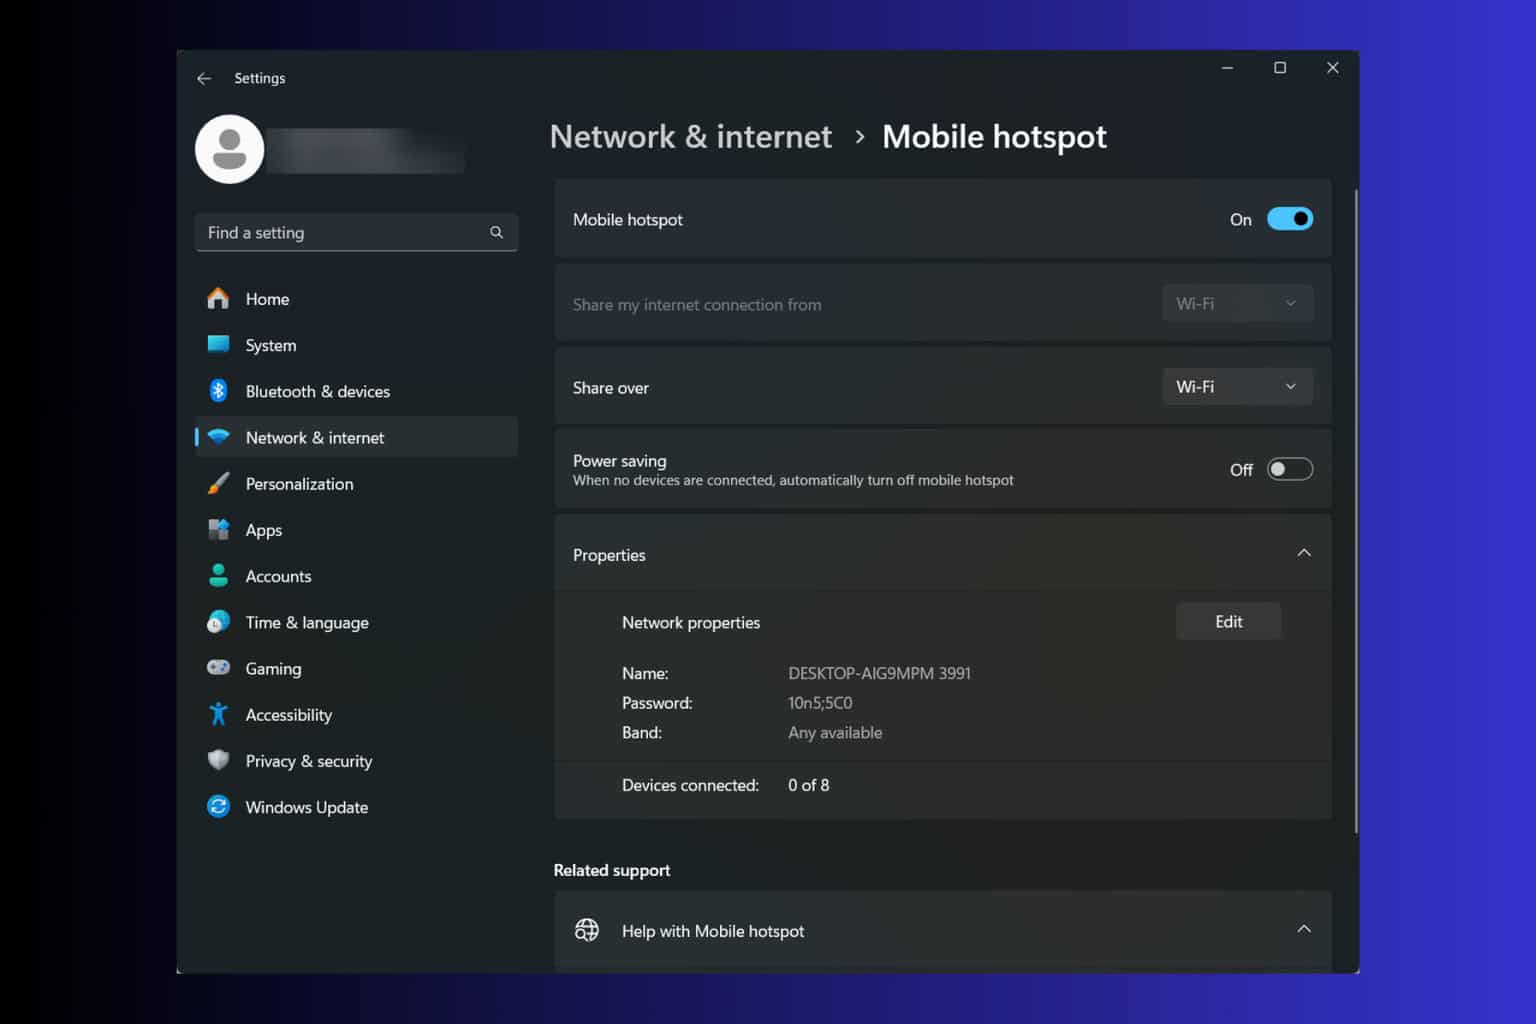
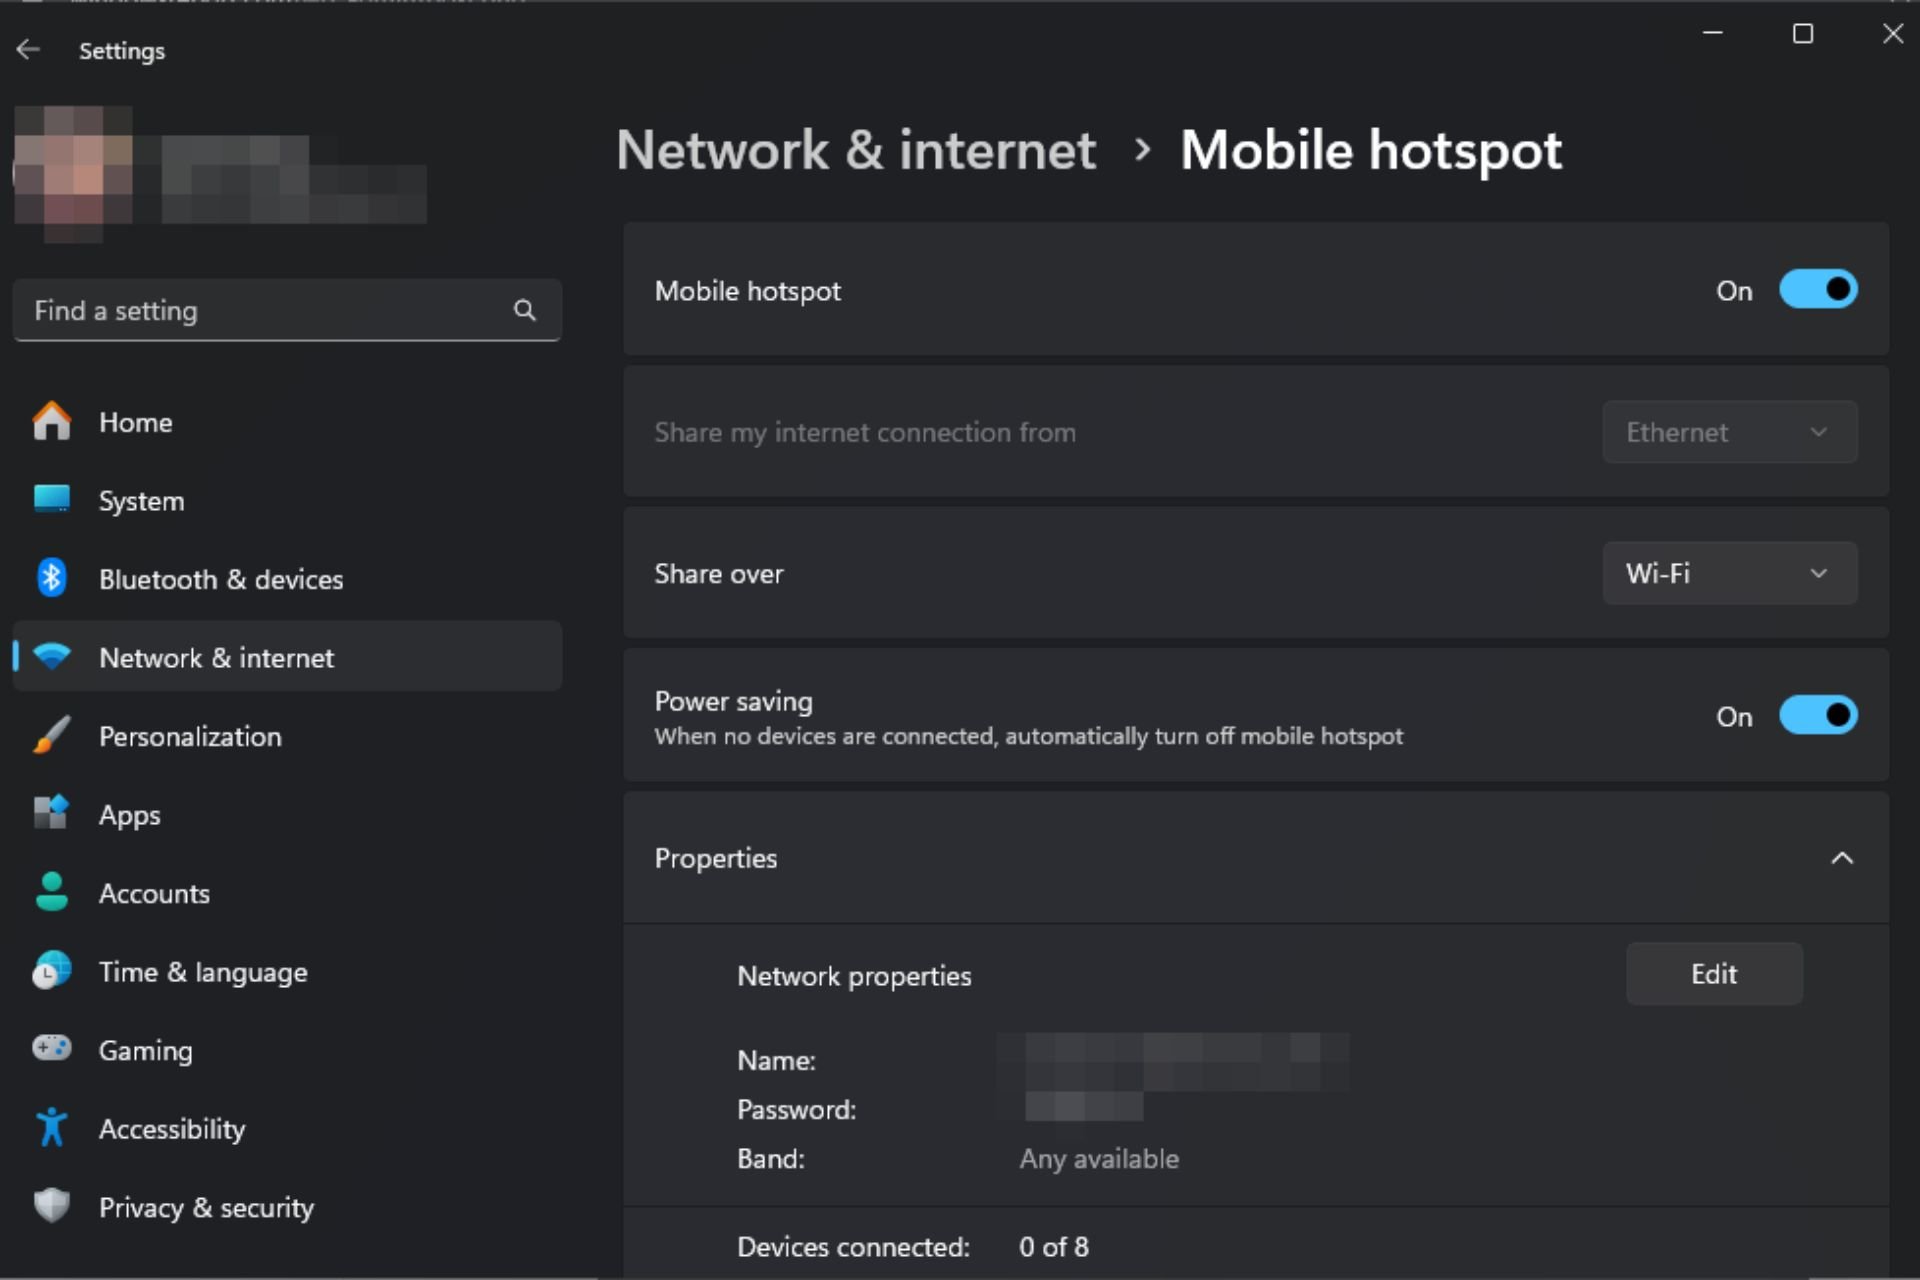
1. Turn off the mobile hotspot Power Saving mode

  1. Press Win + I to start Settings.
  2. Go to Network & internet > Mobile hotspot.
  3. Now, toggle the Power Saving option to Off.
  4. This will keep the hotspot running even if no devices are connected to it.

For this solution to work, you need to have a Wi-Fi adapter and have the Mobile Hotspot feature turned to on.

2. Turn off the Wi-Fi adapter power saving

  1. Press Win + I to start Settings.
  2. Go to Network & internet, and click on Advanced network settings.
  3. Here, click on Wi-Fi and select More adapter options.
  4. Now, click on Configure, right below the adapter name.
  5. Finally, go to the Power Management tab and uncheck the first option that allows the adapter to turn off to save power.

If you’re running the mobile hotspot on a laptop, the Wi-Fi adapter may turn off to conserve power and also turn off the mobile hotspot.

3. Set the mobile hotspot always on using the Registry

  1. Press Win + R to start the Run console, type regedit and press Enter to start Registry Editor.
  2. Navigate to the following key: HKEY_LOCAL_MACHINE\SYSTEM\ControlSet001\Services\icssvc\Settings
  3. If you already have a value called PeerlessTimeoutEnabled, make sure that the value is 0.
  4. If not, right click on a free space, select New > DWORD (32-bit) Value, name it PeerlessTimeoutEnabled and set its value to 0.
  5. Restart your PC and see if the mobile hotspot stays on.

That’s it! Now, the mobile hotspot shouldn’t turn off unless you actually lose the connection of your PC to the internet. If the cable, Wi-Fi or mobile connection of your PC is turned off, it’s obvious that you will not be able to reroute that connection through the mobile hotspot to any other devices.

In other words, you won’t be able to keep the Windows 11 hotspot always on if the computer you’re using to create the hotspot doesn’t have a stable connection. You might want to read our guide on how to improve the Wi-Fi connection of your PC to fix such potential problems. Also, learn what to do if the Windows 11 Wi-Fi icon is not showing.

Tell us in the comments below if you managed to keep the hotspot always on in Windows 11.

Before you go, don’t hesitate to visit our guide on how to hide hotspot SSID on Windows 11 for more useful tips.

Jsonrpcserver.dll is Missing: How to Restore it

Many reported that jsonrpcserver.dll is missing, and that can cause certain antivirus applications such as Avast and AVG to stop working. This can leave your PC vulnerable, but there are ways to fix that.

How can I fix the jsonrpcserver.dll error?

Before we start, ensure that the software that is giving you this error is updated to the latest version.

1. Uninstall the affected application

  1. Right-click the Start button and choose Apps and Features.
    apps and features menu
  2. Locate the application that is giving you this error, click the three dots next to it and choose Uninstall.
    uninstall app w11
  3. Follow the steps on the screen to complete the process.
  4. Once the application is removed, install it again.

Many reported issues with AVG and Avast, and if that’s the case with you, you can use AVG Uninstall Tool or Avast Uninstall Tool to remove them.

2. Use Safe Mode to uninstall the affected software

  1. Open the Start menu and click the Power button. Press and hold Shift and click on Restart.
    restart button start menu
  2. Choose Troubleshoot, then Advanced options. Lastly, select Startup Settings and click Restart.
    Startup settings
  3. Once the PC restarts, select Safe Mode with Networking or any other version of Safe Mode by pressing the dedicated key.
    Enable safe mode with networking
  4. Once you boot to Safe Mode, uninstall the affected application following the steps from the previous solution.
  5. Restart your PC regularly, and try to install the affected application again.

Problems with jsonrpcserver.dll usually affect antivirus software, and in most cases reinstalling the software or updating it is the only course of action.

This isn’t the only DLL that can cause problems, and we wrote about missing mfc90.dll missing. We also have a guide on what to do if libvorbisfile.dll was not found.

Before you go, you might want to check our guide on missing nvwdmcpl.dll file for more useful information.

DISORDERLY_SHUTDOWN 0x000000F3: How to Fix the BSOD

The DISORDERLY_SHUTDOWN BSOD, with error code 0x000000F3, is encountered when you try to turn off the PC, and Windows can’t shut down due to the absence of available memory.

Common causes for the Disorderly Shutdown blue screen error include corrupt/outdated drivers, problematic applications, malware infection, and issues with the RAM modules.

Before you begin troubleshooting, install any pending Windows updates, disconnect non-critical peripherals, and reconnect the RAM modules. For many of you, these basic checks should fix the BSOD!

How can I fix the DISORDERLY_SHUTDOWN blue screen error?

1. Reinstall the problematic driver

  1. Press Windows + X to open the Power User menu, and select Device Manager from the list of options.
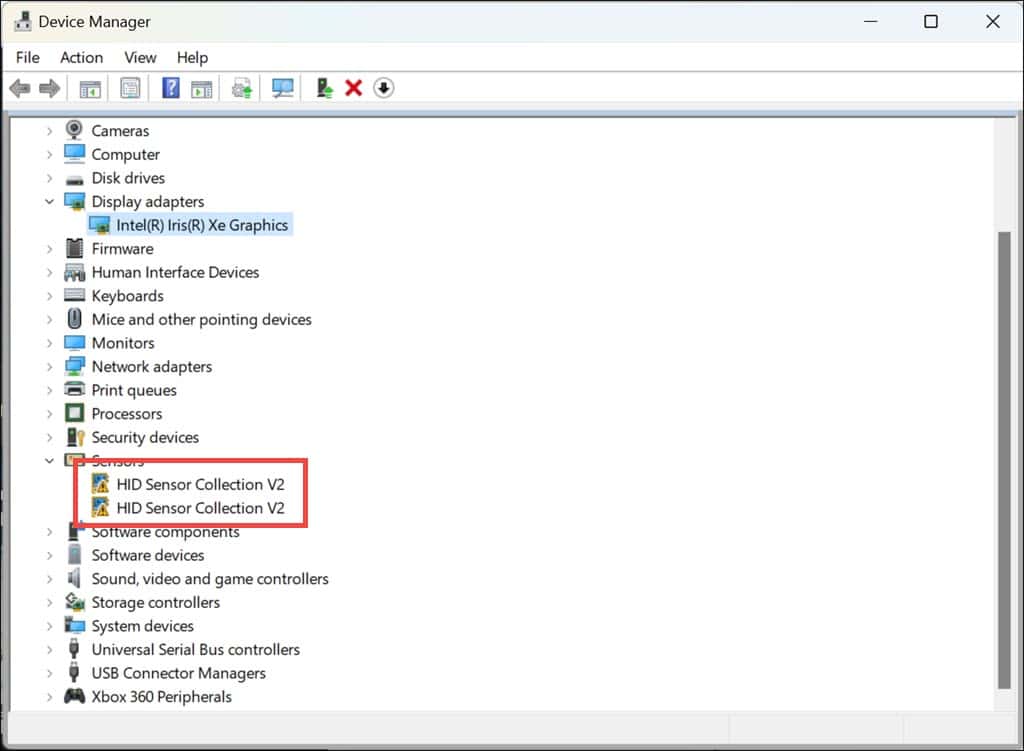
  2. Look for any device with a warning sign next to its icon, right-click on it, and select Uninstall device. The categories under which devices with corrupt drivers are listed auto-expand when opening the Device Manager.uninstall driver to fix DISORDERLY_SHUTDOWN
  3. Tick the checkbox for Attempt to remove the driver for this device, and then click Uninstall.confirm uninstall
  4. Restart the PC, and Windows will automatically install a fresh copy of the driver.
  5. Verify whether the 0x000000F3 DISORDERLY_SHUTDOWN error is fixed.

2. Update the drivers

  1. Press Windows + R to open Run, type devmgmt.msc in the text field, and hit Enter.
  2. Expand all the entries here, right-click on the devices listed underneath individually, and then select Update driver.update driver to fix DISORDERLY_SHUTDOWN
  3. Click on Search automatically for drivers and wait for Windows to install the best locally available version.automatic search
  4. After updating all the critical drivers, restart the computer.

The DISORDERLY_SHUTDOWN BSOD is often caused by outdated drivers (dgsafe.sys and XLGuard.sys, in some cases), and a quick fix is to update all the drivers, especially the ones for the graphics adapter, network adapter, Bluetooth, and connected devices.

If Windows says that the best version is already installed, head to the manufacturer’s website, locate the latest releases, and then manually install the drivers.

3. Roll back driver updates

Tip icon Tip
If the Roll Back Driver option is greyed out, either the driver was not updated recently, or Windows didn’t store the previous version. For the latter, there are other ways to manually roll back driver updates.
  1. Press Windows + S to open Search, type Device Manager in the text field, and click on the relevant result.
  2. Expand all the entries, right-click on the devices individually, and then select Properties.
  3. Go to the Driver tab, and click on Roll Back Driver.roll back to fix DISORDERLY_SHUTDOWN
  4. Choose a reason for rolling back the update and then click on Yes to proceed.driver roll back confirmation
  5. After rolling back all the recently updated drivers, check whether the DISORDERLY_SHUTDOWN Windows blue screen error is fixed.

4. Uninstall conflicting applications

  1. Press Windows + R to open Run, type appwiz.cpl in the text field, and hit Enter.
  2. Select any application that was recently installed or updated from the list, and then click Uninstall.uninstall app to fix DISORDERLY_SHUTDOWN
  3. Follow the on-screen instructions to complete the process.
  4. Reboot the PC and then check for improvements.

If a quick app removal doesn’t work, get a top-rated software uninstaller to delete all the leftover files and Registry entries, which might have been triggering the DISORDERLY_SHUTDOWN Windows BSOD.

5. Scan the PC for malware

  1. Press Windows + S to open Search, type Windows Security, and click on the relevant result.
  2. Click Virus & threat protection.windows security
  3. Click on Scan options.
  4. Select the Full scan entry and then click on Scan now.malware scan to fix DISORDERLY_SHUTDOWN
  5. Wait for the scan to complete, and then check for improvements. It may take 10-30 minutes.

6. Check the RAM for issues

  1. Press Windows + S to open Search, type Windows Memory Diagnostic, and click on the relevant result.
  2. Click on Restart now and check for problems.ram test
  3. After the scan is done running, view the mdsched.exe logs and check for problems.

If Windows Memory Diagnostic doesn’t detect any issues, I suggest using Memtest86+, an advanced open-source memory testing tool, which will run a series of scans on individual RAM modules and identify even the smallest of problems. The scans take 4-6 hours to complete.

In case issues are detected, it’s best to replace the faulty RAM module(s). Because, more often than not, RAM malfunction turns out to be the underlying cause of a BSOD!

7. Reinstall Windows

When nothing else works, the last option is to reinstall Windows. It effectively eliminates all software-based issues on the PC. To be on the safe side, I recommend moving critical files to an external storage device before proceeding.

To reinstall Windows > connect a formatted flash drive to another PC > go to Microsoft’s official website > download the Media Creation Tool > use it to create a bootable Windows USB > plug the bootable flash drive into the affected computer > change the boot order to the USB drive > run the setup and install Windows.

reinstall Windows from a bootable USB
Reinstalling Windows from a bootable USB

If the problem persists, it’s best to visit a local repair shop and get the PC’s hardware inspected for faults.

One of these solutions should have helped with the DISORDERLY_SHUTDOWN blue screen in Windows. In my experience, it’s usually an application, a driver, or faulty RAM to blame for the error. So, that’s what you should focus on!

Before you leave, discover expert tips to make your PC faster than ever.

If you know of more fixes, share them with our readers in the comments section.

Microsoft will make Copilot Extensions available to all users with a license later this month

Microsoft recently integrated its AI-powered productivity assistant, Copilot, into various third-party apps across its ecosystem, including Microsoft 365 and Microsoft Teams. Now, the Redmond-based tech giant is taking the next step by allowing developers to integrate Copilot into their apps through extensions.

In a blog post, the company says this capability will be available to all users with a Copilot license starting mid-September, showcasing an array of advantages of using it.

Several developers have already taken advantage of this functionality, creating new Copilot Extensions for Teams that can help users accomplish even more without leaving their current workflow.

Copilot Extensions can be added to a chat, allowing Teams users to directly access information from apps like Workday, ServiceNow, Box, and Salesforce. The extensions can also help users complete tasks in those apps by suggesting commands in chat.

For example, say you’re chatting with a colleague about an upcoming meeting and want to quickly pull in a few relevant slides from a presentation in Box. A Copilot Extension can help with that, saving you from needing to open Box in another tab or app.

Microsoft says several companies, including Box, ServiceNow, Viva, Creately, Mural, and Miro, are rolling out Copilot Extensions for their apps in Teams today. The Redmond-based tech giant also says that more extensions are in development and will be available soon.

You can read the entire blog post to find out more about them.

What are you hoping to see added to Microsoft Teams through Copilot Extensions?

How to Fix the RAMDISK_BOOT_INITIALIZATION_FAILED BSoD

The RAMDISK_BOOT_INITIALIZATION_FAILED bug check usually comes with the value of 0x000000F8. The error points out that that an initialization failure occurred while booting from the RAM disk. It typically indicates a storage drive hardware error, but it may also be triggered by a corrupted system or a driver problem. Before anything else, disconnect all external drives and try to boot the PC normally. If that works, reconnect them one by one to see which one is causing this issue.

How do I fix the RAMDISK_BOOT_INITIALIZATION_FAILED?

1. Use Automatic Repair Mode to boot in Safe Mode

  1. Reboot your Windows system three times using the Power button until it enters Automatic Repair Mode.
  2. Select the Troubleshoot option from the menu, then choose Advanced options.
  3. Click on Startup Settings in the next menu and hit the Restart button.
  4. After restart, press F5 to select Safe Mode with Networking capabilities.
  5. If all works well, your system will boot in Safe Mode, giving you a chance to troubleshoot potential software issues.

If your PC is unable to boot in Safe Mode, try to use a USB installation media and follow the next solution to run Command Prompt and perform the scan below or to reset your Windows system.

2. Replace the SMSS.exe file (bootable media required)

  1. Insert the bootable media into your PC and restart. You might also need to change the boot order to boot from your media.
  2. When prompted with Press any key to continue… on your screen, do so.
  3. Set your preferences for Language, Time & Currency format, and Keyboard or input method, then click Next.
  4. Next, select the Repair your computer option from the bottom.
  5. In the next menu, select Troubleshoot.
  6. Under the Troubleshoot menu, go to Advanced options.
  7. Choose Command Prompt from the available choices.
  8. In the Command Prompt, input the following commands sequentially, pressing Enter after each one:
    • cd windows/system32/
      ren smss.exe  smss.old
      copy c:\windows\system32\dllcache\smss.exe
  9. Restart your PC and check if the issue has been resolved.

3. Scan your drive and system for errors

  1. Click the Start button, type cmd and select Run as administrator from the search results on the right pane.
  2. Type chkdsk /f /r in the terminal and press the Enter key to run the command.
  3. Wait for the scan to finish, and then restart your computer following the completion of the scan.
  4. If the system doesn’t boot normally, start Command Prompt again, type the following command and press Enter: DISM.exe /Online /Cleanup-image /Restorehealth
  5. After completion of the scan, you may also run the SFC scan by entering sfc /scannow and pressing Enter.

If you’ve managed to boot the PC in Safe Mode, you will be able to start Command Prompt and execute the chkdsk command. If not, as mentioned in the first solution, use a bootable media or System Recovery to use CMD. This method will find and fix potential problems with your drive.

4. Uninstall any problematic drivers (if the OS boots in Safe Mode)

  1. Right-click the Start button and select Device Manager.
  2. Expand the categories on the left and look for devices marked with a yellow exclamation mark.
  3. Right-click on them and select Uninstall device.
  4. Reboot your computer so that Windows can automatically reinstall the necessary drivers.

Look especially at the IDE controllers section because they are most likely to cause the RAMDISK_BOOT_INITIALIZATION_FAILED BSoD. You may also select Update driver instead of uninstalling and selecting Search automatically for drivers or Browse my computer…in case you already have a driver you downloaded straight from the manufacturer’s website.

We also have a list of the best driver updater tools that will automatically refresh all your drivers with only a few clicks.

5. Restore the OS to a previous point

  1. Initiate Automatic Repair Mode by restarting your system three times using the Power button.
  2. Select the Troubleshoot option, then choose Advanced options.
  3. Now, click on System Restore and click Next to start the process.
  4. Choose a restore point that has a date previous to the RAMDISK_BOOT_INITIALIZATION_FAILED event.
  5. Click Finish and wait for the system to be restored to that previous state.

If none of this works, the last resort would be to reset your system or reinstalling Windows entirely by using the bootable media you have used before.

We would also recommend trying the bootable drive on another system and check it for any connection or physical damage if possible.

We remind you that BSoD error typically point to a hardware error, but you can look further into the causes of Blue Screen bug checks. If possible, you may also use a BSoD viewer to find more information about the crash.

Hopefully, by using the solutions above you were able to fix the RAMDISK_BOOT_INITIALIZATION_FAILED BSoD. Let us know in the comments below if it worked for you.

Microsoft Loop lets users upload files up to 250 GB

Microsoft Loop has been an essential tool for collaboration and content management, and now it’s even more efficient. Microsoft 365 Insiders can now upload Word, PowerPoint, Excel, and PDF files to Loop workspaces, simplifying their workflow and giving their team all the context it needs to collaborate better.

Here’s how it works. According to the blog post, users can go to their Loop workspace, select the “Upload a file” option, and access files on their device and network shares. They can then select the file (or files) they want to upload to their workspace and choose Open. When the upload is finished, the file(s) will appear alongside other pages and links in the workspace.

The new feature supports uploading Word, PowerPoint, Excel, and PDF files, with individual files limiting themselves to 250 GB in size. Multi-file uploads are also supported—users can select multiple files simultaneously to speed up the process.

Uploaded files are stored in OneDrive for Business under My files > Loop > Workspace Uploads.

This file upload feature has been fully rolled out to the preview audience of Microsoft Loop users. If you’re a Loop user and don’t have it yet, it’s probably Microsoft, not you. Features are sometimes released over some time to ensure smooth operation.

Feedback is encouraged—Loop users can click the Help button in the bottom right corner of the app to share their thoughts.

In other news, the Redmond-based tech giant recently made Copilot available to Microsoft Loop.

Cudart64_90.dll is Missing: 4 Ways to Get it Back

Many users reported Could not find the cudart64_90.dll message while using Tensorflow or similar tools. This can be a problem if you’re a developer, so today we’re going to show you how to fix it properly.

What can I do if cudart64_90.dll is missing?

1. Install CUDA Toolkit 9

  1. Visit the CUDA Toolkit 9 download page.
  2. Select the version and your operating system.
    cuda 9 download settings
  3. Click on Download in the Base Installer section to download it.
    base installer download
  4. Once downloaded, run the setup file and follow the instructions.

Few users reported that the network installer works better than the offline one, while others say that the offline version works better, so try them both.

2. Manually copy the missing files

  1. Download CUDA Toolkit 9 and extract it. Do not run the setup file.
  2. Press Windows key + R and type %localappdata%.
    localappdata run window
  3. Next, go to Temp\CUDA\cudart\bin
  4. In there, locate cudart64_90.dll and copy it.
  5. Next, navigate to C:\Program Files\NVIDIA GPU Computing Toolkit\CUDA\v9.1\bin
  6. Paste the DLL in that directory.

Keep in mind that the file path in Step 5 might differ depending on the version of CUDA that you have installed.

3. Reinstall CUDA Toolkit 9

  1. Press the Windows key + X and select Apps and Features.
    apps and features menu
  2. Locate CUDA Toolkit 9, click the three dots next to and choose Uninstall.
    uninstall app w11
  3. Follow the instructions on the screen.
  4. Once removed, download CUDA Toolkit 9 again.

If you have any other version installed, such as 9.1, you need to remove it for this solution to work.

4. Change PATH variables

  1. Make sure you have CUDA and cuDNN installed. You need version 9 for this solution to work.
  2. Press the Windows key + S and type view advanced. Choose View advanced system settings from the list.
    Advanced system settings start menu
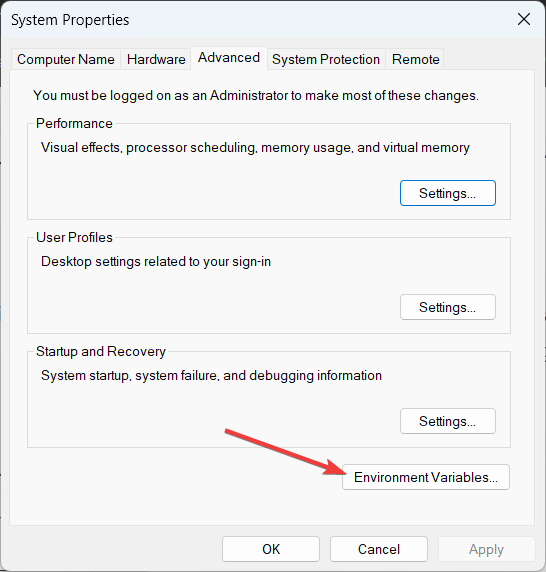
  3. Click on Environment Variables.
    environment variables button
  4. Double-click the Path variable for your user and add paths from CUDA and CuDNN that contain cudart64_90.dll.
  5. Save changes.
  6. In the System variables locate the Path variable and add the same paths from Step 4.
  7. Save changes.

If you’re using a virtual environment, you might have to add these paths to that environment as well.

This isn’t the only error that you can encounter with Nvidia DLLs, and we already wrote about nvapi64.dll and what to do if nvspcap64.dll is not found error.

We also have a guide on how to fix a missing nvcpl.dll file, so don’t hesitate to check it out for more information.

Fix: ERROR_PRINT_CANCELLED (63 (0x3F)

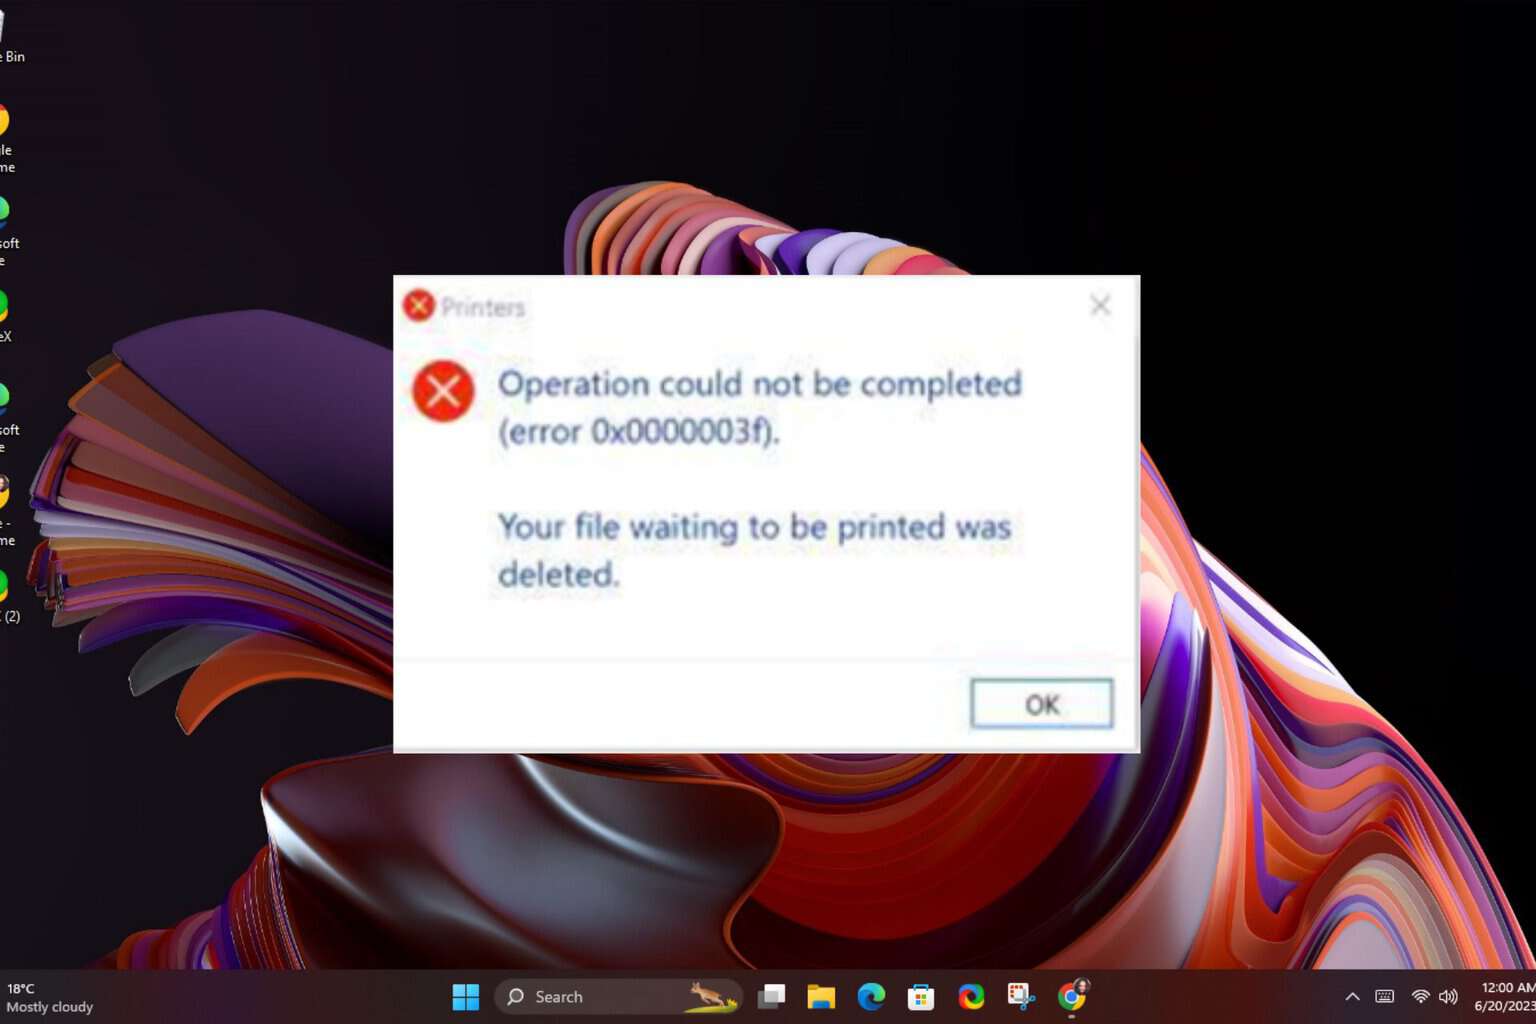
The ERROR_PRINT_CANCELLED can manifest in different ways but the most common one is your printer failing to print jobs sent to the print queue. The error may be accompanied by the Your file waiting to be printed was deleted message.

The triggers behind this error include incompatible printer drivers or issues with the print queues. It is also possible that your printer settings have been misconfigured.

How do I fix the ERROR_PRINT_CANCELLED?

1. Run the Printer troubleshooter

  1. Hit the Windows key and click on Settings.settings windows 11
  2. Select System on the left pane, then click Troubleshoot on the right.Open system troubleshooter
  3. Click on Other troubleshooters.other troubleshooters
  4. Find the Print troubleshooter and click the Run button next to it.System Troubleshooter - Printer - Run

2. Restart the Print Spooler service

  1. Hit the Windows + R keys to open the Run command.
  2. Type services.msc in the dialog box and hit Enter.run services.msc command
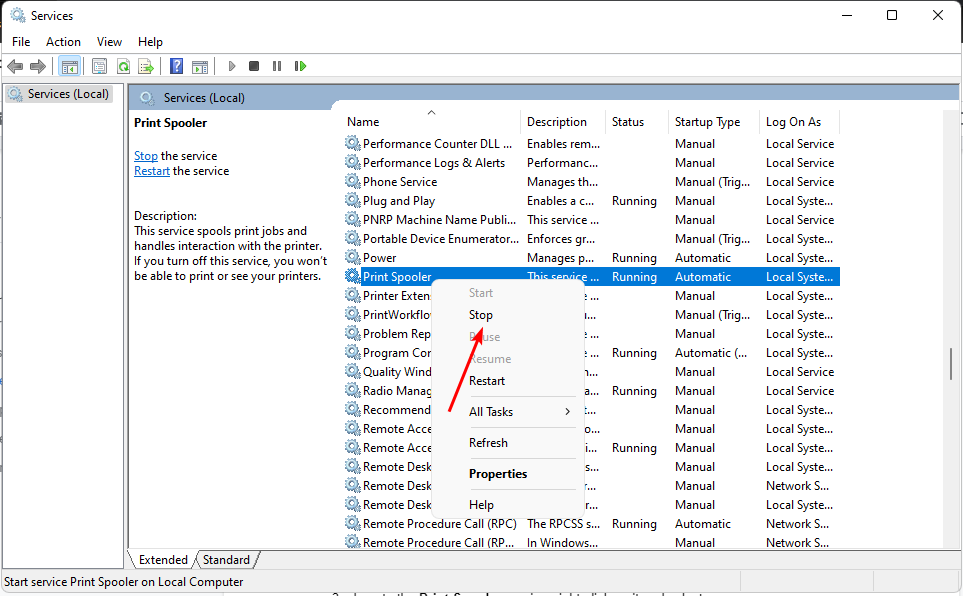
  3. Locate the Print Spooler service, right-click on it and select Stop.
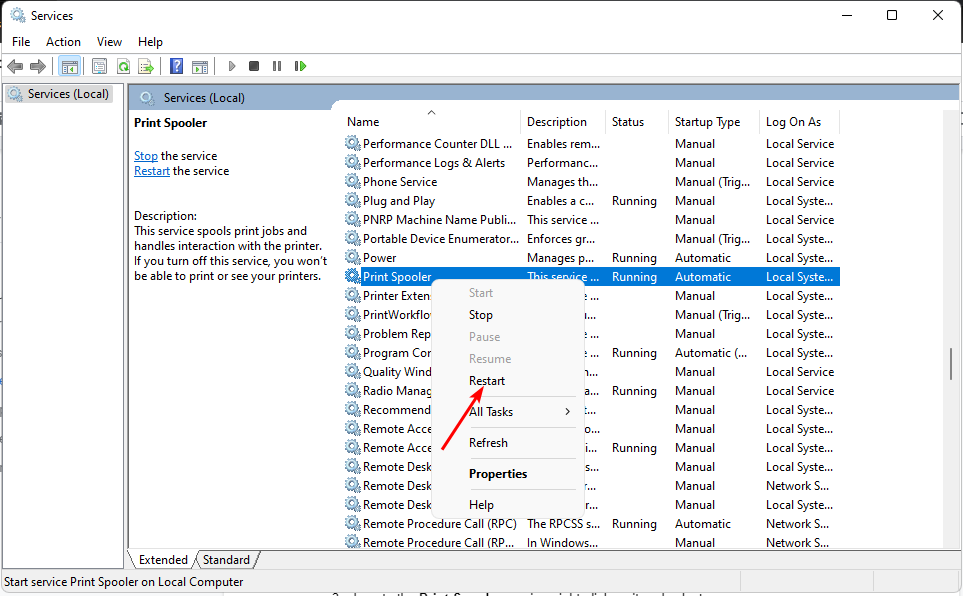
  4. Right-click on it again, then select Restart.

The Print Spooler may stop if there are too many print jobs or your printer drivers are out-of-date.

3. Clear the print queue

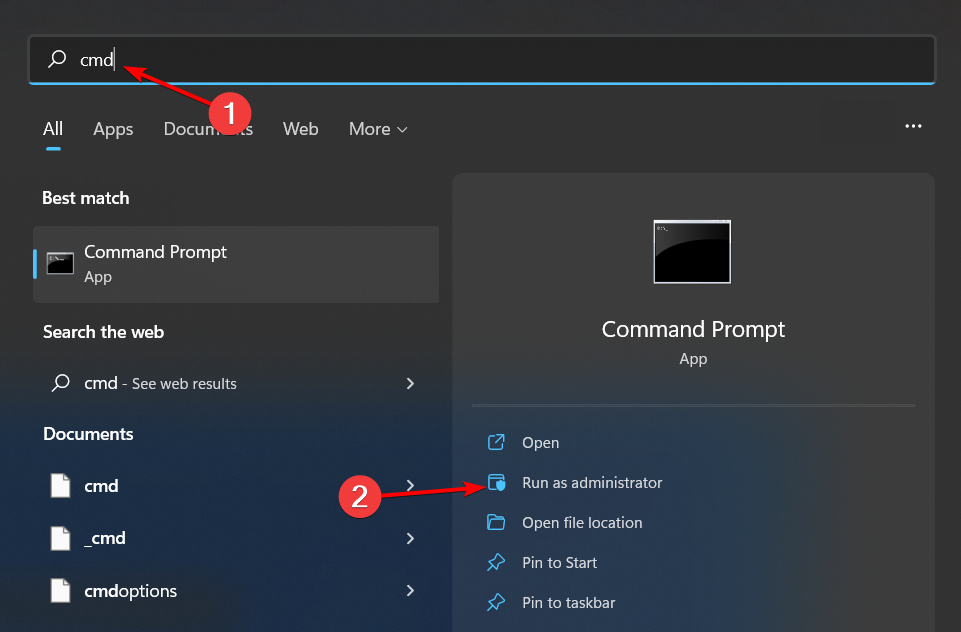
  1. Press the Windows key, type cmd in the search bar and click Run as administrator.cmd-run-admin-w11 unexpected kernel mode trap windows 11
  2. Type the following commands and press Enter after each one: net stop spooler del %systemroot%System32spoolprinters* /Q net start spooler
  3. Exit the command window.

4. Update the Printer drivers

  1. Hit the Windows key, type Device Manager in the search bar and click Open.device manager w11
  2. Navigate to Print queues and locate your printer.
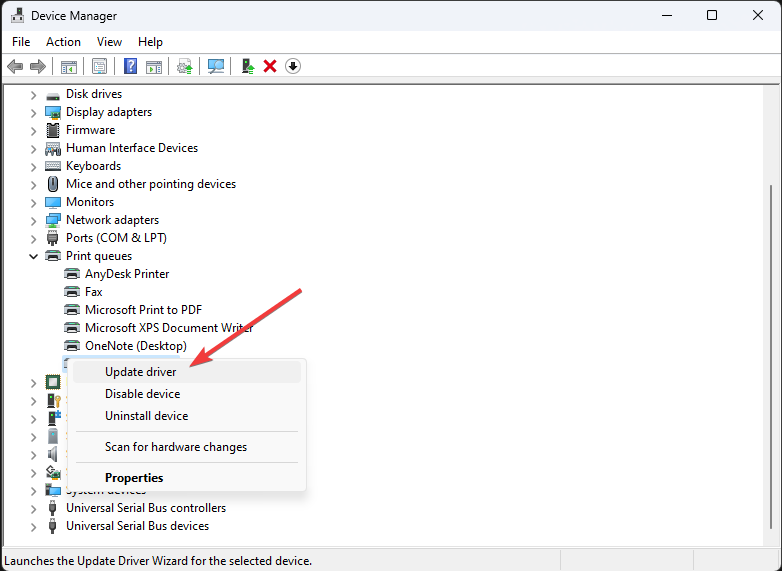
  3. Right-click on it and select Update driver.Update driver Printer -windows 11 can't find printer
  4. Select Search automatically for drivers.Search automatically for drivers
  5. Windows will find the most suitable driver and recommend you install it.

5. Reinstall the printer drivers

  1. Hit the Windows key, type Device Manager in the search bar and click Open.device manager w11
  2. Navigate to Print queues and locate your printer.
  3. Right-click on it and select Uninstall device.uninstall device
  4. Confirm uninstallation in the next prompt, then restart your device.
  5. Navigate to your browser, go to your printer’s manufacturer’s site. In this case, Canon official site, and type in the Canon printer model.
  6. Select Software & Drivers.
  7. Choose your Windows version from the drop-down menu, select your printer driver from the results and hit the Download button.
  8. Locate the exe file in your Downloads folder, double-click on it to run then follow the on-screen prompts to install it.
  9. Restart your PC for the changes to take effect.

6. Remove and re-add the printer

  1. Press the Windows key + I keyboard shortcut for opening Settings.
  2. Click Bluetooth & devices on the left of Settings then select Printers & Scanners to view your added printers.windows 11 printers and scanners
  3. Double-click the added printer you want to remove to open settings for it then press the Remove button.
    The Remove option wireless printer windows 11
  4. Click Yes to confirm you want to remove the printer.
  5. Go back and click the taskbar’s magnifying glass icon.
    The magnifying glass button wireless printer windows 11
  6. Type Control Panel within the search tool that opens and select Control Panel to open that window.
  7. Next, select Large Icons on the View by drop-down menu.
    Large icons option wireless printer windows 11
  8. Click Devices and Printers in the Control Panel.
  9. Then press the Add a printer button.
    Add a printer option wireless printer windows 11
  10. Choose a printer on the Add a device window, and press the Next button to install it.
  11. Press the Finish button after the printer has been added.

You can also check whether your printer’s manufacturer has a troubleshooting tool and run it to see if it detects any problems. It’s not uncommon for documents to disappear from the print queue but once you discover the root cause of the issue, it is easy to recover them.

In future, always check that the files you send to the printer are not corrupted otherwise you’ll end up with a myriad of print issues. As a good rule of thumb, also back up your files to avoid irreversible loss.

If you have encountered the ERROR_PRINT_CANCELLED before and have a solution not mentioned here, feel free to let us know in the comment section below.

Solved: Windows 11 Hotspot Keeps Turning Off

If your Windows 11 hotspot keeps turning off, it can disrupt your workflow. For users who can’t access Wi-Fi or have older hardware that can’t connect to wireless networks, creating a hotspot using your phone comes in handy.

Ideally, hotspots should work with no issues but if the connection keeps dropping randomly, there’s probably an issue with your network configuration settings, device firmware updates or outdated network drivers.

How do I stop mobile hotspot from turning off in Windows 11?

1. Run connection troubleshooters

1.1 Run the Network adapter troubleshooter

  1. Hit the Windows key and click on Settings.settings windows 11
  2. Click on System, then select Troubleshoot.Open system troubleshooter
  3. Select Other troubleshooters.other troubleshooters
  4. Locate the Network Adapter troubleshooter and click on the Run button next to it.Network Adapter Run IPv6 No Internet Access

1.2 Run the Internet Connections troubleshooter

  1. Hit the Windows key and click on Settings.settings windows 11
  2. Go to System, and click Troubleshoot.System - Troubleshoot wifi keeps disconnecting windows 11
  3. Now click Other troubleshooters. Other troubleshooters
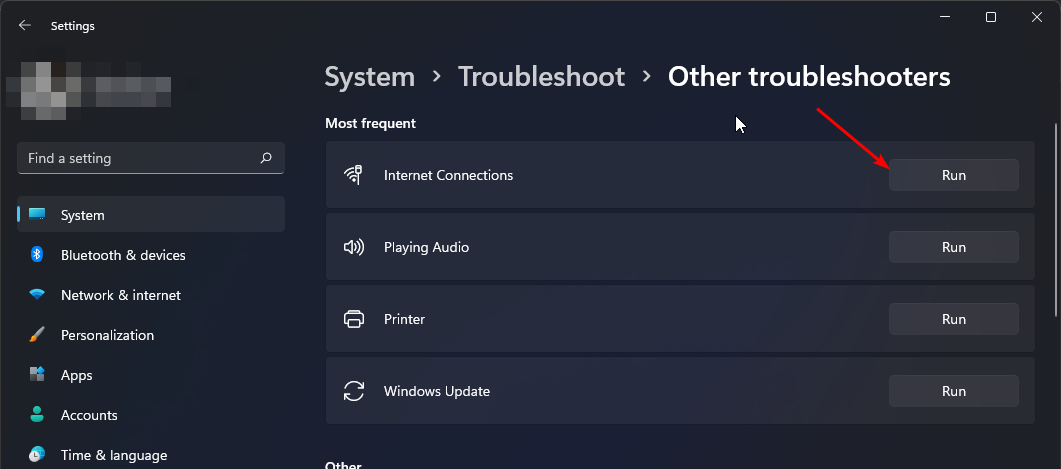
  4. Locate Internet connections, and click Run. 
  5. Follow the onscreen prompts to complete the process.  

2. Restart critical services

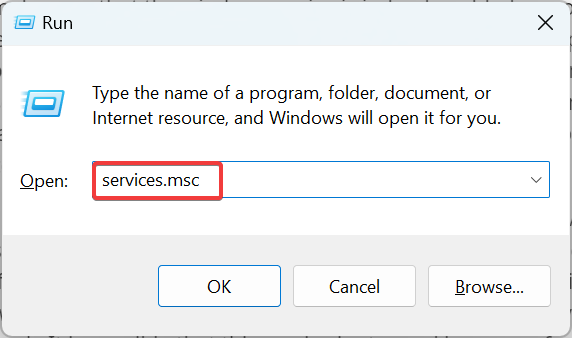
  1. Press Windows + R to open Run, type services.msc in the text field, and hit Enter.services.msc run window
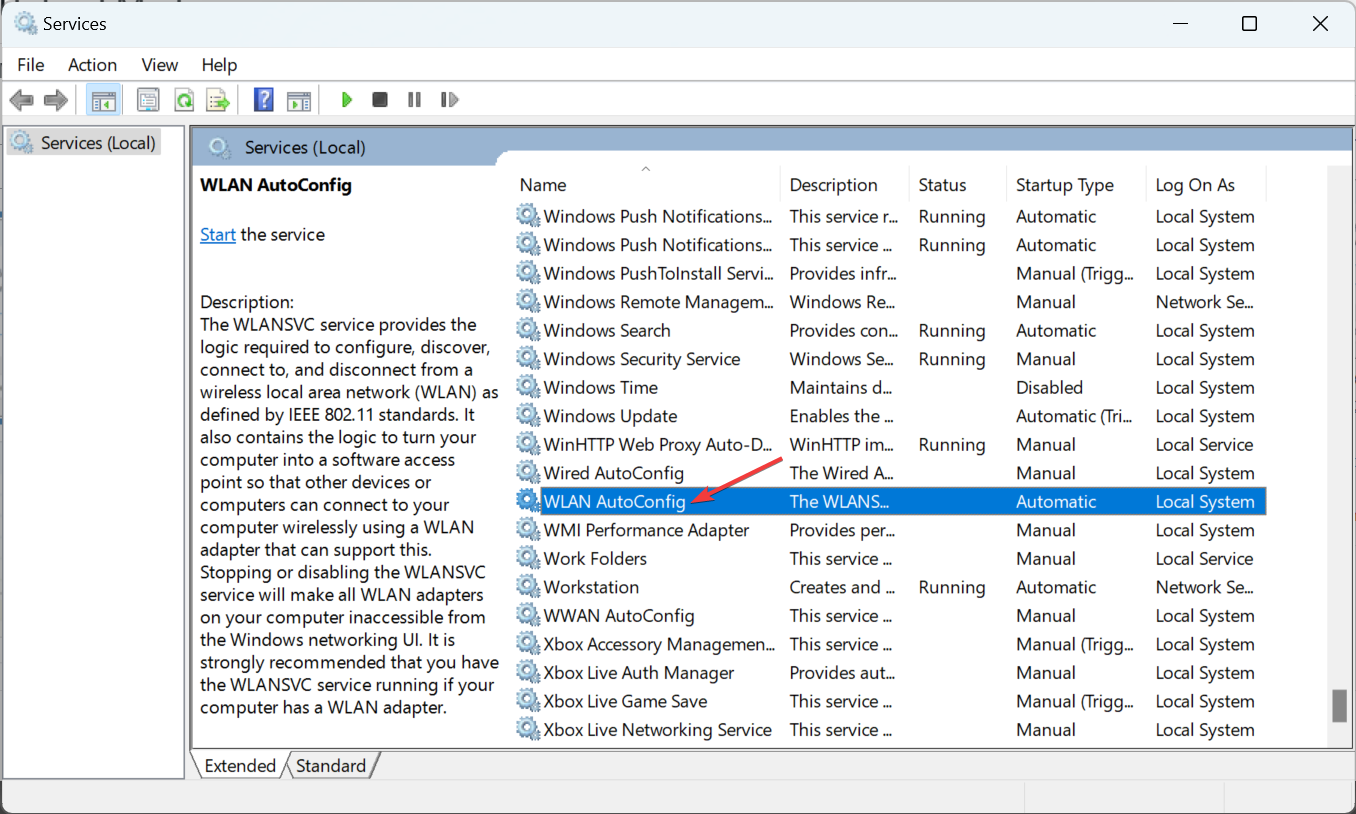
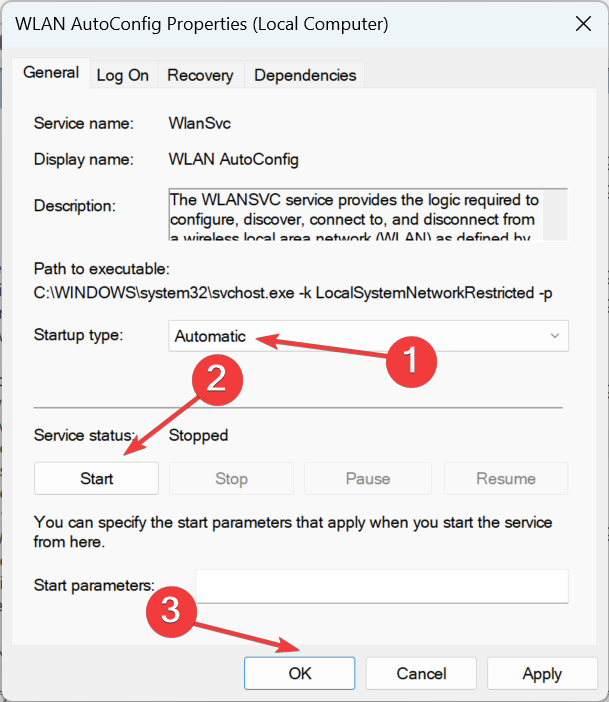
  2. Locate and double-click on the WLAN AutoConfig service to launch its Properties.WLAN AutoConfig service
  3. Now, choose Automatic as the Startup type, click on the Start button if the service is not running, and then click OK to save the changes.automatic startup type WLAN AutoConfig service
  4. After you are done, repeat the same steps but this time with the Windows Mobile Hotspot Service and see if you get a consistent connection to the hotspot.

3. Adjust power saving settings

3.1 Hotspot settings

  1. Hit the Windows key and click on Settings.settings windows 11
  2. Navigate to Network & internet.
  3. Click on Mobile Hotspot and ensure the Share my Internet connection with other devices option is enabled.
  4. Next, under Power saving, toggle off the When no devices are connected, automatically turn off the mobile hotspot option.

Power saving settings are meant to conserve your battery so that you can use the device for longer. However, if you let the device idle for too long, the Wi-Fi hotspot may keep turning off. Switching this feature off solves the intermittent connection problems.

While you’re still on power saving modes, you might also want to adjust your device’s power management settings. If you’ve configured your Windows 11 PC to go on sleep mode or hibernation after some time, you might need to readjust these settings.

3.2 Device settings

  1. Press Win + I buttons to open Settings.
  2. Select System > Power.best power efficiency windows 11 1
  3. Under Battery, click on Battery saver setting.best power efficiency windows 11 2
  4. Ensure the Turn on now button for Battery saver setting is off.best power efficiency windows 11 3
  5. Under the Turn battery saver on automatically option, select Never.best power efficiency windows 11 4

4. Disable your antivirus temporarily 

  1. Hit the Start menu icon, type Windows Security in the search bar and click Open.
  2. Click on Firewall & network protection, then select Public network.league of legends black screen after champion select
  3. Locate Microsoft Defender Firewall and toggle the off button.turning off Microsoft Defender Firewall Windows

Some antiviruses can block connections because it has singled out the hotspot connection as a false positive. If so, you may have to adjust your firewall exceptions so that your hotspot is whitelisted.

5. Change the DNS settings

  1. Hit the Windows key, type Control Panel in the search bar, and click Open.
  2. Select Network and Internet>Network and Sharing Center.Network and Sharing Center
  3. Click on Change adapter settings.
  4. Right-click on your Wi-Fi connection and click on Properties from the list of options.
  5. In the Properties window, select Internet Protocol Version 4 (TCP/IPv4) or Internet Protocol Version 6 (TCP/IPv6) option, depending on your network card configuration and hit OK.

It is possible that your current DNS servers are unreliable hence causing the frequent drop in connections. Switching to a faster and stable server could help maintain a consistent connection.

6. Update your network drivers

  1. Hit the Windows key, type Device Manager in the search bar, and click Open.device manager w11
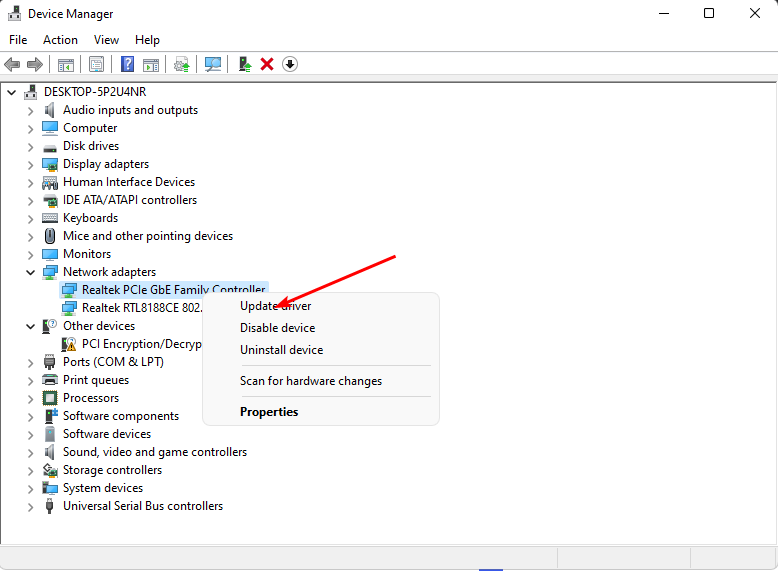
  2. Navigate to your Network adapter, right-click on it, and select Update driver.
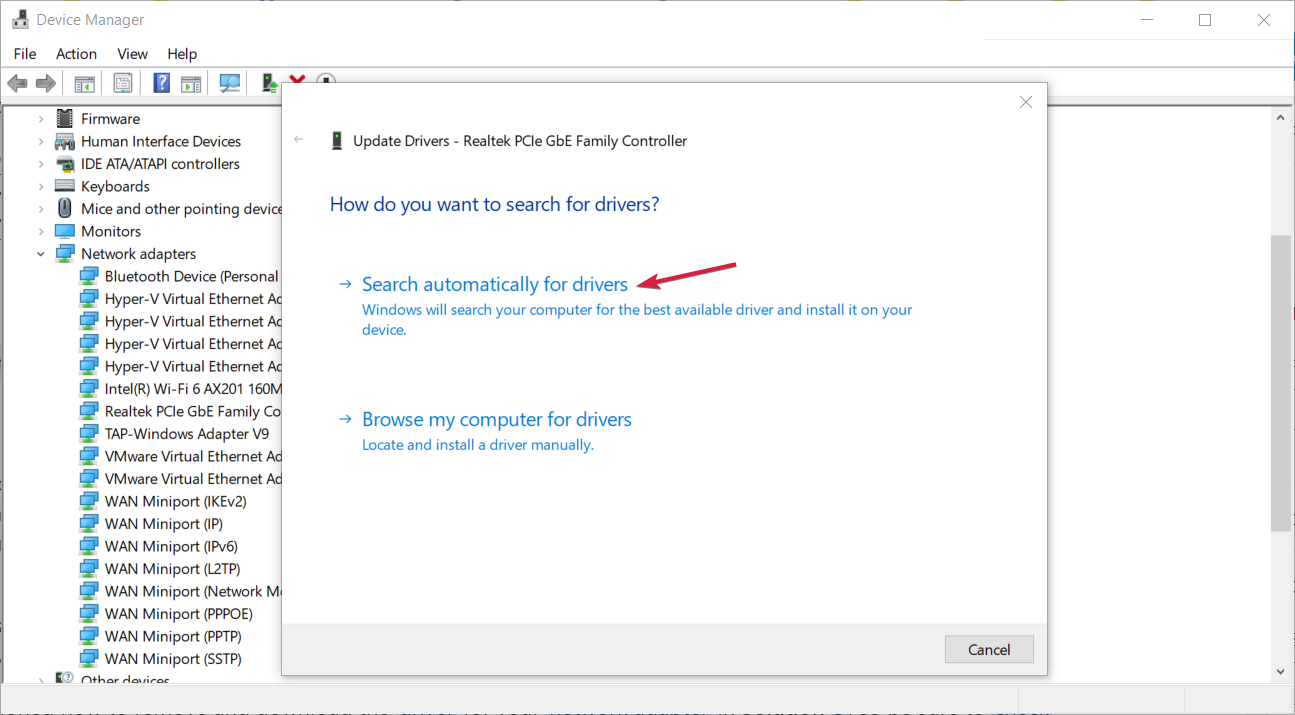
  3. Select Search automatically for updated drivers.

7. Reconfigure your hotspot security settings

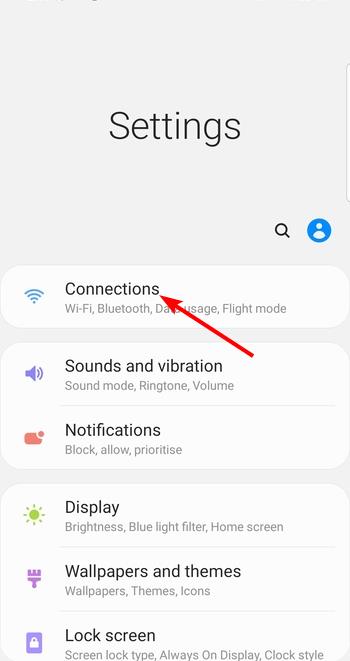
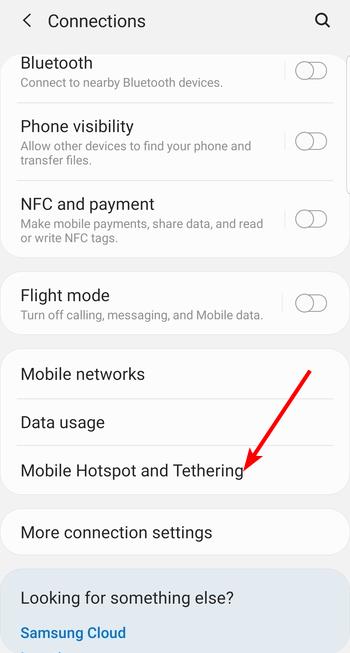
  1. Open the Settings app on your mobile phone and select the Connections option.
    connections phone settings
  2. Now, choose Mobile Hotspot and Tethering.
    Mobile Hotspot and Tethering settings
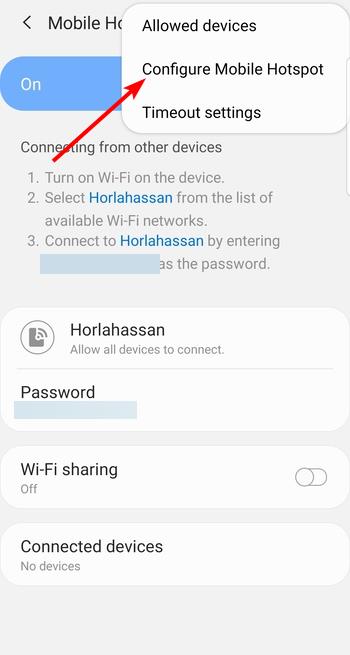
  3. Tap the Mobile Hotspot option.
  4. Tap the three vertical dots in the top right corner and select Configure Mobile Hotspot.
    Configure Mobile Hotspot
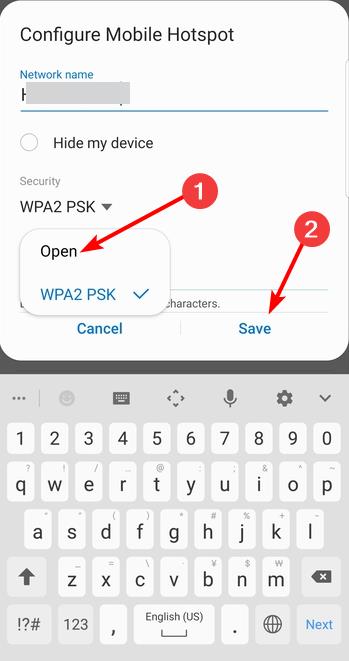
  5. Next, tap the Security dropdown and select WPA2.
  6. Finally, tap the Save option and try connecting again.
    Security settings mobile hotspot

8. Reset your network

  1. Hit the Windows key and click on Settings.settings windows 11
  2. Navigate to Network & internet.
  3. Select Advanced network settings.going advanced network settings win11
  4. Click on Network reset.Network Reset 1
  5. Next, hit the Reset now button.Network Reset now

Hotspots are trickly so you need to set them right the first time to avoid such issues. And if you’re having issues setting up your hotspot, we have the article to ease your frustrations. Just remember that if your hotspot stops working, you can always reset it to default settings.

At times, it may be a unique issue where your laptop is not connecting to the hotspot but other devices have no issue so also test out with other devices.

That brings us to the end of this article but if you have any solutions you think are worth mentioning, drop us a line below.

Fix: ERROR_TOO_MANY_NAMES 68 (0x44)

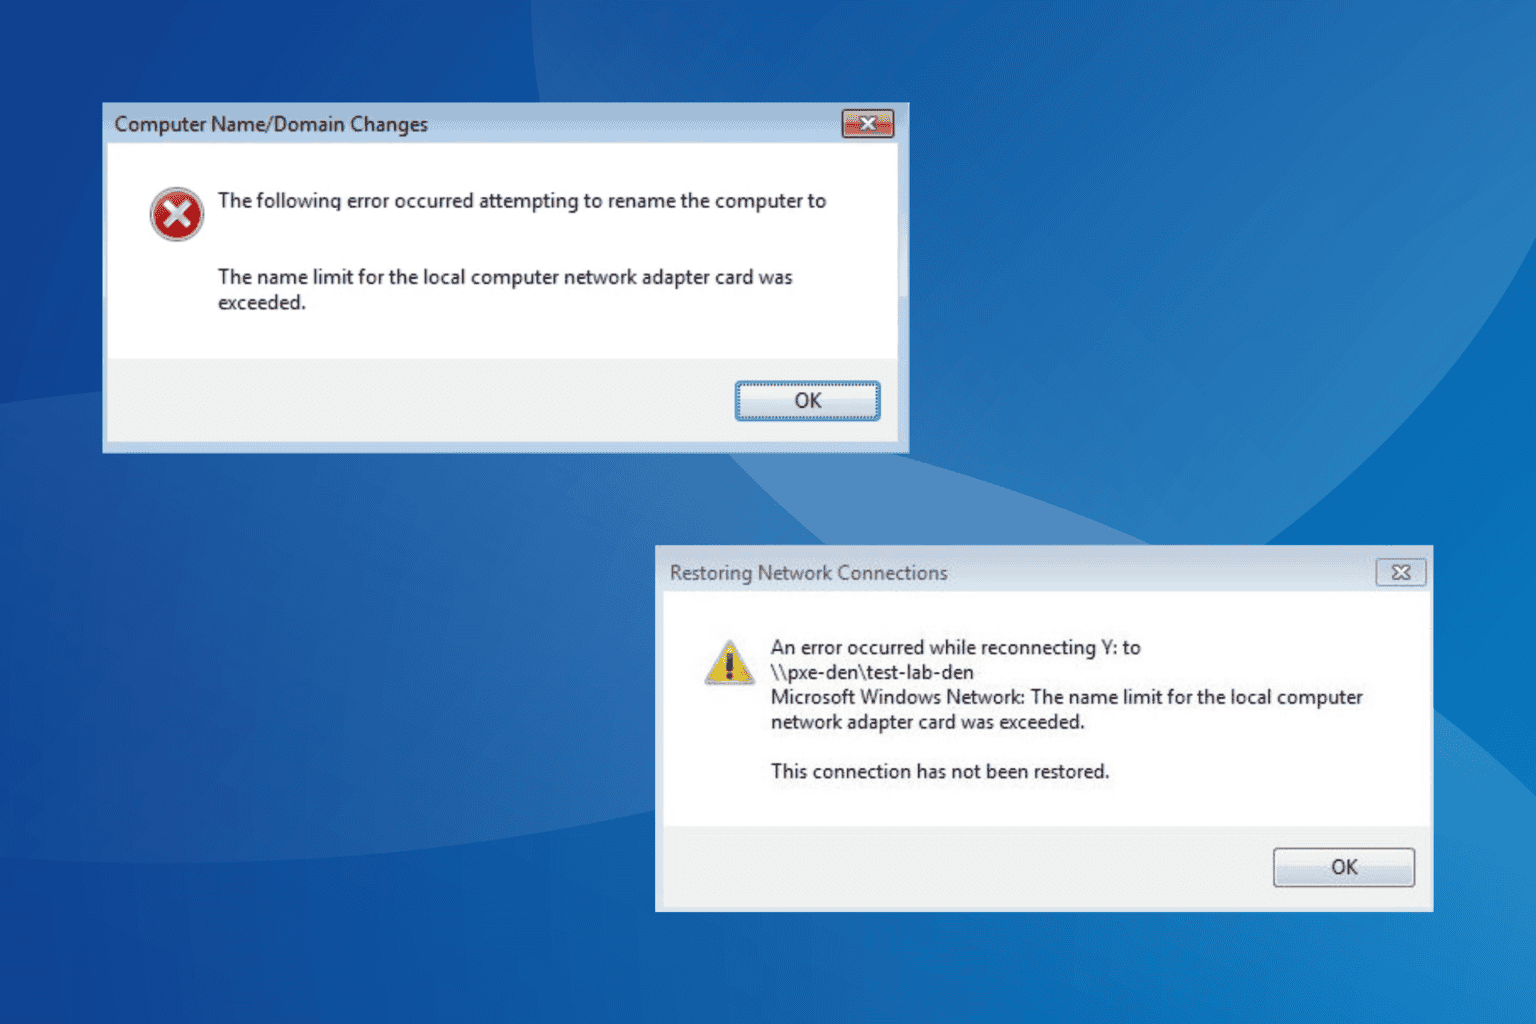
The ERROR_TOO_MANY_NAMES issue with code (0x44), listed as System Error 68, is a network-based problem affecting the PC’s ability to access mapped drives, network shares, UNC path, active directory tools, endpoint protection manager, or symbolic paths.

The error message reads, The name limit for the local computer network adapter card was exceeded.

Before you start troubleshooting, reboot the server and check for improvements. Also, if it’s a case of Failed VCSA deployment, make sure the VCENTER Name is not entirely in upper case and is short.

How can I fix ERROR_TOO_MANY_NAMES?

1. Increase the dynamic ports

  1. Press Windows + S to open Search, type Command Prompt in the text field, and click on Run as administrator.command prompt
  2. Click Yes in the UAC prompt.
  3. Paste this command and then hit Enter to view the present number of ports: netsh int ipv4 show dynamicport tcp
  4. Now, execute this command to increase the dynamic port count to the maximum: netsh int ipv4 set dynamicport tcp start=1025 num=64510increase ports to fix ERROR_TOO_MANY_NAMES
  5. Finally, verify whether the ERROR_TOO_MANY_NAMES system network error on the server is fixed.

2. Reinstall the network adapter

  1. Press Windows + X to open the Power User menu, and select Device Manager.
  2. Expand the Network adapters entry, right-click on the active network adapter, and select Uninstall device.reinstall driver to fix ERROR_TOO_MANY_NAMES
  3. Tick the checkbox for Attempt to remove the driver for this device, and click on Uninstall.confirm uninstall
  4. Finally, reboot the PC, and Windows will automatically install a fresh copy of the driver.

3. Update the network adapter’s driver

  1. Press Windows + R to open Run, type devmgmt.msc in the text field, and hit Enter.
  2. Expand the Network adapters entry, right-click on the active adapter, and select Update driver.update driver to fix ERROR_TOO_MANY_NAMES
  3. Click on Search automatically for drivers and wait for Windows to install the best locally available version.automatic search
  4. Restart the computer for the changes to fully come into effect, and then check for improvements.

The 68 (0x44) The name limit for the local computer network adapter card was exceeded message often appears due to an outdated driver, and updating the network adapter’s driver quickly fixes things!

Besides, if Windows can’t find a better version, go to the manufacturer’s website, locate the recent releases, and then manually install the latest driver.

4. Enable Windows Defender Firewall

  1. Press Windows + S to open Search, type Control Panel in the text field, and click on the relevant result.
  2. Click on System and Security.control panel
  3. Click on Windows Defender Firewall.
  4. Now, select Turn Windows Defender Firewall on or off from the left pane.turn on or off
  5. Choose the Turn on Windows Defender Firewall option under both Private network settings and Public network settings, and then click on OK to save the changes.enable firewall to fix ERROR_TOO_MANY_NAMES

For 2 out of 5 users, enabling Windows Defender Firewall and its service fixed the ERROR_TOO_MANY_NAMES system error. It’s because the service helps with high-range ephemeral ports!

5. Reset the network settings

  1. Press Windows + I to open Settings, go to Network & Internet from the left pane, and click on Advanced network settings.network settings
  2. Click on Network reset.
  3. Click the Reset now button.reset adapter to fix ERROR_TOO_MANY_NAMES
  4. Finally, click Yes in the confirmation prompt to confirm the change.

A network adapter reset is an effective fix against the ERROR_TOO_MANY_NAMES Win32 error code. But before you do that, start with resetting the network components and settings.

6. Perform a system restore

  1. Press Windows + S to open Search, type Create a restore point, and click on the relevant result.
  2. Click the System Restore button.restore to fix ERROR_TOO_MANY_NAMES
  3. Select the Choose a different restore point option and click Next.different restore point
  4. Pick the oldest restore point from the list and click Next.oldest restore point
  5. Verify the restore details and click Finish to start the process.
  6. Wait for the restore to complete. It will take 15-45 minutes.

7. Contact the dedicated support

When nothing else works, the last option is to contact the support team. If it’s a third-party server, get in touch with their dedicated support. For Windows Server, contact Microsoft’s support. Or if your PC is part of an organization, there’s usually an IT team who should fix ERROR_TOO_MANY_NAMES.

In the cases I observed, The name limit for the local computer network adapter card was exceeded message usually appeared due to misconfigurations at the user’s end. And for most, increasing the dynamic port count got things up and running in no time!

Before you leave, discover expert tips to speed up your Internet connection!

For any queries or to share more fixes with our readers, drop a comment below.

How to Use Your Android Phone as a Bluetooth Mouse or Keyboard in Windows 11

Android phones are getting smarter every day, and with the right third-party apps, you can even use them as Bluetooth mice or keyboards for your other devices.

If you have a Windows laptop, Mac, Chromebook, smart TV, or nearly any other platform that supports Bluetooth, you can use your Android phone as a wireless keyboard or mouse. This doesn’t require any software on the receiving device — your Android phone or tablet takes care of everything.

Can you use your phone as a mouse in Windows 11?

Sure thing. You’ll need an Android phone, access to the Internet, and some patience. First, you’ll have to download an app from the Google Store, then you’ll have to connect your Android phone to Windows 11, and with a few tweaks, you’ll turn your phone into a mouse.

How to use your Android phone as a Bluetooth Mouse or Keyboard in Windows 11

1. Download Bluetooth Keyboard & Mouse for PC/Phone

  1. Open the Play Store on your Android phone, and type in Bluetooth & Mouse for PC/Phone.use phone as mouse windows 11
  2. Select the first choice that pops up – Bluetooth Keyboard & Mouse.
  3. Tap on Install.
  4. Open Bluetooth & Mouse for PC/Phone.
  5. Make sure to go to Mouse/Keyboard in the app’s menu.use phone as mouse windows 11
  6. Tap on the Mouse/Keyboard button, and then Setup remote device.use phone as mouse windows 11
  7. Select the Windows PC you want to connect it to. (In our case, this was the device)
  8. Make sure the Windows PC’s Bluetooth is turned on.
  9. The app should then automatically connect to the PC.use phone as mouse windows 11

A pairing code will appear on both the Android and Windows PC screens, and you’ll need to confirm to validate the connection.

Once that is done, you can use your Android Phone as a Bluetooth mouse or Keyboard in Windows 11. You’ll need to move your fingers within the blue square to use it as a mouse.

Like the mouse, if you want to click or right-click on something, tap the two square shapes at the bottom of the screen. For the regular click, tap the left square; for the right click, tap the right square. You’ll get the idea very quickly.use phone as mouse windows 11

To access the keyboard, tap on the keyboard icon at the top of the screen.use phone as mouse windows 11

The Android keyboard will appear. Writing on your Windows 11 PC from there should be as easy as sending a text message.

However, if you want to learn more about turning your phone into a keyboard for Windows PCs, you should read this guide. If you’re interested in using your phone to control your TV, you should also consider our guide on this topic.

For the best results, the receiving device should have Bluetooth 4.0 and run Android 4.4 or higher, Apple iOS 9, iPadOS 13, Windows 10 or Windows 8, or Chrome OS.

This is by no means the only app that enables this functionality — search the Play Store for “Bluetooth mouse” or “Bluetooth keyboard”, and you’ll find plenty of choices. However, the Bluetooth Keyboard & Mouse for PC/Phone was a better and more reliable option.

Can you use your Android phone as a Bluetooth mouse or keyboard when your phone is turned off? Unfortunately, no. When using your phone as a mouse or keyboard, the receiving device does all the heavy lifting—your phone is just acting as a peripheral. So, if your phone is off, the receiving device won’t receive any input.

We also have a guide on how to use your tablet as a keyboard for PC, so don’t miss it for more useful information. You can also use a tablet as mouse for PC using the similar software. Moreover, you can use your phone as a Bluetooth speaker.

What do you think about using an Android phone or tablet as a Bluetooth mouse or keyboard? Would you try it? Do you have better recommendations?

Assembly-csharp.dll Error in Unity: 4 Ways to Fix it

Many users reported issues with assembly-csharp.dll and most often these errors appear in Unity. However, there are ways to solve these problems, and today we’re going to show you how to do it.

How can I fix assembly-csharp.dll errors?

Before we start, try updating Unity Version Control. You can also try restarting Unity and check if that helps. Scan your PC for malware, as many reported that hidden miners can cause this problem.

1. Reimport the scripts

  1. In Unity, right-click on the script folder.
  2. Next, choose Reimport.
    reimport unity
  3. Wait for the process to finish.

2. Add project file to the list of exclusions

  1. Open Kaspersky and click the Settings icon.
  2. Go to Security settings and select Threats and Exclusions.
  3. Click on Manage exclusions.
    manage-exclussions-kaspersky
  4. Now select the Unity project file.
  5. Save changes.

While Kaspersky has been reported as the cause of this problem, other antiviruses might cause it as well.

3. Disable your antivirus

  1. Right-click the Webroot icon in the system tray.
  2. Choose Shut down Protection.
    shut down secure anywhere
  3. Wait for it to shut down.

Keep in mind that disabling your antivirus isn’t safe, and it shouldn’t be used as a permanent solution.

4. Remove the affected file

  1. Remove the following file: Library/ScriptAssemblies/com.unity.multiplayer-hlapi.Runtime.dll
  2. Now try to build the project again.
  3. The build process should be able to complete.

These are several methods you can use to fix assembly-csharp.dll issues in your code editor. Unfortunately, this isn’t the only error with Unity, and we covered unityplayer.dll was not found error not that long ago.

We also have a great guide on what to do if api-ms-win-crt-string-|1-1-0.dll is missing, so don’t hesitate to check it out.

What is NPGoogleUpdate3.dll and How to Fix its Errors

The NPGoogleUpdate3.dll file, developed by Google, is used to update Google’s programs, including Google Earth. On checking the file’s Properties, it should mention that the DLL is a copyright of Google.

On most PCs, NPGoogleUpdate3.dll is stored in one of the following locations (product versions may vary): C:\Program Files\Google\Update\1.3.24.15\npGoogleUpdate3.dll C:\Program Files (x86)\Google\Update\1.3.24.15\npGoogleUpdate3.dll C:\Users\Username\AppData\Local\Google\Update\1.3.21.115\npGoogleUpdate3.dll

There are also reports of threat actors disguising malware and adware as NPGoogleUpdate3.dll or a Google Update service. Amongst these, DealPly and BonanzaDeals are common examples. If your PC is infected, you will find a DealPly Live Service running, or the DLL’s properties will read BonanzaDeals in the File description.

How do I fix NPGoogleUpdate3.dll errors?

1. Use a DLL repair tool

The quickest solution when a Google program throws the missing NPGoogleUpdate3.dll error is to use a top-rated DLL repair tool!

These scan the PC to identify missing or corrupt DLLs, and if any are found, fetch a copy from their database and replace the DLL file.

2. Update the affected application

Often, when a DLL file is not found, simply updating the program should do the trick. While updating, the program auto-checks for any missing critical files and downloads them to the relevant directory!

Remember, this doesn’t work with every app and you may, at times, encounter errors during the update process. In this case, manually fetching a copy of the DLL is the best option.

3. Reinstall the affected application

  1. Press Windows + R to open Run, type appwiz.cpl in the text field, and hit Enter.
  2. Select the Google app throwing the DLL error, and click on Uninstall.uninstall app to fix NPGoogleUpdate3.dll
  3. Follow the on-screen instructions to complete the process, and then restart the PC.
  4. You can now download and reinstall the affected app from the official source.

If you can’t identify the Google app that says NPGoogleUpdate3.dll can’t be found in Windows, start with the ones that were recently installed, updated, or modified. Because these are more likely to cause trouble!

Besides, if a quick reinstall doesn’t work, use an effective software uninstaller to get rid of all leftover files and Registry entries, and then proceed with the reinstallation.

4. Restore and whitelist NPGoogleUpdate3.dll in your antivirus

Sometimes, third-party antiviruses can mistake NPGoogleUpdate3.dll for a threat and quarantine it, making the DLL inaccessible to the concerned program.

In this case, you will first have to unquarantine (restore) the DLL from within the antivirus solution’s dashboard and then whitelist it (exclude it from future scans).

windows defender
Adding exclusions in Windows Security

Before you do, verify that the DLL was stored under a Google program’s directory and that it was published by Google!

5. Perform a system restore

  1. Press Windows + S to open Search, type Create a restore point in the text field, and click on the relevant result.
  2. Click the System Restore button.system restore to fix NPGoogleUpdate3.dll
  3. Select the Choose a different restore point option and click on Next.different restore point
  4. Pick the oldest restore point from the list or one created before the NPGoogleUpdate3.dll error first appeared, and click on Next.oldest restore point
  5. Verify the restore details, and click Finish to start the process.
  6. Wait for the restore to complete. It may take 15-45 minutes.

As a last resort to all NPGoogleUpdate3.dll errors, you can perform a system restore. This will revert all changes to the PC since the creation of the restore point, fixing any recent issues.

Can I safely delete NPGoogleUpdate3.dll?

You may be able to safely delete NPGoogleUpdate3.dll without encountering errors while running Google’s apps. In all likelihood, it will only affect the concerned application’s ability to auto-update.

To be on the safe side, I recommend you go to the DLL’s storage location (mentioned earlier) > rename NPGoogleUpdate3.dll to NPGoogleUpdate3-old.dll > restart the PC > launch the concerned program > check for any issues > if none are encountered > delete the DLL file.

As you can see, the NPGoogleUpdate3.dll file is a part of the Google update plugin. In most cases, users discover the DLL file when it is marked as a threat while running a malware scan. If this happens, first verify whether the file was published by Google or is part of an adware, and then take the necessary measures.

Before you leave, discover expert tips to fix missing DLL errors in Windows!

If you know of any more solutions, share them with our readers in the comments section.

SharePoint will let users create meaningful content with the new and supposedly movable Editorial Card web part

SharePoint will introduce a new Editorial Card web part in its Pages and News section. This part will allow users to manually create content in a card-like container.

We don’t know what precisely this card-like container means. Still, its description is very similar to the capabilities released in Microsoft Loop, which let users move around shareable card-like plans.

If that’s the case, the new Editorial Card should be movable. You can move it around to make creating content for SharePoint sites easier. The Redmond-based tech giant says the new capability will enhance page experiences.

Here’s what the entry says:

Cloud IntelliFrame, the video framing feature that enhances the visibility of people in the room for online meeting attendees, is now available for Teams mobile users when they join a meeting that has participants in a Teams Rooms on Windows.

According to the latest entry in the Microsoft 365 Roadmap, the new Editorial Card will be released in SharePoint in December 2024.

What do you think about it?

Despite bringing major changes to Windows 11, KB5041587 ruined the OS for a lot of users

Microsoft released KB5041587 last month as a non-mandatory preview update that does not need to be installed for Windows 11 to work. Its installation brought significant changes to the OS, such as the new widget placement on the taskbar.

However, installing it left many Windows 11 users in complete disarray. KB5041587 reportedly bricked the operating system, requiring users to perform a complete system restore.

Tried to install Microsoft update KB5041587 the other day. Bricked my system. Force shutdown necessary. Power cycled and went to BIOS and ran system restore. All good so far. Then tried to install KB5041587 again. Took hours to supposedly update only to be told update failed.

Many other Windows 11 users shared the same sentiment; for some, installing KB5041587 caused audio issues.

I’ve lost all sound with the KB5041587 update. I’ve followed the instructions above, removing all files and folders within the Downloads folder. KB5041587 still remains installed. There is still no sound. I check driver updated on for my monitor, it is up-to-date. Still no sound. Options?

Since it’s optional, you don’t need to install it, so you better avoid it. If you have installed it, though, you can remove it this way:

  1. Open File Explorer.
  2. Go to C:\Windows\Windows 11 KB5041587
  3. Look for the SoftwareDistribution folder.
  4. Once there, locate Download.Windows 11 KB5041587
  5. Delete the contents of that folder, not the folder itself.
  6. Restart your PC.

You can also prevent Windows 11 from showing the possibility of installing KB5041587 again by stopping the operating system from automatically downloading the updates.

  1. Open Settings > Windows Update.
  2. Turn the Get the latest updates as soon as they’re available toogle Off.

It’s worth mentioning that not every device is affected, so while the patch does indeed cause issues with many Windows 11, you can still install it. It’s not mandatory, but it can improve the experience of navigating this operating system.

Dota 2 Can’t Connect to Game After Accepting Match [2026 Fix]

Having trouble with Dota 2 not connecting to a game after accepting a match? You’re not alone. Players often encounter this problem with no accompanying error message, and it can be particularly common with recent updates.

How can I fix the Dota 2 not connecting to a game?

1. Check your Internet connection

  1. Press the Windows Key + S and type in Settings.
  2. In the Settings app, select Network & Internet.
  3. Select the Status tab and check your internet connection status.

Poor internet speed, packet loss, and frequent disruptions will affect your Dota2 performance. If you detect any issues, address your ISP. It would also be a good idea to check for Dota 2 latency issues.

Also, if you’re on WiFi, consider placing your router closer to the PC you’re playing on or switching to a wired connection.

2. Use a GPN

If you’re facing issues like Dota 2 not connecting to a match or being unable to connect to the game, using a Gamers Private Network (GPN) like WTFast can help optimize your game connection and reduce lag.

WTFast

WTFast

This Gamers Private Network can optimize your connection to the game server and improve your experience.
Free trial Visit Website

3. Check your firewall, antivirus, and change the game launch options

  1. Launch Dota.
  2. Run the console (enable it in Advanced game options).
  3. Type net_force_steamdatagram 1 and hit Enter.
  4. Try to watch any game via your game client to see if you are able to connect.
  5. If this works, then you should be able to play as well.

First of all, make sure your firewall is not blocking Dota 2. Try temporarily disabling your firewall and connecting to Matchmaking or Lobby.

To disable your firewall, do the following:

  1. Open Control Panel.
  2. Go to System and Security.

  3. Select Windows Defender Firewall.
  4. Then, click on Turn Windows Firewall on or off.
  5. Toggle both of the options to Off and click Ok.
  6. If you wish to add Dota 2 to your firewall’s exception list, press Allow an app or feature through Windows Defender Firewall.

  7. Then, click on Change list, and find Dota 2.
  8. Check bot the Private and Public options, then press Ok.

You might also want to check your antivirus. Sometimes antivirus can block certain features, and cause problems with online games.

4. Verify the integrity of the game files

  1. Open Steam and go to your Library.
  2. Right-click on Dota 2 and select Properties.
  3. Navigate to the Local Files tab.
  4. Click on Verify Integrity of Game Files.verify integrity of game files steam
  5. Wait for Steam to check and replace any corrupted or missing files.

5. Update network drivers

  1. Right-click on Start and select Device Manager.
  2. Expand Network adapters.
  3. Right-click on your network adapter and select Update driver.
  4. Choose Search automatically for updated driver software.

We hope that you succeeded in getting to the Dota 2 server but if you have other issues with the game, we have an excellent article on how to fix frequent Dota 2 issues.

And because you’re obviously into online multiplayer gaming, here’s how you can reduce your ping in such games.

As always, if you’ve come across other solutions, you can help the community by listing the troubleshooting steps in the comment section below.

Microsoft Teams on Mobile users will have access to the IntelliFrame video feed, that makes meetings more immersive

Microsoft Teams on Mobile users will soon have access to one of the platform’s greatest capabilities, the IntelliFrame video feed.

The IntelliFrame video feed enhances users’ visibility in online meetings, making them more immersive and human. The capability was originally released to make Teams meetings more engaging.

According to the latest entry in the Microsoft 365 Roadmap, the new capability will be released on Mobile devices, iOS, and Android, starting in November 2024. If mobile users join a meeting that has participants in a Teams Room on Windows, they will automatically be included in the IntelliFrame feed.

Here’s what the entry says:

Cloud IntelliFrame, the video framing feature that enhances the visibility of people in the room for online meeting attendees, is now available for Teams mobile users when they join a meeting that has participants in a Teams Rooms on Windows.

The new capability should make Microsoft Teams users feel more immersed in online meetings on mobile.

What do you think about this new capability?

DIRTY_MAPPED_PAGES_CONGESTION BSoD 0xEB [Solved]

The DIRTY_MAPPED_PAGES_CONGESTION blue screen error, with a bug check of 0x000000EB, is typically encountered when running resource-intensive applications. According to Microsoft, it highlights the absence of free pages to continue operations, and subsequently, the PC crashes to prevent data loss!

The causes for DIRTY MAPPED PAGES CONGESTION include corrupt/outdated drivers, conflicting third-party apps, corrupted system files, issues with the hard disk and RAM, and low virtual memory.

Before you begin troubleshooting, terminate inactive apps, install all pending Windows updates, disconnect non-critical peripherals, and clear any overlocking. For 2 out of 5 users, these basic checks should fix things!

How do I fix DIRTY_MAPPED_PAGES_CONGESTION blue screen error?

Tip icon Tip
If you are an advanced user, check the BSOD crash log, identify the faulty component, and head to the relevant solution for a quick fix. Otherwise, follow them in the listed sequence. Also, if you see DIRTY_MAPPED_PAGES_CONGESTION immediately after turning on the PC, boot Windows into Safe Mode with Networking and then proceed with the solutions.

1. Update the problematic driver

  1. Press Windows + X to open the Power User menu, and select Device Manager.
  2. Expand all entries here, right-click on the devices listed underneath individually, and select Update driver.update drivers to fix DIRTY_MAPPED_PAGES_CONGESTION
  3. Click on Search automatically for drivers and wait for Windows to install the best locally available version.search driver
  4. Similarly, update all critical drivers, especially the ones for the graphics adapter, network adapter, RAM, hard disk, and connected devices.
  5. Finally, reboot the PC to apply the changes.

While updating the drivers, if Windows tells you that the best ones are already installed, go to the manufacturer’s website, search for the newest versions, and then manually install the latest drivers.

2. Roll back recent driver updates

  1. Press Windows + S to open Search, type Device Manager in the text field, and click on the relevant result.
  2. Expand the entries, right-click on individual devices, and select Properties.
  3. Go to the Driver tab, and click on Roll Back Driver.roll back driver to fix DIRTY_MAPPED_PAGES_CONGESTION
  4. Select a reason for rolling back the update, and click Yes.confirm roll back

If the Roll Back Driver option is greyed out for any device, you can try other ways to roll back the installed driver version and fix the DIRTY_MAPPED_PAGES_CONGESTION BSOD error in Windows.

3. Uninstall conflicting applications

  1. Press Windows + R to open Run, type appwiz.cpl in the text field, and hit Enter.
  2. Select any app that was installed or updated around the same time the issue first appeared, and click on Uninstall.uninstall apps
  3. Follow the on-screen instructions to complete the process, then reboot the PC and check for improvements.
  4. If the error message still appears, uninstall other similar apps.

For some applications, there are remnant files and settings post-uninstallation, which might still be triggering DIRTY_MAPPED_PAGES_CONGESTION. In this case, you must use a top-rated software uninstaller for Windows to delete all leftover files and Registry entries.

4. Repair the corrupted system files

  1. Press Windows + R to open Run, type cmd, and hit Ctrl + Shift + Enter.command prompt
  2. Click Yes in the UAC prompt.
  3. Paste the following DISM commands individually and hit Enter after each: DISM /Online /Cleanup-Image /CheckHealth DISM /Online /Cleanup-Image /ScanHealth DISM /Online /Cleanup-Image /RestoreHealth
  4. Now, run this SFC scan command: sfc /scannowsfc scan to fix DIRTY_MAPPED_PAGES_CONGESTION
  5. Once done, reboot the PC for the changes to come into effect.

If corrupted system files are the underlying cause of the BSOD, running the SFC (System File Checker) scan and DISM (Deployment Image Servicing and Management) commands should do the trick. The two will replace any affected protected system files with their cached copy stored on the PC.

5. Increase the virtual memory

  1. Press Windows + S to open Search, type View advanced system settings, and click on the relevant result.
  2. Click on Settings under Performance.settings
  3. Go to the Advanced tab, and click on Change under Virtual memory.change
  4. Untick the checkbox for Automatically manage paging file size for all drives, then select No paging file, and click on Set.clear page file
  5. Now, choose the Custom size option, and fill out the fields underneath using the following formula based on the available physical memory:
    • Initial size: 1.5 x 1024 x Available physical memory
    • Maximum size: 3 x 1024 x Available physical memory
  6. Click on Set and then OK to save the changes.increase page file to fix DIRTY_MAPPED_PAGES_CONGESTION
  7. Finally, reboot the PC and check for improvements.

When your system doesn’t have enough physical memory, Windows offloads inactive apps to the page file (virtual memory). But if the latter, too, is running low, increasing the virtual memory will fix the DIRTY_MAPPED_PAGES_CONGESTION blue screen error.

6. Check the disk and RAM for issues

6.1 Repair the disk

  1. Press Windows + S to open Search, type Command Prompt, and click on Run as administrator.
  2. Click Yes in the UAC prompt.
  3. Paste the following command and hit Enter: chkdsk /r
  4. If asked to confirm running the scan after a restart, press Y, hit Enter, and then reboot the PC. check disk to fix DIRTY_MAPPED_PAGES_CONGESTION

6.2 Check the RAM

  1. Press Windows + S to open Search, type Windows Memory Diagnostic, and click on the relevant result.
  2. Click on Restart now and check for problems.windows memory diagnostic to fix DIRTY_MAPPED_PAGES_CONGESTION
  3. After the scan is done running, look through the mdsched.exe logs, and identify issues with the RAM.

If the built-in utility can’t find any problems, I recommend using Memtest86+, a third-party memory testing tool that will run extensive scans on individual RAM modules and detect all existing issues.

7. Reinstall Windows

When nothing else works, the last option is to reinstall Windows. Though time-consuming, this will eliminate all software-based conflicts!

To reinstall Windows > connect a flash drive to another PC > go to Microsoft’s official website > download the Media Creation Tool > run it and create a bootable Windows USB > plug the flash drive into the affected PC > change the boot order to the flash drive > follow the on-screen instructions to install Windows.

reinstall Windows
Reinstall Windows using a bootable USB

If even reinstalling Windows fails to fix the DIRTY_MAPPED_PAGES_CONGESTION BSOD, get the PC inspected for hardware malfunction. For this, you can contact the manufacturer’s dedicated support or visit a local repair shop.

Before you leave, discover expert tips to make Windows faster than ever in no time!

For any queries or to share which fix worked for you, drop a comment below.

5 Simple Ways to Fix ERROR_DRIVER_PROCESS_TERMINATED

The ERROR_DRIVER_PROCESS_TERMINATED (1291 or 0x50B) message shows that the process hosting the driver for a particular device has unexpectedly terminated. It appears to be due to issues with the driver or the Windows OS itself.

First, reboot your computer. Sometimes, a simple restart can fix the problem. However, if you still see the message, you need to gather more information. To do that, press Windows + X, select Event Viewer, navigate to Windows Logs > System, and check for errors.

How can I get rid of ERROR_DRIVER_PROCESS_TERMINATED?

1. Perform a clean boot

  1. Press Windows + R to open the Run window. Step 1 type msconfig ERROR_DRIVER_PROCESS_TERMINATED
  2. Type msconfig and click OK to open System Configuration.
  3. On the System Configuration window, navigate to the Services tab, place a checkmark next to Hide all Microsoft services, and click the Disable all button.  This will ensure only non-Microsoft services are disabled.Clean boot Disable all - ERROR_DRIVER_PROCESS_TERMINATED
  4. Go to the Startup tab and click the Open Task Manager link.Open task Manager
  5. On the Task Manager window, locate each Enabled item, select them one by one and click Disable. Note down all the startup items you have disabled; so that you can turn them back on later. Close Task Manager. Disable startup items
  6. On the System Configuration window, click Apply, then OK to save the changes.Click OK and Apply
  7. Click Restart to reboot your computer.Restart clean boot

If you found out, there is nothing wrong with the services and the processes of the computer; reverse engineer these steps to disable clean boot.

2. Update/reinstall the problematic drivers

  1. Press Windows + R to open the Run window.Devie Manager - ERROR_DRIVER_PROCESS_TERMINATED
  2. Type devmgmt.msc and click OK to open the Device Manager app.
  3. Expand the categories one by one to find a device related to the problematic driver (to find it, look for a yellow triangle with an exclamation mark).
  4. Right-click it and choose Update driver from the context menu.Graphics Driver update
  5. Select Search automatically for drivers.Search automatically - ERROR_DRIVER_PROCESS_TERMINATED
  6. Follow the on-screen instructions to allow Windows to find a suitable driver version for your device. You can repeat the process to update other problematic drivers.

If there is no update available, it is recommended that you reinstall the driver. To do that, follow these steps:

  1. Open the Device Manager app using the steps from the above method.
  2. Locate the problematic driver, right-click the driver, and choose Uninstall device from the context menu. Uninstall device - ERROR_DRIVER_PROCESS_TERMINATED
  3. Click Uninstall again to confirm.
  4. Once uninstalled, go to Action and select Scan for hardware changes to reinstall the driver.

If Windows cannot find a better version of your driver, you can manually install it from the manufacturer’s website or use a third-party driver updater tool to install the latest version on your computer safely.

3. Run the System file checker scan

  1. Press the Windows key, type cmd in the search box, and click Run as administrator to launch Command Prompt with elevated rights.CMD elevated - ERROR_DRIVER_PROCESS_TERMINATED
  2. In the Command Prompt window, copy & paste the following command to repair or restore the corrupted system files and hit Enter:sfc /scannowSFCSCANNOW CMD
  3. Wait for the scan to complete, then restart your computer to let the changes take effect.

4. Check for Windows updates

  1. Press Windows + I to launch the Settings app.Windows Update Check for updates - ERROR_DRIVER_PROCESS_TERMINATED
  2. Go to Windows Update, then click the Check for updates button.
  3. If an update is available, click Download & install to install it.
  4. You should check for driver updates; click Advanced options in Windows Update.additional options
  5. On the following screen, locate Additional options and click Optional updates.optional updates - ERROR_DRIVER_PROCESS_TERMINATED
  6. If an update is available, select it and click Download & install.Download & install

5. Perform a system restore

Note icon NOTE
Before following these steps, make sure you have saved all your work and note the names of newly installed apps and system settings preferences.
  1. Press the Windows key, type control panel in the search box, and click Open. Control Panel start menu - ERROR_DRIVER_PROCESS_TERMINATED
  2. Choose Large icons for View by, then select Recovery.Recovery Control Panel
  3. On the following screen, click Open System Restore.Open system restore - ERROR_DRIVER_PROCESS_TERMINATED
  4. Select Choose a different restore point in the System Restore window and click Next. Next Choose a different restore point 
  5. You will see the list of available restore points. Click to select the oldest or most recent restore point from when your computer was functioning correctly, then click Next.Choose a point
  6. Click Finish to start the restoring process.Finish

Windows will restart and restore the system settings to the version you selected. This process may take some time, so don’t turn off your computer. Once your computer restarts, head to Settings, click Windows Update, and then Check for Updates. If an update is available, Click Download & Install to install the latest Windows updates.

If you see the System Restore message wasn’t completed successfully after the restart, we recommend you check out this informative guide for solutions.

In case nothing has worked for you to fix ERROR_DRIVER_PROCESS_TERMINATED, we suggest you reset your PC or reinstall the operating system.

Did we miss any methods that helped you fix the ERROR_DRIVER_PROCESS_TERMINATED issue? If so, please mention them in the comments section below. We will add them to the list.

The new XWine1 lets gamers play Xbox One exclusives on Windows PCs

If you’ve been thinking about playing Xbox One games such as Halo 5: Guardians, Rare Replay, or Forza Horizon 2, you might want to consider the new XWine1, a new Xbox One translation layer for Windows PCs.

According to an official announcement on Reddit and supported by more examples on X (formerly known as Twitter), XWine1 currently supports six fully playable games. Still, the developers behind it will focus on the following titles:

  • Halo 5: Guardians (2015)
  • Rare Replay (2015)
  • Crimson Dragon (2013)
  • Forza Motorsport 5 (2013)
  • Powerstar Golf (2013)
  • Space Jam: A New Legacy – The Game (2021)

Other titles, such as Forza Motorsport 6, Forza Horizon 2, and Crossfire X, are in development to be supported on XWine1. According to the Reddit announcement, many more are coming.

Introducing XWine1, an Xbox One translation layer for Windows PCs. Currently six games are fully playable, with others reaching logos and in-game. More news to come!

However, it’s worth mentioning that XWine1 is not ready for public consumption for now, but it will be in the following months. The developers behind it stated that the project would most likely end up being open-source, allowing others to contribute and twitch the platform to support other titles.

On Reddit, at least, the reception to XWine1 has been overwhelmingly positive, a sign that people want to play Xbox One exclusives on Windows PC.

The developers have also shared a little clip on X, showcasing how XWine1 works. Unfortunately, this platform has no release date yet, but you can follow them on X.

In other news, if your Xbox One stopped updating itself, you should know it’s a bug, and Microsoft fixed it.

What do you think about XWine1? What Xbox One exclusive would you like to play on Windows PCs?

What is Secoh-QAD.dll, Should I Remove it?

The secoh-qad.dll file is often associated with KMSPico, a tool used to activate Windows or Microsoft Office products without a valid license. This file can pose security risks and should be removed. Deleting this file or the secoh-qad.exe won’t affect your Windows OS or the license, but you should probably get a legitimate copy of Windows and register it as soon as possible. For now, here’s how to remove secoh-qad.dll from your system.

How do I remove secoh-qad.dll from my PC?

  1. Open Task Manager by pressing Ctrl + Shift + Esc.
  2. Look for any processes related to KMSPico or secoh-qad.dll (e.g., SECOH-QAD.exe).
  3. Right-click on the process and select End Task.

2. Uninstall KMSPico (if installed)

  1. Open the Control Panel by pressing Win + R, typing control, and pressing Enter.
  2. Go to Programs and Features.
  3. Look for KMSPico or any suspicious software, right-click on it, and select Uninstall.

3. Delete the secoh-qad.dll file

  1. Press Win + E to open File Explorer and navigate to C:\Windows\System32 or C:\Windows\SysWOW64. You may also use the Search function and type secoh-qad.dll and/or secoh-qad.exe to locate it, in case it resides in another folder.
  2. Locate the secoh-qad.dll file, right-click on the file and select Delete. You may also highlight the file and press Shift + Del to remove the file permanently.

4. Use malware removal tools

Although KMSPico and its associated secoh-qad.dll and secoh-qad.exe is not a virus, it is a PUP (potentially unwanted program) and some antiviruses detect it as malware.

So, a quick way to remove secoh-qad.dll is to employ the help of a third-party antivirus. If you have one installed, run a full scan on your system. If it’s ineffective or you don’t have one yet, we recommend downloading and installing one of the best antiviruses from our list of options.

By following these steps, you should be able to remove secoh-qad.dll and any associated files from your system. You may also install one of the best PUP removal tools from our list of tested software.

We also have a dedicate guide on how to block potentially unwanted apps from your PC.

Let us know in the comments below if our guide helped you remove secoh-qad.dll.

How to Blur Background in Zoom

Due to the increase in remote jobs, video conferencing is the new way to meet and greet with your colleagues and clients. However, finding an aesthetically pleasing spot for video calls can’t always be easy. Therefore, you need to blur the background feature in Zoom every now and then.

How can I blur the background in Zoom?

Note icon NOTE
To blur the background on Zoom, you need the Zoom desktop client for Windows or macOS, version 5.5.0 or higher, and a processor with a minimum of a quad-core or higher.

1. Before a call

  1. Press the Windows key, type zoom in the search bar, and click Open.Zoom start menu - how to blur background in zoom
  2. Sign in to your account if you haven’t done so already.
  3. Click the profile icon from the top right corner and choose Settings.Settings
  4. Choose the Background & effects tab.Blur - how to blur background in zoom
  5. Go to Virtual Backgrounds, select the Blur option, and choose this to blur the background on Zoom.

2. During a call

  1. While in a Zoom call, locate the ^ symbol next to the Stop Video button from the toolbar.BLur - how to blur background in zoom
  2. Choose Blur My Background from the menu to instantly blur it on Zoom.

How can I fix the Your blurred Zoom background isn’t showing up issue?

1. Restart Zoom

  1. Press Ctrl + Shift + Esc to open Task Manager.End task - how to blur background in zoom
  2. Go to the Processor tab, select Zoom, and click End task.

2. Reinstall the Zoom app

  1. Press Windows + I to open the Settings app.
  2. Navigate to Apps, then click Installed apps.Apps - Installed apps - how to blur background in zoom
  3. Locate the app, click the three-dot icon, and choose Uninstall.Uninstall zoom
  4. Click Uninstall again.
  5. Now head to Zoom’s official website and click Download (64-bit) or Download (32-bit).Zoom uninstall
  6. Double-click the downloaded file and follow the on-screen prompts to reinstall the app.

In case you are not able to download Zoom to your computer, we have a detailed guide with simple instructions for you. If nothing worked out for you, try contacting Zoom’s support team to receive further assistance.

Are you facing issues like Zoom not launching? It could be due to an outdated app or cache on your device; read this guide to learn the solutions to fix it.

If you have any suggestions or questions about the blur background in Zoom, feel free to mention them in the comments section below.

How to Connect to Bluetooth Hotspot on Windows 11

Did you that you can connect to a Bluetooth hotspot on Windows 11? That’s right, it’s easier than you think, and in this guide, we’re going to show you how to do it.

How do I connect to a hotspot via Bluetooth?

1. Enable Bluetooth and pair both devices

  1. Press the Windows key + I to open Settings.
  2. Next, go to Bluetooth & devices and enable Bluetooth.
    bluetooth enable w11
  3. Click on Add device.
    add bluetooth device
  4. Follow the instructions on the screen to pair the two devices.

For more information, don’t miss our guide on how to enable Bluetooth on Windows 11.

For a complete overview of wired sharing options, visit our USB tethering guide to compare it with Bluetooth connections.

2. Join the Personal Area Network

  1. Open Bluetooth & devices again and select Devices.
    devices bluetooth
  2. Locate your paired device on the list, click the three dots next to it and choose Join Personal Area Network (PAN).
    join personal area network
  3. Select the connection type and click Connect.
  4. Wait for the connection to be established.

To disconnect, follow the same steps, but in Step 2 select Disconnect PAN.

Is Bluetooth tethering the same as a hotspot?

While similar, there are a few differences, with a hotspot you’re utilizing your Wi-Fi to connect to another device to gain internet access. With Bluetooth tethering on Windows 11, you’re using Bluetooth which is slower and less reliable than a Wi-Fi connection.

As you can see, it’s pretty easy to connect to a Bluetooth hotspot on Windows 11. However, if you encounter issues, we have a guide on what to do if Bluetooth is not working, so check it out.

We also have a guide on how to set up a Bluetooth hotspot on Windows 11, so don’t miss it for more information.

Microsoft Edge’s experiment ditches News Feed for a Cleaner New Tab Page Experience

Microsoft is testing a clutter-free New Tab Page, especially without including a feed, in the Edge browser in Canary.

Microsoft Edge has made substantial progress in recent years after switching to Chromium/Blink regarding performance, new features, and stability. However, Edge has long been criticized for its default start page, which is cluttered with a feed and recommendations.

While the new tab settings allow customization, Edge shouldn’t provide a bad startup page to users by default.

Present Edge New Tab Page. Image Credit:WindowsReport

Microsoft tests a Clutter-Free New Tab Page design in Edge

Recently, we reported that Microsoft has quietly released a new tab extension for Edge, WoWTab, which provides regular and calm modes. To address distractions caused by the feed, as well as privacy concerns due to it, Microsoft seems to be experimenting with a minimalistic New Tab Page for the first time since Edge’s launch.

As spotted by us, the new design under testing comes with the removal of the news feed and allows users to choose between two customizable layouts: “Inspiration” and “Focused.”

Image Credit:WindowsReport.

While the “Inspiration” layout displays a visually appealing background image, the “Focused” layout prioritizes a minimalist design.

New New Tab Page Layout Settings. image Credit:WindowsReport

Additionally, quick links are turned off by default, but users can enable them and choose between one or two rows.

The usual search box with the Copilot option included is available for searching the web whenever you want.

With the new design, the new tab page loads much faster and improves the user experience. This also makes Edge align with the new tab page layout offered by Chrome and Firefox, which doesn’t hinder performance.

Users can be able to show frequently visited sites by using the settings provided on the new tab page.

Apart from the minimalist new tab page change in Edge, the Microsoft browser may get an Extension performance detector that warns when extensions slow down pages. Additionally, users can switch to picture-in-picture mode for a video from the Edge taskbar icon.

Microsoft Photos adds Image Search with Bing, allowing users to search the Internet related content similar to their images

The latest update to the Microsoft Photos app introduced many new capabilities for Windows 11 and Windows 10 users.

Microsoft says the update is part of a new version of the Photos app that’s rolling out to Windows Insiders in the Dev and Beta channels. The app’s overall design is a bit more modern, and the navigation panel has been updated to make it easier to find the photos you’re looking for.

The most significant change, though, is adding a new “iCloud Photos” section to the menu on the left side of the app. Once you install iCloud for Windows and log in with your Apple ID, you can view your iCloud Photos library from the Windows app.

You can also download individual pics from iCloud to your device by selecting them, right-clicking, and choosing “Download.”

Microsoft says the new version of Photos is rolling out to Windows Insiders in the Dev and Beta channels now. The company also takes feedback on the update through the Windows Feedback Hub.

Microsoft’s big move is to make its apps more open and intuitive. The new version of Photos is also rolling out to Windows Insiders in the Release Preview channel for those on Windows 11 and Windows 10 version 21H2.

Alongside the new capability for iPhone users, Microsoft Photos will also support Image Search with Bing, which will allow users to easily search the Internet for pictures similar to their own. This capability will also display related content, from Wikipedia posts to videos.Microsoft Photos

Earlier this summer, the Redmond-based tech giant added AI capabilities to Microsoft Photos, making the app more versatile.

5 Simple Ways to Fix Nvwdmcpl.dll Could Not Be Found

Many users have encountered the Nvwdmcpl.dll could not be found error, which prevented them from launching the NVIDIA nView Control Panel, Version 52.16. The Nvwdmcpl.dll is a third-party DLL file associated with the NVIDIA nView Control Panel.

The error occurs if the DLL file is corrupted or damaged. You can also see this problem if your device’s system files are missing. To begin with, you must ensure your Windows version is up to date.

How can I fix the Nvwdmcpl.dll could not be found error?

1. Use a third-party DLL fixer

Nvwdmcpl.dll is a third-party DLL file used by NVIDIA nView Control Panel, Version 52.16. If the DLL file is missing or damaged, the associated app will not launch. You can manually restore it by copying it from another computer.

This approach has its risks and may cause further issues with your device. Therefore, it is recommended that a third-party DLL fixer tool be used.

These software are designed to resolve compatibility issues and common problems associated with third-party and system DLL files.

2. Reinstall the affected app

  1. Press Windows + I to open the Settings app.
  2. Navigate to Apps, then click Installed apps.Apps, installed apps -nvwdmcpl.dll
  3. Locate the app, click the three-dot icon, and choose Uninstall.Uninstall the app
  4. Click Uninstall again.uninstall confirmation app
  5. Go to this NVIDIA official website and look for NVIDIA nView Control Panel. Click Download.
  6. Double-click the downloaded file to initiate the installation.
  7. Follow the on-screen steps to complete the process.

3. Update/reinstall the graphics driver

  1. Press Windows + R to open the Run console.Device Manager Run command - nvwdmcpl.dll
  2. Type devmgmt.msc and click OK to open the Device Manager app.
  3. Locate Display adapters, click it to expand, right-click the graphics driver, and choose Update driver from the context menu.Uninstall device nvwdmcpl.dll
  4. On the following page, select Search automatically for drivers.Search automatically
  5. Windows will now find and install the best driver for your device. Follow the on-screen instructions to complete.

If Windows cannot find a better driver version, you can also head to the manufacturer’s official website and manually install the driver, or you can use a third-party driver updater tool to update the drivers on your PC safely. You can also try reinstalling the driver; for that, follow these steps:

  1. Open Device Manager again, go to the Display adapters category, expand it, right-click the graphics driver, and select the Uninstall device option. Uninstall device
  2. If available, place a checkmark next to Attempt to remove the driver for this device and click Uninstall.
  3. Once done, go to Action and choose Scan for hardware changes from the context menu to reinstall the driver.Action scan for hardware changes nvwdmcpl.dll
  4. Reboot your computer to let the changes take effect.

4. Perform a system restore

Note icon NOTE
Before following these steps, ensure you have saved all your work and note the names of newly installed apps and system settings preferences.
  1. Press the Windows key, type control panel in the search box, and click Open. Control Panel start menu - nvwdmcpl.dll
  2. Choose Large icons for View by, then select Recovery.Recovery Control Panel 
  3. On the following screen, click Open System Restore.Open system restore - nvwdmcpl.dll
  4. Select Choose a different restore point in the System Restore window and click Next.Next Choose a different restore point
  5. You will see the list of available restore points. Click to select the oldest or most recent restore point from when your computer was functioning correctly, then click Next.Choose a point - nvwdmcpl.dll
  6. Click Finish to start the restoring process.Finish nvwdmcpl.dll

Windows will restart and restore the system settings to the version you selected. This process may take some time, so don’t turn off your computer. Once your computer restarts, head to Settings, click Windows Update, and then Check for Updates. If an update is available, Click Download & Install to install the latest Windows updates.

If you see the System Restore message wasn’t completed successfully after the restart, we recommend you check out this informative guide for solutions.

5.  Download the DLL file from a reliable website

Note icon NOTE
If you want to restore the DLL file manually, you should always download it from a reliable website like DLLme. Our experts at WindowsReport have tested & verified that the files on it are safe to use.
  1. Go to the DLLME website, search Nvwdmcpl.dll, choose an appropriate option, and click Download.

  2. Double-click the downloaded folder to open, locate, and copy the .dll file.
  3. Go to this path and paste the DLL file. Don’t forget to replace C with your system drive letter if it is not C for you:C:\Windows\System32
  4. Restart your computer to save the changes.

In conclusion, to fix any issues related to Nvwdmcpl.dll, you should reinstall the affected app, reinstall the update driver, perform a system restore, or use a third-party DLL fixer to restore the missing DLL file.

If you often encounter missing DLL issues on your Windows 10 computer, we have a guide to help you understand the causes and the solutions.

We also have a guide on missing jsonrpcserver.dll, so don’t miss it for more useful information. Our latest guides covers what to do if nvtt.dll is missing, so feel free to visit it for more information.

If you have any suggestions or questions about the Nvwdmcpl.dll could not be found issue, feel free to mention them in the comments section below.

How to Use Your Phone as a Microphone on Windows 11

If you don’t have a mic installed on your PC or you’re forced to use the one on your laptop (which is not too good), it makes sense to use your phone as a microphone on Windows 11. Most likely, your smartphone has a way better mic and that will ensure a crisp sound in your conversations. Here’s how to do that!

How do I use my smartphone as a microphone on PC?

1. Download and install WO Mic on your smartphone and PC

  • On Your Smartphone:
    • Go to the Google Play Store (for Android) or the App Store (for iOS).
    • Search for WO Mic and install the app.
  • On Your PC:
    • Visit the WO Mic website and download the WO Mic Client for Windows.
    • Install the WO Mic Client on your PC by following the installation prompts.

2. Set up WO Mic on your smartphone

  1. Open the WO Mic app on your smartphone.
  2. Tap on the gear icon (Settings) and select your preferred transport method (Wi-Fi, Bluetooth, USB, or Wi-Fi Direct).
    • Wi-Fi: Ensure both your smartphone and PC are connected to the same Wi-Fi network.
    • Bluetooth: Pair your smartphone with your PC via Bluetooth.
    • USB: Connect your smartphone to your PC using a USB cable and enable USB tethering.
    • Wi-Fi Direct: Use Wi-Fi Direct if available on your device.

3. Configure WO Mic on Your PC

  1. Open the WO Mic Client on your PC.
  2. Go to Connection > Connect. For the Wi-Fi connection, you will need to enter the IP of the phone that will be showed in the phone app.
  3. Select the same transport method you chose on your smartphone.
    • Wi-Fi: Enter the IP address displayed on the WO Mic app on your smartphone.
    • Bluetooth: Select your smartphone from the list of paired devices.
    • USB: Ensure your smartphone is connected and USB tethering is enabled.
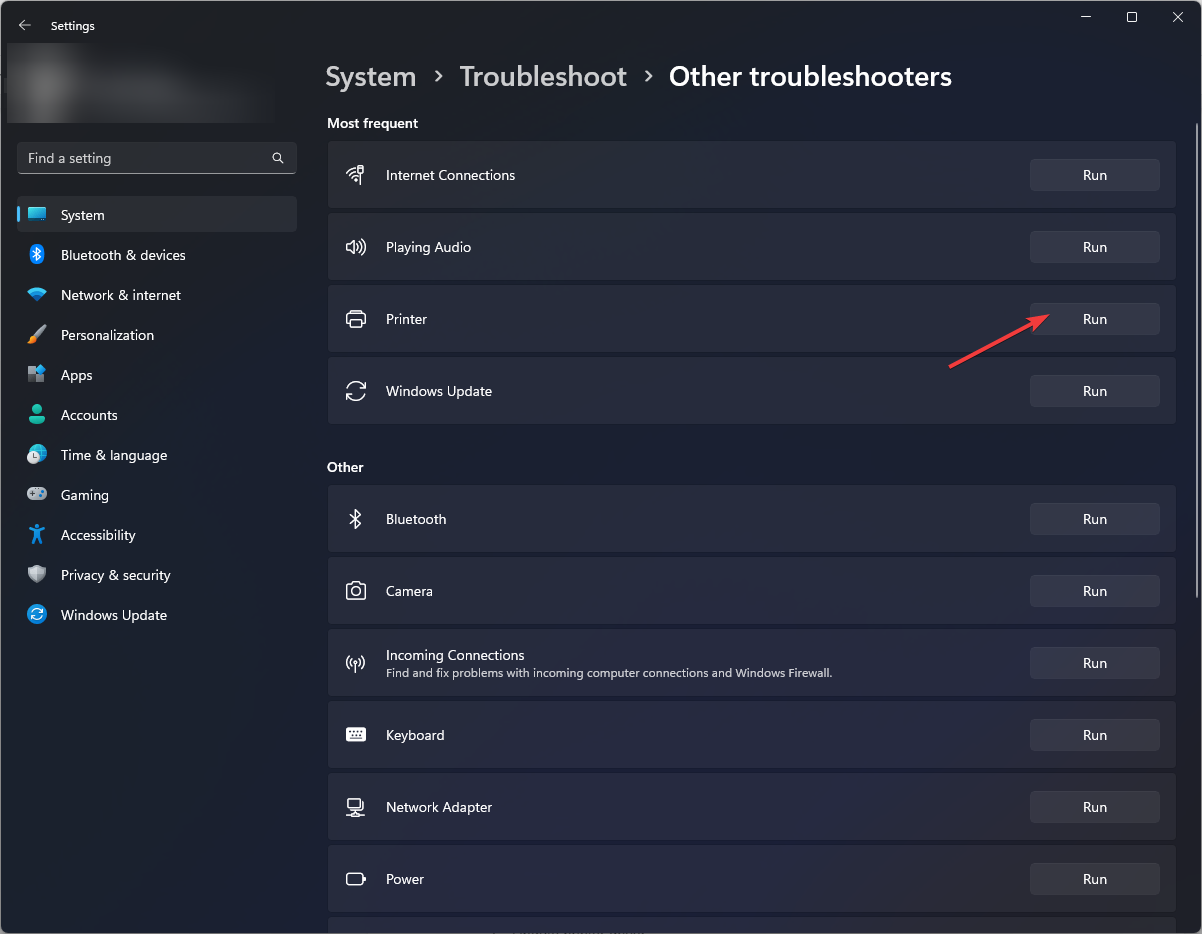
    • Wi-Fi Direct: Follow the prompts to connect via Wi-Fi Direct.

4. Start the Microphone

  1. On your smartphone, tap the Play button to start the microphone.
  2. On your PC, click Connect in the WO Mic Client.

5. Set WO Mic as the Default Microphone

  1. Right-click the sound icon in the system tray and select Sounds.
  2. Go to the Recording tab.
  3. Find WO Mic Device, right-click it, and select Set as Default Device.
  4. Finally, open any application that requires a microphone (e.g., Zoom, Discord, or a voice recording app).
  5. Ensure that WO Mic Device is selected as the input device in the application’s settings.
  1. Click the Start button, enter phone link in the search bar and open the app from the results.
  2. Sign into your Microsoft account if you are not logged in already.
  3. Now, open your mobile device and open the store to download and install the Link to Windows app. Microsoft also provided a dedicated link to download it from your browser.
  4. Sign into the mobile app with the same Microsoft account you’re using on your PC.
  5. Next, go back to your PC, check the I have the  Link to Windows app ready box, and then select Pair with QR code. You may also select Pair manually, which will provide a code you will need to enter on your mobile device.
  6. Now use the mobile device to scan the QR code that popped up on the PC screen.
  7. Allow the permissions, select Done on your mobile and go back to the Phone Link app to see the phone paired up.

With Phone Link and Link to Windows, you will even be able to take WhatsApp calls from your PC. Of course, you will also be able to get images and other content from your phone on the PC.

By following the steps above, you will be able to use the phone as a microphone on Windows 11. If you didn’t know, you may also do the other way around and use the PC microphone on your mobile.

You may also use some headphones with inline mic on your PC and the highlighted link will lead you to the step by step guide on how to do it. Moreover, you can use your phone as a Bluetooth speaker.

Let us know in the comments below if our guide helped you link your phone to the PC and use it as a microphone.

Windows Server Preview Build 26280 is now out but it has dozens of known issues

Microsoft released the Windows Server Preview Build 26280, which contains both the Desktop Experience and Server Core installation options for Datacenter and Standard editions and the Annual Channel for Container Host and Azure Edition.

This new build is labelled as a Windows Server 2025 preview, and if you’re part of the Server Flighting program, you’ll receive it automatically today.

Starting with this release, the Windows Admin Center (WAC) app has been included in the build, making it easier for you to install it on your server. You can download the app from the Windows Server Store, and it is also available as an inbox app on the Windows Server Desktop.

Additionally, build 26280.5000 includes a new Feedback Hub app. The latest version can be obtained by checking the app’s settings tab for updates.

There are a few known issues to be aware of. Sysprep cannot generalize images: This build has a known issue that prevents images from being generalized via Sysprep. The problem is understood and will be fixed in a future release.

The label for this flight may incorrectly reference Windows 11. However, when selected, the package installed is the Windows Server update. This issue will be addressed in a future release.

Applying the WinPE-Powershell optional component does not correctly install Powershell in WinPE. As a result, Powershell cmdlets will fail. Customers who are dependent on Powershell in WinPE should not use this build.

Windows Server 26280 also has an issue where archiving event logs with the “wevtutil al” command causes the Windows Event Log service to crash and the archive operation to fail. The service must be restarted by executing “Start-Service EventLog” from an administrative command line prompt.

Microsoft has published the ISO and VHDX files for Windows Server 2025 preview build 26280.5000 and the Azure Edition. The company has also made available language and optional feature packs.

It’s worth mentioning that Windows Server 26280 is set to expire on September 15, 2025, just a few weeks earlier than the planned EOS of Windows 10 in October 2025.

You can read the full changelog here.

Windows 11 now lets users pin apps to the taskbar by dragging them from Windows Search

The latest Canary Channel builds for Windows 11 have a new feature that makes pinning apps to the taskbar easier.

As spotted by Twitter user @phantomofearth, you can now drag apps from the Windows Search UI and pin them to the toolbar in the new Windows 11 builds.

You can see below what dragging and dropping from Windows Search to the taskbar looks like.

The feature is live now for all Canary Channel builds with “27xxx” in the version number. It’s a small but nifty addition for those who pin shortcuts to apps in the taskbar for easy access.

The addition is part of build 27695, released over a week ago. While there was no new Windows Insider build last week, Microsoft did update the build 27695 release notes to reflect a change that makes it easier to choose Wi-Fi networks and a new “Wi-Fi power mode” setting in the Windows 11 settings app.

What do you think about this new feature?

(Photo credits: phantomofearth)