Run Windows 10/11 as a guest OS in Hyper-V with ARM64 VHDX

In February, Microsoft added the ability to install Hyper-V on ARM64 devices like the Surface Pro X that run Enterprise or Pro editions of Windows 10.

Now, they offer the ARM64 VHDX for Windows 10 Insider Preview Build 19624, so that you can run Windows 10 as a guest OS in Hyper-V.

How can I create an ARM64 VM?

First, you need a Windows 10 ARM-based PC with a Microsoft SQ1, Qualcomm Snapdragon 8cx, or Qualcomm Snapdragon 850 processor

Then you need to install a Windows 10 Pro or Enterprise versions, build 19559 or newer.

After that, you have to enable Hyper-V.

Download and install VHDX

  1. Download the VHDX file from here.
  2. Create a virtual machine in Hyper-V, using the downloaded VHDX as an existing virtual hard disk

How can I create a virtual machine using Hyper-V Manager?

  1. Open the Hyper-V Manager.
  2. Click on the New option from the Action pane, then click on Virtual Machine. Hit Next in the New Virtual Machine Wizard.
  3. Make your selections for your virtual machine and click Finish.
  4. Now right-click the virtual machine and select connect.
  5. In the new window, select Action and Start.

Note: Hyper-V on Windows 10 ARM64 devices only works on Windows 10 Insider Preview Builds 19559 and above. Nested virtualization is not supported.

[wl_navigator]

FIX: Hulu error codes PLAUNK65 and PLRUNK15 in 5 steps

Hulu error codes PLAUNK65 and PLRUNK15 fall into the category of playback errors, which the service seems to get a lot lately.

Before contacting Hulu’s support department and get a general answer that they’re looking into the situation, your only option is to try and fix the problem yourself.

Luckily, there’s a list of common troubleshooting steps that you can try and hope to get your service up and running in no time.


How do I fix PLRUNK15 error code (for Roku users mainly)

1. Force stop the Hulu app

This is just an immediate solution to make sure that all features of the app are turned off and the app can restart anew. So just exit the Hulu app. Additionally, you can turn off your device and power on again, then restart the app.


2. Uninstall/reinstall the Hulu appuninstall hulu app to fix PLRUNK15

  1. Press the asterisk or star button on your Roku remote.
  2. Select Remove Channel.
  3. Then, go to the Roku Channel Store.
  4. Find the Hulu app > Add Channel.

This will force a fresh and updated app to be installed, at the same time, removing streaming history and cached files.


3. Allow ads/uninstall the ad blockerfix plrunk error roku

When you’ve checked the Limit Ad Tracking option in the Settings menu or if you’ve installed a specific ad blocker to enjoy an uninterrupted streaming experience, this might have also messed with the actual functioning of the app.

Try to allow ads or to uninstall the ad blocker to see if video streaming is resumed.


4. Update your Roku device

  1. Turn on Roku in the Home menu.
  2. Go to Settings > System > System Update.
  3. Select Check Now.

This is to make sure that you have the latest firmware installed.


5. Fully restart your Roku devicerestart roku

This helps to refresh your connection and improve streaming conditions. You only have to turn off your Roku device, unplug it from the power source, wait for a few minutes then plug it back in and power back on. Restart the Hulu app to see if the issue has been solved.

6. Use a better app for your TV

After you fully restart your Roku device and it still does not work properly, we recommend you to add Disney+ from the Chanel Store on Roku’s official website.

If you want a different experience on Roku TV, like unlimited streaming and downloading your favorite originals from Pixar, Marvel, Star Wars, Disney, National Geographic, ad-free entertainment, the capacity to watch on 4 different screens at once, and much more, this is the best choice by far. Disney+ is compatible with hundreds of Roku TV models and accessible anytime, anywhere.

⇒ Get Disney+ now


An additional solution  for error PLAUNK65

hulu error plaunk65

Error PLAUNK65 is not as common as PLRUNK15. It can also occur not only on Roku, but also on mobile devices, Play Station or smart TVs.

The above-mentioned solutions should work to recover streaming functionality altogether. Nevertheless, we recommend an additional one, namely clearing cached data.

On devices running on Windows, Android, or iOS, cached data is usually found in the storage/privacy section of the Settings menu.

You can also use professional software to get rid of unnecessary files, such as CCleaner. After downloading and installing the tool, run a scan, and allow the program to remove all unwanted files.

For Play Station, you have to completely turn off the device, unplug the power cord from the back of the device, wait for a few minutes, then plug the cord back in and restart the device.

On Apple TV you need to uninstall and reinstall the app to clear cache and data.

For Xbox One see the following steps:

  1. Go to Menu.
  2. Choose My Games and Apps > Apps.
  3. Highlight the Hulu.
  4. Hit menu on your controller.
  5. Tap on the Manage Apps > Clear saved data.

Got the 0xC00DB3B2 error on Windows 10? Fix it in 4 steps

Despite the fact that Windows 10 is one of the popular platforms, many users often encounter various issues. One of them is error code 0xc00db3b2. This error specifically appears when you try to use the Film & TV app to play videos.

A user complained about a similar issue on the official Microsoft Answers forum:

I’m unable to play 4K HEVC video. when I open the 4K video, showed me some error like – Please try again. If the problem continues, visit https://support.microsoft.com to check for guidance. 0xc00db3b2

If you are on the same boat, a buggy Windows 10 update might be the potential reason behind this issue. Today we will discuss some quick solutions that can help you to fix the error 0xc00db3b2.


How do I fix error 0xC00DB3B2 on Windows 10?

1. Repair HEVC Video Extensions

  1. Simultaneously press Windows + R keys to open the Run dialog box if HEVC Video Extension app is already installed on your system.
  2. Type ms-settings:appsfeatures and hit the Enter button. It will open the Apps & Features tab available in your Windows 10 Settings application.open apps and features error 0xC00DB3B2
  3. Look for the HEVC Video Extension app from the list of applications. Click on the app and select Uninstall from the context menu.
  4. Check if the problem is resolved.
  5. Head towards the second solution if the HEVC Video Extension app is not installed on your system.

2. Install Repair HEVC Video Extensions

  1. Visit Microsoft Store to download HEVC Video Extensions. download HEVC Video extension error 0xC00DB3B2
  2. Click Get to install the application to start the download process. Wait until the installation process is complete.
  3. Finally, reboot your system and check if the problem still persists.

3. Reset the HEVC Video Extension

  1. Open the Settings app and click Applications.
  2. Select the Apps & Features tab and scroll down to find the HEVC Video Extension.open apps & features error 0xC00DB3B2
  3. Click on it, select Advanced options and click the Reset button.
  4. A confirmation prompt will appear on your screen. Click the Reset button again.
  5. Finally, reboot your system.

If you are still experiencing the 0xc00db3b2 error, the Movies & TV app might contain some corrupted elements. You need to reset this app as well.


4. Reset the Movies & TV app

  1. Open the Settings app and click Applications.
  2. Select the Apps & Features tab and scroll down to find the Movies & TV app.
  3. Click on it, select Advanced options and click the Reset button.reset Movie & TV app error 0xC00DB3B2
  4. A confirmation prompt will appear on your screen. Click the Reset button again.
  5. Wait for the Reset process to complete and reboot your system.

Did any of these solutions fix the error code 0xC00DB3B2? Share with us your experience in the comments down below.

[wl_navigator]

FIX: Past duration too large error in FFmpeg

FFmpeg is an open-source tool that is used by billions of people around the world for processing audio, video, and other multimedia content.

This command-line program often generates Past Duration Too Large error during the downscaling or encoding video content. One of the users who experienced a similar problem reported the issue on StackOverflow.

When encoding H.264 using ffmpeg I get the following type of warnings:  Past duration 0.603386 too large

What do they mean? I have not found anything clear online or in the ffmpeg documentation.

It seems like it is a warning message rather than an error that appears when you try to encode a high frame rate file to a low frame rate output.

The framerates are dropped in that case. Today, we will show how you can get rid of this warning message.


How do I fix the Past duration too large error in FFmpeg?

1. Set the input frame rate

set input frame rate FFmpeg Past Duration Too Large error
  1. The problem might appear if the input frames are missing from the video and it can cause some frames to drop.
    • You need to add the input frames to fix the issue.
  2. Look at the call that you are using for video conversion.
    • It should be similar to this one:
      • ffmpeg -framerate 24 -i %05d.png -c:v libx264 -crf 5 out.mkv
  3. You need to separately mention the input and output framerate in the following manner:
    • ffmpeg -framerate 25 -i %05d.png -r 10 -c:v libx264 -crf 5 out.mkv

The issue should disappear because the encoding is now done for 161/400 images. The system will delete the rest of the images.

However, if the problem still persists head towards the second solution.


2. Add Sync Flags

add sync flags FFmpeg Past Duration Too Large error
  1. Right now, you might be using the call mentioned below: ffmpeg -framerate 24 -i %05d.png -c:v libx264 -crf 5 out.mkv
  2. If yes, you might be missing sync commands and it might trigger the error.
  3. Add the -async 1 -vsync1 synchronization commands in order to synchronize the video input and video output:
    • ffmpeg -framerate 24 -i %05d.png -c:v libx264 -crf 5 out.mkv -async 1 -vsync 1

The situation can be frustrating if you are unable to encoding or downscaling a video. It is important to find a quick solution in that case.

Speaking of errors, another common error is Invalid data found when processing input, but we covered it in another guide, so don’t miss it.

Make sure that you are correctly following each and every step to fix this problem. Let us know in the comments section below if our solutions helped you to fix this issue.

Added Money to Revolut But it’s Not Showing: 4 Ways to Fix

Revolut is a popular digital banking solution that offers instant banking facility with its Revolut app. However, many reported that they have added money to Revolut but it’s not showing.

In case you’re not familiar with this service, we have a great guide on how to use Revolut web app, so be sure to give it a try.

This can be a serious issue, so in today’s guide we’ll show you the best ways to fix it.

Why is Revolut taking so long to transfer money?

  • The transfer usually takes 3-5 business days, so you might have to wait for a bit.
  • Issues with the cache can cause this problem to appear.
  • In some rare instances, corrupted installation can lead to this problem.

What can I do if I added money to revolut but it’s not showing?

1. Clear the cache

  1. From your Android device home screen, tap on the Settings icon.
  2. Scroll down to Apps and tap on Manage apps.
  3. Wait for the apps list to load. Locate and tap on Revolut.
  4. At the bottom, tap on Clear data option.
  5. Select Clear Cache and tap on Yes to confirm the action.
  6. Now tap on Force Close option (bottom left corner).
  7. Choose Yes to confirm the action.
  8. Relaunch the Revolut app and check if the money not appearing issue is resolved.

2. Log out and log in

  1. If the issue persists, try to logout and login.
  2. Launch Revolut and tap on your Profile.
  3. Tap on sign out.

  4. Close the app.
  5. Open Revolut and log in without your credentials.
  6. Check if the app displays the balance correctly.

This is a simple workaround, so don’t hesitate to give it a try.

3. Wait and contact support

  1. Money sent from one bank account to your Revolut account may not appear instantly.
  2. At times, international transactions may take a few days.
  3. Normally, international transactions take 2-3 days depending on where you live.
  4. If you haven’t received the money even after 3 days, make sure you contact the Revolut support.
  5. Also, check Revolut social media accounts to check if any of the services are down for maintenance.

4. Uninstall and reinstall Revolut

  1. If the issue persists, try uninstalling the app.
  2. From the home screen, tap and hold on the Revolut app icon.
  3. Select Uninstall from the options.
  4. Restart the phone.
  5. Open PlayStore and search for Revolut.
  6. Download and install the app.
  7. Log in without your Revolut credentials and check if the money not received issue is resolved.

This isn’t the only issue that users reported, and many experienced Revolut is not compatible with your device message, however that can be easily fixed.

By following the steps in the article, you can fix Revolut money not received issue. Transaction related issues are rare and the support staff can resolve the issue when a ticket is submitted.

FIX: Waze send ETA doesn’t work

Waze is a popular app that offers directions, a live traffic map, and road alerts. It can save time by delivering alerts to your phone gathered by other Waze users. Sometimes, you may get Waze eta not working issue on your smartphone.

Several users have reported similar issues with the Waze eta feature in the Reddit Community.

My wife and I use Waze to communicate to each other about when we’re going to be home (or somewhere else that we’re meeting). Used to be when she would share a drive with me and I would open it, I would get a screen that showed her ETA. But for weeks now, that has not been working for either of us, it just shows “Driving“.

If you are also troubled by this issue, here are a couple of troubleshooting tips to fix Waze eta not working problem.


How do I fix Waze eta not working?

1. Check social media settings

  1. The Waze app integrates with your social media accounts for better sharing. If you have connected your Facebook account to the Waze app, check if the ETA feature is turned off.
  2. Open the Waze app on your phone and log in.
  3. Go to Social Settings.
  4. Under Facebook, make sure the Show Facebook friends and friends on the way option is turned on.
  5. Relaunch the Waze app and check for any improvements.

Share drive guide

  1. As a workaround, you can share your guide through a message using the options button.
  2. Your friend receives a message with a link. Taping on the link shows the ETA and follow your itinerary.

Fix Waze not announcing directions with these steps


2. Check services outage

  1. Before taking any other steps to make sure the Waze service is up and running.
  2. At times the Waze eta not working issue may occur if the service is temporarily down.
  3. You can check the Waze social media account to get an update. Or contact Waze support via a ticket.

3. Clear Waze cache data

  1. The old cache can create issues with the app. Try clearing the cache and check if the issue gets resolved.
  2. Tap on Settings from the home screen or App Drawer.
  3. Scroll down to Apps section. Tap on Manage apps.
  4. From the list of apps, locate and tap on Waze.
  5. Tap on Clear Data button at the bottom of the page.
  6. Choose Clear Cache and then tap on Yes to confirm the action.
  7. Next, tap on Force Close option.
  8. Tap on Yes to confirm the action.
  9. Relaunch the Waze app and check if the ETA is working.

4. Update and reinstall Waze

  1. If the issue still persists, check if an update is available for the Waze app.
  2. Open the Play Store on your phone and search for Waze.
  3. Download and install any pending updates.

Reinstall Waze

  1. As a last resort, uninstall and reinstall the Waze app. This will clear any glitches and unfixable issues with the app.
  2. Reinstall the app from the Play Store and check for any improvements.

By following these steps, you should be able to avoid anymore Waze eta issues, both now and in the future.

Let us know which solution you used to get rid of this problem by leaving us a message in the comments section below.


[wl_navigator]

Running Scripts is Disabled on This System on Windows 11

PowerShell is an automation engine that helps users in task automation. However, many reported Running scripts is disabled on this system on their Windows 11 PC.

This can be fixed by enabling scripts to run, but sometimes that’s not enough to fix the core issue that you’re having.

In today’s guide, we’re going to take a closer look at this issue and show you the best ways you can fix it.

Why is running scripts disabled on my PC?

  • This is a security policy enacted by PowerShell in order to protect your PC.
  • By default, all scripts are restricted from running in PowerShell.

How do I fix Running scripts is disabled on this system on Windows 11?

1. Bypass the Execution Policy

  1. You can update the command to get access to the script access via policy.
  2. Open the run dialogue by pressing Windows + R keys.
  3. Type Powershell in the textbox and simultaneously press Ctrl + Shift + Enter keys. This process will run PowerShell as an administrator.
    open powershell running scripts is disabled on this system powershell error
  4. Now you can type the following command to execute a specific PowerShell script:  powershell -ExecutionPolicy ByPass -File testscript.ps1ByPass Execution Policy running scripts is disabled on this system powershell error
  5. Finally, hit the Enter key and check if your system successfully runs the script.

This solution will bypass the Execution Policy to run the script on your system. After running this command, check if Running scripts is disabled on this system on Windows 11 message is still there.

2. Change the Execution Policy

  1. Simultaneously press the Windows + R combo to open the run dialogue box.
  2. Once the dialogue box opens on your screen, type Powershell and press Ctrl + Shift + Enter keys to open PowerShell with administrative access.open powershell running scripts is disabled on this system powershell error
  3. Based on your particular situation, Windows allows you to set the policy to four different modes. To get the List of Execution Policy, you can type the command: Get-ExecutionPolicy -List
  4. Press the Enter key and you will now see a list showing the Execution Policy status for all the User Groups.
  5. Check the status of LocalMachine under the scope column.
  6. If the execution policy is set to Restricted or Undefined, you need to set the Execution Policy to Unrestricted.
  7. Type the following command to change the status in the PowerShell window: Set-ExecutionPolicy RemoteSignedchange execution policy running scripts is disabled on this system powershell error
  8. Press the Enter key to execute the command and then Y to confirm the change.
  9. If the problem still persists, replace RemoteSigned with Unrestricted. 

This is a permanent solution, and it should help you fix Running scripts is disabled on this system on Windows 11 for good.

Note icon NOTE
The RemoteSigned Execution Policy restricts your system from running those scripts that are not signed by a trusted publisher. However, the restriction is removed if you choose Unrestricted.

As you can see this error can be easily fixed with our simple solutions.

In case the problem is still there our Execution of scripts is disabled on this system should be able to provide you with more solutions.

If you found our solutions helpful, do let us know in the comments section below which one of them worked for you.

FIX: Windows error 0199 password retry count exceeded

If you are using a Lenovo computer then you may encounter the Windows error 0199 security password retry count exceeded error when trying to start the system. As the error indicates it is most likely to occur if the user has typed the security password incorrectly.

If you remember the SVP password, you can easily recover the system and get rid of the error. However, if the user has forgotten the password, the recovery process can be tedious and the user may require to change the system board.

If you are also troubled by this error, here are a couple of troubleshooting tips to help you resolve the Windows error 0199 security password retry count exceeded on your Lenovo system.


How do I fix the Windows error 0199?

1. Restore default BIOS settings

 0199 security password retry count exceeded

  1. Press the  Setup key when the computer starts to boot.
  2. The setup key in most cases for Lenovo computer is F1. However, refer to the user manual if the F1 key doesn’t work.
  3. Enter the SVP key when protemted.
  4. From the BIOS menu, press F9 to restore the default settings.
  5. When the Load default configuration now prompt appears, select Yes.
  6. Once the default configuration is loaded, press F10 to save the changes.
  7. Exit BIOS.
  8. Reboot the computer. This should resolve the error and your computer will restart normally without any issues.

Loading the default configuration in BIOS can help you resolve the Windows error 0199 security password retry count exceeded. However, for this to work you must know the SVP security key.


Have sound issues with your Lenovo? Check out thsi article for some fixes.


2. Remove and reinsert the CMOS battery

0199 security password retry count exceeded

  1. Shut down your computer completely.
  2. Make sure you remove all the cords including the power cord from the wall outlet.
  3. Open the case and look for CMOS battery connected to your motherboard.
  4. Leave the motherboard idle for a few minutes.
  5. Insert the CMOS battery.
  6. Connect the power cord and other cables to your computer.
  7. Restart the computer and check if the error is resolved.

3. Perform a manual BIOSreset

0199 security password retry count exceeded

  1. If the issue persists, try performing a manual BIOS reset.
  2. Shut down the computer completely by removing the power cord and disconnecting other cables.
  3. Next, access the motherboard.
  4. Locate the BIOS configuration jumper button on the motherboard.
  5. Move the jumper from pins 1, 2 and 3.
  6. Wait for 20 seconds and then move the jumper back to its original position.
  7. Reassemble your computer and restart the system.
  8. Your system should boot normally without the 0199 security password retry count exceeded error.

The Windows error 0199 security password retry count exceeded error can be easily fixed by resetting the default BIOS configuration.

However, if you have forgotten the SVP password, you may have to remove the CMOS battery to reset the configuration or manually reset BIOS by using the jumper.


[wl_navigator]

FIX: Windows Update error 0x8024a11a

When updating your Windows 10 computer you may encounter the Windows Update error 0x8024a11a. It is caused by a number of reasons including corrupted system files as well as issues with the Windows update services.

Several users have reported similar errors in the Microsoft community forum:

Error Code 0x8024a11a
I get this error when my Win 10 laptop will not restart after a Win update. Help!

If you are also troubled by this error, here are a couple of troubleshooting tips to help you resolve the Windows Update error 0x8024a11a in Windows 10.


How do I fix Windows Update error 0x8024a11a?

1. Try restarting your computer

Windows Update error 0x8024a11a

  1. Before trying other troubleshooting tips, try restarting your system a couple of times.
  2. If you are unable to restart your computer using the Start menu, force shutdown and restart the computer using the power button.
  3. Do this multiple times and check for any improvements.

Need an alternative tool? Here are 5 of the best webinar software for Windows 10


2. Run Windows Update troubleshooter

Windows Update error 0x8024a11a

  1. Click Start and select Settings.
  2. Go to Updates and Security.
  3. Click on Troubleshoot tab from the left pane.
  4. Scroll down to Windows Update section.
  5. Click the Run the troubleshooter button.
  6. Windows will now scan the system for update related issues.
  7. Follow on-screen instructions and apply the recommended fixes to resolve the issue.

3. Run Windows Module Installer

Windows Update error 0x8024a11a

  1. Press the Windows key.
  2. Type cmd.
  3. Right-click on Command Prompt and select Run as administrator.
  4. In the Command Prompt window, type the following command and hit enter:
    SC config trustedinstaller start=auto
  5. You should see ChangeServiceConfig SUCCESS message upon completion.
  6. Close the Command Prompt window and try to update Windows 10 again and check for any improvements.

The Windows Module Installer is a Windows update service that allows you to install and modify Windows updates. For the update to install successfully the service has to be running. You can make the service to restart by using the Command Prompt method.


4. Run System File Checker

Windows update error

  1. Press the Windows Key and type cmd.
  2. Right-click on Command Prompt and select Run as Administrator.
  3. In Command Prompt, type the following command and hit enter:
    Sfc/ scannow 
  4. The process may take some time to complete 100% verifications.
  5. Once the process is complete, close the Command Prompt and update Windows 10.

The Sfc command checks for file corruption in the system and replaces the corrupted system files with new files to resolve issues with Windows update services.


5.  Disable third-party antivirus

Windows update error

  1. If you have third-party antivirus installed, try disabling it temporarily.
  2. Third-party antivirus can create conflict with the update process and prevent the system from restart resulting in Windows Update error 0x8024a11a.
  3. To disable the antivirus, right-click on your Antivirus icon from the taskbar.
  4. Select Disable temporarily or similar option.
  5. Once the antivirus is disabled, open the Windows update page and try installing updates.

6. Install Windows updates manually

Windows update error

  1. Click Start and select Settings.
  2. Go to Update and Security.
  3. From the right pane, click on View installed update history.
  4. Copy the KB code for the first update on the list.
    Windows Update error 0x8024a11a
  5. Go to Microsoft Update Catalog page.
  6. Paste and search the KB code using the search bar.
  7. Download the update to your system. Make sure you download the correct edition (32-bit / 64-bit).
  8. Press the Windows key, type cmd and click on Run as Administrator.
  9. In Command Prompt, enter the following command:
    wusa C:PATH-TO-UPDATE-FILENAME-OF-UPDATE.msu /quiet /norestart
  10. In the above command, PATH-TO-UPDATE-FILENAME-OF-UPDATE must be replaced with the file path of the downloaded update on your computer.
  11. Restart your computer and check for any improvements.

The Windows Update error 0x8024a11a will prevent Windows computers from restarting after installing updates. While the reasons can vary depending on the user, we have listed all the possible solutions to help you resolve the issue.


[wl_navigator]

Charter Email Login: Access It Easily With These Steps

Charter Email has now been fully rebranded to Spectrum Webmail, and some users are looking for ways to login into the account.

This is a non-issue, and the sign-in process is as straightforward as it has always been, and we will show you how to do it in this guide.

Is Charter email the same as Spectrum email?

While the company has been on the market for about 20 years, several takeovers and a rebranding campaign have made it change from Charter email to Spectrum Webmail.

To make this transition smoother, old users can log in to the new Spectrum Webmail with their Charter email login details. So, Charter email is the same as Spectrum email.

However, if you are unable to login into your email account, check our detailed guide to configure the new Spectrum or Charter email settings.

How do I access my Charter email?

  1. Go to the official Spectrum login page. You can also visit your old Charter email login page, but you will be redirected to the Spectrum Webmail page.
  2. Enter your Charter email credentials.
    credentials
  3. Now, you will get access to your Spectrum account homepage.
  4. Finally, click on the Email icon in the upper right corner to explore your email fully.

With the steps above, you can now access login into your Charter email via the Spectrum Webmail page.

While Charter email is now under a new brand name, the mode of getting into your email is the same as before. So, you don’t have to worry, as the rebranding only brought about improvements.

If you want to know how to set up Charter email on Outlook 2016, check our detailed guide to do it effortlessly.

Feel free to let us know if you encounter any problems getting into your email in the comments below.

Got the VBA runtime error 1004? Fix it fast with these steps

If you work in an organization, you most probably have the latest version of the Microsoft Office suite or Office 365 installed on your PC.

Even if this one of the best spreadsheet tools in the market, this doesn’t make Microsoft Excel immune to occasional bugs. This would be the case with an error message users have been reporting: Run time error 1004. Application-defined or object-defined error.


How can I fix the VBA runtime error 1004?

1. Check your Excel add-ins

manage office add-ins

  1. Click File -> Options ->Select Add-ins
  2. Click the Go button
  3. Select the add-ins you want to disable or remove
  4. Uncheck the box in front of the respective add-in
  5. Click OK

2. Verify Excel or install the latest updates

  1. Right-click the Start button
  2. Select Apps and Features on the pop-up menu.
  3. Select the Microsoft Excel, and select Modify

Depending on whether your copy of Office is Click-to-run or MSI-based install, the next steps will vary a little.

Click-to-run

A window called How would you like to repair your Office Programs will appear

  1. Select Online Repair
  2. Choose Repair to make sure everything gets fixed
    • The Quick Repair option is faster but it only detects and then replaces corrupted files
      Microsoft Office Repair Windows 10

MSI-based

  1. In Change your installation, select Repair
  2. Click Continue
  3. Follow the given instruction to complete the process

3.  The named range doesn’t exist

The most common cause of a run-time Error 1004 is when VBA code refers to a named range that doesn’t exist. Maybe the name is spelled wrong in the code or maybe a valid name is used, but it is on an inactive worksheet. In this second case, the solution is to qualify the range reference with a worksheet (and perhaps the workbook).

  1. Worksheet Sheet1 is active, named range Foobar is on Sheet2
  2. Dim cel As Range
  3. Set cel = Range(“Foobar”) ‘Causes run–time error 1004
  4. Set cel = Worksheets(“Sheet2”).Range(“Foobar”) ‘This works

A less common cause of 1004 errors is when you use a named formula or constant in a Range statement. VBA complains because the named formula or constant returns a value rather than a range reference. The workaround is to use the evaluate method to get the value, such as by enclosing in square brackets:

  1. Dim MyVar As Double
  2. Dim cel As Range
  3. Set cel = Range(“SomeNamedConstant”) ‘Causes run-time error 1004
  4. MyVar = [SomeNamedConstant] ‘This works.
    Note the lack of double-quotes

4. Check the contents of the spreadsheet

  • Inserting a row or column
  • Performing calculations
  • Copy and pasting
  • Sorting
  • Opening or closing the workbook

If you are doing any of the actions mentioned above and you receive the error, check what exactly is wrong. If that is the case, try doing the following:

  • Recheck the formulas
  • Recheck the calculations
  • Avoid using excess shapes
  • Avoid using complex PivotTables
  • Try not to use macros and complex charts with many data points

In today’s guide, we explored the best solutions that you can try to fix the VBA runtime error 1004.

If you found this article helpful or you have any suggestions, get into contact with us by using the comment section below.

FIX: Windows couldn’t complete the requested changes

The Error message Windows couldn’t complete the requested changes. The system cannot find the file specified. Error code: 0x80070002 sometimes appears when users are trying to turn on certain Windows features.

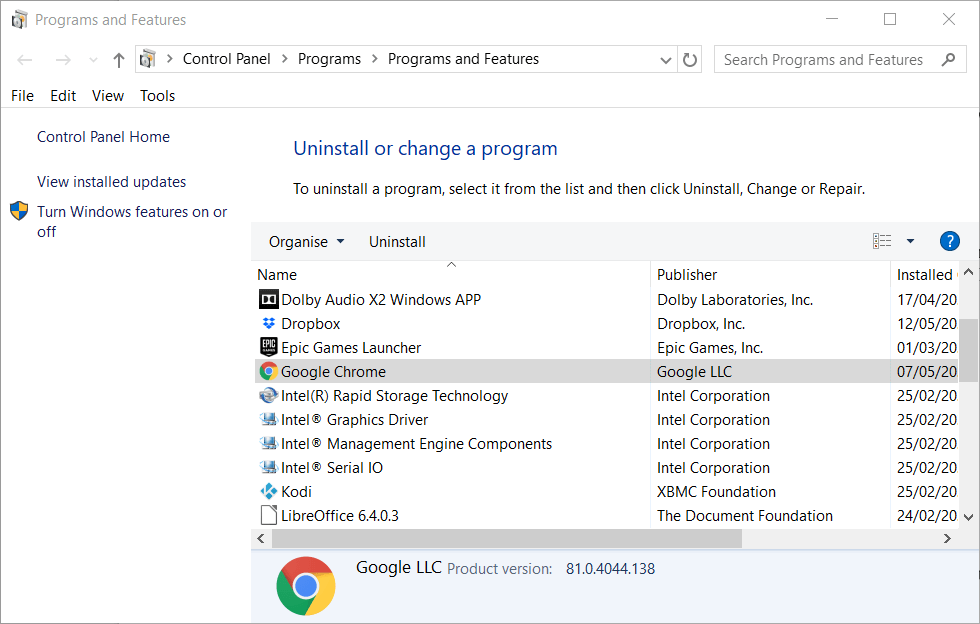
The usual behavior is the following: you open Control Panel, thenPrograms and Features. Here, Turn Windows features on or off and you try to enable .NET Framework.

It has also been reported when trying to enable HyperV, Services for NFS, or Windows Hypervisor Platform.

In most cases, it’s possible that the process starts, but it either fails almost immediately, and uninstall itself, or reboot your computer, and then fail and uninstall. 


How can I fix the Windows error code 0x80070002?

1.Run the sfc/scannow commandrun sfc to solve error 0x80070002

  1. In the search bar, type cmd from the keyboard.
  2. Launch it as administrator.
  3. In the command prompt window, type in sfc /scannow and press Enter.

This process may take several minutes and should detect and repair any issues with the registry files or system references.

You will have to reboot your computer. It is possible that you get another error message saying that the system could not complete the changes and the process will be undone. Nevertheless, go back to Programs & Features to see whether the features are active or not.

If the process was unsuccessful, continue with the following step.


2. Deploy .NET Framework  from installation mediadeploy net framework

  1. In the search bar, type cmd from the keyboard.
  2. Launch it as an administrator.
  3. In the command prompt window, type in DISM /Online /Enable-Feature /FeatureName:NetFx3 /All.

Alternatively, mount the installation media and run the following command: DISM /Online /Enable-Feature /FeatureName:NetFx3 /All /Source:[drive_letter]:sourcessxs /LimitAccess.

Note that Source:[drive_letter]:  refers to the location of the files that are needed to restore the feature.


3. Check for updateswhat to do to fix error 0x00000010

  1. Type Update in the search box.
  2. Select Check for Updates.
  3. Wait for the process to finish and reboot your computer.
  4. Then try to enable the desired features once more and see if it works.
  5. Alternatively, you can run the Windows update troubleshooter from the Troubleshoot menu.

4.  Perform a clean boot

  1. Type System Configuration in the taskbar and select Run as administrator.
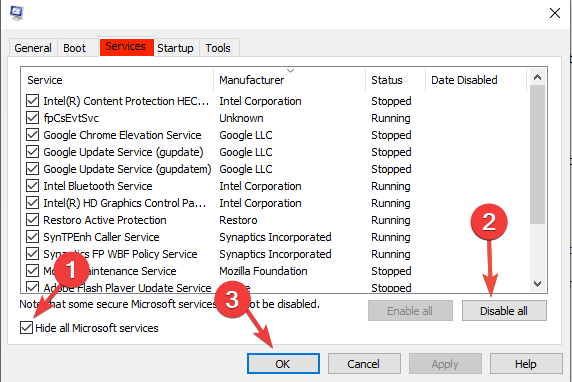
  2. On the Services tab, select Hide all Microsoft services, and then select Disable for all.fix directx installation
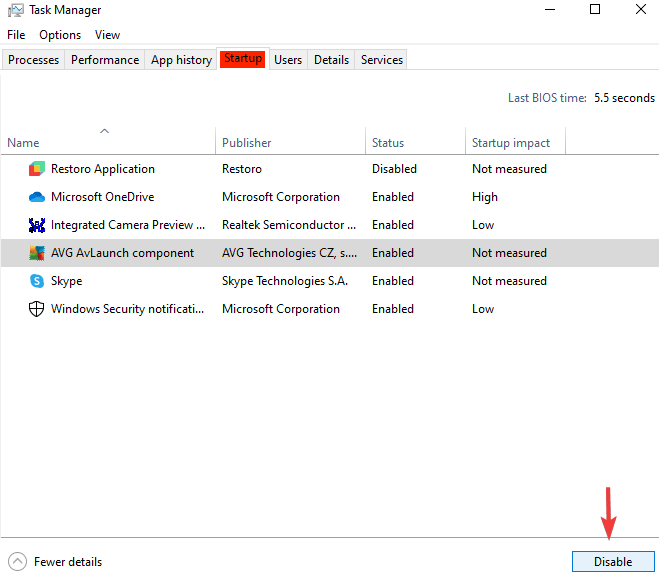
  3. On the Startup tab, open Task Manager, and Disable all items.
  4. Close the Task Manager and click OK in the System Configuration window.
  5. Restart your device and try again to enable the features you wanted.

This should show if any other installed program is preventing respective features from running, so you can uninstall it.

Afterward, set your device to boot normally by opening the System Configuration as shown previously, and in the General tab,  check Normal startup, then OK.

5. Run the.NET Framework Repair Tool

You can use the Microsoft .NET Framework to repair and fix any related issues.

Go to this page to save and download the utility to Windows Then open it, click the Next button to initiate the repairing process.

Note: In case you’re still having trouble enabling the .NET Framework, follow this guide.

In today’s guide, we explored some of the most efficient methods to resolve the 0x80070002 error code. If any of these methods have proven useful, don’t hesitate to let us know in the comment below.

FIX: full_biscuit Amazon showing up on network

Sometime, when going through the network devices you may notice a device named full_biscuit. full_giz or,  full_ford in Windows 1o. This issue of an unknown device full_biscuit amazon showing up on a network is not new and is reported since 2013 by the Windows users.

I have been having trouble with my computers for 4 years- 4 diff computers. follows me.  Today on my new ASUS under devices a new device showed up under “:computers” called “full_biscuit”- can not access properties, have no idea what it is. Have had a device called “hidden device” for 4 years- every tech said “its nothing” but its always “on” has no properties- I cannot shut it off- nothing

The full_biscuit or Amazon FAUWI device can show up on your network if you have an Amazon device like Echo Dot connected to your network. In other cases, it could be because of random WiFi devices like smartphones and tablets trying to connect to your Wireless network.

To begin with, the occurrence of an unknown device in itself does not put your computer or network in harm or open for attacks. However, if you want to get rid of the particular device from your home network, try the steps in the article below.


How do I fix the Full_biscuit amazon showing up on the network?

1. Check your Amazon Echo devices

full_biscuit amazon

  1. Several users have reported that disabling or turning off the Amazon Echo device that is connected to their network has removed the full_biscuit device from the network.
  2. If you have an Amazon Echo as well, power off the device.
  3. Make sure you disconnect the device from the power outlet as well.
  4. Reboot the computer and check if the unknown device has vanished from your network.
  5. Power on your Amazon Echo device and then try connecting to the network.
  6. Recheck your home network to see if the unknown device makes an appearance.
  7. If the network shows the same unknown device, try updating your Amazon Echo device to see if that fixes the issue.

Update Amazon Echo device

  1. Alexa devices receive OTA software updates automatically.
  2. To install any pending updates, make sure the device is turned on and is connected to your network.
  3. Make sure not to use the device when the update is in progress.
  4. Alexa will display a blue light ring when the update is ready to install. So, wait until the updates are installed.
  5. Once the updates are installed, check your network if the unknown device exists.

Looking for a new Amazon Echo device to buy? Check out our expert guide to the best Amazon Echo devices in 2020


2. Disable WiFi SSID broadcast

full_biscuit amazon

  1. Make sure your router is turned on and is connected to your computer.
  2. Open the web browser and type in the following IP address, and then hit enter:
    192.168.1.1
  3. Enter your admin username and password to log in. If you haven’t changed the default password, then enter admin and Password for username and password, respectively.
  4. Once signed in, open the Wireless tab.
  5. Locate the SSID Broadcast option.
  6. Click the Disabled radio button next to SSID Broadcast to hide your SSID.
  7. Make sure the Configuration view is set to Manul before disabling the SSID broadcast.
  8. Click Save Settings to apply the changes.

Note: The above steps are performed on a Linksys router. Refer to the user manual of your router if you are using a different router.

Once the SSID is disabled, reboot your computer. Open the network settings and check if the full_biscuit device is detected on the network. Disabling the SSID broadcast has helped many users prevent unknown devices from appearing on the network. So, try disabling the SSID to see if it fixes the issue.

Update Windows 

full_biscuit amazon

  1. Click on Start and select Settings.
  2. Go to Update and Security.
  3. Download and install all the pending updates.

After the reboot, check your network if it detects any unknown devices.

In many cases, it is the random devices that are passing by your home and are trying to connect to any available wireless network in the area that shows up on your network temporarily and then vanishes as the device goes out of the network range.


The full_biscuit Amazon showing up on network issues, although annoying, seems to be a non-issue for almost all the users. You can begin by checking your Amazon Echo devices and disabling SSID broadcast to see if that helps.

Arduino Serial Monitor is Not Working? 5 Tested Solutions

With Arduino, the Serial Monitor is a feature that can help in debugging sketches or controlling the device from your computer’s keyboard. Also, you can use the Serial Monitor to view data sent by a working sketch.

Sometimes the Serial Monitor just shows a blank page. Although, the Arduino sketch contains Serial.print() and Serial.println() functions, the text doesn’t appear in the serial monitor. To see the Serial Monitor, the Arduino must be connected by USB to your computer.

What can I do if the Arduino Serial Monitor isn’t working?

1. Verify the communication ports

Arduino and the Arduino IDE should be connected to the same communications port. Unplugging and plugging back the Arduino can switch the ports.

For a simple check, re-upload the sketch from the same IDE that you are using to open the Serial Monitor.

2. Match the band rate on the Serial Port

The Serial Monitor on the computer and the Serial Port on the Arduino must have the same data rate (baud rate).

Usually, the baud rate is 9600, so the programming statement is Serial.begin(9600). Set the same value for the Serial Monitor from the dropdown box in the lower-right corner. 

3. Make sure the programming statements are being executed

The Serial.begin() and Serial.println() programming statements must be executed. Sometimes a branching statement, such as if and else, will cause these statements to be missed.

Also, if they are not being executed, the Serial Port will not function.

4. Check the statements for syntax errors

Examine the Serial.print() and Serial.println() statements for syntax errors. Since print and println are common among several programming languages, sometimes a usage that is valid in one doesn’t work with the Arduino.

5. Check the wiring

Inspect the wiring of any circuit connected to the Arduino. The digital pins 0 and 1 should not be used. Both are connected to the components on the Arduino that performs the serial text communication and may not be simultaneously used for something else.

To conclude, we hope that these indications were somewhat helpful to fix the Serial Monitor issue. Any feedback is welcome in the comments section below.

Raspberry Pi password not working? Try these solutions

Raspberry Pi is a great single-board computer, very compact, lightweight ad easy to use. But, like any other system, it has its drawbacks, namely a few frequent errors.

Among these, failure to recognize the password on the first boot or shortly after, as well as after ins. Sometimes, this happens at the first login: other times, after working fine with autologin for a while and the Pi asks again for credentials but won’t recognize the password.

If you happen to type it incorrectly, it will warn you. But if it fails to recognize it, it will just freeze.


What to do if the Raspberry Pi password is not working?

1. Modify the password file for new OS imagemodify password raspberry OS image

    1. Insert the SD card with the OS image in another device
    2. The card should contain a file named cmdline.txt
    3. Open it in Notepad (or other .txt file reader)
    4. Edit the text to have init=/bin/sh at the end. It should look like this:  dwc_otg.lpm_enable=0 console=serial0,115200 console=tty1 root=PARTUUID=04ceb741-02 rootfstype=ext4 elevator=deadline fsck.repair=yes rootwait init=/bin/sh
    5. Save and exit > Insert the SD card into the Raspberry Pi
    6. When prompted type: mount -o remount, rw / (and repeat if an error message appears)
    7. Type passwd pi
    8. Insert a new password
    9. Then type sync
    10. Type exec /sbin/init
    11. Save exit Raspberry Pi

Then put the card into the PC again and delete the init=/bin/sh combination you added. Save the changes and insert the card into the Raspberry Pi.

You should be able to use the new password.


2. Modify the password file for NOOBs

  1. Press Shift key while booting and the system will boot in the recovery mode
  2. Select your Raspbian image, and then click Edit config (e)
  3. Select the cmdline.txt tab and add the init=/bin/sh at the end as above
  4. Press OK and reboot
  5. When it stops, press Enter and where you see a line with #, type:reset password raspberry pi

You should be able to log in with the new password. Then do the process backward, to delete the init=/bin/sh line.


How to change the password after installing TightVNC server

Users sometimes encountered a login issue after installing a VNC server. The Pi boots, the user can log in via SSH, but then another login window pops up, where the Pi won’t accept the default credentials.

The tested solution is to go to the home directory, look for a file called .Xauthority and change the owner using the following command: chown pi:pi /home/pi/.Xauthority


What I should also pay attention to?modify password for raspberry noob

  1. Misspelling can oftentimes be the cause why the password gets rejected (like missing the p in raspberry)
  2. Linux is case-sensitive and only small letters should be used
  3. If you’re not using a qwerty keyboard, pay attention to the letters
  4. When typed, the password it is not visible on the screen (only appears as *******), so typos are again possible

We hope you found this guide helpful. If you did, or if you have any suggestions, don’t hesitate to use the comment section below.


[wl_navigator]

How to effectively use the Not equal to operator in Arduino

Single-board microcontroller Arduino uses C/C++ programming language, which comprises sets of functions, values (variables and constants), and language structure elements.

The not equal to a structure is part of the comparison operators, alongside equal to, less than, less than or equal to, greater than, greater than or equal to. The graphic sign is !=.


How do I use not equal to with Arduino?

Not equal to is an element that compares one variable on the left with a value or variable on the right of the operator.

It returns true when the two operands are not equal.

The syntax is usually the following:

x != y; // is false if x is equal to y and it is true if x is not equal to y

What not equal to condition does is to say that if the current state doesn’t equal the previous state, then do this.arduino not equal

In the above example, you make a call for all values of x that are not equal to 2 to be printed in the Serial Monitor, with a delay of 500ms, to allow you to click the button.arduino not equal to results

It’s recommended to compare variables of the same data type including the signed/unsigned type. Comparing variables of different data types is possible, but it could generate unpredictable results.


The Serial Monitor is not working on your Arduino? Try these solutions.


Note that the Arduino IDE uses C++, but since the physical environment is limited,  not all C/C++ features can be used and the Arduino environment. As a result, Arduino has helper functions (specific extensions) to enable you to use the hardware easily.


[wl_navigator]

Seeing the Arduino upload error? Fix it easily in 8 steps

An Arduino is a single-board microcontroller (or mini-computer) users can connect with Windows PCs. When connected, users can develop and upload programs to their Arduinos with the Arduino IDE software. Then users can run the uploaded programs.

However, users can’t always upload programs when Arduino upload errors arise. When you can’t upload a program, the Arduino IDE software might display a Problem uploading to board error message. There are various potential fixes for Arduino upload errors.


How do I fix Arduino upload errors?

1. Check you’ve selected the right board

  1. First, check you’ve selected the Arduino board you’re utilizing. To do that, click the Tools menu in the Arduino IDE.
  2. Select Board on the Tools menu.
  3. Then select the Arduino board you’re utilizing if it’s not currently selected.

Board submenu arduino upload error


2. Make sure you’ve selected the port you’re utilizing

  1. You’ll also need to have your port selected to upload programs. Click Tools to open that menu.
  2. Select Ports to open the submenu below.
  3. Then select the COM port for your Arduino board, which are typically COM3 ports for Windows.

Port submenu arduino upload error


3. Uninstall third-party firewall and antivirus software

  1. Some users might need to uninstall third-party firewall or antivirus software, such as ZoneAlarm, that can block serial port connections. Launch the Run accessory by pressing the Windows and R keys at the same time.
  2. Open the Programs and Features window by entering appwiz.cpl in Run and clicking OK.
    Programs and Features applet arduino upload error
  3. Select your third-party firewall or antivirus software listed there.
  4. Click the Uninstall button, and select Yes if a confirmation dialog box opens.

4. Check that the board’s USB cable is fully plugged in

Make sure your Arduino board USB cable isn’t in any way loose. If the cable is a little loose at the ports, you might need to press it in more.

Arduino cable and USB port arduino upload error


5. Try connecting the board with an alternative USB cable

USB cables that don’t allow serial communications will not connect Arduino boards. For example, some USB cables are just for charging devices. So, some users might need to change their USB cables to fix sketch upload errors. Your best bet is to get a USB cable from the Arduino website.

Arduino USB cable arduino upload error


6. Unplug all board pins

Some users have confirmed they’ve fixed Arduino upload errors by unplugging all board pins. So, remove any pins you have connected to your board. Then try uploading with those pins removed. You can insert the pins again after uploading them.

Arduino pins arduino upload error


7. Install drivers for your Arduino board

  1. Program upload errors can arise when Arduino drivers have not been correctly installed. To check, open the Run accessory with your Arduino board connected to PC.
  2. Type devmgmt.msc in Run, and press the OK button.
  3. Click Other devices to expand that category.
  4. If there’s an exclamation mark for your Arduino device, right-click it and select Update Driver Software.
    Update Drivers window arduino upload error
  5. Select the Browse my computer for driver software option.
  6. Click the Browse button.
  7. Select the drivers subfolder in your Arduino folder, and click the OK button.
  8. Click the Next button to proceed.
  9. Click the Continue Anyway button.

8. Reset the Arduino board

Finally, try resetting the Arduino board. To do so, press the red button beside the board’s USB port when its connected with PC. The yellow LED light on the board should blink.

An Arduino's reset button arduino upload error

If the board doesn’t reset, you might need to burn the bootloader to it. The Bootloader page on the Arduino website provides further details for how users can do that.


These are some of the ways that you can fix various Arduino upload errors with. Users who have fixed Arduino upload errors with alternative resolutions are welcome to share their fixes in the comments section below.


[wl_navigator]

Seeing the Arduino does not name a type error? Fix it easily

For programing fans, Arduino can be a great development platform that can be the starting point for many electronics projects and prototypes. 

One of the common errors that Arduiono users stumble upon while compiling is an error message containing the syntagm no such file or directory or does not name a type.

Whenever you are getting this (and according to the forums, it is quite frequent), it means that the Arduino IDE can’t find the Adafruit libraries. The solution is to make sure that the file or folder has the right name and is in the right place.


What can I do to fix Arduino does not name a type error?

1. Download the library folder

Make sure to download the complete library for your specific folder from the available libraries in the Manage libraries menu. Use the download option and allow the folder to be compressed as .zip or .tar.gz.

Then look for the folder in the Downloads folder of your device and uncompress it.


2. Move the folder in the right place

After downloading the folder and its files, you should copy the library inside your Arduino folder.

The path of the file or folder should be:

Software/arduino-version number/libraries/library name/file.cpp OR file.c.

The structure of the library folder is very important and most of the time this is the cause for the mentioned errors.

Wrong paths:

Arduino/libraries/library name/library name/file.c

Arduino/libraries/MyLibraries/fodler name/file.c


On a Mac, the Arduino sketch folder is likely going to be called Documents/Arduino so you have to create the libraries folder and place the uncompressed library folder inside.

Then, make sure that the Documents/arduino/libraries/library contains the .cpp and .h files.

After you’ve done all this, close and reopen the Arduino IDE so that it recognizes the new library.


Hopefully, these indications have helped you to make the correct set-up for your libraries and it solves the issue. If you have any further ideas or comments, please level them in the dedicated section below.


[wl_navigator]

Raspberry Pi not reading the SD card? Fix it in 2 easy steps

On the first boot, the Raspberry Pi needs an SD card with the OS mounted on it; otherwise, you can’t go any further.

Many Pi boards come with a microSD card with the NOOBS (New Out Of the Box Software) installer; of course, you can also have your own standalone image. Whichever method you use, it is recommended to use an 8GB for SD card or higher.

But what’s most important, is to use a reliable SD card manufacturer. Now, you might probably not know from the start whether you’ve picked the wrong one, but buying only from authorized suppliers and doing some research on recommended SD card brands for Pi might be helpful.

When booting, you will know that there’s a problem with the SD card if the red LED is blinking, while the green LED is not. Or, the green LED can blink regularly (3 to 8 times) to indicate that there’s a problem with the card.


How do I fix the Raspberry Pi SD card issues?

1. Mount a fresh OS image

  1. Format the SD card in another PC, using SDFormatter. (If the formatting fails, the card is broken.)
  2. Get a clean OS or image from here.
  3. Save and insert the card in your Raspberry Pi to see if it works.

This is the standard recommended solution to fix a faulty microSD card. However, users complained that the Pi fails to recognize the card all too frequently and that they have to re-install a fresh image over and over again.

It is very frustrating, which is why the next solution might be helpful, but only after a first successful first boot: namely to make a read-only copy of the OS on a USD stick or another media device.


2. Make a read-only copy of the SD cardread-only copy of sd card for raspberry pi

  1. Copy the Raspberry image to your SD card.
  2. Boot normally from the card, but don’t Expand filesystem. Set up time zone and international settings.
  3. Run sudo fdisk/ dev/mmcblk0 and press p to print the current partition table.
  4. Then enter the following commands:correct corrupted sd card
  5. Modify the /etc/fstab  as follows:how to fix sd card for raspberry
  6. Run sudo partprobe to recognize the partition.
  7. Format the new partition with sudo mkfs –type ext4 /dev/mmcblk0p3
  8. Reboot.

If you then need to make changes to the system, you can remount the read-only partitions with write access sudo mount -o remount, rw /dev/mmcblk0p2 .

Additional info

  1. Users have reported that their SD card was functional when inserted into another Raspberry Pi board – usually an older version than the one that didn’t boot. In the end, they solved the problem with a new card.
  2. Sometimes, just taking the SD card out and rebooting can fix the issue.
  3. It was also mentioned that the plastic holder of the SD card might have been the problem since some Pi version is very picky about these details.

We would like to have your intake on this matter, so drop us a line with any other solutions that you might have, in the comments section below.


[wl_navigator]

Fix: Error compiling for board Arduino/Genuino Uno

The Arduboy is a small, portable game console with a similar design to the Nintendo Game Boy. It is a game console based on the Arduino board designs, which include Arduino/Genuino Uno.

Users can connect their Arduboys with Windows PCs to upload games to them with the Arduino IDE (Integrated Developer Environment) software.

However, some users have posted on the Arduboy support forum about an Error compiling for board Arduino/Genuino Uno issue.

That error arises when users try to upload a game (otherwise sketch) to the Arduboy with the Arduino IDE software. Consequently, users can’t upload games to their Arduboy when that error arises.

What can I do about the compiling for board Arduino/Genuino Uno error?

1. Make sure you’ve selected the right Arduino board

  1. The Error compiling for board Arduino/Genuino Uno issue can arise when users haven’t selected the right board design within Arduino IDE. To select the correct board, click the Tools menu in the Arduino IDE software.
  2. Then select Board to open the menu shown directly below.
    The Tools menu error compiling for board arduino/genuino uno
  3. Select Arduino/Genuino Uno if that’s not currently selected.

2. Install missing Arduboy libraries

  1. The Error compiling for board Arduino/Genuino Uno error is often due to missing Arduboy libraries needed by the games. To install missing Arduboy libraries, click the Sketch menu.
  2. Then select Include Library to open the menu in the snapshot directly below.
    The Sketch menu error compiling for board arduino/genuino uno
  3. Click Manage Libraries to open the window shown directly below.
    Library Manager error compiling for board arduino/genuino uno
  4. To search for Arduboy libraries, enter the keyword Arduboy in the search box.
  5. Make sure all the Arduboy libraries listed below are installed:
    Arduboy
    ArduboyTones
    Arduboy2
    AdruboyPlaytune
    ArdVoice 469
    ArdBitmap
    ATMlib
    FixedPointsArduino
    Arduboy-TinyFont
    U8GLIB
  6. You can install selected libraries by clicking the More info links and Install buttons for them. Select the latest versions of the libraries on their drop-down menus.
    The Install button error compiling for board arduino/genuino uno
  7. Click the Close button when you’ve installed all missing Arduboy libraries.

3. Reinstall the Adruino IDE software

  1. Some users might need to reinstall the Adruino IDE software to resolve the compiling for board Arduino/Genuino Uno error. First, open File Explorer in Windows.
  2. If you’re utilizing Arduino IDE 1.6.6 or later, open this path in Explorer: C:/Users(username)/AppData/Local /Arduino15.
  1. Users with Arduino IDE 1.6.5r5 or previous should open this folder: C:/Users (username)/AppData/Roaming/Arduino15.
  1. Select the Adruino15 folder, and press the Delete button.
  2. Next, open Run’s window by pressing the Windows key + R hotkey.
  3. Enter appwiz.cpl in the Open box, and click the OK button.
    Programs and Features window error compiling for board arduino/genuino uno
  4. Select Arduino in the Programs and Features window.
  5. Click the Uninstall option.
  6. If an uninstall prompt opens, click the Yes button on it.
  7. Restart Windows before you reinstall Arduino.
  8. Click the Windows app on the Arduino website. Then click the Just Download option.
  9. Thereafter, reinstall the Arduino IDE software. Note that you’ll also need reinstall boards with the Board Manager.

Those are three ways users can fix Error compiling for board Arduino/Genuino Uno error. With that issue fixed, you can then play Arduboy games.

HDCP Error Detected on Your Roku? Fix It in Just a Few Steps

HDCP (High-bandwidth Digital Copy Protection) is the copy and content protection standard used in the movie and TV industry, to prevent the unauthorized circulation of content.

Roku receivers apply the HDCP protocol for the same reason. As is the case with any electronic equipment, errors can sometimes occur.

With Roku, one can get the HDCP Error Detected message, also known as error code 020. A purple screen might also appear in the background.

How can I get past the HDCP Error Detected issue?

Troubleshoot using the on-screen stepsroku hdcp error

Apart from following these indications, some users mentioned that they solved the issue by waiting for a couple of minutes before reconnecting the cables to each device.

Also, if you’re streaming 4K Ultra HD content and you get a purple screen, make sure that your TV or AVR supports HDCP, and that your HDMI cable (if you’re using one) is not faulty.

Additional solutions

  • Use a different HDMI input on your TV.
  • Use a different (or shorter) HDMI cable.
  • Connect the Roku player directly to the TV, if you are using an HDMI switch or AVR.
  • Try another TV, if possible, or switch to a TV if you’re using a computer monitor.
  • Try different Display Settings on your Roku player; change them from Settings > Display type.

Before you go, you might be interested in our guide on Error code Cloud Path error authorization for more solutions.

Raspberry Pi touchscreen not working? Fix it fast in 5 steps

What do you do if you find out that your Raspberry Pi touchscreen is not working? This issue is common and a really tricky one to tackle. Raspberry Pi touchscreen problems come in different forms.

The touchscreen may only work randomly or it may work always but not displaying correctly. Other users complain about their displays fading during reboot or shut down.

Read this guide to the end to learn how to fix your Raspberry Pi touchscreen when it’s not working.


How do I repair my Raspberry Pi touchscreen? It is not working

1. Update Raspbian

update-raspbian-raspberry-pi-touchscreen-not-working

The quickest way to resolve issues related to the Raspberry Pi touchscreen not working is to update your software. Most times, the Raspberry Pi touchscreen issues come from outdated software or an unstable update.

Below is the command you must run in order to update Raspbian. This command will also undo any possible update that was unstable.

sudo apt update

sudo apt install --reinstall libraspberrypi0 libraspberrypi-{bin,dev,doc} raspberrypi-bootloader


2. Confirm that the Raspberry Pi detects the touchscreen

raspberry-pi-touchscreen-not-working-not-detected

After updating Raspbian following the guide in the previous step, if the Raspberry Pi touchscreen is still not working, the problem may be that the device fails to detect the touchscreen. Run the following command to confirm the touchscreen detection:

dmesg | grep -i ft5406

If you see results looking like the lines below, then you can be sure that the Pi touchscreen is being detected.

[ 5.224267] rpi-ft5406 rpi_ft5406: Probing device
[ 5.225960] input: FT5406 memory based driver as /devices/virtual/input/input3

Also, if the touchscreen is detected, you will notice in /proc/cmbline that the values of fbheight and fbwidth will be equal to the screen resolution (480 x 800). To confirm this, run the following command:

cat /proc/cmdline | grep bcm2708_fb


3. Disable overscan

disable-overscan-raspberry-pi-touchscreen-not-working

  1. If your Raspberry Pi touchscreen is not working and Raspbian says that your display is 752 x 448, disable overscan using the command: sudo raspi-config
  2. Next, go to Advanced Options and select Overscan.
  3. Select the Disable option.

4. Fix upside-down Raspberry Pi touchscreen display

raspberry-pi-touchscreen-not-working-upside-down-display

  1. A common Raspberry Pi touchscreen issue is that the display renders upside-down. You can fix this issue quickly by rotating it. First, navigate to the config.txt file using the command below: sudo nano /boot/config.txt
  2. Next, hit Enter to run this command, and then run the following command to rotate the display: lcd_rotate=2
  3. After this, press CTRL+X and press Y to save the config.txt file.
  4. Finally, reboot the system using the following command: sudo reboot

5. How to fix Raspberry Pi display that fades while rebooting or shutting down

display-fading-raspberry-pi-touchscreen-not-working

If the display of your Pi blacks out when you reboot or power off the unit, then, first of all, confirm that it’s running on the latest software update.

The next step is to check that an SD card is inserted into your Pi properly. This Raspberry Pi touchscreen issue may also come about when the ribbon between the display and the Raspberry Pi isn’t seated firmly.

Alternatively, if the Raspberry Pi display turns all white, then the usual suspect is that the ribbon cable between your driver board and the LCD is not firm.


Raspberry Pi touchscreen not working could be a result of different software and hardware problems.

In this guide, we’ve explored the most common Raspberry Pi touchscreen issues and proffered working solutions to fix them quickly.

Are you facing a Raspberry Pi touchscreen issue that we didn’t address here? Let us know in the comments below.


[wl_navigator]

Fix: Amazon Prime Video Not Working on Roku

Amazon Prime Video is available on multiple streaming platforms, including Roku TV. However, Amazon Prime Video may sometimes stop working or crash when trying to watch a show or movie.

Amazon Prime Video may not work due to temporary issues with the Prime Video service or your streaming device.

If you are experiencing issues with Amazon Prime Video, here is how to fix it on Roku and other streaming devices.

How can I troubleshoot Amazon Prime Video not working on Roku?

1. Uninstall and reinstall Prime Video channel on Roku

Amazon Prime Video not working
  1. Press the Home button on your Roku remote.
  2. Use the navigation keys to move to the right and highlight the Prime Video channel.
  3. Press the * Star button on your remote to open the options menu.
  4. Select the Remove channel option and confirm when prompted.

Reinstall Prime Video channel

Amazon Prime Video not working
  1. Press the Home button your Roku remote.
  2. Scroll down and select Streaming Channels.
  3. Enter Prime Video to search for the channel.
  4. Press OK and then select Add Channel to install Prime Video.
  5. Once installed, launch Prime Video and check for any improvements.

Uninstalling and reinstalling the Prime Video channel on Roku has helped resolve the issue for Roku users.

2. Close and re-open the Prime video ap

Amazon Prime Video not working
  1. Try to close and relaunch the Prime Video app and see if that resolves the issue.
  2. On your Android phone, you can force close the app from the settings. Go to Settings > Apps > Amazon Prime Video > Force Close. Relaunch the app and check for any improvements.
  3. If you are using a streaming device like the Fire TV Stick, you can force close the app from the Apps Store.

3. Perform a power cycle

Amazon Prime Video not working
  1. Power off your streaming device like Roku, Apple TV, etc., along with your TV.
  2. Disconnect all the cables, including the power cable and HDMI cables.
  3. Leave the device idle for a few minutes.
  4. Reconnect all the cables back to your devices.
  5. Power on the devices and check for any improvements.

4.  Check for network issues

Prime Video connection issues
  1. Prime Video requires a stable Internet connection to stream videos without buffering or stuttering.
  2. Pause other Internet activities if other devices use the network simultaneously.
  3. Use an Internet speed testing tool to check your Internet connection speed.
  4. Try accessing Prime Video on another device. This will help you to know if the issue is device-specific or not.
  5. Disconnect or turn off any VPN or proxy servers.

5. Clear cache and data and reinstall Prime Video

Clear cache and data

Prime Video connection issues
  1. On your Android phone, go to Settings.
  2. Tap on Apps > All Apps.
  3. Open Prime Video from the list of installed apps.
  4. Tap on Storage.
  5. Tap on Clear cache.
  6. Select Clear data and tap Yes.

If you are using a streaming device, refer to the user manual to know how to apps cache.

Uninstall and reinstall Prime Video  

Prime Video connection issues
  1. If the issue persists, try uninstalling and reinstalling the app.
  2. Uninstall the app from your device on which the Prime Video issue is occurring.
  3. Once uninstalled, restart the device.
  4. Reinstall the app from the app store available for your device.

Amazon Prime Video may stop working due to an unstable Internet connection. However, sometimes the issue can be with the app or the device itself, especially with issues like error 7136.

New to Prime Video on your television? Learn how to sign in to Amazon Prime Video on a smart TV so you can start streaming without the hassle.

How to fix Hulu playback error codes P-TS207 and PLAREQ17

Hulu seems to be failing oftentimes and the messages delivered by the service are not very intuitive. Not to mention that they come in code numbers, which makes it even harder to decipher.

There are many types of errors that Hulu users experience, and there are just as many reasons why the service stops working. Among them, low Internet speed, an outdated app or browser, and even some issues with the main device.

In this article, we’ll be talking about playback errors P-TS207 and PLAREQ17. These are sometimes proceeded by the message We’re having trouble playing this.


How can I fix error code P-TS207 and PLAREQ17 on most devices?

Error code P-TS207

1. Check Internet connectivity

  1. Turn off all devices connected to your home network.
  2. Close all background apps or other programs.
  3. Place the modem or router near your device and check for any improvement.
  4. Or, connect your device to the router using an Ethernet cable.

If using a cable is efficient, it means that you need to check the router. Also, keep in mind that Hulu requires a certain Internet speed to work seamlessly.


2. Perform a power cycle

A power cycle will help to improve streaming conditions, switch off your devices (including modem and router). Wait a few minutes, then switch them back on and see if it helped.


3. Deactivate your deviceP-TS207 hulu

Sometimes, playback errors are caused by too many devices being connected to the service simultaneously. So go to your Hulu account page, remove all devices that are not using the app at the moment by logging out completely. Launch Hulu again on the main device and see if the problem is solved.


4. Disable/change VPN connection (if any)got p-ts207 on hulu

  1. Open the Windows Start menu > Settings.
  2. Choose the Network & Internet.
  3. Choose VPN.
  4. Click on the VPN connection that you’ve set up.
  5. Click on Remove.

With all the extra-layered protection it offers, your VPN can sometimes cause incompatibility between the ISP and the servers. We recommend that you turn it off or make some changes, then re-launch Hulu and see if the playback error has been solved.

5. Uninstall/reinstall the Hulu appuninstall roku app

For Roku 

  1. From the Roku home screen, highlight the Hulu app.
  2. Press the asterisk * or start button on the remote.
  3. Select the Remove channel option.
  4. Once uninstalled, reboot the Roku device.
  5. Reinstall the Hulu app from Channel Store.

For other devices, you will find the Hulu app installed in the Settings > Apps menu and you can uninstall it from there.


Hulu error code PLAREQ17

It seems that the error code PLAREQ17 appears almost exclusively on Roku TVs and streaming sticks. Users reportedly and successfully tried most of the above-mentioned solutions.

It should be mentioned that if you can’t troubleshoot these two errors by yourself, you can always contact Hulu support and find out whether the issue is on their side.


[wl_navigator]

How to fix Hulu error codes 3, 503, and 504

Highly popular streaming services like Hulu, Netflix, or Amazon Prime require a very good Internet connection.

Internet speed can, however, fluctuate due to various reasons such as maintenance works or old equipment.

When this is the case, and you are trying to stream Hulu TV shows or movies, you will usually get an error. Sometimes it is displayed as Error code 3 and also associated with the more common errors like 503 (service unavailable) or 504 (gateway timeout error).


How can I fix error codes 3, 503, and 504?

1. Check Internet connectivity

fix error 3 hulu
  1. Turn off all devices connected to your home network.
  2. Close all background apps or other programs.
  3. Then, place the modem or router near your device.
  4. Or connect your device to the router using an Ethernet cable.

2. Perform a power cycle

A complete power cycle improves streaming conditions by restoring the functionality of all devices and network connections.

Therefore, switch off your devices (including modem and router). Wait a few minutes, then switch them back on and see if it helped.


3. Update or reinstall the Hulu appfix hulu error 503

We recommend this step just for reassurance since most probably the problem should be solved with the previous fixes. Yet, keeping your Hulu app updated is essential to ensure a seamless performance.

As a last resort, uninstall the app and reinstall it on your media player.

Before you go, don’t miss our guide on Hulu P-DEV313 error for more solutions.

Having mentioned all the above, don’t forget that sometimes the error can occur on Hulu‘s end. In this case, you just have to wait for the service to restore the connection.

How to fix Amazon Prime Video error code 9074 in a few steps

Amazon Prime is a video-on-demand service that some users utilize with the Roku media player. Some Amazon Prime users have posted on  Amazon’s forum about error code 9074.

That error can arise for some users when streaming AP content with Roku devices. As a consequence, they can’t watch the Prime videos when that error arises.


How can I fix the Amazon Prime Video error code 9074?

1. Is Amazon Prime Video down?

Downdetector page amazon prime video error code 9074

First, check if Amazon Prime Video is down. AP might be down for server maintenance. To check the Amazon Prime status, open the Downdector page for AP in a web browser.

You can select an alternative country on the drop-down menu at the top right of that page. The Amazon Prime Video Downdector page will tell you if there’s a notable AP outage. If so, you might need to wait a day or two.


2. Power cycle your Roku setup

Roku 3 amazon prime video error code 9074

Try power cycling all the devices that are a part of your Amazon Prime Video setups, such as Roku box and router. First, turn off all the devices that you need to watch Amazon Prime Video.

Unplug all those devices from the wall socket. Wait for about 10 minutes before you plug all the required devices back in.

Then power on the required devices to restart them.


3. Deregister the Roku media player on Amazon

  1. Some users might need to deregister their Roku devices from Amazon to fix account settings. To do so, open Amazon in your browser to sign in there.
  2. Click Account to open settings.
  3. Click Manage content and devices to open a new page.
  4. Click Devices to open a list of devices connected with the Amazon account.
    Devices tab amazon prime video error code 9074
  5. Click the three dots Action button for your Roku device.
  6. Select the Deregister option.
  7. Click Deregister again to confirm.
    Deregister button amazon prime video error code 9074
  8. Next, open the Amazon Channel within the Roku‘s OS.
  9. Open the Search & Menu with the Roku remote’s asterisk button.
  10. Select the Help & Settings menu option.
  11. Select the Sign Out option.
  12. Then select Sign Out again to confirm.
  13. Restart the Roku media player.
  14. Thereafter, reregister Roku on Amazon; and add the Amazon Prime Video channel.

Reset the Amazon Prime Roku channel

  1. Some users might need to reset their Amazon Prime channels in Roku to fix their AP channel configurations. Open the channel menu in Roku.
  2. Select the Amazon Prime Video channel.
  3. Press the star or asterisk button on the Roku remote to open channel options.
    Remove channel option amazon prime video error code 9074
  4. Select the Remove channel option.
  5. Select Remove again to confirm.
  6. Restart the Roku device.
  7. Then open the Roku Channel Store.
  8. Select the Amazon Prime Video channel. Then select the Add channel option for it.
    Add channel option amazon prime video error code 9074
  9. Thereafter, you might need to re-enter the credentials for a fresh channel copy.

The above fixes might resolve Amazon Prime Video error 9074 for Roku devices. In addition, VPNs can be another factor behind error 9074. So, don’t utilize a VPN connection with Amazon Prime Video.

Having trouble logging in? Here’s a step-by-step guide on how to sign in to Amazon Prime Video on a smart TV to help you get started quickly.

Fix: We Encountered an Error when Switching Profiles on Hulu

We encountered an error when switching profiles in Hulu will prevent you from using a different profile on your device.

This can be a problem if you’re sharing it with other people, but there’s a way to fix it, and we’ll show you how to do it.

How can I fix We encountered an error when switching profiles?

1. Properly switch between profiles

On Hulu.com

  1. Hover over the account name in the upper right corner of the page
    create hulu profile
  2. From the list of available options, select the desired profile

On Mobile devices

  1. Tap the Account icon
  2. From the list of available options, tap on the profile you want to switch to

On TV-connected devices

  1. Go to the Account icon
  2. Select Profiles from the menu
  3. Scroll to the profile you want to switch to and select it

2. Try general solutions

For desktops

  1. Log out completely.
  2. Try using your credentials again.
  3. Check if the issue is gone.

For smart TVs, mobile devices or Android boxes

  1. Remote the device from your account.
  2. Add the device again.
  3. Start Hulu and check if the issue is still there.

Did you manage to switch profiles correctly in your Hulu account? If so, ensure you verify your email lest you get We can’t verify your email address error.

Many reported that Hulu keeps logging them out and we covered that problem along with the most common Hulu connection errors in separate guides.

Did you manage to fix the Hulu switch profile error? Your feedback is welcome in the comments section below.

Visual Studio 2019 updated. Also, download the new preview!

Microsoft has announced the new version of Visual Studio 2019, version 16.6 for Windows 10.

Moreover, Microsoft released Preview 1 of Visual Studio 2019 16.7 for Windows 10.

What is new in Visual Studio 2019 version 16.6?

First, Visual Studio 16.6 comes with updates to C++. It can now generate Doxygen and XML comment stubs automatically.

Another improvement is the new Windows Forms Designer for .NET Core apps, which you can enable under the Preview Features. 

There is always to mention the new IntelliSense code linter with the function to check the code as it’s typed, to highlight errors, and to make mak suggestions in the editor window, just like a dictionary in a word processor.

Visual studio 2019

We show you the list of improvements as laid down by Microsoft in the Blog release notes:

  • Version Control with revamped Git tooling that provides great experiences for working with code on remote Git hosting services.
  • Improved snapshot debugging experiences that removes the friction in using the snapshot debugger for the first time.
  • .NET Async tool for profiling .NET apps.
  • .NET Productivity Quick Actions and Refactorings
  • Terminal with the ability to open multiple instances, customize font face and sizes, and automatically generate profiles for CMD, PowerShell, and WSL distributions.
  • Web Tools new experience for configuring Azure services and emulators
  • A variety of new C++20 Standard Library features including initial implementation of <span>. The STL Changelog on GitHub includes a detailed list.

Download and install the latest version of Visual Studio 2019.

Download Preview 1 of Visual Studio 2019 16.7 for Windows 10

Alongside the new update for the Visual Studio 2019, Microsoft added the first preview for the next version: 16.7.

The Preview 1 comes with lots of new improvements like Git Productivity, C++ Address Sanitizer, .NET Productivity features, IntelliCode, XAML Tooling Improvements WPF, UWP, & Xamarin.Forms, Define Playlists Dynamically in Test Explorer, and more.

You can download the Preview 1 of Visual Studio 2019 16.7 and test them for yourself.

Microsoft releases Windows 10 Insider build 19631 and ARM64 VHDX

Microsoft has released today the Windows 10 Insider build 19631 for Windows Insiders in the Fast Ring, which is another minor update with no new features. Highlights include Windows Hello improvements and a fix for an issue preventing devices in connected stand by to wake up after a key press.

You can check out the full list of changes and known issues below:

General changes & improvements

  • We updated the configuration of Windows Hello to make sure it works well with 940nm wavelength cameras.

Fixes

  • We fixed the issue causing the IIS configuration being set to default after taking a new build.
  • We fixed an issue that could result in a key press not waking up a device from connected standby in certain scenarios.
  • Windows Sandbox WSB files are now case insensitive.
  • We fixed an issue impacting Remote Desktop reliability.

Known issues

  • We’re looking into an issue where some devices booting from eMMC storage may bugcheck when resuming from hibernate.
  • We’re looking into reports of the update process hanging for extended periods of time when attempting to install a new build.
  • We’re working on fixing an issue for a future Insider Preview build where in Settings > Privacy the Documents and Downloads sections show a broken icon next to their page name (just a rectangle).
  • We’re looking into reports that taskbar preview thumbnails aren’t rendering consistently (showing a blank area).

In addition to this new Windows 10 preview build, the Windows Insider team also made ARM64 VHDX available for download, which will allow Insiders with Windows 10 on ARM devices to run the Windows 10 Insider build 19624 as a guest host in Hyper-V. Microsoft previously added in the build 19559 from February the ability to install Hyper-V on Windows 10 on ARM devices such as Microsoft’s Surface Pro X. “We will regularly release updated VHDX downloads for newer Insider Preview builds going forward,” the team said today.

Even though Microsoft held its Build 2020 developer conference this week, there’s still no word about the 20H2 update coming later this year, or the 21H1 update to be released in the first half of 2021. Microsoft shared its plans for the 19H2 update right after the spring last year, so we may have to wait a bit more to get some information about future Windows 10 releases.

Get in on the ground floor of Obsidian’s Grounded, join early demo on Xbox One and Steam on June 9

Obsidian Entertainment, one of the new game studios that Microsoft acquired two years ago, revealed a new IP named Grounded at X019 last fall. Before the survival adventure game will enter Xbox Game Preview and Steam Early Access on July 28, Obsidian revealed today that there will be a limited-time early demo on Xbox One and PC from June 9 through June 14.

This first demo will give players “a look at one day in the life of Grounded’s single player campaign,” according to the developer. Grounded is a first-person survival game where players have been shrunk to the size of an ant living in a suburban backyard. The game will support co-op with up to three other players, and Obsidian is working on story-based missions to complement survival activities.

To join this first Grounded flight on June 9, Xbox One gamers will need to sign up for the Xbox Insider Program and register for the demo through the Xbox Insider Hub. Slots on Xbox One will be limited, but the Steam demo for PC players will be available for everyone on June 9. Grounded is actually one of the games that will participate in the Steam Game Festival, which is Valve’s celebration of new games to be released within the next year.

“We’re excited to have you start this journey with us and get into the game, as it is important to us to get your feedback. Having both the Xbox Insider and Steam demos line up at the same time means we can hear from as many of you as possible before the game enters Xbox Game Preview with Xbox Game Pass Ultimate and Steam Early Access on July 28,” wrote, Mikey Dowling, Director of Communications, Obsidian Entertainment.

Source code for Windows NT 3.5 and the original Xbox has leaked

The source code for Windows NT 3.5 and the original Xbox console have leaked online earlier this month, according to a report from The Verge. A Microsoft spokesperson told the publication that “We’re aware of these reports and are investigating,” without sharing further details.

For those unfamiliar with Windows NT, the version 3.5 of the desktop OS was released back in 1994, following the initial 3.1 version released a year earlier. During the nineties, the Windows NT family of desktop OSes lived alongside the consumer-oriented Windows 9x family based on MS-DOS, but NT was finally brought to the masses in 2001 with Windows XP. According to The Verge, what leaked is a near-final version of the OS that “includes all the necessary build tools, and should allow enthusiasts to dig into the old operating system.”

As for the Xbox OS leak, it appears that some of the code could have been circulating for quite some time. “While the Xbox OS leak includes some build environments, the Xbox Development Kit, emulators used for testing, and internal documents, we understand this kernel and source code has been passed around privately among enthusiasts previously. That means it’s unlikely to help further homebrew and emulator efforts for original Xbox games,” the report reads.

Even though these leaks are about decades-old code, we expect Microsoft to do what’s necessary to protect its intellectual property. However, many enthusiasts would like the company to make its old code open source. Following the end of support for Windows 7 back in January, the Free Software Foundation publicly asked Microsoft to make the still-popular OS an open-source project.

How to remove someone from a team in Microsoft Teams

Adding people to a team in Microsoft Teams is how you kick off the right conversations and make sure you can keep your employees in their workflow. But, what happens if you added someone to the wrong team? Perhaps you might have accidentally added someone to a team who doesn’t belong — say a regular employee in a team that is designed only for managers.

No need to worry, though. If you’re a team owner, you can remove someone from your team at any time. The process is quick and easy. Here’s how to remove someone from a team in Microsoft Teams.

To get started, you’ll want to make sure your IT admin has set you as a team owner. If you’re not a team owner, you can’t remove anyone from a team. This is for obvious reasons, security as number one. You can ask your IT admin or the person who manages Microsoft Teams to check the Teams admin center to assign the team roles if you want to remove someone from a team.

If you have the right permission, you can begin the process of removing someone from a team by clicking the team name in the sidebar of Microsoft Teams. You can then click More Options … followed by Manage Team and then Members. From there, you’ll see a team member list. You can click the X to the far-right side of the name of the person you want to remove. Just keep in mind that if you want to remove a team owner, you’ll have to go in and change their role from owner to a member, first. You always can change the roles back later, too.

Please keep in mind that while you’re removing someone from a team, you’re not removing them entirely from the organization. They’ll still have access to Teams, Office, and the other parts of your subscription. That privilege is rather reserved for admins, and they need to do this via the Microsoft 365 dashboard.

As you can tell, the process of removing someone from a Team is quite easy. Microsoft makes it quite easy. If you’re looking for additional Teams coverage, check out our news hub for more how-tos, guides, tours, and more.

Alan Wake and Cities: Skyline join Xbox Game Pass today, with Minecraft Dungeons to follow next week

Microsoft’s Xbox Game Pass subscription service is welcoming two new games today with the survival horror game Alan Wake and the city-building game Cities: Skyline. Both titles are available today on Console and PC, and they will be followed by Minecraft Dungeons next week r on May 27.

For those unfamiliar, Alan Wake is a cult-classic game from Remedy Entertainment (Max Payne, Quantum Break). It was released as an Xbox 360 exclusive back in 2010, and the PC version following two years later. Unfortunately, Remedy didn’t add Xbox Live achievements to the PC version of the game that’s now available for Xbox Game Pass for PC members.

As for Cities: Skyline, the game is actually coming back to Xbox Game Pass for Console and PC today after leaving the catalog back in March 2020. This isn’t the first time that we see games return to Xbox Game Pass catalog after some time, but if you haven’t tried it yet, Cities: Skyline is a great alternative to the popular Sim City series.

Next week, Minecraft Dungeons will be the next Xbox Game Studios title to launch on Xbox Game Pass on day one on May 27, and as Minecraft sales recently crossed 200 million sales worldwide, the much-anticipated dungeons crawler definitely has some potential. Stay tuned for our review of the game that will be published early next week.

Fix: There was an error licensing this video on YouTube TV

YouTube TV users reported an occasional error that they encounter and that reads: Playback error. Sorry, there was an error licensing this video.

It appears only when using Chromecast media players or a Chromebook. Note that YouTube TV supports the latest Chromecast devices, or Chromecast-enabled app, and Chromecast Ultra.

If you’re using a first-generation Chromecast, issues are even more frequent. Additionally, it seems that the error doesn’t affect only YouTube TV streaming, but any video-related content.


How do I fix the licensing error on YouTube TV?

1. Update Chromefix licencing error youtube

  1. Go to the Chrome menu -> Help -> About Google Chrome.
  2. You should see the Chrome version installed and an “Update” button if updates are available.

2. Update the Widevine CDM component in Chrome

  1. Write chrome://components/ in the address bar.
  2. Find Widevine Content Decryption Module (it should be at the bottom of the list).update widevine cdm chrome
  3. Click the Check for update button and confirm.

Up until now, the only solution that would do the trick and fix the licensing error message for the YouTube TV app.


If you got this far and you also want to speed up your Chrome, take a look at these tips.


We hope that this solution worked for you as well. Whether it did or not, please share your thoughts with us in the comments section below and help others improve the youTube Tv experience.


[wl_navigator]

How to Fix Netflix Error Code M7363-1260-00000026

The Netflix error code M7363-1260-00000026 is a video-streaming issue. When that error arises, it displays an Oops, something went wrong error message.

The M7363 error often arises for users utilizing Flix within web browsers. Consequently, users can’t watch Netflix movie streams on their browsers.

How do I fix Netflix error code M7363-1260-00000026?

1. Update your browser

Google Chrome

First, make sure that your browser is the latest version.

  1. To do that in Chrome, click the Customize and Control Google Chrome button.
  2. Select Help on the menu.
  3. Click About Google Chrome to open the tab shown directly below.
    About Chrome tab netflix error code m7363-1260-00000026
  4. Click Relaunch if Chrome updates.

Firefox

  1. Mozilla Firefox users can update that browser by clicking the Open menu button in Fox.
  2. Select Help to open the menu shown directly below.
    Help menu netflix error code m7363-1260-00000026
  3. Click About Firefox to open the window in the shot directly below.
  4. Click the Restart to update Firefox button.
    About Mozilla Firefox window netflix error code m7363-1260-00000026

2. Clear your browser’s data

Google Chrome

Netflix error code M7363-1260-00000026 can be due to corrupted browser data.

  1. To clear Chrome’s data, press the Ctrl + Shift + Del keyboard shortcut in that browser.
  2. Select the Cached images, Cookies, and Browsing history options.
    Clear browsing data options netflix error code m7363-1260-00000026
  3. Select the All time option on the Time range drop-down menu.
  4. Press the Clear data button to erase Chrome’s data.

Firefox

  1. In Firefox, type about:preferences#privacy into the browser’s URL bar.
  2. Click the Clear Data button on the tab that opens.
    Clear Data window netflix error code m7363-1260-00000026
  3. Select the Cookies and Cached checkboxes.
  4. Press the Clear button.

3. Check if you need to free up some hard drive storage

Some users might need to free up some HDD storage on overly full hard drives to make space for Netflix movie streams.

  1. To do that, click the File Explorer button on Windows 10’s taskbar.
  2. Click This PC on the left of the window.
  3. The C: drive icon there shows you how full your HDD is. If your hard drive is almost full, right-click the drive icon and select Properties.
    C: Properties window netflix error code m7363-1260-00000026
  4. Click Disk Clean-up to open the utility below.
    Disk Clean-up utility netflix error code m7363-1260-00000026
  5. Then select most of the Files to delete check boxes.
  6. Click OK, and select the Delete Files option to confirm.
  7. In addition, uninstall superfluous software to free up some storage space.

4. Don’t utilize a browser’s incognito mode

Chrome's incognito window netflix error code m7363-1260-00000026

The M7363-1260-00000026 can often arise for users utilizing browsers in incognito modes. So, don’t open Netflix streams within private (incognito) browser windows.

5. Set up a new browser profile

Google Chrome

Try utilizing your browser with a new profile.

  1. To do that in Chrome, select the profile button on that browser’s toolbar.
  2. Click Add to open the window in the shot directly below.
    Google Chrome window netflix error code m7363-1260-00000026
  3. Enter a title for the new user profile.
  4. Select a profile image.
  5. Click the Add button.

Firefox

  1. To set up a new Firefox profile, enter about:profiles in that browser’s URL bar and press Return.
    About Profiles tab netflix error code m7363-1260-00000026
  2. Click Create a New Profile to open the window in the shot directly below.
    Create Profile Wizard window netflix error code m7363-1260-00000026
  3. Click the Next button.
  4. Enter a profile title in the text box.
  5. Click the Finish option.
  6. Press the Set as default button for the new profile on the about:profiles tab.

6. Reinstall the browser

Reinstalling your browser with a fresh, updated copy might fix Netflix error code M7363-1260-00000026 for some users.

  1. Right-click the Start button and select to open Run from the Win + X menu.
  2. To open the uninstaller, type appwiz.cpl in Run’s Open box and press Enter.
  3. Select your browser.
    Programs and Features window netflix error code m7363-1260-00000026
  4. Click Uninstall and Yes to remove the selected browser.
  5. Restart Windows when you’ve uninstalled the browser.
  6. Open your browser’s website to download the latest version from there.
  7. Install the browser with the downloaded setup wizard.

The fixes above will likely resolve Netflix error code M7363-1260-00000026. However, remember that you can always utilize Windows 10’s Netflix app for video streams as an alternative to browsers.

In case you have additional problems, we have a guide on fixing Netflix error M7362 1269, so don’t miss it.

So, you might not need to fix the M7363-1260-00000026 browser error.

How to fix Netflix errors 1.20 and 1.50

The Netflix 1.20 & 1.50 errors are similar issues that primarily arise for the Netflix Android mobile app. They both have the same error message that states:

There is a problem playing the video. Please try again.

Consequently, users can’t stream Netflix movies on their Android mobile devices.


This is how you can fix Netflix errors 1.20 and 1.50

1. Restart the streaming device

First, try resetting the streaming device. In most cases, users will need to turn off their Android mobile devices. Unplug the Android mobile if it’s plugged in. Then wait five minutes before turning the streaming device back on.

Android mobile netflix error 1.20, 1.50


2. Sign out of Netflix on all devices

Signing out of Netflix, for all your devices, will refresh its data.

  1. You can do that by opening Netflix.com within a supported Windows browser, such as Chrome.
  2. Log in to Netflix if you need to do so.
  3. Click the profile account button at the top right of your Netflix homepage.
  4. Select Account on the drop-down menu.
    The Account option netflix error 1.20, 1.50
  5. Click the Sign out of all devices link within the Settings section.
    Sign out of all devices link netflix error 1.20, 1.50
  6. Thereafter, press the Sign Out button.
  7. Then a message will confirm you’ve signed out from Netflix on all devices.
    • However, wait a few hours before trying to log back in.
  8. Next, turn on your mobile-streaming device.
  9. Open the Netflix app, and sign back into your Flix account.

3. Clear the Netflix app’s data

Netflix error 1.20 can often be due to corrupted Netflix app data.

  1. To clear the data for the Netflix Android app, turn on your mobile device.
  2. Tap the Settings app to open it.
  3. Select Apps in Settings.
    The Apps list netflix error 1.20, 1.50
  4. Next, tap the Netflix app to open further options.
  5. Tap Storage to open the options shown directly below.
    Clear Data button netflix error 1.20, 1.50
  6. Then tap the Clear Data option.

4. Reinstall your Netflix app

  1. In addition, reinstalling the Netflix Android app might also fix errors 1.20 and 1.50.
  2. To do so, tap Settings on your Android mobile.
  3. Tap Apps to open an app list.
  4. Select Netflix on the app list.
  5. Tap its Uninstall button.
  6. Open the Google Play page for Netflix.
    The Google Play Netflix page netflix error 1.20, 1.50
  7. Tap the Install button to add the app to the mobile device.

There aren’t many confirmed fixes for Netflix errors 1.20 and 1.50. However, refreshing the app’s data on the streaming device, as outlined above, is a widely confirmed resolution.


[wl_navigator]