Fix Error 524: A timeout occurred in a couple of easy steps

Millions of users use the CDN service offered by Cloudflare to keep their website secure and make it load faster. However, sometimes, while accessing a website you may encounter Error 524: A timeout occurred Cloudflare server error.

This error can occur if your server failed to respond to a TCP connection established by Cloudflare or if the server is overloaded and limited by resources.

In this article, we discuss a couple of troubleshooting tips to help you resolve the error 524 a timeout occurred Cloudflare server error so that you can get your website back online.

How do I fix Error 524: A timeout occurred?

1. Check server load

524 a timeout occurred Cloudflare server error

  1. One of the reasons for this error can be the high usage of your server resources.
  2. Begin with checking if your server‘s resource is at its peak or above normal use.
  3. If the issue is occurring due to an increase in traffic, you may need to upgrade your server and increase the resources.
  4. If there aren’t noticeable differences in the traffic, then check if the resources are being utilized by some other processes.
  5. Also, try to limit the processes running on the server to keep the server usage in check.

Why is Cloudflare checking my browser? Find out the answer in this handy guide.


2. Check for brute force attack

524 a timeout occurred Cloudflare server error

  1. Run your SSH client and login with root access.
  2. Enter the following command to check if multiple hits are coming from any particular IP address.
    netstat -an | grep 80
  3. The above command will provide the list of IPs from which the website is receiving multiple hits.
  4. To resolve the issue, we can block any suspicious IP addresses to protect your server.
  5. To block any suspicious IP address, enter the following command, and hit enter. Make sure you replace the IP address with xxx below.
    iptables -A INPUT -s xxx.xx.xx.x -j DROP
  6. Repeat the steps to block all the suspicious IP addresses.
  7. Once done, use the following command to restart the server.
    systemctl httpd restart
  8. Now try to access your website again and check if the error 524 is resolved.

By following these steps, you can lower the website hits, which will reduce server usage. This also helps you to ensure that only valid traffic is accessing your server.


3. Other solutions to try

524 a timeout occurred Cloudflare server error

  1. Investigate the issue at your origin server and check if the server is taking longer than 100 seconds to respond. If so, ask your admin or hosting provider to look into the issue.
  2. If you are running a Database server, diagnose the server to find if there are long-running queries. Review your origin server log file to find more information about the issue.
  3. If you have scripts that run for longer than 100 seconds, you can run it via a grey-clouded subdomain. This way, it can end a long-running background process and return a status that the browser can show until the background process is completed.
  4. If you are running a VPS, like Windows VPS,  make sure the firewall at the origin is properly configured and Cloudflare’s connecting IPs are not limited in any way.

The Error 524: A timeout occurred Cloudflare server error indicates that the issue is at the origin server and not at Cloudflare’s end. By following the steps in this article, you can troubleshoot the issues causing the error and get your website back online successfully.

This isn’t the only Cloudflare error you can encounter, and in our latest guide we covered Argo tunnel error, so don’t miss it for more information.

If you have any other questions or suggestions, don’t hesitate to leave them in the comments section below.

Bluetooth devices not connecting to MacBook? Use this fix

We use Bluetooth every day, but many MacBook users reported that devices are not connecting via Bluetooth to their MacBook. This can be a problem, but there’s a way to fix it once and for all.

What to do if Bluetooth is not connecting on the MacBook?

1. Restart Bluetooth and your MacBook

One way to fix Bluetooth issues is to restart Bluetooth. To do that follow these steps:

  1. Click the Bluetooth icon in the menu bar.
  2. Choose Turn Bluetooth Off.
  3. Click the icon again and this time choose Turn Bluetooth On.

If that doesn’t work, try restarting your MacBook and see if that helps.


2. Reconnect your Bluetooth devices

If Bluetooth is not connecting on your MacBook, you might be able to fix it by reconnecting the paired devices. You can do that by following these steps:

  1. Go to System Preferences > Bluetooth.
  2. Click on the X next to a Bluetooth device.
  3. Wait for a few moments and reconnect your Bluetooth device.

Some users are suggesting to restart your Mac before connecting Bluetooth devices, so you can try that as well.


3. Delete Bluetooth .plist file

delete bluetooth file macbook not connecting bluetooth

Sometimes you can fix Bluetooth issues simply by deleting the Bluetooth .plist file. To do that, follow these steps:

  1. Select Go from the Finder menu and choose Go to Folder.
  2. Enter /Library/Preferences and choose Go.
  3. Locate the apple.Bluetooth.plist file and delete it.
  4. Choose Go to Folder again in Finder.
  5. Enter ~/Library/Preferences/ByHost and choose Go.
  6. Find the apple.Bluetooth.xxx.plist and delete it.
  7. Turn off your MacBook and leave it off for a minute or two.

Once you turn the device back on, the issue should be resolved.


4. Reset the Bluetooth module

If the previous solutions didn’t work, you might want to try resetting the Bluetooth module. To do that, follow these steps:

  1. Press and hold Shift + Option and click on the Bluetooth icon in the menu bar.
  2. Select Debug and choose Remove all devices.
  3. Click Debug and this time choose Reset the Bluetooth module.
  4. After doing that, restart your MacBook and connect the Bluetooth devices again.

There you go, several quick and easy solutions that can help you if Bluetooth devices aren’t connecting to your MacBook.

READ ALSO:

Linksys Guest Network is Not Working: 4 Ways to Trigger it

Unfortunately, plenty of users are reporting that Guest network is not working on their Linksys router. This feature allows them to create a separate wireless network, giving visitors online access without sharing the main Wi-Fi password.

Completing the setup of the Linksys router leads to having two wireless network names. There’s one for the main network, and another for the Guest network.

The Guest network appears unsecured when searching for wireless networks. However, it should prompt for the Guest password the second someone tries to open a webpage in a browser.

That is why we’ve created a guide for those that encounter the same issue of the Guest Sign-in screen refusing to show up.

Why is Linksys guest network not working?

  • The guest access isn’t properly enabled on your router.
  • Issues with Internet connection can cause this problem to occur.
  • Some browser can have issues with guest networks.
  • You’re not using the correct password for guest network.

What can I do if Linksys guest network is not working?

1. Double-check Allow Guest Access is set to Yes

  1. Launch Linksys Connect.
  2. Click Change under the Guest access option.
  3. Make sure that Allow Guest Access is already set to Yes. If not, make the change now.
  4. Press Change and enter a password for the guest network.
  5. While here, you could also select how many visitors can access the network.
  6. Click Finish.

If the Linksys smart WiFi guest access not working, make sure that this feature is properly enabled.

2. Confirm active Internet connection

  1. First of all, check if there’s an active Internet connection with the router.
  2. Try connecting your computer or wireless device to the main wireless network.
  3. Next, try disconnecting and reconnecting the wireless device to the Guest Network helps to solve the problem.

After making sure that your connection is working, check if the problem is gone.

3. Try different browsers

You should also try accessing the Internet using a different browser. Even more, close down all browser windows, then try reconnecting to the network.

Oddly, a homepage added to your browser often makes the Guest password page load properly once again.

The good news is that there are several good browsers on the market. The intuitive UI and great performance rates of Opera One make it one of our top recommendations.

The software is highly customizable, secure, has a built-in VPN and adblocker, as well as a large add-on library that you can use for quick access to your most-used platforms and services.

⇒ Get Opera One

4. Make sure you’ve used the Guest password

  1. Check your password.
  2. Make sure that it’s correct.
  3. Ensure you’re entering the guest network password and not the router password.

This is a simple solution, and it can help if Linksys guest login page not working.

Once connected to the Guest network, you will be prompted for the password when you open a web browser. Make sure you enter the Guest network password when getting this prompt.

We hope that this guide helped you fix Linksys guest network not working issue on your computer. In case you have more problems, we have a great guide on Linksys router not working, that you should check.

What solution did you use to fix this problem? Let us know in the comments below.

Updated Wine version improves Windows 10 Linux compatibility

Fans of both Windows 10 and Linux can now rejoice, as Wine has been updated with over 7400 changes.

For those of you that aren’t aware, Wine is a software that Microsoft has partially credited with making Windows 10 Subsystem for Linux possible.

It acts as a compatibility layer, designed for OSes based on Unix. In essence, it enables Linux and macOS systems to run Windows applications.

According to Wine:

PE binaries are copied into the Wine prefix instead of the fake DLL files

Thanks to this change, the installation via Wine is different as follows:

 (The prefix) looks more like a real Windows installation, at the cost of some extra disk space.

As you may already know back from the Windows XP era, Microsoft used its anti-piracy Windows Genuine Advantage program to block updates to Wine users on Linux systems.

However, times changed to the point where Microsoft actually ended up supporting the efforts of Wine developers.

The latest Wine update, also known as Update 5.0, is the result of this change in mentality. Not only will it allow Windows apps to run on Linux, but you will be able to do the opposite as well.

Now that Wine is getting full Microsoft support, what do you expect from the two OSes in the near future?

READ NEXT:

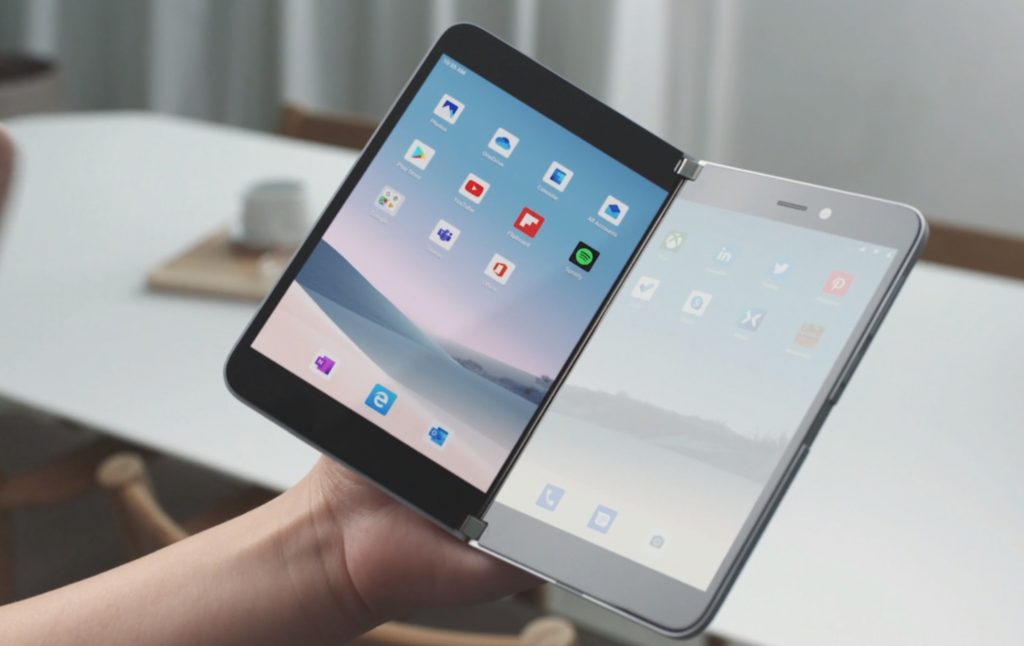
Microsoft’s new emulator provides a hopeful peek at how Android could look on the dual-screen Surface Duo

Yesterday, Microsoft announced an emulator for the Surface Duo. In a blog post, the company described how developers can use it to their advantage to create apps for the upcoming dual-screen device that can “delight people in a new and innovative way.” Since then, many publications have gone hands-on with it, from Rich Woods at Neowin to Windows Central’s Zac Bowden.

After watching demo videos of the emulator, and a video where it was superimposed over an actual Surface Duo, I can’t but help to agree with Microsoft. The Surface Duo emulator definitely is delightful and is providing a hopeful peek at the future of Android on the Surface Duo. Here’s why.

Microsoft Launcher looks beautiful and works more fluently in a dual-screen situation.

We already know that Microsoft Launcher will be powering Surface Duo. An early preview version for standard Android phones provided a look at what things could shape up to be. However, this new emulator is the first time that we’ve seen Microsoft Launcher and the overall user interface of Surface Duo in action on a simulated dual-screen setup. Compared to what Samsung has done with its One UI on the Galaxy Fold, it’s downright fluent and beautiful.

In the demo videos, we can see the redesigned Microsoft Launcher Activity screen on the left, and the standard home screen on the right screen. It’s clean, and the card interface makes much sense and can help increase your productivity on a large dual-screen device. The Activity feed provides information at a quick glance, and you can still see and access your home Android screen on the right. Android’s task manager also only appears on just one display and allows you to choose more apps as you need them — and drag across the screen as needed.

The animation to dismiss the Activity Feed itself is also clean, and the full Android home screen “slides” in a bit, in an efficient way. You even have access to up to 6 apps on the “dock.” (That’s three on each screen when extended to dual-screen and all six on one screen when multitasking) I’ve never quite seen anything this seamless and beautiful before, and I believe there’s a lot of hope here for Surface Duo being used as a productivity device or tablet.

Even more so, Microsoft Launcher on this emulator is consistent with what we’ve seen on Android 10. Android’s card-style app switcher never made more sense. It gives you a “live” look at the app as it was last paused, regardless of which of the two screens its open on. This, too, has the potential for helping boost your productivity, as you can see an all apps how you last left it while switching.

Stock Android apps on Surface Duo look to be clean and efficient

Another point to note with this emulator is the way how Stock Android apps themselves would work on the Surface Duo. While the Google Play Store doesn’t appear (and isn’t compatible) this emulator, we know that Microsoft is urging developers to code apps for the dual-screen format. Apps can span into an  “extended canvas,” “two page,” “dual,” and “companion pane.” mode. Though, as we see, the single-screen view is the default.

Microsoft has obviously put a lot of thought into this, and it’s downright beautiful. For instance, at the 1-minute mark in the video above, we see for the first time outside a promotional video how a Stock Android app can be spanned across the two-screens. It’s held in the middle seam of the device, and then “opens” up like a book, giving you access to it on both the left and right screens. There’s even a neat animation for that, too.

In Neowin’s video, we even see how apps can be “stacked” side by side It’s a small touch, but it’s really delightful, to say the least. The design of Android apps have been known to suck on big-screen tablets, and even on Chrome OS, but Microsoft is changing that. The company is showing developers how their standard apps can be useful for multi-tasking on a dual-screen and even the larger tablet screen.

This is all why Surface Duo (hopefully) won’t end up like Windows Phone

As these videos just show an SDK and emulator, there are many things that could change. Some apps in the SDK and emulator don’t launch side by side and there are limits. However, Microsoft appears to have learned its lesson from Windows Phone. Microsoft is pushing out an Android phone, which has support for millions of apps. It’s also pushing developers to support  SS primitives for dual-screen layouts, the JavaScript Window Segments Enumeration API, and even is helping make PWAs compatible with dual-screen devices. The company means business and it wants to work with developers and help get them on board the dual-screen party, and it’s great.

MacBook is connected but isn’t charging? Here’s the fix

Many users reported that their MacBook is connected to a charger, but it isn’t charging. This can be a big problem, but there might be a way to fix that.

What to do if the MacBook is connected but it’s not charging?

1. Find a proper power source

Sometimes the battery status on your MacBook can say Not Charging. This message appears when the power source doesn’t have enough power to charge your MacBook, but it gives enough power for you to use it without draining the battery.

To fix this issue, connect your charger to a different power outlet.


2. Inspect the charger, cable and the ports

If your cable or charger is damaged, you won’t be able to charge your MacBook, so inspect it closely for any damage. Also, check the ports for any debris. If there’s any debris, be sure to carefully remove it.


3. Reset the SMCreset SMC macbook connected but not charging

If your MacBook is connected but it’s not charging, the problem might be fixed by resetting SMC. To do that, follow these steps on models with T2 security chip:

  1. Shut down your Mac.
  2. Press and hold the following keys for 7 seconds:
  3. Left Control, left Option (Alt), and right Shift.
  4. After holding these keys for 7 seconds, press and hold the Power button alongside these three buttons.
  5. Keep the four buttons pressed for 7 additional seconds.
  6. Now press the Power button to start your Mac.

If you have a T2 chip and non-removable battery do this:

  1. Turn off your Mac.
  2. Now press and hold left Shift, left Control and left Option (Alt).
  3. While keeping these three buttons press, press and hold the Power Keep all four buttons pressed for 10 seconds.
  4. Now press the Power button to start your MacBook.

If you have a removable battery, simply remove it, hold the Power button pressed for 5 seconds and insert the battery again.


4. Inspect the battery health

In case your MacBook isn’t charging when connected, it might be because your battery is damaged. To check the battery health, do the following:

  1. Press and hold the Option (Alt) key.
  2. Check the battery icon in the Menu Bar.
  3. If it says anything other than Normal, you should consider replacing your battery.

Not being able to charge your MacBook can be a big problem, but we hope that you managed to fix it using our solutions.

READ ALSO:

How to check if your Windows OS is 32-bit or 64-bit

While plenty of users know what Windows is and what an OS is, not many know about the differences in architecture. You can see this most often when downloading new programs, as they are usually labeled either x86 or x64.

How do I tell if my Windows is 32-bit or 64-bit?

  1. Press Start
  2. Select Settings
  3. Go to System
  4. Go to System Summary
  5. Select About

WIndows architecture version

This page will display all the basic information regarding your PC, including information about the processor, installed RAM, etc. Additionally, you get to see whether your Windows installation is a 32-bit or a 64-bit version.

Additionally, you also get information regarding the type of processor that the PC uses. In the case above, the processor could allow a 32-bit version of Windows, as well as a 64-bit version.

If the processor were to be a 32-bit, the PC could only run a 32-bit version of Windows, which in turn would only allow for 32-bit programs.

But what exactly is the difference between a 32-bit and a 64-bit version of Windows?

Differences between a 32-bit and a 64-bit of Windows

In terms of performance, 64-bit systems are far more capable. Not only can they handle more computational processes at a time, up to around four billion times the physical memory of a 32-bit processor.

Additionally, the different architecture allows the PCs to handle the available RAM memory as well. For example, 32-bit versions of Windows are perfect for handling 4 GB of RAM or under, but anything over 4 is best handled by 64-bit systems.

In the case of Microsoft Windows, the basic versions of the operating systems put software limitations on the amount of RAM that an application can use. Even so, 4GB is the maximum usable memory the 32-bit version can handle.

If you truly want to take advantage of the newer architecture, you will need to access software designed specifically with that in mind. One good example is that of games that are known to require plenty of system resources in order to run efficiently.

Additionally, this also applies to image editing or 3D editing programs. All in all, 64-bit versions of Windows are best used with programs that require immediate access to information.

If you want to read about more basic Windows 10 terminologies, let us know by commenting in the section below.

RELATED ARTICLES YOU SHOULD CHECK OUT:

Chrome Notification: Change your password. Don’t ignore it!

Google Chrome is one of the most popular web browsers available today. This browsing tool is also one of the best in terms of security. As a matter of fact, Google Chrome asks you to change your password should there be any suspicion that your login information has recently been exposed.

For example, many users have been reporting that they get a notification stating that:

google data breach

A data breach on a site or app exposed your password

First of all, you need to understand what this message means exactly before trying to take any measures.

According to Google experts:

When you type your credentials into a website, Chrome will now warn you if your username and password have been compromised in a data breach on some site or app. It will suggest that you change them everywhere they were used.[…]
You can control this feature in Chrome Settings under Sync and Google Services. For now, it is being gradually rolled out for everyone signed in to Chrome as a part of Google’s Safe Browsing protection.

Regarding the course of action that users should take, the experts added that:

What that actually means is you need to change your password on all websites/apps where you are using the same username/email and password combination.

In conclusion, if you too get the notification, make sure you change the password on all websites. This is the best course of action, even if this does mean having to remember multiple passwords.

We already compiled this guide showing you what are the steps to follow in order to safely change your password. Do check it out now and update your password as soon as possible.

If you want more information on the latest security issues that affect PC users, leave us a message in the comment section below.

READ NEXT:

Microsoft sidelines Windows as it looks to power the next 46 billion devices

The core of Microsoft’s fiscal portfolio still centers around a company that can effectively license software and services but over the past few years, the business has been navigating its way to revenue ambitions as broad as the clouds in the sky.

For anyone who may not have been paying attention to one of the largest players in the tech industry over the past five or so years, Microsoft CEO Satya Nadella succinctly puts in to view the company’s recent half-decade strategy to service 46 billion endpoints (devices including IoT sensors), at a media event earlier this week.

The Verge’s Tom Warren recounts the event and Nadella’s words as an opportunity for Microsoft to make a case for its place among, what the company believes, is the next big wave of intermingled users’ experiences powered by the rapid growth of IoT sensors and “simple” devices.

The way I look at it is Windows is the billion user install base of ours. We continue to add a couple of hundred million PCs every year, and we want to serve that in a super good way,” explained Nadella. “The thing that we also want to think about is the broader context. We don’t want to be defined by just what we achieved. We look at if there’s going to be 50 billion endpoints. Windows with its billion is good, Android with its 2 billion is good, iOS with its billion is good — but there is 46 billion more. So let’s go and look at what that 46 billion-plus 4 [billion] looks like, and define a strategy for that, and then have everything have a place under the sun.

While Nadella’s ambitions seem grandiose at the moment, considering the company has a relatively apathetic appetite for consumer-facing endeavors, market analysts tangentially support the CEO’s numeric claims.

Research and analytics firm Strategy Analytics already states that there are over 22 billion connected devices in use, and that claim was published March of 2019. However, the focus of the Strategy Analytics report was only partly the number of devices while the crux of the research focused on revenue, something Nadella and company will have to contend with as Microsoft continues to shift its business model and clashes with several industry heavyweights for market and mindshare.

Service providers may look at the vast scale of the internet of things and assume that revenues will automatically flow in their direction. But it remains to be seen precisely which applications and services will drive revenue growth, and how much. Furthermore, more research is needed to understand how this ecosystem will evolve to meet the needs of tomorrow’s consumers.

While Strategy Analytics is waiting to see which handful of ecosystems will clearly emerge to power the onslaught of IoT devices, Microsoft has been steadily building a cloud infrastructure to support not only itself in the marketplace, but its partners as well as competitors.

What do you think is the biggest hardware business at Microsoft? “Xbox,” answered a reporter who had been quizzing Nadella on how the company’s hardware products like Surface and Xbox fit into the broader ambitions of Microsoft. “No, it’s our cloud,” fired back Nadella, explaining how Microsoft is building everything from the data centers to the servers and network stack that fit inside.

Over its lifespan, Microsoft has made a business model out of acqui-hires and partnerships. But over the past five or six years and under Nadella’s tutelage, the company has been a bit more strategic with its purse strings and contracts, oftentimes making deals that on the surface, seem to go against the company’s own invested interest.

However, Microsoft has proven over time that it’s often looking beyond the minutia of in-the-moment device, service or software competition. As it turns out, the company would rather set its eyes on a sea of exponential business opportunities powered by oceans of sensory collected cloud data, and partner with friends as well as foes.

Microsoft’s next decade may be less flashy than its go-to-war years of competing directly with companies such as Apple, Facebook and Google with items like Windows Phone, Bing Search, Zune, Microsoft Band, So.cl, Cortana, Windows 10S and more. However, it’s in a much better position to capitalize on the “next big thing.”

“We are absolutely, no question, allocating a lot to what is that next big thing,” explained Nadella last week. “But at the same time, we’re also not saying that’s our way back to saying all of iOS, all of Android, and all of Windows will suddenly be subsumed by this one thing. If anything, what people have come to realize is that Windows is there with a billion users, iOS is there with a billion users, and Android is there with 2 billion users. It’s not like one killed the other.”

Judging from Nadella’s words, Microsoft’s sweet spot and ultimate end goal resides in a business model analogous to transportation, where the company becomes the purveyor of transportation infrastructure (roads, tunnels, bridges, airports) rather than the peddler to the relatively disposable means by which people (data) travels (cars, trains, boats, airplanes).

FIX: MacBook isn’t connecting to TV

Connecting your MacBook to a TV is a great way to expand your working space, but sometimes your MacBook simply is not connecting to a TV. This can be an issue, but there’s a way to fix it.

What to do if MacBook isn’t connecting to a TV?

1. Try turning the TV on and off

The simplest way to fix this problem is to turn your TV on and off and see if that helps. Here’s the correct way to do that:

  1. Make sure that your MacBook is connected to your TV.
  2. Turn off the TV while your MacBook is on.
  3. Now disconnect the HDMI cable from your Mac and connect it again.
  4. Turn your TV back on.

After doing that, check if the problem is still there.

2. Reset SMC

One way to fix this problem is by resetting SMC or System Management Controller. If your MacBook has T2 chip, you can restart SMC by doing the following:

  1. Shut down your MacBook.
  2. Press and hold the following keys:
    • Control on the left side of the keyboard
    • Option on the left side of the keyboard
    • Shift on the right side of the keyboard
  3. Keep these keys pressed for 7 seconds and then press and hold the Power button without releasing the keys. Your Mac might turn on and off, so don’t worry about it.
  4. Keep all four buttons pressed for another 7 seconds.
  5. Release the buttons, wait for a few seconds and turn on your Mac again.

If your MacBook doesn’t have T2 chip and it has a non-removable battery, you can reset SMC by doing the following:

  1. Shut down your MacBook.
  2. Press and hold the following keys:
    • Shift, Control, and Option on the left side of the keyboard
  3. While holding all the three keys pressed, press and hold the Power button as well.
  4. Keep all four keys pressed for about 10 seconds.
  5. Release the keys and start your MacBook again.

If you have a MacBook with a removable battery, you need to do the following:

  1. Shut down your MacBook.
  2. Remove the battery. If you don’t know how to remove it, contact the Apple Store.
  3. Press and hold the Power button pressed for 5 seconds.
  4. Insert the battery and turn on your MacBook.

3. Use Apple’s HDMI cables

Several users reported that they fixed the problem by switching to Apple’s HDMI cables. According to them, they had issues with third-party cables although they were Apple Certified.

Users reported that the issue was resolved by using Amazon Basics cables, so you might want to consider them as well.

There you go, several quick and easy solutions that will help you out if your MacBook isn’t connecting to a TV.

Linksys Parental Controls Are Not Blocking YouTube [Fix]

All the latest Linksys routers come with a few interesting parental control features. However, many reported that Linksys parental controls are not blocking YouTube.

By accessing the Linksys administration page, just specify the URL and that’s it. You don’t have to use any software to block websites. It’s a simple task and not getting it to work is frustrating.

Since there are sometimes issues with this feature, today we’re going to show you how to fix it.

Why are Linksys parental controls not blocking YouTube?

  • The Parental Controls feature isn’t enabled on your router.
  • You have exceeded the number of websites that you can block.
  • The time zone settings on your router aren’t correct.
  • The router’s IP address isn’t added to the list of DNS servers.

What can I do if Linksys parental controls are not blocking YouTube?

1. Make sure that Parental Controls is enabled

  1. Open a web browser.
  2. Type myrouter.local in the Address bar, then press Enter.
  3. Select Parental Controls in the left panel.
  4. Switch Enable parental controls to On, if the option isn’t set like that already.
    Enable parental controls is On
  5. You may further choose the device from the Restrict Internet access on list.
  6. Choose an option under Block Internet access, select Add link, and type the URL or web address of the website you want to block in the given field.

2. Check the number of restricted websites

  1. Open the Parental Controls feature on your router.
  2. Check the number of blocked websites.
  3. Keep in mind that you can restrict up to 10 websites only.
  4. In case of exceeding that number, delete some Internet sites from the blocked list by hovering your cursor over the URL or IP address and clicking the X icon.

After doing that, check if Linksys parental controls are still not blocking YouTube.

3. Take a look at time zone settings

  1. Launch a web browser at your choice.
  2. On the Address bar, enter the gateway’s IP Address, then press Enter. By default, it’s usually 192.168.1.1 used by most Linksys gateways.
  3. After the Setup page of the device appears, click on Basic Setup.
  4. Under Time Settings, you may change the Time Zone.
    time zone settings Linksys router
  5. Click on Save Settings.

Furthermore, make sure that the time zone on your router and devices is set according to the time zone in your current location. You may change the Time Zone on the Setup page, as described above.

4. Add the router’s IP Address to the list of DNS servers published by DHCP

  1. Open your router settings.
  2. Within the Admin Portal, you could go to Connectivity and select Local Network.
  3. While there, enter 192.168.1.1 as the first Static DNS IP and click Apply to save the changes.

After that, things should get back to normal.

We hope that this guide helped you fix the issue with Linksys parental controls not blocking YouTube. In case you’re stuck with blocked websites, we have ways to fix that in our WiFi is blocking websites guide.

If you have any other questions or suggestions, feel free to leave them in the comments section below and we’ll surely check them out.

Linksys router is not showing all devices? Try these fixes

A Linksys router unable to show all devices is indeed something to be concerned about. Let us remind you that there is a greater chance that you’ll be able to fix this by doing some basic troubleshooting procedures.

The DHCP Client Table allows you to check all devices that are connected to your network – both wired or wirelessly.

It displays the name of the device, along with other details such as the assigned IP and MAC addresses, the interface it is connected to, or the precise duration until the connection expires.

That is why we’ve created an article that shows you precisely how to use this tool for the task at hand.

What can I do when a Linksys router is not showing all devices?

1. Ensure that the DHCP Server is enabled

DHCP Server is enabled

  1. Open a web browser at your choice.
  2. Enter your router’s IP Address on the Address bar.
  3. Press Enter.
  4. When the login prompt appears, enter your router’s User name and Password.
  5. While into the web-based setup page, scroll down to the Network Setup section.
  6. Check if the DHCP Server is enabled. If it’s set to Disabled, select the Enabled radio button.
  7. Click Save Settings.

Checking the DHCP Client Table using the web-based setup page is extremely simple, so make sure the DHCP Server is enabled in the first place.

Then, simply following this path Status tab > Local Network > DHCP Client Table under the DHCP Server section. This should reveal a list of clients that are currently connected to your network.


Need to configure a Linksys router? Check out this step-by-step guide.


2. Access the configuration page of your device

DHCP Client Table

Users often describe buying an IP Camera and trying to get the IP Address by plugging in straight into their router. This leads to no result if the IP setting of the camera isn’t in the same segment as the router.

The DHCP Client Table can only show devices currently connected to the router and be assigned an IP Address automatically from the router.

Therefore, the smartest thing to do is to check if your camera is indeed listed, as described above. This helps to retrieve the IP Address assigned by the router to access the configuration page of the device.

3. Use the Refresh option in DHCP Client Table

Refresh option in DHCP Client Table

Note that it may take up to 24 hours or even longer for a new connected device to show up in the list. Your goal is finally seeing the updated list of clients, so keep in mind that the DHCP Client Table page provides a basic, yet useful Refresh option.

In essence, it might be a good idea to use it a few times before resorting to other troubleshooting methods you may find on the Internet.

If you have other questions and suggestions, reach for the comments section below.

READ NEXT:

KB4534310 replaces Windows 7 wallpapers with black screens

Many Windows 7 users have been reporting that KB4534310 is causing their wallpapers to be replaced by black screens. This problem seems to happen every time users boot up their PCs again.

I’ve tried creating a new theme, tried renaming transcodedwallpaper.jpg to .old, but although these changes allow me to restore my graphic wallpaper, after restarting, the desktop wallpaper is black again. Icons and start bar colour are unaffected. The only solution was to uninstall the update. But now my pc is less secure.

This cumulative update is part of the Windows 7 January Patch Tuesday updates. Windows 7 users probably also know it as the last round of Patch Tuesday updates available for Windows 7 before it was decommissioned.

Uninstalling KB4534310 is the only solution

While the users that reported the problem did provide an alternative solution, it is more of a workaround. Additionally, having to uninstall an entire update just because of a graphical issue isn’t all that pleasant.

If you decide to uninstall the update, but don’t know exactly, check out our step-by-step guide on the matter.

This isn’t the first time cumulative updates cause wallpapers to be replaced by black screens. Fortunately enough, we’ve covered the issue in several in-depth guides, and provided you with step-by-step solutions.

No word is out whether Microsoft knows about the issue or plans to do anything about it. However, this bug is easily noticeable, so it will go up on the fix priority list pretty fast.

For you want more articles on the way cumulative updates to affect users, let us know through the comments section below.

Editor’s Note: Microsoft officially ended Windows 7 support. If you want to learn everything there is to know about migrating to Windows 10, this in-depth guide will come in handy.

Windows 10 v1909 is now available via Windows Update

Microsoft has just made the Windows 10 version 1909 OS, also known as the November 2019 update, available to all users.

Those that want to download this update no longer need to go to Microsoft‘s website to download it. Now they can simply do it automatically via the Windows Update.

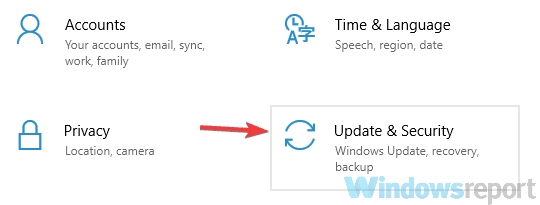
As a quick reminder, this is how you access the Windows Update window:

  1. Press Start
  2. Go to Settings
  3. Select Update & Securityupdates & security
  4. Select Windows Update
  5. Choose Check for updatescheck for updates windows 10

This is just the first in a continuous wave of automatic rollouts for devices. As such, more and more devices should receive this update as available at some point in the future.

Microsoft explains that:

We are starting the next phase in our controlled approach to automatically initiate a feature update for an increased number of devices running the October 2018 Update (Windows 10, version 1809) Home and Pro editions, keeping those devices supported and receiving the monthly updates that are critical to device security and ecosystem health. Our rollout process starts several months in advance of the end of service date to provide adequate time for a smooth update process

This entire operation can be perceived as a preparation phase. This is because Microsoft is already in the process of finishing its latest update, called Windows 10 version 2004.

As such, it is most likely that by the time the Windows 10 update 2004 rolls out, 1909 will be available on all compatible devices.

Do you want to read more news on the development of Windows 10 updates? Let us know in the comment section below.

Microsoft releases preview SDK for Surface Duo, proposes web standards for dual-screen devices

Microsoft first started talking about the Surface Neo and Duo developer story back in November, and the company is following up today by announcing dual-screen preview SDKs for Surface Neo and Windows 10. Developers can download the preview version of the Surface Duo SDK today, while the Windows 10 version will be available in the coming weeks.

“The preview SDK gives developers a first look at how you can take advantage of dual-screen experiences,” explained Kevin Gallo, CVP of Windows Developer Platform. Starting today, developers who download the SDK will have access to an Android Emulator with a preview Surface Duo image for Android Studio, as well as native Java APIs to create dual-screen experiences for Surface Duo. Microsoft has more documentation on how to create apps for dual-screen devices on this page.

While today’s announcements are software-related, Windows Central’s Zac Bowden did spot in the documents mention the dimensions of the Surface Duo displays, and the two separate screens will have a 1350×1800 resolution.

If Microsoft will be pushing app developers to optimize their Android and Windows 10 apps for dual-screen devices, the software giant isn’t forgetting about web apps. Indeed, the company also announced new web standards for dual-screen layouts that web developers could implement for websites and PWAs running on both Android and Windows 10X devices. Microsoft’s Edge browser on Android, which is based on Chromium, is ready for dual-screen experiences on the web, Gallo explained today.

Microsoft will share more details about dual-screen experiences with developers during its Microsoft 365 Developer Day on February 11 at 8:30 AM PDT. This will be an online event that will be streamed on this page.

Microsoft to open first cloud datacenter region in Israel

Microsoft is continuing to expand its Azure datacenter footprint, this time with its first datacenter region in Israel. The new “Israel Central” location is expected to open in 2021, and will bring the total footprint of datacenter to 56 regions among 21 countries.

In addition to offering Azure cloud infrastructure in the region, the company also plans to offer Office 365 further down the road. According to Michel van der Bel, President of Microsoft Europe, Middle East and Africa:

“When I speak to customers across EMEA, it is clear that the power of the cloud is essential for their competitiveness. We have made significant infrastructure investments in the region and with this announcement, our planned region in Israel will join a growing number of EMEA markets recently made available including Germany, Norway, South Africa and Switzerland. Offering Microsoft Azure and Office 365 from a datacenter region in Israel forms a key part of our investment and involvement in the startup nation, as infrastructure is an essential building block for the tech intensity that public sector entities and businesses need to embrace.”

In addition to giving many businesses and organizations data residency within their own country, Microsoft also highlights GDPR compliance as a way to give piece of mind about privacy and security.

As highlighted in the Azure blog post, the company’s investments in Israel began in 1989 with the opening of a local branch, and has also established its first R&D center outside of the U.S. in the country in 1991. The company also plans to open a Microsoft Israel campus later this year.

Microsoft also plans to open a datacenter next year in Qatar, and has also opened detacenters in Norway, Germany, and Switzerland, among others in the last year alone. The company’s continued investments in Azure are likely part of the reason why tech companies have voted more favorably for Azure as opposed to its number one rival, Amazon AWS.

Microsoft will soon make Bing the default search engine for Chrome users with Office 365 ProPlus

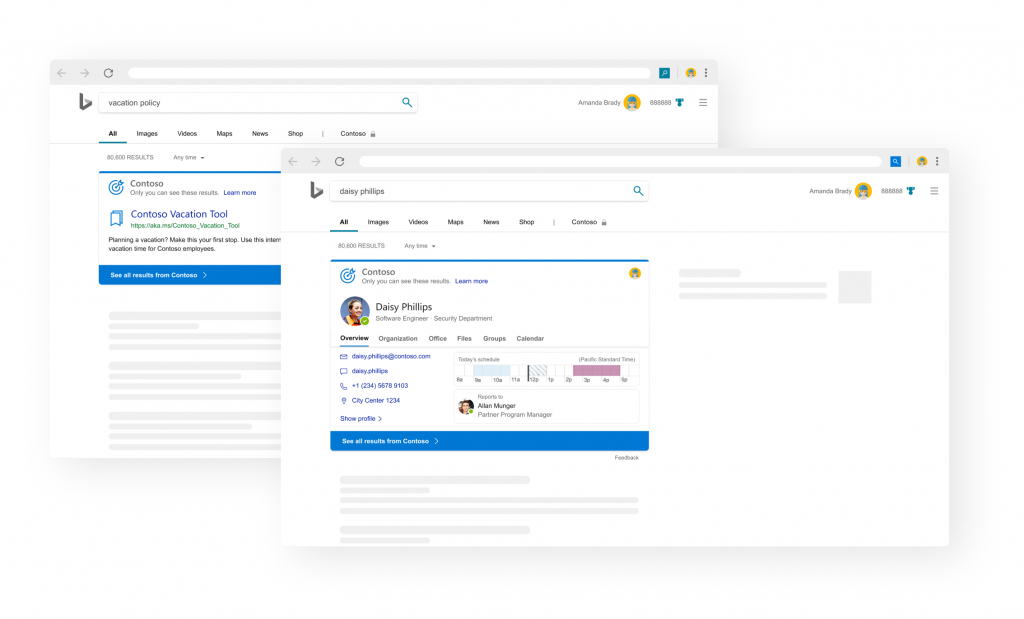
Microsoft will set its Bing search engine as the default search tool in Chrome for some Office 365 ProPlus customers. Beginning in Office 365 ProPlus version 2002, the Microsoft Search in Bing will be enabled thanks to the automatic installation of the Chrome extension in beginning in February in the U.S., Canada, Australia, U.K., France, German, India, and others to follow.

Microsoft wants to give business customers easier access to Microsoft Search, a tool that allows users to find workplace documents, files, sites, tools, people, and other information along with the regular web results all in the Bing search engine. Of course, Microsoft says that employees can still choose to set another search engine as their default, should they prefer.

Of course, users who already have Bing as their default search engine won’t receive the Chrome extension installed automatically, according to Microsoft’s support page.

Multiple users on both Reddit and GitHub (via ZDNet) are rather displeased with the decision, with one users of the Microsoft-owned software hosting service calling its decision “totally unacceptable in a business environment”.

Office 365 ProPlus to change Chrome’s default search engine to Bing in upcoming update from sysadmin

Luckily, further down the document shows users how to keep the extension from being installed, by using either the Office Development tool or using a Group Policy. Users can also choose to remove the extension by entering a single command as an administrator, thereby removing Bing as the default search engine.

What do you think about Microsoft’s decision? Feel free to share your thoughts in the comments area below.

Linksys Router Not Getting Full Speed: How to Boost it

Not getting full speed on a Linksys router can be a major problem that negatively impacts your web browsing activities.

Many users are testing Internet speed, and they aren’t satisfied with the performance of their routers.

However, there are ways to fix this, and today we’re going to show you the best ways to do it.

Why is my Wi-Fi not giving full speed?

  • Temporary glitches with your router can cause this issue to appear.
  • MTU size isn’t properly configured on the router configuration page.
  • Media Prioritization settings on the router aren’t set properly.
  • WMM feature might be interfering with your device.

What can I do if the Linksys router is not getting full speed?

1. Power cycle your router

  1. Power it off using the Power button.
  2. Unplug the power cord, then give it 10 seconds before plugging it back in.
  3. Now press the Power button again to restart it.

To reinforce this action and get full speed back, you could also power cycle the modem.

2. Change the MTU size

  1. Open a web browser.
  2. Enter 192.168.1.1 in the Address bar, as your router’s default IP address.
  3. Then, enter your Router Password.
  4. Click Log in.
  5. Then, click Connectivity.
  6. Click the Internet Settings tab.
  7. In the MTU section, click the drop-down arrow and set it to Manual.
    change MTU size
  8. You may now enter the recommended MTU Size for your router.
  9. Click on Apply.
  10. When prompted to save your changes, click Yes.

MTU is the largest packet size allowed for Internet transmission. Data sent from one point to another is broken up into packets. If the packets are too large for your connection, then the router eventually experiences packet loss or drops the Internet connection.

The Maximum Transmission Unit size is one of the main factors potentially contributing to your Linksys router not getting full speed. Changing the MTU size should help.

To determine the correct value for your network, do a specific ping test on the destination you’re trying to go to by using another computer or even a web address. Use the appropriate command for the ping test.

For Windows computers:

ping [url / local server or IP Address] –f –l xxxx

For Mac computers:

ping [url / local server or IP Address] –d –s xxxx

3. Check Media Prioritization settings

  1. Open the router settings page.
  2. The Settings tab of the Media Prioritization section gives you access to a bunch of settings related to this function.
    Media Prioritization settings
  3. To tackle the full speed error, check if the devices prioritized were assigned specific bandwidths.
  4. Make sure Downstream is set to 0.

4. Try disabling WMM

  1. Login to your router.
  2. The Wi-Fi Multimedia (WMM) Support feature can be configured from Applications & Gaming > QoS in Linksys Wi-Fi routers.
    disable WMM Support
  3. Go under Media Prioritization in Linksys Smart Wi-Fi routers instead. Disable it and let us know of any changes.

This article covers all the major fixes pertaining to the Linksys router not getting full speed. If you go through the above-mentioned steps strictly, you should be able to solve this frustrating issue for good.

In case you need more information, we have a great guide on how to configure Linksys router, so we suggest checking it out.

If you face any difficulty understanding these procedures, please let us know in the comments section below.

How to run the old Edge alongside the new Microsoft Edge

If you’ve decided to (or are thinking about) installing Microsoft’s new Chromium-based Edge browser, you should be aware that it will replace the “old” Microsoft Edge legacy on your Windows 10 PC. The Taskbar icon, the icon on the desktop, and the Start Menu links for the legacy Microsoft Edge will all be gone upon install of Microsoft’s latest browser.

This is by design, as Microsoft’s new Edge browser is much more modern and comes with better features when compared to legacy Edge. Microsoft essentially wants to put its new browser front and center and “hide” the legacy browser. However, that doesn’t mean that the old Edge was removed entirely from your PC. It’s still there, and with a few tweaks, you can still access the old legacy Edge. Here’s how.

Use the Microsoft Edge Insider Beta channel instead

The methods we are about to describe here involve tweaking with the group policy editor in Windows 10 before you install the new Edge. It’s a straightforward process, but it might not be for you if you’re a novice with Windows. That’s why the easiest way of running the old legacy Edge alongside the new Microsoft Edge is to simply not install the final version of the new Edge browser.

Instead, you should visit the Edge Insider page and download the browser from the Edge beta channel. By downloading from the Edge Beta channel, you’ll be able to keep the old Microsoft Edge right alongside the new Microsoft Edge without worry. Please be aware, though, that the Edge Beta channel is a work in progress, so there might be some bugs in the experience. Microsoft does assure users, however, that this channel is the safest and stable as it only gets updated every six weeks.

Try the Group Policy Editor

If you’re a more experienced Windows 10 user, you can run the old legacy Microsoft Edge alongside the new Microsoft Edge by changing a few things inside the Group Policy Editor. This will only work in Windows 10 Pro or Windows 10 Enterprise, as the Group Policy Editor is not available in Windows 10 Home. So, if your PC is up and running with Windows 10 Home, try our method above, instead.

Anyway, this method involves changing a setting option which is turned on by default after the new Microsoft Edge is installed. Keep in mind, this method only works before you install the new Edge. You might be able to do it after the new Edge is installed, but this method is recommended by Microsoft to be done before installation, as it is designed to help enterprises prepare for New Edge deployments.

  1. Open the Group Policy Editor by searching for it with the Windows 10 search box
  2. Under Computer Configuration, go to Administrative Temples, click Microsoft Edge Update, and then click Applications
  3. Under Applications, select the option for Allow Microsoft Edge Side by Side browser experience
  4. Click Edit Policy Setting
  5. Select Enabled and then click OK

If you happen to try this tweak after the new Ege is installed, it won’t take into effect after the installer for the new Microsoft Edge is run again. This installer can be run directly or automatically when the new Edge updates.

Some notes

Once you finish the steps above, you’ll need to re-pin Microsoft Edge Legacy to the Start Menu or the Taskbar. The pin is migrated when the new version of Microsoft Edge is deployed. You’ll also need to be aware of the fact that sites that were pinned to Start to the Taskbar for Microsoft Edge Legacy will also be migrated to the new version of Edge. Learn more about this process at Microsoft by clicking here. And, feel free to keep it tuned to OnMSFT for all your Microsoft Edge news and information.

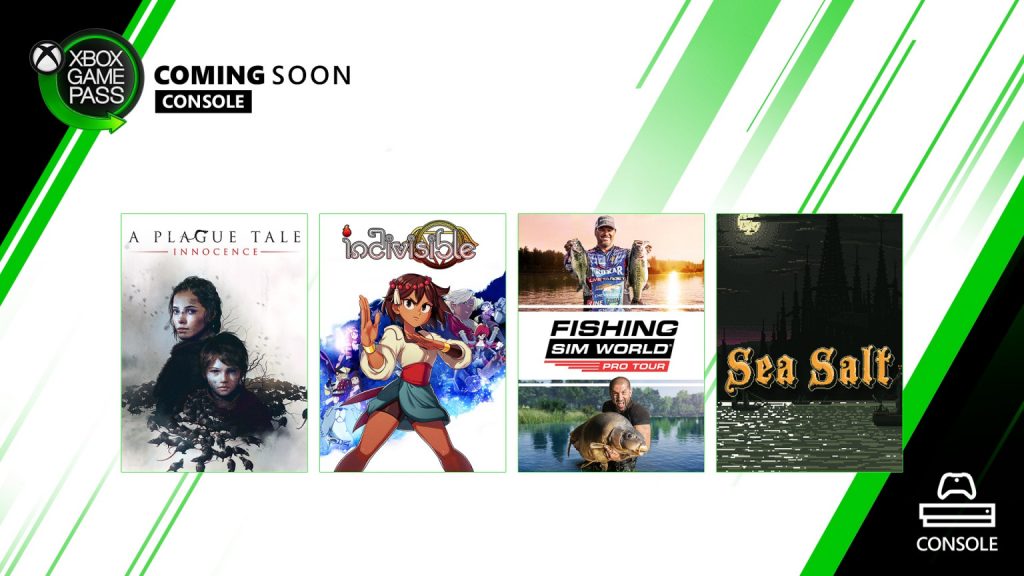
A Plague Tale: Innocence and 3 other games are joining Xbox Game Pass for Console this month

The Xbox team has just announced the second wave of games coming to Xbox Game Pass for Console in January. A Plague Tale: Innocence, which was previously announced for Xbox Game Pass for PC, will be available on both PC and console tomorrow, January 23. Since the PC game has yet to make its way to the Windows 10 Microsoft Store, it’s not clear yet if the PC and Xbox One versions will share cloud saves and achievements.

For those unfamiliar, A Plague Tale: Innocence is an action horror stealth game developed by Asobo Studio, a French developer currently working on Microsoft’s next Flight Simulator Game. A Plague Tale: Innocence ended up in several “Game of the year” lists last year, and it’s definitely one of the most exciting additions to the Xbox Game Pass catalog following other recent games like Devil May Cry 5 or The Outer Worlds.

The other game coming to Xbox Game Pass for console tomorrow is Indivisible, an action RPG title released back in October 2019. Two other games will follow on January 30 with Fishing Sim World: Pro Tour and the action strategy game Sea Salt.

Overall, it’s been an exciting past couple of weeks for Xbox Game Pass subscribers. AAA games like The Witcher 3 and GTA V recently joined the catalog, along with smaller jewels such as Overcooked 2 or Untitled Goose Game. If you have yet to subscribe, we remind that you can get your first month of Xbox Game Ultimate (which also includes Xbox Live Gold and Xbox Game Pass for PC) for just $1 instead of $14.99.

Leaked photos of Xbox Series X prototype reveal the console’s rear ports

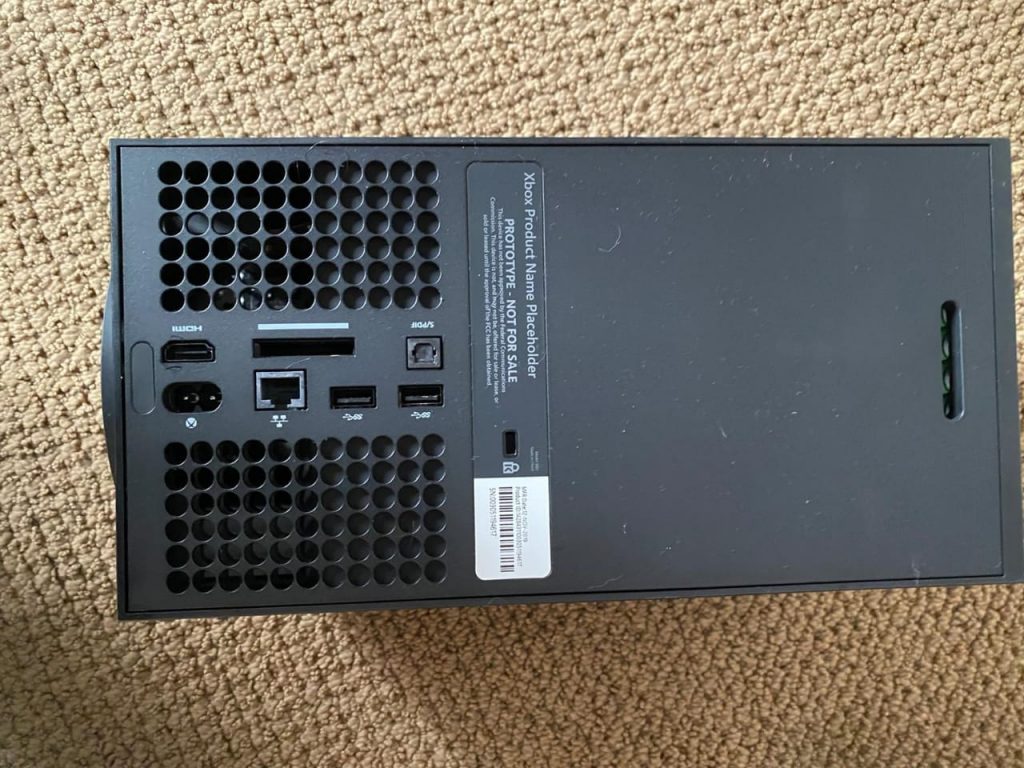
After Microsoft unveiled its next-gen Xbox Series X console last month, there has been some speculation about what ports would be included on the new hardware, especially after AMD admitted to showing an unofficial render of the console back at CES. Well, two pictures of an Xbox Series X prototype have been shared on Twitter a couple of hours ago, and Brad Sams from Thurrott.com has since confirmed their authenticity.

As we can see from these leaked pictures, the back panel of the console features a power input, an HDMI out port, an Ethernet port, two USB-A port, as well as an optical audio port. According to Sams, “the holes on the side of the ports are for venting and that large rectangle port in the middle is for diagnostic reporting. I don’t expect that port to be on the final hardware and as always, these ports could change.”

You’ll notice that the HDMI In port that has been included on all Xbox One consoles since launch is gone on this prototype. Microsoft made quite a big deal of this HDMI passthrough feature at the beginning of the 8th gen, but it’s apparently the latest port to get scrapped after Microsoft removed the dedicated Kinect port on the Xbox One S and Xbox One X.

The Xbox Series X will also have a USB-A port in the front, but this prototype doesn’t have any USB-C ports. That’s a bit surprising considering the new Xbox Elite Series 2 controller is the first to use a USB-C port for charging, but the lack of USB-C ports on the console shouldn’t be an issue for most consumers.

As this is a prototype, things could still change before the console launches in holiday 2020, but it will be interesting to see if Sony has a more forward-thinking approach for its PlayStation 5.

Classic Mortal Kombat video games may be coming to Microsoft’s Xbox One consoles

The iconic original three Mortal Kombat video games may be getting a re-release on modern consoles such as the Xbox One according to a new PEGI rating (via IGN) which was filed recently.

According to the filing, the three games will be updated with improved graphics and gameplay and will also be given some form of online functionality. Mortal Kombat, Mortal Kombat 2, and Mortal Kombat 3 will be bundled together as the Mortal Kombat Kollection Online and it’s currently set for release on Xbox One, PS4, PC, and Nintendo Switch on January 21st 2020.

MK Kombat Kollection PEGI rating

Clearly that release date is just a placeholder as it’s now January 22nd and Mortal Kombat Kollection Online has yet to appear anywhere and no official announcements have yet to be made.

Would you like to see the original MK games on Xbox One? Let us know why or why not in the comments below and then follow us on Pinterest, Twitter, and Facebook for more Xbox gaming news.

Gmail Fix: a server error occurred and your email was not sent

We live in an age where most communication is either based on emails, live messengers, video calls, and audio calls. However, among the 4 mentioned, emails are the most commonly used.

There are plenty of email clients out there, and some developers have even implemented them as web services so that you don’t have to install anything on your PC anymore.

One good example is Google’s very own Gmail service, as it has become one of the most reliable email clients in the world.

Of course, this service is not without its flaws. For example, due to circumstances that have yet to be determined, you may get the occasional error message when trying to send an email.

For example, users have been reporting that they are getting an error message that says:

Oops… a server error occurred and your email was not sent. (#007)

Fortunately enough, there are solutions to this issue, and we have listed them in this step-by-step guide so that you can enjoy using Gmail without any further interferences.

How do I fix the server error issue with Gmail?

1. Clear your browser’s Cache and Cookies

1.1 Google Chrome

  1. Launch Google Chrome
  2. Click the Menu button
  3. Select Tools
  4. Select Clear Browser data
  5. Click Clear cache and cookiesChrome clear Cache

1.2 Firefox

  1. Launch Firefox
  2. Go to Menu
  3. Select Privacy & Security
  4. Select Cookies & Site Data
  5. Click Clear Data…firefox clear cache

1.3 Microsoft Edge

  1. Launch Microsoft Edge
  2. Press Ctrl + Shift + Del
  3. Select Temporary services and files
  4. Press Deleteedge clear cache

1.4 Opera Browser

  1. Launch Opera Browser
  2. Press Ctrl + Shift + Del
  3. Select Since installation as a time period
  4. Check the box next to Images and Files in Cache
  5. Select Delete browser dataOpera Clear Cache

Do you need to send emails in total privacy? Check out our review on a very secure browser.


2. Disable Browser extensions

2.1. Google Chrome

  1. Launch Google Chrome
  2. Click the Menu button
  3. Select More tools
  4. Selec the slider next to each extensionChrome disable extension

2.2 Firefox

  1. Launch Firefox
  2. Go to Menu
  3. Select Add-ons
  4. Select Extensions
  5. Click the three-dot icon next to each extension, and click Disablefirefox disable extensions

2.3. Microsoft Edge

  1. Launch Microsoft Edge
  2. Select the Menu button
  3. Select Extensions 
  4. Right-click the extension you want to remove and select Remove
    • You can also select the extension and click the Remove buttondisable edge extension

2.4. Opera Browser

  1. Launch Opera Browser
  2. Select Menu
  3. Go to Extensions
  4. Go to each extension and click the Disable buttondisable Opera extensions

Once you’ve cleared the cache and disabled all extensions, you should no longer get any server failure messages from your Gmail service. 

If you know of any other fixes for this common issue, share them with us in the comment section below.

RELATED ARTICLES YOU SHOULD CHECK OUT:

Quick fix: Onedrive error code 0x80040c81/0x80040c82

At times, the Windows OneDrive desktop client may show errors if the file synchronization fails. The OneDrive error code 0x80040c81 and 0x80040c82 are just two examples.

These error codes can occur when the users try to update the client or sign in. While they can be resolved with a simple reset of the OneDrive client, there are other troubleshooting tips you can try.

In this article, we take a look at a couple of troubleshooting tips to help you resolve OneDrive error code 0x80040c81 and 0x80040c82 in Windows 10.

How can I fix the OneDrive error code 0x80040c81/0x80040c82?

1. Reset OneDrive app

OneDrive error code 0x80040c81

  1. Click on Start and select Settings.
  2. Go Apps > Apps and Features.
  3. Type OneDrive in the search box.
  4. Locate the OneDrive app from the list and click on it.
  5. Click on Advanced Options under the OneDrive app.
  6. Under OneDrive advanced options, scroll down to Terminate. Click on the Terminate button.
  7. Next, click on the Reset button.
  8. When asked to confirm, click on Reset.
  9. Close the Windows settings window and relaunch OneDrive client. Check for any improvements.

If you’re having trouble opening the Setting app, take a look at this article to solve the issue.


Alternatively, you can also reset the OneDrive desktop client by running a command. Here is how to do it.

OneDrive error code 0x80040c81

  1. Press Windows Key + R to open Run box.
  2. In the Run box, type the following command and click OK.
    %localappdata%MicrosoftOneDriveonedrive.exe /reset
  3. Press Windows key + R to open Run again.
  4. Type the following command and click OK.
    %localappdata%MicrosoftOneDriveonedrive.exe /reset
  5. Restart your computer and try launching the OneDrive client.

Resetting the OneDrive client has worked for many users having similar issues on their Windows PCs.

2. Reinstall Microsoft OneDrive

OneDrive error code 0x80040c81

  1. Click on Start and select Settings.
  2. Go to Apps.
  3. Click on Apps and Features.
  4. Search for OneDrive in the app list.
  5. Click on the OneDrive app.
  6. Click on Uninstall.
  7. Select Yes if asked to confirm the action.

Reinstall Microsoft OneDrive

OneDrive error code 0x80040c81

  1. Open the Windows File Explorer.
  2. Navigate to the following location:
    C:WindowsWinSxS
  3. Now search for OneDrivesetup.
  4. Double-click on OneDriveSetup to run the installer.
  5. Wait for the Windows to complete the installation.

Alternatively, you can also get the latest version of Microsoft OneDrive from the Microsoft Store. It is recommended that you check the Microsoft Store for any pending updates, even if you decide to install it from the Windows directory.

If you want more info on how to reinstall Windows 10 apps, check out this detailed guide and learn how you can do it with ease.


3. Disable firewall and security programs

OneDrive error code 0x80040c81

  1. Click on Start and select Settings.
  2. Go to Update and Security.
  3. Click on Windows Security.
  4. Click on Firewall and Network Protection.
  5. Open the currently active network.
  6. Toggle the switch to turn off the Windows Firewall.

After disabling the firewall, check your antivirus program. If you have a third-party program installed, check if it has a firewall active. If enabled, disable the firewall. Also, temporarily disable your antivirus program.  This also applies to other network-related apps such as proxies and VPNs.

The OneDrive error code 0x80040c81 and 0x80040c82 mostly occur due to network-related issues and can be easily fixed with a simple OneDrive reset. Follow all the steps in this article one by one and let us know which of them helped you resolve the error in the comments section below.

RELATED STORIES YOU MAY LIKE:

Windows 10 will get a new set of redesigned icons soon

Microsoft is constantly updating their products, be it through new features, security features, or even just a design overhaul.

On that note, Microsoft plans on giving Windows 10 a new look, starting off with redesigning 100 icons.

Now it seems that they are getting closer to achieving their goal.  A comment on a public forum revealed that Microsoft has already started releasing the new icons, and putting them on users’ taskbar.

These new icons are based on Microsoft’s Fluent Design System and are only currently available to the taskbar.

new win10 icons fluent design

The icons are already in the Preview Builds

Unfortunately, live users will not be seeing these new icons just yet, as they are only available to those that are part of the Windows Insider program. Additionally, Microsoft hasn’t released all the icons yet, as only a handful are currently available.

Thankfully enough, the rate at which Windows Insider Builds usually evolves is pretty fast. As such, the next update should arrive in about two or three weeks.

Users that are part of the Insider program will then have to give their feedback regarding the icons. Afterward, Microsoft may need to take some extra time making minor adjustments.

After that, we can expect a live release for these icons within the next major feature update, most probably during a Patch Tuesday round of updates.

What icons are you really excited about seeing with new visuals? State your preferences in the comment section below.

How to Download the Microsoft Mouse and Keyboard Center

The Microsoft Mouse and Keyboard Center is the official configuration software for customizing Microsoft-branded mice and keyboards. It helps you assign macros, adjust settings, and update firmware.

Here’s how to safely download and install it on Windows 10 or 11.

How do I download Microsoft Mouse and Keyboard Center?

1. Check Device Compatibility

Before installing, make sure you’re using a Microsoft-branded mouse or keyboard (e.g., Microsoft Sculpt, Surface Keyboard).

  • Only compatible with Microsoft peripherals.
  • Works on Windows 10 and Windows 11 (64-bit only).

2. Visit the Official Download Page

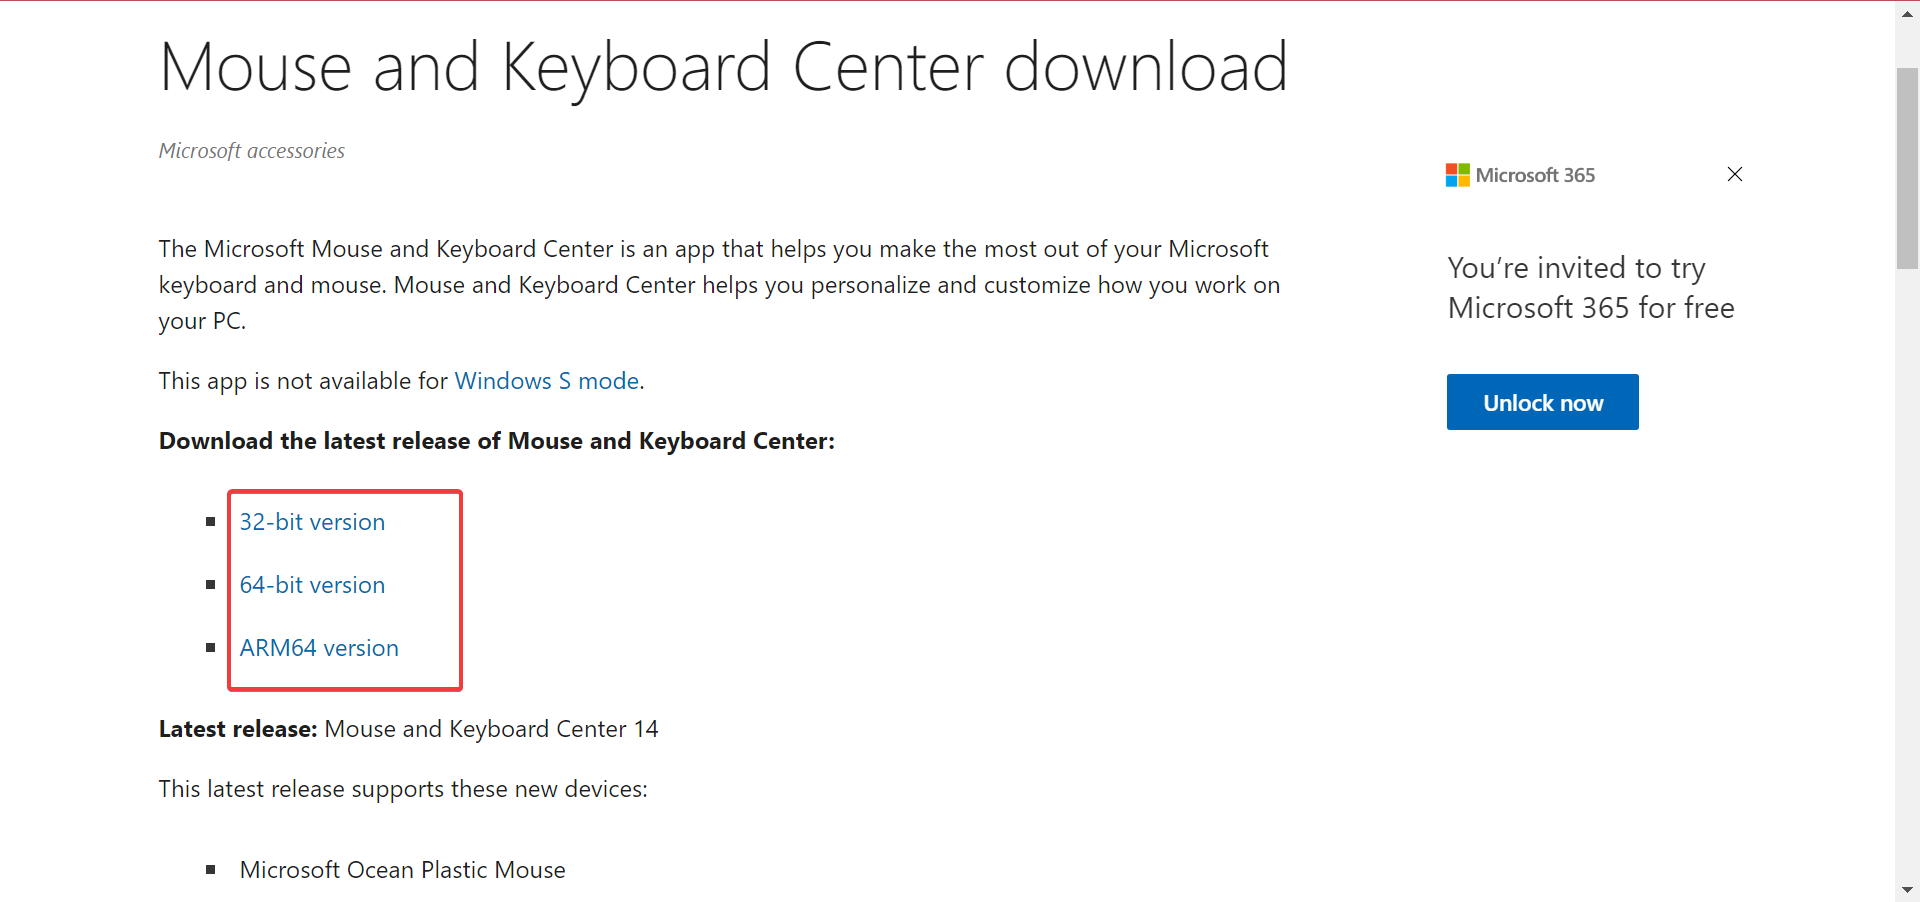
Go to the official Microsoft Mouse and Keyboard Center download site.

  • Select your Windows version.
  • Choose 64-bit download if using modern Windows OS.
    download microsoft mouse and keyboard center

3. Download the Installer

Click Download under the correct version (32-bit or 64-bit).

  • File type: .exe
  • Size: ~15–20 MB

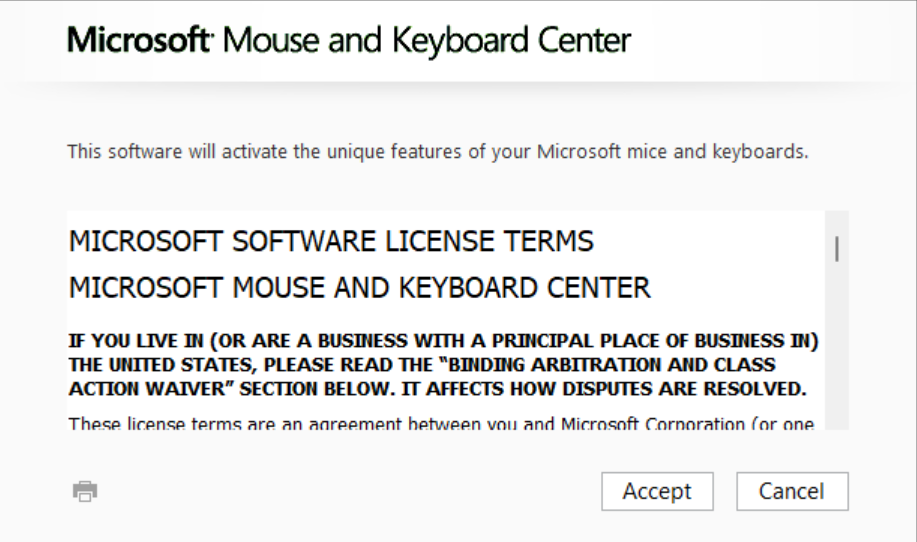
4. Install the Software

  • Double-click the downloaded .exe file.
  • Follow on-screen instructions to install.
    setup
  • Restart your PC if prompted.

Before you leave, discover the best keyboard mapping software and configure the desired layout.

What’s your review of the software? Let us know in the comment section below.

How to install Microsoft fonts on Linux

Arial, Verdana and Times New Roman: whatever operating system you use, you’ve probably received documents which use these fonts. The default Windows font library has become so ubiquitous that you can’t go far online or in an enterprise without encountering one of its members.

Owing to the lack of open-source licenses, Microsoft typefaces can’t be included with Linux distributions. Although close-matching substitutes can be found out-of-the-box, sometimes you may encounter a website or document which renders poorly without the original font.

fonts in the windows settings

On many popular Linux distributions, you can obtain Microsoft fonts through your system’s package manager. We’re using apt on an Ubuntu/Debian-based machine; on other distributions, you may need to search your package manager to find the appropriate package.

The following command will download and install a collection of Microsoft fonts:

sudo apt install ttf-mscorefonts-installer

After the initial download, a set of license terms will appear in your terminal window. Acknowledge the install prompt by tabbing to the “OK” button and pressing enter; repeat on the next screen to select the “Yes” button and accept the EULA.

Installing Microsoft fonts on Ubuntu

The individual fonts will then be downloaded and added to your system. This should only take a few moments, with progress logged to the terminal window. Once the installation is complete, the fonts will appear within your applications. Webpages and documents should now look like their Windows counterparts.

Installing Microsoft fonts on Ubuntu

Not every Microsoft font is included in the mscorefonts package. The complete list consists of Arial, Arial Black, Comic Sans MS, Courier New, Georgia, Impact, Times New Roman, Trebuchet, Verdana and Webdings. Notably absent fonts include Calibri, the default Microsoft Office font since 2007, Consolas, now widely used as Microsoft’s monospaced terminal font, and Segoe UI, the typeface used throughout the Windows interface.

Arguably, the easiest way to obtain these other fonts is by copying them over from a Windows PC. You can find them within C:WindowsFonts. Copy the font files over to your Linux machine and then install them using your font manager application (often by simply double-clicking a font file from a file browser).

Windows 7 still “nearly universal” within large enterprises, says BitSight

Microsoft ceased regular support for Windows 7 a week ago but usage by large businesses remains “nearly universal,” according to a study by security firm BitSight. After Windows 7’s end-of-life on January 14, the BitSight Data Science Team looked at operating system adoption among 60,000 organisations.

The report confirms what many will have long suspected: most large enterprises have not yet entirely migrated to Windows 10. Almost 90% of organisations with over 10,000 employees are still using Windows 7 on at least one machine. The figure falls to 61% for companies with less than 1,000 employees.

Windows 7 dependency graph from BitSight

Larger enterprises tend to find it more difficult to move to new computing platforms. Their operating scale and reliance on legacy processes make overnight migrations impossible. The statistics indicate that the majority of the world’s largest businesses have delayed migration away from Windows 7, although it’s likely that individual reasons will vary significantly.

Some organisations may rely on Windows 7 from a technical perspective. Legacy apps and devices might be incompatible with newer operating systems, leaving businesses stranded on older platforms. For other companies, more fundamental issues such as poor planning or concerns over costs may be responsible for the delay.

BitSight studied Windows 7 usage in different industries and found it has the greatest dominance in the education and government sectors. 84% of organisations in the education industry have a machine running Windows 7; the figure is 82% for government bodies.

Windows 7 dependency graph from BitSight

The report also looks at “dependence” on Windows 7, evaluating its usage relative to an organisation’s total fleet size. BitSight found the finance and healthcare sectors are most reliant on the platform. 45% of healthcare organisations with more than 10,000 employees run Windows 7 on more than 25% of their total device count. The figure rises to 46% for businesses in the financial sector.

Although the report can be interpreted as evidence that Windows 7 will persist for a lot longer, it also indicates that organisations are aware of the need to migrate away. Although most enterprises still use Windows 7 in some capacity, the dependency figures reveal that few businesses are wholly reliant on it. It appears Windows 7 usage is becoming restricted to just business-critical workloads which have no direct migration pathway onto Windows 10.

Microsoft WordPad could be getting “ads” for Office web apps

Microsoft has faced criticism in the past for the “ads” scatted throughout some of the apps Windows 10, but a much-loved free component of Windows might soon be part of the story now too. According to a tweet from Microsoft MVP Rafael Rivera, Microsoft might be considering adding ads for the Office web apps to WordPad in Windows 10.

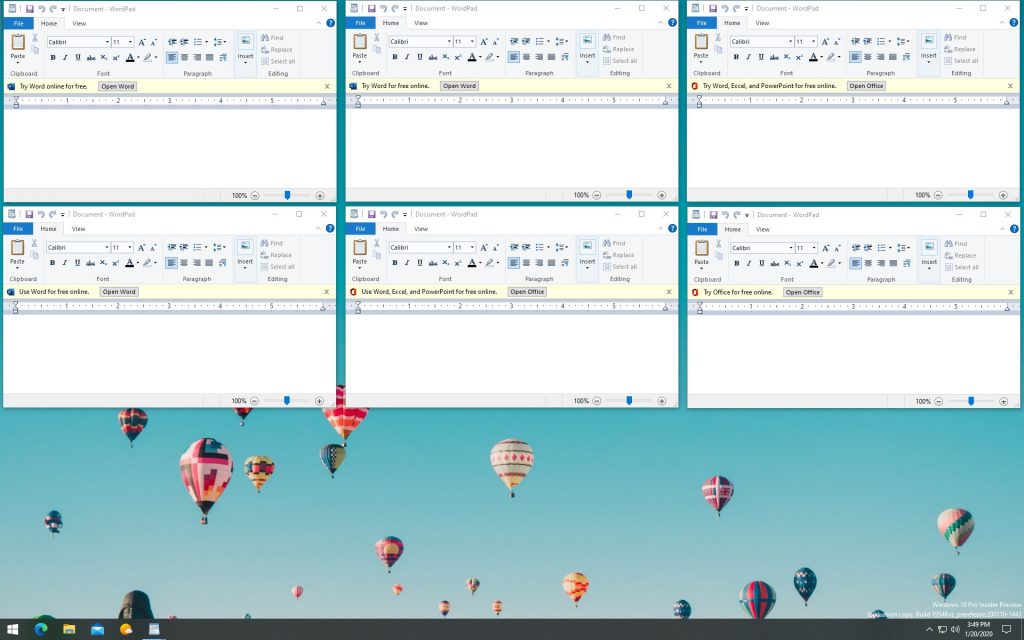
As seen in the featured image above, Microsoft appears to be working on six different variants of these “ads.” They all will show up under the ribbon of WordPad and in a yellow shade with an actionable clickable text box, which presumably will take the user to the Office web apps.

Three variations are themed towards Word, and suggest to “Try Word online for free,” “Try Word for free online,” and “Use Word for free online.”  Another three variations also suggest the other Office online apps. These mention to “Try Word, Excel, and PowerPoint for free online,” “Use Word, Excel and PowerPoint for free online,” and “Try Office for free online.”

To be fair, these “ads” are relatively harmless suggestions. They are not in the way of the user, nor do they tell you to buy a product. Instead, Microsoft is suggesting for you to use what many might see as a more “complete” text-editor, which more features.

It’s also worth mentioning that these “ads” are not in the current version of WordPad, and might not even ship at all. As Rafael points out, it could rather be designed to increase monthly user engagement.

More than 300 Xbox games are on sale this week including Monster Hunter World: Iceborne and Destiny 2: Shadowkeep

If the next massive Xbox Store sale has yet to be announced this year, Microsoft is currently discounting more than 300 Xbox games for a limited time. In addition to the weekly Deals with Gold and Spotlight Sale, you may want to check out this week’s Artistic Adventure Sale featuring games like Outer Wilds, What Remains of Edith Finch, Oxenfree, or Thief of Thieves. Many games in this list are available with Xbox Game Pass or were previously offered with the Games with Gold program, but you can now purchase them without breaking the bank.

The separate Lunar New Year Sale is much more interesting, as it includes many titles from the Assassin’s Creed, Far Cry, and Dark Souls franchises, as well as recent games such as Ace Combat 7: Skies Unknown, Destiny 2: Shadowkeep (33% off), Jump Force, Life is Strange 2, Monster Hunter World: Iceborne (25% off), NBA 2K20, and Red Dead Redemption 2 (50% off).

This week’s Deals with Gold are slightly less interesting this week, except for the discounts on Forza Motorsport 7, Need for Speed Heat, Overcooked 2, and Star Wars: Battlefront II.  All discounts will be available through Monday, January 27, and you can check the full list of deals on Major Nelson’s website.

How to configure read receipts in Microsoft Teams

Back in June of 2019, Microsoft introduced a read receipts functionality for Microsoft Teams. Similar to what you experience on other messaging apps, these read receipts give you a visual cue to let you know when the person you’ve sent a message to, actually opened and read it.

The feature slowly rolled out and is turned on by default, but users do have complete control if they want to use the feature or not. In this Office 365 guide, we’ll dive a bit deeper and explain how you can configure the option.

How to turn off read receipts

As we previously said, read receipts are turned on by default in Microsoft Teams. When you send a message in either a 1:1 or group chat, you’ll see a checkmark to indicate it was sent. When the recipient reads it, you’ll then see the checkmark turn into the shape of an eye, to indicate it was read. If this troubles you, you can actually disable it via the Microsoft Teams app on MacOS, Linux, or Windows 10.

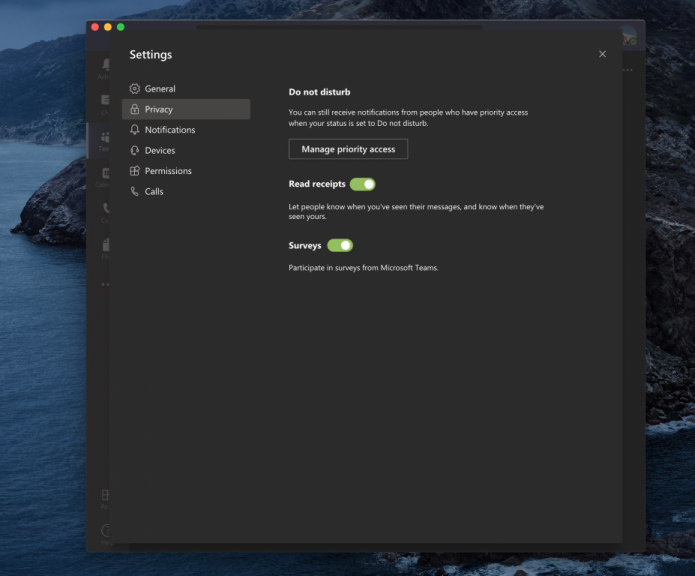
  1. Click your profile icon in the top right corner of the screen
  2. Click the settings icon, it’s the fourth from the top
  3. Close Privacy from the list on the left-hand bar
  4. Toggle the switch for read receipts to off

Keep in mind that if you’re chatting with someone who has read receipts turned off, but you still have the feature turned on, you still won’t see read receipts from that person. You also won’t get a read receipt if someone sees your message in a notification or in their Activity feed, or if they reply via the Toast Tile in Windows 10 or the Banner notification in Mac OS. Read receipts only work if the recipient replies directly from within the chat.

Seeing read receipts in a group chat

If you’re looking to see who has read your message in a group chat, there is a read by option in the chat. Once everyone has seen your message, you’ll get the seen confirmation, which is the eye-shaped icon. You can then see who has read your message by going to that message, selecting more options and choosing the read by option. You’ll then see a list pop-out on the left side.

Administrative options for configuring read receipts

The options we described above are for the user. Microsoft Teams administrators, however, have full control over the feature as well. If an administrator doesn’t want the user to have read receipts, they can change the admin portal value to read receipts to “off.” In the event that an admin wants everyone to have read receipts, the value can be changed to “everyone.” Here’s how to do that.

  1. Visit the Microsoft Teams admin center
  2. Click the messaging icon on the left side of the screen, it’s the eighth one from the top
  3. Click on your messaging policy name and then click the edit icon on the top
  4. You can then see the read receipts option appear. You can choose an option from the drop-down menu, as we described.

More on read receipts

It might be useful for an administrator to turn off read receipts in situations where there are many people in one chat. In this situation, having read receipts on might create confusion within users, and can overwhelm the messages. The read receipts are better used in situations with smaller groups and in private chats where communication is more important. You can learn more about these read receipts here at Microsoft, and feel free to check out our Microsoft Teams hub for all the latest news and information.

Hub71 opens first Microsoft Reactor program in Abu Dhabi

The first Microsoft Reactor has been announced for the Abu Dhabi region which will be used to help foster tech startups and developers both from the area and those that have moved to Abu Dhabi from abroad.

“Built to support the Gulf’s unprecedented rate of digital transformation, we are thrilled to open a Microsoft Reactor within Hub71,”Microsoft’s general manager of cloud and AI division, Jeana Jorgensen, said in a statement. “The concentration of globally minded startups, investors and industry, represents an enormous opportunity. We believe bringing these elements together with Mubadala and Hub71 will be a catalyst for the region.”

Microsoft Reactors are a combination of spaces and programs to assist tech communities by offering the increased opportunity for hosting events, hackathons, and accelerator projects for those either preparing to launch products or who need assistance or encouragement during the final phases.
Microsoft Reactors have already launched in Philadelphia, London, and New York.

Want more Microsoft news? Follow us on Pinterest, Twitter, and Facebook if you dare.

Disney+ streaming service to launch early in UK on March 24th alongside other regions

The Disney streaming platform, Disney+ (or Disney Plus), was expected to rollout to the UK, Austria, France, Germany, Ireland, Italy, Spain, and Switzerland on March 31st but it’s been officially announced today via a press release from Disney that it will launch a week earlier in these regions on March 24th instead.

The rollout of Disney+ has been a gradual one with North America getting it first in early-November of last year, followed by Australia, New Zealand, and Puerto Rico a couple of weeks later.

This strategy has been rather frustrating for a lot of Disney, Marvel, and Star Wars loyalists mostly due to the hit Disney+ exclusive TV series, The Mandalorian, which has already finished its first season and has left many in regions without the streaming service having to resort to piracy to view it.

With more Disney+ exclusive shows on the way, many of which feature Star Wars and Marvel characters, it’s good that the service is being made available as quickly as possible, however, Latin American and Asian regions are still going to have to go without until October 2020 and 2021 or 2022 respectively.

Disney+ is viewable on Xbox One consoles with the official Xbox One Disney+ app and on Windows 10 devices via a web browser. Tech savvy individuals can also try their hands at making a Disney+ UWP app if they so choose.

Do you use Disney+? Let us know which region you’re in and how you watch it in the comments below and then follow us on Pinterest and YouTube for more tech news.

Disney+
Disney+
Developer:
Disney
Price:
Free+

Dying Light 2 is the latest major Xbox One video game to get a delayed launch date

Dying Light 2, the sequel to the hit Dying Light video game, was originally set to launch this spring but has been delayed until an unspecified time in the future.

The announcement came via a post on the official Dying Light Twitter account which stated that the developers needed more time to fully deliver on their vision for the title.

You can read the full announcement here:

Dying Light 2 joins Marvel’s The Avengers and Cyberpunk 2077 in the growing list of major video games set for launch on Microsoft’s family of Xbox One consoles in 2020 that have had their debuts pushed back.

While this could potentially be cause for concern, this also means that those involved behind the scenes are unwilling to launch a poor user experience and likely have faith that the titles will still sell well regardless of when they hit store shelves and digital storefronts.

Are you disappointed by these delays or are you willing to wait for a better product? Share your thoughts with the community in the comments below and then follow us on Twitter, Pinterest, Facebook, and YouTube for more Xbox gaming content.

Folder icon not changing on Mac? Here’s a quick fix

Many users like to customize the look of their folders with custom icons, however, some users reported that the folder icon is not changing on their Mac. This is a small but inconvenient problem, and in this article, we’ll show you how to fix it.

What to do if the folder icon isn’t changing on Mac?

1. Make sure you change the icon properly

If your folder icon won’t change, it’s most likely that you aren’t changing it properly. To change the folder icon, you need to do the following:

  1. Open image in Preview.
  2. Select Edit > Select All > Copy.
  3. Now paste it in the Info section for the folder you want to change.

After doing that, the icon should be changed accordingly.

2. Rename the drive

If you’re unable to change the folder icon on your Mac, try renaming the drive that has that folder on it. This is incredibly simple, and you can do it by following these steps:

  1. Select the drive you want to rename and press Enter.
  2. Enter the desired name and press Enter

Alternatively, you can change the drive name by doing the following:

  1. Go to the Computer
  2. Select the disk you want to rename and choose File > Get Info.
  3. Expand the Name section and set the desired name.
  4. Now press Tab to apply changes.

After changing the name, you should be able to change folder icons without any problems. Changing the drive name won’t affect your system in any way, and if you want, you can revert back to the original name after the issue is resolved.

3. Move the icon to the folder icon section

Sometimes simply dragging and dropping the icon to the Get Info pane can fix the problem. To do that, follow these steps:

  1. Open the Get Info pane of the folder that you want to customize.
  2. Locate the desired icon you want to use and drag and drop it to the Get Info

There you go, several quick and easy solutions that can help you if the folder icon is not changing on your Mac.

How to increase your Xbox One’s download speeds

The Xbox One is currently one of the most popular gaming consoles out there. This Microsoft-owned console has many exclusive titles under its belt and can be used for a variety of things, not just gaming.

You can surf the internet, watch movies, look at pictures, stream online content, and more.

However, all of these things require that you have an Internet connection. In the case of online gaming and streaming 4K content, that Internet connection also needs to be very good.

If you want to make the most out of your Xbox One Internet connection, more precisely the download speeds, then check out this step-by-step guide that will show you how to accomplish just that.

How do I increase my Xbox One’s download speeds?

1. Close games and apps running in the background

  1. Press the Xbox button
    • This will suspend any game or app you are running and return you to the home screen
  2. Navigate to any game or app that is running, and select them
  3. Press the Menu button
    • This has 3 horizontal lines on it
  4. Select Quit
    • Do this by navigating over Quit and press A

By closing the app, you will free some of the bandwidth and increase both your download and your upload speeds.

2. Restart your Xbox

  1. Press the Xbox button
  2. Select the gear-shaped icon
  3. Select Restart Console

Your Xbox should now boot with a fresh set of network settings. However, if this doesn’t work, continue using the method below.

3. Restart Downloads

  1. In the Home Screen, go to My games and apps
  2. Select Queued
  3. Select an active download
  4. Press the Menu button
  5. Select Cancel
  6. Select the Xbox Button
  7. Go to the Store tab
  8. Go to the game or app
  9. Select Install
    • This will restart the download process

This method is similar to the last one, only that instead of rebooting the entire console, you reboot a download process.

4. Switch to a wired connection

  1. Connect an Ethernet cable to the back of your Xbox
  2. Connect the other end of the Ethernet cable to a router
  3. Restart your Xbox using the methods described abovexbox ethernet

No matter how good a router is, a wired connection still offers more speed and stability compared to Wi-Fi.

By following any of these very easy steps, you should be able to increase the download speeds on your Xbox One. However, keep note that even with these methods, you download speeds depend solely on your Internet Service Provider.

If you are experiencing slow Internet connection speeds on your Xbox, check out this article for some quick fixes.

What method did you use that worked at increasing your Xbox One’s download speeds? Let us know in the comment section below.

RELATED ARTICLES YOU SHOULD CHECK OUT: