Edge Dev 130.0.2849.1 brings manual site indexing to the browser

Microsoft has released a new Edge Dev Channel update, 130.0.2849.1, now available for Insiders to test. This update includes a host of new features and changes, as well as the usual bug fixes and performance improvements.

The most notable addition is a new feature that enables Insiders to mark specific sites for reindexing in the Edge browser, allowing users to trigger site indexing manually.

This should help ensure that sites remain up-to-date in the browser’s Index Now feature. Index Now also sees some changes to make it easier to understand when websites are being indexed.

Another addition is the ability to manage cookies and site permissions in the URL bar, thanks to a new button in the address bar. Users can set permissions such as access to the microphone and location per site, and the button will light up when interacting with a site with blocked content.

In addition to new features, this build includes minor changes and fixes. The full list is available in the changelog, but here are a few highlights:

  • A fix for an issue causing the browser to crash when opening the Settings page on Xbox.
  • This update fixes crashes when signing into and out of accounts on iOS and activating Tab Center with existing groups.

The Edge Dev 130.0.2849.1 should now be available for download by those in the Dev Channel. If you’re not seeing it, give it some time to roll out to your device.

You can read its full changelog here.

Microsoft recently released Edge Dev 130.0.2835.2, which now lets users customize the browser experience with their photos.

Gws_rd=cr in Google Search URL: What is it?

Many users reported that Google adds gws_rd=cr to its URLs when performing searches, and many are wondering what this means. Today we’re going to tell you everything you need to know.

What is gws_rd=cr, and can I remove it?

What does gws_rd=cr do?

If you see this in your URL, it means that Google has performed a redirection. This is done so that the search engine delivers localized Google Search based on your current location.

gws_rd=cr search bar

This is a common occurrence if you’re accessing Google outside of the US.

What does each parameter mean?

  • gws – stands for Google Web Server, meaning that the server is performing this operation
  • rd – stands for redirect meaning that you’re being redirected
  • cr – country redirect which means you’re being redirected based on your country or region

How can I disable this?

Unfortunately, there’s no way to disable this parameter since it comes from the server. Perhaps using a VPN with a US server could help. Switching to a different search engine is also an option.

Is gws_rd=cr harmful?

No, this parameter was added by Google over a decade ago, and it’s in no way harmful to users. As stated, it’s used to give localized search results and improve your search experience.

What does gws_rd ssl mean?

This is a different parameter and it means that Google has redirected you to a HTTPS version of a page. We covered this in detail in our gwl_rd=ssl and gws_rd=ssl#spf=1 articles, so don’t miss it for more information.

While this parameter is nothing to be concerned about many reported that Google Search is not working for them.

We also wrote a guide on what to do if Google History is showing unknown searches, so you might want to check it out.

How to Fix ERROR_BROKEN_PIPE in Various Scenarios

The ERROR_BROKEN_PIPE typically occurs when one process tries to write data to another process that is no longer available to receive it. Often it may come with the 109 (0x6D) The pipe has been ended error message as well.

This can happen in various contexts, such as SSH connections, network communications, or inter-process communications. So, first, determine where the error is occurring (e.g., SSH session, network communication, or a specific application).

How do I fix ERROR_BROKEN_PIPE?

1. Check the network stability

  • Ensure that your network connection is stable. Unstable connections can often cause broken pipe errors.
  • Use tools like ping or traceroute to diagnose network issues.

2. Increase the SSH KeepAlive Settings (for SSH Errors)

  1. Edit the SSH configuration file on the client side (/etc/ssh/ssh_config or ~/.ssh/config): Host * ServerAliveInterval 60 ServerAliveCountMax 5
  2. This configuration sends a keepalive message every 60 seconds and allows up to 5 missed messages before disconnecting.

3. Handle Broken Pipe in scripts

Use trap to catch the SIGPIPE signal in your scripts: #!/bin/bash trap 'echo "Broken pipe signal detected" >&2' PIPE yes | head echo "Script finished"

4. Check Application Logs

Review logs for any application-specific errors or warnings that might indicate why the connection was broken.

If you detect any such problems, try reinstalling the problematic application or reconfigure it to the correct values for your environment.

Also, ensure that all relevant software (e.g., SSH client/server, network drivers) is up to date. Sometimes, bugs causing broken pipe errors are fixed in newer versions.

5. Increase the buffer sizes (for Network Applications)

If you are dealing with network applications, consider increasing the buffer sizes to handle larger amounts of data without breaking the pipe.

That is because the ERROR_BROKEN_PIPE can be caused by an overstressed connection between the client and server.

Refer to the documentation of the specific software or protocol you are using for any additional troubleshooting steps or configuration options.

You should also adjust the Server Timeout Settings in case of a SSH error. Try to edit the SSH configuration file on the server side and restart the SSH service afterwards.

By following these steps, you should be able to diagnose and fix the ERROR_BROKEN_PIPE in most scenarios. However, there solutions are not direct solutions, but procedures to apply in specific cases.

For instance, the Error PDF Validation broken pipe is a similar case of a broken pipe error. Hit the highlighted link to get to the bottom of it.

Our latest article tackles the Error_Pipe_Busy issue, so don’t miss it for more information. We also have a guide on Error_Pipe_Local, so feel free to visit it.

If you need more specific guidance based on your context, feel free to ask in the comments below.

The Xbox Game Pass app will no longer be downloadable starting this November

Microsoft is moving features from the Xbox Game Pass mobile app into the main Xbox app, streamlining the experience. This week, Xbox beta members are getting access to the updated mobile app, with a full rollout coming soon.

Microsoft is also killing off the Xbox Game Pass app entirely, with downloads disabled in November.

Several Xbox Game Pass features are coming to the Xbox app on mobile, including the ability to browse the entire Game Pass catalogue, manage your membership and view and claim Game Pass Ultimate Perks.

In a blog post, Microsoft says you can stream select games through Xbox Cloud Gaming on iOS or Android using a supported browser, check your achievements and game stats, compare your progress with friends, and install games on your console remotely. You can continue to use the Xbox app’s features to stay connected with friends and the latest gaming news, receive notifications for game updates, and more.

Game Bar Compact Mode, which optimizes the Game Bar interface for smaller screens and Windows handheld devices, is now available to all PC players on Windows. The mode lets users quickly access recently played games, standard game launchers, other gaming utilities, and the Widget Store, a widget marketplace.

The Xbox app has several features that should make it easier to manage your game library. For example, the app now lets you view and install all add-ons related to a game you’re installing, regardless of when you acquired them or if they were part of the same bundle. It’ll display all of the game’s content in one place.

The Xbox Series X and S will soon let users pre-download game updates so they can start playing right when they go live. Currently supported by a small number of games, including Sea of Thieves and Minecraft, the feature will expand to more titles in the future.

Microsoft is also making the Xbox app’s wish list more useful with notifications. Users can now enable wish list notifications when a game on their list is released, they enter the Game Pass library, or they become available as part of a Free Play Days promotion.

In a related post, Xbox recently made its new Game Pass model, Standard, available to Xbox gamers everywhere.

Microsoft Teams-Planner greatly improves the Grid View, allowing users to customize their tasks

Microsoft has recently rolled out significant updates to its integrated Teams and Planner applications, introducing new features, accessibility improvements, and other quality-of-life changes.

In a blog post, Microsoft says one of the most notable changes is the addition of a new labels column in Grid View, which allows users to categorize and track tasks across different projects easily. You can add labels to tasks directly from Grid View and then use the new filter functionality to view tasks based on their corresponding labels.

Microsoft has also improved Planner’s accessibility features, including fixes to the label menu in task detail pages, keyboard-based data editing, and better support for screen readers.

The My Day page in the Planner app has been updated to more accurately display tasks due on the current day. In addition, to-do tasks with no due dates and tasks created from the Outlook add-in will now correctly appear in My Day.

If you’re not seeing these changes in your Teams-integrated Planner app, you should soon — Microsoft says the updates are rolling out now.

Microsoft experiments with “Edge Lens” to Rival Chrome’s Google Lens

A few months ago, Microsoft introduced a new feature called “Copilot Vision” to allow users to “search for anything on the screen” including Windows Desktop to get answers from Copilot. The feature is getting an upgrade in terms of name and functionality.

Microsoft has been experimenting with different brand names for the feature, which enables users to search for information by drawing a circle around an object or selecting a region on their screen. The latest iteration of this feature is called “Edge Lens,” a rebranding of Copilot Vision.

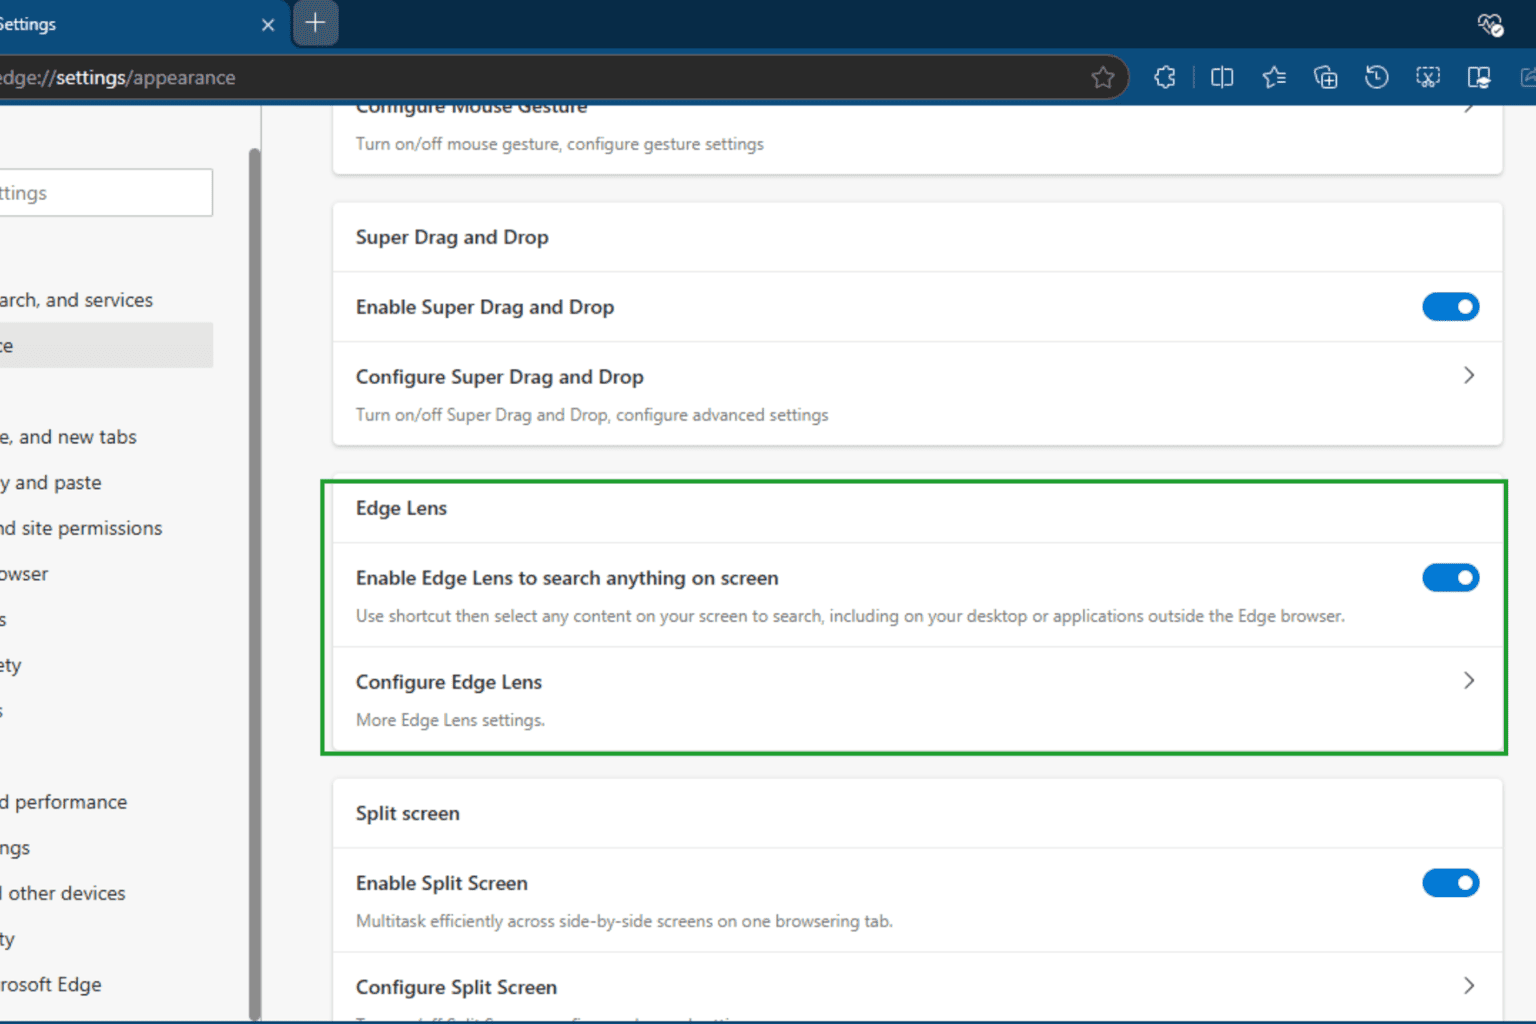
While the Circle to Copilot feature has not yet been officially announced, it is still in testing. Microsoft has renamed the related appearance settings from Circle to Copilot to Copilot Vision. The former allows users to draw a circle around an object to ask Copilot, while the latter enables users to use a shortcut to select any content on their screen to submit to Copilot.

In the latest Canary update, Microsoft rebranded Copilot Vision as Edge Lens, similar to much improved Google Lens in Chrome. which recently got Transate screen feature. Edge Lens allows users to search for anything on their screen using the same “Alt+Shift+X” shortcut that can be configured in Appearance Settings.

Edge Lens Settings. Image Credit:WindowsReport.

By not explicitly mentioning the Circle to Search feature in Edge Lens settings, Microsoft is likely attempting to draw attention to the new feature itself.

Configure Edge Lens feature and keyboard shrotcut. Image Credit:WindowsReport.
  1. Close Microsoft Edge Canary browser.
  2. Right-click on its shortcut and select Properties.
  3. In the Target field, append the following at the end by giving space.
    --enable-features=msEdgeLens
  4. Click OK and Apply.

When you use the Edge Lens shortcut for the first time, a message appears at the top of the screen prompting you to “select an area or text to search.” Once you select a region, Edge Lens will display search results in a sidebar. You can also copy the selected region and view Bing Image search results, as well as extract text from the image.

Edge Lens result for an image search. Image credit:WindowsReport.

With future updates, we can expect Edge Lens to become even more powerful and competitive with Google Lens.

What do you say about Microsoft’s Edge Lens feature? Let us know your thoughts in the comments below.

10 Best Microsoft Word Alternatives You Should Know

Whether you want to write, create, edit, or format a document, Microsoft Word has been the one-stop solution. It offers hundreds of fonts, the ability to add images and tables, customize format, and more. However, its subscription model and pricing can be a barrier for many users, as it is part of the Microsoft Office suite, which may not be affordable for everyone.

Hence, there is a need to look for an alternative. In this guide, we will discuss and explore the ten best Microsoft Word alternatives that help you find the right word processor to meet your needs.

What are the best Microsoft Word alternatives?

Best Microsoft Word Alternatives: A Quick Overview

AlternativePriceStand out featureLink
Google DocsFreeSeamless collaboration and real-time editing in the cloud.➡️Try It Now
Microsoft Office OnlineFreeFamiliar interface with essential Word features accessible online.➡️Try It Now
Zoho WriterFree (Paid plans available)Powerful document management and sharing capabilities with a clean UI➡️Try It Now
WPS OfficeFree (Premium version available for $29.99/year)Comprehensive suite with rich formatting options and templates.➡️Try It Now
LibreOffice WriterFreeRobust open-source solution with extensive features similar to Word.➡️Try It Now
Apache OpenOffice WriterFreeVersatile and customizable with a strong set of productivity tools.➡️Try It Now
ClickUp DocsFree (Paid plans available)Integrates project management features with document creation for teams.➡️Try It Now
FreeOffice TextMakerFree (Paid version for $39.99)Lightweight option supporting multiple file formats for quick use.➡️Try It Now
AbleWordFreeStraightforward word processor with strong PDF editing capabilities.➡️Try It Now
WriteMonkeyFreeFocuses on distraction-free writing with a minimalist interface.➡️Try It Now

Google Docs – Seamless collaboration with real-time editing

Google Docs - Best Microsoft Word Alternatives

Google Docs is one of the best & most advanced word processors powered by AI; therefore, it is our top choice for Microsoft Word alternative.

It lets you stay in sync with edits and comments from external and internal teams, whether using your PC, tablet, or phone.

Google Docs has hundreds of templates, so you don’t have to start from scratch. Type @ and select an appropriate option from the drop-down to get started. It can help you instantly compose formatted emails, review trackers, write meeting notes, calendar invites, and more. You can add names, files, and calendar events to your documents.

The platform has a pageless mode, which allows you to create content continuously, which means you can write and scroll without interruption.

Google Docs comes with an easy-to-manage permissions option, which allows you to stay in control of your document. You can decide the level of permission (view, comment, edit, share, or download) given to a user.

  • Allows real-time editing and commenting
  • Accessible from any device with an internet connection
  • Seamlessly integrates with other Google Workspace tools
  • Requires an internet connection for full functionality
  • Lacks some advanced formatting and features

Microsoft Word Online – Allows you to access Word online

Microsoft Office Online

If you want to use Microsoft Word but don’t want to get a Microsoft Office subscription, you can try Microsoft Word online. The cloud version of Word is free for one person and provides options to share and collaborate with your team members in real-time, which means multiple users can work on a document simultaneously.

This also solves the version control issues, thereby streamlining the editing process and making the document handling seamless.

Unlike Word, it doesn’t have all the advanced word processing features but comes with a basic spelling and grammar checker. However, if you have internet access, you can create, edit, and share documents on the go.

It lets you choose from basic templates, fonts, icons, and stickers. You can also use dictation and voice commands.

Furthermore, the free online version comes with 5 GB of storage. You can also insert charts, graphs, or images directly from their OneDrive storage.

  • Offers a familiar look and feel to the desktop version
  • Multiple users can edit and comment on a document in real-time
  • Integrates with other Microsoft 365 applications and OneDrive
  • A stable internet connection is required for full functionality
  • Might be slower than the desktop version

If you want to learn more about using Word online, here is a separate guide with detailed steps; check it out! Alternatively, if you want to learn how to get a free trial of Microsoft Word, read this guide.

Zoho Writer – Comes with a focus mode

ZOho writer

Zoho Writer is an easy-to-use word-processing tool that can be a great pick if you are looking for a Microsoft Word alternative.

It offers a clean, minimalistic design that promotes focus and enhances your writing experience. With its Focus mode, you can concentrate on the current paragraph, as the tool reduces distraction by hiding tools and menus.

It also comes with a Night Mode, which can be helpful for those who prefer a darker interface. Moreover, it can help reduce eye strain, making writing on the tool comfortable.

You can lock or mask sensitive information in a document to prevent collaborators from editing it. You can also turn off collaboration to hide your changes from others and reveal them once they are ready.

Zoho Writer comes with an AI-powered assistant that can help you write better. It can understand the context of your content and polish it to make it look better.

  • Supports offline editing
  • Offers a wide range of formatting tools, templates, and styles
  • Comes with advanced document organization features
  • The selection of templates is not that extensive
  • Can be slower when handling very large documents

WPS Writer – Similar layout as Word

WPS Office

WPS Writer is a free Word editor that allows you to create, edit, save, and share documents. It is completely compatible with Microsoft Office. Therefore, you can seamlessly transition from Word to WPS.

The app is compatible with Windows, Mac, Android, and iOS. It has an intuitive interface and a layout similar to Microsoft Word.

WPS Writer is compatible with fifteen file formats, including .doc, .docx, .docm, .txt, .dotm, .rtf, and more.

It allows you to effortlessly preserve text, colors, headings, layout, cell and number formats, and other things, ensuring your files remain intact throughout the process. The tool offers 100,000 templates you can download for free to create CVs, letters, invitations, and more.

You can seamlessly sync document files across various devices, including Windows, Mac, Linux, iPhones, Android, iPads, and even cloud platforms.

  • Offers advanced formatting options, styles, and templates
  • A familiar layout similar to Microsoft Word
  • Allows you to open, edit, and convert PDF files
  • The free version includes ads
  • Doesn’t have advanced collaboration tools

LibreOffice Writer – Open source and free

LibreOffice Writer - microsoft word alternative

LibreOffice Writer is an open-source and versatile word processing tool, part of the LibreOffice suite. It supports various document formats, including Microsoft Word (.docx) and OpenDocument (.odt), so you can open, edit, and save these documents without issues.

You can write a simple memo or create a complete book with content, diagrams, indexes, and more. And the AutoCorrect dictionary checks the spelling as you type, ensuring there are no typos and spelling mistakes.

The application has advanced formatting options, styles, and templates, which allow you to create documents for various purposes, like business reports and personal or academic projects.

Along with the intuitive and easy-to-use interface, LibreOffice Writer offers options like tracking changes and comments, which depicts its focus on collaboration and productivity.

It also supports a range of extensions and plugins, is free to use, and is regularly updated by a dedicated community of developers.

  • Completely free to use, no hidden costs or subscription fees
  • Fully functional offline
  • Supports various file formats, including .docx, .odt, .rtf, and more
  • Can be slower with large documents
  • The interface may feel outdated or less intuitive

Apache OpenOffice Writer

Apache OpenOffice Writer

Apache OpenOffice Writer is a simple word processor with all the robust features a modern user needs. That’s why it can also be considered an excellent alternative to Microsoft Word.

The app has various functionalities, such as Wizards, which can easily create standard documents like letters, faxes, and agendas. You can also explore the extensive template repository or create a custom one according to your document needs.

With Styles and Formatting, Apache OpenOffice Writer gives you complete control over the design of your documents. The AutoCorrect feature ensures no spelling mistakes by checking the text as you type, and the AutoComplete feature suggests common phrases, reducing efforts and enhancing productivity.

Writer supports multilingual documents and can read all your older Microsoft Word documents. It can also save your work in Microsoft Word format so that you can send it to the people using Microsoft Office.

The tool displays notes and comments on the side of the document. It shows notes from different users in different colors together with editing time and date, which makes comprehension easier.

  • Free to download and use
  • Offers a robust set of tools for word processing
  • Fully functional without an internet connection
  • The interface is less intuitive
  • Lacks real-time collaboration features

ClickUp Docs – Best Document Management platform

ClickUp Docs is a powerful feature of the ClickUp platform and a great alternative to Microsoft Word. It enhances document management and team collaboration.

It is designed to revolutionize how teams create, share, and manage documents. A user-friendly interface allows you to draft everything from meeting notes to project documentation in one location, reducing the need for multiple apps.

With real-time collaboration features, team members can edit and comment on a document at the same time, ensuring interactive workflow. Its organizational capabilities let you structure your documents so they align with your goals and project.

Within ClickUp, you can create folders, subfolders, and links to documents, tasks, or projects to make all the information related to a project easier to access. It also supports formatting options, such as headers, bullet points, and tables, which lets you present information clearly and concisely.

You can add images, videos, and links directly to their documents to make them more engaging and create templates for frequently used documents to save time.

  • Allows you to edit, comment, and use mentions in real time
  • Offers the option to link documents to tasks
  • Accessible from any device with an internet connection
  • Steep learning curve
  • Doesn’t have some advanced word-processing features

FreeOffice TextMaker – Great for creating complex tables

FreeOffice TextMaker

Whether you want to design flyers or brochures for your business or create a document for personal use, FreeOffice TextMaker is a good choice.

You can easily open and save all Microsoft Word DOC and DOCX files in an identical format to the original files, including password-protected files. It lets you open files in OpenDocument Text, RTF, and HTML formats.

You can draw and design directly in your document using Word-compatible AutoShapes. Moreover, you can insert pictures in different formats and change their brightness, contrast, and gamma.

FreeOffice TextMaker allows you to add date, time, page numbers, etc. Furthermore, you can do calculations using text and tables. You can add borders, fill, shading, patterns, paragraph control, and drop caps.

With this tool, you can create complex, nested, and multi-page tables and design them using borders, fills, and colors. You can merge, split, and rotate the cells as you like.

  • Free to use
  • Supports popular file formats like DOCX, XLSX, and PPTX
  • Has intuitive and easy-to-navigate interface
  • Lack of some advanced features
  • Difficult to master

AbleWord – Comes with a PDF editor

AbleWord is a word processor and PDF editor with many robust features that make document creation and management easier.

It supports different documents, like Microsoft Word (doc, docx), Rich Text (rtf), HTML (HTML, HTM), Adobe PDF (PDF), and Plain Text (txt),

AbleWord is a simple app that is easy to install and use. Therefore, compared to other word-processing apps, it requires minimal system resources. It is usually used as a PDF editor and can convert PDF to Word.

The app comes with spell-checking and text formatting options and lets you insert images and tables necessary for document creation. It is available at no cost and has an intuitive interface, which allows you to focus on your work without getting distracted from complicated menus and settings.

AbleWord comes with various editing functionalities, such as the option to track changes and add comments, which can be helpful in collaborative projects and for those who like to keep detailed notes on their editing process.

  • Allows you to open and edit PDF files
  • Classic word processors like interface
  • Small footprint and runs smoothly even on older devices
  • Can’t convert complex document formats properly
  • Interface is a bit outdated

WriteMonkey – Access the document offline

WriteMonkey - microsoft word alternative

Writemonkey is a minimalist writing tool that fosters a distraction-free environment for the writer, which allows you to focus only on your thoughts. Its interface is clutter-free, which is perfect for authors and bloggers involved in creative writing.

The app features dark mode, customizable layouts, and several formatting options to enhance your writing experience.

It also offers powerful outliner and project management tools, which help organize your thoughts and ideas effectively. This makes structuring complex documents or creative works easier.

Another robust feature. Markdown, a lightweight markup language that simplifies formatting, allows you to quickly format text without breaking your flow. Moreover, you can use plugins with the tool to increase its efficiency.

It also offers various export options, which means you can save your work in different formats, including HTML, RTF, or plain text, and easily share it with other apps. The tool can be accessed offline, so you can keep working on your document without an internet connection.

  • Lightweight and portable app
  • Allows you to customize the interface, including themes and font
  • Can save work automatically
  • Doesn’t offer a built-in spell checker
  • Only available for Windows

What should I consider when choosing the best Microsoft Word alternative?

  • Feature-rich: Look for essential features like formatting options, templates, and collaboration features
  • Compatibility: Should support popular file formats like .docx, and .doc.
  • User interface: The user interface should be intuitive and user-friendly.
  • Collaboration tools: Should offer real-time editing and sharing capabilities, primarily if you work with a team.
  • Platform availability: The tool should work on your preferred devices (Windows, Mac, iOS, and Android).
  • Cost: The price of the tool should fit your budget and needs.

While Microsoft Word is a powerful tool for word processing, offering many features. However, budget constraints and various needs can be addressed through alternatives.

You can use Google Docs for seamless collaboration and real-time editing features or Zoho Writer for powerful document management and sharing capabilities.

However, if you want a familiar interface and essential tools at no cost, Microsoft Office Online is the way to go. If you are looking for a comprehensive suite with a user-friendly design, go for WPS Office.

Others on the list also offer robust features and cater to specific requirements; you can choose any of these to enhance your productivity and streamline your writing process.

If you are still using Microsoft Word and want to reset it to its default settings, here is a guide with detailed steps.

Which Microsoft Word alternative will you choose? Feel free to share your opinions with our readers in the comments section below.

Get Data From Another Sheet in Excel: 3 Ways to do it

Often when working with Excel you need to get data from another sheet to show it. If you don’t know how to do that, this guide is here to help you.

How do I pull data from another sheet in Excel?

1. Use the formula

  1. Open the sheet that you want to copy data to and select the destination cell.
  2. Next, enter the following =WindowsReport!A2. Replace WindowsReport with the name of the sheet that you want to pull data from and change A2 with the cell you want to use to get data. Don’t remove ! as it’s necessary to access the sheet.
    select formula excel
  3. Alternatively, type =, go to the source sheet, and select the cell you want to get data from.

There are other methods to this, and we covered them in our guide on how to reference another sheet in Excel, so don’t miss it.

2. Use VLOOKUP

  1. Select the sheet where you want to add the data.
  2. Now enter the following: =VLOOKUP(A2, WindowsReport!A:B, 2, FALSE)
    vlookup formula
  3. This will return the values from column B if its value is the same as the value from the cell A2.

For more information, let’s quickly explain what this function does:

  • A2 – the value that is being searched for
  • WindowsReport! – the sheet where data is stored
  • A:B – columns that are being scanned
  • 2 – defines the column from which the value will be returned. In this example, the column is no 2, which is B in this example.

This is perfect if you need to get Excel data from another sheet based on cell value.

3. Use XLOOKUP

  1. Select the cell to which you want to add data.
  2. Next enter the following: =XLOOKUP(A2, WindowsReport!A:A, WindowsReport!B:B, “Not Found”)
    xlookup formula

Similarly to the previous function, we’re looking for value from cell A2 in the WindowsReport sheet and are scanning the A column in that sheet for matches.

If there’s a match, we’ll return the corresponding value from the column B or Not Found if there’s no match. This is a perfect method to pull data from another sheet based on criteria in Excel, so don’t hesitate to try it.

To learn the difference between the two, we have a great guide on XLOOKUP vs VLOOKUP so you might want to check it out.

Can you automatically pull data from one Excel sheet to another?

Yes, after you configure a formula to get data from another sheet in Excel, and once you do that, you can apply the formula to an entire Excel column to fill the data automatically.

This comes in handy especially when the Power Query add-in throws the excel error initialization of the data source failed.

If you want to learn more about Excel, don’t miss our guide on how to switch columns and rows in Excel. We also have a fresh article on how to freeze rows and columns in Excel, so don’t miss it.

This is everything you need to know to get data from another Excel sheet from the same workbook. If you have any other suggestions, share them in the comments section below.

How To Block a Website on Firefox in a Few Steps

Knowing how to block a website on Firefox is important for maintaining productivity, protecting your privacy, or limiting access to unwanted content. Firefox has no built-in website-blocking feature; it can only block sites from storing cookies and site data.

However, you can easily block sites by using extensions. I’ll show you how!

How To Block a Website on Firefox

Follow the below steps:

  1. Open Firefox, tap the hamburger menu in the top right corner, and select Add-ons and themes.
Add-ons and themes
  1. Type SiteBlock in the search button and hit Enter.
Type SiteBlock
  1. Tap the Block Site extension to access more details.
Tap the extension
  1. Click Add to Firefox to install the extension.
Add to Firefox
  1. After installation, you’ll be prompted to allow it access to specific permissions. Click Add to confirm.
Click Add
  1. Tap the extension icon in the top right corner, then click Manage extensions.
Manage extensions
  1. Click the three dots beside the extension’s toggle button and tap Options.
Extension options
  1. Add the websites you want to block by entering the URL in the “Add a Rule” field. Tap Add, and the site will be added under Existing Rules.
Add a Rule
  1. Try loading the website and you’ll notice the extension has restricted access.
Restricted access

So, now you know how to block a website on Firefox. It’s a simple and effective way to control your browsing experience, whether you want to improve productivity or avoid specific content. While Firefox doesn’t have a native website-blocking feature, the Block Site extension does the job just as well.

Also, learn to hide YouTube thumbnails and fix the search bar and YouTube if they aren’t working on Firefox.

Microsoft Teams will only update when devices are idle

Say goodbye to waiting for Microsoft Teams to update when opening it. This capability will soon disappear. According to a recent entry to the Microsoft 365 Roadmap, updates for the platform will only happen when devices are in idle mode.

In November 2024, updates from the Teams admin centre for Teams devices will happen when devices are idle to minimise end-user disruption. Finally, or what a shame, you can say goodbye to those little breaks when you would wait for Teams to update.

Here’s what the entry says:

Updates from Teams admin center for Teams devices will happen only when they are idle. This will minimise end-user disruption.

In other news, Microsoft Teams recently made its unified experience available to all users, and it will be interesting to see if this new policy will impact Teams on shared devices.

What do you think about it?

Excel Alternative: 5 Best Picks with Excellent Compatibility

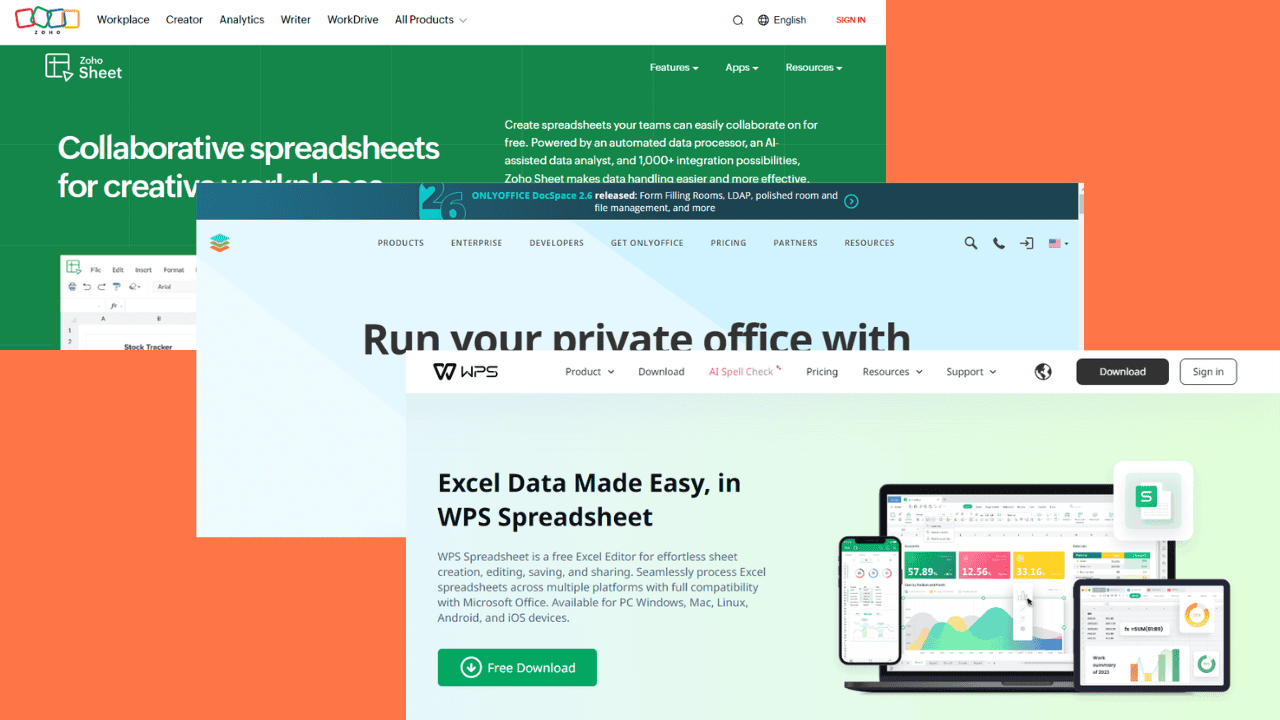
Finding the right Excel alternative can do wonders for your productivity and collaboration. To help you out, I looked for tools that can handle everything from complex data analysis to collaborative projects.

They can help you manage data, create powerful reports, and collaborate more effectively. After trying over 15 options, I picked the five best ones that replicate Excel’s core features and offer even more.

Let’s explore them!

5 Best Excel Alternatives

Here are my picks:

Google Sheets – Best Overall Tool

Google Sheets

Google Sheets is one of the top cloud-based spreadsheet tools available today. It integrates with Google Drive, making file management easy. The best part? You can access your files from anywhere and collaborate in real-time. You can also start a video call through the Google Meet feature.

Google Meet feature

However, its collaboration features set Google Sheets apart from Excel. Multiple users can edit the same sheet simultaneously, with changes updating instantly. The Comments feature and user-specific editing history are helpful for team projects. 

Editing history

Another notable feature is its ability to work offline. This is perfect for those moments without an internet connection when you still need to work on projects. Best of all, Google Sheets is free, making it an excellent budget-friendly Excel alternative.

Pros:

  • Free to use and fully cloud-based for easy access on any device.
  • Real-time collaboration with multiple users.
  • Seamless integration with other Google services like Drive, Docs, and Forms.
  • The Autosave feature ensures no data is lost.
  • Easy sharing options with different permission levels (view, comment, edit).
  • Ability to work offline when needed (with Google Chrome extension).

Cons:

  • Performance can lag with large datasets.

Get Google Sheets

WPS Office Spreadsheets – Best User-friendly Option

WPS Spreadsheets

WPS Office provides a sleek and highly compatible Excel alternative through its WPS Spreadsheets. It’s an excellent option if you seek a tool that looks and feels like Excel without a high price tag. It supports several formats, including .xlsx, .xls, and .csv. It’s also compatible with Windows, macOS, Linux, Android, and iOS.

Compatible

One standout feature of WPS Spreadsheets is its rich template library. Whether you’re managing budgets, analyzing business data, or working on a project plan, you can use pre-designed templates to save time. The software also includes powerful data analysis tools, such as pivot tables and scenario management, and support for several functions and formulas.

formulas

Moreover, you can count on cloud support and mobile access, making it easy to work on your spreadsheets across devices. WPS offers a free version, but premium plans are available at a fee if you want advanced features like collaboration tools and additional cloud storage.

Pros:

  • Supports multiple file formats, including .xlsx, .xls, and .csv.
  • Offers advanced data analysis tools, such as pivot tables and scenario management.
  • Tabbed view for working on multiple documents simultaneously in one window.
  • Cloud support for easy access and sharing across devices.
  • Mobile-friendly app with full editing capabilities.

Cons:

  • Premium features are locked behind a subscription paywall.
  • Ads in the free version can be distracting.
WPS Office Spreadsheets

WPS Office Spreadsheets

Make sure all your data is in order with this powerful alternative to any office software.
Check Price Visit Website

Zoho Sheets – Best Free Option

Zoho Sheets

Zoho Sheets is another cloud-based Excel alternative that stands out for its versatility. Its clean interface makes it easy to use and supports several Excel features like pivot tables, charts, and advanced formulas. 

Pivot tables

It also allows users to lock cells within a spreadsheet. This prevents accidental edits and ensures that critical data remains protected, especially in collaborative environments. By locking cells, you can control who has access while allowing others to view or edit the rest of the sheet.

Lock cells

Moreover, Zoho’s data cleaning feature allows team members to identify and correct errors quickly in real-time. Additionally, the version history function lets users roll back to previous iterations of the spreadsheet. It’s also free to use.

Data cleaning

Pros:

  • Offers automation capabilities with custom macros.
  • Advanced data analysis tools, including pivot tables, charts, and AI-powered insights.
  • Cell-locking feature to protect sensitive data from accidental edits.
  • Easy integration with other Zoho apps like CRM and Mail, making it ideal for businesses.
  • Has a free plan.

Cons:

  • The free version has storage and feature limitations.

Get Zoho Sheets

LibreOffice Calc – Best Open-source Option

LibreOffice Calc

Another top Excel alternative is LibreOffice Calc, which is part of the LibreOffice suite. This free and open-source tool offers features for casual users and data-heavy professionals.

One area where LibreOffice Calc shines is in its support for functions, formulas, and chart creation. Its pivot tables are as powerful as Excel’s, and it also features DataPilot, which lets you pull data from external databases. 

chart creation

Furthermore, LibreOffice Calc’s open-source nature means constant updates and improvements from its active community of developers. It supports several file formats, including Microsoft Excel files. For those who need a fully-featured spreadsheet tool without the cost of a subscription, LibreOffice Calc is an excellent option.

Pros:

  • Free and open-source with no subscription costs.
  • Strong support for Excel formats (.xls, .xlsx) with minimal compatibility issues.
  • Includes DataPilot for pulling external data and running complex analyses.
  • Excellent for offline use with all features available locally.

Cons:

  • The interface is less polished and can feel outdated compared to other modern tools.

Get LibreOffice Calc

OnlyOffice – Best for Compatibility

OnlyOffice

OnlyOffice is an impressive Excel alternative that blends functionality with a sleek, user-friendly interface. Ideal for personal and professional use, this spreadsheet tool is fully compatible with Excel file formats and Windows XP, Vista, and versions up to 11.

Fully compatible

OnlyOffice also offers powerful data analysis tools, including pivot tables, conditional formatting, and support for complex formulas. Moreover, you can manage plugins on the sheet through its Plugins button.

Pivot table

That’s not all.

OnlyOffice can integrate with popular cloud storage services like Google Drive, Dropbox, and OneDrive.

Pros:

  • Full compatibility with Excel file formats.
  • Real-time co-editing with changes tracked for seamless collaboration.
  • Built-in communication tools like comments and chat to streamline teamwork.
  • It has a sleek and modern interface that’s easy to navigate.
  • Integration with major cloud storage platforms like Google Drive, Dropbox, and OneDrive.
  • Free version with all essential features and premium options for advanced features.

Cons:

  • Customization options are more limited than in open-source alternatives like LibreOffice.

Get OnlyOffice

How I Chose the Best Excel Alternative

During my research, I considered key features and functionalities that cater to several user needs. Here are the main criteria I used:

  • Real-time editing and teamwork capabilities.
  • Support for advanced formulas, data analysis, and charting.
  • Ease integration with Excel and other file formats.
  • Free or affordable alternatives with solid value.
  • Ability to work from anywhere with online storage and sharing options.
  • Ease of use and intuitive design.

Each of these options offers something unique, whether it’s Google Sheets’ collaborative prowess or Zoho Sheets’ automation. The key to choosing the best Excel alternative is understanding your specific needs. No matter which one you choose, they’re all worthy contenders for replacing Microsoft Excel in your workflow.

When choosing an Excel alternative, consider your workflow, collaboration needs, and compatibility requirements. For users who prefer instant access without registration, explore our detailed guide on free spreadsheet services with no login to start working right away.

You’ll soon be able to see directly in Outlook if you have permission to open mailboxes and folders

If you don’t have permission to open certain emails, mailboxes and folders in Outlook, you can soon see it directly in the platform. According to a recent entry in the Microsoft 365 Roadmap, the new Outlook for Windows and Web will grant mail delegate sharing permissions directly from the platform.

Users can view mailboxes and folders by granting delegate access from the new Outlook app.

Here’s what the entry says:

Delegate access for mailbox and folders can be granted from the new Outlook app. Users will be able to view the permissions granted for a mailboxes and folders. #newoutlookforwindows

Microsoft doesn’t specify where this permission will appear, but the new capability is set to be released in July 2025, and the Redmond-based tech giant will most likely release blog posts about it.

Either way, this new enhancement is surely set to make admins’ jobs a bit easier while also ensuring that no confidential email or information ever gets out to the wrong employees.

As mentioned, the Redmond-based tech giant says the new capability will only be released next year.

In other news related to this new capability, the new Outlook for Windows and Web will no longer let people share folders with specific users, which the company says will make the platform safer.

You’ll need a PlayStation Network account to play God of War Ragnarok on PC, and there is already a mod to bypass it

There has been much hype about God of War Ragnarok making its way to PCs, and to everyone’s surprise and delight, the popular video game is finally out on these devices now.

You can now download and install it, and the game already has a Steam profile that you can check out. Unfortunately, all is good and well in Valhalla, but as you might know already, you need a PlayStation Network account to play God of War Ragnarok on your PC.

According to the Steam page, you won’t be able to play the game without an account.

PlayStation Network Account required, subject to the PlayStation Terms of Services and User Agreement https://www.playstationnetwork.com/terms-of-service

Steam

Sony wants to gather and use the data, which might be why it’s forcing PC gamers to sign up for such an account. The company has a history of doing so, and it wanted to enforce the policy on Helldivers 2 players, as well; however, after many days of negative criticism that resulted in bad reviews and hundreds of thousands of disappointed fans, Sony retracted its actions.

However, this was not true with God of War Ragnarok on PC. Even though officially there are no solutions to this, the PC gaming community, which is quite ferocious in its own right, has come up with a mod that will allow PC gamers to play the game without signing up for a PlayStation Network Account.

A modder named iArtorias has created a mod called NoPSSDK that removes the PSN requirement. This allows players to launch the game without linking their accounts. The mod also disables the PSN overlay, which the game uses to show your PSN username.

The mod is available on Nexus Mods, and according to sartorius, it’s been downloaded almost 2,000 times and viewed nearly 22,000 times since it went live a couple of days ago.

Edit: It seems that the mod is no longer available.

However, some gamers are baffled that people are upset about this requirement.

I do not understand why people are getting so mad at sony when microsoft does the same thing

I just started playing forza horizon 5 and it forced me to make a xbox account even though i bought it on steam. Its the same as sony with their games on steam, i wanna know why people are only bringing up sony while xbox does the same

Either way, you can already pre-order the game. It’s worth mentioning that God of War Ragnarok will be released in 2 editions for PC: there is the standard edition, which costs 59,99€/59,99$, and then there is the deluxe edition, which costs 69,99€/69,99$.

The deluxe version will contain a digital artbook, as well as the soundtrack of the video game.

You can find more here.

Mail Merge From Excel to Microsoft Word: How to do it

If you’ve used Office before, you might have heard about mail merging. If you’re not familiar with it, in today’s guide we’re going to show you how to mail merge from Excel to Microsoft Word.

How do I mail merge from Excel to Word?

1. Set up mail merge

  1. Create an Excel table. The table should have multiple columns with headers and each data entry should be in a separate row.
  2. Open Word, go to the Mailings tab, and choose Start Mail Marge.
     start mail merge
  3. Select the desired type of merge. We used Letters for example.
    letters merge
  4. Next, go to Select Recipients and choose Use an Existing List.
    use an existing list merge
  5. Locate your Excel file and select it.
  6. Lastly, choose the sheet from the Excel file that you want to use.

2. Insert merge fields

  1. Type your text and place your cursor when you want to make a merge.
  2. Click on Insert Merge Field and choose the desired option from the dropdown.
    insert merge field
  3. The field will be added to your text as <<First_Name>> for example.
  4. Do this for all fields that you want to include.
  5. Once you’re done, click on Preview Results.
     preview results word
  6. If everything looks properly, click on Finish & Merge and choose the desired option.
    finish and merge word

How do I keep formatting from Excel to Word in mail merge?

  1. In Excel, select the columns that are giving you trouble.
  2. Go to the Home tab, and click Cells. Choose Format and then Format Cells.
    format cells
  3. Select the Number tab and under Category select Text.

Can an Excel spreadsheet be used as the data source for a Word mail merge?

As shown above, an Excel sheet is necessary as a data source if you want to perform a Word mail merge.

It’s pretty simple to mail merge from Excel to Microsoft Word, and if you want to know more, we have guides on how to mail merge from Microsoft Outlook as well as how to create mail merges in Publisher.

The same technique is used to print labels from Excel, so don’t miss our dedicated guide on it.

LOADER_BLOCK_MISMATCH Error – 8 Reliable Solutions

0x00000100 LOADER_BLOCK_MISMATCH is a Blue Screen error that points to a critical issue with the loader block in Windows startup. When this occurs, your system may enter a cycle of restarts, preventing normal booting. 

This error can be caused by corrupted system files, recently installed drivers, or faulty updates. Luckily, I’ll take you through the methods to help get your PC back up and running smoothly.

But before we start, try out these simple fixes:

  • Unplug all external hardware. These include scanners, USB drives, and external hard disks. Then restart your computer.
  • Check and update Windows. Press Windows + I > Windows Update > Check for updates > Download and install.

If these don’t work, you should move on to more in-depth solutions.

How To Fix LOADER_BLOCK_MISMATCH Error

Here are the instructions:

Start Windows in Safe Mode

Safe Mode is a diagnostic startup mode that loads your system with only essential drivers and services, making troubleshooting problems easier. Here’s how to do it:

  1. Restart your PC a few times to trigger Automatic Repair Mode.
  2. Tap Troubleshoot.
Troubleshoot
  1. Click Advanced options.
Advance options
  1. Select Startup Settings.
Setup Settings
  1. Click Restart.
Restart
  1. Press F5 to start Windows into Safe Mode with Networking.
Safe Mode with Networking

There’s still more.

Scan Device Performance and Health

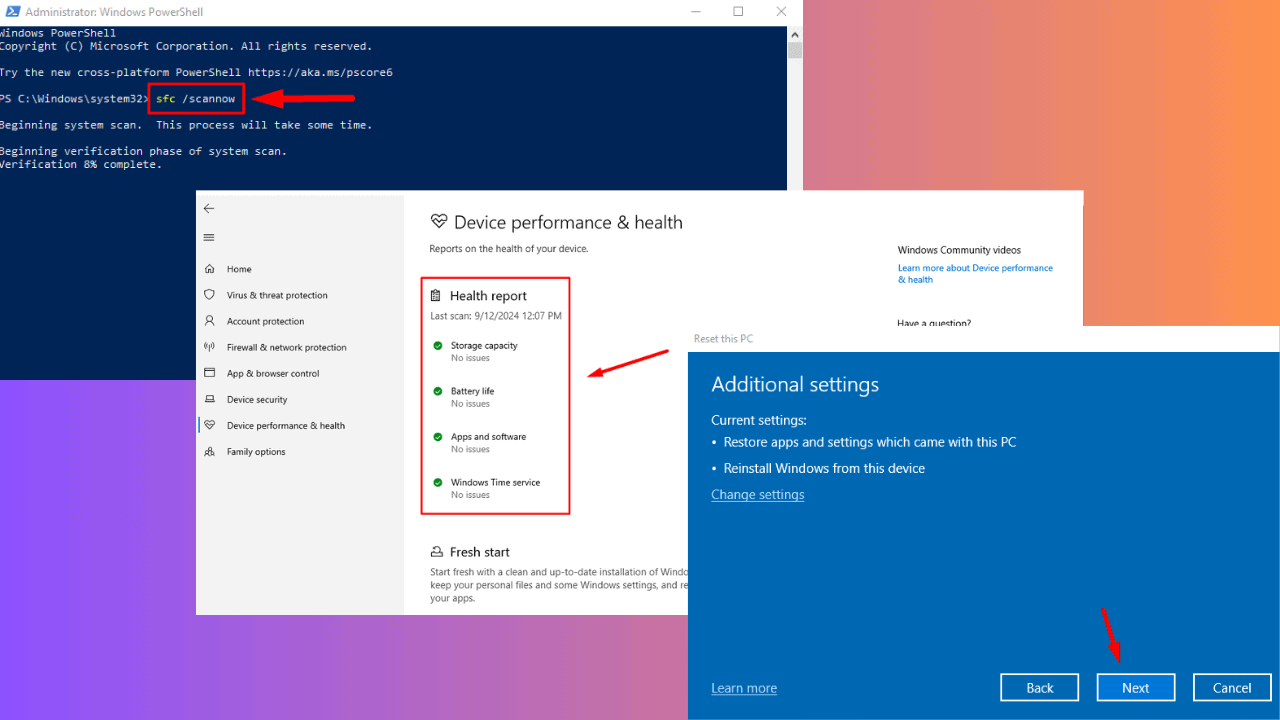
Your Windows PC comes equipped with a Device Performance & Health tool, which allows you to scan for hardware issues that may be causing the LOADER_BLOCK_MISMATCH error. Here are the steps to follow:

  1. Open Windows Security by typing it in the Start Menu search.
Windows Security
  1. Click on Device performance & health.
Device performance & health
  1. It’ll scan your system to detect any hardware or performance-related problems. Check the Health report.
Health report

If any issues are identified, the tool will suggest solutions that could prevent future errors.

Turn Off Fast Startup

Fast Startup helps your PC boot faster by preloading system files. However, this feature can occasionally cause errors like LOADER_BLOCK_MISMATCH when conflicts arise during boot. Here’s how to disable it:

  1. Press Windows + X, then tap Power Options.
Power Options
  1. Click Additional power settings under Related settings on the top right corner of the screen.
Additional Power Settings
  1. Click Choose what the power buttons do.
Choose what the power buttons do
  1. Select Change settings that are currently unavailable.
Change settings that are currently unavailable
  1. Uncheck the box next to Turn on fast startup. Then tap Save Changes and reboot your PC.
Turn on fast startup

Uninstall Corrupted Drivers

Faulty or corrupted drivers can interfere with Windows’ ability to load properly, leading to this error. Uninstalling them and allowing Windows to reinstall the correct drivers can solve the problem. Follow the below steps:

  1. Press Windows + X and tap Device Manager.
 Device Manager
  1. Right-click the device marked with a yellow triangle and choose Uninstall device.
Uninstall device
  1. Confirm your intention and tap Uninstall.
uninstall

Restart your PC to reinstall the default driver automatically.

Run SFC and DISM Commands

The SFC (System File Checker) and DISM (Deployment Image Servicing and Management) tools can scan and repair corrupted system files that could trigger the LOADER_BLOCK_MISMATCH error. Here are the steps to follow:

  1. Press Windows + X and tap Windows PowerShell (Admin).
 Windows PowerShell (Admin)
  1. Type sfc /scannow and press Enter.
Type sfc /scannow
  1. After completing SFC, type DISM /Online /Cleanup-Image /RestoreHealth and press Enter.
Type DISM /Online /Cleanup-Image /RestoreHealth

Let the process finish, and then restart your PC. Confirm if the error was solved.

Uninstall Recently Installed Applications

Newly installed applications, especially third-party software, can interfere with Windows processes, leading to this error. To remove them:

  1. Right-click the Start Menu, then tap Apps & Features.
Apps & features
  1. Identify a program you installed recently, tap on it, and click Uninstall.
Uninstall

Restart your computer and see if the error is resolved.

Restore Windows to a Previous State

A restore point is a quick way to return your system to a stable condition before the error started. Here’s how to do it:

  1. Press Windows + S, type System Restore, and Open it.
System Restore
  1. Tap System Restore.
Click System Restore
  1. Pick a restore point and click Next.
Pick a restore point
  1. Tap Finish.
Finish

Restart your computer once the process is complete.

Reset Windows

If all else fails, a reset can resolve the error by reinstalling the OS and removing any problematic software or drivers. Follow the below steps:

  1. Press Windows + I and tap Update & Security.
Update & Security
  1. Tap Recovery.
Recovery
  1. Click Get Started.
Get Started
  1. Pick Keep my files or Remove everything (only if you backed up your data beforehand). 
Keep my files or Remove everything
  1. Select either Cloud download to reinstall Windows from the cloud or Local reinstall to use files on your device, then click Reset to start the process.
Cloud download or Local reinstall

The LOADER_BLOCK_MISMATCH error can be frustrating, but you can solve it using several methods, from running basic scans to resetting your entire operating system.

Your PC could also face other blue screen errors, like Aswhdske.sys, NETwlv64.sys, and WRkrn.sys.

Windows 10’s new KB5043131 update finally fixes these frustrating surround sound bugs

Microsoft has recently released a new Windows 10 C-release preview update under KB5043131 and Build 19045.4957. This update is a non-security optional update that brings several new features and improvements, including a change in the Start menu.

The user profile picture will now appear in different positions, and the menu’s left pane will have a new background colour.

If the patch solved some of the most annoying Windows 10 bugs for insiders, KB5043131 also continues this trend of fixing issues, including a bug related to surround sound technology. Playback of some media might have stopped when using specific surround sound technology.

However, this update also has several known issues. For instance, users might be unable to change their account profile picture after installing the update. Microsoft is working on a resolution for this issue.

KB5043131 can be downloaded manually from the Microsoft Update Catalog website. The official support article contains the full changelog and a list of known issues.

The company has also released the Windows Update opt-in notifications, and Microsoft Intune features for the Windows Insider Program.

You can read KB5043131’s full changelog here.

Best Discord Chat Exporter Apps and Extensions

Users are still complaining that Discord doesn’t allow exporting the chats like any other communication tool. That’s why we’ve looked for the best chat exporter tools you can use to get the data you want. However, the third-party apps below might pose security and privacy risks so we recommend trying them with secondary Discord accounts first.

What are the best chat exporter tools?

1. DiscordChatExporter

DiscordChatExporter is a full-fledge app for Windows, Linux and ARM64 that comes with command line or graphics interface to fetch your chats on any server or channel.

It exports your chat quickly in TXT, HTML, CVS or JSON formats on your PC together with time stamps and more.

In HTML it also displays full images and URLs, just like they look on your Discord app. However, to use it, you need to get the token for your personal account to prove that you have access to it.

The process involves showing the developer tools in Discord, but the app will display all the indications on how to get it once you log into your account.

We have tested DiscordChatExporter with a few channels and it works flawlessly so make sure to try it.

Get DiscordChatExporter

2. Discordmate

If you’re looking for a Chrome or Edge extension to export the Discord chat, many users recommend Discordmate.

To use it, log into your Discord account on Chrome or Edge, and install the Discordmate extension.

Then, go to the channel you want to export, input the time stamps on the Chat Export tab from the extension and click the Search button. Finally, select the export format and select the destination.

The extension is pretty efficient and fast, but it has a 1,000 message limit for one conversion. We’ve managed to use it on a small conversation, but there are a lot of conversation that exceed that limit and it can be pretty tricky to get a big conversation.

Get Discordmate

3. Discord History Tracker

If you want to record the Discord chat as it develops, you can use Discord History Tracker. The tool doesn’t export previous messages, it only records the new ones. This makes it great if you want to get the transcript of a conversation on one of your content channels for example.

However, after you have built a database of recordings, you can use the History viewer to go through the chats you’ve recorded.

The app has versions for Windows, macOS, Linux and even has a portable version you can take with you on a USB stick.

The only inconvenience is that if you want to see your database without the app, you will need to use SQL.

Get Discord History Tracker

There are more Discord chat exporters out there but many of them are not so reliable or safe as we’ve discovered from our research. Even the apps above might have hidden methods to get a copy of your conversations so we don’t recommend using them for retrieving sensitive or organization-related data.

That is why Discord users are requesting a legitimate and safe way of downloading their chats within the app itself without the need to rely on third-party tools.

For instance, if you’re wondering if people can see the servers you’re in, click the highlighted link to find out. We also have a full guide on Discord read receipts if you want to learn more about the topic.

If you have any questions or suggestions, leave them in the comments below.

Discord Create Account – A Step-by-Step Guide

Discord lets you create an account to chat with friends, join gaming servers, or collaborate with teams. I’ll show you how to do it on the desktop and mobile version.

Let’s begin!

How To Create a Discord Account

Here are the steps for both devices:

On Desktop

Follow these instructions:

  1. Visit the official Discord website and tap the Login button in the top right corner.
Discord website
  1. Click Register.
Register
  1. Fill in the required details and tap Continue.
Add personal information
  1. You’ll be asked to confirm if you’re a human. Tick the box “I am human” and follow the instructions.
Confirm if you are a human
  1. You can create your first Discord server or select an available one. Alternatively, skip it by tapping the cancel button.
Create a server
  1. Your account will be ready for use.
Account created

That’s it! Enjoy interacting with friends and watching Discord videos. You can also explore new Discord features right away by checking your personalized activity recap using this guide on how to check Discord Checkpoint.

On Mobile

The process is similar, with some slight differences:

  1. If you still don’t have the app, go to the App Store/Google Play Store, download and install it.
  2. Launch the app and tap Register.
Register
  1. Add your phone number or email, then tap Next.
Phone number or email address
  1. Confirm you’re human by tapping Confirm and following the instructions.
Confirm you are human
  1. A confirmation code will be sent. Add the digits, then click Verify.
Confirmation code
  1. Add your display name and tap Next. You can also skip the step. 
Enter display name
  1. If you skip step 6, Discord will suggest a username. Create a password or use the suggested one and click Next.
Add a password
  1. Follow the onscreen instructions to complete the process.
Account is ready

That’s it! Your account is ready for use.

Discord lets you create an account in just a few minutes. This piece will help you join the exciting Discord community. Start chatting, gaming, and connecting with friends and groups from all over the world.

Also, learn to change passwords, hide Discord channels from certain roles, and stream Prime Video without a black screen. Alternatively, you can try various Discord alternatives if the service doesn’t suit you.

If you want to make your own Discord app or bot, we have a great guide on Discord Developer Portal, so don’t miss it for more information.

Microsoft Rewards is flagging suspecting search activity

Microsoft Rewards warns people of unusual search activity that might limit their ability to earn points in the program. The platform has been doing this for some months lately, and Reddit and Bing users have been concerned about it.

On Reddit, a user posted an image of their activity on the platform, with Microsoft Rewards posting the following message:

Unusual search activity may limit your ability to earn points.

Microsoft Rewards gives you the option to Learn More or Contact Support. These options will tell you exactly what prompted the platform to issue such a warning.

The incident is not singular, and many other Windows users have reported it, so Microsoft is taking steps to stop fraudulent use of the platform: the Redmond-based tech giant employs an automatic detection that detects when users are searching or completing tasks too quickly within a short period.

There are ways to stop Microsoft from flagging your activity as suspecting. One of the most efficient ways is to pause the search activity on Bing for a while and try again later.

However, you should also hit the Contact Support button and ask Microsoft to explain the detection to you if you think it is unfair.

Either way, it seems that for some users, this is precisely what’s happening:

i find the inconsistency of these warnings/cooldowns interesting. i’ve been hit with the cooldown (with no warning/banner), not changed my behaviour at all, and then had it randomly lifted and continued to do exactly what i was doing before.

I still don’t understand this. I’ve also been restricted, I can only earn points every 15 minutes… so it’s annoying like why would they limit you like this? They ideally want you to do it but then, when you are doing it too much they limit you like this… it actually makes me want to quit it, seriously this is so ridiculous, Microsoft get a grip will you…

My wife and I do the same exact things everyday to get our points. I got restricted, she didn’t. It’s so inconsistent.

Have you experienced this issue with Microsoft Rewards?

In other news, the platform is also crashing on many users’ Xbox apps, as it doesn’t show up when people want to complete their tasks.

Vertical Text in Microsoft Word: 4 Ways to Add it

Sometimes you need to add vertical text in Microsoft Word, and if you don’t know how to do that, this guide will show you a couple of methods that you can use.

How do I put text vertically in Microsoft Word?

1. Insert vertical Text Box

  1. Go to the Insert tab, and select Text Box.
    text box icon word
  2. Choose Vertical Text Box.
    vertical text box
  3. Enter the desired text.

2. Change the text direction of a Text Box

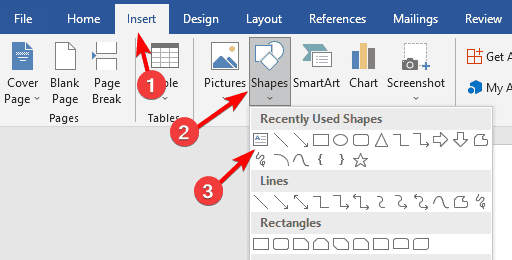
  1. Go to the Insert tab. Expand Shapes and choose Text Box.
    text box word 
  2. Select the size of your text box and place it in the document.
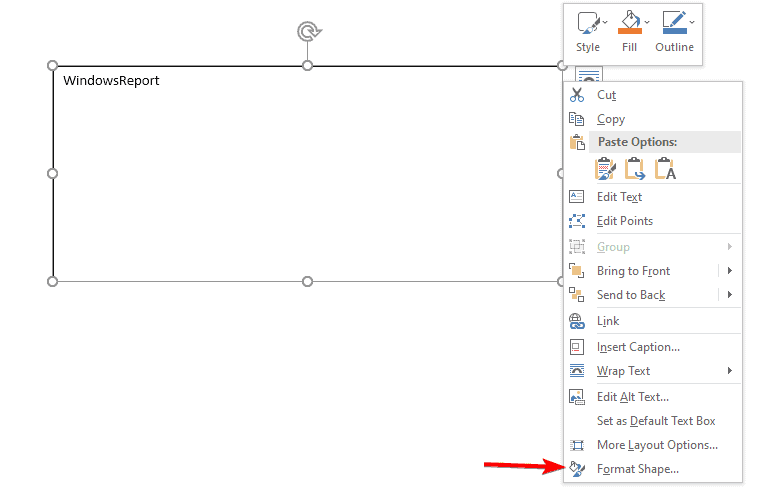
  3. Right-click the edge of the text box and choose Format Shape from the menu.
    format shape
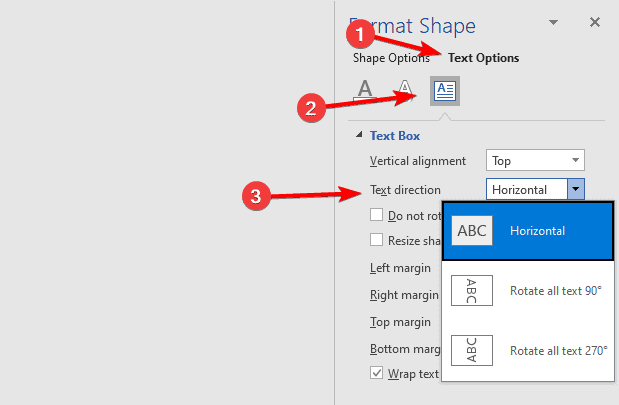
  4. Go to Text Options and then choose the Layout & Properties icon. Lastly, configure Text direction as you wish.
    text direction select word

3. Rotate the horizontal text box

  1. Create a horizontal text box.
  2. Double-click the text box.
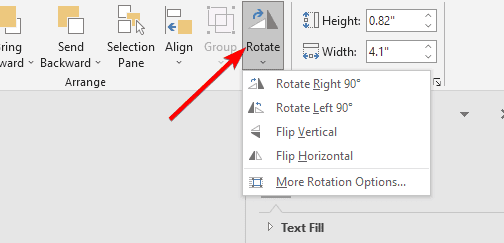
  3. In the toolbar, expand Rotate and select the desired option.
     rotate word
  4. Alternatively, select the text box and click and move the rotate icon.
    rotate icon

If you choose to rotate text in Microsoft Word you can easily have your text at any angle, so don’t hesitate to try this feature out.

4. Resize the text box

  1. Create a new text box.
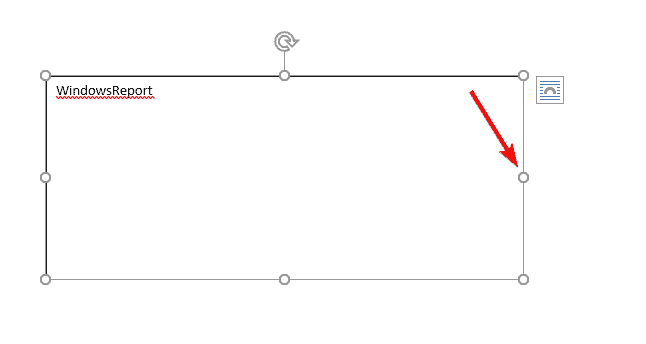
  2. Click the right resize circle and drag it to the left.
     resize circle word
  3. Your text will now be vertical.
    text vertical word

How do I rotate the text direction in Word?

You can rotate the text direction from the Format Shape settings. We explained the procedure in Solution 2.

As you can see, it’s pretty easy to use vertical text orientation in MS Word, and you can easily add vertical text by using the correct Text Box.

To learn more about Word we have guides on how to insert code block in Word and how to type exponents in Word.

You can also remove highlights in Word, and we have a separate guide that shows you how to do that.

How to Use Microsoft Word Voice Typing to Dictate Your Text

It is extremely convenient to use Voice Typing or Dictate in Microsoft Word to take notes or write everything. Both options use a voice to text app and it’s available in many languages.

How do I use Voice Typing in Microsoft Word?

  1. Launch Microsoft Word and open a new or existing document.
  2. Make sure your microphone is connected and working. You might need to grant Word permission to use your microphone the first time you use voice typing.
  3. Press the Win + H keys to start Voice Typing, then press the Mic button again to start the dictation.
  4. The text will automatically appear on your document.
  5. If something is not right, click the cogwheel button to set up the microphone.
  6. Windows will select the default microphone but you can select or add another one from the Settings.

The advantage of Voice Typing is that you can use it on any text box. In fact, if you turn on the Voice typing launcher option from its settings, whenever you click on a text box, the Voice Typing will start automatically. However, Microsoft has its own Dictate feature, so read below to see how to use it.

How do I use the Dictate option in Microsoft Word?

  1. Launch Microsoft Word and open a new or existing document.
  2. Make sure you are logged into your Microsoft account whether you’re using the desktop or online version.
  3. Go to the Home tab on the ribbon and click on the Dictate button (it looks like a microphone icon).
  4. Once you click the Dictate button, it will turn on and start listening. You can start speaking, and your words will appear on the screen as text.
  5. Speak clearly and at a moderate pace. You can also dictate punctuation by saying things like comma, period, new line, or new paragraph.
  6. To pause dictation, click the microphone icon again. To resume, click it once more.
  7. To stop dictation completely, click the Dictate button again to turn it off.
  8. After dictating, review the text for any errors or misinterpretations. You can manually edit the text as needed.

The Dictate option was specifically designed to use voice to text in Word and it has more configurable options. Unlike Voice Typing, which uses the default Windows language, in Dictate, you can select a different language and add language packs if they are not preinstalled.

Additionally, you can use voice commands to format your text, such as bold that, italicize that, or underline that. Ensure you have a stable internet connection, as voice typing relies on cloud-based services.

If you’re interested to learn more, read our guides on how to track changes in Word or how to add a signature in Word.

Our latest guide covers how to use Transcribe feature in Microsoft Word, so don’t miss it for more information.

Feel free to ask in comments if you have any more questions or need further assistance.

How to Use Excel INDEX and MATCH Functions in Formulas

The INDEX function in Excel is used to get the value of a cell from a table when you specify the row and column numbers. In contrast the MATCH function provides the position of a cell in an array that has a certain value. Our article will guide you on how to use the INDEX and MATCH in formulas on Excel.

How do I use INDEX and MATCH formulas in Excel?

1. Understanding the functions

  • INDEX: Returns the value of a cell in a table based on the row and column number.
    • Syntax: =INDEX(array, row_num, [column_num])
  • MATCH: Returns the relative position of an item in an array that matches a specified value.
    • Syntax: =MATCH(lookup_value, lookup_array, [match_type])

2. Basic example

Let’s say you have a table of sales data:

ProductSales
A100
B200
C300

You want to find the sales for Product B.

3. Using MATCH to find the row number

  • Formula: =MATCH("B", A2:A4, 0)
    • lookup_value: “B”
    • lookup_array: A2:A4 (the range where you’re looking for B)
    • match_type: 0 (exact match)

This formula returns 2 because B is in the second row of the range A2:A4.

4. Using INDEX to find the sales value

  • Formula: =INDEX(B2:B4, 2)
    • array: B2:B4 (the range where the sales data is)
    • row_num: 2 (the row number found by the MATCH function)

This formula returns 200, which is the sales value for Product B.

5. Combining INDEX and MATCH functions

We are addressing the INDEX and MATCH formulas because you can combine them conveniently.

  • Formula: =INDEX(B2:B4, MATCH("B", A2:A4, 0))

This combined formula will return 200, the sales value for Product B, in one step.

If you have a more complex table and want to look up values based on multiple criteria, you can use a combination of INDEX and MATCH with nested functions.

ProductRegionSales
ANorth100
BSouth200
CEast300
ASouth150

To find the sales for Product A in the South region:

  • Formula: =INDEX(C2:C5, MATCH(1, (A2:A5="A")*(B2:B5="South"), 0))
    • array: C2:C5 (the range where the sales data is)
    • MATCH(1, (A2:A5=”A”)*(B2:B5=”South”), 0): This part creates an array of 1s and 0s where both conditions are met and finds the position of the first 1.

This formula returns 150, the sales value for Product A in the South region.

Additional tips for using INDEX and MATCH

  • Ensure your data ranges are correct and consistent.
  • Use absolute references (e.g., $A$2:$A$5) if you plan to copy the formula to other cells.
  • Use 0 for exact matches in the MATCH function to avoid errors.

By following these steps, you can effectively use INDEX and MATCH functions in formulas and even combine them to perform powerful lookups in Excel. 

If you want to learn more functions and formulas in Excel, we also have guides on how to count distinct values in a table and how to add bold text in formulas.

Our latest guide shows you how to use the Excel XLOOKUP formula with multiple criteria, so don’t miss it for more information. Did you know that you can freeze rows and columns in Excel? That’s right, and we have a whole guide dedicated to this subject, so feel free to visit it.

For any questions or suggestions, feel free to use the comments section below.

Best Smart Glasses for Your PC: Augmented Reality

The best smart glasses for your PC haven’t been invented yet. That’s what some users may say but we dug deep and we think there are some strong contenders you should try. Depending on your preferences and needs, we believe there’s something for you.

What are the best smart glasses for PC to buy?

1. VITURE Pro XR – Best overall

VITURE Pro XR is the latest addition to the VITURE lineup. It delivers a 135-inch screen at 120Hz and an incredible 4000 nits brightness, so it’s perfect to use in outdoor conditions.

The device has a micro-OLED panel that is equipped with myopia adjustments, which makes it perfect for users that are nearsighted.

Thanks to the electrochromic film, the glasses will block almost 100% of external light allowing you to fully immerse yourself even when outside.

The glasses do not reflect anything that is displayed, so you can rest assured that everything you see will be completely private.

It’s worth mentioning that the device is compatible with a wide array of devices, but to achieve this, you’ll need to get the adapter as well. There’s also a SpaceWalker app available that will allow you to experience AR and get virtual displays in your environment.

Overall, it’s an amazing device, and if you want to learn more, go ahead and visit our VITURE Pro XR review.

Pros:

  • 135-inch screen at 120Hz
  • 4000 nits brightness
  • Micro-OLED panels with myopia adjustments
  • Compatible with a wide array of devices, including iOS

Cons:

  • Edges can become blurry at larger distances
  • Speakers could be louder

⇒ Get it on Amazon

2. XREAL Air 2 – Incredibly lightweight

XREAL Air 2 boasts of being the lightest smart glasses with a 50-50 weight distribution. At 72g, that is impressive which makes them a top choice when it comes to portability. Another winning feature is the color accuracy. Most smart pc glasses tend to either wash out the colors or oversaturate them.

With the XREAL Air 2, you can be assured that the color accuracy is perfect because of the uniform calibration. In gaming, color accuracy is crucial because subtle details like texture stand out and if they’re incorrect, your experience may not be the same.

What other smart glasses won’t provide is light control but with XREAL Air 2, you get the electrochromic dimming feature that allows you to adjust the lighting situation to improve visibility. So whether you’re outdoors or indoors, XREAL Air 2 can rock with you either way.

The sound quality is something else to marvel about. It’s like having a headphone experience but without the headphones. The spatial sound delivers an immersive audio experience where sound is delivered from all directions.

And get this. It has taken into account your surroundings by reducing sound leakages through its private listening experience. Those around you can go on about their day because they won’t hear what you’re listening to.

Pros

  • Color accuracy with uniform calibration
  • Excellent sound quality with directional audio technology
  • Lightweight and portable

Cons

  • The nose pad design apparently makes the edges blurry
  • The beam degrades image quality
  • Can’t charge and use the glasses simultaneously
  • Poor battery life

⇒ Get it on Amazon

3. Lenovo ThinkReality A3 Smart Glasses – Lightweight design

At first glance, the A3s look like they weigh a ton but that’s only at face view. Lucky for you, they weigh only 130 grams passing the comfortability check. But their weight is not why they are on the top spot.

We were particularly intrigued by the advanced software features that enhance their functionality. Voice commands is just one of the features that sparked our interest. You can control apps by just using your voice .

The Lenovo ThinkReality A3 smart glasses can also analyze and identify images in real-time. This gives you a peak into an augment reality experience.

Now the cherry on top is the precision while you’re turning your head. This is where most smart glasses fail because a simple turn can cause the screen to shimmer. However, for the A3s, it has an integrated head and gaze tracking feature.

This ensures precision remains throughout your interaction with digital content. We have a comprehensive Lenovo ThinkReality A3 smart glasses review so head on over there for the full gist.

Pros

  • High-quality display 1080p resolution
  • 3 noise-suppressing microphones
  • High-bandwidth digital content protection (HDCP) for digital rights management (DRM)
  • Lightweight and ergonomic design

Cons

  • Uses a wired connection which may be impractical in a lot of cases
  • May not be affordable to the regular user

⇒ Get it on Amazon

4. RayNeo Air 2S – Delivers large display

Gamers assemble as these are the perfect pair for an immersive experience. If you like streaming video content, the RayNeo Air 2s are also a good buy. Their look and feel are that of regular sunglasses so if you’re an aesthetics person, this is a checkmark.

Now onto their usage. If you’re gaming or streaming on Netflix, you’ll obviously be glued to your screen for an extended period. The RayNeo Air 2s are your perfect companion because they are lightweight.

The high refresh rate of 120Hz and 1080p resolution ensure your gaming needs are met. You’ll experience crisp and clear visuals with smooth motion and the response rate keeps you on top of the fast paced games with no delays.

Now, these smart glasses don’t come with a built-in battery which can be both advantageous and disadvantageous. On one hand, it gives the glasses a slimmer look and makes them lightweight therefore suitable for extended use.

However, this makes their portability score really low because you’ll have to carry chargers everywhere you go. Also, being highly dependent on external power for recharging is not reliable especially if you’re travelling or can’t access a power source.

Pros

  • Large display
  • Lightweight as they only weigh 78g

Cons

  • Blurry around the edges
  • Cumbersome because of cable charging

⇒ Get it on Amazon

5. Hololens 2 – Great for extended use

First things first, they’re bulky but because their primary function is a headset. One can tell they’re not regular glasses. However, if you can get past their look, you can move on to enjoy what it actually offers; AR capabilities.

Because of its bulky look, its comfort may be put to question but unlike the other smart glasses that rest at the end of your ears, these go around your head evenly distributing the weight so that you’re not strained.

With the ergonomic padding, you won’t feel strained wearing them for long periods even though it weighs quite a ton compared to others on this list standing at 566g. Coupled with a knob at the end, you can adjust the headband size for a snug fit.

You also don’t need to remove the headset in case you need to do something not smart glasses-related. You can easily flip up the display and push it back down when ready to use them again.

High-resolution is the name of the game as the HoloLens 2 has an 8-megapixel front-facing camera. The images will be crisp and clear ideal for all your gaming, streaming and video-conferencing needs.

The display technology exceeds expectations with each eye receiving a 2K resolution. The field view is also expanded in this model enhancing the overall view.

And it’s not just the high resolution. The HoloLens 2 also delivers vibrant colors in different lighting conditions but the colors may appear washed out in outdoor settings.

The audio is pretty good with two built-in speakers fitted at the lower part of the headband. And since you’re wearing it around your head, you get a more intuitive experience when moving around.

The HoloLens 2 adapts and incorporates your physical movement with its sensors and allow the augmentations to maintain position.

Pros

  • Positional tracking
  • Ergonomic design for extended use

Cons

  • Quite expensive
  • Color inconsistencies
  • Visible grid lines (screen door effect)

⇒ Get it on Amazon

What features should I consider?

  • Compatibility – Smart glasses are great but are they compatible with your OS? They should be able to pair for you to enjoy the benefits without the constant need for troubleshooting. They should also be able to integrate seamlessly with your preferred apps.
  • Comfortability – Are they ergonomically efficient? Can you wear the smart glasses for an extended period? Is the weight evenly distributed? Can they accommodate your prescription glasses or contact lenses? Consider all these before purchasing.
  • Battery life – How long can you use the smart glasses before you need to recharge? You need to be productive and going uninterrupted for a prolonged time while using the smart glasses is a plus.
  • Resolution – What is the resolution quality and can it be upgraded? If you’re going to be streaming shows or gaming, you need the best quality for an enhanced viewing experience.

Ultimately, your choice of smart glasses for your PC should be guided by your specific needs. Are you looking for an immersive experience or looking to enhance your productivity? How long do you plan to use the smart glasses in one sitting?

Answering these questions will help you narrow down the best fit for you. You don’t want smart glasses that drain battery fast or uncomfortable ones that you can barely put on for an hour. Once you have your non-negotiables, now consider the price.

They do cost a pretty penny so ensure it’s worth the investment. If you’re looking for headsets, we also have a detailed list of the best VR headsets.

Have you used any of the above smart glasses? If so, which one would you recommend and why? And if your is not among the list and you think we should know about it, start us off in the comment section below.

Slack Status Icons: How to Personalize your Slack Statuses

Slack Status Icons are dozens of numbers and can be used to personalize your statuses. Say you’re on vacation, then you could use the palm tree icon; if you’re on your lunch break, you have different icons for meals and foods that you can use (I go for the burger one, for obvious reasons).

It’s a nice little touch to humanize your presence at work and let colleagues know if you’re active or not and what you’re doing if you’re not available for that meeting.

In many ways, Slack Status Icons help you personalize your experience and get your point across: I’m at lunch and eating a delicious burger, so I’m unavailable. They’re self-explanatory; you don’t have to provide additional context for your colleagues to understand your presence or absence.

As Slack is one of the most popular tools for working (behind Microsoft Teams), it’s important to learn to use the status icons effectively.

How to personalize your Slack Status Icons?

Slack does a wonderful job at letting users set statuses very easily. You’ll need to:

  1. Click on your profile picture within Slack.slack status icons
  2. This will automatically open a new panel at the right of the page, displaying your profile.
  3. There, click on Set a status button.slack status icons
  4. A new pop-up will appear, prompting you to set your status.
  5. You can select from a pre-defined list or craft your own statuses by selecting What’s your status?
  6. Here, Slack will ask you about your status. Once you write something, the pop-up will shrink, allowing you to personalize your status with special icons.
  7. For instance, you can see the time and the icon for a doctor’s appointment. Click on the icon, as you can see in the image below.slack status icons
  8. Type in ‘doctor’, and you’ll see dozens of icons explaining your status. Slack even has an icon for a CT scan.
  9. You can choose the preferred skin tone for your icon, which is an inclusive way to personalize your Slack status.
  10. Choose your preferred time, and then hit Save.
  11. Your status will appear next to your profile picture in Slack’s Direct Messages panel.slack status icons

And this is it! This is how you personalize your Slack status with unique icons. Don’t forget that Slack also lets you add custom-made emojis and icons, that you can use to personalize your experience on the platform highly.

For more beginner tips, see our Slack how to use guide to get familiar with the platform before diving into personalization.

In the comments section below, let us know your favourite icons that you use in Slack.

Discord Change Password – Quick Guide

Discord lets you change your password in a few steps. If you use it frequently, updating your password periodically to keep your account secure is a good idea. I’ll show you how to do it below, so read on!

How To Change Your Password on Discord

You can do so on the desktop and mobile version.

On Desktop

Here’s how to do it.

  1. Launch Discord and tap the Settings gear beside your user name on the bottom left. 
Setting gear
  1. My Account section will open on the right. Scroll down to find the Change Password option, then tap on it.
Change Password
  1. The Update Your Password prompt will open. You’ll be asked to fill in your current and new passwords and confirm them. After filling in the correct details, tap Done.
Update Your Password
  1. Once you’ve completed these steps, you’ll receive an email confirming your password has been successfully updated. You’ll need to use this new password the next time you log into Discord.
Email confirmation

On Mobile

Follow the below steps:

  1. Open the Discord app and tap the ” You ” smiley icon at the bottom right of your screen.
" You " smiley icon
  1. Click the Settings gear on the top right corner.
Settings gear
  1. Under Settings, select Account.
Account
  1. Tap Password under How you sign into your account.
 Password
  1. Add your current and new password, then click Change Password.
Update password
  1. You’ll receive an email from Discord confirming the change.
Email confirmation

Overall, Discord lets you change your password quickly and easily. The above steps will help you update your Discord credentials on desktop and mobile in just a few minutes, giving you peace of mind while using the platform.

Also, learn how to favorite GIFs, use bold letters, and use the best Discord server rule templates.

We also have a fresh guide on how to use Discord Developer Portal, so if you ever want to create your own bot, this is the right place to start.

How to Fix The DISM Restore Health Incorrect Function Error?

The DISM Restore Health Incorrect Function error usually appears when there are issues with the Windows system or image files. It could be because the tool cannot access & repair the files essential for restoring the system image’s health, mainly due to permission or corruption.

The first thing to do is launch Command Prompt with administrator rights and check the syntax of the command you want to execute, ensuring there are no typos. Also, run a malware scan using reliable antimalware software.

How can I fix the DISM Restore Health Incorrect Function error?

1. Check the Windows Update service

  1. Press Windows + R to open the Run console.Services RUn command - DISM Restore Health Incorrect Function Error
  2. Type services.msc and click OK to open the Services window.
  3. Locate the Windows Update service, right-click it, and ensure the Start option is greyed out, indicating that the service is running. If it is not, click Start to initiate it.Start Windows Update
  4. Now look for Background Intelligent Transfer Service (BITS) and Cryptographic Services, and do the same for these two.

2. Update Windows

  1. Press Windows + I to open the Windows Settings app.
  2. Go to Windows Update, and click the Check for updates button.Download updates - DISM Restore Health Incorrect Function Error?
  3. If updates are available, click Download and install to get the latest Windows version.

3. Clean up system image components

  1. Press the Windows key, type cmd in the search bar, and click Run as administrator to launch Command Prompt with elevated rights.  CMD elevated - NPFS_FILE_SYSTEM
  2. Type the command below and press Enter: Dism.exe /online /Cleanup-Image /StartComponentCleanup
  3. Wait for the process to finish.
  4. Try to perform the DISM scan again after running these commands.
  5. If the DISM still isn’t working, you can also run the following commands:
    • DISM /Online /Cleanup-Image /StartComponentCleanup
      DISM /Online /Cleanup-Image /AnalyzeComponentStore
      Dism.exe /online /Cleanup-Image /StartComponentCleanup
      Dism.exe /online /Cleanup-Image /StartComponentCleanup /ResetBase

Cleaning system image components can help you fix issues like DISM failure on a Windows PC; read this guide to learn more.

4. Run DISM scan with the Source option

4.1 Create an installation media

Note icon NOTE
Before proceeding with these steps, you should create a backup of important files and ensure you have an 8 GB USB drive to create a bootable installation media.
  1. Visit the Microsoft Windows 11 download page.Download now - DISM Restore Health Incorrect Function Error
  2. Click Download Now to get the Media Creation tool executable file on your computer.
  3. Once the download is complete, plug in the USB drive, double-click the Media Creation tool to run it, and click Yes on the UAC prompt to proceed.
  4. Click Accept to agree to the license terms and agreement.
  5. Select a language, edition, and architecture (32-bit or 64-bit) for Windows 11, then click Next.
  6. Choose USB flash drive and click Next.USB Setup Windows 11 step 3
  7. On the following page, you will see the drive letter of the USB device you connected; cross-check it and click Next.
  8. Follow the on-screen steps to create a USB bootable media, once you see the Your USB flash drive is ready message, click Finish.Finish

4.2 Run the DISM scan

  1. Plug the USB drive into your computer, then press Windows + E to open Windows File Explorer.
  2. In the left sidebar, look for This PC, click it to expand, locate the flash drive, and note down the drive letter.
  3. Press the Windows key, type cmd in the search box, and click Run as administrator.
  4. Type the following command after replacing the drive letter E with the flash drive letter and press Enter. Using the source means you specify an alternative source of the files needed to repair the Windows image.: DISM /Online /Cleanup-Image /RestoreHealth /Source:wim:E:\sources\install.wim:1 /LimitAccessLimit access - DISM Restore Health Incorrect Function Error?
  5. Wait for the command to execute and see if the error appears again.

Running DISM using an alternative source is one of the best methods for fixing DISM errors; if you want to learn other methods, check out this guide.

5. Run the CHKDSK scan

  1. Press the Windows key, type cmd in the search bar, and click Run as administrator to launch Command Prompt with elevated rights.  CMD elevated - DISM Restore Health Incorrect Function Error
  2. Type the following command and hit Enter: chkdsk /f
  3. Click Y if prompted to schedule the scan when your system restarts.cmd_chkdsk
  4. Restart your computer to initiate the scan.

6. Run DISM in Windows Recovery Environment

  1. Press the Power button on your computer to start it.
  2. When you see the Windows logo at the boot time, press the Power button again to shut down your PC. Repeat the power-on and power-off process three times.
  3. In the third restart, you will see a blue screen, which means you have accessed the Windows Recovery Environment (WinRE).
  4. Click Troubleshoot on the Choose an option screen.Troubleshoot - DISM Restore Health Incorrect Function Error? 
  5. Click Advanced options.Advanced option s- CMD SFC  DISM Restore Health Incorrect Function Error?
  6. On the Advanced Options screen, select Command Prompt.Command Prompt
  7. In the command prompt window, type the following command to run the DISM scan and hit Enter: dism /online /cleanup-image /restorehealth
  8. Wait for the process to finish, then reboot your computer to let the changes take effect.

7. Run an SFC scan

  1. Press the Windows key, type cmd in the search bar, and click Run as administrator.CMD elevated -DISM Restore Health Incorrect Function Error
  2. Copy & paste the following command to repair the Windows system files and press Enter: sfc /scannowCMD SFC  scan
  3. Wait for the process to finish, then reboot your computer to let the changes take effect.

Running an SFC scan also fixes other DISM errors like Dism /online /cleanup-image /restorehealth is stuck. To learn more, read this guide

8. Perform a clean installation

Note icon NOTE
Prepare the installation media using Method 3 of this guide’s steps and ensure you have the product key or access to the Microsoft account to activate Windows.

8.1 Install Windows 11

  1. Plug the USB drive into the targeted computer, and press Windows + I to open Settings.
  2. Go to System, then click Recovery. System - recovery - DISM Restore Health Incorrect Function Error?
  3. Go to Advanced startup, and select Restart now.Recovery Advanced Startup
  4. On the blue screen, choose Use a device. If you don’t find it, you need to boot your computer in BIOS mode and select a USB device to boot.Choose-an-option usb SELECTED - DISM Restore Health Incorrect Function Error?
  5. Select language and other suitable options on the first screen, and click Next.
  6. Click Install Now, place a checkmark next to the I accept box, and click Next.
  7. Choose Custom: Install Windows only (advanced)
  8. On the following page, you will see a list of drives and partitions. You can select any of them and click Delete to remove them. Once you have done this, click OK if you see a Windows Setup notification.
  9. Click Next. Follow the on-screen prompts to complete the process.

Installation takes some time, so do not turn off the PC. Once it is complete, you will be greeted with the lock screen.

8.2 Configure Windows settings

  1. Once the installation is done, select your region and keyboard layout.
  2. Connect to the Wi-Fi network when prompted.
  3. Next, sign in with your Microsoft account or create a new one if needed.
  4. Choose the privacy settings according to your choice, then follow other prompts to set up other features.
  5. Once the setup is complete, go to Windows + I to open Settings and go to Windows Update.Check for updates - DISM Restore Health Incorrect Function Error
  6. Click Check for updates to install the latest updates.

In conclusion, you can fix the DISM error by running the DISM in the Windows Recovery environment, running the SFC scan, updating Windows to the latest version, or reinstalling Windows.

To avoid future DISM errors, always make sure that you are using an administrator account and running Command Prompt with elevated rights.

If you have any suggestions or questions about the DISM restore health incorrect function, feel free to mention them in the comments section below.

Barcode Generator in Excel: How to Use it For Free

Many users are wondering if there’s an Excel barcode generator available, and in today’s guide, we’re going to show you everything you need to know about it.

How can I generate a barcode in Excel?

Use Excel formulas

  1. Download and install 3 of 9 Barcode font.
  2. Create your table.
  3. Select the column you want to convert to barcode and set its data type to Text.
     text data type
  4. Next, select a cell next to your data and enter the following formula =”*” &A2&”*” or = “(“&A2&”)”
    formula excel barcode
  5. Next, drag the green square to the bottom to fill in all the data.
    fill data green square
  6. Select your Barcode column and choose the 3 of 9 Barcode font.
    3 of 9 barcode font excel

To make this process a bit faster, you can apply a formula to an entire column in Excel with keyboard shortcuts.

If you need a free Excel barcode generator be sure to give this method a try.

Does Excel come with a barcode font?

Unfortunately, Excel doesn’t have a barcode font, so if you want to use one, you need to manually install it from a third-party source.

How to create a barcode in Excel without a font?

This might be possible with the use of Excel add-ins, as some come with their fonts preinstalled.

Is there a free barcode addon for Excel?

Most Excel barcode add-ins require you to purchase a license. However, Barcode Function Library is free to use, so you might want to check it out.

As you can see, it’s easy to use Excel barcode generator, and you don’t need to rely on any third-party tools, and all you have to do is download a barcode font and you’re good to go.

If you need something more advanced, there are many barcode generator software that you can use, so you might want to consider them.

To learn more about Excel, don’t miss our recent guide on how to sort by alphabetical order in Excel.

DIRTY_NOWRITE_PAGES_CONGESTION Error Fixed

0x000000FD DIRTY_NOWRITE_PAGES_CONGESTION is a blue screen of death (BSOD) error that occurs when the system runs out of the free memory pages needed to maintain essential functions. It may be triggered by damaged system files, corrupted drivers, or incorrect system settings.

Luckily, there are several ways to fix it. But before we begin, try out these quick solutions:

  • Unplug all external hardware. Switch off your PC > Unplug all peripheral devices > Reboot the computer > Reconnect one device at a time to identify the issue.
  • Update Windows. Press the Windows icon + I > Windows Update > Check for updates > Download and install.

If nothing works, let’s move on to the detailed solutions.

7 Methods To Fix DIRTY_NOWRITE_PAGES_CONGESTION

Below are the solutions:

Boot Windows in Safe Mode

Safe Mode is a troubleshooting mode that starts Windows with only essential drivers and services. This can help you determine if the error is caused by a third-party application or driver.

  1. Reboot your computer several times to activate Automatic Repair Mode. 
  2. Select Troubleshoot.
Troubleshoot
  1. Tap Advanced options.
Advance options
  1. Select Startup Settings.
Setup Settings
  1. Click Restart.
Restart
  1. Press F5 on the keyboard to start Windows into Safe Mode with Networking.
Safe Mode with Networking

Once in Safe Mode, you can proceed with further troubleshooting steps to resolve the issue.

Uninstall Recent Windows Updates

New Windows updates may sometimes cause conflicts with existing system components, resulting in errors like DIRTY_NOWRITE_PAGES_CONGESTION. Rolling back recent ones can help fix this problem. Here’s how to do it:

  1. Press Windows + S, type Control Panel, then tap Open.
  2. Click Uninstall a program.
Uninstall a program
  1. Tap View installed updates.
View installed updates.
  1. Tap on the latest program and click Uninstall.
click uninstall

Restart your computer to see if the issue persists.

Uninstall Corrupted Drivers

Corrupted or outdated drivers can cause system instability, leading to BSOD errors. Follow the below steps:

  1. Press Windows + X and choose Device Manager.
Device Manager
  1. Look for any devices with a yellow exclamation mark indicating problematic drivers. Right-click it and select Uninstall device.
Uninstall device
  1. Confirm the uninstallation and restart your computer.
Confirm the uninstallation

Windows will attempt to reinstall the correct driver automatically upon reboot.

Run SFC and DISM Commands

System File Checker (SFC) and Deployment Image Servicing and Management (DISM) are built-in tools that scan and repair corrupted system files. They can resolve errors related to file corruption. Here’s how to scan:

  1. Right-click the start menu, and tap Windows PowerShell (Admin).
Windows PowerShell (Admin)
  1. Type sfc /scannow and hit Enter.
Type sfc /scannow
  1. After the scan, type DISM /Online /Cleanup-Image /RestoreHealth and press Enter.
Type DISM /Online /Cleanup-Image /RestoreHealth

Wait for the process to complete, and then restart your computer.

Run CHKDSK Command

The CHKDSK (Check Disk) command scans your hard drive for errors and attempts to fix any found issues. If the DIRTY_NOWRITE_PAGES_CONGESTION error is caused by disk errors, running CHKDSK may help resolve the problem. Here are the steps to follow:

  1. Open the Windows PowerShell (Admin).
  2. Type chkdsk C: /f /r and press Enter.
Type chkdsk C: /f /r
  1. When prompted, type Y to schedule the check upon the next restart.
Schedule the check

Restart your computer and allow CHKDSK to run.

Perform System Restore

System Restore allows you to roll back your computer to a previous state, undoing any recent changes that might have caused the error. It’s helpful if the problem appeared after installing new software or making system changes.

  1. Press Windows + R, type rstrui, and hit Enter.
Type rstrui
  1. Click Next.
Next
  1. Select a restore point, then tap Next.
Select a restore point
  1. Click Finish.
Click Finish

Your system will restart and revert to the selected restore point.

Reset Windows

If none of the above solutions work, resetting Windows should solve the error. This process reinstalls Windows while keeping your files, though it will remove apps and settings. Here’s how:

  1. Press Windows + I to open Settings and click Update & Security.
Update & Security
  1. Tap Recovery.
Recovery
  1. Click Get started.
Get started
  1. Tap Keep my files.
Choose an option
  1. Pick whether to reinstall Windows from the Cloud download or Local reinstall. Then tap Reset.
Pick how to reinstall Windows

After resetting Windows, the system will revert to its default state, and the error should no longer appear.

The above solutions should help you resolve DIRTY_NOWRITE_PAGES_CONGESTION and restore your system to full functionality.

Additionally, you can learn to fix other Blue Screen errors like 0x00000024, Tcpip.sys, and DATA_COHERENCY_EXCEPTION.

ERROR_TOO_MANY_SEMAPHORES: What It is and How to Fix It

ERROR_TOO_MANY_SEMAPHORES and its ‘Cannot create another system semaphore’ message, per Microsoft, are often encountered by users trying to open the AX 2012 Application Object Server (AOS), an old version of the application. So, why does this happen, and how can you fix it?

ERROR_TOO_MANY_SEMAPHORES: What is it, and what causes it?

When you see the ‘Cannot create another system semaphore’ error, it’s likely due to an issue with the Kernel version of your AX 2012 installation.

The kernel version of your AX 2012 is likely older than your Application version demands. Thus, this older kernel version doesn’t support the current Timezone version, causing the AOS service to fail to start correctly.

How to Fix it?

To fix the problem, you need to upgrade the kernel version of your AX 2012 installation.

  1. Go to Microsoft Dynamics AX 2012 R3 Roadmap, and download the latest kernel build.ERROR_TOO_MANY_SEMAPHORES
  2. Open the kernel and follow the installation process.

After that, you need to update the Timezone version through SQL. Here’s the script you should run:

UPDATE SQLSystemVariables
SET value = 4
WHERE parm = ‘SYSTIMEZONESVERSION’

Wrapping Up

After running the script, you can start the AX 2012 AOS service without the ‘Cannot create another system semaphore’ error preventing you, thus fixing the ERROR_TOO_MANY_SEMAPHORES for good.

However, it’s worth mentioning that the ERROR_TOO_MANY_SEMAPHORES might not be happening nowadays. Eight years ago, Microsoft Dynamics AX transitioned into Microsoft Dynamics 365 for Finance and Operations, and with it, the platform’s UI and services were overhauled.

However, although we don’t know why, this solution should work for those who are still using the old version. The new version of Microsoft Dynamics 365 is cloud-based, making it easier for admins and organizations to keep track of issues, and solve them together with Microsoft’s assistance.

If you have any other recommendations or suggestions that fixed the ERROR_TOO_MANY_SEMAPHORES, drop them in the comments section.

ERROR_INVALID_AT_INTERRUPT_TIME (Fixed)

104 (0x68) ERROR_INVALID_AT_INTERRUPT_TIME is a system error that occurs when a process attempts to execute an invalid or inappropriate operation during an interrupt request (IR). It can be caused by hardware or software conflicts, outdated drivers, or corrupted system files. 

It may cause system crashes or prevent certain applications from running smoothly. Fortunately, there are several methods to fix this issue. Let’s go over the steps together!

6 Ways To Fix ERROR_INVALID_AT_INTERRUPT_TIME

Here are the solutions:

Run System File Checker

Corrupt or missing system files can lead to the ERROR_INVALID_AT_INTERRUPT_TIME. Running the System File Checker (SFC) will scan for such issues and automatically repair them. Here are the steps to follow:

  1. Press Windows + S, type Command Prompt, and select Run as administrator.
Run as administrator
  1. Type sfc /scannow In the command prompt window and press Enter.
Type sfc /scannow

Wait for the scan to complete. If any corrupt files are found, the SFC tool will attempt to repair them. Once the process is finished, restart your computer and check if the error persists.

Run CHKDSK

Errors in the hard disk drive can sometimes trigger the ERROR_INVALID_AT_INTERRUPT_TIME. Running the CHKDSK utility helps detect and fix bad sectors or corrupted files. Here’s how:

  1. Open Command Prompt as an administrator. 
Command Prompt
  1. Type chkdsk /f /r and press Enter. If prompted to schedule the check at the next system restart, type Y and press Enter.
Type chkdsk /f /r

Restart your computer to allow CHKDSK to run and fix any detected disk errors.

Update Your Driver

Outdated or incompatible drivers can often lead to system errors, including ERROR_INVALID_AT_INTERRUPT_TIME. Updating your drivers ensures that your hardware functions properly with the system. Follow the below steps:

  1. Press Windows + X and select Device Manager.
Device Manager
  1. Locate the device that may be causing the error. It’s usually under Display adapters or Network adapters with an exclamation mark. Right-click on the device and select Update driver.
Update driver
  1. Choose Search automatically for drivers.
Search automatically for updated driver software
  1. Follow the on-screen instructions and restart your system.

Roll Back Your Driver

If the error started after a recent driver update, it may be due to compatibility issues. Rolling back the driver to its previous version can resolve the ERROR_INVALID_AT_INTERRUPT_TIME issue. Follow the below steps:

  1. Open Device Manager by pressing Windows + X and selecting it from the list.
Device Manager
  1. Find the problematic device, right-click, and choose Properties.
Properties
  1. Go to the Driver tab and click Roll Back Driver. If the button is greyed out, there’s no previous driver version to roll back. You can either reinstall or disable it.
Roll Back Driver

Once done, restart your computer and check if the issue is resolved.

Perform System Restore

If the error persists and you suspect recent changes in system settings or installations caused the issue, a System Restore can revert your computer to a point before it occurred. Follow the below steps:

  1. Press Windows + S, type Create a restore point, and click open.
Create a restore point
  1. Click System Restore in the System Properties window.
System Restore
  1. Choose a restore point before the error began and click Next.
Choose a restore point
  1. Confirm your restore point and click Finish.
Finish

Your computer will restart, and the system will revert to the selected restore point.

Reinstall Windows

If the ERROR_INVALID_AT_INTERRUPT_TIME persists after trying all other methods, reinstalling Windows can provide a more thorough solution. This process reinstalls the operating system from scratch and can resolve deeper system corruption or configuration issues. Here are the steps:

  1. Download the Windows Media Creation Tool from the official Microsoft website.
 Windows Media Creation Tool
  1. Create installation media on a USB drive or DVD.
  2. Insert the installation media into your computer and restart it.
  3. Press the key to enter the Boot Menu (usually F12, Esc, or F2, depending on your device).
  4. Select the USB drive or DVD as the boot source.
  5. Follow the on-screen instructions to complete the process.

ERROR_INVALID_AT_INTERRUPT_TIME can be disruptive, but the above steps can help you troubleshoot and resolve it. Start with simpler methods like running the System File Checker and CHKDSK, then move on to updating or rolling back drivers. If those tips don’t work, perform a System Restore or reinstall your operating system.

There’s still more to learn. Check out how to fix WRkrn.sys, SERIAL_DRIVER_INTERNAL, and Nvpcf.sys.

Gmail Will Not Accept Keyboard Input: How to Fix it

Many reported that Gmail will not accept keyboard input and this can make writing emails or logging in almost impossible.  This issue seems to affect Windows and Android, so let’s see how to fix it.

What can I do if Gmail will not accept keyboard input?

If you’re having this issue, try closing Gmail and opening it again. Alternatively, try restarting your device. If you’re using a phone or tablet, switch to portrait mode.

1. Clear the Gmail cache

  1. Long tap the Gmail app on your phone and choose application info.
    properties gmail
  2. Tap on Storage.
    storage app info
  3. Tap on Clear cache.
    clear cache app

This is a quick and easy solution that can help you if Gmail will not accept keyboard input on Android.

2. Allow Gmail to access contacts

  1. Open the Gmail app information again.
  2. Go to Permissions.
     permissions app info
  3. Select Contacts and set it to Allow.
    contacts gmail app

As you can see, this issue usually affects phones, but it can be fixed by clearing the cache or changing your permissions.

If the issue persists, you might be interested in our keyboard not working in Chrome guide for more solutions.

As for other Gmail issues, many reported that autocomplete is not working in Gmail as well as that Gmail is stuck on loading, but we already covered those in our earlier guides.

You’ll soon be able to open protected PDF files in OneDrive for Web

Starting in October, OneDrive users will be able to open protected PDFs in the web version of the platform. According to a recent entry to the Microsoft 365 Roadmap, only authorized users can access these PDF files, which can only be accessed in read-only mode.

Here’s what the entry says:

With this capability, OneDrive users can open PDF files that are protected with Microsoft Purview Information Protection sensitivity labels and read them using OneDrive web in read-only mode. Only authorized users will be able to access these PDF files.

Microsoft has recently updated OneDrive with massive enhancements, so it’s no wonder that the Redmond-based tech giant is taking steps to make the platform accessible to everybody, everywhere, especially when it comes to protected PDF files.

However, it seems that the company has rated the Teen platform using the ESRB code, which is used for video games.

Gmail Account Could Not Be Verified – How To Recover It

If you see a message saying your Gmail account could not be verified, it’s because of security measures. They prevent access due to insufficient verification information. So, if you’re locked out of your Gmail account, don’t panic.

I’ll show you how to recover it in just a few steps.

How To Fix Gmail Account Could Not Be Verified

Here are the instructions:

  1. Go to the Account recovery page, add your Gmail account, and tap Next.
 Account recovery page,
  1. Check the box to confirm you aren’t a robot, then tap Next to verify it’s you.
Verify it's you
  1. Enter your password and click Next.
Enter password
  1. Add your phone number and click Send to get a verification code.
Add p[hone number
  1. Enter the code sent to your mobile, then hit Next to get verified.
Enter the code
  1. Update your password if you forgot it, or tap Continue.
Update password or continue
  1. You’ll be logged into your account.
Account recovered

So, now you know how to deal with Gmail account could not be verified. The Google account recovery process can help you regain access. Ensure you fill in the correct details for everything to go smoothly.

Also, you can learn to create and set up a group email, install the Gmail app for Windows, and unarchive emails.

Microsoft will introduce the Copilot license in an effort to find out who’s using AI the most

Microsoft is set to introduce a Copilot license optimizer in the Microsoft 365 admin centre, which will help organizations streamline the usage and cost of AI models throughout their infrastructure.

According to an entry in the Microsoft 365 Roadmap, the feature uses a data-driven approach to suggest users who will gain the most value from the AI Copilot and assign licences to them.

Here’s what the entry says:

Microsoft 365 Copilot license optimizer is a new feature in the Microsoft 365 admin center designed to help organizations streamline Microsoft 365 Copilot license assignment and optimize utilization. This feature uses a data-driven approach to suggest users who are in the best position to gain the most value from Microsoft 365 Copilot and efficiently assign licenses to these users.

This capability comes weeks after the Redmond-based tech giant suggested Copilot candidates to admins, which is a new column in the Readiness section of the Microsoft 365 Copilot Usage report that allows admins to see who’s using Copilot the most.

What are your thoughts on the new Copilot license?

Skype Insider 8.129 lets users know when they’re being scammed with fraudulent conversations

Microsoft has released Skype Insider 8.129, delivering a range of new features and fixes for Android, Windows, iOS, and Mac. The update is rolling out gradually, so it might take a day or two before it lands on your device.

On Android, Skype users will find that calls will no longer come through when Do Not Disturb is enabled. Meanwhile, the share screen button on Windows now triggers the expected sharing popup.

The new Skype Insider build also fixes a bug that made OneAuth SSO accounts unusable on iOS after a reinstall and prevents child accounts from appearing in search by default on the same platform.

Pasting a join link into search on Mac will no longer open the lobby. The update also adds options to block users when receiving fraudulent translated conversation requests in the translator.

The iOS app will now show avatars in notifications, and the correct information text will appear when joining a TwinCam session on mobile.

Other fixes include improved font sizes for some users, ensuring that the login window’s license text is no longer cut off in some languages on Mac, and preventing a blank QR code screen from showing when clicking TwinCam during a call on mobile.

As usual, the update brings a range of improvements and bug fixes, such as enhanced performance when scrolling through a conversation with multiple media or files and a fix for the app not stopping screen sharing when the user stops sharing in a meeting.

You can grab your platform’s latest Skype Insider version from the app’s official website. You can join the Insider program from the app’s settings for early access to future updates.

The update follows the release of Skype Insider 8.128, which made the messenger completely ad-free across platforms and added a new recent conversation section to the search interface on the desktop.

The new version of Microsoft Teams, made for virtual desktops and built for Citrix Virtual Apps, VMware Horizon, and Windows 365 Cloud PCs, is now generally available.

You can read Skype Insider 8.129’s full changelog here.

How to Track Changes in Microsoft Word and Accept or Reject Them

When you’re collaborating on a document, you can track the changes in Microsoft Word to clearly see any modifications or suggestions applied to the content. Read below to see detailed instructions on how to enable Track Changes and how to review the changes in your Word document.

How do I track changes in Word?

1. Enable Track Changes in Word

  1. Open the Word document where you want to track changes.
  2. Go to the Review tab on the Ribbon.
  3. Click on Track Changes in the Tracking group. The button will be highlighted when Track Changes is enabled.
  4. if you’re using the Word online version, the menu is similar.
  5. Now, the app will track all the changes that will be applied to the document.

2. Review and accept or reject changes

  1. After enabling Track Changes, any changes you make will be tracked. Deletions will be marked with a strikethrough, and additions will be underlined.
  2. To see the changes, go to the Review tab and select All Markup from the Display for Review drop-down menu. This will show all changes and comments.
  3. You can customize how changes are displayed. Go to Review > Show Markup and select the types of changes you want to see (e.g., insertions, deletions, formatting).
  4. To accept or reject changes, click on a change and then click Accept or Reject in the Changes group on the Review tab.
  5. To add a comment, select the text you want to comment on, go to the Review tab, and click New Comment.
  6. When you’re done, you can turn off Track Changes by clicking the Track Changes button again in the Review tab.
  7. If you want to prevent others from turning off Track Changes, you can lock it. Go to Review > Track Changes > Lock Tracking and set a password.

With these simple steps, you can turn on Track Changes and easily review them in Microsoft Word, whether you’re using the desktop or the online version. In case you want to accept all changes in Word, the highlighted link will open our guide on how to do that.

If you’re wondering what is the highlight shortcut in Word, click the link to read our detailed instructions.

Feel free to ask in comments if you have any more questions or need further assistance.