How to Fix UP_DRIVER_ON_MP_SYSTEM 0x00000092 Error

Many of our readers have reported the Blue Screen error UP_DRIVER_ON_MP_SYSTEM 0x00000092. In this guide, we will discuss its meaning and how to get rid of it.

What is the UP_DRIVER_ON_MP_SYSTEM error?

The UP_DRIVER_ON_MP_SYSTEM bug check or stop error 0x00000092 indicates that a driver intended for a uniprocessor system is detected on a multiprocessor system.

The issue appears when the system attempts to load a driver incompatible with the hardware specifications, usually in devices with multiple cores or processors.

How can I fix the UP_DRIVER_ON_MP_SYSTEM 0x00000092 error?

1. Update the problematic driver

Note icon NOTE
Before updating the driver, you must restart your computer in Safe mode.

1.1 Restart your computer in safe mode

  1. Press Windows + R to open the Run window.msconfig - UP_DRIVER_ON_MP_SYSTEM  
  2. Type msconfig and click OK to open the System Configuration window.
  3. Go to the Boot tab, under Boot options, place a checkmark next to Safe boot and Network.Safe boot
  4. Click Apply and OK to save the changes.
  5. Click Restart.Restart

1.2 Update the drivers

Once your computer has restarted, follow these steps to update drivers on your computer.

  1. Press Windows + R to open the Run window.Device Manager Run command - UP_DRIVER_ON_MP_SYSTEM  
  2. Type devmgmt.msc and click OK to open the Device Manager window.
  3. In the Device Manager window, expand the categories one by one and look for devices with a yellow triangle with an exclamation mark, which indicates a driver problem.
  4. Once located, right-click the problematic driver and choose Update driver from the context menu.Update driver
  5. Next, select Search automatically for drivers, allowing Windows to find and install the latest driver. Repeat these steps for all the problematic drivers.Search automatically

If Windows cannot find a better driver version, you can use a third-party driver updater and fixer, which can easily update the drivers on your PC, or head to the manufacturer’s official website and manually install the driver!

If you encounter any BSoD errors after an upgrade, updating your computer’s drivers is a good way to fix the problem. Read this guide to learn more.

2. Update your Windows

  1. Follow the steps 1 to 5 from Method 1 to restart your computer in safe mode.
  2. Once your computer boots up, press Windows + I to open the Settings app.
  3. Go to Windows Update, and click Check for updates.Check for updates - UP_DRIVER_ON_MP_SYSTEM
  4. If an update is available, click Download and install. Once downloaded and installed, you will be prompted to reboot your PC.

3. Rollback the problematic driver

  1. Press Windows + R to open the Run window.Device Manager Run command - UP_DRIVER_ON_MP_SYSTEM
  2. Type devmgmt.msc and click OK to open the Device Manager window.
  3. In the Device Manager window, expand the categories one by one and look for devices with a yellow exclamation mark as it indicates a problem with a driver.
  4. Once located, right-click the problematic driver and choose Properties from the context menu.Properties
  5. Go to the Driver tab and click the Roll Back Driver button.Rollback driver
  6. Follow the on-screen instructions to complete the rollback process.
  7. Restart your PC to let the changes take effect.

4. Run the CHKDSK scan

Note icon NOTE
If your computer doesn’t boot to Windows, you must start it in recovery mode and run a disk check. However, if your computer boots up normally, skip steps 1 to 6 and follow steps 7 to 10. If not, follow all the steps.
  1. Press the Power button on your PC to start it.
  2. When you see the Windows logo during booting, press the Power button again to shut down your computer. Repeat the power-on and power-off process three times.
  3. In the third restart, you will see a blue screen, which means you have accessed the Windows Recovery Environment (WinRE).
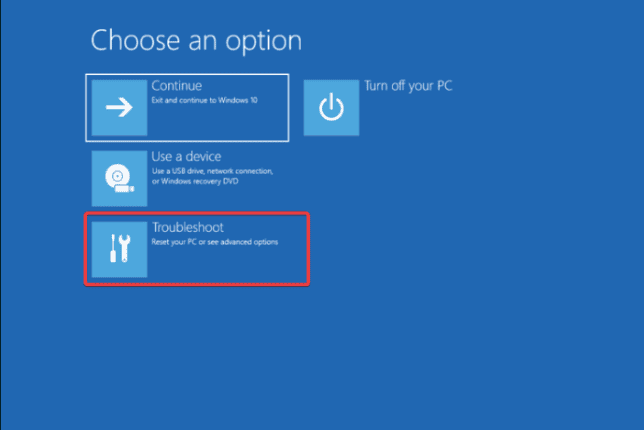
  4. Click Troubleshoot on the Choose an option screen.   
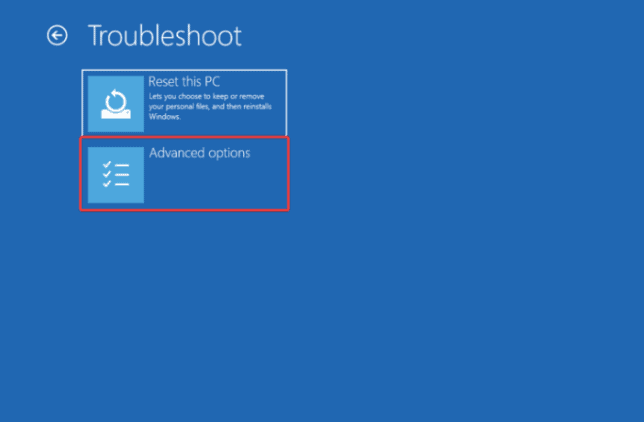
  5. Select Advanced options.Advanced options - UP_DRIVER_ON_MP_SYSTEM
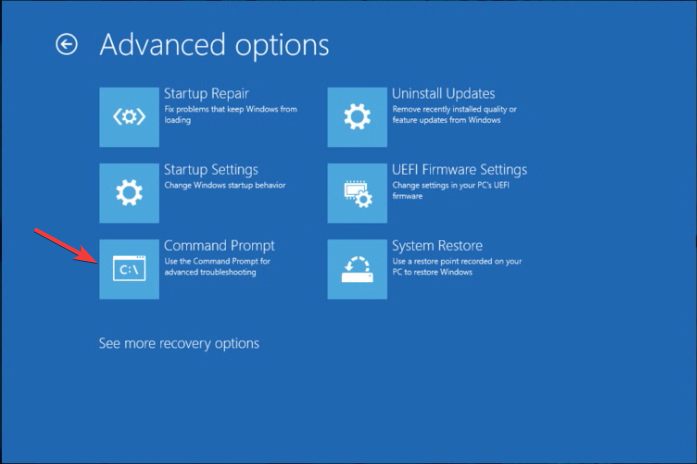
  6. On the Advanced Options screen, choose Command Prompt.
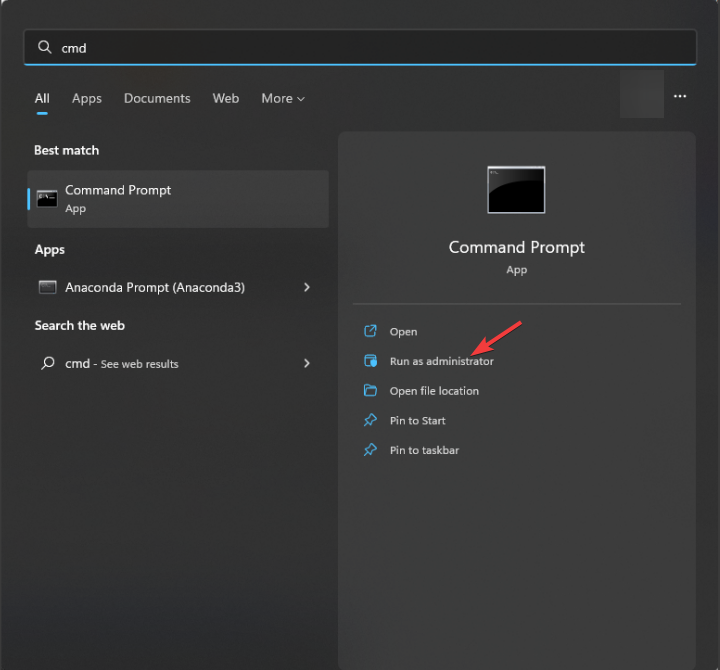
  7.  If your computer can boot up normally, press the Windows key, type cmd in the search bar, and click Run as administrator. 
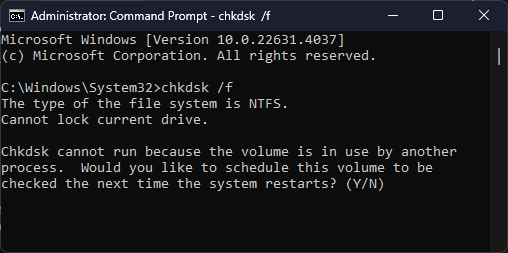
  8. Type the following command and hit Enter:chkdsk /fCHKDSK (2)
  9. Click Y if prompted and wait for the process to complete.
  10. Reboot your computer to save the changes.

5. Perform a System Restore

  1. Press the Windows key, type control panel in the search box, and click Open.Control Panel start menu - UP_DRIVER_ON_MP_SYSTEM     
  2. Select Large icons as View by, then click Recovery.Recovery Control Panel
  3. Click Open System Restore.Open system restore - UP_DRIVER_ON_MP_SYSTEM
  4. Select Choose a different restore point in the System Restore window and click Next.Next Choose a different restore point
  5. Choose the point at which you want your Windows restored and click Next.Choose a point
  6. Click Finish to start the process.Finish UP_DRIVER_ON_MP_SYSTEM

Your computer will reboot and restore your device settings to the selected version. If you get the System Restore wasn’t completed successfully message after your PC reboots, we recommend you check out this informative guide for solutions.

If you have any suggestions or concerns about the UP_DRIVER_ON_MP_SYSTEM Blue Screen of Death error, feel free to mention them in the comments section below.

5 Simple Ways to Fix the MBR_CHECKSUM_MISMATCH 0x0000008B Error

The MBR_CHECKSUM_MISMATCH 0x0000008B bug check happens during the boot process when the MBR checksum calculated by the Microsoft Windows operating system for the Master Boot Record doesn’t match the checksum provided by the loader.

This usually happens when your system is infected with a virus. In this guide, we will discuss the steps to fix the Blue Screen MBR_CHECKSUM_MISMATCH 0x0000008B error.

How can I fix the MBR_CHECKSUM_MISMATCH 0x0000008B error?

1. Use a bootable ISO image of your antivirus

Note icon NOTE
If your computer is not booting into Windows, you can use this method to remove viruses. To create bootable media, you need an external or pen drive with a minimum of 1 GB of free space and an uninfected computer.

1.1 Create a bootable antivirus recovery tool

  1. Go to the antivirus website you use and download its ISO file. We are using TotalAV because it offers a bootable antivirus ISO that can help remove infections even when Windows won’t start.
  2. Click Download.
total av download page

  1. Once downloaded, go to Rufus’ official website and click Download.
  2. Now, double-click the downloaded file and click Yes to launch Rufus with admin privileges.
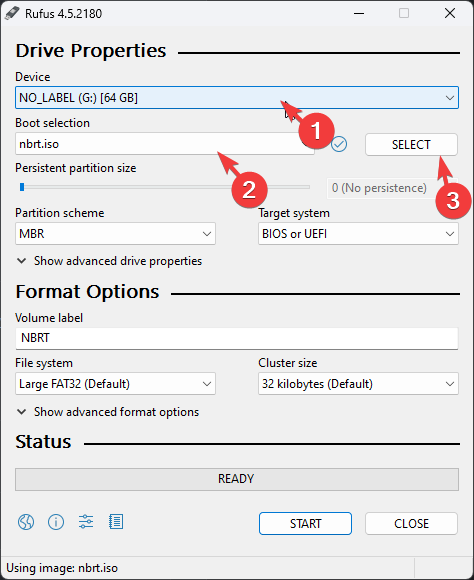
  3. Insert the USB drive and wait until it gets detected on the Rufus window.
  4. Under Boot selection, click the Select button.Select - MBR_CHECKSUM_MISMATCH
  5. Navigate to the location where you have saved to the nbrt.iso and click Open.
  6. Click Start.
  7. Then, click OK. Once the process is completed, you will see the Status as Ready in Green and click Close.

1.2 Scan your computer using the bootable USB drive

  1. Insert the USB drive into your infected computer, then press F2 or Del according to your device’s manufacturer to enter the BIOS setup utility.
  2. Go to the Boot tab and navigate to the boot order options in the BIOS menu.
  3. Use the arrow keys to select USB drive for boot options, then press F10 to save and exit the BIOS menu.
  4. Your computer will restart, and the bootable antivirus setup will open. Select Language, then click OK. 
  5. Click Agree.
  6. Then, click Start Scan and wait for the scan to complete. If you see infected files, click Fix to remove them and clean your computer.
  7. Click Reboot and remove the USB flash drive.
Total AV

TotalAV

Protect your PC now! Create your TotalAV bootable USB and remove viruses in no time.
Try now! Visit website

2. Perform a CHKDSK scan

Note icon NOTE
If your computer doesn’t boot to Windows, you need to start it in recovery mode and run a disk check. However, if your computer boots up normally, skip steps 1 to 6 and follow steps 7 to 10. If not, follow all the steps.
  1. Press the Power button on your PC to start it.
  2. When you see the Windows logo during booting, press the Power button again to shut down your computer. Repeat the power-on and power-off process three times.
  3. In the third restart, you will see a blue screen, which means you have accessed the Windows Recovery Environment (WinRE).
  4. Click Troubleshoot on the Choose an option screen. Troubleshoot - MBR_CHECKSUM_MISMATCH  
  5. Select Advanced options.Troubleshoot WITH AO selected
  6. On the Advanced Options screen, choose Command Prompt.Command Prompt Advanced Options - MBR_CHECKSUM_MISMATCH
  7.  If your computer can boot up normally, press the Windows key, type cmd in the search bar, and click Run as administrator. CMD elevated
  8. Type the following command to check for disk errors and attempt to fix them and hit Enter:chkdsk /fCHKDSK - MBR_CHECKSUM_MISMATCH
  9. Click Y if prompted and wait for the process to complete.
  10. Reboot your computer to save the changes.

3. Repair the MBR via Command Prompt

  1. Press the Power button on your PC to start it.
  2. When you see the Windows logo during booting, press the Power button again to shut down your computer. Repeat the power-on and power-off process three times.
  3. In the third restart, you will see a blue screen, which means you have accessed the Windows Recovery Environment (WinRE).
  4. Click Troubleshoot on the Choose an option screen.  
  5. Select Advanced options.Troubleshoot WITH AO selected
  6. On the Advanced Options screen, choose Command Prompt.Command Prompt Advanced Options - MBR_CHECKSUM_MISMATCH
  7. To repair the MBR without modifying the partition table, type the following command and press Enter: bootrec /fixmbr
  8. Copy & paste the following command to write a new boot sector, and hit Enter: bootrec /fixboot
  9. Restart your computer to save the changes.

4. Restore the system using a restore point

If the error started recently, reverting to a previous system state might resolve it.

  1. Boot from the Windows installation USB/DVD and select Repair your computer.
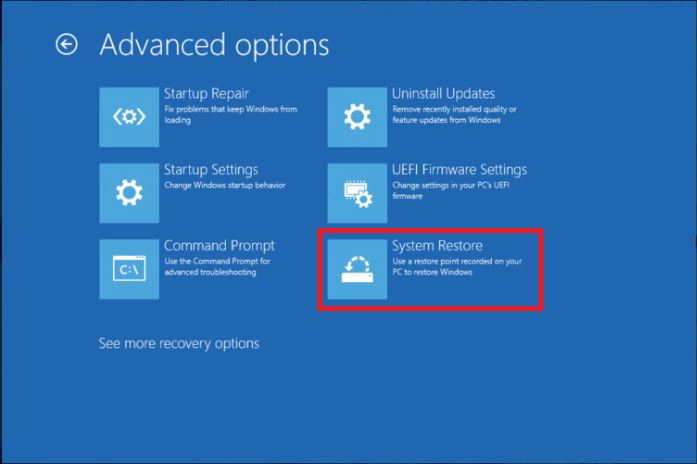
  2. Go to Troubleshoot > Advanced options > System Restore.System Restore AO - Advanced Options
  3. Choose a restore point before the error occurred and follow the prompts.

5. Perform a clean installation of Windows

Note icon NOTE
Before starting the process, create a backup of important data and ensure you have the product key or access to the Microsoft account for Windows activation. Also, keep an 8 GB USB drive handy to create a bootable installation media.

5.1 Create an installation media

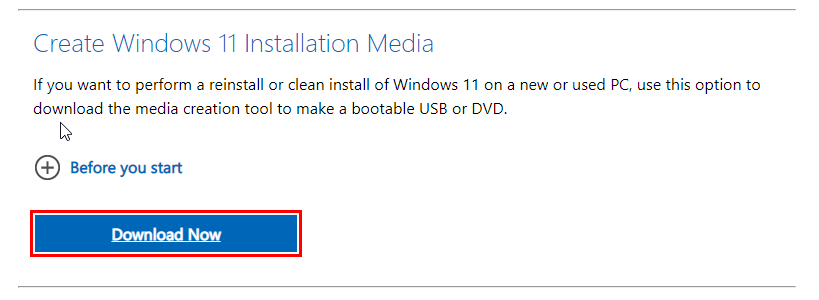
  1. On another computer, visit the Microsoft Windows 11 download page and click Download Now for the Media Creation tool.Download now Installation Media - MBR_CHECKSUM_MISMATCH Now
  2. Once the download is complete, connect the USB drive, double-click the Media Creation tool to run it, and click Yes on the UAC prompt.
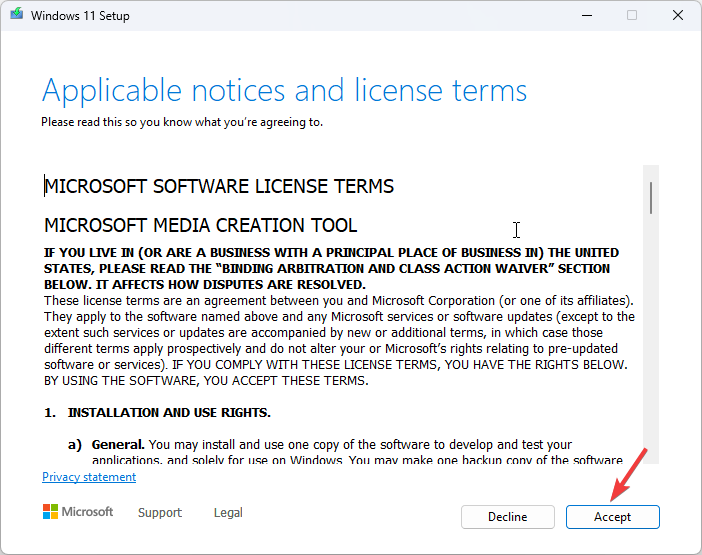
  3. Click Accept to agree to the license terms and agreements.
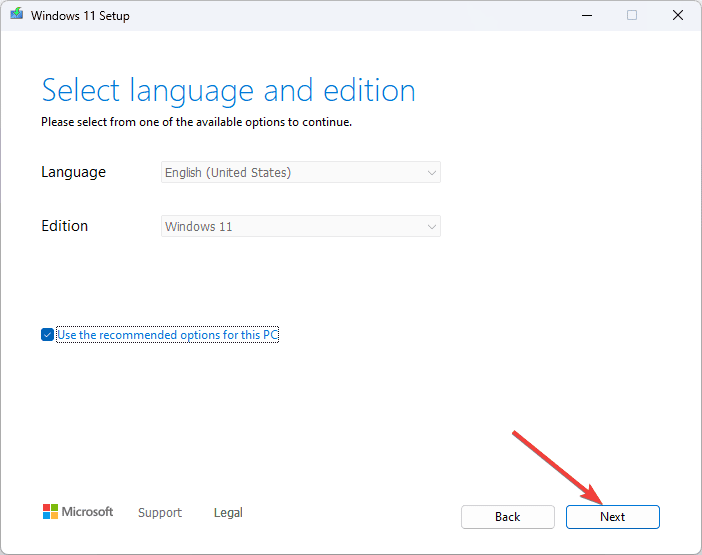
  4. Now, choose a language, edition, and architecture (32-bit or 64-bit) for Windows 11, then click Next.NExt Setup Windows 11 step 2 - MBR_CHECKSUM_MISMATCH
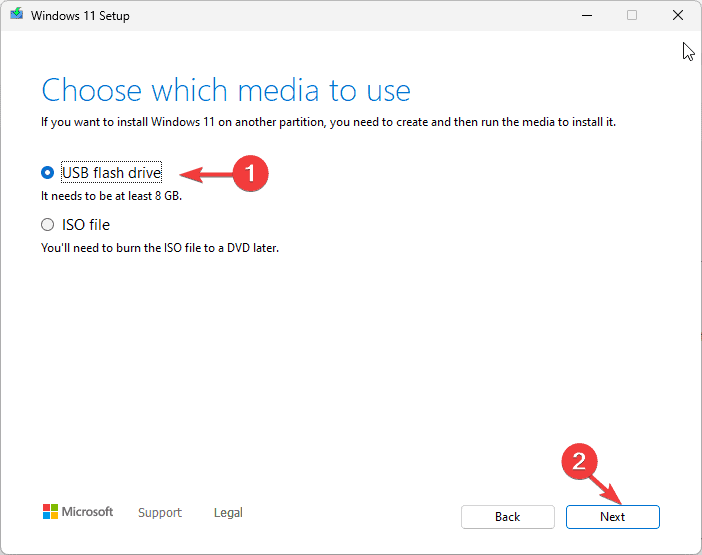
  5. Select USB flash drive and click Next.USB flash drive and click Next
  6. Choose the USB drive that you want to use and click Next.
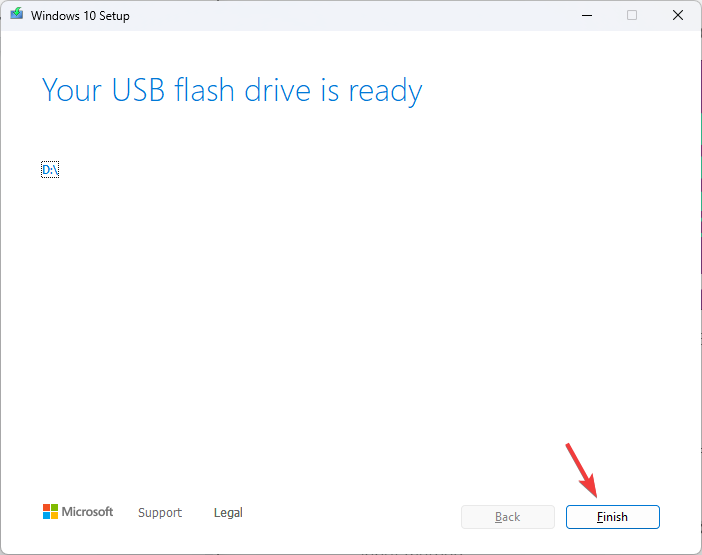
  7. Follow the on-screen steps to create a USB bootable media, then click Finish.Finish

5.2 Install Windows 11

  1. Connect the USB drive to the targeted computer, then press Windows + I to open Settings.
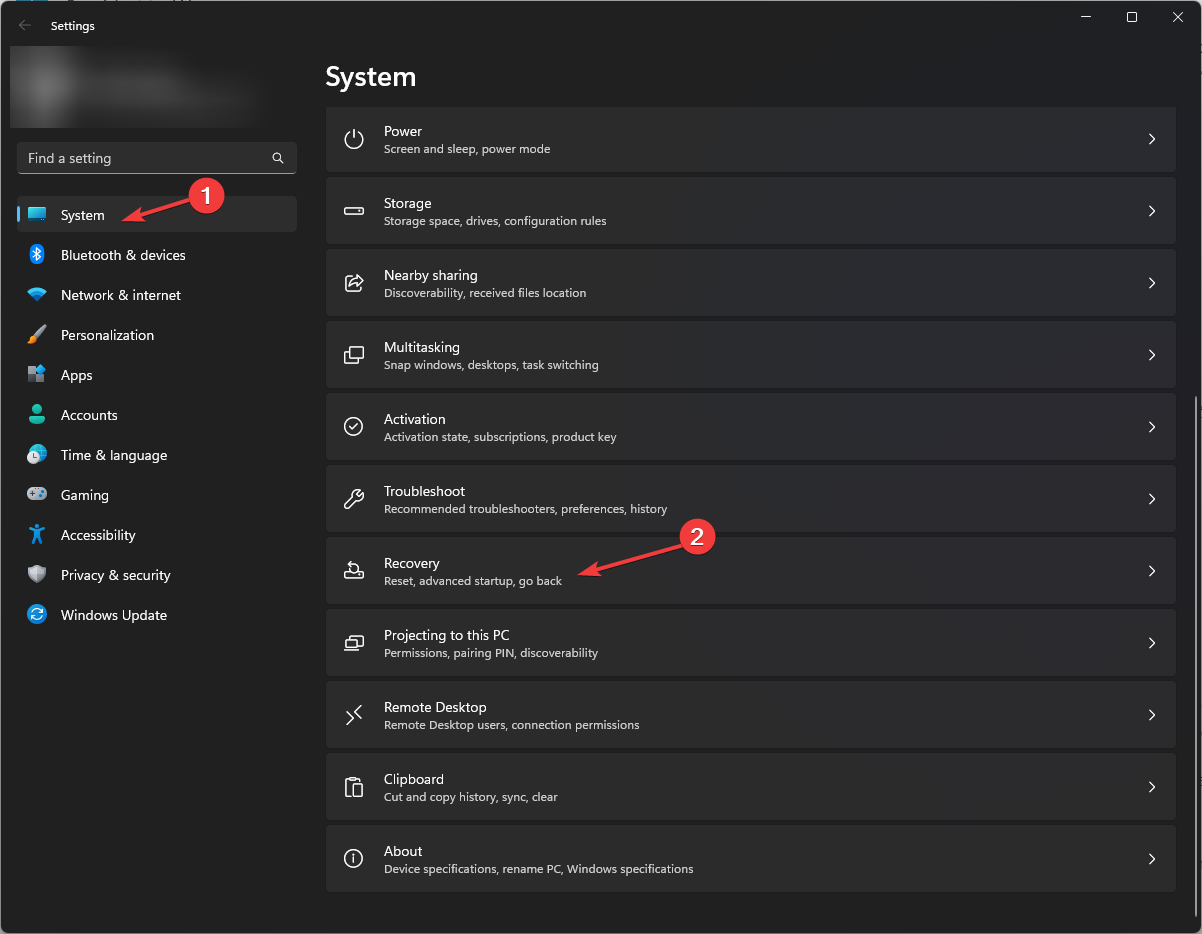
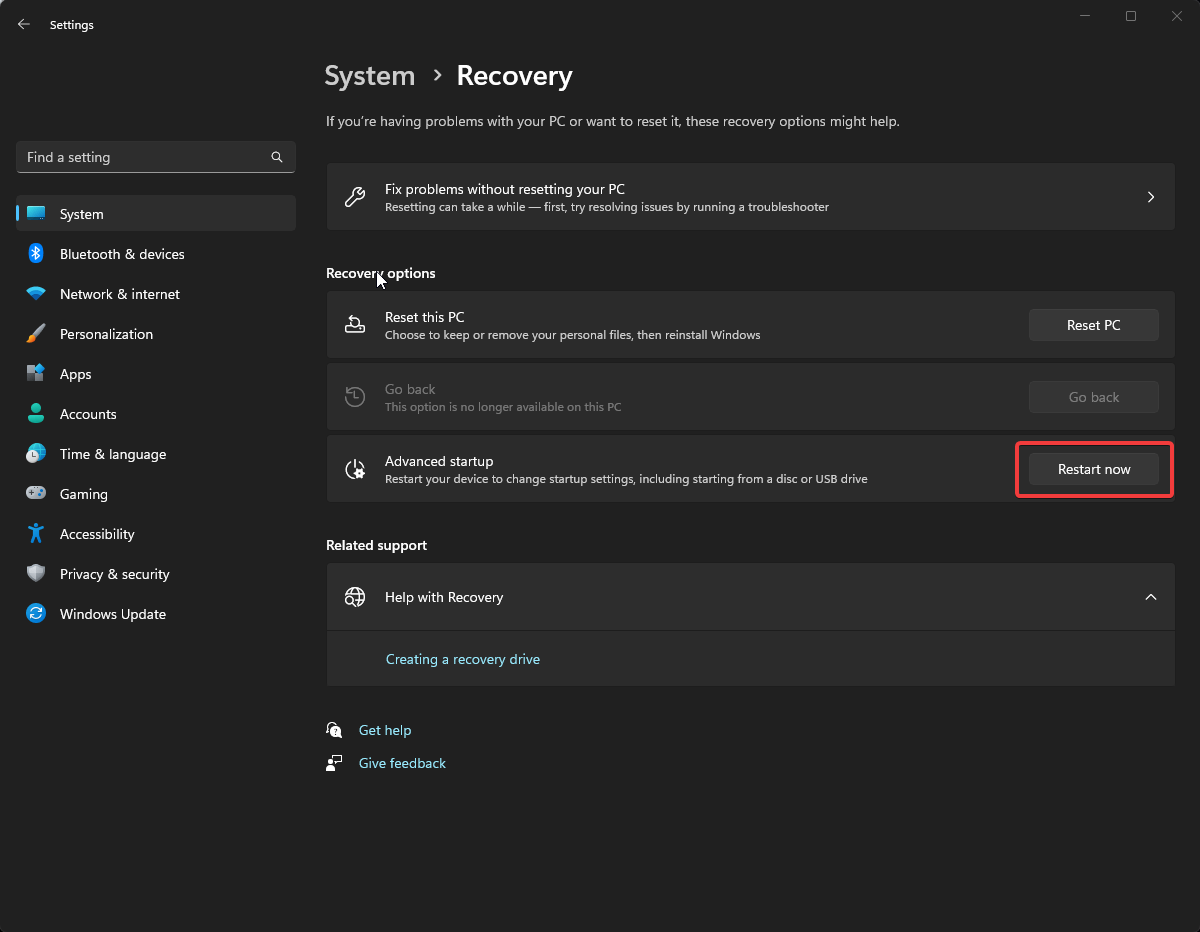
  2. Go to System, then click Recovery. System - Recovery Windows 11
  3. Go to Advanced startup, and select Restart now.Recovery Advanced Startup
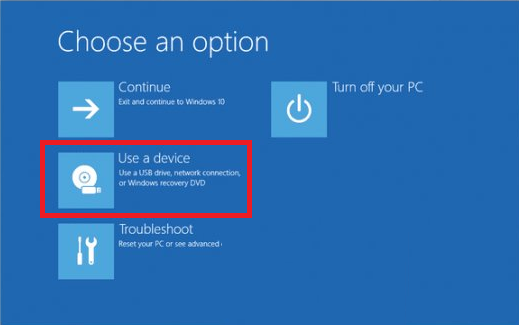
  4. On the blue screen, choose Use a device. If you don’t find it, restart your computer in BIOS mode and select a USB device to boot. Connect the USB drive to the targeted computer, then press Windows + I to open Settings.

Go to System, then click Recovery. 

Go to Advanced startup, and select Restart now.

On the blue screen, choose Use a device. If you don’t find it, restart your computer in BIOS mode and select a USB device to boot.

Choose language and other suitable options on the first screen, and click Next.

Click Install now.

Place a checkmark next to the I accept box to accept the license terms and click Next.

Select Custom: Install Windows only (advanced).

Next, you will get a list of drives and partitions. You can select them and click Delete to remove them. Once done, click OK if you see Windows Setup notification.

Click Next.

The installation will start now; once complete, your device will restart.

Follow the on-screen prompts to complete the process. - MBR_CHECKSUM_MISMATCH 
  5. Choose language and other suitable options on the first screen, and click Next.
  6. Click Install now.
  7. Place a checkmark next to the I accept box to accept the license terms and click Next.Accept Setup Windows 11 step1
  8. Select Custom: Install Windows only (advanced).
  9. Next, you will get a list of drives and partitions. You can select them and click Delete to remove them. Once done, click OK if you see Windows Setup notification.
  10. Click Next.
  11. The installation will start now; once complete, your device will restart.
  12. Follow the on-screen prompts to complete the process.

5.3 Configure Windows settings

  1. Once the installation is done, choose your region and keyboard layout.
  2. Connect to the Wi-Fi network when prompted.
  3. Next, sign in with a Microsoft account or create one if you don’t have one already.
  4. Choose the privacy settings per your preferences, then follow other prompts to set up other features.
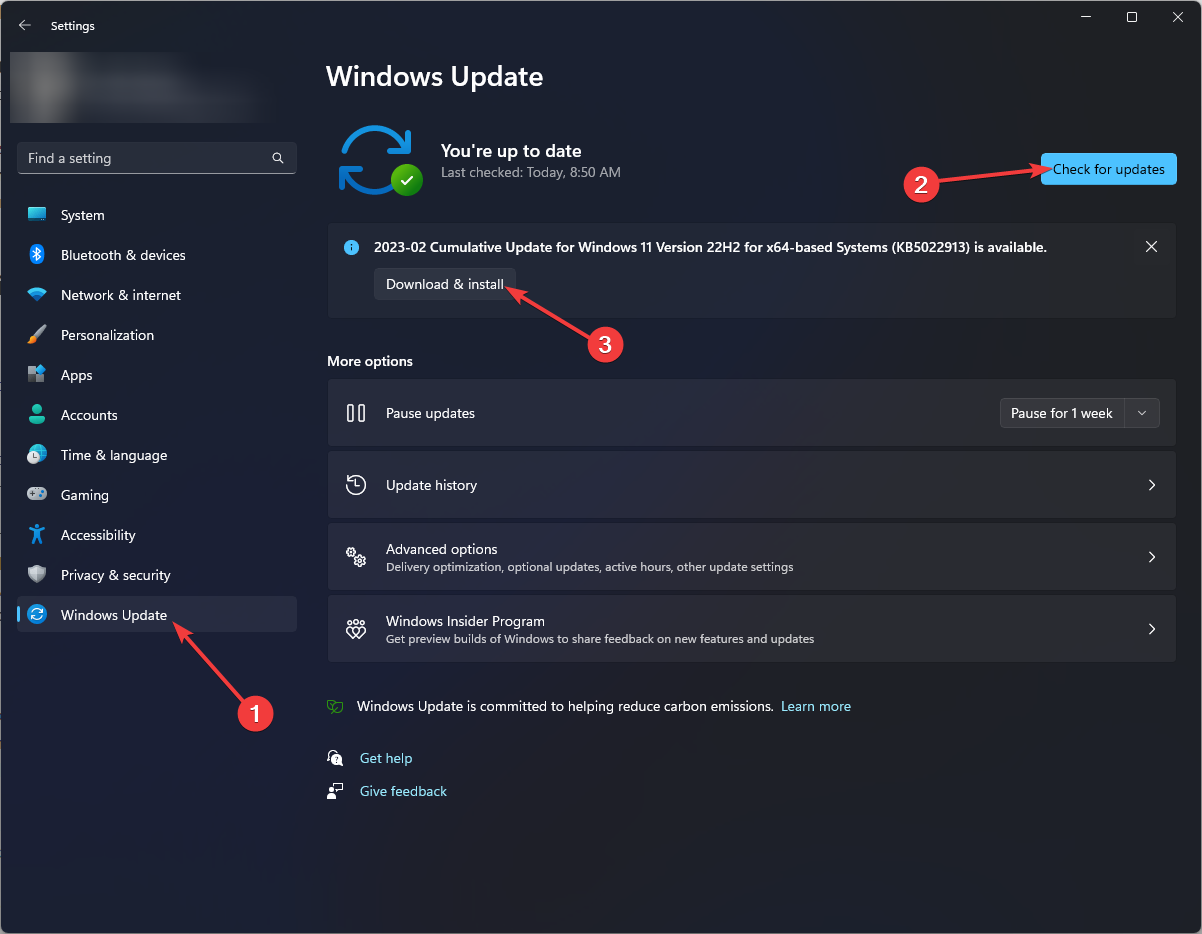
  5. Once the setup is complete, go to Windows + I to open Settings and go to Windows Update.Windows Update Check for updates 0 MBR_CHECKSUM_MISMATCH
  6. Click Check for updates.
  7. If there is an update available, click Download & install to download it.

If you face this problem on Windows 10 and want to fix it via a clean install, check out this quick guide to performing a Windows 10 repair upgrade.

Remember to avoid issues like MBR_CHECKSUM_MISMATCH, keep your operating system, antivirus, and other security tools updated to the latest version. Also, perform regular backups to external storage or cloud services to safeguard your data.

If you have any questions or suggestions about the MBR_CHECKSUM_MISMATCH BSoD error, feel free to mention them in the comments section below.

FAQs

What causes the MBR_CHECKSUM_MISMATCH 0x0000008B error?

This error is caused by corruption or tampering in the Master Boot Record. It can result from malware infections, sudden power loss, bad sectors on the disk, or failed system updates.

Can I fix the MBR checksum mismatch without reinstalling Windows?

Yes. You can use Windows Startup Repair, Command Prompt bootrec commands, or the CHKDSK utility to repair the MBR without reinstalling the operating system.

Is MBR_CHECKSUM_MISMATCH a sign of a virus?

Not always, but malware can cause this issue. It’s important to perform a full offline antivirus scan to eliminate this possibility.

Will replacing the hard drive fix the MBR checksum error?

If the error is due to physical drive failure, replacing the drive is the only solution. Once replaced, you’ll need to reinstall Windows or restore from a backup.

What’s the difference between MBR checksum mismatch and other checksum errors?

MBR checksum mismatch specifically refers to corruption in the boot record, while other checksum errors can affect files, archives, or data transfers.

SETUP_FAILURE Error – 6 Proven Solutions

0x00000085 SETUP_FAILURE is a blue screen error that occurs during Windows setup, leading to an abrupt stop in the process. It’s usually caused by corrupted system files, faulty hardware, or problematic software updates. Luckily, I can show you how to resolve it in no time.

But before we begin, scan your system for viruses and malware to rule out this common cause. Press Windows + I > Update & Security > Windows Security > Open > Virus & threat protection > Quick scan. If it doesn’t solve the problem, let’s move on to more detailed solutions!

6 Ways To Fix SETUP_FAILURE Error

Below are some effective solutions to fix the issue and get your system back on track.

Run SFC and DISM

Corrupted system files often cause the “SETUP_FAILURE” error. Running the System File Checker (SFC) and Deployment Imaging Service and Management Tool (DISM) can help identify and fix these corrupted files.

  1. Right-click on the start icon and tap Windows PowerShell (Admin).
 Windows PowerShell (Admin)
  1. Type sfc /scannow and press Enter to run the SFC scan.
Type sfc /scannow
  1. Once SFC is complete, type DISM /Online /Cleanup-Image /RestoreHealth and press Enter.
Type DISM /Online /Cleanup-Image /RestoreHealth

Wait for the process to finish, and then restart your computer.

Perform a Clean Boot

A clean boot can help you identify if third-party software or services are causing the “SETUP_FAILURE” error by starting Windows with only the essential services. Here’s how to do it:

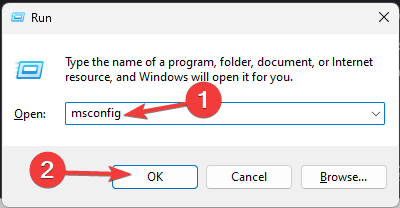
  1. Press Windows + R, type msconfig, and click OK or Enter.
Type msconfig
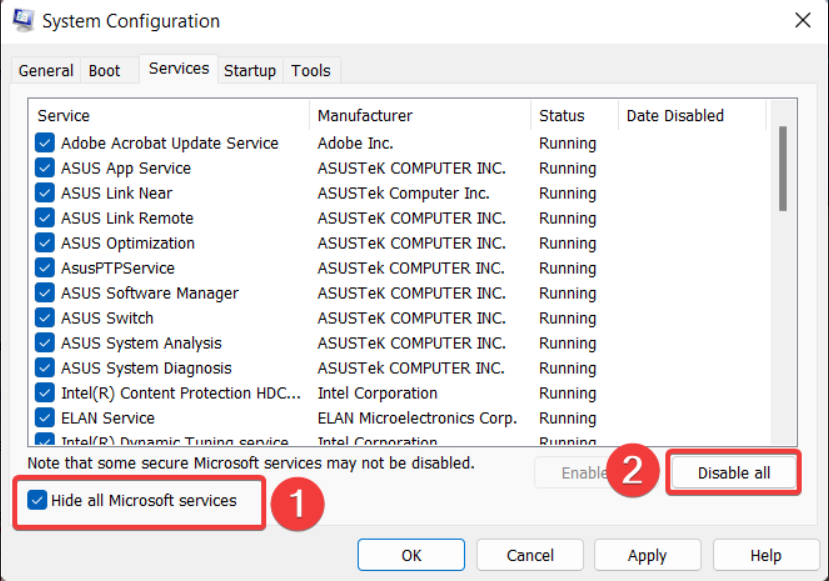
  1. Tap the Services tab, tick the “Hide all Microsoft services” box, and select “Disable all.”
Services tab
  1. Select the Startup tab and tap “Open Task Manager.“
Startup tab
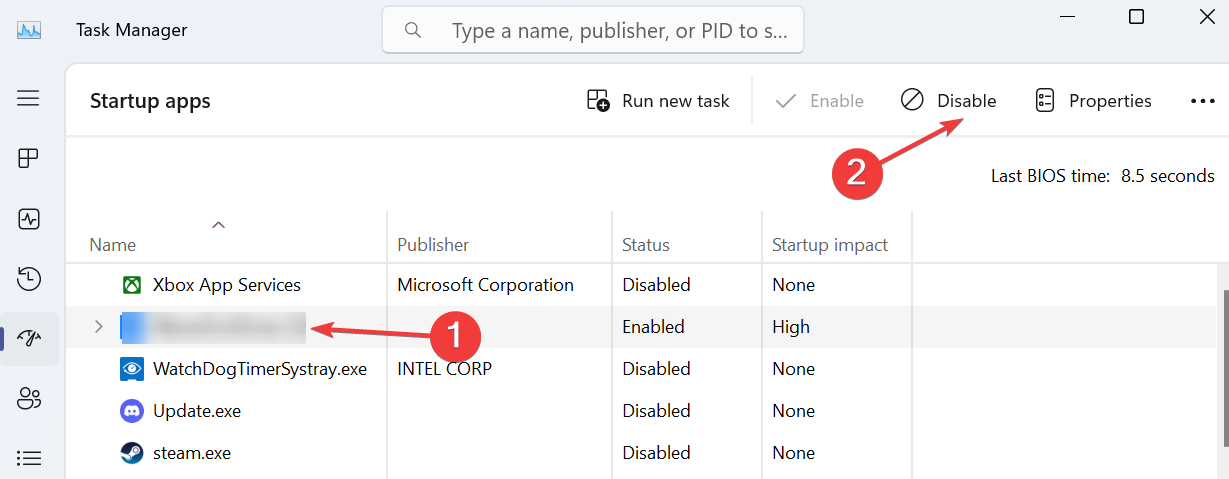
  1. Disable all startup items, and then reboot your PC.
Disable all startup items

Run Check Disk (CHKDSK)

Disk errors can also cause the SETUP_FAILURE issue. Running the CHKDSK utility can identify and fix them:

  1. Open Windows PowerShell (Admin) by right-clicking on the start button and selecting it.
Windows PowerShell (Admin)
  1. Type chkdsk /f /r and press Enter.
  2. You’ll be asked to schedule the scan the next time your system restarts. Type Y and press Enter.
Type chkdsk /f /r

Restart your computer, and CHKDSK will scan and repair any disk errors.

Test Your RAM

Faulty RAM can also trigger the error. You can run a test to identify any issues with your memory modules. Here’s how to do it:

  1. Press Windows + R, type mdsched.exe, and press Enter.
Type mdsched.exe
  1. Choose “Restart now and check for problems” to run the Windows Memory Diagnostic tool.
Restart now and check for problems
  1. Your computer will restart, and the diagnostic tool will check for RAM issues.
  2. Once completed, review the results and replace any faulty RAM modules.

Update Device Drivers

Outdated or incompatible device drivers can cause the SETUP_FAILURE error during installation. Updating your drivers can help resolve this issue. Follow the below steps:

  1. Press Windows + X and select “Device Manager.“
  2. Expand the “Display adapters” category and right-click on your graphics card. Select “Update driver“.
Update driver
  1. Choose “Search automatically for drivers.”
Search automatically for drivers
  1. If any updates are found, follow the on-screen instructions to install them.

Restart your computer after updating the drivers and check if the problem is solved.

Uninstall Recent Updates

Occasionally, recent Windows updates may trigger the “SETUP_FAILURE” issue. Uninstalling them can help resolve it.

  1. Press the Windows icon + I to open Settings, then tap Update & Security.
Update & Security
  1. Click on “View update history.” 
View update history
  1. Tap “Uninstall updates.“
Uninstall updates
  1. Select the most recent updates and click “Uninstall.“
Uninstall

Restart your computer to see if the issue is resolved.

The above tips will help you resolve the SETUP_FAILURE error and proceed with your Windows setup without further interruptions. Regular maintenance and updates can also help prevent similar problems in the future.

Also, learn to solve different blue screen errors like SERIAL_DRIVER_INTERNAL and DATA_COHERENCY_EXCEPTION.

Microsoft might just have unveiled the design plans for Hololens 3, and they could make the device the ultimate VR/AR headset

Microsoft might already have design plans for Hololens 3, the long-anticipated VR/AR headset that was reportedly coming out this year, 2024. In a recently published patent, the Redmond-based tech giant unveils some highly detailed sketches for an unnamed VR/AR headset that seems to allude to the Hololens device while also gearing it for entertainment purposes.

The patent shows how every gesture and gaze brings the digital realm to life right before the user’s eyes. Microsoft’s innovation focuses on a multi-factor intention determination system that enhances users’ interactions with AR environments. Picture this: you’re wearing AR goggles, and with a simple palm-facing gesture combined with your gaze, you summon a virtual keyboard or menu right into your space. hololens 3

This system isn’t just about recognizing a single gesture but combines multiple cues, such as eye movement, head orientation, and finger positions, to understand your intentions accurately.

The beauty of this technology lies in its ability to keep the digital objects anchored to your world or even to your hand, moving with you as naturally as if they were real. Lost one of the cues? No worries. The system smartly displays your summoned digital object briefly, giving you a seamless experience.

Imagine you’ve brought up a virtual control panel. With this system, you can dock this panel to another digital object, creating a persistent, interactive space in your AR environment. Do you want to switch tools or summon that panel again? hololens 3

A combination of gestures and looks will bring it back to where you need it, even reorienting it to face you if you’ve moved.

The implications of this technology are vast. It could transform how users interact with digital information in fields ranging from industrial design to medical training. But it could also make the digital world an intuitive extension of our physical one, where interacting with a virtual object is as natural as picking up coffee.

Microsoft’s patent isn’t just a step forward in AR; it’s a leap towards a future where the boundaries between digital and physical blur, creating experiences that are as rich and interactive as the real world. This multi-factor intention determination system promises to make AR more intuitive, responsive, and ultimately a worthy competitor of the Apple Vision Pro device.

Could this be Hololens 3? Most likely, yes.

Read the full patent here.

inZOI: What is it, and how do you download it?

InZOI is the game that’s been stirring up the life sim community lately, and by the looks of it, it’s set to become the next big thing in the genre. Developed by Krafton, known for hits like PUBG Battlegrounds, InZOI is setting its sights high, aiming to carve out its niche.

With a release window set for late 2024, the anticipation is high and keeps building. It’s already up for wishlisting on Steam, though there’s no word yet on a console release. But given its use of Unreal Engine 5, it’s a good bet it’ll grace the latest PlayStation and Xbox consoles.

What is inZOI, and how do you download it (because, yes, you can experience it before it is released)? Here’s what we know.

What is inZOI?

Simply put, inZOI is a life sim, and its gameplay promises a familiar yet fresh experience. It’s all about creating and nurturing your Zois, ensuring their needs are met, from the basics like hunger and hygiene to their aspirations and happiness. But it’s not just about the mundane; the game’s world is rich with opportunities for work, hobbies, and social interactions, all underpinned by a detailed emotive mood system and a complex web of personal values and traits for NPCs.

The developers have intriguing features, including a choice-driven karma system and cars. You read that right: cars you can drive around in, though not in a GTA-style mayhem. There’s also talk of a unique character customization system that reflects a broad diversity and allows for extensive personalization.

Building and customizing homes in InZOI seems as engaging as in The Sims, with a vast catalogue of items and the freedom to tweak to your heart’s content. And for those who dread the thought of interior design, preset options are available to set up your Zoi’s living space quickly.

One of the more whimsical aspects of InZOI is Psykhet, a fluffy cat that’s more than just a mascot. It appears this feline has a say in the game’s world, needing to approve any changes you make. It’s a quirky touch that adds to the game’s charm.

How to download inZOI?

If you’ve been wondering how to download inZOI, you can’t do so for now, as it is unavailable. However, Krafton allowed gamers to try it through its demo. Unfortunately, the first phase of the demo has ended as of August 26.

However, Krafton will most likely release more demos in anticipation of the game’s release, so you’ll need to keep an eye out on Steam to make sure you can experience it.

Go to the inZOI’s Steam page, wishlist the game, and follow the game there to be notified when the next demo is available. You can also follow us, as we will update this article regularly.

As we wait for more details to emerge, especially regarding the full release of Early Access, the excitement for InZOI continues to grow.

It remains to be seen whether it will become a true rival to The Sims, but it’s certainly shaping up to be a contender.

Meanwhile, if you’re into classic gaming, don’t forget about Age of Mythology: Retold, which is set to enter its Advanced Release phase this week.

Edge 128 is now available on the Stable channel, and some users can enable it to hide the Edge bar automatically

Microsoft recently rolled out Edge 128 to the Stable channel, and with it, a significant change has people talking. The update marks the end of the followable web feature, a tool that once allowed users to easily follow their favourite websites directly from the browser.

This move by Microsoft might leave some scratching their heads, wondering why a seemingly useful feature is being removed. But as it turns out, this decision is just the tip of the iceberg in a series of updates to enhance user experience, security, and performance.

The new Edge 128 build lets certain users try the brand-new capability that automatically hides the bar when the browser is docked to the desktop. Spotted by tech enthusiast @Leopeva64, the capability was initially thought to be present only in the Canary channel of the Edge Insider Program. However, it is also available to users on the Stable channel.

This update has significantly improved performance and security. With improvements to reduce CPU usage and end support for older CPUs, Edge 128 aims to provide a smoother and more secure browsing experience in the Stable channel.

Additionally, the update introduces new policies for managing Copilot’s access to browser context, reflecting Microsoft’s ongoing efforts to balance functionality with privacy and security concerns.

As the update hinted, rounded tabs might be on their way out. This potential change could signal a shift in design philosophy, away from a trend that has been popular across various software interfaces in recent years.

For those concerned about the implications of these updates on their daily browsing habits, it’s worth noting that Microsoft’s approach appears to be one of careful consideration. For example, the deprecation of the followable web feature follows reports of accidental URL leaks to Bing’s API, highlighting the company’s responsiveness to security vulnerabilities.

Moreover, the transition from the followable web feature doesn’t leave users entirely in the lurch. With version 128, Microsoft Edge continues to evolve, introducing new features and policies to enhance the browsing experience while addressing user feedback and security concerns.

You can read the full changelog here.

Windows 10’s latest KB5041582 introduced brand-new icons for the Settings page, but you can’t see them for now

Microsoft has again made waves with its latest release for Windows 10 enthusiasts. The tech giant rolled out the 22H2 build, numbered 19045.4842 under KB5041582, for those in the Windows Insider Program navigating the Release Preview and Beta channels. While not groundbreaking in its feature list, this update brings a handful of improvements and bug fixes that promise to enhance the user experience, plus brand-new icons in Windows 10’s Settings page.

According to Windows Insider enthusiast @phantomofearth, the new icons are hidden, so they’re not part of the official blog post. However, they can be uncovered with a special command using the third-party app ViveTool.

The new icons emphasize blue, similar to Windows 11’s overall theme. They also look modern, sleek, and quite beautiful in contrast to the white background.

With KB5041582, Microsoft has addressed a pesky memory leak associated with the Input Method Editor (IME) when a combo box is in focus and the window is closed. Additionally, there’s something for globetrotters and international users—the update brings COSA profiles up to date for certain mobile operators, ensuring smoother connectivity and performance across borders.

Bluetooth users, there’s good news for you, too. A memory leak that caused apps to stop responding has been fixed, which means fewer unexpected crashes and more seamless use of your favourite Bluetooth devices. Moreover, the update tackles a system response issue related to accessing symbolic links, enhancing overall system reliability.

A vital fix has been implemented for the IT crowd, particularly those using the Unified Write Filter (UWF) and Microsoft System Center Configuration Manager (SCCM). A deadlock issue that prevented devices from restarting as expected when re-enabling UWF via an SCCM task has been resolved. This fix is crucial for maintaining the operational integrity of managed devices.

Microsoft hasn’t stopped with Windows 10; they’ve also been busy rolling out new builds for Windows 11 across various channels, including Beta Preview builds for versions 22H2 and 23H2 and even a build for the latest version, 24H2. These updates, especially for Windows 11, hint at Microsoft’s commitment to refining and enhancing its operating systems.

You can read KB5041582’s full changelog here. What do you think about the new icons?

Is Microsoft really retiring the Control Panel from Windows? Let’s take a look

Microsoft first added the Control Panel to Windows in 1985, and it has been a staple of the operating system ever since. The Control Panel allows users to access advanced settings for pretty much anything, from display options to audio, peripherals, security, privacy, and, later, the Internet.

However, for years, whispers and rumours suggested Microsoft’s intention to phase out the Control Panel in favour of a more modern solution, the Settings app. Initially hinted at with the release of Windows 8, the company aimed for a touch-friendly interface, sparking debates among users about the future of the Control Panel.

The existence of the two boards, the Control Panel and the Settings app, is not bothersome for Windows users, but each has advantages and disadvantages. They’re mainly focused on helping users navigate Windows, so their goal is more or less the same.

Last week, Microsoft officially hinted on a support page that the Control Panel’s days are numbered. The tech giant cited a shift towards a more streamlined and modern experience with the Settings app and said the Control Panel was being deprecated.

The Control Panel is in the process of being deprecated in favor of the Settings app, which offers a more modern and streamlined experience.

However, following a backlash from the tech community worldwide, the Redmond-based tech giant changed the text of the announcement to imply that it will not retire this essential capability.

The Control Panel is a feature that’s been part of Windows for a long time. It provides a centralized location to view and manipulate system settings and controls. Through a series of applets, you can adjust various options ranging from system time and date to hardware settings, network configurations, and more. Many of the settings in Control Panel are in the process of being migrated to the Settings app, which offers a more modern and streamlined experience.

Tip: while the Control Panel still exists for compatibility reasons and to provide access to some settings that have not yet migrated, you’re encouraged to use the Settings app, whenever possible.

It’s also worth mentioning that the Control Panel doesn’t show up on the list of deprecated capabilities from Windows Client, so even if Microsoft announced it on its forums, the list is more indicative of the company’s stance.

So, to answer the burning question: no. Microsoft will not retire the Windows control panel. The decades-old capability will still be an essential part of the Windows 11 experience and future experiences. It’s true that while the Settings are more streamlined and intuitive, the Control Panel is helpful to those who are not prone to change.

SppExtComObjHook.dll: What Does it do & How to Remove it?

Dealing with malicious files like SppExtComObjHook.dll can be a real headache, especially when it disrupts your system’s performance and security. Let’s dive into some effective methods to remove this pesky file and get your Windows system back on track.

What does SppExtComObjHook.dll do?

This DLL file is a part of AutoKMS and it’s used to activate Windows without a license. The file could be potentially malicious, so it’s best to remove it.

How can I remove SppExtComObjHook.dll?

1. Rename the file or delete it

  1. Open File Explorer, click View and check File name extensions.
    file name extensions show
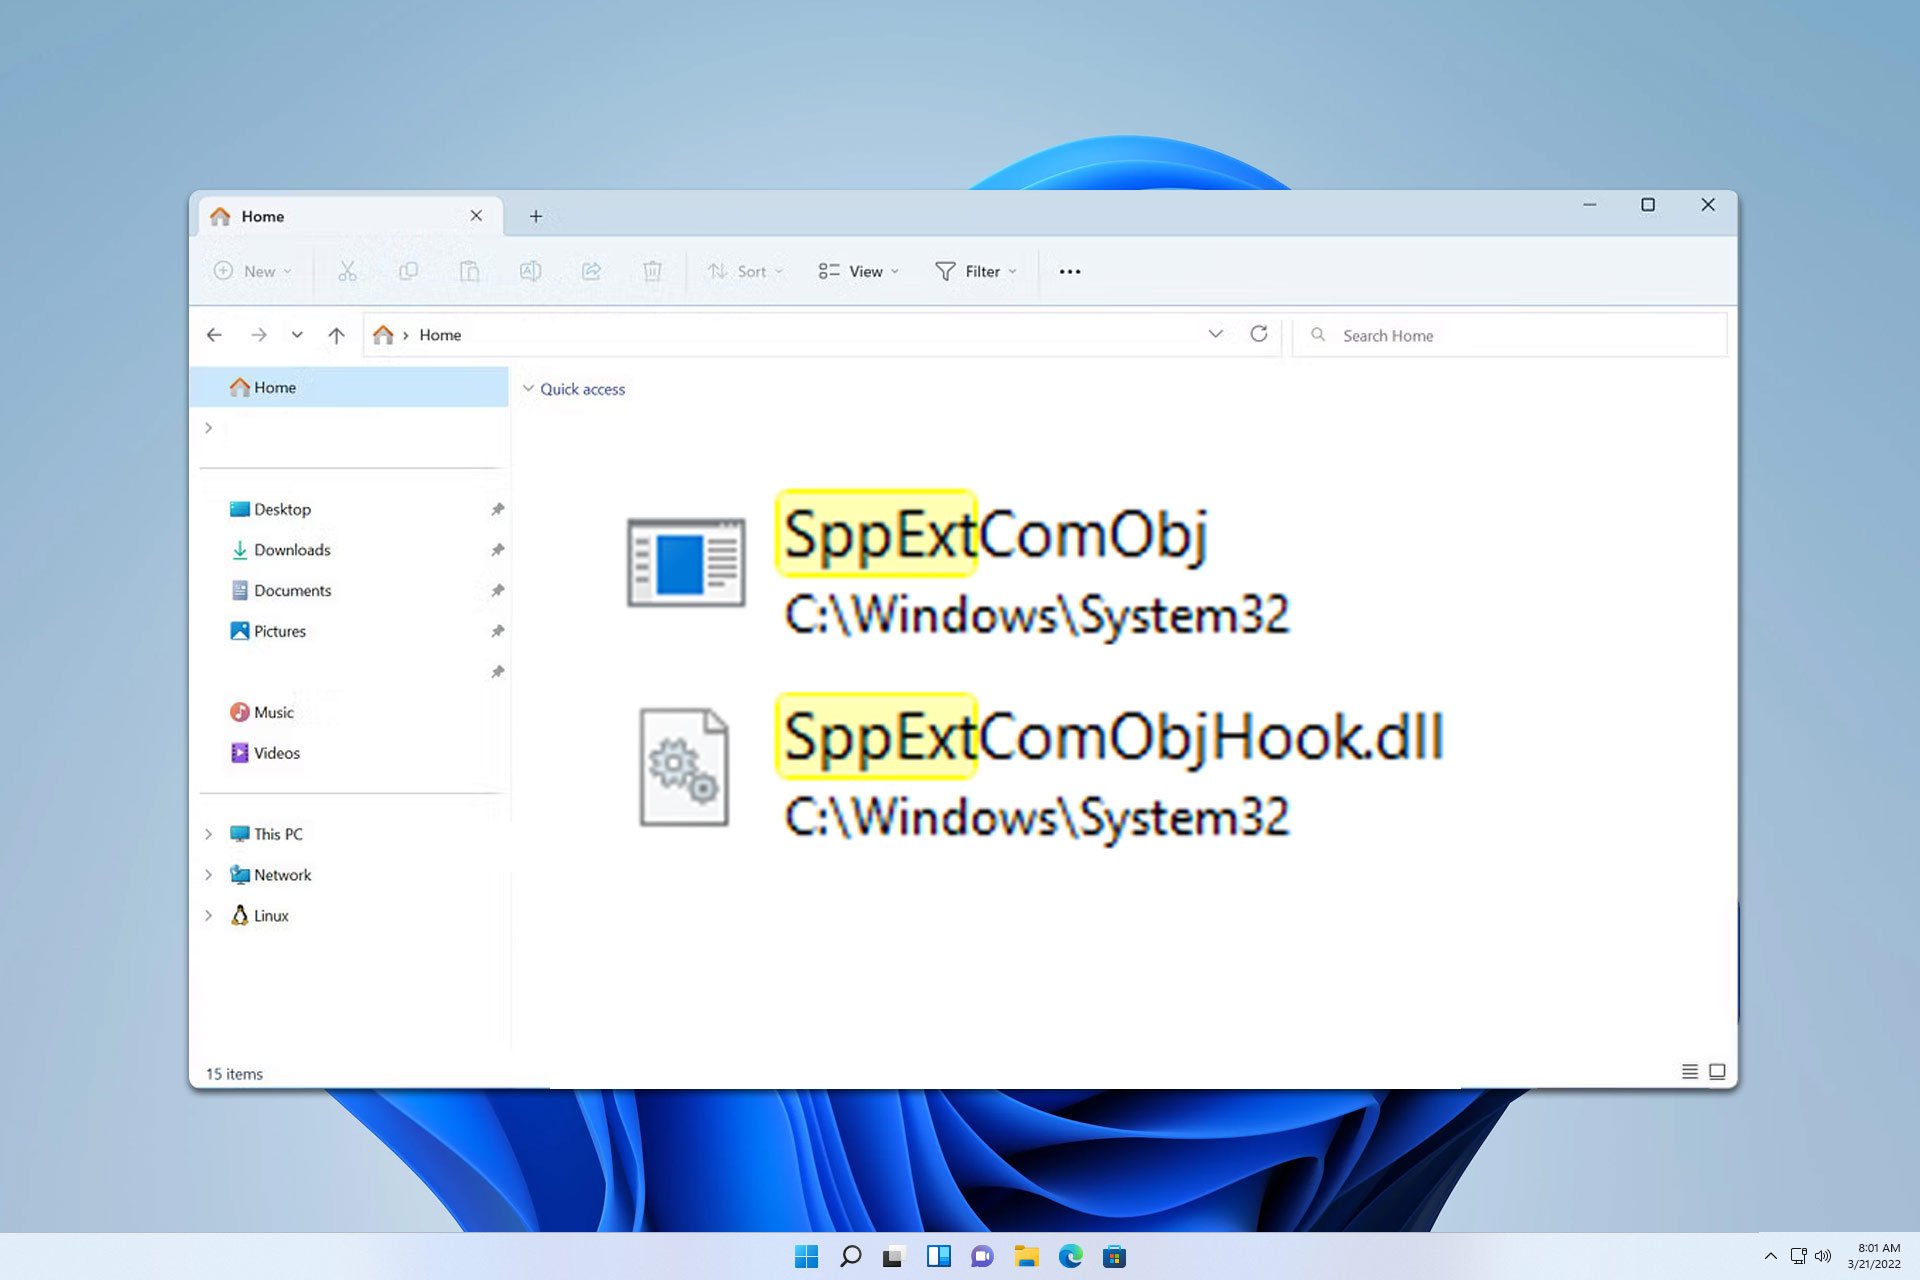
  2. Find SppExtComObjHook.dll, it should be in C:\Windows\System32
  3. Rename the file and change the extension of SppExtComObjHook.dll to .old (e.g., SppExtComObjHook.old).
    rename file context menu

By doing this, the dll file won’t be able to run anymore. Some users are suggesting deleting this file, so you might want to try that as well.

2. Scan your PC

  1. Press Windows key + I to open Settings, then go to Privacy & security and select Windows Security.
    windows security settings app
  2. Click Open Windows Security and look for any issues reported under Virus & threat protection.
    virus and threat protection
  3. Click Manage settings and ensure Real-time protection is turned on.
  4. Click Quick scan to let Windows Defender scan your system for any remaining threats.
    quick scan defender

Of course, you can use any other antivirus software to scan your PC and remove this file.

Using these solutions, you can effectively detect and remove SppExtComObjHook.dll from your system, ensuring it is clean and secure.

To learn more, we have a guide on how to remove AutoKMS.exe from your PC, so don’t miss it. We also have a new guide on fusion.dll, so don’t miss it.

Speaking of other DLLs, we have a guide on how to remove 7-zip.dll as well as a great article on how to remove gcapi.dll so you might want to check them as well.

Our latest guide covers OCComSDK.dll file, and since it’s likely malicious, we advise you to check our removal guide for more information. We also have a guide on hvsigpext.dll that you might be interested in.

With KB5041876 to the Beta Channel, Microsoft tries a new but gorgeous Windows 11 lock screen experience

Microsoft has rolled out a new Windows 11 Insider Program Beta Channel build, numbered 22635.4082, under update KB5041876. This build brings some nifty changes, especially to the Windows 11 Lock screen media control.

For those who like to keep things quiet, there’s an option to turn off suggestions for disabling notifications from specific apps. You can hit the “…” within a notification to silence it or dive into the settings to manage these suggestions. The lock screen has been tweaked for music lovers so that media controls now sit at the lower bottom centre when tunes are playing.

Before, if you were jamming to Spotify or streaming your favourite podcast, you could control playback directly from the right side of your lock screen. But Microsoft decided it was time for a change. With the KB5041876 update, media controls have taken centre stage—literally. They’ve been moved to the centre of the lock screen, complete with a modern, blurry effect that makes them blend seamlessly with the overall aesthetic of Windows 11, as you can see in the featured image above.

This is another important change to Windows 11’s lock screen experience after Microsoft recently added elements to it that might not have been well received by users.

The settings page for Delivery Optimization has been updated to align with the Windows 11 design principles. It’s always refreshing to see consistency in design.

KB5041876 also comes with fixes. Microsoft has addressed an issue causing explorer.exe to crash for some users when closing apps from the taskbar. They’ve also squashed a bug causing the Start menu to crash on launch for some Insiders. And for those experiencing a memory leak after receiving certain notifications, that’s been fixed, too.

There are known issues, like explorer.exe crashing when interacting with archive files and File Explorer crashing when going to Home for some Insiders. But don’t worry; Microsoft is working on fixing it.

You can read KB5041876‘s full changelog here.

What do you think about this new lock screen experience?

Windows 11 introduces the new Category view for app managing

Windows 11 Beta users recently got a sneak peek at a new Start menu Category view, the newest feature discovered for a while now. This feature, inspired by the simplicity of iOS’s app launcher, allows users to arrange their installed apps into categories.

The feature is currently hidden in the latest Beta build, but you can uncover it using a third-party app, such as ViveTool.

According to the popular Windows Insider, update your device to Windows 11 build 22635.4010. Get ViveTool from GitHub, unpack it, use some command prompts, and then restart to explore the new Category view in Windows 11. But don’t be surprised if your pinned apps don’t disappear; this view gives you another way to sort through your app collection.

Plus, it seems that the Redmond-based tech giant will enhance Windows 11’s Category View with the ability to display the apps’ names on hover. According to the Windows enthusiast @phantomofearth, this ability was added to the latest Build to the Beta channel, which looks like this.Windows 11 Category

It seems like Windows puts apps into a JSON file to satisfy those wondering how this magic takes place. But still, the most crucial question is: How will this feature work with all kinds of apps not in the Microsoft Store? This is a puzzle we all want to see solved. Hopefully, Microsoft will spill the beans soon.

This update might show an image of a more structured and easy-to-use Start menu for the daring who enjoy playing around and discovering new things. However, remember that beta always has its share of minor difficulties.

Printer Printing Even Pages First: Fix The Wrong Order

Dealing with a printer that insists on printing even pages first can be incredibly frustrating, especially when you need your documents in the correct order. Let’s dive into some practical solutions to fix this issue and get your printer back on track.

What can I do if the printer is printing even pages first?

Before trying anything else, make sure you update your printer driver to prevent any compatibility issues.

1. Adjust printer duplex settings

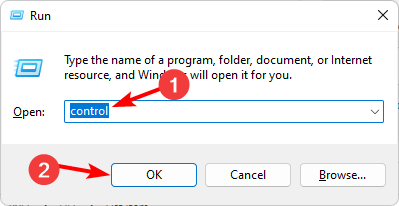
  1. Press the Windows key + R and type control. Press Enter.
    control run window
  2. Navigate to Devices and Printers.
  3. Locate your printer, right-click on it, and select Printer Properties.
    printer properties
  4. In the Printer Properties window, go to the Device Settings tab.
  5. Find the option for Duplex Unit and make sure it is set to Installed.
    duplex unit installed
  6. If installed, go to the Advanced tab and click on Printing Defaults.
  7. Go to the Finishing tab within the Printing Defaults and ensure that the Print on both sides (manually) is unchecked if you want to avoid manual duplex printing.
    print on both sides

2. Check and reset print settings

  1. Open the Start menu and type Printers & scanners, then press Enter.
    printers and scanners search
  2. Select your printer from the list. Click on Printing preferences.
    printing preferences
  3. In the Printing Preferences window, go to the Advanced tab and reset all settings to default.
  4. Ensure that Print on both sides is either checked or unchecked based on your preference and printer capability.

3. Manually print odd and even pages

  1. Open the document you want to print and press Ctrl + P to open the Print dialog box.
  2. Under Page Range, select Odd pages only.
    odd pages print
  3. Print the document. Once done, take the printed stack and place it back into the paper tray in the correct orientation.
  4. Open the Print dialog box again, and this time, select Even pages only.
  5. Print the document.

By following these solutions, you can address the issue of your printer printing even pages first effectively, ensuring your documents are printed in the correct order and format.

This isn’t the only issue, many reported that the printer prints two pages instead of one as well as that the printer prints blank pages in between.

Before you go, don’t miss our guide to learn what to do if the printer prints only half a page.

Uplay_r1_loader64.DLL: What is It, and How To Fix the Errors Related to It?

Many of our readers have encountered The program can’t start because uplay_r1_loader64.dll is missing from your computer or a similar error related to the DLL file. These errors appear if the Uplay_r1_loader64.DLL file is missing, deleted, or corrupted.

What is Uplay_r1_loader64.DLL?

The Uplay_r1_loader64.DLL file is a Dynamic Link Library file associated with Ubisoft games such as Far Cry, Assassin’s Creed, Watch Dogs, etc. Uplay is a game launcher from Ubisoft and works similarly to Epic Games and Steam.

First, to fix this issue, ensure your Windows OS is updated to the latest version and the game is not running in the background.

How can I fix the Uplay_r1_loader64.DLL is missing error?

1. Use a third-party DLL fixer

Uplay_r1_loader64.DLL is a third-party DLL file that comes with the Uplay, a launcher from Ubisoft. You can manually restore a DLL file, but if not done correctly, it can cause more harm than good to your computer and the game you play. Therefore, the safer option is to use a third-party DLL fixer tool.

These software are known to fix compatibility issues, which are significant problems that plague third-party DLL files and Windows PCs.

2. Turn off your antivirus

  1. Press the Windows key, type windows security in the search box, and click Open.Windows Security open Windows key - uplay_r1_loader64.dll
  2. Go to Virus & threat protection, under Virus & threat protection settings, click Manage settings.Manage Setting V&;T
  3. Toggle off the switch next to Real-time protection.Real time protection off -uplay_r1_loader64.dll

You can also use similar steps to disable a third-party antivirus tool. Once you have fixed the problem, remember to enable antivirus software by reverse engineering the abovementioned steps.

3. Check the threat quarantined list

  1. Press the Windows key, type windows security in the search box, and click Open.Windows Security open Windows key - uplay_r1_loader64.dll
  2. Go to Virus & threat protection, and click Protection history.Protection history
  3. Under Protection history, click Threat quarantined.
  4. On the following page, look for Affected items and check if the game is listed. If it is, click Actions and select Restore.

Remember not to restore any other unknown file to avoid other issues on your computer.

4. Add the game folder to the Antivirus exception list

  1. Press the Windows key, type windows security in the search box, and click Open.Windows Security open Windows key - uplay_r1_loader64.dll
  2. Go to Virus & threat protection, locate Virus & threat protection settings, and click Manage settings. Manage settings - uplay_r1_loader64.dll
  3. On the following screen, scroll down to locate Exclusions and click Add or remove exclusions. 
  4. Click Add an exclusion, then select Folder from the drop-down menu.Exclusion list select folder
  5. Navigate to this path or type in this address in the address bar after replacing C with your system Drive Letter: C:\Program Files (x86)\Far Cry 4\Bin
  6. Click Select Folder to add it to the list. The folder will appear under Exclusions. Then, close Windows Security.

5. Perform a System Restore

  1. Press the Windows key, type control panel in the search box, and click Open.Control Panel start menu    
  2. Select  Large icons as View by, then click Recovery.Recovery Control Panel -uplay_r1_loader64.dll
  3. Click Open System Restore.Open system restore uplay_r1_loader64.dll
  4. Select Choose a different restore point in the System Restore window and click Next.Next Choose a different restore point
  5. Choose the point at which you want your Windows restored and click Next.Choose a point
  6. Click Finish to initiate the process.Finish - uplay_r1_loader64.dll

Windows will restart and restore to the version you selected. If you see the System Restore wasn’t completed successfully message after the restart, we recommend you check out this informative guide for solutions.

6.  Download the DLL file manually

Note icon NOTE
Always use a reliable website like DLL-Files to install DLL files, as installing DLL files on a non-reliable website may cause more harm than good. You can follow the steps mentioned to restore the file manually.
  1. Visit the DLL-Files website, search Uplay_r1_loader64.DLL, select an appropriate option, and click Download.
  2. Double-click the downloaded folder to open, locate, and copy the .dll file.
  3. Go to this path and paste the DLL file. Don’t forget to replace C with your system drive letter if it is not C for you: C:\Program Files (x86)\Far Cry 4\Bin
  4. If unsure where the game is, right-click the game icon and select Properties from the context menu.
  5. Go to the Shortcut tab and copy the path mentioned next to Target.
  6. Now, navigate to this path and paste the DLL file.
  7. Reboot your PC to save the changes.

In conclusion, to fix any issues related to Uplay_r1_loader64.DLL, you must ensure that Uplay is updated to the latest version and added to your antivirus exclusion list.

If you often encounter missing DLL issues on your Windows 10 computer, we have a guide to help you understand the causes and the usual fixes.

If you have any suggestions or questions about the Uplay_r1_loader64.DLL file or issues related to it, feel free to mention them in the comments section below. We’re happy to help!

OrangeEmu64.DLL: What is It, and How To Fix the Errors Related to It?

Many users have reported encountering the OrangeEmu64.dll missing error message or a Hello with Wink smiley pop-up when launching SIMS 4. This error usually occurs when the OrangeEmu64 DLL file is corrupted or deleted. The OrangeEmu64.dll is a third-party tool that can modify or enhance the game.

How can I fix the OrangeEmu64.DLL is missing error?

1. Disable Memory Integrity

  1. Press the Windows key, type window security in the search box, and click Open.Windows Security open strat menu - orangeemu64.dll
  2. Click Device security.
  3. Locate Core isolation, then click Core isolation details.Core isolation details
  4. Toggle off the switch under Memory integrity. Click Yes on the UAC prompt to confirm the choice.Memory integration - turn off - orangeemu64.dll
  5. Restart your computer to let the changes take effect.

2. Turn off Windows features

  1. Press the Windows key, type control panel in the search box, and click Open.Control Panel start menu - orangeemu64.dll
  2. Click View by and select Category, then click Programs.  Programs - CaTEGORY
  3. Select Turn Windows features on or off.Turn off Windows Features
  4. Locate Hyper-V and all sub-components, Virtual Machine Platform, Windows Hypervisor Platform, and remove the checkmark next to them.Windows Hypervisor Platform - orangeemu64.dll
  5. Click OK, then restart your computer.

3. Use a third-party DLL fixer

Orangeemu64.DLL is a third-party DLL file that comes with the SIMS 4. You can manually restore a DLL file, but if not done correctly, it can cause more harm than good to your computer. Therefore, it is recommended that you should use a third-party DLL fixer tool.

These software are known to fix compatibility issues, which are significant problems that plague third-party DLL files and Windows PCs.

4. Check if Virtualization is enabled

  1. Press Ctrl + Shift + Esc to open the Task Manager.vIRTUALIZATION ENABLED
  2. Go to the Performance tab, look for Virtualization, and ensure it is Enabled.
  3. Next, press Windows + I to open the Settings app.
  4. Go to System, then click Recovery.System - Recovery Windows 11 orangeemu64.dll
  5. Under Recovery options, locate Advanced options, then click the Restart now button.rESTART NOW
  6. On the Choose an option screen, click Troubleshoot.Troubleshoot - orangeemu64.dll
  7. Select Advanced options from the Troubleshoot screen.Troubleshoot WITH AO selected
  8. Choose UEFI Firmware Settings, then click Restart.UEFI 2 - orangeemu64.dll
  9. Upon restart, go to Security.
  10. Select Virtualization, and choose Disabled.
  11. Press F10 to save and exit to save the changes.

If this doesn’t work for you, reverse engineer these steps to enable Virtualization on your computer. In case the Virtualization option is already disabled, try turning it on to fix the problem.

5. Disable Force randomization

  1. Press the Windows key, type windows security in the search box, and click Open.Windows Security open strat menu - orangeemu64.dll
  2. Go to App & browser control, locate Exploit protection, and then click Exploit protection settings.Exploit protection - Orangeemu64.DLL
  3. Next, locate Force randomization for images and select Use default (Off).orce randomization for images and select Use default (Off).

6. Add Sims 4 to the Antivirus Exception list

  1. Press the Windows key, type windows security in the search box, and click Open.Windows Security open strat menu - orangeemu64.dll  
  2. Go to Virus & threat protection, locate Virus & threat protection settings, and click Manage settings.Manage Settings  - orangeemu64.dll
  3. On the following screen, scroll down to locate Exclusions, and click Add or remove exclusions.
  4. Click Add an exclusion, then select Folder.Exclusion list select folder
  5. Navigate to this or type in this address in the address bar after replacing C with your system Drive Letter: C:\Program Files (x86)\The Sims 4\Game\Bin
  6. Click Select Folder to add it to the list, then close Windows Security.

7. Perform a System Restore

  1. Press the Windows key, type control panel in the search box, and click Open.   
  2. Select  Large icons as View by, then click Recovery.Recovery Control Panel
  3. Click Open System Restore.Open system restore
  4. Select Choose a different restore point in the System Restore window and click Next.Next Choose a different restore point
  5. Choose the point at which you want your Windows restored and click Next.Choose a point -orangeemu64.dll
  6. Click Finish to initiate the process.Finish

Windows will restart and restore to the selected version. If you get the System Restore wasn’t completed successfully message after your PC reboots, we recommend you check out this informative guide for solutions.

8.  Download the DLL file manually

Note icon NOTE
Always use a reliable website like DLLme to install DLL files, as installing DLL files on a non-reliable website may cause more harm than good. You can follow the steps mentioned to restore the file manually.
  1. Visit the DLLME  website, search OrangeEmu64.DLL, select an appropriate option, and click Download.
  2. Double-click the downloaded folder to open, locate, and copy the .dll file.
  3. Go to this path and paste the file: C:\Program Files (x86)\The Sims 4\Game\Bin
  4. If unsure where the game is, right-click the game icon and select Properties from the context menu.
  5. Go to the Shortcut tab and copy the path mentioned next to Target.
  6. Now, navigate to this path and paste the DLL file.
  7. Reboot your PC to save the changes.

Along with these solutions, you must also ensure that your Windows is updated to the latest version and that there are no pending updates for the game.

If you often encounter missing DLL issues on your Windows 10 computer, we have a guide to help you understand the causes and the usual fixes. You can also learn how to deal with the msstdfmt.dll missing error.

We also have a guide on buddha.dll, so feel free to check it out if you want to learn more about other DLL files.

If you have any suggestions or questions about the OrangeEmu64.dll file, feel free to mention them in the comments section below.

Netapi32.dll Error – Step-by-Step Fixes

Netapi32.dll is a common error that can disrupt your Windows system, leading to problems with network connectivity and overall system stability. It occurs due to a corrupted or missing DLL file, conflicts with other software, or malware infections. Luckily, there are several ways to fix it.

But before we start, try out these quick fixes:

  • Update Windows. Press Windows + I > Update & Security > Check for updates > Install any available updates > Restart your computer to apply the updates.
  • Scan for viruses. Press Windows + I > Update & Security > Windows Security > Open > Virus & threat protection > Quick scan.
  • Check hardware. Power off the computer, check whether the RAM and network adapters are correctly seated, and clear any dust buildup.

If these steps don’t resolve the issue, check out the rest of the guide for more detailed steps.

How To Fix Netapi32.dll Error

Simply follow the instructions:

Clean Boot

A clean boot helps you identify if background services or applications are causing the Netapi32.dll error. This process temporarily disables non-essential services to isolate the issue. Here are the steps to follow:

  1. Press Windows + R, type msconfig, and press Enter.
Type msconfig
  1. In the System Configuration window, go to the Services tab. Check “Hide all Microsoft services” and click “Disable all.”
Services tab
  1. Go to the Startup tab and click “Open Task Manager.“
Open Task Manager
  1. Disable all startup items and restart your computer.
Disable all startup

Run System File Checker Tool

The System File Checker tool scans and repairs corrupted system files, including Netapi32.dll. Running it can automatically fix issues related to missing or damaged DLL files. Here’s how to do it:

  1. Right-click the start button and tap Windows PowerShell (Admin).
Windows PowerShell (Admin)
  1. Type sfc /scannow and press Enter.
Type sfc /scannow

Wait for the scan to complete, restart your computer, and check if the error has been solved.

System Restore

System Restore allows you to revert your system to a previous working state. This can resolve this error if it started after recent changes to your system. Follow the below steps:

  1. Press Windows + R to open the Run dialog. Type rstrui and press Enter or OK to open the System Restore tool.
Type rstrui
  1. Click Next in the System Restore window.
System Restore window
  1. Select a restore point from the list that predates the issue, then click Next.
Select a restore point
  1. Review your selection and click Finish.
Tap Finish

Wait for the process to complete and your computer to restart automatically. 

Install NetAPI32.dll Manually

Installing the Netapi32.dll file can fix errors caused by a missing or corrupted DLL. This method involves downloading and registering the correct version of the file on your system. Here’s what to do:

  1. Visit a trusted DLL download site. Download the Netapi32.dll file compatible with your Windows version.
Download the Netapi32.dll file
  1. Copy the downloaded DLL file to C:\Windows\System32\ for 32-bit systems and C:\Windows\SysWOW64 for 64-bit systems.
  1. Press Windows + R, type cmd, and press Enter to open Command Prompt.
Type cmd
  1. Type Regsvr32 C:\Windows\System32\netapi32.dll for 32-bit Systems or Regsvr32 C:\Windows\SysWOW64\netapi32.dll for 64-bit systems. Hit Enter to register the DLL file.
Type Regsvr32 C:\Windows\SysWOW64\netapi32.dll

Resolving the Netapi32.dll error requires systematic troubleshooting, from performing a clean boot to manually installing the DLL file. These steps will help restore your system’s functionality and network operations.

You can also learn to fix other Windows errors, including RGSS102E.DLL, mediatoolbox.dll., Msv1160cp10.dll, and Galaxypeer.dll.

Intel Driver and Support Assistant Scan Failure – 6 Proven Fixes

Did you encounter an Intel Driver and Support Assistant scan failure mid-update?

DSA is vital for keeping your Intel drivers up to date, but it’s not immune to errors. This issue can arise from various factors, such as software conflicts or outdated system files. I’ll show you how to troubleshoot and fix it with ease.

But before we begin, try this quick fix:

  • Clear the browser cache. Press Ctrl + Shift + Delete > Tick Cached images and files and Cookies and other site data boxes > Delete data.

If it doesn’t solve the issue, try these more detailed solutions in the order they appear in.

6 Ways To Fix Intel Driver and Support Assistant Scan Failure

Simply follow these instructions:

Check Intel DSA Service

The Intel DSA service might be disabled or not running correctly, leading to scan failures. To resolve this, follow these steps:

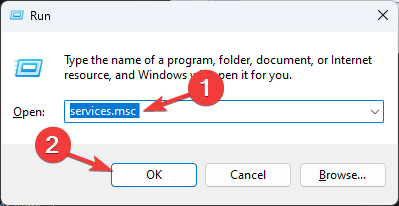
  1. Press Windows + R to open the Run dialog box. Type services.msc and tap OK or press Enter.
Type services.msc
  1. Scroll down and find Intel Driver & Support Assistant in the list.
  2. Right-click on it and select Start if it’s not running. If it’s running, you can restart it by selecting Restart.
Restart
  1. Ensure the Startup type is set to Automatic. Right-click on the service, then select Properties.
Properties
  1. If the Startup type isn’t set to automatic, use the drop-down arrow to select.
Set to automatic

Check and Update Windows

Outdated Windows versions can cause compatibility issues with the Intel DSA. Here’s how to update it:

  1. Open Settings by pressing Windows + I. Tap Update & Security.
Update & Security
  1. Click on Check for updates and install any available ones.
Check for updates

After updating, restart your computer and try running the Intel DSA scan again.

Restart Intel DSA Service Using Command Prompt

You can restart the service via the command prompt:

  1. Right-click on the Start button and select “Command Prompt (Admin)” or “Windows PowerShell (Admin)” to open with administrator privileges.
Windows PowerShell (Admin)
  1. In the PowerShell window, enter the following command to add a local IP address listener: netsh http add iplisten 127.0.0.1
netsh http add iplisten 127.0.0.1
  1. Next, restart the Intel DSA service by entering this command: net stop DSAService && net start DSAService.
net stop DSAService && net start DSAService

Wait for the service to restart, then close the Command Prompt or PowerShell window.

Disable Ad Blocking Extensions

Ad-blocking extensions in your browser may interfere with the Intel DSA’s ability to perform scans. To check if this is the issue:

  1. Open your browser and tap the Extensions button.
Extensions button
  1. Tap Manage extensions.
Manage extensions
  1. Find any ad-blocking extensions you have installed and temporarily disable them by toggling off the button beside Remove.
Temporarily disable

Try running the Intel DSA scan again. If it works, consider adding Intel’s website to the extension’s whitelist.

Rescan Intel Driver & Support Assistant

Before the scan, use a compatible and updated browser (Firefox, Chrome, or Edge). Here are the steps:

  1. Launch one of the compatible browsers, such as Firefox, Google Chrome, Edge, or Legacy Edge with version 44.17763/18.17763 or newer.
  2. Go to the Intel DSA webpage. The page will scan your system for Intel hardware and any available driver updates.
  3. Once the scan is complete, download and install the updates.
Download and install updates

Reinstall Intel Driver & Support Assistant

If the above steps don’t resolve the issue, reinstalling Intel DSA might be necessary. Here’s how to do it:

  1. Remove the current version from your system using the Uninstaller tool.
Uninstaller tool.
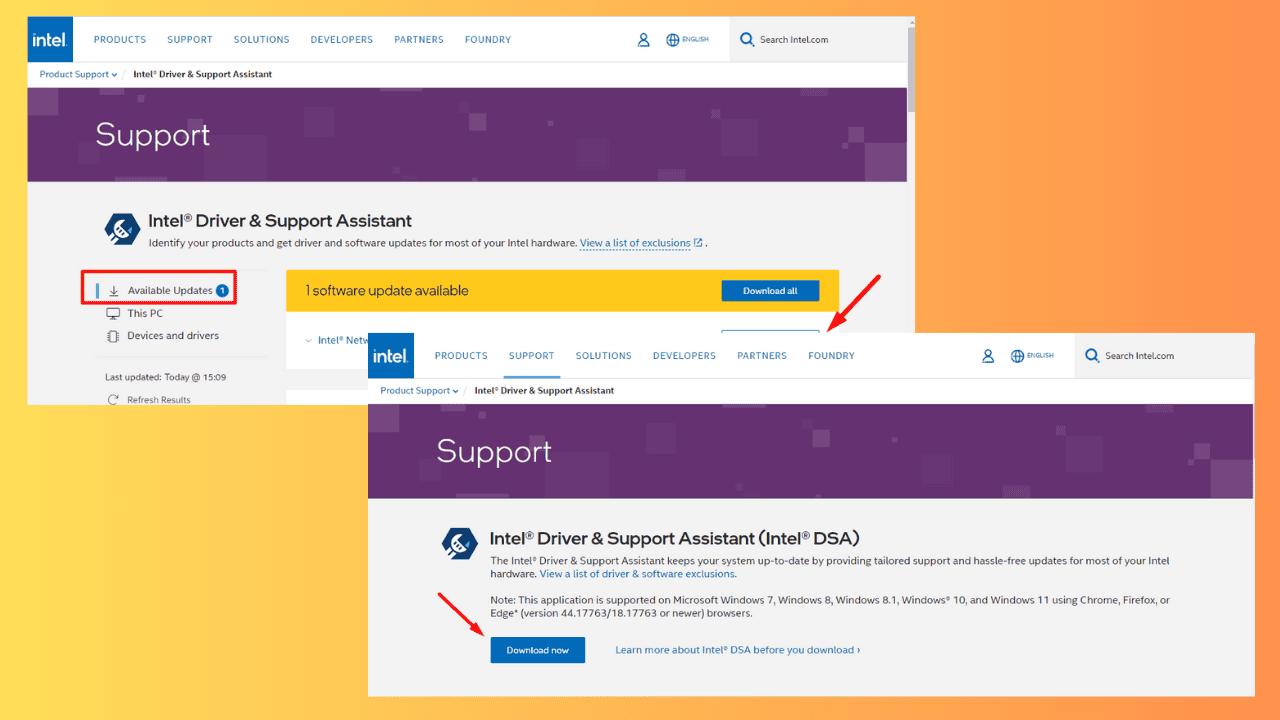
  1. Download the latest edition of Intel DSA from the official website and install it.
Download the latest version
  1. Rerun the scan to see if the issue is resolved.

The steps above will help you fix the Intel Driver and Support Assistant scan failure. This way, your drivers will stay up to date at all times. You can also learn to install Network Drivers in Windows and fix support assistance if it doesn’t work.

Error Driver Failed Sleep: 4 Ways to Fix it

Dealing with the Error_Driver_Failed_Sleep issue can be frustrating, especially when it leads to crashes and failures. Fortunately, there are several steps you can take to resolve this problem.

How can I fix the Error_Driver_Failed_Sleep error?

Before trying anything else, make sure that you have the latest Windows updates installed.

1. Check for faulty drivers

  1. Open Device Manager (you can find it by typing Device Manager in the Start menu search bar).
  2. Look for devices with a yellow exclamation mark, which indicates an issue.
  3. Right-click on the problematic device and select Update driver.
    update driver device manager
  4. Choose Search automatically for updated driver software and follow the prompts.
    automatic driver search

Alternatively, download the driver from the manufacturer’s website since Windows doesn’t always offer the latest drivers.

2. Disable fast startup

  1. Open search and type Choose a power plan. Select Choose a power plan from the list of results.
    choose a power plan windows 11 search results
  2. Select Choose what the power buttons do on the left sidebar.
  3. Click on Change settings that are currently unavailable.
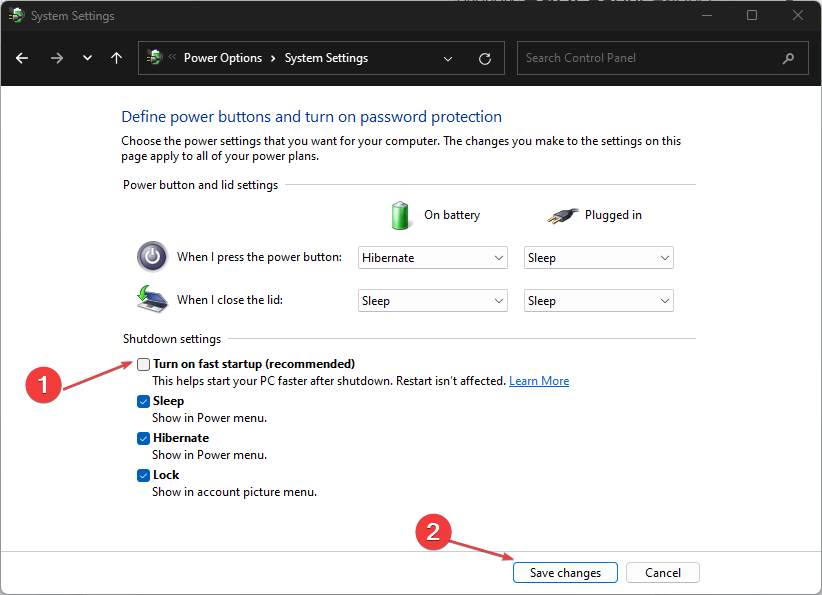
  4. Scroll down to the Shutdown settings section and uncheck Turn on fast startup.
    turn off fast startup
  5. Click Save changes and restart your laptop.

3. Change power plan settings

  1. Open Power plan settings as shown in the previous solution.
  2. Click on Change plan settings next to your selected power plan.
    change plan settings windows 11
  3. Click on Change advanced power settings.
    Change advanced power settings
  4. Expand Sleep, then Allow hybrid sleep, and set it to Off.
  5. Expand USB settings, then USB selective suspend setting, and set it to Disabled.
  6. Click Apply and OK, then restart your laptop.

4. Run a clean boot

  1. Press Windows + R, type msconfig, and press Enter.
    msconfig command
  2. In the System Configuration window, go to the Services tab.
  3. Check Hide all Microsoft services and click Disable all.
    disable services
  4. Open Task Manager by pressing Ctrl + Shift + Esc.
  5. Go to the Startup tab.
  6. Select the unnecessary programs and select Disable.
    disable startallback task manager startup

Performing a clean boot helps identify if a third-party application or service is causing the sleep mode issue.

It’s important to mention that this error has the following code 633 (0x279) and according to Microsoft it means the following:

{System Standby Failed} The driver %hs does not support standby mode. Updating this driver may allow the system to go to standby mode.

By following these steps, you should be able to fix the Error_Driver_Failed_Sleep error. You can also flash BIOS if nothing else works for you.

We also have a guide on what to do if BSOD appears after installing drivers as well as an article on how to fix BSOD on Windows 11, so don’t miss them.

Wnaspi32.dll is Missing: 4 Ways to Get it Back

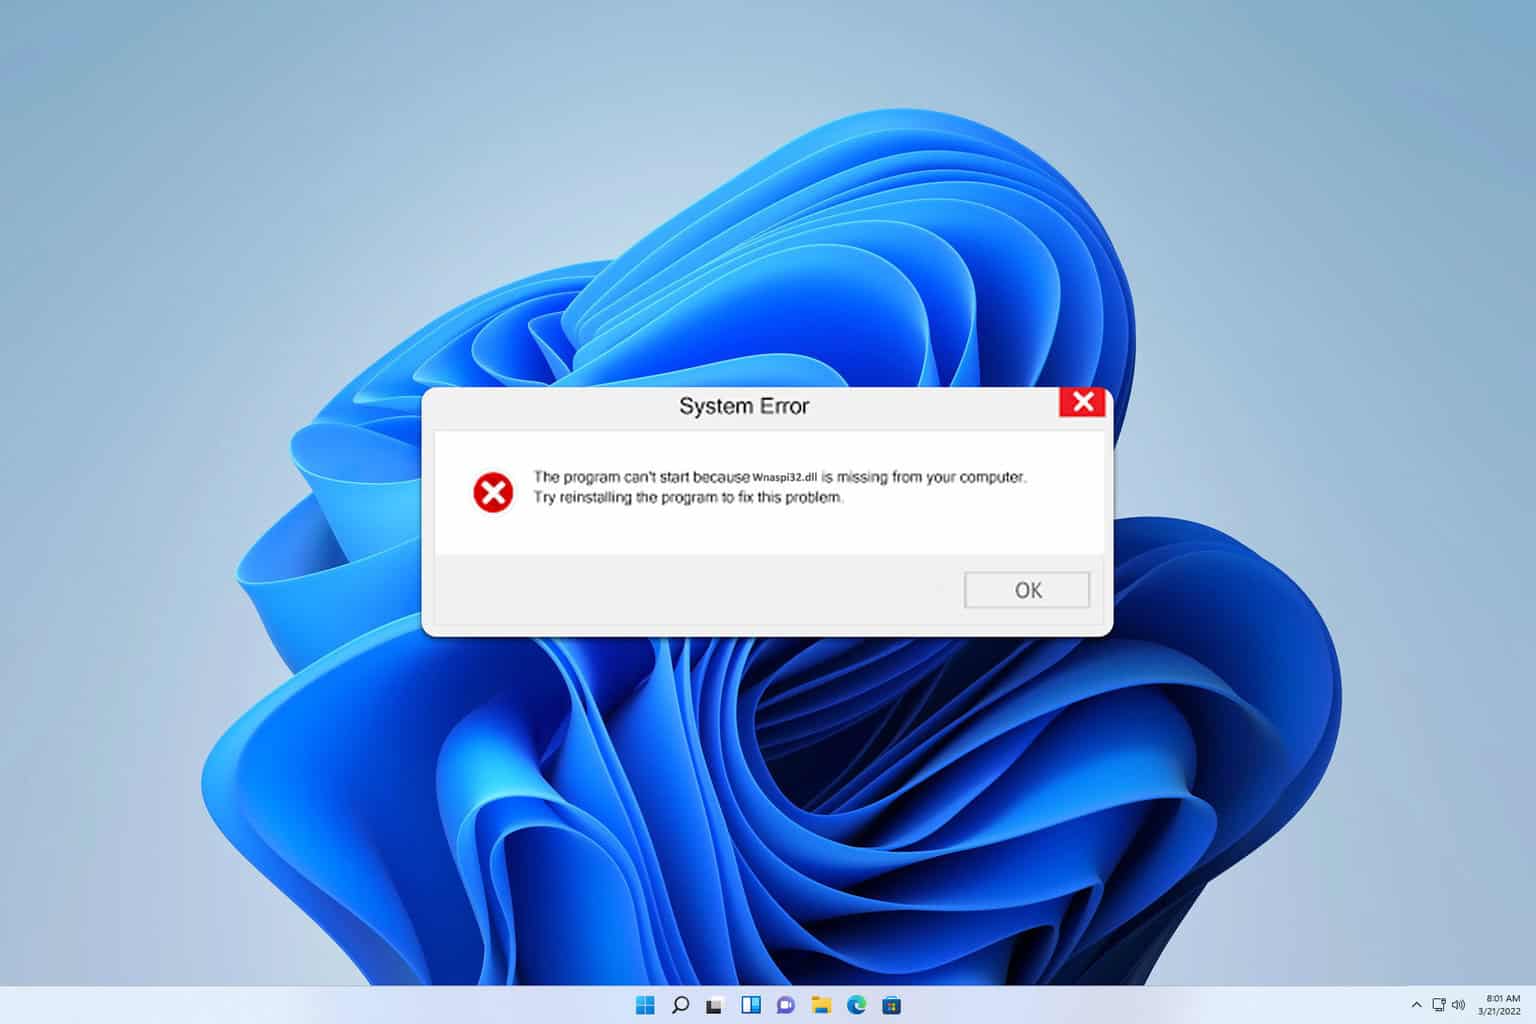
Dealing with wnaspi32.dll errors can be a real headache, especially when it disrupts your workflow. Whether you’re a casual user or a tech enthusiast, these errors can pop up unexpectedly, but they can be easily fixed with our solutions.

How can I fix the wnaspi32.dll missing error?

1. Reinstall the program

  1. Press the Windows key + X and choose Apps and Features.
    apps and features menu
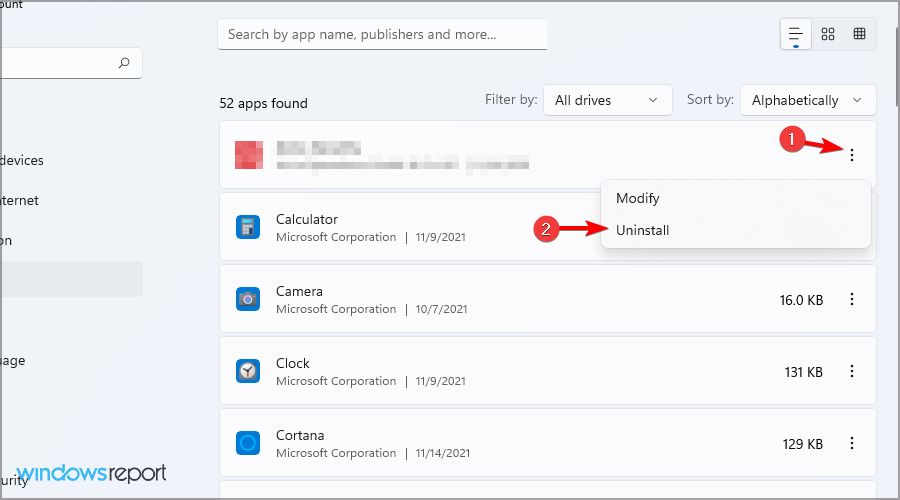
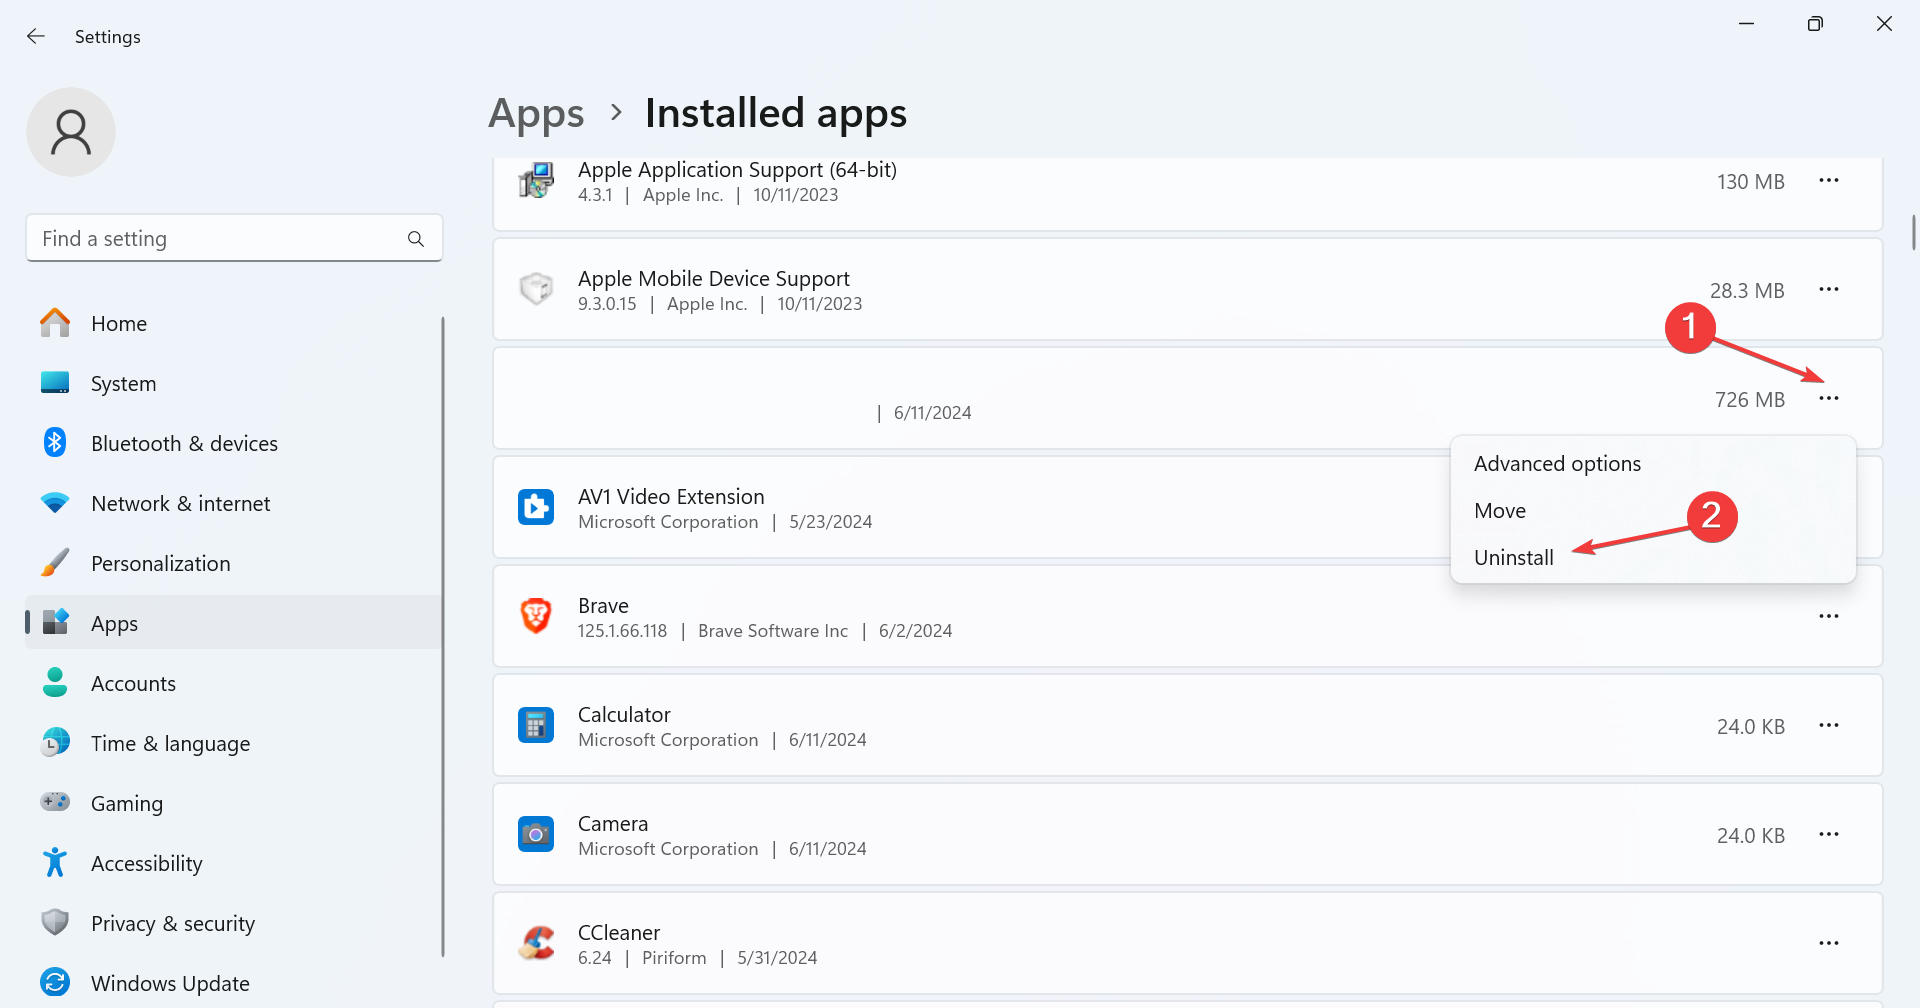
  2. Locate the program that is giving you the error. Click the three dots next to it and choose Uninstall.
    uninstall app w11
  3. Follow the instructions on the screen to remove it.
  4. Visit the official website of the program.
  5. Download the latest version of the program.
  6. Run the downloaded installer.
  7. Follow the on-screen instructions to complete the installation.

2. Run SFC

  1. Click on Start, type cmd, and select Run as administrator.
    cmd run as administrator w11
  2. In the Command Prompt window, type sfc /scannow and press Enter.
    cmd sfc scannow
  3. Wait for the system file check to complete (this might take some time).
  4. Restart your PC to apply the repairs.

3. Update drivers

  1. Press the Windows key + R to open the Run dialog.
  2. Type devmgmt.msc and press Enter.
    devmgmt run window
  3. Expand the category relevant to your hardware (e.g., Sound, video, and game controllers).
  4. Right-click on the device and select Update driver.
    update driver device manager
  5. Choose Search automatically for updated driver software.
  6. Follow the prompts to update the driver.
  7. Restart your PC to ensure changes take effect.

4. Download the WNASPI32.DLL

  1. Go to a reputable DLL file download site.
  2. Download the wnaspi32.dll file (ensure it matches your system architecture, 32-bit or 64-bit).
  3. Extract the downloaded file.
  4. Copy the wnaspi32.dll file to the directory of the application that requires it.
  5. For Windows, it’s usually C:\Windows\System32
  6. Restart the application to verify if the error is resolved.

Keep in mind that downloading DLL files from third-party websites is considered unsafe, so use this solution at your own risk.

Where does wnaspi32.dll go?

This file usually goes to the System32 directory, but sometimes it might be located in the directory of certain applications.

To prevent future wnaspi32.dll errors, keep your software and drivers regularly updated. Missing DLL files in Windows 11, can cause a lot of problems, but we have a guide to help you fix that.

One of those missing files is user32.dll, and we covered what to do if user32.dll is missing in our previous guides, so don’t miss it. We also have a great article on rundll32.exe error, so you might want to check it out.

Chrome’s PDF Viewer getting a Material 3 design Refresh [CR23]

Google continues to modernize the Chrome browser on desktops with the “Chrome Refresh 2023″ (CR23) update. One of the latest additions to this overhaul is a redesigned PDF viewer that aligns more closely with Google’s Material 3 design language.

On the eve of Chrome’s 15th birthday last year, Google rolled out a fresh new look to the Chrome browser. The new design, known as CR23, heavily incorporates Material 3 design principles. This includes elements like rounded corners, dynamic theming, a revamped toolbar, an address bar, a main menu, and tab management in UI.

After updating most of Chrome UI with redesign, now time to update the built-in PDF viewer that comes with the ability to compare two pages, annotations support, presentation mode, and other features.

As we spotted in the flag, Google is working on “PDF Chrome Refresh 2023” which, when enabled, “uses the new CR23 icons and colors for the PDF Viewer”.

PDF Chrome Refresh 2023 flag. Image Credit: WindowsReport

Based on the Commit message and meta bug titled “M2.5: GM3 PDF Viewer” spotted by WindowsReport, Google is introducing several visual changes to the PDF viewer:

  • The toolbar and side panel colors will be adjusted to match the darker theme of Material 3.
  • Chrome will also allow toggling Chrome Refresh 2023 for the PDF viewer via flag. Users can enable or disable the new design through the chrome://flags page.

“Change the toolbar and side panel colors to a darker theme, more according to GM3 themes.” Google notes.

Yep, Chrome PDF Viewer already features a side panel for users to add comments to PDF with a pen. You can check more about it here.

Image Credit: WindowsReport

Apart from PDF Viewer getting a new design, Google is updating Picture in Picture mode in Chrome with new controls.

Intel Driver Support Assistant Not Downloading [Fix]

If you’re frustrated with the Intel Driver Support Assistant not downloading drivers, you’re not alone. Many users face this issue, but don’t worry—we’ve got you covered with some practical solutions to get things back on track.

What can I do if Intel Driver Support Assistant is not downloading?

Before trying more complex solutions, ensure that the Intel Driver Support Assistant is up to date.

1. Change the download location

  1. Open Intel Driver Support Assistant.
  2. Go to Settings.
    intel driver support assistant not downloading
  3. Scroll to find the Folder Location and click the Change Location button.
    change location intel driver support
  4. Choose or create a new folder for the driver updates to be downloaded.

Changing the download location can resolve issues where the Intel DSA faces trouble accessing the default directory due to permission or path issues.

2. Perform a clean boot

  1. Press Win+R to open the Run box. Type msconfig and click OK.
  2. Navigate to the Services tab and check the box next to Hide all Microsoft services. Disable all the services. Click OK to apply the changes.
    Hide all Microsoft services msconfig
  3. Press Ctrl+Shift+Esc to open Task Manager, and navigate to the Startup tab.
  4. Select any programs you suspect might be interfering and click Disable.
    disable startup app
  5. Restart your PC and run Intel Driver & Support Assistant again.

Performing a clean boot helps identify if any third-party services or applications are causing conflicts with Intel DSA.

3. Delete the install history file

  1. Stop the Intel DSA services: Press Win+R, type services.msc, and press Enter.
    Services msc run window
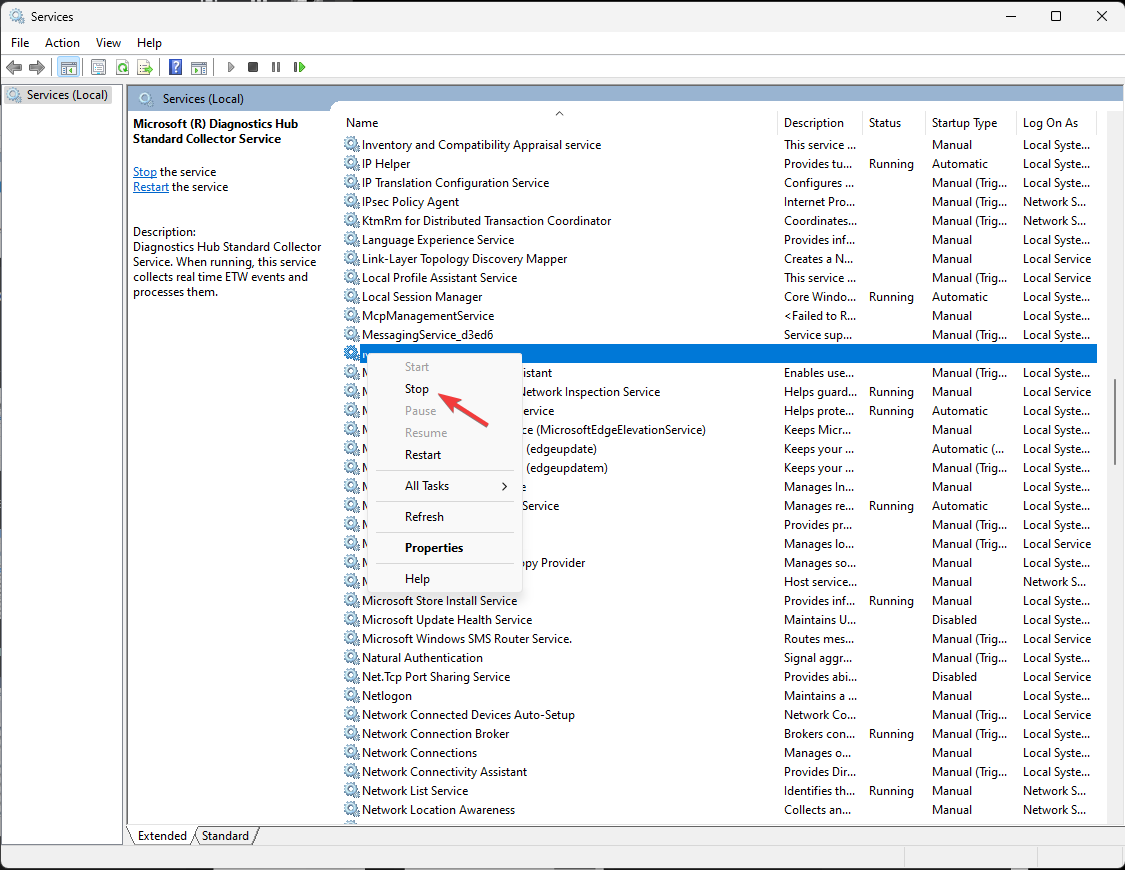
  2. Find Intel Driver & Support Assistant services, right-click, and select Stop.
    stop service context menu
  3. Navigate to c:\programdata\intel\dsa\
  4. Delete the install-history.json file.
  5. Start the Intel DSA services again and relaunch the Intel DSA tray app.

Deleting the install history file forces Intel DSA to re-scan and update drivers correctly without being hindered by previous records.

4. Disable ad blockers and browser extensions

  1. Click the Menu icon and choose Extensions > Manage Extensions.
    extensions manage extensions chrome
  2. Disable any ad-blocking extensions or privacy-related extensions.
    remove or disable extensions
  3. If the problem is resolved, enable extensions one by one until you find a culprit.

5. Reinstall Intel Driver & Support Assistant

  1. Press Win+X and choose Apps and Features.
    apps and features menu
  2. Click the three dots next to Intel Driver & Support Assistant and choose Uninstall.
    uninstall app w11
  3. Restart your PC.
  4. Download Intel Driver & Support Assistant from the official download page.
  5. After installing, restart your PC again.

If nothing else works, you’ll have to manually update your drivers, or use a different driver updater software.

Why is my Intel Driver And Support Assistant not working?

This can occur due to browser extensions or corrupt installations. For more details, visit our Intel Driver Support Assistant is not working guide.

Following these solutions should help you if Intel ARC driver download failed unexpectedly. If you have found a different solution, share it with us in the comments below.

DBeaver Driver Download Failed: 4 Ways to Fix it

Running into the DBeaver driver download failed error can be quite frustrating, especially when you need to connect to your database urgently. Thankfully, there are several ways to tackle this issue and get back on track. Here are some tried-and-true solutions to help you resolve this error.

What can I do if the DBeaver driver download has failed?

Before we start, ensure that your firewall isn’t blocking access to the database and DBeaver in any way.

1. Update DBeaver

  1. Launch the DBeaver application.
  2. Click on the gear icon or go to Help in the menu bar and select Check for Updates.
    check for updates dbeaver
  3. If there are updates available, follow the prompts to download and install them.
  4. Close and reopen DBeaver to ensure the updates take effect.

2. Manually add driver files

  1. Go to the official site of the database vendor and download the required JDBC driver.
  2. Open DBeaver and go to Database > Driver Manager.
    driver manager dbeaver
  3. Click New to create a new driver configuration.
  4. Fill in the required fields:
    • Driver Name: Give it a name.
    • Driver Type: Select JDBC Driver.
    • Class Name: Obtain the class name from the driver’s documentation.
    • Add Jar Files: Click on Add File and navigate to the location where the downloaded .jar file is stored.
  5. Click OK.

Some users are suggesting going to the DBeaver GitHub, downloading the necessary jar file manually, and adding it as previously mentioned.

3. Configure proxy settings

  1. In DBeaver, go to Window > Preferences.
  2. Go to General > Network Connections.
    connection settings dbeaver
  3. If you are behind a proxy, enter the proxy settings provided by your IT department.
  4. Apply the changes and restart DBeaver.

4. Update certificates

  1. On Linux or macOS, open the terminal. On Windows, open Command Prompt or PowerShell.
  2. Run the command update-ca-certificates (for Linux) or update your Java truststore with:
    keytool -import -alias oracleDriversCert -keystore $JAVA_HOME/lib/security/cacerts -file oracleDriversCert.cer
  3. Ensure that the $JAVA_HOME/lib/security/cacerts file exists.
  4. On Linux, it might be located under /usr/lib/jvm/java-1.17.0-openjdk-amd64/lib/security/cacerts

By following these solutions, you can resolve driver download issues in DBeaver and ensure seamless connectivity to your databases. If the issue persists, try using alternative database tools.

If you’re working with databases, don’t miss our guide on how to secure SQL server databases. We also have a guide on how to recover a deleted database in Windows, so you might find it useful.

Connection errors are common when working with databases, and we have a great article on what to do if you get an Establishing a database connection error.

How to Fix the INSTALL_MORE_MEMORY Bug Check 0x7D

If you’re encountering the dreaded INSTALL_MORE_MEMORY 0x7D Blue Screen error on your Windows machine, you’re not alone. This error typically points to memory-related issues, but don’t worry, we’ve got a range of solutions to help you get your system back on track.

How do I fix the INSTALL_MORE_MEMORY BSoD?

1. Install more RAM

  1. Shutdown your computer and unplug your computer from the power source to ensure safety.
  2. Open the computer case by unscrewing the screws on the back or sides (refer to your computer’s manual if needed).
  3. Locate the RAM slots on the motherboard. These are long slots with clips on each end.
  4. Push the clips on each side of the current RAM modules to release them.
  5. Align the notch on the module with the notch in the slot, then firmly press the module into the slot until the clips snap back into place.
  6. Close the computer case and screw it back securely.
  7. Plug your computer back in and power it on. The additional RAM should be recognized automatically.

Installing more RAM directly addresses the error by increasing the available memory, allowing Windows to start up correctly.

2. Check for Hardware Issues

  1. Download a memory testing tool like MemTest86 from its official website.
  2. Create a bootable USB drive with the downloaded tool by following the instructions on the website.
  3. Insert the USB drive into your computer and restart it.
  4. Enter the BIOS/UEFI settings by pressing the designated key (often F2, F10, DEL, or ESC) during startup.
  5. Set the USB drive as the primary boot device by navigating to the Boot menu and moving the USB drive to the top of the list.
  6. Save the settings and exit the BIOS/UEFI. Your computer will now boot from the USB drive.
  7. Run the memory test and wait for it to complete. This might take some time, depending on the amount of RAM.
  8. Review the results to see if any errors are detected.

Running a memory test helps identify if the existing RAM is faulty, which can be causing the error.

3. Adjust the Virtual Memory settings

  1. Open Control Panel by typing Control Panel in the Start menu and pressing Enter.
  2. Navigate to System and Security, then click on System.
  3. Select Advanced system settings on the left sidebar.
  4. In the System Properties window, click on the Advanced tab and then the Settings button under Performance.
  5. Go to the Advanced tab in the Performance Options window and click on Change under Virtual Memory.
  6. Uncheck Automatically manage paging file size for all drives.
  7. Select your system drive (usually C:), click on Custom size, and set the Initial size (MB) and Maximum size (MB) to values suggested based on your system’s needs.
  8. Click Set, then OK to save the changes.
  9. Restart your computer for the changes to take effect.

Adjusting virtual memory ensures Windows has sufficient virtual memory to support physical memory, improving system stability.

4. Clean install Windows

  1. Backup important files to an external drive or cloud storage.
  2. Create a bootable USB drive with the Windows installation media using the Media Creation Tool from Microsoft’s website.
  3. Insert the USB drive into your computer and restart it.
  4. Enter the BIOS/UEFI settings by pressing the designated key (often F2, F10, DEL, or ESC) during startup.
  5. Set the USB drive as the primary boot device by navigating to the Boot menu and moving the USB drive to the top of the list.
  6. Save the settings and exit the BIOS/UEFI. Your computer will now boot from the USB drive.
  7. Follow the on-screen instructions to install Windows. Choose Custom install, select your system drive, and format it if needed (this will erase all data on the drive).
  8. Complete the installation by following the prompts.

Performing a clean installation of Windows can resolve persistent software-related issues by providing a fresh start for the system.

5. Reset BIOS/UEFI to default settings

  1. Restart your computer and enter the BIOS/UEFI settings by pressing the designated key (often F2, F10, DEL, or ESC) during startup.
  2. Navigate to the Reset or Restore Defaults option (this may be under the Exit menu or another section depending on your BIOS/UEFI version).
  3. Select Load Setup Defaults or a similar option and confirm your choice.
  4. Save the settings and exit the BIOS/UEFI. Your computer will restart.

Resetting the BIOS/UEFI to default settings can resolve configuration issues that may be affecting memory management.

By following these steps, you can tackle the INSTALL_MORE_MEMORY 0x7D error head-on. To prevent similar issues in the future, regularly update your system and drivers, and keep an eye on your system’s memory usage.

Sometimes, your PC doesn’t use all the available RAM, so click on the highlighted link to sort this out. We also have a helpful guide on how to fix memory leaks in Windows.

We hope that now, you have been able to boot up Windows and got rid of the INSTALL_MORE_MEMORY bug check. Let us know in the comments below if our solutions helped you.

How To Cancel Skype Subscription – Desktop & Mobile Guide

Want to learn how to cancel your Skype subscription? If you no longer need the service or want to avoid recurring charges, you should quit as soon as possible. You can do so in just a few minutes through your account settings.

I’ll take you through each step to ensure you end your subscription without unexpected charges.

Let’s begin!

How To Cancel Skype Subscription

You can do so on your desktop or mobile. The steps slightly differ depending on the device:

On Desktop

Follow these instructions:

  1. Sign in to your Skype account on the official website using your credentials.
  2. Once logged in, click on the three dots beside your profile picture or name and select Settings.
Skype settings
  1. In the Account & Profile section, scroll down the right panel and select Your Account.
Account & Profile
  1. A new window will open. Tap Manage.
Manage subscriptions
  1. Click Cancel Subscription. 
  1. Skype will ask for a reason. Select one then tap Cancel subscription.
Cancel subscription

On Mobile 

You can cancel your Skype subscription on your phone through the app store you’re using (in my case, Google Play Store) or directly from the app’s settings.

Through Skype

The procedure is similar for Android and iOS. Follow the below steps:

  1. Open your Skype app and tap on your name.
Skype name
  1. Scroll and tap Settings.
Skype settings
  1. Click Account & Profile.
Account & Profile
  1. Tap Your account.
Your account
  1. Click Manage.
Manage
  1. Hit Cancel Subscription, enter the reason, then confirm your decision.
Cancel Subscription

Through Google Play Store

Follow the below steps:

  1. Open the Google Play Store and tap on your profile picture in the top right corner of your screen.
Profile picture
  1. Select Payments & Subscriptions.
Payments & Subscriptions
  1. Click Subscriptions, select Skype, and then tap Cancel Subscription.
Subscriptions

So, now you know how to cancel your Skype subscription. It’s a quick process that ensures you won’t be charged for services you no longer use. These steps will help you manage your subscriptions on the desktop and mobile app.

Before you go, learn how to delete a Skype account or block and unblock someone.

Fix: MEMORY1_INITIALIZATION_FAILED 0x00000065

Many users have reported getting a blue screen error 0x00000065 MEMORY1_INITIALIZATION_FAILED on Windows devices. This error usually appears when Windows encounters a problem related to system memory initialization. It can occur due to corrupted system files, outdated device drivers, faulty hardware, malware infection, or Windows Update problems.

To begin with, check if the recently installed hardware is compatible with your system, review the PC’s specifications, and ensure all installed hardware matches the requirements.

How can I fix the MEMORY1_INITIALIZATION_FAILED 0x00000065 issue?

1. Update Windows

  1. Press Windows + I to open the Settings app.
  2. Go to Windows Update, and click Check for updates.Download updates - MEMORY1_INITIALIZATION_FAILED
  3. If updates are available, click Download and install to update your Windows version.

2. Run SFC and DISM scans

Note icon NOTE
If your computer boots up normally, skip steps 1 to 6 and follow steps 7 to 10. If not, follow all the steps.
  1. Press the Power button on your computer to start it.
  2. When you see the Windows logo during booting, press the Power button again to shut down your PC. Repeat the power-on and power-off process three times.
  3. In the third restart, you will see a blue screen, which means you have accessed the Windows Recovery Environment (WinRE).
  4. Click Troubleshoot on the Choose an option screen.Troubleshoot 
  5. Select Advanced options.Advanced option s- CMD SFC  MEMORY1_INITIALIZATION_FAILED
  6. On the Advanced Options screen, choose Command Prompt.Command Prompt
  7. If your computer can boot up normally, press the Windows key, type cmd in the search bar, and click Run as administrator.CMD elevated -MEMORY1_INITIALIZATION_FAILED
  8. In the command prompt window, type the following command to run the DISM scan and hit Enter: dism /online /cleanup-image /restorehealth
  9. Wait for some time to let the command execute properly, then copy & paste the following command to repair the system files and press Enter: sfc /scannowCMD SFC  MEMORY1_INITIALIZATION_FAILED
  10. Wait for the process to finish, then reboot your computer to let the changes take effect.

Repairing the system files via SFC and DISM scans can also help you fix the LPC_INITIALIZATION_FAILED error; check out this guide to learn other fixes.

3. Run the CHKDSK command

  1. Use steps 1 to 3 from Method 2 again to access the Windows Recovery Environment.
  2. Click Troubleshoot on the Choose an option screen.
  3. Select Advanced options.Advanced option s- CMD SFC MEMORY1_INITIALIZATION_FAILED
  4. On the Advanced Options screen, choose Command Prompt.Command Prompt
  5. Type the following command to run the disk check scan and press Enter: chkdsk /f /rCHKDSK command
  6. CHKDSK will prompt you to schedule the scan for the next system restart; type Y to reboot your computer and start the disk check.

Running a check disk scan can also help you fix the SCSI_DISK_DRIVER_INTERNAL 0x0000002D; check out this guide for more solutions.

4. Replace the SMSS.EXE file

Note icon NOTE
To create a bootable installation media, you need a PC with a reliable internet connection and a USB flash drive with 8 GB of free space.

4.1 Create a bootable installation media

  1. Connect your USB flash drive to the PC and go to the Windows 11 download page.
  2. Locate the Create Windows 11 Installation Media section and click the Download Now button. 
  3. Once the setup file is downloaded, run it, then on the Windows 11 Setup, click Accept to accept the terms of service.
  4. On the following window, select language and edition, then click Next.
  5. Select Create installation media (USB flash drive, DVD, or ISO file) for another PC and click Next.
  6. Choose the USB flash drive option and click Next.
  7. Select your pen drive and choose Next.
  8. The process will take some time; once done, click Finish to close the setup.

4.2 Boot using the USB drive

  1. Restart your computer and tap the F12 key until you enter the One Time Boot menu.
  2. Select the USB drive from the list and hit Enter.
  3. Choose the language to install, time and currency format, keyboard or input method, and then click Next.Select-setup-information.
  4. On the Windows Setup screen, click Repair your computer.Repair your computer - MEMORY1_INITIALIZATION_FAILED
  5. Select Troubleshoot on the Choose an option screen.Troubleshoot - MEMORY1_INITIALIZATION_FAILED
  6. Choose Advanced options.Advanced option s- CMD SFC MEMORY1_INITIALIZATION_FAILED
  7. On the Advanced Options screen, select Command Prompt.Command Prompt
  8. In the Command Prompt window, copy & paste the following commands one by one, pressing Enter after each command:
    • C:
      cd windows/system32/
      copy c:\windows\system32\dllcache\smss.exe
  9. After executing the commands, reboot your PC to check if the issue is resolved.

5. Update BIOS/UEFI

Note icon NOTE
Before updating BIOS/UEFI, ensure you have an ample amount of time, as interrupting the process might damage your system.
  1. Press Windows + R to open the Run window.Msinfo32 - MEMORY1_INITIALIZATION_FAILED
  2. Type msinfo32 and click OK to open System Information.
  3. Go to System Summary, and locate BIOS Version/Date.System information - System Summary - BIOS version
  4. Now go to your PC manufacturer’s website, enter your PC details, like the Product number and Serial number, and follow the manufacturer’s instructions to download and install the update.
  5. Once updated, reboot your computer to check whether the new BIOS/UEFI version is running.

6. Perform a memory diagnostic test

  1. Press Windows + R to open the Run window.msched.exe
  2. Type mdsched.exe and click OK to open the Windows Memory Diagnostic tool.
  3. Save your word before proceeding, then click Restart now and check for problems.Restart and check now - MEMORY1_INITIALIZATION_FAILED
  4. Your computer will restart, and the scan will take a few minutes. Once done, the PC will restart and take you to the login screen.
  5. When you log in, you will see the scan results. If they aren’t displayed, you can review them by checking the Event Viewer logs.

7. Perform a system restore

  1. Use steps 1 to 3 from Method 2 again in the Windows Recovery Environment.
  2. Click Troubleshoot on the Choose an option screen.
  3. Select Advanced options.Advanced options - MEMORY1_INITIALIZATION_FAILED
  4. On the Advanced Options screen, choose System Restore.System Restore AO
  5. Click Next on the System Restore window.Next system restore - MEMORY1_INITIALIZATION_FAILED
  6. Choose the restore point you want and click Next. If you have several, it is recommended that you choose the oldest one.
  7. Click Finish. Your computer will restart and take your computer to the previous system settings.

If your system was not able to restore to the previous version and you see the System Restore did not complete successfully message, check out this guide for quick solutions.

Restoring your computer to the oldest restore point can also help you get out of the Blue Screen loop; read this guide to learn more about it.

8. Reset your Windows computer (Last resort)

  1. Use steps 1 to 3 from Method 2 again to enter the Windows Recovery Environment.
  2. Click Reset this PC from the Choose an option screen.Troubleshoot = Reset this PC - MEMORY1_INITIALIZATION_FAILED
  3. On the following screen, you will get two options:
    • Keep my files – Choose this if you want to remove apps and settings, but keep the personal files.
    • Remove everything – Select this if you want to delete everything.
  4. On the next screen, choose the method to reinstall Windows
    • Cloud download – This will download and reinstall Windows
    • Local reinstall – This will reinstall Windows from this device
  5. Click the Reset button to initiate the process.

To resolve the 0x00000065 MEMORY1_INITIALIZATION_FAILED error in Windows, you can run SFC and DISM scan to restore or repair system files, check the RAM for disk errors, or restore your PC to the previous version.

Want to access Blue Screen of Death crash files? Here is a separate guide with four simple methods for doing that. As for memory errors, we also wrote about ERROR_MEMORY_HARDWARE in our latest article, so you might want to check it out.

If you have any questions or suggestions about the error? Feel free to mention them in the comments section below.

Intel Driver Support Assistant Not Working: 3 Ways to Fix it

Facing issues with the Intel Driver & Support Assistant (DSA) not working can be incredibly frustrating, especially when you rely on it to keep your drivers up-to-date. Here are some practical solutions to get your Intel DSA back on track.

Why is the Intel driver and Support Assistant not working?

This issue occurs if the software installation is damaged or if the necessary services aren’t running.

What can I do if the Intel Driver and Support Assistant is not working?

Before we start, if you get this issue in Vivaldi, disable Shields and check if that helps. Also, ensure that Windows is up to date.

1. Check and restart Intel DSA services

  1. Press Win + R to open the Run dialog. Type services.msc and press Enter.
    Services msc run window
  2. Scroll down to find Intel® Driver & Support Assistant and Intel® DSA Updater.
  3. Ensure both services show the status as Running.
  4. If either service is not running, right-click on it and select Start.
    start service w11
  5. If the services are running, right-click on each and select Restart.

By ensuring these services are running, and your system is updated, you can resolve many common issues with Intel DSA.

2. Clear browser cache and disable extensions

  1. Open your browser (Chrome, Firefox, or Edge).
  2. Press Ctrl + Shift + Delete to open the Clear Browsing Data window.
  3. Select All time and check the boxes for Browsing history, Cookies and other site data, and Cached images and files. Click Clear data.
    clear browsing data confirm
  4. Open the browser menu (three dots).
  5. Go to More tools > Extensions.
  6. Disable Adblocker and privacy-related extensions by toggling them off.
    disable extension chrome
  7. Reopen Intel Driver & Support Assistant and initiate a scan.

3. Uninstall and reinstall Intel DSA

  1. Press the Windows key + X and choose Apps and Features.
    apps and features menu
  2. Find Intel® Driver & Support Assistant, click the three dots next to it, and select Uninstall.
    uninstall apps
  3. Visit the Intel DSA download page.
  4. Download and install the latest version of Intel® DSA.
  5. Right-click the downloaded installer, select Run as administrator, and complete the installation.
  6. Optional: Some users are suggesting using Intel Driver & Support Assistant Uninstaller to completely remove the software, so try that as well.

To learn more, we have a great guide on how to download Intel Driver & Support Assistant, so don’t miss it.

Keep in mind that sometimes Intel Driver Support Assistant is not downloading, but this issue can be easily fixed. Moreover, if you encounter a scan failure, we can help you out.

By following these detailed steps, you should be able to resolve the most common issues with the Intel Driver & Support Assistant not working as expected.

To learn more about Intel drivers, don’t miss our guides on how to install Intel network drivers and what to do if Windows 11 keeps installing old Intel graphics drivers.

How to Fix the Printer if it’s Printing Double Vision

Dealing with a printer that produces double vision prints can be annoying, but that is probably because the print head is not calibrated. This is a common problem that is usually easy to fix so here’s what you need to do.

What do I do if the printer is printing double vision?

1. Clean the print heads

  1. Open your printer’s maintenance menu. This can usually be found by going into the printer settings on your computer or directly on the printer’s control panel.
  2. Choose the Clean Print Heads or similar option.
  3. Follow the instructions to clean the print heads, which may involve several cleaning cycles.
  4. At the end, print a test page to see if the procedure worked.

Cleaning the print heads can remove any ink buildup or debris that might be causing the shadow or double vision effect.

2. Realign the Printer

  1. Access the printer maintenance menu via the printer settings on your computer or the printer’s control panel.
  2. Choose the Align Printer or Align Printhead option.
  3. Follow the on-screen instructions to complete the alignment process.

Realigning the printer ensures that the print heads are correctly positioned, which can eliminate double printing issues.

3. Perform a hard reset

  1. Disconnect the power cord from the printer and the wall socket.
  2. Take out the toner or ink cartridges from the printer.
  3. Allow the printer to sit idle and unplugged for about 30 seconds.
  4. Plug the power cord back into the printer and the wall socket (ensure it is plugged directly into the wall and not a surge protector).
  5. Insert the toner or ink cartridges back into the printer.

This solution can help reset any temporary glitches in the printer’s hardware, often resolving double vision printing issues.

4. Clean the encoder strip

  1. Power off the printer and unplug it from the wall.
  2. Open the printer and locate the encoder strip, a clear plastic strip running parallel to the print head.
  3. Clean the encoder strip gently with a soft, lint-free cloth dampened with water.
  4. Allow the strip to dry completely before reassembling the printer and powering it back on.

Cleaning the encoder strip can remove any dust or oil that might be causing print head misalignment, resulting in double vision printing.

5. Check the printer settings

  1. From any application, open the print dialog by pressing Ctrl + P (Windows).
  2. Click on Properties, Preferences, or Options next to your selected printer.
  3. Ensure the paper type is set correctly (e.g., Plain Paper, Thick Paper, etc.).
  4. Go to the advanced settings and check the option for Print as Image.

Adjusting printer settings can sometimes resolve software-related issues causing double vision in prints.

6. Use genuine supplies

Ensure that you are using genuine toner or ink cartridges from the printer manufacturer. If you are using third-party supplies, consider replacing them with genuine ones.

Using genuine printer supplies can prevent compatibility issues that sometimes lead to print quality problems, including double vision printing.

Following these steps should help you achieve clear, accurate printouts. To prevent future issues, regularly maintain your printer and use genuine supplies.

If the printer is printing dots on paper, click on the highlighted link for some tested solutions to fix it. You might also be interested in reading our guide on what to do if the printer is not printing.

Did you manage to fix the double vision printing on your printer? Let us know in the comments below.

How to Fix GreenShot Not Working on Windows 11

If you press the Print Screen button and GreenShot does not work on your Windows 11 computer, this guide can help! It could be because you have the wrong keyboard settings, an outdated Greenshot app, or Dropbox is interfering in the process.

To begin with, restart your computer, exit the Greenshot app, and close all the third-party screenshot apps; if these don’t work, follow the steps below.

How can I fix the GreenShot not working on Windows 11?

1. Restart the Greenshot app & File Explorer

  1. Press Ctrl + Shift + Esc to open the Task Manager app.
  2. Go to the Processes tab, locate & select Greenshot, then click the End task option.Enbd task - greenshot windows 11 not working
  3. Once done, press the Windows key, type greenshot in the search box and click Open.Oprn greenshot - greenshot windows 11 not working
  4. Open the Task Manager again, locate Windows Explorer, and choose Restart from the top menu.Close Explorer

Restarting an app also fixes the Print Screen not working on your Windows 10; read this guide to learn other solutions.

2. Change the keyboard settings

  1. Press Windows + I to open the Settings app.
  2. Go to Accessibility, then click Keyboard.Accessibility - greenshot windows 11 not working
  3. Locate the Use the Print screen key to open Snipping Tool, or Use the Print screen key to open screen capture, toggle off the switch next to it to disable it.Keyboard accessibility
  4. Restart your computer, then try using Green Shot.

3. Run the app as an admin

  1. Press the Windows key, type greenshot in the search box, and click Open file location.OPen file location - greenshot windows 11 not working 
  2. Right-click Greenshot, and select Properties from the context menu.
  3. On the Greenshot Properties window, go to the Compatibility tab, and select the Run this program in compatibility mode for.Run as admin
  4. Next, under Settings, select Run this program as an administrator.
  5. Click Apply, then OK to save the changes.

4. Disable the Snipping tool

  1. Press Windows + R to open the Run window.   Regedit RUN COMMAND (2) 
  2. Type regedit.msc and click OK to open the Registry Editor app.
  3. First, back up the registry entries. To do that, go to File, then click Export. Save the .reg file to an accessible location.
  4. Navigate to this path: Computer\HKEY_LOCAL_MACHINE\SOFTWARE\Policies\ Microsoft\TabletPC
  5. If you don’t see the TabletPC key, right-click Microsoft, select New, then choose Key. Rename it as TabletPC.New - Key - greenshot windows 11 not working
  6. Now, right-click the TabletPC key, click New, then choose DWORD > (32-bit Value) and rename it DisableSnippingTool.DWORD
  7. Double-click DisableSnippingTool to open its Properties. Change the Value data to 1, and under Base, select Hexadecimal, then click OK.Value data
  8. Reboot your computer to save the changes.

If you ever want to enable the Snipping Tool in the future, change the Value data for DisableSnippingTool to 0 and click OK.

5. Change the Greenshot’s hotkey

  1. Right-click the Greenshot icon in the system tray and select Preferences from the context menu.Preferences 
  2. In the Preferences window, go to the General tab and locate Hotkeys.Hotkeys
  3. Change the Hotkeys for Capture full screen, Capture window, Capture region, Capture last region, and Capture Internet Explorer, and click OK to save the changes.

6. Reinstall the Greenshot app

  1. Press Windows + I to open the Settings app.
  2. Go to Apps, then click Installed apps.    
  3. Locate Greenshot, click the three-dot icon, and select Uninstall.Uninstall - greenshot windows 11 not working
  4. Click the Uninstall button to confirm the action.Uninstall
  5. Once done, go to Greenshot’s official website and click Download Now.Download now - greenshot windows 11 not working
  6. Choose the Latest Stable option.Latest stable
  7. Click Save to download the exe file for the app.
  8. Double-click the executable file and initiate the installation process for Greenshot.

7. Turn off Dropbox’s screenshot feature (if applicable)

  1. Right-click the Dropbox icon in the system tray, then click the gear icon, and from the context menu, select Preferences to open the Dropbox Preferences.
  2. Go to Backups, locate Share screenshots using Dropbox, and remove the checkmark next to it.

If you don’t use Dropbox, you can also use Steps 1 to 3 of Method 6 to uninstall the app completely from your Windows computer.

To sum up, if your Greenshot does not work on Windows 11, it could be due to an outdated app, the wrong keyboard setting, or Dropbox interfering with the entire process.

If you still have trouble using Greenshot on Windows 11, check out the best snipping tools for your Windows computer.

Do you know you can use four different methods to take screenshots on your Windows 11 computer? Read this guide to learn more.

Which method worked for you to fix this Greenshot issue? Please share your thoughts in the comments section below.

How to Fix the Printer if it’s Printing Dots on Paper

Dealing with a printer that leaves dots on your paper can be incredibly frustrating, and it’s usually because the printer drum has ink residue or debris. A cartridge leakage may also cause this problem. Nevertheless, here’s how to solve this problem.

What do I do if the printer is printing dots on paper?

1. Clean the drum unit

  1. Always start by turning off and unplugging your printer. This prevents potential electric shocks and allows safe handling of internal components.
  2. Gently open the front or top cover of the printer to access the drum unit and toner cartridge.
  3. Carefully pull out the drum unit and toner cartridge assembly. You might need to remove the toner cartridge from the drum unit by pressing a lock lever.
  4. Look for any obvious debris or toner build-up on the drum surface.
  5. Use a clean, lint-free cloth or a cotton swab moistened with isopropyl alcohol to gently clean the drum surface. Avoid touching the drum with bare hands as oils from your skin can damage it.
  6. Inspect the drum for any scratches or marks. If you find any, the drum may need to be replaced.
  7. Once cleaned, reinsert the toner cartridge into the drum unit and then place the assembly back into the printer.
  8. Power on the printer and from the printer’s menu, navigate to the maintenance or cleaning option and run a cleaning cycle.

This solution helps because debris or toner build-up on the drum can transfer to paper as dots. Cleaning the drum can remove these particles, improving print quality.

2. Replace the toner cartridge

  1. Start by ensuring the printer is off and unplugged to safely handle the internal components.
  2. Access the toner cartridge by opening the front or top cover of the printer.
  3. Carefully pull out the toner cartridge.
  4. Look for any signs of leakage or damage. If you see any toner leaking or the cartridge looks damaged, it likely needs replacing.
  5. Ensure you shake the new toner cartridge gently to distribute the toner evenly before installing it.
  6. Insert the new toner cartridge into the printer.
  7. Close the cover properly and plug in and power on the printer.
  8. Print a test page to check if the dots have disappeared.

Replacing the toner cartridge is essential if the current one is defective or worn out. A damaged cartridge may leak toner, causing dots on the paper.

3. Clean the transfer belt

  1. Safety first by ensuring the printer is turned off and unplugged.
  2. Access the internal components by opening the printer cover.
  3. Refer to your printer’s manual to locate the transfer belt.
  4. Use a clean, dry, lint-free cloth to carefully wipe any toner or debris from the belt surface.
  5. Access the printer’s maintenance menu and select the option to clean the transfer belt (if it’s available for your printer.
  6. Follow the on-screen instructions to complete the cleaning process.
  7. Ensure the cover is securely closed, plug in the printer, and turn it back on.
  8. Print a page to verify if the issue is resolved.

The transfer belt plays a crucial role in transferring toner to paper. Cleaning it can remove any accumulated debris that might cause dots.

4. Use the correct paper type

  1. Check the type of paper you’re using. Ensure it matches what the printer supports.
  2. Access your printer’s settings from your computer.
  3. Navigate to the print settings menu and select the correct paper type (plain, glossy, thick, etc.).
  4. Use the bypass tray for thicker or specialty paper.
  5. Ensure the paper is loaded correctly and is not wrinkled or damaged.
  6. Print a test page to see if the dots issue is resolved.

Using the incorrect paper type can cause various print issues, including dots or smudging. Ensuring the correct paper type is used helps the printer optimize the printing process.

5. Reset the printer to factory settings

  1. From the printer’s menu, navigate to the settings or setup option.
  2. Look for an option to reset the printer to factory settings. This is usually found under maintenance or setup menus.
  3. Select the factory reset option and confirm your choice.
  4. After resetting, you’ll need to set up the printer again, including reconnecting to your network and configuring print settings.
  5. Print a test page to ensure the dots issue has been fixed.

Resetting the printer can clear any software-related issues causing the dots, restoring its functionality to how it was when first purchased.

6. Use a professional maintenance service

  1. If all else fails, contact the customer support service of your printer’s manufacturer.
  2. Arrange for a professional maintenance service. Explain the issue and the troubleshooting steps you’ve already taken.
  3. Let the technician inspect and repair the printer. They may clean, repair, or replace components as needed.

When internal components are damaged or heavily soiled, professional service ensures your printer is fixed with specialized tools and expertise.

By following these comprehensive steps, you should be able to troubleshoot and resolve issues causing dots on your printed pages. To prevent future problems, regularly clean your printer and use the recommended paper and toner cartridges.

If the printer can’t print at all, click the highlighted link for the right solutions to fix it. In case you need to replace it, here’s our list of the best printers for a medium office.

Did you manage to get rid of the printer printing dots issue? Let us know in the comments below.

How to Fix RGSS102E.DLL Could Not Be Found

Many users have reported encountering the rgss102e.dll could not be found issue when they tried to launch a few old projects from before XP was available on Steam.

This DLL file is associated with RPG Maker, which people use to create role-playing games. If you see this error, it could be due to corrupted files or RPG Maker not being correctly installed.

How can I fix the rgss102e.dll could not be found issue?

1. Reinstall RPG Maker

  1. Press Windows + I to open the Settings app.
  2. Go to Apps, then click Installed apps.Apps installed apps          
  3. Locate RPG Maker, click the three-dot icon, and select Uninstall.RPG maker uninstal - rgss102e.dll could not be found
  4. Click the Uninstall button to confirm the action.Uninstall - rgss102e.dll could not be found
  5. Now go to RPGMaker’s official website, click RPG Maker XP to select it, and click Download Run Time Package.Download the app
  6. Once downloaded, double-click the file and follow the on-screen instructions to complete the installation.

2. Use a third-party DLL fixer

RGSS102E.dll is a third-party DLL file that comes with the RPG Maker software. If not done correctly, manually restoring a DLL file can cause more harm than good to your computer. Therefore, it is recommended that a third-party DLL fixer tool be used.

These software are known to fix compatibility issues, which are significant problems that plague third-party DLL files and Windows PCs.

3. Run SFC & DISM scans

  1. Press the Windows key, type cmd in the search box, and click Run as administrator.CMD elevated - rgss102e.dll could not be found
  2. Type the following command to repair system files and hit Enter: sfc/scannowSFCSCANNOW CMD rgss102e.dll could not be found
  3. Wait for the scan to complete, then copy & paste the following command to restore Windows OS image files, and press Enter: Dism /Online /Cleanup-Image /RestoreHealthRestore health rgss102e.dll could not be found
  4. Once the scan is executed, your computer will automatically connect to the Windows Update service to repair and restore the corrupt files. Restart your computer to let the changes take effect.

4. Perform a System Restore

  1. Press the Windows key, type control panel in the search box, and click Open. Control Panel start menu rgss102e.dll could not be found    
  2. Choose Large icons as View by, then click Recovery.Recovery Control Panel
  3. Click Open System Restore.Open system restore rgss102e.dll could not be found
  4. Select Choose a different restore point in the System Restore window and click Next.Next Choose a different restore point rgss102e.dll could not be found
  5. Choose the point at which you want your Windows restored and click Next.Choose a point
  6. Click Finish to initiate the process.Finish

Windows will restart and restore to the selected version. If the System Restore wasn’t completed successfully, we recommend you check out this informative guide for solutions.

5. Download the DLL file manually

Note icon NOTE
Always use a reliable website like DLL Files to install DLL files, as installing DLL files on a non-reliable website may cause more harm than good. You can follow the steps mentioned to restore the file manually.

  1. Visit the DLL Files website, search RGSS102E.DLL, select an appropriate option, and click Download.Download the DLL file rgss102e.dll could not be found
  2. Double-click the downloaded folder to open, locate, and copy the .dll file.
  3. Go to this path and paste the file: C:\Windows\System32\
  4. Reboot your PC to save the changes.

You can follow these methods to fix the rgss102e.dll could not be found issue. If you are facing the missing DLL files issue on your Windows 10, we suggest you read our informative guide to learn solutions for this common problem. You can also fix a similar issue with Netapi32.dll.

Please share any information, tips, or experience with the subject in the comments section below. We will include them in the guide.

What is Automatic Ducking in Discord and How to Stop It?

If you have ever been interrupted by automatic Discord ducking when you are in a meaningful conversation or at an exciting point in a game, you might want to disable it. In this guide, we will discuss simple methods to stop automatic ducking in Discord.

What is Automatic Ducking in Discord?

Automatic Discord ducking enhances audio clarity by minimizing background noise or music’s volume as soon as another user starts speaking.

When enabled, Automatic Discord ducking monitors the audio input and output levels and reduces the overall volume when a new speaker joins the conversation, which may sometimes result in unbalanced audio output.

How can I stop Automatic Ducking in Discord?

1. Turn off Automatic Ducking

  1. Press the Windows key, type discord, and click Open to launch the Discord app.Discord Open - automatic ducking discord
  2. Click the gear icon next to your Profile pic to open Settings.Profile - Settings -automatic ducking discord
  3. Locate App Settings from the left pane and click Voice & Video.
  4. On the Voice Settings page, scroll down on the right pane to locate Advanced.automatic ducking discord
  5. Go to Automatic Ducking and toggle the switch to disable it.
  6. If you can’t see this feature, look for Stream Attenuation instead and toggle it off. Stream attentuation - automatic ducking discord
  7. If you don’t want to turn it off completely, you can also drag the slider present under Stream Attenuation Strength to the left side to reduce it.

2. Modify the Global Attenuation settings

  1. Launch the Discord app, then click the gear icon next to your Profile pic to open Settings.Profile - Settings -automatic ducking discord
  2. Under App Settings from the left pane, click Voice & Video.
  3. On the Voice Settings page, scroll down on the right pane to locate Advanced.Global attentuation - automatic ducking discord
  4. Go to Global Attenuation, and drag the slider to the left to disable or reduce the Attenuation. You can also specify the setting for When I speak, and When others speak.

3. Change the output device

  1. Press the Windows key, type discord, and click Open to launch the Discord app.
  2. Under App Settings from the left pane, click Voice & Video.Output device - automatic ducking discord
  3. On the Voice Settings page, locate Output Device and choose a different Output device from the drop-down menu.

4. Reduce Input Sensitivity

  1. Press the Windows key, type discord, and click Open to launch the Discord app.
  2. Under App Settings from the left pane, click Voice & Video.Input Sensitivity - automatic ducking discord
  3. Locate Input Sensitivity and toggle off the switch next to it to disable it.
  4. If you don’t want to disable it, move the slider to the left side to reduce it.

If you are facing other issues related to Discord, like the app not opening or freezing, here are the quick steps to fix the problems.

5. Modify the Communications activity (Windows computer)

  1. Press Windows + I to open the Settings app.
  2. Go to System, then click Sound.System - Sound
  3. Scroll down to find More sound settings.More sound settings
  4. On the Sound pop-up window, go to the Communications tab.Do nothing - automatic ducking discord
  5. Under When Windows detects communications activity, select Do nothing.
  6. Click Apply, then OK to save the changes.

6. Disable the Exclusive control (Windows computer)

  1. Press Windows + I to open the Settings app.
  2. Go to System, then click Sound.System - Sound
  3. Scroll down to find More sound settings.More sound settings
  4. On the Playback tab, right-click the audio device, then select Properties.Select Properties of Speaker
  5. On the Properties window, go to the Advanced tab and remove the checkmark next to Allow applications to take exclusive control of this device.Exclusive mode - automatic ducking discord
  6. Click Apply, then OK to confirm the changes.

Now you know what automatic ducking is in Discord and how to control it or stop it entirely from occurring.

If you have any other questions or suggestions about the topic, feel free to mention them in the comments section below.

How to Enable DLSS in Hunt: Showdown 1896

Are you looking to elevate your gaming experience in Hunt: Showdown 1896? Enabling DLSS (Deep Learning Super Sampling) can significantly enhance your performance, providing smoother gameplay and better visuals. Here’s how you can unlock superior performance with DLSS in Hunt: Showdown 1896.

How do I enable DLSS in Hunt: Showdown 1896

1. Update Your NVIDIA GeForce Game Ready Driver

  1. Click on the start menu, type GeForce Experience and press Enter.
  2. Login to your NVIDIA account (if you’re not already logged in)
  3. Click on the Drivers tab at the top left of the screen.
  4. Click on Check for updates or Download if the update is already available.
  5. Follow the on-screen instructions to download and install the latest driver version.

Updating to the latest driver ensures that you have the necessary software to support DLSS in Hunt: Showdown 1896.

2. Enable DLSS in the game settings

  1. Launch Hunt: Showdown 1896
  2. On the main menu, click on Options.
  3. Navigate to Graphics Settings.
  4. Scroll down to the DLSS option.
  5. Click on the dropdown menu and select the desired mode (Quality, Balanced, or Performance).
  6. Adjust DLSS settings to your preference:
    • Choose Quality for the best visual experience.
    • Choose Performance for the best frame rates.
    • Choose Balanced for a mix of both.

Enabling DLSS can significantly improve your gaming performance by rendering your game at a lower resolution and upscaling it, providing better frame rates and smoother gameplay.

3. Fine-tune zdditional graphics settings

  1. Start Hunt: Showdown 1896
  2. Navigate to Options and then select Graphics Settings.
  3. Set Texture Quality to High or Ultra for better visuals.
  4. Lower it to Medium or Low if you experience performance issues.
  5. Enable or disable options like Anti-Aliasing, Reflections, Shadows, and more.
  6. Use NVIDIA Control Panel for further tweaks:
    • Right-click on your desktop and select NVIDIA Control Panel.
    • Go to Manage 3D settings.
    • Scroll to Hunt: Showdown 1896 and tweak settings like Anisotropic Filtering, Power Management Mode, and Texture filtering.

Fine-tuning your graphics settings helps to optimize the balance between visual quality and performance, enhancing your overall gaming experience.

Additional tips to improve Hunt: Showdown 1896 gaming performance

  1. Monitor Performance:
    • Use in-game benchmarking tools to assess the impact of DLSS and other graphical settings.
    • Adjust settings accordingly based on performance metrics.
  2. Regularly Update Drivers:
    • Ensure that your NVIDIA drivers are always up-to-date to get the latest performance enhancements and bug fixes.
  3. Check for Game Updates:
    • Game updates often include performance improvements and bug fixes that can enhance your experience.

By following these solutions, you can enable DLSS in Hunt: Showdown 1896, improve your gaming performance, and enjoy a more immersive experience.

You may also try one of the best game booster software from our list of recommendations. Our guide on how to increase the FPS on a laptop might be helpful as well.

Did you manage to enable DLSS on Hunt: Showdown? Let us know in the comments below.

Is There A Way to Keep Microsoft Office After System Restore?

Generally, you perform a system restore when your computer malfunctions or system files are corrupted, which restores your device to a previous state where it was working fine.

When restoring your PC to the oldest version, you undo all the changes and updates made after the selected restore point. This applies to all apps, including Microsoft Office. Reinstallation is the only way to get the newest version back on your device. To do so, follow these steps sequentially.

How can I keep Microsoft Office after System Restore?

1. Check if you have Microsoft Office installed

  1. Press the Windows key, type control panel in the search bar, and click Open.Control Panel start menu  - keep microsoft office after system restore-
  2. Select Category for View by, then click Uninstall a program under Programs.Uninstall a program
  3. Locate Microsoft Office from the list, select it, and click Uninstall.Uninstall Microsoft Office
  4. Follow the on-screen instructions to complete the uninstallation process.

If you don’t find Microsoft Office in the list, it might have been removed during the system restore.

2. Remove all traces of Microsoft Office

  1. Press Windows + E to open the Windows File Explorer.
  2. Navigate to any of these paths, depending on your system architecture, select the Microsoft Office folder, then click the Delete icon to remove it: Program Files - Microsoft Office - keep microsoft office after system restore
    • C:\Program Files\Microsoft Office
      C:\Program Files (x86)\Microsoft Office (for 64-bit systems)
  3. Next, to remove them from the AppData folder, go to these paths one by one after replacing Your Username with your username and delete the Microsoft Office folder:Office Delete - keep microsoft office after system restore
          C:\Users\[Your Username]\AppData\Roaming\Microsoft\Office
          C:\Users\[Your Username]\AppData\Loca\lMicrosoft\Office
      • Close Windows File Explorer, and press Windows + R to open the Run window.
      • Type regedit.msc and click OK to open the Registry Editor.
      • Before making changes, take a backup of registry entries. To do that, go to File, then click Export. Now save the .reg file at an accessible location.
      • Navigate to these paths one by one, right-click, and select Delete from the context menu to remove the Office folder: Delete the registry
        • Computer\HKEY_CURRENT_USER\Software\Microsoft\Office Computer\HKEY_LOCAL_MACHINE\SOFTWARE\Policies\Microsoft\Office
      • Before deleting them, you might get a warning; confirm your choice and restart your computer to save the changes.

      3. Access a Microsoft account to download Microsoft Office

      Note icon NOTE
      Since Microsoft Office now gets linked with a Microsoft account, you don’t need to keep a product key handy. However, you need the product key if you have not connected the product to your Microsoft account.
      1. Go to Microsoft’s official website.
      2. Click the Blank profile icon and enter your email address and password to sign in to your Microsoft account.
      3. Once signed in, click your Profile picture and select My Microsoft account from the drop-down menu.Microsoft account - keep microsoft office after system restore
      4. From the left pane, click the third option under your profile pic, Services & subscriptions.
      5. Locate your Microsoft Office under the Products you’ve purchased section and click Install.Install the app
      6. This will download the Office setup file. Once downloaded, double-click it to initiate the installation.
      7. Follow the on-screen instructions to complete the process.

      Once Microsoft Office is installed, you can use Word, Excel, PowerPoint, or any other app without issues. If you see a prompt to activate your product, sign in using your Microsoft account, and your purchase will be validated.

      In conclusion, if you take your device to an old restore point, backup your important files in the system drive. Also, be prepared to reinstall the apps that have undergone recent changes.

      If you see the System Restore did not complete successfully message, it could be due to conflicting programs, driver errors, or startup apps; read this guide for detailed solutions.

      In case your System Restore is not working on your Windows 10 or 11 computer, it could be due to outdated Windows Updates, or interfering third-party apps; read this guide to learn more.

      Were you able to get Microsoft Office after performing a system restore using these steps? If so, share your experience with our readers in the comments below.

      The new Outlook will finally let users filter, sort and copy list of meeting attendees

      The new Outlook for Windows and Web will receive a string of capabilities focused on managing event attendees. According to the latest entries in the Microsoft 365 Roadmap, one capability will be released in September, while the other two will be released in October. They’re focused on sorting, filtering, and copying lists of attendees.

      For instance, managers can sort meeting attendees alphabetically with a simple click.

      Allow users to sort meeting attendees in the tracking list alphabetically.

      Outlook will also let them filter meeting attendees by name in the tracking list and copy that list from the calendar event onto any document.

      You’re not wrong if you think these are essential features that every email app should have. However, the new Outlook for Windows has only recently been made generally available to users, so Microsoft has chosen an excellent time to enhance it with these features.

      They’re instrumental in encouraging people to migrate to the new Outlook. Despite the better capabilities and intuitive interface, the new Outlook pales compared to the classic version, and many would prefer to stay with that version.

      While initially thought that the classic Outlook would be retired by 2025, Microsoft decided to keep the version for a while, up until 2029, and it is strongly possible that it will become a web app.

      Let’s hope that until 2029, users will migrate to the new Outlook. What do you think about these new features?

      Microsoft unveils new link-context technology that could radically change the way we use Edge

      Imagine you’re sitting at your desk, working away on your desktop application, and you stumble upon a link in a document that piques your interest. You click on it, and your web browser opens up, loading the linked webpage. But what if, along with that webpage, you could also see the link’s context directly in your browser? No more flipping back and forth between applications to remember why you clicked on that link in the first place.

      If this sounds convenient, we have some good news for you. Microsoft has been working on this technology with its latest patent application.

      This new technology transfers link context from a desktop application to your web browser. So, when you click on a link in an email or a Word document, the browser opens the link and brings along a snippet of information from the original document.

      This snippet could include the desktop application’s name, the document’s name, and the user’s details.

      But how does it work? Once the web browser receives the web address and this additional link context, it identifies a browser-based application that matches the desktop application you were using. It then launches this browser-based version within the web browser, like a sidebar pane, and feeds it the link context. This means you can see the document and the webpage side by side, right within your browser.

      For instance, if you clicked on a link in an email, the browser could open the corresponding web-based email application in a sidebar, showing you the email that contained the link. This way, you can see the email and the webpage it is linked to simultaneously, making your browsing experience more seamless and integrated.

      What’s even better is that this technology isn’t limited to emails. It could work with any document or application, from word processors to spreadsheets, as long as a web-based counterpart can be launched within the browser.

      This could be a future Microsoft Edge feature, as the Redmond-based tech giant has all the tools to make it happen: Edge is now on the roll, and the browser is experiencing a surge in users, and for good reason. The browser is improving with each update, and it already has a sidebar that can be used to employ the technology.

      Let’s not forget that the Microsoft 365 apps have a web-based counterpart to make this technology possible. Word, Excel, and PowerPoint for the Web are available, and Microsoft is keeping them well updated—they recently received a new interface.

      So, while the technology is still at the level of a patent, it has great applicability, and it could be one of the many capabilities that would Edge the edge (sorry for the pun) to move ahead and get closer to the titan that is Google Chrome.

      You can read the patent here.

      Microsoft’s new Phi-3.5 AI family is praised by many from the devs community

      Earlier this week, Microsoft announced and released the new Phi-3.5 family of AI models, making it available for users to test. The family has three models: MoE, Mini, and Vision, and the Redmond-based tech giant crafted them to push the boundaries of what’s possible in artificial intelligence.

      According to many users who have already tested it, the new Phi-3.5 family is doing exceptionally well. On Reddit, people are already praising the model as being very safe.

      I think it’s one of the most censored models to date. Well done, MS. It’s very safe and very effective. It will not answer anything even a little bit ‘offensive’. It resists training, too!

      The models have been enhanced with a staggering 128K token context length, and they can provide meaningful, well-thought-out responses to even the most sensitive questions without being offensive.

      For example, one Reddit user initiated a conversation with the Phi-3.5 Mini model by telling it that their partner is mean, to which the model gave insightful advice, as you can see below.Microsoft Phi-3.5

      Rememeber, Microsoft made all three models from the new Phi-3.5 AI family available on Hugging Face as follows:

      You can fine-tune them to complete specific tasks and respond to particular questions, but it will do so in a censored, neutral, and insightful way.

      Phi-3.5 competes with Gemma, the AI model from Google’s Gemini family, and tries to provide an alternative to ChatGPT, especially OpenAI’s newest GPT-4o. The truth is, it might actually do that.

      The reason is unknown, but Microsoft and OpenAI might not be on good terms anymore. The Redmond-based tech giant is looking to develop its own family of AI models. Will we see the Phi AI family integrated into future Copilot products? Well, in all honesty, we might.

      If Microsoft keeps investing in its own LLMs, without relying too much on other companies for AI, the company might actually not need OpenAI anymore. It’ll be interesting to see that, at least.

      What do you think about it?

      ERROR_READ_FAULT – 5 Quick Fixes

      ERROR_READ_FAULT means the system can’t read from the specified device. It can disrupt your workflow, preventing you from accessing important files or running some programs. In my experience, it’s caused by corrupted system files, outdated or incompatible drivers, or hardware problems.

      Luckily, there’s a way to fix it. I’ll show you how to resolve this error in a few steps, so let’s get into it!

      5 Ways To Fix ERROR_READ_FAULT

      Here are the solutions:

      Repair Corrupted System Files

      Corrupted system files often cause this error. Repairing them will restore system stability. Here’s how to do it:

      1. Type “cmd” in the Windows search bar, and select “Run as administrator.“
      Run as administrator
      1. In the Command Prompt window, type sfc /scannow and press Enter.
      Type sfc /scannow

      Let the scan complete, and then restart your PC. Check if the issue is solved.

      Update Your Driver

      Outdated or incompatible drivers can also trigger ERROR_READ_FAULT. Here’s how to update them:

      1. Right-click on the Start menu and choose “Device Manager.”
      Device Manager
      1. Locate the device causing issues. Normally, they have a yellow exclamation mark. Right-click it, and select “Update driver.”
      Update driver
      1. Choose “Search automatically for drivers” and follow the prompts.
      Search automatically for drivers

      Roll Back Your Driver

      If updating the driver doesn’t resolve the issue and the error started after a recent update, rolling back to a previous version can help. Here’s how:

      1. Open “Device Manager” as before.
      2. Right-click on the device and select Properties.
      Properties
      1. Go to the Driver tab, choose “Roll Back Driver,” and follow the on-screen instructions to complete the rollback process.
      Roll Back Driver

      However, if the option is greyed out, there’s no previous driver version to revert to.

      Restore Your System

      Restoring your system to a previous state can eliminate the error by undoing recent changes that may have triggered it. Here’s how to proceed:

      1. Type “restore” in the Windows search bar and tap the Open button under  “Create a restore point.”
      Create a restore point
      1. Tap System Restore on the System Properties Window.
      1. Click Next.
      Tap Next
      1. Pick a restore point from the list, then hit Next.
      Pick a restore point
      1. Tap Finish.
      Tap Finish

      Reinstall Windows

      For more severe cases of the ERROR_READ_FAULT, reinstalling your operating system can provide a fresh start. However, it should be the last option. Here’s how to proceed:

      1. Save important files to an external drive or cloud storage.
      2. Go to the official Microsoft website, download the Windows Media Creation Tool, and create a bootable USB or DVD.
      Windows Media Creation Tool,
      1. Insert the USB or DVD, restart, and boot from it.
      2. Select language/preferences and click Install now.
      3. Follow the prompts after installation to configure settings.

      Overall, ERROR_READ_FAULT can be frustrating, but with the right approach, it’s manageable. The above steps will help you to resolve the issue and get your PC running smoothly again.

      Additionally, you can learn how to fix MISMATCHED_HAL or what to do when your computer is unable to start.