Webcam JS Error: Could Not Access Overconstrainederror

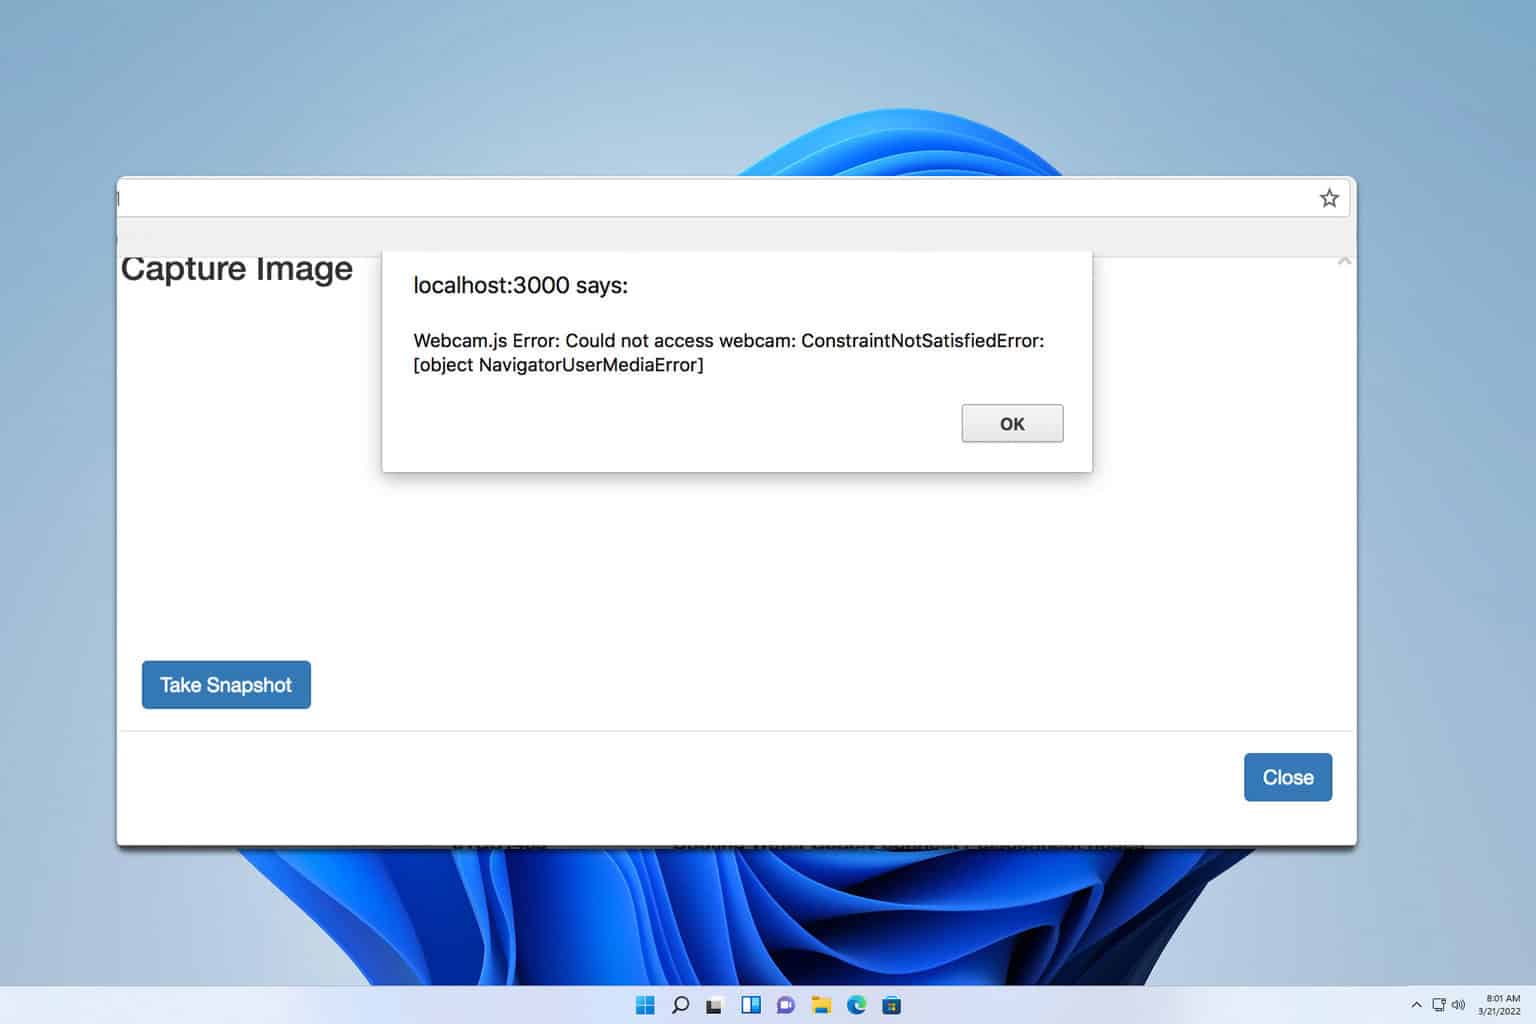
Running into a Could not access webcam issue with Webcam.js can be incredibly frustrating, especially when you’re in the middle of an important task. Let’s dive into some practical solutions to get your webcam up and running again.

How can I fix the Webcam JS error?

Before trying anything else, check if the problem appears in other browsers or PCs. Also, check if the webcam is properly connected and that no other applications are using it.

1. Ensure HTTPS connection

  1. Open Chrome and navigate to the website where you are encountering the webcam.js error.
  2. Check the URL in the address bar to ensure it begins with https.
    https browser
  3. If it starts with HTTP, update your website to use HTTPS. For this, you’ll need to purchase an SSL certificate and install it on the server.

To prevent errors such as this one, all resources need to be loaded using HTTPS.

2. Reset Camera permissions

  1. Open Chrome and navigate to the website experiencing the webcam.js error.
  2. Click on the camera icon in the address bar (it may appear as a blocked camera).
  3. Select Allow to use the camera.
    allow camera access
  4. Refresh the page to apply the new setting.

3. Enable insecure origins treated as secure

  1. Open Chrome and type chrome://flags/#unsafely-treat-insecure-origin-as-secure in the address bar, then press Enter.
     chrome flags unsafely treat insecure
  2. Find the flag for Insecure origins treated as secure.
  3. Enable the flag and add the addresses you want to treat as secure, including the port number if required.
    enabled insecure origin treated as secure
  4. Save and restart Chrome.

This workaround allows you to bypass the secure origin policy temporarily. It can be helpful if you cannot switch to HTTPS immediately but need to test webcam functionality on an insecure site.

4. Revisit webcam.js implementation

  1. Ensure you are using the latest version of Webcam.js by downloading it from GitHub.
  2. Check your implementation against the documentation to ensure all settings are correctly configured.
    Webcam.set({
    width: 320,
    height: 240,
    image_format: 'jpeg',
    jpeg_quality: 90
    });
    Webcam.attach('#my_camera');
  3. Include error handling to manage any issues that arise during initialization.
    Webcam.on('error', function(err)
    {
    console.log(err);
    });

5. Clear the browser cache

  1. Open Chrome, go to the settings menu and click on Clear browsing data.
    delete browsing data chrome
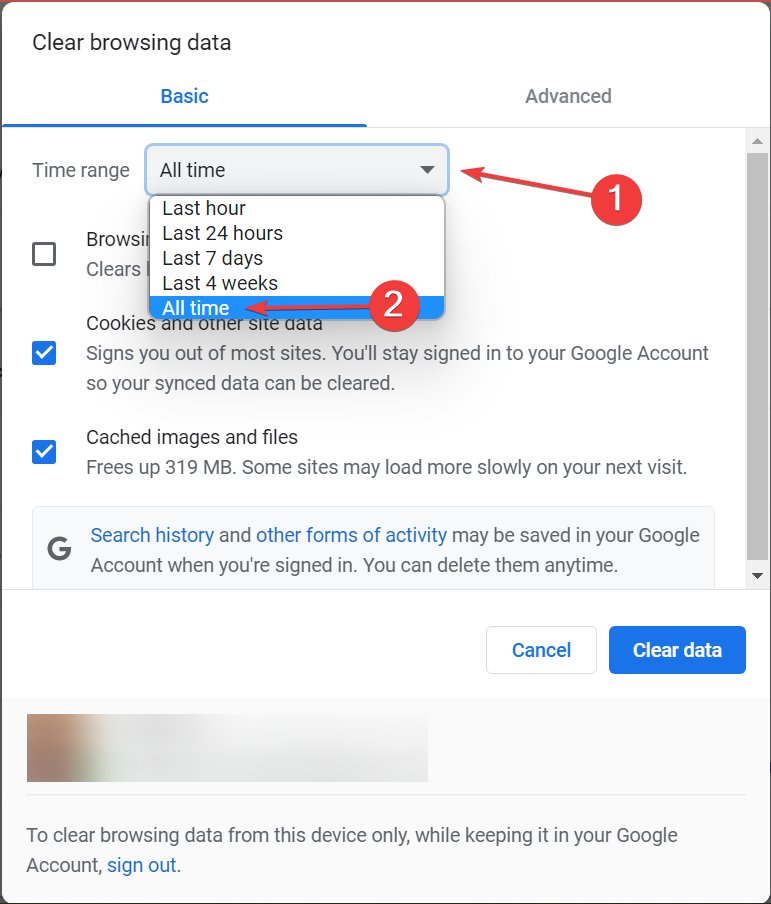
  2. Set the Time range to All time and select data to remove. Click on Clear data.
    clear browsing data in google chrome
  3. Close Chrome completely and restart it.
  4. Try accessing the webcam again on the site.

By following these solutions, you should be able to resolve the webcam.js could not access overconstrainederror message. If the problem is still there, might want to use other libraries such as JpegCamera or CameraTag.

To learn more about how your webcam works, we have a guide that lets you see what app is using your camera. We also have an article on how to test your webcam, so don’t miss it.

Before you leave, did you know that you can use a webcam without any drivers? That’s right, and we covered this subject in another guide.

Microsoft Edge’s Rewards Promotion on Android Offers a Chance to Win $1 Million

After adding Workspaces, Microsoft Edge has launched a new rewards campaign on Android that offers users the opportunity to win a life-changing $1 million prize. The campaign encourages users to earn points by searching with Edge and completing various activities. The campaign is available until October 31, 2024.

To participate in the campaign, users need to open Microsoft Edge on their Android device and look for the rewards card. The card will display a message inviting users to join the sweepstakes and earn entries by searching for 5 days. Once they sign up, users can start searching to accumulate entries.

Microsoft Rewards Campaign of worth $1 Million in Microsoft Edge on Android

“Available until 2024-10-31, Win a life-changing $1M prize! Search for 5 days to earn 15 entries in $1M sweepstakes! Sign up to win $1M Start searching to win $1M!. You will receive emails about Microsoft Rewards, including offers about Microsoft and partner products. Terms|Privacy Search now!” Microsoft Rewards promo spotted by WindowsReport says.

In addition to the sweepstakes, the campaign also offers users the chance to earn points by completing various activities. These activities can range from setting Edge as the default browser, turning on notifications, and planning a trip, to answering trivia questions. The earned points can then be redeemed for rewards, such as gift cards, products, or experiences

Joining the Microsoft Edge Rewards campaign offers users a lot of benefits. Participants have the chance to win a life-changing prize, earn valuable rewards, discover new products and services, and support Microsoft and its partners.

All in all, I can say, that the Microsoft Edge Rewards campaign offers a fun and exciting way for Android users to earn rewards and potentially win a huge cash prize.

Apart from the Rewards campaign in Microsoft Edge on Android, Microsoft is adding screenshots to the PWA install dialog to make them visually appealing.

Printer Printing Blue Instead of Black: 7 Easy Fixes

Often, you find your HP, Canon, Epson, or Brother printer printing blue instead of black. For some, the problem appears after changing the cartridges or resetting the printer, while for others, the printer does it out of the box!

If you are wondering why my printer keeps printing in blue instead of black, the possible reasons include misconfigured print settings/preferences, incompatible cartridges, outdated or corrupt driver, clogged printer head, issues with the nozzles, and the use of unsupported paper.

Before you start fixing things, restart the printer and let it rest for 30-60 minutes. Also, make sure you are using ink cartridges that are compatible with the printer. Remember, region-specific ink cartridge compliances must be verified!

What can I do if the printer is printing blue instead of black?

1. Perform a printer reset

Tip icon Tip
The steps listed here are for an HP printer. If you have another printer, check the manufacturer’s official documentation for the exact steps, although these should be similar.
  1. Turn on the printer and wait for 5 minutes to allow it to reach an idle state.
  2. Now, disconnect the power cord from the printer, then unplug the other end from the power source, and wait for 1 minute.
  3. Now, plug the cord back first into the power outlet and then the printer.
  4. Turn on the printer, wait for the lights to stop flashing, and then check whether the printer printing blue tint problem is resolved.

2. Reinstall the printer

  1. Press Windows + X to open the Power User menu, and select Device Manager.
  2. Expand the Printers entry, right-click on the printer printing in blue instead of black, and select Uninstall device.uninstall device to fix printer printing blue instead of black
  3. If available, tick the checkbox for Attempt to remove the driver for this device, and then click on Uninstall.
  4. Press Windows + R to open Run, type appwiz.cpl in the text field, and hit Enter. appwiz.cpl
  5. Select any printer-related software from the list, and click on Uninstall.delete apps
  6. Follow the on-screen instructions to complete the process.
  7. Now, go to the manufacturer’s official website, be it HP, Canon, Epson, or Brother, and download the dedicated driver and software package for your printer and iteration of the OS.
  8. Run the setup (.exe) file, install any additional printer-related tools along with the driver, and then set up your printer.setup
  9. Finally, restart the computer and check for improvements.

3. Check the print head nozzles

Tip icon Tip
The steps listed here are for the Epson Stylus Photo R280 printer series. If you have another printer, check the manufacturer’s official documentation for the exact steps, although these should be similar.
  1. Press and hold the Paper and Power buttons on the printer, and as soon as the power light begins to flash, release only the Power button.
  2. As you see the nozzle check pattern printing, also release the Paper button, and then check the patterns.
  3. If you see full, straight lines, the print head nozzle is fine, while broken or faint lines indicate clogging. For the latter, you will need to clear the print head. (Image source: Epson’s official documents)print head nozzle check to fix printer printing blue instead of black
  4. To clean the print head nozzles, press the Ink button on the printer for 3 seconds and wait for the power light to start flashing.
  5. After cleaning the print head, again see the nozzle check pattern and verify whether it’s fine. If it is, your Epson printer should no longer be printing blue instead of black.

4. Check for program-specific issues

When your Epson, HP, Brother, or Canon printer is printing blue instead of black with a given software, it could be the program-specific settings to blame. Say, the printer is printing blue instead of black for PDFs using Adobe Acrobat.

adobe acrobat print
Print settings in Adobe Acrobat

In this case, you could reset the program to the default settings, reinstall it, or try an alternative. There are several reliable options for PDF editors as well as Microsoft Office alternatives to try. With one of these, the printing problem shouldn’t appear any longer!

5. Check the ink levels in the cartridges

Low ink levels in the black cartridge may also force the printer to use blue ink instead. So, check the ink levels in all cartridges and make sure they are not out of ink. Also, while you are at it, verify whether all the seals have been peeled off the cartridge, especially the black one in this case.

Besides, try a spare cartridge, if you have one, and look for improvements. In case the printer does not print blue instead of black anymore, the earlier cartridge was likely damaged, and you must get it replaced.

6. Change the paper

In a few cases, it was the paper quality to blame for the HP printer printing blue instead of black. So, if you have recently switched to another paper for the printer, start using the earlier one, and the prints should, in all likelihood, come out fine.

As for the paper size and quality, refer to the printer’s manual to find out the compatible ones and only use those.

7. Contact support

When nothing else works, the last option is to contact the manufacturer’s dedicated support. If it’s a major hardware problem, you must get the printer inspected and the faulty components repaired or replaced.

Now that you have fixed the problem causing the HP, Brother, Epson, or Canon printer to print blue instead of black, learn how to download the latest printer drivers and enjoy an improved performance!

If you know of more fixes for the problem, share them with our readers in the comments section.

How to Disable Pepflashplayer.dll in Google Chrome

Dealing with the pesky pepflashplayer.dll in Google Chrome can be quite a hassle, especially when it causes performance issues or security concerns. If you’re looking for straightforward ways to disable this plugin, you’re in the right place. Here are some easy steps to get it done.

How do I disable Pepflashplayer.dll?

1. Disable Pepper Flash Player via Chrome Plugins

  1. Open Google Chrome.
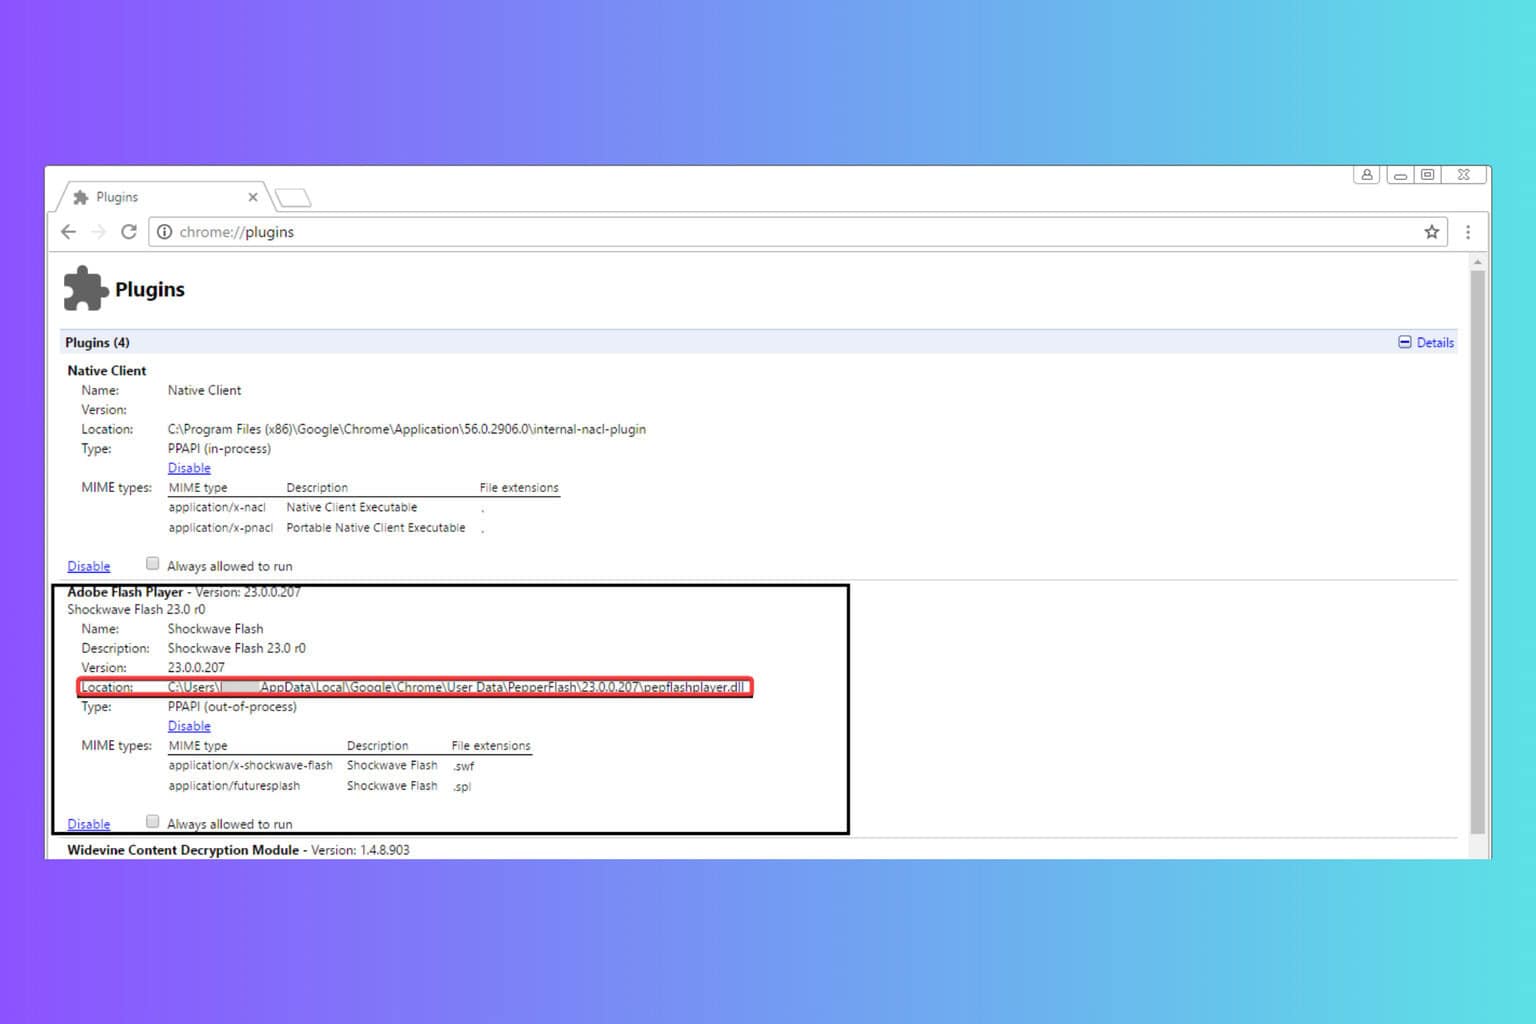
  2. In the address bar, type chrome://plugins and hit Enter.
  3. Locate Adobe Flash Player (Pepper Flash) in the list.
  4. Click on the Disable link right below the plugin name.

This solution will help stop Pepper Flash from running in Chrome by disabling it directly through the browser settings.

2. Delete the PepperFlash folder

  1. Open Google Chrome and navigate to chrome://plugins.
  2. Disable the PepperFlash by clicking the Disable link.
  3. Locate the path of the PepFlashPlayer.dll file.
  4. Open File Explorer (Win + E) and navigate to the path identified.
  5. Delete the PepperFlash folder.
  6. Restart your computer.

By deleting the entire PepperFlash folder, you ensure that the plugin is completely removed from your system, preventing any further automatic activation.

3. Use Windows Security to deny permissions

  1. Open File Explorer (Win + E).
  2. Navigate to the following path or enter it in the address bar: %userprofile%\AppData\Local\Google\Chrome\User Data\Default\Extensions
  3. Right-click on the Extensions folder.
  4. Select Properties and then click on the Security tab.
  5. Click Edit to change permissions.
  6. Select your user account and check the Deny box for Write and Modify permissions.
  7. Click Apply and then OK to save the changes.

Setting the folder permissions to deny write and modify access will prevent Chrome from installing any new plugins automatically, including Pepper Flash.

4. Rename the PepFlashPlayer.dll file

  1. Navigate to the PepFlashPlayer.dll file location, usually found in C:\Users\[YOUR_USER]\AppData\Local\Google\Chrome\User Data\PepperFlash\[version_number]\
  2. Right-click on PepFlashPlayer.dll and choose Rename.
  3. Add a suffix to the file name, e.g., PepFlashPlayer_old.dll.

Renaming the DLL file will effectively disable the Pepper Flash plugin since Chrome won’t be able to access the required file to run it.

5. Use Chrome Extension API

  1. Visit the Chrome Extensions API documentation.
  2. Write a Chrome extension script that uses the API to disable the Pepper Flash plugin.
  3. Package the extension and distribute it to your users for installation.

Creating a Chrome extension using the official API can deliver a programmatic solution to disable Pepper Flash without needing manual intervention from users.

By following these steps, you can effectively disable the pepflashplayer.dll in Google Chrome and improve your browsing experience. To prevent future issues, keep your browser and plugins updated regularly and consider using security extensions.

Some would want to remove the Flash Player completely from their PCs. However, there are not so many browsers that still support Flash Player.

You can also learn how to disable Google Lens during image search.

Did you manage to disable pepflashplayer.dll from Chrome? Let us know in the comments below.

How to Download and Install Greenshot on Windows 11

Finding the right tool to capture your screen can be a hassle, but Greenshot makes it simple and efficient. If you’re looking to download and set up Greenshot on your Windows 11 machine, follow these straightforward steps to get started.

How do I get and install Greenshot on PC?

1. Download Greenshot from the official website

  1. Open your web browser and go to the official Greenshot webpage.
  2. Click the Download Now button.
  3. Now, click on the Latest Stable button to download the installer for Windows.
  4. The download should begin automatically; if prompted, select a location to save the installer file and click Save.

Downloading Greenshot from the official site ensures you get the latest, most secure, and compatible version for Windows 11.

2. Download Greenshot (Unofficial) from Microsoft Store

  1. Open the Microsoft Store app on your Windows 11 computer. You can do this by clicking on the Microsoft Store icon in the taskbar or searching for Microsoft Store in the Start menu.
  2. In the search bar at the top of the Microsoft Store, type Greenshot and press Enter.
  3. Look for the Greenshot (Unofficial) result and click on it.
  4. Click the Get button to download and install the app.

The Microsoft Store provides an easy way to install Greenshot, although it’s noted as an unofficial version, it can be convenient for users who prefer using the Store.

3. Download Greenshot from GitHub

  1. Open your web browser ang go to the Greenshot GitHub page.
  2. Navigate to the Releases section which lists all available versions.
  3. Find the version suitable for Windows 11, and click on the corresponding Download link for the installer.

GitHub is ideal if you want to download different versions, including unstable or previous releases, and it’s particularly beneficial for technical users who might want to contribute to the project.

How do I install Greenshot?

  1. Locate the downloaded installer file, usually in your Downloads folder or click directly on the downloaded file from your browser.
  2. Click Next on the welcome screen.
  3. Accept the license agreement and click Next.
  4. Choose the installation location or leave it at its default, then click Next.
  5. Select additional tasks, like creating a desktop shortcut, if desired, then click Next.
  6. Finally, click Install to begin the installation process.
  7. Once the installation completes, click Finish to exit the setup wizard and launch Greenshot.

By following these steps, you will have Greenshot installed and ready to use on your Windows 11 computer.

Remember to always download software from trusted sources to avoid security risks. Keep your system updated and regularly check for software updates to ensure optimal performance.

Stream Cleaner For Firefox: Best Tools to Remove Twitch Ads

Tired of ads and offensive content interrupting your streaming experience on Firefox? You’re not alone. Many users seek a seamless, ad-free streaming experience, and luckily, there are several effective solutions to achieve this.

How can I use stream cleaner in Firefox?

1. Install Stream Clean for Firefox

  1. Download and install the Firefox browser if you don’t already have it.
  2. Visit the Stream Clean Firefox Add-ons page.
  3. Click the Add to Firefox button to begin the installation.
    stream clean add to firefox
  4. In the prompt that appears, click Add to confirm the installation.
  5. After installation, the Stream Clean extension icon will appear in your Firefox toolbar.
  6. Click the Stream Clean extension icon and configure the filter settings according to your preferences.

2. Use uBlock Origin with custom filters

  1. Download and install the Firefox browser if you don’t already have it.
  2. Visit the uBlock Origin Firefox Add-ons page.
  3. Click the Add to Firefox button to begin the installation.
  4. In the prompt that appears, click Add to confirm the installation.
  5. Open uBlock Origin settings by clicking on its icon in the toolbar and selecting Dashboard.
    settings ublock origin
  6. Navigate to the My filters tab and add custom filters from the TTV LOL Pro GitHub page.
    my filters ublock origin

A few users reported that uBlock isn’t blocking Twitch ads, but we have another guide that tackles this issue.

3. Use GitHub Userscripts for Twitch Ad Blocking

  1. Download and install the Firefox browser if you don’t already have it.
  2. Visit the Greasy Fork website to find userscripts designed to block ads on Twitch.
  3. Install a script manager like Tampermonkey from the Firefox Add-ons page.
    add to firefox tampermonkey
  4. Click the Install button on the userscript page to add it to your script manager.
  5. The userscript will run in the background and handle ad-blocking on Twitch streams.

By employing these solutions, you can enjoy a cleaner, more enjoyable streaming experience on Firefox. To customize Twitch further, don’t miss our guide on BetterTTV for Firefox.

For more customization, don’t miss our guide on the best Twitch browser extensions.

Chrome Prepares a big 2026 UI Update for Picture-in-Picture Mode

The Chrome feature that shows videos in Picture-in-Picture mode is getting much-needed updates this year. Google is streamlining PiP Video controls and confirms more UI changes are in the pipeline in 2024.

PiP mode is the default feature in modern browsers on desktops, including Google Chrome, Firefox, Opera, and Microsoft Edge. The feature allows you to watch playing videos on top of other applications anywhere, so you can do other tasks while watching videos.

Chrome streamlines Picture-in-Picture video controls

Now, when you select the Picture in Picture option in Chrome’s video context menu, it shows controls such as Back to Tab in the center, Pause/resume Playback underneath, and Close PiP window in the corner. We have also reported Chrome PiP getting a Skip ad button, but we don’t know yet when this change will be added.

Present Picture in Picture controls Chrome. Image Credit: WindowsReport

Google’s plan is to simplify the Picture in Picture Video Controls, which they call as the new 2024 UI update for Video Picture in Picture. For this UI change, they are moving the Back to Tab button closer to the Close button and adding a minimize button that restores the original tab.

New Picture in Picture video controls 2024 Chrome. Image Credit: WindowsReport

The commit message spotted by WindowsReport reveals moving back to the tab button to the header, while the meta bug informs that more changes are coming to PiP and that they will come later.

Move back to the tab button to the header. This CL replaces video picture-in-picture’s “back to tab” label button (in the center of the video) with an image button in the header. This is part of the new 2024 UI update for video picture-in-picture, and is put behind a feature flag for it.

How to see the Chrome PiP mode for Video with new 2024 UI controls

  1. Launch the latest Chrome Canary browser.
  2. Visit chrome://flags.
  3. Find and enable Video picture-in-Picture controls update 2024.
  4. Restart Chrome.
Image Credit: WindowsReport

Play any video, right-click on it, and select Picture in Picture. You’ll see the new controls at the top right side, where you can notice the minimize, Back to Tab, and Close buttons in order.

Apart from the PIP mode update, Chrome has added Google Docs support to Reading mode. Additionally, Google is adding Fingerprinting Protection filters and new warnings for insecure sites to Chrome.

What’s your take on Chrome’s new Picture-in-Picture Mode 2024 Update? Let us know your thoughts in the comments below.

Flipgrid for Microsoft Teams: Can You Still Use it?

Using Microsoft Teams with Flipgrid can significantly enhance your classroom’s interactive learning experience. Whether you’re integrating Flipgrid directly into Teams or sharing content, this guide will help you seamlessly navigate the process.

How can I use Microsoft Teams with Flipgrid?

What is Flipgrid in Microsoft Teams?

Flipgrid was a service that allowed teachers to create grids that would hold video responses on certain topics.

flipgrid teams

Is Flipgrid being discontinued?

Yes, Flipgrid is being discontinued and it’s currently in the view-only mode. However, you can download your videos until September 30, 2024. After that, the website will be shut down.

Is Microsoft Flip the same as Flipgrid?

Flipgrid has been rebranded as Flip and some of its core features have been added to Microsoft Teams for Education.

What will replace Flipgrid?

Some of the core features are moving to Microsoft Teams, so you can continue using them there. Alternatively, you can use services such as Padlet or YuJa.

How to access Flip through Microsoft Teams?

You can’t access Flip through Microsoft Teams anymore. The core features of Flip have been integrated into Teams so you can use them out of the box.

Even though Flipgrid is being discontinued, you can still use its core features in Microsoft Teams for Education.

To learn more about Microsoft Teams, we have a great guide on how to create and manage teams in Microsoft Teams as well an article on how to use Teams in Windows 11, so don’t miss them.

Lastly, don’t miss our guide on how to keep the Teams status green at all times.

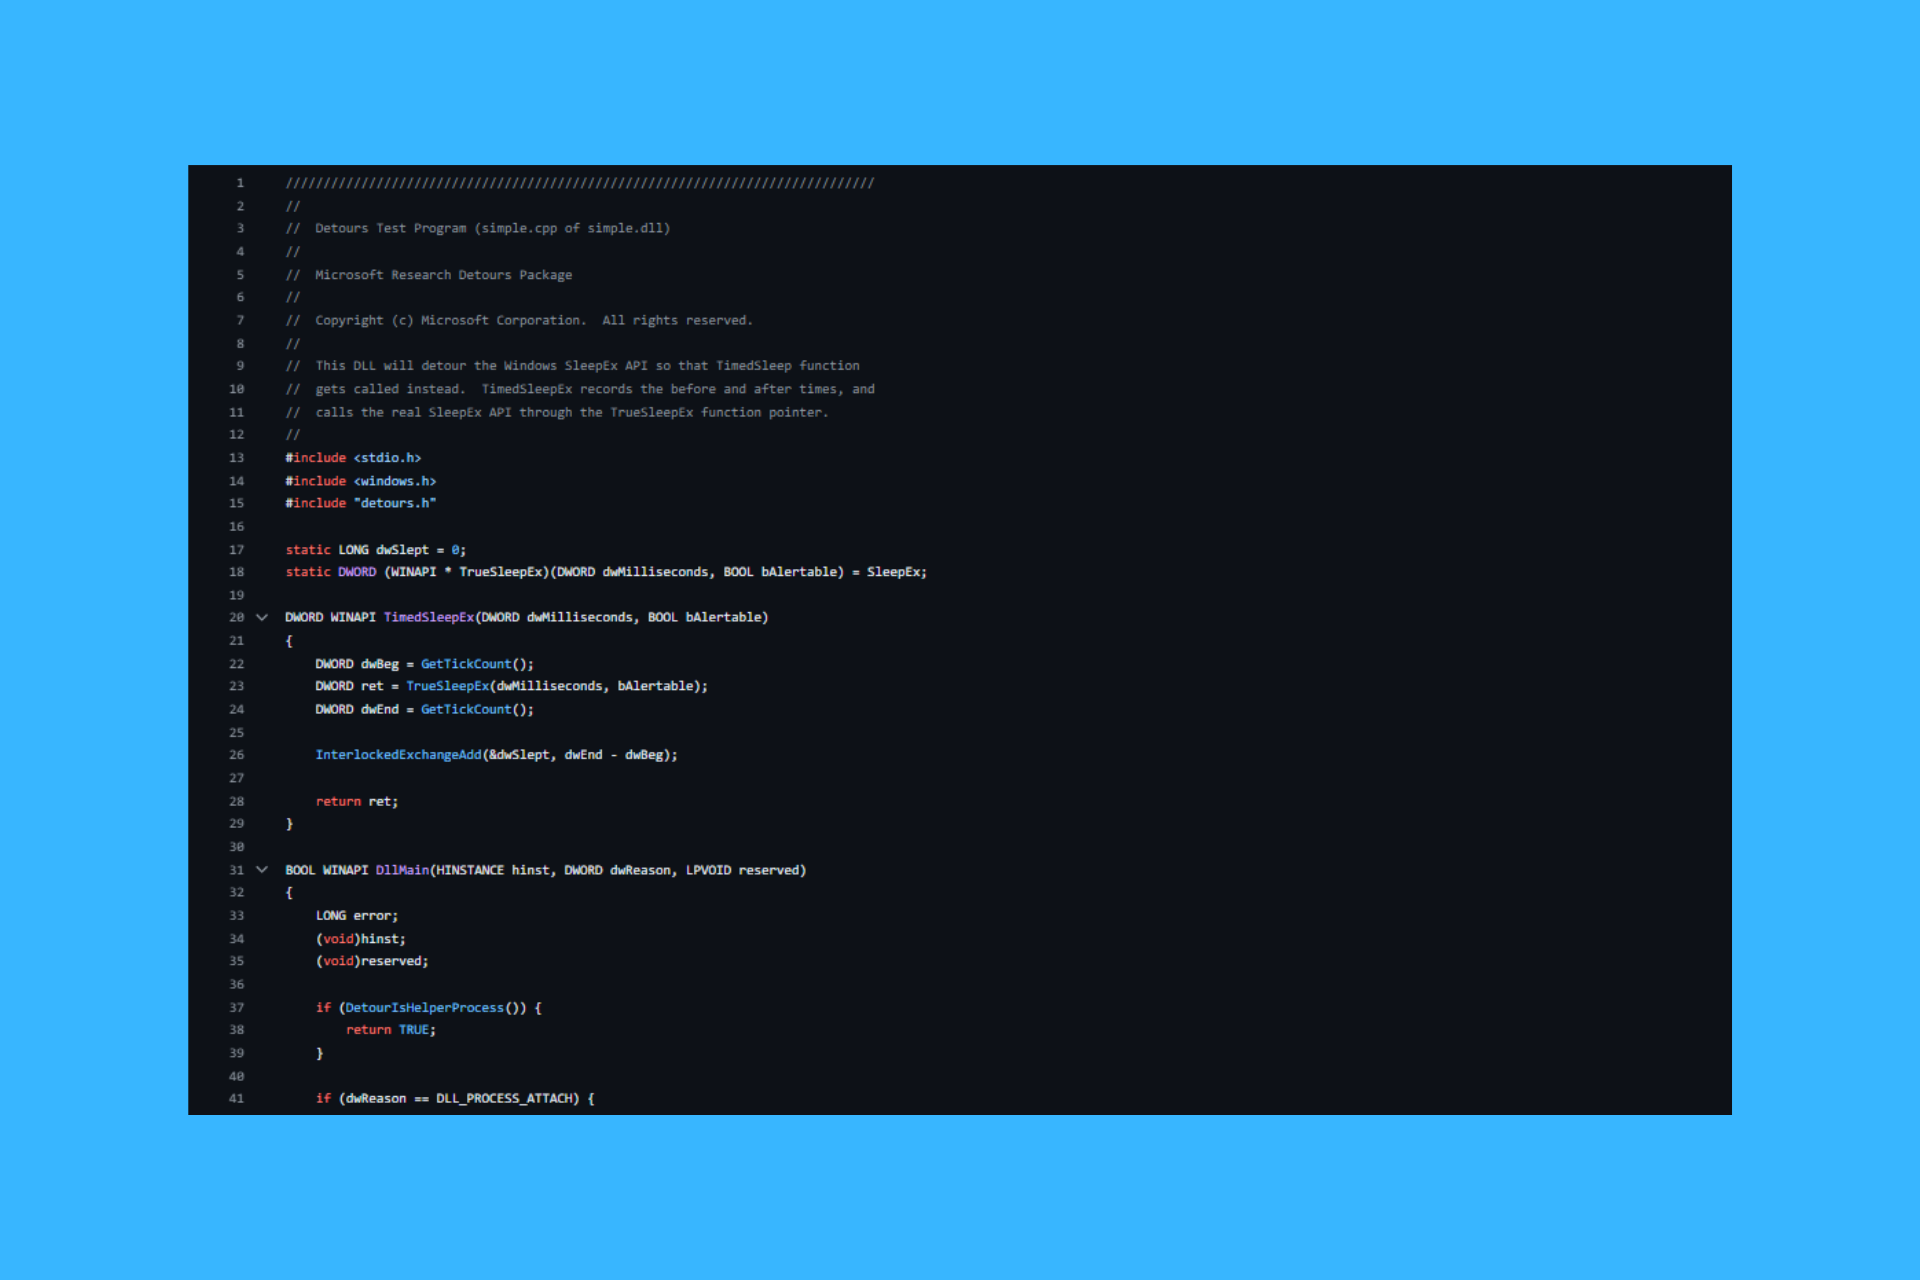
How to Fix ERROR_INVALID_BLOCK in Function Detours

Dealing with the ERROR_INVALID_BLOCK issue can be quite a headache for developers, especially when working with function detours. It usually comes accompanied by the 9 (0x9) The storage control block address is invalid error message.

How do I fix ERROR_INVALID_BLOCK?

1. Ensure the target function is large enough to be detoured

  1. Verify that the function you are trying to detour has enough memory space to accommodate the detour. The function should be sufficiently long, typically at least five bytes, because Detours needs to overwrite the start of the function with a jump instruction.
  2. If the function is too small, consider detouring a larger function that eventually calls the target function.

This ensures that the function is large enough for the detour to attach properly and prevents the ERROR_INVALID_BLOCK error from occurring.

2. Initialize the target function pointer correctly

  1. Make sure the variable pointed to by ppPointer is correctly initialized and not NULL.
  2. Initialize the original function pointer only once before the hook to avoid ERROR_INVALID_BLOCK.
BOOL(WINAPI* originFunc) (HDC, int, int, int, int, HDC, int, int, DWORD) = Bitblt;

This avoids the ERROR_INVALID_BLOCK by ensuring that the function pointer is set up correctly before attaching the detour.

3. Use DetourTransaction API correctly

  1. Begin a new transaction using DetourTransactionBegin().
  2. Attach the detour function using DetourAttach().
  3. Commit the transaction using DetourTransactionCommit().

Here’s an example of using DetourTransaction API:

DetourTransactionBegin();
DetourUpdateThread(GetCurrentThread());
DetourAttach(&(PVOID&)originFunc, MyBitBlt);
DetourTransactionCommit();

This ensures that the detour is part of a transaction and helps in orderly attaching and detaching of detours, preventing errors.

4. Check for memory availability

  1. Ensure there is enough memory available to complete the detour operation.
  2. If memory is insufficient, you might need to optimize memory usage elsewhere in your application or allocate more resources.

Ensuring that there is enough memory available prevents the ERROR_INVALID_BLOCK error due to memory constraints.

5. Verify the integrity of the function being detoured

  1. Check the target function for any modifications or patches that might cause inconsistencies.
  2. Ensure that the function code is intact and not altered by other hooks or debugging tools.

Ensuring the integrity of the target function prevents errors related to function size or corruption.

6. Handle special cases in automation calls (VBA/COM)

  1. When dealing with COM or automation calls, errors like ERROR_INVALID_BLOCK might be due to an unexpected variable type.
  2. Ensure that you are passing the correct types of arguments expected by the function.

For example, using the correct type in a VBA call:

Dim strArg As String
strArg = "Expected Argument"
Call someFunction(strArg)

This method ensures that the argument types match the function’s expectations, preventing block errors.

By following these solutions, you can effectively address the ERROR_INVALID_BLOCK error in your detour operations and ensure smooth and error-free function hooking. Always remember to check your function sizes and memory availability to prevent such issues in the future. You can also learn how to resolve a similar issue, CNSS_FILE_SYSTEM_FILTER.

Did you manage to fix the ERROR_INVALID_BLOCK issue? Let us know in the comments below.

How to Fix ERROR_FS_DRIVER_REQUIRED Bug Check 0x24C

The ERROR_FS_DRIVER_REQUIRED message comes with the following description: 588 (0x24C) A volume has been accessed for which a file system driver is required that has not yet been loaded. This error is returned by the GetLastError function when a function has failed. 

How do I fix the ERROR_FS_DRIVER_REQUIRED?

1. Check for Duplicate Package IDs in System Center Configuration Manager (SCCM)

  1. Open the SCCM console on your server.
  2. Navigate to the Monitoring workspace.
  3. Click on Distribution Status and then Content Status.
  4. Select all entries by pressing Ctrl + A.
  5. Copy the selected entries and paste them into an Excel spreadsheet.
  6. Use Excel’s Conditional Formatting feature to identify any duplicate Package IDs in the column.
  7. If duplicates are found, start by deleting all revisions except the latest to see if that resolves the issue.
  8. If the issue persists, you need to delete and recreate the applications so they get unique Package IDs.

This solution helps by ensuring that no two applications have the same Package ID, which can cause conflicts in the Content Library Explorer.

2. Verify DFS namespace and configuration

  1. Open an elevated command prompt on the server.
  2. Run the command dfsutil /pktinfo to check the referral cache.
  3. Verify that the DFS Namespace is correctly configured and reachable.
  4. Check for any discrepancies or missing shares in the DFS Namespace configuration.
  5. If needed, update or correct the DFS Namespace entries.

Verifying the DFS Namespace ensures that all referrals are correctly mapped, avoiding errors related to BAD NETWORK NAME.

3. Ensure all necessary file system drivers are loaded

  1. Open the Services console by typing services.msc in the Run dialog (Win + R).
  2. Scroll down to find all services related to file systems and drivers.
  3. Verify that services like DFS Namespace and File System Filter drivers are running.
  4. If any service is stopped, right-click on it and select Start.
  5. Set the startup type to Automatic if not already set.

Loading all necessary file system drivers ensures that the system can handle DFS referrals and file system operations properly.

4. Use Process Monitor to identify issues

  1. Download and run Process Monitor from the Sysinternals suite.
  2. Set up a filter to capture only file system activities by going to Filter > Filter… and adding a rule: Path contains [your path], then Include.
  3. Let the capture run while you attempt to reproduce the error.
  4. Look for any BAD NETWORK NAME or STATUS_FS_DRIVER_REQUIRED entries in the logs.
  5. Identify the process causing the error and investigate further to correct the path or permissions issues.

Process Monitor helps by giving a detailed insight into what file system calls are failing, thus allowing you to pinpoint and resolve the exact cause of the error.

5. Verify network ahare permissions

  1. On the server hosting the network share, right-click the shared folder and select Properties.
  2. Go to the Sharing tab and click on Advanced Sharing.
  3. Click on Permissions and ensure that the correct users and groups have appropriate permissions (Full Control, Change, Read).
  4. Apply the changes and test access again from the client machine.

Ensuring the correct permissions on the network share guarantees that the client machines can access the necessary files without encountering permission-related errors.

  1. Identify if any software or drivers are hard-coded with paths or specific configurations.
  2. Modify the source code, if available, to use dynamic paths or updated configurations.
  3. Recompile the software and redeploy it.

Recompiling ensures that the latest configurations and paths are used, preventing errors caused by outdated or hard-coded settings.

7. Downgrade the kernel version for compatibility

  1. Reboot your server and enter the boot menu.
  2. Select an older kernel version (e.g., 6.2.0) from the list available in the boot options.
  3. If the older version is not listed, you may need to install it manually using your operating system’s package manager.
  4. Once booted into the older kernel, test if the error persists.

Downgrading the kernel version ensures compatibility with drivers and software that may not support newer kernel versions.

By following these steps, you should be able to resolve the ERROR FS DRIVER REQUIRED issue. To prevent similar problems in the future, regularly update your drivers and software, and always verify configurations after making changes.

9 Best PSU for RTX 4090 in 2026 and Where to Buy

The best PSU for NVIDIA 4090 needs to deliver steady, high wattage without cutting corners. This GPU pulls serious power, especially when paired with something like the Intel Core i9 14900T. After checking out dozens of solid options online, I narrowed it down to a few standout units that meet the power demands of a top-tier gaming rig. These picks offer reliable performance, proper 16-pin support, and enough headroom to keep your system stable in 2025.

9 Best Power Supply Units for 4090 NVIDIA GeForce RTX

Let’s explore these power supply units suitable for a high-performance gaming PC:

Corsair RM1000e

Corsair RM1000e

The Corsair RM1000e PSU is quiet, reliable, and energy-efficient. It has 80 PLUS Gold efficiency, which means it wastes less power. It also supports ATX 3.0 and PCIe 5.0, so it can power the latest and greatest PC hardware. Furthermore, the cables are fully modular, so you can only connect the ones you need.

The power supply unit comes with a 7-year warranty, so you can be sure it’ll last. Moreover, it’s compatible with the Modern Standby sleep mode technology, so you can wake up your computer faster and save energy. Finally, it weighs a whopping 3.7 pounds, which is important for PSU units. The weight indicates that the manufacturer has used sufficient copper coils and heat sink materials to make it safer and more durable.

Get Corsair RM1000e on Amazon!

EVGA 1000 GT

EVGA 1000 GT

The EVGA 1000 GT Supernova is the best PSU for the 4090 series NVIDIA GPU when it comes to durability and low-noise operation. It includes smarter power management technologies and safeguards, like over-voltage protection (OVP), over-current protection (OCP), over-power protection (OPP), short circuit protection (SCP), and under-voltage protection (UVP). Hence, the manufacturer offers up to 10 years of limited warranty.

Also, it comes with two PCBs, namely the primary and secondary circuit boards for efficient heat distribution and redundancy. Both contain state-of-the-art over-temperature protection (OTP) systems to safeguard the computer chassis from burning hazards.

The 80 PLUS Gold certification ensures that the PSU delivers a higher wattage when the PC’s demand increases and a lower wattage when the system is on standby or running lightweight apps. Thanks to the fluid dynamic bearing (FDB) fan, it always operates on virtually zero noise.

Get EVGA 1000 GT on Amazon!

MSI MPG A1000G

MSI MPG A1000G

MSI MPG A1000G is a PCIe 4.0 and 5.0 compliant power supply that can deliver up to 600 watts just for the graphics card. On the other hand, the NVIDIA GeForce RTX 4090 GPU is based on PCIe 4.0 standard and requires 450 watts of maximum power. Thus, you can use the same PSU for newer GPUs that’ll be marketed for the PCIe 5.0 configuration.

Furthermore, it has Japanese 105°C capacitors for operation in high-temperature environments. They’re used for energy storage, filtering, and buffering throughout the power supply PCB for increased durability.

MSI MPG A1000G has been tested for power excursion of up to three times the rated power for GPU and two times the rated power for the whole system. Heavy transformers, Japanese 105°C capacitors, high-quality MOSFETs, etc., contribute to this functionality.

Get MSI MPG A1000G on Amazon!

ASUS ROG Strix 1000W

ASUS ROG Strix 1000W

ASUS ROG Strix 1000W is a designer PSU with novel qualities. If you’re building an all-white PC for a unique look, you should go for this power supply unit. Its branding, texture, and decals match the ASUS ROG Strix series of white motherboards.

Secondly, the whole aluminum casing works like a massive heat sink. The internal power transformer has been smartly coupled with the metallic casing so the generated heat can easily transfer to the PSU body. Also, there is an axial-tech fan with longer blades and a smaller hub with a three-sided mesh cover for further heat dissipation in lower RPMs.

ASUS ROG Strix 1000W has two specialized certifications: 80 PLUS Gold and Cybenetics Lambda A+. These confirm that the PSU will deliver the required wattage in the most power-efficient way with the least amount of noise.

Moreover, it comes with a 10-year warranty service promise along with PCIe Gen 5.0 standard. Thus, you can use the same unit for multiple generations of NVIDIA GPUs.

Get ASUS ROG Strix 1000W on Amazon!

Thermaltake Toughpower GF3 1000W

Thermaltake Toughpower GF3 1000W

Thermaltake Toughpower GF3 1000W is the best affordable PSU for 4090. It offers low profile cable management even if you use both GPU power output ports for NVIDIA SLI or AMD Crossfire technology.

Also, the PSU is ATX 3.0 and PCIe 5.0 compliant so you can fit it in most modern PCs. Furthermore, you no longer need to replace it after a few years when NVIDIA launches a better GPU in the PCIe 5.0 configuration.

Another cool feature is the option to switch off the fan until the unit reaches 30% power output load. There’s a physical button at the back labeled as Smart Zero Fan.

It also comes with 80 PLUS Gold certification for super-efficient power supply and Japanese 105°C capacitors for durable performance in high-temperature environments. Like other leading PSUs, it offers a warranty service period of up to ten years.

Get Thermaltake Toughpower GF3 1000W on Amazon!

CORSAIR RM850x

CORSAIR RM850x

CORSAIR RM850x is an 80 PLUS Gold certified PSU for a power output of up to 850 watts. This is enough to run a gaming PC at its full potential with the NVIDIA GeForce RTX 4090 GPU and a decent Intel or AMD CPU. Therefore, you can save up to $50 by getting this affordable class PSU instead of a 1,000-watt unit.

The overall power supply weight is around 3.75 pounds. This means you’re only getting heavy and durable components, especially copper-winded transformers, solid capacitors, heavy heatsinks, etc.

Other specialties include Japanese 105°C capacitors, extremely fast wake-from-sleep times, and greater low-load efficiency making it a reliable PSU.

Get CORSAIR RM850x on Amazon!

Thermaltake GF1

Thermaltake GF1

If you’re looking for the best PSU for 4090 in the 850-watt range, you can also check out Thermaltake GF1. It saves energy by complying with the Intel C6/C7 states. When compatible CPUs enter the idle mode, it reduces the output wattage. However, when there’s a spike in CPU requirement, the PSU reacts to that quickly to deliver enough power. Thus, you’ll experience less latency during the CPU performance transition phase.

The manufacturer has coupled the internal PCBs and the outer metal body with a copper plate for enhanced heat dissipation. Therefore, the cooling fan often won’t rotate until the PSU goes beyond 30% load. Also, there’s a dedicated Smart Zero switch to enable and disable this feature.

Thermaltake GF1 has a fully modular cable connection system. None of the cables are fixed to the unit. For example, if you only need the mainboard, CPU, and GPU power connectors, you can connect those and ignore SATA power cables. The PC chassis will then have more free space for efficient air circulation.

Get Thermaltake GF1 on Amazon!

MSI MAG A850GL

MSI MAG A850GL

MSI MAG A850GL is a compact ATX 3.0-compliant power supply offering high energy efficiency for low to higher wattage requirements. It has been tested with the 80 PLUS Gold standard for excellent energy efficiency for 20%-100% load. Also, it has a Cybenetics Platinum certification providing economical energy output in the 10%-115% range.

It’s also power excursion friendly. The 2X Total Power Excursion and 3X GPU Excursion step in to keep the PC powered for a few minutes, enough to continue your gaming without experiencing unexpected system shutdown.

Finally, a novel and helpful feature of this PSU is dual-color 16-pin cables. It has yellow colored-plastic sockets as connectors.

Get MSI MAG A850GL on Amazon!

Cooler Master MWE

Cooler Master MWE

Cooler Master MWE is the best PSU for 4090 RTX GPU featuring future-proof technologies, like two EPS connectors, semi-fanless operation, low RPM operations, and more. This unit is suitable for multi-CPU motherboards as well as single-CPU mainboards that use two EPS connectors for overclocking and efficient power distribution. So, if you’re planning for CPU and GPU overclocking, you should check it out.

It also includes components like Japanese capacitors, hydro-dynamic fans, etc., to make the overall PSU temperature resilient. According to the manufacturer, it’ll work seamlessly even at a steep temperature of 50°C. Moreover, the manufacturer is offering five years of limited warranty.

Get Cooler Master MWE on Amazon!

How I Chose the Best PSU for 4090

Here are the factors I considered while listing the most robust power supply units for NVIDIA GeForce RTX 4090 GPU:

  • Power output: It should deliver enough wattage to handle the GPU’s peak power draw. For an RTX 4090, a minimum of 850W is recommended since the GPU can itself consume a maximum of 450 watts.
  • Energy efficiency: I’ve only listed the 80 PLUS Gold-rated PSUs. These help you reduce the hourly energy cost of running the PC. When the load is high, the PSUs deliver adequate wattage. However, when the PC is idle, the power supplies reduce the output to save energy.
  • Operating temperature: All the units come with heavy and high-quality internal components, like Japanese capacitors, durable MOSFETs, high-speed fans, etc. These qualities enable the device to deliver enough power even in high-temperature conditions.
  • Operating noise: All options are suitable for low or no-noise PCs.
  • Warranty support: These products come with five years or more warranty.
  • Future-proofing features: I’ve chosen only tools with future-ready functionalities, like PCIe 5.0, ATX 3.0, multiple EPS connectors, etc., so you don’t need to upgrade in a 5 to 7-year timeline.
  • Power excursion: Most of these products come with basic to advanced power excursion so your PC doesn’t shut down in the middle of gaming.
  • Efficient heat dissipation: Most of these PSUs use additional copper coupling to connect the transformers, PCBs, MOSFETs, etc., to the metallic body of the device for additional heat dissipation.

Summary

This is a no-brainer list if you’re looking for the best PSU for 4090 NVIDIA RTX GPU. Depending on your PC’s overall wattage requirement, you can choose between a 1,000-watt or 850-watt power supply. However, a 1,000-watt product will help you future-proof your PC.

f your motherboard isn’t getting power, or you’re dealing with a Windows 10 power supply problem, even the most powerful PSU won’t help.

Not sure if your current setup is underperforming? You can run a quick computer performance test online to spot any bottlenecks.

You can also go through the best PSU test software and how to check PSU wattage without opening the case to better manage your power requirements.

Which PSU would you choose for your NVIDIA GeForce RTX 4090 graphics card? Let me know by commenting below.

The 0x8007010b error is preventing Windows 10 from installing KB5041580. Here’s what you can do

Windows 10 received the KB5041580 pack last week as part of the Patch Tuesday updates, but the 0x8007010b error seems to be preventing users from installing it.

The patch, which addresses critical vulnerabilities and fixes the BitLocker Recovery issue, which also happened with Windows 11, is essential for the well-being of Windows 11, so installing it is a must.

The 0x8007010b error, on the other hand, is a common but very frustrating issue with Windows. It is caused by corrupt system files and further errors with the Windows Update components. However, viruses, malware, or Windows Defender can also interfere with certain aspects of the installation process.

So, how do you get Windows 10 to install the KB5041580 patch, even if it encounters the 0x8007010b error? Well, there are some workarounds.

How to bypass the 0x8007010b error to install KB5041580

  1. You can run Windows Update Troubleshooter
  2. Clear Windows Update cache
  3. Reset the Windows Update components (this also seemed to work with the latest Windows 11’s Patch Tuesday updates)
  4. You can also try to disable Windows Defender

If you don’t know how to do these, it’s alright. After all, some of the steps require a bit of tech knowledge. Fortunately, we have a comprehensive guide that will show you step by step what you need to do to stop the 0x8007010b error from happening and properly install the KB5041580 patch on Windows 10.

You’ll find it here. Follow it along, and let us know if these solutions worked for you.

If the Restart Required error stops you from installing KB5041585 on Windows 11, there is a workaround

Microsoft released KB5041585 for Windows 11 23H2 and 22H2 last week as part of the Patch Tuesday updates, but the Restart Required error prevents the patch from installing completely.

In addition to addressing many vulnerabilities, the patch also fixes the BitLocker recovery known issue, which has become quite frustrating for many Windows users.

However, the more frustrating issue is that KB5041585 is not installing, and many users reported that the restart required error prevents the patch from installing.

Just installed the latest updates but have a problem:

I cannot get past this restart – I have rebooted several times, sfs /scannow and dism all look ok.
I have stopped and restarted BTS and windows update services.
Any help would be appreciated

The user tried regular solutions such as sfs /scannow, which might work, nonetheless, but in their case, it didn’t. However, if you’re dealing with the issue and you can’t install KB5041585 because of the restart required error, then you should know there is a workaround.

How do I fix the KB5041585 restart required error?

If you can’t install KB5041585, try resetting Windows Update Components.

According to the user who reported the issue, they could fix it by resetting the Windows Update Components.

Now, doing this might be a bit hard, but we have a comprehensive guide that will walk you through the process step by step.

Once you reset the Windows Update Components, restart your PC or Windows device and try to download KB5041585 again.

It should work this time.

Let us know if this solution worked for you.

Honorlock Chrome Extension: What is it, How to Install & Use

Navigating the installation of the Honorlock Chrome extension can be a bit daunting, especially if you’re new to online proctoring tools. If you’re preparing for an exam, this guide will walk you through the essential steps to ensure a smooth experience.

How can I download and use the Honorlock Chrome extension?

What is the Honorlock Chrome extension?

This extension is a part of online protectoring software that works with a Learning Management System ensuring that students don’t cheat during exams.

How can I install Honorlock Chrome extensions?

  1. Launch your Chrome browser.
  2. Go to honorlock.com/install or the specific Honorlock extension page on the Chrome Web Store.
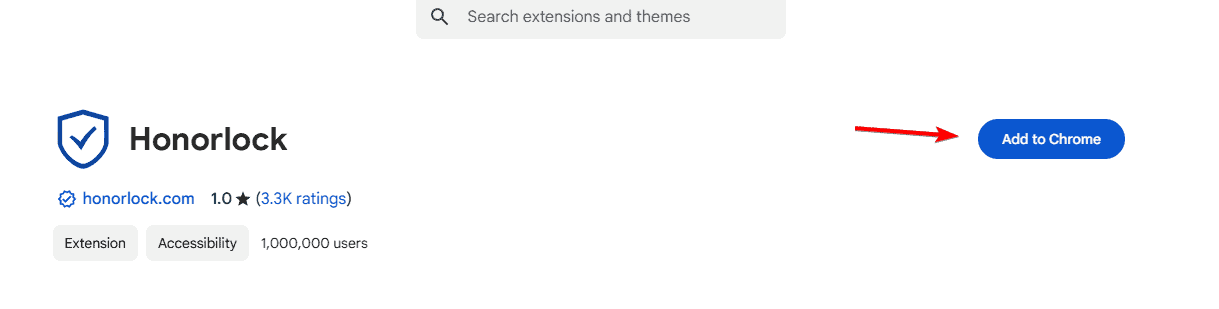
  3. Click the Add to Chrome button.
     add to chrome honorlock
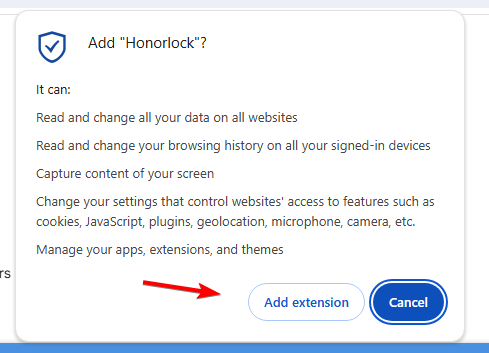
  4. A small pop-up window will appear. Click Add Extension to confirm the installation.
    add extension honorlock
  5. You will see the Honorlock extension icon appear in the upper right corner of your Chrome browser.

How can I use Honorlock during an exam?

  1. Log into your course and start the exam that uses Honorlock.
  2. Honorlock will walk you through the authentication process, including system checks and verifying your identity.
    honorlock authentication
  3. During the exam, Honorlock will use your webcam, microphone, and screen capture tools to monitor your activity.
  4. Once you finish, submit your exam, and Honorlock will stop recording.

Does Honorlock only work on Chrome?

Honorlock works in Chromium browsers, such as Chrome, Edge, and others.

How does Honorlock detect cheating?

Honorlock uses video and screen monitoring as well as voice detection. It will prevent you from accessing other websites and from copying and pasting data into a document.

It can also detect cell phone usage. The service utilizes AI technology, and when an infraction is detected, a live operator will be informed.

Can Honorlock see my browser history?

Yes, Honorlock can see your browser history as well as the websites that you attempt to visit, but only during an exam.

Is Honorlock an invasion of privacy?

Many users would argue that Honorlock is an invasion of privacy since it accesses your webcam, monitor, browsing history, and microphone.

Is someone watching me on Honorlock?

Honorlock uses AI to detect cheating during the exam, meaning that students aren’t monitored by real people. However, if AI detects cheating the live proctor will be informed and it will be able to see you during the exam to confirm that an infraction has occurred.

How do I know if Honorlock is recording me?

Honorlock is recording you only during exams as indicated by the flashing red indicator on the extension.

This is everything you need to know about the Honorlock Chrome extension. If you’re looking for other extensions for learning, you might want to give the Kami extension a try.

In case you’re planning to learn a new language, then you must try these great dictionary extensions.

Printer is Printing A5 Instead of A4 [Solved]

If your printer suddenly started printing copies in A5 instead of A4, fret not. The problem is common and easily fixable!

For anyone wondering why my printer is printing A5 on A4 paper, it’s usually the misconfigured printing preferences, generic driver installation, incorrect software settings, and issues with the Print Spooler service to blame.

Remember, the problem is seen in all printers, be it Brother, HP, or Canon. And in almost every case, it’s an issue at the user’s end to blame. So, let’s find out how to fix things when the printer keeps printing A5 instead of A4!

What can I do if the printer is printing A5 instead of A4?

1. Change the paper size to A4 in printer settings

  1. Press Windows + I to open Settings, go to Bluetooth & devices from the navigation pane, and click on Printers & scanners.printers and scanners
  2. Now, select the printer printing A5 sheets and not A4 from the list.
  3. Click on Printer properties.properties
  4. Click on Preferences.preferences
  5. Next, click on Advanced.
  6. Finally, if A5 is selected in the Paper Size dropdown menu, choose A4, and then click OK to save the changes. change paper size to fix printer printing a5 instead of a4
  7. Reboot the PC, then try printing another page and verify whether it’s in A4 or A5.

2. Reinstall the printer’s driver

2.1 Uninstalling the driver and software

  1. Press Windows + X to open the Power User menu, and select Device Manager from the list of options.power user menu
  2. Expand the Printers entry, right-click on the affected printer, and select Uninstall device.uninstall driver to fix printer printing a5 instead of a4
  3. If available, tick the checkbox for Attempt to remove the driver for this device, and then click on Uninstall.
  4. Now, press Windows + R to open Run, type appwiz.cpl in the text field, and hit Enter.
  5. Individually select any printer-related apps from the list and click on Uninstall. uninstall printer app
  6. Follow the on-screen instructions to complete the process.

2.2 Download the dedicated printer driver

  1. Locate the printer model and search for its drivers on Google. For instance, if you were using the Brother MFC-J5320DW printer, search for Brother MFC-J5320DW driver Windows.search for printer driver
  2. Open the manufacturer’s official website from the search results, and download the Full Software Package for the driver, if one is available. Otherwise, you can download just the the driver.driver and software package
  3. Now, run the downloaded .exe file and follow the on-screen instructions to set up the printer all over again, along with installing a dedicated driver.install driver to fix printer printing a5 instead of a4

Once done, your HP or Brother printer should no longer be printing A5 instead of A4 in Windows. This also helps when the printer is printing A4 instead of A3!

Remember, if you let Windows set up and manage the printer, it may install a generic driver instead of the dedicated one, leading to issues like this. To avoid it, you can use a top-rated driver update utility and automatically locate and install the latest driver version for all connected devices.

3. Check the software’s setting

In case you are printing the documents using a software, its settings play a vital role. Even if your printer has been set up correctly for A4 prints, but the software commands it to print in A5, the latter might be prioritized.

So, check the software’s dedicated print settings. For Microsoft Word, the page size settings can be accessed in the Print tab.

print settings
Print settings in Microsoft Word

It’s the same for all other apps, including PDF viewers and more!

4. Restart the Print Spooler service

  1. Press Windows + R to open Run, type services.msc in the text field, and hit Enter.
  2. Scroll down, right-click on the Print Spooler service, and select Stop.stop service
  3. Again, right-click on it, and this time, select Start.restart print spooler to fix printer printing a5 instead of a4
  4. Now, verify whether the printer is still printing A5 instead of A4.

5. Perform a system restore

  1. Press Windows + S to open Search, type Create a restore point, and click on the relevant result.
  2. Click the System Restore button.restore to fix printer printing a5 instead of a4
  3. Select the Choose a different restore point option, and click Next.
  4. Pick the oldest restore point from the list and click Next.restore point
  5. Verify the details and click on Finish to start the restore process. It will take 15-45 minutes.

If it’s a recent change to settings or a newly installed app behind the printer printing A5 instead of A4 on a Windows PC, you can perform a system restore and revert the changes. Remember, the personal files remain unaffected during the process!

In case nothing works, it’s best that you contact the printer manufacturer’s support team and share the issue in detail. Because it could be a driver or software-specific bug, and they will be better able to share a solution.

Before you leave, find out how to create a printer shortcut in Windows and perform printing tasks much quicker!

If you know more fixes for the problem, share them with our readers in the comments section.

Best Slack Emojis: How to Add New Ones or Create Your Own

Boosting team spirit on Slack can be as simple as adding a few well-chosen emojis. Here are some of the best ways to incorporate emojis into your Slack workspace to enhance team communication and morale.

How do I get the best emojis in Slack?

1. Using custom emojis in Slack

  1. Open Slack and navigate to any channel or direct message.
  2. Click on the emoji icon in the message box to open the emoji panel.
  3. Click on the Add Emoji button usually found at the bottom or top of the panel. This varies slightly depending on Slack updates.
  4. Select Upload Image to choose an image file from your computer.
  5. Ensure the image is square and preferably sized at 128×128 pixels for best results.
  6. Name your emoji in the space provided. This will be how you and your team reference it using :emoji_name:.
  7. Click Save to upload and add the custom emoji to your Slack workspace.
  8. After clicking the Add Emoji button from step 3, you may also click on Emoji packs and add ready-made packs that are already available.

Creating custom emojis adds a personal touch to your Slack workspace, making communication more engaging and fun. It’s especially useful for internal jokes, team culture, and making reactions more specific to your work environment.

2. Download free custom emojis

  1. Visit websites such as Slackmojis or Customemoji.
  2. Browse through their extensive emoji categories which include popular themes like Party Parrot, Cat Emojis, Meme Emojis, and more.
  3. Click on the emoji you want to download.
  4. Right-click on the emoji image and select Save image as… to download it to your computer.
  5. Follow the steps from Solution 1 to upload these emojis to your Slack workspace.

These sites offer a wide variety of pre-made emojis that can be easily integrated into Slack, offering a quick way to enhance your messaging with popular and humorous graphics.

3. Use Gifmojis for animated emotions

  1. Go to Slackmojis and look for the animated emojis section.
  2. Select an animated emoji (also known as gifmoji) that fits the desired emotion.
  3. Right-click the gifmoji and select Save image as… to download the GIF.
  4. In Slack, click on the emoji icon and then on Add Emoji.
  5. Upload the GIF file, name it, and save it.

Using gifmojis can add an extra layer of expression to your Slack conversations. The movement of GIFs often conveys emotions and reactions more vividly than static images.

4. Adding emoji reactions to messages

  1. Hover over a message in Slack.
  2. Click on the small smiley face icon that appears.
  3. Select an emoji from the reaction panel, or start typing the name of the desired emoji to quickly find it.
  4. Click on the emoji to add it as a reaction to the message.

Adding emoji reactions is a quick and non-intrusive way to respond to messages, show approval, or express an emotion without typing out a lengthy response. It’s perfect for maintaining a dynamic and interactive communication flow.

  1. Search for popular emoji packs on websites that offer custom Slack emojis, such as Tech and Software Development emojis, Values and Culture emojis, and Conversation emojis.
  2. Download an entire pack by saving each emoji image to your computer.
  3. Upload these emojis to Slack by following the steps in Solution 1.

Using popular emoji packs can streamline the process of finding and using emojis that fit your team’s culture and work needs. It also ensures a consistent style and theme across your workspace, making communication more cohesive.

Remember, the key to effective emoji use is balance. While they can make communication more engaging, overusing them might lead to confusion. Keep your emoji usage relevant and appropriate to maintain a professional yet fun atmosphere. Moreover, you can further personalize your experience with notification sounds.

We also have a guide on how to open and use the Windows Emoji panel. You might also be interested in how to add emojis in Outlook.

We hope that our guide helped you add and use the best Slack emojis out there, or even include your own. Let us know in the comments if you have any related questions.

Can you play PC video games in a car? Yes, Mercedes-Benz and Boosteroid will make it possible

Playing PC games right from the comfort of your Mercedes-Benz driver’s seat will soon be possible, thanks to a new groundbreaking partnership between Mercedes-Benz and Boosteroid. You read that right: you can play games from your car. Who needs a PC anyway?

Boosteroid, a titan in the cloud gaming platform arena, will allow you to enjoy high-end video games on your PCs and phones and in your own Mercedes-Benz. It seems like capability years in the making, and the truth is, it has been.

Earlier in 2023, Microsoft and Boosteroid shook hands on a deal that was nothing short of a game-changer, bringing PC games to the cloud gaming platform. This meant that Boosteroid members got the keys to a kingdom filled with games purchased through Steam or the Epic Games Store. And if that wasn’t enough, Microsoft supported select games bought through the Microsoft Store or available with a Game Pass membership. Imagine having access to titles like Deathloop, Dishonored, and Gears 5, complete with cross-play and cross-save features, all in your car.

Mercedes-Benz didn’t miss a beat and announced its partnership with Boosteroid, aiming to integrate this gaming paradise into its MBUX infotainment system. Starting next year, if you’re behind the wheel of a Mercedes equipped with the third-generation MBUX system, you’ll have over 1,000 high-quality titles, including Fortnite and Sea of Thieves.

And the best part? This is just the beginning. With Microsoft promising to add more hits to Boosteroid, the list of available PC titles in Mercedes-Benz cars will only grow. Other big names like the Epic Games Store and Ubisoft are on the list, too.

Can you play video games in a car when driving?

No. Gaming is only available for those worried about safety when the vehicle is parked. Connecting the Bluetooth gaming controller or mobile phone is quite easy, and Mercedes offered a sneak peek at this year’s Gamescom.

So, what does this mean for the future of in-car entertainment? With Boosteroid by its side, Mercedes-Benz is steering towards a future where gaming and driving (well, parking) go hand in hand.

Can you play video games in a car? Right now, no. But by 2025, you’ll be able to do so.

In other news, at Gamescom 2024, NVIDIA and Xbox announced a new partnership that will allow Xbox users to connect their accounts to GeForce Now.

Kami Chrome Extension: What is it & How to Use it?

If you’re looking to enhance your Google Chrome experience, the Kami Chrome Extension is a fantastic tool for PDF annotation and editing. Whether you’re a student, teacher, or professional, Kami can streamline your workflow and improve your productivity.

How can I download and use the Kami Chrome extension?

What is the Kami Chrome extension?

Kami is an annotation service and it’s especially helpful to teachers. The service has a Chrome extension that allows you to do the following:

  • Highlight, underline, and strikethrough text.
  • Add comments, text boxes, and shapes.
  • Use freehand drawing tools for annotations.
  • Draw shapes and use the ruler or protractor for precision.
  • Add images, videos, and audio recordings to your documents.
  • Integrate external media from Google Drive or YouTube.

How can I install the Kami Chrome extension?

  1. Launch your Google Chrome browser and go to the Kami extension page.
  2. Click on the Add to Chrome button next to the Kami extension.
     kami add to chrome
  3. A pop-up window will appear asking for confirmation.
  4. Click Add Extension to proceed with the installation.
    add extension kami

How to use Kami with Google Classroom?

  1. Open Google Classroom and navigate to the class where you want to use Kami.
  2. Look for assignments that require annotation.
  3. Click on the assignment, and then click Open with Kami.
  4. Use Kami’s tools to annotate the document as required.
  5. After completing the annotations, click Turn In or Submit within Kami to submit your work.

How to integrate Kami with LMS?

  1. Go to the Kami app and navigate to the integration settings.
  2. Select the LMS you wish to integrate with (e.g., Google Classroom, Canvas, Schoology).
  3. Follow the prompts to authorize Kami to connect with your LMS.
  4. Ensure you grant necessary permissions for Kami to access and manage your files.
  5. Once connected, you can open and annotate files directly within your LMS.
  6. Look for the Open with Kami button in your LMS assignments and resources.

Is Kami still free?

Yes, Kami does offer a free plan, but it has only the most basic functionality that allows you to familiarize yourself with it.

Is the Kami extension safe?

Yes, Kami is highly rated on Chrome Web Store and the service is trusted by 40 million students and teachers around the world.

By following these steps and utilizing the features of the Kami Chrome extension, you can significantly enhance your productivity and streamline your digital tasks.

If you need something different, we have an entire guide dedicated to the PDF editor extensions for Chrome, so you’ll find something that matches your needs.

To learn more about PDF files, we have a great guide on how to annotate and manage PDF files, so don’t miss it. For quick screen markup and live annotations outside of Chrome, try the Epic Pen tool to draw directly over any app or webpage.

If you’re a student who needs to take exams online, you might be interested in learning more about the Honorlock Chrome extension.

Printer Printing Colors Wrong: 6 Ways to Fix it

It’s not often that your printer will be printing colors all wrong but if it happens, it’s probably just a wrong cartridge placement or printer settings.

Often times, the quality of paper, level of ink toner and incorrect color profiles play a part in the final outcome.

How do I get my printer to print in color accurately?

1. Clean the printhead

Note icon NOTE
This method only applies to HP printers.

1.1 Automatically

  1. Open your HP printer paper tray and load some plain paper.
  2. Go to the printer control panel and select Setup.
  3. Scroll until you reach the Printer Maintenance option, then tap to select.
  4. Select Clean Printhead, and a test page will print.
  5. Examine the test page.

1.2 Manually

  1. Turn off your HP printer and unplug the power cord from the wall outlet.
  2. Wait five minutes or until the printer cools down completely before proceeding further to avoid electric shock or injury from hot surfaces while handling parts inside the printer.
  3. Open the cartridge access door, remove all the cartridges, and put them somewhere with the ink opening up. Do not leave the cartridge outside of the printer for longer than 30 minutes.
  4. Now carefully, lift the latch handle on the print carriage until it stops and remove the printhead, also by lifting it up.
  5. Use an alcohol wipe to clean the copper contacts on both sides of each cartridge. Do not touch any other part of these cartridges or let any liquid get inside them.
  6. Blow out any remaining dried ink or dust from inside each nozzle opening on your printhead. Do not use anything sharp or abrasive to clean inside your nozzles.
  7. Replace each cartridge in its slot and ensure it is firmly seated before closing and locking them back into place. You should hear a click sound as confirmation.

To verify that your color alignment and ink distribution are correct, you can print a test page in Windows 11 or 10 and compare the results for consistency.

2. Update your printer software

  1. Navigate to your browser and go to the Software and Driver Downloads page for HP printers.HP software and drivers page Missing or failed printhead
  2. Click on Printers, enter the required model number, and press the Submit button.
  3. Expand the Firmware category on the printer’s software page.HP firmware Missing or failed printhead
  4. Click Download to save the firmware listed there to a folder.
  5. Open the folder that includes the downloaded firmware. Then open the firmware file and follow the on-screen instructions to install the latest firmware.

3. Run the printer’s diagnostic tool

  1. Download the HP Print and Scan Doctor application. Download HP Print and Scan Doctor
  2. Open HPPSdr.exe from the download location. You might need to be an administrator to be able to do this.
  3. Click on Start and select your printer. If your printer is not present, reboot your printer, then choose Retry.Click Start
  4. Follow the prompts the application gives you and choose Yes if it asks to turn on printer updates. Then set your default printer.
  5. Now, select the printer that the Problem with printhead error arises for, and click the Next button.
  6. Select the Fix Printing option.
    HP Print and Scan Doctor printer validation failed
  7. HP Print and Scan will then display some troubleshooting results. Follow the troubleshooting instructions if the software displays any X crosses, highlighting unresolved printer errors.

4. Update Printer drivers

  1. Hit the Windows key, type Device Manager in the search bar, and click Open.device manager w11
  2. Navigate to Printers and locate your printer.
  3. Right-click on it and select Update driver.
  4. Select Search automatically for updated drivers.
  5. Windows will find the most suitable driver and recommend you install it.

5. Calibrate your display

  1. Open Settings by pressing the Windows key + I. Type Calibrate in the Search Box and click on Calibrate display color.
  2. Click on Next and follow the displayed instructions on the screen.
  3. After reading the instructions and consecutively clicking Next. You will see notes on how to adjust Gamma.
    Gamma
  4. Adjust the Gamma the way you like. Then, select Next.
    Adjust Gamma
  5. Click on Next to complete the set-up.
  6. You can decide to Skip brightness and contrast adjustment. If you don’t want to skip it, just select Next.
  7. The screen information is well detailed to enlighten the steps to take. Proceed from each step by selecting Next. Adjust the brightness and contrast to a level you are satisfied with.
  8. You will also be prompted to adjust the color balance. The information on how to do this will be displayed on your screen.
  9. At the end of this setting, You’ve successfully created a new calibration will be displayed. Select Finish to complete the set-up.
    New calibration
  10. Check if you are satisfied with the new color settings with a new print test.

Creating a color profile on your display ensures that the colors are consistent and match so what you see is what will be replicated when you print. Also ensure your printer’s ink levels are not low as this could interfere with the final outcome.

6. Reset your printer

  1. Switch on the printer if it’s off, then remove the power cord from the back of the printer.
  2. After that, unplug the power cord from the wall.HP printer and power cable Missing or failed printhead
  3. Check the cartridge and ensure it is properly seated. Also check the ink levels.
  4. Reconnect the power cable, and turn on the printer while pressing the Resume button for 10-20 seconds.
  5. Once the Attention light turns on, release the Resume button.
  6. Now, wait a few moments while the Attention and Ready lights blink, indicating that the reset is in process.

Your cartridge may be full of ink but your printer is still not printing or printing incorrect colors.

Remember that most printer manufacturers are against using third-party cartridges so if this is the case, switch to a HP-verified or your manufacturer’s cartridge and see if this resolves the printer printing colors wrong.

Issues with your printer printing color inaccurately are not new. Sometimes, the printer won’t print in color at all and other times, your printer is only printing in greyscale. All these are issues we’ve addressed in our fix guides so feel free to check them out.

If none of the above solutions have addressed the issue of printing wrong colors, try reaching out to your manufacturer’s support contact. They may have additional troubleshooting steps unique to your specific model.

That’s a wrap from us but do share with us any other tips or solutions you m ay have in the comment section below.

How to Undo in Microsoft Word: Single or Multiple Changes

If you need to quickly undo a mistake in Microsoft Word, there’s always the Ctrl + Z key combination. However, in this guide you will learn a lot of ways to undo and redo in Microsoft Word that you might not know about.

How do I undo one or more changes in Word?

1. Undo a single change in Microsoft Word

  1. Locate the undo button on the Quick Access Toolbar at the top of your Word window. It looks like a curved arrow pointing to the left. Click it once to undo the last action you performed.
  2. Alternatively, you can press the Ctrl and Z keys on your keyboard simultaneously. This will also undo your last action.

Using these methods, you can quickly correct a mistake you made in your document. This is especially useful if you accidentally deleted text or formatted something incorrectly.

2. Undo multiple changes in Microsoft Word

  1. Find the Undo button on the Quick Access Toolbar. Click the small downward arrow next to it to open the undo history.
  2. In the dropdown list, select the specific action you want to undo. All actions performed after the selected action will also be undone.

This method allows you to undo several recent actions at once, saving you time if you need to reverse a series of edits.

How do I redo or repeat an action in Microsoft Word?

  1. The Redo button on the Quick Access Toolbar looks like a curved arrow pointing to the right. Click it after you have undone an action to redo it.
  2. You can also press the Ctrl + Y keys on your keyboard simultaneously to redo the last action you undid.
  3. The Repeat button looks like the Redo button but is only available when Redo isn’t. Click it to apply the last command to any selected text.
  4. You can also use Ctrl + Y to repeat the last action if the Redo button is not available.

Redo is helpful if you realize that you actually need the action you just undid, letting you quickly restore it without repeating the steps manually.

Also, using the Repeat feature can streamline your workflow, especially if you need to apply the same formatting or action multiple times in your document.

What can I do if the Undo and Redo buttons are missing in Word?

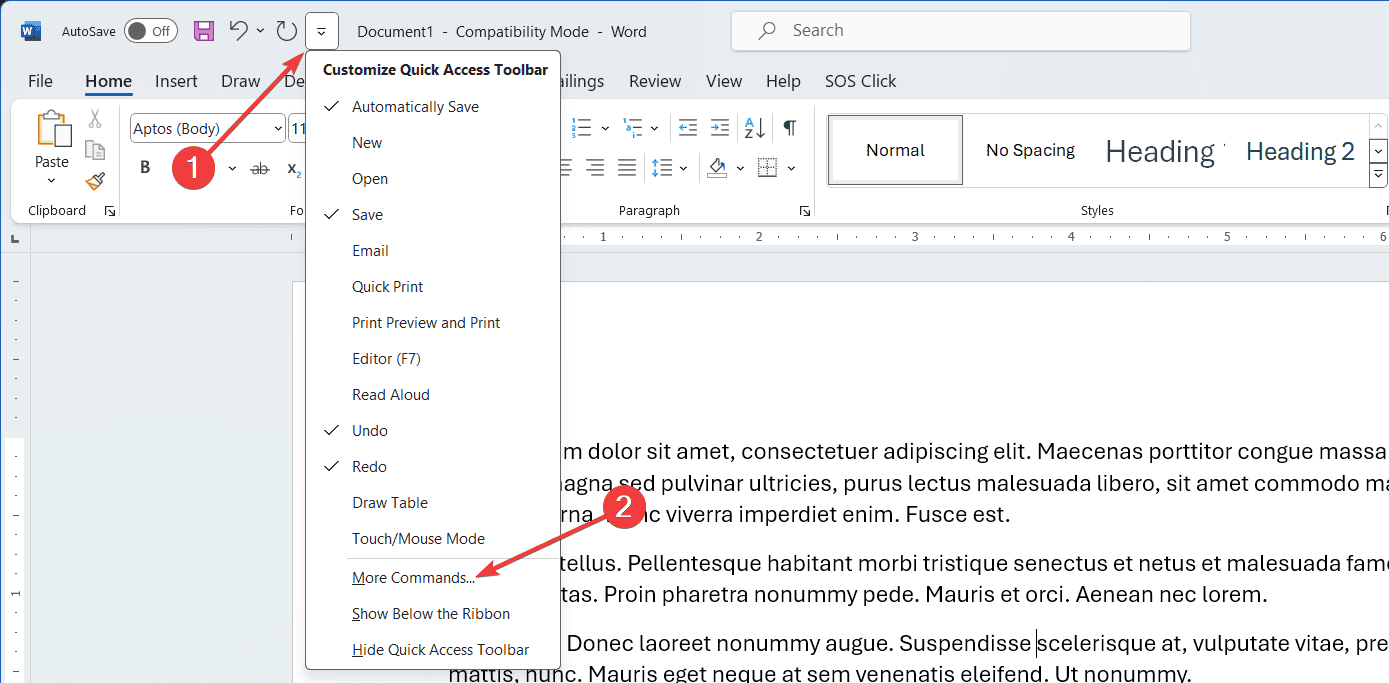
  1. Click the small downward arrow at the end of the Quick Access Toolbar.
  2. In the dropdown menu, select More Commands to open the Word Options window.
  3. In the Word Options window, locate and add the Undo and Redo buttons to your Quick Access Toolbar if they are not already there.
  4. Once added, click OK to save your changes.

Customizing your Quick Access Toolbar allows you to easily access these important functions, making editing your document more efficient.

By mastering these undo and redo techniques, you can make your document editing process smoother and more efficient. Always remember to customize your Quick Access Toolbar for even quicker access to these essential commands.

We have lots of tips guides, including how to type exponents in Word or what to do if Word is not continuing numbering.

Did you manage to undo the last changes in Word by using the instructions in our guide? Let us know in the comments below.
OpenAI fine-tunes its GPT-4o and GPT-4o Mini, making the already affordable models even more competent

OpenAI announced its newest AI model, GPT-4o Mini, a more affordable version of the latest GPT-4o model, to make access to advanced artificial intelligence more democratic. Although the costs of using this new model are lessened, it still performs well, strengthening its competition in the field.

However, it seems the company is taking things even further: OpenAI has rolled out fine-tuning support for its GPT-4o and GPT-4o mini models. This is a game-changer for those looking to tailor AI responses to specific needs, making the technology not only more accessible but also more versatile. With this new feature, developers can train these models using custom datasets, which promises higher performance at a lower cost for particular applications.

OpenAI isn’t holding back on making this feature accessible, either. They’re offering a generous amount of training tokens for free every day to every organization—1 million for GPT-4o fine-tuning and 2 million for GPT-4o mini. This offer, available through September 23, invites developers to dive in and explore the possibilities. The cost for additional training and inference is surprisingly affordable, making it an attractive option for businesses of all sizes.

Getting started is straightforward. Developers head to the fine-tuning dashboard on the OpenAI platform, select their base model, and begin the customization process. This user-friendly approach lowers the barrier to entry for those new to AI development.

The results from early adopters are promising. Distyl, for instance, snagged the top spot on the BIRD-SQL benchmark thanks to its fine-tuned GPT-4o, showcasing the model’s prowess in SQL generation and other complex tasks. Genie, another early tester, achieved state-of-the-art scores on benchmarks, highlighting the significant improvements that fine-tuning can bring to AI performance.

This development clearly signals that OpenAI is committed to making its AI models powerful, adaptable, and easy to use for developers. Whether you’re a seasoned AI expert or a curious newcomer, the potential for innovation and customization is now at your fingertips. So, what could you create with a fine-tuned GPT-4o or GPT-4o mini at your disposal?

You’ll be able to connect your Xbox account to GeForce Now

As part of the Gamescon 2024 announcements, Nvidia is now making it possible to connect your Xbox account to its GeForce Now cloud system. Starting August 22, you can link your Microsoft Account to your GeForce NOW account for a seamless sign-in experience. No more typing in your credentials whenever you want to lose yourself in Starfield or Forza Horizon 5.

It’s a “set it and forget it” deal, not just for Xbox games. Epic Games and Ubisoft titles have been enjoying this convenience for a while. Gaming on GeForce NOW just got a whole lot easier. This means jumping into Fallout 76, Starfield, or Forza Horizon 5 without the hassle of logging in each time. It’s a game-changer, especially for those who game on the go.

GeForce NOW lets you access games on pretty much anything: a low-end Windows laptop, a Chromebook, or even an iPad. Thus, you can play various PC games without needing the latest hardware.

And with a free tier available, it’s accessible to just about anyone with a solid internet connection. For those craving the highest quality, the most expensive plan offers gaming at 4K 120Hz, assuming your internet can keep up.

This is how you connect your Xbox account to GeForce Now

There isn’t much you need to do: connecting your Xbox account to GeForce Now is automatic. You’ll need to link your Xbox profile once, and voilà, you’re automatically signed in for all your future gaming sessions.

Microsoft has added a “Play on GeForce NOW” button to its store listings. This means you can choose how to play Microsoft games in the cloud. And you have more than 2000 games to choose from. And don’t forget, with GeForce Now, you can also play PC games on your Xbox console.

This collaboration is a testament to how the gaming industry is evolving. It’s no longer just about the console you own or the PC specs you boast. Cloud gaming is the future, and Nvidia is leading the charge with GeForce NOW.

By making gaming more accessible and convenient, they’re catering to hardcore gamers passionate about gaming. So, are you ready to connect your Xbox account to GeForce Now and dive into a world of hassle-free gaming?

FILE_INITIALIZATION_FAILED Bug Check 0x68 [Solved]

The FILE_INITIALIZATION_FAILED BSOD, with an error code 0x00000068, usually appears during the boot stage when Windows fails to load critical system files. The error is rarely encountered, according to Microsoft!

The underlying causes for the blue screen error include corrupt system files, outdated or corrupt drivers, issues with data storage or disk, and conflicts triggered by third-party apps.

Before you start troubleshooting, install pending Windows updates, disconnect all non-critical peripherals, and scan the PC for malware. In many cases, these simple checks quickly fixed the File Initialization Failed BSOD.

How do I fix the FILE_INITIALIZATION_FAILED BSOD?

Note icon NOTE
If you keep getting FILE_INITIALIZATION_FAILED every time you turn on the PC, boot into Safe Mode with Networking, and then execute the solutions listed next.

1. Update all the drivers

  1. Press Windows + X to open the Power User menu, and select Device Manager.
  2. Expand the entries here, then individually right-click on the different devices listed underneath, and select Update driver. I am updating the disk’s driver.update driver to fix FILE_INITIALIZATION_FAILED
  3. Click on Search automatically for drivers and wait for Windows to install the best locally available driver version. automatic driver search
  4. Similarly, update the other critical drivers, and then reboot the PC.

If Windows can’t find a better version while updating the drivers, go to the manufacturer’s website, then check for the new releases, and finally, manually install the latest driver version.

2. Repair the corrupt system files

  1. Press Windows + S to open Search, type Command Prompt in the text field, and click on Run as administrator.command prompt
  2. Paste the following three commands individually and hit Enter after each: DISM /Online /Cleanup-Image /CheckHealth DISM /Online /Cleanup-Image /ScanHealth DISM /Online /Cleanup-Image /RestoreHealth
  3. Next, execute this command to run the SFC scan: sfc /scannowsfc scan to fix FILE_INITIALIZATION_FAILED
  4. Restart the computer and check for improvements.

If the FILE_INITIALIZATION_FAILED BSOD in Windows is caused by corrupt system files, it’s best to run the DISM (Deployment Image Servicing and Management) and SFC (System File Checker) scans. The two will find and replace any corrupt protected system files with their cached copy!

3. Repair issues with the disk

  1. Press Windows + R to open Run, type cmd, and hit Ctrl + Shift + Enter.command prompt
  2. Click Yes in the UAC prompt.
  3. Paste the following Check Disk command and hit Enter: chkdsk /r
  4. If asked to schedule the scan during the next reboot, press Y, then hit Enter, and finally, restart the PC.check disk to fix FILE_INITIALIZATION_FAILED

After running the built-in Check Disk utility, you should have fixed issues arising out of bad sectors and prevented further data allocation to them. If this doesn’t work, use a bad sector repair utility for Windows and get rid of the FILE_INITIALIZATION_FAILED blue screen error!

4. Uninstall apps conflicting with Windows

  1. Press Windows + R to open Run, type appwiz.cpl in the text field, and hit Enter.
  2. Select any apps which might be triggering conflicts with the OS, and click on Uninstall.remove app
  3. Follow the on-screen instructions to complete the process, then restart the PC and check for improvements.
  4. If the BSOD error reappears, uninstall other apps which might be causing problems.

5. Perform an in-place upgrade

Note icon NOTE
The steps listed here are for Windows 11. If you are running the previous iteration, learn how to perform a repair upgrade on Windows 10.
  1. Go to Microsoft’s official website, select the OS version and product language, and then download the Windows 11 ISO.windows 11 iso
  2. Double-click on the ISO file and then click Open in the confirmation prompt.
  3. Run the setup.exe file.setup.exe
  4. Click Yes in the UAC prompt.
  5. Now, click Next to proceed.
  6. Click Accept to agree to Microsoft’s license terms.
  7. Finally, make sure the setup reads, Keep personal files and apps, and then click on Install.in-place upgrade to fix FILE_INITIALIZATION_FAILED
  8. Wait for the process to complete. It will take between 45-90 minutes.

If none of the other solutions helped fix the FILE_INITIALIZATION_FAILED error, perform an in-place upgrade. This will fix any OS-based misconfiguration, corrupt system files, and installation errors!

In case this, too, fails, the only possible causes left are hardware failure or connection issues. For this, it’s best to contact the support team or visit a local repair shop and get the computer inspected by a professional.

Before you leave, discover the best Windows 11 security settings for a more secure experience!

If you know more fixes for the error, share them with our readers in the comments section below.
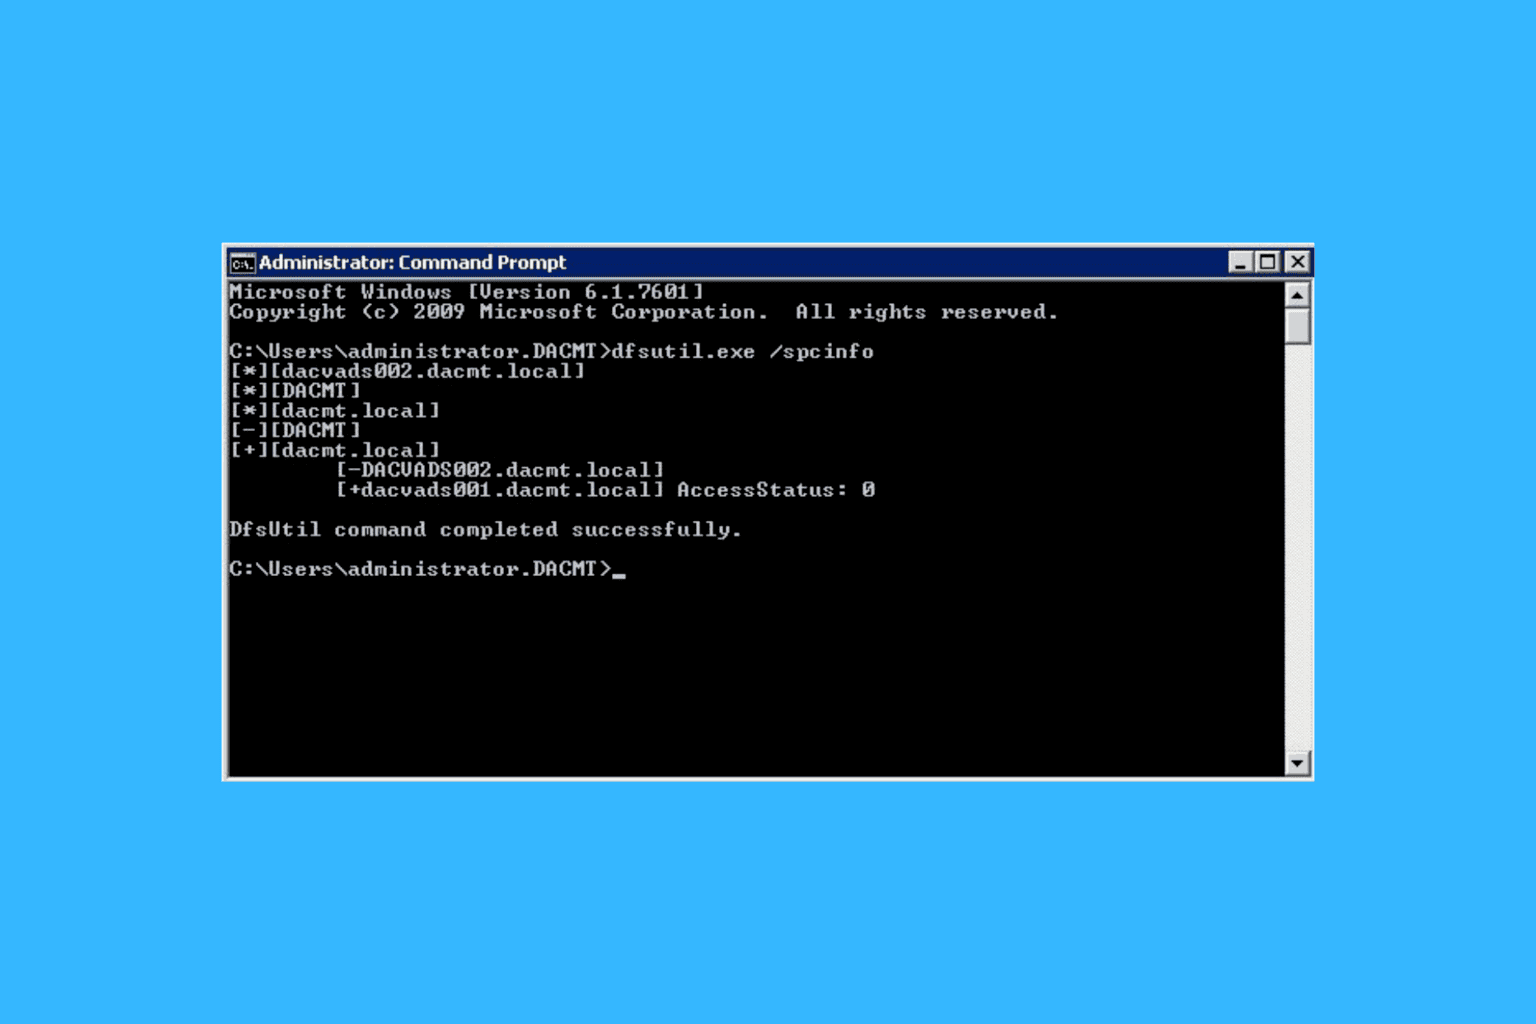
MISMATCHED_HAL Error – 6 Simple Fixes

Encountering the 0x00000079 MISMATCHED_HAL error can be pretty disruptive. Usually, it occurs due to inconsistencies between your hardware and the system’s Hardware Abstraction Layer (HAL) following hardware upgrades, driver issues, or system updates. The error may prevent Windows from booting correctly or cause unexpected crashes. 

Fortunately, I’ll show you the fixes to restore your system’s stability. But before we begin, try unplugging external hardware and confirm if the error is fixed. If that doesn’t work, proceed to more detailed solutions.

6 Ways To Fix MISMATCHED_HAL Error

Here are the solutions:

Check for Windows Updates

Keeping your system updated makes sure that all drivers and system files are compatible with your hardware. Installing the latest updates can often resolve conflicts that cause the error. Follow the steps below:

  1. Press the Windows Icon + I to open the system Settings. Tap Update & Security.
Update & Security
  1. Click Check for updates and install any available ones.
Check for updates

Restart your computer and confirm if the error is resolved.

Scan Device Performance and Health

This error can lead to hardware issues, such as failing components or compatibility problems. A device performance and health scan can identify and address these problems. Here’s how to do it:

  1. Click the Windows icon, then tap Settings. Select Update & Security.
Update & Security
  1.  Select Windows Security from the left menu, then click on Device Performance & Health.
Device Performance & Health
  1. Review the health report. It includes storage capacity, battery life, apps and software, and Windows Time service.
Health report

If any issue has been detected, follow the recommended actions to address it.

Disable Fast Startup

Fast startup is a feature designed to speed up boot times, but it can sometimes cause conflicts with system hardware, leading to the MISMATCHED_HAL error. Disabling it can help avoid these conflicts. Follow the below steps:

  1. Type Control Panel on the search bar beside the Start menu and hit Open.
Control Panel
  1. Click Power Options.
Power Options
  1. Click on Choose what the power buttons do.
Choose what the power buttons do
  1. Select Change settings that are currently unavailable.
  1. Uncheck the Turn on fast startup box, then click Save changes.
Turn on fast startup

Restart your computer, and the issue should be solved.

Run Windows Defender

Some malware may slip under the radar during regular scans. Windows Defender can find and remove hidden threats that could cause the error. Here are the steps:

  1. Press the Windows Icon + I to open Settings, then select Update & Security.
Update & Security
  1. Tap Windows Security, then Click on Virus & Threat Protection.
Virus & Threat Protection
  1. Under Current threats, select Scan options.
scan options
  1. Choose Microsoft Defender Offline scan and click Scan now.
 Microsoft Defender Offline scan

Your computer will restart and perform the scan, which should take about 15 minutes.

Run System Restore

System Restore allows you to revert your computer to a previous state, undoing recent changes that may have caused the MISMATCHED_HAL error. It helps if the problem started after a recent update or software installation. Here are the steps:

  1. Press the Windows icon + I to open Settings, then select System.
System
  1. Scroll and tap About, then click System Protection.
System Protection
  1. Tap System Restore.
System Restore
  1. Hit Next.
Hit Next
  1. Choose a restore point from the list, then tap Next.
Pick a restore point
  1. Click Finish to start the process.
Click Finish

Once done, your Windows will return to the previous state you picked. Check if the error has disappeared. 

Uninstall Recently Installed Software

Newly installed software might conflict with existing hardware or system files, leading to errors. Uninstalling it can eliminate these conflicts and help resolve the MISMATCHED_HAL error. Below are the steps:

  1. Tap the Start menu and select Settings to open the System settings.
System settings
  1. Click Apps.
Applications
  1. Scroll through the list under Apps & features to find any recently installed programs.
  2. Click on the program and select Uninstall.
Uninstall

Restart your computer after uninstalling the software.

The above solutions will help you diagnose and resolve the MISMATCHED_HAL error. If one method doesn’t work, try the next, as the problem may stem from a combination of factors.

Additionally, you can learn to fix the FTDISK_INTERNAL_ERROR, ERROR_READ_FAULT, and INSUFFICIENT_SYSTEM_MAP_REGS.

The Phi-3.5 family, capable of a staggering 128K token context length, is now available to test

Microsoft has unveiled the Phi-3.5 family of models, a trio of AI marvels designed to outshine their competitors. This lineup includes the Phi-3.5-vision, Phi-3.5-MoE, and Phi-3.5-mini, each crafted to push the boundaries of what’s possible in artificial intelligence.

These models are not just about raw power; they’re about intelligent, efficient computing, leveraging synthetic data and the vast expanse of the internet to support a whopping 128K token context length.

Moreover, they’re all available on Hugging Face under an MIT license, making them accessible to innovators everywhere.

The Phi-3.5: Everything you need to know about the new version of the groundbreaking AI family

The MoE model is a true standout, the first in its family to utilize Mixture of Experts (MoE) technology. Imagine an advanced model that activates only a fraction of its parameters to deliver top-notch performance. The Phi-3.5-MoE does that with its 16 x 3.8B MoE model, activating just 6.6B parameters. It’s a game-changer, outperforming several of its predecessors and giving the current AI leader, GPT-4o-mini, a run for its money.

Then there’s the mini version, a testament to the power of efficiency. Despite its relatively modest size, this model punches well above its weight, challenging and surpassing models with significantly more parameters. It’s a marvel in multilingual tasks, proving that sometimes, less is more. Its support for a 128K context length puts it leagues ahead of its main rival, the Gemma-2 family.

Not to be overlooked, the Phi-3.5 Vision brings a new dimension to AI with enhanced multi-frame image understanding. It’s not just about seeing; it’s about comprehending and reasoning across multiple frames, a capability to revolutionize how machines interpret visual data. With improvements across several benchmarks, the Phi-3.5 Vision sets new standards for AI’s visual capabilities.

Microsoft’s latest release is more than just a showcase of technological prowess; it signals its commitment to advancing AI in innovative and accessible ways. Just months ago, the Redmond-based tech giant released the Phi-3.0 family. Hence, the Phi-3.5 family of models represents a leap forward in AI model efficiency and capabilities, promising broader adoption across various applications.

You can get all three models on Hugging Face as follows:

LPC_INITIALIZATION_FAILED: 7 Ways to Fix the BSOD

The LPC_INITIALIZATION_FAILED bug check 0x0000006A appears when the Local Procedure Call (LPC) component, responsible for communication between the different applications and OS, fails to initialize during the boot stage, resulting in a Windows blue screen error.

The LPC Initialization Failed BSOD usually appears due to corrupted system files, outdated or buggy drivers, corrupt registry entries, malware infection, conflicting third-party applications, and an improper Windows install.

Before you start troubleshooting things, install any pending Windows updates, clear storage space, disconnect all non-critical peripherals, and fix overheating issues.

How can I fix the LPC_INITIALIZATION_FAILED blue screen error?

Tip icon Tip
If the LPC_INITIALIZATION_FAILED error keeps appearing when you turn on the PC, boot into Safe Mode with Networking and then execute the solutions listed below.

1. Repair the corrupt system files

  1. Press Windows + S to open Search, type Command Prompt in the text field, and click on Run as administrator.command prompt
  2. Click Yes in the UAC prompt.
  3. Paste the following DISM (Deployment Image Servicing and Management) commands individually and hit Enter after each: DISM /Online /Cleanup-Image /CheckHealth DISM /Online /Cleanup-Image /ScanHealth DISM /Online /Cleanup-Image /RestoreHealth
  4. Now, run this SFC (System File Checker) scan command: sfc /scannowsfc scan to fix LPC_INITIALIZATION_FAILED
  5. Reboot the PC and check for improvements.

2. Update all the drivers

  1. Press Windows + X to open the Power User menu, and select Device Manager.
  2. Expand the different entries here, individually right-click on the devices listed underneath, and select Update driver. I am updating the disk driver.update drivers to fix LPC_INITIALIZATION_FAILED
  3. Now, select the Search automatically for drivers option to let Windows install the best locally available driver version.automatic search
  4. Similarly, update all the other critical drivers, and finally, restart the PC.

If Windows can’t update the drivers or find a better version, head to the manufacturer’s website, locate the newest releases, and then manually install the latest driver.

Or, to automate and streamline the process, you can get a top-rated driver update utility that will automatically detect the connected devices, fetch the latest drivers for each, and install them.

3. Check/repair the disk and RAM issues

3.1 Repair the disk

  1. Press Windows + R to open Run, type cmd, and hit Ctrl + Shift + Enter.command prompt
  2. Click Yes in the UAC prompt.
  3. Paste the following command and hit Enter: chkdsk /r
  4. If asked to schedule the scan, press Y, hit Enter, and then restart the PC.check disk to fix LPC_INITIALIZATION_FAILED

The built-in Check Disk utility can detect and repair several issues with the disk, including bad sectors, which can be why you are getting the LPC_INITIALIZATION_FAILED blue screen error in Windows.

3.2 Check for RAM issues

  1. Press Windows + R to open Run, type mdsched.exe in the text field, and hit Enter.
  2. Click on Restart now and check for problems.mdsched.exe
  3. Finally, check the Windows Memory Diagnostic log files and look for any issues.

If the built-in tool doesn’t work, you can go with Memtest86+, an open-source, third-party utility that runs a series of advanced scans on individual RAM modules and detects even the smallest of problems. Since it takes 4-8 hours, let Memtest86+ run overnight!

4. Scan the PC for malware

  1. Press Windows + S to open Search, type Windows Security, and click on the relevant result.
  2. Click on Virus & threat protection.windows security
  3. Click on Scan options.
  4. Choose Full scan and then click on Scan now.malware scan to fix LPC_INITIALIZATION_FAILED
  5. Wait for the scan to complete, and if any threats are eliminated, check whether the LPC_INITIALIZATION_FAILED bug check 0x6A is fixed.

5. Uninstall conflicting applications

  1. Press Windows + R to open Run, type appwiz.cpl in the text field, and hit Enter.
  2. Select any conflicting or recently downloaded third-party app from the list, and click on Uninstall.remove app to fix LPC_INITIALIZATION_FAILED
  3. Follow the on-screen instructions to complete the process, and then restart the PC.
  4. If the BSOD reappears, similarly uninstall other apps that might be triggering the error.

Often, when a quick app removal doesn’t work, you must go with an effective software uninstaller tool to clear any leftover files and Registry entries. Because, in many cases, these leftover items keep causing the LPC_INITIALIZATION_FAILED crash.

6. Perform a system restore

  1. Press Windows + S to open Search, type Create a restore point, and click on the relevant result.
  2. Click the System Restore button.system restore to fix LPC_INITIALIZATION_FAILED
  3. Select the Choose a different restore point option and click Next.
  4. Pick another restore point from the list, preferably the oldest, and click Next.restore point
  5. Verify the details, and click on Finish to start the restore process. It will take 15-45 minutes to complete.

7. Reinstall Windows

When nothing else works, you are left with no option but to reinstall Windows. While doing so, it’s best to delete all existing data on the PC. As for the critical files, you can move them to an external drive before the reset.

media creation tool
Media Creation Tool for Windows 11

To reinstall Windows, download the Media Creation Tool from Microsoft’s official website > connect a pre-formatted USB drive > run the .exe file > follow the on-screen instructions to create a bootable USB drive > restart the PC > change the boot order to the USB drive > proceed with the Windows installation.

If even reinstalling Windows doesn’t fix the LPC_INITIALIZATION_FAILED blue screen error, it’s most likely a hardware failure or connection issue to blame. In this case, it’s best that you visit a local repair shop or contact the dedicated support team for more help.

Before you leave, discover expert tips to make your Windows PC faster than ever and enjoy the ultimate performance!

For any queries or to share which fix worked for you, drop a comment below.

Microsoft Teams’ new unified experience is now available for Windows and Mac users

As you might know, Microsoft promised a unified Teams platform for personal and professional experience a while ago. You should know the Redmond-based tech giant has just rolled it out. The app is designed to make your life easier, whether you’re using it for work, personal matters, or education. This fresh version is now available for anyone using Windows 10, 11, or Mac.

First off, the convenience factor is through the roof. You no longer need to juggle between different accounts or apps for your various needs. With this update, Microsoft lets you add multiple accounts to the Teams app. You can seamlessly switch from a work meeting to chatting with your family or diving into your school project within the same app.

In a blog post, Microsoft says you can join a Teams meeting with whichever account you prefer, or even as a guest, without the hassle of signing in and out. This means less fumbling around and more time connecting with people who matter. Whether it’s a business call or planning the next big event for your school’s fundraiser, the choice is yours at the click of a button.

And for those who love freebies, here’s some good news: Windows 10 and Mac users can now connect and collaborate with anyone on Teams for free, as long as you sign in with a personal email. You can schedule meetings, share files, or create a community for your hobby group or parent-teacher association, all without spending a dime.

If you’re already a Teams user, your app will update automatically. But if you’re impatient for the unified experience, you can download the new Microsoft Teams immediately from the Microsoft Store.

What is Read & Write For Google Chrome & How to Install it

Today’s student has all the tools available to enhance their productivity with Read and Write for Google Chrome.

You can make your work easier whether it’s translation, text-to-speech and vice versa or even need help with practicing reading.

Key features of Read and Write for Google Chrome

1. Text-to-Speech

If you open up a text document on Google Docs and click on the read aloud icon, Read and Write for Google Chrome will begin reading. You can pause or stop at any time if you need to take down notes.

Further, if you’d like to use it on webpages, you simply need to select a text and the extension toolbar will be activated at the top where you can select different menus options.

Aside form text-to-speech, you can also convert spoken words into text. For instance, if you want Read and Write to type out some work for you, all you have to do is hit the microphone icon and start talking. Make sure you’re audible enough for the tool to capture accurately.

2. Vocabulary list

In case you run into new words that you would like to practice or use at a later time in other literary works, you can highlight them and they will be sent to your vocabulary list. You can also conduct a web search of the highlighted words for further analysis.

Once you highlight these words, Read and Write will create a separate document with the collected words and in table format with their meanings.

3. Translator and audio maker

If your document or webpage is in a different language and you’d like o=it translated to your preferred language, Read and Write has this option.

Further, aside from translating, you can also select parts of a text in a document or website then create an audio. This audio file will then be created and automatically downloaded to your computer’s local storage. You can listen to it while on the go if you won’t be in an internet accessible area.

4. Screen masking

In case you’re easily distracted, the screen masking can help you stay focused. It works by dimming the light on the background text and focus on sections.

You can also choose to highlight this section with a different color so that you’re only consuming content you need to at that particular time. For more distraction-free tools, check out our list.

5. Dictionary, spell checker and prediction

If you’re reading a text and you come across a word you’re unfamiliar with, there’s a dictionary that can help you look up its meaning. There’s also an option for a pictorial dictionary.

For those who are writing, you can enable the spell checker and prediction options to help you write more accurately and efficiently.

6. Practice reading

If you’re having issues reading or writing, Read and Write can help you sharpen your skills with its read aloud feature. Over time, your reading and writing efficiency will improve significantly.

How do I install Read & Write for Google Chrome?

  1. Launch your browser.
  2. Type chrome.google.com/webstore in the address bar and hit Enter.
  3. Next, type Read and Write in the search bar and from the results, hit the Add to Chrome button.
  4. Confirm installation in the next dialog box then restart your browser.
  5. You can log in with your Google account to access more features.

What are the pros and cons of Read and Write?

Pros

  • Offline use – You can convert your text to an audio file and download it to listen later. This works for people who do not have regular access to the Internet.
  • User-friendly interface – The Read and Write extension creates its menu on top of Google Docs and doesn’t take up too much space. This makes it easily accessible and has no learning curve.
  • Multilanguage support – You can translate text to different languages for better understanding.

Cons

  • Compatibility test – While Read and Write integrates seamlessly with Google Docs, you might have some trouble with certain webpages and document formats. For instance, we had some trouble getting the plugin to work with a PDF document.
  • Consumes resources – It is a known fact that extensions do slow down your browser because of their extensive use in system resources. Read and Write stayed true to this as we noticed the memory usage shot up quite a bit while it was running.
  • Frequent breakdowns – Any extension is prone to bugs and glitches but Read and Write seems to have more than the normal share. There were some instances that it took a while to load the menu.

Hopefully, with this detailed guide, you’ll be able to make a decision on whether Read and Write is a worth extension to install for your Chrome browser.

And if you’d like to boost your productivity even more, we’ve outlined some of the best productivity tools to help you stay focused. For other browser users like Microsoft Edge, the immersive reader comes close to Read and Write so give it a try and see which one you prefer.

Have you tried this extension? Would you recommend it? Share your thoughts in the comment section below.

Microsoft is working on a wrinkle prediction tech that accurately depicts how individuals age

Imagine a tool where you upload a picture of yourself, and moments later, the tool displays the image back to you, showcasing how your face will wrinkle. Microsoft is working on such a wrinkle prediction tool. On September 1, 2022, the company introduced a groundbreaking method for computing an image depicting a face with an expression and wrinkles, and the patented technology was made public a few days ago.

The technology is not your ordinary Snapchat or Instagram filter; it’s a sophisticated process involving a 3D polygon mesh model of a face, which showcases the wrinkled face in all sorts of expressions and emotions.

The tech starts with a tension map computed from the 3D polygon mesh model to generate your wrinkled face. This map is quite the brainiac; it knows exactly how much compression or expansion is needed to transform a vertex to model the face with a neutral expression or add more expression.Microsoft wrinkle prediction

But the real game-changer here is the use of wrinkle textures. These aren’t just textures; they are computed by aggregating maps of your face with different expressions using the tension map. A neutral texture shows the face in a calm state, a compressed wrinkle texture, and an expanded wrinkle texture for when the face is all about showing those expressions.

How are these textures applied, you might ask? Through a graphics engine that’s clever enough to use the tension map to apply these wrinkle textures to the 3D model. The result? An image rendered from the 3D model that looks so real, you’d think it’s a photograph.

However, this method isn’t just about creating one image. It can render many photos depicting the face with various wrinkles and expressions. These images can be used for training machine learning models, whether for a face image synthesizer, facial landmark recognition, or even predicting how you’ll age accurately.

The tech has a variety of applications, and it can be used to create realistic images of faces for video games, films, or any digital content.

You can read more about Microsoft’s wrinkle prediction tech here.

6 Ways to Fix Printer That is Printing ASCII Characters

When your printer is printing ASCII characters instead of the print job you’ve sent, something must be off with your settings.

ASCII is a standard format used between printers and computers that ensures the commands sent to your printer are interpreted and translated to visual text you can understand.

Your printer may print ASCII characters instead of normal readable text if you’ve recently configured your printer settings, have outdated drivers, or your printer firmware is out-of-date.

It is also possible that you’re printing from an application that requires special ASCII character handling or the software itself has compatibility issues with your printer.

How can I fix my printer printing ASCII characters?

1. Run the Printer troubleshooter

  1. Hit the Windows key and click on Settings.settings windows 11
  2. Select System on the left pane, then click Troubleshoot on the right.Open system troubleshooter
  3. Click on Other troubleshooters.other troubleshooters
  4. Find the Print troubleshooter and click the Run button next to it.printer-run windows cannot connect to the printer

2. Update your printer software

  1. Navigate to your browser and go to the Software and Driver Downloads page for HP printers.HP software and drivers page Missing or failed printhead
  2. Click on Printers, enter the required model number, and press the Submit button.
  3. Expand the Firmware category on the printer’s software page.HP firmware Missing or failed printhead
  4. Click Download to save the firmware listed there to a folder.
  5. Open the folder that includes the downloaded firmware. Then open the firmware file and follow the on-screen instructions to install the latest firmware.

3. Update the Printer drivers

  1. Hit the Windows key, type Device Manager in the search bar, and click Open.device manager w11
  2. Navigate to Print queues, locate your printer, right-click on it, and select Update driver.
  3. Select Search automatically for updated drivers.
  4. Windows will find the most suitable driver and recommend you install it.

4. Run your printer’s maintenance tool

  1. Download the HP Print and Scan Doctor application. Download HP Print and Scan Doctor
  2. Open HPPSdr.exe from the download location. You might need to be an administrator to be able to do this.
  3. Click on Start and select your printer. If your printer is not present, reboot your printer, then choose Retry.Click Start
  4. Follow the prompts the application gives you and choose Yes if it asks to turn on printer updates. Then set your default printer.
  5. Now, select the printer that the Problem with printhead error arises for, and click the Next button.
  6. Select the Fix Printing option.
    HP Print and Scan Doctor printer validation failed
  7. HP Print and Scan will then display some troubleshooting results. Follow the troubleshooting instructions if the software displays any X crosses, highlighting unresolved printer errors.

Most printers have their own maintenance and troubleshooting tool but if it doesn’t, move on to the next solution.

5. Cancel the print job and reset the printer

Note icon NOTE
This method only applies to HP printers.
  1. Press Windows + R to open Run, type Control Panel, and click OK or hit Enter.control panel
  2. Click on View devices and printers under Hardware and Sound.view devices and printers
  3. Now double-click on your HP printer.printer
  4. Cancel all the print jobs assigned to the printer.
  5. Power off the printer and disconnect the cable for at least 30 seconds.
  6. Reconnect the power cable, and turn on the printer while pressing the Resume button for 10-20 seconds.
  7. Once the Attention light turns on, release the Resume button.
  8. Now, wait a few moments while the Attention and Ready lights blink, indicating that the reset is in process.

Cancelling a print job and resetting your printer to default settings will allow you to start in a clean slate. If there were any misconfigured settings, they’ll be deleted.

6. Uninstall and reinstall your printer

  1. Open the Control Panel, and select View devices and printers under Hardware and Sound.view devices and printers
  2. Now right-click on the problematic printer and select Remove Device.remove device
  3. Click Yes to confirm the action.yes
  4. Next, click the taskbar’s magnifying glass icon.
    The magnifying glass button wireless printer windows 11
  5. Type Control Panel within the search tool that opens then select Control Panel to open that window.
  6. Next, select Large Icons on the View by drop-down menu.
    Large icons option wireless printer windows 11
  7. Click Devices and Printers in the Control Panel.
  8. Then press the Add a printer button.
    Add a printer option wireless printer windows 11
  9. Choose a printer on the Add a device window, and press the Next button to install it.
  10. Press the Finish button after the printer has been added.

In another similar situation, you may also find that your printer is printing gibberish but rest assured we’ve already tackled how to bypass this too.

Hopefully, your printer is back to printing normal and readable visual text and not ASCII characters anymore. Should the issue persist, contact your printer’s manufacturer and see if they have any additional solutions.

That’s all from us but do let us know if you have any other solutions not mentioned here. Feel free to share them with us in the comment section below.
DJ Software for Windows 7 – Top 4 Tools for Older Systems

Looking for lightweight DJ software for Windows 7? It’ll come in handy if you need to play or mix records during live performances at parties, clubs, radio shows, festivals, or events.

However, the obsoletion of Windows 7 has narrowed the scope of available software for this operating system. To help you save time and get started with DJing, I’ve evaluated over 15 such programs and have found that the following four are the finest of the lot.

Let’s have a look, shall we?

4 Best DJ Software for Windows 7

Here are the features, functionalities, pros, and cons of the apps that are worthy of your time:

Zulu DJ Software – Best Minimalistic Interface

Zulu DJ is a clutter-free DJ software for Windows 7 and later operating systems. It’s popular among learners, hobbyists, and amateur DJs because of its easy-to-understand user interface. The default interface shows two decks, which is enough for professional-level audio mixing.

However, if you’re an expert and want to create a unique experience for an event, you can open up to six decks for multiple deck effects, loops, etc.

Zulu DJ Software

It also includes an automatic beat or tempo detection tool. Then it creates a waveform graph with indicators for tempos. By looking at this visualization, you can sync other tracks with the primary music. You can also set cue points, create loops, use transitional tracks, and more.

Moreover, Zulu DJ has an auto-play mode. You can create a playlist and set the queue positions for each track. Then, you can configure values for Auto-Mixing, Beat Matching, Loop and Skip Controls, etc., to create a DJ effect. It’ll playback the mixed audio content seamlessly.

Pricing: You can learn DJing or perform in non-commercial events using the free edition. If you’re looking for a commercial performance license, you can buy a one-year license for $49.99.

ProsCons
A free and non-commercial version is available for everyone.There are no visualization options for audio performances. You need a different app for that.
You can record mixed audio and play it back.The built-in library contains basic and limited mixing effects or transitions.
It integrates with broadcasting platforms, like YouTube for online performances.Getting live technical support can be challenging or time-consuming.
You can install external VST plugins.
Compatible with audio file formats, like MP3, WAV, etc.
Works with various internal and external MIDI controllers.

Get Zulu DJ Software for free!

VirtualDJ – Best for Smart Stem Separation

VirtualDJ brings futuristic DJing features that are backward compatible so you can run it on a Windows 7 PC. One of its most popular features is Stem separation. It includes virtual Stem Pads like on physical DJ controllers and mixers.

The software uses advanced algorithms to separate the Vocals, Instrumentals, Bass, Hihats, Kicks, etc., in real time when you play live music. The Stem Pads also light up in distinctive colors so you can easily notice the used pads.

VirtualDJ

It’s a multi-deck standalone DJ mixer. Therefore, it has all the functionalities you need to start DJing as a beginner or expert. Additionally, it’s not necessary to connect the software with DJ hardware. You get jog wheels, transport controls, waveforms, track information, equalization & filter, advanced mixer, performance pads, loops, and many other virtual control features.

If your DJ setup includes hardware, you don’t need to worry about compatibility either. VirtualDJ is compatible with over 300 DJ mixing hardware. For example, it easily syncs with devices from Hercules, Denon DJ, Rane, Numark, Reloop, Pioneer DJ, and more.

Pricing: Its Pro subscription starts from $19/month.

ProsCons
A free trial version is available.It requires a moderately high-performance PC setup.
Includes both audio and video mixing features.You must connect the software with social channels to unlock most features. So, an internet connection is required to use it effectively.
It has visualizations for audio DJ events, like tunnels, psychedelic patterns, equalizers, hypnotic ambient, etc.
Works with the most affordable and premium sound cards to offer a high sample rate.
Auto detects all sound cards and DJ controllers. No need to download drivers manually.
Comes with an interface switcher so you can upgrade or downgrade the features depending on your expertise level.

Get VirtualDJ for free!

Mixxx – Best Open-Source Solution

Mixxx is a popular open-source DJ software for Windows 7 and newer PCs. It’s especially useful if you’re a DJ who often comes across different audio mixing setups. It seamlessly works with many physical DJ setups. Also, since the app is open source, you no longer need to worry about commercial licenses to perform at public and business events.

Mixxx interface

Furthermore, you can download its source code and develop your own DJ software with unique features. There’s a highly engaged community behind this app that will support you when you face challenges. The developers are also from DJing backgrounds so you get the expert technical support you need.

Though it’s an open-source program, it doesn’t lack feature variety. It has functionalities, like Four Decks, Beat Rolls and Censor, Pitch and Key Control, Quantization, Beat Looping, Broad Format Support, Sync Lock, EQ and Crossfader Control, Hotcues, and more.

Finally, you’ll love its personalizable interface. Depending on your DJing expertise, you can make the program interface from basic to mid-level and advanced. For example, by clicking on the Waveforms, Mixer, and Effects button in the top toolbar, you can switch to the basic virtual DJ mixer.

Mixxx intermediate

Contrarily, you can select all the buttons in the menu bar except the Big Library to get the full-service Mixx app interface.

Mixxx advanced

Pricing: It’s completely free for personal and commercial use. However, you can donate to the development team if you like.

ProsCons
Freely available for download for any kind of usage.Since the tool is open-source, there are no dedicated and real-time support options.
The source code is available for custom development and branding.Various DJ hardware vendors might come up with firmware codes to restrict the app from syncing with those controllers.
A lightweight audio mixer that runs smoothly on basic Windows 7 systems.Automatic stem separation isn’t available.
Expert community support is available from the DJ community.
Supports dragging and dropping new tracks from Traktor and iTunes libraries.
The Auto DJ can take over and continue a pre-programmed audio mixing when you’re taking a short break.

Get Mixxx for free!

Virtual DJ Free – Best for Virtual DJing

Virtual DJ Free is a full-service DJing software for trainees and expert disc jockeys. As the name suggests, it’s a digital transformation of physical DJ hardware, like mixers and controllers. It doesn’t sync with real DJ devices as the previous two apps.

Virtual DJ Free

You can import tracks to its playback interface by dragging and dropping. If you’ve got an LP vinyl record player connected to your Windows 7 PC, you can import tracks to the virtual DJ’s library seamlessly.

You can also create fade-in, cross-fade, or fade-out effects between two music tracks using the elaborate BPM counter interface. It captures the tempo of the loaded music tracks so you can manipulate those using the advanced Virtual DJ equalizer.

Furthermore, you can record your experiences in real-time as MP3 tracks. Now, you can playback the recorded content in future events to produce automatic audio mixing effects. Moreover, if you like to stream your DJ mixing sessions online, you can use this tool along with ShoutCast to broadcast live performances to online radio stations or YouTube live streams.

Pricing: Free for individual and business use.

ProsCons
Freeware DJ software for Windows 7.No clear indications of whether the app is suitable with physical DJ hardware.
Up to four decks for mixing and playback purposes.You might face challenges with technical support.
Advanced music and effects track library.
Supports track imports from LP players.
Compatible with YouTube and other online streaming platforms.

Get Virtual DJ Free for free!

How I Chose the Best DJ Software for Windows 7

I considered the following points when selecting my top apps:

  • Windows 7 compatibility: I’ve ensured that the tools I’ve listed work on Windows 7 devices.
  • DJ mixing features: I’ve chosen only those programs that offer medium to advanced-level functionalities. These are the minimal features you can use to host a professional DJ event.
  • Affordability: Most of the apps mentioned above are free or highly affordable.
  • Open-source: I’ve also included an open-source option so you can custom-develop and include unique features.
  • No vendor lock-in: Most of these work with any DJ hardware, avoiding any lock-ins imposed by the manufacturers.

Summary

So, now you checked out some of the top DJ software for Windows 7. You can try these using your own music tracks and DJ effects to choose one that satisfies your requirements.

Feel free to comment below to let me know which one you selected. Also, if you know about a better DJ software that I didn’t list, you can share it.

Additionally, you can read about the best DJ software with virtual turntables, to use without a controller, and for Windows 10 & 11.

Microsoft is releasing a new version of its Planner app later this year

Microsoft is set to release a new version of its Planner app for the web in October. According to the latest entry to the Microsoft 365 Roadmap, this new version will be a single, unified work management experience.

The Redmond-based tech giant will enhance it with even more AI. As you might already know, Microsoft added Copilot to Planner earlier this year. Still, it seems the new version will integrate Planner with Microsoft Project and possibly the other 365 Apps.

Microsoft says the new version will be simple to navigate, scalable, and intelligent. It will also consider individual task management and professional project management.

Here’s what the entry says:

The new Microsoft Planner app for the web is a single, unified work management experience. Assisted by AI, it brings together the simplicity of Microsoft To Do, the collaboration of Planner, and the power of Microsoft Project into a simple, scalable, intelligent solution that spans from individual task management to enterprise and professional project management.

We’ll have to wait until October. What are your thoughts about it?

Microsoft introduces brand-new camera settings in Windows 11, and they are incredibly useful

It’s safe to say Windows Insiders have started the week right: Microsoft released multiple builds to the Insider Community, including a new build for the Dev Channel, one for the Preview Channel, another one for the Beta Channel, and finally, Copilot+ PC users also got a new build.

With all the new builds, there will be several undocumented features, and these are no exception: @phantomofearth already discovered that the new mouse settings, including the scrolling direction option, will also be coming to Windows 11 22H2/23H2. They were thought to be coming only to Windows 11 24H2.

However, the Redmond-based tech giant is also enhancing the camera with additional settings. According to the same spotter, Windows 11’s Camera settings will include an advanced configuration section.

Two new camera settings will be introduced to Windows 11 users: a multi-app camera and a basic debugging mode. They were released as hidden options in the latest Dev Build, and if you want to see them, you’ll have to use a third-party app, such as ViveTool, to uncover them.

So, what do these two new options do? Fortunately, the spotter took a picture of them, and each one is described.

The Multi-app Camera is designed for the hard-of-hearing community. It allows multiple video apps to stream from this camera at the same time. Once turned on, camera settings such as Brightness can only be changed from this page.

The description for the Camera Basic Mode reads: This mode turns on basic camera streaming functionality. It is to be used to debug serious camera issues when all other methods have failed.

The two functionalities are quite useful, as they allow users to easily manage multiple meetings and fix their web camera on their own if necessary.

The new camera settings are hidden for now, but the Redmond-based tech giant will most likely release them in a future build as part of the 24H2 Update, which is slated to be released in September/October.

Photo credits: @phantomofearth

The new scrolling direction settings are coming to Windows 11 22H2/23H2, as well

Microsoft recently released the KB5041873 update to the Beta Insider Channel. This update, targeting versions 22H2, 23H2, and the already privileged 24H2 users, introduces new mouse settings that enhance control and comfort, including scrolling directions for Windows 11.

The two new options are under Settings > Bluetooth & devices > Mouse. First, there’s a toggle for “enhancing pointer position,”. Then, there’s a dropdown for “Scrolling direction,” offering the choice between “Down motion scrolls down” and its opposite.

Microsoft didn’t stop at just tweaking mouse settings. This update also brings many improvements, including fixes for Wi-Fi data transmission issues and those pesky memory leaks.

Plus, for those who love sharing content between our Windows PC and Android devices, the gradual rollout of an enhanced Windows Share feature is something to look forward to. Imagine seamlessly sharing content to your Android device from the Windows Share window—convenience at its best.

The new mouse scrolling direction and pointer position features were thought to be released only for Windows 11 24H2, but according to tech enthusiast @phantomofearth, Microsoft is releasing them for versions 23H2 and 22H2. windows 11 scrolling direction

Whether you’re a hardcore gamer, a digital artist, or just someone who appreciates a smooth and responsive computing environment, these new mouse settings will surely enhance your Windows 11 experience.

Photo credits: Unsplash, @phantomofearth

How to Download and Install the HP Laserjet Pro M404dn Driver

For your HP Laserjet Pro M404dn printer to work properly when connected to the PC, you must download and install the latest drivers. And while it may seem complex for first-timers, the driver update/install process doesn’t take more than a few minutes!

For most of you, it shouldn’t even come down to that. Windows automatically installs the best available driver as soon as a device is connected or plugged in. Although, it doesn’t always deliver the best performance and is often outdated. That’s why experts recommend manually installing the latest drivers for printers.

How can I install the HP Laserjet Pro M404dn driver?

1. Download from HP’s official website

  1. Go to HP’s official website, and click the Download button next to HP LaserJet Pro M404/M405dn/M404/M405n/M404m Printer Full Software Solution under All software and drivers.download driver
  2. Connect the HP Laserjet Pro M404dn printer, then run the downloaded .exe driver setup file and follow the on-screen instructions to complete the installation. install hp laserjet pro m404dn driver

While installing the HP Laserjet Pro M404dn driver, you may be asked to install supplementary software solutions. Although many recommend against installing anything other than the drivers, you can verify whether the additional utilities serve any purpose and proceed accordingly!

2. Use the HP Smart app

  1. Download the HP Smart app from the Microsoft Store.download HP Smart
  2. Once done, run the app and complete the initial setup.
  3. Click on Set Up a New Printer.new printer setup
  4. Now, wait for the HP Smart app to detect your HP Laserjet Pro M404dn printer, and then follow the on-screen instructions to download and install the driver for it.search for hp laserjet pro m404dn

The HP Smart app is an easy way to download and install the HP Laserjet Pro M404dn printer drivers for both 64-bit Windows 10 and 11. Besides, it provides a wide array of other user-oriented features, in addition to streamlining common, everyday printing tasks.

3. Manually install a driver available on the PC

  1. Download the HP Laserjet Pro M404dn driver from the official website.
  2. Press Windows + X to open the Power User menu, and select Device Manager from the list of options.device manager
  3. Expand the Printers entry, right-click on the HP Laserjet Pro M404dn device, and select Update driver.
  4. Click on Browse my computer for drivers.browse for drivers
  5. Now, select the Let me pick from a list of available drivers on my computer option.pick best driver software
  6. Now, choose HP from the Manufacturer column, select the driver software from the right, and click Next.install hp laserjet pro m404dn driver manually
  7. Click Yes in the confirmation prompt.
  8. Finally, reboot the PC for the changes to fully come into effect.

While manually installing the driver for HP Laserjet Pro M404dn, you will have to be careful. Installing an incompatible driver will render the printer non-functional altogether, and you will have to repeat the entire process. To avoid these issues, experts recommend a simpler solution explained next!

4. Use an effective driver update utility

If you want to streamline the update process and install the latest driver version for each device automatically, a top-rated driver update utility is the best option!

It will detect the connected devices, including the HP Laserjet Pro M404dn printer, fetch the latest drivers, and install them, all within a matter of minutes.

As you can see, installing or updating the printer drivers in Windows is simple as long as you have a basic understanding of the OS. So, from now on, you should always have the latest HP Laserjet Pro M404dn driver installed on the Windows PC!

Before you leave, discover more ways to download and install HP printer drivers in Windows.

For any queries or to share which method worked best for you, drop a comment below.
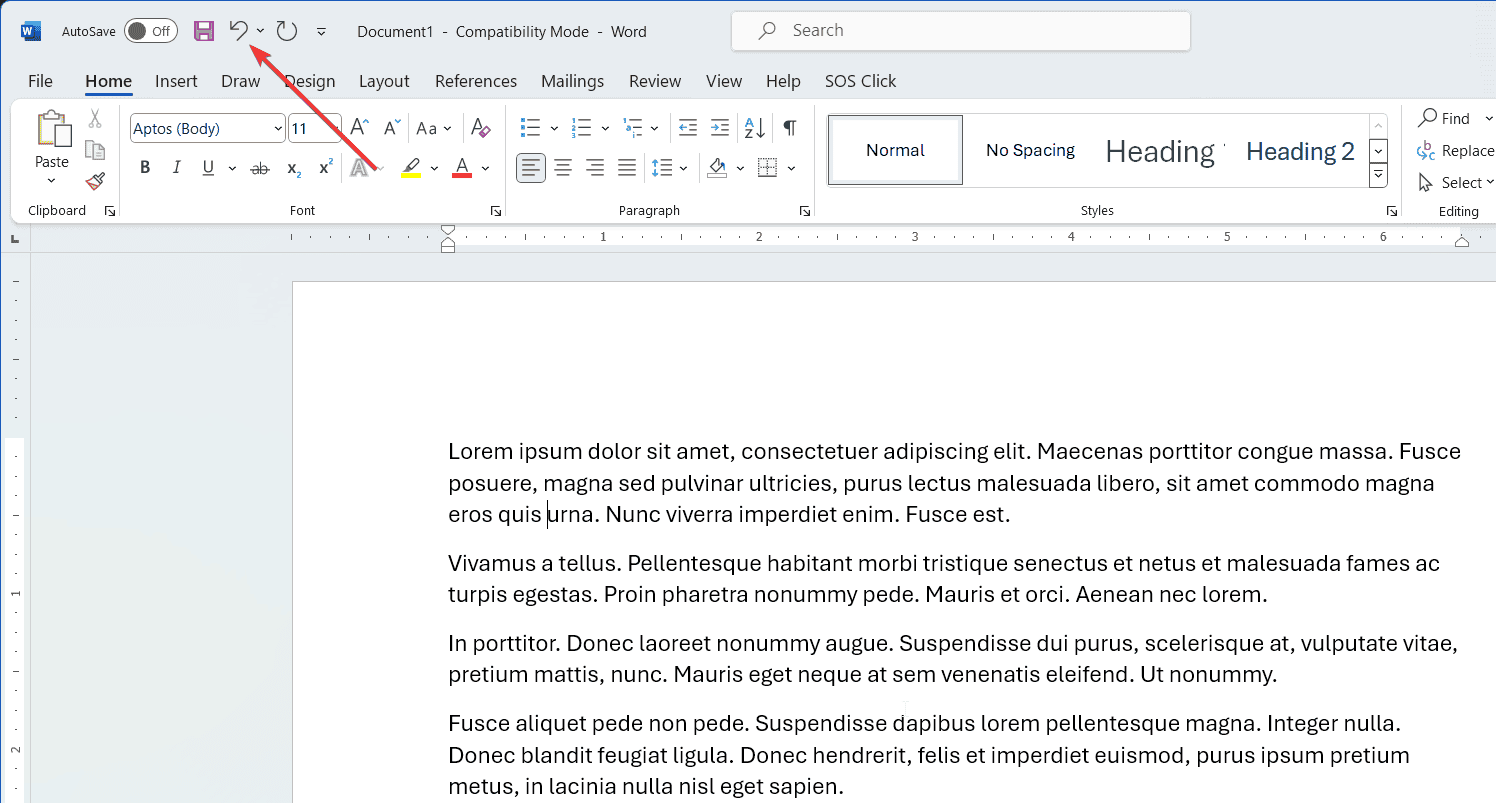
Several Microsoft 365 apps are at serious risk of compromising macOS devices, according to Cisco Talos

A recent discovery by Cisco Talos has spotlighted a somewhat unsettling reality for users of Microsoft’s macOS applications. Eight vulnerabilities across various Microsoft 365 apps have been identified, potentially allowing hackers to bypass macOS’s permission model.

This means that a hacker could send emails, record audio, or even take pictures and videos without any additional verification from the user. The vulnerabilities affect popular applications such as Microsoft Outlook, Teams, PowerPoint, OneNote, Excel, and Word.

TALOS-2024-1972CVE-2024-42220Microsoft Outlook
TALOS-2024-1973CVE-2024-42004Microsoft Teams (work or school)
TALOS-2024-1974CVE-2024-39804Microsoft PowerPoint
TALOS-2024-1975CVE-2024-41159Microsoft OneNote
TALOS-2024-1976CVE-2024-43106Microsoft Excel
TALOS-2024-1977CVE-2024-41165Microsoft Word
TALOS-2024-1990CVE-2024-41145Microsoft Teams (work or school) WebView.app helper app
TALOS-2024-1991CVE-2024-41138Microsoft Teams (work or school) com.microsoft.teams2.modulehost.app

These vulnerabilities stem from a technique known as code injection. In this technique, malicious code is sneaked into legitimate processes, allowing access to protected resources. MacOS has defences, like the Hardened Runtime feature, designed to prevent such code injection. However, Microsoft’s macOS applications enable a setting that bypasses this protection, leading to these vulnerabilities.

Microsoft’s response to these findings was somewhat underwhelming. They acknowledged the issues but deemed them low risk, citing the need for their apps to load unsigned libraries to support plugins. They’ve fixed the vulnerabilities for some apps but left others, like Excel, Outlook, PowerPoint, and Word, vulnerable.

This isn’t the first time Cisco Talos has apprehended vulnerabilities in the Microsoft 365 environment. Earlier this year, the cybersecurity expert found malware in the form of Microsoft installers spreading in Google Cloud Run.

This situation leaves users in a bit of a pickle. While Microsoft prioritizes plugin functionality over security for certain apps, it exposes users to significant risks. The balance between functionality and security is tricky, and it’s unclear how Apple will address these vulnerabilities on its platform.

If you use Microsoft’s macOS applications, you could be at risk. The vulnerabilities could allow bad actors to exploit the permissions granted to these apps, doing things on your behalf without your knowledge.