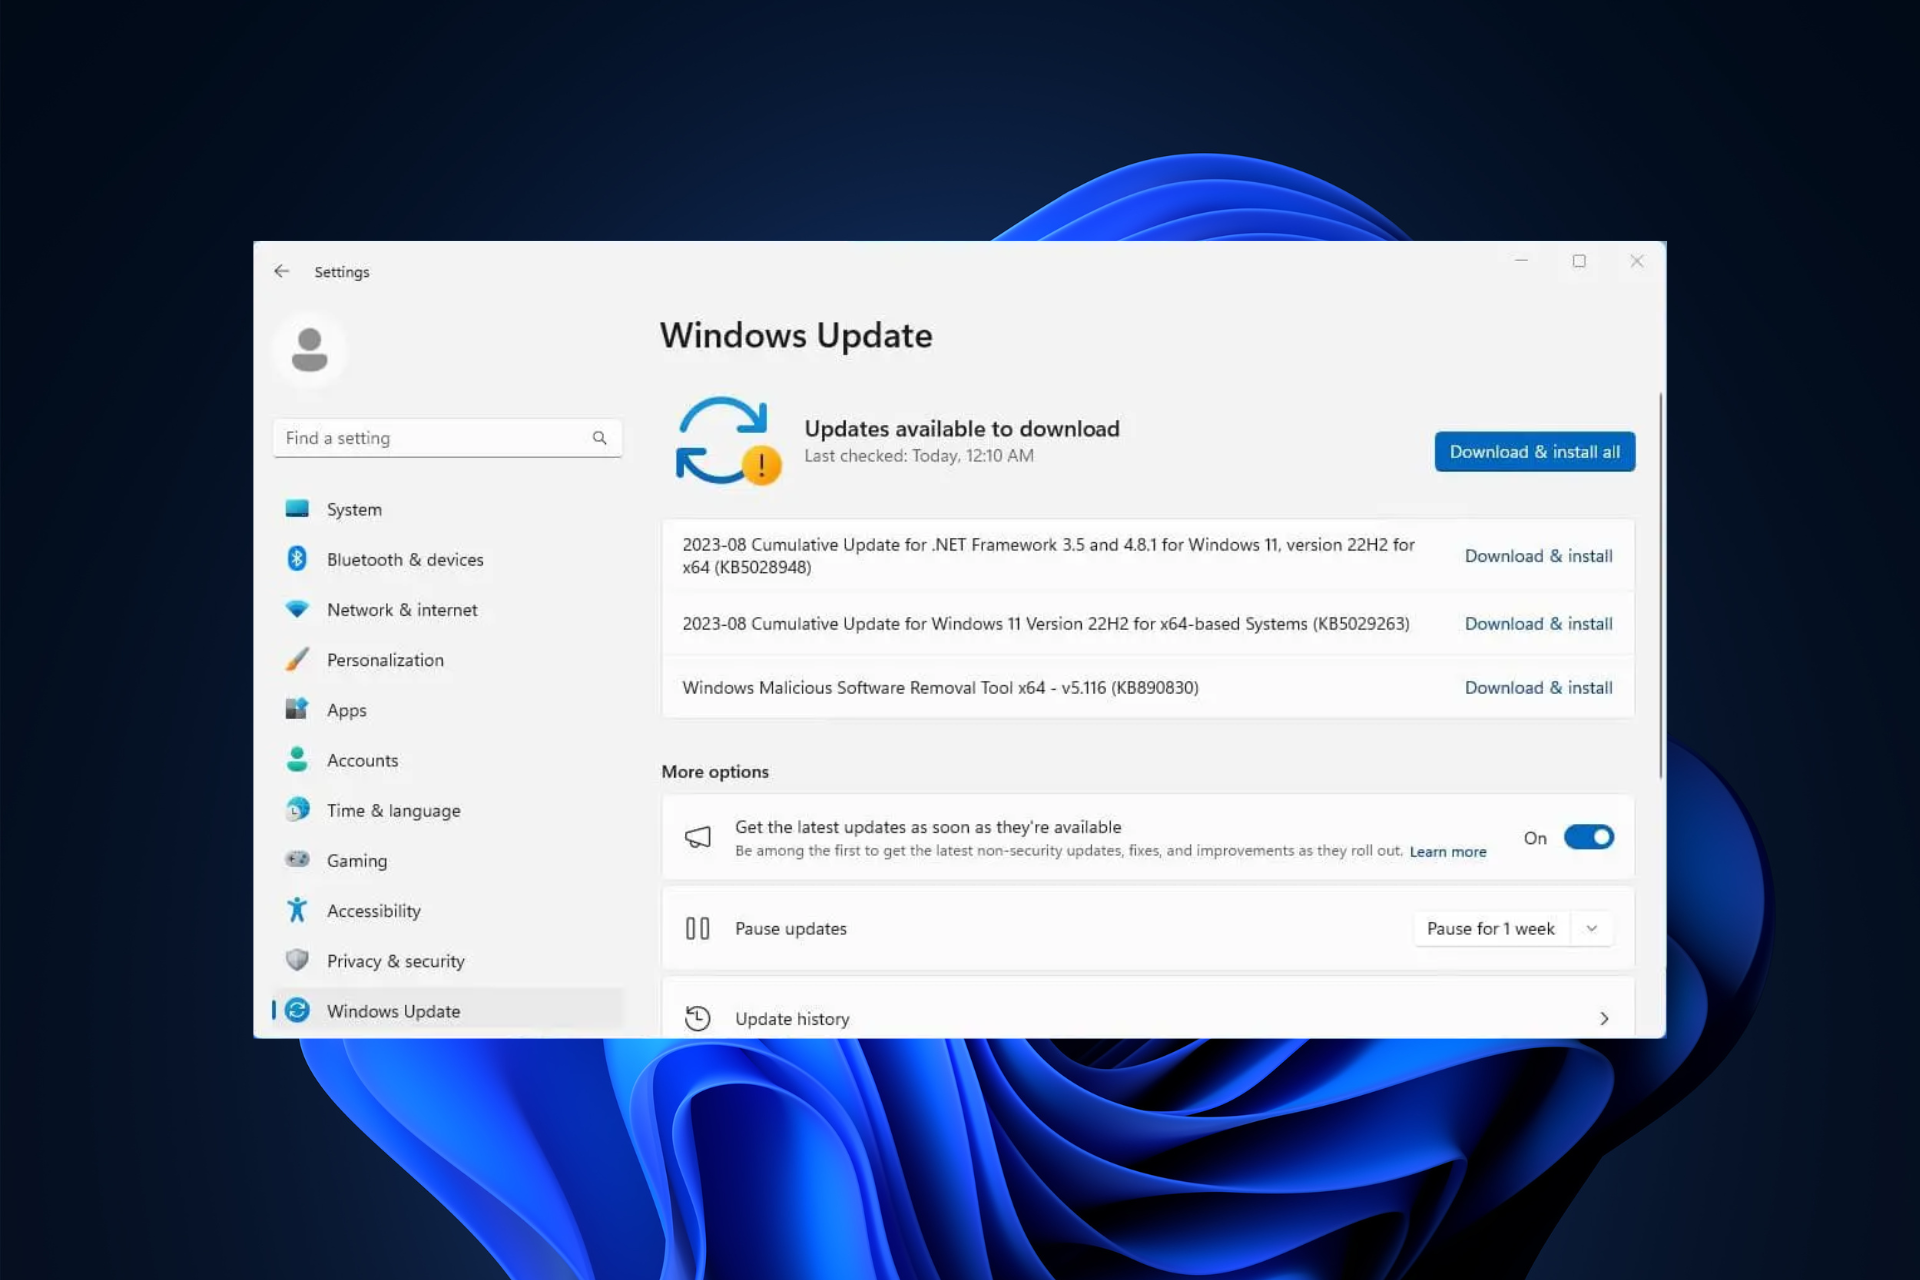
Windows 11 features may soon be accessible via Windows Copilot and Bing Chat

In a recent report by Windows Latest, it has been suggested that Microsoft has been utilizing Microsoft Edge APIs to improve Windows Copilot, a feature in Windows 11 being previewed now in the Windows Insider Dev Channel. The new enhancements are aimed at helping Copilot control OS-level features more effectively.

The potential new capabilities might include changing system settings, opening apps, toggling between dark and light modes, adjusting brightness levels, and even reading content from different apps.

A Sneak Peek into New Features

Windows Latest appears to have found new .json files in recently released Windows 11 preview builds. Among these, the most interesting seems to be TaskManagerService-ai-plugin.json. The new addition suggests that Copilot might soon be able to reach the Task Manager.

After the upgrades are completed, it may be possible for users to ask Copilot to manage processes using Task Manager. This could involve directing it to terminate a process or obtain additional information about it.

A Modular Copilot for a Customizable Experience

Microsoft visualizes the Windows Copilot to be as modular as possible, and therefore, most of its features are delivered using inbox and third-party plugins. These could enable users to swiftly launch or close apps, set alarms, search for files, and more.

Pilot plugins seem to be at the core of these upgrades. Microsoft is testing a plugin that would integrate Task Manager into Copilot and allow users to monitor or close running apps using Copilot’’s AI technology. It adds an entirely new dimension to the user experience.

User-Friendly Plugins

Among the sea of plugins, the AccessibilityTools-ai-plugin.json stands out as it might enable users with disabilities to navigate the system more fluidly.

Some of the other potential plugins include the ai-plugin-WindowsSettings.json to manage Windows 11 settings, the ClockService-ai-plugin.json to handle time and alarm settings, and the LaunchApplication-ai-plugin.json and SmartFileActions-ai-plugin.json plugins that could offer an interactive approach of opening apps through simple AI-powered commands.

A Wide Array of Plugins Under Testing

Microsoft is testing several new plugins. Some of the most notable ones include:

  • Open Feedback Hub Plugin: Facilitating users to access the Feedback Hub app through Copilot.
  • Set Windows Theme Plugin: Allowing users to change Windows theme through Copilot.
  • Fix Slow PC, Close App, and Screen Snipping Plugins: Occupying the functionality of accelerating PC performance, shutting down specific programs, and taking screenshots on command.
  • Set Timer and Set Alarm Plugins: Catering to user-specific needs like setting timers and alarms.
  • Suggest Media Plugin: Recommending movies similar to the ones a user enjoys.

To sum up, the new plugins are being developed to make Windows Copilot a one-stop control center for Windows 11.

Microsoft introduces Typeface AI for Microsoft Teams for Business

Microsoft announced that the Typeface app is now integrated with Microsoft Teams, making it easier for users to incorporate generative AI into their marketing tools and messaging apps.

Typeface AI is an AI-powered application that generates personalized and streamlined enterprise content. It employs several AI models to create text, images, and other creative content that cater to the unique requirements of each brand.

By training the AI with a company’s brand guidelines, style examples, and product details, Typeface’s Affinity AI generates personalized multimedia content, including images, ad copy, SEO meta tags, and more. This technology can significantly expedite the content creation process.

Typeface App

Here are some takeaways from the blog post:

  1. Integration with Microsoft Teams: Typeface’s AI-powered content creation is now integrated into Microsoft Teams, making collaboration and content sharing more streamlined for marketing teams.
  2. Personalization and Ideation: The app uses AI to help users quickly brainstorm and generate polished content. It can be shared within Teams for feedback and refinement.
  3. Rich Editing Experience: Typeface uses AI to improve content quality and coherence by allowing users to refine text and images to match brand voice and messaging.
  4. Brand Control and Responsible AI: Typeface uses brand control and Azure OpenAI Service to ensure companies’ information is only used for their specific model while maintaining responsible AI practices.
  5. Future Expansion and Integration: Typeface is expanding its app to include Microsoft 365 applications for better content generation using enterprise data from Microsoft Graph while maintaining data privacy.
  6. Unified Content Hub: Typeface aims to personalize content across business functions like marketing, HR, and sales, using generative AI-powered content creation to maximize reach and impact within Teams.

Typeface is accessible to Microsoft Teams for Business users through the “Apps” section. The integration is available to existing Typeface customers with a Microsoft Teams account.

Microsoft urges users to adopt Bing on Chrome: A tale of unwanted notifications

In an unusual move that has left many internet users bemused and somewhat concerned, Microsoft has been observed engaging in aggressive marketing campaigns, asking its customers to switch their default search engine from Google’s Chrome to Microsoft’s Bing.

What makes the case even more gripping is that some of these notifications have reportedly popped up while users were engrossed in video games, adding an intrusive aspect to what many already consider a breach of etiquette.

Maarten Balliauw, an internet user and developer at software tool company Jetbrains, stumbled upon this surprising behavior and took to Twitter to express his discontent in a lengthy thread. According to his explosive revelations, each time a user opens a new tab in Microsoft Edge, the Redmond-based tech giant is seemingly dispatching a machine fingerprint to a remote server.

This kind of fingerprint can be utilized to track users across various websites. A matter that, if confirmed, could raise serious concerns about privacy and potential misuse of data.

Moreover, Balliauw stated that Microsoft is also scoping out a user’s public IP address through a non-Microsoft service – another development that could potentially be exploited to uncover the user’s location.

Despite the seemingly weighty implications of user privacy, Microsoft affirmed that Balliauw’s report was rejected because it did not fit the company’s criteria for the definition of “malware.” It seems the tech giant is steadfast in its stance, believing that there are no infringements on user privacy.

Balliauw was quite vocal about his disagreement, stating Edge’s recent behavior quite convincingly aligns with what one would attribute to malware. Sidestepping the term, he laid out the specifics – obfuscation, a lack of control, excess advertising, and more, based on the definitions provided by the MITRE ATT&CK framework.

Overall, the situation appears puzzling, with Microsoft striving to increase Bing’s market share while also addressing privacy concerns. It will be interesting to see how Microsoft handles this delicate balance and how users respond.

Via MSPowerUser

Microsoft discountinues popular OneDrive for Business (Plan 2), no longer offers unlimited storage

Microsoft has changed its OneDrive for Business plans regarding storage offerings. Previously, OneDrive for Business (Plan 2) was a popular choice for large organizations needing extensive storage, such as managing a growing number of media files like videos and artistic assets. This plan offered unlimited monthly storage for approximately $10 per user, excluding taxes.

Microsoft no longer offers unlimited storage to new customers. OneDrive for Business (Plan 1) now provides 1TB of storage by default, potentially expanding to 5TB with more users.

OneDrive plans

Microsoft’s spokesperson explained that these changes were made in response to customer demand, streamlining the purchasing process for those using OneDrive for Business standalone plans. Existing customers can still add seats and renew their licenses under these plans.

OneDrive for Business (Plan 1) is now the only monthly option for $5 per user with 1TB storage. Microsoft also offers other packages at higher prices.

OneDrive for Business (Plan 2) is used to offer unlimited storage with conditions. Organizations needed at least five users subscribed, with a 1TB limit per user. Extra storage of up to 25TB could be requested from Microsoft support.

Microsoft seems to be adjusting its offerings to meet customer needs and encourage the use of OneDrive within broader Microsoft 365 plans.

via Neowin

Elon Musk labels LinkedIn ‘cringe’, suggests launching a rival to the platform

Elon Musk, the CEO of Tesla and SpaceX, caused a stir among professionals who use networking platforms when he publicly criticized LinkedIn. He even went as far as to disavow the popular platform. However, his statement that he plans to introduce a new competitor to LinkedIn was even more surprising. Many people were skeptical but also intrigued about his plans.

Yesterday, Musk entered a Twitter (X) conversation challenging LinkedIn’s quality. One user, Ian Zelbo, posed a rhetorical question on his feed: “Is there anything worse than LinkedIn?” The tweet drew a surprising amount of attention.

The billionaire mastermind behind ground-breaking projects like SpaceX’s Starship and Tesla’s electric vehicles, responded, stating, “People send me LinkedIn links sometimes but the cringe level is so high that I can’t bring myself to use it. I ask for the resume or bio to be emailed instead.”

Musk doubled down on this stance, making an unexpected announcement to millions of followers, teasing the idea of a cooler alternative to LinkedIn. “We will make sure that the X competitor to LinkedIn is cool.” He wrote, turning thousands of speculative heads toward X (formerly known as Twitter).

Besides that, X unveiled the beta version of ‘Hiring.’ This feature, exclusively available to verified organizations, promises to provide them with an expedient method to connect with millions of relevant candidates.

“Unlock early access to the X Hiring Beta — exclusively for Verified Organizations. Feature your most critical roles and organically reach millions of relevant candidates,” X wrote in a post.

Although the monthly fee is steep, approximately $1,000 (₹82,300) according to CNBC, many experts and individuals are closely following this fascinating advancement, given Musk’s history of successful endeavors.

What are your thoughts on this? Let us know in the comments section below.

Xbox Game Pass $1 trial gets the axe once again ahead of Starfield launch

It appears as though the Xbox Game Pass $1 trial has once again been removed. As reported by Eurogamer and others the offer, which gave new members a 14-day Game Pass Ultimate trail of just $1, is no longer available on the sign-up page on Xbox.com.

This after the long-running $1-for-your-first-month offer was first suddenly cut earlier this year, only to return a few months later before being reduced to a 14-day trial. At this point it isn’t known whether the trial of gone for good.

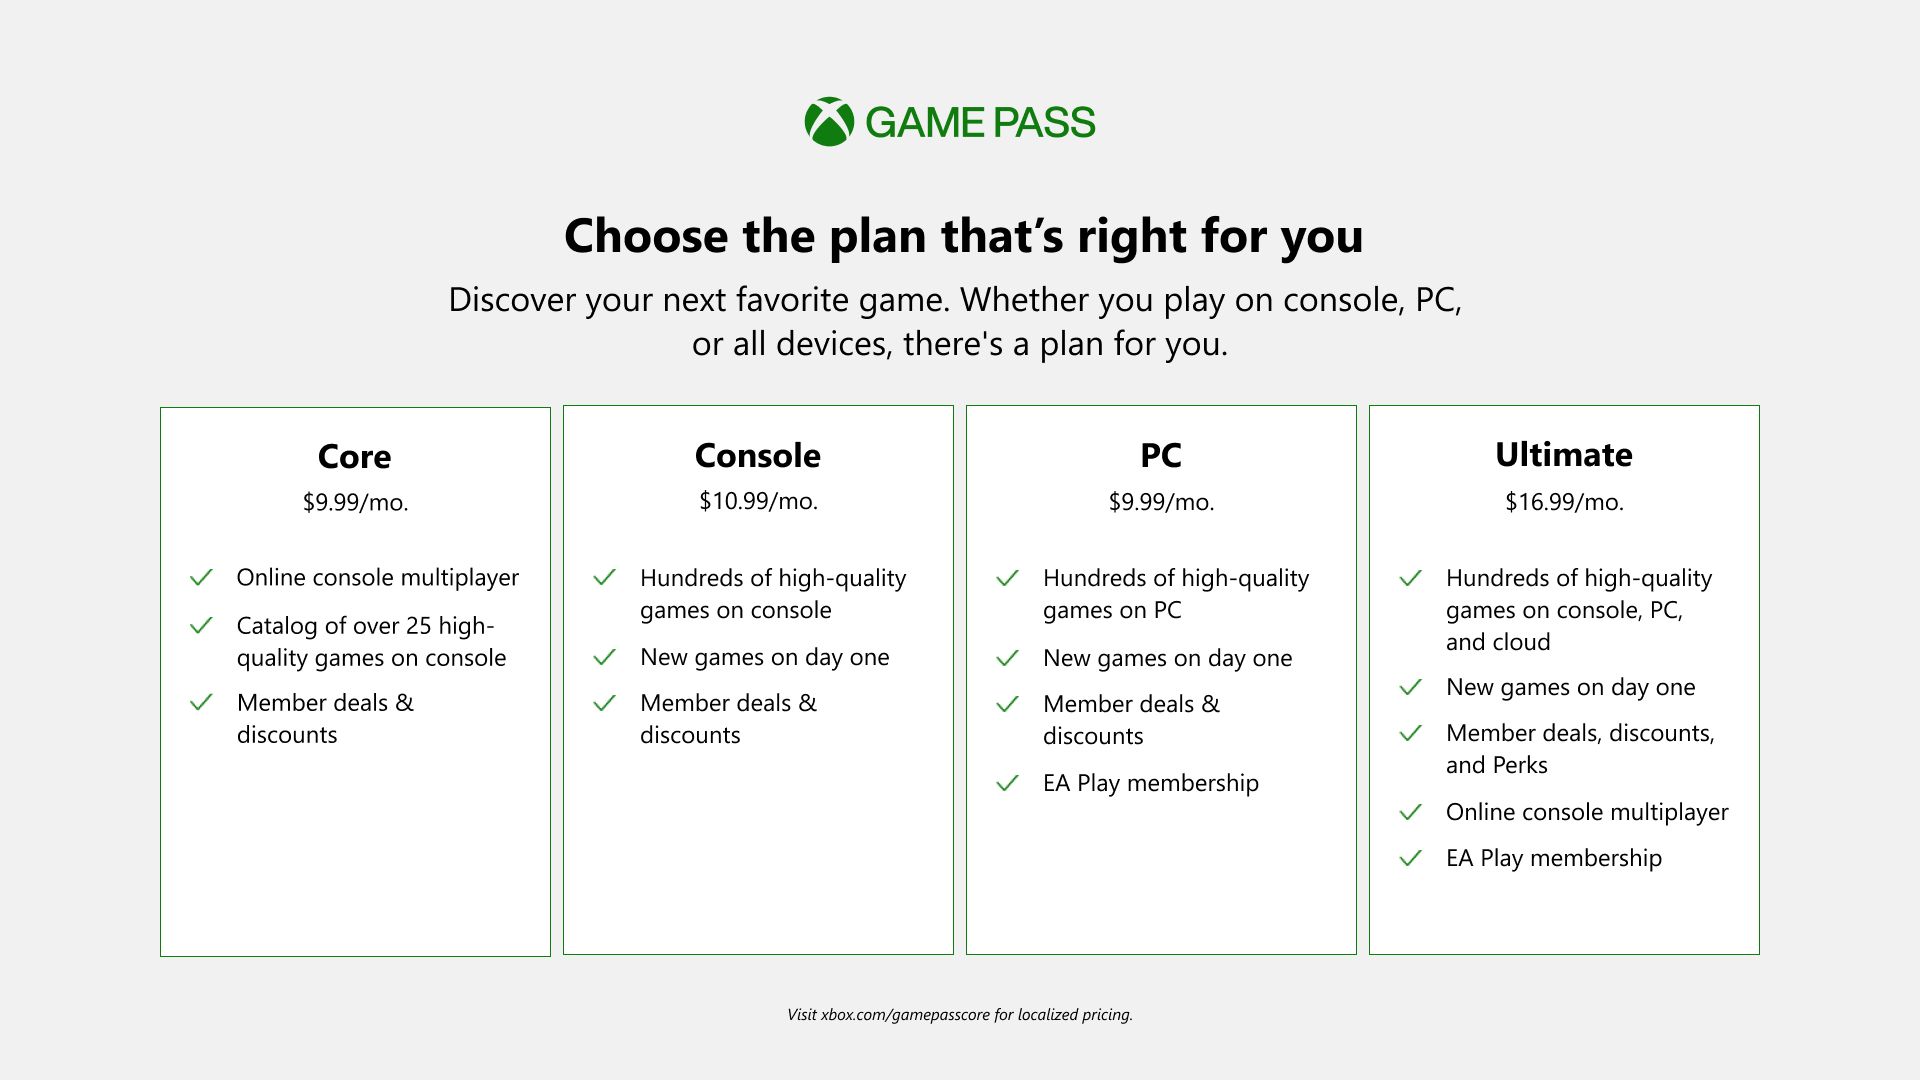
Game Pass Core SKU Chart

Curiously, the removal of the $1 trial comes just ahead of next week’s Starfield release. (For those who bought the Premium Edition, early access will begin on Friday, September 1).

Starfield
Starfield
Developer:
Bethesda Softworks
Price:
Free

Next month will also see the transition of Xbox Live Gold into Xbox Game Pass Core. This slightly more affordable Game Pass tier will offer over 25 games from the Game Pass catalog including Gounded, Psychonauts 2, Forza Horizon 4 and more. Starfield however will not be included in the Game Pass Core lineup.

Microsoft Edge introduces ‘E-tree in Wallet’ feature, to cut Grammar Tools, more

Several features will be deprecated in the upcoming Microsoft Edge Beta version 117 to enhance the user experience and simplify complex menus. Edge also launched Microsoft Edge for Business last week. The deprecated features include:

  1. Math Solver: Assists users in solving mathematical problems.
  2. Picture Dictionary: Provides visual explanations of words.
  3. Citations: The Citations tool for generating citations and references.
  4. Grammar Tools: Aid in checking and improving grammar and writing.
  5. Kids Mode: Designed to provide a safer and more child-friendly browsing experience.

While specific details regarding the reasoning behind each deprecation have not been provided, Microsoft emphasizes that these changes aim to improve the overall end-user experience and simplify intricate menus. These adjustments are expected to make the browser more streamlined and user-friendly.

The beta version of Microsoft Edge, version 117, is set to be released on September 14, 2023, and will be accessible on Windows 10, 11, macOS, and Linux.

Besides deprecating certain features, Microsoft introduces new capabilities to enhance the browsing experience. These new features include:

  1. Smart Find: Leverages AI to simplify webpage searches. It suggests related words and corrects misspellings, streamlining the search process. Administrators can manage its availability using the “RelatedMatchesCloudServiceEnabled” policy.
  2. “E-tree in Wallet”: Grow a digital tree in your Wallet through a virtual seed. When it’s fully grown, Microsoft will plant a real mangrove tree for you. Sign in to Edge with your Microsoft account to access this feature.

Microsoft Edge for Business is introducing enhancements for better automatic switching between personal and work browsing, streamlining the experience for users who use Edge for both purposes.

via Neowin

What is the Briefcase Icon on the Edge Browser?

A briefcase is a sign that you mean business, and that’s what the icon stands for when you spot it on your Edge browser. The browser is tailored to meet the needs of enterprises, but a few users think it makes the browser ugly.

You can still carry out your daily tasks without the visual reminder, so if you’re of the opinion that it needs to go, we have compiled a few steps to help you revert to the good old Microsoft Edge icon.

What is the briefcase icon on the Edge browser?

The briefcase icon is a way of telling you that you have switched from the base browser to the business one. It is part of Microsoft’s plan to make the browser more appealing to businesses and avoid confusion between personal and business modes.

As you may or may not know, Microsoft Edge is the latest version of Microsoft’s web browser. Although it has undergone a design overhaul and new features, it hasn’t exactly gotten the reception the Redmond Giant expected, but with time, it’s slowly winning some users over to their side.

Most companies have been reluctant to adopt the browser because of its lack of support for common enterprise features. However, when you download the Edge for Business version, you’ll get introduced to some key features that make it one of the top browsers for work.

So aside from all the features available in the base browser, you’ll also be getting:

  • Separate work and personal profiles in terms of cache and storage locations.
  • Protect corporate data with enhanced security features.
  • Automatic download for Azure Active Directory users.

What are the benefits of Personal Browsing with Edge for Business?

  • You’ll be more productive because you won’t have to worry about distractions like social media and news sites.
  • You get to protect your personal data with enterprise-level security.
  • Enjoy backward compatibility, as the business mode supports legacy apps that don’t work well with the modern Edge browser interface.

Although Microsoft Edge for Business is among the best browsers suitable for enterprises, you are not limited to using it only in a work-related context. You can still use it for personal browsing. Ultimately, your user experience will be elevated in this mode.

How can I disable or remove Edge’s briefcase icon?

  1. Launch your Microsoft Edge browser.
  2. Click on the three-dot menu at the top-right corner and select Settings.
  3. Select Appearances.
  4. Find the Show briefcase icon on work profiles option and toggle it off.
  5. Restart your browser for the changes to take effect.

And that’s a wrap for this article. If you often forget what browser mode you’re on, perhaps keeping the business icon on your Edge browser isn’t so bad.

However, if you like to keep things neat and clean, consider removing the briefcase icon. After all, it only serves as a symbol and doesn’t affect the functionality of the browser.

What do you think of the briefcase icon in Edge? Do you prefer it enabled for clearer distinction or disabled for a decluttered UI? Let us know in the comment section below.

Microsoft news recap: Bing Chat trials NoSearch feature, Activision’s cloud gaming rights to be sold to Ubisoft, and more

Microsoft news recap is a weekly feature highlighting the top Microsoft news stories of the past week. Sit back, grab some coffee, and enjoy the read!

Microsoft finally launches Microsoft Edge for Business, boosting work security and productivity.

Microsoft has launched Microsoft Edge for Business, a new version of its web browser designed for businesses. Edge for Business includes a number of features that are designed to improve security and productivity, such as switching between work and personal browsing, as well as automatic sign-in with for those with Microsoft Entra IDs.

Microsoft to sell off Activision’s cloud gaming rights to Ubisoft as it seeks to conclude ABK deal.

Microsoft has tabled a deal to sell off Activision’s cloud gaming rights to Ubisoft as part of its ongoing attempt to complete its acquisition of Activision Blizzard, in an attempt to appease the UKs Competition and Markets Authority. The revised acquisition deal is now being reviewed by the CMA.

Microsoft Activision Blizzard Custom

Microsoft commits to EU’s Digital Services Act (DSA) for transparency in ads.

Microsoft has committed to complying with the European Union’s Digital Services Act (DSA), which is designed to increase transparency in online advertising. The DSA requires online platforms to provide more information about how they target ads, and it also gives users more control over their personal data. To help provide detail on Microsoft’s compliance efforts, the company will release a report every six months to outline its compliance with the Act.

Bing Chat trials “NoSearch with Bing” feature, opting out of default web searches.

Microsoft is trialling a new feature for Bing Chat called “NoSearch with Bing”. This feature allows users to opt out of the default web search functionality in Bing Chat, meaning that responses will not provide information from a web search, and will therefore be limited to answering the user’s query without supporting web content.

Bing Chat

That’s it for this week. We will be back next week with more Microsoft news.

How to Enable DNS over HTTPS in Firefox for Max Security

Mozilla Firefox, one of the most rated privacy-centric browsers made a shift to DNS over HTTPS (DoH) as a more secure alternative to prevent spying and exploitations.

DoH encrypts your DNS lookups in an encrypted HTTPS connection. This means whenever you type a website address, DoH takes your query and sends it to a DoH-compatible server, which in this case is Cloudflare through an encrypted HTTPS connection, thus making it harder for third parties to see which websites you’re about to access.

Firefox offers four protection levels which you can select for maximum security. By default, the browser decides when to use secure DNS to protect your privacy.

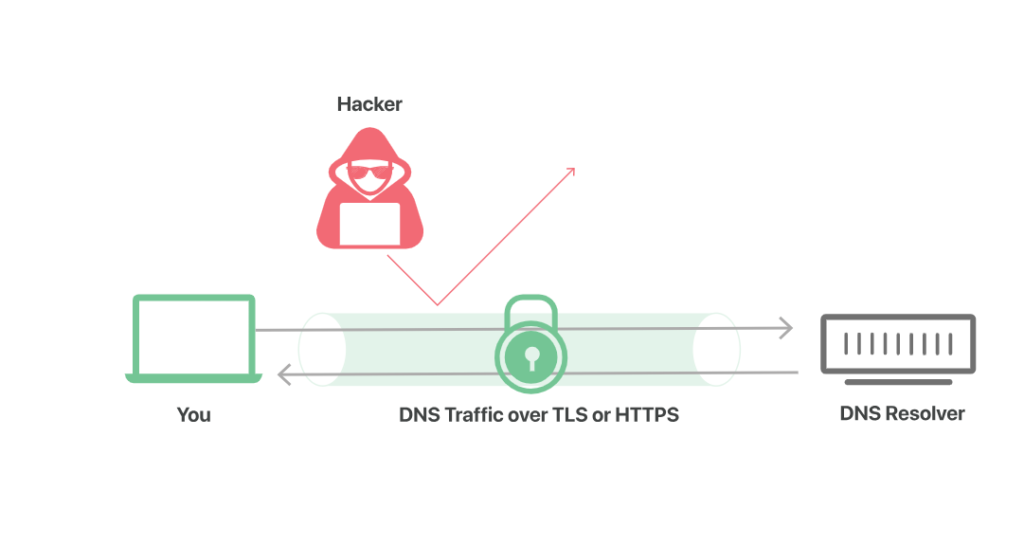
DNS over HTTPS illustration
An illustration by Cloudflare.

There are three other options to select from, namely Increase Protection and Max Protection. Based on the protection level you use, the status indicator will reflect accordingly.

You can turn it off as well in case you have a local DNS resolver. Firefox uses Cloudflare’s DNS over HTTPS service by default, however, users can manually change to some other encrypted DNS service.

Note that other browsers like Opera also offer this service for enhanced security. So, in case you’re also using that browser, you can enable DNS over HTTPS on Opera as well.

How do I know if DNS over HTTPS is working in Firefox?

So, you first want to check if DNS over HTTPS is already enabled on your Firefox browser. Well, it’s easier to check. While the Status of the DoH setting can tell the same, you can also follow these quick steps.

  1. Type “about:networking” in the Firefox address bar and press Enter.
  2. Click on the “DNS” tab.
  3. If you see ‘2’ below the DoH Mode, it means DoH is working in Firefox. If you see ‘5,’ it means the DoH is not working.

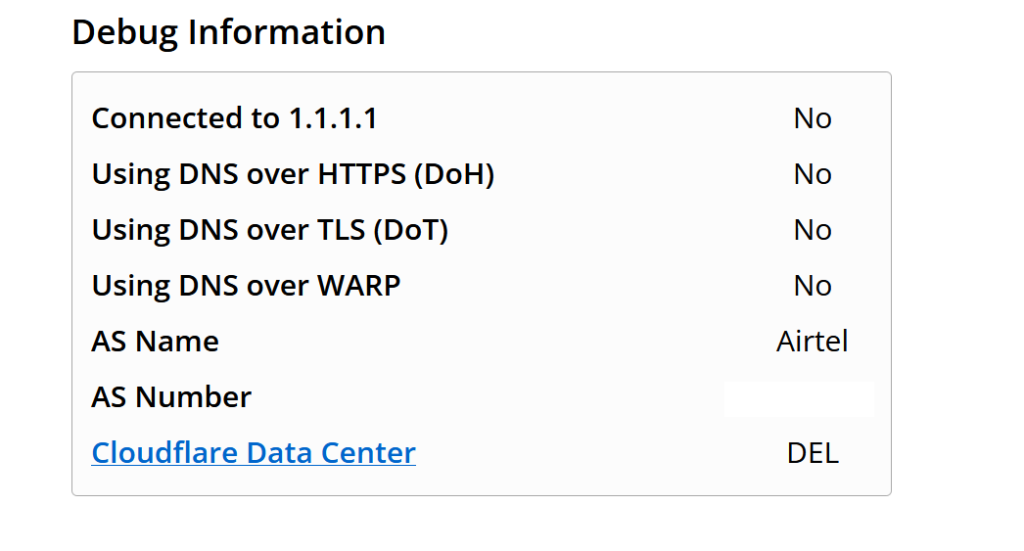
Alternatively, enter https://1.1.1.1/help in Firefox’s address bar to verify if DoH is enabled and working properly.

DNS over HTTPS connected

This web page will also show you other important aspects.

How do I enable DNS over HTTPS on Firefox?

So, you have checked that the DoH feature is not already enabled on Firefox and now you want to enable it after knowing the advantages of it. The guide will show you how you can enable DNS over HTTPS on Firefox and unlock enhanced protection when you’re browsing.

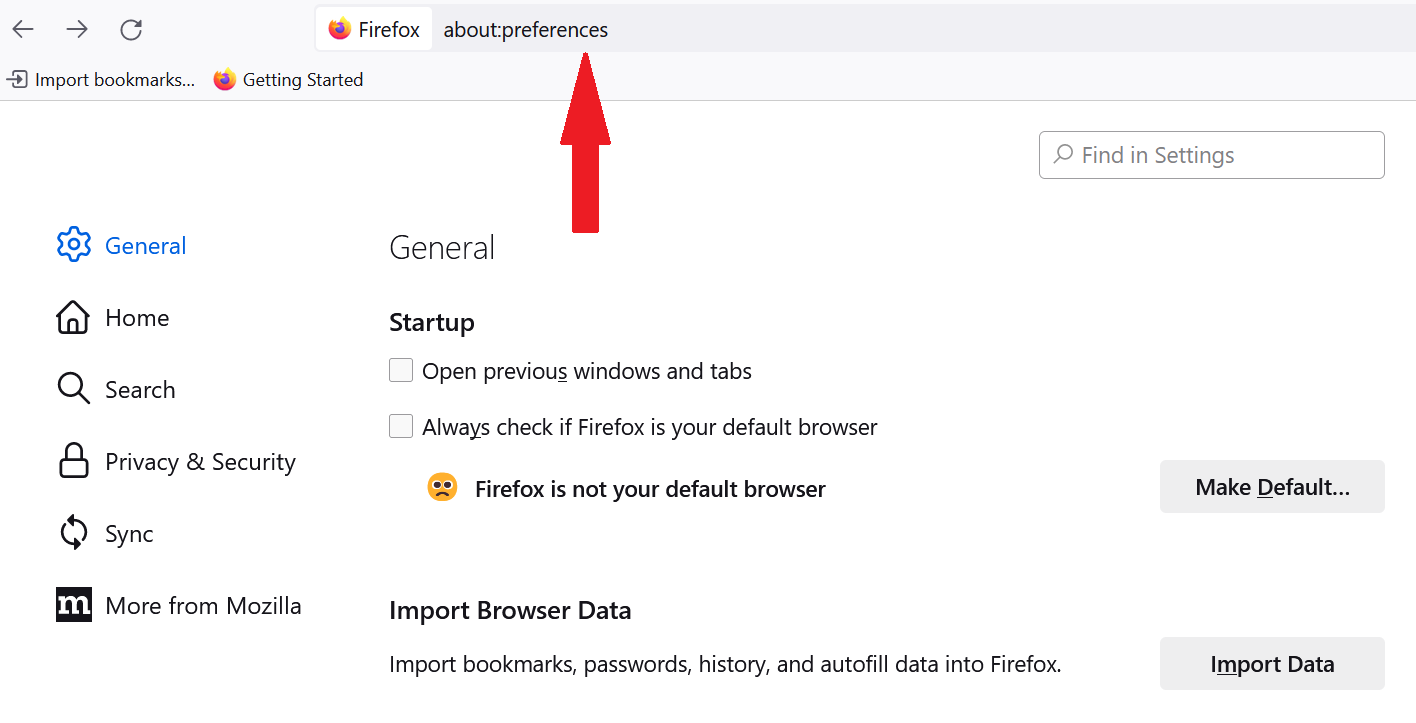
  1. In Firefox on Windows 11, go to Settings OR type about:preferences in the address bar.
    Firefox settings page
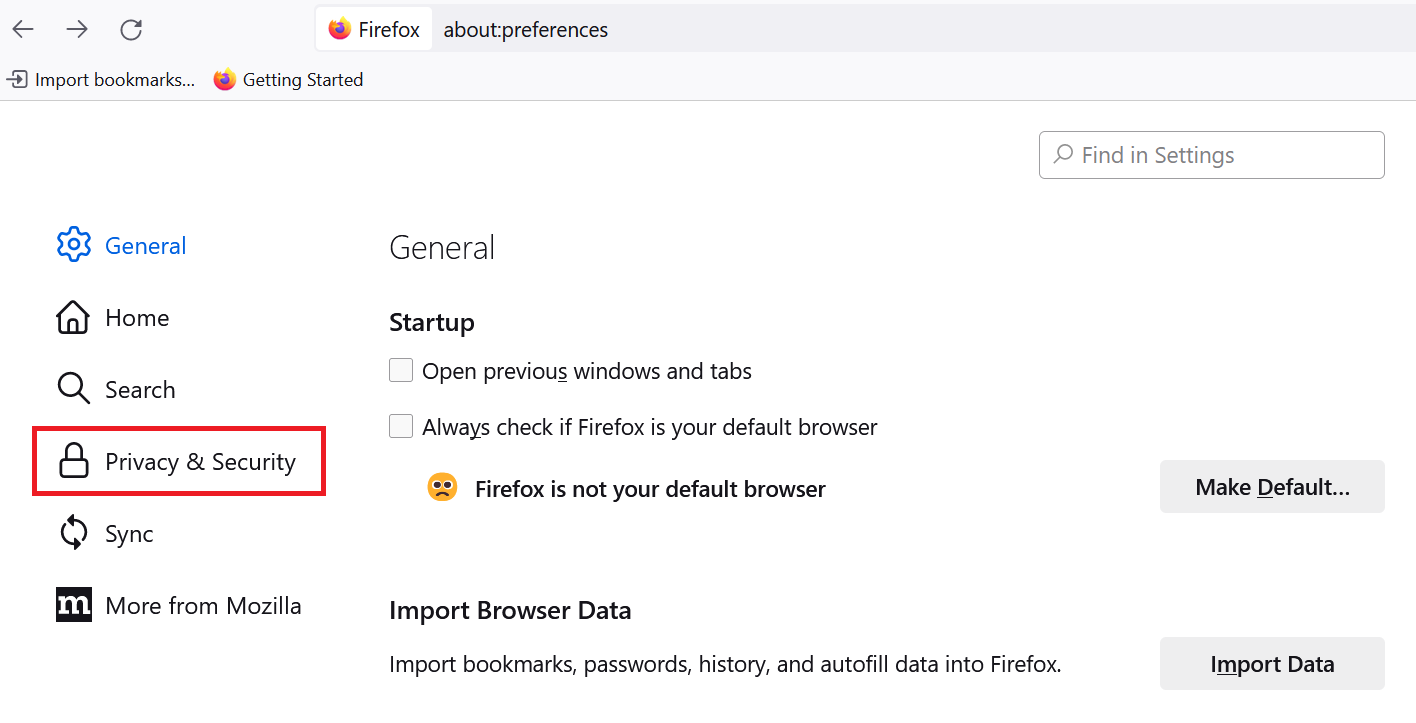
  2. Choose Privacy & Security.
    Firefox Privacy & Security
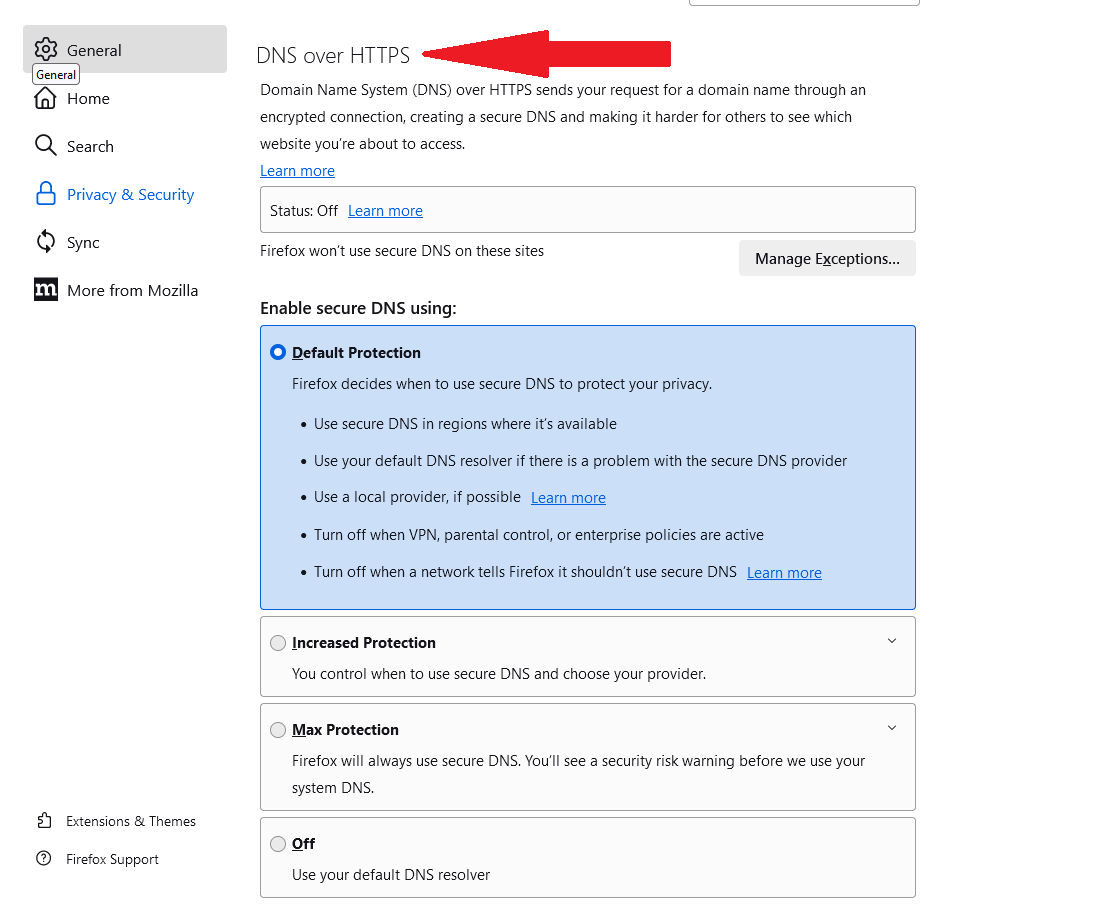
  3. Scroll down until you find “DNS over HTTPS”
  4. By default, Firefox has chosen the first way of protection, where it decides when to use DNS.
    Enable DNS over HTTPS in Firefox

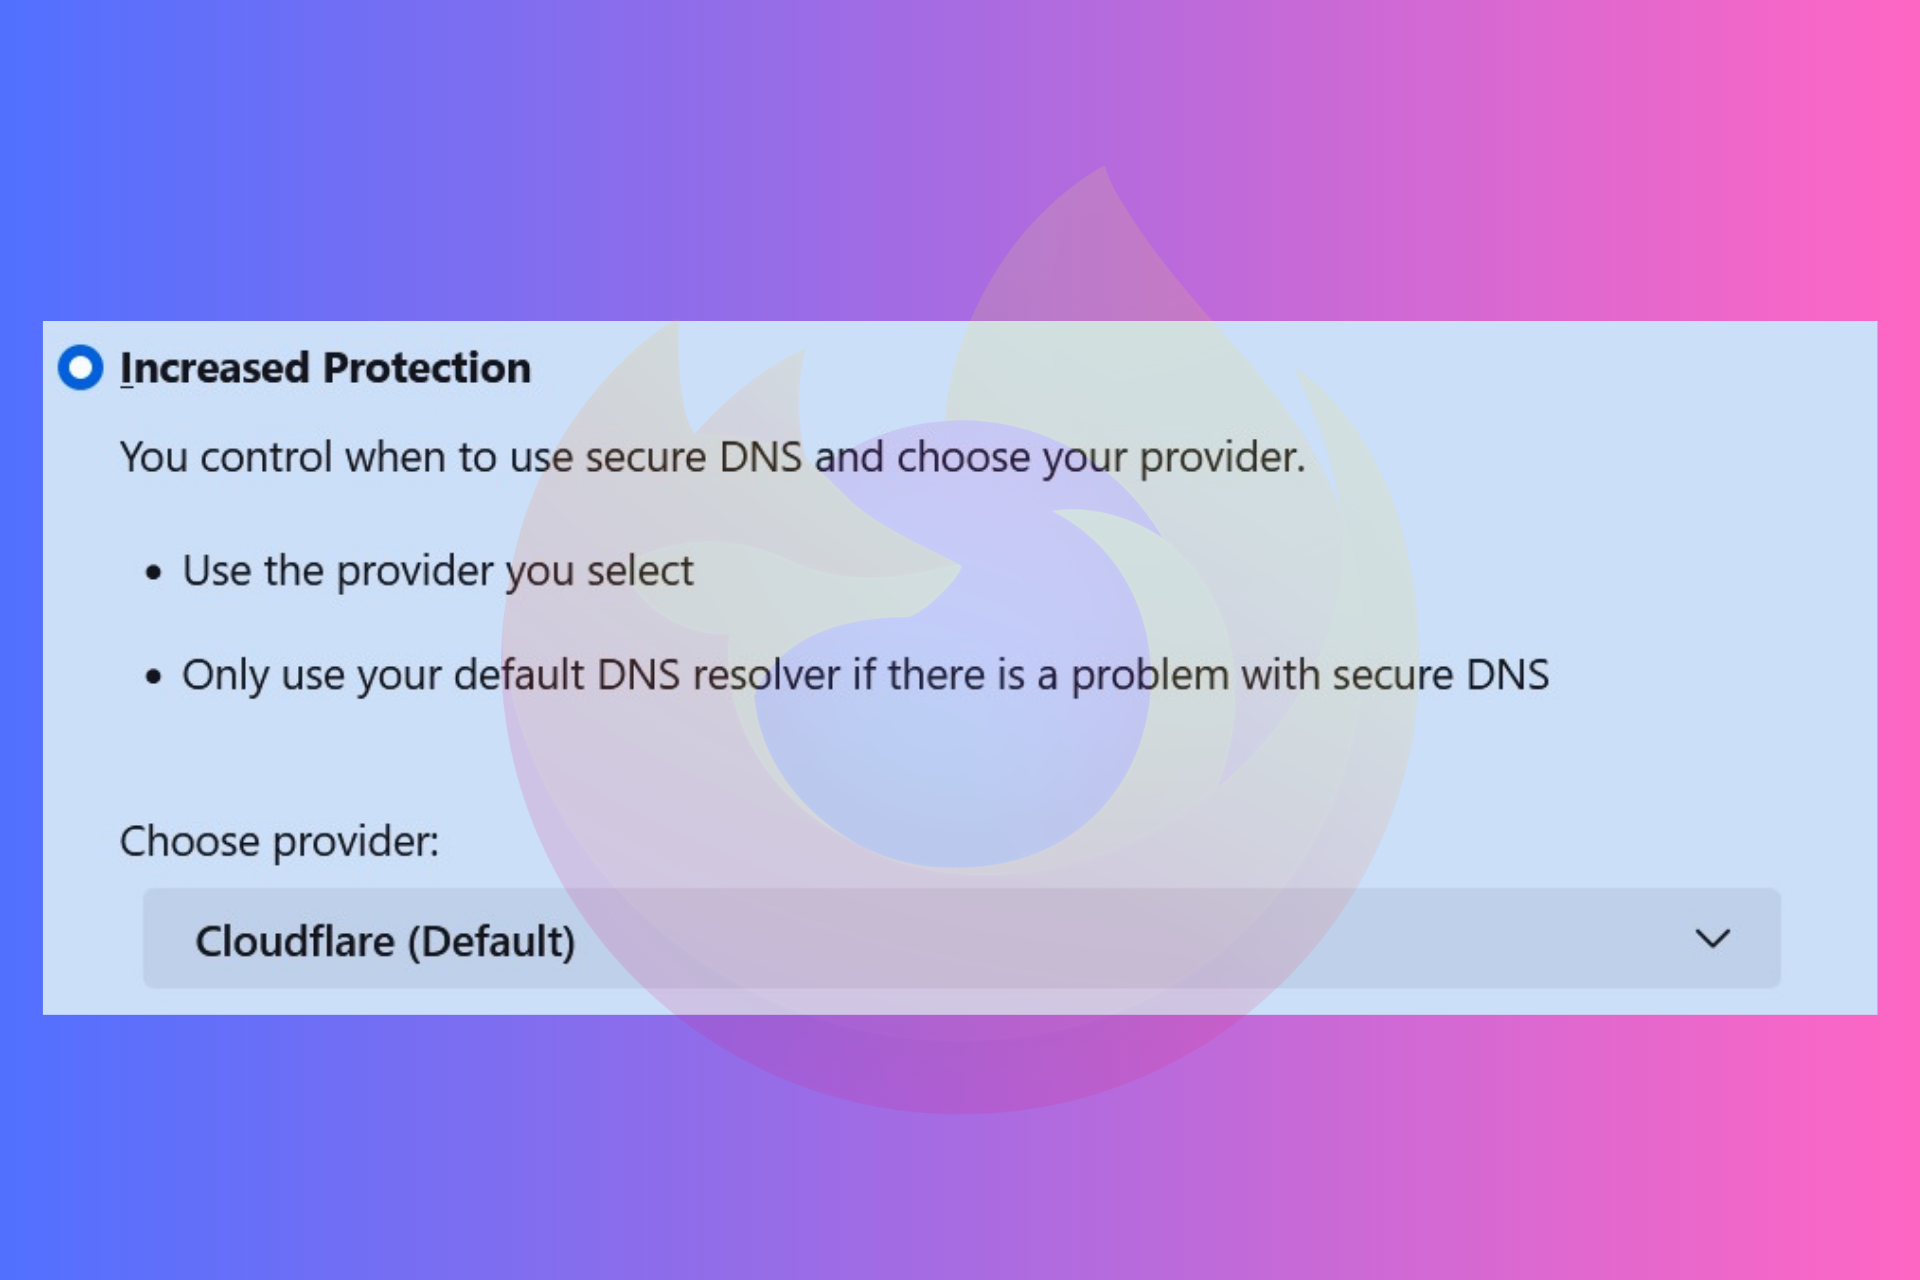
The other three protection level includes ‘Increased Protection,’ ‘Max Protection,’ and ‘Off.’

To turn DNS over HTTPS in Firefox, enable either of these two options. As soon as you select any one of them, Firefox will change the status to ‘Active.’

If the status shows ‘Active,’ it means your DNS requests are wrapped inside the HTTPS protocol to ensure that the requests cannot be intercepted via a Man in the Middle (MITM) attack.

If the status shows ‘Not Active,’ it depicts certain network conditions like VPN, parental controls, and enterprise policies that have directed Firefox not to use DoH. And, ‘Off’ is self-explanatory.  

How do I turn off DNS over HTTPS in Firefox?

First off, it is recommended to turn on the DNS over HTTPS setting in Firefox to safeguard yourself from potential risks. However, there could be reasons why you need to turn it off. For instance, a network is telling Firefox not to use DNS requests because certain websites are inaccessible.

Furthermore, some organizations have their own secure DNS and they will ask Firefox not to bypass it. Additionally, some users may prefer to use their ISP’s DNS servers for faster and more reliable resolution of domain names.

Another possibility that you want to disable DNS over HTTPS in Firefox is that it’s interfering with certain services or applications that rely on DNS resolution. Therefore, you should only enable it if you fully understand the implications.

Simply select ‘Off’ from the list of options to turn off Firefox’s default DoH service.

Can I use custom DNS providers with DoH in Firefox?

Yes, you can use custom DNS providers in Firefox. By default, Firefox uses Cloudflare as its DoH provider, but you can change this to a custom provider of your choice. You can use NextDNS and other providers that are partners with Mozilla and follow the DoH resolver policy.

Other DNS providers are satisfied as partners for Mozilla’s Trusted Recursive Resolver (TRR) program. As per Mozilla, it is open to adding more DNS providers as long as they meet a list of requirements.

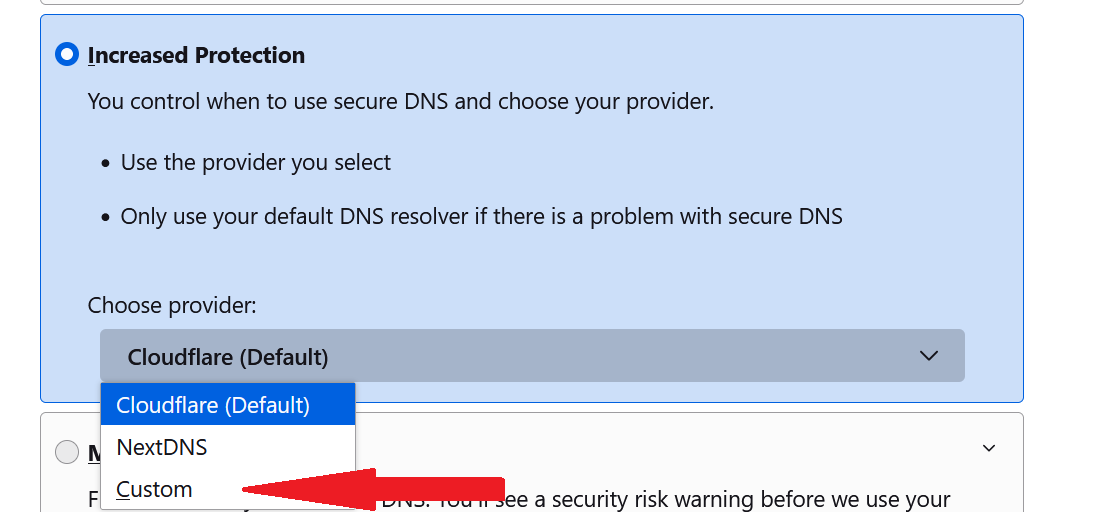
Here’s how you can change the default DoH provider on Firefox –

  1. Select “Increased Protection” from the list.
  2. Open the drop-down under “Choose provider”
  3. Select custom.
    Turn on DNS over HTTPS in Firefox browser

To use a custom DoH provider in Firefox, you need to know the provider’s DoH endpoint URL.

Furthermore, every DNS provider provides a configuration guide that you can follow to add them to Firefox using “about:config” panel. So, it’s recommended to go by those instructions.

Tidio for Windows: How to Download & Install?

In this digital age, effective communication is important for businesses to connect with customers, and Tidio, a cloud-based customer engagement & interaction platform, can help you with that.

If you are looking for a way to download and install Tidio on your Windows computer to get the maximum potential of the platform, this guide can help!

The Tidio Chat integrates live chat, email, Facebook messenger, and website chat widgets inquiries onto a single page, which helps businesses manage & respond to queries faster, leading to more streamlined customer service.

The chatbots on the platform automatically collect and qualify leads based on their behavior, which can increase average order value, reduce cart abandonment, and help customers place orders directly in the chat widget.

How do I download & install Tidio on my computer?

First, we will download the app from the Tidio platform. Here are the steps to do so:

  1. Login to your Tidio account.
  2. On the dashboard, from the bottom left corner, click Settings.
  3. Under General, click Download apps.Download the Tidio app on Windows
  4. Next, under Download Desktop App, locate Windows and click Download.

Now that you have the setup file downloaded follow these steps to install it:

  1. Double-click the setup file, and on the Tidio Setup dialog box, select Anyone who uses this computer or Only for me according to your preferences, then click Next.Tidio+Setup Install Windows 11
  2. On the Choose Install Location page, check the location of the app, then click Install.Tidio+Setup+Install Window 2
  3. Once the setup is completed, click Finish to close the Tidio Setup window.Finish

Once installed, launch the app, sign in, and use its chat features to optimize your overall customer handling process.

Chat Features in Tidio for Windows

  • Lets you build a repository of frequently used responses and use them to reply to queries.
  • Drag and drop chatbot builder enables you to build & personalize the interactions and responses of the chatbots even without any coding skills.
  • Seamlessly integrate Tidio to popular platforms like Shopify, WordPress, Squarespace, WIX, BigCommernce, WooCommerce, Webydo, and more.
  • Link your Instagram, Live chat, Messenger, & email inboxes with the platform’s multichannel tool to manage all your conversations in one place.
  • Allows you to add pre-chat surveys to get visitors’ names, email addresses, phone numbers, and more.
  • Over 35+ chatbot templates for different departments, including sales, support & customer service.
  • Integration with Google Analytics to track chatbot interactions to get insights like user engagement patterns, number of interactions, and popular queries.
  • With Chatbots, a business can offer 24*7 support and address common queries & provide instant assistance.
  • Create customized email templates using AI to send email marketing campaigns to your contacts.
  • Comes with a free mobile app to give the agents the liberty to reply to your customers on the go.
  • Serves as a powerful helpdesk tool that turns customer requests into tickets, then assigns the ticket to specific agents to help resolve the query faster.

From managing conversations to assigning tickets and even integrating tools like Google Analytics, Tidio is a one-stop solution to increase your brand value and improve its visibility.

The app comes with a 7-day free trial period and has affordable pricing options to choose from, so if you own a business, you must give this customer management platform a try.

Using Tidio on Windows? If yes, then drop your insights on how it helped your business enhance customer engagement and increase lead or revenue generation in the comments section below. We would love to hear your thoughts!

Is Microsoft the right party to talk about the Flax Typhoon?

Flax Typhoon, a Chinese threat actor group, was reportedly identified by Microsoft as targeting dozens of organizations in Taiwan with the likely intention of performing espionage, per Microsoft’s claims.

Flax Typhoon gains and maintains long-term access to Taiwanese organizations’ networks with minimal use of malware, relying on tools built into the operating system, along with some normally benign software to quietly remain in these networks. Microsoft has not observed Flax Typhoon using this access to conduct additional actions. 

Microsoft

However, many of the espionage techniques performed by Flax Typhoon include access or usage of Microsoft’s software, including Windows Management Instrumentation command-line (WMIC), PowerShell, or the Windows Terminal application.

Microsoft claims that its blog post is about informing people about this threat actor and raising awareness about it, which is the right thing to do, yes. But is Microsoft really the best party to inform people about this?

Especially when not so long ago, the Redmond-based tech giant was harshly criticized by Tenable, a cybersecurity company, for not even addressing important vulnerabilities at the right time.

Microsoft is right to raise awareness about Flax Typhoon, but it should do better

There are countless examples where Microsoft products and their users were the victims of phishing attacks, malware, security breaches, and so on. As we extensively covered these examples, we found out that Microsoft Teams is by far one of the most targeted products.Flax typhoon

In 2022, alone, 80% of the Microsoft 365 accounts, including Microsoft Teams, were hacked, and an astonishing 60% were successfully hacked. A later report found out that Microsoft Teams is prone to modern phishing attacks more than any other app.

However, these phishing attacks were all caused by not addressing certain vulnerabilities by Microsoft. The Redmond-based tech giant either addressed them too late, or never bothered with trying to fix them, as they were not considered dangerous.

Earlier this summer, Tenable’s CEO harshly criticized Microsoft for failing to address a vulnerability that could have ended up revealing a lot of customers’ banking information. Only after Tenable went public, did Microsoft react, but it was almost 5 months later.

So, while Microsoft has all the rights to raise awareness about a dangerous Flax Typhoon, the Redmond-based tech giant should really take a step back and do its best to address all the security vulnerabilities that its products have or might have.

The company should employ the best in the field to make sure its products are safe, secure, and most importantly, reliable to use. And then, yes, it can talk and raise awareness about threat actors.

Otherwise, if you don’t follow your own advice, then what’s the point? But what do you think?

How to Set IrfanView as Default Photo Viewer in Windows 11

The Photos app in Windows is useful, but it’s not as versatile as many others, and this is the main reason why many want to set IrfanView as the default photo viewer in Windows 11.

These are the most common reasons why users want to switch to IrfanView:

  • It’s extremely lightweight and fast.
  • Highly customizable with third-party plugins and skins.
  • Supports advanced image editing.
  • Offers conversion and batch processing.

How to make IrfanView your default image viewer on Windows 11?

1. Use the Properties menu

  1. Locate the desired image, right-click it, and choose Properties.
     
  2. Click the Change button.
  3. Choose InfranView and click on Set default.

  4. Now click on Apply and OK.
  5. Do this for all images you want to open with IrfanView as the default program.

2. Reset the Photos app

  1. Press the Windows key + I to open the Settings app.
  2. Navigate to Apps and select Installed apps.
  3. Locate Microsoft Photos and click three dots next to its name. Select Advanced.
  4. Click on Reset and wait for the process to finish.

Next, change the file association by doing the following:

  1. Locate the image you want to open. Right-click it and choose Choose another app.
  2. Select IfranView on the list and click on Always.
  3. After that, the changes will be applied to that file type.
  4. Repeat the steps for different image formats that you use.

3. Manually change the default app

  1. Open the Settings app.
  2. Next, to go Apps and select Default apps.
     
  3. Select Photos.
  4. Choose the desired format and click it.
  5. Next, select IrfanView and click on Set as default.
  6. Repeat these steps for all file extension types that you want to associate with IrfanView.

For a quick overview of features, see this guide to IrfanView as an image editor for Windows.

What is the best photo-viewing app for Windows 11?

  • Adobe Lightroom
  • Apowersoft Photo Viewer
  • Movavi Photo Viewer
  • ACDSEE Photo Studio Ultimate 2022
  • 123 Photo Viewer
  • IrfanView
  • Google Photos

All these apps are from our guide on the best photo viewers for Windows 11, so be sure not to miss it for more information.

Changing file associations isn’t as straightforward as it was on Windows 10, and this means that if you want to open NEF files or any other file type, you need to change the default image viewer on Windows 11 for each image format.

In case you’re still on Windows 10, we have a great guide on the best photo viewers for Windows 10 that might interest you. All of them also work on Windows 11, so don’t be shy to give them a try!

Did we miss your favorite method of setting IrfanView as the default viewer in Windows 11? If so, let us know in the comments below.

VAL 59 Error Code in Valorant [Fix]

The Val Error code: 59 troubles a lot of users, and will prevent you from joining the queue, so it can be a major problem. However, we have a few solutions that can fix it.

How do I fix the VAL 59 error code in Valorant?

Before we head to the slightly complex solutions, try restarting your PC and router. Also, check the Riot Games service status on the official website for any problems with the service.

1. Run Riot Client with administrative privileges

  1. Terminate all active Riot Client processes on the PC.
  2. Locate the Riot Client’s shortcut, right-click on it, and select Properties.
  3. Now, navigate to the Compatibility tab, tick the checkbox for Run this program as an administrator, and click OK to save the changes.run as administrator to fix val 59 error
  4. Finally, launch Valorant and verify whether Val error 59 disappears. 

2. Repair Valorant’s game files

  1. Launch the game client, click on the profile icon near the top right, and select Settings.settings
  2. Navigate to the Valorant tab, and click the Repair button.repair to fix val 59 error
  3. Wait for the process to complete, and then relaunch the game.

Often, it’s a game bug responsible for Valorant error codes. A quick solution is to use the built-in Repair function to eliminate any trivial issues. 

3. Change the IP address and DNS server

  1. Press Windows + S to open Search, type Command Prompt, right-click on the relevant search result, and select Run as administrator.
  2. Click Yes in the UAC prompt.
  3. Now, paste the following commands one at a time, and hit Enter after each:ipconfig /flushdns ipconfig /renewrenew IP
  4. Press Windows + R to open Run, type ncpa.cpl in the text field, and hit Enter.ncpa.cpl
  5. Right-click on the active network adapter, and select Properties.properties
  6. Choose Internet Protocol 4 (TCP/IPv4) from the list, and click the Properties button.
  7. Next, select Use the following DNS server addresses, and input the following values:
    • Preferred DNS server: 8.8.8.8
    • Alternate DNS server: 8.8.4.4change DNS server to fix val 59 error
  8. Finally, click OK to save the changes.

While you could manually choose another IP address from the network adapter settings and fix the Val 59 error code in Valorant, we recommend letting the OS handle the task to avoid misconfiguration. And we have used Google’s DNS, but you can use the fastest DNS server in your location.

Keep in mind that certain DNS can affect your ping negatively, so if you choose to do this, test Valorant latency to ensure that there are no network problems.

4. Reset the network settings

  1. Press Windows + I to open Settings, go to Network & Internet from the navigation pane, and click on Advanced network settings.advanced network settings
  2. Now, click on Network reset.
  3. Click the Reset now button.reset now to fix val 59 error
  4. Finally, click Yes in the confirmation prompt.
  5. Once the reset is complete, connect to the network, relaunch Valorant, and verify whether the error code is fixed.

5. Reinstall Riot Client and Valorant

  1. Press Windows + R to open Run, type appwiz.cpl in the text field, and click OK.
  2. Select Valorant from the list of installed apps, and click Uninstall.uninstall to fix val 59 error
  3. Similarly, remove Riot Client from the PC.
  4. Delete the Riot Games folder in the C: drive, if it exists.C: drive
  5. Restart the computer for the changes to apply.
  6. Now, reinstall both Riot Client and Valorant.

Often, the problem lies with an improper installation, and re-downloading both the game client and Valorant will fix the Val 59 error. For effective removal and to clear any leftover files and registry entries, we recommend using a reliable uninstaller tool.

6. Create a new Valorant account

A few users reported that creating a new Riot Client account and then playing Valorant on it fixed the problem. Though you will lose any in-game progress.

So, we recommend using this trick if you are new to Valorant or the game throws an error just for you while others can play Valorant fine.

7. Contact Riot support

When nothing else works, the last option is to contact Valorant support. The team will identify the underlying cause and list out the relevant solution.

Or, if it’s a server or technical issue to blame, they will provide a timeline as to when you can expect things to be up and running.

Now that you have fixed the Val 59 error in Valorant, it’s time to optimize the PC for gaming and get the best performance. Because games deliver a thrilling experience when run under optimal conditions!

And if you are faced with the server maintenance Valorant Error code 46, we have some valuable insights!

We also have a guide on Valorant could not enter matchmaking, so be sure to visit it.

Do share your experience with Valorant and any other verified solutions in the comments section.

How to Remove Focus Sessions From the Clock App

Are you at your wits end with the Focus Sessions screen that appears immediately after you open the Clock app? We all want to stay productive, but at the same time, reminders set within a short period to take breaks can be more disruptive than helpful. 

Luckily, you can easily keep this feature tucked away with a few basic steps that shouldn’t be too hard to follow, as you shall see below.

How do I turn off Focus Sessions from the Clock?

1. Turn off Focus Assist

  1. Hit the Windows key and click on Settings.settings windows 11
  2. Click on System and select Focus assist.
  3. Tap on the Stop focus session button and restart your Clock app again.

Remember that when you turn off Focus Assist, you’ll start getting app notifications again. Still, you can disable your notifications and view them from the Notification Center whenever you’re ready.

2. Roll back recent Windows updates

  1. Hit the Windows key and select Settings.settings windows 11
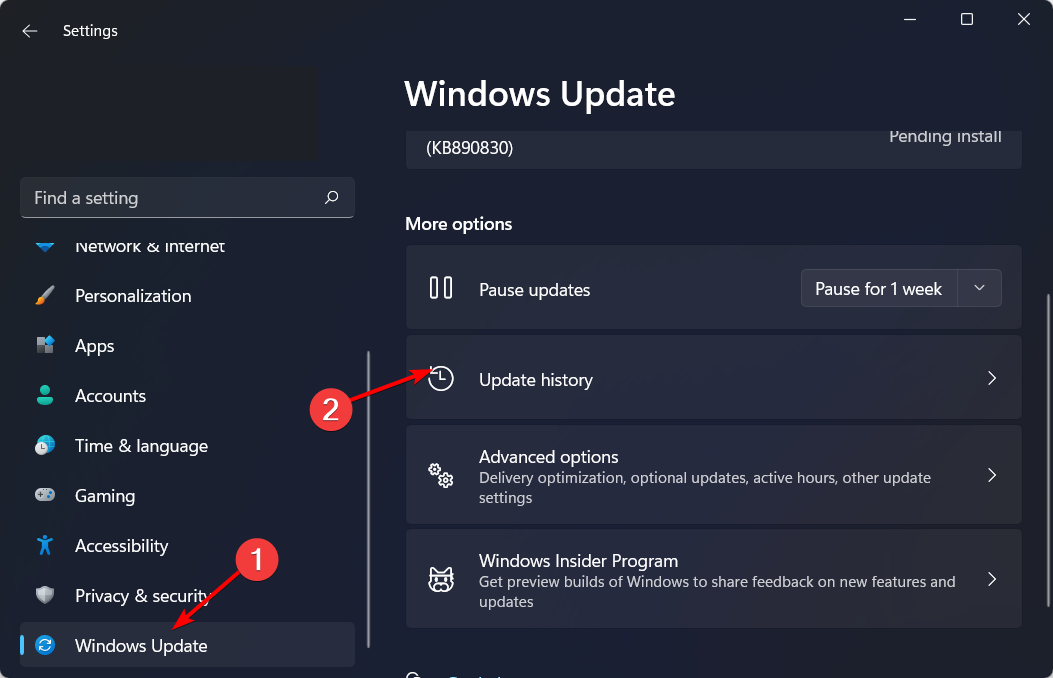
  2. Click on Windows Update and select Update history on the right pane.update-history restart to repair drive errors
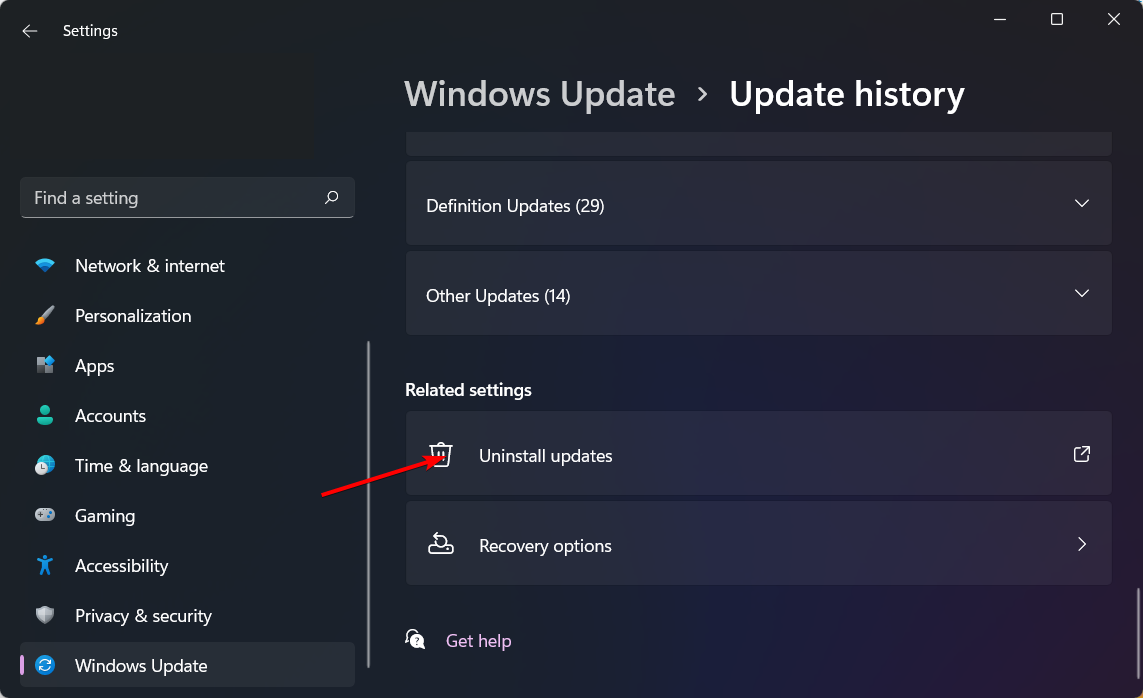
  3. Scroll down, and under Related settings, click on Uninstall updates.uninstall-updates-w11 computer-recognize-logitech-unifying-receiver
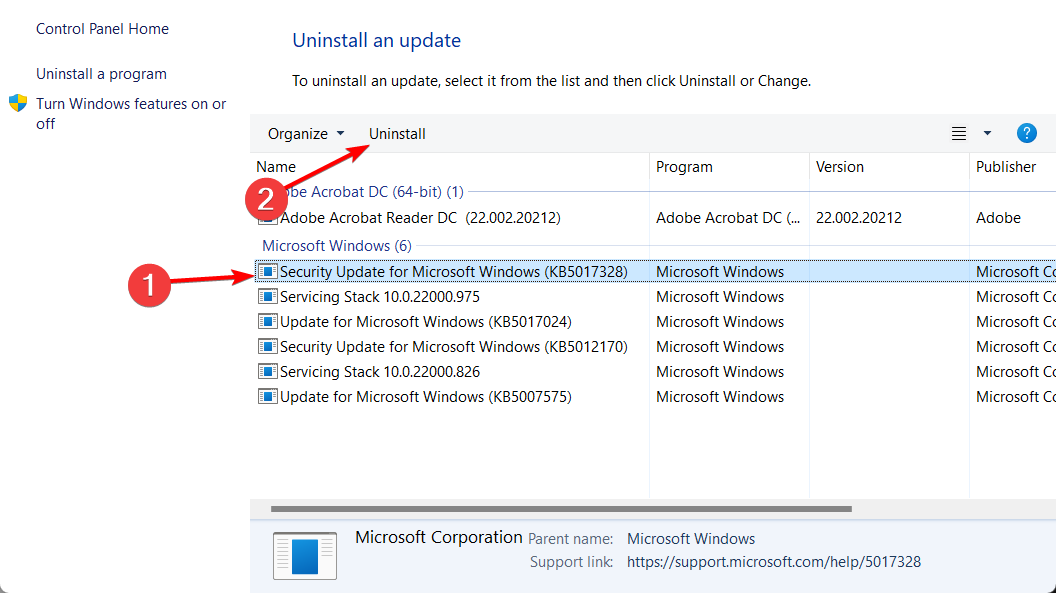
  4. This will take you to the most recent installed updates.
  5. Select the topmost update and click on Uninstall. (The feature is part of the 23481 Build, so you can find this update and uninstall it).uninstall-update-latest computer-recognize-logitech-unifying-receiver
  6. Restart your PC and check if the problem persists.

While this may be a temporary workaround, remember that there are risks associated with running outdated operating systems, so don’t stay too long without checking for updates.

3. Use the Group Policy Editor

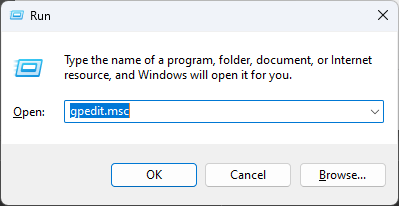
  1. Hit the Windows + R keys to open the Run command.
  2. Type gpedit.msc in the dialog box and hit Enter.GPEDiT.msc -Windows Remediation Service Failed to Start?
  3. Navigate to the following location: User configuration/Administrative Templates/Start Menu and Taskbar/Notifications
  4. Double-click on Turn off Quiet Hours policy, and in the pop-up window, check the Disabled box, then hit Apply and OK to save changes.

The downside to this method is that all your toast notifications will also be disabled. To counter this, repeat the steps above, but in 4, instead of Disabled, set it to Not Configured, and the permissions will be back to the default settings.

What are the benefits of removing Focus Sessions from the Clock App?

  • You can set your own focus mode within manageable limits without the constant reminder to finish everything in a given time frame.
  • Strict guidelines on achieving your daily goals are often counter-active. Productivity will look different every day, so having a set of predefined focus periods cages you into a box that is not sustainable in the long run.
  • Focus Sessions can generate a lot of alarms & clock notifications that disrupt your workflow and interrupt you. Fewer distractions mean more productivity allowing you to have maximum concentration. 

If you’re one of the users who don’t mind having the Focus Sessions feature, perhaps exploring some of the benefits of removing it may convince you to get rid of it after all.

Obviously, the best way to focus on your tasks will be different for everyone. If you’re perfectly fine with being interrupted every time and want your daily progress reports, keep the Focus Assist settings.

However, if you tend to be a little more productive when you’re not being distracted by notification badges and need a little more deep focus, this simple tweak might just be worth a shot.

What’s your opinion on Focus Sessions? Should they be enabled or disabled? Share your thoughts with us in the comment section below.

KB5029263 not installing on Windows 11? Fix it in 6 Steps

KB5029263 is a Cumulative Update for Windows 11 version 22H2 for x64-based Systems, which addresses security issues in internal OS functionality.

If you are stuck with KB5029263 not installing and a stop error code like 0xEF, and it is refusing to budge on your system, this guide can help!

There are various reasons for KB5029263 not working on your computer; some of the common ones are:

How do I fix KB5029263 not installing on Windows 11?

Before moving to the detailed troubleshooting solutions to fix the cumulative update failed issue, make sure you perform these checks:

  • Restart your computer.
  • Check your internet connection.
  • Turn off the Windows Firewall.
  • Disable or uninstall third-party antivirus (if applicable).
  • Unplug all external peripherals except the Keyboard, LAN cable, and Mouse.

1. Run the Windows Update troubleshooter

  1. Press Windows + I to open the Settings app.
  2. Go to System, then click Troubleshoot. troubleshoot  KB5029263 not installing
  3. Next, click Other Troubleshooters.Select Other Troubleshooters
  4. On the next page, locate Windows Update under the Most Frequently Used section and click the Run button.Run Windows Update Troubleshopoer
  5. Wait for the process to complete and follow the prompts.

2. Restart the related services

  1. Press Windows + R to open the Run dialog box.Services RUn command   KB5029263 installation issue
  2. Type services.msc and click OK to open the Services app.
  3. Locate Background Intelligent Transfer Service (BITS) and double-click it to open Properties.BITS service
  4. Next, locate the Startup status; if it says Stopped, click Start. If it is running, click Stop, then Start to restart the service.Start the service BITS
  5. On the Services window, locate Windows Update, and double-click it to open the Properties window.Windows Update service
  6. Go to Startup status; if it is Stopped, click Start. If not, then click Stop, then Start to restart it.Start the service

3. Run DISM & SFC scans

  1. Press the Windows key, type cmd, and click Run as administrator.CMD elevated
  2. Copy & paste the following command to repair the Windows image using Windows Update as a source and press Enter: DISM /Online /Cleanup-image /RestorehealthRestore health
  3. Wait for the scan to complete; once you see The operation completed successfully message, type the following command to replace the corrupted versions of files from the local Windows cache and hit Enter: sfc /scannow SFCSCANNOW CMD  KB5029263 not installing
  4. After you get the Verification 100% complete message, close the Command Prompt window & restart your PC.

If you applied this process and it didn’t solve the issue, don’t panic. There is dedicated repair software designed for such Windows troubles regarding corrupted files or other issues.

4. Reset Windows Update Components

  1. Press the Windows key, type cmd, and click Run as administrator.CMD elevated KB5029263 not installing
  2. To stop the BITS, Cryptographic & Windows Update services, type the following commands one by one and hit Enter after every command:
    • net stop bits
      net stop wuauserv
      net stop cryptsvc
      net stop msiserver
      Stop the services
  3. Copy & paste the following command to delete the qmgr* .dat files and press Enter: Del "%ALLUSERSPROFILE%\Application Data\Microsoft\Network\Downloader\qmgr*.dat"
  4. Type the following command and hit Enter: cd /d %windir%\system32
  5. To reregister the BITS & Windows Update files, copy & paste the following commands one by one and press Enter after every command:
    • regsvr32.exe atl.dll
      regsvr32.exe urlmon.dll
      regsvr32.exe mshtml.dll
      regsvr32.exe shdocvw.dll
      regsvr32.exe browseui.dll
      regsvr32.exe jscript.dll
      regsvr32.exe vbscript.dll
      regsvr32.exe scrrun.dll
      regsvr32.exe msxml.dll
      regsvr32.exe msxml3.dll
      regsvr32.exe msxml6.dll
      regsvr32.exe actxprxy.dll
      regsvr32.exe softpub.dll
      regsvr32.exe wintrust.dll
      regsvr32.exe dssenh.dll
      regsvr32.exe rsaenh.dll
      regsvr32.exe gpkcsp.dll
      regsvr32.exe sccbase.dll
      regsvr32.exe slbcsp.dll
      regsvr32.exe cryptdlg.dll
      regsvr32.exe oleaut32.dll
      regsvr32.exe ole32.dll
      regsvr32.exe shell32.dll
      regsvr32.exe initpki.dll
      regsvr32.exe wuapi.dll
      regsvr32.exe wuaueng.dll
      regsvr32.exe wuaueng1.dll
      regsvr32.exe wucltui.dll
      regsvr32.exe wups.dll
      regsvr32.exe wups2.dll
      regsvr32.exe wuweb.dll
      regsvr32.exe qmgr.dll
      regsvr32.exe qmgrprxy.dll
      regsvr32.exe wucltux.dll
      regsvr32.exe muweb.dll
      regsvr32.exe wuwebv.dll
  6. Type the following command to reset Winsock and hit Enter: netsh winsock resetcmd_netsh winsock reset
  7. To restart the BITS, Cryptographic & Windows Update services, copy & paste the following commands one by one and press Enter after every command:
    • net start bits
      net start wuauserv
      net start cryptsvc
      net start msiserver

      Start the services
  8. Once the commands are executed, reboot your PC and try to reinstall the update.

5. Run your computer in a clean boot environment

  1. Press Windows + R to open the Run dialog box. cleanboot - KB5029263 not installing
  2. Type msconfig and click OK to open System Configuration.
  3. Go to the Services tab, select Hide all Microsoft services, then click the Disable all button.Clean boot Disable all
  4. Switch to the Startup tab and click the Open Task Manager link.Open task Manager Clean boot
  5. In Task Manager, for each Enabled item, select it and click Disable from the top right corner of the window. Close Task Manager.Enable Task
  6. Go to the System Configuration window, click Apply, then OK.CLEAN BOOT 5
  7. Select Restart from the next window.Restart clean boot

Windows will restart in a clean boot environment without the third-party apps interference & limited functionality; try to install the update now. Once successfully installed, use the steps above to reverse and gain full functionality.

6. In-Place upgrade (The last resort)

  1. Visit the Windows 11 website.
  2. Locate Download Windows 11 Disk Image (ISO), select Windows 11(multi-edition ISO) and click Download Now.Select the editon and click Download
  3. Select the product language and click Download.
  4. Once the ISO is downloaded, right-click it and select Mount.Mount KB5029263 not installing
  5. A window will open, locate, and click Setup.exe.Setup exe
  6. Click Yes on the UAC prompt.
  7. On the Install Windows 11 dialog box, click Next.Click Next
  8. Click Accept on the license terms window.Accept the terms KB5029263  not installing
  9. Next, on the Read to install page, ensure the Keep personal files and apps option is selected. If not, you can click the Change what to keep option to decide.Ready to Install
  10. Click Install and follow the onscreen instructions.

During the process, your machine will restart several times, and once done, you will be at the lock screen of your computer. This method repairs corrupted OS files without removing your personal files and installed apps.

How to prevent Windows 11 update install issues in the future?

  • Create a restore point before installing the update.
  • Backup your important data
  • Use the Windows Update feature to check for updates.
  • Ensure you have a stable internet connection.
  • Download & install the cumulative update for Windows 11 using the Microsoft Update Catalog website.
  • Ensure your PC has the latest drivers modified by Microsoft.

Failing to install essential updates like KB5029263 might have various implications, including security vulnerabilities, bugs, glitches, system instability, and more.

However, using the preventive measures and solutions discussed, you can avoid Windows Update errors like pending installation.

If you bump into any other error codes or need more info about the KB5029263 update, don’t hesitate to leave a comment in the section below.

Fix: Keyboard Shortcuts are Not Working in Word

Keyboard shortcuts are vital for quick and seamless functioning, and many rely too much on these. There’s nothing wrong with the approach until the keyboard shortcuts are not working in Word. This issue is usually due to misconfigures shortcut mapping or incorrect default language. However, Office update bugs or keyboard issue may also create problems with shortcuts in Word.

In case you have problems with a shortcut that employs the F1 – F12 keys, try holding Fn when using the keyboard shortcut. Also, try connecting an external/different keyboard if possible, to rule out keyboard problems.

How do I fix my shortcuts if they’re not working in Word?

1. Launch Microsoft Word in Safe Mode

  1. Press Windows + R to open Run, type winword /safe in the text field, and hit Enter.winword /safe
  2. When Word launches in Safe Mode, open a new document and verify whether the keyboard shortcuts work fine. If they do, it’s a conflicting add-in to blame.
  3. To remove add-ins, click on the File menu near the top left, then choose More, and select Options.options
  4. Navigate to the Add-ins tab, select COM Add-ins from the dropdown menu, and click the Go button.COM Add-ins
  5. Select any add-ins that appear in the list, and click on Remove.remove to fix shortcuts not working in word
  6. After you have removed all the add-ins, click OK to save the changes.
  7. Finally, launch Microsoft Word normally, and the shortcuts should start working.

When the Ctrl shortcuts are not working in Word, inspect the installed add-ins. Also, instead of removing them all in one go, you could remove one, launch Word in normal mode, and verify if the problem is fixed.

When things improve, the add-in last uninstalled triggered issues with the keyboard shortcuts functionality. You can now reinstall the other add-ins removed in the process.

2. Run the dedicated troubleshooter

Tip icon Tip
Users running the latest version of Windows 11 may not find the Keyboard troubleshooter. In that case, head to the next solution.
  1. Press Windows + I to open Settings, and click on Troubleshoot on the right in the System tab.troubleshoot to fix shortcuts not working in word
  2. Click on Other troubleshooters.
  3. Click the Run button next to the Keyboard troubleshooter.
  4. Follow the on-screen instructions to complete the process and make the recommended changes, if any.

When the undo shortcut is not working in Word, the dedicated troubleshooter will help. Also, you may run the Hardware and Devices troubleshooter.

3. Manually configure the keyboard shortcut

  1. Launch Microsoft Word, click on the File menu, then choose More from the bottom left, and select Options.
  2. Go to the Customize Ribbon tab, and click the Customize button next to Keyboard shortcuts.customize
  3. Select All commands under Categories, then choose the task for which the shortcut is not working from the right, and press the keyboard shortcut key(s) you want to set for it.command
  4. Once done, click on Assign and save the changes.

When facing problems with specific ones, say the copy paste shortcuts are not working in Word, you can check if there were any changes and manually configure the shortcut.

Here are the command names for some of the popular shortcuts:

  • EditCopy: Copy text
  • EditCut: Cut text
  • EditPaste: Paste text
  • EditUndo: To undo an action
  • ShrinkFont: Reduce the font size
  • GrowFont: Increase the font size

4. Update the keyboard drivers

  1. Press Windows + X to open the Power User menu, and select Device Manager from the list.
  2. Expand the Keyboards entry, right-click on the affected keyboard, and select Update driver.update driver to fix shortcuts not working in word
  3. Choose Search automatically for drivers and wait for Windows to install the best one available locally.search automatically
  4. Once done, restart the computer.

Drivers are critical for the effective functioning of any device, so make sure you update the keyboard drivers.

In case Windows can’t find a newer version stored locally or the subscript shortcut is still not working in Word, head to the manufacturer’s website and manually install the latest driver.

5. Change the language 

  1. Launch Word, click the File menu, choose More, and select Options.
  2. Go to the Language tab, and click on Add a Language.add a language to fix shortcuts not working in word
  3. Select English (United States) from the list, and then click the Install button.English (United States) 
  4. Wait for the download to finish, and then relaunch Microsoft Word.
  5. Once done, set English (United States) as the preferred language under both Office display language and Office authoring languages and proofing.set as preferred
  6. Again, relaunch Word for the changes to come into effect and verify whether the keyboard shortcuts now start working. 

6. Repair Microsoft Office

  1. Press Windows + R to open Run, type appwiz.cpl in the text field, and hit Enter.
  2. Select Microsoft 365 from the list of programs, and click on Change.microsoft 365
  3. Click Yes in the UAC prompt.
  4. Now, select Quick Repair, click on Repair, wait for the process to complete, and check whether the problem is resolved.quick repair
  5. If not, run an Online Repair, and follow the on-screen instructions.online repair to fix shortcuts not working in word

When everything else fails to work, you can always repair the Office installation. An Online Repair, though it takes more time and requires an Internet connection, is a foolproof solution against most Microsoft Office issues.

How do I reset keyboard shortcuts in Word?

  • Open Microsoft Word > click File > select More > choose Options. Then go to Customize Ribbon > click Customize > click on Reset All > Finally, click Yes in the confirmation prompt > relaunch Word.

If the Reset all button is greyed out in Word, a quick workaround is to change the shortcut for any command that functions well, say EditCopy or Bold. As soon as you save the changes, the Reset all button will be available, and you can reset configurations to the default settings.

Remember, in most cases, it’s the keyboard to blame for the problem, not Microsoft Word. And replacing it worked for many.

Now that you know what to do when keyboard shortcuts are not working in Word and have things up and running check the best Windows 11 shortcuts to perform tasks effortlessly. In case you’re still having issues, our Ctrl + D not working guide should provide you with additional solutions.

And for those who are yet to upgrade to Windows 11, we also have a list of the best Windows 10 shortcuts.

If you know any additional solutions, drop them in the comments section below.

Fix: Unable to Install SQL Server on Windows 11

SQL Server is often used by developers as a relational database management system, and many of them reported that they are unable to install SQL Server on Windows 11.

Without the SQL Server running, their project won’t have a database it can use, so it’s crucial to fix this problem, and this guide will help you with that.

How do I download and install SQL Server on Windows 11?

1. Delete the affected registry key

  1. Press the Windows key + S and type the command prompt. Select Run as administrator from the list of results.
  2. Now run the following command: reg DELETE “HKLM\SOFTWARE\WOW6432Node\Microsoft\Microsoft SQL Server Management Studio” /reg:32
  3. After that, close Command Prompt.

This is a straightforward solution, and it can help if you can’t install SQL Server 2014.

 2. Check the sector size of your drive

  1. Press the Windows key + X and choose Terminal (Admin).
  2. Now run the following command. Be sure to replace C with the drive you’re installing SQL Server to. fsutil fsinfo sectorinfo C:
     
  3. Locate the PhysicalBytesPerSectorForAtomicity and PhysicalBytesPerSectorForPerformance values.

If the values are different, locate the one that has a higher value. If that value is higher than 4096 you need to make a few changes in the registry by doing the following:

  1. Start Command Prompt as administrator.
  2. Run the following command to add the key: REG ADD "HKLM\SYSTEM\CurrentControlSet\Services\stornvme\Parameters\Device" /v "ForcedPhysicalSectorSizeInBytes" /t REG_MULTI_SZ /d "* 4095" /f
  3. Run the following command to validate if the key is added successfully:
    REG QUERY "HKLM\SYSTEM\CurrentControlSet\Services\stornvme\Parameters\Device" /v "ForcedPhysicalSectorSizeInBytes"

If you don’t feel comfortable modifying the registry and changing the disk sector size, you can always install SQL Server on a different drive. Just check the drive with fsutil fsinfo sectorinfo command and make sure its values aren’t higher than 4096.

3. Set the trace flag to 1800

  1. Open the command line.
  2. Now run the following command: DBCC TRACEON (1800, -1);
  3. Close the command line tool.

By modifying startup parameters you’ll force the SQL Server to use 4 KB as the disk sector size for read and write processes.

Why is SQL Server not installing?

  • Issues with certain registry keys can cause this problem to appear.
  • A sector size that is larger than 4KB is the common cause of this problem.

Microsoft is fully aware of this issue, and according to them, some newer storage devices will use higher block sizes than the supported 4-KB sector size used by SQL Server.

Hopefully, this issue will be resolved when Microsoft upgrades its software. Speaking of upgrades, we have a great guide on how to upgrade from SQL Server 2008, so be sure to check it out.

Upgrading will also prevent various compatibility issues such as the Operating system is not supported by SQL Server error.

Have you found a different way to fix this problem? If so, let us know in the comments below.

Samsung Galaxy Flip5: The First 48 hours hands on

Back with another installment of the First 48, and this time we’re handling the Samsung Galaxy Flip5 thanks once again to AT&T.

Unboxing

Continuing its trend of minimalistic packaging, Samsung ships the Flip5 in discrete matte black box with an embossed silhouette of an unfolded Flip phone that resembles a two-tone black domino dead center.

When opened, the packaging reveals a single unfolded Flip5 wrapped in fine black construction paper and little else visible. Under the phone, tucked away is the necessary paperwork, single black USB-C to USB-C 2-foot cable, and metal sim card ejector.

Aside from using eco-friendly practices as an excuse for packaging, Samsung’s approach to wrapping their devices does in a little more than thin sheets of construction paper and equally thin boxes helps to center the object and jump starts the experience.

In a roundabout way, the less that there is in the box, the sooner a user is up and playing with their new device.

Clever girl.

Clever Girl

Look and Feel

Holding the Flip5 unfolded feels almost like any other smartphone aside from its slightly elongated design. For a common comparison, I’d imagine holding a Sony Xperia 1, 10 Plus, and PRO-I net a similar in-hand experience, right down to the narrow width to aid in reachability.

At $1,119.99 the Flip5 offers a premium heft that accents its metal and glass frame without being overly bulky or cumbersome when unfolded.

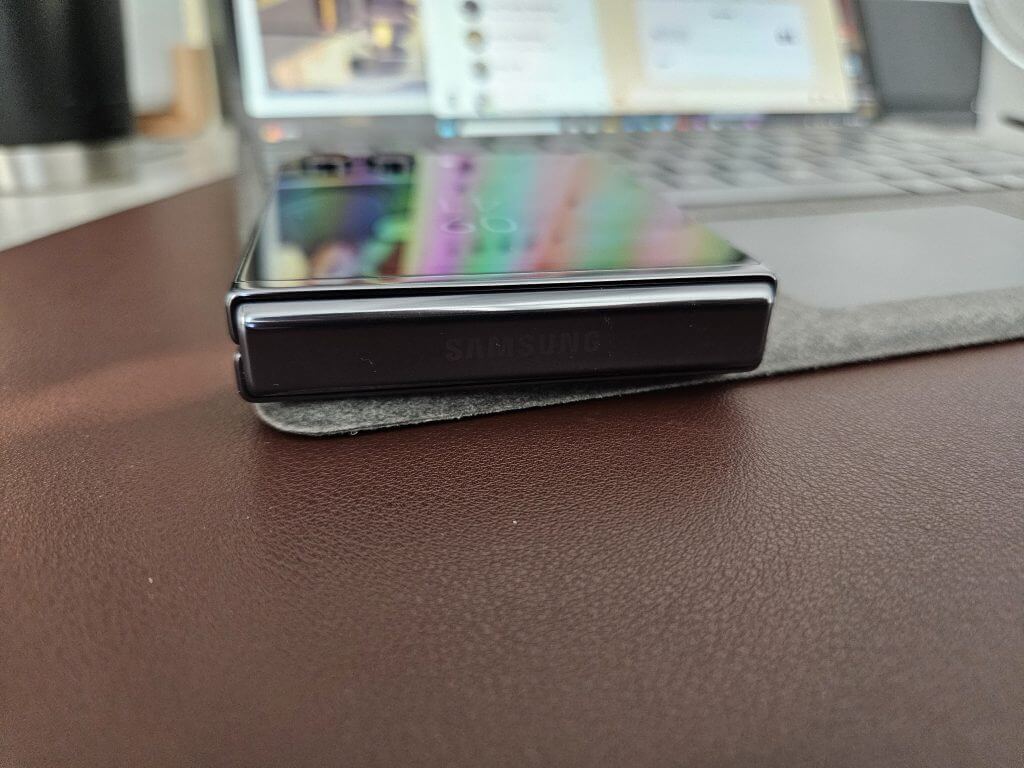
Samsung Flip5 - Closed

The edges are wrapped in polished aluminum that can look black or dark grey depending on the lighting. With half the exposed body of the Flip5 being a screen the Graphite color only really shines on the half-sized back panel but looks nice in contrast to those darker graphite edges, and the completely black Wi-Fi bands

The infamous Samsung folding hinge in the Flip5 is initially hidden and tucked away between the two separate ends of the phone when unfolded while flush power and volume buts sit anchored on the left side of the phone.

Unlike the Fold5, the Flip5 doesn’t feel as slippery, thanks to its narrow design when opened or its squatter position when closed most users will be able to get a full grip around the smartphone when in use.

The weight of the phone feels comforting and in its folded position it feels intuitive for anyone whose first cellphone experience included an LG Tracfone, Sharp GX, Motorola RAZR or V300 or the myriad of other flip formed devices.

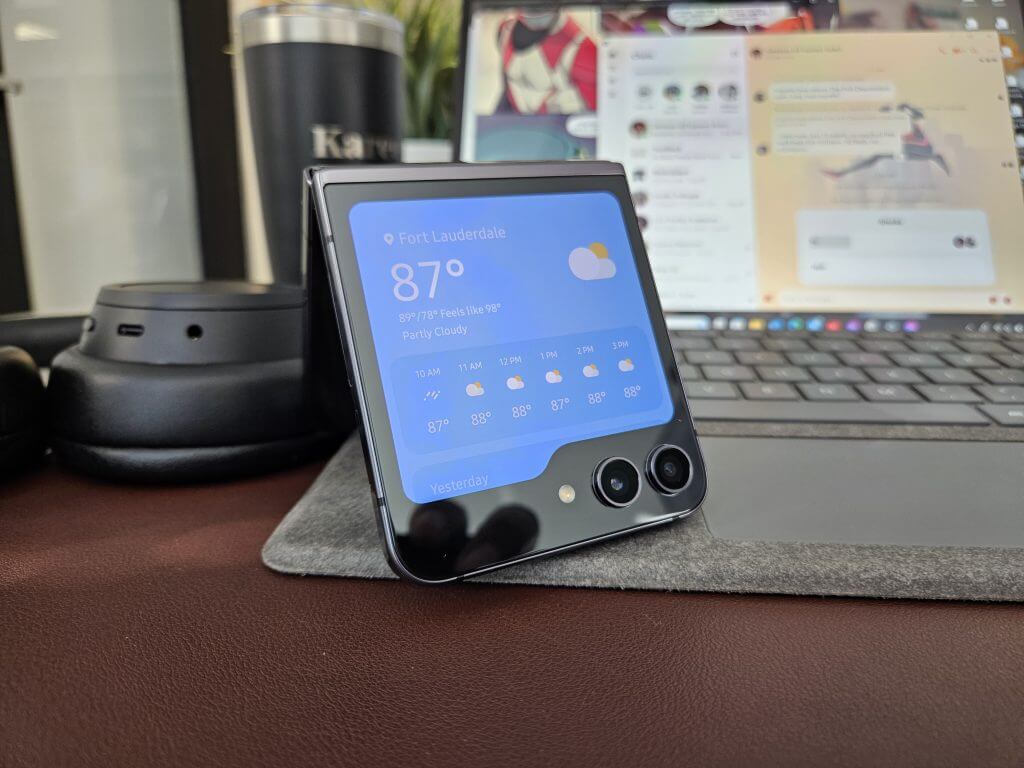
Samsung Flip5 - Widget 2

On the inside of the phone there is an initial notice of the crease in the screen, and its presence tends to linger longer than the Fold5 as its horizontal presence makes it a constant contact point when scrolling the long screen vertically.

We’ll see if the crease eventually becomes white noise when using the Flip5 as it did while using the Fold5.

Lastly, the camera arrangement is another notable design observation as it protrudes out of the top screen enough to offer a physical marker to help users identify the top front of the phone when scavenging for it in a pocket.

Performance

I mean, there isn’t much to say here just yet. The Flip5 performs like a modern smartphone in most ways.

The biggest caveat is the widget accessibility on the cover screen. With full screen sized widget support on the Galaxy Flip5, opening the phone takes a backseat to skimming quick notifications that include weather, stocks, messages, step count, calendar events, calls, alarms, maps, Whatsapp.

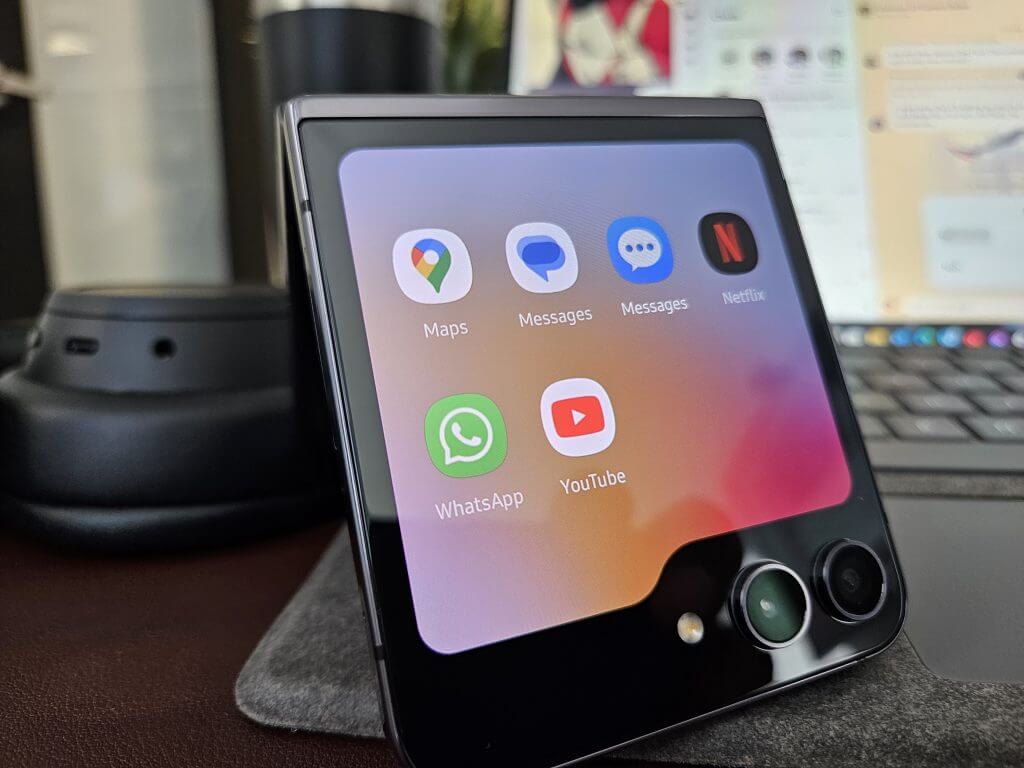
Samsung Galaxy Flip5 - App support

For longer engagements, users can watch video content from Netflix and YouTube which is a nicety paired with its compact design allowing for much longer viewing sessions with the phone nestled in the palm of the hand rather than some finger contortions that include pinky balancing.

Equipped with the Snapdragon 8 Gen 2 mobile SoS, the Flip5 has speed through all tasks I’ve put it through that includes downloads (mostly thanks to AT&T’s network coverage in South Florida) loading web pages, gameplay, and video streaming.

Samsung’s OneUI has gotten optimized and feels just as fluid on the Flip5 as it did on my S22.

Initial Thoughts

Aside from the nostalgic appeal of condensing the physical footprint of your smartphone, Samsung’s work on the outer screen is by far the biggest reason to get into this style of phone.

I’m victim to getting lost in my phone when attempting to do quicker and more focused interactions like responding to text, checking notifications, or keeping up on news. While the widgets panel is limited in its app support, the ones that are available are currently more than enough for me to keep my phone closed at most times.

Samsung Galaxy Flip5 - Dual Apps

Using the phone for a couple of days with a focus on the outer screen has brought me to the realization that if phones replaced their notification shade with a handful of full-sized widgets with varying degrees of functionality, people may not be on their phones as much, at least not me.

But it’s also early days, we’ll see how widgets help with my phone detox weeks in.

Dell’s latest Alienware monitor brings a new design, AMD FreeSync and HDR10 support

Dell introduced its refresh rate breaking Alienware monitor, the Alienware 500Hz Gaming Monitor at CES earlier this year and the company is following up that announcement with a top-shelf variant that offers a revised design, AMD FreeSync Premium technology and VESA AdaptiveSync Display certification.

The newer version of the Alienware 500Hz panel (AW2524HF) still delivers a 500/480Hz (native) refresh rate with 0.5ms gray to gray response times for the smoothest ghosting-free gaming experience around.

However, with the addition of AMD FreeSync Premium, gamers will now be unincumbered by GPU support and worrying if their monitors can keep up with their other hardware.

The IPS paneling supports 99% sRGB color accuracy at wider angles as well as incorporating blue light technologies in the form of TUV-certified ComfortView Plus Low Blue light hardware solutions.

Alienware - 500Hz Gaming Aw2524Hf 6

As for the new design, the base of the monitor takes up a hexagonal shape rather than the elongated V as many other monitors adhere to so that it can be placed in most modern desktop set ups. The stand is fully adjustable, meanwhile Dell managed to tack on a retractable headset arm for gamers to rest their headphones on.

As for ports and connectivity, Dell seems to have chucked the kitchen sink at the back and bottom of them monitor:

  • Power Connector
  • SuperSpeed USB 5 Gbps (USB 3.2 Gen 1) Type-B upstream port
  • 2x SuperSpeed USB 5 Gbps (USB 3.2 Gen 1) Type-A downstream ports
    Joystick
  • SuperSpeed USB 5 Gbps (USB 3.2 Gen 1) Type-A downstream port with Power
    Charging
  • SuperSpeed USB 5 Gbps (USB 3.2 Gen 1) Type-A downstream port
  • Security-lock slot
  • HDMI port
  • 2x DisplayPort

The Alienware 500HZ Gaming Monitor (AW2524HF) will be available for purchase on September 12, 2023 starting at $649.99 USD.

Microsoft Teams Premium trial licenses to be available next month

Microsoft will seemingly enhance organizations looking to optimize their collaboration experience. Next month, Microsoft Teams will offer self-service trial licenses for Teams Premium, enabling businesses to explore advanced features before committing to full licenses.

Teams Premium is an add-on license designed to elevate the Teams experience for Microsoft 365 subscribers. This move aims to allow IT administrators and users to harness the power of Teams Premium features on a trial basis. The trial period will allow organizations to feel the benefits and tailor the offerings to their needs.

Beginning next month, organizations can access the Teams Premium 30-day trial license directly from the Microsoft 365 admin center. This initiative will allow interested parties to explore the capabilities of Teams Premium at no cost.

The trial version will include a comprehensive set of Teams Premium features, such as personalized and intelligent meetings, enhanced meeting protection, advanced management tools, and virtual appointments.

Each organization with a trial license can assign up to 25 users to test Teams Premium features during the trial period. This will enable teams to experiment with the offerings and make informed decisions.

It’s important to note that some advanced features, like end-to-end encryption for meetings, customized meeting templates, and organization-branded backgrounds, may require administrative configuration before users can fully utilize them.

This initiative marks a step forward in Microsoft’s commitment to enhancing organizational collaboration experiences.

via Petri

Microsoft commits to EU’s Digital Services Act (DSA) for transparency in ads

Microsoft is taking steps to comply with the European Union’s Digital Services Act (DSA), which aims to protect users online and increase transparency for tech platforms.

Microsoft has committed to providing more information about targeted advertisements to users. This move is likely in response to the DSA’s requirements for platforms to be more transparent about their advertising practices.

From October onwards, Microsoft plans to release a report every six months on its DSA compliance efforts on the Microsoft Reports Hub. This report will provide updated information on Bing’s average monthly active users in the EU.

The Digital Services Act (DSA) is a regulation in EU law that aims to update the Electronic Commerce Directive 2000 regarding illegal content, transparent advertising, and disinformation.

The DSA has a significant requirement that platforms should provide users with the choice to have a feed that is not personalized and not based on user profiling. Microsoft’s LinkedIn has successfully implemented this change on both the desktop and mobile versions of the network.

  • A new Digital Safety website has been launched to inform users about Microsoft’s safety practices policies and how to report concerns across its online services.
  • Bing’s “Report a Concern” process now includes easier reporting of exposed personal information by minors, a new category for reporting concerns in generative AI features, clearer policies on nonconsensual intimate imagery and synthetic “deepfake” images.
  • The Microsoft Ad Library has been introduced to enhance transparency for consumers about the advertisements on the Bing platform.
  • Additional transparency documentation is being developed to better explain Bing’s search processes, ranking principles, moderation policies, and user controls.

The DSA applies to “very large” social media networks and websites. Microsoft-owned platforms like Bing and LinkedIn, along with other major tech players such as Facebook, Instagram, Snapchat, and TikTok, are among the platforms covered by these regulations.

Microsoft identifies Flax Typhoon: a Chinese state-backed hacking campaign targeting Taiwanese organizations

Microsoft has uncovered a series of concerning activities aimed at organizations primarily located in Taiwan. This campaign, attributed to Flax Typhoon (also connected to ETHEREAL PANDA), is suspected to be orchestrated by a nation-state actor based in China. 

The operation involves sophisticated techniques that could be replicated in other regions, raising concerns about potential global implications. Microsoft has chosen to make this threat public due to the significant risks it poses and the need for collective vigilance within the security community.

The Flax Typhoon campaign has been in operation since mid-2021, with its primary targets encompassing government agencies, education institutions, critical manufacturing, and information technology organizations within Taiwan. Although the impact has been concentrated in Taiwan, certain victims have also been identified in Southeast Asia, North America, and Africa. 

Flax Typhoon’s tactics are centered around persistence, lateral movement, and acquiring credential access. As per established practices, Microsoft has directly notified affected parties to help bolster their security measures.

Preventive measures to counter Flax Typhoon

To respond effectively to suspected compromises, organizations are advised to take the following steps:

  • Identify Compromised Accounts or Systems:
    • Locate instances of LSASS and SAM dumping to detect affected accounts.
    • Scrutinize compromised accounts for malicious activities or exposed data.
    • Invalidate or modify credentials for all compromised accounts, considering the potential scope of compromise.
    • Isolate and meticulously examine affected systems for traces of malicious actions.
  • Defend Against Flax Typhoon Attacks:
    • Maintain updated security patches for public-facing servers, which are attractive targets for threat actors.
    • Employ methods like user input validation, file integrity monitoring, behavioral monitoring, and web application firewalls for enhanced server security.
    • Monitor the Windows registry for unauthorized modifications, leveraging the Audit Registry feature.
    • Utilize network monitoring and intrusion detection systems to spot unusual or unauthorized network traffic.
    • Ensure Windows systems are up-to-date with the latest security patches, including MS16-075.

How to mitigate the risk of compromised accounts

Microsoft also recommends several strategies to mitigate the risk of compromised accounts and systems:

  • Enforce Strong Authentication:
    • Implement robust multifactor authentication (MFA) policies involving hardware security keys or Microsoft Authenticator.
    • Leverage passwordless sign-in methods, such as Windows Hello and FIDO2 security keys, to reduce vulnerability.
    • Set password expiration rules and deactivate unused accounts to curtail risk.
  • Enhance Security Measures:
    • Randomize Local Administrator passwords using tools like Local Administrator Password Solution (LAPS).
    • Employ attack surface reduction rules to block or audit identified malicious activity patterns.
    • Strengthen LSASS process security with features like Protective Process Light (PPL) and Windows Defender Credential Guard.
    • Implement cloud-delivered protection in Microsoft Defender Antivirus for dynamic threat coverage.
  • Deploy Endpoint Detection and Response (EDR):
    • Utilize EDR in block mode to enable Microsoft Defender for Endpoint to neutralize threats even when other antivirus systems are passive.

The exposure of Flax Typhoon’s operations underscores the importance of robust security practices and collaboration across the security landscape. Microsoft’s proactive approach aims to empower organizations and the security community at large to bolster defenses against evolving threats like the Flax Typhoon.

Via: Tech Times

How to Auto-install Approved Apps in Microsoft Teams

If you’re an IT admin, you’ll soon be able to let your organization discover apps to install after you have approved them first. The feature was recently added to the Microsoft 365 Roadmap.

As an IT admin, you must approve all the apps that can be installed in your organization. After you do that, the auto-install approved apps feature will send recommended suggestions to install the apps to the organization.

The installation is not enforced but instead suggested and recommended so that users will naturally choose to install apps.

Microsoft Teams Auto Install Approved Apps uses intelligent signals from your users to install and surface the apps that the admin has already allowed for the tenant. An admin can enable it to help users naturally discover and use apps that are highly relevant to their needs within Microsoft Teams.

Microsoft

There are a lot of benefits that come with this feature. For instance, as an IT manager, you won’t have to waste time making particular policies for specific users.

On the other hand, users won’t have to ask IT managers for specific apps and won’t have to install them either, as the feature will take care of everything once it’s enabled.

How can I auto-install approved apps in Microsoft Teams?

Auto-installing approved apps in Microsoft Teams could be an oxymoron, as there is no need for human input when it comes to it. But auto-installing will still need to be enabled by an IT manager who has to approve apps first.

And to do so, it’s fairly easy. Sure, it will take some time to go through each app to decide if you approve it, but once done, you never have to bother again with it. So, it’s just a one-time job.

  1. Sign in to the Teams admin center, go to Teams apps, and then go over to Manage apps.
  2. Once there, select Org-wide app settings and enable the Auto to install approved apps option.
  3. You can enable or disable specific, by going to Manage selected apps and changing the setting for each app.
  4. Select Save and that’s it.auto install apps in microsoft teams

Once this feature is enabled, it can take up to 2 days for the installation to happen. According to Microsoft, users receive a welcome message from the app if the installed app supports bots.

Users also receive an Activity Feed notification on Teams desktop or web client informing them about the new app that is added. Unfortunately, the notification isn’t available on mobile devices, for now.

If you want to install the Teams app for all user profiles on a computer, read this guide to learn the detailed steps.

What do you think about this new feature coming to Microsoft Teams?

How to Overlay and View Multiple Outlook Calendars at the Same Time

Managing multiple schedules in Outlook is straightforward with its calendar overlay feature. This functionality allows you to view multiple calendars simultaneously, merging them into a single, color-coded view. Whether you’re juggling personal, work, or shared calendars, overlaying helps prevent scheduling conflicts and streamlines your planning process.

In this guide, we’ll walk you through the steps to overlay calendars in both the Outlook desktop application and Outlook on the web, ensuring you can efficiently manage your time across all platforms.

How do I view multiple calendars in Outlook?

1. Use the Side-by-side feature

  1. Launch your Outlook app.
  2. Right-click on the Calendar icon to reveal any additional calendars.
    calendar icon
  3. Check all calendars you wish to display in the main view.

All selected calendars will be in different color options to easily tell them apart. The side-by-side view is appropriate when you just have a secondary calendar. This way, you can easily see which calendar appointments conflict with each other and adjust them accordingly.

2. Use the Overlay Mode

  1. Launch your Outlook app.
  2. Still having selected the calendars from the side-by-side view above, right-click on them and select the Overlay option.

The main advantage of this option is that you can easily spot conflicting calendar entries and drag appointments around on the screen if they overlap.

How do I manage multiple calendars in Outlook?

The calendar app is a powerful tool. It can keep track of your tasks to help you manage your time and be more productive, but only if you know how to put it to good use.

Aside from displaying multiple calendars in one view, you can also tweak a few settings to ensure you get the most out of it. 

Some tips to stay on top of your game include:

  • You can assign colors to individual calendars. Using color-coded calendars helps keep your schedules organized and avoid scheduling conflicting events.
  • You can also close inactive calendars to create space for more. 
  • You can switch from overlay to side-by-side mode by clicking the right arrow to view one calendar. To revert, click the left arrow.

How can I add and manage other people’s calendars in Outlook?

Below is the step-by-step procedure:

  1. Launch your Outlook app.
  2. Click on the Calendar icon from the left side menu.
    calendar icon
  3. Navigate to the Home tab, click Manage Calendars, select Add Calendar, then Open Shared Calendar.
  4. Type in the mail address of the person you’d like to add, and a request will be sent out. Once they accept, their calendar will appear in your calendar list. Repeat these steps to add more people.

Note that you may require permission to add some people’s calendars. Their calendars won’t be visible until they receive and accept your request to share their calendars.

After adding a colleague’s calendar, you may also want to share your own schedule with them. Here’s a simple guide on how to share your Outlook calendar securely.

Even after accepting the request, the owner has full control of the calendar items available to you and can choose to make their calendars private at any time.

If you have been having issues juggling all of your Outlook Calendars, try some of these go-to techniques for viewing multiple calendars simultaneously. You can also try opening multiple Outlook windows and having separate calendars in each window.

Should you find that your Outlook crashes when opening the calendar, proceed to our expert guide to resolve this issue. For more ways to customize your experience, you can set a default Outlook calendar or add holidays to your calendar for better planning.

Which method do you prefer? The side-by-side or overlay method? Let us know in the comment section below.

How to Automatically Accept or Decline Meetings in Outlook?

If you often have to accept or decline meeting invites but don’t like doing it manually, you can set them to be accepted or rejected automatically.

This will help you set a clash-free meeting schedule and minimize distractions so that you can focus on what’s important.

In this guide, we will explore detailed steps to auto accept or decline incoming meeting requests on Outlook so that a timely response is sent to the meeting organizer.

How do I automatically accept a meeting without sending response in Outlook?

  1. Press the Windows key, type outlook and click Open.Outlook Start menu open Automatically Accept/Decline Meetings
  2. On the Outlook main window, go to the File tab.File menu
  3. Select Options to open Outlook Options.OUTLOOK Options
  4. Go to Calendar from the left pane, locate Automatic accept or decline, then click the Auto Accept/Decline button.OUTLOOK_Accept meeting request
  5. On the Automatic Accept or Decline window, to accept a meeting, place a checkmark next to Automatically accept meeting requests and remove canceled meetings and click OK.OUTLOOK_select  Automatically accept meeting requests and remove canceled meetings
  6. Next, on the Outlook Options window, Calendar pane, locate Calendar options and select Accept for the Use this response when proposing a new meeting time option.Accept
  7. Click OK and relaunch Outlook to save the changes.

If you use Outlook 2010 or an older version, look for the Resource Scheduling option instead of Automatic accept or decline. Click the Resource Scheduling button to get the Automatic Accept or Decline window, and change the meeting request settings on Outlook.

How do I automatically accept meetings with a response in Outlook?

1. By setting a rule

  1. Launch Outlook and go to the Home tab.
  2. Click Rules, then select Manage Rules and Alerts from the drop-down list.Rules - Manage Alerts
  3. Click New Rule.OUTLOOK_New Rule
  4. On the Rules Wizard dialog box, select Apply rule on messages i receive and click Next.OUTLOOK_V Apply rule on messages i receive Automatically Accept/Decline Meetings
  5. On the next page, select which is a meeting invitation or update and click Next.OUTLOOK_which is a meeting invitation or update
  6. From the Step 1 box, select reply using a specific template, then go to the Step 2 box and click the specific template hyperlink.OUTLOOK_reply using a specific template
  7. On Select a Reply template window, for Look In, choose Standard Template or User Templates in File System; you will see the meeting response template in the box below. If there are multiple options, choose one and click Open.Template to accept meeting
  8. Click Next, then click Next.
  9. Now name the Rule if you want and click Finish.Create a rule

You can also select Create this rule on all accounts to auto accept the meeting invite on all your email addresses on Outlook.

2. By running a VBA script

First, you need to save the script in VBA; for that, follow these steps:

  1. On the Outlook window, press Alt + F11 to open the Visual Basic Application (VBA) for Outlook.
  2. Go to Insert, then select Module.Insert Module
  3. When the new module opens, copy & paste the following script to auto accept the meeting invitations on Outlook and press Ctrl + S to save it:
Sub AutoAcceptMeetingRequests()
    Dim objNamespace As Outlook.NameSpace
    Dim objFolder As Outlook.MAPIFolder
    Dim objItem As Object
    Dim objMeetingRequest As Outlook.MeetingItem
    
    ' Set up Outlook objects
    Set objNamespace = Application.GetNamespace("MAPI")
    Set objFolder = objNamespace.GetDefaultFolder(olFolderInbox)
    
    ' Loop through inbox items
    For Each objItem In objFolder.Items
        If objItem.Class = olMeetingRequest Then
            Set objMeetingRequest = objItem
            objMeetingRequest.GetAssociatedAppointment(True).Respond olMeetingAccepted, True ' olMeetingAccepted for acceptance, True to send no response
        End If
    Next objItem
    
    ' Clean up objects
    Set objMeetingRequest = Nothing
    Set objItem = Nothing
    Set objFolder = Nothing
    Set objNamespace = Nothing
End Sub

Once you have the script in VBA, you need to run it; follow these steps to do that:

  1. Go to the Outlook window and go to the Developers tab.
  2. Select Macros, and from the drop-down list, choose the Macros you created to run it.Macros run  Automatically Accept/Decline Meetings

Before using VBA scripts on Outlook, create a backup of your data and configuration settings, and always test the script on a small scale before running it for the entire mailbox.

Auto-responding to meeting invitations in Outlook saves you time. It is a hassle-free way to inform the meeting organizer about your attendance. However, always check the meeting request to know your fellow attendees to ensure you are aligned with the participants on the meeting agenda.

How do I automatically decline meetings in Outlook?

1. Use Outlook Options to decline all meeting invites

  1. Launch Outlook and go to the File tab.File menu
  2. Select Options to open Outlook Options.OUTLOOK Options
  3. Go to Calendar, locate Automatic accept or decline & click the Auto Accept/Decline button.OUTLOOK_Accept meeting request
  4. Select Automatically decline meeting requests that conflict with an existing appointment or meeting to decline a meeting.OUTLOOK_ Automatically decline meeting requests that conflict with an existing appointment or meeting to decline a meeting.
  5. Next, Select Decline for the Use this response when proposing a new meeting time option under Calendar options and click OK.OUTLOOK_Decline meeting request
  6. Relaunch Outlook to save the changes.

2. Set a rule to decline meeting invites from a specific email address

First, you have to create a response and save the template to reject the meeting; for that, follow these steps:

  1. On the Outlook main window, go to Calendar and select New Meeting.OUTLOOK_calendar New Meeting
  2. In the Meeting window, enter the text in the body you want to send to decline a meeting invite and go to the File tab.Go to File
  3. Now click Save as.OUTLOOK_Save as
  4. On the Save As window, for Save as type, select Outlook Template (.oft), and for the File name, input a name and click Save.OUTLOOK_save file as otf Automatically Accept/Decline Meetings

Now that you have a customized template let us create a rule to decline the meeting.

  1. Launch Outlook and go to the Home tab.
  2. Click Rules, then choose Manage Rules and Alerts from the drop-down list.Rules - Manage Alerts
  3. On the Rules and Alerts window, select New Rule.OUTLOOK_New Rule
  4. On the Rules Wizard dialog box, select Apply rule on messages i receive and click Next.OUTLOOK_V Apply rule on messages i receive Automatically Accept/Decline Meetings
  5. From the Step 1 box, Select the from people or public group option, then move to Step 2, and click the people or public group hyperlink.OUTLOOK_from people or public group option
  6. It will open the Rule Address window; select the username whose meeting invite you want to reject, click From, and then OK.OUTLOOK_Rule Address window
  7. Now select which is a meeting invitation or update and click Next.OUTLOOK_ reply using a specific template
  8. On the following page, choose the reply using a specific template option from the Step 1 box and in Step 2, click the specific template hyperlink.
  9. On Select a Reply template window, for Look In, choose User Templates in File System; you will see the meeting response template in the box below. Select the one you created and click Open.OUTLOOK_Decline meeting
  10. Click Next, then click Next.
  11. Now name the Rule and click Finish.OUTLOOK_Name the rule and click Finish

Select Create this rule on all accounts if you want to respond automatically to meeting requests on the other email accounts.

3. Use a VBA script to reject multiple meeting invites

First, you need to add and save the script to VBA, here’s how you can do that:

  1. Launch Outlook, and on the main window, press Alt + F11 to open VBA.
  2. Go to Insert, and click Module.Insert Module
  3. Copy & paste the following script to delete the meeting request in the module and press Ctrl + S to save it:
Function GetCurrentItem() As Object
    Dim objApp As Outlook.Application
    Set objApp = Application
    On Error Resume Next
    Select Case TypeName(objApp.ActiveWindow)
        Case "Explorer"
            Set GetCurrentItem = objApp.ActiveExplorer.Selection.Item(1)
        Case "Inspector"
            Set GetCurrentItem = objApp.ActiveInspector.CurrentItem
    End Select
        
    Set objApp = Nothing
End Function

Sub Decline_Meeting()
    Dim oAppt As AppointmentItem
    Dim cAppt As AppointmentItem
    Dim num_declines As Integer
    Dim oResponse
    
    Set cAppt = GetCurrentItem.GetAssociatedAppointment(True)
    Set oAppt = Application.CreateItem(olAppointmentItem)
    
    num_declines = InputBox(Prompt:="How many declines?", Title:="Decline It")
    
    If num_declines < 0 Then
        MsgBox "Nope."
    ElseIf num_declines > 40 Then
        MsgBox "Too far. Be nice."
    Else
        While num_declines > 0
            Set cAppt = GetCurrentItem.GetAssociatedAppointment(True)
            Set oResponse = cAppt.Respond(olMeetingDeclined, True)
            oResponse.Send
            num_declines = num_declines - 1
        Wend
    End If
    
    Set cAppt = Nothing
    Set oAppt = Nothing
End Sub

Now that you have saved the script, close the VBA window. To run the script, follow these steps:

  1. On the Outlook window, select the meeting invites that you want to decline, then press Alt + F8.
  2. You will get the Macros window, select the Decline_Requests module and click Run.OUTLOOK RUn code
  3. On the next window, enter the number of declines and click OK. Here, enter the number of meeting requests you have selected.OUTLOOK_ Declines

If you are unavailable at the same time slot, the script will automatically decline the meeting but will not delete the email message from Outlook, so you can forward the meeting invite to someone to attend it on your behalf.

Also, to avoid back-and-forth emails about the meeting logistics, you can use Bcc to add the person to the meeting.

Automating the response for a meeting invite can increase your scheduling efficiency by letting you know which time slots are free, streamlining your workflow.

Tell us how auto-responding to the meeting request has helped you in the comments section below.

Xbox Free Play Days: NFS Unbound, Destiny 2: The Witch Queen and more

Another week for Xbox Free Play Days, another stacked lineup of free titles for Xbox Live Gold and Xbox Game Pass Ultimate members. This week there are four games representing a range of genres, so there’s bound to be something for everyone here.

This week’s Xbox Free Play Days games will be available as part of the event from Thursday, August 24-Sunday, August 27. See the lineup below.

NARUTO TO BORUTO: SHINOBI STRIKER

Answer the call of the shinobi! Create your own custom shinobi, or select your favorite character, and participate in 4v4 battles where you can unleash a multitude of ninja techniques on your opponents. Follow your ninja way and lead your team to victory! Starting August 25th, play as Kaguya Otsutsuki, the final character for Season Pass 6. Get Season Pass 6 now, and purchase Naruto to Boruto: Shinobi Striker for 50% off this weekend! —Xbox Wire.

Destiny 2: The Witch Queen

A twisted wonderland of corruption and splendor, Savathûn’s Throne World plays host to a fragile balance of terrifying power. From the foundation of her glistening palace to the gnarled roots in the swamp, all that she hides can be found here. Seek the truth and learn that in this place, mystery makes its home in both the Darkness and the Light.—Xbox Wire.

Warhammer: Vermintide 2

Warhammer: Vermintide 2 is the sequel to the critically acclaimed Warhammer: End Times – Vermintide. Fight together with your friends against the forces of Chaos and Skaven in this epic 4-player co-op game set in the Warhammer Fantasy Battles world. Vermintide 2 expands the intense first-person combat with a brand-new enemy faction, 15 new career paths, talent trees, new weapons, an improved loot system, and more. —Xbox Wire.

Need for Speed™ Unbound

Feel the rush in Need for Speed Unbound Volume 4 as cops join the chase in new Gauntlet Playlists. Celebrate 75 years of Porsche with special events and the wildest Legendary Custom Porsche that Lakeshore has ever seen! Stand out on the streets with new premium content in the Store including the Hip Hop Origins Pack. —Xbox Wire.

Learn more about Xbox Free Play Days

Nearly every week Xbox Free Play Days brings a list of games for Xbox Live Gold and Xbox Game Pass Ultimate members to try at no extra cost. If you would like to learn more then head on over to the Xbox Free Play Days FAQ page.

Featured image via Xbox Wire. 

Microsoft enables real-time calendar sync for Outlook and Microsoft Teams via Microsoft 365 Roadmap

Microsoft is making it easier to sync your calendars between Outlook and Teams with their latest Microsoft 365 roadmap additions.

Microsoft has introduced a real-time calendar sync feature between Outlook and Teams. When you modify your Outlook calendar, they will automatically reflect in your Teams calendar, and the same applies vice versa, and it all happens in real time.

For Feature ID 138248, this update was added to the roadmap on August 22, 2023. The feature will be available for Microsoft Teams users in various instances, including DoD, GCC, GCC High, and Worldwide (Standard Multi-Tenant). Desktop and Mac platforms will be covered, and the feature will be generally available starting September 2023.

In another move to improve calendar functions, Microsoft Teams is also getting an update. Feature ID 138326, added to the roadmap on the same date, lets you see real-time meeting changes on your Teams calendar using Android and iOS devices. This feature covers multiple cloud instances like the previous one and will be generally available. The rollout for this enhancement began in August 2023.

These updates from Microsoft aim to streamline calendar management, helping users keep track of their schedules seamlessly across Outlook and Teams.

Microsoft introduces Windows Backup app to Windows 10 with KB5029331 update

Despite the regular feature introduction in Windows 11 and Microsoft forcing users to switch to the latest OS, Microsoft is demonstrating its commitment to the loyal user base of Windows 10 by rolling out a new tool borrowed from Windows 11. The recent release of the KB5029331 update brings an exciting addition for Windows 10 users: the new Windows Backup app, now available for download.

While the Windows Backup app is poised to become a standard feature for all Windows 10 users in due time, it’s currently accessible only to those who actively seek it out. This is because the KB5029331 update, serving as a preview version of an upcoming release, remains an optional update for the moment.

Windows Backup added to Windows 10

For users eager to experience the benefits of the Windows Backup app and explore the other enhancements within the KB5029331 update right away, there are a couple of routes to take. You can manually initiate a search for optional updates or, alternatively, make use of the Microsoft Update Catalog to secure the update package.

However, the allure of the KB5029331 update extends beyond the inclusion of the Windows Backup app. Microsoft highlights the broader spectrum of updates and improvements contained within the package, which you can read in our post on the Windows 10 KB5029331 update.

Via: Beta News

Phil Spencer talks Activision Blizzard, hardware prices, Xbox 360 Store closure and more at Gamescom 2023

Gamescom 2023 continues into its second day and as promised, Xbox is having its biggest presence ever at the event. It has already been quite a showing with the Starfield opening demo and the first teaser for the upcoming Fallout TV show from Amazon Prime Video.

Xbox chief and Microsoft Gaming CEO Phil Spencer has had a lot to say at Gamescom 2023 on a wide range of topics in an interview with Eurogamer. Let’s try and break it all down.

Xbox on Mobile

It’s no secret that Microsoft is planning to create a “next-gen” Xbox mobile gaming store sometime in 2024. And it’s also clear that Microsoft’s pending $68 billion acquisition of Activision Blizzard King is a big part of that endeavor, as laid out by Spencer.

The reason we’re in the acquisition discussion with Activision Blizzard King is around their mobile capability,” said Spencer. “Because it’s just something we don’t have.

“We obviously already have Call of Duty on our platform, we already have Diablo on our platform. So it’s not about new games that Xbox players don’t have access to today. It is about a capability on mobile, and some broader ambitions that we have on the largest gaming platform, which is mobile phones.”

Don’t expect Xbox Series X|S prices to drop any time soon

Xbox Series X And S Side By Side Custom

Spencer told interviewers at Gamecom that we shouldn’t wait for current-gen hardware prices to be cut anytime in the near future.

“…you’re not going to be able to start with a console that’s $500 thinking it’s gonna get to 200 bucks. That won’t happen. Because the core components that you use – you’re used to Moore’s Law shooting up and to the right – but your components… you can’t buy them anymore as a hardware maker because nobody’s making that kind of RAM or other components.”

“It’s not the way it used to be where you could take a spec and then ride it out over 10 years and ride the price points down. It’s why you see console pricing relatively flat.”

In fact, both Sony and Microsoft have increased hardware price points (at least in certain regions) for their current-gen consoles within the last 12 months.

“The prices aren’t coming down. We see it now, and that’s why we did Xbox Series S. I know there’s a bunch of questions like, ‘what is it doing?’ We wanted to make sure we had a sub-$300 console because we want to grow, and we think an entry level price point for many new families or players coming into the market is going to be important.”

The future of the Xbox Series S

And sticking to the topic of the Series S, Spencer was asked about the ongoing debate over Microsoft’s less powerful entry level current-gen offering, and whether it was holding back the Series X due to the parity mandate.

“I don’t see a world where we drop S. I want to make sure games are available on both, that’s our job as a platform holder and we’re committed to that with our partners.”

The debate over the Series S feature parity clause has been rekindled by the delay of Baldur’s Gate 3 on Xbox. While Larian Studios’ action-RPG is eventually headed to Xbox, in the meantime the game is enjoying enormous popularity on other platforms including PlayStation 5, Windows and even Mac.

Spencer on the closure of the Xbox 360 store and game preservation

Last week it was announced that the Xbox 360 Store would be closed down in July 2024. This has led to a renewed discussion online about games preservation. Spencer also touched on this during his interview with Eurogamer at Gamescom.

Xbox 360 console
Xbox 360 console

“Game reservation is critical to us at Team Xbox. One of the things we do is ship all of our games on PC, because I actually think PC is the best ecosystem for game preservation because it’s not tied to one piece of hardware.”

Spencer went on to say that the Xbox 360 community is a very small one, adding

“There’s a list of, what 220 games that are not back compat, and I have that list and I’ve got it stapled on my forehead, and like, how can we make sure [you can play them still?] How many of those are on PC?”

Hopefully, the team at Xbox will find a way to ensure these games remain accessible after the 360 Store closure.

Gamescom 2023 will run through Sunday, August 27. Stay tuned to the Xbox YouTube, Twitch and Facebook channels for more info on everything Xbox-related going on at the event.

Via VideoGamesChronicle. 

Microsoft Viva Engage introduces new video and image features for enhanced user experience

Microsoft has released information about the new features and updates coming to the Viva Engage platform, focusing on enhancing the use of video and images for communication and engagement within organizations. Another Microsoft Viva suite product, Viva Pulse, announced nine updates.

What is Viva Engage?

Viva Engage is an app for social collaboration and part of the Microsoft Viva suite of employee experience (EX) products. Its purpose is to assist employees in connecting with each other, sharing knowledge, and establishing a community.

Changes to the “Stories” Feature

Based on user feedback received during its public preview, improvements are being made to the “Stories” feature. Videos and images will not be separated into a distinct carousel to prevent confusion. Instead, all media will appear in the existing feeds. Engaging layouts and immersive viewers will showcase videos and images within posts.

Media Sharing

Users can access dedicated buttons for adding videos and images in the command bar. This feature is available for both desktop and mobile devices. Mobile users can also record videos. Desktop users can record videos using their webcam or screen recording.

Media Presentation

The updated design now displays videos and images right in the feeds. A post with only one video or photo and very little text will be showcased automatically.

Availability

  • Next quarter, Viva Engage users will receive new buttons for uploading and recording media at no additional cost. 
  • Later in the year, preview customers will have access to enhanced media experiences, such as showcasing media in feeds and using the immersive player. 
  • Creators using the Microsoft Viva suite will have access to the new video and image experiences.

These updates seem to provide a more streamlined and engaging experience for sharing and consuming video and image content within the Viva Engage platform.


How to move old apps to a new Windows 11 computer

Thinking of moving to a new Windows computer? Or maybe you’d like to switch to a new Windows 11 version on the same PC. Whatever options you choose, if you decide to go the simple copy-and-paste route, you’ll have a fair amount of heavy lifting here.

For one, you’ll have to install all the system files and then reconfigure your settings. Now, if that was all you’d to do, you could still have pulled through, however grudgingly. But when you go with the default way of moving things around on Windows (which means reinstalling everything from zero), you’ll also have to install all your third-party apps individually; a nasty, long-winded way to go about things, for sure.

Don’t worry, though, because we’ve got your back. So let’s jump in and look at how to move your old apps to the new Windows 11 in as simple manner as possible.

How to move old apps to a new Windows 11 computer

As I’ve said repeatedly over the years, there’s more than one right way to do things in tech—whether that’s the larger tech scene or even your daily Windows things.

If you’re a long-term Windows user, you know precisely what I’m talking about. Broke something? Here, try out these twenty-four different ways to fix your PC backup! Can’t restart your Windows? Here are ten other ways to do it!

So, it’s no surprise that the same holds for moving your old apps to a new Windows 11. Now, don’t worry—you won’t have to jump through any unnecessary hoops here; just two methods are enough to move your old apps to your new Windows 11.

You can use your Microsoft account or a third-party tool, and you’ll be done in no time. Let’s start with the Microsoft account first.

1. Move your old apps to a new Windows 11 through Microsoft account

It goes without saying that to take your old apps and settings to a new Windows 11 system through your Microsoft account, you’ll have to have your files backed up in the first place. Basically, you need to have your files stored in the cloud—OneDrive in this case—and you can then download your apps and settings to your new Windows 11.

If you have backed up your apps or settings already, here’s how you can do it:

  1. Launch the Windows Settings app by pressing the Windows key + I shortcut.
  2. Head to the Accounts > Windows backup section from there.
  3. Move to the Remember my apps option and toggle on the Windows settings.
  4. Click on Remember my preferences option to back up your settings.

windows backup

You can confirm your backup by checking the Preferences section from the top; it should now have “backed up” there.

When you have cloud backup in place

If you have a cloud backup in place from beforehand, or if you created one just now, you’re ready to move your old apps to a new Windows 11 machine.

When you’re done installing your Windows 11, sign in with your user account (where you’d earlier backed up the files) whenever you’re asked.

You’ll then get a dialog box asking you to confirm your restoration. Click Next to go ahead, and your old apps will be transferred to the new Windows 11 system in no time.

When your PC boots up, you’ll be taken to the Microsoft Store, where you can then restore your additional apps on your PC. From there, click on the Restore my apps button.

In the Store, click on Restore all, and you will get all your Microsoft Store apps back.

2. Use a third-party app

The above method is enough for almost all your Windows apps. But if you want to move your third-party apps as well, you need additional help. You’re looking for a third-party app to help you in that case.

For example’s sake, we’ll be using Ninite. You are, of course, free to use any app you find better suited. Ninite works by helping you install or update multiple apps in a single go, without having to resort to installing the apps one at a time. So, while you won’t be able to carry your apps to the new Windows 11 with you, you can install them through a custom installer created by Ninite. Here’s how:

  1. Head to official Ninite website.
  2. Pick the apps you’d like to install simultaneously from the Pick the apps you want section.
  3. Finally, click on Get Your Ninite button to create a custom installer.

ninite installer creation

After you have followed above the above steps, the Ninite website will create and download the custom installer for you. All you have to from here is to launch the .exe setup and the app will take care of the installation.

Moving old apps to new Windows 11 PC

Moving to a new computer system setup can be overwhelming in itself. You might have to get used to new hardware and software (if you’re changing the OS), and you might have to adjust yourself. Add in moving your old apps to the new Windows 11 on top of this, you will unnecessarily complicate the things.

If you follow the above methods, though, you can easily transfer your apps from one Windows to another without any hassles. So try them out and let us know if you have any tricks in mind.

Opera GX VPN not working? Try these fixes now!

Opera GX, a special version designed specifically for gamers can encounter several stumbling blocks like VPN not working issues. It’s imperative to get rid of these connectivity issues to continue your private browsing.

Opera GX has a free VPN that one can enable with a mere click. The makers added the feature to enhance user privacy and security while browsing the internet. VPNs encrypt internet traffic and hide the user’s IP address, making it difficult for third parties to track their online activities.  

Secondly, VPN helps to bypass geo-restrictions and lets you access region-locked content.

You can troubleshoot VPN issues on Opera GX on your own. We can assist you in navigating the process of maintaining your anonymity while using the internet.

Apart from a built-in VPN, Opera GX comes with an adblocker, AI features, a password manager, and much more.

You should consider making Opera GX your default browser for quick access to web applications in case you’ve already been using it for a while.

 Opera GX

Opera GX

Enjoy the free VPN feature on the Opera GX browser.

Why is my Opera GX VPN not working?

There can be many potential reasons why the VPN on Opera GX has stopped working properly. However, the most common underlying reason could be staying connected to the VPN over time. Other times, you might be having difficulty connecting to the VPN.

Well, the possible issues related to VPN not working on Opera GX could be anything. You can always troubleshoot to know the root cause and apply fixes.

Opera GX’s free VPN lets you connect to three continents mainly – the Americas, Asia, and Europe. By default, it chooses an optimum location. For starters, you can shuffle between these three provided locations to get your VPN back to work.

And, if the primary solution doesn’t seem to work, you can always follow the below troubleshooting guide to fix Opera GX VPN issues.

How do I get a VPN to work on Opera GX?

Fixing VPN connecting issues could be tricky as you never know what triggered the problem in the first place. Nevertheless, the goal is to bring the virtual connection back to work and continue private browsing.

Here are some troubleshooting tips and fixes that you can use to resolve common VPN-related problems.

Check internet connection

The first and foremost fix is to check that you’re on a stable and reliable internet connection. A weak connection is often the main cause of interruptions in establishing a VPN connection.

Restart the VPN and browser

Another solution that you should try first is to restart the VPN and browser. Firstly, cancel the connection attempt. Restart your browser and then reconnect to the VPN. More often than not the VPN connectivity issue is tied to this. So, it’s better to use the primary fixes first before jumping on to the bigger ones.

Try a different server location

Opera GX VPN not working

Another fix that you can try to reconnect Opera GX VPN is by simply switching to another server. It is possible that you might be encountering a VPN connectivity issue with a particular server of the available location.

Reasons could be anything, sometimes, servers are taken offline for maintenance. It’s also possible that the server you’re trying to connect to is under heavy load.

Another obvious reason is the server you’re getting connected to is far from your physical location, hence the slower speeds. So, it’s better to switch. You can choose between a server in the Americas, Asia, or Europe.

Clear browser cache and cookies

One of the main reasons that your VPN keeps on disconnecting is because of the stored caches. Caches can interrupt a VPN connection by storing outdated or incorrect information about the VPN server or client.

So, go to the left sidebar of the browser click the “Privacy & Security” section, and then tap on the ‘Clear browsing data’ option to clear caches and cookies.

Opera GX clear caches

Update Opera GX and resolve the VPN connectivity issue

You should also update Opera GX to the latest available version because it’s possible that the VPN connection issue is tied to an older version of the browser. An outdated browser or software can invite many vulnerabilities that can make it more unstable and hence unable to be used.

Disable other VPN software/ extensions

Needless to mention, if you have any third-party VPN extension installed on your Opera GX then you have to disable it. This is because it might conflict with Opera GX’s built-in VPN. Also, uninstall any other VPN software installed on your system.

Disable firewall or antivirus software

One of the main causes that may interfere with the VPN connection is firewall or antivirus software. Disable them and check if the issue is resolved. However, enable them back once you’re done with your VPN session.

Here’s how you can disable the firewall on Windows 11.

  1. Open Settings go to Privacy & Security and select Windows Security  > Firewall & Network Protection.
  2. Select a network profile: Domain network, Private network, or Public network.
    Alternatively, you can type ‘Control panel’ on the Start and search for ‘Firewall’ for quick access.
    Windows firewall
  3. Under Microsoft Defender Firewall, switch the setting off (if it’s On already).
    Note that turning off the Microsoft Defender Firewall could make your device (and network, if you have one) more vulnerable to unauthorized access.

Note: It’s possible that you may not be able to access popular video streaming sites like Netflix. This is not an issue of Opera GX. The streaming site has geo-restriction block mechanisms in place and the browsers can’t bypass them.

Also, unlike standalone VPN software that we install on our Windows system, Opera GX’s built-in VPN is easy to solve. You just have to solve the troubleshooting guide to get the private browsing back to work.

Outlook BAK File: What is it & How to Open or Restore it?

If you have come across a BAK file in the Outlook folder, wondering what it is used for, or if it is legit, this guide can help!

We will discuss how the BAK file is created, its functionality, and detailed instructions to restore lost Outlook data.

An Outlook BAK file is a backup file that is created by Microsoft Outlook Inbox Repair Tool just before making changes in the original PST file during a repair process

The file created has the same name as the original file but has a .bak extension and is stored in the same folder as the Outlook data file, which is System Drive:\Users\<username>\AppData\Local\Microsoft\Outlook

It may contain additional data, including email messages, contacts, calendar items, and settings. Therefore, it can recover data if the original data file becomes inaccessible.

In case you don’t want to save this file, you can remove the checkmark next to Make backup of scanned files before repairing before you click the Repair button on the Inbox Repair window.

How do I open a BAK file in Outlook?

You can not directly open the BAK file in Outlook; however, you can access it after changing the file format from .bak to .pst. Once you change the extension, you can follow these steps to open the file in Outlook:

  1. Press the Windows key, type Outlook, and click Open.Outlook Start menu open
  2. Go to the File tab.File menu option
  3. Select Open & Export, then click Open Outlook Data File.OPen Outlook data file outlook bak file
  4. On the Open Outlook Data File window, go to the address bar, paste the path, select the file and click OK.OUTLOOK_Select the file and click OK

Outlook will refresh and show you the contents of the file. Go through the email messages, contacts and configuration settings to confirm that the data you want to recover is on the file.

How do I restore a BAK file in Outlook?

  1. Press the Windows key, type Outlook and click Open.Outlook Start menu open
  2. Go to the File tab.File menu option
  3. Select Account Settings, then Account Settings.Account Settings - Account Settings
  4. On the Account Settings window, select Data Files. Go to the email related to the Data file; you will get the location of the original PST file.Open the  Outlook BAK file using the Open File location option
  5. Click Open File Location and locate the file with the .bak extension.
  6. Select the file and click Copy, then right-click and select Paste to get a copy of the file.Copy the file
  7. Now to restore the BAK file to PST, double-click the file name and add .PST to the existing name. For example, if your BAK file name is backup.bak, create a copy, then name it backup-Copy.bak.pst.

How do I import a BAK File in Outlook?

Now that you have the .PST file ready, you can import it using the Import & Export Wizard window. To do so, follow these steps:

  • Press the Windows key>Outlook>Open. Afterward, go to File>click the Open & Export option>select Import/Export.
  • Choose Import from another program or file, click Next, select Outlook Data File (.pst), and click Next.
  • Click Browse to select the file, select the radio button next to Do not import duplicates, then click Next.
  • Select Include subfolders, click the radio button next to Import items into the same folder, choose the Import Folder, and then click Finish.

Once the import process is complete, Outlook will refresh itself, and you can see the recovered items in the selected folder.

If the Import process fails, the BAK file is likely corrupted; in that case, you might need a reliable data recovery tool to restore the lost data.

Always be extra careful when you change the file’s extension, as if not done correctly, the file becomes unusable and might not appear in the Import Outlook Data File window.

Also, before changing the extension, you should create a copy of the backup file and make changes to always have the original backup file if anything goes wrong.

Speaking of BAK files, if you want to open the SQL Bak files on Excel, we have an exciting guide to help you with that.

To learn about a similar file type, our guide on how to open BCK files is here to answer all your questions. For conversion, we have a simple guide to transform MSG to PST format.

To understand more about this file format in general, see what a BAK file is and how it works.

If you have any other questions related to BAK files, please mention them in the comments section below.

What is a Tentative Meeting in Outlook & How Can I Use it?

Outlook is a popular email service allowing users to set up meetings and send requests. When one does that, they sometimes find that the particular meeting slot shows up as Tentative in Outlook, which leaves them wondering whether the user is available.

Going by the dictionary definition, tentative is anything that’s not fixed or certain. Uncertainty is the key aspect.

What does Tentative mean in Outlook?

Tentative allows users to inform the meeting administrator that they may or may not be able to join the meeting. When Outlook meeting requests appear tentative, the administrators will know your participation is not certain. 

Remember, tentative isn’t foolproof and is one of the primary reasons behind double-booking a given time slot since administrators can’t see the tentative status in Event. Instead, it’s visible under the Scheduling Assitant.

How do I set Outlook meeting requests to show as Tentative?

  1. When you receive a meeting notification or an invitation via email, there will be several meeting responses available. Simply click on Tentative. Alternatively, you can open up the meeting and choose the response.tentative
  2. After you do that, the user who set up the meeting will receive a notification, and their calendar will reflect the same.

Marking participation as tentative confuses the person who forwarded the meeting invite. Making your plans evident right away is the best way to proceed! Also, Outlook uses color coding to highlight how attendees have marked their presence.  

When responding to meeting requests in Outlook, you have the following options:

  • Accept: This shows that you are available, and the meeting is added to your calendar.
  • Tentative: It indicates that you may join the meeting, and it’s still added to the calendar.
  • Decline: This indicates your inability to join the meeting, and it’s not added to the calendar.
  • Propose a new time: If allowed by the meeting organizer, you can propose a new time for the meeting, one when you will be available. A new meeting request is sent to the organizer.

How to manage Tentative appointments in Outlook?

  1. Launch Outlook and open up the meeting.
  2. Go to the Show as dropdown menu, and select an option other than Tentative.choose an option

You can change the tentative appointments and meetings, and accept or decline them at a later stage, once things clear up. As a rule, choose your response to meetings carefully and go through the meeting details.

Remember, meetings and appointments always show as Busy by default in Outlook, and you must manually change the status.

To sum up, while Tentative meeting in Outlook is a great feature, there’s still room for improvement, especially for users who are often double-booked. Use the feedback section in Outlook to share your suggestions!

Our recommendation is to be direct with your responses to meeting requests and leave no room for ambiguity. 

If you are facing issues with Outlook meetings or can’t seem to find the right slot, send meeting invites with multiple times to get everyone on board.

For any queries or to share issues you faced with tentative meetings in Outlook, drop a comment below.

Microsoft releases enhancements for live camera embedding ‘Cameo’ in PowerPoint presentations

Microsoft announced enhancements to the “cameo” functionality in Microsoft PowerPoint for both Windows and Mac platforms.

A cameo in this context refers to a small video feed, often from a camera, that can be embedded into PowerPoint slides. This feature is particularly useful for presentations where you want to include live video content within your slides. Microsoft 365 subscribers can access cameo on the desktop app for Windows and macOS.

Here are the introduced enhancements:

  1. Camera Preview and Source Control: Users can now turn the camera preview on or off and change the camera source while in Slide Show View or Presenter View mode. This allows for greater control over when and how the cameo appears in your presentation.
  2. Improved Design and Consistency: Fresh cameo designs have been added to align with the overall theme of your PowerPoint presentation. With a single click, you can now easily insert these cameo designs into all your slides, creating a cohesive look throughout the presentation.
  3. Personalized Cameo Styles: Users can insert a cameo on a single slide, customize its format, and then apply the same format to all slides with a single click. This ensures that the cameo maintains a consistent style across all slides.

Cameothumbnailppt

You can learn more about how to apply this in your presentation here.

If you are utilizing these additional features, it has been reported that the camera may not appear when using the cameo. This could be because another application is using the camera. In this case, you may need to select a different camera or disable the camera for the other application.

These enhancements are available to Beta Channel users running specific versions:

  • Windows: Version 2307 (Build 16731.10000) or later
  • Mac: Version 16.76 (Build 23081101) or later

These updates aim to give users greater flexibility and control when integrating live camera feeds into their PowerPoint presentations. It’s a great way to make presentations more engaging and dynamic by incorporating real-time video content directly into your slides.