Xbox users can get 3 months of Game Pass Ultimate for $1

Gaming has never been more fun and easily accessible than it is in this day and age and not having to physically go to the store to buy anything gaming related, has made it so much better.

Now, everything you need is just a few clicks and a payment method away. And what better way to spend your spare time than gaming on your console or PC?

Game Pass Ultimate is now available for only $1

For all you Xbox fans and bargain lovers out there, know that, right now, you can purchase the Game Pass Ultimate subscription for the price of just $1, for three months.

This amazing offer provides a 98% discount off the $44.97 price you’d typically pay for three months.

This offer is time-limited so you might want to jump on the opportunity before it’s too late. As you all know, this payable service grants you access to over 100 awesome games on consoles, PCs, and Android mobile devices.

However, after these three months, members will be charged the normal price of $14.99 per month.

These great offers that Microsoft keeps making a reality for fans means that more and more of them will continue to stay connected for a longer time.

And its also a great way to enjoy your favorite games, while also saving some hard earned money.

Have you already purchased your Game Pass Ultimate subscription with the discount? Tell us how you feel Microsoft can improve gaming experience in the comments section below.

Phone Manager for PC: 5 Best Software in 2026

Phone manager programs for PCs act as perfect tools for your mobile phone data management.

Using such software, you will be able to synchronize your mobile phone with the PC to access mobile data and perform all kinds of operations between your phone and your computer.

There are a lot of phone manager tools on the market, but we’ll list five of the best ones just to make your choice much easier.

Check out their features and their official websites in order to be able to decide which one is the best for your phone management needs.

What are the best phone manager tools for Windows PCs?

Mobile Go

MobileGo is the one-stop solution that allows you to manage your whole mobile lifestyle in a single convenient place.

It supports Windows 10, 8, 7, Vista, and XP and this great multi-files manager will make it really easy to download, manage, import, and export your music photos, and videos as well with the push of a button.

MobileGo is very rich in features, and at the same time, it is able to do lots of complex tasks effortlessly. You can currently try the software for free for PCs running Windows.

All you have to do is download MobileGo for free and try it.

Check out the most impressive features that come with this program:

  • You will be able to de-duplicate contacts, switch devices, manage your growing app collection, backup and restore and send messages from your desktop
  • You will be able to use apps on your PC straight from your mobile device without any restrictions
  • You can also send SMS right from your computer’s keyboard
  • You will be able to play Android mobile games on your computer thanks to Android Mirror
  • You will be able to view multiple notifications at the same time on your computer screen
  • MobileGo’s Essential Toolkit makes optimizing and managing your mobile devices essentials easy
  • You can easily recover your lost files or erase your mobile in order to protect your privacy
MobileGo

MobileGo

MobileGo’s rich features will help you get the best mobile functions straight to your PC.

Apowersoft Phone Manager

Apowersoft Phone Manager syncs your PC and your mobile phone automatically. The software is free, and it’s one of the best choices for a Windows phone sync utility.

If your files get deleted, you will still be able to recover data to your phone from the previous backup.

This program managed to become extremely popular among users, and it will be able to display mobile screen on your PC.

Take a look at some of the best features that are packed in this tool:

  • It comes with a great looking and well-organized layout, and it also supports additional devices as well.
  • This a fully-featured mobile device manager on your PC.
  • The program allows you to manage mobile data from your computer or vice versa.
  • It can effortlessly import or export music, videos, images, contacts, apps, books, messages and more between your mobile device and your computer.
  • This program can also serve as a backup tool, and it will enable you to backup your mobile data to your computer with a single click.
  • You can back up your contacts, SMS, videos, music, apps and much more.
Apowersoft Phone Manager

Apowersoft Phone Manager

Manage your mobile with Apowersoft Phone Manager to organize everything from your PC on mobile.  
Check priceVisit website

Xilisoft Mobile Phone Manager

Xilisoft Mobile Phone Manager will act as an ideal PC freeware for mobile phone data management.

This tool will be able to sync your mobile phone with your PC in order to access mobile data and perform phone data transfers, restoration, copying, and more mobile management between your PC and your phone.

This mobile manager program works well with mobile devices that are running Windows mobile.

With the help of this program, you will be able to turn your PC into a mobile world, and also your mobile data will never get lost again.

Take a look at more impressive features packed in this software below:

  • Xilisoft Mobile Phone Manager lets you create your own account to protect phone data
  • You will be able to load your contacts from the phone, read messages and emails, edit contacts, add tasks and calendar, view favorites and notes, and so on
  • Xilisoft Mobile Phone Manager also allows you to contact and communicate with more phones and the connection can be made via Bluetooth
  • You can transfer mobile content from a phone to your PC or you can backup local data on your computer.
  • You can restore the backup data to any supported phones
  • You can copy and manage mobile content among phones and also between a phone and a PC⇒

⇒ Get Xilisoft Mobile Phone Manager

Mitel Phone Manager

Mitel Phone Manager allows you to take advantage of the features of MiVoice 250 directly from your PC desktop.

You have three versions of Mitel Phone Manager available, and you can check out their complete set of features on Mitel official website.

Check out the best features that come with Mitel Phone Manager:

  • Mitel Phone Manager will make day to day office communications simple by providing users complete control over their phones
  • It offers presence information for all users, and it makes transferring calls simple
  • Instant messaging is a key tool for daily communication, and the integration of Microsoft Outlook offers users screen popping and easy dialing of contacts
  • This tool provides you call control from the desktop and instant messaging as well
  • You will also get a detailed individual call history

⇒ Get Mitel Phone Manager

Vibosoft Android Mobile Manager for Windows

Vibosoft Android Mobile Manager for Windows allows you to efficiently and safely manage and control everything that you have on your Android phone from your computer running Windows.

You will finally be able to keep your mobile data safe with this really practical solution that will help you make a copy of your data on the PC.

Supported operating systems include Windows 10, 8, 7, Vista and XP so it will work even on the less powerful configurations.

Check out more essential features that are included in Vibosoft Android Mobile Manager for Windows:

  • Vibosoft Android Mobile Manager for Windows provides unlimited control of your Android data from your PC
  • You can back up everything from your Android device to your computer without losing anything
  • You will have the ability to organize apps, download, install and uninstall, and also export app easily and quickly
  • This tool also allows you to edit your contacts and sync your PC with your phone
  • You can set up new catalogs on your PC when you are exporting files from your phone
  • You will also be able to add multimedia files instantly and to choose the format in which you plan to save your exported messages

⇒ Get Vibosoft Android Mobile Manager for Windows

These are five of the best phone manager programs for PCs running Windows that you can currently find out there.

We recommend that you head to their official websites and check out the complete list of features that are packed in these tools.

You’ll eventually be able to pick the ideal one that best suits your needs for syncing your PC and mobile device.

Lenovo ThinkPad X1 Titanium Yoga review: The executives showoff laptop

In a time where everyone is roughly their own independent contractor while working from home, the Lenovo ThinkPad X1 Titanium Yoga offers an executive experience like very few laptops can.

The Lenovo ThinkPad X1 Titanium is a flossy silver notebook that weighs less than any other previous or current ThinkPad laptop and that includes the newly released Nano. As such, the X1 Titanium is patently designed to be used by the more mobile employee who’s often in meetings, doesn’t need bleeding edge processing and who might weigh presentation over productivity.

I’ve likened the X1 Titanium to the executive laptop for all of the above considerations as well as its price. Coming in at $1,769.40, the X1 Titanium isn’t being made for the cubical jockey or even the mid-level manager with a propensity for self-entitlement. The X1 Titanium is an executive laptop through and through.

The new X! Titanium carries the same branding as other ThinkPads and for most durability standards achieves a similar hardness to its exterior as its thicker laptop cousins.

However, the immediate departure from matte black to the more noticeable Titanium colored lid denotes a conspicuous effort to stand out from the crowd.

Couple the visual distinct color scheme of the Titanium and its ultra-portable weight of 2.5 pounds, the X1 Titanium isn’t meant to simply rest on a desk or homogenize with the average desktop setup.

A noticeable caveat is that the X1 Titanium has way more flex to the chassis than other ThinkPads which appears to be a result of the lightweight materials used in its construction.

Fortunately, the X1 Titanium isn’t just a pretty package, it packs most the accoutrement needed for productivity as well as ushering in the much needed 3:2 display aspect ratio for optimized productivity.

Look and Feel

The X1 Titanium is a Lenovo Yoga class laptop which means its screen can be folded back close to 360-degrees of rotation. While I’ve found the Yoga branding and marketing to be more a tangential feature of Lenovo’s laptops, the Titanium’s incredibly reduced weight had me using its ‘tablet mode’ more often than I’ve done on any other Yoga-like device in the past.

The keys are still readily present when holding it in tablet mode and will always seem to take some getting used to but once that is overcome or at least acknowledged, using a 13.5-inch Windows tablet can be pretty useful.

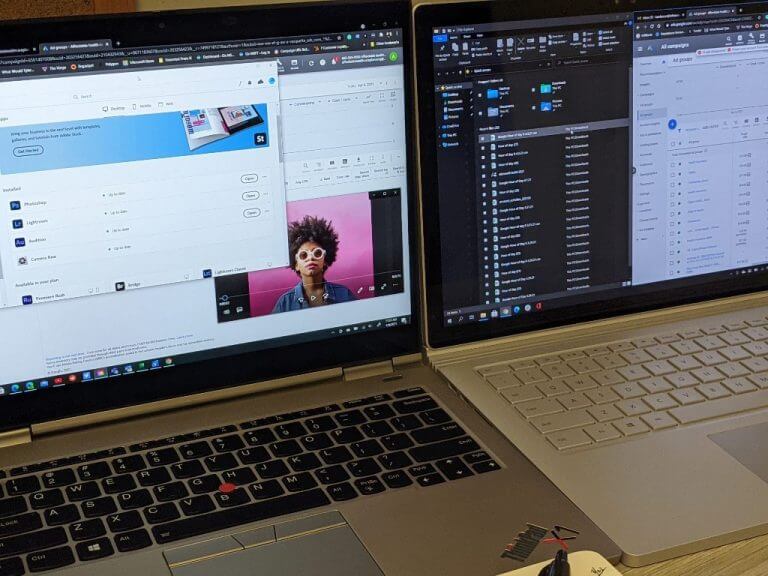
At 13.5-inches and sporting a 3:2 aspect ratio with anti-reflective and anti-smudge technology allowed me to view more web content in both desktop and tablet modes when pairing windows side by side.

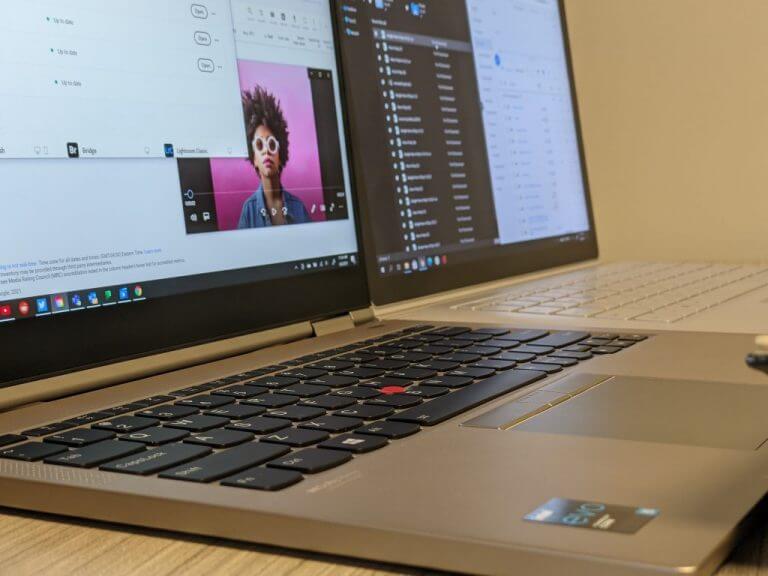
Lenovo ThinkPad X1 Titanium Yoga

The executive who spends 2/3 of their day triaging emails, PDF’s and Excel reports, the Titanium’s elongated display ratios will be much appreciated. In addition, the 450 nits of brightness (indoors) should help with eye strain as well as its QHD resolution which comes out to 2,256 v 1,504 pixels.

Unlike other ThinkPads, the Titanium has a textured tactile lid that is very different than the chalkboard-like feels you get from other ThinkPads. The lid of the Titanium feels bumpier than previous Thinkpads, and as such, offers a grippier feel in hands.

Moving beyond the exterior, the Titanium packs the infamous 11th Gen Intel Core processors with configurations up to an i7 vPro and is crafted alongside Intel’s new Evo platform standards.

Once again, the inclusion of a vPro enabled processor makes its top choice for Fortune 500 companies who may look to deploy these laptops to the top brass who weed through mountains of macros-enabled Excel sheets or 80+decks of PowerPoint proposals or presentations.

The model I reviewed was spec’d out at 16GB of LPDDR4X 4267MHz memory and 512GB of PCIe storage.

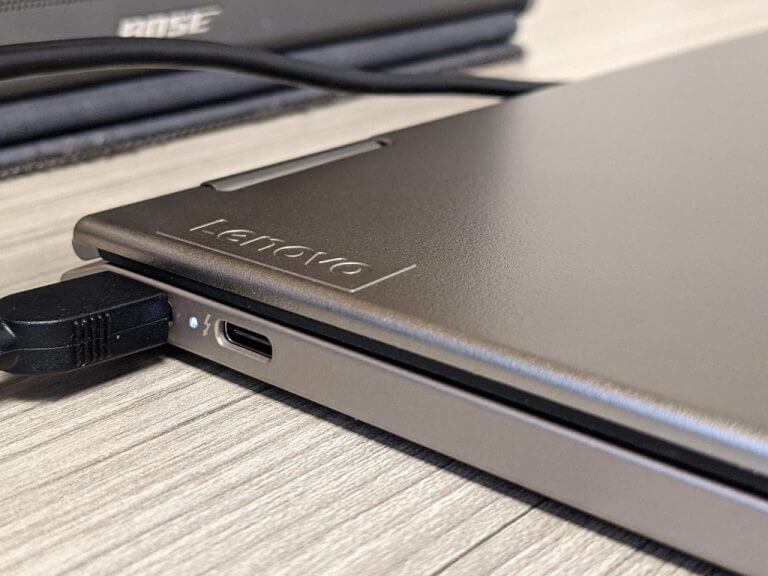
While I was able to squeeze out the same sort of performance, I normally get with most other ThinkPads, another reason I equate this device to executive arm candy is its limited port selection. Similar to a MacBook, the Titanium only offers 2 Thunderbolt 4 ports, a Kensington lock slot and a headphone/mic combo and that’s it.

X1 Titanium ports

Most productivity workers tend to need USB-A and HDMI ports from a device that’s powering their daily workstation. Yes, dongles and adapters can be used and, in fact, I used many, but its normally the executive whose connectivity needs are as limited as the Titanium’s.

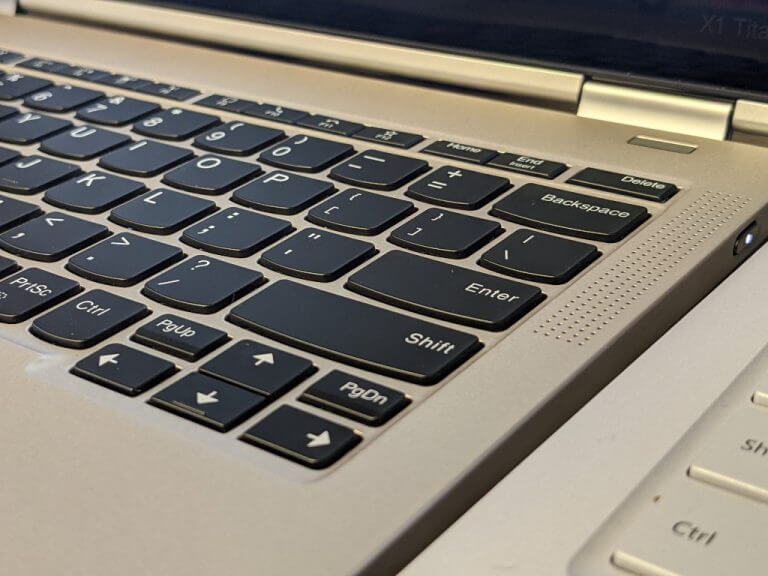
In addition to its limited port selection, the Titanium sacrifices the familiar keyboard tactical feel. Key travel is capped at 1.35mm and is noticeably different than that of other ThinkPads but it’s definitely passable, but not for extended amounts of time.

X1 Titanium Keyboard

Comparisons

As my day job, I work in marketing so I have a hybrid management and cubicle workflow so I was able to enjoy the benefits of the power packed into the ThinkPad X1 Titanium as well as its focus on portability. Unfortunately, in its efforts to market its wafer-thin design, its airflow suffers and as a result, it comparatively comes up short to similar competitors.

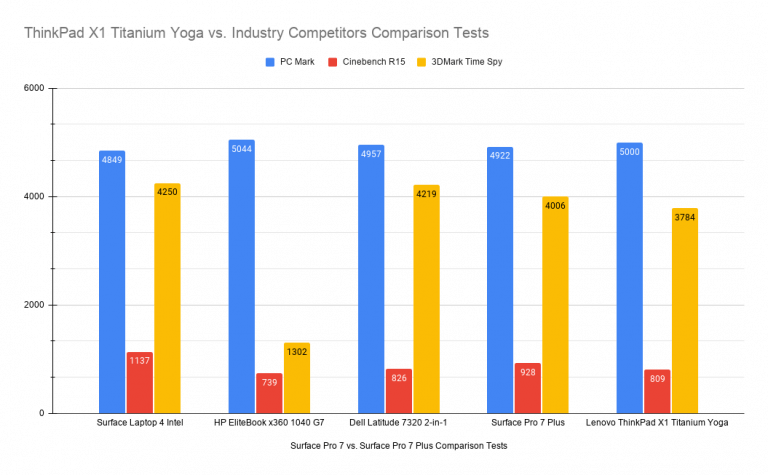
When testing generic content-creation workflows, the X1 Yoga holds it owns against some of the best, with its easily scoring above 4,000 in the PCMark benchmarks. The PCMark benchmark synthetically test items such as word processing, spreadsheet triage, web browsing, and the all-important video conference.

When it comes to stressing the CPU and the cores to render complex images, it’s a step above the HP Elitebook but comes in fourth among its competitors. Cinebench R15 does negate some of the gains in GPU performance that Intel’s 11th gen chip boots, but with all things being equal the CPUs are relatively the same across the board and the X1’s performance may be due to throttling that happens when the fans kick up on the device.

It should be noted, none of the devices tested are gaming PCs but most can used for an extremely casual video game experience. Thanks in large part to the Iris Xe Graphics processor from Intel, the Surface devices performed slightly better but the X1 can be used to play games such as State of Decay 2, Wasteland 3, Red Dead Redemption 2 on super low settings for a couple of hours.

As for battery comparisons, the HP Elitebook outlasted all devices at 19:02 hours and the X1 Titanium Yoga came up second to both Surface devices which lasted over 14 hours a piece. The X1 Yoga does a decent job at a smidge over 14 hours in a battery drain test, but when working on devices full time, screen time on the Titanium Yoga topped out at just under 12 hours and the Surface lasted over 12 hours.

Summary

As I said before, the Titanium is a ThinkPad for the most part but in its pursuit of more casual features it differentiates itself from its cousins in ways that feel excessively premium. The reduced weight is appreciated but at the sacrifice of a familiar typing experience, quicker throttling of the CPU, tiny audio (the drivers are limited in space presenting a tinny auditory experience), and flex in the chassis, the X1’s tradeoffs feel better suited for a highly productive executive than a content creator, coder, or process professional.

FIX: QLBController.exe stops working on Windows 10/11, 7

Executable files have the .exe extension and Windows has a lot of them. But some users accidentally install Trojans on their computers and these dangerous executable files appear in the Windows Task Manager. QLBController.exe is a process belonging to the software HP HotKey Support (HP Hotkey Support), so it’s a trusted application, but it can cause problems. Its purpose is to record keyboard and mouse inputs and when it stops working, there are some things that can be done to fix the issue.

How to fix QLBController.exe stops working error on Windows 10?

QLBController.exe stops working message can be problematic and cause issues with certain applications on your PC. Speaking of application issues, here are some problems that users reported:

  • Controller has stopped working Windows 10, Elitebook – This message can sometimes appear on Elitebook devices that are running Windows 10. To fix this problem, be sure to check your antivirus, and make sure that it’s not interfering with this application.
  • QLBController exe error – This is a generic error and it can be caused by certain applications on your PC. To fix the problem, reinstall the problematic applications and check if that helps.
  • QLBController exe stops working Windows 7, 8.1, HP, laptop – This problem can appear on other versions of Windows. Even if you don’t use Windows 10, you should be able to apply almost all solutions to older versions of Windows.
  • QLBController.exe crash – This is another common problem that you can encounter on your PC. If you notice this problem, perform the Clean boot and disable all startup applications and services.

Solution 1 – Check your antivirus

According to users, sometimes you might get QLBController.exe stops working message due to your antivirus. Your antivirus can sometimes interfere with this process and cause this issue to occur.

However, you can fix that problem simply by scanning QLBController.exe and making sure that it’s not infected. If the file is clean, you can add it to the exceptions list and check if that solves the problem.

If that doesn’t work, try disabling certain antivirus features or disable your antivirus altogether. In case that doesn’t work, your next step would be to remove your antivirus entirely.

If that solves your issue, you should consider switching to a different antivirus solution, that has the benefit of whitelisting files, folders, and even processes.

You might want to try an antivirus that will offer maximum security without interfering with your system, and make sure you add the process in the settings of the security tool and put it on a whitelist.

Solution 2 – Perform an SFC and DISM scans

QLBController.exe stops working error can appear if your Windows installation is damaged. However, you can fix this problem by performing an SFC or DISM scan. To perform an SFC scan, you just need to do the following:

  1. Press Windows Key + X to open Win + X menu. Choose Command Prompt (Admin) or Powershell (Admin) from the list.
    QLBController.exe crash
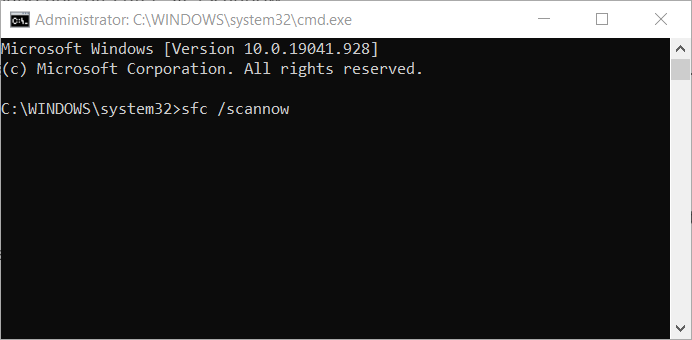
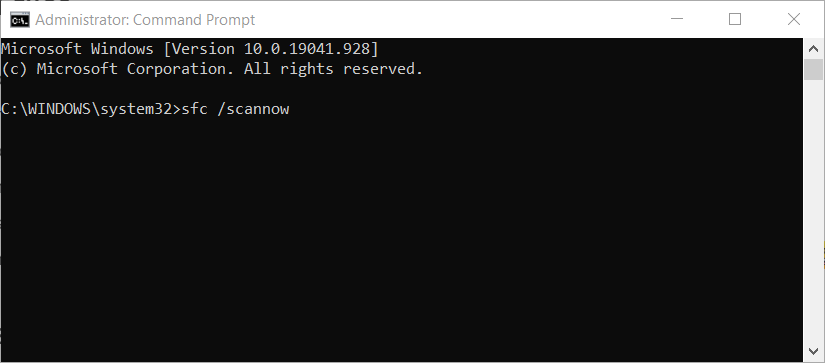
  2. When Command Prompt opens, enter sfc /scannow and press Enter to run the scan.
    QLBController.exe crash

SFC scan will now start, and the process will take about 10 minutes, so don’t interrupt it or interfere with it. Once the scan is finished, check if the problem is still there.

If the issue persists, or if you weren’t able to run SFC scan, you might want to try using DISM scan instead. To do that, you just need to do the following:

  1. Start Command Prompt as administrator.
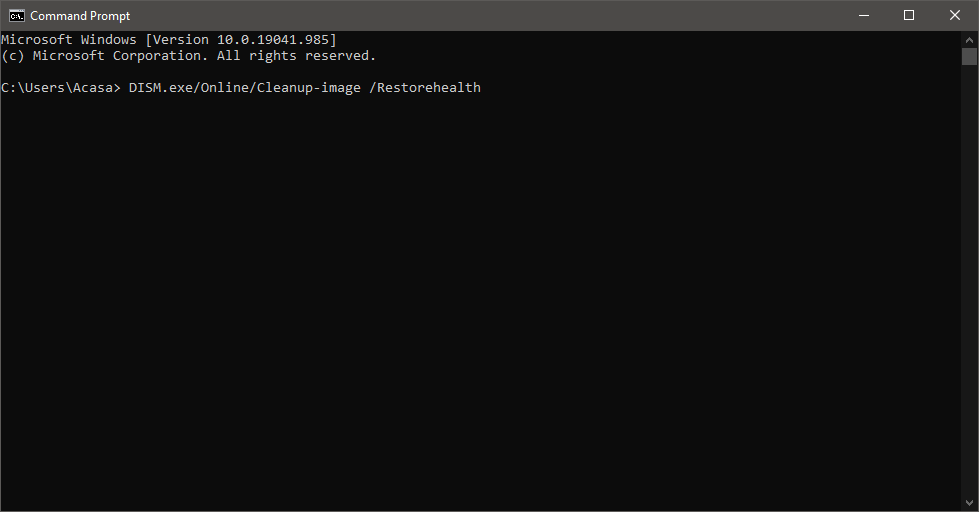
  2. Enter DISM /Online /Cleanup-Image /RestoreHealth and press Enter.
    Controller has stopped working Elitebook

DISM scan will now start and try to repair your system. DISM scan can take about 20 minutes, so don’t interfere with it. Once the scan is finished, check if the issue is still there. If you weren’t able to perform SFC scan before, try to run it once again.

After completing both scans, the issue should be resolved.

Solution 3 – Reinstall HP HotKey Support

Several users reported that QLBController.exe stops working error can occur due to third-party applications. To fix the problem, you need to reinstall HP HotKey Support, HPAsset component for HP Active or HP Power Assistant.

If you don’t have all mentioned applications or your PC, you can just uninstall the ones that are available. Once you remove them, the problem should be completely resolved. If you need to use those applications, you can just reinstall them again and the issue shouldn’t appear.

In order to completely remove these applications from your PC, we advise you to use uninstaller software. Uninstaller and cleaner software is a special application that will remove the selected application along with all of its files and registry entries.

As a result, the application will be completely removed and there won’t be any leftover files to interfere with your system.

Solution 4 – Perform a Clean boot

Sometimes third-party applications can interfere with your system and cause various problems to appear. If you’re getting QLBController.exe stops working message, you might be able to fix the problem simply by disabling all startup applications and services. To do that, just follow these steps:

  1. Press Windows Key + R and enter msconfig. Now press Enter or click OK.
    QLBController exe error
  2. When System Configuration window opens, go to Services tab and check Hide all Microsoft services. Now click Disable all button.
    QLBController exe stops working laptop
  3. Go to Startup tab and click Open Task Manager.
    Controller has stopped working Windows 10
  4. You’ll see a list of startup applications in Task Manager. Select the first item on the list, right-click it and choose Disable from the menu. Do this for all entries on the list.
    QLBController exe error
  5. Close Task Manager and go back to the System Configuration window. Click Apply and OK to save changes. Restart your PC.
    QLBController exe stops working Windows 7

Once your PC restarts, check if the problem is still there. If not, you should try enabling applications and services one by one until you find the one that is causing the issue. Keep in mind that you need to restart your PC every time after enabling an application or a service in order to apply changes.

After you find the problematic application or process, simply keep it disabled or uninstall it and check if that solves your problem.

Solution 5 – Set the startup type of QuickLaunch to Manual

According to users, sometimes certain services can cause QLBController.exe stops working error to appear. To fix the problem it’s advised to change the Startup Type of the QuickLaunch service. This is relatively simple, and you can do it by following these steps:

  1. Press Windows Key + R and enter services.msc. Now press Enter or click OK.
    QLBController exe error
  2. Locate QuickLaunch service on the list and double-click it to open its properties.
  3. When Properties window opens, set the Startup type to Manual. Now click Apply and OK to save changes.
    QLBController exe stops working HP

After doing that, restart your PC and check if the problem is resolved. Alternatively, you can set the Startup type to Disabled and check if that helps. If you don’t have QuickLaunch service available, then this solution won’t apply to you, so you can just skip it.

Solution 6 – Perform System Restore

If this problem started appearing recently, you might be able to fix it by performing a System Restore. In case you’re not familiar, this feature allows you to restore your PC to an earlier state and fix various problems.

To perform a System Restore, you just need to follow these steps:

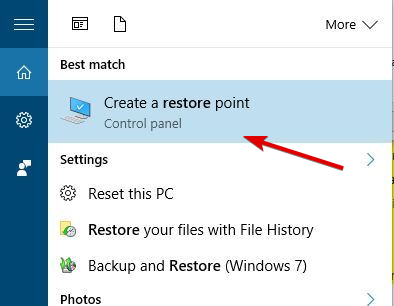
  1. Press Windows Key + S and enter system restore. Choose Create a restore point from the menu.
    QLBController exe error
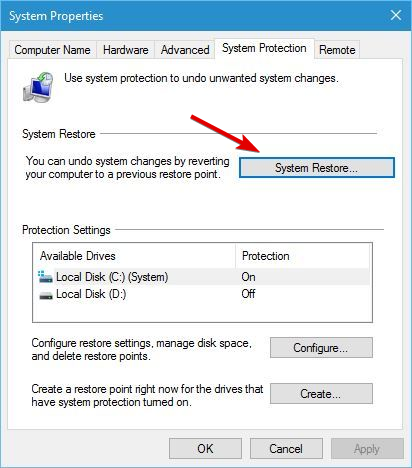
  2. System Properties window will now appear. Click the System Restore button.
    QLBController exe stops working Windows 8.1
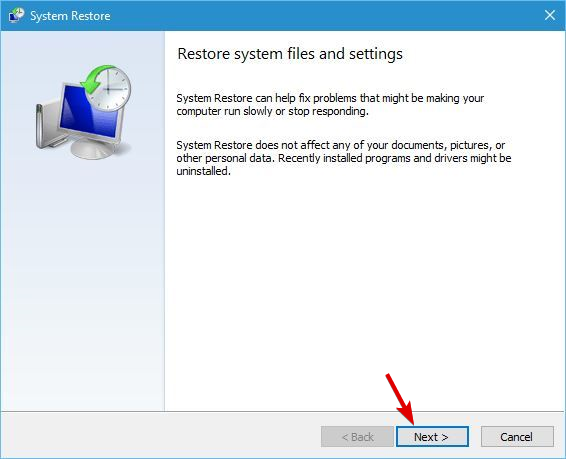
  3. System Restore window will now open. Click Next to proceed.
    QLBController.exe crash
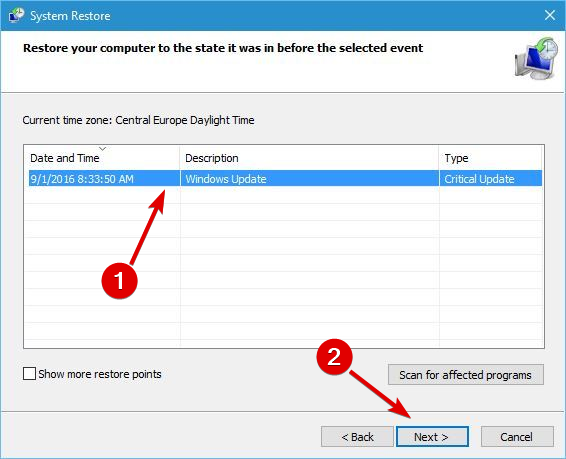
  4. If available, check Show more restore points option. Now select the desired restore point and click Next.
    Controller has stopped working Windows 10
  5. Follow the instructions on the screen to complete the restoration process.

Once your system is restored, check if the problem still persists. If not, keep a close eye on your PC, especially on software and software updates. If the problem reappears, it’s possible that certain software is causing this issue.

Solution 7 – Install the latest updates

If you’re getting QLBController.exe stops working error frequently on your PC, you might be able to fix it by installing the latest updates. Microsoft is working hard to make sure that Windows 10 is running smoothly and without any major issues, and if you want to ensure that your PC is working properly, it’s advised to keep your system up to date.

By default, Windows 10 is downloading the latest updates automatically in the background, but sometimes you might miss an update or two. However, you can always check for updates manually by doing the following:

  1. Open the Settings app. You can do that quickly by pressing Windows Key + I.
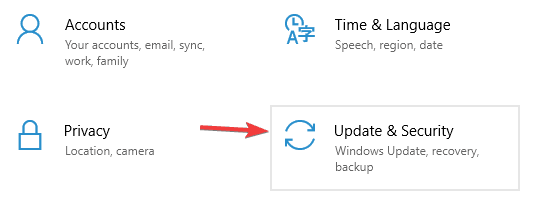
  2. When the Settings app opens, go to Update & Security section.
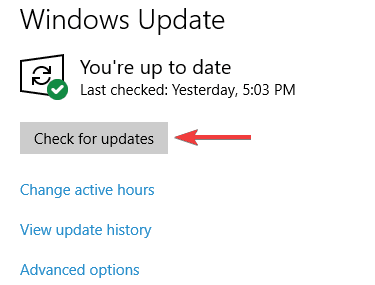
  3. Click Check for updates button.

Windows will now check for updates and download them in the background. Once your system is updated, check if the problem is still there.

QLBController.exe stops working error message can be quite annoying, but you should be able to fix this problem with ease using one of our solutions.

Posted in Fix

BullGuard antivirus gets enhanced support for Google Drive, Dropbox, OneDrive

One can never have too much protection. Protection is what helps us complete our various tasks without having to fear additional issues, especially when talking about computers and the online medium. As such, protection is something you should always focus on improving. One way of doing that is by keeping an eye for the newest updates and implementations in the security department, such as BullGuard and their newest update which focuses on cloud functionality.

With the new update to BullGuard Internet Security, users can enjoy multiple new features that provide easier integration with the rest of the ecosystem. For starters, better integration has been added for the popular cloud services available. Dropbox, Google Drive and OneDrive now are much better supported by BullGuard, allowing BullGuard to provide enhanced cloud backup solutions.

The cloud backup features also include a schedule administrator that initiates periodic backups as per user settings and set time periods. If users want more protection, they can opt to encrypt their files before uploading them to the cloud. This ensures that in the eventuality of someone somehow getting their hands on your files, you have a safety net in the encryption set — meaning they have your files but can’t read them. This method of securing one’s files seems to be more popular.

Other things that users should take a look at are the parental control settings new cleanup tools, which can be used to clean up the computer. These round up the update and give it more beefiness, pleasing a wider range of customers.

Those interested in BullGuard and BullGuard Internet Security can acquire its license for $60, or $100 for the premium version.  The main difference between the two is that the standard edition comes with three licenses which users can split between three compatible devices (PCs, Macs and Android devices), while the premium solution offers 10 licenses and additional social media related options for improving identity security.

FIX: Windows Defender application failed to initialize

Windows Defender is the built-in antivirus app included in Windows 10 and it’s pretty effective in defending your PC against threats.

However, some users have reported a Windows Defender error message along the lines of: Windows Defender. Application failed to initialize:0x800106ba.

The error message might pop up during the Windows startup, and Windows Defender doesn’t open. So, are you getting that software error? If so, here are a few potential fixes for it.

What can I do if Windows Defender fails to initialize?

  1. Remove any problematic programs
  2. Turn Windows Defender off
  3. Check the Windows Defender Service Startup configuration
  4. Re-register DLL files for Windows Defender
  5. Check the latest Windows updates installed
  6. Run the SFC scan
  7. Restart the Security Center Service
  8. Change your group policy
  9. Install a third-party antivirus

1. Remove any problematic programs

First, note that any third-party software can cause such problems to Windows Defender especially some third-party antiviruses.

Some utilities such as McAfee and Norton even disable Windows Defender to free up system resources and prevent potential software errors.

So, if there is third-party antivirus software running, that might be why you’re getting the 0x800106ba error.

You can uninstall the software accessing the Apps option from Settings, or you can use the dedicated uninstaller apps that come with the antivirus.

But it’s a lot faster and more convenient to uninstall the programs with reliable uninstaller software to ensure there are no leftover registry entries.

Hence, it is more efficient to entirely erase persistent applications from the PC and eliminate the ones that cause running issues with your Windows antivirus.

2. Turn Windows Defender off

  1. Enter security in Windows search and click on Windows Security from the results.
  2. Click on Virus & threat protection.
  3. Now select the Manage settings option.
  4. Then you can switch the Real-time Protection option off.
  5. In addition, switch off the Cloud-based Protection and Limited Periodic Scanning settings.

If you only need to stop the 0x800106ba error message popping up, then switch Windows Defender off. Do that by following the simple steps above.

3. Check the Windows Defender Service Startup configuration

  1. Enter services in the search box and select the Services app.
  2. Now double-click Microsoft Defender Antivirus Service.
  3. Select either Automatic or Automatic (Delayed Start) from the Startup type drop-down menu. The Automatic (Delayed Start) setting delays the Windows Defender startup until the other applications have loaded.
  4. Click the Apply and OK buttons.
  5. Then you can restart Windows.

The Microsoft Defender Antivirus Service startup configuration must be either Automatic or Automatic (Delayed Start).

If it isn’t, that’s probably why Windows Defender isn’t initializing. You can configure the startup type for Windows Defender as follows.

4. Re-register DLL files for Windows Defender

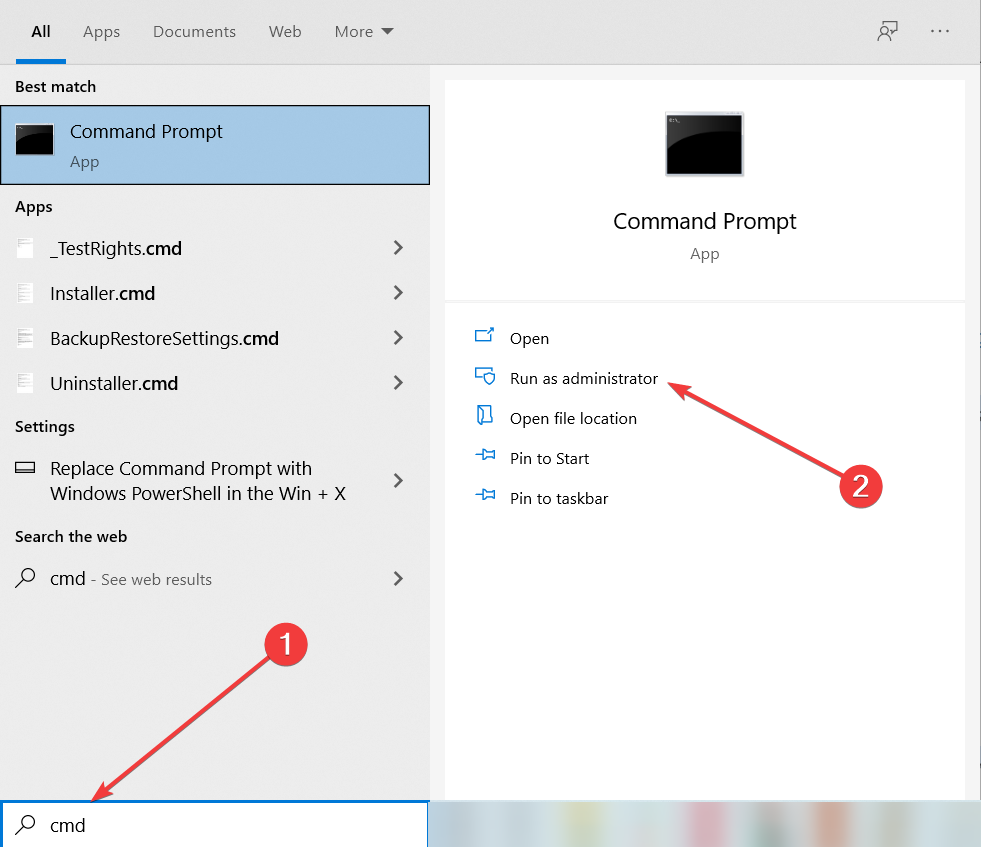
  1. Type cmd in Windows search and select Run as administrator to start Command Prompt with full privileges.
  2. Type the following commands, pressing Enter after each one:
    • regsvr32 wuaueng.dll
      regsvr32 wucltui.dll
      regsvr32 softpub.dll
      regsvr32 wintrust.dll
      regsvr32 initpki.dll
      regsvr32 wups.dll
      regsvr32 wuweb.dll
      regsvr32 atl.dll
      regsvr32 mssip32.dll
  3. Restart Windows after re-registering the DLL files.

Finally, reregistering Windows Defender DLL files can also fix the 0x800106ba error so make sure you perform the simple steps above.

5. Check the latest Windows updates installed

5.1 Delete the most recent update

  1. Press Windows Key + I to open the Settings app.
  2. Once the Settings app opens, navigate to Update & security section.
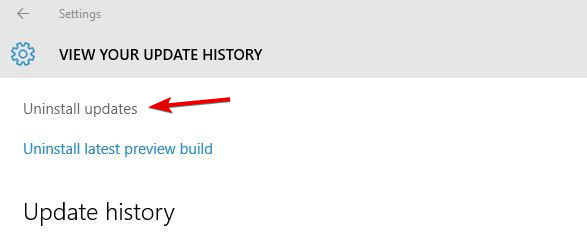
  3. Go to Windows Update tab and click on Update history.
  4. Click on Uninstall updates.
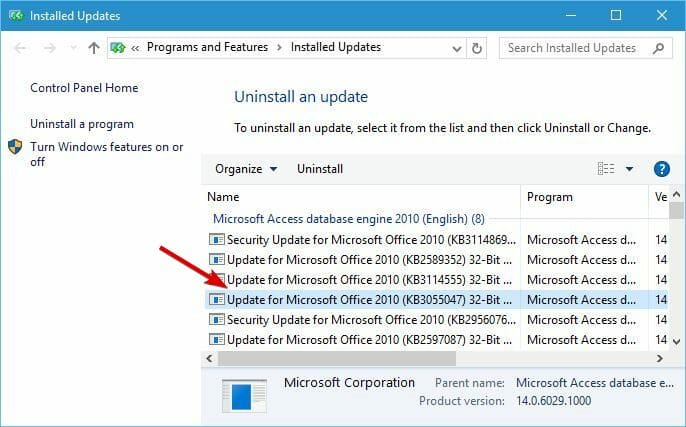
  5. A list of installed updates will now appear. Select the problematic update that you want to remove and click the Uninstall button.
  6. After removing the update, restart your PC.

It could be a recent Windows Update that actually breaks Windows Defender. If you suspect this may be the case, your best bet is to go and delete the most recent update.

5.2 Check for the most recent updates

If uninstalling the latest update didn’t make things right, you can try the opposite action. As Windows Defender is a part of Windows 10, it receives updates through Windows Update.

So, if the issue we’re dealing with is widespread, there’s a good chance Microsoft is working on the fix.

To check if the patch is available, simply check for updates by going to Settings, selecting Update & security, and clicking on the Check for updates button.

6. Run the SFC scan

  1. Open Command Prompt as administrator, as indicated in a previous solution.
  2. Type the following line and press Enter: sfc/scannow
  3. Wait until the process is done (it may take a while).
  4. If the solution is found, it will automatically be applied.
  5. Now, close the Command Prompt and restart your computer.

In case Windows Defender files got corrupt, there’s a good chance you’ll see all sorts of errors, including this one. To make sure the files are repaired, we’re going to run the SFC scan.

This is a command-line tool that scans the system for potential damaged system files, and repairs them (if possible).

7. Restart the Security Center Service

  1. Go to Search, type services, and open the Services app.
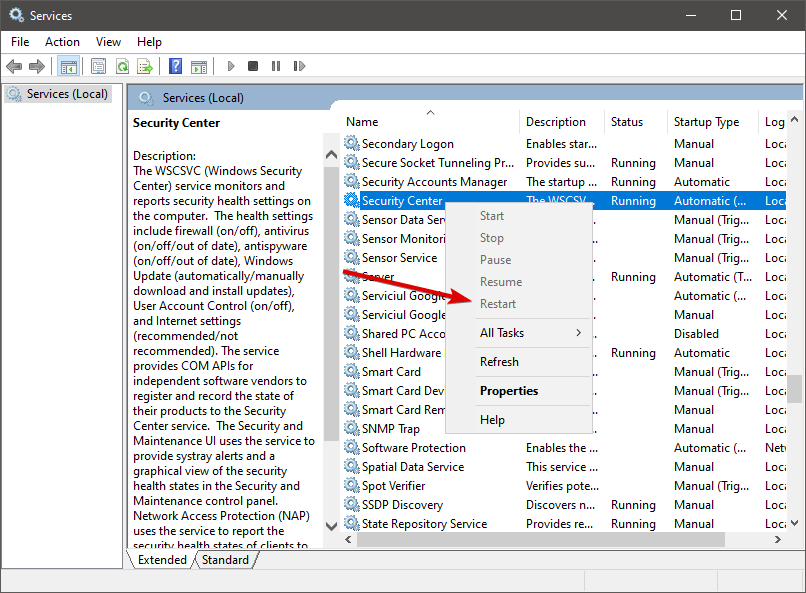
  2. Scroll down and find the Security Center service.
  3. Right-click the Security Center service and click Restart.
  4. Wait for the system to restart the service.
  5. Restart your computer.

Just like it’s the case with the Windows Defender service itself, the Security Center service is also crucial for running Windows Defender.

In case this service doesn’t function properly, we’re going to restart it in order to bring it back to working conditions.

8. Change your group policy

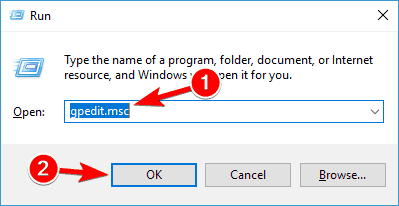
  1. Press Windows Key + R and enter gpedit.msc. Now press Enter or click OK.
    Windows Defender won't turn on after uninstalling Avast
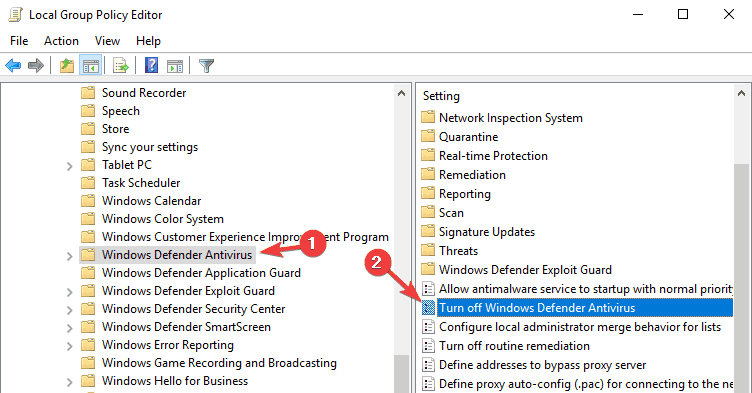
  2. When Group Policy Editor opens, in the left pane navigate to Computer Configuration/ Administrative Template/ Windows Components/ Windows Defender Antivirus
  3. In the right pane, double click Turn off Windows Defender Antivirus.
    Windows Defender won't turn on Windows 10 Spybot
  4. Select Not Configured and click on Apply and OK to save the changes.

If none of the previous solutions resolved the problem, you can try with changing the group policy.

Those are some of the best fixes for the 0x800106ba error code. If you still can’t get Windows Defender up and running after applying those fixes, check out this comprehensive article for more fixes.

9. Install a third-party antivirus

Windows Defender is not a bad solution when it comes to security, but it’s pretty riddled with problems and errors like this one.

You can just choose to ignore its issues and get yourself a third-party antivirus like the excellent software recommended below that will bypass the default security app.

This tool is extremely easy to install and use although it has complicated, multi-layered protection technologies that will safeguard all your devices not only the PC.

Yes, it can also secure your mobile, your router and webcam and make sure that your online transactions will never be hijacked.

TotalAV

Clear your mind from Windows Defender issue and get a fast and reliable antivirus for your devices.
Check Price Visit Website

We can now conclude our guide hoping that you managed to fix the Application failed to initialize 0x800106ba Windows Defender problem and restore its functionality.

If it still gives you more headaches, you can always replace it with one of the best antiviruses with unlimited validity from our list.

Should you have other solutions or advice for clearing this problem, don’t hold back, write a comment in the section below.

Windows 10X is officially canceled says Microsoft

We already knew that Windows 10X will soon be canceled but only today did we get the confirmation from Microsoft that this is actually happening.

The information was presented by Microsoft in the same blog that is announcing the next important release, and that is the Windows 10 21H1 update.

As they already mentioned several times, they put in the center of their decision their customers and their needs, trying to constantly live up to them.

Windows 10X canceled

According to Microsoft Windows 10X technology will be better off as an integrative part than as a stand alone product:

Instead of bringing a product called Windows 10X to market in 2021 like we originally intended, we are leveraging learnings from our journey thus far and accelerating the integration of key foundational 10X technology into other parts of Windows and products at the company.

Additionally, the giant informed that they will continue to invest in areas where the Windows 10X technology will help meet customers’ needs.

This is definitely a shift that once again confirms how Microsoft puts great emphasis on customers and makes them their first focus point.

It’s been a year-long of testing and discussing, so for sure the decision has not been taken lightly, as Microsoft itself states:

Following a year-long exploration and engaging in conversations with customers, we realized that the technology of Windows 10X could be useful in more ways and serve more customers than we originally imagined. We concluded that the 10X technology shouldn’t just be confined to a subset of customers.

As always, your thoughts on the matter are important to us, so don’t hesitate to leave us a comment in the dedicated section below.

CCleaner isn’t deleting Firefox history [Step-by-step Guide]

CCleaner is a popular application that can remove old and unnecessary files. The application is extremely useful in removing leftover files, and it can even help you remove certain applications.

Another great feature of CCleaner is the ability to remove browsing history and cookies. This is useful because it allows you to remove browsing history of all browsers with a single click.

However, Windows 10 users reported certain issues with CCleaner. According to them, CCleaner isn’t deleting Firefox history, so today we’re going to show you how to fix that.

What can I do if CCleaner doesn’t delete Firefox‘s history? The simplest thing you can do is updating CCleaner to the latest version. In most cases, the issue is triggered by outdated software or improper settings. If that doesn’t work, close all processes related to Firefox and use CCleaner advanced file detection.

If you want to find out how you can do that, check the steps below.

Steps to take if CCleaner is not clearing Firefox history on Windows 10:

  1. Make sure that you have the latest version of CCleaner
  2. Select Internet Cache option in CCleaner
  3. Make sure that Firefox is closed
  4. Delete cookies.sqlite and permissions.sqlite
  5. Change Better Privacy settings
  6. Use CCleaner advanced file deletion
  7. Remove Firefox history using Firefox

Solution 1 – Make sure that you have the latest version of CCleaner

If CCleaner can’t delete Firefox history, you might be able to fix that by updating the CCleaner to the latest version.

Many users reported this issue on their Windows 10 PCs, and according to them, the easiest solution is to perform an update.

Simply download and install the latest version of CCleaner and check if that solves the issue.

Solution 2 – Select Internet Cache option in CCleaner

If you have any issues with Firefox and CCleaner, and you can’t delete Firefox history, you might want to try this solution. According to users, you need to select Internet Cache option in CCleaner in order to completely clean the browsing history.

This is relatively simple, and you can do it by following these steps:

  1. Start CCleaner.
  2. When CCleaner starts, go to the Cleaner section.
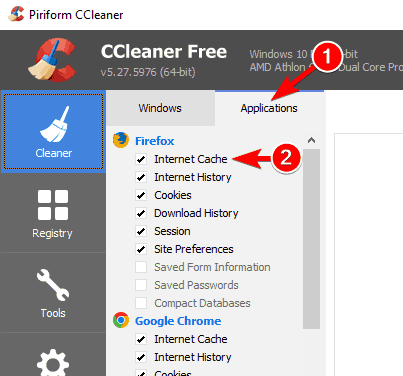
  3. Now click the Applications tab and locate Firefox on the list. Make sure that Internet Cache option is checked.
  4. After doing that, run the scan and check if that solves the problem.

Solution 3 – Make sure that Firefox is closed

If you can’t delete Firefox history using CCleaner, you need to be sure that Firefox isn’t running in the background.

Before trying to delete Firefox history, close Firefox and then run CCleaner. We have to mention that Firefox process can sometimes run in the background, so you’ll need to find it and stop it.

To do that, follow these steps:

  1. Press Ctrl + Shift + Esc to open Task Manager.
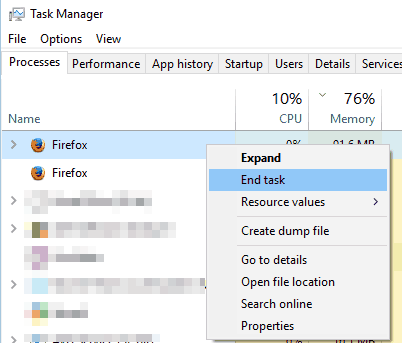
  2. When Task Manager starts, go to Processes tab and locate Firefox. Right click Firefox and choose End Task from the menu. Be sure to close all Firefox processes.
  3. Optional: You can also navigate to the Details tab and close firefox.exe processes from there by following the similar steps.

After closing all Firefox processes, start CCleaner and try to remove Firefox history again.

Solution 4 – Delete cookies.sqlite and permissions.sqlite

According to users, CCleaner is sometimes unable to delete your Firefox history and cookies due to cookies.sqlite and permissions.sqlite files.

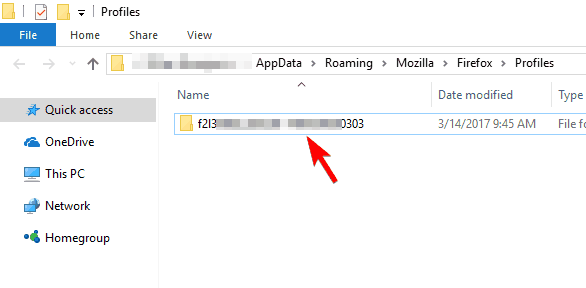
These files are located in your Firefox profile folder, and in order to fix this problem you need to access this folder by doing the following:

  1. Open Firefox.
  2. Click the Menu button in the top right corner and then click on question mark icon at the bottom.
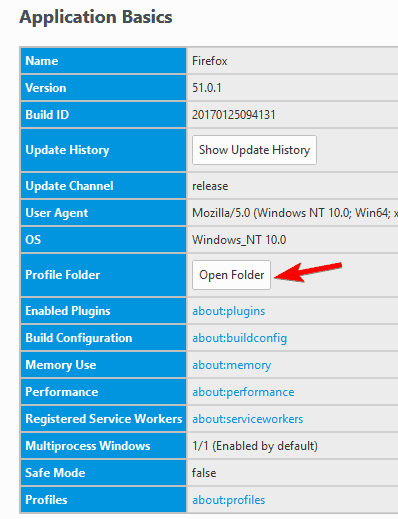
  3. Troubleshooting Information tab will now appear. Scroll down to the Application Basis section and click on Open Folder button.
  4. After doing that, your Firefox profile folder will appear.

Alternatively, you can open your Firefox profile folder by following these steps:

  1. Press Windows Key + R to open the Run dialog.
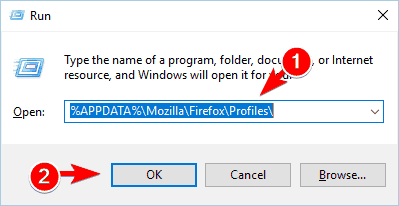
  2. When Run dialog opens, enter %APPDATA%MozillaFirefoxProfiles and press Enter or click OK.
  3. Profiles folder will now appear. Here you’ll see the list of profiles. Enter the folder that represents your profile.

You can use any of the methods to access your Firefox profile folder. The first method is better if you’re a novice user of if you have multiple Firefox profiles on your PC.

If you have just one profile or if you want to quickly access your Firefox profile folder, use the later method.

After you access your Firefox profile folder, simply locate and delete cookies.sqlite and permissions.sqlite files. Keep in mind that you need to close Firefox completely in order to delete those files.

Few users reported that they were unable to delete those files even after closing Firefox. If that happens, restart your PC and try to delete the files again.

Solution 5 – Change Better Privacy settings

If you’re unable to remove Firefox history or cookies by using CCleaner, you might want to check Better Privacy settings.

This is a useful Firefox extension, but it can cause problems such as this one to occur.

If that’s the case, open Better Privacy settings and enable Delete Flash cookies on application start option. After doing that, you’ll be able to remove Firefox cookies and history with ease.

Solution 6 – Use CCleaner advanced file deletion

If CCleaner can’t delete Firefox history or cookies, you might want to try this workaround. According to users, you can use CCleaner’s advanced file deletion feature to remove history or cookies.

Simply select Firefox cookies folder and remove it using CCleaner. This isn’t the best solution, but it’s a decent workaround that might work for you.

If you’re having any issues with CCleaner and Firefox, be sure to try this solution.

Solution 7 – Remove Firefox history using Firefox

According to some users, you shouldn’t use third-party tools such as CCleaner to remove Firefox history and cookies.

Even though using a single application to remove history and cookies is extremely useful, some users claim that this method can cause problems.

If you still have this problem, you might want to remove your Firefox history manually by using Firefox. To do that, follow these steps:

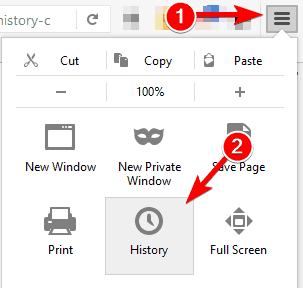
  1. Click the Menu button in the top right corner in Firefox. Choose History from the menu.
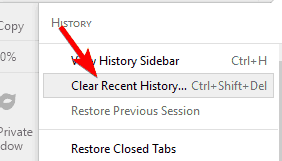
  2. Now choose Clear Recent History from the menu.
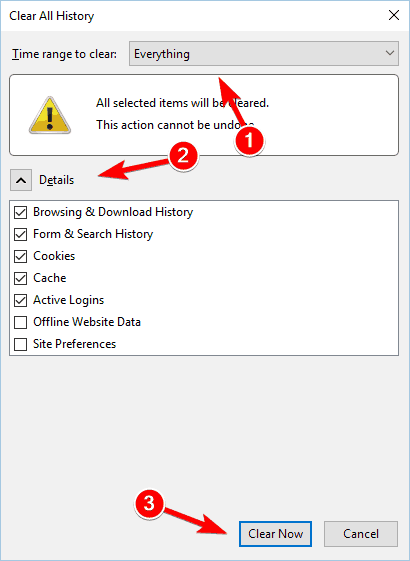
  3. From the Time range to clear menu choose Everything. Expand the Details section and select what type of data you wish to remove. After you’re done, click Clear Now to delete the data.

This solution won’t fix CCleaner, but it’s the best way to remove Firefox history if CCleaner can’t do that.

CCleaner is a rather useful application, but if you can’t remove Firefox history with it, be sure to try some of our solutions.

If you found another way to solve the problem, please leave your troubleshooting steps in the comments section below along with any other questions you may have.

How to download Microsoft Hosted Network Virtual Adapter driver

A wide range of users have reported trying to create a Wi-Fi hotspot on their Windows 10 PC without success.

This is extremely frustrating for users, as the situation seems to be created by the new Windows 10 update.

Here is what one user had to say about this issue on Microsoft Answers:

I couldn’t find Microsoft Hosted Network Virtual Adapter under Network Adapters in Device Manager which is essential for creating a Wi-Fi Hotspot. From where could I download Microsoft Hosted Network Virtual Adapter Driver?

Even though there isn’t an official way to download the missing driver as of now, in this article we will explore some of the best methods to deal with this issue.

So, once again, there is actually no way to download Microsoft Hosted Network Virtual Adapter drivers.

However, in this article, we’ll tell you what alternative methods you can use to fix the issue where you can’t create a Wi-Fi hotspot on your computer.

How can I fix the Network Virtual Adapter on Windows 10?

1. Un-hide the device from your PC

  1. Press Windows+R keys, type in devmgmt.msc and press Enter.devmgmg.msc in run window - download microsoft hosted network virtual adapter driver
  2. Select the View tab and click on Show Hidden Devices.
  3. Check to see if the driver is on the list. If so, right-click on it and select Update driver.

Sometimes, devices and their drivers can be hidden, so you can’t see them in Device Manager. Perform the steps above to uncover them and update them.

2. Update your drivers

2.2. Update your drivers using Windows Update

  1. Click on the Windows search box and type update.
  2. Select the first option at the top of the results.
  3. Click Check for updates and wait for the process to complete.
  4. Check to see if the issue persists.

2.1. Update your drivers using a third-party driver updater

Using dedicated driver updating software to update your driver may be the best solution in order to avoid any risk of damaging something in your computer.

There’s no easier way of doing that than using a specialized driver updating tool that can fix your problem in seconds.

3. Use WLAN auto config

  1. Press the Windows + R keyboard shortcut, type services.msc, and press Enter.
  2. Scroll through the list, right-click WLAN AutoConfig, and click Start.WLAN AutoConfig - download microsoft hosted network virtual adapter driver
  3. Check to see if the issue is solved.

Some users claim that they solved this issue by starting the WLAN AutoConfig service so try that out by performing the steps above.

4. Change value in Registry Editor

  1. Press Windows + R, type regedit, and hit Enter.
  2. Navigate to this location: HKEY_LOCAL_MACHINE\System\CurrentControlSet\Services\Wlansvc\Parameters\HostedNetworkSettingsHostedNetworkSettings in Registry Editor - download microsoft hosted network virtual adapter driver
  3. Right-click the EverUsed parameter and select Modify
  4. Change the value to 1 and select hexadecimal.
  5. Close the Registry Editor and check to see if the issue is resolved.

Changing the Registry value for the HostedNetworkSettings parameter can fix this issue so make sure you perform the steps above to do that.

5. Use the Microsoft Store app to bypass missing Hosted Network Support

  1. Press Windows key + X and select PowerShell (Admin).
  2. Inside the PowerShell window run the following command and press Enter: netsh wlan show drivers
  3. Wait for the process to end and check the results. (your results should show: Hosted Network Supported: No)Hosted Network supported in Powershell - download microsoft hosted network virtual adapter driver
  4. Open Microsoft Store and search for the NoWifi application.
  5. Click Get and wait for the process to complete.Download button NoWifi app - download microsoft hosted network virtual adapter driver
  6. Open the NoWifi app, set a name in the SSID box, and a password, then toggle the button Access Point to On.
  7. The Wi-fi Hotspot is now set and ready to use.

In this article, we explored the best troubleshooting methods to try and fix the missing Network Virtual Adapter driver on Windows 10, and in the end, we explored an easy workaround for this issue.

Make sure to follow the steps presented in this article in the order that they were written, in order to avoid causing any other issues with your Windows 10 PC.

Since this is an issue caused by problematic drivers, you should check our best driver update software for Windows 10 list and get yourself a great tool for that.

Please feel free to let us know if this article helped you solve your issue, by using the comment section found below.

Malwarebytes now features better memory usage and enhanced stability

After the release of Malwarebytes 3.0 and the merging of the company’s products into a single app, the company has dealt with various issues such as stability problems, high memory usage, and functionality issues. The Malwarebytes 3.2 beta was recently released and promises a few improvements such as better memory usage, but in the end it just wasn’t enough.

Malwarebytes 3.2 improvements

With this beta version, memory usage has been improved. For instance, MBAMSrvice.exe drops below the 200,000 K mark on 64-bit versions of Windows. Still, Malwarebytes remains a large program since it runs three operations on Windows devices.

The software’s developers have managed to fix a few stability issues in this new version as well, including hangups and crashes related to the service, tray app, and the UI.

Automatically receive the beta versions of the app

Malwarebytes added the option to download and install the beta versions automatically. Until now, interested users had to download and install these updates manually.

While it’s not always the greatest idea to install beta software on production systems, if you’re really interested in the cutting edge and if you don’t mind running into a bug or two every once in a while, this is a good option. It is also useful to test the new versions of security software early before deploying them on the production systems.

The new option can be found under Settings – Application – Beta Application Updates. Click on the Install application updates button in the UI and the download will begin. You will then be able to install all the new components.

⇒ Get Malwarebytes

Microsoft planning to shut down Windows Live Mail 2012; is there an alternative?

There are a couple of clues that point to Microsoft discontinuing its older email service, Windows Live Mail 2012. Although the company hasn’t confirmed this claim, it announced that Windows Live Mail 2012 won’t support Outlook.com accounts in the future, which is basically the same thing as killing the program.

In a recent blog post, Microsoft stated that users of Outlook.com email accounts currently using Windows Live Mail 2012 will have to find another, newer solution, like Outlook Express or Windows 10’s Mail app.

“You will not be able to send or receive Outlook.com email from Windows Live Mail 2012 after your account is upgraded. This means the time has come for you to upgrade to a new email application.”

Apparently, Windows Live Mail 2012 doesn’t support the Office 365 infrastructure, meaning that users won’t be able to send and receive their emails with it anymore. Microsoft hasn’t precisely said when WLM 2012 would be discontinued, but Outlook.com accounts will be upgraded to new Office 365 infrastructure on June 30, so users should switch to another service before that date.

What about Windows 7 users?

Microsoft presented migration from WLM 2012 as a normal technology step. New technologies are developed and we move on to them, leaving old ones behind — it’s a natural circle. But what about Windows 7 users?

When Windows Live Mail 2012 stops supporting Outlook.com accounts completely, Windows 7 users will be left without any mailing software at all. So they will have three options: either using the web-based Outlook.com, using a third party email software or upgrading to Windows 10.

Many people see this Microsoft’s move as an effort to force users to make the third choice. As we already discussed earlier, when Microsoft presented the ‘Service Pack 2’ for Windows 7, everything the company does with this system will be categorized as an effort to force people to upgrade to Windows 10.

And although it might sound like a conspiracy theory, this theory might make perfect sense. As you can notice, Microsoft is pushing the upgrade mostly through Windows Update, but also discontinuing programs compatible with Windows 7 (in this case Windows Live Mail 2012), more or less disguising efforts to force people to upgrade.

Speaking about email clients, you can also consult our list of best Windows mail alternatives or download Mailbird, one of the best mail clients on the market at this moment.

⇒ Get Mailbird

Tell us what do you think about all of this? Will you upgrade to Windows 10 once Microsoft shuts down Windows Live Mail 2012? Are all these actions actually Microsoft’s attempts to push people to upgrade? Speak your mind in the comments below!

Super Bomberman R Online launches next week on PC, PS4, and Switch, Xbox gamers will have to wait

Super Bomberman R Online, the free-to-play action-maze game that launched exclusively on Google Stadia last year is finally coming to more platforms next week. Indeed, the game will reach a much bigger player base when it launches on Steam, PlayStation 4, and Nintendo Switch next week, but the Xbox version of the game still has no release date.

Super Bomberman R Online is a new battle royale version of the original Super Bomberman R game that launched a couple of years ago (including on Xbox consoles), and it will allow up to 64 players across all platforms to blast it out together. The upcoming cross-play support should hopefully address the matchmaking issues that Stadia players have been encountering since launch.

It’s a bit disappointing for Xbox gamers to not get Super Bomberman R Online on May 27, but it is what it is. Xbox gamers are also still missing fun multiplayer games such as Among Us and Fall Guys, though both of them have been announced for Xbox with no release date.

Super Bomberman R Online will adopt the same Season and Battle Pass systems that many free-to-play games have adopted to keep players engaged over time, with an optional Gold Pass offering exclusive rewards. You can check out Super Bomberman R Online on Google Stadia today, where it remains one of the rare free-to-play games alongside Bungie’s Destiny 2.

How to remove BitCoinMiner malware from PC

BitcoinMiner is a malicious software that forces computers to run complex tasks, draining CPU resources. As its name suggests, it has a very specific purpose: to generate bitcoins for its creators.

BitcoinMiner slows down your PC causing various performance issues. However, most of the time, it’s very hard to notice that the malware is even there. Its creators programmed it to activate when you’re not using your computer.

BitcoinMiner usually enters your computer through infected files. Good old pieces of advice, such as the one telling you to avoid downloading suspect files, could make a difference between getting your PC infected with BitcoinMiner or not.

The good news is that you can quickly remove BitcoinMiner using standard anti-malware software.

Remove BitcoinMiner malware with these tools

Remove BitcoinMiner with Bitdefender

If your antivirus failed to detect and block BitcoinMiner, maybe you should install a new one. Bitdefender Antivirus Plus removes all malware installed on your computer and prevents future malware attacks as well.

This solution identifies malware installed on your PC, and removes it in the blink of an eye.

Bitdefender has had the best malware detection rate in the cybersecurity industry for the past 5 years. Artificial Intelligence-backed algorithms and other revolutionary technologies will instantly detect and remove BitcoinMiner, and block future threats.

Bitdefender ensures instant reaction to malware, without affecting your PC’s performance.

Bitdefender

Bitdefender

Remove BitcoinMiner malware in just a few seconds!
Check priceVisit website

Remove BitcoinMiner with EMISOFT Anti-Malware

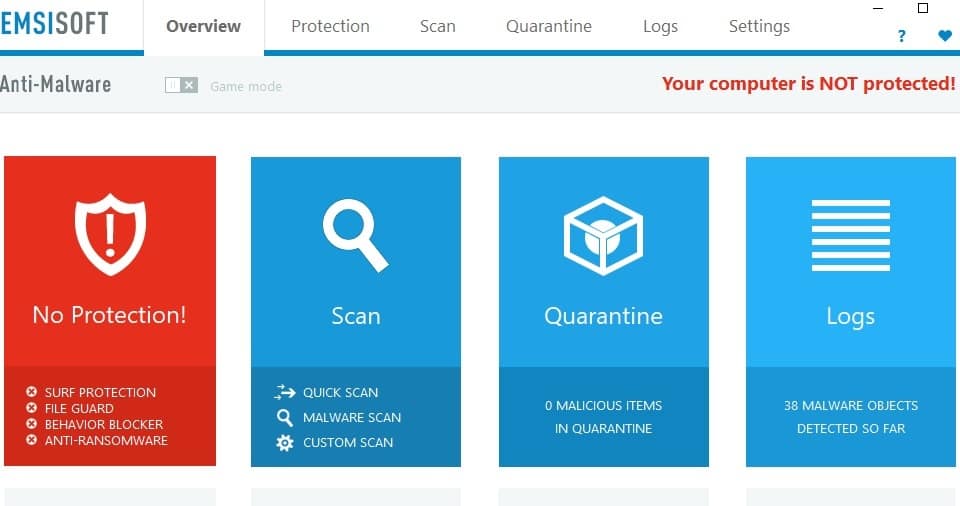
Emisoft’s Anti-Malware is a powerful malware removal tool that will clean all BitcoinMiner’s traces from your computer. The software features a unique dual malware scanner that will instantly detect BitcoinMiner.

The scanner actually features two major antivirus and anti-malware technologies, allowing it to scan quicker and more efficiently. There is very little impact on memory as any unnecessary duplicates in detection are avoided.

The cleaning and restoration module will then take over and will completely remove BitcoinMiner.

Emisoft’s tool also detects behavioral patterns of ransomware attacks and blocks them before they encrypt your files. The tool also removes annoying PUPs, adware, and other similar unwanted software.

EMISOFT Anti-Malware

EMISOFT Anti-Malware

Clean all BitcoinMiner’s traces from your computer!
Check priceVisit website

Remove BitcoinMiner with Malwarebytes 3

best malwarebytes deals

Malwarebytes is a handy tool that removes annoying malware that sneaked into your computer. The tool has a really light footprint, doesn’t require much space to install, and is very silent, running in the background.

Malwarebytes is a complex tool, that does more than just removing malware installed on your device. Thanks to its four-module architecture, the tool blocks malware, ransomware, as well as various exploits and website-targeted threats.

If you’re looking only for an malware remover tool, you should stick to the free version of Malwarebytes 3. This version doesn’t come with a price tag, but is quite limited. It only disinfects your computer after an attack.

After the scan and removal of BitcoinMiner, a reboot is required. Malwarebytes will prompt you to do this.

To benefit from the full range and features, we recommend the full real-time protection of Malwarebytes Premium. This tool will help you prevent malware infections in the first place.

Malwarebytes

Malwarebytes

Detects and removes malware and other advanced threats from BitcoinMiner.
Check priceVisit website

Remove BitcoinMiner with Microsoft’s Malicious Software Removal Tool

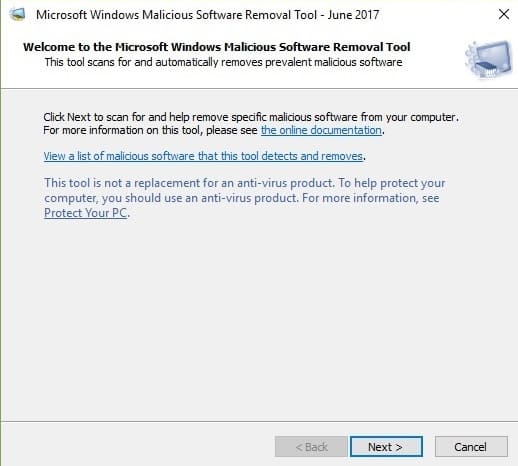
The Redmond giant offers Windows users a dedicated Malicious Software Removal Tool (MSRT) to keep computers free from malware. Microsoft’s malware removal tool detects and removes malware, including BitcoinMiner, reversing the changes made by untrustworthy software.

After the tool has scanned your computer and removed threats, it displays a report that lists the threats.

Microsoft rolls out the MSRT on a monthly basis through Windows Update. You can also download the standalone tool from Microsoft’s website.

There you go, we hope that the antimalware software listed above helped you get rid of BitcoinMiner. If you’ve got other tips on how to remove this malware, use the comments below to let us know.

5 Best Mobile Credit Card Readers For Businesses

Investing in a robust credit card reader for your business is a smart decision since it gives your customers more payment options. We live in such a time where everything is becoming automated and it would frustrate your customers if you are still living in the old cash and carry era. Thanks to technology that we now have a plethora of mobile credit card readers that allow you to collect payment even on the go.

Mobile credit card readers offer payment processing with straightforward fees, point of sale (POS) systems, inventory management tools and so much more. Now your mobile phone can handle all the payment processing, making it easier and convenient for your customers to pay for goods and services.

Most of the service providers discussed below offer free basic card readers and have companion apps that make payment processing even easier. In this guide, we break down for you the 5 best payment processors or mobile credit card readers that are good for your business.

Related: Microsoft introduces new payment options with Windows 10 creators update

5 best mobile credit card readers for your business

Square

Mobile credit card readers

Square is one of the big names in the mobile credit card processing. As one of the oldest mobile credit card payment options, Square focuses on a straightforward pricing. It doesn’t require a contract either. Its users benefit from a flat-rate processing cost with no monthly, annual or hidden fees. The processing cost is 2.75% of all swiped cards. Better even, Square does not distinguish between card types, so credit, debit, and all other card types are all charged the same rate.

The company’s respective app, Square Register is compatible with both Android and iOS operating systems. When you sign up for Square, the company ships you a free mobile magnetic stripe credit card reader. The free Square card reader works with the free Square point of sale app to allow you process payments on your smartphone or tablet. What’s more, it allows you to send receipts via email or text message as well as connect a receipt printer to a tablet. Square also has an EMV compliant mobile credit card reader that can accept contactless payments such as Apple pay, that use NFC technology.

Get Square

QuickBooks GoPayment

Created by Intuit, the company that develops QuickBooks, GoPayment is the QuickBook’s arm that handles all the mobile credit card processing. Though it integrates well with QuickBooks, you don’t need to have QuickBooks to process via QuickBook’s GoPayment. The GoPayment app comes with a clean interface that is easy to use on mobile phones and tablets. Everything you enter into the app goes into your QuickBooks account, whether its sales, receipts or inventory management.

QuickBooks GoPayment offers two different plans: a pay as you go plan and a monthly plan. The pay as you go plan charges a flat rate of 2.4% plus a $0.25 fee for each transaction while the monthly plan has lower rates but includes a monthly fee. Though the QuickBook’s GoPayment charges less than most of the other mobile credit card readers, it does have a PCI-compliance fee that varies depending on the number of transactions you make.

⇒ Get QuickBooks GoPayment

PayAnywhere

This is one of the cheapest options available for mobile credit card processing. PayAnywhere mobile allows you to accept credit cards, MasterCard, Visa, PayPal cards, and Discover all at the same low rate. You get a free credit card reader that lets you transform your Android or Apple smartphone or tablet into a mobile credit card reader. The mobile payment processing app is not only easy to use but robust in every way.

The app is highly customizable, allowing you to add unlimited users to your merchant services and account. Moreover, the detailed in-app and online reporting lets you know what, where, and when your customers are transacting. The processing cost is pegged at 2.69% per swipe and the charge is flat for all cards including American Express. There are no setup, monthly, or hidden fees.

⇒ Get mobile Pay Anywhere

PayPal Here

PayPal Here is the mobile processing arm of PayPal. It makes it possible for you to accept credit card payments on your PayPal business account. PayPal Here accepts all types of credit and debit cards while allowing you to send invoices for later payments. It offers two types of readers; the mobile card reader and the chip card reader. The mobile card reader accepts both debit and credit magnetic stripe cards and is available on Android, iOS, and Windows devices.

Both readers are powered by the PayPal Here app.  This processor is easy to use and it plugs into your tablet or smartphone’s audio jack. When you open an account with PayPal Here, you get a free swiper. PayPal Here charges a flat fee of 2.7% on all transactions regardless of the card used. This is a good option for small businesses since it doesn’t have monthly fees or monthly minimum set by the service provider. However, PayPal here takes longer to receive your funds than other mobile credit card processors. It might also take up to 3 days for PayPal to approve your account once setup is complete.

⇒ Get PayPal Here

  • READ ALSO: PayPal issues critical patch to prevent hackers from stealing OAuth tokens

EMS+

EMS+ is the mobile processing arm of Electronic Merchant Systems, a global leader in merchants processing and transactions services for over 25 years. The company offers simple, secure, and cost-effective credit card processing services. When you sign up, you get a free mobile magstripe swiper, but you have to purchase any additional swiper for $10. At a flat swipe rate of $2.25 per transactions with no monthly or hidden fees, the EMS+ rates are among the lowest in the market. This rate applies to all card types, whether they are debit or credit cards, basic or rewards credit cards.

Setup up is easy and straightforward. All you have to do is download the free EMS+ app, plug the credit card reader into the headphones jack of your smartphone or tablet and begin accepting credit cards immediately. EMS+ provides real-time processing from anywhere. Once the customer acknowledges an automated receipt, money is automatically deposited into your checking account.

⇒ Get EMS+

Conclusion

If you run a small business, you don’t have to rely on the clunky old cash registers anymore to get money from customers. You can use any of these mobile credit card readers to get money from your customers instantly and at the comfort of your office seat. Most of these mobile credit card readers have to be plugged into the audio jack of your tablet or smartphone. However, advancement in mobile technology has left no leaf unturned and we now have advanced mobile processing apps like Cartwheel Register that don’t require the use of a card reader.

Instead, the Cartwheel Register and the rest of its kind uses your smartphone’s camera to capture data. Since these transactions are treated as online transactions rather than card-present transactions, you don’t have to worry about complying with the EMV regulations and so on. All in all, use of credit card readers is an efficient way to collect payments and increase your business productivity.

Windows Defender blocks all threats in real-world AV-Comparatives tests

Many Windows 10 users choose to rely on Windows Defender for malware and virus protection. According to the latest real-world AV-Comparatives tests, they actually made a good choice.

AV-Comparatives recently published their February 2018 Real-World Protection Test results revealing that Windows Defender blocked absolutely all the threats used in the tests.

Windows Defender did great at URL malware detection

The tests evaluated the behavior of 18 antivirus software when accessing thousands of malicious URLs, malware hosted on servers and IP addresses, and more.

Interestingly enough, Windows Defender was able to block every single threat that researchers threw at it. Indeed, Microsoft’s cloud-based protection feature is an insanely amazing feature.

However, as AV-Comparatives explains, keep in mind that while Windows 10’s built-in antivirus managed to block all the cyber threats encountered during tests, this doesn’t mean that it will necessarily have the same success rate on the web.

The results simply confirmed that Windows Defender successfully blocked all the malware samples used in the tests, not all the threats lurking on the Internet.

Apart from Windows Defender, three other antivirus software solutions managed to get a clean score:

Keep your antivirus up-to-date

windows defender blocks all malware

Irrespective of the antivirus tool that you choose to use, keep in mind that it’s essential to install the latest definition updates as soon as they’re available.

Deferring security updates means exposing your machine to threats, and there are plenty of malicious codes our there waiting to infect your computer.

Saints Row The Third Remastered video game to get free Xbox Series X upgrade next week

Saints Row: The Third Remastered will be getting a free current-gen upgrade for Microsoft’s Xbox Series S and Xbox Series X consoles next week on May 25th. This means that all current and future owners of the Xbox One version of Saints Row: The Third Remastered will get this update for free without the need to buy any kind of upgrade DLC or a separate version.

This update will add 60 FPS and dynamic 4K resolution for those playing on an Xbox Series X console while Xbox Series S players will be able to select from the new Performance (60 FPS, lower visuals) and beauty (30 FPS, higher quality graphics) modes.

Both consoles will benefit from faster loading times when compared to playing on an Xbox One with this new version of Saints Row: The Third Remastered being officially described as like playing the PC edition with High settings turned on.

Saints Row: The Third Remastered launched on Xbox One almost exactly a year ago on May 20th 2020, itself a remaster of the original Saints Row: The Third which came out on Xbox 360 in 2011.

Are you excited to play Saints Row: The Third Remastered with these enhancements on your Xbox Series S or X console? Let us know in the comments below and then follow us on Pinterest and Twitter for more Xbox gaming news.

Saints Row The Third Remastered
Developer:
Deep Silver
Price:
$39.99

How to Fix ArcheAge Issues on Windows 10/11

ArcheAge is a popular Korean MMORPG with millions of players around the world. It receives frequent updates and new content every year.

Despite the popularity of this game, Windows 10 users have reported certain issues, such as low performance and graphical glitches or the Archeage Unchained error 1020.

In this article, we’re going to address these issues and provide thorough solutions to fix them and continue your experience in this awesome MMO.

How do I fix Common ArcheAge Issues On Windows 10?

1. Make sure that your computer meets the hardware requirements / lower your graphic settings

  1. While playing ArcheAge, press Esc.
  2. Go to Options, then Screen Settings, and Quality.
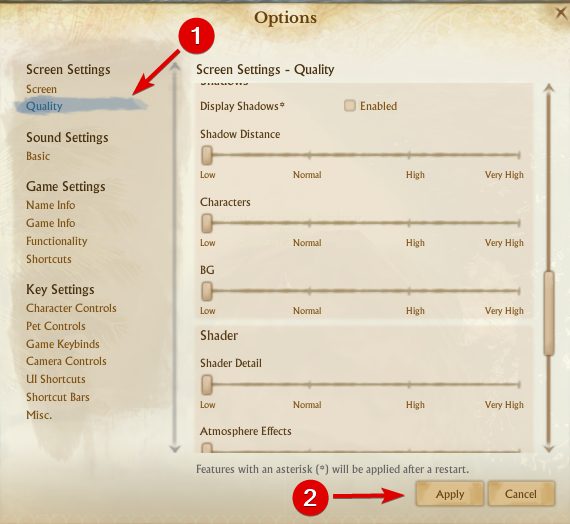
  3. Move the Graphics Quality Settings slider all the way to the left to set your graphic settings to Low.
  4. Click Apply to save the changes.

If you’re having graphic issues with ArcheAge, make sure that your computer meets the minimum hardware requirements.

Note icon NOTE
ArcheAge’s minimum system requirements are:
Processor: Intel Core2 Duo or higher.
Hard Disk: 30 GB (NTFS-formatted disk)
Memory: 2 GB RAM.
Graphics card: Must have at least 1024MB video memory.
Operatingu00a0system: Windows Vista SP1, Win7 SP1, 8, 10.
High-speed internet connection.

If your computer meets the hardware requirements for ArcheAge on windows 10, maybe your graphical settings need to be lowered. If graphic issues are resolved, try increasing the graphic quality.

2. Switch from DirectX 11 to DirectX 9 mode

  1. While playing ArcheAge, press Esc to open the menu.
  2. Go to Options, then Screen Settings, and Screen.
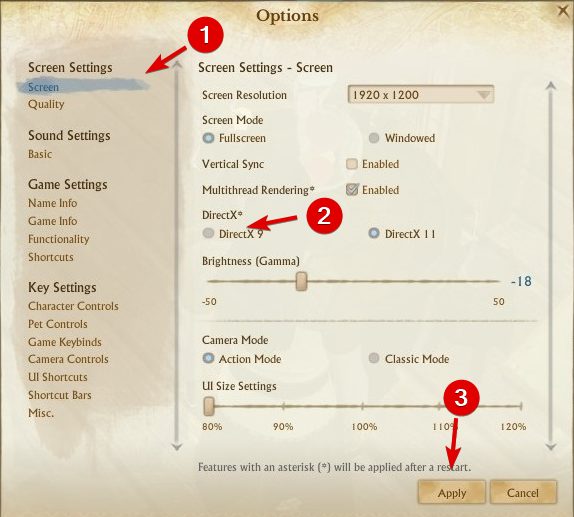
  3. Click DirectX 9 and click Apply.

In certain situations, DirectX can cause graphical issues with ArcheAge, so it’s advised to switch back to DirectX 9. To do that, follow these steps:

If you wish, you can always switch back to DirectX 11 by performing the same steps.

3. Delete shaders cache

  1. Go to the following path: DocumentsArcheAgeUSERshaders
  2. You should see cache folder. Delete it.
  3. Start the game again.

It has been reported that ArcheAge has some graphical glitches such as showing parts of characters completely black without textures. In order to fix this graphical issue, you need to delete the shader cache folder.

4. Update your video drivers

Graphical issues are often caused by video drivers, and if you’re having graphics issues, make sure that you download and install the latest drivers for your graphic card.

All your drivers need to be updated, but doing it manually is very annoying, so we recommend you to do it automatically with the help of a professional driver updater tool.

Updating drivers automatically you avoid the risk of serious malfunctions and save time.

⇒ Get Outbyte Driver Updater

5. Run game client as administrator

  1. Go to the Glyph folder. By default, it should be under the following path: C:Program Files (x86)Glyph
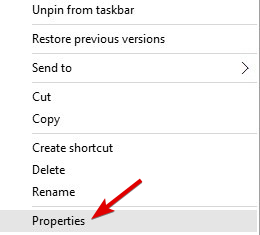
  2. Right-click GlyphClient and choose Properties.
  3. Go to the Compatibility tab and make sure to check Run this program as an administrator.
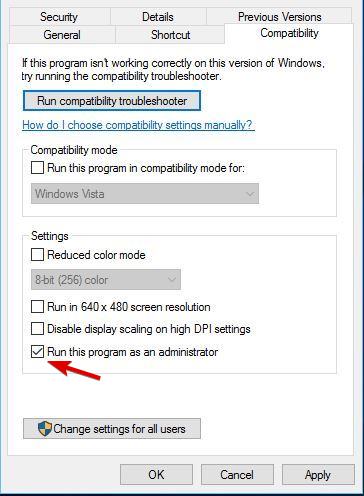
  4. Click Apply and OK and try patching the game again.

Users have reported issues with patches, and according to users, they are unable to install ArcheAge patches. To fix this issue it’s advised to run Glyph as administrator. To do that, follow these steps:

In addition, it’s advised to run GlyphDownloader.exe from Glyph directory in order to check if patcher is up to date.

6. Check your firewall / antivirus

Sometimes your Windows Firewall or antivirus can interfere with the game’s patching system, so it’s advised to add the ArcheAge folder to the exclusion list in your firewall/antivirus.

If that doesn’t work, you might have to disable your antivirus / firewall before launching ArcheAge.

7. Close other applications before starting ArcheAge

Other installed applications can sometimes cause issues with ArcheAge, so it’s advised that you close them before you start ArcheAge.

In addition, you might have to disable some applications from Startup in order to be sure that they aren’t interfering with ArcheAge.

8. Use default administrator account to run the game

  1. Open Command Prompt as administrator.
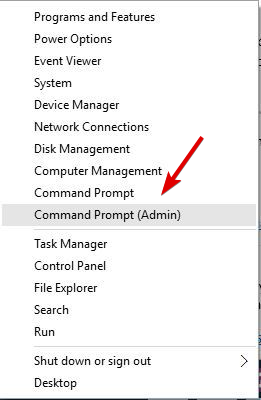
  2. You can do that by pressing the Windows Key + X and choosing Command Prompt (Admin) from the list.
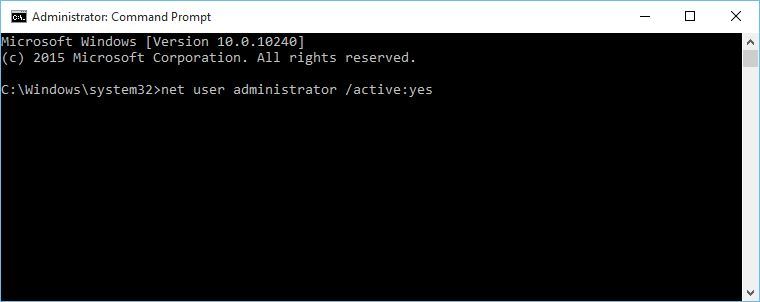
  3. When Command Prompt starts, enter the following line and press Enter to run it: net user administrator /active:yes
    administrator-account-cmd
  4. Log out of your account and switch to the Administrator account.
  5. When you switch to the Administrator account, try patching the game again.
    1. After you’re done, you can switch back to your original account and disable the administrator account by starting Command Prompt as administrator and typing net user administrator /active:no

If you have issues with patching the game, you might want to run patching software from a default administrator account. To enable the default administrator account, follow the steps above.

9. Delete the ArcheAge folder from Documents

  1. While in-game, change a certain setting.
  2. Exit to the character select screen.
  3. Exit the game.
  4. Start the game again. If your settings haven’t been saved, proceed to the next step.
  5. Close the game and go to the path: C:UsersUSERNAMEDocuments
    • We have to point out that the location of this folder might be slightly different on your computer.
  6. Once you open the Documents folder, you should see ArcheAge folder. Delete it.
  7. After you’ve deleted this folder, your settings should be saved.

Some users have reported that their settings aren’t saved after logging out, and that settings revert to default values as soon as the player logs out of ArcheAge. To fix this issue, do the following:

10. Select your region

  1. Run the game.
  2. In the top right corner, select your desired region.

Some users have reported Error 1035 while trying to play ArcheAge. This error appears if you don’t select your region, and in order to fix it, follow these steps:

11. Update DirectX

Users have reported D3dx9_42.Dll Is Missing From Your Computer error while trying to start ArcheAge. If you are getting this error message, it means that you are using an unsupported version of DirectX.

So you’ll need to update it by going to the official website and downloading the latest available versions. After you’ve updated DirectX, restart your computer and try running ArcheAge again.

12. Delete Hackshield files

  1. Close ArcheAge and Glyph completely.
  2. Go to the ArcheAge installation directory.
    • By default, it should be here: C:Program Files (x86)GlyphGamesArcheAgeLive
  3. Open bin32 folder. Next, go to hshield folder.
  4. Find asc and Update folders and delete them both.
  5. Try to launch ArcheAge again.

Some users report that they are getting “Gods Have Disconnected You” message, and in order to fix it, it’s advised to check your antivirus software.

To make sure that other software isn’t interfering with ArcheAge. In addition, it’s also recommended that you delete your Hackshield files by following these steps:

If the issue persists, you might have to reinstall ArcheAge on your computer.

13. Edit system.cfg file

  1. Go to the Documents folder and find ArcheAge folder.
  2. In ArcheAge folder you should see system.cfg file. Open that file with Notepad.
  3. When system.cfg file opens, find the following line: login_first_movie =
  4. Change it to: login_first_movie =1
  5. Save the changes and try running the game again.

Users have reported that Archeage crashes before the intro movie, and if this happens to you, you might need to change ArcheAge system.cfg file. To do that, follow these steps:

If you don’t have system.cfg in ArcheAge folder, you can also skip the intro video by pressing Esc key on your keyboard while the game loads.

14. Disable your antivirus and reinstall ArcheAge

  1. Disable your antivirus.
  2. Open Glyph.
  3. Right-click ArcheAge and select Uninstall. If you get asked to confirm, click Yes.
  4. Press Windows Key + R and in Run window enter %localappdata%. Click OK or press Enter.
  5. Go to Glyph, then Games folder.
  6. Find ArcheAge folder and delete it.
  7. Switch back to Glyph, find ArcheAge, and click Install button to download it again.

If you’re getting error message saying that certain .dll files are missing, you might want to disable your antivirus software and reinstall ArcheAge.

15. Restart the game

Users have reported that they are experiencing screen flickering in ArcheAge when they switch from Windowed to Fullscreen mode.

If this happens to you, you just need to restart the game, and flickering issues will disappear entirely.

16. Check the sound settings

  1. Open Documents, then ArcheAge.
  2. Locate system.cfg and delete it.

Users have reported that they aren’t getting any sound while playing ArcheAge. If you have some sound problems, make sure that you have the latest audio drivers installed.

In addition, make sure that your speakers are working properly and that the volume in-game isn’t lowered. If everything is in order, you might want to delete system.cfg file.

17. Move cryphysics.dll to the game directory

  1. Download this file.
  2. Extract the file to the following path: C:Program Files (x86)GlyphGamesArcheAgeLivebin32
  3. Try running the game again.

Sometimes cryphysics.dll might get deleted by your antivirus software, and if this happens you need to do the following:

To avoid this problem in the future, you might want to disable your antivirus or reinstall ArcheAge with your antivirus software disabled.

18. Flush your DNS cache

  1. Open Command Prompt.
  2. When Command Prompt opens, enter the following and press Enter to run it: ipconfig /flushdns
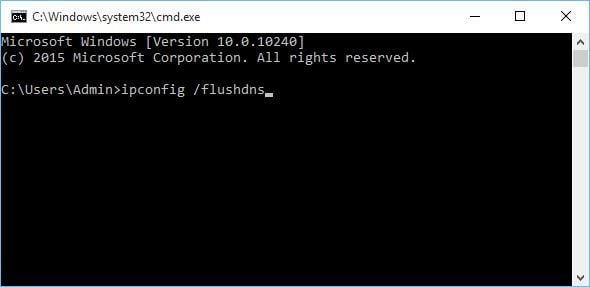
    flush-dns-cmd

Users have reported Error 1035 while starting ArcheAge, and if you’re having this error, you need to check your firewall settings. In addition, it wouldn’t be a bad idea to flush your DNS cache.

19. Turn off anti-aliasing

  1. Open the Nvidia Control Panel.
  2. Click Manage 3D Settings.
  3. Find Antialiasing – Mode and set it to Off.
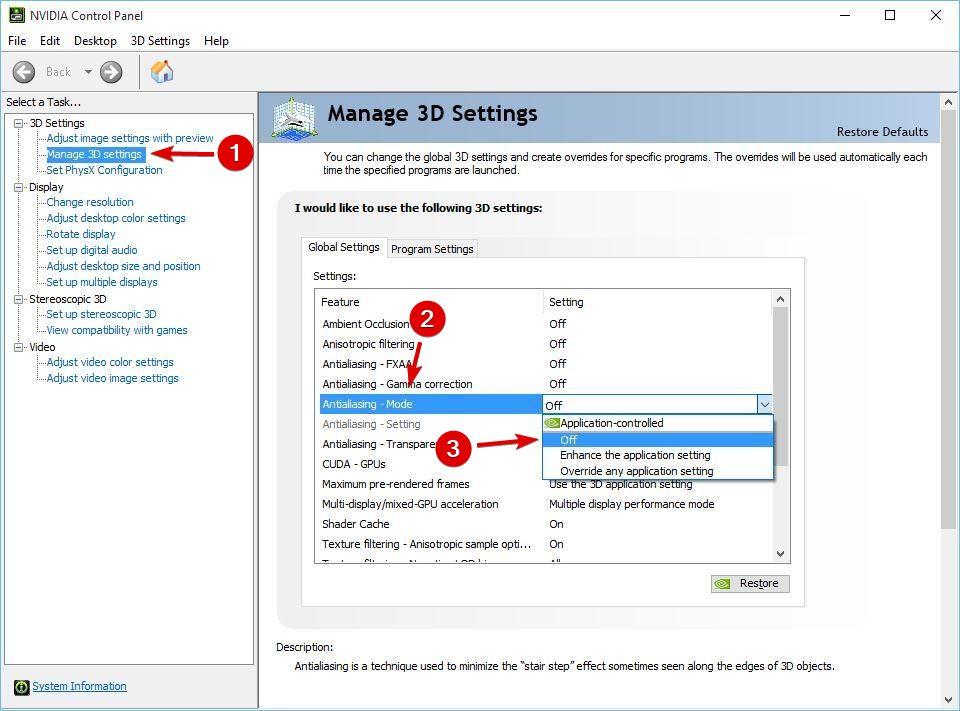
If you have problems with game performance, it’s advised that you turn off anti-aliasing in Nvidia Control Panel and Catalyst Control Center.

In order to turn off anti-aliasing for AMD cards, follow these steps:

  1. Open Catalyst Control Center.
  2. Go to Gaming, then 3D application settings.
  3. Lower your anti-aliasing settings.

After you’ve turned off anti-aliasing in the Catalyst Control Center or Nvidia Control Panel, start the game.

  1. When the game starts, go to the Game setting.
  2. Then, go to Display settings, select DirectX 9, and click Apply.
  3. Restart the game, and everything should be working without problems.

When the game starts, go to Game setting Display settings -> DirectX 9 and click Apply. Restart the game, and everything should be working without problems.

20. Make sure that Glyph isn’t running in background

  1. Open Task Manager.
  2. If Glyph is running, right-click and choose End Task.
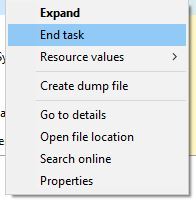
    end-task
  3. Close Task Manager and try to start the game again.

Users have reported Can’t enter Glyph platform error, and in order to fix it, you need to make sure that Glyph isn’t running in the background.

Although ArcheAge has some issues on Windows 10, most of them can be easily solved, and we hope that our solutions have helped you solve these issues.

FIX: EntryProtect has blocked this screen capture error

EntryProtect is third-party security software, however, many users reported EntryProtect has blocked this screen capture error while using it.

Although this is a great tool, it can create conflict with legitimate screen capture and screen sharing programs as well.

Since errors with EntryProtect are somewhat common, in this article we’ll show you how to fix them.

How to fix EntryProtect has blocked this screen capture error?

  1. Change AOL Desktop Gold settings
  2. Install a less restrictive version of SafeNet Authentication Client
  3. For Sophos User
  4. Whitelist / Allow the app through firewall
  5. Check your antivirus and firewall

1. Change AOL Desktop Gold settings

  1. Launch AOL Desktop Gold and click on Edit (top-left).
  2. Select General Settings.
  3. From the Premium Security tab, uncheck Enable Screen Capture Protection option.
  4. Restart your PC and check for any improvements.

AOL Desktop Gold by default enables the EntryProtect feature for the users in order to prevent information leaks. But you can use disable the feature manually.

If you are not the system administrator, you probably won’t be able to add a screen capture tool to the whitelist.

In that case, be sure to contact your administrator or SafeNet support to allow screen capture in your environment.

2. Install a less restrictive version of the software

  1. First, uninstall the regular version of SafeNet Client.
  2. Insert the disk and check if it contains a less restrictive version of the same tool. Install the software and restart your PC.
  3. Launch the screen share or capture program to see if the issue is resolved.

If you are the system administrator, you can try to install the less restrictive version of this security software in order to fix EntryProtect has blocked this screen capture error.

To install the less restrictive version, you need the original SafeNet Client Authentication software disc. When removing software, it’s important that you remove it completely.

This is relatively hard to do manually, but thanks to the tools such as the recommended tool below, you can easily remove any application along with all of its files with ease.

⇒ Get CClaner

3. For Sophos users

Sophos is another data security third-party software with top-level network protection. If you have it installed on your computer, it may block the screen capture and screen sharing feature as well.

To fix the issue, you may have to whitelist the web traffic by creating a web policy. The process can be a little tedious, but you can check out the step-by-step information on the Sophos official website.

4. Whitelist / Allow the app through firewall

  1. Type firewall in the search bar and select Firewall and Network Protection.
  2. Click on Allow an app through firewall option.
  3. Click on Change Settings button.
  4. Look at all the listed programs under Allowed apps and features.
  5. Find the screen capture program and check both Private and Public boxes to whitelist the program.
  6. Click OK to save the changes.

Start with allowing the program through Firewall. You can easily whitelist any app from your Antivirus program.  You may also need to whitelist programs in Windows Security.

5. Check your Antivirus and Firewall

  1. Type Firewall and open Firewall and Network Protection.
  2. Click on Private Network and turn off Windows Defender Firewall. Do the same with Public Network, if you are connected to one.
  3. Once the Firewall off, launch the screen capture program and check if you can capture the screenshot. If not, disable the antivirus.
  4. You can easily disable antivirus by quitting from the taskbar. Or launch the malware protection program and turn off real-time protection.

If whitelisting the screen capture program in Windows Defender Firewall didn’t work, turn off the Firewall temporarily to check if has any effects.

Note that even your antivirus may come with a Screen Shot Capture protection feature. Antivirus programs such as Kaspersky have this feature built-in.

Check for any such features in the setting before disabling the Antivirus completely. If no such feature is found, proceed with the below steps.

Make sure to re-enable the software once you are finished taking screenshots so that you stay protected.

EntryProtect has blocked this screen capture error mostly occurs if you are using a work PC where the administrators usually block the user from sharing their screen remotely or capturing it locally.

In such a situation, the best approach is to contact the system administrator and ask them to remove the restriction.

However, you can also try to follow the solutions listed in this article to fix the error on your work or personal computer by yourself.

If the screenshot tool is still not working or it’s producing more problems, you can always try one on the best Windows 10 Screen recorder software.

If you have any other suggestions, don’t hesitate to tell us all about them in a comment from the dedicated section below.

Microsoft confirms Windows 10X isn’t coming this year, but its innovations will live on in Windows 10

Microsoft has confirmed today the previous reports suggesting that Windows 10X wasn’t coming this year, if at all. In the blog post announcing the public rollout of Windows 10 version 21H1, John Cable, Vice President, Program Management, Windows Servicing and Delivery, explained that Microsoft has been listening to customer feedback in recent months and realized that it made more sense to integrate Windows 10X features in the regular Windows 10 OS.

“Following a year-long exploration and engaging in conversations with customers, we realized that the technology of Windows 10X could be useful in more ways and serve more customers than we originally imagined. We concluded that the 10X technology shouldn’t just be confined to a subset of customers,” Cable explained.

Windows 10X was originally designed as a new lightweight version of Windows 10 optimized for dual-screen devices like the Surface Neo prototype Microsoft showed in October 2019. Last year, the company announced a shift in strategy with Windows 10X now targeting single-screen devices for the Enterprise and Education markets, but the company has apparently given up on trying to compete with Chromebooks.

The good news is that all the work that Microsoft did on Windows 10X, including the container technology allowing apps to run more securely will live on in the regular Windows 10 OS. Some of the design ideas we’ve seen in Windows 10X will also be applied to Windows 10, and we’ve already seen glimpses of these visual changes in recent Insider builds. Microsoft has yet to officially confirm it, but the 21H2 update coming later this year is expected to introduce a big design update codenamed “Sun Valley.”

Window 10X Sun Valley UI Design

“Instead of bringing a product called Windows 10X to market in 2021 like we originally intended, we are leveraging learnings from our journey thus far and accelerating the integration of key foundational 10X technology into other parts of Windows and products at the company. In fact, some of this is already reflected in the core of Windows in Windows Insider preview builds, for example the new app container technology we’re integrating into products like Microsoft Defender Application Guard, an enhanced Voice Typing experience, and a modernized touch keyboard with optimized key sizing, sounds, colors and animations. Our teams continue to invest in areas where the 10X technology will help meet our customer needs as well as evaluate technology experiences both in software and hardware that will be useful to our customers in the future”, Cable wrote today.

All in all, Microsoft probably made the right call about not shipping Windows 10X on new devices this year. The company failed to get PC manufacturers on board with Windows RT in the past decade, and recent experiments to lock down Windows 10 such as Windows 10 in S Mode didn’t really have great results. As Cable emphasized today, it’s important for Microsoft to focus on what customers want, which is a better Windows 10 OS with useful features and a more coherent design. Windows 10X may have looked like an unnecessary distraction, but it’s nice to know that all the work Microsoft did on the OS won’t go to waste.

How to enable Exploit Protection on Windows Defender

Most people tend to say that we currently enjoy Microsoft’s most secure OS. The latest Windows 10 version features a series of new security features and improvements that close the door to malware attacks.

Windows 10’s main tool in the fight against malware is its built-in antivirus. Microsoft has added a bevy of new security features to Windows Defender, making it more powerful than ever.

Users can configure and the Windows system and app exploit mitigation settings with ease. It’s all done from the Windows Defender Security Center.

How can I enable Windows 10 Exploit Protection?

1. Enable Windows 10 Exploit Protection

  1. Start Windows Security by clicking on the shield from the notification area.
  2. Click on App & browser control.
  3. Scroll to the bottom of the screen to find Exploit Protection and click the Exploit protection settings.
  4. In the new window, customize the System settings and Program settings.
  5. When you’re done, click Apply and OK.

Perform the steps above steps to enable Exploit Protection for the system and installed programs. As you can see, it’s pretty easy to tweak the settings from Windows Security.

2. Additional actions to make sure that your PC is protected

Apart from customizing the Exploit Protection settings, you need to carry out a series of additional actions to make sure that your computer is fully protected against malware:

  • Install the latest Windows updates
  • Upgrade to the latest OS version available
  • Run a full system scan periodically
  • Install additional anti-malware tools compatible with your main antivirus, etc.

3. Try out a different antivirus solution

Even if it’s incredibly intuitive, Windows Defender has serious cybersecurity and online banking safety issues.

In the meantime, the tool recommended below is popular all over the globe for a good reason. Firstly, this antivirus is surprisingly lightweight and has little to no impact on the system.

Moreover, it’s known for its accurate malware blocking and it’s fully compatible even with earlier Windows versions.

Some valuable bonus features include parental control features, a useful vulnerability scanner, and a VPN.

TotalAV

Get to the next level of protection with a trusted, light but strong security tool for your PC.
Check Price Visit Website

We hope that our guide helped you learn how to turn on the Exploit Protection for your system and apps in Windows 10.

The exploit protection is also very useful with Windows 10 gaming so make sure you activate it for your favorite tiles.

However, you should know that the built-in antivirus is not the most secure way of protecting your PC. Check out our best antiviruses with unlimited licenses to get a third-party security tool.

Have you tested out these security features available on Windows 10? Let us know what you are thinking by using the comments area below. Your thoughts may help other users like yourself.

7 Best Yoga Studio Software to Use in 2026

When you run a yoga studio, it can be quite tedious to try and manage the business manually, without technology or software backing you up.

However, when you actually decide that you’ve had enough of using physical paper cards and ledger books or stressing your customers by making them have to book appointments while at the studio, you’re probably hunting for the best yoga software to run your studio professionally and efficiently.

Today’s consumer expects to conduct most, if not all, transactions online, including managing their schedules whether it’s work meetings, fitness appointments, or any other that can (and should ideally) be managed via digital platforms.

Business owners, too, need tools that can help them thrive and reduce overhead costs such as administrative expenses, while saving time and increasing income, attracting new customers, and seeing their performance from an easy and user-friendly dashboard.

With the best yoga software, you can allow your customers to book yoga classes online, and keep them updated and engaged while keeping up with trends and happenings in your own studio.

Before choosing the best yoga software, some of the considerations you need to keep in mind include whether it is online or desktop-installed software.

Plus, if it meets security standards, whether it can run on your devices, the features that meet your yoga studio’s needs, how long the software company has been in existence, and price of course.

Here are our top picks for the best yoga software you can use in 2022.

Best yoga software for 2023

Mindbody – Track attendance and retention levels

best yoga software

This yoga software caters for your daily tasks so you can spend more time with your yogis because balance is key in everything you do.

With MindBody, you get features such as point of sale so you can sell anything quickly including studio memberships, 10-class passes, and other services. The POS is complete across all your devices, and it keeps pace with your busy front desk and beyond.

Other features include automation so you can finish tasks faster from sending client reminders and confirmations to monitoring clients’ account status and calculating sales tax.

Online booking lets your clients view your schedule, book their next class online, and pay even before they arrive.

It also generates reports letting you track sales and revenue, attendance, retention levels, and other tools so you can adjust your business plan.

You can also attract new customers by getting exposure and tracking your results. This best yoga software helps you create a seamless customer experience, and get the most out of it with more products and services.

⇒ Get MindBody

Tula – Handling special events

best yoga software

This is the best yoga software for independent yoga studios, providing a powerful and easy to use tool to help you grow your business.

Some of the advantages Tula offers is accepting payments, managing memberships, sharing your calendar, handling registrations, tracking credits, and recording attendances.

It features a sub, which your instructors can find at the click of a button, easy check-in with a simple search, online payments with a unique payment form, online registrations to sign up students for class right from your own website, electronic waivers to capture electronic signatures and store signed waivers, member management, special events handling, gift certificates, and multiple permission levels for employees to access your data.

For your website, Tula has widgets like calendars and payment forms, that you can add right into your own website. The best part is you don’t need to sign any contract as Tula software is compelling enough on its own so you need not feel locked into it. you can always export your most important studio data.

⇒ Get Tula

Schedulebliss – Powerful website integration

best yoga software

ScheduleBliss is an app that lets your clients make purchases and book appointments, classes, and events with your yoga studio from anywhere and anytime on their devices, especially for growing businesses.

It is simple, fast, and powerful, plus helps streamline your client check-in, as you benefit from its advanced marketing and client retention tools.

Another good thing about this best yoga software is it accepts credit and debit purchases, plus keeps clients engaged through automated emails, online check-in, and waitlisting.

Features include a powerful POS, multiple payment methods, gift cards, promo codes and discounts, client apps for devices, reports and marketing tools, memberships and autopay, powerful widgets, and website integration tools.

Plus, with class/event, and appointment scheduling, you can migrate your data from another business management software vendor easily, and hassle-free.

⇒ Get ScheduleBliss

DaySmart Salon – Access to marketing tools

This all-rounded salon management platform is the right place for anybody that runs their own yoga business and needs reliable support.

The software delivers smart functionalities to help you manage any business efficiently. For example, you have online appointment booking, client and salon management tools, financial reports, and more.

You can thus monitor the salon metrics to always keep track of business performance and what can be improved.

With the client management feature, you have digital records for all your clients and essential data presented by them.

Additionally, there are payment processing tools or payroll meant to improve your HR processes, paying your people in time.

You should also know about marketing tools capable of engaging with your audience, using email marketing campaigns or SMS strategies.

⇒ Get DaySmart Salon

Zenplanner – Option to sell merchendise

best yoga software

This is an advanced, all-in-one fitness business software with an arm for Yoga studio management.

Some of the key benefits include ease of use with its intuitive tools, you can grow your yoga studio business (guaranteed), and saving you time, plus it is a smarter suite to help your yoga business thrive by letting you refocus your attention on your true passion.

ZenPlanner is simple, intuitive, easy to use, and has features that include simplified check-ins from any device, and event management including registration, payment, and communication.

Moreover, you have retail management in case you sell merchandise and simplified billing that is also automated through integrated payment processing partners so you get paid on time monthly.

Plus free onboarding sessions so you can know how best to use this tool based on your studio’s needs.

⇒ Get ZenPlanner

Wellness Living Yoga Studio Software – Can setup online store

wellness living yoga studio software

If you’re looking for yoga software, you might be interested in Wellness Living Yoga Studio Software. This tool allows your customers to easily book classes with just a couple of clicks.

One way to book classes is by WellnessLiving website, but you can also add a booking box to your website or the Facebook page as well. Of course, there’s also dedicated iOS and Android apps that you can use for booking.

This service also supports email and SMS notifications, so your staff and customers will be informed regarding their appointments. The service also has a cloud-based scheduling software that allows you to make scheduled appointments easily on the fly. This system is incredibly simple to use thanks to the built-in wizards.

This service allows you to set up an online store in order to sell your products or services online. It’s worth mentioning that this service supports recurring billing, which is great if you need to manage yearly or monthly subscriptions.

Yoga Studio Software service also supports various marketing campaigns, so you can easily set up mobile or email campaigns.

In addition, this tool also allows you to easily manage your staff and manage their invoices. Lastly, there are detailed reports, so you can easily monitor how your studio is performing.

If you’re looking for powerful yoga software, Wellness Living Yoga Studio will be a perfect choice for you, especially if run your own studio, so be sure to check it out.

Overview:

  • Ability to book classes easily
  • Dedicated iOS and Android app
  • Email and SMS notifications
  • Cloud-based scheduling software
  • Ability to set online store for products and services
  • Ability to set up marketing campaigns

⇒ Get Wellness Living Yoga Studio

PerfectMind – Easy staff administration

best yoga software

This yoga software keeps your studio running in harmony with the intuitive cloud-based platform that manages memberships, marketing, billing and point of sale. You can manage all essentials of your yoga studio while minimizing the workload and overhead costs.

PerfectMind is the best yoga software that lets you create an extraordinary guest and member experience, boost new signup and retention rates, streamline business operations, and increase revenue without being bogged down in technology.

Clients can book and pay for classes and memberships online, and from any device, while you can track and increase client retention, and boost sales with the fast and secure, mobile friendly online store, using the intelligent POS app to sell merchandise, track inventory, and manage purchase and reordering.

Other features include integrated marketing, built-in reporting, easy staff administration of the system, alerts, integrated email, a website builder to customize your site, automated billing and collections, plus multiple location management for all your studio’s branches from a single interface.

⇒ Get PerfectMind

Did your best yoga software make the list? If not, which one are you currently using, or which one of these fits your studio’s needs? Let us know in the comments section below.

Best Statistics Software in 2026 [Out of 15 Tested]

Statistics is an important aspect in the business and academic world making data processing an integral aspect. Nowadays, there are many ways to undertake statistical analysis with numerous software which help to organize, analyze, and interpret data.

Moreover, statistical softwares are able to analyze descriptive statistic; this is the statistics that arranges data from samples and inferential statistics which draws the conclusion from data provided. One major advantage of this software is they provide factual data for your project and business.

This article highlights some of the best statistical software you need for your business or project. Windows Report has compiled the list of the best software for learning and for doing statistics.

Best tools for learning and doing statistics

MaxStat

software for learning and for doing statistics

Ranked as the best software for learning statistics, MaxStat is affordable statistical software with many features, which fit your bill. This software enables users to set up statistical analysis with three simple steps. The software is easy to use and is handy for students and business auditors.

In addition, MaxStat enables you to understand the basics of statistics with various tutorials which explain various key statistical functions. You just have to input your data and set necessary requirements, with the software taking care of business. Another key reason to utilize MaxStat is that the result gotten for each analysis is easy to understand and interpret in scientific terms.

Although, MaxStat has a standard plan with additional costs arising from extra services.

⇒ Get MaxStat

AcaStat

software for learning and for doing statistics

Another best software for learning and for doing statistics, AcaStat is an effective statistics software that is available on Windows and other OS. One unique feature is you can easily format variables such as values, labels and configure controls.

Meanwhile, AcaStat also enables you to import data from your spreadsheet files with its copy and paste tool. The software analyzes data quickly which enables you can design frequency tables, OLS, and logistic details using AcaStat.

However, AcaStat pricing starts from $10 with the price increasing as users incorporate more features.

⇒ Get AcaStat

Statwing

software for learning and for doing statistics

If you are in a rush to run statistical analysis, then Statwing is the best tool available for your instant need. This statistical software runs statistical data analysis faster than the majority of the statistical software available on the market.

In addition, this software has a simple interface with easy directions which makes generating data easier. Statwing enables users to easily choose outlines for analysis which gives a large degree of confidence to statistical results. Moreover, users also have access to basic charting such as bar charts and histograms which can be exported into your spreadsheets.

However, Statwing offers users a free trial albeit limited, and then users are charged based on the features required for their statistical analysis.

⇒ Get Statwing

SPSS

software for learning and for doing statistics

SPSS (developed by IBM) is one of the best software for learning and for doing statistics used by millions worldwide. The analytical software provides users with numerous features and gives an accurate analysis of data.

Users can easily analyze data with the simple interface with all tools properly arranged in the Menu. With an intuitive user interface, you can also use cloud features; this enables SPSS to discover new trends for your data.

In addition, IBM SPSS provides numerous statistical analytics such as text and entity analysis automated modeling, and decision management and development. Also, SPSS helps you to manipulate data analysis with its automated modeling and ensures the accurate result is attained within a short period of time.

Moreover, IBM SPSS is quite affordable as they charge $1 for every analysis performed on the software which is fair for the services being rendered.

⇒ Get IBM SPSS

Minitab

software for learning and for doing statistics

Minitab is a popular software for doing statistics used by thousands of companies and institutions around the world. The software has numerous tools and features tailored to meet various statistical patterns and analyses. With Minitab, you can use mathematical methods such as confidence intervals to check for the median or mean of your data.

In addition, Minitab also has a unique model reduction technique that enables the software to find the best regression equation for your sample data. Statistical results gotten from Minitab are accurate and you can import Excel files into your Minitab software.

Furthermore, Minitab has a free trial with the premium version starting out at $29 for six months after which users pay a fixed fee of $49 per year to use the features.

⇒ Get MiniTab

In conclusion, each of the software listed above has their strengths and weakness; hence, you can opt for any of them to meet your statistics needs. Have you used any software from our list of the best software for learning and for doing statistics? Feel free to share your experience with us by commenting below.

Microsoft Lists will let users share entire lists using links in June

Microsoft Lists is getting a new update that will bring the ability to share an entire list using sharing links with other people. The feature was recently added to the Microsoft 365 roadmap, and it could arrive as soon as June 2021.

Currently, the new Lists app only allows users to share an individual list item with the “Copy link” option, and there is no way to share entire lists. With the release, the app will enable users to “create unique sharing links for lists based on who and how you wish to share them” and forward them to others. The new experience will be similar to the existing functionality available for sharing files and folders, and it would comply with organizational policies and settings.

This feature should help enterprise customers to make collaboration on shared content easier for users. The software gaint noted on the Microsoft 365 Admin center that the new setting is expected to be generally available in late June, though the timeline is always subject to change. In addition to this update, Microsoft Lists is also getting support for disabling commenting on individual list items.

Here are 5 best tools to recover deleted photos from your PC

When it comes to choosing the best photo recovery software for recovering deleted or lost photos from your PC, you should be bound and determined to find out which provider is offering the most features for the best value.

We recommend taking into consideration five essential components when choosing the best photo recovery software for your PC: security, ease of use, quality, compatibility and also technical support.

Security

Security is an essential factor when choosing the best photo recovery software for your PC because it’s critical that the program does not contain malware and instead it provides safe operations to recover your lost files and to avoid damaging your computer.

Quality

Quality is another important thing to consider while picking up the best recovery tool because it is essential that the program supports more file types and storage devices. A good quality tool should also be able to provide less time to complete the scan.

File preview and quality checks are essential for making sure that the pics you plan to bring back are in great shape.

Usability

When evaluating whether a recovery software for lost photos from your PC is worth trying, usability is an essential factor. The more straightforward a software interface is designed, the better you will be able to manage it.

Windows compatibility

This factor reflects whether the tool is kept updated. This is important because an outdated tool will have compatibility issues with the latest Windows OS. It will also feature security concerns as well.

Technical support

Even if backup and recovery might sound easy, they involve processes with lots of advanced computer expertise. If you may have any questions or if you encounter any issues while using a tool for photo recovery, it would definitely be helpful to have developers or providers of that specific product offering their support via live chat, phone or e-mail.

That’s why it’s important that the recovery software also provides tech support and/or troubleshooting tips on their official websites.

You don’t have to worry because the roundup of photo recovery software that we are presenting below has all these essential factors taken into consideration, to provide you the best recovery services.

Recover deleted photos with these tools

1. Stellar Photo Recovery (recommended)

stellar photo recovery

Stellar Photo Recovery tool is a highly reliable software, and it’s one of the most recommended photo recovery programs out there. Check out its most essential features:

  • It can recover all lost and deleted photos along with video files and music from corrupt or formatted hard drives or external storage devices.
  • The utility is easy to use, and it can efficiently recover deleted pictures.
  • It will save recovered photos individually with their original file names.
  • The program scans storage devices with more than 2TB storage capacity.
  • Specific media file formats supported include JPEG, PNG, TIF, TIFF, RAW, MP3, MP4, AVI, WMV, FLV, MOV, WAV.
  • The tool’s improved scanning engine makes sure that your files and folders are found out quickly enabling the photo recovery software to restore all your data accurately.
  • The tool also allows you to scan only a desired region of the hard drive and this feature is useful if you know precisely where a lost photo resided before it was lost or deleted.
  • The software is compatible with all versions of Windows.

–  Download now the free version


2. Easy Digital Photo Recovery (suggested)

Recover deleted photos pc

This is a most recommended image recovery tool that works flawlessly to recover your lost or deleted photos from your system. Keeping a simple interface makes it user-friendly and speeds up the process. Take a look at the software’s most impressive features below:

  • It can recover many types of graphic images (JPEG, TIFF and many RAW formats).
  • It scans all your system quickly.
  • The tool allows you to preview all found images and this way you will locate the lost items much faster and with less panic.
  • The tool includes multiple languages on the Interface such as English, French, German, Spanish and more.
  • The software works perfectly on Microsoft Windows 10, XP, Vista, 7 and 8.

–  Buy now Easy Digital Photo Recovery


2. OdBoso PhotoRetrieval (suggested)

Recover deleted photos pc

This is another excellent photo recovery software that will come in handy in case you need to retrieve your lost/deleted pictures from your PC. Take a look at its most important features:

  • It is developed to perfectly recover deleted or lost photos, videos, and audio from both computers hard drives and portable devices.
  • The program has no problem in handling the situation no matter how you lost your photos.
  • The file formats supported by this retrieval program range from photo formats including JPEG, PNG, TIF, TIFF and camera RAW photos, etc., to video and audio formats such as MP3, MP4, AVI, WMV, FLV, MOV, WAV and more.
  • The software comes with robust photo retrieval capabilities, and it can also retrieve RAW photo files.
  • With the help of advanced algorithms, the tool is fast so you won’t have to lose time scanning for photos.
  • Even the trial version of the app allows you to preview the found photos to see whether they are exactly what you need to recover.
  • The tool also evaluates the retrieval quality in advance.
  • It is compatible with all Windows versions starting with Windows 2000.

–  Buy now Odboso PhotoRetrieval


4. PhotoRec

Recover deleted photos pc

PhotoRec is a free photo recovery utility. The tool comes available in two versions. One of them runs in the command prompt, and the other version only runs on 64-bit Windows. Check out its most impressive features:

  • PhotoRec is a recovery utility that supports more than 440 file formats.
  • Users widely prefer the tool due to its secure recovery techniques.
  • It checks your complete partitions in a safe mode without affecting file systems and partitions while searching missing pictures.
  • It is not specific to just recovering photos, and it focuses on all the file formats while it’s searching.
  • The tool is compatible with Windows 10, 8, 8.1, 7, Vista, XP, and older versions of the operating system.

5. Disk Doctors Photo Recovery

Recover deleted photos pc

This is one of the best photo recovery tools because it balances the ease of use with fast scans and strong performance. Check out its essential features that make it a high-quality software for recovering lost photos from your PC:

  • It provides excellent recovery rates, and this gives you the best chance to get back your lost or deleted pictures.
  • It can recover JPGs flawlessly with a 100% success rate and the GIFs TIGs, PNGs and BMPs with a 99% success rate.
  • The software is straightforward to use, and it features only a few steps to the process of picking a drive and initiating a scan.
  • The average scan speed is around 88GB per hour.
  • The Disk Doctors tool also provides exceptional support for the photo recovery software.
  • It is compatible with all Windows versions.

Tips to recover your deleted photos from the PC

Here are more ways to recover your deleted pictures:

  1. Use the Recycle Bin

This is the most obvious advice. Open the Recycle Bin and check for your lost photos there. Select the files or folders that you want to recover. Right-click on them and choose Restore from the menu that appears. This action will result in restoring your files to their original location before the deletion.

  1. Restore previous versions of deleted photos on Your Computer

Pull up the Start Menu and select Computer to locate the folder that used to contain the images that you want to recover. Make sure that it will be the folder where the files were saved and not a library. Right-click on the designated folder. Select Restore previous versions from the pop-up menu. Review the list of previous versions of the files or folder within this drive or folder. Determine the most recent version of the photos and double-click on the folder that includes them.

Finally, move the deleted pics/folder to a new location of your PC by clicking on them and dragging them to that specific location in the access menu located on the left side of the window with the Computer.

  1. Retrieve deleted photos from Backup Files

More cautious users always back up their essential data. Once the data is lost, you will be able to restore anything from the backup files quickly. Recovering lost files from backup is a very efficient and quick way to save your data with less trouble.

  1. Retrieve deleted pictures via Data Recovery Companies

If nothing else works, you also have the opportunity to turn to data recovery companies to get your lost pictures back, this will turn out to be an effective solution, but besides high recovery fees, you will also have to bear the risk of privacy leaks in the whole process of photos recovery.

  1. Recovery Windows deleted pics via third-party software

With the rapid development of software technology there are lots of data recovery tools on the market, and probably these will turn out to be the best solutions in case you need to recover lost photos without leaking your privacy. The five solutions that we detailed above along with their essential features are the best ones on the market. No matter which one you prefer, it will flawlessly recover your lost photos. Good luck!

GTA V remaster to be released on November 11 on Xbox Series X|S and PlayStation 5

The much-anticipated GTA V remaster will be re-released on Xbox Series X|S and PlayStation 5 consoles on November 11, Rockstar Games announced today. The open-world action-adventure game remains incredibly popular to this day thanks to the bundled GTA Online mode, and this new remaster is guaranteed to breathe new life into the franchise until Rockstar Games is ready to share some details about GTA VI.

“The expanded and enhanced versions of Grand Theft Auto V and Grand Theft Auto Online are arriving on PlayStation 5 and Xbox Series X|S with new features and more, on November 11th, 2021. As an added bonus — this summer’s updates to GTA Online will include special benefits for players to take advantage of in these expanded and enhanced versions when they drop,” Rockstar Games said today.

GTA Online fans can also expect “even more fun surprises” in the coming months as Rockstar Games is planning some special celebrations for the 20th anniversary of GTA III. The upcoming standalone version of GTA Online coming to Xbox and PlayStation consoles later this year will also be free to grab for PlayStation 5 players during the first three months, Rockstar announced today.

The GTA V Remaster launching in November is probably getting other game developers nervous. Halo Infinite, Battlefield VI, and a new Call of Duty game are all expected to be released this fall, and they’ll be competing with a remastered version of one of the most popular games of all time. In February, GTA V had sold an impressive 140M copies since its launch in 2013, but Minecraft remains far ahead with 200M copies sold as of May 2020.

If you have yet to play it, GTA V is currently available on Xbox Game Pass for Console and Xbox Cloud Gaming. Unlike Red Dead Redemption 2, GTA V was never optimized for the Xbox One X and Sony’s PlayStation 4 Pro and we can’t wait to learn more details about all the visual upgrades Rockstar Games has been working on for this remaster.

Grand Theft Auto V (Xbox One)

5 best tools to convert DVDs to MP4 files

In the past, if you wanted to watch a movie at home, you had to use a clunky DVD player and the TV you had at home. Those days are long gone, now everybody owns either a PC , tablet, smartphone and laptop, or all of the above.

Playing DVDs on your PC or laptop is easy if you have a physical DVD player incorporated, or a virtual image of the DVD and the appropriate software to mount the image.

If you want to watch DVDs on your favorite mobile device, you won’t be able to play the DVD files. In this case, you need a software that allows you to easily transform any DVD file into MP4 files.

5 tools to transform DVDs into MP4 files

Movavi Video Converter

Movavi Video Converter - DVD to MP4

Movavi Video Converter is a powerful tool that offers a great range of options for converting any DVD to an MP4 file. This software works fast and has batch processing options that come in very handy when you have to process a large number of videos.

This software contains a large number of video resolution templates that allows you to easily choose the one that is perfectly compatible with your mobile device’s screen size. You can choose to export your files to a mobile device directly from this software, as soon as the conversion process is complete.

With this software you can edit, trim, merge, modify the audio settings, and also cut your DVD files in order to create stunning videos that you can proudly present to your family and friends.

⇒ Get Movavi Video Converter

AnyVideo Coverter

AnyVideo Converter - DVD to mp4

AnyVideo Converter is another great software option that gives you the power to change the format of your DVD files into MP4 files, for easy watching on mobile devices or saving space on your hard-drive.

This tool manages to convert the DVD files to MP4 without losing much of the quality, even though the size of the files will be altered.

This software supports may other video inputs – MPEG, VOB, WMV, 3GP, 3G2, MKV, MOD, M2TS, etc. and can also export files to WMV, MPG, AVI, ASF, M2TS, 3GP, 3G2, FLV, etc.

AnyVideo Converter comes in both free and paid versions. Even though the paid version has some additional features, the free version is a very useful and complete tool.

⇒ Get AnyVideo Converter Pro

Even if AnyVideo Converter comes in both a free and paid version, the paid one doesn’t offer many extra features, but it is suitable for businesses.

Key features include:

  • HEVC/H.265 Video Coding
  • Fast conversion speeds with high quality results
  • HEVC –  compressed videos to half the size of source file, without loss of quality
  • Can rip and extract audio from CDs and DVDs
  • Burn video to DVD or AVCHD DVD
  • Editable video codecs, dimension, bitrate, frame rate, sample rate, channel, video/audio quality, etc.

⇒ Get  AnyVideo Converter 

UniConverter by Wondershare

UniConverter is an incredibly powerful tool that allows you to simply transform DVD files into Mp4 format files. This allows you to save space on your hard drive or portable device, and this way you can watch your favorite videos anywhere.

This software can also convert MP4, MKV, WMV, MP3, etc., and can also convert 4K/HD video in 1080p and 720p HD format, without losing any quality.

With UniConverter you can also use the built-in video editor to adjust any parts of the video you want, and also crop, trim and rotate. You can also add watermarks, subtitles, and metadata information with ease.

You can customize your DVD videos with built-in templates with different themes, like – romantic, holiday, ocean, etc. You can burn multiple DVDs at the same time, and convert the DVD into any file format, including Mp4.

This software also allows you to back up your projects, giving you peace of mind regarding losing any important video, and in case of an accidental erase or damage to the hard-drive, the files can be easily retrieved.

⇒ Get Uniconverter

AimerSoft DVD Ripper

AimerSoft DVD Ripper - DVD to MP4

AimerSoft DVD Ripper is another great software option that gives you the power to transform DVD to a large range of formats, with great speed and quality results.

You can use this software to convert your DVD movies to both SD and HD video formats, including – AVI, MP4, WMV, MOV, FLV, MKV, 3GP, MPEG, 3D movies, etc.

One of the best features found in AimerSoft DVD Ripper is the great range of built-in presets for different devices. This option simplifies the process of choosing which format output you want to obtain. This comes in even more handy for people who are not used to dealing with different file formats.

This software brings a very useful built-in video editor that allows you to customize your DVD movies to your desires. You can rotate the videos, trim, crop, add subtitles, watermarks,  and also merge multiple files into one video. The merge option allows you to play your movies seamlessly.

⇒ Get AimerSoft DVD Ripper

Apowersoft Free Online Video Converter

Apowersoft Video Converter - DVD to MP4

This is a great free online video conversion option that allows you to easily transform your DVD files into MP4s. Apart from this, you can also transform your DVD files into all popular formats – MOV, AVI, WMV, MKV, SWF, ASF, FLV, VOB, RM, 3GP, and can also convert all popular formats to DVD.

Even though this is an online conversion tool, in order to use it, you will need to install the launcher.

This software also has a good range of video editing tools that allow you to obtain professional-looking results. You can merge videos, apply effects and watermarks, trim, resize and preview all the changes before applying them.

You can also download the desktop version for Apowersoft Video Converter Personal or Commercial version.

⇒ Get Apowersoft Video Converter

Conclusion

With the knowledge you obtained by reading this guide, you can now convert your DVDs to MP4s and watch your favorite TV shows, movies, and music videoclips on the go.

Transforming your files into MP4s allows you to save space on your hard-drive, which can be very useful if you’re using a PC with a small storage space.

The features found in the software presented in this article cover other tasks as well, like video editing, merge options, export to mobile devices directly, etc.

We would love to know what software option you chose to convert your DVD files into MP4s. Let us know in the comment section below.

Microsoft Teams will support custom-made Together Mode scenes for more fun meetings

Last year, Microsoft announced a new Together Mode for its Teams collaboration platform. While the feature is great for virtual meetings, it doesn’t allow users to upload custom backgrounds, and they can only choose the pre-set background options available in the Teams library.

In a recent update to the Microsoft 365 roadmap, the software giant indicated that it’s planning to add support for custom Together Mode scenes in June 2021. This update will allow developers to create their own “immersive” scenes for meetings. “Build your own scenes that elevate your meeting experience. We believe that by making Together Mode extensible, creators can create immersive scenes and users can go beyond simple video conferencing. Started building your scenes by going to the Developer Portal for Microsoft Teams,” the company explained on the Microsoft 365 roadmap.

The Together Mode feature aims to make meetings more engaging by allowing people to connect and collaborate in the same virtual meeting space, such as a coffee shop or a meeting room. The firm says that the addition of custom Together Mode scenes for meetings will further improve the user experience by making it more fun and interactive for Teams users. In case you missed it, the app is also adding support for apps in external meetings and chats next month.

Top Windows 10 keyboard shortcuts for Teams meetings and how to use them

If you’ve ever found yourself in a Microsoft Teams meeting, then you know how busy things can get. Well, one way to stay efficient during meetings is to try to use keyboard shortcuts. These keyboard shortcuts can help you work a lot faster, saving you a few clicks and a drag of your mouse. We’ve collected some of our favorite Windows 10 Microsoft Teams shortcuts for you below.

Getting around Teams

Yammer In Microsoft Teams App

We’ll start first with some of the most common shortcuts for navigation. These shortcuts let you get around Teams more easily, without needing to click things like activity, chat, or calendar while you’re in the middle of a call. After all, those are some of the most common areas you might be going to during a meeting, anyway. Have a look below in the table for more.

Task Shortcut on Desktop Shortcut on Web
Open Activity Ctrl+1 Ctrl+Shift+1
Open Chat Ctrl+2 Ctrl+Shift+2
Open Teams Ctrl+3 Ctrl+Shift+3
Open Calendar Ctrl+4 Ctrl+Shift+4
Open Calls Ctrl+5 Ctrl+Shift+5
Open Files Ctrl+6 Ctrl+Shift+6

Keep in mind that these shortcuts only work if you’re using the default configuration in the Teams desktop app. If you’ve changed the order of things, the order will depend on how it sequentially appears.

Navigating meetings and calls

Teams Video Conference Cropped 1

Next up, we’ll move on to some ways you can navigate meetings and calls with your keyboard. These are the most important keyboard shortcuts which we want to mention. With these, you can accept and decline calls, mute calls, toggle video, control your screen share sessions, and more. Again, we’ve collected some of our favorites into the table below. These work across both the desktop app, as well as the web.

Task Shortcut on Desktop Shortcut on Web
Accept video call Ctrl+Shift+A Ctrl+Shift+A
Accept audio call Ctrl+Shift+S Ctrl+Shift+S
Decline call Ctrl+Shift+D

Ctrl+Shift+D
Start audio call Ctrl+Shift+C Ctrl+Shift+C
Start video call Ctrl+Shift+U Ctrl+Shift+U
Toggle mute Ctrl+Shift+M Ctrl+Shift+M
Toggle video Ctrl+Shift+O N/A
Accept screen share Ctrl+Shift+A N/A
Toggle background blur Ctrl+Shift+P N/A
Admit people from lobby notification Ctrl+Shift+Y N/A
Raise or lower your hand Ctrl+Shift+K Ctrl+Shift+K

While we’ve only focused on a few shortcuts, we’d like to remind you that we have a full collection of Microsoft Teams shortcuts right here. Those shortcuts cover messaging, as well as general navigation. Microsoft even has a full list on its own website, along with steps on how you can leverage the shortcuts to your own advantage.

We’ve got you covered!

This is just one of many guides that we’ve written about Microsoft Teams. You can check out our Microsoft Teams news hub for more. We’ve covered lots of other topics, ranging from scheduling meetings, recording meetings, changing participant settings, and more. As always, we also invite you to use our comment section below if you have your own suggestions and tips and tricks for Teams.

Numerical Analysis Software for Engineering: 3 Best to try

In order to create complex projects that involve large mathematical equations and calculations, it is recommended that you use specialized software to do so. Fortunately for you, there is a wide range of numerical computing software options found on the market, but choosing the best one can be a daunting task.

This type of design, mathematics, rendering and visualization software is also known as CAE (Computer-Aided Engineering).

This software allows you to streamline the entire process of engineering for a specific project, and includes useful tools to help you manage the design process, offers support for the engineering process, performs high-end tests based on the physics and mathematical equations that apply, and also incredibly powerful rendering.

The most commonly used simulation and analysis types that are included in CAE software:

  • Finite Element Analysis
  • Computational Fluid Dynamics
  • Thermal Analysis
  • Multibody Dynamics
  • Optimizations

In this article, we will explore some of the best software options found on the market this year, that can help you streamline the process of engineering, and offer other great features and options. Read on to find out more.

Best numerical computing software for Windows 10 PCs

Fusion 360 by Autodesk

Autodesk Fusion 360 - numerical computing software

Fusion 360 is an incredibly useful software that can be used by product designers, mechanical engineers, and even machinists. This software combines the features that can be found in design, engineering, and manufacturing, into one all-encompassing hub.

This software is a fully featured CAD, CAM, and CAE software that allows you to generate designs, use 2.5 to 5 axis machining, and also offers great processing power when it comes to high quality and real-life renderings.

This program combines the professional capabilities of high-end CAD programs with a user-friendly interface, making it one of the best software options in this domain.

Here are some of the best features found in Fusion 360:

  • CAM – create tool paths to machine your components or create a prototype using the 3D printing workflow
  • Great engineering and simulation features – allows you to test the fit and motion, can create assemblies, and produce extremely good looking rendering and animations
  • Solid modeling – very useful sculpting tools
  • Data translation – transforms mathematical data into visual representations
  • Joints & motion studies – gives you the opportunity to test any renderings in a virtual environment
  • Freeform modeling & sculpting
  • Parametric modeling
  • Mesh modeling

If you are a bit overwhelmed by the large range of features found in Fusion 360, you can find a step by step tutorial on the official Fusion 360 webpage.

Get it now from the official website

Matlab

Matlab - Numerical computing software

Matlab is one of the best numerical computing software option found on the market in this year that can be used for developing algorithms, analysis of data, visualization, and also numerical computations.

This software is incredibly complex, being a CAE (Computer Aided Engineering) system that brings together the desktop environment (with design, iterative, and analysis features), with a programming language that is built specifically to make matrix mathematics understandable and applicable to your project.

Matlab allows you to program, simulate, model different processes for analyzing data, model creation, and algorithm development. The tools included in this software are completely documented.

Because of the fact that this software can be scaled to any sized project, you only need to modify a small part of the code when running it through GPUs, on the cloud, or in clusters.

Here are some of the best features found in Matlab:

  • Great user-friendly debugging tools
  • Wide range of functions found in the built-in library of mathematical and statistical functions
  • A great online community that constantly creates great new tools and resources
  • Comprehensive help tutorials
  • Can design, create, and visualize incredibly complex neural networks
  • Access to the latest deep learning features – VGG-16, VGG-19, GoogleNet, ResNet-50, Inception-v3, and AlexNet
  • Great image processing features

This software can be used in a variety of fields, here are some of the most common ones:

  • Data Analytics
  • Image Processing and Computer Vision
  • Signal Processing and Communications
  • Computational Finance
  • Control Systems
  • Computational Biology

Try MATLAB

GNU Octave

GNU Octave - numerical computing software

GNU Octave is another greatly powerful that uses syntax oriented mathematics to help you in the process of plotting and also visualization. This software is completely free and has a wide range of very useful features.

This software is similar to the Matlab option we explored before, but the main difference between them is the syntax that they use. If the software developer wants to build the project from scratch, then GNU Octave is a lot more useful than Matlab.

In the case that the programming starts at a level that includes pre-built structure, it is recommended that you go with Matlab.

Here are some of the best features found in GNU Octave:

  • A high-level language that was built specifically for numerical computations
  • Can solve both linear and nonlinear problems
  • Incredibly powerful syntax based on mathematics
  • Great built-in plotting and visualization tools
  • Drop-in compatible with Matlab scripts
  • Easily solve linear algebra operations on vectors and matrices
  • Great visualization tools in both 2D and 3D
  • Features can be extended to be used to solve nonlinear equations, integration of ordinary functions, etc.
  • Completely free to redistribute and modify

If you want to know a bit more information about this software, you can visit the official Support page, and if you want to go even in depth, even more, you can visit the official documentation page.

Download GNU Octave

Conclusion

In this article, we explored some of the best software options found on the market in 2019 that allow you to streamline the entire process of engineering.

By using this type of software, you can design, edit, manage, visualize and then transform your projects into real life elements/projects/designs.

Feel free to let us know what your experience was when trying out this software, and also let us know if you have any other software recommendations, by using the comment section below.

19 Amazing Windows 10 Screensavers To Download in 2026

The best screensavers for Windows 10 do more than prevent screen burn-in. They can refresh your desktop, create a calming atmosphere, or add a touch of personality while your PC is idle. Screensavers have evolved into interactive, artistic, and customizable experiences.

From realistic aquariums and retro game loops to stylish clocks and space visuals, the options below work smoothly on Windows 10.

Top Screensavers for Windows 10

1. Dream Aquarium – Stunning virtual fish tank with realistic 3D fish

Dream Aquarium brings an ultra-realistic aquarium to your screen with 100+ lifelike fish from 27 species. Unlike video footage, everything is rendered in real-time 3D. Fish have moving mouths, articulated fins, and even gills. Multi-monitor support and a free trial make it a standout visual experience.
→ Get Dream Aquarium


2. Screensaver Wonder – Create your own screensaver with images, video, and music

Screensaver Wonder allows you to build your own screensavers using multimedia, custom transitions, text, and background music. Whether it’s a personal slideshow or a business product loop, this tool gives you total creative control.
→ Get Screensaver Wonder


3. Stardock DeskScapes – Convert videos and effects into live wallpapers or screensavers

Stardock’s DeskScapes lets you use short video clips and apply stunning effects to create animated screensavers. The result? A fully personalized, animated desktop that feels alive, with transitions and filters layered in.
→ Get Stardock DeskScapes


4. Fliqlo Flip Clock – Minimalist flip clock with classic aesthetic

Fliqlo transforms your screen into a stylish, old-school flip clock. It supports both 12- and 24-hour formats and lets you resize the clock up to 125%. Available for Windows, macOS, and iOS.
→ Get Fliqlo Flip Clock


5. NES Screensaver – Play NES games as your screensaver

This clever screensaver emulates over 150 NES games right on your desktop. You can even resume from checkpoints. It requires a manual install, but once set up, it delivers nostalgic fun straight to your idle screen.
→ Get NES Screensaver


6. 3D Earth Screensaver – Animated Earth view with sun rays and city lights

Render a rotating, real-time view of Earth, complete with sunlight zones, space station flyovers, and city lights at night. Zoom in on geography and learn while enjoying stunning visuals.
→ Get 3D Earth Screensaver


7. Briblo – Interactive Lego-like building blocks screensaver

Briblo is a playful, interactive screensaver where colorful Lego-style bricks drop in 3D. It’s oddly satisfying and fully customizable. Build your own towers or let the pieces fall freely.
→ Get Briblo


8. Screensavers Planet – Largest curated archive of free screensavers

This massive archive offers 1,500+ clean, safe screensavers across every category. All downloads are vetted and come with previews and install instructions. From digital clocks to 3D environments, it’s the most reliable source for free Windows 10 screensavers.
→ Get classic and modern screensavers from Screensavers Planet


9. Windows10Screensavers.net – Windows 10–only screensavers, no junk

Built specifically for Windows 10, this site focuses on 100% compatible screensavers without bloatware. It features abstract visuals, retro styles, nature scenes, and animated clocks with easy, direct downloads.
→ Get curated screensavers built for Windows 10


10. Screensavers.com – Nostalgic designs and classic themes

This long-running site has kept many early 2000s favorites alive. It offers fun, quirky screensavers (sports, animals, seasonal) with a retro vibe. While the site may prompt optional extras, most downloads are safe if you’re careful.
→ Get throwback-style screensavers and old-school favorites


11. ScreenSaverNexus – Minimalist and animated themes in small packages

This compact but well-curated site offers simple and modern animated screensavers. Ideal for low-resource machines or users looking for subtle, stylish motion effects.
→ Get lightweight animated screensavers with clean visuals


12. NewFreeScreensavers – Seasonal and festive screensavers updated regularly

Perfect for holiday moods, this site features hundreds of handmade screensavers themed around Christmas, Halloween, seasons, and minimal clocks. All are freeware, lightweight, and ad-free.
→ Get festive and themed screensavers all year long


13. SaversPlanet – Themed screensavers with relaxing motion effects

Offers traditional and 3D-style screensavers, including galaxies, forests, fantasy scenes, and analog clock animations. Most files are small and install easily.
→ Get relaxing visuals and animated themes for free


14. Electric Sheep – Evolving fractal screensavers driven by community input

This open-source project creates dynamic abstract animations that evolve over time based on user votes. It requires an internet connection and turns your screen into collaborative digital art.
→ Get surreal, evolving fractal visuals in real time


15. Really Slick Screensavers – GPU-powered 3D effects and physics demos

An indie collection of OpenGL-based screensavers featuring vortexes, plasma, and particle systems. These GPU-hungry visuals are perfect for showcasing hardware power even while idle.
→ Get high-performance 3D screensavers with stunning effects


16. 3Planesoft – Beautifully animated 3D screensavers (some free)

While most are paid, a few 3Planesoft screensavers are available for free. These feature stunning 3D renderings like aquariums, lighthouses, and outer space, with high production value.
→ Get cinematic-quality screensavers with smooth 3D animation


17. Webshots – HD photo slideshow screensaver with curated themes

Webshots delivers rotating, high-resolution nature and travel photos as a screensaver. It functions as an app with a free tier and premium upgrade option.
→ Get curated photo slideshows and calm desktop vibes


18. Pixabay – Free video loops perfect for screensaver playback

Use royalty-free HD or 4K video loops as screensavers with tools like VLC or custom wrappers. Nature, abstract visuals, and slow-motion effects are plentiful here.
→ Get video loops and turn them into animated screensavers


19. Pexels – Cinematic HD visuals to turn into screensavers

Another source of free, license-cleared video loops. Download and use them with VLC or Lively Wallpaper to transform your screen into a calm, moving scene.
→ Get cinematic loops and customize your screensaver look

Conclusion

Screensavers are a simple way to personalize your Windows 10 desktop and make it feel more dynamic. Whether you prefer something relaxing, functional, or creative, there are many great options available for free or as premium tools.

Installing a screensaver is quick, and most options require little setup. Once added, they can transform an idle screen into something useful or visually interesting. Explore the options above, pick one that fits your style, and give your desktop a fresh new look.

3D Screensavers for Windows 11 & 10 [2026 List]

Lots of Windows screensavers are flat and two-dimensional. However, there are also plenty of alternative 3D screensavers that can add a visual extravaganza to Windows.

Those screensavers can have fully 3D landscapes, rotating camera angles or include some glossy 3D effects that the 2D alternatives just can’t match. These are ten 3D screensavers that add a little extra sparkle to Windows.

Which are the best 3D screensavers for Windows 10?

Dream Aquarium

You don’t have to be a fish lover to enjoy the most beautiful virtual aquarium and screensaver for PC.

We’re talking about one of the most realistic representation of a fish tank with 100% computer generated fish that move and behave just like their real, natural counterparts.

You will witness all the aspects of their like including eating and chasing each other in the lush vegetation decor that will feast your eyes with colors.

The detail for this video is simply amazing. The fish have articulated fins, moving eyes, gills and mouth so you can be easily tricked that you are watching at the real thing.

The Dream Aquarium features over 100 fish from 27 species and it has a free trial version without any ads so try it out now.

Dream Aquarium

Dream Aquarium

Get the most amazing and realistic aquarium with over 100 colorful naturally moving fish.
Free trialVisit website

Stardock DeskScapes

Rather than being a screensaver itself, DeskScapes is a software tool that gives you access to a multitude of other screensavers by granting you access to a wide library that also includes live wallpapers.

Additionally, you can use DeskScapes to create your own live wallpapers and screensavers from photos and videos that you already own.

These will then be transformed into videos that will run on your desktop continuously on a loop, and you can also add certain special effects to make the end-result all the more appealing.

Turn a family photo or a short video of a lake into a screensaver, and think about the good old times with you own screensavers, all thanks to DeskScapes.

DeskScapes

DeskScapes

Transform your videos into live wallpapers and screensavers and immortalize your special moments with DeskScapes!
Check priceVisit website

Screensaver Wonder

This next tool follows the same principle as the previous ones, allowing you to transform your own home videos and photos into fantastic live wallpapers and screensavers.

Besides, these home-made screensavers and wallpapers can be  made self-extracting so that you can also share them with friends and family.

It boasts 100 transition effects, so screensavers and wallpapers made up of photos won’t just like like a boring PowerPoint presentation, but they will feel as alive as an actual video.

Besides, the screensavers that you create can also be made to have sounds, making it great for the overall atmosphere of the room.

Screensaver Wonder

Screensaver Wonder

Liven your desktop with either a live wallpaper or a screensaver of your own making with Screensaver Wonder!
Check priceVisit website

Earth 3D Live Wallpaper

The Microsoft Store is filled with screensavers and live wallpapers that you can buy, and a lot of them are 3D as well, one great example being Earth 3D Live Wallpaper.

This amazing wallpaper/screensaver will give you a fantastic 3D representation of our planet as it rotates into space.

The model of the globe is very detailed, and you can even use your mouse to zoom in and out of it as well so that you can see things in even greater detail.

All in all, if you’re into geography or stargazing, this is definitely a screensaver that you should try.

⇒ Get Earth 3D Live Wallpaper


Ocean 3D Live Wallpaper

Those of you that are fans of the ocean and sea life will love the Ocean 3D Live Wallpaper, as it will make you feel as if you’re on a yacht traveling the high seas.

Enjoy incredibly realistic water effects as your sail endlessly through your desktop, and the great part is that you can use it both as a live wallpaper and as a screensaver.

The camera angle changes so you can enjoy different views of the water, and the clear blue sky will make you definitely miss the beach.

⇒ Get Ocean 3D Live Wallpaper


Mars 3D Live Wallpaper

If you’re not the kind of person that is down to Earth, and you like the idea of space exploration, then Mars 3D Live Wallpaper is what you need.

It follows the same principle as Earth 3D Live Wallpaper, only this one display the red surface of Mars in all its glory.

It is fully animated and controllable, and you can use it as both a live wallpaper and as a screensaver to liven up your desktop while you’re away.

It is created in great detail, so you can enjoy the plant Mars in all it’s beauty, with surface craters, whirlwinds, and more.

⇒ Get Mars 3D Live Wallpaper


That’s a very small selection of some of the great 3D screensavers for Windows 10. There are, of course, loads more 3D screensavers that you can spruce up Windows with. Which one is your favorite 3D screensaver?

FIX: Windows Defender error code 0x80073afc [Full Guide]

Keeping your PC safe is crucial, and in order to protect it from malicious software Windows 10 relies on the Windows Defender.

This tool works as an antivirus, but users reported certain issues with it. One issue that appears while using Windows Defender is the error 0x80073afc.

If you get this error, it means that your Windows Firewall is malfunctioning. That’s really bad news since it will leave your device vulnerable to viruses, malware, and other dangerous files.

How can I fix the Windows Defender error 0x80073afc?

  1. Uninstall your antivirus software
  2. Change your registry
  3. Remove the malicious software
  4. Check for problematic updates
  5. Use System Restore
  6. Wait for the official fix
  7. Update Windows 
  8. Run the SFC scan
  9. Run DISM
  10. Clean your registry
  11. Check environmental values
  12. Change system permissions
  13. Restart the Security service 
  14. Change the group policy
  15. Reset Windows 10

1. Uninstall your antivirus software

Windows Defender is designed to work as a default antivirus software on Windows 10, however, it can’t work with other security tools.

If the installer encountered the error code 0x80093acf, be sure to uninstall your antivirus and check if that solves the problem.

By default, Windows Defender will turn itself off after you install a third-party antivirus program.

One way to eliminate such issues is to simply replace the in-built Windows solution with a modern antivirus that will not interfere with your system in any way.

Therefore, we suggest a powerful security suite that will protect your PC against all kinds of malicious programs such as spyware, ransomware, viruses, rootkits, exploits, and more.

Emerging threats make no exception as this well-balanced antivirus relies on a smart, cloud-based technology that allows it to update its signatures automatically and never fail to stay on top of the cybersecurity game.

TotalAV

Enjoy seamless protection and flawless security thanks to TotalAV and its wide range of features.
Check Price Visit Website

2. Change your registry

  1. Press Windows Key + R, enter regedit, and press Enter or click OK.

  2. Go to the following path in the left pane: HKEY_LOCAL_MACHINESOFTWAREMicrosoftWindows NTCurrentVersionImage File Execution Options
  3. Try to find MSASCui.exe, MpCmdRun.exe, MpUXSrv.exe, or msconfig.exe keys. If you find any of them, right-click them and choose Delete.
  4. After deleting the problematic keys, check if the problem is resolved.

It’s possible that your registry was altered by a malicious program, thus causing error code 0x80073afc to appear. To fix this problem you’ll need to change your registry.

Before you start altering your registry, keep in mind that changing the registry can be potentially dangerous, therefore be sure to create a backup of your registry just in case.

3. Remove the malicious software

Sometimes malicious software can be located on your PC and cause this error to appear.

You need to look for MpCmdRun.exe, MpUXSrv.exe, MSASCui.exe, and msconfig.exe files or folders in the following directories:

  • %AppData%
  • C:WindowsTemp
  • %temp%
  • C:Program Files.

You can easily access any of these folders simply by pasting the folder’s address into File Explorer and pressing Enter.

If you find any of the aforementioned files or folders, delete them and check if that fixes the problem.

4. Check for problematic updates

  1. Open the Settings app. (If you’re unable to open the Settings, here are some fixes).
  2. Go to the Update & Security section.
  3. In the Windows Update tab click on Advanced options.
  4. Now click on View your update history.
  5. Click Uninstall updates.
  6. Now, the Installed Updates window will appear. Locate the update that you want to remove and double click it to remove it.

Users reported that certain Windows updates caused this error to appear, hence you need to find and remove the problematic ones.

Bear in mind that you need to remove the problematic update, so keep a close eye on all installed updates.

To prevent this issue from appearing again, block the problematic update from installing. If you encounter problems with the process, this great guide about fixing Windows Update problems will help you.

5. Use System Restore

  1. Press Windows Key + S and enter restore. Select Create a restore point option.
  2. When the System Properties window opens, click the System Restore button.
  3. When System Restore starts, click Next.
  4. Select the restore point you want to revert to and click Next.
  5. Follow the instructions to restore your PC.

Few users reported that they fixed this issue simply by restoring their computer with the System Restore feature. Restoring your PC is easy, and can be done using the aforementioned steps.

6. Wait for the official fix

Few users reported that their issue was fixed by installing the latest updates, so you might want to wait for Microsoft to solve the problem themselves.

Usually, Windows updates fix these kinds of issues, so you might have to wait a bit until the official fix is released. This might take a while, unfortunately.

The time it takes for such problems to be solved by Microsoft depends on the number of people that signal the problem to them, so don’t hesitate to make a ticked or a post on the official forums.

7. Update Windows

  1. Go to Settings.
  2. Then, Update & Security.
  3. Select check for updates.
    check for updates
  4. Wait for the Windows to finish updating.

This step is, in a way, tied to the 6th one. You need to keep your Windows updated at all times, so make sure you are using the latest versions.

As Windows Defender is a part of Windows 10, it receives updates through Windows Update. So, maybe the issue you’re facing is acknowledged by Microsoft, and the company is working on a fix.

8. Run the SFC scan

  1. Right-click on the Start Menu button, and open Command Prompt (Admin).
  2. Enter the following line and press Enter: sfc/scannow
  3. Wait until the process is done (it may take a while).
    • If the solution is found, it will automatically be applied.
  4. Now, close the Command Prompt and restart your computer.

If none of the previous solutions worked, let’s try a few troubleshooting tools. The first one is the SFC scan.

This command-line tool scans your computer for potential issues and resolves them if possible. So, it might be helpful in this case, as well.

9. Run DISM

  1. Open the Command Prompt as shown above.
  2. Enter the following command and press Enter: DISM.exe/Online /Cleanup-image /Restorehealth
  3. Wait for the process to finish.
  4. Restart your computer.
  5. In case the DISM can’t obtain files online, try using your installation USB or DVD.
  6. Insert media and type the following command: DISM.exe/Online /Cleanup-Image /RestoreHealth /Source:C:RepairSourceWindows /LimitAccess

DISM is another tool that we’re going to try. It will scan your system’s disks. Make sure to replace the C:RepairSourceWindows path of your DVD or USB and follow further on-screen instructions.

10. Clean your registry

Some users report that Windows Defender won’t work because there are issues with your registry. To eliminate the doubt, go ahead and clean your registry.

The best way to clean the registry in Windows 10 is by using a third-party registry cleaner.

If you don’t have the first choice already, check out our list of the best registry cleaners for Windows 10 to get some ideas.

Additionally, note that you should look for a registry cleaner that scans your PC periodically for corrupted files and other issues. Such an app will make sure that your device is working smoothly.

11. Check environmental values

  1. Press Windows Key + S and enter advanced system settings.
  2. Select View advanced system settings from the menu.
  3. Now click the Environment Variables button.
  4. Locate the %ProgramData% variable and check if it’s set to C:ProgramData
  5. If not, change the variable accordingly.

Environmental values are handy, but a less-known feature that helps your system access certain directories which contain important data and values.

Sometimes third-party apps may change these values, and that could lead to interferences with Windows Defender resulting in potential problems like the error 0x80073afc.

12. Change system permissions

  1. Go to C:ProgramData directory.
  2. Now locate the Microsoft directory and right-click it.
  3. Choose Properties from the menu.
  4. Now go to the Security tab and click Advanced.
  5. Now you should remove all inherited permissions. After doing that, save changes and check if the problem is resolved.

Another reason for Windows Defender issues may be the system permissions. If some permissions are set to block Windows Defender, it obviously won’t work.

13. Restart the Security service

  1. Press the Windows key + R and launch Run.
  2. Type services.msc and hit Enter or click OK.
  3. In Services, search for Security Center.
  4. Right-click Security Center and click Restart.

Everything in Windows 10 has its own service, and Windows Defender is not different. Make sure that the Security service is running in order for Windows Defender to function normally.

14. Change the group policy

  1. Press the Windows Key + R and enter gpedit.msc.
  2. Now press Enter or click OK.
  3. When the Group Policy Editor opens, in the left pane navigate to the following path:  Computer ConfigurationAdministrative TemplateWindows ComponentsWindows Defender Antivirus
  4. In the right pane, double-click Turn off Windows Defender Antivirus.
  5. Select Not Configured and click Apply and OK to save changes.

If you have all the necessary permissions, and the service is running, you might need to make a few changes in the Group Policy editor. Here’s what you need to do:

15. Reset Windows 10

If you still have this issue, you might want to reset Windows 10. You can check this in-depth guide about resetting Windows 10 to factory settings to learn more about the process.

Resetting Windows 10 will delete all installed applications and in some cases, all your files from the primary partition, so use this option as the last resort.

We strongly encourage you to switch to a better security tool. You can choose one from this list of antivirus software with lifetime license.

Windows Defender error code 0x80073afc can cause a lot of problems, so be sure to try some of our solutions and let us know what worked for you in the comments section below.

4k Video Player for Windows 10: We Tested 7 Best

As you all know, 4K is a 3,840 x 2,160 resolution for monitors and TVs. For digital cinema, 4K is a slightly different 4,096 x 2,160 picture resolution.

With these measurements in mind, it’s easy to see why you need an optimized 4K video player for Windows 10 to view crystal clear clips or movies on your device.

However, 4K is more widely recognized as an Ultra HD 3,840 x 2,160 VDU (Visual Display Unit) resolution. It provides a much more detailed and sharper picture than 1,080p on larger monitors and TVs.

The 4K resolution isn’t really something new anymore. 5K and 8K (7,680 x 4,320) resolutions have now eclipsed 4K. As such, there are quite a few media players that support the 4K video resolution. Even so, you can still get a solid 4K player Windows 10.

And in this article, we’ll show you some of the best options out there. So dig in, and get yourself the best 4K media player Windows 10.

What is the best 4K video player for Windows 10?

CyberLink PowerDVD Ultra

top 4k media players

CyberLink’s PowerDVD Ultra is a Windows 10, 8, and 7 media player optimized for Ultra HD Blu-ray Disc playback. There are three alternative versions of the software, depending on the paid plan – Standard, Ultra, and 365.

PowerDVD Ultra is the best version that supports the full range of video disc formats, such as 4K Blu-ray Disc, DVD, 3D, ISO, 21:9 aspect ratio playback, AVCHD, and 3D DVD.

It’s not entirely surprising that PowerDVD has been getting rave reviews as it boasts a great feature set. This 4K video player for Windows 10 provides unique TrueTheater enhancements that boost color, lighting, and sound in videos for better picture and audio quality.

PowerDVD fully supports virtual reality and 360-degree video. What’s more, it even includes a VR Mode. Even if you don’t have a VR-ready headset, you can still watch 360-degree videos from all angles by selecting the software’s Tri-View Mode.

This 4K player Windows 10 tool enables users to cast video, photos, and music from PC to TV via FireTV, Apple TV, Chromecast, and Roku media streamers. If that isn’t enough, this best 4K media player Windows 10 also plays online 4K, HDR, 360, and 3D-360 Youtube and Vimeo videos.

The Media Library is another notable addition to PowerDVD. It automatically imports all your videos, photos, and music files. So you can also utilize the software to play photo slideshows and music as well as video content.

CyberLink PowerDVD

Watch, stream and share 4K video content anytime, and anywhere with this top all-around multimedia player.
Free trial Visit website

GOM Player

best 4k video media player GOM

GOM Player is another top 4K video player for Windows 10 to stream Ultra HD content. Not only it supports tons of popular video formats, but it will also play damaged files or partially downloaded files.

Just as CyberLink, GOM also includes a 360° VR Playback mode, so you can fully immerse yourself in the cinematographic environment.

With over 80k subtitles in the built-in library, this 4K player Windows 10 will automatically look for and load subtitles for the video that’s being played.

Another useful aspect we simply cannot overlook is GOM’s versatility. In fact, it is available for devices running from Windows Vista onwards. Moreover, its user-friendly interface makes it a convenient 4K media player Windows 10 for just about anyone.

GOM Player

Check out this sleek media player that will display 4K videos smoothly and vividly on your Windows 10 PC.
Free trial Visit website

Aiseesoft Blu-ray Player

Blu-ray Disc is one notable input media that VLC doesn’t directly support. If you need a 4K media player Windows 10 that plays Blu-ray content without any hiccups, then this tool from Aiseesoft is a better choice than VLC.

This 4K video player for Windows 10 is optimized for 1080p Blu-ray playback, and it also supports 4K playback for MOV, AVI, MKV, FLV, WebM, and MP4 video formats.

But there’s more to come! Aiseesoft Blu-ray Player boasts smooth audio playback and HD surround sound for crystal-clear video/audio as well as super-fast video loading time, especially when connected to the Internet.

Although less rich in configuration settings and features compared to the previous options, this 4K player Windows 10 can still be customized in terms of playing effects, video playback time, and skins.

Needless to say, Aiseesoft Blu-ray Player is compatible with Windows platforms starting with Windows XP.

⇒ Get Aiseesoft Blu-ray Player

LEAWO Blu-ray Player

Leawo Free Blu-ray Player has all the features you need to use as a Blu-ray player and it’s also one of the best free 4K video players out there.

In fact, it doesn’t play only Blu-ray disks but it can also play BDAV movie folders and ISO image files even if they are home made.

The software is light on your system and it’s perfectly adapted to your Windows 10 and even older versions like Windows 7, 8 and 8.1.

Of course, it can also act like a region-free DVD player, also completely free with crisp image quality and unaltered audio on your PC.

Leawo Free Blu-ray Player can play 4K videos on MKV, MP4 and TS formats but it also supports 1080P videos in most formats, including HD MP4, HD MKV, HD MOV and also 720P videos.

And if you’re creating your own content, it can easily play your footage from your camcorder. It can also handle online or streamed video with ease.

As for the audio, the player supports all advanced audio decoding technologies like DTS, AAC, Dolby, TrueHD, multiple channel DTS-HD and more so you can benefit from ultimate sound quality.

The player comes with a virtual controller panel that allows you to access the settings from the disc menu (if available) during the playback like the Scene Selection or Languages for instance.

The player is completely free, and it has a very friendly interface that can be enjoyed by everyone without the need of any instructions.

Let’s see a recap of some of its best features:

  • 6-in-1 free 4K, Blu-ray, DVD, Video, Audio media player software
  • Supports all major media formats
  • Lossless 4K image quality
  • Incredible sound with support for all advanced audio decoding technologies
  • Advanced disc protection removal technology

LEAWO Blu-ray Player

Bring your cinematic experience to a whole new level with LEAWO’s free media player!

CnX Player

what are the best 4k media players

With an abundance of 10-bit HDR & 4K Ultra HD video content, the world is looking for an authentic and efficient 4K video player for Windows 10 that can give a smooth playback without any blurriness.

So here comes the CnX Media Player, aided by Intel-based hardware acceleration. This tool is an incredible choice even you want to enjoy a phenomenal visual experience.

With high-Performance Playback Core, natural and intuitive gesture controls, and easy video management, this 4K video player for Windows 10 will deliver a breath-taking visual experience.

Versatility is another feature that seriously propels this 4K player Windows 10. It can play 4K, 10-bit, FHD, and HDR videos and it has native support for a plethora of codecs and video formats. What’s more, CnX is a cross-platform media player that works seamlessly on Windows 10, Android, and iOS.

⇒ Get CnX Media Player

VLC Media Player

best media player for 4K videos

If you’re looking for a freeware tool, VLC is certainly one worthy to note. This is an open-source media player that’s compatible with Windows platforms from XP to 10, Mac OS X, iOS, Android, and Linux.

VLC is an excellent 4K video player for Windows 10 as it plays almost all video and music file formats without you needing to install additional codec packs.

You can play a whole host of input media with VLC, such as DVD, CD, SVCD, DVB for digital TV, VCD, and numerous streaming protocols.

The latest VLC comes with hardware acceleration support for 4K videos and support for 8K playback. The tool is undoubtedly one of the most customizable media players as it includes a slew of settings for customizing video playback, audio, subtitles, hotkeys, and the software’s UI.

Furthermore, there is also a wide range of plug-ins and skins that users can add in order to further enhance this 4K player Windows 10.

⇒ Get VLC Media Player

5KPlayer


Just as its name implies, 5KPlayer supports playback up to the 5K (5,120 × 2,880) resolution, 4K included. This 4K media player Windows 10 provides better 4K playback than most video players primarily because it supports Nvidia, DXVA 2.0, and Intel hardware acceleration. This boosts decoding for high-resolution video.

The software also incorporates an HEVC decoder that enables it to play H.265 coded 4K and 5K videos at a high frame rate. Consequently, 5KPlayer plays 4K videos with very little stutter and lag.

Aside from its smooth 4K playback, 5KPlayer includes some great media features. For instance, the software supports Apple Airplay so that users can stream audio and video files between 5KPlayer and iPhone and iPad devices.

Another great thing about this 4K video player for Windows 10 is that it enables users to download videos from more than 300 video websites.

⇒ Get 5KPlayer

So these are some great tools to play your 4K videos on Windows 10 and other platforms. Few other software can match the range of video options and media features that these 4K player Windows 10 tools include.

Your suggestions are welcome, so feel free to use the comments section below to share more awesome software ideas with us.

Microsoft Teams releases new in-meeting UI share feature

Microsoft has finally made it happen after continuous testing and coming up with better ways to improve the in-meeting share experience.

This new feature makes it much more easier to find what you are looking for and share it. Instead of this option being on the bottom left of your screen, it is now located on the top right menu.

This new addition comes shortly after Teams already received the Webinar tool, earlier this moth.

The UI share feature is available for desktops only

You can still share everything you already could with the old version, the major change being, as we mentioned above, that Microsoft made it a lot easier for users to find and share their desired content.

When you click the new share button, located on the top menu, the dropdown will provide easy access to all the different screens that are available for sharing.

Note icon NOTE
This new way of sharing your content is available for Windows and Mac OS desktops, not for mobile devices yet.

As you can observe in the picture above, you have multiple sharing options. By selecting the first one, which is Screen, you allow all participants to the meeting to view your entire screen.

When you click on Window, you will see a list of all the windows you have open, and you can choose which one you want to share with the others.

You can also share PowerPoint files and, thanks to a new option added by Microsoft, you are able to Include computer sound.

Further more, you now have the ability to share InVision’s content with the members of the call.

What Microsoft is, most likely, working on now is an update that will fix the latency issues that some users have confirmed to deal with while in-meeting.

The tech giant also promised new features for the Android and iOS versions of the app as well and we could see them hit live in the upcoming months.

Have you tried the new UI share experience in Microsoft Teams? If so, tell us what you think about it in the comments section below. And if you happen to like the idea of finding Teams Meetings notifications in the Start Menu, take a closer look at our dedicated guide right away.

When will Microsoft launch Windows 10 version 21H1?

As the next major update and revamp of the operating system, Windows 10 version 21H1 is on the minds of everyone, especially since it has been announced to drop soon.

During this month’s Patch Tuesday, some of the important fixes and features that Microsoft issued are precursors for 21H1.

The question on everyone’s lips right now is: When exactly is this going to happen?

Note icon NOTE

Windows 10 21H1 is coming soon to your computer

Even though Windows Insiders had the chance to fiddle with this new version of the OS, an official launch hasn’t yet happened. This left a lot of people wondering about the date that Microsoft had in mind.

More than likely this project has entered the final stage, where engineers are scrambling to rewrite every mistake and smooth out the rough patches encountered in designing it.

If we think about it, it doesn’t seem that discouraging anymore, as the big change is almost upon us.

As we all know, 21H1 was announced for May 2021, but we can remember how these releases happen in reality. What this means is that it could take another few weeks for it to be ready.

So, most likely, the end of May 2021, or the start of June 2021 will mark the beginning for this new chapter. Hopefully, by then, all the major problems that this version might still have will be corrected.

Acting as an enablement package, KB5000736 will activate the new experience once it becomes available to the public. Keep in mind that the update is already available in the form of MSU files.

So, let’s just kick back, relax, and let Microsoft work out the final details before we get to enjoy everything that Windows 10 21H1 has to offer.

What are the best new features in Windows 10 21H1?

And speaking of what does it have to offer, the new spring update should be more consistent in new features than its autumn counterpart.

And there are, indeed, some notable features and improvements, although we will only list a few of them here.

For instance, the Windows Hello multi-camera feature that will prioritize the better webcam if you have more than one.

Again, there’s the new Windows Mixed Reality feature that will let you set the idle time interval before a headset goes to sleep.

Of course, there is also the News and interests widget on the taskbar that can be highly customized to keep you up to date with your desired information.

Microsoft also promises that the startup times for apps that have roaming settings will improve with 21H1.

Also, with the new update, the Chromium version of Microsoft Edge becomes the official default option for all Windows users.

You can get the new Windows 10 20H1 by checking for new updates. You can do that by accessing the Settings menu and then clicking on the Update & Security section.

Tell us in the comments section below if you have already tried version 21H1 and what your thoughts about it are.

Full Fix: Common PlayerUnknown’s Battlegrounds bugs

PlayerUnknown’s Battlegrounds is an Early-Access shooter game that takes players to an isolated island, challenging them to locate weapons and supplies. In this last-man-standing shooter game, mercy is a sign of weakness and may even get you in trouble sooner or later.

PlayerUnknown’s Battlegrounds is still a work in progress. Many players have reported that the game is affected by low FPS issues, sound bugs, graphics issues, and other technical issues.

Fortunately, many of these bugs can be quickly fixed. In this article, we’re going to list a series of workarounds that you can use to fix common PlayerUnknown’s Battlegrounds issues.

How to fix frequent PlayerUnknown’s Battlegrounds bugs

PlayerUnknown’s Battlegrounds is a great game, but many users reported various bugs. Speaking of bugs, here are some common problems that users reported:

  • Player Unknown Battlegrounds won’t start, launch – This problem can occur if you’re trying to run the game without appropriate privileges. Simply start the game as an administrator and check if that solves the problem.
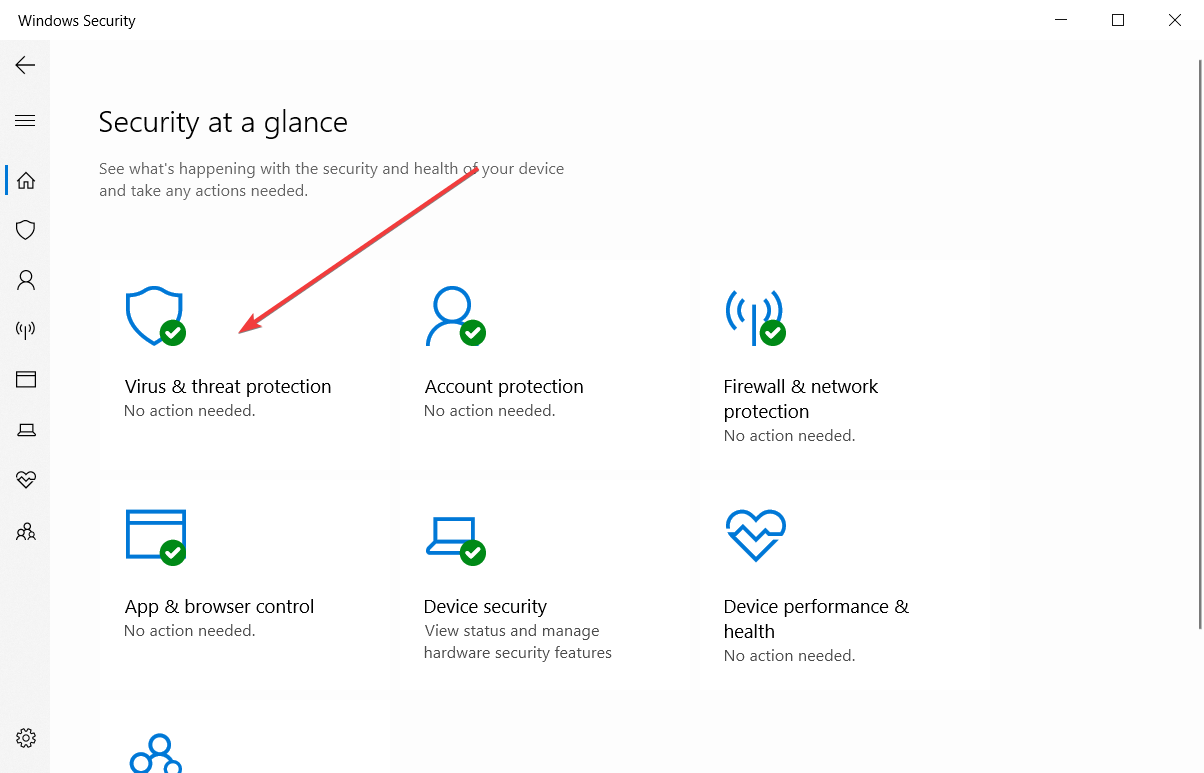
  • Playerunknown’s Battlegrounds failed to initialize Steam – This issue can occur due to lack of privileges. To fix it, simply start the Steam as administrator and check if that solves the problem.
  • Playerunknown’s Battlegrounds crash – Crashes can occur due to third-party applications, most commonly your antivirus. If you’re experiencing crashes, you might want to try switching to a different antivirus software.
  • Playerunknown’s Battlegrounds out of video memory – If this problem occurs, try to lower your graphics settings and start the game again.
  • Playerunknown’s Battlegrounds lag – This issue can occur due to third-party background applications. Be sure to close any applications that might be utilizing your network connection and check if that helps.
  • Playerunknown’s Battlegrounds connection closed – If you’re getting connection closed message, the issue might be your antivirus or firewall. To fix the problem, add Playerunknown’s Battlegrounds to the list of exceptions.
  • Playerunknown’s Battlegrounds buildings not loading – This problem can occur due to your graphics settings, so be sure to change them and check if that solves the problem.

Solution 1 – Restart Steam

If you have issues with PlayerUnknown’s Battlegrounds, you might be able to fix the problem simply by restarting Steam. Sometimes you might encounter certain glitches, and one way to fix them is to restart Steam.

After you restart Steam, try to start the game again and check if the issue is still there.

Solution 2 – Make sure that all of your drivers are updated

Sometimes PlayerUnknown’s Battlegrounds issues can occur due to your drivers. Your graphics card drivers are the common cause for this problem, and if you want to fix them, it’s advised that you update them.

Updating your graphics card drivers is relatively simple, and in order to do it, you just need to find the model of your graphics card and download the latest drivers for it. You can download the drivers from the following websites:

If you don’t want to manually download the necessary drivers, you can always use a dedicated tool that will automatically download and install the missing drivers for you.

Solution 3 – Verify the integrity of the game on Steam

According to users, issues with PlayerUnknown’s Battlegrounds can occur if your installation is damaged. To fix the problem, it’s advised to check the integrity of game files. You can do that by following these steps:

  1. Go to Steam > right click PlayerUnknown’s Battlegrounds and choose Properties.
    Playerunknown's Battlegrounds out of video memory
  2. Click the Local Files tab > select Verify Integrity of Game Files.
    Playerunknown's Battlegrounds lag

After verifying the integrity of the game files, try to start the game again and check if the issue is resolved.

Solution 4 – Make sure your Windows OS is up to date

If you have any issues with PlayerUnknown’s Battlegrounds on your PC, be sure to check if your system is up to date. Sometimes issues can occur due to certain bugs on your system, and in order to ensure that your PC is bug-free, we advise you to keep your system up to date.

For the most part, Windows 10 automatically installs the missing updates, but sometimes you might miss an update or two. However, you can always check for updates manually by doing the following:

  1. Press Windows Key + I to open the Settings app.
  2. Select Update & Security.
    Player Unknown Battlegrounds won't start
  3. Click the Check for Updates button.
    Playerunknown's Battlegrounds out of video memory

If any updates are available, they will be downloaded automatically in the background and installed as soon as you restart your PC. Once your system is up to date, check if the problem is still there.

Solution 5 – Low FPS issues

1. Install the latest Windows OS updates on your computer and update your drivers.
2. Install the game on the same drive as your OS.
3. Install the latest game updates when they are available. Since PlayerUnknown’s Battlegrounds is an Early Access game, much of the devs’ work is focused on optimization right now. The upcoming patches will definitely improve the game’s FPS rate.

In order to boost your game performance and get rid of slowdowns, lags, low FPS and other annoying issues, we recommend a professional game booster.

⇒ Get Kill Ping

Solution 6 – Run Steam or the game as administrator

Sometimes problems with PlayerUnknown’s Battlegrounds can occur if you don’t have the necessary privileges. However, you can fix the problem simply by running Steam as an administrator. This can also help fix the “Steam Initialization Failure” error. To do that, just follow these steps:

Simply go to C:Program Files (x86)Steam > right click on Steam.exe and select Run as Administrator.

If that works, you can set Steam to always run with administrative privileges. To do that, just follow these steps:

  1. Right-click Steam’s .exe file and choose Properties from the menu.
    Playerunknown's Battlegrounds buildings not loading
  2. Navigate to the Compatibility tab and check Run this program as an administrator. Now click Apply and OK to save changes.
    Player Unknown Battlegrounds won't launch

If that doesn’t work, you can also set PlayerUnknown’s Battlegrounds to run with administrative privileges by doing the following:

Go to C:Program Files (x86)SteamsteamappscommonBattlegroundsTslGameBinariesWin64 > select TsLGame.exe > right click it > run as Admin.

Solution 7 – Update/Reinstall Visual C++ Redistributable

According to users, sometimes PlayerUnknown’s Battlegrounds issues can occur due to problems with Visual C++ Redistributables. However, you can fix the problem simply by downloading the Visual Studio 2015 redistributables.

If you don’t feel like downloading the necessary components, you can always check the game’s installation directory and look for vcredist folder. Once you find it, install all files from this directory and you’ll have all the necessary components to run the game.

In addition to Visual C++ Redistributables, users are also suggesting downloading the latest update for Universal C Runtime, so be sure to do that as well.

Solution 8 – Check your antivirus

If you have problems with PlayerUnknown’s Battlegrounds, the issue might be a third-party antivirus. To fix the problem, it’s advised that you check your antivirus settings and make sure that PlayerUnknown’s Battlegrounds is allowed through your firewall. In addition, you can also try disabling certain antivirus features.

If disabling the features doesn’t do anything, your next step would be to completely disable your antivirus. In the worst-case scenario, you might have to completely uninstall your antivirus.

If removing the antivirus solves the problem, you should consider switching to a different antivirus. Some antivirus applications have a Gaming Mode feature, so they won’t interfere with your system in any way.

Solution 9 – Scan your registry

According to users, sometimes problems with PlayerUnknown’s Battlegrounds can occur due to your registry. Your registry can become corrupted, and in order to fix the problem, it’s advised to scan your registry with a registry cleaner software.

Solution 10 – Use the lowest settings

  1. Start the game.
  2. Go to Settings, then Graphics.
  3. Bring all the sliders to the lowest setting then select Apply.
  4. You can also lower your resolution.

Players report that various launch errors also occur because the game opens up on some unusual resolution by default. Try loading the game on the lowest possible settings, running at 1280×600 windowed.

Solution 11 – Missing texture of buildings/players can go through walls

1. Restart the game and this should fix this issue.
2. If you don’t like the first method, you can also use ALT + TAB.
3. Turn off ShadowPlay.

The missing texture glitches are usually tied to some problems with the game instance. All you need to to is quickly restart the game and you should be good to go.

Solution 12 – Infinite loading screen

1. Install the game on SSD.
2. Run a full system scan using your antivirus program, as well as additional tools such as ADWCleaner.
3. Lower your graphics settings.

Solution 13 – Low memory errors

1. Lower your resolution and decrease the graphics settings.
2. Install the latest Windows OS updates on your computer. Update your graphics card drivers.
3. Run tslgame.exe and Steam as an Admin.

Solution 14 – Black boxes/ weird shadows randomly appear in the game

  1. Go to Settings.
  2. Then, go to Graphics.
  3. Set the Shadow slider to the lowest setting.
  4. Hit Apply and restart the game.

Set shadow on the lowest possible setting. Keep in mind that this action will affect the overall graphics quality of the game and won’t completely eliminate the black boxes.

We’ll end our list of workarounds here. If you’ve come across other solutions to fix various PlayerUnknown’s Battlegrounds bugs.

Feel free to describe the respective issues if you have any others to share with us and list the troubleshooting steps in the comment section below.