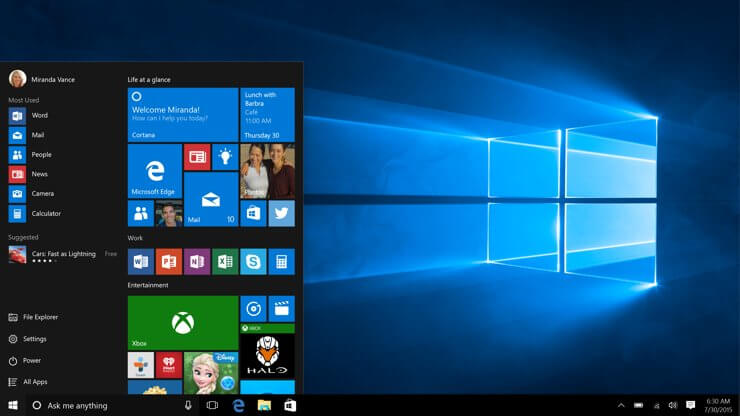
VMware upgraded its Fusion and Workstation products, adding support for the Windows 10 Anniversary Update and Windows Server 2016. For the time being, support for the Anniversary Update is available and support for Windows Server 2016 will become available when Fusion is launched.
VMware is going to release the new versions of its products on September 7 to all users. The releases will also support multiple VMs in a single window and will bring bug fixes and overall performance improvements as well.
This year we are delivering Fusion 8.5 and Fusion 8.5 Pro, and the big surprise is this: It’s a free upgrade for all current-version customers. So, if you’re on Fusion 8.1.1, you’re going to be able to upgrade to the latest Fusion with full support for […] Windows 10 Anniversary edition, for free. We’ll also be adding Windows Server 2016 support when it comes available.
The good news doesn’t end here: the company also updated its Workstation product family, rolling out the VMware Workstation 12.5 Pro and Player editions.
This piece of news reassures many users who were worried about Fusion’s future after VMware laid off the Fusion and Workstation teams. Apparently, the changes the company made were beneficial since it marks the first time VMware provided a yearly update for no additional cost to current-version customers.
The regular price for Fusion 10 is $88.95, but if you upgrade from Fusion 4 or higher, you can save $30. Workstation 14 Pro costs $247.95, but if you upgrade from Workstation 7 or higher, you’ll pay only $151.95, saving $100. If you’re already running Fusion 8 or Workstation 12, you can upgrade for free. You can get them both from VMware’s official store.
According to Microsoft, one of the most highly requested features by all the Office aficionados out there has finally been released to the public.
You guessed it, we are talking about the dark mode element for the Android version of the app.
Dark Mode is now available for Microsoft Office Android
This theme variation has been on the mind of users for quite some time now, seeing how it creates a less stressful work environment. Long overdue, everyone can now rejoice in the fact that it has become reality.
So we can definitely say that this is a more than welcome addition to the Office suite, as it provides you with better viewing options and, also, keeps battery consumption low.
How do I turn Dark Mode on in the Microsoft Office app?
Activating this new feature on your mobile device is as easy as taping the application, to access it.
Remember that the newest version of the Office app for Android will automatically adjust to Dark Mode if your device already has that preference selected.
Also, you can turn dark mode on or off by simply tapping your profile icon, on the Home tab in the Office app, selecting Settings, and then choosing Light, Dark, or System Default from the Theme options.
Keep in mind that this new feature will be rolling out to users worldwide over the next couple of weeks. So, if you do not see it in your app yet, it will be a part of the next update your app receives.
Have you tried the new dark mode feature for the Android version of Microsoft Office? Tell us what you thought about it in the comments section below.
Windows 10 is already out in the wild and there are claims that more than 14 million users have made the jump to the most recent version of the OS. And if you want to diagnose and benchmark your Windows 10 device, you can now do so with the popular AIDA64 software.
FinalWire Ltd has its AIDA64 software to the most recent version with support for Windows 10. Besides support for Windows 10, the new version also works with Intel’s upcoming Skylake processor and also brings support to Windows Server 2016. Here’s how the official changelog looks like:
Microsoft Windows 10 RTM and Windows Server 2016 RTM support
AVX2 and FMA accelerated 64-bit benchmarks for Intel Skylake and Broadwell-H CPUs
Optimized 64-bit benchmarks for Intel Braswell and Cherry Trail processors
AVX and SSE accelerated 64-bit benchmarks for AMD Nolan APU
Improved support for Intel Braswell, Broadwell-H, Cherry Trail, Skylake CPUs
Preliminary support for AMD Stoney APU
Preliminary support for Intel Cannonlake, Goldmont and Skylake-E/EN/EP/EX processors
GPU details for AMD Radeon Rx 300 and R9 Fury Series
GPU details for nVIDIA GeForce GTX 980 Ti, Tesla M60
This update only affects the AIDA64 Extreme version, but I guess an upcoming release will come up with support for the other versions, as well. Tamás Miklós, managing director of FinalWire, said the following:
When we release an update, it’s always one of our priorities to ensure that AIDA64 seamlessly supports the needs of home users, system integrators and sysadmins, so that they can use our software on the latest hardware and operating systems. We believe that PC users will migrate to Windows 10 and Intel Skylake in great numbers, that’s why providing support for these was our top priority. Porting our app to Tizen was a real challenge for us in programming terms as this ecosystem is still in its infancy. Sure, we don’t expect this edition to become a huge hit, but we are glad to be among the first to offer a great app for the users of this promising platform.
AIDA64 Extreme Edition 5.30 and AIDA64 Extreme Edition Portable 5.30 are both available as function-limited 30-day trials, with their prices starting from $39.95 for an AIDA64 Extreme Edition non-commercial license. Go ahead and download them from the official websiteto see if you want to diagnose and benchmark your Windows 10 computer or tablet.
These types of apps come in very useful as they streamline the process in which each member shares information regarding a specific project, access databases of manuals and guides, gain access to the apps needed, and communicate in real-time.
What makes this type of software very useful is its ability to assign specific tasks to specific users, and then be able to track their progress, but it also allows your team members to make sure they finish their tasks in time.
In this article, we will explore some of the best software options on the market that allows you to work on your projects together with your team, from one all-encompassing dashboard.
What are the best cloud collaboration tools for your team?
Collaboration software is a vital part when it comes to productivity and work from home and OnlyOffice provides all the elements needed for such a task.
First of all, so don’t have to install anything because this is a web service so all you need is a steady Internet connection.
And as with any successful productivity tool, OnlyOffice offers the benefit of editing and creating documents, presentations, and even spreadsheets.
What would a collaboration app be without instant messaging, e-mail client, and file sharing? You can have them all and even project management and workflow supervision.
Nowadays, work is highly dependent on all resources and OnlyOffice is also available on mobile platforms so you can always be completely connected with your team.
Another important aspect of collaboration software is the ease of use and the interface for this tool is extremely straightforward.
And if you want to talk about implementation, that comes down to zero as it’s only online. Therefore, maintenance and upgrades are all performed automatically.
Here are its key features:
Dedicated cloud service
Edit and create documents
Perfect compatibility with Microsoft Office documents
Available for desktop, online, and on mobile platforms
Easy to use
OnlyOffice
Take the productivity of your team to the next level with this complete cloud-based collaboration tool.
Wrike is a cloud-based project management tool, specially designed for team collaboration and communication.
The solution helps you create a project from scratch, then add different assignments for the members of your team.
Additional options include writing comments, setting deadlines, managing tasks, and a lot more.
The cloud service integration is over the top, and whether you’re using Google Drive, Dropbox, Box, MSFT Office 365, or OneDrive, Wrike has you covered.
However, even for the free version, you will get 2GB of storage for your account, and starting with the Professional plan, the quota includes 2 GB per user.
On the downsides, you can note the fact that there’s no built-in chat app but there are collaboration features within the projects.
Let’s review its key features below:
Support for external collaboration
Live progress updates
2GB of dedicated storage per account for the free version
Shareable dashboards
Interactive Gantt charts
Wrike
This cloud-based project management tool enhances you productivity with Gantt charts integration.
Zoho Connect – Great for online team collaboration
Zoho Connect is a very powerful collaboration app that is completely based in the cloud, and it allows you to keep your team up to date with the latest changes, unifies the resources available, and also offers everybody in the group the possibility to access what apps they need.
Your team members can easily hold real-time discussions, share their projects and ideas, build apps, and even manage work schedules and work plans.
Having the entire range of tools and information under one good-looking user interface simplifies the process of managing a team, both for small, medium, and large-sized companies.
Zoho Connect allows you to create custom groups, allowing you to share specific information with the people that need it, and for them to share their progress and ideas with you and other members.
Another very efficient way to go about managing your team and keeping everybody informed, you can also create Channels. Using channels allows you to communicate in real-time with your team.
If you want to share your information with your team members, you can also use the Feeds features found in Zoho Connect.
This looks and works very similar to what you experience when posting on your wall on Facebook.
Anybody can contribute to the ideas you present, and the sharing of information is done instantly. You can also automate repetitive processes in order to save precious time.
You can also create plans for specific members of your company, and assign them accordingly. You can then simply track the progress of the work that is being done from one simple dashboard.
Zoho Connect integrates perfectly with RSS Feeds, Zoho Campaigns, Google Calendar, Asana, MailChimp, Zapier, Appear.in, to expand the use of this software even more.
Another very useful feature of Zoho Connect is its ability to organize the knowledge your company members need to know in comprehensive manuals.
If you’re looking for a cloud-based solution for teamwork, you can’t overlook Desktop.com.
It was designed for small businesses and covers more than the basic needs of communication but also task management.
You may use voice or video calls, instant text chat, but also transfer files seamlessly with your peers, or offer video feedback on the spot.
The app offers extended app integrations with tools like Google Workspace, Gmail, Dropbox, and Trello.
When it comes to task management, you can easily set up different workspaces for different projects and work on what matters based on their importance.
The universal chat helps you interact with your clients or users of other communication platforms like Slack without installing any other apps.
Don’t reach for your wallet yet because you can try this cloud-based software for free before commiting to any plans.
Teamwork Projects is a very intuitive software option that enables you to manage and stay connected with your team in the cloud.
This software can be used for free for 30 days, has an integrated calendar, and an incredible customization power.
The user-friendly UI found in this software enables any user to quickly find his way around the software and offers quick access to any tool needed to finish the project.
It gives you the power to communicate instantly with anybody from the team, assign tasks, set goals for the team or specific members, and also allows you to keep an eye on the efficiency of your team.
This software can be extremely useful for managers, no matter if your team is small, medium-sized, or very big.
You have access to all managing features from one slick-looking dashboard – can create projects, add tasks with specific milestones, assign tasks to members, and even set custom goals for each day of work.
If you want to see a more detailed list with the features contained in Teamwork Projects, you can visit the official features webpage, and you can click here for the official pricing plans webpage.
Here are some of the best features found in Teamwork Projects:
Can generate a panoramic view of all progress your team has made dealing with projects
Board view – allows you to automate processes and offers your team access to specific tasks
Can use Gantt Chart view – allows you to see an overview of all tasks with milestones included
Can set tasks and subtasks
Can set custom permissions for your members
Built-in messaging features
Can keep track of all files from the server and have quick access to them from across the globe
Managing a big team is a hard enough job as it is, the software options we presented in this article will surely help you streamline your progress and also keep in touch with every team member.
These software options have an incredibly wide range of features that range from the ability to share files with the entire group to the ability to assign specific tasks, create projects, and also manage the workflow and productivity of your team.
We would love to know what software option you chose and how it worked for your projects. Feel free to let us know how your experience was in the comment section found below.
Microsoft has just released the Windows Insider build 21387 for Dev Channel Insiders, which includes no new features and actually removes two things from the OS. The soon-to-be-retired Internet Explorer 11 is gone in this build, and so is the new “Eco mode” feature in Task Manager that made its debut in an April 21 flight.
The new Eco Mode in Task Manager could throttle process resources for certain apps to give the priority to other activities, but the Windows Insider team has removed it in this build “in order to refine the experience and address several issues thanks to Windows Insider feedback.” Today’s build 21387 also brings various bug fixes and you can check the full list below:
Changes and Improvements
The Internet Explorer 11 desktop application is now retired as of this Insider Preview build. For additional details see https://aka.ms/IEmodeblog.
We are turning off the “Eco mode” feature in Task Manager in order to refine the experience and address several issues thanks to Windows Insider feedback.
Fixes
We fixed an issue in the previous flight where during the upgrade and in the welcome screens displayed after first sign in, the text was unexpectedly using the Times New Roman font.
We fixed an issue resulting in some Insiders seeing errors when trying to launch Notepad via the Run dialog.
We fixed an issue for WSL users, preventing some Linux GUI apps from launching correctly via the shortcut that is automatically added to Start menu.
We fixed an issue resulting in the reset or change PIN workflows not working.
We fixed an issue where for some Insiders, night light was immediately turning off after being enabled.
We fixed an issue in recent flights where you might unexpectedly get a “We can’t find an audio device” error when trying to play audio from a connected Bluetooth speaker.
We fixed an issue where explorer.exe might crash after repeated use of the touchpad gesture for switching Virtual Desktops.
We fixed two issues impacting the ability to print using USB printers.
We fixed an issue resulting in the Windows Update page potentially becoming unresponsive after clicking Pause Updates.
We fixed an issue causing some devices to fail with error code 0xc1900101. While this fix will resolve the problem on some devices, there is a second issue causing the same error code (noted below). We’re working on a fix for this issue as well.
We fixed an issue where some devices were re-offered the .NET update after it is installed. After taking this build you should no longer be reoffered the .NET update. If you experience and issue getting Build 21387 because of a pending .NET update, you can work around the issue by pausing then un-pausing updates.
We fixed an issue where some devices would crash with a DPC_WATCHDOG_VIOLATION error when using OneDrive Personal Vault.
We fixed a ctfmon.exe crash when using ATOK (a third-party IME) if reconversion was triggered in some win32 apps.
Known issues
The Windows Camera App currently does not respect the default brightness setting set via the new Camera Settings page.
We’re investigating an issue where elements of Search (including the search box in File Explorer) are no longer displaying correctly in dark theme.
[News and interests] We’re investigating an issue where the flyout may occasionally flash in the top left corner of your screen after clicking the button on your taskbar.
We’re working on a fix for a second issue causing some devices to fail when updating to this build with error code 0xc1900101. When the update fails, it will roll back to the previous build. If you are encountering this issue, we recommend pausing updates until we release a build with the fix.
It’s pretty rare for the Windows Insider team to release new builds on a Friday, and today’s flight is definitely a minor one. With Microsoft’s Build developer conference set kick off next week on May 25, we hope that the Windows Insider team will use this opportunity to flight another build with interesting new features.
“The impact of Covid-19 has forced students to use more digital learning tools and incorporate their web browser into everyday learning. Students rely on the browser to help them find solutions to their studies, including math. To help these students on their learning journey, we are excited to announce that Microsoft Math Solver will be available as a preview feature starting with Microsoft Edge 91 stable,” the Microsoft Edge Team explained.
To try Math Solver, you’ll need to head to the Settings menu (…) available in the top right corner of Microsoft Edge, select the “More Tools” option, and then click Math Solver. Now open a math problem and use the Math Solver selection tool to highlight it. Finally, click on the “Solve button” to get an instant solution in the sidebar. You can also click the “Show solution steps” button to check the step-by-step instructions.
In addition to the selection tool, students can also use the keyboard to type the problem statement in the Math Solver section manually. The Math Solver feature also provides learning resources, including online videos, quizzes, and worksheets, to help the students better understand a specific topic.
Math Solver is currently only available for Insiders as a preview feature in Microsoft Edge 91 or higher, although Microsoft says that it’s “exploring the possibility of including the feature permanently” in an upcoming stable release. As usual, the Edge Insider team will be collecting feedback to improve the experience for students looking for help in a hybrid learning environment.
If you’ve ever looked through the running processes of your Windows 10 PC and noticed a running process called RSGUPD.exe but don’t know what it is or where it’s from, you’re not the only one.
This application is identified as malware and comes bundled with the Remo Software. Even though the system impact on resources for this application is low, having a malware file on your PC is never a good idea. RSGUPD.exe constantly tries to open a support gateway, and it stops you from being able to boot your system in Safe Mode:
For these reasons, in this article, we will explore the best way to remove this malware from your PC once and for all and get full access to your computer. Read on to find out how.
How can I remove RSGUPD.exe from my PC?
1. Update your Antivirus software
Make sure you have the latest version of your antivirus installed.
If security definitions are out of date, be sure to update them as well.
3. Manually end any ‘rsg’ processes and remove the source folder
Right-click on your Windows taskbar, and select ‘Task Manager’.
Inside the Task Manager window, select the ‘Processes‘ tab, and search for any applications that have ‘rsg’ in their name.
Select each of these processes, and click on ‘End Task’ for each of them.
After you’ve closed all of them, navigate to C: -> ProgramData -> RSG , and delete all the files named ‘rsg’.
Note: Some programs from that folder might try to run again, so please be consistent with this method to achieve the best results.
This article explored some of the best-proven methods to deal with RSGUPD.exe malware running on your system. This malware stops you from being able to log into Windows Safe Mode.
If you want to know more about various processes, don’t hesitate to check our what is rsmui.exe guide.
Following the steps presented in this list will surely help you solve this issue. Please make sure to let us know if it did by using the comment section below.
Now click on the Troubleshoot option from the left pane and select Additional troubleshooters from the right pane.
Click on Internet Connections and hit the Run the troubleshooter button.
Perform the steps provided on the screen to go through with the procedure.
Using the dedicated troubleshooter is the first thing to do in this situation. And although it may be considered basic, it helped a lot of users fix their connection.
2. Verify the connection
Firstly, let’s eliminate other possible causes for this occurrence. There are so many various reasons why your PC is unable to connect to the Internet or the Wi-Fi network of choice.
So, we advise you to follow the instructions below, and check for the alternative causes for this burning issue:
Restart your PC.
Restart your modem and router.
Use the LAN cable instead of Wi-Fi and look for changes.
Boot in Safe Mode with Networking mode and try connecting.
Run the dedicated Windows Troubleshooter.
Update router’s/modem’s firmware.
On the other, if you’re prompted by the antivirus itself and informed about the blocked network, subtly continue reading.
3. Check firewall exceptions
The antivirus or antimalware solution can’t block the internet connection per se. However, with the unifying of various security solutions into one package, we got ourselves third-party firewalls.
Those firewalls may be blocking the Internet or Wi-Fi connections. Sometimes by mistake, other times because of the justified suspicion that your network isn’t safe.
In order to regulate that, you can reconnect your router, reset all equipment like we already advised, and look for changes.
If those actions are to no avail, make sure to thoroughly inspect the Firewall part of your antimalware suite.
You can create exceptions to let individual programs (like browsers and e-mail clients) to communicate through the firewall.
This procedure varies, so make sure to google your antimalware or check the Help section in order to find out how to do it.
In addition, some users reported that large updates caused issues for various antivirus solutions. Make sure to update it again and, hopefully, the developers will provide timely patches.
4. Reset the antivirus to default settings
If you meddled with the implemented firewall on your own or a peculiar update changed something and thus blocked the internet access, you should just reset the antivirus to its default values.
That seems like the best way to resolve the problem at hand. It’s not an unusual practice for antivirus solutions to go bonkers and, with the introduction of secondary security tools, that practice flourished.
Reset everything to default values, restart your PC and look for changes. If you’re still unable to connect, there’s still one thing you can do.
5. Disable the antivirus or use another one
We can’t call this a solution but rather a workaround, but you might want to disable your antivirus or go for an alternative.
Of course, there’s always an option to contact the antivirus support and ask for help.
Maybe there’s a bug at hand with the current iteration and you pointing towards it should help developers deal with it swiftly.
If you find out that the antivirus was the problem blocking the Internet access, we strongly suggest changing your antivirus with less problematic one.
The security solution recommended below will not interfere with your system or your connection and it’s less prone to errors such as this one.
This antivirus is perfect for the modern people who use the Internet for shopping, banking, work and communication but are aware of the online risks involved.
TotalAV
Try using a solution that protects your privacy and security without getting in the way of your connection or system.
Finally, if none of the previous steps proved fruitful, the only solution that we can offer is the reinstallation of the antivirus solution.
Now, before you navigate to Control Panel and uninstall the antivirus, have in mind that most of the supporting applications that come with the suit are not really essential.
Meaning: Windows Firewall is quite sufficient and you don’t need a third-party firewall unless you’re a knowledgeable user who can take advantage of extra features.
So, reinstall your antivirus, but consider installing only the antivirus this time. That should resolve your problem and you should be able to connect to the internet just like before.
In case you’re unable to do so with the standard procedure, make sure to boot in the Safe Mode and try again.
That should do it. We hope this helped you resolve your issues with firewall or antivirus blocking the Internet.
If you’re tired of the problems caused by your present antivirus, you can also take a look at our selection of the top antiviruses with unlimited licenses and pick one from there.
The number of ransomware attacks is growing at an alarming rate. And so is the cost to businesses.
The estimated cost of the Wannacry ransomware that hit between 200,000 and 300,000 computers in 150 countries in May this year is estimated to climb past $5 billion, a huge amount.
The damage from ransomware attacks can take the form of data theft, corrupted files, and extended downtime while systems are cleaned and secured.
But the damage can also extend to costs that cannot be easily quantified in financial terms, like dampened consumer confidence.
And don’t think that it’s only the large pharmaceuticals and banks that are a target. Everyone is at risk and Paragon can provide a tool to the rescue.
Needless to say, the damage from a ransomware attack like Wannacry for smaller, not very well-resourced businesses can be catastrophic.
How to protect my data from ransomware?
That your entire computer systems must be securely backed up is, thus, absolutely important. The Paragon Backup & Recovery is designed as just the solution for your backup needs.
This tool isn’t revolutionary, which isn’t surprising for this free version. But it will do a decent job backing up your files and folders.
Once downloaded, a wizard will prompt you to choose the drive or files you would like to backup.
You will have a choice to save your files to a local destination, another computer on the network, or an external storage device.
The tool comes with a convenient scheduler that allows your backup to run almost on autopilot – when you log on or startup your computer.
You can also set it to run the backup sequence every week, fortnight, or monthly. Another welcome feature is the File Transfer Module that enables you to migrate files from another location on the same network to your computer.
Perform differential backups
Perhaps the one feature that will nudge you towards the commercial version of the tool is the differential backup. You won’t find that feature with the free version.
With this functionality, you won’t have to backup files that you have already backed up. Ideally, only new and files updated since the last backup should be backed up.
Otherwise, the backup will take longer every time you back up.To restore your files all you will need is to reload your old drive or file folders with your backup file.
If for some reason you can’t access these, the tool will create a recovery disc that you can use to boot your computer and restore your old files.
If some of the features you need while backing-up or recovering are locked, you can always buy the product for a full-throttle experience.
And speaking about recovery, the restore wizard will help you retrieving entire systems, disks, partitions, or just a selection of files depending on your specific needs.
You can even restore a backup of an entire system on different hardware completely with just a few clicks from your part.
It also has a free version that you can download from the official website and test it on your PC.
Paragon Backup & Recovery
Keep your data and your business safe with this excellent back-up and recovery tool.
Managing the time off of your employees is hard work, especially if you own a big company with over 50 employees. It is extremely important to efficiently coordinate your employees work time, in order to make sure you don’t end up understaffed on busy days. If a particular department of your company is mishandled, the effects could be devastating for your business as the trust of your customers will also be affected.
If you own a big company, managing your dispersed workforce will be an even harder task, and with an increase of the number of employees, your scheduling for free time becomes crucial. In this situation, you want to make sure that everyone involved in the company – from the staff members to the executive branch – are informed about scheduling plans long before any vacation is due.
Managing this area of your company effectively, will avoid any misunderstanding between your employees, and also offer you an easy way to make sure you’re up to par with the service quality your company offers.
Fortunately, there is a good range of specialized software options available on the market that allow you to simplify the process of scheduling employee time off.
Using this type of software allows you to always keep informed about the current state of your workforce, can manage schedules, overtime, labour compliance, and time off.
What are the best time-off software to use this year?
ReplicOn Time Attend
ReplicOn is a great software option that allows you to manage every aspect of your employee’s time and attendance with ease. You can track your workforce from a centralized dashboard, allowing you to avoid any gross pay errors, and the need to recheck after.
This software allows you to keep on track with all labour compliance needs by the use its integrated pay rule library that can also automate policy application. This allows you to not worry about checking compliance constantly and to focus on the more important tasks in your company.
By using ReplicOn, you gain complete control over days off work and also work schedules of your employees, and you can add real-time adjustments, notes, images, etc. This feature will keep all your schedules organized in one single workspace, is easily searchable, and easy to understand.
Some of the best features found in ReplicOn include:
Manage payroll by employee types – full-time, part-time, hourly, contractors, remote employees, etc.
Global compliance library – allows you to easily comply to any rules and regulations
Customize employee availability and create a wide range of schedules
Instant employee time update – automatically updates employee times
Punch in and out – feature that allows you to keep track of your employees start and end of day
Meal breaks and rounding – calculates all meal brakes and rounds up times automatically
Intelligent approvals – automatic brake approval that can be customized to suit your company’s needs
Activity tracking -allows you to see real time data regarding the activity of your employees
This software also contains a great set of features designed specifically for absence management of your employees: self-service time off, employee availability and intelligent approvals.
ReplicOn also has a great set of compliance and payroll features that are worth mentioning:
Compliance library
Pay rules
Pay codes
Payroll workbench
Payroll exports
You can also use this software to assign shifts, mass edits, shift adherence , and for instant communication. Beyond this, this software also allows you to track your company’s expenses and offers advanced analytics features that allow you to always be informed about the inner workings of your company.
If you want to see a complete list of features for ReplicOn, you can visit their official site.
ReplicOn Time Attend was released in 3 different versions, each catering to the needs of different users:
ReplicOn Quick Start
Up to 5 users and with option to add more at a cost
Timesheet
Punch In/Out
Meal Breaks
Validations
Activity Tracking
Simple Time Off
Single-Location Compliance Library
ReplicOn Plus – contains all the features found in the Quick Start version, and adds :
Customized fields for time tracking
Location conformity library with multiple options
Report sharing
ReplicOn Premier – contains all features of the Plus versions, and also adds:
PurelyHR is another great software option that allows you to easily manage the time off of your employees. This software combines employee database features with leave management software.
PurelyHR has an easy to understand user interface, and can adapt to the size of your business no matter how fast it grows. You can use the included centralized leave data you collected to make informed decision about your employee leave schedule. You can also share the leave calendar with your employees, and is a fully secure option.
Let’s explore some of the best features of PurelyHR:
Employees can access their own profile page from the company anywhere in the world
Account Setup Checklist – for easy installation of the software
Great customer service support
Designed for small to medium businesses
Great number of time-off configurations – you can set your company’s paid holidays
Restrictions – can set rules regarding the number of employees that can book time off in one day
Employees can request more holiday depending on the amount of overtime they worked
Reports can be exported to PDF or CSV files
XML data export via API
You can also create custom leave types, adjust increments for exact counting, can track FMLA, and also have a wide range of automation capabilities.
You can set up PurelyHR so that it automatically increases the accruals of your employees once they reached a certain number of months or years with your company. Using this software also allows you to set reminders that will help you be prepared with exact schedules for paid holidays, pending requests, etc.
Time Doctor is another great software option that allows you to manage all aspects of employee attendance, the amount of hours they worked, time they spent on breaks, etc.
This software tracks the time worked by every employee and produces a comprehensive report that can be broken down by client, project, and tasks. This feature allows you to see all the wasted time and allows you to identify issues in the schedule in order to fix them.
One of the best features of Time Doctor is that it can take screenshots of your employees computer screens, either randomly, or after a specific number of hours have passed. Using this feature allows you to observe how efficient your employees are, and if they are wasting time. The screenshot feature can only be activated by the employer once the employee’s status is in ”working” mode, to avoid any privacy issues.
Time Doctor also gives you the power to see an overview of employee data regarding time spent in meetings and calls, who they communicated with, and for how long. Finding and fixing any issues in this department by using this dashboard is far easier than manually trying to gather data about inefficiencies.
Some other great features that are worth mentioning include:
Daily and weekly reports for managers that contains valuable data about hours, website and application usage, task breakdown, etc.
You can grant access to your clients on your company’s domain to view screenshots and reports of in-progress/completed tasks with their company
Can track specific program/app usage, and even time spent on specific websites – if your employees spend too much time on Facebook, you will be informed
Can sync up with all well-know project management and accounting tools – Salesforce, Zoho, QuickBooks, etc.
Displays pop-up alerts to your employees if they’ve been idle for too long
Absence.io is another great software option that gives you the tools you need in order to easily manage and customize all aspects of you dealing with your employees schedules, employee data and time off work.
This software allows you to easily track the vacation times of your employees, and choose substitutes if needed, all from one central hub that allows you a full overview over data.
When it comes to managing the absent employees, you can use Absence.io to have a great visual overview of your company’s calendar scheduling, and can also create custom leave permissions to fit your needs.
Absence.io has a great set of features that allows you to easily keep track of your employee’s overtime and work hours, and has reporting and admin capabilities. This software also allows you to manage all digital employee files from one screen, making the process of searching data a lot easier.
Other notable features include:
SSL encryption – allows you peace of mind regarding the security of your company’s data
Planday is a very powerful software that allows you to manage employee schedules easily, by taking into account staff vacation, availability, payroll costs, etc.
Inside the Schedule tab of Planday you can find information regarding the number of hours worked, revenue, how much of the revenue is paid in salaries, payroll costs, etc.
Having this information at your disposal whenever you need it allows you to increase the productivity of your company, better manage customer and employee relationships, and create more exact schedules.
Using this software’s powerful features means that you don’t need to spend any time dealing with your employees schedules. Planday offers you a wide range of pre-made templates, and allows you to even create your own.
Having the possibility to create your own templates simplifies the process of and that can increase the productivity of your company. You can also share templates with your employees and colleagues.
One of the best features found in Planday is that your employees can contact their manager and announce him/her of their work days preference. This feature makes your employees happier, and in turn, creates more profit.
Planday was released in two different versions, each capable of covering the needs of different users.
Planday Starter Edition
Can create employee schedules at a basic level
Can arrange schedules by job role
Schedule templates for fast planning
Personal and group-chat
Can manage the exchange of shifts between your employees
Dealing with every aspect of your employees time off scheduling is hard work, and one mistake can cause a wide range of issues that can end up affecting the productivity of your company, and your image on the market.
The software solutions we presented in this list were chosen because of the wide range of capabilities they include. These programs can assure you that all your employee and customer data is stored safe, easy access to employee information, offers a great overview of the time that your employees wasted at work, and you can even take screenshots to verify their activity on the schedule.
We would love to know if you have any software suggestions regarding time-off software. Please feel free to let us know in the comment section below, what software you used from this list and how effective it was.
Speccy is a useful application, but sometimes Speccy can crash on your PC and cause many other problems. If you’re having any problems with Speccy on your PC, in today’s article we’ll show you how to properly fix them.
Sometimes certain applications can crash on your PC, and while this is somewhat normal, if an application is constantly crashing, that can be a problem. Many users use Speccy and they reported frequent crashing. Speaking of this issue, here are some common problems that users reported:
Speccy crash on startup – Sometimes this issue can occur if you’re using a 64-bit of Speccy. To fix the problem, switch to a 32-bit version and the problem should be resolved.
Speccy crashes computer –This problem can occur if your Speccy installation is corrupted. To fix the problem, reinstall it and the issue should be resolved.
Speccy keeps crashing – Sometimes the Speccy can keep crashing on your PC if you don’t have the administrative privileges. Simply start the application as an administrator and the problem should be resolved.
Many users reported that Speccy has some issues with 64-bit versions of Windows. The 64-bit of Speccy has some compatibility problems with Windows 10, and that can lead to crashes and other various issues.
To avoid this problem, users are suggesting using a 32-bit version of Speccy instead since that version doesn’t suffer from this problem. When you install Speccy, you install both 32-bit and 64-bit versions on your PC, so you won’t have to download Speccy again.
To check if this solution works, navigate to Speccy’s installation directory. Now you should notice both Speccy.exe and Speccy64.exe files. Run the former and check if everything works. If it does, you just have to modify your Speccy shortcut on your desktop so it can always run the 32-bit version.
To do that, just follow these steps:
Right-click the Speccy shortcut on your desktop and choose Properties from the menu.
Locate the Target field and change Speccy64.exe to Speccy.exe. After doing that, click Apply and OK to save changes.
Once you make these changes, your shortcut will always start the 32-bit version of Speccy and the problem should be resolved.
2. Check your antivirus
According to users, sometimes your antivirus can interfere with certain applications, and that can cause this and many other errors to occur. If Speccy crashes on your PC, try changing your antivirus settings and disabling certain features.
If that doesn’t help, your next step would be to disable your antivirus altogether. In some instances, the only way to fix this issue is to uninstall your antivirus, so you might want to try that. Even if you remove Windows 10, you should remain protected by Windows Defender, so there’s no need to worry about your safety.
Antivirus can sometimes block certain applications even if they don’t pose a security threat, and if Speccy works after removing your antivirus, perhaps you should consider using different antivirus software.
In order to benefit from top-ranked security against advanced malware, there is valuable software that provides high detection services, dangerous malware removal, or other cyber threats like phishing or spyware.
Additionally, you will find highly useful antiviruses that are also compatible with your system and do not interrupt other processes or applications.
If you want all-rounded protection from consistent solutions, consider the most efficient antivirus tools available right now.
3. Try running the application as administrator
If Speccy crashes on your PC, the problem might be the lack of administrative privileges. Sometimes in order to use certain applications properly, you need to run them as an administrator. If Speccy crashes on your PC, try running it as administrator by doing the following:
Locate the Speccy shortcut, and right-click it.
Choose Run as administrator from the menu.
If Speccy starts without problems, it means that the administrative privileges are the problem. Basically, you can avoid this problem by always running the application with administrative privileges using the steps above.
If you want, you can force the application to run with administrative privileges by doing the following:
Right-click Speccy’s shortcut and choose Properties from the menu.
Navigate to the Compatibility tab. Now check Run this program as an administrator and click Apply and OK.
After doing that, Speccy will always start with administrative privileges and the problem should be resolved.
4. Make sure you have the latest version of Speccy installed
If Speccy crashes on your Windows 10PC, it’s possible that the issue was caused by a glitch or a bug in the application. These kinds of issues can happen, and the developers are usually quick to fix them.
If Speccy crashes on your PC, check for the updates from the application or simply download the latest version and install it. By doing so, you’ll force Speccy to update, and once the application is updated, the problem will be completely resolved.
5. Reinstall Speccy
According to users, if Speccy crashes on your PC, the problem might be your installation. Sometimes the Speccy installation can become corrupted, and this can cause all sorts of issues. To fix those problems, it’s required that you reinstall Speccy completely.
First, you need to uninstall the application. While you can uninstall Speccy like any other application, we would advise a different approach. Certain applications can leave leftover files and registry entries, even after you remove them.
These files and entries can still interfere with your system, therefore it’s important to remove them as well. While you can do so manually, we would advise you to use third-party software such as Revo Uninstaller. It uninstalls many software leftovers as well, which is a great option.
This is a special software optimized for removing applications, and by using it you can remove any application from your PC, along with all files and registry entries associated with it.
Once you remove Speccy from your PC, download the latest version and install it and the problem should be completely resolved.
6. Install the latest updates
If you keep having problems with Speccy, perhaps the best way to fix the problem is to install the latest updates. Sometimes issues with Windows 10 and other applications can appear if your system is out of date, and to fix that problem you need to update Windows to the latest version.
Windows 10 installs the latest updates automatically for the most part, but sometimes you might miss an update or two due to certain glitches. However, you can check for updates manually by doing the following:
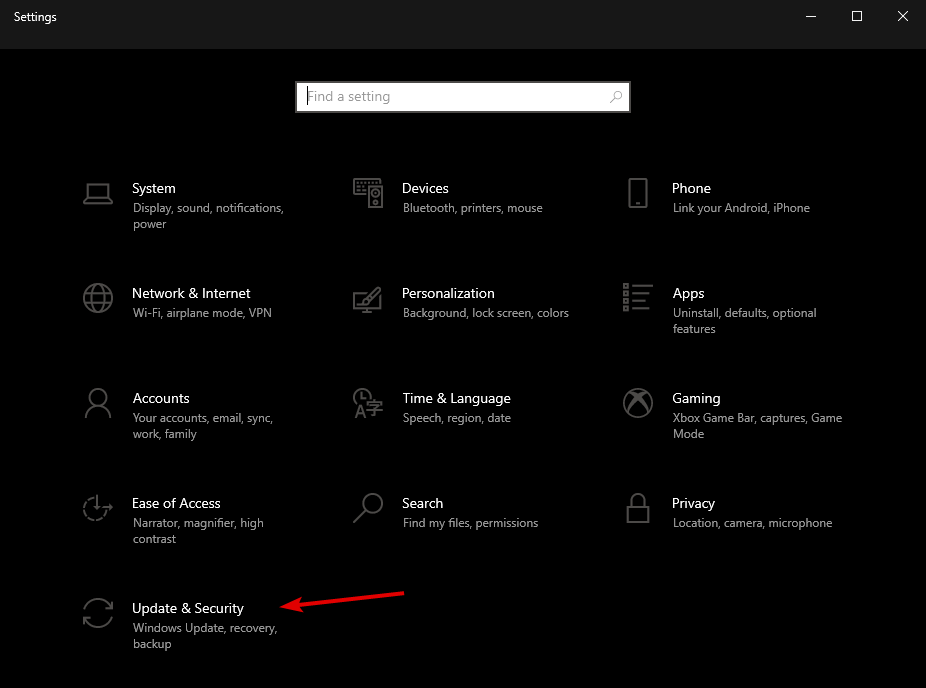
Open the Settings app navigate to the Update & Security section.
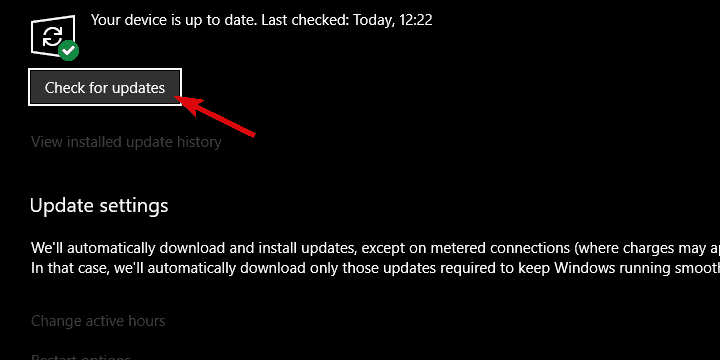
In the right pane, click the Check for updates button.
Windows will now check for available updates and download any available updates automatically in the background. Once the updates are downloaded, just restart your PC to install them. After updating your system to the latest version, check if the problem is still there.
7. Try using a different application
Speccy is a simple-to-use application that allows you to easily monitor your hardware. However, this isn’t the only application that offers these features. If Speccy is crashing on your PC and the previous solutions didn’t fix the problem, perhaps this is a good time to consider using a different application.
AIDA64 Extreme offers the same features as Speccy, but it also will show you some advanced information that Speccy might not offer. If you didn’t manage to fix the problem with Speccy, or if you want a more advanced tool, consider trying out AIDA64 Extreme.
Speccy can be a quite useful application if you want to monitor your PC or find out your computer specifications. You can learn how to use Speccy on Windows 11 for accurate hardware monitoring and system information once it’s running smoothly again.
Filing tax returns is something that most people dread doing simply because of how inconvenient and annoying it can get really fast. The newer generations have a great advantage on their side in the form of the internet and specifically the Windows Store. Microsoft’s app purchasing platform, Windows Store, now hosts a new app which deals with filing taxes.
The application is called TurboTax and it focuses on facilitating the process of filing tax returns. One of the best characteristics of this app is that it is free and allows users to simply install it and give it a try rather than have to test their luck and potentially buy an app they won’t be using.
There are many benefits to using this app
Those that are interested about getting TurboTax can get it right now off of the Windows Store where it is available. It will provide an array of features and functionalities revolving around taxes, and it will also open the way to a very competent and helpful customer support service.
Filling out entry forms can be a real pain, but this app is also helpful by removing the necessity of filling them out manually. Through the app, W-2 forms as well as 90’s forms can be filled out automatically and thus users save a lot of time and effort each time they do their tax return.
The level of intricacy possessed by the app is determined by the version of the app that is used. There is a free version which works just fine for things like state or federal returns. However, those that want to get deeper into things like rentals, stock bonds or investments will have to get the Deluxe version of the app.
Tax return support and representation
There is also a solution for those that don’t necessarily know or aren’t completely sure how to do their tax returns. For them, there is the Expert Review service which has an expert look over the manually done tax return. All changes that need to be made will be highlighted and users will get the chance to modify them before actually submitting them for good. The expert reviewing the tax return can also help and represent users in the eventuality in which they are contacted by the IRS.
However, Windows users reported that they experienced CCleaner error r6002 which crashes the active program window and generates computer freezes. Meanwhile, the reason for CCleaner error r6002 may be due to the following reasons:
Virus or malware infection
Corrupt Windows registry
Intrusive Piriform programs
Incomplete CCleaner installation
Hence, Windows Report Team has compiled the best solutions for you to solve the CCleaner error r6002.
Viruses and malware can cause CCleaner error “R6002 floating point support not loaded”. Hence, run a full system scan on your PC to remove every possible virus corruption. There are several third-parties antivirus software around that you may use.
You can also use Windows’ built-in antivirus, Windows Defender. Here’s how to run a full system scan on Windows 10 Creators Update:
Go to Start > type ‘defender’ > double click Windows Defender to launch the tool.
In the left hand pane, select the shield icon.
In the new window, click the “Advanced scan” option.
Check the full scan option to launch a full system malware scan.
Alternatively, we strongly suggest you check out some of the best antivirus software for your Windows PC and install them on your computer. Some third-party antivirus programs, such as TotalAV is ideal for virus removal.
Solution 2: Perform PC Registry cleanup
One of the major causes of the CCleaner error r6002 is due to a missing or bad system file. Meanwhile, the System File Checker scans for corrupt or missing files and repairs them. Here’s how to run an SFC scan on your Windows 10 PC:
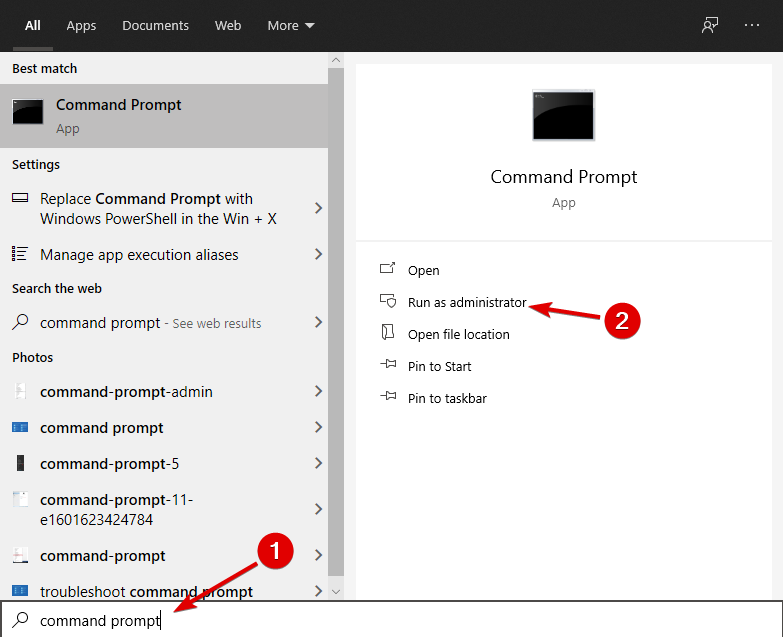
Go to Start > type cmd > right-click Command Prompt > select Run as Administrator.
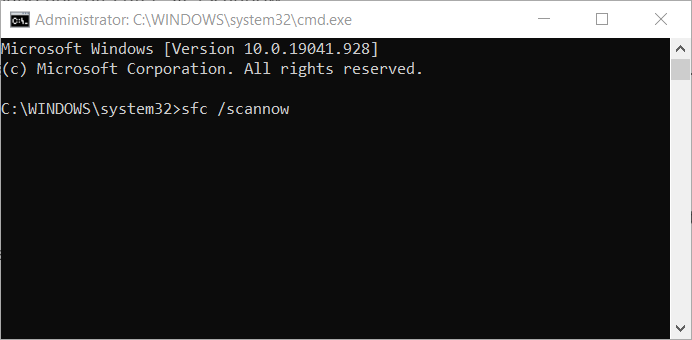
Now, type the sfc /scannow command.
Wait for the scanning process to complete and then restart your computer. All corrupted files will be replaced on reboot.
However, if this method does not prevent CCleaner error r6002, you may proceed to the next method.
Solution 3: Perform System Restore
Safe mode is a diagnostics mode in Windows which starts your PC with only basic files and drivers running.
However, you can perform system restore in safe mode to revert back to a certain restore point on your system before you started experiencing CCleaner error r6002. Here’s how to do this:
Shut down your PC and turn it on again.
Navigate to the “Run in Safe Mode” option and hit “Enter”.
Go to Start > Type “system restore” and then hit “Enter”.
Follow the prompts to revert back to a certain restore point.
Wait for the process to complete, and then reboot.
Note: Ensure you are able to identify the restore point dated before the error message display. Also, System restore does not affect any of your files, documents, and personal data.
Solution 4: Use MalwareBytes
Another means of fixing CCleaner error r6002 is by using MalwarebytesAdwCleaner. This program is a free utility that will scan and remove malware from your PC.
Here’s how to download, install, and use MalwarebytesAdwCleaner on your Windows PC:
Double-click on the download .exe file and follow the prompts to complete the installation.
After installation, right-click on the MalwarebytesAdwCleaner icon and then select “Run as administrator” to open the program.
In the MalwarebytesAdwCleaner display, click on the “Scan” button to commence the scanning operation.
After the completed scan, click on the “Clean” button.
Now, click “OK” when prompted to reboot your PC to complete the cleaning.
Solution 5: Reinstall CCleaner
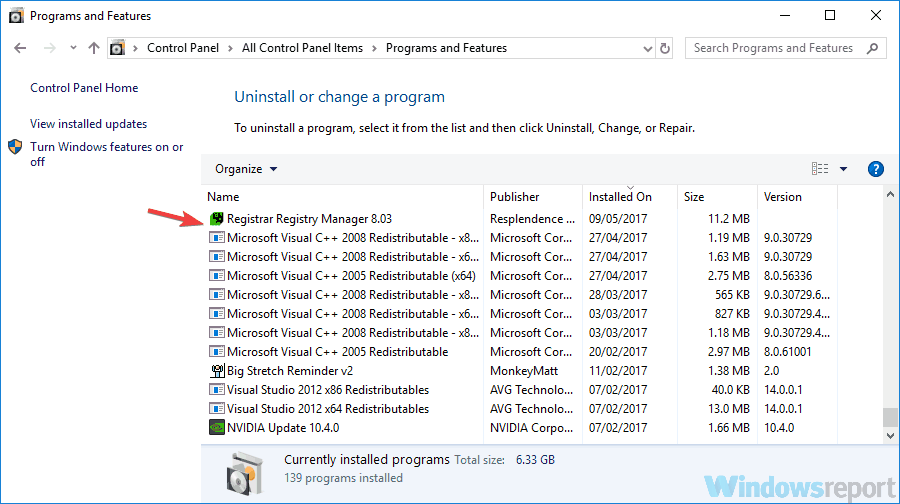
Some Windows users reported that they were able to fix CCleaner error r6002 by simply reinstalling CCleaner. To reinstall CCleaner, you have to uninstall it from Programs and Features, and then install it afterward. Here’s how to do this:
Click Start button, and then click Control Panel.
Click Programs and Feature, or Uninstall a Program under the Programs category.
In the list of installed programs, search CCleaner
Click Uninstall button which appears at the top of the program list and follow the instructions to uninstall CCleaner
Double-click on the executable file and follow the prompts to install CCleaner.
In addition, you may consider downloading Microsoft Visual C++ 2010 Redistributable Package ; this installs runtime components of Visual C++ Libraries required to run applications such as CCleaner developed with Visual C++ on a computer.
Solution 6: Run Windows Update
Microsoft constantly releases Windows updates so as to improve the system’s stability and fix various issues and errors on your PC. However, you can follow these steps to update your Windows OS:
Go to Start>type “update” in the search box and then click on “Windows Update” to proceed.
In the Windows Update window, check for updates and install the available updates.
After the update is complete, restart your Windows PC.
Did any of these solutions help? Let us know in the comments section below.
Back in the beginning of November 2013, we shared with you the news according to which Acronis True Image has received full Windows 8.1 support and now, quite a while after that, sister-software Acronis Disk Director gets the same treatment.
Acronis International has released Acronis Disk Director 12 software, a tool which is most known as an all-in-one partition and drive management product. The present release doesn’t come with big new features in terms of usability, but it finally brings full Windows 8, compatibility and also support for Windows 8.1. Also, improved WinPE 4.0 and 5.0 support suggests that the latest version of Windows Assessment and Deployment Kit when creating bootable rescue media will be possible, as well.
Acronis Disk Director will now work flawlessly on Windows 8.1
Also, both WinPE and Linux-based boot discs are now fully compatible with UEFI-based systems, which is another feature that has been requested for far too long by its users. Just as before, you can use Acronis Disk Director to create and work with basic, dynamic, spanned, striped and mirrored volumes; it’s possible o resize, move, copy, split or merge volumes without losing any data. Besides this, you can use tools to clone drives, recover lost and damaged partitions, view and edit volumes at the sector level and many, many other features.
Acronis Global Consumer Business Senior Vice President and General Manager Nat Maple said the following:
With most computers now shipping with one large single partition hard drive, the most basic form of data protection available is to create different logical partitions for the operating system and your personal data, protecting your data in the case of an issue or infection of the operating system
You can get Acronis Disk Director 12 for $49.99 ($29.99 is for the upgrade) for a single PC and $79.99 ($47.99 for the upgrade) for three PCs.
If you experienced MSI.netdevicemanager40 fatal error from MSI.netdevicemanager40 when installing HP printer software, read on. We’ve got you covered. Here’s what a Windows user reported to us:
Hello Windows Report, I recently bought a new HP Officejet 6000, I wanted to install the printer software from the CD, but instead I got this error message: Fatal error MSI.netdevicemanager40. Any help pls.
This fatal error revolves around the system and the installation package. The Windows PC might have issues with corrupted system drivers and/or the Windows registry, and the installation software might be faulty.
However, we have responded to the MSI.netdevicemanager40 fatal error problem by enlisting germane solutions for this problem.
How can I fix MSI.netdevicemanager40 fatal error?
1. Run an SFC scan
Go to Start > type cmd > right-click Command Prompt > select Run as Administrator.
Now, type the sfc /scannow command.
Wait for the scanning process to complete and then restart your computer.
All corrupted files will be replaced on reboot.
Corrupt or missing system files can prevent the printer’s installation from being successful, thereby resulting in MSI.netdevicemanager40 fatal error.
Therefore, you can fix this error by using the Windows built-in system file checker tool. This tool checks for file integrity violations and fixes corrupt system files.
Nevertheless, if you cannot install the printer installation package afterward, you may proceed to the next method.
2. Uninstall any/all HP printer drivers/software
Software conflicts might occur while attempting to install a new HP printer in the presence of already installed HP printers. In simpler terms, HP applications share similar components. Therefore, when attempting to install a new HP printer, application components of preinstalled HP printers prevent the ‘override’ of those components. This results in MSI.netdevicemanager40 fatal error.
So, you may have to uninstall all existing HP printer software from your Windows PC.
However, before you do this, we recommend removing preinstalled HP printers from available printers on your device list. Here’s how to do this:
Go to Start > Type ‘View Devices and Printers’ without quotes, and hit ‘Enter’
In the Printers and Faxes section, right-click on the preinstalled HP printer
Select the ‘remove printer’ option, and follow the prompts.
Afterward, you may proceed to remove the existing HP printers’ software from ‘Programs and features and then install the new one.
Here’s how to do this:
Click the Start button, and then click Control Panel.
Click Programs and Feature, or Uninstall a Program under the Programs category.
In the list of installed programs, search HP printer.
Click the Uninstall button, which appears at the top of the program list, and follow the instructions to uninstall the HP printer software.
Restart your PC afterward.
Now, take out the new printer’s installation CD, and insert it into your system
Follow the prompts to complete the new install process.
In addition, you may consider downloading Microsoft Visual C++ 2010 Redistributable Package ; this installs runtime components of Visual C++ Libraries required to run applications such as HP printer.
Right-click the Windows 10 taskbar and select Task Manager.
Select the Task Manager’s Start-up tab shown in the shot below.
Now select your anti-virus utility and press the Disable button.
The anti-virus software will no longer start when you reboot Windows.
Some Antivirus programs have ‘false positive’ issues; this implies that they perceive harmless codes as virus, and then blocks them from running. This may be the reason for MSI.netdevicemanager40 fatal error on your Windows PC.
Therefore, you need to disable your antivirus program, install the HP printer’s software, and then enable the antivirus program afterward.
4. Run Windows Update
Go to Start
In the search field, type Windows Updates
Click on Windows Updates Settings from the search results
Click Check for updates
Install the latest Windows Updates
As we have said earlier, Microsoft Windows responds to issues like MSI.netdevicemanager40 fatal error by releasing patches to fix issues. In addition, constantly updating your Windows OS keeps your PC fresh and up-to-date. This also helps resolve any other issues or difficulties you may be experiencing.
After successfully updating your Windows PC, you may install the printer installation package. But, if you still experience MSI.netdevicemanager40 fatal error, you may proceed to the next method.
5. Clear spooler files and restart the spooler service
Click Start
Go to the search field box and type Services
Click Services from the search results
Under Services, double click Print Spooler
Select Stop then Ok
Go to the search box again and type %WINDIR%system32spoolprinters
Select the file folder. You need admin privileges to access it.
Delete all the folders in the folder
Under Services, double-click Print Spooler again
Click Start
Go to the Startup Type list
Select Automatic box
Click Apply, then click Ok
Install the printer software afterward.
Some Windows users bypass MSI.netdevicemanager40 fatal error issue by clearing spooler files, and then restarting the spooler service.
In conclusion, if the solutions did not fix MSI.netdevicemanager40 fatal error problem, contact your printer’s manufacturer (HP) for more troubleshooting and support based on this error problem.
NBA 2K18 is an addictive basketball simulation game that offers gamers the chance to become the best basketball players in the world.
Unfortunately, many gamers reported that the overall NBA 2K18 gaming experience leaves a lot to be desired, even if it does bring lots of new features and awesome graphics.
The game is affected by a plethora of issues, ranging from minor bugs to severe problems that actually prevent gamers from playing the game.
In order to help you fix some of the most frequent NBA 2K18 issues, we’ve compiled a list of workarounds that should quickly resolve these problems.
How do I fix NBA 2K18 issues?
1. Install the latest Windows updates
Press the Windows Key + S and type in Settings.
Select Update & Security.
Then, select Windows Update and click on Check for updates.
Let the Windows search and finish the updating process.
Make sure that you’ve installed the latest Windows updates on your PC in order to enjoy a smooth gaming experience.
To access the Windows Update section, you can simply type follow the instruction above. We have to mention that Microsoft includes lots of security changes in their Windows update.
Therefore, we advise you to keep your operating system up-to-date for your safety and the well-being of your PC.
2. Install the latest graphics driver updates
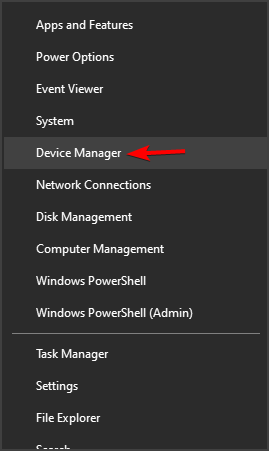
Press the Windows Key + S and search for Device Manager.
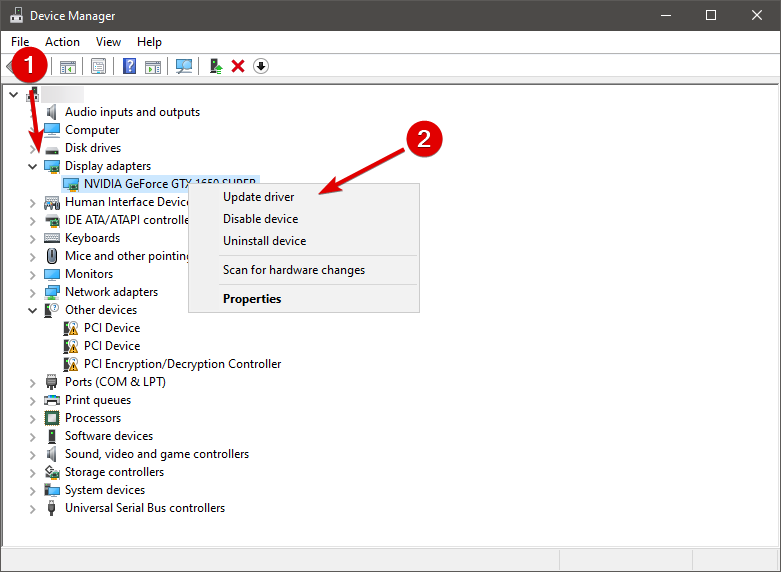
In the Device Manager, go to your Display adapter and expand it.
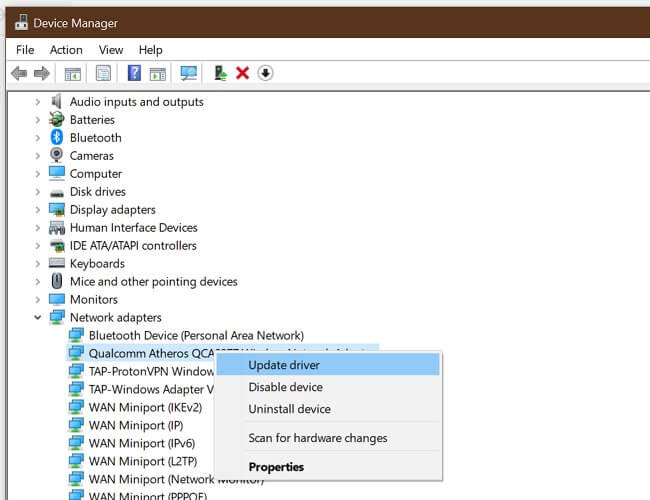
Right-click on your GPU and select Update driver.
Make sure you’ve installed the latest drivers on your computer. Using the latest optimization resources significantly improves your gaming experience.
You can also use the links below to check if you’re running the latest graphics drivers on your Windows computer. Also, make sure to use the dedicated GPU while playing NBA 2K18.
One other way to update your GPU drivers is using third-party software that will do it for you. The program will constantly scan your PC’s hardware for newer available versions.
Never worry about out-of-date drivers again, and never get through the trouble of manually updating them thanks to this automated tool.
3. Reset your graphics card software
How to reset NVIDIA Control Panel:
Right-click on your desktop.
Select NVIDIA Control Panel
Go to Manage 3D Settings and click Restore Defaults.
How to reset AMD Catalyst Control Center
Right-click on your desktop then select Catalyst Control Center (aka VISION center)
Go to Preferences and click on Restore Factory Defaults.
Graphics cards come with their own software: NVIDIA comes with the NVIDIA Control Panel and AMD has the Catalyst Control Center.
The two programs allow users to set up profiles that can potentially interfere with NBA 2K18. By resetting them to default values, you allow the game to take control over the graphics settings.
Right-click on Command Prompt and selectRun as Administrator.
Now type the following command sfc /scannow
Wait for the scanningprocess to complete and then restart your computer.
All corrupted files will be replaced on reboot. Launch NBA 2K18 again and check if the issues persist.
The simplest way to repair your registry is to use a third-party dedicated repair tool. Don’t forget to first back up your registry in case anything goes wrong.
You can also use Microsoft’s System File Checker to check for system file corruption. The utility verifies the integrity of all protected system files and repairs files with problems when possible.
5. Update DirectX
DirectX is a set of tools that allows games to work directly with your PC’s video and audio hardware. They are required for playing any game, so they are mandatory.
Installing newer DirectX versions isn’t that hard. For more information about the latest DirectX version and how to install it, go to Microsoft’s Support page.
6. Fix NBA 2K18 data user file corruption issues
Go to Dashboard and select NBA2k18.
Choose Manage game then go to Saved data.
Clear Reserved Space files.
Exit and go to Settings, then choose All Settings.
Open System then open Storage.
Select Clear local saved games, then restart your Xbox One.
Start Nba2k18 and wait for files to be synced.
Once the files are synced, you should be able to continue your game.
If you are prompted with the File is corrupted or File is missingerrors on your Xbox One, this workaround can help you.
More specifically, you’re going to delete the corrupted files from your console and then retrieve them from cloud.
In order to boost your game performance and get rid of slowdowns, lag, low FPS, and other annoying issues, we recommend downloading Game Fire.
To fix corrupted files issues on PC, you can also verify the integrity of your game files on Steam:
Restart your PC and launch Steam
Go to the Library section, then right-click on NBA 2K18 and select Properties.
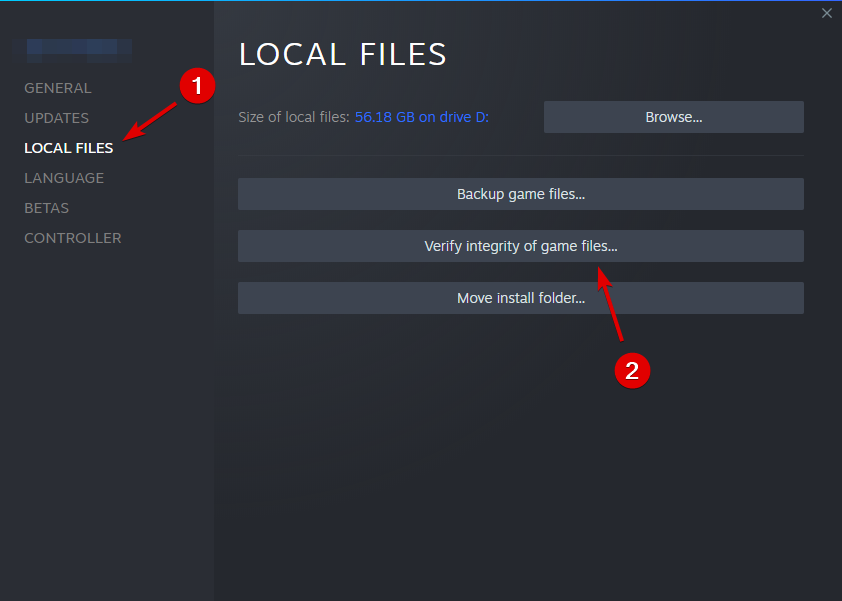
Select the Local files tab and click the Verify integrity of game files button.
Wait until Steam finishes the task, then launch the game again and check if the issue persists.
7. Restart your network
PC:
Go to Start and type settings. Double click the first result to open the Settings page
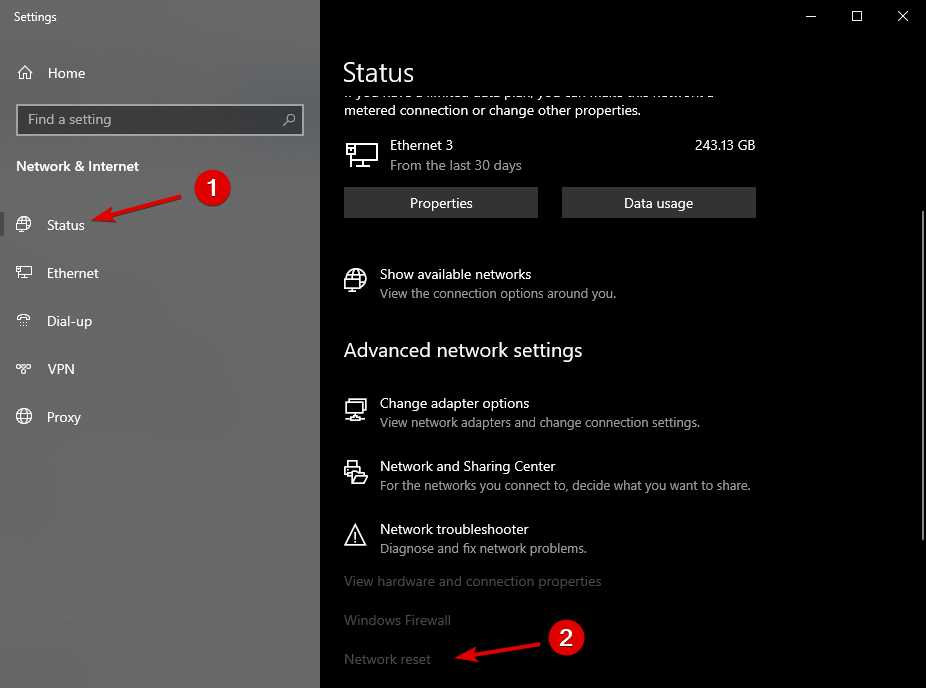
Go to Network and Internet, then Status, and scroll down to Network reset.
Hit the Reset now button and confirm your choice.
Setup your network again.
An alternative workaround is to manually switch your network. It seems that some online modes can occasionally cause file corruption. Follow the instructions below in order to resolve this issue.
Xbox One:
Go to Settings then go to Network Settings.
Choose to Forget your network or Go Offline.
Shut down the console and unplug your Power Source.
Start Xbox One again.
Enable your Network then start the Game.
8. Disable background apps
On Windows 10, you can disable background apps using the Settings page
Go to Start, then type settings and double-click the first result.
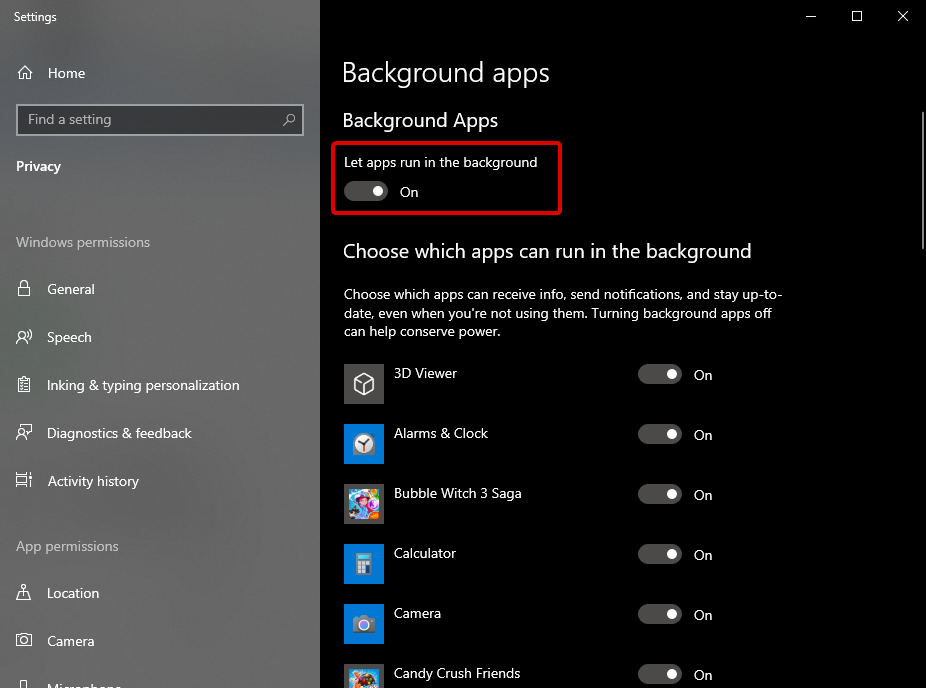
Go to Privacy, scroll down to Background apps, then turn off the background apps toggle.
Restart your PC and check if the issue persists.
Sometimes, background apps may interfere with your games. Try disabling them to see if this action fixes some of the NBA 2K18 bugs that you’re experiencing.
We hope that the solutions listed above helped you to fix some of the most common NBA 2K18 issues.
If you’ve come across other workarounds to fix the bugs affecting the game, you can help the gaming community by listing the troubleshooting steps in the comment section below.
According to the suits, Microsoft and Amazon have both failed to get informed consent from residents before initiating its facial recognition to collect, store and analyze their biometric data.
Breaking down the suits per their respective defendants, Amazon allegedly scans the faces in photos uploaded to its Prime Photo storage service, while Microsoft violated Illinois resident’s privacy rights in similar fashion as it partnered with Uber for bio authentication.
The suit alleges, however, that Uber’s “Real Time ID Check,” unbeknownst to drivers, works by providing a picture of the individual to Microsoft’s API, which then extracts the driver’s facial biometrics to build a geometric template that is then compared against the template from their original picture. Per the suit, Microsoft has failed to obtain proper consent and provide required disclosures to Illinois Uber drivers before collecting and storing their biometric data.
Beyond, the consent issue, Uber driver Mario Pena who launched the BIPA-related suit questions the security implications of Microsoft’s involvement as it relates to fraud and ID theft perpetuated by his own biometrics stored on Microsoft’s servers.
Microsoft has attempted to dance a fine line on communicating its intents and actions behind its facial recognition tech. Despite publicly touting its decision to shelf its efforts to partner with local law enforcement on facial recognition software last year over similar concerns presented in the new class action lawsuits, Microsoft was found to have ultimately been turned away by law enforcement prior to its announcement.
Since last summer, Microsoft has publicly maintained its position in championing federal legislation that would regulate government surveillance and the use of facial recognition technology.
Microsoft tends to announce company-wide reorganizations in mid-summer and 2021 appears to be no different.
Microsoft CEO Satya Nadella primed the reorg well ahead of its planned merger of its Global Sales and Marketing Organization and Worldwide Commercial Business, by announcing 37-year company veteran Jean-Philippe Courtois would not be leading the newly combined division as expected.
Courtois, who currently heads up Microsoft’s Global Sales, Marketing & Operations group would have been the likely executive to head up the company’s reorg division.
However, according to GeekWire, Nadella alerted Microsoft employees that Courtois will instead be splitting his time between data expansion and cloud business projects at the company as well as personal interest that include the entrepreneurial foundation Live for Good Foundation.
Instead, eight-year company veteran Judson Althoff has been tapped to lead Microsoft’s reorg that’s scheduled to take effect July 1, 2021.
Structurally speaking, Althoff appears to report to Nadella directly. The newly reorg Sales and Marketing and Commercial Business divisions has puts yet another exclamation point on Microsoft’s efforts to streamline its sales and support of its fastest growing product, Azure.
In March of this year, Microsoft’s move of 15,000 employees was the latest puzzle piece put into place to address its sprawling cloud business as it established the Digital Transformation Platform Group.
Back in July of 2020, Microsoft once again announced a reorg that focused on establishing a new consulting arm to, in some part, address its field sales of cloud computing solutions.
There’s a software for almost everything these days and the newsletter software is one of them.
These type of software programs add to the efficiency of a business system and help promote their brand.
A newsletter is one such important aspect of a business and it vastly helps with brand’s email marketing. And, the best software to create a newsletter helps accomplish that effortlessly.
There are a wide number of powerful tools available these days that can help create and manage email newsletters easily.
While users may choose any tool for regular needs, there are certain features specific to only certain tools.
So, instead of choosing a tool a blindly, we suggest you check our recommendations for the best email newsletter tools.
Here’s a quick list of some of the best software to create a newsletter.
Create enticing email newsletters with these tools
SamLogic MultiMailer 2014
For those looking for a convenient tool, SamLogic MultiMailer 2014 is one of the best software to create newsletters.
While it creates newsletters seamlessly, it also sends the newsletters to the desired recipient easily.
As a part of the process, it creates HTML messages in graphics editor that looks like a word processor. This makes the entire process easy to use even for those with no knowledge in HTML scripting.
It comes with a native newsletter wizard that enables users to build a basic template which can be later customized based on needs.
The program helps users create notable HTML or plain text newsletters that may include images, tables, colors, fonts, and more.
In addition, users can also add sound and attachments to the HTML newsletters. Users can also data fields in the message that may help in creating personalized messages.
Besides, the integrated database manages the mailing lists just right. It also allows users to import email addresses and contact information from platforms like Oracle, Outlook, MS Excel, etc.
Users can also get the email delivery status from the status tab in the software. While the statistics tab in the software offers detailed data about the mailings, the software also handles the email bounces efficiently.
While the Email Platinum Customer Bulk Emailer does not exactly create a newsletter, but it does sort your email addresses. Moreover, it can help users enhance other aspects of the newsletter.
This means that it automates the search engine marketing process by automatically submitting the email addresses and the URL entered to the different search engines, live.
All that the users need to do is to enter the email address and the URL and it directly submits them to the separate search engines using a browser format.
Users receive the feedback from the format ensuring that the recipient indeed received and accepted the URL and the email address. The status is displayed live on the special browser pane.
In addition, it offers free ads through free web ads helping users to list their offerings. Users can submit endless URLs and webpages to all the possible search engines using the power submitter.
Meta tag generator is another feature that activates the meta tags such as, keywords, title, and description that can be formatted in HTML source code.
These codes are then ready to be copied and pasted into the webpage. While the submission log keeps a record of the data submitted, the code wizard offers a range of tools to create amazing JavaScript effects.
Popup magician and sitemap maker are among its other significant features.
Price: free trial available, upgrade available at $29.97.
Use Email Platinum Customer Bulk Emailer
PIMEX MailExpress
For those looking for a free alternative to the best software to create a newsletter, PIMEX MailExpress is the answer.
This tool offers a robust and effective method that helps reach customers and contacts through email.
This free program is just the right solution for an individual as well as for businesses helping them send newsletters and other important details.
What’s interesting is, users can personalize every message using plain text or HTML templates.
Since each message can be personalized, this ensures that all recipients receive the letters that are especially sent to them.
The software also helps import the complete lists email addresses in addition to the optional guidelines in either text or CSV format.
Newsletters form a critical aspect of the email marketing process of a business. Doing it the right way in and in an attractive manner, prove to be beneficial for the business in the long run.
Therefore, make a choice of your email newsletter software from the above list and get going with the marketing campaign.
In the plethora of malicious software, the special place is reserved for browser hijackers. Perhaps they’re not the most dangerous ones but they are probably the most annoying piece of malicious software you’ll ever encounter. One of those annoyances is known as safesear.ch. This is a prolific browser hijacker which is actively plaguing users for more than a couple of years rendering the affected browser (or browsers) completely useless.
For that purpose, we enlisted ways to remove it and explained what safesear.ch indeed is. Make sure to check it out below.
What’s safesear.ch and how to remove it from Windows 10
What’s the deal with the safesear.ch
When it comes to browser hijackers, the pestilence known as safesear.ch is right there at the top. This is a known browser hijacker which originated in old days when Internet Explorer was a viable browsing solution. In comparison to some others, it is rather resilient and a lot of common fixes do not apply.
You’ve probably got it via a third-party application where it was hidden within the installer. That’s why it’s important to get your software from trusted sources, as they tend to disclose the presence of PUP software. On the other hand, it can get on your PC in various other ways, so having the right protection is of utmost importance.
How does it operate? Well, it takes controls of your browser and takes over the default search engine, home page, new tabs, and extensions. Basically, it completely disrupts the functionality of the said browser. The affected user is basically in a trap and every new step just showcases that every part of the browser is under control of the safesear.ch.
Luckily, there are a few ways to remove it completely. And, no, you won’t have to nuke your system in order to save the browser.
How to remove safesear.ch
As we already stated above, this is a rather resilient browser hijacker. A lot of users give the browser reinstallation a go, but with no success. They weren’t as thorough as they should. We made sure to provide you with all needed steps (even if it’s an overkill to some extent but better safe than sorry).
The first thing you should do is completely remove all untrusted and/or suspicious programs from your system. After that, running the dedicated anti-PUP tool and antivirus scan seems like a good idea. And, finally, make sure to backup your passwords and reinstall the browser clean (completely, including the residual files). Delete all browser accounts, as the hijacker might return after you re-establish the account after the reinstallation.
This is how to remove the program from your computer plainly:
In the Search bar, type Control and open Control Panel.
Click on the “Uninstall a program” under Programs.
Remove any suspicious applications from the list.
Use CCleaneror another to remove the remaining files.
Restart your PC.
Our choice is AdwCleaner by Malwarebytes (free) but you can use any other specialized tool. This is how to utilize the third-party anti-PUP tool.
Wait until the tool scans your system and click Clean & Repair.
After the cleaning procedure ends, restart your PC.
Good internet protection is quite important as the precautionary, proactive measure, which is why we immensely recommend Bitdefender Internet Security 2018. On the other hand, you can use a good old Windows Defender for malware scans after the damage is already done. Here’s how to do it:
Open Windows Defender from the Start menu.
Choose Virus & threat protection.
Click the “Run new advanced scan” option.
Choose Windows Defender Offline Scan and click Scan now.
Finally, the only remaining thing to do is reinstalling your browser. We recommend using one of these uninstaller tools, with special emphasis on the recommended ones.
After that, the safesear.ch browser hijacker won’t bother you. If that’s not the case, make sure to tell us in the comments section. We’ll gladly help you.
There is no stopping the future and, as much as we all wanted a more futuristic way to store our data and conduct business, we have all become to fear how easy it is for it to be accessed by external entities.
The complexity of vastness of the storage clouds makes the detection and repelling of threatening events more and more difficult.
How can you tell if your security has been bypassed?
According to the specialists at Vectra AI, there are a few signs that indicate the fact that security for our Microsoft 365 or Azure has been compromised.
External Teams access and non-authorized, suspicious mail forwarding should be the first red flags when it comes to your, or your company’s cloud security. This could easily mean that an attack has already begun.
Regularly checking what accounts are part of the team in Office 365 is an excellent way to make sure that an external account has been already added.
This type of activity could indicate that a malicious third party has added an account under their control.
Another sign that you should keep your eyes open for is risky Office 365 Exchange operations, which could point to an attacker that is controlling Exchange in order to gain access to specific data or further attack progression.
Also, peculiar Azure AD actions may imply that attackers are already escalating privileges and also performing admin-level operations, after the account takeover.
Office 365 accounts that are downloading or sharing files and folders at a volume that was higher than normal, which could indicate a third party is using either SharePoint, or OneDrive to download functions to exfiltrate data, is another sign.
Tell the difference between friend and foe
Taking into consideration the examples above, you can understand that every activity that is being detected isn’t necessarily of malicious nature, which is why it’s paramount to have the right data before we take action.
It’s all about being able to determine and, also, tell the difference between what’s considered to be normal activity for your environment and what could be a potential issue that needs to be addressed.
People used to rely on the yellow pages to find and call a service professional if they had an emergency at home. Thankfully, those days are long gone.
Thanks to the brilliance of Internet technology, now we can simply look up a plumber or technician on our smartphones. More so, we can set up a job without even having to talk to someone.
We have prepared the best field service solutions that can be used by plumbing and electrical companies. These allow them to seamlessly collaborate with their clients and field workers.
What are the best plumbing and electrical software tools?
WorkWave
WorkWave is a software solution that facilitates a cloud collaboration environment between field workers and office technicians using mobile apps and desktop tools. It can be used by both plumbers and electricians.
The cloud-based service provides an intuitive graphical interface that makes it easy to navigate all features, send commands, and customize settings.
The dashboard shows an overview of all field workers and their status, including a real-time position on the world map, provided that it’s paired with the mobile app of the field worker. You can look up information with a search tool and filter results by zones.
WorkWave makes it possible to manage services, schedule tasks, and recurring jobs, and create one-time work orders, thanks to a built-in calendar that lets you assign individual workers or entire teams.
You can consult the revenue for each route in the dispatch board, handle unscheduled jobs, manage accounts, set up agreements for each account, as well as issue payments for the plumbers or electricians. Distinct sections of the program show you sales, billings, and reports.
Housecall Pro is another excellent choice when it comes to plumbing and electrical software solutions. It can only be used by people who live in the United States and Canada.
Available as a cloud-based service, it enables professionals to automate their tasks and communicate on a single platform.
The tool includes a mobile app for Android and iOS customers who can book services in just a few clicks. All data is centralized in the cloud, where the technicians can accept jobs and provide home services.
The specialists can use the web portal to respond and fulfill the client’s requests. This way, you can easily stay in touch with your customers and get notified of any issues.
Wrapped in a clean and stylish interface, Housecall Pro gives office managers the possibility to create and schedule jobs, dispatch plumbers, electricians and other service specialists on the field, as well as keep track of their progress.
With the help of this software solution, you can also issue invoices for each home service, process payments, and send emails as a marketing strategy. After paying for a successful service, customers get receipts automatically.
A free edition of Housecall Pro can be used by single operators, but not all features are unlocked.
Designed for businesses of any size, Ai Field Management is an elaborate software solution available in the cloud, which allows plumbers and electricians to communicate with their customers, manage jobs, and issue payments.
The graphical interface of the tool is simplistic and neatly organized, leaving no room for error. But that doesn’t mean that it has standard features. On the contrary, Ai Field Management is one of the most advanced in its industry.
There are three distinct sections: an administration panel for the company, a management panel for the customers, and another management panel for the workers.
It’s possible to organize the company’s assets, use a time-tracking tool, manage one-time and recurring jobs, issue payments for the workers, generate payroll reports, as well as keep track of revenue and commissions.
All jobs can be reviewed in a color-coded calendar, including their status. You can also manage the database of workers, including personal information and required actions.
Thanks to mobile apps available for Android and iOS, office managers can stay in touch with the field technicians, in order to constantly update their status and troubleshoot any problems.
What’s more, Ai Field Management can be integrated with multiple other software applications, such as QuickBooks for financial transactions, Slack for team collaboration, and Google Maps or Wave for GPS navigation.
Those who are interested in Ai Field Management can check out various monthly subscription plans.
Pros:
Lets you review the jobs in a color-coded calendar
Comes with different panels for different levels of control
Are you looking for the best auction listing software to install on your Windows 10 computer? Look no further, we have enlisted the best auction tools for you.
Auctioning has become easier for many businesses since the turn of the century, with selling just a matter of uploading your items online. This has led to the emergence of hundreds of auction listing websites with the popular ones being eBay, Amazon, Etsy, eBid, and Bonanza.
With auction listing websites, individual sellers may find it easy listing just few items manually. However, for small businesses that has different items to list, this would be time-consuming and not effective.
Hence, it is ideal to use auction listing software. These programs enable listing of several items at once and some give feedback on how your listings are performing. Also, this auctionprograms enable access to live auction events, where you can bid and auction antiques, and valuable items from the comfort of your home.
In addition, it is ideal that any auction listing software used should be compatible with multiple market platforms and have a good user interface. If you’re still contemplating which software is ideal for your needs, we have enlisted the best auction listing software available.
Auction listing programs for PC
Auction!
Ranked as the best auction listing software, Auction! enables accurate management of auctioning activities. The program which is available only on Windows OS enables users to organize and manage auction fundraising activities easily.
Also, the software has features for both silent and live auctions; therefore, users can view the progress of their auctions in the simple user interface.
Auction! has a unique event pager support, where you can easily plan your auctioning event to suit your preferences. The software gives detailed information about donation receipts, bidder invoices, item categories, reservations, and ticket sales.
In addition, Auction! is ideal software for auction activities as it has all the features needed to set up an auction bidding event. Furthermore, Auction! is compatible with various Windows Operating System from Windows XP up to Windows 10.
Auction Defender is a simple auction listing software that allows users to manage multiple listings on a single window. Auction Defender may look clogged up on the user interface; however, individual menu is placed strategically to provide scalability and precision.
The program is developed to give efficient and fast management of listings as users can track several listings at a time. This removes the need to constantly refresh listings as this is automatically performed by the program.
In addition, Auction Defender enables users to easily bid for items and allows for greater efficiency in winning bids. Users also receive alerts on changes in bidding such as high bids or outbids by fellow bidders. These features above make the software one of the best auction listing software to use for your bidding processes.
Auction Defender is particularly optimized for eBay and gives comprehensive features on other auction listing website. The program is free and secure to use as the company keeps your entire personal information safe using a secure encryption process.
BidStation is an excellent auction software by GoAuctionZoom which manages your auction information into a single database for easy auctioning. It uses a smart intuitive design which ensures easy access to several information. You also get tutorial videos which teach newbies how to use the software effectively.
Also, BidStation is ideal for new auctioneers as the full auction process which takes several hours can be easily prepared within minutes. Bid numbers, table numbers and check-in reports can be easily assigned to bidders and creation of custom auction bid sheets is performed easily.
There are several versions of BidStation software with each differing in terms of functionality and price. However, this best auction listing software is compatible with Windows OS.
When it comes to all-around auction program which gives comprehensive services, Auctionic is one of the best listing software. This auction listing software enables easy creation of listing and allows users to access hundreds of free templates.
Its comprehensive management toolbox allows users to easily import listings from the popular TurboLister and users can also use keyword optimization for listings. This keyword optimization enables you to rank highly on ecommerce websites which leads to more sales. Also, users can also add location and shipping preference to the listings. This enables proper management of places where items can be shipped to as well as the shipping client.
Another area where Auctionic excels is the feedback aspect of the software. For every listing sold, Auctionic sends instant prompts with information on the checkout and payment status. The messaging centre has a simple interface with all menus properly arranged to enable user precision and scalability.
Lastly, Auctionic is compatible with all versions of Windows OS from Windows XP to Windows 10; also, it can be downloaded for free.
All the auction listing software we mentioned above have been reviewed by our team of experts. It is worth mentioning that some of them may have contrasting features. However, their features and user base makes them rated as the best auction listing software available.
Do you know of any software which did not make our list? Feel free to let us know by commenting below.
Before you can create hostednetwork, you need to be sure that your wireless connection is working properly. If you have a laptop, be sure that the Wi-Fi button is pressed and that your wireless connection is active.
Keep in mind that problems with hostednetwork can occur if the Airplane mode is enabled, so be sure to turn it off.
2. Check if Microsoft Hosted Network Virtual Adapter is working
Press Windows Key + X and choose Network Connections.
When Network Connections window opens, locate your wireless network, right click it and choose Disable.
Wait for a few seconds and then enable wireless network connection by following the similar steps.
Close Network Connections window.
In order to create hostednetwork, you need to be sure that your wireless connection and Microsoft Hosted Network Virtual Adapter are working properly.
After doing that, you need to check if Microsoft Hosted Network Virtual Adapter is enabled in Device Manager. To do that, follow these steps:
Press Windows Key + X and select <str from the menu.
Go to View and check Show hidden devices.
Navigate to the Network adapters section and expand it.
Locate Microsoft Hosted Network Virtual Adapter, right click it and choose Enable.
Sometimes, the driver could be the problem. Check out this guide that will show you how to download the latest Microsoft Hosted Network Virtual Adapter driver.
After enabling the Virtual Adapter, do the following:
Start Command Prompt as administrator. You can do that by pressing Windows Key + X and choosing Command Prompt (Admin) from the menu.
When Command Prompt starts, enter the following lines:
netsh wlan set hostednetwork mode=allow ssid=NetworkName key=YourPassword
netsh wlan start hostednetwork
Keep in mind that you need to replace NetworkName and YourPassword values with the desired network name and password.
3. Change Power Management settings
Open Device Manager.
Once the Device Manager opens, locate your wireless adapter and double click it to open its properties.
Go to the Power Management tab and make sure that Allow the computer to turn off this device to save power is checked.
Click OK to save changes.
Restart your PC and try to start hostednetwork again.
You can fix the problem with hosted network simply by changing the Power Management settings.
4. Be sure that sharing is enabled
Open Network Connections.
Locate the network that you want to share, right-click it and choose Properties.
Go to the Sharing tab and make sure that Allow other network users to connect through this computer’s Internet connection and Establish a dial-up connection whenever a computer on my network attempts to access the Internet options are enabled.
In order to create hostednetwork, you need to make sure that sharing option is turned on.
5. Check if your wireless adapter supports hosted networks
In some cases your wireless adapter might not have the support for hostednetwork, and that can cause this problem to appear. To check if your adapter supports hosted networks, do the following:
Start Command Prompt as administrator.
When Command Prompt opens, enter netsh wlan show driver | findstr Hosted and press Enter.
Look for Hosted network supported option. If it says No it means that your network adapter doesn’t support this feature.
If your network adapter doesn’t have support for hosted networks, you should be able to fix it by downloading and installing the latest drivers for your network adapter.
5.1 Update drivers
Right-click the Start button and select Device Manager from the list.
Click on the Network adapters section to expand it.
Right-click the network adapter and select Update driver from the list of options.
If there is any better driver, the system will install it and you will have to restart your PC.
If you don’t want to install the network drivers on your own, we suggest you use a dedicated driver updater tool that’ll do that for you.
A professional driver updater tool will help you update drivers automatically and prevent PC damage caused by installing the wrong driver versions.
You just have to select the drivers you want to update and leave the rest for the automated software.
6. Change your wireless adapter properties
Open Device Manager.
Locate your wireless adapter and double-click it to open its properties.
Once the Properties window opens, go to the Advanced tab.
Select HT mode option and from the Value menu select Enabled.
Click OK to save changes.
According to users, you can fix this problem simply by changing your wireless adapter properties. If you have any other problems with your wireless adapter, we recommend you check out this guide that deals with the most common wireless adapter issues.
7. Try using a different driver
Open Device Manager.
Locate your wireless network adapter and double click it to open its properties.
Go to the Driver tab and click the Roll Back Driver button. If this option isn’t available, click Uninstall to remove the driver.
After removing the driver restart your PC and install the older version. Keep in mind that you don’t need to install anything if you choose the Roll Back Driver option.
If the hosted network feature is supported, you should have Virtual WiFi Miniport Adapter in Device Manager. According to users, sometimes network adapter drivers don’t install this feature, so you might want to consider using a different driver.
Some users are also suggesting to use Windows 8.1 drivers if the Windows 10 drivers aren’t Users reported issues with Belkin drivers, but after switching to Mediatek driver the issue was completely resolved. working on your PC.
In addition, few users recommend to roll back to the older version of the drivers or to uninstall your driver and install the older version instead.
After you roll back the driver, you’ll need to prevent Windows from automatically updating it. To do that, follow the simple steps in this complete guide.
There are several variations of this error, such as Hosted network could not be started. A device attached to the system is not functioning or Hosted network could not be started. The group or resource is not in the correct state to perform the requested operation.
You can easily fix any of these errors by using one of our solutions. If you have any other questions, don’t hesitate to leave them in the comments section below.
Open Windows Security from the notification area or use the search bar.
Select Virus & threat protection.
Open Virus & threat protection settings.
Disable both Real-time protection and Cloud-delivered protection.
Exit Windows Defender Center and enable the third-party antivirus again.
Due to system conflicts, there can be only one antimalware tool enabled at the time. The dual antivirus presence when both of them work in the background and provide real-time protection is a no-go.
So, you need to make a choice. Whether you’ll use a native antimalware tool or you’re more prone to use a third-party alternative.
Furthermore, even though most antivirus solutions will disable Windows Defender upon installation, some of them might not.
Therefore, in case you’ve made your choice and you just installed a third-party antivirus, make sure Windows Defender is disabled afterward.
This, of course, applies only if you’re using a dedicated antivirus solution. In case you want to use Windows Defender instead and the error reappears frequently, make sure to continue with the steps.
2. Update the system
In the Windows Search bar, type update and open Check for updates from the results.
Click on the Check for updates button and install any pending updates.
On the other hand, under the same section, you can open View installed updates history.
Now, click on Uninstall updates and then remove the latest security update.
The error with the 0x80016ba code can be caused by various things and the faulty definition update is one of them.
If you’re unable to locate Windows Defender or just unable to perform a scan, we advise you to update your system.
Security updates are the most commonly distributed on Windows 10 and there’s a chance that one of them inflicted the error at hand.
Now, updates are mostly provided automatically, but, depending on your settings, they might get postponed. Therefore, checking for updates manually isn’t a bad idea.
Also, you can uninstall recent Windows Defender-related updates and look for improvements.
3. Exclude large, compressed files from scanning (ZIP, ISO, CAB)
Create a new folder and name it as you wish.
Move all large, archived files in this newly created folder.
Open Windows Defender from the notification area.
Choose Virus & threat protection.
Open Virus & threat protection settings.
Scroll down and click on Add or remove exclusions.
Click on Add an exclusion and choose Folderfrom the drop-down menu.
Browse for the chosen folder and add it as an exclusion.
Some users noticed that large chunks of compressed data can also cause this error. Namely, the scanning procedure worked as intended until the compressed or archived files come into play.
That’s when the Defender crashes and the error prompt appears. This covers all conventional file formats, starting with ISO files and reaching to Microsoft-own CAB extensions.
In comparison to third-party tools, Windows Defender kind of makes file format exclusions hard to work with.
What you can do is group all large, archived files into one folder and exclude that folder from future scans. This should resolve the in-scan errors.
However, since those formats tend to be the source of malware too often, this carries a certain danger factor.
If you want to exclude a single folder from the Windows Defender’s scanning procedure, follow the steps we provided above.
4. Check the Windows Defender service
Uninstall a third-party antivirus and restart your PC.
Press Windows key + R to open the elevated Run command-line tool.
In the command line, type services.msc and press Enter.
Scroll down until you reach Windows Defender Antivirus Service.
It should start Automatically (this is mandatory) but, due to collision with an alternative tool, it can get switched to Manual. If that’s the case, right-click on it and open Properties.
Set its Startup type to Automatic and confirm the changes.
Restart your PC.
You can’t remove Windows Defender from Windows 10. It can be subdued (as we explained above), but its dedicated service will still work in the background.
Unless it’s stopped manually or by the third-party antivirus. That service is, on many occasions, the probable cause of Windows Defender failure.
Namely, the dedicated service should always run in the background, automatically starting with the system shell.
Especially if you’re using Windows Defender for either real-time protection or for scheduled scans. Now, for some peculiar reason, the Windows Defender service tends to get disabled.
Some third-party tools will limit it, but if you’re using solely Windows Defender for the sake of system protection, it should be enabled all the time.
For that reason, we recommend checking Windows Defender’s dedicated service as indicated in the steps above.
5. Reset your PC
Back up all files you deem important from the system partition onto a data partition, external drive, or cloud.
Press Windows key + I to open Settings.
Choose Update & Security.
Select Recovery.
Click Get started under Reset this PC.
Choose Remove everything and start the restoring procedure.
Finally, there’s turning to recovery options in order to resolve the issue completely and without chances of relapse.
Namely, some users suggest that the system upgrade is causing issues with Windows Defender on Windows 10.
As some users upgraded to Windows 10 over Windows 7, Microsoft Security Essentials were not uninstalled properly. This invokes the collision between the new native security solution and the old one.
For that purpose, the best solution that comes to my mind is (besides the clean system reinstall) to reset your PC to factory settings.
That way, you’ll have an effectively brand-new Windows 10 system without colliding Windows 7 files. We agree that this can be time-consuming, and you’ll lose some of your data.
But we reckon this is a small sacrifice for a good-performing system. In case you’re not sure how to reset your PC to factory values, make sure to follow the steps we provided above.
We hope that our solutions helped you fix the Microsoft Security Essentials error code 0x80016ba in Windows 10.
However, if you’re still suffering from this built-in software, you can always install one of the best antiviruses with unlimited licenses to upgrade your security.
We also recommend you a lightweight antivirus that provides complex digital security anytime you’re in trouble, namely TotalAV.
That’s a wrap-up. In case you have any alternative approach or maybe a question regarding the enlisted solutions, make sure to tell us in the comments section.
If you use Windows 10 the way it should be used, you’re probably installing updates on a regular basis. Or trying to. Windows 10 update issues are one of the most common problems that bother users, as almost every cumulative update, Preview builds, or major update fails to install on at least some computers.
This time, we’re going to talk about Windows 10 update error 8024a112 that prevents users from installing new updates, or Preview builds. This is, more or less, a common problem in Windows 10, but luckily, it’s solvable. And in this article, we’re going to show you how to do it.
How to fix Windows 10 update error 8024a112?
Update error 8024a112 can be problematic and in some cases, it can leave your system vulnerable. Speaking of these kinds of issues, here are some similar problems that users reported:
Windows Update failed – Windows Update can fail due to your antivirus, so if you’re having this problem, be sure to disable or to remove your antivirus software.
Windows restart error 0x8024a112 – Sometimes this problem can occur while your PC restarts. To fix this problem, disable all startup applications and try to install the update again.
Windows 10 update error code 0x8024a112 – This problem can occur due to Windows Update services, but you can fix the issue simply by restarting Windows Update components.
1. Restart your computer
The most common solution for this update problem can’t be simpler. All you need to do is restart your computer, and run Windows Update again. Microsoft mentioned this solution when some users failed to install Windows 10 Preview build 15060, and it proved as a good one.
So, before you try anything more serious, simply restart your computer, and try to download updates again. If it works now, you’re done. If not, check out some of the solutions listed below.
2. Reset Windows Update components
Update error 8024a112 can sometimes appear if Windows Update components aren’t working properly. To fix this issue, it’s advised that you reset update components. There are several ways to do that, but the simplest one is to use the command line. To do that, follow these steps:
Open Win + X menu and choose Command Prompt (Admin) from the list. You can do that by pressing Windows Key + X shortcut.
Once the Command Prompt opens, run the following commands:
After running these commands, check if the problem is resolved. If this process seems a bit complicated, you can always fix the issue by creating a reset script. Read through our article to find out how to create a WUReset script.
3. Disable antivirus
One cause for update error 8024a112 can be your antivirus software, and if you keep getting this error, we advise you to temporarily disable your antivirus software. If that doesn’t help, your next step would be to uninstall your third-party antivirus. Users reported that this error was caused by Avira and Norton, so if you’re using any of these tools, you might want to remove them.
Even if you uninstall your antivirus, you’ll still be protected by Windows Defender, so there’s no need to worry about your online safety. If removing the antivirus solves the issue, we suggest that you switch to a different antivirus solution.
4. Remove entries from your registry
According to users, sometimes update error 8024a112 can occur due to problems with your registry. However, you can fix the issue simply by removing the problematic entries. This is relatively simple, and you can do it by following these steps:
Press Windows Key + R and enter regedit. Now press Enter or click OK.
In the left pane, navigate to the HKEY_LOCAL_MACHINESOFTWAREMicrosoftWindowsCurrentVersionWindowsUpdateAuto UpdateRequestedAppCategories key and expand it.
Right-click 8B24B027-1DEE-BABB-9A95-3517DFB9C552 key and remove it. Before removing the key, it’s a good idea to extract it just in case anything goes wrong.
After removing this key, restart your PC and check if the problem still appears.
5. Perform a Clean boot
If you keep getting update error 8024a112 on your PC, it’s rather likely that a third-party application is interfering with your system and causing this issue to appear. However, you might be able to fix this issue simply by disabling all startup applications and services. To do that, just follow these steps:
Press Windows Key + R and enter msconfig. Now press Enter or click OK.
When System Configuration window opens, go to the Services tab. Now check Hide all Microsoft services and click the Disable all button.
Navigate to the Startup tab and click Open Task Manager.
Task Manager will now show you a list of startup applications. Right-click the first entry on the list and choose Disable from the menu. Repeat this step until you disable all startup applications.
Navigate to the System Configuration window. Now click Apply and OK to save changes and restart your PC.
After your PC restarts, try to perform a Windows update once again. If you manage to download and install the update, repeat these steps once again, but this time enables all startup applications and services.
6. Check your proxy
Another common cause for update error 8024a112 can be your proxy. According to users, the proxy can sometimes interfere with your system and cause this and many other errors to appear. However, you can fix this issue by doing the following:
Open the Settings app. Navigate to the Network & Internet section.
Select Proxy from the menu on the left. Disable all options in the right pane.
After doing that, check if the problem is still there. If you still want to protect your privacy online, a better choice would be a VPN.
7. Download the update manually
If you can’t update your PC due to update error 8024a112, you might be able to fix the problem by downloading the update from Microsoft’s Update Catalog. Before you can do that, you need to find the updated code of the update you want to download.
The update code has KB at the beginning, followed by an array of numbers. Once you find the updated code, you can download the update manually by doing the following:
Navigate to Microsoft Update Catalog website.
Enter the update code in the search box.
List of matching updates will now appear. Locate the update that uses the same architecture as your system. Click the Download button next to the update to download it.
Once you download the update, run the setup file and follow the instructions on the screen.
Once you install the update, the issue should be resolved and everything will start working again. Keep in mind that this method might not fix the core problem, but it will allow you to download and install the missing update.
8. Perform an in-place upgrade
If other solutions didn’t fix the update error 8024a112, your last option is to perform an in-place upgrade. Basically, this process will reinstall the latest version of Windows, while keeping all your files and applications intact. To perform an in-place upgrade, you just need to do the following:
When Media Creation Tool starts, choose Upgrade this PC now option.
Now choose Download and install updates (recommended) and click Next.
Wait while the setup downloads the necessary files.
Once the updates are downloaded, you just need to follow the instructions until you reach Ready to install screen. Now click Change what to keep.
Be sure to pick Keep personal files and apps and click Next.
After doing that, follow the instructions on the screen to complete the process.
Once you complete the in-place upgrade, you’ll have the latest version of Windows installed, and the problem with Windows update should be completely resolved.
That’s about it, in most cases, the first solution will be enough. But we listed more solutions, just to get you covered. So, we certainly hope at least one of our workarounds helped you to deal with the Windows 10 update error 8024a112.
If you have any additional comments, questions, or suggestions, feel free to let us know in the comments section below.
Even though there are a number of powerful fundraising software on the market, they tend to cost quite a lot. If you are running a new or small nonprofit, you won’t afford to pay the full price for a donations software because of other costs like salaries for your staff, paying your nonprofit’s location rent, etc.
Luckily, there is a good range of very useful free fundraising software on the market, that cover a great range of features that can be easily compared with the paid versions.
Today we will explore some of the best software options that allow you to easily manage all aspects of the fundraising process for your charity.
4 free fundraising software for your charity
Houdini Project
Houdini Project is one of the best free fundraising software available on the market, offering you an incredibly wide range of features. Most of the advanced features found in this software are usually found in other paid subscription software.
This software can cover a lot of areas, and simplify the process of managing your charity no matter how big it is, or how many donations you receive monthly.
You can process donations, create fundraising campaigns, set schedules for custom professional events, and also manage the database of donors, all from one user-friendly dashboard.
Using this software allows you yo easily build and share donation forms, and is perfectly suitable for individual nonprofits, but is also suitable for fully built crowdfunding sites and startups.
Because of it’s open source nature, this software is costantly upgraded and improved by users across the globe. This gives Houdini Project a great advantage compared to the other software options presented in this article.
Here are some of the best features found in Houdini Project:
Can process payments – automatic disbursals with reports (CSV), SSL 256-bit encryption
Can create event pages and print out tickets – tickets can be fully customized to fit your charity
Allows you to easily keep an eye on the amount of money raised in events, and the number of attendees
Gives you the power to observe the history of transactions from one dashboard – also offers powerful filtering and search options
Supported database management – unlimited number of records, detailed filtering, can send bulk email with filters, great set of email templates and drafts, etc.
Donation processing
Dashboard that encompasses recurring donations, analytics, and payouts
If you want to see a full list of features found in Houdini Project, you can visit the official website.
CiviCRM is another great free fundraising software that can help you manage all aspects of your charity from the comfort of one comprehensive dashboard. You can use this app to manage the registration process, create content, and manage all aspects of membership.
This software was designed specifically in order to help you run your charity and gather donations, keep track of donors, and communicate easily with them.
CiviCRM perfectly integrates the the front-end fundraising elements with the data collection part, making it one of the best software options on the market.
The tool can be set up to allow both individual and teams of donors to activate in peer fundraising, you can set a fundraising goal, create your own webpage, and send invitations to donate, all from one simple dashboard.
Here are some of the best features found in CiviCrm:
Contact management – stores entire range of contact data in one secure location
Configurable and customizable – you can hire a programmer and customize the installation to your needs
Membership management – users can sign up and pay online with automatic membership renewal reminders
Compatible with all accounting software
Case management – can create, manage and keep track of your workflows
Event management – everything you need to set up and manage all aspects of your event
Email marketing – can create and send bulk emails to lists with A/B testing and statistical analysis
Can track contributions and create professional reports
This software is a great online donation management software that offers you both a free and paid version.
The free version of this software has a great set of features that will surely get you started on your fundraising journey.
It bolsters a custom donation page, allows you to manage the fundraising event, gives you easy sharing options, and also allows for peer-to-peer fundraising.
The free version of ProcessDonation includes almost all the features found in the paid version, but is limited to only one campaign at a time, and with the capability to set just one administrator.
This shouldn’t be an issue for newly started fundraising charities, and once your charity grows, you can always invest in a paid version if needed.
Here are some of the features of the free version of ProcessDonation:
Great user-friendly dashboard that offers you an overview of all information in the software
Can manage all aspects of causes and edit details
Can produce professional looking email campaigns – this allows you to promote your campaign with ease
Auto-notifications and receipts
Allows you to start social media campaigns
1 standard donation page – with an option of buying a ‘custom’ donation page separetely
The paid versions of the software add a few other useful features:
Can manage crowdfunding campaigns
Allows you to manage every aspect of your donor database
DonorBox is another great software option to use if you need a free fundraising software.
This app offers a great range of features, and it is mostly focused on getting new donors, the processing of donations, and also helps you to keep your donor databases up to date.
You can create custom donation pages, allows multi-currency, and can also easily export reports to MailChimp or SalesForce.
DonorBox is a great software option, and can be used freely for charities that do not exceed the amount of $1000/month donations.
If you exceed that amount, you will need to pay a fee of 1.5% of your donations, to continue to get access to DonorBox dashboard and features.
Here are some of the best features found in the free version of DonorBox:
Beautiful customizable forms that can be modified to be compatible with any website by using CSS
WalletAsk – has the option to set up the campaign so that donators pay the fees, allowing you to save money
Great integration with Zapier, Salesforce, and Mailchimp
Allows your patrons to donate weekly, monthly, or annualy – allows you to secure regular funds
Donors can donate by debit card, credit card, Google Pay, Apple Pay, PayPal, etc.
In this article, we explored some of the best software options on the market that allow you to easily manage all aspects of your fundraising, CRM, and also payments and event planning.
We would love to know what software option you chose and why. Use the comment section below.
Yahoo has already started to notify Mail app for Windows 10 users that the app will be shut down next week, solidifying a rather negative trajectory for the app.
In September 2016, Yahoo admitted that in 2014, it suffered a huge data breach and over 500 million user accounts were hacked. That December, another security breach took place with a billion accounts affected. And this February, Yahoo warned everybody that the source code for generating cookies was stolen. Judging by all these events, we can’t really say that we’re shocked that Yahoo is in the process of terminating the Mail app.
Yahoo Mail app can’t be downloaded anymore
Even if the company has not yet made an official statement on the subject, various users have already reported getting a notification in the app informing them of its upcoming shutdown. Users have begun reporting on Twitter that the app has stopped working, suggesting that support for it has already begun to be cut off. The message that some users have been getting reads loud and clear:
Your Windows 10 app will stop working after May 22. Thank you for using Windows 10 app to check your Yahoo Mail. Going forward, please check your email in any web browser on your computer. You haven’t got the opportunity to complain about this, you just have the option of pressing “Got it.”
While the Windows Store listing for the Yahoo Mail app is still there and can be still seen online, it seems that the ability to download it has been removed.
We suggest you to read our article about best mail clients available on the market right now. Surely you will find a good alternative to Yahoo mail app.
Yahoo recommendations
However, Yahoo Mail users will still be able to login to their accounts on their Windows 10 devices. Yahoo recommends users should access the app using its website. There is also another option available and it involves choosing to set up your Yahoo Mail account in other apps such as Outlook or the Windows 10 Mail app.
The app is currently being taken over by Verizon and the company plans on merging Yahoo and AOL into Oath, a brand new company.
Although Windows 10 is a free upgrade for all Windows 7 and Windows 8 users, it doesn’t mean that upgrade is always smooth. User have reported error 0x800704DD-0x90016 during Windows 10 Setup, so let’s see if we can fix this somehow.
If you’re getting error 0x800704DD-0x90016 while upgrading to Windows 10 from Windows 7 or Windows 8, you need to follow this simple solution.
What to do if you’re unable to install Windows 10 due to an error 0x800704DD-0x90016?
0x800704DD-0x90016 error can be problematic and it can prevent you from installing Windows 10. Speaking of this error message, here are some common problems that users encountered:
Windows 10 Media Creation Tool error 0x800704dd 0x90016 – This error usually appears if you’re not using an administrator account. To fix it simply switch to an administrator account and try to run Media Creation Tool again.
0x800704dd-0x90016 Windows 10 laptop – This issue can also appear on your laptop. If you encounter this issue, just perform a clean boot and disable your Internet connection during the installation.
1. Switch to the administrator account
If you’re unable to install Windows 10 due to 0x800704DD-0x90016 error, the issue might be the lack of administrative privileges. To fix this issue, you just need to log in to Windows using the administrator account and try to run the setup again.
In case you don’t have an administrator account available, you can create one by doing the following:
Open the Settings app. You can do that quickly using theWindows Key + I shortcut.
When Settings app opens, go to the Accounts section.
SelectFamily & other people from the menu on the left. Now click Add someone else to this PCbutton in the right pane.
You’ll be asked to enter sign-in information for the new user. ChooseI don’t have this person’s sign-in information.
Now selectAdd a user without a Microsoft account.
Enter the desired username and click Next.
After you create a new user account, you need to convert it to the administrator account. To do that, follow these steps:
In Settings app go to Accounts > Family & other people.
Locate your new account and chooseChange account type.
Set Account type to Administrator and click OK.
After creating a new administrator account, switch to it and try to run the setup again.
2. Enable hidden administrator account
As we already mentioned in our previous solution, 0x800704DD-0x90016 error can occur if you don’t have the necessary privileges, but you can obtain those privileges simply by using an administrator account.
If you don’t want to create a new user account, you can always enable the hidden administrator account and use it to install Windows 10. All versions of Windows have this hidden account available, and you can switch to it by doing the following:
Start Command Prompt as administrator. The simplest way to do that is to press Windows Key + X and choose Command Prompt (Admin) or PowerShell (Admin) from the menu.
When Command Prompt opens, run net user administrator /active:yes command to enable the hidden account.
After running this command, the hidden administrator account should be enabled and you’ll be able to to access it. Once you access the new administrative account, try installing Windows 10.
If the process is successful, you can disable the hidden administrative account by starting Command Prompt and running net user administrator /active:nocommand.
This method is quite effective, especially if you don’t want to create a new user account, so you might want to try it out.
3. Disable/uninstall your antivirus
Having a good antivirus is important, but sometimes your antivirus can interfere with Windows 10 installation and cause 0x800704DD-0x90016 error to appear. Your antivirus will prevent certain applications from modifying the system files, and that will cause this issue to occur.
To fix the problem, it’s advised to disable your antivirus before you try to install Windows 10. If disabling the antivirus doesn’t help, it’s advised to completely remove your antivirus and try to run the setup again.
To make sure that your antivirus is completely removed, download the dedicated removal tool for your antivirus and run it.
Once your antivirus is removed, try to install Windows 10 again, and 0x800704DD-0x90016 error shouldn’t appear. If you manage to complete the installation process, you should consider installing a new antivirus on your PC.
There are several stable antivirus tools that won’t interfere with your system. We recommend you look for a tool with a strong threat database.
Along with that, make sure to get an antivirus with a transparent privacy policy, a small footprint and multi-layered protection.
4. Disconnect unnecessary USB devices
If you’re having 0x800704DD-0x90016 error while trying to install Windows 10, the problem might be your USB devices. Certain USB devices such as external hard drives, card readers, and such can sometimes interfere with Windows 10 installation.
To make sure that the installation process goes smoothly, we strongly advise you to disconnect all USB devices except your keyboard and mouse and your installation media. Once you disconnect all USB devices, you shouldn’t have any issues with them.
5. Perform a Clean boot
Third-party applications can sometimes interfere with Windows 10 installation, and if you keep getting 0x800704DD-0x90016, perhaps you should try disabling the startup applications and services. This is quite simple to do, and you can do it by following these steps:
Press Windows Key + R,entermsconfig and click OK or press Enter.
System Configurationwindow appear.Go to theServices tab. Now you need to checkHide all Microsoft services option and click the Disable all button.
Now go to theStartup tab and click Open Task Manager.
List of all applications will now appear. Now you need to disable all startup applications. To do that, right-click the first application on the list and chooseDisable. Repeat this for all entries on the list.
After disabling startup applications, go back to theSystem Configuration window. Now clickApply and OK to save changes and restart your PC.
After doing that, all startup applications will be disabled. Now try to install Windows 10 again and check if the issue is still there.
6. Disconnect from the Internet during the setup
According to users, if you’re trying to install Windows 10 using the ISO file, be sure to disconnect from the Internet. To be on the safe side, disconnect your Ethernet cable or in some cases you might even have to remove your wireless adapter from your PC.
After doing that, try to install Windows 10 again.
7. Download the ISO from on a different PC
Sometimes the ISO file you’re using to install Windows 10 isn’t good, and that can cause 0x800704DD-0x90016 error to appear. This can be a problem, but several users reported that you can fix the issue simply by downloading the ISO file on a different PC and using that ISO to install Windows 10.
This sounds like an unusual solution, but users claim that it works, so you might want to try it out.
8. Run Windows Update Troubleshooter
If you keep getting 0x800704DD-0x90016 error while trying to install Windows 10, you might be able to fix the problem simply by running Windows Update troubleshooter. Windows has many troubleshooters and they are designed to automatically scan your system and fix various problems. To run Windows Update troubleshooter, you just need to do the following:
Press Windows Key + I to open the Settings app.
Now navigate to Update & Security section.
Select Troubleshootfrom the menu on the left. Select Windows Update from the list and click the Run the troubleshooter button.
Follow the instructions on the screen to complete the troubleshooter. Once the troubleshooting is finished, try to install Windows 10 again.
We hope that our solutions were helpful and that you’ve managed to fix error 0x800704DD-0x90016 on your computer.
HP recently announced its new generation of HP ENVY mid-range Windows 10 laptops, bringing with it a new sleek design. The main element of its design is metal, offering a very fashionable and attractive look to these new devices. The improvements don’t stop at its design: these two new laptops offer top-tier performance and a spectacular viewing experience thanks to their edge-to-edge flush glass displays.
The first laptop has 15.6″ diagonal display while the second one offers a more generous 17.3″ display. If you need to carry your laptop to various places, the ENVY series of laptops is a good choice since both are a half a pound lighter than their predecessors. Smaller is better seems to be the motto at HP at the moment after the company launched the world’s thinnest laptop just the other day.
The HP Fast Charge feature lets customers charge the battery up to 90% in only one and half hours when powered off — again, a very useful feature for those users who are always on the go. The battery is slated to deliver up to 11 hours of life when fully charged, with both devices equipped with Intel Core i7 processors and Windows Hello support.
Below are the main differences between both ENVY laptops.
UMA or Intel Iris graphics for the smaller laptop vs. NVIDIA GeForce 940MX graphics for the bigger one
An optical disk drive is available only for the 17.3″ display laptop
An optional HD IR camera for the 15.6″ diagonal display laptop vs. an optional Intel RealSense camera for the 17.3″ display laptop
4.4 pounds and 17.95 mm thin vs. 6.6 pounds with a 25.45 mm profile.
The 15.6″ laptop should be available on HP’s site on May 25 with a price tag of $779.99 and starting from June 12, you should also be able to buy it from retailers. The 17.3″ laptop should make it to HP’s site on June 1. However, the device should be available three days earlier on BestBuy.com on May 29. Of course, its price is higher, starting at $1,029.99.
Resident Evil Village is, undoubtedly, one of the top games right now, and for good reason. The graphics are amazing, and the developments keep you always on your toes as they’re supposed to.
But like any other game since its release, the 8th title of the Resident Evil series has manifested its own bugs and problems.
Of course, not all of them can be avoided from your side but there are a lot of actions that can tip the balance in your favor.
Many users have reported crashes, and lots of problems with the sound, including stuttering, skipping, and cutting out.
In this article, we’re going to tackle those problems and more and help you fully enjoy this great title.
How can I fix the common Resident Evil Village bugs?
1. Make sure you have the minimum specs to run RE8
We’re sure you checked the minimum specifications required to play this game but just to get the elephant out of the room, here are the cold numbers for you to follow:
MINIMUM
RECOMMENDED
Requires a 64-bit processor and operating system
OS: Windows 10 (64 bit) Processor: AMD Ryzen 3 1200 / Intel Core i5-7500 Memory: 8 GB RAM Graphics: AMD Radeon RX 560 with 4GB VRAM / NVIDIA GeForce GTX 1050 Ti with 4GB VRAM DirectX: Version 12 Additional Notes: Estimated performance (when set to Prioritize Performance): 1080p/60fps. ・Framerate might drop in graphics-intensive scenes. ・AMD Radeon RX 6700 XT or NVIDIA GeForce RTX 2060 required to support ray tracing.
Requires a 64-bit processor and operating system
OS: Windows 10 (64 bit) Processor: AMD Ryzen 5 3600 / Intel Core i7 8700 Memory: 16 GB RAM Graphics: AMD Radeon RX 5700 / NVIDIA GeForce GTX 1070 DirectX: Version 12 Additional Notes: Estimated performance: 1080p/60fps ・Framerate might drop in graphics-intensive scenes. ・AMD Radeon RX 6700 XT or NVIDIA GeForce RTX 2070 required to support ray tracing.
If your rig doesn’t meet the necessary requirements, it’s normal to experience a lot of problems and bugs. If you need a more powerful PC take a look at our selection of the best Windows 10 gaming laptops.
2. Update your drivers
Manually updating your drivers can be time-consuming and a little bit tricky because you can miss some of the important drivers, and you could also install the wrong version which will, in turn, cause system instability.
A far more safe and fast solution is to use a dedicated, third-party tool for automatically updating your drivers. The solution recommended below can update all your drivers in one go.
It works with all versions of Windows and makes upgrading drivers a breeze. Outbyte Driver Updater may be set to discover outdated drivers automatically.
It is a useful program for updating drivers on your drivers. After installing the software, you only need to scan your computer. It will detect outdated drivers and request your permission to update them.
All you have to do is choose whether to update all of the drivers at once or one by one if you have reasons not to install specific drivers. You may rely on Outbyte Driver Updater to make such changes to ensure a proper upgrade with the most latest game-ready drivers.
If you want to do the entire process locally and know what you’re doing, you can also apply this solution:
Right-click the Start button and select Device Manager from the list.
Look for the graphics and audio drivers, right-click them and select Update driver.
If there are any new drivers, the system will automatically install them.
Restart your PC after updating the drivers.
Sometimes, manufacturers launch specific drivers and patches for them to fix certain problems in new and demanding games so you need to update them regularly.
Microsoft also includes a lot of new optional updates for drivers. You can reach them if to go to Windows Updates from Settings and click on View all optional updates.
You will see a dedicated section with Driver updates. You only need to check the one you like to install and hit the Download and install button under it.
3. Run Steam as an administrator
Look for the Steam icon on your PC.
Right-click on it and select Run as administrator from the list of options.
Confirm your choice when prompted.
This simple but powerful procedure will ensure that the game will be able to use all available resources on your system.
4. Verify the integrity of the game
Start the Steam app.
Go to Library and select Home.
Find Resident Evil Village in your game library, right-click on it, and select Properties.
Go to Local Files and select Verify Integrity of Game Files.
Wait for steam to perform a check on the files, then wait for it to download the necessary ones.
If some files from the game are missing, you will get crashes and all sorts of other problems to this is a very useful thing to do to fix it.
5. Select the correct playback device
Press the Windows key + I to start the Settings app.
Select System.
Click on Sound from the left pane.
Now set the correct playback device from the right pane and check the Device properties from underneath to check for the levels.
This is a dedicated solution for those who experience the no sound issue in Resident Evil game.
As simple as it may look, this procedure may fix the majority of sound issues with the game as sometimes you will see that it’s a different device set as the default one.
6. Perform a clean boot
Go to the search box, type msconfig, and select System Configuration.
After this procedure, you will have a clean boot environment and you can try and check if the game runs smoothly.
Exit the Safe Mode
Right-click the Start button and select Run.
Type msconfig, and press Enter.
Go to the Boot tab.
Deselect or uncheck the Safe Boot option box.
Restart your computer.
This procedure will complete the process and the next time you restart the computer it will boot normally.
7. Reinstall the game and the Steam client
Unfortunately, this is the last resort but if the steps above didn’t solve the problems, it’s probably the game or the Steam client that are creating the problem.
Start by uninstalling and reinstalling the game, and if that still doesn’t work, proceed with the same process for Steam.
That’s it! We hope that our solutions helped you fix the Resident Evil Village no sound bugs and crashes for Windows 10.
If you have any other suggestions or if you faced any other problems, don’t hesitate to communicate them via the comments section below.
Windows errors can happen for different reasons such as when your operating system is corrupted, or there’s malware and other emerging threats on your computer or the programs aren’t installing properly.
Other system conflicts or registry and Active X errors can also contribute to such errors including error 0x80010100, which can slow down your computer’s response time making it lag more.
Additionally, other causes of error 0x80010100 include system file damage (like corrupted system files), hardware or RAM decline, registry errors, excessive startup entries, or redundant program installations, among others.
There are many events that may result in system file errors such as incomplete installations, improper deletion of apps or hardware, improper computer shutdown, or if your computer is recovered from a virus or other malware attack. When any of this happens, the file system is corrupted hence missing and wrongly linked information, as well as files needed for the app to function properly.
Some symptoms of error 0x80010100 include system freeze, error message displays, slow boot, and slow system performance.
In order to fix this problem, you can run the Windows app troubleshooter, and then try other solutions outlined below.
Sometimes you may encounter error 0x80010100 with Windows Store so resetting the cache may fix the issue as it resets Store without changing account settings, or deleting installed apps.
Right click Start and select Run
Type WSreset.exe and press enter or click OK
Restart your computer so that the fix can work
Solution 2: Uninstall any damaged programs
Right click Start and select Control Panel
Find the damaged program(s) and right click on each then select Uninstall
After the uninstallation, restart your computer
Check if error 0x80010100 goes away. If not, try the next solution.
Solution 3: Clear all the junk and temporary files from your computer
Click Start
Go to the search bar and search for temporary, junk or cache files
Select on each and right click then select delete
After each has been deleted, restart your computer to effect the changes
Check if error 0x80010100 goes away. If not, try the next solution.
Solution 4: Run an antivirus program/software
If you have antivirus software, click on it to scan your computer. If you don’t have one, download a good antivirus program and install it, then use it to scan all the files or data on your computer. This antivirus should detect any crash data or files on your computer, after which you can delete them from the system. We strongly recommend TotalAVTotalAV, as World’s nr. 1 antivirus at the moment.
Once they’re all deleted, scan your computer once again, and uninstall every other remaining crash file and restart your machine to effect the changes.
Check if error 0x80010100 goes away. If not, try the next solution.
Solution 5: Perform a System restore
Click Start
Go to the search field box and type System Restore
Click Create a restore point in the list of search results
Enter your administrator account password or grant permissions if prompted to
In the System Restore dialog box, click System Restore
Click Next
Click a restore point created before you experienced the problem
Click Next
Click Finish
To go back to a restore point, do the following:
Right click Start
Select Control Panel
In the control panel search box, type Recovery
Select Recovery
Click Open System Restore
Click Next
Choose the restore point related to the problematic program/app, driver or update
Click Next and then click Finish
Solution 6: Update BIOS
You can update your computer’s BIOS to version A16 by downloading the BIOS Update Executable file for Windows. Once you find the file from your computer manufacturer’s site, do the following:
Click Download File to download the file.
When the File Download window appears, click Save to save the file to your hard drive.
Run the BIOS update utility from Windows environment
Browse to where you downloaded the file and double-click the new file.
Windows System will auto restart and update BIOS while system startup screen.
After BIOS update is finished, the system will automatically reboot to effect changes.
Note: Do not turn off your computer or disconnect from your power source while updating the BIOS or you may harm your computer. Do not carry out other tasks on the computer until the BIOS update has been completed. Back up your data files to external media before updating the BIOS.
In the search bar, type Disk Management and click Create and format hard disk partitions.
Solution 7: Use manual ways to resolve error 0x80010100
There are other manual ways you can use to resolve this error including removing all drivers that were recently installed on your computer, updating old drivers, removing malicious or incompatible drivers, and then scanning your computer with a trusted and good antivirus. Once you’re done, start your computer in safe mode. Also, ensure all Windows Updates are installed as this fixes error 0x80010100 very well.
Have you managed to fix error 0x80010100 using any of these solutions? Let us know which one worked for you by leaving a comment in the section below.
Have you ever noticed a cpx.exe file on your PC? In this article, we’ll show you how to remove this file from your PC once and for all.
What is cpx.exe?
Cpx.exe is an executable file for Google Embedded Application (which is a background process). However, Google Embedded Application is not in any way related to Google Corporation but rather it is a component of the s5Mark adware suite. Hence, cpx.exe can be classified as a potentially unwanted program (PUP).
On the other hand, cpx.exe is responsible for utilizing a lot of CPU resources and users can’t remotely shut down its process from the Task Manager. Hence, we can assume that the cpx.exe process is used to mine cryptocurrencies.
Other common symptoms that your PC is infected with the cpx.exe program include:
Web browsers are injected with random advertisement toolbars
Random pop-up ads appear to recommend other software or updates
Advertising banners appear with different text such as: “Advertisements by S5Mark“, “Brought to you by S5Mark“, “Powered by S5Mark“, “Ads by S5Mark” or “Ads powered by S5Mark“.
CCleaner is a powerful utility tool developed and maintained by Piriform Ltd which is can be used to remove the cpx.exe program from your Windows PC. Besides, CCleaner comes with powerful PC optimization tools such as disk cleaner, registry cleaner, duplicate finder, startup manager, program uninstaller, and more.
Follow these steps in order to download, install, and use CCleaner:
Install and follow the prompts to complete the installation.
After installation, launch CCleaner, and then click on the Tools tab.
In the Uninstall menu, locate the program associated with the cpx.exe file (i.e. s5Mark program) and then click on uninstall to commence the uninstall operation.
Afterward, click on the Registry Cleaner and then scan for issues to remove the software leftovers by the program.
2. Use Apps and Features
Cpx.exe is a part of the s5mark adware application suite. Therefore, you need to remove s5mark in order to ultimately remove the cpx.exe program.
Here’s how to do this:
Right-click on the Start and then select Apps and Features. The App and Features window will display a list of all the programs installed on your PC.
Scroll through the list of installed programs until you find the s5Mark program.
Click on the s5Mark program, and then click Uninstall.
Follow the prompts in order to proceed with the uninstall process.
Note: the s5mark program may have a different name on your Windows PC. If you cannot find the program on your PC, you may proceed to the next method.
3. Scan your PC for malware
With MalwarebytesAdwCleaner, you can easily remove the cpx.exe process from your PC effortlessly. Besides, this program not only removes cpx.exe but another malware disguising as genuine programs on your Windows PC.
Here’s how to use MalwarebytesAdwCleaner on your Windows PC:
Double-click on the downloaded executable file and follow the prompts to complete the installation.
After installation, right-click on the MalwarebytesAdwCleaner icon, and then select Run as administrator to open the program.
In the MalwarebytesAdwCleaner display, click on the Scan button to commence the scanning operation.
After the completed scan, click on the Clean button.
Now, click OK when prompted to reboot your PC to complete cleaning.
Recommended Tasks to perform after removing cpx.exe
You should carry out the following tasks after removing the cpx.exe program on your Windows PC:
Install a strong antivirus program: You should install a strong antivirus program with malware-blocking features on your Windows PC. Some of the recommended antivirus programs which you can use include Bitdefender, BullGuard, and Kaspersky.
Reinstall your web browser: If your web browser is injected with myriads of unwanted ads from the s5mark program, you can easily resolve this by reinstalling your web browser. You can do this by uninstalling the web browser (whether Google Chrome, Microsoft Edge, Mozilla Firefox, etc.) from the Apps and Features and then install a new version from the official web browser site.
Run Windows update: Windows updates can also fix various malware issues most especially cpx.exe program. Moreover, Windows 10 built-in antivirus program (Microsoft Defender) is constantly updated by Microsoft to provide users with up-to-date security protection against any form of malware.
There you go, we hope that our solutions were helpful and that you managed to fix problems with cpx.exe.
Because managing the wiring of your own electrical network requires both expertise and great attention to detail, we can use specialized software that allows us to streamline the process, and also allows for electrical systems drafting and measuring.
Whether you were wondering how both big and small companies handle their load of work with correct measuring and electrical circuit planning, need some help with your home electrical wiring, or you want to start a business in this domain, then you will surely find this article to be very useful.
To streamline the process of managing your electrical wiring system, we first need to understand what circuits and circuit diagrams are.
A circuit diagram is a 2D virtual representation of the electrical wiring found in your building. Diagrams are most commonly used for circuit designs, construction work, and also to easily maintain an already existing circuit. Circuit diagrams can be divided into two categories:
Pictorial circuit diagram – allows users without any experience to easily identify the components of the circuits, by using comprehensive images to represent each element
Schematic circuit diagram – as the name suggests, this type of diagram can be understood by people with experience with electrical setups, and the representation of the elements is done by using specialized icons (internationally standardized symbols).
In this article, we will explore some of the best-specialized software found on the market that offers you guidance and help regarding creating both pictorial and schematic circuit diagrams, by using creative and easy to understand guidelines and templates.
4 tools to design pictorial or schematic electrical systems
Edraw Max is an incredibly powerful software option that allows you to easily create, manage, and repair any sort of electrical systems. This software has both pictorial and schematic circuit creation capabilities and also offers a great range of other useful features.
This software was designed to be easily understandable by different users indifferent of their proficiency in this domain. Edraw has great built-in symbols, doesn’t require you to waste any time by learning how to use it, and gives you the power to construct professional-level electrical circuits with drag and drop features.
After the process of creating the system is done you can easily use the built-in sharing tools to share your projects with partners or friends.
The range of symbols found in Edraw is incredible. You can find a great number (more than 2000) schematic diagram symbols, that are split into categories to offer easy access and use.
All these symbols are vectors, so that means that you can stretch the image as big as you want it, without losing any of the quality. This list covers the entire range of elements that make a circuit work efficiently.
This application can be downloaded completely free, but it was also released as a paid option. You can choose from a single-user or a multi-user license. Here are the subscription options :
Perpetual License – this license allows you full access to the features found in Edraw Max, and includes 280 types of diagrams, can be used on 2 computers and allows you to upgrade the software freely for 3 years.
Lifetime License – this licensing option contains all the features found in the Perpetual License, and also adds – unlimited email support, 1GB cloud storage space
Subscription License – this type of license allows you to pay a subscription fee every month with an annual contract that can be extended if you need to and contains all the features found in the Perpetual License.
If you want to get an idea of the wide range of templates that you can find in Edraw Max, you can visit their official templates page.
Smart Draw is another great software option that allows you to easily design professional looking electrical wiring setups. Because of easy-to-use templates, Smart Draw really helps you draw ‘smart’.
You get constant suggestions and recommendations based on what options you choose, and you also get access to a big database of already made and built-in templates, with great symbols and details.
One of the big advantages of using this software is the fact that it can be used either as a downloadable package or as a fully features online version – comes in very handy when your computer hard-drive is full or you need to access the information from a remote location.
Here are some of the most notable features of Smart Draw :
Can easily build and share diagrams with its intelligent formatting engine
Automatically sets up spacing, alignment, size and color schemes
Integrates seamlessly with MS Office, Google Apps, etc.
Great range of content – more than 34.000 symbols and 4500 templates
Great CAD-like environment with engineering scales
Wide range of electrical design templates that can be easily customized to fit your needs
Smart formatting – automatically connect symbols to circuit lines, with great drag-and-drop features that can be used to customize your circuit endlessly
Free email support
Great built-in sharing tools – can share on Smart Draw account, Dropbox, Google Drive, OneDrive, or by emailing a link (for non-SmartDraw users)
Another important feature of SmartDraw that needs to be mentioned is the integrated database filled with electrical design examples. This database can be customized and modified to fit your needs by dragging and dropping detailed symbols, rearranging elements, etc.
Some of the other great features included are – automatic spacing, automatic alignment and color schemes, automatic sizing, etc. SmartDraw uses standard engineering scales, and perfectly integrates with Visio and other similar apps, while also being able to adapt to the size of your business as it grows.
This software offers you a few licensing options:
Smart Draw Single User
Only one user allowed
AutoCAD import
Powerful intelligent formatting
Save and open diagrams from Dropbox, Google Drive, etc
Can import data to generate charts, bar charts, and graphs
Integration with Microsoft Office and PowerPoint
Free
SmartDraw Multiple Users – contains all features found in the Single User version, and adds:
Allows more than 5 users
Great administrative controls regarding who can access which project, and with specific permissions for sharing and access
If you want to get an idea about what this program can create, you can visit the official templates page to have a look.
DesignSpark is another great software option that allows you to build, maintain and manage every aspect of your electrical design project.
It has a very large database of built-in electrical parts, allows you automate the process of device and wire numbering, can set specific time checkers and can even help you buy the missing parts or cables needed, all from one screen.
This software integrates perfectly with any other software that deals with electrical CAD and offers you access to a wide range of useful tools that can guide you through the entire electrical system design process.
You can design your wiring setup, and also get a good range of tech information about your system. You can optimize the setup for your electrical system in a variety of ways, while also producing comprehensive and automated reports that cover a wide range of topics and are easy to understand.
This software also includes a wide range of symbols that are designed to simplify the process of both system control, and also when it comes to the ease of use. You get access to over 250.000 parts, with a few more million options available to download from the official library.
One of the best features found in this software is its ability to estimate, make suggestions, and even order parts from your providers with ease. Using this feature gives you peace of mind that all your electrical system parts are calculated and that the estimation of costs, both for individual parts or bulk, is exact.
Electra E8 is another great software option that allows you to create electrical wiring systems with ease by offering you easy access to all the tools required, all found on one screen. This software also allows you to create material estimations and even print out bills.
This software was designed so that any user – beginner, intermediate, or advanced can use without too much time spent on learning how to use it. If you’ve ever used Microsoft Office applications, you are able to navigate Electra as well.
Electra E8 can create completed and professional-level electrical schematics fast gives you the ability to easily activate the ‘reuse’ command so you can simply drag and drop elements to your design.
You will also find around 700 amazingly good looking symbols that are designed to help you understand and create a drawing fast. By the use of the customization options the 700 options can be extended up to a few thousand.
This software simplifies your workflow by automating the process of applying tags, symbols, and wires. They can be assigned to a specific component, generate terminals, and can also generate reports instantly. You can create, edit and print out material bills, listings of terminals, the layout of the panels, etc.
To make this software even better, the team at Electra offer you great support options, with a guaranteed response within 24 hours of contact.
Here are some other notable features that can be found in Electra:
Software was designed to minimize the amount of typing you need to do, while also avoiding human errors
Automatic and intelligent naming of elements – allows you to save precious time
Smart wires – the ones with no name will be shown in red, and if they are connected to an element, the wire automatically picks the element’s name
Great cross reference features – allows you to easily keep track of what elements you have on your drawing
Circuit re-use tool – copy and pasting circuits allows Electra to automatically rename all symbols and wires, you need to draw the circuit once, and then you can use it as many times as needed
If you want to try this software out, you can use the 30-day trial version, which is completely free to download, and also contains all the features of the full version. If you are happy with the program’s capabilities and want to buy a license, you can do so with ease by choosing one of the paid options, each of them having a 30-day money back guarantee.
The people of Electra E8 offer you the possibility to learn tips and tricks by visiting their blog, if you want to learn how to get started, you can click here for help.
Because of how hard it can be to deal with electrical systems, in this article we explored some of the best software options available on the market in 2019 that can help with that.
The features found in the software options we presented in this list cover all the needs of both beginner-level and more advanced users alike. Managing your electrical project will never be easier.
We would love to know what your opinion is about the software we presented in this top 4 list. Please feel free to let us know what you think in the comment section found below.
Want to improve developers GitHub workflows with your GitHub Marketplace app? GitHub Marketplace is a place where developers can use the free and paid tools. The platform offers developers different types of tools such as Actions and Apps, where each tool requires different steps to be added into the platform. This article is about getting started with GitHub Marketplace.
Applying for publisher verification
On the top right corner of GitHub, click your profile photo, then click Your organizations. Click Settings next to the organization. In the left sidebar, click Developer settings. Then, under “Developer settings”, click Publisher Verification. Under “Publisher Verification”, complete the information in the checklist. Click Request Verification, GitHub will review your details and let you know once your publisher verification is complete.
Viewing metrics for your listing
In order to access GitHub Marketplace Insights. In the upper-right corner of the site, click on the profile photo and then click on Settings from the drop down menu. Then, on the left sidebar menu, click on Developer settings.
You can click on the OAuth Apps or GitHub Apps depending on the Marketplace listing developers would likely manage. Then, on the app settings landing page, scroll down to the Marketplace section and click List in Marketplace. If the draft was already completed as a Marketplace draft listing, click on Edit Marketplace listing.
Click on the Insights tab, where it gives you an option to select the different time period by clicking the Period dropdown in the upper right corner of the Insights page.
Viewing transactions for your listing
To access the GitHub Marketplace transactions. In the upper-right corner of any page, click your profile photo, then click Settings. In the left sidebar, click Developer settings.
In the left sidebar, you have an option to click on either OAuth Apps or GitHub Apps depending on the GitHub Marketplace listing you’d like to manage. If you have created an GitHub Marketplace App, you would have to select GitHub App that you’d like to view transactions for.
On the app settings landing page, scroll down to the Marketplace section and click List in Marketplace. If you already have a Marketplace draft listing, click Edit Marketplace listing. If you allowed the app you created for GitHub Marketplace to be installed by any user or organization when registering the app, when the Marketplace section is only visible.
Then click on the Transaction tab. Then, you can optionally select different time period by clicking the Period dropdown in the upper right corner of the Transactions page.
Testing your app
You can draft GitHub Marketplace listing to simulate each of the billing flows. Your testing scenarios may require setting up listing plans that offer free trials and switching between free and paid subscriptions.
GitHub provides a developer-only feature to “Apple Pending Change”. You can access Apply Pending Change for apps by drafting as draft Marketplace listings under pending cycle page (https://github.com/settings/billing#pending-cycle:).
Drafting a listing for your app
In the left sidebar, click the Developer settings section. In the left sidebar, you have an option to click either OAuth Apps or GitHub apps, which depends on the app you’re publishing on GitHub Marketplace. You have to select the app you’d like to add to GitHub Marketplace.
On the app settings landing page, scroll down to Marketplace section and click on List in Marketplace. If you already have created a drafted listing, you can edit it.
Once you’ve created the draft listing, you would see an overview of sections to go through before your GitHub Marketplace listing is completed.
Setting pricing plans for your listing
To create a pricing plan for your GitHub Marketplace listing, you click on Plans and pricing in the left sidebar of your GitHub Marketplace listing page.
If a pricing plan for your GitHub Marketplace listing is no longer needed, or if you need to adjust pricing details, you can remove it.
Submitting your listing for publication
Once your app listing meets the GitHub Marketplace requirements, you can submit the app. In the top left of the app listing page, you click on Overview.
To submit your completed app listing, click on Request review. An onboarding expert at GitHub will reach out to you with additional information.
So what is Unity you ask? Unity is a game engine originally developed around the year 2005 for Mac OS X, it has since been extended to over 20 platforms including iOS, Android and Windows as well as the web. The engine is built using C++ and leverages C# for scripting.
Microsoft has been slowly but surely improving .NET over the course of the last five years. These efforts have not gone unnoticed by the development team over at Unity. However keeping up with the latest release and features of .NET has not been happening, but that’s about to begin to change, according to a thread on the Unity forums:
Unity’s fork of Mono is about two years behind the latest upstream code.
So this effort pulls in many bug fixes from upstream Mono.
It also improves the managed debugger.
It will allow Mono to run in 32-bit floating point mode, improving floating point performance.
It brings in more .NET Core class library implementation, including many changes to the way the class library code interacts with platform-specific code.
Josh Peterson, Unity Technologies
Some of the notable changes include added support for .NET Standard 2.1, C# 8 support and soon after C# 9 support as well.
.NET 6 support further away on the horizon. This addition is a huge step forward, however it is a breaking change. The Unity team does not have a firm idea of when it will be delivered, but once implemented it will pave the way to being able to quickly bring on new features and fixes.
At the end of the day these changes mean improved performance, stability and ease of use. This progress is great news for .NET developers, as Microsoft evolves .NET its great to see partners like Unity keeping up with these changes. Chances are some of the video games you’ve played in the last 15 years have been powered by Unity, so these benefits will undoubtedly mean better games for all of us to enjoy.
Head over to Unity’s forum for more information and to follow the conversation around these upcoming updates and more.


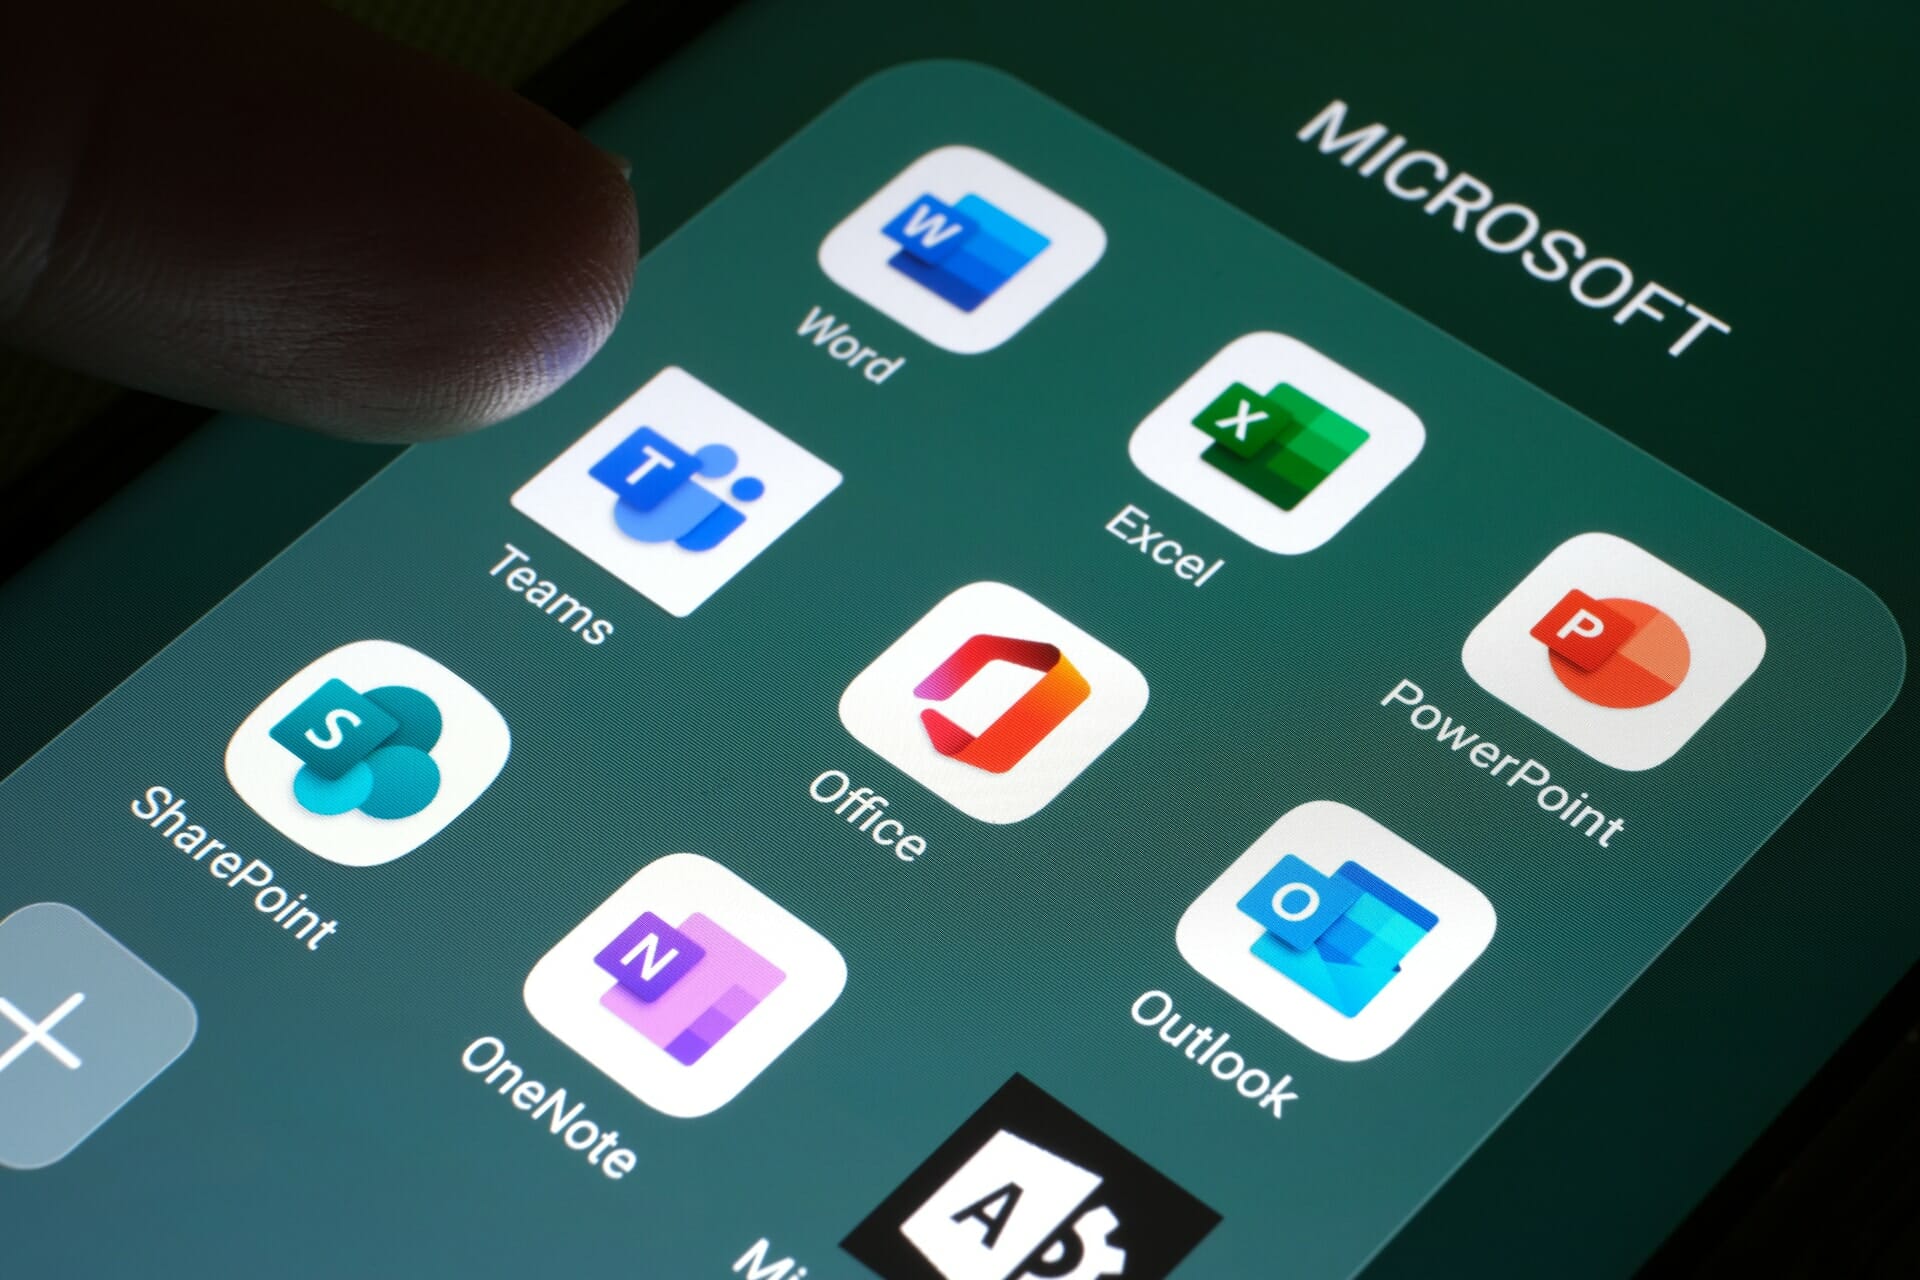

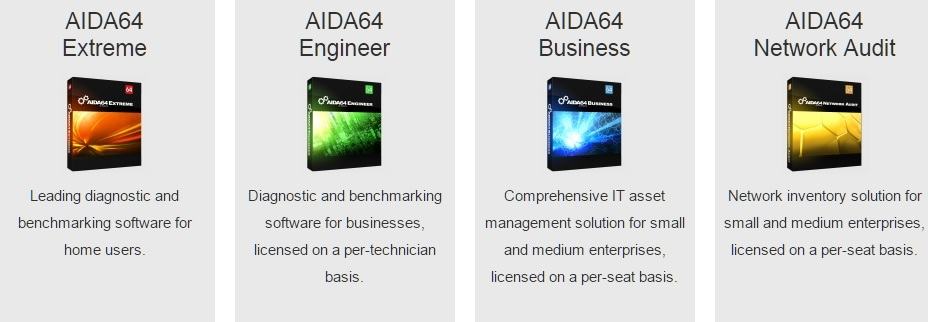

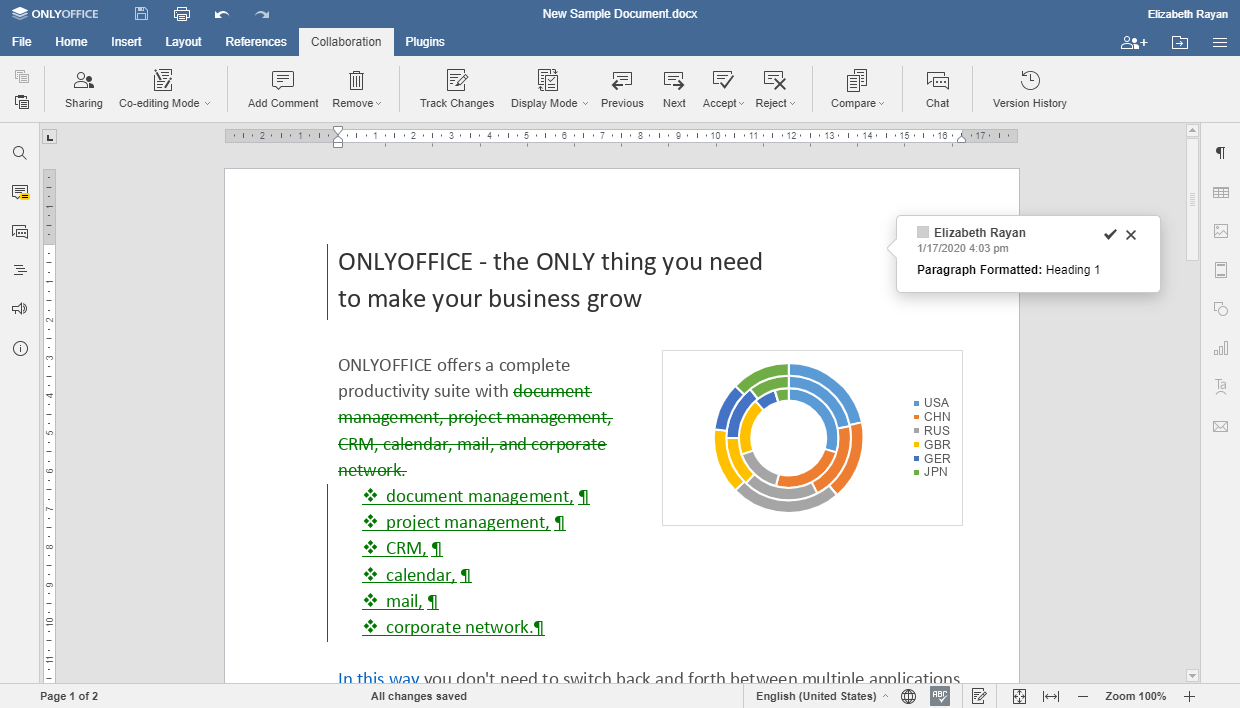



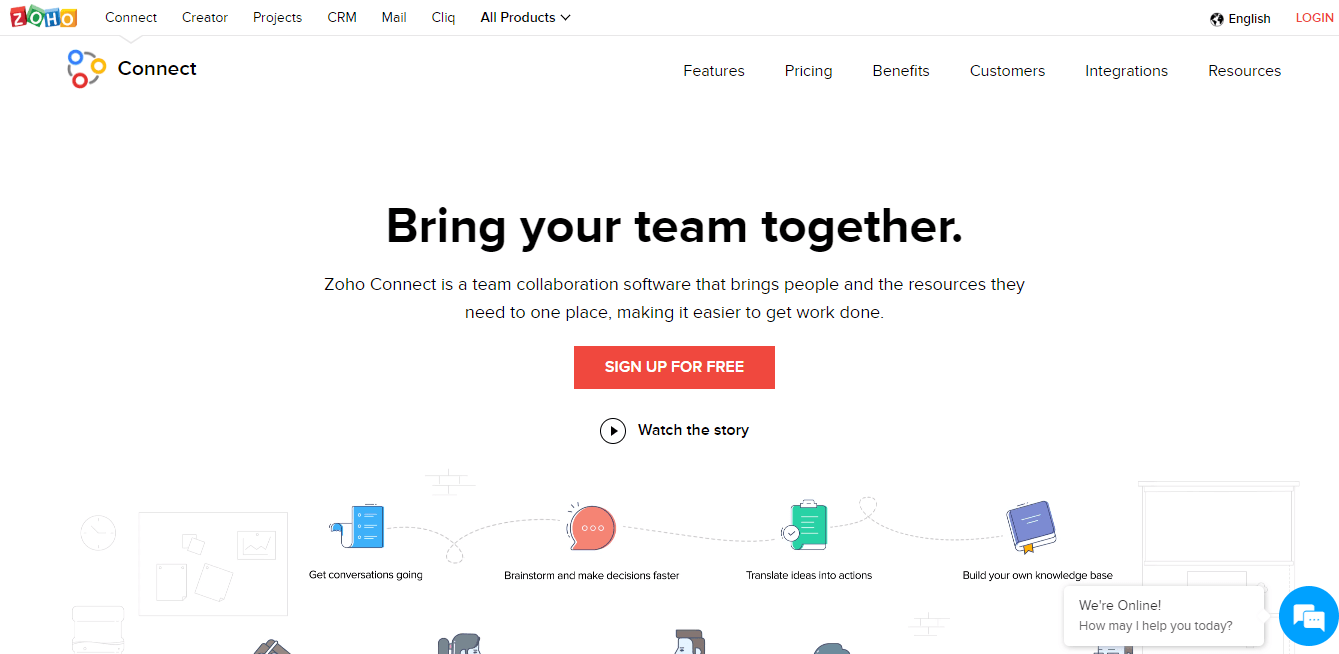
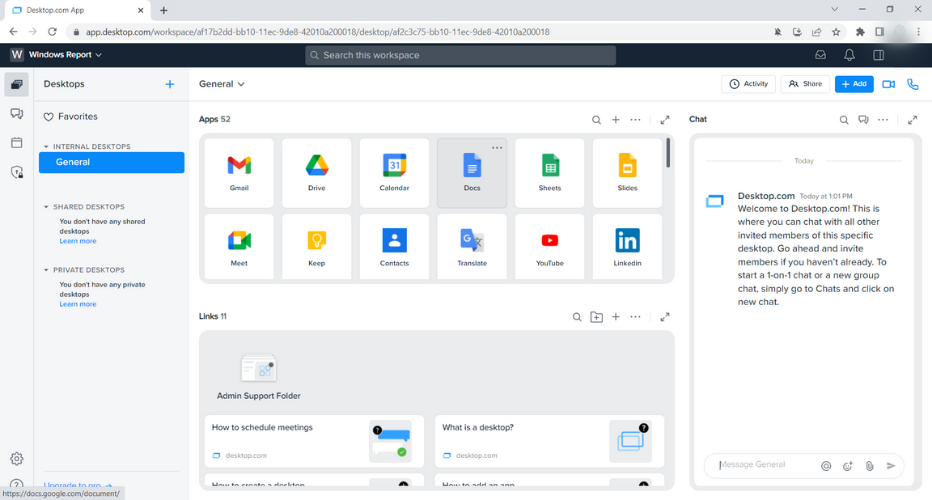

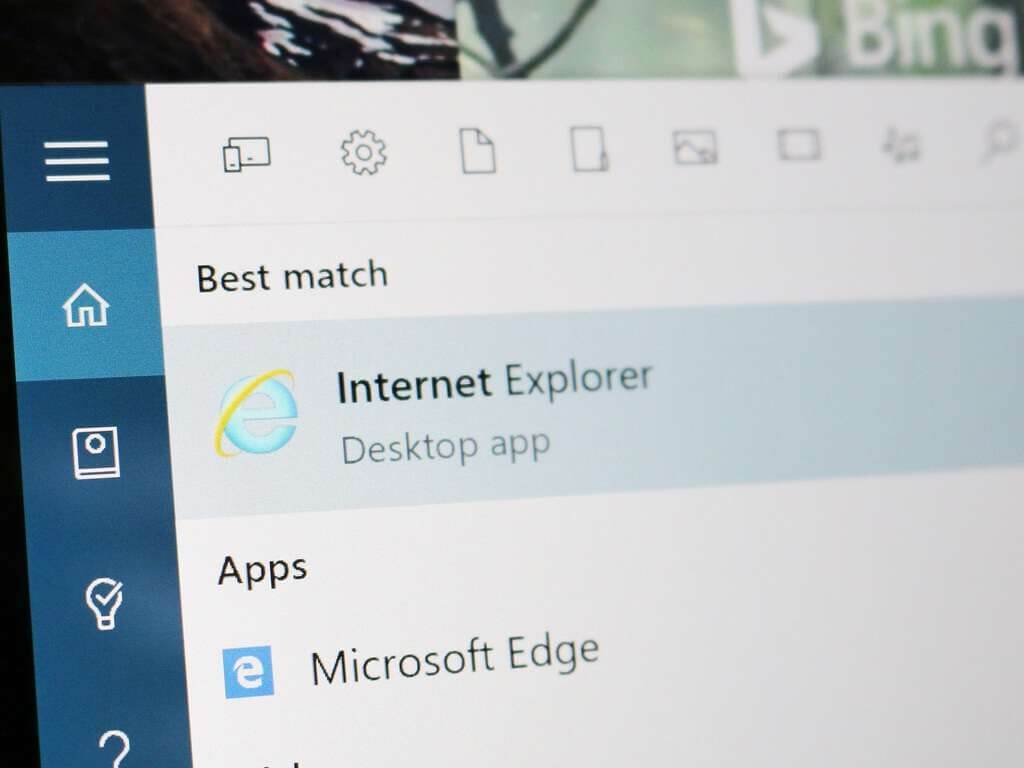


![What is RSGUPD.exe and How to Remove It [Expert Guide]](https://windowsreport.com/wp-content/uploads/2019/06/RSGUPD.exe-what-is-it-and-how-to-remove-it.jpg)


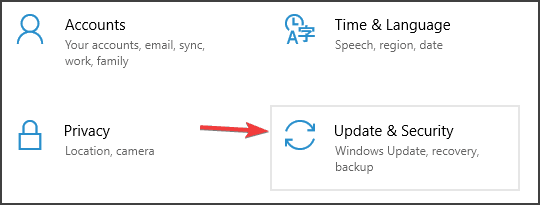
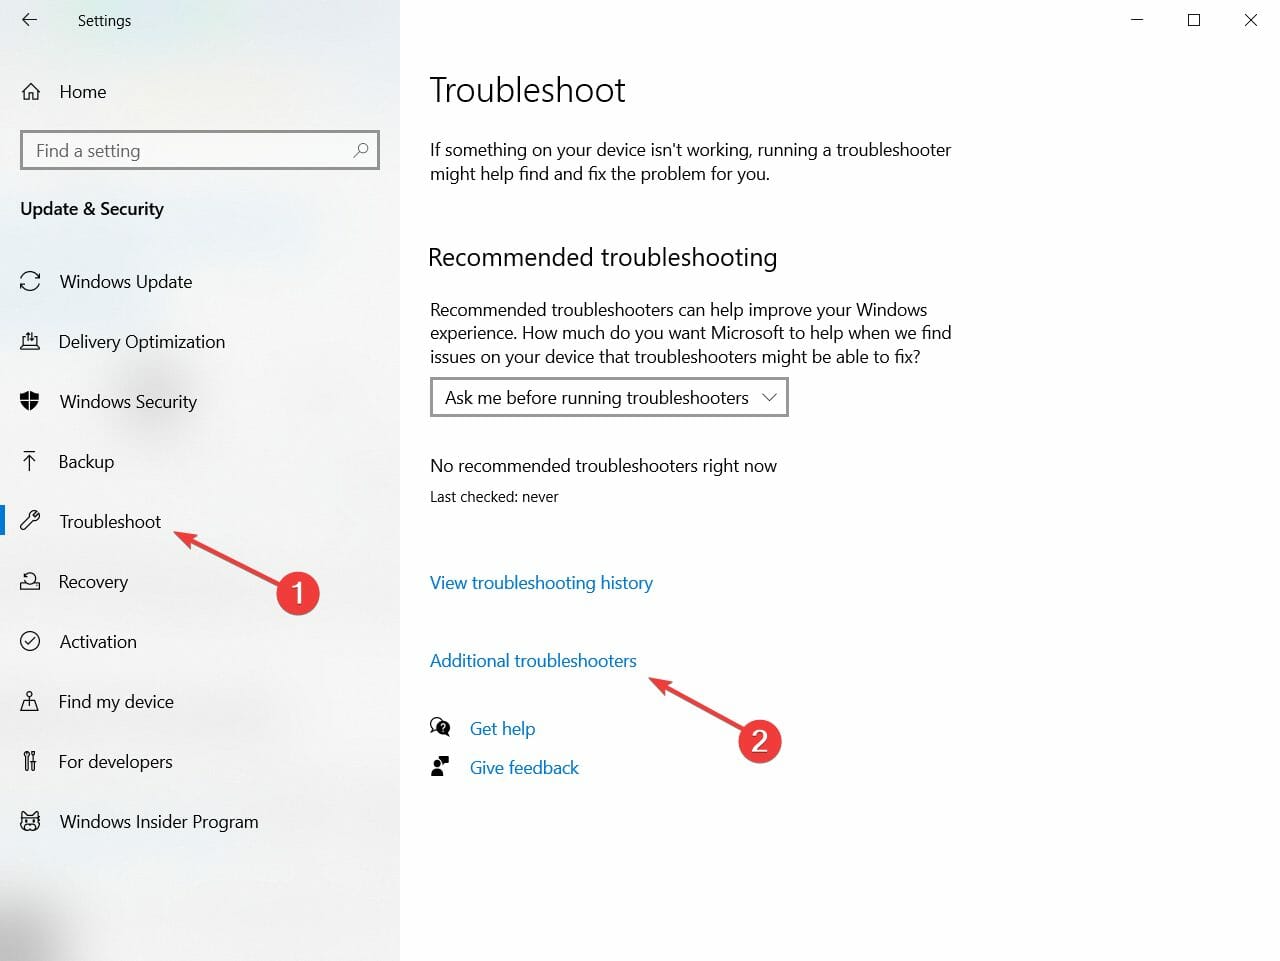









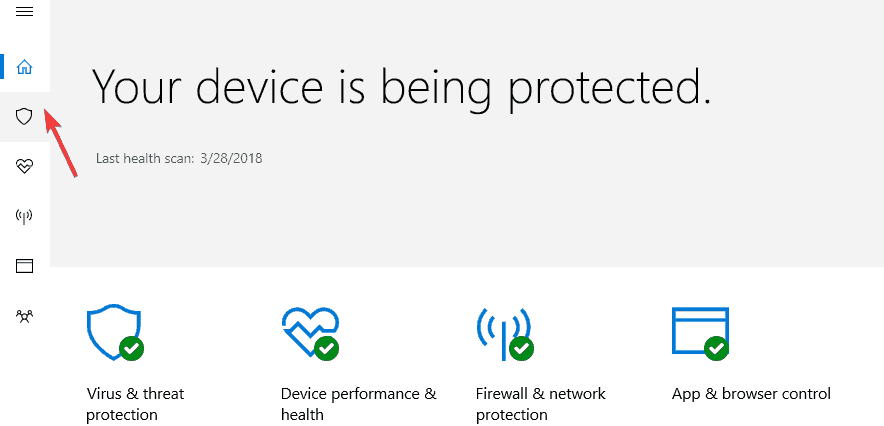
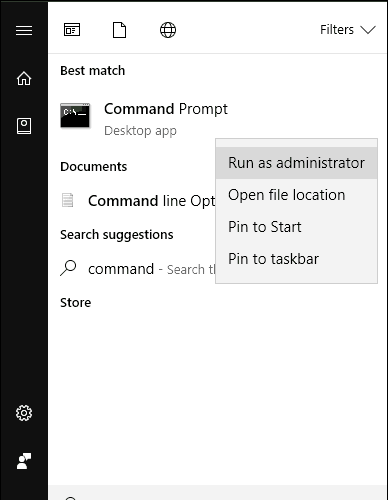
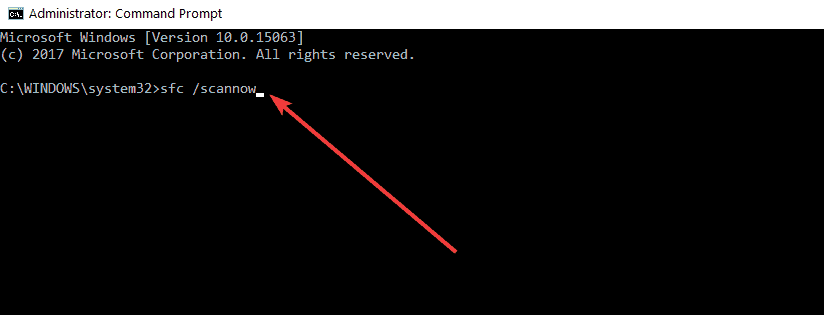
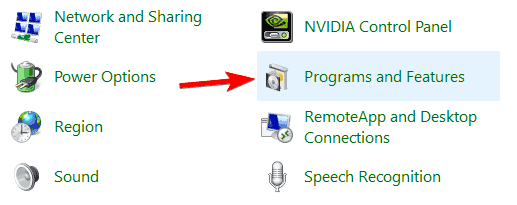
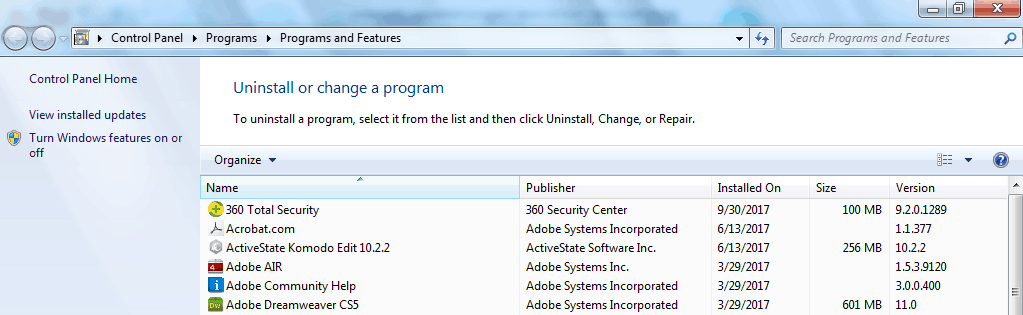



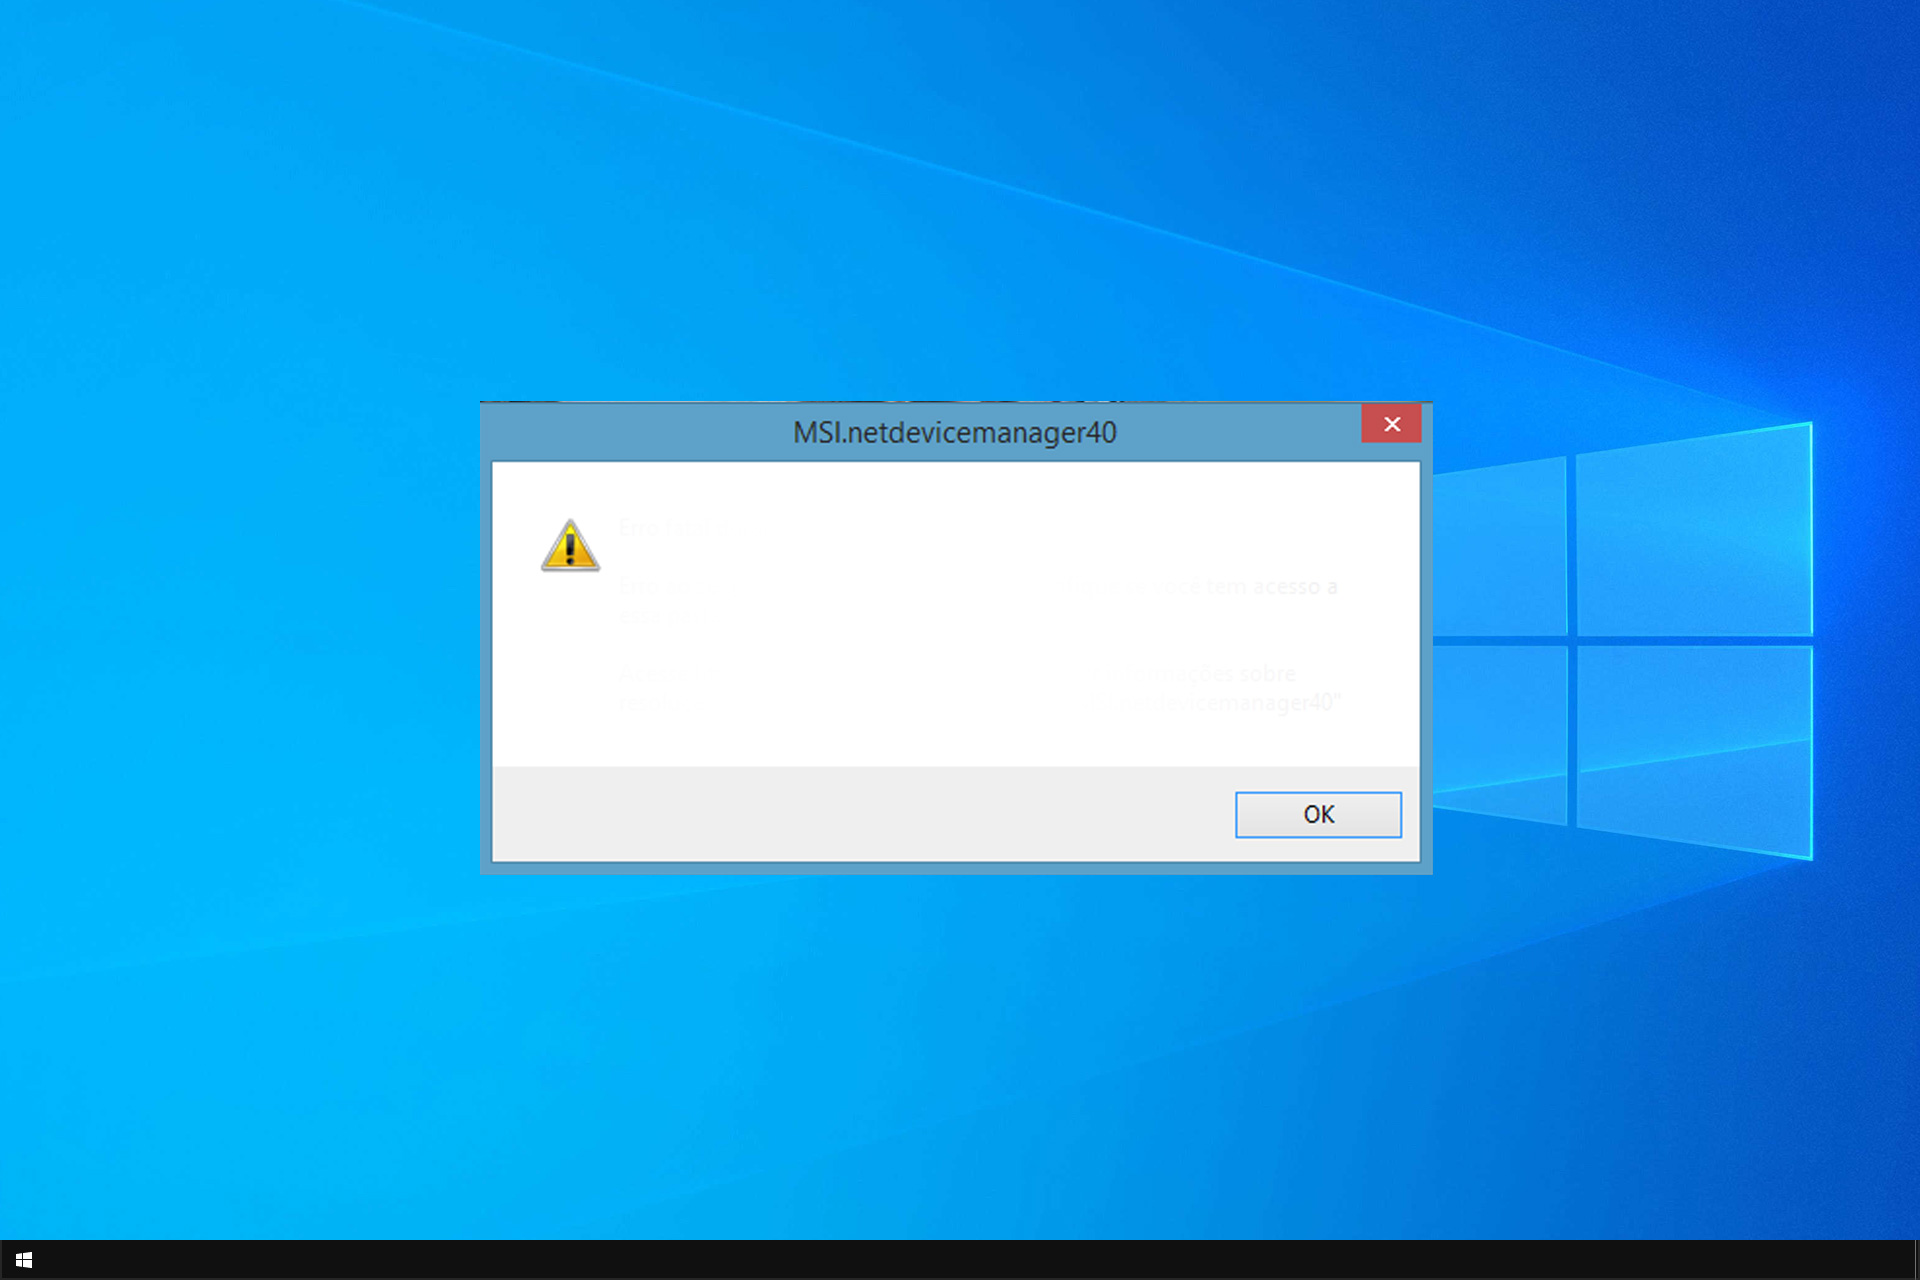
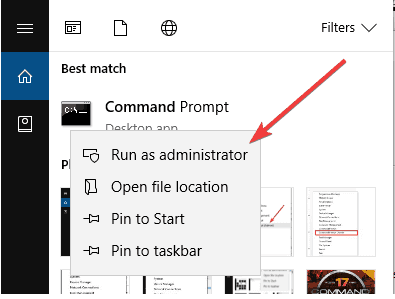
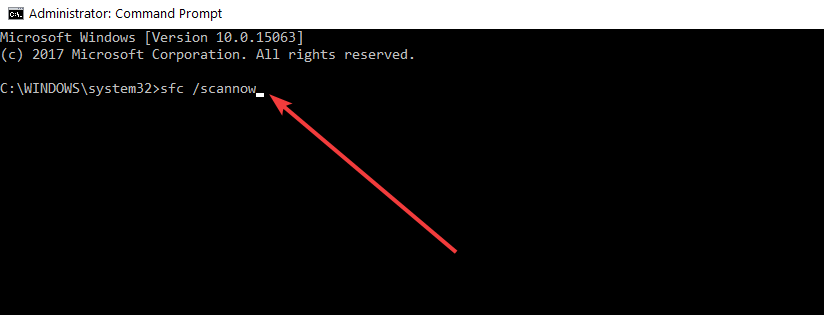
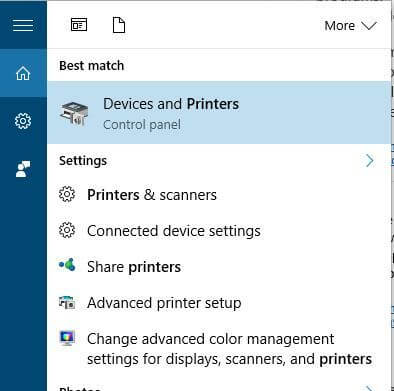

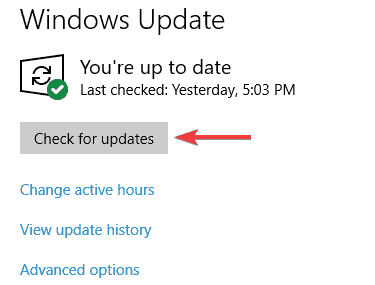
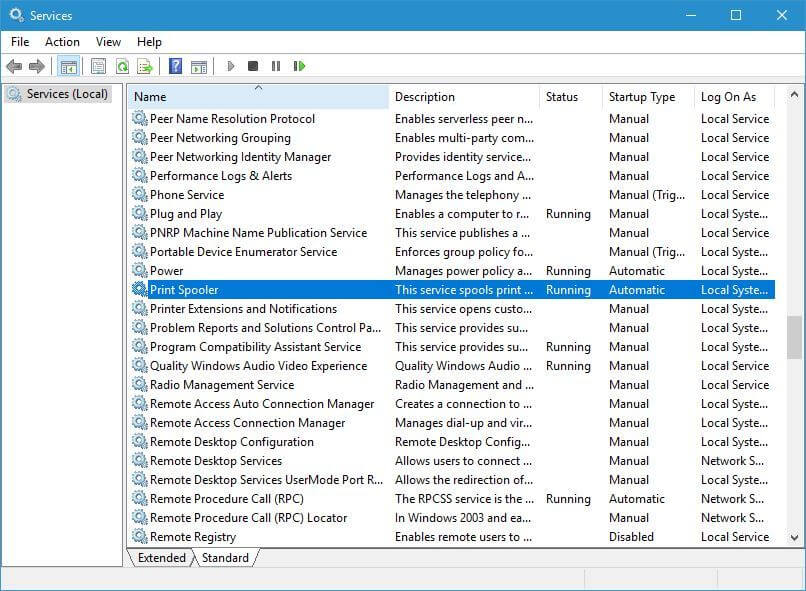
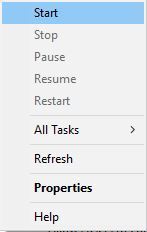
![How to Fix Common NBA 2K18 Bugs and Issues [Full Guide]](https://windowsreport.com/wp-content/uploads/2021/05/nba-2k18.jpg)