5 best online mastering services to unlock your creativity

Music mastering was and is a complicated process that requires a lot of technical knowledge, but also the use of appropriate tools.

However, with the advent of online mastering services, the process has become much simpler for the individual and professional music producers who don’t want to learn the complex plug-ins.

Online mastering services offer an AI-driven mastering process that is all on the cloud. These platforms are capable of effectively making minor changes to your tracks to enhance the overall quality.

In this article, we explore the best mastering services online to help you find the best mastering service that works for you best.

What is the best online mastering service?

LANDR

LANDR is an algorithm-based online mastering service that has been designed with the goal to make the mastering process quick and easy.

Whether you are a pro or getting started with, LANDR makes it easy to master your tracks without compromising on quality. It offers multiple plans, starting from $48/yr with basic functionalities.

All the plans include instant AI mastering tools, and a distribution feature that allows you to partner with LANDR to sell your music on Spotify and other streaming platforms.

Additionally, you also get access to the promotion tool to share your work, collaboration and statistics feature and educational content to make the most out of service.

You can begin by creating a free account that offers 2 free masters per month to see it in action before swiping your credit card.

LANDR

If you need a professional platform where you can create, tweak around with, and then sell your music, then LANDR is for you!
Free trial Visit website

CloudBounce

CloudBounce is another AI-enabled online mastering service that allows you to master your music during or after your creative process.

Using the free version, you can upload your track, master it, and purchase the final master or proceed to make more changes.

Once you have uploaded the file, CloudBounce’s mastering engine analyzes it and applies just the right amount of various audio processing inputs to make it sound clear.

It also provides you with synth and bass instruments for free during the mastering process for free. CloudBounce offers multiple plans beginning with $9.90 per track plan. Or you can choose the monthly/yearly infinity plans.

CloudBounce

Bring out the best in your composition to show off your creativity only with CloudBounce!
Check price Get it now

eMastered

eMastered is a similar online mastering service with its own touches. It is an online mastering engine that is fast, offers an intuitive user interface and excellent output quality.

Unlike CloudBounec and LANDR, eMastered offers a Reference feature. Using the feature, you can upload your original track and a reference track to help the engine determine your expectations.

It uses machine learning to improve with every song it masters. To offer professional sound, it applies the same studio process like EQ, Compression, Saturation, and other bits without human interference.

Using eMastered is easy. Once you have uploaded the file, the mastering engine will analyze the file and apply the necessary changes to make your track loud and clear.

After that you can preview and download the mastered tracks to your computer and enjoy them.

⇒ Get eMastered

Majordecibel

If you are looking for an instant mastering service, Majordecibel is a good company to consider. The powerful algorithms can transform any track into professional-sounding music.

Similar to LANDR, Majordecibel also allows you to master 2 tracks for free every month even if you don’t have an account.

If you choose to upgrade, it starts at $6 a month with the unlimited master for individual music producers. There are more expensive Studio plans if you are a music studio.

⇒ Get Majordecibel

BandLab Mastering

BandLab Mastering is one of the best free online mastering services that offer unlimited free algorithmic mastering to everyone.

It offers the tools to bring out the best in your composition to show off your creativity.

The downside with this service is that the library offered is not as extensive as other mastering programs. However, it is more than just a mastering tool.

BandLab projects it as a complete online DAW tool with over 200+ virtual instruments, advanced features such as guitar and bass amp, and live audio recording.

⇒ Get BandLab Mastering

Mastering is like icing on the cake and is highly recommended even if you are just getting started with your musical journey.

Online mastering tools help you to be consistent with all your tracks in an album. Some services like LANDR even offer free distribution platform to sell your music on streaming platforms like Spotify and iTunes.

All the tools listed in the article will help you to get your tracks mastered with excellent quality without breaking the bank. For more suggestions, please access the comments section below.

BUGCODE ID DRIVER error in Windows 10/11 [Fixed by Experts]

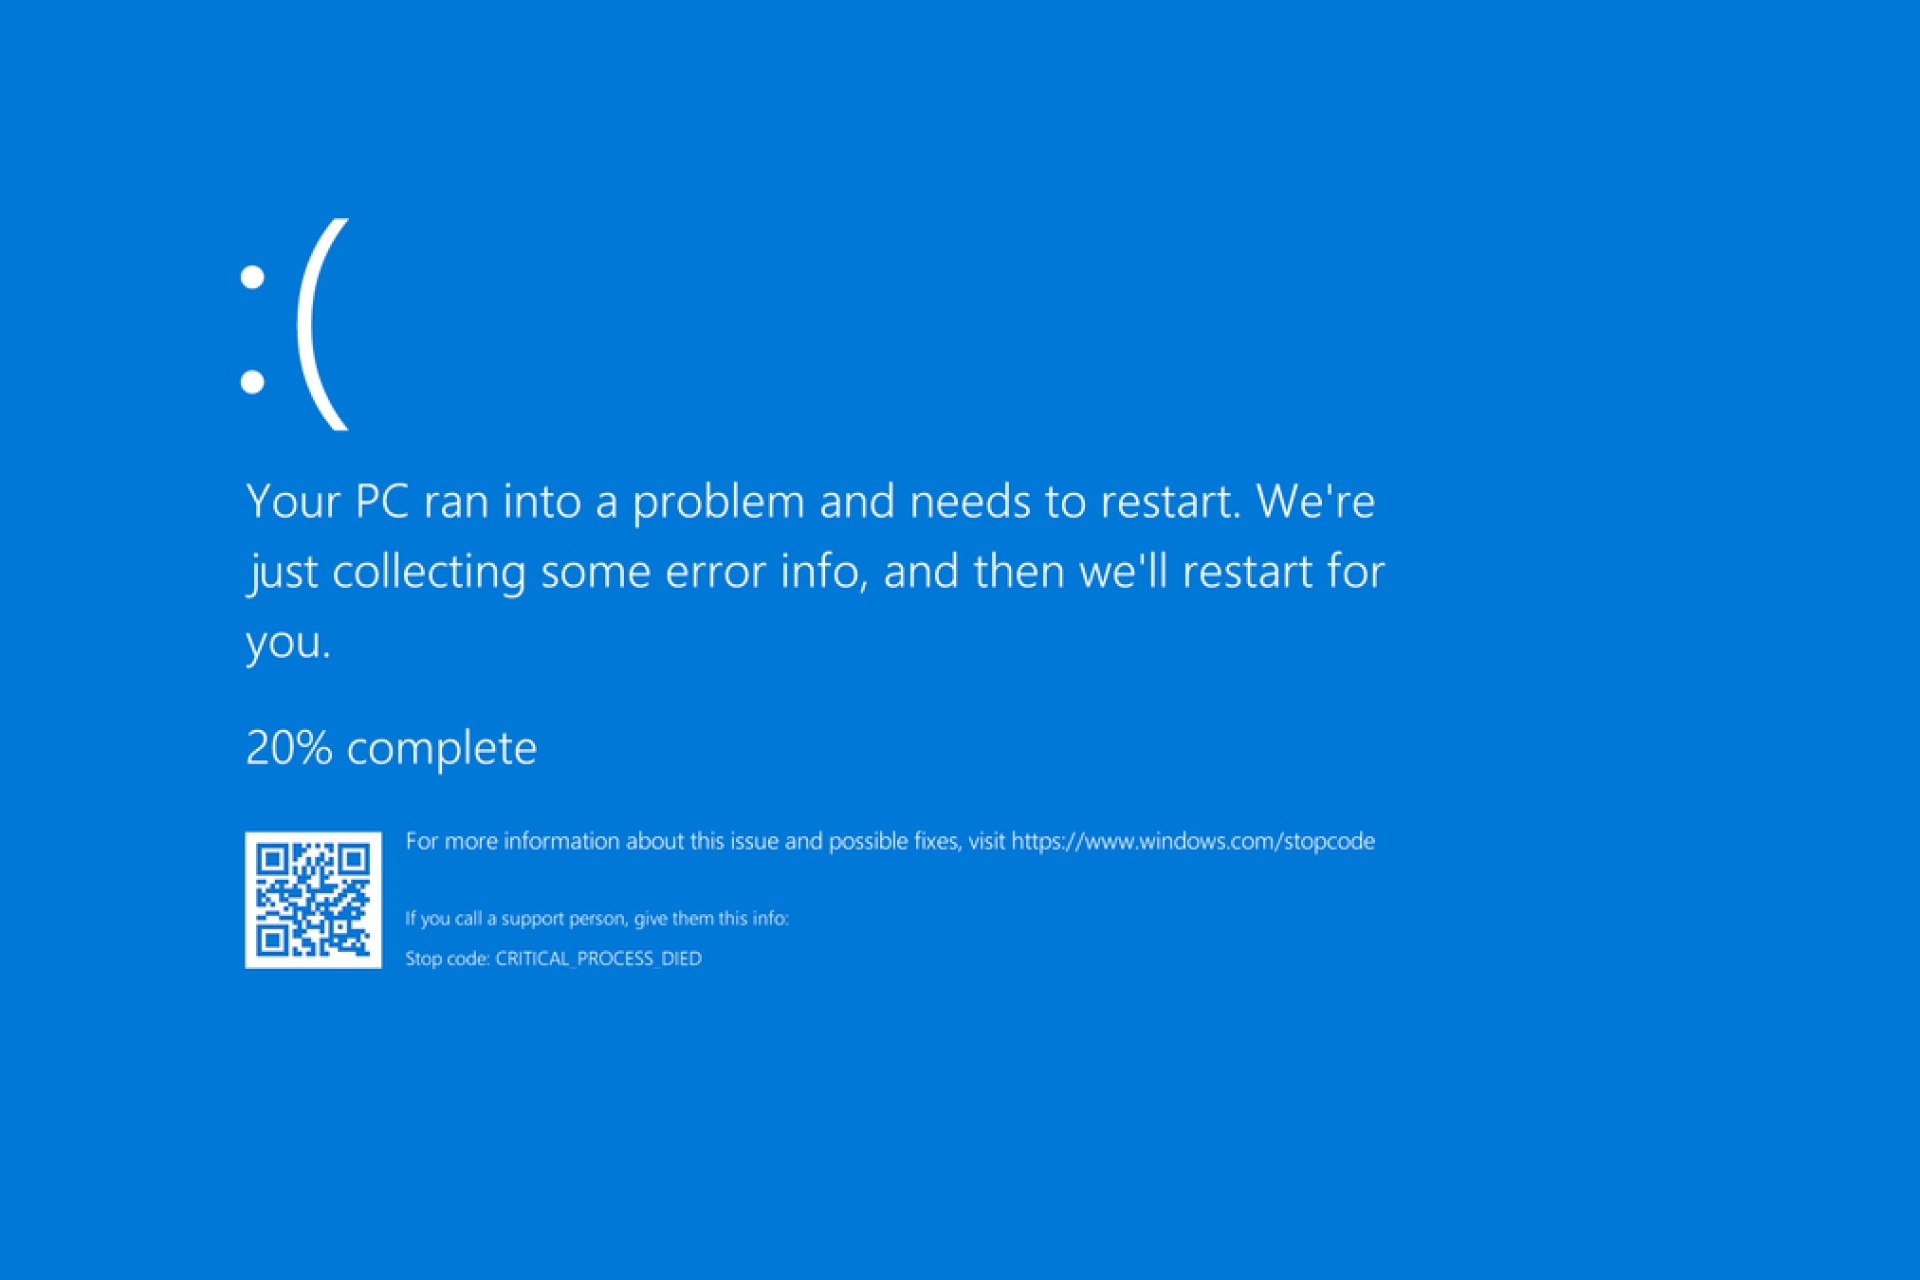
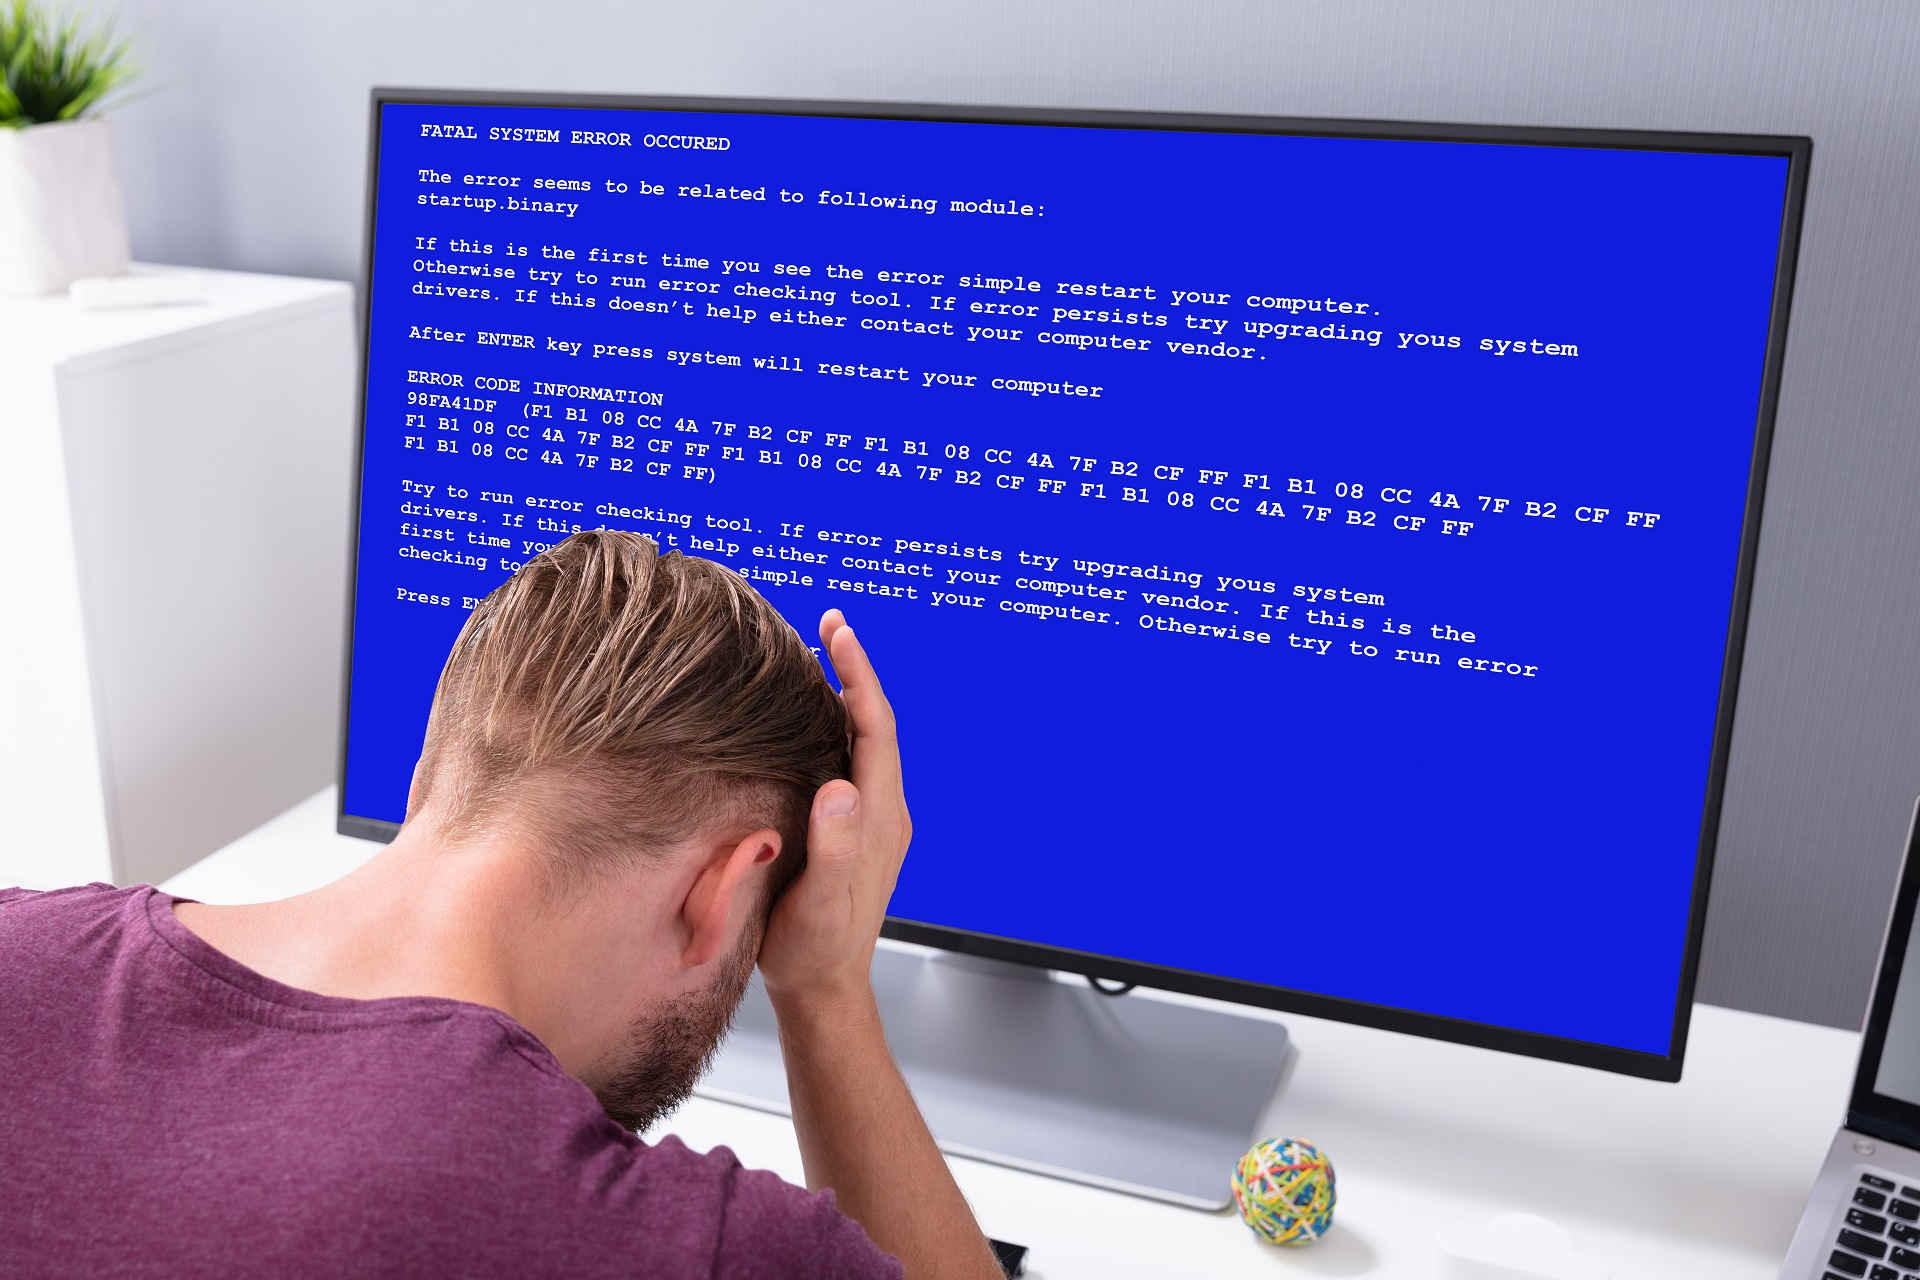
Blue Screen of Death errors can appear on almost any version of Windows, and, unfortunately, Windows 10 is no exception from these types of issues.

These errors can be sometimes hard to diagnose and harder to fix, and they tend to cause a lot of problems since they will restart your PC in order to prevent damage.

Since these BSoD errors tend to cause so much trouble for your computer, today we’re going to show you how to fix BUGCODE ID DRIVER error.

How do I fix the BUGCODE ID DRIVER BSoD error?

1. Update all your computer drivers

If you want to prevent BSoD errors from appearing, we strongly suggest that you keep your Windows 10 up to date with the latest drivers.

Searching for drivers on your own can be time-consuming. So, we advise you to use a tool that will do this for you automatically.

Using an automatic driver updater will certainly save you from the hassle of searching for drivers manually, and it will always keep your system up to date with the latest drivers.

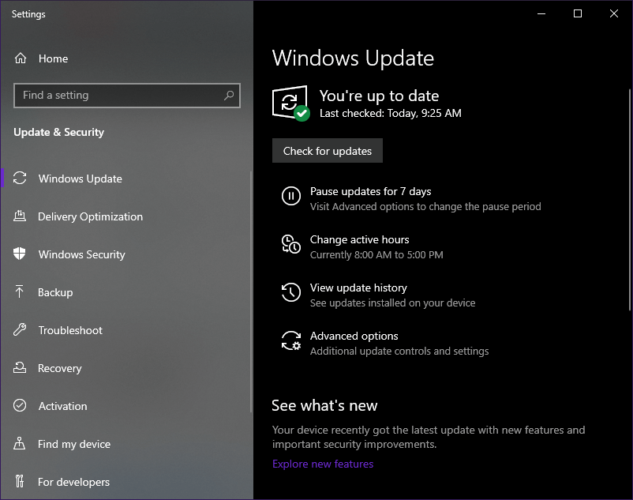
1. Update your Windows 10

Windows 10 has a few minor issues with certain hardware and software, and sometimes these issues can cause Blue Screen of Death errors such as BUGCODE_ID_DRIVER to appear.

Microsoft is aware of these issues, and it’s working hard to fix them, and in fact, many of these issues are fixed by using Windows Update.

New patches are being released frequently and many of these patches offer new features, security improvements, and various bug fixes related to both hardware and software.

If the Windows 10 update is not working on your computer, use our comprehensive guide to troubleshoot and solve the issue. 

3. Run the hardware troubleshooter 

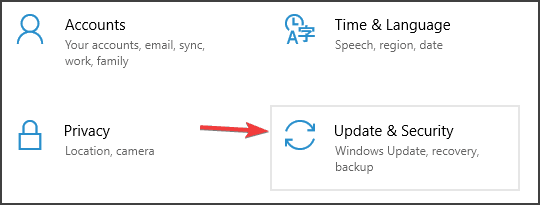
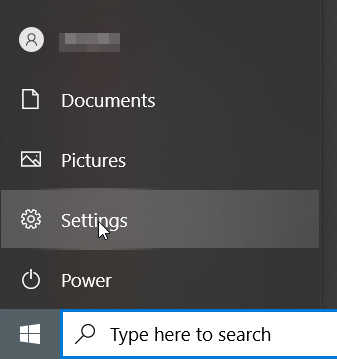
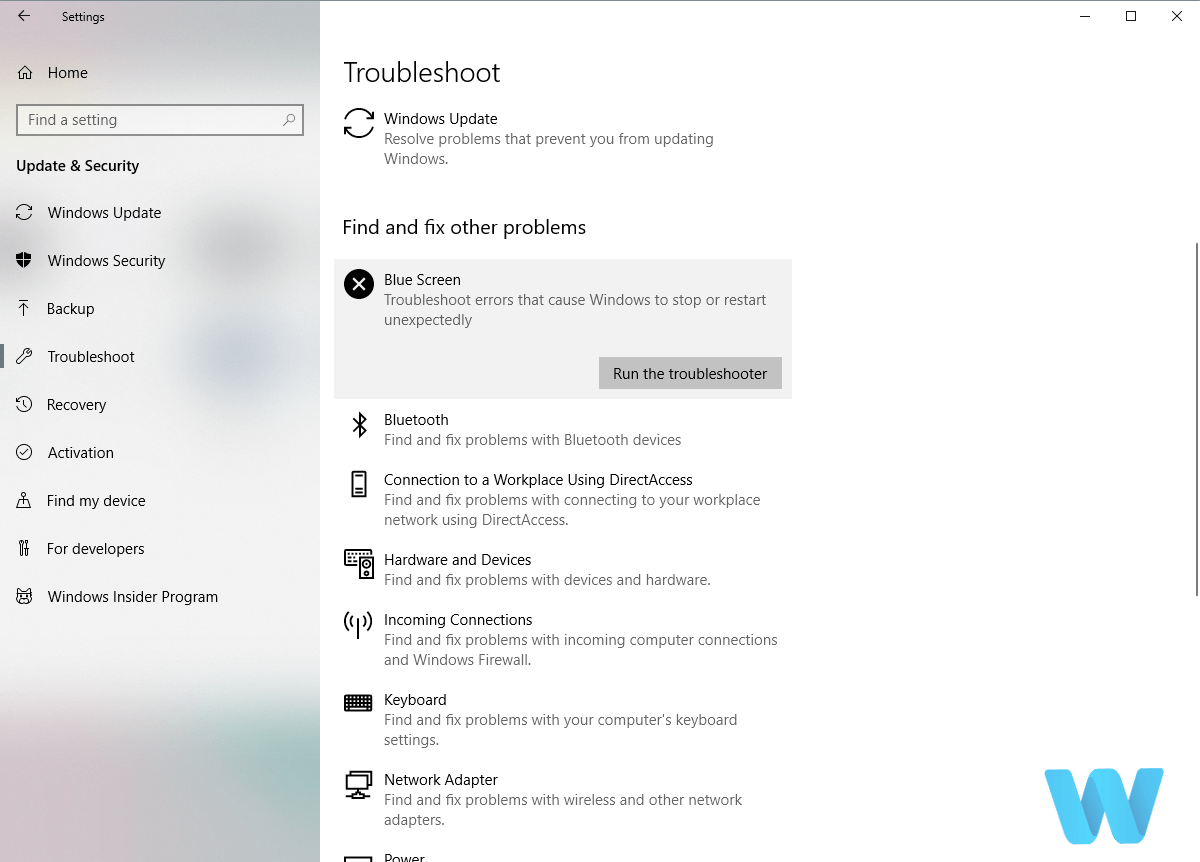
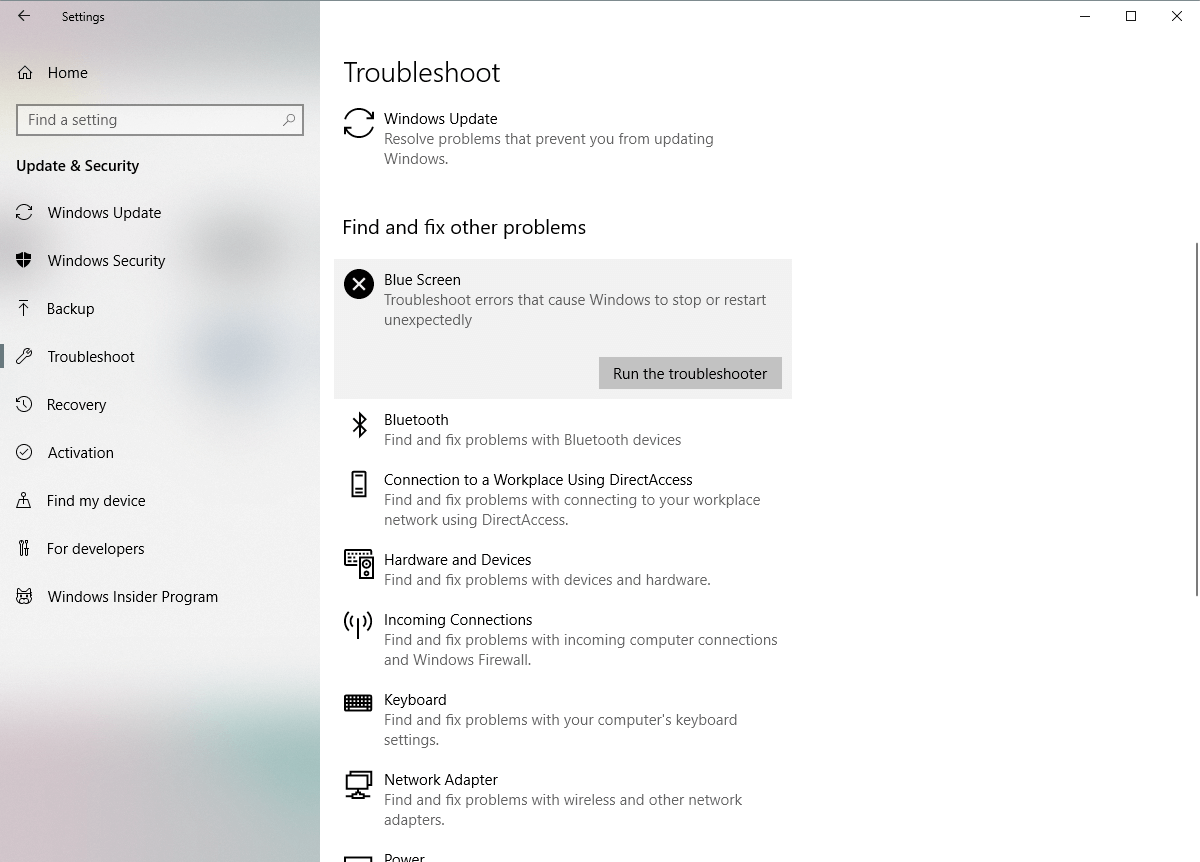
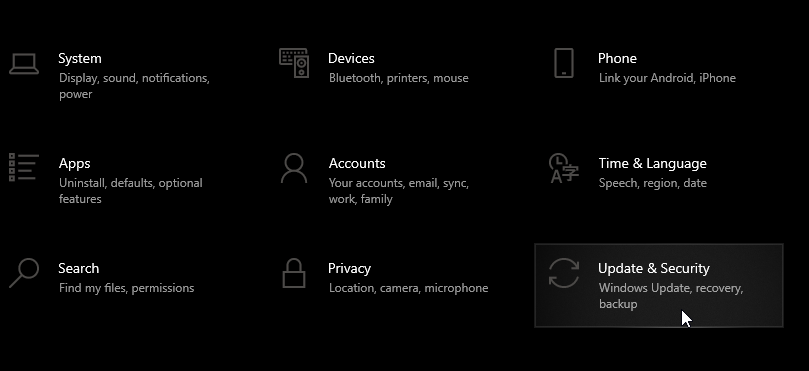
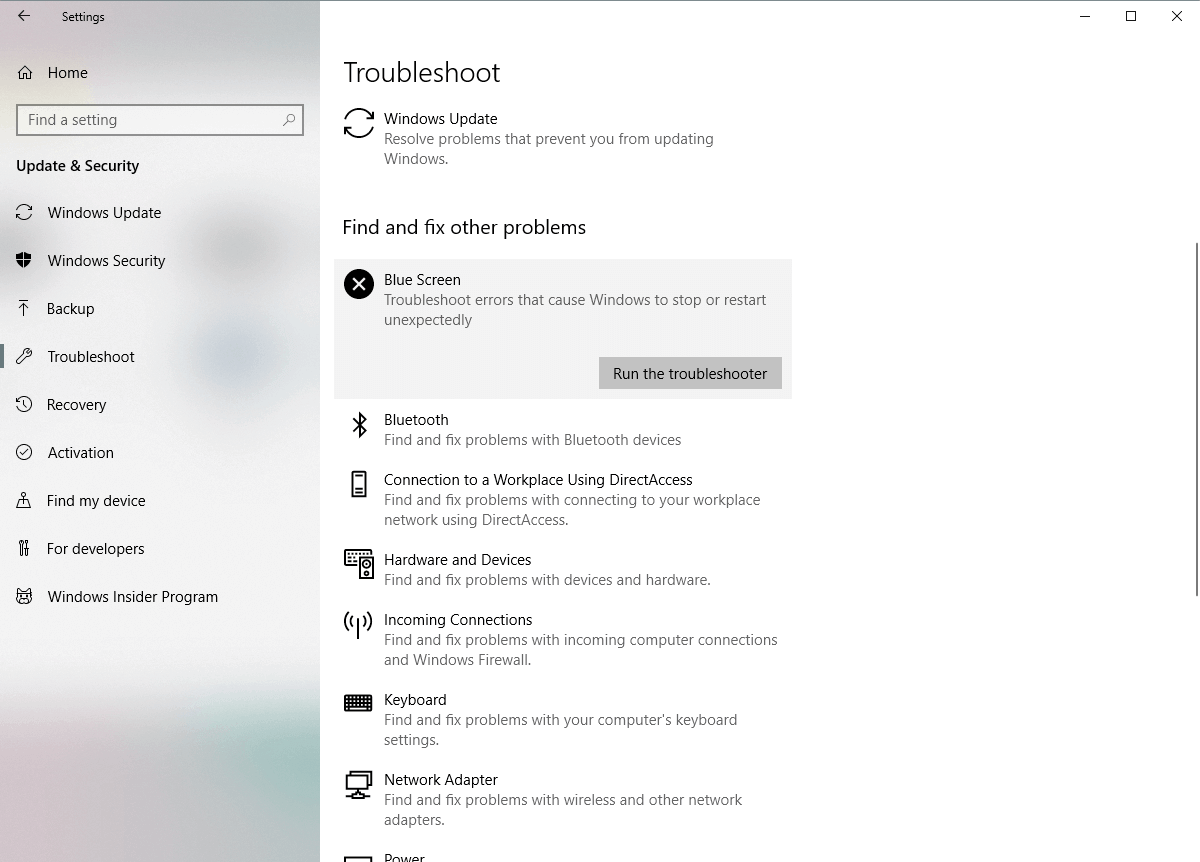
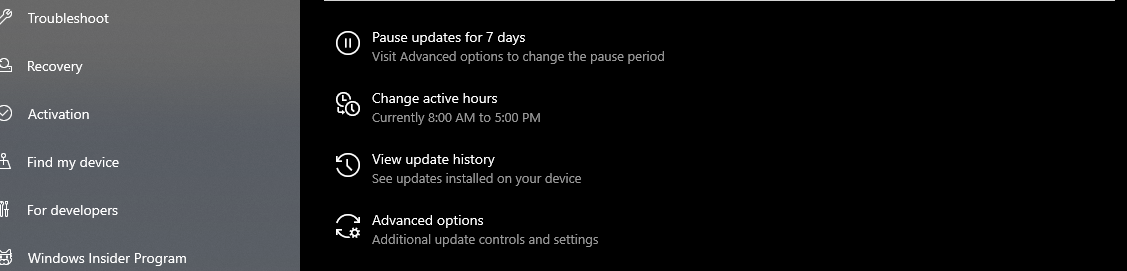
  1. Open the Settings app and go to Update & Security section.
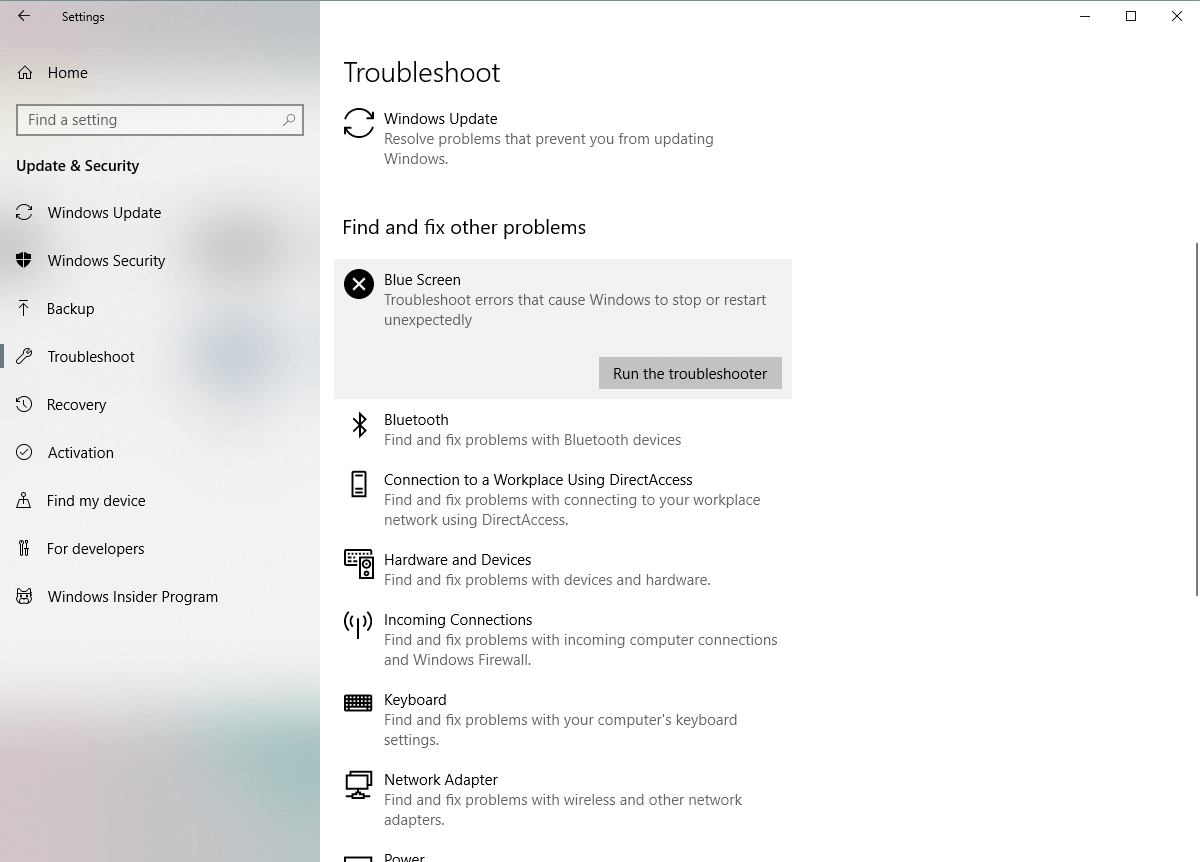
  2. Select Troubleshoot from the menu on the left.
  3. Select BSOD from the right pane and click Run the troubleshooter.
  4. Follow the instructions on the screen to complete the troubleshooter.

Windows 10’s built-in troubleshooter can be used for addressing various issues, including the BSOD errors. So, if updating your drivers didn’t resolve the problem, let’s try this tool.

Windows troubleshooter is a great tool when you want to find the cause of an issue. However, if it has stopped working and does not finish the process, use our dedicated guide to solve the error.

4. Run the SFC scan

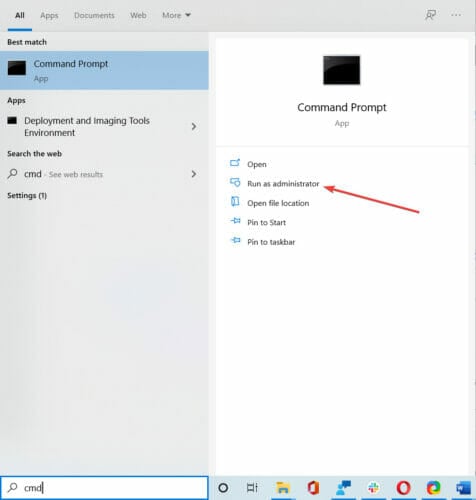
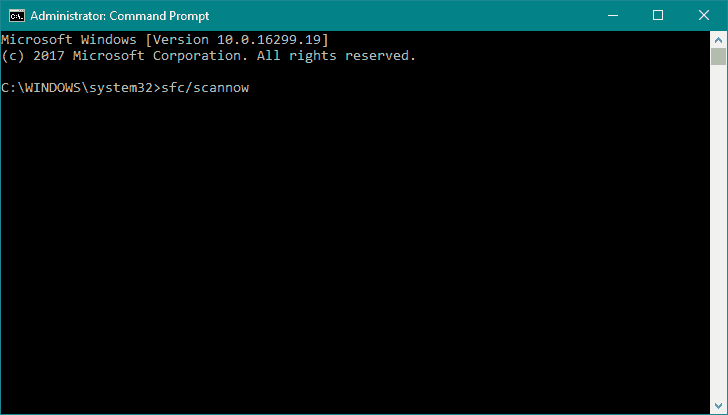
  1. Open the Windows search bar and type cmd.
  2. Open Command Prompt (Admin).
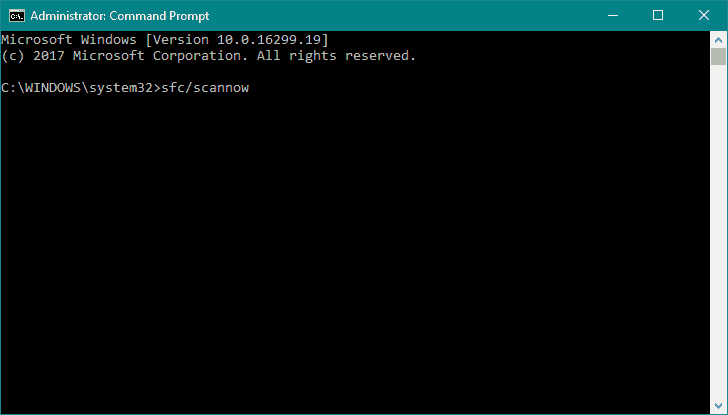
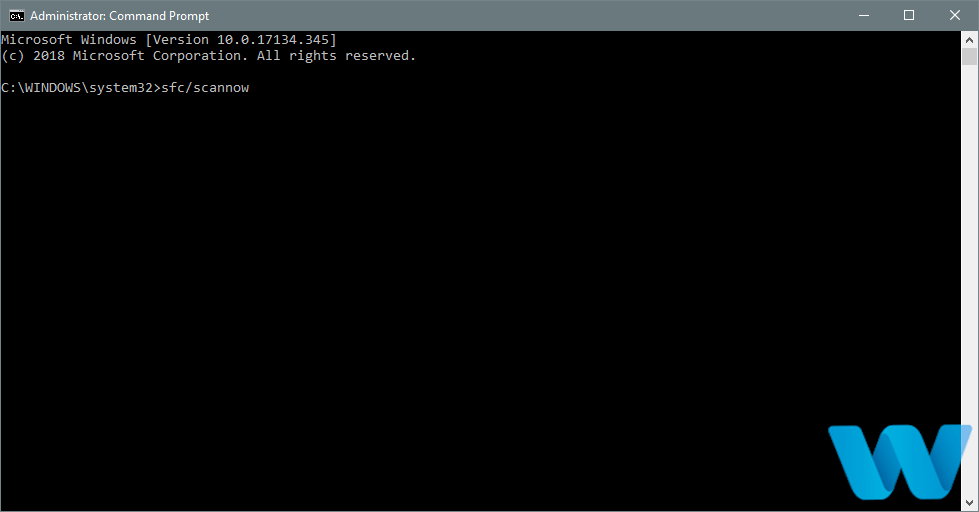
  3. Enter the following line and press Enter: sfc/scannow
  4. Wait until the process is done (it may take a while).
  5. If the solution is found, it will automatically be applied.
  6. Now, close the Command Prompt and restart your computer.

If Windows 10’s troubleshooter didn’t get the job done, we’re going to try with the SFC scan. This command-line tool resolves various issues within the system, and it might be helpful.

However, if you encounter issues with Sfc /scannow, it stops before finishing the task, you can use our complete guide to diagnose and fix the issue.

5. Run the DISM tool

  1. Follow the first 2 steps from the above solution.
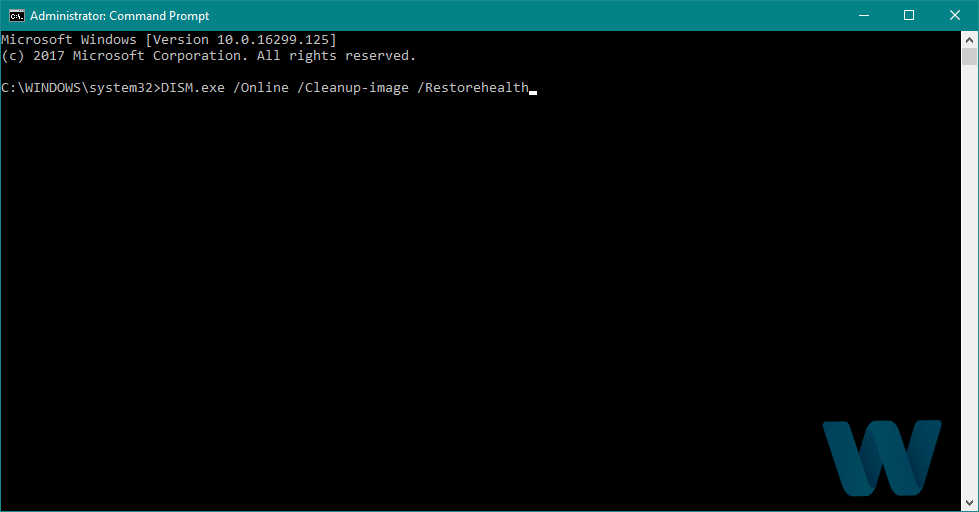
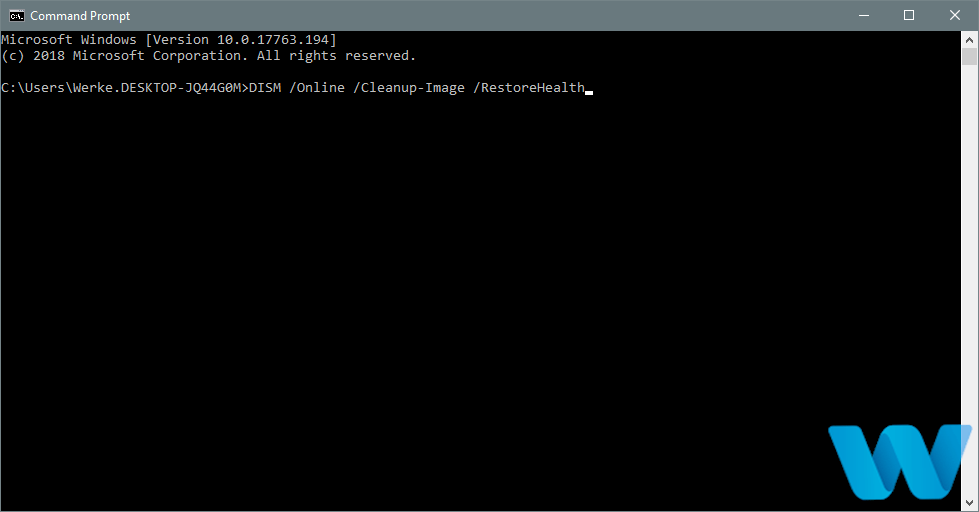
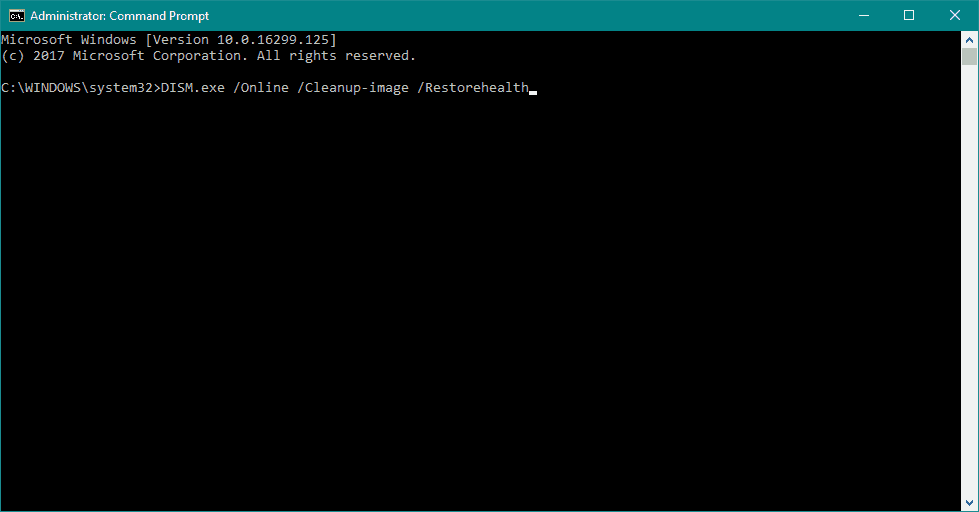
  2. Paste the following command and press Enter:
    • DISM /Online /Cleanup-Image /RestoreHealth
  3. Wait until the scan is finished.
  4. Restart your computer and try updating again.

Deployment Image Servicing and Management (DISM) is a powerful tool that freshly deploys the system image. And that process can eliminate potential BSOD issues. 

6. Remove / disable problematic applications

  1. Press Windows Key + R to open Run dialog.
  2. Enter msconfig and press Enter or click OK.
    bugcode-id-driver-msconfig
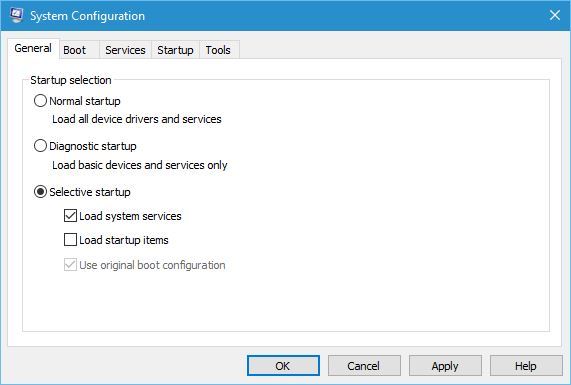
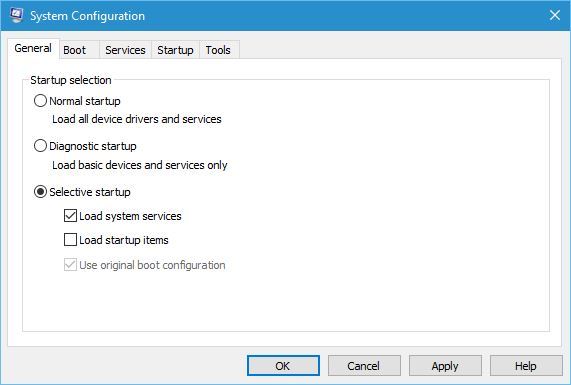
  3. When System Configuration window opens, select Selective startup and uncheck Load startup items.
    bugcode-id-driver-system-configuration
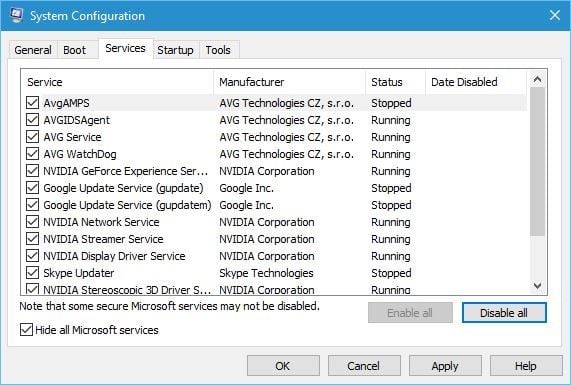
  4. Go to Services tab and check Hide all Microsoft services. Click the Disable all button.
    bugcode-id-driver-system-configuration-services
  5. Click Apply and OK to save changes.
  6. Now start Task Manager by pressing Ctrl + Shift + Esc on your keyboard.
  7. When Task Manager opens go to Startup tab.
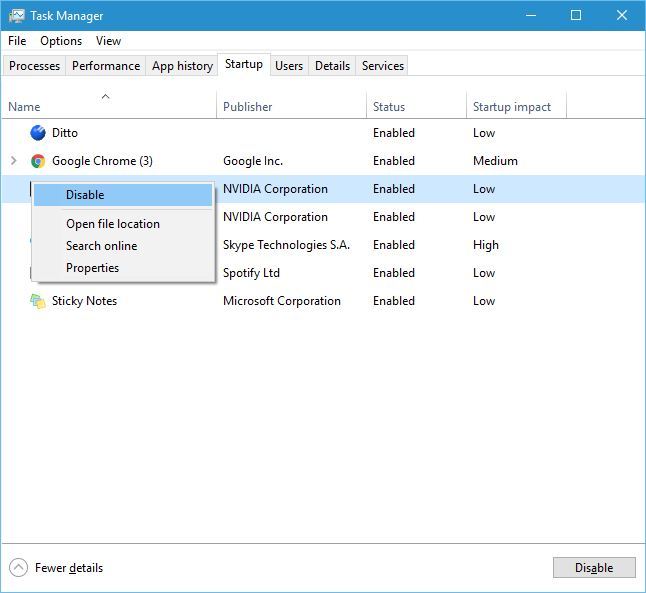
  8. Right click each item on the list and select Disable from the menu.
    bugcode-id-driver-Task-manager-disable
  9. After you disable all startup applications close Task Manager and restart your computer.

Many third-party applications can cause BSoD errors to appear, and in order to fix this error, you’ll have to find and remove the problematic applications.

The simplest way to do that is to perform a Clean boot by following the above steps. When your computer restarts, check if the error appears again.

If there’s no BSoD error, it means that one of the disabled applications or services was causing it. Now, all you have to do is to figure out what is the app causing issues.

To find the problematic service or application you’ll have to repeat the same steps, enable services and applications one by one until you find the one that is causing this problem.

7. Reset your Windows 10

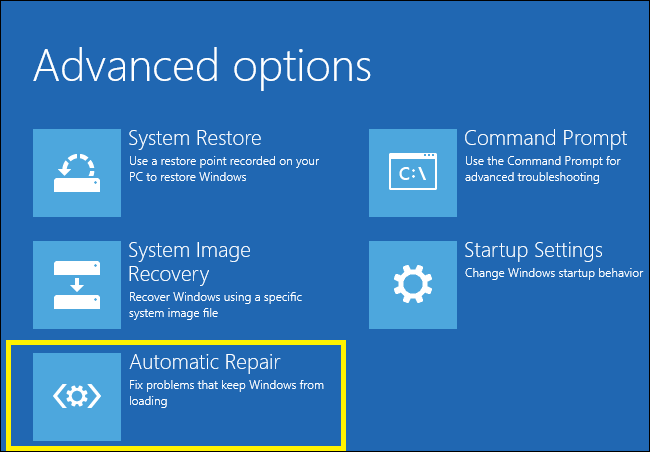
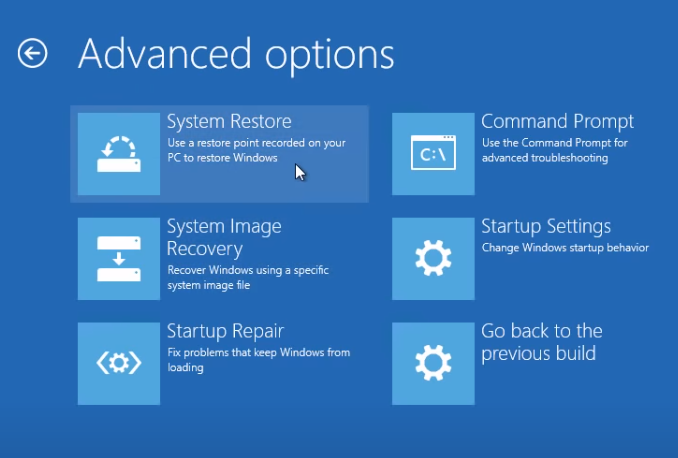
  1. Restart your computer few times while it boots to start Automatic Repair.Yellow Screen of Death in Windows 10
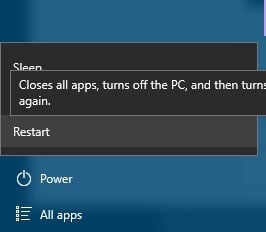
  2. . You can also do that by holding the Shift key and clicking the Restart button.
    bugcode-id-driver-restart
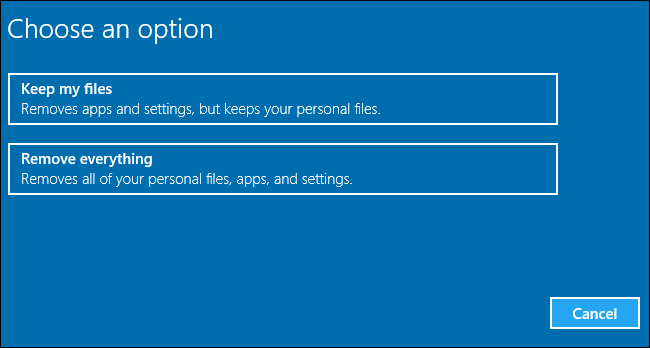
  3. Choose Troubleshoot > Reset this PC > Remove everything. During this step you might be asked to insert Windows 10 installation media, so be ready to do that.
  4. Choose Only the drive where Windows is installed > Just remove my files.
  5. Click Reset to start the Windows 10 reset and follow the instructions.

If this error is caused by certain software, you can fix it by performing Windows 10 reset. To complete Windows 10 reset, be sure to create a bootable USB flash drive by using Media Creation Tool.

Since Windows 10 reset is similar to clean install, it’s highly advised that you back up your important files since this procedure will delete all files from your C drive. 

After you’re done, you should have a clean installation of Windows 10, without any third-party software. If the error appears again, it means that it’s caused by your hardware.

8. Check your hardwar

Blue Screen of Death errors such as BUGCODE ID DRIVER are often caused by your hardware, most commonly RAM, so be sure to test your RAM modules one by one until you find the faulty one.

If your RAM is working, be sure to check other hardware components. Few users reported that this issue was caused by overheating, so we advise you to clean your computer case.

Dust can fill your CPU or GPU fan, and that can increase the temperature of your PC and cause your system to crash, so be sure that your computer is clean from dust.

BUGCODE_ID_DRIVER Blue Screen of Death error can be a major problem, but you can usually fix this error by following the above steps provided in this guide.

We also have a new guide on Bugcode Mbbadapter Driver BSOD, so don’t hesitate to check it out.

If you have any other issues with your personal computer or a suggestion that we should include in this guide, please let us know in a comment below.

How to convert .mkv to .mp4 without losing quality

MKV format is rather popular, but it doesn’t work on all devices, so sometimes it’s better to use MP4 instead. Speaking of which, in today’s article we’ll show you how to convert MKV to MP4 with ease.

There are several methods that you can use to do this, so be sure to closely follow instructions from this article and you’ll be converting MKV to MP4 in no time.

How to convert a MKV file to MP4?

1. Use WinX HD Video Converter Deluxe

If you’re looking for an MKV converter to MP4, then you must try WinX HD Video Converter Deluxe. The software supports a wide array of formats, so it can convert almost any file type.

In addition, the software works with videos from various devices, such as camcorders, DSLR cameras, action cameras, drones, etc.

As for file conversion, you can convert videos and optimize it to work on mobile and other devices, or optimize them for uploading to video sharing websites:

Other great features:

  • Level-3 hardware acceleration
  • 47x faster
  • Supports basic video editing
  • Lossless compression
  • Ability to download videos
WinX HD Video Converter Deluxe

WinX HD Video Converter Deluxe

WinX HD Video Converter Deluxe is a powerful file converter that will easily convert MKV files to MP4.
Free trialVisit website

2. Use Wondershare UniConverter

Another software that can work as an MKV converter to MP4 is Wondershare UniConverter. The device supports MP4, AVI, MKV, WMV, MOV, MP3, WMA, ACC, OGG, FLAC, and many other formats.

Speaking of which, the device can optimize your videos for both iOS and Android devices, as well as game consoles.

It’s also worth mentioning that the software supports batch file conversion allowing you to convert multiple videos with ease.

Other great features:

  • Supports more than 1000 video and audio formats
  • 30X faster conversion speed
  • Screen recording
  • Ability to download videos
  • DVD burning
Wondershare UniConverter

Wondershare UniConverter

Wondershare UniConverter is a file converter that supports over 1000 different formats, and it can easily convert MKV to MP4 files.
Free trialVisit website

3. Use VLC

  1. Download VLC and install it. You can also use a portable version instead.
  2. Open VLC.
  3. Go to Media > Convert / Save.
    VLC convert How to convert mkv to mp4

  4. Click the Add button and choose the MKV file that you want to convert.
    VLC add button How to convert mkv to mp4
  5. Now click on the arrow next to Convert / Save and choose Convert.
    VLC convert How to convert mkv to mp4
  6. Set Profile to Video – H.265 + MP3 (MP4), choose the destination directory, and click on Start.
    VLC conversion settings How to convert mkv to mp4
  7. Now, wait for the conversion process to finish.

If needed, you can always click the wrench icon in order to customize the conversion settings.


4. Use Handbrake

  1. Download Handbrake software and install it.
  2. Add the file MKV file that you want to convert.
    HandBrake How to convert mkv to mp4
  3. Now select MP4 as the output format and customize the settings.
  4. Start the conversion and wait for the process to finish.

Keep in mind that Handbrake is an advanced MKV converter to MP4 software, so you might have to experiment with different settings until you get the desired results.


5. Use Cloudconvert

  1. Visit the Cloudconvert website.
  2. Now click on Select File and upload the file, or link a file from cloud storage.
    cloudconvert How to convert mkv to mp4
  3. Optional: Change the conversion settings. Keep in mind that this is intended only for advanced users.
  4. After the conversion process is finished, download your MP4 file.

You can prepare clean MKV files that convert more reliably by using MakeMKV software, which lets you create high quality MKV videos from your DVDs and Blu rays before turning them into MP4 format.

There are many websites that offer file conversion feature, and you’re free to try any of them.

Converting MKV to MP4 isn’t hard, but you’ll need to use tools such as WinX HD Video Converter Deluxe or Wondershare UniConverter to do it.

If these tools don’t work for you, then feel free to try any other solution from this article.

Solarwinds unexpected error occurred. job failed to execute

When applying a SAM template to a node for network monitoring, it can happen that one or more components are failing.

The central cause for this is that the node applied to a template is using a Linux agent that does not support all the components that SAM can monitor.

Users report getting the following error message when using Solarwinds:

Unexpected error occurred. Exception: Unknown or unsupported probe type SolarWinds.APM.Probes.SmtpProbe

In this article we will explore a few easy ways of solving this Solarwinds issue, so make sure to keep on reading.

How can I fix error message unexpected error occurred in Solarwinds?

1. Use specialized software

A software that is reliable and error-free is one of the best choices when it comes to choosing the best option for monitoring your network.

What recommends PRTG Network Monitor are its great capabilities, and the available features for monitoring the availability of the hardware.

Moreover, with this tool you can set customized alerts to ensure that you’ll receive instant notification if anything happens.

PRTG Network Monitor

PRTG Network Monitor

Use a specialized and error free software that will help you stay on top of everything that happens in your network.
Free trialVisit website

2. Modify the settings in Solarwinds

  1. Open Slarwinds application and edit the application with the failing component(s).
  2. Next, click on the Advanced section to expand it.
  3. Set the Preferred Polling Method to Agentless (you may need to click OVERRIDE TEMPLATE to be able to change this).
  4. Save the changes.

Solving the solarwinds unexpected error occurred. job failed to execute is easy by following the solutions presented in this guide.

If you have additional recommendations and suggestions, please share them in the comments section below.

MANUALLY INITIATED CRASH1 error in Windows 10 [Full Fix]

MANUALLY_INITIATED_CRASH1 and many other Blue Screen of Death will cause your system to crash and restart your PC in order to prevent damage.

BSoD issues can appear on every Windows version, and Windows 10 is no exception. However, at times, it can be difficult to investigate the cause of the problem

BSoD error such as this one can be quite problematic, therefore today we’re going to show you how to fix this error on Windows 10.

The error code 0xdeaddead is also known as MANUALLY_INITIATED_CRASH1, thus, if you see this code, you can use the below solutions.


How do I fix MANUALLY INITIATED CRASH1 BSoD error?

1. Use a dedicated tool for BSoD 

Discovering the cause and the solutions to fix computer errors such as BSoD can be a complicated task. Fortunately, there are specialized repair tools to help you out.


2. Download the latest Windows 10 updates

 Certain hardware and software have issues with Windows 10, and sometimes these issues can lead to MANUALLY_INITIATED_CRASH1 and other Blue Screen of Death errors.

 Microsoft is working hard to improve Windows 10, and many of these patches offer both hardware and software related fixes as well as security improvements.

If you want to keep your PC stable, safe and free from errors, we strongly suggest that you download the latest patches through Windows Update.


Windows Update not working in Windows 10? Don’t worry! Check our guide and solve this error with ease.


3. Run the BSOD troubleshooter 

  1. Open the Settings app.
  2. Go to the Update & Security section.
  3. Select Troubleshoot from the left pane.
  4. Select BSOD from the right pane and click Run the troubleshooter.MANUALLY INITIATED CRASH1 Windows 10 error
  5. Follow the instructions on the screen to complete the troubleshooter.

The next thing we’re going to try is running the built-in troubleshooter featured in Windows 10. This troubleshooter can help with all sorts of issues, including the BSOD errors. 

If the Windows Troubleshooter has stopped working on your computer, you can find quick solutions for this problem in our dedicated guide.


4. Update your drivers

If your drivers are outdated or buggy, you won’t be able to properly use any hardware that is associated with them. Also, this can be another cause for BSoD errors.

To fix this error it’s advised that you download the latest drivers for your hardware. Bear in mind that almost any hardware can cause this error to appear, thus, update all your drivers.

Searching for drivers on your own can be time-consuming. So, we advise you to use a tool that will do this for you automatically.

Using an automatic driver updater will certainly save you from the hassle of searching for drivers manually, and it will always keep your system up to date with the latest drivers.

⇒ Get Outbyte Driver Updater


5. Run the SFC scan

  1. Open the Windows search bar and type cmd and open Command Prompt as administrator.
  2. Enter the following line and press Enter: sfc/scannowMANUALLY INITIATED CRASH1 Windows 10 error
  3. Wait until the process is done (it may take a while).
  4. If the solution is found, it will automatically be applied.
  5. Now, close the Command Prompt and restart your computer.

The next troubleshooting tool we can try is the SFC scan. The System File Checker is a command-line tool that scans your system for potential corrupt system files.

However, if you encounter errors while running SFC, it stops or does not work at all on Windows 10, use our dedicated guide in order to fix the issue.


6. Run the DISM tool

  1. Follow the first two steps from the above solution to open Command Prompt as admin.
  2. Paste the following command and press Enter:
    • DISM /Online /Cleanup-Image /RestoreHealth
  3. Wait until the scan is finished.MANUALLY INITIATED CRASH1 Windows 10 error
  4. Restart your computer and try updating again.

And the third troubleshooting option we’re going to try here is DISM. Deployment Image Servicing and Management (DISM) is a tool that re-deploys the system image. 


DISM failed on Windows 10? Take a look at our complete guide and learn how to solve the error.


7. Check the hard drive

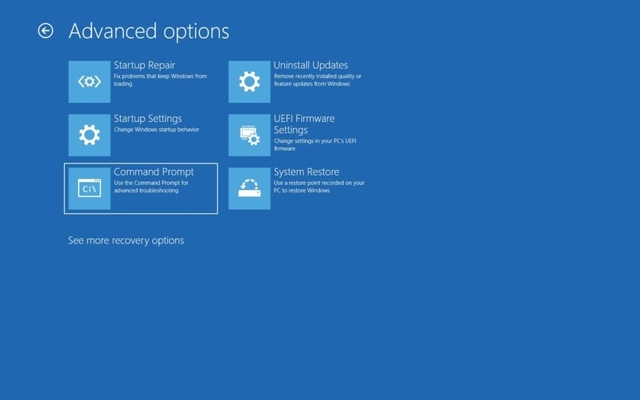
  1. Enter the Advanced Startup (Restart your computer while holding the Shift key).
  2. Choose Troubleshoot > Advanced Options.Keyboard works in BIOS and not in Windows
  3. Select Command Prompt from the list of options.
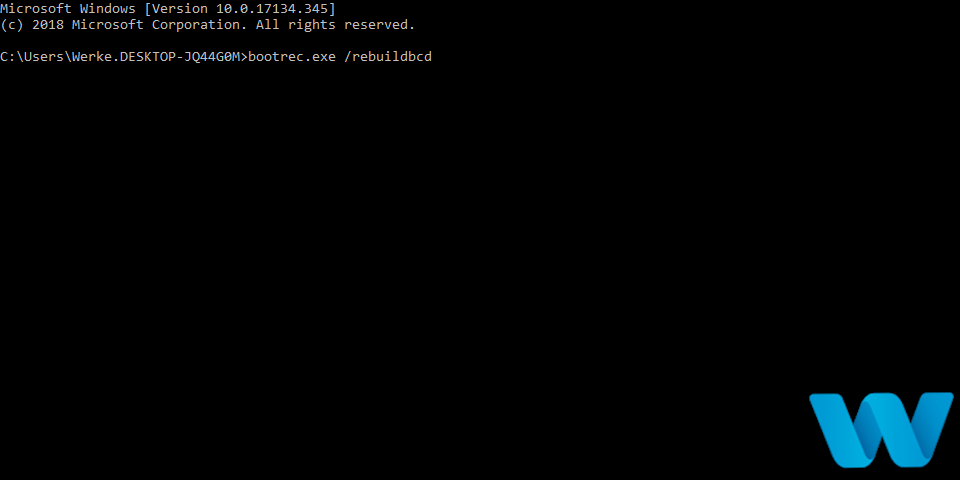
  4. When Command Prompt appears, enter the following lines and press Enter after each line in order to run it:
    • bootrec.exe /rebuildbcdMANUALLY INITIATED CRASH1 Windows 10 error
    • bootrec.exe /fixmbr
    • bootrec.exe /fixboot
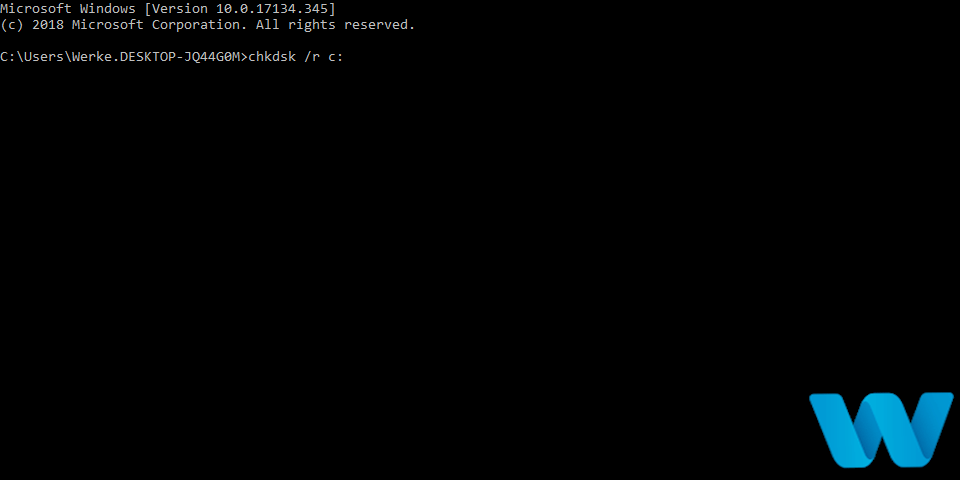
  5. Some users are also suggesting that you need to run additional chkdsk commands as well.
  6. To perform these commands, you need to know drive letters for all your hard drive partitions. In Command Prompt you should enter the following (but remember to use the letters that match your hard drive partitions on your PC):
    • chkdsk /r c:MANUALLY INITIATED CRASH1 Windows 10 error
    • chkdsk /r d:
  7. This is just our example, so keep in mind that you have to perform chkdsk command for every hard drive partition that you have.
  8. Restart your computer and check if the issue is resolved.

If there’s a problem with your hard drive, BSOD issues are quite common. So, we’re going to check the current state of your hard drive, by running the chkdsk command. 


8. Remove problematic software

delete files

Third-party applications can also cause MANUALLY_INITIATED_CRASH1 and many other Blue Screen of Death errors to appear. It’s recommended that you find and remove the problematic software.

Most common cause for BSoD errors can be your antivirus software, therefore we suggest that you temporarily remove all third-party antivirus programs from your PC.

To completely remove certain antivirus from your PC, you’ll have to uninstall it and use the dedicated removal tool to remove any remaining files associated with your antivirus program.

If the issue is fixed by removing the antivirus software, you can reinstall it, or you can switch to a different antivirus solution.

According to users, this error can be caused by any application on your PC, therefore it’s recommended that you remove all third-party applications that you don’t recognize or don’t use.

It’s worth mentioning that your drivers can also cause this error, and few users reported that they fixed this issue on Dell laptop by uninstalling and reinstalling the wireless driver. 


You can’t completely remove software leftovers on Windows 10? Use the solution from our quick guide.


9. Reset Windows 10

  1. Restart your PC few times during the boot sequence to start Automatic Repair.Yellow Screen of Death in Windows 10
  2. Select Troubleshoot > Advanced options > Remove everything. During this step you might be asked to insert Windows 10 installation media, so make sure that you have one ready.
  3. Select Only the drive where Windows is installed > Just remove my files and click the Reset button to start the procedure.
  4. Follow the instructions to complete the reset.

If this error is caused by software, you should be able to fix it by performing a Windows 10 reset. To perform the reset you might need a bootable USB flash drive.

We also have to mention that this process will delete all files from your C drive, so we advise you to back up the important files. To perform the reset, do the following:

Once the reset is completed don’t install any third-party applications or drivers. Test your computer for a while and check if the error appears again.

If the BSoD error appears, this means that it’s being caused by your hardware. Commonly, the hard disk driver or the RAM is the main cause.

If Automatic Repair couldn’t repair your Windows 10 PC, we recommend you to follow the steps from our dedicated guide and easily fix the issue.


10. Check for faulty hardware

If the MANUALLY_INITIATED_CRASH1 error still persists, we suggest that you remove or replace any recently installed hardware since it might not be compatible with your PC.

If new hardware is not the problem, be sure to perform a detailed hardware inspection and remove the faulty hardware.


MANUALLY_INITIATED_CRASH1 BSoD error can be a major problem, but we hope that you managed to fix it by using one of our solutions.

If you have any suggestions for us or dealing with other type of error, please let us know in a comment below.

Microsoft Teams will let meeting organizers set a timer for Virtual Breakout rooms

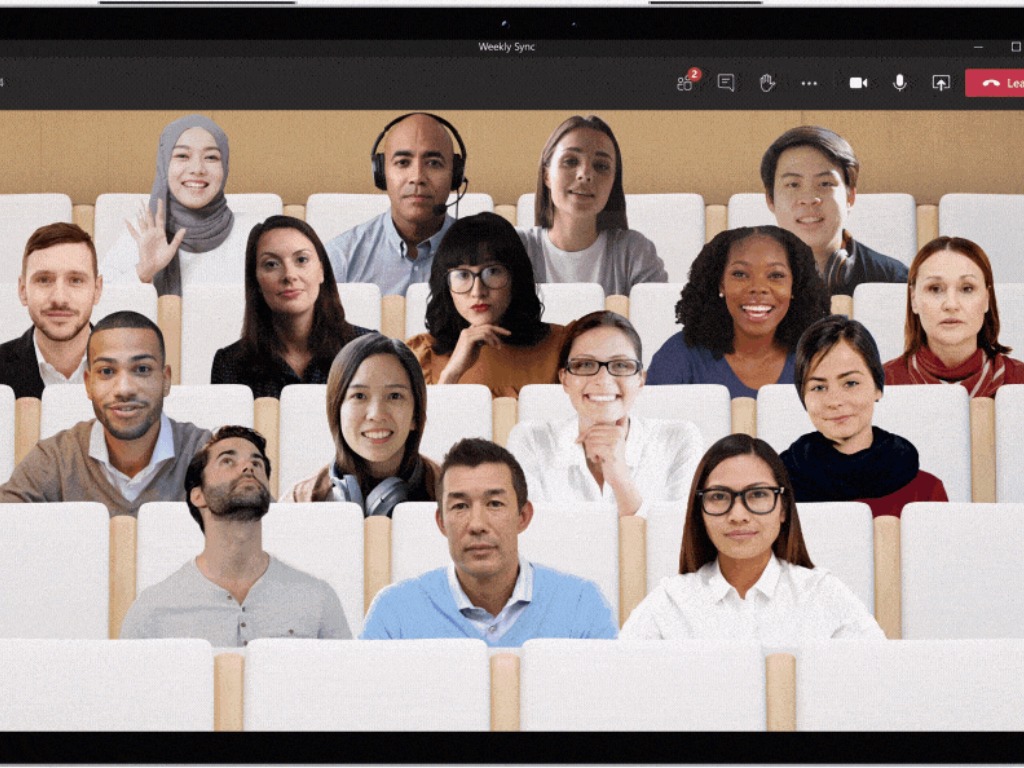
Microsoft Teams introduced a new Virtual Breakout rooms feature on the desktop last year along with other improvements such as Together mode scenes, custom backgrounds, and more. Now, the company is working on a new set of admin options for managing Breakout rooms in the app.

According to the Microsoft 365 roadmap, Microsoft Teams is adding a timer option in the Breakout Room settings. It will allow the meeting organizers to set the time limit for each room. When the timer duration expires, the breakout room will close automatically, and all the participants will return to the main meeting.

In addition to this, the app is adding room assignment retention settings to retain room configuration and assignment over various brainstorming sessions. Microsoft is also bringing the ability for organizers to move participants across rooms & main meeting when Breakout rooms are open.

Lastly, a new bypass lobby option is coming to Teams meetings. This setting will make it mandatory for all attendees to bypass the meeting lobby rather than directly jumping into the ongoing meeting. However, It will be up to the meeting hosts to apply this meeting policy to people in their organization and exclude external guest users.

The Microsoft 365 roadmap indicates that these updates will start gradually rolling out to users later this month. In case you missed it, other improvements being planned for Teams this year include the ability to pause video recordings, an Out of Office message scheduling option, and a Walkie Talkie feature for iOS.

5 best software to fix music tags [Windows 10/11]

If you have a large music collection, then you surely know how important is to have correct music tags. In case your tags aren’t correct, you might have problems organizing or finding certain songs.

However, you can easily fix your tags, and in today’s article, we’re going to show you the best software to fix music tags on your PC.

What is the best software to fix music tags?

Wondershare UniConverter

Wondershare UniConverter is a file converter that works with both video and music files. Speaking of music files, the software also allows you to edit your music tags.

The application supports ID3 tags and you can easily enter all the metadata such as Artist name, Album name, etc, with ease. In addition to ID3 editing, the software can also perform file conversion.

Wondershare UniConverter supports over 1,000 different audio and video formats, so you can convert almost any type of file with ease. Of course, you can also optimize files for certain devices.

The software also offers lossless conversion, and optimization for multi-core processors, which results in 30 times faster video conversion.

Wondershare UniConverter is a great file converter, but it also doubles as a music tags editor, so you might want to try it out.

Wondershare UniConverter features:

  • ID3 tags editing
  • File conversion for over 1000 audio and video formats
  • Batch file conversion
  • Lossless conversion
  • Multi-core processor optimization
Wondershare UniConverter

Wondershare UniConverter

Wondershare UniConverter is a powerful file conversion software that can also be used to fix music tags.
Free trialVisit website

Pistonsoft MP3 Tags Editor

Pistonsoft MP3 Tags Editor is a specialized tool designed for editing your music tags. In addition to editing ID3 tags, the software can also rename files, folders, and export data to various formats.

The software works with ID3v1 and ID3v2 tags, and it even has ID3v1 tags Lyrics3 support. If needed, you can also save pictures inside MP3 and WMA tags.

Pistonsoft MP3 Tags Editor supports both lyrics and picture editing, and it can change multiple tags for multiple files in order to speed up the tag editing process.

Support for FreeDB is also available, allowing you to update your tags from the Internet automatically. The software also supports templates, and you can use them to easily rename files and folders.

Pistonsoft MP3 Tags Editor is a great solution if you’re looking for software to fix music tags, so we strongly encourage you to try it out.

Pistonsoft MP3 Tags Editor features:

  • Ability to rename files and folders
  • Support for ID3v1 and ID3v2 tags
  • Works with WMA, OGG, ASF, and MP3 files
  • Can change multiple tags in multiple files
  • FreeDB integration for automatic tag updating
Pistonsoft MP3 Tags Editor

Pistonsoft MP3 Tags Editor

Pistonsoft MP3 Tags Editor is a software that can fix music tags automatically by using FreeDB service.
Free trialVisit website

MusicBrainz Picard

MusicBrainz Picard software to fix music tags

If you’re looking for free and open-source software to fix music tags, you might want to consider using MusicBrainz Picard. This is a multi-platform software, so it will work on Windows, Mac, as well as Linux.

The software supports all popular audio formats, including MP3, FLAC, OGG, M4A, WMA, WAV, and many others.

The application is easy to use, and it can add tags to your audio files using the data from the MusicBrainz database. In addition, the software can also work with AcoustID fingerprints.

Another great feature is the ability to rename and move files to specific directories using templates. In addition, you can also get album art covers from multiple sources.

MusicBrainz Picard is a great tool that can help you fix music tags, and since it’s completely free and available on multiple platforms, you might want to try it out.

MusicBrainz Picard features:

  • Free and open source
  • Available on Windows, Mac, and Linux
  • Works with MP3, FLAC, OGG, M4A, WMA, WAV, and many other formats
  • Ability to rename and move files to specific directories
  • Can update tags using the MusicBrainz database

⇒ Download MusicBrainz Picard


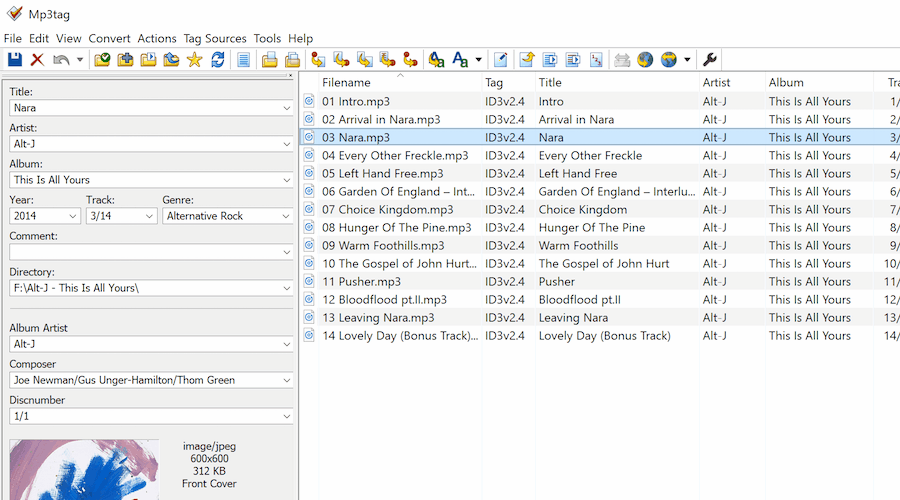
Mp3tag

Mp3tag software to fix music tags

Mp3tag is another powerful software that you can use to fix music tags on your computer. As for supported formats, there’s support for ID3v1.1, ID3v2.3, ID3v2.4, MP4, WMA, and APEv2 tags.

To make this process faster, there’s support for batch tag editing so you can change tags on multiple songs with ease. In addition, the software can also download and add album covers.

Support for services such as Discogs, freedb, MusicBrainz is also there, so you can update your tags automatically from the Internet.

If you’re an advanced user, you’ll be pleased to know that there’s support for regular expressions, so you can use them to rename files or tags, and you can even rename files according to your tags.

Mp3tag is rather powerful, and it offers a wide array of features, and since it’s available for free, you might want to try it out.

Mp3tag features:

  • Supports ID3v1, ID3v2.3, ID3v2.4, iTunes MP4, WMA, Vorbis comments, and APE tags
  • Batch tag editing
  • Support for Discogs, MusicBrainz, and freedb service
  • Support for regular expressions
  • Free to use

⇒ Download Mp3tag

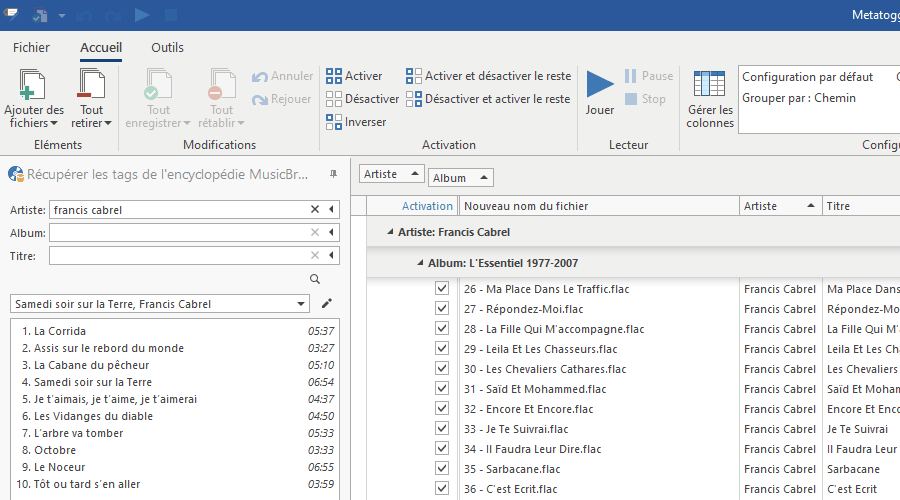
Metatogger

Metatogger software to fix music tags

Another great software that can fix music tags for you is Metatogger. The software supports tag editing for MP3, Ogg Vorbis, FLAC, M4A, and WMA files.

The software connects to the MusicBrainz database, so it can automatically get audio tags for you. In addition, there’s archive.org integration for album covers and Acoustid technology support.

Metatogger can edit multiple tags, and if you want, you can use C# scripts to automate the tag update process so you don’t have to do it by hand.

Using this software, you can get tags from the file names or paths, rename, copy, or move audio files according to their tags to better organize your library.

Overall, Metatogger is a great tag editor, and if you want to keep your music library organized, this is a software that you must try.

Metatogger features:

  • Supports MP3, Ogg Vorbis, FLAC, M4A, and WMA files
  • Integration with MusicBrainz, Acoustid, and archive.org database
  • Ability to edit multiple tags
  • Automation with C# scripts
  • Free to use

⇒ Download Metatogger

Keeping your music tags up to date is important, and with tools such as Wondershare UniConverter and Pistonsoft MP3 Tags Editor, fixing your music tags will be a breeze.

Fix: MSRPC STATE VIOLATION error in Windows 10/11

Blue Screen of Death errors can be quite serious, therefore it’s important to know how to properly fix them. Since BSoD errors can cause many problems, today we’re going to show you how to fix the MSRPC_STATE_VIOLATION error on Windows 10.

How do I fix MSRPC_STATE_VIOLATION BSoD error

  1. Run a third-party BSoD troubleshooter
  2. Run the Hardware Troubleshooter
  3. Run the SFC scan
  4. Install the latest Windows 10 updates and download the latest drivers
  5. Run a DISM
  6. Remove/reinstall your antivirus software
  7. Perform a clean boot
  8. Reset Windows 10
  9. Check for faulty hardware

1. Run a third-party BSoD troubleshooter

Especially if you don’t know how to tackle blue screen errors, there are a couple of dedicated tools that can do the job for you. You might have to install and run them in Safe Mode.

2. Run the Hardware Troubleshooter 

  1. Open the Settings app and go to the Update & Security section.
  2. Select Troubleshoot from the menu on the left.
  3. Select BSOD from the right pane and click Run the troubleshooter.
  4. Follow the instructions on the screen to complete the troubleshooter.

3. Run a SFC scan

  1. Right-click on the Start Menu button, and open Command Prompt (Admin).
  2. Enter the following line and press Enter: sfc/scannow
  3. Wait until the process is done (it may take a while).
  4. If the solution is found, it will automatically be applied.
  5. Now, close the Command Prompt and restart your computer.

The SFC is a command-line scanning tool that scans your computer for potential issues and resolves them along the way. A lot of users have reported that the SFC scan can be useful when dealing with BSOD issues in Windows 10.

4. Install the latest Windows 10 updates and download the latest drivers

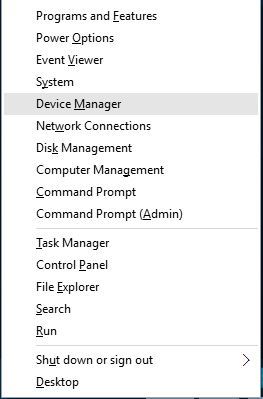
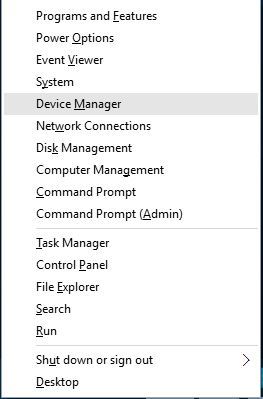
  1. Press Windows Key + X on your keyboard to open the Power User Menu and select Device Manager from the list.
    msrpc-state-violation-windows-manager
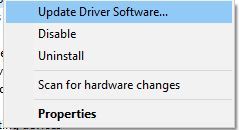
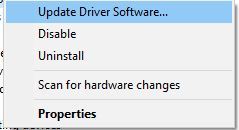
  2. When Device Manager opens, locate the driver that you want to update, right-click it and choose Update Driver Software.
    msrpc-state-violation-windows-update-driver-software
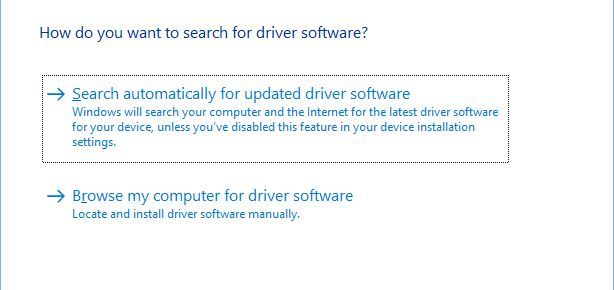
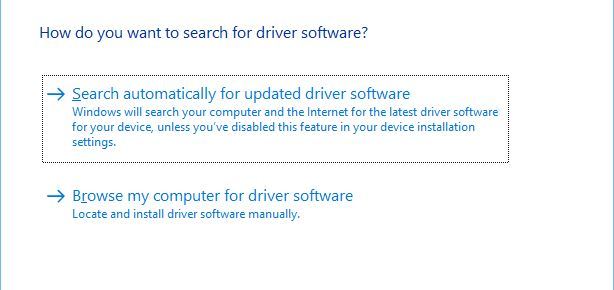
  3. Click Search automatically for updated driver software and wait for Windows 10 to install the suitable driver.
    msrpc-state-violation-windows-driver-software
  4. Repeat these steps for all drivers that you want to update.

Although updating drivers by using Device Manager is fairly simple, many users are complaining that Device Manager doesn’t always download the latest drivers.

If you want to download the latest drivers for your hardware, you’ll have to download them manually. To download your drivers manually just visit your hardware manufacturer’s website and download the latest driver for your device.

4.1 Update drivers automatically

Searching for drivers on your own can be time-consuming. So, we advise you to use a tool that will do this for you automatically.

Using an automatic driver updater will certainly save you from the hassle of searching for drivers manually, and it will always keep your system up to date with the latest drivers.

These tools are software that you can use to detect missing or outdated drivers. With just one click, you will get all the necessary details on the main dashboard.

From there, you have several further actions that you can take: either update one driver or several, depending on your needs.

Additionally, it is easy to set up and use and saves you a lot of trouble with guessing the right drivers.

⇒ Get Outbyte Driver Updater

5. Run DISM

  • The standard way
  1. Right-click Start and open Command Prompt (Admin).
  2. Paste the following command and press Enter:
    • DISM /Online /Cleanup-Image /RestoreHealth
  3. Wait until the scan is finished.
  4. Restart your computer and try updating again.
  • With the Windows installation media
  1. Insert your Windows installation media.
  2. Right-click the Start menu and, from the menu, choose the Command Prompt (Admin).
  3. In the command line, type the following commands and press Enter after each:
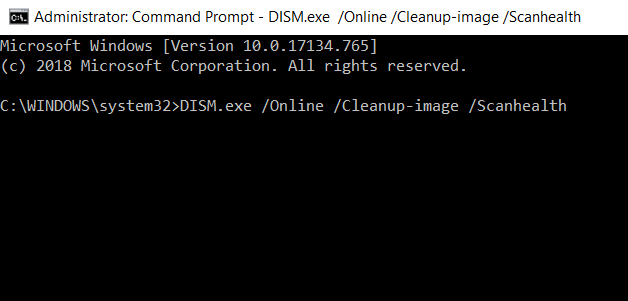
    • dism /online /cleanup-image /scanhealth
    • dism /online /cleanup-image /restorehealth
  4. Now, type the following command and press Enter:
    • DISM /Online /Cleanup-Image /RestoreHealth /source:WIM:X:SourcesInstall.wim:1 /LimitAccess
  5. Make sure to change an X value with the letter of the mounted drive with Windows 10 installation.
  6. After the procedure is finished, restart your computer.

DISM stands for Deployment Image Servicing and Management, and as its name says, it reloads the system image, which can lead to solving potential BSOD issues.

6. Remove/reinstall your antivirus software

remove antivirus

Antivirus software is important for your online safety, but sometimes antivirus programs can cause the MSRPC_STATE_VIOLATION error to appear.

According to users, AVG is the cause for this error, but bear in mind that almost any other antivirus software can cause these types of errors to appear, so be sure to remove all third-party antivirus software that you have installed.

Uninstalling the antivirus program might not be enough, since many of these programs tend to leave certain files behind even after you remove them, therefore we advise you to use a dedicated removal tool.

Almost all antivirus companies offer dedicated removal tools for their software, so be sure to download one of these tools for your antivirus.

After you remove your antivirus, Windows Defender will automatically turn itself on, thus keeping your computer protected from viruses.

If the problem is fixed by removing your antivirus software, we advise you to install the latest version of the antivirus program that you were using before, or to switch to a different antivirus solution.

7. Perform a clean boot

  1. Press Windows Key + R and enter msconfig. Press Enter or click OK.
    msrpc-state-violation-windows-msconfig
  2. When System Configuration window opens, select Selective startup and uncheck Load startup items.
    msrpc-state-violation-windows-configuration
  3. Go to Services tab and check Hide all Microsoft services. Click the Disable all button.
    msrpc-state-violation-windows-system-configuration-services
  4. Click Apply and OK to save changes.
  5. Now start Task Manager by pressing Ctrl + Shift + Esc.
  6. When Task Manager opens go to Startup tab.
  7. Right-click every item on the list and choose Disable from the menu.
    msrpc-state-violation-windows-Task-manager-disable
  8. After you’ve disabled all startup applications close Task Manager and restart your PC.

When your computer restarts check if the error still persists. If the error doesn’t manifest, it means that one of the disabled applications or services was causing it.

To find the problematic application you need to repeat the same steps and enable services and applications one by one until you find the one that is causing this problem.

8. Reset Windows 10

reset windows 10
  1. Restart your computer a few times during the boot sequence to start Automatic Repair.
  2. Choose Troubleshoot > Reset this PC > Remove everything. During this step you might get asked to insert Windows 10 installation media, so be ready to do that.
  3. Choose Only the drive where Windows is installed > Just remove my files.
  4. Follow the instructions to complete the reset process.

This procedure will delete all files and folders from your C partition, therefore we urge you to back up your important files. To perform Windows 10 reset, you might need a bootable USB flash drive, so be sure to create one. To reset Windows 10, do the following:

After the reset is completed, you should have a clean installation of Windows 10 without any third-party applications. If the error appears again, it means that there’s a hardware problem with your PC.

9. Check for faulty hardware

Check for faulty hardware

Hardware components can often cause BSoD errors, especially if they aren’t compatible with your PC, therefore we advise you to remove any recently installed hardware.

If the problem isn’t new hardware, then you should check for faulty components. Many users reported that a faulty hard drive caused this error, so check your hard drive first and then check all other hardware components.

MSRPC_STATE_VIOLATION Blue Screen of Death error isn’t that serious, and we hope that you managed to fix this error by using one of our solutions.

Full Fix: EVENT TRACING FATAL ERROR error in Windows 10/11

Blue Screen of Death errors can be caused by both hardware and software, therefore it’s important to fix these errors as soon as possible. Errors such as EVENT_TRACING_FATAL_ERROR can cause you many problems, so today we’re going to show you how to fix this error on Windows 10.

How do I fix EVENT TRACING FATAL ERROR BSoD error

  1. Use a dedicated BSoD tool
  2. Run the Window BSoD troubleshooter 
  3. Run the SFC scan
  4. Download the latest Windows 10 updates and install the latest drivers
  5. Run a DISM
  6. Check the hard drive
  7. Disable Secure Boot and driver integrity checks
  8. Set English as your default language
  9. Uninstall the problematic software
  10. Reset Windows 10
  11. Check for faulty hardware

1. Use a third-party BSoD tool

If you don’t know how to handle blue screen errors, there are a couple of dedicated tools that can do the job for you. You might have to install and run them in Safe Mode.

2. Run the Windows BSoD troubleshooter 

  1. Open the Settings app
  2. Go to Update & Security > Troubleshoot.
  3. Select BSOD from the right pane and click Run the troubleshooter.
  4. Follow the instructions on the screen to complete the troubleshooter.

3. Run the SFC scan

  1. Go to Search, type cmd, and open Command Prompt as Administrator.
  2. Enter the following line and press Enter: sfc/scannow
  3. Wait until the process finishes (it’s a longer one).
  4. If the tool finds a corrupt system file, it will automatically repair it.
  5. Now, close the Command Prompt and restart your computer.

The system file checker is a command-line tool that basically scans through your system searching for potential issues.

If a corrupted system file is a problem, this tool will automatically repair it, and the problem will be resolved.

4. Download the latest Windows 10 updates and install the latest drivers

As we previously mentioned, these types of errors can be caused by hardware or software issues, and in order to prevent these errors from appearing, it’s strongly recommended that you download the latest Windows 10 updates.

New updates are released frequently, and while some of them offer new features and security improvements, many of them bring various bug fixes related to both hardware and software. To download the latest updates and keep your PC safe and stable, be sure to use Windows Update.

Downloading drivers is fairly simple, and you can download all the latest drivers right from your hardware manufacturer’s website. We have to mention that you might have to update all your drivers before you find the one that is causing this issue.

Update drivers automatically

Searching for drivers on your own can be time-consuming. So, we advise you to use a tool that will do this for you automatically. Using an automatic driver updater will certainly save you from the hassle of searching for drivers manually, and it will always keep your system up to date with the latest drivers.

⇒ Get Outbyte Driver Updater

5. Run a DISM

  • The standard way
  1. Right-click Start and open Command Prompt (Admin).
  2. Paste the following command and press Enter:
    • DISM /Online /Cleanup-Image /RestoreHealth
  3. Wait until the scan is finished.
  4. Restart your computer and try updating again.
  • With the Windows installation media
  1. Insert your Windows installation media.
  2. Right-click the Start menu and, from the menu, choose the Command Prompt (Admin).
  3. In the command line, type the following commands and press Enter after each:
    • dism /online /cleanup-image /scanhealth
    • dism /online /cleanup-image /restorehealth
  4. Now, type the following command and press Enter:
    • DISM /Online /Cleanup-Image /RestoreHealth /source:WIM:X:SourcesInstall.wim:1 /LimitAccess
  5. Make sure to change an X value with the letter of the mounted drive with Windows 10 installation.
  6. After the procedure is finished, restart your computer.

6. Check the hard drive

  1. Enter the Advanced Startup (Restart your computer while holding the Shift key).
  2. Choose Troubleshoot > Advanced Options.
  3. Select Command Prompt from the list of options.
  4. When Command Prompt appears, enter the following lines and press Enter after each line in order to run it:
    • bootrec.exe /rebuildbcd
    • bootrec.exe /fixmbr
    • bootrec.exe /fixboot
  5. Some users are also suggesting that you need to run additional chkdsk commands as well. To perform these commands, you need to know drive letters for all your hard drive partitions. In Command Prompt you should enter the following (but remember to use the letters that match your hard drive partitions on your PC):
    • chkdsk /r c:
    • chkdsk /r d:

      This is just our example, so keep in mind that you have to perform chkdsk command for every hard drive partition that you have.

  6. Restart your computer and check if the issue is resolved.

7. Disable Secure Boot and driver integrity checks

  1. Press Windows Key + X on your keyboard to open Power User Menu and select Command Prompt (Admin) from the list.
    event-tracing-fatal-error-command-prompt-admin
  2. When Command Prompt opens, enter bcdedit.exe /set nointegritychecks on and press Enter to run it.
    event-tracing-fatal-error-no-integirty-check

After doing this, driver signature checking should be disabled, and hopefully, the BSoD error will be fixed.

Since there are so many different versions of BIOS, we strongly suggest that you check your motherboard manual for detailed instructions on how to enter BIOS and disable Secure Boot.

8. Set English as your default language

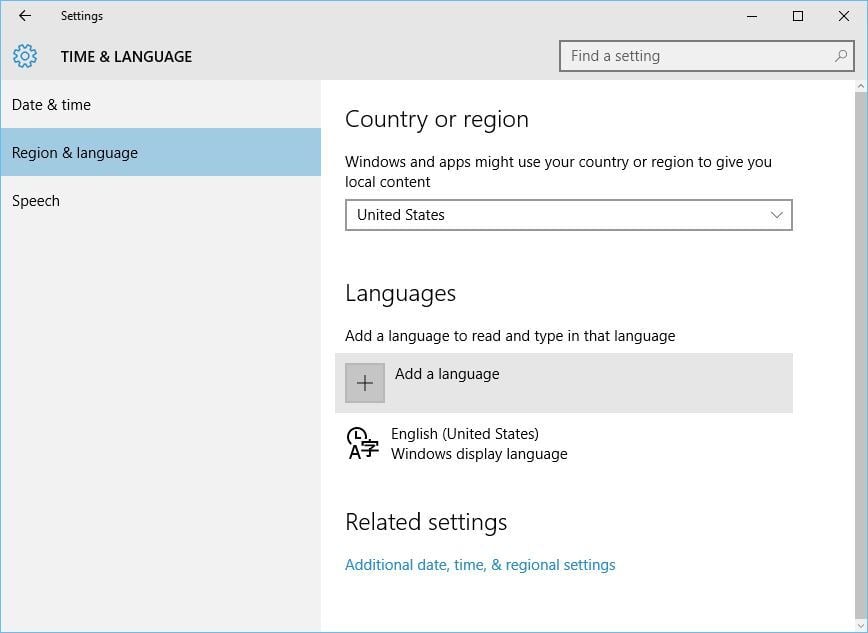
  1. Open the Settings app and go to Time & Language > Region & Language.
  2. Click Add a language and select English (United States).
    event-tracing-fatal-error-add-a-language
  3. Select English (United States) and click the Set as default button.

Next time you sign in to Windows 10, English will be set as your default language, and hopefully the BSoD error will be fixed.

9. Uninstall the problematic software

uninstall problematic software

Blue Screen of Death errors are often caused by incompatible software, and in order to fix this error, you need to find and remove the problematic software.

These types of errors are often caused by your antivirus or firewall, therefore we advise you to temporarily remove all third-party antivirus programs.

To completely remove certain antivirus from your PC, we suggest that you use a dedicated removal tool that will remove all files and registry entries associated with your antivirus.

Bear in mind that Windows 10 comes with its default antivirus, Windows Defender, so even if you remove your antivirus program your PC won’t be completely defenseless. If removing the antivirus software fixes the error, we suggest that you reinstall it again, or to switch to a different antivirus solution.

10. Reset Windows 10

reset windows 10
  1. Restart your computer a few times to start Automatic Repair.
  2. Select Troubleshoot > Reset this PC > Remove everything. Be prepared to insert Windows 10 installation media if you’re asked to.
  3. Choose Only the drive where Windows is installed > Just remove my files and click the Reset button.
  4. Follow the instructions on the screen to complete the reset.

A Windows 10 reset will delete all files from your C drive, so we advise you to create a backup. In addition to creating a backup, you might also need to create a bootable USB flash drive with Windows 10 on it in order to complete the reset process.

11. Check for faulty hardware

check for faulty hardware

If the problem still appears, even after Windows 10 reset, it means that it is caused by your hardware. To fix this error it’s important that you remove any recently installed hardware since it might not be fully compatible with your PC.

If new hardware is not the issue, we suggest that you perform a detailed inspection of your computer and replace the faulty hardware.

We also wrote about Efs Fatal Error in our latest guide, so don’t miss it.

EVENT_TRACING_FATAL_ERROR BSoD error can cause certain problems on your PC, but we hope that you managed to fix this error by using one of our solutions.

FIX: DRIVER VIOLATION error in Windows 10 [Full Guide]

Computer errors are relatively common, and while certain errors are harmless, some of them, such as DRIVER VIOLATION BSoD error, can cause many problems on Windows 10.

Blue Screen of Death errors are somewhat rare, but they can be troublesome, therefore it’s important to know how to deal with them. Most of the causes for such errors include hardware and software issues.

Rid yourself of these pesky crashes that can ruin a day’s work or a school project, by following our awesome list of solutions thoroughly.

How do I fix the DRIVER VIOLATION BSOD error?

  1. Run the BSOD Troubleshooter 
  2. Run the SFC scan
  3. Run DISM
  4. Make sure that your drivers are up to date
  5. Check the hard drive
  6. Download the latest Windows 10 updates
  7. Remove problematic software
  8. Update your BIOS
  9. Check your hardware

1. Run the BSOD Troubleshooter 

  1. Open the Settings app and go to Update & Security section.
  2. Select Troubleshoot from the menu on the left.
  3. Select BSOD from the right pane and click Run the troubleshooter.
  4. Follow the instructions on the screen to complete the troubleshooter.

If updating your drivers didn’t get the job done, let’s try with Windows 10’s troubleshooting app. You can use this tool to resolve various system issues, including BSOD issues like the DRIVER VIOLATION error.

2. Run the SFC scan

  1. Right-click the Start Menu button, and open Command Prompt (Admin).
  2. Enter the following line and press Enter: sfc/scannow
  3. Wait until the process is done (it may take a while).
  4. If the solution is found, it will automatically be applied.
  5. Now, close the Command Prompt and restart your computer.

The next troubleshooting tool we’re going to try is the SFC scan. This is a command-line tool that searches for potential problems and corrupt files in your system and resolves them (if possible).

So, it could also resolve the DRIVER VIOLATION. Make sure you type in the command correctly, because typing the wrong command might result in other problems.

3. Run DISM

  1. Right-click Start and open Command Prompt (Admin).
  2. Paste the following command and press Enter: DISM/Online/Cleanup-Image/RestoreHealth
  3. Wait until the scan is finished.
  4. Restart your computer and try updating again.

Deployment Image Servicing and Management (DISM) is a tool that re-deploys the system image. This could lead to resolving some system problems, including the BSOD issues.

We’ll walk you through both the standard way, which we gladly demonstrated above, and the other procedure that utilizes the installation media below:

With the Windows installation media

  1. Insert your Windows installation media.
  2. Right-click the Start menu and, from the menu, choose the Command Prompt (Admin).
  3. In the command line, type the following commands and press Enter after each: dism/online/cleanup-image/scanhealth dism/online/cleanup-image/restorehealth
  4. Now, type the following command and press Enter: DISM/Online/Cleanup-Image/RestoreHealth/source:WIM:X:SourcesInstall.wim:1/LimitAccess
  5. Make sure to change an X value with the letter of the mounted drive with Windows 10 installation.
  6. After the procedure is finished, restart your computer.

4. Make sure that your drivers are up to date

  1. Press Windows Key + X on your keyboard to open Power User Menu.
  2. Select Device Manager from the list of options.
    driver-violation-manager
  3. When Device Manager starts, locate the driver you want to update, right-click it and choose Update Driver Software.
    driver-violation-update-driver-software
  4. Select Search automatically for updated driver software.
  5. Windows 10 will now download and install the appropriate driver.
    driver-violation-driver-software
  6. Repeat these steps for all drivers that you want to update.

Updating drivers is crucial for system stability, and if your drivers are out of date, buggy, or simply not compatible with Windows 10, that can cause instability issues and BSoD errors such as DRIVER VIOLATION.

To fix this and other BSoD errors, it’s important that you keep your drivers up to date. You can easily download the necessary drivers simply by following these steps:

Updating drivers with Device Manager is pretty simple, but bear in mind that Device Manager doesn’t always download the latest drivers.

To ensure that you have the latest drivers installed, we strongly suggest that you download your drivers manually.

Downloading drivers manually isn’t hard, and all that you have to do is to visit your hardware manufacturer’s website and download the latest drivers for your device.

To fix this and many other BSoD errors, you might have to update all drivers on your PC.

4.1 Update drivers automatically

Searching for drivers on your own can be time-consuming. So, we advise you to use a tool that will do this for you automatically.

Using an automatic driver updater will certainly save you from the hassle of searching for drivers manually, and it will always keep your system up to date with the latest drivers.

⇒ Get Outbyte Driver Updater

5. Check the hard drive

  1. Enter the Advanced Startup (Restart your computer while holding the Shift key).
  2. Choose Troubleshoot > Advanced Options.
  3. Select Command Prompt from the list of options.
  4. When Command Prompt appears, enter the following lines and press Enter after each line in order to run it: bootrec.exe /rebuildbcdbootrec.exe /fixmbrbootrec.exe /fixboot
    • Some users are also suggesting that you need to run additional chkdsk commands as well.
    • To perform these commands, you need to know drive letters for all your hard drive partitions.
  5. In Command Prompt you should enter the following (but remember to use the letters that match your hard drive partitions on your PC): chkdsk /r c:chkdsk /r d:
    • This is just our example, so keep in mind that you have to perform chkdsk command for every hard drive partition that you have.
  6. Restart your computer and check if the issue is resolved.

According to users, you might be able to fix DRIVER VIOLATION error on your PC simply by running a chkdsk scan.

This error can occur due to corrupted files on your hard drive, but you should be able to fix it by doing the following:

6. Download the latest Windows 10 updates

  1. Press Windows Key + S and go into Settings.
  2. Next, select Update & Security.
  3. Choose Windows Update.
  4. Then, select Check for updates.
  5. Just let Windows install all the necessary updates now.

Many operating systems have some issues with certain hardware or software, and Windows 10 is no exception.

Fortunately, Microsoft is working hard to fix these issues, and it’s frequently releasing new patches through Windows Update.

These patches contain new features, security improvements, and many bug fixes related to both hardware and software, therefore in order to avoid errors, we strongly suggest that you keep your Windows 10 up to date.

7. Remove problematic software

  1. Press Windows Key + R and enter msconfig.
  2. Press Enter.
    driver-violation-msconfig
  3. When System Configuration window opens select Selective startup and uncheck Load startup items.
    driver-violation-windows-configuration
  4. Go to Services tab and check Hide all Microsoft services and then click the Disable all button.
    driver-violation-system-configuration-services
  5. Click Apply and OK to save changes.
  6. If you’re asked to restart your computer, choose not to.
  7. Press Ctrl + Shift + Esc to open Task Manager.
  8. When Task Manager opens go to Startup tab and right click each item on the list and choose Disable from the menu.
    driver-violation-Task-manager-disable
  9. Once you disable all startup applications restart your computer.

Third-party applications can cause errors such as DRIVER VIOLATION to appear, and if you’re having these errors we suggest that you remove any recently installed or updated applications.

Most common cause for these types of errors can be your antivirus, therefore we advise you to remove all third-party antivirus programs that you have installed.

To completely remove an antivirus program from your PC, we advise you to use a dedicated uninstaller tool. Many antivirus companies offer these tools for their software, therefore we strongly advise that you download them.

It’s worth mentioning that almost any application can cause this error to appear, therefore you might want to perform a clean boot in order to find the problematic application. To perform clean boot, do the following:

When your computer restarts, check if the issue is resolved. If the BSoD error doesn’t appear, you need to repeat the same steps and enable services and applications one by one until you find the one that is causing this error to appear.

We have a detailed guide containing the best antivirus software that you can get if you’re interested in upgrading your current antivirus.

8. Update your BIOS

Updating BIOS unlocks the new features of your motherboard, and it allows it to work with new hardware. Several users reported that updating their BIOS fixed the DRIVER VIOLATION Blue Screen of Death error.

Bear in mind that updating BIOS can sometimes cause damage if you’re not careful, so be extra cautious and be sure to check your motherboard manual for instructions.

A BIOS that isn’t compatible with your current GPU or CPU will constantly crash, or give other types of errors. Updating your BIOS is really important, especially when you’re installing new hardware n your old motherboard.

9. Check your hardware

Blue Screen of Death errors are often caused by your hardware, especially if that hardware isn’t compatible with your PC.

Few users reported that the TV card was causing this error, and after removing the aforementioned card, the issue was completely resolved.

Bear in mind that almost any hardware component can cause these types of errors to appear, so we advise you to perform a detailed hardware inspection.

One last thing that we encourage you to do is clean your computer’s hardware and make sure your ventilators aren’t full of dust. Overheating is one of the other causes of BSOD crashes.

To learn more about these types of errors like the AGP_INVALID_ACCESS, don’t miss our guide on Error Drivers Leaking Locked Pages for more information.

This isn’t the only error you can encounter, and we wrote about Elam_Driver_Detected_Fatal_Error in our latest article, so you might want to check it out.

DRIVER VIOLATION Blue Screen of Death error can cause certain problems on your PC, but you can easily fix this error by using one of your solutions. Make sure to give us any feedback regarding the subject in the comments.

Fix: DRIVER RETURNED HOLDING CANCEL LOCK error in Windows 10/11

DRIVER RETURNED HOLDING CANCEL LOCK and other Blue Screen of Death errors can cause many problems on your PC because they will restart your computer every time they appear in order to prevent damage.

As you can see, these errors can be serious, therefore it’s important to know how to fix them on Windows 10. Fixing such errors will keep your hardware and system in good condition.

How do I fix DRIVER RETURNED HOLDING CANCEL LOCK error?

1. Install the latest Windows 10 updates

  1. Press Windows Key + S and type Settings in the search box.
  2. Go to the Update & Security section.

  3. Select Windows Update, then click Check for updates.
  4. Windows will now scan for any new updates.
    • If it finds any, it will automatically install them.

Blue Screen of Death errors such as DRIVER RETURNED HOLDING CANCEL LOCK Windows 10 hpssvbus.syscan error is caused by hardware or software issues.

Many operating systems have a few bugs with certain hardware or software, and sometimes these bugs can lead to system instability and Blue Screen of Death errors.

To fix these types of errors, it’s important that you download the latest patches for Windows 10. New updates are released frequently, and they offer various bug fixes along with security improvements and new features.

To ensure that your PC is safe and error-free, we strongly suggest you download the latest patches using Windows Update.

2. Make sure that your drivers are up to date

For your hardware to work with Windows 10, you need to have the appropriate drivers. If your system doesn’t have suitable drivers, or if your drivers contain bugs, Windows 10 won’t be able to use your hardware.

Therefore, you’ll most likely encounter a Blue Screen of Death error such as DRIVER RETURNED HOLDING CANCEL LOCK. To fix this and all other Blue Screen of Death errors, you must update your drivers.

These types of errors usually tell you which file caused the crash, and with little research, you can find the culprit. If you can’t find the problematic driver, updating all your drivers’s always a good idea.

Updating your drivers is relatively simple, and you can do it by visiting your hardware manufacturer’s website and downloading the latest drivers for your device.

2.1 Update drivers automatically

Searching for drivers on your own can be time-consuming. So, we advise you to use a tool that will do this for you automatically. This will save you lots of time and stress.

Using an automatic driver updater will certainly save you from the hassle of searching for drivers manually, and it will always keep your system up to date with the latest drivers.

Therefore, the most convenient way to manage all your drivers correctly is with automated support provided by expert software like Outbyte Driver Updater.

3. Run the BSOD Troubleshooter 

  1. Open the Settings app and go to Update & Security section.
  2. Select Troubleshoot from the menu on the left.
  3. Select BSOD from the right pane and click Run the troubleshooter.
  4. Follow the instructions on the screen to complete the troubleshooter.

If updating your drivers didn’t get the job done, let’s try Windows 10’s troubleshooting tool. This is a universal tool that basically deals with all sorts of issues within Windows 10, including BSoD crashes.

4. Run the SFC scan

  1. Right-click on the Start Menu button, and open Command Prompt (Admin).
  2. Enter the following line and press Enter: sfc/scannow
  3. Wait until the process is done (it may take a while).
  4. If the solution is found, it will automatically be applied.
  5. Now, close the Command Prompt and restart your computer.

The SFC scan is a command-line tool that scans your system for potential issues and resolves them on the way (if the solutions are possible, of course).

So, it might be helpful when dealing with the DRIVER RETURNED HOLDING CANCEL LOCK error, as well.

5. Run DISM

  1. Right-click Start and open Command Prompt (Admin).
  2. Paste the following command and press Enter: DISM/Online/Cleanup-Image/RestoreHealth
  3. Wait until the scan is finished.
  4. Restart your computer and try updating again.

And the third tool we’re going to use is DISM. Deployment Image Servicing and Management (DISM) is a tool that, as its name says, deploys the system image all over again. And that process could resolve potential BSOD issues.

We’ll walk you through both standard procedures, which we talking about above, and the procedure that utilizes the installation media below:

With the Windows installation media

  1. Insert your Windows installation media.
  2. Right-click the Start menu and, from the menu, choose the Command Prompt (Admin).
  3. In the command line, type the following commands and press Enter after each: dism/online/cleanup-image/scanhealth dism/online/cleanup-image/restorehealth
  4. Now, type the following command and press Enter: DISM/Online/Cleanup-Image/RestoreHealth/source:WIM:X:SourcesInstall.wim:1/LimitAccess
  5. Make sure to change an X value with the letter of the mounted drive with Windows 10 installation.
  6. After the procedure is finished, restart your computer.

6. Check the hard drive

  1. Enter the Advanced Startup (Restart your computer while holding the Shift key).
  2. Choose Troubleshoot > Advanced Options.
  3. Select Command Prompt from the list of options.
  4. When Command Prompt appears, enter the following lines and press Enter after each line in order to run it: bootrec.exe /rebuildbcd bootrec.exe /fixmbr bootrec.exe /fixboot
  5. Some users are also suggesting that you need to run additional chkdsk commands as well.
    • To perform these commands, you need to know drive letters for all your hard drive partitions.
  6. In Command Prompt you should enter the following (but remember to use the letters that match your hard drive partitions on your PC): chkdsk/r c:chkdsk/r d:
    • This is just our example, so keep in mind that you have to perform chkdsk command for every hard drive partition that you have.
  7. Restart your computer and check if the issue is resolved.

In case your hard disk drive is damaged, BSOD issues will likely occur. To see if that’s indeed the case, go and run the chkdsk command. This command will scan your partition for potential issues and solve them.

7. Temporarily remove your antivirus

Antivirus software is important for your security online, but sometimes antivirus software can cause DRIVER RETURNED HOLDING CANCEL LOCK and other BSoD errors to appear.

To fix this and other errors, it’s important that you temporarily remove your currently installed antivirus. Users reported that McAfee was the potential cause for this error, but bear in mind that almost any third-party antivirus program can cause this error to appear.

Uninstalling your antivirus program might not fix the error since it tends to leave certain files and registry entries once you remove them.

To completely remove certain antivirus software from your PC, we strongly advise using dedicated app removal and PC cleaning tools. Most antivirus companies offer these tools for download.

Be sure to download and use one for your antivirus program. If removing the antivirus software fixes the problem, you can reinstall it, or you can switch to a different antivirus solution entirely.

If you’re looking for a new antivirus, you can check out this useful list with the best ones compatible with Windows 10.

8. Remove the problematic software

Third-party applications can regularly cause DRIVER RETURNED HOLDING CANCEL LOCK and many other BSoD errors to appear, therefore it’s important that you find and remove the problematic application.

According to users, applications such as KeyMaestro, Windows Virtual PC, and Teredo Tunneling Adaptor can cause these types of errors to appear, therefore it’s recommended to remove or update them.

Few users reported issues with AOL software, and some even reported that Google Chrome is causing this error, but you can easily fix this problem by removing that software.

9. Perform a Windows 10 reset

  1. Restart your computer a few times during the boot sequence to start Automatic Repair.
  2. Choose Troubleshoot > Reset this PC > Remove everything.
    • You might get asked to insert Windows 10 installation media, so be prepared to do so.
  3. Select Only the drive where Windows is installed > Just remove my files and click the Reset button.
  4. Follow the instructions to complete the reset.

If the DRIVER RETURNED HOLDING CANCEL LOCK error is caused by certain software, you can try to fix it by performing a Windows 10 reset.

Resetting your Windows 10 will delete all files and folders from your C partition, so we strongly advise you to back them up.

Bear in mind that you might also need a bootable USB flash drive with Windows 10 on it, so be sure to create one. To reset Windows 10, do the following:

After the reset process is completed, you’ll have a clean installation of Windows 10 without any third-party applications. If the BSoD error appears again, it means that your hardware most likely causes the problem.

10. Check for faulty hardware

If the problem isn’t fixed by Windows 10 reset, check your hardware. Sometimes newly installed components aren’t compatible with your PC, so you might have to remove them or replace them.

If the issue isn’t new hardware, we advise you to perform a detailed inspection of your hardware for any faulty components.

You should also check your computer for dust and clogged ventilators because they can also cause a system failure. Make sure your system is clean at all times.

DRIVER RETURNED HOLDING CANCEL LOCK error can be problematic, but since this error is usually caused by certain software, you can easily fix it by using one of our solutions.

If the problem remains unresolved, some of the solutions for Your system has a driver that is locked to manufacturer specifications may work in this case as well.

DRIVER PAGE FAULT BEYOND END OF ALLOCATION error [Full Fix]

Blue Screen of Death errors is always a big problem on Windows 10 since they tend to crash your computer in order to prevent damage. This will affect your productivity and your hardware.

Since these errors can be such a major inconvenience, today we’re going to show you how to fix the DRIVER_PAGE_FAULT_BEYOND_END_OF_ALLOCATION error.

How do I fix DRIVER PAGE FAULT BEYOND END OF ALLOCATION?

  1. Update your drivers
  2. Run the Hardware Troubleshooter
  3. Run the SFC scan
  4. Run DISM
  5. Update Windows 10
  6. Remove problematic applications
  7. Update your BIOS
  8. Perform System Restore or reset Windows 10
  9. Replace faulty hardware

1. Update your drivers

  1. Press Windows Key + X on your keyboard to open the Power User Menu and select Device Manager from the list.
    driver-page-fault-beyond-end-of-allocation-manager
  2. When Device Manager opens, locate the driver you wish to update, right-click it and choose Update Driver Software.
    driver-page-fault-beyond-end-of-allocation-update-driver-software
  3. Select Search automatically for updated driver software and wait for Windows 10 to download and install the best driver for your device.
    driver-page-fault-beyond-end-of-allocation-driver-software
  4. Repeat this step for all drivers that you want to update.

Drivers are a key component of every operating system since they allow Windows 10 to recognize and use certain hardware.

Since drivers are such a big part of every operating system, faulty or outdated drivers can often cause this error to appear.

Most Blue Screen of Death errors will tell you which file caused the system to crash, and with little research, you can find exactly which driver you need to update.

If you cannot find the faulty driver, we urge you to update all your drivers. Updating drivers is simple, and you can do it right from the Device Manager.

Update drivers automatically

Even though Device Manager provides simplicity when it comes to updating drivers, it’s worth mentioning that this tool might not always download the latest drivers.

Searching for drivers on your own can be time-consuming. So, we advise you to use a tool that will do this for you automatically.

Using an automatic driver updater will certainly save you from the hassle of searching for drivers manually, and it will always keep your system up to date with the latest drivers.

You should therefore consider a driver software like Outbyte Driver Updater, and optimize your system with the latest version of your device drivers.

2. Run the Hardware Troubleshooter 

  1. Open the Settings app and go to Update & Security section.
  2. Select Troubleshoot from the menu on the left.
  3. Select BSOD from the right pane and click Run the troubleshooter.
  4. Follow the instructions on the screen to complete the troubleshooter.

If updating your drivers didn’t get the job done, let’s try with the troubleshooting tools. The first tool we’re going to try is Windows 10’s built-in troubleshooter.

3. Run the SFC scan

  1. Right-click on the Start Menu button, and open Command Prompt (Admin).
  2. Enter the following line and press Enter: sfc/scannow
  3. Wait until the process is done (it may take a while).
  4. If the solution is found, it will automatically be applied.
  5. Now, close the Command Prompt and restart your computer.

The next troubleshooter we’re going to seek help from is the SFC scan. This command-line tool scans your system in search of various problems and automatically resolves them. which is useful against BSOD issues.

4. Run DISM

  1. Right-click Start and open Command Prompt (Admin).
  2. Paste the following command and press Enter: DISM/Online/Cleanup-Image/RestoreHealth
  3. Wait until the scan is finished.
  4. Restart your computer and try updating again.

And the final troubleshooting tool we’re going to try is DISM. This is perhaps the most powerful troubleshooter, as it deploys the system image all over again.

We’ll walk you through both standard and the procedure that utilizes the installation media below.

With the Windows installation media

  1. Insert your Windows installation media.
  2. Right-click the Start menu and, from the menu, choose the Command Prompt (Admin).
  3. In the command line, type the following commands and press Enter after each: dism/online/cleanup-image/scanhealth dism/online/cleanup-image/restorehealth
  4. Now, type the following command and press Enter: DISM/Online/Cleanup-Image/RestoreHealth/source:WIM:X:SourcesInstall.wim:1/LimitAccess
  5. Make sure to change an X value with the letter of the mounted drive with Windows 10 installation.
  6. After the procedure is finished, restart your computer.

5. Update Windows 10

  1. Press Windows Key + S and search for Settings.
  2. Go to Update & Security.

  3. Then, select Windows Update.
  4. Next, select Check for updates.
  5. Let Windows scan for newer versions and install all of them.

Installing the latest updates is crucial for the stability and safety of your system.

Many BSoD errors are caused by hardware or software incompatibilities, and in order to fix these issues, it’s important that you keep your Windows 10 up to date.

New patches are being released frequently through Windows Update, so if you want your PC to be safe and error-free, we strongly advise you to update Windows 10 frequently.

6. Remove problematic applications

DRIVER PAGE FAULT BEYOND END OF ALLOCATION and many other Blue Screen of Death errors can be caused by third-party applications, therefore it’s important that you find and remove those applications.

Many users reported that uninstalling applications such as Logitech Webcam Software or Virtual Audio Cable fixed the BSoD error, therefore if you’re using any of these applications be sure that you remove them.

Few users also reported issues with Catalyst Control Center, and according to them, uninstalling and reinstalling will fix the problem. Learn how to do it with this awesome article.

Bear in mind that your antivirus software can also cause this error to appear, therefore it’s crucial that you temporarily uninstall all third-party antivirus programs.

Bear in mind that uninstalling antivirus software might not fix this issue, therefore it’s important that you remove all files and registry entries left by your antivirus software.

The easiest way to do that is to use a dedicated removal tool for your antivirus software. All major security companies have these tools available for download, so be sure to download and use one.

7. Update your BIOS

Updating BIOS often fixes certain hardware compatibility issues, and according to users, a BIOS update can also fix DRIVER PAGE FAULT BEYOND END OF ALLOCATION error.

Before you start updating BIOS, we strongly advise you to check your motherboard manual for detailed instructions.

Updating BIOS is an advanced procedure, and if you don’t perform it correctly you can cause permanent damage to your PC, so be extra cautious if you’re going to update BIOS.

8. Perform a System Restore or reset Windows 10

  1. Restart your computer few times in order to start Automatic Repair.

  2. Select Troubleshoot > Advanced options > System Restore.
  3. Select your username and enter your password.
  4. Select Choose a different restore point and click Next.
  5. Choose a restore point you wish to return to and click Next.
  6. Wait for the process to complete.

If the Blue Screen of Death error is caused by software, you can easily fix it by performing a System Restore. To perform System Restore, do the following:

If System Restore didn’t fix the blue screen stop code DRIVER PAGE FAULT BEYOND END OF ALLOCATION, we advise you to perform a Windows 10 reset.

This process is similar to clean install, so we strongly advise you to back up your important files before performing Windows 10 rest. To reset Windows 10, you need to do the following:

  1. Restart your computer few times during the boot sequence to start Automatic Repair.
  2. Choose Troubleshoot > Reset this PC > Remove everything.
    • You might be asked to insert Windows 10 installation media during this step, so be sure to do that.
  3. Select Only the drive where Windows is installed > Just remove my files.
  4. Click the Reset button and follow the instructions to complete Windows 10 reset.

If the issue isn’t resolved by Windows 10 reset, it’s most likely that you have a certain hardware issue that is causing this error.

9. Replace faulty hardware

Hardware issues can often cause Blue Screen of Death errors to appear, and since RAM is the most often cause for this error, we advise you to check your RAM first.

Many users reported that removing or replacing a faulty RAM module fixed this issue for them, therefore be sure to test all your RAM modules one by one.

If your RAM is working properly, check all other major hardware components. The motherboard and GPU can also cause BSoD problems. Overheating is also a serious issue.

This error can cause you a lot of problems, but you can easily fix it by removing the problematic applications or by finding and replacing the faulty hardware.

Make sure you tell us how things went in the comment section below. Feedback of any kind would be kindly appreciated.

Fix: SESSION_HAS_VALID_VIEWS_ON_EXIT error in Windows 10

Blue Screen of Death errors can be hard to fix since they can be caused by both hardware and software. You just need to follow the solutions below and you’ll be good to go.

These errors are also problematic because they will crash Windows 10 and restart your PC, and since they can cause so many problems, today we’re going to show you how to fix SESSION_HAS_VALID_VIEWS_ON_EXIT error.

How do I fix SESSION_HAS_VALID_VIEWS_ON_EXIT error?

  1. Update Windows 10 and all your drivers
  2. Run the Hardware Troubleshooter
  3. Run the SFC scan
  4. Run DISM
  5. Uninstall your antivirus software
  6. Disable any problematic applications
  7. Perform Windows 10 reset
  8. Check your hardware

1. Update Windows 10 and all your drivers

  1. Press Windows Key + S and search for Settings.
  2. Go to Update & Security.

  3. Go to Windows Update.
  4. Then, select Check for updates.
  5. Let windows run its course and install anything necessary.

As we briefly mentioned, the blue screen error session has valid pool on exit can be caused by both hardware or software issues, and in order to prevent these errors from appearing it’s advised to keep Windows 10 up to date.

Microsoft is frequently releasing new patches through Windows Update, and many of these patches are designed to fix both hardware and software issues.

By installing the latest updates, you’ll make sure that your Windows 10 is stable, safe, and error-free. The updates are important for your system stability, it is important that you install the latest drivers.

Drivers are an integral part of every operating system, and by updating your drivers you’ll ensure that Windows 10 is fully utilizing your hardware.

Updating drivers is quite simple, and in order to do that, you just have to visit your hardware manufacturer’s website and download the latest drivers.

Update drivers automatically

Searching for drivers on your own can be time-consuming. So, we advise you to use a tool that will do this for you automatically. Using an automatic driver updater will save you from the hassle of searching for drivers.

It will always keep your system up to date with the latest drivers as well. So do not hesitate and give this program a try, and never worry about updating your drivers again.

In this regard, we recommend Outbyte Driver Updater because it is light and easy to use. Just install the software and let it scan your drivers. It will give you a quick and easy-to-understand report and update or repair all problematic drivers on your PC.

Automated tools remove the risk of severe system damage that comes with installing a driver that doesn’t match your hardware, so we strongly suggest you look into it.

⇒ Get Outbyte Driver Updater

2. Run the Hardware Troubleshooter 

  1. Open the Settings app and go to Update & Security section.
  2. Select Troubleshoot from the menu on the left.
  3. Select BSOD from the right pane and click Run the troubleshooter.
  4. Follow the instructions on the screen to complete the troubleshooter.

The next thing we’re going to try is Windows 10’s built-in troubleshooter. This is a collection of troubleshooting tools for various issues within the system.

And it also includes a BSOD troubleshooter. So, running this tool is perhaps the easiest way to resolve the SESSION_HAS_VALID_VIEWS_ON_EXIT error.

3. Run the SFC scan

  1. Right-click on the Start Menu button, and open Command Prompt (Admin).
  2. Enter the following line and press Enter: sfc/scannow
  3. Wait until the process is done (it may take a while).
  4. If the solution is found, it will automatically be applied.
  5. Now, close the Command Prompt and restart your computer.

If the unified troubleshooter failed to resolve the problem, we’re going to run the SFC scan.

This tool scans your computer for potential issues, and delivers a solution, if possible. So, it might be helpful with the SESSION_HAS_VALID_VIEWS_ON_EXIT error, as well.

4. Run DISM

  1. Right-click Start and open Command Prompt (Admin).
  2. Paste the following command and press Enter: DISM/Online/Cleanup-Image/RestoreHealth
  3. Wait until the scan is finished.
  4. Restart your computer and try updating again.

And the final troubleshooting tool we’re going to try here is DISM. Deployment Image Servicing and Management is a command-line utility that reloads the system image.

Reloading the system image can eliminate various problems, including (hopefully) the BSOD errors. We’ll walk you through both standard and the procedure that utilizes the installation media below:

With the Windows installation media

  1. Insert your Windows installation media.
  2. Right-click the Start menu and, from the menu, choose the Command Prompt (Admin).
  3. In the command line, type the following commands and press Enter after each: dism/online/cleanup-image/scanhealth dism/online/cleanup-image/restorehealth
  4. Now, type the following command and press Enter: DISM/Online/Cleanup-Image/RestoreHealth/source:WIM:X:sourceInstall.wim:1/LimitAccess
  5. Make sure to change an X value with the letter of the mounted drive with Windows 10 installation.
  6. After the procedure is finished, restart your computer.

5. Uninstall your antivirus software

Even though Windows 10 comes with Windows Defender, it’s also required that you install third-party antivirus software in order to protect your PC.

Unfortunately, many antivirus programs can cause SESSION_HAS_VALID_VIEWS_ON_EXIT and many other Blue Screen of Death errors to appear.

Therefore it’s crucial that you remove any third-party antivirus programs that you have installed. We have to mention that many antivirus programs leave certain files and registry entries behind even after you uninstall them.

Therefore you need to use a dedicated uninstaller tool in order to completely remove a certain antivirus from your PC.

Many security companies have these tools available for their software, so be sure to download and use one of these tools.

6. Disable any problematic applications

  1. Press Windows Key + R and enter msconfig.
  2. Click OK or press Enter. 
  3. Windows Configuration window will open.
    msconfig
  4. Choose Selective Startup and uncheck Load startup items.
    system-configuration
  5. Go to Services tab.
  6. Check Hide all Microsoft services and click Disable all button.
    system-configuration-services
  7. Click Apply and OK to save changes.
    • If you get asked to restart your PC, choose not to.
  8. Start Task Manager by pressing Ctrl + Shift + Esc.
  9. When Task Manager opens, go to the Startup tab, right-click each entry on the list and choose Disable.
    Task-manager-disable
  10. After you disable all applications, close Task Manager and restart your PC.

All sorts of applications can cause SESSION_HAS_VALID_VIEWS_ON_EXIT error, and in order to find an application that is causing this error, you might need to perform a clean boot.

When your PC restarts, check if the problem is resolved. If the BSoD error doesn’t appear anymore, it means that error was caused by one of the disabled services or applications.

In order to find the problematic service or application, you need to repeat the same steps and enable all services and applications one by one until you found the one that is causing this problem.

7. Perform a Windows 10 reset

  1. Restart your computer during the boot sequence to start Automatic Repair mode.
    • Alternatively, you can just press and hold the Shift key and click the Restart button.
      restart
  2. Choose Troubleshoot > Reset this PC > Remove everything.
    • You might get asked to insert Windows 10 installation media, so be ready to do so.
  3. Select Only the drive where Windows is installed > Just remove my files and click the Reset button.
  4. Follow the instructions carefully to complete the reset.

If SESSION_HAS_VALID_VIEWS_ON_EXIT is caused by certain software, you should be able to fix this problem by performing Windows 10 reset.

This procedure is similar to clean install, and it will delete all files from your C partition, so before you start Windows 10 reset be sure to back up your important files.

It’s also recommended to have Windows 10 installation media, and if you want to create one, you’ll just need a USB flash drive and Media Creation Tool.

If the problem persists even after Windows 10 reset, it’s most likely that the issue is caused by certain hardware.

8. Check your hardware

Error SESSION_HAS_VALID_VIEWS_ON_EXIT can be caused by recently installed hardware, especially if that hardware isn’t compatible with your PC.

Therefore if you installed any new hardware recently make sure that you remove it or replace it. If the issue isn’t caused by new hardware, we advise you to check all major hardware components starting with your RAM.

SESSION_HAS_VALID_VIEWS_ON_EXIT error is often caused by certain third-party applications, and you can usually fix this error by finding the problematic application or by performing Windows 10 reset.

Wondershare FamiSafe [Review]

We live in a digital era where everyone has some device that can connect to the Internet. Our children have access to an infinite amount of information through social media, articles, etc, from a very young age.

However, children aren’t the best at taking care of themselves. Using a phone or tablet inappropriately can actually cause them harm. The safest way to protect them is by using parenting software such as FamiSafe.

Among other things, the software allows parents to monitor their children’s activity on their devices, block certain apps they consider harmful and alerts them whenever they get exposed to age-restricted content.

A cross-platform and powerful parental control app and software

With FamiSafe, you won’t have to worry about your children’s well-being anymore. The app lets you monitor their whereabouts, the sites they access, and when they do it, as well as keeping age-restricted content away.

What is even better is the fact that it is all customizable. You are the one who decides what is good and not for your children, therefore the software reflects that, giving you complete customization control over its features.

What features does FamiSafe bring?

Overall, the software includes plenty of parenting control features. We have to mention that, in order to have access to them, you need to download the mobile app. With that being said, let’s dive into them, shall we?

The Windows version of the software includes the following features:

  • Activity Report
  • App Blocker
  • Screen time
  • Browser History
  • Web Filter
  • Smart Schedule

Activity Report

FamiSafe’s Activity Report feature will monitor your child’s online and offline activity on his device. Your mobile app will show you how much they used a certain app, when, and what exactly they watched with it.

You can see which sites your kids have visited, as well as what they searched on google or watched on youtube. Activity Report lets you have their entire phone/PC activity.

Moreover, this feature allows you to monitor the apps that your child installs or updates, which allows you to get a general idea of his interests and warn him of the potential dangers.

How to use Activity Report

  1. On your Parent Device, tap Features.
  2. Then, tap Activity Report.
  3. Scroll down to see all the activity details.
  4. Tap < and > to change to days.
  5. Tap the Calendar icon to check the activity on a specific date.
  6. The calendar contains activity reports for all the previous days.

App Blocker

The App Blocker feature lets you block certain software you deem harmful to your child. You can deny access to apps that usually cause obsessive use, such as games, youtube, or social media.

Besides keeping your child’s obsession at bay, this feature can also block inappropriate apps that contain age-restricted content from your child, keeping his mental state safe.

How to use the App Blcker feature on Windows

  1. On the Parent Device, tap Features.
  2. Tap App Blocker.
  3. Select which app you’d like to block and Toggle the switch beside it.
  4. Tap Advanced Rules to set specific types of rules and limits.
  5. In order to set a Restriction schedule, choose the start and end times.
    • Turn on the Repeat toggle and select on which days to apply the restriction.
  6. Set a Time limit that will decide how much time your children spend using certain apps.
    • Turn on the Repeat toggle and select which days will be affected by this time limit.

Screen Time

Thanks to the Screen Time feature gives you access to a detailed graph containing your child’s screen time. This means you can see how much time he spends on his device, what apps he uses the most, and when he does it.

This helps you set certain schedules and make sure your child follows them. You’ll find out if they spent time playing or watching videos instead of doing their daily chores.

How to use Screen Time

  1. On the Parent Device, tap Features.
  2. Tap on Screen Time.

  3. Tap Block Device to get more options.
  4. To block the device’s screen, tap Block Device.
  5. To set a time limit, tap Screen Time limit, then set your time intervals.
    • Tap Repeat if you want the time limit to be in effect for multiple days.

Browser History

Browser History lets you track the websites your children have visited. You will be able to see the entire history and ensure that your child isn’t accessing illegal or dangerous sites.

In addition, you can also block the sites, so you won’t have to worry about them randomly popping up while your child is browsing the internet.

How to use Browser History

  1. On the Parent Device, tap Features.
  2. Tap Browser History.
  3. You can scroll and see all the visited websites.
  4. If you wish to block a website, tap on the Lock icon on the right.
  5. Tap < or > to switch between the days.
  6. Tap the Calendar icon to select specific dates.

Website filter

Filter inappropriate websites with the Website filter feature. FamiSafe allows you to deny access to whichever sites you wish to keep your children safe from age-restricted content that could mentally scar them.

This feature will also show you what your children are browsing and searching on the internet. You will get a list with the date and time of their searches.

How to use the Website Filter

  1. On the Parent Device, tap Features.
  2. Tap Web Filter.

  3. On Categories, toggle the website categories you would like to be blocked.
  4. Under the Exceptions, tap Add an Exception to add a specific site.
  5. Type the address of the site that you want to allow or block.

Smart Schedule

You can set up a certain schedule to block specific apps at set time intervals so that you can block the apps only during school or nighttime.

This will help your children concentrate during important times and keep their minds off of games or other distractions when they need to sleep. Your children will be rested and fully focused.

How to use the Smart Schedule

  1. On the Parent Device, tap Features.
  2. Tap Smart Schedule.
  3. Tap Add Smart Schedule.
  4. Write a name for your Schedule.
  5. Choose when it starts and when it ends.
    • Toggle Repeat if you want to select certain days when it will be in effect.

Here are some other of FamiSafe’s features

Location Tracking

Location Tracking lets you view your child’s real-time location on a map so you know where they are at all times. Besides, the app also shows you where they have been, giving you a history of their past locations.

You can create special locations and perimeters on the map, called Geo-Fences, such as School or Home. If your child ventures out of their set perimeter, you will get notified so you can take action quickly.

Driving History Report

If your child has a driving license and you’re worried about their safety due to reckless driving, FamiSafe’s Driving History Report will show you a graph with details of their trip.

You can see their average, max, and min speed, route, stops, and how long they drove the car. You can use all this information to prevent accidents and stop them from making a habit out of reckless driving.

Suspicious photo detection

Shelter your children from inappropriate content and possible exposure to child pornography with this very useful feature.

FamiSafe will automatically detect nude selfies and adult content that is inappropriate for underage children, then send instant alerts to you so you can intervene.

Suspicious text detection

The constant exposure to social media can possibly affect your child’s mental state.

Make sure they are safe and prevent such atrocities from happening by setting offensive words and receiving alerts whenever they pop up on your children’s device.

How do you set FamiSafe up?

  1. Create an account on their official website.
  2. Download the app.
  3. When asked Who uses this device?
    • Select Parent on the device you’ll use to control the others.
    • Select Kid on the monitored device.
  4. On the Parent device:
  5. Type in your login credentials.
    • Go to the App’s Features section and start setting it up the way you want to.
  6. On the Kid’s device:
    • Follow the setup instructions.
    • Type a Nickname and your child’s age.
    • Then type in your login credentials.
    • Then the setup should be completed.
    • On the right expandable icon pane, select FamiSafe.
    • Make sure the app is saying the message FamiSafe is Protecting this Computer.
    • You can also pause/unpause the app with a toggle.

The app must be installed on a phone as the main control device. Afterward, install it on other devices you want to be monitored. To connect these devices, you must log in with the same account.

What is the pricing?

FamiSafe comes with a free 3-day trial to try out the app on Google Play and App Store so, to get free trial of FamiSafe, parents should download the Windows version from their websites and the mobile app from either Google Play or the App Store

  • Monthly Plan: $9.99 billed monthly, protecting up to 5 devices with all features included
  • Annual Plan: $59.99 billed yearly (about $4.99/month), protecting up to 30 devices with all features included
  • Quarterly Plan: $19.99 billet quarterly (about $6.66/month), protecting up to 10 devices with all features included

FamiSafe

Protecting, monitoring, and keeping your children safe has never been easier with FamiSafe
Try it now Visit website

Closing thoughts

Pros
All of its features are great for monitoring
Constantly updated
Multiple price plans
Free trial for those who are unsure
GPS tracking is working flawlessly
Interactive and easy-to-use interface
Compatible with multiple platforms
Cons
The website filter could use some improvement because it sometimes blocks safe pictures
The software can be paused from within the monitored device with no safety measure
The text filter needs improvement as well

Overall, FamiSafe is a good parenting software with all the features you need to keep your children safe. However, we found some inconveniences when testing the text and photo filters.

We strongly believe that the developer team is constantly working to improve these features, and in time, they will be even more polished. The pricing plans are pretty diverse and affordable as well.

We’ve reviewed many products from Wondershare in the past, and they always pleased us, therefore, we recommend at least trying out the product and letting us know what you think about it in the comment section below.

Xbox Game Pass beta app is now optimized with dual-screen controls catered for the Surface Duo

If you’re still sporting the Microsoft Surface Duo, we have some big news for you. Xbox Game Pass beta now supports spanning across the dual-screens of the Duo, with a new dedicated gamepad area showing on the second screen of the device. Additionally, the Surface Duo is also getting its March firmware and security update, too.

Now that the Xbox Game Pass Beta app is optimized for the Microsoft Surface Duo, playing some of your favorite Xbox games on the dual-screen device should be a lot more fun. Several notable games already have the support for the new dedicated gamepad on the second screen, as pointed out by Daniel Rubino on Twitter. Minecraft Dungeons is one of them and New Super Lucky’s Tale is another. Minecraft Dungeons even has custom controls, catered to the things you can do in the game.

It is up to developers to specifically tweak the controls for the game though, so your mileage might vary depending on the game. And, importantly, this is still a beta, so you’ll need to download the (separate) Beta version of the app via the Google Play Store to try it out.

Still, this is indeed nice to see the feature as Microsoft initially teased these types of controls in the Surface Duo trailer back in 2019. This also makes playing games more ergonomic, too, as our own Kareem Anderson argued when he said that the Duo was the perfect showcase for both Google Stadia and XCloud. See it for yourself above, as The Verge’s Tom Warren demonstrates.

Anyway, we’ll end by mentioning the latest Surface Duo firmware update. This update is a bit small and weighs in at 82MB and first rolled out on March 2. It’s currently only rolling out to unlocked versions of the Duo and will bring March’s Android Security Updates, too. The latest version of Android on Surface Duo is now at version 2021.207.70 and the security patch should now be up to March 5th, 2021 after the update.

So, head to the Google Play Store now and download the latest beta of Xbox Game Pass to try out these new touch controls. And, when you’re done, update to the latest firmware, too. Happy downloading!

Xbox Game Pass (Beta)

Stay fit and lose weight with Ring Fit Adventure game

Nintendo Switch is one of the best-selling game consoles in the world with a wide array of great accessories.

The Switch also has some amazing online games, but if you’re looking for something different, you might want to consider getting Ring Fit Adventure for Nintendo Switch.


Ring Fit Adventure, an adventure game that will keep you fit

What’s Ring Fit Adventure actually?

Ring Fit Adventure is a Nintendo Switch game released in late 2019, and it’s an adventure that utilizes motion control. In order for the game to run, you’ll need Ring-Con and Leg Strap accessories that you attach your controller to.

Once your controllers are attached to the accessories, you can start on your adventure. The game takes place in a fantasy world, and to traverse it and defeat enemies, you need to perform certain exercises with the Ring-Con and Leg Strap accessories.

The game has 60 real-life exercises and 100 levels in over 20 worlds, so you’ll have a good workaround while trying to beat the game. If you’re not in the mood for an adventure, you can enjoy in 12 different minigames or you can create your own customizable workout routines.

The game itself looks great, with cel-shaded graphics, and it will give you hours of fun and great exercise at the same time.

  • 60 exercises
  • 100 different levels
  • Mini games
  • Custom workouts
  • Minor issues with motion detection

Ring Fit Adventure is a creative adventure game that utilizes motion controls, and if you won’t feel like working out, then this game might be the perfect way for you to get a quick exercise.

The game comes with the Ring-Con and Leg Strap accessories, so you just need to attach your controller to it, and you’re good to go to start your adventure and get some exercise.

Create a video with pictures in only 5 minutes using InVideo

It’s not easy to create a video and give it a professional look, ready to be posted or shown to your friends and relatives. It takes a lot of time and skill and usually, you will need to invest in a dedicated video editor.

You need to cut your clip, add some effects, maybe add pictures sound and text, a logo, and a lot of other elements, especially if you want to create a tutorial, a presentation video, or a video collage.

What would you say if we told you that you can do all that with a new online tool from InVideo?

How to create a video with pictures and music using InVideo?

First, you will have to create an account on InVideo’s website to be able to edit videos on the go. It takes just a couple of seconds and you will be able to use your Google or Facebook account to start.

The next thing to do is to choose one from over 4,000 templates available on the platform. And you can be sure that you will find the one you need for your video, especially if you’re creating a video for your business.

As you can see, you can even set the format of the video to select the perfect template. Moreover, you can also create a video from a bare text or, if you’re a pro, you can start with a blank canvas.

How do you find the correct template for your video? You can use the search function to find the thematic like testimonial or slideshow or even a product like shows or sunglasses if you want to create an ad.

InVideo’s interface is extremely easy to use

Once you’ve found your template, you can start customizing the video with your own text and videos, or you can use one of over 1 million clips available to use in the app.

You can even add your own fonts, company logo and soundtrack to customize your video. And as you can see from the picture above, the interface is extremely friendly and easy to use in just a few minutes.

If you’re still a bit puzzled, you can use one of the many tutorials that will guide you on the spot for any function of the editor.

Changing the colors, adding the brand logo with a simple drag-and-drop movement, and saving the video is also like a gameplay even for beginners.

When you’re done, you can create dedicated versions for all the social network services and YouTube, export it and download it or simply uploading it with just a click.

InVideo

InVideo

Use the best watermark free online tool to create stunning videos for you and your business in only 5 minutes.
Free accountVisit website

With that being said, you can unleash your creativity with this free watermark free video creation tool and start to create and share videos. If you already did, share your experience in a comment below.

Terminal server driver made incorrect memory reference [Solved]

The

TERMINAL_SERVER_DRIVER_MADE_INCORRECT_MEMORY_REFERENCE
error is a Blue Screen of Death error, and it can appear on almost any version of Windows, including Windows 10.

Since BSoD errors can be troublesome and cause damage to your PC, today we’re going to show you how to fix this error, so be sure to read on!

How do I fix the
TERMINAL_SERVER_DRIVER_MADE_INCORRECT_MEMORY_REFERENCE
 error?

  1. Update Windows 10
  2. Update your drivers
  3. Run the Hardware Troubleshooter 
  4. Run the SFC scan
  5. Run DISM
  6. Remove your antivirus
  7. Remove the problematic software
  8. Reset Windows 10
  9. Check your hardware

1. Update Windows 10

Many Blue Screen of Death errors can be caused by hardware or software incompatibilities, therefore it’s important that you fix those incompatibilities if you want your PC to be stable and without errors.

Microsoft is aware of all major issues, and it’s constantly working on them, therefore if you want to fix BSoD errors on Windows 10, we advise you to download the latest patches through Windows Update.

Many of these patches add new features, but there are also security improvements along with various bug fixes related to both hardware and software.

Downloading Windows updates is one of the simplest ways to fix and prevent Blue Screen of Death errors from appearing, so be sure to download them frequently.

2. Update your drivers

Drivers are important because they allow Windows 10 to recognize and utilize your hardware.

When a certain driver is outdated or buggy, you won’t be able to use a specific hardware component, or you might even get a

To ensure that your system is stable and that your hardware is recognized and working well, it’s always good to keep your drivers up to date.

Blue Screen of Death errors usually tell you which file caused the crash, and if it’s a driver, you just need to update that driver in order to fix the problem.

If you can’t find out which driver is causing the crash, it’s advised that you update all your drivers.

Users reported few issues with Dell laptops and audio drivers, but after downloading the necessary drivers the problem was fixed.

In order to update your drivers, you just have to visit your hardware manufacturer’s website and download the latest drivers for your device.

Be sure to download motherboard and chipset drivers first, and then move to all other drivers.

Update drivers automatically

Searching for drivers on your own can be time-consuming. So, we advise you to use a tool that will do this for you automatically.

Using an automatic driver updater will certainly save you from the hassle of searching for drivers manually, and it will always keep your system up to date with the latest drivers.

We recommend you update your drivers with Outbyte Driver Updater. Just install the utility and let it scan your drivers. It will detect the exact driver version that is compatible with your driver, and then install it to your PC.

The software can also repair damaged drivers and you can set it up to automatically check and update your drivers so you won’t have to think about it again.

⇒ Get Outbyte Driver Updater

3. Run the hardware troubleshooter 

  1. Open the Settings app and go to the Update & Security section.
  2. Select Troubleshoot from the menu on the left.
  3. Select BSoD from the right pane and click Run the troubleshooter.
  4. Follow the instructions on the screen to complete the troubleshooter.

Another thing we can try is running Windows 10s built-in troubleshooting tool. This tool is designed to deal with various system issues, including BSODs. So, it might be helpful in this case, as well.

4. Run the SFC scan

  1. Right-click on the Start Menu button, and open Command Prompt (Admin).
  2. Enter the following line and press Enter:sfc/scannow.
  3. Wait until the process is done (it may take a while).
  4. If the solution is found, it will automatically be applied.
  5. Now, close the Command Prompt and restart your PC.

If Windows 10’s troubleshooter didn’t get the job done, let’s try another one. The SFC scan is a command-line tool that scans the system and searches for potential issues.

So, it can be useful when dealing with the

5. Run DISM

  • Standard way
  1. Right-click Start and open Command Prompt (Admin).
  2. Paste the following command and press Enter:
    • DISM /Online /Cleanup-Image /RestoreHealth
  3. Wait until the scan is finished.
  4. Restart your PC and try updating again.
  • With the Windows installation media
  1. Insert your Windows installation media.
  2. Right-click the Start menu and, from the menu, choose the Command Prompt (Admin).
  3. In the command line, type the following commands and press Enter after each:
    • dism /online /cleanup-image /scanhealth
    • dism /online /cleanup-image /restorehealth
  4. Now, type the following command and press Enter:
    • DISM /Online /Cleanup-Image /RestoreHealth /source:WIM:X:SourcesInstall.wim:1 /LimitAccess
  5. Make sure to change an X value with the letter of the mounted drive with Windows 10 installation.
  6. After the procedure is finished, restart your PC.

And the third tool we’re going to use is DISM. Deployment Image Servicing and Management (DISM) is a tool that, as its name says, deploys the system image all over again.

6. Remove your antivirus

Antivirus and firewall are crucial for the safety of your PC, but sometimes third-party antivirus software can cause Blue Screen of Death errors to appear.

Almost any third-party antivirus program or firewall can cause

If removing your antivirus and firewall fixed the problem, then you can reinstall the same antivirus program, or you can switch to different antivirus software.

Bear in mind that just uninstalling the software won’t probably fix the problem, and you’ll have to use a dedicated removal tool to completely remove any files associated with your antivirus program.

In this regard, we recommend CCleaner because it lets you uninstall the application and remove corresponding files from one central UI.

7. Remove the problematic software

  1. Press and hold the Shift key on your keyboard and click the Restart button.
    terminal-server-driver-made-incorrect-memory-reference-restart
  2. Choose Troubleshoot > Advanced options > Startup Settings and click the Restart button.
  3. When your computer restarts you’ll see a list of options. Select Safe Mode with Networking by pressing 5 or F5.

Sometimes these types of errors can be caused by certain software, and if you want to fix this error, you’ll have to find and remove the problematic software.

If you installed or updated certain software recently, be sure that you remove it in order to fix this error.

To see if

Safe Mode uses only the default drivers and applications, and if the BSoD error is caused by any software, you shouldn’t have any BSoD errors in Safe Mode.

If your computer is stable in Safe Mode you just need to find the application or driver that is causing this error and remove it.

8. Reset Windows 10

  1. Restart your PC a few times during the boot sequence. You can also just hold Shift and click the Restart button.
  2. Choose Troubleshoot > Reset this PC > Remove everything. If you’re asked to insert Windows 10 installation media, be ready to do so.
  3. Choose Only the drive where Windows is installed > Remove everything. Click the Reset button to start the process.
  4. Follow the instructions to complete Windows 10 reset. This process is almost identical to Windows 10 installation, so you won’t have any problems with it.

If the

This procedure is similar to clean install, and it will remove all files from your C partition, so be sure to create a backup before you proceed.

You might also need a bootable USB flash drive with Windows 10 to complete this process, and you can easily create one with Media Creation Tool.

If the problem persists even after Windows 10 reset, it’s most likely that the issue is caused by your hardware.

9. Check your hardware

If the Blue Screen of Death error still appears, it might be due to a faulty hardware. The Most common cause for BSoD errors is faulty RAM, so be sure to check your RAM first.

If you want to perform a thorough scan we suggest that you use MemTest86+ and test each RAM individually.

If your RAM is working well, be sure to check other components such as your graphic card, motherboard, hard drive, network adapter, etc.

The

TERMINAL_SERVER_DRIVER_MADE_INCORRECT_MEMORY_REFERENCE
BSoD error can cause certain problems, but in most cases you can fix this error by finding the problematic driver and updating it.

We hope that our solutions were helpful. For more suggestions, please access the comments section below.

JUICED ZipHUB Pro Surface Pro 7 Adapter Review: Precision design with plenty of USB connectivity

I recently wrapped a review of Microsoft’s Surface Pro 7 Plus at the same time I was fortunate enough to have had snagged a couple of JUICED Systems Adapters to help me properly put the device through its paces.

Now that we’re officially in the future of dongles, choosing the right one is becoming as important as the flagship device they’re going to be attached to. Fortunately, there is no shortage of dongles, however, the reliability and quality across the sea of connected peripherals vary from excellent to device ruining.

A couple of weeks ago, I was given three JUICED adapters to try out, 2 of which, were specifically designed for use with a Surface Pro. It’s not often you find Surface Pro-specific hardware being sold that isn’t coming from Microsoft, and it’s even rarer to find something of lasting quality. So, given the chance to try out the Quad HUB – USB-C 4 Port Travel Hub, Surface Pro 6 – Optix Multifunction Adapter, and ZipHub Pro – Surface Pro 7 Adapter, I had to answer the call.

While I don’t currently possess a Surface Pro 6, I was able to test out the other two adapters.

ZipHUB Pro

I started my testing with the ZipHUB – Surface Pro 7 Adapter.

The ZipHUB Pro is the latest adapter that Juiced Systems has designed specifically for the Surface Pro 7. The aluminum casing makes this unit perfect for those business trips or remote work spaces. We added only the essential ports without any compromise to performance. HDMI 4K @ 60 Hz, Gigabit Ethernet (10/100/1000), two USB 3.2 Generation 2 ports, and a USB-C port featuring USB 3.2 Gen 2 10 Gbps. Zip through your tasks with the ZipHUB Pro.

  • HDMI 4K @ 60 Hz
  • Gigabit Ethernet (10/100/1000)
  • 2x USB-A 3.2 Gen 2 (10 Gbps)
  • USB-C 3.2 Gen 2 (10 Gbps)

JUICED ZipHUB - Surface Pro 7 Adapter

For $35.00 (sometimes on sale on Amazon), you get a cool-to-the-touch piece of solid aluminum. Unlike other docks, hubs, or dongles I’ve used the ZipHUB Pro doesn’t flex or creak under pressure, doesn’t appear to get warm and its connecting pins continue to feel as rigid as they were on day one.

Thanks in part to its precision-cut dimensions, the ZipHUBvPro feels like more of an extension of the Surface Pro 7 than most other dongles, it snaps in to place alongside the tablet with ease.

With both support for HDMI 4K @ 60Hz and USB-C 3.2 Gen 2 with 10 Gbps, I was able to usher aside my dependency on my Surface Dock and use the much more portable ZipHUB Pro. While the custom design is great for aesthetics, it should be noted its proximity to the adjoining Surface Pro 7 ports, peripherals with short cables may need a second consideration when choosing the ZipHUB Pro.

The other thing of note is its support for 4K @ 60Hz which makes it ideal for most normal workstation setups but for gaming and professional level video editing, users may need to look elsewhere.

Now that I’m back in the office, I was able to test out the hardwire connectivity of the gigabit ethernet connector and while I didn’t run any specific speed tests, the connection was every bit as quick as it was for my dedicated desktop setup.

More importantly, there felt like there was zero lag between the ZipHUB Pro and my Surface Pro 7 Plus when transferring large files like edited audio, videos, batch image files, and CAD projects.

ZipHUB ZipHUB PRO
HDMI 4K @ 30 Hz 4K @ 60 Hz
Gigabit Ethernet 10/100 10/100/1000
USB-A 2x (5 Gbps) 2x (10 Gbps)
USB-C 1x (5 Gbps) DATA ONLY
NO VIDEO/ NO POWER DELIVERY
1x (10 Gbps) FULL FEATURE
DATA / POWER DELIVERY / VIDEO SUPPORT
SD Memory 60 mb/s N/A

In hand, the ZipHUB Pro is about 2/3 the length of a 12.3-inch Surface Pro 7 and Plus tablet, about as wide as the device as well, and weighs a little bit more than Apple TV or Roku Stick. The ZipHUB Pro is pretty slender and pocketable which made it the ideal carry between the home office and work office for me. I used to rely on my Surface dock at home, an additional USB port on the Surface Pro 7 Plus charger, and a dongle to achieve what I can now do with the ZipHUB Pro.

If I were to have any complaints about the ZipHUB Pro, it would be the color options. The ZipHUB Pro comes in only a matte black color, which is an ideal match for a black Surface Pro 7 but I have the magnesium grey and would have preferred a similar color tone. Again, not quite a legitimate complaint of its design or functionality, just a “wish they had” sort of observation.

QuadHUB – USB-C 4 Port Travel Hub

While the title is a bit of a tongue twister, this JUICED four-port hub is anything but complicated. Users get a straightforward four-port dongle connected through USB-C as many other options before it.

At $35.00 the QuadHUB offers the basics in dongle connectivity with two USB-C (10 Gbps) and two USB-A ports all of which, do not support video output. Womp-womp!

Tech Specs

Ports

  • 2 USB-C (10 Gbps) NO VIDEO OUTPUT
  • 2 USB-A (10 Gbps) NO VIDEO OUTPUT

Dimensions

80x40x13mm

Compatibility

Any USB-C Device

Box Contents

QuadHUB

Warranty

1-Year Warranty

The QuadHUB was designed for quick device connections and rapid data transfers. Two USB-C ports and two USB-A 3.2 Generation 2 (10Gbps) ports will keep your efficiency at optimal levels. The QuadHUB serves as a quick USB hub for all of your external peripheral needs. Whether you need to connect multiple external hard drives or just a simple full-size keyboard, the QuadHUB is a fast easy solution. The QuadHUB does not need an external power supply to work and will power itself through the laptop’s bus power. The small form factor makes this the smallest and most powerful travel hubs available.

JUICED Quad Hub Adapter

There isn’t much else to the QuadHUB, but unlike its ZipHUB brethren, this dongle is the most versatile of the bunch thanks to its tried-and-true form factor.

Owners will get a similar cold aluminum touch dongle with a sturdy rubber-covered USB-C stemmed wired.

For a quick fix or portable expansion, the QuadHUB is more than serviceable and can be used on any device with a USB-C port, so I was able to toggle its use between my Surface Pro 7, Lenovo’s X12 detachable, Chromebook, and Surface Go 2 without an issue.

The read and write speeds for the ports are quick at 10Gbps per port and while it doesn’t host a dedicated SD card or HDMI port, double the USB-A’s and USB-C’s connections cover more than 80% of use cases for most people.

The physicality of the QuadHUB is that it is slightly thicker than the ZipHUB Pro but shorter than it as well. The 4-inch rubber-clad USB-C connector is relatively rigid at the moment, and I’ll have to follow up with this measure after prolonged use. The QuadHUB also feels lighter than the ZipHUB Pro despite being a little thicker at its base.

Life-Line USB-C Cable Combo

In addition to the dongles, I also received a JUICED Life-Line USB-C Cable Combo which retails for $40.00 on the company’s website. A set of USB-C to USB-C and USB-C to USB-A set of 10ft-long threaded cables that come in a nifty threaded hard case for travel. The red, green, yellow and mostly black color aesthetic of the cable is a stand-out while the case itself is black and accented with neon green highlights coordinated design, like the Xbox theme.

Pxl 20210318 200749222

For buyers who already have their favorite dongles or hubs at home but need charging cables or would like a bit more distance from an outlet, the Life-Line USB-C Cable combo should be another area of interest to visit on the JUICED website.

These were just a handful of peripherals I was able to recently test but based on the build quality, reliability, and craftsmanship, I’ve already ordered a couple of other items to round out my workstation at home and on the go.

Windows 10 version 21H1 is now available for commercial pre-release validation

Windows 10 version 21H1, the next version of the desktop OS is now available for commercial customers ahead of its public release later this Spring. Just like Windows 10 version 20H2 before it, 21H1 will be a service-pack-like update that will be installed via an “enablement package” that will activate dormant features in Windows 10 version 2004 or 20H2.

New features in Windows 10 version 21H1 include multi-camera support for Windows Hello, as well as performance improvements for Windows Defender Application Guard. The update is already available for Windows Insiders in the Beta channel, but Microsoft will now IT admins install it on commercial devices through all standard channels.

“We not only want to ensure that you have access to the upcoming Windows 10 feature update payload via any channel you may use today, we also want to enable you to validate with confidence. Therefore, customers in the Windows Insider Program for Business can once again receive Microsoft Support for the Windows 10, version 21H1 build available through WSUS, ISO download, Azure Marketplace, and directly from Windows Update in the Release Preview Channels,” the company said today.

Last year, Microsoft released a big Windows 10 update in the Spring followed by a minor update in the Fall, but the company is expected to do the opposite this year with a more substantial update in the second half of 2021. We don’t have any official details about the “21H2” update so far, though previous reports suggested a big design update for Windows 10 codenamed “Sun Valley.” Windows 10X, a new version of the OS designed for Chromebook-like devices is also expected to ship later this year.

How to fix Trend Micro antivirus BSoD errors in Windows 10

If you use a Trend Micro antivirus and you’re still using Windows 10 version 1709 on your computer, you should know that might result in BSoD errors.

More specifically, when attempting to install the Windows 10 Fall Creators Update while running a Trend Micro antivirus tool, the following bluescreen error occurs: PAGE_FAULT_IN_NONPAGED_AREA.

Due to this error, the install process fails and Windows 10 rolls back to the previous version (Windows 10 version 1703).

How do I fix Trend Micro BSoDs errors?

1. Update your Windows 10 PC

  1. Press the Windows Key to open the Start Menu
  2. Click on Settings
  3. Select Update & Security
  4. Click on Check for updates, and let the update process unfold
    • Since this will be an upgrade between major versions of Windows 10, it may take a while.
  5. Restart your PC

Since this BSoD error mainly occurs with Windows 10 v1709, the most obvious solution is to simply update your OS to a newer version, maybe even the newest if your PC hardware allows it.

2. Tweak Trend Micro’s process exceptions list

  1. Identify if  there’s an endpoint that has already applied the Windows 10 Update by checking the OfficeScan web console
  2. Go to Agents > Agent Management
  3. Sort by Platform, and look for Windows 10 10.0.17134
  4. Select endpoints with the Windows 10 update
  5. Apply the following exclusions via Settings > Behavior Monitoring Settings > Exceptions > Add to Approved List.
    Add the following processes:
C:Program FilesWindowsAppsMicrosoft.Messaging_*SkypeHost.exe
C:WindowsSystemApps*SearchUI.exe
C:WindowsImmersiveControlPanelSystemSettings.exe
C:Program FilesWindowsAppsmicrosoft.windowscommunicationsapps_*HxTsr.exe
C:WindowsSystemAppsMicrosoft.LockApp_*LockApp.exe
C:WindowsSystemAppsMicrosoft.MicrosoftEdge_*MicrosoftEdge.exe

If you have both Deep Security Agent (DSA) and OfficeScan (OSCE) agent installed on the same host, it can trigger a BSoD error due to driver conflicts and crashes, so not having both active would be ideal.

3. Remove the Deep Security Anti-Malware function

  1. Press the Windows key to open the Start Menu
  2. Type in registry and open the Registry Editor with administrator rights
  3. Go to the following location: HKEY_LOCAL_MACHINESYSTEMCurrentControlSetservicestmevtmgr
  4. Check out the version of Tmevtmgr.sys.
  5. If the Tmevtmgr.sys version is 5.5 or above, re-install DSA with disabled AM function to avoid the Tmevtmgr.sys file from being replaced again.
  6. Re-install the OSCE client to rollback the Tmevtmgr.sys file to the version used by OSCE AM.

4. Consider using an alternative antivirus tool

While Trend Micro is a great cybersecurity solution, there are plenty of other tools out there that can do the same job, if not more, so don’t be discouraged if Trend Micro is causing BSoDs, since alternatives are plenty.

More so, a lot of the better antivirus tools offer a free trial period of several days, so you can test them out and see whether they too cause any errors and if they do a better job at protecting your PC.

⇒ Get TotalAV

5. Use a third-party BSoD troubleshooter

BSoDs are caused by a wide variety of reasons, both software and hardware-related, and this makes it difficult to figure out which component is the culprit.

While this could be something you could easily find out if you knew where to look and how to read the BSoD logs, it can be time-consuming, and there’s always the chance of human error.

That’s why we suggest you go for a third-party automatic system scanner and fixer since these go ahead and handle all of the most common causes of BSoD errors, from bad DLLs, broken registries, software incompatibilities, and more.

By following these steps, you should be able to avoid future BSoD errors caused by using Trend Micro products again.

Let us know which solution worked best for you by leaving your feedback in the comments section below.

YubiKey 5 Series review: Yubico has a key for every one and every type of your secure login needs

Microsoft has long been working to phase out passwords in favor of Windows Hello, a security key, or a pin to help add an extra level of security to both your PC and your online logins.

But in addition to using a pin or Windows Hello on the computer itself, two-factor authentication (2FA) or an app like Microsoft Authenticator is also a good idea. The combination adds an extra layer of security to your accounts when you’re logging in across different devices.

But did you know, Yubico is also part of that passwordless and security journey, too? Yubico was founded in 2007 with the mission to make secure login easy and available for everyone. Their sole invention, the YubiKey, is a piece of hardware (like an actual physical key) used around the world to help secure servers and logins.

Basically, with YubiKey, instead of having a 2FA code texted to your phone (or using an app like Microsoft Authenticator), you can use a physical Yubikey to prove your identity and log into your online accounts across different devices and platforms. It adds a third hardware-based layer of 2FA to your account, where you’ll need to plug a key into your machine or phone (or tap it) then touch it to prove your identity (you can see a list here of services that work with Yubikey. there are many!)

At my curiosity and request, the company was kind enough to send me a few of their YubiKeys for review. Particularly, I got three keys from the YubiKey 5 Series — YubiKey 5Ci, YubiKey 5C Nano, YubiKey YubiKey 5 NFC. I also got a traditional Security Key NFC, too. Here’s a look at each of these keys, and why Yubico has a security key for every one of your login needs.

Pick a Yubikey 5 Series security key that’s right for you!

Img Products Yk5 Family

Before getting into my review, I want to note that Yubico has a lot of security keys for sale on its website. That might seem confusing, but each of the keys is different and catered to different form factors. The company actually has a survey you can take to pick one that’s right for you. All keys are battery-free and draw power from your device to work.

If you’re considering buying one, I highly recommend the survey to begin your YubiKey journey. Most of these YubiKeys support FIDO2, FIDO U2F, Yubico OTP, OATH-TOTP, OATH-HOTP, Smart card (PIV), OpenPGP, and Challenge-Response capability protocols. It’s best to check the product pages, though to see which is compatible with your needs. Keep in mind they are also IP68 rated and dust-tight and water submersible, too.

In terms of the 5-series, though, there are currently six keys you can buy. There is the YubiKey 5 NFC ($45,) the YubiKey 5C NFC ($55,) YubiKey 5CI ($70,) YubiKey 5C ($50,) and the YubiKey 5C Nano ($60.) Note that only the YubiKey 5 NFC and the YubiKey 5C NFC offer NFC communication and wireless, whereas the rest of the keys will require you to physically plug it into your device.

The focus of this review will be on the YubiKey 5Ci, YubiKey 5C Nano, and YubiKey 5 NFC. This post has the mindset of the average consumer in mind, but we’re also planning a separate post later on which explains YubiKey for enterprise and business. We sat down with Yubico’s Chief Solutions Officer, Jerrod Chong to discuss that matter, and will follow up next week with a separate post next week with our discussion.

YubiKey 5Ci security key

Yubikey 5ci Iphone Security Key

Out of the bunch of security keys that Yubico sent my way, my favorite is the YubiKey 5Ci. The reason comes down to the key being multiplatform and mobile-centric (which is what all YubiKeys do one way or another). Also, this security key is the most compact of the bunch and is durable, and portable, too. It comes in black plastic and has a metal-reinforced hole for attaching to a keyring. Anyway, the key slides into my iPhone, as well as my Android phone, and my PC, too (this is the multiplatform aspect I hint to.)

It works across all my mobile and desktop devices, thanks to the lighting port on the bottom and the USB-C end on the top. There’s also a metal notch on the middle, too, which is used to verify you’re touching it. YubiKey 5Ci can do everything YubiKey 5 NFC can do, too, which is one of Yubico’s most popular keys. 5Ci supports the same protocols, sans the NFC support.

It’s important to note, though, that before using any YubiKey, you’ll need to set it up with your service first. I used all of the Yubikeys I am mentioning here with various services that I use every day. YubiKey is compatible with most services that consumers use. I used it with my Google, Twitter, Microsoft, and Instagram accounts.

Of course, you’ll have to run the setup through these services before doing anything. YubiKey suggests you visit their getting started pages for more information on how you can do this. YubiKey even suggests using the Yubico Authenticator app to store and manage your credentials on/from a YubiKey and not on your mobile phone.

Yubi Key Add Account

In most cases, to get started, you’ll have to plug YubiKey into your device and follow the setup instructions on the screen for your service or app. In the case of Twitter, it involves setting up 2FA via the desktop web version of Twitter and plugging YubiKey into your device. With Instagram, I needed to enable 2FA from the web, plugin my YubiKey into my iPhone, and then scan a QR code via the Yubico Authenticator app.

My accounts then became protected and subsequent logins only required me to plug in the key or enter in a key from the Yubico Authenticator app itself after plugging in and touching the key itself. A great way to stay safe and carry my YubiKey across devices! YubiKey has a nice video that explains the process here.

YubiKey 5C Nano Security Key

Yubikey 5c Nano Secirity Key

While I think the YubiKey 5Ci is all about multiplatform and having a key you can carry everywhere for different devices, there’s also the YubiKey 5C Nano, too. This key is the smallest of Yubikey’s products and is designed to plug into a PC and stay out of the way.

In my initial review period, I tested this key solely with my Microsoft Account and used it to sign into and out of my account on a single-PC. That’s why I’ll dedicate this section to talk about the Microsoft Aspect of YubiKey. Just be aware that currently, a YubiKey cannot be used in conjunction with signing into your computer using a Microsoft Account.

In terms of the hardware, YubiKey 5C Nano works just like all the other security keys, except it’s more compact. It’s TINY and is designed to slide into a USB-C port and stay there. I preferred this for my personal computer, which I usually keep under lock and key and away from everyone else. For logins to my Microsoft Account, I just needed to tap my finger to the 5C Nano whenever I wanted to get in via the web. The video below explains my experience.

For setup, I needed to plug the key into my computer, visit the Microsoft Account sign-in page, visit Security options, and add the key to my account. After that, I was able to authenticate any subsequent logins across different with my YubiKey 5C Nano instead of my password.

Of course, I could still use Microsoft Authenticator if I prefer, too. But it is nice to see that the YubiKey adds an extra layer of security. You can manage Yubikeys from Windows 10 settings itself, too. Simply click Accounts, Sign-in options, and Security Key. You can erase a key, or protect it with a PIN from here. Of course, you can download YubiKey’s dedicated app on Windows, too to get started.

YubiKey 5 NFC security key and more!

Yubikey 5c Nfc Key

To end my review, I have a note on the YubiKey 5 NFC. YubiKey tells me that this product as well as the Security Key NFC (which is not part of the 5-series) is one of their most popular amongst consumers. YubiKey 5 NFC is one of the best sellers, too. Unlike the other UbiKeys which I have mentioned, this one has NFC capabilities, so you can tap it to log in to your accounts, rather than plug it into a USB-A port. It still keeps the key chain form factor, though, and is plenty portable.

I really enjoyed trying out these security keys, and I now strongly believe in protecting my accounts with 2FA and YubiKey. With recent high-profile hacks, you’re just never certain who can gain access to your accounts, or how. Having a YubiKey keeps you safe, and if you’re in a business, your work safe, too. Stay tuned for another look at YubiKey next week, and my interview with Chief Solutions Officer, Jerrod Chong.

Microsoft announces ID@Xbox Twitch showcase on March 26

It’s been a pretty crazy week for Xbox news so far with new Xbox Game Pass games and FPS Boost support for a couple of Bethesda games, but next week is shaping to be just as exciting. Indeed, Microsoft has just announced an ID@Xbox showcase on Twitch on Friday, March 26 where the company plans to show new trailers and reveal new indie games coming to Xbox and Xbox Game Pass.

“We’re featuring tons of independent titles, including brand new game announcements from developers and publishers such as DrinkBox, Curve Digital, Devolver Digital, Dear Villagers and others,” the company explained. Overall, more than 25 games will get some screen time during the event including S.T.A.L.K.E.R. 2, Second Extinction, The Ascent, The Wild at Heart, Voidtrain, and Exo One.

The event will kick off at 9AM PDT on March 26, and it will be live-streamed on twitch.tv/twitchgaming and twitch.tv/xbox. This is hopefully just the first in a series of digital game showcases Microsoft is planning for 2021. The software giant held a special roundtable last week to discuss its acquisition of Bethesda with some of the company’s execs, but there were no announcements in this event. However, we learned that Bethesda is planning a big game showcase to stick with its tradition of having a press conference during E3.

2021 is shaping to be a pretty exceptional year for Xbox, with Microsoft going all-in on Xbox Game Pass and bringing more third-party games on the service on day one. That will be the case for Square Enix’s Outriders on April 1, and the company will likely announce a few more surprises during its ID@Xbox Twitch showcase next week.

Excel for the web will let users see edits from colleagues over the past 60 days

Microsoft has recently announced a new capability that is coming soon to Excel on the web (via Petri). The feature will allow users to track all changes made by their colleagues to the Excel workbook during the past 60 days. The update started rolling out last week and is available in preview for Office Insiders running the Targeted release builds.

“The Show Changes feature enables you to collaborate confidently with others by letting you see exactly what edits were made to your workbooks in the past 60 days. You can see details about who changed what, where, and when, along with the previous value of the cell for quick reversion, if needed,” the company explained.

Show changes in Excel.

The ability to spot and review changes comes in handy for people who collaborate remotely on shared workbooks. It enables the document owner to filter bulk edits by choosing an Excel sheet, a specific range, or even an individual cell. The feature is supported on all platforms, including Mac, Windows, iOS, Android, and iPads.

To try out this feature, you will need to open the Excel workbook in the Web app, select the Review tab, and then click the “Show Changes” option. The list of changes will appear on the right side in the Changes pane, and the most recent changes will appear at the top of the screen.

Microsoft has noted that the Excel file must be stored in OneDrive or SharePoint to track these changes, and this functionality is only available to users with editing permissions. The Office Insider team has also acknowledged a couple of known issues as well, and you can find the list on this support page.

Microsoft teams up with The Rock to offer customized Xbox Series X mini-fridge

The Xbox Series X fridge meme lives on this month thanks to a new partnership between Microsoft and Dwayne “The Rock” Johnson. Indeed, the software giant has designed new Xbox Series X mini-fridges to promote The Rock’s new ZOA energy drinks, and Xbox fans will get the chance to win one of these fridges starting next week on the Microsoft Rewards website.

“Fans have the chance to win their very-own customized ZOA Xbox Package that includes a custom Xbox Series X ZOA mini-fridge fully stocked with ZOA Energy products, a custom ZOA Xbox wireless controller and other fun surprises through Microsoft Rewards beginning next week on March 25,” the company explained today. Be aware that the sweepstakes will only be available for US citizens and will end on June 1, 2021.

You may have already seen some influencers receiving the cool-looking Xbox Series X mini-fridges this week. YouTuber iJustine posted a video of the mini-fridge inside her real Xbox Series X fridge that Microsoft sent to her and other celebrities last fall.

Unfortunately, Microsoft isn’t selling these Xbox Series X fridges to Xbox fans, which is probably a missed opportunity. The company managed to surf pretty well on all the memes that followed the original reveal of the Xbox Series X at the Game Awards 2019, and it’s clear that Series X’s monolith design has already left its mark in the history of video games consoles. Microsoft’s new Xbox consoles may remain very hard to find these days, but there’s probably a lot of fans who would like to spend some money on a collector item like these Xbox Series X fridges.

Kernel Mode Exception Not Handled M in Windows 10/11 [FIX]

Blue Screen of Death errors aren’t that common, but they are without a doubt one of the most serious errors that you can encounter on Windows 10.

Since BSoD errors can create so many problems, today we’re going to show you how to fix KERNEL_MODE_EXCEPTION_NOT_HANDLED_M error.

You can encounter the error code 0x1000008E, which is the same as the above issue. The complete text of the pop-up is:

The KERNEL_MODE_EXCEPTION_NOT_HANDLED_M bug check has a value of 0x1000008E. This indicates that a kernel-mode program generated an exception which the error handler did not catch.

How do I fix KERNEL_MODE_EXCEPTION error?

1. Use a third-party tool for BSoD

There are numerous software tools that you can use in order to detect the cause of a BSoD error and also to find a valid solution for it. 

They can repair system files, DLL files, restore virus damage, and more. Also, they can offer a basic report on your hardware and guide you on how you can change your user behavior to make it perform better and maintain it for a longer time.

2. Run the BSoD troubleshooter 

  1. Open the Settings app and go to Update & Security section.
  2. Select Troubleshoot from the menu on the left.
  3. Select BSOD from the right pane and click Run the troubleshooter.Kernel Mode Exception Not Handled M Windows 10 error
  4. Follow the instructions on the screen to complete the troubleshooter.

This tool is designed to deal with various system issues, including the BSOD problems. So, it might be helpful when resolving this error and others similar, as well.

If the Windows troubleshooter doesn’t complete the task or has become unresponsive or inaccessible, use our dedicated guide and fix this problem.

3. Update your Windows and drivers

Installing the latest updates is important for your system’s stability and safety, and you can download all the necessary updates by using Windows Update.

Windows 10, just like any other operating system, has its share of flaws, and sometimes certain hardware or software issues can cause the Blue Screen of Death error to appear.

To fix this and many other problems, it’s highly recommended that you download the latest updates. Many of these updates bring security improvements and various bug fixes.

If the Windows 10 update is not working on your computer, use our comprehensive guide to troubleshoot and solve the issue. 

In addition to Windows 10 updates, it’s just as important to download the latest drivers. They are a major component of your OS since they allow your operating system to work with your hardware.

In case your drivers are outdated, or not compatible with Windows 10, you won’t be able to use your hardware and you’ll most likely encounter a Blue Screen of Death error.

To fix this issue it’s important that you update your drivers, and you can do that simply by visiting your hardware manufacturer’s website and downloading the latest drivers for your device.

Bear in mind that usually, one driver is causing this issue, so you’ll need to find it and update it. If you cannot find the problematic driver, you’ll need to update all your drivers in order to fix this issue.

Searching for drivers on your own can be time-consuming. So, we advise you to use a tool that will do this for you automatically. Using an automatic driver updater will always keep your system up to date.

⇒ Get Outbyte Driver Updater

4. Run the SFC scan

  1. Open the Windows search bar and type cmd.
  2. Run Command Prompt as administrator.
  3. Enter the following line and press Enter: sfc/scannowKernel Mode Exception Not Handled M Windows 10 error
  4. Wait until the process is done (it may take a while).
  5. If the solution is found, it will automatically be applied.
  6. Now, close the Command Prompt and restart your computer.

The next troubleshooting tool we can try is the SFC scan. The System File Checker is a command-line tool that scans your system for potential corrupt system files.

 So, if a system file is a culprit of the KERNEL_MODE_EXCEPTION_NOT_HANDLED_M error, this tool will likely deal with it.

5. Run the DISM tool

  1. Open the Windows search bar and type cmd.
  2. Select Command Prompt (Admin).
  3. Paste the following command and press Enter:
    • DISM /Online /Cleanup-Image /RestoreHealthKernel Mode Exception Not Handled M Windows 10 error
  4. Wait until the scan is finished.
  5. Restart your computer and try updating again.

The third troubleshooting tool we’re going to use here is DISM. It is another possible solution to resolve the KERNEL_MODE_EXCEPTION_NOT_HANDLED_M error.

Deployment Image Servicing and Management (DISM), as its name says, re-deploys the system image all over again, and resolves potential issues along the way.

However, DISM scan can fail to complete or to run. If this happens, we recommend you take a look at our dedicated guide and learn how to deal with the issue.

6. Check the hard drive

  1. Enter the Advanced Startup (Restart your computer while holding the Shift key).
  2. Choose Troubleshoot > Advanced Options. Keyboard works in BIOS and not in Windows
  3. Select Command Prompt from the list of options.
  4. When Command Prompt appears, enter the following lines and press Enter after each line in order to run it:
    • bootrec.exe /rebuildbcdKernel Mode Exception Not Handled M Windows 10 error
    • bootrec.exe /fixmbr
    • bootrec.exe /fixboot
  5. Some users are also suggesting that you need to run additional chkdsk commands as well.
  6. To perform these commands, you need to know drive letters for all your hard drive partitions. In Command Prompt you should enter the following (but remember to use the letters that match your hard drive partitions on your PC):
    • chkdsk /r c:
    • chkdsk /r d:
      Kernel Mode Exception Not Handled M Windows 10 error
  7. Restart your computer and check if the issue is resolved.

If you encounter any errors with your HDD and you think of getting a new one, check our dedicated guide with the best hard disk to buy.

7. Remove your antivirus

Antivirus and firewall tools are important, especially if you want to protect your PC from malicious software. Unfortunately, sometimes antivirus programs can cause BSoD errors.

 To fix this issue, it’s recommended that you temporarily stop, or even remove all your antivirus programs for a short period of time

Bear in mind that Windows 10 comes with Windows Defender that works as a default antivirus, so even if you remove all third-party antivirus solutions, your computer will still be safe.

We have to mention that uninstalling the antivirus software isn’t enough since many of these tools tend to leave certain files even after you uninstall them.

To completely remove all files associated with your antivirus, like the registry or other configuration files, we strongly suggest that you use a dedicated removal tool.

A third-party app and junk file remover will help you to easily get rid of all residual files, called leftovers, that are otherwise, hard to find and remove. CCleaner is a typical example of such a tool.

8.  Remove problematic software and drivers

  1. Press Windows Key + X on your keyboard to open Power User Menu.
  2. Select Device Manager from the list.
    kernel-mode-exception-not-handled-m-manager
  3. Once the Device Manager opens, locate the driver you want to uninstall, right-click it and choose Uninstall.
    kernel-mode-exception-not-handled-m-uninstall-driver
  4. If available, check Delete the driver software for this device and click OK.
    kernel-mode-exception-not-handled-m-confirm-uninstall-driver
  5. After you remove the driver, restart your computer.

Certain software can cause these errors to appear, therefore we suggest that you remove all recently installed apps, using the recommended tool from the above solution.

We have to mention that certain drivers can also cause this error to appear, therefore you might have to uninstall them. To uninstall a certain driver, do the above steps.

When your computer restarts, Windows 10 will automatically install the default driver. If the default driver works well and your PC is stable, you can continue using it, or you can try to update it.

9. Reset Windows 10 and check for faulty hardware

  1. Restart your computer a few times during the boot sequence to start Automatic Repair.  Yellow Screen of Death in Windows 10
  2. Choose Troubleshoot > Reset this PC > Remove everything.
  3. During this step you might need to insert Windows 10 installation media, so be sure to have one ready.
  4. Now choose Only the drive where Windows is installed > Just remove my files and click the Reset button to start the process.
  5. Follow the instructions to complete the reset.

After you complete the reset, don’t install any new applications, drivers, or updates. Instead, just test your PC for a while, and check if the error appears again.

If the error appears, it’s probably caused by your hardware, therefore we strongly advise that you check if all of your hardware components are working properly.

We have to warn you that this process will delete all files from your C partition, therefore it’s recommended that you back them up.

KERNEL_MODE_EXCEPTION_NOT_HANDLED_M error can be problematic, but we hope that you managed to fix it by using one of our solutions.

If you have any other suggestions for us or if you encounter a different type of BSoD issue, please write us a comment below and we will try to help you out.

Windows 10X may not be ready until later this year according to new report

Windows 10X, Microsoft’s answer to Chrome OS, may not be ready until later this year according to a new report from Windows Central. Earlier this month, Microsoft’s Chief Product Officer said that “it’s going to be a massive year” for Windows, though the exec didn’t discuss anything related to Windows 10X or the Windows 10 “Sun Valley” Update during the event.

This silence is ahead of the release of “The New Windows” is pretty strange, though Microsoft may have some good reasons to remain secretive. According to Zac Bowden from Windows Central, the software giant may have decided earlier this year to delay the release of the first Windows 10X devices to the second half of 2021, which could give the company and its partners more time to iron out the edges of the new OS.

According to my sources, earlier this year the company decided to push the launch of Windows 10X back a bit more to ensure the product is ready and robust for a smooth release. I believe Microsoft is now aiming to sign-off on a shipping build of Windows 10X in late spring, and hopes to have the first single-screen PCs begin shipping later in the second half of this year.

Previous reports suggested that the first Windows 10X devices targeting the Education and Enterprise markets might ship in the first half of 2021 alongside the release of Windows 10 version 21H1, but that’s apparently no longer in the cards. Microsoft is expected to hold a series of digital events focusing on gaming and Windows this year, but it will be interesting to see if Microsoft’s Build 2021 conference, which expected to be held on March 25-27, could be an opportunity for the company to share more details about Windows 10X.

We went hands-on with a leaked Windows 10X build back in January, and our overall impression was that Microsoft did a job transforming an OS initially designed for dual-screen devices into something quite similar to Google’s Chrome OS, with some unique twists and pretty cool animations. This leaked build was not final and many things may have changed since then, but Microsoft may also use the additional development time to add support for legacy Win32 apps on Windows 10X, which would really help the first devices to be more competitive against Chromebooks.

Shadow Tactics: Blades of the Shogun black screen [FIX]

Shadow Tactics: Blades of the Shogun allows gamers to dive into a world ruled by assassination, sabotage, and espionage. This hardcore tactical stealth game is set in Japan around the Edo period when a new Shogun seizes power over the land.

Players will take control of a team of deadly specialists and sneak in the shadows behind enemy lines. You’ll always need to be one step ahead of your enemies, as you infiltrate mighty castles, set traps, or even poison your opponents.

Just like any game, Shadow Tactics: Blades of the Shogun also brings its own share of issues.

As such, many gamers complained about black screen issues during the first start-up.

Game boots to a black screen, both through steam and running the game as admin directly through the launch application in the game folder. When done through steam, pulling up the steam community UI by hitting Shift + tab will prevent me from exiting the steam community

Just to be sure that we eliminate some possible causes, when installing the game, make sure that your system meets the necessary requirements.

Now, let’s see how this game blocker can be fixed so that you can enjoy smooth gameplay.

Note: The same solutions should be useful if you’re faced with Shadow Tactics: Blades of the Shogun pink screen or even a purple screen.

How do I fix Shadow Tactics black screen issues?

1. Get all the necessary system components

It’s possible that although your system meets the requirements, some components are missing.

In that case, just install the Microsoft Visual C++ Redistributable Package 2010 (x86) from the official Microsoft page. It will download the latest full package, replacing the one that you already have.

Relaunch the game afterward and check if you still get the black screen.

2. Update your drivers

There are good chances that outdated drivers might cause this type of error. If you experience black screen issues with this game, you should thus check your drivers to be up to date.

Instead of updating drivers manually, which can take time, you can use dedicated software to manage your drivers safely, installing the latest version of the needed drivers.

Hence, by choosing the expert driver manager from below you will update every driver or fix damaged drivers in a few simple steps, quickly and without much effort.

⇒ Get Outbyte Driver Updater

3. Install missing Windows updates

This action will solve the DirectX-related problems that may lead to the BSoD issues you’re experiencing.

Just type update in the home screen search bar and open the Check for updates feature. Allow the system to download any missing updates if that is the case.

4. Verify the integrity of the game files

  1. Restart your computer and launch Steam.
  2. From the game’s library page, select Manage > Properties.
  3. Select the Local files tab and click the Verify integrity of game files… button.
  4. Steam will start verifying the game’s files. The process may take several minutes.

5. Tweak some game files

Games say that when deleting the gameState.save file, they were able to bypass the black screen issue.

The file should be located in the savegame folder located, at the following location: C:\Users\your_username\AppData\Local\Daedalic Entertainment GmbH\Shadow Tactics Blades of the Shogun\user\gameState_00

If none of the solutions listed above work for you, use this Steam support thread to provide the game‘s developers with more details about the bug.

On the other hand, if you’ve tried other solutions that worked, please share them with other gamers in the comments section.

Black screen laptop issues after Windows updates [FIX]

Microsoft admits that after installing periodic major system updates a series of devices are faced with functionality issues.

On this note, black screens are one such example of a stop error that users have faced on their laptops upon restarting their system.

With the Windows updates running on millions of devices worldwide, complaints about Asus laptop black screen or Toshiba laptop black screen start to appear.

Microsoft oftentimes confirms the issues, while also mentioning that there might be more laptops impacted. They usually offer a workaround until a final fix.

How do I fix black screen issues on a laptop?

1. Force reboot your device

Microsoft sometimes recommends a forced reboot. It should return the laptop to a working state, but the bug will again come up when trying to wake from sleep at some point.

This problem then reoccurs the next time the lid is closed and re-opened, the giant tech company explains.

In such cases, the problem might be related to the display driver installed on those specific laptops, and users are strongly advised to download and install the latest drivers.


2. Run a black screen troubleshooter

Black screens can be caused by a wide range of factors, so trying to find out exactly what caused them can be somewhat difficult.

That’s where specialized software can come in handy, especially one that goes around and fixes pretty much all software-related issues on your PC, and even troubleshoots some of the hardware as well.

3. Roll back the updates

fix black screen issues
  1. You might have to log into Safe Mode.
  2. Once on the home screen, type update in the search bar.
  3. Choose View update history.
  4. Go to Uninstall updates.
  5. Choose the one that has caused the black screen issue, right-click and uninstall it.

4. Reset your PC

  1. Start your PC and enter the BIOS
  2. Tweak your setting to allow your PC to boot from either a bootable Windows CD or a bootable removable media
  3. Follow the on-screen instructions to reset your PC

Keep note that you need to be careful what kind of reset you choose during this process, since you may end up wiping out all of the data stored on that device.

These were a few general solutions to fix a black screen stop error after installing a mandatory Windows update.

Should you face a black screen issue randomly, Microsoft also recommends to use the OS bootable media to fix it.

We hope that one of these solutions was helpful in your particular case. If so, let us know in the comments how the experience went.

FIX: MANUALLY INITIATED CRASH error in Windows 10/11

Blue Screen of Death errors are one of the most serious errors that you can encounter on Windows 10.

These errors can cause instability issues and data loss, therefore today we’re going to show you how to fix MANUALLY_INITIATED_CRASH error.

Since BSoD crashes are so problematic, you need to make sure you get rid of them completely. We’ve comprised a list with the best solutions, so make sure you follow all of them.

How do I fix the MANUALLY_INITIATED_CRASH error?

  1. Update your drivers and install the latest Windows 10 updates
  2. Remove the problematic software
  3. Perform Windows 10 reset
  4. Check if your hardware is working properly
  5. Run the Hardware Troubleshooter 
  6. Run DISM
  7. Use System Restore
  8. Run the SFC scan

1. Update your drivers and install the latest Windows 10 updates

  1. Press the Windows Key + S and type in Settings.
  2. Go to Update and Security.
  3. Select Windows Update.
  4. Then, select Check for updates.
  5. Let windows search and install any necessary updates.

Downloading the latest Windows 10 updates is crucial for system stability and safety. Many of these updates offer security improvements and new features, but there are also various hardware and software bugfixes.

Blue Screen of Death errors are often caused by hardware or software issues, and if you want to keep your system stable and free from errors, we strongly advise you to download the latest patches.

In addition to Windows updates, it’s also important that you download the latest drivers for your hardware. Your hardware cannot work without the proper drivers.

If your drivers are outdated or just not fully compatible with Windows 10, that can cause Blue Screen of Death error such as MANUALLY_INITIATED_CRASH to appear.

To update your drivers, you can simply use Device Manager by following these steps:

  1. Press Windows Key + X and select Device Manager from the list.
    manually-initiated-crash-manager
  2. When Device Manager opens, select the device you want to update.
  3. Right click it and choose Update Driver Software.
    manually-initiated-crash-update-driver-software
  4. Choose Search automatically for updated driver software and Windows 10 will automatically download and install the best driver for your device.
    manually-initiated-crash-driver-software
  5. Repeat these steps for all devices that you want to update.

Update drivers automatically

Although downloading drivers by using Device Manager is simple, we have to mention that Device Manager doesn’t always download the latest drivers.

In fact, it’s usually better that you download the necessary drivers automatically, by using third-party software that will ensure the correct drivers are installed on your computer.

To proceed with this you should install this specialized tool that will run a comprehensive scan on your system and detect outdated drivers.

Afterward, it will request you to choose which drivers need to be updated before starting the process automatically. The process works smoothly and you can rest assured regarding the system protection.

⇒ Get Outbyte Driver Updater

2. Remove the problematic software

  1. Press Windows Key + X and choose Device Manager from the menu.
  2. When Device Manager opens, locate the driver you wish to uninstall, right-click it and choose Uninstall. Click OK to confirm.
    manually-initiated-crash-uninstall-driver

These types of errors can often be caused by your software, therefore it’s important that you find and remove any software that can cause this error.

These errors are most commonly caused by your antivirus, and if you want to fix the MANUALLY_INITIATED_CRASH BSoD error we advise you to temporarily remove all third-party antivirus programs.

It’s important to know that Windows 10 comes with its own antivirus program, so even if you delete all third-party antivirus programs, your computer won’t be without any protection.

We have to mention that certain drivers can cause this error too, and you might have to remove them in order to fix it. According to users, removing keyboard and processor drivers can sometimes fix it as well.

After uninstalling a driver, Windows 10 will install the default one instead. If the default driver works, you can continue using it, or you can update it to the newer version.

3. Perform a Windows 10 reset

  1. Start Automatic Repair by restarting your computer a few times during the boot sequence.
  2. Choose Troubleshoot > Reset this PC > Remove everything.
    • During this step you might be asked to insert Windows 10 installation media, so be sure to do that.
  3. Choose Only the drive where Windows is installed > Just remove my files. Click the Reset button.
  4. Follow the instructions on the screen to complete Windows 10 reset.

If the MANUALLY_INITIATED_CRASH error is caused by third-party software, you can fix it by performing Windows 10 reset. Before you do that you should know that this process will delete all files from your C partition.

so be sure to back them up. You might also need a bootable USB flash drive with Windows 10 to complete this process, so keep that in mind.

After the reset process is complete, you’ll have a clean installation of Windows 10. If the error appears again, it means that is caused by your hardware.

4. Check if your hardware is working properly

Blue Screen of Death errors are often caused by hardware, and if you’re getting MANUALLY_INITIATED_CRASH BSoD error, we strongly advise you to check your hardware.

Be sure to check your RAM first, and then move to other major components. Several users reported that this issue was caused by a faulty motherboard, so be sure to check and replace your motherboard.

With this occasion, you should clean your PC for dust and clogged fans, because overheating is also a cause of BSoD issues, and you should take every measure to make sure your components are properly ventilated.

5. Run the Hardware Troubleshooter 

  1. Open the Settings app and go to Update & Security section.
  2. Select Troubleshoot from the menu on the left.
  3. Select BSOD from the right pane and click Run the troubleshooter.
  4. Follow the instructions on the screen to complete the troubleshooter.

If none of the previous solutions resolved the problem, we’re going to turn to built-in troubleshooting tools.

The first tool we’re going to try is Windows 10’s built-in troubleshooter. You can use this tool to resolve various issues, including the BSOD problems.

6. Run DISM

  1. Right-click Start and open Command Prompt (Admin).
  2. Paste the following command and press Enter: DISM /Online /Cleanup-Image /RestoreHealth
  3. Wait until the scan is finished.
  4. Restart your computer and try updating again.

The next troubleshooter we’re going to try is the Deployment Image Servicing and Management (DISM). As its name says, this tool deploys the system image all over again, so it might resolve the BSOD issue on the way.

The procedure above is the standard one that you should follow simply without any other requirements. If you have Windows Installation Media, you should use another procedure.

With the Windows installation media

  1. Insert your Windows installation media.
  2. Right-click the Start menu and, from the menu, choose the Command Prompt (Admin).
  3. In the command line, type the following commands and press Enter after each: dism /online /cleanup-image /scanhealth dism /online /cleanup-image /restorehealth
  4. Now, type the following command and press Enter: DISM /Online /Cleanup-Image /RestoreHealth /source:WIM:X:SourcesInstall.wim:1 /LimitAccess
  5. Make sure to change an X value with the letter of the mounted drive with Windows 10 installation.
  6. After the procedure is finished, restart your computer.

7. Use System Restore

Sometimes the best way to fix BSoD errors is to use System Restore. Using System Restore is easy, and you can do it by following these steps:

  1. Restart your computer a few times during the boot in order to start Automatic Repair.
  2. Choose Troubleshoot > Advanced options > System Restore.
  3. Select your username and enter your password.
  4. Select Choose a different restore point and click Next.
  5. Select restore point that you wish to return to and click Next.
  6. Wait for the restore process to finish.

8. Run the SFC scan

  1. Right-click on the Start Menu button, and open Command Prompt (Admin).
  2. Enter the following line and press Enter: sfc/scannow
  3. Wait until the process is done (it may take a while).
  4. If the solution is found, it will automatically be applied.
  5. Now, close the Command Prompt and restart your computer.

And finally, the last troubleshooting tool we’re going to try is the SFC scan. This tool scans your system for potential issues and resolves them, if possible.

So, if none of the previous solutions resolved the BSOD error, we hope you’ll have more luck with the SFC scan.

MANUALLY_INITIATED_CRASH BSoD error can cause you many problems, but we hope that you managed to fix this error by using one of our solutions.

Make sure you give us any feedback regarding the error in the comment section below.

FIX: ATTEMPTED_WRITE_TO_READONLY_MEMORY error in Windows 10/11

Blue Screen of Death errors such as ATTEMPTED_WRITE_TO_READONLY_MEMORY can cause you a lot of problems on Windows 10 since they will frequently restart your PC in order to prevent damage.

These errors can cause system instability and data loss, therefore today we’re going to show you how to fix this error.

How can I fix ATTEMPTED_WRITE_TO_READONLY_MEMORY?

  1. Update your drivers and Windows 10
  2. Run the dedicated troubleshooter
  3. Run the SFC scan
  4. Run DISM
  5. Remove problematic applications
  6. Reset BIOS to default
  7. Use System Restore or Windows 10 reset
  8. Check your hardware

1. Update your drivers and Windows 10

1.1 Manually update the drivers

  1. Press Windows Key + X to open the Power User Menu and select Device Manager.
    device-manager
  2. Once Device Manager opens, locate the device you want to update, right-click it and select Update Driver Software from the menu.
    update-driver-software
  3. Select Search automatically for updated driver software and wait for Windows 10 to install the appropriate driver for your device.
    browse-my-for-driver-software
  4. Repeat the steps for all devices that you want to update.

Blue Screen of Death errors are often caused by outdated or incompatible drivers, therefore it’s important that you update them as often as you can.

Windows 10 relies heavily on drivers in order to recognize and use certain hardware, and if your drivers are corrupted, or simply not compatible with Windows 10, that will cause an ATTEMPTED_WRITE_TO_READONLY_MEMORY or any other BSoD error to appear.

In order to fix this error, it’s highly recommended that you update your drivers. Updating drivers in Windows 10 is fairly simple, and you can do that right from the Device Manager by following the steps above.

Using Device Manager to update your drivers is pretty straightforward, but some users claim that Device Manager doesn’t always download the latest drivers for your device.

To download the latest drivers, it’s always better to visit your hardware manufacturer’s website and download the necessary drivers manually.

Bear in mind that you’ll have to update as many drivers as you can in order to fix this issue.

1.2 Update drivers automatically

Searching for drivers on your own can be time-consuming. So, we advise you to use a tool that will do this for you automatically.

Using an automatic driver updater will certainly save you from the hassle of searching for drivers manually, and it will always keep your system up to date with the latest drivers.

The tool recommended below will help you update drivers automatically and prevent PC damage caused by installing the wrong driver versions.

Outbyte Driver Updater is able to update multiple drivers at the same time. Just let it scan your whole PC and then approve all updates necessary and wait for the process to complete.

It can also automatically update your drivers on a regular basis with no effort on your part. You only have to schedule how often you want the app to scan, update and repair your drivers and you are all set.

⇒ Get Outbyte Driver Updater

2. Run the dedicated troubleshooter 

  1. Open the Settings app and go to the Update & security section.
  2. Select Troubleshoot from the menu on the left.
  3. Select BSoD from the right pane and click Run the troubleshooter.
  4. Follow the instructions on the screen to complete the troubleshooter.

If updating your drivers didn’t get the job done, let’s try Windows 10’s troubleshooting tool.

This is a universal tool that basically deals with all sorts of issues within Windows 10. And it might also be helpful with the BSOD issues.

3. Run the SFC scan

  1. Type cmd in Windows search and click on Run as administrator to start Command Prompt as administrator.
  2. Enter the following line and press Enter: sfc/scannow
  3. Wait until the process is done (it may take a while).
  4. If the solution is found, it will automatically be applied.
  5. Now, close the Command Prompt and restart your computer.

The next troubleshooting tool we’re going to run is the SFC scan. This is a command-line troubleshooter that scans your system for potential issues and resolves them (if the solution is possible, of course).

4. Run DISM

4.1 Standard way

  1. Right-click Start and open Command Prompt (Admin).
  2. Paste the following command and press Enter:
    • DISM /Online /Cleanup-Image /RestoreHealth
  3. Wait until the scan is finished.
  4. Restart your computer and try updating again.

4.2 With the Windows installation media

  1. Insert your Windows installation media.
  2. Start Command Prompt as administrator as indicated in the previous solution.
  3. In the command line, type the following commands and press Enter after each:
    • dism /online /cleanup-image /scanhealth
    • dism /online /cleanup-image /restorehealth
  4. Now, type the following command and press Enter:
    • DISM /Online /Cleanup-Image /RestoreHealth /source:WIM:X:SourcesInstall.wim:1 /LimitAccess
  5. Make sure to change an X value with the letter of the mounted drive with Windows 10 installation.
  6. After the procedure is finished, restart your computer.

DISM is the third troubleshooter we’re going to try, in case the previous two failed to resolve the problem.

DISM stands for Deployment Image Servicing and Management, and as its name says, it reloads the system image. So, maybe this process will resolve the BSOD issue.

5. Remove problematic applications

Errors such as ATTEMPTED_WRITE_TO_READONLY_MEMORY can be caused by certain applications, therefore it’s necessary that you find and remove them.

Users reported that Gigabyte On/Off software is the common cause for this error, so if you have this software installed, be sure that you remove it.

Another common cause for BSoD errors can be your antivirus software. Users reported that tools such as NoVirusThanks can cause these types of errors, and according to them, the issue was fixed after removing this tool.

We have to mention that almost any antivirus program can cause this error, and if you want to fix this problem, you’ll have to remove all third-party antivirus programs from your PC.

To completely remove an antivirus program, we strongly suggest that you use a dedicated removal tool.

Many antivirus companies have dedicated removal tools available for their software, so be sure to download one for your antivirus program.

If uninstalling the antivirus fixes the issue, you might want to download the latest version of the same antivirus program that you were using before, or you can switch to any another antivirus software.

6. Reset BIOS to default

Few users reported that they managed to fix this error by resetting BIOS to default, and you can do that easily. To see how to access and reset BIOS, be sure to check your motherboard manual for detailed instructions.

Before you reset BIOS, we advise you to check your SATA Controller and see what mode you are currently using.

Controller mode will be set to IDE, AHCI, or RAID, so be sure to set the SATA controller mode to the same value after you reset BIOS.

7. Use System Restore or Windows 10 reset

7.1 Perform a System Restore

  1. Hold the Shift key on your keyboard and click the Restart button. Alternatively, you can restart your computer a few times during the boot sequence to start Automatic Repair.
    restart
  2. Select Troubleshoot, select Advanced options, and click on System Restore.
  3. Select your username and enter your password if you have one.
  4. Select Choose a different restore point and click Next.
  5. Choose the restore point you wish to return to and click Next. Wait for the process to finish.

If the ATTEMPTED_WRITE_TO_READONLY_MEMORY error is caused by a software problem, you should be able to fix it by performing System Restore.

If System Restore didn’t fix the issue, you’ll have to perform a Windows 10 reset. To complete Windows 10 reset you might need Windows 10 installation media.

You can easily create an installation media by using Media Creation Tool and an empty USB flash drive.

7.2 Perform a Windows 10 reset

  1. Start the Automatic Repair process and choose Troubleshoot, then click on Reset this PC, and then on Remove everything. Be prepared to insert Windows 10 installation media if you’re asked to.
  2. Select Only the drive where Windows is installed, select Just remove my files and click the Reset button.
  3. Follow the instructions to complete the reset process.

We have to warn you that the reset process is similar to a clean install, so make sure that you back up important files from your C partition before you start this procedure.

If the BSoD error appears even after Windows 10 reset, the error is most likely caused by faulty hardware.

8. Check your hardware

ATTEMPTED_WRITE_TO_READONLY_MEMORY error can be caused by your hardware, so we urge you to check if your RAM is working properly.

The easiest way to do that is to test your RAM modules one by one, but you can also use tools such as MemTest86+ to perform a detailed scan of your RAM.

If your RAM is not the problem, you should check all other major hardware components.

The BSoD such as the Windows error ATTEMPTED_WRITE_TO_READONLY_MEMORY can be sometimes hard to fix, but we hope that you managed to fix this error by using one of our solutions.

If you have any other suggestions or solutions, don’t hesitate to leave them in a comment below.

Fix: STATUS SYSTEM PROCESS TERMINATED error on Windows 10/11

Blue Screen of Death errors can be quite problematic sometimes, therefore it’s important to know how to fix them.

Errors such as STATUS_SYSTEM_PROCESS_TERMINATED can be severe. Therefore, today we’re going to show you how to fix this error on Windows 10.

How do I fix the STATUS SYSTEM PROCESS TERMINATED error?

1. Use a third-party BSoD fixer

The easiest way to solve BSoD errors is to install software that will automatically detect any crucial problems with your system and system files and automatically repair or replace what is necessary.

You won’t have to worry about finding the root of the problem and even worry about fatal errors or crashes overall, as long as you have specialized repair software installed on your PC.

With these tools, you can detect risky screen errors automatically with a thorough scan. Then, it will resolve malfunctioning or missing Windows software files in a few moments.

2. Download the latest Windows 10 updates

  1. Press Windows Key + S and type Settings.
  2. Go to Update & Security.
  3. Then, go to Update, and select Check for updates.
  4. Let Windows run its course and install any updates.

Just like many other operating systems, Windows 10 has some issues with certain hardware and software.

Usually, the software or hardware isn’t fully compatible with Windows 10, and that can sometimes cause STATUS_SYSTEM_PROCESS_TERMINATED errors to appear.

To fix this and many other Blue Screen of Death errors, it’s recommended to use Windows Update to download the latest Windows 10 patches.

Microsoft is releasing new patches frequently, and many of these patches bring improved security along with various bug fixes related to both hardware and software.

If you want your PC to be stable and error-free, we strongly suggest you download the latest Windows updates frequently.

3. Remove your antivirus software

Having antivirus software installed is important for your safety, but sometimes your antivirus can cause STATUS_SYSTEM_PROCESS_TERMINATED and other Blue Screen of Death errors to appear.

To fix this error, you might have to temporarily remove all antivirus programs from your PC. Bear in mind that Windows 10 comes with Windows Defender that works as a default antivirus program.

So, even if you remove all third-party antivirus programs, your PC won’t be completely unprotected.

We have to mention that uninstalling the antivirus program might not fix this error because antivirus programs tend to leave certain files and registry entries once you uninstall them.

Sometimes these files can also cause BSoD errors to appear. To completely remove all files associated with your antivirus software, we strongly advise downloading a dedicated removal tool.

Many antivirus companies have these tools available for download, so be sure to download one for your antivirus program.

4. Update your drivers

In order for your hardware to work with your operating system, you have to have the proper drivers installed. If your drivers are outdated or if they contain specific bugs, you won’t be able to use them.

And you might get STATUS_SYSTEM_PROCESS_TERMINATED or any other Blue Screen of Death error. To fix this problem, it’s recommended that you find and update the problematic driver.

If you cannot find the problematic driver, we advise that you update drivers for all major components, such as your motherboard, chipset, network adapter, etc. This also helps with Error 1067: The process terminated unexpectedly.

Be sure to update as many drivers as you can to fix this problem. Updating your drivers is fairly simple, and you can do it by visiting your hardware manufacturer’s website and downloading the latest drivers.

Update drivers automatically

As we previously mentioned, you might have to update all drivers on your PC in order to fix this error. Updating all your drivers can sometimes take a while, especially because you need to find and download them one by one.

If you need to update them quickly and you want to make sure the proper version of the driver is installed on your computer, we suggest using a third-party tool that will do that for you.

⇒ Get Outbyte Driver Updater

5. Enter Safe Mode and remove the problematic applications

  1. Restart your computer few times during the boot sequence to start Automatic Repair.
    • Alternatively, you can just hold the Shift key on your keyboard and click the Restart button.
      status-system-process-terminated-restart
  2. Choose Troubleshoot > Advanced options > Startup Settings and click the Restart button.
  3. When your computer restarts, you’ll see a list of options.
  4. Press 5 or F5 to select Safe Mode with Networking.

Sometimes BSoD errors are caused by third-party applications, and the only solution is to find and remove the problematic application.

To determine if software is causing STATUS_SYSTEM_PROCESS_TERMINATED error to appear it’s advised that you enter Safe Mode.

Safe Mode starts with only default applications and drivers, therefore, if the problem is caused by third-party software or drivers, you shouldn’t have any problems in Safe Mode.

If your PC is stable in Safe Mode, you can now use it to find and remove the problematic software.

6. Reset Windows 10

  1. Restart your computer a few times during the boot sequence to start Automatic Repair.
  2. Select Troubleshoot > Reset this PC > Remove everything.
    • To complete this step you might need to insert Windows 10 installation media, so be prepared to do that.
  3. Choose Only the drive where Windows is installed > Just remove my files and click the Reset button.
  4. Follow the instructions to complete the reset.

Once you complete Windows 10 reset, don’t install any software or drivers. Instead, test your PC for a while. If the BSoD error appears again, it means that it’s being caused by your hardware.

Sometimes you just can’t find the application that is causing this error, so it’s recommended that you perform Windows 10 reset.

To complete this process you might need a bootable USB flash drive with Windows 10, but it’s also recommended that you create a backup since this process will delete all files from your C drive.

7. Find and replace the faulty hardware

Sometimes STATUS_SYSTEM_PROCESS_TERMINATED errors can be caused by recently installed hardware, especially if that hardware isn’t fully compatible with your PC.

If you installed any new hardware, be sure to remove it or replace it and check if that fixes the problem. If the error still persists, we suggest that you perform a detailed hardware inspection and replace the faulty hardware.

8. Check your hard drive for errors

  1. On your keyboard, press Windows Key + S.
  2. In the search box, type cmd, then run Command Prompt (Admin).
  3. In the command prompt window enter the following command: chkdsk /f X: chkdsk /r X:

  4. X is the letter of the driver to scan.
  5. Change it for your needed driver.

You can also use another simple manipulation from your PC to check your hard drive for errors.

STATUS_SYSTEM_PROCESS_TERMINATED error can be problematic, but users reported that they fixed it by updating Windows 10 or by performing a Windows 10 reset.

If these solutions don’t work for you, feel free to try any other solution from this article.

A new Ninja Gaiden video game collection is coming to Xbox One and Xbox Series X in June

Ninja Gaiden: Master Collection is a new bundle of classic Ninja Gaiden video games set for release on Microsoft’s Xbox One and Xbox Series X consoles on June 10th.

This new collection includes Ninja Gaiden: Sigma, Ninja Gaiden: Sigma 2, and Ninja Gaiden 3: Razor’s Edge plus all of their costume-related downloadable content (DLC).

Ninja Gaiden: Sigma originally came out on PlayStation 3 back in 2007 as a kind of remaster of the Xbox title, Ninja Gaiden, that debuted on the original Xbox console in 2004. This Sigma release boasted improved visuals and some additional game modes and in-game content.

Similarly, Ninja Gaiden: Sigma 2 came out in 2009 on PlayStation 3 and was an enhanced version of the Xbox 360’s Ninja Gaiden 2 that came out in 2004.

Ninja Gaiden 3 launched on both the Xbox 360 and PlayStation 3 in 2012. Interestingly, it was then enhanced for a re-release on the Nintendo Wii U that same year which was called Ninja Gaiden 3: Razor’s Edge. Ninja Gaiden 3: Razor’s Edge in turn was then released on the Xbox 360 and PlayStation 3 the following year.

It’s a little confusing but essentially Ninja Gaiden: Master Collection includes two enhanced versions of Xbox games that haven’t been available on Xbox consoles until now and an Xbox 360 game re-released for the Xbox One and Xbox Series X. Most of the content appears to be in tact though the Microsoft Store listing does mention that online support has not been added for several online modes in the second and third game.

In good news, the listing does mention that Ninja Gaiden: Master Collection will support 60 FPS+ which means that gamers should expect some very fluid gameplay this time around.

Are you going to pick up Ninja Gaiden: Master Collection? Share your thoughts with the community in the comments below and then follow us on Twitter and Facebook for more Xbox gaming news.

GL Wand (Excel4apps): What is it and how does it Work?

In any organization, financial data and reports are very important and sometimes even critical. Many reports and analyses done in the Finance Department are used by managers in making key decisions.

Closing month-end, performing ad hoc analysis, reconciling, and other reports are increasingly difficult tasks. If you are a manager or work in Finance, you probably know that by now.

The best news is that there are tools that can make your life easier, GL Wand is a perfect help.

What is GL Wand, and how does it help you?

1. GL Wand: Intro

GL Wand is an add-in to Microsoft Excel that allows you to have real-time financial reporting and analysis. It has been designed to work with your ERP security settings with no middleware needed, so it is very easy to set up.

GL Wand

It features an easy-to-use Excel interface, providing self-service tools. You can create highly customized reports with complex requirements. You can then schedule mass distribution of reports in multiple formats via email or shared drive.

This amazing tool can be used for all modules of your company. Access data covers the most common information requests from Finance, HR, Projects, and other modules.

2. Integration with Oracle E-Business Suite

Gl Wand has integrations will Oracle E-Business Suite. On installation, the add-in will automatically detect your Oracle E-Business Suite. Moreover, you can use HTTP, so it will connect to the Oracle Application Server.

It is an alternative to Oracle Standard or Custom Reports, OBIEE, Discoverer, Web ADI, and others for operational reporting.

3. Integration with SAP

It works perfectly with SAP. You can run a report from any SAP module, including MM, SD, AP, AR, and AA. Furthermore, in the GL Wand tab, you can run CDS Views.

Nonetheless, you can use this great tool as a complementary solution for BOBJ, BW, and other reporting software.

4. Budget, Planning, and Journal Wand

Other great Excel-based solutions that can be used combined with GL Wand are Budget, Planning, and Journal Wand.

You can use Budget Wand to import budget values or journals through the Oracle budget-loading interface. It effectively replaces Web ADI and allows for faster creation and uploading of budgets.

Use Planning Wand to enable the validation and upload of budget planning
and forecasting data from Excel to SAP. This amazing feature will reduce manual work and time-consuming tasks for maintaining planning models.
You will quickly update plans and produce new forecasts, critical tasks in today’s economic environment.

journal wand

Besides these two ideal Excel-based solutions for your company, you can also have Journal.

Journal Wand allows you to batch-upload journal entries with multiple attachments into Oracle. In addition, you can quickly create custom templates, populate them with journal data, validate, and upload the journals into Oracle.

GL Wand: Verdict

With GL Wand, obtaining, analyzing, sharing, and presenting essential information when and how you need it is easy. Because of these great features, this Excel add-in is a reliable solution for any company, helping your Financial department work more efficiently.

⇒ Get GL Wand

Fix: BSOD Appears Because f CRITICAL_STRUCTURE_CORRUPTION

Blue Screen Of Death has been torturing users for ages. This issue is one of the most annoying ones in the history of Windows, and various factors can cause it.

But this time, we hopefully have a solution for the CRITICAL_STRUCTURE_CORRUPTION error.

There are a couple of things that could cause the CRITICAL_STRUCTURE_CORRUPTION error.

Users have complained about this issue in the Microsoft forum:

I have encountered the blue screen error on my Windows laptop whilst surfing and shopping online. Please help.

We have researched this issue and prepared a few solutions for it. Read the next section and learn what you should do to fix the critical_structure_corruption error in Windows 10.

How can I fix the critical_structure_corruption in Windows 10 error?

1. Use third-party software

The critical_structure_corruption in Windows 10 error can be dealt with when you use a dedicated solution. For this reason, we recommend considering third-party software.

It is a complete system solution that not only will prevent this error in Windows 10, but it will optimize your PC. After you download and install it, this software removes any detected malware files.

Thus, you can use this repair tool and run a deep scan to detect system fatal errors and fix them accordingly. 

2. Download Hardware Acceleration Manager

One of the reasons CRITICAL_STRUCTURE_CORRUPTION appears is when the kernel of your system finds a critical error in itself or associated data.

This usually happens when you want to run an emulator of some other system on your Windows 8/8.1 (Android emulator, for example).

To solve this problem try downloading Hardware Acceleration Manager from your chipset manufacturer’s site.

⇒ Get Hardware Acceleration Manager

3. Disconnect all external devices

This critical error could also appear due to some corruption in your external hardware. To find out what external hardware causes you problems, disconnect all external devices except mouse and keyboard.

When you find out what piece of hardware gives you headaches, try updating its driver or consider replacing it with the new one, if there’s no other solution. 

Also, check if drivers of your other external hardware are up to date, just in case to prevent this problem from happening again.

4. Check for the presence of faulty software

A user of the Microsoft forum reported he used a program called MacDrive installed on his computer. He noticed that the program caused the above-mentioned error.

You also should check if there’s any software on your computer that may cause a CRITICAL_STRUCTURE_CORRUPTION error.

We have gathered for you the main solutions to a couple of problems that cause Blue Screen Of Death.

If you have some additional questions, comments or suggestions, please reach out for the comments section, we would love to hear your thoughts.

Best Voice Activated Recorders: Top 5 Picks

When you are an active person that enjoys learning and improving, then lectures, interviews and meetings should be your best choices. You can make an inspired choice in this regard after finding out about the best voice activated recorder.

To extract the main ideas from these activities, you need a reliable device, and in this guide we’re going to help you pick one for your needs.

What is the best voice activated recorder?

Zoom H5

  • Interchangeable input capsules
  • Four-track simultaneous recording
  • 400mw built-in speaker
  • Two mic/line inputs with XLR/TRS connectors
  • Ergonomics could be better

Zoom H5 Portable Recorder is the perfect device, enhancing your abilities in creating audio of a professional quality. This recorder device contains a detachable stereo X/Y microphone.

The Zoom H5 also utilizes a system composed of interchangeable input capsules. This allows you to always choose the best microphone for every situation.

Choosing this high-quality product means finding the perfect recorder for live concerts, rehearsal recording and AV settings.

Moreso, you can also use the Zoom H5 4-Track Portable Recorder for broadcasting, podcasting and news gathering.

Sony ICDUX560BLK

  • Built-in stereo microphone
  • Voice operated recording
  • Three recording options
  • Quick charging
  • Microphone and headphone jack
  • Built-in speaker could be better

Sony ICDUX560BLK is a thin and light digital voice recorder that allows you to capture all your meetings, radio broadcasts and lectures. Using settings optimized for every situation, the result is clear and high-quality audio files.

Use Sony ICDUX560BLK’s new user interface let’s you search with ease for your recordings and music files to play. You can also monitor the recording levels at the same time.

Be always ready for recording: Sony ICDUX560BLK has a storage capacity of up to 4 GB, expandable using MicroSD cards.

It supports both SDHC and SDXC card formats and uses fast-charge technology via its built-in USB port.

Zoom H1n

  • 90-Degree x/Y format condenser microphone
  • 10h of recording time
  • Playback speed control, voice emphasize filter
  • Support for SD cards up to 32GB
  • Build quality could be better

Zoom H1n was designed especially for journalists, podcasters, musicians and other professionals. This recorder has a compact and portable design and it will provide you with high-quality features.

You will be amazed by this portable device’s capability to record WAV and MP3 up to 24-bit/96 kHz. Its stereo X/Y microphone configuration allows you to capture stereo recordings with astounding accuracy and realism.

You can record to microSD and microSDHC type memory cards with a capacity of up to 32 GB. Also, Zoom H1n contains a high-quality built-in speaker that allows you to listen right away to your recordings.

Other notable features include intuitive menu with 1-button recording, playback functions with physical controls, input and volume levels, and more.

Sony ICD-PX370

  • Support for MP3 format
  • Up to 57 hours of battery life for recording
  • Built-in USB connector
  • Auto voice recording
  • No rewind option for playback

Use Sony ICS-PX370 to easily record lectures and meetings, and create high-quality audio files with ease. Enjoy its long battery file of up to 57 hours and use its built-in USB port for a fast and easy file transfer.

Thanks to the MP3 file support, files will occupy less storage space, making this device excellent to use for recording a long lecture or a meeting.

Expand Sony ICD-PX370’s has 4GB of internal storage, but there’s microSD card slot for expansion.

Optimize your audio settings with the Scene Select feature, allowing you to choose from four presets: music, interview, dictation or meeting.

EVISTR 16GB

  • Support for 1536kbps audio recording
  • MP3 format support
  • Voice activated recording
  • Playback controls
  • Minor issues with record naming

Use EVISTR Digital Voice Recorder to create clear voice recordings, reminders or to take notes. This device has a good quality built-in speaker that will easily play crystal clear sound.

With its user-friendly design, EVISTR Digital Voice Recorder supports the following audio file formats: MP3, FLAC, WAV, WMA, OGG, and APE.

EVISTR has created a small and lightweight voice recorder for your needs, weighing only 63 grams. It is so small and compact, you can hold it in the palm of your hand.

These are the best voice activated recorders you could buy this year. We have chosen them because of their good rating and variety of features.

Read this small guide, check them out and let us know your opinion about them in the comments section.