You can now turn Microsoft Word documents into PowerPoint presentations

Microsoft has just announced a new AI-based feature for Word on the web that allows users to convert text documents into PowerPoint presentations. The new Transform feature, which was previously limited to Office Insiders, is now generally available in Word for the web for all Microsoft 365 subscribers.

“This feature uses artificial intelligence (AI) capabilities to save you time and provide you with slide suggestions powered by Designer in PowerPoint. The slides are derived from your section headers in the document, so make sure to organize your Word document accordingly for optimal suggestions. Based on key words in your document, Designer in PowerPoint will suggest imagery, icons, videos, themes and fonts to arrange your content,” the company explained in the blog post.

thumbnail image 1 captioned Export to PowerPoint presentation right from Word for the web

To get started, open the Word document and head to File >> Export > Export to PowerPoint presentation. Choose a design theme to apply to your presentation, and then click the “Export” button. Microsoft Word will instantly begin the transformation process, and the presentation will be automatically saved to the OneDrive root folder. Finally, review the results in PowerPoint for the web to make any changes.

For now, the feature only works with English language documents, and it is incompatible with select browsers, including Safari and Internet Explorer. Furthermore, it is currently limited to text-based documents and doesn’t support other media content such as images. The Redmond giant recommends that users should insert them manually into the presentation.

Overall, it’s a welcome addition for those students and remote workers that rely heavily on PowerPoint presentations for collaboration during the pandemic. It should help them save some time and effort by quickly summarizing large Word documents into professional-looking presentations. In case you missed it, Microsoft’s PowerPoint Presenter Coach feature is now generally available across all platforms.

How to fix 0x0000000D error [Complete Guide]

The operation failed with error 0x0000000d occurs if there are incorrectly configured system settings or irregular entries in the Windows registry.

This error can occur on Windows 7 as well as Windows 10 machines as reported in the Microsoft community forum.

Working on a Dell Latitude E5580 laptop with Windows 7 Professional installed.
The computer and printer are both on a network domain. The end-user attempted to connect the printer, and got the above error message. I attempted as well on the Administrator login – got the same error. Any other computer on the network can connect to this printer except this one. 

If you are also troubled by this problem, here are a couple of troubleshooting tips to help you resolve The operation failed with error 0x0000000d issue in Windows computers.

If you are experiencing a similar error with a device other than your printer, refer to the last solution in the article below.

How do I fix the operation failed with error 0x0000000d?

1. Run the printer troubleshooter

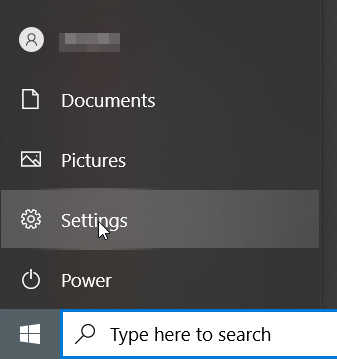
  1. Click Start and select Settings.
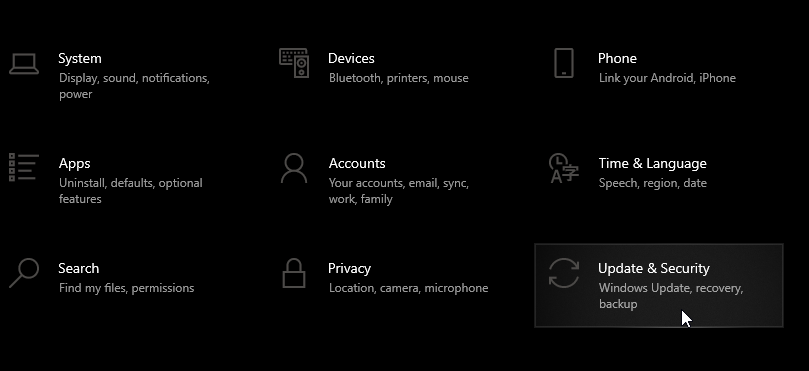
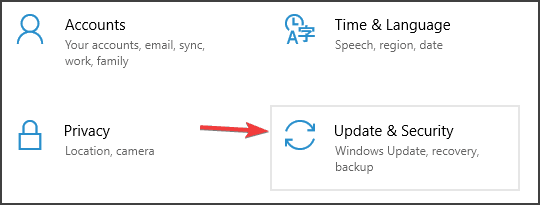
  2. Go to Update & Security.
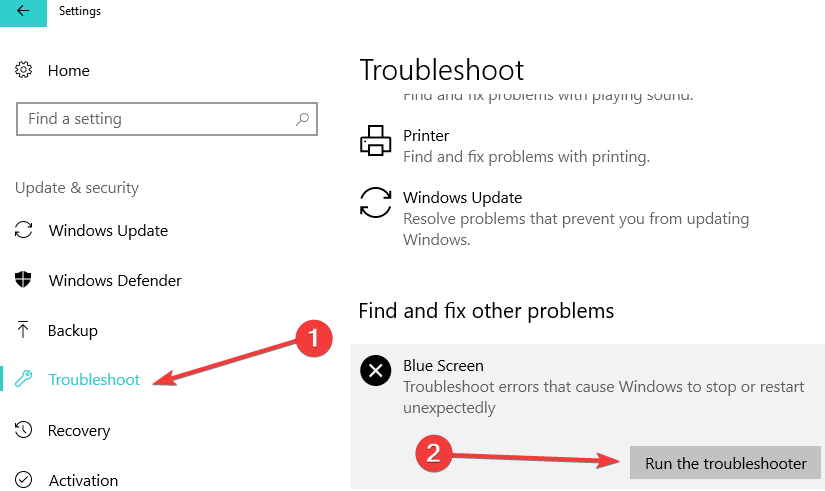
  3. Select Troubleshoot from the left pane.
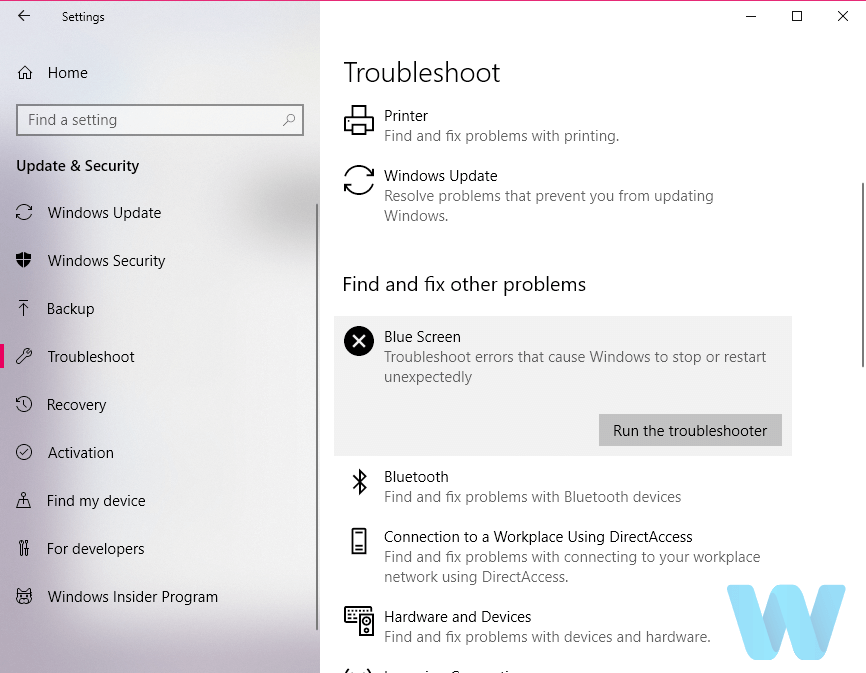
  4. Click the Printer option and then click on Run the Troubleshooter.operation failed with Printer error
  5. The troubleshooter will scan the system for printer-related issues and recommend fixes accordingly.
  6. Apply the fixes and check if you can connect to the network/shared printer without triggering the error.

The Windows 10 built-in troubleshooter is a troubleshooting tool that can help you resolve various issues, including BSoD, and hardware problems.

2. Update via Device Manager 

  1. Click on Start and type Device Manager.
  2. Open Device Manager from the options.
  3. Expand the Print queues category.
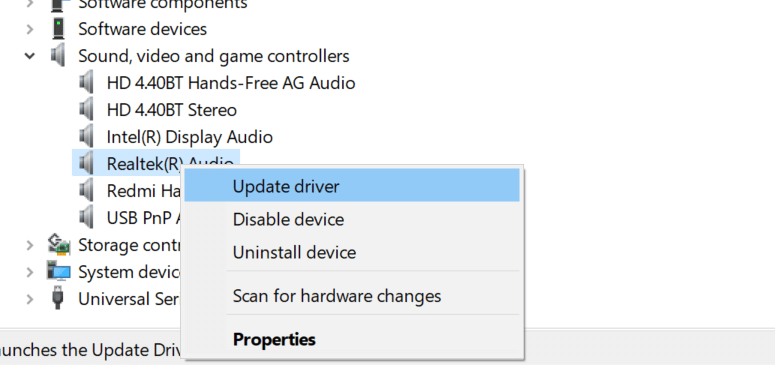
  4. Right-click on your printer device and select Update Driver.0x0000000d error
  5. Select Search automatically for updated driver software option.0x0000000d error
  6. Windows will download and install any pending driver updates.
  7. Reboot the computer and check for any improvements.

Device Manager is the place where you can find all the drivers installed on your computer. From here you can manually delete, disable and update each of them.

3. Restore the Windows Firewall to default3

  1. Click on Start and select Settings.
  2. Go to Update and Security.
  3. Open Windows Security.
  4. Click on Firewall and Network Protection.
  5. Open your currently active network and turn off Firewall.
  6. Do this for Public, Private, and Domain Network if required.
  7. After disabling the firewall, try connecting to the network.
  8. If the printer works without any error, restore firewalls to default.
  9. Go back to Firewall and Network Protection.
  10. Scroll down and click Restore firewall to default link.
  11. Click the Restore Defaults button to reset the firewall settings.

Windows Defender Firewall is a built-in security feature from Windows 10. If you have no other antivirus software installed, make sure to have Windows Defender active.

If you are unable to activate Windows Firewall, make sure to check our dedicated guide to easily fix this issue.

4. Update your drivers

Many errors occur due to faulty or outdated drivers. So, make sure to have the latest drivers on your computer. To update them, you can go to Device Manager.

However, searching and updating drivers manually can be time-consuming. However, there is a tool that will automatically perform these tasks for you.

⇒ Get Outbyte Driver Updater

5. Add your device as legacy hardware

  1. Press Windows Key + R to open Run.
  2. Type devmgmt.msc and click OK to open Device Manager.devmgmt.msc
  3. Select your computer name in Device Manager.
  4. Click on Actions.
  5. Select Add legacy hardware.
  6. Click Next.
  7. Select Install the hardware that I manually select from a list (Advanced).
  8. Select your device category from the list and click Next.
  9. Choose your manufacturer’s model and click Next.
  10. Install the device and close Device Manager.

If you have downloaded the printer driver from the manufacturer’s website, you can add it into Device Manager following the above steps.

The operation failed with error 0x0000000d error is usually triggered by an incompatible or missing printer driver. Follow the steps in this article to diagnose and fix the error with your network printer.

Do let us know which method helped you resolve the issue, or if you have any other suggestions for us, in the comments section.

How to best sync files in Microsoft Teams to your device using OneDrive

Microsoft Teams is a great way to communicate with people at work. Recently, Teams has added a number of great functionalities, including the ability to respond to specific messages starting next month.

When using Teams on Windows 10, you may assume that your files are automatically synced up wherever you have Microsoft Teams installed. The fact is, you need to complete one extra step to make sure your files are synced on Microsoft Teams on all of your devices. When it comes to having files at the ready using Teams, you have to make sure that you have your files backed up using OneDrive. Here’s what you need to do.

First, make sure that you have OneDrive installed on all the devices you want to sync. If you have a free Microsoft account or a Microsoft 365 account, you will already have access to OneDrive. OneDrive is a SharePoint site and Microsoft Teams stores all of your files in dedicated SharePoint sites.

In order to sync your files in Microsoft Teams, here’s what you need to do:

1. Go to the Files tab and select Sync.Microsoft Teams Files Sync
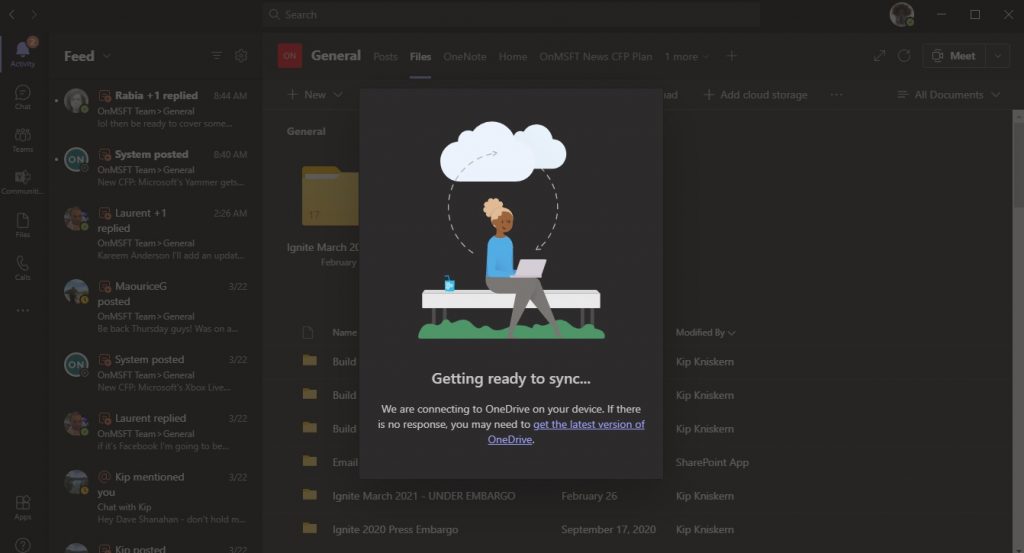
2. From here, a OneDrive dialog box will pop up as Teams connects to OneDrive to sync your files. If you have already set up OneDrive, you don’t have to do anything. If not, you will need to set up your OneDrive account.
Onedrive Sync Microsoft Teams
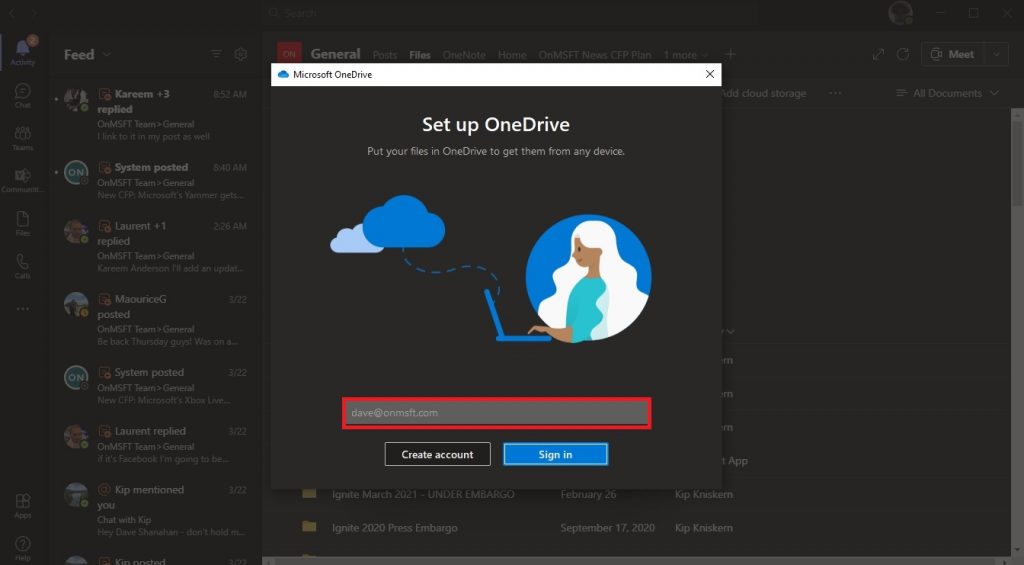
3. If your OneDrive is not set up, you will be prompted to set it up. Again, you can use your Microsoft 365 account or your own personal Microsoft account to backup the Teams files.Setuponedrive
Please note that if you set up two-factor authentication on your Microsoft 365 account or your organization did, you will need to approve the sign-in using either the Microsoft Authenticator app or a SMS text code.
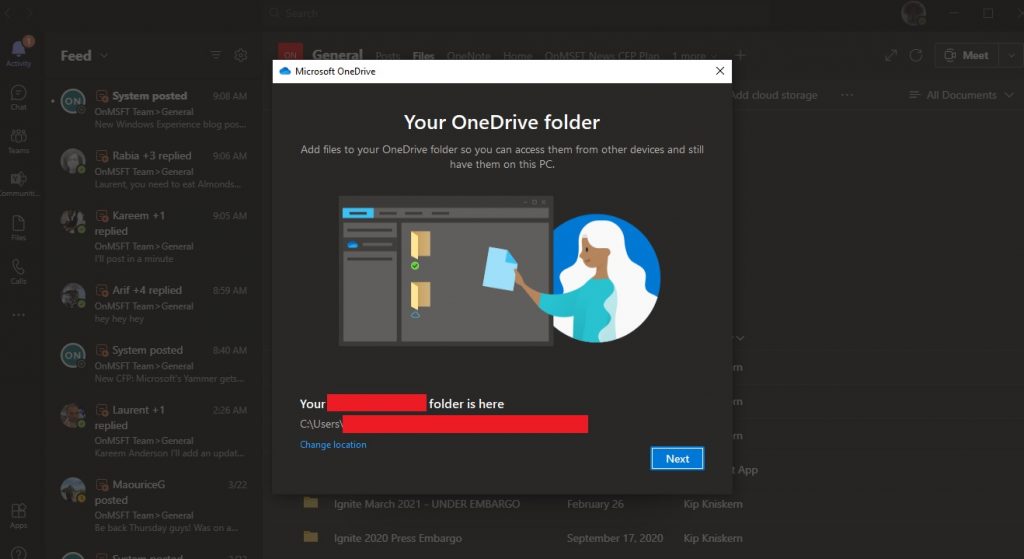
4. Once you enter your Microsoft 365 or Microsoft account username and password, your OneDrive account folder will be automatically be set up. By default, your OneDrive folder name will be the following:
Users\[username]\[organization name]\[Team – Channel]
If you want to change the folder location, pick Change Location and choose a different folder location.
Your OneDrive Folder
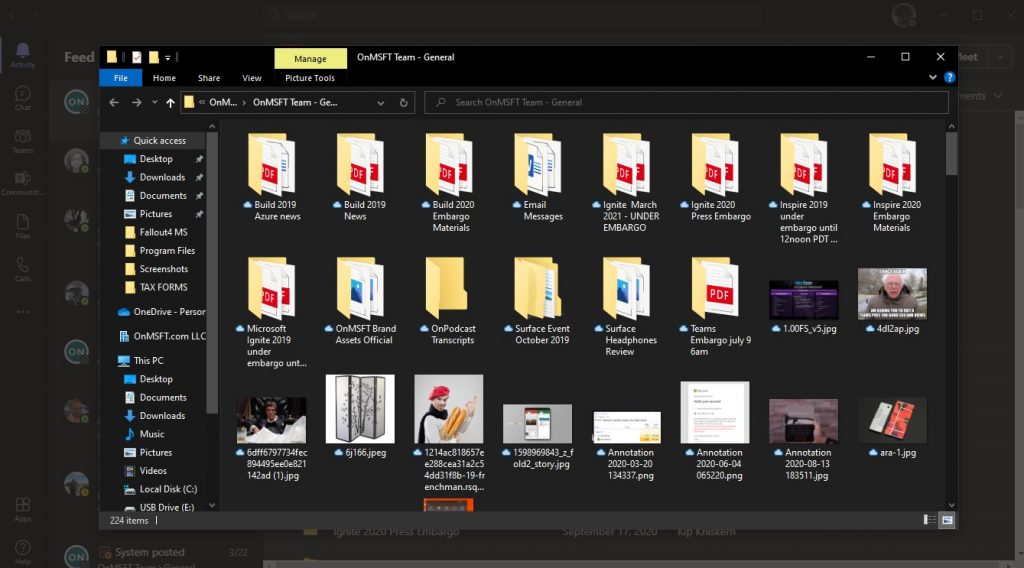
5. Once your account is set up, OneDrive will explain the basics of OneDrive to you and you will have the option of having OneDrive sent to your mobile device now or later and you will be all set. Pick Open my OneDrive folder and your OneDrive folder will open on your device.
Microsoft Teams OneDrive Folder

Now, any changes you make on your device to any files in the Microsoft Teams folder will be automatically synced back to the files in Teams. Additionally, anyone in your Teams channel that makes changes to the files will also be synced to your device.

Whenever you are working offline, the Teams files will be synced when you get back online. Keep in mind syncing your files in Teams only works with one channel at a time, so if you want to sync files from a different Teams channel, you will have to run this process again.

It is also important to point out that if you delete any synced files from OneDrive on your device, those files will be deleted from Teams too. In case you want to avoid accidentally deleting Teams files or if you no longer need to have access to those files on your device, you need to stop syncing the OneDrive folder on your device.

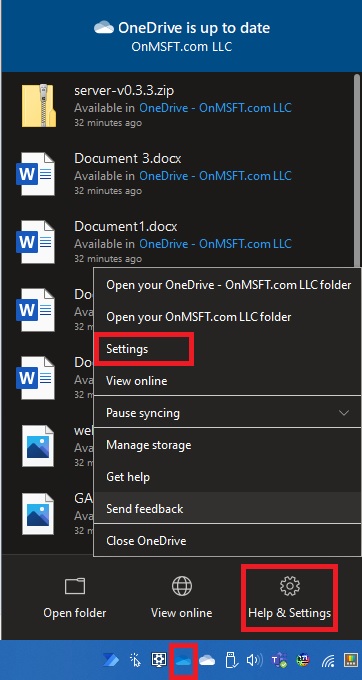
All you need to do is go to OneDrive settings on your device by right-clicking the OneDrive icon in your system tray, going to Help and Settings and then Settings as shown.

OneDrive Settings

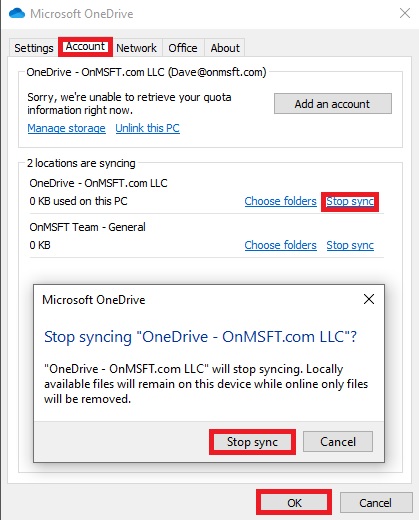
In the Account section, find the Teams channel that you are syncing and select Stop sync and select OK. A OneDrive confirmation window will pop up to confirm that you want to stop syncing the files.

Onedriveconfirm Settings

Once you are sure you want to stop syncing, select Stop sync and the files will no longer sync with the files located in Microsoft Teams. From now on, any changes you make to the files will not be reflected online in Microsoft Teams. You can now delete the folder from your device and you will not have to worry about deleting any files from Microsoft Teams.

How to Fix a Bitlocker Fatal Error During Startup

Are you a Windows user experiencing Bitlocker fatal error with code 0x00000120? This (Blue Screen of Death) BSoD error pops up resulting in automatic shutdown and/or system restart.

BitLocker is a full-disk encryption feature that protects data by providing encryption; hence, it is a Windows security feature.

It uses the AES encryption algorithm in cipher block chaining (CBC) or XTS mode with a 128-bit or 256-bit key.

Meanwhile, BitLocker is not available on Windows XP, Windows 2000, or Windows 2003 OS but in subsequent OS versions.

However, the Bitlocker fatal error BSoD appears during the boot process in Windows OS, and today, we will show you how to solve this error problem.

The reasons for this error include corrupted system files, corrupted Bitlocker program files, incomplete Windows installation and/or upgrade or corruption in the Bitlocker drive encryption.

Other reasons may imply the addition/removal of drives, missing Dynamic Link Libraries(DLL) or even changes in the BIOS boot order.

Meanwhile, Windows Report Team has provided solutions that are applicable in fixing the Bitlocker fatal error with stop code 0x00000120.

How can I fix the Bitlocker fatal error on Windows PC?

1. Use a dedicated tool for BSoD

BSoD errors are hard to troubleshoot and diagnose. There are plenty of reasons for them, from hardware to software issues. Fortunately, there are tools to help you out.

Namely, you can use a system repair tool and clean your computer like a pro. If your PC doesn’t work great anymore, these tools will free up hard drive space and optimize your PC’s performance.

We suggest you use one of these effective utilities that can fix corrupt system files, remove obsolete system files, and repair your PC registry.

Moreover, they can be used to delete the browsing history and trackers to keep browsing private, update software to close security holes, and monitor your system info.

2. Disconnect your USB devices

According to some Windows users, USB devices such as Wi-Fi adapters, keyboards, mice, and Bluetooth or can cause this problem to occur.

During boot, the system may attempt to boot from any of these devices resulting in the Bitlocker fatal error display.

However, you can fix this issue, by disconnecting all attached USB devices and booting your system afterward.

In addition, check your PC if there is any CD, DVD, or any other secondary storage devices and eject them before you boot up your PC. If this method does not work, you can proceed to the next method.

3. Use the Disk Cleanup tool

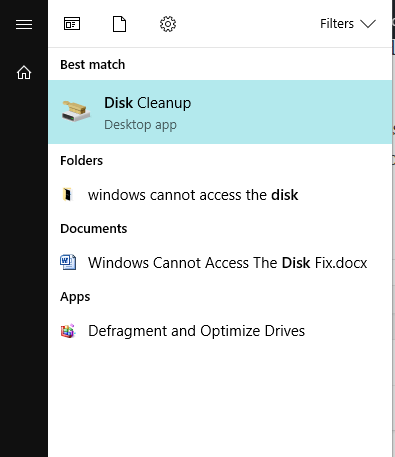
  1. Go to Start and type Disk Cleanup then hit Enter.
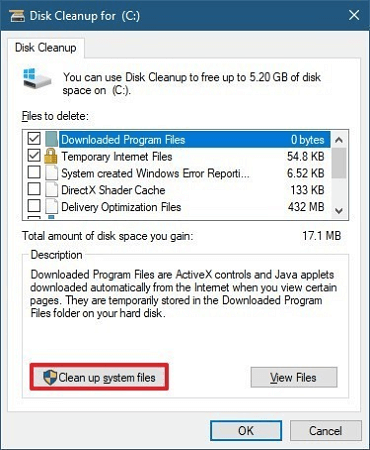
  2. Select the first two options then click on the Clean up system files button.
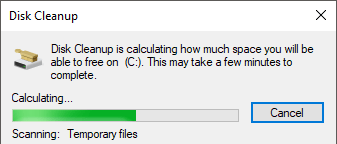
  3. Wait for Disk Cleanup to scan your drive(s).Disk cleanup - Error 0xc190012e
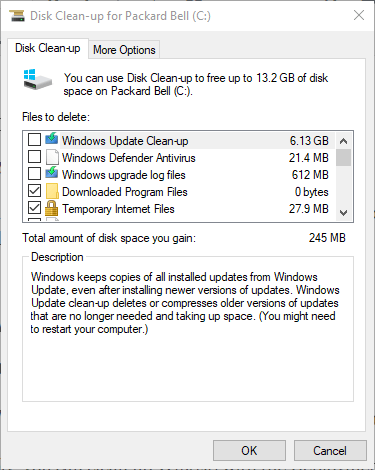
  4. After the scanning, check the file boxes, and then click on OK to delete.
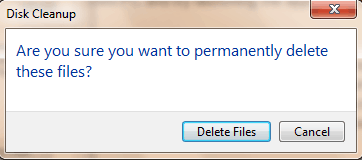
  5. Select Delete files to proceed.bitlocker fatal error disk cleanup permanently delete files

You can also fix the error problem by running disk cleanup on your Windows PC. Disk Cleanup is a Windows utility program that reduces the number of unnecessary files on your hard disk to free up disk space.

4. Repair the computer registry

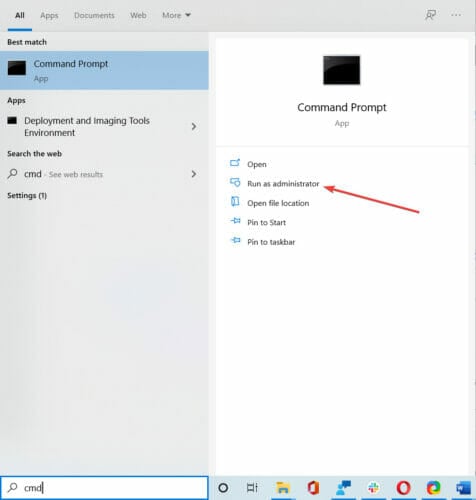
  1. Open the Windows search bar and type cmd and open Command Prompt as administrator.
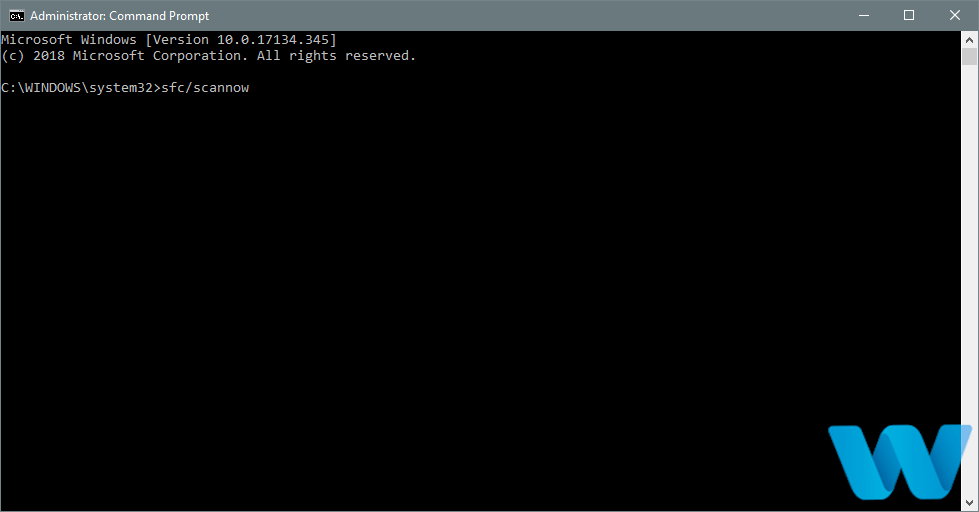
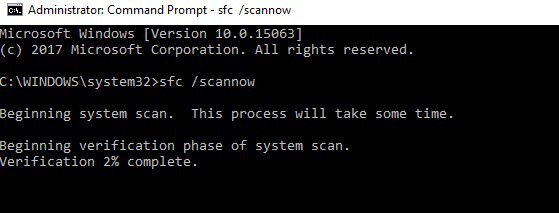
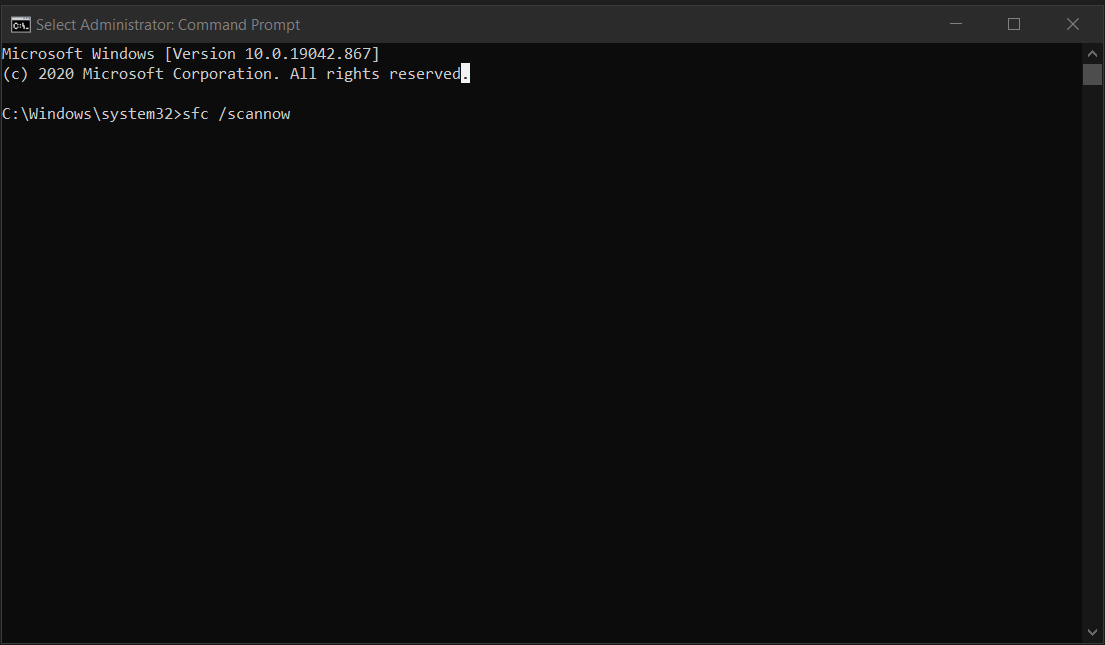
  2. Now, type sfc /scannow and hit the Enter key.bitlocker fatal error sfc /scannow cmd
  3. Finally, restart your Windows PC and try launching the application again

Another way by which you can fix Bitlocker’s fatal error problem is to use System File Checker. SFC can be used to scan, check for system file integrity, and fix corrupt system files.

If you encounter errors while running SFC, it stops or does not work at all on Windows 10, take a look at our dedicated guide in order to fix the issue.

5. Reset BIOS settings

  1. Restart your computer.
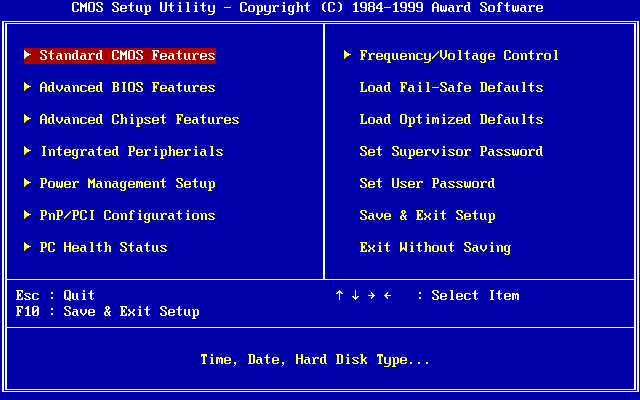
  2. Hit the F2 key repeatedly until a System Setup screen window appears. (The BIOS function key varies; you may have to check during boot which Function key to use so as to access the BIOS settings).
  3. Now, Hit on the Right Arrow on your keyboard and wait until Exit menu is highlighted.
  4. Next, hit on the Down Arrow on your keyboard and select Load Optimized Defaults option.
  5. Finally, hit the Enter button.

BIOS consists of system settings that determine the order and how your PC boots up. However, resetting BIOS settings to the default state can fix the Bitlocker fatal error problem.

Before you proceed with these steps, ensure you disconnect connected external drives (as indicated in Method 1). 

6. Update your Windows OS

  1. Go to Start and selected Settings from the left pane.
  2. Go to Update & Security.
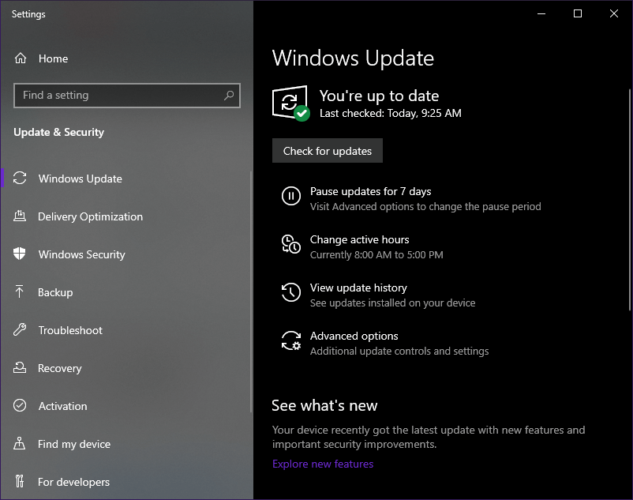
  3. In the Windows Update window, check for updates and install the available updates.
  4. After the update is complete, restart your Windows PC.

Microsoft constantly releases Windows updates to improve system stability, PC performance, and fix various issues and errors such as the Bitlocker fatal error.

7. Disable the Bitlocker

However, if you are unable to fix the BitLocker fatal error using the methods listed above, then you may have to disable the Bitlocker from your computer. 

After you disable Bitlocker, we do recommend that you use any of the best 256-bit encryption software to protect your files. In addition, you may also consider file and folder locker tools and software for Windows PC.

If you don’t know how to disable the Bitlocker on your computer, we recommend you use our dedicated guide on how to perform this action.

If you have wondered how to fix this Bitlocker problem, you can try out any of the methods we discussed in any order. If you have any suggestions, feel free to let us know in the comment section below.

FIX: 0x00000003 stop error

Your Windows system may crash with the 0x00000003 stop error due to hardware failure or driver issues. This blue screen of death can occur when playing games or browsing the web.

Several users have reported this error in the Microsoft community forum.

Hello.   I’ve been having trouble with a Blue Screen Error past few days.   The code is as follows:
STOP 0X00000F4  0X00000003   0XFFFFFA800A502370   0XFFFFFA800A502650     0XFF80000338E460
Memory Dump Failure 0xC0000010

To fix the issue, try restarting your system. If the issue persists, check out the troubleshooting tips in the article below to resolve the 0x00000003 stop error in Windows.

How do I fix the 0x00000003 stop error?

1. Restart in Safe Mode

0x00000003 stop error
  1. Press Windows key + R to open Run.
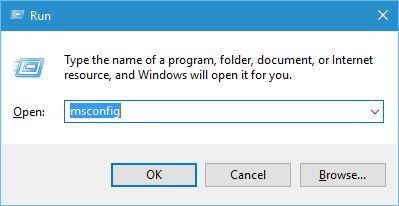
  2. Type msconfig.msc and click OK.
  3. In the System Configuration window, open the Boot tab.
  4. Check the Safe Mode box under Boot options.
  5. Click Apply and OK to save the changes.
  6. Click Yes when prompted to restart the system in safe mode.

Alternatively, you can also boot into Safe Mode from the Advanced Options.

0x00000003 stop error
  1. Press Windows Key + I.
  2. Go to Update & Security.
  3. Open the Recovery tab.
  4. Scroll down to Advanced Startup
  5. Click the Restart now button.
  6. Go to Troubleshoot > Advanced Options > Startup Options.
  7. Click the Restart button.
  8. After the Restart, you will see the Startup Settings menu.
  9. Press the F4 key to start Windows in Safe Mode.

Once booted into Safe Mode, check if the 0x00000003 stop error occurs again. If the error does not occur, you may have third-party software or hardware triggering the error.

Try to uninstall the most recently installed programs to see if that helps you resolve the error. Restart the PC to get out of Safe Mode.


2. Run a BSoD troubleshooter

A BSoD troubleshooter is the easiest way to deal with such situations, especially if you’re unsure of the cause. Such a tool will safely scan your system and fix all the bugs. No action is necessary on your side.

You might have to do this while also in Safe Mode.


3. Rollback device driver

0x00000003 stop error
  1. Press Windows + Key + R.
  2. Type devmgmt.msc and click OK to open Device Manager.
  3. In Device Manager, expand the category of the device that you want to roll back the driver for.
  4. Right-click on the device and select Properties.
  5. Open the Driver tab.
  6. Click the Roll Back Driver button. Click Yes to confirm.
  7. Windows will now roll back the driver for the selected device and install the previously available driver.

Rolling back the device driver can help you fix the issue if the error is triggered by a newly installed device driver. Try disconnecting and reconnecting all the external devices connected to your computer to find the peripheral causing the error.


4. Install Windows updates

Window BSOD error
  1. Click on Start and select Settings.
  2. Go to Update and Security.
  3. Click on Check for updates now button.
  4. Download and install all the pending Windows updates.

Installing the latest version of Windows can help you resolve the blue screen of death issues. The newer releases come with updated Windows as well as third-party drivers.


5.  Perform a full virus scan

Window BSOD error
  1. Click Start and open Settings.
  2. Go to Update and Security.
  3. Click on Windows Security.
  4. Click on the Virus and Threat Protection option.
  5. Select the Scan Options.
  6. Choose Full Scan and then click on Scan now.
  7. Windows Defender will now scan the system for virus and other malicious software that may be triggering the error.

You can also use third-party antivirus solutions to perform a deep scan and remove malware and adware from your system.


6. Use System Restore Point

0x00000003 stop error
  1. Press the Windows key and type Restore Point.
  2. Click on Create a Restore Point option.
  3. In the System Properties window, click on System Restore.
  4. Check the “Show more restore points” box.
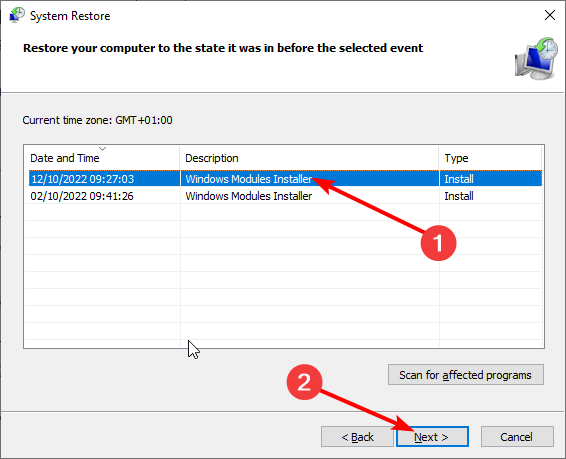
  5. Select the most recently created restore point and click Next.
  6. Read the description and click on Finish.

The restoration process may take some time. If successful, your computer will be restored to the state it was in before the event in the description.


7. Update the SSD firmware

how do I fix the 0x00000003 stop error
  1. If you are using an SSD for storage, check the manufacturer website for any updates.
  2. You may also want to clean your system for dust and reinsert the SSD drives, RAM stick, and GPU.
  3. Also, make sure you have the latest version of BIOS installed.

The 0x00000003 stop error is just another blue screen of death error in Windows 10 and can occur due to various reasons. We have listed the most common solutions to fix this error on your computer.

FIX: IO1 Initialization Failed error in Windows 10

Computer errors are a common occurrence, and while some issues are relatively harmless, certain ones such as Blue Screen of Death errors can be more severe.

For example,  IO1_INITIALIZATION_FAILED, will crash Windows 10 and restart your PC.

Therefore it’s crucial to fix these problems as soon as you can, considering the fact that no issue is always resolved with the easiest troubleshooting step.

Use the solutions in this article to fix this issue.

How can I fix a Windows 10 io1_initialization_failed issue?

  1. Update your drivers and Windows 10
  2. Run the BSOD Troubleshooter
  3. Run the SFC scan
  4. Run DISM
  5. Change Disk Controller mode from RAID or AHCI to SATA/ATA
  6. Disable or remove the problematic software
  7. Use Command Prompt
  8. Change Disk Controller mode from RAID or AHCI to SATA/ATA
  9. Check your hardware

1. Update your drivers and Window 10

Drivers are an integral part of every operating system since they allow your PC to utilize your hardware.

In case a certain driver isn’t working properly or it has compatibility issues with Windows 10, you’ll have to update it in order to avoid getting BSoD errors.

To update a driver, you just need to visit your hardware manufacturer’s website and download the latest drivers for your device.

It’s important to update as many drivers as you can, so be sure to download drivers for your motherboard, chipset, and every other major component.

Alternatively, you can also use Device Manager to download all the necessary drivers, but it’s usually better to download the drivers manually directly from the manufacturer.

Downloading drivers is important, but it’s more important to keep Windows 10 up-to-date with the latest updates.

Many updates bring new features and security improvements, but most importantly, these updates fix many bugs and compatibility issues with certain hardware and software.

Since hardware and software compatibility is the common cause for BSoD errors such as IO1_INITIALIZATION_FAILED, you can see why it’s important that you update Windows 10 on a regular basis.

Update drivers automatically

Searching for drivers on your own can be time-consuming. So, we advise you to use a tool that will do this for you automatically.

Using an automatic driver updater will certainly save you from the hassle of searching for drivers manually, and it will always keep your system up-to-date with the latest drivers.

⇒ Get Outbyte Driver Updater

2. Run the BSoD Troubleshooter

  1. Open the Settings app and go to Update & Security section.
  2. Select Troubleshoot from the menu on the left.
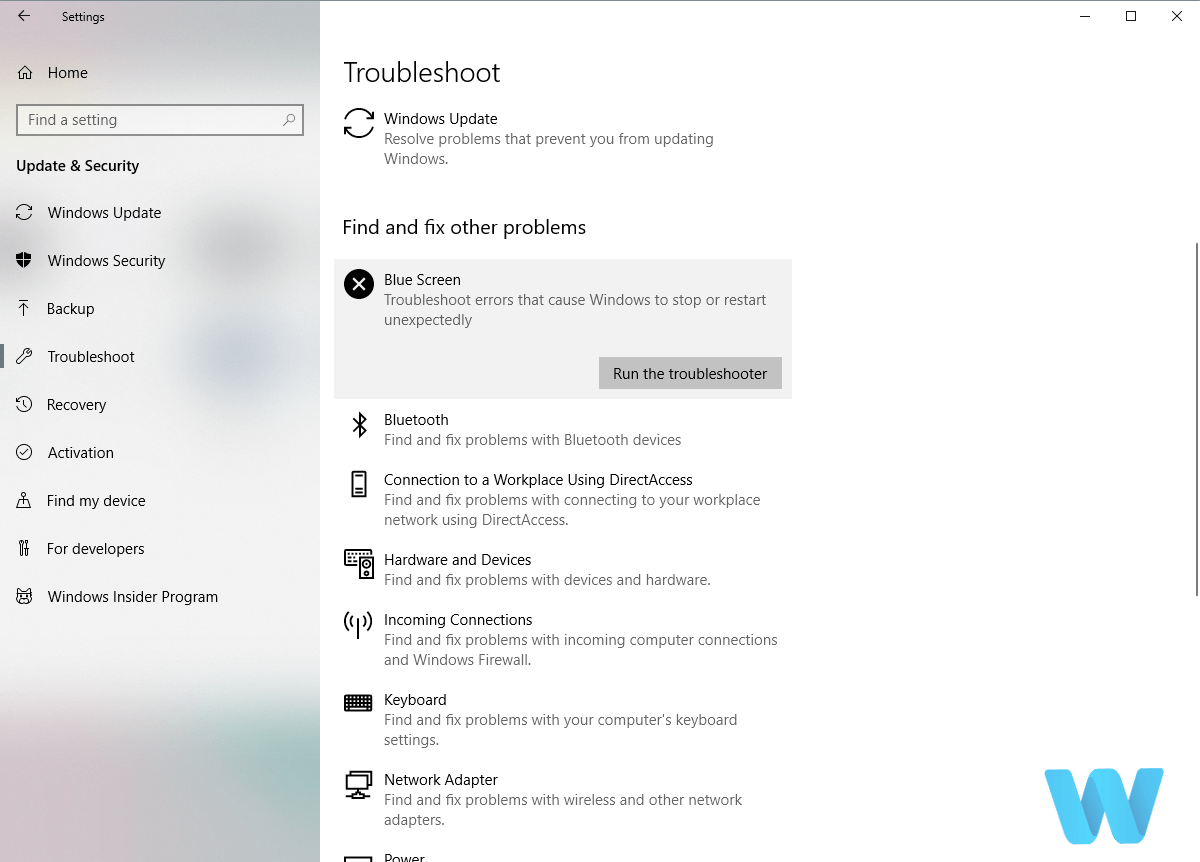
  3. Select BSoD from the right pane and click Run the troubleshooter.
  4. Follow the instructions on the screen to complete the troubleshooter.

Note: If you are running on update version 1809 or later you will need to access the BSoD troubleshooter on the Microsoft website, go to the bottom of the page and answer the questions available there for possible fixes.

Does the troubleshooter fail to load with an error? Follow this useful guide and fix it in just a couple of simple steps.

3. Run the SFC scan

  1. Go to Search, type cmd, and open Command Prompt as Administrator.
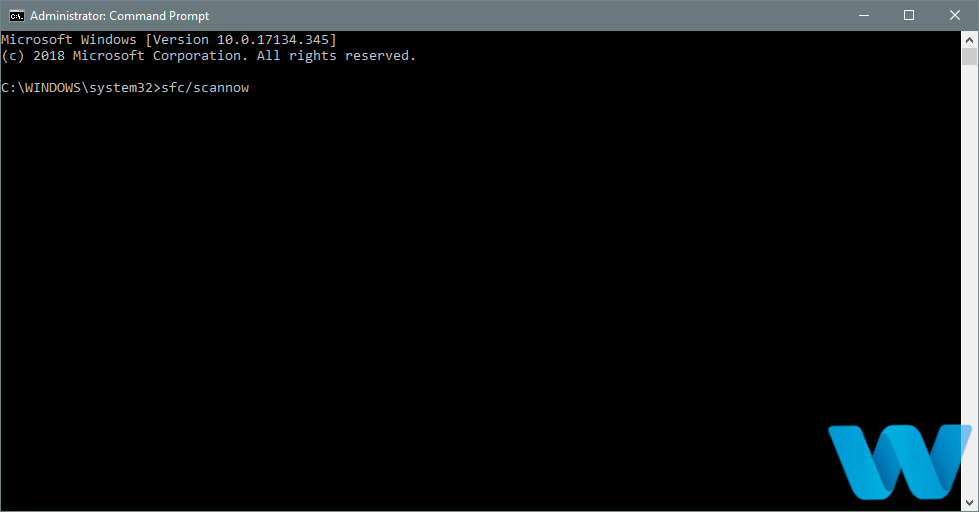
  2. Enter the following line and press Enter: sfc/scannow
  3. Wait until the process finishes.
  4. If the tool finds a corrupt system file, it will automatically repair it.
  5. Now, close the Command Prompt and restart your computer.

The System file checker is a command-line tool that basically scans through your system searching for potential issues. If a corrupted system file is a problem, this tool will automatically repair it, and the problem will be resolved.

If you’re having trouble accessing Command Prompt as an admin, then you better take a closer look at this guide.

4. Run DISM

  • The standard way
  1. Right-click Start and open Command Prompt (Admin).
  2. Paste the following command and press Enter:
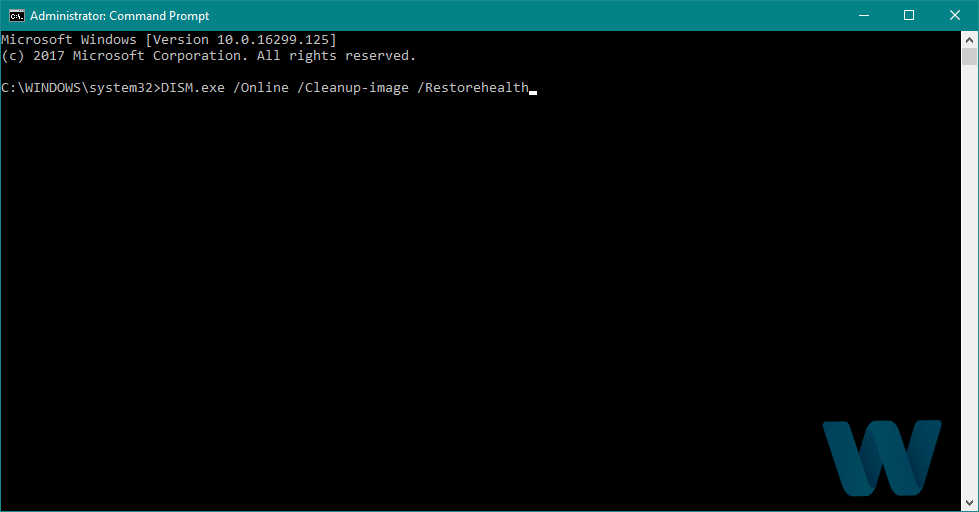
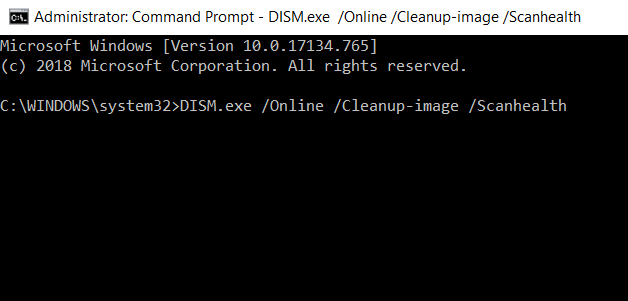
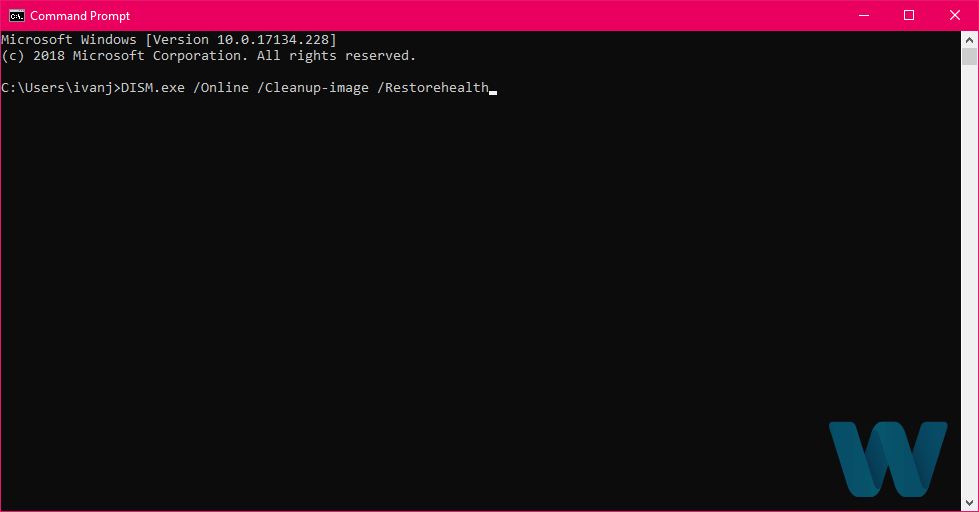
    • DISM /Online /Cleanup-Image /RestoreHealth
  3. Wait until the scan is finished.
  4. Restart your computer and try updating again.

The DISM tool re-deploys the system image and resolves potential issues along the way. So, it’s possible that running DISM will also resolve the IO1_INITIALIZATION_FAILED error.

Does it seem that everything is lost when DISM fails on Windows? Check out this quick guide and get rid of the worries.

  • With the Windows installation media
  1. Insert your Windows installation media.
  2. Right-click the Start menu and, from the menu, choose the Command Prompt (Admin).
  3. In the command line, type the following commands and press Enter after each:
    • dism /online /cleanup-image /scanhealth
    • dism /online /cleanup-image /restorehealth
  4. Now, type the following command and press Enter:
    • DISM /Online /Cleanup-Image /RestoreHealth /source:WIM:X:SourcesInstall.wim:1 /LimitAccess
  5. Make sure to change an X value with the letter of the mounted drive with Windows 10 installation.
  6. After the procedure is finished, restart your computer.

5. Check the hard drive

  1. Enter the Advanced Startup (Restart your computer while holding the Shift key).
  2. Choose Troubleshoot > Advanced Options.
  3. Select Command Prompt from the list of options.
  4. When Command Prompt appears, enter the following lines and press Enter after each line in order to run it:
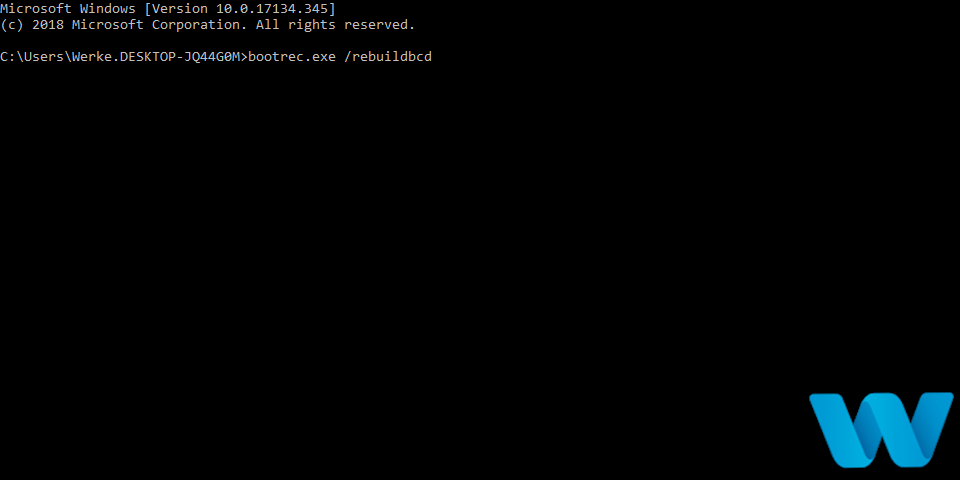
    • bootrec.exe /rebuildbcd
    • bootrec.exe /fixmbr
    • bootrec.exe /fixboot
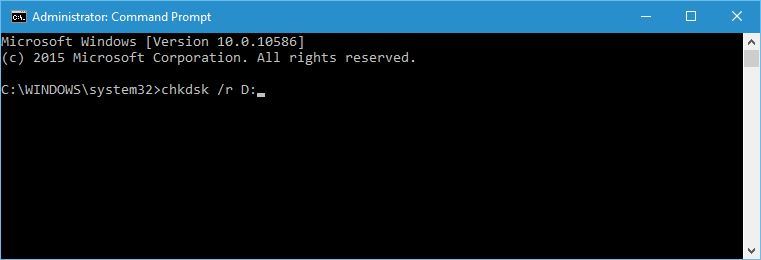
  5. Some users are also suggesting that you need to run additional chkdsk commands as well. To perform these commands, you need to know drive letters for all your hard drive partitions. In Command Prompt you should enter the following (but remember to use the letters that match your hard drive partitions on your PC):
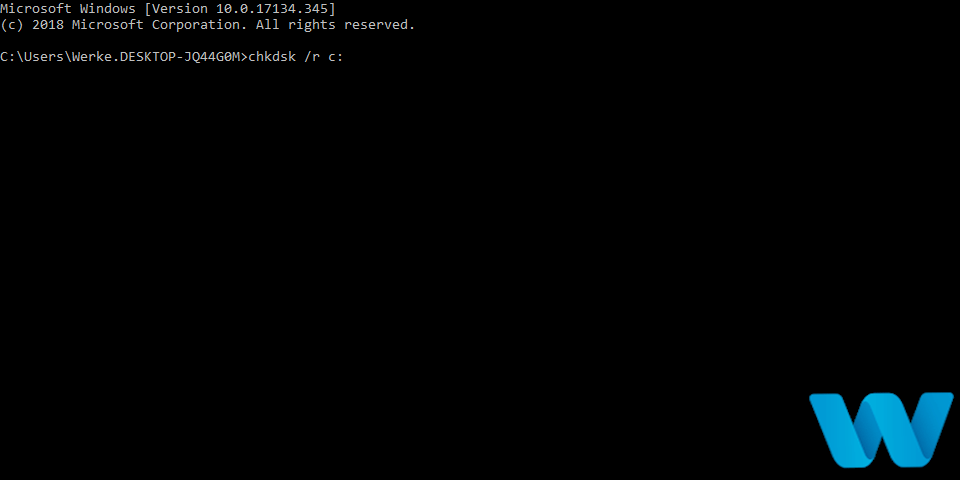
    • chkdsk /r c:
    • chkdsk /r d:

      This is just our example, so keep in mind that you have to perform chkdsk command for every hard drive partition that you have.

  6. Restart your computer and check if the issue is resolved.

If your hard drive is damaged, BSoD issues are more than possible. To eliminate the doubt, you should run the chkdsk, which scans all your partitions and resolves potential problems (if possible). So if the culprit of the IO1_INITIALIZATION_FAILED is a corrupt hard drive, this tool will likely resolve the problem.

6. Disable or remove the problematic software

  1. Press Windows Key + R and enter msconfig. Press Enter or Click OK.
    msconfig
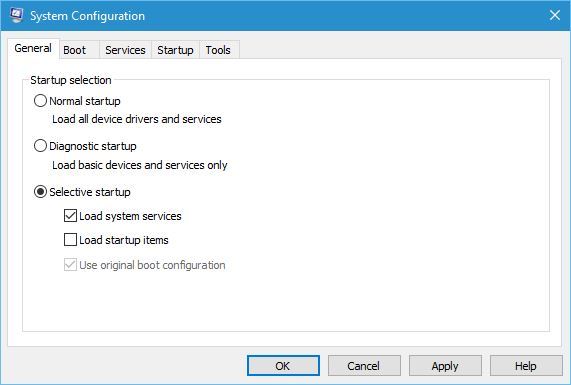
  2. System Configuration window will open. Select Selective startup and uncheck Load startup items.
    system-configuration
  3. Navigate to Services tab. Check Hide all Microsoft services and click the Disable all button.
    system-configuration-services
  4. Click Apply and OK to save changes.
  5. Press Ctrl + Shift + Esc to start Task Manager.
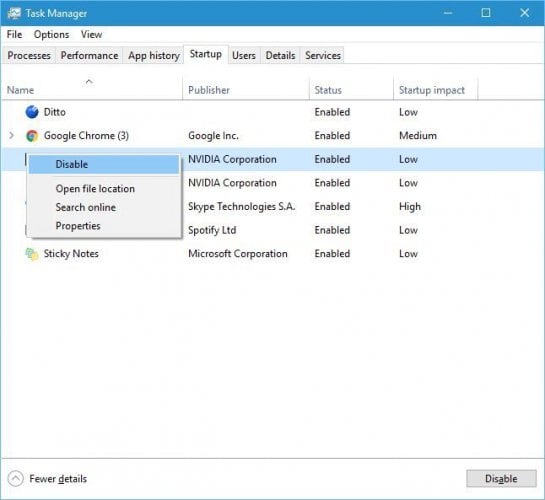
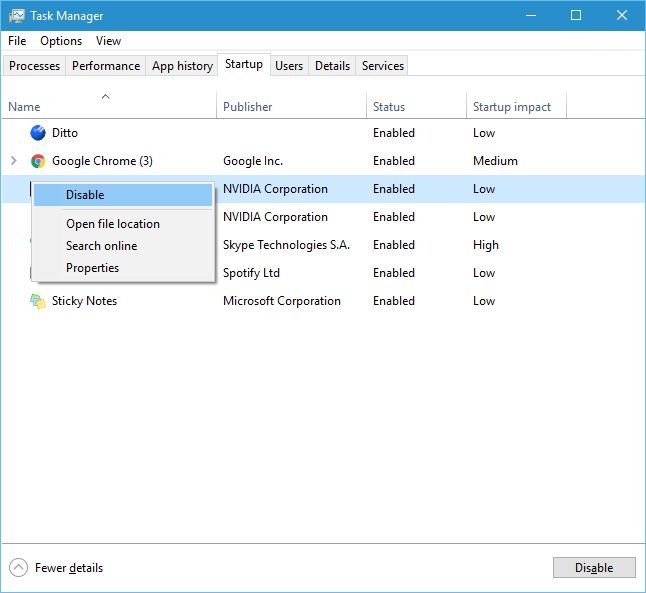
  6. When Task Manager opens, navigate to Startup tab. Right-click each entry on the list and choose Disable from the menu.
    Task-manager-disable
  7. Restart your computer.

Once your computer boots, check if your PC is working properly. If there are no BSoD errors, your problem is probably caused by one of the disabled applications. Now you need to repeat the same steps and enable applications one by one until you find the one that is causing this error.

Certain software might have issues with Windows 10 and that can be a common cause for BSoD error. In order to fix this error, it’s important to find and remove the problematic software.

Sometimes problems can be caused by a recently installed or updated program, therefore you need to locate the problematic software and remove it.

It’s worth mentioning that antivirus software is the common cause for all sorts of BSoD errors, including IO1_INITIALIZATION_FAILED, therefore it’s advised to remove any third-party antivirus programs.

Uninstalling the antivirus software might not fix the problem since antivirus programs tend to leave certain files and registry entries once you remove them. To completely remove a certain antivirus you need to download a dedicated uninstaller.

Many antivirus companies have these tools on their websites, so be sure to download one for your antivirus program.

Can’t open Task Manager? Don’t worry, we’ve got the right solution for you.

7. Use Command Prompt

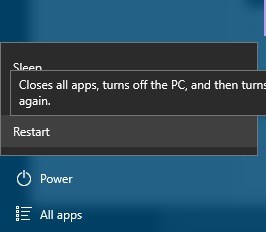
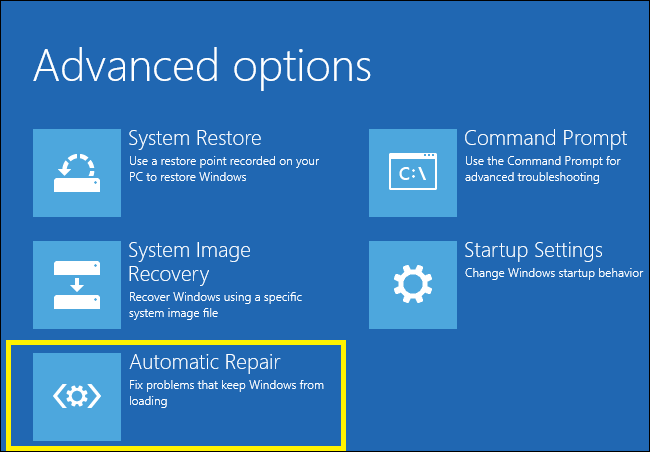
  1. Restart your computer while it boots. Repeat this step until Automatic Repair process starts. Alternatively, you can just hold Shift on your keyboard and click the Restart button.
    restart
  2. Choose Troubleshoot > Advanced options > Command Prompt.
  3. Once the Command Prompt opens, enter the following lines and press Enter after each line:
    • cd /d c:windowssystem32config
    • del default
    • del sam
    • del security
    • del software
    • del system
    • copy c:windowsrepairdefault
    • copy c:windowsrepairsam
    • copy c:windowsrepairsecurity
    • copy c:windowsrepairsoftware
    • copy c:windowsrepairsystem
    • exit

Now restart your computer and check if the issue is resolved. If you get stuck on the Automatic repair loop, don’t worry. We’ll throw you this amazing lifeline.

8. Change Disk Controller mode from RAID or AHCI to SATA/ATA

If you set your Disk Controller mode to RAID or AHCI, but you don’t have the necessary drivers for it, you might get an IO1_INITIALIZATION_FAILED error. To fix this problem you need to set the Disk Controller mode to SATA/ATA.

To do this, you’ll need to enter BIOS and change the necessary settings. For detailed instructions be sure to check your motherboard manual.

Accessing BIOS seems too big of a task? Let us make things easier for you with the help of this amazing guide.

9. Check your hardware

If the problem persists, it might be due to faulty or recently installed hardware. If you installed any new hardware recently, be sure to remove it or replace it. In addition, check if your hardware is working properly.

These types of errors are often caused by RAM or motherboard issues, so be sure to check those components first. To find the cause of the problem be sure to perform a detailed examination of your hardware.

IO1_INITIALIZATION_FAILED error can cause you problems, but just like many other BSoD errors, this one is most likely caused by faulty hardware. Before you replace your hardware, be sure to try other solutions from this article.

Don’t hesitate to reach in the comments section below for any other questions or suggestions that you may have.

Critical_structure_corruption on Windows 11 [BSoD Fix]

Many users have encountered the CRITICAL_STRUCTURE_CORRUPTION, a BSoD error in Windows 11, while launching a problem, restarting their PC, browsing the internet, or even when the system is idle. It appears when the kernel detects that critical kernel code or data has been corrupted.

In this guide, we will discuss expert-recommended solutions with step-by-step instructions to eliminate the stop error code so that you can use your device without any hassle.

What causes the critical_structure_corruption blue screen in Windows 11?

  • Damaged or corrupted system files might hinder the normal functioning of your computer, causing such issues.
  • Outdated or faulty drivers.
  • Hardware failure or incorrect configuration.
  • Malware infection.
  • Faulty RAM modules.

How do I fix critical_structure_corruption in Windows 11?

Before proceeding with any detailed steps, go through the following preliminary checks:

  • Disconnect all the external peripherals except the keyboard and mouse.
  • Restart your computer in clean boot & ensure you have no incompatible devices.
  • If you are using a desktop computer, open the CPU panel and check it to ensure all the components are properly seated.
  • Ensure there are no pending Windows updates, and check the Event Viewer to learn more about the error.
  • Uninstall any new or problematic software on your computer.

1. Run a malware scan

  1. Press the Windows key, type windows security, and click Open.Windows Security open -Critical_structure_corruption on Windows 11
  2. Go to Virus & threat protection from the left pane.
  3. Click Scan options.V& T Scan options
  4. Now select Full scan and click Scan now. Full scan - scan now

Wait for the scan to complete. If it flags any suspicious files, delete them from your computer.

2. Run SFC and DISM scans

  1. Press the Windows key, type cmd, and click Run as administrator.CMD elevated Critical_structure_corruption on Windows 11
  2. Type the following command to repair the corrupted system files using cached copies and hit Enter: sfc /scannowSFCSCANNOW CMD
  3. To check & fix the component store corruption using Windows Update and restore the image to a good known state, copy & paste the following command and press Enter: Dism /Online /Cleanup-Image /RestoreHealthRestore health
  4. Once executed, restart your computer to confirm the changes.

These system scans can also fix similar BSoD errors like Critical Process Died on Windows 11; to learn more about it, read this detailed guide. Furthermore, you can use a BSoD repair tool if the manual steps seem like a hassle.

3. Update your device drivers

  1. Press Windows + R to open the Run dialog box.
  2. Type devmgmt.msc and click OK to open the Device Manager app.
  3. Go to each section and check if you see a yellow triangle next to any of the listed items. If it is present, right-click the driver and select Update driver.Graphics Driver update
  4. Click Search automatically for drivers.Update driver 2
  5. Follow the on-screen instructions to complete the process.

Keep repeating steps 3 and 4 until all the drivers listed are updated. Once done, reboot your PC. This method works as a BSoD fixer for all the blue screen errors caused by the driver issues.

4. Check the hard drive

  1. Press Windows + E to open the Windows Explorer. Go to This PC, right-click your system drive (most likely C:), and select Properties.Properties Scan Critical_structure_corruption on Windows 11
  2. Switch to the Tools tab, locate Error checking, and click the Check button.Check
  3. Next, select Scan drive. The tool will scan your hard drive to identify and potentially repair bad sectors on it.scan drive
  4. Wait for the process to finish, then restart your computer.

5. Run the Driver Verifier Manager

Driver Verifier Manager is a preinstalled Windows tool that puts the drivers through a verification process and is designed for advanced users and developers.

It can detect misbehaving drivers that can cause system crashes, freezes, or other issues to enhance system stability.

  1. Press Windows + E to open the Windows File Explorer.Go to the address bar and type verifier - Critical_structure_corruption on Windows 11
  2. Go to the address bar and type verifier. Click Yes on the UAC prompt.
  3. Once the Driver Verifier Manager wizard pops up, choose Create custom settings (for code developers) and click Next.Create custom settings (for code developers)
  4. For Select individual settings from this full list, select all except Randomized low resources simulation and DDI compliance checking and click Next. Select individual settings from this full list
  5. Next, place a checkmark next to the Select driver names from a list option. Select driver names from a list o
  6. Now select all the drivers that appear unofficial and click Finish.verifiergui_7Finish

Now to manage and review the configuration of the tool on your Windows, follow these steps:

  1. Press the Windows key, type cmd, and click Run as administrator.CMD elevated -Critical_structure_corruption on Windows 11
  2. Copy & paste the following command to check the current settings of the tool and press Enter:verifier /querysettingscmd_gk3wpVwGS9
  3. Type the following command to reset and disable the configuration of the tool and hit Enter: verifier /resetcmd_oZEDfhS9JB -
  4. Now reboot your computer.

6. Run the Windows Memory Diagnostic tool

  1. Press the Windows key, type memory diagnostic, and click Run as administrator.Memory diagnostic tool - Critical_structure_corruption on Windows 11
  2. On the Windows Memory Diagnostic window, select Restart now and check for problems.Restart now and check for problems.
  3. Your computer will restart, and the tool will start scanning your RAM for potential issues.memory-diag-tool
  4. Once complete, your computer will reboot, and you will be greeted with a login screen.

As you log in, you will see the scan results; if the results come back fine, then proceed to the next method.

However, if it indicates issues, then remove the RAM module, clean the dust & debris, reseat it, and run the scan again. If you see the errors again, you might have to replace the RAM.

7. Reinstall Windows (the last resort)

First, take a backup of your important data, plug in a USB flash drive with 8 GB free space on a different computer, and follow these steps to create a USB Windows installation media:

  1. Visit the Microsoft official website and click Download now.Download now
  2. Follow the instructions to complete the download, and double-click the file to run the Windows 11 Setup wizard.
  3. On the next window, accept the license terms and agreements, then for the Choose which media to use option, select USB flash drive, and click Next.Create installation media (USB flash drive, DVD, or ISO file) for another PC
  4. Select a language, edition, and architecture (64-bit or 32-bit), and click Next.NExt-Setup-Windows-11-step-2
  5. Select the USB flash drive from the list and click Next.
  6. Follow the onscreen prompts to complete, click Finish, and remove the flash drive.Finish

Now follow these steps to reinstall:

  1. Plug the thumb drive into the affected computer and press Windows + E to open the File Explorer.
  2. Click the drive with installation media, locate and double-click setup.exe, and click Yes on the UAC prompt.
  3. Ensure the Keep personal files and apps option is selected. However, if you want to change it to Keep personal files only or Keep nothing, click Change what to keep.Keep personal files and apps option is selected. However, if you want to change it to Keep personal files only or Keep nothing  - Critical_structure_corruption on Windows 11
  4. Next, click Install.

Your PC will restart several times, so be patient. Once the installation is complete, you will be greeted with the login screen.

Tips to prevent BSoD errors on Windows 11

  • Always install the latest security updates and patches to address the stability and vulnerabilities issues of a system.
  • Ensure all the device drivers are compatible and up to date.
  • Run a deep scan using a reliable antivirus tool once a month.
  • Regularly optimize your computer by removing temp files, unused apps, and unwanted files.
  • Make sure your hardware components are clean, the vents get a proper airflow, and monitor the temperature and disk health to avoid overheating.

To conclude, if you ever face blue screen errors, first restart your computer in the clean boot or safe mode and check the Event Viewer to understand the nature of the error, whether it is due to hardware failure or software conflict. Once confirmed, perform the mentioned steps to fix it.

To know about the BSoD causes to ensure you steer clear of these annoying error codes, read this guide.

Did we miss a method that worked for you to fix the CRITICAL_STRUCTURE_CORRUPTION on Windows 11? Don’t hesitate to mention it in the comments section below. We will happily add it to the list.

FIX: 0x00000002 DEVICE_QUEUE_NOT_BUSY

The 0x00000002 DEVICE_QUEUE_NOT_BUSY error in Windows can occur when you restart your PC. It is a blue screen of death error and can occur due to several reasons.

This error can occur if your computer’s hard drive is running out of space, because of incompatible BIOS version, or system file corruption.

If you are also troubled by this error, here are a couple of troubleshooting tips to help you fix the 0x00000002 DEVICE_QUEUE_NOT_BUSY error in Windows.

How do I fix the 0x00000002 DEVICE_QUEUE_NOT_BUSY?

1. Boot into Safe Mode

1.1 Boot using System Configuration 

  1. Press Windows Key + R to open Run. 0x00000002 DEVICE_QUEUE_NOT_BUSY error
  2. Type msconfig.msc and click OK to open System Configuration.
  3. Open the Boot tab.
  4. Under Boot options, check the Safe Boot box.Fix  0x00000002 DEVICE_QUEUE_NOT_BUSY error
  5. Click Apply and OK to save the changes.
  6. When prompted, click Yes to restart the PC in Safe Mode.

1.2 From System Settings

  1. Press Windows Key + I.BSOD error  0x00000002 DEVICE_QUEUE_NOT_BUSY
  2. Go to Update & Security.
  3. Open the Recovery tab.
  4. Scroll down to the Advanced startup section. 0x00000002 DEVICE_QUEUE_NOT_BUSY Windows error
  5. Click the Restart now button.
  6. Click on Troubleshooter.
  7. Go to Advanced Options > Startup Settings.
  8. Press the shown function key on your keyboard to Enable Safe Mode.
  9. Click Restart.

Once you are booted into Safe Mode, you can uninstall a third-party software that is creating conflict with the system or hardware.

  1. Press Windows Key + R to open Run.
  2. Type control and click OK.0x00000002 DEVICE_QUEUE_NOT_BUSY error
  3. Go to Programs > Programs and Features.
  4. From the list of installed apps, select the most recently installed app and uninstall it.
  5. Reboot the computer and check for any improvements.

In Safe Mode, Windows only loads essential Microsoft services to run the system. It allows you to diagnose the system for a third-party software conflict and remove it.

2. Update your new hardware driver

  1. Press Windows Key + R to open Run.
  2. Type devmgmt.msc and click OK.0x00000002 DEVICE_QUEUE_NOT_BUSY Windows 10 error
  3. In Device Manager, expand the hardware category.
  4. Right-click on the newly installed device and select Update Driver.0x00000002 DEVICE_QUEUE_NOT_BUSY
  5. Select the Search for updated driver software automatically option.
  6. Windows will scan and install any pending drivers for the device.
    • This will require an active internet connection.

If the error is occurring after installing a new piece of hardware to your computer, try updating the driver. If the Windows crashes and can’t get past the login screen, then remove the connected hardware device and restart the computer.

Next, open the hardware manufacturer’s website and download the latest drivers available for your device. Install the driver then try connecting the device to your computer.

We recommend a smart strategy for your computer drivers: use software to improve your computer performance. It will perform efficient driver management using its daily updated extensive database.

You must download this program, install it, and let it scan your operating system. It will find any outdated, missing or damaged drivers and fix them right away.

After you have updated your drivers, that will solve the error 0x00000002 DEVICE_QUEUE_NOT_BUSY, and it will allow your computer to function at its optimum performance.

We must also note that this tool can regularly update your drivers so you won’t face this issue ever again. Just pick a time that works for you and let it run in the background.

⇒ Get Outbyte Driver Updater

3. Run System File Checker tool

  1. Press the Windows key and type cmd.
  2. Select the Run as Administrator option.Windows error 0x00000002 DEVICE_QUEUE_NOT_BUSY
  3. In the Command Prompt window, type the following and hit Enter:
    • sfc /scannow 
  4. The System File Checker will scan the system for missing or corrupted files.
  5. Once the verification is 100% complete, it will show if any files found are corrupt and repaired during the process.0x00000002 DEVICE_QUEUE_NOT_BUSY
  6. Close the Command Prompt and check for any improvements.

4. Run Check Disk utility

BSOD error Windows 10
  1. Open Command Prompt as administrator.
  2. In the Command Prompt, type the following command and hit enter:
    • chkdsk c: /f
  3. The Check Disk utility will scan the C:/ drive for issues and repair them.
  4. Once the process is complete, restart the computer.

5. Install Windows updates

  1. Press Windows key + I.
  2. Go to Updates & Security.0x00000002 DEVICE_QUEUE_NOT_BUSY
  3. Check for any pending Windows updates.
  4. Download and install all the pending updates.

The 0x00000002 DEVICE_QUEUE_NOT_BUSY blue screen of death error in Windows can occur due to both software and hardware issues. Follow the solutions in this article to diagnose and fix the issues with ease.

FIX: 0x0000000E blue screen error

The dreaded 0x0000000E NO_USER_MODE_CONTEXT blue screen of death (BSOD) is the problem we will treat in this guide. It’s not a common error in Windows and the BSoD hints at some troubleshooting steps.

This Windows 10 boot error 0x0000000e problem generally points to a corrupt boot configuration data (BCD) file. Sometimes, it says windows 10 update your pc needs to be repaired 0x0000000e.

To fix the Windows 10 boot error 0x0000000e, you will need a bootable disk for your Windows version. If you don’t have one and are not sure how to do this, please read this guide first.

How do I fix error 0x0000000E in Windows 10?

1. Use a third-party troubleshooter

An easy and safe way out in this case would be to use a third-party troubleshooter mainly because it can look into all your systems’ bugs. You might have to work in Safe Mode for this.

A PC repair tool can provide helpful support for this kind of BSoD error. Using automated technology, it can detect damaged software files and replace them with usable ones to fix the issue.

With a comprehensive repository of functional system files, you can fix defective software and recover your PC automatically.

Therefore, using such a practical third-party troubleshooter means you can efficiently resolve this screen error and avoid system freeze or crashes using automated support.

2. Disconnect external drives

A drive connected to your PC while booting can cause it to bring up a BSOD (blue screen of death) with the error code 0x0000000E.

Windows boots in an order (boot order), which you can change, and you normally want the drive with your operating system to be the top priority. Now, your BIOS or UEFI is configured to prioritize any connected drive.

If you have a USB stick, hard drive, or other external storage connected and the PC boots from it, you may get the 0x0000000E BSOD screen.

So, the first thing you should do in troubleshooting this type of BSOD is to remove any connected drives before booting the computer. The next solution shows you how to fix error 0x0000000e especially when you install an SSD drive after migration.

3. Repair Windows startup to 0x0000000E stop error

  1. Go to the Startup Repair screen.
    • With a Windows installation media
      1. If you have a Windows 10 installation media (USB or disk), insert it and power on your computer.
      2. Hit Next, and on the Windows Setup screen, select the Repair your computer link at the bottom of the page.
      3. On the Advanced Startup environment, select Troubleshoot.
      4. Next, click on Advanced options.
      5. Finally, on the Advanced options page, select Startup Repair.open-startup-repair-0x0000000E-bsod
    • Without a Windows installation media
      1. If you don’t have the Windows installation media, simply power on the computer and follow the steps below.
      2. Wait for the Windows logo to appear on your PC screen. Immediately it shows, press your computer Power button.
      3. Next, turn on the computer again and repeat step 2. Do this two more times.
      4. On the third try, the system will boot into the Advanced Startup screen.
      5. Finally, click on Startup Repair.
  2. In Startup Repair, choose an account.
  3. Next, enter your password and hit Continue.

At this point, if the 0x0000000E issue is not a problem from your booting, Windows will tell you that Start Repair couldn’t repair your PC.

If you get that message, then continue with this solution. Otherwise, reboot your computer to see if the 0x0000000E problem is solved.

4. Rebuild the BCD file

  1. Insert a bootable disk into your computer and power it on.
  2. On the Windows Setup screen, select the right parameters and click on the Next button.
  3. After this, click on the Repair your computer link on the next page.
  4. Select Troubleshoot.
  5. Next, go to Advanced options and then select Command Prompt on the screen that follows.
  6. Now, select your account and enter its password if you have one.
  7. Click Continue to launch Command Prompt.
  8. In Command Prompt, input the following command and hit Enter:bootrec /rebuildbcd
  9. On pressing Enter, you will be asked if you want to add installation to boot list. Press the Y key to authorize it.
  10. Wait for the process to complete, and then type in these commands.
    bootrec /fixmbr
    bootrec /fixboot
    fix-bcd-in-command-prompt-0x0000000E-bsod
    Remember to press Enter after typing in each of these commands.
  11. Restart the machine to check if the 0x0000000E error.

5. Mark your drive as online

  1. Insert your bootable disk and power on your machine.
  2. On the first screen, click on Next.
  3. Select the Repair your computer link.
  4. Next, go to Troubleshoot and select Advanced options.
  5. Here, click on Command Prompt.
  6. Choose a user account, enter the password, and click Continue.
  7. In Control Panel, type diskpart and hit Enter to run the Diskpart utility.
  8. Next, type select disk to bring up a list of connected drives.
    • You could also use the select volume or list disk commands.
    • Press Enter to run either.
      diskpart-utility-0x0000000E-bsod
      In these commands, replace * with the number for the disk on which Windows is installed.
      • For example, select disk 0.
  9. After selecting the relevant volume, use either the online disk or online volume commands to mark your drive as online.
  10. Finally, quit the Diskpart utility by typing Exit and pressing Enter.
  11. Finally, close Command Prompt and restart your PC.

6. Reinstall Windows

reinstall-windows-0x0000000E-bsod

Unfortunately, if none of the preferred solutions gets you past the 0x0000000E BSOD, then the last resort would be to reinstall Windows.

Note that although reinstalling Windows should resolve the challenge, you risk losing all the data saved on your computer. Read this guide for a detailed, step-by-step tutorial on how to reinstall Windows 10.

That’s it! You now know the causes and how to fix the error 0x0000000e in Windows. By following the solutions in this guide, you should be able to get your computer back running without the 0x0000000E BSOD screen.

FIX: ACPI_DRIVER_INTERNAL error in Windows 10

ACPI_DRIVER_INTERNAL is a Blue Screen of Death error, and just like many other BSoD errors, this one will crash Windows 10 and restart your PC in order to prevent damage.

These types of errors can be somewhat serious, therefore today we’re going to show you how to fix ACPI_DRIVER_INTERNAL error.

How can I fix ACPI_DRIVER_INTERNAL BSoD error?

1. Update your drivers

1.1. Update drivers manually

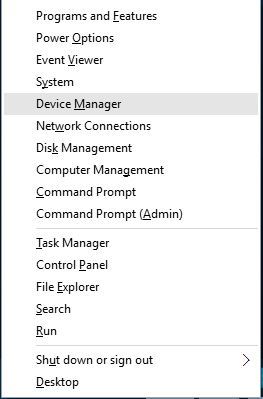
  1. Press Windows Key + X to open Power User Menu. Select Device Manager from the list.
    device-manager
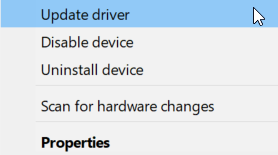
  2. Once the Device Manager opens, find the device you wish to update, right-click it and choose Update Driver Software.
    update-driver-software
  3. Select Search automatically for updated driver software. By choosing this option Windows 10 will automatically search and install the best driver for your device.
    browse-my-for-driver-software
  4. Repeat these steps for all devices that you want to update.

Drivers allow Windows 10 to recognize and use certain hardware, and if your drivers are outdated or corrupted, Windows won’t be able to use certain hardware and you’ll get a Blue Screen of Death error.

Updating drivers through Device Manager is fairly simple, but users claim that Device Manager doesn’t always download the latest drivers for certain devices.

If you want to install the latest drivers, we strongly suggest that you download them directly from your hardware manufacturer’s website.

Simply visit your hardware manufacturer’s website, find your device, and download the latest drivers for it. It’s worth mentioning that you’ll have to update drivers for all major hardware components in order to fix this error.

1.2. Update drivers automatically

Searching for drivers on your own can be time-consuming. So, we advise you to use an advanced tool that will do this for you automatically.

One of the most impressive characteristics of such a tool is that it can scan your device for missing patches and provide you with an accurate report of what programs are out of date.

On top of that, dedicated software can detect whether your PC has any damaged or missing drivers and fix the issue right away.

Outbyte Driver Updater is a driver updater with a very small footprint that you can set up to regularly scan your drivers and keep them in check as you work on more important tasks.

⇒ Get Outbyte Driver Updater

2. Run the Hardware Troubleshooter 

  1. Open the Settings app and go to Update & Security section.
  2. Select Troubleshoot from the menu on the left.
  3. Select BSOD from the right pane and click Run the troubleshooter.
  4. Follow the instructions on the screen to complete the troubleshooter.

If updating drivers and the system didn’t get the job done, we’re going to try with the troubleshooting tools. The first such tool we’ll use is Windows 10’s built-in troubleshooter.

This tool can deal with various issues within the system, including the BSOD issues and it’s possible it will resolve the ACPI_DRIVER_INTERNAL error on Windows 10, as well.

3. Run the SFC scan

  1. Right-click on the Start Menu button, and open Command Prompt (Admin).
  2. Enter the following line and press Enter: sfc/scannow
  3. Wait until the process is done (it may take a while).
  4. If the solution is found, it will automatically be applied.
  5. Now, close the Command Prompt and restart your computer.

The next troubleshooter we’re going to try is the SFC scan. This command-line tool scans your system, in search of potential issues, and resolves them along the way (if possible).

4. Run DISM

4.1. Standard way

  1. Right-click Start and open Command Prompt (Admin).
  2. Paste the following command and press Enter:
    • DISM /Online /Cleanup-Image /RestoreHealth
  3. Wait until the scan is finished.
  4. Restart your computer and try updating again.

The final troubleshooting tool we’re going to try is DISM. As its name says, Deployment Image Servicing and Management (DISM) reloads the system image.

This process can resolve some system issues, including the ACPI_DRIVER_INTERNAL Blue Screen of Death error, so just follow the steps described above.

4.2. With the Windows installation media

  1. Insert your Windows installation media.
  2. Right-click the Start menu and, from the menu, choose the Command Prompt (Admin).
  3. In the command line, type the following commands and press Enter after each:
    • dism /online /cleanup-image /scanhealth
    • dism /online /cleanup-image /restorehealth
  4. Now, type the following command and press Enter:
    • DISM /Online /Cleanup-Image /RestoreHealth /source:WIM:X:SourcesInstall.wim:1 /LimitAccess
  5. Make sure to change an X value with the letter of the mounted drive with Windows 10 installation.
  6. After the procedure is finished, restart your computer.

5. Disable problematic applications

  1. Press Windows Key + R and enter msconfig. Press Enter or click OK.
    msconfig
  2. When System Configuration window opens, select Selective Startup and uncheck Load startup items.
    system-configuration
  3. Go to Services tab and check Hide all Microsoft services. Click the Disable all button.
    system-configuration-services
  4. Click Apply and OK to save changes.
  5. Press Ctrl + Shift + Esc in order to start Task Manager.
  6. Go to Startup tab and right-click any item on the list and choose Disable from the menu. Repeat this step until you’ve disabled all startup applications.
    Task-manager-disable
  7. Close Task Manager and restart your PC.

When your PC restarts, check if the problem is resolved. If BSoD error doesn’t appear, it means that one of the disabled applications or services was causing it.

Now you need to repeat the same steps and enable applications and services one by one until you find the one that is causing this error.

Certain applications can cause ACPI_DRIVER_INTERNAL error to appear, therefore if you installed any new application recently, be sure that you remove it in order to fix this error.

It’s worth mentioning that your antivirus can often cause these types of errors, therefore we strongly advise you to remove any third-party antivirus programs from your PC.

To completely remove a certain antivirus, you should use dedicated removal tool since antivirus programs are prone to leaving certain files behind even after you uninstall them.

Many security companies have dedicated removal tools for their software, so be sure to download one.

Another way to find problematic applications is to disable all startup applications and services. To do that, you just need to follow the instructions above.

You can find out exactly what program is interfering with the Windows 10 system and causing the Blue Screen of Death errors, by accessing the BSoD log file.

6. Perform System Restore or Windows 10 reset

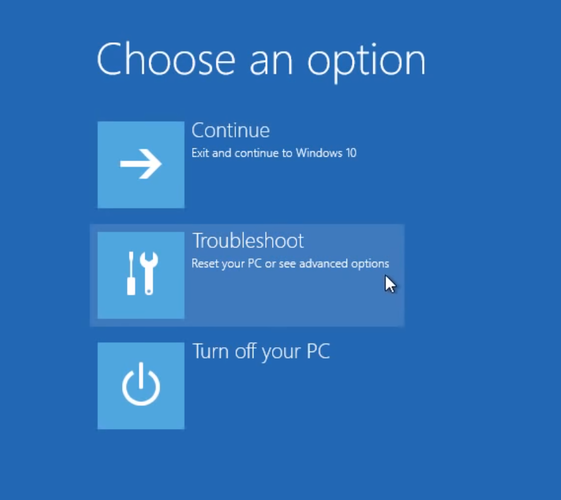
  1. Start Automatic Repair by restarting your computer a few times during the boot sequence. Alternatively, you can just hold the Shift key on your keyboard and click the Restart button.
    restart
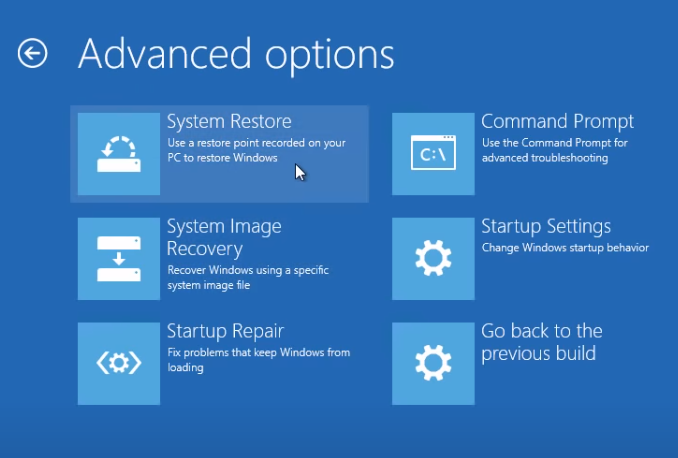
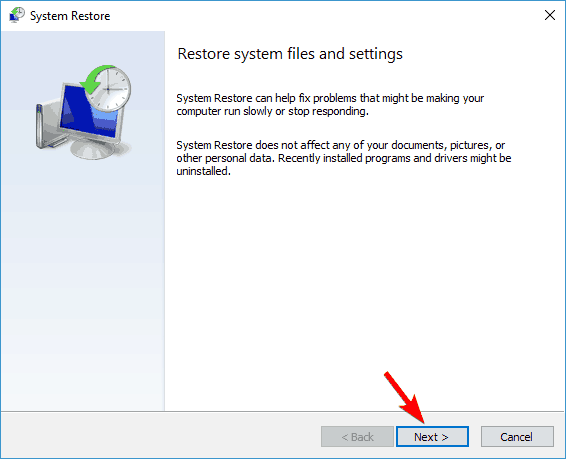
  2. Choose Troubleshoot > Advanced options > System Restore.
  3. Select your username, enter your password and select the Choose a different restore point option. Click Next.
  4. Select a restore point you wish to return to and click Next.
  5. Wait for the restore process to complete.

If the ACPI_DRIVER_INTERNAL error is caused by certain software, you can easily fix that by performing System Restore. You can perform System Restore by following the steps above.

If System Restore doesn’t fix the issue, you can try performing Windows 10 reset.

We have to warn you that the reset process is similar to clean install, therefore we highly advise that you back up all important files from your C partition.

  1. Start Automatic Repair by using the instructions above.
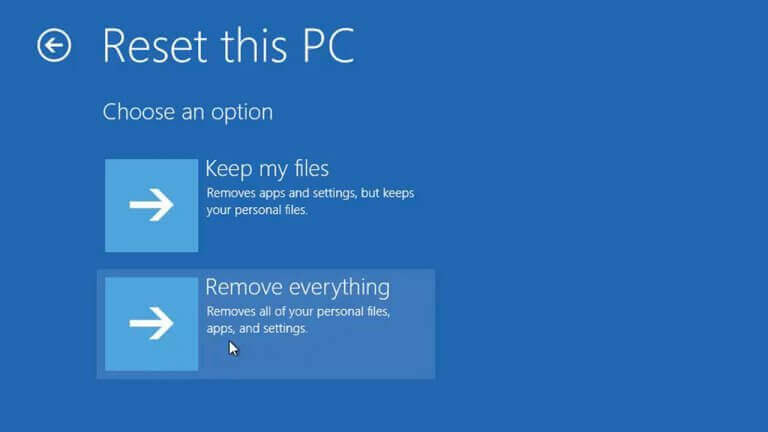
  2. Choose Troubleshoot > Reset this PC > Remove everything. During this step you might get asked to insert Windows 10 installation media, so be sure to do so.
  3. Select Only the drive where Windows is installed > Just remove my files and click the Reset button.
  4. Wait for the process to complete.

In order to perform Windows 10 reset, you might need Windows 10 installation media, and you can easily create one by using an empty USB flash drive and Media Creation Tool.

If the ACPI_DRIVER_INTERNAL error appears again, it’s most likely that the cause of this error is faulty or incompatible hardware.

Find out all the main factors that generate the Blue Screen of Death problems, by taking a look at this ultimate guide that explores the most common causes for the BSoD errors.

7. Check your hardware

Several users reported that ACPI_DRIVER_INTERNAL error is caused by incompatibility between certain hardware components and RAM.

This can be due to the fact that some motherboards don’t work with certain memory modules, and the same goes for certain processors.

According to users, some processors don’t support more than 8GB of RAM, so be sure to perform a detailed inspection of your hardware and check for any incompatibility issues.

If there are no incompatibilities, check if all your hardware components are working properly.

ACPI_DRIVER_INTERNAL BSoD error can be problematic, but we hope that you managed to fix this problem by using one of our solutions.

This isn’t the only ACPI error you can encounter, and we already wrote about ACPI BIOS ERROR in one of our previous guides, so don’t miss it.

We’d like to know which one of the solutions presented in this article worked for you, so drop us a comment in the dedicated section below.

Attempted Write to Readonly Memory: Causes & How to Fix

Blue Screen of Death errors such as ATTEMPTED_WRITE_TO_READONLY_MEMORY can cause you a lot of problems on Windows 10 since they will frequently restart your PC in order to prevent damage.

Occasionally, users have reported an error variations saying attempted_write_to_readonly_memory dxgmms2 sys or attempted_write_to_readonly_memory unisafe sys.

These errors can cause system instability and data loss, therefore today we’re going to show you how to fix this error.

What steps do I take to fix a 0x000000BE attempted_write_to_readonly_memory stop message?

  1. Update your drivers and Windows 10
  2. Run the Hardware Troubleshooter
  3. Run the SFC scan
  4. Run DISM
  5. Remove problematic applications
  6. Reset BIOS to default
  7. Use System Restore or Windows 10 reset
  8. Check your hardware

1. Update your drivers and Windows 10

Blue Screen of Death errors are often caused by outdated or incompatible drivers, therefore it’s important that you update them as often as you can.

Windows 10 relies heavily on drivers in order to recognize and use certain hardware.

And if your drivers are corrupted, or simply not compatible with Windows 10, that will cause an ATTEMPTED_WRITE_TO_READONLY_MEMORY or any other BSoD error to appear.

In order to fix this error it’s highly recommended that you update your drivers.

Updating drivers in Windows 10 is fairly simple, and you can do that right from the Device Manager by following these steps:

  1. Press Windows Key + X to open Power User Menu and select Device Manager.
    device-manager
  2. Once Device Manager opens, locate the device you want to update, right-click it and select Update Driver Software from the menu.
    update-driver-software
  3. Select Search automatically for updated driver software and wait for Windows 10 to install the appropriate driver for your device.
    browse-my-for-driver-software
  4. Repeat the steps for all devices that you want to update.

Using Device Manager to update your drivers is pretty straightforward, but some users claim that Device Manager doesn’t always download the latest drivers for your device.

To download the latest drivers, it’s always better to visit your hardware manufacturer’s website and download the necessary drivers manually. Bear in mind that you’ll have to update as many drivers as you can in order to fix this issue.

Updating your drivers with a professional solution is a realistic choice for resolving the BSoD problem ATTEMPTED WRITE TO READONLY MEMORY in Windows 10. Take advantage of the technology that is easy, quick, and safe, all wrapped up in one performant program that will also optimize your computer hardware.

This solution has a large daily-updated driver database, so it will propose the most recent drivers available after scanning your system. You will also receive a comprehensive report outlining the precise state of your Windows 10’s missing, damaged, or obsolete drivers.

Update drivers automatically

Searching for drivers on your own can be time-consuming. So, we advise you to use a tool that will do this for you automatically.

Using an automatic driver updater will certainly save you from the hassle of searching for drivers manually, and it will always keep your system up to date with the latest drivers.

Outbyte Driver Updater can assist you in automatically updating drivers and preventing PC harm caused by installing the incorrect driver version. It keeps up with the latest modifications, preventing the system from experiencing latency, system failures, and BSoD concerns.

⇒ Get Outbyte Driver Updater

2. Run the Hardware Troubleshooter 

  1. Open the Settings app and go to Update & Security section.
  2. Select Troubleshoot from the menu on the left.
  3. Select BSOD from the right pane and click Run the troubleshooter.Troubleshooting BSoD
  4. Follow the instructions on the screen to complete the troubleshooter.

3. Run the SFC scan

  1. Right-click on the Start Menu button, and open Command Prompt (Admin).
  2. Enter the following line and press Enter: sfc/scannow
  3. Wait until the process is done (it may take a while).
  4. If the solution is found, it will automatically be applied.
  5. Now, close the Command Prompt and restart your computer.

4. Run DISM

  • The standard way
  1. Right-click Start and open Command Prompt (Admin).
  2. Paste the following command and press Enter:
    • DISM /Online /Cleanup-Image /RestoreHealth
  3. Wait until the scan is finished.
  4. Restart your computer and try updating again.
  • With the Windows installation media
  1. Insert your Windows installation media.
  2. Right-click the Start menu and, from the menu, choose the Command Prompt (Admin).
  3. In the command line, type the following commands and press Enter after each:
    • dism /online /cleanup-image /scanhealth
    • dism /online /cleanup-image /restorehealth
  4. Now, type the following command and press Enter:
    • DISM /Online /Cleanup-Image /RestoreHealth /source:WIM:X:SourcesInstall.wim:1 /LimitAccess
  5. Make sure to change an X value with the letter of the mounted drive with Windows 10 installation.
  6. After the procedure is finished, restart your computer.

5. Remove problematic applications

Errors such as ATTEMPTED_WRITE_TO_READONLY_MEMORY can be caused by certain applications, therefore it’s necessary that you find and remove them.

Users reported that Gigabyte On/Off software is the common cause for this error, so if you have this software installed, be sure that you remove it.

Another common cause of BSoD errors can be your antivirus software.

Users reported that tools such as NoVirusThanks can cause these types of errors, and according to them, the issue was fixed after removing this tool.

We have to mention that almost any antivirus program can cause this error, and if you want to fix this problem, you’ll have to remove all third-party antivirus programs from your PC.

To completely remove an antivirus program, we strongly suggest that you use a dedicated removal tool.

Many antivirus companies have dedicated removal tools available for their software, so be sure to download one for your antivirus program.

If uninstalling the antivirus fixes the issue, you might want to download the latest version of the same antivirus program that you were using before, or you can switch to any other antivirus software.

6. Reset BIOS to default

ATTEMPTED_WRITE_TO_READONLY_MEMORY Windows 10 error

Few users reported that they managed to fix this error by resetting BIOS to default, and you can do that easily.

To see how to access and reset BIOS, be sure to check your motherboard manual for detailed instructions.

Before you reset BIOS, we advise you to check your SATA Controller and see what mode you are currently using.

Controller mode will be set to IDE, AHCI, or RAID, so be sure to set the SATA controller mode to the same value after you reset BIOS.

7. Use System Restore or Windows 10 reset

  1. Hold the Shift key on your keyboard and click the Restart button. Alternatively, you can restart your computer a few times during the boot sequence to start Automatic Repair.
    restart
  2. Select Troubleshoot > Advanced options > System Restore.
  3. Select your username and enter your password if you have one.
  4. Select Choose a different restore point and click Next.
  5. Choose the restore point you wish to return to and click Next. Wait for the process to finish.

If System Restore didn’t fix the issue, you’ll have to perform a Windows 10 reset.

To complete Windows 10 reset you might need Windows 10 installation media, and you can easily create one by using Media Creation Tool and an empty USB flash drive.

We have to warn you that the reset process is similar to clean install, so make sure that you back up important files from your C partition before you start this procedure. To perform Windows 10 reset, follow these steps:

  1. Start Automatic Repair process and choose Troubleshoot > Reset this PC > Remove everything. Be prepared to insert Windows 10 installation media if you’re asked to.
  2. Select Only the drive where Windows is installed > Just remove my files and click the Reset button.
  3. Follow the instructions to complete the reset process.

If the BSoD error appears even after Windows 10 reset, the error is most likely caused by faulty hardware.

8. Check your hardware

ATTEMPTED_WRITE_TO_READONLY_MEMORY error can be caused by your hardware, so we urge you to check if your RAM is working properly.

The easiest way to do that is to test your RAM modules one by one, but you can also use tools such as MemTest86+ to perform a detailed scan of your RAM.

If your RAM is not the problem, you should check all other major hardware components.

Blue Screen of Death errors such as ATTEMPTED_WRITE_TO_READONLY_MEMORY can be sometimes hard to fix, but we hope that you managed to fix this error by using one of our solutions.

FIX: Windows 10/11 error applying security

When you get a Windows 10 apply security error, the issue is usually caused by incorrect settings, or, when you are not the owner of the content you’re trying to access.

The error, which reads as Failed to enumerate objects in the container. Access is denied is usually resolved by changing permission settings and can also be brought about by file encryption.

Another variation of the same error comes with the following message: An error occurred while applying security information to Windows 10.

In order to check whether the problem is with the file encryption, right-click on the folder, then select Properties, and go to Advanced settings.

The same error pops up when you try to save or create a new file on your main drive directly, which essentially is saying you have no permission to create or edit your files even if you’re an admin in Windows 10.

Admin accounts are heavily limited as to what you can do even if your User Account Control settings are on the lowest level possible.

This article looks at the various other solutions so you can try and see which one helps.

How can I fix the applying security error in Windows 10?

  1. Create a new user account
  2. Change security settings to open the folder
  3. Change Permissions
  4. Allow permission to Full Control
  5. Use UAC setting to change privileges

1. Create a new user account

1.1 Create another user account

  1. Click Start.
  2. Select Settings.
  3. Select Accounts.
  4. Click Family and Other people.
  5. Under Other people, click Add someone else to this PC.
  6. Fill in the form with the user name and password. Your new user account will be created.
  7. Click on Change account type.
  8. Click the drop-down arrow and choose Administrator to set the account to administrator level.
  9. Restart your computer.
  10. Login to the new account you just created.

If the issue is resolved in the new profile, then it may mean your other user profile is corrupted, you need to fix the profile.

1.2 Fix your profile

  1. On your new account, use it to downgrade your usual account.
  2. Click Apply or OK.
  3. Raise back your old account to its default admin level.
  4. Rinse and repeat a few times as this will help to remove any corruption.
  5. Leave your account on as Administrator.

Some Windows operating system files are usually under the ownership of the system by default as these are the core files needed for the smooth running of the OS.

Other files and folders like pictures, videos among others, are under the owner’s name (the current person logged in as user or admin).

If the problem disappears, then you can either fix the old user account or migrate to the new account.


2. Change security settings to open the folder

change security chip settings in bios
  1. Right-click the Main Folder.
  2. Go to Properties.
  3. Select Security Tab.
  4. Click Advanced.
  5. Check the box Replace all child object permission entries with inheritable permission entries from this object
  6. Click OK or press Enter.

This will change all the permissions for the child accounts and will prevent the security error from Windows.

If the security settings block you from downloading a file from the Internet, check out this expert article that will help you fix the problem quickly.


3. Change Permissions

  1. Press Windows key + E to start File Explorer.
  2. Click on This PC from the left pane.
  3. Right-click on the external hard disk drive (or drive C:) and select Properties.
  4. Select the Security tab.
  5. Click Advanced.
  6. The popup window should show the current owner, so click Change.
  7. The Select User or Group pop-up box appears.
  8. In the text box, type in your current username if you’re the administrator.
  9. Click the Check Names button. Your name will be replaced with the official system name (preceded by the computer name and back slash symbol).
  10. Click OK or press Enter.
  11. The box disappears, sending you back to the Advanced Security Settings window.
  12. A new tick box appears below owner, with the text: Replace owner on subcontainers and objects. Select this tick box.
  13. Select the tick box Replace all child object permission entries with inheritable permission entries from this object.
  14. Make sure that everyone appears on the Permission entries window, if not, click Add.
  15. Type everyone, click Check Names, and then OK.
  16. Click Apply.

Did you accidentally deleted the Admin account? Here’s a great guide that will help you fix that.


4. Allow permission to Full Control

4.1 Manually change permissions to Full Control

  1. Right-click on the file.
  2. Select Properties.
  3. Select Security tab.
  4. Click Advanced.
  5. The popup window should show the current owner, so click Change.
  6. Change the Owner to your user name; you need to have admin access to change this. Close the window once this is done.
  7. Right-click on the file again.
  8. Select Properties.
  9. Select Security tab and click on Advanced.
  10. Click Disable Inheritance and select Convert inherited permissions into explicit permissions on this object.
  11. Remove any permissions entries which you don’t want. Make sure Everyone and your user has Allow permission to Full Control.
  12. Click OK. Now you should be able to open the file.

4.2 Use Command Prompt to take ownership

  1. Type cmd in Windows search and click on Run as administrator to run Command Prompt with full privileges.
  2. Type the following command and press Enter: takeown /f <foldername> /r /d y
  3. Type the following command and press Enter (replace <foldername> with the path of the folder): icacls <foldername> /grant administrators:F /T

The above process lets you take ownership of the folder and then assigns the Admin group Full Control of the Permissions folder.

If you can’t run Command Prompt as administrator, here’s a helpful guide that will help you solve the problem right away.


5. Use UAC setting to change privileges

  1. Right-click Start and select Run.
  2. Type secpol.msc to load Local Security Policy with admin privileges.
  3. Go to the left pane and navigate to Security Settings.
  4. Select Local Policies.
  5. Select Security Options.
  6. Scroll down on the right-hand list to find the User Account Control setting: Run all administrators in Admin Approval Mode
  7. Double click it or right-click and select Properties.
  8. Change the setting from Enabled to Disabled.
  9. Click Apply.
  10. Click OK or press Enter.

A notification will pop up saying You must restart your computer to off User Account Control.

Restart your computer, and you’re good to go! You can now add, change or edit your files without receiving Windows 10 error applying security, or other permission errors.

However, you need to note that if the UAC is turned off, some potentially bad programs can run without your permission, but these can be thwarted if your security software is up to date.


Did any of these solutions help you fix the Error applying security. Access is denied? Let us know in the comments section below.

Surface Pro Blue Screen: 8 Easy Methods to Stop Crashes

The Surface Pro blue screen usually appears when installing the update. This dreaded BSOD is sometimes accompanied by a step code that reads Error – 0x800f0203.

This error can be pretty frustrating, but it can be easily fixed by following the steps in this dedicated guide.

Why is my Surface Pro just a blue screen?

Below are some of the factors that can cause the Surface Pro blue screen issue:

  • Faulty drivers: Sometimes, the Microsoft Surface Pro 1 or 7 blue screen of death issues is usually down to driver problems. The solution to this is to reinstall or update your driver.
  • Outdated PC: If you have not updated your PC for some time, you are likely to get the blue screen of death. Hence, you need to update your operating system to solve the problem.
  • Changes made to your PC: In some cases, you might be getting a BSOD on Surface Pro because you made some changes to your PC. What you need to do is to perform a system restore.

How can I fix the Surface Pro’s blue screen?

1. Update your PC

  1. Press the Windows key + I to open the Settings app and select Update & Security.
    update and surface pro blue screen
  2. Click the Check for updates button.
    check for
  3. Now, wait for the scan to complete and install all available updates.
  4. Finally, restart your PC.

One of the leading causes of the blue screen on Surface Pro is an outdated operating system. However, following the steps above, you should be able to update your PC and restore normalcy. If the issue persists, you might need to consider a full factory reset of your Surface Pro as an additional fix.

2. Use Command Prompt

  1. Press the Windows key + E and go to this file path: c:/windows/INFinf
  2. Open the setupapi.dev.log logfile located within.
  3. Find the error Failed to install device instance.
  4. Above this error, it will say which inf file caused the issue (example: oem90.inf).
  5. Press the Windows key, type cmd, and select Run as administrator under Command Prompt.
    cmd admin
  6. Now, run the following command (replace oem90.inf with the file you found): pnputil -d oem90.infcmd surface pro blue screen
  7. Finally, close Command Prompt and try to update your PC, as shown in the first solution.

According to Surface Go, Pro 3, and Pro 4 users, if you’re getting a blue screen after the Surface firmware update, you might be able to fix the problem simply by examining the log file and running a couple of commands in Command Prompt.

After doing that, the problem should be resolved, and you’ll be able to install the update without any issues.

3. Use a third-party BSoD fixer

Another easy way to fix BSOD issues is installing a third-party app that restores crucial system files and keeps your computer data safe.

The app will scan your computer for damaged, corrupted, or missing files and replace or restore them according to the case, thus making sure your PC runs smoothly.

4. Enter Safe Mode

  1. Restart your PC and shut it down forcibly when the manufacturer logo appears. Repeat this twice to bring up the Advanced startup page.
  2. Now, select Troubleshoot > Advanced options.
    advanced options
  3. Choose Startup Settings.
    startup settings
  4. Next, click the Restart button.
    restart
  5. After your PC restarts, you’ll see a list of options. First, select the version of Safe Mode that you want to use by pressing the appropriate keyboard key.

If you’re getting a Surface Pro blue screen after restarting your PC, you need to boot into Safe Mode to troubleshoot the potential cause of the problem.

Safe Mode is a segment of Windows that runs with default settings and drivers, so it’s perfect for troubleshooting.

5. Remove the DisplayLink driver

If you’re getting a Blue Screen of Death after the Surface Pro firmware update, your DisplayLink drivers may be causing the issue.

It seems that DisplayLink drivers aren’t fully compatible with Intel drivers, causing the problem to appear. To fix this, be sure to remove DisplayLink drivers from your PC.

6. Update your video card drivers

  1. Press the Windows key + X and select Device Manager.
    device manager surface pro blue screen
  2. Click the arrow next to the Display adapters section to expand it, and right-click your GPU device.
  3. Next, select Update driver.
    update driver surface pro blue screen
  4. Finally, click the Search automatically for drivers option.
    search auto surface pro blue screen

Users say your drivers can sometimes cause the Surface Pro blue screen issue with your GPU or keyboard. To fix it, it’s advised that you update your drivers.

To do that, visit your graphics card manufacturer and download the latest drivers for your model, or use the Device Manager.

However, you can easily update them using third-party software such as Outbyte Driver Updater. This tool will automatically update all your drivers, so if you don’t want to search for drivers manually, try this tool.

Thanks to this tool, you won’t have to worry about installing the wrong drivers again. So be sure to use it since it gets constantly updated with newer driver versions.

7. Perform a System Restore

  1. Press the Windows key + R, type rstrui.exe, and click the OK button.
    rstrui  Surface Pro blue screen
  2. Click the Next button on the next page.
    next
  3. Now, select a restore point and click Next.
    restore point Surface Pro blue screen
  4. Lastly, click the Finish button and follow the onscreen instructions to complete the process.
    finish button

Sometimes, the blue screen you get on your Surface Pro is due to a change you made to your PC.

System Restore will revert any recent changes and fix various issues. After your PC is restored, check if the problem is still there.

8. Disable Windows Hello

  1. Open the Settings app and select Accounts.
    accounts
  2. Select the Sign-in options from the menu on the left.
    sign-in options
  3. Now, locate Windows Hello in the right pane and click the Remove button.

Windows Hello is a security feature that allows you to sign in to your PC using your fingerprint or facial recognition. This is a great security feature, but sometimes this feature can cause issues.

So, you need to disable it and use other sign-in options to fix the issue.

With this, we can conclude this guide on the Surface Pro blue screen issue. Hopefully, you can solve the problem before exhausting the solutions on our list.

Similarly, if you are experiencing a blue screen loop on your Windows 10 PC, check our detailed guide to fix it.

Feel free to let us know the solution that helped you solve the problem in the comments below.

VirtualBox Uninstall this app now [Full fix]

Certain older applications might not be fully compatible with Windows 10, but many users reported VirtualBox uninstall this app now message while trying to update to a new version of Windows 10.

This is an unusual problem, but it can be fixed in a matter of minutes, and in this guide, we’re going to show you how to properly fix this problem.

Before we start, it’s a good idea to check this short guide on What needs your attention error for more useful solutions.

What do I do if VirtualBox uninstall this app now message appears?

1. Search for the problematic file manually

  1. Press Windows Key + R and enter the following line: C:$WINDOWS.~BTSourcesPanther
     
  2. Press Enter.
  3. Now locate the file that ends with _APPRAISER_HumanReadable.xml. The format should be <array of symbols> _APPRAISER_HumanReadable.xml.
  4. Open the file with Notepad.
  5. Press Ctrl + F and search for the following values: <Property Name="DT_ANY_FMC_BlockingApplication" Value="TRUE"
  6. Go few rows up to the Property-List Type Inventory section.
  7. There you should find LowerCaseLongPathUnexpanded property followed by a Value to a certain file path.
  8. Open that file path in File Explorer and move or remove virtualbox.exe.

After doing that, check if the Uninstall this app now because it isn’t compatible with Windows 10 message is gone. This is a complicated solution, so be sure to follow the instructions carefully.

2. Remove VirtualBox with specialized software

Removing the application manually doesn’t always fix the problem because there are many leftover files and registry entries, and this is why it’s recommended to use uninstaller software.

The software will keep an eye on any newly installed applications, and if needed, it can completely uninstall any application from your PC, along with all of its files.

Once you download this software, remove VirtualBox with it and the VirtualBox uninstall this app now message should be gone.

⇒ Get CCleaner

3. Use Microsoft’s script

microsoft script virtualbox uninstall this app now
  1. Download Microsoft’s script.
  2. Extract the contents of the AppRPS directory.
  3. Now run the appraiser.bat file.

After running this file, you should see the paths to the files that are causing this error. Now simply move those files and check if that fixes the What needs your attention Windows 10 error.

These are just a couple of quick and easy solutions that you can use to fix the VirtualBox uninstall this app now error. If a different solution worked for you, feel free to share it with us in the comments below.

FIX: RDR FILE SYSTEM error in Windows 10

Computer errors are relatively common, and for the most part, these errors aren’t usually serious.

Blue Screen of Death errors, on the other hand, can be caused by faulty hardware, therefore it’s crucial to fix these errors as soon as possible.

Since BSoD errors are a serious issue, today we’re going to show you how to fix the RDR_FILE_SYSTEM error on Windows 10.

The complete error message you can see before the computer restarts is:  Stop Code RDR_FILE_SYSTEM/ What failed: mrxsmb20.sys.

How can I fix the RDR_FILE_SYSTEM BSoD error?

1. Update your Windows 10 and drivers

The most common cause for BSoD error is software or hardware incompatibility, and you can avoid most of the compatibility issues by downloading the Windows updates regularly.

Updates often fix compatibility issues and security flaws, so it’s a good practice to download them frequently. In addition to Windows 10 updates, we advise you to update your drivers.

Searching for drivers on your own can be time-consuming. So, we advise you to use a tool that will do this for you automatically.

Using an automatic driver updater will certainly save you from the hassle of searching for drivers manually, and it will always keep your system up to date with the latest drivers.

2. Run the BSoD Troubleshooter 

If you’re still facing the problem after updating your drivers, let’s try a few troubleshooting solutions.

First and foremost, try using the built-in Windows 10 BSOD troubleshooter. The tool is equipped to deal with various BSOD issues, including the RDR_FILE_SYSTEM error.

  1. Open the Settings app and go to Update & Security section.
  2. Select Troubleshoot from the menu on the left.
  3. Select BSOD from the right pane and click Run the troubleshooter.Troubleshooting BSOD
  4. Follow the instructions on the screen to complete the troubleshooter.

If you are not satisfied with the results or want to save some time, you also have the alternative to use a third-party BSoD fixer. This type of tool will scan your system and identify all error-causing problems.

They usually repair or replace damaged system files with new, well-functioning ones. Plus, such tools typically use more advanced filtering to detect errors, so they may identify problems with higher accuracy.

3. Run the SFC scan

  1. Go to Search, type cmd, and open Command Prompt as Administrator.
  2. Enter the following line and press Enter: sfc/scannow
  3. Wait until the process is done (it may take a while).
  4. If the solution is found, it will automatically be applied.
  5. Now, close the Command Prompt and restart your computer.

This is a command-line tool that goes through your system seeking potential issues. If the solution is possible, the SFC scan will resolve the problem automatically.

If you encounter any problems while running SFC, it stops or does not work at all on Windows 10, you can use our dedicated guide in order to solve the error.

4. Run the DISM tool

  1. Follow the first two steps from the above solution to open Command Prompt as admin.
  2. Paste the following command and press Enter:
    • DISM /Online /Cleanup-Image /RestoreHealth
  3. Wait until the scan is finished.
  4. Restart your computer and try updating again.

And the final troubleshooter we’re going to use is DISM. Deployment Image Servicing and Management (DISM) deploys the system image all over again, resolving potential issues along the way.

There are times when the DISM tool fails on Windows 10. If this happens to you, we recommend you check our dedicated guide to fix the error.

5. Uninstall/reinstall your antivirus software

It was reported by users that Norton antivirus can often cause RDR_FILE_SYSTEM error to occur. Apparently, Norton has some minor issues with Windows 10.

In order to fix the aforementioned error, you need to completely uninstall Norton antivirus from your PC. In order to remove all remaining Norton files, you should use Norton Removal Tool.

Although Norton is confirmed to cause this issue, another antivirus can also cause RDR_FILE_SYSTEM error. It’s advised that you remove any antivirus software that you currently have installed.

Many antivirus companies offer uninstaller tools for their software, so make sure to download them and use them to completely remove a certain antivirus.

After you’ve uninstalled your antivirus software, you can reinstall it again, but be sure to use the latest version, since the latest version will probably have most of the older bugs fixed.

Alternatively, if the error does not appear after you uninstall it, we recommend you install another antivirus program.

6. Remove any recently installed software

RDR_FILE_SYSTEM BSoD error can be caused by incompatible software, and if you recently installed any third-party software, that software can be the cause of this error.

To fix this issue, we advise you to uninstall any software that you installed a few days before this issue occurred.

Most commonly BSoD errors are caused by antivirus, VPN, or overclocking software, so if you’re using any of those, make sure that you uninstall them.

In some rare cases, even recently installed drivers can cause BSoD errors to appear. If you installed any new drivers in the past, make sure to remove them or roll back to the previous version.

7. Run the chkdsk command

  1. Go to Search, type cmd, and open Command Prompt as Administrator.
  2. Once the Command Prompt starts, enter the: chkdsk /f /r C:chkdsk-cmd
  3. You can replace C with the letter that matches your hard drive partition. You might have to restart your computer in order to perform chkdsk for the C drive, so keep that in mind.
  4. If you cannot access Windows 10 due to RDR_FILE_SYSTEM error, restart your computer a few times while it boots. This should start Automatic Repair process.
  5. Choose Troubleshoot > Advanced options > Command Prompt.Keyboard works in BIOS and not in Windows
  6. When Command Prompt starts enter the following comand: chkdsk /f /r C: 
  7. Be sure to perform chkdsk for all hard drive partitions that you have.

In certain cases, these errors can be caused by corrupted files and folders on your hard drive, therefore you need to perform a chkdsk command.

If Automatic Repair couldn’t repair your Windows 10 PC, you can take a look at our dedicated guide and easily solve the error.

8. Check your hardware

  1. Download MemTest86+.
  2. Burn the tool to a CD or create a bootable USB flash drive.
  3. Connect the CD or USB flash drive and boot your PC from it.
  4. Let the MemTest86+ run for a couple of hours.
  5. If any errors are found, it means that one or more RAM modules are corrupt and that you need to replace it.

Often the cause for RDR_FILE_SYSTEM is faulty hardware, most commonly RAM. Users reported that after replacing the faulty RAM module, the issue was permanently fixed.

In order to check your RAM, follow the above steps. In addition to RAM, almost any other hardware component can cause this BSoD error to appear.

It’s also worth mentioning that any recently installed hardware can cause an RDR_FILE_SYSTEM BSoD error if that hardware isn’t fully compatible with your motherboard.

To diagnose the problem, you should replace recently added hardware and check if your PC works without it.

RDR_FILE_SYSTEM BSoD error can create certain problems on Windows 10, but you can fix this error easily by following one of our solutions.

If you want to share with us your suggestions or if one of the solutions helped you, please leave us a comment below.

FAT FILE SYSTEM error in Windows 10/11 [Full Fix]

FAT FILE SYSTEM is a Blue Screen of Death error, and just like any other BSoD error, it will restart your PC in order to prevent damage.

These BSoD issues may be very common, but solutions may depend on the error message or the stope code that you can see before the computer restarts.

This error is usually caused by your hard drive, and today we’re going to show you how to fix the Windows 10 FAT FILE SYSTEM error.


How can I fix the FAT_FILE_SYSTEM BSoD error in Windows 10?

1. Update your Windows and drivers

Most commonly BSoD errors are caused by outdated or incompatible drivers. You can download all the necessary files from the manufacturer’s website.

Searching for drivers on your own can be time-consuming. So, we advise you to use a tool that will do this for you automatically.

Using an automatic driver updater will certainly save you from the hassle of searching for drivers manually, and it will always keep your system up to date with the latest drivers.

2.  Run the BSoD Troubleshooter 

  1. Open the Settings app and go to Update & Security section.
  2. Select Troubleshoot from the menu on the left.
  3. Select BSoD from the right pane and click Run the troubleshooter.Troubleshooting BSOD
  4. Follow the instructions on the screen to complete the troubleshooter.

The next tool we’re going to use is Windows 10’s built-in troubleshooter. This tool can help with dealing with all sorts of system issues, including BSoD errors.


Windows Troubleshooter has stopped working? You can use our dedicated guide to fix this problem right away!


3. Run the SFC scan

  1. Go to Search, type cmd, and open Command Prompt as Administrator.
  2. Enter the following line and press Enter: sfc/scannow
  3. Wait until the process is done (it may take a while).
  4. If the solution is found, it will automatically be applied.
  5. Now, close the Command Prompt and restart your computer.

The next troubleshooting tool we’re going to try is the SFC scan. It is a command-line tool that serves as a system scanner, and it is effective for BSoD issues also.

If you encounter any errors while running SFC, it stops or does not work at all on Windows 10, you can use our dedicated guide in order to fix the problem.


4. Run the DISM tool

  1. Follow the first two steps from the above solution to open Command Prompt as admin.
  2. Paste the following command and press Enter:
    • DISM /Online /Cleanup-Image /RestoreHealth
  3. Wait until the scan is finished.
  4. Restart your computer and try updating again.

And finally, the last troubleshooting tool we’re going to use is DISM. This tool deploys the system image all over again.

So it’s quite possible it’ll eliminate potential BSOD errors. Including the FAT FILE SYSTEM error (hopefully).

However,  the DISM tool can fail on Windows 10. If this happens to your computer, you can take a look at our dedicated guide in order to fix the issue.


5. Try starting your computer with only one hard drive

portable hard drive attached samsung t5 ssd not recognized

As we already mentioned FAT FILE SYSTEM is usually caused by your hard drive. You can sometimes fix this problem by disconnecting your second hard drive and starting Windows 10 without it.

If you don’t have two or more hard drives, you can skip this solution and try a different one.

In order to disconnect your hard drive, you’ll have to open your computer case and disconnect the power cable that connects to your hard drive.

Make sure to do this for all hard drives except for the one that has Windows 10 installed on it.

In addition to internal hard drives, users are suggesting removing any additional memory cards and USB drives that you might have connected to your PC.

If the error is fixed after disconnecting additional hard drives, you can try reconnecting them one by one until you find the one that is causing FAT FILE SYSTEM error to appear.


Your external HDD is broken and need a new one? Check our guide including the best USB 3.0 external HDD.


6. Check your hardware is working properly

Blue Screen of Death errors can be often caused by faulty hardware, and if that’s the case, you should find the faulty hardware and replace it.

If your hardware is new and recently installed, it could be that it’s not compatible with your PC.

In case you don’t have any recently installed hardware, this means that your current hardware isn’t working properly.

Few users reported that a faulty motherboard is the cause of this issue, so make sure to check your motherboard.

Bear in mind that almost any other hardware can cause this issue, and if you need help in diagnosing the faulty hardware, it’s best that you take your PC to the repair shop.


7. Uninstall Folder Protect and Folder Lock software

  1. While your computer boots restart it. You’ll have to repeat this step a few times before your PC starts Automatic Repair process.Keyboard works in BIOS and not in Windows
  2. Choose Troubleshoot > Advanced options > Startup settings and click on Restart.
  3. When your computer restarts, press F5 or 5 to access Safe Mode with Networking.

Certain folder protection and encryption software can cause FAT_FILE_SYSTEM to appear. If you use any of these tools, the only solution is to uninstall them from your computer.

According to users, software such as Folder Protect and Folder Lock can cause BSoD error since their encryption method interferes with your hard drive.

Few users reported that they can’t even access Windows 10, so they cannot uninstall this software.

If FAT FILE SYSTEM error prevents you from accessing Windows 10, you can try to uninstall these tools from Safe Mode. To access Safe Mode you need to follow the above steps.


Windows 10 Safe Mode not working? Don’t worry, use our step-by-step guide to easily fix this issue for good.


8. Uninstall your antivirus software

Due to incompatibility issues, certain antivirus can cause FAT FILE SYSTEM error to appear. If you are having this error, we advise you to remove your currently installed antivirus software.

If the issue persists even after the antivirus software is removed, you might have to use a special uninstaller to remove your antivirus software.

Many antivirus companies offer tools that will uninstall their antivirus software completely, so make sure that you download one of these tools and use it to remove your antivirus.

If removing your antivirus software fixes the issue, you should install different antivirus software on your PC.

However, sometimes you can’t completely remove software leftovers on Windows 10. We recommend you touse the solutions from our dedicated guide.


9. Reset your Windows 10

  1. While your computer boots restart your PC couple of times. This should start the Automatic Repair.Yellow Screen of Death in Windows 10
  2. Choose Troubleshoot > Reset this PC.
  3. You can choose between Keep my files and Remove everything options. The first option will install Windows 10 again, but it will not remove your personal files and folders.
  4. The second option will delete all files and folders that you have on your C drive. If the first option isn’t working for you, you can always repeat these steps and choose the Remove everything option.
  5. The process of resetting will now start, so make sure that you don’t interrupt it.

If all other solutions fail, you can reset Windows 10. Bear in mind that resetting Windows 10 will remove all your installed applications, so you’ll have to download and install them again.

If the reset option doesn’t help, you can always perform a clean reinstall and format your hard drive partition completely.

Bear in mind these procedures will delete some of your files and folders, so make sure that you have a backup available.


FAT FILE SYSTEM Blue Screen of Death error can be troublesome, but we hope that some of our solutions were helpful to you.

If you have any other suggestions that we should include in this guide or if you are dealing with other issues, please leave us a comment bellow.

Fix 0x00000009 IRQL NOT GREATER OR EQUAL Stop Code

Blue Screen of Death errors can be a big problem on your computer, can cause serious damage to it, but some of them are relatively easy to fix.

However, most BSoD errors are hard to troubleshoot and diagnose. Because your computer is at risk, you have to solve these issues as fast as you can.

Users have reported the IRQL NOT GREATER OR EQUAL error on Windows 10, and today we’re going to show you how to fix it.

How do I fix the IRQL NOT GREATER OR EQUAL BSoD error?

1. Use a dedicated tool

Finding on yourself the causes and then fixing computer errors such as BSoD can be a difficult task. Luckily, many software solutions were developed.

2. Run the BSOD Troubleshooter 

  1. Go to the Settings app.
  2. Navigate to the Update & Security section.
  3. Select Troubleshoot from the menu on the left.
  4. Select BSOD from the right pane and click Run the troubleshooter.Troubleshooting
  5. Follow the instructions on the screen to complete the troubleshooter.

The next thing we’re going to try is running Windows 10’s built-in troubleshooting tool. This tool can help you resolve all sorts of issues, including the BSOD problems.

3. Update your graphics card drivers

In most cases, IRQL NOT GREATER OR_EQUAL is caused by a graphic card driver, and in order to fix this issue, it’s advised that you update the driver with the latest version.

Searching for drivers on your own can be time-consuming. So, we advise you to use a tool that will do this for you automatically.

Using an automatic driver updater will certainly save you from the hassle of searching for drivers manually, and it will always keep your system up to date with the latest drivers.

⇒ Get Outbyte Driver Updater

4. Run the SFC scan

  1. Go to Search, type cmd, and open Command Prompt as Administrator.
  2. Enter the following line and press Enter: sfc/scannow
  3. Wait until the process is done (it may take a while).
  4. If the solution is found, it will automatically be applied.
  5. Now, close the Command Prompt and restart your computer.

The SFC scan is another troubleshooting tool that can help with BSOD issues. If Windows 10’s built-in troubleshooter didn’t resolve the problem, the SFC scan is definitely a tool worth running.

If you have any problems while running SFC, it stops or does not work at all on Windows 10, use our dedicated guide in order to fix the error.

5. Run the DISM tool

  1. Follow the first two steps from the above solution to open Command Prompt as admin.
  2. Paste the following command and press Enter:
    • DISM /Online /Cleanup-Image /RestoreHealth
  3. Wait until the scan is finished.
  4. Restart your computer and try updating again.

The third and final troubleshooting tool we’re going to run is DISM. Deployment Image Servicing and Management is a tool that re-deploys the system image and resolves possible problems on the way.

Unfortunately, sometimes the DISM tool fails on Windows 10. If this happens on your computer, you can use our dedicated guide to fix the problem.

6. Check the hard drive

  1. Enter the Advanced Startup (Restart your computer while holding the Shift key).
  2. Choose Troubleshoot > Advanced Options.Keyboard works in BIOS and not in Windows
  3. Select Command Prompt from the list of options.
  4. When Command Prompt appears, enter the following lines and press Enter after each line in order to run it:
    • bootrec.exe /rebuildbcdMANUALLY INITIATED CRASH1 Windows 10 error
    • bootrec.exe /fixmbr
    • bootrec.exe /fixboot
  5. Some users are also suggesting that you need to run additional chkdsk commands as well.
  6. To perform these commands, you need to know drive letters for all your hard drive partitions. In Command Prompt you should enter the following (but remember to use the letters that match your hard drive partitions on your PC):
    • chkdsk /r c:MANUALLY INITIATED CRASH1 Windows 10 error
    • chkdsk /r d:
  7. This is just our example, so keep in mind that you have to perform chkdsk command for every hard drive partition that you have.
  8. Restart your computer and check if the issue is resolved.
  9.  

If you have a corrupt partition or there’s something else wrong with your hard drive, BSOD issues are quite possible.

To make sure that’s not the case, we’re going to run the chkdsk command that will thoroughly scan your hard drive, and resolve potential issues.

7. Download the older version of graphics card drivers

As we previously mentioned, it’s always good to keep your drivers updated, but in certain rare cases, older version of the driver software might work better.

Few Intel(R) HD Graphics 3000 owners reported that by using the older version of the drivers, the IRQL NOT GREATER OR EQUAL error was resolved.

Bear in mind that this solution could work for non-Intel owners as well, and if the latest drivers aren’t working for you perhaps you should use the older version.

8. Check your RAM

RAM is often the cause for many BSoD errors, and IRQL NOT GREATER OR EQUAL is no exception. Users reported that MemTest86+ and similar tools showed no memory errors.

A number of users reported that the faulty RAM module caused the issue for them, so if you’re having this issue, you might want to replace your RAM.

For some reason, the RAM module can not be compatible with the motherboard, and this can be the cause for IRQL NOT GREATER OR EQUAL BSoD error.

9. Check the other computer hardware

Most commonly BSOD errors are caused by a faulty RAM, but other hardware components can also cause this error to manifest.

Relatively often your motherboard can cause IRQL NOT GREATER OR EQUAL error, so you might want to check it if it’s working properly.

In addition to the motherboard, there were reports that a faulty hard drive or a graphic card can cause this error, so you might have to perform a thorough inspection of your hardware.

If you don’t know how to do this, we strongly advise you to take your PC to the repair shop and ask them to this for you.

In addition to faulty hardware, your recently added hardware can cause issues as well.

If you installed in any new hardware, such as a new hard drive, RAM, graphic card, or anything similar, it might be incompatible with your motherboard, and that can cause this BSoD error to appear.

To fix this issue, we advise you to replace any recently added hardware and see if your PC works well without it.

9. Remove problematic software

Certain tools can cause IRQL NOT GREATER OR EQUAL error to appear, and to fix this error you need to remove these tools from your PC.

Certain VPN or encryption tools can cause a BSOD error, so if you use any of those make sure that you remove them. Also, antivirus software can often cause IRQL NOT GREATER OR EQUAL error.

Almost any antivirus software can cause a BSoD error, and in order to fix this issue, it’s advised that you remove your currently installed antivirus software.

In order to completely remove antivirus software, we strongly advise that you use one of the dedicated uninstallers.

Most antivirus companies have uninstaller tools available on their websites, and you can download them and use them to completely remove a certain antivirus program from your PC.

After you’ve removed your antivirus software, you can try to reinstall it, or you can install any other antivirus software instead.

11.  Keep your Windows 10 up to date

BSoD errors are often caused by incompatibility issues, and in order to avoid potential issues, we strongly advise you to update Windows 10 frequently.

Most incompatibility issues and security flaws are fixed through Windows Update, so in order to avoid IRQL NOT GREATER OR EQUAL error, make sure that your Windows 10 is up to date.

If Windows update is not working on your computer this can be a serious issue. Take a look at our dedicated guide and fix the problem with ease.

12.  Reset your Windows 10

  1. Restart your computer couple of time while it boots so it can enter Automatic Repair mode. Yellow Screen of Death in Windows 10
  2. Choose Troubleshoot > Reset this PC.
  3. Select Remove Everything > Only the drive where Windows is installed.
  4. Wait for the process to finish.

Resetting Windows 10 will delete most of your files on your C drive, so if you decide to use this step, we advise you to create a backup aforehand.

This process will delete all files from your C drive, and if the problem persists even after you’ve performed a Windows 10 reset, you should check your PC for faulty hardware.

IRQL NOT GREATER OR EQUAL Blue Screen of Death error can cause many problems, but it can be fixed by using one of our solutions.

In the past we also covered irql_not_less_or_equal BSOD error, so you might want to check that article as well. Feel free to leave us a comment below if you have any suggestions for us.

Fix: SNMP error request timed out [Tested solutions]

If you’re a network administrator, you know that certain errors such as SNMP error request timed out can appear from time to time.

Errors such as this one can disrupt your network and cause various issues, so in today’s guide, we’re going to show you how to fix this error once and for all.

How can I fix the SNMP error request timed out error?

1. Use specialized software

monitoring software snmp error request timed out

If you’re having issues in your network, then Paessler PRTG software should be able to help you. The application works as a bandwidth monitor, allowing you easily to find any bottlenecks in your network.

The software also supports database, application, and cloud monitoring. You can also monitor your entire local network, and there’s in-depth support for SNMP monitoring.

Overall, Paessler PRTG offers great features, and it should be able to help you fix SNMP error request timed out and other network errors with ease.

Paessler PRTG

Paessler PRTG

Monitor your network and fix all SNMP issues with Paessler PRTG software.
Free trialVisit website

2. Check the settings

settings snmp error request timed out
  1. Check the community’s name. For SNMP to work properly, the community string in the message must match the community’s name.
  2. Check the listening port on the agent. By default, this port should be UDP 161, but it might be different on your configuration.
  3. Increase the timeout time. By default, the timeout is set to 5 seconds, but you can increase the timeout with SnmpPDU.setTimeout(int time_in_ms) method or setTimeout(int time_in_sec) of SnmpTarget / SnmpRequestServer method.
  4. Make sure that the switch responds to ICMP (ping) requests).

3. Use the tcpdump command

error code 0xc0000034 command line
  1. Open two Control Server CLI windows.
  2. In the first one run the following command. Be sure to replace the IP address with the address of your switch: tcpdump -nni eth0 host <ip address> and port 161
  3. In the second window run the following command: snmpwalk
  4. After the snmpwalk is completed, press CTRL-C to stop tcpdump.

Depending on the results, you need to do the following:

  • If the SNMP traffic isn’t reaching the switch, check the network path.
  • In case the traffic is reaching the switch, but the switch isn’t responding, check the switch.
  • In case the tcpdump doesn’t show any packets, verify that the SNMP traffic is reaching the switch.

Fixing the SNMP error request timed out error isn’t an easy task, but we hope that this guide helped you fix this issue. Did you find a different solution on your own? Let us know in the comments below.

FULL FIX: NDIS INTERNAL ERROR error in Windows 10/11

Blue Screen of Death errors are some of the most troublesome issues on Windows 10. These types of errors will crash Windows and restart your computer in order to prevent damage.

And since they are caused by software, or sometimes a faulty hardware, they can be hard to fix.

Since these types of errors are so serious, today we’re going to show you how to fix NDIS INTERNAL ERROR BSoD.

How do I fix NDIS_INTERNAL_ERROR error in Windows 10?

  1. Check if Windows 10 and your drivers are up to date
  2. Run the BSOD Troubleshooter
  3. Run the SFC scan
  4. Run DISM
  5. Check the hard drive
  6. Uninstall problematic software
  7. Update your SSD firmware
  8. Reset Windows 10
  9. Check your hardware

1. Check if Windows 10 and your drivers are up to date

These types of errors are often caused by hardware or software incompatibility, therefore it’s crucial to download the latest Windows updates.

By using Windows Update you’ll download the latest security improvements as well as bug fixes.

And since many of these fixes are designed to fix hardware and software compatibility issues, it’s possible that downloading the latest Windows update might fix NDIS INTERNAL ERROR error for you.

Windows updates are crucial for system stability and security, but downloading the latest drivers is just as important.

Sometimes your drivers might not be fully compatible with Windows 10, and that can cause these types of errors to appear.

In order to fix BSoD errors, it’s important that you keep your drivers updated.

Updating drivers is rather simple, and all you need to do is to visit your hardware manufacturer’s website and download the latest driver for your device.

Alternatively, you can always use Device Manager to download the latest drivers. To download the latest drivers with Device Manager, do the following:

  1. Press Windows Key + X to open Power User Menu and choose Device Manager from the list.
    device-manager
  2. When Device Manager opens, locate the device you wish to update, right-click it and choose Update Driver Software.
    update-driver-software
  3. Now select Search automatically for updated driver software. Windows 10 will now automatically search and download the best driver for your device.
    browse-my-for-driver-software
  4. Repeat the previous steps for all devices you want to update.

Update drivers automatically

Searching for drivers on your own can be time-consuming. So, we advise you to use a tool that will do this for you automatically.

Using an automatic driver updater will certainly save you from the hassle of searching for drivers manually, and it will always keep your system up to date with the latest drivers.

2. Run the BSOD troubleshooter 

  1. Go to Settings.
  2. Head over to Update & Security.
  3. Select Troubleshoot from the menu on the left.
  4. Select BSOD from the right pane and click Run the troubleshooter.Troubleshooting BSoD
  5. Follow the instructions on the screen to complete the troubleshooter.

3. Run the SFC scan

  1. Go to Search, type cmd, and open the Command Prompt as Administrator.
  2. Enter the following line and press Enter: sfc/scannow
  3. Wait until the process is done (it may take a while).
  4. If the solution is found, it will automatically be applied.
  5. Now, close the Command Prompt and restart your computer.

4. Run DISM

  • The standard way
  1. Go to Search, type cmd, and open the Command Prompt as Administrator.
  2. Paste the following command and press Enter:
    • DISM /Online /Cleanup-Image /RestoreHealth
  3. Wait until the scan is finished.
  4. Restart your computer and try updating again.
  • With the Windows installation media
  1. Insert your Windows installation media.
  2. Right-click the Start menu and, from the menu, choose the Command Prompt (Admin).
  3. In the command line, type the following commands and press Enter after each:
    • dism /online /cleanup-image /scanhealth
    • dism /online /cleanup-image /restorehealth
  4. Now, type the following command and press Enter:
    • DISM /Online /Cleanup-Image /RestoreHealth /source:WIM:X:SourcesInstall.wim:1 /LimitAccess
  5. Make sure to change an X value with the letter of the mounted drive with Windows 10 installation.
  6. After the procedure is finished, restart your computer.

5. Check the hard drive

  1. Enter the Advanced Startup (Restart your computer while holding the Shift key).
  2. Choose Troubleshoot > Advanced Options.
  3. Select Command Prompt from the list of options.
  4. When Command Prompt appears, enter the following lines and press Enter after each line in order to run it:
    • bootrec.exe /rebuildbcd
    • bootrec.exe /fixmbr
    • bootrec.exe /fixboot
  5. Some users are also suggesting that you need to run additional chkdsk commands as well. To perform these commands, you need to know drive letters for all your hard drive partitions. In Command Prompt you should enter the following (but remember to use the letters that match your hard drive partitions on your PC):
    • chkdsk /r c:
    • chkdsk /r d:

      This is just our example, so keep in mind that you have to perform chkdsk command for every hard drive partition that you have.

  6. Restart your computer and check if the issue is resolved.

6. Uninstall problematic software

NDIS INTERNAL ERROR BSoD

Software is the often cause for NDIS_INTERNAL_ERROR BSoD error, and in order to fix this problem, you need to find the software that is causing this error.

Often the cause for BSoD errors can be your antivirus, so be sure to uninstall it.

Unfortunately, almost any antivirus software can cause this error, so be sure to completely remove any third-party antivirus programs that you have.

To completely remove an antivirus program, you should use dedicated uninstaller tools.

Many antivirus companies offer these tools for their programs, so be sure to download one of these tools for your antivirus software.

After you’ve removed your antivirus software, check if the problem is resolved.

If the NDIS_INTERNAL_ERROR BSoD error doesn’t appear, it means that it was caused by your antivirus software.

Now you can replace your antivirus software with a different one, or you can install the same software again, but be sure to download the latest version in order to avoid the same problem.

Although antivirus can be the common culprit, it’s worth mentioning that almost any software can cause this problem.

So if you installed or updated a certain software or a driver, be sure to remove it and see if that fixes the error.


7. Update your SSD firmware

Update your SSD firmware

Users have reported problems with NDIS_INTERNAL_ERROR while using an M4 SSD, and according to the users, this is a relatively common problem.

Supposedly, M4 SSDs have a certain problem, and after 5.000 hours this problem starts appearing causing this error.

In order to fix this problem, it’s advised to update firmware on M4.

Updating firmware on an SSD is an advanced procedure, and if you don’t perform it properly you can cause irreversible damage to your SSD.

To see how to update the firmware of your SSD, be sure to check your manual or the manufacturer’s website for detailed instructions.


8. Reset Windows 10

NDIS INTERNAL ERROR BSoD error in Windows 10
  1. Restart your computer a few times while it boots. This should start Automatic Repair mode.
  2. Choose Troubleshoot > Reset this PC.
  3. Select Remove everything > Only the drive where Windows is installed > Just remove my files.
  4. Wait for the process to complete.

As previously mentioned, resetting Windows 10 will delete all files and folders from your C drive and reinstall Windows 10, so if the issue was caused by a software problem the reset process should fix it.

If the problem remains, the cause is probably faulty hardware.


9. Check your hardware

check your hardware

If the reset didn’t fix the problem, it means that the NDIS_INTERNAL_ERROR error is caused by hardware.

Make sure to remove any recently installed hardware and check if your PC works without it. If no new hardware was installed, then the issue is probably faulty hardware.

BSoD errors are most commonly caused by your RAM, so be sure that your RAM is working properly. You can do that by removing all but one installed RAM module and testing if your computer works properly. Do this until you find the faulty module.

In addition, you can try tools such as MemTest86+ and check each RAM module for errors.

If your RAM is working properly, the cause might be your motherboard or any other hardware component.

NDIS_INTERNAL_ERROR can cause you inconvenience, but just like most other BSoD errors, this one is fixed by replacing the faulty hardware or by updating or removing the problematic software.

FIX: PHASE1 INITIALIZATION FAILED error in Windows 10

Computer errors are a common occurrence, but without a doubt, Blue Screen of Death errors are one of the most serious errors on Windows 10.

These errors are usually caused by certain software or faulty hardware. However, as you will see in this article there are many other causes that we will explore.

And since they are such a major problem, today we’re going to show you how to fix PHASE 1 INITIALIZATION FAILED errors.

How can I fix PHASE1 INITIALIZATION FAILED BSoD?

1. Make sure your Windows is up to date

Microsoft is constantly working on Windows 10, and if you wish to get the latest Windows 10 features, you’re advised to perform Windows updates regularly.

In addition to the latest features, these updates offer security and bug fixes, and often they fix many hardware and software issues.

So if you’re having problems with the PHASE INITIALIZATION FAILED BSoD error, we advise you to update Windows 10 as soon as you can.

2. Update your drivers

2.1. Perform a manual update

  1. Press Windows Key + X to open Power User Menu and select Device Manager from the list.
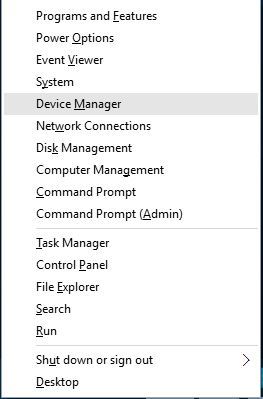
    device-manager
  2. When the Device Manager opens, locate the driver you want to update, right-click it, and choose Update Driver Software.
    update-driver-software
  3. Choose Search automatically for updated driver software and wait for the process to finish.
    browse-my-for-driver-software

Drivers are a key component of Windows 10, and if a certain driver isn’t working properly, that can cause the session 1 initialization failed BSoD error to appear.

In order to update a certain driver, you need to visit your hardware manufacturer’s website, find the model of the device you wish to update, and download the latest drivers for it.

Alternatively, you can download all the necessary files by using Device Manager and then follow the steps we mentioned above.

2.2. Update drivers automatically

Searching for drivers on your own can be time-consuming. So, we advise you to use a tool that will do this for you automatically.

Using an automatic driver updater will certainly save you from the hassle of searching for drivers manually, and it will always keep your system up to date with the latest drivers.

This high-quality software will help you update drivers automatically in just a few seconds and prevent PC damage caused by installing the wrong driver versions.

⇒ Get Outbyte Driver Updater

3. Run the BSOD Troubleshooter 

  1. Go to the Settings app.
  2. Navigate to the Update & Security section.
  3. Select Troubleshoot from the menu on the left.
  4. Select BSOD from the right pane and click Run the troubleshooter. Troubleshooting BSOD
  5. Follow the instructions on the screen to complete the troubleshooter.

Now, we’re going to try Windows 10’s built-in troubleshooting tool. This tool can resolve basically any system-related problem you can think of, including the Windows 10 error, PHASE1 INITIALIZATION FAILED.

4. Run the SFC scan

  1. Go to Search, type cmd, and open Command Prompt as Administrator. 
  2. Enter the following line and press Enter: sfc/scannow
  3. Wait until the process is done (it may take a while).
  4. Now, close the Command Prompt and restart your computer.

The SFC scan is another troubleshooting tool we’re going to try here. You can run the SFC scan from the command line, and it also scans your computer for potential flaws and resolves them (if possible).

5. Run DISM

5.1. Standard way

  1. Right-click Start and open Command Prompt (Admin).
  2. Paste the following command and press Enter:
    • DISM /Online /Cleanup-Image /RestoreHealth
  3. Wait until the scan is finished.
  4. Restart your computer and try updating again.

And the third tool we’re going to run is DISM. Deployment Image Servicing and Management is a tool that reloads the system image, which tends to resolve potential issues.

So, it might be helpful when resolving the PHASE1 INITIALIZATION FAILED error, as well.

5.2. With the Windows installation media

  1. Insert your Windows installation media.
  2. Right-click the Start menu and, from the menu, choose the Command Prompt (Admin).
  3. In the command line, type the following commands and press Enter after each:
    • dism /online /cleanup-image /scanhealth
    • dism /online /cleanup-image /restorehealth
  4. Now, type the following command and press Enter:
    • DISM /Online /Cleanup-Image /RestoreHealth /source:WIM:X:SourcesInstall.wim:1 /LimitAccess
  5. Make sure to change an X value with the letter of the mounted drive with Windows 10 installation.
  6. After the procedure is finished, restart your computer.

6. Check the hard drive

  1. Enter the Advanced Startup (Restart your computer while holding the Shift key).
  2. Choose Troubleshoot, select Advanced Options.
  3. Select Command Prompt from the list of options.
  4. When Command Prompt appears, enter the following lines and press Enter after each line in order to run it:
    • bootrec.exe /rebuildbcd
    • bootrec.exe /fixmbr
    • bootrec.exe /fixboot
  5. Some users are also suggesting that you need to run additional chkdsk commands as well. To perform these commands, you need to know drive letters for all your hard drive partitions. In Command Prompt you should enter the following (but remember to use the letters that match your hard drive partitions on your PC):
    • chkdsk /r c:
    • chkdsk /r d:

      This is just our example, so keep in mind that you have to perform chkdsk command for every hard drive partition that you have.

  6. Restart your computer and check if the issue is resolved.

If there’s a problem with your hard drive or partitions, BSOD errors are quite possible. So, we’re going to run a test to see if everything is in its place.

7. Copy Catroot, Catroot2 and CodeIntegrity folders from a working PC

According to the users, PHASE1 INITIALIZATION FAILED BSoD error sometimes appears due to corrupted Catroot, Catroot2, and CodeIntegrity folders.

In order to fix this issue, users are suggesting copying these folders from a working computer and replace them. Before copying these files, make sure that both versions of Windows 10 are identical.

For example, if you’re using a 32-bit version of Windows 10, make sure to copy these folders from another computer that runs a 32-bit version of Windows 10.

8. Temporarily uninstall your antivirus software

In many cases your antivirus can be responsible for the stop code PHASE1 INITIALIZATION FAILED error and in order to fix it, it’s advised that you remove your antivirus software completely.

Removing your antivirus software is relatively simple, but to remove antivirus software completely including all the remaining files and registry keys it’s advised to use dedicated uninstaller tools.

Many antivirus companies offer these tools, and you can download them for free. If uninstalling your antivirus fixes this problem, you can install the latest version of your current antivirus software.

9. Check for problematic software

In some cases, your software can cause this error to appear, especially if you use VPN tools or any similar programs.

If you recently installed or updated certain software, uninstall that software in order to fix this Blue Screen of Death problem.

One of the most efficient methods that allow you to find out exactly what program is causing the Blue Screen of Death error is to access the BSoD file log location.

10. Perform System Restore or reset your PC

  1. Start the Automatic Repair process by restarting your computer while it boots. (You might have to repeat this step a few times before you access Automatic Repair options.)
  2. Choose Troubleshoot, select Advanced Options, click System Restore.
  3. Choose the restore point and follow the instructions.

If the problem is caused by problematic software or a driver, you can fix the PHASE1 INITIALIZATION FAILED BSoD error by performing a System Restore.

  1. Start Automatic Repair.
  2. Choose Troubleshoot then Reset your PC.
  3. Select Remove everything, choose Only the drive where Windows 10 is installed.
  4. Follow the process and wait for Windows 10 to install again.

If the System Restore didn’t fix the problem, you need to reset your PC. Before we start, we urge you to back up all your important files since this process will remove all files and folders from your C drive.

By performing this process you successfully deleted all files and folders from drive C thus removing any potential software problems.

If the error PHASE1 INITIALIZATION FAILED still appears, it’s most likely that it’s being caused by a hardware problem.

11. Check your hardware

If you recently installed any new hardware, make sure to replace it or remove it since it might not be fully compatible with your PC.

If no new hardware is installed, make sure to check your hard drive and RAM since they are the most likely causes of PHASE1 INITIALIZATION FAILED errors.

To check your RAM you can use tools such as MemTest86+, just make sure to keep the tool running for a couple of hours in order to perform a thorough scan.

If your RAM is working properly, the error is probably caused by another component. Users reported that your hard drive can also cause this error, so make sure to replace it.

You can also check out other solutions that can help you when it comes to the BSoD error, so take a look at these quick fixes for Black Screen of Death on Windows 10.

PHASE1 INITIALIZATION FAILED error can be problematic, especially if it’s caused by faulty hardware. We hope that some of our solutions were helpful to you and that you managed to fix this error.

We also strongly advise you to try a high-quality dedicated tool for fixing this type of error. See what apps we’re recommending, in this article on the best software for fixing BSOD errors.

See what are the most common factors that generate the Blue Screen of Death errors in this excellent article that explores all the causes for the BSoD on your Windows 10.

We’d like to hear more on this subject from you so please drop us a comment in the dedicated section below.

FIX: CONFIG INITIALIZATION FAILED error in Windows 10/11

Blue Screen of Death errors can be caused by faulty hardware or incompatible software, and sometimes it’s difficult to pinpoint the exact problem.

Since these errors will crash Windows 10 and restart your computer frequently, it’s important that you fix them, therefore today we’re going to show you how to fix CONFIG INITIALIZATION FAILED error.

It is important that you follow the steps thoroughly, so make sure you do that since we will be using the Command Prompt and other methods.

How can I fix CONFIG INITIALIZATION FAILED BSoD error?

  1. Use a system restoration tool
  2. Update Windows 10
  3. Update your drivers
  4. Run the BSOD Troubleshooter
  5. Run the SFC scan
  6. Run the DISM scan
  7. Check the hard drive
  8. Disable caching on your motherboard
  9. Update your SSD firmware
  10. Check for problematic software
  11. Check for problematic hardware

1. Use a system restoration tool

Manually finding out the root of the problem and trying to solve it is not the best and most reliable way to fix such problems. Moreover, it can be quite confusing for those who don’t have the necessary knowledge.

Therefore, we suggest installing specialized software that will scan your computer for you and download all the necessary files to repair it and bring it back to perfect condition.

2. Update your Windows

  1. In the Windows search bar, search for Settings.
  2. Go to Update & Security.
  3. Then, click on Windows Update.
  4. Afterward, select Check for updates.
  5. Let Windows download all the necessary updates.

In order to avoid BSoD errors it’s crucial that you download and install Windows updates.

Certain hardware or software might have issues with Windows 10, and since hardware and software issues can create these types of errors, it’s extremely important that you update Windows 10 as often as you can.

In addition to many bug fixes, these updates bring improved stability, security as well as new features.

3. Update your drivers

  1. Press Windows Key + X to open Power User Menu and select Device Manager from the list.
    device-manager
  2. When Device Manager opens, locate the driver you wish to update, right click it and choose Update Driver Software.
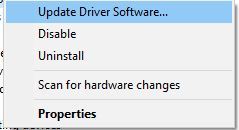
    update-driver-software
  3. Select Search automatically for updated driver software.
    • By choosing this option Windows 10 will automatically search and download the best driver for your device.
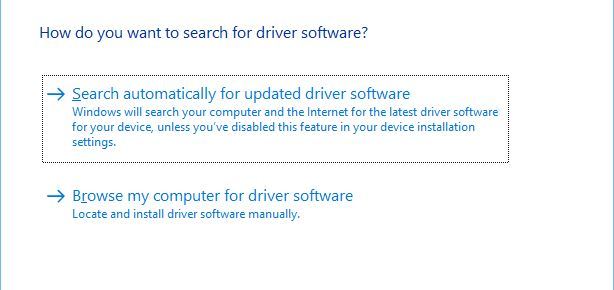
      browse-my-for-driver-software

Another common cause for BSoD errors can be your drivers. Drivers allow Windows 10 to recognize and use certain hardware.

And if particular driver is outdated or not compatible with Windows 10, you will most likely get CONFIG INITIALIZATION FAILED error.

In order to make sure that your system is stable and free from BSoD errors, be sure to update your drivers frequently.

To update a certain driver you just need to visit your hardware manufacturer’s website and download the latest drivers for your device.

Alternatively, you can download all the necessary drivers by using the Device Manager.

Some users claim that using Device Manager to update your drivers isn’t as effective as downloading them directly from the manufacturer’s website.

Device Manager sometimes won’t be able to download the latest drivers, so if you wish to have the latest drivers, you might have to search and download them manually.

Update drivers automatically

Searching for drivers on your own can be time-consuming. And relying on the Device Manager is not a good idea, so we advise you to use a tool that will do this for you automatically.

Using an automatic driver updater will certainly save you from the hassle of searching for drivers manually, and it will always keep your system up to date with the latest drivers.

⇒ Get Outbyte Driver Updater

4. Run the BSOD Troubleshooter 

  1. Go to the Settings app.
  2. Head over to the Update & Security section, and select Troubleshoot from the menu on the left.
  3. Select BSOD from the right pane and click Run the troubleshooter.Troubleshooting BSoD
  4. Follow further on-screen instructions to complete the process.

Now, let’s turn to troubleshooting tools. The very first troubleshooter we’re going to try is Windows 10’s built-in BSOD troubleshooter.

Hopefully, this tool can deal with the CONFIG INITIALIZATION FAILED error, as well.

5. Run the SFC scan

  1. Go to Search, type cmd, and open Command Prompt as an administrator.
  2. Enter the following line and press Enter: sfc/scannow
  3. Wait until the process finishes (it’s a long one).
  4. If the tool finds a corrupt system file, it will automatically repair it.
  5. Now, close the Command Prompt and restart your computer.

Another troubleshooting tool we’re going to try here is the SFC scan. The system file checker is a command-line tool that basically scans through your system searching for potential issues.

If a corrupted system file is a problem, this tool will automatically repair it, and the problem will be resolved.

6. Run the DISM scan

  1. Right-click Start and open Command Prompt (Admin).
  2. Paste the following command and press Enter: DISM/Online/Cleanup-Image/RestoreHealth
  3. Wait until the scan is finished.
  4. Restart your computer and try updating again.

And the third troubleshooter we’re going to try here is DISM. This tool re-deploys the system image, and resolves potential issues along the way.

So, it’s possible that running DISM will also resolve the CONFIG INITIALIZATION FAILED error.

You can do this the standard way, as we showed you above, or using the procedure that utilizes the installation media below

With the Windows installation media

  1. First, insert your Windows installation media.
  2. Use the Windows search Bar and type in Command Prompt.
  3. Right click on Command Prompt and start it as an admin.
  4. In the command line, type the following commands and press Enter after each: dism/online/cleanup-image/scanhealth dism/online/cleanup-image/restorehealth
  5. Now, type the following command and press Enter: DISM/Online/Cleanup-Image/RestoreHealth/source:WIM:X:SourcesInstall.wim:1/LimitAccess
  6. Make sure to change an X value with the letter of the mounted drive with Windows 10 installation.
  7. After the procedure is finished, restart your computer.

7. Check the hard drive

  1. Enter the Advanced Startup (Restart your computer while holding the Shift key).
  2. Choose Troubleshoot > Advanced Options.
  3. Select Command Prompt from the list of options.
  4. When Command Prompt appears, enter the following lines and press Enter after each line in order to run it: bootrec.exe /rebuildbcd bootrec.exe/fixmbr bootrec.exe /fixbootINVALID SOFTWARE INTERRUPT Windows 10 error
  5. Some users are also suggesting that you need to run additional chkdsk commands as well.
    • To perform these commands, you need to know drive letters for all your hard drive partitions.
    • In Command Prompt you should enter the following (but remember to use the letters that match your hard drive partitions on your PC): chkdsk/r c: chkdsk/r d:INVALID SOFTWARE INTERRUPT Windows 10 error
    • This is just our example, so keep in mind that you have to perform chkdsk command for every hard drive partition that you have.
  6. Restart your computer afterward.

A broken hard drive is alarming. And the first warning messages come in the form of BSOD issues. So, go and check the current state of your hard drive.

To do that, you should run the chkdsk command. This command will scan your partitions, and apply solutions, if possible.

8. Disable caching on your motherboard

A Few users reported that disabling the caching on the motherboard has fixed the REFMON INITIALIZATION FAILED Blue Screen of Death error.

You can disable caching from BIOS, but for detailed instructions on how to do it, be sure to check your motherboard manual.

Since every motherboard is different, so is its interface. Make sure you find out your motherboard’s model and look for your instructions manual that came in its box. There, you’ll most likely find all the information you need.

9. Update your SSD firmware

If you’re using an SSD, be sure to update your firmware. Few users reported that they managed to fix the issue by updating their SSD firmware, so you can try that.

It’s worth mentioning that updating your firmware might delete all files from that SSD, so keep that in mind.

Updating SSD firmware is an advanced procedure, and if you don’t perform it carefully you can cause permanent damage to your SSD, therefore be extra careful while updating firmware.

10. Check for problematic software

Sometimes certain software can cause CONFIG INITIALIZATION FAILED BSoD error to appear.

Almost any installed software can cause this error, and if you installed any new software recently be sure to remove it.

A common cause for BSoD errors can be your antivirus software, therefore you might want to remove it in order to fix this error.

It’s worth mentioning that almost any antivirus program can cause this error, so be sure to remove any antivirus tool that you have installed.

If removing the antivirus fixed the problem, you can now download the latest version of the same tool, or you can switch to a different antivirus software.

If you’re looking for an alternative, we wrote about best antivirus programs for Windows 10, so be sure to check them out.

If you cannot access Windows 10 at all due to CONFIG INITIALIZATION FAILED error, you can try removing the problematic applications from Safe Mode.

To access Safe Mode, do the following:

  1. Restart your computer a few times while it boots to start Automatic Repair.
  2. Choose Troubleshoot > Advanced Options > Startup Settings. Click the Restart button.
  3. When your computer restarts again, you’ll see a list of options. Select Safe Mode with Networking.

When you enter Safe Mode, try finding and removing the problematic application that is causing the BSoD error.

Bear in mind that if your computer is working without any problems in Safe Mode, the BSoD error is probably caused by a certain application or a driver, so you need to find it and remove it.

In order to completely remove certain antivirus, it’s advised to use a dedicated uninstaller. Many security companies offer removal tools for their software, so be sure to download one for your antivirus program.

Uninstaller software is meant to swiftly delete any undesirable program along with its associated files, resulting in a safe, fast, and light PC.

Logged applications, folders, registries, and any other leftovers will be checked and displayed at a glance, allowing you to swiftly wipe up any leftovers. For stubborn software, such as antivirus, you can also use force removal to start over fresh.

11. Check for problematic hardware

BSoD errors such as CONFIG INITIALIZATION FAILED can be caused by new hardware, and if you installed any new hardware recently be sure to remove it or replace it.

Sometimes certain hardware isn’t fully compatible with your PC and that can cause BSoD error.

In addition to new hardware, faulty hardware can also cause these types of errors. RAM is the common cause for these types of errors, so be sure to test your RAM with tools such as MemTest86+.

Remember to keep testing your RAM for couple of hours in order to perform a thorough scan.

If your RAM is working properly, check other hardware such as your motherboard, hard drive, graphics card, and processor.


CONFIG INITIALIZATION FAILED error can be problematic, but hopefully, you managed to fix it by using one of our solutions. Either way, make sure you let us know how things went in the comment section below.

NO MORE SYSTEM PTES error in Windows 10/11 [Safe FIX]

Blue Screen of Death errors are one of the most problematic errors on Windows 10. These types of errors are often caused by a certain software or in the worst-case scenario faulty hardware.

BSOD errors can be a big problem, so today we’re going to show you how to fix the NO_MORE_SYSTEM_PTES BSoD error.

How do I fix NO MORE SYSTEM PTES BSoD error on Windows 10?

  1. Make sure your drivers and Windows 10 are up to date
  2. Run the BSOD Troubleshooter
  3. Run the SFC scan
  4. Run DISM
  5. Use System Restore or reset Windows 10
  6. Check the hard drive
  7. Uninstall problematic software and your antivirus
  8. Uninstall any recently installed software
  9. Check your hardware

1. Make sure your drivers and Windows 10 are up to date

1.1 Update the drivers manually

  1. Open Power User Menu by pressing Windows Key + X and select Device Manager from the list.
    device-manager
  2. Locate the driver you wish to update, right-click it and choose Update Driver Software.
    update-driver-software
  3. Select Search automatically for updated driver software. Windows 10 will download all the necessary drivers for this device.
    browse-my-for-driver-software
  4. Repeat these steps for all the drivers you wish to update.

As previously mentioned, many BSoD errors can be caused by a software issue or incompatible hardware.

In order to eliminate most of the hardware and software issues, we advise you to regularly perform Windows update.

Microsoft is constantly releasing new updates for Windows 10, and many of these updates offer bug fixes for many software and hardware issues.

In order to make sure that Windows 10 is running without any incompatibility issues, be sure to download Windows updates regularly.

Downloading updates is rather important, but it’s crucial to keep your drivers up to date as well.

Certain hardware isn’t fully compatible with Windows 10, and this is why it’s mandatory to update your drivers.

Updating drivers is relatively simple, and in order to update a specific driver, you just need to visit your hardware manufacturer’s website and download the drivers for your device.

Alternatively, you can download the necessary drivers by using Device Manager. To update your drivers with Device Manager follow the steps above.

If you have a CD with drivers that you got along with your hardware, you can also use it if you haven’t installed any recent drivers.

Drivers on your CD might be outdated a bit, but they might work better than the default Windows 10 drivers.

1.2 Update drivers automatically

Searching for drivers on your own can be time-consuming. So, we advise you to use a tool that will do this for you automatically.

Using an automatic driver updater will certainly save you from the hassle of searching for drivers manually, and it will always keep your system up to date with the latest drivers.

The solution recommended below will help you update drivers automatically and prevent PC damage caused by installing the wrong driver versions. 

After several tests, our team concluded that this is the best-automatized solution.

⇒ Get Outbyte Driver Updater

2. Run the BSoD troubleshooter

  1. Open the Settings app and go to Update & Security section.
  2. Select Troubleshoot from the menu on the left.
  3. Select BSoD from the right pane and click Run the troubleshooter.NO MORE SYSTEM PTES Windows 10 error
  4. Follow the instructions on the screen to complete the troubleshooter.

If updating your drivers didn’t resolve the problem, we’re going to use Windows 10’s troubleshooting tools.

The first tool we’re going to use is the built-in troubleshooter that can be found in the Settings app.

You can use this tool to resolve all sorts of issues within the system, including BSoDs.

3. Run the SFC scan

  1. Right-click on the Start Menu button, and open Command Prompt (Admin).
  2. Enter the following line and press Enter: sfc/scannowNO MORE SYSTEM PTES Windows 10 error
  3. Wait until the process is done (it may take a while).
  4. If the solution is found, it will automatically be applied.
  5. Now, close the Command Prompt and restart your computer.

The next troubleshooter we’re going to try is the SFC scan. This tool scans your system for potential issues and resolves them.

If the solution is possible, of course. The SFC scan can be helpful when resolving BSOD problems, as well.

4. Run DISM

4.1 Run DISM the standard way

  1. Type cmd in the search windows and click on Run as administrator to start Command Prompt with full privileges.
  2. Paste the following command and press Enter: DISM /Online /Cleanup-Image /RestoreHealthNO MORE SYSTEM PTES Windows 10 error
  3. Wait until the scan is finished.
  4. Restart your computer and try updating again.

4.2 Run DISM using the Windows installation media

  1. Insert your Windows installation media.
  2. Start Command Prompt as administrator as shown in the previous solution.
  3. In the command line, type the following commands and press Enter after each:
    • dism /online /cleanup-image /scanhealth
    • dism /online /cleanup-image /restorehealth
  4. Now, type the following command and press Enter:
    • DISM /Online /Cleanup-Image /RestoreHealth /source:WIM:X:SourcesInstall.wim:1 /LimitAccess
  5. Make sure to change an X value with the letter of the mounted drive with Windows 10 installation.
  6. After the procedure is finished, restart your computer.

And the third troubleshooter we’re going to use is DISM. Deployment Image Servicing and Management (DISM) is a powerful tool that reloads the system image.

So, it can also resolve potential BSOD errors. We offered you both standard and the procedure that utilizes the installation media above.

5. Use System Restore or reset Windows 10

5.1 Perform a System Restore

  1. Restart your computer a couple times while it boots. This should start Automatic Repair.
  2. Select Troubleshoot, select Advanced options, and click on System Restore.
  3. Select your username and enter your password and choose the restore point.
  4. Follow the steps carefully to complete the process.

If the issue is caused by certain software, you can easily fix it by using System Restore. To use System Restore, perform the steps above.

If the System Restore didn’t fix the NO_MORE_SYSTEM_PTES BSoD error, you might have to reset Windows 10.

Bear in mind that this process will delete all files and folders from your C drive, so be sure to back them up.

5.2 Reset your PC

  1. Start Automatic Repair by restarting your PC while it boots.
  2. Choose Troubleshoot and select Reset this PC.
  3. Select Remove everything and click on Only the drive where Windows is installed.
  4. Wait for the reset process to complete.

If the problem still persists, the NO_MORE_SYSTEM_PTES BSoD is most likely caused by a hardware problem.

5.3 Use a dedicated solution

All these solutions worked for some users so you should definitely try them but you can also fix this BSoD error by using a dedicated, third-party solution.

This tool recommended below is light, and fast and it only needs a couple of clicks to fix any Windows 10 error, including BSoD like the NO MORE SYSTEM PTES error.

More so, an efficient method to resolve corrupted systems is with dedicated tools that are capable of repairing serious screen errors on your PC.

Plus, with repositories of millions of files, these tools will surely fix malfunctioning or missing software files and stop BSOD issues effectively.

6. Check the hard drive

  1. Enter the Advanced Startup (Restart your computer while holding the Shift key).
  2. Choose Troubleshoot and click on Advanced Options.
  3. Select Command Prompt from the list of options.
  4. When Command Prompt appears, enter the following lines and press Enter after each line in order to run it:
    • bootrec.exe /rebuildbcdNO MORE SYSTEM PTES Windows 10 error
    • bootrec.exe /fixmbr
    • bootrec.exe /fixboot
  5. Some users are also suggesting that you need to run additional chkdsk commands as well. To perform these commands, you need to know drive letters for all your hard drive partitions. In Command Prompt you should enter the following (but remember to use the letters that match your hard drive partitions on your PC):
    • chkdsk /r c:NO MORE SYSTEM PTES Windows 10 error
    • chkdsk /r d:

      This is just our example, so keep in mind that you have to perform chkdsk command for every hard drive partition that you have.

  6. Restart your computer and check if the issue is resolved.

Unfortunately, the hard drive can be the main culprit for this error so make sure you check it by using the chkdsk command as shown above.

If the hard drive is malfunctioning, check our list with the best hard drives for Windows 10.

7. Uninstall problematic software and your antivirus

  1. Press Windows + X and choose the Device Manager.
  2. When Device Manager opens, locate your graphic card, right-click it and choose Uninstall.
    uninstall-driver
  3. Check Delete the driver software for this device and click OK.
    confirm-uninstall-driver
  4. Restart your PC.

NO_MORE_SYSTEM_PTES error can be caused by problematic software, therefore it’s recommended to locate and uninstall the software.

Common causes for this error are graphics card drivers and backup programs, so if you have any backup programs installed, be sure to uninstall them.

Regarding the graphic card drivers, you can uninstall them by following the steps above.

After you uninstalled the driver, you need to download it again. If you had the latest version of the driver installed, be sure to download and install an older version this time.

In addition to backup software and display drivers, sometimes your antivirus software can cause NO_MORE_SYSTEM_PTES error, so it’s recommended that you uninstall it.

Almost any antivirus program can cause this error to appear, so be sure to uninstall all antivirus software from your computer.

If you’re worried about your computer safety, you should know that Windows 10 comes with Windows Defender antivirus software, so your computer won’t be completely vulnerable.

Bear in mind that uninstalling your antivirus software isn’t always enough since there might be some registry keys or files left after the uninstallation process.

Therefore it’s always recommended to use dedicated uninstaller tools. Many security software companies offer these tools for their software, so be sure to use one of these tools to completely remove antivirus software.

⇒ Get IObit Uninstaller

8. Uninstall any recently installed software

  1. Restart your computer while it boots. Repeat this until the Automatic Repair process starts.
  2. Select Troubleshoot, select Advanced options, click on Startup Settings, and then on Restart.
  3. When your computer restarts, you’ll see a list of options. Select Safe Mode with Networking by pressing 5 or F5.

Sometimes NO_MORE_SYSTEM_PTES BSoD is caused by a recently installed software, so in order to fix it, you need to remove any software you installed in the last couple of days or weeks.

To check if the BSOD error is caused by software, you can always use the Windows 10 Safe Mode.

This mode starts with only the necessary software and drivers, and if the problem is caused by certain software, your computer should work without any problems in Safe Mode.

Once you enter Safe Mode, check if your computer works without any issues. If everything is in order, you might want to uninstall certain software or drivers and check if that fixes the issue.

9. Check your hardware

Recently installed hardware can cause NO_MORE_SYSTEM_PTES error to manifest since the new hardware might not be fully compatible with your PC.

If so, try removing or replacing the newly installed hardware to see if your computer works without it.

If no new hardware is installed, your RAM or motherboard might be faulty, so you might want to replace them.

It’s worth mentioning that almost any hardware can cause this error, so you might need help from an expert to locate the faulty hardware.

NO_MORE_SYSTEM_PTES BSoD error is usually caused by software, and you can fix this problem easily by using one of our solutions.

If you have any other suggestions or solutions in mind, don’t hesitate to leave them in the comments section below.

Fix NO EXCEPTION HANDLING SUPPORT [0x0000000B]

Blue Screens of Death errors are probably one of the most serious errors that you can encounter on Windows 10.

These errors can create many problems, so today we’re going to show you how to fix NO_EXCEPTION_HANDLING_SUPPORT error.

How do I fix NO_EXCEPTION_HANDLING_SUPPORT BSoD error?

  1. >Use a third-party BSoD tool
  2. Install the latest Windows 10 updates
  3. Install the latest drivers
  4. Run the BSOD Troubleshooter
  5. Run the SFC scan
  6. Run DISM
  7. Check the hard drive
  8. Remove the problematic applications
  9. Remove overclock settings
  10. Update your BIOS
  11. Check for faulty hardware

1. Use a third-party BSoD tool

Since you’re unsure of the probable cause for this stop error, you might as well log into Safe Mode and download a BSoD troubleshooter.

It will quickly detect the problem and fix it, saving you a lot of time and trouble.

2. Install the latest Windows 10 updates

Hardware or software issues can cause Blue Screen of Death errors to appear, therefore it’s important to fix these issues as soon as possible.

To fix both hardware and software issues, it’s recommended to use Windows Update and download the latest patches for Windows 10.

Microsoft is constantly improving Windows 10 by releasing new patches frequently.

Many of these patches bring bug fixes related to both hardware and software, but there are also various security improvements.

If you want to keep your PC stable and safe from errors, we strongly suggest that you download the latest patches frequently.

3. Install the latest drivers

  1. Press Windows Key + X on your keyboard to open Power User Menu. Select Device Manager from the list.
    no-exception-handling-support-manager
  2. When Device Manager opens locate the device that you want to update, right-click it and choose Update Driver Software.
    no-exception-handling-support-update-driver-software
  3. Select Search automatically for updated driver software and wait for Windows 10 to download the appropriate driver.
    no-exception-handling-support-driver-software
  4. Repeat the same steps for all drivers that you want to update.

As you can see, updating your drivers with Device Manager is pretty straightforward, but bear in mind that Device Manager doesn’t always download the latest drivers.

If you want to have the latest drivers installed, we strongly suggest that you download the necessary drivers manually.

Downloading drivers manually is relatively simple and all that you need to do is to visit your hardware manufacturer’s website and download the latest drivers for your device.

Bear in mind that you might have to update all your drivers in order to fix this problem.

Update drivers automatically

Searching for drivers on your own can be time-consuming. So, we advise you to use a tool that will do this for you automatically.

Using an automatic driver updater will certainly save you from the hassle of searching for drivers manually, and it will always keep your system up to date with the latest drivers.

On that note, we strongly recommend Outbyte Driver Updater.  This is an easy-to-use software that will not only scan your device for outdated or missing drivers.

It will also help to find the right one, depending on your device’s brand and specifications. All that with just two clicks.

4. Run the BSOD Troubleshooter 

  1. Open the Settings app.
  2. Head over to Update & Security section.
  3. Select Troubleshoot from the menu on the left.
  4. Select BSOD from the right pane and click Run the troubleshooter.NO EXCEPTION HANDLING SUPPORT Windows 10 error
  5. Follow further instructions to complete the troubleshooting process.

5. Run the SFC scan

  1. Go to Search, type cmd, and open the Command Prompt as Administrator.
  2. Enter the following line and press Enter: sfc/scannowNO EXCEPTION HANDLING SUPPORT Windows 10 error
  3. Wait for the scan to complete (it will take a while)
  4. The tool will automatically resolve the problem, if possible.
  5. Now, close the Command Prompt and restart your computer.

6. Run DISM

  • The standard way
  1. Right-click Start and open Command Prompt (Admin).
  2. Paste the following command and press Enter:
    • DISM /Online /Cleanup-Image /RestoreHealthNO EXCEPTION HANDLING SUPPORT Windows 10 error
  3. Wait until the scan is finished.
  4. Restart your computer and try updating again.
  • With the Windows installation media
  1. Insert your Windows installation media.
  2. Right-click the Start menu and, from the menu, choose the Command Prompt (Admin).
  3. In the command line, type the following commands and press Enter after each:
    • dism /online /cleanup-image /scanhealth
    • dism /online /cleanup-image /restorehealth
  4. Now, type the following command and press Enter:
    • DISM /Online /Cleanup-Image /RestoreHealth /source:WIM:X:SourcesInstall.wim:1 /LimitAccess
  5. Make sure to change an X value with the letter of the mounted drive with Windows 10 installation.
  6. After the procedure is finished, restart your computer.

7. Check the hard drive

  1. Enter the Advanced Startup (Restart your computer while holding the Shift key).
  2. Choose Troubleshoot > Advanced Options.
  3. Select Command Prompt from the list of options.
  4. When Command Prompt appears, enter the following lines and press Enter after each line in order to run it:
    • bootrec.exe /rebuildbcdNO EXCEPTION HANDLING SUPPORT Windows 10 error
    • bootrec.exe /fixmbr
    • bootrec.exe /fixboot
  5. Some users are also suggesting that you need to run additional chkdsk commands as well. To perform these commands, you need to know drive letters for all your hard drive partitions. In Command Prompt you should enter the following (but remember to use the letters that match your hard drive partitions on your PC):
    • chkdsk /r c:NO EXCEPTION HANDLING SUPPORT Windows 10 error
    • chkdsk /r d:

      This is just our example, so keep in mind that you have to perform chkdsk command for every hard drive partition that you have.

  6. Restart your computer and check if the issue is resolved.

8. Remove the problematic applications

Third-party applications can cause NO_EXCEPTION_HANDLING_SUPPORT and other BSoD errors to appear, therefore if you installed or updated any applications recently we urge you to remove them.

One common cause of BSoD errors can be your antivirus software or firewall. According to users, almost any antivirus can cause this error to appear, and in order to fix this problem, we strongly suggest that you remove all third-party antivirus programs from your PC.

In addition to uninstalling the antivirus, it’s also recommended that you use a dedicated removal tool to remove all files and registry entries associated with your antivirus.

Most antivirus companies have dedicated removal tools available for download, so be sure to download one for your antivirus program.

9. Remove overclock settings

By overclocking your PC, you’ll get improved performance but bear in mind that overclocking can cause certain issues.

If your overclock isn’t stable, your PC will crash and give you the NO_EXCEPTION_HANDLING_SUPPORT error.

To fix this error, we strongly suggest that you remove all overclock settings and check if your PC works well without them.

10. Update your BIOS

update your bios

Sometimes certain hardware isn’t fully compatible with your motherboard, and that can cause the Blue Screen of Death error to appear.

To fix this issue, and to unlock new features of your motherboard maybe you should update your BIOS.

Updating BIOS is somewhat an advanced procedure, therefore we advise you to be extra cautious if you want to avoid causing permanent damage.

To see how to properly update your BIOS, we suggest that you check your motherboard manual for detailed instructions.

11. Check for faulty hardware

NO_EXCEPTION_HANDLING_SUPPORT and other Blue Screen of Death errors can be caused by faulty hardware, therefore we suggest that you check if your hardware is working properly.

Users reported that issues with RAM and motherboard can cause this error to appear, therefore be sure to check those components first.

Few users reported that they managed to fix this issue on their HP laptop by removing the wireless mouse, so you might want to try that as well.

NO_EXCEPTION_HANDLING_SUPPORT BSoD error is usually caused by your hardware, but before you check your hardware, we advise you to try all other solutions from this article.

FULL FIX: MULTIPLE_IRP_COMPLETE_REQUESTS in Windows 10/11

Windows 10 is a complex operating system – serving millions of PCs all around the world and running on thousands of different hardware combinations.

Unfortunately, this complexity also means there are bound to be errors due to various reasons that can be hard to diagnose.

One of such problems is the MULTIPLE_IRP_COMPLETE_REQUESTS Blue Screen of Death error.

A BSoD happens as the last resort – when the OS does not know what else to do, it decides to simply crash and inform the user of the problem.

This error can be caused due to various reasons, it could be anything from bad drivers to a faulty hard disk, so diagnosing it isn’t simple.

We can, however, give a shot at the most common solutions and see if they work.

The stop code MULTIPLE_IRP_COMPLETE_REQUESTS can be quite problematic. Speaking of these kinds of errors, here are some similar issues that users reported:

  • MULTIPLE_IRP_COMPLETE_REQUESTS Blue Screen of Death – This is a blue screen error, and if you encounter it, you should be able to fix it by using one of our solutions.
  • MULTIPLE_IRP_COMPLETE_REQUESTS ntoskrnl.exe, classpnp.sys, wdf01000.sys, hal.dll, usbport.sys, acpi.sys, ntfs.sys, nvlddmkm.sys – Sometimes a specific file can cause this error to occur. To fix this issue, you need to do a bit of research and find out how is this file related to your hardware or software. Once you find the problematic hardware or software, the issue should be resolved.
  • MULTIPLE_IRP_COMPLETE_REQUESTS Windows 10, Windows Server 2003, Windows Server 2008 r2 – This error can occur on other versions of Windows, but even if you don’t use Windows 10, you should be able to apply some of our solutions to it.

How can I fix MULTIPLE_IRP_COMPLETE_REQUESTS error?

1. Use a dedicated software to fix the BSoD

You need to address any BSoD seriously and immediately as they can also lead to hardware failure. Don’t worry because we offer a lot of good solutions below and we will get to the bottom of this.

However, before trying the solutions below, you should try a quicker and easier one that involves using a third-party specialized solution to fix BSOD issues.

2. Check your antivirus

In some cases, your antivirus can cause MULTIPLE_IRP_COMPLETE_REQUESTS error to appear, and in order to fix it, it’s advised to check your antivirus settings.

Sometimes certain features of your antivirus can cause this problem to appear, and in order to fix the issue, you just need to disable those features.

If disabling these features doesn’t help, you might have to completely disable your antivirus.

In some cases, you might even have to completely remove your antivirus and check if that solves the problem.

If disabling the antivirus didn’t fix your issue, your next step would be to completely remove your antivirus.

Keep in mind that Windows 10 has Windows Defender as its default antivirus, so even if you remove your antivirus, you’ll still have some form of basic protection.

Once you remove your antivirus, check if the problem is still there. If not, you should perhaps consider switching to a different antivirus solution.

3. Update your drivers

Another cause for MULTIPLE_IRP_COMPLETE_REQUESTS can be your drivers. Sometimes this issue can be caused by outdated drivers, and a way to solve the problem is to update the main drivers on your PC.

This usually includes your graphics card, network, and chipset drivers. To do so, just visit your hardware manufacturer’s website and download the latest drivers for your device.

Doing this manually can be a bit tedious since you need to download each driver manually.

However, you can use a dedicated tool to update all your drivers with just a couple of clicks in just a few seconds.

This kind of tool will automatically update your drivers for you, so you won’t have to search for them manually. Once your drivers are up to date, check if the problem is still there.

4. Perform SFC and DISM scans

4.1 Perform a SFC scan

  1. Start Command Prompt as an administrator. To do that, just type cmd in Windows search and click on Run as administrator below the results.
  2. Now run the sfc /scannow command.
    Multiple_irp_complete_requests blue screen of death
  3. The System File Checker scan will start. This scan can take about 15 minutes, so don’t interfere with it.

After the scan is completed, check if the problem is still there. If the problem is still there, or if you weren’t able to run the SFC scan at all, we suggest you try DISM scan.

4.2 Perform a DISM scan

  1. Open Command Prompt as an administrator.
  2. Now enter the following command and press Enter to run it: DISM /Online /Cleanup-Image /RestoreHealth
    Multiple_irp_complete_requests classpnp.sys
  3. DISM scan will now start. Keep in mind that this scan can take about 20 minutes, so don’t interfere with it.

According to users, sometimes corrupted system files can cause this issue to appear. However, you can fix the issue simply by performing an SFC scan. To do that, just follow the steps above.

After both scans are finished, check if the problem is still there.

5. Run CHKDSK to fix this problem

  1. Open Command Prompt as administrator. To see how to do that properly, check our previous solution.
  2. When Command Prompt opens, enter the following command and press Enter (Replace the X with the letter that represents your system drive. In most cases that would be C): chkdsk /f :X
    Multiple_irp_complete_requests Windows 10
  3. You’ll be asked to schedule a scan, so press Y to do so.

Using CHKDSK to fix this error is another way as it can easily fix many types of errors including errors like KERNEL_DATA_INPAGE_ERROR in Windows 10.

After running the command, you have to restart your PC and let it scan your system drive. This process can take about 20-30 minutes, but after it’s finished the problem should be completely resolved.

6. Remove the problematic software

Sometimes third-party applications can interfere with your system and cause MULTIPLE_IRP_COMPLETE_REQUESTS error to appear.

According to users, applications such as LogMeIn Hamachi, AsRock, and EasyTune software can cause this issue to appear.

If you’re using any of these applications, we advise you to remove them and check if that solves the problem.

Although you can remove these applications using the Settings app, we strongly recommend using dedicated uninstaller software to remove them.

Uninstaller software is designed to completely remove all files and registry entries associated with the application you’re trying to remove.

As a result, the application will be removed in its entirety and there won’t be any leftover files available to interfere with your system.

Keep in mind that other applications can also cause this issue, so be sure to perform a detailed inspection of your system.

7. Reset your BIOS to the default

In some cases, your BIOS settings can cause a MULTIPLE_IRP_COMPLETE_REQUESTS error to appear.

This is usually caused by your settings, but you can fix the issue simply by resetting BIOS to the default.

This is quite simple to do, and you just need to enter BIOS and choose the option to load the default settings.

This procedure might differ depending on the version of BIOS you’re using.

So in order to see how to properly enter and reset BIOS to default, we suggest that you check your motherboard manual for detailed instructions.

8. Update your BIOS

Another way to fix the MULTIPLE_IRP_COMPLETE_REQUESTS error is to update your BIOS.

Before we start, we have to mention that BIOS update can be a risky procedure, so if you decide to update it, keep in mind that you’re doing that at your own risk.

We already wrote a short guide on how to flash your BIOS, but since this is just a general guide, we advise you to check your motherboard manual for detailed instructions on how to update your BIOS.

Be sure to carefully follow the instructions in the instruction manual in order to avoid causing permanent damage to your system. Once your BIOS is up to date, check if the problem is resolved.

These solutions should at the least help you figure out what is exactly going wrong with your Windows, and in some cases also be able to fix these issues.

We have solved errors and provided methods to fix NTFS_File_System Error on Windows 10 in the past so you can expect these solutions to work for you.

We hope that our guide helped you fix the MULTIPLE_IRP_COMPLETE_REQUESTS ntoskrnl.exe issue and if you have any suggestions, leave them in a comment below.

INVALID SOFTWARE INTERRUPT BSoD error on Windows 10/11 [Fix]

Computer errors are relatively common, and while certain errors are harmless, some errors, such as INVALID_SOFTWARE_INTERRUPT can cause major problems.

This error will crash Windows 10 and restart your PC, therefore it’s important that you know how to fix it. Thankfully, we included some great solutions in this article.

How do I fix INVALID SOFTWARE INTERRUPT BSoD error?

  1. Use a third-party BSoD fixer
  2. Run the BSOD Troubleshooter
  3. Download the latest Windows updates and update your drivers
  4. Run the SFC scan
  5. Run DISM
  6. Check the hard drive
  7. Remove your antivirus
  8. Perform clean boot and remove the problematic applications
  9. Reset Windows 10 and check your hardware

1. Use a third-party BSoD fixer

If you’re having trouble with your system files, and you keep getting BSoD errors that ruin your workflow, you can easily solve them by downloading a third-party BSoD fixer.

You won’t have to worry about diagnosing your PC and pinpointing the problem yourself. The software will scan your computer for you and make all the necessary changes to your files to restore them.

2. Run the BSOD Troubleshooter 

  1. Open the Settings app and go to the Update & Security section.
  2. Go to Troubleshoot.
  3. Select BSOD from the right pane and click Run the troubleshooter.INVALID SOFTWARE INTERRUPT Windows 10 error
  4. Follow the on-screen instructions to complete the process.

The next thing we’re going to try is running Windows 10‘s built-in troubleshooter.

This tool can be used for addressing all kinds of different problems, including BSOD issues. So, it could also resolve the INVALID_SOFTWARE_INTERRUPT error.

3. Download the latest Windows updates and update your drivers

  1. Press the Windows Key + S.
  2. Select Settings.
  3. Next, click on the Update & Security section.
  4. Choose Windows Update, then Check for updates.
  5. Now windows will automatically install any updates it finds.
  6. Let it run its course and follow any extra instructions.

Windows 10 has a few minor bugs and certain issues with some hardware and software, and sometimes these issues can cause Blue Screen of Death errors to appear.

To prevent errors such as INVALID_SOFTWARE_INTERRUPT from appearing, it’s recommended that you download the latest Windows 10 updates.

Windows updates offer new features, security improvements and various bug fixes, therefore it’s important that you download these updates if you want your PC to be safe, stable, and error-free.

In addition to downloading Windows updates, it’s just as important that you keep your drivers up to date. Outdated or buggy drivers cannot be used properly by your operating system.

In such cases you can encounter a BSoD error. To fix this problem, it’s highly recommended that you update your drivers.

Usually only one driver is causing this error, and with little research, you find the problematic driver and update it.

3.1 Update drivers automatically

Searching for drivers on your own can be time-consuming. So, we advise you to use a tool that will do this for you automatically. Using an automatic driver updater will certainly save you from the hassle of searching for drivers manually.

The software will always keep your system up to date with the latest drivers, so you won’t have to worry about driver-related problems or incompatibility issues.

⇒ Get Outbyte Driver Updater

4. Run the SFC scan

  1. Right-click on the Start Menu button, and open Command Prompt (Admin).
  2. Enter the following line and press Enter: sfc/scannowINVALID SOFTWARE INTERRUPT Windows 10 error
  3. Wait until the process is done (it may take a while).
  4. If the solution is found, it will automatically be applied.
  5. Now, close the Command Prompt and restart your computer.

The next troubleshooting tool we’re going to try is the SFC scan. This tool scans your computer through the Command Prompt for potential problems. If the solution is possible, the SFC scan will automatically resolve it.

5. Run DISM

  1. Right-click Start and open Command Prompt (Admin).
  2. Paste the following command and press Enter: DISM/Online/Cleanup-Image/RestoreHealthINVALID SOFTWARE INTERRUPT Windows 10 error
  3. Wait until the scan is finished.
  4. Restart your computer and try updating again.

Deployment Image Servicing and Management tool is another command-line troubleshooter.

But unlike the previous two, this one completely re-deploys the system image, which can lead to resolving various problems. Including the INVALID_SOFTWARE_INTERRUPT error (hopefully).

We walked you through both standard procedure above, and we’ll walk you though the procedure that utilizes the installation media below.

With the Windows installation media

  1. Insert your Windows installation media.
  2. Right-click the Start menu and, from the menu, choose the Command Prompt (Admin).
  3. In the command line, type the following commands and press Enter after each: dism/online/cleanup-image/scanhealth dism/online/cleanup-image/restorehealth
  4. Now, type the following command and press Enter: DISM/Online/Cleanup-Image/RestoreHealth/source:WIM:X:SourcesInstall.wim:1/LimitAccess
  5. Make sure to change an X value with the letter of the mounted drive with Windows 10 installation.
  6. After the procedure is finished, restart your computer.

6. Check the hard drive

  1. Enter the Advanced Startup (Restart your computer while holding the Shift key).
  2. Choose Troubleshoot > Advanced Options.
  3. Select Command Prompt from the list of options.
  4. When Command Prompt appears, enter the following lines and press Enter after each line in order to run it: bootrec.exe /rebuildbcd bootrec.exe/fixmbr bootrec.exe /fixbootINVALID SOFTWARE INTERRUPT Windows 10 error
  5. Some users are also suggesting that you need to run additional chkdsk commands as well.
    • To perform these commands, you need to know drive letters for all your hard drive partitions.
    • In Command Prompt you should enter the following (but remember to use the letters that match your hard drive partitions on your PC): chkdsk/r c: chkdsk/r d:INVALID SOFTWARE INTERRUPT Windows 10 error
    • This is just our example, so keep in mind that you have to perform chkdsk command for every hard drive partition that you have.
  6. Restart your computer afterward.

BSOD issues are quite common when there’s something wrong with your hard drive. So, we’re going to check your hard drive for potential problems.

To do that, you need to run the chkdsk command, which will scan all your partitions, and resolve potential problems, if possible.

7. Remove your antivirus

Although antivirus and firewall are important for your computer’s safety, sometimes antivirus programs can cause INVALID_SOFTWARE_INTERRUPT and other Blue Screen of Death errors to appear.

To fix this problem, it’s advised that you remove your currently installed antivirus program and check if that fixes the error.

Users reported that Avira antivirus was causing this error, but bear in mind that almost any antivirus program can cause this issue to appear, therefore we advise you to remove all third-party antivirus programs from your PC.

We have to mention that uninstalling your antivirus program might not fix this issue, therefore it’s recommended to use a dedicated removal tool.

Many antivirus programs tend to leave certain files and registry entries after you uninstall them, therefore it’s important to use a dedicated removal tool to remove all those files.

If you’re interesting in upgrading your current antivirus software, we suggest taking a look at our useful article containing the best choices on the market.

⇒ Get IObit Uninstaller

8. Perform a clean boot and remove the problematic applications

  1. Press Windows Key + R on your keyboard.
  2. Enter msconfig and press Enter.
    invalid-software-interrupt-msconfig
    • The System Configuration window will now open.
  3. Choose Selective startup and uncheck Load startup items.
    invalid-software-interrupt-windows-configuration
  4. Now go to the Services tab, check the Hide all Microsoft services and click the Disable all button.
    invalid-software-interrupt-services
  5. Click Apply and OK to save changes.
  6. Now open Task Manager by pressing Ctrl + Shift + Esc.
  7. When Task Manager opens go to Startup tab, right-click each entry on the list and choose Disable from the menu.
    invalid-software-interrupt-Task-manager-disable
  8. After disabling all startup applications restart your PC.

Third-party applications can cause Blue Screen of Death errors to appear, and in order to fix this issue, it’s recommended that you find and remove the problematic applications.

Users reported that Folder Lock was causing this error, and after removing it, the issue was completely fixed.

Bear in mind that almost any third-party application can cause this error, and in order to find the problematic application, we advise that you perform clean boot by following these steps:

After your PC restarts, check if the error appears again. If there are no BSoD errors, it means that one of disabled services or applications was causing this error.

Now you need to repeat the same steps, but this time be sure to enable services and applications one by one until you find the one that is causing this error.

9. Reset Windows 10 and check your hardware

  1. Restart your computer a few times during the boot sequence to start Automatic Repair.
  2. Choose Troubleshoot > Reset this PC > Remove everything.
    • You might get asked to insert Windows 10 installation media, so be prepared to do so.
  3. Select Only the drive where Windows is installed > Just remove my files and click the Reset button.
  4. Follow the instructions to complete the reset.

If you can’t find the software that is causing this issue, you might want to perform Windows 10 reset.

It’s worth mentioning that this procedure will delete all files from your C partition, therefore we strongly suggest that you back up your important files.

In addition to backing up your files, you might also want to create a bootable USB flash drive with Media Creation Tool in order to perform Windows 10 reset.

After the reset process is completed, test your PC for a while. Don’t install any applications or drivers, just wait and see if the error appears without any third-party software installed.

If the error appears again, it means that your hardware is most likely faulty, therefore we suggest that you perform a detailed inspection of your hardware.

The INVALID_SOFTWARE_INTERRUPT error is usually caused by third-party applications, and you can easily fix it by finding and removing the problematic application.

Make sure you try all these solutions out and tell us which one worked for you in the comment section below.

FIX: UNEXPECTED_KERNEL_MODE_TRAP_M error on Windows 10/11

Blue Screen of Death errors is one of the most serious errors that you can encounter on Windows 10.

Since these BSoD errors can be so problematic, it’s important to know how to fix them, and today we’re going to show you how to fix the UNEXPECTED_KERNEL_MODE_TRAP_M error.

Here are some more error codes that you can resolve with the solutions below:

  • UNEXPECTED_KERNEL_MODE_TRAP_M 1000007f – This is the main error that we are addressing in this article so check for the solutions below to fix it
  • Bugcheck code 0x1000007f – This is a variation of the same error in it can be solved with one of our solutions
  • Ntkrpamp exe unexpected_kernel_mode_trap – This error is caused by the ntkrpamp.exe module crashing but you will solve the problem with the solutions below
  • Windows error code 0x7f – It is the same error but it occurs when installing Windows
  • Unexpected_kernel_mode_trap parameters – The error has multiple parameters but you will solve it with our solutions regardless

How do I fix UNEXPECTED_KERNEL_MODE_TRAP_M error?

  1. Update your drivers
  2. Install the latest Windows 10 updates
  3. Use a third-party solution
  4. Remove your antivirus
  5. Remove problematic applications
  6. Reset Windows 10 and check your hardware

1. Update your drivers

  1. Press Windows Key + X on your keyboard to open Power User Menu. update driver. Select Device Manager from the list.
    unexpected-kernel-mode-trap-m-manager
  2. When Device Manager opens locate the driver you wish to update, right-click it and choose Update driver.
  3. Select Search automatically for updated driver software and wait for Windows 10 to download the appropriate driver.
    unexpected-kernel-mode-trap-m-driver-software
  4. Repeat the same steps for all drivers that you want to update.

Blue Screen of Death errors are often caused by outdated drivers, and in order to prevent these errors from appearing, it’s crucial that your drivers are up to date.

If your drivers are outdated or buggy, Windows 10 won’t be able to recognize and use hardware that is associated with them.

To fix this error, it’s advised that you update the problematic driver by following the steps above.

Even though updating your drivers through Device Manager is simple and straightforward, you should know that Device Manager doesn’t always download the latest drivers.

This can sometimes be an issue; therefore we suggest that you download your drivers manually.

Downloading drivers manually is relatively simple, and you can update the necessary drivers by visiting your hardware manufacturer’s website and downloading the latest drivers for your device.

Bear in mind that you might have to update all drivers on your Windows 10 PC in order to fix this error.

Few users reported that the issue was caused by Realtek audio drivers, therefore we strongly suggest that you update these drivers first and then update all other drivers.

Updating your drivers is crucial for your system’s stability but updating all your drivers manually can be a long and tedious process.

To quickly update all your drivers, we suggest that you try this Driver Update software that downloads all the necessary drivers with just a single click.

2. Install the latest Windows 10 updates

Errors such as UNEXPECTED_KERNEL_MODE_TRAP_M can appear due to hardware or software issues.

Windows 10, just like any other operating system, has few issues with certain hardware and software, and sometimes these issues can cause Blue Screen of Death errors to appear.

To prevent BSoD errors from appearing, we strongly suggest that you install the latest Windows 10 updates. Microsoft is frequently releasing new updates, and you can download them by using Windows Update.

Many of these updates address security flaws and bugs related to both hardware and software, therefore if you want your PC to be safe, stable, and free from BSoD errors, we strongly suggest that you download the latest updates.

3. Use a third-party solution

BSoD errors can be serious, and you should address them as soon as possible. We have plenty of solutions for you to try below but they can be time-consuming and require a bit of skill.

However, there is a simpler approach to this problem, to use a third-party solution that is specialized in fixing any Windows 10 errors, including BSoD.

4. Remove your antivirus

Your antivirus or firewall can sometimes cause the UNEXPECTED_KERNEL_MODE_TRAP_M error to appear and crash your PC.

To fix this error, it’s strongly recommended that you remove all third-party antivirus programs from your PC.

Users reported that Avast was causing this error, and after removing the software, the BSoD error was completely fixed. Bear in mind that almost any antivirus program can cause this issue, so be sure to remove them all.

To completely remove certain antivirus programs from your PC, we advise that you use a dedicated removal tool.

Almost all antivirus companies have these tools available, so be sure to download one for your antivirus program.

If removing the antivirus fixes the problem, you can continue using Windows Defender, or you can reinstall your antivirus program again. Alternatively, you can completely switch to a different antivirus solution.

5. Remove problematic applications

  1. Press Windows Key + R and enter msconfig. Press Enter or click OK.
    unexpected-kernel-mode-trap-m-msconfig
  2. The System Configuration window will now open. Select Selective startup and uncheck Load startup items.
    unexpected-kernel-mode-trap-m-windows-configuration
  3. Go to Services tab and check Hide all Microsoft services and then click on Disable all button.
    unexpected-kernel-mode-trap-m-services
  4. Click Apply and OK to save the changes.
  5. Start Task Manager by pressing Ctrl + Shift + Esc.
  6. When Task Manager opens, go to the Startup tab, right-click each entry on the list and choose Disable.
    unexpected-kernel-mode-trap-m-Task-manager-disable
  7. After you disable all startup applications, close Task Manager and restart your PC.

In addition to your antivirus, other third-party applications can cause this error to appear, therefore it’s recommended that you remove them.

According to users, Daemon Tools can cause this error on Windows 10, so we highly recommend that you remove it from your PC.

Another way to find problematic applications is to perform a clean boot, and you can do that by following the steps above.

When your PC boots, check if the UNEXPECTED_KERNEL_MODE_TRAP_M error appears again.

If there’s no error, you need to repeat the same steps and enable disabled services and applications one by one until you find the one that is causing this error to appear.

6. Reset Windows 10 and check your hardware

  1. Restart your computer a few times while it boots to start Automatic Repair.
  2. Choose Troubleshoot, select Reset this PC and click on Remove everything. Be sure to have Windows 10 installation media ready because you might need it for this step.
  3. Select Only the drive where Windows is installed and click on Just remove my files and click the Reset button to start.
  4. Follow the instructions to complete the Windows 10 reset.

If the UNEXPECTED_KERNEL_MODE_TRAP_M error is caused by certain third-party software, you should be able to fix this error by resetting Windows 10.

This procedure will delete all files from your C partition, therefore we strongly advise that you back them up.

Bear in mind that that you might also need a bootable USB flash drive in order to complete the reset, so be sure to create one, just in case. To reset Windows 10, perform the steps above.

When the reset process is finished, you’ll have a clean installation of Windows 10 without any third-party applications.

Test your PC for a while and check if the BSoD error appears again. If the error appears, check if your hardware is working properly.

Users reported that a faulty graphic card can cause this error, so be sure to check your graphics card first and then check all other components.

UNEXPECTED_KERNEL_MODE_TRAP_M error can sometimes be problematic, but since it’s usually caused by outdated drivers or certain software, you can easily fix it by using one of our solutions.

FIX: Driver irql not less or equal (mfewfpk.sys) error

As you know, Windows 10 is available as a free upgrade to all genuine Windows 8 and Windows 7 users.

However, the upgrade process to Windows 10 isn’t always smooth and some users report getting driver_irql_not_less_or_equal (mfewfpk.sys) error.

Driver_irql_not_less_or_equal (mfewfpk.sys) is usually followed by a Blue Screen of Death after which your computer restarts.

This error is caused by a file mfewfpk.sys that is related to McAfee Security Software, and usually, the best solution to this is to remove McAfee security software before upgrading to Windows 10.

If you have already upgraded to Windows 10, don’t worry, there’s still a way to fix this issue.

How do I fix Driver_irql_not_less_or_equal (mfewfpk.sys) error?

1. Start Windows 10 in Safe Mode

  1. While your computer boots keep pressing F8 or F2 or Shift + F8.
    • This will sometimes allow you to access Advanced Boot Options.
    • If it doesn’t work, after your computer resets several times you’ll get the option to Restart or to enter Advanced Startup.
    • When this happens make sure that you choose Advanced Startup.
  2. Then choose Troubleshoot.
  3. Next, you need to go to Advanced Options > Startup Settings.
  4. When you enter the Startup Option you’ll have the option for Safe Mode with Networking.
  5. Choose it, and download the McAfee removal tool from the link below.
  6. Run the McAfee removal tool to remove McAfee software completely.
  7. Restart your computer.
  8. After you’ve removed McAfee Security Software everything should be working as usual.

If the problem is resolved after removing McAfee, you might want to keep using Windows Defender or switch to a different antivirus solution.

Windows Defender offers solid protection, but if you want full system protection, it might be wise to install third-party antivirus software.

2. Move the problematic file to a different directory

  1. Start Windows 10 in Safe Mode.
    • To see how to do that, be sure to check the previous solution for detailed instructions.
  2. When Safe Mode starts, open File Explorer and go to the following directory: C:WindowsSystem32drivers
  3. Now locate mfewfpk.sys file and move it to a different location, outside of the Windows directory.

After doing that, restart your PC and the problem should be completely resolved. Keep in mind that this isn’t a system file, so you can also remove it if you want.

In most cases, this problem is caused by mfewfpk.sys, and in order to fix this issue, you need to find and move the file to a different location.

This file is located in the Windows directory, but it’s not crucial for Windows, so you can easily move it.

3. Perform a System Restore

  1. Restart your PC a few times during the boot sequence to force your PC to boot to start Automatic Repair.
  2. A list of options will appear. Select Troubleshoot > Advanced options > System Restore.
  3. Now select your username and enter your password.
  4. System Restore window should now appear. Click on Next to proceed.
    Driver irql not less or equal mfewfpk sys
  5. If available, check to Show more restore points option. Now you should see several restore points available. Check the date and time for each entry and select the desired restore point. Now click on Next.
    Driver irql not less or equal mfewfpic.sys BSOD
  6. Follow the instructions on the screen to restore your PC.

After performing a System Restore, your PC should be restored to an earlier state, and the problem should be resolved completely.

Keep in mind that this isn’t a perfect solution, and sometimes even the System Restore won’t be able to fix your problem.

Use a third-party system restoration tool

You can also restore your system files using a third-party specialized tool, so you won’t need to use any System Restore and lose your current windows files and settings.

Simply download the tool, run it, and it will automatically scan the system for corrupted, damaged, or missing files, and then it will restore them or replace them accordingly.

4. Use Linux boot drive

  1. Download the Linux ISO.
  2. Create a bootable drive.
  3. Connect the boot drive to your PC and boot from it.
  4. Once you start the PC in the Linux environment, search for the following: C:WindowsSystem32drivers
  5. Remove the mfewfpk.sys inside of it.

If driver_irql_not_less_or_equal (mfewfpk.sys) error is preventing you from starting Windows, you might be able to fix the problem simply by booting from a Linux boot drive.

Keep in mind that in a Linux environment your drive might not be labeled as C, so you’ll have to find the Windows directory on your own.

This is a bit advanced solution, so if you don’t know what is an ISO file or Linux, and if you don’t know how to create a bootable drive, you might want to read a tutorial or two or try a different solution.

5. Remove McAfee

Since McAfee is supposedly a cause of this error, removing the program is the safest solution. You can do it from within the device manager, or you can use a third-party app removal tool.

To do this, you will need to download and run a McAfee removal tool. After you’ve downloaded the tool, you just need to run it and it will remove McAfee Security Software completely from your computer.

If you’re getting Blue Screen of Death with driver_irql_not_less_or_equal (mfewfpk.sys) error then you probably won’t be able to access your system.

To download the necessary McAfee removal tool, you’ll have to start your Windows 10 in Safe Mode.

⇒ Get IObit Uninstaller

6. Use Command Prompt to remove the file

  1. Right-click the Start Menu button or press Windows Key + X.
  2. Now choose Command Prompt (Admin) or PowerShell (Admin).
    Driver irql not less or equal crash
  3. When Command Prompt starts, run the following command: DEL /F /S /Q /A "C: WindowsSystem32driversmfewfpk.sys
    Driver_irql_not_less_or_equal (mfewfpk.sys)

This command will force Windows to remove this file. After doing that, just restart your PC and check if the problem is resolved.

7. Use Windows 10 installation media to perform Automatic Repair

  1. Connect the bootable drive to your PC and boot from it.
  2. In order to boot from the USB drive, you might have to change your boot settings in BIOS.
  3. Once you boot from your boot drive, click on Repair your computer option.
  4. Now choose Troubleshoot > Advanced Options > Automatic Repair.
    these updates help protect you in an online world is stuck
  5. Let the program run its course.
  6. Once the repair process is finished, check if the problem is solved.

If you aren’t sure how to do it, know that you can learn how to boot from a USB drive with our useful article. Just follow the steps and you’ll know how to do it in no time.

Note: Before you start, you need to download Windows 10 ISO using the Media Creation Tool and create a bootable drive. You can do that from Safe Mode or from a working PC.

A variation of this error can appear on any Windows operating system, and we wrote about the Irql Not Less or Equal error in Windows 11 in another guide, so don’t miss it.

We hope these solutions helped you with Driver_irql_not_less_or_equal (mfewfpk.sys) error, if you have any questions, or comments, just reach for the comment section below.

Fix 0x1000007e bugcheck blue screen error

Getting an error message immediately after starting your Windows 10 computer is not an uncommon occurrence.

The 0x1000007e BSoD error is caused by a severely outdated Silverlight version, system file corruption, or interference from a third-party service.

A hardware-related issue may also be the reason why this 0x1000007e error is shown, but you shouldn’t imagine the worst scenario yet.

Because of the multiple factors that cause this error, it’s likely that you may have to attempt more than one potential fix to suitably repair it.

With that said, we may only suggest you try the solutions below in the given order.

How can I fix error 0x1000007e on Windows?

1. Install pending updates

pending updates
  1. Press Windows key + R keyboard hotkey to open up a Run dialog box.
  2. Type wuapp.exe inside the text box and press Enter to open up the Windows Update tab of the Settings app.
  3. Once you’re inside the Windows Update screen, click on Check for updates.
  4. After that, follow the next on-screen instructions to install every pending update.
  5. After each Windows update is installed, restart your computer and you should be good to go.

Windows 10 updates are supposed to be automatically downloaded when available and installed. Make sure you install every pending update that Windows has lined up for you.


Can’t install Windows updates? Just check out this guide to see how easy is to fix that.


2. Use a troubleshooting tool

Since the issue might be deeper than you thought and finding the cause might be difficult, a general troubleshooting BSoD tool can be very useful.


3. Use SFC /Scannow

corrupt files
  1. Click on Start.
  2. Then, you need to search for Command Prompt, right-click the top result, and select Run as administrator.
  3. Type the following command and then press Enter:
    sfc /scannow
  4. System File Checker will now verify the integrity of all protected operating system files on your computer.
  5. It might take quite a while to finish. Once you start this process, you must not interrupt it until the operation is finished.
  6. Restart your computer if sfc /scannow repaired any files.

System file corruption problems could occur as a result of an issue installing a driver, a system update, or application, or even while making any changes to the installation manually.

Windows 10’s System File Checker (SFC) scannow command can’t fix hardware issues.

But it’s a great place to start if you’re still experiencing the 0x1000007e error and suspect corrupted system files as the culprit.

In the unlikely case that the scannow command stops before the process finishes, we’ve also got an easy fix for you.


4. Use the System Restore utility

confirm restore point
  1. Open up a Run dialog box by pressing Windows key + R.
  2. Inside the text box, type rstrui and press Enter to open up the System Restore wizard.
  3. Click Next at the initial prompt.
  4. Select the Restore point you wish to return to and click Next.
  5. Follow the instructions to complete the process.
  6. Lastly, your computer will restart and the new state will be enforced at the next system startup.

Many users reported that the 0x1000007e error was fixed after restoring their PC with the System Restore tool. You may try to do the same.

If System Restore is not working, there is no reason to panic. Just take a look at this useful guide and set things right once again.

Have you attempted to apply one or more of the solutions we have outlined below? Let us know which one worked for you in the comments area below.

How to fix the Invalid game executable error for Halo MCC

Many players have posted on support forums about an Invalid game executable error.

That issue is widely reported for games with Easy Anti-Cheat, such as Halo: The Master Chief Collection.

When some players try to launch the game, a Launch Error Invalid game executable error message pops up.

How can I fix the Invalid game executable error for Halo: MCC?

1. Run the game with administrator privileges

  1. First, open File Explorer’s window by clicking its folder taskbar button.
  2. Then open the game folder that includes the Halo: Master Chief EXE file.
  3. Right-click the Halo: Master Chief Collection EXE and select Properties.
  4. Then select the Compatibility tab shown directly below.
    Compatibility tab halo mcc error invalid game executable
  5. Select the Run this program as an administrator checkbox.
  6. Select the Apply option.
  7. Click OK to exit.

Note: Players who play Halo: Master Chief via Steam should also run Steam as an administrator. Check out our guide to running Steam as an administrator for further details.


2. Disable Easy Anti Cheat

Open the Master Chief Collection page in your Steam or Xbox app game library and select Play.

A small window pop-up will then open that includes two options. Select the Play Halo: MCC Anti-Cheat disabled option in Steam or Halo: MMC Anti-Cheat Disabled setting in the Xbox app.

The MCC Anti-Cheat Disabled option halo mcc error invalid game executable

Note: You might not be able to play Halo: MMC online with Easy Anti-Cheat disabled. However, Halo might at least start for you to play it single player with Easy Anti-Cheat disabled.


3. Repair Easy Anti-Cheat

  1. Open your Halo: Master Chief Collection folder in File Explorer.
  2. Open the easy anti cheat subfolder within the Halo: Master Chief Collection folder.
    The easyanticheat folder halo mcc error invalid game executable
  3. Click easyanticheat_setup to open the Easy Anti-Cheat window.
  4. Select Halo: The Master Chief Collection on the drop-down menu.
    Easy Anti-Cheat Service Setup window halo mcc error invalid game executable
  5. Then click the Repair Service button.
  6. Click Finish when done.

4. Reinstall Halo

  1. Press the Windows and I keyboard keys at the same time to launch Settings.
  2. Click Apps in Settings.
  3. Select Halo: Master Chief Collection within Apps & features.
    The Apps & features tab halo mcc error invalid game executable
  4. Click the Uninstall button.
  5. Thereafter, restart Windows before reinstalling Halo: MCC.
  6. Then reinstall your Halo: MCC game via Steam or MS Store.

You can also uninstall Halo: MCC with third-party uninstaller software, some of which will more thoroughly erase leftover files, folders, and registry entries.

⇒ Get iOBit Uninstaller


5. Verify the integrity of game files (Steam fix)

  1. First, open the Steam client software.
  2. Click Library in Steam.
  3. Right-click Halo: Master Chief Collection to select the Properties option for it.
  4. Then select the Local Files tab shown directly below.
    The Verify Integrity of Game Files option halo mcc error invalid game executable
  5. Select the Verify Integrity of Game Files option.

6. Select the Repair option

  1. Click the Type here to search button on the left side of Windows 10’s taskbar.
  2. Input the keyword Halo in the search tool’s text box.
  3. Select App settings for Halo: The Master Chief on the right side of the search tool.
    A Halo search halo mcc error invalid game executable
  4. Press the Repair button.
    The Repair button halo mcc error invalid game executable
  5. You can also click Reset to clear Halo’s data. However, try the Repair option first.

Note: The above resolution is more specifically for the MS Store Halo: The Master Chief Collection game app.


7. Disable antivirus utilities before launching Halo: MCC

  1. Click the Windows Security system tray icon.
  2. Click the shield button on the Windows Security sidebar.
    shield button halo mcc error invalid game executable
  3. Then click Manage Settings to open the options in the snapshot directly below.
    The Real-time protection setting halo mcc error invalid game executable
  4. Toggle the Real-time protection option off.

To disable third-party antivirus software, you’ll need to right-click the antivirus utility’s system tray icon to open a context menu for it.

Then you can usually select some kind of disable option on most antivirus utilities’ context menus. Select to disable the antivirus shield for about an hour if you can.

Note: If disabling antivirus software fixes the issue, it’s most likely that its shield is incorrectly flagging Easy Anti-Cheat or Halo: The Master Chief Collection. In which case, you can add Easy Anti Cheat or Halo: MCC to your antivirus utility’s white list to stop the false positive flagging.


8. Update Windows 10

  1. Open the Settings app (press the Windows + I hotkey).
  2. Click Update & Security to open the options in the shot directly below.
    The Check for updates option halo mcc error invalid game executable
  3. Press the Check for updates button to download and install available patch updates.
  4. If a feature update is available, click Download and Install to update Windows 10 to its latest build version.

Players have confirmed some of the fixes above can resolve the Invalid game executable error for Halo: The Master Chief Collection and other games.

However, players who still need further potential fixes can submit a support ticket at the Halo Support website.

Disable auto-lock Windows 7 [Quick Guide]

Since data protection is important, Windows 7 comes with an incorporated feature where the operating system is locked automatically.

Preventing the device from going into Sleep mode or locking can be easily done if you are an administrator with the help of specialized tools.

We will explore in this article the exact steps you need to make in order to disable the auto-lock in Windows 7, so make sure to keep on reading.

How can I disable auto-lock on Windows 7?

1. Change the settings

  1. In the Search box type Control panel and click on the option when displayed.
  2. Go to Appearance and Personalization and click on Change Screen Saver.
  3. Uncheck the option On resume, display logon screen.
  4. Click OK to save these changes.

This is one of the simplest ways to disable auto lock on Windows 7, so be sure to try it out.


2. Disable the password

disable vsync
  1. Click on Start and go to Control Panel.
  2. Click Power Options and select Require Password on Wakeup.
  3. Select the option Don’t require a password.
  4. Click OK to save the changes.

There you go, these are the steps you need to make in order to disable the auto-lock on Windows 7.

Keep in mind though, that by performing these actions, anyone can access the data from your device because it is not locked.

We would love to know in the comments section below if you have additional recommendations or suggestions, so don’t hesitate.

FIX: DRIVER PAGE FAULT IN FREED SPECIAL POOL [Windows 10/11]

DRIVER_PAGE_FAULT_IN_FREED_SPECIAL_POOL and other Blue Screen of Death errors can cause many problems on your PC.

These errors are usually caused by certain software or by faulty hardware, and since they can cause so many problems, today we’re going to show you how to fix this error on Windows 10.

How do I fix the DRIVER_PAGE_FAULT_IN_FREED_SPECIAL_POOL BSoD error?

  1. Update Windows 10 and all your drivers
  2. Run the hardware troubleshooter 
  3. Run the SFC scan
  4. Run DISM
  5. Use a repair tool
  6. Remove problematic software
  7. Update your SSD firmware
  8. Reset Windows 10
  9. Check if your hardware is working properly

1. Update Windows 10 and all your drivers

Many BSoD errors are caused by both hardware and software issues, and in order to fix these issues, it’s important that you update Windows 10.

New patches are being released frequently through Windows Update, and many of these patches offer new features, security improvements, and all sorts of bug fixes related to both hardware and software.

By installing the latest patches, you’ll ensure that your Windows 10 is up to date, safe, and free from BSoD errors.

Although Windows updates are important, it’s just as important to install the latest drivers for your devices.

Windows 10 uses drivers to communicate with your hardware, and if your drivers aren’t working with Windows 10, you won’t be able to use your hardware, or you’ll get a BSoD error.

In order to fix these kinds of problems, it’s advised that you update all your drivers.

Updating drivers is fairly simple, and you can do it by visiting your hardware manufacturer’s website and download the latest drivers for your hardware. To fix this issue be sure to download the latest drivers for all your devices.

Several users reported that this error was fixed after updating the Wireless adapter driver, so be sure to update this driver first and then update all other drivers.

Update drivers automatically

Searching for drivers on your own can be time-consuming. So, we advise you to use a tool that will do this for you automatically.

Using an automatic driver updater will certainly save you from the hassle of searching for drivers manually, and it will always keep your system up to date with the latest drivers.

We strongly recommend you use a professional tool that will help you update drivers automatically and prevent PC damage caused by installing the wrong driver versions.

After several tests, our team concluded that this is the best-automated solution, so be sure to try it out now!

⇒ Get Fortect Driver Updater


2. Run the hardware troubleshooter 

  1. Open the Settings app and go to the Update & Security section.
  2. Select Troubleshoot from the menu on the left.
  3. Select BSOD from the right pane and click Run the troubleshooter.
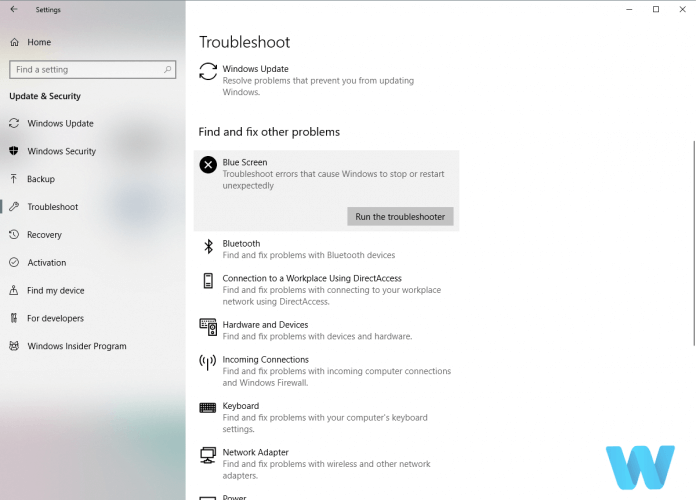
  4. Follow the on-screen instructions to complete the troubleshooter.

If updating your drivers didn’t resolve the DRIVER_PAGE_FAULT_IN_FREED_SPECIAL_POOL error, we’ll try with a troubleshooting tool.

Windows 10 features a handy built-in troubleshooter that can help you with various issues, including BSOD errors. So, we can try it and see if we have any luck.


3. Run the SFC scan

  1. Right-click on the Start Menu button, and open Command Prompt (Admin).
  2. Enter the following line and press Enter:sfc/scannow
  3. Wait until the process is done (it may take a while).
  4. If the solution is found, it will automatically be applied.
  5. Now, close the Command Prompt and restart your computer.

The next troubleshooter we’re going to try is the SFC scan. This is a command-line tool that goes through your system searching for potential issues.

Of course, if resolving these issues is possible, the SFC scan will do it automatically.


4. Run DISM

  • Standard way
  1. Right-click Start and open Command Prompt (Admin).
  2. Paste the following command and press Enter:
    • DISM /Online /Cleanup-Image /RestoreHealth
  3. Wait until the scan is finished.
  4. Restart your computer and try updating again.
  • With the Windows installation media
  1. Insert your Windows installation media.
  2. Right-click the Start menu and, from the menu, choose the Command Prompt (Admin).
  3. In the command line, type the following commands and press Enter after each:
    • dism /online /cleanup-image /scanhealth
    • dism /online /cleanup-image /restorehealth
  4. Now, type the following command and press Enter:
    • DISM /Online /Cleanup-Image /RestoreHealth /source:WIM:X:SourcesInstall.wim:1 /LimitAccess
  5. Make sure to change an X value with the letter of the mounted drive with Windows 10 installation.
  6. After the procedure is finished, restart your PC.

And the third troubleshooter we’re going to use is DISM. Deployment Image Servicing and Management (DISM) is a powerful tool that reloads the system image. So, it can also resolve potential BSOD errors.


5. Use a repair tool

BSoD errors can affect all Windows operating systems and fixing them is quite a difficult task that requires a lot of patience.

A powerful system repair software can help you streamline the repair process and replace the files that caused the BSoD in just a few moments.


6. Remove problematic software

Many applications can cause Blue Screen of Death errors to appear, and in order to fix this problem, it’s recommended to find and remove the problematic application.

In most cases this error is caused by your antivirus or firewall, therefore you’ll have to remove your antivirus or firewall to fix this error.

Users reported issues with Kaspersky Internet Security and GlassWire firewall, and according to them, updating these tools to the latest version fixed the BSoD error.

Bear in mind that sometimes you might have to completely remove all third-party antivirus programs in order to fix this error.

Uninstalling the antivirus software won’t be enough, and you might have to use a dedicated removal tool to remove all files and registry entries related to your antivirus.

Almost all major security companies have these tools available for download, so be sure to download one for your antivirus software.

Bear in mind that uninstalling third-party antivirus won’t leave your PC completely vulnerable because Windows 10 comes with its own antivirus software called Windows Defender.

If removing the antivirus software fixes the problem, you can now switch to a different antivirus tool, or you can install the same antivirus software again.

Few users also reported that Razer Overlay Support can also cause this error, so be sure to remove this tool and all files associated with it.


7. Update your SSD firmware

If you have Windows 10 installed on your SSD, you might be experiencing DRIVER_PAGE_FAULT_IN_FREED_SPECIAL_POOL error due to outdated firmware.

According to users, they managed to fix this error by updating firmware on their SSD, but before you decide to do that we urge you to back up all important files.

Updating SSD firmware is an advanced procedure, and if you’re not careful you can cause irreversible damage to your SSD, therefore be extra cautions and thoroughly check the instruction manual.


8. Reset Windows 10

  1. Restart your PC a few times during the boot sequence to start Automatic Repair.
  2. Choose Troubleshoot > Reset this PC > Remove everything. If you get asked to insert Windows 10 installation media, be sure to do that.
  3. Select Only the drive where Windows is installed > Just remove my files and click the Reset button.
  4. Follow the instructions and wait for the process to finish.

If this error is caused by software, you can fix it by performing Windows 10 reset. To perform Windows 10 reset, follow the above steps.

You should know that Windows 10 reset is quite similar to clean install, so we advise you to back up all important files from your C partition.

To complete Windows 10 reset you might need a bootable USB flash drive with Windows 10 on it, and you can easily create one by using Media Creation Tool.

After the reset process is completed you’ll have a new installation of Windows 10. If the error appears again, it’s most likely that the error is caused by faulty hardware.


9. Check if your hardware is working properly

Hardware issues can also cause Blue Screen of Death errors to appear, therefore we urge you to remove or replace any recently installed hardware and check if that fixes the BSoD error.

If the error isn’t caused by new hardware, be sure to check your RAM. To do that, you need to test RAM modules one by one until you find a faulty module.

Few users reported that after reseating their RAM the issue was resolved, so be sure to try that. If your RAM is working properly, check other hardware components such as your motherboard, graphic card, network adapter, hard drive, etc.


DRIVER_PAGE_FAULT_IN_FREED_SPECIAL_POOL BSoD error can be a problem, but you can easily fix this error by removing the problematic applications or by updating the outdated drivers.

We hope that these recommendations from our list were helpful to fix the BSoD error. For more suggestions, please access the comments section below.

FIX: UNMOUNTABLE BOOT VOLUME error in Windows 10/11

Blue Screen of Death errors can cause all sorts of problems on your PC, and therefore it’s important that you know how to fix them.

Many users reported an UNMOUNTABLE BOOT VOLUME BSoD error, and today we’re going to show you how to fix it on Windows 10.

How do I fix the UNMOUNTABLE_BOOT_VOLUME BSoD error?

  1. Download the latest updates and update your drivers
  2. Run the hardware troubleshooter 
  3. Run the SFC scan
  4. Run DISM
  5. Use chkdsk scan
  6. Change the SATA Mode in BIOS
  7. Check your hardware

1. Download the latest updates and update your drivers

Blue Screen of Death errors are often caused by hardware or software issues, and in order to fix those issues, it’s required that you update Windows 10.

Downloading updates is pretty straightforward, and you can download the necessary updates simply by using Windows Update.

New updates are released frequently, and many of them offer security improvements and new features, but they also fix various bugs related to both hardware and software.

If you want your PC to be safe and free from errors, we strongly suggest that you update Windows 10.

Your hardware requires drivers in order to work with your PC, and if your drivers are out of date or buggy, you’ll encounter a BSoD error such as UNMOUNTABLE BOOT VOLUME.

To fix these types of errors, it’s important that you keep your drivers up to date, and you can do that simply by visiting your hardware manufacturer’s website and downloading the latest drivers for your device.

Update drivers automatically

Searching for drivers on your own can be time-consuming. So, we advise you to use a tool that will do this for you automatically.

Using an automatic driver updater will certainly save you from the hassle of searching for drivers manually, and it will always keep your system up to date with the latest drivers.

Our software recommendations will help you update drivers automatically and prevent PC damage caused by installing the wrong driver versions.

Outbyte Driver Updater will scan your system for faults or missing drivers and generate a report in a matter of seconds. It contains practically all of the drivers and automatically updates them if obsolete or broken ones are found.

You can update drivers manually if you are completely familiar with the drivers your PC requires. The driver updater utility is the best alternative.

Outbyte Driver Updater can assist you in automatically updating drivers and preventing PC harm caused by installing the incorrect driver version. It keeps up with the latest modifications, preventing the system from experiencing latency, system failures, and BSoD issues.

After several tests, our team concluded that this is the best-automatized solution, so be sure to try it out.

⇒ Get Outbyte Driver Updater

2. Run the hardware troubleshooter 

  1. Open the Settings app and go to the Update & Security section.
  2. Select Troubleshoot from the menu on the left.
  3. Select BSOD from the right pane and click Run the troubleshooter.blue screen troubleshooter
  4. Follow the on-screen instructions to complete the troubleshooter.

If updating your drivers didn’t resolve the UNMOUNTABLE BOOT VOLUME error, we’ll try with a troubleshooting tool.

Windows 10 features a handy built-in troubleshooter that can help you with various issues, including the BSOD errors. So, we can try it and see if we have any luck.

3. Run the SFC scan

  1. Right-click on the Start Menu button, and open Command Prompt (Admin).
  2. Enter the following line and press Enter:sfc/scannow
  3. Wait until the process is done (it may take a while).
  4. If the solution is found, it will automatically be applied.
  5. Now, close the Command Prompt and restart your PC.

The SFC scan is a command-line tool that basically scans your computer for potential errors, and resolves them if the solution is available.

Among other errors that the SFC scan can help with are the BSOD issues, so be sure to check it out.

4. Run DISM

  • Standard way
  1. Right-click on Start and open Command Prompt (Admin).
  2. Paste the following command and press Enter:
    • DISM /Online /Cleanup-Image /RestoreHealth
  3. Wait until the scan is finished.
  4. Restart your computer and try updating again.
  • With the Windows installation media
  1. Insert your Windows installation media.
  2. Right-click the Start menu and, from the menu, choose Command Prompt (Admin).
  3. In the command line, type the following commands and press Enter after each:
    • dism /online /cleanup-image /scanhealth
    • dism /online /cleanup-image /restorehealth
  4. Now, type the following command and press Enter:
    • DISM /Online /Cleanup-Image /RestoreHealth /source:WIM:X:SourcesInstall.wim:1 /LimitAccess
  5. Make sure to change an X value with the letter of the mounted drive with Windows 10 installation.
  6. After the procedure is finished, restart your PC.

DISM is yet another command-line troubleshooter that we can use if the previous ones failed to resolve the issue.

In fact, DISM might be the most powerful troubleshooter, because it freshly deploys the system image.

5. Use chkdsk scan

  1. Press the Windows Key + X, and select Command Prompt (Admin).
    unmountable-boot-volume-admin
  2. Type the following command and press Enter: chkdsk /r c:unmountable-boot-volume-chkdsk-cmd
  3. Wait for the chkdsk scan to finish.

Some users are also recommending using the bootrec /fixmbr command before chkdsk, so you might want to try that as well.

If you cannot enter Windows 10 due to a UNMOUNTABLE BOOT VOLUME error, you can perform the chkdsk scan by following these steps:

  1. Start Automatic Repair by restarting your PC a few times during the boot sequence.
  2. Choose Troubleshoot > Advanced options > Command Prompt.
  3. When Command Prompt starts, type the following command and press Enter the chkdsk /r c:

Sometimes corrupted files on your hard drive can cause these types of errors to appear, but you can fix these errors by performing a chkdsk scan.

Alternatively, you can just connect that hard drive to a different PC and run the chkdsk scan. Just remember to replace C with the letter that matches your hard drive.

6. Change the SATA Mode in BIOS

Sometimes UNMOUNTABLE BOOT VOLUME Blue Screen of Death error is caused by the incorrect SATA Mode setting in BIOS, but you can easily change that.

To change the SATA Mode you need to enter BIOS first, and you can do that by pressing F2 or Del while your computer boots.

Certain motherboards use a different key, so you might want to check your motherboard manual and see how to access BIOS.

Once you enter BIOS you need to find SATA Mode setting. There should be several modes available such as IDE, RAID, AHCI, etc. Select any of these modes, save your changes and restart your PC.

If the problem isn’t resolved, enter BIOS again and choose a different mode. If you cannot find SATA Mode setting, check your motherboard manual for detailed instructions.

7. Check your hardware

This error can be sometimes caused by faulty hardware, therefore we advise you to check if your hard drive and motherboard are working properly.

If you made any changes to your PC and added new hardware, we strongly advise you to remove or replace the new hardware since it might not be fully compatible with your PC.

Also, be sure to check for any loose cables connecting to your hard drive. If a certain cable is loose and not properly connected, that might cause this error to appear.

If everything is connected properly, connect your hard drive to a different SATA port on your motherboard and check if that fixes this error.

UNMOUNTABLE BOOT VOLUME Blue Screen of Death error is one of the more serious errors, and it’s usually caused by a hard drive problem.

In order to fix this annoying BSoD error, be sure to try all solutions from our article. For more suggestions, please access the comments section below.

Former 20th Century Fox and Netflix exec joins Xbox as Director of Global Partnership

Perhaps, it isn’t enough that Microsoft’s new Game Pass platform is often made analogous to Netflix by the gaming industry, the company has now gone and hire a former Netflix executive to help solidify that mindshare broadly.

Microsoft’s gaming business welcomes Marcos Waltenberg as its new Director of Xbox Global Partnership this week. Waltenberg, a former Twentieth Century Fox and Netflix alum took to LinkedIn to celebrate his new position with Team Xbox.

After a fantastic 5-year journey with countless stunning colleagues at Netflix, I’m thrilled to share that I am joining Team Xbox to lead the Global Partnerships group. I can’t wait to learn from the teams behind the iconic Xbox brand, products, services and games (so many amazing games!), and I look forward to doing great things together at such an exciting time of change, growth and new opportunities in the world of Gaming.

Waltenberg is bringing his talents to the big green and black for Microsoft where he’ll oversee and build on Xbox’s current stable of high-profile brand partnerships that include Disney (The Mandalorian, Falcon and Winter Soldier), Warner Bros Pictures (Wonder Woman, Space Jam), ZOA Energy, which is co-founded by Dwayne ‘The Rock’ Johnson, plus partnerships with multi-platinum artist Saweetie, and more.

Xbox Partnerships

While Microsoft continues to drum the beat of a gaming-first ethos, at its heart the division is the entertainment wing of the company, regardless of how much Teams wants that title. With that being said, Waltenberg’s hire will be a key one to keep an eye on as Microsoft looks to expand the brand beyond plastic, buttons, silicon, and pixels.

Microsoft releases new build with no changes for Dev Channel Insiders

Microsoft has just released the Cumulative Update Build 21337.1010 (KB5001618) for Windows Insiders in the Dev Channel, which includes no new features or fixes. This is another update to help the Windows Insider team test its servicing pipeline following the release of the build Build 21337 on Wednesday.

If you have yet to install it, the build 21337 is actually packed with new features including Auto HDR Preview for PC, which will bring HDR visuals to over 1,000 DirectX 11 and DirectX 12 games that don’t support HDR natively. This build also introduced new controls for reordering and customizing Virtual Desktops, as well as a new layout for File Explorer.

Today’s cumulative update doesn’t fix any of the known issues in the build 21337 affecting ARM64 devices or users with Realtek network adapters. If you’re on an older build, make sure to check out the full list of known issues on the blog post before installing the new bits.

We hope the team will be back with another flight for the Dev Channel next week. If News and interests in the taskbar has been the main focus in recent Dev Channel builds, things may finally start to change in the coming weeks, and Wednesday’s build 21337 was definitely an exciting change.

5 alternative games like Roblox to play online

Roblox is a sandbox MMO (massively multiplayer online) game, and it’s one of the most played freely available alternatives to Minecraft. It enables players to build their own 3D worlds or play in ones created by other players.

However, there are numerous other free-to-play games like Roblox in which you can build your own 3D worlds to play in. These are some of the more notable alternative games like Roblox online that are freely available.

Quick tip:

Opera is one of the best browsers to play online browser games with. It’s the only browser that has a special game version, in the form of OperaGX. OperaGX is the first dedicated gaming browser that includes numerous game-orientated features.

OperaGX’s sidebar incorporates most of that browser’s gaming features. There users can access GX Control settings for limiting RAM and network bandwidth usage and view RAM and CPU usage for open tabs. Twitch and Discord are also integrated within OperaGX’s sidebar.

Opera GX

Opera GX

Use Opera GX to get the best lag-free gaming experience in your browser.
Get it freeVisit website

What are the best games like Roblox to play online?

Trove

trove games like roblox online

Trove is an online multiplayer game that mixes sandbox with massively multiplayer online arena gameplay. Players can play with mages, knights, pirates, lancers, and other character classes to explore many in-game worlds via the HUB. Or they can engage in PvP combat in Trove Battleverse.

Players can also build lots and lots in Trove. The game includes cornerstone home bases that players can build up to their hearts’ content. Trove players can also create their own special club worlds for other players to join. So, it incorporates similar sandbox building aspects to Roblox.

⇒ Get Trove


Kogama

kogama games like roblox online

Kogama is an open-ended sandbox game that you can play in your web browser. You can play, create, and share your very own 3D multiplayer games at the Kogama online universe without the need to download anything. However, there is a downloadable Android Kogama app available at Google Play.

You can get an idea of the sort of games you can make by playing those on the Kogama website. The website includes a plethora of player-made games you can play without registering on it. However, you’ll need to sign up on Kogama to make and share your own games.

⇒ Get Kogama


Creativerse

creativeverse games like roblox online

Creativerse is a sandbox action-adventure game in which players wield gauntlets to mine materials and build objects. Players must craft items, harvest materials, interact with wildlife, and build their own shelters to survive within a massive 3D world in this survival game.

Creativerse features a Creator Mode to build your own worlds other players can join. This game takes building to a new level as it enables players to fully rotate blocks and provides Blueprint instructions for structures. Creativierse also has a big creative community with regular activities and events.

⇒ Get Creativerse


Minecraft Classic

minecraft classic games like roblox online

Minecraft is the best sandbox game ever, but unlike Roblox it isn’t freely available. However, you can still play the original Minecraft game in your browser with Minecraft Classic. Mojang released Minecraft Classic to celebrate the 10th anniversary of the game.

Minecraft Classic is the original 2009 game restored in your browser. It includes the 32 building blocks from the original and even the same bugs. You can also invite up to nine players to join you at your hosted Minecraft Classic game.

⇒ Get Minecraft Classic


Terasology

terasology games like roblox online

Terasology is an open-source sandbox game that originated from a Minecraft tech demo. It is now a full-featured Java game with an online multiplayer mode you can play on Windows, Mac, and Linux platforms. Terasology players can craft and build landscapes that resemble Minecraft’s blocky worlds.

Terasology is certainly a visually impressive sandbox title. It features a rendering engine that provides some dazzling shadow and lighting effects. Players will also love some of the atmospheric music within Terasology.

⇒ Get Terasology


Those are five great sandbox creation game alternatives to Roblox that players can unleash their creativity with. You can play those games online with their Internet multiplayer modes and some of them will even run in web browsers.

Microsoft Edge Canary now details new features and more on New Tab page

Tracking new features in the Microsoft Edge Insider channels is a bit of a hit-and-miss experience, but the company is making it easier to keep up with what’s new on the docket for Canary users. The Edge Insider team has launched a What’s New page in the Canary channel that details all the new features and more on the New Tab page.

As noted by Missy Quarry, a community manager for Microsoft Edge Insiders, the page includes the build number along with a weekly round-up of all the latest announcements. It also gives an insight into the new features, recent blog posts, top forum posts, and more.

In addition to the new features and blog posts, the page lists a couple of known issues that are reported by Edge Insiders. There is also an Insider Spotlight section that highlights people currently making an impact in the community.

The Microsoft Edge Insider Channels are preview channels for the new Microsoft Edge browser. The Canary and Dev channels get new updates daily and weekly, respectively, and the Beta channel receives major updates every four weeks. This means that the company is constantly adding new features to these channels, and keeping track of new features can be a bit of a hassle for some users.

The What’s new page is a welcome change for Edge users running the Canary branch of Microsoft Edge, and it’s already available in the Dev channel. Going forward, it will likely help to keep users informed about all the latest changes in the browser. Have you spotted the What’s new page on your PCs? Let us know in the comments down below.