Fix HP driver error 9996 on Windows PCs

If an update from HP cannot be installed on your Windows 10 computer, you are most likely receiving the system error 9996.

This alert is displayed by default and indicates a general problem that occurred during the update process.

So, based only on this error code is quite complicated to isolate the actual problem and find the right troubleshooting solutions.

That’s why we are here to assist you. In this article, we will try to find the best methods that you can use to address the HP driver error 9996 issue.

How can I fix the HP Driver error 9996 on Windows 10?

  1. Make sure you have the right software installed on your computer
  2. Your computer might not meet certain system requirements
  3. Update drivers on your computer
  4. Uninstall and reinstall outdated drivers
  5. Apply Windows 10 system updates that might be waiting for your approval
  6. Remove a recently installed Windows 10 system update

1. Make sure you have the right software installed on your computer

You can receive the HP Driver error 9996 while an update is being installed if certain hardware or software is not set up on your Windows 10 machine.

For example, if Microsoft .NET is missing, you will get the 9996 error code.

The same will happen if an update for an HP keyboard will be initiated on a system that uses a non-HP keyboard (you replaced the original HP keyboard – or any other HP manufactured hardware component – with a new one).

Thus, you should first verify if the required programs for the actual HP update are installed on your computer.

Also, if a hardware component is missing, then most likely you won’t have to install the particular update package.

That’s a situation during which the HP Driver error 9996 problem is not really an actual problem at all – the update is not needed on your computer.

2. Your computer might not meet certain system requirements

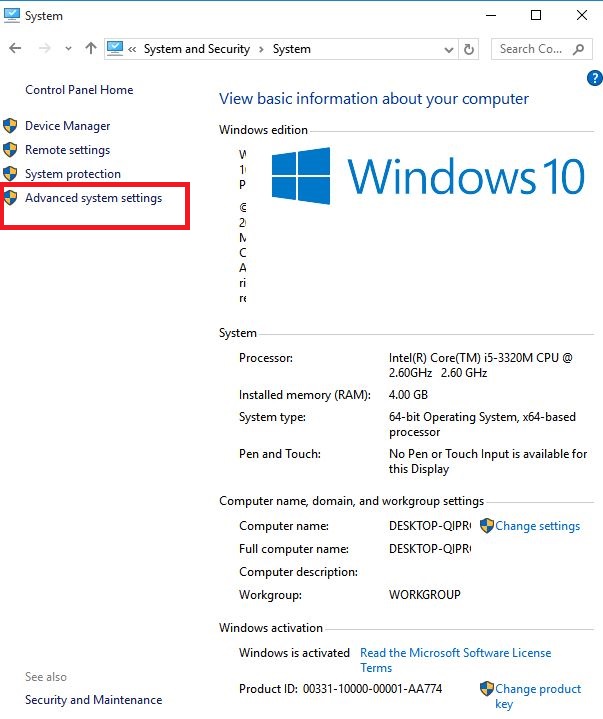
The same error code can occur if your computer is running low on memory – for example, if the update has 2 GB in size but on your computer, you have only 1 GB free disk space.

That’s why, at this point, you need to make sure that these system requirements are not the reason why you experience the HTC Driver error 9996.

Do note that system requirements might include software aspects such as the latest version of a certain program.

For example, if Microsoft .Net v2.0 is required but your PC is running on Microsoft .Net v1.0.

3. Update drivers on your computer

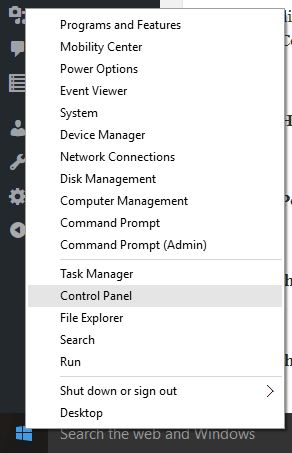
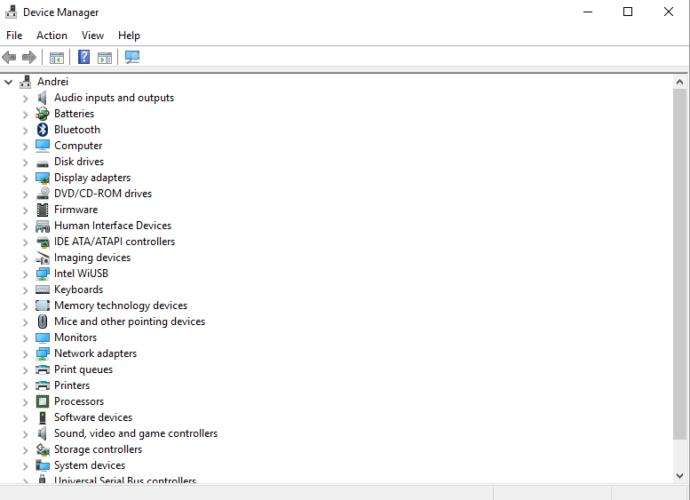
  1. On your computer right-click on the Start icon.
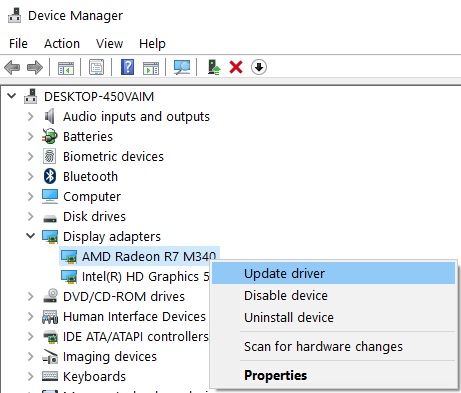
  2. From the list that shows up, click on the Device Manager entry.update graphic drivers from device manager
  3. In the Device Manager window find the driver that must be updated.
  4. Right-click on this driver and select Update.
  5. Wait while the flashing process is automatically completed and when done reboot your PC.

If your issue is tied to HP accessories, such as docking stations, you may also need to manually install specific drivers. For example, check out this HP USB-C Dock 5G drivers guide to download and install the correct package for stable performance.

If you are getting the HP error code 9996 while trying to install an update, that’s most likely related to a certain HP driver.

Therefore, you should update all drivers that run on your computer. This process can be completed with the help of the above steps, yet it isn’t the only way.

If it sounds a bit too tricky for you, don’t hesitate to install a dedicated driver updater tool and let it handle this job. The tool is best known for keeping your drivers updated automatically.

There’s a huge database updated daily, not to mention that it will prevent file loss and avoid permanent damage to your PC.

More than that, you can repair corrupted drivers that may become dangerous for the system due to malfunctions like BSoD errors.

This tool can actually cover everything related to driver functionality, installing up-to-date drivers, or finding missing drivers from Windows PCs.

⇒ Get Fortect Driver Updater

4. Uninstall and reinstall outdated drivers

  1. Access Device Manager as explained above.
  2. Then, find the driver that must be updated.
  3. Right-click on this driver and instead of Update choose Uninstall.
  4. Then, access your manufacturer website and download the driver package.
  5. Install this software by running the executable file and by following on-screen prompts.
  6. That should be all.

Sometimes it is better to reinstall the drivers that are not running properly. So, you need to follow the above steps or simply use Outbyte Driver Updater, the tool detailed in the first solution.

5. Install pending Windows 10 system updates.

  1. Press the Win+I keyboard hotkeys.
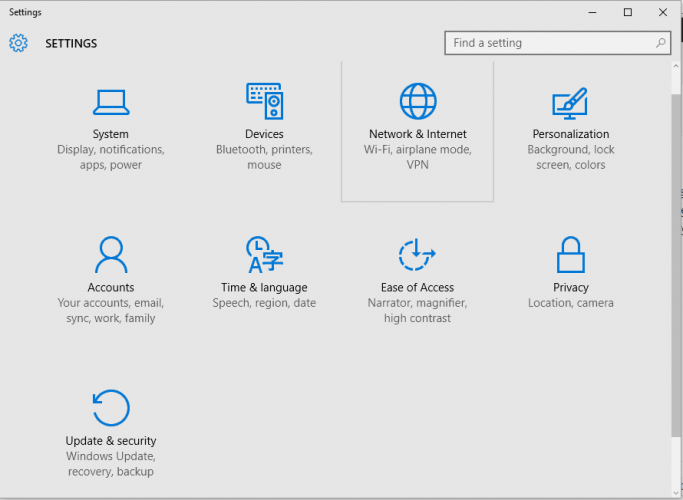
  2. From System Settings click on Update & Security.
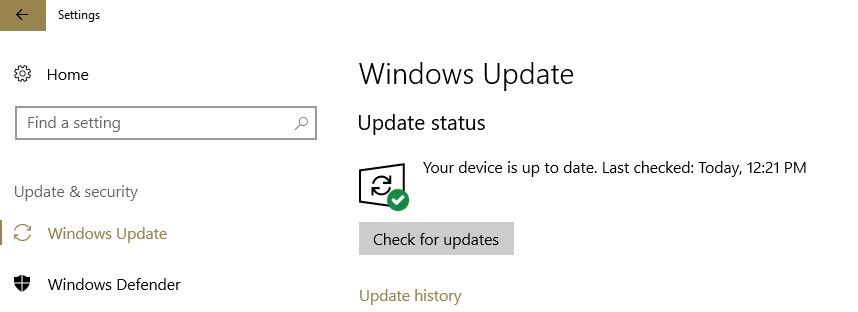
  3. Switch to the Update tab.access windows update options
  4. If a firmware patch is available, install it – just follow on-screen prompts as the update will be then automatically flashed.
  5. In the end, reboot your computer.

In some situations, if your Windows 10 system is not properly updated you might receive different system errors, including the HP error code 9996 issue.

That’s why you need to make sure that there isn’t any system update that’s waiting for your approval

6. Remove a recently installed Windows 10 system update

  1. Press Win+I keyboard keys and select Update & Security.
  2. Switch to Windows Update Tab.
  3. From there click on the View installed update history link.
  4. A list of recently installed patches will be now displayed.remove windows updates
  5. Click on Uninstall updates and choose the firmware package you want to remove from your PC.
  6. Reboot your computer in the end.

If you received the HP Driver error 9996 after installing a new Windows 10 update, a good idea might be to revert the update process.

You can uninstall certain Windows patches by following the above procedure.

The methods explained above should help you fix the HP Driver error 9996. When this error pops on the screen, you shouldn’t panic.

Probably the actual HP update is not really needed on your computer, so you can just ignore the error code.

If you have questions or if you want to learn other related stuff, contact our team. You can do it without hassle through the comments field from below.
Microsoft Edge Canary lets select Insiders easily translate text on a web page

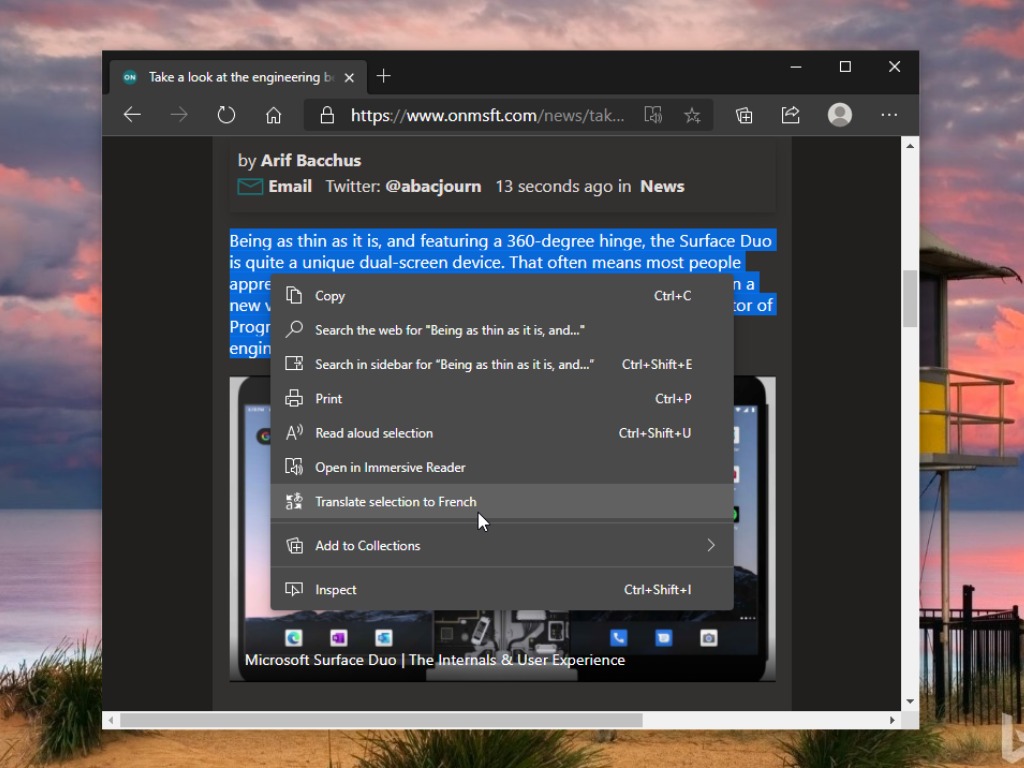
Microsoft Edge is getting a new feature that should make it possible for users to translate selected parts of the text on a webpage (via Deskmodder). The feature is currently under a controlled rollout, and it’s available for select Insiders in the Canary channel.

By default, Microsoft Edge comes with a built-in translation capability that lets users automatically translate web pages in a language that is different than the default language of the browser. The enhancements to the translation feature will bring the ability to translate certain sections of the page and then display the content in English while browsing a website.

If you’re running the latest Canary version of Edge on your PC, you can find this new option in the context menu. Simply open a webpage in the browser, and select a section of its text you want to translate. Then right-click on the selection and select the “Translate selection to English” option. Once done, the selected text should be translated into the default language configured by the user. If you want to revert this change, click on the translation symbol in the address bar and select “show original” to see the original text.

The updated functionality has been borrowed from legacy Edge, and it’s not available in Chrome natively yet. Considering that it’s a minor feature, the change could be made available to the Dev channel, and eventually, the stable version, sooner rather than later.

How to make transparent background in Paint.NET [Full Guide]

Paint.NET is a free image editing program, much better suited for image processing than the other free programs on the market.

Of course, this simple tool does not have the same variety of functions as Photoshop. But the free image editor also offers numerous editing options and is therefore a real hit: it has already been downloaded millions of times.

When editing, you can divide different layers, have freely positionable tool palettes and a multitude of different filters at your disposal.

Paint.NET also offers you the much-loved transparency function which leads you to add transparent background to your images or make individual areas transparent.

In the following lines, you will find a complete guide on how you can use this beloved transparency function.

How can I add transparency to an image?

1. Make the background of an image transparent

Add transparency to an image How to make transparent background in Paint.NET

  1. Start Paint.NET, and select File.
  2. Click Open to open the image in which you want to insert a transparent area or a transparent background.
  3. Select the Magic Wand icon from the Toolbox.
  4. Click in the background.
  5. If parts of the background have not been selected, adjust this under Tolerance.
  6. To make the area transparent, press the Delete key on your PC keyboard.
  7. Save the image as a PNG file.

2. Tips for transparency in Paint.NET

Add tips for transparency to an image How to make transparent background in Paint.NET

  1. When you click on the Magic Wand, an additional settings bar appears.
  2. Under Tolerance, you can set how strictly the wand should differentiate the colors. This will help you definitely if the wand removes more than just the background.
  3. The background and the foreground should be in different colors.
  4. If there are gaps in the image so that the background shines through (like the angled arms), make these gaps transparent.
  5. Select Global from the menu, and everything with the same color will be removed.
  6. Be sure to save the image as a PNG file in order to save it as an image with a transparent background.
  7. Please do not use any other image format (such as JPEG) as the transparent area will not be saved as such.

3. Change Background in Paint.NET

Add lasso background how to make transparent background in Paint.NET

  1. Start Paint.NET, and select File.
  2. Click Open to open the image in which you want to give a new background.
  3. Select the Eraser icon from the Toolbox, and erase the background.
  4. Leave only the object you want to put in front of the new background.
  5. Click on the Color Pot from the Toolbox, and select a color for the new background.
  6. To recolor the background, simply click in the erased area of the image.
  7. If you want the area to remain transparent, save the file in PNG format.

Note: If small areas have not taken on the new color, zoom into the image a little, and fill the background with color again.


Paint.NET can make images transparent and thus hide backgrounds, for example. This works particularly easily with the free Paint.NET, as it does not have any complicated functions.

The best way to make the background of an image transparent is to give it a uniform color and to make it stand out clearly from the object in the foreground.

If you have any more questions or suggestions, feel free to let them in the comments section below, and we will check them out.

[wl_navigator]

Atibtmon.exe Runtime Error: 6 Methods you can use to Fix it

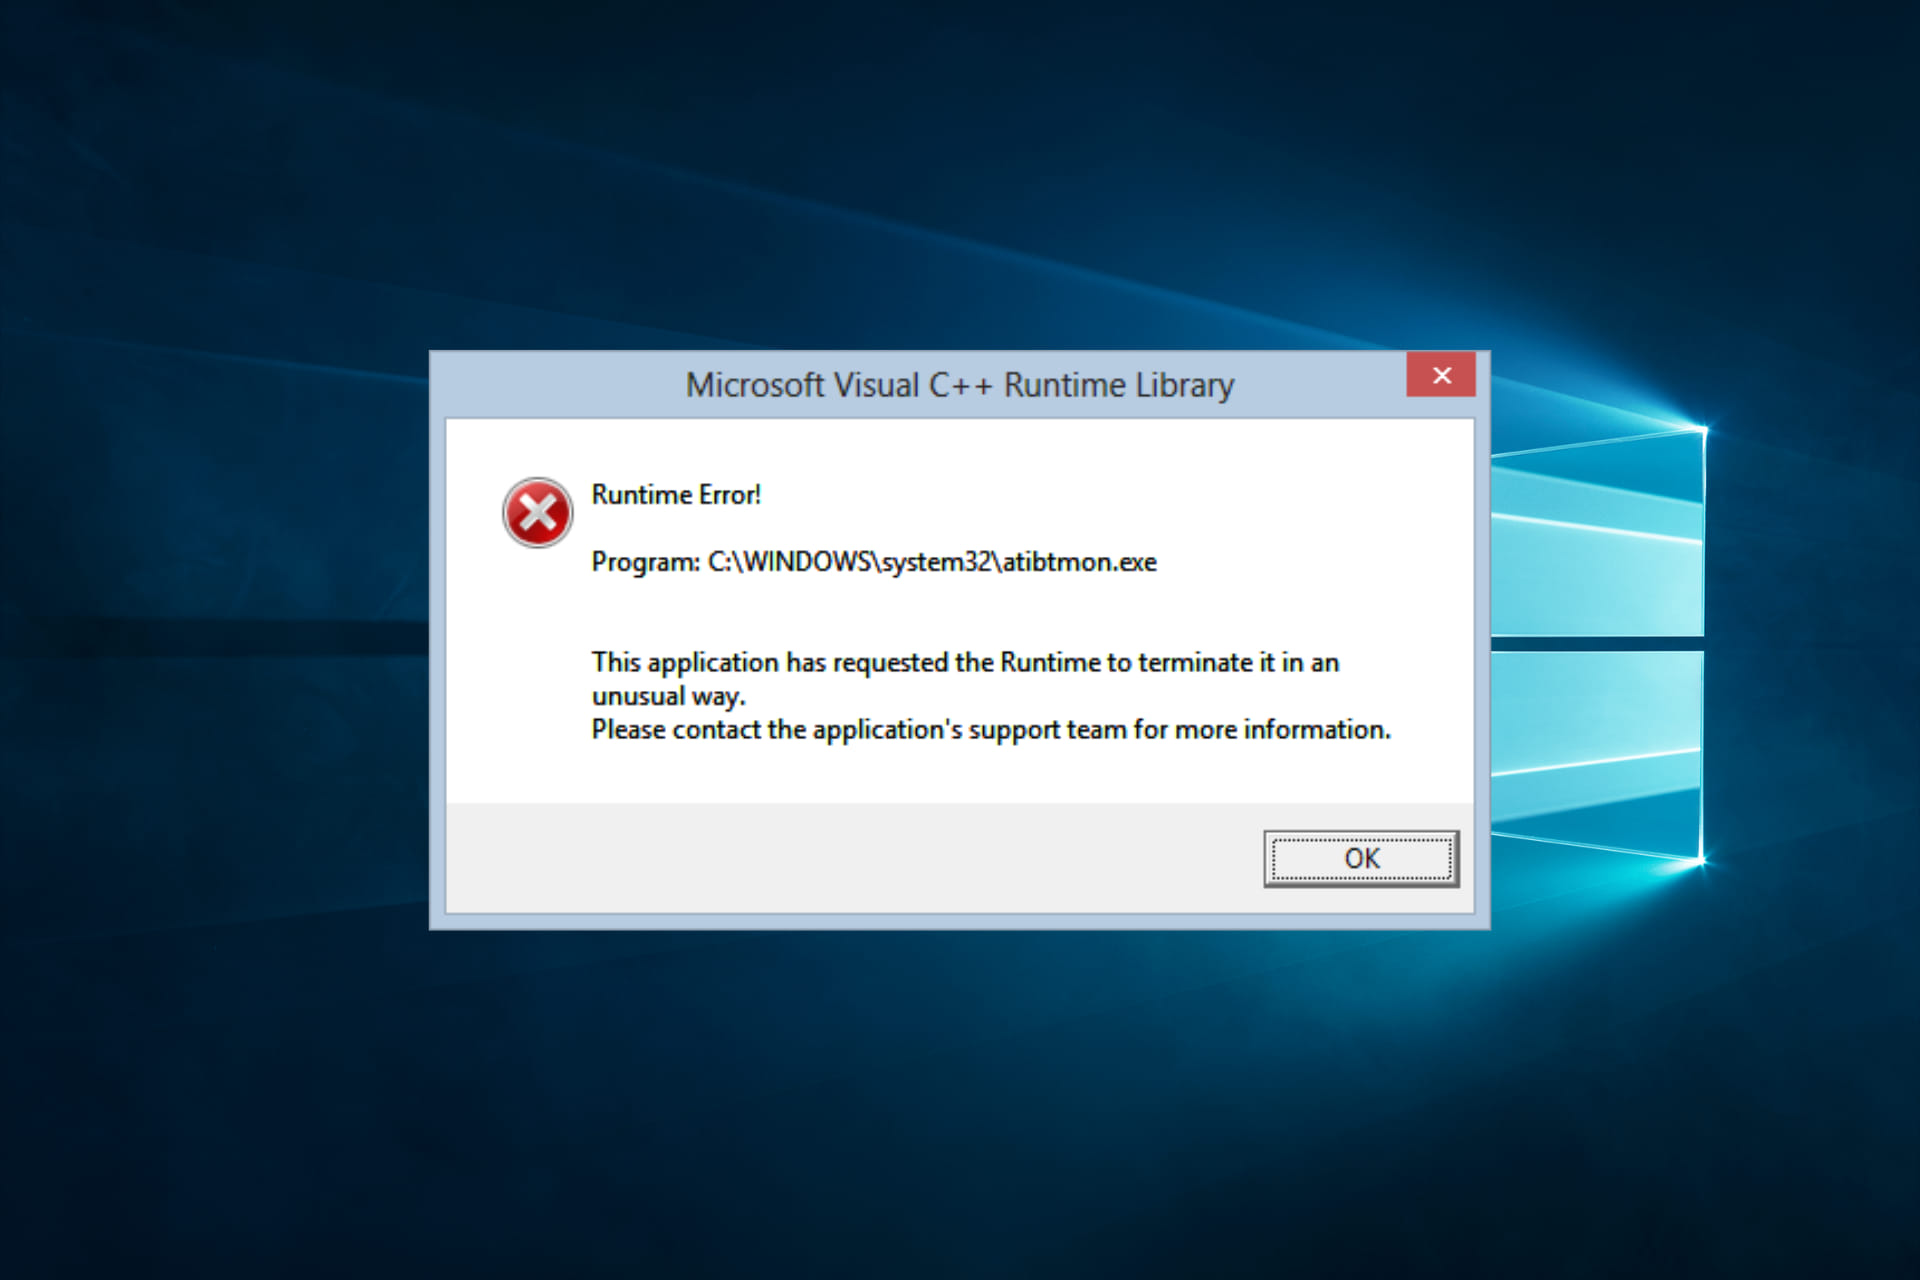
A runtime error on Windows 10 can be frustrating, and Atibtmon.exe is one of the more common ones.

Atibtmon.exe is designed to switch to a power-saving mode when you unplug your laptop and to work with ATI graphic cards. As for its power-saving features, this application does it by dimming the brightness of your laptop display.

Many users have reported getting a runtime error that says that atibtmon.exe has requested Runtime to terminate it unusually. According to users, this issue happens when they disconnect their AC power cord.

Why does the Runtime error atibtmon.exe appear?

We have investigated this error and have concluded that the following are the primary triggers.

  • Outdated drivers – If you run on outdated drivers, especially the graphics card, you may run into this runtime error.
  • Malware – Malware is a common trigger for many computer issues, including the atibtmon.exe runtime error.
  • Conflicting software – Some users have observed that a particular set of third-party applications may result in this error.

Atibtmon.exe Runtime Error can be an annoying problem, and many users reported it on their PC. Speaking of Atibtmon.exe, users said the following issues:

  • Atibtmon.exe runtime error Toshiba – This error can appear on almost any device, and many Toshiba owners reported it. We advise you to try some of our solutions to see how to fix this problem.
  • Vari Bright Windows 10 – Many users claim that this problem is related to Vari Bright feature in Catalyst Control Center. However, you can fix the problem simply by disabling this feature.
  • Runtime error atibtmon.exe AMD – This error is related to your AMD graphics card, and to fix it, it’s advised to install an older graphics card driver.
  • Atibtmon.exe runtime error on startup – This error can sometimes appear as soon as Windows 10 starts. However, you can fix the problem by disabling startup applications and services.
  • Atibtmon.exe application error – This is just a variation of the original error, and you should be able to fix it using the same solutions.
  • Atibtmon.exe stopped working – If you get a message saying that Atibtmon.exe stopped working, the problem might be your power settings. To fix the problem, change your power settings and check if that helps.

Let’s explore the best resolutions to this error on a Windows 10 device without much ado.

How can I fix the atibtmon.exe runtime error?

1. Get the older version of the display driver

  1. Press Windows Key + X and choose Device Manager from the list.
    atibtmon.exe runtime error
  2. Locate your display adapter on the list, right-click it, and choose Uninstall device from the menu.
    atibtmon.exe runtime error
  3. Check Attempt to remove the driver for this device and click on Uninstall.
    atibtmon.exe runtime error

Atibtmon.exe Runtime Error can appear due to problems with your display driver; however, you can fix the problem simply by installing an older AMD driver.

Before installing the older driver, you need to remove the current one. Once you remove the driver, restart your PC, and the default version should be installed automatically.

It’s worth mentioning that you can altogether remove your display driver using a Display Driver Uninstaller. This is a freeware tool that will remove your display driver along with all files associated with it.

To learn more about this tool, we advise you to check our article on how to use Display Driver Uninstaller.

Once the default driver is installed, check if the problem still appears. If not, you might want to consider updating the driver to a newer version, but be sure not to install the same version that gave you this problem in the first place.

If you choose not to update your driver manually, you might want to prevent Windows from updating the driver.

Windows 10 updates outdated drivers automatically, which can sometimes cause various issues, so you need to prevent Windows 10 from updating specific drivers. Follow this handy guide to learn how to do that.

2. Automatically update drivers

While installing the drivers manually is a reliable option, specialized software can save you time and effort and get the latest updates.

This kind of tool can automatically update your drivers safely and preferentially by scanning your PC and giving you a list of outdated drivers.

3. Disable Vari-Bright in Catalyst Control Center

  1. Launch the AMD Radeon Software.
  2. Click the Settings icon, and select the Display tab.
  3. Under Display Options, toggle off the switch for Vari-Bright.

4. Disable Powerplay in Catalyst Control Center

  1. Press Windows Key + S and enter power settings. Now select Power & sleep settings from the list of results.
    Atibtmon.exe application error
  2. Select Additional power settings in the left pane.
    Atibtmon.exe stopped working
  3. Locate your currently selected power plan and click Change plan settings next to it.
    Atibtmon.exe runtime error Toshiba
  4. Now click on Change advanced power settings.
    Atibtmon.exe runtime error Toshiba
  5. Locate ATI Graphics Power Settings on the list and expand it.
  6. Now set both ATI Powerplay Settings to Maximum Performance and save changes.

According to users, Atibtmon.exe Runtime Error can sometimes appear due to the Catalyst Control Center Powerplay feature. This feature can conflict with your power settings, causing this error.

However, you can fix the problem by disabling Powerplay in Catalyst Control Center. After disabling this feature, you also have to change your power settings.

After doing that, the conflict with the Powerplay feature should be entirely resolved, and you won’t see this error message anymore.

5. Disable AMD External Events service

  1. Press Windows Key + R and enter services.msc. Press Enter or click OK.
    Vari Bright Windows 10
  2. A list of services will now appear. Double-click the AMD External Events service to open its properties.
  3. Set the Startup type to Disabled and click the Stop button to stop the service. Now click on Apply and OK to save changes.
    Vari Bright Windows 10

To work correctly, Windows and other applications require specific services. However, sometimes services can cause Atibtmon.exe Runtime Error to appear on your PC.

Several users reported that AMD External Events service caused this problem; you must disable it to fix it.

After disabling this service, check if the problem persists.

6. Perform a Clean boot

  1. Press Windows Key + R and enter msconfig. Now press Enter or click OK.
    Runtime error atibtmon.exe AMD
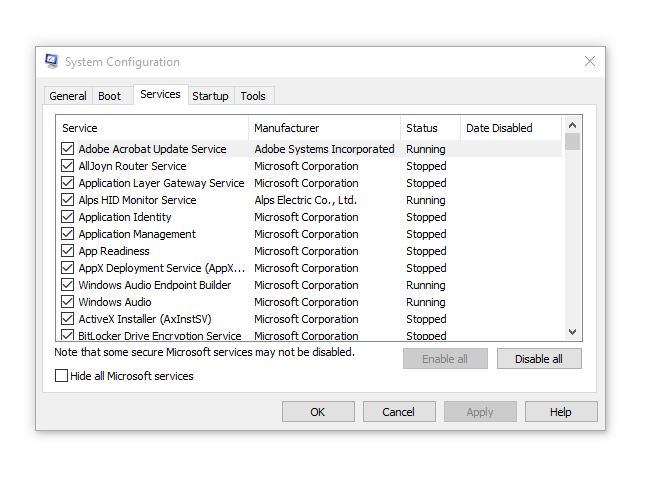
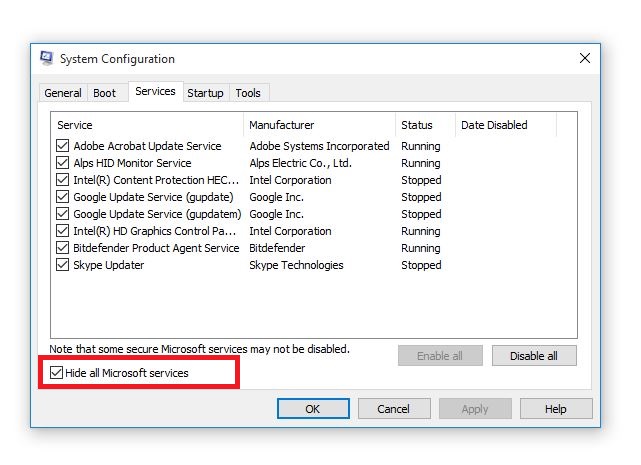
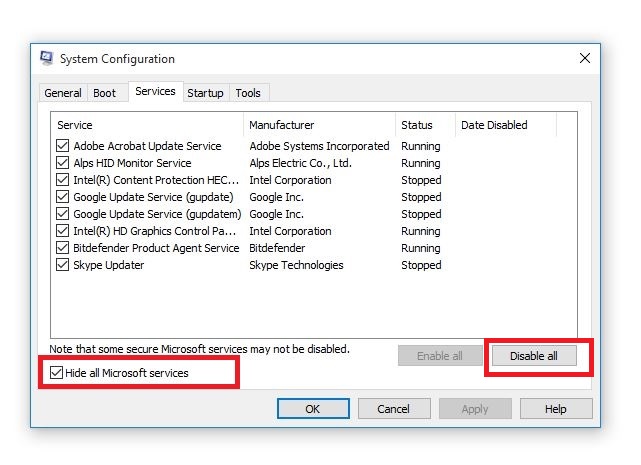
  2. Navigate to the Services tab and check Hide all Microsoft services; click the Disable all button to disable the services.
    Atibtmon.exe runtime error on startup
  3. Navigate to the Startup tab and click on Open Task Manager.
    Atibtmon.exe application error
  4. A list of startup applications will now appear. Locate the first item on the list, right-click it, and choose Disable from the menu.
    • Repeat this step for all startup applications on the list.
      Atibtmon.exe stopped working
  5. Now go back to the System Configuration window and click on Apply and OK.
    Atibtmon.exe runtime error Toshiba
  6. Restart your PC.

As mentioned, third-party applications can interfere with Windows and cause Atibtmon.exe Runtime Error to appear. In addition, sometimes, these applications can automatically start with Windows and cause this error on startup.

Once your PC restarts, check if the problem still appears. If not, it means that one of the disabled applications or services is causing the issue.

We hope these solutions helped you with solving this runtime error. If you have any comments or questions, or you maybe know some other solutions for this problem, reach for our comment section below.

Also, if you have any other problem related to Windows 10, you can search for the solution in our Windows 10 Fix section. We also have a guide on atiumdag.dll errors, so don’t miss it.

If you’re having runtime issues with Microsoft Visual C in Windows 10, here’s how to fix that, or in case your issues are related to RuntimeBroker.exe Error in Windows 10, we have a fix for that, as well.

FIX: The VPN client failed to establish a connection

If you’re using Cisco AnyConnect, you may have encountered the infamous VPN client failed to establish a connection error. More often than not, this issue solves itself, but sometimes it may take a bit of elbow grease to put the wheels in motion.

Although a VPN client, Cisco AnyConnect isn’t your regular privacy-protection security tool. In fact, this service was developed to help remote workers access the enterprise network and share company resources in a safe, secure manner.

How to fix Cisco AnyConnect’s connection error?

1. Restart your PC

Restarting not only your PC, but also the app itself, your router, and possibly your modem too can have quite the effect in this situation. It’s well-known that your PC builds upon on cached data, but so does your router.

Thus, giving them a chance to refresh their internal configuration, discard old, outdated data, and acquire new one might work wonders. There’s a good reason why restarting is the first suggestion of most customer support agents.

Furthermore, you could try uninstalling the AnyConnect VPN client and perform a fresh install. It’s not exactly uncommon for updates to render perfectly functional features unusable.

2. Flush your DNS

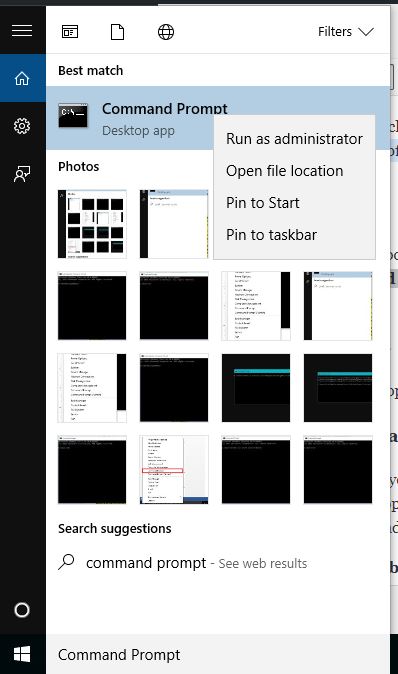
    1. Press the Win key on your keyboard
    2. Type CMD
    3. Right-click the Command Prompt icon
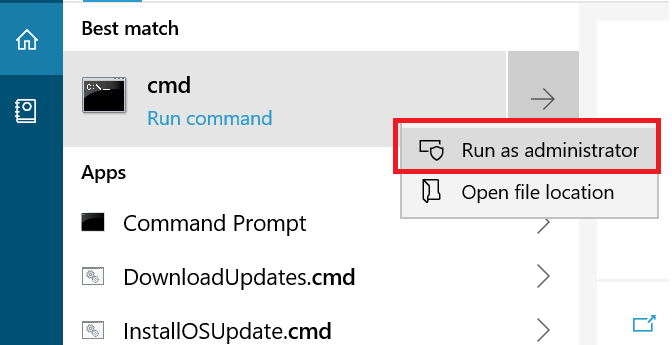
    4. Select Run as administratorflush DNS servers in Windows 10
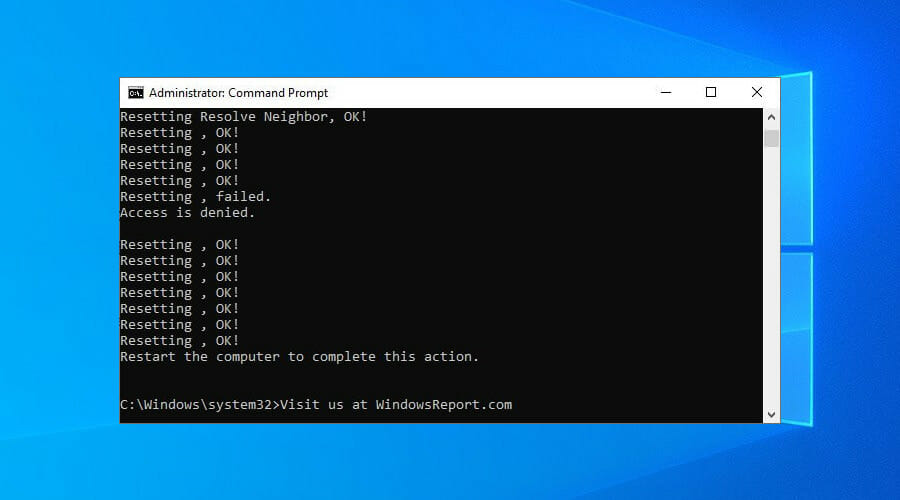
    5. Type the following commands, in this precise order, one by one:
      • ipconfig /flushdns
        ipconfig /registerdns
        ipconfig /release
        ipconfig /renew
        netsh winsock reset
        exit
    6. Restart your computer
    7. Launch Cisco AnyConnect
    8. Check if the connection problem still persists


If restarting your PC and router didn’t do the trick, manually forcing your PC to discard old cached DNS and acquire a new set of DNS servers might just be enough to put things back in order.

3. Disable Wi-Fi hotspot

If you have a Wi-Fi hotspot up and running on your PC, it would be wise to turn it off and checking if the problem still persists.

Reportedly, this issue occurs more frequently for Windows 7 PC users, but it might’ve slipped on later versions of this operating system, as well.

4. Disable ICS

  1. Hit the Win key
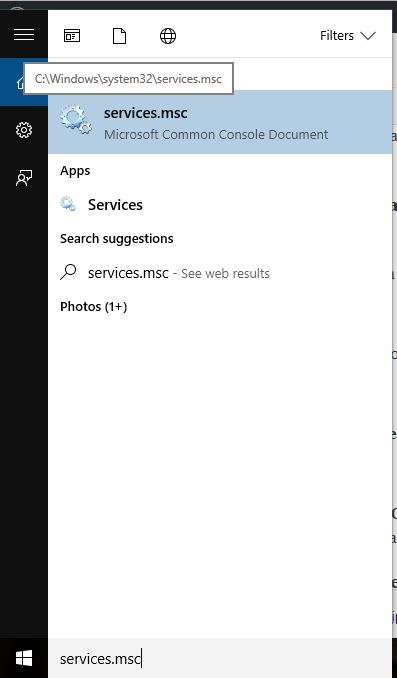
  2. Type Services
  3. Select the Services app from the resultsServices Start menu
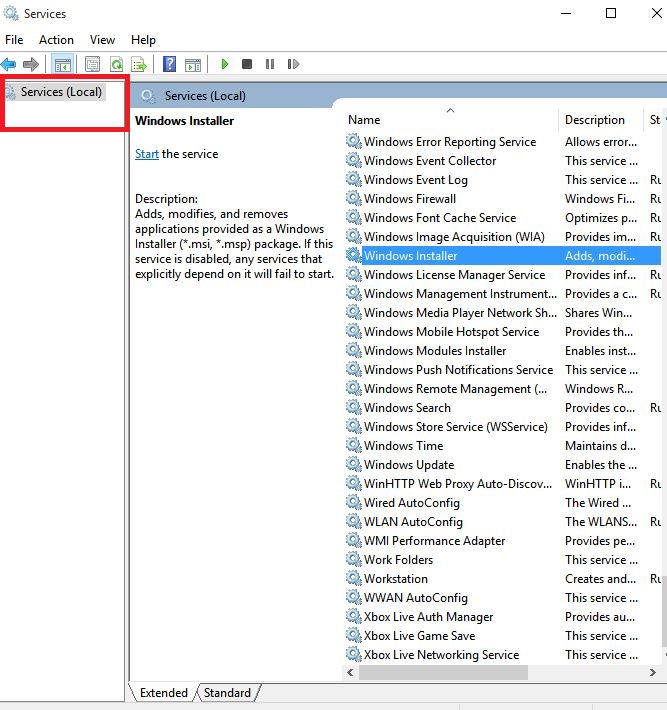
  4. Scroll down to Internet Connection Sharing (ICS)
  5. Right-click it and select Properties
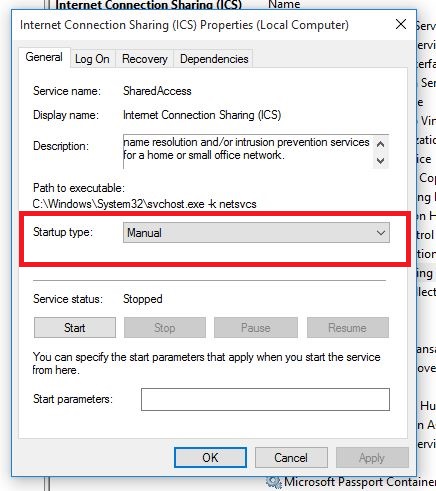
  6. Click the Startup type combo menu
  7. Select Disabled from the menuDisable ICS
  8. Click Apply and OK
  9. Restart your PC
  10. Check if the issue still persists

5. Change adapter settings

  1. Press the Win key on your keyboard
  2. Type Ethernet settingsEthernet settings in start menu
  3. Access the Ethernet settings section
  4. Click the Change adapter options buttonThe change adapter options button
  5. Right-click your active connection and select Properties
  6. Go to the Sharing tab
  7. Make sure the sharing option is not checked (uncheck it if necessary)Disable Internet Sharing
  8. Restart your PC
  9. Check if the VPN client failed to establish a connection error still persists

6. Check your firewall/antivirus settings

  1. Press the Win key
  2. Type Firewall
  3. Select the Firewall & Network protection option
  4. Click the Allow an app through firewall button
  5. Press the Change settings button
  6. Look for Cisco AnyConnect in the list
  7. If you can’t find it, use the Allow another app button
  8. Make sure the Private and Public boxes are both checked
  9. Click OK
  10. Check your antivirus for any signs of blocking Cisco AnyConnect
  11. Add Cisco AnyConnect to your antivirus’ exception list
  12. Restart your computer
  13. Check if the VPN connection error is still there

Some users reported that certain antivirus software solutions block some programs by default. Therefore, it’s not enough to leave the program (Cisco AnyConnect) as it is.

What you’ll need to do is open the antivirus program and add the VPN to a trusted list.

Final thoughts on fixing VPNs failing to establish connections

All things considered, if you’re having a difficult time getting your VPN to establish a connection, you might want to try troubleshooting the issue manually.

More often than not, the situation fixes itself. However, sometimes you might need to step into action and perform certain steps such as restarting your PC, clearing your cache, flushing your DNS, or even disabling Windows services temporarily.

[wl_navigator]

How to fix SonicWall SSL VPN failed to login [Easy Guide]

SonicWall Global VPN Client is a business VPN solution you can set up on your organization to provide remote access for work-at-home or traveling employees. It’s an excellent alternative to Cisco VPN.

Unfortunately, many system admins have trouble with the user configuration and can’t find a way to fix the SonicWall SSL VPN failed to login error.

It occurs when attempting to use NetExtender to create a user login sequence over SSL-VPN, resulting in the E-mail address may be configured wrong error message.

The problem is that the administrator activated a one-time password on the group associated with the user but didn’t also enable the user’s email address. Our guide below shows you how to quickly fix it in just a few steps.

How do I fix SonicWall SSL VPN failed to login?

require one-time password in SonicWall

  1. Using the SonicWall Global VPN Client, go to Users > Local Groups.
  2. Locate the group associated with the user and click the Edit button.
  3. Make sure to enable Require one-time passwords.
  4. Head over to Users > Local Users.
  5. Find the user’s group and click Edit.
  6. Switch to the Setting tab and specify the user’s email address.
  7. Click OK.
  8. To test the fix, reconnect to the SSL-VPN.
  9. Check the email account for a temporary password.
  10. You should now be able to enter the password and log in successfully.

If SonicWall SSL VPN failed to login and displayed the User is not authorized to use NetExtender error message, make sure to upgrade SMB SSL-VPN 2000/4000 and SRA 4200 appliance’s firmware version to 3.5.0.11 or newer.

Once you successfully log in, you should gain access to the company’s shared resources in the intranet. However, if SonicWall VPN stops working or doesn’t connect, you have to determine and solve the problem.

Switch to a better VPN solution for your business

use Perimeter 81

If you got tired of fixing SonicWall VPN errors, consider dropping it and replacing it with a more powerful VPN solution, such as Perimeter 81. It’s an elaborate business VPN with a cloud management platform, seamless network deployment, and user-friendly client tools.

When using Perimeter 81, you can take advantage of automatic Wi-Fi security, single sign-on, activity audits and reports, custom DNS and DNS filtering, SIEM integration, and other awesome features.

What else you should know about Perimeter 81:

  • Made for 5 or more team members
  • Integrates with AWS, Azure, Google Cloud, Salesforce, and others
  • 24/7 chat support
  • 30-day money-back guarantee (no free trial)

Perimeter 81

Perimeter 81

Drop SonicWall VPN and replace it with a more powerful VPN solution for your company.
$12/mo. Buy now

In conclusion, you should be able to quickly fix the SonicWall SSL VPN failed to login issue by following the simple workaround we provided above. But if you’re interested in a better corporate VPN solution, pick Perimeter 81 instead.

[wl_navigator]

AT&T Fixed Wireless running with VPN [Easy Guide]

AT&T Fixed Wireless Internet has the potential to connect numerous remote households to the Internet, but can it support VPN usage?

A lot of Internet users have relocated and are pursuing a work-from-home lifestyle. This highly depends on two things: Internet availability and connection speed.

When VPNs are involved, speed can take a serious hit. And it’s not exactly a secret that a wireless connection is not as capable as its wired counterpart.

What is Fixed Wireless Internet?

Fixed Wireless Internet (FWI) is a nifty service that’s mainly designed for rural households or regions where wired Internet is unfortunately not an option.

It comprises an exterior antenna, which picks up radio signals from nearby cell towers. The signal is then carried to your a router in your home, which you connect to for Internet access.

As its name suggests, Fixed Wireless Internet is not dependant on wires. Except for the wire that’s between the antenna and your router, of course

How fast is AT&T Fixed Wireless Internet?

Currently, AT&T has a single offer of FWI for personal use, and another one for business. Both are capped at 10 Mbps, although the consumer-grade one boasts download speeds of even 25 Mbps (under certain circumstances).

In a world where Gigabit Ethernet is no longer a myth, having a 10 Mbps connection is like still using floppy disks to move data around. To put it shortly, having a 10 Mbps connection is 100 times slower than a Gigabit connection.

Not to mention that AT&T Fixed Wireless Internet has upload speeds capped at 1 Mbps, which is extremely low. Furthermore, data is capped at 250 GBs per month, which is a whole nother story, but relevant to our situation.

Can AT&T Fixed Wireless Internet support VPN?

1. Consumer-grade VPN

  1. Purchase a Private Internet Access subscription
  2. Download Private Internet Access to your PC
  3. Install the VPN client
  4. Launch PIA and connect to your account
  5. Select a fast server (the closer it is to you, the better)

Although AT&T Fixed Wireless Internet’s speed is nothing to write home about, using it with a fast VPN service such as Kape Technologies’ PIA shouldn’t increase latency too much.

The fact that Private Internet Access has an impressive network of servers makes it even more suitable for home use with AT&T’s FWI. If a server seems to be kind of slow, just switch to another one and you should be set.

However, you shouldn’t expect to be able to stream HD Netflix content, for instance. If things were slow by default on FWI, using a VPN will definitely make them even slower.

Note: To make the most out of your AT&T Fixed Wireless Internet + VPN combo, make sure you’re using Ethernet instead of Wi-Fi.

2. Business VPN

If you have other needs from your VPN aside from privacy, such as accessing company resources remotely, you’ll most likely use a business VPN.

Several companies set their own VPN server, which their employees connect to using Windows’ built-in VPN feature. Some of them, anyway.

Well, things are quite the same as with consumer-grade VPNs. You’ll definitely notice some slowdowns, depending on the capacity of the VPN server and its current load (e.g. how many users are currently connected to it).

The only drawback is that such a VPN doesn’t allow you to switch servers. This means that if the speed is extremely low, you’ll have to soldier on, as there’s nothing you can do about it.

Final thoughts on using a VPN with AT&T FWI

If you’re considering signing up for AT&T Fixed Wireless Internet and plan on using a VPN with it, you may want to reconsider. This connection type’s speed is capped at 10-25 Mbps, which is not entirely awful considering the lack of wires.

Although it’s obvious that adding a VPN to your FWI connection will slow it down, using a service such as Private Internet Access (fast and has a lot of servers) might just do the trick.

Microsoft adds more AI security protection for Azure clients

Azure is the top cloud platform for businesses right now so keeping it secure to protect its clients is a priority for Microsoft.

To top that up, the Redmont giant will test a satellite base connection to download satellite data to the Azure Cloud for immediate processing.

Now, Microsoft is trying a different approach to improve on Azure client’s data security: a partnership with a security company.

The partnership with Abnormal Security brings AI security to Azure

Microsoft signed a partnership with Abnormal Security to deliver a security solution for enterprises that can be purchased directly from Microsoft’s Azure Marketplace.

Microsoft for Startups is committed to helping B2B startups use the Microsoft platform to scale their business quickly and deliver innovative AI-powered solutions to enterprise customers.

Abnormal has hit the ground running, seeing success with Fortune 1000 companies in a short time, and we’re looking forward to joining forces to further accelerate their security solution to our global customers

, said Jeffrey Ma, VP Microsoft for Startups.

The great advantage of the Abnormal Security platform is that it integrates directly into the enterprise’s environment immediately and doesn’t require configuration or setup.

The solution also offers a 90 days overview with the detection activity of the attacks just to have a report about it’s effectiveness.

If you have any thoughts about Microsoft’s new deal, please leave your insights in the Comments section below.

[wl_navigator]

FIX: Lenovo N700 driver error on Windows 10/11

When you are having difficulty connecting your Lenovo N700 to a PC, it usually has to do with its Bluetooth drivers.

So naturally, solving Lenovo Bluetooth driver issues will help you get your Lenovo N700 working again.

Below are 3 methods that you can use to get things working again. It is important to note that these instructions are designed for Windows 10 users.

How can I fix Lenovo N700 driver issues on Windows 10?

1. Update drivers

  1. Press the Windows Key + S and type in Check for updates into the search bar.
  2. This should lead you to a window that will allow you to manually check for updates again.

Manually search for an updated driver on the Lenovo official website. You might have to do a little digging, but it is usually not very difficult to find the latest updates for your mouse.

Keep in mind that updating your drivers is an advanced procedure. If you’re not careful you can cause permanent damage to your system by downloading the wrong driver versions.

We strongly recommend a dedicated driver updater program to automatically download all the outdated drivers on your PC.

2. Ensure Bluetooth hardware is enabled

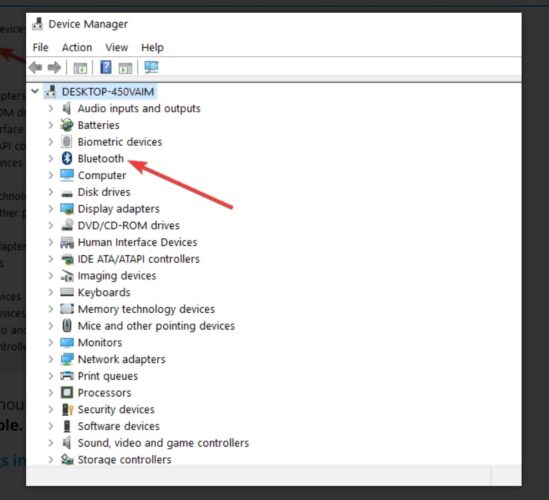
  1. Press the Windows key + X key and select Device Manager.
  2. Locate the Bluetooth or Bluetooth Radio section.
  3. Expand that section and find your N700 Bluetooth driver.
  4. Right-click on it and press Enable. 

3. Enable Discovery Mode

  1. First make sure your N700 mouse Bluetooth is on and in range of your PC.
  2. Open Start, type Settings and double-click on the first result.
  3. Go to Devices section.
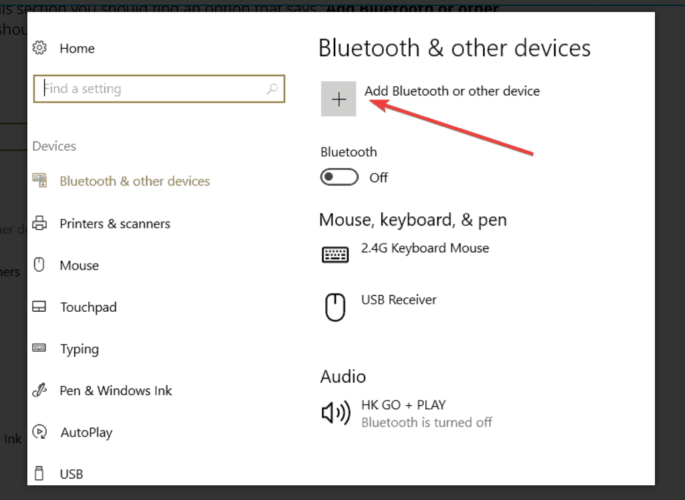
  4. Select the Add Bluetooth or other device option.
  5. It should help you find your Lenovo N700 mouse.

Typically, a Lenovo N700 driver error has to do with an out of date computer. Your discovery settings on your PC might not be properly set either.

Therefore, the solutions above should help you connect your mouse to the computer again without any trouble.

For any more questions or suggestions, don’t hesitate to reach for the comments section below.

Microsoft will end support for many products in October

When Microsoft ended the support for Windows 7 the moment marked the entering into a new era. At least that’s what we thought because many users remained very attached to the old OS.

But Windows 7 is still in the extended support period and the software company released security updates for Windows 7 and 8.1.

In October, Microsoft will make a new step in sending some of the old apps and even a Windows version to the unsupported list.

What is the Windows end-support list?

According to Microsoft’s end-support document, the most important software that will go on the unsupported list will be Windows 10, version 1709 (Enterprise, Education, IoT Enterprise).

But if you also have Windows 10 versions 1803 (Enterprise, Education, IoT Enterprise), 1809 (Home, Pro, Pro Education, Pro for Workstation, IoT Core) or Windows Server version 1809 (Datacenter Core, Standard Core), they will expire on November 10th.

You should also start preparing to upgrade if you have Windows 10, version 1903 (Enterprise, Home, Pro, Pro Education, Pro for Workstations, IoT Enterprise) or Windows Server, version 1903 (Datacenter, Standard) because they will be retired on December 8th.

What is the software end-support list for October 13th?

Regarding Microsoft software, the list is a lot longer, and all the tools listed below will be retired on October 13th.

Access 2010
Dynamics GP 2010
Excel 2010
Excel Mobile 2010
Exchange Server 2010 (all editions)
FAST Search Server 2010 (all editions)
Groove Server 2010
Office 2010 (all editions)
OneNote 2010
PowerPoint 2010
Project 2010
Publisher 2010
Search Server 2010
System Center Data Protection Manager 2010
System Center Essentials 2010
Visio 2010 (all editions)
Word 2010
Windows Embedded Standard 7
Office 2016 for Mac (all editions)
Excel 2016 for Mac
Outlook 2016 for Mac
PowerPoint 2016 for Mac
Word 2016 for Mac

We also have to mention that most of these products will switch to an extended support regime but to stay safe you will need to purchase Extended Security for them.

If you are using any of these OS versions or software, you should consider alternatives or upgrades. Also, make sure you have the latest security updates installed.

Are you prepared to upgrade to the next versions? Please tell us your opinion in the Comments section below. And don’t forget that Incase just announced that we’ll be offering Incase Designed by Microsoft starting in 2024, so all those accessory projects we thought were abandoned have a chance.

Google Earth cannot connect to server? Here’s how to fix it

Google Earth is an amazing tool that helps you explore the globe from the comfort of your home, but sometimes using this program might end in a proxy server error.

Surely enough, you can use Google Earth even if you’re behind a proxy. However, like any other online utilities, Google Earth can also experience connectivity issues.

The server error usually means that the desktop version of this app (called Google Earth Pro) can’t communicate with Google’s servers. As a result, you might not be able to use the program as intended, or at all.

How to fix Google Earth server error?

1. Use the Repair Tool

  1. Launch Google Earth Pro
  2. Click the Help button
  3. Select Launch Repair Tool from the Help menu
    The Help button on Google Earth
  4. Click the Clear disk cache button
  5. Wait for the operation to come to an end, if necessary
  6. Click the Restore default settings button
    Google Earth's Repair Tool
  7. Check if the problem still persists

If this fix doesn’t seem to be working, try closing Google Earth Pro after launching the Repair Tool. Make sure that the tool is still running, even with Google Earth Pro being closed.

Another possible workaround is backing up the entire My Places folder somewhere on your PC, repeating the steps above, and also selecting the Delete My Places option.

Note that it’s not mandatory to back up the content of the folder. You should only perform the backup if the content of the folder is important and you don’t want to lose your saved data.

2. Wait it out

Sometimes, due to various server-side reasons that have nothing to do with you, Google Earth might not be able to communicate with Google’s servers.

Thus, in this situation, the best approach would be waiting for the issue to fix itself. More often than not it’s related to maintenance work.

3. Use a VPN

  1. Purchase a Private Internet Access subscription
    PIA Google Earth
  2. Download PIA and install it on your PC
  3. Launch the VPN client and log into your account
  4. Connect to an optimal, fast server (nearby servers are usually the fastest)
  5. Launch Google Earth Pro
  6. Check if the problem still persists

If your network is poorly configured in terms of routing and resource allocation, you may experience the occasional connection error, even with Google Earth.

Private Internet Access

Private Internet Access

Experiencing connectivity issues in Google Earth? PIA might help you bypass them without great effort.
$2.85/mo. Buy it now

VPNs such as Kape Technologies’ PIA are designed to go around your default ISP connection, thus circumventing any badly-configured connection segments.

In turn, you may also notice speed improvements, not to mention privacy and security perks that are associated with VPN usage.

4. Flush your DNS

  1. Close the Google Earth Pro app
  2. Hit the Win key on your PC
  3. Type CMD
  4. Right-click Command Prompt
  5. Select Run as administrator
    Cmd as admin
  6. Type the following commands, in order, one by one:
    • ipconfig /flushdns

      ipconfig /registerdns

      ipconfig /release

      ipconfig /renew

      netsh winsock reset
  7. Close the CMD window
  8. Restart your computer
  9. Check if the error still persists

Flushing your DNS is a healthy practice, as it makes sure your system doesn’t cache old, outdated, or inaccurate information.

In our case, having an old cache can prevent you from accessing Google Earth servers properly, and might even trigger the infamous proxy error.

5. Check your firewall

Firewall settings Google Earth

This should be quite obvious. If you’re using a firewall (you should) to manage incoming and outgoing connections to and from your PC, make sure Google Earth connections aren’t blacklisted.

Furthermore, you also need to check if the Google Earth app isn’t blocked in any way by your firewall. The same rule applies to your antivirus software, as this type of utility can also restrict certain apps from functioning properly on your PC.

6. Disable proxy usage

disable proxy in Windows 10

While using a proxy server, Google Earth might not be able to access its servers properly. First of all, check that your PC doesn’t rely on a proxy connection.

Try disabling the proxy connection temporarily, just enough to test if Google Earth works without proxy. If it does, it means that the issue is likely to have been triggered by the proxy.

In this case, you can either check the proxy‘s configuration or switch it off whenever you plan on using Google Earth.

Final thoughts on Google Earth proxy server error

All things considered, Google Earth can sometimes have issues connecting to Google’s servers. Although most of the time this issue is only temporary and fixes itself rather quickly, sometimes it can also be triggered by certain factors.

For instance, poorly-applied firewall filters and rules can tamper with Google Earth’s ability to connect to its servers. The same goes for outdated cached content on your PC, which can be easily solved by flushing your DNS.

Google Earth offers many features, but if you’re looking for a new way to explore the world, you might want to try the free Google Flight Simulator.

Last, but not least, a VPN can save you from all the headaches of having a poorly-configured connection. However, it’s not guaranteed to work all the time, especially if the underlying issue has nothing to do with improper routing.

[wl_navigator]

FIX: Star Wars Battlefront 2 doesn’t work in Windows 10

Star Wars fever is still present! And while some people have yet to see the movie, many of them enjoy the Star Wars phenomenon by using branded merchandise, or even by playing one of the most popular same-name games ever – Star Wars Battlefront 2.

Battlefront 2 was released in 2005, and Microsoft released a couple of Windows OS versions since then. As a result, some compatibility issues might arise.

So in this article, we’re going to talk about getting Star Wars Battlefront 2 to work in Windows 10.

How can I launch Star Wars Battlefront 2 in Windows 10?

  1. Update Windows and install the latest drivers
  2. Enable Stereo Mix
  3. Run the game in the compatibility mode
  4. Delete vidmode
  5. Turn off firewall
  6. Run the game as Admin

1. Update Windows and install the latest drivers

First, make sure that you’re running the latest Windows version. Running outdated OS versions may trigger various issues, including game launch issues or crashes.

Go to Settings / Update & Security and open Windows Update. Click on the Check for updates button, if available.

windows 10 update

Windows Update automatically installs the latest driver updates when you check for updates.

However, make sure that you’ve indeed installed the latest driver versions by launching Device Manager.

If there is an exclamation mark next to particular drivers, right-click on the respective drivers and select Update.

update windows 10 drivers

We also strongly recommend dedicated third-party driver update tools, such as Fortect Driver Updater, to automatically download all the outdated drivers on your PC.

This is optimal since it will periodically scan for updates and will keep your system healthy and safe, as you can manually download and install the wrong driver version.

Once you install the tool, you only have to hit the Scan button and allow it to go through the entire system. By the end of the process, you’ll know exactly what drivers need updating, as well as available options.

⇒ Get Fortect Driver Updater

2. Enable Stereo Mix

  1. Right-click on the Speaker icon in the taskbar.
  2. Open Recording Devices (or Sounds).open sound control in windows 10
  3. Right-click on the empty space, and choose Show Disabled Devices.
  4. Stereo Mix will show up, so just right-click on it, and choose Enable.
  5. If you’re not able to turn on the Stereo Mix, you’re probably missing a driver, so head to Device Manager, and see if your audio drivers are missing

Note: Some of the latest sound drivers don’t support Stereo Mix anymore. So you might need to install an older sound driver if you can’t see or enable Stereo Mix.

After enabling Stereo Mix, go and try to open Star Wars Battlefront 2, it should work fine now. But if it doesn’t, try running the game in compatibility mode, as shown below.

3. Run the game in the compatibility mode

  1. Open Star Wars Battlefront 2 folder (if you’re using it through Steam, access it in the following location:  C:SteamsteamappscommonStar Wars Battlefront 2
  2. Right-click on the Start Wars Battlefront 2 icon, and choose Properties.
  3. Head to the Compatibility tab, under Compatibility mode, check Run this program in compatibility mode for: and choose Windows 7 from the dropdown menu.
  4. Click OK.

4. Delete vidmode

Some users confirmed that deleting vidmode fixed the problem. Navigate to this location:

C:Program Files (x86)SteamsteamappscommonStar Wars Battlefront IIGameDataDATA_LVL_PC

Simply delete vidmode, then check if you can launch Start Wars Battlefront 2 in Windows 10.

5. Turn off firewall

  1. Go to Start  and open Control Panel
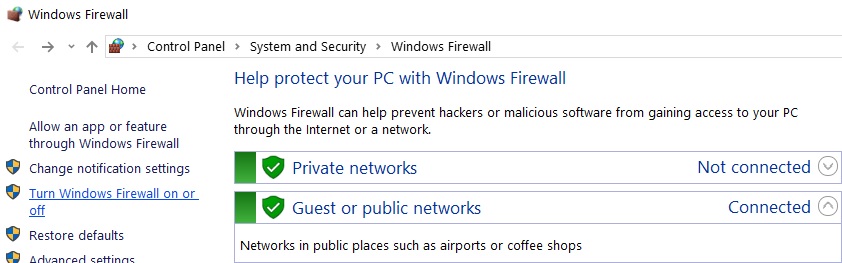
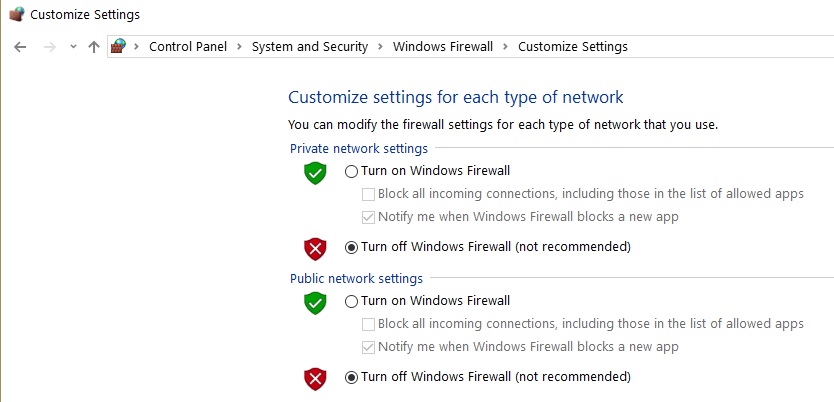
  2. Select System and Security / Firewall and go to Turn Windows Firewall on or off.turn off windows firewall
  3. Check the check boxes that allow you to turn off the firewall.
turn off windows firewall pc

6. Run the game as admin

  1. Go to: C:Program FilesOriginOrigin.exe
  2. Right-click the executable file and select Properties
  3. Next, go to the Compatibility tab and select Run as administrator.run start wars as administrator
  4. Then, go to C:Program FilesOrigin GamesSTAR WARS Battlefront IIstarwarsbattlefrontii.exe
  5. Right-click on the executable, select Properties, go to the Compatibility tab and check the Run as administrator.

Here are the steps to follow on Steam:

  1. Go to your Steam Library, right-click the game, go to Properties / Local Files tab.
  2. Navigate to Browse Local Files, right-click the game executable and select Properties.
  3. Select the Compatibility tab, then select Run this program as an administrator / Apply
  4. Restart Steam and launch Star Wars Battlefront 2 again.

As a last resort, try uninstalling and reinstalling the game.

That’s about it. We hope this article helped you to solve the problem, and that you’re now able to play your favorite Star Wars game on your Windows 10 computer.

If you have any comments, questions, or maybe some solution for this problem that we didn’t touch upon, feel free to leave it in the comments below.

We’ve extensively covered a lot of topics related to Microsoft’s OS, so check out the Windows 10 Hub.

When you’re looking for particular guides, our Troubleshooting section will surely help.

Microsoft Azure will use satellites to improve cloud data

Microsoft invested heavily in its business cloud platform, Azure. The last thing we reported about it, the software giant was building on its security features.

The platform’s evolution was extremely fast culminating with getting two new big customers and a huge agreement with the U.S. Government.

Nevertheless, Microsoft still aims even higher by trying to implement Azure on a Spanish satellite system.

What does the cloud has to do with satellites?

For starters, Amazon has a similar service with their AWS Ground Station system. With this technology, Amazon gives their clients control over their satellite data by downlinking them straight to an AWS data center.

Microsoft filed an FCC request to test the connection between a Spanish imaging satellite named DEIMOS-2 to two ground stations at its data center from Quincy in Washington.

The software giant aims to demonstrate that they can download satellite data to the Azure Cloud for immediate processing.

The request was approved by FCC and now, Microsoft has a six-month license for communications and imagery data downloads through the satellite system.

If the demonstrations result in significant market interest, Microsoft will file an application for regular earth station authority with the International Bureau (IB) to support future commercial operations, and that application will include a request for U.S. market access for DEIMOS-2

, specifies Microsoft in its FCC application.

The demonstration is expected to run around the days preceding and during the Ignite conference starting on September 22.

This system reduces the time it takes to analyze satellite data from hours to minutes or even just seconds also saving customers a big percentage of the costs implied for the process.

If Microsoft‘s test will succeed, we will enter a new era of big data communication.

What do you think about the new Microsoft Azure move? Leave your thoughts in the Comments section below.

Source: CNBC

[wl_navigator]

How to Recover Deleted Games in Windows 10

Windows games always save files to keep in-game progress and configuration settings. However, players might sometimes accidentally erase these files.

Usually, some useful game files are mistaken for unnecessary records and are deleted.

There is still some chance players can restore deleted games, and that’s especially the case if they’ve taken precautions to back up game data.

How can I restore deleted games from my PC?

1. Check the Recycle Bin

  1. Open the Recycle Bin. The Recycle Bin how to recover deleted games in windows 10
  2. Have a look through the deleted files and select a game file to restore.
  3. Then press the Restore the selected items button.

2. Use File History

  1. 1. Type File Explorer in the home screen’s search bar and click on the first result to open the app.

  2. 2. Right-click the folder that includes the game that’s missing some files and select Properties (It’s possible that the game includes subfolders with the saving files).

    properties window game
  3. 3. Select the Previous Versions tab.

    previous versions tab folder
  4. 4. Choose the version that should include copies of the deleted saved games.

  5. 5. Then press the Apply button, and select the OK option to exit.

  6. If you’re looking to recover permanently deleted games on your PC, you can try out resetting the game’s folder to a previous version. This is likely to restore the previous data that was contained within, including the game itself.

3. Check out GameSave Manager

GameSave Manager is a freeware game backup software used to store current versions of a particular game. By using this tool, you can recover deleted files in the future.

In this particular case, the tool is useful only if you’re already familiar with it. Namely, if you do have a previously archived version of the game.

You can download the tool from the GameSave Manager website at any time and make sure you have handy backups of all your favorite games.

4. Use a recovery tool

Using a dedicated recovery tool such as Recoverit Data Recovery is the safest method because it will restore exactly the necessary files.

Besides, you can use the tool not just for a simple recovery, but also for more complex operations that involve database recovery in case of lost partitions, system crashes, or virus infection.

Recoverit is compatible with hundreds of document, audio, and video formats and can recover data from both internal and external sources.

Recovering your games files with Recoverit is a four-step process, installation included:

  1. Download the tool.
  2. Scan your system to find the missing files.
  3. Preview the files
  4. Recover the files in the desired location.

So, that’s how you can recover deleted game saves in Windows 10. If you have other ideas on this topic, share them with us in the comments below.

High Definition Audio Device has a driver problem

The high definition audio has a driver error occurs when Windows fails to detect necessary audio drivers for the audio device. As the error indicates, it is triggered by a missing audio driver.

In some cases, the error can also occur if the audio driver is corrupt. It can be resolved by updating the required audio driver.

In this article, we explore a few troubleshooting steps to help you resolve the High Definition Audio Device has a driver error in Windows 10.

How do I fix the High Definition Audio Device has a driver problem?

1. Run Windows audio troubleshooter

high definition audio has a driver problem
  1. Press the Windows key + I.
  2. Click on Update & Security.
  3. Open the Troubleshoot tab from the left panel.
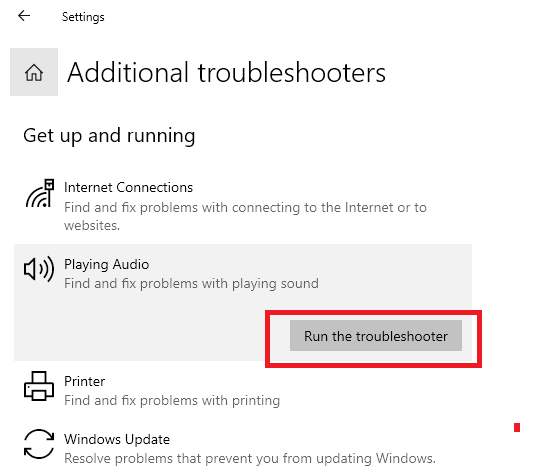
  4. Click on Additional Troubleshooters
  5. Select Playing Audio.
  6. Click on Run the Troubleshooter.
  7. The troubleshooter will scan the system for audio issues and recommend fixes accordingly.
  8. Follow the on-screen instructions to apply the fixes.

If the issue persists, run the Hardware and Devices troubleshooter. Here’s how to do it.

  1. Open Settings and go Update & Security, and click on Troubleshoot.
  2. Click on Additional Troubleshooter.
  3. Select Hardware & device troubleshooter and run the troubleshooter.
  4. Skip these steps if you can’t find hardware and devices troubleshooter.

2. Update your drivers

  • Go to Settings
  • Select Update & Security
  • Click on Windows Update
  • Select the Check for updates option
  • Reboot your PC after Windows installs the audio drivers

Follow these steps to install the latest audio drivers using Windows Update. If you want to opt for a less time-consuming solution, we recommend using third-party driver updating software for Windows that scans your computer and automatically installs the drivers for you.

3. Uninstall and reinstall the audio drivers

high definition audio has a driver problem
  1. Press the Windows key, type device manager.
  2. Click on Device Manager to open it.
  3. Expand the Sound, video, and game controllers
  4. Right-click on your Audio Device and select Uninstall Device. Confirm the action if you see a prompt.
  5. Follow the on-screen instructions to uninstall the driver. Reboot the computer after the driver is uninstalled.
  6. After the restart, open Device Manager.
    audio driver issue
  7. Click on Action > Scan for hardware changes.

Windows will download and install the required drivers for your audio device. You can also manually update the driver by right-clicking on the audio device in Device Manager and selecting Update driver.

The high definition audio device has a driver problem issue can be resolved by updating the audio drivers or reinstalling the same if required. You can also try updating Windows to get new driver updates.

[wl_navigator]

Are the pictures taken with the Surface Duo camera looking a little dull and wrong? Here’s how to use Google Photos to fix them

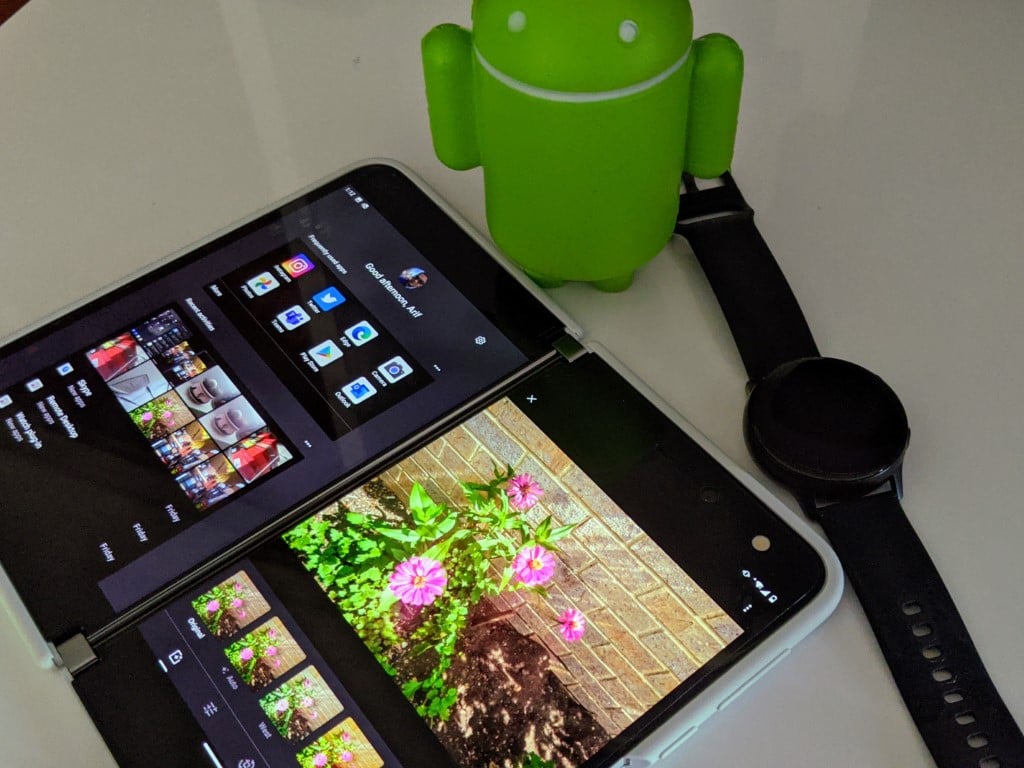
The single 11-megapixel camera on the Surface Duo doesn’t exactly produce some of the best quality images in all situations, but if you’re sporting a Duo and hope to get better image quality, there’s a quick fix for it. All it takes is to use the in-built Google Photos app, then edit your photos with the “Auto” function. This will change your boring looking photos to the shaper, colorful, and crisper images they deserve to look like. Here’s a few sample images, and a look at how to fix your images on your own.

Sample 1: Garage

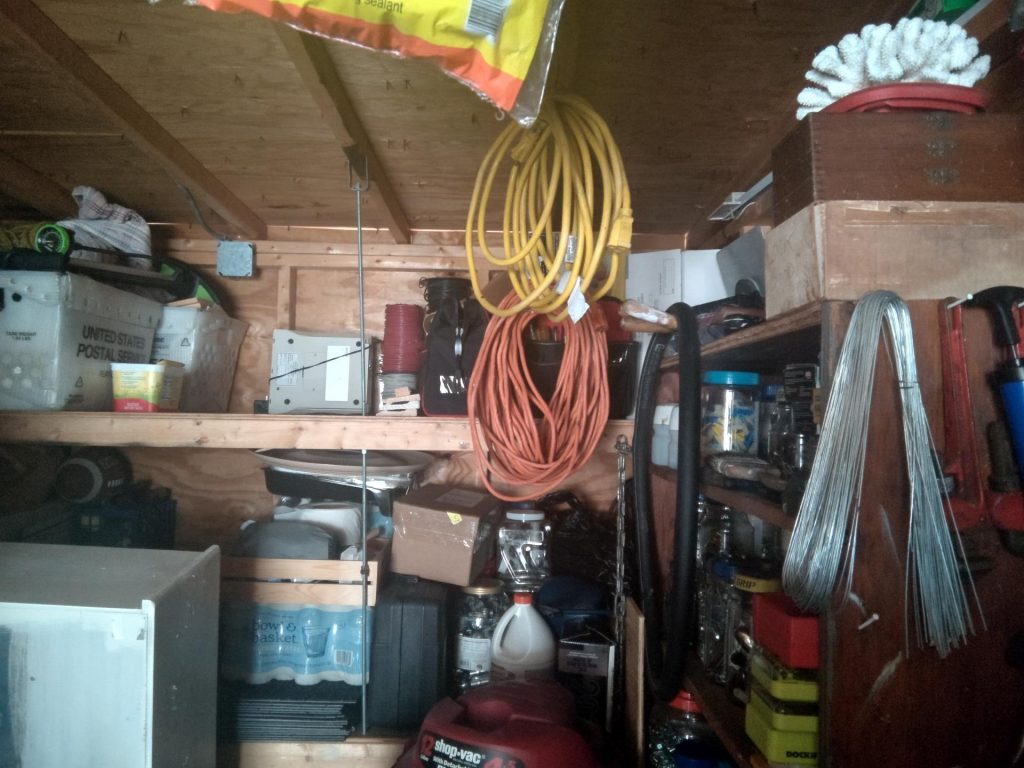
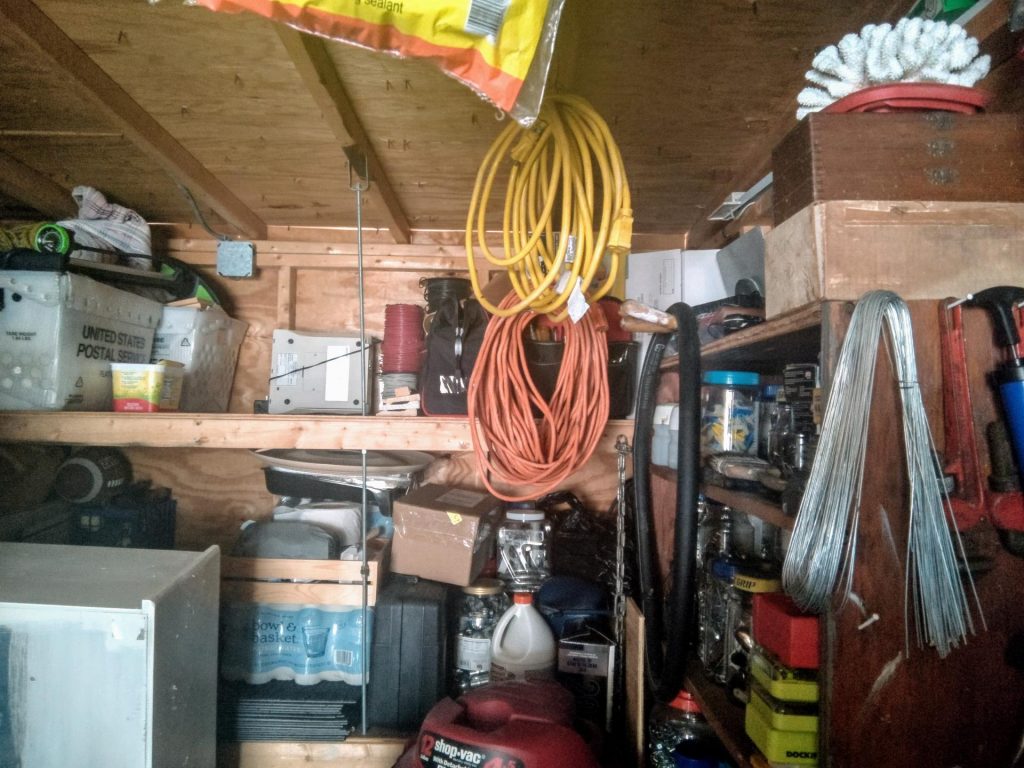
This low-light image was taken inside my garage, with the sun facing away from me, so that the garage is dimly lit. You can see that because of this situation, the overall color in the photo isn’t great. The wood in the roof appears a bit washed out, as do the colors in the power cord and the shop vacuum. Changing that in Google Photos with the “Auto” edit option, though, switches things up a bit. The wood ends up looking a bit more natural, as do the boxes and tools sitting on the shelf.

Sample 2: Flowers

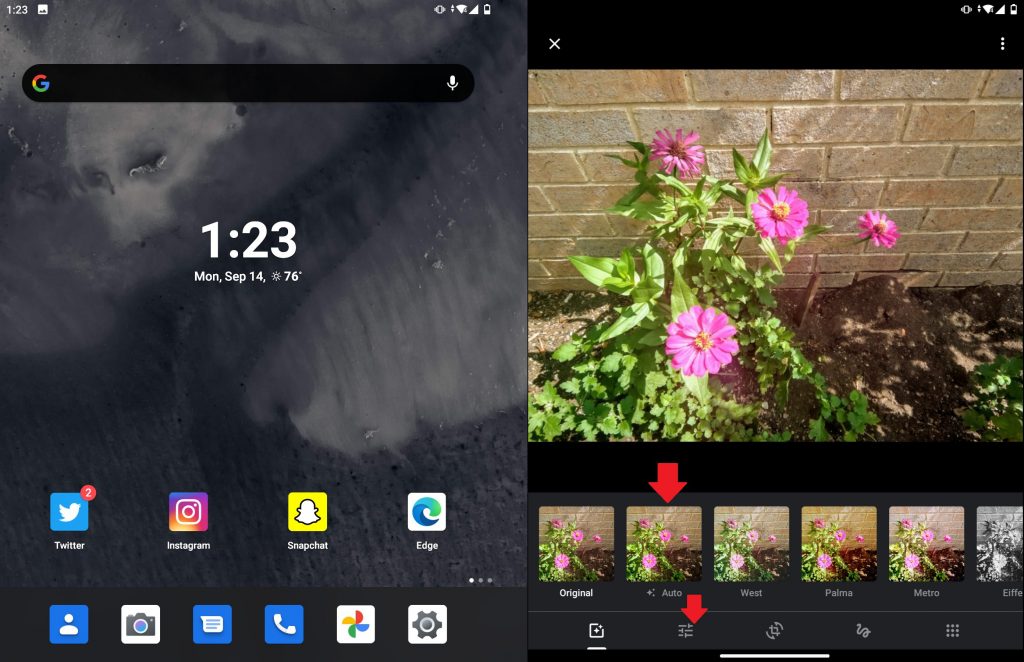
Now, for another image taken in bright sunlight. Here, you can see that the pink flowers aren’t exactly vibrant. The greens in the leaves also look a bit washed out, as does the dirt. Switching over to Google Photos and editing it with “Auto” meanwhile, makes the photo seem a bit more natural. You can see the bricks in the background change to their true to real-life color as will the and the brown in the dirt.

Sample 3: Indoors, inside a house

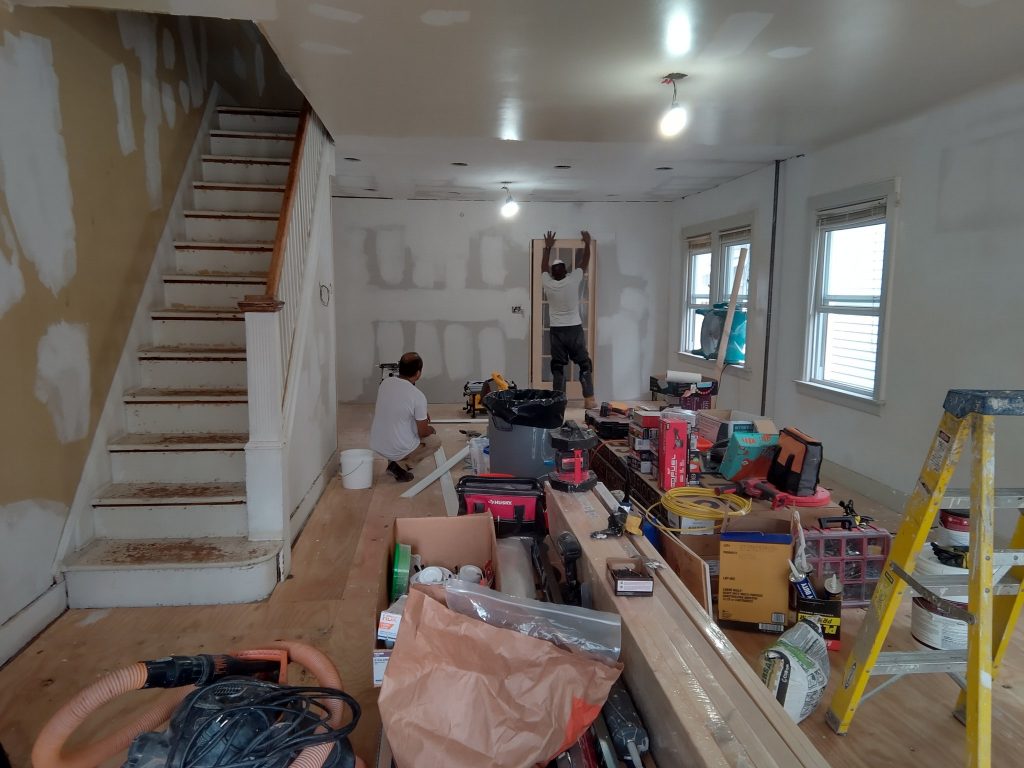
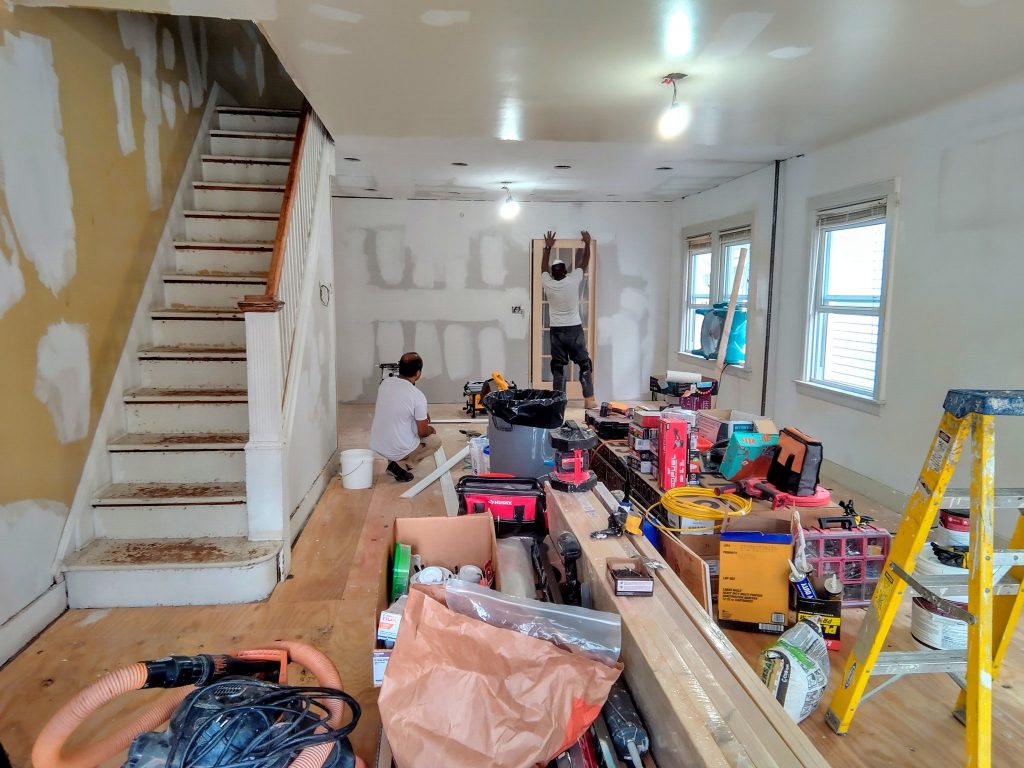
Finally, there’s another indoor situation. Here you can see some construction going on inside my home. In the Duo’s original photo, everything looks washed out and dark. When going to Google Photos, though. the wood floor suddenly becomes more vibrant, and the yellow in the walls pop out a bit more. The difference is bright as day with this one (pun intended.)

How to fix your images in Google Photos

Duo Edit Photos

Now that you can see the difference, you can try it for yourself. Since Google Photos is the default app for viewing images on the Surface Duo, you can correct the image in just a few steps. First, click the icon which looks like three switches. It’s the one that’s the second from the left in the bottom of the screen. Once you click that, you can choose “Auto.” You’ll then be able to see the difference.

You also can tweak the image manually, too. Just click the three switches again, and drag the light, color, and pop sliders around. When finished, click “Save a Copy” on top.

Could the camera be improved with software updates?

Since Google Photos is able to enhance the Duo’s photos with its software. we’re wondering if Microsoft’s stock Android camera app on the Duo could see an update in the future to improve overall image quality. Of course, we also hope that Google will port its GCam app to the Duo too (which is unlikely since it’s only designed for Pixel photos) to help make a difference. Until then, this is one way to improve image quality on the Duo. Or, you can also try checking out a third-party camera app (many of which aren’t yet optimized for the Duo and will just crash.)

Microsoft Teams gets its own 30 second commercial, shown on NFL games this weekend

Microsoft Teams saw an unprecedented growth this year when the covid-19 pandemic forced many employees to start working from home. The app now has over 75 million monthly active users and more than 13 million daily active users, and Microsoft recently launched a free consumer version of Teams that anyone can use to stay in touch with family and close friends.

As the fastest growing app in the Microsoft 365 ecosystem, Teams now gets its own TV ads during big events, such as the NFL games that aired in the US this weekend. In case you missed it, here’s the 30-second ad for Microsoft Teams that was shown (at least) on the Seahawks-Falcons game, and again on Sunday Night Football.

Interestingly, Teams has now become so big that these ads are apparently causing some people to freak out, especially due to the use of the Teams meeting sound. “Can we go ahead and not have Microsoft Teams commercials on Sunday Night Football? If Sunday Scaries aren’t bad enough, every commercial break I’m hearing the noise I hear whenever I join a meeting,” wrote Twitter user @ryanhelm75.

Another funny tweet from @tayahmarie__ echoed this sentiment. “Microsoft made a Teams commercial and anytime i see it/hear that ding sound, specifically on the weekends, i get triggered,” the tweet reads.

It’s good to see that Microsoft Teams is getting some screen time, and so did the company’s brand new Surface Duo dual-screen phone during the NFL games this weekend. Have you ever seen ads for Microsoft Teams on TV in your country? If so, let us know in the comments if they caught your attention in a positive or negative way.


Xbox Game Pass is welcoming Destiny 2: Shadowkeep & Forsaken and more this month

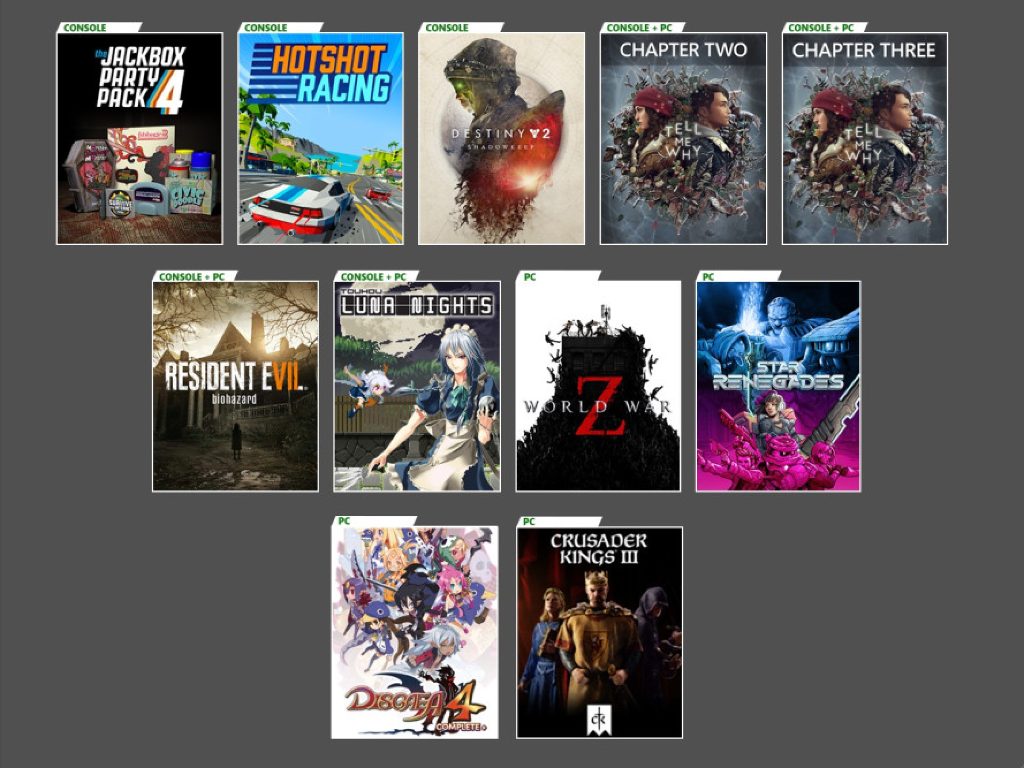
Microsoft announced another wave of new Xbox Game Pass titles this morning. With the launch of Cloud Gaming as part of Xbox Game Pass Ultimate tomorrow, new Xbox Game Pass announcements will include three platforms going forward: Xbox Consoles, Android devices, and PCs.

The first new Xbox Game Pass game coming in September is the PC RTS game Company of Heroes 2, which will be available on Thursday, September 17. It will be followed next week by two other games on September 22, Halo: 3 ODST on PC as well as Destiny 2: Shadowkeep & Forsaken on Console and Android. Beyond Light, the next Destiny 2 expansion launching on November 10 will also be available on Game Pass on day one.

Two more games will join Xbox Game Pass on September 24, Warhammer: Vermintide 2 on Console and Android, as well as Night in the Woods on Console, PC, and Android. Last but not least, the Xbox team announced that the following six games will leave the Xbox Game Pass catalog on September 30:

  • Bad North (Console & PC)
  • DiRT Rally 2.0 (Console & PC)
  • Dishonored 2 (Console & PC)
  • Panzer Dragoon Orta (Console)
  • Westerado: Double Barreled (Console)
  • Yooka-Laylee (Console)

In case you missed it, Xbox Game Pass for PC will also drop its beta tag and double its price to $9.99/month on Thursday, September 17, though existing subscribers will get to keep paying just $4.99 for the next billing cycle. For new subscribers, all new Xbox Game Pass subscriptions remain at $1 for the first month, and that also applies to Xbox Game Pass Ultimate which now includes Xbox Game Pass for Console and PC, Xbox Live Gold, and starting tomorrow, September 15, access to 150 Xbox games via Cloud Gaming on Android devices.


OneNote vs OneNote for Windows 10, what’s the difference?

If you ever looked through the list of apps on your Windows 10 PC, you might have noticed that two versions of OneNote are installed. Well, you shouldn’t be too confused.

If at one point you installed the Microsoft 365 apps (Word, Excel, PowerPoint) in your PC, you would have gotten a dedicated OneNote app installed as part of your Office purchase. However, most new PCs also come with another OneNote app (known as OneNote for Windows 10) installed as well.

Both versions of this app share the same codebase and will help you take notes (and do the same thing,) but there are actually quite different. OneNote for Windows 10 is a dedicated desktop app that you can install via the Microsoft Store, while OneNote is a classic Win32 program (like Google Chrome.) But the differences don’t end there. Today, we’ll explain how these two apps are unique.

OneNote

Onenote Desktop App

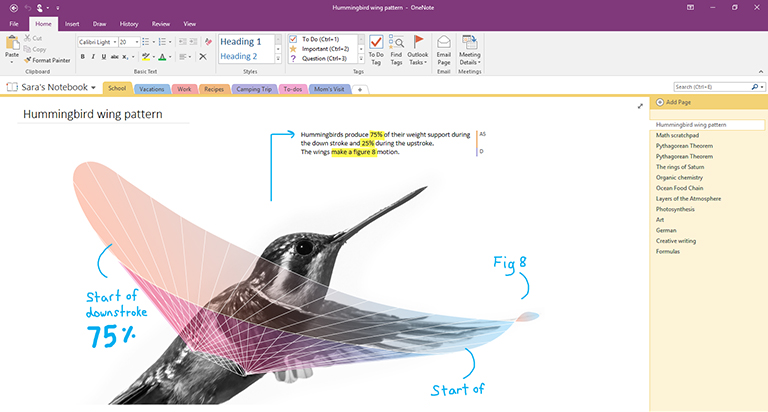
First up, there’s OneNote, also known as the OneNote desktop app. This version of OneNote is bundled with Office 2016, Office 2019, and Office 2013 versions, but it also can be downloaded on its own from Microsoft’s website. This desktop app was also known as OneNote 2016 or OneNote 2013, in the past, but it is now known as just “OneNote.”

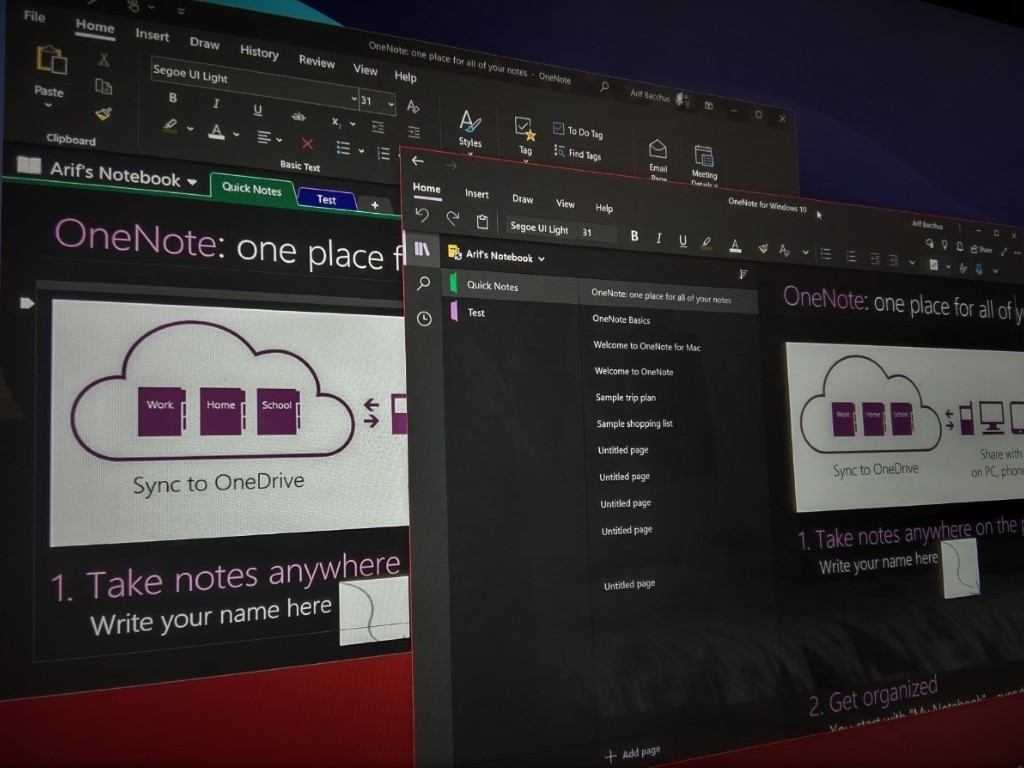
When you open the OneNote desktop app, you’ll notice that it looks quite familiar to the other Microsoft 365 apps. It has a full Office ribbon, just like Word, Excel, or PowerPoint might have. It also has colorful section tabs, and things are displayed vertically across the screen, with a list of page tabs being shown on the right side of the screen. Keep this in mind, as this one of the core differences of the app compared to OneNote for Windows 10.

Additionally, to update OneNote, you’ll have to update it just as you would any other Microsoft 365 app. You’ll need to click File, followed by Account. Then, next to Office Updates, you’ll have to click the Update Options button, followed by Update Now.

We’d also like to mention that if you prefer to store your notes on your computer’s hard drive, you’ll need to use OneNote. The OneNote for Windows 10 app won’t be able to read your disk-based notebooks.

OneNote for Windows 10

Onenote For Windows 10

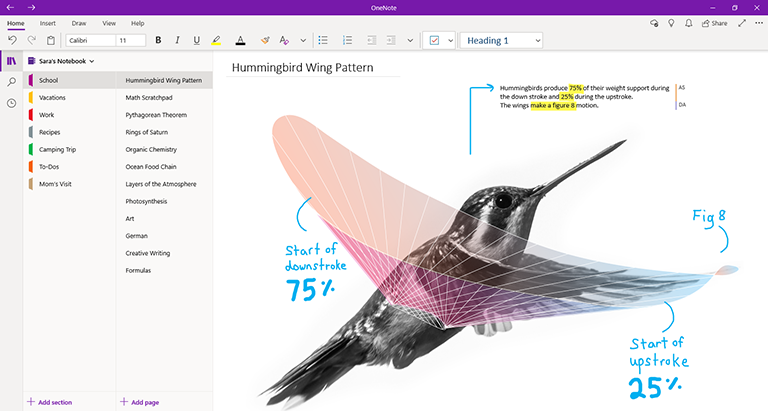
Now, for OneNote for Windows 10. This version of OneNote comes pre-installed on all editions of Windows 10 and is available as a free download in the Microsoft Store. Visually, you will see that this app is a bit different from OneNote desktop as it doesn’t feature a ribbon. Instead, you’ll see that it has a smaller single-line interface near the top of the screen.

Additionally, the navigation pane and navigation of Notebooks works a bit differently. When the navigation pane is revealed, it displays colorful notebook section tabs vertically on the left side of the screen. The list of page tabs is also shown directly to the right of the section tabs.

Updating OneNote for Windows 10, meanwhile, is a bit easier. It is updated on a much more regular basis than the standard OneNote desktop app. Just click the Start button, open the Microsoft Store, and then click the See more button followed by Download and Updates. In the Downloads and updates window, click Get updates in the upper right corner. OneNote will then update.

The differences

OneNoteNotebooks

Finally, we’ll end with the differences. First, there are some important notes about what you can ONLY get in the OneNote desktop app. These features will be appreciated if you’re using OneNote alongside the other apps like Outlook or Teams. Some of the features that plugin with the rest of Microsoft 365 are only available in the desktop version. We’ve gathered these into a list below.

  • Embedding Outlook Tasks
  • Send emails and meetings from Outlook
  • Sorting your notes with custom tags
  • Applying templates to pages
  • Storing notebooks on your hard drive instead of on the cloud.

Now, for OneNote for Windows 10. This version of OneNote has more features that will be appreciated by general consumers. It now shares the same codebase as the desktop app, but there are some cool features. One of those is being able to sync your notes through OneDrive, and view them across the OneNote app all your devices, even if they’re not Windows-based (like iPhones) See the others below.

  • Share notebooks with your colleagues and work on notebooks with them at the same time
  • Replay your inking and handwriting to provide step-by-step instructions, or to better understand the flow of others’ thoughts
  • Use the Math Assistant so OneNote can help you graph or solve it step-by-step
  • Enjoy new ink colors like rainbow, galaxy, gold
  • Use a researcher tool to help you during projects to find quotes, articles, sources, and more
  • Use an immersive reader

Check out our other OneNote coverage for more

Now that you know the differences, we invite you to check out our other OneNote coverage. We’ve previously explained how you can use OneNote 2016 with Outlook for your productivity advantage. We’ve also explained some of our favorite tips and tricks for OneNote on Windows 10, too. Which version of OneNote do you prefer? Let us know in the comments.

FIX: This content isn’t available right now [Facebook Error]

Sorry, this content isn’t available right now is one of the most common Facebook errors.

Almost everyone faced this error message from Facebook, but we all know that this beloved social platform can sometimes also block some contacts.

It has to make you think if your crush is suspiciously quiet after a social networking dispute. That means you have been blocked.

And you will not receive a message about any block, but only the above-mentioned error message.

What does it mean when Facebook says this content isn’t available right now?Facebook error this content isn't available right now block profile

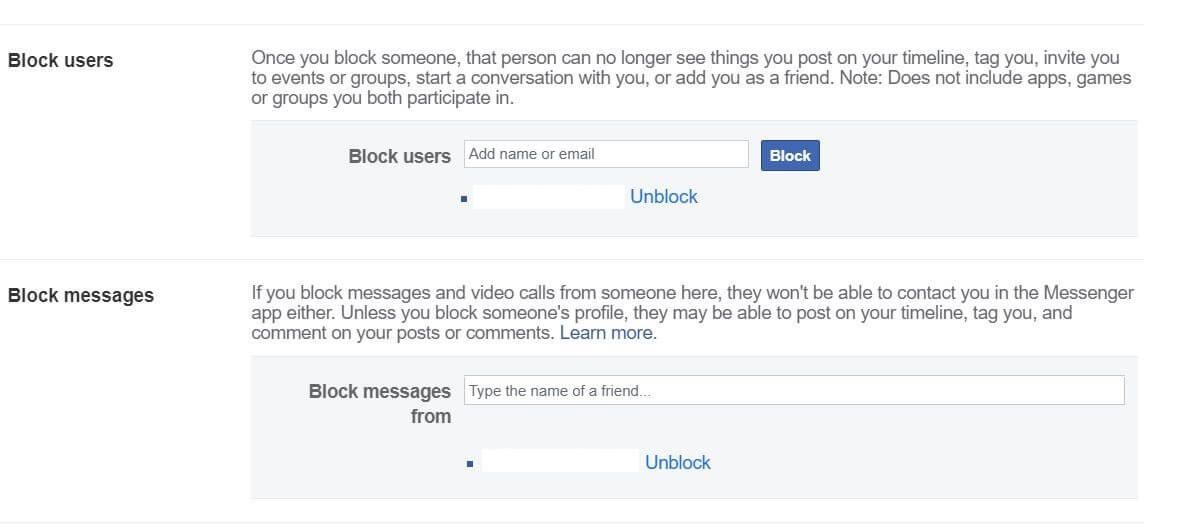
If you’ve been blocked on Facebook, the following features will no longer be visible or available to the contact on the blocking user:

  1. Content and new posts from the contact will no longer be visible or available to the blocking user.
  2. Adding as a friend is no longer possible.
  3. Chats cannot be conducted.
  4. Invitations to groups and events can no longer be issued.
  5. You can’t see almost anything from the other contact. Only comments and old conversations can appear.

Check out the solutions below to learn how you can get past this annoying problem.

How can I fix the Sorry, this content isn’t available right now error?

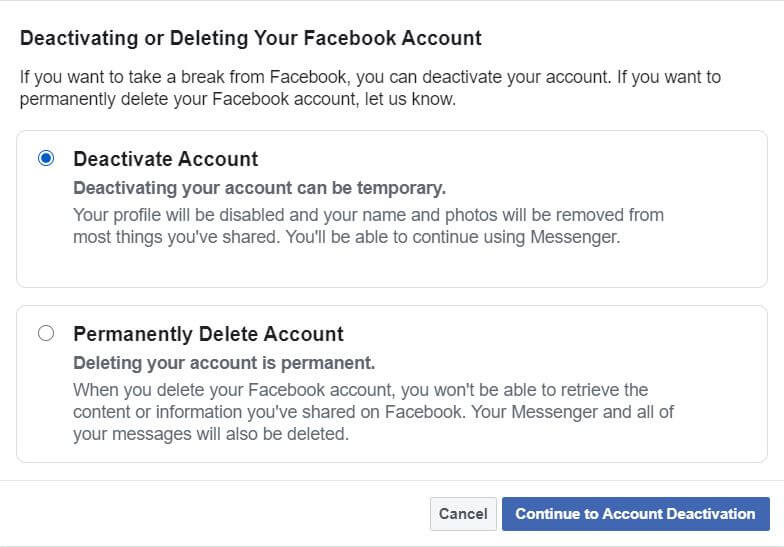
1. Your profile has been deactivated or deleted

Facebook error this content isn't available right now deactivate and delete

The error message can appear because of the violating guidelines or the authenticity of your profile.

Facebook optimizes its website every day by removing profiles that are susceptible of vicious content, and you have to make sure that you are up to date with its guidelines.


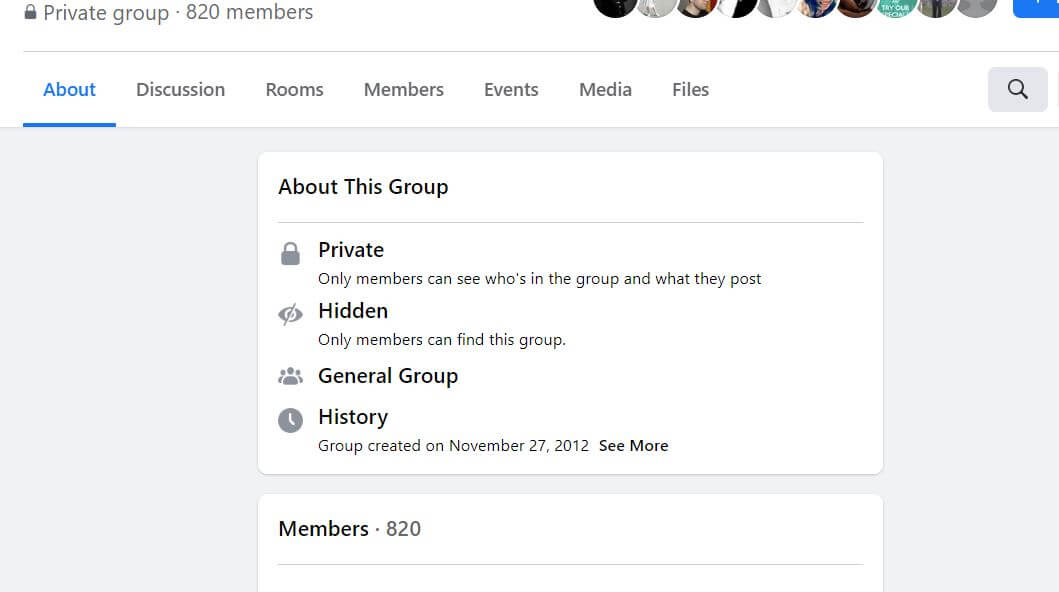
2. The owner has changed his privacy settings

Facebook error this content isn't available right now private group

Privacy settings could be a reason why you receive this error message. If the post owner changes his privacy settings after some time, the content remains available only to those whom he allows to.

Be sure to check with the owner about the recent changes that he implemented.


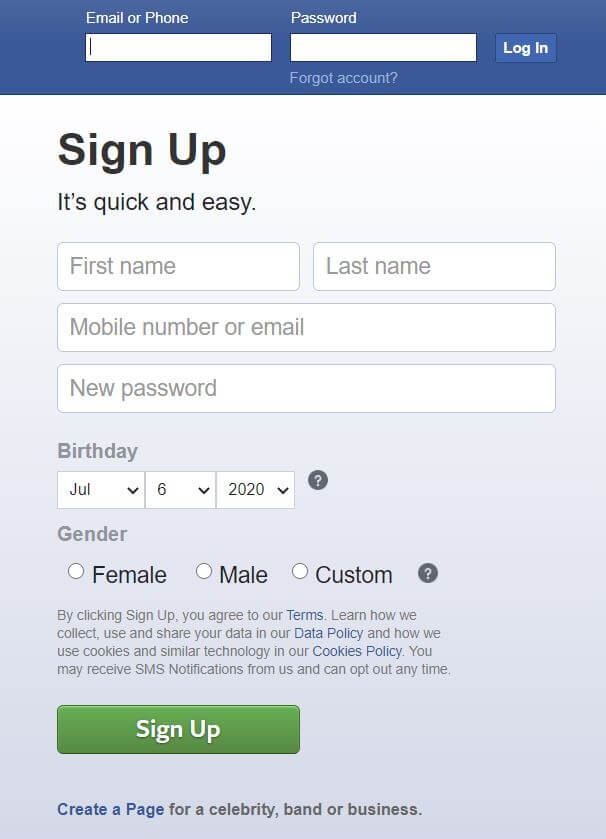
3. You are logged out

Facebook error this content isn't available right now sign up

If you are spending too much time on the Internet, it might happen that Facebook makes you log out of your account involuntarily.

You have to refresh the page and enter your credentials.


If you want to replace your browser with a better one, check out this list with the best Facebook browsers.


4. Facebook’s servers are down


Sometimes Facebook is doing maintenance work, or the server is overloaded. Usually, maintenance does not take longer than a moment.

However, you can try to log in at regular intervals of 15 minutes.

If you have any more questions or suggestions, feel free to leave them in the comments section below.

[wl_navigator]

FIX: NVidia driver error code 3 on Windows 10/11 [OpenGL]

Whenever you get error codes related to drivers, the first place you need to check is your computer’s Device Manager.

You basically need to use it to locate your error code and then click on the specific error to get more detailed information about it.

You can find the error code by going to Device Manager and double-clicking on the device type that has the problem.

Once you double click on the device, right-click, and select Properties, then you will find the error code in the Device Status area.

Error code 3, on Device Manager, usually reads The driver for this device might be corrupted, or your system may be running low on memory or other resources, but this shouldn’t be a cause for alarm.

If you get the NVidia driver error code 3 with a similar message description, you can use the solutions below to fix it.

How can I fix the NVidia driver error code 3?

  1. Update the driver
  2. Run a troubleshooter
  3. Close some open apps
  4. Uninstall and reinstall the driver
  5. Install additional RAM

1. Update the driver

There are different ways you can update the driver: from Device Manager, from Windows Update, from the manufacturer’s website, or by using a dedicated tool.

Update drivers from Device Manager

  1. Right-click Start.NVidia driver error code 3
  2. Select Device Manager.NVidia driver error code 3
  3. Click Display adapters to expand it.NVidia driver error code 3
  4. Right-click on the NVidia card driver.
  5. Select Update driver software.

If you don’t have any driver updates available, right-click on the graphics card driver and click Uninstall, then restart your computer.

Update drivers from Windows Update

  1. Click Start.
  2. Select Settings.NVidia driver error code 3
  3. Select Update & Security.NVidia driver error code 3
  4. Select Windows Update.NVidia driver error code 3
  5. Click Check for updates.NVidia driver error code 3

Update drivers from manufacturer’s website

  1. Right-click Start.NVidia driver error code 3
  2. Select Device Manager.NVidia driver error code 3
  3. Expand the Sound, Video, and game controllers option.NVidia driver error code 3
  4. Right-click on the NVidia card.
  5. Click Update driver software.
  6. Restart your computer.

You can also o to the NVidia manufacturer website, check for the latest Windows 10 drivers available, and then install it based on the instructions on the website.

Update drivers by using a dedicated tool

Sometimes, downloading and updating drivers on your own can damage your system by choosing and installing the wrong versions. On top of that, you might lack the time for such a task these days.

In order to prevent any unfortunate situation from the very start, we strongly suggest doing it automatically by using a specialized tool.

As imagined, it will help you avoid damaging your PC by downloading and installing the wrong driver versions.

2. Run the hardware troubleshooter

  1. Right-click Start.
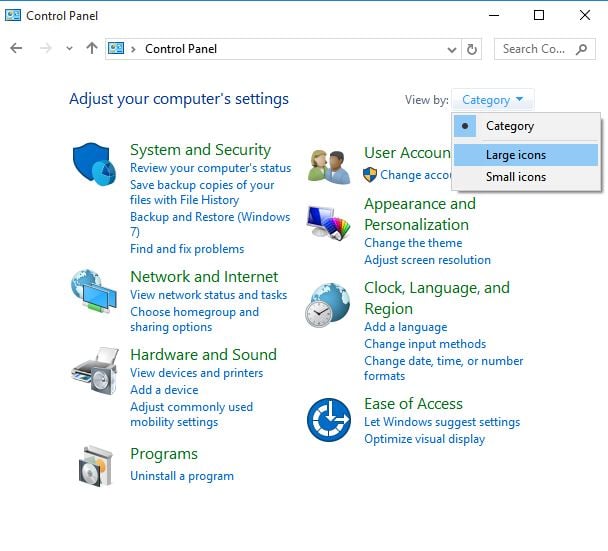
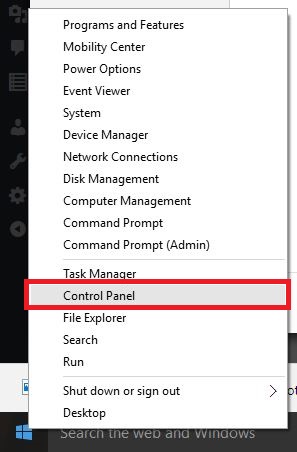
  2. Select Control Panel.
  3. Go to the View by option on the top right corner.NVidia driver error code 3
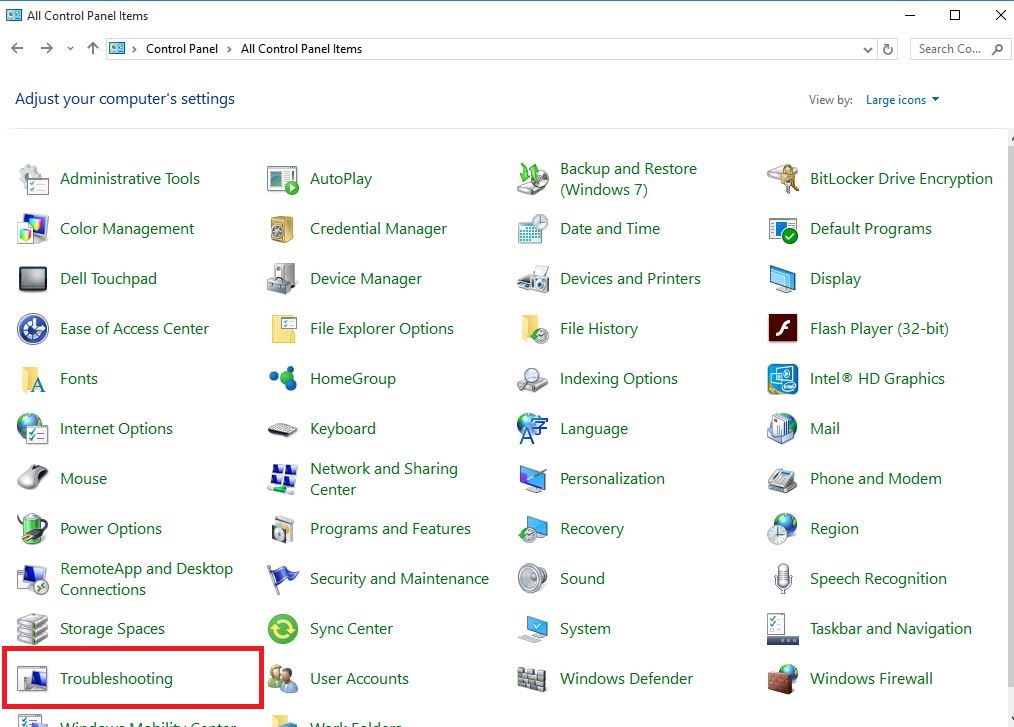
  4. Click the drop-down arrow and select Large icons.NVidia driver error code 3
  5. Click Troubleshooting.NVidia driver error code 3
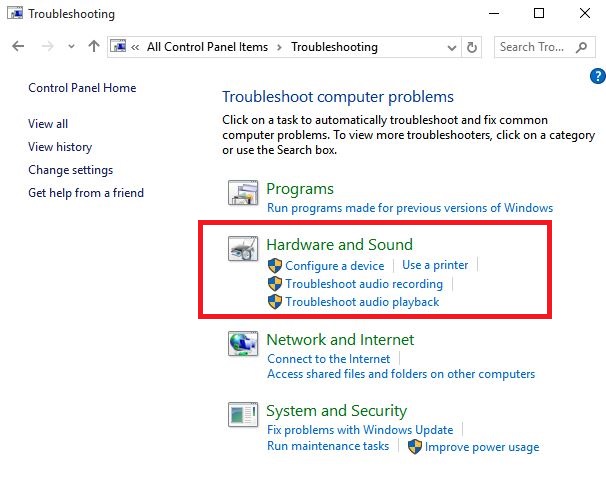
  6. Click Hardware and Sound.
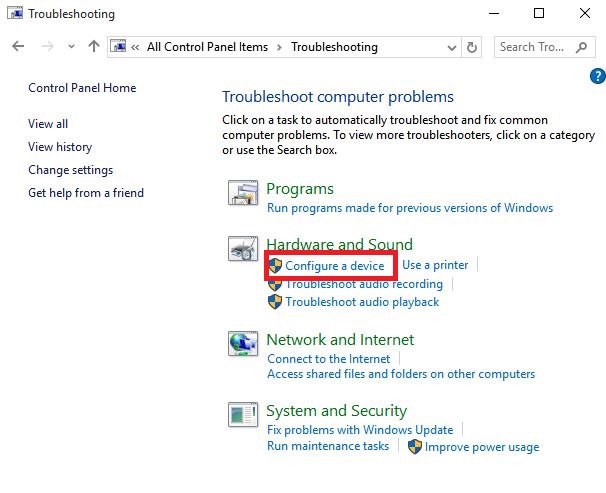
  7. Click Configure a Device.NVidia driver error code 3
  8. Click Next to run the troubleshooter.

The Hardware and Devices troubleshooter checks for commonly occurring issues and ensures any new device or hardware is correctly installed on your computer.

Follow the instructions to run the Hardware and Devices troubleshooter. This will begin detecting any issues that may be causing the drag and drop problem.

3. Close some open applications

  1. Right-click Start.NVidia driver error code 3
  2. Select Task Manager.NVidia driver error code 3
  3. To view virtual memory, right-click Start.NVidia driver error code 3
  4. Select Control Panel.NVidia driver error code 3
  5. Click System and Security.NVidia driver error code 3
  6. Select System.NVidia driver error code 3
  7. Click Advanced system settings.NVidia driver error code 3
  8. Open System Properties dialog box.NVidia driver error code 3
  9. Click the Advanced tab.NVidia driver error code 3
  10. Click Settings under the Performance area.
  11. Click the Advanced tab and check Virtual memory.NVidia driver error code 3

As mentioned earlier, NVidia driver error code 3 can be caused when your system is running low on memory or other resources.

If this is the case, or your computer has insufficient memory to run the device, close some apps to avail more memory.

You can also check memory and system resources, plus virtual memory settings by doing as described above.

Can’t open Task Manager? Don’t worry, we’ve got the right solution for you.

4. Uninstall and reinstall the driver

  1. Right-click Start.NVidia driver error code 3
  2. Select Device Manager.NVidia driver error code 3
  3. Go to Sound, Video, and Game controllers and click to expand the list.NVidia driver error code 3
  4. Right-click on the NVidia graphics card.
  5. Select Properties.
  6. Click the Driver tab.
  7. Select Uninstall and follow the prompts to uninstall the driver.
  8. Restart your computer.
  9. Right-click Start again.NVidia driver error code 3
  10. Select Device Manager.NVidia driver error code 3
  11. Right-click the Action tab on the menu.NVidia driver error code 3
  12. Select Scan for hardware changes and follow the instructions to complete the reinstall.NVidia driver error code 3

The device’s driver may have become corrupted so you may need to uninstall the driver from Device Manager and scan for new hardware so as to install the driver all over again.

You may be prompted to provide the path of the driver. Windows may have the driver built-in already or may have the driver files installed from the last time you set up the device.

Sometimes, however, it will open the New Hardware Wizard which may ask for the driver. If you are asked for the driver and you don’t have it, download the latest driver from the hardware vendor’s website.

5. Install additional RAM

try to install additional RAM

NVidia driver error code 3 may also be caused by insufficient memory so you can install additional Random Access Memory (RAM) on your computer.

Did any of these solutions help fix the NVidia driver error code 3 on your computer? Let us know by leaving a comment in the section below.

FIX: No Directx 10 or 11 adapter or runtime found

The No Directx 10 or 11 adapter or runtime found error message is one that occasionally pops up for some Grand Theft Auto 5 players.

When they launch GTA 5, the game returns this error message:

No Directx 10 or 11 adapter or runtime found. Please install latest Directx runtime or install a compatible Directx 10 or 11 video card.

Consequently, GTA 5 doesn’t run when that error message pops up. If that sounds like a familiar issue, this is how you can fix it.

How do I fix a missing Directx 10 or 11 adapter?

  1. Update the Graphics Card driver
  2. Check that your Graphics Card supports DirectX 10 or 11
  3. Switch TruePlay on
  4. Uninstall the D3D Gear software
  5. Switch off the Game Bar

1. Update the Graphics Card driver

You can manually update your driver following these steps:

  • First, open Run and enter dxdiag to open the window in the shot directly below.
  • Note down the operating system listed on the System tab and the graphics card title listed on the Display tab.
  • You’ll need those details to update the video card driver.
  • Next, open your graphics card manufacturer’s website, such as Nvidia or AMD, in your browser.
  • Open the driver section on the manufacturer’s website.
  • For example, on the Nvidia site you can click Drivers to open the drop-down menus in the snapshot directly below.
  • Select the required graphics card details from the drop-down menus it the site includes menus.
  • Alternatively, you might need to enter your graphics card in a search box.
  • Then the site will list drivers that match the details selected or keyword entered when you press the Search button.
  • Download a driver that matches your 32 or 64-bit Windows platform.
  • Thereafter, press the Win key + X hotkey.
  • Select Device Manager on the Win + X menu.
device manager windows 10
  • Double-click Display adapters to expand its devices.
  • Then right-click your listed graphics card and select the Update driver option to open the window directly below.
  • Click the Browse my computer for driver software option on that window.
  • Then you can select a Let me pick from a list of available drivers option to select the latest graphics card driver.
  • Press the Have Disk button.
  • Click the Browse button to select the required driver file, and then press the Open button.
  • Click Next to install the driver.
  • If your video card driver is already the latest one and doesn’t need updating, reinstall it by right-clicking the graphics card listed on the Device Manager window and selecting Uninstall device.
  • Windows will then automatically reinstall the driver when you restart the desktop or laptop.

Reinstalling graphics card drivers has fixed the DirectX runtime error for some Grand Theft Auto 5 players. There are a few ways that you can reinstall a video card driver.

Your best bet is probably to get the most updated graphics card driver from the manufacturer’s website to ensure you have the latest one, and then install that driver.

2. Check that your Graphics Card supports DirectX 10 or 11

  • Press the Win key + R hotkey to open Run.
  • Enter dxdiag in Run and click OK to open the window directly below.
  • Now click the Display tab.
  • Check the Direct3D DDI detail highlighted in the snapshot directly below.
  • That should have a value of at least 10 (for DirectX 10), and if it’s anything lower than that you’ll probably need a new DirectX 11 compatible graphics card.

First, check that your graphics card is DirectX 10 or 11 compatible. If your video card only supports DirectX 9 or less, then GTA 5 isn’t going to work. So, it might be the case that you need a new video card.

3. Switch TruePlay on

  • First, press the Cortana button on your taskbar to open the search box.
  • Enter TruePlay in Cortana’s search box and select TruePlay.
    • That will open the window in the shot directly below.
  • Now click the TruePlay setting to toggle it on.

If your graphics card is DirectX 11 compatible, switch the TruePlay setting on. Microsoft hasn’t made it entirely clear what this setting is supposed to do, but some have found that switching the setting on can fix the DirectX runtime error.

The TruePlay setting details do state, Turning this off may limit the games you can play.

4. Uninstall the D3D Gear software

  • Press the Win key + X hotkey, and select Run from the Win + X menu.
  • Enter appwiz.cpl in Run’s text box, and click its OK button.
  • Now select the D3D Gear software listed on the window shown directly below.
  • Press the Uninstall/Change button.
  • Click Yes to further confirm that you need to remove D3D Gear from Windows.

D3D Gear is software that records games. Some Grand Theft Auto 5 players have fixed the DirectX runtime issue by uninstalling that software. If you have D3D Gear installed, this is how you can remove that program.

5. Switch off the Game Bar

  • Open the Cortana app.
  • Enter Game bar in Cortana’s search box, and click the OK button.
  • Select Control how Game bar opens and recognizes your game to open the window shown directly below.
  • Toggle the Record game clips, screenshots and broadcast using Game Bar setting off if it’s currently on.
  • In addition, click Game DVR and toggle the Record in the background setting off.

Update Windows 10 builds also include Game bar and Game DVR-recording options. Switching the Game bar off might also help resolve the DirectX runtime issue.

One, or more, of those resolutions, might kick-start Grand Theft Auto 5 for you. This article also provides further tips for fixing DirectX error messages. Do you have any other fixes for the DirectX runtime error? If so, please share them below.

[wl_navigator]

Microsoft news recap: Xbox Series X and S prices announced, GitHub adding new integration with Microsoft Teams, and more

Microsoft news recap is a weekly feature highlighting the top Microsoft news stories of the past week. Sit back, grab some coffee, and enjoy the read!

GitHub announces new integration with Microsoft Teams

A public preview has been launched of a new integration between GitHub and Microsoft Teams. The aim of the integration is to allow developers to communicate with the team for tracking issues, pull requests, deployment status updates, code reviews, and more right within Teams.

GitHub Integration Microsoft Teams

Microsoft will offer EA Play for free with Xbox Game Pass this holiday season

Starting this holiday, Xbox Game Pass Ultimate will begin to include EA Play, EA’s game subscription service, as part of the bundle, at no extra cost. This means that Xbox Game Pass Ultimate member’s will have access to an even larger number of games, without any individual purchases being required.

Xbox Game Pass Ea Play

Xbox Series X and Xbox Series S prices and launch dates have leaked

First leaked, and later confirmed by Microsoft, the Xbox Series X and Xbox Series S prices and launch dates have been revealed. The Xbox Series X will come in at $499, whilst the Xbox Series S will come in at $299. Both will be available on Xbox All Access at $35/month and $25/month respectively. Both consoles are set to launch on November 10.

Xbox Series S And Xbox Series X

Xbox All Access is coming to 12 more countries this holiday season

As noted above, both of Microsoft’s new Xbox consoles will be available on Xbox All Access, a monthly finance agreement to own an Xbox console with no upfront cost, and everything you need thrown in – such as Xbox Game Pass and Xbox Live Gold. Now, Xbox All Access is set to come to 12 more countries from this holiday.

Xbox All Access

That’s it for this week. We’ll be back next week with more Microsoft news.

Microsoft’s Xbox Virtual Press Briefing has leaked online and its cancellation may have been a blessing

The past week was a pretty big week for next gen Xbox news. After a number of leaks, Microsoft was pretty much forced to confirm the Xbox Series S and Xbox Series X prices and specs which triggered the premature announcements of EA Play coming to Xbox Game Pass, Dolby Vision and Atmos support on the Series X, and Xbox All Access expanding to more regions.

Microsoft was originally planning to make all of these announcements in one big digital presentation but that was scrapped after it became clear that all of its big reveals would be known by the audience beforehand.

Nothing ever stays hidden on the internet for long though and the entire pre-recorded Xbox Virtual Press Briefing has now leaked online and can be watched in full thanks to reliable Microsoft news leaker, WalkingCat.

Rather amusingly, the Xbox Virtual Press Briefing is a bit of an awkward watch due to an incredibly corporate vibe and a scripted faux interview format that most will associate with cheesy shopping channel shows. All of the leaked information from the past week is here but it’s a surprisingly low key 30 minutes for what should be an exciting debut of an unannounced console (the Xbox Series S) and a collaboration with EA that no one saw coming.

This feels more like an investors meeting than a buzz-worthy video event.

There’s also several moments that are unintentionally hilarious as those on screen very noticeably begin over articulating the ‘S’ and ‘X’ in the consoles’ names so as not to confuse the Xbox Series X and Xbox Series S with each other. Things get even more convoluted when the Xbox One X is brought into the mix.

While the naming of the Xbox Series X and S consoles is easy to understand in writing, this Xbox Virtual Press Briefing is a reminder of how confusing these next gen Xboxes can sound in spoken conversation.

Funnily enough, it actually feels like Microsoft may have dodged a bullet here as the leaks, and the spaced out official announcements of each product and service over the days that followed, garnered a lot of attention online and allowed the media and consumers to process each major announcement on its own before the next one was revealed. Xbox news dominated the entire week.

The viral sharing also created a fun and excitable energy around each item that was seriously lacking in the formal briefing. The whole ordeal does make one wonder if Microsoft might reconsider how they do their announcements going forward.

What do you think? Do you think seeing this Xbox Virtual Press Briefing first would have been better or do you prefer how Microsoft spread out all of the news via their social channels? Share your thoughts with us in the comments below and then follow us on Twitter and Facebook for more Xbox gaming news.

Killing Floor 2 packet loss: how to fix it?

Killing Floor 2 is the sequel of the popular Killing Floor co-op horror survival game. The title might not immediately give it away, but the purpose of the game is to defend your fragile existence from zombies (which the game calls specimens or ZEDs);

You can either play by yourself, but trust us, when facing several waves of increasingly powerful zombies, you’ll want all the help you can get. Including matching up with random strangers on the Internet.

Now comes the not-so-fun part: if you do play Killing Floor 2 online, you’ll probably face (at some point) certain connectivity issues such as packet loss, jitter, and high ping.

Left untreated, these problems may eventually ruin your gaming experience and make you stick to playing by yourself. However, that’s now how things should be: certain issues such as high ping and packet loss could be easily fixed.

What is packet loss in Killing Floor 2?

Packet loss isn’t something that immediately catches your eye. For instance, when you lag, it quickly becomes obvious.

ZEDs freeze and then fast forward to bludgeoning you (we call that rubberbanding; the freeze-teleport thing, not the bludgeoning), menus become irresponsive, you know the drill.

Now here’s the thing: packet loss triggers similar symptoms, which might make you mistake it for high latency. However, packet loss occurs whenever data packets can’t reach their destination.

So the server creates a temporary delay, still hoping to receive the packets, which then never come. Losing packets can create desync issues so severe that you might even get disconnected from the game.

And that can be downright frustrating, especially late-game.

What can cause packet loss in Killing Floor 2?

There’s a huge list of reasons why packet loss can occur. This goes for every situation that might prone to leaking packets, not only Killing Floor 2. Here are just a few of the potential causes:

  • Network congestion
  • Bad Ethernet cables
  • Using WiFi instead of wired connections
  • Game server issues
  • ISP throttling
  • Improper routing
  • Poor subnet management
  • Outdated drivers
  • Connection can’t handle high-quality settings you’re using in-game
  • Bandwidth-hogging background apps or services
  • Subpar Internet subscription

And the list is far from being complete. As you can see, the number of reasons is quite large as it is.

It might seem somewhat pointless to pinpoint the potential causes of packet loss, but truth be told, knowing what you’re dealing with can help you find a fix quicker.

How to detect packet loss in Killing Floor 2?

First thing’s first, you’ll have to identify the IP address of the Killing Floor 2 server. You can tackle this task in several ways, ranging from using the CMD netstat command, turning to third-party tools like WireShark, or just using the Internet.

Note that Killing Floor 2 doesn’t have any official dedicated server. Neither did Killing Floor, by the way. All the servers are hosted by other players like you, or by dedicated hosting companies that have nothing to do with TripWire.

Whatever floats your boat. Unfortunately, the game‘s server locator doesn’t display the IP addresses. After you identify the IP address of the game server, take the following steps:

  1. Launch CMD instance on your PC
  2. Type pathping x.x.x.x (make sure to replace x.x.x.x with server IP)CMD pathping
  3. Wait for the test to finish
  4. Check if there’s any packet loss on any hop

What pathping does is show you packet loss values for each hop (node) your connection bounces through. Thus, it’s quite important to locate the server’s IP address before you start the test.

You could do the pathping test with another host, but the results wouldn’t be as relevant to your Killing Floor 2 packet loss situation.

How to fix Killing Floor 2 packet loss?

1. Try another server

This is quite the most effective fix we could think of. Killing Floor 2 doesn’t have server-tied progress, so you could take your character and move to another server without any repercussions.

Two things could come of this fix: either it works, which means that the previous server was leaking packets, or it doesn’t, which means that the problem lies someplace else.

Either way, it’s cheap, it’s fast, don’t hesitate. Pull the plug and try another server.

2. Use a VPN

  1. Purchase a subscription plan from Private Internet Access
  2. Download the VPN installer
  3. Install PIA on your PC
  4. Launch the VPN client
  5. Connect to your account
  6. Choose a fast server to connect to (nearby servers are generally faster)
  7. Launch Killing Floor 2
  8. Check if you’re still losing packets

Note that using a VPN such as Kape Technologies’ PIA won’t work if the problem lies with you or the game server.

This quick-fix will only work if your ISP is causing the packet loss by limiting your bandwidth or routing traffic improperly.

Private Internet Access

Private Internet Access

Getting packet loss in Killing Floor 2? PIA could help you fix it in no time.
$2.85/mo. Buy it now

The VPN will bypass your ISP’s default connection, thus circumventing any limitations that your provider might’ve imposed on it.

3. Troubleshoot your connection

  • Flush your DNS
  • Restart Killing Floor 2
  • Use another server
  • Restart your PC, router, modem
  • Update your drivers to their latest version
  • Replace old, poor-quality Ethernet cables
  • Use a wired connection instead of Wi-Fi
  • Call your ISP if you notice something wrong on their side
  • Reset your network adapter
  • If you’re not using a VPN to bypass network congestion, avoid peak hours

It goes without saying that these suggested fixes might not work every time. As a matter of fact, they might not work at all, since we’ve already told you that packet loss could have an outstanding number of causes.

However, trying them certainly won’t hurt your connection. In fact, you might even improve the overall quality of your connection, which might slightly improve packet loss, if not curb it altogether.

Final thoughts on Killing Floor 2 packet loss

All things considered, sometimes you might experience packet loss in Killing Floor 2. Although it sounds bad, the truth is that this issue usually solves by itself after a while.

However, if you start to notice a pattern, you might want to step into action. You can use a VPN to get rid of packet loss, but it will only work if the problem is triggered by your ISP.

Alternatively, you can also try some manual troubleshooting suggestions like switching to another server, restarting your PC, or replacing any old component on your side of the network.

Remember, a well-maintained network is less prone to connectivity issues such as packet loss.

Fix: Email attachments stuck in outbox [Gmail, Outlook]

Gmail is one of the most used email services on the market, but some users reported that emails are stuck in outbox while uploading attachments.

This can be a problem and cause all sorts of issues, but there’s a way to fix this problem, and today we’ll show you how to do it.

What can I do if Gmail/Outlook attachments are stuck uploading in outbox?

1. Check the size of the attachments

  1. Check the size of your attachments.
  2. If sending multiple files, try sending fewer files at a time.
  3. If possible, try to reduce the file size of the attachment.

These are just simple tips, but they can be helpful if you have large email attachment stuck in Outbox.


2. Use cloud storage to host the files

  1. Upload the files that you want to send to the cloud storage.
    cloud storage gmail send uploading attachments outbox stuck
  2. Once the files are uploaded, add the link to them to your email message.

This is just a workaround, but it might help if your Gmail emails with attachments are stuck in Outbox.


3. Check if the Gmail app has storage permissions

  1. On your Android phone go to Settings > Apps.
  2. Select Gmail > Permissions.
  3. Make sure that Gmail is allowed to access your storage.
    gmail storage allow gmail send uploading attachments outbox stuck

4. Clear Gmail app cache and data

  1. Tap and hold the Gmail app to open its properties.
  2. In the Storage section, tap the Clear cache button.
    clear storage gmail send uploading attachments outbox stuck
  3. Restart your phone and check if the problem is still there.
  4. If the issue is still present, repeat the steps, but this time use the Clear storage or Clear data button.

Note: If you use the Clear data option, you might have to log in with your Gmail account again before you can use the Gmail app.

Few users reported that you don’t have to clear the cache. You just need to use the Force Stop option and restart the app.


5. Turn off Wi-Fi and update the app

  1. Turn the Wi-Fi off on your phone.
  2. Wait for a few moments and turn it back on.
  3. If that doesn’t help, you might have to update the app and check if that helps.

If Gmail attachments are stuck in outbox while uploading, you might be able to fix the problem by reducing the size of the attachment or uploading files elsewhere before sending them.


6. Remove an attachment stuck in outbox in Microsoft Outlook

  1. In Outlook, click on Send/Receive and choose Work Offline.
  2. Now navigate to your Outbox.
  3. You can now delete the message, or just move it to the Drafts folder and remove the attachment.

This is a simple solution, but it should help if you have Outlook email with attachments stuck in Outbox.

In case nothing else works, you can always use the Gmail web app as an alternative.

[wl_navigator]


5 best sniping software that bids for you on eBay

eBay is one of the oldest e-commerce sites out there. However, it isn’t like the traditional Amazon e-commerce website that only allows you to buy through fixed-price listings. eBay offers both fixed priced listing and auction format listing. In the auction format listing, the seller puts a product on sale through auction. The auction runs for only a limited amount of time that is 1-10 days depending on the seller’s preference. The interested buyers must place a bid that should be higher than the current bid. When the time ends, the highest bidder wins. This is where it gets interesting in this sales format. eBay uses an in-house automatic bidding algorithm that takes the maximum bid from the users and automatically adds a bid with an increment. Since no one knows what the highest bid set by the other member is, and they don’t have time to sit in front of the computer to bid after every few seconds, they use automated bidding software that does last second bidding. The process of last-second bidding is known as sniping, and the automated bidding programs are called sniping software aka sniper. If you are new to the eBay auction and wondering why you lose some last time deals despite sitting in front of your computer at the right time, this is the reason. A good number of eBay users take advantage of this type of software to place last minute bidding, hence increasing the chances of winning the bid. Do keep in mind that eBay recognizes the bid sniping tactic on its official website. As eBay says while the use of sniping software does not guarantee a winning bid, it is perfectly normal to use the software to place your bid. So, what software should you for bid-sniping on eBay? There are several sniping software tools available on the Internet that include Chrome extensions, web-based apps, and desktop applications. To make the task easier for you, we have put together a list of bid sniping software that bids for you on eBay.

What’s the best sniping software that bids for you on eBay?

Rapidcatch

try out Rapidcatch

Rapidcatch is an automated bid placing system that allows you to place a bid on auction sites such as eBay, Newauction, Skylots, etc.

It is a cloud-based system, so no installation is required. Rapidcatch offers a free plan to get started but limited to 1 auction site and one bid per day.

The more premium plans remove these limitations offering 1-10 auction site support with an unlimited number of bids per day.

The user needs to register to use the software. From the dashboard, you need to enter your auction credentials like the username and password, URL of the website, etc.

To place a bid, click on the Place Bid button. Select a bidding scenario like just watch, do not place a bid, try to buy all items from the list, or exact quantity.

Next, enter the Item URL, bid amount, the quantity you want to buy, load time (the time to place the bid before the bid ends, in seconds), email address, phone number, etc.

You can check the status of the bid from the Bids tab. It shows active, leading, losing, won, and lost bids. You can easily add multiple auction site credentials from the Settings > Credential tab.

Rapidcatch also offers a Google Chrome extension allowing the Rapidcatch users to bid directly from the auction page without having to access the Rapidcatch account.

Click the extension icon and fill the details to place the bid. The bid details can be accessed from the Rapidcatch account if needed.

Rapidcatch is one of the most popular automated bidding systems. Sign up using the free account to test the software without any risk.

⇒ Go to Rapidcatch 

Gixen

try out Gixen

Gixen is a free eBay auction sniper service that is available both online and offline for desktop use. It automatically places your bids on eBay at the last second.

It also comes with Group bidding and allows you to make unlimited bids. If you are on Mozilla Firefox, Gixen has a free plugin for the browser.

Gixen also offers a premium service called Gixen Mirror that costs $6 a year.

Gixen Mirror comes with all the great features of standard Gixen, plus:

  • A multi-server, fault-torrent sniping service that sends your snipes twice for two different locations to increase the chances of winning
  • It is ad-free, offers contingency group biding and a new multi-win group bidding
  • You can customize snipe time from 3 to 15 seconds based on your preferences
  • Auction end times are refreshed hourly instead of daily

Using Gixen is easy. First, create an account with Gixen. Next, open eBay and log in. Go to the auction page and from the URL copy the item number.

In Gixen, enter the item number and your maximum bid for the auction. Click on Add to save the changes.

That’s it. Gixen will snipe the bid in the last seconds. With the premium plan, you get more features, although completely optional.

⇒ Download Gixen 

EZ Sniper

try out EZ Sniper

EZ Sniper is another popular sniping software that offers an automated bidding system for multiple auction sites including eBay.

It is a premium service with a free trial on offer. EZ Sniper offers commission-based, subscription-based, and pre-paid plans.

To use EZ Sniper, you need to register for the service. From the Auction tab, you can set new snipes.

Under the Add interface, type Item ID (that is item number from the auction URL), max bid, auction site (in this case eBay), contingent if any, and Note (optional).

Click on the Snipe button to schedule the bidding. EZ Sniper will automatically snipe the bid at the last second.

You can view your eBay watching list, subscription plans, change account settings, and archives from the Menu.

You can search for items on eBay directly from the EZ Sniper dashboard. From the bottom left, click on eBay search under EZ Sniper Recon and enter the keyword for the item.

Hit Enter and EZ Sniper will display all the available listing on the dashboard.

Note: The latest version of EZ Snipper may require you to link your eBay account with the service for better stability.

⇒ Go to EZ Sniper

BidNapper

try out BidNapper

BidNapper is a sniping service offered by the same company as EZ Sniper. The only difference appears to be in the pricing plans on offer.

BidNapper allows you to increase the chances of winning auction through automated last-minute bidding.

It also keeps your bids private, allows to change or delete bids, keeps prices down, and bid only as much you need to win the auction.

BidNapper also offers a free trial account that allows you to snipe three bids on any site. The working of BidNapper is identical to EZ Sniper with an identical set of features.

⇒ Go to BidNapper

YouBidder

try out YouBidder

YouBidder is a Google Chrome extension that allows you to place unlimited bids on eBay auction for free.

The extension automates the bidding process, so you don’t need to keep your PC running.

The working of the plugin is straightforward. After installing it on Chrome, visit the auction page for bid sniping.

Click on the YouBidder icon on your browser and enter your eBay username and password. Next, you need to enter your highest bid.

The extension will automatically bid at the last second. Why free? The website doesn’t specify how the free thing works.

But, if we are to guess, seems like the developer’s added their affiliate ID to every bid their automated system makes on your behalf which in return generates revenue for the developer at no extra cost to the buyer.

YouBidder is a popular extension and has 4.5 stars on the Chrome Webstore. However, the only problem seems to be reliability. While it works, it works, if not, it won’t let the user login.

⇒ Get YouBidder  

All the software tools listed in this article offer a sniping feature allowing you to bid automatically on eBay. However, sniping software does not guarantee anything.

While using such sniping tools, it is important to understand the fact that this software can only snipe at the right time and you can hope it to outbid hundreds of other bidders using the sniping services.

Try the services listed in this article for sniping eBay auctions. You will able to assess the effectiveness of the tools in a short time without having to spend a fortune.

[wl_navigator]

How can I fix HP driver error 1603 on Windows 10/11 PCs?

When you install HP software on your computer, you can get the HP driver error 1603 a fatal error occurred during installation displayed on your screen. The text ERROR_INSTALL_FAILURE may also accompany the error message.

Error 1603 occurs when the Windows Installer is trying to install multiple programs simultaneously such as system updates, startup services, or other installations.

Specifically, HP driver error 1603 occurs when:

  • An app that’s already installed on your computer
  • The folder you’re trying to install the Windows Installer Package to is encrypted
  • The drive containing the folder you’re trying to install the Windows Installer Package to is accessed as a substitute drive
  • The system account doesn’t have full control permissions on the folder you’re trying to install Windows Installer package to, so the error comes because the Windows Installer service uses the System account to install software.

Here’s how to fix the HP driver error 1603 when it pops up on your computer.

  1. Update drivers
  2. Run the hardware troubleshooter
  3. Use a Microsoft Fix It
  4. Verify that the Windows Installer service is set to Automatic
  5. Install the driver in compatibility mode
  6. Grant full control permissions to the System account
  7. Register Windows components
  8. Temporarily disable services, and then reinstall the HP software
  9. Upgrade to the latest Microsoft Windows Installer version

How can I fix the HP driver error 1603?

1. Update drivers

  1. Open the Start menu on your Windows PC
  2. Go to Settings and click on Update & Security settings
  3. Select Windows Update
  4. Click on the Check for updates button

If you get HP driver error 1603, you can fix it by uninstalling previous versions of drivers installed for the HP printer from the computer, and then download the latest drivers and firmware updates. Follow the steps mentioned above to update HP drivers using Windows Update.

There are many versions for HP printers, so select the appropriate model of the printer and then download and install the drivers.

This can be a long process, especially if you do it manually, therefore we recommend that you use a dedicated tool to do it automatically.

This kind of tool will help you avoid permanent damage to your PC by downloading and installing the wrong driver versions.

Download and launch the software, start the scan and wait until it finishes downloading and installing the latest drivers on your device.

If there are any missing drivers or broken ones, this tool will identify and update/fix them as well.

Additionally, you can set it up to regularly scan your drivers. This way, the app will run in the background and fix and update your drivers as you take care of other tasks.

The tool is very lightweight, so you won’t have to worry about it affecting your PC’s performance.

⇒ Get Fortect Driver Updater

2. Run the hardware troubleshooter

  1. Right click Start and go to Control Panel.HP driver error 1603
  2. Go to the View by option on the top right corner and select Large icons.HP driver error 1603
  3. Click Troubleshooting.HP driver error 1603
  4. Next, go to Hardware and Sound.HP driver error 1603
  5. Click Configure a Device and press Next to run the troubleshooter.

HP driver error 1603

3. Use a Microsoft Fix It

Microsoft Fix It or easy fix solutions help diagnose and resolve issues for Microsoft products or third-party software that affects them.

Once you click the download button, a Microsoft easy fix solution will download to help you deal with software issues automatically.

The easy fix package can be a .msi or .diagcab (for later versions of Windows only) based on the technology used to create the package.

4. Verify that the Windows Installer service is set to Automatic

  1. Click Start
  2. Type services.msc in the search box and press enter.HP driver error 1603
  3. In the Services list, double-click Windows Installer.HP driver error 1603
  4. In Windows Installer Properties dialog box, click Automatic under Startup Type list.
  5. Click Apply and then OK.
  6. Start the software installation.

5. Install the driver in compatibility mode

  1. Download the latest driver and right-click on the driver setup file.
  2. Click Properties and go to the Compatibility tab.
  3. Click the checkbox Run this program in compatibility mode.
  4. Restart your computer.

6. Grant full control permissions to the System account

  1. Open File Explorer.
  2. Right click the drive you want to install the Windows Installer package to.
  3. Click Properties and go to the Security tab.HP driver error 1603
  4. Verify that the Group or user names box contains the SYSTEM user account.HP driver error 1603
  5. Select SYSTEM user account.HP driver error 1603
  6. Verify in the Permissions section that Full control is set to Allow (if not set, select Allow checkbox).HP driver error 1603
  7. Close Permissions dialog and return to Properties dialog then click Advanced.HP driver error 1603
  8. Select Change Permissions.HP driver error 1603
  9. In Permissions tab, select SYSTEM entry and click Edit.HP driver error 1603
  10. Click Applies to dropdown and select This folder, subfolder and files then click OK.HP driver error 1603
  11. Run the Windows Installer package.

7. Register Windows components

7.1. Register the Atl.dll file

  1. Right click Start and select Run.
  2. Type regsvr32 Atl.dll and then press enter or click OK
  3. On the RegSvr32 screen, click OK

7.2. Unregister and reregister Microsoft Windows Installer

  1. Click Start.
  2. Type cmd in the search box.
  3. Right-click Command Prompt and select Run as Administrator.HP driver error 1603
  4. Type MSIEXEC/UNREGISTER and then click OK.
  5. Try installing the program and check if the issue persists.

7.3. Reinstall HP software

  1. Turn on the printer.
  2. If your printer is connected to the computer with a USB, disconnect the cable from the printer.
  3. Go to the HP website under Software and Driver Downloads.
  4. Identify your printer model and follow the instructions to download it.
  5. Click Download next to the full feature driver or click Basic Drivers for other options

8. Temporarily disable services, and then reinstall the HP software

8.1. Temporarily disable startup services

  1. Click Start.
  2. Type msconfig in the search box and press enter.
  3. Select Services tab and click Disable All to turn off any programs that start when you turn on your computer.HP driver error 1603
  4. Select Hide All Microsoft Services checkbox.HP driver error 1603
  5. Click Disable All and click OK
HP driver error 1603

8.2. Temporarily disable Windows Update

  1. Click Start
  2. Click All Programs and go to Windows Update.
  3. In the left pane, click Change settings.
  4. Under Recommended updates, click Never check for updates.
  5. Click OK.

8.3. Remove  and reinstall HP software

  1. Unplug the USB cable connecting the HP product to your computer.
  2. Right-click Start and select Control Panel.USB WiFi adapter is not connecting to the Internet
  3. Open the list of installed programs and remove the software
  4. Click Programs
  5. Right click the HP product and select If asked to remove shared files, click No as other programs using these files may not work if you delete them.

8.4. Reinstall HP software by doing the following:

  1. Turn on the printer
  2. If your printer is connected to the computer with a USB, disconnect the cable from the printer.
  3. Go to the HP website under Software and Driver Downloads.
  4. Select a method to identify your printer model and follow the instructions to download.
  5. Click Download next to the full feature driver or click Basic Drivers for other options.

8.5. Enable startup programs

  1. Click Start.
  2. Type msconfig and press enter.HP driver error 1603
  3. Select the General tab and select Normal startup checkbox.HP driver error 1603
  4. Click Apply and then click Close.
  5. Restart your computer.

8.6. Re-enable Windows Update

  • Click Start
  • Select All Programs
  • Click Windows Update
  • In the left pane, click Change settings
  • Under Install updates automatically, click Never check for updates and click OK

9. Upgrade to the latest Microsoft Windows Installer version

  1. Right-click Start and select Run.fix error 80070436
  2. Type appwiz.cpl and press Enter.
  3. In Currently Installed Programs list, select Windows Installer.
  4. Click Remove and follow the instructions to remove Windows Installer.
  5. Visit the Microsoft website to install the latest Windows Installer version. Make sure you download the .msi file for your version of Windows.
  6. If you have 32-bit version, you’ll see x86, and 64-bit version gives x64. If you’re unsure, download and install the latter version.

Did any of these solutions work for you? let us know in the comments section below.
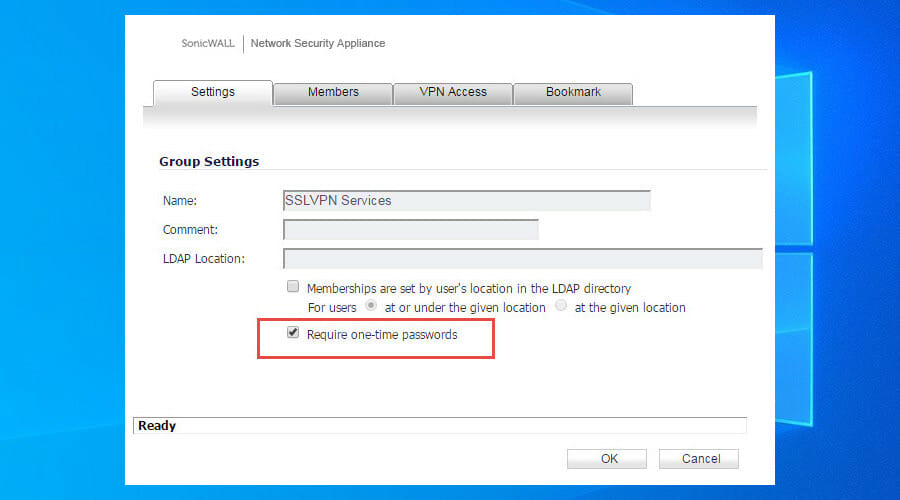
Is VPN safe for online banking? [Complete guide]

Online banking is a risky business because you have to enter your login credentials and credit card info on the web. If you’re directly connected to the Internet, you might accidentally leak them and compromise your data. But you can use a VPN to stay safe.

A virtual private network creates a secure tunnel and uses it to isolate your data traffic from the public web, all thanks to encryption. In case of a man-in-the-middle attack, a hacker might obtain your data but can’t unscramble it.

Should you use a VPN for online banking?

Yes, you should definitely use a VPN for online banking since it makes you safer on the Internet.

Although most banks are doing the best they can to make you feel as safe as possible when making online transactions, sometimes they fail.

Internet banking is particularly dangerous during the COVID-19 pandemic when most people stay home and pay taxes or shop exclusively online. But a VPN helps a lot.

Here are some legit reasons why you need a VPN for online banking:

  • Keeps you safe from cybercriminals when using public Wi-Fi hotspots.
  • Amps up your security level when traveling and connecting to the airport, hotel, or restaurant Wi-Fi.
  • Shields your mobile apps since they’re most vulnerable to hacker attacks.
  • Adds an extra layer of security to your home network and protects your router.
  • Excellent in combination with HTTPS websites.

How to use a VPN for safe Internet banking

1. Say no to free VPN

don't use free VPN

A VPN is only as good as its privacy policy. If you stumble upon a legit service with a strict, no-logging policy, that’s great! But you can’t trust a free VPN with your data. In fact, it’s safer to use online banking without a free VPN.

Even if the VPN provider won’t collect your data, there are still dangers since free mobile apps are usually ad-supported. Any ad or banner to a third-party website is a door left open for malware injections. But a premium VPN is worth it.

2. Don’t use VPN servers from other countries

PIA VPN countries

If your bank is actually doing a good job and monitoring your account for any suspicious activity, it will flag and freeze it if you try to connect from another country. Plus, it will probably call you soon to let you know.

Clearing this issue with the bank BEFORE won’t do you any good if you keep connecting to various countries through the VPN. And it’s never a wise idea to ask your bank to stop doing this, in case an authorized user actually attempts this.

Instead, limit your VPN server options inside your own country. It doesn’t matter which one you use, anyway, since all bring the same level of security.

3. Set the VPN‘s security settings to the max

maximize VPN security

VPNs have numerous benefits, like circumventing geoblocks and unlocking streaming services like Netflix. But, when it comes to online banking, what you’re looking for is the highest level of security.

Set your VPN service to use a highly secure protocol, like OpenVPN with 256-bit military-grade encryption, WireGuard, or SSTP. Keep in mind that more encryption means a slower connection.

If you have trouble maintaining your Internet connection stable over VPN, dial it down a notch until you find the balance between encryption and speed. Whatever you do, never use a VPN over PPTP or L2TP because they provide low security.

Besides encryption, enable the app’s kill switch, activate its built-in ad and malware blocker, and switch to its private DNS servers, depending on what features are supported by the VPN service (unlike encryption, they won’t slow you down).

4. Don’t use weak passwords or turn off 2FA

A VPN can’t keep your online banking account safe from illegal logins, so don’t compromise when it comes to passwords and two-factor authentication. Set a strong lengthy password made out of a random combination of uppercase and lowercase letters, numbers, and symbols (or use a password generator).

If you have trouble keeping up with your passwords, use a reliable password manager to keep track of them, especially since it’s recommended to change them often. Furthermore, check if you have two-factor authentication enabled.

5. Use a secure browser

Tor browser

Unless you use a mobile app to access your banking account, consider switching to a secure web browser for online banking. You don’t have to get rid of the current browser if you’re fond of it since you can install a new one to use for banking purposes, such as Tor Browser, Brave, or Firefox.

6. Use security-focused browser addons

If you want to continue using your current web browser, even if it’s unsafe, you can amp up its security level by turning to security-focused extensions like DuckDuckGo Privacy Essentials, Ghostery, Privacy Badger or HTTPS Everywhere.

What’s the best VPN for safe online banking?

use Private Internet Access for online banking

Made by Kape Technologies, Private Internet Access (PIA) is the top-ranked VPN for Internet banking, thanks to its excellent security features. It uses OpenVPN with up to 256-bit military-grade encryption to redirect your entire network traffic through VPN.

PIA also supports the newer WireGuard protocol. And, if you want to raise the bar, you can connect to a second VPN location through Shadowsocks or SOCKS5 proxy. However, as we previously mentioned, it’s not advisable to connect to another country.

This VPN app has its own ad and malware blocker for web browsers called PIA MACE, which keeps you safe from phishing and other scams. It runs private DNS servers and cuts off your Internet access in case the VPN connection drops to ensure your data isn’t compromised.

What else you must know about PIA:

  • Fully transparent with a zero-logging privacy policy
  • No IP, DNS, or WebRTC leaks
  • Works with Windows, Mac, Linux, iOS, Android, routers
  • Static and dynamic IP addresses
  • 24/7 live chat support
  • 30-day money-back guarantee (no free trial)

Private Internet Access

Private Internet Access

Use this awesome VPN for online banking to stay safe and make secure transactions anywhere.
$2.85/mo. Buy it now

A lot of people believe that HTTPS is enough to stay safe when making online banking transactions. Although it’s designed to provide end-to-end encryption, HTTPS is not foolproof. But you can throw into the mix a trustworthy VPN like Private Internet Access to change that.

[wl_navigator]


Microsoft’s Surface Duo is “not meant to be repaired,” says iFixit

Repair website iFixIt is back with a new teardown, and despite the gains Microsoft made with the Surface Pro X and Surface Laptop 3, this time things aren’t in favor of the Redmond giant. In its latest teardown, iFixit gives the Surface Duo a score of 2/10.

According to a press release from the repair website, this score means Surface Duo is not something “that is meant to be repaired, maybe not even by Microsoft.” Factors in the score include very easy to slice cables, sticky glue traps, and the pains of replacing the battery.

iFixit’s only high was the displays and the back covers being able to be replaced without disassembling other components. Unfortunately, though, the batteries being glued, and the USB-C port being soldered contributed to the low score. Other issues include uncommon tri-point screws, OLED panels not being protected from accidental prying, and the stubborn glue at all entry points.

Surface Duo Teardown

Some other interesting points in the detailed teardown reveal the Duo’s left battery resembling a mini iPad, and the right half being full with lots of circuitry. There’s also the multi-strand interconnected cables, too, which are routed through the hinges. Finally, there’s an interesting bit about the Duo’s geared hinges which iFixIt calls a “pretty simple hinge design compared to some of the other options we’ve seen.”

Indeed, it looks as though if you’re buying a Duo, there’s no chance that you’ll be able to repair it on your own if something goes wrong. The Duo might not be the “glued-filled monstrosity” that iFixit deemed the original Surface Laptop to be, but it still doesn’t look like something that’s easy for yourself or repair shops to replace. You should instead consider investing in the $200 Microsoft Complete Protection Plan at checkout, which covers accidental damage.

How to fix Hulu proxy error [NordVPN, ExpressVPN]

Hulu is one of the hottest video streaming services, but it doesn’t offer the same movies and TV shows to all countries. If you want to bypass licensing issues and geo-location restrictions, you need a VPN.

Using a free VPN to stream Hulu is not usually a good idea since most free VPNs get immediately detected and blocked by the website. That’s why most users turn to premium VPN services like NordVPN or ExpressVPN to fix the Hulu proxy error.

In some cases, however, Hulu might detect and block NordVPN or ExpressVPN, resulting in the dreadful error. If you stumbled upon Hulu videos unavailable to your location, too, here’s what you can do about it.

How to fix Hulu proxy error (NordVPN)

Disable WebRTC in your web browser

block WebRTC leaks with NordVPN

If WebRTC is enabled in your web browser, your VPN leaks your true IP address and geo-location. That means that you will encounter the Hulu proxy error even when connecting to a NordVPN server.

However, you can easily fix this issue by disabling WebRTC and preventing browser leaks. Make sure to use NordVPN’s browser extension, even if you also use the desktop client, because it has an integrated feature for turning off WebRTC.

Disable CyberSec or your ad blocker

CyberSec in NordVPN

CyberSec is NordVPN’s exclusive ad blocker. If you turned it on, it might interfere with Hulu’s website, resulting in the Hulu proxy error.

Try turning it off and accessing Hulu while connected to a NordVPN server. Otherwise, if you don’t have CyberSec enabled, make sure to deactivate any other ad blocker extensions in your web browser.

Enable obfuscation mode

use NordVPN obfuscated servers

Obfuscation mode is a rare feature found in VPN tools. It hides the fact that you’re using a VPN, making your network traffic look like HTTPS instead. It’s a cool way to access websites that reject VPN connections, and it might just work with the Hulu proxy error.

NordVPN is one of the few VPNs with support for obfuscated servers, which you can find and enable in the settings panel. Keep in mind that it works only when using the OpenVPN protocol.

Once you turn it on, make sure to connect to the Obfuscated Servers.

Use NordVPN’s SmartDNS instead of VPN

enable NordVPN's SmartDNS

SmartDNS is an awesome feature shipped with NordVPN, which lets you stream media content on devices without VPN support, such as smart TVs and gaming console. It doesn’t encrypt your network traffic like a VPN, but it changes your geo-location for Hulu (US only).

Besides, you can also use SmartDNS to stream other media services like Prime Video US, BBC iPlayer, HBO US, and Netflix Originals. Since there’s no encryption involved, your connection will be significantly faster, which is great for those who can’t benefit from stable Internet connections. It’s a great way to bypass the Hulu proxy error.

You can enable the SmartDNS feature in the Nord Account dashboard by whitelisting your IP address (without connecting to VPN). If you have a dynamic IP, you have to update the whitelist every time it changes. Otherwise, you can request a static IP address from your ISP or set up dynamic DNS. Only IPv6 addresses are supported.

Switch to a better VPN

use Private Internet Access for Hulu

  • Sign up for a PIA subscription plan.
  • Download and set up PIA on your device.
  • Launch the app and connect to a VPN server.
  • Enjoy Hulu streaming!

If you end up getting disappointed by NordVPN due to the Hulu proxy error and can’t find a permanent fix for it, consider canceling your NordVPN subscription and looking for an alternative, better VPN service, such as Private Internet Access (PIA).

Created by Kape Technologies, PIA is one of the best VPNs for video streaming. You can use it to watch not only Hulu but also Netflix US and other media streaming services. The service covers more than 3,300 VPN servers across 48 countries.

PIA comes with exclusive DNS servers, split tunneling, WireGuard and OpenVPN with up to 256-bit encryption, Shadowsocks and SOCKS5 proxy, a kill switch, and port forwarding.

Besides, you don’t have to worry about video buffering caused by VPN since PIA optimized for streaming. It’s compatible with all major platforms, including Windows, Mac, Linux, iOS, and Android.

More about PIA:

  • 10 simultaneous connections
  • Zero logs and leaks
  • 24/7 live chat support
  • 30-day money-back guarantee
  • No free trial
Private Internet Access

Private Internet Access

Upgrade to this awesome VPN to bypass the Hulu proxy error without any issues.
$2.85/mo. Buy it now

ExpressVPN Hulu proxy error

configure ExpressVPN settings

In addition to NordVPN, users have complained about getting the Hulu proxy error with ExpressVPN. To fix this issue, use the solutions we provided for NordVPN above when it comes to WebRTC leaks, ad blockers, and the Smart DNS feature (ExpressVPN calls it MediaStreamer).

You can also head over to the app’s settings panel and make sure to activate IPv6 leak protection, ExpressVPN DNS servers, and Windows networking optimization.

If everything fails, consider dropping ExpressVPN and making the switch to Private Internet Access.

In conclusion, the solutions we presented in this article should help you fix the Hulu proxy error caused by NordVPN or ExpressVPN.

[wl_navigator]

FIX: Facebook won’t let me post anything from my PC

Facebook is one of the most beloved social networking platforms with 2.2 billion active users.

If we exclude mobile devices, the application was always rather stable on PCs, even after numerous aesthetic and functional changes.

But a moderate number of users occasionally encounter some issues with this app, as they are unable to post anything or interact with their feed from a PC.

In the following lines you will find five simple solutions to solve this annoying problem.

How can I fix Facebook posting from PC?

1. Make sure you’re not banned

Facebook banned

Facebook’s regulations are harsh occasionally, and the penalty for spamming your profile can come in a limitation of posts.

However, you should know that Facebook informs all users who cross the predicated boundaries. So, we suggest logging out of all devices and logging in again.

After you log in, there should be viable information about your potential wrongdoings. You can file a complaint to Facebook, and if that’s your first ban, chances are they’ll reduce the ban length or terms.


2. Clear browser’s cache

  1. Open a new page in Google Chrome.
  2. Press Shift + Ctrl + Delete to open the Clear browsing data menu.
  3. Select All time as the preferred time range.
  4. Check the Browsing history, Cookies and other site data, Cached images and files boxes.
  5. Click on the Clear data button.


3. Remove extensions and suspicious applications

  1. Open a new page in Google Chrome.
  2. At the top right, go to More tools and click on Extensions.
  3. You can add, remove or just disable a site.
  4. Remove the unnecessary extensions.

If we exclude the extensions you’re using by choice, there are some which can infiltrate unknowingly. We all know about toolbars and hijackers which basically take the control over an affected browser.

Furthermore, to be completely safe, you should remove all the malicious applications.

  1. Press the Win + R keys to open the Run window.
  2. Type control and hit Enter.
  3. Open Control Panel.
  4. Go to Programs and select Uninstall a program.
  5. Remove the suspicious software.

4. Scan for malware and run anti-PuP tool

  1. Download Malwarebytes.
  2. Run the tool and click Scan Now.
  3. Wait until the tool scans your system and click Clean & Repair.
  4. Restart your PC.

PC have to be clear from malware which potentially spreads into browser‘s configuration files. If that’s the case, only removing the malicious extension won’t do any good.

Use Malwarebytes to scan for malware and successfully remove all PuPs (Potentially Unwanted Programs) from the system registry.


5. Reset the app

facebook won't let me post anything from pc

  1. Open Settings.
  2. Choose Apps.
  3. Under the Apps & features section, search for Facebook.
  4. Open Advanced options.
  5. Scroll down and click Reset.

We can’t overlook temporary Facebook server issues (especially when they decide to implement changes) as a possible reason for this error. Therefore, you’ll have to wait awhile until you’ll be able to post again.

Don’t forget to tell us whether one of the steps get you through the problem. You can do so in the comments section below.
[wl_navigator]

Mute vs Do Not Disturb on Snapchat [Difference Explanation]

Social media platforms can be a bit noisy – you open the Snapchat app, for example, and are greeted with thousands of posts. You leave the app closed, and your smartphone is flooded by notifications.

To keep it all sane, Snapchat (and almost every other social platform) have the block, mute, and Do Not Disturb features.

Blocking is straightforward, as it outrightly bans the user from your account. However, Snapchat‘s Mute vs Do Not Disturb features are confusing as they seem to be one and the same.

How can I tell the difference between Snapchat’s Mute vs Do Not Disturb?

How does the Mute option work in Snapchat?

snapchat-mute-vs-do-not-destroy-muting

When the muted user posts a story, it’s not queued with other recent stories. Instead, the story will be relegated to the end of your story list.

On your story slideshow, the stories from contacts that you muted will be nowhere to be found. This feature is similar to the muting feature of Instagram.

Muting a Snapchat group or user is like taking a break from them. In this sense, nothing changes on the side of the muted contacts.

People that you mute will have no clue that you did that because Snapchat will continue to show your recent stories to them in the story slideshow.
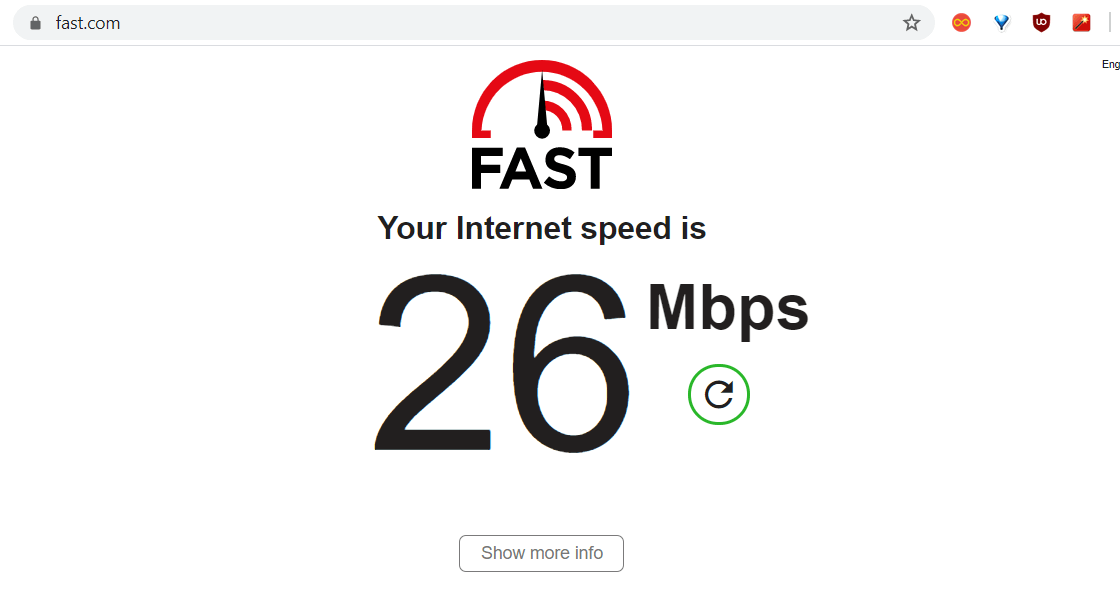

How does Do Not Disturb work in Snapchat?

mute-vs-snapchat-do-not-disturb

When you use the Do Not Disturb feature on a Snapchat contact or group, your application stops delivering notifications from the person or group.

Unlike the Mute feature, Snapchat doesn’t stop showing you their stories; this one is all about your notifications.

Nothing happens inside the app itself. As the name says, you simply don’t want that contact or group to disturb you anymore.

Whenever you’re ready to open the Snapchat app, you’ll see all of their recent stories and messages as they should be, just like everyone else’s.

On Snapchat, if you no longer want to have anything to do with a user, you can block them.

However, if it’s not that deep, and you only want to take a break from them, you have the Snapchat Mute and Do Not Disturb features to play with.

Muting a contact or group hides their stories from you, while the Do Not Disturb feature stops their notifications from coming through.

[wl_navigator]

[Updated] Microsoft releases new Windows 10 Dev build with no new features to test servicing pipeline

If Microsoft already released a new Windows 10 Insider build for the Dev Channel yesterday, the company is following up today with the cumulative update build 20211.1005 (KB4581021) that includes no new features. “This update does not include anything new and is designed to test our servicing pipeline,” the team said today.

This isn’t the first time that the company does such testing, though because this is just a cumulative update, this build should be pretty quick to install. As a reminder, the build 20211 released yesterday added Search to the Default Apps pages in Settings, as well as the ability for users to attach and mount a physical disk inside of a WSL 2 distro. You can get more details in our previous post here.

We hope to see the Windows Insider team releasing another Dev build with more new features next week. In case you missed it, the company also released a new 20H2 build for the Beta channel on Tuesday.

Update 1PM PT: The Windows Insider team said it has pulled the update after discovering a bug preventing Insiders from installing it.

GitHub announces new integration with Microsoft Teams

Microsoft has launched a public preview of a new GitHub integration with Microsoft Teams. The integration will allow developers to communicate with the team for tracking issues, pull requests, deployment status updates, code reviews, and more right within Teams. 

“Developers spend a considerable amount of time communicating with the team, monitoring the issues, pull requests and deployment statuses. This necessitates constant switching of context between GitHub and Microsoft Teams (collaborate). The GitHub integration for Microsoft Teams gives you and your teams full visibility into your GitHub projects right in your Teams channels, where you generate ideas, triage issues and collaborate with other teams to move projects forward,” the company explained. 

The GitHub integration with Microsoft Teams gives developers the ability to add the GitHub (Preview) app from the Teams app store, just like they have been able to integrate the service with Slack. Users will be able to subscribe/unsubscribe notifications for pull requests and issues organization or a repository’s activity to get customized notifications. 

Subscribe

Moreover, the app also brings the ability to list notifications for issues and pull requests under a parent card to promote collaboration. The card will group the latest issues as well as details about the title, description, assignees, reviewers, labels, and checks.

PR Card

Another new feature that the company highlighted allows developers to ‘unfurl’ GitHub links. The feature has been designed to automatically extract information from a GitHub page when a user posts a link in a Microsoft Teams channel. The current implementation supports link previews for pull requests, issues, comments, code snippets, repositories, accounts or organizations. 

Keep in mind that the GitHub integration with Microsoft Teams is still a work in progress and the company promised to bring additional capabilities soon. Feel free to check out the GitHub support page to learn about the installation process. 

Windows Hello is Not Available on This Device: How to Get it

Windows Hello isn’t available on this device is a common error issued by the Windows 10 system. This can be a serious error since you can’t log into Windows 10 with biometrics until you fix it.

This can leave your PC vulnerable to access from third parties, so it’s important to fix this issue as soon as possible. In today’s guide, we’re going to show you how to do it properly.

Why is Windows Hello not available on my device?

  • Missing or incompatible biometrics driver will cause this problem to appear on your PC.
  • Sometimes this issue appears because Windows is out of date.
  • In case our group policies aren’t properly configured, you’ll get this error message.

What can I do if Windows Hello isn’t available on this device?

1. Update the drivers

  1. Press the Windows key + X keyboard keys and click on Device Manager from the displayed list.device manager windows 10
  2. Click on Scan for hardware changes.
  3. Expand the Biometric devices section.
  4. Click on Update.
  5. Alternatively, you can choose Roll back in order to use a previous build of the driver and see if that works.
  6. You can also try to delete the driver and install it again.

Automatically update drivers

Installing the drivers manually involves a risk of damaging your system by downloading and installing the wrong driver version. Thus, we recommend updating your drivers automatically with a dedicated tool.

We strongly recommend Fortect Driver Updater, which is currently the best tool for this task. Here’s how you can update your drivers very easily:

  1. Download and install Fortect Driver Updater
  2. Launching it will automatically start scanning your computer for new drivers or problems with current ones.
  3. Now you just need to select which drivers you want to install or update. Or just hit the Update All button. It’s THAT simple!

This solution is so simple that it almost looks too good to be true, but it worked for so many users that it would be a shame not to try it.

⇒ Get Fortect Driver Updater

2. Make sure your device is running the latest Windows updates

  1. Press the Windows key + I keyboard keys in order to bring Windows System Settings.
  2. Click on Update & Security.update & security windows 10
  3. Click on the Check for updates option.
  4. Well, initiate this scan operation and if you are prompted with any updates, apply them.update windows
  5. Reboot your computer and verify if the Windows Hello feature was restored.

After updating your system, check if the problem is still there.

3. Enable the Allow the use of biometric option

  1. Press the Windows key + R keyboard keys and in the Run window type gpedit.msc; press OK when done.
  2. From the Local Group Policy Editor you need to navigate towards Computer Configuration, then go to Administrative Templates. Lastly, go to Windows Components and choose Biometrics.
  3. Look for the Allow the use of biometrics feature located on the right side of the main pane.
  4. Double-click on the option.
  5. Select Enabled and then click OK and Apply.
  6. Reboot your Windows 10 system.

We hope that everything works as it should now. Those solutions can be applied when you deal with the Windows Hello isn’t available on this device error.

In case you’re having additional problems, we have a great guide on what to do if Windows Hello is grayed out, so we encourage you to check it out.

You can tell us how the troubleshooting process worked using the Comments section below.