Fix: Email attachments stuck in outbox [Gmail, Outlook]

Gmail is one of the most used email services on the market, but some users reported that emails are stuck in outbox while uploading attachments.

This can be a problem and cause all sorts of issues, but there’s a way to fix this problem, and today we’ll show you how to do it.

What can I do if Gmail/Outlook attachments are stuck uploading in outbox?

1. Check the size of the attachments

  1. Check the size of your attachments.
  2. If sending multiple files, try sending fewer files at a time.
  3. If possible, try to reduce the file size of the attachment.

These are just simple tips, but they can be helpful if you have large email attachment stuck in Outbox.


2. Use cloud storage to host the files

  1. Upload the files that you want to send to the cloud storage.
    cloud storage gmail send uploading attachments outbox stuck
  2. Once the files are uploaded, add the link to them to your email message.

This is just a workaround, but it might help if your Gmail emails with attachments are stuck in Outbox.


3. Check if the Gmail app has storage permissions

  1. On your Android phone go to Settings > Apps.
  2. Select Gmail > Permissions.
  3. Make sure that Gmail is allowed to access your storage.
    gmail storage allow gmail send uploading attachments outbox stuck

4. Clear Gmail app cache and data

  1. Tap and hold the Gmail app to open its properties.
  2. In the Storage section, tap the Clear cache button.
    clear storage gmail send uploading attachments outbox stuck
  3. Restart your phone and check if the problem is still there.
  4. If the issue is still present, repeat the steps, but this time use the Clear storage or Clear data button.

Note: If you use the Clear data option, you might have to log in with your Gmail account again before you can use the Gmail app.

Few users reported that you don’t have to clear the cache. You just need to use the Force Stop option and restart the app.


5. Turn off Wi-Fi and update the app

  1. Turn the Wi-Fi off on your phone.
  2. Wait for a few moments and turn it back on.
  3. If that doesn’t help, you might have to update the app and check if that helps.

If Gmail attachments are stuck in outbox while uploading, you might be able to fix the problem by reducing the size of the attachment or uploading files elsewhere before sending them.


6. Remove an attachment stuck in outbox in Microsoft Outlook

  1. In Outlook, click on Send/Receive and choose Work Offline.
  2. Now navigate to your Outbox.
  3. You can now delete the message, or just move it to the Drafts folder and remove the attachment.

This is a simple solution, but it should help if you have Outlook email with attachments stuck in Outbox.

In case nothing else works, you can always use the Gmail web app as an alternative.

[wl_navigator]


5 best sniping software that bids for you on eBay

eBay is one of the oldest e-commerce sites out there. However, it isn’t like the traditional Amazon e-commerce website that only allows you to buy through fixed-price listings. eBay offers both fixed priced listing and auction format listing. In the auction format listing, the seller puts a product on sale through auction. The auction runs for only a limited amount of time that is 1-10 days depending on the seller’s preference. The interested buyers must place a bid that should be higher than the current bid. When the time ends, the highest bidder wins. This is where it gets interesting in this sales format. eBay uses an in-house automatic bidding algorithm that takes the maximum bid from the users and automatically adds a bid with an increment. Since no one knows what the highest bid set by the other member is, and they don’t have time to sit in front of the computer to bid after every few seconds, they use automated bidding software that does last second bidding. The process of last-second bidding is known as sniping, and the automated bidding programs are called sniping software aka sniper. If you are new to the eBay auction and wondering why you lose some last time deals despite sitting in front of your computer at the right time, this is the reason. A good number of eBay users take advantage of this type of software to place last minute bidding, hence increasing the chances of winning the bid. Do keep in mind that eBay recognizes the bid sniping tactic on its official website. As eBay says while the use of sniping software does not guarantee a winning bid, it is perfectly normal to use the software to place your bid. So, what software should you for bid-sniping on eBay? There are several sniping software tools available on the Internet that include Chrome extensions, web-based apps, and desktop applications. To make the task easier for you, we have put together a list of bid sniping software that bids for you on eBay.

What’s the best sniping software that bids for you on eBay?

Rapidcatch

try out Rapidcatch

Rapidcatch is an automated bid placing system that allows you to place a bid on auction sites such as eBay, Newauction, Skylots, etc.

It is a cloud-based system, so no installation is required. Rapidcatch offers a free plan to get started but limited to 1 auction site and one bid per day.

The more premium plans remove these limitations offering 1-10 auction site support with an unlimited number of bids per day.

The user needs to register to use the software. From the dashboard, you need to enter your auction credentials like the username and password, URL of the website, etc.

To place a bid, click on the Place Bid button. Select a bidding scenario like just watch, do not place a bid, try to buy all items from the list, or exact quantity.

Next, enter the Item URL, bid amount, the quantity you want to buy, load time (the time to place the bid before the bid ends, in seconds), email address, phone number, etc.

You can check the status of the bid from the Bids tab. It shows active, leading, losing, won, and lost bids. You can easily add multiple auction site credentials from the Settings > Credential tab.

Rapidcatch also offers a Google Chrome extension allowing the Rapidcatch users to bid directly from the auction page without having to access the Rapidcatch account.

Click the extension icon and fill the details to place the bid. The bid details can be accessed from the Rapidcatch account if needed.

Rapidcatch is one of the most popular automated bidding systems. Sign up using the free account to test the software without any risk.

⇒ Go to Rapidcatch 

Gixen

try out Gixen

Gixen is a free eBay auction sniper service that is available both online and offline for desktop use. It automatically places your bids on eBay at the last second.

It also comes with Group bidding and allows you to make unlimited bids. If you are on Mozilla Firefox, Gixen has a free plugin for the browser.

Gixen also offers a premium service called Gixen Mirror that costs $6 a year.

Gixen Mirror comes with all the great features of standard Gixen, plus:

  • A multi-server, fault-torrent sniping service that sends your snipes twice for two different locations to increase the chances of winning
  • It is ad-free, offers contingency group biding and a new multi-win group bidding
  • You can customize snipe time from 3 to 15 seconds based on your preferences
  • Auction end times are refreshed hourly instead of daily

Using Gixen is easy. First, create an account with Gixen. Next, open eBay and log in. Go to the auction page and from the URL copy the item number.

In Gixen, enter the item number and your maximum bid for the auction. Click on Add to save the changes.

That’s it. Gixen will snipe the bid in the last seconds. With the premium plan, you get more features, although completely optional.

⇒ Download Gixen 

EZ Sniper

try out EZ Sniper

EZ Sniper is another popular sniping software that offers an automated bidding system for multiple auction sites including eBay.

It is a premium service with a free trial on offer. EZ Sniper offers commission-based, subscription-based, and pre-paid plans.

To use EZ Sniper, you need to register for the service. From the Auction tab, you can set new snipes.

Under the Add interface, type Item ID (that is item number from the auction URL), max bid, auction site (in this case eBay), contingent if any, and Note (optional).

Click on the Snipe button to schedule the bidding. EZ Sniper will automatically snipe the bid at the last second.

You can view your eBay watching list, subscription plans, change account settings, and archives from the Menu.

You can search for items on eBay directly from the EZ Sniper dashboard. From the bottom left, click on eBay search under EZ Sniper Recon and enter the keyword for the item.

Hit Enter and EZ Sniper will display all the available listing on the dashboard.

Note: The latest version of EZ Snipper may require you to link your eBay account with the service for better stability.

⇒ Go to EZ Sniper

BidNapper

try out BidNapper

BidNapper is a sniping service offered by the same company as EZ Sniper. The only difference appears to be in the pricing plans on offer.

BidNapper allows you to increase the chances of winning auction through automated last-minute bidding.

It also keeps your bids private, allows to change or delete bids, keeps prices down, and bid only as much you need to win the auction.

BidNapper also offers a free trial account that allows you to snipe three bids on any site. The working of BidNapper is identical to EZ Sniper with an identical set of features.

⇒ Go to BidNapper

YouBidder

try out YouBidder

YouBidder is a Google Chrome extension that allows you to place unlimited bids on eBay auction for free.

The extension automates the bidding process, so you don’t need to keep your PC running.

The working of the plugin is straightforward. After installing it on Chrome, visit the auction page for bid sniping.

Click on the YouBidder icon on your browser and enter your eBay username and password. Next, you need to enter your highest bid.

The extension will automatically bid at the last second. Why free? The website doesn’t specify how the free thing works.

But, if we are to guess, seems like the developer’s added their affiliate ID to every bid their automated system makes on your behalf which in return generates revenue for the developer at no extra cost to the buyer.

YouBidder is a popular extension and has 4.5 stars on the Chrome Webstore. However, the only problem seems to be reliability. While it works, it works, if not, it won’t let the user login.

⇒ Get YouBidder  

All the software tools listed in this article offer a sniping feature allowing you to bid automatically on eBay. However, sniping software does not guarantee anything.

While using such sniping tools, it is important to understand the fact that this software can only snipe at the right time and you can hope it to outbid hundreds of other bidders using the sniping services.

Try the services listed in this article for sniping eBay auctions. You will able to assess the effectiveness of the tools in a short time without having to spend a fortune.

[wl_navigator]

How can I fix HP driver error 1603 on Windows 10/11 PCs?

When you install HP software on your computer, you can get the HP driver error 1603 a fatal error occurred during installation displayed on your screen. The text ERROR_INSTALL_FAILURE may also accompany the error message.

Error 1603 occurs when the Windows Installer is trying to install multiple programs simultaneously such as system updates, startup services, or other installations.

Specifically, HP driver error 1603 occurs when:

  • An app that’s already installed on your computer
  • The folder you’re trying to install the Windows Installer Package to is encrypted
  • The drive containing the folder you’re trying to install the Windows Installer Package to is accessed as a substitute drive
  • The system account doesn’t have full control permissions on the folder you’re trying to install Windows Installer package to, so the error comes because the Windows Installer service uses the System account to install software.

Here’s how to fix the HP driver error 1603 when it pops up on your computer.

  1. Update drivers
  2. Run the hardware troubleshooter
  3. Use a Microsoft Fix It
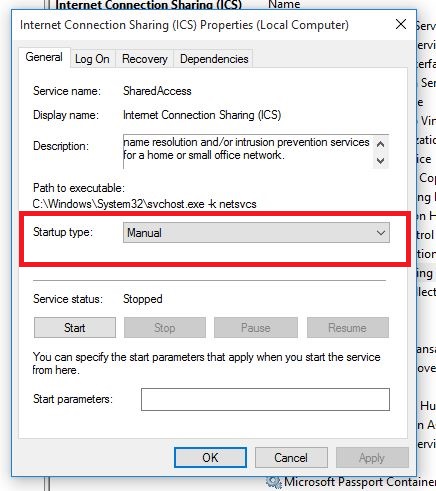
  4. Verify that the Windows Installer service is set to Automatic
  5. Install the driver in compatibility mode
  6. Grant full control permissions to the System account
  7. Register Windows components
  8. Temporarily disable services, and then reinstall the HP software
  9. Upgrade to the latest Microsoft Windows Installer version

How can I fix the HP driver error 1603?

1. Update drivers

  1. Open the Start menu on your Windows PC
  2. Go to Settings and click on Update & Security settings
  3. Select Windows Update
  4. Click on the Check for updates button

If you get HP driver error 1603, you can fix it by uninstalling previous versions of drivers installed for the HP printer from the computer, and then download the latest drivers and firmware updates. Follow the steps mentioned above to update HP drivers using Windows Update.

There are many versions for HP printers, so select the appropriate model of the printer and then download and install the drivers.

This can be a long process, especially if you do it manually, therefore we recommend that you use a dedicated tool to do it automatically.

This kind of tool will help you avoid permanent damage to your PC by downloading and installing the wrong driver versions.

Download and launch the software, start the scan and wait until it finishes downloading and installing the latest drivers on your device.

If there are any missing drivers or broken ones, this tool will identify and update/fix them as well.

Additionally, you can set it up to regularly scan your drivers. This way, the app will run in the background and fix and update your drivers as you take care of other tasks.

The tool is very lightweight, so you won’t have to worry about it affecting your PC’s performance.

⇒ Get Fortect Driver Updater

2. Run the hardware troubleshooter

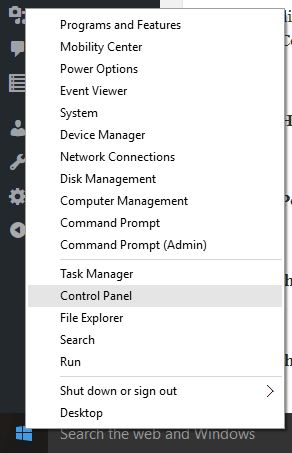
  1. Right click Start and go to Control Panel.HP driver error 1603
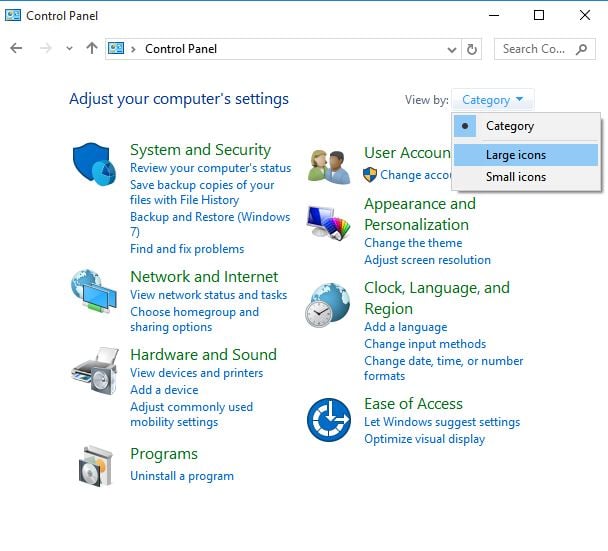
  2. Go to the View by option on the top right corner and select Large icons.HP driver error 1603
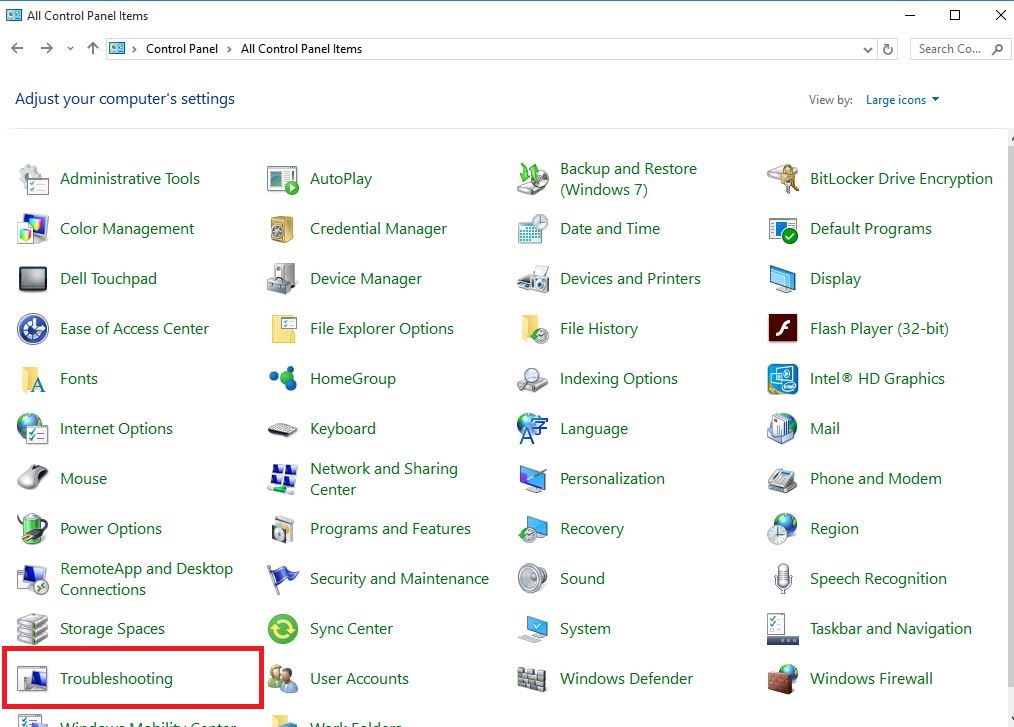
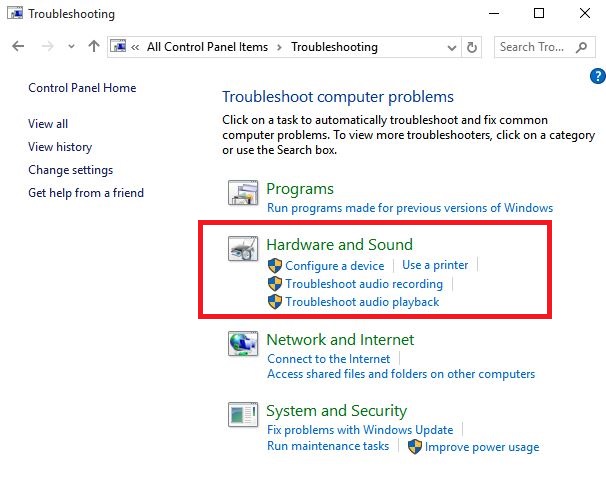
  3. Click Troubleshooting.HP driver error 1603
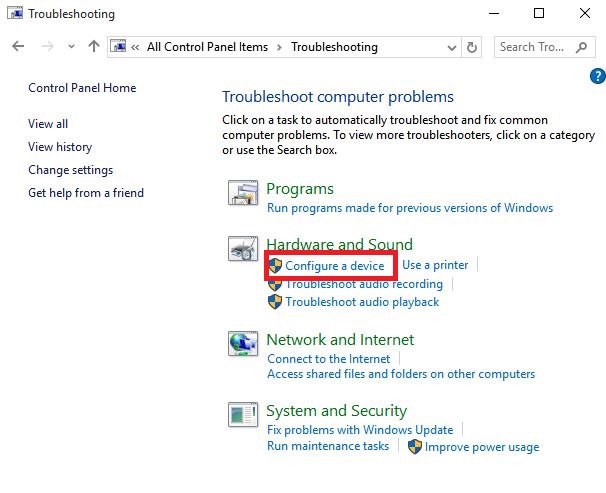
  4. Next, go to Hardware and Sound.HP driver error 1603
  5. Click Configure a Device and press Next to run the troubleshooter.

HP driver error 1603

3. Use a Microsoft Fix It

Microsoft Fix It or easy fix solutions help diagnose and resolve issues for Microsoft products or third-party software that affects them.

Once you click the download button, a Microsoft easy fix solution will download to help you deal with software issues automatically.

The easy fix package can be a .msi or .diagcab (for later versions of Windows only) based on the technology used to create the package.

4. Verify that the Windows Installer service is set to Automatic

  1. Click Start
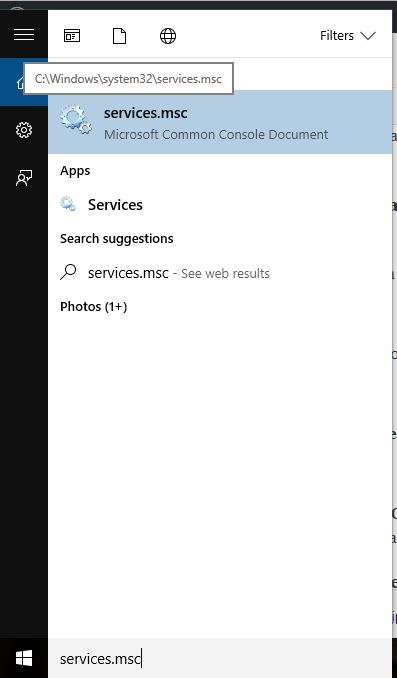
  2. Type services.msc in the search box and press enter.HP driver error 1603
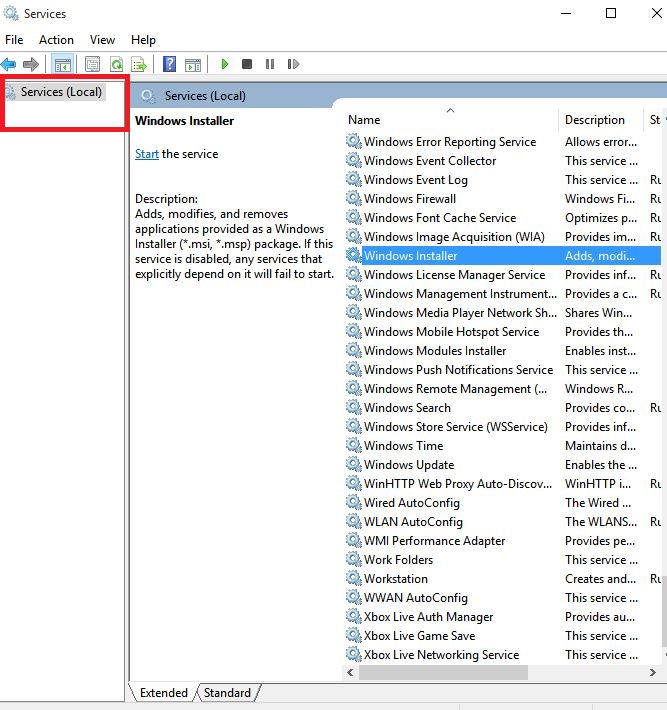
  3. In the Services list, double-click Windows Installer.HP driver error 1603
  4. In Windows Installer Properties dialog box, click Automatic under Startup Type list.
  5. Click Apply and then OK.
  6. Start the software installation.

5. Install the driver in compatibility mode

  1. Download the latest driver and right-click on the driver setup file.
  2. Click Properties and go to the Compatibility tab.
  3. Click the checkbox Run this program in compatibility mode.
  4. Restart your computer.

6. Grant full control permissions to the System account

  1. Open File Explorer.
  2. Right click the drive you want to install the Windows Installer package to.
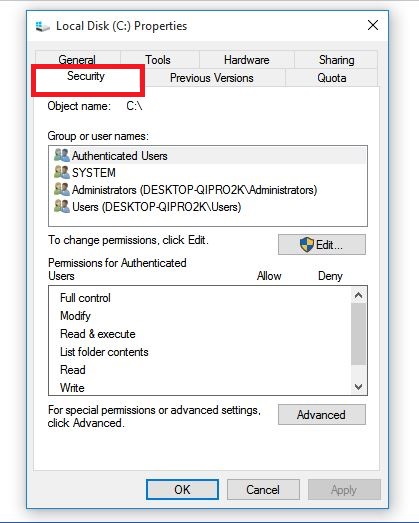
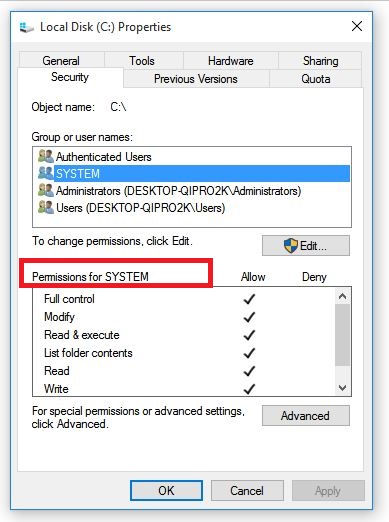
  3. Click Properties and go to the Security tab.HP driver error 1603
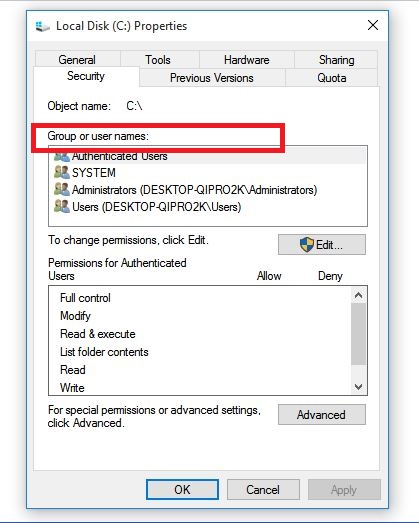
  4. Verify that the Group or user names box contains the SYSTEM user account.HP driver error 1603
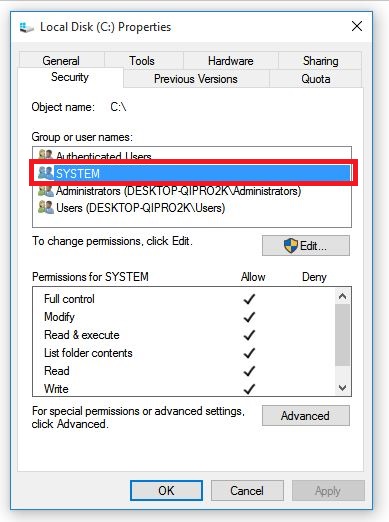
  5. Select SYSTEM user account.HP driver error 1603
  6. Verify in the Permissions section that Full control is set to Allow (if not set, select Allow checkbox).HP driver error 1603
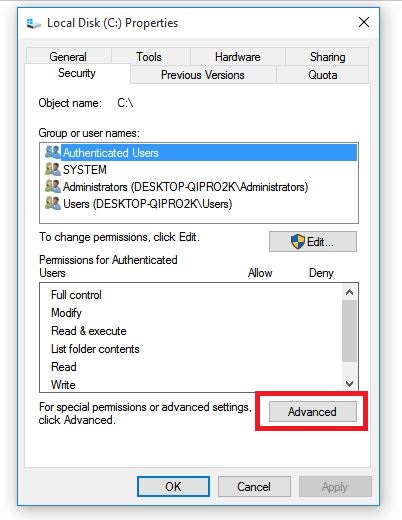
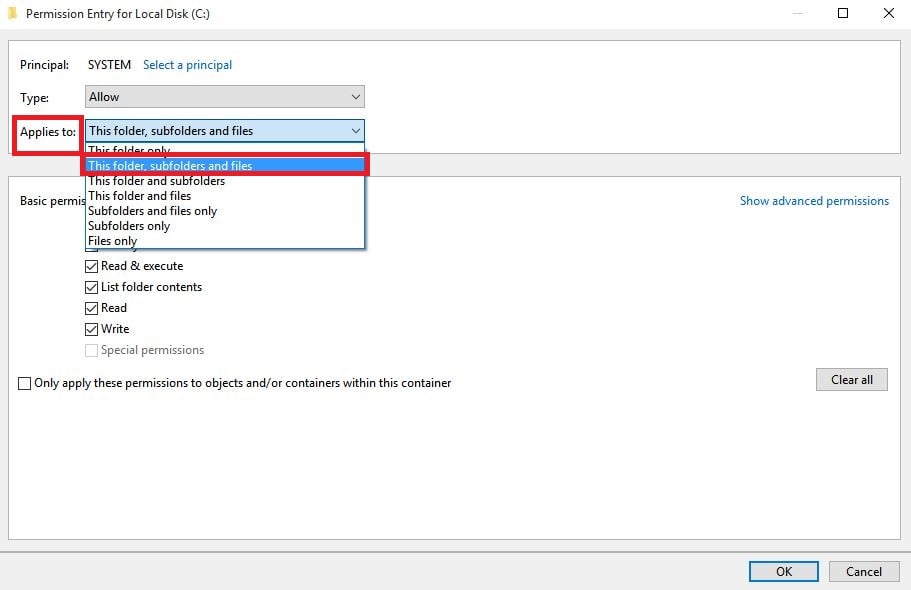
  7. Close Permissions dialog and return to Properties dialog then click Advanced.HP driver error 1603
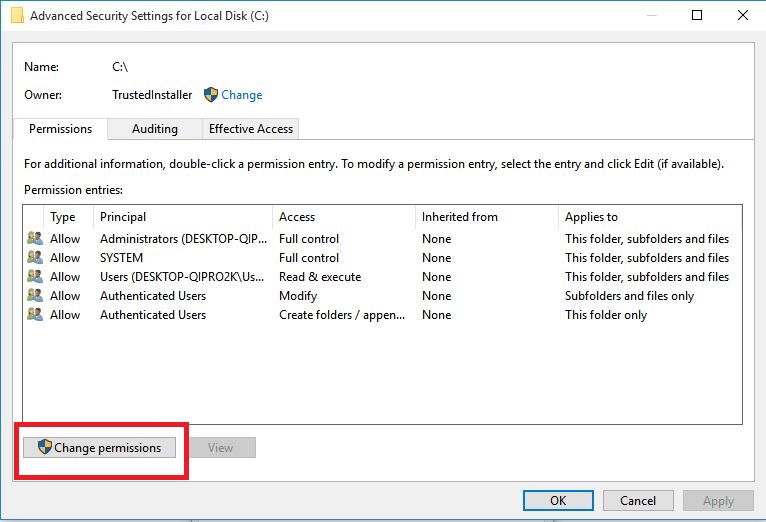
  8. Select Change Permissions.HP driver error 1603
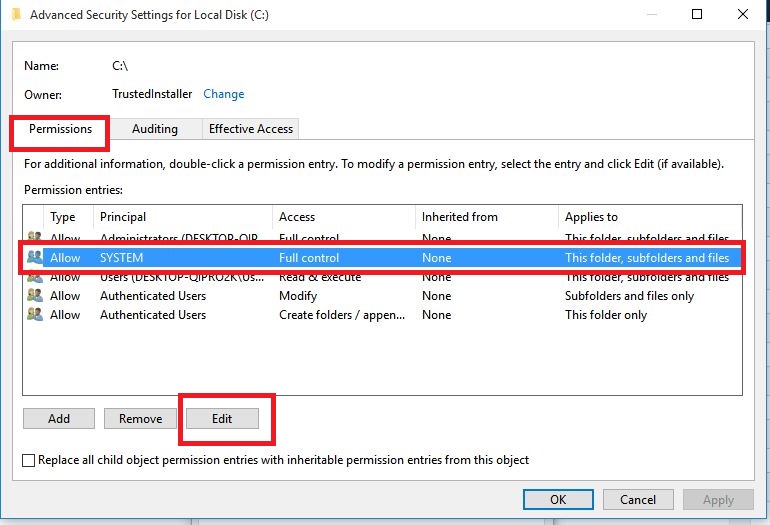
  9. In Permissions tab, select SYSTEM entry and click Edit.HP driver error 1603
  10. Click Applies to dropdown and select This folder, subfolder and files then click OK.HP driver error 1603
  11. Run the Windows Installer package.

7. Register Windows components

7.1. Register the Atl.dll file

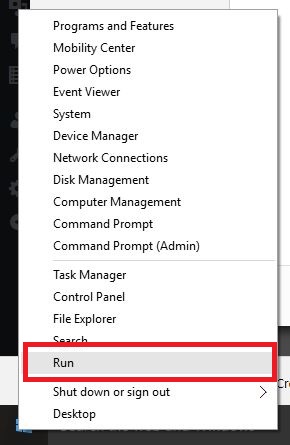
  1. Right click Start and select Run.
  2. Type regsvr32 Atl.dll and then press enter or click OK
  3. On the RegSvr32 screen, click OK

7.2. Unregister and reregister Microsoft Windows Installer

  1. Click Start.
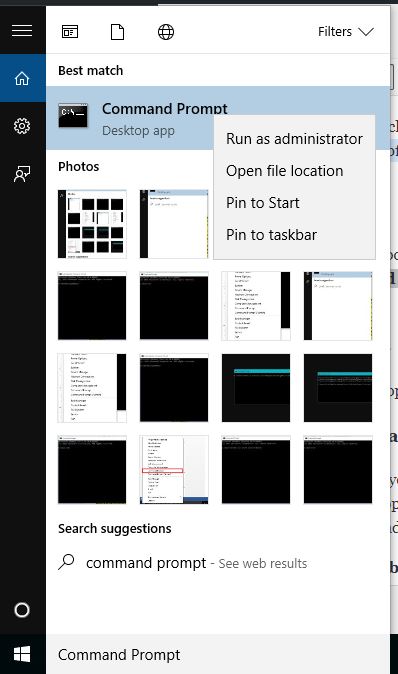
  2. Type cmd in the search box.
  3. Right-click Command Prompt and select Run as Administrator.HP driver error 1603
  4. Type MSIEXEC/UNREGISTER and then click OK.
  5. Try installing the program and check if the issue persists.

7.3. Reinstall HP software

  1. Turn on the printer.
  2. If your printer is connected to the computer with a USB, disconnect the cable from the printer.
  3. Go to the HP website under Software and Driver Downloads.
  4. Identify your printer model and follow the instructions to download it.
  5. Click Download next to the full feature driver or click Basic Drivers for other options

8. Temporarily disable services, and then reinstall the HP software

8.1. Temporarily disable startup services

  1. Click Start.
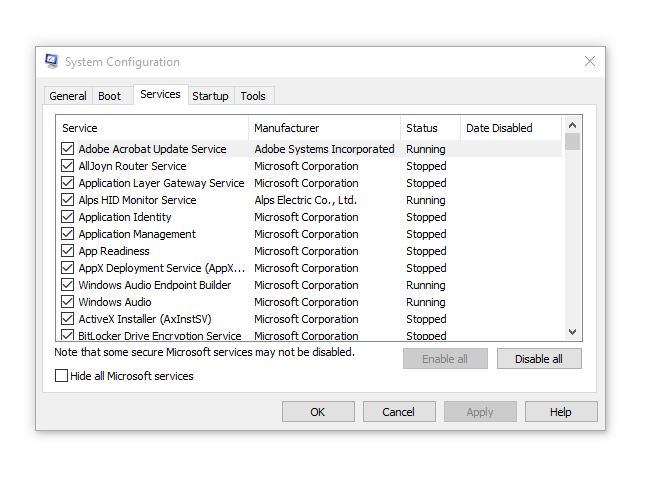
  2. Type msconfig in the search box and press enter.
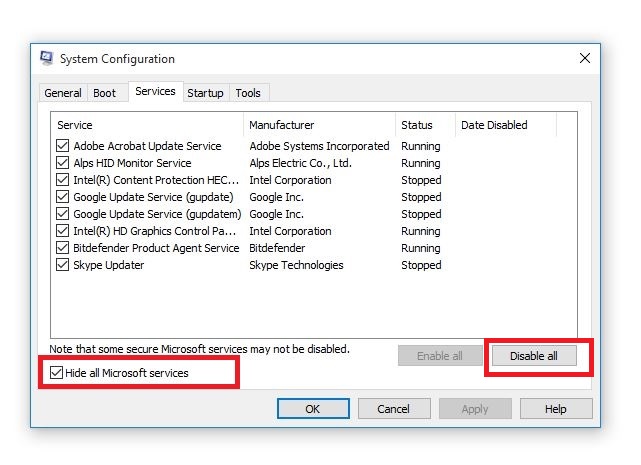
  3. Select Services tab and click Disable All to turn off any programs that start when you turn on your computer.HP driver error 1603
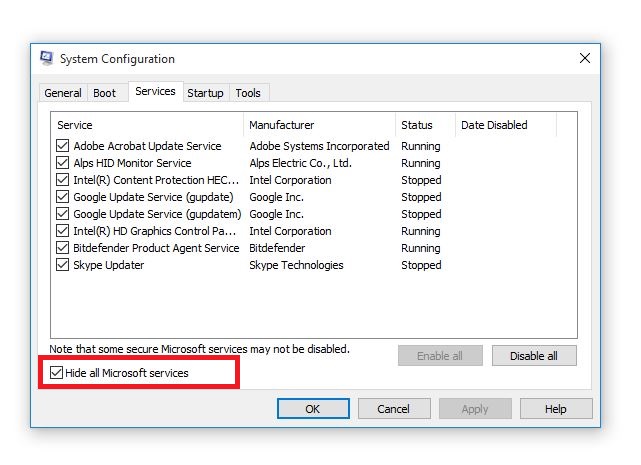
  4. Select Hide All Microsoft Services checkbox.HP driver error 1603
  5. Click Disable All and click OK
HP driver error 1603

8.2. Temporarily disable Windows Update

  1. Click Start
  2. Click All Programs and go to Windows Update.
  3. In the left pane, click Change settings.
  4. Under Recommended updates, click Never check for updates.
  5. Click OK.

8.3. Remove  and reinstall HP software

  1. Unplug the USB cable connecting the HP product to your computer.
  2. Right-click Start and select Control Panel.USB WiFi adapter is not connecting to the Internet
  3. Open the list of installed programs and remove the software
  4. Click Programs
  5. Right click the HP product and select If asked to remove shared files, click No as other programs using these files may not work if you delete them.

8.4. Reinstall HP software by doing the following:

  1. Turn on the printer
  2. If your printer is connected to the computer with a USB, disconnect the cable from the printer.
  3. Go to the HP website under Software and Driver Downloads.
  4. Select a method to identify your printer model and follow the instructions to download.
  5. Click Download next to the full feature driver or click Basic Drivers for other options.

8.5. Enable startup programs

  1. Click Start.
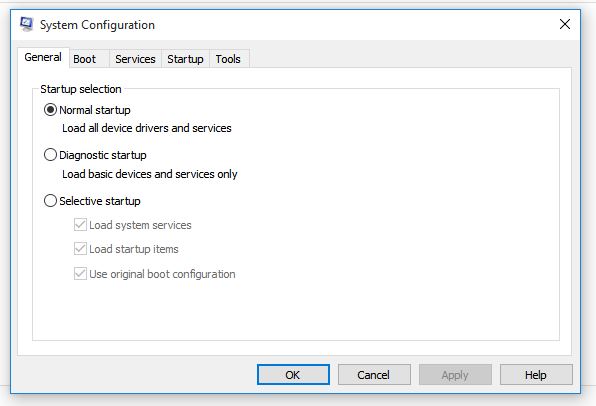
  2. Type msconfig and press enter.HP driver error 1603
  3. Select the General tab and select Normal startup checkbox.HP driver error 1603
  4. Click Apply and then click Close.
  5. Restart your computer.

8.6. Re-enable Windows Update

  • Click Start
  • Select All Programs
  • Click Windows Update
  • In the left pane, click Change settings
  • Under Install updates automatically, click Never check for updates and click OK

9. Upgrade to the latest Microsoft Windows Installer version

  1. Right-click Start and select Run.fix error 80070436
  2. Type appwiz.cpl and press Enter.
  3. In Currently Installed Programs list, select Windows Installer.
  4. Click Remove and follow the instructions to remove Windows Installer.
  5. Visit the Microsoft website to install the latest Windows Installer version. Make sure you download the .msi file for your version of Windows.
  6. If you have 32-bit version, you’ll see x86, and 64-bit version gives x64. If you’re unsure, download and install the latter version.

Did any of these solutions work for you? let us know in the comments section below.

Is VPN safe for online banking? [Complete guide]

Online banking is a risky business because you have to enter your login credentials and credit card info on the web. If you’re directly connected to the Internet, you might accidentally leak them and compromise your data. But you can use a VPN to stay safe.

A virtual private network creates a secure tunnel and uses it to isolate your data traffic from the public web, all thanks to encryption. In case of a man-in-the-middle attack, a hacker might obtain your data but can’t unscramble it.

Should you use a VPN for online banking?

Yes, you should definitely use a VPN for online banking since it makes you safer on the Internet.

Although most banks are doing the best they can to make you feel as safe as possible when making online transactions, sometimes they fail.

Internet banking is particularly dangerous during the COVID-19 pandemic when most people stay home and pay taxes or shop exclusively online. But a VPN helps a lot.

Here are some legit reasons why you need a VPN for online banking:

  • Keeps you safe from cybercriminals when using public Wi-Fi hotspots.
  • Amps up your security level when traveling and connecting to the airport, hotel, or restaurant Wi-Fi.
  • Shields your mobile apps since they’re most vulnerable to hacker attacks.
  • Adds an extra layer of security to your home network and protects your router.
  • Excellent in combination with HTTPS websites.

How to use a VPN for safe Internet banking

1. Say no to free VPN

don't use free VPN

A VPN is only as good as its privacy policy. If you stumble upon a legit service with a strict, no-logging policy, that’s great! But you can’t trust a free VPN with your data. In fact, it’s safer to use online banking without a free VPN.

Even if the VPN provider won’t collect your data, there are still dangers since free mobile apps are usually ad-supported. Any ad or banner to a third-party website is a door left open for malware injections. But a premium VPN is worth it.

2. Don’t use VPN servers from other countries

PIA VPN countries

If your bank is actually doing a good job and monitoring your account for any suspicious activity, it will flag and freeze it if you try to connect from another country. Plus, it will probably call you soon to let you know.

Clearing this issue with the bank BEFORE won’t do you any good if you keep connecting to various countries through the VPN. And it’s never a wise idea to ask your bank to stop doing this, in case an authorized user actually attempts this.

Instead, limit your VPN server options inside your own country. It doesn’t matter which one you use, anyway, since all bring the same level of security.

3. Set the VPN‘s security settings to the max

maximize VPN security

VPNs have numerous benefits, like circumventing geoblocks and unlocking streaming services like Netflix. But, when it comes to online banking, what you’re looking for is the highest level of security.

Set your VPN service to use a highly secure protocol, like OpenVPN with 256-bit military-grade encryption, WireGuard, or SSTP. Keep in mind that more encryption means a slower connection.

If you have trouble maintaining your Internet connection stable over VPN, dial it down a notch until you find the balance between encryption and speed. Whatever you do, never use a VPN over PPTP or L2TP because they provide low security.

Besides encryption, enable the app’s kill switch, activate its built-in ad and malware blocker, and switch to its private DNS servers, depending on what features are supported by the VPN service (unlike encryption, they won’t slow you down).

4. Don’t use weak passwords or turn off 2FA

A VPN can’t keep your online banking account safe from illegal logins, so don’t compromise when it comes to passwords and two-factor authentication. Set a strong lengthy password made out of a random combination of uppercase and lowercase letters, numbers, and symbols (or use a password generator).

If you have trouble keeping up with your passwords, use a reliable password manager to keep track of them, especially since it’s recommended to change them often. Furthermore, check if you have two-factor authentication enabled.

5. Use a secure browser

Tor browser

Unless you use a mobile app to access your banking account, consider switching to a secure web browser for online banking. You don’t have to get rid of the current browser if you’re fond of it since you can install a new one to use for banking purposes, such as Tor Browser, Brave, or Firefox.

6. Use security-focused browser addons

If you want to continue using your current web browser, even if it’s unsafe, you can amp up its security level by turning to security-focused extensions like DuckDuckGo Privacy Essentials, Ghostery, Privacy Badger or HTTPS Everywhere.

What’s the best VPN for safe online banking?

use Private Internet Access for online banking

Made by Kape Technologies, Private Internet Access (PIA) is the top-ranked VPN for Internet banking, thanks to its excellent security features. It uses OpenVPN with up to 256-bit military-grade encryption to redirect your entire network traffic through VPN.

PIA also supports the newer WireGuard protocol. And, if you want to raise the bar, you can connect to a second VPN location through Shadowsocks or SOCKS5 proxy. However, as we previously mentioned, it’s not advisable to connect to another country.

This VPN app has its own ad and malware blocker for web browsers called PIA MACE, which keeps you safe from phishing and other scams. It runs private DNS servers and cuts off your Internet access in case the VPN connection drops to ensure your data isn’t compromised.

What else you must know about PIA:

  • Fully transparent with a zero-logging privacy policy
  • No IP, DNS, or WebRTC leaks
  • Works with Windows, Mac, Linux, iOS, Android, routers
  • Static and dynamic IP addresses
  • 24/7 live chat support
  • 30-day money-back guarantee (no free trial)

Private Internet Access

Private Internet Access

Use this awesome VPN for online banking to stay safe and make secure transactions anywhere.
$2.85/mo. Buy it now

A lot of people believe that HTTPS is enough to stay safe when making online banking transactions. Although it’s designed to provide end-to-end encryption, HTTPS is not foolproof. But you can throw into the mix a trustworthy VPN like Private Internet Access to change that.

[wl_navigator]


Microsoft’s Surface Duo is “not meant to be repaired,” says iFixit

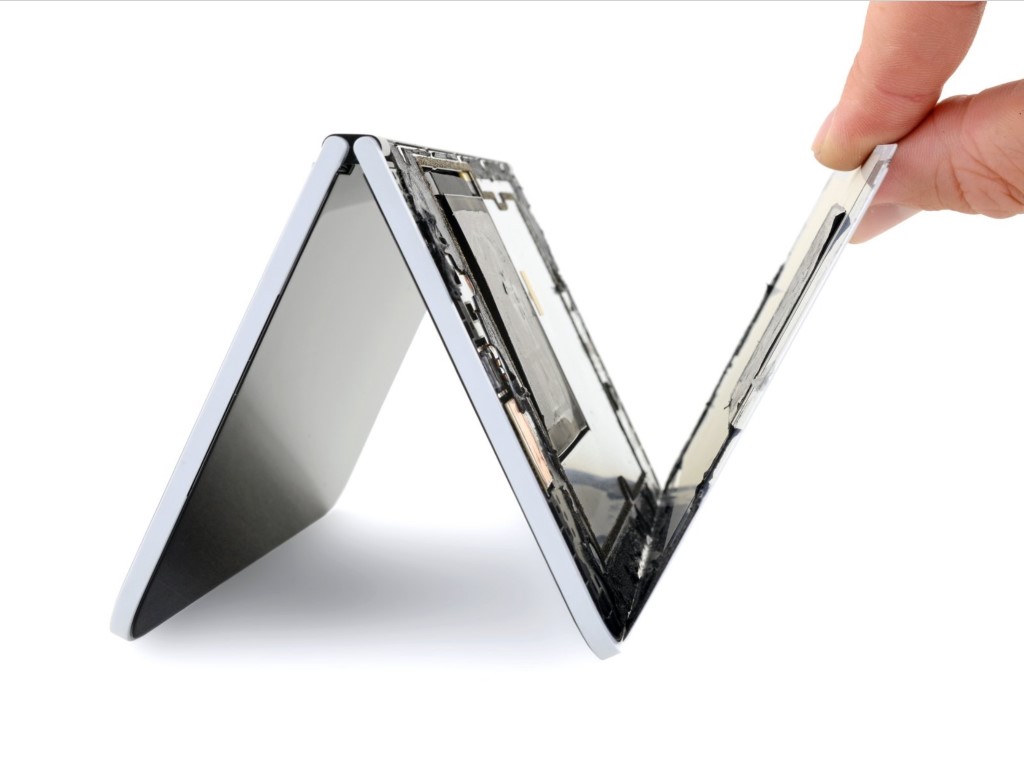
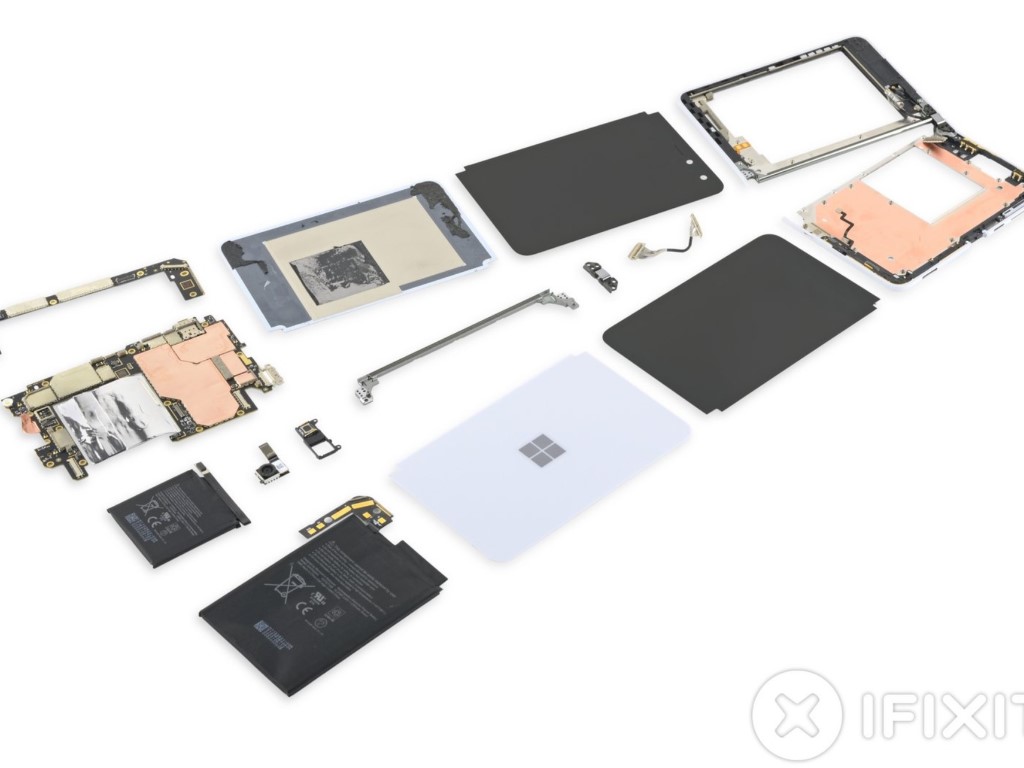
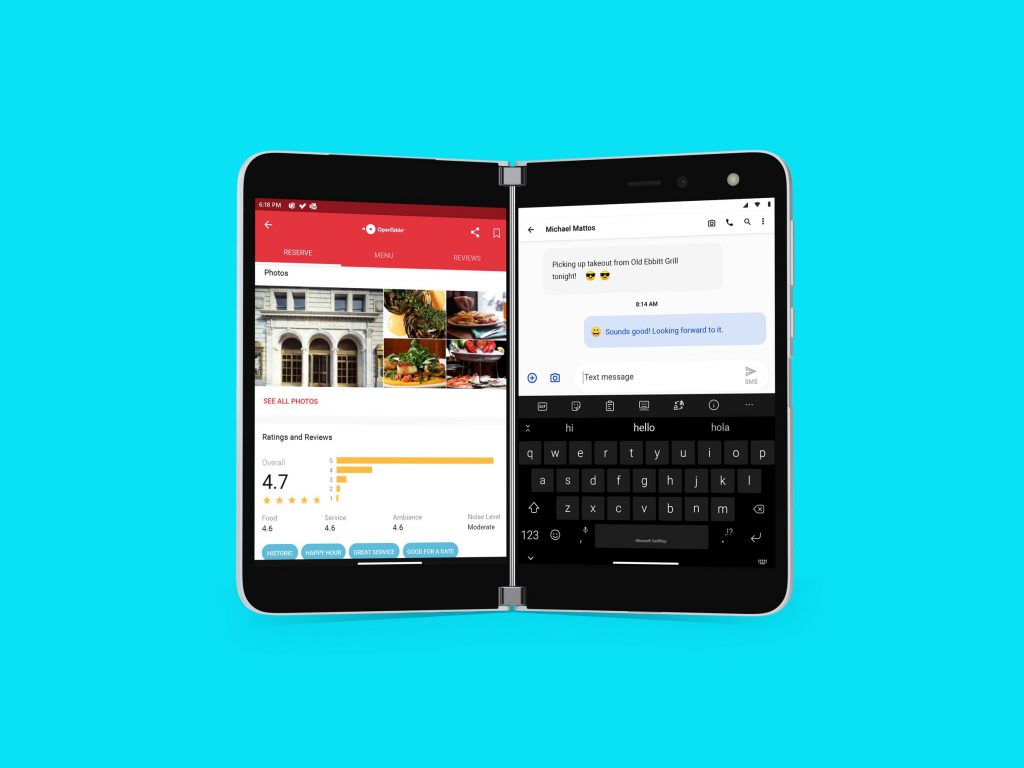
Repair website iFixIt is back with a new teardown, and despite the gains Microsoft made with the Surface Pro X and Surface Laptop 3, this time things aren’t in favor of the Redmond giant. In its latest teardown, iFixit gives the Surface Duo a score of 2/10.

According to a press release from the repair website, this score means Surface Duo is not something “that is meant to be repaired, maybe not even by Microsoft.” Factors in the score include very easy to slice cables, sticky glue traps, and the pains of replacing the battery.

iFixit’s only high was the displays and the back covers being able to be replaced without disassembling other components. Unfortunately, though, the batteries being glued, and the USB-C port being soldered contributed to the low score. Other issues include uncommon tri-point screws, OLED panels not being protected from accidental prying, and the stubborn glue at all entry points.

Surface Duo Teardown

Some other interesting points in the detailed teardown reveal the Duo’s left battery resembling a mini iPad, and the right half being full with lots of circuitry. There’s also the multi-strand interconnected cables, too, which are routed through the hinges. Finally, there’s an interesting bit about the Duo’s geared hinges which iFixIt calls a “pretty simple hinge design compared to some of the other options we’ve seen.”

Indeed, it looks as though if you’re buying a Duo, there’s no chance that you’ll be able to repair it on your own if something goes wrong. The Duo might not be the “glued-filled monstrosity” that iFixit deemed the original Surface Laptop to be, but it still doesn’t look like something that’s easy for yourself or repair shops to replace. You should instead consider investing in the $200 Microsoft Complete Protection Plan at checkout, which covers accidental damage.

How to fix Hulu proxy error [NordVPN, ExpressVPN]

Hulu is one of the hottest video streaming services, but it doesn’t offer the same movies and TV shows to all countries. If you want to bypass licensing issues and geo-location restrictions, you need a VPN.

Using a free VPN to stream Hulu is not usually a good idea since most free VPNs get immediately detected and blocked by the website. That’s why most users turn to premium VPN services like NordVPN or ExpressVPN to fix the Hulu proxy error.

In some cases, however, Hulu might detect and block NordVPN or ExpressVPN, resulting in the dreadful error. If you stumbled upon Hulu videos unavailable to your location, too, here’s what you can do about it.

How to fix Hulu proxy error (NordVPN)

Disable WebRTC in your web browser

block WebRTC leaks with NordVPN

If WebRTC is enabled in your web browser, your VPN leaks your true IP address and geo-location. That means that you will encounter the Hulu proxy error even when connecting to a NordVPN server.

However, you can easily fix this issue by disabling WebRTC and preventing browser leaks. Make sure to use NordVPN’s browser extension, even if you also use the desktop client, because it has an integrated feature for turning off WebRTC.

Disable CyberSec or your ad blocker

CyberSec in NordVPN

CyberSec is NordVPN’s exclusive ad blocker. If you turned it on, it might interfere with Hulu’s website, resulting in the Hulu proxy error.

Try turning it off and accessing Hulu while connected to a NordVPN server. Otherwise, if you don’t have CyberSec enabled, make sure to deactivate any other ad blocker extensions in your web browser.

Enable obfuscation mode

use NordVPN obfuscated servers

Obfuscation mode is a rare feature found in VPN tools. It hides the fact that you’re using a VPN, making your network traffic look like HTTPS instead. It’s a cool way to access websites that reject VPN connections, and it might just work with the Hulu proxy error.

NordVPN is one of the few VPNs with support for obfuscated servers, which you can find and enable in the settings panel. Keep in mind that it works only when using the OpenVPN protocol.

Once you turn it on, make sure to connect to the Obfuscated Servers.

Use NordVPN’s SmartDNS instead of VPN

enable NordVPN's SmartDNS

SmartDNS is an awesome feature shipped with NordVPN, which lets you stream media content on devices without VPN support, such as smart TVs and gaming console. It doesn’t encrypt your network traffic like a VPN, but it changes your geo-location for Hulu (US only).

Besides, you can also use SmartDNS to stream other media services like Prime Video US, BBC iPlayer, HBO US, and Netflix Originals. Since there’s no encryption involved, your connection will be significantly faster, which is great for those who can’t benefit from stable Internet connections. It’s a great way to bypass the Hulu proxy error.

You can enable the SmartDNS feature in the Nord Account dashboard by whitelisting your IP address (without connecting to VPN). If you have a dynamic IP, you have to update the whitelist every time it changes. Otherwise, you can request a static IP address from your ISP or set up dynamic DNS. Only IPv6 addresses are supported.

Switch to a better VPN

use Private Internet Access for Hulu

  • Sign up for a PIA subscription plan.
  • Download and set up PIA on your device.
  • Launch the app and connect to a VPN server.
  • Enjoy Hulu streaming!

If you end up getting disappointed by NordVPN due to the Hulu proxy error and can’t find a permanent fix for it, consider canceling your NordVPN subscription and looking for an alternative, better VPN service, such as Private Internet Access (PIA).

Created by Kape Technologies, PIA is one of the best VPNs for video streaming. You can use it to watch not only Hulu but also Netflix US and other media streaming services. The service covers more than 3,300 VPN servers across 48 countries.

PIA comes with exclusive DNS servers, split tunneling, WireGuard and OpenVPN with up to 256-bit encryption, Shadowsocks and SOCKS5 proxy, a kill switch, and port forwarding.

Besides, you don’t have to worry about video buffering caused by VPN since PIA optimized for streaming. It’s compatible with all major platforms, including Windows, Mac, Linux, iOS, and Android.

More about PIA:

  • 10 simultaneous connections
  • Zero logs and leaks
  • 24/7 live chat support
  • 30-day money-back guarantee
  • No free trial
Private Internet Access

Private Internet Access

Upgrade to this awesome VPN to bypass the Hulu proxy error without any issues.
$2.85/mo. Buy it now

ExpressVPN Hulu proxy error

configure ExpressVPN settings

In addition to NordVPN, users have complained about getting the Hulu proxy error with ExpressVPN. To fix this issue, use the solutions we provided for NordVPN above when it comes to WebRTC leaks, ad blockers, and the Smart DNS feature (ExpressVPN calls it MediaStreamer).

You can also head over to the app’s settings panel and make sure to activate IPv6 leak protection, ExpressVPN DNS servers, and Windows networking optimization.

If everything fails, consider dropping ExpressVPN and making the switch to Private Internet Access.

In conclusion, the solutions we presented in this article should help you fix the Hulu proxy error caused by NordVPN or ExpressVPN.

[wl_navigator]

FIX: Facebook won’t let me post anything from my PC

Facebook is one of the most beloved social networking platforms with 2.2 billion active users.

If we exclude mobile devices, the application was always rather stable on PCs, even after numerous aesthetic and functional changes.

But a moderate number of users occasionally encounter some issues with this app, as they are unable to post anything or interact with their feed from a PC.

In the following lines you will find five simple solutions to solve this annoying problem.

How can I fix Facebook posting from PC?

1. Make sure you’re not banned

Facebook banned

Facebook’s regulations are harsh occasionally, and the penalty for spamming your profile can come in a limitation of posts.

However, you should know that Facebook informs all users who cross the predicated boundaries. So, we suggest logging out of all devices and logging in again.

After you log in, there should be viable information about your potential wrongdoings. You can file a complaint to Facebook, and if that’s your first ban, chances are they’ll reduce the ban length or terms.


2. Clear browser’s cache

  1. Open a new page in Google Chrome.
  2. Press Shift + Ctrl + Delete to open the Clear browsing data menu.
  3. Select All time as the preferred time range.
  4. Check the Browsing history, Cookies and other site data, Cached images and files boxes.
  5. Click on the Clear data button.


3. Remove extensions and suspicious applications

  1. Open a new page in Google Chrome.
  2. At the top right, go to More tools and click on Extensions.
  3. You can add, remove or just disable a site.
  4. Remove the unnecessary extensions.

If we exclude the extensions you’re using by choice, there are some which can infiltrate unknowingly. We all know about toolbars and hijackers which basically take the control over an affected browser.

Furthermore, to be completely safe, you should remove all the malicious applications.

  1. Press the Win + R keys to open the Run window.
  2. Type control and hit Enter.
  3. Open Control Panel.
  4. Go to Programs and select Uninstall a program.
  5. Remove the suspicious software.

4. Scan for malware and run anti-PuP tool

  1. Download Malwarebytes.
  2. Run the tool and click Scan Now.
  3. Wait until the tool scans your system and click Clean & Repair.
  4. Restart your PC.

PC have to be clear from malware which potentially spreads into browser‘s configuration files. If that’s the case, only removing the malicious extension won’t do any good.

Use Malwarebytes to scan for malware and successfully remove all PuPs (Potentially Unwanted Programs) from the system registry.


5. Reset the app

facebook won't let me post anything from pc

  1. Open Settings.
  2. Choose Apps.
  3. Under the Apps & features section, search for Facebook.
  4. Open Advanced options.
  5. Scroll down and click Reset.

We can’t overlook temporary Facebook server issues (especially when they decide to implement changes) as a possible reason for this error. Therefore, you’ll have to wait awhile until you’ll be able to post again.

Don’t forget to tell us whether one of the steps get you through the problem. You can do so in the comments section below.

[wl_navigator]

Mute vs Do Not Disturb on Snapchat [Difference Explanation]

Social media platforms can be a bit noisy – you open the Snapchat app, for example, and are greeted with thousands of posts. You leave the app closed, and your smartphone is flooded by notifications.

To keep it all sane, Snapchat (and almost every other social platform) have the block, mute, and Do Not Disturb features.

Blocking is straightforward, as it outrightly bans the user from your account. However, Snapchat‘s Mute vs Do Not Disturb features are confusing as they seem to be one and the same.

How can I tell the difference between Snapchat’s Mute vs Do Not Disturb?

How does the Mute option work in Snapchat?

snapchat-mute-vs-do-not-destroy-muting

When the muted user posts a story, it’s not queued with other recent stories. Instead, the story will be relegated to the end of your story list.

On your story slideshow, the stories from contacts that you muted will be nowhere to be found. This feature is similar to the muting feature of Instagram.

Muting a Snapchat group or user is like taking a break from them. In this sense, nothing changes on the side of the muted contacts.

People that you mute will have no clue that you did that because Snapchat will continue to show your recent stories to them in the story slideshow.


How does Do Not Disturb work in Snapchat?

mute-vs-snapchat-do-not-disturb

When you use the Do Not Disturb feature on a Snapchat contact or group, your application stops delivering notifications from the person or group.

Unlike the Mute feature, Snapchat doesn’t stop showing you their stories; this one is all about your notifications.

Nothing happens inside the app itself. As the name says, you simply don’t want that contact or group to disturb you anymore.

Whenever you’re ready to open the Snapchat app, you’ll see all of their recent stories and messages as they should be, just like everyone else’s.

On Snapchat, if you no longer want to have anything to do with a user, you can block them.

However, if it’s not that deep, and you only want to take a break from them, you have the Snapchat Mute and Do Not Disturb features to play with.

Muting a contact or group hides their stories from you, while the Do Not Disturb feature stops their notifications from coming through.

[wl_navigator]

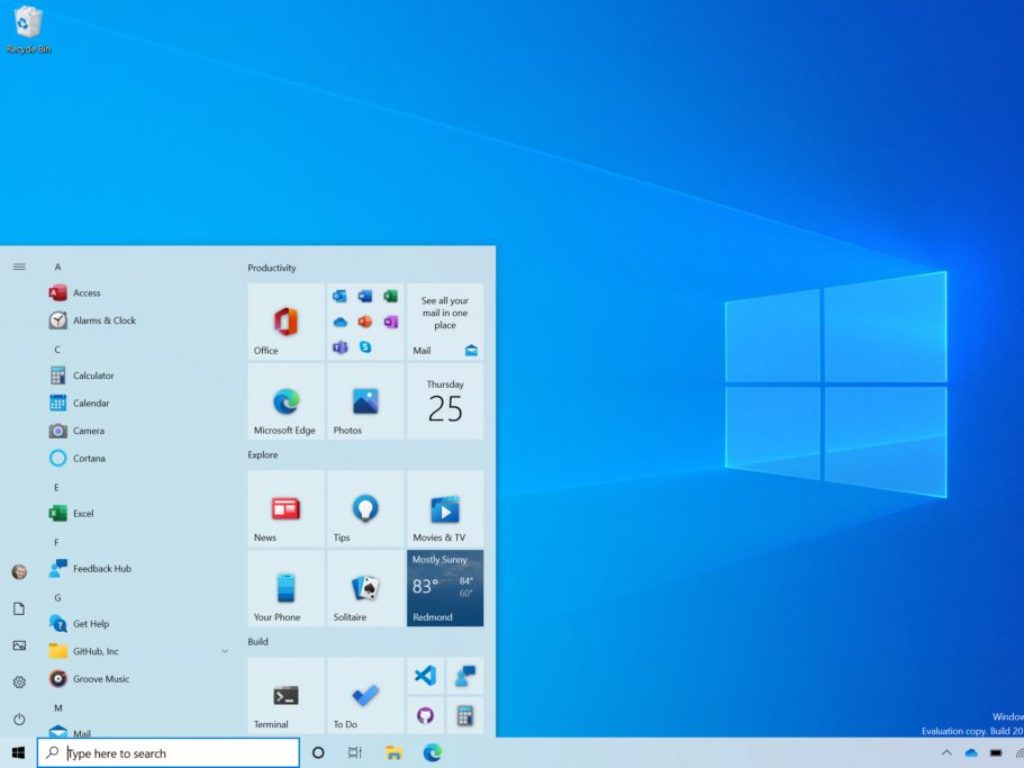
[Updated] Microsoft releases new Windows 10 Dev build with no new features to test servicing pipeline

If Microsoft already released a new Windows 10 Insider build for the Dev Channel yesterday, the company is following up today with the cumulative update build 20211.1005 (KB4581021) that includes no new features. “This update does not include anything new and is designed to test our servicing pipeline,” the team said today.

This isn’t the first time that the company does such testing, though because this is just a cumulative update, this build should be pretty quick to install. As a reminder, the build 20211 released yesterday added Search to the Default Apps pages in Settings, as well as the ability for users to attach and mount a physical disk inside of a WSL 2 distro. You can get more details in our previous post here.

We hope to see the Windows Insider team releasing another Dev build with more new features next week. In case you missed it, the company also released a new 20H2 build for the Beta channel on Tuesday.

Update 1PM PT: The Windows Insider team said it has pulled the update after discovering a bug preventing Insiders from installing it.

GitHub announces new integration with Microsoft Teams

Microsoft has launched a public preview of a new GitHub integration with Microsoft Teams. The integration will allow developers to communicate with the team for tracking issues, pull requests, deployment status updates, code reviews, and more right within Teams. 

“Developers spend a considerable amount of time communicating with the team, monitoring the issues, pull requests and deployment statuses. This necessitates constant switching of context between GitHub and Microsoft Teams (collaborate). The GitHub integration for Microsoft Teams gives you and your teams full visibility into your GitHub projects right in your Teams channels, where you generate ideas, triage issues and collaborate with other teams to move projects forward,” the company explained. 

The GitHub integration with Microsoft Teams gives developers the ability to add the GitHub (Preview) app from the Teams app store, just like they have been able to integrate the service with Slack. Users will be able to subscribe/unsubscribe notifications for pull requests and issues organization or a repository’s activity to get customized notifications. 

Subscribe

Moreover, the app also brings the ability to list notifications for issues and pull requests under a parent card to promote collaboration. The card will group the latest issues as well as details about the title, description, assignees, reviewers, labels, and checks.

PR Card

Another new feature that the company highlighted allows developers to ‘unfurl’ GitHub links. The feature has been designed to automatically extract information from a GitHub page when a user posts a link in a Microsoft Teams channel. The current implementation supports link previews for pull requests, issues, comments, code snippets, repositories, accounts or organizations. 

Keep in mind that the GitHub integration with Microsoft Teams is still a work in progress and the company promised to bring additional capabilities soon. Feel free to check out the GitHub support page to learn about the installation process. 

Windows Hello is Not Available on This Device: How to Get it

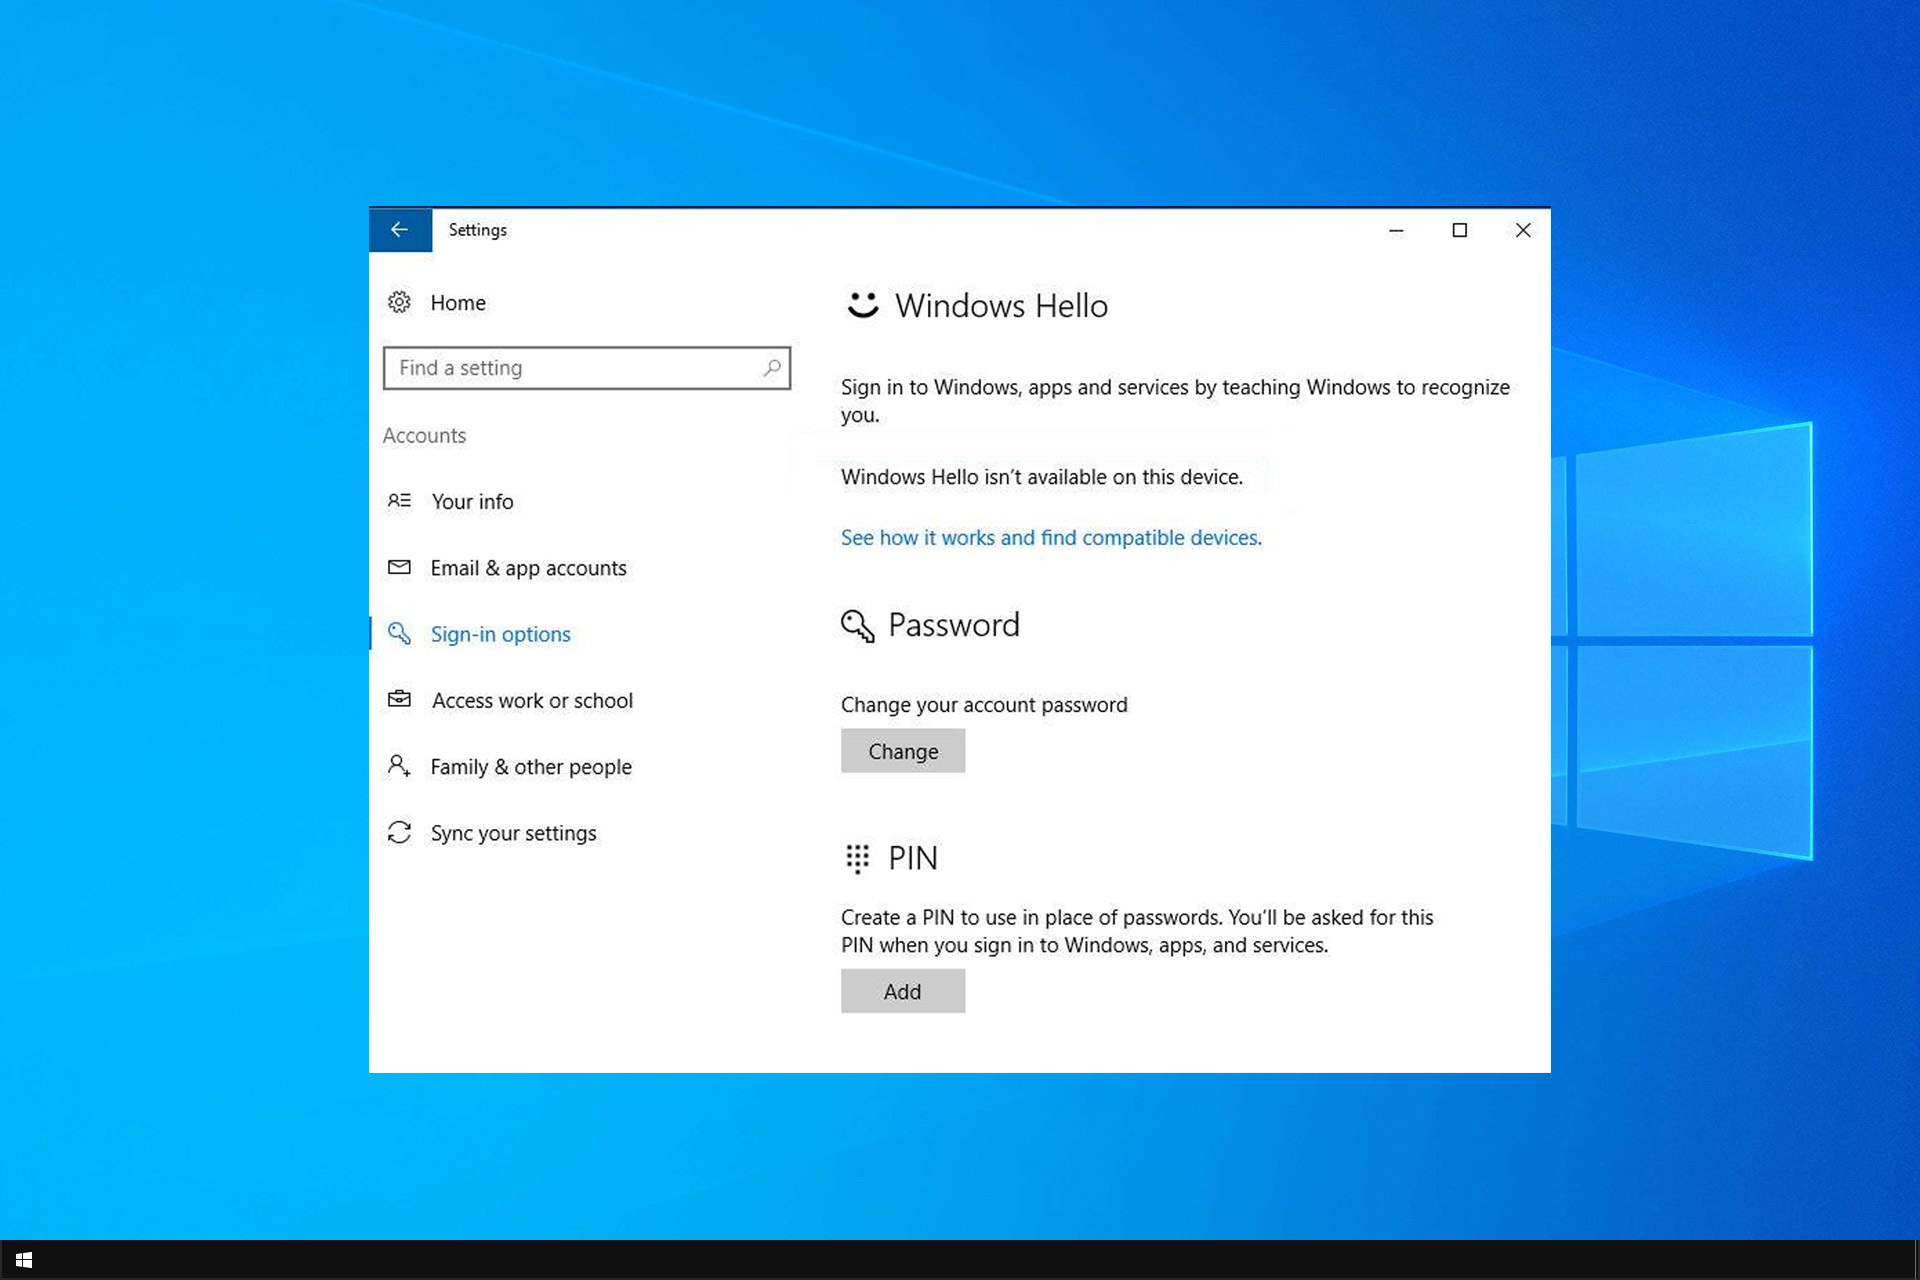
Windows Hello isn’t available on this device is a common error issued by the Windows 10 system. This can be a serious error since you can’t log into Windows 10 with biometrics until you fix it.

This can leave your PC vulnerable to access from third parties, so it’s important to fix this issue as soon as possible. In today’s guide, we’re going to show you how to do it properly.

Why is Windows Hello not available on my device?

  • Missing or incompatible biometrics driver will cause this problem to appear on your PC.
  • Sometimes this issue appears because Windows is out of date.
  • In case our group policies aren’t properly configured, you’ll get this error message.

What can I do if Windows Hello isn’t available on this device?

1. Update the drivers

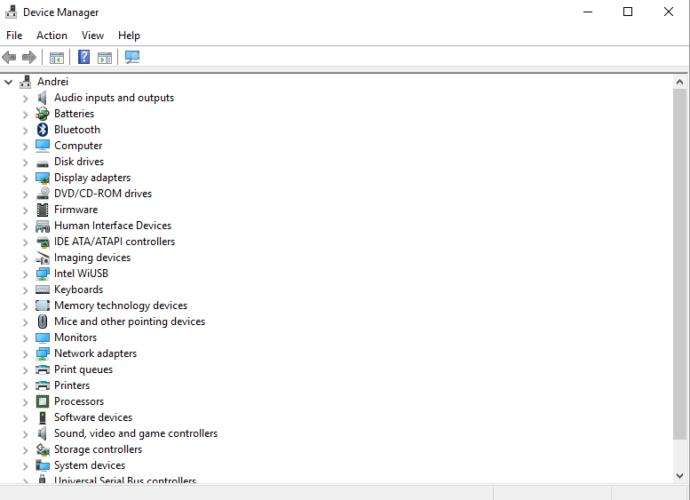
  1. Press the Windows key + X keyboard keys and click on Device Manager from the displayed list.device manager windows 10
  2. Click on Scan for hardware changes.
  3. Expand the Biometric devices section.
  4. Click on Update.
  5. Alternatively, you can choose Roll back in order to use a previous build of the driver and see if that works.
  6. You can also try to delete the driver and install it again.

Automatically update drivers

Installing the drivers manually involves a risk of damaging your system by downloading and installing the wrong driver version. Thus, we recommend updating your drivers automatically with a dedicated tool.

We strongly recommend Fortect Driver Updater, which is currently the best tool for this task. Here’s how you can update your drivers very easily:

  1. Download and install Fortect Driver Updater
  2. Launching it will automatically start scanning your computer for new drivers or problems with current ones.
  3. Now you just need to select which drivers you want to install or update. Or just hit the Update All button. It’s THAT simple!

This solution is so simple that it almost looks too good to be true, but it worked for so many users that it would be a shame not to try it.

⇒ Get Fortect Driver Updater

2. Make sure your device is running the latest Windows updates

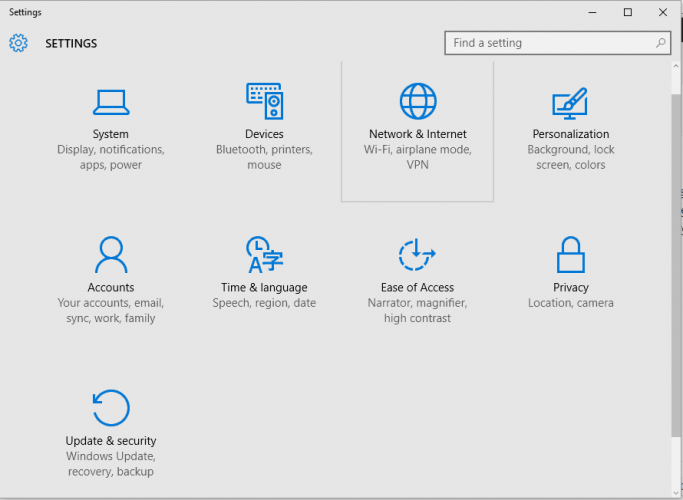
  1. Press the Windows key + I keyboard keys in order to bring Windows System Settings.
  2. Click on Update & Security.update & security windows 10
  3. Click on the Check for updates option.
  4. Well, initiate this scan operation and if you are prompted with any updates, apply them.update windows
  5. Reboot your computer and verify if the Windows Hello feature was restored.

After updating your system, check if the problem is still there.

3. Enable the Allow the use of biometric option

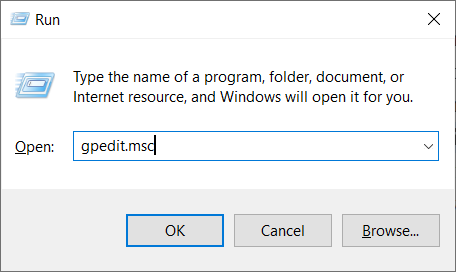
  1. Press the Windows key + R keyboard keys and in the Run window type gpedit.msc; press OK when done.
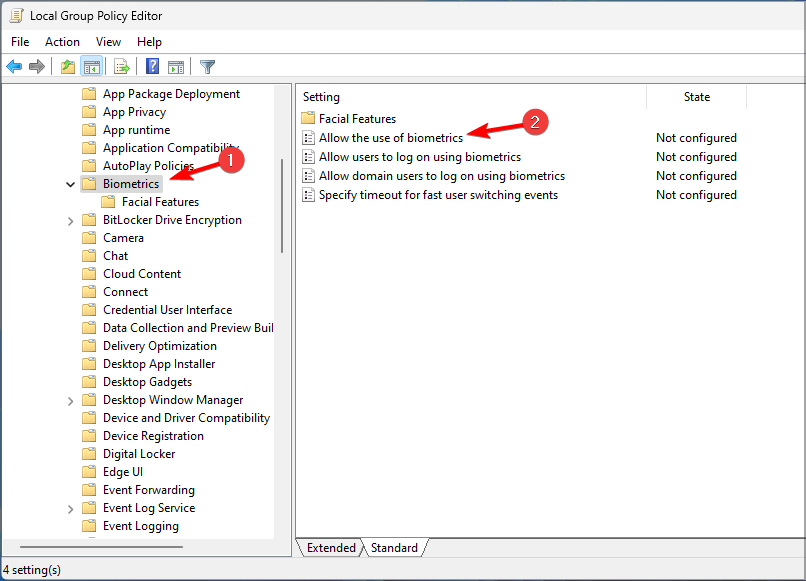
  2. From the Local Group Policy Editor you need to navigate towards Computer Configuration, then go to Administrative Templates. Lastly, go to Windows Components and choose Biometrics.
  3. Look for the Allow the use of biometrics feature located on the right side of the main pane.
  4. Double-click on the option.
  5. Select Enabled and then click OK and Apply.
  6. Reboot your Windows 10 system.

We hope that everything works as it should now. Those solutions can be applied when you deal with the Windows Hello isn’t available on this device error.

In case you’re having additional problems, we have a great guide on what to do if Windows Hello is grayed out, so we encourage you to check it out.

You can tell us how the troubleshooting process worked using the Comments section below.

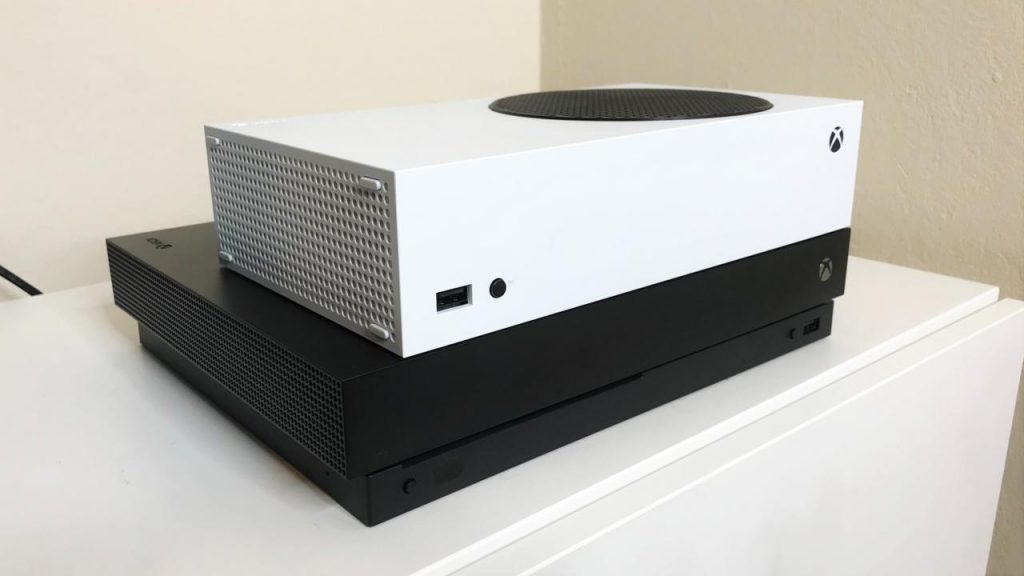
Microsoft’s Xbox Series X and Xbox Series S next gen consoles will support Dolby Vision and Dolby Atmos

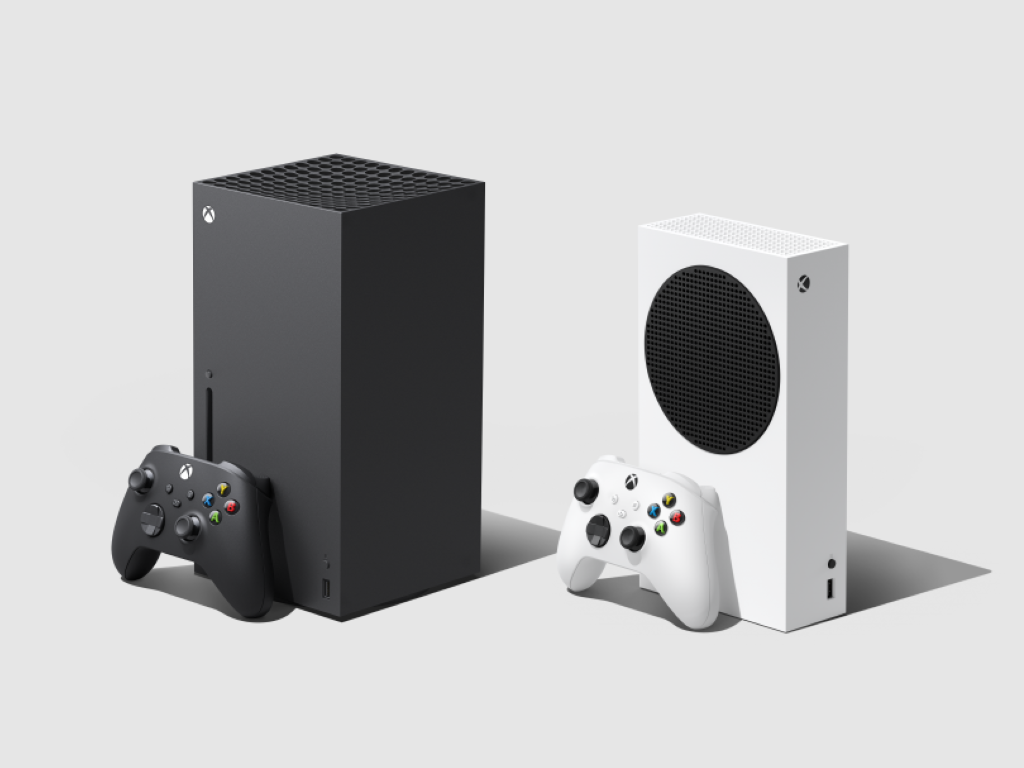
Dolby announced today that both their Dolby Vision and Dolby Atmos technologies would be fully supported on Microsoft’s upcoming next gen Xbox Series X and Xbox Series S consoles when they release on November 10th later this year.

This will make each next gen Xbox the first ever to support gaming in both Dolby Vision and Dolby Atmos.

Microsoft’s current gen Xbox One X console does support Dolby Vision right now but it only works for supported video content such as movies like Star Wars: The Rise of Skywalker in the Disney Plus app. Dolby Atmos, however, does work with video games on the Xbox One X console so the addition of this feature on its own isn’t too ground-breaking.

What is Dolby Atmos and Dolby Vision?

Dolby Atmos is a technology that allows for a more immersive audio experience that moves beyond separate audio channels and creates the illusion of a three-dimensional space by making certain sounds sound as if they’re happening closer to or further away from the listener.

Dolby has confirmed that gamers will still need to download the free Dolby Access app on their Xbox console to enable this feature. A Dolby Atmos-enabled TV, soundbar, or home theater system is also required. Those will headphones will still need to pay for the Dolby Atmos for Headphones add-on through the app though existing owners should be able to continue using it on the next gen consoles without paying again.

Dolby Vision creates a more realistic color profile in games and media. Dolby claims that Vision enhances content even more than HDR with 40x brighter highlights and 10x deeper blacks. A TV with Dolby Vision support will be needed to use this feature. Unlike Dolby Atmos, Dolby Vision won’t be available at launch on the Series X and S and is set to come sometime in 2021.

Are you excited for Dolby Vision and Dolby Atmos support on the Xbox Series X and Xbox Series S or are you fine with your current setup? Share your thoughts with the community in the comments below and then follow us on Pinterest and Twitter for more Xbox gaming news.

Dolby Access
Dolby Access
Developer:
Dolby Laboratories
Price:
Free

Lost internet connection on Windows 10? Here’s how to fix it

Many Windows 10 users reported that KB3201845 caused a loss of Internet connection. This problem is causing a lot of discomfort and trouble, especially for online gamers who get disconnected while trying to climb up the ladder. To help users and the gaming community, we will offer you a tutorial on how to fix Internet connection issues.

Why does my internet keep disconnecting?

There are three common reasons why Internet disconnects:

  1. The first reason could be a configuration error caused by the Transmission Control Protocol/Internet Protocol or the TCP/IP.
    • If it is not renewed, this might generate Internet connection loss errors. Getting a valid IP configuration may fix this problem.
    • You can easily validate your IP address in Command Prompt.
  2. Internet may disconnect due to Winsock API registry key corruption issues or simply because this key disappeared.
    • This API gives apps permission to use the transport protocols, granting them the Internet access they need.
    • You can easily reset the Winsock API in Command Prompt.
  3. The third reason why this loss of Internet connection may occur is because the network device driver may not be compatible or correctly installed.
    • This network device driver manages the communication of the computer with other network computers or operating systems, so corruption or incompatibility issues make it impossible to keep the Internet connection up.

How do I fix the loss of Internet connection

1. Update your driver

The final fix to the network device driver can be achieved by updating your driver. You can download the latest driver for your PC from the manufacturer’s official website. You can also open Device Manager to download the latest driver updates on your computer.

For the direct approach, go to your PC’s manufacturer’s official website and download the suitable driver.

For the updated version, after downloading the file from the Internet, use Win + X to go to Device Manager, select Network Adapters, and right-click the option used for the Internet connection, and then select Update Driver Software.

When the browsing window pops up, choose the downloaded file, click Next, and after the installation is complete restart your PC.

In order to prevent PC damage by installing the wrong driver versions,  we strongly suggest doing it automatically by using Fortect Driver Updater.

This tool will find the right driver versions and will keep your firmware up to date. Keep in mind that some drivers can be installed by this tool in multiple steps.

⇒ Get Fortect Driver Updater

2. Renew your IP

To fix the TCP/IP configuration problem, you need to renew your IP.

Open Command Prompt using Win + R and type cmd.exe or go to Windows search and type cmd or use Win + X and launch Command Prompt as Admin.

Once you open Command Prompt as administrator, type the command ipconfig/renew. You have to repeat this step two times in order for it to work.

3. Reset Winsock API

Fixing the Winsock API takes only a couple of minutes. Launch Command Prompt as Admin and enter the following commands:

  • netsh winsock reset catalog
  • netsh int ipv4 reset reset.log

After inserting these two commands, you need to restart your computer for the commands to take effect. Sometimes this can prove to be a temporary fix as many users had to reset Winsock API every time they started their PCs.

However, this must have been caused by a virus and we suggest that you also run a system scan and repair any corrupted files. That might turn this temporary fix into a permanent one.

That’s about it, we hope that this article helped you fix the annoying loss of Internet connection issues. If you’ve come upon other solutions to fix this problem, please list them in the comments below to help the Windows community.

Is Avast VPN good & safe for torrenting? [Must read]

Avast VPN is, as its name suggests, a virtual private network service, but is Avast VPN fit for your torrenting needs? It’s widely accepted that a VPN should be capable of keeping both your privacy and security safe.

However, it’s been proven that certain providers only offer these amazing features on paper. Therefore, we’re going to carefully analyze Avast VPN and find out whether or not it’s fit for the job when it comes to hiding torrenting data.

What makes a good torrenting VPN?

1. Privacy

First and foremost, a decent VPN should be able to protect your Internet activity against prying eyes. Since some users partake in P2P activities, it’s safe to say that torrenting is also a type of online activity.

Therefore, it should be shielded by your VPN of choice, by default.

We put privacy at the top of our list as we believe that this is what separates great VPNs from ones that we would never recommend. If you chose a VPN based on its server speed, then you probably shouldn’t use one, to begin with.

A VPN‘s privacy can be measured by how restrictive its privacy policy is, in regards to data collection. Usually, a VPN that has a strict no-logging policy is fit for torrenting use.

2. Security

While torrenting, you connect with other peers, which can easily see your IP address and location. With just a bit of skill and the right tools, even a script kiddie (non-experienced, hacker wannabe) can do harm to your PC.

A good VPN won’t let that happen by doing a bunch of things. First of all, it will shield your IP address. Second, it will assign you a fake location, based on the server you connected to. A good VPN will also be leak-proof.

Last, but not least, all traffic between you and the VPN gateway will be safely encrypted. Although we placed security on the second spot, it’s actually a tie between it and privacy. No competition, they’re equally important.

You can check if your VPN‘s leaking by visiting either one (or all) of these services:

We advise you to do so before actually torrenting, as it can save you from a lot of headaches with local authorities.

3. Does it allow torrenting?

Before you go any further, it’s worth mentioning that some VPN providers frown upon P2P activities such as torrenting, while others downright forbid you from engaging in torrenting.

Thus, you’ll need to figure out whether or not your VPN provider allows torrenting. If it does, you’ll also want to know what are the terms you must follow while performing this action.

Some great ways of figuring out if a VPN allows torrenting are:

  • Asking a customer support agent or company rep
  • Giving a thorough read to the VPN’s Terms of Service (we know you won’t do that)
  • Checking if there are any dedicated P2P servers you can connect to

4. Speed

Alright now, even though speed is saved for last, it’s not exactly unimportant. If your VPN has passed the privacy and security tests, you’ll obviously need it to be fast.

But not just fast. The fastest. You’ll want to look after VPNs that don’t have the habit of restricting bandwidth. Yes, they are real, just like bandwidth-limiting ISPs are still a thing in the 21st century.

How good is Avast Secureline VPN for torrenting?

1. No-logging policy

Privacy-wise, Avast VPN can be a trustworthy torrenting ally. We absolutely don’t mean that in a shady way, not just one bit. We don’t endorse any kind of unlawful activity, and neither does Avast.

We’re just saying that if you decide to download some files via torrent, Avast VPN will keep it on the hush if the authorities start asking questions.

While Avast does collect some data from you while using the service, it’s not information you can be identified after.

Data Avast VPN collects:

  • Connection timestamps
  • Original IP address subnet (only the last digits)
  • The IP address of the VPN server you’re connected to
  • How much data you transmitted
  • OS version
  • Avast VPN client’s version
  • App events

Data Avast VPN doesn’t collect:

  • Full IP addresses of its customers
  • Online activity logs that may include what websites you visit or what services you use
  • Any DNS queries you may make (Avast VPN uses proprietary DNS servers)

2. Great security features, no leaks

Like any respectable VPN provider, Avast VPN provides its customers with military-grade 256-bit AES standards. This means that all of your Internet traffic will be safely encrypted by the client and kept away from prying eyes.Avast VPN main window

Reportedly, the VPN service is based on OpenSSL and OpenVPN. These are some of the best and widely-used protocols in the world in terms of transparency, reliability, compatibility, and overall security.

We’ve connected to a P2P-enabled server, started torrenting a file (legally, of course), and performed the leak tests we’ve mentioned above.

You can check the results below.

  • ipleak – no IP, DNS, location, Torrent address, WebRTC leaks ipleak test Avast VPN torrenting
  • IPX – no IP, DNS, WebRTC, location leaksIPX leak test Avast VPN
  • BrowserLeaks – no IP, DNS, location, WebRTC leaksBrowserLeaks test Avast VPN

The ipleak service also has a torrent address test. After connecting to a VPN server, you add a magnet link to your default torrent client and wait for the results. As you can see, there was no leak on our side while using Avast VPN.

Therefore, it’s safe to assume that security-wise, you’re in good hands while torrenting behind Avast VPN.

3. Does Avast VPN allow torrenting?

Yes, Avast VPN does allow torrenting. We wouldn’t have gotten so far with our article just to reach this point and tell you that it doesn’t.

There’s no mention of P2P we could find in the Terms of Service documentation (which is shared with other Avast products and somewhat confusing).

However, if you access Avast SecureLine VPN’s FAQ page, you’ll notice that they covered a question regarding whether or not this service allows P2P connection. The answer is yes.

To clarify things even further, there are several dedicated torrenting servers you can connect to within the Avast VPN app. Just look for the P2P category or a small P2P indicator next to the server you want to use.

Avast VPN P2P servers

4. Speed tests

Well, we’ve seen that Avast VPN can keep your privacy safe, and your connection secure, and leak-free. But how well does it fare when it comes to speed?

We’ve run some tests to determine if and how much does Avast VPN slow down your connection while torrenting.

The results are not exactly good, but they’re not awful, either. While using a P2P-enabled server, we’ve attempted to torrent a Linux distribution from its official website, with and without the VPN.

  • While using the VPN, the speed peaked at about 10 MBps, give or take ~ 1 MBsAvast VPN torrent with VPN
  • Without the VPN, we reached a top speed of approximately 30 MBps, give or take ~ 2-3 MBsAvast VPN torrent without VPN

Thus, we can assume that using Avast VPN while torrenting results in a speed drop of about 2/3. However, we weren’t satisfied with these results and decided to do one more test.

We’ve used two different speed test tools (Netflix’s fast.com and Ookla’s Speedtest.net) to see if our initial assessments were correct. Mind you that we’ve used the same server throughout our entire battery of tests. Here are the results:

  • Fast.com
    • With VPN: 83 Mbps / 30 MbpsFast.com speed test with Avast VPN
    • Without VPN: 920 Mbps / 490 MbpsFast.com speed test without Avast VPN
  • Speedtest.net
    • With VPN: 151.72 Mbps / 21.22 MbpsSpeedtest with Avast VPN
    • Without VPN: 839.4 Mbps / 500.38 MbpsSpeedtest without Avast VPN

Although we were hoping to notice a smaller difference between VPN/non-VPN speed values, the speed test results have yielded a huge difference between the two types of usage.

As you can see, using Avast VPN gave us an average of ~ 90% speed reduction. Thus, it’s safe to conclude that even though Avast VPN does great when it comes to privacy and security, it’s not exactly brilliant when it comes to speed.

Final thoughts on torrenting with Avast VPN

All things considered, if you’re looking for a safe VPN to use while torrenting, Avast VPN might be exactly what you’re looking for. It has a strict no-logging policy, has military-grade encryption, and is completely airtight (no leaks).

On the downside, if you care a lot about speed, you’re in for some disappointment. Neither our torrenting tests nor our standard speed tests showed great results regarding Avast VPN’s speed.

Our speed tests lead us to believe that Avast VPN has some speed restrictions, despite the fact it advertises unlimited bandwidth.

[wl_navigator]

How to use two Instagram accounts? [Multiple Accounts Login]

Instagram is the largest social network in the world, and many Instagram users have two accounts. Managing two accounts can be hard, especially because you need to switch back and forth between them.

In this article, we’ll show you how to login to two Instagram accounts and how to easily switch between them.

How to add & switch between multiple Instagram accounts?

1. Add new Instagram account on your phone

  1. Open the Instagram app and go to your profile.
  2. Now tap the Menu icon in the top right corner and choose Settings.
    settings login two accounts instagram
  3. Scroll down to the Logins section and tap on Add Account.
    add account login two accounts instagram
  4. Enter the login credentials for the other account.
  5. After doing that, the new account will be added.

To switch between accounts, you just need to do the following:

  1. Go to your profile on the Instagram app.
  2. Tap the arrow next to your username.
  3. Select the account you want to switch to.

2. Use Incognito mode or a different browser

  1. Click the Menu icon in your web browser.
  2. Now select New Private Window.
    new private window login two accounts instagram
  3. A new window will appear.
  4. In the new window, visit Instagram and log in with your second account.

After doing that, you should be able to use two Instagram accounts simultaneously on your PC.

You can also use another browser as a permanent solution. To do that, follow these steps:

  1. Open a non-default web browser on your PC, for example, Microsoft Edge.
  2. Now visit Instagram and log in with your second account.

Now you can use two Instagram account simultaneously.

If you’re looking for a browser that is optimized for social networks, you should consider using Opera. The browser is based on Chromium, and it can even run Chrome extensions.

Opera One allows you to run Instagram and Twitter in the sidebar, so you can always keep a close eye on your social media feed.

The browser also allows you to have a messenger in the sidebar, and you can use Facebook Messenger, WhatsApp, Telegram, and VKontakte right from Opera One.

As for security, the browser has tracking protection, built-in ad blocker, VPN and there’s even free AI.

If you’re looking for a fast and reliable browser that is optimized for social networks, and especially for Instagram, be sure to consider Opera One.

Editor's choice
Opera-browser
  • Fast browsing technology
  • Free VPN
  • Includes Messenger Apps
  • Has Dark Mode
  • Built-in Ad-blocker

Merge/combine two Instagram accounts

Although it’s permitted to have multiple Instagram accounts, currently there’s no way to combine or merge two Instagram accounts.

The only way to use two Instagram accounts is by following the methods we previously mentioned.

Having multiple Instagram accounts can be useful, especially if you have both personal and professional accounts.

Managing two Instagram accounts doesn’t have to be a hassle, and we hope that you understand better how to do it properly after reading this guide.

[wl_navigator]

What happens when you block someone on WhatsApp [Full Guide]

WhatsApp is one of the most used instant messenger applications, and it currently has 2 billion users. With such a large number of users, sometimes you need to block certain contacts.

In today’s article, we’re going to show you what happens when you block a certain contact in WhatsApp and how to actually block someone.

What happens when I block someone on WhatsApp?

1. WhatsApp block, how does it work?

WhatsApp blocking is pretty simple, and you just need to select a contact and then pick the Block option from the menu.

After doing that, the messages from the blocked contact won’t be delivered to you, and the same goes for calls.

In addition, the contact won’t be able to see your status updates, online/last seen status.


2. WhatsApp block, how to know/check?

  1. Check if you can see the contact’s last seen or online status in the chat window.
  2. Pay attention to the contact’s profile photo. If it doesn’t change for you ever, you might be blocked.
  3. If your messages always have sent instead of delivered status, it’s rather likely that you’re blocked.

3. WhatsApp block, what can they see?

Blocking a contact on WhatsApp is pretty simple, and if you choose to block somebody, that person won’t be notified about being blocked.

However, the blocked person can figure out if it’s blocked because it won’t be able to see certain information from your profile.

This applies to your last seen status or your online status in the chat window. Also, all messages that are sent by the blocked contact will always have sent status next to them.

Of course, the biggest clue are calls that won’t be able to go through at all. The same applies to messages, they’ll be sent, but never delivered.


4. Whatsapp block, how to unblock?

  1. Select the contact that you want to unblock.
  2. Tap the Menu icon and choose Unblock from the list of options.

Alternatively, you can do the following:

  1. Go to More options > Settings.
    settings whatsapp block what happens
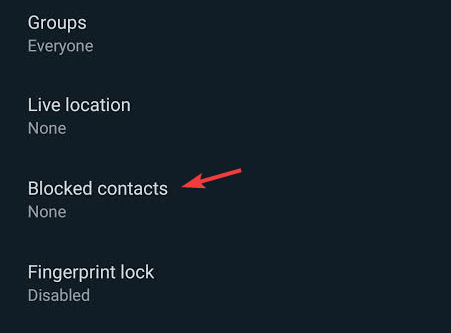
  2. Now choose Account > Privacy > Blocked contacts.
    blocked contacts whatsapp block what happens
  3. Tap the constant that you want to unblock and choose the Unblock

If you’re blocked by someone, there’s no way to remove the block, and only the person that blocked you can do that on its own.

Blocking someone on WhatsApp is pretty simple, and you can do it in a matter of moments from the chat or from the Blocked contacts page.

Although the blocked person won’t be notified about being blocked, it won’t be able to contact you at all, and the same goes for you if you’re blocked by someone.

We have a similar guide on what to do if You have been blocked from originating in Messages, so don’t miss it.

Did you find this guide helpful? Let us know in the comments below.

Arma 3 rubberbanding and packet loss: how to fix them?

Arma 3 is a popular military sandbox game. It manages to place you quite realistically in a soldier’s virtual combat boots. The game’s single-player campaign has a wide variety of missions, such as infiltrations or armored warfare.

What makes Arma 3 stand out in a crowd is the variety of weaponry and objectives you can easily switch between. Thus, there’s no wrong way to play it as long as you manage to meet your briefing’s objectives.

But you’re not here for the singleplayer babble. Arma 3 also comprises multiplayer, which is totally awesome.

However, like many other online titles, Arma 3 can sometimes face a series of unfortunate connectivity issues, such as packet loss.

What is packet loss in Arma 3?

Packet loss occurs whenever data packets you send or receive never make it to their destination points. The connection increases the waiting time, expecting the packets to be a bit delayed, but the packets never make it.

In Arma 3, packet loss is the cause of various noticeable phenomena, including sluggish movement, rubberbanding, and even sudden disconnections.

Arma 3 rubberbanding

Perhaps you’ve heard the term rubberbanding in reference to video games at least once. If not, at least you might’ve experienced it without knowing what it is.

Has it ever happened for you to keep the focus on an enemy player and taking a shot that should’ve been a certain hit, only to realize that the enemy has been suddenly yanked to another part of the map?

Or maybe it’s been happening to you; running towards an objective and discovering that you’ve been rolled back to a previous game point or suddenly teleported to a random spot on the map?

That’s rubberbanding. We know, it’s annoying, and it can totally ruin your game if it doesn’t pass after a few moments. Fortunately, rubberbanding doesn’t happen by itself and has a bunch of easy fixes that can counter it.

What can cause packet loss in Arma 3?

Wherever you may encounter it, packet loss usually happens for the same reasons: poor connection, network congestion, bad cables, improper ISP routing, outdated drivers.

Actually, anything awry regarding your connection can trigger a packet loss episode. Truth be told, it’s quite difficult putting your finger on an exact reason if it’s not immediately apparent.

For instance, if you only experience packet loss during peak hours, it goes without saying that the reason is most likely network congestion.

How to detect packet loss in Arma 3?

  1. Find the IP address of the Arma 3 server you’re playing on
  2. Launch a CMD instance on your computer
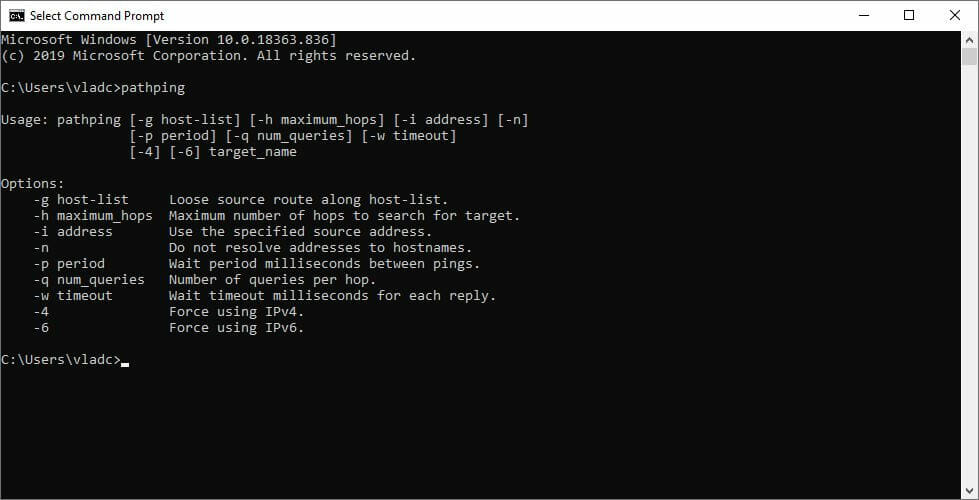
  3. Type pathping x.x.x.x in the CMD (replace x.x.x.x with the server’s IP)CMD pathping
  4. Wait for the test to come to an end
  5. Check for packet loss at each node (hop)

Although it looks a bit complicated, the pathping method is among the most accurate ones when it comes to packet loss. It shows you all the hops your connection bounces through until it reaches the server.

Furthermore, pathping also shows ping and packet loss values for each hop. Thus, not only will you get to know for sure if the issue is indeed packet loss, but you’ll also find out exactly the connection spot where it happens.

Fortunately, the official site has a dedicated section where you can find the IP addresses of official servers. You won’t have to rely on network monitors or other similar third-party tools.

How to fix packet loss in Arma 3?

1. Rely on a VPN

  1. Buy a Private Internet Access subscription plan
  2. Download the VPN installer on your PC
  3. Install PIA’s VPN client
  4. Launch Private Internet Access
  5. Log into your account
  6. Choose a fast server to connect to (nearby servers are faster)
  7. Launch Arma 3
  8. Check if the packet loss issue still persists
  9. Optionally: run the pathping test again to make sure

Kape Technologies‘ Private Internet Access is an excellent VPN tool that can help you in a wide variety of scenarios. Aside from the obvious privacy and connection security features, this VPN can tackle many other issues.

For instance, you can use it to improve packet loss, reduce in-game ping, circumvent geoblocking, and even stop ISP bandwidth throttling.

Private Internet Access

Experiencing rubberbanding and packet loss in Arma 3? Private Internet Access can help you fix these issues.
Free Trial Visit Website

Although using a VPN such as PIA is one of the fastest ways to get rid of packet loss, there’s a catch. This quick-fix will only work if there’s something wrong on your ISP’s side, such as bandwidth throttling or improper routing.

Therefore, it won’t work if the packet loss occurs on your home network or if there’s something wrong with the game server.

2. Switch the server

As we said just a bit earlier, the reason why you’re losing packets might have something to do with the Arma 3 server. In this case, there’s almost nothing you can do about it since it’s merely a matter of waiting for it to pass.

However, you could at least try playing on another server. Just disconnect from the Arma 3 server you’re currently playing on and choose another one.

If the problem seems to have vanished, then at least you’ll know the issue wasn’t on your side.

3. Troubleshoot your connection manually

  • Carefully check your end of the connection for any malfunctioning component
  • Fix or replace anything that might seem out of the ordinary
  • Replace old Ethernet cables with new ones, especially old Cat types
  • Try using wired connections while playing Arma 3 (Wi-Fi packet loss happens more frequently)
  • Update any outdated drivers, especially network-related ones
  • Restart your PC, router, and/or modem
  • Try restarting the game
  • Don’t connect during peak hours if possible, to avoid network congestion (or use a VPN)
  • Contact your ISP and ask them if they can do anything about it (after running a pathping test)
  • Reach out to Arma’s customer support section and let them know if there’s something wrong with the servers
  • Try lower-quality settings and see if there’s any improvement
  • Flush your DNS
  • Close any unnecessary service and/or background application that might be bandwidth-consuming
  • Try running the game on another device if possible to rule out your PC as the culprit

Agreed, there are a lot of potential fixes. However, as we’re sure we’ve told you before, packet loss is no simple matter. It can happen at any time, and for a huge number of reasons.

Thus, it can’t hurt trying our suggested fixes, especially if the first two steps didn’t seem to produce the desired effect.

Most of these suggestions are related to network maintenance. Truth be told, a healthy, well-maintained network can be less likely to host issues such as packet loss, jitters, or any other connectivity-related problems.

Final thoughts on Arma 3 packet loss

To wrap it up, if you’re among the ones who encounter packet loss in Arma 3 on a regular basis, there might be something you can do about it.

First thing first, make sure it’s packet loss you’re dealing with by running a pathping test.

After the results come back, you’ll know exactly if and where there’s packet loss on your connection. Using that knowledge you can take the most appropriate measure.

If the packet loss occurs on your ISP’s side, just use a VPN. If it occurs on either end of the connection, you’ll need to get your hands a bit dirty and perform a bunch of manual troubleshooting.

Microsoft Surface Duo unboxing and quick impressions: We can get used to dual-screens

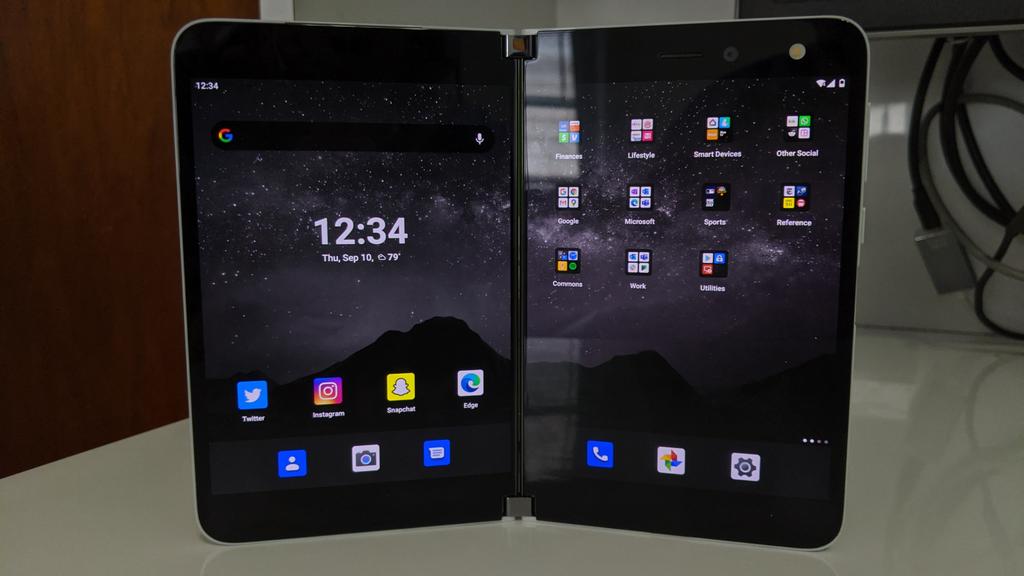
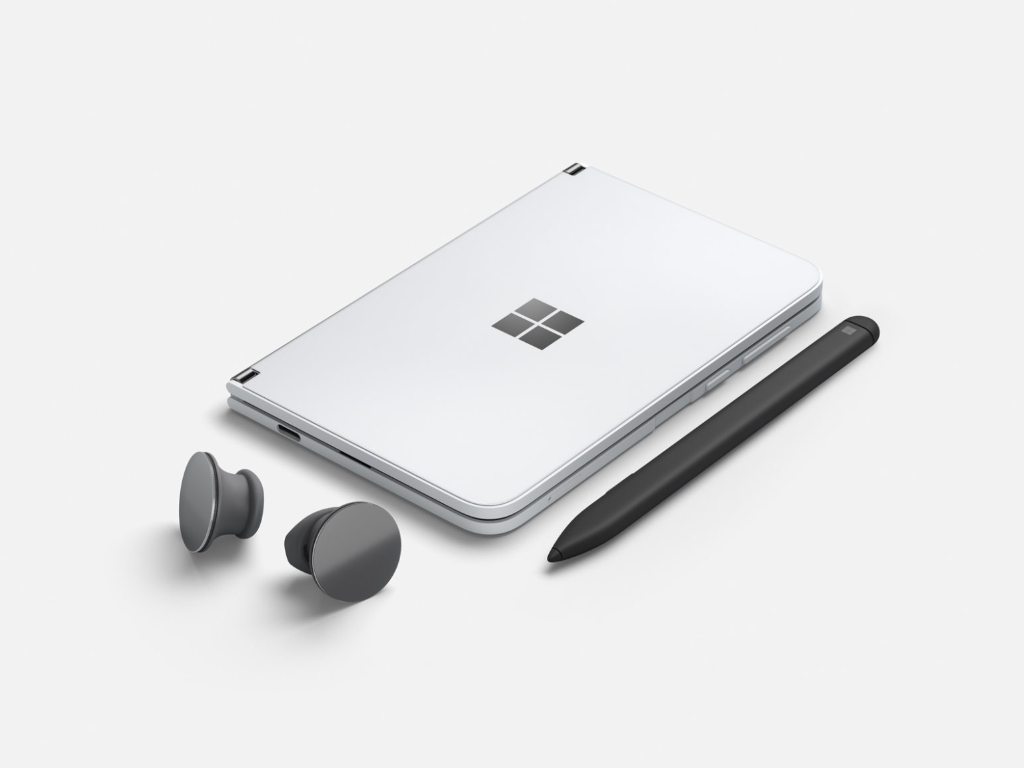
After a year of anticipation, the Surface Duo is finally here, and today, we’ll be unboxing it. Available from Microsoft starting at $1,400, we purchased our own Surface Duo for a full review. Our unit comes configured with 128 GB of storage, and 6GB of RAM, as well as the Qualcomm Snapdragon 855 processor inside. Of course, the RAM and processor are standard, but adding extra storage will cost you an extra $100 and bring the price up to $1,500.

We opted to go the cheaper route and stick with the base configuration.  Anyway, we’ve spent the last couple of hours with the Surface Duo, here’s our unboxing and quick impressions:

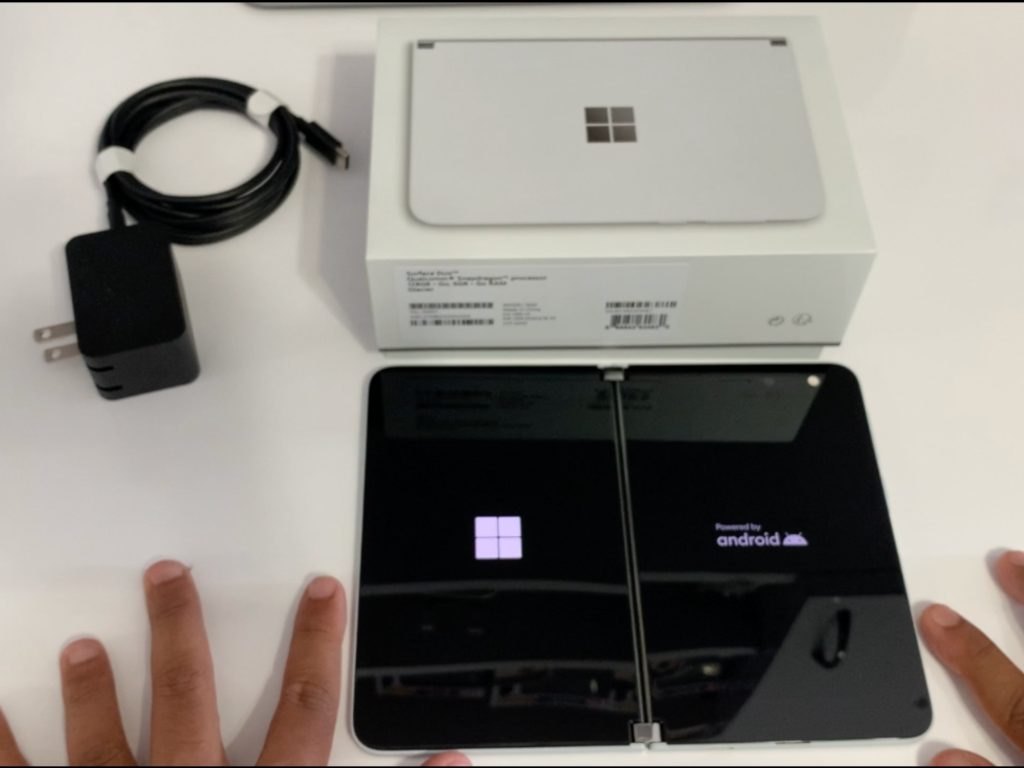
What’s in the Box:

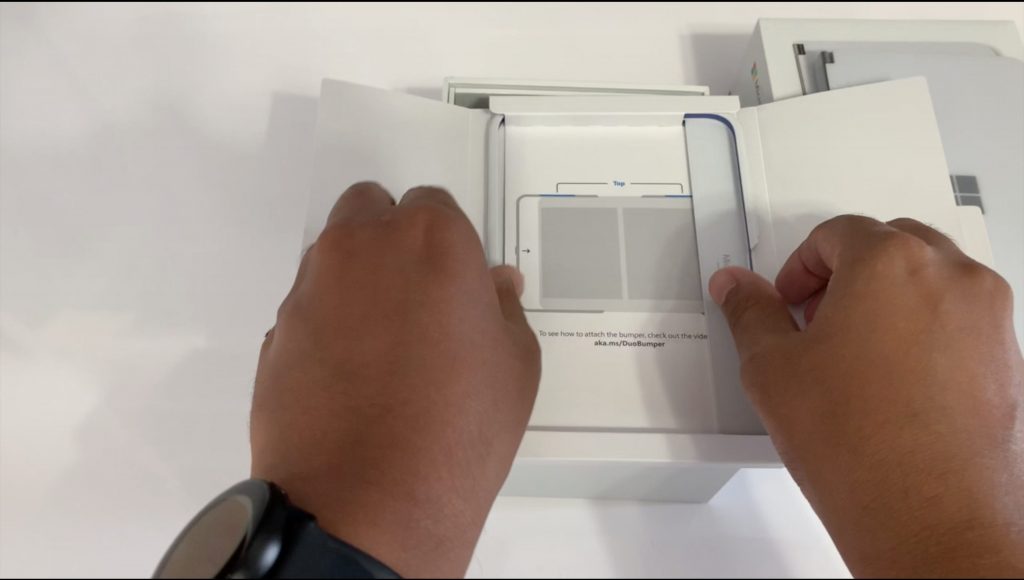
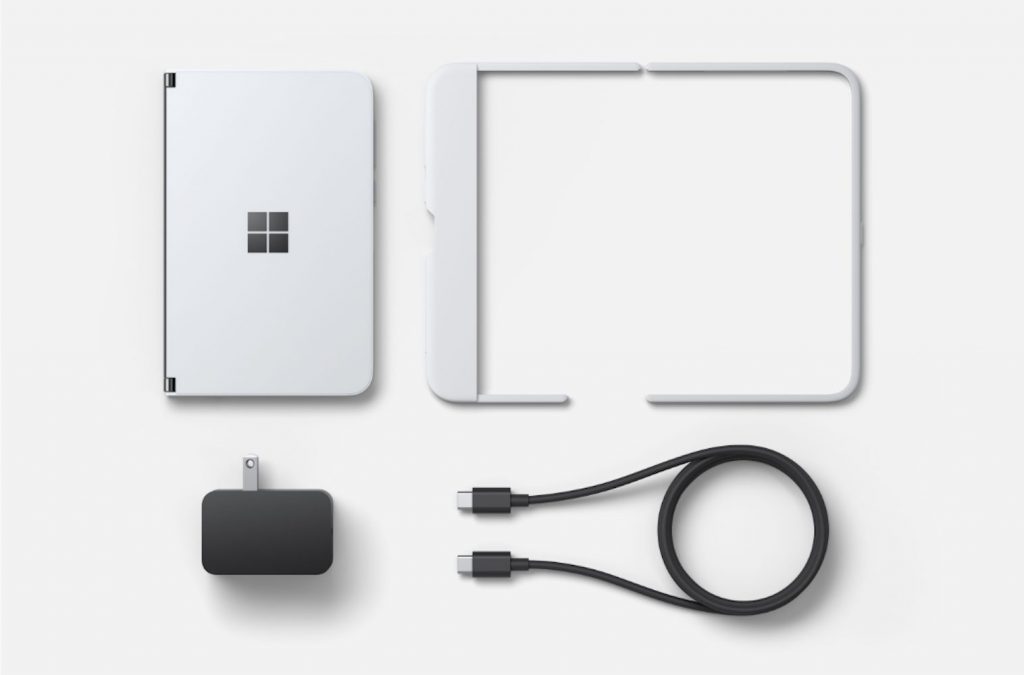
Duo Bumper

Inside the Surface Duo are some routine things. As soon as you open the box, you’ll find the Duo housed on top, and then another box with the Duo’s Bumper Case. As we’re planning to take photos of the Duo in its nude and glory, we won’t be installing the case just yet. However, it is pretty straight forward to install and there’s a pamphlet explaining how to do so. It’s as simple as peeling the blue stickers off and then applying the bumper to the Duo.

Other than the bumper case, the box also includes a USB-C to USB-C charging cable. There’s also an 18-watt quick charger, included as well. In our brief tests, we were able to get about 20 percent of juice added to the Duo’s battery in just a few minutes.

Touching the Duo:

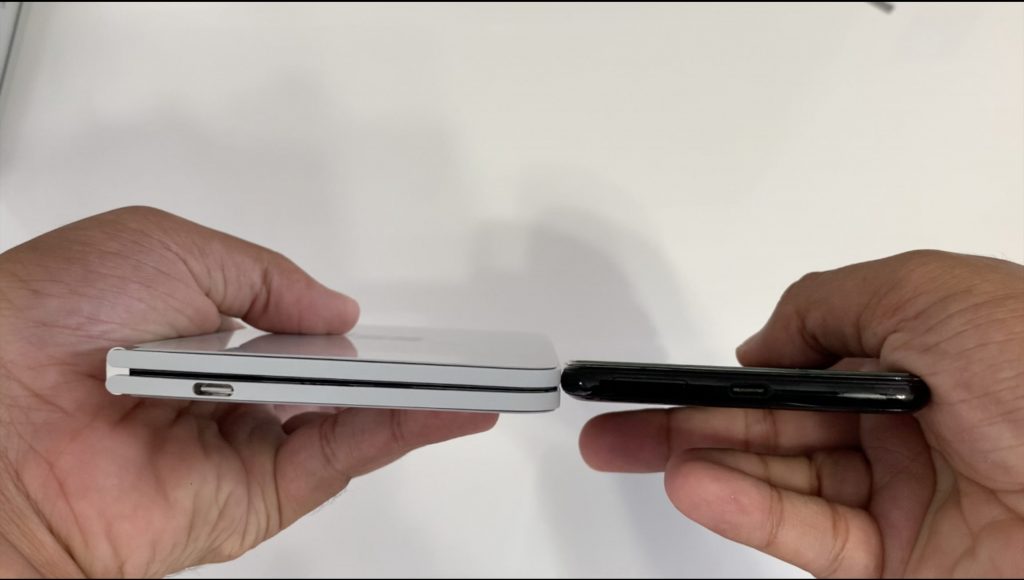
Duo Thinness

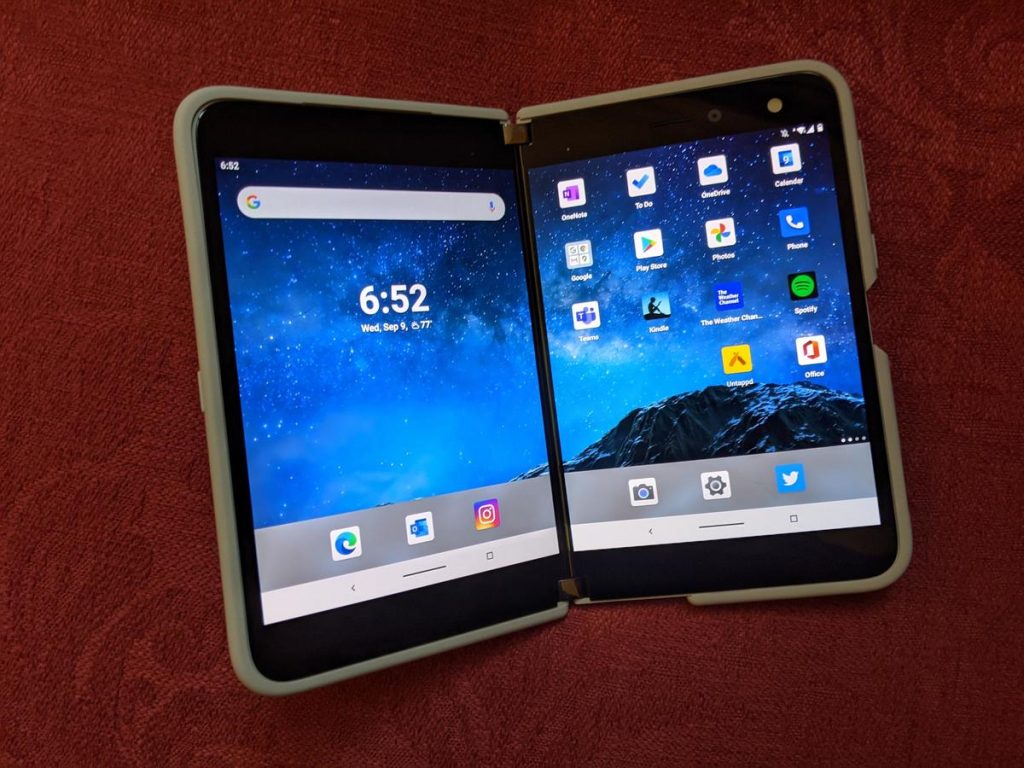
As we took the Duo out of the box, we felt similar impressions as to our initial hands-on at Best Buy. The Duo is a super-thin phone. It’s just as thin as a USB-C port. We also compared the Duo to our Pixel 3XL and found that it’s just as thick as the Pixel when its two screens are folded shut. However, the Duo is much shorter and wider when compared to a Pixel. Not surprising, as Microsoft wanted to keep the 3:2 aspect ratio and make it feel really natural.

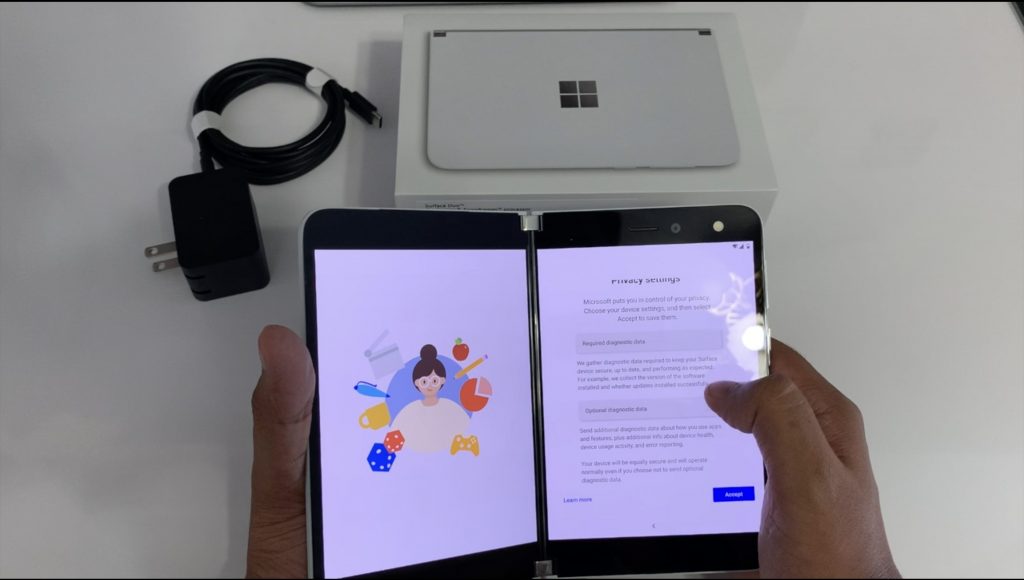
Setting up the Duo:

Duo Privacy Settings

Comparisons done, we also guide you through setting up the Duo. It takes just a few steps. An initial update is available, and it weighs in at around 270 MB. Installing takes about 15 minutes, and when the install is finished, you get to finish the setup. You’ll sign in with Google, choose your privacy settings, and then sign in with Microsoft, too. There’s also a step to configure diagnostics data, as well. When you get to the end, a welcome screen will explain some of the Duo’s gestures and other offerings, if you’re not familiar with it.

Using the Duo:

Duo In Use

After the setup, we spent the remainder of the afternoon using the Duo in place of our iPhone XS. We set it up with our apps which include Instagram, Twitter, WhatsApp, Snapchat, and more. Most apps aren’t ready for dual-screen support just yet, including Snapchat and Instagram, and they are separated in the middle when you use it in the expanded mode across the two screens. Microsoft apps like OneNote, Outlook, and Edge, though, can take advantage of the dual-screens, which isn’t all too surprising as it is a Microsoft phone. his is all something we can get used to.

We also tried out the camera, which as many have said, appears to be decent. Photos definitely don’t have as much brightness or vibrancy as they do on other phones, but at first glance, they will pass and get the job done.

We also didn’t experience any crashes or bugs that early reviewers have mentioned. Apps work fine in the single-screen mode, and it’s really fun to pair apps like Instagram and Snapchat, and experience two social media at once. However, one interesting point we want to note is that the Duo “squishes down” apps to fit the screen when multitasking. When in split-screen or open on one screen, Apps like Instagram or WhatsApp will feel a little more narrow and wider than you’d expect, coming from a Pixel or an iPhone. However, the one advantage is that this aspect ratio allows for more things to fit wide across the screen (when display settings are configured for a smaller display text.) We were able to see an entire almost row of stories along the top of the screen on Instagram, which was never before possible for us.

Have any questions? Let us know

Again, we’re still playing with the Duo and will be exploring more situations soon before our full review in a few weeks. Your feedback helps us, too, so be sure to submit your questions to us below. We’ll discuss them during our upcoming Podcast!

Surface Duo gets first batch of firmware updates after launch

Microsoft officially unveiled its Surface Duo last month with the dual-screen device reaching its first customers starting today. With the Surface Duo just available, the company already rolled out the first batch of firmware updates for the device (via Neowin).

The changelog isn’t big in number, but these updates largely bring camera stability, performance, and image quality enhancements for Surface Duo owners. The unlocked Surface Duo is getting the firmware version 2020.812.86, while the AT&T Locked version is getting version 2020.812.87, but the fixes are identical across both variants.

You can see the official changelog below:

  • Device stability improvements.
  • Camera stability, performance, and image quality improvements.
  • Improved application gestures for dismissing and moving apps to full screen.
  • Improvements in calling features and stability.

If you have a Surface Duo arriving today, you can grab these updates right away by tapping Settings > System > System update > Check for update. Otherwise, the new Surface Duo is available to buy now in the US with a price starting at $1,399. The product comes in 128GB and 256GB variations, and you can get up to $700 cashback with a qualified trade-in when you purchase from Microsoft Store.

FIX: Microsoft Jigsaw is not loading / working [Quick Guide]

Microsoft Jigsaw is a fun jigsaw app. However, some MS Jigsaw users have posted on forums stating that the software app crashes when they start it.

Consequently, they can’t get the app up and running. These are a few resolutions that might fix a Microsoft Jigsaw app that isn’t working.

How to fix Microsoft Jigsaw problems?

  1. Open the Microsoft Store App Troubleshooter
  2. Reset MS Jigsaw
  3. Reset the Microsoft Store cache
  4. Check for app updates
  5. Set up a new user account
  6. Reinstall Microsoft Jigsaw

1. Open the Microsoft Store App Troubleshooter

  1. Open Cortana by pressing the Type here to search button on the taskbar.
  2. Enter troubleshoot as a keyword in Cortana’s search box.
  3. Select Troubleshoot to open the list of troubleshooters in Settings.
  4. Select Microsoft Store App and click Run the troubleshooter.
  5. Then you can go through the app troubleshooter’s resolutions.

First, check out the Microsoft Store App troubleshooter included in Windows 10. That troubleshooter fixes apps that aren’t working. You can do so by completing the above procedure.

2. Reset MS Jigsaw

  1. Open the Cortana app.
  2. Enter the keyword apps in the search box, and then select to open Apps & features.
  3. Scroll down the app list and select MS Jigsaw.
  4. Then click Advanced options to open the settings shown directly below.
  5. Press the Reset button.
  6. A small box then opens stating that the option resets the app’s data. Press the Reset button there to confirm.
  7. Restart Windows after resetting MS Jigsaw.

Resetting apps is one of the best ways to fix them. Windows 10 includes a Reset option that erases app data and restores the selected app to its default settings.

Do not hesitate to reset MS Jigsaw as described above.

3. Reset the Microsoft Store cache

  1. Open the Win + X menu by pressing its Win key + X hotkey.
  2. Select Run to open that accessory.
  3. Then enter wsreset.exe in Run.
  1. Press the OK button to reset the MS Store cache.

A corrupt MS Store cache can have an impact on UWP apps. Some users have confirmed that resetting the MS Store cache fixed Microsoft Jigsaw for them.

4. Check for app updates

  1. Click the Microsoft Store tile on the Start menu to open that app.
  2. Click the See more button at the top right of the MS Store app.
  3. Select the Downloads and updates option to open a list of updates.
  4. Then press the Get updates button to check for updates.

An outdated app is more likely to crash when it starts than an updated one. So make sure that MS Jigsaw is the most updated version. You can check for app updates within MS Store as described above.

5. Set up a new user account

  1. Press the Settings button on the Start menu.
  2. Then select Accounts > Family & other people to open the window shown below.
  3. Select the Add someone else option to open the window in the snapshot below.
  4. Click I don’t have this person’s sign-in info to open the account setup fields.
  5. Click the Add a user without a Microsoft account option, fill out the required account text boxes, and press Next.
  6. Then log out of Windows, and sign in with your new user account.
  7. Open the MS Jigsaw app within the new user account.

The MS Jigsaw app might not work due to a user account issue. To check if that’s the case, set up another user account and then run the app from there.

One, or more, of those resolutions, might kick-start the Microsoft Jigsaw app. In addition to those resolutions, a System File Checker scan might also fix the app.

6. Reinstall Microsoft Jigsaw

Alternatively, you can reinstall Microsoft Jigsaw. To do that, right-click Microsoft Jigsaw on your Start menu’s app list and select its Uninstall option.

However, you further need to use an appropriate method to scan for leftovers after the standard uninstall. This is the most suitable job for an uninstaller software

You should use dedicated software for this task to completely uninstall the app with all its registry entries. Otherwise, the app will leave residual files behind.

If you thus consider powerful tools to help you with this, choose from the most efficient uninstaller programs out there.

If you have another fix for the MS Jigsaw app, feel free to share it below.

New Windows 10 Dev Channel build brings minor updates to Settings and WSL2

Microsoft has just released the Windows 10 Insider build 20211 for Windows Insiders in the Dev Channel. This new flight brings two new features, the ability to search the Default Apps pages in Settings, and to attach and mount a physical disk inside of a Windows Subsystem for Linux 2 (WSL2) distro.

This new build also brings some fixes for bugs affecting the Lock Screen, Live tiles, Windows Update, as well as the Start Menu on Windows 10 on ARM devices. You can find all details about new features, bug fixes, and known issues below:

What’s new in Build 20211

Adding Search to the Default Apps pages in Settings

After making some updates to help improve performance, this changeto enable searching the lists of file types, protocols, and apps when setting a default is now rolling out to all Insiders in the Dev Channel – thanks everyone who’s shared feedback along the way.

Search the lists of file types, protocols, and apps when setting a default.

Access Linux file systems in the Windows Subsystem for Linux

This latest insiders preview build adds the ability for users to attach and mount a physical disk inside of a WSL 2 distro. This enables you to access file systems that aren’t natively supported by Windows (such as ext4). So if you’re dual booting with Windows and Linux, and are using different disks, you can now access your Linux files from Windows! To learn more about this feature please read this blog post on the Windows Command Line blog.

Fixes

  • Fixed an issue where certain 32-bit applications running on a 64-bit OS do not get properly promoted to the discrete GPU for hybrid configurations.
  • We fixed an issue that could result in Start menu tiles continuing to display an “app update in progress” progress bar after an app had already finished updating.
  • We fixed an issue that could result in some of the app icons in Start appearing unexpectedly tiny.
  • We fixed an issue on ARM64 devices resulting in Start crashing on launch the next time it was opened after launching certain apps from Start and then closing them.
  • We fixed an issue that could result in the lock screen hanging.
  • We fixed an issue that could result in ShellExperienceHost.exe hanging.
  • We fixed an issue where hero images weren’t showing up in notifications (for example, when taking a screenshot using WIN + Shift + S).
  • We fixed an issue from the last few flights that could result in Windows update getting stuck while downloading the update.

Known issues

  • We’re looking into reports of the update process hanging for extended periods of time when attempting to install a new build.
  • We’re working on a fix to enable live preview for pinned site tabs.
  • We’re working on enabling the new taskbar experience for existing pinned sites. In the meantime, you can unpin the site from the taskbar, remove it from the edge://apps page, and then re-pin the site.
  • We’re investigating reports of some Office applications crashing or missing after updating to a new build.
  • We’re working on a fix for an issue resulting in Settings crashing for some Insiders when opening Manage Disks and Volumes.
  • We’re working on a fix for the Linux kernel not being installed when using the `wsl –install` command in the Windows Subsystem for Linux. For an immediate workaround run `wsl –update` to get the latest kernel version.
  • We are investigating an issue affecting Windows Subsystem for Linux 2 distros where users can receive the error: “The remote procedure call failed” on startup.
  • We’re working on an issue where on a small subset of devices the Start menu does not reflect when an update is pending restart and scheduled restarts are cancelled. To install the next update, you will need to update and restart through the Windows Update settings page, notification area (system tray) icon, or restart notification.
  • We’re investigating a bug where the vEthernet adapter in Windows Subsystem for Linux 2 distros becomes disconnected after a period of use. For full details please follow this Github thread.
  • We’re working on a fix for seeing generic errors when using `wsl –install` in the Windows Subsystem for Linux.

The Windows Insider team also announced that the next Windows Insider webcast, which will air on September 15 at 10 AM PDT, will focus on Windows 10 on ARM. Following the closure of Microsoft’s Mixer platform, the livestreams are now happening on Twitch.tv/windowsinsider.

Com.apple.mobilephone Error 1035 [Verizon, AT&T]

Visual voicemail allows you to view voicemails that you receive on your iPhone, which can come in very handy in some situations.

Voicemail greetings are the short messages that your callers listen to before they record voicemail messages.

The com.apple.mobilephone error 1035 pops up sometimes when you attempt to configure or update your iPhone‘s visual voicemail greetings.

This software issue comes with a prompt that says:

The operation couldn’t be completed. (com.apple.mobilephone error 1035.)

This problem arises due to network connectivity misconfiguration. It also comes up mostly when you are connected to a Wi-Fi network, and not mobile data.

In this guide, we’ll teach you how to get rid of this com.apple.mobilephone error 1035 quickly.

How do I fix com.apple.mobilephone error 1035?

1. Put your device in Airplane Mode

Before we go into more in-depth troubleshooting procedures, first make sure that the com.apple.mobilephone error 1035 is not caused by a minor connectivity issue.

To check this, disable all your connectivity options using the Airplane Mode.

Swipe your screen and tap on the Airplane Mode icon. Leave Airplane Mode enabled for around a minute and then disable it back.

When your network connections come back on, recreate the error, and see if it still shows up. If it does, continue to the next solution.

2. Configure the visual voicemail

com.apple_.mobilephone-error-1035-configure-visual-voicemail
  1. Swipe your screen and enable your Wi-Fi connection.
  2. Open the Call applet on your iPhone.
  3. Dial 1 and hold it until you are taken to the voicemail settings screen.
  4. Put in your voicemail password.
  5. Continue to set up your voicemail.
  6. When done, hang up the phone.
  7. Restart your device.

When your iPhone comes up fully, return to your voicemail, and confirm if the solution worked.

3. Switch to your mobile data

com.apple_.mobilephone-error-1035-mobile-data
  1. Go to the Settings app and tap on Cellular.
  2. Toggle on the switch to enable Cellular data.
  3. Return to the previous screen and tap on Wi-Fi.
  4. Switch off your Wi-Fi connection.

4. Reset your iPhone network

com.apple_.mobilephone-error-1035-reset-network-settings
  1. Open the Settings app.
  2. Tap on General.
  3. Go to Reset > Reset Network Settings.
  4. Allow the phone to restart.

Putting your iPhone in airplane mode and then disabling airplane mode is the most straightforward fix for the com.apple.mobilephone error 1035.

Switching to mobile data and resetting your network also help.

However, if the problem is caused by configuration in your voicemail, you have to set it up properly.

How to see everyone in a Microsoft Teams video meeting

After much anticipation, Microsoft Teams now allows you to view video streams from everyone in a meeting simultaneously. Well, in most cases it’ll be everyone, but unfortunately very large teams may still be out of luck – Microsoft now caps support at 49 participants, a leap upwards from the previous 9.

To enable this new layout, click the “…” icon at the top-right of a Teams meeting. From the menu which appears, choose “Large gallery” to enable expanded participant support.

With this mode selected, Teams will display up to 49 participants in a 7×7 grid on your display. The grid will be dynamically scaled depending on the actual number of guests – it starts out at 2×2, then 3×3, followed by the new 4×5, 6×5 and 7×7 layouts. Teams will automatically resize the grid as people join and leave.

As with the previous 4- and 9-speaker limits, Teams chooses people to display based on whether their camera is enabled and whether they’ve spoken recently. If you do end up in a meeting with more than 49 individuals, people will switch in and out of the grid based on who’s contributing the most.

If you don’t see the Large Gallery option, make sure there’s actually more than ten people in the meeting. It only becomes available when at least ten individuals have their cameras enabled. There’s no way to enable Large Gallery at the start of the meeting, so you’ll have to remember to turn it on yourself once the eleventh participant has added.

Check out more on Microsoft Teams from OnMSFT.com!

Microsoft Endpoint Manager adds Day 0 support for Surface Duo

Microsoft today announced Day 0 management support for its new Surface Duo device. In a recent Microsoft Endpoint Manager Blog post, the company explained that Surface Duo users will now be able to access the Android enterprise controls like Conditional Access, App Protection Policies, and Android Enterprise management directly from the Microsoft Endpoint Manager admin center.

Microsoft Endpoint Manager is basically an integrated endpoint management platform that has been designed to make it easier to manage all devices in an organization. It helps IT Admins to protect corporate data while allowing employees to work using both personal and corporate devices.

With this announcement, Microsoft Endpoint Manager gains some significant improvements to offer an optimized Surface Duo experience. The first improvement that the company highlighted today is dual-screen optimization. Moreover, the Microsoft Authenticator app and the Company Portal app will now come pre-installed for Surface Duo users. Here’s a video showing Microsoft Endpoint Manager app protection experience on Surface Duo:

Microsoft noted a bunch of Company Portal and Work Profile enhancements that will be reflected in the Duo experience, including an improved sign-in experience, setup checklist design, and more. If you want to learn more about the upcoming features and support for Surface Duo in Microsoft Endpoint Manager, make sure to check out Microsoft’s official support document.

Check out how the Xbox Series X looks next to the Xbox Series S and the Xbox One X

If Microsoft’s new Xbox Series X and Series S consoles won’t start shipping until November, the company has shipped some dummy units to a couple of publications this week such as GameSpot and The Verge. We’ve already seen both next-gen consoles side by side in video trailers and marketing images, but we now have pictures of the two consoles taken from all angles, as well as a side by side comparisons with the Xbox One X.

Microsoft has said that the Xbox Series S would be nearly 60% smaller than the Xbox Series X, and the console is indeed much more thinner as well as slightly shorter in height. Both consoles look pretty great vertically, and they also both come with a single USB port on the front (they both have two more USB ports on the back).

Xbox Series X Next To Xbox Series S The Verge
image credit: The Verge.

When put horizontally, the Xbox Series X is just as wide as the Xbox One X, though it’s much taller. However, the Series X is quite shorter in length, and in that position, the top fan will fire hot air on the side instead of the top. It’s clear that the vertical position is probably best for the Xbox Series X, and all marketing images actually also show the console in the vertical position. However, depending on the dimensions of your cabinet, laying the console horizontally is possible.

Xbox Series X Next To Xbox One X Gamespot
Image credit: GameSpot

Compared to the Xbox Series X, the Xbox Series S looks much better in horizontal position, and it’s actually quite similar to the Xbox One S with the large fan on the right. Overall, the console is much smaller than the Xbox One X, and GameSpot also noted that both consoles have about the same height. Considering that the Series S packs the same powerful CPU as the Xbox Series X plus a GPU that will support 1440p/60FPS gaming and DirectX Ray Tracing, this compact design is pretty impressive.

Xbox Series S Next To Xbox One X Gamespot

Again, you’re looking at non-functional consoles which have just been created for taking side by side pictures. Microsoft has already shown bits of gameplay footage on its next-gen consoles, though we have yet to truly see how next-gen features like DirectX Raytracing and Variable Rate Shading will make a difference on the Xbox Series X and the Xbox Series S. It will also be interesting to see how next-gen games will look on the latter, which will target 1440p at 60FPS but still be able to upscale every games to 4K.

This holiday season, Microsoft will have the most powerful next-gen console with the $499 Xbox Series X, which will target 4K at 60FPS. However, the cheaper Xbox Series S may well be more attractive for gamers on a budget or everyone else who doesn’t obsess about playing games in native 4K. The smaller form factor may also be a big selling point, and the Xbox Series S is indeed the smallest Xbox console ever created by Microsoft.

Do you prefer the design of the Xbox Series S over the Xbox Series X’s taller form factor? Let us know in the comments below.

Surface Duo review round-up: Solid hardware, a camera that falls short, and buggy, unpolished software

Today marks Surface Duo Launch day, and after tech reviewers had the last two weeks to spend time with the Duo (under an embargo) the final reviews are finally out. The reviews cover a wide spectrum, which is a lot of good about the hardware and a lot of bad about the software (which has been updated twice so far, by the way.)

From Windows Central, ZDNet, Wired, and more, we’ve gathered up a look at some of these reviews thus far. We also remind you that we will be doing our own review soon, too, to help you with your buying decision. In the meantime, check out this roundup, and our hands-on from Best Buy, too.

Windows Central: 3/5: A dual-screen phone of tomorrow, that’s not quite ready today

First on our list is a review from our friends at Windows Central. This well-trusted publication amongst many Microsoft fans gave the Duo a score of 3/5. For Daniel Rubino, some pros of the Duo were the overall design, and the hinge, as well as the battery life and the dual-screens increasing productivity. The cons, meanwhile, included the OS being buggy, RAM, and CPU slowing down the experience, the device being expensive. There’s also the lack of Qi charging, additional cameras, and water resistance.

In a one-sentence summary, Daniel proclaims that “Can dual-screens be better than one? The answer is yes, but Microsoft has some work to do before Surface Duo is ready for the masses.” There you have it, you be the judge.

Petri.com: The Pursuit of Productivity

Next up is a review from Brad Sams, another trusted source with Microsoft reviews. In his review, Sams finds that the Duo is the “best ‘productivity pocketable’ available today but it is far from the best smartphone for the money.” Sams also mentions the excellent feeling hardware, the bright screens, and the tactile feeling of the buttons.

When it comes to the camera, meanwhile, Sams finds that the “experience falls short of other premium smartphones.” Other highlights of the review include a look at how productivity works on the device, as well as the learning curve that comes with it. “The Duo, for the right type of productivity user, is the best device available today but it is not for everyone: it is not a mass-market device and it is not perfect,” summarizes Sams’ review in one sentence.

Sams talks a lot about the productivity aspect of the Duo, so if you’re into that, we suggest you give his review a read.

The Verge: 6/10: Double Troubles

Third, on our list is a review from The Verge’s Dieter Bohn. This reviewer finds that the Duo has all the right ideas, but is spoiled by buggy software and a bad camera. Some of the good stuff for him includes using two apps at once, the thin and beautiful hardware, as well as the good battery life. The bad stuff, meanwhile, include the “terrible” camera, the software being buggy, and the price.

The Verge’s review really dives a bit deeper into the troubles with the software, and if this is a concern for you, we suggest giving it a read. Microsoft pushed out a firmware update, but the Duo is still buggy for now, and that “it’s worth waiting to see what more people say about their Surface Duo experience over time before considering buying one.”

ZDNet: I am not so sure the Duo scratches any itch for me

Du Foley Review

Moving along is a “non-reviewers review” of the Surface Duo from veteran Microsoft reporter, Mary Jo Foley. In this review, Foley discusses how the Duo is an “interesting concept, but it definitely feels like a “Generation 1 solution that’s in search of a problem more than a solution to a problem I have with mobile devices.”

Her review is one that’s simple, and straight to the point. So, if you’re not interested in the technical things and just want to see how someone uses the Duo, give Foley’s a read.

Anyway, like everyone else, Foley is impressed with the overall hardware, as well as the battery life. She also mentions how the Duo is a “big and somewhat unwieldy phone” for phone calls. As for camera quality, she says it “is OK but it is not amazing.” Other points of the review mention the perplexing gestures, too.

At the end of the day, Foley did find one thing. She says that though the Duo can replace her Pixel 3XL, she still found herself reaching for her single-screen pixel when she was in a rush to get things done. She also finds it can replace her Kindle, but not her Surface Laptop 3.

“I don’t open multiple browser tabs on my phone. I don’t use two side-by-side monitors in my PC setup, which may be a reason I don’t feel a need for two separate screens on a mobile device,” said Foley.

Wired: 4/10 “A future for mobile technology that is both exciting and disappointing”

Gear Microsoft Surface Duo Two Apps Side By Side Source Microsoft

A final review for our list comes from Julian Chokkattu, a senior associate editor at WIRED. This review is definitely one of the most critical, as it explains a lot of the personal issues that were faced due to the buggy software. For Julian, the two screens on the Duo are the future. He gets into how the screens are bright, the battery life is good, and how Microsoft’s user interface is likable.

Then, there are the lows. Like everyone else, it includes the stuttery performance, typing being hard, the camera being bad, and apps not being optimized. “What drains the Duo of its mobile multitasking charm is glitchy software that makes this $1,400 phone feel like a work in progress,” said Julian.

Other reviews: MKBHD, Mr. Mobile, and more

Of course, we can’t possibly cover all the Surface Duo reviews in one post, but we do want to end by highlighting some other perspectives. In his review, popular YouTuber Mr. Mobile finds that the Duo is “Double Trouble” He proclaims that “Those considering investing $1399 in one of these wafer-thin experimental gadgets should do so only if they’re the most devoted of Microsoft fans.”

Finally, there’s everyone’s favorite tech YouTuber, MKBHD. He says that most people should not buy the Duo and that there is a lot of “Good” “Meh” and “Ugly” with it. All of his gripes also come with it being a first-gen device, it seems.

What do you think of these reviews? Do you think it’ll hold you back from buying one? Let us know in the comments below, and remember to drop us anything you want us to discuss or talk about in our next podcast, too!

How to update headphone drivers in Windows 10 [Safe Guide]

If your headphone has stopped working or facing other issues, it could be due to a glitchy headphone driver in Windows 10.

There are multiple ways to update hardware drivers in Windows 10. You can use the proprietary software included with your headphone, use a third-party tool or the more traditional Device Manager to update the driver.

In this article, we take a look at the best ways to update headphone drivers in Windows 10.

How can I update headphone drivers in Windows 10?

1.  Update drivers manually

update headphone drivers
  1. Press the Windows key + R.
  2. Type devmgmt.msc and click OK. This will open the Device Manager.
  3. In Device Manager, expand the Sound, video and game controllers category.
  4. Right-click on your headphone from the list and select Update Driver.
  5. Select Search automatically for drivers.
  6. Device Manager will download and install the compatible drivers for the headphone.

Once installed, connect your headphone to the computer and check if your headphone is working.

2. Update drivers using a dedicated tool

A professional program allows you to update your computer hardware drivers automatically without having to go through all the drivers one by one manually.

With a built-in download manager and drive backup feature, these tools offer unprecedented features with just a few clicks of the mouse, while also creating a backup of current drivers for safety.

3. Update drivers using the official tool

For Razer headphones

update headphone drivers
  1. Download and install the Razer Cortex
  2. Launch the app and click the Update Software button.

You can also manually check for updates by going to Settings (gear icon) > Software Updates. Click Check now to scan for pending updates.

If you are using headphones from Razer or HyperX, you can use the propitiatory tools like the Razer Cortex to download and install the pending driver updates for your headphones.

4. Install Windows updates

update headphone drivers
  1. Press the Windows key + I.
  2. Click on Updates & Security.
  3. Open Windows updates tab.
  4. Proceed to download and install pending Windows 10 updates.

Installing the latest Windows 10 updates will update the outdated sound and headphone drivers automatically.

If your Windows 10 won’t recognize headphones. you’ll find all the required steps in this comprehensive guide.

Updating the headphone drivers in Windows 10 is easy. While the Fortect Driver Updater tool offers a convenient way to update your drivers quickly, you can also manually update individual drivers from Device Manager.

Buy a drink at Taco Bell to get the chance to win an Xbox Series X console

We’re now just two months away from the launch of Microsoft’s next-gen Xbox consoles, and the company has once again teamed up with Taco Bell to give US consumers the chance to win one. Starting September 24, any purchase of a medium or large drink at Taco Bell will include a code on the cup for a chance to win an Xbox Series X console.

In the announcement, the Xbox team specified that consumers will be able to redeem up to three codes per day, adding that “there will be a winner every 15 minutes throughout the promotion.” It’s worth mentioning that you’ll also get a code on your drink if you purchase it via Taco Bell’s mobile app. “To get your hands on a free taco and gain even earlier access to win an Xbox Series X bundle, make sure you sign up for Taco Bell’s all-new rewards program,” the Xbox team added.

Every winner will get an Xbox Series X bundle including a console, the new Xbox Wireless Controller, and six months of Xbox Game Pass Ultimate. The console only will cost $499 and start shipping on November 10 alongside the $299 Xbox Series S. This promotional offer is only available in the US, but consumers in other Xbox markets will be able to pre-order both the Xbox Series X or the Xbox Series S on September 22.

Microsoft’s Surface Duo is now available and shipping in the US

After more than a year of waiting, one of Microsoft’s most anticipated and much talked about products is finally here. Today, September 10, marks a new day in Microsoft history, the official launch date, and the public availability of the Surface Duo.

As a reminder, the Surface Duo is available for purchase unlocked from either the Microsoft Store or Best Buy. There’s also a carrier-locked AT&T version for sale, too. Pricing starts at $1,400 for a model with 128GB of storage, or $1,500 for a model with 256 GB of storage. Both variants come with 6GB of RAM inside, as well as the Qualcomm Snapdragon 855 processor. The Microsoft Store also has a trade-in program as well, for you to save up to $700 by trading in your old phone.

It should also be noted that the Duo features a single 11MP selfie camera, which also serves as the main camera when the phone’s two screens are flipped around and rotated. Software-wise, the Duo ships with Android 10, with an upgrade to Android 11 when it’s ready. The device will also get three years of Android updates, too.

It has been been a big journey to this day, and it all began when Microsoft played with the idea with its canceled Project Courier concept. Panos Panay recently talked to The Verge about these origins, as well as the future of the Duo, too, and the article is a really good read.

We recently went hands-on with the Surface Duo at Best Buy and invite you to check out our initial impressions post. We’ve also ordered ourselves our own Surface Duo, too, and will be doing a full review in the coming weeks, and an unboxing within the next few days.

We’ll even be showcasing the Duo on our new Podcast, so be sure to drop us any comments, questions, or suggestions about the Duo in the Discus section below. We’ll do our best to answer your questions on camera during our show!

7 best software to recover files deleted from Recycle Bin

Have you ever deleted files from your Recycle Bin and want to recover them? This may seem impossible.

However, the permanently deleted files are not technically deleted from your hard drive storage but changed to unrecognizable data and are overwritten by your new files.

This enables you to recover your permanently deleted files from your system.

For example, you can restore the deleted files from your file history backup. Before using any software to recover your files, you can try to recover from your file history.{“type”:”block”,”srcClientIds”:[“3c51282a-8eed-41b6-98c8-7b32c0426f03″],”srcRootClientId”:””}

We listed below 6 of the best software for retrieving permanently deleted files on Windows, so keep reading,


Which are the best software to recover deleted files?

Stellar Data Recovery

Stellar Data Recovery is one of the most powerful tools that can help you recover any type of lost documents: emails, photos, videos, etc.

Interestingly enough, Stellar Data recovery doesn’t just recover the documents but also helps you retrieve lost photos and videos.

When recovering data becomes a priority, take your time to check out this elaborate Stellar Data Recovery review. You won’t regret doing so.

To be more precise, you can quickly recover for free up to 1 GB of lost or deleted files, including data from a corrupt or malware-infected drive.

The software has many useful features such as Quick Scan function that can be used in all common data loss situations.

The Filtered Tree tab is also helpful to view different ways in which you can filter the files identified by the software.

Stellar Data Recovery

Stellar Data Recovery

Restore your corrupted fies and retrieve deleted ones in just a few steps, using this reliable tool.
Free trialVisit website

Recuva

recover files deleted from recycle bin on Windows 10

Recuva is the most popular software used for recovering deleted files. The software has over the years gained a reputation which makes it well known in the industry.

Recuva has an easy to use interface which makes recovery of files simple to use for beginners.

After launching the software, a recovery menu would open requesting what you intend to recover.

When you select the file type, it automatically starts scanning through all deleted files of that format. You can also choose a particular partition where the scan should occur.

Meanwhile, you can also undergo a quick or deep scan depending on the file you want to recover. Lastly, Recuva is an excellent file recovery software to get.

Recuva

Recuva

Accidental file deletions or those caused by system corruption can be quite common, so Recuva is there to recover everything

Wise Data Recovery

recover files deleted from recycle bin on Windows 10

This software is an excellent tool to recover files deleted from Recycle Bin on Windows 10 computers. Wise Data Recovery has an easy friendly interface that is ideal for beginners.

You can easily use it to scan and recover files from selected partitions.

All you need is to launch the software and select which partition you wish to recover your file from and the tool would do the rest. It also supports both hard drives and removable devices.

However, there is a trial version which gives limited features. Hence, to access the full feature you need to upgrade to the paid version which costs $59.97.

Wise Data Recovery

Wise Data Recovery

Just because a file was deleted doesn’t mean that it is gone for good. Recover it now with Wise Data Recovery.

MiniTool Partition Recovery

This tool offers easy and quick recovery of deleted files on your Windows 10 PC. There are tons of features available on this software for the recovery of files.

The tool also enables you to recover files from different sources.

One unique feature about MiniTool Partition Recovery is the success rate of the software is very high, unlike some other tools.

However, you can only recover 1GB of data with free software. When you reach the 1GB threshold, you need to go premium.

MiniTool Partition Wizard Pro

MiniTool Partition Wizard Pro

If you find manually managing your partitions too difficult, then let MiniTool Partition Wizard Pro take over for you!
Check priceGet it now

DMDE

DMDE Free is an excellent tool for recovering files deleted from Windows 10’s Recycle Bin.

This tool does a good job in scanning and recovering lost files. The software is well developed as you can recover your deleted files from anywhere on our PC.

The user interface is relatively less complex and the software has a huge range of file format database.

The software enables you to select a drive and scans through to check for all mountable partitions.

After this has been completed, a window opens to where you can recover your lost files. You can always try DMDE Free since it comes at no cost.

⇒ Get DMDE


PhotoRec

recover files deleted from recycle bin on Windows 10

PhotoRec can recover all types of files and supports removable devices like your flash drives, memory cards, and removable drives.

In addition, the tool has a huge database of file formats and you can easily scan various partitions for files.

However, the software is complex to use as it contains a command type user interface which may not be easy for beginners to understand.

It also does not support mouse usage; hence, you would need knowledge of command prompt to effectively use the software.

Meanwhile, it does the basic things needed for a file recovery website and is free to download.

⇒ Get PhotoRec


Disk Drill

Disk Drill is an excellent feature software to recover deleted files. The software gives users many customization features and enables deep scanning.

Meanwhile, the simple user interface is appealing as beginners can easily navigate through the software to perform recovery functions.

It can also recover files from anywhere on your PC and enables you to scan a particular file type or the whole system. This tool also supports removable devices and is excellent all-round recovery software.

Disk Drill is free to download and set up. Hence, you can take advantage and explore the features so as to recover files deleted from the recycle bin on Windows 10 computers.

⇒ Get Disk Drill


Have you used any of the tools we mentioned above to recover files deleted from Recycle Bin?

Share your experience with us by commenting below.

[wl_navigator]

Microsoft Whiteboard app updates on Windows 10 and iOS with new poll options

The iOS and Windows 10 versions of the Microsoft Whiteboard app both updated this week but, while their release notes on their app store pages show identical release notes to the previous update, the notes within the Microsoft Store app on Windows 10 actually lists changes which suggests that the web versions of the store listings haven’t been updated yet.

Regardless of what the situation is, here’s what’s new with this update:

  • New poll options! You can now create multi-choice polls and public polls
  • Fixed crash when downloading files
  • Dark mode fixes when adding people to groups and starting direct messages

Do you use Microsoft Whiteboard? Let us know what features you’d like to see added in future updates in the comments below and then follow us on Pinterest for more Microsoft app content.

Microsoft Whiteboard


‎Microsoft Whiteboard

FIX: Path of Exile issues [Wrong Hash, Connection, Sound]

If you are a fan of Diablo 2 and similar types of games, you’ve probably heard about Path of Exile.

Although Path of Exile is a great game, it has been reported that it has certain issues. Therefore, let’s see how to fix them easily on Windows 10.

How do I fix common Path of Exiles issues?

Easily fix Path of Exile crash

1. Update your graphics card drivers

Sometimes Path of Exile will crash and give you an Unable to render water error message. This is usually caused by your graphics card since it doesn’t support certain technologies that are required by the game.

In order to somewhat fix this issue, it’s advised to download and install the latest drivers for your graphics card.

One quick way to do so is to use a third-party driver updater, and one of the best out there is a software tool called Fortect Driver Updater.

This program is incredibly easy to use, and portable, and all you need to do is simply launch it, let it scan your PC, and it will take care of the rest.

More so, it doesn’t just update older drivers, it also scans your system and compares your drivers with its built-in databases in order to find and fix broken or missing drivers.

⇒ Get Fortect Driver Updater

2. Run Pack Check / Verify integrity of the game cache

  1. Go to Path of Exile installation directory. By default, it should be:
    • C:Program FilesGrinding Gear GamesPath of Exile.
  2. Locate PackCheck.exe, right-click it, and choose Run as administrator.
  3. Pack Check will perform a scan and replace any corrupted files. This can take a while, so you need to be patient.
  4. After the process is completed, start the game again.

Users have reported that Path of Exile crashes while giving them The protocol is out of date error message. In order to fix that, you might have to perform Pack Check.

If you have the Steam version, you need to verify the integrity of the game cache. To do that, follow these steps:

  1. Start Steam and locate Path of Exile in your library.
  2. Right-click it and choose Properties from the menu.
    steam-properties
  3. Go to the Local files tab and click Verify the integrity of the game cache button.
    verify-steam
  4. This process might take a while so you’ll have to be patient.
  5. After the process is completed, try running the game again.

If the issue still persists, you might have to reinstall the game in order to fix this issue.

3. Switch your keyboard to US/UK English profile and remove other language profiles

  1. Click ENG (it might be something different depending on the language that you’re using) in the Taskbar.
  2. Choose English from the list.
    • In addition, you can switch quickly between languages by pressing Alt + Shift or Windows Key + Space on your keyboard.
      english-keyboard

If you use a different language profile on Windows 10, that can cause the Path of Exile GAME to crash, so it’s advised that you switch to US/UK English keyboard profile.

If this doesn’t help, you might have to temporarily remove non-English keyboard profiles. To do that, follow these steps:

  1. Click the ENG button in the Taskbar and choose Language preferences.
    language-preferences
  2. Time & Language window will open. Locate non-English language, click it, and choose Remove.
    remove-language
  3. Repeat this process for all non-English languages.
  4. After you’ve removed all non-English languages, you can add them again by clicking the Add a language button.

4. Make sure that you’re using the dedicated graphics card/reinstall DirectX

If you have both dedicated and integrated graphics cards, make sure that you are using your dedicated card or else Path of Exile might crash.

In addition, if you have a production_config.ini file in the Documents/My Games/Path of Exile folder, make sure that you remove it.

If the problem still persists, check if you have the latest version of DirectX installed. If the issue still persists, you might have to reinstall the game.

5.  Lower Texture Quality and add -gc 2 parameter.

  1. Find the Path of Exile shortcut and right-click it.
  2. Choose Properties from the menu.
  3. Go to the Shortcut tab and locate the Target section.
  4. In the Target section add -gc 2 after the quotes.
  5. Your Target section should similar to this:
    • C:Program FilesGrinding Gear GamesPath of Exilepathofexile.exe” -gc2
  6. Remember, don’t change anything between the quotes, just add -gc2 and save the changes.

Users have reported that Path of Exile crashes while giving them the EOUTOFMEMORY or Unable to Map File or Unable to MapViewOfFile error.

This crash is caused by the lack of RAM memory mostly on 32-bit versions of Windows. Path of Exile is a demanding game, and in order for it to run smoothly, you’ll need 4GB of RAM or more.

Users have reported that lowering Texture Quality fixes this issue to some extent, but Path of Exile can still crash after some time.

If the problem still persists, you can try launching the game with -gc 2 parameter.

6. Edit production_config.ini file

  1. Go to this location:
    • Documents/My Games/Path of Exile
  2. In there you should find production_config.ini file.
  3. Open production_config.ini file with Notepad.
  4. Locate texture_quality=1 and change it to texture_quality=2.
  5. Save the changes.

As we already mentioned, Path of Exile can crash due to the Texture Quality setting, and you can change this setting by editing the production_config.ini file.

We have to mention that by changing this setting it might be much harder for you to see certain enemy spells, so keep that in mind.

7. Update your sound card drivers

It has been reported that Path of Exile crashes if you’re using certain sound cards such as Creative, and if you’re having this problem, you should try using –softwareaudio parameter.

If the –softwareaudio parameter doesn’t fix this issue, you can use –nosound parameter instead. This parameter will disable all sounds, but Path of Exile won’t crash anymore.

We have already explained how to add parameters in Solution 4, so make sure that you check it.

Before adding any parameters, it would be a good idea to install the latest drivers for your sound card, because this issue can sometimes be fixed by updating your drivers.

In case you don’t have the necessary skills or time to search for the best driver versions, it is better to do it automatically.

New drivers for your computer to work properly because they are crucial for some of your system functionalities.

Easily fix Path of Exile installation problems

1. Copy Path of Exile directories to a different location

  1. When the error message appears, don’t close it and don’t click OK.
  2. Switch to your desktop.
  3. You can use the Windows Key + D shortcut to do that.
  4. You should see the Path of Exile shortcut on your desktop.
  5. Click it to start the download.
  6. After the download is completed, right-click the Path of Exile shortcut and from the menu choose Open file location.
    open-file-location
  7. Now you need to copy the Grinding Gears folder to another location on your computer.
  8. Press OK in the error message window to close it.

Users have reported that they are getting There is a problem with this windows installer package. A program run as part of the setup did not finish as expected. Contact your support personnel or package vendor message when they try to install Path of Exile.

It’s important that you don’t press the OK button in the beginning, because that will remove all Path of Exile files from your computer.

After you move your files to a different location, your files will be safe, and they won’t be deleted automatically when you close the error message window.

2. Use a wired connection to download the game

  1. Download the drivers for your wireless adapter.
  2. When downloading drivers, try to find an older version and not the latest one.
  3. Press Windows Key + X and choose Device Manager from the list.
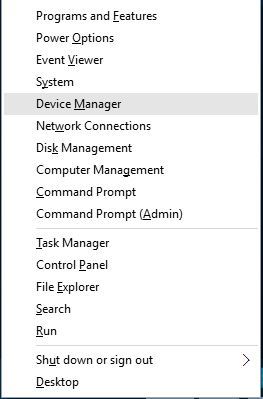
    device-manager
  4. When Device Manager opens, find your wireless adapter, right-click it, and choose Uninstall.
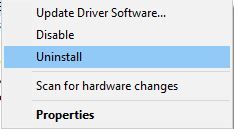
    uninstall-driver
  5. After the driver has been uninstalled, install the older version of the driver.

Users have reported that they are getting Received a packet that is too large to deserialize messages while trying to update the game.

According to them, after getting this error they are unable to download the game, and this can be a big problem.

It seems that the Wi-Fi driver update is the cause of this issue, and the only solution is to remove your wireless driver and to install an older version.

If you don’t want to uninstall your drivers, you can just switch to the wired connection in order to avoid this issue.

3. Run the installer with administrator privileges

  1. Locate the Path of Exile MSI installer.
  2. Hold Shift and right-click the installer.
  3. Choose Copy as path from the menu.
    copy-as-path
  4. Press Windows Key + X and choose Command Prompt (Admin) from the menu.
  5. When Command Prompt starts enter msiexec /i and press Ctrl + V to paste the location of the MSI installer.
  6. Your command should look similar to this:
    • msiexec /i "C:UsersAdminDesktopInstaller.msi
      command-prompt-msiexec
  7. Remember, this is just our example, so don’t copy and paste this code, because it will not work on your computer.
  8. Press Enter to execute the command.

If you’re having Path of Exile installation problems, maybe you should run the installer with administrator privileges.

Users have reported Installation Directory must be on a local hard drive message while trying to install the game, and if you have the same problem, you can fix it by following the above-mentioned steps.

4. Add Path of Exile to your antivirus/firewall exceptions

  1. Locate the Path of Exile client.
  2. Right-click it and choose Run as administrator from the menu.
    run-as-administrator

Sometimes while patching the game, the patching process stops when it’s almost complete, and few files are left outside the pack file.

This can be caused by your antivirus or firewall software, so you should add the Path of Exile client to the list of exceptions in your security software.

If adding Path of Exile to the list of exceptions doesn’t help, you might want to try running the game as an administrator. To do that follow the above steps.

If the issue persists, you might want to try moving your Path of Exile installation folder to a different location.

5. Remove the Client.exe file

  1. Open Path of Exile installation directory.
    • By default, it should be:
      • Program Files/Grinding Gear Games/Path of Exile
  2. Make sure that you have Client.tmp file in that folder.
    • If there’s no Client.tmp, you should skip this solution.
  3. After you’ve found Client.tmp, locate Client.exe, and delete it.
  4. Right-click Client.tmp and choose Rename.
  5. Rename Client.tmp to Client.exe.

It has been reported that Path of Exile gives the Could not overwrite executable with new patched executable or the Timed out waiting for patching process to exit message to the users when they try to patch the game.

This issue is usually related to the game’s Launcher, and you can fix this problem by following the above steps.

We have covered some of the common Path of Exile issues, and we hope that our solutions have been helpful to you. Also, refer to them when encountering the following problems:

  • Path of Exile disconnect issues – Several users complain about getting the Unexpected disconnection occurred error or Failed to Connect to Instance. If that’s your case too, make sure to update your graphics card drivers or try to reinstall DirectX.
  • Path of Exile lag issues – Lag problems aren’t that uncommon either. In spite of that, updating your sound card drivers often does wonders.
  • Path of Exile FPS issues – Massive FPS drops can also be included in the list. Anyway, in this case, you can verify the integrity of the game cache or refer to the above tips.
  • Path of Exile login issues – If you happen to experience login issues, rest assured that you’re not the only one. Run Pack Check and you should be able to solve the problem in no time.
  • Path of Exile display issues – Reinstalling the game isn’t the only option when facing such inconveniences. You can also take a closer look at the procedures detailed above.

Were they helpful in fixing the issues found in your Path of Exile game? Let us know in the comments area below.

How to remove DRM from WMA [Quick Guide]

Digital rights management (or DRM for short) tools are a set of protocols used to prevent the unauthorized use of proprietary digital content. These protocols can be applied to everything from movies, music, games, software, and more.

Thankfully enough, bypassing DRM content isn’t actually illegal as long as what you do with the content does not violate its terms of use in any way.

That being said, we’ve decided to showcase some tools that can help remove DRM from files, and this article will be covering WMA audio files.

How do I remove DRM from WMA files?

1. Use a third-party multimedia converter converter

Most multimedia converters will usually remove all DRM from the files that handle as a default solution.

However, if you’re interested in more than just that, then you might as well go for a tool that can do wonders with all kinds of media files, a tool like AnyMP4 Video Converter Ultimate.

You can use the tool to convert almost all kinds of video and audio files without losing quality, and it also allows you to extract audio tracks from DVD and video files. That being said, AnyMP4 Video Converter Ultimate to convert WMA to MP3 format.

Here’s how you can use AnyMP4 Video Converter Ultimate to remove the DRM from WMA files:

  1. Download and install AnyMP4 Video Converter Ultimate
  2. Import the WMA file into the program via drag & drop
    • You can also do this by using the Add file button
    • The program supports batch processing, so multiple conversions at a time.
  3. Select Profile and choose the output format that you need
    • In your case, choose MP3 from the Audio submenu
    • To customize your audio options even further, select the Settings menu before conversion
  4. Choose Convert All and wait for the program to be finished
AnyMP4 Video Converter Ultimate

AnyMP4 Video Converter Ultimate

If you need a tool that will swiftly remove DRM protection from WMA files, then go ahead and give the converter a try!
Free trial Visit website

2. Use the Windows Digital Rights Update Tool

If you have previously tried converting an audio CD to a WMA audio file using Windows Media Player, you might have been surprised to learn later that your audio files were DRM-protected.

Audio files get DRM protection once they are downloaded or during the CD ripping process. While the files will play on the device they are stored, the problem arises when you transfer the audio files to another system as DRM protection prevents you from playing them.

This happens due to the link between the DRM of the audio files and a particular machine or media player. You might notice the problem following Windows Media Player updates, Windows upgrades, or audio files transfer to another Windows PC.

Thanks to Microsoft, you can address DRM-related issues through the Digital Rights Update Tool. It works to remove DRM protection from WMA files. Keep in mind that the tool works only for WMA audio files, though, and cannot remove other forms of protection from audio files.

To get started, select a music file in your library and click the Play button. Decide whether you would like to make backups in the Settings.

You must first enable the backup option in the preferences before starting the process. It is unclear, though, whether the Digital Rights Update Tool works with WMA files purchased online.

In terms of design, the tool features a basic interface where you only have to click on the folder icon to open an audio file and add WMA audio files to the program. You can kick off the process by clicking on the Play button.

The tool is available only for Windows 10 devices. Nonetheless, you can run Windows 10 in a virtual machine to use the tool on devices running older versions of the operating system.

⇒ Download the Windows Digital Rights Update Tool 

By following these steps and using these tools you should be able to remove the DRM from WMA files without effort.

While other tools do exist, they aren’t as reliable as efficient as the ones mentioned above, so we deemed them not worth mentioning.

Let us know which tool helped you with your WMA files by leaving us your feedback in the comments section below.
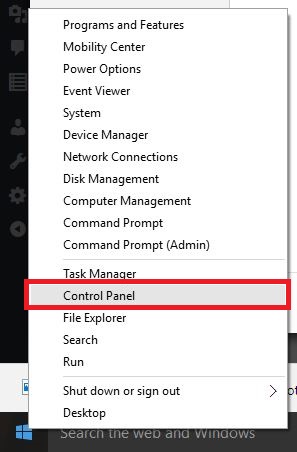
Slack warns investors of broad “retaliation” from Microsoft amid antitrust legal battle

Perhaps, in an effort to sow the legal landscape with a crop of anti-competitive rhetoric, Slack recently warned its investors that Microsoft could act in a “retaliatory” manner soon.

As vague as the threat sounds, Slack stuffed the warning into its latest 10-Q filing with the U.S. Securities and Exchange Commission as part of its fiduciary responsibilities when reporting its latest quarterly earnings.

On Tuesday, Slack underscored a potentially bumpy road ahead for investors as the company’s recent antitrust complaint to the European Commission against Microsoft might result in earnings-effected retaliation from the Redmond-based company.

Furthermore, we could be subject to retaliatory or other adverse measures by Microsoft, its employees, or agents in response to the complaint that we filed with the European Commission.

Despite the dire admonition, Slack has yet to clarify what retaliatory actions Microsoft could enact that would result in a direct adverse result for the company.

In another seemingly obfuscating move, Slack CEO Stewart Butterfield explained to investors openly that the market was just too big at the moment to be worried about any significant pressure from Microsoft.

Win rates are the same. We are now in Quarter 14 of competing with Microsoft. We’ve won over and over again in Office 365-using customers. … No doubt that it causes some friction, it’s another thing for us to overcome, but it doesn’t put any kind of ceiling or limiter on our growth.

Meanwhile, the company buried another nugget of fearmonger rhetoric regarding Microsoft’s continued growth in its 10-Q stating, “This competition has intensified in recent periods and we believe that it has harmed, and may continue to harm our business, results of operations, and financial condition.”

Even as Slack’s earnings report beat analysts’ predictions with revenue up to $215.9 million for the quarter, the company continues to view Microsoft’s ability to leverage its enterprise suite to grow its enterprise chat solution as illegal.

While Slack’s eye has been largely on Microsoft, the company’s after-hour trading was affected by dark-horse newcomer Zoom and its crazy ridiculous growth amid the COVID-19 pandemic.

Microsoft has not publically addressed Slack’s claims over the past few months and continues to make inroads with customer adoption for Teams at the moment.

As it stands, Slack and Microsoft’s Office 365 continue to work interoperably and should maintain for the time being, especially as the European Commission scrutinizes Microsoft’s every Teams related move for the foreseeable future.

The Surface Duo is already out of stock at the Microsoft Store, just one day before it releases [Update: It is back!]

Update: It appears as though the Duo is now back in stock at Microsoft. Our original article still can be seen below.
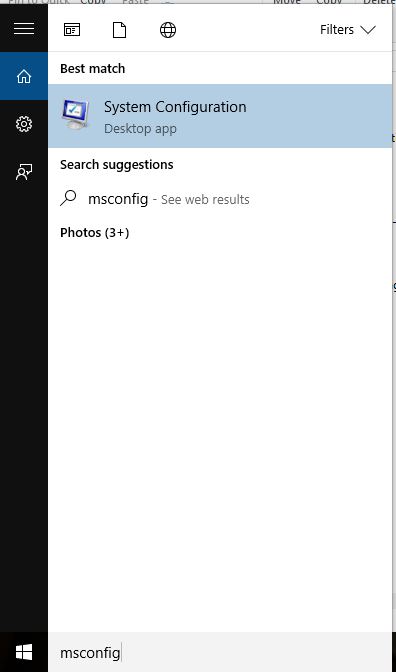
The Surface Duo is set for release tomorrow, September 10, but if you’re hoping to buy one directly from Microsoft at the very last minute, you might be out of luck. We’ve just realized that the Surface Duo is currently listed as out of stock online at the Microsoft Store.

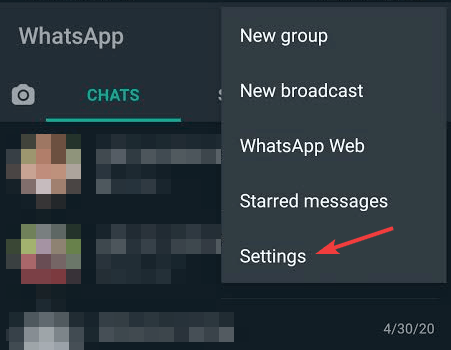
Currently, when adding the Surface Duo to our Microsoft Store Cart for checkout, both the 128 GB and the 256GB models of the Duo end up being listed as out of stock. Seen in the image below, the store cart also gives us an error, telling us that one or more of our items are currently out of stock, suggesting that we remove it or save it for later.

Duo Out Of Stock

It’s unknown to everyone how many Surface Duo devices Microsoft initially manufactured for this first run on the launch day, so there’s no telling if this sell-out really can be used as a gauge of interest for the dual-screen foldable. Still, the Duo is actually listed as available for pre-order at Best Buy, so if you really want a Duo tomorrow, you can buy it from that retailer instead.

On another side, it is also possible that this could just be a temporary store error. And, it could also be linked to the fact that since September 10 is now less than 24 hours away, Microsoft could no longer possibly deliver actual pre-orders in time for September 10.

Anyway, our own Surface Duo just shipped. We will be doing a full review within the next few weeks. We’ll also be doing an unboxing in the days ahead, so be sure to keep it tuned to OnMSFT for all your Surface Duo news and information.

Microsoft Hololens 2 is now available for everyone

Microsoft announced in a short Twitter post that the HoloLens 2 mixed reality glasses are available for purchase directly from the Microsoft Store online in selected markets.

HoloLens 2 was launched last year in Spring, during Mobile World Congress 2019.

Unfortunately for many of us, this is not just another fun gadget to watch movies or play games but it’s a professional device targeted at business users.

It’s a productivity tool and Microsoft didn’t make any moves yet to show their intention in turning it into a consumer device. However, there are hopes for future smart glasses pair for consumers.

What is new about HoloLens 2?

Unfortunately, there are no new announcements about HoloLens 2 but if you’re still interested in buying yourself a pair let us remind you about the price and technical specifications for the device.

To begin with, the price is still $3,500, a lot higher than that of the consumer smart glasses on the market.

Here’s a shortlist with some of the Microsoft HoloLens 2 technical specifications:

  • Video Resolution: 2K
  • Processor: Qualcomm Snapdragon 850
  • WiFi: 802.11ac (2×2)
  • Bluetooth: ver. 5.0
  • Connector: USB-C
  • Camera: 8MP photo resolution, 1080p video capture
  • Speakers: Built-in, spatial audio
  • Other features: Eye tracking, head tracking,  6-degrees-of-freedom (6DoF) tracking

As we mentioned above, you can now buy your own HoloLens 2 from the Microsoft Store. While you’re still here, make sure you check out other smart glasses you may be interested in.

If you’re looking for VR glasses for gaming instead, take a look at our list with the best such devices.

What do you think about Microsoft HoloLens 2? Leve your thoughts below in the Comments section.

[wl_navigator]