Microsoft starts migrating users automatically to new Edge

This year started off strong for Microsoft. The first round of updates, called the January Patch Tuesday updates, has just been rolled out.

Not only did it bring the typical improvements, bug fixes, and security patches, but they were also the last Patch Tuesday updates for Windows 7.

After 10 years of being a customer favorite, the OS has finally been retired by Microsoft. Unfortunately, not everyone is willing to migrate from it just yet.

Of course, other changes were made as well, even though they weren’t as publicized.

Microsoft installs Edge on your PC via Windows Update

One day after the January patch Tuesday updates, Microsoft finally released the first full version of their Chromium-based Microsoft Edge. Not only that, but they are also urging users to migrate towards Microsoft Edge.

For those that are still using Windows 7, Microsoft announced that this latest version of Edge will still be compatible with the now-dated OS, and will continue to be compatible for at least another 2 years.

Even if you don’t want to install Microsoft Edge, it will be part of the Windows Update patches anyway. This is Microsoft’s subtle way of introducing the new browsers to consumers.

If you use any browser other than Edge, it will carry over any saved data and settings once it gets installed automatically.

Those that are part of the Windows Insider program have already received the latest updates that also come with the browser. If you can’t wait to try it for yourself, you can always download it from Microsoft Edge’s official website.

Do you think Microsoft Edge will be just as good as other mainstream Internet browsers? Let us know in the comment section below.

READ NEXT:

How to fix OneDrive’s SSL_error_no_cypher_overlap

If you are using a third-party firewall on your computer, the firewall may block some connections.

Several users have reported the OneDrive SSL_error_no_cypher_overlap error while trying to access OneDrive from the browser.

As discussed above, this error occurs if a security program is blocking the connection for security reasons. If you are also troubled by this error, here are a couple of troubleshooting tips to help you resolve this error.

Steps to solve OneDrive’s SSL_error_no_cypher_overlap

1. Disable BT Web Protect

OneDrive SSL_error_no_cypher_overlap

If you are using the BT broadband connection, do the following:

  1. Launch the My BT app
  2. Go to Inclusive Extras and select BT Web Protect.
  3. Disable BT Web Protect if enabled.
  4. Close My BT app
  5. Try accessing the OneDrive account and check for any improvements.

BT Web Protect is a software feature offered by BT broadband with its My BT app. The app may block some websites if found to be suspicious. In this case, it is nothing but a false flag that is causing the issue.


Unable to download OneDrive files to your PC? Read how you can easily fix it in this awesome guide.


2. Disable Windows Firewall

OneDrive SSL_error_no_cypher_overlap

  1. Click on Start and select Settings
  2. Go to Updates and Security
  3. Select Windows Security
  4. Next, click on Firewall and Network Protection
  5. Click on the currently active network
  6. Scroll down and toggle the switch to turn off Windows Firewall
  7. Close and relaunch the web browser. Check for any improvements

2.1 Disable third-party antivirus

  1. If you are using a third-party antivirus, check if it has a firewall option enabled
  2. Disable any third-party software that can block the connection
  3. If necessary, disable the antivirus temporarily
    • Right-click on the Antivirus icon from the taskbar and select Disable temporarily

Do you want to check if your firewall is blocking some features? Follow the simple steps from this guide to find out.


3. Check for web browser issues

  1.  Try to use a different browser to check if it is a browser-related issue.
  2. If the issue is with a particular web browser then do the following.

3.1 For Google Chrome and Microsoft Edge 

OneDrive SSL_error_no_cypher_overlap

  1. Launch the Google Chrome
  2. Click on the Chrome menu
  3. Select Help and feedback option
  4. Select About Microsoft Edge / Chrome
  5. The browser will check if any updates are pending
  6. Click on Update if the option is available to install the updates

3.2 For Firefox

OneDrive SSL_error_no_cypher_overlap

  1. Launch the Firefox browser
  2. Click on the Open Menu icon
  3. Go to Help > About Firefox
  4. You will see the Update button if any updates are available for installation.

Once the web browsers are updated, check if the OneDrive SSL_error_no_cypher_overlap error is resolved.


4. Reset TLS settings in Firefox

OneDrive SSL_error_no_cypher_overlap

  1. Launch Firefox
  2. In the search box type about:config and hit entertrong>
  3. Click on I accept the risk! 
  4. In the search box, type TLS

Now check if any of the value is in bold. If so, that value is modified recently.

  1. Right-click on the value in bold and select Reset.
    • This will restore the value to its earlier settings.
  2. Next, repeat the search again with SSL3.Check for any value that appears in bold.
  3. Right-click on the value and select Reset.
  4. Make sure the following values are set to <strong< span=””>>False</strong<> before closing the browser:
    • security.ssl3.dhe_rsa_aes_128_sha
    • security.ssl3.dhe_rsa_aes_256_sha

The OneDrive SSL_error_no_cypher_overlap is caused by third-party security programs or apps from your ISP. By following these steps you can fix the problem and access OneDrive online without any issues.

Do you know of any other way that can fix this OneDrive error? Share what you know with the other users in the comment section below.

RELATED STORIES YOU MAY LIKE:

How to connect Alexa to a stereo receiver in a few easy steps

You’re obviously looking for a quick way to connect Alexa to a stereo receiver. If you’ve invested in a nice stereo system already, be sure that it’s easier than ever to ask Alexa to play music.

The idea is that Amazon’s Alexa voice control system already offers a wide range of voice commands on its Amazon Echo systems. Wired and wireless are both great options to go for when you want to immediately connect Alexa to your stereo receiver.

Moreover, the possibilities of voice control seem endless these days. So, that’s even better if integrated voice control was on the initial checklist for your stereo receiver.

From using Bluetooth to voice control, here we’ll tell you everything you need to know for successfully establishing the connection. Just keep on reading the lines below.

How can I connect Alexa to a stereo receiver?

1. Connect Alexa to your stereo receiver via Bluetooth

Connect Alexa to stereo receiver via Bluetooth

Assuming that your current sound system supports Bluetooth or has a line-in connection, let us assure you that integrating the voice assistant works like a breeze.

An Amazon Alexa system (e.g. Amazon Echo, Echo Dot, Echo Plus, or Echo Spot) is though required. Each of these Amazon devices has Bluetooth and an analogue sound output as active interfaces to the existing systems.

Therefore, waste no more time and pair an Amazon device with your own sound system in the Alexa app. Enter into Settings > Bluetooth and remember that both systems must be in pairing mode.

You can manage pairing and device control more easily by installing the desktop client, so you may use the Amazon Alexa app for PC to set up your Echo device and access additional configuration options.

Alexa will immediately answer with a voice message, proving the successful coupling to your stereo receiver.

While setting up Alexa with your stereo is simple, smart devices can sometimes cause additional headaches. If you also use Sengled bulbs and they aren’t responding to Alexa, check this guide on Sengled not working with Alexa for detailed fixes.


Interested in the best 2 channel stereo receiver with Bluetooth? Check out this list with our top picks.


2. Stream music by using an AUX cable

Use aux cable

How to stream music over a system that is not even equipped with Bluetooth? Just use your smartphone and connect Alexa to your stereo receiver with an AUX cable (3.5 mm).


3. Use voice control to establish the connection

Harmony Hub-based remotes

Another simple way to connect your stereo receiver to Alexa is by using voice control. Unfortunately, there’s an unpleasant limitation you need to take into consideration from the very start.

There’s no chance to switch the system on or off, just as you cannot control video by only using your receiver. Voice control is limited to music playback. That’s rather disappointing with this list of commands expanding so rapidly.

If music playback isn’t enough for you, give a try to Harmony’s Hub-based remotes. Bottom line, these are compatible with Alexa and give you that touch of extra functionality you want to enjoy.

One remote is all it takes to control your home entertainment system and all home automation devices. Feel free to choose between:


Looking for some voice-controlled home automation software? Take a look at this handy list.


No matter what you’re thinking of, you’re clearly attempting to make Alexa a part of your daily life. Now that there are so many ways of interaction, you might find yourself talking to Amazon’s voice assistant more often.

Besides giving voice commands such as Alexa, show me the weekend forecast, connecting Alexa to your stereo receiver is just another natural step to take in this process.

If you have any other questions about the procedures detailed above, remember that you can get into contact with us. Just leave a comment in the section below and we’ll get back to you.

READ ALSO:

Tom Clancy’s The Division, four more games to leave Xbox Game Pass soon

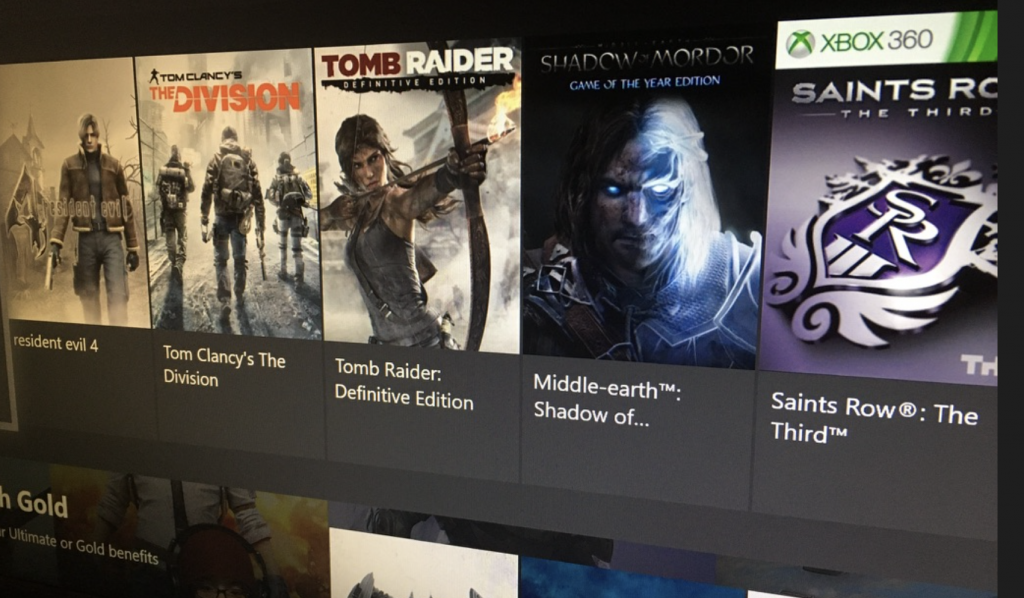
If Microsoft announced three new additions to Xbox Game Pass for PC earlier today, Xbox Game Pass for console subscribers will soon lose access to five games (via Windows Central). Tom Clancy’s The Division, which came back the catalog on December 12 is among the list of games to be removed at a still unknown date

The four other games to disappear soon from the Xbox Game Pass catalog are Resident Evil 4, Tomb Raider: Definitive Edition, Middle-Earth: Shadow of Mordor, and the Xbox 360 title Saints Row: The Third. You can check out the list by yourself on the Xbox Game Pass section of the Xbox One dashboard, or the Xbox Game Pass app for iOS and Android.

If some games leave Xbox Game Pass every month, they’re usually quickly replaced by new games. Tekken 7 and Children of Morta are the latest additions to the catalog, and the Xbox team will likely announce more in the coming days.

If you have yet to try Xbox Game Pass, Microsoft currently offer one month of Xbox Game Pass Ultimate (which also includes Xbox Live Gold and Xbox Game Pass for PC) for $1 instead of $14.99. With more than 200 Xbox games and over 100 PC games, Xbox Game Pass Ultimate remains one of the best deals in gaming.

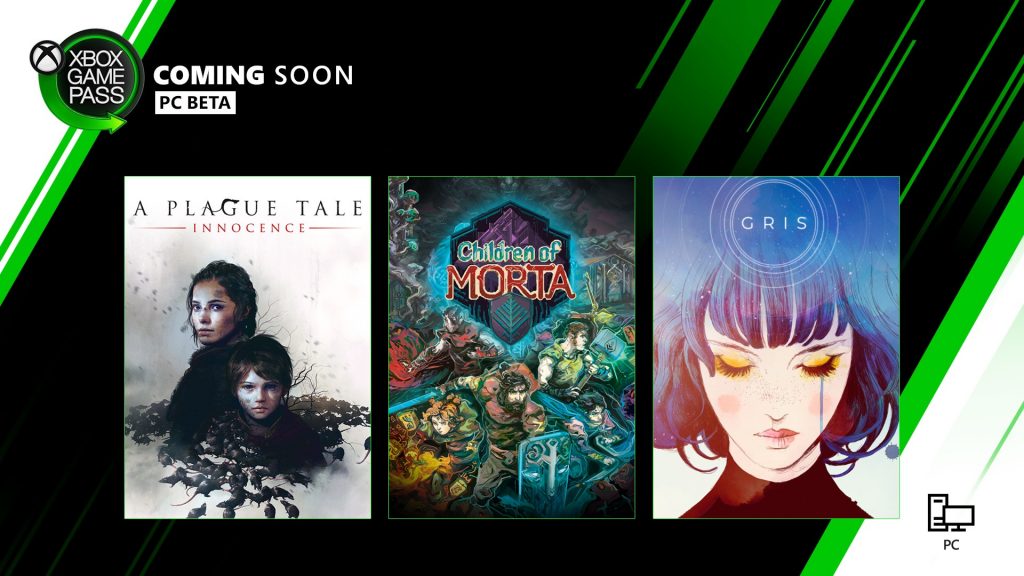
A Plague Tale: Innocence, Children of Morta, and Gris are coming to Xbox Game Pass for PC

Microsoft has just announced three exciting additions to Xbox Game Pass for PC. The subscription service that is still in beta is welcoming the story-driven action RPG Children of Morta today, an Xbox Play Anywhere game that is also available now on Xbox Game Pass for Console. The ID@Xbox title also supports Xbox Live cloud saves, so you can switch between the two platforms at will T

Gris, another ID@Xbox game is also coming to Xbox Game Pass for PC later this month. The platform-adventure game was released on Windows back in December 2018, and Spanish indie developer Nomada Studio has yet to port it on Xbox One.

The third game coming to Xbox Game Pass for PC this month is A Plague Tale: Innocence, the critically-acclaimed game from French developer Asobo Studio, currently hard at work on the next Flight Simulator game. A Plague Tale: Innocence is a horror stealth game that has often been compared to the hit PlayStation exclusive The Last of US, and it also received a nomination for Best Narrative game at The Game Awards 2019. The fact that this high-profile game joins Xbox Game Pass for PC and not console is quite a surprise, to be honest.

If you didn’t take advantage of the 3 months of Xbox Game Pass Ultimate for $1, Microsoft is now offering 3 months of Xbox Game Pass for PC for just $1 for a limited time. As a reminder, Xbox Game Pass for PC requires Windows 10 version 1903 and newer and the new Xbox Beta app available on the Microsoft Store.

Microsoft quietly removes pledge to share 95% of app revenue on the Microsoft Store

Back in March, Microsoft brought new policies to the Microsoft Store to allow developers to keep a 95 percent cut of revenue generated from purchases, provided the traffic comes from the developer itself as opposed to straight from the Store. It seems this type of revenue model didn’t pay off, as the company has removed the clause from its developer agreement, as spotted by an app developer on Twitter.

It’s no secret the Redmond tech giant wants its Microsoft Store to be the central place for users to obtain applications on Windows 10. The company continually promotes it as the most secure way to install apps, and even forbids installing apps outside of it on devices with S Mode enabled.

Of course, in order for that vision to become reality, the Microsoft Store needs a healthier catalog of apps. It’s more than likely that the initial revenue program was meant to further attract developers to jump on its platform, even as companies Apple and Google can easily get away with taking almost a third of app revenue on their respective platforms.

To be clear, the 85% of revenue the developer keeps from app sales on Windows devices (outside of Xbox consoles) when a users find it though Microsoft’s own sources doesn’t seem to have changed. While it’s likely disappointing for many developers, the company is still be charging considerably less than that of Apple and Google.

What do you think about the app revenue policy changes?

Microsoft Edge Insider beta channel is now ready for Windows 10 on ARM

Microsoft Edge has officially been released, and while definitely more stable than the Insider versions that users are testing, it was shipped with many features still missing—including support for ARM-based processors. Only a day after its release, however, Beta users are now able to test the Beta version of Edge with full support for the 64-bit ARM architecture. The company has been testing ARM64-support in the Dev builds of Edge for nearly a month now, providing some time to smooth out some rough edges (pun intended) before the Beta build.

The beta release gives many mobile devices running ARM-based processors—notably the company’s own Surface Pro X—the ability to run the full Chromium-based browser with uncompromised performance, with likely more stability running the Dev builds. Should testing go well, it’s possible that the feature could be added to the next stable version of Edge, presumably six weeks after its launch.

For those who aren’t caught up, the stable version of Microsoft Edge was officially released yesterday for Windows 7, 8.1, and 10 with Intel/AMD CPUs as well as for macOS. While these users are likely best to download the stable version for their general browsing needs, ARM-based PC users can test and provide feedback of the Beta version ahead of support for stable users.

Do you own an ARM-based Windows PC? Feel free to leave you comments and heads-on impressions below.

Microsoft goes all-in on education with new Windows 10 devices, Always Connected PCs, and new features for OneNote, PowerPoint

Microsoft is announcing today, January 16, several new updates to its education initiatives. The company is planning on introducing new Windows 10 devices for the education market and will be bringing new education-related features to OneNote and PowerPoint. Microsoft will also be entering a new partnership with T-Mobile to offer schools Always Connected PCs.

We’ll be starting first with the new Windows 10 devices. On this front, Microsoft and its partners will be introducing updates to 14 of the most affordable Windows 10 devices from Acer, Dell, HP, Lenovo, JP.IK, and Positivo. In a continued jab at Chromebooks, prices on the devices will start at $200.

Some of these new Windows 10 PCs will have Intel’s newest Gemini Lake processors, which Microsoft promises will boost device performance by 46%. Other features on some of the new education PCs include indicator lights to see students’ status from the front of the classroom and built-in pen storage with charging on select devices.

Next, there are the Always Connected PCs, which Microsoft hopes can close the broadband gap for 1.15 billion students around the world. In this area, Microsoft’s partners Positivo and JP.IK will be introducing two new Always Connected PCs, built and priced especially for education — the JP.IK Turn T101 and Positivo Wise N1212S. Microsoft claims these PCs will be the “most affordable Connected PCs yet,” with the JP.IK Turn T101 starting at $299 and the Wise N1212S at $575 USD. Both devices will be shipping later this summer, and Microsoft promises the PCs will have twice the battery life and 25 percent better performance than competing platforms.

Microsoft will also be partnering with T-Mobile to offer select school districts in rural and underserved areas in the U.S. a chance to test the newest Connected PCs. T-Mobile will provide pilot schools with SIM cards and free 4G LTE coverage plans to get these new PCs up and running. Outside of the United States, Microsoft will partner with Vodafone (and its subsidiary Vodacom in Africa) to provide education-specific cellular plans to customers using the newest Connected PCs.

Third up is the news on the Microsoft Edge and OneNote side of things. Here, Microsoft will be planning to push its new Chromium-based Edge browser as a solution for educators, with ease of management for IT, the ability to change text size, reading text aloud, and even inking on PDFs right in the browser. Microsoft will also be starting a private preview of OneNote Live Captions, which will allow students to connect OneNote to a Microsoft Translator session via a Join Code and receive the captions and translation stream while still taking notes.

Finally, there’s the news about the new professional development tools for educators that Microsoft will be introducing for the education market. There are three specific things here, including PowerPoint Live Presentations, updates to Microsoft Stream to create training videos on the web, and Microsoft Teams Class Insights.

With PowerPoint Live Presentations schools will be able to train teachers from anywhere via the web. Schools will be able to present slides on the web and using a QR code, while viewers will be able to follow along with live translation in more than 60 languages on their personal device. With updates to Microsoft Stream, a new Flipgrid camera integration will make it fun for anyone to personalize and share content in seconds. Stream will also soon support browser-based screen recording and editing, too. Lastly, with Microsoft Teams Class Insights, Microsoft will help equip educators with more data on student performance and activity and help educators generate Parent and Guardian emails that summarize a student’s weekly progress and the week ahead.

Microsoft will be in attendance and is a worldwide partner of BETT, an annual trade show in the United Kingdom organized by ITE Group. You can expect to hear more about these initiatives as the show rolls on.

Taskbar Not Going Away in Fullscreen? 3 Ways to Hide it

Windows 10 is an incredible OS with plenty of features, but it has issues such as Taskbar not going away in fullscreen.

This is a minor issue compared to Takskbar not working at all, and since it’s a minor issue, it can be easily fixed.

While this does not break system functionality, it can interfere with your work, video, or game, making it unpleasant, so let’s see how to fix it.

Why does my Taskbar show in fullscreen?

  • Temporary glitches with Windows Explorer can cause this issue.
  • Issues with DPI calling in certain web browsers can lead to this problem.
  • Certain visual settings in Windows can affect the Taskbar.

How do I make the Taskbar go away in fullscreen?

1. Restart explorer.exe

  1. Press Ctrl + Shift + Esc. This will open the Task Manager
  2. Go to the Processes tab.
  3. Locate Windows Explorer, and press Restart.
    task manager explorer

2. Override high DPI scaling behavior in Chrome

  1. Right-click on Google Chrome in your Taskbar or Start Menu.
  2. Select Properties.
  3. Go to the Compatibility tab.
  4. Go to the Settings tab.
  5. Check the box next to Override high DPI scaling behavior.Chrome DPI
  6. Click Apply
  7. Restart Chrome

After doing that, check if the problem is resolved.

3. Turn off visual effects

  1. Press Windows + R and type in control.

  2. This will open the Control Panel.
  3. Go to System and Security.
  4. Select the System subheading.
  5. Go to Advanced system settings.
  6. In the new window, go to the Advanced tab.
  7. Click on Settings, under Performance.
  8. Select the option labeled Adjust for performance.
    Adjust for best performance, visuals

Following these steps, you should no longer see the Windows taskbar when running programs in fullscreen mode.

If you’re still having problems, check our guide on how to permanently hide the Taskbar on your PC.

Did you find this guide to be useful to you? Let us know of any other fixes to this problem in the comment section below.

3 months later, File Search still unusable on Windows 10 1909

With the first round of Patch Tuesday updates coming around, many users were expecting improvements in the security department.

While there have been significant improvements as far as security goes, some users are not happy about certain issues.

For example, users are reporting that File Search is still unusable on Windows 10 v1909, despite being promised otherwise.

Ever since I updated to Windows 10 1909 the Search Box in the File Explorer is completely unuseable. It shows a text cursor but I cannot click inside the box or type any text into it. Essentially it’s a text box with no “wiring”.

This problem has been affecting the OS for three months now and it seems Microsoft still needs more time to fix it.

No one knows what causes the File Search error

What makes matters worse is that there doesn’t seem to be a precise trigger for this issue to occur. This makes it all the more difficult since users don’t know what actions to avoid.

Problem seems to be inconsistent, sometimes I am able to use the search, other times it won’t let me click. This morning I was able to use it, but the text box appeared broken and misaligned. After a reboot, it returned to not working.

Unfortunately enough, no word from Microsoft has come out regarding the issue. This leaves users with no choice but to either perform a rollback or use temporary fixes such as shutting down File Explorer.

I wrote a .bat that taskkills file explorer. That seems to have fixed the problem, but its only a temporary fix. If you go into taskmgr and kill explorer.exe it should start working again. 

Indeed, this is the 3rd consecutive month since this issue has first been reported, and users are not pleased that is has still gone unsolved.

This bug can seriously hinder the efficient use of the Windows 10 OS.

Have you experienced this File Search error ever since installing Windows 10 version 1909? Let us know in the comment section below.

Salesforce Add-in not Showing in Outlook: How to Restore it

After the recent Salesforce for Outlook updates, the side panel has been added. As a result, the old Add Email button has been relocated, and many users have reported that the Salesforce Add-in is not showing from Outlook.

This issue can occur due to the new Side Panel, and disabling the feature can fix it. However, there can also be other reasons for this problem.

In this article, we have listed a couple of troubleshooting tips to help you find the Salesforce button in Outlook.

What can I do if the Salesforce Add-in is not showing in Outlook?

1. Enable Salesforce add-ins

  1. Launch Outlook client and click on New Email.
    new email salesforce add-in not showing outlook
  2. Right-click on the Clipboard ribbon and select the Customize the Ribbon option.
    customize
  3. Click Add-ins.
  4. At the bottom, select Disabled Items for the Manage: option.
  5. Click Go to proceed.
  6. Select anything with Salesforce in the name and click Enable.
  7. Click on Close.
  8. Again from Manage: menu, select COM Add-ins and click GO.
  9. Make sure that the Salesforce for Outlook Add to Salesforce Toolbar and Salesforce for Outlook Side Panel options are checked.
  10. Close Salesforce for Outlook and Outlook clients.
  11. Restart Salesforce for Outlook and Outlook clients and check for any improvements.

These steps are only required if the Salesforce for Outlook add-in is not working or disabled.

2. Enable Email to Salesforce in Salesforce

  1. On the Classic client, click on the User Name.
  2. Select Setup and go to Email Administration.
  3. Email to Salesforce and make sure the Active box is checked.
    active
  4. On the Lighting client, click on the User icon.
  5. Go to Settings and select Email.
  6. Select My Email to Salesforce.
  7. Make sure the Active box is checked for My Email to Salesforce.
  8. Relaunch the client and check for any improvements.

3. Reset Outlook customization

  1. Click on File and select Options.
    options
  2. Select Customize Ribbon.
  3. You can export the current customization to a file. It can be imported by the users if required.
  4. In the Customize the Ribbon window, click on Reset.
  5. Next, click on Reset all customization.

Alternatively, you can also reset only the selected tab. In the Customize the Ribbon window, select the default tab that you want to reset to the default settings.

4. Confirm Add Email is enabled for Outlook Configuration

  1. On the Classic client, click on your name.
  2. Click on Setup.
  3. Select Desktop Integration
  4. Click on Salesforce for Outlook and make sure it is enabled.
  5. On the Lighting client, click on the User icon.
  6. Go to Settings and select Dekstop Add-ons.
  7. Select Salesforce for Outlook and make sure it is enabled.

Note that you must have Salesforce System Administrator rights to be able to view or edit settings.

5. Turn off User Account Control

  1. Press the Windows key + R to open Run.
  2. Type msconfig and click OK to open the System Properties window.
    msconfig salesforce add-in not showing outlook
  3. Click on the Tools tab.
  4. Select Change UAC Settings and click on Launch.
  5. Drag the slider to Never Notify.
  6. Click OK and click Yes when asked to confirm the action.

The Salesforce add-in not showing in Outlook issue mostly occurs due to the add-ins being disabled in the Salesforce for Outlook setting. We have listed all the possible fixes, so go through them and see which solves your problem.

If you have any more questions or suggestions, feel free to reach for the comments section below.

KB4528760 still plagued by old errors and unresolved bugs

Microsoft recently released the first round of updates for 2020, called the Windows 10 January Patch Tuesday updates. Part of this major set of updates is the Windows 10 Cumulative Update KB4528760 for Windows 10 version 1903 and 1909.

Several security vulnerabilities regarding the crypt32.dll component of Windows were probably the highlight of the entire round of patches, as far as security goes.

However, KB4528760 also comes with its fair share of issues as well.

The list of bugs is already pretty long, despite the updates barely having been rolled out. As such, we expect the list to grow as users discover more and more issues, and we will update the article as new problems emerge.

KB4528760 reported bugs

Error messages when installing the Cumulative Update

Users are receiving constant error messages when trying to install the Windows 10 Cumulative Update KB4528760. This error bears the code 0xc1900403.

Windows10 update 2020-01 Cumulative Update for Windows 10 Version 1903 for x64-based Systems (KB4528760)failed 3 times with this error:

Last failed install attempt on ‎1/‎14/‎2020 – 0xc1900403  (also displayed download error, reason for 3 runs)

On the same note, other users are receiving an error code 0x80073701 when trying to install the Windows 10 Cumulative Update KB4528760. This isn’t the first time this particular issue affects users, as it also appeared back in the August Patch Tuesday updates.

If you too are encountering this issue, make sure that you follow this in-depth guide that will show you exactly how to fix it.

Night Light is broken

Several users have reported that Windows 10’s Night Light feature no longer works after installing the latest Cumulative Update. Apparently, it stopped working, regardless of whether it was set to scheduled or non-scheduled.

it doesn’t work. scheduled or non-scheduled.

Explorer issues

Users were also expecting that this round of updates would also bring a fix to the Explorer issues for WIndows 10 version 1909. However, it would seem that these have failed to come.

This pretty much sums up the list of issues for Windows 10 Cumulative Update KB4528760 for now. If any more appear, we will constantly update this article, so be sure to keep an eye on it.

If you bumped into any other problems with KB4528760, don’t hesitate to share them in the comments section below.

RELATED ARTICLES YOU SHOULD CHECK OUT:

How to get the new Edge on your Windows 10 PC today

After nearly a year-long journey of testing, Microsoft’s new Chromium Edge browser is exiting beta and an official final version is now available for download. There’s plenty that’s new in this new version of Edge, be it the improved performance, user interface, and support for a wider set of extensions. In this guide, we’ll show you how you can download it.

Step 1: Head to Microsoft’s Website

The first step in getting the new Microsoft Edge is to head over to Microsoft’s website in an existing web browser like the old Microsoft Edge, or even Interner Explorer or Google Chrome. You can then click the blue Download for Windows 10 button. If you’re on other platforms, you can also click the down arrow and choose from Windows 8.1, 8, 7, or macOS.

There are even links to the iOS and Android versions, available through the app store. Anyway, you’ll need to read through the licensing terms and then click Accept and download to proceed with the download. The file is pretty small and should download in seconds.

Step 2: Run the installer

After you download the file, head over to where you saved it. That can be in your download folder or desktop. Next, double click it. You’ll get a prompt from the Windows 10 UAC, and you’ll need to press Yes to allow the system to the installer to make changes to your system. The installer will then download Edge from the internet. Give it a few minutes to download, and install it to your system.

Step 3: Set up your browser and enjoy

After the installer is complete, you’ll notice that the new Microsoft Edge will automatically launch. If you’ve been using the old version of Edge, you’ll also see that it’s now gone from your Windows 10 PC. New Edge replaces and “hides” the old Edge, but you can still bring back old Edge with a few steps if needed. We previously talked about that here.

And, that’s it! In just three simple steps, you’re now up and running with Microsoft’s newest web browser. There’s plenty that you can enjoy in the new browser. Chrome extensions, tracking prevention and more. Compared to Old Edge, you’ll also get more security updates and new features, as Microsoft has now committed new Edge to a six-week update cycle. Are you enjoying the new Edge? Let us know in the comments below.

How to view and delete your Bing search history

Bing tracks every search you make when you’re logged into your Microsoft account. That history can be useful if you need to get back to something you did in the past. It could also be a privacy concern, as search history can by nature reveal some quite personal information. Here’s how to take back control.

Search history in Bing's menu

The easiest way to see your search history is by visiting Bing itself. From the homepage, click the hamburger menu in the top-right. Click the “Search history” link towards the top of the drop-down which appears.

Bing’s Search History interface is simple but functional. Your search history is broken down by date. By default, an infinitely loading list of your search history is visible. You can filter to data from the past week, month or six months using the tabs.

Viewing Bing search history

Bing displays a basic graph of the types of content you search for. There are categories for Web, Images, Videos and News, depending on which of Bing’s services you use.

You can search for specific items from your history using the searchbar below the graph. Click any item to reopen the search results page in Bing.

Clearing search history from Microsoft account

To disable search history tracking, click the “Show new searches here” toggle button at the top-right of the screen. Once it’s toggled to the off position, Bing will stop logging all new searches. However, existing search data will be preserved.

To delete everything you’ve already stored, click the “Go to dashboard” link under “Manage your search history.” Login to your Microsoft account when prompted. On the Privacy dashboard, you’ll see another, less-detailed view of your search history. Click the “Clear activity” button to erase all stored records.

In a blow to Slack, AvePoint secures $200M in funding to help move more customers to Microsoft Teams

There’s no doubt that Microsoft Teams is picking up steam when compared to Slack, but the competition might have just gotten a bit rougher for Slack. Microsoft Partner AvePoint recently announced that it raised $200 Million in funding to help businesses and enterprises running Slack move to Microsoft Teams.

According to a report from Business Insider, AvePoint attributed the “bright future” of Teams for a reason to raise the funding, led by TPG Sixth Street Partners. AvePoint is actually a Microsoft Global ISV Partner, and in its own press release, states that it is seeing an “outstanding growth driven by the rise in adoption of Office 365 and other cloud office solutions.” The company also claims that over 7 million cloud users and 16,000 large enterprises across all seven continents already use its software to help move from traditional services like Google G Suite to Office 365, and Slack to Teams.

Tianyi Jiang, co-founder, and co-CEO of AvePoint, reflected on this in a statement seen in Business Insider.

“Once you start using [Teams], you have hundreds, if not thousands of teams populating everywhere and it becomes unmanageable. “So we’re able to…handle all of that, essentially automate all of that and give companies that governance and control, so in return, we’re increasing significant Teams adoption”

Jiang also tells Business Insider that AvePoint is trying to help customers get the most out of Teams. With the new funding, AvePoint is hoping to add 40,000 more customers through its channels. That’s a lot of users, and Slack might just have to watch its back.

How to create a collection of Bing search results

Searching the web and taking notes: there’s dozens of ways to do it, and Microsoft itself offers quite a few. Whether it’s with To-Do, OneNote, or Edge’s new Collections feature, you’ve got plenty of options when it comes to snipping search results for later.

Yet if you’re using Bing, you might not need to use any of them. Although now barely mentioned, Bing has had its own “collections” feature for years. It lets you save images, videos and news from search results into a special interface that’s reminiscent of both note-taking apps and Pinterest.

You can use collections from any image, video or news search. We’re using images in this example. To add an image to a collection, click its thumbnail preview to open the fullscreen image. Then, click the “Save” button at the bottom of the screen. Click the “See all” link to view the image in your collections.

Saving an image to a Bing collection

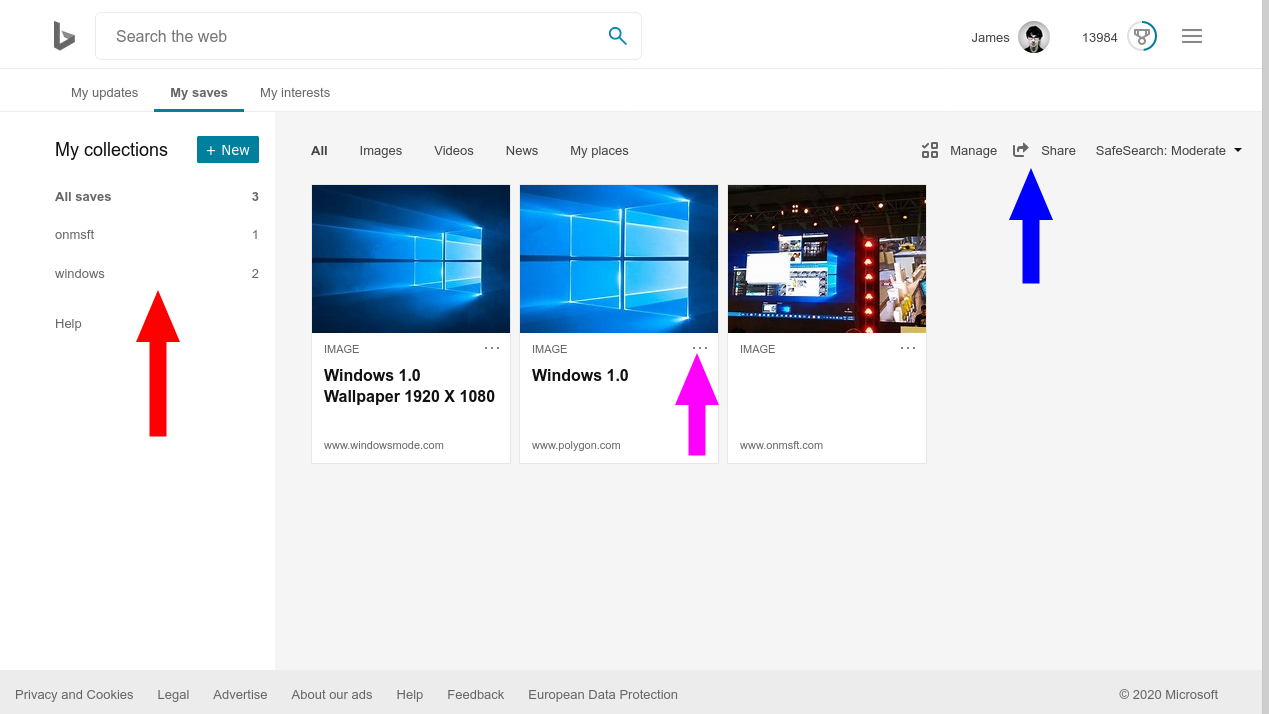
Content is automatically sorted into collections named after the search result you saved them from. Bing automatically grabs metadata such as image title and description too. You can access your saved collections at any time via the “My Content” link in Bing’s top-right hamburger menu.

To create a new collection, click the “New” button in the left sidebar. Name your collection. You can then move items into it by clicking their checkbox, pressing “Move to” and selecting your new collection.

Bing collections

To delete items, click the three dots icon on their card (“…”) and then press “Remove.” You can share collections via the “Share” button in the top-right. This will generate a publicly accessible link which others can use to view your content.

All things considered, Bing’s collections are rather barebones compared with Microsoft’s more recent attempts at web snipping. Apps such as OneNote and To-Do already surpassed Bing’s featureset while remaining as quick and simple to use. With the advent of Collections in Edge, you might find little reason to use Bing Collections.

It does have a few advantages though, such as true cross-device and cross-platform compatibility (it’s just a website) and automatic labelling of content by search query. Even so, we wouldn’t be surprised to see it disappear or get integrated into another service in the coming years.

Windows 7 vs. Windows 8 Comparison: Old Meets New

If you are still wondering what are the differences between Windows 7 and Windows 8, then it’s time to put a stop to that, as we have compiled a guide showcasing what has been improved in Windows 8 compared to Windows 7.

Windows 8, the newest operating system released by Microsoft, one that carries the Microsoft Flag into uncharted waters and promises to assure in a new age in mobile and computer communications.

Of course, like every product, it has received good reviews and bad remarks.

Some are still wondering if the new way Microsoft is heading is not what users want, after all, the new OS comes with a completely renewed user interface and with lots of new improvements and features.

Despite all the new aspects of Windows 8, some still want to downgrade to the old version, Windows 7, an operating system that has been around since 2009 and proved its worth time and time again. So, which one is the best, in a head-to-head battle, will the new Windows 8 take out Windows 7?

Or will the old beat the new? Let’s see how this battle of generations will go and who will be crowned the Microsoft king. Also, if you want to downgrade from Windows 10 to Windows 7 or 8, you can check this article.

Windows 7 vs. Windows 8

Because the first thing users will see when installing Windows 8 is the new Modern UI and other visual improvements, we will first look at the surface changes, and later, we will delve deeper into the performance and other lower-level improvements that Microsoft have implemented in their new operating system.

A step-by-step comparison will reveal which operating system is better on each level of operation and when we will be done, we will compare results. Now, let’s begin!

1. Look and Functionality

personalization

Windows 7 has not gone astray from the look we were accustomed to.

Although it received some improvements over its predecessor, Windows Vista (one of Microsoft’s more rubbish operating systems), it kept to the wide lines and anyone who looked at it would realize from the get-go that it was a Microsoft OS.

The same is not true about Windows 8. Microsoft seemed to have tossed legacy out the windows (get it? out the “windows”?) and went with a completely revamped UI.

We previously covered all the major visual improvements that Windows 8 brings to the table in our “getting started with Windows 8” article.

Winner: This is a very personal decision, each having a different opinion on which of them looks best, but as far as innovation goes, I would say that Windows 8 is the winner here.
If you’re looking for the best Windows 10 skin packs for Windows 7 and 8, you can find here the best options.

2. Windows Explorer

8-29-2011windows8explorer

In Windows 7, Windows Explorer was something that no one gave attention to.

It was the medium for every action you would do on your computer, and until then, it was virtually unchanged, keeping pretty much the same aspect since Windows 95.

It did receive some upgrades, but nothing so eye-catching that we would call it a big improvement.

Yet again the story changes in Windows 8. One of the most striking improvements brought by Windows 8 is the Explorer Ribbon. This is where all the different formatting and viewing tools are located, making them more accessible.

Other explorer upgrades can be seen in the new Task Manager and the copy/move window.

On the other hand, one change here has left users wondering why Microsoft would do such a thing: they have removed the Start Orb.

Winner: I don’t think anyone would have a problem with Windows 8 taking the prize here. Windows Explorer has definitely become more useful and it has a great aspect.

3. Other elements

Although Windows 7 has the old elements that we are all used to it, they present themselves at their pinnacle. They work as they should, and the visual features are awesome (compared to the other versions before it).

But apart from this, there is not much innovation here, as opposed to Windows 8.

Microsoft has implemented some new elements that make Windows 8 truly unique: the Charms bar. This element is present throughout Windows 8 and it allows users to search their computers or do accomplish other tasks.

This is somewhat of a replacement for the start orb, but opinions differ on how well it can accomplish the task.

Winner: For those who prefer the Charms bar, Windows 8 would be the winner here, but some might want to use the old start orb, and for them, Windows 7 is still the way to go.

4. Personalization

win 8 vs win 7

Windows 7 had some great personalization features. Allowing you to add more than one desktop background and they would change automatically.

Also, you could add transparency to Windows and desktop gadgets. All these awesome features made Windows 7 a great OS and it offered many customization options.

Windows 8 has some new features, but it also dropped some of the old features. For instance, you now have an entire Personalize Panel from where you can change the visual aspects of your Windows OS.

Also, Microsoft has removed the desktop gadgets and window transparency features.

Winner: I can’t be subjective here, the lack of window transparency is something that Microsoft should have implemented, so the winner is Windows 7.

5. Integrated Elements

windows 8 pc settings

Windows 7 did not have many integrated programs from the get-go. Only the usual Windows utilities and Internet Explorer, which we have nominated to be the best Internet browser to download other browsers with.

But that’s about it, and what was the biggest problem is that it was no simple way to download some other programs. This being said, let’s look at what its competitor has to offer.

Windows 8, right from the start has a bunch of apps pre-installed. Of course, Internet Explorer is still there, but it does not suck as much as before. But what is the best feature: the Windows Store.

This is where you can download apps and get started. You can find here almost all the apps you need for utilizing Windows.

The only bad part is that you still have to install all the programs you need in Windows Explorer because the apps are separate from the desktop.

Winner: Windows 8

6. Moving to the Clouds

Although Windows 7 had some cloud integration features, they could only be used if you manually installed cloud services like DropBox, Box.com, or other storage services.

So, as you can see, not many integrated cloud storage options. This is somewhat understandable because when Windows 7 was released, cloud storage was not a big deal.

But now it is, and Microsoft has jumped on the opportunity to improve its SkyDrive, which is preinstalled on Windows 8 and it offers users 7 GB of space.

This is a great initiative for Microsoft, because they were kind of falling behind in regard to cloud storage, and with Windows 8, SkyDrive integrates seamlessly.

Also, Windows 8 allows users to log on to their computer using a Microsoft account that can sync their settings and other information to a server and have it ready for them if they choose to reset their computers.

Winner: Windows 8

7. Compatibility

dualmonitor windows 8

As far as Windows 7 is concerned, it pretty much was limited to computers and laptops. This however is not true for Windows 8.

The Modern UI was specially designed for touchscreen devices, allowing users to quickly open programs and jump between them.

Also, the multi-monitor support is very well designed and much faster to set up.

ARM compatibility lets Windows 8 run not only on computers anymore, but on mobile devices also, this makes for better cross-device compatibility.

This single feature is probably its most powerful aspect, allowing Windows to run on multiple devices.

I guess, in this regard, Microsoft is covering all bases and they are trying to get into the race for mobile devices, right alongside Google and its Android OS and Apple with iOS.

Winner: Windows 8

8. Security

Your system security is rather important, so you want to make sure that your system is secure and free from malware. To ensure the security of your system, it’s important to install a good antivirus, and this is where Windows 8 comes out ahead of its predecessor.

Windows 7 doesn’t have a built-in antivirus, so you’ll need to download Microsoft Security Essentials or any other antivirus software. We recently wrote about the best antivirus solutions for Windows 10, so be sure to check them out. On the other hand, Windows 8 comes with built-in antivirus software that should provide decent protection to your system, so you won’t have to use a third-party antivirus.

Windows 8 also supports Secure Boot on the UEFI system thus providing extra protection to your bootloader.

Winner: Windows 8

9. Price

Price is a very important aspect of any device or software. And here is where Windows 8 lands the finishing blow to Windows 7. Microsoft allows any user to upgrade to Windows 8 for only $40 (or $70 for Windows 8 Pro).

This will definitely drive Microsoft sales up and users will be far more likely to spend so little and get so much than to take out of their pocket over $100 for a copy of Windows 7.

Winner: Windows 8

10. Performance

In terms of performance, we will use Windows 7 as the starting point and we will compare different aspects of each operating system.

To better show the improvements in performance that are present in Windows 8, ZDNet has done a side-by-side comparison of the two operating systems, on the same computer and has created a pretty good comparison table that clearly shows the differences between the two.

Here is the test computer that the comparison was made:

  • Intel Core i7-2600K processor
  • Crucial 4GB DDR3 1600 (PC3 12800) RAM
  • EVGA 01G-P3-1460-KR GeForce GTX 560
  • GIGABYTE GA-Z77MX-D3H motherboard
  • Western Digital Caviar Black WD1002FAEX 1TB hard drive
  • CORSAIR Enthusiast Series TX650 V2 650W power supply unit

After the tests were done and the results were in, here is what the benchmark has revealed:

Test-performance-speed-of-Windows-8-and-Windows-7

Windows 8 has a faster boot time than Windows 7 and it also performs slightly better in benchmarks. Although, from a gaming perspective, they are about the same.

The differences come when we look at the other stats of the two operating systems. As seen in the graphs below, Windows 8 performs much faster on specific tasks, such as copy time, file compression, and boot or shutdown speed.

Here are the benchmark results, so you can have a look for yourself:

Test-performance-speed-of-Windows-8-and-Windows-7

These stats are, of course, based on testing in lab conditions, so they might not apply to everyone.

Also, they can widely depend on your system and on the amount of information stored on your hard drive, and the number of programs that you have installed.

Bechmark-Windows7-vs-windows-8

But, regardless of what the numbers say, I can attest from personal experience that Windows 8 is faster than Windows 7 on many different levels, but I cannot say that Windows 7 is too slow either.

Winner: Windows 8

11. System requirements

Although I don’t think anyone has ever looked over the system requirements for an operating system before, we do have to take them into account for the purpose of this article.

Windows 7

  • 1GHz or faster 32-bit (x86) or 64-bit (x64)
  • 1 GB RAM (32-bit) or 2GB (64-bit)
  • Hard Disk space: 16 GB (32-bit) or 20 GB (64-bit)
  • DirectX 9 graphics device with WDDM 1.0 or higher driver

Windows 8

  • Processor: 1 gigahertz (GHz) or faster with support for PAE, NX, and SSE2
  • RAM: 1 GB (32-bit) or 2GB (64-bit)
  • Hard Disk space: 16 GB (32-bit) or 20 GB (64-bit)
  • Graphics card: Microsoft DirectX 9 graphics device with WDDM driver

So, from a requirements standpoint, the two are not different. They both require the same components to work, so we will have no winner here. Of course, apart from x86 processors, Windows 8 offers support for ARM processors.

Winner: Tie

A quick recap:

Browser_1

After seeing all the pros and cons of each operating system, your decision will definitely be easier, but just to give you one more extra hand, here are some highlights of the battle:

Windows 7 pros

  • familiar interface with a start button and start menu
  • better personalizing features (at least in my opinion)

Windows 7 cons

  • slower overall speed, from booting to copy/move
  • poor cloud integration
  • no compatibility between devices
  • higher price

Windows 8 pros

  • improved functionality
  • compatibility with ARM designs
  • faster
  • many new features

Windows 8 cons

  • missing start orb and start menu
  • no possibility to deactivate Modern UI

Running the numbers

So, we covered all the major aspects, we looked at all the features and we decided who is the winner for each category.

Before we begin adding, we will have to make some remarks: in aspect, we will consider a draw, due to the fact that each of them has a different look, and so, they will appeal to different people.

Now, let’s see who wins the most points:

Windows 7 earns points for aspects, different elements, personalization, and requirements, so it gets an overall score of 4/10
Windows 8 has on its side aspect, windows explorer, other elements, integrated services, cloud storage service, compatibility, price, performance, and requirements.

This totals up to a very good score of 9/10.

But is this outcome surprising? I would say not and it would have been a surprise if it was any other way. Windows 8 is, after all, the “new and improved” operating system.

I only wish they taught more about us computer users. It is true that for touchscreen devices, this operating system will be absolutely awesome and it will give users many great features.

Update – Windows 10: upgrade or not?

When Windows 10 has been launched, many users were very skeptical about it.

In fact, they thought that this was Windows 8 + the traditional start menu and Cortana. Despite that, since its launch, Windows 10 proved that upgrading it’s worth it.

The best components from Windows 7 and Windows 8 are bundled into Windows 10.

There are many features added to Windows 10 that may push a non-upgrader over the edge :

  • New features added to Cortana: asking it about meetings, flight information, and more, directly from the lock screen
  • Ink API added – that means that Stylus users don’t need anymore to come up with their handwriting and gesture algorithms because they can work directly into their apps
  • Edge extensions – now, the browser can be customized with extensions like Chrome or Firefox (still better than IE from Windows 7)

Windows 10 vs. previous versions

While Windows 7, 8, and 8.1 versions were paid for, their users can upgrade to Windows 10 without any cost. Even if there are some that say it’s not free anymore – you can do it for free, just check our article.

Another major reason to upgrade to Windows 10 and leave behind previous editions is the support offered by Microsoft: the company announced that Windows 10 will be supported longer than any of the 7,8 or 8.1 versions.

Other reasons why Windows 10 is more flexible than previous versions are:

  • It brings DirectX 12 – an important piece of software for every true gamer
  • Universal compatibility for apps – the new Windows Store apps will work on any device
  • Possibility to stream games from Xbox One
  • Multiple desktops – a useful separation between your workspace and personal space
  • Several security features were added like Device Guard (blocks unsigned software and apps) or Windows Hello (biometric support);

You can find more arguments and information in the following titles:

– Windows 10’s market share eclipsed Windows 7 in October 2017

– Windows 7 market shares drop below 40 percent and Windows 10 takes over

– Windows 8 vs Windows 10: Worth the Upgrade?

Bottom Line

If now is the time that you wanted to see a definitive winner, I am sorry to disappoint you.

Picking an operating system is pretty much based on personal options. If you were to rely strictly on the benchmark scores and you want an operating system that is blazing fast, then Windows 8 is the one for you.

Also, if we were to look only at the features it offers, Windows 8 has a bigger dish of toys than Windows 7, so this would be a chapter where it also takes the prize.

However, some of its visual changes might not appeal to everyone (including myself) and because the operating system was designed for touchscreen interfaces more than for regular computers, I can see many still sticking to Windows 7 for a while.

The decision is up to you: which do you prefer?

Do you choose Windows 7 or Windows 8? And now that Windows 8.1 and 10 have been also launched, how does that change your opinion or you’ll rather stick with good old Windows 7?

Watch: Xbox One’s Doom Eternal and Resident Evil 3 video games get exciting new trailers

DOOM Eternal and Resident Evil 3, by far two of the most highly anticipated Xbox One video games of 2020, both got new trailers today showcasing their characters, plot, and location.

Check them out below:

DOOM Eternal is due out on Xbox One consoles on March 20th and supports online multiplayer for up to three players. All pre-orders of the game get a copy of the classic DOOM 64 title for free in addition to a host of additional skins.

Resident Evil 3 is a remake of the classic game of the same name. It’s due for release on Xbox One on April 3rd and comes with the free Resident Evil Resistance online multiplayer game. It will support 4K Ultra HD when played on an Xbox One X console and, presumably, also on the Xbox Series X console which is due out later in 2020.

Are you more excited for Resident Evil 3 or DOOM Eternal? Share your thoughts with the community in the comments below and then follow us on Pinterest, YouTube, Twitter, and Facebook for more Xbox gaming news.


RESIDENT EVIL 3
RESIDENT EVIL 3
Developer:
CAPCOM CO., LTD.
Price:
Free

The Hitman 2 Isle of Sgail Pack is now live and playable on Microsoft’s Xbox One consoles

The latest expansion for the popular Hitman 2 Xbox One video game, the Isle of Sgail Pack, is now live and ready to play.

Like previous Hitman 2 expansions, the Isle of Sgail Pack is also completely playable as a standalone title and doesn’t require the player to own the main Hitman 2 video game. If players enjoy this expansion though, they can upgrade to the full game by purchasing the Upgrade Pack DLC.

The Isle of Sgail Pack adds two new locations based within the North Atlantic and New Zealand, a new Sniper Assassin Map based in Austria, new contracts, and the promise of future content.

Here’s the full description:

Welcome to the Isle of Sgail, one of the most secretive places on Earth. Located somewhere in the North Atlantic, this mysterious location is preparing to host a gathering of Ark Society members – but not all of them will make it out alive.

Get started with HITMAN 2 today and enter the world of assassinations in style with the Isle of Sgail Pack.

  • Included in the Isle of Sgail Pack:
  • Isle of Sgail (North Atlantic) sandbox location
  • Hawke’s Bay (New Zealand) sandbox location
  • Contracts Mode for the Isle of Sgail & Hawke’s Bay
  • Himmelstein (Austria) Sniper Assassin Map
  • All permanent and future content for the Isle of Sgail and Hawke’s Bay

If you enjoy this pack and want more HITMAN 2 in your life, you can upgrade to the full HITMAN 2 experience at a reduced cost via the Upgrade Pack.

Are you a fan of Hitman 2? Let us know if you’re enjoying these packs in the comments below and then follow us on Pinterest, Twitter, YouTube, and Facebook for more Xbox gaming content.

Download Adobe Patch Tuesday Updates [January 2020]

The January Patch Tuesday updates are here adding improved security features to all the supported Windows operating systems.

As always, Adobe rolled out their own security updates for a series of products affected by various security vulnerabilities.

The updates target five critical security issues that could enable arbitrary code execution on Illustrator following memory corruption attacks. The affected versions are Illustrator CC 2019 versions 24.0 and earlier running on Windows computers.

These vulnerabilities are described in detail under the following security reports:

  • CVE-2020-3710
  • CVE-2020-3711
  • CVE-2020-3712
  • CVE-2020-3713
  • CVE-2020-3714

The updates are rated 3 on the company’s severity and priority rating system. This means the product has not been a target for hackers. This is reassuring for users, but the best approach is to install the update for peace of mind.

To benefit from the latest security patches, Adobe recommends that users install the newest software version via the Creative Cloud desktop app. Simply launch your Adobe product, go to Help and search for updates.

Adobe Experience Manager, the company’s content management solution for building websites also received important security updates this month (CVE-2019-16466 and CVE-2019-16467). These flaws could enable hackers to send malware code to users via specially crafted web apps.

Editor’s Note: If you want to know everything there is to know on Patch Tuesday, check out this in-depth guide.

12 Windows Search Indexer bugs fixed on Patch Tuesday

Microsoft has just delivered its first set of updates for the year 2020. The Patch Tuesday January 2020 updates bring an entire host of new security updates, as well as a few notable bug fixes.

These are meant to improve and secure the way users experience working with Windows 10.

Speaking of which, this latest set of updates brings a fix to 12 Windows Search Indexer security bugs.

Tens of bugs got fixed

In an effort to get rid of as many security vulnerabilities as possible, over 50 different bugs got fixed, 12 of these bugs were part of the Windows Indexer Service:

All of these bugs have one thing in common: they all fall under the Elevation of Privilege classification.

These types of bugs would allow an attacker with limited access to a system to gain more control over an affected system. In the case at hand, they could elevate this privilege level to that of the Search Indexer service.

If you want to get your hands on the latest Patch Tuesday updates, but don’t know exactly how the process goes, check out this detailed guide on the matter.

Do you think that Windows Indexer Services bugs are a priority? Let us know in the comment section below.

READ NEXT:

Download the last Windows 7 Patch Tuesday updates ever

This year Microsoft is starting off strong when it comes to updates.. The Patch Tuesday January 2020 updates bring not only the typical new features, bug fixes, and security patches, but it also marks a turning point for Windows as an OS.

The Patch Tuesday January 2020 updates are the last set of updates that will also include Windows 7, as it has officially reached the end of its life.

This means that the OS will no longer be supported and that now users will have to either continue using an unsafe OS or upgrade to Windows 10, and users are urged to upgrade to Windows 10 immediately.

KB4534310 and KB4534314 changelog

The update notes are general and refer to the security improvements added to various OS components:

  • Security updates to the Microsoft Scripting Engine, Windows Input and Composition, Windows Storage and Filesystems, and Windows Server.

As you can see, the last Windows 7 Patch Tuesday updates are not so rich in system optimization improvements.

Windows 7 users are getting more EOS notifications

Starting January 15, Windows 7 users will receive regular notifications about the risks of continuing to use an outdated OS.

Starting on January 15, 2020, a full-screen notification will appear that describes the risk of continuing to use Windows 7 Service Pack 1 after it reaches end of support on January 14, 2020. The notification will remain on the screen until you interact with it. This notification will only appear on the following editions of Windows 7 Service Pack 1:

  • Starter.
  • Home Basic.
  • Home Premium.
  • Professional. If you have purchased the Extended Security Update (ESU), the notification will not appear. For more information, see How to get Extended Security Updates for eligible
  • Windows devices and Lifecycle FAQ-Extended Security Updates.
  • Ultimate.

Do you think the notifications will convince users to upgrade sooner? Let us know what you think in the comment section below.

Editor’s Note: If you’re still not sure whether you should upgrade to Windows 10 or not, you’ll find all the information you need to take the right decision in these guides:

Microsoft fixes 5 RDP security bugs on all Windows 10 editions

January 14 Patch Tuesday is finally here and it brings a lot of security improvements on all Windows 10 versions.

While Microsoft’s latest security vulnerabilities regarding the crypt32.dll component of Windows grabbed all the attention, some people are worried about older threats that are, in one form or another, still present.

Windows 10 and Windows Server are vulnerable

Here’s what one concerned user is saying:

I’m surprised I’m not seeing any mention of CVE-2020-0609 and 0610 “Microsoft Windows Remote Desktop Gateway allows for unauthenticated remote code execution“

Yes, that’s right, there are some RDP (Remote Desktop Protocol) vulnerabilities that are getting patched, and they’re very similar with last year’s BlueKeep.

Before you panic, know that they aren’t nearly as big or as dangerous as BlueKeep. For more context, here are the 5 bug fixes that are getting resolved in this months Patch Tuesday:

  • Remote Desktop Gateway Server – CVE-2020-0609, CVE-2020-0610, CVE-2020-0612
  • Remote Desktop Web Access – CVE-2020-0637
  • Remote Desktop Client – CVE-2020-0611

Update your Windows right now to avoid malware attacks

You should know that these vulnerabilities may allow a remote, unauthenticated attacker to execute arbitrary code with SYSTEM privileges on a vulnerable system, so the best thing is to update right away.

While the Remote Desktop Gateway and Web Access services are strictly related to Windows Server, the Remote Desktop Client is present on all Windows versions, so CVE-2020-0611 can be a real threat for anyone.

To avoid any malware, data theft, or any other security risks, update your version of Windows to the latest available. You can do that automatically, through Windows Update, or manually, directly from Microsoft Update Catalog.

What do you think about the RDP vulnerabilities? Share your thoughts in the comments section below.

READ ALSO:

Download KB4528760 for Windows 10 versions 1903 and 1909

Microsoft just rolled out the Patch Tuesday January 2020 updates and, as usual, it brings a host of new features for users to try, as well as several security patches and fixes for Windows 10.

As far as Windows 10 versions 1903 and 1909 go, they are pretty much identical. This is because they share a common core operating system and an identical set of system files.

KB4528760 improvements

As a result of the two Windows 10 versions being identical, the new features in Windows 10, version 1909 are the same ones included in version 1903.

Windows 10, version 1903
Note This release also contains updates for Microsoft HoloLens (OS Build 18362.1044) released January 14, 2020. Microsoft will release an update directly to the Windows Update Client to improve Windows Update reliability on Microsoft HoloLens that have not updated to this most recent OS Build.

This security update includes quality improvements. Key changes include:

Security updates to Windows App Platform and Frameworks, Windows Input and Composition, Windows Management, Windows Cryptography, Windows Storage and Filesystems, the Microsoft Scripting Engine, and Windows Server.

Windows 10, version 1909
This security update includes quality improvements. Key changes include:

This build includes all the improvements from Windows 10, version 1903.

In order to get the latest updates as soon as possible, simply use Windows 10’s Windows Update feature. This will automatically scan your PC for all of the missing updates, download them and install them.

However, if you are only interested in a particular set of updates, you can always update them one-by-one by downloading them from the Windows Update Catalog.

If you aren’t aware of how important Patch Tuesday updates are, then you should check out this detailed guide that will explain everything.

Did you find this guide useful? Let us know in the comment section below.

RELATED ARTICLES YOU SHOULD CHECK OUT:

Windows 10 v1507 update secures Windows Cryptography

The January 14 Patch Tuesday cumulative updates are finally out, and many users were eager to see if Microsoft’s latest security vulnerabilities will get fixed or not.

While there’s nothing certain for now, there’s no shortage of security improvements for all of the Windows 10 versions, including the original version.

Windows 10 v1507 gets patched for vulnerabilities

Yes, you heard it right, Windows 10 version 1507 is getting some improvements, especially on the security side. More specifically, the new cumulative updates will improve security when storing and managing files.

Also, there are similar improvements for using input devices like mice, keyboards, or styluses. Here are the quality improvements for Windows 10 v1507:

  • Security updates to the Microsoft Scripting Engine, Windows Input and Composition, Windows Media, Windows Cryptography, Windows Virtualization, Windows Storage and Filesystems, and Windows Server.

Maybe the most important part is Windows Cryptography, which directly leads to the fact that Microsoft is patching the important exploit that affected all Windows versions.

Also, there are some known issues in this update:

  • Certain operations, such as rename, that you perform on files or folders that are on a Cluster Shared Volume (CSV) may fail with the error, “STATUS_BAD_IMPERSONATION_LEVEL (0xC00000A5)”.

As a workaround, Microsoft is recommending to perform the operation with administrative rights or perform the operation from a node that doesn’t have CSV ownership.

If you want to get this update, you can do so by automatically download it from Windows Update in your PCs Setting. You can also download it manually from the Microsoft Update Catalog.

What do you think about Microsoft’s latest cumulative updates? Share your thoughts in the comments section below.

Microsoft updates support for Chrome’s new cookie policies

This year is starting off strong with a very important set of Patch Tuesday updates. The Patch Tuesday January 2020 updates bring the typical new features, bug fixes, and security patches.

For example, KB4534273 updates its support for Google Chrome‘s new cookie policies.

What are Google’s Chrome’s new cookie policies

Google Chrome plans to modify the way cookies work, to the point of totally eliminating them in a maximum of two years.

Google announced that Chrome will soon protect users from cross-site cookies and fingerprinting. The company also plans to launch an open-source ads transparency browser extension.

This latest set of Patch Tuesday updates is set to support this decision. In fact, it is expected that future updates will also support this change in development from the tech giant.

For those that are already users of Windows 10, remember that Patch Tuesday updates are very important and that installing them on a regular basis is the key to staying safe.

You can install the latest Patch Tuesday updates using two methods:

  • Use Windows 10‘s Windows Update feature to automatically download and install all available updates
  • Manually download each update one by one via the Windows Update Catalog

For more information on how to get the latest Windows updates, check out this step-by-step article that we have created just for the occasion.

Did you find this guide useful? Let us know in the comment section below.

RELATED ARTICLES YOU SHOULD CHECK OUT:

Windows 10 v1709 and 1607 get more security improvements

It’s Patch Tuesday time again, and Microsoft has just released the first cumulative updates of this year.

These updates are very important, as they will shade some light on the latest security vulnerabilities that affected all versions of Windows. Now, with their release, the company should answer some of the questions surrounding the exploit.

Microsoft is betting big on security, again

While newer versions of Windows are the main focus, Windows 10 version 1709 and 1607 have not been forgotten.

As a quick reminder, Windows 10 v1709 reached end of service on April 9, 2019, while Windows 10 v1607 reached end of service on April 10, 2018, with some Enterprise and Education editions still receiving additional servicing.

With January 14 Patch Tuesday, the big M focused on security. More specifically, both versions got increased security when using input devices like mice, keyboards, or styluses, as well as improved security for file management and storage.

Windows 10 v1607 also got support for Google Chrome’s new cookie policies. 

Here are some key changes for Windows 10 v1709:

  • Security updates to the Microsoft Scripting Engine, Windows Input and Composition, Windows Media, Windows Virtualization, Windows Storage and Filesystems, and Windows Server.

And here’s the list of improvements for Windows 10 v1607:

  • Addresses an issue to support new SameSite cookie policies by default for release 80 of Google Chrome.
  • Security updates to Windows Input and Composition, Windows Cryptography, Windows Virtualization, Windows Storage and Filesystems, the Microsoft Scripting Engine, and Windows Server.

If you want to get your hands on the latest updates, you can do so by using Windows Update from your PC’s Settings. Additionally, you can manually download the updates from Microsoft Update Catalog.

What’s your take on Microsoft’s latest security improvements? Leave your thoughts in the comments section below and we’ll continue the talk.

Windows 10 v1809 and 1803 get new Patch Tuesday updates

The first Patch Tuesday edition of 2020 is here. This month’s release brings two cumulative updates to Windows 10 October 2018 Update and Windows 10 April 2018 Update, namely KB4534273 and KB4534293.

You can manually download these updates from the Microsoft Update Catalog website by following the link below:

Alternatively, you can automatically download these updates via Windows Update. Simply go to Settings > Update and Security and hit the Check for updates button.

And now let’s see what’s new.

KB4534273 changelog

This update brings support for Google Chrome’s new cookie policies. At the same time, it improves system security when users utilize input devices such as keyboards.

The update brings the following quality improvements:

  • Addresses an issue to support new SameSite cookie policies by default for release 80 of Google Chrome.

  • Security updates to Windows App Platform and Frameworks, Windows Input and Composition, Windows Management, Windows Cryptography, Windows Virtualization, the Microsoft Scripting Engine, and Windows Server.

KB4534293 changelog

On the other hand, KB4534293 improve security when storing and managing files. This cumulative update also packs the same security features brought by KB4534273.

KB4534273 known issues

  • Certain operations on files or folders that are on a Cluster Shared Volume (CSV) may fail after installing this update.
  • Devices with some Asian language packs installed may receive the error 0x800f0982.
  • When setting up a new Windows device during the Out of Box Experience (OOBE),some users might be unable to create a local user when using Input Method Editor (IME).

KB4534293 known issues

The first and third issues are affecting KB4534293 as well.

KB4534276 adds new security patches to Windows 1709

The Patch Tuesday January 2020 updates are here. As always, these updates bring new security features and system improvements to all Windows 10 versions.

KB4534276 improvements

This cumulative update is available for Windows 7 v1709, aka The Fall Creators Update.

The official changelog reads as follows:

  • Updates to improve security when storing and managing files.

  • Updates to improve security when using input devices such as a mouse, keyboard, or stylus.

  • Security updates to the Microsoft Scripting Engine, Windows Input and Composition, Windows Media, Windows Virtualization, Windows Storage and Filesystems, and Windows Server.

In order to get the latest updates, you can use the Windows Update feature. Your computer will automatically scan for updates and install the latest patches as soon as they’re available.

If you installed earlier updates, keep in mind that your computer will download and install only the new fixes contained in this package.

If you are only interested in a particular set of updates, you can download them separately from the Windows Update Catalog.

For more information on Patch Tuesday, check out this detailed guide that will explain everything.

Did you find this guide useful? Let us know in the comment section below.

RELATED ARTICLES YOU SHOULD CHECK OUT:

Sea of Thieves doesn’t work in fullscreen? Try these fixes

If you’re looking to play a first-person multiplayer Co-op and PvP game that is themed around pirates and the high seas, then Sea of Thieves is the game for you.

The graphics are superb, and the combat mechanics are incredibly fun to use, and it is also available for Windows 10 and Xbox One.

However, it is a game after all, and no game is without the occasional bug. For example, Sea of Thieves players have been reporting that they cannot truly play the game in fullscreen:

Everytime I put my crosshair where my windows taskbar is , it pops up and If i look all the way up in the game, the game tab shows up (where you can “x” out the game “minimize”, and etc. pls help its really annoying when ur trying to the play the game.

This issue has been playing players for some time now, and there are several ways you can fix it. While admittedly some of the methods are considered workarounds at best, you will at least be able to enjoy Sea of Thieves in fullscreen mode.

How can I play Sea of Thieves in fullscreen?

1. Change your user account control settings

  1. Press Start
  2. Type Run
  3. Type in control.exe in the search bar
    • This will open the Control Panel
  4. Select User Accounts
  5. Go to User Accounts
  6. Go to Change User Account Control Settings
  7. Make sure the slider is moved to any setting other than NeverWIndows 10 User Account Control Settings

You can’t open Control Panel? Take a look at this step-by-step guide to find a solution.

2. Update the game

The game is installed via the Microsoft Store App, and as such, it can be updated through it.

As such, if you already have it installed, make sure that Sea of Thieves is updated by following these steps:

  1. Open the Microsoft Store App
  2. Press the three dots on the top right of the screen
  3. Select Downloads and updates from the dropdown menu
  4. Press Get updatesMicrosoft Store Get updates

If you don’t like manually updating your Store Apps, you could always set them to update automatically by following this guide.

3. Update Windows 10

Store App games such as Sea of Thieves may not work if you’re not running the latest version of your OS. Thus, a good step to fixing the fullscreen issue is updating your WIndows 10.

  1. Press Start
  2. Choose Settings
  3. Select Update & Security
  4. Press Check for UpdatesWindows 10 Check for Updates
  5. Reboot the PC

4. Run the Store App Troubleshooter

  1. Press Start
  2. Go to Settings
  3. Select Update & Security
  4. Choose Troubleshoot
  5. From the list select Windows Store apps
  6. Choose Run the troubleshooterWindows 10 Troubleshoot

5. Reset Sea of Thieves

  1. Press Start
  2. Choose Settings
  3. Select Apps
  4. Find Sea of Thieves on the list
  5. Select Advanced Options
  6. Select Reset

reset app

By following this guide, you should be able to play Sea of Thieves in fullscreen mode without interference from Windows 10 UI elements.

Do you know of any other methods to bypass this issue? Let us know in the comment section below.

RELATED ARTICLES YOU SHOULD CHECK OUT:

Should I upgrade from Windows 7 to Mac?

Microsoft has officially ended support for Windows 7, and now common users and organizations are left wondering what their next step should be. Officially, there are only 3 things that a user can do as of now:

Of course, these are the only option if you plan on continuing using Windows as your personal or your company’s OS. This is because the option of migrating to an entirely new OS is always available.

For example, Microsoft’s biggest competitor in the OS market is Apple’s macOS. Given how popular these two OSes are, we’ve decided to do a breakdown and analyze several aspects:

  • Windows 7 vs macOS: Which is cheaper for companies?
  • How to migrate from Windows 7 to MacBook
  • How to transfer data from Windows 7 to mac

Windows 7 vs macOS: What should I go for?

1. Windows 7 vs macOS: Which is cheaper for companies?

Windows 7 still holds strong popularity among companies, and plenty of them aren’t keen on migrating just yet. As mentioned before, one of the options for companies that wish to continue using Windows 7 is buying the Windows 7 Extended Support for Business.

This feature is quite easy to acquire, but it is only a temporary solution, as it will only buy you up to 3 more years of security support. The only problem is that the costs ramp up quite a lot as time passes by, as you can see for yourself in the table below.

Sr. NoYear DurationCost
(Windows 7 Pro)
Cost
(Windows Enterprise (add-on))
1Year 1January 2020 - January 2021 $50 per device $25 per device
2Year 2January 2021 - January 2022$100 per device$50 per device
3Year 3January 2022 - January 2023$200 per device$100 per device

As you can see, a full 3 years of extended support for Windows 7 Pro will end up costing you $350, while 3 years of extended support for Windows 7 Enterprise will cost you $175 per computer.

That is a lot of money for both regular users and companies. This is especially the case when you consider the latter will just end up paying tends of thousands of dollars for an OS they will have to migrate from anyway eventually.

On the flipside, migrating to Mac seems to be a far more attractive offer as far as costs go. For example, Apple’s latest version of the macOS, called macOS Catalina is free of cost. The only downside is that it is free as long as you have the hardware.

Thus, the true question is whether it is cheaper to maintain an old OS, or buy some new hardware and get a free OS for life. The truth of the matter is that if you are still running Windows 7, most likely your hardware is in dire need of replacement anyway.

Because of that, putting hardware costs aside, the only real money sink is in the long run. While Apple kit is expensive, it does come with several advantages:

  • Hardware tends to last longer before needing replacement
  • The FreeBSD-based operating system that runs Mac desktops & laptops is still relatively virus-free
  • The OS running on Macs is free
  • Plenty of standard software run natively on Mac
  • The macOS is more reliable and users rarely are ever in need of customer support.

If all of these arguments have got you thinking about migrating, then you should probably know how to get started with the process.

2. How to migrate from Windows 7 to MacBook

Before migrating your data, there are several things you need to assess:

  • Make sure your Windows 7 PC is updated to the latest version
  • You need to know the name and password of the admin account of that PC
  • Connect your PC and your MacBook to the same network, either via Wi-Fi or Ethernet cable
  • Uninstall OneDrive from your PC
  • Use the chkdsk utility to make sure your Windows PC doesn’t have any issues.

If everything seems to be in place, you may begin the migration process itself.

You will need to download the right Windows Migration Assistant, which varies depending on the version of macOS on your MacBook:

  1. Launch the Windows Migration Assistant
  2. Press Continuemigration assistant1
  3. Go to your Mac
  4. Go to the Applications folder
  5. Open the Utilities folder
  6. Open the Migration Assistant
  7. Follow the on-screen instructions until you reach the migration pane
  8. Select the option to transfer data From a Windows PC
  9. Click Continuemigration assistant 2
  10. When prompted, enter an administrator name and password
  11. Click Continue
  12. In the migration window on your Mac, select your PC from the list of available computers
  13. Wait for the PC to show the same passcode that your Mac showsmigration assistant 3
  14. When you see the same passcodes, press Continue
  15. Your Mac will now scan your PC for data that can be transferred
  16. Select the information that you want to migrate to your Mac
  17. Click Continuemigration assistant 4
  18. Wait for the transfer to complete

Once you’ve followed all of these steps, you should have migrated all of your data from Windows 7 to macOS efficiently.

If you just want to try out macOS before migrating to it entirely, then maybe you should see how to transfer data from Windows 7 to macOS.

Afterward, you can use the data in macOS, and see if you feel more comfortable with this new OS.

3. How to transfer data from Windows 7 to macOS

There are plenty of methods that allow you to transfer data from Windows 7 to macOS. Besides the Migration Assistant mentioned above you can also use one of these methods to transfer data efficiently:

3.1 Portable hard drive or storage device

Simply create backups of your data on an external hard drive or a USB flash drive and then transfer them to your MacBook, similarly to old-fashioned PC-to-PC transfers.

3.2 Burn CDs and DVDs

SImply burning data on a disk and then transferring it to your MacBook is the easiest way to transfer data. By using this method you also get the added benefit of having a spare backup of your data at hand.

3.3. Shared network folders

Using a server to which both a PC and a Mac have access to is another great way of transferring data since now everything is done without the need of any type of hardware.

The only limitation is that both the PC and Mac need to be connected to the same server.

3.4 Email

Small amounts of information like text documents or pictures are not worth having to use an external hard drive, CD, DVD or set up a shared folder. This is when transferring data via Email becomes really handy.

3.5. Via Ethernet cable

If both the PC and the Mac are in close vicinity to each other, you can always use an Ethernet cable to connect the two and share files between them almost instantly.

3.6 Move the hard drive entirely

This is probably the most complicated method of all since PC-formatted hard drives are not always compatible with Macs. Keep in mind though that Mac OS X v10.3 or later can read the contents of an NTFS-formatted drive, but will be unable to save any new files or make changes to existing files without first reformatting the drive.

Conclusion

Now you know the pros and cons of staying with Windows 7 or moving to macOS. Additionally, you now know how to transfer data between a PC and a Mac, or even migrate entirely.

With this information, you will now be able to make a better decision regarding what your next step will be in terms of the OS you will use for both personal use, and within your company.

Will you remain with Windows 7, upgrade to Windows 10, or move on to macOS? Let us know what your choices are in the comment section below.

Mic not working in Sea of Thieves? Try these fixes

Sea of Thieves is a first-person multiplayer co-op/PvP pirate game developed for Xbox One and Windows 10. It features a unique art style, great combat mechanics, plenty of story elements, and more.

However, one key aspect of Sea of Thieves is that it is a multiplayer game. This means that players can interact with each other, for trading, partying, PvP and more.

They can do this via either text messages, or by using the game’s built-in voice chat support.

The problem is that some players cannot use this feature since the game is having problems picking up their microphones.

As the title says. Microphone is not working. Voice/chat/VOIP proximity voice it’s a huge flaw in the game. I am not the only one complaining, i see a lot of people here and reddit with problems. And let me say i tried all the fixes available! I use mic in steam/ts/discord and in many many other games without any issue. Here it simply doesn’t work.
What’s even worse is that i can see the voice icon appearing in top of other players and i can’t hear what they say. This game is meant to be played with a team and if it’s not possible to use voice chat / mic then this game is not fun to play.

Fortunately enough, there are a few things you can try that will fix this issue immediately. We went along and used them to create this step-by-step guide so that you can finally enjoy voice chatting with your fellow pirates in no time.

How do I fix the mic issue in Sea of Thieves?

1. Adjust your OS’ Microphone settings

  1. Turn off Sea of thieves completely
  2. Press Start
  3. Click on Settings (the cogwheel-shaped button)
  4. Look for the Privacy menu
  5. Under App permissions, select Microphone
  6. Under Allow apps to access the microphone, move the slider to On
    Windows 10 Microphone

Looking for a new headset for gaming as well? Then check out our top picks!


2. Fix your Xbox One audio chat settings

As far as the console version of the game goes, there are plenty of solutions that you can try to fix this problem:

2.1 Reconnect audio devices

This solution is as simple as it sounds. Simply disconnect and then reconnect your microphone, headset or Kinect.

For Kinect, there’s a Kinect mic for chat option in the Settings menu while it is connected to the console. This must be set to On to activate the microphone.

2.2 Adjust your Xbox One‘s microphone permissions

  1. Go to Settings
  2. Select Account
  3. Choose Privacy and online safety
  4. Go to Xbox Live privacy
  5. Select Communication and multiplayer
  6. Choose Voice, text, invites
  7. You must then choose App privacy after Privacy and online safety
  8. The Microphone setting can now be adjusted

By following these steps, you should now be able to chat with other players without any further issues.

Did you find this article useful? Let us know in the comment section below.

For more voice chat troubleshooting, see our full guide on Peak voice chat not working and compare solutions.

Microsoft has changed the Online Services Terms for Office 365

In 2019, the European Data Protection Supervisor investigated Microsoft’s alleged breach of European data protection laws. That body confirmed it had serious concerns regarding Microsoft’s contracts with European organizations. Microsoft has now published new Online Services Terms for Office 365.

In 2018, the Dutch Ministry of Justice launched its own investigation into MS Office’s hidden collection of telemetry data. In early 2019, the DMOJ claimed Microsoft was breaching the EU’s General Data Protection Regulation on eight accounts. Those breaches of the GDPR more specifically pertained to the telemetry data collection systems of Office 365 and Office Pro Plus. The DMOJ accused Microsoft of collecting personal data on a grand scale without correctly informing users.

That verdict sent alarm bells ringing in Brussels. The European Data Protection Supervisor followed up the original investigation in Holland. Later in 2019, the EDPS stated:

Though the investigation is still ongoing, preliminary results reveal serious concerns over the compliance of the relevant contractual terms with data-protection rules and the role of Microsoft as a processor for EU institutions using its products and services.

In response, Microsoft promised that it would change its cloud service contracts toward the end of 2019. Microsoft ‘s privacy officer stated:

[We] will clarify that Microsoft assumes the role of data controller when we process data for specified administrative and operational purposes incident to providing the cloud services covered by this contractual framework, such as Azure, Office 365, Dynamics, and Intune. The basic promise was to introduce greater transparency about data processing in Microsoft’s OST.

Now Microsoft has just published its new Online Service Terms for Office 365. That new OST is available for download in various languages from the Microsoft website. The new OST includes four key changes to the original. It is a 40-page document that does not authorize Microsoft to process customer data for commercial purposes unless the customer permits it.

Therefore, the new OST document makes it much clearer about how Microsoft Office 365 processes customer data. It will end the big M’s covert processing of customer data with Office 365 and Office Pro Plus.

RELATED ARTICLES TO CHECK OUT: 

Fix: Salesforce is not connected to Outlook

While browsing records in the Salesforce for Outlook side panel, you may come across a “Not connected” error. Many users have reported a similar error while working with the client.

This issue usually occurs due to incorrect Internet configuration. If you have also bumped into this error, here are a couple of troubleshooting tips to help you resolve this Salesforce syncing error in Windows 10.

What can I do if Salesforce won’t connect with Outlook?

1. Change Internet Explorer settings

salesfroce not connected to Outlook

  1. Close all Internet Explorer windows if open. Make sure all the programs running on your computer are also closed along with SFO clients.
  2. Press Windows Key + R to open Run.
  3. Type inetcpl.cpl and click OK. This will open the Internet Properties window.
  4. Click on the Advanced tab.
  5. Click on Restore Advanced Settings.
  6. Click Reset to restore default settings. This will open the “Reset Internet Explorer Settings” window.
  7. Check the “Delete personal settings” box and click Reset.
  8. Close the Internet Properties window.

2. Clean Internet Options browsing history 

salesfroce not connected to Outlook

  1. Press Windows Key + R to open Run.
  2. Type inetcpl.cpl and click OK.
  3. In the Internet Properties window, click on the General tab.
  4. Under “Browsing History” section, make sure the “Delete browsing history on exit” option is unchecked.
  5. Click the Delete button.
  6. In the Delete Browsing History window, uncheck the “Preserve favorite website data” option.
  7. Check “Temporary Internet files and website files“, “Cookies and website data“, “History” options.
  8. Click the Delete button.
  9. Close the Internet Properties option.

Browsing history doesn’t delete? Follow the steps from this simple guide and fix the issue in no time.


3. Change website data settings

salesfroce not connected to Outlook

  1. Press Windows Key + R to open Run.
  2. Type inetcpl.cpl and click OK.
  3. In the Internet Properties window, click on the General tab.
  4. Under “Browsing history” section, click Settings. This will open Website Data Settings.
  5. Select the “Every time I visit the webpage” option.
  6. Change Disk space to use to 225.
  7. Click OK to save the changes.
  8. Click on the Security tab.
  9. Select Trusted sites option under “Select a zone to view or change security settings:”.
  10. Click the Site button.
  11. On the Trusted Site window, type in https://*.salesforce.com in the “Add this website to the zone”.
  12. Click on the Add button.
  13. Click Close.
  14. From the Security tab, select Trusted sites again.
  15. Click on the Custom Level button.
    salesfroce not connected to Outlook
  16. On the “Security Settings – Trusted Sites Zone” click the Reset to: drop-down menu.
  17. Set it to Low and click Reset.
  18. When prompted to confirm the action, click Yes.

If you need more info on how to add trusted sites in Windows 10, take a look at this detailed guide and learn how to do it with ease.


4. Change Security Settings – Trusted Sites Zone

salesfroce not connected to Outlook

  1. On the “Security Settings – Trusted Sites Zone” window, locate “Websites in less privileged web content zone can navigate into this zone” option under Settings.
  2. Click Enable.
  3. Now locate “Display mixed content” and set it to Enable as well.
  4. Click Yes if prompted to confirm the action.
  5. Now, look for “Initialize and script ActiveX controls not marked as safe for scripting” and set it to Enable.
  6. Click OK and close Internet Properties window,
  7. Restart the PC to apply the changes.

5. Change privacy settings 

salesfroce not connected to Outlook

  1. Press Windows Key + R to open Run.
  2. Type inetcpl.cpl. and click OK.
  3. On the Internet Properties window, select the Privacy tab.
  4. Click on the Sites button and in the domain name field add Salesforce.com and click on Allow.
  5. Next, click on the Advanced button in the Privacy tab and check the boxes for “Override automatic cookie handling” and “Always allow session cookies“, then click OK.
  6. Again click on the Advanced tab.
  7. Make sure “Allow active content to run in files on my computer ” is checked. Also, uncheck “Check for server certificate revocation“.
  8. Close Internet Properties window.
  9. Restart your computer and check for any improvements.

The Salesforce is not connected to Outlook error occurs due to incorrect Internet configuration. By following the steps in this article you can fix the syncing issue with Salesforce and Outlook.

If you have any other questions or suggestions, don’t hesitate to leave them in the comments section below.

RELATED STORIES YOU MAY LIKE:

How to open SMC files on Windows

There are numerous file types available and your PC can handle most of them, with proper software of course. Speaking of file types, today we’ll show you how to properly open SMC files on your Windows 10 PC.

How can I open a SMC file on Windows 10?

What is SMC file?

how to open smc file in windows

If you ever encountered an SMC file type on your PC, you should know that this file is actually a Super Nintendo Entertainment System file. Basically, this file is an SNES game, and yes, you can run it on your PC.


Are SMC files safe?

Yes, SMC files are safe to use and they don’t contain any malware. If you want to be on the safe side, you can always scan those files with your antimalware software and make sure that the files are clean from malware.


What applications work with SMC files?

Opening these files is easy, and in order to do so, you’ll need a SNES emulator. There are many great emulators for SNES, and if you want to run SMC files, here are few applications that you need to consider:

ZSNES

  • Open-source
  • Runs on Windows, Linux, FreeBSD, and DOS

Snes9X

  • Portable, freeware
  • Made in C++

SNEeSe

  • For x86 PCs
  • Written in 32-bit C, C++, and NASM x86 assembly

Looking for the best all-in-one emulator for retro games? Be sure to check these apps!


How to open SMC files?

To open an SMC file, you just need to download and run the appropriate emulator. Once the emulator opens, you should see the Open option from the top menu.

Now you just need to locate the SMC file on your PC, select it, and it should run immediately. Bear in mind that some applications don’t have the option to open individual SMC files. Instead, you’ll need to choose the folder that holds all your SMC files, and then select the SMC file that you want to run from the list.

There you go, this is all you need to know about SMC files. If you found our article helpful, feel free to leave a comment below.

READ ALSO:

How to remove Xbox Gaming Overlay on Windows 10

Windows 10 is great for gaming, but sometimes you might encounter Xbox Gaming Overlay while playing your favorite games. This is a built-in Windows 10 feature, but some users are so distracted by it that they want to remove it.

In this article, we’ll show you how to properly remove Xbox Gaming Overlay on your Windows 10 PC.

How do I remove Xbox Gaming Overlay on Windows 10?

1. Disable Game Bar

The fastest way to get rid of Xbox Gaming Overlay is to disable the Game bar feature. You can do that by following these steps:

  1. Open the Settings app. You can do that quickly with Windows Key + I shortcut.
  2. Head over to the Gaming section.
    windows 10 how to remove xbox gaming overlay settings app
  3. Select Game bar from the menu on the left and disable Record game clips, screenshots and broadcasting using Game bar option.
    windows 10 how to remove xbox gaming overlay game bar settings

After doing that, the Xbox Gaming Overlay should be disabled on your PC.

If you’re having trouble opening the Setting app, take a look at this article to solve the issue.

2. Delete the Xbox Gaming Overlay app

If you want to completely remove Xbox Gaming Overlay from your PC, you need to remove its app. This is fairly simple to do, and you can do it by following these steps:

  1. Press Windows Key + S and enter powershell. Select Run as Administrator.
    windows 10 how to remove xbox gaming overlay powershell
  2. When PowerShell opens paste the following command and press Enter:
    • get-appxpackage *Microsoft.XboxGamingOverlay* | remove-appxpackage
  3. After doing that, close the PowerShell and the Gaming Overlay app should be completely removed.

Note: Few users reported that certain games won’t run properly if you remove the Gaming Overlay app. If this happens, you’ll need to install Xbox Game Bar again from the Microsoft Store.

There you go, these are the two ways you can get rid of Xbox Gaming Overlay on your PC. The first method will only disable the Game Bar feature, and it won’t break any games.

The other method will remove the actual app from your PC which may lead to issues with certain games, but that can be easily remedied.

If you have any other questions or suggestions, don’t hesitate to reach in the comments section below.