Microsoft Research wants to make face-swapping deepfakes easier, but also make forged face swapping images easier to detect

A pair of research papers jointly published by Microsoft Research and Peking University purpose a new face swapping AI in addition to a new facial forgery detector (via VentureBeat). Both tools offer high-quality results relative to other services available, all while maintaining similar performance and can do so with substantially less data.

FaceShifter is the proposed face-swapping solution. Like its alternatives such as Reflect and FaceSwap, the newer tool is able to account for many variations including color, lighting, facial expression and other attributes. What sets it apart, however, is that the tool can also account for posture and angular differences, according to the authors of the published paper.

Faceshifter takes advantage of a generative adversarial network, or GAN, in which a generator ties to fool with a discriminator that the image is authentic. In contrast to existing tools, it also doesn’t need foreknowledge of the methods used in face-swapping or human supervision, instead creating grayscale images to determine if it can be decomposed into the two blended images from various sources.

In addition to the FaceShifter, the purposed Face X-Ray is a tool that detects counterfeit facial images. Face swaps and image manipulations are somewhat common for malicious purposes, which is what lead to the research and creation of the new AI tool for detecting fake images. The tool doesn’t use any previous knowledge on image manipulation, and was trained using FaceForensics++, a large video catalog with over a thousand original clips.

As it turn out, the tool was able to distinguish previously unseen images, and was able to reliably predict bending regions, although the team noted that this also means that it might not be able to detect wholly synthetic image and that it could potentially be defeated by adversarial samples.

What do you think about these new face-swapping and forgery detector tools? Feel free to leave a comment down below.

New Writing Canvas shows up in Windows 10 Mail app, while Focused Inbox stops working for Insiders

Windows Insiders may have noticed some changes after installing the latest update for the Windows 10 Mail app. As spotted by Winbuzzer, the version 16005.12427.41000.0 of the app introduces a new Writing canvas feature which appears, but doesn’t seem functional as of this writing. Writing Canvas can be found after selecting “Draw” in the top Menu bar, as a new option next to the existing Drawing Canvas.

If Drawing Canvas lets you draw anything with mouse, touch or pen in a new email, Writing Canvas will apparently allow users to use their digital pens to handwrite text that should automatically convert into digital text. This new feature may be in preparation for Microsoft’s Surface Neo dual-screen device, which should put a greater emphasis on pen use.

Another change in this latest Insider update is that Focused Inbox has apparently stopped working. The feature is designed to help users separate important emails from the rest, and it’s usually turned on by default for Outlook.com and Office 365 accounts.

It’s not clear if a bug made Focused Inbox non-functional in this latest update, or if Microsoft plans to remove the feature at some point. Focused Inbox is also present on Outlook for iOS and Android, though just like on Windows 10, it’s not always able to correctly identify important emails.

Windows 10 Mail is one of the few UWP apps that gets frequent updates on Windows 10, and it should play a much bigger role on Windows 10X. We wouldn’t be surprised to see more touch and pen-friendly features appear in the app ahead of the release of Surface Duo.

How to install Extensions from the Chrome Store on Edge Insider

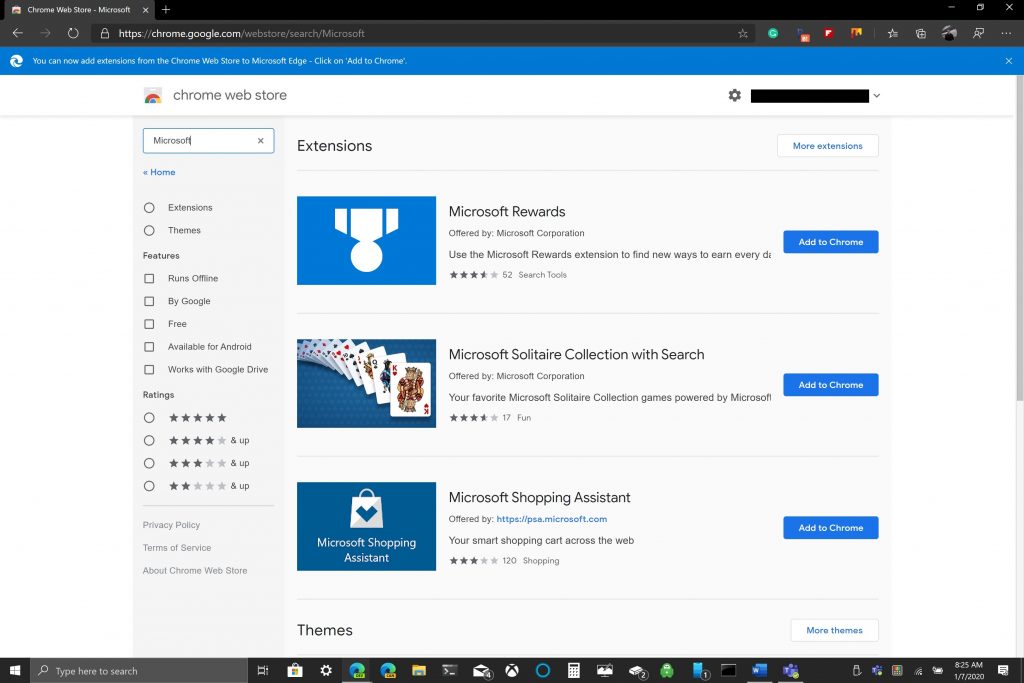
Since Microsoft Edge switched EdgeHTML to Chromium, adding extensions from the Google Chrome Web Store on Edge is pretty straightforward. The process of adding extensions to Edge is no different from adding extensions to Chrome. Microsoft only has about 100 extensions on Edge to choose from, whereas the Chrome Web Store has many hundreds of extensions.

Once you toggle a few settings within Edge, all you will need to do is go to the Chrome Web Store and click “Add to Chrome” to add your Chrome extensions on Edge. The only caveat with adding Chrome extensions to Edge is that if you require a Google Account to sync, some Chrome extensions may not work well on Edge because the extensions were not tested on Edge and you may experience bugs.

Here are the steps required to install extensions from the Chrome store on Edge.

1. Go to the hamburger menu located in the upper-right corner of an Edge browser window as indicated.
2. Go to Extensions.

3. Toggle the “Allow extensions from other stores” option in the lower left of the Edge browser window.

4. Confirm that you want to enable (or disable) the ability to allow extensions from other stores.

Now that your Edge browser settings are configured, you can install extensions from the Chrome store on Edge. Just as a reminder, here is the process of adding Chrome extensions on Edge.

1. Go to the Chrome Web Store using Edge.
2. Pick a Chrome extension you want to add and click “Add to Chrome.”
3. Some Chrome extensions may need access to your data or certain permissions in order to operate. Click “Add extension.”

4. You should see a notification showing the Chrome extension was added to Edge.

As indicated, if you want to manage your extensions, you can always go back to Extensions in the Edge settings menu to add or remove extensions. Just a quick reminder, Chrome extensions were not designed to be used on Microsoft Edge so you may experience bugs and Edge might crash. It might be a good idea to add Chrome extensions one at a time and see how they work on Edge before using them. What Chrome extensions do you use on Edge? Let us know in the comments.

How to enable Legacy Windows 7 boot menu on Windows 10


How do I enable Windows 7 boot menu on Windows 10?

  1. Use bcdedit
  2. Use bootrec

Are you one of the Windows users who switch from Windows 7 to the Windows 10 operating system on your device?

Well seeing that the bootloader in Windows 10 looks completely different than the one you are used to in the Windows 7 operating system you can find out by reading the tutorial posted below how exactly you can enable the legacy Windows 7 boot menu in Windows 10 as well.
How to enable the legacy Windows 7-like boot menu using Windows 10

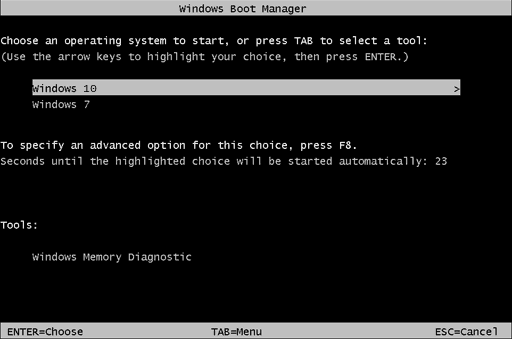
Windows 10 brought a new boot menu that is an improvement over the previous one. This boot menu is graphical, and it allows you to use your mouse, which is a major plus. In addition, it offers more options and it’s more user-friendly.

Despite the aforementioned improvements, some users still prefer the older textual boot menu. One of the main reasons is because the new boot menu will restart your PC if you’re using your PC in dual boot mode. This isn’t the case with the legacy boot menu, and instead of restarting, your PC will boot straight to the select operating system thus saving your time.


Learn more about enabling Legacy Boot in Windows 10 by reading this guide.


Tutorial on how to enable the legacy Windows 7 boot menu using Windows 10

Use bcdedit

  1. Left click or tap on the search box situated in the Start menu of your Windows 10 operating system.
  2. In the search dialog box write the following: “cmd.exe” without the quotes.
  3. After the search has finished you should have an icon with Command Prompt.
  4. Right click or hold tap on the Command Prompt icon and from the menu that appears left click or tap on the “Run as administrator” feature.
    Note: If you are prompt by a user account control window you will need to left click or tap on the “Yes” button to proceed.
  5. Now in the “Elevated Command Prompt” window you just opened write the following: “bcdedit /set “{current}” bootmenupolicy legacy” without the start and end quotes.
    Note: If you manually write the command above be very careful on the spaces in the line as the command will not work if you type something wrong.
  6. After you wrote the command above press the Enter button on the keyboard.
  7. Now in the command prompt window write the following: “Exit” without the quotes.
  8. Press the Enter button on the keyboard.
  9. Reboot your Windows 10 operating system and check if the boot menu has switched to the Windows 7 like legacy.

Turn the Windows 10 boot menu on:

  1. If by any chance you wish to switch back to the Windows 10 boot menu go to the Start button again and in the search box write “Cmd.exe” as you did in the steps above.
  2. Right click again on the command prompt icon and select the “Run as administrator” feature.
  3. In the command prompt write the following line: “bcdedit /set {default} bootmenupolicy standard” without the quotes.
  4. Press the Enter button again in order for the command to execute.
  5. Close the command prompt window and reboot your operating system.

Read our detailed guide and learn to properly dual-boot Windows 10 with another OS.


Use bootrec

You can try to use bootrec feature in order to enable legacy Windows 7 boot menu on your Windows 10.

It will be the same as fixing Windows 7 boot, but you will arrive to open Windows 7 legacy boot menu with one condition – having your Windows 7 installation CD/DVD. Here’s how you do it:

  1. Boot from the original Windows 7 installation CD/DVD
  2. Select the language you prefer; click ‘Next’
  3. Select the operation System from the list (Windows 7) and then click ‘Next’
  4. When ‘System Recovery Options’ screen appears, click on ‘Command Prompt‘
  5. In Commander type the following command ‘bootrec /fixmbr’ (without the quotes) and press ‘Enter’
  6. Type ‘bootrec /fixboot’ (without the quotes) and press ‘Enter’
  7. Type ‘bootrec /ScanOs’ (without the quotes) and press ‘Enter’
  8. Type ‘bootrec /rebuildBcd’ (without quotes) and press ‘Enter’
  9. Eject Windows 7 installation CD/DVD
  10. Type ‘exit’, press ‘Enter’ and reboot your PC

And there you go, some quick methods on how to change the new boot menu in Windows 10 to the legacy Windows 7– like boot menu you are used to.

Also if you are having trouble doing the steps above you are welcomed to write us in the comments section situated a little bit below these lines and I will help you further as soon as possible.

Windows 10 Telegram Desktop app updates with new autoplaying videos and spellchecker

The Telegram Desktop app updated for Windows users today with several new features that should make users of the privacy-focused messaging app happy.

Among the more-notable improvements are the addition of native spellchecking and autoplaying videos in addition to a new resume functionality for long videos which will automatically continue a video from where the users had left off in a previous session.

Here’s the full release notes:

Spellchecker Support, Autoplaying Videos and More

  • Videos in chats start playing automatically without sound.
  • Resume playback from where you left off when watching long videos and listening to long audio tracks.
  • Control automatic playback for videos, GIFs and round video messages in Settings > Advanced > Automatic media download.
  • Enjoy system spell checker support on all modern systems.

Happy new year and farewell to typos!

Are you a Telegram user and do you use the Windows 10 version? Let us know in the comments below and then follow us on Pinterest, Facebook, and Twitter for more Windows app news.

Telegram Desktop
Telegram Desktop
Price:
Free

How to transfer Sticky Notes from Windows 7 to Windows 10

With the end of Windows 7, plenty of users are now forced to make a difficult choice: continue using an unprotected version of Windows, get the Extended Support (only for business), or upgrade to Windows 10.

Most of you will probably choose the latter, either now by choice, or later by lack of alternatives. Either way, the bottom line is you’ll need to find a way to migrate all of your personal data from one OS to another, and that also includes Sticky Notes.

Everyone knows what Sticky Notes is, and for those of you who’ve never tried Windows 10, you’ll be glad to know that it is a feature that is also present there.

However, migrating your Sticky Notes from Windows 7 to 10 isn’t as easy as doing a Copy and Paste. Luckily enough, we’ve compiled this step-by-step guide that will show you how you can migrate all of your Sticky Notes to Windows 10 in no time.

How do I transfer my Sticky Notes from Windows 7 to 10?

One thing you need to know is that there is a difference between the Windows 7 format of Sticky Notes, and the Windows 10 format.

Windows 7 Sticky Notes store the data in a .snt file, whereas the current Sticky Notes app stores the data in a .sqlite file.  Therefore, you will need to know how to convert the files, before going through any actual migration.

1. Convert StickyNotes.snt to plum.sqlite

  1. Go to your Windows 10 PC
  2. Press Start
  3. Open Settings
  4. Go to Apps
  5. Select Sticky Notes
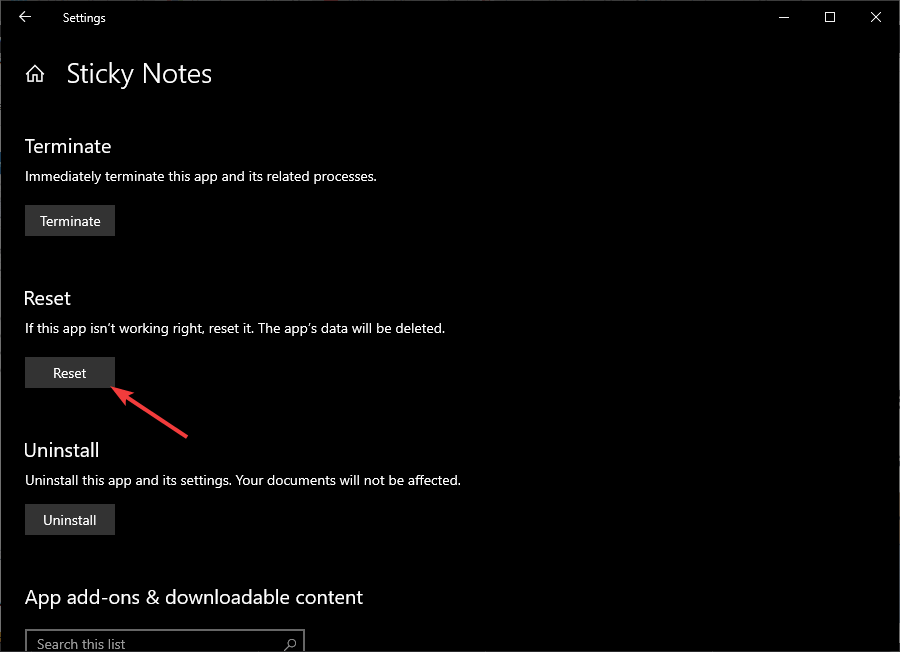
  6. Choose Advanced Options
  7. Press the Reset button
    • The app will be reset to default, and all app data will be deleted as wellreset sticky
  8. Open the File Explorer and navigate to the following file path:
    • C:UsersusernameAppDataLocalPackagesMicrosoft.MicrosoftStickyNotes_8wekyb3d8bbweLocalStateLegacy
    • If you cannot access the folder, make sure your File Explorer is set to view hidden files and folders
  9. Rename the StickyNotes.snt file to ThresholdNotes.snt.
  10. Start the Sticky Notes app
    • The data in the .snt file will be automatically transferred to a new .sqlite data file
  11. Reinstall Sticky Notes
  12. Open PowerShell
  13. Run this line:
    • Get-AppxPackage -Allusers | Select “PackageFullName”
  14. Write down the PackageFullName
  15. Now run this line:
    • Remove-AppxPackage Microsoft.MicrosoftStickyNotes_3.0.118.0_x64__8wekyb3d8bbwe
    • Include your Sticky Note package full name
  16. Reboot the PC
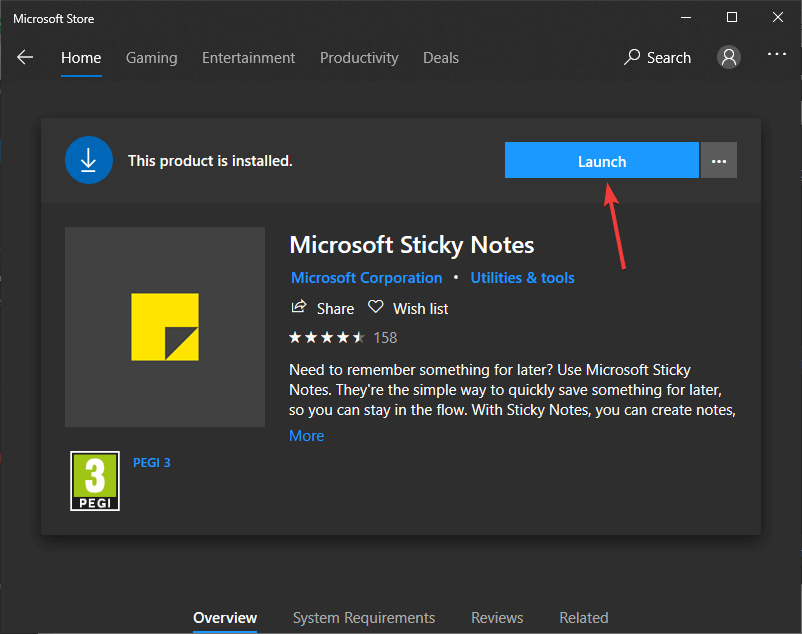
  17. Open the Microsoft Store App and reinstall Sticky NotesInstall Sticky Notes
  18. Do not open Sticky Notes, instead, open the File Explorer and go to this file path:
    • C:%LocalAppData%PackagesMicrosoft.MicrosoftStickyNotes_8wekyb3d8bbweLocalState
  19. Create a Legacy folder if it does not exist
  20. Copy your Stickynotes.snt file into the new Legacy folder and rename it to ThresholdNotes.snt.
  21. Open Sticky Notes and see if it worked

By following these steps, you should be able to migrate your Windows 7 Sticky Notes to Windows 10 without any further issues.

Did you find this article to be useful? Let us know in the comment section below.

RELATED ARTICLES YOU SHOULD CHECK OUT:

How to transfer OneNote files from Windows 7 to Windows 10

With Microsoft pulling the plug on Windows 7, many users are left with few options, one of which is upgrading to Windows 10.

The problem with migrating from one OS to another is that certain files and features do not sync, and will eventually be lost. Such would be the case with OneNote files which some users would like to take along the way and have them in their Windows 10 PCs.

Fortunately enough, there are solutions to this issue, and we’ve compiled a step-by-step guide on how you can export your OneNote files effortlessly.

How do I move OneNote files from Windows 7 to Windows 10?

1. Manually copy the OneNote notebooks

Probably the simplest method of all, it involves simply copying and pasting the locally stored OneNote files from your Windows 7 PC to your Windows 10 PC.

The only drawback to this method is that you can only use it with two different PCs, or if you have some sort of removable media to store the data on while you upgrade the Windows 7 PC.

Another thing you should remember is that the last version of Onenote to support Windows 7 is OneNote 2013. What makes this version special is that the file location for the saved notebooks differs from user to user.

As such, before you export the files, you first have to know where they are hidden.

  1. Open OneNote 2013
  2. Go to File
  3. Select Options
  4. Expand the Save & Backup tab
  5. Look at the file path labeled BackupFolder
  6. Once you found the location of the folder, simply navigate to it, and copy the contents on a removable media.

Once you have your Windows 10 PC, you will be using OneNote 2016. Thankfully enough, no changes in file formats were made between OneNote 2013 and OneNote 2016, so pasting the notebooks where OneNote 2016 stores data is all it takes.

2. Use a third-party migration tool

If you are planning to migrate more than just your OneNote notebooks, you might as well use a third-party tool that will migrate everything in an efficient and lossless manner.

Laplink PCmover is such a tool, and it will oversimplify the way you migrate all of your data from a Windows 7 PC to a Windows 10 PC.

Not only will it migrate OneNote data, but also files, folders, profiles, settings, installed programs, games, and more. For more info on this neat tool, check out this detailed article.

By following these methods, you should be able to migrate your OneNote notebooks from Windows 7 to Windows 10 without any issues.

Do you know of any other method of exporting OneNote notebooks from Windows 7 to Windows 10? Share them with us in the comment section below.

RELATED ARTICLES YOU SHOULD CHECK OUT:

How to export Certificates with Private Key in Windows 7

As you most probably know, Microsoft has stopped updating Windows 7, and now users are left with the choice of either getting the Extended Support or upgrading to Windows 10.

While some users may choose the Extended Support, they need to keep in mind that this is a temporary and costly solution. Thus, they will have to upgrade to Windows 10 at some point.

Their biggest concern with upgrading to a newer OS is how they will migrate their data since not all of it can be simply copied and pasted from one computer to another.

One good example is how some users may want to export their Windows Certificates with the Private Key.

That is precisely why we’ve compiled this step-by-step guide that will show you how you can export your Windows Certificates with the Private Key, and maybe make it usable in Windows 10.

How do I export a Windows Certificate with the Private Key?

Before starting, you need to remember several things regarding the process:

  • A private key is exportable only when it is specified in the certificate request or certificate template that was used to create the certificate.
  • You should clear the Enable strong protection checkbox if you will use the private key with any program that does not support strong protection
  • You need to be a User or local Administrator to complete this procedure

Once you’ve taken this situation into account, you can proceed with the steps:

  1. Open the Certificates snap-in for a user, computer, or service. This involves using the Microsoft Management Console
    • To view the certificates for a certain device
      • Select Run from the Start menu, and then enter certlm.msc.
    • To view the certificates for the current user
      • Select Run from the Start menu, and then enter certmgr.msc.
  2. Look in the console tree under the logical store that contains the certificate to export
  3. Click Certificates
  4. Look in the Details pane
  5. Click the certificate that you want to export
  6. On the Action menu, point to All Tasks
  7. Click Export
  8. When the Certificate Export Wizard appears, click Yes, export the private key
  9. Under Export File Format, you will need to choose one of the following:
    • Include all certificates in the certification path if possible
      • This will include all certificates in the certification path
    • Delete the private key if the export is successful
      • This will delete the private key if the export is successful
    • Export all extended properties
      • This will export the certificate’s extended propertieswindows certificates
  10. Choose a password to encrypt the key that you are exporting
  11. Give the file a name, and select a file path for it to be exported

By following these steps, the certificate will remain in the certificate store in addition to being in the newly created file.

Did you find this article useful? Let us know in the comments section below.

RELATED ARTICLES YOU SHOULD CHECK OUT:

How export ODBC data from Windows 7 to Windows 10

As you probably all know by now, Microsoft has ceased support for Windows 7. This means that it will no longer receive any security updates and that everyone still running it should really consider upgrading to Windows 10.

Of course, there’s always the option of staying with Windows 7 (if you are part of a company), by buying the Windows 7 Extended Support for Business.

Unfortunately, this is not a long-term option, since the Extended Support will only buy you an extra 2 years, after which upgrading to Windows 10 is pretty much your only choice.

Because of this, more and more users are already migrating to the newer OS. The problem is that migrating means more than just the OS, it also involves moving your files and folders between upgrades.

Such would be the case with ODBCs (Open Database Connectivities), as plenty of users will now need to know how to migrate them between one computer and another.

Thankfully enough, we’ve created a step-by-step guide that will show you just how you can do this with the least amount of effort.

How do I migrate an ODBC to another computer?

1. Manually export the ODBC.INI folder

The first thing you need to remember is that this method does not work with self-upgrades, and as such you will require a Windows 7 and a Windows 10 computer.

If you already have them, then you can continue carrying on with these steps:

  1. Go to the Windows 7 computer
  2. Press Start
  3. Select Run
  4. Type in regedit
    • This will open the Registry Editorwin7 regedit
  5. Navigate to the following registry key :
    1. For User DSN data sources:
      1. HKEY_CURRENT_USER\Software\ODBC
    2. For System DSN data sources:
      1. HKEY_LOCAL_MACHINE\Software\ODBC
  6. Right-click on the ODBC.INI folder
  7. Choose Export
  8. Save the .reg file to the location of your choice
  9. Copy the .reg file to any location in your Windows 10 computer
  10. On the Windows 10 computer, double click the .reg files to import the DSN data sources to the registry
  11. Select Yes and OK when prompted

If you can’t edit your Windows 10‘s registry, read this handy guide and find the quickest solutions to the issue

2. Use a third-party migration tool

ODBC data is data after all, and you can always opt for specialized tools that can help you migrate data efficiently between Windows 7 and Windows 10 PCs.

One good example is Laplink PCmover, which can easily migrate any type of data between a Windows 7 and a Windows 10 PC. This includes personal files and folders, user profiles, and even programs that have already been installed, such as applications and games.

For more details about this amazing tool, check out this comprehensive guide.

By using any of the two methods listed above, you should be able to migrate ODBC data between two PCs, even if their have different operating systems.

Did you find this guide to be useful? Let us know in the comment section below.

RELATED ARTICLES YOU SHOULD CHECK OUT:

Here’s why we believe Windows 7 is the new Windows XP

User complaints about Microsoft’s unfair upgrade strategies are nothing new. Judging by the type of complaints and their frequency, it seems that Microsoft is choosing to deploy even fiercer methods in response. As a quick reminder, the latest upgrade campaign Microsoft launched was in December 2019.

Well, this upgrade campaign is much milder compared to the previous ones. Missing X button on the update window, anyone? Windows 10 installing the latest updates despite users having blocked the feature? Does that sound familiar?

Windows 10 forced upgrade history

Back in 2016, many users accused Microsoft of cutting off the possibility of choice with an upgrade window that only displayed two options: “Upgrade now” and “Download now, upgrade later”.

Others claimed the tech giant changed the behavior of the X button on the upgrade pop-up, preventing them from cancelling the update. If they did click the X button, Windows would display a message informing them about the day the upgrade is scheduled for. In extreme cases, hitting the X button immediately started the upgrading process.

The third type of complaint suggested that Microsoft avoided informing users of the upgrade at all, with some users simply noticing a new OS when they turn on their computer again.

Husband turns on the computer this morning and it has automatically installed Windows 10. This has happened to all of our office computers. At the office we were able to stop the upgrade and uninstall the update and block further updates.

But what if Microsoft’s scariest nightmare comes true? What if Windows 7 becomes the next Windows XP? What if most users refuse to upgrade and continue to use Windows 7 beyond 2020 when support officially ends?

We believe this is a very probable scenario for the following reasons.

Why Windows 7 could become the new Windows XP

1. Users are frustrated and feel Microsoft betrayed them

When you buy a computer, that device becomes your property, not Microsoft’s. But the tech giant seemed to have forgotten this when it decided to automatically install the latest updates on users’ computers. Choosing the Windows platform proves that users trust Microsoft and the company should appreciate this. It should also not forget there are other operating systems out there and users may soon choose to switch sides as a response.

I am really annoyed. I left my computer for an short time. […] When I came back to it, it was mid Windows 10 upgrade!!!!! I hadn’t chosen this, and didn’t want it. […] What right has Windows got to upgrade my laptop when I did not want it! […] This is a total breach of my privacy.

2. Lots of Windows 10 bugs!

Microsoft’s latest OS brings too many bugs: font bugs, camera bugs, driver issues due to incompatibility problems between hardware components and Windows 10, Wi-Fi issues, and many others.

If you installed the Windows 10 October 2018 Update, you must clearly remember the OS was plagued with bugs. Windows updates often delete user data. Moreover, according to a survey, Windows updates trigger bugs for 50% of users.

Is there any guarantee your upgrade from Windows 7 to Windows 10 will a bug-free process? Not really.

3.  Windows 10 collects very private information about its users — more than Windows 7 does

A service like Cortana constantly gathers information about you, but the good news is that you can edit permissions. Even your Windows 10 computer camera may be spying on you without you even being aware, and those recently introduced Skype bots are digging through your Skype conversations.

Not to mention the latest privacy scandal Microsoft was involved in, as it was proved that Visual Studio 2015 C++ compiler’s hidden codes make calls to Microsoft’s telemetry services — something Microsoft didn’t mention anything about in its documentation.

If you are worried about your privacy not being respected, you can use one of these privacy tools to limit Windows 10’s access to your private date.

4. Windows 7 still runs fine

windows 7 next windows xp
You know what they say: if ain’t broken, don’t fix it. We have a computer running Windows 7 Professional, and we’re pretty satisfied with it. Windows 7 can run many of the programs you find on the Windows 10 version, except for a few apps such as Cortana or Edge.

If Windows 7 meets your computing needs, you don’t have to hurry up and accept the upgrade just so that you can get it for free: Windows 10 might be more trouble than it’s worth.

If you’re worried about security issues, don’t forget that Microsoft will continue to roll out critical security patches even after 2020. It did that with Windows XP. Why would the company not do the same with Windows 7?

5. Old peripherals might not work on Windows 10

Windows 10 is not compatible with the drivers of old devices, as such an operation would require too many development resources considering most users upgrade their equipment anyway. If you’re using very old peripherals because you simply cannot throw them away, you should keep Windows 7.

Windows 7 is stable and easy to use and as any good OS, it won’t go down easily. Windows 7 still has an impressive 30% market share or 250M users, despite Microsoft’s desperate efforts to trick users into upgrading.

We will definitely see a visible decrease in Windows 7‘s market share after January 14, 2020. However, we expect Windows 7 to retain a 20% market share at the end of 2020 or 15% in the worst case scenario. Then we expect Windows 7‘s market share to plateau somewhere around 10% over the next 5 to 10 years.

If you’re choosing to run an old version of Windows instead of upgrading to Windows 10, please share the reasons that contributed to this decision in the comment section below.

How to create, share, delete and export Outlook Quick Parts

In Microsoft Outlook, Quick Parts is the ideal way when it comes to automating email responses. This comes as a time-saving feature as of Office 2007 and allows you to store or reuse document elements.

These might include responses to requests for information, document properties, tables, your most used links to resources, or other email content. Well, you’re entitled to think of AutoTex when reading these. Quick Parts pretty much replaces that functionality in older Office versions.

AutoText still exists, but Quick Parts has plenty of extra features and is far more versatile. And it works the same way in all versions of Outlook for Office 365, Outlook 2019, Outlook 2016, Outlook 2013, Outlook 2010, as well as Outlook 2007.

So, to create Quick Parts for text, follow the procedure here detailed. Then, feel free to learn how to better manage them and don’t forget that the steps are the same for emails, contacts, appointments, or tasks.

How can I create, share, delete and export Outlook Quick Parts?

1. Create Quick Parts in Outlook

  1. Type the text you want to use in a Quick Part into a new email message.
  2. Highlight the text you want to save as a Quick Part. All of the formatting, images, links, or other content will be stored as part of the Quick Part.
  3. You may now move to the Insert tab.Insert tab
  4. In the Text group, click Quick Parts.
  5. To create the Quick Part, choose the option to Save selection to Quick Parts Gallery.
  6. From the Create New Building Block dialog box, it’s time to enter a descriptive name for your entry.
  7. Click OK to save it.
  8. Once the Quick Part is created, you can access and reuse it at any time from everywhere.

2. Share Quick Parts in Outlook

Quick Parts saved in NormalEmail.dotm

Quick Parts are saved in files called NormalEmail.dotm and Normal.dotm. These are NOT designed to be shared. When you want to share several useful Quick Parts, create and save a new template.

It can be a .dotx template rather than a .dotm one, which makes sharing possible even when using this email client.

3. Delete Quick Parts in Outlook

  1. First of all, open the template that contains the building block that you want to delete.
  2. Go to the Insert tab.
  3. Towards the right-hand side is Quick Parts, found in the Text group. Click it.
  4. Right-click on any entry, then click Organize and Delete.
  5. Select the entry you want to remove and click the Delete button.Delete button
  6. Finally, when asked if you really want to delete the selected building block, confirm by clicking Yes.

Note: This building block is no longer available in galleries when you distribute the template, even if the content might still appear in the template.


4. Export Quick Parts in Outlook

  1. First of all, open a folder.
  2. Enter %APPDATA%MicrosoftTemplates in the address box.
  3. Press the Enter key.
  4. You’ll then get the NormalEmail.dotm and Normal.dotm files in the new opening folder.Normal.dotm files
  5. Now, simply copy these two files from the folder, and paste them in your desired folder.

Note: NormalEmail.dotm and Normal.dotm are usually located in your Templates folder. From here, feel free to manually copy and paste them.


Conclusion

If you often reuse content, you might benefit from Outlook’s Quick Parts functionality. Whether you are composing a new message or simply replying to an existing one, this remains a great way to save time when composing your next email.

Once you start getting to know Quick Parts, you’ll most likely wonder how you ever managed without them!

READ ALSO:

How to translate emails in the Outlook app in Windows 10

Sometimes you might end up in a situation where you could get an email sent to you in a different language from the one you speak. That can be for a variety of reasons, but did you know that you don’t need to visit Google or Bing translate to bring the email over into your own native language? With Translator for Outlook, you can translate emails in a rush, right from the Outlook app in Windows 10. Here’s how to get started.

Install the add-in from the Office Store

The first step in translating emails in the Outlook app in Windows 10 is to install the Translator for Outlook add-in from the Office Store. You’ll need to visit this page and sign in with your work account or the email address you’re using with the Outlook app.  You can also log in with your personal Microsoft Account if you please so you can also add the add-in to your secondary account in the Outlook app in Windows 10.

Once done, you can then check to see if the add-in has been enabled by going to the Outlook app in Windows 10. When the app is open, head up to the main bar along the top. Click the Home tab and then click Get Add-Ins. You can then click My add-ins to check and see if Translator for Outlook has been enabled.

Launch the add-in

Now that you’ve installed the add-in from the Office Store, you can open an email in a foreign language. You should notice a Translate Message option in the Home tab. When you click this, the message will be auto-translated, but you also can switch things up and pick another language by choosing the dropdown menu next to Translated to.

If you like, you can also copy and paste the translated message, just like a normal email. You can then close the translated message by clicking the X at the top of the Translator window.


Other notes

Now that you’re enjoying the Translator for Outlook add-in, there are a few points to note. These translations are all powered by the online Microsoft Translator service. Essentially, this means that your data is secure and no samples are stored. You can learn more about the process here, and you can also check out the Translator app for Outlook on iOS and Android via the links below.

Translator
Translator
Price:
Free


‎Microsoft Translator


Windows 7 to Windows 10/11 upgrade FAQ: Here are the answers

As we all know, all the good things come to an end. The countdown timer for the ageing Windows 7 OS has been officially started by Microsoft. The end of support deadline has encouraged most of the users to upgrade to Windows 10.

Windows 7 was officially launched in 2009. Most of the users (both individual and enterprise) are still using the ageing Windows 7 operating system even after a decade. Some are obsessed with the narrow Start Menu, colourful and glassy Aero theme, and the iconic startup sound. While others are just in love with the minimalistic Windows 7 UI that they even don’t want to mess up with a new version of Windows.

What so ever is the case, you will no longer be receiving critical security fixes and official support after January 14, 2020. Therefore, you will have to upgrade to Windows 10 if you want to get security updates and new features from Microsoft.

For all those who have tons of questions in mind, here are the answers that can help you in a smooth Windows 7 to Windows 10 Upgrade.

Windows 7 to Windows 10 FAQ

1. Can I still use Windows 7 after 2020?

Yes, you can still use and operate on the Windows 7 operating system after January 14, 2020. But the bottom line is, Microsoft will no longer be releasing free security updates for those who continue to use Windows 7.

You will not be eligible for receiving any software, security, or feature updates. You will have to pay a huge amount for the extended support for Windows 7 on a per device basis. While the cost is going to increase on a yearly basis so it is definitely going to be an expensive option especially for the individuals.

Please have a look at the pricing details:

Sr. NoYear DurationCost
(Windows 7 Pro)
Cost
(Windows Enterprise (add-on))
1Year 1January 2020 - January 2021 $50 per device $25 per device
2Year 2January 2021 - January 2022$100 per device$50 per device
3Year 3January 2022 - January 2023$200 per device$100 per device

Therefore, it is highly recommended that you should upgrade to the latest version of Windows i.e Windows 10.


2. How can I upgrade my Windows 7 to Windows 10 for free?

After July 29, 2016, Windows 10 does not support the free upgrade offer via Get Windows 10 (GWX) app. While if you are still interested in the upgrading your PC for free your should go for Microsoft 365 Business.

This version of Windows offers a free upgrade to the users who have a Windows 7, 8, or 8.1 Pro license. Therefore, you will not have to pay any additional cost for the upgrade by purchasing Microsoft 365 Business.

Additionally, you can also try our guide in order to upgrade to Windows 10 for free.


3. What happens if I continue to use Windows 7 after January 2020?

Microsoft has officially announced that it will no longer support Windows 7 PC beyond January 14, 2020. This means that if you continue to use Windows 7 after January 2020, you will not be eligible to receive free security updates from Microsoft.

While keeping in mind the latest cyber-attacks, your operating system will be vulnerable to the increasing security threats. You will also have to pay a huge cost for extended support. Furthermore, you will not be able to get Windows 7 technical support from Microsoft customer service.

Therefore, Microsoft recommends its users that they should consider upgrading to Windows 7. Windows 10 comes with free security updates, so you will be able to protect your data.


4. Can I still activate Windows 7 after support has ended?

Yes, you can still install and activate Windows 7 after January 14, 2020. However, you will not receive any security updates from Microsoft beyond the deadline. Hence, the lack of security updates will increase your chances of being vulnerable to viruses and security risks.

Microsoft recommends all of its users to upgrade to Windows 10 for continued security updates after support has officially ended.


5. What happens if Windows 7 is not supported?

Despite the fact that the unsupported version Windows 7 will continue to work, you will not be receiving any software updates from Microsoft through Windows Update. These software updates include both security and reliability updates for the users. Your personal information will be vulnerable to spyware, viruses, and similar malicious software.

Moreover, Microsoft customer support will no longer entertain any queries related to the unsupported version of Windows 7. If you are still using Windows 7, you should upgrade to Windows 10 before January 14, 2020.


6. Does Microsoft extend Windows 7 support?

Microsoft has officially announced to stop Windows 7 support after January 14, 2020. While Windows 7 Professional or Windows 7 Enterprise will be allowed to receive security updates through the paid Extended Security Updates (ESU) program. The extended support will be available for 3 years after the end of support deadline. The users will have to pay a huge per-device cost that is expected to increase year by year.

Here are the pricing details for the extended support:

Sr. NoYear DurationCost
(Windows 7 Pro)
Cost
(Windows Enterprise (add-on))
1Year 1January 2020 - January 2021 $50 per device $25 per device
2Year 2January 2021 - January 2022$100 per device$50 per device
3Year 3January 2022 - January 2023$200 per device$100 per device

Microsoft recommends upgrading to Windows 10 to receive free security updates and support from the company.


7. How do I transfer files from Windows 7 to Windows 10?

Various third-party tools are available in the market that can help you in transferring your data and files from Windows 7 to Windows 10. You just need to follow a number of steps whether you are buying a new Windows 10 PC or planning to upgrade your existing Windows 7 powered machine to Windows 10. You can follow our Guide to migrate your apps, settings, options etc on Windows 10.


8. Can I downgrade from Windows 10 to Windows 7?

Although millions of users have upgraded to Windows 10, after the official end of support deadline from Microsoft. Few of them are still interested in sticking to the ageing Windows 7.

They might have reservations while migrating to a new version regarding upgrade and compatibility issues, program support etc. If you are one of them, don’t worry you can always go back to your previous version.Your simply need to follow these steps to downgrade from Windows 10 to Windows 7.


9. Can Windows 7 key activate Windows 10?

Yes, Windows 10 can be activated with a genuine Windows 7 key. In order to activate it, you just need to enter the key during the setup phase or activate it from the Update & Security section of the Settings app.


10. Can Windows 7 install over Windows 10?

Yes, you can install Windows 7 over Windows 10, but that will completely remove Windows 10 from your PC. If you want to use Windows 7 and Windows 10 side by side, you should consider using a dual boot or a virtual machine.


11. Can Windows 7 look like Windows 10?

Yes, it’s possible to make Windows 7 look like Windows 10, but in order to do so, you’ll need to use third-party applications. One way to make your Windows 7 look like Windows 10 is to use Windows 10 Transformation Pack.

Bear in mind that this type of software will modify your system files, so you’re using it at your own risk.


12. How to upgrade non-genuine Windows 7 to Windows 10?

You can’t upgrade the non-genuine version of Windows 7 to Windows 10, and if you try to do so, you’ll get a message that your product key isn’t genuine. If you do manage to upgrade from a non-genuine version of Windows 7 to Windows 10, bear in mind that your Windows 10 won’t be activated.


13. How long does it take for Windows 7 to upgrade to Windows 10?

The upgrade process lasts usually about an hour, but it can take more depending on how your PC is configured and the age of your device.


14. What are Windows 7 to Windows 10 upgrade requirements?

These are the minimum hardware requirements for Windows 10:

  • 1GHz or faster processor
  • 1GB of RAM for the 32-bit version, 2GB of RAM for the 64-bit version
  • At least 16GB of storage space for the 32-bit version, 20GB for the 64-bit version
  • Graphics card with DirectX 9 support and WDDM 1.0 driver
  • Internet connection

Conclusion

It’s not like that your PC will stop working after January 2020, but it’s better to stay protected from potential threats and cyber attacks by migrating to Windows 10.

While, if you are a business owner or an individual, why not opt for an upgrade rather than paying a huge cost for the extended support?

If you have any more questions, please comment down below or you can always send your queries via email. The post will be updated with additional answers to your questions.   

RELATED ARTICLES:

3 Best Windows 10 Skin Packs For Windows 7 You Can Use

Even though Windows 10 has been out for a while, some users didn’t make the switch. If you like Windows aesthetics, today we’re going to show you the best Windows 10 skin pack for Windows 7.

If you want, you can use Windows 7 forever, but make it look like Windows 10 without even switching to it. If you want to transform it, be sure to keep reading to learn how to do it.

Can I make Windows 7 look like Windows 10?

  • This is possible thanks to third-party skin packs and themes.
  • Many of these will change the user interface, icons, and other visual elements.
  • Remember always to create a system restore point since these packs can modify system files.

What is the best Windows 10 skin pack for Windows 7?

Windows 10 SkinPack – Best overall

This is one of the many good Windows 10 skin packs you can download and apply on Windows 7, Windows 8 or Windows 8.1.

Not only does this make your version of Windows 7 or 8/8.1 look similar to Windows 10, but it also changes many aesthetics of the user interface that will force other people who are not aware of the skin pack to think that they are using Windows 10.

Everything looks different, from icons to explorer style and even the start menu. You also get a sidebar that is designed on the lines of Modern UI and looks good on this skin pack.

You also get Windows 10 wallpapers, themes, icons that make this skin pack an amazing skin.

Do not forget to uninstall other versions of skin packs before you install this one. If nothing happens after applying your preferred theme, you must use uxtheme patcher.

You will have to download it, and after the installation, you’ll have to select the new theme from Personalization.

Other great features:

  • Works on all older versions of Windows
  • It changes all icons on the PC
  • New start menu and file explorer
  • Comes with a sidebar

⇒ Download Windows 10 SkinPack

Windows 10 Transformation Pack – Great visuals

This is a transformation pack by Windows X, which is known for creating packs that are not only good but are also the ones that work on oldest of systems.

You can even install this pack on Windows XP, and it will make Windows XP look similar Windows 10. Of course, the support for Windows 10, Windows 8, and Windows 8.1 is still there.

After installing this pack, you will have Windows 10 user interface on your old version of Windows along with the login screen, Windows 10 cursors, fonts, sounds, multiple desktop support, start menu, and much more.

Don’t forget to uninstall any previous theme pack before installing a new one. Also, it is recommended to create a Restore Point before you install any transformation pack.

If you want to uninstall an old pack, you can use the same installer file from the initial installation process or from Add/Remove Programs in Windows XP/2003 and Uninstall Programs/Programs and Features in Windows 10/8/7/Vista.

Other great features:

  • Looks incredibly like Windows 10
  • Supports older operating systems, even Windows XP
  • It comes with Windows 10 cursors, fonts, and sounds
  • Multiple desktop support

⇒ Download Windows 10 Transformation Pack

Windows 10 UX Pack – Doesn’t affect system files

If you don’t want to mess with the system files on your system, then it is recommended that you go ahead and install this pack.

Unlike Windows 10 Transformation Pack, this pack will not touch the system files on your installed system and hence you can just uninstall the pack and your system will be back to normal.

The main features include a quick and seamless installation, an easy and intuitive interface, virtual/multiple desktops, uxstyle memory patching, cursors/wallpaper/logon customization, and many others.

In this pack, you get Windows 10 theme in 3 different styles i.e. Modern, Glass, or Metro. You get Windows 10 cursor, icons, login screen, and even the multiple desktop feature.

Other great features:

  • Doesn’t affect system files.
  • Easy to install and uninstall.
  • Intuitive interface.
  • Multiple desktop support.

⇒ Download Windows 10 UX Pack

Currently these three are the only packs that we recommend to users as others are either too complex to install, or they just provide a mixture of Windows 10 plus old Windows UI which looks totally odd.

We must mention that these tools might cause issues with your current Windows installation. Some of these applications will modify some of your system files to change the look of your user interface, which can, in some instances, cause issues.

To avoid potential problems, we strongly encourage you to create a backup of your files, to be on the safe side. In addition to file backup, it might be a good idea to create a System Restore point and use it t restore your system if anything goes wrong after trying one of these tools.

If you use one of these packs or know some other packs with interesting features, please share in the comments section below, and we’ll be sure to check them out.

Astronomy Software for Windows 10 PC: 5 Professional Tools

There are many astronomy software programs dedicated to hobbyists, students, and educators. Most of them give you the possibility to visualize astronomy objects. But few are equipped with advanced features reserved for professional environments. Those features should permit you to conduct scientific research, analyze data, and handle operations involved with telescope maintenance. In this article, we picked what we think are the 5 best professional astronomy software solutions. All of them are fitted with telescope control support, too.

What professional astronomy software tools should I get?

C2A

C2A main window

C2A (Computer Aided Astronomy) is a free planetarium software solution for Windows computers, which can be used in professional astronomy. Featuring an intuitive graphical interface, it gives you the possibility to create detailed views of stars.

It has a database of stars from the Smithsonian Astrophysical Observatory (SAO), Washington Double Star (WDS), Gliese Catalogue of Nearby Stars, Hipparcos, and other sources. You can create your own catalogs, too.

Besides zooming in and out, you can get information on any selected star, adjust visibility settings, create an observation planner, and put together a scheduler. Telescope control is supported as well.

C2A provides you with multiple tools. For instance, you can set solar system trajectories, filter asteroids and comets, view sunrise and sunset times, check out the moon phases, investigate planet positions, or set field markers.

As far as images are concerned, it’s possible to make adjustments, perform analysis, use a digitized sky survey, browse an atlas of object pictures, and change background images.

Pros:

  • Free
  • Intuitive graphical interface
  • Lets you calculate the trajectories of celestial objects

Cons:

  • The interface may seem cluttered for some

Get it now

KStars

KStars main window

KStars is a free and open-source astronomy software tool that can be used by professionals to observe the night sky from Earth’s perspective. It’s also possible to switch to day mode by controlling time settings.

Delivered in an easy-to-use graphical interface, KStars simulates a space environment for investigating 8 planets, up to 100 million stars, approximately 13,000 deep-sky objects, asteroids, the sun and moon, comets, satellites, and supernovae.

Thanks to adjustable time settings, you can carefully observe elaborate celestial events which took a long time to unfold. You can set coordinates manually, quickly locate objects with a search function, and enable tracking mode.

Additional tools are available to help you convert coordinates, calculate time, plan solar system conjunctions, or predict eclipses. You can check out a sky calendar, generate graphs for objects by altitude and time, and run a solar system simulator with XPlanet, if you choose to install this free third-party tool.

Depending on what compatible equipment you have and wish to use, it’s possible to integrate a telescope, eyepiece, lens, or filter with the telescope control software.

Pros:

  • Free and open-sourced
  • Simulates 8 planets, up to 100 million stars, approximately 13,000 deep-sky objects

Cons:

  • May cause issue son old PC systems

Get it now

Stellarium

Stellarium main window

Stellarium is a top choice among many professionals when it comes to astronomy software. Just like the previous listings, it’s free and open-source, facilitating a 3D simulator for planets, stars, and other celestial objects.

You can explore numerous stars, deep-sky objects, constellations, nebulae, novae, supernovae, the Milky Way, meteor showers, and others using a powerful zoom. These are accompanied by photo-realistic images and various effects, like star twinkling.

Plugins are supported, which means that you can add extra functionality to Stellarium. For example, you can connect your telescope and configure settings, simulate ocular mode, or load new solar system objects, artificial satellites, and constellation pictures.

There are many professional approaches to this astronomy software solution. For instance, you can install the VirGo extension to view and analyze data from the archive of ESO.

Pros:

  • Free and open-sourced
  • Supports plugins

Cons:

  • May need a tutorial to learn how to use it efficiently

Get it now

Cartes du Ciel (Sky Charts)

Cartes du Ciel

Cartes du Ciel is a free and open-source astronomy software tool that boasts a wide range of options and configuration settings for professionals.

It renders a sky map that allows you to investigate more than 9,000 stars and 10,600 deep-sky objects, including planets, comets, asteroids, nebulae, constellations, and solar systems.

The catalog can be enriched by downloading additional resources. And you can use an advanced search tool to quickly track down objects. The orbital motion of solar system objects can be plotted after configuring simulation settings.

It’s possible to save images and record animations to file, change the coordinates and chart mode, select the types of objects to display by applying catalog filters, toggle night vision, set a different field of vision, as well as increase or decrease the number of stars and deep-sky objects.

Telescopes are supported by Cartes du Ciel, which can be connected to your device using INDI, ASCOM or manual mount drivers. Aside from customizing telescope preferences, you can synchronize data and activate slewing or tracking mode.

Pros:

  • Holds detailed information about each known celestial object
  • Supports telescopes
  • Can be used to plot the orbital motion of celestial objects

Cons:

  • Celestial objects only have text associated with them, no pictures

Get it now

Best telescope control software

Starry Night main window

If you are looking for the best telescope control software solution, we recommend using Starry Night. It comes in multiple editions for astronomers and enthusiasts who want to use their telescope.

In addition to telescope control features, you can use a large database to explore deep-sky objects, listen to audio descriptions, make time adjustments, and travel to other stars with one click.

Starry Night has a user-friendly graphical interface that lets you study suns and exoplanets in 3D. And, by using your keyboard or plugging your joystick into the computer, you can fly an intergalactic spaceship.

It’s possible to toggle night vision mode, configure coordinate settings, inspect data about asteroids, comets, and satellites, create and save video animations, as well as take screenshots and save images to file.

The telescope control software tool includes a light pollution simulator that displays only the brightest stars, along with a database that indicates the positions of major meteor showers.

Those are just part of the feature-set available in the Starry Night software. You can explore many other professional astronomy options and configuration settings to help you observe the night sky and analyze various celestial objects.

Pros:

  • Comes in multiple editions for astronomers and amateurs alike
  • Expansive database of celestial objects
  • Includes a light pollution simulator
  • Stylish interface
  • Simulates night-vision mode

Cons:

The price tag

Get it now

Conclusion on professional astronomy software

Taking everything into account, professionals can turn to the C2A, KStars, Stellarium, Cartes du Ciel, or Starry Night software solutions for various astronomy projects.

These applications come in handy for scientific research, data analysis, and telescope maintenance.

Best Photo Scanning Software to Use in 2026

Photo scanning software solutions are practical for many reasons. These include helping you scan your ID to send it via email, to creating a digital copy of all your precious memories.

In the end, they prove useful when trying to put together amazing photo albums with your family and friends.

If you already have a scanner device at home, then you also probably have the scanning software tool it was shipped with. Unfortunately, many default photo scanning software solutions do not deliver the results you would expect.

Some of them have low quality and poor features, such as lack of photo scanning in batch mode. Others are simply outdated and do not work on the newest operating systems.

As such, we went through the trouble of finding the best photo scanning software tools available. These give you the possibility to process multiple files at the highest quality.

What are the best picks for photo scanning software?

VueScan

VueScan main window

VueScan is a photo scanning software solution that specializes in negatives. Images can be scanned in flatbed, transparency or doc feeder mode, at any preferred resolution (up to 300 dpi).

It supports OCR, so that you can also use it to obtain text from scanned files.

The application has a clear-cut interface that unlocks features based on the licensing model you choose: basic, standard, or professional. Evidently, professional mode comes with the most options and configuration settings.

Before starting the scanning operation, it’s possible to preview the photo and crop it in order to eliminate any unnecessary parts.

In fact, VueScan provides you with several image size presets and, if you want to scan anything bigger than that, it will be necessary to scan multiple parts and later put them side by side in the same picture.

Several editing tools are available for the photos, such as cropping, color, and fading restoration, grain reduction, sharpen, de-screen, flatten, color balance, brightness, or scanner color space. The output files can be saved as TIFFs, JPGs or PDFs.

The application receives regular updates and can be purchased in two ways: standard or professional edition. While the standard version allows only flatbed scanning, the professional mode unlocks features for film and slide scanning, automatic document feeders, OCR and advanced features.

Pros:

  • Both editions come with a 30-day money-back guarantee
  • Updated regularly
  • Contains several editing tools

Cons:

  • Doesn’t support many file formats as scan results

Get it now

ScanSpeeder

ScanSpeeder Pro main window

ScanSpeeder is an easy-to-use photo scanning software solution that makes it possible to obtain photographs from flatbed scanners. It is capable of scanning multiple images in bulk, and it can restore faded photos as well as scan slides or negatives.

The images can be scanned at any resolution you want, such as 300 dpi for best speed or 600 dpi for best quality. You can add frames to scanned images before extracting them to the disk, write tags, and toggle photo enhancements.

The tool can automatically straighten the photos, append frames, as well as save the images as TIFF or JPEG files.

ScanSpeeder also works with scrapbooks and album images, featuring 48-bit deep color scanning and 16-bit true gray scanning modes.

If you are interested in this photo scanning software solution, you can opt for two paid premium plans: standard or pro edition.

The only difference between the two is that the standard edition can’t scan photo negatives, slides and films, nor perform 48-bit deep color scanning or 16-bit true gray scanning.

Pros:

  • Efficiently gets photos from flatbed scanners
  • The demo comes with 10 free scans

Cons:

  • Not much of a difference between the two versions

Get it now

Closing thoughts on photo scanning software

Taking everything into account, photo scanning software tools are useful for scanning multiple images in bulk after you can select the preferred resolution.

Both VueScan and ScanSpeeder are excellent tools for the job, although they approach the entire task a bit differently.

Thus, if you want a reliable tool for scanning your favorite pictures to put together image albums or scrapbooks, you shouldn’t miss these two photo scanning software solutions. Finally, if you need photo colorizing tools, we’ve got you covered as well.

How to export Group Policy settings in Windows 7

Network administrators that are used to handling a large number of computers simultaneously are probably aware of what Group Policies are.

For those of you that don’t know, suffice it to say they are a Windows feature that contains a variety of advanced settings, particularly for network administrators.

Given the nature of the settings, this isn’t a feature that is available to Windows 7 Home users, only those that have Windows 7 Professional, Ultimate, and Enterprise.

There are plenty of reasons why one would want to know how to export these Group Policies from one computer to another. That is why we’ve created this step-by-step guide that will help you along the way.

How do I export Group Policies in Windows 7?

1. Manually export the GPO files

If you are trying to export a local Group Policy file, then you need to know there are different steps for exporting normal settings and security settings.

1.1 Export normal Group Policy settings

  1. Open the File Explorer
  2. Go to this file path:
    • %systemroot%\System32\GroupPolicy
  3. In this folder, you will find two other folders labeled Machine and User
  4. Copy these to folders to the %systemroot%\System32\GroupPolicy of the computer you want to export to
    • If you cannot see the folders, make sure that you can see hidden files and folders.

1.2 Export Group Policy security settings

  1. Open the Microsoft Management Console
  2. Add the Snapin called Security Templates
  3. Create a template and then save it as an .INF file
  4. Copy the created file to the targeted machine
  5. Import it via command-line tool secedit:
    • secedit /configure /db %temp%temp.sdb /cfg yourcreated.inf

mmc

There are a few drawbacks to using this method:

  • The GPO may not work if the OS version and its build on a source and a target computer are different
  • You cannot use the imported GPO to create a domain GPO
  • When copying a policy, you will have to manually correct any references to the local computer name in the settings
  • Migrating custom ADMX templates is known to have issues at times

2. Use LocalGPO

  1. Download Security Compliance Manager
  2. Open Security_Compliance_Manager_Setup.exe as an archive file
    • You can use WinRAR, 7Zip etc
  3. Extract data.cab and then unpack it
  4. Open the new directory, find the GPOMSI file and rename it to GPO.msi
  5. Run GPO.msi

localgpo

Using LocalGPO is done via the command prompt, so proceed with these steps:

  1. Launch the Command Prompt using administrator rights
  2. Go to these folders in order to launch it:
    • C:\Program Files\LocalGPO
      • (for x86 systems)
    • C:\Program Files (x86)\LocalGPO
      • (for x64 systems)
  3. To export local GPO settings to the C:\GPObackup folder, run this command:
    • cscript LocalGPO.wsf /Path:\C:\GPObackup /Export

A new folder with some GPO GUID will appear in the target directory that will contain all local policy settings for this computer.

By following any of the two methods mentioned above, you should be able to export local Group Policies from a Windows 7 PC.

Did you find this guide useful? Let us know in the comment section below.

RELATED ARTICLES YOU SHOULD CHECK OUT:

Microsoft Security Essentials end of support: What to do?

Those of you that are running Microsoft Windows 7 on their PCs are probably aware that support for it has ended. The biggest change that comes with this is that Windows 7 will no longer receive any security updates.

More precisely, Microsoft Security Essentials will no longer be supported. As such, Windows 7 Home users that relied on it for protection will have to find a good alternative for it if they want to continue having protection.

The most obvious course of action would be to simply upgrade to Windows 10 and benefit from its extraordinary security features. However, some users want to remain with Windows 7.

Organizations can even opt to buy the Windows 7 Extended Support, although this too is nothing more but postponing the inevitable for another 2 years.

In the Extended Security Updates’ FAQ page, Microsoft mentioned that it won’t provide Microsoft Security Essentials updates anymore after support for Windows 7 is terminated.

Will Microsoft Security Essentials (MSE) continue to protect my computer after the end of support?
No, your Windows 7 computer is not protected by MSE after January 14, 2020. MSE is unique to Windows 7 and follows the same lifecycle dates for support.

What to do after the MSE end of support?

If upgrading to Windows 10 is out of the question, then your only viable solution is to get a third-party antivirus tool and be extra careful with your browsing habits.

The good news is that Windows 7 still has quite a considerable market share, and because of this all major antivirus programs still support it, at least for the time being.

This being said here are some of the best Antivirus programs that you can get for Windows 7:

  • Bitdefender
  • Defencebyte Antivirus Pro
  • AVG Antivirus
  • Kaspersky Antivirus
  • Avast Antivirus
  • Avira Antivirus for Windows 7

For more details on these antivirus programs and how they work, check out this detailed guide.

Despite once being considered one of the best antivirus programs in the world, times change and even Microsoft Security Essentials has to give up the throne at some point.

So, if you value your digital safety, you have three choices:

  • Upgrade to Windows 10
  • Get the Extended Support if you own a company
  • Get a third-party antivirus program

Did you find this article useful? Let us know in the comment section below.

RELATED ARTICLES YOU SHOULD CHECK OUT:

Windows Media Center Electronic Program Guide alternatives

Those of you that love watching television on your PC probably own or have at least heard about the Windows Media Center and its Electronic Program Guide.

The Windows Media Center is a media solution developed by Microsoft meant to bridge the media environment to the PC experience. Users could use it to watch and record live TV shows and play music and other media saved on the hard drive or other attached storage devices.

The Electronic Program Guide is part of the WMC, and it is a feature that lets you scan an on-screen listing of available channels and television program data for an extended time period.

Unfortunately, all good things must come to an end, and besides Windows 7‘s retirement, the Windows Media Center Electronic Program Guide is also being discontinued.

That is why many users have been asking whether or not viable alternatives exist, and we are here to answer.

wmc epg

What alternatives are there to the Windows Media Center’s EPG?

While it is indeed a shame that Microsoft has abandoned the Windows Media Center‘s Electronic Program Guide, many alternatives exist that mimic its functionality to the finest details.

For example, If you loved having complete control of storage and integration with your other media libraries then you should check out the DVR capabilities of Plex.

Those of you that are using HDHomeRun tuners should look at HDHomeRun DVR. More so, those of you that are using their HDHomeRun Prime CableCARD tuners then HDHomeRun DVR could be your only option.

If budget isn’t an issue and you want the best TV experience available, then you should opt for TiVo. You can even take advantage of their newer devices, called the TiVo Edge.

Are you still using Windows Media Center? If so, what’s your plan? If you moved on to something else, share your experiences in the comments below.

Of course, these are just some of the best alternatives, since the Internet is full of them anyway. Other worthy mentions include:

No news from Microsoft about an official replacement for the Windows Media Center Electronic Program Guide has been revealed yet. However, if you too were a fan of it, go ahead and take advantage of all the alternatives.

Did you find this guide useful? Let us know in the comment section below.

RELATED ARTICLES YOU SHOULD CHECK OUT:

How to Migrate a Profile From Windows 7 to Windows 10

With Windows 7 no longer receiving any more support, users are now forced to upgrade to Windows 10 or pay for Windows 7 Extended Support.

If you choose the latter, then your biggest concern is probably migrating your user profile from a Windows 7 PC to the Windows 10 one.

Thankfully enough, there are plenty of methods on how to migrate your user profile from one PC to another. That is why we’ve decided to compile a list of the most efficient methods of transferring user profiles from Windows 7 PCs to Windows 10 PCs.

How to migrate profiles from Windows 7 to Windows 10?

1. Manually copy the user profile

  1. Go to My computer
  2. Navigate to C:\Windows\System32
  3. Select the MIGWIZ  folder
  4. Right-click it and select Copy
  5. Paste it on an external drive such as a USB stick
Migwiz

There may be cases where the copying process will fail due to the profile being temporary. In order to fix this issue, you will need to modify certain registries

  1. Press Start
  2. In the search box type in regedit
  3. In the Registry Editor, go to this line:
    • HKEY_LOCAL_MACHINE\Software\Microsoft\Windows NT\Current Version\Profile List
  4. If you find any duplicates of your profiles, rename them
  5. Launch Windows Easy Transfer
    • You will be asked What do you want to use to transfer items to your new computer?
  6. Select An external hard disk or USB Flash drive
  7. Select This is my old computer
  8. The next window will present you with a Windows Easy Transfer key. Write it down
transfer key

Now that you have copied the profile on the USB stick, it is time to transfer it to the new Windows 10 PC

  1. Insert the USB drive in the Windows 10 PC and copy the MIGWIZ  folder on the hard drive
  2. Launch migwiz.exe
  3. Click Next
  4. Select This is my new PC
  5. Click Next
  6. Select My old computer is running Windows 7
  7. Insert the Windows Easy Transfer key 
  8. Finish the setup
enter key

2. Use a third-party migration tool

If the above-mentioned steps seem too complicated for you, you could always opt for a simpler alternative. One such alternative is using a third-party tool that is specially created for efficient and lossless data migration between PCs.

The perfect example of this is Laplink PCmover, an easy-to-use software solution made to facilitate the migration of data between Windows 7 and Windows 10 PCs.

Safety first
laplink pc mover express product box

Migrating from an OS to another is a big risk unless you have the right tool to do it. PCmover Express will move from without any data loss:

  • All your user profiles
  • OS settings
  • Personal data
  • Installed apps and software

For more information about this tool, check out this detailed guide.

Another reliable option is User Profile Wizard, a free utility designed to migrate Windows user profiles quickly while preserving settings, permissions, and data integrity.

By following these steps, you should be able to efficiently transfer user profiles between a Windows 7 PC and a Windows 10 PC.

What method do you prefer when transferring profiles between Windows 7 and Windows 10 PCs? Let us know in the comment section below.

RELATED ARTICLES YOU SHOULD CHECK OUT:

Raspberry Pi Astronomy Software: 4 Best Picks

Astronomy software solutions pave the way to observe sky charts and can be installed on almost any device, including Raspberry Pi. With the help of these programs, anyone can visualize astronomy objects, such as stars, planets, comets, asteroids, and constellations. Meanwhile, Raspberry Pi quickly became a favorite among computer fans, thanks to its affordable price, lightweight package, minimal power consumption, zero noise, and the fact that it’s completely customizable. Therefore, we prepared this article for enthusiasts looking for astronomy software for Raspberry Pi. We selected the 4 best tools that we think you would love to engage for stargazing activities.

What are the best astronomy software tools for Raspberry Pi?

Stellarium

Stellarium main window

Stellarium is an astronomy software solution that can be installed on Raspberry Pi. It’s free and open-source, giving you the possibility to observe the sky from Earth during the day or at night.

The tool simulates stargazing with binoculars, a telescope, or without any proper equipment. It provides a 3D environment where you can explore the Milky Way, stars, deep-sky objects, constellations, and nebulae in a full Messier catalog.

There’s also an extra catalog available, which unlocks more than 1 million deep-sky objects and 177 million stars. Stellarium is complete with all sorts of effects, such as star twinkling and atmosphere settings for day cycles.

You can investigate the satellites of planets, track comet tails, and view equatorial and azimuthal grids. It’s also possible to control time and use fisheye projection for planetarium domes.

Thanks to the fact that Stellarium supports plugins, you can add more functions to the tool. For example, it’s possible to configure telescope settings, load new constellation images, and simulate ocular mode.

Pros:

  • Free and open-source
  • Includes day and night cycles
  • Simulates stargazing, telescope view, and much more
  • Allows you to monitor satellites

Cons:

  • You may need a tutorial to use it properly

Get it now

KStars

KStars

KStars is another free and open-source astronomy software tool that works well with Raspberry Pi. It simulates the night sky, as seen from Earth. And you can control time, which means that you can toggle day and night mode for stargazing.

With the help of this application, you can explore 8 planets, the sun and moon, up to 100 million stars, and about 13,000 deep-sky objects. It also displays comets, satellites, asteroids, and supernovae.

KStars comes with an educational feature that allows you to adjust the simulation speed to inspect astronomical events which took place over great lengths of time. It can predict conjunctions, too.

Moreover, you can use an observation planner, track objects, and consult a sky calendar. Coordinates can be changed manually. It’s possible to make various calculations, like equinoxes and solstices, coordinates, and eclipses in our solar system.

For additional images and data, you can access some Internet resources within the program. Favorite sky images can be saved to file. You can also select a sky object from a database or point it out on the map to prepare it for high-quality printing.

Pros:

  • Free and open-source
  • Holds data on up to one million stars
  • Can be used to access the Internet for extra resources

Cons:

  • May be a bit too simplistic for some

Get it now

Celestia

Celestia

Celestia is a favorite choice among the community when it comes to astronomy software, and it can be installed on Raspberry Pi, too. It facilitates a 3D space simulation environment, where you can freely roam the universe using keyboard controls.

Using Celestia is almost like playing a sandbox space game. It’s incredibly entertaining and you don’t have to be an astronomer to enjoy it. You can also capture videos and screenshots.

There are various navigation tools put at your disposal, allowing you to take over time settings, track celestial objects, choose what labels you want to display on the screen or switch to a different perspective.

The application comes with a rich database of stars, planets, constellations, asteroids, moons, comets, galaxies, nebulae, and spacecrafts. We recommend running the demo at startup. It includes an interactive tour with subtitles.

Thanks to the fact that Celestia is open source and supports scripts, you can download other tours made by the Celestia community and load them into your desktop program.

Pros:

  • Free 3D roaming and keyboard control
  • You can download scripted tours of the galaxies

Cons:

  • Not for beginners

Get it now

Cartes du Ciel (Sky Charts)

Cartes du Ciel

Cartes du Ciel is an open-source and feature-rich astronomy software solution that can be integrated with Raspberry Pi. It provides a sky chart with stars, nebulae, planets, asteroids, and comets.

The standard catalog of the tool includes a little over 9,000 stars and 10,600 deep-sky objects, but you can download more catalogs if you want to add more items.

Because Cartes du Ciel was designed as an optimal solution that works even with weaker hardware configurations, it doesn’t have resource-demanding features by default, making it ideal for Raspberry Pi setup.

For example, celestial objects are not accompanied by pictures but only text information. However, you can download and use pictures instead of symbols.

You can search for objects, change the field of vision, adjust the deep sky filter, switch to a different coordinate system, customize solar system options, capture and save screenshots to file, as well as print images.

Furthermore, Cartes du Ciel has a special feature dedicated to telescopes. You can connect a telescope through INDI, ASCOM or manual mount drivers, configure telescope settings, enable slewing and tracking, or synchronize data.

Pros:

  • Open-source
  • Includes a little over 9,000 stars and 10,600 deep-sky objects

Cons:

  • Celestial objects come with next, but no pictures

Get it now

Conclusion on astronomy software for Raspberry Pi

The popularity of Raspberry Pi can’t be argued, thanks to its numerous benefits. However, it’s impossible to overlook its drawbacks: ARM architecture and non-upgradable RAM.

Therefore, it can be tricky to find software solutions that are not only compatible with Raspberry Pi but also work well, without OpenGL errors or delays.

When it comes to astronomy software, though, we think that you should give a shot to Stellarium, KStars, Celestia, or Cartes du Ciel, depending on your Raspberry Pi configuration.

Best speaker simulation software for Windows 10/11

Speaker simulation software tools give you the possibility to use accurate measurements and design a home theater system or any other kind of venue for hosting audio systems. Such applications have features to help you mimic the real-life audio environment, set the room dimensions, add multiple speakers of different makes and models, and run various simulations to test the sound quality. In this article, we are showing you the 5 best speaker simulation software tools that we could find. Some are free to use while others are just free to try, so you might as well take advantage as much as you can.

What are the best speaker simulation software utilities?

EASE Focus 3

The main window of EASE Focus 3

Designed as a free speaker simulation software tool, EASE Focus 3 primarily focuses on testing acoustics. It features 3D modeling functions for several kinds of speakers, including conventional, digitally steered columns, line arrays, and sub-arrays.

The program is wrapped in a simple interface, where you can begin a project by adding the sound source. When adding the audience zone, you can select its shape, even if we are talking about a stadium with curved and inclined seating.

You can explore multiple sound sources and tinker with various attributes like frequency, bandwidth, temperature, air pressure, and humidity. The distribution graph is displayed on the bottom part of the window, together with other view modes.

The sound coverage is immediately computed by EASE Focus 3 so that you can find out the frequency response. Because the software product is backed by several major speaker makers, it’s possible to simulate devices from multiple manufacturers within the same project.

Pros:

  • It is free
  • Lets you test out various sound settings
  • It features 3D modeling functions for several kinds of speakers

Cons:

  • Not as feature-packed as the other alternatives

Get it now

Y-S3 Yamaha Sound System Simulator

The main window of Y-S3 Yamaha Sound System Simulator

Yamaha Sound System Simulator is a free-to-use software utility that can help you determine the best position of speakers in any kind of venue by simulating multiple aspects.

To get started with Y-S3 Yamaha Sound System Simulator, you must set up the venue shape, size, number of floors, along with the listener’s ear height above the floor.

The properties of the speakers must be added in the following steps, including position and angle. Based on these settings, the tool generates the 3D coverage area of the venue with the speaker placement and gives you the possibility to make further adjustments, like changing the array data.

For instance, you can get a clear idea of how many points are necessary to put together a design system by determining the sound pressure distribution affected by speaker interference, the frequency response, and the floor sound pressure levels after modifying the system gain.

Pros:

  • It is free
  • Lets you calibrate the software to the exact needs of the room

Cons:

  • Not beginner-friendly

Get it now

SpeakerSim

The main window of SpeakerSim

SpeakerSim is a plugin that can be integrated with any VST or AAX host to simulate different kinds of speakers. It’s specially designed for audio processing in TV and movie post-production, music production, and for generally checking audio mixes within distinct environments.

The plugin is presented in a stylish dark-themed interface, where you can experiment with over 18 speaker simulations, such as headphones, computers, car speakers, cellphones, answering machines, radio, toys, or jukeboxes.

You can take advantage of a Lo-fi distortion tool, intelligent Limiter, a 3-band equalizer with low shelf, mid and high shelf, along with LowPass and HighPass filters.

It’s also possible to create transition effects and use SpeakerSim with many kinds of tracks, including synths, vocals, basses, and acoustic elements.

Pros:

  • Comes with a free demo
  • Can simulate a wide variety of speakers
  • Advanced sound filters

Cons:

  • The price tag

Get it now

VituixCAD

virtuixcad

VituixCAD is a free Windows application that takes a more complex approach toward speaker simulation software solutions. It can be used with active and passive loudspeakers that have any number of separate frequency bands and drivers.

When starting a project, you can add driver types, the nominal sound pressure level and other properties, set the frequency response, polarity, delay, and smoothing if required, as well as insert the impedance response and make adjustments (if any).

It’s also necessary to estimate the axial and power response, along with the axial responses of each driver. Then, you can draw the crossover, enter filter blocks and manually adjust their settings.

To get it right, it’s advisable to keep tweaking the circuit properties until your project hits the target values you previously estimated for the directivity index and axial, power, polar and impedance response.

Pros:

  • It is free

Cons:

  • Not for beginners

Get it now

WinSpeakerz

The main window of WinSpeakerz

The last item on our list, WinSpeakerz is a Windows software product that you can use to design and evaluate various kinds of loudspeaker systems. It comes with many advanced options and configuration settings.

To get started, you can import a bass speaker from the driver database into the workbench and set the audience area. 18 variations are available for closed, vented and bandpass boxes, so there are plenty of options worth exploring.

After settling on the box type, it’s time to specify different audio levels, make adjustments, and run the analysis. For example, you can instruct WinSpeakerz to calculate the system’s response on the workbench and simulate various responses like frequency, excursion, phase, group delay, and impedance.

Since you can save up to 10 system memories into the same project file, it means that you can load up to 10 systems on the screen at once, in order to compare them. A detailed report of the system currently loaded in the workbench can be printed for closer inspection.

Pros:

  • A great speaker evaluation tool
  • Can save up to 10 systems in its memory

Cons:

  • The free demo is pretty limited

Get it now

Conclusion

Taking everything into account, do not hesitate to take advantage and try out the five-speaker simulation software tools designed to help you design the perfect home audio systems or other types of venues.

Hands-on with the new Gmail and Google Drive integration in Outlook.com

After developing a new web browser based on Google’s open-source Chromium engine, Microsoft is now also playing nicer with Google’s own emailing and storage services. In the months following limited testing of new Gmail and Google Drive integration on Outlook.com, Microsoft is now rolling out the feature in beta to a larger group of Outlook.com users.

Along with Tom Warren from The Verge, we’re now seeing the new Google integrations on our end. However, it is noteworthy that this feature isn’t standard: It will only show up of you’re an Outlook.com Premium member, either paid or as included free as part of Office 365.

Once the Gmail and Google Drive integration is available for you, you’ll notice a pop-up message in your Outlook.com inbox, which looks like the one in the featured image above. You’ll also see a new Add Account icon in the sidebar, similar to the one in the Outlook app on mobile. Alternatively, you can check to see if you have the feature by clicking the bullhorn-shaped Announcements icon and then Try it on the top left corner of the screen, which is right next to your profile icon.

If you choose to add your Gmail inbox to Outlook.com, you’ll be prompted to grant Microsoft permissions to access your Google Account. That includes reading mail, seeing and editing Google Drive files, seeing your contacts and calendars, and your other personal information. Once you proceed, all your Gmail messages will now appear in your Outlook.com inbox.

As this is still a beta, the experience is still a bit messy. We weren’t easily able to sort between our Outlook.com inbox or the Gmail inbox. We actually needed to head back to the announcements icon and click Try it to see Gmail in the Outlook experience. Despite the sidebar and account toggle appearing in the original set-up and notification prompt, it doesn’t seem to persist in the Outlook.com UI once Gmail integration is actually enabled — at least on our end.

Google Calendar in Outlook is really convenient

One of the best parts of this new experience is the Google Calendar integration. As I am sporting an Android phone, it is great to see the same calendar meetings and appointments that I made on the Google Calendar app from my Pixel 3XL Android Phone, right on Outlook.com.

Now, when I create a calendar meeting on my phone, I don’t need to go back into Gmail.com to check on it, get reminders, or add more details.  Rather, I can just open Outook.com, toggle my Google account with Try it from the top bar, click the Calendar icon, and all the information I need is there. I often add reminders to watch my TV shows on my phone through Google Calendar, and it is great seeing these on my desktop now too.

This also can be useful for folks who have multiple calendars too, as there are the same toggle options from Google Calendar in the left bar to create more calendars, and switch between them. I prefer the more flat-looking and business look of Outlook.com when compared to the rounded and colorful Google Calendar, so there is that, too.

Google Drive Integration is great for sharing files

It’s also nice to see Google Drive integration, which lets you easily share files in Outlook.com that are stored in Google’s online cloud storage service. It’s a nice option if you’re emailing someone who doesn’t want to deal with OneDrive or prefers Google’s cloud storage service instead.

This is available by toggling over to Gmail in Outlook.com via the Try it at the top bar. Once you do that, you can access Google Drive by choosing the Browse cloud locations option. You’ll then see a pop-up option to choose Google Drive. A list of your recent files show up, and you can click the one you want to share. You also can use the search box to pick a file not listed. A recent attachment option is also available. And, if you want to use OneDrive in Gmail, you can do that too, by clicking add an account. 

Once you choose your file, you can choose an option to either share as a Google Drive link or Attach as a copy. You also can remember your choice and choose it as a default option. This is quite nifty, as the process of picking files is exactly the same as it is when choosing files via OneDrive with a Outlook.com or Microsoft email account.

A useful addition for those invested in both Google’s and Microsoft’s ecosystem

At the end of the day, it is indeed quite convenient to have access to Gmail directly from within Outlook.com, as it moves the experience closer to what you get with the dedicated Outlook app. You’re able to access your emails, calendar, and even send Google Drive files without having to open Google’s own websites, and it is great for those who prefer the user experience out Outlook.com. The experience still has quite a ways to go, but I am glad to see the new Microsoft in action and playing nice with Google services. That will be especially important with the Android-powered Surface Duo coming up later this year.

Microsoft news recap: GTA V arrives on Xbox Game Pass, Google may have blocked Stadia on Microsoft Edge, and more

Microsoft news recap is a weekly feature highlighting the top Microsoft news stories of the past week. Sit back, grab some coffee, and enjoy the read!

Grand Theft Auto V is the first new Xbox Game Pass title of 2020

Taking some by surprise, it has been announced that Grand Theft Auto V is the first game to be added to Xbox Game Pass in 2020.

Grand Theft Auto V

Google has apparently blocked its Stadia cloud gaming service on the Chromium-based Microsoft Edge

Google’s subscription-based, cloud gaming service Stadia apparently doesn’t work on Microsoft’s new Chromium-based Edge browser because Google has blocked it.

Microsoft Outlook takes aim at Google’s Gmail and hits the 100 million install mark on the Google Play Store

Another of Microsoft’s apps on Android has reached a new milestone, with Outlook crossing the 100 million install mark via the Google Play Store.

Outlook for Android Update Featured

New Microsoft Edge icon appears on latest Android beta

The latest update to the Microsoft Edge beta app on Android has delivered a new icon for the web browser.

That’s it for this week. We’ll be back next week with more Microsoft news.

Upgrade from Windows 7 to Windows 10 using SCCM

Windows 7 has reached the end of its life, and due to security concerns, everyone is urged to upgrade to Windows 10 immediately.

The problem is that this isn’t easy when you have multiple PCs that need upgrading, such as the case of IT admins in big companies. That is why using software solutions such as the SCCM (System center configuration manager) is advised.

It allows users to manage a large number of Windows-based computers, as it includes remote control properties, patch management, operating system deployment, network protection, and other various services.

In the case at hand, the SCCM can be used to upgrade multiple Windows 7 PCs to WIndows 10 at once, without going through each PC one by one.

How do I upgrade from Windows 7 to Windows 10 with SCCM?

The first step is to set up the SCCVM sequence, which you can do by following these steps:

1. Set up the SCCM sequence

  1. Launch the SCCM Console
  2. Go to Software Library
  3. Select Operating Systems
  4. Select Task Sequences
  5. Right-click Task Sequences
  6. Select Upgrade an operating system from upgrade packageSCCM
  7. Go to the Task Sequence Information tab
  8. Enter a Task Sequence Name and Description
  9. Go to the Upgrade the Windows Operating System tabsccm 2
  10. Use the Browse button to select your upgrade package
  11. Go to the Include Updates tab
  12. Select one of the following Software Update tasks:
    • All Software Updates
      • This will install the updates regardless of whether there is a deadline set
    • Mandatory Software Updates
      • This will only install updates from deployments that have a scheduled deadline
    • Do not install any software updates
      • This will not install any software update during the Task Sequencesccm 3
  13. Go to the Install Applications tab
  14. Select any application you want to add to your upgrade process
  15. Go to the Summary tab
  16. Review your choices and click Next
  17. In the Completion tab, click Close

2. Deploy the SCCM sequence

  1. Go to Software Library
  2. Choose Operating Systems
  3. Select Task Sequences
  4. Right-click Task Sequences and then select Deploy
  5. In the General pane, select a collection
  6. In the Deployment Settings tab, select the Purpose of the deployment:
    • Available
      • This will prompt the user to install at the desired time
    • Required
      • This will force the deployment at the deadline (see Scheduling)deployment sccm
  7. In the Scheduling tab, enter the date and time
  8. In the User Experience pane, select whatever options suit you better
  9. Check Create a deployment alert when the threshold is higher than the following check-box in the Alerts tab if you want to create a failure alert
  10. In the Distribution pane, select your Deployment options

3. Begin the upgrade process

  1. Log into a Windows 7 PC
  2. Open the Configuration Manager Icon
  3. Go to the Actions tab
  4. Select Machine Policy Retrieval & Evaluation Cyclesccm 5
  5. Open the new Software Center from the Windows 7 Start Menu
    • Here you will see the SCCM sequence you created earlier
  6. Click it, and select Install
  7. In case a warning will appear, disregard it and select Install Operating System
  8. Let the upgrade unfold

sccm6

By following these steps, you should be able to efficiently upgrade a Windows 7 PC to Windows 10 by using an SCCM sequence.

Do you think that this is an efficient method of upgrading Windows 7 PCs? Let us know in the comment section below.

RELATED ARTICLES YOU SHOULD CHECK OUT:

Windows 7 to Windows 10 Transfers via Ethernet Cable

Despite being at the end of its life, Windows 7 is still popular among users and companies. That is precisely why plenty there are many cases where the two Operating Systems may even coexist.

Of course, in order to do so, data transfer between Windows 7 PCs and Windows 10 PCs needs to be possible.

Fortunately enough, pretty much every option you can think of that involves data transfer exists. This includes sending and receiving files via a cable.

In order to proceed, you will need the following:

  • A Windows 7 PC or Laptop
  • A Windows 10 PC or Laptop
  • An Ethernet cable (the better the cable, the faster the transfer speeds will be)

How do I transfer files between PCs using an ethernet cable?

Once you’ve connected the two PCs via the Ethernet crossover cable, you will need to configure the subnet masks and select what folders that can be shared.

1. Configure the Windows 7 PC

  1. Go to the Windows 7 PC
  2. Press Start
  3. Go to the Control Panel
  4. Go to Network and Sharing Center
  5. Select Change adapter settings
  6. Look for Local Area Connection
  7. Right-click it and select Properties
  8. In the Networking tab, expand Internet Protocol Version 4 (TCP/PV4)
  9. Click Properties
  10. Click Use the following IP Address and enter an IP address
  11. Add a subnet mask
Internet Protocol Version 4 (TCP/PV4)

2. Define what files can be shared

  1. Select a folder you want to share
  2. Right-click it and select Properties
  3. Go to the Sharing tab
  4. Select Advanced Sharing
  5. Check the box next to Share this folder
  6. Give the folder whatever control options you want
  7. Select Apply
share folder

3. Configure the Windows 10 PC

  1. Go to the Windows 10 PC
  2. Press Start
  3. Go to Settings
  4. Go to Network & Internet
  5. Choose Ethernet
  6. Select Change adapter optionschange adapter settings
  7. Look for Local Area Connection
  8. Right-click it and select Properties
  9. In the Networking tab, expand Internet Protocol Version 4 (TCP/PV4)
  10. Click Properties
  11. Click Use the following IP Address and enter the same IP address as the Windows 7 PC
  12. Add a subnet mask
  13. Press OK

Once you’ve set up the Windows 10 PC as well, you can visit the Network window from File Explorer, and the connection with the Windows 7 PC should appear there.

Double-click it, and all the files and folders that were shared will be at your disposal.

Did you think sharing data via the ethernet cable is efficient? Let us know in the comment section below.

RELATED ARTICLES YOU SHOULD CHECK OUT:

Windows 7 vs Windows 10 on Old PCs: What to Expect

Windows users are probably already aware that Windows 7 is at the end of its life. Thus, they are forced to either get Extended Support for Business or upgrade to Windows 10.

However, a newer OS means that many users are concerned about their hardware. While Windows 10 has been around for some time now, those that have very old PCs or laptops are wondering whether or not they can handle Windows 10.

In theory, a newer OS always comes with higher system requirements, which leads some to eventually change the hardware for the sake of the software.

However, this doesn’t seem to be the case with Windows 10, as you will see in the article below.

What OS is better for my low-end PC?

First of all, you need to define what exactly “low-end” PC means. If you are talking about a PC that is more than 10 years old, more or less from the Windows XP era, then staying with Windows 7 is your best bet.

However, if your PC or laptop is new enough to meet Windows 10’s system requirements, then the best bet is Windows 10.

Tests revealed that the two Operating Systems behave more or less the same. The only exceptions were the loading, booting, and shutdown times, where Windows 10 proved to be faster.

On the flip side, you need to understand that if your hardware is too old, the drivers that come with it may not be compatible with Windows 10.

Older hardware sometimes works better with legacy programs, so downloading older releases can help you maintain stability on a slow PC. You can use trusted sources such as old version software archives when newer builds feel too heavy or incompatible.

If that is the case, Windows 10 will simply replace the missing drivers with generic ones developed by Microsoft. While they may not be the best choice out there, they are better than having no drivers at all.

More so, take into consideration that Windows 10 has been proven to handle updates much more efficiently and faster. If that doesn’t convince you, keep in mind that even with Extended Support you will still have to upgrade to Windows 10 at some point.

Technology is evolving, and we as users need to evolve alongside it. This includes upgrading our hardware and software.

However, if circumstances force you to remain with older hardware for longer periods of time, going from Windows 7 to Windows 10 is a safe bet. Speaking of safe, the improved security features alone should be enough of an incentive to upgrade.

Do you prefer Windows 7 or Windows 10 or your older hardware? Let us know in the comment section below.

RELATED ARTICLES YOU SHOULD CHECK OUT:

Windows 7 vs Windows 10 sound quality

Windows 7 has reached the end of its life, and as such, everyone is advised to move on to the next better OS: Windows 10.

It goes without saying that such a migration is for the better since Windows 10 has better security features, better support, and more.

Of course, if you want to stay with Windows 7, you could always opt for the Windows 7 Extended Support, although you should know that this too can only be done for an extra 2 years.

Audiophiles, however, might be interested in knowing that there are differences between how the two OSes handle sound, and how one may provide overall better sound quality than the other.

Thus, if you too are interested in pristine sound quality and clarity, you should continue reading the article below.

How does Windows 10 affect sound quality?

In theory, audio quality should not change if the only thing you do is switch the Operating System. As such, Windows 7 or Windows 10 per se will not affect the audio experience.

Windows 10 makes listening to music easier and better

One thing you should remember is that Windows 10 does come with a set of changes that indirectly affect the way you will listen to music. These include:

  • Improved audio stack performance
  • An Opt-in dedicated audio core
    • This allows you to move audio processing to a dedicated processor core
  • WASAPI enhancements
  • AudioGraph, which is a new API, built on WASAPI, offers ‘higher-level constructs’ for working with audio
  • New Codecs, namely FLAC and ALAC
  • Web Audio, which is included in Microsoft Edge
  • Bluetooth MIDI
  • Lower audio latency
  • Audio aggregation and routing
  • MIDI routing

These are just one of the many improvements that affect your audio experience more or less directly.

Additionally, because of the universal app development changes, more users can now develop more and better apps, for all devices that support Windows 10.

Why Windows 7 may seem the better option

If you just upgraded from Windows 7 to Windows 10 and the audio seems inferior, it may be due to the driver. Those of you that have older PCs may have been using drivers that were optimized for WIndows 7.

However, not all developers bothered making further optimizations for the newer OS. As such, you may end up using the generic audio drivers provided by Microsoft.

Conclusion

As you can see for yourself, there are differences in audio quality and response rate between Windows 7 and Windows 10. However, these are extremely subtle and hard to notice.

In fact, the only ones that can truly tell the difference are those that work in audio player development or those that have home recording studios.

For the rest of the consumers, a 128 kbps song will still sound like a 128kbps sound regardless of the OS.

Do you think Windows 10 is superior as far as audio goes? Let us know in the comment section below.

RELATED ARTICLES YOU SHOULD CHECK OUT:

Best astronomy chart software tools for Windows 10/11

Astronomy chart software programs are incredibly attractive for people of all ages, because you don’t have to be an astronomer to understand the appeal of celestial objects and visualizing astronomy elements, in general.

Therefore, we have selected the 4 best astronomy chart software tools that you can use to immerse yourself in outer space, freely roam the universe, discover planets and stars that you never heard about, and ultimately gain new knowledge on astronomy.

What are the best astronomy chart software tools that I can get?

Celestia

Celestia main window

Celestia is a free and open-source 3D space simulator. It gives you the possibility to freely explore planets, stars, moons, galaxies, asteroids, comets, spacecrafts, constellations, and nebulae. The software tool can also display astronomy charts.

Navigating space in 3D in Celestia feels like playing an open-world game, especially since you use mouse and keyboard controls to move, change the camera orientation, orbit around objects, look behind, track objects, control time, toggle labels, and perform additional actions.

To get a better idea of the program, you can run a demo that takes you on a tour to Earth, the moon and sun, Jupiter, and a star system. We suggest switching to fullscreen mode first.

And, if your hardware supports it, turn on anti-aliasing, maximize the texture resolution, and increase the ambient light to obtain the best graphical conditions.

You can take screenshots and record videos, get more information on solar systems and stars, find eclipses in the universe, select the type of celestial bodies to render, as well as increase or decrease the number of visible stars with the press of a key.

Celestia also lets you add bookmarks to later review your favorite parts from outer space.

And, if you’re interested in more interactive tours like the demo integrated in the program, you can find other scripts online made by the Celestia community, complete with subtitles.

The only thing missing is an audio feature, which would’ve worked great with deep space music or educational voice recordings.

Pros:

  • Easy on your PC’s resources
  • Free and open-source
  • Key-board controlled exploration

Cons:

  • Not as many features as a premium product

Get it now

Stellarium

Stellarium main window

Stellarium is another free and open-source Windows application that provides you with a 3D planetarium for your PC. It can also be used as an astronomy chart software solution.

The program takes a unique approach, allowing you to watch the sky from Earth in 3D and in full screen, as if you were using a telescope or binoculars, or just observing with the naked eye.

It has more than 600,000 stars, 80,000 deep-sky objects, and 20 constellations registered in its standard catalog, together with nebulae images. But you can access over 177 million stars and 1 million deep-sky objects in an extra catalog.

A search tool is put at your disposal to help you easily identify celestial objects. You can also change coordinates, switch to a different location and time zone, and perform various astronomical calculations.

Stellarium shows a realistic representation of the Milky Way, sunrise and sunset, the planets with their corresponding satellites, comet tails, star twinkling, equatorial and azimuthal grids, eclipses, and various 3D sceneries.

It can also simulate novae and supernovae, as well as show you the sky at day or during the night, thanks to atmosphere settings. And, if you are interested in extra functionality, you can take advantage of the application’s plugin system.

For instance, you can add ocular simulation, telescope configuration, new solar system objects, landscapes, artificial satellites, and constellation images.

Pros:

  • Free and open source
  • Detailed space charts
  • Simulates day and night cycles
  • The UI is almost non-existent

Cons:

  • May need a tutorial on how to use properly

Get it now

SpaceEngine

SpaceEngine

SpaceEngine has more in common with Celestia than Stellarium, but it takes everything to a whole new level. It’s a 3D space simulator that’s more a game than a program. And it includes astronomy chart software solutions, too.

Featuring an interactive 3D planetarium, SpaceEngine is science-based and goes to great lengths to accurately portray the entire universe. The most interesting aspect is that it uses procedural generation for rendering the uncharted areas of the universe.

You can freely roam orbital landscapes, planets and moons, the deep space, photo-realistic celestial objects, and even spaceships. The scenery is actually breathtaking.

And you can also apply mods, such as galaxies and nebulae, HD close-up textures of planets, spaceship models, or custom-made solar systems. It’s even possible to build your own star or planet.

Using exploration tools, you can get complete information on celestial bodies and surroundings, navigate a map of stars, find out the composition of each planet, and get an overview of the planets, sorted by size.

The newest edition of SpaceEngine has VR support and must be purchased through Steam. However, you can download and install older versions for free.

Pros:

  • Offers VR support
  • Feels like a game
  • Mod compatibility

Cons:

  • Not for those seeking professional tools

Get it now

Solar System Scope

Solar System Scope

Solar System Scope isn’t as feature-rich as other astronomy chart software solutions on this list. But it’s still entertaining. It facilitates a 3D simulated environment of the solar system and night sky, complete with celestial bodies.

You can freely roam our solar system and get technical information about any planet or star, including composition, distance, galaxy, and structure, along with convective and radiative zone.

When exploring the encyclopedia of a body, you can switch to night sky mode to see where you would have to look to locate the body and how it is positioned compared to known planets.

A simple catalog is put at your disposal for exploring the solar system, night sky, planets, stars, Messier objects, and nearby star systems. Sound effects and background music are included, but you can turn them off.

As far as viewing options are concerned, you can control what you wish to display in the map when it comes to stars and their names, Messier objects and their names, star position lines, scale grid, as well as distance names and lines.

The online version of Solar System Scope is free to use. There’s an offline mode, too, which comes with a free demo. The main difference is that the offline version has superior graphics.

You can also download new high-resolution textures for free, which are based on NASA elevation and imagery data.

Pros:

  • Great 3D design and navigation
  • Great for calculating the trajectory of celestial objects
  • The online version is Free
  • Comes with an offline mode

Cons:

  • The downloadable client is not free

Get it now

Conclusion on astronomy chart software

With Celestia and SpaceEngine, you feel that you joined a sandbox video game, where you can freely roam the universe.

Stellarium gives an accurate representation of the sky as seen from Earth, while Solar System Scope focuses on objects from our own solar system and the neighborhood, too.

Whether you need to work on an important astronomy project for school or just take a break and lose yourself in outer space, you can look into the astronomy chart software tools on this list.

Silhouette Software for PC: Best to Use in 2026

Silhouette software solutions simplify your job when it comes to designing and printing various materials that can be used with die-cutting machines, such as paper, vinyl, or metal.

There are many types of electronic die-cutting machines available, but perhaps the most popular one is Silhouette. With a stylish look, it plugs into your computer and awaits your command to print stunning designs. And all you have to do is come up with the artwork, whether you create it yourself or get inspired by others.

That is why we’ve decided to compile a list of the best Silhouette software tools that you can buy right now.

What are the top 4 Silhouette software for Windows 10?

Silhouette Studio Basic Edition

The main window of Silhouette Studio Basic Edition

The prime choice of users is Silhouette Studio Basic Edition, a free-to-use software application that features standard functions for design and text, enabling you to create printing tasks for Silhouette die-cutting machines.

Wrapped in a rather intuitive interface, it gives you the possibility to work with move, rotate, scale, align and replicate tools, along with weld, crop, divide and subtract utilities. These are pretty basic functions found in photo editing software.

Thanks to PixScan technology, you can cut around any printed picture with precision, or place the cut lines on the right spots of your material using a scanner, in order to import the image into Silhouette Studio and continue designing it.

Pros:

  • Come with a wide variety of tools
  • Free of charge
  • Unlimited use

Cons:

  • Contains only the basic toolset

⇒ Get it now

Silhouette Studio Designer Edition

The main window of Silhouette Studio Designer Edition

In addition to including all features of the free version, the Designer Edition of Silhouette Studio permits die-cutting machine enthusiasts to import artwork from SVG format.

For example, you can use Adobe Illustrator to create stunning designs for Silhouette machines. After saving it as an SVG file, you can then import it into Silhouette Studio Designer Edition and pick up where you left off.

Pros:

  • Plenty of online tutorials are provided on how to use it
  • Can manage formats and layers
  • More tools than the basic edition

Cons:

  • Not very beginner-friendly

⇒ Get it now

Silhouette Studio Designer Edition Plus

The main window of Silhouette Studio Designer Edition

As you can imagine, Silhouette Studio Designer Edition Plus contains all features available in Silhouette Studio Designer and makes room for new ones.

More specifically, you are free to import embroidery artwork from PES, EXP, JEF, DST or XXX files. A more enhanced version of the Rhinestone feature can be used here so that you can create and print more elaborate designs.

Pros:

  • Supports a wide variety of file formats
  • Can be used to create elaborate designs

Cons:

  • The price tag

⇒ Get it now

Silhouette Studio Business Edition

The main window of Silhouette Studio Business Edition

Silhouette Studio Business Edition is the richest version out of the four. Suffice it to say, it supports new features aside from the previously mentioned options and configuration settings.

The business version is dedicated to helping you put together large-scale projects at the highest possible quality. The goal is to reduce the time it normally takes you to cut huge chunks of material that will be used with the Silhouette die-cutting machine.

For instance, the software solution gives you the possibility to import AI, CDR and EPS files that you have created using tools like Adobe Illustrator or CorelDraw.

Pros:

  • The most tools of all Silhouette editions
  • Can be used for large-scale projects

Cons:

  • The premium price tag

⇒ Get it now

Closing thoughts on Silhouette software

Die-cutting machines are incredibly useful for creating and personalizing objects made of various fabrics. And the beauty of Silhouette software solutions is that they can help you turn your dreams into reality.

DiRT Rally 2.0 is free to play this weekend with Xbox Live Gold

Microsoft is kicking off the new year with its first Free Play Days in 2020. This weekend,  the company is offering DiRT Rally 2.0 to Xbox One owners subscribed to Xbox Live Gold, or those that get Gold benefits though Xbox Game Pass Ultimate.

DiRT Rally 2.0 was released not even a year ago, so the free trial period this weekend could give many gamers the opportunity to try something somewhat new. The game features more than 50 cars that can be raced in six real life rally locations—the U.S., Australia, New Zealand, Argentina, Spain, and Poland—all with realistic driving physics.

If you decide you’d like to own the game after the trial period which ends on Sunday, it’s also receiving a steep discount for a limited time. Those in the U.S. can get it for up to 70% off, for instance, which brings the Standard Edition and Digital Deluxe Edition to $18 and $24, respectively.

DiRT Rally 2.0
DiRT Rally 2.0
Developer:
Codemasters
Price:
Free

Those with Game Pass can also continue playing past the trial period this weekend, as the title joined the subscription’s free games catalog in September for both console and for those on PC, as well.

If you’re new to Xbox Live Gold or Game Pass, it might be worth noting that Game Pass Ultimate, the subscription that combines both for consoles and PC, is on sale for three months for $1 for new members. It’s definitely worth it if you’re into free games each month.

Xbox Game Pass Ultimate

Will you be racing in DiRT Rally this weekend? Share your thought about the game in the comments area below.

Want to get the most out of Microsoft Teams meetings? Here’s how to multitask and take Meeting Notes

During a meeting in Microsoft Teams, you might want to take notes. For some people, that might mean opening-up another program like Microsoft Word or even the Sticky notes app in Windows 10. But, did you know that Teams has a meeting notes feature to help you capture and share your thoughts during your important calls? In our latest Microsoft Teams guide, we’ll show you how you can use the feature to your advantage and perhaps even multitask.

Important notes on Notes

Before getting into the experience of taking notes in Teams, there are some important points to note. Currently, only people from within your organization will be able to start or access meeting notes. That means guests won’t have the feature. It’s also important to note that there is a 20 person limit for notes access. If your meeting has more than 20 people, only the first 20 will be able to access your notes. You also need to know that only people who have been previously invited to join a meeting before notes are created will have access to notes. If you joined later, you won’t have access.

Taking Notes before the meeting

In Teams, you can take notes before the meeting, during the meeting, and after the meeting. In this step, we’ll explain how you can take notes before the meeting.

You’ll want to go to the Calendar section in Teams, and then select your meeting from the list. Next, click Chat with participants, and select the Meeting Notes tab. You can then select Start taking meeting notes. If you want, you can also add to the agenda @mention people, or assign action items. However, please be aware that you’ll only see pre-meeting notes if you’re in a meeting that doesn’t take place in a channel.

Taking notes during the meeting

Once you’re in a meeting, you can get to your notes by selecting More Options at the bottom of the screen and choosing Show meeting notes in the meeting controls. You might also notice an option to Start taking meeting notes if you haven’t already.

Once you select that option, you’ll be able to start typing notes. You can use controls at the top of the panel to format and layout your text. You can also add new notes by choosing to Add a new section here. If you want, you even can get someone’s attention by assigning an action item.

Image via Microsoft

Seeing notes after the meeting

Once a meeting is complete, you can access notes in a few ways. If you want to access notes from a channel meeting, all you need to do is to head to where the meeting occurred and find it. You can then select show notes in fullscreen. For finding notes in a private meeting, you can go to Chat and find the meeting, and select Show notes in fullscreen. Notes will show up in a Wiki tab, and you can read, edit, or add more notes.

Meeting Notes are just the beginning

Taking notes during meetings is just the beginning of what you can accomplish. You also can schedule meetings, use keyboard shortcuts, blur your background, and much more. We’ve got a guide which explains how to get the most out of meetings. We’ve also previously given a look at where Teams is heading into the future and explained some incoming features which will help boost your experience.

Are you using Teams? Share your tips and tricks or frustrations in the comments below.

How to upgrade a domain-joined PC from Windows 7 to 10

Since the support for Windows 7 has ended, there are two courses of action that you can take:

However, those of you that have your PCs joined in a domain may not receive the upgrade notifications as everybody else.

While this doesn’t mean that you can’t upgrade, you won’t be reminded to do it as soon as possible.

Keep in mind that no support means that your windows 7 PCs will no longer receive any more security updates. This translates into an increased risk from cyberattacks, which can be especially devastating to joined-domain PCs.

Thankfully enough, the upgrade process is fairly simple, especially since all you need is Microsoft’s provided Media Creation Tool. additionally, you’ll need to have a valid Windows 10 license for each of the domain-joined PCs that you own.

How do I upgrade my domain-joined PCs to Windows 10?

As such, if you want to upgrade your domain-joined PCs to Windows 10, simply follow these steps:

  1. Visit the Windows 10 Media Creation Tool website
  2. Press Download now
  3. Once the setup has been downloaded, launch it
  4. Select Upgrade this PC nowmedia creation tool
  5. Follow the on-screen instructions
  6. Input the Windows 10 license key when prompted
  7. Finish the installation
  8. Reboot the PC

Repeat the process with each PC until all the PCs in your domain have been upgraded.

Keep in mind that you need to create a backup of all of your data on each PC before proceeding with the upgrade since there is no guarantee that there won’t be any data loss.

Additionally, if you are upgrading an OEM Windows 7, make sure you know you know the license key before the upgrade, or else you won’t be able to activate your version of Windows 10 Pro.

If you want to learn how you can migrate from Windows 7 to Windows 10 without any data loss, check out this in-depth guide.

Admittedly, the entire process can take a lot of time, depending on how new the PCs are, and how many of them there are. Other than that, there should be no inconveniences, neither from a functionality or from a performance point of view.

Do you know of any other way of upgrading your domain-joined PCs? Let us know in the comment section below.

RELATED ARTICLES YOU SHOULD CHECK OUT:

How to Upgrade Windows 7 to Windows 10 on Bootcamp

For those of you that are more Mac users than Windows users, Apple has been able to support Windows 10 on Bootcamp for some time now.

Now that Windows 7 is no longer officially supported, you’ll probably need to learn how to upgrade to Windows 10.

Of course, those of you that have purchased the Windows 7 Extended Support can postpone this for another 2 years. However, the vast majority of you will probably choose to upgrade to windows 10.

Thus, we’ve created this guide on how you can upgrade from Windows 7 to Windows 10 in Bootcamp on a Mac.

How do I upgrade from Windows 7 to Windows 10 on Bootcamp?

Before proceeding with the upgrade, you need to make sure you have all the necessary items and made all the preparations:

  • A Mac PC
  • Windows 7 Service Pack 1
  • A 64-bit edition of Windows
    • Keep in mind that Bootcamp only allows the installation of 64-bit editions of Windows
  • A valid Windows 10 license key

The final step that you need to take before actually upgrading your Windows is to make sure that your version of Mac is updated to the latest version.

In order to do this, follow these steps:

  1. Boot your Mac into the OS X system
  2. Log in
  3. Open the App Store app
  4. Go to the Updates tab
  5. Install any available updatesUpdate Mac
  6. Boot into Windows
  7. Launch the Apple Software Update application
  8. Install any available updates from hereUpdate windows from Mac

Once you’ve made these preparations, you can proceed with the actual upgrade from Windows 7 to Windows 10.

Simply follow these steps:

  1. Download the Windows 10 Media Creation tool
  2. Launch the executable
  3. Select Upgrade this PCmedia creation tool
  4. Follow the on-screen instructions as if it were a regular Windows PC
  5. Once the upgrade process is finished, run the Apple Software Update application again and install any available updates

By following these steps, you should be able to successfully upgrade your Bootcamp Windows 7 to Windows 10 efficiently.

Also, remember that this process will register your Mac hardware to Microsoft and that any future installs of Windows 10 on that PC will be made much easier.

Remember that since Windows 7 is no longer supported, you won’t be able to benefit from new security updates. This makes upgrading extremely important and should be mandatory to those that want to keep their data safe.

Did you find this article useful? Let us know in the comment section below.

RELATED ARTICLES YOU SHOULD CHECK OUT:

How do I backup Windows 7 before upgrading to Windows 10/11?

Windows 7 is nearing the end of support, and more and more users are preparing to migrate to the more advanced Windows 10. The problem is that when it comes to migrating to a new OS, you may want to take all of your files and folders along with you.

These include user profiles, documents, games, pictures, etc. Thankfully enough, there are plenty of ways you can backup your Windows 7 PC and prepare for migration towards Windows 10.

That is why we’ve compiled this step-by-step guide that will run you through all the methods so that you can backup all of your data and prepare for the new OS.

How do I backup Windows 7 documents?

1. Use Windows 7’s Backup and Restore feature

The default method of performing a Windows 7 backup is through the Windows Backup and Restore feature. However, keep in mind that you will need 3 items before proceeding with these steps:

  • Your Windows 7 PC
  • An external storage device
  • The PC you will install Windows 10 on

If you do have these items, then you can proceed with the Backup and Restore procedure.

1. Create a Windows 7 Backup

  1. Press Start 
  2. Go to the Control Panel
  3. Select System and Security
  4. Choose Backup and Restore
  5. Select Set up backup
  6. Connect your external storage device to the Windows 7 PC
  7. Under Backup Destination, select your external storage device
  8. Click Next
  9. Select Let me choose
  10. Click Next
    • Normally, all files under Documents, Music, Pictures, and Videos will be backed up.
    • You can choose to add other files to the list as well during this stage.
  11. Unselect Include a system image of drives
  12. Click Next
  13. Choose Change schedule
  14. Unselect Run backup on a schedule
  15. Click OK
  16. Select Save settings
  17. Run backup

windows 7 backup

2. Restore files on a Windows 10 PC

  • Connect the external storage device where you backed up your files to your Windows 10 PC
  • Press Start
  • Go to Settings
  • Select Update & Security
  • Select Backup
  • Go to Backup and Restore (Windows 7)
  • Choose Select another backup to restore files from
  • Select the backup created from your Windows 7 PC
  • Click Next 
  • Choose Select all files from this backup
  • Click Next
  • Select Restore to start restoring files to the Windows 10 PC

windows 10 backup

This is the default method used to backup and restore data from a Windows 7 PC  to a Windows 10 PC while using Windows’s proprietary backup tools.

However, if you find these steps to be too complicated or too redundant you can always choose third-party backup tools that can do the work for you.

2. Use a third-party backup tool

There are plenty of backup-tools out there that can finish the job fast and quicker than Windows 7‘s Back and Restore feature. These tools will either finish the job faster, require fewer steps, or a combination of both.

While each of these tools has different steps to follow, suffice it to say they are simple enough that they do not require their own guides.

Here are a few examples of good third-party backup tools that can prepare your Windows 7 PC for a Windows 10 upgrade:

By using any of the methods listed above, you will be able to successfully backup all of your personal files and documents and migrate them for your Windows 7 PC to your Windows 10 PC.

What method do you prefer when backing up your Windows 7 PC? Let us know in the comment section below.

RELATED ARTICLES YOU SHOULD CHECK OUT:

How to upgrade Windows 7 to Windows 10 in Parallels

Windows 7 users are most likely aware that their OS is at the end of its life, and that they will need to upgrade sooner or later to Windows 10.

The same thing can also be said about their Windows 7 virtual machines that they are running on their Mac in Parallels, which will also need an upgrade soon enough.

While not many users need virtual machines, those that do will definitely benefit from knowing how to upgrade.

That is precisely why we’ve decided to compile a step-by-step guide on how to upgrade Windows 7 to Windows 10 in Parallels Desktop for Mac.

How do I upgrade Windows 7 to Windows 10 in Parallels?

  1. Create a snapshot of your VM
    • This step is only needed if you’ve done any work on a Windows 7 VM and need to save it for the upgrade
    • You can back up the entire virtual machine by copying its .pvm file somewhere on your hard drive
  2. Update your Windows 7 VM until it is the latest version
  3. Download the Windows 10 Media Creation Tool
  4. Run it and download the ISO into your PC
  5. Connect the ISO to your VM
    1. If you’re in Window view mode:
      1. In the Mac menu bar click on Devices
      2. Select CD/DVD 1
      3. Choose Connect ImageWindow Mode
    2. If you’re in Coherence view mode:
      1. Click on Parallels menu icon
      2. Go to Devices
      3. Select CD/DVD 1
      4. Choose Connect Image…Coherence Mode
  6. Open File Explorer
  7. Go to This PC
  8. Run Setup from the mounted image
  9. Follow the on-screen instructions
  10. Restart the VM

By following these steps, you will be able to successfully upgrade Windows 7 to Windows 10 in Parallels Desktop for Mac.

Keep in mind that in order to prepare for these steps, your PC should have enough processing power to run the two operating systems in parallel.

Additionally, make sure you have at least 10 GB of hard disk space for the upgrade from Windows 7 to Windows 10. If you do meet these criteria, then the upgrade process should go flawlessly.

Do you use Parallels to run a Windows VM on a Mac too? Tell us what other articles you might be interested in reading in the comment section below.

RELATED ARTICLES YOU SHOULD CHECK OUT: