GOG is a popular video game distributing and management client for the Windows platform. However, multiple users have reported the GOG games won’t open in full-screen issue when playing.
This issue mostly occurs with the classic games that may not support modern display resolutions. This results in black bars at the side of the games (windowed mode).
If you are also troubled by this issue, here are a couple of troubleshooting tips to help you fix GOG games won’t open in full-screen issue Windows.
What can I do if GOG games won’t open in full-screen?
1. Turn off GPU frame rate software
If you are using frame rate software that helps you match the graphic card frame rate with the monitor frame rate, it can create issues with the display resolution.
Several users have reported that turning off software like Vsync has helped fix the GOG games full-screen issue.
Try turning off Vsync or any other similar software and check for any improvements.
If the issue persists, check your graphic card settings for the scaling.
If the automatic scaling option is disabled, the graphic card will not scale the games to your display resolution.
Follow these steps to turn on GPU scaling for AMD and NVIDIA graphics.
Turn on AMD GPU scaling
From your desktop, right-click on anywhere and select AMD Radeon Settings menu from the options.
In the AMD Radeon Settings window, click the Display tab (top menu).
Click on the GPU Scaling option and toggle the switch to turn it on.
Choose the Scaling Mode. If you are not sure which scaling mode to choose, select one from the option, apply it and check if it resolves GOG games won’t open in the full-screen issue.
If the issue persists, change the scaling mode again until you find the right mode.
Turn on NVIDIA GPU scaling
Right-click on your desktop and select NVIDIA Control Panel.
In the NVIDIA Control Panel, open the Display tab.
Click on Adjust desktop size and position option.
Click the drop-down many under “Perform scaling on” and select GPU.
Here you can choose all the available scaling mode and accompanying options according to your needs.
3. Run the game in compatibility mode
If the issue persists, try running the game in compatibility mode in Windows.
Right-click on the game shortcut on the desktop. If you don’t have a shortcut, then navigate to the installation folder and right-click on the game.exe file.
Select Properties.
In the Properties window, click the Compatibility tab.
Check the box “Run this program in compatibility mode for” option.
Click the drop-down menu and select the Windows OS. Select the older version of the OS.
Click on Apply > OK to save the changes.
Launch the games again and check for any improvements.
By following the steps in this article, you can fix GOG games won’t open in full-screen issue in Windows computers. Do let us know which fix helped you in the comments.
PayPal is probably the world’s most well-known company operating a worldwide online payment system.
This system supports online money transfers and has become the go-to solution when it comes to making cross-border payments, or general online shopping.
However, you need to remember that PayPal is only a messenger and that you need to actually have your own funds in order to make any transfers or purchases.
As such, the most common way to provide PayPal with funding is by linking it to your bank account.
Remember that all Paypal payments are secured with multiple layers of protection.
Additionally, your own bank may have its own multiple-step verification systems that needs clearing before PayPal transactions can be made.
How do I link my PayPal account to a bank account?
Some Microsoft Office users might encounter account error messages that state: There are problems with your account. To fix the, please sign in again. Users might see that error message when they click File > Accounts to update Office. When that issue arises, the Office activation isn’t working; and users can’t fully utilize their Office software.
How can Users Fix the Problems With Your Account Error?
1. Click the Fix me Button
The problems with your account error message include a Fix me option under it. First, try clicking that Fix me button. The Fix me button probably won’t always work for all users, but it might still resolve the issue for some users.
2. Reset the Office Account Password
Some users have said they’ve fixed the account error for Office 365 by resetting their account passwords. To do that, log in to your Office 365 portal with a web browser.
Click the user account title at the top right of the Office 365 portal and select My account.
Click Security on the left of the portal’s page.
Press the Manage security button, and select thePassword option.
Then fill out the password fields, and click the submit button.
3. Edit the Registry
Some Office 365 Click-to-run users (within VMware UEM 9.3 environments) have fixed the problems with your account error by deleting the Identity registry key. To do that, launch the Run accessory (press the Windows key + R hotkey to open).
Input ‘regedit’ in the Open text box, and click the OK button.
Office 2016 and ‘19 users should open this key in the Registry Editor: HKEY_CURRENT_USER\Software\Microsoft\Office\16.0 \Common\Identity. If using earlier Office versions, open HKEY_CURRENT_USER\Software\Microsoft\Office, click the version number key, and then Common > Identity.
Next, right-click the Identity key and delete.
It’s recommended that users set up System Restore points before deleting registry keys. So, set up a System Restore point as outlined in the post below before editing the registry.
The problems with your account error can be due to expired or fake Office product keys that need deleting. To check the Office product keys, open the Win + X menu with the Win + X hotkey.
Input ‘cmd’ in the Open box, and click the Ctrl + Shift + Enter hotkey.
Open the Office folder in the Command Prompt by entering cd in the Prompt followed by the full MS Office path. For example, users would enter this command to open the default path for MS Office 2016: cd C:\Program Files (x86)\Microsoft Office\Office16.
Then enter ‘cscript ospp.vbs /dstatus’ in the Prompt’s window, and press the Return key. That command will show users their Office product keys.
To uninstall a fake or expired product key, input ‘cscript ospp.vbs /unpkey:XXXXX’ and press Enter. Replace the XXXXX in that command with the last five letters or numbers of the expired or fake product key.
Then enter ‘cscript ospp.vbs /act’ to activate the valid Office product key.
The above resolutions should fix the Microsoft Office account error There are problems with your account. In addition, check out the Microsoft Report and Recovery Assistant, which might also come in handy for fixing Office activation errors.
Dona Sarkar, the energetic and charismatic head of the Windows Insider Program, is moving on to a new role at Microsoft. Sarkar succeeded to Gabe Aul back in June 2016, and the Microsoft veteran announced today that she’ll be joining the Microsoft Developer Relations team to lead advocacy for Microsoft’s Power Platform ((Microsoft Flow, PowerApps, Power BI).
3/ Do you want to learn how to be a dev in 5 mins, win this unreleased OFFBRAND swag + be featured on our channels & Ignite?
Modify this sample code or build your OWN PowerApp. Reply back to this tweet with a screenshot or video.
“Currently, we are conducting a search for a new leader of the Windows Insider Program,” wrote Eran Megiddo, CVP of Windows and Education today. “In the meantime, I and the Insider crew (including Brandon, Jennifer, Blair, Jason, Vivek, Eddie) look forward to continuing to engage with you each week as we ship new builds.”
Dona Sarkar left quite a big mark on the Windows Insider program over the years. She launched the #Insiders4Good initiative, aiming to help Insiders around the world to solve problems creatively with Microsoft products. The Windows Insider team also increased engagement with Insiders under her leadership, especially with the regular Windows Insider webcasts on Mixer.
In addition to her work at Redmond, Sarkar is also an author and fashion designer. We wish her all the best in her new role at Microsoft, and we’re looking forward to see who Microsoft will chose as new leader of the Windows Insider Program.
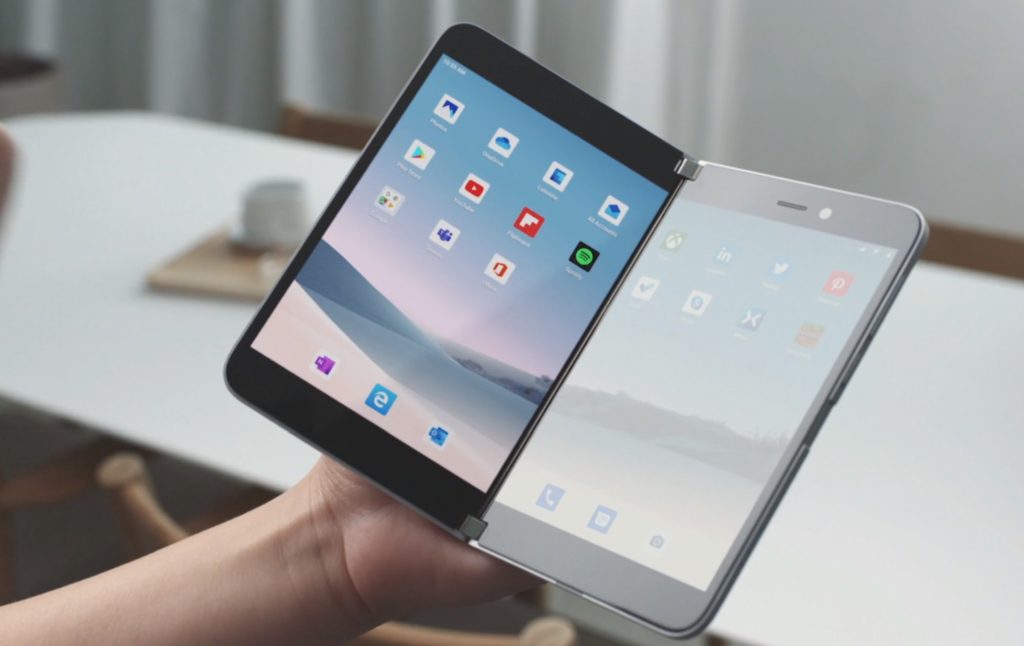
After the flood of camera flashes and 360-degree spanning slow-mo videos, we’re finally able to take a breather and fully examine Microsoft’s new Surface Duo and a few internet sleuths are starting to pose some interesting questions, like, will there be more than just the off-white color option for the device?
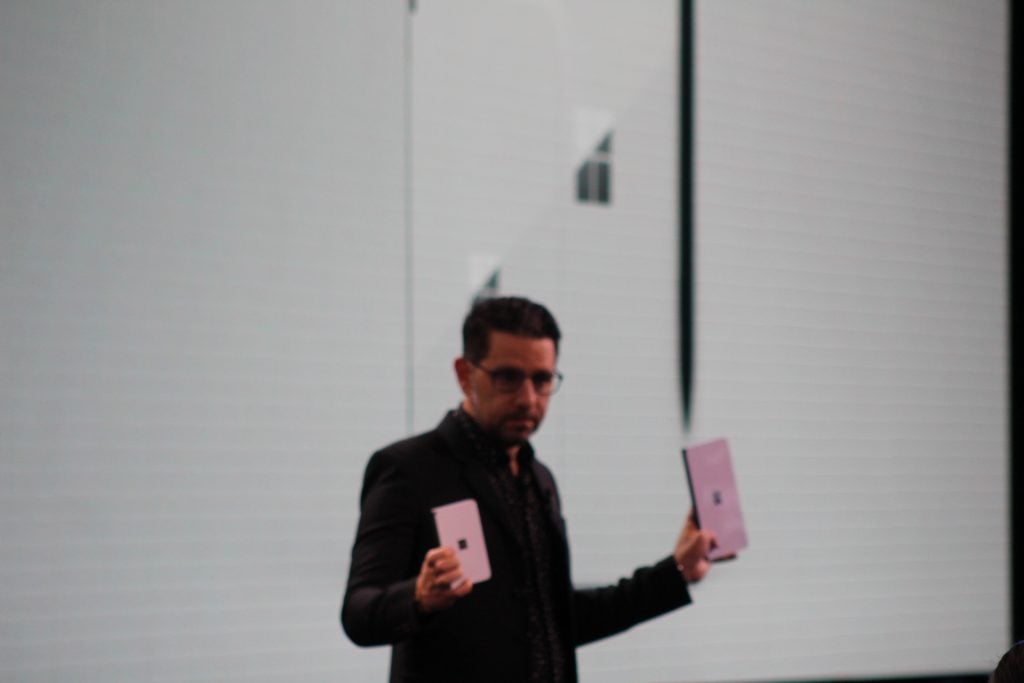
While Microsoft paraded around its white/off-white Surface Duo to the press and for the cameras on October 2, 2019, there have been captures and brief moments in video that have spotted a black version of the device in use.
Alongside @galayder’s observation, Microsoft’s CPO of hardware, Panos Panay has been spotted, in this Marques Brownlee YouTube video, using a black version with a reference area in place for what could be a future camera module.
Over the past, 120 hours or so, Panay and his team of executives have stated consistently that the hardware for the Microsoft Duo is locked in and will likely not change over the next year as the company prepares to court developer for apps and services for the device. Despite their vocal convictions, there appears to be a couple of unanswered questions about the hardware of the Duo including final color options and camera inclusions (note that the black Duo Panos is holding does have what appears to be a rear facing camera, unlike the white version shown last week) as well as final chipset offerings.
The Surface Duo is currently running a custom Snapdragon 855 chipset, however, by holiday season 2020, chip designer Qualcomm will presumably be offering as a beefier upgrade for mobile devices.
Microsoft has doubled down on its matte black color options for the Surface Pro, Surface Laptop and now the Surface Pro X and it would seem its newest foldable options, the Neo and Duo will probably follow suit, especially if the head of the division is already rocking a black version.
Dark Mode is beautiful. The popular feature in most apps and operating systems turns off the lights and brightness and makes things easier to understand and read. But, did you know that each of the Office apps has its own Dark Mode too? Well, in this guide, we’ll explain how you can enable Dark Mode in Office 365 in Windows 10.
To get started with enabling dark mode, you’ll need to first launch either a new document in Word, a presentation in PowerPoint, or a spreadsheet in Excel. Once done, you need to click on the File tab along the top of the open window.
Next, click the Account options on the bottom left-hand corner of the screen. From there, you’ll want to look for the Office Theme drop-down menu. Be sure to click the box and choose Black from the list. After choosing Black, you should notice that most menus inside yout Office 365 app have turned dark. This includes items in the ribbon, as well as the navigation and status bar along the bottom of the screen.
If you’d like, you can choose additional customization options from this Account menu. You can change the background image for the app, which generally appears in the upper right-hand corner of the screen. Some options range from Circles and Stripes, Circuit, Lunchbox, and more. You also can disable the background, and get a pure dark mode by choosing the No Background option.
As you can see, enabling Dark Mode just takes a few simple steps. So, do you like the looks of Dark Mode in Office 365? Let us know your thoughts in the comments below.
Microsoft’s Edge Insider builds now include support for tracking prevention. This feature helps protect your privacy online by disabling website trackers. This stops companies from monitoring your browsing history to serve up targeted ads.
Tracking Prevention is now enabled by default in current Edge dev builds. You can find it under “…” > Settings > Privacy and services > Tracking prevention. You can disable the feature altogether by turning the “Tracking prevention” toggle button to “Off.”
With Tracking Prevention on, you have access to three different prevention levels: Basic, Balanced and Strict. Balanced is the default. It blocks known malicious trackers, as well as some third-party trackers which may power personalized ads.
Switching to Basic mode will allow third-party trackers to continue operating. Only malicious trackers are blocked by this setting.
Using the Strict mode gives you the greatest privacy. The majority of third-party tracking scripts will be caught and blocked. However, this is likely to break some webpages. You might see empty spaces where third-party content should be loaded.
You can mitigate the impact of this by adding exceptions for particular sites. Click the “Exceptions” button to configure a whitelist of sites where trackers should be allowed. This gives you the best protection while ensuring reputable sites continue to work as intended.
Tracking prevention is a valuable feature which is becoming more common across browsers. It is therefore a positive move by Microsoft to include it in the next version of Edge. Whether you use it is ultimately a personal choice; although there are clear benefits, the feature is not without its drawbacks, which some may see as significant shortcomings.
The evolution of Microsoft’s search has been a relatively complicated matter since the company seemingly sidelined the convention of Cortana as a conduit to Bing Search.
However, with just 20 something odd days away from Microsoft’s corporate developer’s conference Ignite 2019, there is news surfacing that the company may have plans to streamline its messaging behind its various search initiatives.
Get the latest updates on Microsoft Search. Come on the journey to learn how insights, actions, and answers are being built into your everyday experiences across Microsoft 365, Bing, and Edge. See the latest roadmap across all of your experiences, from SharePoint to Office and beyond. In addition, get insights on how to connect external third-party content connectors, customization, and extensibility.
Learn about the impact of Microsoft Search on you, the administrator. We’ll take you through the inner workings of Microsoft Search and pull back the curtains on the architecture. Then we’ll translate that into practical tasks for search administration that will help you and your organization get the most out of Microsoft Search.
Modern information workers need to find knowledge quickly and easily regardless of where the data resides. Come take a first look at Microsoft Graph Connectors, which will enable users in your enterprise to search over content sources beyond Microsoft 365. You will see how Microsoft and our partners are jointly making Microsoft Search more powerful to benefit your users. We will also show you a simple set of APIs that you can start using for your custom connector development.
For human beings, reading comprehension is a basic task, performed daily. As early as in elementary school, we can read an article, and answer questions about its key ideas and details. But for AI, full reading comprehension is still an elusive goal—but a necessary one if we’re going to measure and achieve general intelligence AI. In search applications, machine comprehension will give a precise answer rather than a URL that contains the answer somewhere within a lengthy web page. Moreover, machine comprehension models can understand specific knowledge embedded in articles that usually cover narrow and specific domains, where the search data that algorithms depend upon is sparse. In this session, see and learn about the latest innovation with natural language and machine reading comprehension in Microsoft Search.
Microsoft Search is an intelligent, enterprise search experience from Microsoft that applies the artificial intelligence technology (AI) from Bing and deep personalized insights surfaced by the Microsoft Graph, to make search more effective for you. In this session, we demonstrate new Graph APIs and how Microsoft Search will let you create and customize rich search experiences around all of your enterprise content, regardless of where it resides. See our roadmap and examples of how to modernize your existing SharePoint-based enterprise search experiences to take full advantage of Microsoft Search.
There will several other sessions in relation to Microsoft Search during the four-day event, but the above list was one handpicked by a contributing member of the Microsoft Search Blog. For anyone interested in other the other related sessions that include, “Getting Started with Microsoft Search in Bing and Edge,” as well as “Hands-on with the Microsoft Search API in the Microsoft Graph,” visit here for the list.
Microsoft Ignite is scheduled for November 4 through the 8 in Orlando, FL this year and should go a bit more in-depth on things Microsoft’s only hinted at in other conferences such as what developers can expect for Office 365, Azure and even second-generation HoloLens development.
Amazon Fire Stick is one of the best devices to watch movies or listen to music, but many users reported download failure on Firestick.
This is a big issue since it will prevent you from downloading any new apps and severely impact your multimedia experience. This isn’t the only problem, and many reported that Fire Stick won’t work in fullscreen mode, but we covered that in previous guides.
Today we’re going to focus solely on download issues you can experience.
Why is my FireStick not allowing downloads?
Issues with network connection can prevent you from downloading apps on your device.
Older models might not work too well with modern apps.
One Click purchase isn’t enabled on your Amazon account.
How can I fix download failure on Firestick?
1. Make sure your Wi-Fi connection works
Test your Wi-Fi connection.
Check if your phone or other devices can use Wi-Fi.
Restart your router if any issues are present.
2. Ensure your Amazon Fire Stick is not too old
Check the model of your device.
Make sure it’s not too old.
If it is, you’ll have to upgrade it.
Purchase failure on Amazon Fire Stick occurs on older and outdated models, so if your device is older, it might be time for an upgrade.
3. Activate 1-Click
Go to your account.
Select content and devices
Go to Preferences
Select 1-Click setup.
Add your details.
You can activate this service even though you download only free apps. Also, it is easier to get Amazon applications through 1-Click.
After doing that, check if download failure on Firestick is gone.
This issue is not as serious as it seems. Just make sure your connection works and buy a newer version of Amazon Fire Stick.
Some users might wonder what has happened to their missing MS Office shortcuts on the Windows 10 Start menu. MS Office app shortcuts can disappear from the Start menu’s app list for various reasons. In earlier Windows 10 build versions, Office apps can go missing when there are more than 512 apps on the Start menu’s app list. Here are a few potential resolutions for users who can’t find their Office app shortcuts on the Start menu.
How can Users Fix Missing MS Office Shortcuts?
1. Check How Many Apps Are Installed
First, check how many installed apps there are with PowerShell. Press the Windows key + S hotkey to open the search utility.
Enter ‘PowerShell’ as the search keyword.
Click PowerShell to open its window.
Then enter ‘Get-StartApps | measure’ in PowerShell, and press the Return key. Powershell will then tell users how many apps there are on their Start menus.
2. Uninstall Superfluous Apps
If there are more than 512 apps on the Start menu, uninstall some software. To do that, enter ‘apps’ in the search box.
Click Apps & features to open the window shown directly below.
Resetting the MS Office 365 app might restore its app shortcuts on the Start menu. To do that, open Apps & features in Settings again as outlined above.
Select the Office suite app, which might be listed as Microsoft Office Desktop Apps.
Then click Advanced options.
Press the Reset button to reset the data for Office apps.
The Repair button is another option there that might fix Office shortcuts.
Users can also try repairing MS Office shortcuts with the Quick Repair or Online Repair options. Press the Windows key + R keyboard shortcut.
Open Programs and Features by entering ‘appwiz.cpl’ in Run and clicking OK.
Select the Microsoft Office suite listed in the Programs and Features.
Click the Modify button.
Then select either the Quick Repair or Online Repair option.
5. Check Out the Start menu Troubleshooter
The Start menu troubleshooter might also come in handy for fixing Office Start menu shortcuts. Users can still download the Start menu troubleshooter from Softpedia. Click Download Now on its Softpedia page, and then click startmenu.diagcab to open the window shown directly below. Thereafter, users can press the Next button to initiate the troubleshooter.
6. Pin Office Apps to the Taskbar
This isn’t really a fix, but users can always add Microsoft Office shortcuts to the taskbar instead of Start menu. To do so, open an MS Office Word or Excel document. Right-click the Office application’s taskbar icon to select the Pin to taskbar option. Thereafter, users can open their pinned Office software from the taskbar.
Those are some of the resolutions that might fix missing Microsoft Office Start menu shortcuts. Aside from those fixes, users can also try reinstalling the MS Office software to restore its Start menu shortcuts.
Earlier this week, Microsoft announced its foray back into the smartphone market, surprisingly under the Surface brand.
The company took to the stage to announce the Surface Duo, a dual-screen Android phone.
But at this same event, Microsoft announced the Surface Neo and Windows 10X, the first Surface with a dual-screen running Microsoft’s new operating system built for dual-screen devices.
Now, a petition has been started on Change.org that is calling on Microsoft to offer a variant of the Surface Duo phone with Windows 10X instead of Android (via Neowin).
The petition claims that Microsoft promised that its Universal Windows Platform (UWP) would work across all form factors, including phones.
Because there are many developers still out here that want to write Universal Windows Platform (UWP) apps that run on all form factors. When UWP was announced you promised one code base to run on any form factor… including phones and other small form factor “pocketable” devices.
Bringing Windows 10X to the Surface Duo would potentially create the ‘Surface Phone’ that many have dreamed of for years, since the demise of Windows phone.
The question is – is Microsoft ready to dive head-on back into the smartphone market with Windows?
GOG is a popular classic games publishing and distribution platform used by gamers to manage their titles. However, sometimes it may happen that you try to launch a game and encounter GOG games black screen issue in Windows.
Compatibility issues usually cause the black screen problem in GOG. You can try to fix it by running the game in compatibility mode.
If you are also trying to troubleshoot this issue, here are a couple of tips that you can apply to fix GOG games black screen problem in Windows.
Steps to fix GOG games black screen problem
1. Run the game in compatibility mode
Many users have reported that they are able to resolve the black screen issue after running the game in compatibility mode. Here is how to do it.
Open File Explorer.
Navigate to the location where the problematic game is installed.
Right-click on the game.exe file and select “Properties”.
Open the Compatibility tab.
Check the “Run this program in compatibility mode for:” box under “Compatibility mode” section.
Click the drop-down menu and select the older version of Windows. If you are using Windows 10, try Windows 7.
Click on Apply > OK to save the changes.
Close the properties window and launch GOG client.
Try to open the game and check if the black screen issue is resolved.
Add -no3d -doublebuffe
If the issue persists, try adding -no3d -doublebuffe in the target field of the game shortcut.
Right-click on the game‘s shortcut and select “Properties“.
In the Shortcut tab, locate the Target field.
Add the following command at the end of the file path. (refer the image) -no3d -doublebuffe
Click Apply > OK to save the changes.
Double-click on the shortcut again to launch the game and check for any improvements.
2. Start the game directly
If the black screen occurs while trying to launch the game from GOG Galaxy, try launching it from the installation directly.
Open File Explorer.
Navigate to the location where the game is installed. The location generally looks like this: C:GOG GamesMy Friend PedroMy Friend Pedro – Blood Bullets Bananas.exe
Double-click on the game.exe file.
Many users have reported that running the game directly from the installation directory has resolved the black screen issue.
Run as administrator
Another quick workaround that has worked for other users is to run the game as administrator.
If you have the game shortcut on the desktop, right-click on it and select Run as admin.
If not, navigate to the game installation folder.
Right-click on the game.exe file and select Run as Administrator.
If it is not a GOG exclusive, try to install the game directly from the developer.
Many users have reported that the GOG games black screen issue is fixed after installing the game directly from the developer.
Make sure you have uninstalled the game from the Control Panel > Programs > Programs and Features.
So these are the troubleshooting steps that you need to follow to fix GOG games black screen issue in Windows. Do let us know any other workarounds in the comments.
Glyph is a popular software distribution and game management platform for the Windows OS. Sometimes, when opening a game or performing Glyph update, you may encounter glyph launcher error 1013.
This is a common error and can occur due to system issues that may not be related to Glyph etc.
If you are also troubled by this error, here are a couple of troubleshooting tips to help you fix Glyph launcher error 1013 in Windows computers.
Steps to fix Glyph launcher error 1013
1. Check for Glyph update
Check if you have the latest version of Glyph installed. If the issue is widespread, the developer will release an update to fix the problem.
Launch Glyph and click the Update button to download and install the new version if available.
Manually update Glyph
If you are unable to update directly from the Glyph client, update the client manually.
First, open Control Panel and go to Programs > Programs Features.
Select Glyph and click on Uninstall.
Now go to the Glyph page and check if a new update is available.
Download and install the newer version of the client.
Even though Glyph update’s automatically, manually doing the same can help you resolve the issue.
Check for service issues
The aforementioned error also occurs if the Glyph service is down due to regular maintenance.
Check Glyph’s social media accounts as the developers usually posts about the issues at their end on social media.
The Glyph launch error can occur if your antivirus is blocking connection to the internet. Also, check if Windows Defender Firewall is blocking the connection.
Click on the System Tray icon to show the hidden icons.
Right-click on your Antivirus software and select Disable/Quit.
Turn off Windows Defender Firewall
Click on Start and select Settings.
Go to Updates and security.
Click on Windows Security.
Choose the “Firewall and Network Protection” option.
Click on your currently active network.
Click the little switch under the “Windows Defender Firewall” to turn it off.
Relaunch Glyph and check if the launcher error is resolved.
Make sure you enable the Antivirus as well the Firewall after diagnosing the issue.
3. Perform System Restore
Windows OS automatically creates Restore Point when the users install updates and software on the system. You can use these restore points to fix many issues.
Type restore in the Windows search bar.
Click on the “Create a Restore Point” option.
Click on the “System Restore” button and click Next.
Check the “Show more restore points” box is available.
Select the most recent restore point and click on Next.
Read the description and click on Finish.
Wait till the PC is restored to the selected restore point.
Once done, try launching Glyph and check if the error is resolved.
Closing words
By following the steps in this article, you can fix the Glyph launcher error 1013 in Windows computers. Do let us know which fix worked for you in the comments.
If you noticed that your Glyph Launcher crashes after a few seconds of turning on your PC, you must know you’re not the only one experiencing this problem.
This issue seems to be different from case to case, with some users saying that it happens as soon as they open their PC and others that are saying that the Glyph app disappears from the processes window after a couple of minutes.
In today’s fix article we will list a series of methods that could prove useful in this situation. Please read on to find out the details.
Is Glyph Launcher closing by itself? Fix it by trying these methods
1. Run Glyph with administrator privileges
One time:
Right-click the Glyph launcher.
Choose the Run as administrator option.
Check to see if this fixes your issue.
Using Properties:
Right-click the Glyph launcher.
Choose Properties from the menu.
Click the Compatibility tab.
Tick the box next to the option Run this program as an administrator.
Press Ok.
Try to see if this method worked.
2. Close background tasks
In some cases, your RAM memory might not be enough to permit the smooth running of a bigger number of applications.
If that is the case, then it is recommended that you close any apps running in the background.
This will allow you RAM memory to be used specifically to run the Glyph application.
Under the Compatibilitymode section -> Click the box next to the option Run this program in compatibility mode for.
From the drop-down menu -> choose another version of Windows.
Pres Ok -> try to see if this method helps you.
4. Verify the game cache integrity on Steam
Restart your PC and launch Steam.
Inside the Librarysection -> right-click on the game that’s causing issues -> select Properties.
Select the Localfilestab -> click the Verify integrity of game files button.
Steam will start verifying the game’s files.
Conclusion
In today’s article, we explored some of the best troubleshooting steps you can try to fix the issue caused by the Glyph launcher suddenly crashing.
We hope this guide managed to help you solve your problem. If that is the case, or if you have any suggestions, please feel free to use the comment section below.
If you find that your Glyph launcher won’t open or is not working when it does open, you are not the only user experiencing this issue. From the research we made online relating to this issue, it seems the problem is server-side.
But in a few cases, users reported issues with the PC or app setup that triggered the problem. Keep reading to find out the solutions!
What can I do if the Glyph launcher won’t open?
1. Reinstall the Glyph app
1.1. Uninstall the app
Press Windows + X, and choose the Apps and features option from the menu.
Search for the Glyph app inside your app list, select it, and press Uninstall.
Make sure to get rid of the Glyph folder in this location where Username is the current profile name:C:\Users\USERNAME\AppData\Local
Remove any other folders that remain on your PC by doing a full search of your hard drive.
1.2 Re-install Glyph
Visit the official Glyph webpage and download the latest installer.
Run the installer and follow the on-screen instructions to complete the setup.
Often, it’s the app files, the previous installation settings, or issues with the Glyph launcher itself to blame when it won’t open. And a quick solution is to reinstall the app.
In case the manual method doesn’t work, use a reliable uninstaller tool to get rid of all leftover files and registry entries.
2. Edit the .cfg file from the installation folder
Press Windows + E to open File Explorer and navigate the following path where Username is the active profile name: C:\Users\USERNAME\AppData\Local\Glyph
Find the file with the name GlyphClient.cfg, and open it in Notepad.
Under the Glyph section inside the text, copy-paste this text: BetaOptin=true
Press Ctrl + S to save the file, and restart the computer for the changes to apply.
Many users reported that modifying the GlyphClient.cfg file fixed things when the Glyph launcher won’t open in Windows.
If you’re wondering how to remove Overwolf from your computer, this article will help you understand all the options available to you.
Removing apps from your PC can sometimes be complicated.
Some would even go as far as saying that some application developers are trying their best to make it harder to remove an app than installing it.
Even though the reasons for this happening are somewhat obvious, Overwolf doesn’t fit into this category.
The software is user-friendly in all aspects and has been designed with the user in mind. This implies that the process of installing, using, and uninstalling is as simple as it can be.
In this guide, we will discuss the entire range of removing options at your disposal. Read on to find out the details.
Want to remove Overwolf from your PC? Follow these steps
1. Use the Add/Remove programs feature of Windows
The most common way of uninstalling an app entirely on Windows is to use the uninstalling wizard found built into your Windows platform.
Here are the steps to complete this process:
Press the Win+X keys on your keyboard -> select Apps and Features from the menu that pops up.
This will open the list of installed apps on your PC.
Scroll through the list and find Overwolf.
Select it by left-clicking on the app.
Click theUninstall button to start the removal process.
Follow the on-screen instructions to complete the task.
This should have removed the Overwolf app from your PC, but if this method doesn’t work, you can try out the next option.
Welcome back to our Windows 10 news recap, where we go over the top stories of the past week in the world of Microsoft’s flagship operating system.
Surface Neo is Microsoft’s new dual-screen Surface, coming on holiday 2020
Microsoft has announced a new dual-screen Surface device that is arriving next year. Called the Surface Neo, it will run a new operating system by Microsoft, Windows 10X.
Microsoft to launch new Surface Audio app on Windows 10, iOS, and Android devices
Coinciding with Microsoft’s new Surface Earbuds, the company is set to launch a new app called Surface Audio. It will act as a companion to the Surface Earbuds. It will be available on Windows 10, iOS, and Android.
ASUS, Dell, HP and Lenovo to release new devices powered by Windows 10X in Fall 2020
The Windows 10X Start Menu won’t have any Live Tiles
With all the talk of Windows 10X, it has become known that it will not have Live Tiles on the Start Menu. Depending on how you feel about Live Tiles, this may or may not be a good thing.
That’s it for this week. We’ll be back next week with more Windows 10 news!
Star Wars Battlefront II’s community calendar for the month of October has just been released and there are quite a few surprises for players coming over the next few weeks.
In addition to the expected Heroes Unleashed event in the middle of the month and the Double XP events every Wednesday, Star Wars Battlefront II will also be getting a new map for the popular Ewok Hunt mode. This new map will be a revamp of the current Endor map but its addition is still surprising given the addition of the new Felucia map in September.
The new Ewok Hunt map will come as part of an update on October 23rd. Also included with this update will be new skins for Hero characters. New appearances for reinforcements have recently leaked from the PC version of the game so it’s possible that these will also be included with this update.
Details on the exact skins coming this month will likely be confirmed closer to the update date.
Here’s the rundown of the important dates for this month:
October 4-6th: Boots on the Ground event (No heroes or vehicles in GA and CS modes.)
October 23rd: Game update with new Endor map, skins, fixes, etc.
October 23-31st: Halloween Double XP event.
Star Wars Battlefront II launched on Microsoft’s Xbox One console almost two years ago and continues to receive frequent content updates which are free for all owners of the game. While a smaller update is expected for November, a much bigger one will likely drop in December or January to tie into the launch of Star Wars Episode IX The Rise of Skywalker with a new map and several new skins inspired by the movie having already been confirmed.
Mozilla Thunderbird is a top-notch email client, news client, RSS, and chat client that is most famous because it is free and open-sourced.
However, being an email client means you must log in using an email and a password. Unfortunately, as we all know, we tend to forget passwords most of the time.
If you forgot your Thunderbird password, we will show you the best recovery method to get it back in this guide.
How to recover a forgotten Thunderbird password?
There are two known methods to recover a forgotten Mozilla Thunderbird password. These methods are listed below:
Using the built-in password manager: If you have set Thunderbird to remember your password but have forgotten it, you can get your password back within the app. However, this requires you to have access to the app.
Using a password recovery tool: If you cannot recover your password from the Thunderbird profile, you can use a specialized password recovery tool.
Where is Thunderbird’s password stored?
The Thunderbird password location is not the most difficult to find. Provided you ask the app to remember your password, it will be stored in the Password Manager.
You can find this under the Privacy and Security section of the app’s settings.
How can I perform Thunderbird password recovery?
1. Use the built-in Password Manager
Launch Mozilla Thunderbird and click Tools > Options.
Now, click the Security tab at the top.
Go to the Passwords tab and click the Saved Passwords button.
If you want to see the passwords you have saved, click Show Passwords.
Next, click Yes to continue.
This will add a column named Password will appear in the Saved Logins window.
Finally, you can copy your account’s password from here.
The first method to use if you want to perform Thunderbird password recovery is to check the password manager. However, this requires you to have the app logged in on your PC.
But if you don’t have access to the app, proceed to the next solution.
If you are logged out of the Thunderbird app and need to recover your password, your only option is to use a specialized password recovery tool.
While you can use a series of tools, we recommend using a top-notch app like Passware Kit basic. This tool decrypts the password of the Thunderbird app and restores access to your account.
We have reached the end of this guide on how to perform Thunderbird password recovery. You should now be able to regain access to the email client using the two methods above.
While visiting any website or looking in the event find viewer in Windows Server, users may encounter “The following fatal alert was generated: 10, The internal error state” error. Many users have reported similar errors in the Microsoft community forum.
Hello, Has anyone ever found a fix for this error in event viewer? “The following fatal alert was generated: 10″. The internal error state is 10. I have been receiving this error in the past three weeks by the hundreds. It seems like I start getting the error after I log in to a web site.
If you are also troubled by this error, here are a couple of troubleshooting tips to help you fix the following fatal alert was generated 10 error.
How can I fix The following fatal alert was generated error?
1. Disable TLS in Internet Properties
If the error occurs while using a web browser, try disabling the TLS option in the Internet Options.
Press Windows Key + R to open Run.
Type control and click OK to open the Control Panel.
Go to Network and Internet > Internet Options.
In the Internet Properties window, click the Advanced button.
Scroll down to the end and uncheck the following options: Use TLS 1.0 Use TLS 1.1 /Use TLS 1.2
Click Apply and OK to save the changes.
Now try to open the website and check if the error is resolved.
If the issue persists, it is possible that the problem is not in your computer but on the server. Disabling SCHANNEL in the Registry Editor should help you fix the problem.
Press Windows Key + R to open Run.
Type regedit and click OK to open the Registry Editor.
In the Registry Editor, navigate to the following location:
Now try to access the web browser or web sites and check if the service is working fine.
3. Allow Local Activation Security Check Exemption
You can fix this issue by enabling “allowing local activation security check exemption” in the Group Policy editor.
Press Windows Key + R to open Run.
Type gpedit.msc and click OK to open the Group Policy editor.
In the “Group Policy Editor“, navigate to the following location: Computer Configuration > Administrative Templates > System > Distributed COM > Application Compatibility
Double-click on “Allow local activation security check exemptions”.
Select the “Enabled” option.
Click Apply and OK to save the changes.
Close the Group Policy Editor and check for any improvements.
Conclusion
The error “The following fatal alert was generated 10” can be triggered by multiple non-SSL requests that are flooding the IIS, SSLv3 communications, failed connection through port 339 etc. Following the tips in this article can help you to fix this issue in no time.
The Amazon Fire Stick is a simple device people use for streaming. However, many reported that the Firestick does not connect to a TV.
This issue differs from the one we covered before, where Amazon Fire TV Stick is not connecting to the server. However, reading if you’re having network issues is still helpful.
Today’s guide will show you what to do if the TV doesn’t recognize your device.
Why is my FireStick not picking up by my TV?
You may be having issues with the power adapter.
Problems with HDMI cables can cause various connection issues.
Temporary glitches with Firestick can cause this problem.
Incorrect resolution can also cause this problem at times.
What can I do if Firestick is not connecting to TV?
1. Make sure your Power indicator is static
Check the power cord, plug, and socket for damages.
If everything seems fine, connect the power cord to another socket.
Start your device again.
2. Check the HDMI cable
Ensure your HDMI cable is not faulty and stays fixed in the port.
Disconnect and reconnect the cable to see if you can solve the issue.
Also, you should use only an authenticated cable.
If everything seems fine, try connecting the cable to another port.
A loose HDMI connection can often be responsible for Firestick not connecting to the TV, so be sure to fix it.
Wait at least 5-10 minutes, and then plug the power cord into the Amazon Fire TV stick and wait for 5 minutes.
Make your TV set ON.
Reconnect the Fire TV stick with the HDMI port.
Press any button on the Fire TV remote. Wait for a few seconds after each input. Executing the commands might take time.
Sometimes reconnecting the device can help if Firestick is not connecting to the TV or other network-related issues.
4. Ensure you select the correct resolution
Press the UP and REWIND buttons from your Fire Stick remote.
Then, select Use current resolution.
Save changes.
You can fix this issue with some quick solutions. Ensure you get a good connection with the power source and that your HDMI cable and port are not damaged.
Also, reconnect your Amazon Fire TV stick and make sure you selected the correct resolution for your monitor.
Microsoft Office is probably the most well-known product from Microsoft, after the Windows 10 itself of course.
This family of client software, server software, and services offers you the chance to do pretty much anything you would need in an office environment.
You can write documents, create presentations, write e-mails, create spreadsheets, and more. Of course, this all comes at a price and making sure that your license is secure is a must.
As such, getting access to any of your Microsoft Office components is usually done via logging in with an account name and password. The problem with passwords is that they are usually prone to be forgotten, and that can be really troublesome at times.
How do I recover my lost Microsoft Office password?
1. Use a dedicated Microsoft Office password recovery tool
Forgetting your Microsoft Office password is something that happens more frequently than anyone would like to admit.
As such, the Internet is full of software tools dedicated specifically to recover your Microsoft Office password.
However, you must know that these tools can only recover the password from older versions of Microsoft Office.
These include:
Microsoft Office 95
Office 97 and 2000
Microsoft Office XP and 2003
Microsoft Office 2007
Office 2013
Here are some of the best Microsoft Office password recovery tools you can find online:
Keep note that most of them are hidden behind a paywall and that the free version offers little actual functionality.
2. Perform an Office 365 password recovery
This may seem like the most obvious choice, especially for those using Office 365.
Click the account you want to access at the Office 365 login screen
Enter your email address
Next to Password, click I forgot
Enter your email address and click I forgot
Enter your email address, and click Continue
Under How do you want to reset your password, select the account you want to send the reset email to
If for any reason you don’t have access to another email account, select the My account administrator option. Your account administrator will receive a password reset request, and he can then provide you with a temporary password.
Send a password reset email
Click Send Email.
Within a few minutes, you’ll receive a password reset link in the email inbox you specified
Open the email, and click Reset Your Password
However, this method only works if you have Office 365.
If you’re concerned about security and the privacy of your data, then most likely, your PC is protected by layers upon layers of passwords.
These protection methods range from password protecting files and folders or encrypting files, folders and drives.
Of course, if you want to bring your protection to a whole new level, you could password protect your PC with an account password, and lock your PC with a BIOSpassword to safeguard data on a PC.
The problem with a password is that it is, well, a password, and we sometimes tend to forget them.
This is perfectly normal, especially if you haven’t accessed your BIOS in a while or if you use a different password for every single thing.
How can I recover my own BIOS password in Windows 10?
1. Reset your BIOS by removing the CMOS battery
You must first disconnect your PC from any power source.
If you are using a laptop, this includes removing the battery
Remove your PC‘s cover, and locate the CMOS battery
Remove the battery
Press the power button for around 10 seconds
Put the CMOS battery back in place
Put the cover back, or reassemble the laptop
Boot the PC
You will get a warning telling you that the BIOS date is not set, which is a clear sign that it was reset, and that there is no password anymore
2. Remove BIOS password using an MS-DOS Command
You will first have to enter your computer in MS-DOS mode:
Reboot your PC
Enter the Boot menu
Choose Safe Mode with Command Prompt
While in MS-DOS mode, a black dialogue box of cmd will turn up with a C:WINDOWS> prompt
Type in Debug
Hit Enter
Enter the following command given below and press Enter:
debug
o70 2E
o71 FF
quit
Type in Exit, and hit Enter
Reboot your PC
Next time you will try to access the BIOS settings, you won’t be asked about a password anymore
3. Reset your BIOS password with a backdoor password
If, for some reason, your CMOS battery cannot be removed, or you aren’t too sure of yourself using the Command Prompt, your only choice is to use a backdoor password.
This password is especially built-in by the computer’s manufacturer and is generally not known by most users.
Boot your PC
Try to access the Boot Menu and intentionally type in the wrong BIOS password 3 times
This will force your PC to go into a lockdown mode along with a System disabled message paired with a code
If you want to know how to use Overwolf for a streamlined experience, you’ve found the perfect guide.
Overwolf is an un-obstructive overlay that acts like a platform offering you the capability of adding apps inside your PC games. Yes. You read that correctly.
The variety of apps that can be attached to your favorite games varies incredibly. Some of the most praised add-ons include Twitch streaming, game recording apps, and even an in-game Chrome browser.
You can choose from thousands of applications inside the Overwolf Appstore. These cover the needs of game players, but also for various development teams.
In this article, we will talk about how to use Overwolf, and what are some of the best features this platform has to offer. Read on to find out more.
Here’s how to use Overwolf for a streamlined gameplay experience
Installation
In order to install Ovoerwolf, you will need to install it on your PC. To do so, you can visit the official download page and get the installer package.
To install this app on your PC, you will need to double-click the installer package and follow the on-screen instructions to complete the setup.
Once you’re done with this step, read the next section of this article to get started using it.
Once installed, you can simply launch Overwolf and start your favorite game. If you want to summon the Overwolf dock, you can press the Ctrl+Tab keys on your keyboard.
The application comes with some pre-installedapps, but if you truly want the full Overwolf experience, it is recommended that you visit the Appstore for more options.
To use the Overwolf apps inside the game, you can simply select them by using your mouse.
If you’re inside a game where you don’t have access to the mouse cursor, you can use the Ctrl+Tab keys to switch from the game to the app control.
If you press Shift+F2, you will be able to show/hide the Overwolf app windows.
One great feature found in Overwolf is that you can customize your hotkeys exactly as you want them. You can do this by opening the settings window – right-click the Overwolf tray icon -> select Settings.
Overwolf is compatible with a large number of games. The list includes Alan Wake’s American Nightmare, Assassins’s Creed, and the Battlefield series, just to name a few options.
If you’re curious to see a complete list of supported games, you can find this information by visiting the official game list.
Conclusion
In today’s how-to article we explored some of the featured that are offered by the free overlay platform named Overwolf.
This tool can be incredibly useful for both gamers and developers alike. The range of apps available also helps you customize how you use it almost endlessly.
If you found this guide helpful make sure to let us know by using the comment section below.
Rockstar Games announced that Red Dead Redemption 2 is coming to Windows 10 PC on November 5, 2019. Red Dead Redemption 2 will also be available on Stadia at launch, but Google has not yet to confirm an actual launch date for its hyped cloud gaming service. As noted in a blog post on the Rockstar Games blog, Red Dead Redemption 2 will have a number of special bonuses available when you pre-order the game through the Rockstar Games Launcher starting on October 9th.
Previously, Rockstar Games gave away a free copy of Grand Theft Auto: San Andreas just for downloading their launcher in September 2019. For those that did not take advantage of that offer, you have until October 8th to claim your free copy of Grand Theft Auto: San Andreas. It’s important to note that Red Dead Redemption 2 will also be released on Steam in December 2019.
Pre-purchases for Red Dead Redemption 2 for PC begin at 11 AM ET on October 9th exclusively by downloading the Rockstar Games Launcher for Windows. From October 9th through October 22nd, Rockstar Games is offering two free Rockstar Games PC titles from this list:
Grand Theft Auto III
Grand Theft Auto: Vice City
Grand Theft Auto: San Andreas
Bully: Scholarship Edition
L.A. Noire: The Complete Edition
Max Payne 3: The Complete Edition
Pre-orders made on the Rockstar Games Launcher will also include free upgrades to the Premium Editions of Red Dead Redemption 2, and the Special Edition and Ultimate Edition will get $20 off discounts. Rockstar Games will also offer discounts on special Red Dead Redemption 2 bonuses purchased through the Rockstar Games Launcher, including:
Microsoft’s Edge Insider builds bring a different approach to data management than the outgoing EdgeHTML-based browser. You have more granular control over the types of data that are affected when you clear cached resources.
Before we start, it’s worth noting that the “Clear browsing data” option isn’t necessarily what you’re looking for. The most common forms of data deletion, such as clearing history or deleting bookmarks, can also be found within their respective menus. This function is geared towards the mass reset of browser settings, for when you want to get back to a clean slate.
Click the “…” button in the top-right of the Edge interface. Select “Settings” from the menu which appears and then switch to the “Privacy and services” page.
At the top of the page, click the blue “Choose what to clear” button. A popup will appear which lets you precisely define the types of data which should be removed.
First, use the “Time range” dropdown menu to choose how much data should be deleted. Options range from “Last hour” to “All time.”
Next, use the checkboxes to select the types of data to be removed. You will see warnings of the potential impact of each deletion – for example, removing cookies will sign you out of sites, while clearing cached images could result in slower page loads.
Most of the checkboxes should be fairly self explanatory. Some to note are “Passwords” (this will delete your stored site passwords, potentially leaving you locked out), “Site permissions” (resets all the permission popups displayed when you visit pages) and “Hosted app data.” The latter option will clear all data used by web apps installed on your machine. This might have implications on the functionality of those apps.
Once you’ve made your selection, click “Clear now” to perform the deletion. The selected data types will be removed immediately.
Finally, Edge lets you automatically clear this data each time you close the browser. Back on the “Clear browsing data” settings page, click the “Choose what to clear every time you close the browser” link. You’ll arrive on a new page of options very similar to what we just saw. Use the toggle buttons to enforce automatic deletion for your chosen cache types.
Microsoft To Do recently rolled out support for creating groups of lists. This feature lets you tidy up your navigation menu by nesting related task lists under named folders.
To create a group, press the icon to the right of the “New list” button in To Do’s navigation. Next, type a name for your list group.
With the group created, you’re ready to add some lists to it! Drag and drop any of your lists into the panel below the group’s name. They’ll now belong to the group. You can click the group’s name to hide or reveal the lists which are within it.
Groups are a convenient way to combine related lists of tasks. However, the functionality is currently quite limited. There’s no way to view a list of all the tasks in a group, aggregated from all the lists within it. Groups are static collections of lists, so you can’t use them to create any more complex task management workflows. It’s possible Microsoft will add more group-specific capabilities in the future but for now they’re an organisation mechanism only.
Sometimes you might encounter Unable to continue please reboot error message in Windows Easy Transfer. This can be a problem and prevent you from transferring your personal data to a different PC.
However, there’s a quick and way to fix this, and today we’ll show you how to do it.
How can I fix Unable to continue Windows Easy Transfer error message?
1. Remove any unknown user accounts that have no name
Press Windows Key + S and enter advanced system settings. Select View advanced system settings from the list of results.
Now click the Settings button in the User Profiles section.
List of profiles will appear. Locate the profiles that don’t have a user name assigned to them and delete them.
After doing that, restart your PC and check if the issue is still there.
Note: Several users reported that removing the profiles that they didn’t want to transfer fixed the issue for them, so be sure to try that as well.
2. Make sure you’re logged in as an administrator
Sometimes Unable to continue please rebooterror can appear in Windows Easy Transfer if you’re not logged in as administrator.
To fix that, make sure that you log in as a PCadministrator and run the application with administrative privileges.
The iOS OneDrive app updated to Version 11.2.6 today with a variety of fixes for existing bugs and full support for iOS 13’s Multiple Windows feature when used on an Apple iPad tablet.
This new feature allows users to open and view numerous files from the OneDrive app at the same time which should prove useful for those who like to multitask.
Here’s the full release notes:
We’ve added support for the new iOS 13 Multiple Windows feature on iPads. If you’ve got an iPad with iOS 13 handy, you can now open multiple files at once for your viewing and editing needs.
Tapping on notifications for shared Office documents sometimes crashed the app. This is now fixed.
Some users saw an error message when opening Microsoft Visio files. This has been fixed. These files now open in Microsoft Visio Viewer app.
Do you use OneDrive on your iPad and will you be using the Multiple Windows feature? Share your thoughts with the community in the comments below and then like us on Facebook for more Microsoft news.
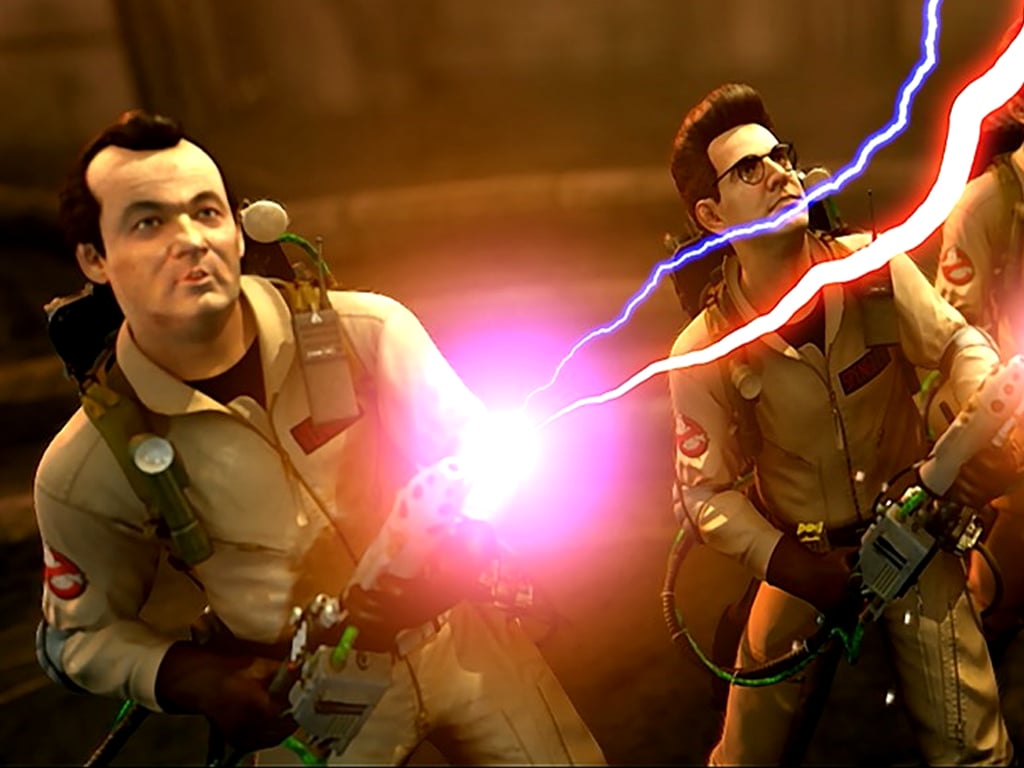
This new version of the classic game, which launched on the Xbox 360 way back in 2009, features all of the content from the original but with a significant graphical upgrade on the Xbox One and Xbox One S and a 4K Ultra HD presentation on the Xbox One X. Ghostbusters:
Ghostbusters: The Video Game Remastered also features its own set of unique Xbox Achievements for players to unlock as well.
Here’s the official game description and reveal trailer:
Authentic Ghostbusters Experience – The game features the voices and in-game likenesses of Bill Murray, Dan Aykroyd, Harold Ramis, and Ernie Hudson in an original story penned by the writers of the original films – Dan Aykroyd and Harold Ramis. Unique Gameplay – Experience unique ghost hunting, wrangling and trapping with upgradeable weapons in widely destructible environments. Test the team’s mettle with large scale boss fights. Storyline Campaign – Play through a unique storyline as the player battles and captures ghosts – both well-loved and brand new – throughout New York.
Were you a fan of the original Ghostbusters: The Video Game game or will this be your first time playing it? Let us know in the comments below and then follow us on Twitter for more Xbox gaming news.
This Sway is unavailable error will prevent you from accessing shared Sway presentations, but there’s a way to fix this problem. Without further ado, let’s see how can we fix this problem once and for all.
What to do if your Sway presentation isn’t available?
1. Try opening the presentation URL in a different browser
This Sway is unavailable can appear if there’s an issue with your web browser, therefore it’s advised to try opening the link in a different web browser.
If you’re looking for the best browser for the job, we’d suggest trying out Opera Browser.
This browser is built on Chromium engine, so it’s quite similar to Chrome.
Regarding the features, there’s malware, tracking, and privacy protection as well as a built-in VPN.
Opera’s VPN, which is embedded into the web browser, allows you to surf the web in some more privacy. It is 100% free and has no bandwidth restrictions.
However, instead of using an OpenVPN, it encrypts your data using a proxy, which is less private than a complete, standalone VPN service.
The Opera browser is fast and dependable. It now has a one-click capability for saving the current web page to PDF. Opera Browser Allows you to open a large number of tabs without experiencing memory saturation or latency thanks to efficient memory management.
Users have been complaining on the official forums that they are experiencing an error message whenever they try visiting a website using the Xbox console.
I’m getting error code 0x97e10bca and can’t access many of my sites. How do I remedy this?
While no further details were given, others came complaining about getting that error message as well:
after installing free app in store , i haven’t any problems but after restart xbox one any time run apps this error code appears . and didn’t work app . for example Media and movie app, mirror app
How do you fix an error code 0x97e10bca?
1. Delete the last apps you installed
If this problem started appearing right after you installed an app, try to uninstall them to see if that fixes the problem.
Press the Xbox button
Select My Games & Apps
Select the app you want to uninstall and press the Menu button on your controller (the Start button)
Choose Manage Game
In the new screen, select Uninstall All
2. Perform a power cycling
Power cycling revolves around shutting down your console in a controlled manner.
2.1. Restart your console from the Power Center
Press and hold the Xbox button in the center of your Xbox One controller
This will open the Power Center
Choose Restart console
Confirm the Restart
2.2. Restart your console from the guide
Press the Xbox button to open the guide
Navigate to System
Choose Settings
Select Restart console
Confirm the Restart
2.3. Physically power cycle the console
Hold the Xbox button on the front of the console for approximately 10 seconds
Press the on the console or the Xbox button on your controller to restart your console back on
2.4. Disconnect and reconnect your console’s power cable
Hold the Xbox button on the front of the console for approximately 10 seconds
Unplug the console’s power cable. Wait 10 seconds
Be sure to wait 10 seconds, as this step resets the power supply
Press the on the console or the Xbox button on your controller to restart your console back on
3. Perform a factory reset on your Xbox
Press theXbox button on the controller
This will open the Guide
Now go toSystem
Select Settings
Go toSystem
At Console info, chooseReset console
You’ll be given two options:
Reset and keep my games & apps – Select this option is you want to reset your console but save the important data
Reset and remove everything– Select this option is you want to reset your console and completely wipe everything that is on it.
Heading into the future, Microsoft is taking a big bet on a new trend we’ve seen emerge with phone and even some laptop makers (like Lenovo) this year — dual-screen devices.
There have been plenty of patents, leaks, and more relating to Microsoft’s work in this area, but yesterday, at the October 2 Surface event, the company finally came out and made everything public. Big Redmond showcased a working prototype of a dual-screen Windows 10 PC known as Surface Neo, and shocked the world with a dual-screen Android-powered phone that is known as Surface Duo.
Microsoft kept the two new devices pretty much under lock and key, but we were able to get close, anyway. Here’s everything we currently know about the two devices, and why it matters.
Surface Neo
We’re starting first with Surface Neo. The device will be shipping first to developers within the next couple of months. Later, it will then come to consumers next year, around holiday 2020. There are also a few other important things to note.
First off, Neo features two 9.1 inch screens, that when folded together add up to 13 inches. Apparently, it is also the thinnest Gorilla Glass LCD screen ever created. Next, the weight is about 654 grams. Judging from the photos of the prototype that we took, it also sports a nicely hidden polished 360-degree hinge between the screens.
You’ll also notice the detachable magnetic pen on the back of the screen, as seen in this photo from the keynote that we took of Panos holding Neo. Finally, under the hood, Neo is powered by Intel Lakefield processors, an as-yet unreleased hybrid processor for dual-screen devices.
Why does it matter? Because of Windows 10 X
What matters most about Neo is not the hardware. Instead, it is the fact that it is running Windows 10 X, a flavor of Windows Core OS just for dual-screen devices. Not only will this power Neo, but also a new wave of future devices from HP, Dell, and ASUS. Much like it did when pioneering the 2-in-1 form factor with the Surface Pro, Microsoft is betting big on dual-screen devices, and actually has the software and partners for it, or so we hope.
There’s not much we know about Windows 10 X, but we were shown on stage at the Surface event how two apps (Mail and Edge) could run side by side on the two screens, and how an app can cross the two screens with a “spanning” feature. We also were shown that apps could launch on one screen, and pushed to the other by dragging around the hinge. It was also confirmed that all Windows apps and the Office apps will be supported in Windows 10 X, with developers not having to worry about changing the coding for apps, although it’s less clear exactly how the “spanning” feature will work.
Elsewhere, we were shown the “Wonderbar” feature of Windows 10 X. Somewhat like the TouchBar on the MacBook Pro, this small half-portion of the bottom screen appears when you attach a physical keyboard to the bottom of Neo. It will show emojis, a trackpad, inking options, and even work as a small screen. Presumably, if you connect a physical keyboard or third-party keyboard, the same will happen.
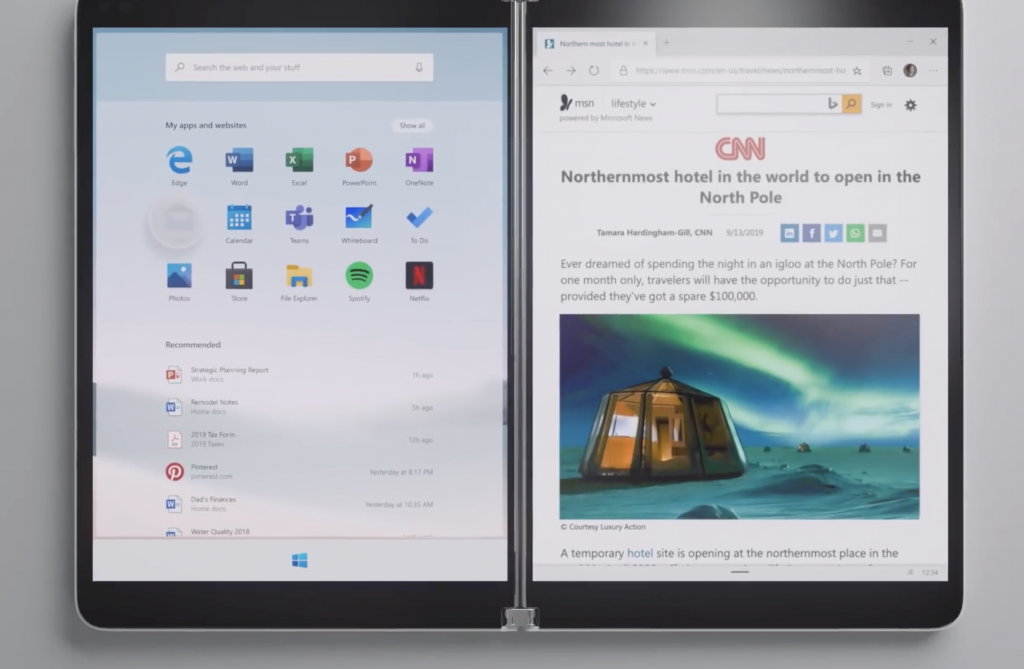
It’s also become apparent that Windows 10 X on Neo, and other devices, will ditch the traditional start menu. According to The Verge, the new Start menu is similar to the one we saw when a rogue Windows Insider build went public. You’ll just see a list of pinned apps, a list of recent documents, as well as a search bar, and a Start button. There are no more live tiles.
Surface Duo
Next, there’s Surface Duo. Also coming in time for Holiday 2020, this is a similar dual-screen device to Neo. However, instead of being a PC, it is meant to perhaps mark Microsoft’s return to the phone world. We especially saw this in the teaser video for Duo, where a woman pulled the device out of her bag while already working on Surface Duo, and answered a phone call. Anyway, there’s a couple of tidbits to note on this device.
To begin some specs lists, the Surface Duo sports two separate glass 5.6-inch displays, which fold out to one 8.3 inch display. It’s also 4.8 mm thin and sports the same 360-degree hinge as Neo. According to The Verge, the demo device also sports a Snapdragon 855 processor inside. Much to our surprise, it also powered by Android.
There’s also some confusion as to what cameras are on Duo, as the prototype we saw during the Surface Event only had one front-facing camera. However, MSPoweruser reports that Microsoft had two separate versions of the device. One of which is a black version that YouTuber Marques Brownlee, captured with a camera hole.
Why does it matter? Because of Android
But, why does this all matter to you, as a Microsoft fan or follower? Well, for the first time ever, a Microsoft product is not featuring a Microsoft operating system. Instead of running Windows, the Duo is powered by Android. That’s right. Microsoft is becoming an Android phone maker.
Be damned if you may, but there there is a good reason as to why. According to press interviews, Panos Panay believes that Android has the apps people want. This is something that’s part of the reason why Microsoft’s last venture into the world of phones failed. That’s you, Windows 10 Mobile.
Anyway, when Panos Panay was asked about why Android, this quote from The Verge puts it’s best.
“Because there are hundreds of thousands of apps, and you want them. And [Microsoft CEO Satya Nadella] and I talked about it, and it’s about meeting our customers where they are, where they’re going to be. I don’t think the mobile application platform’s going anywhere anytime soon.”
But, Android won’t suddenly be the big operating system for Microsoft. The other dual-screen device, Neo still runs Windows. Instead, it appears as though Android on Duo is all about giving customers choice, again, in the words of Panos via The Verge. Which is a good thing, considering the flops of Surface RT, Windows 10 S, and Windows 10 Mobile.
“You want to give customers what they want in the form factor that they’re using. We’ve learned this — let’s put the right operating system on the wrong product or the other way around. But what’s the right operating system for the form factor? And in this case, on mobile devices, Android’s the obvious choice, But anything [bigger than] that, Windows is everything”
Big steps forward for the future at Microsoft
Putting everything together, Microsoft is taking a big step forward in its history. At the same time, it also has demonstrated that it learned from the failure of its past. Bidding on the dual-screen PC and phone is a huge thing, and I think Microsoft is setting itself up for some success here.
Why? Well, though the company has the physical hardware ready for both Duo and Neo, it’s waiting for developers to test it first. Microsoft won’t be releasing an unpolished and app-less operating system as it did with Windows 10 Mobile. With Android, and Windows 10 X, it is letting the developers test the products, then release it first to consumers in all the glory.
Here is what Insiders on the Fast Ring can expect to see changed, improved upon and fixed in preview build 18995 (20H1).
We’ve made some improvements to address an issue resulting in some users frequently seeing a notification saying their account needed to be fixed, but the Settings page that opened showed no action was necessary.
We fixed an issue resulting in some Insiders seeing error 0x80242016 when trying to upgrade.
We fixed an issue where you might be prompted to fix something before you could update, but the dialog with what to fix didn’t display the issue that needed fixing.
We fixed an issue resulting in the mouse cursor unexpectedly showing up in screenshots in recent builds.
We fixed an issue impacting the reliability of taking screenshots with WIN+Shift+S / Snip & Sketch.
We fixed an issue where, if you started a snip from Snip & Sketch by pressing New and had “automatically copy to clipboard” enabled, the first initial copy might be blank.
We fixed an issue where the Action Center might be visible in screenshots recently if you started them by pressing the Screen Snip quick action.
We fixed an issue for multi-mon devices that could cause random crashes in UWP apps when switching focus between monitors.
We fixed a high hitting DWM crash from the last few flights.
We fixed an issue in recent flights that resulted in Skype unexpectedly closing the first time it was launched and you tried to sign in.
We’ve updated our File Explorer context menu logic, so if you right-click on a .HEIC image file, you’ll now have the option to Print or Set as Desktop Background, as you can with other image file types.
We fixed an issue where you might need to invoke the File Explorer context menu twice before the option to create a new Text Document would appear.
We’ve made some improvements to help address an issue where search may appear blank.
We fixed an issue resulting in some users seeing a 0x000007D1 when trying to print.
We fixed an issue where the publisher’s information was unexpectedly blank for some apps in App Settings.
We fixed an issue where the Windows Update information in the Settings header could be out of date.
We fixed an issue where turning Bluetooth off then back on while a Bluetooth audio device was paired could take an unexpectedly long time.
We fixed a crash when adding devices in Devices Settings.
We fixed an issue where the ImmGetVirtualKey function wasn’t returning VK_PROCESSKEY even if an IME was enabled.
We fixed an issue where pressing space to enter a selected word with the Changjie IME when using the touch keyboard might not work.
We fixed a ctfmon.exe crash when using the Japanese IME if reconversion was triggered with a partial selection.
We fixed an issue where ctfmon.exe would crash if you attempted to use dictation from the touch keyboard in certain apps.
We fixed an issue impacting Windows Ink Workspace reliability.
We fixed an issue that could result in pinned websites icons in the taskbar sometimes unexpectedly switching from their actual icon to the default browser icon.
We fixed an issue where calendar events created from the taskbar clock and calendar flyout wouldn’t have a default 15min reminder set.
We fixed an issue where if the taskbar changed scale enough times while an IME was active, it would lead to the input indicator disappearing from the taskbar.
We fixed an issue resulting in transparent/invisible app thumbnails in snap assist when snapping an app to the side when in tablet mode.
We fixed an issue where Task View would display that the navigation pane of certain apps was expanded, even if it was actually collapsed.
We’ve improved Magnifier performance when using touch.
We’ve updated our logic, Magnifier UI will now show properly when alt-tabbing if Magnifier was minimized originally.
We’ve fixed a few small issues with the Text cursor indicator page in Settings.
We fixed an issue where, when using the text cursor indicator, you might unexpectedly see a focusable Eoaexperiences.exe app running in the taskbar.
We’ve improved the reading of email when objects such as images are embedded in the message while using Narrator to remove the repeating of information while moving through the content.
We fixed a bug in Narrator where the link sound did not play in certain scenarios.
We fixed an issue with older drivers showing as available for download. If you continue to see older drivers in the Option updates section of Windows Update, please let us know.
Fortunately, the list of known issues is much shorter by comparison.
There has been an issue with older versions of anti-cheat software used with games where after updating to the latest 19H1 Insider Preview builds may cause PCs to experience crashes. We are working with partners on getting their software updated with a fix, and most games have released patches to prevent PCs from experiencing this issue. To minimize the chance of running into this issue, please make sure you are running the latest version of your games before attempting to update the operating system. We are also working with anti-cheat and game developers to resolve similar issues that may arise with the 20H1 Insider Preview builds and will work to minimize the likelihood of these issues in the future.
Certain 2D apps (like Feedback Hub, Microsoft Store, 3D Viewer) are incorrectly being treated as having protected content within Windows Mixed Reality. During video capture, these 2D apps block their content from being recorded.
When capturing a repro video while filing a bug via Feedback Hub in Windows Mixed Reality, you won’t be able to select Stop video, due to the protected content issue noted above. If you want to submit a repro video, you will need to wait 5 minutes for the recording to time out. If you’d like to file the bug without a repro video, you can close the Feedback Hub window to end the recording and resume filing your bug when you reopen the app in Feedback > Drafts.
When using the Search bar in either Control Panel or File Explorer, the box becomes grey and prevents input. We’ve identified the cause, and we’re working on a fix for a future flight.
Devices configured for dual scan (WSUS and Windows Update) for updates may not be offered new builds in the Fast ring. Selecting Check online for updates from Microsoft Update will scan for updates, but may return with the message, “Your device is up to date.” We’re working on a fix for a future flight.
Some devices configured to Use HDR may experience a bluish tint on their HDR displays after using Night Light. We have identified the cause, and we are working on a fix for an upcoming build.
Theme packs downloaded from the Microsoft Store fail to apply.
Starting with the previous flight, some Insiders may find that Settings doesn’t launch from the button in Start, isn’t listed in the All apps list, or as a search result. If you are impacted, pressing WIN+R and inputting “ms-settings:” (without the quotes) will launch Settings if you need it.
After successfully updating to a new build, the Windows Update Settings page may show the same build needs to install. You can verify the build was successfully installed by checking the build number in the corner of the screen or going to Win+R, typing winver, and confirming the build number. We have identified the cause of this issue, and we’re working on a fix for a future flight.
The slow march of progress moves on in the shadow of Microsoft’s tease of Windows 10X now but preview build 18995 brings some solid improvements and fixes, none the less.
Windows 10X, the new version of Windows 10 built for dual screens will come with a brand new Start Menu that won’t have any Live Tiles. We briefly saw the new Start Menu when Microsoft demoed the Surface Neo yesterday, and gone are the flipping Live Tiles showing you unread emails, upcoming calendar events, latest news, and more.
Still, despite the removal of Live Tiles, the new Start Menu in Windows 10X seems provide easy access to what users really care about: Unified Search, Recent apps and websites, and there’s also a “Recommended” section highlighting documents or websites you may be interested in. The whole design is a bit reminiscent of what you can see on Office.com, which also features Search at the top, a grid of apps in the middle, and a Documents section below
You can see the Windows 10X Start Menu at the beginning of the Live demo below:
Speaking with The Verge, Microsoft’s Joe Belfiore explained that this new Start Menu experience should feel intuitive for consumers coming from Windows 10.
“We think this feels familiar to people who are using tablets and mobile devices today, and we’ve tried to use the screen real estate in a way that combines app launching with suggestions of things like websites, documents, or things you’re working on,” explains Belfiore. “We’re trying to really strike a great balance between familiarity and progress.”
Live Tiles were a key differentiation point when Windows Phone was still a thing, but the animated icons didn’t really have the same impact on Windows 8, and later Windows 10. The app gap is still real on the Microsoft Store in 2019, and very few apps make good use of Live Tiles. Earlier this year, Microsoft accidentally released a Windows 10 preview build that included a redesigned Start Menu with no Live Tiles, but the latest 20H1 preview builds still come with the familiar Start Menu.
A redesigned Start Menu appeared in the Windows 10 build 18947 that Microsoft released accidentally.
It’s not clear if Microsoft eventually plans to make its Start Menu more consistent across Windows 10 and Windows 10X, but we wouldn’t be surprised if Live Tiles eventually fade away. Most Windows 10 users probably don’t spend that much time staring at Live Tiles on their Start Menu, and it’s probably not a coincidence that neither Apple or Google copied that feature in their own operating systems.