Halo: Reach on Xbox One gets delayed as 343 Industries deals with memory issues

After 343 Industries shipped the first Halo: Reach Insider flight on PC a month ago, we were wondering when Halo Insiders on Xbox One would be able to test the remastered version of Halo: Reach. Unfortunately, the first Xbox flight has been delayed as 343 Industries is currently working on memory issues affecting the Xbox One version of Halo: MCC.

In the latest MCC Development update published on Halo Waypoint yesterday, 343 Industries explained that the work being done with Unreal Engine 4 to create new character customization options as well as the new progression system is really pushing the Xbox One to its limits. As a result, flighting on Xbox will be delayed until the developers manage to solve some unexpected memory issues.

You can read the team’s detailed explanation below:

As has been stated previously, making any game is hard, let alone where you’re dealing with 11 game engines and 7 complete games under the roof of one title sharing the same hardware resources.

One key goal that has been a part of bringing Halo: Reach into MCC is that for Xbox One, the team has been attempting to bring UE4 online for new character customization options on Xbox. You can read more about the progression system in the May and June development updates. This however has proved to be quite challenging as MCC was already close to memory limits running on the original Xbox One consoles. Bringing the entire progression and customization system into MCC also requires memory to be used to run the additional UE4 engine. Currently, a lot of progress has been made in getting it up and running, but the title still is not within memory constraints to properly run on the Xbox One. In order to flight on Xbox One, we need to be within these limits, otherwise instability will be an issue.

Until the team has an adequate solve for this unique issue, flighting on the Xbox One will continue to be delayed. That being said, the team is pushing hard on a solution as they want to flight the Xbox One build as soon as possible. Until then though flighting will continue to remain solely on the PC build.

As we’re nearing the end of this console generation, the Xbox One hardware is definitely starting to show its age. To be fair, Halo: MCC is quite an exception as it bundles together seven Halo games using different engines, and the Xbox One anthology has been plagued by issues since launch. Expectations about the PC version of Halo: MCC are also very high, and 343 Industries is now readying the next PC flight which will include the game’s campaign. There’s still no ETA for the next PC Insider build, but the team promised to share more details soon.

Microsoft’s Xbox One is getting 60 new video games over the next 40 days, New promotion announced

From now until September 9th, at least 60 new video game titles will launch on Microsoft’s Xbox One console.

To build hype for all of these new Xbox One games, Microsoft has announced a special Summer Spotlight promotional campaign which will last for the entire release window.

The main two aspects of the Summer Spotlight promotion are:

  • Xbox One owners will earn 4,000 bonus Microsoft Rewards points if they spend over $40 on new games.
  • Participants will have the chance to win bundles containing new Xbox One S consoles, controllers, and all 60 titles.

The 4,000 Microsoft Rewards points will be calculated all automatically, however, to win one of the Xbox bundles, interested parties will need to enter via a specific form on this webpage here.

Currently, not all 60 games have been announced yet but they will be gradually revealed on the Summer Spotlight website here. The games currently revealed are Pawarumi, Hoggy2, Furwind, Mighty Switch Force! Collection, Tetsumo Party, The Blackout Club, Super Wiloo Demake, The Tower of Beatrice, Solo: Islands of the Heart, The Church in the Darkness, Meow Motors, Metal Wolf Chaos XD, Age of Wonders: Planetfall, Wreckfest, and Blair Witch.

Several of these are already available on Xbox One after launching earlier this week while others are due out over the coming days or weeks.

Are you excited to learn more about these 60 new games? Let us know what ones interest you the most in the comments below and then follow us on Pinterest for more Xbox gaming content.

Today’s new Edge Dev channel build (77.0.230.2) adds inking and other new features to the browser

Build 77.0.230.2 is now available for Edge Insiders on the Dev channel. This latest build adds ink functionality to the test browser’s screenshots, prevents banned Chrome extensions from being installed, and also added a feature that can import settings from the current Edge browser.

Here’s the full release notes with all of the changes and improvements:

New features and behavior:

  • Added the ability to mark up screenshots with ink.
  • Prevented extensions that are banned from the Chrome extensions store from being installed.
  • Added messaging to better help users for some cases when Internet Explorer mode fails to start.
  • Added the ability to import settings from the original version of Edge.
  • Added additional text to identify when a window is InPrivate or Guest.

Fixes for improved reliability and stability:

  • Fixed a crash when pressing Tab.
  • Fixed a crash when pressing F6.
  • Fixed an issue where the Downloads page sometimes didn’t render.
  • Fixed an issue where Netflix was slow when playing 4K video.
  • Fixed a crash when installing extensions.
  • Fixed a hang when playing certain types of videos.
  • Fixed some hangs when opening Application Guard windows.
  • Fixed an issue where the popup blocker would sometimes fail to work in Internet Explorer mode.
  • Fixed an issue where Read Aloud sometimes fails to start properly.
  • Fixed some issues where opening certain PDF files sometimes failed.

Fixes for improved behavior:

  • Fixed an issue where SafeSearch couldn’t be turned on.
  • Fixed an issue where selecting all text in a PDF didn’t work.
  • Fixed an issue where the Apps page occasionally shows duplicate entries.
  • Fixed an issue where languages were getting added to edge://settings/languages when they shouldn’t have been.
  • Fixed an issue where PDF form fields sometimes don’t appear properly.
  • Fixed an issue where tab icons are occasionally the wrong color.
  • Fixed an issue where address bar icons are occasionally the wrong color.
  • Fixed an issue where certain icons weren’t displaying correctly in certain countries.
  • Fixed an issue where the correct start page wasn’t appearing in some countries.
  • Fixed an issue where Application Guard windows sometimes didn’t display in the proper language.

As always, thanks for being an insider, and keep sending us all of your valuable feedback and suggestions!

The Dev channel updates on a weekly basis with new builds of Microsoft’s upcoming revamped Edge browser for Edge Insiders to test. Recent builds added a data privacy feature and a dark mode.

Are you excited for the new Edge browser? Let us know in the comments below and then follow us on Twitter for more Microsoft news.

Is my printer RGB or CMYK? [WE ANSWER]

RGB (red, green, and blue) and CMYK (cyan, magenta, yellow, and key, which is otherwise black) are two alternative color models. They are two alternative models of representing colors. Some users might wonder what the distinction between them is and which of those color models printers utilize for printing.

CMYK is a subtractive color model that mixes cyan, magenta, yellow, and black to produce more colors. It does that by masking colors on white paper. Thus, it essentially subtracts lightness by mixing colors together.

The RGB model is the antithesis of CMYK as that forms more colors by adding them together. Thus, the RGB is an additive color model. Instead of mixing colors on plain white, the RGB model adds red, green, and blue together and mixes them on dark backgrounds.

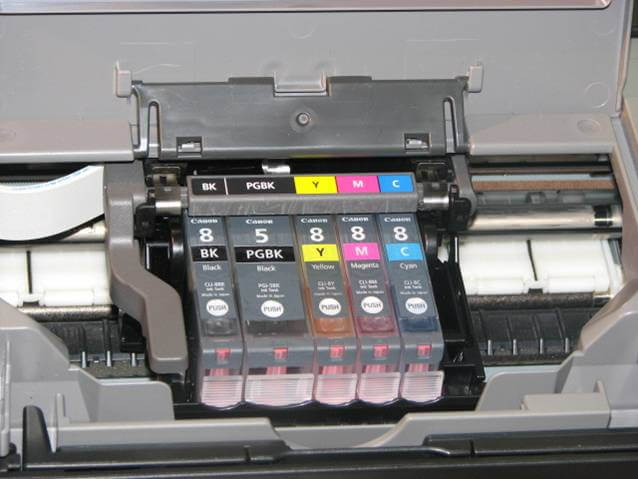
Almost all printers utilize the CMYK color model for printed output. That’s why they print on plain white printing paper. Ink cartridges consist of the cyan, magenta, yellow, and black CMYK colors for printing.

A CMYK ink cartridge is my printer rgb or cmyk

Some companies have started to experiment with RGB printing. Merck KgaA has developed a new RGB printing technique. However, few companies have yet to embrace RGB printing as a viable alternative to CMYK. So, RGB printers aren’t available on Amazon just yet!

RGB is a device color model widely utilized by VDUs (Visual Display Units). Thus, monitors are based on the RGB model that mixes colors on dark backgrounds. RGB can display a wider variety of colors than CMYK.

Consequently, Adobe Photoshop and other software typically save images with an RGB color format. Printing RGB images with CMYK printers can generate some color disparity between the image and its printed output. Although this doesn’t generate a drastic difference, there can often be a slight color mismatch between the CMYK printed output and the RGB image.

1. How Users can Convert RGB Images to CMYK

  1. Users can convert RGB images to the CMYK color model before printing to ensure there’s no color disparity. Open the rgb2cmyk page in a browser.rgb2cmyk converter page is my printer rgb or cmyk
  2. Click Choose file to select the RGB image file to convert.
  3. Then click the Select Output format drop-down menu to choose an image output format.
  4. Press the Start button.
  5. Thereafter, click the CMYK file link to download the converted image.
  6. Then users can open the new CMYK file in an image editor to print it.

Looking for the best photo-editing software to soft proof images before printing? Check these solutions.


2. Convert RGB Files to CMYK With ReaConverter

  1. Alternatively, users can convert RGB images to CMYK with the reaConverter software. Click Download Lite on the software’s download page.
  2. Install reaConverter with its setup wizard, and open the software’s window.
  3. Click the add files button to select the RGB file to convert.
  4. Select the image thumbnail to convert in ReaConverter.
  5. Click Menu > Saving Settings > Format saving settings to open the window shown directly below.Format saving settings window is my printer rgb or cmyk
  6. Select the JPG file format tab on the window.
  7. Then select CMYK on the Color model drop-down menu, and click the OK button.
  8. Select to convert the picture to JPG, and click the Start button.

So, that’s how users can convert their RGB images to CMYK alternatives before editing and printing. That will ensure there is no color disparity between the image and its printed output.

RELATED STORIES YOU SHOULD CHECK OUT:

How to Fix ADB Driver Not Installing on Windows (Full Guide)

When the ADB driver is not installing, your Android phone won’t connect properly to your PC for debugging or APK installation. This can break essential tasks like listing devices via adb devices or using ADB install to specific device.

Follow these native solutions to resolve ADB driver not installed errors.

How to Fix ADB Driver Not Installing

Enable USB Debugging and Use the Right USB Mode

  1. Open your phone settings
  2. Go to About phone > Tap “Build number” 7 times to unlock Developer options
  3. Return to Settings > Developer options
  4. Enable USB Debugging
  5. Connect the phone to your PC with a data-capable cable
  6. On your phone, tap Allow USB debugging when prompted
  7. Change the USB mode to File Transfer (MTP)

Manually Install Android ADB Interface in Device Manager

  1. Press Win + X, select Device Manager
  2. Find your device under “Other devices”, “Unknown device”, or “Portable Devices”
  3. Right-click it → Update driver
  4. Select Browse my computer for drivers
  5. Choose Let me pick from a list of available drivers on my computer
  6. Select Android Device > Android ADB Interface
  7. Click Next and confirm the installation

If you’re using Windows 11 and running into compatibility issues, here’s a guide specifically for installing ADB drivers on Windows 11.

Install Google USB Driver (for Pixel or Stock Android Phones)

  1. Download the driver from Google’s official site:
    👉 https://developer.android.com/studio/run/win-usb
  2. Extract the ZIP file
  3. Open Device Manager
  4. Right-click your device → Update driver
  5. Browse to the extracted folder and complete installation

You can also follow this guide on how to install Google USB driver on Windows by checking this install Google USB driver resource for phones that rely on stock Android drivers.

Disable Driver Signature Enforcement

Unsigned drivers may be blocked by Windows. Disable signature enforcement before retrying installation:

  1. Hold Shift and click Restart from the Start menu
  2. Navigate to:
    Troubleshoot > Advanced Options > Startup Settings > Restart
  3. On the boot screen, press 7 to disable driver signature enforcement
  4. Try the manual driver install again via Device Manager

Try a Different USB Port or Cable

  • Use a built-in USB port (not a hub)
  • Try USB 2.0 ports instead of USB 3.0
  • Swap the cable with an original or certified data cable

For additional troubleshooting on connection issues, you can also check our guide on fixing Media Transfer Protocol errors. This might help resolve file transfer problems between your phone and PC.

Test on Another PC

If the driver still fails, test your device on a different Windows PC to determine if the issue is:

  • OS-specific
  • Due to corrupted USB drivers
  • Caused by software like Samsung SmartSwitch or Huawei HiSuite

Reinstall ADB and Platform Tools

  1. Download the latest version of ADB tools:
    👉 https://developer.android.com/studio/releases/platform-tools
  2. Extract the ZIP file
  3. Open Command Prompt inside the extracted folder
  4. Run the following command:
    • adb devices

If your phone shows up, the driver is working correctly.

If the command fails, follow this fix for the “ADB command not found” error to make sure your system paths are properly configured.

Final Check: Test ADB Connection

In the platform-tools folder, open Command Prompt and run:

  • adb devices

You should see something like:

  • List of devices attached
  • XXXXXXXXXX device

That confirms your ADB setup is working, and you’re ready to use it for development or commands like ADB install APK to device.

Conclusion

You don’t need third-party tools to fix ADB driver installation issues. Most cases can be resolved by configuring your phone properly, using Device Manager, or installing Google’s official USB drivers.

FAQ

How do I install the ADB driver?

Open Device Manager, locate your device, and manually install Android ADB Interface by browsing available drivers.

Why is ADB not installed?

ADB may fail to install due to missing USB debugging permissions, an incompatible cable, improper USB mode, or driver signature enforcement.

How do I install Android ADB Interface on Windows?

Use Device Manager > Update Driver > Let me pick from a list > Android ADB Interface > Install.

How to add a secondary axis in Power BI [EASY STEPS]

Creating charts in Power BI Desktop is one of the main features of this tool, but quite a few users are encountering issues in creating the Y-axis (secondary axis).

One user reported the following on the official Power BI forum:

Currently using Power BI Desktop (just downloaded last week). I’m trying to create chart with secondary axis (Y-axis). However, in the tool, when I select from Visualization pane, ‘Y-Axis’ then ‘Show secondary’, nothing happens. In the video, I see that underneath that option when it is selected, there are other options to select like position it on ‘right’ side.

So, when trying to create a chart with a secondary axis (the vertical axis of the chart) through the usual method, nothing happens. Fortunately, the issue has a very easy solution.

Steps to add a secondary axis in Power BI

Add a metric to the line values

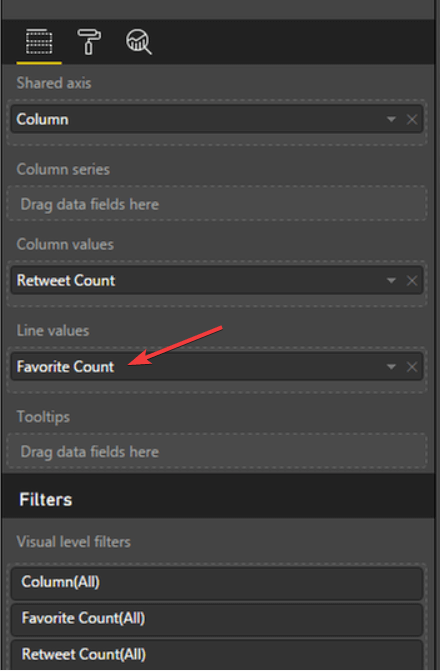
To solve the issue quickly, you simply add a metric to the line values.

power bi line values metric

  1. Click on Favorite Count.
  2. Select the metric you prefer for your axis.

Conclusion

So, that’s about it. Adding a metric to Y-axis will allow you to create a chart with a secondary axis.

Leave your answer along with any other questions in the comments section below.

RELATED STORIES YOU NEED TO CHECK OUT:

Your Browser is Not Supported For Private Mode [We Answer]

If your PC has multiple users, using private mode has many benefits. Every browser has it, and it’s usually quite simple to access it.

However, some users reported getting a specific error from certain websites while using Private mode: the Your browser is not supported for private mode prompt or something like that.

We heard you out and will try to provide you with an answer as best as we can below.

Why is the browser private mode not supported on some websites?

First, let’s start by explaining what private (incognito) modes do. First, there’s no caching or loading of any previously locally stored data.

In their standard mode, browsers will keep the cache from the visited websites locally in a JSON file. Not in private mode.

This prevents revisited websites from identifying your activity and the following user from tracking your online activity.

Your browser Is not supported for private mode

There are also things like log-in details, browsing history (obviously), and cookies that won’t load, and everything you’ve done during that private session is immediately deleted afterward.

Just keep in mind that Private mode is made to keep your privacy uncompromised locally (for other users), not online. There are ways that websites or services will track you even in a private mode.

Also, you can open blocked sites and avoid geo-restrictions with one of these impeccable browsers. You’ll like the first pick.

How to resolve issues with private mode and third-party websites?

So, once we got that out of the table, let’s answer why some websites give you the Your browser is not supported for private mode. All websites have a way to identify the browser that you use to visit them.

Some will require you to disable your ad block, others will ask to accept cookies, while the minority won’t accept Private mode.

It’s their right to put certain criteria and it’s your right to go with it or just switch to an alternative website. Simple as that.

The way to avoid this is quite self-explanatory. Just disable private mode or try using private mode but in an alternative browser.

Some websites have issues with Internet Explorer so switching to Chrome, Firefox, or our favorite, UR Browser is maybe the right thing to do.

Here are the best PIM software solutions for Windows 10

As the name suggests, Product Information Management software (PIM) allows you to store every bit of information that involves your business products – description, pricing, shipping setup, logistics, etc.

This type of software is also known by other names – Product Lifecycle Management (PLM), Product Resource Management (PRM), Master Data Management (MDM), and others.

The most important thing to consider when choosing a PIM software is to make sure that it can easily store entire ranges of product information, under one easy to understand and access hub.

This allows you to streamline the process of product management, promotion, and also configuration.

In this article, we will explore some of the best PIM software available on the market in 2019.

What’s the best PIM software for Windows 10 PC?

IBM InfoSphere MDM

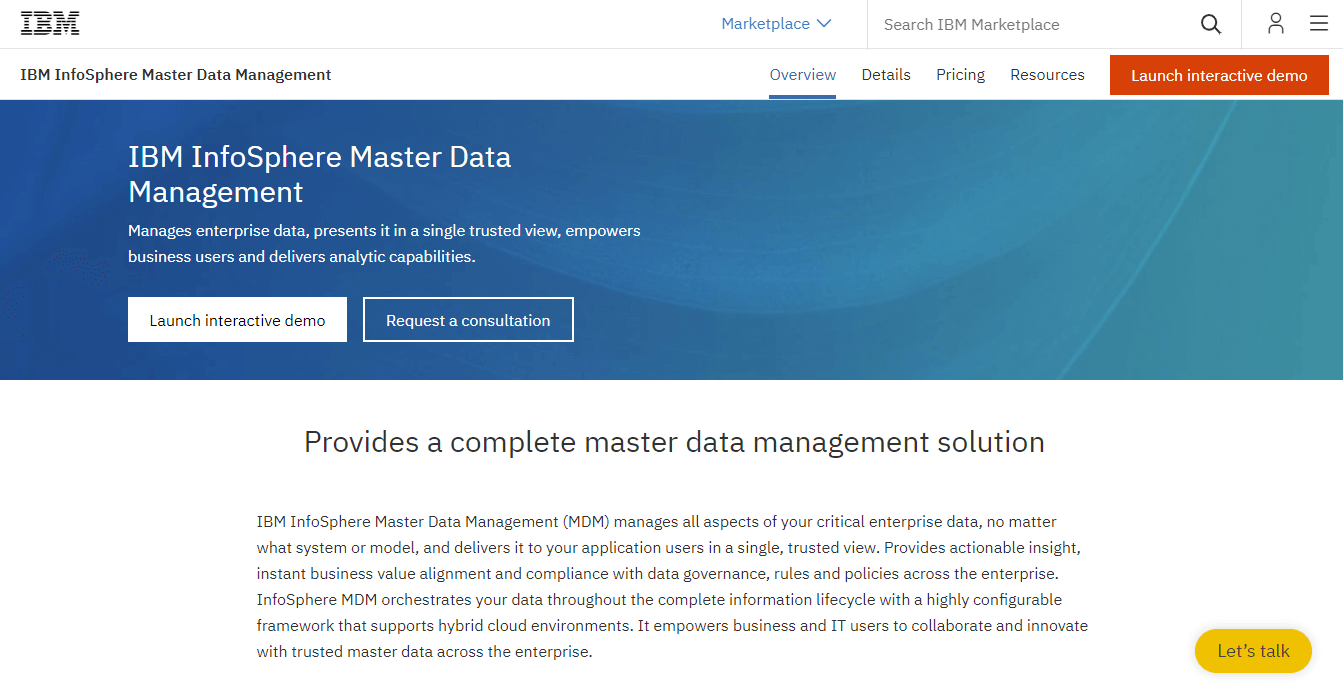
IBM InfoSphere MDM - PIM software

IBM InfoSphere MDM is a great software option that gives you complete control over the way your business data is managed, without needing to be an expert in the field.

This software helps you always keep your business’s values and terms in accordance with the specific rules set in that domain, data management, and all the policies found in your establishment.

Because this is a hybrid application, your data will always be stored online and can be easily accessed from anywhere in the world, by simply using a Windows 10 PC connected to the Internet.

Because of its customizable structure, this software can adapt to any environment and makes it easy for your IT team to modify it if needed.

Here are some of the best features found in IBM InfoSphere MDM:

  • Great built-in domain patterns covering a wide range of industries
  • Advanced management tools – self-service access, analytical graphs, etc.
  • Easy to understand user interface
  • Option to use the service entirely online at a lower cost
  • Real-time sharing of information across all departments of your company

Try IBM InfoSphere MDM


Looking for automated chat software? Be sure to try one of these tools!

Product 360

Product 360 - PIM software

Product 360 is another great software option that offers you access to all the tools you need in order to manage every aspect of your products for your business.

You can also buy and publish up to date information about any product in your online store, offering your customers the ability to choose the best product, while also saving your company valuable time.

One of the best features found in Product 360 is its ability to automatically collect and store all the data from your ERP (Enterprise Resource Planning) and CRM ( Customer Relations Manager) software, but also from the data stored on your PC – images, videos, texts, data polls, etc., and then manage the entire data package in accordance to your company’s requirements.

Managing all the aspects of data processing allows you to offer your clients up to date information about the products they are interested in, allows your company to find out valuable information about the client’s preferences, and adapt accordingly.

Here are some of the best features found in Product 360:

  • Great overview of all customer data
  • Allows collaboration over the web for retailers, distributors, suppliers, etc.
  • Can be used to embed digital assets for your marketing department
  • Automated data processing
  • Great data storage quality and business process management

Try Product 360

Salsify

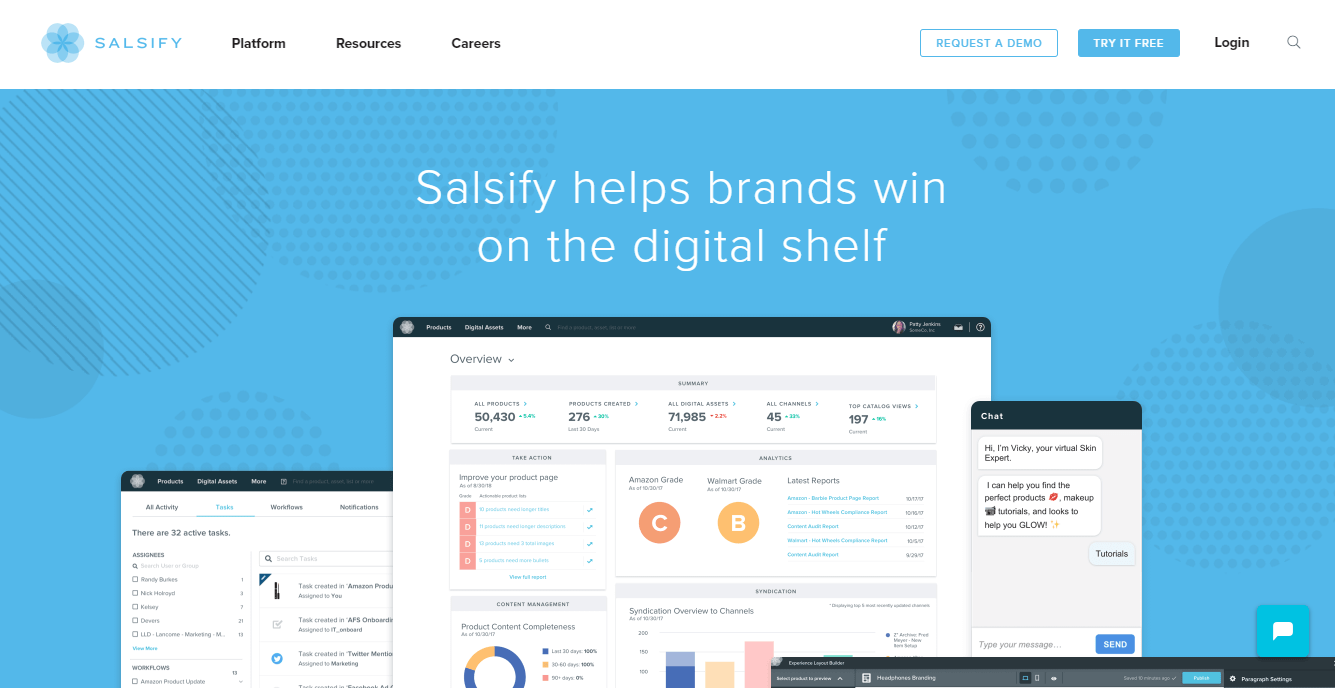
Salsify - PIM software

Salsify is another great software option that can help you manage every aspect of your product platform, from customer preferences to the way you present your product-related information on the web.

Because of its high-performance engines, this software can gather all the information relating to the way your customer reached your website, giving you valuable information about how you can make the process more efficient.

Salsify can also take the capability of product management from your IT team, and adapt it so it can be easily understandable by anyone in your company, while also offering you the tools to modify any aspect of your product management and client data storage.

These tools allow you to always keep in touch with your client’s preferences, and gives you comprehensive results regarding the level of completion for each of your product’s dataset.

Here are some of the best features found in Salsify:

  • Uses SaaS databases with applied machine learning
  • Can generate recommendations about your digital catalogs and products
  • Can easily import product data from any software
  • Retailers that use your platform can inform you in real-time about their preferences
  • Automatically sorts data that can and can’t be used for your products
  • Perfectly integrates with a wide range of APIs
  • Connects seamlessly to analytics providers, content agencies, distributor channels, retailer and distributor portals, etc.
  • Very powerful machine learning that can adapt your business’s platform automatically based on the data received
  • Scalable to any size
  • Security features – single sign-on, data encryption, user roles, and permissions, etc.

Try Salsify

Conclusion

In this article, we explored some of the best PIM (Product Information Management) software options that give you the power to manage every aspect of the way you present, sell and manage data for your business.

The wide range of features found in the software presented in this list offer you all the tools you need for a fast, and more efficient data management.

Using these features to your advantage allows you not to worry about the compartmentalization of information, and assures a more streamlined way of dealing with updating product information for customers while adapting to your customer’s needs.

Please feel free to let us know what software option you chose from this list by using the comment section below.

READ ALSO:

Microsoft releases 20H1 build 18950, confirms you’ll soon be able to reinstall Windows 10 from the cloud

Microsoft has just released the Windows 10 20H1 build 18950 for Windows Insiders on the Fast Ring, which brings improvements for the new Japanese IME and the Snip & Sketch app. This new build is a minor update overall, but the most interesting bit from the release notes is that Microsoft confirmed that it will soon be possible to reinstall Windows 10 from the cloud, though the feature isn’t live yet in the build 18950

In case you missed it, this Cloud download feature was first mentioned by Twitter user WalkingCat a couple of days ago:

https://twitter.com/h0x0d/status/1155811201604915200

Being able to download Windows 10 from the cloud should make it much easier to reinstall the OS, and it’s worth noting that this is a feature Apple already implemented in recent versions of macOS. The Windows Insider team said today that it will soon announce when Windows Insiders can try this new feature, and we’ll let you know as soon as we get more details. In the meantime, here are the full release notes for the build 18950:

What’s new in Build 18950

Japanese IME Improvements

Thank you everyone who’s shared feedback so far about the new Japanese IME. The development team has been working on improving the quality based on your feedback. Here are some improvements that you can try out in this build:

  • Prediction Candidate window key navigation: We fixed an issue where the focus inside prediction candidate window wouldn’t move when using the Up Arrow key.
  • Key customization: We’ve improved the discoverability of key assignment settings. Also, based on feedback, we’ve updated the default assigned value of Ctrl + Space to be “None”. Ctrl + Space can still be used for toggling IME-on/off by changing the value through its setting.

Showing the improved key assignment settings in the Key & touch customization on the Japanese IME settings.

Please don’t hesitate to continue sharing your thoughts with us about typing in Windows – our ears are open and we’d love to hear from you.

Other Updates for Insiders

Snip & Sketch improvements headed your way

Thanks everyone who’s shared feedback so far for our updated snipping experience! We really appreciate it and are starting to roll out some more improvements based on what you’ve told us:

  • Single window mode: Do you tend to retake snips multiple times in order to get the perfect screenshot? We’re updating the New button to now open new snips in your current app window, so you don’t end up with a ton of open snips (that you then need to close.) If you’d rather keep all snips open in separate windows. the option is now a toggle in settings, so you can decide which mode you prefer.

Showing the setting where you can choose whether or not to open snips in separate windows. 

  • Zoom: Need we say more? You can now zoom in on your screenshots if they’re a bit too small for you to annotate on (and yes, CTRL+Plus, CTRL+Minus and Ctrl+Mouse wheel are supported!). We’ll also zoom out to make sure the whole snip fits in the Snip & Sketch window. If you want to see the snip at its original size, click the Zoom button and then “Actual Size”.

Showing the new Zoom options in action.

  • Improving WIN+Shift+S discoverability: You mentioned you loved learning about using WIN+Shift+S to take new snips any time and we thought others would too! If you haven’t taken a snip yet, we’ll now use the canvas space in Snip & Sketch to help you learn how to start a snip without needing to open the app first.

These changes are currently available for a portion of Insiders in the Fast ring as we evaluate the quality before continuing the rollout. Note the rollout for each change mentioned above is being handled separately, with separate random populations in the initial rollout, so seeing one of the changes with app version 10.1907.2064.0 doesn’t necessarily mean you’ll see all three.

General changes, improvements, and fixes for PC

  • Insiders may notice some references to “Cloud download” relating to PC reset or refresh. This feature isn’t available and working quite yet. We’ll let you know once it is, so you can try it out!
  • We fixed an issue where ctfmon.exe might crash if clicking the input mode indicator in the taskbar to switch the Japanese IME between modes.
  • We fixed an issue where pasting from clipboard history (WIN+V) wouldn’t work when using the Bopomofo IME.
  • We fixed an issue resulting in hanja conversion not working for the updated Korean IME when typing in certain apps.
  • We fixed an issue that could result in the OneNote app intermittently acting as if the Ctrl key was pressed when it wasn’t.

Known Issues

  • There has been an issue with older versions of anti-cheat software used with games where after updating to the latest 19H1 Insider Preview builds may cause PCs to experience crashes. We are working with partners on getting their software updated with a fix, and most games have released patches to prevent PCs from experiencing this issue. To minimize the chance of running into this issue, please make sure you are running the latest version of your games before attempting to update the operating system. We are also working with anti-cheat and game developers to resolve similar issues that may arise with the 20H1 Insider Preview builds and will work to minimize the likelihood of these issues in the future.
  • Some Realtek SD card readers are not functioning properly. We are investigating the issue.
  • Tamper Protection may be turned off in Windows Security after updating to this build. You can turn it back on. In August, Tamper Protection will return to being on by default for all Insiders.
  • Occasionally, the candidate selection in prediction candidate window for the Japanese IME doesn’t match with the composition string. We are investigating the issue.

The Windows Insider webcast will also make a comeback on Mixer tomorrow at 2PM PDT, and this episode will have special guests from the FX Amplify team. This should be a good opportunity to learn more about the state of the 19H2 and 20H1 updates, especially since the 20H1 update still seems to get more attention from the Windows Insider team these days.

Project xCloud Test Game for Xbox One shows up on the Microsoft Store

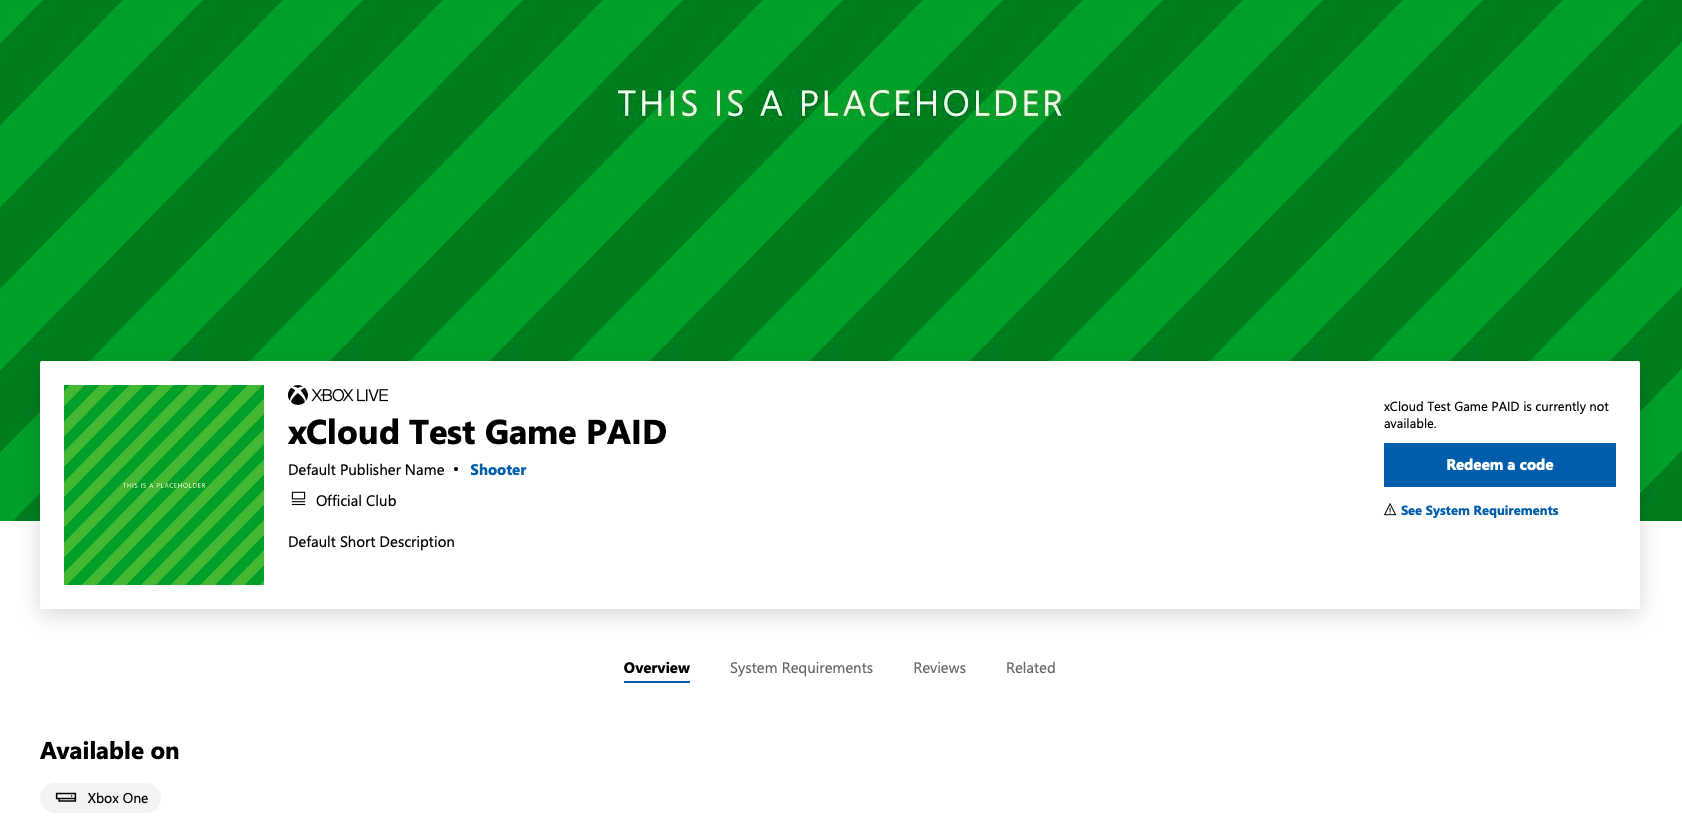
As Microsoft is now gearing up for the Project xCloud public beta coming in October, Microsoft watcher WalkingCat spotted an xCloud Test Game for Xbox One on the Microsoft Store today. The store listing has no description and a placeholder image, but the fact that this is targeting the Xbox One is quite surprising.

https://twitter.com/h0x0d/status/1156491354832113664

Back at E3 2019, Microsoft made it pretty clear that it was initially focusing on smartphones with Project xCloud, and all the public demos we’ve seen so far were done on smartphones. Google will be exploring a different road with its own Stadia game streaming service, which will be available on TVs with a Chromecast Ultra, PCs with Google’s Chrome web browser, and select Google Pixel smartphones.

We don’t yet if the full-fledged Project xCloud service will eventually be available on Xbox One consoles, but Microsoft announced at E3 that it was working on a separate console streaming feature that will allow Xbox One owners to stream Xbox games they own to mobile devices. This feature is expected to launch later this year, and it has yet to make its way to Xbox Insider builds.

We hope to get more details about Project xCloud at gamescom next month, as the event will be the first time Microsoft lets the general public go hands on with the game streaming service. With pre-orders for the Google Stadia Founders Edition already opened, Microsoft shouldn’t wait too long before revealing the business model for Project xCloud and other important details to help gamers choose between the two services later this Fall.

Windows 10 Calculator app will soon get new Always on top mode

Earlier this year, Microsoft announced that it was open sourcing the Windows Calculator app, opening the doors for some new community-built features. Well, this is already giving some interesting results as a new Always on top mode will soon be implemented in the app, allowing users to pin Calculator on top of other windows.

Dave Grochocki, Senior Program Manager working on Notepad and Windows Calculator at Microsoft, shared a GIF showing the new Always on Top mode yesterday (via Thurrott.com). “This is our second-highest customer feedback request in Feedback Hub with some users reporting their only alternative is to pay for an app which is sticky,” Grochocki wrote on the project’s GitHub page.

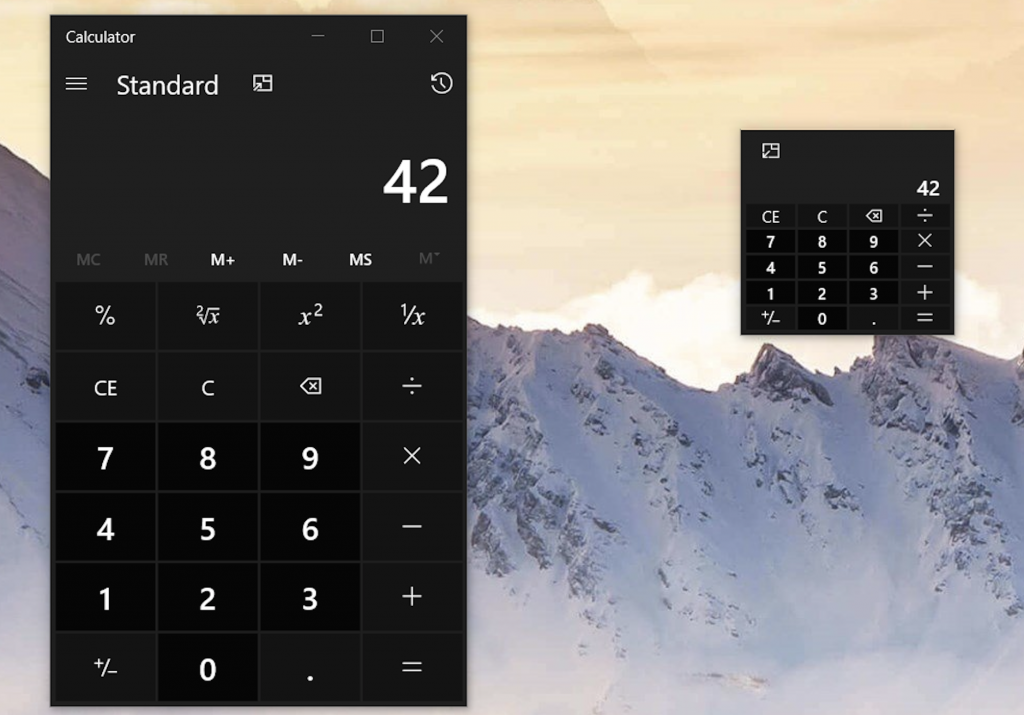
As you can see in the GIF, pinning the Calculator window initiates a new compact view that hides some advanced features, but keeps basic Calculator functionality. It’s not clear when this new Always on Top mode will be generally available, but it will likely come to Windows Insiders first. Now that Windows Calculator has been open sourced, it will be interesting to see if the app will continue to get new features inspired by user feedback.

DirectX Is Not Compatible With This Version of Windows [FIX]

This version of DirectX is not compatible with this version of Windows message usually appears when the operating system of your PC was changed or updated, or in the case that there is a conflict with the version of DirectX you’re using.

This can stop you from being able to run your favorite games and can affect the way your PC can be used as well. For these reasons, in today’s article, we will discuss the best way to deal with this issue. Read on to find out how to do it.

What to do if DirectX is not compatible with my version of Windows?

1. Check if your antivirus or Windows Defender firewall is blocking access

  1. Click on the Cortana search box found inside your taskbar.
  2. Type firewall -> select the first option from the top. Firewall Windows 10 - This version of DirectX is not compatible with this version of windows
  3. Inside the Firewall settings -> select the option Allow an app or feature through Windows Defender Firewall (found on the left side of your screen).
  4. Search for ActiveX inside the list -> make sure that all connections are allowed.
  5. Save the settings and close the window.

Note: If you use a Firewall service from a third-party antivirus, you will need to allow the connections there as well.

2. Scan for Registry errors using a professional tool

A reliable third-party PC repair tool can perform an advanced scan and detect all registry issues within minutes. We highly recommend using this type of software to keep track of your installed apps and computer’s performance.

Replacing the files that have been damaged is equally important for your OS’s stability. A closely monitored and healthy Windows registry will provide you with an error-free experience.

3. Make sure you’re running the latest version of DirectX

To check:

  1. Press Win+R keys on your keyboard -> type dxdiag -> press Enter.
  2. Under the System tab, you will see the DirectX version installed on your PC.
  3. Check the version of DirectX you have.

To download:

  1. Click on Cortana search box -> type in Windows Update -> select the first option from the top.
  2. Inside the Windows Update screen -> press the Check for updates button. Windows Update - This version of DirectX is not compatible with this version of windows
  3. Windows will automatically download and install any DirectX updates.

4. Run sfc command in PowerShell (Admin)

  1. Press Win+X keys on your keyboard -> select Windows PowerShell (Admin).
  2. Inside the PowerShell window -> type sfc /scannow -> press Enter.Sfc command - This version of DirectX is not compatible with this version of windows
  3. Wait for the process to complete -> close the command prompt window.
  4. Try to see if the issue is fixed.

In this article, we explored the best methods to solve the error message saying This version of DirectX is not compatible with this version of Windows.

Should you run into another related error where DirectX 12 is not detected, check out our guide on how to bypass it.

Please feel free to let us know if this guide helped you solve your issue by using the comment section below.

Microsoft Outlook app adds Calendar events to in-app search results in latest update

The official Microsoft Outlook app updated to Version 3.34.0 on Apple’s iOS devices this morning. This latest update finally adds the ability for events within the Calendar portion of the app to be searchable when doing a search.

Previously, a search within the iOS Microsoft Outlook app would just display emails.

Here’s the short, full release notes:

Looking for an event? Your calendar events will now appear as part of your search results so it’s easier to keep track of your busy life.

Feel free to send us any comments or questions through our in-app support in Settings – we’d love to hear from you.

While just a small update, this new feature has been a long time coming and should prove popular with those who use the Outlook app for planning meetings and events. Previous Outlook app updates on iOS added support for Apple’s iCloud Drive and Office 365’s category colors.

Are you happy to have events finally being searchable? Share your thoughts with the community in the comments below and then follow us on Twitter for more Microsoft news.

Scrivener does not start [TECHNICIAN FIX]

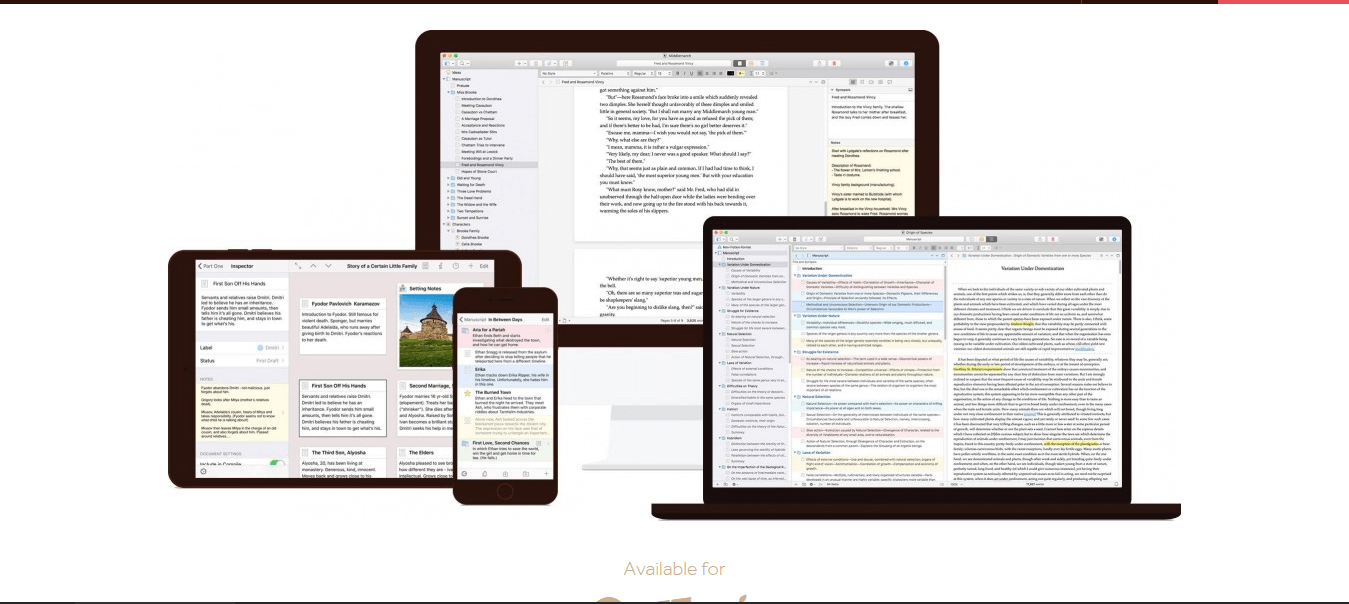
Scrivener is one of the most popular apps for creative writing, from a first draft to finished product. With all kinds of tools on offers, the popularity of the app is not surprising. That said, the app is not immune to general errors. Several users have reported that Scrivener does not start on the official Scrivener and Microsoft Community Forums.

 I am running Windows 7 (home) and have downloaded a new program (Scrivener). When I try to start it, I get this message: The application has failed to start because its side-by-side configuration is incorrect. Please see the application event log or use the command-line sxstrace.exe tool for more detail.

Here are a couple of troubleshooting tips to fix the Scrivener app in Windows computer.

How to fix Scrivener not responding on Windows

1. Run Troubleshooter

Scrivener does not start

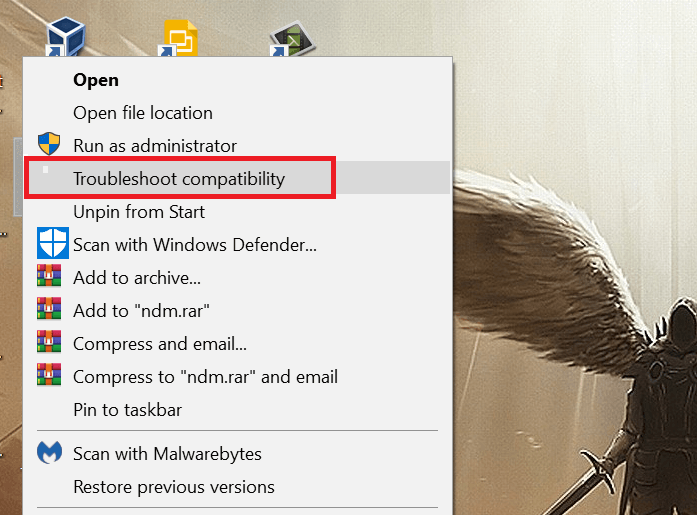
  1. On your desktop, right-click on the Scrivener app and select Troubleshoot Compatibility.
  2. The troubleshooter will scan the app‘s files for any issues and recommend appropriate fixes.
  3. Apply the appropriate fixes. Reboot the system and check for any improvements.

2. Reinstall Microsoft Visual C++

  1. Press Windows Key + R to open Run.
  2. Type control and press OK to open Control Panel.
  3. In the Control Panel, go to Programs  > Programs and Features.
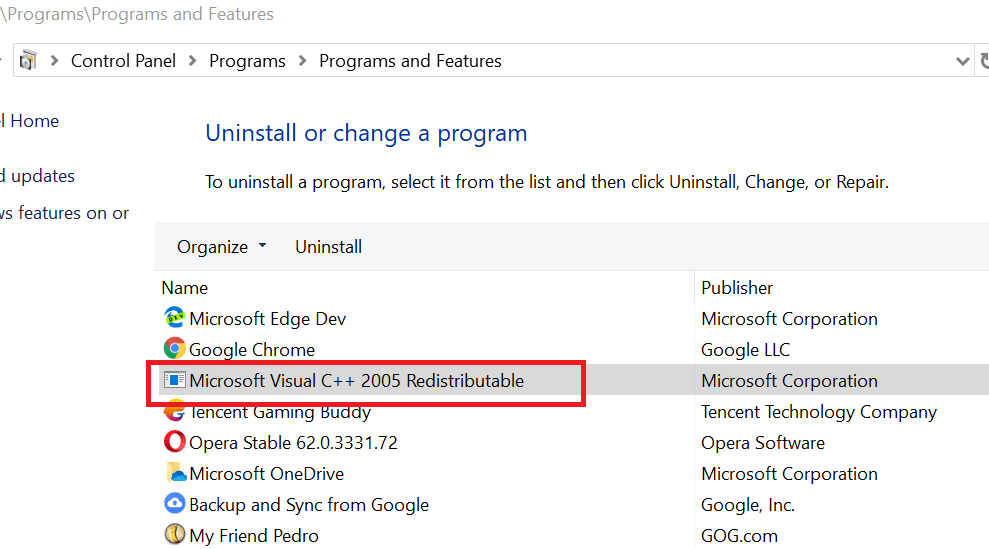
  4. Select “Microsoft Visual C++ Redistributable” and click on Uninstall.
    Scrivener does not start
  5. Reboot the system and download the latest version of Microsoft Visual C++ 2010 Redistributable Package (x86).
  6. Install Microsoft Visual C++ and reboot the system.
  7. Now try to open the Scrivener app and check if it starts.
  8. If the issue persists, uninstall and re-install the scrivener app and check for any improvements.

Write flawlessly with these 5 proofreading software solutions! Check them out now.


3. Enable / Disable Compatibility Mode

  1. Open “File Explorer” and go to Scrivener installation folder as shown below:
    C
    : -> Program Files (x86) -> Scrivener
  2. Locate and right-click on the “Scrivener.exe” file.
  3. Select “Properties”.
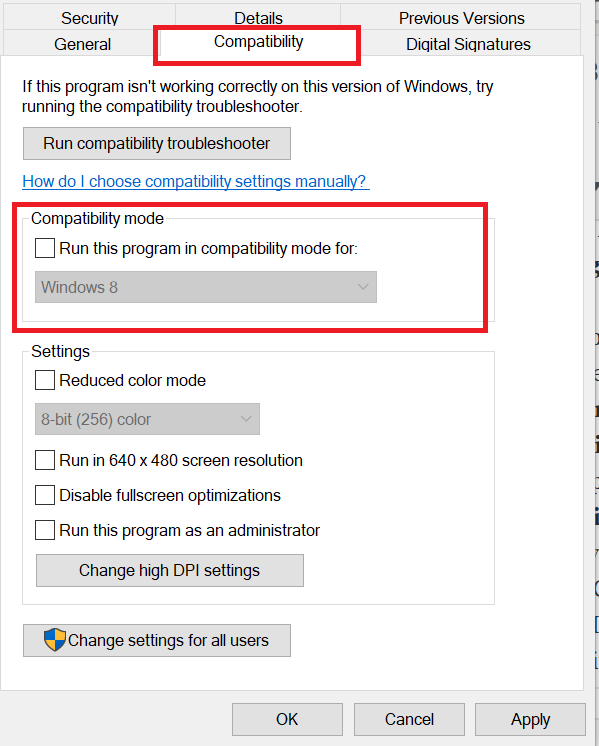
  4. Click on the “Compatibility” tab.
    Scrivener does not start
  5. Under “Compatibility Mode” section, uncheck “Run this program in compatibility mode for:“.
  6. If the Compatibility Mode is already unchecked, check the “Run this program in compatibility mode for:“.
  7. Click Apply and OK to save the changes.
  8. On some PCs, Scrivenever may run in a compatibility mode to function properly. However, this can also cause issues with the app. Disabling / Enabling compatibility mode for the app can resolve the issue.

4. Install Older Version


  1. If the issue occurred after you installed an update for the app, try to roll back to the previous version.
  2. First, uninstall the current version of the Scrivener app.Scrivener does not start
  3. Now download the older version of Scrivener app and check if the app runs fine.
  4. If the issue is resolved, make sure you notify the developer about the issue.

RELATED STORIES YOU MAY LIKE:

Skype for Business Online to be replaced by Microsoft Teams in 2021

Microsoft announced that Skype for Business Online will be retired on July 31, 2021.

Microsoft retires Skype for Business Online in two years

This comes as a natural continuation to a process that was started in 2017, namely Microsoft calls it, combines chat, calling, video, and document collaboration.

The idea is that Teams combines all these features and more in a single, integrated app, the workflow and the experience being much more intuitive and complex in Teams.

If you’re a current Skype for Business Online customer, you’ll be happy to know that for now, things will remain the same and you’ll be able to add new users and continue your work without any changes.

However, from September 1, 2019, all new Office 365 customers will be onboarded to Teams for chat, meetings, and calling. Also, Skype Consumer service and Skype for Business Server will remain the same.

Teams will include many Skype for Business Online features

To help customers migrate easily to Teams, Microsoft is working on adding missing features from Skype for Business Online as follows:

  • Dynamic 911. A feature of Microsoft Teams Phone System, Dynamic E911 automatically uses the caller’s current location to route to a Public Safety Answering Point (PSAP) call center operated by the local government.  Dynamic E911 will be delivered in Teams for the United States by the end of this calendar year.
  • Shorter Retention Periods. New retention period options will allow customers to limit channel and chat retention periods to as short as 1 day and ensure that when data is deleted it is removed from all permanent storage locations in the Teams service.  Shorter Retention Periods will be available in Teams by the end of this calendar year.
  • Teams and Skype Consumer Interop. Interop between Teams and Skype Consumer will allow users on the two services to communicate using both chat and calling.  Teams and Skype Consumer Interop will be available in Teams in the first quarter of calendar year 2020.
  • Contact Center Integration and Compliance Recording. At Inspire earlier this month we announced Teams partnerships with Five9, Genesys, and NICE to enable Contact Center solutions – and with ASC, NICE, and Verint to provide Compliance Recording.   We’re also working with other Skype for Business Online certified partners to bring other Contact Center and Compliance Recording solutions to market for Teams.

With these changes, Microsoft aims to make the transition smoother and to help customers every step of the way.

Microsoft launches new code samples browser to help you get started with your development project

For developers who need a little bit more guidance than others, Microsoft is consolidating its code samples into a more streamlined experience.

The Microsoft’s docs team took to Twitter to announce the new docs.Microsoft.com experience which is being hailed as the “unified, company-wide code sample browser “for interested developers.

According to the company’s blog post, starting today, this new location will be the place to find the most up-to-date code samples provided by Microsoft for various workflows.

The new experience will incorporate trusted search and filters options that support GitHub hostings as well as a reciprocal contribution method. Newer features of the docs.Microsoft.com experience include One-click Azure deployment, downloadable ZIP functionality, Browse Code search tool, keyword, and in-page search options are all present as of today.

Microsoft plans to keep this location a living and breathing repository of samples and plans to add more in the coming days and months.

Microsoft’s heavily investing in solar power for Arizona data centers

Microsoft is looking to reduce the carbon footprint its data centers present with significant investments in solar power and its center in Arizona is becoming its showcase example.

With a relatively aggressive goal of having its data centers using up to 70% of renewable energy sources by 2023, Microsoft’s sustainability project with its Arizona data center has been a focal point of the company.

We intend to develop our new datacenter campuses in El Mirage and Goodyear, Arizona to be among the most sustainably designed and operated in the world – powered with 100% renewable energy. Arizona has been increasingly embracing the technology industry with a pool of growing talent, an affordable quality of life for employees, and as many 200 as sunny days a year making it an ideal location for investing in solar power.

More specifically, Microsoft is partnering with the Arizona-based solar energy company First Solar and collaborating on the Sun Stream 2 photovoltaic (PV) solar plant. Ideally, Microsoft would leverage the 150-megawatt plant to carry the load of each of the company’s new data centers in the area. In turn, First Solar gets first dibs on Microsoft cloud services and technologies such as Azure IoT Hub and SQL Data Warehouse, to run its various business interests.

First Solar joins a growing list of Microsoft partners committed to providing the latest and very best renewable energy sources around. Microsoft’s renewable energy partnerships have brought in 1.5-gigawatts of energy to-date.

Microsoft is also looking beyond its solar plant partnership in Arizona to address the conservation and replenishing of water in the state.

The effort is intended to increase Arizona’s water resiliency and help the state meet its Drought Contingency Plan Commitments. Microsoft’s investment in this project has also generated a one-to-one cash match from the Water Funder Initiative that will support the state’s efforts and further expand project impact. The project will benefit the Colorado River Indian Tribes, ultimately resulting in more water in Lake Mead and more efficient water infrastructure.

Microsoft says that eventually, it would like all its data centers to be running on 100% renewable energy and its pitching a lot of money into Arizona to supercharge that timetable, to the tune of more than $800,000, just last year alone.

With the company continuously expanding its data center footprint as it provides more people and businesses cloud services it’s nice to see Microsoft taking into account the environmental toll cloud computing actually presents.

How do I fix Windows script host error 800a03f2

While installing the Microsoft Framework or trying to launch any software on your PC, you may encounter Windows script host error 800a03f2. This error can occur due to several reasons including system file corruption and third-party programs creating conflicts with other apps.

If you are also troubled by this error, here is how to fix it.

How do I fix Windows script host error?

1. Run System File Checker

  1. Type cmd in the search bar.
  2. Right-click on Command Prompt and click on Run as Administrator.
    Windows script host error 800a03f2
  3. In the command prompt, enter the following command press Enter to execute.
    sfc /scannow 
  4. Wait for the System File Checker to scan the system for any missing system files. If it finds any file corruption or file is missing, the tool will automatically repair the system files by replacing the corrupted files with new ones.
  5. Reboot the system and check if the error is resolved.

2. Boot into Safe Mode / Safe Boot

  1. Press Windows Key + R to open Run.
  2. Type msconfig.msc and press OK to open System Configuration.
  3. Click on the Boot tab.
    Windows script host error 800a03f2
  4. Click the “Safe boot” box and click Apply. Then click OK to save the changes.
  5. Now you will see an option to Restart and Exit without Restart. Click on the Restart button and wait for the system to boot into safe mode.
  6. Now try to open the application that was giving the error. Check if the error appears again.
  7. If the error does not appear, you have a third-party app to blame for it.
  8. Press Windows Key + R to open Run.
  9. Type control and press OK.
  10. In the control panel go to Programs > Programs and Features.
  11. Now start with uninstalling the most recently installed program. Reboot the system and check again. Repeat the steps if necessary.
  12. Make sure after uninstalling any program you disable safe boot (uncheck safe boot option) before restarting your PC.

Sometimes, Windows 10 critical issues call for the system factory reset. Here’s how to do it.


3.  Perform System Restore

  1. Type restore in the search bar.
  2. Click on the “Create a Restore Point” option.
    System Properties - System Restore Windows script host error 800a03f2
  3. Click on System Restore button and click Next.
  4. Select the “Show more restore points”  box.
    Windows script host error 800a03f2
  5. Now select the most recent restore point where your computer was working fine without any error.
  6. Select the restore point and click Next.
  7. Read the description and click on Finish.
  8. Wait for the Windows to restore your PC to an earlier point where it was working without any issues.

4. Update Java / Flash

  1. One of the common reasons for this error is outdated Java or Flash player installed on your system.Windows script host error 800a03f2
  2. If you have these frameworks installed, you may want to update them to the latest available versions from the official website.

RELATED STORIES YOU MAY LIKE:

How to Create Real-time Polls in Outlook and Outlook.com

Microsoft is continuously working to improve its Forms service. The recent Microsoft Forms update brings a Quick Poll add-in for Outlook users.

Most of the times, users need to get feedback with the help of online surveys. We rely on many third-party tools to create polls. Oftentimes, users send the poll links via email.

However, it is a time-consuming task when we need to get instant responses via emails. Microsoft decided to fix this problem by adding the option to create polls within Outlook.

The company announced on its official blog that the service has got many new features. Many of these grabbed the attention of Outlook users.

By far, the most popular feature is the new Quick Poll add-in for Outlook.com and Outlook. You can now quickly create a real-time poll in just a few minutes.

Adding questions and options is easy with the new Forms Quick Poll add-in button — and you can do that while writing your emails.

The best thing about using this built-in feature is that recipients can submit their responses within the email. On top of that, the poll results are instantly visible on the voting card.

How can I create polls in Outlook?

  1. Install the Quick Poll Add-in. To do that, go to the Home tab > Get Add-ins > search for Quick Poll.
  2. Hit the New message button to write a new email message > navigate to the Message tab > click Create a poll.
  3. Type your questions and add the options for your respondents.
  4. You can then decide if you want your respondents to choose a single answer or multiple answers by toggling the appropriate answers button.
  5. Hit Insert to send out your newly created poll.

The Quick Poll add-in for Outlook is available for download from Microsoft. The list of new features does not end here.

Outlook gets new features

Create a quiz and branching

Microsoft Forms allows its users to use the service to create new quizzes directly from Office.com. Furthermore, the branching feature helps you efficiently manage your survey structure.

Branching removes distractions for the survey respondents. Microsoft already pushed the branching feature for Office 365 users.

Theme Recommendation

Many people prefer to use themes when they need to add some professional touch to their online polls and surveys. The respondents like the customized versions, and this eventually increases the response rate.

Microsoft Forms uses your initial input to recommend themes. The company explains in a blog post:

Today, we’re thrilled to announce a better, yet faster, way to add background images with Theme Ideas. Once you enter a title, you’ll see a flash icon on the “Theme” button, which indicates there are recommended background images for your form. The theme of your form will also automatically update to best match the background image.

Polls aren’t the only feature you can add in Outlook, and we have a short guide on how to insert HTML into Outlook, so don’t miss it.

Which one of these features do you like the most? Let us know in the comments section below.

How to refresh data in Power BI [STEP-BY-STEP GUIDE]

The Refresh option is a basic function in Power BI. The tool has Refresh Now and Schedule Refresh as available options. You can use Refresh Now to perform a manual refresh in Power Bi Desktop. Also, you can schedule a refresh in a few easy steps.

Still, refreshing data in Power Bi is not so obvious at first sight, as one user said:

I have created some reports using Power BI desktop and Published those as a Web Page from Power BI service. My source is SharePoint. I want to schedule refresh of Power BI data from source SharePoint in every 2 hours. How to achieve this?

So, we know that the OP wants to refresh the Power Bi data from the SharePoint source once every two hours. Here’s how to do that.

Steps to refresh your data in Power BI

1. Configure credentials

First of all, you need to configure the credentials for data sources used in the Power Bi report.

  1. In the Power BI Report Server, right-click on the Power BI Reports.
  2. Select Manage.manage power bi report server
  3. Select the Data sources tab.
  4. Choose the type of authentication to use when connecting to that data source.
  5. Enter the appropriate credentials.
power bi credentials

2. Create a plan for Schedule Refresh

  1. Right-click on the Power BI Reports.
  2. Select Manage.
  3. Select the Scheduled refresh tab.
  4. Select New scheduled refresh plan.power bi schedule select steps
  5. Write a description and set a time for when you want your data model to be refreshed and then click on Create scheduled refresh plan.power bi create schedule

Find out more about Power BI Desktop from our comprehensive guide!


3. Use manual Refresh button from Home in Power BI Desktop

This is rather simple, but you can refresh your data one time only.

  1. Open Power BI Desktop.
  2. Load your file you want to refresh.
  3. Click on Refresh button from the Home ribbon.
power bi manual refresh

Conclusion

Refreshing your data in Power BI is a very useful feature, especially Schedule Refresh. Generally, people who work with this tool use dynamic sets of data and it is not physically possible to refresh them manually.

These steps can be useful, but if scheduled refresh on Power BI is greyed out, we have a guide that can help you with that.

Did you find the methods useful? Let us know in the comments section below!

RELATED STORIES YOU NEED TO CHECK OUT:

Microsoft Teams update brings emoji reaction support to Android users

Microsoft recently released a new update for the Android version of Microsoft brings a bunch of improvements and change in the recent release. The company has finally released some performance improvements and bug fixes for the app.

Furthermore, you can now use emojis to react to the messages that you send or receive from other users. These emojis express the feelings of angst, sadness, love, and surprise.

Many users have already spotted this new feature and confirmed that the app now offers six different emojis for that purpose. Microsoft Teams users are happy to see the new feature.

The previous version just allows them to use a thumbs-up button for reacting to message. Apparently, Microsoft plans to add a little more fun to the boring work discussions.

Microsoft Teams update changelog

The complete changelog of the recent update explains the new features in Microsoft Teams app in the following manner.

Emoji reactions

You can now express your emotions in better ways with the help of emoji reactions on messages.

Improved search experience

Microsoft Teams now allows its users to view their search results in a single view.

View announcement posts

You can now view different announcements posts available on different channels.

Hide private team

Microsoft is completely focused to improve the privacy of Microsoft Teams users. The recent update enables you to hide your private team. It means that others can no longer discover your private team in search results.

Improved @mention suggestions

This update brings some major improvements for the @mention suggestions in the application.

It is not the first time that Microsoft has introduced Message reaction capabilities in its products. As a matter of fact, you will see the animated Slype emojis in Microsoft Teams.

As you may know, Skype has a similar feature that lets you different emojis to react to messages. Other messaging apps such as Facebook Messenger or Apple’s iMessage also support message reactions.

It’s also worth noting that Microsoft Teams actually uses the Skype emojis across all platforms, which are animated and still look pretty good after all these years.

If you are interested in trying out the new emojis, you can visit Play Store to download the update today.

RELATED ARTICLES YOU NEED TO CHECK OUT:

Microsoft removes IE mode from Edge, says it’s an enterprise-only feature

Microsoft announced Internet Explorer mode for Edge back in May 2019.  There is a dedicated Microsoft Edge tab that you can use to open a web page in Internet Explorer.

In order to enable this feature, you need to utilize a specific flag. When enabled, the flag displays an option in the menu Show this page using Internet Explorer.

However, the flag is still there but Microsoft removed the menu option. This indicates that the option to launch IE from Edge won’t be available for all users.

One of the major reasons that brought this change stems from the reason why this feature was developed in the first place.

Microsoft’s blog post suggests this option was originally developed for the Enterprise version. This feature was built for IT administrators to help them debug problems faster.

As a result, from now onwards, the IE mode on Edge will only be available to IT admins.

IE mode Chromium Edge

If we look into the details, the Internet Explorer mode helps us to open webpages that need some specific technologies. These technologies are required to overcome compatibility problems.

Internet Explorer supports many such technologies that are not compatible with Microsoft Edge.

Microsoft describes the functionality of IE mode as follows:

One of the features available for evaluation is Internet Explorer mode, a feature that integrates IE11 natively into Microsoft Edge. Internet Explorer mode allows users to navigate seamlessly from a modern web application to one that requires legacy HTML or plugins. You’ll no longer need a “two-browser” solution.

The company confirmed that the menu option was added for internal testing purposes only.

That menu entry was always intended only for internal debugging purposes, and we’ve removed it now that IE mode is formally released. IE mode is a enterprise-only feature. Only the admin controls whether a site ends up in IE mode or not (this is key to the security model).

Microsoft’s Docs support site also mentioned that IE mode is now limited to Windows 10 version 1809 Enterprise systems. You can use the original Internet Explorer to get the same functionality.

Meanwhile, if you’re looking for a reliable, safe to use and privacy compliant browser, we recommend UR Browser.

For more information about this browsing tool, you can check out our in-depth review.

RELATED POSTS:

  • Microsoft Edge now has easy to see InPrivate Mode tabs

Microsoft releases Windows Server vNext preview build 18945 and Windows 10 SDK build 18945

Following the release of Windows 10 Insider build 18945 last week, Microsoft is making available a Windows Server vNext build today, as well as a new preview build of the Windows 10 SDK. For Windows Server Insider, the preview build 18945 of the server OS introduces the ability to authenticate to hybrid environments using FIDO2 security keys.

For app developers, Windows 10 SDK preview build 18945 brings the ability to sign apps with Device Guard Signing, a feature available in Microsoft Store for Business and Education. There are also many API changes in this release, and we invite you to check the full lit of changes on the blog post.

As usual, the new Windows Server build can be downloaded from the Windows Server Insider Preview download page. If you’re looking for the latest Windows 10 SDK, you can get it from the developer section of Microsoft’s Windows Insider website.

How to open CRT files on Windows 10 [FULL GUIDE]

If you’re wondering how to open a CRT file on Windows 10, you came to the right place. A CRT file is a file that contains information about the certificate used by secure websites.  The files with the CRT format can also be accessed on a variety of devices and with different programs that use certificates.

In this article, we will explore different ways of opening CRT files from your Windows 10 PC. Read on to find out more.


How do I view certificates in Windows?

1. Use certmgr.msc command inside Run dialog

certmgr - how to open crt files

  1. Press Win+R keys -> type certmgr.msc command -> press Enter.
  2. Inside the Certificate Manager window -> search for your preferred certificate inside the left-hand-side panel.
  3. Selecting a certificate from the left panel will show you details in the right panel.
  4. Double-click the certificate you want to open and use the key to decrypt the file.

Need to install root certificates on Windows 10? It’s super easy with this guide!


2. Use Windows 10 to open the certificate

  1. You can also simply double-click your .crt file in order for Windows to open it. This will open the Certificate window, in which you can see all the details of that certificate.
    Certificate example - How to open .crt files
  2. After checking if the entire range of information is correct, you can simply click the button Install Certificate for the changes to be applied.
  3. Depending on the environment in which you want to use the certificate, the data will automatically be installed.

3. Open .crt file inside your favorite browser

open with crt file - how to open crt files

  1. Right-click on the .crt file -> select Open with.
  2. Choose the browser software in which you want to open the certificate in -> tick the box next to Always use this app to open .crt files if you want that to be the default software to open .crt files with.
  3. Click OK.

In this article, we explored some of the best software options that allow you to open .crt files on your Windows 10 operating system. We hope this guide helped you understand the process.

Looking to handle more file formats on Windows? Check out our detailed tutorial on how to open RPT files to learn the best tools and steps for viewing and converting report files with ease.

Please feel free to let us know if this guide helped you in any way by using the comment section found below.

READ ALSO:

Life after Windows Phone: are you using Android or iOS?

There’s no question about it, Windows Phone is dead. Change is hard for everyone and I admit it took me some time to finally give up on Windows Phone. I went from a Lumia 950 to a Samsung Galaxy S9 Plus. The last Android phone I used before Windows Phone was the HTC EVO 4G, so the switch back to Android went relatively smooth. After the Samsung Galaxy S9 Plus, I moved on to my current phone, the Google Pixel 3 XL. Besides the Pixel 3 XL battery life, I don’t have much to complain about using a Pixel.

On Android, Microsoft Launcher is a highly-rated launcher has over 10 million downloads in the Google Play Store. Microsoft Launcher integrates with Android well, offering a user-friendly experience with easy access to plenty of other Microsoft apps and services available on Android. Microsoft Launcher allows you to use your Microsoft account, which makes switching between your phone and Windows 10 PC even easier. The launcher allows you to see all your calendar events, Outlook emails, and use Continue on PC to continue being productive.

On the other hand, there is iOS, which offers secure messaging with iMessage, easy backup and storage with iCloud, and the Apple Store offers plenty of apps that allow ease of use with everything. Facetime and the ability to interact with family members through video chat is another big upside. If you are wary of Google always listening to what you are browsing, listening to, and talking about, iOS would be the most secure alternative. One major downside with iOS is choice. Apple is the only company that makes the iPhone and if you want to phone appearance and customization is kept to a bare minimum.

I could talk ad nauseam about all the Windows Phone features I miss and what device was the best, but the platform is dead, it’s time to move on. Now that there are only two choices for smartphone OSes, Android and iOS, I wonder which platform did most recovering Windows Phone users switch to and why. So sound off in the comments, or take our poll:

What phone do you use now and what do you like most about the operating system? (Bonus question: what do you miss most about Windows Phone?)

Gears of Wars 4 and Forza Motorsport 6 highlight Xbox Games with Gold for August

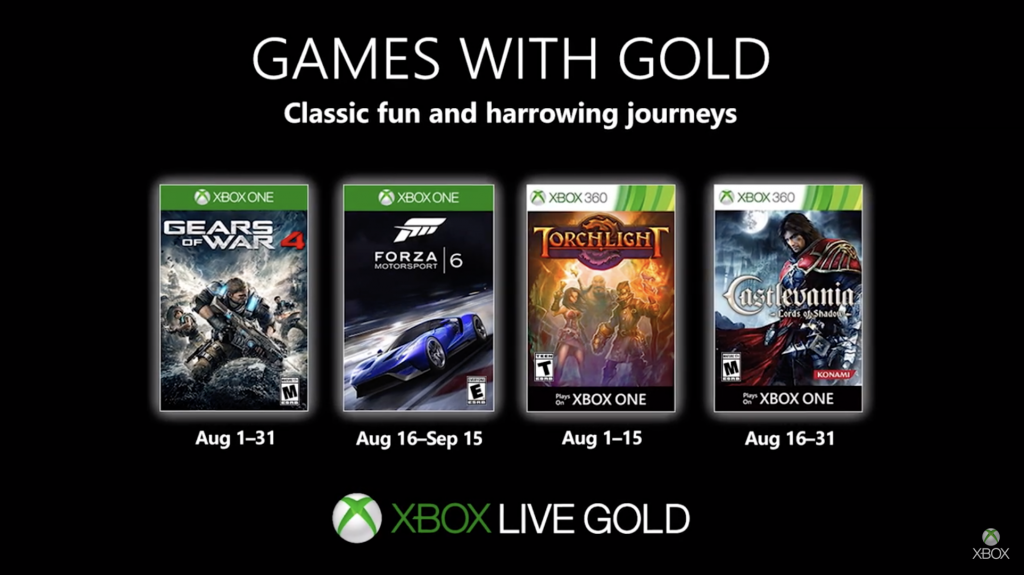
The August 2019 Games with Gold have just been revealed by Xbox’s Major Nelson, and they include the first-party titles Gears of War 4 and Forza Motorsport 6. Gears of War 4 will be free to grab on August 1 along with the Xbox 360 game Torchlight, and this is a well-timed promotion as Gears 5 will be released on Xbox One on September 10. 

As for Forza Motorsport 6, it will be available on August 16 with the Xbox 360 game Castlevania: Lords of Shadow. We expect the 2015 racing game to reach end of support later this Fall. Forza games usually disappear from the Microsoft Store after four years, and that’s what happened last year with Forza Horizon 2 which was one of the Games with gold for August 2018.

Overall, these four games represent 6200 in gamerscore and $95 in value, which is more than what we had with July’s Games with Gold. As a reminder, you have until tomorrow, July 31 to grab Inside and Meet the Robinsons for free with your Xbox Live Gold subscription.

How to create and use shared lists in Microsoft To-Do

Microsoft To-Do has support for shared lists, which allow multiple users to collaborate on tasks. The sharing procedure is quite straightforward, as To-Do uses simple links to grant access to lists.

Screenshot of Microsoft To-Do shared lists

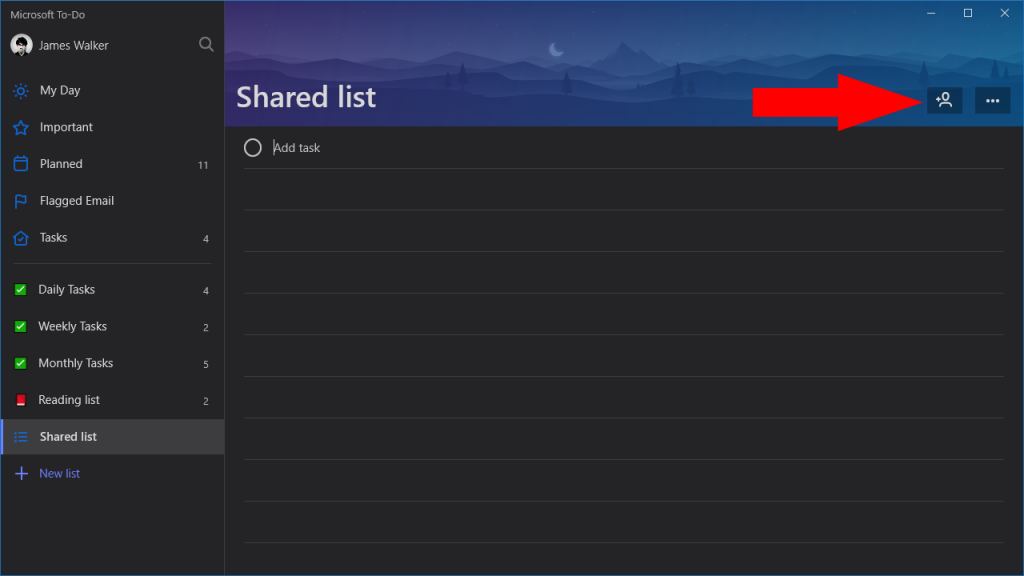
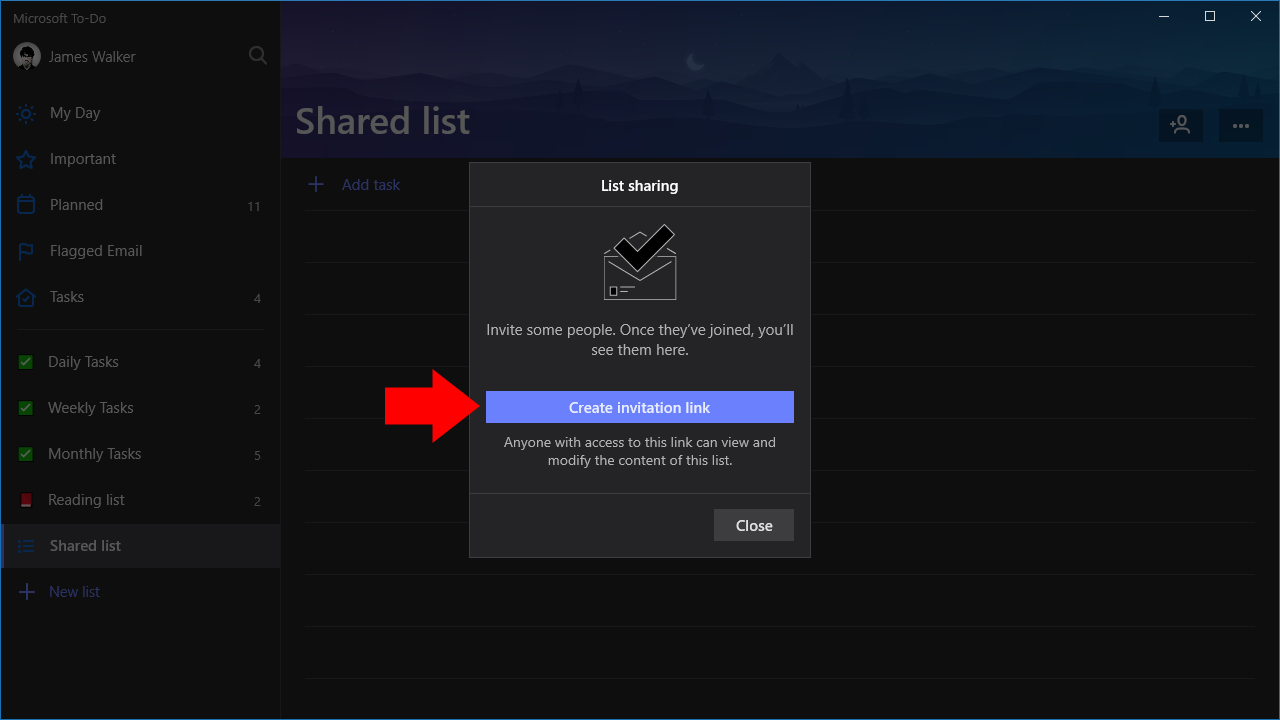
You can convert any existing To-Do list into a shared list. Select the list you want to share and click the person icon in the bottom-right of the list header. This will display the “List sharing” popup.

Screenshot of Microsoft To-Do shared lists

Click the blue “Create invitation link” button to generate a link for your list. You can now send this link to the people you’d like to share the list with. Anybody with access to the link will be able to view and edit the items within your list. They’ll need to login to To-Do with their Microsoft account credentials, so To-Do can track usage and display usernames.

Screenshot of Microsoft To-Do shared lists

Once a person has joined the list, you’ll see their name in the “List sharing” popup. They’ll be able to add, edit and view tasks, so you can work collaboratively within To-Do. To-Do also supports assigning tasks to the users in the list, so you can keep track of who’s working on each item.

Screenshot of Microsoft To-Do shared lists

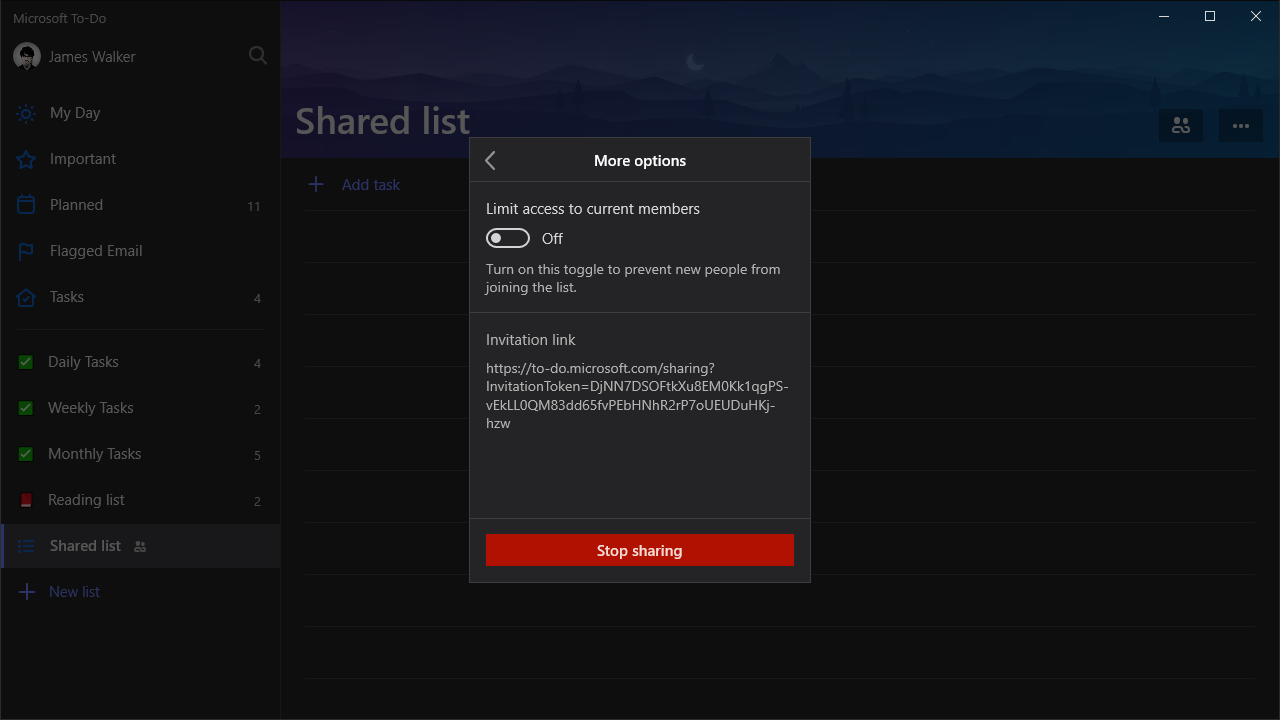
To stop sharing a list, return to the “List sharing” popup and click the “More options” button at the bottom of the screen. Here, you can access the invitation link and optionally disable it to prevent new people from joining. At the bottom of the page you’ll find a “Stop sharing” button. Click it to revoke access from all third-party users, converting the list back to a regular To-Do list in your account.

Doom, Doom II, and Doom 3 come to Xbox One in 25th Anniversary celebration

Bethesda has released the Doom trilogy to Xbox One this week. The classic first person shooters titles, Doom, Doom II (Classic), and Doom 3, have all been ported over not just to Xbox One consoles for users to purchase now, but also PS4 as well as the Nintendo Switch.

The releases come not too long after the original game launched in December of 1993, making it more than 25 years old. Those who might have grown up playing the games can re-experience them for just $4.99 each for the first two titles, and $9.99 for Doom 3.

Of course, while the games might have been officially released for the Xbox and its two competitors just recently, some Xbox players have been playing them even longer thanks to the Xbox 360 backwards compatibility implementations. However, now that the games have been officially released for the Xbox One hardware, users will get to experience the best performance.

Also worth mentioning, as per the initial release of the games, a Bethesda account is required in order to play the first two games as noted in the product descriptions on the Microsoft Store. Bethesda admitted the mistake on their part, saying that they “are working on changing the requirement to optional now.”

If you’re interested, you can download the games using the link below. Also, feel free to leave your thoughts in the comment area further down.

DOOM (1993)
DOOM (1993)
Developer:
Bethesda Softworks
Price:
Free


DOOM 3
DOOM 3
Developer:
Bethesda Softworks
Price:
Free


DOOM II (Classic)
DOOM II (Classic)
Developer:
Bethesda Softworks
Price:
Free

Droid Turbo Not Showing Up On Computer [FIXED BY EXPERTS]

A number of users have reported that their Motorola Droid Turbo is not showing up on the computer. This issue can be extremely frustrating, as this doesn’t allow you to transfer files from the device to your PC.

In most of the cases we researched, it seems that the issue is not with the phone itself but probably caused by a conflict between the phone drivers and your PC.

For these reasons, in today’s article, we will explore some of the best troubleshooting methods to deal with this issue. Read on to find out more.

How do I get my Motorola Droid to connect to my computer?

1. Download the latest USB drivers

  1. Visit the official Motorola website to download the latest release of USB drivers for your OS.
  2. Choose from the two options available depending on your system’s configuration by clicking the respective link (32 bit or 64 bit).Motorola USB drivers - Droid turbo not showing up on computer
  3. Download the file.
  4. Run it and install it on your PC.
  5. Restart Windows and then check to see if the issue persists. If it does, please follow the next method.

In addition, you can ease your work by installing your USB drivers automatically with dedicated software. You can manage any driver easily using specialized support for updating or fixing your drivers with Fortect Driver Updater.

2. Check the USB settings on your phone

  1. Open the top menu on your phone.
  2. Choose USB Settings.
  3. Inside the USB Settings window -> select Media Device (MTP).
  4. Activate the option USB Debugging.
  5. Check to see if the issue is solved. If it still persists, follow the next method.

3. Check the antivirus software/windows firewall on your PC

  1. On your Windows 10 PC -> click on Cortana search box.
  2. Type firewall -> select the first option from the results.Firewall search cortana - Droid Turbo not showing up on computer
  3. Inside the Firewall window -> select Allow an app or feature through Windows Defender Firewall.
  4. Search for the driver you installed in the previous step -> make sure that all connections are allowed.
  5. Save the settings and try to see if this solved your problem.

Note: In case you are using antivirus software with an included firewall service, you will need to open it and allow all connections for the USB drivers installed earlier.

4. Use the phone’s Safe Mode when connecting through USB

  1. Turn your phone off -> press and hold the power key.
  2. Once it vibrates press and hold the volume down key (keep holding it until the phone powers on all the way).
  3. This process will start your Droid Turbo into Safe mode.
  4. Try to connect your phone to your PC again using your USB cable.

Please feel free to let us know if this guide helped you connect your Droid Turbo to your PC.

You can do so by using the comment section below.

Windows 10 Surface app updates with new languages and improvements

The official Surface app for Microsoft’s Windows 10 Surface devices updated to Version 39.600.139 (via MSPU) this week. This latest update adds support for 11 new languages, the latest Pen firmware, and more descriptive names.

Here’s the official release notes:

  • Descriptive names for the Surface template name on the Surface tab
  • Pen firmware version in the Accessories tab
  • Support for 11 new languages (Bulgarian, Croatian, Czech, Estonian, Greek, Hungarian, Latvian, Lithuanian, Romanian, Slovenian, Slovak)
  • Bug fixes on window sizing and text alignment issues

While most people don’t use the Surface app, it can be a convenient way for finding out information about a Surface computer or tablet such as its model number and warranty expiry date. It can also be used to manage Microsoft-branded accessories and adjust Surface Pen settings.

Do you use the Surface app? Let us know why or why not in the comments below and then follow us on Twitter for more Microsoft news.

The app was not found in the store. ?

Avengers: Endgame is now live on Xbox One and Windows 10 with the infamous Microsoft Store glitch

The mega-popular Marvel movie, Avengers: Endgame, is now available to watch digitally via the Microsoft Store on Xbox One consoles, Xbox 360 consoles, Windows 10 PCs, and other Windows devices.

Unfortunately, the digital release of Endgame has been marred by a glitch that has affected numerous film releases on the Microsoft Store in the past, one that Microsoft should have fixed by now.

The glitch involves the pre-ordering of the digital versions of films from the Microsoft Store on the web, Windows 10 app, or the Xbox One’s digital storefront.

The whole situation is very confusing but basically when one pre-orders a film before its release, they’re usually promised the feature film and one or two short (as in two to five minutes long each) bonus extras. On the day of the film’s home release, those who pre-ordered gain access to the film with the one or two extras while a second version, that has a completely identical title in the Microsoft Store listings, suddenly appears and features all of the bonus content from the Blu-Ray release, including an audio commentary track.

For whatever reason, the proper version with all of the features doesn’t replace the pre-order placeholder version and everyone who pre-ordered gets screwed.

This has happened with other Marvel movies such as Black Panther and also happened with Star Wars: The Last Jedi.

I personally spoke with around eight different Microsoft customer support personnel in different regions after being affected by this after the release of The Last Jedi. Some were confused, some didn’t understand what the problem was, but most were aware of the issue and confirmed that they had received numerous calls and emails from other customers who were frustrated by the missing extra features on their pre-orders.

Yet, this glitch hasn’t been fixed.

The best thing to do now is to not pre-order movies from the Microsoft Store and purchase them on or after their release date instead. It’s also incredibly important to take a close look at the store’s listings before hitting that Buy button as, even after the release date, the pre-order version with limited extras still remains within the store and is buyable.

For example, there are now two films called Marvel Studios’ Avengers: Endgame + Bonus in the Microsoft Store. Only by looking at their full description can you see which one has all of the content. You can see the pre-order version here (which you shouldn’t buy) and the proper release with all of the bonus content here (which you should buy).

Have you noticed this problem with the Microsoft Store movie pre-orders before? Did you end up buying the wrong version of Avengers: Endgame? Share your thoughts with the community in the comments below and then follow us on Pinterest for more geek content.

Netflix Application Doesn’t Show the Continue Watching [FIX]

A wide range of users have complained that suddenly, the Netflix application doesn’t show the ‘Continue watching’ group.

Users report that they sometimes can see the ‘Continue watching’ list, and My lists groups at the top of the page while logged into Netflix. Some users say that they can’t find the lists anywhere, and others find it sometimes at the bottom of the page.

Netflix has not addressed this issue officially, and people are very eager for an official response and solution to this problem.

Until the official Netflix fix is released, in today’s article we will explore some useful workarounds relating to this problem. Read on to find out more.

What to do if Netflix Continue watching isn’t working?

1. Change the settings of your account through My list order

  1. Visit this link to open up your list order settings in your Netflix account.
  2. Select the option Manual Ordering by ticking the box besides the corresponding text.Netflix order lists options - Netflix app doesn't show continue watching
  3. Select Save.
  4. After this process is completed, you will be able to modify the order of the lists on your Browse page.
  5. Move the Continue watching list to the top of the page to fix the issue.

2. Add extensions to your Google Chrome browser

  1. Click here to open up the official Chrome Store page.
  2. Click on the Add to Chrome button.continue watching extension chrome - Netflix App doesn't show continue watching
  3. Click on Add Extension.
  4. Wait for Google Chrome to install the extension.
  5. Restart Chrome and try to see if this extension solved your issue, by logging into your Netflix account.

Even though the full fix for this issue still needs to be released by the Netflix developers, in this article we explored some of the best workaround dealing with the problem of the ‘Continue watching’ list disappearing.

These methods will surely solve the issue you’re facing with your Netflix account. After trying out these steps, you will be able to get back to enjoying your favorite shows without getting confused about the location of your lists.

Please feel free to let us know if this guide helped you in any way. You can do so by using the comment section found below.

How to add filters in Power BI [EASY STEPS]

When it comes to organizing and visualizing various sets of data, Power BI is definitely up to the challenge. Still, that doesn’t mean the program is problem-free for some people.

Quite a few users reported issues with adding filters in Power BI:

I am trying to enable filter pane for my existing Power BI report. I followed the which are mentioned in the link. But I did not see any Filter Pane on the report page after enabling the filter pane option. But I see on New Power BI file.

So, the tutorial from Microsoft didn’t help, because the OP didn’t see any Filter Pane in the Power BI. If you’re in the same situation, here are some additional solutions that you can use.

Steps to add filters in Power BI

1. Turn on new filters for all new reports

  1. In Power BI Desktop, click on File.
  2. Select Options and Settings, and then Options.power bi options filter
  3. Select Preview Features, and then select the New filter experience checkbox.
  4. Restart Power BI Desktop.
  5. After you restart Power BI Desktop, the filters should be enabled by default for all new reports.

Learn everything there is to know about Power BI from our in-depth article!


2. Turn on new filters for an existing report

  1. In Power BI Desktop in an existing report, select File.
  2. Select Options and Settings, then Options.
  3. Select Report Settings under the Current File category.
  4. Check Enable the updated filter pane, and show filters in the visual header for this report from under Filtering experience.

power bi report settings filtering experience

Conclusion

As you can see, you only need to change certain options to make your filtering work, because the filter pane is not present in Power BI by default.

If for some reason you don’t want filters, just click again on Enable the updated filter pane, and show filters in the visual header for this report to disable the filter pane.

Did you find these methods useful? How do you use filters in Power BI? Do let us know in the comments section below!

RELATED STORIES YOU NEED TO CHECK OUT:

Windows Media Player cannot sync list [SOLVED]

If you are still using Windows Media Player to play music from a local library, chances are you’ll use it to sync music with your phone or MP3 Player. Now, there’s an issue with this classic native media player. Some users report that Windows Media Player cannot sync list once connected to external devices.

This is usually easy to resolve with the solutions below. Hopefully, they’ll help you out. Just, before moving to solutions, ensure that your device is connected and that the audio files you are trying to sync are supported.

Why won’t my music list sync on Windows Media Player?

1. Run the Windows Media Player troubleshooter

  1. Click on the Start button.
  2. Type Control Panel in the search box and open Control Panel.
  3. Search for the Troubleshooting in the Control Panel’s search bar.
  4. Open Troubleshooting.
  5. Now, select View all.
  6. Then, click on Windows Media Player Settings troubleshooter.windows media player cannot sync list
  7. Follow the on-screen instructions and check if the syncing problem persists.
  8. Alternatively, you can run Windows Media Player Library troubleshooter, as well.

2. Reinstall Windows Media Player

  1. Press the Windows key + the R button together.
  2. Type appwiz.cpl in the Run box and click the OK option.
  3. Then find the Turn Windows features on or off.
  4. Find Windows Media Player under the Media Features. Uncheck the box next to it.windows media player cannot sync list
  5. Click OK.
  6. Restart the computer.
  7. Navigate to the same section and check the box again.

3. Use an advanced media player alternative for Windows

Using a Windows Media Player alternative to sync music with your phone or MP3 player is the most efficient and convenient solution. We recommend going for a flexible, all-in-one tool that has the seamless capability to connect to other devices.

With its cloud user interface, Cyberlink PowerPlayer 365 is a great alternative, allowing you to manage your shared media collection with a few clicks.

Here’s how you can sync a portable device with CyberLink PowerPlayer 365:

  1. Connect the device to the PC (via USB cable)
  2. Go to the Devices tab of the Media Panel and select the connected device
  3. Click the General tab
  4. Select the Sync music in library with my device option
CyberLink PowerPlayer 365

CyberLink PowerPlayer 365

Enjoy your favorite music in super HD quality with CyberLink PowerPlay!
Check priceVisit website

4. Change Sync Settings

  1. Plug your device on your computer.
  2. Go to the Player Library.
  3. Click on the Sync Section.
  4. Go to Sync Options and Press Set up Sync.windows media player cannot sync list
  5. Follow the instruction on the screen.

5. Perform Windows Media Player Sync

  1. Turn on the device you want to connect.
  2. Then, plug the device you wish to connect to your computer.
  3. From there navigate to Windows Media Player and Open.windows media player cannot sync list
  4. After the device has been detected, click Finish to sync files.
  5. If you wish to choose the files manually, click Finish and then on the Sync tab.

RELATED STORIES TO CHECK OUT:

Office 365 now available from South Africa data centers

Earlier this year, Microsoft made some significant headway in bringing its Azure cloud solutions to regions in South Africa.

In March, Cape Town and Johannesburg became two South African locations newly imbued with Azure datacenters and the potential to host 112,000 new jobs over the next fours year, in large part due to that investment.

Just a mere five months later, Microsoft is already leveraging its presence in South Africa to provide another one of its cloud-based services in Office 365.

Office 365, delivered from local datacenters in South Africa, helps our customers enable the modern workplace and empower their employees with real-time collaboration and cloud-powered intelligence while maintaining security, compliance, and in-country customer data residency. The addition of South Africa as a new geography for Office 365 increases the options for secure, cloud productivity services combined with customer data residency in 16 geographies across the globe along with three additional geographies also announced.

To comply with regulatory requirements and avoid another lengthy court proceeding such as the Microsoft-Ireland case, the company plans to keep core customer data “store only in their data center geography (Geo)- in this case, the cloud datacenters within South Africa.”

Microsoft has also invested in its first African Development Center (ADC) in both Nairobi, Kenya and Lagos, Nigeria. The ADC is tasked with being the hotbed of world-class African talent creating solutions on a local and global scale.

KB4505903 brings a long list of bugs and errors for many users

Microsoft recently rolled out Windows 10 Cumulative Update KB4505903 for Windows 10 version 1903. Although the update resolved many of the problems that initially came the update, it also brings issues of its own.

The list of issues is so long that it was difficult to cover them all in a single article. In this post, we listed some of the most commen problems that you may encounter after installing KB4505903.

KB4505903 reported bugs

Audio shuttering bug

The Windows 10 update KB4505903 brings audio Shuttering with Ryzen 3000 processors. One Reddit user who managed to resolve the problem shared a quick workaround to get rid of this problem.

I had issues when I upgraded to Ryzen 3000. I wasn’t sure what it was, but it was happening every minute, sometimes 2-3 times per minute when audio was playing. I moved my pagefile to another drive and did some driver cleaning/updating along with updating Windows to 1903 and it solved it.

DPC latency issues

Microsoft fixed some DPC latency issues in the recent release. However, people reported that some of them still exist.

I’m still getting stuttering for audio and video. LatencyMon is showing high latency for dxgkrnl.sys and storport.sys. Didn’t fix anything related to latency as far as I can tell. Had to roll back. Previous versions of Windows works great. I used the ISO to do the update.

Windows Sandbox doesn’t work

Apparently, the recent release fixed Windows Sandbox issues only for some Windows 10 users. Someone explained that:

From OP’s changelog apparently the problem is still worked on and has not been addresed with this update. No idea why suddenly it works for me. But I am pretty sure that this update fixed it for me. I tested that sandbox was not working just before the update and was the first thing I launched after the update.

However, some people are still experiencing the same problem.

Mine does still not work…

Action center transparency bug

A previous release introduced Action center transparency issues in Windows 10. Unfortunately, Microsoft didn’t fix the issue in the recent release.

I can’t believe they don’t fix the action center transparency bug..omg..it is sooo annoying.

Driver compatibility and BSoD issues

Many people reported that their Bluetooth and Wifi are not working fine after installing KB4505903. Furthermore, some of them were also affected by BSoD bugs.

I rolled back from 1903 after a day of use. Unfortunately the update seems to play havoc with my wifi and bluetooth. And on my wife’s computer it caused the mouse to have intermittent problems like stuttering and a loss of accuracy. Edit: Also forgot how a driver hangup caused me to blue screen everytime I would restart the desktop.

Windows Update error

Some Windows 10 users reported that the update failed to install on their systems with the error code 0x800f0982. If you are one of those who are experiencing similar issues, you should follow this step-by-step guide to fix it.

Update stalls and long installation hours

Some recent reports suggest that many people had to wait for long hours to complete the installation process. Apparently, the update progress gets stuck at some point and the only solution is to go for a hard reset.

I have been installing this update for 14 hours now but its only at 21% i’m not sure what to do my pc has a ssd and all other updates have been quite fast i’m not sure if it will ever finish or if i should just give up and risk rebooting my pc.

Display problems

Microsoft claims to resolve the display issues in the latest release. However, the full-screen display is still not working correctly for many.

It fixed banding problem, but not fully. it’s a lot smoother but there are still some lines. The full screen display is not fixed yet And the high DPC latency is still not fixed (but now it reaches high numbers after a minute or more of testing)

Missing app bugs

Windows 10 users confirmed that KB4505903 brings missing apps bug. Many popular apps such as VLC, Spotify and Store disappeared after the installation of this update.

Anyone more have the missing apps bug back again with this update? Store, Spotify and VLC disappeared from my start menu after this update, and I need to restore them thought powershell.

Computer freezing issues

Apart from all the above-mentioned bugs, Redditors confirmed that the recent update causes freezing issues on the loading screen.

This update broke my pc (kind of). When I open any game, on any loading screen, the computer freezes and speakers make a noisy buzzing sound and I can do nothing but force shutdown.

Screen rotation issues

Finally, Windows 10 users are still experiencing problems while rotating the screen in night light mode.

Still having the problem when rotating the screen in night light mode, the screen will flash back to bright mode for a split second. Anyway to contact a representative here to take a look at this?

The list of issues does not end here and we are sure that you must be experiencing many other problems as well. Let us know in the comments section below.

RELATED ARTICLES YOU NEED TO CHECK OUT: