Project Cars 2 list of compatible wheels

Project Cars 2 is the ultimate driver journey. This impressive car racing game should be on every gamer’s list this year. You’ll have a blast spinning that wheel and performing various tricks with your car.

Speaking of wheels, if you’re planning to purchase Project Cars 2, you should first check the list of compatible wheels. In this manner, you’ll know if you need to buy a new wheel, or you can use the one that you already own.

Project Cars 2 wheel compatibility

Project Cars 2 compatible wheels on PC

  • Thrustmaster RTG Force Feedback Clutch
  • Thrustmaster Ferrari GT Experience
  • ​Thrustmaster Ferrari F430 Force Feedback
    Thrustmaster Ferrari F1 Wheel Integral T500
  • Thrustmaster T500RS
  • Thrustmaster T300RS
  • Thrustmaster Ferrari F1 Wheel Advance T300
  • Thrustmaster Ferrari F458 Force Feedback
  • Thrustmaster T150
  • Thrustmaster TMX
  • Thrustmaster TS-XW
  • Thrustmaster TS-PC Racer
  • Logitech G25
  • Logitech G27
  • Logitech G29
  • Logitech G920
  • Logitech Driving Force
  • Logitech Driving Force Pro
  • Logitech Driving Force GT
  • Logitech MOMO Force
  • Logitech MOMO Racing​
  • Fanatec CSR (+ Pedals)
  • Fanatec CSR Elite (+ Pedals)
  • Fanatec CSW
  • Fanatec CSW V2
  • Fanatec CSL Elite
  • Fanatec CSL Eliten PS4
  • Fanatec CSW V2.5
  • Fanatec Porsche 911 Turbo
  • ​Fanatec Porsche Turbo GT2 Turbo
  • Fanatec Porsche Turbo GT3RS
  • Fanatec Porsche Turbo GT3RS V2
  • Fanatec Porsche Turbo PWC
  • Fanatec Porsche Turbo PWC4
  • HORI RWA

Project Cars 2 compatible wheels on Xbox One

  • Thrustmaster Ferrari 458
  • Thrustmaster Ferrari 458 Spider Racing
  • Thrustmaster TMX
  • Thrustmaster TS-XW
  • Mad Catz Pro Racing Force Feedback
  • Fanatec CSW V2 Base
  • Fanatec CSW V2.5 Base
  • Fanatec CSL Elite Base
  • Fanatec CSLE
  • Logitech G920

There you go, we hope you already own these wheels so that you don’t spend more money buying one.

RELATED STORIES TO CHECK OUT:

Turn-off automatic default printer management in Windows 10/11

Setting up a new printer is easy, especially if you are using the default Windows 10 configuration wizard. The drivers for the new printer are scanned and applied automatically, so you will not have to download the drivers by yourself.

Of course, depending on each printer, you might have to use the original installation CD for properly setting up the hardware. Anyway, in some situations, while using more than one printer from the same computer you might receive the following message: ‘Setting this printer as default means Windows will stop managing your default printer in Windows 10’. Well, during this tutorial we will show you what to do in order to prevent this alert or similar other system errors.

Understanding how Windows 10 sets the default printer

Windows 10 has extremely useful features which can assist you while adding a new printer to the system. Additionally, the Windows OS offers intuitive troubleshooting solutions to apply when problems with a certain printer are found. And everything can be initiated and completed by using built-in system settings.

However, there is a small problem that might affect some users. As you might know the Windows firmware is choosing the default printer based on certain, yet intuitive, algorithm: Windows 10 marks the last printer you used as the default printer. Of course, this process is done automatically each time you print something. Actually the OS will reconfigure the printer each and every time you print.

Now, this can turn out to be a real issue especially if you use different printers at once – the Windows 10 message / prompt that will be displayed when you will try to switch from one printer to another will be this one: ‘setting this printer as default means Windows will stop managing your default printer in Windows 10’. The message can be translated in one sentence: if you choose to set the default printer manually, Windows will stop automatically assigning the default printer as explained above.

So, for preventing such prompts you should choose to turn off automatic default printer management in Windows 10. This process is explained below.

How to turn-off automatic default printer on Windows 10

  1. Open the Windows 10 Settings app interface – press the Win+I keyboard keys at once.
  2. From the main Settings window click on ‘Devices (Bluetooth, printers, mouse)’.windows settings
  3. All the printers and scanners that are currently in use will be listed there.
  4. Scroll down until you see the ‘Let window manage my default printer’ option.disable default printer management windows 10
  5. Turn off this feature.
  6. That’s all.

Don’t forget: switching from different printers might bring other problems which might not be easily addressed through the built-in Windows 10 troubleshooting wizard. The fastest way in which you can fix a printer malfunction is by reinstalling associated drivers or removing and reconfiguring the hardware.

Now Windows will no longer reconfigure the default printer each time you will switch from one printer to another in the printer dialog. And, of course, you will no longer receive the ‘Setting this printer as default means Windows will stop managing your default printer in Windows 10’ error message.

If you have other problems with your printers, use the comment section below to tell us more about the issues that you encountered.

RELATED STORIES TO CHECK OUT:

Ronaldo Lima’s FIFA 18 rating is too low for his signature move

The official version of FIFA 18 will be released soon and include all the exciting features we’ve been reading about for a past few months. However, there’s one oversight in the game that caught the attention of many players: ‘the original’ Ronaldo’s four-star skill rating in the game. Most players who discover this mistake find it shocking as Ronaldo Lima is one of the most technically gifted players of all time, so giving him a four-star skill rating is surprising to say the least.

To make things even worse, having this rating means Ronaldo won’t be able to perform his famous elastico move invented by the man himself. It makes little to no sense for a player who made this move famous to be unable to perform it in the new FIFA game.

Maybe Ronaldo was given the four-star skill rating by accident or maybe EA did this on purpose — we don’t know for sure. But fans are definitely unsatisfied, as many of them have already expressed their disapproval on social media.

Since the official version of FIFA 18 is still more than a week away from its release (we only have a demo for now), there’s still time for the development team to fix this. But we’re not sure if they’re going to do it after all.

What do you think about player ratings in FIFA 18? Let us know in the comments below!

RELATED STORIES YOU NEED TO CHECK OUT:

Windows Insiders: get ready for a very busy next few days

Get ready for some hot and heavy Windows Insider action. Dona Sarkar has just revealed that things are going to get very busy as we get close to a final RTM Windows 10 Fall Creators Update release.  Unlike previous builds, though, there will be no build teasers, no major features, and only mostly bug fix releases in the coming days ahead.

Given that the release of the Windows 10 Fall Creators Update is just a few short weeks away, this is not a real surprise. As you may recall, Microsoft was busy this week too, pushing out two new builds which were fairly minor and mainly focused on improving stability and fixing the small bugs which Windows Insiders reported.

Build 16291 rolled out on Tuesday, with just one new Cortana related feature in tow. Then, shortly after, on Wednesday night, Microsoft pulled a surprise and pushed out build 16294, mainly to fix some issues which were plaguing Surface Pro 3 users.

You can expect more of the same in the next few days, as Microsoft get itself ready to release the Windows 10 Fall Creators Update to a wider audience. Be sure to keep it tuned in right here to OnMSFT, as we will be following all the Microsoft news carefully over the next few days!

Panasonic launches the rugged Windows 10 2-in-1, Toughbook CF-33, in India

Panasonic has unveiled the new rugged, detachable Windows 10 2-in-1, the Touchbook CF-33, in India. The CF-33 is world’s first rugged laptop with 3:2 aspect ratio for display.

An evolution of the bestselling Panasonic Toughbook CF-31 and CF-20, this 7th generation rugged Toughbook laptop is aimed for police, emergency services, government agencies, defense, and field service workers.

The Toughbook CF-33 is a detachable laptop for mobile workers and offers a fully rugged laptop with detachable keyboard as well as a larger display tablet. It sports a magnesium chassis and comes with IP65 rating for water and dust resistance. It includes an IP55-rated digitizer pen for workers in toughest of weather conditions.

With the evolving needs of enterprise and government sectors, we are transforming with times to offer best computing solutions for our customers. Old bulky laptops present safety concerns, portability issues and are not very resilient to damage. We at Panasonic are constantly looking to offer products that not only improve the efficiency, but enhance productivity and bottom-line performances for a number of years.

– Vijay Wadhwan, Business Head System and Solution Business, Panasonic India

Panasonic Toughbook CF-33 Key

  • Operating System: Windows 10 Pro
  • Display: 12-inch 10-finger capacitive touch QHD (2160 x 1440)
  • Processor: Intel Core i5-7300U vPro 2.6GHz (with i7-7600U option)
  • RAM: 8GB (with 4GB and 16GB options)
  • Internal Storage: 256GB SSD (with 128GB and 512GB options)
  • Camera: 2MP webcam | 8MP rear camera
  • Weight: 2.76 kg in laptop mode | 1.53 kg for tablet
  • Ports: 2 x USB 3.0 | USB 2.0 | HDMI | LAN | micro SD-XC | Serial | VGA

The Panasonic Toughbook CF-33 is priced at ₹270,000 ($4167). According to the company, Panasonic Toughpad devices enjoy 65% market share in India, and with the introduction of new products in the Toughbook and Toughpad series, the company aims to increase the market share to over 70%.

Windows 10 version 1803 will bring full support for Progressive Web Apps

Last week, Microsoft announced during its Edge Summit that Progressive Web Apps would soon hit the Windows Store, with Microsoft Teams being first in line. All sessions from the event are now available on demand, and the one called “PWA, HWA, Electron, oh my! Making sense of the evolving web app landscape” includes interesting information about what seems to be one of the biggest features of Windows 10 version 1803, the next major revision to Windows 10 after the soon to be released Fall Creators Update, coming next spring .

As spotted by Thurrott.com, Microsoft’s Senior Program Manager Kirupa Chinnathambi reveals in this session that Progressive Web Apps support will be enabled in the next major version of Windows 10 (which likely be named version 1803), but Windows Insiders should get early access to these new type of hybrid apps before everyone else.

If you’re not familiar with Progressive Web Apps (PWAs), they’re expected to become an excellent alternative to full native apps on Windows 10. PWAs are much more than a simple web app wrapped in an .appx container, meaning that they can work across a variety of devices (including phones, Xbox One consoles, Windows Mixed Reality headsets, etc.). Additionally, PWAs run over HTTPS, and they can work offline and send you push notifications.

To be clear, PWAs on the Windows Store will behave and look like native UWP apps, and Windows 10 users should not see any difference. Microsoft Teams is a perfect example of a PWA done well.

Interestingly, Chinnathambi revealed that Microsoft is already piloting a limited set of PWAs, and Windows 10 users can now test PWAs in Edge by enabling “Service Workers” under about:flags in the settings. Later this year, Microsoft will turn on Service Worker functionality by default in Windows 10 preview builds, and full PWA support will roll out to everyone with the next major Windows 10 release.

Microsoft is already courting developers to bring their PWAs to the Windows Store, but the company will also crawl the web to automatically add reputable PWAs to its digital store. Time will tell if this can be a good solution for the lack of quality apps on the Windows Store, but this could definitely help make Windows 10 S a more viable option for many consumers. However, it’s still not clear if PWAs could help Windows 10 Mobile in any way.

Project CARS 2 is now available to play on Xbox One

Project Cars 2 is now available to play on Microsoft’s Xbox One family of consoles. This sequel to the original Project Cars game features over 180 cars to drive, a 24-hour day and night cycle, and gameplay that was tested by real car racers. Here’s the official game description and link.

Project CARS 2 delivers the soul of motor racing in the world’s most beautiful, authentic, and technically-advanced racing game. Features 180+ licensed cars from iconic manufacturers, largest track roster on console, dynamic surface & weather physics, full 24-hour cycle featuring real-time atmospheric conditions and seasonal ambience, state-of-the art physics model, all-new Online Championships mode and more.

Buy Project Cars 2 on Xbox One

Are you going to play Project Cars 2 or is there another new title like The LEGO NINJAGO Movie Video Game that’s caught your eye? Let us know in the comments below.

Play The LEGO NINJAGO Movie Video Game on Xbox One right now

The LEGO NINJAGO Movie Video Game is now available to play on the Xbox One in most regions. The game, as its title suggests, is based on the new LEGO NINJAGO movie which also debuts in cinemas this week. The film is a reboot of the popular NINJAGO animated TV series and features a host of celebrity actors lending their voices to the different LEGO characters. Here’s the official game description and shopping link:

Find your inner ninja with the all-new LEGO NINJAGO Movie Video Game! Play as your favorite ninjas, Lloyd, Jay, Kai, Cole, Zane, Nya and Master Wu to defend their home island of Ninjago from the evil Lord Garmadon and his Shark Army. Master the art of Ninjagility by wall-running, high-jumping and battling the foes of Ninjago to rank up and upgrade the ninja’s combat skills. Only in the LEGO NINJAGO Movie Video Game will you experience the film across 8 action packed locations each with its own unique Challenge Dojo. And with the Battle Maps, play against friends and family in competitions for up to four players!

Buy The LEGO NINJAGO Movie Video Game on Xbox One

This latest LEGO video game differs from previous ones in that it allows for characters to level up with different skill sets and also supports four-play local multiplayer in a special battle mode. Are you planning to buy The LEGO NINJAGO Movie Video Game? Let us know in the comments.

Fix: ”0x86000c09 err_quic_protocol_error” in Google Chrome

It’s hard to be at the top for so many years, especially if you’re referred to as ”resource-hogging monster” or ”private data collector for Google”. But Chrome still is the most used web browser on multiple platforms. It would be even better if there are fewer errors that occasionally plague users, like the ”0x86000c09 err_quic_protocol_error” error we’re addressing today.

If you have had a hard time with repetitive slowdowns in loading followed by the error prompt, look no further. The solution for your problem is below.

How to address the ”0x86000c09 err_quic_protocol_error” in Google Chrome

Solution 1 – Clear Browsing history

The first step you should take concerns the stored browsing data. Especially, the cache that can pile up quickly and cause performance drops and similar issues. Chrome is already acknowledged as one of the most resource-hogging browsers, and the abundance of cache is making things even worse. It can, like in this scenario, cause an error or two, as well.

Follow the instructions below to clear the Chrome browsing data:

  1. Open Google Chrome.
  2. Press Ctrl + Shift + Delete to summon the Browsing data dialog box.
  3. Check the ”Cached images and files”, ”Cookies”, and ”Download” history boxes.
  4. Under the ”Clear the following items from” drop-down box, select the ”the beginning of time”.
  5. Finally, click on the ”Clear browsing data” button.

Solution 2 – Disable VPN or proxy and check the connection

Connection issues are commonly related to a large variety of Chrome errors, including the one we’re referring to today. In order for everything to work in a seamless manner, you’ll need to ensure that your connection is stable. In addition, it’s strongly advised to temporary disable VPN or Proxy and look for changes. Occasionally, they can cause the stall within Chrome, or even invoke crashes and errors.

The best way to confirm that everything is working fine is by using the alternative browser. If the alternative browser works without issues and you’re still stuck with the Chrome error, make sure to check the remaining step.

Solution 3 – Disable QUIC protocol

The innovation-wise, Chrome is right at the top, with an abundance of experimental features tested on a daily basis. However, some of those can occasionally cause issues with the browser itself. That just may be the case with the QUIC (Quick UDP Internet Connections) protocol. Even though the initial thought behind this protocol is to speed up the internet browsing, it can be quite unstable at times. That can, consequently, lead to slower loading times or even the ”0x86000c09 err_quic_protocol_error” error.

For that purpose, we advise you to disable it, and you can do so by following the instructions below:

  1. Open Chrome.
  2. Copy-paste chrome://flags/ in the address bar.
  3. Press Ctrl + F to open the search bar.
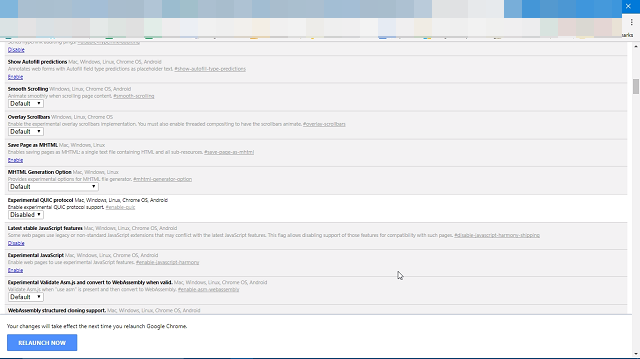
  4. In the Search bar, paste Experimental QUIC protocol and press Enter.
  5. Now, once we successfully located the QUIC protocol, click on the contextual box below the protocol and choose Disable instead of Default.
  6. Relaunch browser and you should be good to go.

That should do it. In case you have any additional issues or a suggestion on how to address this Chrome error, make sure to tell us in the comments below.

RELATED STORIES YOU NEED TO CHECK OUT:

PS1 to EXE Converters: Best to Use in 2026

Ps1 files are PowerShell scripts used for configuring various execution policies that can be executed only by PowerShell. As a quick reminder, PowerShell is a Windows OS shell and scripting tool which encrypts files.

The process of converting Ps1 (PowerShell scripts) to executable files is a complex process.

However, we’ve come up with a few solutions to tackle the complexity making it easier for you to convert Ps1 files to .exe.

What are the best tools to convert Ps1 to .exe?

PS2EXE – Simple and easy to use

PS2EXE is a Microsoft PowerShell script that lets you convert PS1 scripts to executable files.

The tool encapsulates the script with a lightweight PowerShell host written in C# and compiles the dynamically generated C# source code in memory to a .exe file. PS 2EXE compresses the PowerShell script within the executable file that is generated.

⇒ Get PS2EXE

PowerShell to exe&msi Converter – Fast conversion

PowerShell to exe/msi Converter is a free tool that does exactly what it says: it converts your PS1 scripts to either exe or msi executable files.

The interface is so simple that a child can use it. Just choose your ps1 file and click on Build to convert it. You may also rename it and select an exe or a msi file. Is that simple.

⇒ Get PowerShell to exe/msi Converter

PowerShell Studio – Best for professionals

Converting Ps1 files to .exe files is easier with PowerShell Studio – a premium Windows PowerShell editor.

This software can visually create PowerShell GUI tools, carry out multi-file and file debugging, create MSI installers, monitor script performance, and many more.

PowerShell Studio Integrated Synthesis Environment (ISE) supports Ps1 32-bit and 64-bit files.

The tool developed by Sapien Technologies is available as a free trial, and it’s an indispensable tool for coders.

⇒ Get PowerShell Studio

ISE Steroids – Great PowerShell editor and converter

You can convert Ps1 files to .exe using ISE Steroids which is a desktop application. The software specifically extends the built-in ISE of a typical PowerShell editor.

ISESteroids is premium software that can be downloaded for free, but the trial version lasts 10 days.

The tool has various slick features to the ISE editor, which you can customize.

⇒ Get ISESteroids

We’ll end our list here. With these tools, you can easily convert your PS1 files to .exe files, improving your PowerShell scripts security.

You may also be interested in reading our guide on what is PowerShell and how to use it. You can get a clearer view of the conversion process by checking this guide on how to convert PowerShell to EXE.

If you know about any other great PS1 to exe converters that you’re using successfully, let us know about them in the comments section below.

Disable SMBv1 on Windows using these quick methods

Recently, the cyber world was hit by Petya and WannaCry ransomware which has generated a lot of security concerns for Windows users. Unfortunately, the vulnerabilities of the Windows Server Message Block (SMB) service helps ransomware to propagate. Due to security reasons, Microsoft recommends that you disable SMBv1 so as not to fall victim of ransomware attacks.

Server Message Block is a network file sharing protocol meant for sharing information, files, printers and other computing resources between computers. There are three versions of the Server Message Block (SMB) which are SMB version 1 (SMBv1), SMB version 2 (SMBv2), and SMB version 3 (SMBv3).

Disable SMBv1 on Windows

SMBv1 is the oldest version of the Server Message Block protocol. Microsoft released official documentation on how to disable SMBv1 as a preventive measure against the WannaCry ransomware. As a result of this, all Windows users are required to install the latest patches released by Microsoft. We will show some ways to disable SMBv1.

Disable SMBv1 using PowerShell

First of all is PowerShell a Windows shell and scripting tool. You can disable SMBv1 on your Windows using PowerShell.

Step 1: Go to the Start menu and type “Windows PowerShell”

disable-smbv1-windows

Step 2: Also, Launch PowerShell window in the administrator mode

disable-smbv1-windows

Step 3: In addition, Type the following command

Set-ItemProperty -Path "HKLM:SYSTEMCurrentControlSetServicesLanmanServerParameters" SMB1 -Type DWORD -Value 0 –Force
disable-smbv1-windows

Step 4: Finally, Hit the “Enter” key to disable SMB1

Experiencing legacy shares failing over NetBIOS on Windows? Learn how to fix SMBv1 file sharing broken over NetBIOS before you proceed with disabling the protocol.

Disable SMBv1 using Windows features (Windows 7, 8 & 10)

Also, you can disable SMBv1 by turning it off using Windows features.

Step 1: First of all, Search for “Control Panel” in the Start menu and open it.

disable-smbv1-windows

Step 2: Also, In the Control Panel window click on the option “Programs and Features.”

disable-smbv1-windows

Step 3: Also, Click on the link “Turn Windows Features On or Off” that appears on the left panel.

disable-smbv1-windows

Step 4: In the Windows Features window; Scroll down, find the “SMB 1.0/CIFS File Sharing Support” option, uncheck it and click on the “OK” button to save the changes.

disable-smbv1-windows

Step 5: Windows will perform necessary changes and prompts you to restart your system.

disable-smbv1-windows

Step 6: Finally, Click on the “Restart Now” button to effect the changes.

disable-smbv1-windows

Disable SMBv1 using Windows registry (Windows 7)

Furthermore, disabling SMBv1 using Windows registry requires editing the Windows registry.

Step 1: Press the Windows button and type “regedit”

Step 2: Also, Press Enter to open Registry Editor and give it permission to make changes to your PC

disable-smbv1-windows

Step 3: In the Registry Editor, use the left sidebar to navigate to the following key:

disable-smbv1-windows

Step 4: In addition, Create a new value inside the Parameters subkey. Right-click the Parameters key and choose New > DWORD (32-bit) Value.

disable-smbv1-windows

Step 5: Also, Name the new value SMB1. The DWORD will be created with a value of “0”, and that’s perfect. “0” means SMBv1 is disabled. You don’t have to edit the value after creating it.

disable-smbv1-windows

Step 6: Hence, You can now close the registry editor. You will also need to restart your PC before the changes take effect. If you ever want to undo your change, return here and delete the SMB1 value.

Disable SMBv1 using Windows registry (Windows 10)

How to disable SMBv1 using Windows registry on Windows 10.

Step 1: In the Start menu, search for regedit and open it.

Step 2: Navigate to the highlighted path.

disable-smbv1-windows

Step 3: In the right panel, right-click and select the option “New” and then “DWORD (32-bit) Value.”

disable-smbv1-windows

Step 4: Name the new value “SMB1” and press Enter.

disable-smbv1-windows

Step 5: Double-click on SMB1, enter “0” in the Value Data field and click on the “Ok” button.

disable-smbv1-windows

Step 6: Restart your system to disable SMBv1.

Note: If you ever want to enable SMBv1 again, change the value data to “1” instead of “0”.

These methods are only applicable to disable SMBv1 on a single PC but not a web server or an entire network. For more information concerning disabling SMBv1 across an entire network or a web server, consult Microsoft official documentation on disabling SMB.

RELATED STORIES TO CHECK OUT:

Pre-order your Xbox One X now before it’s sold out again

Xbox One X consoles will start at $499 in the U.S., with European and UK pricing set at €499 and £449, respectively. All consoles are set to ship later this year with a release date currently set for November 17, 2017.

Pre-order sales of the Project Scorpio edition were a success and standard edition Xbox One X pre-order today for $499.99 across all important retailers.

Xbox One X, Microsoft’s best console ever

The console will power 4K experiences and will provide the best visuals for all games across all consoles. The amazing device will be able to perform everything that the Xbox One S can perform but much better, offering better visuals, 4K, a smaller design and a faster HDD. You’ll get to live a premium Xbox experience unmatched in today’s market.

The Xbox One X might just be the best place to play your games

The console is Microsoft’s attempt to fight back in the evolving console war currently dominated by Sony’s PlayStation 4. Although multi-platform games on the PS4 have outperformed their Xbox One counterparts, that might no longer be the case after the Xbox One X is unleashed because it is supposed to be 50% more powerful than Sony’s PlayStation 4 Pro.

With the largest line-up of console games now able to span generations due to backwards compatibility, the Xbox platform is an incredible place to play. And with the Xbox One X coming up, it should become the best place to play your games, playing faster and looking better than ever before.

Don’t waste any more time and make sure to place your pre-order now! For any additional info check out the Store.

The next Xbox Live Sessions will feature James Corden and FIFA 18

Microsoft has announced that the next Xbox Live Sessions will feature James Corden, host of the host of The Late Late Show. Corden will be playing FIFA 18, and viewers definitely are in for some jokes and humor during the entire session.

As usual, the session will be hosted on the Xbox Mixer Channel, this time on Sunday, September 24 at 12:00 PM PDT. Xbox fans will also have a chance to get an early look at the game before it launches on September 29th, ask Corden questions, or enter to win codes for FIFA 18 and EA Access.

Aaron Greenberg, GM of Games Marketing at Xbox, remarked on having Corden as a guest.

Xbox One is the only console with EA Access, which allows fans to play FIFA 18 first starting today and what better way to celebrate that than with James Corden who will undoubtedly entertain fans globally during his Xbox Live Session,”

Previous guests for Xbox Live Sessions included DJ Khaled and Marlon Wayans. Microsoft is saying that other guests will be doing Xbox Live Sessions soon, including athletes, actors, and some of the best musical talent.

Microsoft Teams previews Dial In Conferencing

Earlier this month, we learned that Microsoft was preparing to upgrade Skype for Business users to Microsoft Teams, a transition that would be opt-in while the company continues to enhance the Microsoft Teams experience. There are definitely a lot of synergies between the two products, and a new feature that lets users join Microsoft Teams Meetings using their Skype for Business dial-in number is apparently in public preview.

credit: Jeff Brown.

After creating a new Microsoft Teams Meeting yesterday, Skype for Business Technical Consultant Jeff Brown spotted the dial-in conferencing information in the meeting description, with a new “Join by Phone” section including dial-in number and conference ID details. When a participant joins the Teams Meeting using PSTN, he will be identified by his phone number in the participant list, explained Brown.

credit: Jeff Brown.

“The dial-in conferencing is a welcome feature and only goes to show that Microsoft Teams is rapidly taking on Skype for Business features,” shared Brown in a blog post yesterday. “One noticeable feature missing from meetings is the ability to dial-out or the “call me at” feature to dial out to a phone.” Despite the Dial In Conference ability being in public preview, it looks like Microsoft has yet to officially announce the new feature. There are a couple of Ignite sessions dedicated to Microsoft Teams and Skype for Business next week, and we expect to learn more about dial-in conferencing in Teams on this occasion.

Marvel vs. Capcom: Infinite now out on Xbox One in most regions

Marvel vs. Capcom: Infinite is now available to play on the Xbox One family of consoles in all major regions. The game is the latest in the popular Marvel vs. Capcom fighting franchise and features a new art style, new characters, and the complete removal of any character whose movie rights currently belong to FOX. Here’s the official description, shopping link, and trailer:

The epic clash between two storied universes returns with Marvel vs. Capcom: Infinite, the next era of the highly revered action-fighting game series. Marvel and Capcom universes collide like never before as iconic characters team up for action-packed player-versus-player combat. Ultron Sigma has begun the systematic eradication of all biological life. Against all odds, heroes arise from the rubble, form new alliances and stand together against the ultimate threat, their only hope laying with the all-powerful Infinity Stones.

Buy Marvel vs. Capcom: Infinite on Xbox One

Have you played Marvel vs. Capcom: Infinite and would you recommend it to others? Let us know why or why not in the comments. Did it meet your expectations?

Enhance Scoria Gaming Headset Review

The Scoria Gaming Headset is a relatively new headset designed for gamers. It boasts 7.1 audio for a more immersive gameplay experience and also features a built-in mic for multiplayer chat or online streaming.

Due to its USB connectivity, the Scoria Gaming Headset unfortunately isn’t compatible with Microsoft’s Xbox One family of consoles however it works perfectly fine on Windows 10 PCs and impressively sets itself up automatically within minutes after the initial connection is made. No manual installation of software is required to get it running.

An Impressive 7.1 Surround Experience

When it comes to sound quality, the Scoria really impresses with a clear separate focus on each individual audio channel that effectively creates a truly immersive experience when playing supported games or watching a movie or TV show. The bass, while not the deepest, works completely fine and few will find much to complain about here.

LED Lightshow

Arguably the main feature of the Scoria Gaming Headset is its LED lighting which can be set as either one of five available color options or left to cycle through the spectrum on an automated basis. The lights aren’t as bright as most would expect when turned on in a well-lit environment though which could disappoint some users who play games with the lights turned on. They really are designed to be used in a dark room while playing games on a PC and they suit this situation just fine.

Comfort Level & Practicality

The Scoria Gaming Headset is fairly well designed with both of its earpieces fitting into place comfortably. Its double-headband (or whatever you’d call it) creates a form factor that quickly and conveniently adjusts to the user’s head size automatically without requiring any trial-and-error manual fixing as is the case with most rival headsets.

The headset’s microphone is also worth mentioning due to its ability to extend to a fully-functional mic form or be quietly pushed back into the left earpiece when not being used.

What lets the Scoria Gaming Headset down is its weight which is surprisingly heavier than one would expect. At 14.4oz (or 408g for everyone not in the U.S.A.), the Scoria is the heaviest of Enhance Gaming’s headsets and it definitely feels like it. It’s not heavy enough to cause any neck pain or be made unusable but it does cause a strain when looking down or when sitting in any position that isn’t completely upright. This extra weight appears to be a side effect of the metal headband which, while making the overall device look cool, does make it heavier than it should be. This may be a headset worth trying on in a store before buying.

Overall Impressions

The Scoria Gaming Headset is fantastic value for its current price (under US$50) with its very solid 7.1 surround sound experience that really elevates the gaming and movie-watching experience on a PC. The customizable LED lights are a very attractive feature that could be a major selling point for many gamers though will likely appeal more to those who stream on services such as Twitch and Mixer due to their added visual flair. Worth checking out.

Available on Amazon & Enhance Gaming

Microsoft Band sign-in issues: 5 easy ways to fix them

Nowadays, maintaining a well-balanced and healthy life can turn out to be a real challenge. Balancing our working hours and the remaining time of the day to take care of our daily problems is a difficult act. But, as it should be, the goal is to build a healthy lifestyle – we must protect our body in order to keep our mental and emotional balance.

Now, there are a few ‘tricks’ to use for ensuring that you achieve this balance every day. And such solution is the Microsoft Band, a gadget that can help you exercise wisely every day. The best thing is that the Microsoft Band can be paired with your smartphone, so you can apply your own exercise regimen whenever you wish to. Of course, there are dedicated Microsoft Band apps available for the major OS platforms that are currently available on the market.

However, the purpose of this tutorial is not to review the Microsoft Band but to show you how to troubleshoot a common problem that recently affected many users: the sign-in issue. Apparently there is a small glitch within the Microsoft Band app (regardless of the OS platform you are currently using) that is stopping the usual sing-in process.

Don’t worry, since we are talking about a soft-related bug, there are different solutions that can be used in order to easily fix the already discussed issue. Now, if you haven’t already experienced this problem, here is the main behavior: you open the Microsoft Band app and you enter your sign-in details (the Microsoft ID and your personal password) and instead of being prompted with the actual app interface you get a white screen that says “We’re logging you in to your Microsoft account”, which enters into a loop state. So, you basically never get to use the Band app on your smartphone or tablet.

If you get this sign-in error, you shouldn’t panic. This is not a hardware problem but a software issue which can be easily addressed with the help of some easy steps, which are explained in this tutorial.

How to fix Microsoft Band sign-in problems

Solution 1 — Uninstall and re-install the Microsoft Band app

As usual, the first thing to do should be a fresh start. So, uninstall the app from your handset and re-install it afterwards. This should fix any bugs that are related with blocked processes that run in the background or any other compatibility problems. The uninstall / install operation should only take a few moments so you can re-try the sign-in sequence within minutes.

Solution 2 — Disable Bluetooth, restart and unpair

Another way in which you can try to fix the Microsoft Band sign-in problem is by trying to reconnect the Band to your phone and to the mobile operating system that is used. You can do that easily by disabling the Bluetooth connection, by unpairing the app from your device and by rebooting your handset when done. Eventually, you will have to reinstall the app and reconnect it with your handset via Bluetooth.

Solution 3 — Clear app data cache and wipe dalvik cache

If you are still having troubles while trying to sign-in into the Microsoft Band app, you should also try to clear the cache from your device. In this way, you can make sure that there aren’t any processes related with the Band still running on your handset after you remove the software. By clearing cache you can afterwards obtain a clean install of the app, thus you can refresh the sign-in processes.

Solution 4 — Reset the Microsoft Band

Up until now we applied solutions that weren’t aiming the Band. But, a reset might also help you troubleshoot all the issues. You can choose to restart your Microsoft Band by following:

  1. Press and hold the Power and the Action buttons at the same time – after 3 seconds you will get the ‘turn power off’ message.
  2. Swipe left and tap on ‘yes’, or just keep pressing the already mentioned keys for about another 8 seconds.
  3. Eventually the screen will be flashed red. You can now release the buttons for initiating a quick restart, or you can keep pressing the keys for a few more moments in order to completely turn off your gadget.
  4. When done, press on the Power button in order to power-on your Microsoft Band.

The reset process can be done differently, by using the built-in settings as it’s showed below:

  1. On your band tap on the Settings icon.
  2. Navigate towards Power.
  3. Swipe left and choose ‘factory reset’.
  4. Tap on ‘reset device’.
  5. When asked about ‘erase all data’ choose ‘yes’.

Of course, after you apply the reset you need to set up the Microsoft Band again – reestablish the Bluetooth connection.

Solution 5 — Wait for a new update

The sign-in problem might appear after an update. If that’s the case, troubleshooting solutions listed in this article won’t work for you. You might have to wait for a new official update – then, all the issues will be automatically fixed. Anyway, just make sure that you are using the latest version of the Microsoft Band app and that everything is up to date on your smartphone.

Conclusions

Hopefully, the guidelines from this tutorial helped you to fix the Microsoft Band sign-in problems. We will update this step by step guide as soon as we find new solutions that could work for you.

2 Quick Ways to optimize Windows 10/11 startup

Windows as an operating system is not exactly known for its fast boot times.

In fact, Windows will start getting sluggish after usage of a year or two. The issue with Windows is that it needs doses of maintenance laced with the latest updates.

That being said, there do exist a couple of ways by which we can make the Windows boot faster. In this segment, we will walk you through all the possible methods that can be employed for a faster Windows machine.

How to speed up PC startup

1. Access Windows 10 Start Manager

optimize Windows 10 startup

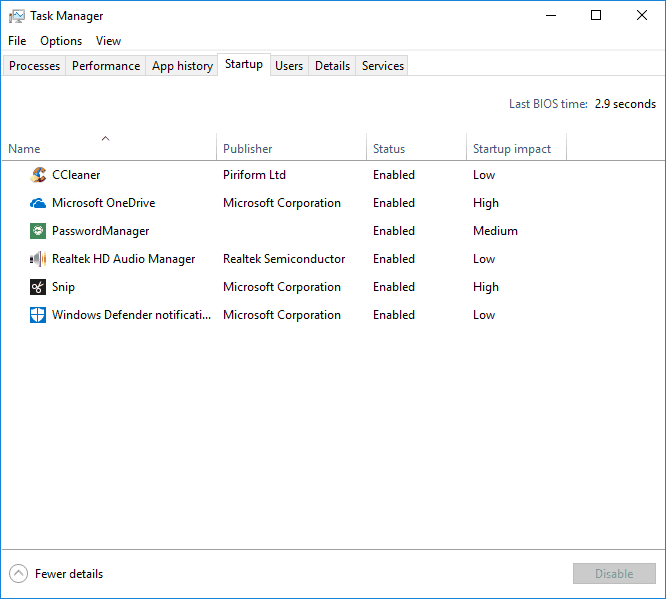
Start Manager is a subset of Task Manager and the former allows you to choose all the apps that need to be started during a boot. The best approach is to activate only a couple of apps for startup and use the rest when needed.

In order to access the Startup Manager go to Taskbar > Right Click > Task Manager.

At first, the processes page will be opened post where you will find the ‘Startup Tab’ on the right-hand side. Clicking on the Startup tab will show you all the programs that are consuming the computing resources during boot.

Thankfully Windows also has a Startup Impact Column that shows the impact of the programs and thus will eventually help you decide between the apps.

Please note that some of the apps are labeled “Not Measured”. this means that Windows 10 doesn’t have sufficient data to measure the impact of that particular program.

Select all the programs you wish to shut down during boot. Click on the program and then select the “Disable” button at the bottom of the dialog box.

Also, use your discretion to shut down some of the manufacturer preinstalled programs as its very likely that you won’t be needing them. If you need more information about any of the programs simply right-click and select search online.

2. Enable Fast Windows 10 Startup

  1. Open Power Options by typing “Power” in the search bar and select the best results.
  2. In the next menu select the following option, “Choose What the Power buttons do.”
  3. In case of the grayed-out menu select “Change settings that are currently unavailable” from the top section of the menu as shown in the figure above.
  4. The last step is to tick the box against the option “Turn on fast startup (recommended)” and most importantly don’t forget to click on “Save Changes.”

If you want to have a Windows PC that boots relatively faster then this is the best bet for you. The Fast Startup intelligently kills the programs that are not needed during a boot and thus speeds up the entire boot process.

The Fast Startup stores all the required system files including those of the Windows Kernel and device drivers in a master file and loads the same into the RAM while rebooting.

So what happens, in this case, is that all the applications are shut down and yet the user will not lose any data.

In order to improve the startup process on your PC, there is effective repair software capable of detecting current system issues and speeding up overall performance.

That being said the Fast Startup has its own downsides, for instance, it can potentially cause problems if your machine is set up to dual boot.

In some cases, especially with dual-boot systems, the boot options might not appear as expected. Enable Windows Boot Manager to ensure your PC displays all operating system choices during startup.

We wouldn’t recommend the Fast Startup feature for advanced/power users however for general users it shouldn’t pose any problems.

One thing we have noticed after switching Windows 10 to Fast Startup is that the battery backup has also improved, though marginally. You can also improve startup time by going to the Startup folder on Windows 11 or 10 and removing all items from it.

Another piece of advice is to try and avoid storing files on the desktop, I know it’s convenient but also adversely affects the startup time.

On a related note, the temporary files also tend to slow down your system, so consider using programs like Wise Registry Cleaner or AVG TuneUp to clear the temporary files and also repair your registry.

Night Light not working in your download of Windows 10 Fall Creators Update? Here’s a fix

The latest version of Windows 10 Creators Update offered a slew of new features, with one of the most useful being the Night Light. This feature blocked the notorious blue light emitted by the display when evening sets in. Blue light is considered to disturb the circadian sleep cycle and will trick the brain into believing that it’s not nighttime yet. The quality of a person’s sleep is also adversely affected by blue light.

The feature has now made it to several smartphone operating systems and also other computer operating system alongside other blue light-taming apps like the much-acclaimed f.lux. In the recent past, Windows Insiders running the latest Windows 10 Builds have complained that a certain Nvidia update breaks the Night Light feature.

The worst part, however, is that the driver update is also breaking f.lux or another third party software that promises to filter the blue light. The culprit seems to seek refuge in the latest Windows 10 Fall Creators Update build 16288 which comes with Nvidia GeForce driver v387.68. The bad driver update has also caused stuttering during gameplay. That being said one can get the Night Light working by following the steps given below.

How to fix Night Light issues on PC

  1. Click on the Start
  2. Search for “Device Manager” and then press enter
  3. Expand Display adapters
  4. Select GPU option by double-clicking
  5. Click the Driver Tab
  6. Click Roll Back Driver, fill the corresponding feedback form that asks you for reasons to roll back
  7. Wait for some time and ignore the “Not Responding message”

With the driver rolled back the Night Light should start working just fine along with f.lux. Microsoft will surely iron out the issue but with the rollout date for the Windows 10 Fall Creators Update rollout nearing a lot is at stake.

RELATED STORIES TO CHECK OUT:

Microsoft joins Dell and General Dynamics in $1 billion contract to bring the cloud to the U.S. Air Force

Microsoft has joined General Dynamics and Dell in a contract with the U.S. Air Force, granting the collection of companies $1 billion to build a Cloud Hosted Enterprise Services (CHES) program. The program will be part of an ongoing effort by the United States Government to implement more cloud technology into their infrastructure, driving efficient and less costly work.

The program is meant to be rolled out to 776,000 users, and is planned to be ready to go in under a year. “The CHES contract extends the ability of the Air Force to collaborate across the enterprise,” explained Leigh Madden, General Manager for U.S. Defense at Microsoft. “We aren’t just delivering a secure productivity solution, we’re freeing up resources, so our airmen can focus on mission critical tasks,” he added. On top of the US Air Force, the CHES will also benefit the Defense Logistics Agency and the U.S. Army Corps of Engineers.

One of the biggest contracts that the U.S. Government has ever struck in terms of its communications technology, the design of the new CHES is something that can make serious leaps and bounds in the efficacy of the American government. Depending on how this works out in the long run, it could also mean that more aspects of the government will be moved over to the cloud for faster and less expensive operation.

Microsoft joins the Coalition for Better Ads

Microsoft announced in a blog post that the Redmond-based company has joined the Coalition for Better Ads. The Coalition helps provide a better, more streamlined online experience for consumers so that they are not inundated with online ads while browsing.

Here is Microsoft’s full statement:

“At Microsoft, we believe in supporting and collaborating with the online advertising industry to develop standards that make the digital ecosystem function better for consumers, marketers and publishers.

In this spirit, we are excited to announce that Microsoft has joined the Coalition for Better Ads (CBA). Through our advertising platforms, and our multitude of consumer services, we believe we can make an important contribution to improving and safeguarding advertising standards on the web.

Microsoft is committed to working with our industry partners and the Coalition for Better Ads to continue the development and implementation of standards that will have a positive impact on consumers and the entire online advertising community.”

By joining the Coalition for Better Ads, Microsoft wants to make sure its own ads platform, Bing Ads, stays within consumers’ rights and expectations for online advertising.

Windows 10 Creators Update improves quality, lowers customer support calls

Since Microsoft launched Windows 10 and “Windows as a Service,” Windows 10 users now get two major updates every year which bring several new features as well as under the hood improvements. And if the Windows 10 Fall Creators Update will start rolling to all users on October 17, Microsoft is describing today the current Windows 10 version (aka the Creators Update) as “the most performant and reliable version of Windows 10 ever.”

If the timing of the announcement is quite interesting, Microsoft penned a lengthy blog post to detail all the performance, battery life, reliability and security improvements introduced by the Creators Update. Highlights include the new power slider, which allows user to prioritize battery life over performance, and vice versa. Many stock Windows 10 apps such as Movies & TV, Outlook Mail and Microsoft Edge are now more battery efficient (though other browsers vendors may disagree).

If performance matters to you, Microsoft also shared the following data proving that Creators Update is significantly faster than the Anniversary Update:

  • Booting up your device is now 13% faster, and logging in after boot is up to 18% faster.
  • Unlocking your device with Windows Hello Facial recognition is up to 30% faster.
  • Microsoft Edge is also up to 53% faster in the Creators Update thanks to efficiency improvements that make scrolling pages and loading pages faster, and website rendering and interaction more responsive.
  • Two features used daily are the Start Menu and Windows Search, and we’ve improved both – the Start Menu opens faster, and we’ve optimized Windows Search performance.
  • For devices on which multiple users log-in (e.g., classrooms) the first user log-in is up to 47% faster in the Creators Update.

Microsoft also says that its close relationship with its OEM partners really helps to make Windows 10 more reliable across the vast ecosystem of devices running the OS. “With well over 400 thousand ecosystem drivers on Windows 10, we work closely with device manufacturers to test and ensure the reliability of their device drivers,” explained John Cable, Director of Program Management, Windows Servicing and Delivery. As a result, Microsoft claims that it saw a 18% reduction in users seeing certain system stability issues in the Creators Update compared to earlier versions of Windows 10.

Likewise, Microsoft and its OEM partners saw reduced customer support volumes since last year. “Our close collaboration with our ecosystem partners has resulted in a 39% total reduction in operating system and driver stability issues between the Anniversary Update and Creators Update,” explained Cable.

“By listening to user and partner feedback, we evolve Windows to make each quality update and each feature update better than the last,” added Cable. “It also assures we continue to keep Windows 10 the most reliable, performant and secure version of Windows ever.”  Overall, it seems that Windows as a service as come a long way since the days when Microsoft was aggressively pushing the Windows 10 update to Windows 7 and 8 users. AdDuplex recently noted that the Creators Update was rolling out to all users at a slower pace compared to the Anniversary Update, and it’s also worth noting that Microsoft no longer hesitates to delay major updates that are not fully baked (My People, Timeline, etc). Quality is always better than quantity, and Microsoft obviously agrees with that.

Would you also say that Windows 10 is becoming more reliable after every major update, or did you encounter any major issues after installing the Creators Update? Let us know what you think in the comments below.

Latest Windows 10 Maps app on Skip Ahead provides bus, ferry, train schedules, more

Microsoft has released an update for the Windows 10 Maps app for those who have opted to Skip Ahead (via Aggiornamenti Lumia.) The update is fairly minor but adds in bus, ferry, train schedules and more.

After updating, the latest version of the Windows 10 Maps app gets pushed to version 5.1708.2511.0. Other notable features delivered in this update are some Fluent Design elements, and user interface changes. A rough translation of the changelog for the update can be seen below.

  • It is now possible to check the schedules of Bus, Metro and ferries: Simply click or “tapping” on the icons that symbolize the vehicle and automatically you will see the list of all upcoming departures
  • Improvements with Fluent Design
  • Improvements and minor fixes
A look at the bus schedule (Image via Aggiornamenti Lumia.)

As has been the case in the past, you can expect for this update to roll out to the standard Windows 10 Mobile and Windows 10 Mobile users very soon. If you’ve already received this update on your device, let us know your thoughts by dropping us a comment in the section below.

Xbox Live trolls can now play in Overwatch multiplayer matches

Apparently, Overwatch is no longer governed by Xbox Live’s reputation system, allowing “Avoid me” players (AKA trolls) to be able to be put in matchmaking with anyone (via Reddit). As outlined in the Reddit post, Overwatch players will be all be grouped from the same matchmaking pool, regardless of reputation in competitive play.

The Reddit post comes after an Overwatch patch update yesterday (full patch notes available here), which includes a number of general, interface, and other updates that include the aforementioned “Avoid me” players on Xbox Live:

[XB1] Players whose Xbox Live reputation has been downgraded to “Avoid Me” will remain in the same matchmaking pool as other Overwatch players. However, they will no longer be able to use the in-game voice communication.

In other news, Overwatch will be free to play on Windows, Xbox One, and PS4 this weekend, starting September 22 and running until September 25, 2017. While Overwatch will be available free to play for Xbox Live Gold members in all regions, Windows 10 PC users will only be able to participate in the following regions: “Americas, Europe, and Asia gameplay regions—excluding Korea.”

Xbox One gamers with Xbox Live Gold memberships will be able to play as one of the 25 heroes available in Overwatch. There are also 4 different game modes and 16 different maps available to play, including:

  • Assault: Hanamura, Horizon Lunar Colony, Temple of Anubis, and Volskaya Industries
  • Escort: Dorado, Junkertown, Route 66, and Watchpoint: Gibraltar
  • Assault/Escort Hybrid: Eichenwalde, Hollywood, King’s Row, and Numbani
  • Control: Ilios, Lijiang Tower, Nepal, and Oasis

Any progress made in Overwatch this weekend will be saved and carried over if you decide to purchase the game. Xbox Live Gold members are also offered a special discount and can get Overwatch for $38.99, down from its regular price of $59.99!

Download Overwatch today from the Microsoft Store and get ready to start playing for free this weekend!

PepsiCo CFO Hugh Johnston joins Microsoft’s board, ValueAct’s Morfit to leave in November

Microsoft announced yesterday the appointment of Hugh Johnston, vice chairman and chief financial officer of PepsiCo, to its board of directors and to the board’s audit committee. The 56 years-old exec previously worked as a director and audit committee chair for Twitter Inc. and AOL Inc, and will bring his valuable experience to Microsoft’s board.

“Hugh is an accomplished financial and business leader who brings a depth of experience from his successful career at PepsiCo where he has oversight of finance, IT, e-commerce and the company’s digital transformation,” said John W. Thompson, independent Microsoft board chairman. “He is a great addition to Microsoft’s board of directors, and we look forward to working with him.”

Johnson’s addition is effective immediately and will make the board reach 13 members. However, the Redmond Giant also announced yesterday the upcoming departure of ValueAct Capital President G.Mason Morfit, who chose not to seek re-election to the board. Morfit will leave the board at Microsoft’s annual shareholders meeting set for Nov. 29, 2017. “Mason has been a valuable adviser at an important time in Microsoft’s transformation, and we are grateful for his contributions,” Thompson said.

The next Windows Insider Webcast is later today (9/20) at 10:00 AM PDT

Microsoft has revealed that the next Windows Insider Webcast will be later today on September 20th at 10:00 AM PDT. This webcast is set to focus on Microsoft’s flighting system and will feature familiar faces including Jason Howard, Program Manager on the Windows Insider Engineering Team.

For those who are unsure, 10 AM PDT is 5 PM in UTC, and you can convert this time to your specific time zone by checking here. The webcast is a great way to connect with the Windows Insider team and have them answer your burning questions about the company’s flighting system. As usual, you can watch on Mixer or check later in the day on demand if you happen to miss it live.

Microsoft last held a Windows Insider Webcast last month on August 29th, and it was focused on the mechanics of the Windows engineering systems. So, be sure to tune in again this time, as you no doubt will learn more about how the Windows Insider team works to get those new builds to your desktop!

Minecraft’s Better Together Update begins rolling out on Xbox One, Windows 10, & Mobile

It looks as if the beta for Minecraft’s Better Together Update has no finished and the full, proper, public launch of the new unified Minecraft is ready to rollout.

https://twitter.com/Chupacaubrey/status/910213343528419328

According to Mojang’s Aubrey Norris, the update has already begun to roll out to Xbox One consoles and will continue in waves throughout the rest of the week while the Windows 10 and mobile versions will update tomorrow. The Nintendo Switch version will apparently update later in the year as Mojang is still testing this new version on that console.

After the update has been installed, all versions of the game will be renamed as simply, Minecraft (i.e. no Minecraft: Windows 10 Edition-type titles), and a load of new changes will be implemented. You can read a comprehensive of what will be new here. The biggest new feature will be the ability to play with other players on different platforms. As long as they’re running the latest version of the game that is.

Minecraft will be getting another big update later in the year with its Super Duper Graphics Pack which will add 4K graphics and higher resolution imagery (pictured above).

Are you excited to play this new version of Minecraft? Let us know in the comments below.

Xbox 360’s Fable Anniversary is coming to Xbox One

Microsoft’s Phil Spencer has confirmed in a tweet that the popular Xbox 360 video game, Fable Anniversary, will indeed be coming to the Xbox One family of consoles via the system’s backwards compatibility feature. While no estimated release date was announced, Spencer did state that it’s being worked on right now so fans shouldn’t have to wait too long.

Fable Anniversary was a re-release of Fable: The Lost Chapters for the Xbox 360 and contained a variety of improvements such as better graphics and Xbox Achievements. The game came out relatively recently in early 2014.

Do you enjoy playing Xbox 360 games on your Xbox One via backwards compatibility? Let us know your favorites in the comments below.

USB Drive Not Mounting in Windows 10: How to Fix it

Have you ever tried to plug in your external USB drive to your computer, but it’s not mounting in Windows?

This can be problematic, especially when you urgently need the files saved in the drive or your drive is the only tool you have to save your files for use elsewhere.

The first instinct would be to unplug and plug it back through another port. However, if this doesn’t resolve the issue, then either your external USB drive has a problem, and if not, there are various solutions you can use to resolve it. Keep reading to find out!

What can I do if USB drive is not mounting in Windows 10?

Before we head to the slightly complex solutions, try these quick ones:

  • Restart the computer.
  • Unplug any USB hub connected to your computer and remove other devices.
  • Check for any pending updates from Windows Update.
  • If the external USB drive has a power switch, power it on.
  • Try your external USB drive on a different computer. If it still isn’t working, then the drive has a problem.
  • Sometimes Windows may ask you to format the external USB drive. Don’t do it yet because you may lose all your files. It is possible your drive was formatted on a different operating system, so you can either read it on a different OS or choose a third-party program to help you read its contents. Otherwise, if you don’t need the files, choose Format disk and proceed.

If none work, head to the fixes listed next.

1. Scan for hardware changes

  1. Right-click the Start button.
  2. Select Run.
  3. Type devmgmt.msc.
  4. The Device Manager will open, then select the USB entry.
  5. Go to the Action tab, and select Scan for hardware changes.scan or hardware change to fix usb drive not mounting windows 10

If this still doesn’t resolve the issue with your external USB drive, then the next solution.

2. Uninstall and reconnect the external USB drive

  1. Right-click the Start button and select Device Manager.
  2. Select Disk Drives.
  3. Right click on the problematic external USB drive, and click Uninstall device.uninstall device
  4. Unplug the external USB drive, then wait for about a minute and reconnect it again.

Once you do the above, the drive should load automatically.  To be sure it has been recognized, go to Windows/File Explorer and check for it.

3. Reinstall USB controllers

  1. Right-click the Start button.
  2. Select Device Manager.
  3. Find Universal Serial Bus controllers and click to expand it.
  4. Right-click on the device.
  5. Click Uninstall device.uninstall
  6. Rinse and repeat for all other problematic devices.
  7. Reboot your computer.

Once you do the above, the drive should load automatically.

4. Disable USB selective suspend

  1. Click on the battery icon from the taskbar and select Power and sleep settings.
  2. Click on Additional Power settings.
  3. Next to your current power plan, choose Change plan settings.change plan settings to fix usb drive not mounting windows 10
  4. Click on Change Advanced Power Settings.
  5. A pop up will appear.
  6. Find USB settings, and expand it.
  7. Expand USB Selective Suspend.
  8. Click on the drop down menu, and choose Disabled.disable to fix usb drive not mounting windows 10
  9. Click Apply, then OK.

Ensure you have a system restore point created first, and if these solutions do not yield any results, remember to restore your old settings back.

5. Update the drivers

  1. Right-click the Start button.
  2. Choose Control Panel.
  3. Under Hardware and Sounds, click View Devices and Printers.
  4. Your computer will start scanning for available devices.
  5. Check for any entry on any Unidentified USB device or Unknown Device.
  6. Open the Properties of the unknown or unidentified external USB drive.update
  7. Update the driver if there’s an update available.

6. Prevent computer from turning off device

  1. Right-click the Start button.
  2. Select Device Manager.
  3. Click on Universal Serial Bus Controllers to expand the list.
  4. Select the USB Root Hub for your drive.
  5. Right-click and select Properties.
  6. A popup box will appear. Navigate to the Power Management tab.
  7. Uncheck the Allow the computer to turn off this device to save power option, and click OK.disable setting

In case the USB drive is still not mounting in Windows 10, head to the next method.

7. Update the USB drive drivers

  • Right click Start button
  • Select Device Manager
  • Click on Universal Serial Bus Controllers to expand the list
  • See whether there are any devices with either a yellow exclamation mark, question mark, down-arrow mark, or an error notification or code.
  • If the driver has a yellow exclamation mark on it, double-click on it, then open Properties
  • Under Drivers tab, choose Update Driver, and follow the on-screen instructions to complete the process.update to fix usb drive not mounting windows 10

Perhaps your computer cannot identify or see the external USB drive, but it is visible on other computers. This indicates that something is wrong with your USB drive drivers. In this case, updating the drivers will do the trick.

And if the USB drive was not mounting earlier, it should be listed both under the Device Manager and File Explorer now.

Hope these solutions worked. But let us know your experience.

Something Went Wrong in Microsoft Office 2013: Error 30088-4

Error Code 30088-4 is a generic error that pops up when you try to install Office 2013. Oftentimes, You can’t fix this error by uninstalling Office and trying to install it again. Here you’ll find a few ways you can deal with it.

Something Went Wrong in Microsoft Office 2013 [FIX]

This error is particularly prone to happen on operating systems that have had Office installed on them before. Sometimes, the built-in uninstaller just doesn’t cut it; it doesn’t delete everything and leaves some files on your computer, and those cause issues on subsequent installs of Office.

Solution 1 — Completely uninstall Office using Microsoft’s tool

Thankfully, Microsoft has provided a tool that was specifically made to help you uninstall Office. You can follow these steps to download and use the tool:

  1. Download the tool from here.
  2. When it has finished downloading, double-click on it and open it.Uninstall Tool for Office
  3. Click on next on the first screen. Wait a bit until the next screen shows up that gives you a yes or no choice. Click on Yes to remove office.
    Click on Yes to remove Office
  4. Wait for the tool to do its job.

You should try installing Office again to see if the error code 30088-4 still persists. Hopefully, it won’t, but If it does, you should try the next method.

Solution 2 — Completely uninstall Office manually

Deleting all of Office’s files manually consists of many steps. But before we start, you have to make sure your computer displays hidden files and folders. Do so by following these steps:

  1. Open Start and search for File Explorer Options. Click on the first choice.
  2. Go to the View tab.
  3. Under Advanced Settings, you’ll two radio buttons. Make sure to select ‘Show hidden files, folders, and drivers’.
    Show hidden files and folders
  4. Uncheck the ‘Hide extensions of known file types’ checkbox and hit OK.
    uncheck hide extensions for known file types Error Code 30088-4

Now that you can see hidden files on your system, it is time to delete the ones related to Office.

Read also: How to run Microsoft Office Picture Manager on Windows 10.

Stop Office’s service

Microsoft Office has a service named Office Source Engine Service, and this should be stopped before proceeding further. It locks Office files on your computer, and if you attempted to delete them, your computer will only show a “File in use by another process” error.

  1. Search for Services in Start and select the option with a gear icon.
  2. After the Services window opens, search for Office Source Engine and right-click on it. If the Stop option is available, click it. If it’s not, that means it wasn’t running, to begin with, and you should move forward.Stop Office Source Engine Error Code 30088-4

Uninstall Office packages

  1. We first have to navigate to the Installer folder to delete all of Office’s installer packages. You can do this by simply copying this address ‘C:\WindowsInstaller’ and pasting it in your Windows Explorer’s address bar (note: this address may not work with some locales, in which case you should simply navigate to the folder).
  2. Open the View tab by clicking on (it’s on the top right corner). In the Layout section, you should make sure Details is selected. This will display more information about each file and help you locate the Office 13 ones.
  3. While still on the View tab, click on Add columns and then choose Choose columns.
    Choose columns photo Error Code 30088-4
  4. A window should pop up. Scroll down until you find an option titled Summary and check it.
  5. Before clicking OK, you should make sure that the Width of selected column (in pixels) box has a value over 350. This will help you see all of the summary, which is vital to know which files are the Office installers.Width of selected column photo Error Code 30088-4
  6. Sort the files by their summary by clicking on the Summary in the Column Headings.
  7. Find any file that starts with “Microsoft Office” and ends with “2013”. These are all related to Office 13 but don’t delete them by simply pressing the delete button. You must right-click on each one and select Uninstall.

Delete the leftover Office files

Depending on whether you are running A 64-bit version of Windows or a 32-bit, the locations you need to search will differ. The ‘(x86)’ part of each address is only required if you have a 64-bit system, and you should omit it if you have a 32-bit one.

  1. Navigate to “C:\Program Files (x86)\Common Files\Microsoft Shared”. This is the folder where Microsoft stores files of several of its flagship programs.
  2. Locate the folders “Office 15” (which is Office 2013‘s official version number) and “Source Engine” and delete both of them.
  3. Now, navigate to “C:\Program Files(x86)\Microsoft Office”. This folder is specifically for Office files.
  4. Delete the “Office 15” folder here too.
  5. Finally, You might find a folder named “MSOCache” at the root of each of your hard disk drives. Open each one and search for a folder named “All Users”. Type “0FF1CE}- ” in the search bar and delete everything that turns up.

You may need to repeat step 5 a number of times depending on how many drives you have. One time for each hard drive. 

Finishing touches

  1. Navigate to “C:\Users\[username]\AppData\Roaming\Microsoft”. You should replace [username] with your specific username on the computer.
  2. Open the templates folder and delete both Normal.dotm and  Welcome to Word.dotx files.
  3. Go back and then go into the Document Building Blocks folder.
  4. You’ll find a folder with four digits as its name. Open it and you may find a file titled ‘Building blocks.dotx’ delete it. If you didn’t find it, you may find a “15” folder. Open it and delete the Building Blocks.dotx there.

Delete Office keys in the Registry

A word of warning, deleting Registry keys is quite risky to do and you might make your computer unfunctional. You should attempt this as a last resort and make sure you backup your Registry before doing it.

  1. Open Registry by searching for regedit in Start.
  2. Navigate to “HKEY_LOCAL_MACHINE\SOFTWARE\Microsoft\Office15″. 
  3. Delete that folder and all of its keys.

Solution 3 — Use the offline installer

If you are using an online installer for your Office installation, switching to the offline counterpart might help. There are a lot of unknown variables like firewalls and ISP specific settings that might cause the error. The offline installer will eliminate those uncertainties and, hopefully, help you install Office successfully.

Conclusion

In this article, we looked at three ways you can deal with the stubborn error code 30088-4. We hope that as you are reaching this point in the article, your Office is happily installing without any issues.

Use the comments section below to tell us about the problems you’ve faced when trying to install Office, and whether this article helped you resolve the error code 30088-4, or if there was a method we overlooked and didn’t mention.

RELATED STORIES TO CHECK OUT:

pCloud: what it is and how to install it [Windows, Mac]

Are you looking for personal storage space for all your files and folders? Then pCloud is your friend.

pCloud is a personal cloud storage space where you can keep away all your folders, files, and any other documents.

What’s more, its interface is user-friendly and shows you where everything is located, as well as what each item does. Plus, you can get it on almost any device and operating system such as Windows (10, 8, 7, Vista and XP), or get it as a mobile app, or web extension (this is the latest feature on pCloud).

Once you install it on your computer or device, the app, which works pretty much like Google Drive, creates a well-secured virtual drive that enlarges your local storage space.

Each change made instantly reflects on your computer, or device, and synchronizes them so you can access any updates made.

Some of the main tasks you can fulfill with pCloud include:

  • Sharing files and folders

You get instant access to all your files and easily share with anyone (up to 150 times), anywhere in three ways:

  1. Share a link by creating a link to files or folders in your account and share the link. This works whether they have their own pCloud accounts or not. They can view and download your files.
  2. Invite others to a folder for collaboration. You can control who can edit or view files on your pCloud storage.
  3. Upload links by providing a link to your folders where others can upload their content to.
  • Instant file synchronization

You can sync all your files instantly between your computer, phone, and tablet using pCloud Drive, then sign in with the same login credentials across all the devices. If you have it already, every change you make is synced on all your devices so you can access from any device, anywhere, anytime.

Note: you need the app on your other devices in order to access and synchronize your files.

You can register for the app on your mobile device as well. When you install and launch it, you’ll either use an existing account or create a new one. This comes with most pCloud features and 10 GB storage space for free! You can only have one app installation per device, linked to a single account, which means you cannot use multiple accounts.

pCloud key features include:

  • Sharing download and upload links
  • File versioning
  • Data recovery
  • Upload your files and data remotely, or work offline (by adding your files to Favorites – click on the star sign next to your files, and you can use any files, photos, videos or audios while offline).
  • Preview documents while online
  • Restore files using Rewind feature
  • Have an extension for your HDD
  • Get detailed statistics for your shared links, including number of downloads
  • Save 5 copies of files on different servers, and you have an option for extra encryption
  • Automatic uploads of photos (including camera roll)
  • Create backups from various platforms such as Dropbox, Facebook, Instagram, OneDrive and/or Google Drive

Types of pCloud applications available

There are three types of applications available:

  • pCloud for Desktop
  • pCloud for Mobile
  • pCloud for Web

pCloud for Desktop

This can be used on almost any operating system including Windows. It creates a virtual drive that you can use the way you use your hard drive but doesn’t take up any space on your computer. It secures your data using pCloud Crypto – this is a new feature that requires a Crypto pass to encrypt and decrypt your files.

pCloud for Mac

pCloud works seamlessly on all Mac operating systems, offering quick access to its functions without affecting your hard-drive in any way. It does this in the same way as on the Windows platform, by creating a virtual drive, thus offering a sandbox-environment which can not affect your system even if it gets corrupted.

pCloud for Mobile

Once you install the app on your device, you can use its mobile features to preview, upload, download, or share files on the go. The pCloud Automatic Upload feature also backs up your photos and videos from your device to the cloud.

pCloud for Web

pCloud’s web platform on my.pCloud.com allows you to preview, upload, and download any files. You can share them with anyone, and do more in any web browser.

How to get pCloud for your computer

To get pCloud on your computer, there are quick yet simple steps you can follow as outlined below:

pCloud website

  • On the top right-hand side, click Download

pCloud download

  • You will see a variety of operating systems and devices to which you can install the app
  • Click on Windows

pCloud Windows

  • Point on the ‘Choose another version’, and select your version of Windows

pCloud download Windows

  • If using Windows 10, click on it
  • Your download should start immediately

pCloud download

How to install pCloud on your computer

To install the app, take the following steps:

  • Go to the folder in which the pCloud download (.exe file) was saved

pCloud download exe

  • Double click on the .exe file OR right click and select Openpcloud download exe
  • A setup box will appear
  • Read the terms and conditions, then check the box to agree

pCloud setup

  • Click Install
  • Windows will ask whether you want to continue with the installation: Click Yes or Allow
  • The set up will begin processing your installation request

pCloud setup process

  • A pop up will appear asking “Would you like to install this device software”, click Install

pCloud install prompt

  • You will receive a confirmation that your setup was successfulpcloud set up successful
  • A little blue cloud icon with the letter P on it will appear on your taskbar. That means the app has been installed and appears as a virtual drive on your computer

pCloud icon taskbar

  • Click Launch

pcloud set up launch

  • The login window will appear. You can sign in with your existing account or create one

pcloud login

  • Upon successful signing in, pCloud will send a welcome message.

Once set up and installation is complete, and you’re logged in, you can proceed to save your files to pCloud.

pCloud pros and cons

Pros

  • Easy file backup
  • Guaranteed security/Password protection
  • User-friendly interface
  • Easy to navigate File Manager
  • You can connect using your Facebook profile if the email addresses match
  • Easy sharing (with advanced features)
  • Set expiration date on shared files/links
  • You can track the number of link downloads
  • Rewind feature lets you restore files
  • Comes with 50 GB storage for a free account (has premium accounts as well). You can get additional free space when yours is used up, by inviting other users to register for pCloud. Each registration expands your storage space with 1GB when either the user has uploaded 1GB to pCloud, or has signed in from a device or virtual file system. You can also backup your documents to pCloud and get additional free space.
  • Comes with a free version before upgrading to paid or premium versions

Cons

  • For users on the free version, accounts are deleted after 12 months of inactivity, permanently deleting the files (and account) altogether
  • Some users have noted that the app constantly pulls some processor time after a while
  • Users on the free version can only restore deleted files within the first 24 hours upon deletion, though the files are held in the Trash folder for 15 days. An upgrade to the Premium version is required to restore these files, and other files deleted more than 24 hours ago.

Have you tried pCloud or do you use it? Share your experience with us in the comments section.

RELATED STORIES TO CHECK OUT:

Convert LibreOffice documents to Word file format with these converters

ODT is the default text document format of the OpenOffice and LibreOffice suites. However, not every MS Word application supports ODT; and those versions that do don’t always exactly preserve the original ODT page formatting. Thus, it’s better to convert a ODT file to either a DOC or DOCX format before opening it in Word. Here are a few file converters that you can convert the ODT and DOC formats with.

Best ODT to DOC converters

Doxillion Document converter Software

Doxillion Document Converter Software is a program that you can convert numerous document file formats with. The software has a freeware version that supports a more limited range of file formats than the Pro version, which is retailing at $14.99. Doxillion is compatible with 64-bit Windows platforms from XP up. Press the Download Now button on this website page to add Doxillion to Windows.

Doxillion supports the ODT, DOC, DOCX, PDF, TXT, HTML, RTF, XML and EPUB document formats among others. As such, you can convert various file formats with this software. Doxillion users can convert multiple ODT documents to DOC formats with the software’s batch file converter. This program also adds options to context menus in Windows Explorer so that you can select to convert documents by right-clicking their files.


MultiDoc Converter

MultiDoc Converter is a freeware ODT to DOC converter with which you can convert a batch of documents to alternative file formats. You can run this software on both 32 and 64-bit Windows platforms from Vista to 10. Click Setup.exe on this website page to save the program’s installer to Windows.

This software is primarily a batch conversion tool with which you can select to convert a group of ODT documents within a specified folder path. It includes filters that you can select to convert just one file format within a specified folder.

MultiDoc users can then select to convert their files to DOC, DOCX, RTF, XML, HTML, TXT or EPUB formats. This program doesn’t have a huge range of additional options, but it’s a straightforward batch-processing tool with which you can quickly convert multiple files to other formats.


Soft4Boost Document Converter

Soft4Boost Document Converter is a freeware file conversion utility that has a few novelties. The main novelty is the that software is a file viewer and converter wrapped into one. The program works on Windows 10, 8.1, 8, 7 and Vista; and you can save its setup wizard by pressing the Download S4B Document Converter button on this website page.

You can convert ODT documents to DOC, PDF, DOCX, TXT, RTF and HTML formats with Soft4Boost Document Converter. Unlike some alternative file converter software, S4B Document Converter also displays selected documents in its window and includes a Print option.

You can select to convert multiple documents at once, and the program also supports drag and drop so that its users can drag files onto its window. S4B Document Converter users can also modify the output file titles and select to extract images from the documents.


AVS Document Converter


AVS Document Converter is a utility designed specifically for converting ODT, DOC, PDF, DOC X, TXT, EPUB, HTM and HTML file formats. The software is freely available, but the non-activated version adds watermarks to converted output files. To remove the watermarks, you’ll need a $39 access subscription. Press the Download AVS Document Converter button on this page to save the installer to Windows.

AVS Document Converter’s UI bears an uncanny resemblance to S4B Document Converter. In fact, the UI design is almost something of a copy as it also incorporates document tab previews within its window and shares similar rename, extract images and format settings options. AVS Document Converter users can batch convert documents, and the software includes a Create Archive option with which you can compress output files. This software also includes a command line mode that users can convert and merge files with.


Total Doc Converter

Total Doc Converter is software that you can convert ODF files to the DOCX format with, which is the default file format for more recent Word versions. Total Doc Converter users can also convert DOCX to a format more compatible with earlier Word versions. This software is retailing at $49.90, and you can try out a one month trial package.

Total Doc Converter supports 10 output file formats, which include RTF, DOCX, PDF, TXT and HTML. The software has a preview panel that displays the selected document, and you can print out the files. Total Doc Converter users can batch process their documents and merge PDF and DOC output files. This program also has additional options for adding header or footer logos, digital signatures, page counters and dates to output documents.

Those are five file converters that support the ODT, DOC and DOCX formats. With those programs, you can quickly convert multiple ODT documents to MS Word’s DOC or DOCX default formats. That will ensure the documents retain their original formatting and layout when you open them in Word.

RELATED STORIES TO CHECK OUT:

NBA 2K18 players bothered by microtransactions

NBA 2K18 is finally here! The hype is still real but the game itself might actually kill the excitement for some players. According to the very first 1500+ reviews on Steam (around 1,600 reviews), players are quite unsatisfied with the game.

The main problem? Microtransactions, an aspect of the game that has angered gamers for years in general and with NBA 2K releases in particular. Almost every Steam review says that the game has become pay-to-win and comment on how the balance between buying VC for actual money and earning has been disrupted.

Here’s what some of the players say:

“AAA price tag for a game that has more pay-to-win microtransactions than 99% of mobile games. They’re probably going to charge you VC to be able to skip cutscenes in an upcoming patch too,” said user Zyrrac.

“I fear that in NBA 2k20, 2k will demand VC for every step we take. It’s ridiculous to ask money for even hairstyles that were available for free last year. Even f2p games don’t ask for this much money for in-game items and the game itself is expensive in the first place. For God’s sake, what does it take to satisfy 2k’s greed,” asked Kuraf.

Players indeed have a point on this one. It would make sense for free-to-play games to as many transactions as developers need at least some money from players. But doing the same thing with an AAA title is unfair towards players, to say the least.

What do you think about the whole concept of the game? Is it really pay to win now? Let us know in the comments below.

RELATED STORIES YOU NEED TO CHECK OUT:

‘Pirate Speak’ mode transforms your Outlook.com account on International Talk Like a Pirate Day

Today, September 19th marks International Talk Like a Pirate Day, and of course, Microsoft is getting into the fun. A temporary ‘Pirate Speak’ mode is now showing up on Outlook.com Beta accounts, allowing you to have a couple of laughs and celebrate the day dedicated to pirates (via Windows Central.)

If you’ve enabled the Outlook.com beta, you can find the button to toggle the Pirate Speak mode by looking for the skull and crossbones icon in the upper right-hand side of your inbox. After you click and toggle this switch, the text in Outlook.com will transform into a Pirate-type language. Here is a list of what you can expect if “ye be so brave enough” to toggle the button and “walk the plank” down into the world of Pirate talk.

  • Your Favorites heading will be marked as “Loot.”
  • Your Folders will be marked as “Treasure Troves.”
  • The search button will be labeled as “hunt for.”
  • New mail will be marked as “New Slavo.”
  • Delete will be “Throw Overboard.”
  • Send will be “Fire away.”
  • CC will be “Expand Crew”
  • BCC will be “Stow Away”

Several other areas of the Outlook.com Beta experience also see language changes when “Pirate Speak” mode is enabled. And, if you don’t like the mode, you can disable it by clicking on the skull and crossbones icon again.  We’ll let you explore the other changes on your own, so have fun, and let us know your favorite part of the Pirate Speak mode by dropping us a comment below.

Steam Inventory Helper reportedly spies on users

If you installed the Steam Inventory Helper on your computer, you may want to uninstall it as soon as possible: recent reports suggest this extension used to buy and sell digital goods on Steam is spying on its users.

Redditor Wartab made a thorough analysis of the tool and reached the following conclusions:

  • The spyware code tracks your every move starting from the moment you visit a website until you leave. It also tracks where you are coming from on the site.
  • Steam Inventory Helper tracks your clicks, including when you are moving your mouse and when you are focusing on an input.
  • When you click a link, it sends the link’s URL to a background script.
  • Fortunately, the code does not monitor what you type.

The purpose of this spyware is to collect data about gamers for promotional purposes.

Steam spyware

Here’s what Wartab wrote on Reddit:

I have just analyzed the current code of Steam Inventory Helper. Step by step what it does:

On every single page you visit, SIH executes code at document_start (meaning as soon as the page is opened). It even executes on your about:blank page and in all sub-frames on the currently visited site! The code executed is js/common/frame.js […]

What this script does is very nasty. First of all, it monitors EVERY SINGLE HTTP request you make. […] It will then send to their own server a summary of this HTTP request if some condition is met (promoteButter?). […]

Bottom line is: they are monitoring what sites you visit and may be sending a lot of your online activity to their own server. I couldn’t figure out when they do it, yet, but it seems to be for promotional stuff. More importantly, in the future, even if what they do now is legit, you will not be informed about any changes to their permissions, because it basically already has every permission it can get in that regard. Therefore I strongly suggest uninstalling and reporting this extension.

Steam has yet to issue any comment on this matter.

Users fear Steam could go into full tracking mode

This entire debacle has unsurprisingly let many users down and put them on edge, fearing that Steam could include something harmless to enable the permission at first and later enable a full-on tracking mode in a later update. However, it’s not likely Steam would ever resort to such a move considering the negative reaction to the spyware that was just discovered.

As a result of this news, many users have decided to uninstall many other Steam-related apps and extensions, fearing these programs might be spying on them as well. All in all, this revelation deals a devastating blow to Steam’s reputation.

Back to the user data privacy debate

There have been many revelations concerning the breaching of user data lately, like reports revealing that Netgear routers collect analytics data,  Windows 10 Enterprise ignores user privacy settings, and the infamous advanced NSA backdoor infection that affected tens of thousands of Windows computers.

How can users prevent companies and other organizations from collecting data on their digital behavior and preferences? It seems that in the era of no privacy, VPN software could be the answer. However, any tool claiming to protect your online privacy isn’t 100% bulletproof and ultimately, there is no perfect solution to this quandary. With an increasing number of users becoming more aware and subsequently concerned about their data privacy, we’re sure developers will focus more on creating software that helps them defend the integrity of user privacy.

Just like the antivirus industry boomed after malware started to invade the internet, we’re sure companies that develop user data privacy software will become very successful in the future. No matter where you fall — consumer, developer, or hacker — the battle to keep user data private has only just begun.

What do you think about Steam spying on its users? How does this revelation affect your online behavior? Let us know in the comment section below!

RELATED STORIES TO CHECK OUT:
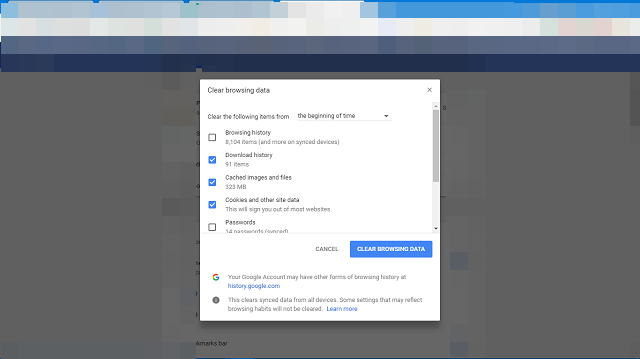
Phil Spencer promoted to Executive VP as Xbox gains a seat on Microsoft’s Senior Leadership Team

Phil Spencer has just received a promotion to Executive Vice President of Xbox, and a seat on the Senior Leadership Team. First noted by Microsoft watcher Mary Jo Foley, the promotion suggests that Microsoft may be taking its Xbox and gaming incentives more seriously moving forward.

Now that Phil Spencer has moved up to an EVP position, Microsoft has a total of 16 members in the Senior Leadership team— including CEO Satya Nadella, Terry Myerson, Brad Smith, and others. Spencer will continue to be responsible for Microsoft’s gaming incentives across all of its platforms, such as Xbox HoloLens, and Windows. He is well known by Xbox fans and was previously the head of Microsoft Studios before he was promoted to Executive Vice President of Gaming at Microsoft.

The change in position is effective immediately was shared with employees today by Satya Nadella. Along with this, he also shared the news that the Enterprise Mobility and Security (EMS) team is moving from the Cloud and Enterprise unit to Windows and Devices. The new team is being renamed to “Enterprise Mobility and Managment” and members will report to Corporate Vice President Brad Anderson and Windows and Devices chief Terry Myerson.