You’re not alone if you ever want to return to a local account on your Windows PC from a Microsoft account. The Redmond-based tech giant updated its guides, making it easier to do so, but not before engaging in some flip-flopping—they first removed the guide for switching from a Microsoft Account to a Local account and then brought it back again after listening to user feedback.
There are several advantages to using a Microsoft account to sign into Windows instead of using a local one: smooth service connections, better protection, and the ability to sync devices. Even so, not everyone wants their Windows login linked with a Microsoft Account—some like local accounts because they are easier to access or offer more privacy, and they’re easier to manage if you forget the password.
The guide’s disappearance and later reappearance were truly interesting. Microsoft appeared to be holding back from highlighting the move back to Local accounts, stressing the benefits of using a Microsoft Account instead. Still, they reacted to user comments by putting the guide again, but with another part about recovery through a password reset disk.
According to the restored guide, changing from a Microsoft Account to a Local account is simple. Go into the Settings app, find your account information, and sign in using a Local account instead. This will require you to make new username and password for it, then you are returning on Local account setup. However, creating a password reset disk is better. This will help if you forget the new password and get locked out of your account.
Microsoft also provided a document explaining how to reset passwords for Microsoft and local accounts. This is very useful when you forget your password and need help logging back into your account.
Flexibility and user preference appear to be key. While Microsoft may have valid reasons to encourage Microsoft account use, switching back to a Local account is important for people who want this option.
Also, users obtain the details required for shifting when the guide is there again. This guarantees that people can utilize their Windows devices in a manner that aligns with their choices.
If you have ever been locked out of your local Windows account and ended up looking at the login screen because you forgot your password, a new guide from Microsoft may help.
They have updated their guide for recovering local accounts in Windows using passwords, which could make it easy to regain access to the system without much hassle.
This is a relief, especially for people who like using the old local account rather than a Microsoft one (if you prefer a local Windows account, you have several ways to create it). It’s horrible to think about losing all access to files and settings just because you forget your password.
Microsoft’s guide has an interesting new part about making a password reset disk on a local Windows account, similar to having another key for your digital kingdom. You will use a USB flash drive to create this reset disk.
Creating a password reset disk is a precautionary measure that allows you to reset your Windows local account password in case you forget it. The password reset disk is a USB flash drive that acts as a recovery tool, providing you with a way to regain access to your files and settings in case you forget your password.
Microsoft
It works as an important backup when you forget or cannot remember your password. The process is simple: plug in your USB, go into the Control Panel, and follow the instructions to make a password reset disk. It’s an easy step to take now that might prevent future annoyance.
But here’s the twist: when you make this disk, it lasts forever. Even if you change your password later, producing a fresh disk is unnecessary. Ensure that the USB is secure and becomes your dependable partner, always available to assist when things get tough.
With that being said, did you create the password reset disk? It could be very clever today to ensure that forgetting your password doesn’t stop you from accessing your digital world.
Experiencing low FPS in Call of Duty Warzone on a high-end PC can be incredibly frustrating, especially when you know your hardware should handle the game effortlessly. Let’s dive into some ultimate fixes that can help you boost your FPS and enjoy a smoother gaming experience.
How do I fix low FPS on CoD Warzone?
1. End the Runtime Broker processes
Open Task Manager by pressing Ctrl + Shift + Esc.
Click on the Details tab in Task Manager.
Sort processes by name by clicking on the Name header.
Look for and select all instances of RuntimeBroker.exe.
Right-click each one and select End Task.
Closing these Runtime Broker processes can free up system resources that the game is consuming unnecessarily. This helps improve the FPS in the Warzone menu and during other parts of the game.
2. Disable Path Tracing and Ray Reconstruction
Open Warzone and go to Settings.
Navigate to the Graphics section and go to the Quality settings.
Find the option for Path Tracing + Ray Reconstruction and turn it off.
While you are in this menu, find some features that you may live without and turn them off to lower the burden on your GPU.
Path Tracing and Ray Reconstruction can be very demanding on your system, even if it has a high-end GPU. Disabling these features can drastically improve the FPS in menus and overall gameplay performance.
3. Adjust Render Worker Count
Open Task Manager by pressing Ctrl + Shift + Esc.
Click on the Performance tab.
Under CPU, find out how many cores your CPU has (e.g., 8 cores).
Navigate to the Call of Duty game folder in Documents.
Open the players folder and find the adv_options.ini file.
Open the adv_options.ini file with a text editor and set RenderWorkerCount to the number of your CPU cores.
Save and close the file.
Modern Warfare can sometimes set the Render Worker Count to an incorrect value, leading to FPS drops. Adjusting this value manually ensures that the game optimally uses all available CPU cores.
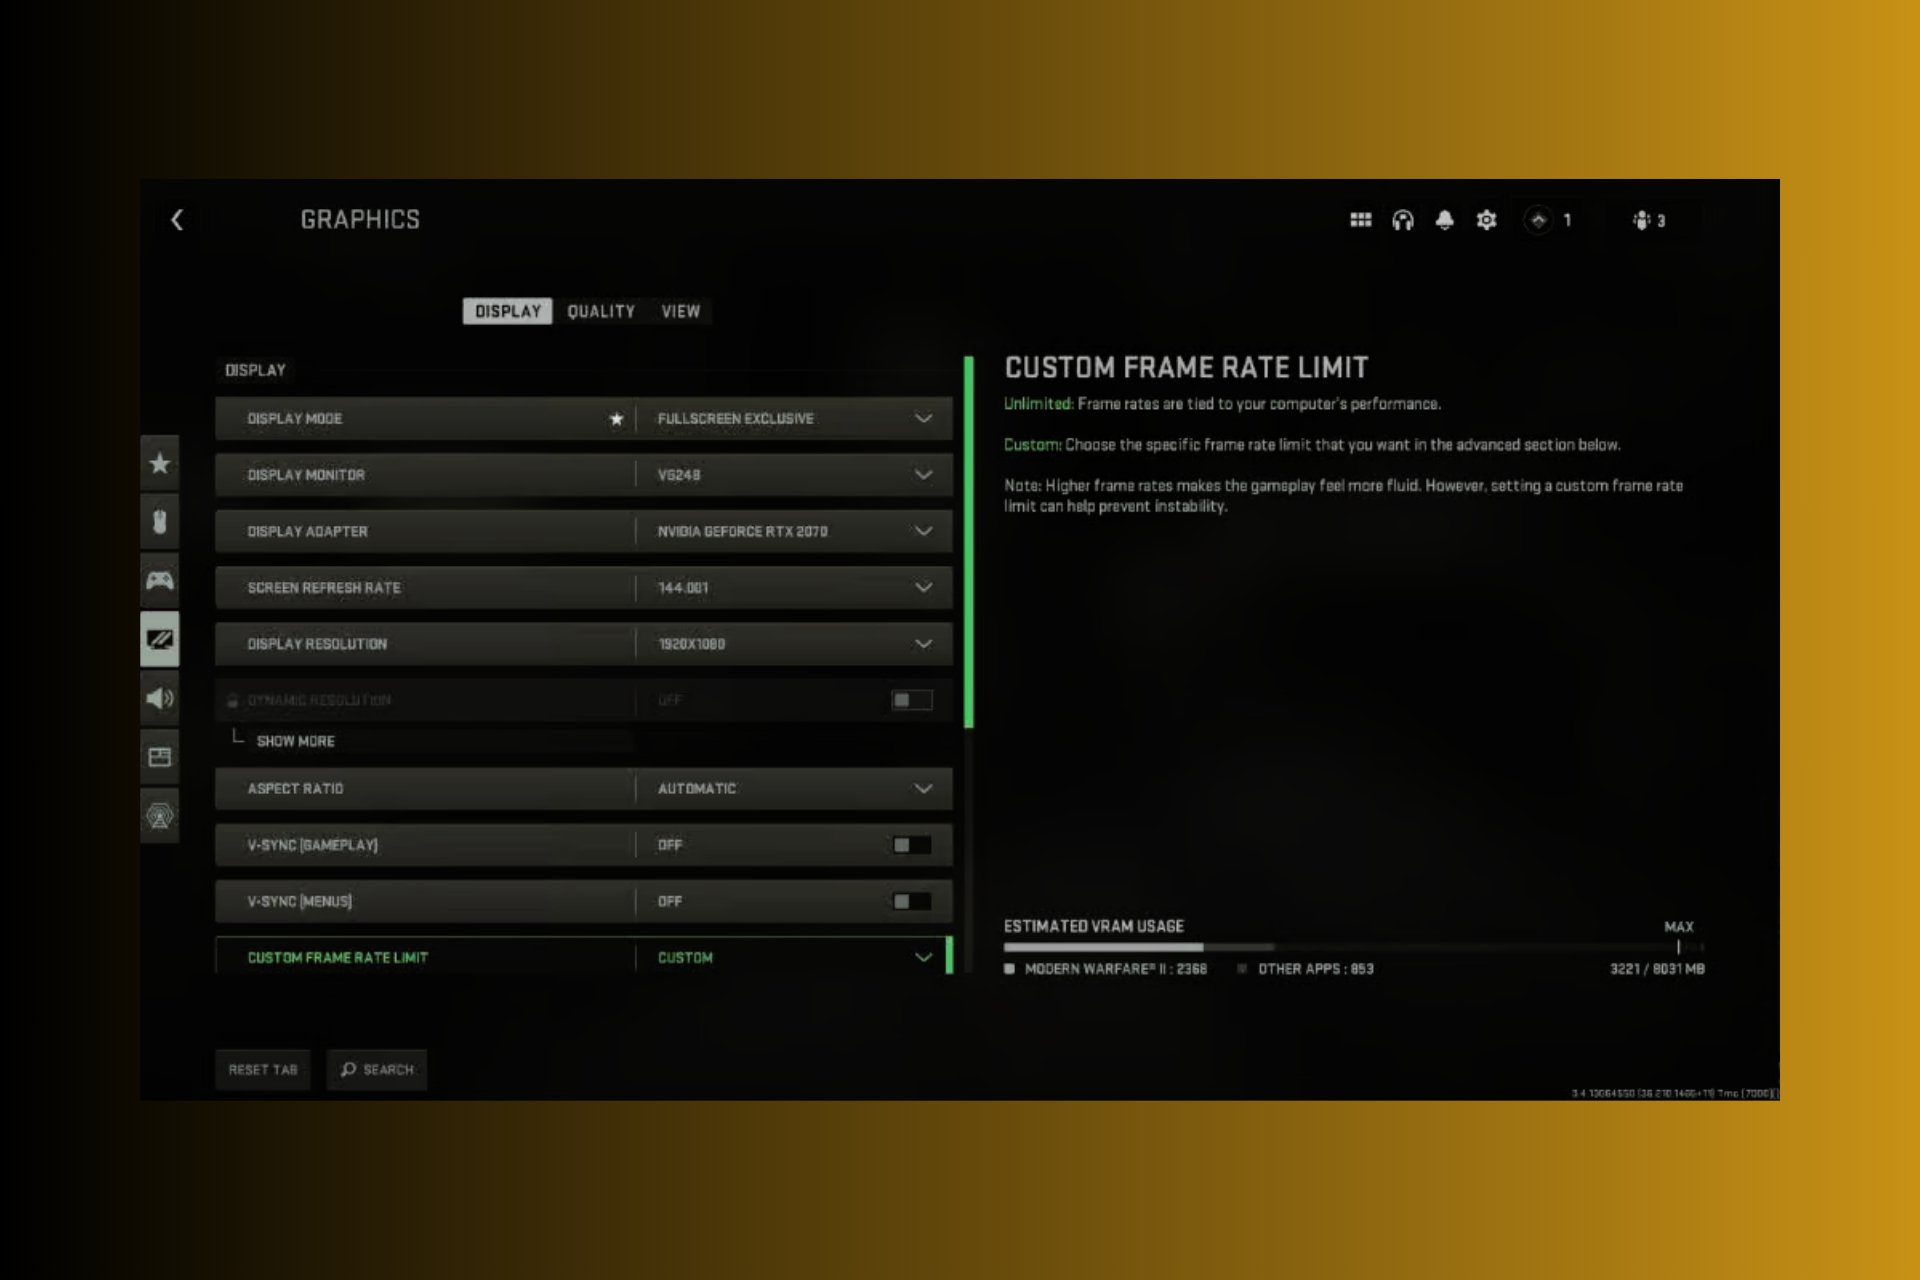
4. Play in Fullscreen Exclusive Mode
Open Warzone and go to Settings.
Navigate to the Graphics section.
Set Display Mode to Fullscreen Exclusive.
Fullscreen Exclusive mode optimizes GPU performance as it dedicates resources to the game, which boosts FPS and reduces input lag and stuttering.
5. Use NVIDIA DLSS
Open Warzone and go to Settings.
Navigate to the Graphics section.
Click on Quality settings.
Find the Upscaling/Sharpening option and select NVIDIA DLSS.
You can further tweak the Quality and Sharpening settings under DLSS options.
DLSS can significantly improve FPS by rendering the game at a lower resolution and then upscaling it. This provides better performance without a substantial drop in visual quality.
6. Roll back to the previous NVIDIA driver
Right-click the Start button and select Device Manager.
Expand the Display Adapters section.
Double-click your graphics card, and then open the Driver tab.
Click on Roll Back Driver. If this option is greyed out, click on Uninstall Driver instead.
Go to the NVIDIA website and download a previous, stable version of the driver.
Install the downloaded driver and restart your PC.
Sometimes the latest drivers can cause performance issues. Rolling back to a previous version can resolve these issues and improve your FPS in Warzone.
7. Disable Hardware-Accelerated GPU Scheduling
Right-click on the desktop and select Display Settings.
Scroll down and click on Graphics Settings.
Toggle off Hardware-accelerated GPU Scheduling.
Restart your PC for the changes to take effect.
This feature can sometimes cause performance issues in games like Warzone. Disabling it can stabilize FPS and reduce stuttering.
8. Clear the game cache
Navigate to the Call of Duty game folder in Documents.
Delete the entire folder to clear the cache.
Restart the game to generate a fresh set of game files.
Clearing the game cache can resolve any corrupted files that might be causing FPS issues, resulting in smoother gameplay.
9. Scan and repair game files
For Steam:
Open Steam and go to your Library.
Right-click on Call of Duty and select Properties.
Click on Local Files and then select Verify integrity of game files.
For Battle.net:
Open Battle.net and go to Call of Duty.
Click on the Cog icon next to the Play button.
Select Scan and Repair.
Verifying and repairing game files can fix any corrupted or missing files that might be causing FPS drops, ensuring a smoother gaming experience.
10. Reinstall the game
Open the game launcher (Steam or Battle.net).
Uninstall Call of Duty Warzone.
Re-download and install the game.
As a last resort, you can reinstall the game. A fresh installation can resolve any deeply embedded issues that might be causing FPS drops, providing a clean slate for optimal performance.
Other useful tips to fix the Call of Duty Warzone low FPS issue on high end PCs
Adjust settings such as Texture Resolution, Shadow Map Resolution, and Particle Quality to lower values. Also, disable unnecessary features like Motion Blur or Film Grain.
Disable Windows Game Mode in Windows 10. This feature can sometimes interfere with game performance. Disabling it can result in better resource allocation and higher FPS in Warzone.
To avoid similar issues in the future, regularly update your drivers and clear your game cache. For any other questions, feel free to hit the comments below and let us know.
While Steam Deck has offered dual boot capabilities since the early days, audio issues after installing Windows 11 are common. And for it to work, you need to install the sound/audio driver for Windows 11 on Steam Deck.
However, the problem is that audio driver installation on Steam Deck is a little different from Windows 11 on a PC. You don’t have an executable file (.exe) to directly run the setup. Instead, there’s a .inf file for driver installation, and the Install option is often missing from the context menu.
So, let’s find out how you can install all sound drivers and fix audio issues on a Steam Deck running Windows 11!
How can I install sound drivers for Windows 11 on Steam Deck?
Right-click on the downloaded driver folder, select Extract All, choose the extraction path, click on Next, and wait for the process to complete.
Similarly, extract the other audio driver. As long as the driver files are compressed, you won’t see an Install option in the context menu.
Go to the extracted files, open the cs35l41 driver folder, right-click on the cs35l41.inf file and select Install. If it is missing, click on Show more options and the Install entry should now appear.
Click Open in the confirmation box and then on Yes in the UAC prompt.
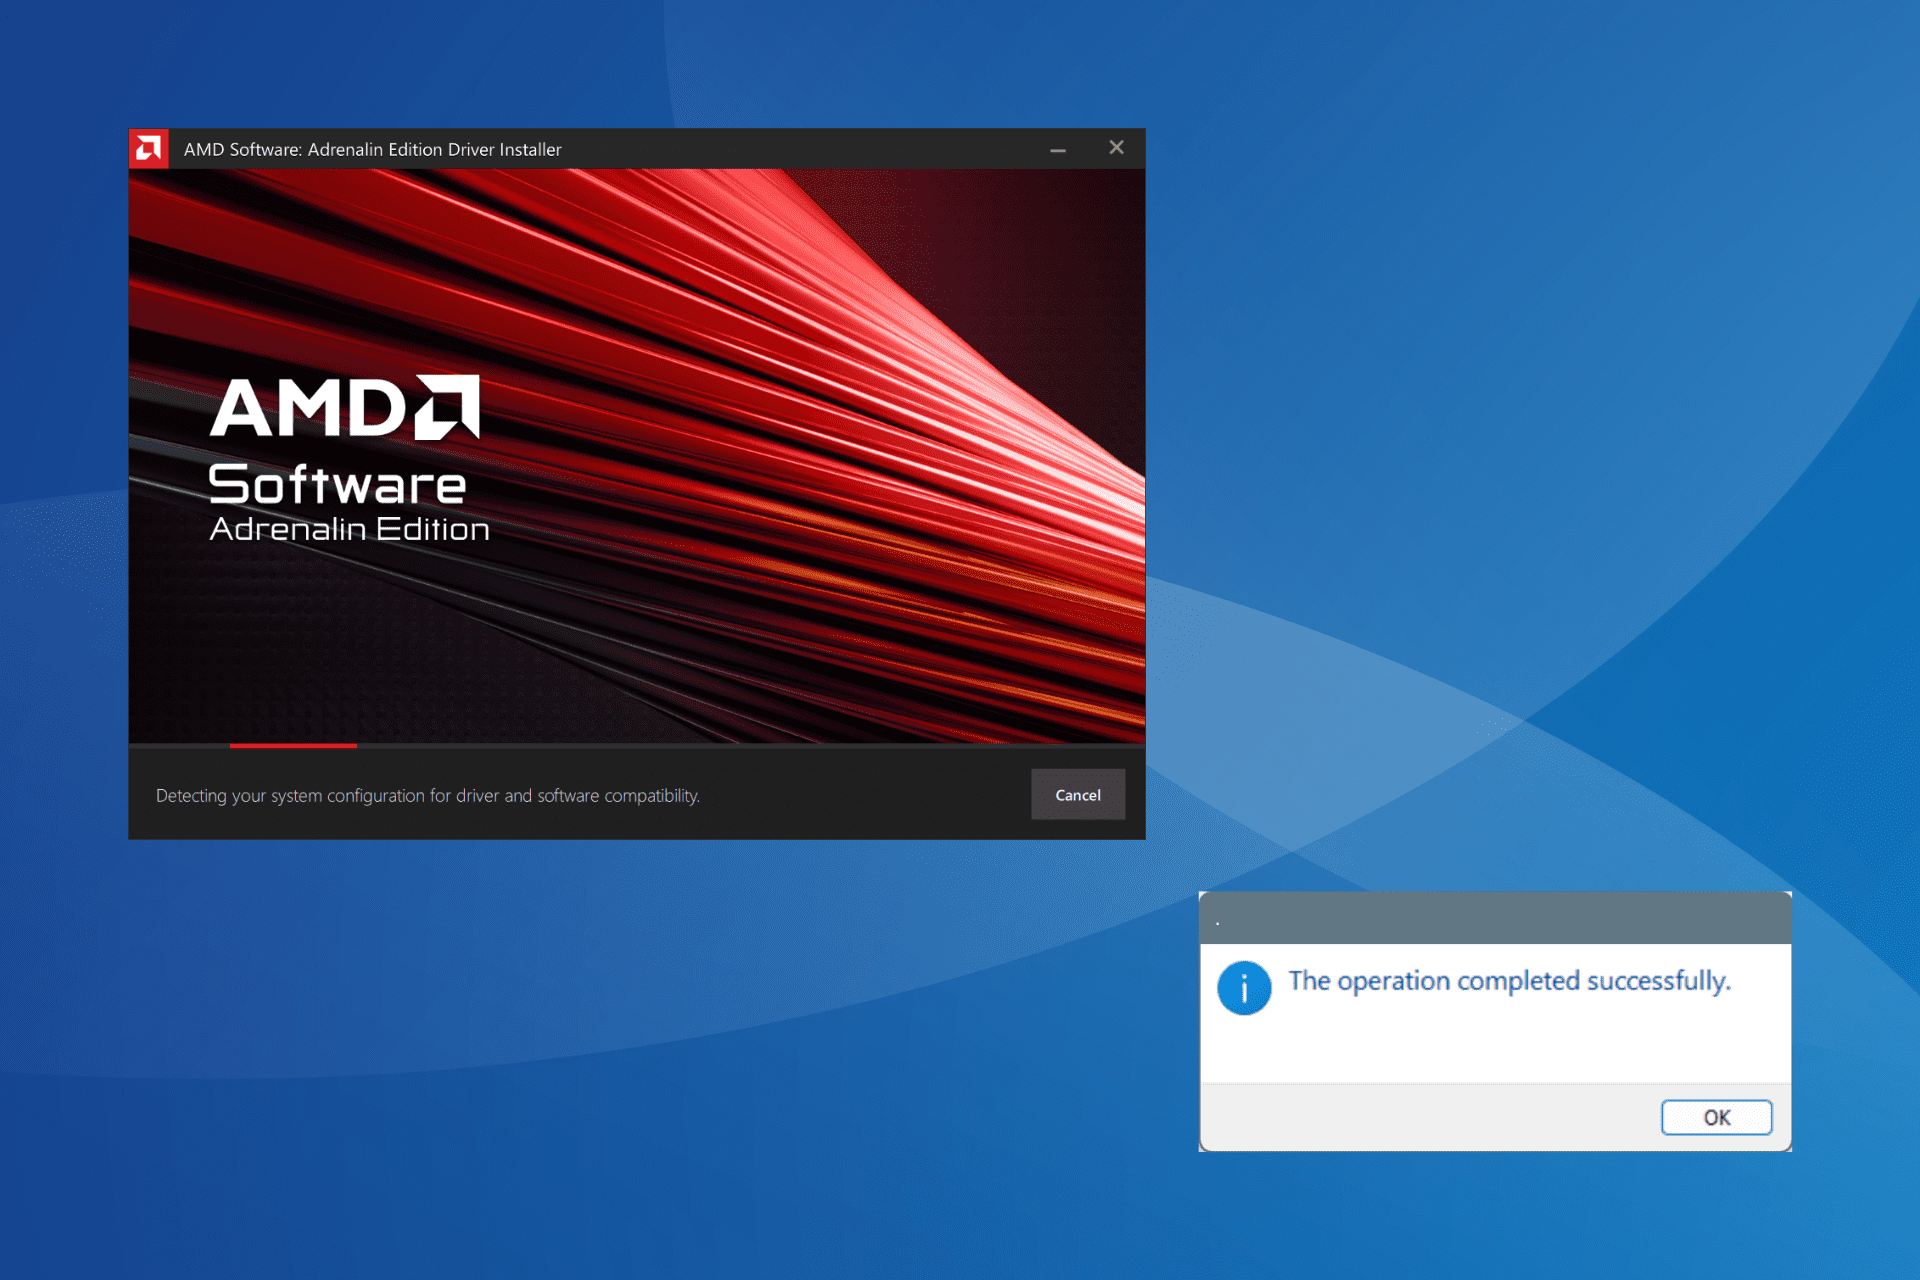
The sound driver installation for Windows 11 on Steam Deck is complete once you get The operation completed successfully message.
Similarly, run the NAU88L21.inf file to install the NAU88L21 audio driver.
As for the APU driver, the installation is rather straightforward since it features an .exe file. Simply run the setup and follow the on-screen instructions to complete the installation.
If you still face audio issues after installing all the Windows 11 sound drivers for Steam Deck, uninstall the drivers, then install them again, and this time for the APU drivers, choose Factory Reset under Additional Options in the setup. This should in all likelihood get things up and running!
Remember, the drivers available right now only work for Steam Deck LCD. As for Steam Deck OLED, Valve has confirmed that it is working on sound/audio drivers for Windows 11. These should soon be rolled out.
If you ever have to update the Windows 11 sound driver for Steam Deck, check Valve’s official website or Optional updates (under Windows Update) for a newer driver version.
Why is there no sound on my Steam Deck window?
Missing OS updates: Make sure you are running the latest version of Windows 11 on Steam Device for the sound drivers to properly work.
Missing drivers: If you haven’t installed all the three Windows 11 audio drivers for Steam Deck, do that and check for improvements.
Improper driver installation: Open the Device Manager, expand Other devices, right-click on any with a warning sign > choose Update driver > pick Browse my computer for drivers > paste the path to driver’s folder in the text field > click Next. If you get an error, try the same with the next device in the list until the driver is installed for one.
Installing Windows 11 sound/audio drivers on Steam Deck
By now, you must have the Steam Deck audio drivers for Windows and there shouldn’t be any issues with the sound output.
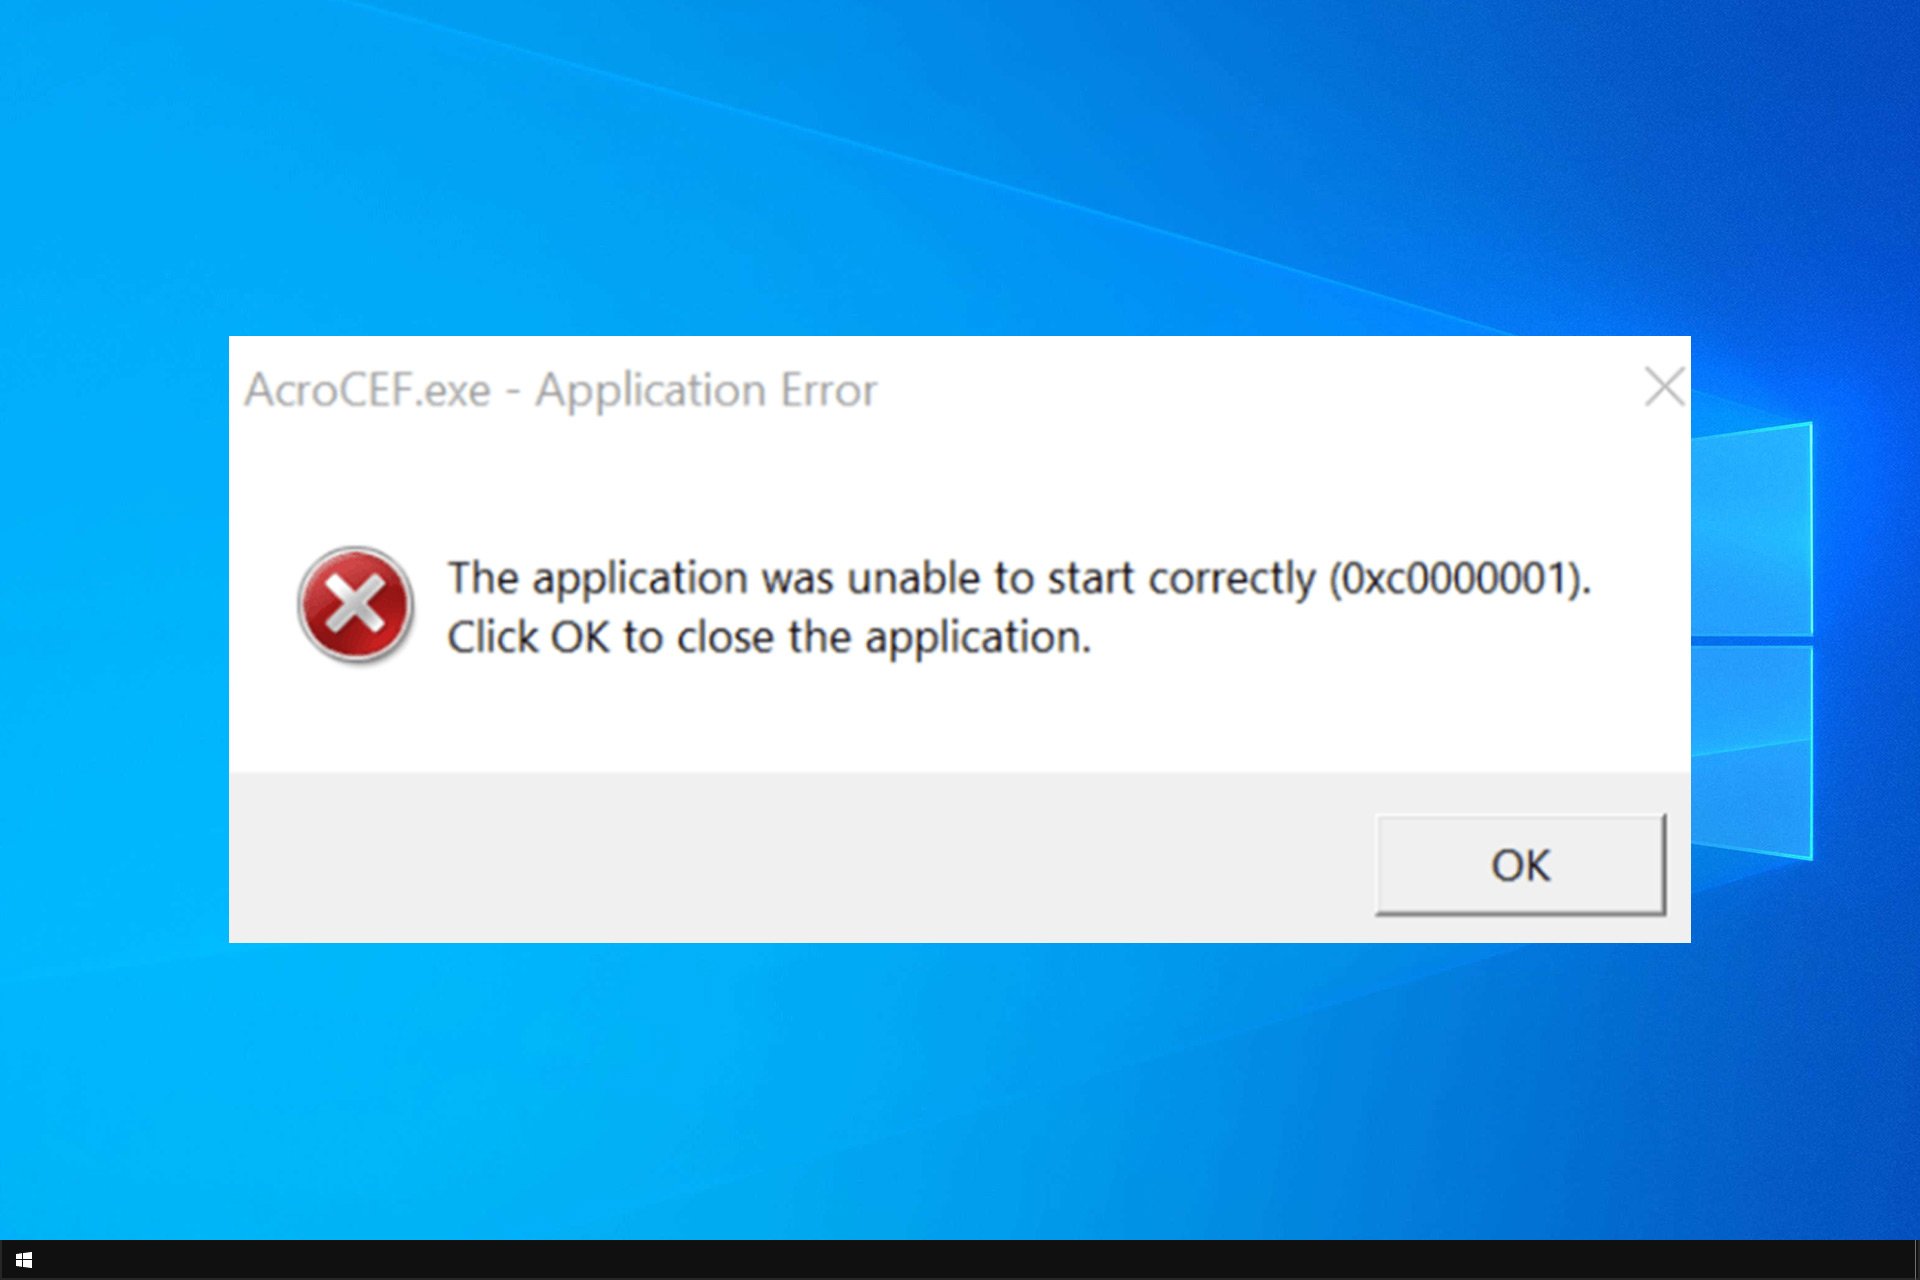
Many reported AcroCEF.exe application error in Windows 10 whenever opening a file. This can be a tedious error, but there are ways to fix it.
What does AcroCEF.exe do?
This executable handles several network integrations, such as Adobe Cloud storage, Fill and Sign, Send for e-signature and more.
How do I fix the AcroCEF.exe application error on Windows 10?
Before we try anything else, make sure you have the latest version of Adobe Reader installed. You can also try restarting the application and closing all AcroCEF/RdrCEF processes in Task Manager.
1. Rename or delete the file
Open File Explorer and navigate to C:\Program Files\Adobe\Acrobat Reader DC\Reader\AcroCEF
In there, locate acrocef.exe and rdrservicesupdater.exe.
Change their file names to acrocefDisabled.exe and rdrservicesupdaterDisabled.exe.
2. Update your drivers
Issues with drivers can sometimes cause AcroCEF.exe application error in Windows 10, so ensure that all your drivers are up to date.
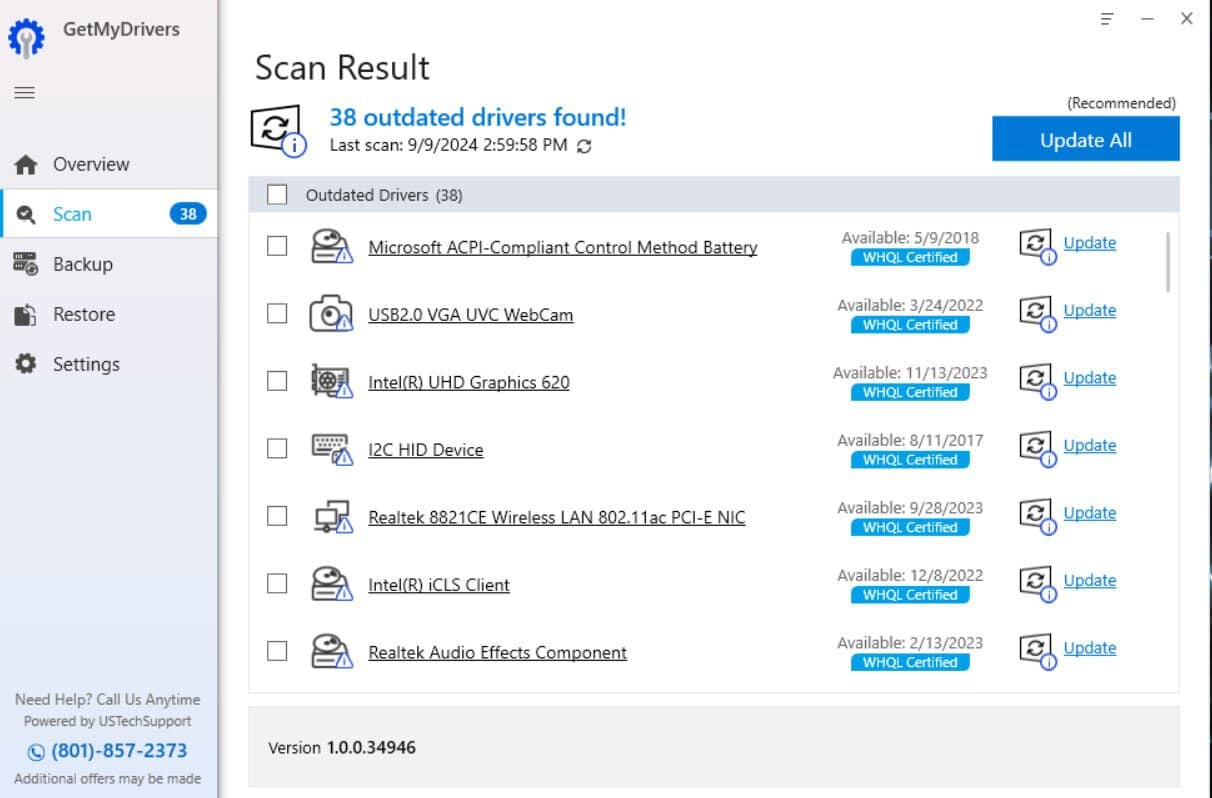
You can do this by manually updating individual drivers, but this can be a tedious process. Instead, why not use software such as GetMyDrivers that can automatically update all your drivers with just a few clicks?
GetMyDrivers
Updating your drivers was never easier, and with GetMyDrivers it just takes a few clicks to do it.
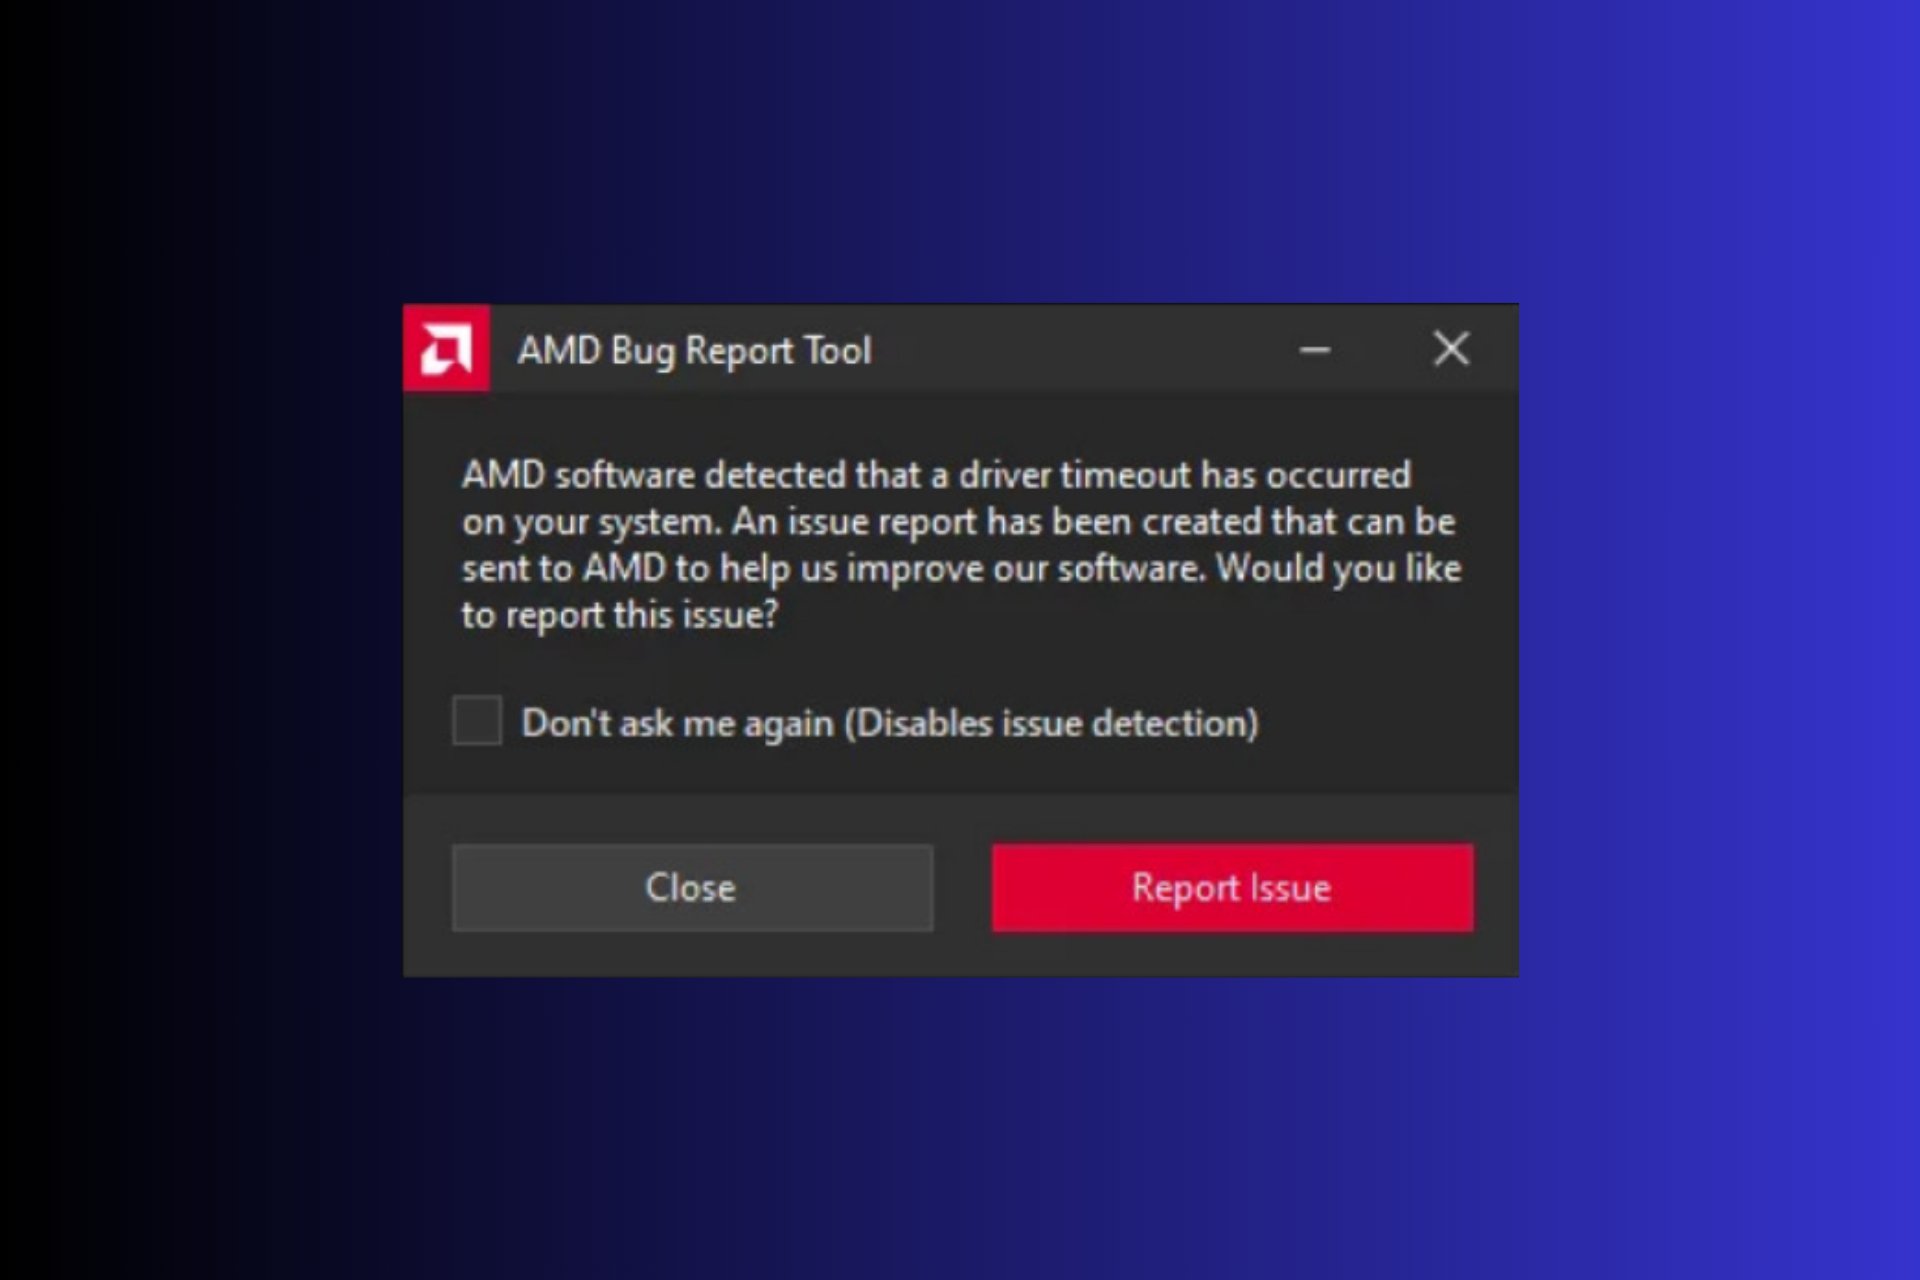
The message of this error states that the AMD software detected that a driver timeout has occurred on your system. Unfortunately, it mostly occurs on the AMD Radeon RX 7900 XTX graphics card which is pretty new and performant. A tested workaround for this problem is to lower FPS in your games or AMD software to 60 FPS or less, but it’s not optimal since this card is a lot more potent.
We must let you know that if none of the solutions below work, you will have to contact the manufacturer because in a lot of cases, there is a hardware issue and you will need to replace the card.
How do I fix the AMD driver timeout error?
1. Clear the Shader Cache
Click on the Start menu, type AMD Software in the search bar, and press Enter.
Click on the Gear icon in the top-right corner of the AMD Software window.
Click on the Graphics tab in the Settings menu.
Scroll down and click on the Advanced button to reveal more settings.
Scroll down until you find the Reset Shader Cache option and click on Perform Reset.
Click OK to confirm your choice.
Clearing the shader cache can solve AMD driver timeout errors by removing potentially corrupted cached files, which improves overall performance and stability.
Click on Download for Free, and install the app on your PC.
After the installation is complete, the tool will start automatically and scan your system to identify any outdated, missing or corrupt drivers.
In just a few seconds, you will have a complete rundown of needed updates. Check for any AMD graphics driver and click on Update to its right.
Restart the PC after the driver is installed and check if the AMD software detects a driver timeout.
This tool is free and has a massive driver library, which makes it the quickest way to fix the AMD driver timeout issue. Moreover, if the new driver is also problematic, you can revert to the old one easily from the Backup tab.
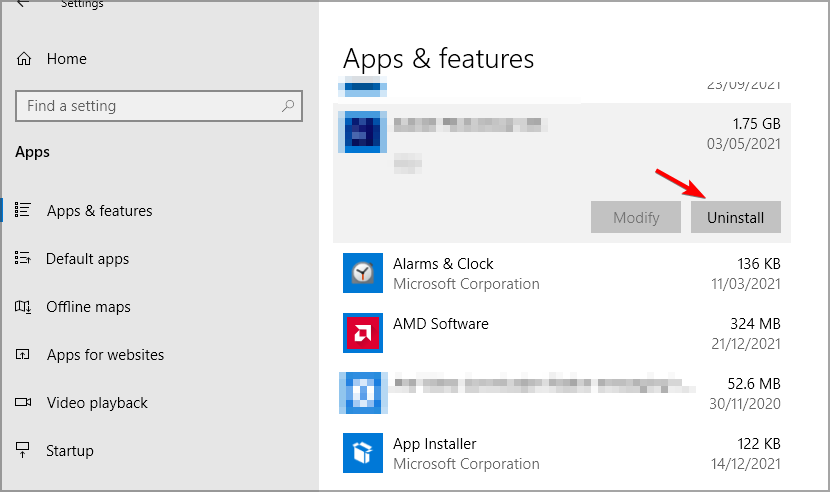
4. Uninstall AMD Adrenaline
Download and run the AMD Cleanup Utility from AMD’s support page. Follow the on-screen instructions to uninstall the AMD Adrenaline software, selecting Safe Mode when prompted.
Once uninstalled, reboot your computer.
Press Win + I to open Settings, navigate to Windows Update, and click Check for updates.
Allow Windows to download and install pending updates, which include the AMD graphics driver.
Letting Windows install a compatible driver ensures that you have a stable and verified version, which can solve many driver-related issues.
5. Install the AMD driver without the Adrenaline software
Use the AMD Cleanup Utility you installed in the previous step to uninstall current drivers.
In the AMD installation wizard, click on Additional Options, select Driver Only from the Install Type dropdown, and click Install.
Installing the driver without the Adrenaline software can help isolate and resolve the driver timeout issue by minimizing potential software conflicts.
6. Disable the Multi-Plane Overlay (MPO)
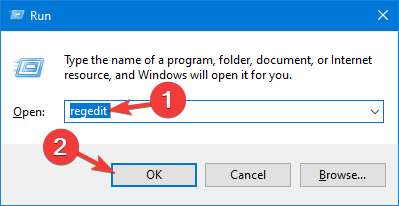
Press Win + R to open the Run dialog box, type regedit and click OK to open the Registry Editor.
In the Registry Editor, navigate to the following key: HKEY_LOCAL_MACHINE\SOFTWARE\Microsoft\Windows\Dwm
Right-click on the Dwm key, select New > DWORD (32-bit) Value, and name it OverlayTestMode.
Right-click on OverlayTestMode, select Modify, type 5 in the Value data field, and click OK.
Disabling MPO can reduce conflicts with the AMD drivers, which may be causing the timeout error.
7. Disable Hardware Acceleration in browsers
For Google Chrome:
Click on the Three-dots menu in the top-right corner and select Settings.
In the left pane, click on the System tab.
Toggle off the Use hardware acceleration when available option.
Close and reopen Chrome.
For Microsoft Edge:
Click on the three-dots menu and select Settings.
Open the System and performance tab.
Toggle off the Use hardware when available option.
Close and reopen Edge.
The AMD driver timeout error also appeared when running graphics intensive web apps in browsers. Disabling hardware acceleration can reduce the load on the GPU and fix the problem.
8. Change Power Plan to Best Performance
Press Win + R, type control panel, and press Enter.
Click on System and Security, then on Power Options.
Click Create a power plan in the left pane.
Choose High performance, name the plan, and click Next.
Adjust sleep and display settings if necessary, then click Create.
Setting your power plan to Best Performance ensures that your GPU is receiving adequate power, which can help prevent driver timeouts.
9. Disable Fast Startup
Press the Win key, type cmd and select Run as administrator from the search results.
Type or paste this command and press Enter to run it: powercfg -h off
Restart your computer to apply the changes.
Disabling Fast Startup can eliminate potential startup conflicts that cause driver timeouts.
10. Check for overheating and overclocking Issues
Use software like HWMonitor to keep an eye on your system’s temperature.
Ensure all fans are free of dust and are operating correctly.
Reapply thermal paste if necessary.
If you have overclocked your GPU or CPU, revert to default settings.
Addressing overheating and overclocking issues can improve system stability and prevent driver timeouts.
11. Disable AMD Issue Detection
Open the AMD Software Adrenaline Edition app.
Click the Gear Icon to go to Settings.
Click on the System tab, then scroll down to Issue Detection and toggle the switch to Disabled.
Disabling AMD Issue Detection can stop unnecessary error alerts without affecting performance, providing a temporary fix for the timeout error.
12. Use underclocking
Launch the AMD Software and click on the Performance tab.
Under Tuning, enable GPU Tuning.
Reduce the MaxFrequency (%) to about 95% of the default value.
Click Apply to save your settings.
Underclocking the GPU can stabilize its performance, potentially resolving driver timeout issues. Lowering down the graphics settings also fixes the AMD driver timeout problem although we totally understand that you bought the card to have the desired outcome when playing games.
We reiterate that if none of these solutions work, you should contact the manufacturer on their support page and find a way to replace the card on your PC.
However, we hope that the solutions above helped you fix the AMD timeout issue and now you’re enjoying your games without restrains. You might also get additional information from our guide on how to deal with AMD driver crashes on Windows.
Windows Hello is a Windows 10 and 11 feature that allows you to sign in to your device using facial recognition, fingerprint scanning, or a PIN. Chrome can also use Windows Hello for authentication purposes on compatible websites.
Previously, there was a problem with Windows Hello authentication in Chrome on Windows 11. When Chrome used the new Windows Hello API for authentication, the resulting sign-in dialog wouldn’t appear correctly. It would be visible “behind” the Chrome window instead of integrated into it.
This misplaced sign-in dialog was confusing and frustrating for users. It could also pose a potential security risk, as a malicious program could create a fake sign-in window behind Chrome that might trick you into entering your information.
Google is now addressing that issue to make sure the Windows Hello sign-in dialog is integrated into the Chrome window.
“On Windows11 use IUserConsentVerifierInterop to pass window explicitly
This CL changes the authentication api on Windows11. From now on the api will receive explicitly window to which it should attach the OSdialog.” the commit spotted by us reveals.
Chrome now explicitly specifies the window it wants the sign-in dialog attached to when using the Windows Hello API on Windows 11. This ensures a smoother authentication experience where the Windows Hello dialog appears seamlessly within the Chrome window itself.
“OS authentication will use IUserConsentVerifierInterop api if available” is the relevant flag for that in Chrome, available in Canary.
Image credit: Windows Report
This flag, when enabled, will make Chrome use the new IUserConsentVerifierInterop with explicit window attachment on Windows 11 with Windows Hello configured. Otherwise, Chrome will use the regular authentication method.
This change makes authentication with Windows Hello on Chrome for Windows 11 more user-friendly and intuitive.
If you wish to remove the underlining from a link in Microsoft Outlook, use the formatting toolbar or change the Styles and Formatting pane. However, there are other methods; let’s discuss them all in detail.
How can I remove the underline on the link in Outlook?
1. Using the formatting toolbar
Press the Windows key, type outlook, then click Outlook from the list.
Click the New Email button to create a new email.
If you have inserted a hyperlink with an underline that you want to remove, select the linked text.
Locate the Underline icon in the formatting toolbar and click on it.
2. Using the Styles and Formatting pane
Press the Windows key, type outlook, then click Outlook from the list.
Click the New Email button to create a new email.
Type or insert the hyperlink as usual. Now click on the Format Text tab.
Locate the Change Styles, then click the arrow to get a list of styles.
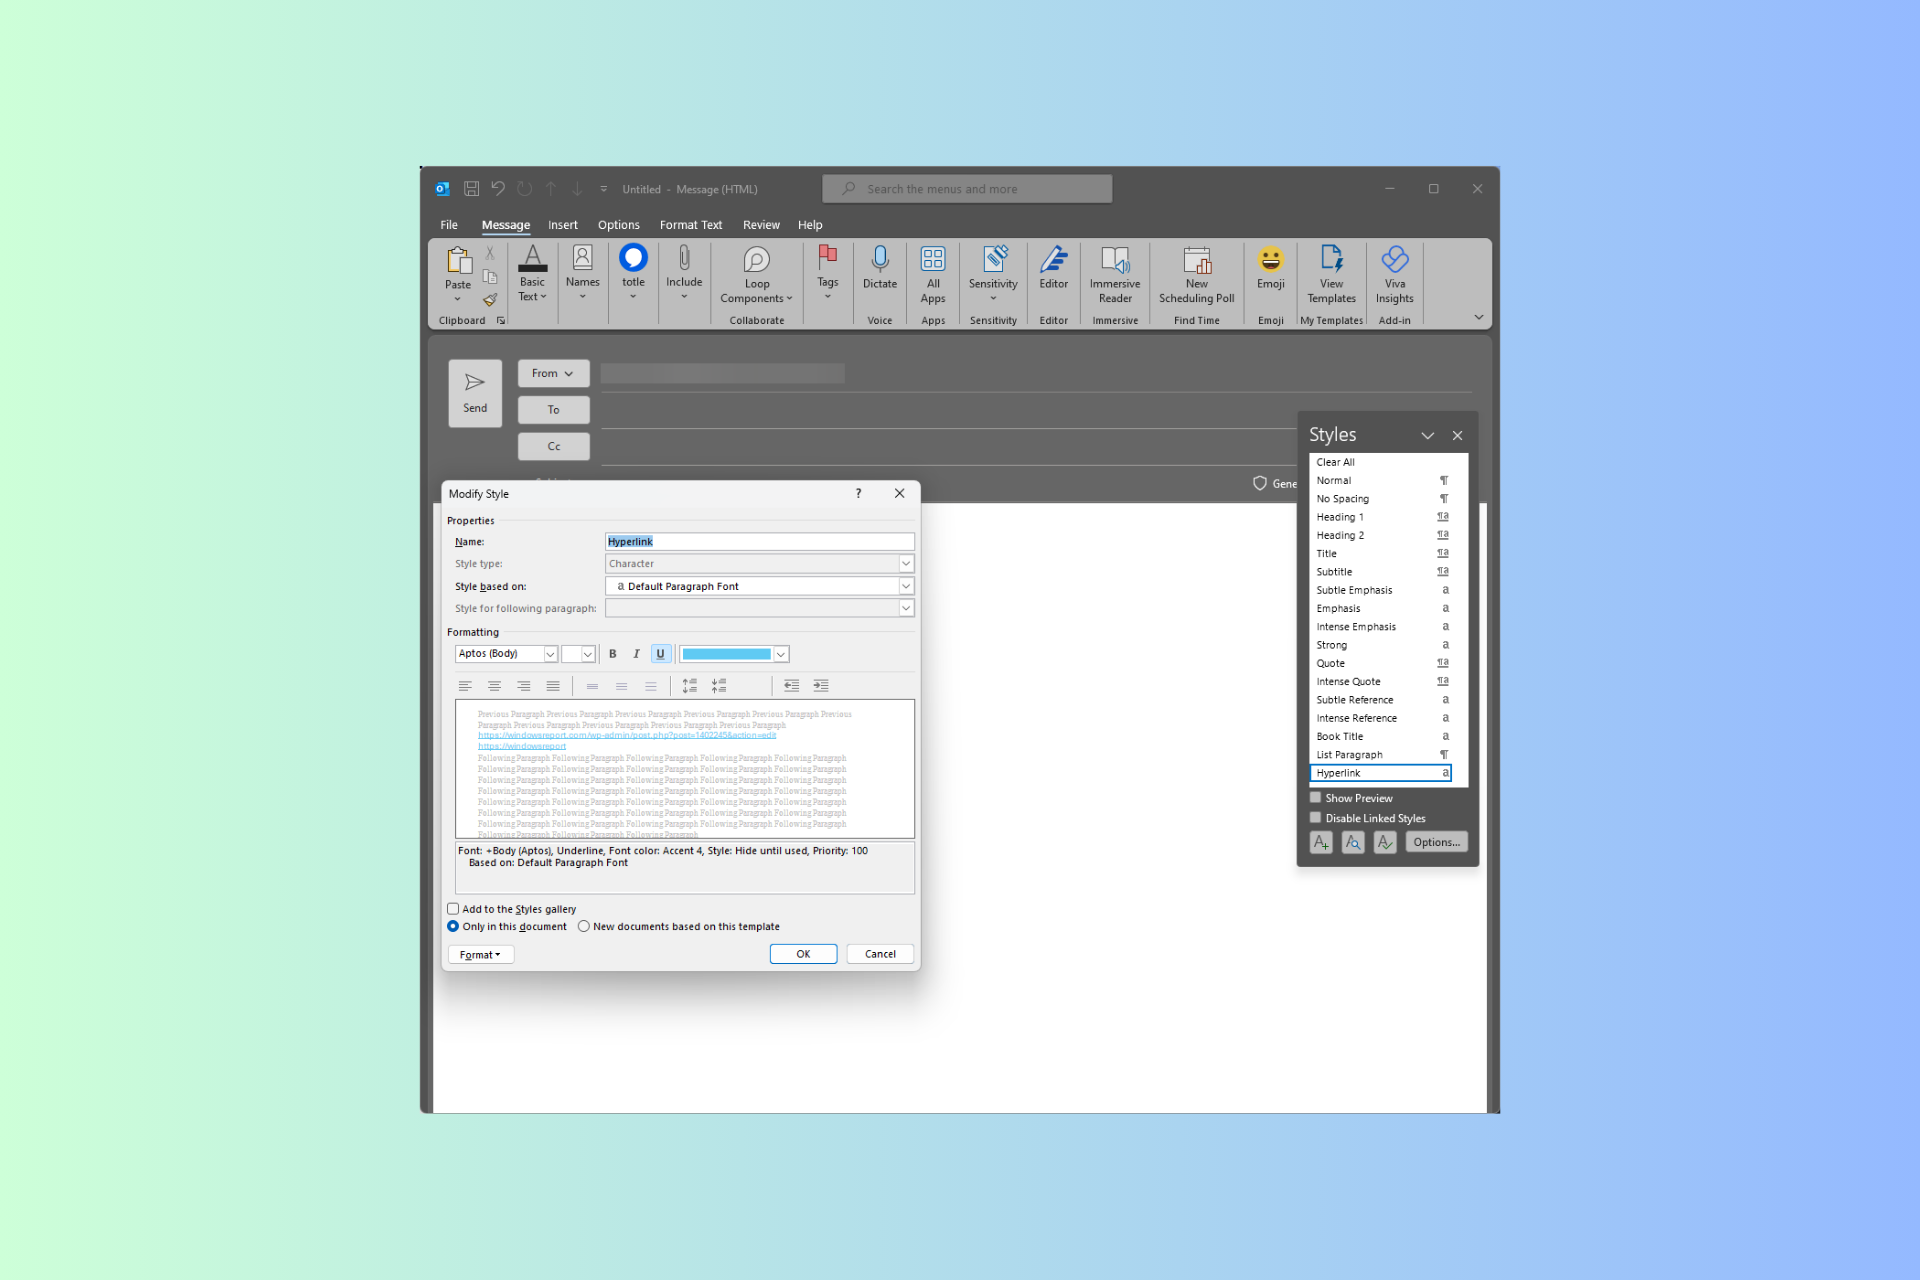
Now locate and right-click Hyperlink, and select Modify.
From the Modify Style dialog box, under Formatting, click the Underline button.
If you want the same setting for all the new emails, select the New documents based on this template option.
Press the Windows key, type outlook, then click Outlook from the list.
Click the New Email button to create a new email.
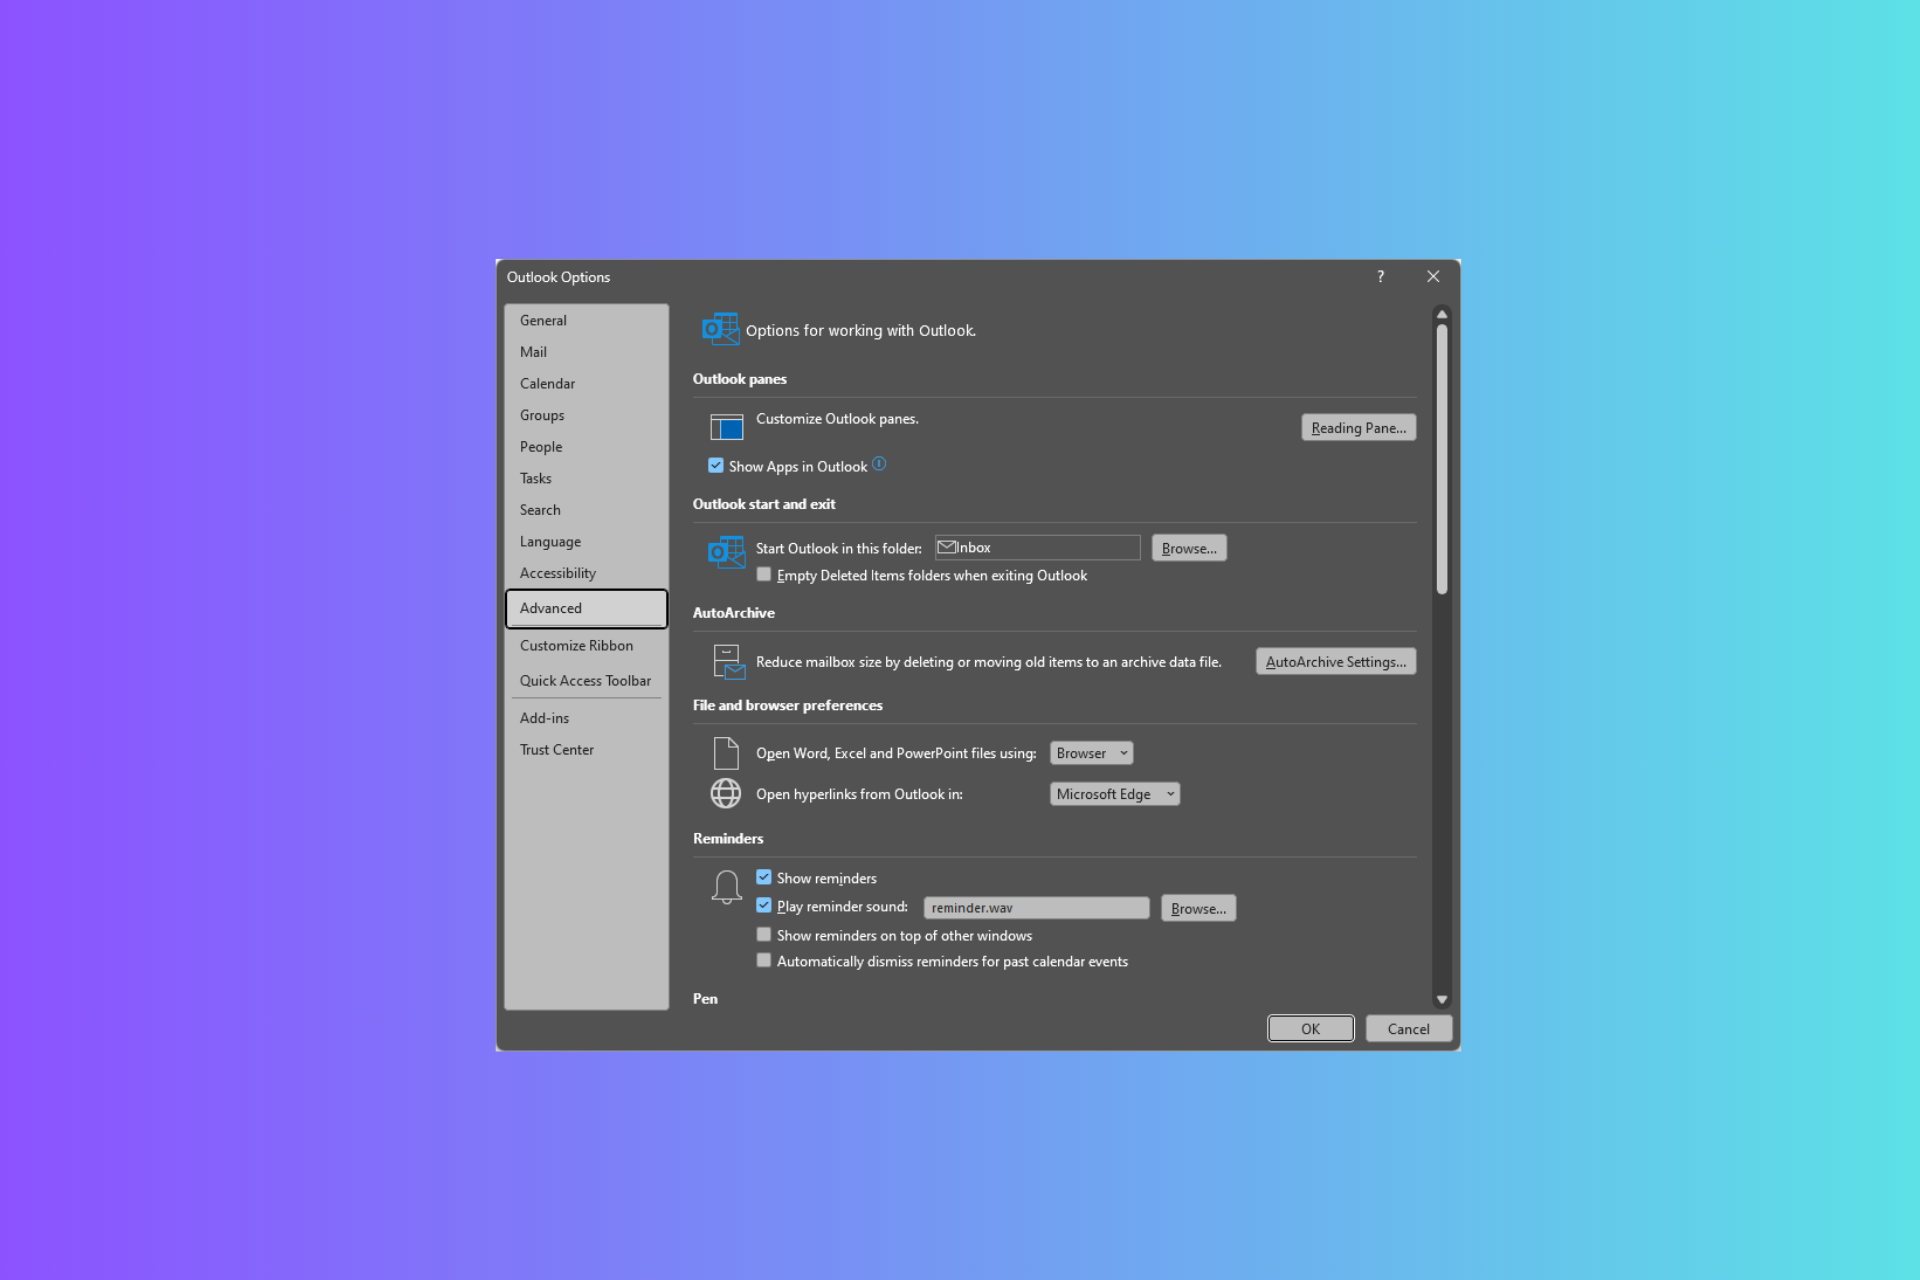
Go to File.
Now select Options.
Click Mail, then select the Stationery and Fonts button. If you are using an older version, go to Tools>Options>Mail Format>Stationery and Fonts.
Click the Font button under New mail messages or Replying or forwarding messages, whichever is getting affected.
On the next dialog box, locate the Underline style, and select None from the drop-down menu.
Click OK to save the changes.
4. Modify the HTML code (Advanced users)
NOTE
You need to have a third-party add-in to view or edit the HTML code of emails.
Press the Windows key, type outlook, then click Outlook from the list.
Click the New Email button to create a new email.
In the email composition window, go to Message, click the third-party add-in, and select View>View HTML Source. If you can’t find HTML, look for Source or similar options.
Locate the <a> tag in the HTML code related to the hyperlink for which you want to remove the underline. It would look like this: html <a href="https://example.com">Click here</a>
Now delete or change the style attribute within the <a> Tag to remove the underline. Let’s say: style="text-decoration: underline;" attribute.
To delete or modify it, use this: html <a href="https://example.com" style="text-decoration: none;">Click here</a>
You can delete the style attribute if you want to obliterate it.
Once you have made the changes to the HTML code, go to File, then click Save or Close to save the changes.
If nothing has helped you so far and you are still experiencing issues related to underlining in your email signature, you should contact Microsoft Support. Provide them with the specific problem and details about the steps taken for further assistance.
In case you encounter issues like Something went wrong on Outlook and can’t sign in due to third-party conflicts or corrupted browser cache, we have a separate guide for you.
Which method worked for you to remove the underlining from a link in Outlook? Share your thoughts in the comments section below.
If your Outlook Autoarchive Settings are greyed out, it could be due to permission issues or the feature being unavailable on your Windows edition.
The first step is to check if your mailbox is an Exchange on-premise one or Exchange online, then check if you have logged in with an account with administrator privileges.
How can I fix the Outlook AutoArchive Settings greyed out?
1. Ensure AutoArchive is enabled globally
Press the Windows key, type outlook, then click Outlook from the list.
Go to the File tab and click Options.
Click Advanced, then locate AutoArchive Settings.
Locate Run AutoArchive every 14 days is selected. If not, proceed with the next step.
2. Check Group Policy Settings (for Office 365 or Exchange accounts)
Press Windows + R to open the Run window.
Type gpedit.msc and click OK to open the Group Policy Editor.
Navigate to this path: User ConfigurationAdministrative TemplatesOffice 2016 Microsoft Outlook 2016Outlook OptionsOtherAutoArchive
Double-click the AutoArchive policy to open its Properties.
Now check if the policy is set to Disabled or Enabled. If it is Enabled, the AutoArchive settings in Outlook will be greyed out.
So select Disabled, then click OK to access these settings. However, if you want to disable the entire policy, select Not Configured.
3. Check if the mailbox is connected to an Exchange server
Press the Windows key, type outlook, then click Outlook from the list.
Go to the File tab.
Click Account Settings, then select Account Settings from the drop-down menu.
You will see a list of email accounts configured in Outlook in the Account Settings dialog box.
Go to the Email tab. Under Type, you will see the type of account. Your mailbox is connected to an Exchange Server if it says Exchange or Microsoft Exchange.
Click Change to check the Exchange Server to which your mailbox is connected. Once verified, click Close or Cancel to exit the settings.
4. Repair the Microsoft Office
Press Windows + I to open the Settings app.
Go to Apps, then select Installed apps.
Locate the Microsoft Office app, click the three-dot icon, and choose Modify.
Click Yes on the UAC prompt.
Select Quick Repair, then click the Repair button.
5. Update/Reinstall your Outlook app
Press the Windows key, type outlook, then click Outlook from the list.
Go to the File tab.
Next, click Office Account.
Click Update Options, then select Update Now.
If there is no update available, you need to reinstall it. For that, follow these steps:
Press Windows + I to open the Settings app.
Go to Apps, then select Installed apps.
Locate the Microsoft Office app or Outlook (if you’re using the new one), click the three-dot icon, and choose Uninstall.
Select Account Settings, then click Change Profile.
You will be notified that Outlook will restart; click OK to proceed.
Click New.
Type in the new Outlook profile name and click OK.
Once the profile is created, enter the email account to the profile and click Connect.
7. Add a Registry entry
Press Windows + R to open the Run window.
Type regedit and click OK to open the Registry Editor.
Navigate to this path: Computer HKEY_CURRENT_USERSoftwareMicrosoftOffice16.0OutlookPreferences
Right-click Preferences, then select New>DWORD 32-bit Value.
Name it disablemanualarchive.
Double-click the DWORD, set the Value data to 1, and then click OK to save the changes.
Restart your computer.
Remember that AutoArchive Settings used to be enabled with Outlook 2003 and 2007; however, the feature is turned off by default in Outlook 2010 and newer versions.
Another thing to note is that if you have the AutoArchive feature enabled in Outlook 2003 or 2007 and upgrade to Outlook 2010 or later versions, it remains enabled.
If nothing works for you, you can contact Microsoft support and describe the issue and the steps taken to fix it for further assistance.
Did we miss a step that helped you fix the Outlook AutoArchive settings that were greyed out? Share it with our readers in the comments section below, and we will add it to the list.
Qualcomm has been working for quite some time to make the fastest processor series, Snapdragon X, AI-ready.
In the same direction, the company has also launched the Snapdragon X Elite Dev Kit for Windows, a powerful mini PC-looking development solution designed to simplify next-gen AI application development for Windows on Snapdragon. Let’s learn more about it!
What is the use of the Snapdragon X Elite Dev Kit?
The Snapdragon Dev kit for Windows comes with one of the fastest processors created for Windows. Developers can use this kit to scale the development process with easy access to the Arm64 toolchain, thereby letting you optimize for application performance.
In the official documentation, Qualcomm mentioned:
With the world’s fastest NPU for laptops, your teams can unlock AI and accelerate AI/ML workloads, enhancing your solution. Seamlessly integrate generative AI by running LLM and LVM locally without compromising performance or relying heavily on cloud resources.
This device has multiple ports and can easily be configurable for on-site and dev-test labs. It allows you to rack and stack various devices and supports connecting up to 3 UHD monitors, increasing efficiency in coding tasks.
What are the features of the Snapdragon X Elite Dev Kit?
It allows you to build, debug, test, and port native apps for Windows on Snapdragon.
You can optimize your apps for CPU, GPU, and NPU to enhance application performance and power efficiency.
It lets you access the native Arm64 toolchain, including Visual Studio/ VS Code, runtimes, libraries, and frameworks, providing a fast, familiar, and highly productive developer experience.
You can accelerate AI/ML workloads on the 45 TOPS NPU, which can help improve app performance and user experiences.
It uses on-device AI to run neural networks locally, which frees up cloud resources.
You can build generative AI experiences by running LLMs and LVMs locally.
It allows you to use Qualcomm AI Hub for 100+ pre-trained and optimized AI models for Snapdragon for faster execution.
Developers can use the Qualcomm AI Stack to deploy AI models quickly, leveraging its support for AI community resources, frameworks, runtimes, developer libraries, and system software.
What are the benefits of the Snapdragon X Elite Dev Kit?
Efficient development environment
The Snapdragon Dev Kit for Windows helps you seamlessly build, test, and port native apps for Windows on Snapdragon processors. You can use the native Windows on Snapdragon toolchain, including Visual Studio/VS Code. It also supports various runtimes, libraries, and frameworks, simplifying the development workflow.
Unleashing AI capabilities
You can use the power of the fastest NPU for laptops to improve apps and on-device capabilities. This means you can accelerate AI/ML workloads and use the local execution of models supported by Qualcomm AI Stack and AI Hub to deploy pre-trained AI models on Snapdragon efficiently.
High-performance hardware
The dev kit provides superior performance in a compact device specially customized for developer environments. It has robust connectivity options and is compatible with multi-monitor setups, ensuring you have the tools to create and test apps efficiently.
What are the specifications of the Snapdragon X Elite Dev Kit for Windows?
Specifications
Details
Processor
Snapdragon X Elite (X1E-00-1DE)
CPU
Qualcomm Oryon CPU 12 cores, up to 3.8 GHz Total cache: 42 MB Dual Core Boost up to 4.3 GH
GPU
Qualcomm Adreno GPU Up to 4.6 TFLOPS
NPU
Qualcomm Hexagon NPU Up to 45 TOPS
Size
8” x 7” x 1.3” (199 mm x 175 mm x 35 mm)
Memory
32 GB LPDDR5x RAM
Storage
512 GB Fast NVMe Storage
Software
Windows 11
Security
fTPM
Weight
970g
What’s in the Box
Snapdragon Dev Kit for Windows 180W AC Adapter Power Cable User Guide
Connections
3x USB 4 Type-C 2x USB 3.2 Type-A 1x RJ45 Ethernet 1x 3.5 mm audio jack 1x HDMI
Wireless
Qualcomm® FastConnect™ 7800 Mobile Connectivity System Wi-Fi 7 Bluetooth 5.4
Exterior
Materials: Shell made with 20% recycled ocean plastic Color: Black Physical buttons: Power button
Warranty
1-year limited hardware warranty
How can I get the Snapdragon X Elite Dev Kit?
To get the Snapdragon X Elite Dev Kit, sign up for the waitlist on Qualcomm’s Support page. You must mention your first name, last name, email address, company name, country, and the number of kits you need to submit the request. The dev kit will be available in the coming weeks.
What are your views on the Snapdragon X Elite Dev Kit? Share them with our readers in the comments section below.
You can use the Chris Titus debloat tool on Windows 11 to ditch unnecessary services, visual elements, and Windows Update features. That way, you can speed up your PC for gaming or any other high-performance tasks.
Windows 11 is an extremely bloated operating system compared to Windows XP or Windows 7. Therefore, it automatically consumes about 5% of the CPU, 20% of the Memory, 5% of the GPU, and 10% of the Network even when you don’t run any Microsoft UWP or third-party desktop apps.
To stop it from unnecessarily eating up system resources, read this guide until the end. I’ve tried and tested the Winutil app from Chris Titus Tech for over a week. Here’s what I discovered!
What Is the Chris Titus Debloat Tool?
Chris Titus offers a debloat method to remove unwanted pre-installed apps and settings from your Windows 11 system. Think of it like cleaning out your digital drawers! These apps, often called “bloatware,” can take up space and run in the background, potentially slowing down your PC.
You can customize your Windows 11 experience to focus on the programs you actually use by following Chris Titus’s recommendations. The tool can make your PC run faster.
However, debloating can be risky if you’re not careful. So, only do it if you’re comfortable navigating critical Windows settings and understand what different built-in Microsoft services do.
The main tool behind the Windows 11 debloat technique is the Winutil software. Its source code is available on GitHub for free download, re-packaging, personal use, and more.
If you wish to use the debloater for free, you must use the Windows PowerShell terminal software to add it to your PC’s UI shell. I’ll demonstrate the process later in this article.
Don’t want to run any PowerShell script? You can buy the premium Winutil or Windows Toolbox installer package from the Downloads section of the Chris Titus Tech website. When I reviewed the app, it was priced at $10 per download.
Tips to Run the Chris Titus Debloat Windows 11 Tool
Before you begin to run the actual tool and tweak your PC, check out these expert tips for the best results with the Winutil tool:
If you’ve just installed a fresh copy of Windows 11, apply the tweaks just before creating the first administrator user account.
You should also use the tool after applying a major features update.
Backup all data from Desktop and Downloads folders to avoid unexpected deletion of important files.
Connect the device to a trusted power source, use UPS if it’s a desktop PC.
Use a broadband Ethernet or Wi-Fi network of moderate bandwidth for communication between the tool’s repository and PC.
How To Use Chris Titus To Debloat Windows 11
Here’s how to apply the Windows 11 debloating features of Winutil.
Getting and Opening the GUI on Your PC
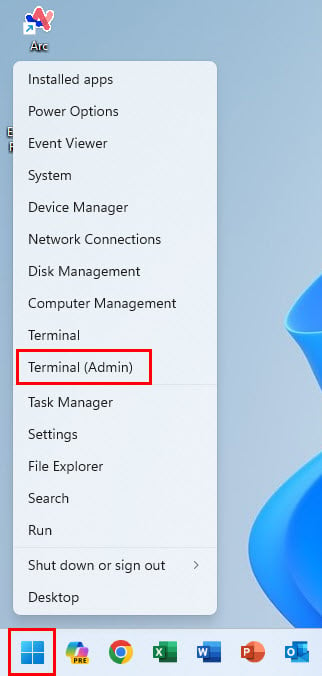
Right-click on the Start Menu to open the Power User context menu.
There, click on the Terminal (Admin) option to launch PowerShell.
Now, copy and paste the following command inside the Terminal and hit Enter:
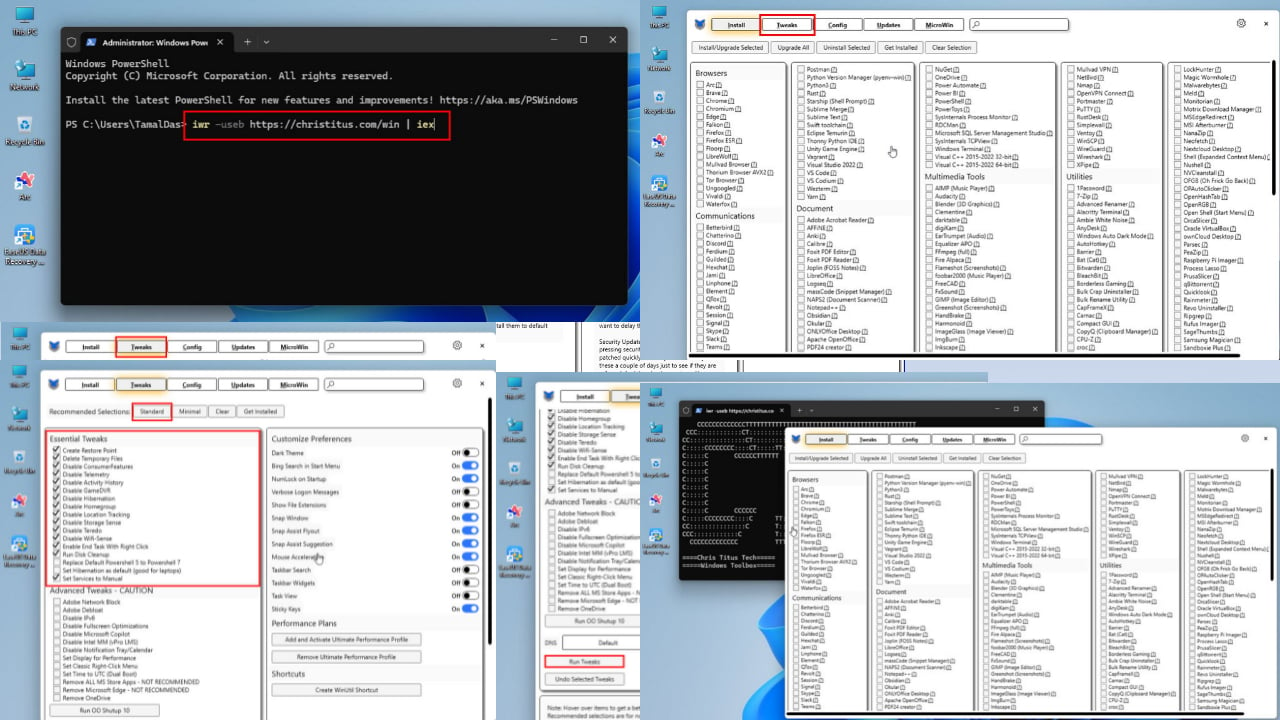
iwr -useb https://christitus.com/win | iex
Winutil will open in a new PowerShell UI.
Performing System Tweaks
On the Winutil or Windows Toolbox UI, the default selection will be the Install tab.
Navigate to Tweaks.
There, you can choose any of the following debloating options:
Standard
Minimal
Clear.
As you pick an option from the above, the user interface will automatically checkmark appropriate customizations.
You can personally modify some selections if you know how those changes will impact the debloating.
Scroll down and hit the Run Tweaks button.
Wait some time as the tool runs some codes.
Reboot the PC once all the codes have run.
Getting Rid of Microsoft Edge
If you don’t want Edge, try these steps on Winutil:
Open the Winutil tool and go to the Advanced Tweaks section in the Tweaks tab.
Mark the checkbox for Microsoft Remove Edge.
Hit the Run Tweaks button.
Performing Windows Update Tweaks
Go to the Updates tab after launching the Winutil tool.
There, you should find the following three options for Windows Update optimization to debloat Windows 11:
Default settings
Security settings
Disable All Updates.
If you wish to reduce the frequency of Windows Update without compromising security updates, choose the second option.
Click OK on the Set Security Updates button.
Restart the PC.
How To Reverse These Changes
If you wish to go back to the original Windows 11 settings, perform these steps:
Launch the Winutil tool and navigate to the Tweaks tab.
Scroll down until you find the Undo Selected Tweaks button.
Click on that.
Reboot your PC once the tool executes the necessary scripts.
Summary
So, now you know how to apply the Chris Titus Debloat Windows 11 method to enhance PC performance. You should try it out right now if you fulfill any of the following conditions:
You exclusively use your Win 11 PC for high-end gaming.
The default Microsoft Edge browser is buggy when you view online PDFs or click on any redirect links on Word, Excel, etc.
You’ve upgraded a dated PC to Windows 11 and you’re facing an extremely slow performance.
You don’t want to receive frequent Windows Updates due to internet data restrictions.
Additionally, you can apply the same steps on a Windows 10 PC.
Did this article help you speed up your device? Share your thoughts in the comment box.
Chrome’s experimental version, Canary, recently started showing a prompt in Google Password Manager. It encourages users to “Protect passwords with a screen lock” if they share their device with others. This suggests Google is introducing a feature that uses your device’s screen lock for added security when using Chrome Password Manager. The feature and message are currently being tested for Chrome on Windows and Mac.
Previously, accessing your saved passwords in Chrome might not have required any additional verification beyond your Windows login. This new promo card marks the initial testing for a feature that will eventually require an extra layer of security – biometric verification through your device’s screen lock system.
Chrome Password Manager prompts users to enable screen lock verification for added security
“Protect passwords with your screen lock If you share this device with others, you can use your screen lock to verify it’s you whenever you use a saved password”.
Image credit: Windows Report
A code commit spotted by us, Windows Report, reveals more about the new feature. It introduces authentication logic when a user interacts with the screen lock promo card in settings. If the authentication is successful (likely involving your fingerprint reader, facial recognition, or PIN), a preference for biometric re-authentication is turned on. Additionally, a confirmation message will be displayed.
“Add authentication logic to screenlock promo in pwm settings .This CL introduces an authentication logic when user interacts with the screenlock promo card in settings. After the successful authentication the pref responsible for biometric reauth is turned on. Additionally this CL introduces a new confirmation toast that is displayed after the successful authentication.”
If everything works as expected, after typing your Windows password, this likely enables the “Use Windows Hello when filling Passwords” toggle. This means Chrome will remember your preference and prompt for biometric verification through your screen lock whenever you try to access or use your saved passwords.
If the authentication is successful, Chrome will likely remember this preference and prompt for biometric verification through your screen lock whenever you try to access or use your saved passwords.
This improves the security of your saved passwords in Chrome. By requiring biometric verification through your screen lock, it ensures that only authorized users can access your sensitive login information, even if they have access to your unlocked device. This is particularly beneficial if you share your computer with others.
Microsoft has just rolled out some hefty firmware updates for Surface Laptop 7 and Pro 11, and it’s not just any ordinary update. We’re discussing fixes that tackle display issues, audio hiccups, and other tweaks to make your experience smoother. Imagine turning on your device without squinting at distorted colors or jumping at unexpected audio jitters. Sounds good, right?
First, if you’ve been annoyed by the color distortion when your device wakes up or reboots with HDR, this update covers you. And for those who’ve noticed a pesky horizontal white line flickering during setup, guess what? That’s been addressed, too. Microsoft is trying to make our screens as perfect as a clear sky.
Accessibility settings resetting on a reboot? Not anymore. And you can breathe a sigh of relief for anyone who’s faced the frustration of audio playback failing after connecting a Bluetooth headset. Plus, if your system’s been under a heavy load and the audio starts acting up, this update will smooth out those jitters.
Now, let’s talk about compatibility. This update is specifically for the Surface Laptop 7 and Pro 11 running on those nifty Qualcomm Snapdragon chips, with Windows 11 version 24H2 or newer. Getting this update is a breeze. Head over to Settings > Windows Update, and you’re all set. There’s no need for manual installation packages, especially since we’re dealing with ARM-powered Surface devices here.
Before you dive into the update, it’s smart to back up your important data. You know, just in case. But don’t worry too much. If things go sideways, Microsoft has those official Surface recovery images ready to get you back on track.
The Surface Laptop 7 and Pro 11 start at a cool $999 for their base configurations, and they’re not going anywhere anytime soon. With a six-year lifecycle, these devices are set to receive support and firmware updates until at least June 18, 2030. So, if you’ve been on the fence about getting one, this kind of long-term support might tip the scales.
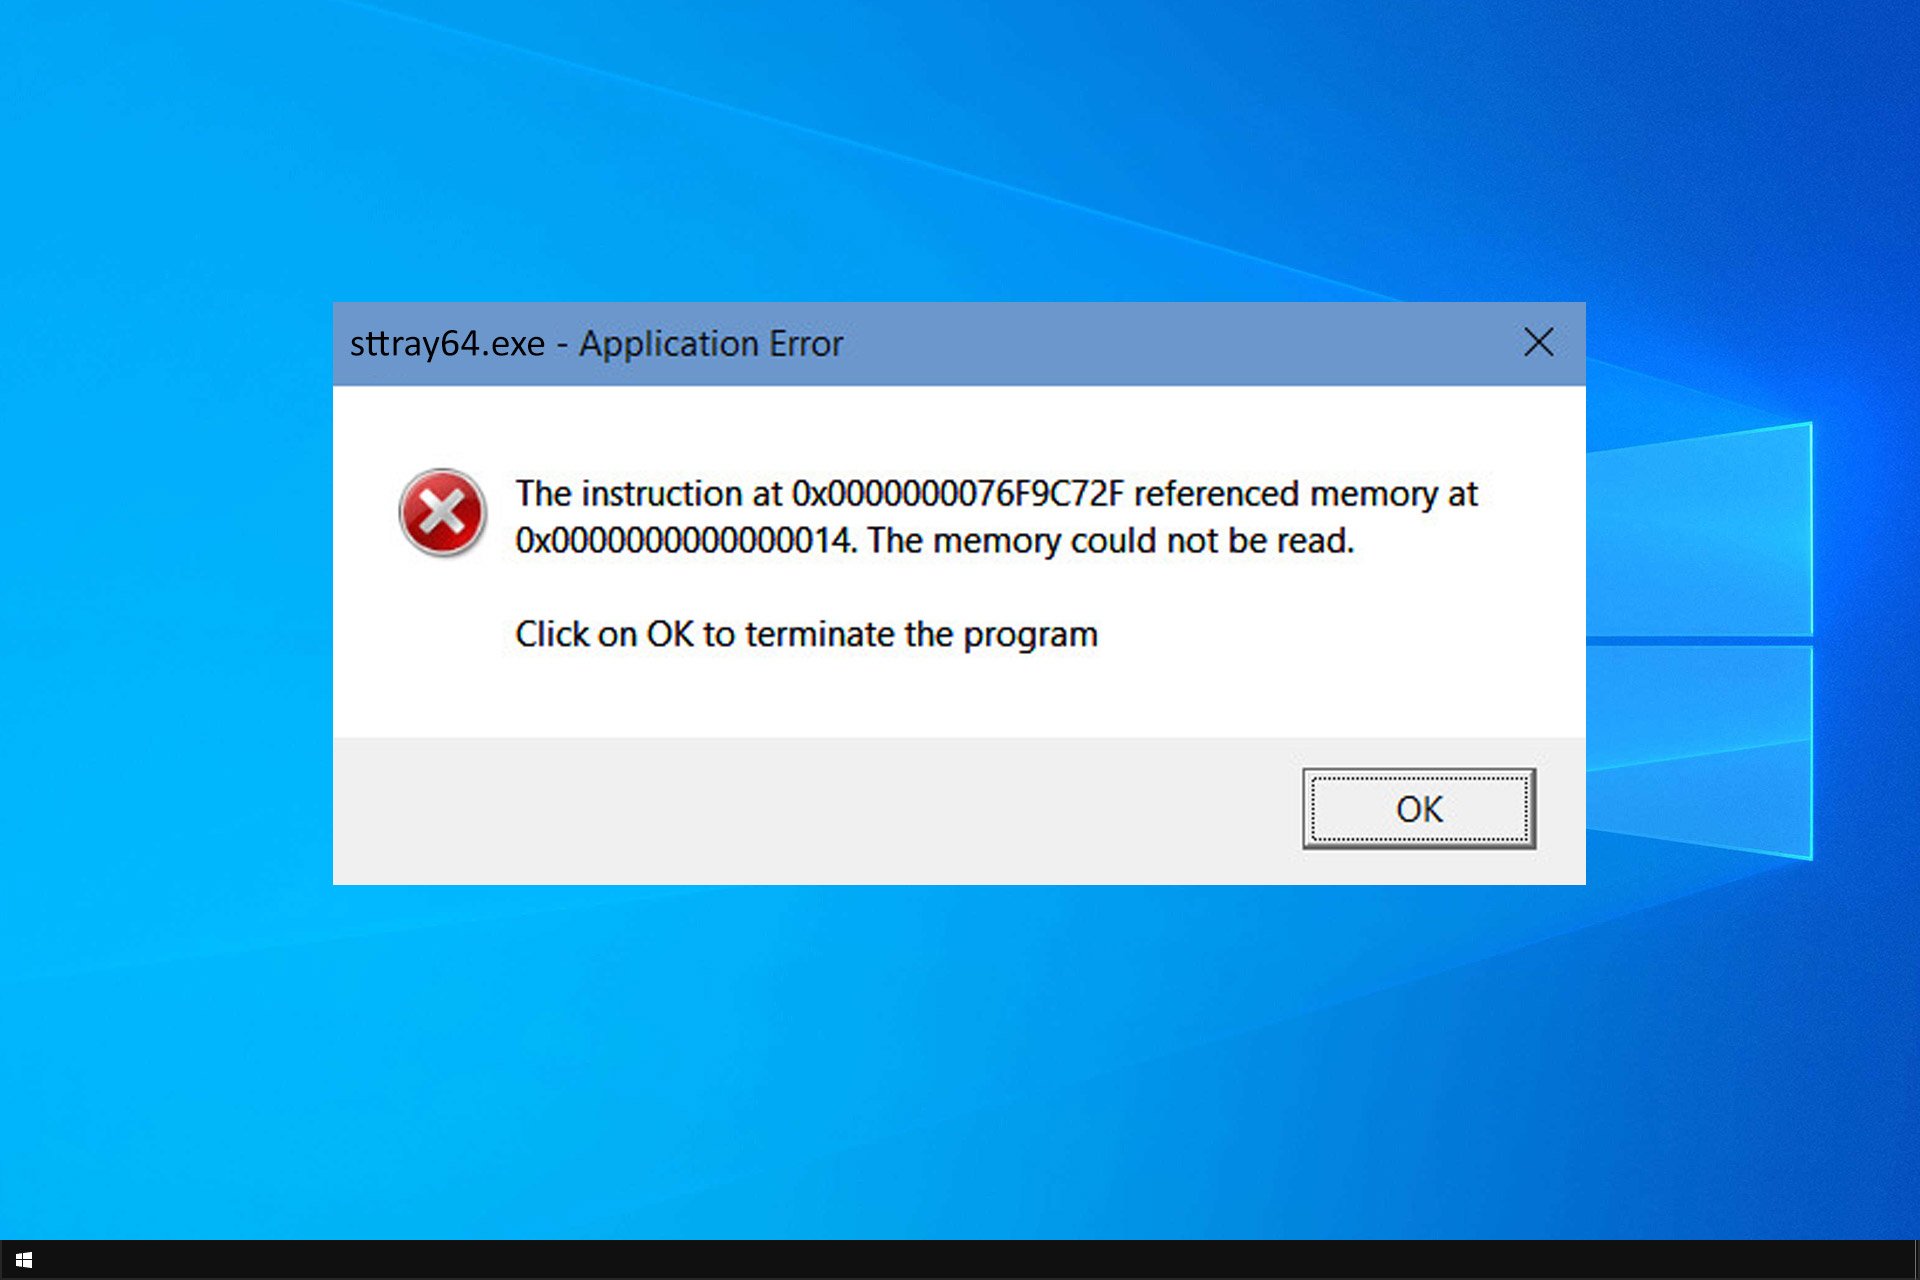
Many users reported sttray64.exe application error on Windows 10 and this can be a problem and prevent certain features from working, so let’s see how can we fix this issue.
What does sttray64.exe mean?
This file is associated with the HD Audio codec on Windows, and it’s made by IDT Audio.
How can I fix the sttray64.exe application error on Windows 10?
1. Disable the Sigmatel service
Press Ctrl + Shift + Esc to open Task Manager.
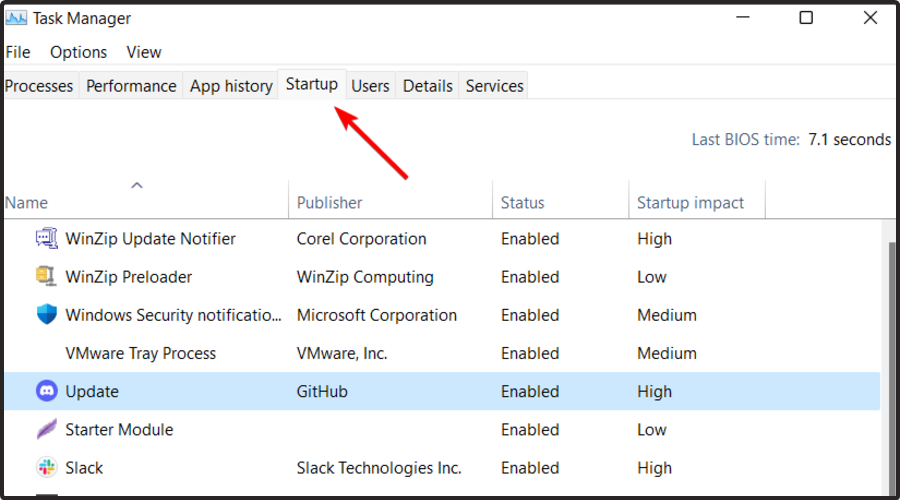
Next, go to the Startup tab.
Locate Sigmatel Audio Driver or sttray.exe. In some cases, the audio driver software might have a different name.
Select it and click the Disable button.
Restart your PC.
2. Reinstall your audio driver
Press the Windows key + X and choose Device Manager.
Locate your audio driver, right-click it, and choose Uninstall device.
If available, check Delete the driver software for this device and click Uninstall.
After the driver is removed, visit your motherboard or audio card manufacturer to download the latest version.
For more information, we have a guide on how to reinstall the audio driver, so don’t miss it for detailed instructions.
Finding the exact driver manually might be a tedious task, especially if you don’t know how to search for it. Luckily, tools such as GetMyDrivers can easily find and install all the missing drivers on your PC without hassle.
GetMyDrivers
Find and install missing audio drivers on your PC with just a few clicks!
These are just some of the solutions that can help you fix sttray64.exe application error on Windows 10. In most cases, you just need to remove and download the audio driver again to fix this problem.
Did you find a different solution? If so, share it with us in the comments below!
Microsoft Rewards is set to receive a new optimization feature called Rewards Notes, which will act as an official changelog for all the changes, improvements, enhancements, or new features coming to the app.
As you may know, Microsoft Rewards is a loyalty program that allows users to earn points for performing easy tasks like searching on Bing or making purchases at the Microsoft Store. These gathered points can be used later in exchange for different rewards and benefits, making it very popular among those who play Xbox games.
Rewards Notes will help users earn and use Rewards points with frequent suggestions and recommendations. Microsoft plans to release Rewards Notes on Xbox consoles first, but it will be added later to the app on PC.
Spotted by Microsoft Reward users and posted on Reddit, Microsoft says Rewards Notes is intended as a direct line of communication between Microsoft and its users so that you can stay informed about any recent alterations. The Redmond-based tech giant says users can claim points straight from program notifications instead of going through the whole platform whenever they wish to redeem their points.
So, why is it important? These updates are all about making Microsoft Rewards clearer and easier to use. The arrival of Rewards Notes could make Microsoft Rewards clearer and easier to use. They simplify earning and using points while also improving communication about what’s happening in the program, something that Microsoft has been keen on doing so with the addition of extra details to the program, earlier this year.
Be ready for these changes, as they will come soon. Who knows? Maybe managing Microsoft Rewards will be as fun as playing games.
Once Human is a video game that has been generating much discussion recently. To everyone’s delight, it is set to be released on July 9, 2024. Interestingly, the game will first be available on PC alone. Starry Studio, the mastermind studio behind the game, hasn’t said anything about a release on Xbox and PS5.
They have hinted that they are also thinking about launching it on the console based on feedback from players and testing. So, don’t lose hope if you love playing games on a console.
Once Human is not a regular game. It’s a free-to-play open-world survival shooter in an after-disaster future where Earth has been filled with alien lifeform called Stardust. You become a Meta-Human, immune to the effects of Stardust and possessing its abilities at your disposal. The game, highly focused on multiplayer aspects, can handle many players in both PvE (player versus environment) and PvP (player versus player) modes.
For those who ask about cross-platform play, the good news is that Once Human will have cross-platform play on PC, iOS, and Android devices. You can join up with your friends no matter what their device is, ensuring nobody gets left behind regarding action time. The game’s all-inclusive nature broadens its scope by enabling players from different gaming experiences to come together within this engaging universe.
The game is set to release on July 9 for PC. However, the timeline for mobile gamers is not yet clear. There might be a release date for iOS on September 26th, later this year. Sadly, we do not have any information about whether or when a preload option will come out. But the good news is that this game should not need too much storage space, as it is expected to take up around 70 GB of room on your computer.
In Once Human, there are different groups and monsters to fight, customizing weapons and creating safe places. The game emphasizes teamwork and planning, providing a full experience that includes searching, fighting, and making things. Whether you play on PC, iOS, or Android – cross-platform play always guarantees companionship in this world after the apocalypse.
So, are you eager to jump into Once Human? It’s getting close now, and its claim of being an extensive multiplayer game makes it one of 2024’s notable games, right alongside Palworld, or Senua II. Also, remember that playing this game will not cost anything – it is free for everyone, as you can see on Steam. You can dive into the action without spending even a single cent.
If you consume a lot of audio or video content, then your media player on your Windows 11 device is a matter of concern. The default player may not meet your needs so you can easily change it for a unified experience or if you’re just looking for a performance upgrade.
The default Windows media player does a good job but sometimes, the media player fails to open. In other cases, some media files come in different formats that may not be compatible with your default media player in Windows 11.
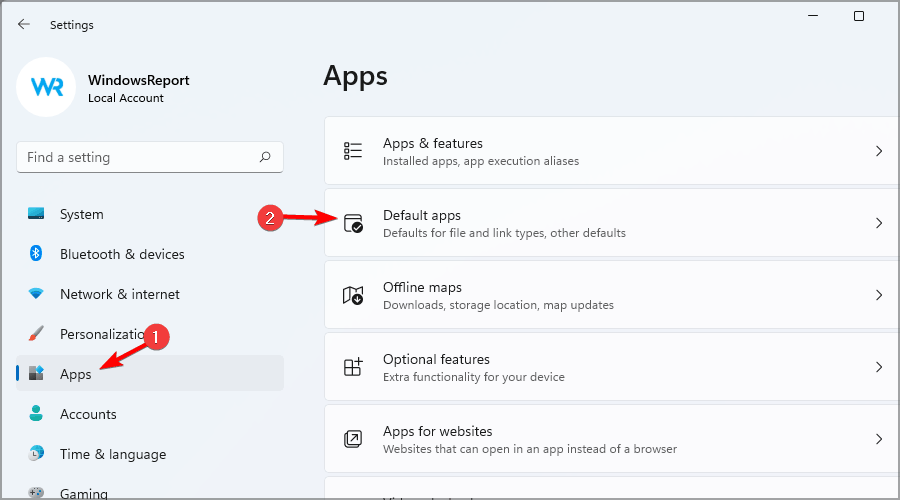
Navigate to the Apps section in the left pane. Now select Default apps.
In the Set defaults for applications section, select the app that you want to change as the media player for your Windows 11.
You’ll now see a list of all file types that use that app as their default.
Now you have to change the default app for the desired file types simply by clicking the current app and choosing the new one from the menu.
Repeat this for all file types that you want to change.
4. By changing default apps by file or link type
Open the Settings app by pressing Windows Key + I.
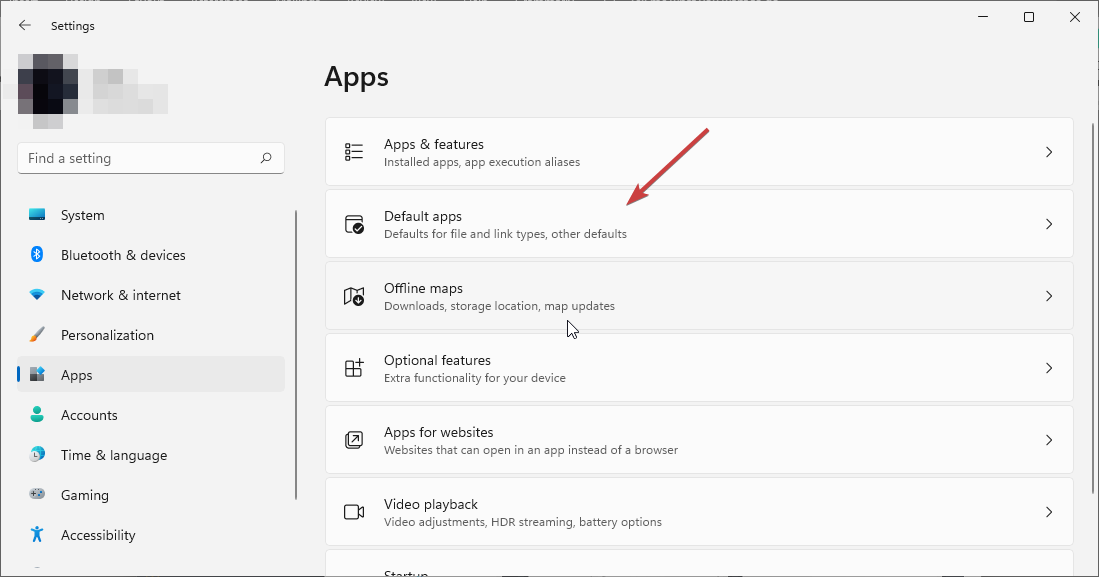
Select Apps in the left pane. In the menu that opens, choose Default apps.
Now click on Choose defaults by file type.
You should see a list of file types and their default applications.
Find the desired file type and click it.
Select the new default application for that specific file type or click on More apps if it is not among the list.
Repeat this process for all the file types that you want to change.
Additional tips to enhance your experience
Compatibility – When selecting your new media player, ensure you check compatibility with the different formats.
Customization – Once you’ve settled on a media player, go ahead and tweak the settings for an enhanced audio experience. You can apply the system-wide sound settings but most of these media players have their built-in settings that can be tailored to meet your specific needs.
Install plugins – If you’re looking for additional functionality, plugins, extensions and audio codecs will come in handy.
And because 4K media players will likely use more system resources, you can uninstall your Windows media player to create room and avoid slowing down your PC with unused apps.
That’s all we had for this article but do let us know if you’ve been successful in switching to another media player. Which one did you choose and why? Let us know in the comment section below.
If you ever found yourself endlessly scrolling down through downloaded applications in the Microsoft Store, annoyed at the fact that it takes you so long to get to the one app that you need, you’ll be pleased to find out that Microsoft is introducing a search box on the Library page of the Microsoft Store for Windows 11 beta testers.
This handy feature is designed for easy app management, so you can quickly find any app you have downloaded previously.
Microsoft Store has been freshening lately, bringing in things like “installers for web” to enhance users’ interactions with it. However, many people found one thing puzzling about the Library page: it lacked a basic search function. In this time when we can easily locate a needle in a digital haystack, why was such an elementary feature not included?
The popular @PhantomOfEarth noticed this update on social media platform X. This game changer for people like us who enjoy maintaining order and effectiveness in their digital lives. If you are not acquainted with the Library page, it is where all your app procurements from the Microsoft Store reside. You use this to upgrade applications, add fresh ones, or reinstall the ones you already used.
The Microsoft Store's Library page will be getting a search box to let you quickly find an app in the list. (Present in v22406.1401.1.0, don't know if it's rolling out.) pic.twitter.com/mNABcl8T8o
But there’s a twist: not everyone may see this update yet. Microsoft is doing a trial run by launching different types of OS to different user groups in the Canary channel. Thus, if you are eagerly looking at your Library page and do not observe the search box, do not worry—it could be just a matter of time before it becomes available.
Also, if you assume that a search box is a solitary surprise that Microsoft Store provides, reconsider. The Redmond-based tech giant also recently made Microsoft Store faster by an enormous 40%. Yet another reason to start using this app more frequently.
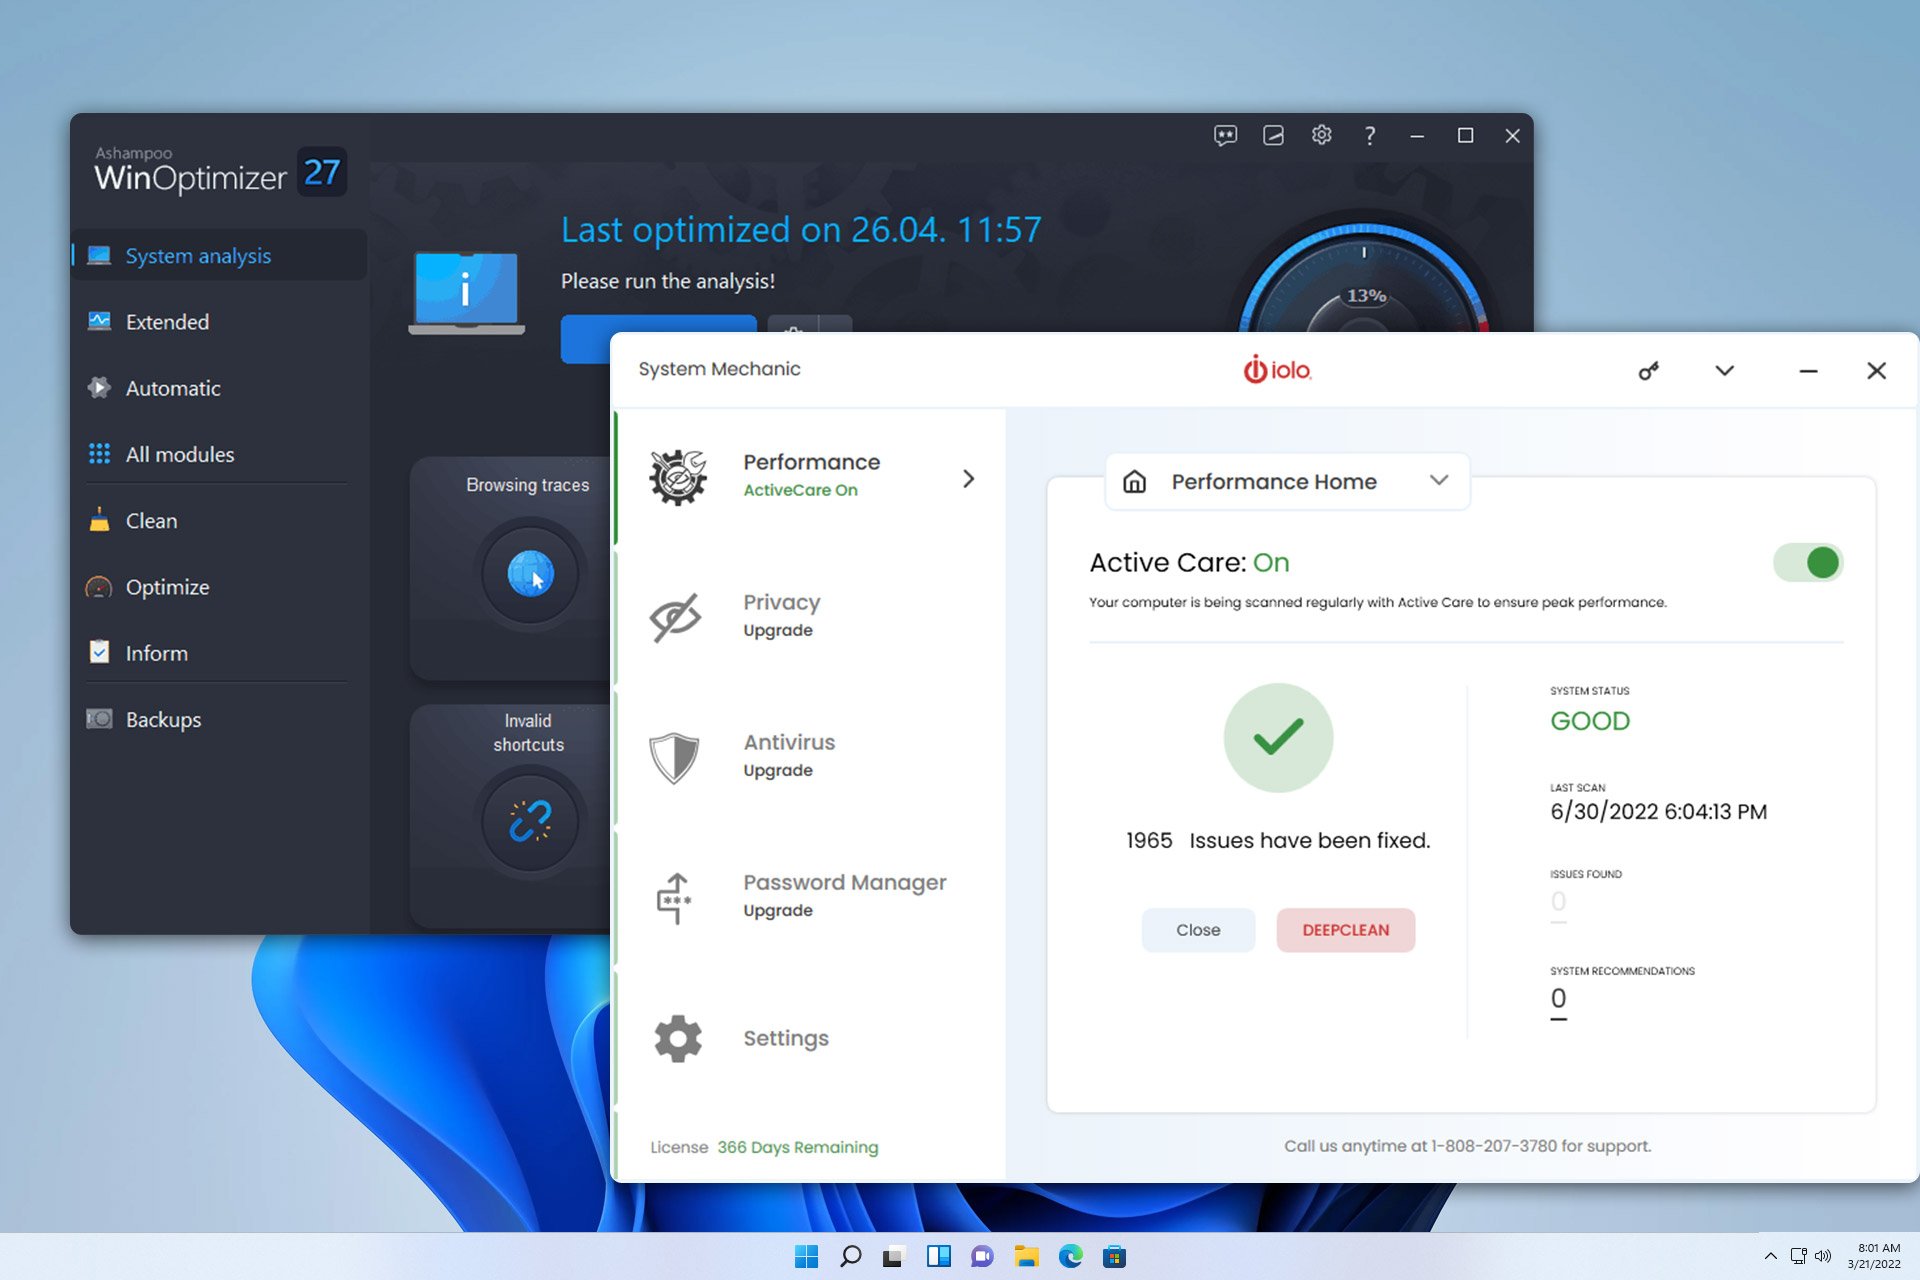
To improve your performance, many are using PC optimizers for gaming, and in today’s guide we’re going to show you the best software you can use to improve your performance, so let’s get started.
If you need a performance boost while gaming Iolo System Mechanic can help you with that. The software automatically increases the speed and availability of your CPU, RAM, and hard drive.
By doing this, more resources will be available for more demanding tasks, such as gaming. It’s not just the hardware, the software has a NetBooster feature that optimizes your network connection, thus improving your online experience.
The software is automated and easy to use, so it won’t require too much user input, so if you’re looking for something to improve your PC performance for gaming and other tasks, be sure to give Iolo System Mechanic a try.
Other great features:
Clears up system resources
Removes bloatware
Repairs over 30,000 different issues
Removes 50 types of junk files
Patches security vulnerabilities
Iolo System Mechanic
Optimize your PC for gaming or other intensive tasks in a matter of minutes with this tool.
With Advanced SystemCare, you can speed up your PC by disabling startup applications and unknown applications or services that are using your memory.
The software also has an Internet Booster feature that will diagnose and optimize your network and improve the speed and stability of your Internet connection.
Thanks to the real-time tuneup feature, your resources are monitored in real-time, and during gaming or other intensive tasks your RAM or disk space can be released if needed. Overall, this is a great tool, so don’t hesitate to check it out.
If you’re looking for a PC optimizer for gaming, look no further than Hone. The software allows you to disable or optimize Windows features with a single click to boost your performance.
You can also use this tool to boost your system by removing junk files or by defragging your drives. Hone can also fix various system and drive errors, so it can come in handy with other non-gaming problems.
It’s worth mentioning that this software can optimize individual games, and it can even change certain BIOS settings, making it one of the more advanced tools on the market.
Ashampoo WinOptimizer uses improved search algorithms that bring next-level cleaning capabilities. The software has several profiles available that will ensure processor and memory efficiency.
In addition to improving your performance, this software can also find and delete sensitive data thus ensuring that your files are safe from prying eyes.
WinOptimizer also lets you view your performance at a glance, so it’s suitable for everyday users and gamers alike.
Optimizing your PC is simple with Advanced System Optimizer and the software will both clean and optimize your registry.
That’s not all, this tool will clean your PC by removing unwanted files, and it will defrag your disk, thus improving its performance.
As for gaming, Advanced System Optimizer has a built-in game optimizer that runs games in sandbox mode as well as a memory optimizer that will free up your RAM when needed.
These are just some of the most notable features, and to learn more, go ahead and give this tool a spin. For even more performance boosts, check out these top game booster software for Windows 10.
These are some of the best PC cleaner applications for gaming, so if you want to optimize your machine and unlock more resources, be sure to give these tools a try.
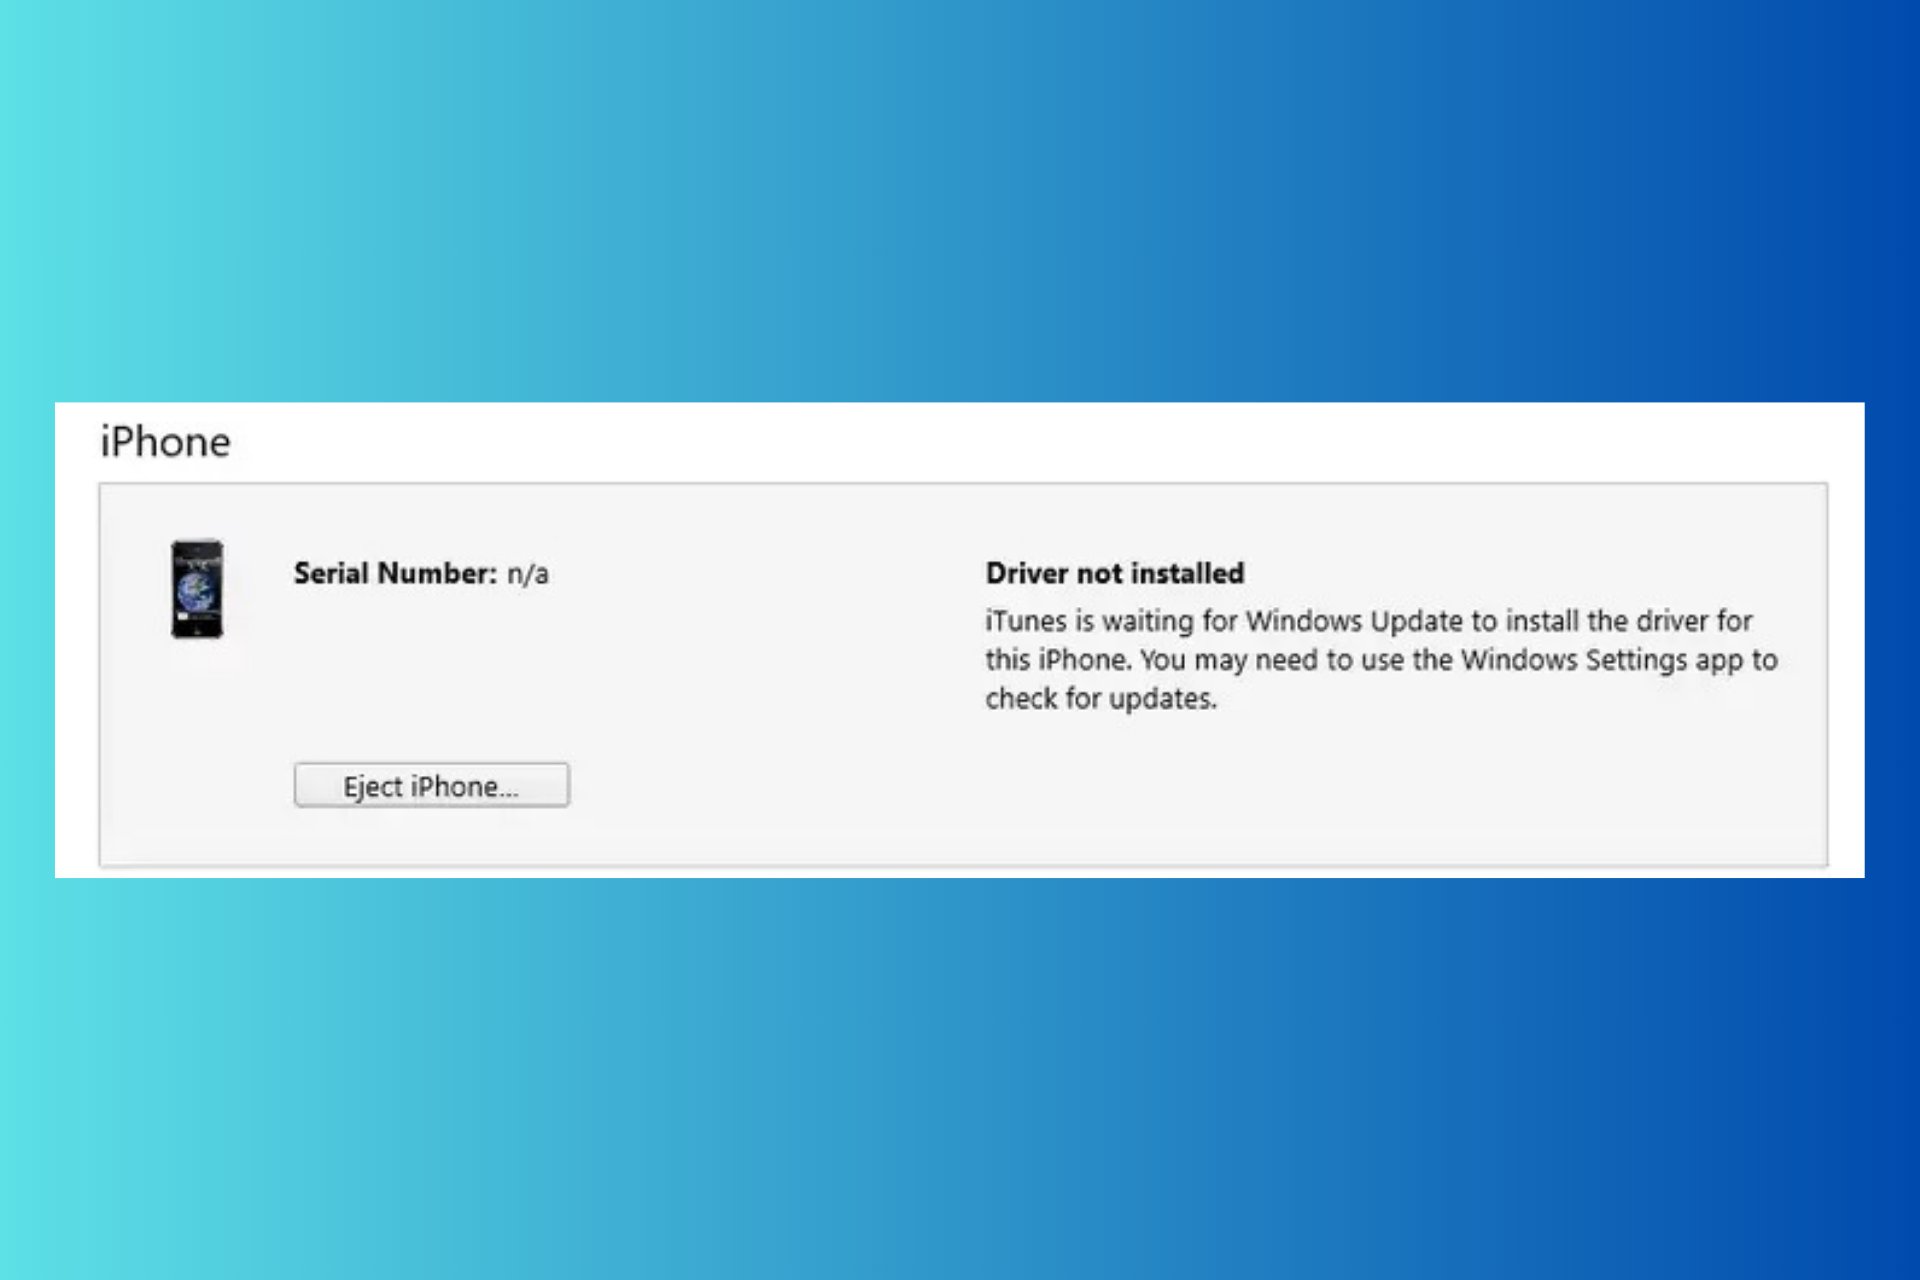
When you encounter the message iTunes is waiting for Windows Update to install driver, it can be quite frustrating, especially when you’re eager to sync your iPhone. This issue often stems from outdated software or drivers. So, before anything else, make sure that iTunes and Windows are updated to the latest version. Also, try connecting your iPhone to the PC on a different port or with a different cable.
What do I do if iTunes is Waiting for Windows Update to Install driver?
1. Quickly update the iPhone driver using GetMyDrivers
Click on Download for Free, and install the app on your PC.
After completing the installation, the app will start automatically and perform a scan of your system. Make sure that your iPhone is connected at this point.
In just a few seconds, you will have a list of missing or outdated drivers, including the iPhone driver.
Restart the PC after the driver is installed and check if Windows and iTunes see your iPhone.
Using a driver updater tool like GetMyDrivers will fix this problem a lot quicker than with any other methods and it’s free.
2. Reinstall and update the driver manually
Press the Windows key + X and select Device Manager from the menu.
In Device Manager, find Portable Devices, right-click on Apple iPhone, and select Uninstall device.
Restart your computer to complete the removal process.
After restarting, open Device Manager again, find Portable Devices, right-click on Apple iPhone, and select Update driver.
In the pop-up window, choose Search automatically for updated driver software.
Reinstalling the driver ensures that any corrupted files are replaced, resolving issues that prevent iTunes from recognizing your iPhone.
3. Disable third-party conflicting apps
Press Windows key + R to open the Run dialog box, type appwiz.cpl and hit Enter to open the Programs and Features window.
Browse the list of installed programs, select any third-party applications or antivirus software that may conflict with iTunes, and click Uninstall.
Disabling or removing conflicting applications can prevent them from interfering with iTunes, allowing it to recognize your iPhone.
4. Manually install the iTunes driver
Press Windows key + E to open File Explorer.
Go to the following path: %ProgramFiles%\Common Files\Apple\Mobile Device Support\Drivers
Right-click on the file named usbaapl64.inf and select Install.
Manually installing the iTunes driver bypasses any automated updates that may have failed, ensuring the driver is correctly installed.
5. Disable Restrictions on iPhone
Tap on the Settings app on your iPhone.
Scroll down and tap on Screen Time.
Tap on Content & Privacy Restrictions and toggle it off.
Disabling restrictions on your iPhone can resolve connectivity issues with iTunes, allowing the software to recognize your device.
If you want to tweak your Surface Duo device, you can always try a new operating system other than Android. Why not Windows 11, for instance? With the WOA Device Manager app, you can easily install Windows 11 on Surface Duo devices.
The best thing? The app can be found on the Microsoft Store, and with it, you can upgrade your Surface Duo and Surface Duo 2 to support Windows 11.
This app is not a regular tool; it links Android smartphones and the stylish, modern Windows 11 interface. With this application, you can perform full-flash updates and service drivers, boot into various modes such as fast boot or recovery mode (adb reboot bootloader), unlock your bootloader, and much more.
This program’s design aligns with the principles of Windows 11, and its interface is simple to use. It offers an appealing choice for those who are ready for change. However, swapping Android for Windows 11 is not a job for the weak-hearted, and if you’re now knowledgeable in how to work with technology, you might want to skip this experiment.
The WOA Device Manager app has been updated, its bugs fixed, and an update notification banner has been added. It can now service drivers on the attached device; there is a useful overlay that shows the active driver letter when the device is in mass storage mode. If you want to customize more, you have choices: specify a custom UEFI image or pick a custom driver package.
If you are curious about this project’s development, you can download the app for free in the Microsoft Store or from GitHub. But you can always try more conventional ways to turn your Duo into a desktop device if that’s your thing.
If you have been using an SD card for a long time, the performance may have diminished. And a quick way to verify that is to run a speed test on the SD card in Windows 11!
To run a speed test on an SD card, you have both built-in monitoring tools and reliable third-party software. The latter, however, delivers a more comprehensive overview of the SD card’s performance and is the recommended approach. Although, I am listing both ways to help you make the right choice.
How can I test my SD card speed in Windows 11?
1. Via Task Manager
Connect your SD card to the PC. If there’s a dedicated port, use that, or else go with an SD card reader.
Press Ctrl + Shift + Esc to open the Task Manager, and go to the Performance tab from the left pane.
Now, select the SD card (named Disk#) and the Read speed and Write speed should be visible on the right. In addition to that, you can also check the capacity and other information.
The Task Manager saves you the effort of downloading a third-party tool but isn’t very reliable, and neither does it provide a complete overview. Besides, the information displayed is in real-time, so you won’t be able to discover the maximum read and write speed of the SD card in Windows 11.
2. Via a third-party software
Tip
I will be using H2testw to check the SD card speed, given the tool’s effectiveness and excellent user reviews. However, it’s vital to mention that Windows Report is not associated with H2testw. You could go with another option, but before using any third-party software, make sure to scan the downloaded files with an effective antivirus solution.
Right-click on the downloaded ZIP file, select Extract all, set the desired location, and click Extract.
Once done, run the h2testw.exe file and select English within the app.
Click on Select target, choose your SD card, and click on OK.
Now, click on Write + Verify, and let the test fully run.
In the results, you will find the Read speed of the SD card.
H2testw is an old tool, so don’t expect ultra-fast performance. However, I have seen it help many users identify fake SD cards by running a series of tests and verifying whether the actual configuration matches what was advertised.
Also, while checking the SD card speed, focus on the Write speed, as it’s more crucial than the Read speed. The latter is always higher and advertised by manufacturers. But it’s the Write speed that decides how long it would take to write data to the SD card, for instance, saving captured images.
How can I speed up my SD card?
Delete unnecessary files: More the free space on an SD card, the faster it will perform, as is the case with almost all storage devices. So, delete the non-critical files.
Update the SD card driver: If the problem is limited to a specific PC, you may need to update the drivers for the SD card. Outdated and corrupt drivers are known to affect performance.
Use a better card reader: Using an average or incompatible card reader can also affect the SD card’s performance. It’s imperative that you use the built-in SD card slot, if available, or pick a compatible and fast SD card reader.
Format the SD card: If nothing else works, you can always format the SD card. This will wipe all the stored data, and the SD card will deliver a new-like performance.
You can now easily test and find the SD card speed in Windows 11 and even improve the card’s performance. The tips listed here will also boost the SD card’s lifespan.
Have you ever clicked the Get Started app in Windows 11, or does it just stay there like a digital paperweight? If you haven’t, you should know you can hide the button.
The famous PhantomOfEarth noticed that the newest Insider Preview build for Windows Server 2025 lets you cover the Get Started app. This isn’t a huge change but a sign that the server environment is becoming more streamlined. In such a setup, an app like this may not be needed.
The Get Started app and nearby sharing settings page will soon be hidden in Windows Server. These changes are present in Insider build 26244*. pic.twitter.com/9mOzeUUf0s
However, the main question is whether these alterations will be applied to the consumer editions of Windows 11. Nearby Share could be useful for home users, but the Get Started app might not receive such attention. Microsoft’s previous app for tips and tricks is being phased out, suggesting a potential change in the company’s attitude towards such onboard guidance tools.
The Get Started app is a portion of the Windows Feature Experience Pack for people unfamiliar with the app. This combination makes it difficult to eliminate without possibly impacting other system functions. It’s somewhat like a paradox for users who prefer their systems to stay light.
What does this imply for the everyday user or IT professional? Well, Microsoft will adjust the user experience according to surroundings, such as personal use or server management: if for your personal account, the Get Started button might be quite useful, for professional matters, the lack of it would streamline the UI.
Let’s hope Microsoft will also add the option to hide Get Started to commercial Windows 11.
Wondering how to change where sent items go in Outlook? I’ve got you covered.
Outlook offers flexibility in customizing where you can store your sent items and managing your email workflow. Let me guide you through changing this setting to keep your emails organized and your work smooth.
Let’s begin!
How To Change Where Sent Items Go in Outlook
Follow the below steps:
Go to Outlook and tap the Filebutton on the top left corner of your screen.
Tap Options.
Click Mail and scroll down to access Save messages.
Tick the “Save copies of messages in the Sent Items folder” and “When replying to a message that is not in the Inbox, save the reply in the same folder” check box.
If you use Outlook with an IMAP account, you might find that it saves messages sent twice. To fix this, you can stop Outlook from saving multiple copies of sent items. This ensures that it stores only one copy of each sent message to avoid redundancy.
Here’s what to do:
Tap File.
Click Account settings and select Account settings from the drop-down menu.
Select your IMAP account and tap Change.
Tick the “Don’t save copies of sent items” box and hit Next.
You’ll get a message confirming your account has been successfully updated. Tap Done.
That’s it! Simple, right?
So, now you know how to change where sent items go in Outlook. The emails you send will be stored exactly where you need them, keeping your Outlook organized and your email management efficient. You can also delete your search history to declutter your workspace. Additionally, you can turn on Dark Mode to make the app easier on the eyes.
Did you hear about the big discount on the LG 45-inch OLED curved monitor? It started off at a high $1,700, but now it can be yours for just $1,000. Isn’t this an offer you find difficult to pass up?
LG is famous for being innovative in gaming monitors, and this model shows that. It has a WQHD screen, giving you an aspect ratio of 21:9, which is great for fully entering the game. With almost no delay in response time and up to 240Hz for motion performance, it should provide gamers with smooth gameplay. No more ghosting or lag to ruin your gameplay!
However, the true standout feature of this monitor is its OLED technology. If you have ever witnessed an LG OLED TV in use, you understand the kind of visual delight you are about to experience. The colors, contrast, and black levels are excellent, guaranteeing that every game will appear incredibly striking.
For connections, it includes HDMI 2.1 and DisplayPort 1.4. But be aware that your cables must be good enough to offer the finest transfer rates. Also, if you like detailed gaming performance information, this monitor supports NVIDIA G-SYNC and AMD FreeSync Premium to maintain steady frame rates without any issues, even in the toughest games.
I can’t tell you for sure, but deals like this are not common. Now, considering that improving your gaming arrangement could be the right chance, Picture yourself diving into your preferred games on this beauty!
So, what are you waiting for? You can get the LG 45-inch OLED curved monitor today from here.
Once you have it, you can easily start your gaming side with the powerful HP Omen 25L Gaming PC, which is also available at a considerable discount these days.
Encountering the ENE.sys driver cannot load error on Windows 11 can be frustrating, but you can easily fix it. Ene.sys is a MSI RGB lighting control driver for your PC, so it’s not a vital component. Here’s what to do to fix it!
After installing the app, it will start automatically and perform a scan of your system to identify any outdated or problematic drivers.
In just a few seconds, you will have a full status of missing or outdated component drivers, including the Ene.sys. Just find it within the list and click Update from its right.
Restart the PC after the driver is installed.
Using a driver updater tool such as GetMyDrivers is the quickest way to get around this issue, and it’s free. You will probably find a lot more outdated drivers and if you pay for the full version, you will be able to update all of them with a single click.
Don’t worry, if something is wrong after the update, you can restore any driver from the Backup tab of the app.
2. Disable Memory Integrity
Press the Windows key and type Core isolation into the search bar, then press Enter.
In the Core isolation settings, locate the Memory integrity toggle switch.
Turn off the Memory integrity setting by clicking on the toggle switch.
Close the settings window.
Restart your computer to apply the changes and see if the error is resolved.
Disabling Memory Integrity can help resolve the ENE.sys loading error by allowing the older or incompatible driver to load. This may, however, reduce system security.
3. Install optional updates
Press Windows + R to open the Run dialog box.
Type ms-settings:windowsupdate and press Enter to open Windows Update settings.
Click on Advanced options, then on Optional updates.
Look for available updates related to drivers and click Download & install.
Restart your computer after the updates are installed.
Installing optional updates can sometimes include necessary driver updates that resolve compatibility issues with ENE.sys.
4. Rename the Ene.sys file
Press Windows + E to open File Explorer.
Navigate to C:\Windows\System32\drivers.
Locate the file named Ene.sys.
Right-click on Ene.sys and select Rename.
Rename the file to ENE_old.sys or any other name of your choice.
Close File Explorer and restart your computer.
Renaming the ENE.sys file may help Windows bypass the file during system checks, resolving the driver loading error.
According to the latest reported issues on official Microsoft forums, the service platform learn.microsoft.com is inaccessible to many Microsoft users. The platform keeps asking users to register repeatedly with their accounts.
The issue has been happening for some days, and multiple users are affected, but the Redmond-based tech giant hasn’t acknowledged it yet.
I successfully logged on today, June 28, 2024, from 12 p.m. to 2 p.m. EST. I completed one module and started a new one, but encountered issues with re-registering my Microsoft Account. I need assistance to investigate the cause and find next steps to restore access. Please refer to the attachment for details.
Microsoft user
The platform runs into the same issue regardless of the browser or the device, as the user stated:
In addition, I did validate the same symptom occurs on different devices (e.g. Surface Pro 7+ and iPhone 14+), different browser type (e.g. Microsoft Edge and Google Chrome) and different browser isolation (e.g. Microsoft Edge InPrivate and Google Chrome Incognito). before I witness the signed in as behavior, there were some slow page responses when flipping to the next module pages and did witness at June 28, 2024 @ 2pm EST “…maintenance page: that the site may not be responding due to backup maintenance…” Hopefully this will help the support team for a successful remediation path, without user data being lost.
Microsoft user
Many other users reported the same issue, and on another thread, some users resorted to logging into the platform with professional emails, which seemed to work.
If you have access to a work / school MS account, register as Learn profile (private browser tab). After that, returns to your personal profile. “Register” again and go to Settings (click on your image upper-right). Search for linked accounts (up to 5 work / school accounts and 1 personal). When merging ends, sign in with work / school login. And all works again.
Microsoft user
However, as the Redmond-based tech giant has yet to say anything, it can’t be confirmed that this could allow you to access learn.microsoft.com.
But if you have another Microsoft account besides your personal one, you can use that one to register on the platform. In many ways, this could be just an error with the Microsoft account per se, as the issue is not necessarily widespread or even general, so the servers aren’t the culprit.
In that case, you can also try to fix your Microsoft account by checking out thoroughly. How? Well, there are many ways to try. From logging into other Microsoft services, such as Microsoft 365, to troubleshooting your account entirely. Try one of these solutions, and let us know which one worked for you.
Meanwhile, if Microsoft acknowledges the issue, we will update this article.
Call of Duty: Modern Warfare III recently released Season 4, which includes many new features, updates, and enhancements, including new maps, such as Paris or Tokyo, new ammo, new game modes, and many other surprises.
As you can see in the lengthy blog post, Season 4 of Call of Duty: Modern Warfare III is quite big, and gamers will require lots of space and patience when they download it. However, with a patch so big, there could only be issues.
And there are quite a few. On official Xbox forums, dozens of gamers reported that their devices, including PCs and Xbox consoles, started behaving erratically or lagging to extremes after installing Season 4.
What’s going on with the new update on call of duty? My game is lagging horribly.
Call of Duty gamer
Others have reported that the game is either freezing or lagging, and it’s quite simply unplayable.
Since the last update on Modern Warfare 3 the lag is so bad the game is unplayable, Internet connection is perfect with 146mb/s. It’s getting beyond a joke trying to move around the map and it’s either freezing for a couple of seconds or you’re literally jumping around the map.
Gamers have also tried to clean their Xbox consoles, thinking these devices might be the culprit, but again, to no avail, as you can see below.
After this weeks COD mw3 update the game has been lagging to the point of freezing and jumping a cross map. I have cleaned out my Xbox. I have uninstall the game and reinstall the game. I have moved closer to the router and restarted the router. None of my other online games are lagging.
While some are understandably concerned that Microsoft might be playing a trick on them, the issues with Season 4 of Call of Duty: Modern Warfare III shouldn’t be extended to such topics. Why? Well, to state the obvious, Season 4 is a big patch with many new things coming to the game, so of course, it won’t be perfect right from the start.
What can you do then? Well, if you’re experiencing intense lag right after installing the Season 4 update, then it might be worth following this specific guide on how to get rid of it in Call of Duty.
The game is known for being laggy at times, so this particular bug is not a new one. While the issue is indeed happening to many gamers out there, it’s not entirely a general issue for now, which leads us to believe some devices might be more prone to running into it than others.
For this very reason, make sure you follow every step of the guide: one of them will surely work, and let us know which one in the comments section below.
Manually updating your drivers can be a daunting, time consuming task. That’s why we’ve tested the fastest driver updater tools and perform that task automatically, with a few clicks. This way, you will get the newest driver versions in the quickest way possible.
Which are the fastest driver updater tools for PC?
The fastest way to update your drivers is by using the GetMyDrivers tool right now. From the first click to download the app until all our drivers were updated didn’t take more than ten minutes and we didn’t need to do anything except for a few clicks.
After you install GetMyDrivers, the app will automatically scan your system for all the drivers. Although we were thinking that everything was updated on our system, the tool found more than 30outdated drivers.
A single click on the Update All button in the app started the process. GetMyDrivers has a huge database of drivers that is constantly updated to meet the daily requirements, but just to be on the safe side, it also performs a backup before updating them. It makes sense since.
You should know that the tool is free for manual updating. However, to update all the drivers in a single go, you will need to buy a license which was only $20 at the moment when we wrote this piece.
Drivers need constant updating and you may forget to do so. That’s why GetMyDrivers has a scheduling feature to automate the process. In other words, the tool can be programmed to perform an automatic driver update daily, or weekly, starting from the desired date and time.
Also, if anything goes wrong with one of the drivers, you can restore the individual driver or all of them from the Backup tab in the app.
Here are some of the best features of GetMyDrivers:
Completely free for manual update
Huge database of updated drivers
Works for most Windows OS versions
Extremely fast operation
Creates a safe backup ready for restauration in case of problems
GetMyDrivers
This tool is the fastest driver updater tool right now and it even works on older Windows versions.
Fortect Driver Updater, a flexible and simple software, aids in extending the lifespan of your system by making driver updates more automatic.
After you install this software, it will carry out a system scan. During the scan, the program will recognize all components and find necessary drivers to make them function correctly.
In case the tool finds any driver to be old, it will notify you about this and show a download window where you can easily substitute problematic drivers by just clicking once.
The Fortect Driver Updater gives you the option to set up regular scans so that your system is never left vulnerable due to outdated or missing drivers. It also includes advanced features for creating and deploying back-ups of your drivers.
In case you simply desire to mend one issue of your system, the Toolbox characteristic enables targeting particular drivers like fixing the sound, display issues, networking and so on.
To sum up, this software gives you ability to fix and do maintenance work on your system using a simple interface along with strong tools.
Best features of Fortect Driver Updater:
You can set it up for scheduled scans
Backs up the drivers for later restauration if needed
Long-term maintenance
Targeted fixes with the advanced toolbox feature
Fortect Driver Updater
Relax and let this tool update your PC drivers automatically with just a few clicks.
You can utilize Outbyte for updating any drivers that are causing problems on your device and optimizing your computer’s performance.
This driver solution is an answer for updating all drivers at once, not having to search for the correct driver version manually. If you are curious about how it functions, nothing could be simpler than Outbyte.
Initially, you could begin the system scan by opening the application on your desktop. Within a time frame of 5 minutes at most, it will identify every influenced driver and present you with a complete list.
In the scanning stage, you just need to rest until it’s finished and observe the detected issues as they appear in real-time. Later on, there arrives a summary scan where you see all drivers that require updating.
The upcoming actions need your involvement in deciding which drivers to update. You can select them individually or click on a button to choose all at once, enhancing the performance of your computer. To proceed with the update, you will press one button and the software will handle it from there.
Nevertheless, you may find useful capabilities such as the driver backup characteristic or the System Tweaks that can lower CPU utilization or enhance battery life.
Let’s quickly look at its key features:
Free diagnostics for problematic drivers
Scan schedule available
Back-up and restore point
Performance tweaks
Driver categorization for easy identification
Outbyte Driver Updater
You will get a few other features besides the driver updater function.
Driver Booster has a nice interface and strong features, making it one of the finest driver updater software for Windows.
The Professional edition comes with all you require to maintain your system’s cleanliness, plus additional elements. It has basic compatibility with Windows versions like 10, 8.1, 8, 7, Vista and XP (both 32-bit or 64-bit).
And it contains among the best free driver updater versions, having all the instruments to upgrade every driver you possess quickly.
This tool contains a vast database of more than 3,500,000 drivers. Additionally, it is compatible with offline PCs and can be carried on portable media for problem restoration from a remote location.
But suppose the driver offered by the manufacturer doesn’t fit well with your PC? You can relax because before any driver update, Driver Booster makes a restore point.
Let’s quickly look at its key features:
Updates multiple drivers in one go
Creates a system restore point before each driver update
Enables driver download acceleration
Schedule your PC to turn off or restart after driver updates
Turns off notifications while gaming in the silent mode
IObit Driver Booster
If you’re a gamer, turn this driver updater tool to silent mode and you won’t be disturbed.
The main purpose of Driver Fusion is to update drivers on Windows, and it also works with the old Windows 7.
Additionally, Driver Fusion is famous for its ability to quickly clean up the software and driver entries that were previously installed for a device at specific time.
That is important if you don’t want to deal with startup and performance issues, or just want a quick way to clean up old drivers.
While it is very good at updating drivers, this software can do much more. It makes a copy of your system files, settings and desktop before you make important changes.
It also keeps an eye on every installed device in your computer providing sensor data if they are available. So, you can see the temperature, power usage and clock speed of your PC.
Additionally, you can utilize this tool to discover the kind, title, and creator of the PC components. It also aids in recognizing those that have a yellow query mark associated with them.
Let’s quickly look at its key features:
Simple scheduler settings
Creates backups of your computer’s system files automatically
Lets you monitor the performance of your processor and graphic card
Diagnoses computer issues
Helps you with PC troubleshooting
Driver Fusion
This tool automatically updates the drivers of your PC, even if it runs on Windows 7.
So, here we go! Now you know what are the fastest driver update tools for your PC. If you’re asking, yes, you can still update your drivers manually, but as you will see in the highlighted guide, but you will have to bring a lot of time and patience along the way.
A tool such as GetMyDrivers automatically identifies any problematic driver and updates it for free in a fraction of the time needed for the manual process.
Do you want to keep all your drivers up to date? This doesn’t have to be a tedious or daunting task anymore, and speaking of which, today we’ll review GetMyDrivers software that can help you with that.
GetMyDrivers, what is it and how does it work?
A quick overview of its features
GetMyDrivers is a driver updater software that will scan your system for any outdated drivers and update them automatically.
The software will create backups of all your drivers, so in case anything goes wrong after the update process you can easily restore individual or all drivers.
Your drivers will be backed up to a folder so you can always manually back them up or install them if needed. GetMyDrivers sounds great, but how does it work? Keep on reading to find out!
How does driver update work?
As soon as you open the application, you’ll notice a friendly and simple user interface and the scan option is available right at your fingertips.
The scan process is incredibly fast, and during our testing, it took about a minute, maybe less to scan all our installed drivers.
Once the scan is finished, you’ll see the list of all drivers on the PC and GetMyDrivers will label the ones that need updating.
If needed, you can check each driver and see the additional information such as its version, publish date, and publisher.
As for the update process, you can update all drivers, only the selected ones or individual ones. The update process is simple and fully automated, but it might take a few minutes because GetMyDrivers is backing up all your drivers before the update.
In addition, the software will create a system restore point allowing you to restore your system if anything goes wrong.
With GetMyDrivers, you can back up your drivers at any time right from the Backup tab. You can back up all your drivers, or you can select individual drivers.
Of course, you can manually set the backup folder and store your drivers in a safe location.
As for restoring your drivers, you can do that from the Restore tab, and just like before, you can restore all your drivers or select individual drivers.
Additional features
We also have to mention that GetMyDrivers allows you to ignore certain drivers from future scans, and this can be useful if the software doesn’t find the correct driver, or if it labels the driver as outdated by mistake.
You can even schedule scans, so you can rest assured that your drivers are always up to date. Lastly, the software allows you to see all restore points that were created, allowing you to restore your PC right from the app.
Is GetMyDrivers free?
The software is free to download and you can use it to scan your PC, but certain features will require you to purchase a license.
Conclusion
GetMyDrivers is incredibly simple to use, and even first-time users won’t have any issues with it. The software is safe to use, and the scanning process is incredibly fast.
The update process might take a bit longer than expected, but that’s because the driver backup is being created. Do keep in mind that some of the features, such as backup and bulk driver updates require a license to work.
Microsoft Sway, the Redmond-based tech giant’s service for creating newsletters, presentations, or various forms of documentation, is currently malfunctioning to the degree that it’s unusable for dozens of users.
Apparently, Sway is not uploading nor downloading anything, with some users claiming to be unable to contact support or even get it to function again. Others are claiming Microsoft Sway doesn’t fully load when accessed on a browser and doesn’t properly connect to servers.
Even more, it seems that the service does not function even if you try to access it from browsers other than your default one or other accounts. It’s not working in incognito mode, either. Microsoft Sway is also unable to open older newsletters, which is frustrating for many users who are relying on the service to create their weekly newsletters.
Hello,
I’m having difficulties accessing Sway to produce our weekly newsletter. The browser just hangs, rarely connecting and then not loading fully.
This is happening:-
– on separate accounts
– on different browsers
– in private mode
which is leading me to think there may be an issue at the service end. Please could someone confirm or suggest what else I can try?
Many thanks in advance
ETA: Older issues of newsletters are not loading on different devices, either.
Microsoft user
In the forum, Microsoft, through an advisor, confirmed the issues with Microsoft Sway. From not loading to loading too hard or not properly displaying elements on the webpage, the tech giant says the service’s server might temporarily be the culprit.
So what can you do? For now, if you encounter the issue, you should contact the admin in your Microsoft 365 tenancy and let them know about it. If you are the admin, open a support ticket to Microsoft and let them know. You can do so here.
If you can’t wait long, you might also want to try these simple steps to make Microsoft Sway work properly again. The five steps are explained in great detail, enough to revive the service quickly. You don’t need to be a troubleshooting expert; the guide will explicitly show you what to do.
Are you dealing with this issue now? What’s your situation with Microsoft Sway? Let us know if any of the steps worked for you in the comments section below.
In the past few years, we have seen several cases where MSConfig opens in Notepad on Windows 7. The characters in the text editor are all illegible, and you can’t make any changes to the PC. This is usually caused by incorrect file association, malware infection, and corrupt system files.
Similarly, you may even find Regedit.exe opening in Notepad or all programs opening in Notepad on Windows 7. Let’s find out how you can fix all these problems at once!
What can I do if MSConfig opens in Notepad on Windows 7?
1. Correct the file associations (default apps)
Press Windows + R to open Run, type regedit in the text field, and hit Enter.
Click Yes in the UAC prompt.
Paste the following path in the address bar and hit Enter:Computer\HKEY_CURRENT_USER\Software\Microsoft\Windows\CurrentVersion\Explorer\FileExts
Right-click on the .exe key, and select Delete.
Click Yes in the UAC prompt.
Now, restart the PC and Windows will automatically clear any misconfigured file associations and revert them to default.
If you have ever manually tried opening MSConfig with Notepad on Windows 7, it may have set the choice as default. In this case, you should clear the file associations via Registry.
Press Windows + R to open Run, type cmd in the text field, and hit Ctrl + Shift + Enter.
Click Yes in the UAC prompt.
Paste the following DISM commands individually and hit Enter after each: DISM /Online /Cleanup-Image /CheckHealthDISM /Online /Cleanup-Image /ScanHealthDISM /Online /Cleanup-Image /RestoreHealth
Next, execute this command to run the SFC scan: sfc /scannow
Finally, reboot the PC.
3. Run a malware scan
Open Windows Defender or Windows Security Essentials on your PC via the Search menu.
In the Home tab, choose Full from the right, and click on the Scan now button.
Wait for the scan to complete, and if any virus/malware is found, make sure that it’s deleted.
Restart the computer and check for improvements.
In case you haven’t manually changed the file associations and MSConfig still opens in Notepad on Windows 7, malware/viruses are known to do that. So, I recommend you run a full system scan to remove any possible threats.
Press Windows + R to open Run, type rstrui.exe in the text field, and hit Enter.
Click on Next to proceed.
Select the Choose a different restore point option, and click Next.
Pick a restore point created before the issue with MSConfig first appeared and click Next.
Verify the restore details and click Finish.
Click Yes in the confirmation prompt, let the restore complete, and then check for improvements.
5. Reset/reinstall Windows 7
If nothing else works, you can always reset Windows 7 to factory defaults. This will revert every setting to default and delete any third-party apps that might be causing MSConfig to open in Notepad on Windows 7.
In case that too fails, the last option is to reinstall Windows 7. While Microsoft doesn’t officially offer the OS anymore, you can download the Windows 7 ISO from other sources. Once done, create a bootable USB and then reinstall Windows 7 via it!
After you are done with the reinstall, neither MSConfig nor any other .exe file will open in Notepad on Windows 7, and you can proceed with installing the apps that were wiped out in the process.
If Msconfig is not working properly, it could be due to corrupted system files, malware infection, or missing registry files. To fix it, you need to run a DISM & SFC scan, then a malware scan to begin with.
How can I fix the msconfig not working issue?
1. Run DISM & SFC scan
Press the Windows key, type cmd, select Command Prompt, and click Run as administrator.
Copy & paste the following commands one by one and hit Enter after every command: DISM /Online /Cleanup-Image /CheckHealthDISM /Online /Cleanup-Image /ScanHealthDISM /Online /Cleanup-Image /RestoreHealth
Once done, run the following command and press Enter: sfc/scannow
This will scan and repair the corrupted system files, fixing the issue.
Once done, restart your computer and try opening the System Configuration window.
2. Run a malware scan
Press the Windows key, type windows security, and click Open.
Click Virus & threat protection.
Now, click Scan options.
Select Full scan and click Scan now.
The security software will look for viruses and malware and ask you to delete them if found. Remove the malicious files and restart your computer.
3. Add msconfig.exe key in Registry Editor
Press Windows + R to open the Run window.
Type regedit and click OK to open the Registry Editor.
Navigate to this path: Computer\HKEY_LOCAL_MACHINE\SOFTWARE\Microsoft\Windows\CurrentVersion\App Paths\MSCONFIG.EXE
If you don’t find it, we will have to add it. Right-click App Paths and select New>Key
Name the key as MSCONFIG.EXE.
Now, press Windows + E to open the Windows Explorer, then go to the system drive and look for the Windows folder. Type msconfig.exe to get a file with the same name. Right-click it and select Copy as Path from the context menu.
In the right pane, double-click (Default), paste the path under Value data, and click OK.
Reboot your computer to let the changes take effect.
Follow these steps if msconfig went missing after a Windows update.
Press Windows + I to open the Settings app.
Go to Windows Update and select the Update history option.
Click Uninstall updates.
You will get a list of updates, locate the latest ones, and click Uninstall.
5. Restore your computer to the previous version
Press Windows + R to open the Run window.
Type rstrui and click OK to open the System Restore window.
Select the Choose a different restore point option and click Next.
Now choose the restore point and click Next.
Click Finish.
Your computer will restart and restore the system settings to the chosen point. If the System Restore did not complete successfully, it could be due to conflicting programs or driver errors; read this guide to learn more.
Double-click on the ISO file, and click Open in the prompt.
Run the setup.exe file.
Click Yes on the UAC prompt.
Click Next on the Windows 11 Setup.
Now, click Accept to agree with the Microsoft license terms.
On the next screen, ensure the setup wizard says Keep personal files and apps, then click Install. Otherwise, click the Change what to keep option, choose Keep personal files and apps, and click Install.
Follow the on-screen instructions and wait for some time to complete the process.
Remember that if your computer is infected with a virus or has missing files, it could cause various problems, including Windows Update error 0x8007370
Therefore, it is essential to run scheduled security scans and keep the system up to date to prevent other issues.
If you can’t get msconfig to work and don’t have time to reset your computer, try these msconfig alternatives.
Did these steps help you fix the issue of the msconfig not working? Share your thoughts with our readers in the comments section below.
Firefox always focuses on user privacy and ensures a smooth experience when browsing the internet in multiple languages. Firefox used to come with a Translations add-on, which helps you translate websites directly from Firefox without depending on cloud services.
However, with the newest technology and the need for a better browsing experience, Firefox has now introduced a built-in translation feature, which means the Translations add-on will slowly fade away. Let’s learn more!
What are the changes to the Firefox translations add-on?
Firefox has introduced an inbuilt translation feature, starting with version 118. This feature is integrated into your browser and lets you translate web pages locally, keeping your privacy intact and security uncompromised.
With this, the company has decided that the Firefox Translations add-on will not receive any updates or maintenance. Also, the old extension will be functional for some time so that users can get time to transition to the built-in translation feature.
This built-in tool enables effortless web surfing in your preferred language, eliminating the need for separate translation add-ons.
How do I get Firefox to translate a page automatically?
Go to the website which doesn’t have the default language; the translation panel will open automatically.
If it doesn’t appear, click the horizontal lines icon and select the Translate page.
Firefox will detect the language on the page and reflect it in the Translate from option from the drop-down menu. You can choose the desired language for the Translate to option from the drop-down, then click the Translate button.
To revert the web page to the original language, you can click the Show Original button.
How can I customize translation settings?
Click the Translation icon from the right side of the toolbar.
Now click the Settings icon from the right corner of the translation panel.
You will be presented with options like Always offer to translate, Always translate German, Never translate German, Never translate this site, Manage languages, and About translations in Firefox.
Select the ones you want to choose, and a checkmark will appear in front of the options selected.
To revert the changes, reverse engineer the steps, and checkmarks will be removed.
How can I install other languages for offline translation?
From the top right corner, click the three horizontal lines and select Settings from the list.
Under the General pane, go to Language.
Locate Translations, choose the language you want to add, and click the Download button next to the language.
If you wish to delete languages from the list, click the Remove button.
What if I want to use the translation add-on?
If you don’t want to use the built-in one, you can continue using the old Firefox Translations add-on. You can add it; then the Firefox Translations toolbar will be available when you go to a website that doesn’t have chosen Firefox language.
Click Translate to translate the page into the language you set Firefox to. When the page is translated, a counter at the top shows the number of elements that still need translation.
Once done, you can choose the Translate this tab automatically option to translate the web page as you browse.
For the sake of an updated browsing experience and seamless integration, Firefox has replaced the translate add-on with the new built-in full-page translation feature.
Would you stick with the old translate add-on or move to a built-in full-page translation feature? Share your views with our readers in the comments section below.
VPNs are all the rage right now for protecting you on the internet, but with all of them making big promises, it’s hard to know which live up to the hype. I recently tested IPVanish, which I haven’t used in years. In this IPVanish review, I found some great new features, so read on to see if it’s the solution for you!
IPVanish Overview
One of many Virtual Private Networks (VPNs), IPVanish encrypts your real-time internet activity from cybercriminals, network admins, and even your internet provider itself.
Its easy-to-use apps mask your real IP address, making it seem like you are almost anywhere in the world. Not only does this hide your location, but also lets you unblock international streaming services and other geo-restricted content on the web.
IPVanish is available in multiple languages across mobile, desktop, and streaming devices.
IPVanish Review – Top Features
The versatile VPN has all the expected features, plus many benefits not offered by some of the more well-known providers. I got hands on to see what stands out the most:
Unbreakable Internet Encryption
IPVanish employs military-grade AES 256-bit encryption, which is what you want from any leading VPN.
Since I last used it, older protocols like PPTP, L2TP, and SSTP have been dropped for faster and more secure protocols like WireGuard. If you’re looking to stream or game with a VPN, WireGuard is king.
Its apps also let you switch to other protocols that are useful in different situations. For example, IKEv2 works better on mobile devices. OpenVPN is useful for troublesome networks or when setting up a VPN at the router level.
Fast Servers and Unlimited Devices
You’ll never find yourself without a fast server to connect to with IPVanish. It boasts over 50 countries, countless cities, and a total of 2,400+ individual servers that you can choose manually.
This is useful if you just want to encrypt your connection at home or on the go, or access the open web and apps from countries with censorship. It’ll also get you past those annoying firewalls and filters at school, work, or home.
That’s without mentioning access to your favorite overseas streaming services without getting region-blocked.
IPVanish currently has one of the strongest server backbones, running data centers with 25Gbps machines. I can easily stream in 4K, game without lag, and download torrents at good speeds.
What’s more, thanks to its unlimited devices and connections policy, other members of the household can do the same and you won’t notice any bandwidth issues.
This is good to see when big names like ExpressVPN and NordVPN limit connections and charge more to add devices.
The apps will connect you to the fastest server by default in one click or tap. However, I love that you can dig into the entire list and view the server load and ping. You can connect anywhere and ensure you aren’t getting bogged down by an overload of other users.
So, if you want to use a VPN on all your devices, share it among your family, or even protect a small business, IPVanish is more than capable of doing so.
Optimized For Streaming Services
All VPNs promote their ability to work with popular streaming platforms at home and abroad. However, with increased scrutiny, not all are successful. And, if they are, buffering and disconnects can be an issue.
I tested IPVanish from the UK to watch US versions of Hulu, Netflix, and Disney+ and experienced zero restrictions or performance issues. Moreover, it now has optimized servers for most of the popular streaming services in the US, UK, Denmark, France, and Japan.
Even if there isn’t a dedicated server, as long as you choose the right country, it does a great job.
Comprehensive Apps for All Devices
IPVanish has dedicated apps for a large variety of popular devices. These include:
Desktop: Windows, macOS, Chrome OS, Linux
Mobile: iOS, Android, Apple Vision Pro
Streaming: Fire TV, Apple TV, ONN4K, Chromecast, Nokia Streaming Box, NVIDIA SHEILD
You can also easily set it up on a VPN compatible router by following the guidance on the IPVanish website.
Automatic Kill Switch
VPNs need a kill switch to protect your real IP and connection if you become disconnected. Turn this on and all internet activity is paused until IPVanish reconnects to a secure server.
Unlike other providers, IPVanish implements this feature on most of its devices, including FireStick.
This means any time you watch Amazon Fire TV to access an overseas library, the platform will never see an IP switch or recognize you have been using a VPN. No banned accounts here!
Advanced Split Tunneling
Split Tunneling allows you to pick and choose which traffic you want to send through the encrypted tunnel. For example, I must access all my work apps via my static home IP, so need a VPN that lets me whitelist them.
Not only does IPVanish let you split tunnel apps, but it also allows for individual websites. Furthermore, the feature is now available on Windows, Andorid, and iOS, which is often not the case with other VPNs.
Strict No-Logs Policy
Using a VPN is all about protecting your internet activity, so it’s no good if the provider itself doesn’t limit the info it collects about you.
Since I last used IPVanish, it has now been independently audited by Leviathan Security, confirming it does not “Does not collect, monitor, or log your browsing activity.”
While it will still have a billing record, there is no meaningful data that can be accessed by law enforcement or non-state actors.
IPVanish does collect “…aggregated and anonymous performance data to improve functionality and product performance,” but this does not include any personally identifiable information.
Its privacy policy is clear about not selling or sharing your details with third parties.
Free Threat Protection
Many VPNs try to bundle extra features for a fee, but IPVanish offers some pretty good threat protection as a standard feature.
When you turn this on, trackers, dangerous ads, and malicious sites are blocked. Threat protection is available on Windows, macOS, iOS, Android mobile, Android TV, Amazon Fire TV, and Apple Vision Pro. This is much more comprehensive than other VPNs.
Multi-Language Support
As well as English, it’s good to see language support for Polish, Italian, and Portuguese on Windows, mobile, and its streaming devices.
German, French, Dutch, Spanish, Polish, Portuguese, and Italian, is also supported on macOS.
Ease of Use
IPVanish has a clean and modern interface that’s consistent across all its supported devices.
It couldn’t be easier for beginners – just click or tap to connect right away or browse the location list for a specific country or city. You’ll even see an animated map, which is useful for gauging the distance between your real and encrypted location.
If like me, you want to dig a bit deeper, you can find any of its 2,400+ servers, view the load and ping, and favorite them for quick connection later.
Overall, the apps are intuitive with simple tabs and clear settings, and they don’t lag or hog system resources.
24/7 Customer Support
If you need help, the site itself has a large knowledge base, but support staff are only an email or live chat message away.
It even operates a phone line from 9 am to 5 pm CT, Monday to Friday, if you prefer to speak to someone directly.
It takes a couple of minutes to reach a real person, but I found support staff to be helpful and fully educated on the finer workings of the VPN apps.
IPVanish Pricing Plans
IPVanish is priced competitively alongside the leading VPNs with some excellent discounts if you pay for a year or two upfront.
$12.99 per Month
Yearly 78% off – ($2.79/mo; $33.48)
Two Years 83% off – ($2.19/mo; $52.56)
You get a 30-day money-back guarantee on its yearly and two-year plans.
The only downside is the 7-day free trial is limited to mobile only and you must provide billing information first, though it’s easy to cancel.
IPVanish
See the current IPVanish plans and prices on the official website.
Concluding this IPVanish review, I find it to be one of the best with great improvement in recent years.
It doesn’t get much better than unblocking geo-restricted streaming services, unlimited devices, fast and optimized servers, and advanced split tunneling. Free threat protection is an added bonus.
While other VPNs might boast more locations and servers, the average user doesn’t need every country in the world. Plus, IPVanish performs well in speed tests thanks to its 25Gbps infrastructure.
Is the Service Host: SysMain high memory issue slowing down your Windows PC?
Your PC runs hundreds of services in the background to keep the whole system up and running. One of them is the SysMain or Superfetch process. If you’ve noticed that it consumes an unusually high amount of memory, read on as I show you how to lower it.
What Is the Service Host: SysMain Process?
Service Host: SysMain or Service Host: Superfetch is a signed and certified Windows OS tool. With the release of the Windows 10 version 1809 update, Microsoft has replaced Superfetch with SysMain. That’s because many users started disabling the Superfetch service manually. So, by changing its name to SysMain, Microsoft hoped that users wouldn’t know that Superfetch still exists.
This process learns from your regular interaction with the PC. After accumulating enough data, it predicts which apps you might be using. Then, it pre-loads those apps, so executing the app icon on the Desktop opens quickly without loading much data.
However, many Windows 10 and 11 users have reported that the service utilizes extensive RAM, CPU, SSD, and other resources, ultimately slowing down the whole PC.
How To Fix Service Host: SysMain High Memory
Try these troubleshooting methods in the order they appear. I’ve organized them so you can start with the easiest ones and keep advancing to more complex methods.
Stop the Service Host: SysMain Temporarily
If the issue appears only sporadically, you can simply end the process to prevent overuse of PC memory and CPU.
Here’s how:
Press Ctrl + Shift + Esc to launch the Task Manager.
Click on the Memory column header to sort all processes by memory usage.
If the SysMain process utilizes the most RAM, it’ll be at the top.
Alternatively, you can scroll down to the Windows processes section and look up the Service Host: SysMain process.
Right-click on it and select End task from the context menu.
It should stop instantly.
On certain devices or user accounts, you might get the following additional confirmation box:
Checkmark the checkbox for Abandon unsaved data… and hit the Shut down button.
The PC will shut down.
Turn it on and the SysMain process shouldn’t bother you this time.
Disable the Service Host: SysMain Process
You can permanently disable this process by following any of these methods:
Disable SysMain from Services
Click on the Start Menu icon and type Services.
Under the Best match result, click on the Services System tool.
The Windows Services app will open.
Find the SysMain service in the list of items.
Right-click on it and select Properties from the context menu.
You should see the SysMain Properties (Local Computer) dialog.
Under the General tab, click on the Startup type drop-down list and choose Disable.
Click Apply and select OK to save the changes.
Disable SysMain Using Command Prompt
If you’re unable to try the previous method, check out this alternative below:
Open Windows Command Prompt with administrative privilege from the Start Menu.
In the Command Prompt window, enter the following code and press Enter:
Look for the following message in the Windows terminal window:
The above message confirms that Windows has successfully disabled SysMain.
Increase Virtual Memory or Page File
If you don’t want to disable SysMain completely, you can take the following steps to increase the virtual memory by allocating a portion of your HDD, SSD, or M.2 NVMe SSD.
Press the Windows key and type SystemPropertiesAdvanced. Click Run as administrator in the search results.
In the System Properties window, click the Advanced tab and then the Settings button under Performance.
In the Performance Options window, select the Advanced tab and click Change under Virtual memory.
Uncheck Automatically manage paging file size for all drives if it’s selected. Then, select Custom size.
Enter the desired initial and maximum size for the paging file (in megabytes) and click Set.
You should aim for 2,048 MBInitial size and 10,240 MBMaximum size.
Click OK and select Apply to save the changes.
Restart your computer for the new paging file size to take effect.
Scan for Malware and Viruses
Sometimes, a malicious program might keep SysMain busy and force it to eat up your PC’s memory. Use the Windows Security tool to detect and remove such programs with these steps:
Press Windows + I to bring up the Settings app.
Click on Update & Security.
Select Windows Security on the next screen.
Now, click on Virus & threat protection on the right side.
Choose Scan options and select the Full scan selection.
Select Scan now.
Update Windows OS
Go to the Windows Update & Security menu from the Settings app.
Select the Windows Update option on the left side navigation panel.
On the right side, click on Check for updates, Resume updates, or Download & install.
Identify and Remove Conflicting Programs
Press the Windows key + R to open the Run dialog.
Type msconfig and press Enter to open the System Configuration window.
Click on the Services tab.
Select the Hide all Microsoft services checkbox.
Click Disable all.
Click on the Startup tab.
Select the Open Task Manager option.
In Task Manager, right-click on each startup program you want to disable and select Disable.
Close Task Manager and click OK in the System Configuration window.
Reboot your Windows PC.
If the SysMain service doesn’t occupy much memory after performing the above steps, the issue is linked to recently installed software.
Here’s how to locate the latest apps on your PC for uninstallation purposes:
Go to the Apps menu from the Windows Settings app.
Below the Apps & features section, click on the Sort by: Name drop-down menu.
Choose the Install Date option.
Windows will show all the recently installed apps on the top.
Remove the app that you’ve added recently.
Now, check if the issue is fixed.
So, these are the tried and tested methods to deal with the Service Host: SysMain high memory problem.
If the article helped you speed up your PC or you wish to share critical feedback, feel free to comment below! Moreover, if you’re experiencing something similar with Bdservicehost or you want to reduce the service’s disk usage, we’ve got you covered.