OPatch Failed With Error Code 73? How to Fix it

Oracle is a popular Relational Database Management System (RDBMS) developed by the Oracle Corporation. It’s used extensively worldwide, but some administrators came across OPatch failed with error code 73 while installing a patch or during an Oracle upgrade.

The problem is widely reported for certain updates, but it’s usually an issue at the user’s end to blame for the inability to apply interim patches.

For those wondering what is error code 73, it indicates that the patch is incompatible with the current installation or another process is blocking it. Here are the common reasons behind it:

  • Incorrect path
  • Insufficient permissions
  • Another Oracle Universal Installer is running
  • Inventory issues
  • Running the incorrect Oracle Interim Patch Installer

How do I fix OPatch failed with error code 73?

Before we head to the slightly complex solutions, try these quick ones first:

  • Restart the computer and then try running the Oracle patch again.
  • Make sure you are installing the correct patch. Check whether it’s applicable to your system.
  • Verify you are installing the Oracle patch with an administrator account.
  • Run Command Prompt with administrative privileges. Simply right-click on it and then select Run as administrator.
  • Check whether the ORACLE_HOME/.patch_storage directory is locked. If that’s the case, restore it and then delete the patch_locked lock file.
  • Download the patch again, in case it’s the corrupted patch files to blame.

If none work, move to the fixes listed next.

1. Terminate all other Oracle processes

  1. Press Ctrl + Shift + Esc to open the Task Manager and locate all Oracle processes.
  2. Right-click on each individually, and then select End task.end task to fix opatch failed with error code 73
  3. After you have terminated them all, retry the patch installation.

Often, when you see OPatch failed with error code 73 19c, it’s another Oracle process to blame, and terminating it should get things running.

2. Reconfigure the permissions

  1. Head to the ORACLE_HOME/.patch_storage folder, then right-click on it, and select Properties.
  2. Go to the Security tab, and then click on Edit.edit
  3. Select Administrators or the active user profile from the list, then tick the checkbox for Full control under Allow, and click OK to save the changes.full control   

Alternatively, you could modify the ownership for the subdirectory of oraInventory and configure it correctly. 

3. Re-register Oracle Home

When OPatch LsInventory returns the OPatch failed with error code 73 message, it’s likely that we are pointing to an incorrect OPatch inventory location or that Oracle Home is not attached to it.

To fix things, run the following commands: % cd $ORACLE_HOME/oui/bin % ./attachHome.sh

4. Manually move the files

When the CPU patches are not being installed, manually move the following files from the OPatch installation directory to the dedicated OPatch directory:

  • opatch.install
  • opatch.log
  • opatch.license
  • opatch.manual
  • opatch.properties
  • opatch.scripting
  • opatch.service
  • opatch.settings
  • opatch.version

5. Change the location of Oracle Home 

A system administrator reported getting the OPatch failed with error code 73 message with Weblogic 12c when Oracle Home was not set up correctly. Simply changing its location did the trick.

It should initially be in: /oracle/DRD/11203

Move Oracle Home to: /oracle/DRD/112_64

And do make sure that the ORACLE_HOME environment variable is stored in the same directory as Oracle.

6. Use the ignoreSysPrereqs switch

  1. Press Windows + S to open Search, type Command Prompt, then right-click on the relevant result, and select Run as administrator.command prompt
  2. Click Yes in the UAC prompt.
  3. Set up the OPatch installation folder.
  4. Now, run the following command: OPatch -ignoreSysPrereqscommand to fix opatch failed with error code 73
  5. Wait for the command to execute and check whether the OPatch installation completes successfully. 

7. Contact Oracle support

When nothing else works, the last option is to contact Oracle support. Maybe it’s a bug in the latest patch, and if others, too, have reported the same, the support team would know.

Even otherwise, they are well equipped to handle such queries and know what issues could trigger the OPatch failed with error code 73 message.

While there are a lot of underlying causes behind the error, including a few patch conflicts, things are usually easy to fix.

Remember, it’s better to download updates over a stable and fast Internet connection to avoid missing critical files or corrupting any in the process.

Tell us what helped you fix the error in the comments section below.

Todd Howard writes internal thank you letter to Xbox, Bethesda teams ahead of Starfield launch

Todd Howard has penned an internal memo for staff at Microsoft, Xbox and Bethesda just ahead of Starfield’s early access release. The letter begins,

I knocked on Robert Altman’s door. “Got a few minutes?”

“Sure.”

It was early 2013, we were developing Fallout 4, and Skyrim was still enjoying enormous success. I was there to pitch him on our next game. It would not be a sequel to our current games, (he looked concerned), but a grand space RPG and our first new IP in over 25 years (looks curious). It would delve into creation and the search for our place in the universe (slight twinkle). You would explore the galaxy in ways only video games can do. And it would be called – Starfield. (Smile)

“Sounds fantastic.”

Starfield Screen Shot 15

Howard continued by saying that “Robert would be the very first to believe in us, no matter the situation.”

Altman, who was one of Zenimax’ co-founders, passed away in 2021. And while he didn’t live to see the project come to fruition, Howard made sure to give recognition to Altman and all those without whom Starfield would never have happened, saying “It’s incredible to be at the moment where Starfield is finally launching this week. It only exists because everyone else believed as well.”

Starfield Screen Shot 12

Indeed the launch of Starfield will mark one of the most important occasions in Bethesda’s history, and both Xbox and Bethesda have a lot riding on the game, which is one of the most anticipated releases of the last decade.

In the letter Howard also acknowledges Microsoft Gaming CEO Phil Spencer specifically, thanking him for his support of “every game and every player.” The letter ends with a thank you to the “Xbox and Bethesda family.”

Starfield Screen Shot 13

Your enthusiasm and encouragement have meant the world to us. Creating this game has been one of the most challenging and thrilling experiences of our careers – a journey we’ll never forget.

Starfield reviews are about to go live as the embargo lifts later today. No matter the outcome, the release of a game of the size, scope and ambition of Starfield is a monumental achievement for Bethesda Softworks and the team at Xbox. Here’s hoping it lives up to our expectations!

Starfield
Starfield
Developer:
Bethesda Softworks
Price:
Free

Via Windows Central. 

Featured image via Game World Observer. 

Xbox Free Play Days: Dead by Daylight, LEGO 2K Drive and Tom Clancy’s Rainbow Six Siege

Xbox Free Play Days returns with yet another exciting lineup of games for Xbox Live Gold and Xbox Game Pass Ultimate subscribers to try out. This week’s Free Play Days event runs from Thursday through Sunday, September 3. Let’s go ahead and jump into the list.

Tom Clancy’s Rainbow Six® Siege

Engage in a tactical team-based shooter where superior planning and execution triumph. Tom Clancy’s Rainbow Six Siege features 5v5 attack vs. defense gameplay and intense close-quarter combat in destructible environments. This is a great opportunity for new players to try the full game for free, including all maps and modes. All your progress and Operators will carry over if you decide to upgrade to the full game. Save up to 75% off for a limited time!—Xbox Wire.

LEGO® 2K Drive (for Xbox One)

Welcome to Bricklandia, home of a massive open-world LEGO driving adventure. Race anywhere, play with anyone, build your dream rides, and defeat a cast of wild racing rivals for the coveted Sky Trophy! Unkie’s Emporium is open for business during Free Play Days, and any in-game purchases will be available during the event. When the event ends, any purchases made will only be available if you purchase LEGO 2K Drive and log in with the same 2K Account you originally used to make those purchases.—Xbox Wire.

Dead by Daylight

There’s no better time to step into The Fog. Dead by Daylight is free to play this weekend with up to 50% discounts on the base game and select DLCs until September 12. In addition, the Alien Chapter is now available on Xbox, featuring a new Killer – the Xenomorph, and a new Survivor – Ellen Ripley.—Xbox Wire.

Learn more about Xbox Free Play Days

Xbox Free Play Days brings a new slate of games nearly each and every week for members. Learn more about the program over on the Xbox Free Play Days FAQ page.

Featured image via Xbox Wire. 

Microsoft Edge’s new hidden feature discovered on Reddit

Microsoft’s Edge web browser has introduced a useful and relatively unknown feature called “Copy Video Frame.” This feature enables users to capture screenshots of web-based videos, even when the video is not in full-screen mode, in full resolution. It is particularly useful for users who need to capture specific frames from videos without losing quality, especially those found on YouTube.

This feature was discovered by a Reddit user named u/MrElectrifyer, who noticed it while trying to switch to Picture in Picture mode. This user found that the “Copy Video Frame” option captures the video frame in its original resolution. It could be particularly useful for content creators or anyone who wants to share high-quality stills from videos.

09Fwcy8Cizkb1

In addition, Microsoft revealed more features to its Edge browser. One upcoming feature is the Smart Find, set for a September release. This feature improves user search experiences by suggesting related words and phrases, even if the initial search term is misspelled. This could potentially save users time and effort when searching for information online.

How to use the new Windows Backup App on Windows 11/10

In a move to ease the backup and restore, Microsoft has introduced a new Windows Backup app for Windows 11 and 10 users. The app, which is currently available only for Windows Insiders, aims to simplify the backup process by allowing users to securely store their data in the cloud, ensuring that their valuable information remains accessible and protected.

In this guide, we will learn how to install and use the new Windows Backup app on Windows 11 and Windows 10.

What is the Windows Backup app?

The Windows Backup app is a recently launched utility designed to facilitate seamless data backup and restoration for Windows 11 and Windows 10 users. This innovative application empowers users to protect their critical information by securely storing it in the cloud, ensuring that it remains readily accessible and shielded from potential data loss scenarios.

Prerequisites for installing Windows Backup

To fully capitalize on the benefits of the Windows Backup app, it’s essential to ensure that you’re utilizing the appropriate environment.  Microsoft has seamlessly integrated this app into the latest build.

On Windows 11, you need to install at least Windows 11 Insider Preview Build 23466. Whereas on Windows 10, you need to be at least on Windows 10 KB5029331 version.

Windows 11 Specifications

How to use the Windows Backup app

Leveraging the Windows Backup app is a user-friendly process that simplifies the complexities of data protection and restoration. To effectively utilize this app, follow these step-by-step instructions:

Step 1: Enable Windows Backup from Settings

Before launching and starting back up using the Windows Backup app, launch Windows settings and navigate to Accounts  > Windows backup. Here, turn on the Remember my apps and Remember my preferences options.

Turn On Windows Backup From Settings

Step 2: Open the Windows Backup App

Start by launching the Windows Backup app, which can be found within the Windows operating system. You will be able to search and open the app only if you have installed the minimum required version of Windows 11 or 10.

launch Windows Backup

Step 3: Check What Categories are being Backed up

Upon accessing the app, you’ll be presented with a list of categories that will be backed up. These categories encompass various folders such as Desktop, Documents, Pictures, Videos, Music, and even app preferences. Importantly, the app seamlessly syncs data with your OneDrive account, ensuring that files are stored safely in the cloud.

Step 4: Initiate the Backup Process

Now, proceed by clicking the Back up button at the bottom right. This action triggers the app to initiate the backup process. Allow the application some time to efficiently save the chosen files to your OneDrive account.

Back Up button

Step 5: Effortless Data Restoration

In scenarios where data restoration is required, whether due to data loss or the setup of a new system, the Windows Backup app provides a straightforward process. Users have the option to choose the source PC from which they wish to restore data. This feature is particularly useful when migrating to a new computer and desiring the familiarity of your previous setup.

Restoring using Windows Backup

As you can see, the Windows Backup app extends its functionality beyond file backup. It also encompasses crucial Windows settings, including accessibility preferences, language configurations, personalization choices, and even Wi-Fi network credentials. This comprehensive approach ensures that both files and essential system configurations are backed up.

What are the limitations of the Windows Backup app?

Despite its merits, the Windows Backup app does exhibit certain limitations that users should be aware of:

  • Limited Control Over App and Setting Selection: In comparison to some third-party backup solutions, the app doesn’t offer extensive control over which apps and settings are included in the backup. Users are unable to individually select apps or settings for backup, making it a more basic backup solution.
  • Restore Process Lacks Specific Folder Selection: While users can toggle specific folders for backup, this option is notably absent during the restore process. Consequently, users are unable to selectively restore specific folders, potentially causing inconvenience.
  • Exclusion of Desktop Apps from Backup: Notably, the app excludes desktop apps available on the Microsoft Store and Android apps installed on your computer from the backup process. This exclusion could present challenges, particularly for users who rely on specific work-related apps that would need to be set up anew.
  • Exclusively Supports Personal Microsoft Accounts: The Windows Backup app solely caters to personal Microsoft accounts and is incompatible with Work or School accounts. This limitation restricts its applicability in professional environments.

Keep your system backed up

While it may not be a comprehensive solution for all backup needs, the Windows Backup app is a step towards ensuring the security and accessibility of valuable data for users across the Windows ecosystem. Its features offer convenience and essential backup options, but it does come with limitations, such as limited app and setting selection and exclusion of certain app types. As this is an early version of the app, it’s hopeful that Microsoft will continue to refine and enhance its functionalities based on user feedback.

HP joins the 16-inch laptop club with the Pavilion Plus 16 powered by Windows 11

With the advent of improved industrial designs, smaller chips, quieter fans and improved battery technologies, large consumer-grade laptops are coming back into style and HP is joining the crowd with the release of the HP Pavilion Plus 16 laptop.

While the Spectre line tends to encompass HP’s attention for consumer offerings, the new Pavilion Plus 16 will offer customers a similar level of creature comforts as the more mainstream laptop such as a 16-inch 2.5K WQXGA display panel powered by Intel’s latest 13th Gen Core i7 processors that are also Evo certified, or an AMD Ryzen chips with optional AI engines onboard.

To help take advantage of the larger real estate, HP is stuffing an NVIDIA RTX 3050 GPU in the Pavilion Plus 16 which should make content creators, graphics designers, architects, and data scientist students happy.

HP is also offering a 5MP web cam that’s Windows Hello enabled for quick logins and security convenience as well as up to 16GB of LPDDR5x-5200RAM to start with.

The entire package comes in at 4.19 lbs. and will retail starting at $849.99 when it hits shelves in October.

How to use Microsoft 365 Copilot in Business Chat

Every individual seeking convenience in productivity and efficiency in workflow might find great interest in a recent announcement from the tech giant Microsoft. It declared its new AI-powered assistant, Microsoft 365 Copilot, an innovative technological addition to its office-related suite of applications and services.

Microsoft has presented Copilot as a powerful tool that can enhance productivity. “It turns your words into the most powerful productivity tool on the planet,” claims the tech giant. Quite a fascinating proposition, considering that typing is practically second nature to us today.

The Magic of Copilot

Copilot is an AI-powered tool that can assist users in completing repetitive tasks that we often find time-consuming. It can help in tasks such as writing lengthy documents, summarizing lengthy emails, or preparing detailed presentations.

It uses the latest GPT-4 language model, which is similar to the technology available on Bing Chat. With its advanced AI technology, Copilot can significantly enhance productivity and make work less of a chore.

One of the notable features of Copilot is the Business Chat. Integrated throughout the Microsoft 365 applications, this bot will scan and peruse your business data and applications to find relevant data you require.

With Business Chat, searching for information becomes a thing of the past as Copilot takes the manual labor out of data retrieval and tracking.

How to enable Microsoft 365 Copilot in Business Chat

  1. Locate the Copilot icon positioned on the chat window and click on it.
  2. Provide Copilot with the necessary permissions to access your apps and data.
  3. Once these steps are completed, you can begin interacting with Copilot using natural language commands.

How to use Microsoft 365 Copilot in Business Chat

Business Chat is a highly interactive tool that integrates across various platforms like LLM, Microsoft 365 apps, and your personalized data – from your calendar to emails, chats, documentation, meetings, and contacts. This enables unique functionalities that were previously unattainable.

For instance, a simple instruction such as “Kindly update my team on our modified product strategy” can trigger Business Chat to create a comprehensive status update, incorporating inputs from the day’s meetings, emails, and chat discussions.

It can be accessed on Microsoft365.com, Bing, and inside Microsoft Teams. And using it is as simple and as natural as chatting. You can input your questions just as you would to a human, and the bot will understand and respond accordingly.

How It Works

When a query poses in natural language within a Microsoft application or Business Chat, the system starts processing it while enriching the prompt with relevant databases retrieved from emails, meetings, files, or various other sources leveraging the Microsoft Graph.

An enriched prompt, now fortified with original questions and additional data, is sent to a Large Language Model, or ChatGPT, a cutting-edge AI system. It formulates an appropriate response to the question, tailoring it further to the original prompt’s context.

Thus, the response you get varies from Teams, Word, and Excel. All these features are managed under one sophisticated architecture termed “The Copilot System.”

For users, this means quick access to information and data with minimal effort, allowing you to concentrate on key aspects of your business operations. It helps create an unparalleled customer experience, combining advanced technology consisting of natural language processing, machine learning, and data analytics.

Xbox users may soon be able to automatically upload captures to OneDrive

A new feature has come to the Xbox Insider Program’s Alpha and Alpha Skip-Ahead rings that will allow users to upload game clips and screenshots to OneDrive cloud storage.

As reported by The Verge, the new feature will also let users upload existing captures to OneDrive as well, with the option to upload your entire capture library or only selected captures. By default, video clips will upload to the videos folder in OneDrive, with screen captures going to the pictures folder. 4K video uploads are being excepted in current testing.

Xbox Controller Image Custom

As with any feature that gets tested in the Xbox Insider Program, this isn’t guaranteed to reach a public launch, though it seems likely. The ability to access captures through OneDrive’s cloud storage would add a whole new layer of convenience for Xbox players. Alternatively, captures can be accessed in a similar manner across devices via the Xbox App on mobile and PC platforms.

Sony to increase PlayStation Plus annual membership prices

Sony has announced that it will be bumping up the annual cost of its PlayStation Plus subscriptions. In a statement on the PlayStation site’s blog,

We also wanted to let you know that starting September 6 we will be increasing the price for PlayStation Plus 12-month subscriptions globally across all benefit plans. This price adjustment will enable us to continue bringing high-quality games and value-added benefits to your PlayStation Plus subscription service. 

These price changes are as follows:

  • PS Plus Essential: $80 annually (up from $60)
  • PS Plus Extra: $135 (up from $100)
  • PS Plus Premium: $160 (up from $120)

These considerable price hikes take effect starting on September 6. For current PS Plus members, they’ll take effect upon annual subscription renewals on or after November 6. Monthly and quarterly subscriptions don’t seem to be affected by the change. Even with the price increase, these annual subscriptions will still be less expensive than paying monthly over the course of a year.

The move comes just a couple months after Microsoft elected to increase the cost of its Xbox Game Pass service. Also, it announced that Xbox Live Gold will transition into a new (slightly more affordable) Game Pass tier known as Xbox Game Pass Core. This change will also take place in September.

Lenovo Legion 9i with liquid cooling & pinnacle specs, arriving this October

It seems the wait for the mighty Lenovo Legion 9i is nearly over, with the laptop targeted for an October 2023 unveiling, possibly at IFA 2023 Berlin.

We are positively buzzed to piece together all the technical specifications, availability, price, and of course, the latest product imagery of the 16-inch laptop. But first, let’s dive into its groundbreaking cooling system.

Lenovo Legion 9i: Liquid Cooling

What sets the Legion Coldfront, Legion 9i’s self-contained liquid-cooling system, apart from other competitors like the CyberPowerPC Tracer VII Edge is its integrated cooling pump which requires no external attachment. The device could be available for €4,499, as reported by MSPowerUser.

It is purportedly the first such assembly in a 16-inch laptop, with a staggering 230-watt thermal design power (TDP). Backed by a triple-fan air cooling system furnished with 6,333 individual intake vents, the laptop ensures the perfect conditioning for a high-stakes gaming session.

With the complete cooling system housed in a 2.56kg laptop, Lenovo needed to design a dedicated A-cover case out of forged carbon chips, a testament to their expert engineering prowess.

Sight and Sound: Display and Audio Features

You’re in for a visually stunning treat with Lenovo’s PureSight 3.2K Mini-LED 16:10 display, boasting a 165 Hz Variable refresh rate. The alternating between DCI-P3 and sRGB is made easy with the pre-installed X-Rite software. The LA-2 AI chip powers SmartFPS, dynamically adjusting the GPU and CPU in response to real-time frame rate monitoring.

Enhancements are not just restricted to sight but sound too. With the Tobii Horizon software’s gearless head tracking, the immersive nature of gaming is significantly heightened.

Lenovo Legion 9i: Specs to Swoon Over

Information about Legion 9i specs has been floating around for a while, but here’s the final roundup, comprising everything a buyer might want to consider.

While similar in some ways to the Lenovo Legion 7i, the Legion 9i has conspicuous advantages, including superior cooling, higher display resolution, and reduced weight. And now, for the grand reveal of the complete specifications:

Processor | 13th Generation Intel Core i9-13980HX |
Graphics | NVIDIA GeForce RTX 4090 Laptop GPU 16GB GDDR6 (150W+25W Boost) |
Display | 16″ 3.2k Mini LED 16:10 165 Hz |
Memory | Up to 64GB 5600Mhz Dual Channel DDR5 |
Storage | Up to 2TB PCIe 4.0 NVMe SSD |
Operating System | Windows 11 Pro/Windows 11 Home |
Battery | 99.99WHr, Rapid Charge |
Weight | Starting at 2.56kg (5.64 lbs) |
Cooling | Legion Coldfront Liquid Cooling |

Aesthetic Excellence

Beyond these eye-popping specs, the Legion 9i is a piece of art, featuring a futuristic, forged carbon-chipped luster adorned by a backlit keyboard. Lenovo’s audio enhancement software, Nahimic by SteelSeries, ensures high-quality in-game sound.

Lenovo’s Vantage tool, to eke out every bit of the system’s performance, coupled with Lenovo Arena, for easy game management, sweetens the deal further. The icing on the cake is the three-month subscription of Xbox Game Pass Ultimate that comes bundled with the machine.

All eyes are now on the IFA 2023 Berlin. The Lenovo Legion 9i promises to be a heavyweight contender in the laptop world with its advanced features and ground-breaking design. Will it live up to the hype? Only time will tell.

Via MSPowerUser 

Fix: Keyboard Shortcuts are not Working in Outlook

Keyboard shortcuts are the quickest way to navigate Windows 11 and its apps, especially when multitasking. The same applies to programs and apps, Outlook being a prime example. Many users work in at least one other app while using Microsoft Outlook.

That makes quick actions and shortcuts necessary, and productivity takes a big hit when these fail. That’s the case with some Outlook users complaining of shortcut problems in the Outlook desktop and web app.

We’ve researched the topic and found some working methods to fix this problem, but first, let’s see what’s causing it.

Common causes of shortcuts not working in Outlook:

  • Outlook Add-ins Conflicts: Some add-ins might conflict with Outlook’s default settings.
  • Keyboard Language Settings: Incorrect keyboard language settings can lead to unresponsive shortcuts.
  • Corrupted Outlook Profile: A damaged user profile might be the culprit.
  • Outdated Software: Running an older version of Outlook might cause compatibility issues with shortcuts.
  • Faulty upgrade to new Outlook: Upgrading to the latest version might temporarily cause this

How do I fix shortcuts that aren’t working in Outlook?

1. Disable conflicting add-ins

  1. Open Outlook.
  2. Click on File. Then, go to Options > Add-ins.
  3. In the Manage dropdown, select COM Add-ins and then click Go.
  4. Uncheck the boxes for any suspicious add-ins.
  5. Click OK and restart Outlook to see if the problem is resolved.

2. Check keyboard language settings

  1. Open Search and type language, then click Edit language and keyboard options.
  2. Under Preferred languages, click on the three dots next to your commonly used input language > Language options.
  3. Now, check if all the language features are installed. If some are missing, download and install them by clicking on Install.
  4. Scroll down and under Keyboards, make sure the selected input methods support keyboard shortcuts. If not, add another layout from the Add a keyboard button.
  5. Restart the computer and check if the problem is solved.

3. Repair corrupted Outlook profile

  1. Open Search, type Control Panel, and click on the first result.
  2. Go to User Accounts > Mail (Microsoft Outlook).
  3. In the new window that opens, click on Email Accounts.
  4. Under Name, click on the profile that needs repairing.
  5. Click on Repair.
  6. Follow the on-screen instructions, complete the process, and restart Outlook.

4. Update Outlook to the latest version

Note icon NOTE
We recommend trying this only as a last resort, as some upgrading to the latest version caused the problem in the first place.
  1. Open Outlook and click on File.
  2. Go to Office Account > Update Options > Update Now.
  3. Wait for the update to complete, then restart Outlook.

Using one or more of the above methods should help you solve the problem and return to your daily routine as soon as possible. Know that this issue is common enough, and you might also bump into it on Microsoft Word; if that’s the case, we’ve also found some quick solutions to fix it.

After fixing the issue, take your productivity to the next level with the 50 most used Windows 11 shortcuts. These will help you in Outlook and all other daily programs. For more information on shortcut issues, we advise you to check our Ctrl + D shortcut is not working guide.

If you found other ways to fix your keyboard shortcuts when not working in Outlook, share them with the community in the comments section below.

How to Check Monitor Model on Windows 11

In this piece, we’ll show you how to check your monitor model on Windows 11 as well as related specs.

Besides the monitor name and the graphics card it’s connected to, you may need information related to the Active signal mode, Bit depth, Color format, and Color space.

All this can be found in the display settings, but a third-party tool is usually more helpful. Let’s learn about both!

How do I find my display information on Windows 11?

1. View the Display settings

  1. Press Windows + I to open the Settings app, and click Display on the right in the System tab.display
  2. Scroll down and click on Advanced display under Related settings.
  3. You will now find the various configurations listed under the monitor name set as Display 1. This includes:
    • Desktop mode: Available display resolution and refresh rate
    • Active signal mode: Current display resolution and refresh rate
    • Bit depth: Number of bits required to indicate the color of a single pixel in an image. The higher it is, the better. Modern monitors have it at 8 or higher.
    • Color format: Current color format. It should be RGB in most cases.
    • Color space: Signifies the array of colors the monitor can display. It could be Standard Dynamic Range (SDR) or High Dynamic Range (HDR).display information in Windows 11
  4. If you want to view the screen resolution or monitor information for another display, choose the monitor name from the Select a display to view or change its settings dropdown menu.another monitor
  5. To access the monitor settings in Windows 11, click on Display adapter properties for Display X, where X is the number assigned to the monitor.display adapter properties

The advanced display settings are one of the easiest ways to view the screen resolution settings and monitor details. Remember, it works for wireless displays as well.

2. Check the System Information app

  1. Press Windows + S to open Search, type System Information in the search box, and click on the relevant result.
  2. Expand Components from the navigation pane, and then select Display.system information
  3. You will now find the display Resolution, Bits/Pixel, Color Table Entries, and Color Planes. Besides, there will be details for the available graphics adapter, including Adapter RAM and display Driver Version.basic display information in Windows 11

The System Information app is a built-in tool that lists everything about the PC in an orderly manner. Apart from the monitor details, you will also find information related to Sound, Network, Storage, and Printing, amongst others.

3. Use a third-party software 

  1. Go to Speccy’s webpage and download the free version of the tool. 
  2. Run the setup and follow the on-screen instructions to complete the installation.
  3. Launch Speccy, head to Graphics from the navigation pane, and you will find the monitor name and other relevant details listed here.view display information in Windows 11 using Speccy

While the built-in settings do the job, you could use Speccy, a reliable PC information software, to find the display information, monitor name, and specs in Windows 11.

4. Search the Internet

If you want to find out more details about the monitor, say compatibility, various features, or things only advanced users require, head to the manufacturer’s website and open the monitor’s official page. It will list out all the information you would ever need. 

Even third-party sellers and e-commerce platforms provide device details, so you could check that as well. But we wouldn’t blindly rely on the information provided on these websites.

How do I rename my monitor on Windows 11?

Tip icon Tip
The process requires editing the Registry. We recommend you be extra cautious and create a restore point before proceeding to revert the changes if something goes wrong.
  1. Press Windows + X to open the Power User menu, and select Device Manager from the list of options.
  2. Expand the Monitors entry here, right-click on the monitor name you want to change, and select Properties.properties
  3. Head to the Details tab, and from the Property dropdown menu, choose Driver key.driver key
  4. Right-click on the alpha-numeric string that appears, and select Copy.copy key
  5. Now, press Windows + R to open Run, type regedit in the text field, and hit Enter.regedit
  6. Click Yes in the UAC prompt.
  7. Paste the following path in the address bar and hit Enter: Computer\HKEY_LOCAL_MACHINE\SYSTEM\ControlSet001\Enumnavigate path
  8. Select the Enum key in the left pane, press Ctrl + F, paste the Driver key you copied earlier, and click on Find Next.find driver key
  9. You will now be redirected to the registry keys for the monitor. Double-click the FriendlyName string, enter the desired name in the Value data text field, and click OK.FriendlyName
  10. Once done, head back to Device Manager, click the Action menu, then select Scan for hardware changes, and the new monitor name should now reflect.

It’s neither that easy to change the name of the built-in display or an external monitor in Windows 11, nor do we recommend that you do it frequently. But just as you can rename the PC, you can also change the monitor or display name in Windows 11.

With proper knowledge of the monitor details, specifications, and other display information, you would be in a far better position to asses things. Besides, you may want to check the other PC specifications for an even deeper understanding of the computer.

Do tell us in the comments section what prompted you to check the display information in Windows 11 and whether the methods listed here proved helpful. 

5 Ways to Create a Batch (.bat) File on Windows 11

Performing repetitive tasks or running a series of commands might be essential to your computing routine, but it can take a lot of time. That’s where creating a Batch (.bat) file on Windows 11 comes to the rescue.

In this guide, we will discuss step-by-step instructions to create a batch script file on Windows 11 to automate tasks while reducing errors and saving time.

Batch files can be beneficial for novice and experienced users:

  • Automate repetitive tasks and streamline workflows, saving significant time & effort.
  • Consistent execution of tasks, reducing human error and improving efficiency.
  • Carry out specific tedious tasks like backups, system configuration, software installation & more.
  • Help you execute commands on multiple computers at the same time.
  • Can carry out complex procedures that involve multiple steps.
  • Are portable and can be shared with other computers.

How do I create a batch file in Windows 11?

1. Create a basic batch file

  1. Press the Windows key, type notepad, and click Open.Open Notepad create a batch file Windows 11
  2. Type the following lines:
    • @ECHO OFF
      ECHO Hi, this is my first batch file.
      PAUSE
  3. Here @ECHO OFF – Disables the display prompts & shows content; ECHO – Prints the text after the space; PAUSE – Keeps the window open after executing commands.
  4. Go to File and click Save as.File - Save as
  5. Name the file Test.bat, and for Save as type, select All files, then click Save.Notepad_Save file
  6. Once created, locate the file and double-click to open it. On the Command Prompt window, you will see the Hi, this is my first batch file message.WindowsTerminal_ run the script

You can also save the .reg files in .bat file format to automate the modification of your registry files, which can minimize the risks involved.

2. Access network drives and folders

  1. Press the Windows key, type notepad, and click Open.Open Notepad create a batch file Windows 11
  2. Type the following line after replacing the driver letter F with the one you want: Echo Create new F: drive mapping
  3. Copy & paste the following command after replacing the Network path with the path you want to map to: @net use F: \Network path /persistent: yes
  4. Repeat the process if you want to add multiple drives. Type the following lines:
    • : exit
      @pause
      Notepad_crreate a batch file on Windows 11
  5. Click File, then choose Save As. Now name the file and add a .bat extension. For Save as type, select All files, then click Save.Notepad_Save file
  6. Once the file is created, locate and double-click it to execute the task.

3. Add user inputs

To create a batch file that takes user input and displays a customized message, follow these steps:

  1. Press the Windows key, type notepad, and click Open.Open Notepad create a batch file Windows 11
  2. Type the following script:
    • @echo off
      : start
      set /p input = Enter the Name:
      echo %input% We are thrilled to welcome you to the event!
      pause
      go to start
      Notepad_user inpiut commands  create batch file Windows11
  3. You can change the Enter the Name instruction and the personalized message you see after that as per your task & preferences.
  4. Click File, then Save As. Name the file, add a .bat file extension and for Save as type, select All files, then click Save.Notepad_Save file
  5. Once the file is created, locate and double-click it to open it in the Command Prompt & execute the task.

4. Automate repetitive tasks

  1. Press the Windows key, type notepad, and click Open.Open Notepad create a batch file Windows 11
  2. Here, we will show you how we automated the process of opening frequently used apps on our computer.
  3. This is the script we used to open Google Chrome, Word, Slack, and ShareX:
    • @echo off
      cd "C:\Program Files\Google\Chrome\Application\chrome.exe"
      start chrome.exe
      start – "C:\Program Files\Microsoft Office\root\Office16\WINWORD.EXE"
      cd "C:\Program Files\ShareX\ShareX.exe"
      start ShareX.exe
      Exit
      Notepad_create a batch file Windows 11
  4. You can use the script, but replace the app path with the one you want to open. Click the File menu and choose Save As.
  5. Name the file, add a .bat extension, for Save as type, select All files, then click Save.

5. Edit lines of code with the command window

  1. Press the Windows key, type notepad, and click Open.
  2. This script can help you replace lines in a simple code; let’s assume you have a file named code.txt, which has oldtext mentioned multiple times, and you want to replace it with newtext.Notepad_edit commands create a batch file Windows 11
  3. For that, you can use this script:
@echo off

setlocal enabledelayedexpansion

set "inputFile=code.txt"
set "outputFile=code_modified.txt"
set "oldText=oldtext"
set "newText=newtext"

if not exist "%inputFile%" (
    echo Input file not found.
    exit /b
)

(
    for /f "usebackq delims=" %%a in ("%inputFile%") do (
        set "line=%%a"
        set "line=!line:%oldText%=%newText%!"
        echo !line!
    )
) > "%outputFile%"

echo Lines with '%oldText%' replaced by '%newText%' have been written to '%outputFile%'.

endlocal

You need to change code.txt with your file name and replace oldtext and newtext with the lines you want to use.

Now save the file using these steps:

  1. Click File and choose Save As. Name the file, add a .bat extension, for Save as type, select All files, then click Save.Notepad_Save file
  2. Locate and double-click the file to open it in the Command Prompt window & execute the task.

Now that you have created .bat file, you can use the Windows Task Scheduler to schedule it to run automatically at specific intervals.

How do I edit a batch file in Windows 11?

To edit a batch file, you can open Notepad and click File>Open, or you can locate and right-click the file and choose Edit from the context menu.

You can make the required changes once the file is opened in Notepad. Once edited, click Ctrl + S to save the changes.

To run the batch file in Windows 11, you can locate it in the File Explorer window and double-click it or open Command Prompt and use the cd command to go to the folder where the batch file is located, then type the batch file name and press Enter.

You should always save the batch script file to an accessible location like your user account’s Document or Desktop folder.

Remember that the batch files can execute commands, interact with your system, automate tasks, and edit simple codes; however, if you want to do sophisticated editing or code manipulation, we suggest you use a programming language like Python or PowerShell.

What tasks would you carry on using batch files? Feel free to mention them in the comments section below.

Fix GTA Online Not Working with VPN [5 Tested Methods]

Like other many other video games, GTA Online is banned in some countries, such as United Arab Emirates, Thailand, Saudi Arabia, and Malaysia.

On top of that, it’s necessary to opt for proper security tools to protect your network traffic from getting intercepted by deceptive users.

That’s where VPNs come into play; they arrange the perfect gaming environment by providing a safe, lag-free experience plus bypassing bans imposed by governments.

Unfortunately, many users report facing connectivity issues when attempting to play GTA Online through a VPN server.

To be specific, when they try to play a game after connecting to a VPN, they have issues such as the game failing to connect to the server or experiencing extremely high ping.

Although frustrating, the regarded issue is arguably manageable. Keep reading to find out why the error surfaces and how to fix it.

Why is GTA Online not working with your VPN?

The gaming companies do not want gamers to use VPNs to circumvent their rules; thus, you’re running into problems.

Here are a few reasons behind GTA Online not working with VPN:

  • Blocked VPN traffic: Most popular gaming companies implement VPN-prohibiting laws to bypass IP Bans, regional pricing, etc. As a result, it is possible that the GTA Online developers have blocked the VPN you are using from accessing the game’s servers.
  • Lack of quality servers: If your VPN is having trouble connecting you to GTA Online, it’s either very slow or it’s actually not doing a great job in actually hiding your data.
  • Insufficient virtual locations: Gaming companies block known VPN IP addresses to prevent users from misusing such services. That is why it’s best to pick a reputable VPN provider that offers thousands of servers from different countries.

Now let’s see how to fix the issue once and for all.

How to fix GTA Online not working with VPN?

Although it’s already clear how to work around the error, let’s dive into the walkthrough and fix it together.

1. Connect to a different server

As mentioned, many gaming companies, including GTA Online, restrict VPN use on their platform by blacklisting the servers.

So, it’s best to test different servers until you find one that works.

It is worth noting that one of the main advantages of premium VPNs is their obfuscated servers which bypass VPN-detecting systems.

So, your chances of finding a working server during your initial attempts are higher.

Here’s how it goes:

  1. Click on the Start Menu, type your VPN provider’s name, and press Enter.
Opening NordVPN
  1. Click the Arrow icon, scroll down to the server list, and select one.
select vpn server
  1. You’ll now get connected!
nordvpn connected

Note: Changing server locations is somewhat the same for all VPN programs. Please get in touch with your provider for further assistance.

Switching servers is the most straightforward solution in this article. So, repeat the steps above until you find a server that works with GTA Online.

2. Clear your browser cookies

Although cookies primarily aim to help websites provide a better user experience, they collect information like your IP address.

So, it’s best to clear these cookies so websites can no longer recognize your previous IP.

Here’s how to do so:

  1. Click on the Start Menu, type Chrome, and press Enter.
open chrome from start menu
  1. Select the Ellipsis icon from the top right corner.
chrome kebab menu
  1. Hover over More Tools and hit Clear browsing data.
chrome clear browsing data
  1. Pick the Time range, check the box next to Cookies and other site data, and choose Clear data.
chrome clear cookies

Note: Clearing browser cookies is somewhat the same for all browsers. Please get in touch with your support line for further assistance.

While browser cookies mean well, they can save errors and display formatting and loading issues on websites even after fixing them.

3. Change your VPN provider

Low-tier VPN providers negatively impact your performance and often get you banned from the game or blocked by websites.

In contrast, a reputable provider delivers high-quality servers and advanced security measures.

One of these features includes Obfuscated Mode, which hides the fact that you’re using a VPN and avoids getting restricted on services like GTA Online.

Here’s how to download and install NordVPN:

  1. Go to the NordVPN order page and pick the desired subscription period and the security package among Standard, Plus, and Complete.
Picking NordVPN subscription plan
  1. Choose a payment method and click Continue to purchase the license.
nordvpn enter billing information
  1. After receiving an activation email, go to the NordVPN download page and hit Download App.
download nordvpn
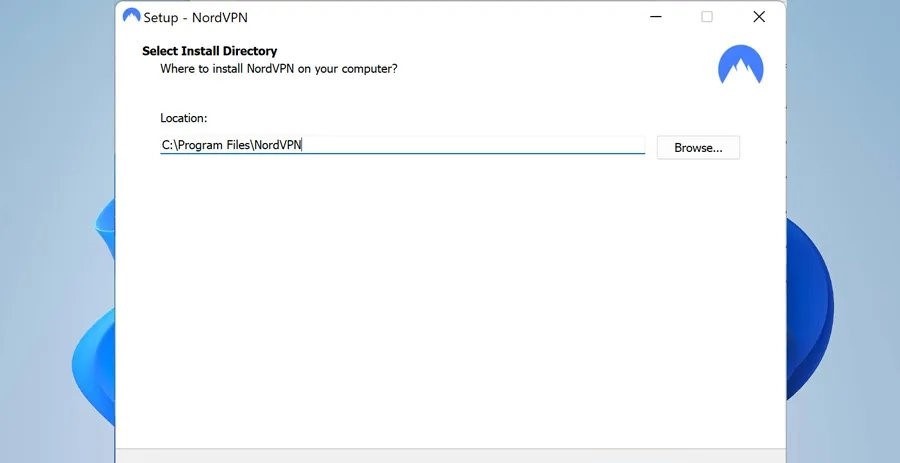
  1. Launch the downloaded file and follow the on-screen instructions to Install it.
installing nordvpn
  1. When the program loads, choose login and enter your credentials.
nordvpn log in
  1. Click the Arrow icon, scroll down to the server list, and select one. Enjoy!
select vpn server

NordVPN is a premium choice for gamers looking to enhance their experience. It provides 5500 high-quality servers in 59 countries that won’t get you blocked on platforms like GTA Online.

It is worth noting that, NordVPN is great for GTA and a tested way to fix online mods like RAGE MP connectivity issues.

NordVPN

Switch to this top-tier VPN to get rid of any GTA Online issues without being detected!
Check price Visit Website

4. Uninstall and reinstall your VPN software

Reinstalling computer programs resets them to their default configuration and removes possible conflicts. Accordingly, it’s best to do so with your VPN software to resolve connectivity issues and access GTA Online.

Here’s how to uninstall and reinstall your VPN.

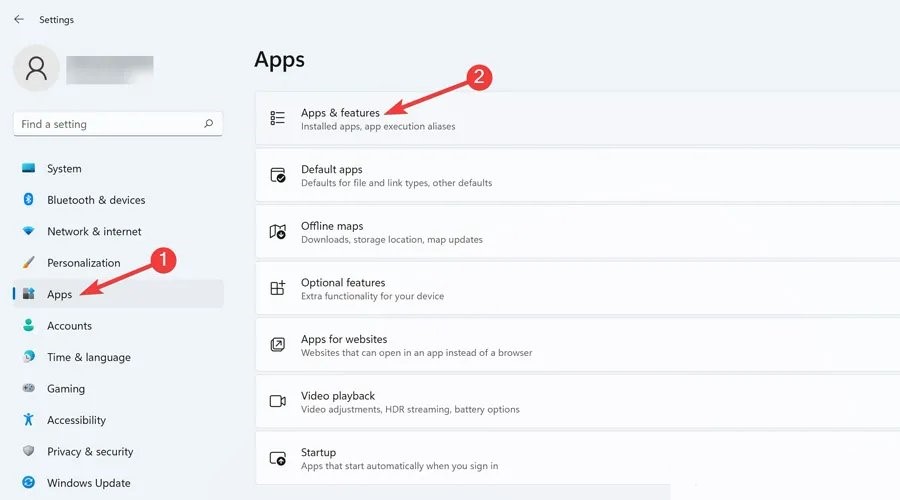
  1. Right-click the Start Menu and select Settings.
  1. Click on Apps and open Apps & Features.
  1. Find your VPN from the list, click on the three dots to open the drop-down menu, and choose Uninstall.
  1. Go to the VPN’s download page and hit Download App.
  1. Launch the downloaded file and follow the on-screen instructions to Install it.
install nordvpn

Your VPN now runs with default configurations and should connect you to GTA Online servers with no hassle.

5. Contact a support team through your VPN

If you have yet to find a way to fix GTA Online not working with VPN even by using the guidelines in this article, you have no choice but to contact your provider and discuss the matter with them.

  1. Go to your VPN’s contact page and choose Let’s Chat or Email Us to contact support.
nordvpn customer support
  1. Explain the error clearly and wait for a response.
nordvpn customer support chat

After receiving an answer, follow the instructions provided by the support team to get rid of the error once and for all.

Wrap up

When GTA Online isn’t working with VPN, it can be extremely upsetting for fans of the game whose countries have banned it.

Alternatively, they may wish to play GTA lag-free and stay safe from DDOS attacks.

To fix this problem, all you need to do is try different servers to find the right that works for you, clear browser cookies, change your VPN provider to a reputable one, or reinstall the VPN software.

And finally, as a last resort try contacting your VPN provider support line. Follow the steps above and these methods will certainly solve your problem.

OneDrive Always Opens Two Instances? How to Stop it

OneDrive is a popular file hosting service developed by Microsoft. While it works fine for most users, a few persistently face issues with the service. And recently, some users came across a problem where OneDrive always opens two instances.

The two instances are visible in both the system tray and the navigation pane of the Windows File Explorer. In some cases, the first instance was logged in, while the other was not, and the latter basically had no files to show. It didn’t sync files or display the linked email address.

For those wondering, OneDrive is opening twice because you have set up both a personal and work/school account. The personal account has a greyed-out icon in the system tray, while the one configured for business/education is blue.

Also, incorrect Registry entries are often to blame when OneDrive is opening multiple times. Besides, a few who contacted Microsoft support were informed that it was a bug in the recently rolled-out OneDrive version and that a patch should be released soon.

Keep reading to find out how to fix two instances of OneDrive in Windows!

How do I stop OneDrive from opening twice?

Before we head to the slightly complex solutions, try these quick ones:

  • Restart the PC.
  • Make sure you are running the latest version of Windows.
  • Update the OneDrive app.
  • Check with the system administrator if they have set up OneDrive for Business.

In case none work, move to the fixes listed next.

Tip icon Tip
The first two solutions require making changes to the Registry Editor, which is tricky. So, we recommend you create a restore point to be able to revert the changes in case something goes wrong. Also, follow the steps as it is, and do not modify or delete any other keys/entries.

1. Delete the related Registry key

  1. Press Windows + R to open Run, type regedit in the text field, and hit Enter.regedit
  2. Click Yes in the UAC prompt.
  3. Paste the following path in the address bar and hit Enter: HKEY_CURRENT_USER\SOFTWARE\Microsoft\Windows\CurrentVersion\​Explorer\Desktop\NameSpace
  4. Locate any additional keys under NameSpace in the left pane, select each individually, and check what’s listed under the Data column on the right.namespace
  5. If there are multiple keys with the same entry under Data, right-click on each, and then select Delete.delete key to fix onedrive opens two instances
  6. Click Yes in the confirmation prompt.
  7. Restart the computer for the changes to apply.

Also, if OneDrive is running twice, and has distinct names, OneDrive – Personal and OneDrive Business Accounts, make sure you delete the desired registry key, i.e., whichever OneDrive account you don’t want appearing in the Windows Explorer. 

2. Modify the Registry

  1. Press Windows + S to open Search, type Registry Editor in the text field, and click the relevant search result.
  2. Click Yes in the prompt.
  3. Now, click the Edit menu, and select Find from the list of options.find 
  4. Enter OneDrive in the text field, select only Data, then tick the checkbox for Match whole string only, and click Find Next to initiate a search.find next 
  5. Keep pressing F3 or Fn + F3, depending on whether the Function key is locked, until you find the System.IsPinnedToNameSpaceTree DWORD. It should be listed under either HKEY_USERS or HKEY_CURRENT_USERS.
  6. Double-click the DWORD, enter 0 under the Value data field, and click OK to save the changes.change value data to fix onedrive opens two instances
  7. Restart the computer for the changes to apply.

The System.IsPinnedToNameSpaceTree DWORD could be stored under different paths in the Registry Editor, so we recommend you perform a search instead of manually locating it.

And if OneDrive still opens two instances, change the Value data back to 1 head to the next solution.

3. Unlink the other OneDrive account

  1. Choose the unwanted OneDrive entry in the system tray, click the gear icon, and then select Settings.settings 
  2. Now, go to the Account tab, and click on Unlink this PC.unlink this PC
  3. Click Unlink account in the confirmation prompt that appears.

When OneDrive opens two instances, and one reads OneDrive while the other reads OneDrive – Company Name, unlink the account you don’t want to show up in Windows 11.

4. Reset the OneDrive desktop app

  1. Press Windows + R to open Run, type the following command, and click OK: %localappdata%\Microsoft\OneDrive\onedrive.exe /resetreset to fix onedrive opens two instances
  2. Once the reset is complete, verify whether OneDrive still shows up twice.

5. Perform a system restore

  1. Press Windows + S to open Search, enter Create a restore point, and click on the relevant search result.
  2. Click the System Restore button.system restore to fix onedrive opens two instances
  3. Select the Choose another restore point option, and click Next.
  4. Pick a restore point from the list, preferably the one created the earliest, and click Next to proceed.restore point
  5. Verify the restore details, and click Finish to start the process.

If the OneDrive folder shows twice in File Explorer and has two instances in the taskbar, the last option is to perform a system restore. It will revert any recent changes to the PC that triggered the error without affecting the personal files.

How do I delete all OneDrive instances?

To delete all OneDrive instances, you could unlink the PC for all configured accounts. Another option is to set the Value data to 0 for the System.IsPinnedToNameSpaceTree DWORD in Registry found for the different accounts.

Besides, if you are not actively syncing files with OneDrive, go with another reliable cloud storage service and then disable OneDrive for good.

OneDrive remains a popular cloud file storage service, but issues with it on desktop and mobile devices seem to bother many, especially if it opens two instances or when OneDrive is not syncing on Windows.

A few also found OneDrive not opening, a problem triggered by misconfigured settings or local policies. So, unless it’s set up by the administrator, you can always switch to a more user-friendly option.

If you know any other fixes that work when OneDrive opens multiple times, drop them in the comments section below.

Microsoft introduces new ways of creating tables in Power Apps, powered by Copilot

The updated tables page in Power Apps is now available to all makers, thanks to Microsoft. The new feature incorporates recent innovations made to the home page and offers two new methods for table creation. These methods include conversation-based creation and one-click table upload from Excel files, both powered by Copilot.

We are excited to share with you the updated tables page experience, which is now generally available for all makers, the company said in a blog post.

Unfolding the Microsoft’s Updated Tables Page Experience in Power Apps

The new tables page experience in Power Apps promises a series of nifty features all bundled together in one efficient platform. It offers an opportunity to create tables utilizing a wide array of versatile options, recently added to the new home page.

Key among these features are the conversation-based table creation and a swift one-click table upload feature. Both these functionalities are powered by Microsoft’s intelligent assistant, Copilot.

Getting Started with the New Tables Page in Power Apps

When you access the updated tables page, you’ll find multiple options that cater to different needs, regardless of whether you’re a novice or an experienced user. The main tiles on the tables page are clickable, and each will take you on a unique journey to create a table that suits your requirements.

Users can now create new tables via dialogue or upload an Excel file. A click on Describe the new table opens up a communicative, AI-fueled avenue to create new tables, complete with pre-populated sample data. This innovative offering is brought to life by Microsoft’s Copilot.

If you want to create a new table from Excel data, choose the “Upload an Excel file” option and follow a few easy steps. If you would rather begin with a blank slate or a virtual table, choose the “Start with a blank table” or “Create a virtual table” options.

Currently, Copilot capabilities are only available in the U.S. region, but there are plans to expand to more regions in the future.

For the Advanced Makers

If you’re an advanced user and want more control over your table metadata, you can select the “Set advanced properties” option. This will give you access to the advanced table properties and launch the create table panel, giving you extensive control over your table.

The new tables page experience provides an exciting mixture of new features that revamp the table creation process. Let us know your thoughts in the comments section below.

Starfield “Children of the Sky” music video by Imagine Dragons releases

A new Starfield music video just dropped courtesy of Imagine Dragons. That’s right: Starfield now has a pop rock song. The track is titled “Children of the Sky,” and runs at 3:34 minutes.

The song is performed by pop rock band Imagine Dragons, as mentioned. The Las Vegas-based band is best known for hits like “Radioactive,” “Demons,” and “Whatever it Takes.” The group has won many accolades including three American Music Awards and nine Billboard Music Awards.

Imagine Dragons: From Home Studio to Shangri-La | Ableton

As for the video, it consists of various clips from the game and shows off just how stunning Starfield really is graphically, as well as showcasing the diversity of environments that will be offered up by the game’s 1,000 or so planets.

The video has been posted on both the band’s social media and Bethesda Game Studios’ Twitter.

This unconventional promotion comes just as Starfield’s early access period is just about to launch. For those who didn’t get the Premium Edition (including Xbox Game Pass players), Starfield will release on September 6 for Windows and Xbox Series X|S.

Starfield
Starfield
Developer:
Bethesda Softworks
Price:
Free

Featured image via EIP Gaming. 

Nine unique features of Bing Chat not available in ChatGPT

In the fascinating arena of AI, specifically chatbots, two powerhouses – Bing Chat and ChatGPT, both offspring of OpenAI’s technology – vie for dominance. Indeed, Microsoft’s significant investment in OpenAI influenced its decision to incorporate and contextualize ChatGPT into its distinct product, Bing Chat.

Although the two AI-powered chatbots share a common ancestry, there are critical variations that distinguish the two.

Here, we will explore nine impressive uses of Bing Chat that ChatGPT simply can’t match.

1. No sign-in required

When it comes to ChatGPT vs. Bing Chat, privacy concerns are a reality that cannot be ignored. Typically, AI chatbots require users to sign in for data collection, but Bing Chat operates differently.

Thanks to Microsoft, you can enjoy up to five initial prompts without having to create an account, which provides a level of anonymity that ChatGPT cannot match.

2. Access Web Results and Live Information:

While Bing Chat benefits from its integration with the search engine, allowing access to live, up-to-date information from the web, ChatGPT, in contrast, is unaware of ongoing events and lacks access to live information.

3. Multiple Chat Modes:

Bing Chat’s versatility is noticeable in its three chat modes, which lend a different sense to every interaction. Unfortunately, this variability is a feature that ChatGPT doesn’t offer, making it devoid of settings or fine-tuning options.

4. Free Access to GPT-4:

GPT-4, OpenAI’s latest language model, is capable of supporting image and multilingual text inputs. However, while you would need to purchase a ChatGPT Plus subscription to access this, Bing Chat generously offers free access.

5. Image Uploads to Bing Chat:

Along the lines of the aforementioned GPT-4’s image support, Bing Chat also allows you to upload images onto the platform, facilitating analysis, comparison, and discussion – something that ChatGPT lacks.

6. Image Generation:

Unleashing another powerful trait, Bing Chat can be urged to produce images. While OpenAI’s Dall-E is an impressive image generator, ChatGPT does not directly support this ability.

7. Summary of Web Pages and Documents:

Bing Chat’s integration with Microsoft Edge allows convenient article and document summaries. Users can review summaries and discuss them without leaving the pages, a feature not available in ChatGPT.

8. An In-Browser Office Assistant:

Bing Chat wears another hat as an in-browser office assistant. Need a summarised discussion in a Word document or a PDF file? Bing Chat has you covered, exporting your discussions directly into your desired file format. ChatGPT, however, leaves you to your own devices when it comes to documentation.

9. Entertainment Companion:

Bing Chat’s distinct ability to integrate with internet browsing permits an entertaining extension: it can help you choose a movie, find an appropriate streaming service, and let the entertainment begin. This is made possible with the Edge sidebar feature, turning Bing Chat into your personal entertainment assistant.

In summary, Bing Chat delivers a set of features that establish it as a versatile tool. From multi-modal support and document summarizing to movie recommendations and direct document exports, Bing Chat exhibits numerous additional functionalities absent in its communication counterpart, ChatGPT.

If optimally utilized, these features have the potential to enhance user interaction and productivity, providing a sophisticated and convenient usage experience for consumers.

Microsoft is looking to expand its Xbox Gaming AI team

A recent Microsoft job listing indicates that the company is looking to revolutionize video gaming with AI. The job description, titled “Principal Software Engineer, Gaming AI,” was posted in July.

The overview begins,

Do you want to help shape and define the future of gaming? Does being at the forefront of innovation excite you?

At Xbox Emerging Technologies, we are exploring new emerging technology trends to craft the next era of gaming.

Xbox

The description says that the Xbox Gaming AI team is looking for a principle software engineer with experience in both gaming and AI “to explore and create innovative new Artificial Intelligence/Machine Learning (AI/ML) based features, tools and services.”

Clearly Microsoft—or more specifically its Xbox brand—is exploring how it might implement artificial intelligence in game development in some new and novel way. Of course, AI itself is nothing new to games. In fact, even the oldest video games like Pong for instance, utilized AI for computer-controlled characters and objects.

How exactly advanced AI might alter the way video games are developed and experienced remains an unknown. But it’s easy to imagine how AI could be used to create game worlds that are more adaptive to individual player choices, and thus more immersive. It will be interesting to see what the Xbox Gaming AI team comes up with going forward.

Via Gizmochina. 

Featured image via The Xbox Hub. 

Microsoft SharePoint News for Email finally announced

A new feature called SharePoint News for Email has been introduced. It allows users to convert their SharePoint News Posts into email distributions that can be read directly in email inboxes. Earlier this month, Microsoft made efforts to make it easier to use Copilot with Sharepoint.

With SharePoint news, users can create and share news within their organization. This tool allows you to go beyond plain text and create compelling news stories that keep your teams and organization informed.

This feature enables users to directly engage their audience through their email inboxes directly, making consuming news content easier. Furthermore, this feature allows tracking the number of times the email is read. SharePoint News authors can now send news posts as emails, which enhances their ability to share news content. During the discussion, some crucial topics were covered.

  1. Templates: Users can select “Made for email” templates from the news template picker to create posts suitable for email distribution.
  2. Posting News: Users can post a fully viewable email of their News post with just one step.
  3. Permissions: Sending a page as an email will not change existing site permissions. Recipients of the email will only have access to the content of the email and not the original SharePoint page.

Vesajuvonen 2 1693316254927

The feature will be rolled out to Targeted Release customers starting in August 2023. It will be available to all customers by the end of September 2023.

A live video demo of the feature is mentioned, and there’s also a reference to Microsoft 365 Roadmap ID 124803.

OpenAI’s 1 billion-dollar boom: Should Microsoft be concerned?

OpenAI, a leading AI company, is set to surpass $1 billion in revenue next year, showcasing the clear trend toward intelligent tech solutions.

The verdict, included in a comprehensive report by The Information, paints a vivid picture of an era where businesses increasingly appreciate and leverage the latent value of OpenAI.

The AI tech startup has developed cutting-edge conversational AI technology that has numerous commercial applications. Integral to its revenue surge is its prodigal child, the ChatGPT. It is a technological breakthrough feted by businesses across multiple industries.

Despite some known limitations, the adoption of ChatGPT has redrawn business operations such as coding, customer service, and data analysis. It is obliterating task redundancies through relentless automation, thus improving operational efficiency like never before.

The extraordinary rendezvous between AI-led innovation and business efficiency has ignited a fiercely competitive landscape in the realm of technology, attracting substantial investment from venture capitalists and corporations who aim to capitalize on the tech frontier.

An intriguing dynamic is at play with the partnership between OpenAI and Microsoft. While they may be competing for the same customer base, Microsoft holds a distinct advantage thanks to their strategic investment in OpenAI. This exclusive collaboration has granted them several significant benefits.

Microsoft has the privilege of integrating OpenAI technology into its popular products, including but not limited to Office 365, Bing Chat, and GitHub Copilot. Furthermore, the software giant possesses the exclusive rights to host and offer OpenAI services on its robust Azure cloud platform, thereby drawing a line of enterprise customers pining for robust privacy and security.

In a targeted effort to accommodate the swelling demand, OpenAI recently unveiled its ChatGPT Enterprise. It is a business-focused plan that goes beyond the standard offerings.

The suite offers unrestricted and high-speed access to GPT-4, advanced data analysis tools, customizable options, and enhanced security and privacy features for processing long inputs to cater to diverse business needs.

OpenAI’s meteoric rise and widespread commercial acceptance don’t just denote the potential and voracity of AI services. It also illustrates a broader paradigm shift in the global tech industry’s appetite for the assimilation of artificial intelligence.

Via Economic Times

Microsoft Outlook getting UI update for better folder navigation via Microsoft 365 Roadmap

Microsoft has revealed via the Microsoft 365 Roadmap an upcoming update for Outlook’s user interface that will affect both the Windows app and the web version. The primary goal of this update is to enhance the user’s experience by improving the folder list’s readability and navigation. Last week, Microsoft also revealed that they have enabled real-time calendar sync for Outlook and Microsoft Teams.

There is a noteworthy modification in the way links are organized. Previously, links were grouped under folders. But now, they can be accessed through the context menu. This allows users to create new folders or subfolders by simply right-clicking on the mailbox folder. Additionally, generating a new search folder can be done by performing the same right-click action on search folders.

“Create new folder” is currently down here, as shown in the picture, before the update goes live.

Screenshot 2023 08 30 At 6.37.13 Pm

A specific identification number, 166993, has been assigned to this feature. The update was added to the roadmap on August 29, 2023. The changes primarily impact Outlook, which serves a worldwide audience through the Worldwide (Standard Multi-Tenant) cloud instance. It’s worth noting that these UI enhancements will be available on both desktop and web platforms.

The rollout of this update is scheduled to initiate in September 2023. Notably, this rollout will encompass the General Availability and Current Channel release phases. Users of Outlook can anticipate a more streamlined and user-friendly experience as they navigate their folders and utilize search functions.

Microsoft Edge’s competitor Vivaldi 6.2 introduces speedy new Portal Windows

Vivaldi 6.2 is introducing a feature called “Browser Windows in Portal.” This feature involves how Vivaldi, an open-source web browser based on the Chromium web browser, similar to Microsoft Edge, handles multiple windows, making the browser faster and more memory-efficient.

Vivaldi is known for its high degree of customization. Users have the ability to customize the appearance and functionality of their browsers according to their preferences by adding or removing features.

By using the React framework for Portal Windows, code sharing between Windows becomes more efficient, resulting in reduced memory and CPU usage and improved performance.

Windows Portal and its effects

  1. The new approach involves having a single UI document for all windows of the same profile, leading to a more streamlined script context. These architectural changes led to a 37% boost in opening new windows and a 64% faster opening time than the 2018 version.
  2. The original Window Panel, which started out displaying only the state of tabs in the current window,  now has evolved to display tabs across multiple windows. This feature allows users to navigate tabs across different windows more efficiently.
  3. The Pop-up Windows initiated by websites have been made portal-based, leading to faster and more efficient loading of these windows.

The update also includes several other features and improvements, such as:

  • Users can customize the order of the drop-down menu suggestions in the Address Bar.
  • On MacOS, Vivaldi now has the same geolocation feature as its Windows counterpart.
  • A button in the History panel allows users to clear their browsing history and data quickly.
  • New mail filters, support for FastMail OAuth login, and improved filter view buttons.

Overall, the Vivaldi 6.2 update focuses on enhancing browser performance, memory efficiency, and user experience by introducing the concept of Portal Windows and incorporating various feature improvements.

5 Ways to Find the Process ID for Apps in Windows 11

Windows is a user-friendly operating system and handles most tasks at the back end with minimal human intervention. And for that, it allots a PID. While regular users don’t need it, finding the process ID for an application is important to some.

If you look through the Task Manager, there would be several tasks running under a parent process. How do you identify these individually? That’s where the PID comes into the picture. It’s also useful when terminating a subprocess or verifying the current one.

For those wondering what this Application ID is, it’s a distinct number assigned to each running process by Windows, or, for that matter, every operating system. 

So, let’s find out how to get the process ID for an application in Windows.

How do I find an application’s process ID in Windows 11?

1. Via the Task Manager

  1. Head to the desktop, and press Ctrl + Shift + Esc to open the Task Manager.
  2. Head to the Details tab from the navigation pane.details
  3. You will now find the PID listed in the dedicated column next to each active process.find process ID (PID) for application

Task Manager is surely the easiest way to find the process ID for an application. And given that most of us are already used to it, things should be all the more simple. Also, the Task Manager clubs all sub-processes, making the identification easier. 

2. Using the Resource Monitor

  1. Press Windows + S to open Search, type Resource Monitor in the text field, and click on the relevant search result.
  2. Navigate to the CPU or Memory tab, and you will find the PID listed next to every running process.resource monitor

Resource Monitor is a built-in tool that lists how the processes are interacting with the OS and the hardware and software resources consumed by each.

3. From the Command Prompt

  1. Press Windows + R to open Run, type cmd, and hit Ctrl + Shift + Enter.cmd
  2. Click Yes in the UAC prompt.
  3. Now, paste the following command and hit Enter: tasklisttasklist to find process id for application
  4. Command Prompt will now list the active processes along with their PID.
  5. If the data is difficult to decipher, you can always export the Windows process ID list to a text file. Use this command to create a text file named PID in the C: drive: tasklist > C:\PID.txtexport PID to text file

4. With Windows PowerShell

  1. Press Windows + S to open Search, type Windows PowerShell, right-click on the relevant result, and select Run as administrator from the context menu.
  2. Click Yes in the prompt.
  3. Paste the following command and hit Enter:Get-Processget-process
  4. PowerShell will now list the PID along with other critical parameters for individual processes.
  5. If you want to view just the PID, execute this command instead: Get-Process | Format-Table -Property ProcessName,Idfind only process ID for application

Windows PowerShell is a useful command-line utility that helps perform advanced actions in no time. Besides, you can check the process start time to further troubleshoot application-related issues using PowerShell.

5. Through a dedicated app

When it comes to something as simple as finding the PID, you don’t necessarily need a third-party app. Especially one that comes with a paid license. But Microsoft’s Process Explorer will do the job for free!

Process Explorer

Simply head to the official website, download Process Explorer, run it (doesn’t require installation), and you will find a column dedicated to PID. Besides, you can use the utility to terminate all processes in Windows.

What can you do with a process ID?

Many use the application or process ID to check the CPU memory usage and identify which process is hogging the maximum resources. This helps boost the system’s performance.

And for those wondering, does a process ID ever changes, the answer is no! They don’t change as long as the process is active. But after the process is terminated or you reboot the OS, Windows may change the PID.

At the same time, Windows does reuse the process IDs. When assigning one, it will pick an ID from the available lot. This process ID could have been allotted to another previously terminated process. 

Again, most of us would never need to find the process ID for an application. But for those who would, a deep understanding of the concept is imperative, especially the ones who develop codes or face performance issues.

Remember, if the computer seems slow, it could be the high number of processes to blame. So, you may want to find out how many processes should be running in Windows 11.

For any queries or to share more methods to find the PIDs, drop a comment below.

How to Easily Add Tags to Files on Windows 11

When you have a lot of data on your hard drive, it can be difficult to search files. Fortunately, Windows 11 allows you to add descriptive information to your files right on your computer screen.

This is a great way to organize your files automatically, and it will be super easy to find them later. Not only will you save time, but also improve your workflow. In this tutorial, you will learn how to add tags to files on Windows 11 easily.

How do I add tags to files in Windows 11?

1. Use File Explorer

1.0 Use File properties

  1. Hit the Windows + E keys to open File Explorer.
  2. Navigate to the folder location with the files you wish to create tags for.
  3. If they are interrelated files, select all otherwise, right-click on one and select Properties.
  4. Navigate to the Details tab in the file properties window that opens.
  5. Under Description, click on Tags, then add a keyword, say School work. You can add more than one tag but separate with a semicolon.
  6. Once done, click Apply, then OK to save changes.
  7. To confirm the tag has been added, repeat steps 1-4, and the keywords should be under Tags.

1.1 Use the Details pane

  1. Hit the Windows + E keys to open File Explorer.
  2. Navigate to the folder location with the files you wish to create tags for.
  3. Click on the View menu at the top and select Show Details pane.
  4. Now click on the file you want to add tags, and on the preview pane, click on Add a tag.
  5. To add more than one tag, separate using a semicolon, then hit Save.

2. Use the Save as feature

  1. Open any Microsoft Office file.
  2. Click on Save as.
  3. Locate Tags and add your keywords, then hit Save.

The downside to this method is that it limits your file tagging capabilities to only Microsoft Office apps and may not apply to other file formats.

This should, however, not be a deterrent. For instance, if you’re wondering how to add tags to PDF files in Windows 11, you can always change the file type to one of the Office formats.

3. Use a third-party tool

  1. Navigate to your browser, go to the TagSpaces website, and click on Get started now.
  2. Hit the Download for Windows button.
  3. After installing the app, you will be greeted with a Get Started guide.
  4. From the main screen, click the Connect a Location button.
  5. In the next pop-up window, insert the name and the path of the folder you want to index.
  6. Now, click on the newly created location from the Location Manager. The indexing will take a few seconds, depending on the size and number of the files.
  7. Select the Tag Library icon from the bottom left corner of the window. The pre-made library will show up.
  8. If you want to create your own tags, click the three vertical dots from Tag Library and select Create Tag Group. You will be prompted to select a name and color of the group and text. We have created the Music group as an example.
  9. Go to the newly created Music group, click its three dot menu and select Add Tags.
  10. You may add all the tags, separated by comas. If you want to edit them, just click their individual three dots button and select Edit Tag. This way, you can change its name, background and text color.
  11. Now, start tagging your files by simply dragging and dropping the tag over your chosen files.
  12. To be more efficient, you can select more tunes with your mouse or by holding Ctrl and selecting additional songs, then right click and select Add/ Remove Tags.
  13. If you want to see your progress, click the three dots button of a tag and select Show Files With This Tag.
  14. Another easy way of tagging is to search for the band name, for instance, click the Select all marking and then right-click the selection and tag all of them in one go.
  15. Now, you only need to search for a tag and all associated files will appear immediately.

TagSpaces is more efficient and supports multiple operating systems. Its offline availability also makes it one of the most sought-after tools. You can find a more comprehensive review of TagSpaces in our detailed article.

How do I edit tags in Windows 11? 

The process is similar to adding tags, as seen above. Only this time, you’ll be deleting and making new entries.

Onto testing whether your tags work, the next question is how do you search for files with tags? Easy. Here’s how:

  1. Hit the Windows + E keys to open File Explorer.
  2. Go to your file folder and click on Sort, More Tags.
  3. Your files will now be listed as per the tags.

Hopefully, we’ve given you a few ideas to make your file management easier on Windows 11. With tags, you can easily organize your various files in a way that makes sense instead of creating hundreds of folders. In addition to that, another option is to add comments to folders in Windows 11.

Still on file organization, you can also change your file or folder icons to spot your frequently used files and folders with ease.

If you have used any of the above methods, please share your thoughts in the comments below. We would love to hear what you think. Additionally, if you have any other alternative methods for tagging files that work great for you, do let us know about them, too.

How to Quickly Insert HTML Into Outlook [3 Ways]

Standard email messages can look rather plain, and this is the main reason why many choose to insert HTML into Outlook email.

By doing so, users can create engaging emails with images and make them stand out, so let’s see how can we do that.

How do I insert HTML into Outlook?

1. Use Insert as file option

Add the attach button

  1. In the toolbar, click on the More button and select More Commands from the menu.
  2. Select Attach File and click on Add.
  3. Now you’ll have the File Attach option in the toolbar.

Add the HTML file to the email

  1. Start writing a new email message.
  2. Click on Attach file and locate your HTML file in the Attach dialog.
  3. Click the down arrow next to the Insert button and choose Insert as text option when attaching the file.

Once the file is attached, the HTML content will render.

Note icon NOTE
Keep in mind that in order to insert HTML file into Outlook, you need to create a valid HTML file with DOCTYPE declaration, html, and body tags.

2. Use Insert HTML add-in

  1. Visit Insert HTML by Designmodo page and click Get it now.
     
  2. The add-in will be added to Outlook.
  3. Start writing a new email, click the More icon, and choose Insert HTML by Designmodo.
  4. Enter the desired HTML code and click on Insert HTML to insert HTML into the message body.

3. Use macro code

  1. In Outlook, open VBA Editor. You can use the Alt + F11 shortcut to do so.
  2. Paste the following source code:
    Sub CreateHTMLMail()
    'Creates a new email item and modifies its properties.
    Dim objMail As Outlook.MailItem
    'Create email item
    Set objMail = Application.CreateItem(olMailItem)
    With objMail
    'Set body format to HTML
    .BodyFormat = olFormatHTML
    .HTMLBody = "<HTML><BODY>Enter the message text here. </BODY></HTML>"
    .Display
    End With
    End Sub

  3. Save the macro and run it in your email editor.

You might have to edit the HTML code manually each time you want to insert HTML code into Outlook by using this method.

Quick tips on how to create awesome emails with HTML formatting

  • Optimize HTML code for mobile devices and small screen sizes. It’s recommended to use 550-600px width and create responsive emails.
  • Relative paths aren’t supported, so use absolute links for images.
  • Use in-line CSS styles since Outlook doesn’t support external stylesheets. Also, not all HTML tags and attributes are supported.
  • Only a handful of fonts are supported, so use the following: Courier, Courier New, Arial, Arial Black, Veranda, Tahoma, Georgia.
  • Your mail client can block images, so always use alt text in order to describe the image.

Even though we can use HTML for email signatures, adding HTML natively to Outlook messages isn’t possible, and instead, you have to rely on workarounds, add-ins, or macros, but we hope that will change in the future.

To make your emails stand out, check our guide on how to add gifs to Outlook as well as a guide on adding emojis to Outlook, since both of them work with HTML. We also have a guide on real-time polls in Outlook, so you can consider adding those as well.

Have you used HTML in Outlook? Share your experience with us in the comments.

Remove Home From Navigation Pane in File Explorer [2 Easy Ways]

The File Explorer in Windows 11 received a major overhaul and now offers a friendlier user interface. Among these changes was the introduction of OneDrive and the Home icon in the left pane. But you can remove the Home from the Windows 11 File Explorer.

As a matter of fact, users can also remove the OneDrive entry. Simply unlink the OneDrive account, and it should be gone. But things aren’t as simple with the Home tab in Quick Access, though you can still remove it. Keep reading to find out the methods!

How do I remove the Home icon from File Explorer in Windows 11?

Tip icon Tip
The steps listed below require modifying the Registry. We recommend creating a restore point beforehand to revert to a stable state in case things go wrong during or after the process.

1. Add the HubMode DWORD in the Registry

  1. Press Windows + R to open Run, type regedit in the text field, and hit Enter.regedit
  2. Click Yes in the UAC prompt.
  3. Paste the following path in the address bar at the top, and hit Enter: HKEY_LOCAL_MACHINE\SOFTWARE\Microsoft\Windows\CurrentVersion\Explorer
  4. Right-click on the empty portion, hover the cursor over New, select DWORD (32-bit) Value, and name it HubMode.HubMode to remove home from file explorer in windows 11
  5. Double-click the entry you just created, enter 1 under Value data, and click on OK to save the changes.value data
  6. Now, navigate to the following path: HKEY_LOCAL_MACHINE\SOFTWARE\Microsoft\Windows\CurrentVersion\Explorer\Desktop\NameSpace_36354489
  7. Locate the {f874310e-b6b7-47dc-bc84-b9e6b38f5903} registry key, right-click on it, and select Delete.delete key
  8. Click Yes in the dialog box.
  9. Once done, restart the computer for the changes to come into effect.

Creating the HubMode DWORD and deleting the registry file related to the HomeGroup feature will also remove the Quick Access feature from File Explorer in Windows 11.

2. Modify Attributes

  1. Press Windows + S to open the Search menu, type Registry Editor in the text field, and then click the relevant result.
  2. Head down the following path using the navigation pane on the left: HKEY_CLASSES_ROOT\CLSID\{679f85cb-0220-4080-b29b-5540cc05aab6}\ShellFolder
  3. Right-click on the ShellFolder key, and select Permissions from the context menu.permissions
  4. In the Security tab, click the Advanced button.
  5. Click the Change button.
  6. Now, enter administrator in the text field, click Check Names, and then on OK.administrator to remove home from file explorer in Windows 11
  7. Tick the checkboxes for Replace owner on subcontainers and objects and Replace all child object permission entries with inheritable permission entries from this object, and click OK.replace subcontainer
  8. Finally, make sure the Administrator group has full control, and again, click OK to save the changes.full control to remove home from file explorer in Windows 11
  9. Double-click the Attributes DWORD on the right, enter a0600000 in the text field, and click OK.value
  10. Restart the File Explorer process or the PC for the changes to come into effect.
  11. To get back the Home icon, change the Value data for Attributes to a0100000.get back home icon

Though slightly complex, modifying the Attributes DWORD will remove the Home tab in File Explorer on Windows 11 for good. 

And if you find the Windows 11 File Explorer’s Home crashing, it’s likely the corrupted system files to blame. In this case, running the DISM commands and the SFC scan should fix things.

How do I change icons in File Explorer’s Navigation Pane?

  • Remove items: Press Windows + E to open File Explorer > identify icons to remove > right-click and select Unpin from Quick Access.
  • Remove frequently opened folders: Right-click on the folder and select Remove from Quick Access. 

Now that you know how to remove the Home tab from the navigation pane in Windows 11, there are a few other customizations to speed up File Explorer you might be interested in.

And for enhanced clarity and better sorting of frequent folders and files, you might want to disable grouping in File Explorer.

Do not forget to share whether the steps worked and any more methods you may be aware of, in the comments section below.
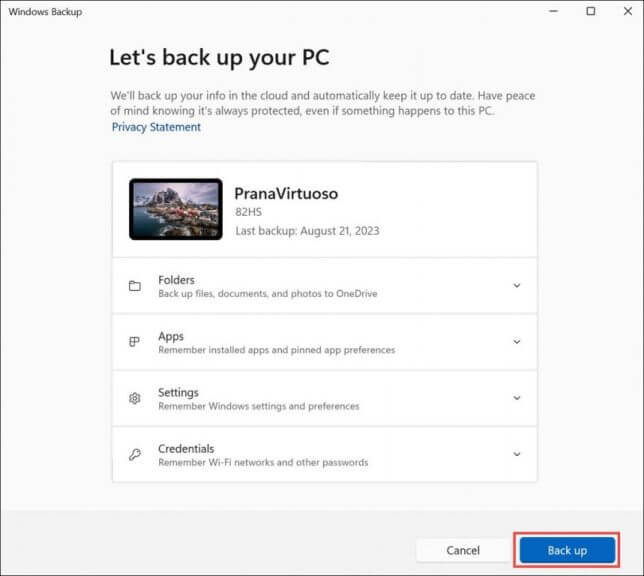
Fix: Immersive Reader not Working in OneNote

Immersive Reader is a great feature in OneNote, especially for those with dyslexia or otherwise a hard time reading and comprehending text.

An issue may arise where it is not working as expected, just like many other programs. Luckily, it doesn’t take a lot of technical know-how to get it working again, as you shall see below.

Some of the common reasons why your Immersive Reader is not working include:    

  • Unsupported language – If you’re trying to read a language yet to be included in the text-to-speech for Immersive Reader, the feature will not work or greyed out.
  • Unstable connection – Immersive Reader requires an internet connection to sync your reading speed with the speech rate of the narrator. It may not load or work as expected with a slow connection.
  • Outdated app – If you’re using an older version of Office, Immersive Reader may present some compatibility issues, and you’ll notice that your OneNote keeps crashing.
  • Unsupported document format – Immersive Reader may not be able to recognize special formatting or certain document formats like PDF.

Other reasons include build-up cache, a virus infection, or an outdated operating system.

What can I do if Immersive Reader is not working?

Start off with the following basic checks before proceeding to the slightly complex solutions:

  • Verify that you have not muted your volume and adjust accordingly.
  • Test your microphone to ensure it is in good working condition.
  • Ensure you have securely plugged in your listening device securely to your PC.
  • Verify that your Immersive reader supports the language displayed on the screen.
  • Check that your device meets the minimum system requirements to run OneNote.
  • Ensure that your internet connection is stable and you have optimal speeds.
  • Check whether you’re running the latest version of OneNote.

If you’ve had no luck with the above workarounds, it’s time to try the multiple-step solutions:

1. Delete OneNote cache

  1. Hit the Windows+ R keys to open the Run dialog.
  2. Type the following in the dialog box and hit Enter: %localappdata%
  3. Go to the following path and delete the cache folder: Microsoft/OneNote/16.0

Note that 16.0 is your version of OneNote, so the directory may be slightly different depending on your version.

2. Scan for viruses

  1. Press the Windows key, search Windows Security, and click Open.
  2. Select Virus & threat protection.
  3. Next, press Quick scan under Current threats.
  4. If you don’t find any threats, proceed to perform a full scan by clicking on Scan options just below Quick scan.Scan options
  5. Click on Full scan, then Scan now to perform a deep scan of your PC.Full Scan Scan Now
  6. Wait for the process to finish and restart your system.

You might also be interested in a powerful antivirus tool like TotalAV because it offers strong cyber threat protection and prevention that Windows Defender may not have.

3. Repair/Reset OneNote

  1. Hit the Windows key and click on Settings.settings windows 11
  2. Select Apps, then click on Apps & features.
  3. Locate OneNote, click on the three ellipses, and select Advanced options.
  4. Scroll down and hit the Repair option but if that doesn’t work, hit Reset.
  5. Confirm reset in the next dialog box and restart your PC.

4. Reinstall OneNote

  1. Hit the Windows key, type PowerShell, and select Run as administrator.
  2. Type and Enter the following command: get-appxpackage microsoft.office.onenote | remove-appxpackage

5. Perform a System Restore 

  1. Press the Windows + R keys, type rstui, and hit Enter.
  2. The System Restore window will open. Click on Next.
  3. Select the restore point you wish to revert to and click on Next.
  4. Now click on Finish.

A System Restore should be the last resort if all the other solutions fail.

What are the best alternatives for Immersive Reader in OneNote? 

Because users are always looking for ways to automate PC tasks, it only makes sense to have a pool to choose from. Every user has different needs, so we’ve rounded up some of the best alternative text-to-speech apps.

  • Speechify – Supports multiple languages and document formats.
  • Microsoft Azure – Suitable for large-scale businesses and is open-source.
  • Google Cloud – Best for developers and easily integrates with other apps.
  • Natural Reader – Best used as a learning tool for students with disabilities.

With that out of the way, perhaps you’d like to explore other extra features the app has to offer. It’s not just your ordinary read-aloud assistant. Find out more on how to use Immersive Reader on Microsoft Edge and unlock a whole new world of endless possibilities.

So there we have it. These are quick and easy methods to fix the issue of Immersive Reader not working quickly.

If you’ve tried any other solutions missing from our list, feel free to share them with us, and we’ll do our best to update the article.

How to Enable/Disable Wake on LAN in Windows 11

Wake-on-LAN is a networking feature on Windows 11, and with it, you can remotely wake up your PC from hibernation or sleep mode.

Although it’s not used often by casual users, this feature is incredibly useful to network administrators and advanced users who work with wired networks, and today we’re going to show you how to set it up.

How do I know if my computer supports Wake-on-LAN?

  • PC needs to be connected to an ATX power supply so that you can wake it up from sleep mode remotely.
  • An access control list needs to be created and added to all routers in the network.
  • The network card needs to support the wake-on LAN feature.
  • For this feature to work, both computers need to be on the same network.

While most Ethernet adapters support the wake-on LAN feature via the Ethernet cable, this feature isn’t usually available on wireless adapters. If you want to use it with a Wi-Fi adapter, make sure that it has the Wake-on-Wireless-LAN or Wake-on-WLAN feature.

How do I enable Wake on LAN on my PC?

1. Configure BIOS

  1. Restart your PC.
  2. While it restarts, keep pressing F2 or Del or the dedicated BIOS key for your motherboard.
  3. From the BIOS menu navigate to the Power Management section.
  4. Locate Wake on LAN and set it to Enabled.
  5. Save changes and exit BIOS.

2. Change the network adapter settings

  1. Press the Windows key + X and select Device Manager.
  2. Locate your network adapter and double-click it.
     
  3. Navigate to the Advanced options tab. After that select Wake on Magic Packet, and set it to Enabled.

  4. Lastly, go to the Power Management tab, and enable all options. Click on OK to save new power options.

3. Use the command line

  1. Press the Windows key + X and select Windows Terminal (Admin).
  2. Run the following command powercfg /devicequery wake_programmable
  3. Locate your adapter from the network adapters list.
  4. Now run the following command: powercfg /deviceenablewake "Adapter Name"
  5. After doing that WoL feature should be enabled.

How do I turn off Wake on LAN on Windows 11?

To disable Wake on LAN on Windows 11, you just need to follow the same steps from above, but this time disable all settings that mention this feature.

You can do it also do it quickly with the command line:

  1. Open the Terminal as administrator.
  2. Run the following command: powercfg -devicequery wake_armed​
  3. Locate your network adapter on the list.
  4. Now run this command: powercfg -devicedisablewake "Adapter Name"

Why is Wake-on-LAN not working in Windows 11?

  • Your remote wake up software isn’t properly configured.
  • Wake on LAN isn’t configured properly on the remote computer.
  • The remote computer can’t be located by the device that is waking it up.
  • If the MAC address for the magic packet doesn’t match with MAC address of the remote PC, wake on LAN won’t work.

Wake on LAN on Windows 11 is easy to setup and you’ll use it if you’re a network administrator or a PC enthusiast, however, issues such as a laptop waking on its own or Wi-Fi disconnects after sleep mode can appear if you don’t configure it properly.

Have you ever used this feature before? Let us know in the comments section.

Windows 7 Simulator: How to Run & Test the OS Online

Windows 7 has long been the preferred iteration for many. And even though support for it ended on January 14, 2020, the OS continues to command a significant market share. If you, too, are a fan but can’t run the iteration forever, a Windows 7 simulator will help!

A simulator runs an OS without the need for an extensive installation. And we have several options for Windows. Remember, a Windows 7 online simulator is the first choice of users. But you could go with a dedicated app.

Listed below are the benefits of using a Windows 7 simulator:

  • Increased accessibility: Simulators are easily accessible, with most offering an app for mobile devices as well. So, you can run Windows 7 on Android and iOS. 
  • Reduced cost: While a Windows key will cost you a few bucks, an emulator, on the other hand, offers most of the functionality for free, and you can run Windows without installing.
  • Support for older apps: While the newer iterations have dropped support for several apps, you can run these using a Windows 7 online emulator.
  • Relive the good old days: Many who use a simulator do it for the nostalgic Windows 7 and to get back to the interactive desktop we were all used to on one of the most popular operating systems.

How can I run Windows 7 in my browser?

Tip icon Tip
There are a few online Windows 7 emulators available, and these do appear safe. Remember, WindowsReport is not associated with any, and we recommend you perform some basic checks and have an effective antivirus solution installed to thwart any attacks.

1. Win7 Simu

  1. Launch a web browser on your device, and open Win7 Simu.
  2. The simulator will show the initial boot process and then lead to the logon screen. Select the Guest profile to proceed or create a new account.guest profile on windows 7 simulator
  3. Win7 Simu will now display the desktop.win7 simu
  4. You can now access the Start Menu from the bottom left to open other apps, the Computer folder on the desktop, or any other elements listed here.
  5. We ran a few apps simultaneously, including the classic Paint, Notepad, Chrome, Command Prompt, and Calculator, and they worked fine.apps on windows 7 simulator
  6. To turn it off, do what you would on a real Windows 7 PC. Launch the Start menu, and click on Shut down.shut down
  7. You will now see the shutdown screen. Wait for the process to complete or terminate the tab/browser.

Win7 Simu remains one of the best ways to run Windows 7 in a browser, and it offers a set of Assistive Controls to quickly configure things.

However, there are a few drawbacks to this fantastic simulator. It can’t load webpages unless you install the Requestly browser extension and import the critical rules. Check the official guide for detailed steps. 

Also, on the web version of Win7 Simu, you can’t access local files via Computer or open the native apps. Besides, there are no system notifications.

But it’s provided in the mobile version. You can download Win7 Simu for an Android device and run simulated programs effortlessly without missing out on any features.

2. Windows 7 Simulator on TurboWarp

  1. Launch an up-to-date web browser, and open the Windows 7 Simulator on TurboWarp.
  2. Log in with the User profile.windows 7 simulator
  3. It’s very similar to Windows 7, though there are fewer options than Win7 Simu, and it’s not as appealing user interface-wise.emulator desktop

Windows 7 Simulator is a decent option for anyone looking to run the iteration for entertainment purposes. However, the simulated interface is no match for Win7 Simu, in our opinion.

But again, you get the ability to run Windows 7 without installing, and that, too, through a browser. 

Other ways of running Windows 7 without installation

1. Run Windows 7 from a USB

An easy solution when you don’t want to install the OS on a PC is to run Windows 7 from a USB. The installation process is a bit intricate and requires a third-party tool. And it’s recommended that you use a USB 3.0 flash drive for better performance.

However, don’t expect Windows 7 running on a USB to perform as well as it would on a PC. There are several constraints here, but you can at least run a wide variety of apps and experience the OS without reconfiguring the PC.

2. Run Windows 7 on a Virtual Machine (VM)

Virtual Machines have long been used when running another iteration of the OS in a contained and safer environment. They are quick to set up, and the most popular ones offer a seamless OS installation. Besides, you can migrate Windows 7 to VirtualBox without losing data.

However, performance and compatibility issues with VMs affect the experience. Besides, since the OS doesn’t directly use the hardware, it’s less efficient. And the licensing costs, coupled with a cloud computing service, can be expensive for a few. 

To conclude, Windows 7 simulators will serve as your companion in the long run, though we recommend against over-reliance.

If you want to work on the usual interface for extended periods, install the iteration and stay on Windows 7 forever. Or you could dual boot Windows 11 and Windows 7 to avoid losing vital functionality. Many users prefer WinSetupFromUSB to dual-boot Windows 7, so you can try it out.

Do share your favorite Windows 7 simulator and the reason for using one in the comments section.

Fix: Colors Change While Gaming on Windows 11

If you notice that the color saturation changes while playing games, then there’s a good chance you have some kind of screen tearing problem.

It can become difficult to get the right color combinations, especially if it changes every time, but here is an easy tutorial to ensure your colors are consistent throughout.

So what causes these colors to change while gaming? In most cases, the issue occurs due to incompatibility between graphics drivers and games you’re playing. Some games require specific drivers to work properly and in their absence, you may encounter black screen issues.

Another possible cause could be your monitor. If you are using an older monitor that does not have any type of calibration software installed, then it is possible that the colors being displayed by your monitor could be off from what they should be.

How can I fix my color profile if it changes while gaming on Windows 11?

Before embarking on the slightly technical steps, try the following basic workarounds:

  • Make sure you’re using the latest version of Windows 11.
  • Check that your PC meets the minimum system requirements for the specific game.
  • Verify that your monitor is plugged in directly to the computer, not through a USB hub.
  • Disconnect any unused outputs such as HDMI and only leave the one for your monitor.
  • Ensure you’re running the latest version of your game.

If all the above are in check and your monitor still changes colors when you open a game, proceed to the steps below:

1. Reset display color settings

  1. Click on the Search bar icon, type Color Management, and click Open.
  2. Navigate to the Advanced tab.
  3. Ensure each entry is set to System default.

2. Recalibrate display colors

  1. Click on the Search bar icon, type Color calibration, and click Open.
  2. Follow the on-screen prompts and hit Next.
  3. Click and hold the slider to adjust the settings to a calibration of your preference.
  4. Go back, click on the Search bar icon, type Color management, and click Open.
  5. Navigate to the Advanced tab and select Change system defaults.
  6. Select the display profile and click on Set as Default profile.

3. Update your video card

  1. Click the Search icon, type Device Manager in the search bar, and click Open.device manager w11
  2. Navigate to Display adapters to expand, right-click on your graphics card, and select Update driver.Graphic Driver Update
  3. Select Search automatically for drivers.

In some instances, updating your drivers manually could still present problems because Windows can sometimes match you with the wrong drivers. A more sure way of getting the correct drivers would be to use an automatic tool.

Outbyte solution is the best in the game. It contains a massive database and will automatically scan your system for any outdated, damaged, or missing drivers and then match you with the right ones.

4. Disable GPU acceleration

  1. Hit the Windows key and select Settings.settings windows 11
  2. Click on System on the left pane, then Display on the right pane.Settings - System - Display High CPU usage New World
  3. Scroll down and select Graphics.graphics
  4. Select the Change default graphics settings option.
  5. Now, toggle off the Hardware-accelerated GPU scheduling option.disable Hardware-accelerated GPU scheduling

Although hardware acceleration helps games run better, with less lag and fewer FPS drops, it can cause some issues with screen colors.

If your GPU is responsible for handling colors, it’s possible that colors could be off or inaccurate because they’re being handled differently than usual. This is particularly true with older monitors that were not designed to work with it.

What are the best graphics settings to use on Windows 11? 

Although Windows 11 has been feted to offer the best gaming performance yet, you still need to tweak some settings to get an all-rounded elevated performance.

You already have features like DirectX 12 and HDR enabled by default, so the rest is really up to you to optimize your gaming. Some of the key gaming settings that will definitely give you an immersive experience include:

In addition, a good gaming laptop can make all the difference, but if you’re on a budget laptop, we recommend using integrated graphics instead of dedicated graphics cards.

This is because they tend to consume less power and generate less heat than their dedicated counterparts. If you insist on a discrete GPU, you may encounter a white screen while gaming because of overheating.

So, there you have it. Hopefully, these suggestions will help you get your display color calibration back on track.

Have you applied any of these changes, and has the color calibration settled? We’d love to hear your feedback, so let us know in the comment section below.

Microsoft and Apple set to debut exciting products in September showcases

As Microsoft and Apple release their major products, September will be a big month for technophiles.

The Microsoft event is announced to take place on September 21, 2023. It is speculated to unveil new Surface devices, including potential updates to the Surface Laptop Studio 2, Surface Laptop Go 3, Surface Go 4, and Surface Laptop 6.

As for Apple’s event, it’s the usual September iPhone event on September 12, 2023. The new iPhones are anticipated to include the
– 6.1-inch iPhone 15
– 6.7-inch iPhone 15 Plus
– 6.1-inch iPhone 15 Pro
– 6.7-inch iPhone 15 Pro Max

These models are expected to feature
– Dynamic Island
– Updated 5G chip from Qualcomm
– USB-C port instead of Lightning port.

The Pro models, iPhone 15 Pro and Pro Max could have additional features, including a redesigned titanium frame, a new 3-nanometer A17 chip, and camera upgrades. The Pro Max model might include a periscope zoom lens for enhanced optical zoom capabilities.

The pricing for the iPhone 15 Pro and Pro Max models could increase due to the added features and upgraded chip. The base prices for the standard iPhone 15 models are expected to remain unchanged. Alongside the new iPhones, the event might also introduce the Apple Watch Series 9 and a new version of the Apple Watch Ultra.

Baldur’s Gate 3 still coming to Xbox this year, but no split screen on Series S

The good news is that Baldur’s Gate 3 is still heading to Xbox sometime throughout the remainder of 2023. The official Xbox X (Twitter) account posted a few days ago reassuring fans that Larian Studios hugely popular RPG will indeed come to Series X|S at some point before the year is out. And the post was reposted by the game’s director, Swen Vincke.

The not-so-great news is that it looks like the Series S version of the game will not include a split-screen co-op mode. This would appear to be an exception to the Xbox Series S feature parity clause—something that has been a hot-button issue this console generation.

It is known that the Xbox team and Larian Studios have been working together to bring Baldur’s Gate 3 to the platform. After getting its full release on PC following an early access period, the game has been showered with critical acclaim. The PlayStation 5 release will come on September 6.

Baldur's Gate 3 UI

Many are pointing to this as a missed opportunity for Xbox, and have blamed the more accessible but less powerful Series S for holding back the Xbox launch because of technical limitations. Stay tuned for the official Xbox release date for Baldur’s Gate 3 when it becomes available.

How to enable Copilot on a Windows 11 computer

AI is all the rage these days, and Microsoft has made a new splash with its new Copilot program. First announced on March 16, 2023, the Copilot program is an artificial intelligence assistant feature for Microsoft 365 applications and services.

cHow to enable Copilot on a Windows 11 Computer

If you have enrolled into the Insider Preview Build 23493 or higher in the Dev Channel, you might have the Windows Copilot enabled in your PC by default. However, if you aren’t using the Dev Channel then you might have to rely on external help, which in this case will be ViveTool.

Before you download ViveTool to run Copilot, we’d also like to state that ViveTool has sometimes been found to cause problems in Windows, breaking many of its rules, and for that reason is generally not liked in the Microsoft community.

So if you cannot run Copilot yet, it might be better to be on the side of caution and perhaps wait for little more. You can check out ViveTool on GitHub and decide for yourself.

If you want to enable Copilot regardless, though, then follow the steps below:     

  1. Head to GitHub and download the ViveTool-vx.x.x.zip file.
  2. Launch the downloaded Zip folder.
  3. Click on Extract all.
  4. Select the Extract button.
  5. Copy the folder’s path from the address bar.
  6. Head to Start menu, type in ‘cmd’, and launch the command prompt as an administrator.
  7. In the CMD, type in the following command and hit Enter:
    cd c:\folder\path\ViveTool-v0.x.x

    Remember to change the path to the folder with your folder’s address in the command above.


  8. Then, to enable Copilot, type in the following command and hit Enter:
    vivetool /enable/id:44774629,44776738,44850061,42105254,41655236

extracting vivetool

extracted vivetool folder


After you have followed the above steps, give your PC a quick reboot right away. Just head to Settings > Personalization and click on the Taskbar tab.

From there, turn on the toggle on the Copilot (preview) switch to enable the Copilot app.

That’s it, really. Now that you have enabled the Copilot switch, you can quickly launch it by pressing the Windows key + C shortcut.

Once Copilot is active, you can explore its full potential by reading our complete guide on how to access Microsoft Copilot and start using it across your favorite apps.

Need to turn it off later? Follow this guide on how to disable Microsoft Copilot when you are done testing.

FAQ

How can I enable Copilot on Windows 11?

Press Windows + C or go to Settings > Personalization > Taskbar and toggle on Copilot (preview).

Why don’t I see Copilot on my Windows 11 PC?

Your device might not have the latest Windows 11 update. Install all pending updates and restart.

Can I disable Copilot later?

Yes, you can turn it off anytime from Settings > Personalization > Taskbar > Copilot (preview).

Is Copilot available for all Windows 11 editions?

It’s available on Windows 11 Home and Pro, but may roll out gradually in certain regions.

Like other AI technologies such as ChatGPT, the AI program from Microsoft uses large language models (LLMs) to improve your productivity this time on your Microsoft tools like Teams, Outlook, Word, and so on. Amongst other soft tasks, that tool also comes in handy in summarizing your emails or reading documents.

Enabling Copilot on a Windows 11 PC

Again, the feature is still in its initial phases, so it’s left to seen what you can do with it. But follow the above steps, and you can run the beta version for fiddling around with the features that best fit your daily uses for now.

Microsoft gears up for the next generation of transportation

Microsoft going to be a platinum sponsor of the Automotive News World Congress 2023 event, which will be held in Detroit, Michigan, on September 12, 2023. The event will focus on the future of mobility. Microsoft will provide thought leadership on how its cloud platform can help companies in the automotive and mobility industries innovate and transform.

Microsoft is particularly focused on the following areas:

  • Products and services: Microsoft is helping companies develop new digital and software-driven solutions for connected, autonomous, shared mobility, and electric vehicles (CASE). Example: Microsoft and BMW are collaborating to create a cloud platform to manage data from connected vehicles for better safety, efficiency, and new mobility services.
  • Factory: Microsoft is helping manufacturers improve productivity, adaptability, and sustainability in their operations. Example: Microsoft and Ford collaborate on a cloud-based MES to boost manufacturing efficiency and reduce waste.
  • Supply chain: Microsoft is helping companies rebalance their supply chains to make them more resilient to future disruptions. Example: Microsoft and Volkswagen are collaborating to create a cloud-based supply chain management system to track physical goods and identify supply chain risks.
  • Customer experience: Microsoft is helping companies improve the customer experience across marketing, sales, and service. Example: Microsoft and Mercedes-Benz collaborate on a cloud-based CRM system to enhance customer service and personalize experiences.
  • Data and AI: Microsoft is helping companies use data and AI to drive innovation and improve decision-making. Example: Microsoft and Volvo Cars are collaborating on a cloud-based platform to collect and analyze data from connected vehicles for improved safety and new mobility services.
  • Security: Microsoft is helping companies protect their data and systems from cyberattacks. Example: Microsoft and General Motors are teaming up for a cloud-based security solution to protect GM’s intellectual property and prevent cyberattacks on their vehicles.

With Azure, a secure and scalable cloud platform, Microsoft supports the automotive and mobility industries. They also invest in research to stay ahead in these fields.

Microsoft Teams now makes it easier to work with people in other tenants

Microsoft Teams is introducing new features designed for multi-tenant organizations, enabling more effective collaboration and communication. Microsoft also introduced Typeface AI for Microsoft Teams for Business.

A multi-tenant organization comprises several tenants. There are several reasons why an organization may have multiple tenants, such as having multiple independent subsidiaries or business units or acquiring and merging with other organizations.

Here are the features introduced by Microsoft Teams:

  • Side-by-side multitasking and cross-tenant notifications: This feature allows users to work on different tenants and accounts simultaneously in separate windows while receiving notifications for all added accounts and tenants in Teams client.
  • Improved people search and chat experience: This ensures that when searching for colleagues in an MTO group, only one result is returned with their home tenant name, and chat conversations are combined.
  • Richer meeting experience: This feature allows users to join meetings from their own tenant and enjoy the same high-quality meeting experience.
  • Using shared channels for seamless cross-tenant collaboration and communication: Users can chat, call, meet, and collaborate on files with stakeholders in other tenants without switching.

To enable MTO in Teams, admins must configure their MTO tenant in the Microsoft 365 admin center. Teams will automatically activate MTO features after configuration.