Google Chat’s dynamic revamp to rival Microsoft Teams and Slack with Duet AI support

Google has launched a new version of Google Chat, highlighted by the most anticipated feature – the Duet AI.

In an official blog post, the technology giant noted that Duet AI will be employed in Chat as a real-time collaboration ally.

With Duet AI in Chat as a real-time collaboration partner, you can get updates, insights, and proactive suggestions across your Google Workspace apps. We plan for Duet AI to answer complex queries by searching across your messages and files in Gmail and Drive, summarize documents shared in a space, and provide a recap of missed conversations.

Furthermore, the sophisticated AI will be capable of summarizing documents shared in space and recapping missed conversations.

But that’s not all. Other augmentations incorporated in Google Chat encompass plans to dramatically boost the membership limit in its Spaces section. From the existing 50,000 limit, the company aims to reach a staggering 500,000 members.

This enhancement is scheduled to be tested in a private preview version slated for a late 2023 debut.

Aesthetic-wise, Google Chat received a refreshing facelift inspired by Google’s Material 3 aesthetics. Users can expect a refreshed color palette, typography, and visual styling. To streamline its text messaging, an autocorrect feature is introduced for on-the-go corrections.

The tech giant is planning to update its search features. The new features will include suggested queries, autocomplete, did-you-mean suggestions, and AI-based relevance ranking of results.

Moreover, Google is already eyeing further enhancements for Chat, especially its home page design. An early 2024 timeline is set for this forthcoming upgrade that promises an intelligent prioritization of your messages.

In tandem with its Google Chat enhancements, Google launched Duet AI for its business Workspace subscribers. The AI will deliver generative features specifically for businesses. One of these business-focused features includes attending online meetings. Duet AI is programmed to capture notes, action items, and video snippets in real time.

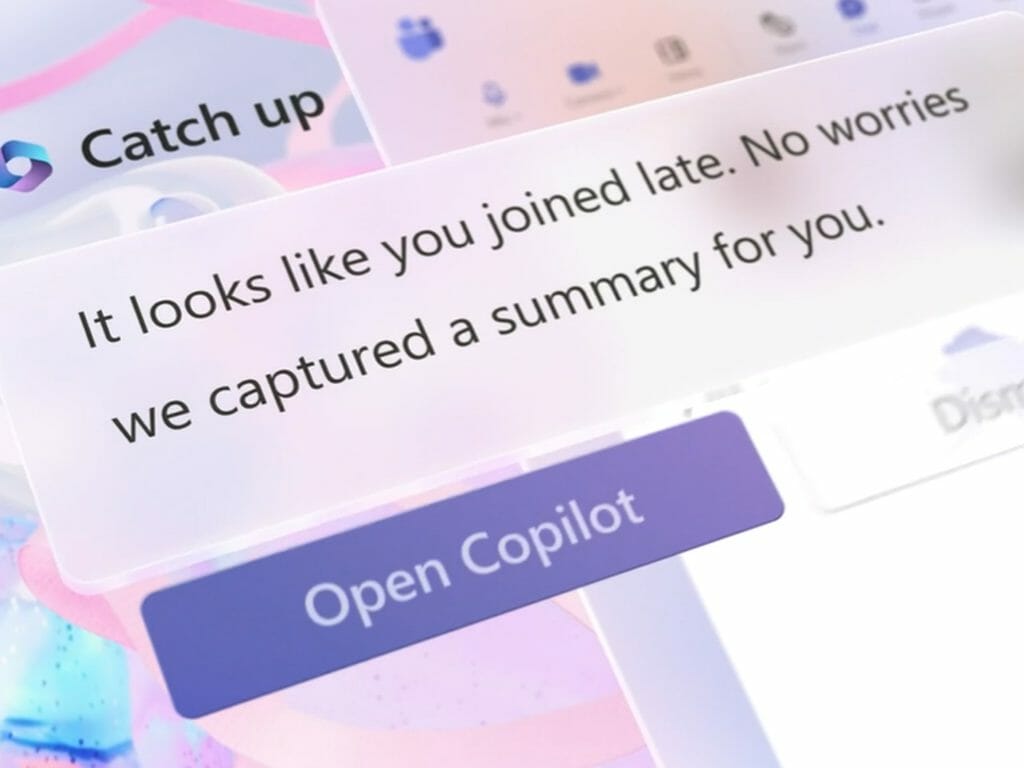
If you need to take notes during a meeting, the “take notes for me” feature can help you compile a summary for all attendees to review. In case someone arrives late, the “summary so far” feature can give them a quick snapshot of what was discussed.

Additionally, Duet AI’s “attend for me” feature can attend meetings on behalf of absent members and deliver messages so they can receive a recap later.

Google has invited businesses to a free trial sign-up to get a flavor of Duet AI. An official pricing structure for Duet AI for Workspace users is yet to be announced.

The technological race amongst Microsoft, Slack, and Google has proven beneficial for customers, who eagerly wait for more innovative features to ease their work processes.

OpenAI launches ChatGPT business edition that rivals Microsoft’s Bing Chat Enterprise

In a strategic move, OpenAI, the leading AI firm, announced the rollout of a new version of its popular AI program, ChatGPT, designed for large enterprises on Monday. The latest product, dubbed ChatGPT Enterprise, blurs the lines further between the offerings of OpenAI and its financial ally, Microsoft.

The new variant is intended to serve businesses, with enhanced features focusing on security, privacy, and high-speed access to the advanced OpenAI tech. Block, Carlyle, and Estée Lauder are some of the first companies to benefit from the service.

We’re launching ChatGPT Enterprise, which offers enterprise-grade security and privacy, unlimited higher-speed GPT-4 access, longer context windows for processing longer inputs, advanced data analysis capabilities, customization options, and much more, the company said in a blog post.

Growth and Projection

OpenAI initially launched the consumer-oriented version of ChatGPT last November. The AI, capable of performing tasks varying from writing to coding, stirred up significant interest among users, leading to a staggering count of 100 million active users a month by January.

Recent reports, however, indicate a downward trend in ChatGPT’s traffic. Consequently, the introduction of a new variant could potentially be OpenAI’s strategic response to regain its popularity.

Expanding Offerings

ChatGPT Enterprise subscribers are not required to subscribe to Azure, OpenAI clarified, thereby creating a possible competitive rift between OpenAI and Microsoft.

Among the newly-introduced features, firms can look forward to unlimited GPT-4 access through ChatGPT Enterprise. Currently, Plus subscribers face a cap limiting the GPT-4 conversation frequency. OpenAI has resolved this with ChatGPT Enterprise, letting businesses use the chatbot limitlessly.

It’s worth noting that the newest edition of ChatGPT Enterprise offers a faster performance, with a speed that’s twice as fast as before. Moreover, the capacity limit has also been increased, which means that users can now input lengthy data for responses.

If your company is interested in utilizing the Advanced Data Analysis tool or ChatGPT Code Interpreter, you’ll be pleased to know you have unrestricted access to these features.

Emphasis on Security

Security remains the prime concern while dealing with advanced AI, and OpenAI addresses this by employing enterprise-grade security in ChatGPT. The new enterprise version guarantees to encrypt all conversations while moving and being stored. OpenAI reassures users that their AI does not train on business data or conversations.

Starfield gets its first patch ahead of early access release

Insider Gaming has reported that the first patch for Starfield has now gone live for PC and Xbox Series X|S consoles. Update 1.7.23.0 will apparently weigh in at 13.4 GB and 15.48 GB respectively.

The update will be of particular intertest to Steam Deck owners, as it will include the addition of a virtual keyboard. Also the patch notes state that “Starfield will run on both the Steam Deck and the ROG Ally with the correct drivers, but the hardware below the recommended minimum specs and performance may suffer.”

In addition the update features several fixes to graphics, gameplay and quests. Among the fixed issues were ones where “sometimes hair would not appear on characters,” and “a rare issue that could cause Companions to float in the air.”

This sounds like classic Bethesda stuff, although reports have indicated that Starfield will be less buggy than past Bethesda releases. We won’t have to wait too long to find out, as Starfield will finally release in early access for those with the Premium Edition on September 1. For everyone else—including Game Pass players—the game will launch on September 6.

Starfield
Starfield
Developer:
Bethesda Softworks
Price:
Free

Via Pure Xbox. 

Microsoft President demands ‘human oversight’ on AI to avert ‘weaponization’

Microsoft President Brad Smith cast light on an emergent concern in the technology world during an exclusive conversation with CNBC.

I think every technology ever invented [has] the potential to become both a tool and a weapon. We have to ensure that AI remains subject to human control. Whether it’s a government, the military or any kind of organization, that is thinking about using AI to automate, say, critical infrastructure, we need to ensure that we have humans in control, that we can slow things down or turn things off, said Smith, as per his interview with CNBC.

AI has made significant progress in recent years and is now being used in various areas of human activity, challenging traditional ways of thinking. The emergence of AI-powered chatbots like ChatGPT has prompted worldwide tech leaders to express caution about the potential risks associated with AI.

The new age risk has drawn dramatic comparisons with seminal threats of the past era. OpenAI CEO Sam Altman, echoed by executives from tech giants Google AI division DeepMind and Microsoft, likened the risk of human extinction from AI to nuclear warfare. The tech giants caution that, just like nuclear powers, AI could become an existential danger if it slips out of human control.

Meanwhile, global corporations are also grappling with another dimension of the AI transition: the impact on human jobs. A recent IBM report brings a warning bell, suggesting that if workers globally do not reskill, they might stand to lose their jobs to generative AI. It foresees that 40% of the workforce will need to reskill in the next few years to secure their jobs.

Despite the alarming projection, Smith offers a soothing perspective. He reiterates that AI is merely a tool supplementing human work and not a replacement. The Microsoft exec remains optimistic about the potential of AI in synergy with human intelligence and claims its primary role is to augment our capabilities and not to usurp them.

While optimism rings, the call for effective control mechanisms and adaptability to AI underlines the gravity of the task. It is a collective challenge for technology creators, governments, and society, urging them to steer AI evolution in a manner that assures its benefits and checks the perils.

Diskpart Commands: How to Manage Hard Drive Partitions in Windows 11/10

Efficient hard drive management is essential for maintaining an organized and optimized computer system. Windows operating systems offer various tools to help users manage their data, and Diskpart is one such powerful utility. Diskpart allows users to manipulate hard drive partitions directly from the command line, providing granular control over disk space allocation.

Whether you want to create, extend, delete, or format partitions, Diskpart offers a command-line-driven approach that’s particularly useful for system administrators and advanced users. This guide delves into the details of using Diskpart to manage hard drive partitions effectively in Windows 11/10.

What is Diskpart?

Diskpart, short for “Disk Partition,” is a command-line utility included in Windows 11/10 that empowers users to manage disks, partitions, and volumes. Unlike graphical interfaces, Diskpart operates solely through text-based commands, offering a powerful way to interact with storage devices. It’s especially valuable for managing partitions in scenarios where the graphical interface might not be accessible, such as during system recovery or maintenance.

Diskpart provides a comprehensive set of commands that enable users to create new partitions, extend existing ones, format partitions with different file systems, and even remove partitions entirely. Its versatility and direct control over disk structures make it a preferred tool for those who require a more hands-on approach to disk management.

Precautions to take while using Diskpart commands

While Diskpart can be a highly effective tool, it’s essential to take precautions before using its commands to avoid unintended data loss or system disruptions. 

Here are some precautions to consider:

  • Backup Your Data: Before performing any disk management operations using Diskpart, create backups of your critical data. Diskpart commands can lead to irreversible changes, and having a backup ensures that you can restore your data if something goes wrong.
  • Double-Check Disk Selection: Make sure you’re selecting the correct disk and partition when applying Diskpart commands. A wrong selection can result in unintended changes to your system.
  • Understand Commands: Familiarize yourself with the specific commands you’re going to use and their implications. Misinterpreting commands can lead to data loss or system instability.
  • Use “List” Commands: Utilize commands like list disk, list partition, and list volume to get a clear view of your disk configuration before making any changes. This helps you verify your selections.
  • Avoid Direct “Clean” Command: Be cautious with the clean command, as it removes all partitions from a selected disk without confirmation. This command can lead to complete data loss if not used carefully.

List of common Diskpart commands

Diskpart commands are the building blocks of disk management. Here’s a list of common commands along with their purposes:

Command Use
list disk Displays a list of available disks.
select disk <number> Selects a specific disk for further actions.
detail disk Provides detailed information about the selected disk.
attributes disk clear Clears read-only or hidden attributes on a disk.
online disk Brings a disk online if it’s marked as offline.
offline disk Takes a disk offline to prevent it from being accessed.
clean Removes all partitions and volumes from a disk.
convert gpt Converts the selected disk to the GPT partition style.
convert mbr Converts the selected disk to the MBR partition style.
create partition primary size=<size> Creates a primary partition with a specified size.
create partition extended Creates an extended partition.
format fs=<filesystem> quick Formats a partition with the specified file system.
assign letter=<letter> Assigns a drive letter to a partition or volume.
remove letter=<letter> Removes a previously assigned drive letter.
active Marks the selected partition as active (bootable).
delete partition override Deletes the selected partition.
extend Extends a partition into adjacent unallocated space.
shrink desired=<size> Shrinks a partition by the specified size (MB).
create volume simple size=<size> Creates a simple volume with the specified size.
create volume stripe disk=<disk>... Creates a striped volume across specified disks.
create volume mirror disk=<disk>... Creates a mirrored volume across specified disks.
create volume raid5 disk=<disk>... Creates a RAID-5 volume across specified disks.
format quick Formats the selected volume quickly.
format fs=<filesystem> Formats the selected volume with the specified file system.
delete volume Deletes the selected volume.
list partition Shows all partitions on a selected disk.
list volume Lists all volumes on the system.
list volume verbose Provides detailed information about all volumes.
list partition verbose Provides detailed information about all partitions.
offline volume Takes the selected volume offline.
online volume Brings the selected volume online.

How to launch Diskpart on Windows 11/10

Launching Diskpart is a straightforward process. Here’s how you can do it:

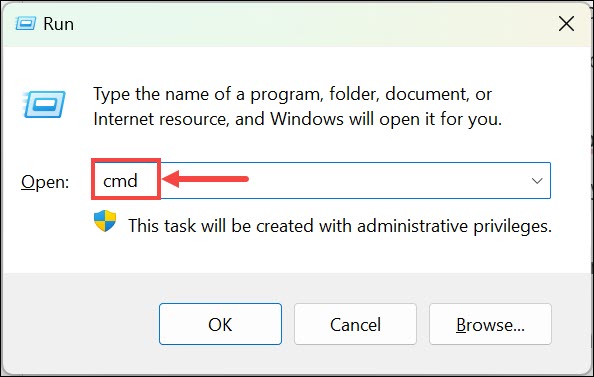
  1. Press Windows + R to launch the Run Command box. 
  2. Type “cmd” and press Shift+Enter to open the Command Prompt with admin rights.Launch Command Prompt with Admin Rights
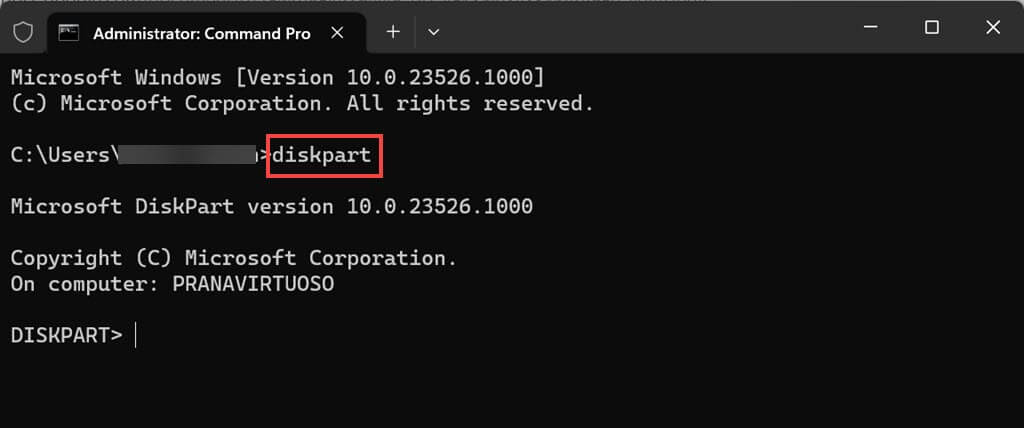
  3. In the Command Prompt, type diskpart and press Enter. This initiates the Diskpart utility.Diskpart Launched
  4. If prompted by User Account Control, click “Yes” to grant administrative privileges to Diskpart. You’ll now be within the Diskpart environment, ready to execute disk management commands.
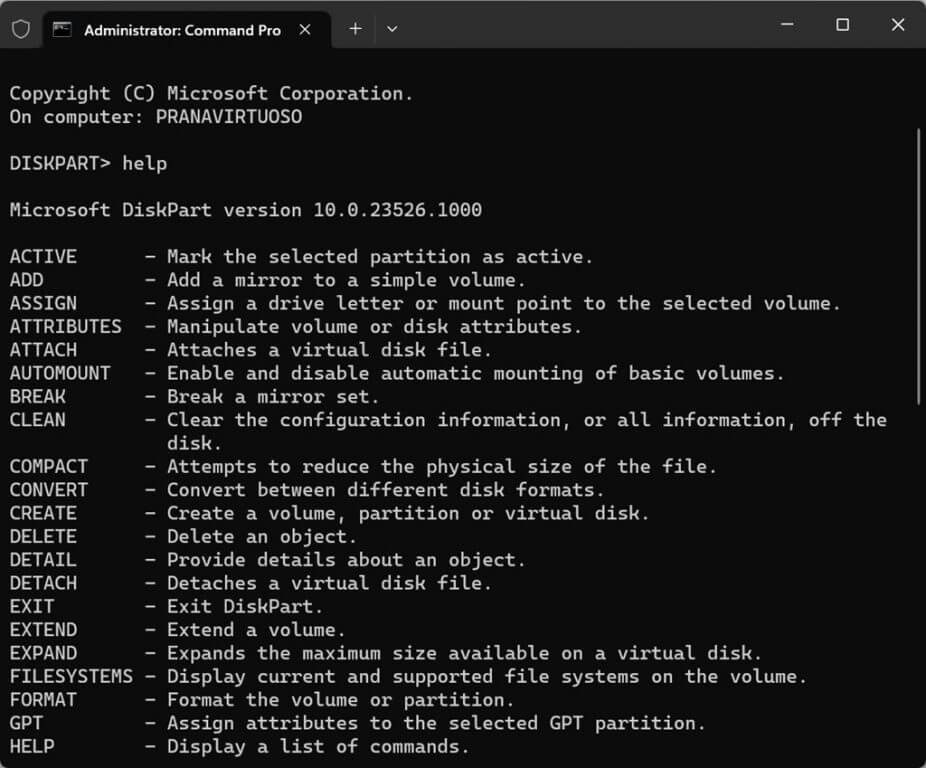
  5. To view the complete list of available commands for DiskPart, simply type help in the command window and hit the enter key.Diskpart Commands
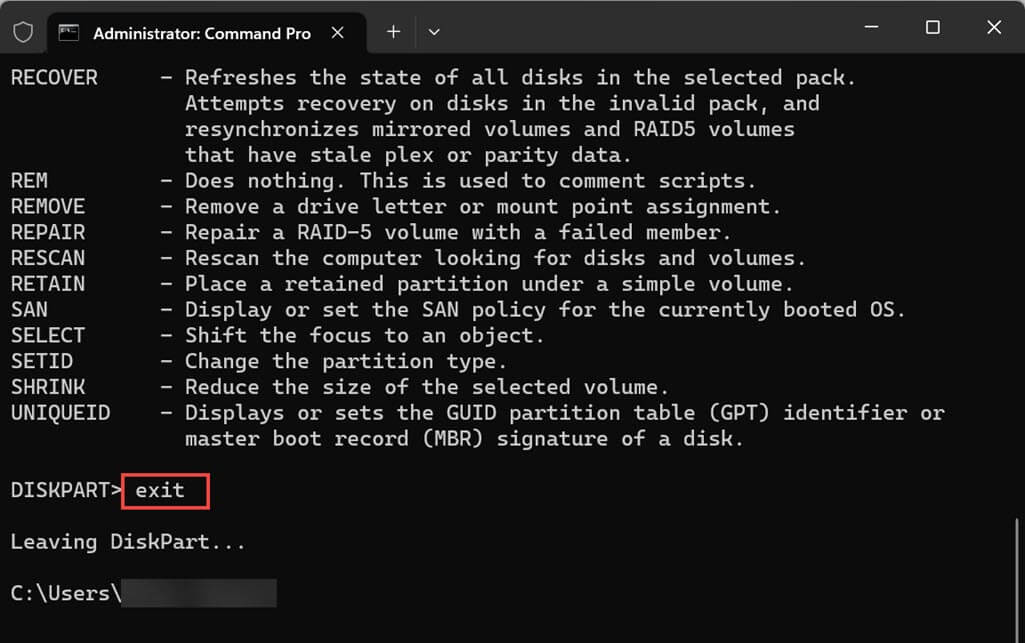
  6. After utilizing the Diskart, you can simply use the Exit command to come out of it.Exit Diskpart

Before running Diskpart, you can verify which account is currently active and ensure you have administrative rights using the whoami command in Windows. It’s a quick way to confirm your privileges before executing system-level tasks.

How to check existing hard drives, volumes, & partitions using DiskPart

Before making any changes, it’s crucial to understand your disk’s current configuration. Diskpart can help you get this information:

  1. Open the Command Prompt and enter diskpart.
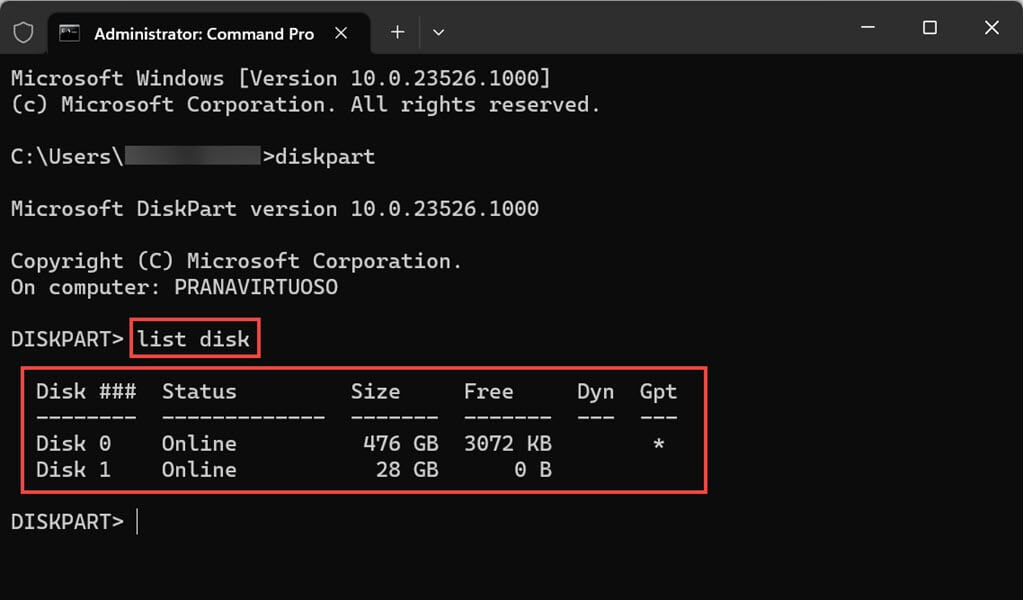
  2. Enter list disk to see a list of available disks on your system. Note or remember the disk number you want to work with.List Disk Command
  3. Type select disk <number> to choose the disk you want to inspect.
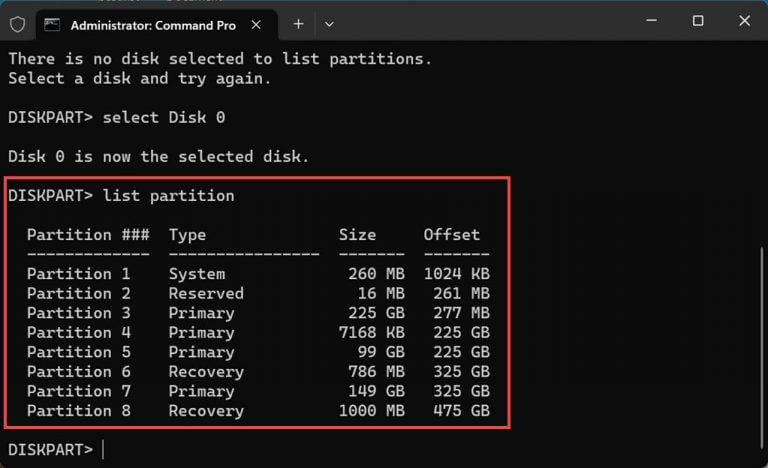
  4. Similarly, use the list partition and list volume commands to see the partitions and volumes on the selected disk.

How to create a partition using Diskpart

Creating a partition using Diskpart provides you with control over its size, file system, and drive letter assignment. 

Creating a partition using Diskpart involves a few steps. Let’s go through the process:

  1. Launch Diskpart as described earlier.
  2. To access the disk list, use the list disk command, and then choose the desired disk by entering its corresponding number with the select disk # command, where “#” is the disk number.
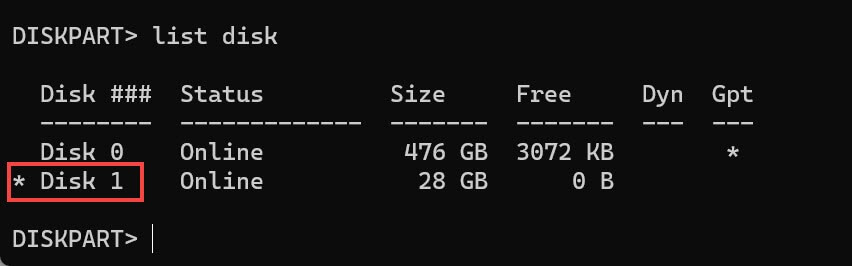
  3. Before beginning to create a partition, you need to clean the disk so there are no partitions already. So, be very careful while selecting the disk for parting it. To ensure that you have selected the right disk for partitioning, again use the list disk command and look for the asterisk mark against your selected disk. The asterisk mark indicates that further commands will be taken under the selected disk.Ensure You Selected The Right Disk
  4. After selecting the disk, use the clean all command to wipe out the disk. (optional step)
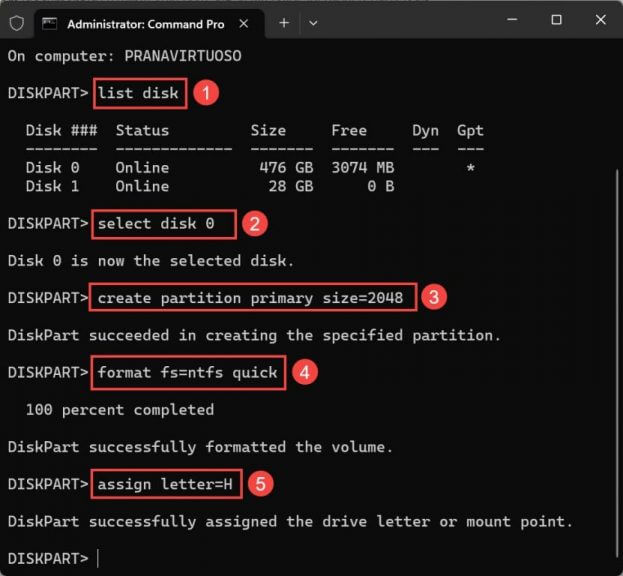
  5. Once the disk is wiped out, use the create partition primary command to create a partition using the entire space on that drive.
  6. If you want to create multiple partitions, you can assign how much space a partition could take. For that, use the create partition primary size=X command, where “X” is the size that you wish to set to the partition in megabytes.
  7. After creating the partition, format it with a file system using the format fs=<filesystem> quick command. For instance, use the format fs=ntfs quick for NTFS or format fs=fat32 quick for FAT32.
  8. Once the formatting process is complete, Diskpart will automatically assign a letter to the partition. In the event that it does not, you can manually set it by using the command assign letter=<letter>. Replace “<letter>” with the desired drive letter. 
Create Partition Using Diskpart
You can also create an additional partition in an already partitioned disk. Just skip step 4, i.e., using the Clean command to sweep the disk. Use the create partition primary size=X command to create a partition of X MB. Ensure that enough space is available to create a partition on an already divided hard disk.

How to extend a partition using Diskpart

Extending a partition allows you to combine unallocated space with an existing partition. It’s an excellent way to make efficient use of available space.

Here’s how you can do it:

  1. Launch Diskpart using the earlier method.
  2. Make sure that there is enough free space adjacent to the partition you plan to extend on the same drive without any partitions in between. Verify the contiguous availability of the free space.
  3. Use the list disk command to list all the attached disks on your system. Choose the disk containing the partition you want to extend using the select disk <number>.
  4. Next, use the list volume command to get the list of all the volumes under the selected disk.
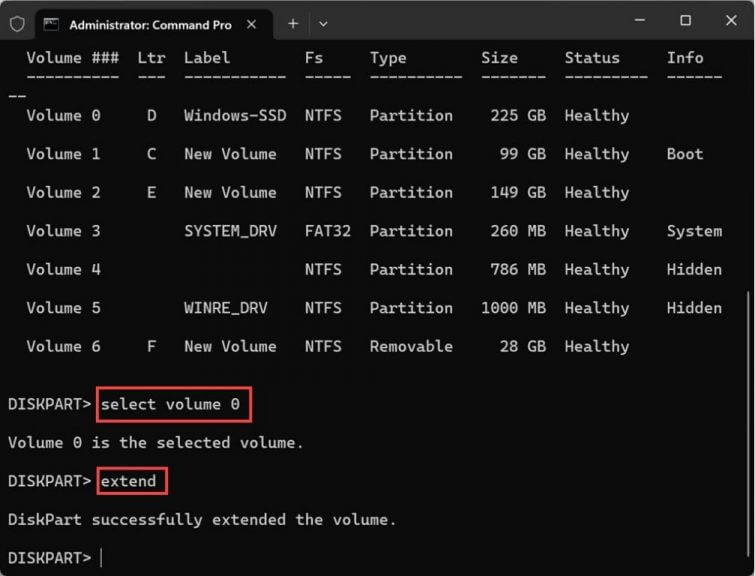
  5. Now, choose the volume that you want to extend using the select volume # command. Insert the volume number in place of “#”.
  6. Next, use the extend command to add the entire free space to the selected volume. However, if you don’t want to include the entire unallocated space to the selected volume, use the extend size=#, and replace “#” with the amount of space you want to extend in megabytes.
Extend The Disk Using Diskpart

How to shrink a volume using Diskpart

Shrinking a volume allows you to reclaim unused space, which can then be used to create new partitions or extend existing ones. Here’s how you can shrink a volume using Diskpart:

  1. Launch Diskpart using the previously outlined steps.
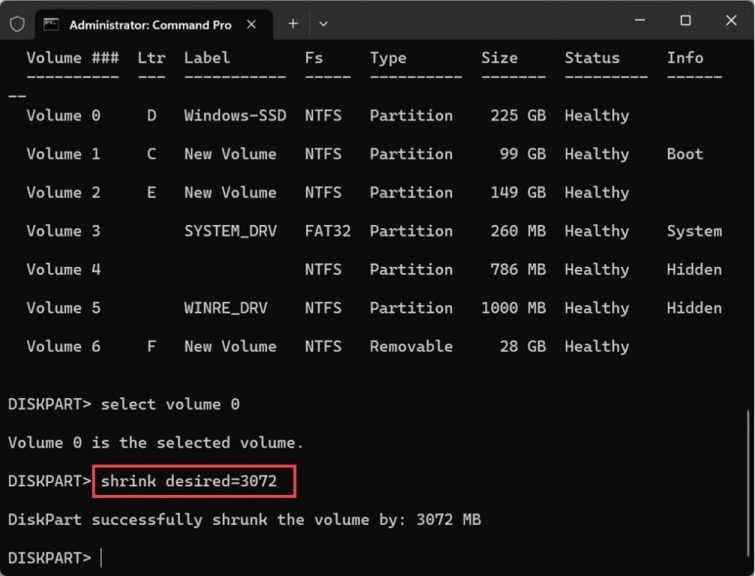
  2. Type list volume to see a list of all volumes on your system. Note the volume number of the one you want to shrink.
  3. Enter select volume <number> to choose the volume you wish to shrink.
  4. To initiate the shrinking process, type shrink desired=<size> and press Enter. Replace “<size>” with the amount of space you want to shrink the volume by in megabytes.
  5. Diskpart will calculate the available space that can be shrunk based on the specified size.
  6. Once the process is complete, you can exit Diskpart by typing exit and pressing Enter.
Shrink Volume Using The Diskpart

How to delete a partition using Diskpart

You can easily delete a partition, too, using Diskpart. Removing a partition should be done with caution, as it leads to data loss. Follow these steps:

  1. Open the Command Prompt and launch Diskpart.
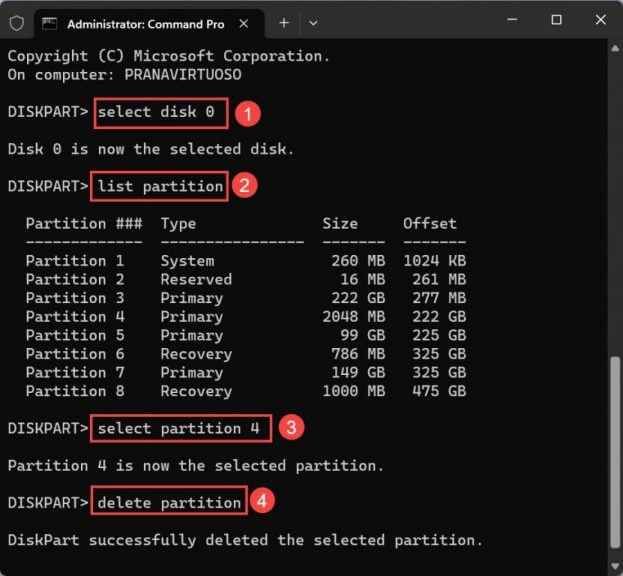
  2. Select the disk containing the partition you want to delete using select disk <number>. If you don’t know the disk number, use the list disk command.
  3. Now, use the select partition <number> command to select the partition that you want to delete. Use the list partition command if you don’t know the partition number.
  4. After selecting the partition, use the delete partition command to delete it.
Delete A Partition Using Diskpart

Similarly, you can use the delete volume command to delete a partition.

How to completely wipe out the hard disk using DiskPart

If you encounter issues when formatting your system’s hard disk, an external hard drive, or a USB pen drive, you can use DiskPart to wipe them clean. However, please note that you cannot clean the disk on which your operating system is installed.

If you need to wipe out an entire hard disk using Diskpart, follow these steps with caution:

  1. Open the Command Prompt and enter diskpart.
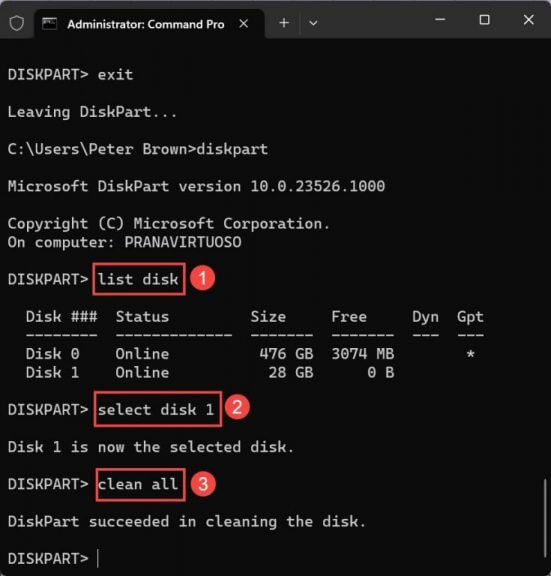
  2. Type list disk and note the disk number you want to wipe.
  3. Select the disk by typing select disk <number>.
  4. Now type the clean all command and press Enter. This command will erase all data on the selected disk. Be patient; depending on the size of your hard disk, it could take even hours to complete this command.
Clean Disk Using Diskpart

Alternatives to Diskpart

While Diskpart is a powerful tool for managing hard drive partitions in Windows 11/10, there are alternative methods and third-party tools available for users who prefer different approaches. Here are a couple of alternatives to consider,

Windows Disk Management

Windows Disk Management

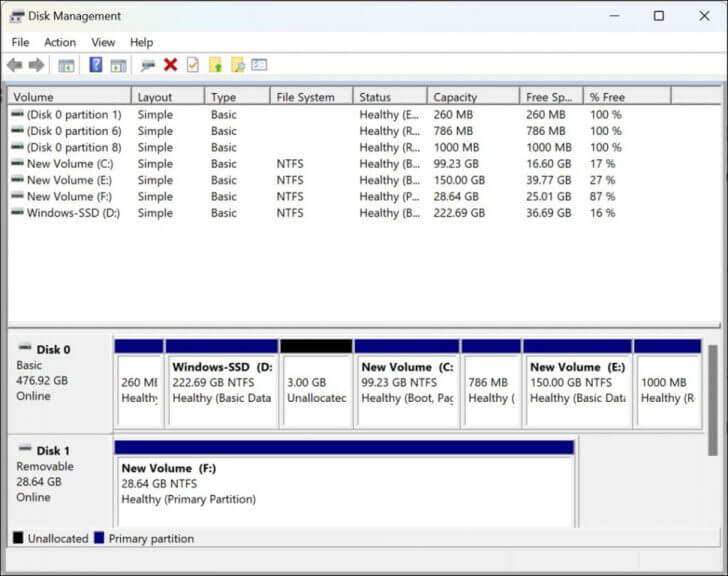
Windows provides a built-in graphical tool called “Disk Management.” To access it, right-click on the “Start” button and select “Disk Management.” This tool offers an intuitive interface where you can perform tasks like creating hard drive partitions, formatting, deleting, and resizing them. While it might not offer the same level of command-driven control as Diskpart, it’s user-friendly and suitable for most basic partition management needs.

Third-Party Partitioning Tools

Several third-party partitioning tools are available that provide advanced features and user-friendly interfaces. Tools like EaseUS Partition Master, MiniTool Partition Wizard, and AOMEI Partition Assistant offer capabilities beyond what Diskpart provides, including visual representations of your disk layout, more flexible partition resizing, and better data protection during operations. These tools can be especially useful for users who prefer not to work with command-line utilities.

FAQ

Can Diskpart commands be undone?

Unfortunately, Diskpart commands are irreversible and can lead to data loss if executed incorrectly. It’s crucial to double-check your commands and backup your data before making any changes using Diskpart.

Can I use Diskpart on external drives and USB devices?

Yes, Diskpart can be used on internal and external drives, including USB devices. However, exercise caution and make sure you select the correct disk to avoid accidental data loss.

Is it possible to resize volumes using Diskpart?

Yes, resizing the volume is possible using the Diskpart shrink and extend commands.

Manage your system hard drive easily

Effective hard drive management is essential for maintaining a well-organized and optimized computer system. Diskpart provides a versatile and powerful solution for managing hard drive partitions in Windows 11/10. By understanding its commands and following the steps outlined in this guide, you can confidently create, extend, delete, and manage partitions according to your needs. Remember to exercise caution, back up your data, and double-check your actions before executing Diskpart commands. With this knowledge, you’ll be well-equipped to make the most of your disk space while ensuring the safety of your data.

Looking for more? Check out these OnMSFT.com posts on Diskpart. We also have a guide that explains what is fdisk, so don’t hesitate to check it out.

Legion Go Takes the Lead: How It Stacks Up Against Steam Deck & ASUS Rog Ally

Handheld consoles have taken over the on-the-go gaming scene for some years, but there’s a constant debate about their usability, especially regarding battery life and comfort. Yes, you can play triple-A titles on most handhelds, but is it worth doing it for just 2-3 hours at a time?

As gaming laptops got bigger and heavier, handhelds gained more popularity, starting with Valve’s Steam Deck and AYANEO’s consoles. After that, it was ROG Ally’s turn to shake the market down with a new set of features and the promise of incredible performance.

Now, Lenovo is entering the scene with the Legion Go. This highly-specced gaming handheld combines the features of all its competitors and comes with an entire ecosystem behind it. But is that enough for Lenovo to be the new top dog in the handheld space? Let’s compare them and find out.

Pricing & Availability

Pricing may be the most essential factor gamers consider when buying a handheld. It’s not an ultra-powerful desktop PC, it’s not a gaming laptop, and it’s not a gaming phone. It’s somewhere in between and has to fulfill one purpose: playing full-fledged games on the go.

That’s also the reason for the Steam Deck’s success, the cheapest gaming handheld of the bunch, coming in at only $399 for the 64GB base model. Increasing the storage to 256GB bumps the price to $529, while going for the 512GB version will cost you $649. You can buy the Steam Deck right now directly from the official website.

The ROG Ally comes in two versions: a standard one priced at $599 and a more powerful version priced at $699. Both versions come with 512GB of storage, the difference between them being the chip inside – the standard version gets the AMD Ryzen Z1 APU while the more powerful version sport an AMD Ryzen Z1 Extreme with better graphics performance. You can buy the ROG Ally from ASUS’s official store.

Lenovo Legion Go is the most expensive handheld, starting at $799. For the money, you’ll get 256GB of storage, an AMD Ryzen Z1 APU, a bigger screen, and detachable controllers. There’s no official info yet on the 512GB and 1TB versions or how the upgrade to the AMD Ryzen Z1 Extreme APU will impact the price, but based on what we already know, we can expect a top-tier version to cost around $1000. The Legion Go will be available for purchase starting in October 2023.

Performance & Usability

Regarding performance, the oldest handheld here, the Steam Deck, shows its age. Of course, not everything translates to real-life usage experience, but at least on paper, the ROG Ally and the Legion Go are way ahead of the Steam Deck.

Lenovo Legion GoASUS ROG AllyValve Steam Deck
APUUp to AMD Ryzen Z1 ExtremeRyzen Z1 Extreme
8C/16T up to 5.1 GHz
Ryzen Z1
6C/12T up to 4.9 GHz
AMD Van Gogh
4C/8T up to 3.5 GHz
RAM16GB 7500Mhz LPDDR5X16GB LPDDR5-640016GB LPDDR5-5500
Storage 256GB / 512GB / 1TB256GB / 512GB256GB / 512GB SSD
Display8.8” QHD+ (2560 x 1600) IPS;
16:10 10-point Touch 500nits
7″ 1920×1080, 120Hz (VRR),
500 nits, 7ms
7″ 1280×800, 60Hz
Connectivity2xUSB Type-C,
1xmicroSD slot,
Wi-Fi 6E (802.11 ax), BT 5.2
Wi-Fi AX, BT 5.2Wi-Fi AC, BT 5
Battery49.2WHr / 900 mAh40 Whr40 Whr
Weight 640g / 854g with controllers608 g669 g
OSWindows 11 HomeWindows 11Steam OS/Win 11
Release DateSeptember 2023June 2023February 2022

ASUS promised that the Ally would perform twice as well as the Steam Deck at 30W, which does hold true in some instances, but keep in mind that the latter is better optimized and, according to benchmarks, runs better at 5W or in specifically optimized games. We can also expect similar performance advantages from the Legion Go, thanks to its APU (same as ROG Ally’s).

The Ryzen Z1 Extreme has 8 cores and 16 threads, based on Zen 4 architecture. The Steam Deck’s 4 cores and 8 threads can’t keep up with that, especially considering it’s based on Zen 2 architecture. Legion Go & ROG Ally are based on RDNA 3 graphics architecture, while the Steam Deck is based on RDNA 2.

This means that some significant performance gains are expected for the first two. It might seem like a two-way battle, but remember that both Lenovo and ASUS handhelds lack the seamless optimization Valve’s console is known for.

Another thing to mention in the graphics department is that the ROG Ally is the only one to support external GPUs. Using the ROG Xg mobile interface, you can connect the handheld to up to an Nvidia GeForce RTX 4090, significantly boosting performance. This makes a lot more sense while playing on a bigger screen and not so much in handheld mode.

RAM and storage are the first two areas where we see clear gains for the Legion Go. The brand new gaming console comes with LPDDR5X, compared to the LPDDR5 with lower frequencies of the competitors. And the ROG Ally and the Steam Deck are missing the 1TB storage option available for the Legion Go.

Another critical difference is the screen: Lenovo’s Legion Go has the biggest and fastest screen, with 8.8″ and 144Hz refresh rate. That’s undoubtedly one of the selling points, as the Ally has a 7″ 120Hz display, and the Steam Deck is lacking behind with a 7″ 60Hz display that can’t compete with the smoothness of the other two. If you’re after FPS, there’s only one choice here.

Things get a bit worrying for the Legion Go when it comes to battery and weight. For only 9.2WHr more than the 40WHr of the other two, it gains around 250 grams more, reaching 854 g with the controllers compared to 608 g for the Ally and 669 g for the Steam Deck.

It’s a matter of give and take: more power, a bigger screen, and more versatility at the price of weight.

Software & Game Library

In the OS department, Lenovo Legion Go and ASUS ROG Ally come with Windows 11 out of the box, while Valve’s Steam Deck runs SteamOS. With a bit of fiddling, you can also run Windows 11 on Steam Deck, but it’s not as straightforward as in the case of the other two.

Why does that matter? Because of the game libraries you can access. Since ROG Ally and Legion Go run Windows 11 natively, you can play almost any game available for PC, including Steam, Epic Games, Xbox, and many other game libraries available on Windows. The only downside is that Windows 11 is less optimized for touch than SteamOS, but this might not be a dealbreaker, depending on your use scenarios.

On the other hand, SteamOS has two significant advantages: better touch optimization and the Deck Verified program. The Deck Verified titles are games confirmed to work on Steam and are somewhat optimized. But the library isn’t big for now, which cuts some of the Steam Deck’s advantage here (pair that with the fact that you’ll have to tinker a bit to get Windows 11 and other game libraries on the console).

ROG Ally has a similar optimization called ASUS Armoury Crate SE, a user interface much like SteamOS but much less integrated into the system. Think of it as an overlay or a layer. The moment you jump out of it, the touch optimizations end, and you’ll return to the “normal” Windows 11 interface.

Design & Ergonomics

Desing-wise, the Steam Deck, ROG Ally, and Lenovo Go aren’t that different. There’s so much you can do with a specific form factor.

When it comes to the general shape and weight, the ROG Ally is the smallest, and the Legion Go is the biggest and also the heaviest, but the size of the screen plays a big part here. Steam Deck sits somewhere in the middle, being only 60 grams heavier than the Ally.

All three have similar controls with two analog sticks, directional buttons or D-PADs, ABXY buttons, and shoulder triggers, respectively shoulder buttons. Around the back, the Steam Deck has an extra pair of buttons, while the Legion Go has 2 sets of back triggers and a scroll wheel. All three consoles have menu and navigation buttons on the front.

The most significant design difference is the removable Gamepad Controls of the Legion Go, similar to Nintendo’s Switch. Both controls can be removed, leaving you with only the screen. They have their own battery and charge separately, adding another control layer to the console.

The Legion Go is undoubtedly the most versatile as it combines the best features from all the competition, starting with Steam Deck’s touchpads and ending with Nintendo Switch’s removable gamepads.

Which one should you buy?

Depending on your priorities, the answer might differ. The Steam Deck is the clear winner if you’re going after price. Lenovo’s Legion Go is the performance champ, so this should be your choice if you want FPS and versatility. The ROG Ally might bridge the gap regarding software and UI, so it’s a safe middle ground between the other two.

There’s no straightforward choice that fits everyone. Our take is that the Legion Go is a class above the others thanks to its bigger screen, button versatility, and raw performance. The downside? Weight. But taking into account that it also has some incredibly awesome accessories like the Lenovo Legion AR Glasses, we’re pretty confident giving this one to Lenovo.

The price is definitely a thing to keep in mind. Still, if you want blazing-fast performance, a big screen that can also be used for media consumption, awesome versatility, and a plethora of gaming accessories, the Legion Go is the only one that offers a complete package.

Do you agree that Lenovo Legion Go is the most powerful and feature-rich gaming handheld on the market? Let us know your opinion in the comments section below!

Epson Easy Photo Print is Not Working? 7 Ways to Fix

If your Epson Easy Photo Print isn’t working, you’ve come to the right place. Many users reported not being able to start the software or getting an error while using it.

Compatibility issues, incorrect attributes, outdated drivers or missing criticial components can all contribute to this problem. Follow the steps below to get it fixed in the blink of an eye.

  • Leftover files from the previous installation: When the error message reads, The same version of Epson Easy Photo Print is already installed, you likely have leftover files, or the software is present.
  • Incorrect attributes: In response to one of the queries, Epson shared that the problem may appear due to incorrect file attributes, especially when it’s set to Read-only.

How do I get Epson Easy Photo Print to work?

To make errors like Restart Epson Easy Photo Print after installing the latest version of easy print module go away, make sure your operating system is up to date, try restarting your PC and reconnecting your printer

  • Uninstall any apps that might be conflicting with Epson Easy Photo Print.
  • Reconnect the printer and revert any recent changes to the printer settings.

If none of that works, start with the fixes below:

1. Change the file attributes

  1. Press Windows + S to open Search, type Epson Easy Photo Print in the text field, right-click on the relevant result, and select Open file location.
  2. Right-click on the launcher, and select Properties.
  3. Untick the checkbox for Read-only and Hidden in the General tab, and click OK to save the changes.disable attributes to fix epson easy photo print not working
  4. Once done, restart the computer and verify whether Epson Easy Photo Print is still not working in Windows 10.

2. Delete the temporary files

  1. Press Windows + R to open Run, type temp in the text field, and hit Enter.temp
  2. Press Ctrl + A to select all the files, and then hit Delete to clear them.clear cache to fix epson easy photo print not working
  3. Now, navigate to %temp% via the Run command.
  4. Similarly, delete all the files here, and then restart the device.local temp

When Epson Easy Photo Print is not working, it could be the temporary files or app cache to blame. Clear it both for the Windows’ Applications folder and the active user account to get back to borderless printing.

3. Update the drivers

  1. Press Windows + X to open the Power User menu, and select Device Manager from the list.
  2. Expand the Printers entry, right-click on the Epson device, and select Update driver.update driver to fix epson easy photo print not working
  3. Choose Search automatically for drivers.search automatically
  4. Wait for Windows to find the best available version available locally, and then reboot the PC.

When the Epson Creativity Suite (which Epson Easy Photo Print is a part of) stops working, updating the printer drivers does the trick.

In case the problem remains unresolved or Windows can’t find a newer version, head to the manufacturer’s website and manually install the latest printer driver.

4. Change Epson Easy Photo Print’s compatibility settings

  1. Locate the Epson Easy Photo Print shortcut, right-click on it, and select Properties.
  2. Go to the Compatibility tab, tick the checkbox for Run this program in compatibility mode for, and select a previous iteration of Windows from the dropdown menu.compatibility mode
  3. Now, tick the checkbox before Run this program as an administrator.run as administrator 
  4. Once done, click OK to save the changes and run the software.

5. Download the latest Visual C++ Redistributables

  1. Go to Microsoft’s official website, and download the latest Visual C++ Redistributables. We recommend you get both the x64 and x86 versions for enhanced compatibility.download redistributables to fix epson easy photo print not working
  2. Run the downloaded setup and follow the on-screen instructions to complete the process.redistributables
  3. Similarly, install the other Visual C++ Redistributables you got earlier.

A few users reported getting an error while installing the redistributables. In that case, we recommend you verify whether that particular package is already installed and repair it instead. Also, check for corrupt system files and use the SFC scan or DISM commands to fix things.

6. Reinstall the program

  1. Press Windows + R to open Run, type appwiz.cpl in the text field, and click OK.
  2. Locate Epson Easy Photo Print from the list of apps, select it, and click Uninstall.uninstall epson easy photo print
  3. If you can’t find the individual program, uninstall the entire Epson Creativity Suite.
  4. Once done, restart the computer.
  5. Now, reinstall the program using the CD that came along with the printer.

If you get an error while installing Epson Easy Photo Print, use an effective uninstaller software to clear any files from the previous installation.

This will also remove the EPTBL Registry entry, an underlying cause for many errors. Or you could use the dedicated uninstaller tool for Mac available on Epson’s official website. 

7. Perform a system restore

  1. Press Windows + R to open Run, type rstrui.exe in the text field, and hit Enter.rstrui.exe
  2. Choose Select a different restore point, and click Next to proceed.
  3. Select another restore point from the list, one created before the issue first appeared, and click Next.restore to fix epson easy photo print not working
  4. Verify the restore details, and click Finish to start the process.
  5. Wait for the restore to complete. Even if it takes time, let the process run uninterrupted.

If nothing helped fix things and Epson Easy Photo Print is stilll not working, a system restore should get it up and running. It will revert any changes and eliminate recent inconsistencies that are triggering the error.  

Epson Easy Photo Print Alternatives:

While Epson Easy Photo Print is a reliable tool and an effective solution when you want to configure the paper size, issues with it are common.

If you can, we recommend switching to another reliable printing software for an error-free experience and to benefit from an even wider range of editing options.

For any queries pertaining to the steps listed here or to share what worked for you, drop a comment below.

Does a VPN Protect You from Phishing? [+ Best Practices]

Phishing attacks are getting more and more sophisticated these days, and it’s becoming difficult to keep your data safe online. 

But wait! Have you considered using a VPN to protect yourself?

VPNs are great at encrypting your online traffic and making it harder for hackers to intercept and steal your data. But can VPN protect against cyber attacks like phishing?

The answer might surprise you.

 Keep reading to find out if it is your ally in the fight against phishing attacks.

What is phishing and how does it work?

Phishing is a cyber-attack where attackers impersonate trustworthy entities to deceive individuals into revealing sensitive information such as passwords, credit card details, or social security numbers. 

Typically, attackers use emails, instant messages, or malicious websites that mimic legitimate ones, tricking victims into believing they are interacting with a trusted source. 

Once the victims provide their information, the attackers can exploit it for fraudulent activities.

Phishing attacks often rely on psychological manipulation and social engineering techniques to persuade victims to take certain actions.

For example, they may create a sense of urgency or fear or a once-in-a-lifetime opportunity that urges recipients to click on a link or open an attachment to avoid negative consequences. 

These may contain malware, which can compromise the victim’s device and further exploit their information.

Attackers may also use spear phishing, a targeted form of phishing.

In spear phishing, the perpetrators customize their messages or websites to appear highly relevant to the recipient, increasing the chances of success. 

They gather information about the victim from various sources, such as social media profiles, to make their impersonation more convincing.

Does VPN protect you from phishing?

A VPN  primarily provides encryption and anonymity for internet connections, but it does not directly protect against phishing attacks.

This is because phishing attacks do not rely on your IP address but on your human vulnerability. 

For instance, A VPN cannot prevent you from clicking on a malicious link or opening a fraudulent email that looks legitimate. 

While some VPNs may have features that can block ads, trackers, or malicious websites,  they are not foolproof and cannot replace vigilance.

How can a VPN help with phishing?

While a VPN doesn’t directly prevent phishing attacks, it can offer some benefits in terms of protection. 

Here are various ways a VPN can help:

1. Encryption and anonymity

If someone can observe your DNS queries aka what you search for online and what data you type in, they have the ability to redirect you to a fraudulent website. 

So, if you input any confidential data, such as payment card information, on the website, the attacker can fully access it, which can compromise your funds or other sensitive details.

But VPNs can encrypt your DNS requests, mask your IP address, and route your internet traffic through a VPN server to hide the content from hackers. 

Reputable providers like ExpressVPN and NordVPN go further by managing these requests through their DNS servers.

This anonymity can make it harder for attackers to target you specifically, track your online activities, or gather information about your identity for phishing purposes.

2. Secure WiFi

It can be risky to use unprotected public WiFi networks, particularly when connecting to a deceitful WiFi hotspot called an evil twin. 

These are fraudulent WiFi networks that mimic the name of a legitimate public network, such as the WiFi found at a café or airport.

When connected to an evil twin hotspot, all of your online activities can be easily accessed by the phishing attacker unless you use a VPN for protection.

A VPN can create a secure tunnel between your device and the VPN server. 

This protects your data from potential eavesdropping or interception by malicious actors who may be present on the same network.

3. Geo-blocking evasion

Some phishing attacks may be region-specific, targeting users in specific locations. 

According to Avanan, phishing actors use GeoTargetly, a tool commonly used by businesses to personalize advertisements based on the recipient’s location. 

The attackers redirect users through this tool and present them with tailored phishing pages specific to their local area.

Avanan shared an example email in which the phishers sent a message in Spanish regarding a speeding subpoena. 

The email included a link that directed victims to a page hosted on GeoTargetly. 

The tool automatically detects the user’s geographical region without their awareness and redirects them accordingly.

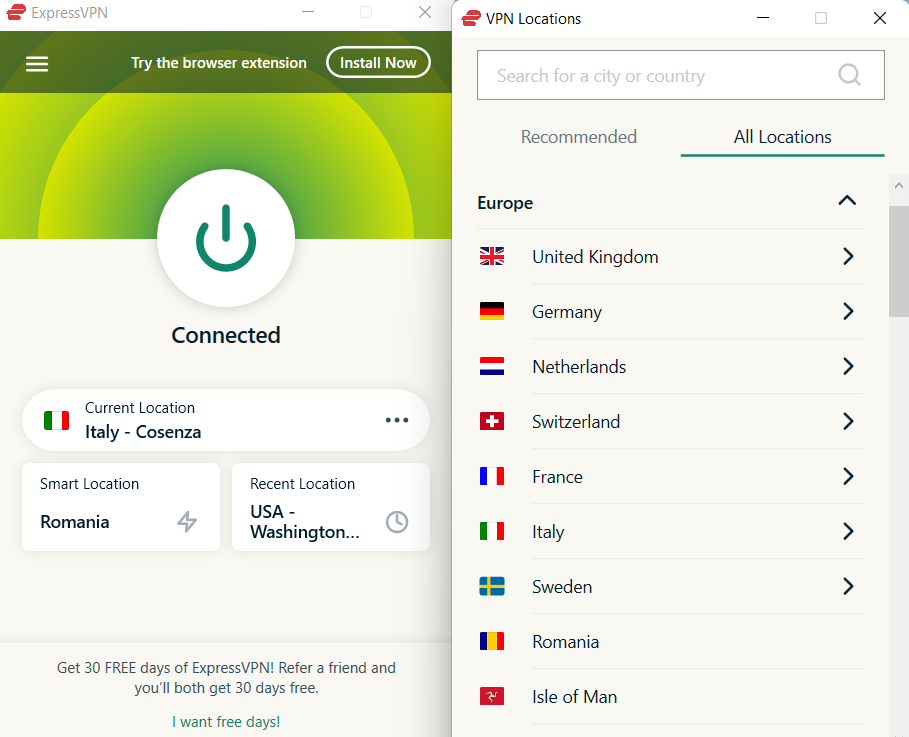
However, A VPN can allow you to change your virtual location by connecting to a server in a different country. 

This can help bypass these geo-specific malicious websites or links that may be part of phishing campaigns.

How to block phishing?

Blocking phishing attacks requires a multi-layered approach that combines technological measures and user awareness. 

Here are several practical methods for phishing protection:

1. Use an email service with built-in spam and phishing filters

Some email services, such as Outlook and Gmail, have filtering systems that can automatically detect and block phishing emails before they reach your inbox. 

These filters can analyze factors such as sender reputation, content analysis, and URL reputation to identify potential phishing attempts.

They can also warn you if an email is suspicious or potentially harmful. 

2. Anti-phishing software and browser extensions

Utilize anti-phishing software or browser extensions that can detect and warn users about suspicious websites or links.

These tools often leverage databases of known phishing sites and employ algorithms to identify potential phishing indicators.

Some of the popular examples include Phishdetector, Netcraft, and Kryptonite.

3. Multi-factor authentication (MFA) 

Enable MFA wherever possible, especially for critical accounts like email, banking, or social media. 

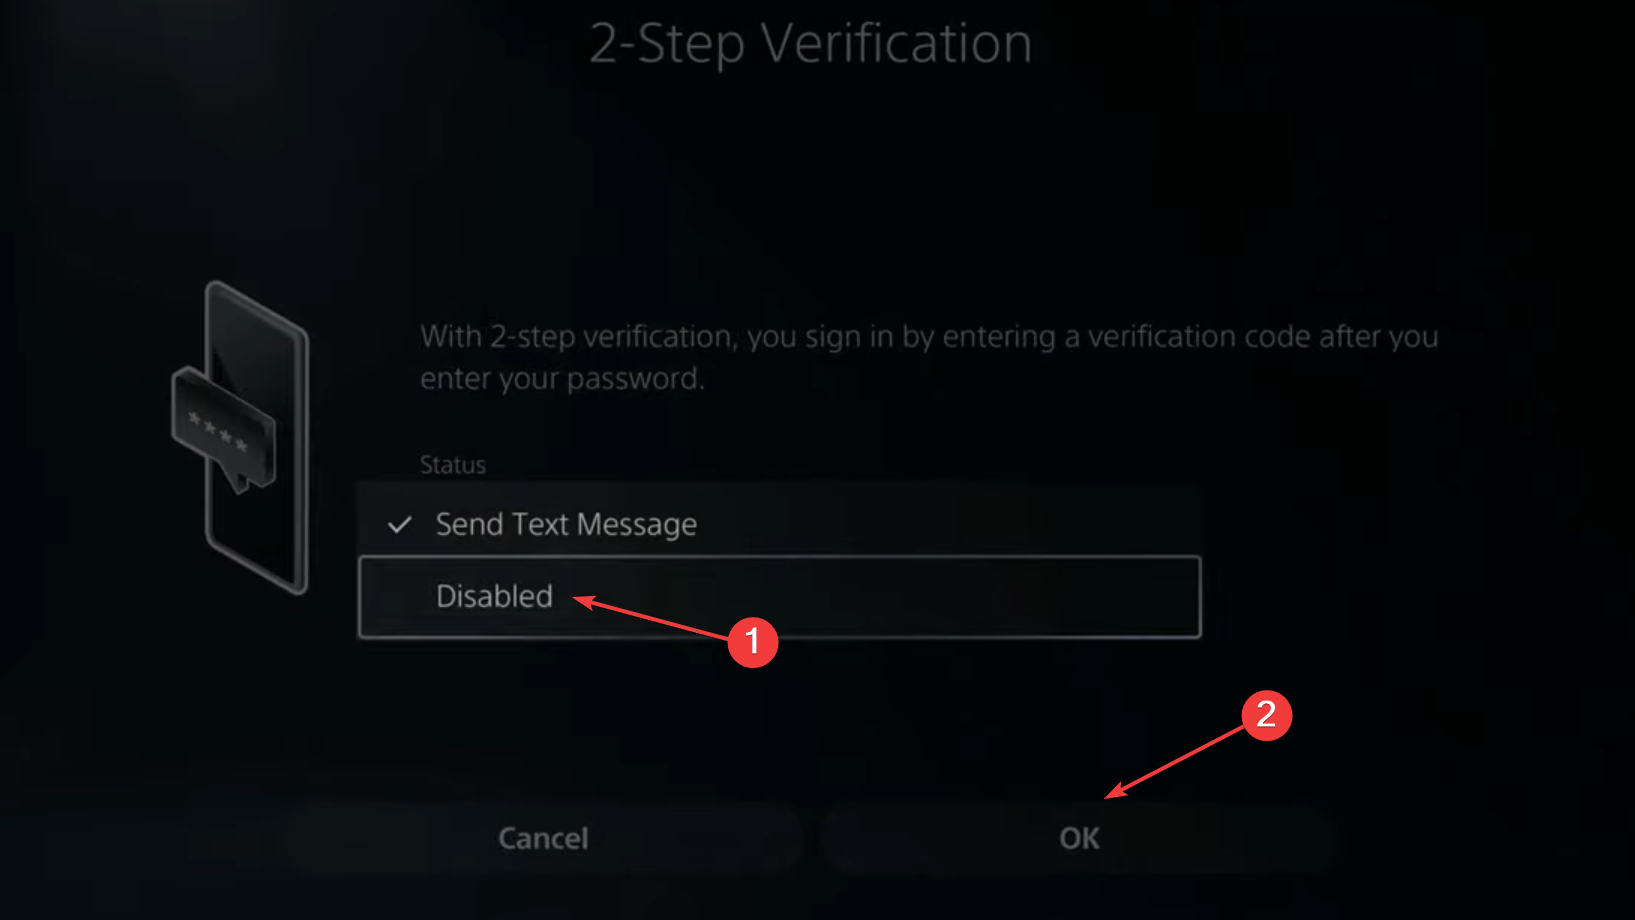
MFA adds an extra layer of security by requiring users to provide additional verification, such as a unique code sent to their mobile device, in addition to their password.

This reduces the risk of falling victim to phishing attacks by warning the user and allowing them to stop the perpetrators.

4. Use a VPN to hide your IP address and online activity from hackers

A VPN encrypts and routes your internet traffic through a secure server, hiding your IP address and online activity from prying eyes. 

This can prevent hackers from monitoring your traffic and leading you to a phishing website.

 It can also protect you from DNS hijacking when hackers redirect your DNS queries to malicious servers that send you to fake websites.

5. Use antivirus software and update your devices and applications regularly

Antivirus software can help you detect and remove malware installed on your device by phishing emails or websites. 

It can also block ads, trackers, or malicious websites containing phishing links or malware. 

You should also update your devices and applications regularly to fix any security vulnerabilities that hackers might exploit.

6. Be careful about what you open, click, or download online

The best way to block phishing is to avoid falling for it in the first place. You should always be careful about what you open, click, or download online.

Moreover, never enter your personal or financial information on websites that are not secure (look for a padlock icon and https in the address bar) or that have suspicious domain names.

If you receive an email or message that asks you to verify your account, reset your password, or claim a prize, do not click on any links or attachments.

Instead, contact the sender directly or visit their official website to verify the authenticity of the request.

7. Incident response and reporting

Last but very important, you should report any phishing emails you receive to help improve the filters.

By doing so, you contribute to improving email filters and security measures, helping to prevent similar phishing attempts from reaching you in the future or others, and raising awareness about emerging threats.

This collective reporting effort enhances the overall effectiveness of email security systems and strengthens the defense against phishing attacks.

What to do when caught in a phishing email trap?

Despite our best efforts, falling victim to a phishing email can still happen.

However, there are proactive steps you can take to mitigate the potential damage and safeguard your information. 

By following these measures, you can regain control and minimize the impact of a phishing attack.

1. Notify close contacts

Inform your close friends and family that your email account has been compromised.

You should advise them to exercise caution and avoid clicking on any messages originating from your email address. 

This prevents the phishing attack from spreading further.

2. Change passwords

Act swiftly to change the passwords for all your accounts. 

Prioritize securing your Google, iCloud, Amazon, and banking accounts, especially anything related to your financial information.

Additionally, you can contact your mobile service provider to verify if your mobile phone has been cloned.

3. Update credit card information

Terminate all your credit cards and update your financial account information. 

You can freeze your bank cards immediately and modify your passwords to protect your finances.

4. Report the incident

Contact the appropriate authorities, such as the police, to report the phishing attack. 

Phishing activities are criminal offenses and should be legally addressed. 

By sharing your experience with law enforcement, you contribute to the efforts to reduce such incidents.

5. Avoid interacting with the phishing email

Refrain from revisiting the suspicious email and resist the temptation to further click on any links or download attachments in an attempt to rectify the situation. 

Taking such actions could worsen the situation. Instead, focus on implementing preventive measures to reduce future risks.

Summary

Does a VPN protect you from phishing? Not exactly.

While a VPN does not directly protect against phishing, it can provide encryption and anonymity for internet connections. This makes it difficult for hackers to monitor your activities. 

However, combining other measures discussed in this article with user awareness is necessary to block phishing effectively.

Stay safe!

Posted in VPN

Exclusive: Legion Go is priced at €799 with 8.8-inch QHD+ screen & Super Rapid Charge; arrives September 1

Update: Lenovo officially announced the Legion Go at IFA 2023, confirming the info below.

Lenovo is ready to take on Valve and ASUS with their new gaming handheld, the Legion Go, at IFA 2023. The device might be the most powerful console yet, with features and specs that surpass those of its competitors but with a price tag to match.

We were the first to exclusively report that Lenovo is looking to challenge Valve with a Steam Deck rivel, and now we’re exclusively bringing you some more information. From our trusted source, who has gotten hold of Lenovo’s official press release, we bring you the full specs & pricing for the Lenovo Go, Lenovo AR Glasses, and Lenovo Legion In-Ear Headphones.

But first, here’s what you should know:

  • Lenovo’s Legion Go is the latest gaming handheld that will run Windows 11
  • It will go up against the Steam Deck, ROG Ally, and AYANEO’s consoles
  • Legion Go will sport up to an AMD Ryzen Z1 Extreme processor
  • It’s pegged to be released on September 1st at IFA, alongside a plethora of gaming accessories
  • Windows Central uncovered the first rumors about the device
  • You can check the full specs, price, and accessories down below

Lenovo’s handheld also plays a significant role in streamlining the on-the-go experience. With more manufacturers entering the market, the possibility of a native handheld mode in Windows 11 becomes more of a reality and less of an experiment.

Disclosure: The document we received was from an anonymous tipster. It contains nine pages from the official press release that will be launched on September 1st across various media outlets. We haven’t received such a document from Lenovo itself. It also contains a private link to a YouTube-posted video with the full showcase of the product, but we’ve chosen not to share that publicly.

Lenovo Legion Go full specs

Specs aren’t everything, right? The overall experience might count more, especially in the case of the Legion Go. Imagine pairing it with the gaming AR Glasses and playing your favorite games everywhere…on a HUGE screen!

But reading through the confirmed specs from the press release, it seems that the handheld won’t be great just for gaming:

Lenovo Legion Go
Dimensions (L x W x H)Base Module: (mm): 210mm x 131mm x 20mm (inches): 8.27″ x 5.15″ x 0.79”   Base Module w/ Controllers Attached: (mm): 299mm x 131mm x 41mm (inches): 11.8” x 5.15” x 1.61”
WeightControllers Detached: 640g (1.41lbs)   Controllers Attached: 854g (1.88lbs)
ColorShadow Black
Display8.8” QHD+ (2560 x 1600) IPS; 16:10 10-point Touch (144Hz / 97% DCI-P3 / 500nits / 83%AAR
TouchpadMulti-finger
ProcessorUp to AMD Ryzen Z1 Extreme with AMD RDNA Graphics
Memory16GB 7500Mhz LPDDR5X on board
Storage256GB / 512GB / 1TB PCIe 4.0 NVMe M.2 2242
Operating SystemWindows 11 Home
Battery2-cell 49.2WHr Super Rapid Charge2 Controller battery capacity: 900mah2
Power AdapterUSB Type-C, 65W AC adapter Output: 20V DC, 3.25A, 65W Input: 100~240V AC 50/60 universal
PortsTop 3.5mm audio combo jack1 x USB Type-C (USB 4.0, DisplayPort™ 1.4, Power Delivery 3.0)1 x microSD card reader   Bottom 1x USB Type-C (USB 4.0, DisplayPort 1.4, Power Delivery 3.0)
Control and InputGamepad Controls Legion L/RABXY buttonsD-padL & R hall effect joysticksL & R bumpersL & R analog triggersLegion L & R buttonsView button (L)Menu button (L)Trackpad (R)6 x assignable grip buttons1 x mouse wheel (R)1x mouse sensor (R)2 x controllers release buttons Haptics: HD haptics Gyro: 6-Axis IMU
Audio2 x 2W SpeakersDual-array near-field microphone
Connectivity2 x 2 Wi-Fi 6E (802.11 ax)3Starting from Bluetooth® 5.2
SoftwareLegion Space Xbox Game Pass Ultimate – Complimentary 3-month membership4,5

We’ve already confirmed the big picture and the most important specs in our previous article, but it’s worth noting that now we know the Legion Go will have 16 GB of 7500Mhz LPDDR5X RAM and 256 GB/512 GB/ 1TB of storage.

This is the first clue that Lenovo aims to surpass the Steam Deck and ROG Ally, as the RAM is significantly faster than both of those 2 consoles, and the top storage capacity is doubled. But that’s also the first hint at a more substantial price, bumped up by the bigger (and completely overkill) screen 8.8″ QHD+ screen.

Do we need more than 1080p on a sub-10″ screen? Most gamers will agree that FullHD is perfectly fine when gaming, and the refresh rate or battery life is much more critical. For the first one, the 144Hz is right on par, but the battery of 49.2WHr is only marginally bigger than the competition and most likely determined by the device’s size.

Based on gamers’ feedback on the Steam Deck and ROG Ally, the battery is one of the most significant downsides of a handheld, and it seems that Lenovo’s console won’t address that issue. But at least it will have Super Rapid Charge with 65W of fast charging, which means the downtime won’t affect your gaming sessions much.

The Legion Go will also come with 3 months of Xbox Game Pass Ultimate, so triple-A titles won’t be an issue. And the USB 4.0 ports will play a massive role in streaming those games on your TV or gaming monitor.

Our take on the specs? The QHD+ screen is maybe the most interesting part, as it might imply that the Legion Go could be used as a media consumption device and not only for gaming. Get rid of the Gamepad Controls, and you have a mini tablet to watch movies and YouTube on the go. Attach them, and you can play Cyberpunk or Forza Horizon in just a few seconds. Neat, right?

Lenovo Legion AR Glasses will work with any USB-C device

Let’s not forget about the AR Glasses, which will complement the experience and take it to an entirely new level. Here are the technical specifications for Lenovo Legion Glasses:

Lenovo Legion Glasses
DisplayMicro OLED
Resolution1920 x 1080 per eye
AudioHigh-fidelity built-in speakers
Device CompatibilityRequires full-functionality USB-C with DP Alt mode
Cable Length1.2m (3.93ft)
In-Box Accessories2 x Adjustable Nose Pads Carrying Case Prescription Lens Frame Anti-slip Adapter Cleaning Cloth

Micro OLED with Full HD per eye? Yes, gaming sounds a lot more enticing right now! And the most important part, the prescription lens frame. Those wearing glasses won’t bump into the usual problems, hopefully.

60Hz refresh rate and high-fidelity built-in speakers complete the package.

But the catch is that you can hook them to any other device, not only with Legion Go. It has a full-function USB-C compatible with any Windows, Android, or macOS device.

Lenovo Legion E510: gaming earbuds with RGB

We found another accessory called Lenovo Legion E510 7.1 RGB Gaming In-Ear Headphones in the press release.

Source: Leaked Lenovo Document

As the name suggests, it’s a pair of in-ear 7.1 surround sound headphones that, according to the press release, feature 10 mm armature drivers. They are supposed to deliver punchy bass, balanced mids, and highs free from distortion.

Moreover, they feature an inline controller for quick adjustments and a stylish RGB strip on the controller. Here are the specs for Lenovo Legion E510 7.1 RGB Gaming In-Ear Headphones:

Lenovo Legion E510 7.1 RGB Gaming In-Ear Headphones
AudioSpeaker Size10mm Dynamic & Balanced Armature Receiver
Sensitivity94 ± 3 dBSPL at 1kHz
Frequency Range20 Hz – 40 kHz
Microphone1 Omnidirectional Analog Silicon Mic
Mic Sensitivity-38 ± 1 dBV/Pa at 1 kHz
Mic Frequency Range50 Hz – 10 Khz
ConnectivityInterfaceUSB-C
Cable Length150cm
DesignPacked Dimensions24.6mm x 19.7mm x 21.8mm 0.97 in x 0.78 in x 0.86 in
Weight26g (0.06lbs)
Warranty1 Year

These in-ear headphones will most likely be revealed with the Legion Go and will complement the device, making the gaming experience even more immersive.

Legion lineup: pricing & availability

According to the press release we received, here’s what to expect concerning Legion Go’s prices and accessories.

  • Legion Go – Will be available starting in October at the price of €799/$799.
  • Lenovo Legion Glasses – Are expected in October 2023, starting at €499/$499
  • Lenovo Legion E510 7.1 RGB Gaming In-Ear Headphones – Are expected to be available in October 2023 starting at €49.99

Windows 11 proved great for gaming, so we might see more and more gaming handhelds with the OS pre-installed. If the rumors are true and Microsoft releases a handheld mode of Windows 11 specifically for these devices, gaming on the go will become more streamlined.

But what’s your take on Lenovo’s ecosystem? Tell us what you think about the top specs & price of the Legion Go in the comments section below.

How to Change the Teams Background Before the Meeting

You can change the background image in Microsoft Teams during and before a meeting. While Microsoft offers a bunch of preset backgrounds, you can always add a custom image as well. Keep reading to find out the steps for both!

How do I change the background in Microsoft Teams before a meeting?

  1. Click Meet or Join to be a part of the video meeting or start one.start meeting on teams
  2. Enable the camera and click on Background filters.filters to change background before meeting in microsoft teams
  3. Now, choose from the list of images available on the right.
  4. Once done, click the Join now button, and the selected image will be used throughout the meeting unless changed manually.join now

How to blur the background in Teams?

  1. Start a meeting and wait for the Choose your video and audio options window to appear.
  2. Select the Blur filter, and click on Join now.blur background in Microsoft Teams

The Blur filter in Teams is a popular choice amongst users with a messy background or anyone who wants to hide the real background.

How to change the background in Teams mobile app?

  • Open the Teams mobile app > click Join > tap on Background effects. Now, select a background filter > tap on Done > finally tap Join now.

While most use the PC, you can also change the background image in the Teams mobile app. The option is available on both Android and iOS mobile devices and shouldn’t take more than a few seconds if you know which background image file to select.

How to download & install custom backgrounds in Teams?

  • Open the pre-meeting settings > turn on the camera > click Background filters > click Add new > locate the image > select it > click Open > start the meeting.

As we explained earlier, downloading a custom background for Microsoft Teams will help curate and personalize the experience. Also, you can set a custom background before joining a meeting in Teams, making it all the more seamless. And the animated backgrounds in Teams are sure a great addition!

You will find the following restrictions on custom backgrounds in Teams:

  • File size: Minimum – 360 x 360 px, Maximum – 2048 x 2048 px
  • File type: PNG, JPEG, JPG, BMP
  • Aspect ratio: Width: Height < 4

For those who are fans of custom images, do check our list of the best backgrounds for Teams and share your favorite pick. We also have a nice selection with Halloween Teams backgrounds.

Besides, Microsoft has a dedicated page for Custom Background Gallery, where you will find various images categorized into different sections. Some of these are community submissions, while Microsoft offers others.

On the website, you can download individual backgrounds or get the entire category as a ZIP (.zip) folder.

A proper understanding of how to change the background outside of a meeting in Microsoft Teams is imperative. But you must also know the various background settings for an optimal experience and to troubleshoot issues when the feature or Teams is not working.

Do share your experience with setting a background in Microsoft Teams and if you have a personal favorite.

How to Fix Black and White Squares on the Computer Screen?

Display issues can be frustrating, making your device challenging to use. One of the common issues is black and white squares flickering back and forth across your computer screen.

In this comprehensive guide, we will discuss some of the expert-recommended solutions for the black square or white screen issue right after examining the causes of the problem.

There could be various reasons for the black screen with white flashing squares; some of the common ones are:

  • Outdated display driver
  • Oxidation on the GPU’s PCI-E connection
  • Damaged GPU
  • Incorrect display resolution settings
  • Heating issues
  • Corrupted system files

How do I get rid of the black and white squares in Windows 10 & 11?

Before we go to the advanced fixes, here are a few preliminary checks you should do:

  • Check your cables for loose connections, try a different display, or restart your PC.
  • Remove the dust from the CPU panel and reseat the video card.
  • If you notice the system panel is hot, shut down the PC and wait for it to cool down.
  •  Hit Windows + Ctrl + Shift + B on your keyboard to reset the graphics driver.
  • Disable overclocking and try running a benchmark tool.
  • Ensure there is no pending Windows Update and close the unnecessary programs & processes.
  • Run a malware scan.

1. Run the troubleshooter

  1. Press Windows + X to open the Power User menu.Windows Terminal open black and white squares on computer screen
  2. Locate Terminal (Admin) and click it to launch Windows Terminal.
  3. Type the following command to launch Hardware and Devices Troubleshooter and hit Enter: msdt.exe -id DeviceDiagnosticWindowsTerminal_command to open Hardware and Devices troubleshooters
  4. Click Advanced on the Hardware and Devices window.Click Advanced
  5. Now, select Apply all repairs automatically, then click Next.Apply repairs automatically 
  6. Follow the on-screen instructions to complete the process.

2. Disable the Color filter

Windows 11

  1. Press Windows + I to open Settings.
  2. Go to Accessibility, then Color filters.Accessibility Color filters
  3. Locate Color filters and toggle off the switch to disable.Disable Color filters to fix black and white squares on computer screen
  4. Navigate to the Keyboard shortcut for color filters option and turn it off.

This also helps if your TV’s HDMI connection results in a black and white screen.

Windows 10

  1. Press Windows + I to open Settings.
  2. Click Ease of Access.Ease of Access
  3. Locate Color filters and switch the toggle off for the Turn on color filters option.
  4. Also, remove the checkmark next to Allow the shortcut key to toggle filter on or off.
    Turn off Color filter to fix black and white squares on computer screen

This fix can also help you quickly eliminate a common display problem like a black-and-white computer screen.

3. Update the graphics driver

  1. Press Windows + R to open the Run dialog box.Device Manager Run command
  2. Type devmgmt.msc and click OK to open the Device Manager app.
  3. Locate Display adapters, click it to expand & get the list of graphics drivers.
  4. Right-click your graphics driver and select Update driver.Update driver to fix black and white squares on computer screen
  5. Click Search automatically for drivers.Update driver 2
  6. If an update is available, follow the on-screen instructions to complete the process.

Keeping the graphics drivers up to date can help you avoid many display issues, including vertical lines on your monitor.

Alternatively, you can try professional software updaters, such as Fortect Driver Updater. This tool can scan your whole system to identify any missing or outdated drivers, and install new ones within minutes.

⇒ Get Fortect Driver Updater

4. Change the resolution settings on your monitor

  1. Press Windows + I to open Settings.
  2. Go to System, then click Display.System Display - black and white squares on computer screen
  3. Under Scale & layout, locate Display resolution and ensure you have selected the Recommended option from the drop-down list.Screen resolution change

5. Run diagnostics on your computer

  1. First, close all the windows and apps and save all the work. Press the Windows key, type windows memory diagnostic, and click Open.Memory diagnostic tool  - black and white squares on computer screen
  2. On the Windows Memory Diagnostic tool, select Restart now and check for problems.memory-diag-tool 3
  3. Your computer will restart, and a memory scan will start. Wait for a couple of minutes, and your PC will take you back to the login screen once the test is complete.memory-diag-tool
  4. Log on to your computer to check the test results.

If the test results indicate errors, you might have to check the memory modules to ensure they are correctly seated. Also, remove dust and rerun the test.

However, if the test still shows errors, it could be a sign of faulty RAM, and you have to replace it and resolve the black and white squares on the computer monitor screen.

6. Perform a system repair

First, you need to enter Windows Recovery Environment; for that, follow these steps:

  1. Hold down the Power button for 10 seconds to switch off your machine.
  2. Press the Power button again to turn it on.
  3. When you see the first sign of Windows starting up, hold down the Power button for 10 seconds to turn it off.
  4. Now, press the Power button again to switch it back on. Repeat the process, but let the computer turn on completely this time.
  5. You will get the Automatic Repair window.

Next, you can choose System Repair from the diagnostics options; for that, follow these steps:

  1. On the Automatic Repair window, select Advanced options.Advanced options - Automatic repair  black and white squares on computer screen
  2. Click Troubleshoot on the Choose an option screen.
  3. Select Advanced options.Advanced options
  4. Next, on the Advanced options page, choose Startup Repair.
  5. Your computer will restart, look for corrupted system files, and try to repair them.

System Repair can help you fix all startup errors, like a black screen with a cursor, to ensure your Windows starts normally.

To check if the issue is resolved, run the LCD BIST test, turn off your PC, press the D key, and the Power button together, and release them after a couple of seconds. Your screen will turn white, red, blue, green, and black to determine if the video distortion persists, then try to reset the PC.

If the methods mentioned don’t resolve the black and white squares on the computer screen, check the video card for bulging capacitors, brown bits, or fly checks. If there are signs of damage, replacing graphics card could help.

However, it is not recommended if you don’t have the expertise; go to a technician for a proper evaluation instead.

Did you miss a step that helped you fix the black and white squares on your laptop screen issue? Feel free to mention it in the comments section below; we will happily include it in our guide.

TypingClub for Windows 11: How to Download & Install

Whether you’re working or playing, it is easy to become frustrated with typing on the computer. A valuable tool for anyone who spends time on the computer is software that helps improve your typing speed and accuracy.

It’s really easy to use once you know the steps that are needed. But first, you need the software on your PC. Keep reading to find the exact steps to get the program installed.

Since TypingClub is our tool of choice, just how good is it on Windows 11? First, it is a free online typing software with minimal system requirements. This makes it a top choice since you can practice without limitations.

It has a simple interface with a virtual keyboard and typing lessons that make it easy to use right away. If you want to learn faster typing skills, this is the app for you, but it can also be useful for those who want to learn the basics of touch typing or increase their speed with various difficulty levels.

How can I download & install TypingClub on Windows 11?

  1. Navigate to your Chrome browser and go to the webstore.
  2. Find TypingClub, and hit Add to Chrome.
  3. Click Launch app.

You’ll notice that this application is no longer supported on Windows 11, and you may be unable to launch it. Since the last time it was updated was nearly a decade ago, it is no longer compatible with newer operating systems.

To get around this, you can either downgrade your Windows or Chrome version until you find a supported one that allows you to download and launch the extension.

Remember that Chrome does not provide official download links for older versions, so you may have to download them from third-party sites.

Note: Uptodown.com is a third-party website and not an official source. WindowsReport is not affiliated with it in any way. Be sure to run an antivirus check after downloading it.

Since this process is long, the easiest workaround is to access it on the web version by going to the TypingClub official site and starting your classes right away without downloading or signing in.

What are some common TypingClub issues on Windows 11?

  • TypingClub won’t launch – This is an issue that appears when you try to add the TypingClub extension to your browser. 
  • Progress not recorded – To keep track of your typing progress, you must log in with your account.
  • TypingClub won’t load – If the TypingClub is not working, you might be experiencing an intermittent internet connection. You can switch to another network to get a stable connection.
  • Can’t access TypingClub – Sometimes, an antivirus program can cause issues if it thinks the site might be dangerous or malicious. You can disable your firewall temporarily to allow connection.
  • TypingClub is not responding to key presses – This can happen if your keyboard is not working or you have outdated drivers.

To sum it app, TypingClub is a must-have app for anyone who wants to improve their typing accuracy and enhance their typing skills.

The different modes make it easy for beginner and average users of all ages and experience levels to learn basic typing skills while improving their typing speed. Best of all, the app doesn’t require any special hardware or software requirements.

Still, advanced users may find it a bit bland, so if you’re looking for more powerful typing software, feel free to explore our expert list for more recommendations.

Have you tried the TypingClub program? What was your typing experience, and would you recommend it? Leave us your review in the comment section below.

Hohem iSteady M6 smartphone gimbal kit review – possibly the best smartphone gimbal out there

Earlier this month back we reviewed Hohem’s iSteady MT2 motorized gimbal. That impressive piece of kit was a 4-in-1 affair with compatibility for smartphones as well as compact and DSLR cameras as well as action cameras. But what if you like to stick with your smartphone for all your video content creation? Well Hohem has the answer for that too with its iSteady M6 smartphone gimbal.

The question is: how does the iSteady M6 measure up against other smartphone gimbals out there, and is it the right choice for your personal and/or professional videography needs? Read on to find out.

Hohem iSteady M6 gimbal specs

Dimensions  6.5L x 2.1W x 11.8H inches
Weight 1.3lbs
Payload 400g (or about o.88lbs)
Package contents
  • iSteady M6 smartphone gimbal
  • AI vision sensor with fill light
  • Tripod
  • Carrying case
  • USB-C charging cable
  • USB-C to USB-C cable
  • User manual
Battery
  • 22600mAh/19.24Wh capacity
  • Up to 18 hours battery life (6-8 using AI tracking and fill light)
  • 3 hours charge time
Mechanical range
  • Pan: 360° infinite rotation
  • Roll: 335°
  • Tilt: 335°
Special features
  • 0.91-in. OLED display
  • iSteady 7.0 Anti-Shake System
  • AI tracking 
  • Fill light with color options
  • 3-axis stabilization
  • Hohem App compatibility

Summary

To start, the Hohem iSteady M6 is a premium piece of equipment. The build quality here is very good on all accounts. The gimbal feels light but sturdy when using it. While it may not be quite as rugged as Hohem’s MT2 or other heavy-payload gimbals, it doesn’t need to be, keeping in mind that this is exclusively for smartphones.

All the button controls, multifunctional control wheel, zoom lever, latches and trigger all feel well-built and not once did I worry about breaking anything while using the gimbal. Note however that the AI tracking sensor/fill light component (which attaches to the gimbal magnetically) can be knocked off easily enough if you aren’t careful. The OLED display is clear and easily readable. Battery life is ample enough that you can easily use the gimbal all day and without worrying about charging it. Reverse charging for your smartphone is also available.

Overall I found using the gimbal comfortable and ergonomic. And as a nice bonus, the generous payload means you can attach additional accessories such as microphones and lenses, etc.—just be careful not to overdo it as you’ll overload the gimbal and hurt its stability.

Mounting your smartphone onto the M6 should be relatively painless, especially with the help of this video tutorial from Hohem. For beginners, there will be a bit of a learning curve when it comes to mastering the various controls and functions of the M6, though this is true of any gimbal. Not to worry though—there are plenty of resources online dedicated to teaching owners all about this particular model, like this video guide and others like it—and you’ll be using your M6 like a pro in no time. These will cover everything from charging the gimbal to balancing your smartphone to using the AI tracking and the Hohem Joy App.

And speaking of the app, it has a few extra features for those who want to try it out, though the app is not necessary to use the gimbal or even the AI tracking feature. On that last point, the gesture-controlled AI tracking means you can operate the gimbal completely remotely.

The verdict

DISCLAIMER: A sample unit was provided for an honest review

There are plenty of cheaper smartphone gimbals out there than the Hohem iSteady M6? Sure; but you won’t be getting the same array of features or overall quality. Is the M6 the king of smartphone gimbals right now? Probably. And it’s what I would recommend for anyone who is really serious about using their smartphone for videography and content creation.

Cons:

  • One of the more pricey smartphone gimbals

Pros:

  • Lots of control features, which means…
  • …Versatile shooting possibilities
  • Works with a wide range of smartphones
  • Can accommodate additional accessories
  • Lightweight and comfortable to use
  • Compatible with optional Hohem Joy App
  • Excellent stabilization tech means your videos will look better than ever

The Hohem iSteady M6 gimbal is available on Amazon or on the Hohem website for $209 (USD).

Featured image via Hohem. 

TypingClub is Not Working on Windows 11? Here’s What to do

If TypingClub is not working, you won’t be able to access any of the interactive lessons, and you’ll lose all your progress.

This can be a major problem since this service is used by both teachers and students alike, but there are ways to fix this problem, and we’re going to explore them in this guide.

Why is Typingclub not working?

  • Incorrect credentials or incorrect login URLs will prevent you from using TypingClub.
  • If your school account isn’t properly configured, you won’t be able to use this service.
  • In some cases, browser cache can cause problems such as this one.
  • Problems with your connection can cause issues with TypingClub.

How do I fix TypingClub if it’s not working in Windows 11?

1. Check your school URL and login information

  1. Firstly, make sure that you’re using the correct URL to log in. It should be in the following format: https://school-name.edclub.com
  2. Check your login information or try using a different login method.
  3. Ensure that you’re properly added to the school account. This will require you to contact a teacher or a school administrator.

2. Clear the browser cache

  1. Click on the Menu button and choose More tools. Then select Clear browsing data.
  2. Select the data you want to clear and click on Clear data.
  3. Wait for the process to finish, restart your browser, and check if the Typing Club login is still not working.

3. Use a VPN

  1. Download and install the ExpressVPN client.
  2. Launch it on the desktop, and then visit the TypingClub webpage.
  3. Log in and connect to another server; check if the issue is resolved.

To find a suitable VPN client, we encourage you to visit our guide on the best free VPN for Windows 11.

If TypingClub is not working, the issue is caused by the corrupted browser cache in most cases and that can be fixed easily. In case you’re having problems, you can always try downloading TypingClub for Windows 11.

Network issues such as the DNS server might be unavailable messages can also lead to problems with the service.

Have you ever experienced issues with TypingClub and how did you fix them? Let us know in the comments section below.

Microsoft launches Bing Chat Enterprise in Windows Copilot preview

Today, Microsoft announced the rollout of Bing Chat Enterprise in the Windows Copilot Preview, available to eligible commercial customers in the Dev Channel and some customers in the Beta Channel. This offers a major advantage to enterprises already using Bing Chat Enterprise, as they will not have to perform additional steps to enable it in the Windows Copilot Preview.

Bing Chat Enterprise gives your organization AI-powered chat with commercial data protection. In July, we made Bing Chat Enterprise available in preview on Bing.com and the Edge sidebar, said the tech giant in a blog post.

Bing Chat Enterprise: What’s New?

Essentially, from the employee’s perspective, the Bing Chat experience remains consistent, although the presentation will now be aligned with the Bing Chat Enterprise branding.

There’s also a constant reminder under each prompt indicating that both personal and corporate data are safeguarded — a crucial feature in an era where privacy concerns are at the forefront of many discussions.

However, the more significant changes lie ‘under the hood,’ intended mainly for IT Pros and other individuals in charge of data protection and compliance. The transition to Bing Chat Enterprise means organizations will be able to utilize Windows Copilot with the assurance that their data is secured.

To elaborate, chat data will neither be stored nor accessible to Microsoft and won’t be used for training the underlying models, thus ensuring complete data privacy.

Windows Copilot Preview Availability

The Windows Copilot Preview has been launched to Windows Insiders in the Dev Channel. Further rollouts to Insiders in the Beta Channel are in progress.

 Just click the “…” icon at the top right of the side bar in Windows Copilot to submit feedback on any issues you run into, Microsoft tells users.

Stay tuned for further updates on Microsoft Windows Copilot Preview and Bing Chat Enterprise.

Windows 11 features may soon be accessible via Windows Copilot and Bing Chat

In a recent report by Windows Latest, it has been suggested that Microsoft has been utilizing Microsoft Edge APIs to improve Windows Copilot, a feature in Windows 11 being previewed now in the Windows Insider Dev Channel. The new enhancements are aimed at helping Copilot control OS-level features more effectively.

The potential new capabilities might include changing system settings, opening apps, toggling between dark and light modes, adjusting brightness levels, and even reading content from different apps.

A Sneak Peek into New Features

Windows Latest appears to have found new .json files in recently released Windows 11 preview builds. Among these, the most interesting seems to be TaskManagerService-ai-plugin.json. The new addition suggests that Copilot might soon be able to reach the Task Manager.

After the upgrades are completed, it may be possible for users to ask Copilot to manage processes using Task Manager. This could involve directing it to terminate a process or obtain additional information about it.

A Modular Copilot for a Customizable Experience

Microsoft visualizes the Windows Copilot to be as modular as possible, and therefore, most of its features are delivered using inbox and third-party plugins. These could enable users to swiftly launch or close apps, set alarms, search for files, and more.

Pilot plugins seem to be at the core of these upgrades. Microsoft is testing a plugin that would integrate Task Manager into Copilot and allow users to monitor or close running apps using Copilot’’s AI technology. It adds an entirely new dimension to the user experience.

User-Friendly Plugins

Among the sea of plugins, the AccessibilityTools-ai-plugin.json stands out as it might enable users with disabilities to navigate the system more fluidly.

Some of the other potential plugins include the ai-plugin-WindowsSettings.json to manage Windows 11 settings, the ClockService-ai-plugin.json to handle time and alarm settings, and the LaunchApplication-ai-plugin.json and SmartFileActions-ai-plugin.json plugins that could offer an interactive approach of opening apps through simple AI-powered commands.

A Wide Array of Plugins Under Testing

Microsoft is testing several new plugins. Some of the most notable ones include:

  • Open Feedback Hub Plugin: Facilitating users to access the Feedback Hub app through Copilot.
  • Set Windows Theme Plugin: Allowing users to change Windows theme through Copilot.
  • Fix Slow PC, Close App, and Screen Snipping Plugins: Occupying the functionality of accelerating PC performance, shutting down specific programs, and taking screenshots on command.
  • Set Timer and Set Alarm Plugins: Catering to user-specific needs like setting timers and alarms.
  • Suggest Media Plugin: Recommending movies similar to the ones a user enjoys.

To sum up, the new plugins are being developed to make Windows Copilot a one-stop control center for Windows 11.

Microsoft introduces Typeface AI for Microsoft Teams for Business

Microsoft announced that the Typeface app is now integrated with Microsoft Teams, making it easier for users to incorporate generative AI into their marketing tools and messaging apps.

Typeface AI is an AI-powered application that generates personalized and streamlined enterprise content. It employs several AI models to create text, images, and other creative content that cater to the unique requirements of each brand.

By training the AI with a company’s brand guidelines, style examples, and product details, Typeface’s Affinity AI generates personalized multimedia content, including images, ad copy, SEO meta tags, and more. This technology can significantly expedite the content creation process.

Typeface App

Here are some takeaways from the blog post:

  1. Integration with Microsoft Teams: Typeface’s AI-powered content creation is now integrated into Microsoft Teams, making collaboration and content sharing more streamlined for marketing teams.
  2. Personalization and Ideation: The app uses AI to help users quickly brainstorm and generate polished content. It can be shared within Teams for feedback and refinement.
  3. Rich Editing Experience: Typeface uses AI to improve content quality and coherence by allowing users to refine text and images to match brand voice and messaging.
  4. Brand Control and Responsible AI: Typeface uses brand control and Azure OpenAI Service to ensure companies’ information is only used for their specific model while maintaining responsible AI practices.
  5. Future Expansion and Integration: Typeface is expanding its app to include Microsoft 365 applications for better content generation using enterprise data from Microsoft Graph while maintaining data privacy.
  6. Unified Content Hub: Typeface aims to personalize content across business functions like marketing, HR, and sales, using generative AI-powered content creation to maximize reach and impact within Teams.

Typeface is accessible to Microsoft Teams for Business users through the “Apps” section. The integration is available to existing Typeface customers with a Microsoft Teams account.

Microsoft urges users to adopt Bing on Chrome: A tale of unwanted notifications

In an unusual move that has left many internet users bemused and somewhat concerned, Microsoft has been observed engaging in aggressive marketing campaigns, asking its customers to switch their default search engine from Google’s Chrome to Microsoft’s Bing.

What makes the case even more gripping is that some of these notifications have reportedly popped up while users were engrossed in video games, adding an intrusive aspect to what many already consider a breach of etiquette.

Maarten Balliauw, an internet user and developer at software tool company Jetbrains, stumbled upon this surprising behavior and took to Twitter to express his discontent in a lengthy thread. According to his explosive revelations, each time a user opens a new tab in Microsoft Edge, the Redmond-based tech giant is seemingly dispatching a machine fingerprint to a remote server.

This kind of fingerprint can be utilized to track users across various websites. A matter that, if confirmed, could raise serious concerns about privacy and potential misuse of data.

Moreover, Balliauw stated that Microsoft is also scoping out a user’s public IP address through a non-Microsoft service – another development that could potentially be exploited to uncover the user’s location.

Despite the seemingly weighty implications of user privacy, Microsoft affirmed that Balliauw’s report was rejected because it did not fit the company’s criteria for the definition of “malware.” It seems the tech giant is steadfast in its stance, believing that there are no infringements on user privacy.

Balliauw was quite vocal about his disagreement, stating Edge’s recent behavior quite convincingly aligns with what one would attribute to malware. Sidestepping the term, he laid out the specifics – obfuscation, a lack of control, excess advertising, and more, based on the definitions provided by the MITRE ATT&CK framework.

Overall, the situation appears puzzling, with Microsoft striving to increase Bing’s market share while also addressing privacy concerns. It will be interesting to see how Microsoft handles this delicate balance and how users respond.

Via MSPowerUser

Microsoft discountinues popular OneDrive for Business (Plan 2), no longer offers unlimited storage

Microsoft has changed its OneDrive for Business plans regarding storage offerings. Previously, OneDrive for Business (Plan 2) was a popular choice for large organizations needing extensive storage, such as managing a growing number of media files like videos and artistic assets. This plan offered unlimited monthly storage for approximately $10 per user, excluding taxes.

Microsoft no longer offers unlimited storage to new customers. OneDrive for Business (Plan 1) now provides 1TB of storage by default, potentially expanding to 5TB with more users.

OneDrive plans

Microsoft’s spokesperson explained that these changes were made in response to customer demand, streamlining the purchasing process for those using OneDrive for Business standalone plans. Existing customers can still add seats and renew their licenses under these plans.

OneDrive for Business (Plan 1) is now the only monthly option for $5 per user with 1TB storage. Microsoft also offers other packages at higher prices.

OneDrive for Business (Plan 2) is used to offer unlimited storage with conditions. Organizations needed at least five users subscribed, with a 1TB limit per user. Extra storage of up to 25TB could be requested from Microsoft support.

Microsoft seems to be adjusting its offerings to meet customer needs and encourage the use of OneDrive within broader Microsoft 365 plans.

via Neowin

Elon Musk labels LinkedIn ‘cringe’, suggests launching a rival to the platform

Elon Musk, the CEO of Tesla and SpaceX, caused a stir among professionals who use networking platforms when he publicly criticized LinkedIn. He even went as far as to disavow the popular platform. However, his statement that he plans to introduce a new competitor to LinkedIn was even more surprising. Many people were skeptical but also intrigued about his plans.

Yesterday, Musk entered a Twitter (X) conversation challenging LinkedIn’s quality. One user, Ian Zelbo, posed a rhetorical question on his feed: “Is there anything worse than LinkedIn?” The tweet drew a surprising amount of attention.

The billionaire mastermind behind ground-breaking projects like SpaceX’s Starship and Tesla’s electric vehicles, responded, stating, “People send me LinkedIn links sometimes but the cringe level is so high that I can’t bring myself to use it. I ask for the resume or bio to be emailed instead.”

Musk doubled down on this stance, making an unexpected announcement to millions of followers, teasing the idea of a cooler alternative to LinkedIn. “We will make sure that the X competitor to LinkedIn is cool.” He wrote, turning thousands of speculative heads toward X (formerly known as Twitter).

Besides that, X unveiled the beta version of ‘Hiring.’ This feature, exclusively available to verified organizations, promises to provide them with an expedient method to connect with millions of relevant candidates.

“Unlock early access to the X Hiring Beta — exclusively for Verified Organizations. Feature your most critical roles and organically reach millions of relevant candidates,” X wrote in a post.

Although the monthly fee is steep, approximately $1,000 (₹82,300) according to CNBC, many experts and individuals are closely following this fascinating advancement, given Musk’s history of successful endeavors.

What are your thoughts on this? Let us know in the comments section below.

Xbox Game Pass $1 trial gets the axe once again ahead of Starfield launch

It appears as though the Xbox Game Pass $1 trial has once again been removed. As reported by Eurogamer and others the offer, which gave new members a 14-day Game Pass Ultimate trail of just $1, is no longer available on the sign-up page on Xbox.com.

This after the long-running $1-for-your-first-month offer was first suddenly cut earlier this year, only to return a few months later before being reduced to a 14-day trial. At this point it isn’t known whether the trial of gone for good.

Game Pass Core SKU Chart

Curiously, the removal of the $1 trial comes just ahead of next week’s Starfield release. (For those who bought the Premium Edition, early access will begin on Friday, September 1).

Starfield
Starfield
Developer:
Bethesda Softworks
Price:
Free

Next month will also see the transition of Xbox Live Gold into Xbox Game Pass Core. This slightly more affordable Game Pass tier will offer over 25 games from the Game Pass catalog including Gounded, Psychonauts 2, Forza Horizon 4 and more. Starfield however will not be included in the Game Pass Core lineup.

Microsoft Edge introduces ‘E-tree in Wallet’ feature, to cut Grammar Tools, more

Several features will be deprecated in the upcoming Microsoft Edge Beta version 117 to enhance the user experience and simplify complex menus. Edge also launched Microsoft Edge for Business last week. The deprecated features include:

  1. Math Solver: Assists users in solving mathematical problems.
  2. Picture Dictionary: Provides visual explanations of words.
  3. Citations: The Citations tool for generating citations and references.
  4. Grammar Tools: Aid in checking and improving grammar and writing.
  5. Kids Mode: Designed to provide a safer and more child-friendly browsing experience.

While specific details regarding the reasoning behind each deprecation have not been provided, Microsoft emphasizes that these changes aim to improve the overall end-user experience and simplify intricate menus. These adjustments are expected to make the browser more streamlined and user-friendly.

The beta version of Microsoft Edge, version 117, is set to be released on September 14, 2023, and will be accessible on Windows 10, 11, macOS, and Linux.

Besides deprecating certain features, Microsoft introduces new capabilities to enhance the browsing experience. These new features include:

  1. Smart Find: Leverages AI to simplify webpage searches. It suggests related words and corrects misspellings, streamlining the search process. Administrators can manage its availability using the “RelatedMatchesCloudServiceEnabled” policy.
  2. “E-tree in Wallet”: Grow a digital tree in your Wallet through a virtual seed. When it’s fully grown, Microsoft will plant a real mangrove tree for you. Sign in to Edge with your Microsoft account to access this feature.

Microsoft Edge for Business is introducing enhancements for better automatic switching between personal and work browsing, streamlining the experience for users who use Edge for both purposes.

via Neowin

What is the Briefcase Icon on the Edge Browser?

A briefcase is a sign that you mean business, and that’s what the icon stands for when you spot it on your Edge browser. The browser is tailored to meet the needs of enterprises, but a few users think it makes the browser ugly.

You can still carry out your daily tasks without the visual reminder, so if you’re of the opinion that it needs to go, we have compiled a few steps to help you revert to the good old Microsoft Edge icon.

What is the briefcase icon on the Edge browser?

The briefcase icon is a way of telling you that you have switched from the base browser to the business one. It is part of Microsoft’s plan to make the browser more appealing to businesses and avoid confusion between personal and business modes.

As you may or may not know, Microsoft Edge is the latest version of Microsoft’s web browser. Although it has undergone a design overhaul and new features, it hasn’t exactly gotten the reception the Redmond Giant expected, but with time, it’s slowly winning some users over to their side.

Most companies have been reluctant to adopt the browser because of its lack of support for common enterprise features. However, when you download the Edge for Business version, you’ll get introduced to some key features that make it one of the top browsers for work.

So aside from all the features available in the base browser, you’ll also be getting:

  • Separate work and personal profiles in terms of cache and storage locations.
  • Protect corporate data with enhanced security features.
  • Automatic download for Azure Active Directory users.

What are the benefits of Personal Browsing with Edge for Business?

  • You’ll be more productive because you won’t have to worry about distractions like social media and news sites.
  • You get to protect your personal data with enterprise-level security.
  • Enjoy backward compatibility, as the business mode supports legacy apps that don’t work well with the modern Edge browser interface.

Although Microsoft Edge for Business is among the best browsers suitable for enterprises, you are not limited to using it only in a work-related context. You can still use it for personal browsing. Ultimately, your user experience will be elevated in this mode.

How can I disable or remove Edge’s briefcase icon?

  1. Launch your Microsoft Edge browser.
  2. Click on the three-dot menu at the top-right corner and select Settings.
  3. Select Appearances.
  4. Find the Show briefcase icon on work profiles option and toggle it off.
  5. Restart your browser for the changes to take effect.

And that’s a wrap for this article. If you often forget what browser mode you’re on, perhaps keeping the business icon on your Edge browser isn’t so bad.

However, if you like to keep things neat and clean, consider removing the briefcase icon. After all, it only serves as a symbol and doesn’t affect the functionality of the browser.

What do you think of the briefcase icon in Edge? Do you prefer it enabled for clearer distinction or disabled for a decluttered UI? Let us know in the comment section below.

Microsoft news recap: Bing Chat trials NoSearch feature, Activision’s cloud gaming rights to be sold to Ubisoft, and more

Microsoft news recap is a weekly feature highlighting the top Microsoft news stories of the past week. Sit back, grab some coffee, and enjoy the read!

Microsoft finally launches Microsoft Edge for Business, boosting work security and productivity.

Microsoft has launched Microsoft Edge for Business, a new version of its web browser designed for businesses. Edge for Business includes a number of features that are designed to improve security and productivity, such as switching between work and personal browsing, as well as automatic sign-in with for those with Microsoft Entra IDs.

Microsoft to sell off Activision’s cloud gaming rights to Ubisoft as it seeks to conclude ABK deal.

Microsoft has tabled a deal to sell off Activision’s cloud gaming rights to Ubisoft as part of its ongoing attempt to complete its acquisition of Activision Blizzard, in an attempt to appease the UKs Competition and Markets Authority. The revised acquisition deal is now being reviewed by the CMA.

Microsoft Activision Blizzard Custom

Microsoft commits to EU’s Digital Services Act (DSA) for transparency in ads.

Microsoft has committed to complying with the European Union’s Digital Services Act (DSA), which is designed to increase transparency in online advertising. The DSA requires online platforms to provide more information about how they target ads, and it also gives users more control over their personal data. To help provide detail on Microsoft’s compliance efforts, the company will release a report every six months to outline its compliance with the Act.

Bing Chat trials “NoSearch with Bing” feature, opting out of default web searches.

Microsoft is trialling a new feature for Bing Chat called “NoSearch with Bing”. This feature allows users to opt out of the default web search functionality in Bing Chat, meaning that responses will not provide information from a web search, and will therefore be limited to answering the user’s query without supporting web content.

Bing Chat

That’s it for this week. We will be back next week with more Microsoft news.

How to Enable DNS over HTTPS in Firefox for Max Security

Mozilla Firefox, one of the most rated privacy-centric browsers made a shift to DNS over HTTPS (DoH) as a more secure alternative to prevent spying and exploitations.

DoH encrypts your DNS lookups in an encrypted HTTPS connection. This means whenever you type a website address, DoH takes your query and sends it to a DoH-compatible server, which in this case is Cloudflare through an encrypted HTTPS connection, thus making it harder for third parties to see which websites you’re about to access.

Firefox offers four protection levels which you can select for maximum security. By default, the browser decides when to use secure DNS to protect your privacy.

DNS over HTTPS illustration
An illustration by Cloudflare.

There are three other options to select from, namely Increase Protection and Max Protection. Based on the protection level you use, the status indicator will reflect accordingly.

You can turn it off as well in case you have a local DNS resolver. Firefox uses Cloudflare’s DNS over HTTPS service by default, however, users can manually change to some other encrypted DNS service.

Note that other browsers like Opera also offer this service for enhanced security. So, in case you’re also using that browser, you can enable DNS over HTTPS on Opera as well.

How do I know if DNS over HTTPS is working in Firefox?

So, you first want to check if DNS over HTTPS is already enabled on your Firefox browser. Well, it’s easier to check. While the Status of the DoH setting can tell the same, you can also follow these quick steps.

  1. Type “about:networking” in the Firefox address bar and press Enter.
  2. Click on the “DNS” tab.
  3. If you see ‘2’ below the DoH Mode, it means DoH is working in Firefox. If you see ‘5,’ it means the DoH is not working.

Alternatively, enter https://1.1.1.1/help in Firefox’s address bar to verify if DoH is enabled and working properly.

DNS over HTTPS connected

This web page will also show you other important aspects.

How do I enable DNS over HTTPS on Firefox?

So, you have checked that the DoH feature is not already enabled on Firefox and now you want to enable it after knowing the advantages of it. The guide will show you how you can enable DNS over HTTPS on Firefox and unlock enhanced protection when you’re browsing.

  1. In Firefox on Windows 11, go to Settings OR type about:preferences in the address bar.
    Firefox settings page
  2. Choose Privacy & Security.
    Firefox Privacy & Security
  3. Scroll down until you find “DNS over HTTPS”
  4. By default, Firefox has chosen the first way of protection, where it decides when to use DNS.
    Enable DNS over HTTPS in Firefox

The other three protection level includes ‘Increased Protection,’ ‘Max Protection,’ and ‘Off.’

To turn DNS over HTTPS in Firefox, enable either of these two options. As soon as you select any one of them, Firefox will change the status to ‘Active.’

If the status shows ‘Active,’ it means your DNS requests are wrapped inside the HTTPS protocol to ensure that the requests cannot be intercepted via a Man in the Middle (MITM) attack.

If the status shows ‘Not Active,’ it depicts certain network conditions like VPN, parental controls, and enterprise policies that have directed Firefox not to use DoH. And, ‘Off’ is self-explanatory.  

How do I turn off DNS over HTTPS in Firefox?

First off, it is recommended to turn on the DNS over HTTPS setting in Firefox to safeguard yourself from potential risks. However, there could be reasons why you need to turn it off. For instance, a network is telling Firefox not to use DNS requests because certain websites are inaccessible.

Furthermore, some organizations have their own secure DNS and they will ask Firefox not to bypass it. Additionally, some users may prefer to use their ISP’s DNS servers for faster and more reliable resolution of domain names.

Another possibility that you want to disable DNS over HTTPS in Firefox is that it’s interfering with certain services or applications that rely on DNS resolution. Therefore, you should only enable it if you fully understand the implications.

Simply select ‘Off’ from the list of options to turn off Firefox’s default DoH service.

Can I use custom DNS providers with DoH in Firefox?

Yes, you can use custom DNS providers in Firefox. By default, Firefox uses Cloudflare as its DoH provider, but you can change this to a custom provider of your choice. You can use NextDNS and other providers that are partners with Mozilla and follow the DoH resolver policy.

Other DNS providers are satisfied as partners for Mozilla’s Trusted Recursive Resolver (TRR) program. As per Mozilla, it is open to adding more DNS providers as long as they meet a list of requirements.

Here’s how you can change the default DoH provider on Firefox –

  1. Select “Increased Protection” from the list.
  2. Open the drop-down under “Choose provider”
  3. Select custom.
    Turn on DNS over HTTPS in Firefox browser

To use a custom DoH provider in Firefox, you need to know the provider’s DoH endpoint URL.

Furthermore, every DNS provider provides a configuration guide that you can follow to add them to Firefox using “about:config” panel. So, it’s recommended to go by those instructions.

Tidio for Windows: How to Download & Install?

In this digital age, effective communication is important for businesses to connect with customers, and Tidio, a cloud-based customer engagement & interaction platform, can help you with that.

If you are looking for a way to download and install Tidio on your Windows computer to get the maximum potential of the platform, this guide can help!

The Tidio Chat integrates live chat, email, Facebook messenger, and website chat widgets inquiries onto a single page, which helps businesses manage & respond to queries faster, leading to more streamlined customer service.

The chatbots on the platform automatically collect and qualify leads based on their behavior, which can increase average order value, reduce cart abandonment, and help customers place orders directly in the chat widget.

How do I download & install Tidio on my computer?

First, we will download the app from the Tidio platform. Here are the steps to do so:

  1. Login to your Tidio account.
  2. On the dashboard, from the bottom left corner, click Settings.
  3. Under General, click Download apps.Download the Tidio app on Windows
  4. Next, under Download Desktop App, locate Windows and click Download.

Now that you have the setup file downloaded follow these steps to install it:

  1. Double-click the setup file, and on the Tidio Setup dialog box, select Anyone who uses this computer or Only for me according to your preferences, then click Next.Tidio+Setup Install Windows 11
  2. On the Choose Install Location page, check the location of the app, then click Install.Tidio+Setup+Install Window 2
  3. Once the setup is completed, click Finish to close the Tidio Setup window.Finish

Once installed, launch the app, sign in, and use its chat features to optimize your overall customer handling process.

Chat Features in Tidio for Windows

  • Lets you build a repository of frequently used responses and use them to reply to queries.
  • Drag and drop chatbot builder enables you to build & personalize the interactions and responses of the chatbots even without any coding skills.
  • Seamlessly integrate Tidio to popular platforms like Shopify, WordPress, Squarespace, WIX, BigCommernce, WooCommerce, Webydo, and more.
  • Link your Instagram, Live chat, Messenger, & email inboxes with the platform’s multichannel tool to manage all your conversations in one place.
  • Allows you to add pre-chat surveys to get visitors’ names, email addresses, phone numbers, and more.
  • Over 35+ chatbot templates for different departments, including sales, support & customer service.
  • Integration with Google Analytics to track chatbot interactions to get insights like user engagement patterns, number of interactions, and popular queries.
  • With Chatbots, a business can offer 24*7 support and address common queries & provide instant assistance.
  • Create customized email templates using AI to send email marketing campaigns to your contacts.
  • Comes with a free mobile app to give the agents the liberty to reply to your customers on the go.
  • Serves as a powerful helpdesk tool that turns customer requests into tickets, then assigns the ticket to specific agents to help resolve the query faster.

From managing conversations to assigning tickets and even integrating tools like Google Analytics, Tidio is a one-stop solution to increase your brand value and improve its visibility.

The app comes with a 7-day free trial period and has affordable pricing options to choose from, so if you own a business, you must give this customer management platform a try.

Using Tidio on Windows? If yes, then drop your insights on how it helped your business enhance customer engagement and increase lead or revenue generation in the comments section below. We would love to hear your thoughts!

Is Microsoft the right party to talk about the Flax Typhoon?

Flax Typhoon, a Chinese threat actor group, was reportedly identified by Microsoft as targeting dozens of organizations in Taiwan with the likely intention of performing espionage, per Microsoft’s claims.

Flax Typhoon gains and maintains long-term access to Taiwanese organizations’ networks with minimal use of malware, relying on tools built into the operating system, along with some normally benign software to quietly remain in these networks. Microsoft has not observed Flax Typhoon using this access to conduct additional actions. 

Microsoft

However, many of the espionage techniques performed by Flax Typhoon include access or usage of Microsoft’s software, including Windows Management Instrumentation command-line (WMIC), PowerShell, or the Windows Terminal application.

Microsoft claims that its blog post is about informing people about this threat actor and raising awareness about it, which is the right thing to do, yes. But is Microsoft really the best party to inform people about this?

Especially when not so long ago, the Redmond-based tech giant was harshly criticized by Tenable, a cybersecurity company, for not even addressing important vulnerabilities at the right time.

Microsoft is right to raise awareness about Flax Typhoon, but it should do better

There are countless examples where Microsoft products and their users were the victims of phishing attacks, malware, security breaches, and so on. As we extensively covered these examples, we found out that Microsoft Teams is by far one of the most targeted products.Flax typhoon

In 2022, alone, 80% of the Microsoft 365 accounts, including Microsoft Teams, were hacked, and an astonishing 60% were successfully hacked. A later report found out that Microsoft Teams is prone to modern phishing attacks more than any other app.

However, these phishing attacks were all caused by not addressing certain vulnerabilities by Microsoft. The Redmond-based tech giant either addressed them too late, or never bothered with trying to fix them, as they were not considered dangerous.

Earlier this summer, Tenable’s CEO harshly criticized Microsoft for failing to address a vulnerability that could have ended up revealing a lot of customers’ banking information. Only after Tenable went public, did Microsoft react, but it was almost 5 months later.

So, while Microsoft has all the rights to raise awareness about a dangerous Flax Typhoon, the Redmond-based tech giant should really take a step back and do its best to address all the security vulnerabilities that its products have or might have.

The company should employ the best in the field to make sure its products are safe, secure, and most importantly, reliable to use. And then, yes, it can talk and raise awareness about threat actors.

Otherwise, if you don’t follow your own advice, then what’s the point? But what do you think?

How to Set IrfanView as Default Photo Viewer in Windows 11

The Photos app in Windows is useful, but it’s not as versatile as many others, and this is the main reason why many want to set IrfanView as the default photo viewer in Windows 11.

These are the most common reasons why users want to switch to IrfanView:

  • It’s extremely lightweight and fast.
  • Highly customizable with third-party plugins and skins.
  • Supports advanced image editing.
  • Offers conversion and batch processing.

How to make IrfanView your default image viewer on Windows 11?

1. Use the Properties menu

  1. Locate the desired image, right-click it, and choose Properties.
     
  2. Click the Change button.
  3. Choose InfranView and click on Set default.

  4. Now click on Apply and OK.
  5. Do this for all images you want to open with IrfanView as the default program.

2. Reset the Photos app

  1. Press the Windows key + I to open the Settings app.
  2. Navigate to Apps and select Installed apps.
  3. Locate Microsoft Photos and click three dots next to its name. Select Advanced.
  4. Click on Reset and wait for the process to finish.

Next, change the file association by doing the following:

  1. Locate the image you want to open. Right-click it and choose Choose another app.
  2. Select IfranView on the list and click on Always.
  3. After that, the changes will be applied to that file type.
  4. Repeat the steps for different image formats that you use.

3. Manually change the default app

  1. Open the Settings app.
  2. Next, to go Apps and select Default apps.
     
  3. Select Photos.
  4. Choose the desired format and click it.
  5. Next, select IrfanView and click on Set as default.
  6. Repeat these steps for all file extension types that you want to associate with IrfanView.

For a quick overview of features, see this guide to IrfanView as an image editor for Windows.

What is the best photo-viewing app for Windows 11?

  • Adobe Lightroom
  • Apowersoft Photo Viewer
  • Movavi Photo Viewer
  • ACDSEE Photo Studio Ultimate 2022
  • 123 Photo Viewer
  • IrfanView
  • Google Photos

All these apps are from our guide on the best photo viewers for Windows 11, so be sure not to miss it for more information.

Changing file associations isn’t as straightforward as it was on Windows 10, and this means that if you want to open NEF files or any other file type, you need to change the default image viewer on Windows 11 for each image format.

In case you’re still on Windows 10, we have a great guide on the best photo viewers for Windows 10 that might interest you. All of them also work on Windows 11, so don’t be shy to give them a try!

Did we miss your favorite method of setting IrfanView as the default viewer in Windows 11? If so, let us know in the comments below.

VAL 59 Error Code in Valorant [Fix]

The Val Error code: 59 troubles a lot of users, and will prevent you from joining the queue, so it can be a major problem. However, we have a few solutions that can fix it.

How do I fix the VAL 59 error code in Valorant?

Before we head to the slightly complex solutions, try restarting your PC and router. Also, check the Riot Games service status on the official website for any problems with the service.

1. Run Riot Client with administrative privileges

  1. Terminate all active Riot Client processes on the PC.
  2. Locate the Riot Client’s shortcut, right-click on it, and select Properties.
  3. Now, navigate to the Compatibility tab, tick the checkbox for Run this program as an administrator, and click OK to save the changes.run as administrator to fix val 59 error
  4. Finally, launch Valorant and verify whether Val error 59 disappears. 

2. Repair Valorant’s game files

  1. Launch the game client, click on the profile icon near the top right, and select Settings.settings
  2. Navigate to the Valorant tab, and click the Repair button.repair to fix val 59 error
  3. Wait for the process to complete, and then relaunch the game.

Often, it’s a game bug responsible for Valorant error codes. A quick solution is to use the built-in Repair function to eliminate any trivial issues. 

3. Change the IP address and DNS server

  1. Press Windows + S to open Search, type Command Prompt, right-click on the relevant search result, and select Run as administrator.
  2. Click Yes in the UAC prompt.
  3. Now, paste the following commands one at a time, and hit Enter after each:ipconfig /flushdns ipconfig /renewrenew IP
  4. Press Windows + R to open Run, type ncpa.cpl in the text field, and hit Enter.ncpa.cpl
  5. Right-click on the active network adapter, and select Properties.properties
  6. Choose Internet Protocol 4 (TCP/IPv4) from the list, and click the Properties button.
  7. Next, select Use the following DNS server addresses, and input the following values:
    • Preferred DNS server: 8.8.8.8
    • Alternate DNS server: 8.8.4.4change DNS server to fix val 59 error
  8. Finally, click OK to save the changes.

While you could manually choose another IP address from the network adapter settings and fix the Val 59 error code in Valorant, we recommend letting the OS handle the task to avoid misconfiguration. And we have used Google’s DNS, but you can use the fastest DNS server in your location.

Keep in mind that certain DNS can affect your ping negatively, so if you choose to do this, test Valorant latency to ensure that there are no network problems.

4. Reset the network settings

  1. Press Windows + I to open Settings, go to Network & Internet from the navigation pane, and click on Advanced network settings.advanced network settings
  2. Now, click on Network reset.
  3. Click the Reset now button.reset now to fix val 59 error
  4. Finally, click Yes in the confirmation prompt.
  5. Once the reset is complete, connect to the network, relaunch Valorant, and verify whether the error code is fixed.

5. Reinstall Riot Client and Valorant

  1. Press Windows + R to open Run, type appwiz.cpl in the text field, and click OK.
  2. Select Valorant from the list of installed apps, and click Uninstall.uninstall to fix val 59 error
  3. Similarly, remove Riot Client from the PC.
  4. Delete the Riot Games folder in the C: drive, if it exists.C: drive
  5. Restart the computer for the changes to apply.
  6. Now, reinstall both Riot Client and Valorant.

Often, the problem lies with an improper installation, and re-downloading both the game client and Valorant will fix the Val 59 error. For effective removal and to clear any leftover files and registry entries, we recommend using a reliable uninstaller tool.

6. Create a new Valorant account

A few users reported that creating a new Riot Client account and then playing Valorant on it fixed the problem. Though you will lose any in-game progress.

So, we recommend using this trick if you are new to Valorant or the game throws an error just for you while others can play Valorant fine.

7. Contact Riot support

When nothing else works, the last option is to contact Valorant support. The team will identify the underlying cause and list out the relevant solution.

Or, if it’s a server or technical issue to blame, they will provide a timeline as to when you can expect things to be up and running.

Now that you have fixed the Val 59 error in Valorant, it’s time to optimize the PC for gaming and get the best performance. Because games deliver a thrilling experience when run under optimal conditions!

And if you are faced with the server maintenance Valorant Error code 46, we have some valuable insights!

We also have a guide on Valorant could not enter matchmaking, so be sure to visit it.

Do share your experience with Valorant and any other verified solutions in the comments section.

How to Remove Focus Sessions From the Clock App

Are you at your wits end with the Focus Sessions screen that appears immediately after you open the Clock app? We all want to stay productive, but at the same time, reminders set within a short period to take breaks can be more disruptive than helpful. 

Luckily, you can easily keep this feature tucked away with a few basic steps that shouldn’t be too hard to follow, as you shall see below.

How do I turn off Focus Sessions from the Clock?

1. Turn off Focus Assist

  1. Hit the Windows key and click on Settings.settings windows 11
  2. Click on System and select Focus assist.
  3. Tap on the Stop focus session button and restart your Clock app again.

Remember that when you turn off Focus Assist, you’ll start getting app notifications again. Still, you can disable your notifications and view them from the Notification Center whenever you’re ready.

2. Roll back recent Windows updates

  1. Hit the Windows key and select Settings.settings windows 11
  2. Click on Windows Update and select Update history on the right pane.update-history restart to repair drive errors
  3. Scroll down, and under Related settings, click on Uninstall updates.uninstall-updates-w11 computer-recognize-logitech-unifying-receiver
  4. This will take you to the most recent installed updates.
  5. Select the topmost update and click on Uninstall. (The feature is part of the 23481 Build, so you can find this update and uninstall it).uninstall-update-latest computer-recognize-logitech-unifying-receiver
  6. Restart your PC and check if the problem persists.

While this may be a temporary workaround, remember that there are risks associated with running outdated operating systems, so don’t stay too long without checking for updates.

3. Use the Group Policy Editor

  1. Hit the Windows + R keys to open the Run command.
  2. Type gpedit.msc in the dialog box and hit Enter.GPEDiT.msc -Windows Remediation Service Failed to Start?
  3. Navigate to the following location: User configuration/Administrative Templates/Start Menu and Taskbar/Notifications
  4. Double-click on Turn off Quiet Hours policy, and in the pop-up window, check the Disabled box, then hit Apply and OK to save changes.

The downside to this method is that all your toast notifications will also be disabled. To counter this, repeat the steps above, but in 4, instead of Disabled, set it to Not Configured, and the permissions will be back to the default settings.

What are the benefits of removing Focus Sessions from the Clock App?

  • You can set your own focus mode within manageable limits without the constant reminder to finish everything in a given time frame.
  • Strict guidelines on achieving your daily goals are often counter-active. Productivity will look different every day, so having a set of predefined focus periods cages you into a box that is not sustainable in the long run.
  • Focus Sessions can generate a lot of alarms & clock notifications that disrupt your workflow and interrupt you. Fewer distractions mean more productivity allowing you to have maximum concentration. 

If you’re one of the users who don’t mind having the Focus Sessions feature, perhaps exploring some of the benefits of removing it may convince you to get rid of it after all.

Obviously, the best way to focus on your tasks will be different for everyone. If you’re perfectly fine with being interrupted every time and want your daily progress reports, keep the Focus Assist settings.

However, if you tend to be a little more productive when you’re not being distracted by notification badges and need a little more deep focus, this simple tweak might just be worth a shot.

What’s your opinion on Focus Sessions? Should they be enabled or disabled? Share your thoughts with us in the comment section below.

KB5029263 not installing on Windows 11? Fix it in 6 Steps

KB5029263 is a Cumulative Update for Windows 11 version 22H2 for x64-based Systems, which addresses security issues in internal OS functionality.

If you are stuck with KB5029263 not installing and a stop error code like 0xEF, and it is refusing to budge on your system, this guide can help!

There are various reasons for KB5029263 not working on your computer; some of the common ones are:

How do I fix KB5029263 not installing on Windows 11?

Before moving to the detailed troubleshooting solutions to fix the cumulative update failed issue, make sure you perform these checks:

  • Restart your computer.
  • Check your internet connection.
  • Turn off the Windows Firewall.
  • Disable or uninstall third-party antivirus (if applicable).
  • Unplug all external peripherals except the Keyboard, LAN cable, and Mouse.

1. Run the Windows Update troubleshooter

  1. Press Windows + I to open the Settings app.
  2. Go to System, then click Troubleshoot. troubleshoot  KB5029263 not installing
  3. Next, click Other Troubleshooters.Select Other Troubleshooters
  4. On the next page, locate Windows Update under the Most Frequently Used section and click the Run button.Run Windows Update Troubleshopoer
  5. Wait for the process to complete and follow the prompts.

2. Restart the related services

  1. Press Windows + R to open the Run dialog box.Services RUn command   KB5029263 installation issue
  2. Type services.msc and click OK to open the Services app.
  3. Locate Background Intelligent Transfer Service (BITS) and double-click it to open Properties.BITS service
  4. Next, locate the Startup status; if it says Stopped, click Start. If it is running, click Stop, then Start to restart the service.Start the service BITS
  5. On the Services window, locate Windows Update, and double-click it to open the Properties window.Windows Update service
  6. Go to Startup status; if it is Stopped, click Start. If not, then click Stop, then Start to restart it.Start the service

3. Run DISM & SFC scans

  1. Press the Windows key, type cmd, and click Run as administrator.CMD elevated
  2. Copy & paste the following command to repair the Windows image using Windows Update as a source and press Enter: DISM /Online /Cleanup-image /RestorehealthRestore health
  3. Wait for the scan to complete; once you see The operation completed successfully message, type the following command to replace the corrupted versions of files from the local Windows cache and hit Enter: sfc /scannow SFCSCANNOW CMD  KB5029263 not installing
  4. After you get the Verification 100% complete message, close the Command Prompt window & restart your PC.

If you applied this process and it didn’t solve the issue, don’t panic. There is dedicated repair software designed for such Windows troubles regarding corrupted files or other issues.

4. Reset Windows Update Components

  1. Press the Windows key, type cmd, and click Run as administrator.CMD elevated KB5029263 not installing
  2. To stop the BITS, Cryptographic & Windows Update services, type the following commands one by one and hit Enter after every command:
    • net stop bits
      net stop wuauserv
      net stop cryptsvc
      net stop msiserver
      Stop the services
  3. Copy & paste the following command to delete the qmgr* .dat files and press Enter: Del "%ALLUSERSPROFILE%\Application Data\Microsoft\Network\Downloader\qmgr*.dat"
  4. Type the following command and hit Enter: cd /d %windir%\system32
  5. To reregister the BITS & Windows Update files, copy & paste the following commands one by one and press Enter after every command:
    • regsvr32.exe atl.dll
      regsvr32.exe urlmon.dll
      regsvr32.exe mshtml.dll
      regsvr32.exe shdocvw.dll
      regsvr32.exe browseui.dll
      regsvr32.exe jscript.dll
      regsvr32.exe vbscript.dll
      regsvr32.exe scrrun.dll
      regsvr32.exe msxml.dll
      regsvr32.exe msxml3.dll
      regsvr32.exe msxml6.dll
      regsvr32.exe actxprxy.dll
      regsvr32.exe softpub.dll
      regsvr32.exe wintrust.dll
      regsvr32.exe dssenh.dll
      regsvr32.exe rsaenh.dll
      regsvr32.exe gpkcsp.dll
      regsvr32.exe sccbase.dll
      regsvr32.exe slbcsp.dll
      regsvr32.exe cryptdlg.dll
      regsvr32.exe oleaut32.dll
      regsvr32.exe ole32.dll
      regsvr32.exe shell32.dll
      regsvr32.exe initpki.dll
      regsvr32.exe wuapi.dll
      regsvr32.exe wuaueng.dll
      regsvr32.exe wuaueng1.dll
      regsvr32.exe wucltui.dll
      regsvr32.exe wups.dll
      regsvr32.exe wups2.dll
      regsvr32.exe wuweb.dll
      regsvr32.exe qmgr.dll
      regsvr32.exe qmgrprxy.dll
      regsvr32.exe wucltux.dll
      regsvr32.exe muweb.dll
      regsvr32.exe wuwebv.dll
  6. Type the following command to reset Winsock and hit Enter: netsh winsock resetcmd_netsh winsock reset
  7. To restart the BITS, Cryptographic & Windows Update services, copy & paste the following commands one by one and press Enter after every command:
    • net start bits
      net start wuauserv
      net start cryptsvc
      net start msiserver

      Start the services
  8. Once the commands are executed, reboot your PC and try to reinstall the update.

5. Run your computer in a clean boot environment

  1. Press Windows + R to open the Run dialog box. cleanboot - KB5029263 not installing
  2. Type msconfig and click OK to open System Configuration.
  3. Go to the Services tab, select Hide all Microsoft services, then click the Disable all button.Clean boot Disable all
  4. Switch to the Startup tab and click the Open Task Manager link.Open task Manager Clean boot
  5. In Task Manager, for each Enabled item, select it and click Disable from the top right corner of the window. Close Task Manager.Enable Task
  6. Go to the System Configuration window, click Apply, then OK.CLEAN BOOT 5
  7. Select Restart from the next window.Restart clean boot

Windows will restart in a clean boot environment without the third-party apps interference & limited functionality; try to install the update now. Once successfully installed, use the steps above to reverse and gain full functionality.

6. In-Place upgrade (The last resort)

  1. Visit the Windows 11 website.
  2. Locate Download Windows 11 Disk Image (ISO), select Windows 11(multi-edition ISO) and click Download Now.Select the editon and click Download
  3. Select the product language and click Download.
  4. Once the ISO is downloaded, right-click it and select Mount.Mount KB5029263 not installing
  5. A window will open, locate, and click Setup.exe.Setup exe
  6. Click Yes on the UAC prompt.
  7. On the Install Windows 11 dialog box, click Next.Click Next
  8. Click Accept on the license terms window.Accept the terms KB5029263  not installing
  9. Next, on the Read to install page, ensure the Keep personal files and apps option is selected. If not, you can click the Change what to keep option to decide.Ready to Install
  10. Click Install and follow the onscreen instructions.

During the process, your machine will restart several times, and once done, you will be at the lock screen of your computer. This method repairs corrupted OS files without removing your personal files and installed apps.

How to prevent Windows 11 update install issues in the future?

  • Create a restore point before installing the update.
  • Backup your important data
  • Use the Windows Update feature to check for updates.
  • Ensure you have a stable internet connection.
  • Download & install the cumulative update for Windows 11 using the Microsoft Update Catalog website.
  • Ensure your PC has the latest drivers modified by Microsoft.

Failing to install essential updates like KB5029263 might have various implications, including security vulnerabilities, bugs, glitches, system instability, and more.

However, using the preventive measures and solutions discussed, you can avoid Windows Update errors like pending installation.

If you bump into any other error codes or need more info about the KB5029263 update, don’t hesitate to leave a comment in the section below.

Fix: Keyboard Shortcuts are Not Working in Word

Keyboard shortcuts are vital for quick and seamless functioning, and many rely too much on these. There’s nothing wrong with the approach until the keyboard shortcuts are not working in Word. This issue is usually due to misconfigures shortcut mapping or incorrect default language. However, Office update bugs or keyboard issue may also create problems with shortcuts in Word.

In case you have problems with a shortcut that employs the F1 – F12 keys, try holding Fn when using the keyboard shortcut. Also, try connecting an external/different keyboard if possible, to rule out keyboard problems.

How do I fix my shortcuts if they’re not working in Word?

1. Launch Microsoft Word in Safe Mode

  1. Press Windows + R to open Run, type winword /safe in the text field, and hit Enter.winword /safe
  2. When Word launches in Safe Mode, open a new document and verify whether the keyboard shortcuts work fine. If they do, it’s a conflicting add-in to blame.
  3. To remove add-ins, click on the File menu near the top left, then choose More, and select Options.options
  4. Navigate to the Add-ins tab, select COM Add-ins from the dropdown menu, and click the Go button.COM Add-ins
  5. Select any add-ins that appear in the list, and click on Remove.remove to fix shortcuts not working in word
  6. After you have removed all the add-ins, click OK to save the changes.
  7. Finally, launch Microsoft Word normally, and the shortcuts should start working.

When the Ctrl shortcuts are not working in Word, inspect the installed add-ins. Also, instead of removing them all in one go, you could remove one, launch Word in normal mode, and verify if the problem is fixed.

When things improve, the add-in last uninstalled triggered issues with the keyboard shortcuts functionality. You can now reinstall the other add-ins removed in the process.

2. Run the dedicated troubleshooter

Tip icon Tip
Users running the latest version of Windows 11 may not find the Keyboard troubleshooter. In that case, head to the next solution.
  1. Press Windows + I to open Settings, and click on Troubleshoot on the right in the System tab.troubleshoot to fix shortcuts not working in word
  2. Click on Other troubleshooters.
  3. Click the Run button next to the Keyboard troubleshooter.
  4. Follow the on-screen instructions to complete the process and make the recommended changes, if any.

When the undo shortcut is not working in Word, the dedicated troubleshooter will help. Also, you may run the Hardware and Devices troubleshooter.

3. Manually configure the keyboard shortcut

  1. Launch Microsoft Word, click on the File menu, then choose More from the bottom left, and select Options.
  2. Go to the Customize Ribbon tab, and click the Customize button next to Keyboard shortcuts.customize
  3. Select All commands under Categories, then choose the task for which the shortcut is not working from the right, and press the keyboard shortcut key(s) you want to set for it.command
  4. Once done, click on Assign and save the changes.

When facing problems with specific ones, say the copy paste shortcuts are not working in Word, you can check if there were any changes and manually configure the shortcut.

Here are the command names for some of the popular shortcuts:

  • EditCopy: Copy text
  • EditCut: Cut text
  • EditPaste: Paste text
  • EditUndo: To undo an action
  • ShrinkFont: Reduce the font size
  • GrowFont: Increase the font size

4. Update the keyboard drivers

  1. Press Windows + X to open the Power User menu, and select Device Manager from the list.
  2. Expand the Keyboards entry, right-click on the affected keyboard, and select Update driver.update driver to fix shortcuts not working in word
  3. Choose Search automatically for drivers and wait for Windows to install the best one available locally.search automatically
  4. Once done, restart the computer.

Drivers are critical for the effective functioning of any device, so make sure you update the keyboard drivers.

In case Windows can’t find a newer version stored locally or the subscript shortcut is still not working in Word, head to the manufacturer’s website and manually install the latest driver.

5. Change the language 

  1. Launch Word, click the File menu, choose More, and select Options.
  2. Go to the Language tab, and click on Add a Language.add a language to fix shortcuts not working in word
  3. Select English (United States) from the list, and then click the Install button.English (United States) 
  4. Wait for the download to finish, and then relaunch Microsoft Word.
  5. Once done, set English (United States) as the preferred language under both Office display language and Office authoring languages and proofing.set as preferred
  6. Again, relaunch Word for the changes to come into effect and verify whether the keyboard shortcuts now start working. 

6. Repair Microsoft Office

  1. Press Windows + R to open Run, type appwiz.cpl in the text field, and hit Enter.
  2. Select Microsoft 365 from the list of programs, and click on Change.microsoft 365
  3. Click Yes in the UAC prompt.
  4. Now, select Quick Repair, click on Repair, wait for the process to complete, and check whether the problem is resolved.quick repair
  5. If not, run an Online Repair, and follow the on-screen instructions.online repair to fix shortcuts not working in word

When everything else fails to work, you can always repair the Office installation. An Online Repair, though it takes more time and requires an Internet connection, is a foolproof solution against most Microsoft Office issues.

How do I reset keyboard shortcuts in Word?

  • Open Microsoft Word > click File > select More > choose Options. Then go to Customize Ribbon > click Customize > click on Reset All > Finally, click Yes in the confirmation prompt > relaunch Word.

If the Reset all button is greyed out in Word, a quick workaround is to change the shortcut for any command that functions well, say EditCopy or Bold. As soon as you save the changes, the Reset all button will be available, and you can reset configurations to the default settings.

Remember, in most cases, it’s the keyboard to blame for the problem, not Microsoft Word. And replacing it worked for many.

Now that you know what to do when keyboard shortcuts are not working in Word and have things up and running check the best Windows 11 shortcuts to perform tasks effortlessly. In case you’re still having issues, our Ctrl + D not working guide should provide you with additional solutions.

And for those who are yet to upgrade to Windows 11, we also have a list of the best Windows 10 shortcuts.

If you know any additional solutions, drop them in the comments section below.

Fix: Unable to Install SQL Server on Windows 11

SQL Server is often used by developers as a relational database management system, and many of them reported that they are unable to install SQL Server on Windows 11.

Without the SQL Server running, their project won’t have a database it can use, so it’s crucial to fix this problem, and this guide will help you with that.

How do I download and install SQL Server on Windows 11?

1. Delete the affected registry key

  1. Press the Windows key + S and type the command prompt. Select Run as administrator from the list of results.
  2. Now run the following command: reg DELETE “HKLM\SOFTWARE\WOW6432Node\Microsoft\Microsoft SQL Server Management Studio” /reg:32
  3. After that, close Command Prompt.

This is a straightforward solution, and it can help if you can’t install SQL Server 2014.

 2. Check the sector size of your drive

  1. Press the Windows key + X and choose Terminal (Admin).
  2. Now run the following command. Be sure to replace C with the drive you’re installing SQL Server to. fsutil fsinfo sectorinfo C:
     
  3. Locate the PhysicalBytesPerSectorForAtomicity and PhysicalBytesPerSectorForPerformance values.

If the values are different, locate the one that has a higher value. If that value is higher than 4096 you need to make a few changes in the registry by doing the following:

  1. Start Command Prompt as administrator.
  2. Run the following command to add the key: REG ADD "HKLM\SYSTEM\CurrentControlSet\Services\stornvme\Parameters\Device" /v "ForcedPhysicalSectorSizeInBytes" /t REG_MULTI_SZ /d "* 4095" /f
  3. Run the following command to validate if the key is added successfully:
    REG QUERY "HKLM\SYSTEM\CurrentControlSet\Services\stornvme\Parameters\Device" /v "ForcedPhysicalSectorSizeInBytes"

If you don’t feel comfortable modifying the registry and changing the disk sector size, you can always install SQL Server on a different drive. Just check the drive with fsutil fsinfo sectorinfo command and make sure its values aren’t higher than 4096.

3. Set the trace flag to 1800

  1. Open the command line.
  2. Now run the following command: DBCC TRACEON (1800, -1);
  3. Close the command line tool.

By modifying startup parameters you’ll force the SQL Server to use 4 KB as the disk sector size for read and write processes.

Why is SQL Server not installing?

  • Issues with certain registry keys can cause this problem to appear.
  • A sector size that is larger than 4KB is the common cause of this problem.

Microsoft is fully aware of this issue, and according to them, some newer storage devices will use higher block sizes than the supported 4-KB sector size used by SQL Server.

Hopefully, this issue will be resolved when Microsoft upgrades its software. Speaking of upgrades, we have a great guide on how to upgrade from SQL Server 2008, so be sure to check it out.

Upgrading will also prevent various compatibility issues such as the Operating system is not supported by SQL Server error.

Have you found a different way to fix this problem? If so, let us know in the comments below.

Samsung Galaxy Flip5: The First 48 hours hands on

Back with another installment of the First 48, and this time we’re handling the Samsung Galaxy Flip5 thanks once again to AT&T.

Unboxing

Continuing its trend of minimalistic packaging, Samsung ships the Flip5 in discrete matte black box with an embossed silhouette of an unfolded Flip phone that resembles a two-tone black domino dead center.

When opened, the packaging reveals a single unfolded Flip5 wrapped in fine black construction paper and little else visible. Under the phone, tucked away is the necessary paperwork, single black USB-C to USB-C 2-foot cable, and metal sim card ejector.

Aside from using eco-friendly practices as an excuse for packaging, Samsung’s approach to wrapping their devices does in a little more than thin sheets of construction paper and equally thin boxes helps to center the object and jump starts the experience.

In a roundabout way, the less that there is in the box, the sooner a user is up and playing with their new device.

Clever girl.

Clever Girl

Look and Feel

Holding the Flip5 unfolded feels almost like any other smartphone aside from its slightly elongated design. For a common comparison, I’d imagine holding a Sony Xperia 1, 10 Plus, and PRO-I net a similar in-hand experience, right down to the narrow width to aid in reachability.

At $1,119.99 the Flip5 offers a premium heft that accents its metal and glass frame without being overly bulky or cumbersome when unfolded.

Samsung Flip5 - Closed

The edges are wrapped in polished aluminum that can look black or dark grey depending on the lighting. With half the exposed body of the Flip5 being a screen the Graphite color only really shines on the half-sized back panel but looks nice in contrast to those darker graphite edges, and the completely black Wi-Fi bands

The infamous Samsung folding hinge in the Flip5 is initially hidden and tucked away between the two separate ends of the phone when unfolded while flush power and volume buts sit anchored on the left side of the phone.

Unlike the Fold5, the Flip5 doesn’t feel as slippery, thanks to its narrow design when opened or its squatter position when closed most users will be able to get a full grip around the smartphone when in use.

The weight of the phone feels comforting and in its folded position it feels intuitive for anyone whose first cellphone experience included an LG Tracfone, Sharp GX, Motorola RAZR or V300 or the myriad of other flip formed devices.

Samsung Flip5 - Widget 2

On the inside of the phone there is an initial notice of the crease in the screen, and its presence tends to linger longer than the Fold5 as its horizontal presence makes it a constant contact point when scrolling the long screen vertically.

We’ll see if the crease eventually becomes white noise when using the Flip5 as it did while using the Fold5.

Lastly, the camera arrangement is another notable design observation as it protrudes out of the top screen enough to offer a physical marker to help users identify the top front of the phone when scavenging for it in a pocket.

Performance

I mean, there isn’t much to say here just yet. The Flip5 performs like a modern smartphone in most ways.

The biggest caveat is the widget accessibility on the cover screen. With full screen sized widget support on the Galaxy Flip5, opening the phone takes a backseat to skimming quick notifications that include weather, stocks, messages, step count, calendar events, calls, alarms, maps, Whatsapp.

Samsung Galaxy Flip5 - App support

For longer engagements, users can watch video content from Netflix and YouTube which is a nicety paired with its compact design allowing for much longer viewing sessions with the phone nestled in the palm of the hand rather than some finger contortions that include pinky balancing.

Equipped with the Snapdragon 8 Gen 2 mobile SoS, the Flip5 has speed through all tasks I’ve put it through that includes downloads (mostly thanks to AT&T’s network coverage in South Florida) loading web pages, gameplay, and video streaming.

Samsung’s OneUI has gotten optimized and feels just as fluid on the Flip5 as it did on my S22.

Initial Thoughts

Aside from the nostalgic appeal of condensing the physical footprint of your smartphone, Samsung’s work on the outer screen is by far the biggest reason to get into this style of phone.

I’m victim to getting lost in my phone when attempting to do quicker and more focused interactions like responding to text, checking notifications, or keeping up on news. While the widgets panel is limited in its app support, the ones that are available are currently more than enough for me to keep my phone closed at most times.

Samsung Galaxy Flip5 - Dual Apps

Using the phone for a couple of days with a focus on the outer screen has brought me to the realization that if phones replaced their notification shade with a handful of full-sized widgets with varying degrees of functionality, people may not be on their phones as much, at least not me.

But it’s also early days, we’ll see how widgets help with my phone detox weeks in.

Dell’s latest Alienware monitor brings a new design, AMD FreeSync and HDR10 support

Dell introduced its refresh rate breaking Alienware monitor, the Alienware 500Hz Gaming Monitor at CES earlier this year and the company is following up that announcement with a top-shelf variant that offers a revised design, AMD FreeSync Premium technology and VESA AdaptiveSync Display certification.

The newer version of the Alienware 500Hz panel (AW2524HF) still delivers a 500/480Hz (native) refresh rate with 0.5ms gray to gray response times for the smoothest ghosting-free gaming experience around.

However, with the addition of AMD FreeSync Premium, gamers will now be unincumbered by GPU support and worrying if their monitors can keep up with their other hardware.

The IPS paneling supports 99% sRGB color accuracy at wider angles as well as incorporating blue light technologies in the form of TUV-certified ComfortView Plus Low Blue light hardware solutions.

Alienware - 500Hz Gaming Aw2524Hf 6

As for the new design, the base of the monitor takes up a hexagonal shape rather than the elongated V as many other monitors adhere to so that it can be placed in most modern desktop set ups. The stand is fully adjustable, meanwhile Dell managed to tack on a retractable headset arm for gamers to rest their headphones on.

As for ports and connectivity, Dell seems to have chucked the kitchen sink at the back and bottom of them monitor:

  • Power Connector
  • SuperSpeed USB 5 Gbps (USB 3.2 Gen 1) Type-B upstream port
  • 2x SuperSpeed USB 5 Gbps (USB 3.2 Gen 1) Type-A downstream ports
    Joystick
  • SuperSpeed USB 5 Gbps (USB 3.2 Gen 1) Type-A downstream port with Power
    Charging
  • SuperSpeed USB 5 Gbps (USB 3.2 Gen 1) Type-A downstream port
  • Security-lock slot
  • HDMI port
  • 2x DisplayPort

The Alienware 500HZ Gaming Monitor (AW2524HF) will be available for purchase on September 12, 2023 starting at $649.99 USD.