Gamerscore leaderboards are coming back to Microsoft’s Xbox mobile apps

It’s been a while but it looks like Gamerscore leaderboards are finally returning to the Xbox mobile apps in the very near future. The announcement was made by Microsoft’s Larry Hryb this morning who revealed on his personal Twitter account that the feature was currently being tested in the Beta version of the iOS Xbox app.

Those users who are currently testing the Xbox Beta app on iOS should be able to see the new leaderboard today.

Leaderboards that rank friends by how much Gamerscore they’ve earned in a current month have long been a staple of the Xbox gaming experience and were present in previous versions of the Xbox mobile and PC apps. They were removed, however, as part of the recent design revamp which was considered very odd by most as the feature has been a favorite of gamers ever since it was introduced.

Are you looking forward to the return of the Gamerscore leaderboard in the Xbox apps? Let us know why or why not in the comments below and then follow us on Pinterest and Twitter for more Xbox gaming news.

FIX: Solarwinds unexpected error during installation

Solarwinds is a great tool for network monitoring but it does come with its share of error messages.

Users report getting the error:

An unexpected exception occurred during installation

Most often the cause of this error has to do with A/V and permissions to the directory.

In this article we will explore the easiest way to fix this error, so make sure to keep on reading.

How can I fix Solarwinds unexpected error during installation?

1. Use a specialized software

monitoring software snmp error request timed out

When it comes to network monitoring, considering how any error can impact all the devices, making sure the tool you are using is error-free comes without saying.

PRTG Network Monitor is a great tool, recommended by the amazing features that are integrated and the hardware availability monitoring features.

This tool also allows for custom alerts, meaning that you can receive immediate alters if anything is going wrong with the network.

PRTG Network Monitor

PRTG Network Monitor

Use an error free and specialized tool monitoring and stay updated with everything that happens.
Free trialVisit website

2. Modify the restriction policies

  1. Open Start, type local security policy and select Local Security Policy.
  2. In the left pane, click Software Restriction Policies.
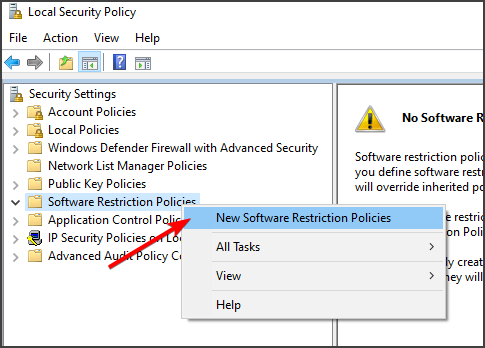
  3. If no software restrictions are defined, right-click Software Restriction Policies in the left pane, and then click New Software Restriction Policy.
  4. Next, click on Enforcement and select All users except local administrators.
  5. Click OK and reboot your SolarWinds server.

Solarwinds unexpected error occurred during the agent deployment and/or installation is an error message that can be solved in just a few easy steps.

Make sure to follow the exact indications we have presented in this article and you will surely fix this problem.

If you have additional recommendations and suggestions, please share them in the comments section below.

FIX: Keyboard not working in Turbo C [Full Guide]

Turbo C++ is compiling software that runs within DOSBox. Some users have posted on Microsoft’s forum that keyboard is not working in Turbo C.

For those users, all keyboard input doesn’t work or they can’t input certain keys in Turbo C++ DOSBox. One user said this in an MS forum post:

I used DOSBox on my laptop, but from the last two days it’s not taking any of keyboard input, like not accepting arrow keys too. The problem listed above is specially for Turbo C++ compiler.

Luckily, there’s a way to fix this issue, and in today’s article, we’re going to show you how to fix it.

What can I do if the keyboard is not working in Turbo C?

1. Uninstall dedicated anti-keylogging software

Uninstalling anti-keylogging apps, like Spyshelter and Zemana AntiLogger could help if the keyboard is not working in Turbo C++.

If you want to get rid of the program’s leftovers, use a trusted uninstaller utility that can remove any software without a trace. That utility removes more leftover files than Windows’ built-in uninstaller.

Furthermore, some of the greatest removal tools pack in some unique features, such as an Install Monitor. The Install Monitor logs software installation system changes for users to view.

You can also remove toolbars and plugins for browsers with the uninstaller Toolbars & Plug-ins feature.

2. Disable anti-keylogging settings in antivirus software

Users have fixed Turbo C++ DOSBox keyboard input by disabling anti-keylogging settings within third-party antivirus software.

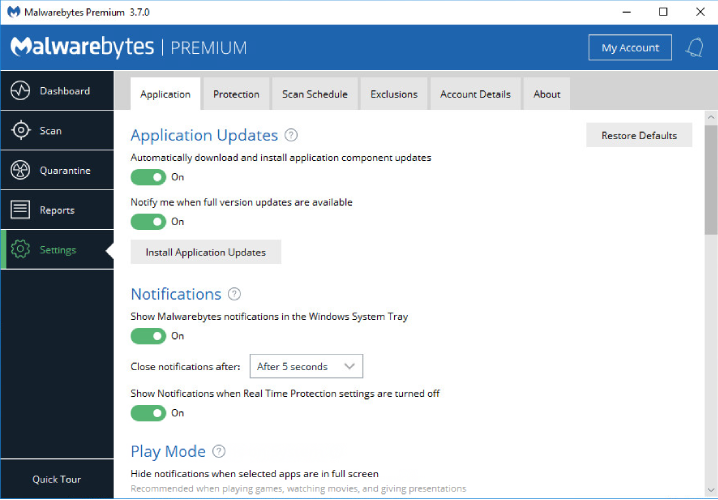
Open a third-party antivirus utility you have installed, and look for an anti-keylogging option in it settings like the one shown above. Disable the anti-keylogging option and the issue with Enter key not working in Turbo C++ should be gone.

3. Make sure Windows 10’s keylogging is enabled

  1. Click the Type here to search button on the far left of your Windows 10 taskbar.
  2. Input the keyword diagnostics within the search box.
    diagnostics
  3. Click Diagnostics & feedback to open Settings as in the snapshot directly below.
    The inking and typing setting keyboard not working in turbo c
  4. Select the Optional diagnostic data option.
  5. Toggle the Improve inking and typing setting on if it’s off.

4. Clean boot Windows

  1. Press the Windows key and R at the same time, which will open Run.
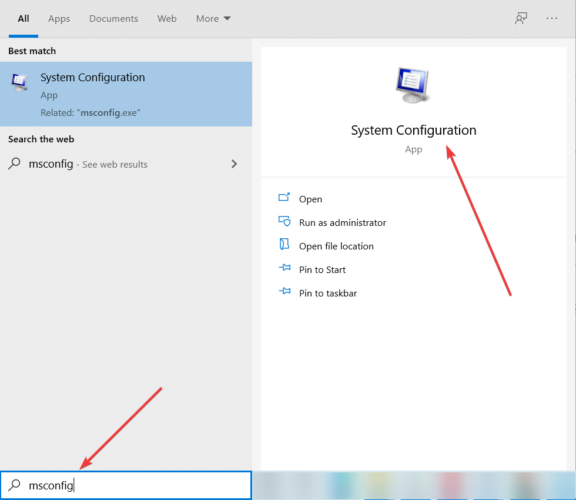
  2. Next, type this msconfig command into Run’s Open box.
  3. Click OK to open the MSConfig utility.
  4. Click the Selective startup radio button if required.
  5. Select the checkboxes for Load system services and Use original boot configuration if they’re not already checked.
    The General tab keyboard not working in turbo c
  6. Click Services to open that tab.
  7. Select the Hide all Microsoft services checkbox to exclude those services.
    The Services tab keyboard not working in turbo c
  8. Thereafter, click Disable all to disable third-party services.
  9. Press the Apply button to save the new startup settings.
  10. Click OK to exit the System Configuration window.
  11. Select the Restart option on the dialog box prompt that pops up.
  12. Then try utilizing Turbo C++ DOSBox after clean-booting Windows.

Note: You can restore your original startup configuration by selecting the Load startup option in MSConfig. Click the Enable all button on the Services tab to restore disabled services. 

5. Uninstall additional keyboard drivers

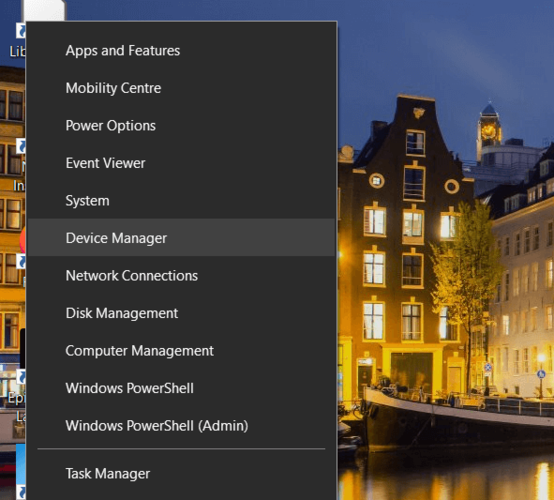
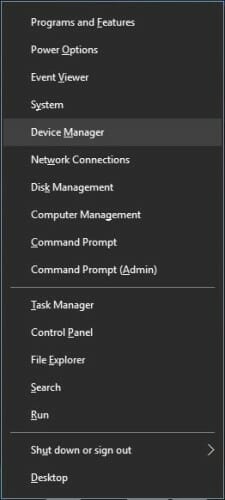
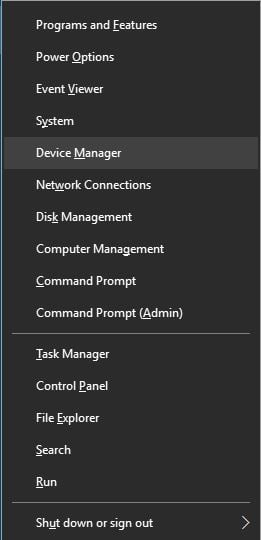
  1. Right-click the Start menu button to open a Win + X menu and select Device Manager.
  2. Double-click the Keyboards category.
    Device Manager window keyboard not working in turbo c
  3. Identify which of the listed keyboards is the one you’re utilizing. Do not uninstall the driver for that keyboard.
  4. Right-click any additional listed keyboard you don’t need and select the Uninstall device option.
  5. Click the Uninstall option to remove the superfluous keyboard driver.
  6. Repeat the above steps for all listed keyboards you don’t need.
  7. Then start Turbo C++ DOSBox.

This is a simple solution, but it might work if your keyboard is not working in Turbo C++ in Windows 10.

6. Press the NumLk key to fix numeric keypad input

If it’s only Numpad keys that don’t work, you might need to enable Num Lock.

Press the NumLk key around the Numpad to enable the numerical keypad. Then try inputting some numbers with the Numpad.

The above resolutions will likely fix the keyboard not working in Turbo C for the majority of users.

Did you found a different solution on your own? Share it with us in the comments section.

FIX: TP-Link router bandwidth control not working

The bandwidth control is a great option as it helps to minimize the impact when more than one device is connected to your TP-Link router.

With this feature each device can be assigned with a specific bandwidth which is why any error with it can cause further issues.

We will explore in this article how you can fix the TP-Link router bandwidth control if it’s not working, so make sure to keep on reading.

What do I do if TP-Link router bandwidth control is not working?

1. Use a specialized software

Ensuring that your bandwidth monitor works at all times is without saying extremely important when dealing with multiple devices, and using a specialized software simplifies this process.

Pressler PRTG software does not work only as a bandwidth monitor but you can also use it cloud and network monitoring.

Moreover you can also benefit from in depth support for SNMP monitoring. Overall, this is a tool that comes with fantastic features and is reliable which ensures a high that you will not encounter errors.

Paessler PRTG

Use this fantastic and reliable tool for bandwidth monitoring at all times, without encountering any errors.
Free trial Visit website

2. Update the firmware

  1. Download the TP-Link router’s firmware and log in using your credentials. (Note: you can find the default login in credentials on the label)
  2. Next, open the Routers management page and go to System Tools.
  3. In here, click on Firmware upgrade.
  4. Next, click Choose File and click on the downloaded unzipped firmware file.
  5. Select the Open option and click on the Upgrade button.

After upgrading your firmware, be sure to check if TP-Link router bandwidth control is still not working.

3. Configure the bandwidth control

  1. Click on the Bandwidth Control option and in the left panel select Control Settings.
  2. Now, tick the Enable Bandwidth Control box.
  3. In the Egress Bandwidth and Ingress Bandwidth fields enter the correct details.
  4. Finally, click on Save to apply the changes.

It may be a bit complicated to solve the TP-Link router bandwidth control not working issues, but by following the steps listed in this article, you should be able to solve the problem.

Please share with us in the comments section below which of the presented solutions worked best for you, or, if you have additional recommendations.

Lenovo ThinkPad X12 Detachable review: An update to the Surface Pro

Lenovo ThinkPad X12 Detachable starting at $1,409.40

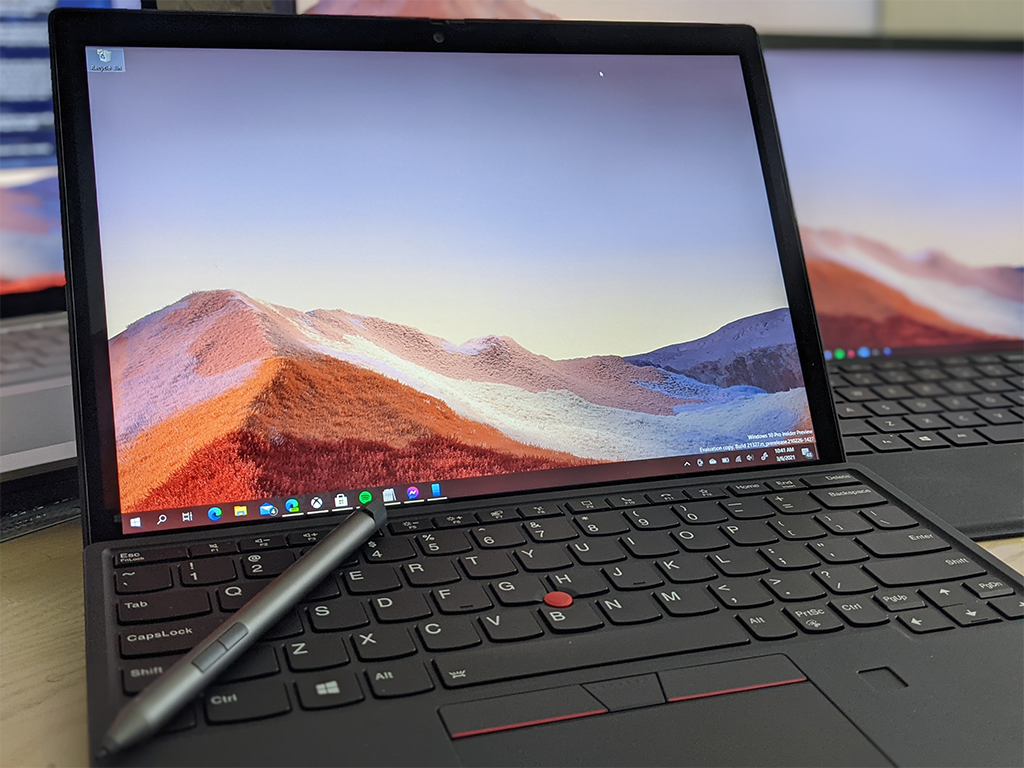
Lenovo clearly has its sights set on Microsoft and its Surface Pro line with its own thin and light ThinkPad X12 Detachable.

While Microsoft released a follow-up to its Surface Pro 7 in the form of a spec bump and a new title in the Surface Pro 7 Plus, there is still an unsatiated audience craving some easily visible and accessibility improvements to the company’s flagship computer.

Microsoft may or may not deliver a device in 2021 that addresses the wants and needs of longtime fans and consumers of the Surface Pro line. Fortunately, it seems other PC makers are finally ready to re-compete for the detachable market with devices that arguably rival the industry frontrunner.

Enter the Lenovo ThinkPad X12 Detachable.

ThinkPad X12 Detachable Specs
Processor
11th Generation Intel® Core™ i3-1110G4 Processor (2.50 GHz, up to 3.90 GHz with Turbo Boost, 2 Cores, 4 Threads, 6 MB Cache) Color Black
11th Generation Intel® Core™ i5-1130G7 Processor (1.80 GHz, up to 4.00 GHz with Turbo Boost, 4 Cores, 8 Threads, 8 MB Cache)
Certifications
11th Generation Intel® Core™ i5-1140G7 Processor with vPro™ (1.80 GHz, up to 4.20 GHz with Turbo Boost, 4 Cores, 8 Threads, 8 MB Cache) Energy Star® 8.0
11th Generation Intel® Core™ i7-1160G7 Processor (2.10 GHz, up to 4.40 GHz with Turbo Boost, 4 Cores, 8 Threads, 12 MB Cache) EPEAT® Gold
11th Generation Intel® Core™ i7-1180G7 Processor with vPro™ (2.20 GHz, up to 4.60 GHz with Turbo Boost, 4 Cores, 8 Threads, 12 MB Cache)
Connectivity
Operating system
Optional: WWAN LTE 4G CAT9*
Windows 10 Pro WLAN: Intel® Wi-Fi 6 AX201 802.11AX (2 x 2)
Display
Bluetooth® 5.1
12.3″ FHD+ (1920 x 1280) IPS, anti-reflective, anti-smudge, touchscreen, 400 nits, Corning Gorilla® Glass Optional WWAN availability varies by region and must be configured at time of purchase; it requires a network service provider.
Memory
Keyboard
Up to 16 GB LPDDR4x 4267MHz Backlit with white LED lighting
Battery
Keyboard is optional.
Up to 10.36 hours 42Wh (MM18)
What’s in the box
Rapid Charge included ThinkPad X12 Detachable
*All battery life claims are approximate and based on results using the MobileMark® 2018 battery-life benchmark test. Actual battery life will vary and depends on many factors such as product configuration and usage, software use, wireless functionality, power management settings, and screen brightness. The maximum capacity of the battery will decrease with time and use. 65W AC Adapter (Supports Rapid Charge)
Storage
4 Cell 42Whr Internal Battery
Up to 1 TB PCIe SSD Keyboard (Select Models)
Graphics
Pen (Select Models)
Integrated Intel® Iris® Xe Graphics Quick Start Guide
Integrated Intel® UHD Graphics
Audio
Security
Dolby® Premium
Discrete Trusted Platform Module (dTPM) 2.0 Dual-array mics
Windows Hello & IR camera for facial recognition login
Camera
Fingerprint reader on optional keyboard 5MP front-facing hybrid infrared (IR) with webcam privacy shutter
Webcam privacy cover 8MP rear-facing
Kensington lock slot
Dimensions (H x W x D)
Audio
Tablet only: 283.3mm x 203.5mm x 8.8mm / 11.15″ x 8.01″ x 0.34″
Dolby® Premium Folio keyboard: 283.3mm x 217.8mm x 5.7mm / 11.15″ x 8.57″ x 0.22″
Dual-array mics With keyboard: 283.3 mm x 203.5mm x 14.5mm / 11.15″ x 8.01″ x 0.57″
Weight
Tablet only: 760 g (1.67 lbs)
Folio keyboard: 340 g (0.75 lbs)
With keyboard: Starting at 1.1kg / 2.4lbs

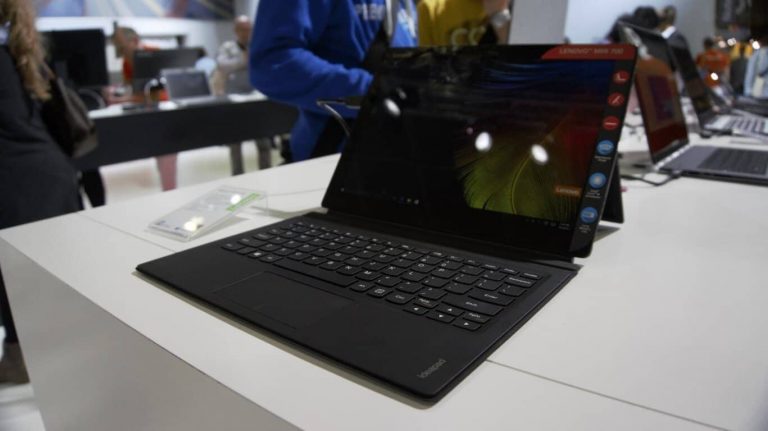
Yes, Lenovo began re-entering the detachable market in 2020 with its Yoga Duet 7i for international markets last Spring after exiting it in 2017 with its Miix 720, but now it’s expanding both its geographic footprint and audience reach with its new X12 PC.

Hardware

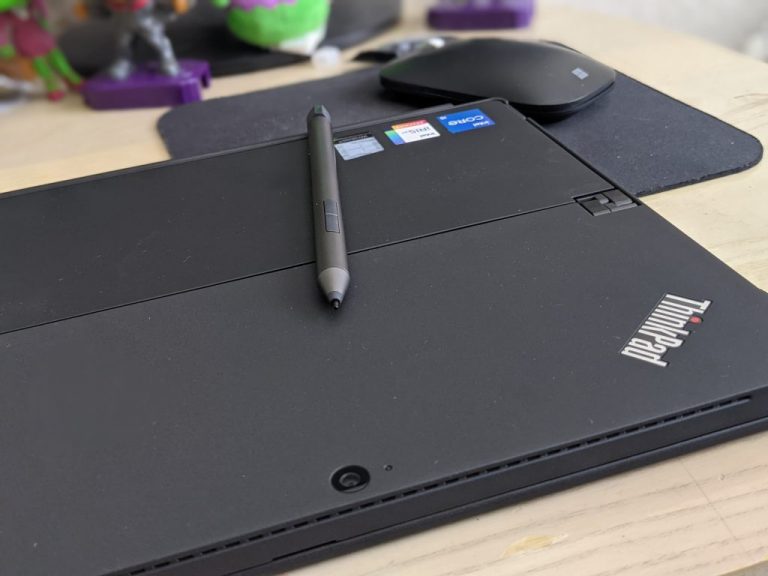
The X12 Detachable follows similar design tenants of Lenovo’s ThinkPad line that include the company’s premiere 12-point military grade spec requirement, to the lightweight magnesium chassis. I’m not sure what sort of oleophobic coating Lenovo has tossed on the outside portion of the tablet PC, but unlike other matte black ThinkPad’s, the X12 Detachable seems pretty resistant to collecting oily fingerprint smudges across its body. The reduced oil accumulation appears to contribute to the retained grippiness of the PC when it’s used in tablet mode.

Another reason a buyer might want to make use of the tablet mode of the X12 more often than other detachables is the balanced weight profile of the device. At 1.67lbs or 760g, Lenovo’s computer feels every bit as comfortable held in the hand from its initial detached state as it does an hour in. I know it feels hyperbolic to gush about the reduction of 0.03lbs or 15g from its closest competitor in the Surface Pro 7, but it surprisingly makes a difference in the hand.

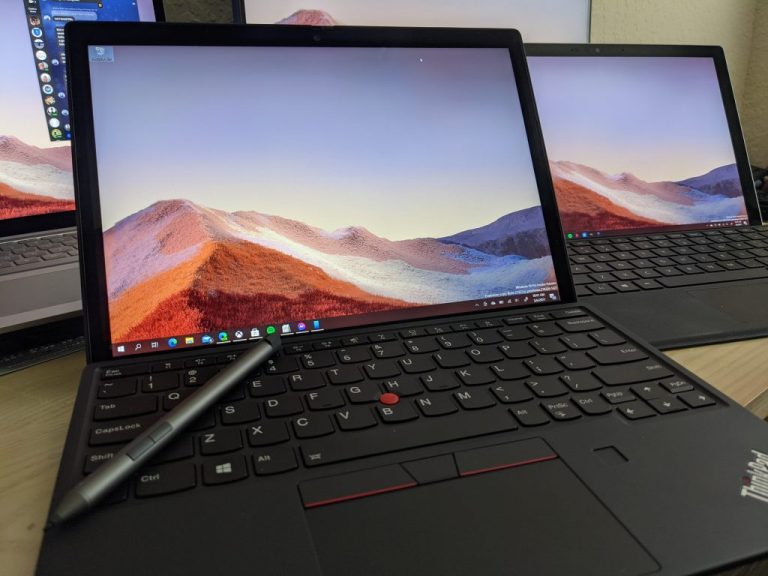
Lenovo ThinkPad X12 Detachable - Hero

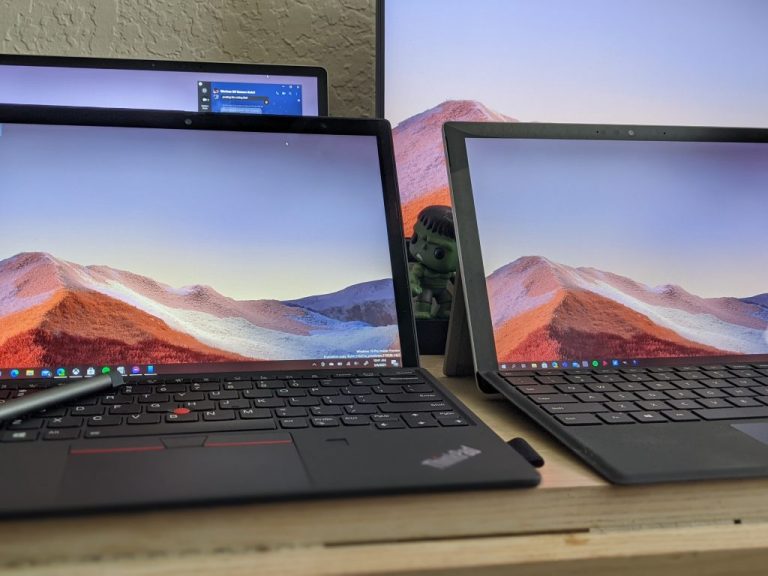
Aside from the feel in hand, the X12 does make a host of other design changes that set it distinctly apart from its Surface Pro 7/Plus cousin. Among the hardware changes are thinner bezels. While the bezels aren’t as razor thin as the Surface Pro X, they are still significantly reduced compared to other Surface Pro’s. The reduced bezels also enabled the overall footprint of the X12 Detachable to remain concise at 283.3mm x 203.5mm x 8.8mm or 11.15″ x 8.01″ x 0.34″. The slightly smaller 12.3″ FHD screen contributes to its comparatively smaller footprint than the Surface Pro 7 Plus at 13.5″, however, because of the reduced bezel profile the net screen real estate is roughly the same.

Another welcomed change is the application of an anti-reflective and anti-smudge screen which has been something of contention for a long time Surface Pro user. Anit-reflective and anti-smudge coating on the screen adds a certain level of polish that’s lacking on the Surface Pro side as well acknowledges the device’s long-term use as a viable tablet solution. With anti-reflective coating, the viewability in both indoor and outdoor usage is very nice as well as not having to be tethered to a wipe cloth because of my OCD about smudge-free screens.

While the X12 offers fewer pixels to peep than the Surface Pro 7 Plus at FDH (1920 x 1280) IPS resolution, its 400 nits of brightness, Corning Gorilla Glass, and coating technologies more than make up for it. The color gamut for the X12 closely matches that of the Surface Pro 7 Plus at 75% of DCI-P3 color gamut measurements where the Pro 7 Plus sits at 76%.

Lenovo ThinkPad X12 Detachable - Screen comparison

Further inspecting the hardware, the X12 comes with a similar if not identical hinge-enabled kickstand supporting up to 160-degrees of flexibility. Lenovo’s hinge engineering is arguably better than Microsoft’s own Surface hinge tech, so the fluid-rigidness of the X12’s kickstand positioning is every bit as good if not better than the Pro 7’s.

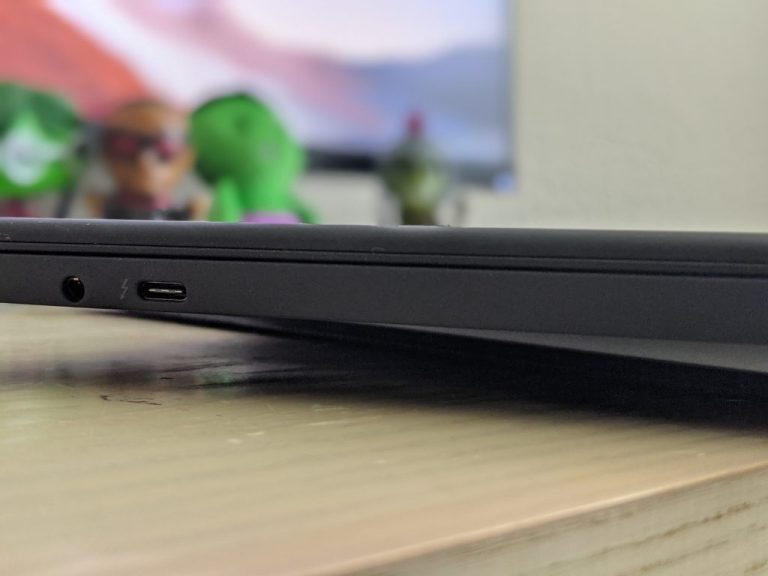
The X12 begins to differentiate itself further away from the Surface Pro 7 Plus with its port game. While the Surface Pro 7 Plus offers a single USB-C, USB-A, and earphone/mic jack, the X12 offers two USB-C ports with one supporting Thunderbolt 4, a Nano-SIM slot for 4G LTE support, and a Kensington lock slot in addition to the headphone/mic combo jack.

Lenovo ThinkPad X12 Detachable - ports

The keyboard, which is included in the box (point Lenovo), is just as good as any other Lenovo keyboard, albeit a bit cramped. As it succumbs to the limited footprint of the X12, the overall typing experience on the keyboard takes some time to get used to. The familiar U-shaped chicklet keys of the X12 keyboard are springy as expected and that’s in large part because the keyboard is just thicker than Microsoft’s Surface Type Cover. The X12’s keyboard is by no means garishly thick but it’s noticeably thicker when compared to Microsoft’s Type Cover and it’s not a bad thing. The added thickness adds a layer of protection to the overall X12 package when it’s closed. Unlike the Surface Pro 7 Plus which feels like jewelry comparatively, a closed X12 feels rugged enough to be tossed around with nary a second thought.

If there were any negatives about the hardware, they would stem from Lenovo’s inability to come up with an elegant pen solution. Ten years in and Lenovo is still trying to push pen loops as a viable answer to “where do I put this pen?” Despite engineering embedded pen housings in their Yoga solutions, the X12 still forces its included pen into its laughable pen-loop housing that’s attached to the keyboard. It’s a nitpick of epic proportions in the grander scheme of value and productivity but still feels inelegant compare to the magnetism engineering of the Surface Pro 7 or even the embedded housing of Lenovo’s own Yoga line.

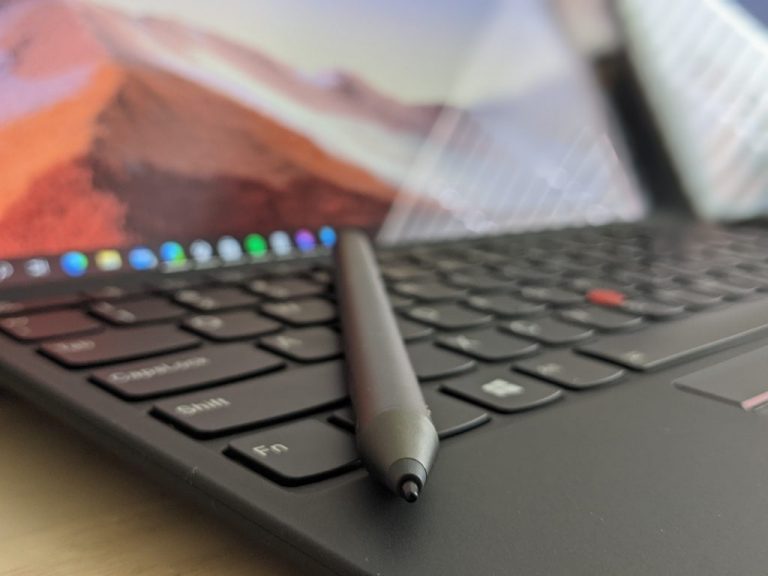
Lenovo ThinkPad X12 Detachable - pen tech

Experience

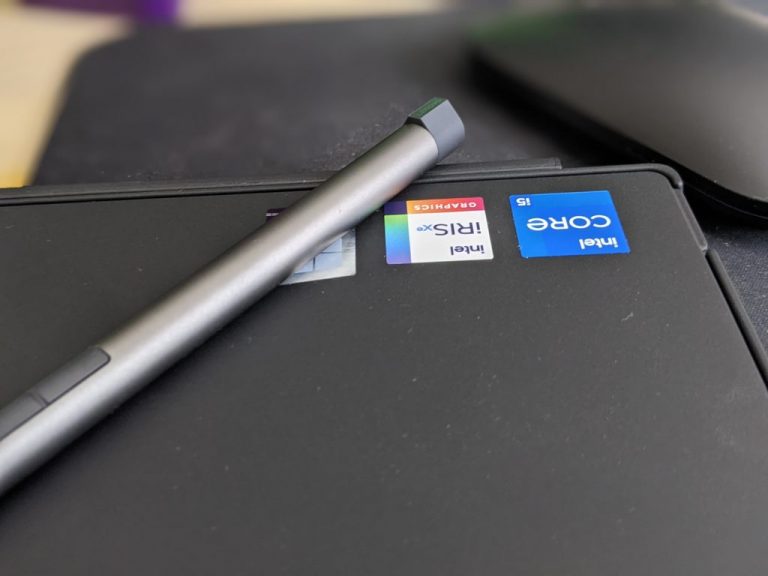
With hardware accounted for, the experience of the X12 is just as impressive as its housing. 2021 will be a showcase of the detachable with Intel or AMD’s chipsets at the core of the competition among PC manufactures. Fortunately, for buyers, Intel’s 11th generation Tiger Lake chips are proving to be powerhouses and AMD’s Ryzen 5000s are no slouches either.

On this particular review model, Intel’s 11th generation chip with support of its own integrated Iris Xe graphics handled everything I threw at it with relative ease. Intel’s 2021 trick of low-power efficiency with the Tiger Lake chip line made using a Core i5-1130 G7 variant feel like using an older and speedier i7. I’ve begun to start adding Adobe’s suite of applications to my daily workload as I add more image editing, video, and audio mixing to my weekly list of tasks, and I was able to easily accomplish all of these tasks without a hitch.

During my day job, as I’ve mentioned ad nauseum here, I work in Excel, PowerPoint, Google Docs, specialized .exe applications, GIMP, Outlook, Adobe Dreamweaver, and dozens of Chrome and Edge tabs, but recently I’ve taken on using Audacity and Adobe Audition to mix and edit a podcast, Adobe Photoshop to edit images, FL Studio to mix music and Filmora to edit videos. Using the X12 was just easy and pleasant an experience as using the Surface Pro 7 Plus. The added GPU gains I experienced with the Surface Pro 7 Plus were mainly because of Intel’s Tiger Lake focus and that same focus and experience carried over to the X12.

Lenovo ThinkPad X12 Detachable - Intel

I was able to fly through windows, virtual desktops, and even VW’s with only a handful of hiccups, most of which I attribute to putting the device into Insider testing. I didn’t run side-by-side benchmarks for the two devices because, well, I was busy using them for work, but I did manage an export comparison. On the X12, converting a 40-minute video shot in 4K resolution to 1080p for portability took 22 minutes and was two minutes faster than the same conversion on the Pro 7 Plus. Since the Surface Pro 7 Plus and X12 use the same chips, I assume it comes down to the different SSD’s the X12 and the Pro 7 Plus support. The reads and writes on the X12 “felt” faster on average when doing a few anecdotal downloads and uploads to OneDrive.

ThinkPad’s are designed for work and at work-related tasks, the X12 inched out the Pro 7 Plus in several tasks but when it came to things outside of the scope of productivity such as gaming, there was definitely a cliff the device fell off of. Most games run on the X12 were glitchy and dropped frames at identical default settings between the Pro 7 Plus. Dropping games to medium, low, or bare minimum produced slightly better and playable experiences, but the X12 is not meant for native gaming right now. Thankfully, solutions such as Google Stadia and xCloud will help democratize the gaming experience on these ultra-portable detachables soon.

Thanks to the pandemic, I’m going to have to start measuring the video conferencing setup on computers more earnestly and the experience on the X12 is, simply fine. The webcam, mic, and speaker configuration are slightly better than what we experienced in 2019, but it’s still recommended that buyers also invest in a separated webcam, mount, and mic for those more professional feeling video conferencing experiences. For a quick pop-up Zoom meeting to plan a more elaborate meeting (we’ve all had them), the X12’s 5mp is fine but suffers from the same up the nose positioning and tinny sound recording as most other computers on the market now.

Lenovo ThinkPad X12 Detachable v. Surface Pro 7 Plus

Lastly, the whole X12 experience is wrapped up in a device that pushes north of 10 hours for battery life. When running Chrome and even pushing the fans at full blast during encoding, converting, or exporting, I was able to squeeze a solid 6 hours out of the device from start to finish, which isn’t bad for a 12.3-inch portable workstation. Recharging the device was also impressive, where Lenovo’s Rapid Charge technology could get me back up and running at 50% in roughly 20 mins.

Summary

The X12 is every bit as good as the flagship Surface Pro 7 Plus and even manages to outclass it on a handful of occasions. Lenovo took its sweet time to re-enter the detachable market, but it reemerges with a solid hit on its hands for anyone who was looking for a Surface Pro replacement or couldn’t talk their organization into switching contracts. As I mentioned, the in-hand tablet feel of the X12 was preferable to me, offering a bit more ruggedness and grippiness, so for warehouse or in-the-field workers, the military-grade engineering of the X12 may be the right balance between portability and real-world usage. Couple the fact that both the pen and keyboard come bundled in the box, the X12 is a clear winner for anyone who isn’t buying their device based on brand loyalty.

Microsoft experiments with immersing computer servers into cooling tanks

In recent years, Microsoft has been experimenting with new ways to cool its various data centers around the globe. In 2016, Project Natick saw Microsoft put a data center underwater inside submarine-like tubes, but the company may have found a simpler solution with immersing servers into cooling tanks.

“We are the first cloud provider that is running two-phase immersion cooling in a production environment,” said Husam Alissa, a principal hardware engineer on Microsoft’s team for datacenter advanced development. The current experiment takes place at one of the company’s US datacenters on the eastern bank of the Columbia River, and the results are already very promising.

If most data centers these days use air cooling to chill servers, the cryptocurrency industry has been leveraging liquid immersion for quite some time to cool chips that can get really hot. Microsoft has also been experimenting with liquid immersion for high-performance applications such as AI, and saw that power consumption for any given server could be reduced by 5% to 15%.

Compared to air cooling, liquid cooling has the advantage of allowing servers to run at elevated power without overheating. The fluid inside the tank boils at a low 112 degrees Fahrenheit (50° C), and Microsoft has built a closed-loop cooling system where the vapor changes into liquid after getting in contact with a cooled condenser in the tank lid. The result is a technology that could eventually make the process of running servers more environmentally-friendly.

The cooling coils that run through the tank and enable the vapor to condense are connected to a separate closed loop system that uses fluid to transfer heat from the tank to a dry cooler outside the tank’s container. Because the fluid in these coils is always warmer than the ambient air, there’s no need to spray water to condition the air for evaporative cooling, Alissa explained.

Microsoft, together with infrastructure industry partners, is also investigating how to run the tanks in ways that mitigate fluid loss and will have little to no impact on the environment.

Microsoft is still in the experimenting phase right now with its partners designing the couch-shaped tank and the engineered fluid that goes inside it. In the coming months, the software giant plans to perform a series of tests to see if its technology is actually viable.  “If done right, two-phase immersion cooling will attain all our cost, reliability and performance requirements simultaneously with essentially a fraction of the energy spend compared to air cooling,” said Ioannis Manousakis, a principal software engineer with Azure.

Outlook on the Web is getting a new calendar board view this month

Last month, Microsoft announced a bunch of time management features coming to Outlook at its spring Ignite conference, including a new calendar board view for web users. Now, the company has announced in the Microsoft 365 Admin Center that the feature will begin rolling out to Targeted Release customers later this month.

The new Calendar board view transforms the existing Calendar experience available in Outlook on the Web. It works much like Trello and provides tools for organizing and managing calendars and meetings. More specifically, users will be able to create a customized board with calendars, tasks, notes, goals, links, files, etc., and manage them all in one place.

“Outlook

At launch, the new board calendar view will only be available in Outlook for the web, and it’s coming soon to commercial and education users, too. But it’s unclear when this new capability will show up in the mobile apps and Outlook for Windows, though. In case you missed it, Microsoft Outlook has recently released a new Suggested times feature for Android users.

FIX: UFO VPN not working (6 tested solutions)

UFO VPN is, as its name suggests, a VPN service that can help you protect your online privacy.

It comes with a free version that you can use to gauge its potential and decide whether or not you should invest in its premium counterpart.

The free version offers you a limited range of servers and also includes ads.

However, we’re not here to describe UFO VPN’s business model. Instead, we’re focusing on a more technical issue.

Some users reported that occasionally, UFO VPN stops working on their side.

The bad part is that these interruptions are not device-specific, so they can happen on all devices you’re using UFO VPN on.

If you’re in this situation, our guide could help you troubleshoot this issue and make your online whereabouts private again.

How can I fix UFO VPN?

1. Switch servers

If you didn’t try this so far, just disconnect from your current VPN server and connect to a different one.

This goes especially if you’re using the free UFO VPN service, as free servers can often get overcrowded.

If you’ve already tried another server and noticed it didn’t work, you could also try switching to a server from a different region.

Already tried that? Head to our next suggestion.

2. Restart the app

A simple way of kickstarting any software app back to life is to restart it.

While a VPN app shouldn’t stop working under normal circumstances, it sometimes happens.

And when the app stops working, it drags down the entire functionality of the VPN.

Therefore, just close UFO VPN, make sure it’s not running anymore, and launch it again.

If you’re using it on your phone, you may want to interrupt the malfunctioning VPN connection, as well.

3. Restart your devices

Ever wondered why those nice customer support agents keep you asking if you’ve tried turning your device off and on again?

It’s because this fix works 9 out of 10 times. Well, we’re not sure if that’s the correct percentage, but it does help a lot.

With that in mind, try restarting the device you’re running UFO VPN on and your router/modem.

This method works great if your device recently underwent certain configuration changes and didn’t have the chance to catch up to them.

4. Use mobile data

If UFO VPN stopped working on your iOS or Android device, try switching to mobile data and check again.

Granted, a VPN shouldn’t expose your privacy if there’s something wrong with the network, but you never know.

However, UFO VPN has a built-in kill switch on all devices, so make sure the kill switch isn’t turned on by default.

If your Wi-Fi connection dropped and UFO VPN doesn’t seem to work any longer, it’s probably because the kill switch.

On the other hand, the app kill switch will only severe your Internet connection, which is actually a sign that it’s working.

5. Update or reinstall UFO VPN

Many VPN providers have failsafes to make sure that their service runs as it should at all times.

One of the most popular methods is making the VPN unusable if the client is not updated to its latest version.

Without further ado, check if your UFO VPN client has been updated to its latest version. If not, update it.

You can also try uninstalling the app, downloading the client from a trusted source, and re-installing it from scratch.

On Windows PCs you might want to grant Administrator rights to the installer executable.

If you’re installing on Android and iOS, make sure you grant UFO VPN the permissions it asks for, so it can work as intended.

6. Try a different VPN

PIA

If nothing seems to work, you may want to switch to a different, better VPN.

You could also contact UFO VPN’s customer support and ask them to look into the matter.

However, if you’re ready to take the leap, we suggest you give Private Internet Access a try.

It has more than 29,000 servers worldwide and works great on various devices. Not to mention that it supports up to 10 simultaneous connections.

On the downside, PIA doesn’t offer a free version of its services, nor a free trial.

Private Internet Access

Private Internet Access

UFO VPN suddenly stopped working? Maybe it’s time to look for a better alternative. Private Internet Access could be just what you need.
Check priceBuy it now

Conclusion

All things considered, if UFO VPN stopped working for you, there are some things you could try to fix it.

However, if none of our suggested fixes seem to work, it may be time to switch to a better VPN service.

FIX: Can’t access Nordstrom website (8 tested methods)

Nordstrom is a US-based luxury store chain that provides its customers with both in-store and online services.

Although many prefer browsing and purchasing clothing, jewelry or cosmetics from Nordstrom’s physical stores, there are also many online enthusiasts.

Unfortunately, the latter category of consumers can sometimes have a hard time when trying to access the Nordstrom website.

As with any other online services, Nordstrom may face its fair share of technical issues every once in a while.

However, often times the problem is not on Nordstrom’s site and has to be handled by the customers who are trying to access the website.

So we ask you this: are you unable to access the Nordstrom website? Then check out our guide and learn how you can fix this issue.

How can I fix Nordstrom website inaccessible?

1. Clear your cookies

Cached data can start building up on your PC and it may affect your ability to access certain services such as Nordstrom.

If you notice that you suddenly can’t access the Nordstrom website any longer, you may want to remove cached data and cookies from your browser.

The process of clearing your cache and cookies depends on the browser you’re using and it shouldn’t be hard to perform.

Just open your browser’s configuration screen and start looking around for an option that mentions clearing cookies.

If the browser’s cache was the reason why you couldn’t access the Nordstrom website, clearing the cookies should make it work in no time.

2. Restart your PC

Have you installed some new software on your PC or messed around with your device’s settings and didn’t give it a chance to load them properly?

Just press that old reliable restart button and check if you’re still experiencing the issue.

More often than not, restarting your PC does wonders in regards to whatever issue you may be experiencing.

That’s probably why tech support agents ask you so often if you’ve tried turning your device on and off.

While you’re at it, you can also restart your router and/or modem to rule out any issues associated with them that a restart could solve.

Still nothing? Let’s move on to the next fix.

3. Check your firewall’s configuration

Did you know that your firewall can effectively block certain online services from reaching your PC?

Well, in case you weren’t aware, it also works the other way by restricting your access to some websites, such as Nordstrom.

That being said, it would make sense that checking your firewall settings could make it possible for you to access Nordstrom once more, right?

Note that your firewall has inbound and outbound rules, so make sure Nordstrom is not blacklisted on either one set of rules.

You may also want to check your antivirus/antimalware for any signs of restrictions towards Nordstrom.

4. Disable extensions

If you’re a fan of extensions, chances are you already have a set of favorites in your default browser.

While extensions are more often than not lifesavers, they also have a bad rap because they tend to interfere with certain websites.

That being said, try using your browser’s incognito mode (granted that you haven’t allowed any extensions to run in incognito).

Are you able to access Nordstrom in incognito? Good, then it’s probably one of your extensions.

Want to find the extension that’s been giving you a hard time? Try turning them off one by one and access Nordstrom after disabling each one.

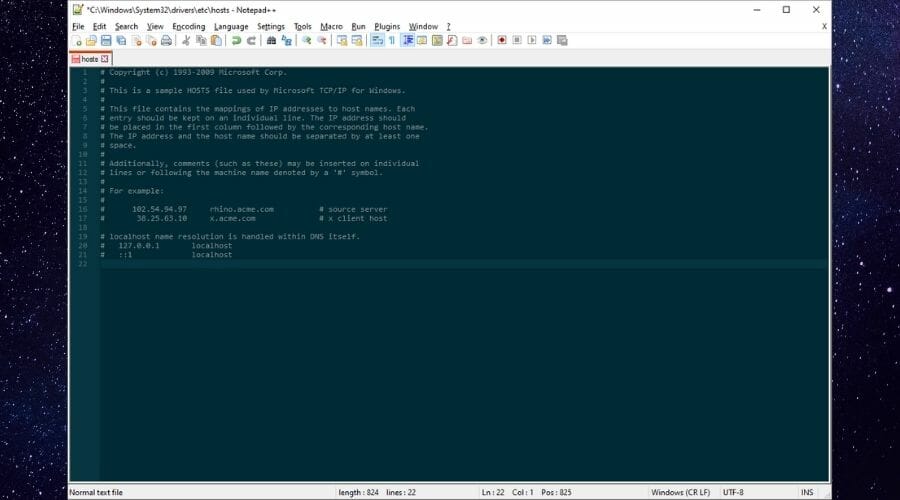
5. Look at your hosts file

Windows’s hosts file is a great way to restrict your PC from accessing certain websites or online services by blocking their domains entirely.

All you’d have to do is put your localhost address (127.0.0.1) along with the address/domain you want to block on an empty line inside this document.

This file usually comes in handy for system-wide ad-blockers who use it to prevent your PC from seeing ads on those domains.

Thus, there’s a possibility that Nordstrom may have been blocked on your PC by being mentioned on this Death-Note-type of file.

You can find your hosts file at the following location:

C:WindowsSystem32driversetc

Open the file with any word editor and make sure that Nordstrom’s domain doesn’t appear anywhere in this document.

Scroll all the way down and check for lines that are not preceded by the # symbol.

Seeing any such lines but only IP addresses are present in the document? Sometimes that happens.

Back up the original Nordstrom file by copying it someplace safe, then open the original one in a text editor.

Now remove any lines with IP addresses that are not preceded by the # symbol. You should end up with a hosts file that looks like the one in the screenshot below.

Save the file at its original location, then try to access Nordstrom. If it works, then you’ll know thtat your hosts file was blocking it.

If it doesn’t, you can restore the file you backed up.

6. Switch to public DNS

Public DNS services such as Google’s or Cloudflare’s are great alternatives to ISP-assigned DNS servers.

If you’ve noticed for a while that your connection is not exactly in its prime, you may want to try switching to public DNS.

Here’s how you can do that on your Windows PC:

  1. Right-click your Start menu
  2. Go to Network Connections
  3. Click on Change adapter options
  4. Right-click your default connection and select Properties
  5. Double-click Internet Protocol Version 4 (TCP/IPv4)
  6. Select the Use the following DNS server addresses option
  7. Type 8.8.8.8 in the first field and 8.8.4.4 in the second one
  8. Click OK

Now you can either restart your PC or flush your old DNS data to make sure you get the most out of your new DNS servers.

7. Flush your DNS

  1. Launch CMD with Administrator rights
  2. Type the following commands, one by one:
    • ipconfig /flushdns
    • ipconfig /registerdns
    • ipconfig /release
    • ipconfig /renew
    • netsh winsock reset
  3. Restart your PC

After your PC reboots, you can launch a browser and check if you can now access Nordstrom.

Flushing your DNS and forcing your PC to renew DNS data has been proven several times to fix certain connectivity issues.

Most likely, if your PC hasn’t been able to access Nordstrom for a while, you might have some DNS cache data build-ups you may need to get rid of.

Flushing your DNS can do just that.

8. Use a VPN

PIA

If your ISP or network administrator decided to keep you from accessing Nordstrom, a VPN can help you with that.

More so, it can also make it possible to access Nordstrom from any geo-restricted locations and offer you top-notch privacy protection.

Private Internet Access, for instance, is an excellent VPN that could help you unblock Nordstrom and keep you private without great effort.

It features the largest network on the market, counting more than 29,000 servers worldwide.

Private Internet Access

Private Internet Access

Network restrictions make Nordstrom’s website inaccessible for you? Try using Private Internet Access to fix this issue.
Check priceBuy it now

Conclusion

All in all, if you can’t access the Nordstrom website, there are some things you may want to try to fix it.

You should try all of our suggestions and avoid skipping either one of them.

We’re quite sure you’ll be able to find a solution that unblocks Nordstrom on your end in no time.

GTA V comes back to Xbox Game Pass in April with support for Xbox Cloud Gaming

Xbox Game Pass will have more great games to play this month in addition to Outriders, Square Enix’s brand new cover shooter that joined the catalog on its launch day, April 1. Rockstar Games’ GTA V, which first joined on Xbox Game Pass for Console between January and May 2020 will come back to the catalog on Thursday, April 8.

GTA V will also be added to the growing list of cloud-enabled games that can be played on Android devices via Microsoft’s Xbox Cloud Gaming technology. This month, Microsoft is also adding touch controls support to 50+ cloud-enabled games such as Sea of Thieves, Gears 5, Dragon Quest XI: Echoes of an Elusive Age, Slay the Spire, and more.

Xbox Game Pass Cloud Enabled Games Supporting Touch Controls

In addition to GTA V, Microsoft is also bringing two new sports games to Xbox Games in April, including the baseball game MLB The Show 21. The Sony-developed game will be the first game in the MLB The Show series to be released on Xbox consoles, and Xbox Game Pass subscribers will get to play it on its launch day, April 20. For Xbox Game Pass Ultimate members, the hockey game NHL 21 will also available through EA Play starting April 12.

You can check out the full list of new Xbox Game Pass games coming in April below:

  • Grand Theft Auto V (Cloud and Console) – April 8
  • Zombie Army 4: Dead War (Cloud, Console, and PC) ID@Xbox – April 8
  • Disneyland Adventures (Cloud) – April 8
  • Rush: A Disney/Pixar Adventure (Cloud) – April 8
  • NHL 21 (Console) EA Play – April 12
  • Rain on Your Parade (Cloud, Console, and PC) ID@Xbox – April 15
  • Pathway (PC) ID@Xbox – April 15
  • MLB The Show 21 (Cloud and Console) – April 20

Microsoft usually announces a second wave of new Xbox Game Pass games later in the month, and we hope to see more blockbuster games in the list. In the meantime, Deliver Us the Moon, Gato Roboto, and Wargroove will leave the Xbox Game Pass for Console and PCs catalogs next week on April 15. For Xbox Game Pass Ultimate members, a couple of old Madden and NHL games released before 2019 will also disappear from the EA Play catalog on April 16.

If you have yet to try Xbox Game Pass, we remind you that you can still enjoy your first month of Xbox Game Pass Ultimate for just $1. The $14.99/month service includes Xbox Game Pass for Console, Xbox Game Pass for PC, Xbox Live Gold, and Xbox Cloud Gaming on Android devices, and it’s still one of the best deals in gaming in 2021.

Outlook can now share emails and attachments to Microsoft Teams chats and channels

Microsoft Teams on the desktop is getting a new Outlook integration that should make it easier for users to share emails in chats and channels. Jeff Teper, CVP of Microsoft 365, announced the news on Twitter, though the feature is now gradually rolling out to Outlook clients globally.

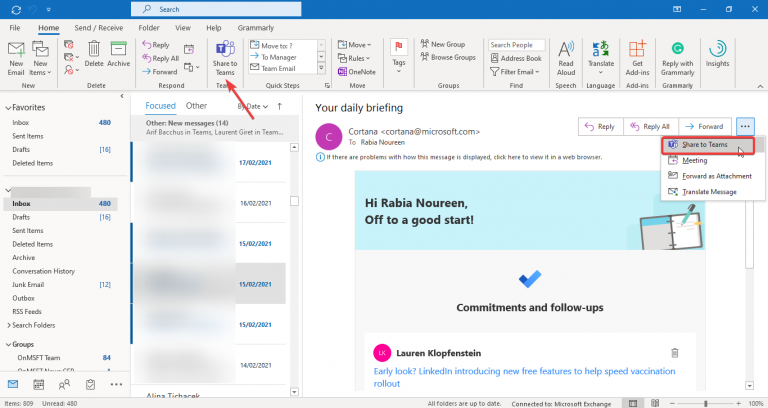
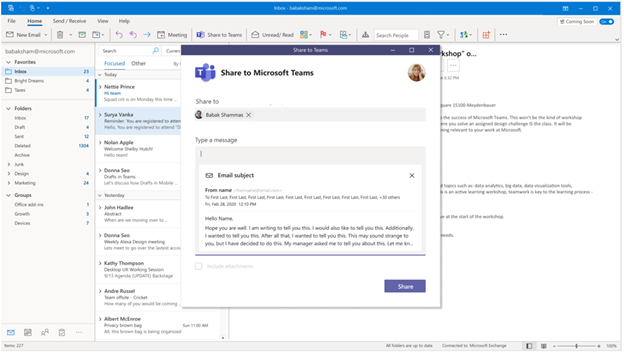
The Share to Teams experience enables Outlook users to share an email or a conversation, including attachments, with a co-worker, group chat, or a Teams channel. When a user clicks the Share to Teams button in Outlook, the app will launch a window in the Teams desktop client (if it’s already installed) or open a new window within the Outlook app.

The Teams desktop app will create a copy of the email and attachments, and the recipients will be able to see the email message in preview, and users will need to click it to view the contents.

The new sharing experience requires the Outlook add-in for Share to Teams. It will be installed automatically when a user runs the Microsoft Teams web or desktop app for the first time after this feature is available in their tenant. To get started, you will need to follow the steps mentioned below:

  1. Click the Share to Teams button on the Home tab to open the Share to Teams dialog box.
  2. Type the name of the chat or channel and fill in the relevant details in the “Type a message” section.
  3. If the email message contains any attachments, select the “Include attachments” checkbox and finally click the Share button.

As of now, the Share to Teams feature is supported on Outlook for Windows, Outlook on the web, and the new Outlook for Mac Preview. However, it’s not clear when it will be available for mobile users. Microsoft noted that It Admins can manage this add-in for individual users, and more details are available on this support page.

FIX: Mouse or keyboard not detected in Windows 10/11

There are certain problems and errors that will exist for as long as there will be Windows.

Despite the fact that we’re already running on Windows 10,  8.1, there are still annoying problems like your mouse or keyboard not being detected by your computer, laptop, or tablet.

If you are running on Windows, then you probably have encountered this widespread problem at least once in your lifetime – your mouse or keyboard wasn’t being detected or recognized by the system.

I know it happened to me, as well, and only after trying out all the possible solutions did I manage to find a fix for this problem.

It doesn’t matter whether you have a corded mouse or keyboard, with or without USB or a wireless Bluetooth one. This error keeps appearing and the solutions to fix it aren’t too hard but will take a little time.

This problem is not the only one that can give you a hard time while using your mouse or keyboard. In order to fix your specific problem, we strongly recommend you find the exact cause.

Trying fixes that do not work is annoying, isn’t it? Then be careful when searching for the origin of the problem. The first thing you have to do is to figure out the symptoms.

How to fix keyboard or mouse not detected in Windows 10, 8.1?

1. Update your drivers

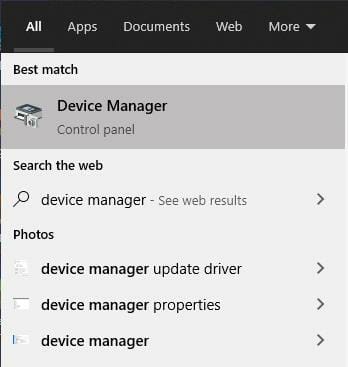
  1. Press the Windows Key + S and open the Device Manager.
  2. In the Device Manager, look for the device you want to update.
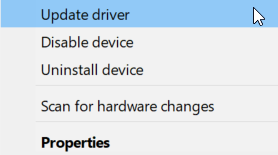
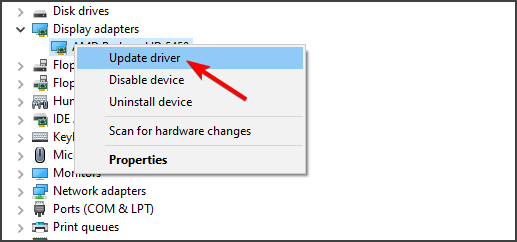
  3. Right-click on it and select Update driver.
  4. Let Windows search and update the driver.

Update your drivers automatically

One easier way to update your drivers without the need to manually check each device in the device manager is doing it automatically.

If you are tired of constantly having to check for available drivers for all of your software, know that you can actually use a third-party software that will do it for you.

2. Check your components

The first thing that you need to do when such a thing happens is to make sure that hardware, physical problems are out of the question.

What I mean by this is that you need to make sure whether the problem isn’t caused by dust, moisture, or a faulty USB drive.

With a wireless mouse or keyboard, naturally, you need to make sure that the battery isn’t depleted.

What I experienced on my own was the fact that the battery wasn’t apparently entirely dead, so my mouse cursor just stopped from time to time. After having replaced the battery, the issue has been solved.

Also, it doesn’t really matter who is the maker of your mouse, keyboard and of the laptop, computer or tablet running Windows 8 or Windows 8.1.

Most of the time the issues are similar, if not, the same. Many have been reporting such issues especially after they have either upgraded their Windows.


3. Remove all USB connected devices

If you have a USB enabled mouse or keyboard, try removing all USB connected devices, restart your device and then connect only that device which you think has troubles.

Also, while you are in the above-mentioned Device Manager category, you could try and search for driver updates specifically for USB (Universal Serial Bus controllers).

Moreover, if you’re using a Bluetooth device, also, check out whether you have the latest Bluetooth drivers updated.


4. Boot your device in Safe Mode

  1. Press the Windows Key + I to open the Settings.
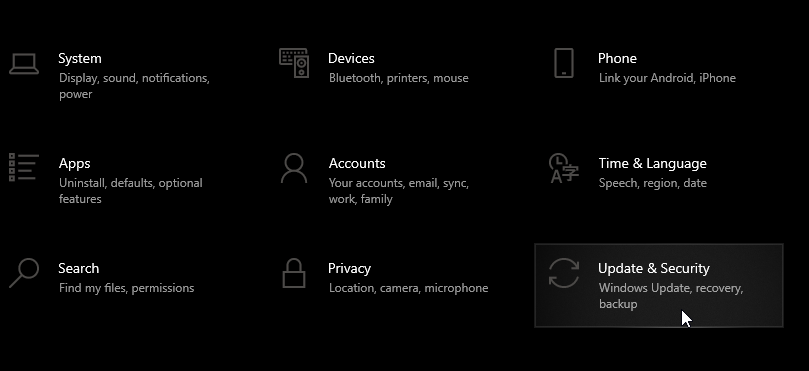
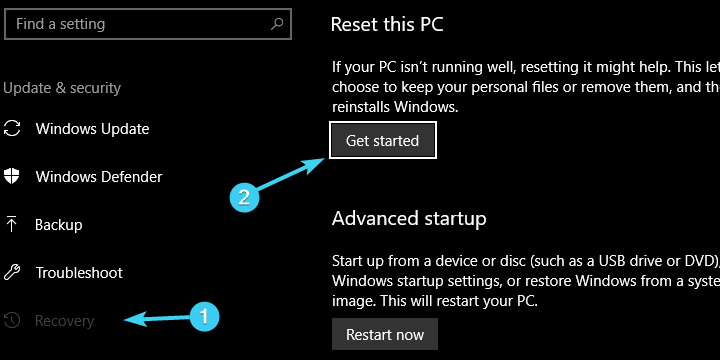
  2. Go to Update & Security, then to Recovery.
  3. Next, go to Advanced Setup.
  4. Select Restart Now.
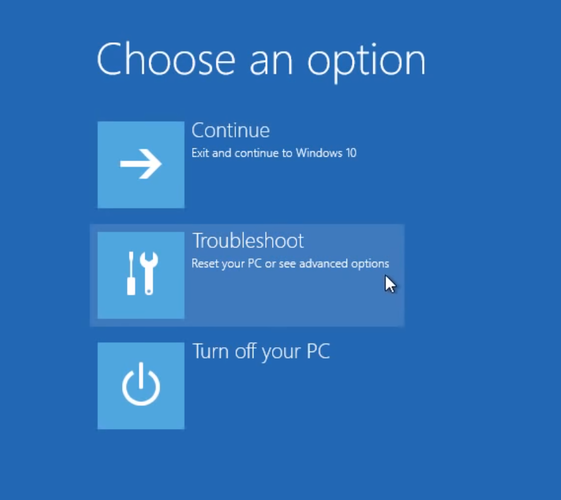
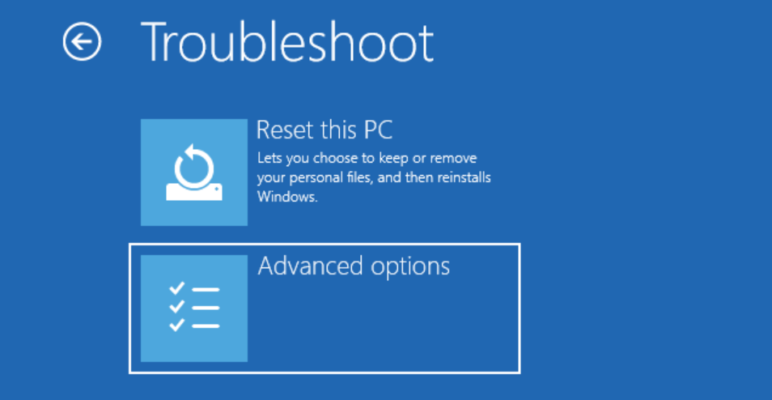
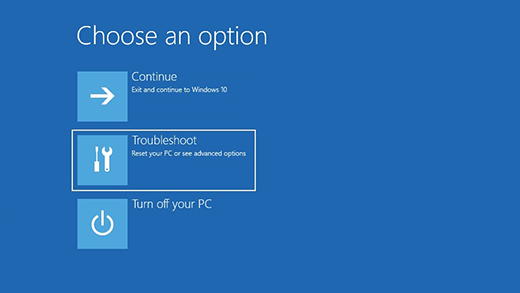
  5. Your PC will restart. After it finished restarting, select Troubleshoot.
  6. Then go to Advanced options.
  7. Next, select Startup Settings, then Restart.
  8. After your PC restarts, select 4 or F4 to boot your PC in Safe Mode.

There might be a software or hardware conflict with your mouse and keyboard, so try and reboot in Safe Mode and from the same Device Manage, simply delete the devices.

Then, when you will restart, Windows will recognize them and will start to search for drivers automatically, if needs be.

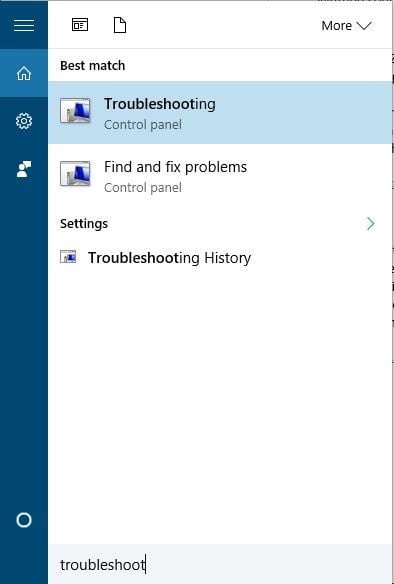
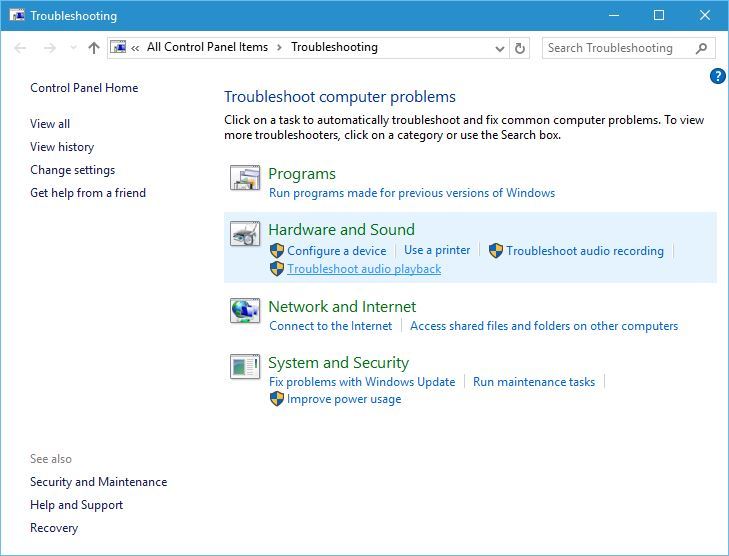
This has been the solution that worked for me. Also, just in case, make sure that your BIOS is also updated. Of course, in case you haven’t tried this out already, the built-in Troubleshooting tool could also help.


Here you go, now you are well equipped against any mouse or keyboard issues in Windows 10, 8.1. Let us know in the comment section what problem you had and how have you got rid of it.

Microsoft, Cloud Security Alliance Discuss Zero Trust for Enhanced Security

Many organizations across the world are beginning to recognize the importance of enhanced network security. With more companies requiring their staff to work from home, more robust security solutions are needed to cover emerging issues that range from unpatched devices to poor best practices adherence. As such, Microsoft has been looking to provide customized solutions that not only cover intrusion detection, but breach mitigation to provide better security to more diverse online environments. In this regard, it has revealed recent discussions with Cloud Security Alliance regarding Zero Trust.

Cloud Security Alliance is a not-for-profit whose main focus is enhancing network security by providing best practices awareness. It also works to enlighten internet users on the benefits of cloud-based security as a holistic approach.

What’s Zero Trust

Zero Trust is a network security solution that is based on the concept that all network connections connected to a system should be vetted regardless of whether they are internal or external connections. The main goal behind the strategy is to ensure that all communications within a network are authenticated before access privileges are granted.

Issues Discussed

In the latest Microsoft – Cloud Security Alliance discussion, ten security managers from companies in the energy, insurance, and finance industries were involved. Some of the points discussed included identity authentication. Identity authentication is typically achieved through IP confirmations and reliance on Unique Device Identification Systems. Multifactor and passwordless authentication methods were also brought up, as well as execution through cryptographic keys, PINs, and biometric data.

Lastly, network and application segmentation strategies were explored. Such procedures help mitigate an escalation of data access privileges by preventing applications from reading what others on a network are doing. This creates a secure environment that can also be used to run virtual testing spaces before full network access is granted.

Microsoft is Providing Zero Trust Services

Microsoft is already providing Zero Trust solutions to its customers. It is partly doing this via the Azure Active Directory (Azure AD). Some of the features available to clients include passwordless authentication using end-to-end security configurations. The setting allows members to log in using biometrics and has been made possible via Windows Hello, and the Microsoft Authenticator app. Some third-party access options are also available for Yubico, AuthenTrend, and Feitian users via the FIDO2 authentication protocol.

In the setup, Azure AD Conditional Access helps to reinforce data access policies on apps to ensure that devices attempting to connect to a network meet minimum access principles.

FIX: Someone is still using this PC

A large number of users have reported seeing the confusing message Someone is still using this PC on their Windows 10 devices. It can be extremely frustrating, as the message appears when trying to shut down or restart your PC.

This error also implies that your work will be lost on the other account if not saved.

For this reason, some users that encounter this error end up not restarting or shutting down their PC for months on end. This, in turn, makes your PC run slower overall and causes you even more stress.

Because we understand how it feels to be stuck in this vicious cycle, and also know how important it is for you to be able to access your files, in today’s article we will explore a quick fix.

Because the specific cause for this error message can vary, we compiled a list with the best troubleshooting methods that managed to help users that experienced the same situation.

What do I do about Someone is still using this PC error?

1. Run an anti-malware tool


As a first and easy step, we recommend running a deep scan with a powerful antivirus tool to remove any unwanted malware (if that is the case).

You can always go for a free tool for a simple scan and malware removal, but real-time protection is only available with a premium product.

More so, a paid antivirus is also efficient against malicious exploits of any kind and it brings various features meant to ensure safety against more complex exploits including webcam protection or password managers.

You should get an antivirus with high detection rates to make sure that no threat is overlooked. On top of that, a good antivirus should be able to detect and block threats before they even get the chance to infect your PC.

2. Check accounts inside Windows 10

  1. Press Win+X keys on your keyboard and select Settings.
  2. Inside the Settings window, select Accounts.accounts option in settings - windows 10 someone is still using this PC
  3. Check to see the available accounts.
  4. Log into any of them found beside the Administrator. Save your work then log out. (In case there is no work to be saved it is recommended that you delete that account)
  5. After removing all the accounts besides the Administrator, retry to restart your PC and check to see if the issue is resolved. If not, try the next method.

3. Uninstall your third-party antivirus software

Some Windows 10 users have dealt with Someone still using this PC error by simply uninstalling their third-party antivirus software.

This issue seems to be caused by Avast and AVG antivirus software options. It is recommended that you temporarily uninstall your antivirus software, and check to see if that caused the issue.

There are a few security software that are known to be unintrusive, so you should have no problem if you switch up to one of those.

Besides, to eliminate any suspicion of interference, we suggest using a dedicated PC cleaning utility such as CCleaner, to delete all traces of unwanted programs.

Just select the app you want to remove from the Uninstall sub-menu and then use the registry and PC scanner to remove all leftover files.

⇒ Get CCleaner

4. Check for qued printing tasks on your PC


Some users have solved the Someone is still using this PC error by simply checking the queue of their printing devices.

Remove all unfinished tasks from that list, and try to see if this fixes your issue.

5. Run SFC scan in PowerShell

sfc scan - windows 10 someone is still using this pc
  1. Press Win+X keys and select PowerShell (Admin).
  2. Inside the command prompt, type sfc /scannow a and press Enter.
  3. Wait for the process to complete and check to see if the issue is resolved.

We would love to know if this guide helped you solve your issue. You can let us know by using the comment section found below.

Fix: Stutter in games caused by Diagnostics Policy Service

Stuttering in your game can be caused by many things, and sometimes cause for stuttering is Diagnostics Policy Service.

If you’re experiencing any stuttering caused by this service, you might want to have a closer look at our solution.

According to users, stuttering appears at every minute while playing video games on Windows 10, and stutters can sometimes be barely noticeable and sometimes can last more than half a second.

Of course, this kind of stuttering is unacceptable while playing your favorite video game.

The main cause of this stuttering problem is System Resource Usage Monitor of Diagnostics Policy Service, or Energy Estimation Provider (eeprov.dll) if you want to be more specific.

It seems that this application is collecting information about energy consumption in the background and this is causing the stuttering while playing video games.

How to fix stuttering caused by Diagnostics Policy Service?

  1. Install the latest NVIDIA drivers
  2. Disable the Diagnostic Policy Service
  3. Update Windows
  4. Install a game booster

1. Install the latest NVIDIA drivers

download nvidia driver

Don’t forget to install the latest GeForce drivers to enhance your gaming experience and run apps faster. NVIDIA regularly rolls out updates to improve game compatibility and fix various issues limiting your gaming experience.

To install the newest drivers, go to NVIDIA’s Geforce support page and simply click on the download button.

NVIDIA will automatically identify your GPU type and install the corresponding drivers.

Update drivers automatically

Constantly having to check for newer drivers for your hardware can be tiresome and tedious, especially when you have no background knowledge and you’re not sure what hardware models you have.

Thankfully, there’s a third-party software that will automatically scan your components for the newest available drivers so you don’t have to do it on your own.

2. Disable Diagnostics Policy Service

  1. Press Windows Key + R, type services.msc and press Enter to run it.
  2. Services window should open.
  3. Now find Diagnostics Policy Service from the list of services.
  4. Right-click it and choose Properties.
  5. In the Startup type section choose Disabled.Stutters in Games Caused by Diagnostics Policy Service
  6. Now check Service status.
  7. If it’s running make sure that you stop it by pressing the Stop button.
  8. Click Apply and OK then restart your computer.

This is relatively simple workaround and all that you have to do is to disable Diagnostics Policy Service from Services.

After disabling Diagnostics Policy Service your gaming experience shouldn’t be affected by it anymore. Once again, this is just a workaround, so it may not work for all users.


3. Update Windows

  1. Go to Settings.
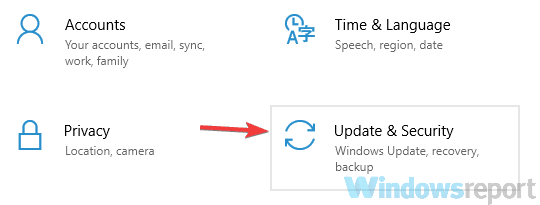
  2. Then, go to Update & Security.
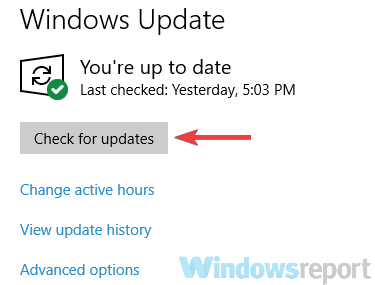
  3. Then go to Update and select Check for updates.

Make sure that you download the latest Windows 10 updates on your computer to benefit from the latest system improvements.

Microsoft rolls out major system updates on Patch Tuesday to make the OS more stable and reliable.


4. Install a game booster

A powerful game boosting software can be a lifesaver. Game boosters make your games run smoother by helping your PC perform better while you are playing games.

There are plenty of game boosters out there and choosing the right one for your computer is not an easy task.

Windows Report did the homework for you and compiled a list of the best game boosting tools that you can use on your Windows 10 PC.

We recommend you to install a powerful program that temporarily disables unnecessary background processes, features, and programs while playing games.

The tool also optimizes CPU and memory usage to that your computer can direct its resources to powering your gaming sessions.

⇒ Get GameFire


That’s about it for this article. We hope that these quick solutions helped you fix game stuttering. Let us know which suggestion worked best for you.


FIX: Rstrui.exe errors in Windows 10/11, 7

Rstrui.exe is a Windows 10 file responsible for System Restore and is located in a subfolder of C:WindowsSystem32.

In other words, the rstrui.exe file is an essential part of Windows 10, allowing users to revert their computer’s state to that of a previous point in time.

This feature enables the OS to recover from system malfunctions or other problems.

When you recover system files, applications, the Windows Registry, and other system settings, your system can perform these actions thanks to the rstrui.exe file.

Unfortunately, sometimes Rstrui.exe is not working due to a series of errors.

Rstrui.exe is closely related to the System Restore feature, and if you’re having problems with rstrui.exe, you won’t be able to perform System Restore anymore.

This can be a big problem, and speaking of issues, here are some common problems reported by users:

  • Rstrui.exe no restore points – This issue can occur due to your settings. To fix the problem, be sure to check System Restore settings and make sure that the feature is enabled.
  • Rstrui.exe not working, won’t run, not recognized – Sometimes file corruption can cause this problem to occur. To fix the issue, perform both SFC and DISM scans.
  • Rstrui.exe error Windows 7, 8.1, 10 – This issue can appear on any version of Windows, and even if you don’t use Windows 10, you should be able to apply most of our solutions to your PC.
  • Rstrui.exe application error – In some rare cases, this problem can occur due to malware infection, so if you want to ensure that your PC is safe and free from malware, be sure to perform a detailed scan.
  • Rstrui.exe missing – This problem can sometimes be caused by certain bugs on your system. However, you should be able to fix the problem by installing the latest updates.
  • Rstrui.exe entry point not found – In some cases, this issue can occur due to problems with your registry. Simply clean your registry and check if that solves the problem.
  • Rstrui.exe access denied – Your user account can sometimes cause this issue to appear. To fix the problem, create a new user account and check if that helps.

How can I fix Rstrui.exe problems in Windows 10?

1. Use the SFC and DISM tools to repair the system files

1.1 Run the SFC scan

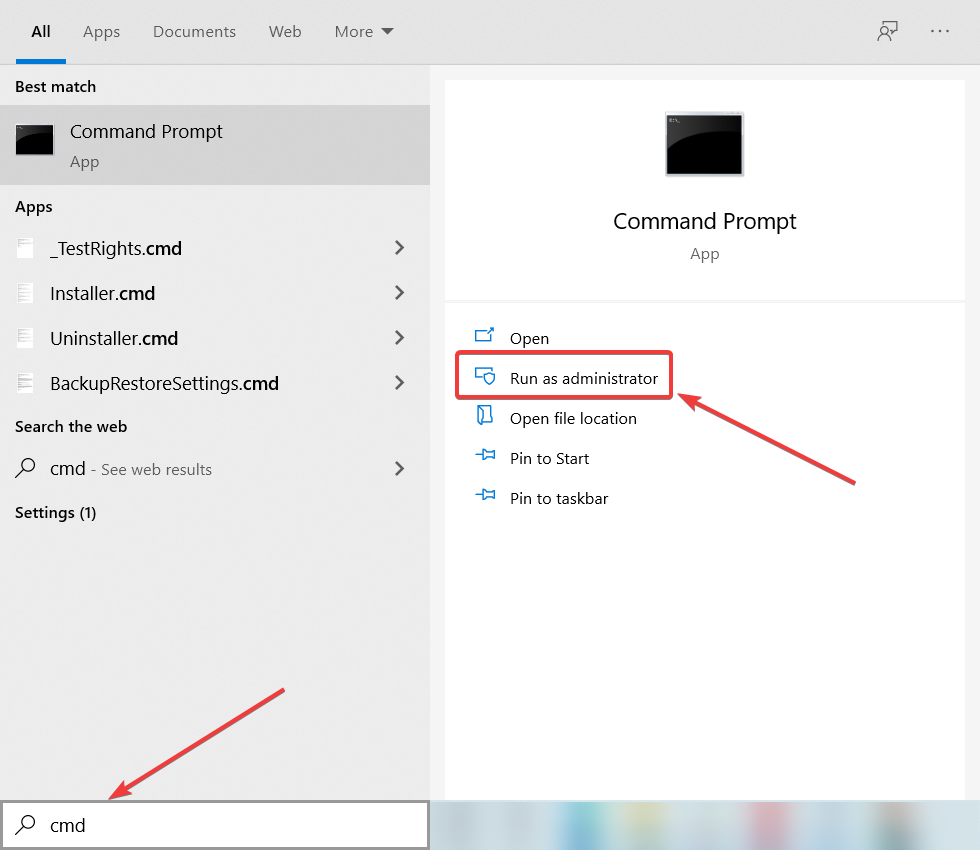
  1. Press Windows key + S, type cmd and click on Run as administrator to start Command Prompt as administrator.
  2. When Command Prompt starts, enter sfc /scannow and press Enter.
    Rstrui.exe not working
  3. SFC scan will now start. Keep in mind that this scan can take about 10 minutes, so don’t interrupt it.

Once the scan is finished, check if the problem is still there. If the issue is still present, or if you can’t run the System File Checker scan at all, you’ll need to use the DISM scan instead.

1.2 Run the DISM scan

  1. Start Command Prompt as an administrator as shown in the previous solution.
  2. Now enter the following command and press Enter: DISM /Online /Cleanup-Image /RestoreHealth
    Rstrui.exe missing
  3. The scan can take about 10-20 minutes, so don’t interrupt it.

Once the DISM scan is finished, the problem should be resolved. If the issue is still there or if you couldn’t run an SFC scan before, try to run it again and check if that solves the problem.

If you’re having problems with rstrui.exe on your PC, the problem might be caused by corrupted system files. This can be a big problem, but you can easily fix it by running an SFC scan. To do that, you just need to follow the steps above.

2. Scan your computer for malware

Sometimes issues with rstrui.exe can occur due to malware infections, and in order to fix the problem, you need to check your PC for malware.

Windows 10 already has a decent built-in antivirus tool called Windows Defender, but sometimes you might need to use a different tool to deal with malware.

Even though Windows Defender provides solid protection, it doesn’t have certain advanced features. If you want an antivirus tool that provides maximum security, we strongly suggest that you consider the antivirus below.

Once you scan your system and remove all malware, check if the problem is still there.

⇒ Get TotalAV

3. Update your Windows

  1. Open the Settings app. You can do that instantly by pressing Windows Key + I.
  2. Now navigate to Update & Security section.
    Rstrui.exe application error
  3. Click Check for updates button.
    Rstrui.exe error Windows 7

In some cases, the problem with rstrui.exe can be caused by your system. Your operating system might suffer from certain glitches, and that can cause problems to occur.

Microsoft is constantly fixing problems using Windows updates, so if you’re having any problems, be sure to download the latest updates.

Windows 10 downloads the missing updates automatically in the background, but you can always check for updates manually by following the previous steps.

If any updates are available, they will be downloaded automatically in the background and installed as soon as your PC restarts. Once your PC is up to date, check if the problem is still there.

4. Repair the Windows Registry

In some cases, the problem might occur due to issues with your registry. A corrupted registry entry might cause issues with rstrui.exe, and to fix the problem, you need to find and remove the problematic entries.

Doing this manually can be a big problem, so it’s better to use registry cleaner software. After you clean your registry, the problem should be completely resolved and everything will start working again.

5. Clean install Windows 10

If none of the above solutions helped you, you may need to perform a clean installation of Windows. Reinstalling Windows will delete everything from your hard drive and will remove all the junk accumulated.

In order to avoid data loss, don’t forget to back up all of your important documents before performing the clean installation.

For more information about the steps to follow in the process, check out our article on how to clean install Windows 10.

6. Update your drivers

  1. Right-click the Start button and select Device Manager from the list.
  2. Click on the component you want to update the driver for to expand it.
  3. Now right click on the component (in our example the graphics adapter) and select Update driver.
  4. Select Search automatically for drivers.Automatically search for drivers - Wireless drivers are missing
  5. The system will search and install the correct driver for your component.
  6. You need to do the same for all components and restart the system after each one.

As you can see, you can update your drivers manually, but that can be a tedious and time-consuming task.

There’s a far easier alternative, to use specialized software that will download and repair the drivers for you automatically.

The tool recommended below will repair all the outdated drivers on your system and will make sure you always get the newest ones, without any effort from your side.

⇒ Get Outbyte Driver Updater

7. Create a new user account

  1. Open the Settings app and go to the Accounts section.
    Rstrui.exe application error
  2. In the left pane, select Family & other people. Now choose Add someone else to this PC.
    Rstrui.exe missing
  3. Choose I don’t have this person’s sign-in information.
    Rstrui.exe entry point not found
  4. Select Add a user without a Microsoft account.
    Rstrui.exe access denied
  5. Enter the desired username and click Next.
    Rstrui.exe no restore points

If you’re having problems with rstrui.exe, the issue might be your user account. Your account can get corrupted, and that can lead to this and many other errors.

To fix the problem, the simplest way would be to create a new user account. This is quite simple to do, and you can do it by following the steps above

After creating a new user account, switch to it and check if the problem is still there. If not, you might have to move all your personal files from the old account to your new one and start using it instead of your old one.

8. Try using Safe Mode

  1. Open the Settings app and go to System & Security section.
  2. Go to Recovery tab and in the Advanced startup section choose Restart now.
    Rstrui.exe no restore points
  3. List of options will now appear. Choose Troubleshoot > Advanced options > Startup Settings. Now click the Restart button.
  4. Once your PC restarts, you’ll be presented with a list of options. Select any version of Safe Mode by pressing the corresponding key.

According to users, sometimes you can fix the problems with rstrui.exe simply by using Safe Mode. Users reported that the System Restore feature didn’t work for them, but they were able to use it from Safe Mode.

In case you’re not familiar, Safe Mode is a segment of Windows 10 that runs with default drivers and settings, which makes it perfect for troubleshooting. To access Safe Mode, you need to perform the previous steps.

Once you enter Safe Mode, try to perform System Restore again and check if the problem is resolved.

If you’ve found other workarounds to fix rstrui.exe errors, you can help the community by listing your fix in the comment section below.

LEGO Star Wars: The Skywalker Saga video game delayed for Xbox Series X and other platforms

LEGO Star Wars: The Skywalker Saga was originally set to launch on Windows and Microsoft’s Xbox One and Xbox Series X consoles in spring 2021 but it’s now been delayed to give the developers more time to create the cross-generational Star Wars experience that they think fans deserve.

The announcement came via the official TT Games Twitter account this past weekend. No new release window has been mentioned which means that fans could expect LEGO Star Wars: The Skywalker Saga to drop sometime in late-2021 or even next year.

This is the second time that the game’s release date has been pushed back. LEGO Star Wars The Skywalker Saga was originally set for release in October 2020.

LEGO Star Wars: The Skywalker Saga is an entirely new game in the LEGO Star Wars video game series that will have characters, locations, and storylines from all nine of the main Star Wars films. While not confirmed yet, the likelihood of elements from the various Star Wars TV series appearing in the game are also expected to be included. Especially with the popularity of The Mandalorian and The Clone Wars with modern fans.

Are you disappointed by this delay? Let us know in the comments below and then follow us on Twitter and Pinterest for more Xbox gaming news.

What is SppExtComObjPatcher.exe? How can I remove it?

You might have noticed this file pop up whenever you scan for malware with your antivirus software.

You might have also notice this file lurking in the Task Manager‘s Processes tab, automatically starting at start-up.

The most common locations this file has been reported to lurk on our hard drives are: C:\Windows\Setupscripts\Win32\SppExtComObjPatcher C:\Windows\Setupscriptsx64\SppExtComObjPatcher

Even though Sppextcomobjpatcher.exe looks and acts like a keylogger (possibly collecting and sending information to third parties), this file is part of the operating system of your PC. 

It appears on users’ systems after they illegally used it to activate either their Windows operating system or other Microsoft products without actually buying the software.

Needless to say, using pirated software is not the way to go. Doing so exponentially increases the risk of malware and virus infections. Not to mention that it’s illegal.

Illegal software brings only trouble to you and your devices. Read why in this quick article.


What is SppExtComObjPatcher.exe?

SppExtComObjPatcher is part of Key Management Service (KMS) Licensing for Microsoft Products.

Because this file is not natively part of a freshly bought Windows software/application, if you find this file on your PC after buying a seemingly fresh version of Windows, then it means that your copy of Windows is pirated.

But that’s not surprising since Windows activators are often plagued with malware.

The antivirus software on your PC is picking up on this .exe file because the people at Microsoft do not want pirated copies of their operating system on the market. And rightfully so.

If you are knowingly using a pirated version of Windows, then having this file run in the background of your system is totally normal.

We recommend that you avoid using pirated software from any provider, as this can leave you open to pishing, malware, keylogger, and other malware attacks.

Losing access to your files, or getting your bank account and other personal information released to other third parties will surely cause you more harm than investing in an original Windows version.


How do I remove SppExtComObjPatcher.exe from my PC?

  1. Before attempting to remove this file from your PC, please make sure to backup your important data on an external hard drive or in the cloud.
  2. Restart your computer in Safe Mode.
  3. If you already have installed an antivirus on your PC, make sure to update it, and then run an in-depth scan of your system.
  4. After you cleaned up your PC with a good malware removal tool, restart your machine in normal mode, and enjoy a spyware-free environment.

If you aren’t sure that your antivirus program is doing a good job, we recommend switching to one that is known for its premium quality and strong defense.

Your best bet is to get an antivirus that has multilayered protection and advanced AI which will constantly improve itself and detect the newest threats.

TotalAV

A strong antivirus software that has powerful anti-malware and spyware tools at its disposal.
Check Price Visit Website

Now you know what SppExtComObjPatcher.exe is and how you can remove it from your PC. We highly recommend you to post your experience with the error in the comment section below.

Gamarue malware: How it works and how to remove it

Gamarue is an invasive and one of the most severe malware strains around. Dubbed Win32/Gamarue Malware by Microsoft Software Security, the program literally works to take over your computer.

The malware can change your PC’s security settings as well as download malicious files from the internet and install them onto your computer.

This family of malware will download and install files and folders directly onto your PC’s Registry to disable some functions and get permission for others.

The Gamarue malware will also make changes to your web browser’s settings as well as add toolbars, adware, browser redirects, add-ons, and extensions. All of this without ever asking for your permission.

How does Gamarue malware infect computers?

There are many possible ways the Gamarue malware can worm itself into your computer system. It can be through infected USB drives.

It also affects external hard drives you connect to your computer, as well as through attachments to spammy emails that show up in your inbox.

The malware will then download malicious files onto your computer and make registry changes.

Perhaps most disturbingly, Gamarue’s first act once it infects your computer is to make changes to the startup folder in the registry so all the rogue software it installs launches on startup.

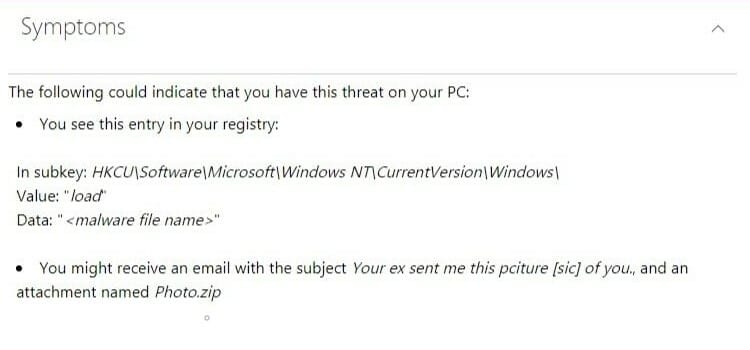
Once this happens you are literally at the mercy of the malware. Microsoft cites a few signs you can use to tell if Gamarue has infected your computer:

The malware opens you up to all manner of threats. For one, it can give hackers remote access to your computer.

They will use plugins and other add-ons the malware installs on your computer to harvest your personal information, including passwords and banking information.

Besides exposing you to these threats, the malware will also make changes to your computer and browser that can open the door to viruses that harm your computer and corrupt your files.

Win32/Gamarue is known to target major browsers like Google Chrome, Internet Explorer, and Mozilla Firefox.

By adding extensions and dubious browsers, the malware can unleash spammy adware that slows your computer and disturbs your browsing experience.


How to remove Gamarue malware from your computer

1. Scan your computer

Before you do anything, you will want to neutralize the malware threat and stop it from spreading to the rest of your files. The best way to do that is by restarting your computer in Safe Mode.

If you encounter problems while trying to restart your PC in Safe Mode, this awesome guide will help you fix them.

Safe Mode will start the PC with only the basic services running, which prevents the malicious software installed by the malware from launching on startup.

Then, we strongly recommend that you run an in-depth or full scan of your computer, which should remove any malicious elements.

On this note, an antivirus would be just the right solution since it can detect a wide range of viruses, worms, Trojans, rootkits, and other harmful software, eliminating it from your system.

The software is quite popular, thanks to its user-friendly interface and intuitive options.

The installation process is quick and easy. Once you finalize the setup, the antivirus takes over the computer’s defenses and replaces Windows Defender as your primary anti-malware solution. 

Run the on-demand scan option immediately after installation, to allow the tool to check for vulnerabilities in your device’s system. The process might take up to half an hour.

TotalAV

TotalAV provides real-time protection and removal of the most dangerous malware, adware, and other harmful software.
Check Price Visit Website

2. Manually search the Windows Registry for malicious malware

  1. Open the Registry Editor by typing regedit in the search bar. Open with administrator rights.
  2. Then, look for the following path (open successive folders until you get there): HKEY_LOCAL_MACHINE\SOFTWARE\Microsoft\Windows\CurrentVersion
  3. Double click the Current Version folder to reveal a drop-down menu.
  4. Browse the drop-down menu from top to bottom and look for all folders with Run in the title.
  5. Depending on your computer, there could be folders like Run, Run Once, and others.
  6. These are programs that are set to run automatically, as soon as you start the PC.
  7. Once you locate one, click on it once.
    • A list of files will show in the column to the right.
    • Scan these files to pick any that may look suspicious.
    • To be sure the files are indeed malicious, google and read up on each of them.
  8. If you are sure the file is malicious, right-click on it to get the delete option.
  9. Repeat the process with all the other Run folders, deleting all malware, until the registry is clean.

But beware, deleting or making changes to the wrong files in your registry will harm your computer. Before you proceed, backup your registry so can easily restore it if something goes wrong.

If you are not sure how to backup your Windows 10, learn everything about it in this thorough article and see what you need to do.

If you are not sure whether a file is safe or not, better look for professional help, since you might delete some important files.


3. Reset your browser settings

  1. Head over to your browser’s settings and navigate to the Reset folder.
  2. In Chrome, for instance, the reset option can be found in Advanced Settings.
  3. There you have it. Your browser will be stripped of all extensions and add-ons.

Undoing all the changes made to your browser settings ensures a clean browser and helps you get rid of extensions and spammy add-ons.

This will strip your browser of all extensions and add-ons. Sadly, even those extensions you added yourself will be removed. You will thus need to add them all from scratch.

We also recommend switching to a more safer browser that will have some kind of in-built adblock system and extra protection features that will keep you safe from malware.

⇒ Get Opera


4. Disable autorun in Windows

We have discussed how USB thumb drives and other portable drives can be used to spread malware like Win32Gamarue.

The infection is usually a consequence of the Autorun or Autoplay feature that is set as default on most Windows PCs.

Every time you connect an external drive to your computer the PC will use the option you chose the last time you connected a similar external drive to open the files on the drive.

The consequence is, without Windows Defender or similar protection, the Autorun feature will inadvertently run malicious software that will infect your computer.

The malware will then make harmful changes to your PC’s registry and install plugins that steal your passwords and other important personal information.

One way to avoid running this risk is to disable Autorun on your computer. We wrote an useful article dedicated to disabling the autorun feature in Windows 10, so check that out.

With the Autorun feature turned off, as in the image above, you can be sure your computer will not automatically run any malicious software attached to the portable drives you may connect to your computer.

There is always a risk these portable drives will have malware on them, especially if you sometimes use them on other people’s machines or if you use them to store files you download off the internet.


How to prevent Gamarue infections

1. Replace your passwords with stronger ones

Cleaning your PC of the Gamarue malware and all the malicious add-ons, plugins, and extensions will remove any immediate threat on your machine.

However there is a risk your personal information may already have fallen into the wrong hands.

To protect yourself, make sure you replace all your passwords with new, stronger ones. Also, check your e-banking accounts for any unauthorized purchases that may have been made.

Notify your bank or credit card issuer if you notice any suspicious activity on your credit cards.

It may not be a bad idea to check if your social media accounts haven’t been breached also.


2. Scan all removable drives

But, perhaps to totally eliminate the threat posed by malware that comes through your portable drives, always scan USB drives, and any media device, before you connect them to your computer.

If you don’t know how to scan your USB flash drive, check out this quick list of the best antivirus for USB scanning.

Continuing the idea set forward in the first solution, you should clean your computer periodically with a full scan, to remove all malware, viruses, and bugs you pick up through your web browser.

Importantly, make sure all your antivirus software is up-to-date and that it is always enabled, especially when you are working online.

Otherwise, always be vigilant and avoid visiting websites with expired security certificates. Today it can be Gamarue, tomorrow it may be a totally new malware, with a different mode of infection.


Tell us if you’ve been affected by Gamarue malware or if you’ve succeeded in eliminating it. Any feedback will be helpful for the community.


Download FotMob: Live Score Football/Soccer App

If you are a soccer fan, and you want to know all the scores and all the games that will be played, then you might be interested in an app that provides you this information. A great example of such an app is FotMob.

Many of you might be already familiar with this name, as the Android and iOS versions of FotMob have been very successful and received great feedback from the users.

Now, the developers have created a Windows-compatible version of the app, and we’ll be taking a look at it today.

FotMob for Windows 10 & Windows 8

fot-mob-for-windows-8-live-score-app-soccer-football (3)

This free app can be downloaded from the Microsoft Store, and if you haven’t used it before, you’ll be in for a treat.

As mentioned before, the app targets soccer fans that want to be informed of all the scores and the games that are played.

From the start, you can see that the app has a simple user interface, that shows all the information you need in a clean manner that is simple to read. In the main menu, you will be able to find four categories of games, each showing games from a different period:

  • Yesterday
  • Today
  • Tomorrow
  • Ongoing

By clicking on each category’s header you will see a more detailed look of it, with all the games and the scores very well placed.

From this same menu, you can jump to any other category. Also, for each category, you can see how many games it contains.

fot-mob-for-windows-8-live-score-app-soccer-football (4)

If you want more information on a particular game, all you have to do is click on it and it will open an additional menu where you can see Match Facts, Lineup, Stats, and Table.

In the Table column, you can see the country’s leaderboard, but this only works if both the playing teams are from the same country.

One of the best features that FotMob provides for its users is the Ongoing panel, where you can see in real-time each game.

The scores are live and are updated on the spot. Also, if you click on a particular match, you can hear commentaries in different languages. This feature is not found on all of the games, so you will have to look for the headphones icon next to the playing teams.

The audio quality of the stream is top-notch, and thanks to the fact that it is provided in different languages, it is of use for a much larger audience.

FotMob

FotMob

A football app any soccer fan should have to stay up to date with real-time details in every football league out there.

Overall, the app has a quality build, it displays live and detailed information and soccer fans will definitely want to try it out. In the time I tested the app, there were absolutely no glitches, and everything worked perfectly.

Last but not least, here are some of the leagues covered by this app:

  • Premier League
  • SPL (Scottish Premier League)
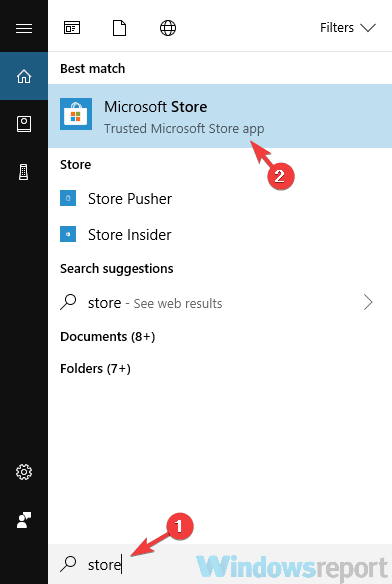
  • League 1 & 2
  • Euro 2012
  • Champions League
  • Bundesliga (1, 2 & 3)
  • Serie A
  • Liga BBVA
  • Ligue 1
  • MLS (Major League Soccer)
  • Plus over 100 additional leagues.

If you’ve already tried the app, tell us what you liked about it. Use the comments section.

How to stop saving documents to OneDrive [Complete guide]

OneDrive is one of the most commonly used cloud storage services since it’s already integrated with Windows10 and you can find the OneDrive folder in File Explorer.

Since for some users the cloud storage is already enabled, your files will begin to synchronize automatically with the cloud storage.

Regardless of the reason why you want to stop saving documents to OneDrive, there is a quick and simple solution for this and we will present it in this article, so keep on reading.

How can I stop saving documents to OneDrive?

1. Use a specialized tool

If you don’t want to necessarily use the cloud storage that already comes with Windows 10 then we have great news for you. There are plenty of other, more advanced, cloud storage solutions that you can try.

With the advancement of information and communication technology, data volumes continue to grow, requiring more and more storage for organized documents as well as fragmented images and videos.

While cloud storage technology makes data management easier, data permanence is always a major problem and an important basis for cloud service providers to evaluate service levels.

Thus, we recommend browsing our list with the best options for cloud storage services out there.

Cloud Storage may be used for a variety of purposes, including providing website content, archiving and disaster recovery data, and sending huge data to your contacts via direct download.

2. Pause syncing

  1. From the notification/menu area, select the OneDrive icon.
  2. Select Help & Security, and click on Pause syncing.

  3. Here, you can select how much time to pause syncing: 2, 8, or 24 hours.
  4. Now you will see that the OneDrive cloud icon shows Paused.

This is one way to stop saving documents to OneDrive, but this is just a temporary solution that you’ll have to repeat regularly.

3. Remove all the files

  1. Press the OneDrive icon and click on Help & Settings and choose Settings.
  2. Navigate to the Account tab. In here, press Choose Folders.
  3. Next, disable Sync all files and fodlers in OneDrive.
  4. Finally press OK for the change to save.

4. Stop OneDrive from starting with Windows

  1. Press the OneDrive icon and click on Help & Settings.
  2. Select Settings tab and disable the Start OneDrive automatically when I sign in to Windows option.
  3. Press OK to save the changes and close the window.

After making these changes, you’ll stop saving documents to OneDrive permanently.

5. Unlink OneDrive

  1. Locate OneDrive icon in the notification area and click on Help & Settings. Choose Settings.
  2. Next, navigate to the Account tab, and click on the Unlink this PC option.
  3. When asked to confirm the change press Unlink this account.

  4. After you confirm, OneDrive will sign out from your PC.

If you want to stop saving documents to OneDrive, you should be able to do so with the solutions from this guide.

Please let us know in the comments section below if you have additional comments and recommendations, we would love to read them.

Top 10 tips and tricks to get the most out of Microsoft Edge

The new Microsoft Edge web browser is great for many reasons, but not everyone might be used to it. If you’ve clicked upon the new surf icon for Edge and just landed inside by accident, there’s plenty of good reason to keep using it. The browser is built on the same engine as Google Chrome and is more optimized, modern, and speedy when compared to what we now know as legacy Microsoft Edge.

So, what if you’re hoping to switch Edge to your new web browser? Today, we’ll be sharing our top 10 tips and tricks to get the most out of Edge. Sit back, and get ready as we tour you through Microsoft’s web browser (which is now the second most popular web browser, by the way!)

Microsoft Edge Tip 1: Download and use Edge everywhere!

Microsoft-Edge-MacBook-iPhone

Our first tip might seem obvious, but it is one that longtime users like ourselves usually like to begin with when talking to other people about the new Edge. Unlike the legacy Microsoft Edge, the new Edge is cross-platform just like Chrome. You can experience it across all your major devices — Android phones, iPads, iPhones, MacBooks, and even Linux computers. That’s why we suggest you download Edge on all your devices to begin your journey. Everything will sync up well, as we’ll get into later.


Microsoft Edge Tip 2: Optimize the memory usage and performance of Microsoft Edge

Microsoft Edge Performance Settings

The next tip in our list is one that will be useful for you if you’re switching over from Google Chrome. It’s well known that Chrome can be a hog on system resources, slowing down your PC and taking up RAM and CPU usage. Well, the new Microsoft Edge isn’t like that at all, despite being built on the same engine as Chrome.

You can actually configure both the sleeping tabs feature, as well as Startup boost to get the most out of Microsoft Edge. These are available by clicking to Edge System Settings (or going to edge://settings/system in the address bar.) The sleeping tabs feature will put inactive tabs to sleep to help save system resources. In addition, the startup boost feature will help boost Microsoft Edge and start it up in the background when you log in so you can jump into your web browsing more quickly.

Microsoft Edge Tip 3: Sync your history across your devices

Microsoft Edge History Sync

Our first tip mentioned that Edge is available across all different types of devices. Well, that also means you can sync across your devices, too. For tip 3, we suggest you enable syncing in Microsoft Edge. This makes it easier to pick up where you left off and get to webpages more quickly across different devices. Of course, you’ll need to sign in with a Microsoft Account to enable this feature, though.

You can enable this by going to edge://settings/profiles/sync in the Edge address bar. From there, you can check to see if all the switches are turned on. Currently, you can sync your favorites, personal info, passwords, history, open tabs, extensions, and collections. You also can sync up your settings, too, so it’s easier to set up Edge on new devices.

Microsoft Edge Tip 4: Use Edge and Microsoft Authenticator for password generation

So, we talked about syncing, so what about passwords? Well, the new Microsoft Edge is great at creating strong passwords, too, which is why this lands in as our fourth tip.

You can enable a password generator in Edge by going to edge://settings/passwords in the address bar. From there, click the Suggest Strong Passwords toggle switch to make sure it’s blue. Once clicked, every time you visit a new page to sign up for something, Edge will suggest a password for you to use.

And while we’re talking about passwords, did you know that if you sign into Edge with a Microsoft Account, your saved passwords will save to your account? You can download the Microsoft Authenticator app on your iPhone or Android to see these passwords at any time, even when Edge isn’t open. This makes Edge a great password manager! We talked more about that in a separate post.

Microsoft Edge Tip 5: Take control of your privacy

Microsoft Edge Privacy

Privacy is everything these days, and you really don’t want websites following you around, don’t you? Well, Edge actually has a lot of privacy features built-in to help out, which is why we add it to number 5 on our list. Simply visit edge://settings/privacy to see a list of all the privacy settings you can take control of. We suggest setting tracking prevention to Strict, sending do not track requests, and clearing your browsing data regularly.

Microsoft Edge Tip 6: Use vertical tabs

Are you the type of person who has a lot of tabs open in your web browser? Well, Edge has your back with our sixth tip. Nobody likes seeing a list of open tabs at the top of the screen, but with the vertical tabs feature in Edge, you can see your open tabs to the left, instead, allowing you to easily drag them around, and quickly peek at what you’re working on. You can toggle to vertical tabs at any time by clicking the icon at the top left of the browser, next to your most left-facing open tab.

Microsoft Edge Tip 7: Use multiple profiles

Microsoft Edge Profile Settings

Just like Google Chrome, in Microsoft Edge it’s possible to add multiple profiles to your browser. This allows you to separate out your web browsing sessions if you’re sharing a PC with someone. It also lets you separate your work and personal profiles, too. This is a great way to avoid using multiple web browsers, as well.  You can set this up by going to edge://settings/profiles, and then clicking the Add profile button.

Microsoft Edge Tip 8: Use Collections and Edge for shopping

Doing a research project? Collecting recipes? Shopping? Why don’t you consider using the Collections feature in Edge to do so? Collections in Edge lets you keep track of your ideas and save webpages in a hub at the top of the browser. It syncs up with all your devices where you’re signed in.

In addition to Collections, Edge also has built-in shopping tools, too. At any time you visit a webpage when shopping, you’ll see an icon of a price tag appear in the address bar. If you click it, you’ll see a list of prices and retailers where you can get the item that you want. There could be coupon offers, too. Just hover over the deal and click the Copy Code link.

Microsoft Edge Tip 9: Take screenshots with Edge

Edge Screenshots

There are a lot of ways to take screenshots on a computer, but Microsoft Edge also has its own screenshot tool, too. If you click CTRL+SHIFT+S on your keyboard on Windows, you’ll get a selection tool that will let you select text and pick a spot to screenshot. You also can summon the tool by going to the Edge settings menu via the (. . .) at the top of the screen and choosing Web Capture. Once you capture something, you can click Add Notes to ink or annotate what you see on your screen. When finished, you can click Save to save it as a file.

Microsoft Edge Tip 10: Immersive Reader and PDF reader

Edge Immersive Reader

Our last tip is one that’s easy on the eyes, as well as the mind. Edge has a feature known as an immersive reader, which will cut out the excess on web pages and show you just text and images. You’ll see the immersive reader when you visit a webpage and see a book icon in the address bar. We talked about immersive reader before, so check it out if you’re curious as to what it can do. There are grammar, learning tools, and so much more in it.

Also related to this is the built-in PDF reader in Edge. Edge can be used as a PDF reader, in place of Adobe Reader or other programs. Edge’s reader lets you ink on PDFs, annotate, and more. You can set Edge as your default PDF reader by going into Windows 10 settings, searching for default apps, choosing default apps by file type, and then choosing Microsoft Edge as default.

Edge is always improving!

We’ll end our piece with a quick note. Although we’ve covered or top tricks and tips for Edge, the web browser is always evolving. Microsoft releases new Edge versions every six weeks, and there are always big improvements and features coming with new releases. So, unlike old Edge which was only updated with operating system releases, you can always expect new features to play with. Join the Edge Insider program to try these features out early!

Microsoft Teams will let users join a meeting with a digital code next month

Microsoft Teams is set to launch a new feature that will allow users to join meetings via digital code. Last week, the company announced the introduction of the feature on the Microsoft 365 Admin Center, which is expected to roll out to Teams users starting in May.

Microsoft recently updated Teams to make it possible for users to create and share meeting invites, but the app will soon match Zoom’s ability to join a new meeting by entering a meeting ID. The feature will be available on all platforms, including the Microsoft Teams desktop, mobile, and Web clients.

“All meetings will have a Meeting ID that is automatically assigned to a Microsoft Teams user and added to the meeting invite under the meeting link. Meeting attendees can join the meeting by entering the Meeting ID. For all meeting attendees, the pre-join, lobby and security will remain the same,” the company explained.

The addition of the new meeting joining experience will further expand the usability of the Teams collaboration platform. This should provide an additional way for users to quickly jump into the Teams meetings when they don’t have the full meeting invite or join link. While the feature will begin rolling out in early May, Microsoft noted that it should be generally available by the end of next month.

How to fix Malwarebytes memory issues

Malwarebytes is a great antimalware tool, however, many users reported Malwarebytes memory issues.

It seems that this application is using more memory than it should, and this can be a big problem and drastically impact your performance in Windows 10.

Malwarebytes is a solid antimalware tool, but sometimes Malwarebytes memory issues can occur and cause various problems.

Speaking of memory issues, here are some problems that users reported:

  • Malwarebytes high memory usage Windows 10, CPU usage Windows 10 – Sometimes high CPU or memory usage can appear with Malwarebytes. If that’s the case, try ending the process and change its priority to low.
  • Malwarebytes freezes computer – This can be a serious problem, and in most cases, it’s caused by a corrupted installation. To fix the problem, update Malwarebytes to the latest version and check if that helps.
  • Malwarebytes service high CPU, high disk usage – According to users, sometimes Malwarebytes service can cause this issue to appear. To solve the problem temporarily, you can disable the service and check if that helps.
  • Malwarebytes uses too much memory – If Malwarebytes uses too much memory on your PC, perhaps you should consider switching to a different antimalware software tool.

How can I fix Malwarebytes memory usage issues?

  1. End the process and set its priority to low
  2. Switch to a different antivirus solution
  3. Disable HTTPS Everywhere add-on
  4. Start the scan and end the process
  5. Stop Web Protection
  6. Disable Malwarebytes Service
  7. Reinstall Malwarebytes
  8. Update Malwarebytes to the latest version

1. End the process and set its priority to low

  1. Press Ctrl + Shift + Esc to open Task Manager.
  2. Locate the Malwarebytes process, right-click it, and choose End Task.
    malwarebytes memory end task
  3. Now Malwarebytes should start again. If it doesn’t start on its own, start it manually.
  4. Go to the Details tab and locate the new Malwarebytes process, right-click it and choose Set priority, and change to Low.
    malwarebytes memory priority

If you’re having problems with the memory usage on your PC, perhaps you can fix the problem simply by restarting the Malwarebytes process and changing its priority.

This isn’t as hard as it sounds, and you can do it by following the above steps. After doing that, the problem should be resolved and everything will start working again.

Bear in mind that this is just a workaround, so you might have to repeat it if the issue reappears. If Malwarebytes won’t open use this excellent troubleshooting guide to fix it in no time.

2. Switch to a different antivirus solution

If you keep having Malwarebytes memory issues on your PC, perhaps the best way to fix the issue is to try out a different antivirus solution.

There are many great antivirus tools on the market, but if you’re looking for one that is light on your system resources while providing unbeatable protection, you should consider the security solution recommended below.

Having a quality antivirus able to face the latest threats – viruses, spyware, and malware, to name a few – doesn’t have to cost a small fortune.

The ultimate package provides a suite of tempting security tools, is capable of covering multiple devices at once, and is currently available at a major discount.

TotalAV

Try an antivirus solution that doesn’t interfere with your system and apps and it’s less prone to errors.
Check Price Visit Website

3. Disable HTTPS Everywhere add-on

  1. Open your browser and click the Menu icon in the top right corner.
  2. Choose More tools and select Extensions from the list.
    malwarebytes memory high usage extensions
  3. A list of extensions will now appear. Locate HTTPS Everywhere and click the little switch next to it to disable the extensions.
    disable extension malwarebytes high memory

Many users tend to use HTTPS Everywhere add-on in their browser. This is a great extension since it will force your browser to use an encrypted version of a website thus providing extra security.

Although this extension can be useful, it can also cause Malwarebytes memory issues on your PC.

If Malwarebytes is using too much memory, perhaps you can fix the problem by disabling the HTTPS Everywhere add-on in your browser. To do that, follow the steps detailed above.

After disabling the extension, restart your browser and check if the problem is still there.

The method that we showed you will allow you to disable this extension in Google Chrome, but if you’re using a different browser, the steps should be more or less the same.

4. Start the scan and end the process

  1. Start the threat scan in Malwarebytes.
  2. Now start Task Manager.start Task Manager
  3. While the scan is running, locate the Malwarebytes process in Task Manager and end it.
  4. An error message will appear. Ignore it and don’t click the OK button.
  5. End the Malwarebytes process a couple more times. Be sure not to click the OK button if the error message reappears.

This is another workaround, but if Malwarebytes is using too much memory, perhaps this solution might help.

Several users are suggesting to keep ending the Malwarebytes process and the memory usage will eventually go down. To do this, just follow the steps above.

After ending the Malwarebytes process a couple of times, the issue should be resolved. This is an unusual workaround, but several users reported that it works, so you might want to try it out.

5. Stop Web Protection

stop Web Protection
  1. Open Malwarebytes and click on Settings.
  2. Go to the Protection tab and set Web Protection to off.

If you’re having Malwarebytes memory issues on your PC, perhaps the issue is the Web Protection feature.

Several users reported that this feature was causing high memory usage on their PC, but after disabling it, the problem was completely resolved.

To disable this feature, just complete the above procedure.

Bear in mind that by disabling the Web Protection you might leave your system more vulnerable, so keep that in mind.

6. Disable Malwarebytes Service

  1. Press Windows Key + R to open the Run dialog. Enter services.msc and press Enter or click OK.
    malwarebytes memory hog run dialog
  2. When the Services window opens, locate Malwarebytes Service and double-click it to open its properties.
  3. Set the Startup type to Disabled. Click the Stop button to stop the service and click Apply and OK to save the changes.
    stop service malwarebytes memory

After doing that, Malwarebytes will be prevented from starting automatically and you should be able to troubleshoot this problem.

Many users reported Malwarebytes memory issues, and sometimes even the ending the application doesn’t help, since it will start automatically on its own.

To fix this problem, users are suggesting to permanently disable Malwarebytes Service. By doing so, you’ll prevent Malwarebytes from automatically restarting itself.

7. Reinstall Malwarebytes

how to reinstall Malwarebytes

If this problem keeps appearing, perhaps your Malwarebytes installation is corrupted. Sometimes Malwarebytes memory issues occur if the installation is corrupted or damaged.

In order to fix that problem, it’s advised that you reinstall Malwarebytes. You can use several methods to reinstall the application, but the most effective one is to use uninstaller software such as Revo Uninstaller.

If you’re not familiar, the uninstaller software will completely remove the selected application, but it will also remove all its files and registry entries.

This is quite useful since there won’t be any leftover files that can interfere with future installations or other applications.

Once you remove Malwarebytes, install it again and check if the problem is still there.

⇒ Get Revo Uninstaller

8. Update Malwarebytes to the latest version

Malwarebytes memory issues can be quite problematic, and in most cases, these issues are related to the code itself.

If that’s the case, the only way to fix the problem is to update the application to the latest version.

Once you update the application, check if the problem is resolved. Many users reported that updating Malwarebytes to the latest version fixed the problem, so be sure to try that.

Problems with the Malwarebytes memory usage can lead to various issues, and in most cases, this is caused by HTTPS Everywhere add-on.

If disabling the add-on doesn’t help, try reinstalling or updating Malwarebytes to the latest version.

You should also check our list with the best antiviruses for routers. Ensuring protection at the router-level can provide enhanced protection.

We hope that our solutions helped you fix the Malwarebytes memory usage. Let us know in the comments area below.

5+ best antiviruses with boot scan to remove hidden malware

An antivirus tool is a necessity since there are many threats that can infect your Windows PC. Although many viruses target your OS, some malware can be tricky and it can infect your boot sector.

This type of malware can be hard to remove, and the only way to eliminate it is to use an antivirus with a boot scan.

If malware infects your boot sector, you might not be able to boot to Windows or you’ll experience booting issues. Several antivirus tools have a built-in feature that can initiate a boot scan on system restart.

If you suspect that your boot sector is infected, but you can still boot to Windows, you can start a boot scan using these tools.

In other cases, you might not be able to boot to Windows at all. This can be a big problem, and to fix it, you need to download and use a rescue CD or DVD to remove the malware.

As you can see, dealing with these types of malware can be difficult, so we compiled a list of antivirus tools that can scan and fix your boot sector.

What are the best antiviruses to remove hidden malware?

ESET HOME Security Premium

Not all antiviruses can be used with command-line parameters and that makes ESET HOME Security Premium even more attractive for advanced users.

You can quickly enable the boot sector scanning and master boot scanning by using the /scanboot+ and /scanmbr+ commands.

But this premium security solution can do a lot more than boot scanning. It comes with multi-platform protection, password management, file encryption, and even theft protection for your laptop.

Its minimum power usage will not modify your portable’s autonomy and will keep you up to date with all security solutions to ensure constant protection.

Take a look at some of its key features:

  • This solution is used by over 110 users around the world
  • Easy to renew, install, and update
  • Adapted for both beginner and advanced users
  • Password management features
  • Anti-theft and identification features

ESET HOME Security Premium

Use this premium security solution to ensure perfect boot sector and MBR scanning at your fingertips.
Check Price Visit Website

Avast Free Antivirus

Another antivirus with boot scan is Avast Free Antivirus. With this tool, you can easily schedule a boot scan from Windows.

In addition to boot scanning, this tool can also remove all sorts of viruses and other malware. In order to achieve maximum security, Avast Free Antivirus will also analyze unknown files in order to prevent malware infection.

Thanks to the Behavior Shield, Avast Free Antivirus will keep an eye on your apps and report any suspicious behavior.

The application will scan your Wi-Fi for any security vulnerabilities, and it will inform you if you miss an important security update or if your applications are out of date and vulnerable.

It’s also worth mentioning that it has a DNS shield and a Sandbox mode that allows you to run potentially unsafe applications in a safe environment.

Let’s quickly look at its key features:

  • Boot scan, malware, and ransomware protection
  • Wi-Fi vulnerability scanner
  • Behavior Shield
  • Password manager
  • Fraud detection and Sandbox
  • Firewall and spam protection
Avast Free Antivirus

Avast Free Antivirus

An antivirus solution that will cover all the protection necessities of a home PC.
Free downloadVisit website

Avira

Although it’s a free antivirus, it comes with an impressive set of features and not even boot scanning escapes this great solution.

To start the boot scanning, you only need to go to its Extras tab and click on the Boot records scan option from the list.

And if we’re talking about great features, Avira even offers a free VPN that can protect your privacy and identity online, a very prized feature nowadays.

And that’s not all, this antivirus comes with tune-up tools that can speed up and clean your PC to make it run like a new machine again.

Let’s see its best features:

  • Completely free
  • Built-in VPN service
  • Speed boosting and cleaning tools for your PC
  • Blocks all online threats, including spyware, ransomware and malicious websites
  • Built-in, configurable firewall

Avira

This free-for-life antivirus will amaze you with its multiple features and boot records scanning.

Bitdefender

Bitdefender

If you’re looking for an antivirus with boot scan, Bitdefender might be just what you need to protect yourself against viruses, worms, and Trojans.

In order to provide you with maximum protection, this tool has an advanced scanner that monitors the behavior of your applications, and in case anything suspicious occurs, you’ll be notified immediately.

Bitdefender antivirus also offers multi-layer ransomware protection so you can easily protect your files.

It’s also worth mentioning that there’s phishing protection available that will recognize and prevent malicious websites from stealing your data.

If you have malware in your boot sector, you’ll be pleased to hear that the Bitdefender boot scanning feature called Rescue Mode can scan your PC before Windows starts.

Thanks to this feature, you can remove hidden viruses or rootkits that are located in your boot sector. Keep in mind that you need to log in to Windows in order to use this feature.

If you can’t access Windows at all, you might have to download and use Bitdefender Rescue CD to remove the malware from your boot sector.

Let’s quickly look at its key features:

  • Data protection, ransomware protection, Rescue mode
  • Anti-phishing, anti-fraud
  • Secure browsing
  • Vulnerability scanner
  • Password manager
  • File Shredder

Bitdefender

If your boot sector is in distress, Bitdefender’s Rescue Mode will come to the rescue.
Free trial Visit website

Panda Antivirus

Panda

Another antivirus that can protect you from hidden malware is Panda Antivirus. The basic version offers real-time protection for your Windows or Android device.

Panda also offers Panda Cloud Cleaner Rescue ISO that you can download and boot your PC from it to remove various malware that can infect your boot sector.

Overall, Panda Antivirus is a solid antivirus, but if you want to remove malware from the boot sector, you need to download and use the Panda Rescue disc.

Let’s quickly look at its key features:

  • Windows and Android antivirus and anti-theft protection
  • Wi-Fi protection
  • iPhone location service
  • Parental control, Data Shield and File Backup
  • File encryption, file shredding
  • Basic Tuneup utilities

⇒ Get Panda

Kaspersky Rescue Disk

Kaspersky

Many antivirus companies offer rescue disks that you can use to scan your PC and remove malware from it.

Sometimes if your boot sector is infected, you might not be able to boot to Windows. This can be a problem, so you need to use a Rescue Disk to remove the malware.

As we already mentioned, many antivirus companies offer rescue disks, but one that stands from the rest is Kaspersky.

To use a rescue disk, you need to download it on a working PC and burn the ISO to the CD or create a bootable USB flash drive.

Once you boot your PC from the bootable media, you need to choose graphic or text mode. Now you just have to follow instructions on the screen to perform a Kaspersky boot scan and remove the malware.

Keep in mind that this tool requires a bit of setup and configuration before you can use it.

Let’s quickly look at its key features:

  • Solid solution if you have malware that prevents you from booting to Windows
  • Dedicated boot scanner
  • Graphical and text interface
  • Free of charge

⇒ Get Kaspersky Rescue Disk

Norton Bootable Recovery Tool

Norton

Norton Bootable Recovery Tool is a recovery and booting tool that allows you to quickly resume your activities if your PC has been infected to the point where it no longer starts.

You have the option of creating a CD / DVD, a bootable USB stick, or an ISO file as bootable media.

Once copied to your CD or backup USB stick, you can restore your system in no time. To do this, you only have to run Norton Bootable Recovery Tool on the infected computer.

⇒ Get Norton Bootable Recovery Tool

F-Secure Rescue CD

F-Secure

F-Secure Rescue CD scans your system’s hard drive, USB drives, and partitions to identify and eradicate malware.

The tool can be very useful if your system does not start anymore thanks to its boot scan function.

Other benefits would be the recovery modules which allow you to restore accidentally erased data as well as its databases which are updated regularly.

F-Secure Rescue CD is one of the easiest antivirus programs to use, its interface is just text.

You must use your keyboard to navigate the menus (the tool does not allow you to use your mouse), but there are no intricated options to confuse you.

You will benefit from a boot scan in no more than a few commands.

⇒ Get F-Secure Rescue CD

BullGuard

Bullguard

Industry-leading and award-winning BullGuard is more than an antivirus, it’s a complete security suite that covers everything and anything starting with your boot sector.

Malware has no chance of remaining hidden thanks to this tool’s unmatched next-gen triple-layered antimalware protection that recognizes trusted sites.

It continually scans for emergent malware codes, and immediately neutralizes infected files.

Furthermore, sophisticated behavioral detection rules are fed daily automatic upgrades to guarantee your PC is shielded against any threat, no matter how new or how cunningly disguised.

Let’s quickly look at its key features:

  • Sophisticated algorithms to deliver lightning-fast threat detection
  • Next-gen triple-layer antimalware protection
  • Vulnerability Scanner and boot scan options
  • Integrated firewall for end-to-end protection before, during and after apps’ download
  • Behavioral engine and advance machine learning-based prevention and detection

⇒ Get Bullguard

Malware in your boot sector can be a big problem, but you should be able to remove it using one of the applications from our list.

And if you don’t want to bother with renewing your license every month or year, you can also look at these great antivirus tools with a lifetime licenses and choose one from there.

Tell us which product you chose and why in a comment below. This information might help other users like yourself.

Best tools to fix corrupted video files on Windows 10/11

Do you want to fix all corrupted video files on your Windows PC? We will show you how to do this in this post.

Sometimes due to virus infections, user files most especially video files might get corrupted.

For instance, in a scenario whereby a video is corrupted and won’t play, especially when we’re talking about precious memories of birthday, wedding, meetings, the aftermath becomes a big problem and can be very devastating.

Therefore, it is very important to repair such corrupt MP4, AVI, and MOV video files by using quality video repair tool.

Windows report has compiled some of the best tools to help you in fixing all corrupted video files. These tools are compatible with Windows 7, 8, 8.1, and 10.

What tools should I use to fix corrupted video files?

1. Stellar Repair for Video

This video repair software is capable of repairing corrupt AVI Video Files. It is a good video repair tool for Microsoft Windows to fix all corrupted video files such as unplayable MOV files in QuickTime player.

In addition, video files with corrupted issues such as header corruption, sound corruption, duration corruption, format change, and movement issues can be automatically fixed by using Stellar Repair For Video.

Also, this tool enables the repair of multiple video files simultaneously.

Stellar Repair For Video features:

  • MOV, MP4, M4V, 3GP, 3G2, M4A, and F4V video file formats repair supported
  • Repairs videos on memory cards, hard disks, and other storage media
  • Preview of the repaired videos is provided
  • Repaired files are saved at a user-specified location
  • It supports Windows 10/8/8.1/7/Vista

Meanwhile, the new version has a new feature which enables users to repair severely corrupted video file by using a sample file.

A sample file, on the other hand, is a working file of any size created from the same device and of the same format as of your corrupt video file.

Stellar Repair for Video

Stellar Repair for Video

Repair all of your video files and restore them to their previous state with the help of this very simple utility!
Free trialVisit website

2. Wondershare Video Repair

In keeping with its developer’s name, Wondershare Video Repair is an absolute wonder when it comes to the recovery and repair of video files.

It can handle the video files from different storage devices, like hard drive, SD card, camera, USB drive, so you are not bound to PC-only files.

The product is also extremely versatile since it can process MOV, MP4, M2TS, MKV, MTS, 3GP, AVI, FLV, and M4V files.

More so, you can preview the videos during the repair process,s so that you can see in real-time what a great job this product does.

Wondershare Video Repair

Wondershare Video Repair

If you need your precious video files to be recovered and restored to pristine condition, then you need this tool!
Free trialVisit website

3. Kernel Video Repair

The third entry in this article is a tool that emphasizes simplicity above all else, having been designed for users of all experience levels.

It doesn’t matter if it is a short 10 MB video or a Bluray-quality 60 GB video, Kernel Video Repair will repair it for you in an instant.

Simply open the tool, browse for the corrupted media, and then choose to repair it.

The repair duration varies based on filesize and the level of data corruption, but it accts fast nonetheless.

Kernel Video Repair

Kernel Video Repair

Video file recovery shouldn’t be a headache, and Kernel Video Repair makes the recovery process all the more easier!
Free trialVisit website

4. iSkysoft Data Recovery

Unlike the other entries on our list, Recoverit form iSkysoft is not just a dedicated video repair tool, as it can easily handle all sorts of other formats as well.

In fact, the number of supported file formats ramps up toa round 1000, and it can recover them from all sorts of media.

This includes your HDD, external HDDs and SSDs, flash drives, disks, and more.

Finally, you must know that you don’t need any experience using similar tools since Recoverit was created with the common user is mind.

iSkysoft Data Recovery

iSkysoft Data Recovery

Recover all files from your system, bot just your videos, with the help of this well-rounded recovery and repair tool!
Free trialVisit website

5. Yodot AVI Repair

The Yodot AVI Repair video software can also be used to fix all corrupted video files most especially corrupt MP4 and AVI video files.

Here are features of Yodot AVI Repair:

  • It effectively repairs AVI, XVID and DIVX video files on Windows.
  • Corrupted AVI files by DSLR cameras or camcorder brands can be repaired.
  • Corrupted AVI files on hard drive, USB drive, memory card, media players, etc can be repaired.
  • It easily mends video files in 3 to 4 steps with a simple and user-friendly interface.
  • It previews video file after the completion of the repair process.

⇒ Download Yodot AVI Repair

5. Remo Repair AVI

Saving the last for the best, Remo Repair AVI is very good at repairing corrupt XVID, DIVX, AVI, and other video file formats. Therefore, it can be utilized in fixing all corrupted video files.

In addition, Remo Repair tool comes with a powerful algorithm that is able to de-mux broken parts of a damaged file. Remo Repair enables corrupted videos to be turned into useful files.

Remo Repair tool features:

  • Repairs corrupt XVID, DIVX AND AVI, file formats that are unplayable.
  • Repairs and adjoins video and audio data stream side by side.
  • Fixed AVI files can easily be played both on Windows.
  • It has a demo version that fixes the corrupted file.
  • It provides a preview of the repaired file.
  • Remo Repair AVI supports memory cards, hard disk drives, USBs etc.

⇒ Download Remo Repair AVI

Manually fix all corrupted video files with VLC

In addition to using standalone tools for fixing corrupted video files, you can also make use of VLC media player. VLC comes with lots of features, some of which are not generally known such as fixing corrupt video files.

For instance, you can fix corrupt MOV files using VLC Player by using the ‘transcode’ feature; this enables VLC to convert the damaged MOV videos into playable files.

Method 1: Repair corrupt MP4 or MOV Files with VLC Media Player

Here’s how to do this:

  • Launch VLC Player > Go to Media, and then select Convert or Save
  • Include input files that need to be transcoded, and then click Convert or Save
  • When the convert window appears, a file name for the destination file should be provided.
  • From the profile list, select the desired input Codec.
  • Press Edit Selected Profile button to edit profile settings
  • Also, you can select ‘to add a new profile’ or delete any existing profile
  • Click on Start.

Method 2: Replicate Video File

Here’s how to do this:

  • Copy the corrupted MOV file.
  • Rename the video file extension to .AVI.
  • Launch the VLC media player.
  • Select VLC > Preferences, and then click on Input or Codecs.
  • Click on Save in the Preferences tab.
  • Select Always Fix next to repair AVI Files
  • Open the copied video file with VLC media player afterward.

All corrupted video files stored on internal or external hard drives, memory cards, smartphones, digital camera or other video storage devices can be repaired with any of the video repair tools we mention in this post.

Video file formats such as MOV, MP4, F4V, M4V, 3GP, etc can be repaired on Windows PC by using any of the tools.

On the other hand, VLC Media Player is a free option to repair corrupt video files but it is not easy to use unlike the aforementioned video files repair tool.

With the Stellar Phoenix, Yodot AVI, Digital, or Remo Video Repair, you can repair multiple videos of various file formats in just three steps i.e. upload, repair, and save. These Windows compatible professional video repair tools save time.

Meanwhile, in order to prevent future video files corruption, we do recommend that you use a strong antivirus such as BullGuard, Malwarebytes, or Bitdefender.

If you o have any question regarding how to fix all corrupted video files on your Windows PC, don’t hesitate to comment below.

Fix: The Presentation Cannot be Opened [Antivirus error]

Have you ever toiled away on a presentation, perhaps for a new project idea or for pitching your services to a prospect, and then the morning of the big day comes, and it just won’t open?

This can be really devastating, especially if the night before, the presentation worked just fine, and you probably even rehearsed, timed it, and your workmates gave it a thumbs up.

Sometimes, the antivirus is preventing PowerPoint from opening the presentations, and you get an error message saying Your antivirus software has blocked the file you were trying to open, Then you go blank and don’t understand why this would happen.

This happens when your antivirus program and its signature files are out of date, thus preventing or blocking files from opening, including your presentations.

The error message is sent back for three reasons: incompatibility issues between your antivirus and Office, the file may be infected with a virus that your antivirus could not remove, or the file is damaged.

So, it’s important to treat the file with caution, or the file you’re trying to open is damaged.

When you get the PowerPoint antivirus error, there are some quick-fix solutions to help you restore it, as well as fix the problems based on the error message, and get back to your presentation in good time.

What can I do if the antivirus is blocking PowerPoint?

1. App PowerPoint to the antivirus exclusion list

  1. Launch the Search field and type Windows Defender.
  2. From Windows Security, click on Virus & Threat protection.
  3. Next, navigate towards Virus & Threat protection settings.
  4. Click on Add or remove exclusions.
  5. Add PowerPoint or the whole Microsoft 365 suite to the exclusion list so that the program can be re-enabled.
  6. Save your changes and reboot.

If you have installed a third-party antivirus, go to its settings and find the exclusion option. All antiviruses have it.

2. Uninstall and reinstall the antivirus program

Sometimes it helps to uninstall your antivirus and reinstall the correct version for the Windows 10 operating system. Try this and see if it fixes the antivirus-blocking PowerPoint problem, or try the next solution.

Antivirus vendors periodically provide updated virus signature files downloadable from the internet.

If your antivirus is outdated or needs an update, connect to the Internet and download the latest updates available from your antivirus software vendor.

You can also purchase a new antivirus program altogether.

We want to recommend our list of the best antiviruses that will keep your PC safe without having any compatibility problems with Windows or any other programs.

3. Recover your files if infected or damage

  1. Delete the file from your system.
  2. Re-create the file or restore it from a backup if you have one.
  3. If the file is damaged, it cannot be correctly managed or handled by the antivirus or Office. In order to use the file again, try to recover it.

Symptoms of a damaged file give back errors when trying to open the presentation such as:

  • This is not a PowerPoint presentation
  • PowerPoint cannot open the type of file represented by ppt
  • Part of the file is missing
  • General Protection Fault
  • Illegal Instruction
  • Invalid Page Fault
  • Low system resources
  • Out of memory

There are several ways to determine whether your presentation is damaged, including opening the file on another computer. If the same behavior occurs, try creating a new file and see if it persists.

4. Try a temporary file version of the presentation

  1. Right-click the file.
  2. Select Rename.
  3. Change old file name extension from .tmp to .pptx
  4. Start PowerPoint.
  5. In PowerPoint, click File, then select Open.
  6. Browse to the folder that has the renamed file.
  7. Try opening it in PowerPoint.

When you edit a PowerPoint presentation, the program creates a temporary version or copy of the file, named PPT####.tmp (#### represents a random four-digit number).

If you find several corresponding files, try opening each to see if one is the temporary copy of your presentation.

When issues arise with your presentation, the temporary file remains in the saved file location.

This temporary version or copy of the presentation may be in the same folder as the original presentation, or in the temporary files folder.

If there are no temporary files or copies of your presentation, or you can’t open them, try using PowerPoint Viewer as described in the next solution.

5. Use PowerPoint for web

  1. Open your browser.
  2. Go to PowerPoint for web (You will need a Microsoft account to use it).
  3. Now upload your presentation in your OneDrive.
  4. Now, when you click on your presentation from OneDrive it should open automatically on PowerPoint for web.

This is a solution that worked for a few users but it’s not guaranteed to work if your presentation is too damaged. It doesn’t hurt to give it a try though.

6. Make a copy of the damaged presentation

  1. Right-click on the presentation and select Copy.
  2. Press the Windows key + E to open File Explorer, right-click on a blank space, and click Paste.

If the file cannot be copied, it may be damaged, or resides in a damaged part of the hard disk (see solution 2). If you can copy the file, try opening it in PowerPoint.

7. Run Scandisk on your hard drive

  1. Press Windows key + E to start File Explorer.
  2. Right-click the hard disk drive that has the damaged presentation.
  3. Click Properties.
  4. Select Tools tab.
  5. In Error checking, click Check.
  6. Select Automatically fix file system errors.
  7. Select Scan for and attempt recovery of bad sectors.
  8. Click Start.

Scandisk may verify that your presentation is cross-linked and then repair the presentation, but this doesn’t guarantee PowerPoint will read it.

8. Perform a clean boot and install/reinstall the antivirus

8.1 Perform a clean boot

  1. Go to the search box.
  2. Type system.
  3. Select System Configuration.
  4. Find Services tab.
  5. Select Hide all Microsoft services box.
  6. Click Disable all.
  7. Go to Startup tab.
  8. Click Open Task Manager.
  9. Close Task Manager then click OK.
  10. Reboot your computer.

You will have a clean boot environment after all these steps are carefully followed, after which you can try and check if you can perform a system restore.

After performing the clean boot, perform the next step.

8.2 Uninstall the antivirus

  1. Install, uninstall antivirus program.
  2. Run PowerPoint application.
  3. Fix an error or problem, in this case to fix antivirus blocking PowerPoint.
  4. Reset the computer to start normally after clean boot process.

While your computer is in a clean boot environment, try to install or uninstall the program (antivirus), or an update of it, which you had tried before clean boot but failed.

If successful, the issue has been resolved. But, if it fails, then the antivirus blocking PowerPoint issue isn’t caused by an app or service interference.

If you could not run PowerPoint before the clean boot, try and run it again while in clean boot environment. If it runs correctly or your presentation opens, then the issue is caused by an app or service interference.

If you manage to boot in Safe Mode, perform a clean boot to eliminate any software conflicts that may be causing the antivirus blocking system restore problem in Windows 10.

Performing a clean boot for your computer reduces software-related conflicts that can bring up the root causes of the problem.

These conflicts can be caused by applications and services that start running in the background when you start Windows normally.

Follow the next procedure described below to fix an error or problem after a clean boot.

9. Troubleshoot the Powerpoint blockage

  1. Log on using the administrator account.
  2. Click Start.
  3. In the search box, type msconfig.
  4. Select System Configuration from the results.
  5. In the System Configuration box, click Services tab.
  6. Click to check the Hide all Microsoft Services box.
  7. Click to select the upper half of the boxes in the Service list
  8. Click OK, and then click Restart
  9. After the restart is complete, check if the antivirus blocking PowerPoint issue persists.

If the problem persists, repeat the above steps but this time clear the lower half of the boxes in the Service list you selected before.

If the problem goes away, repeat the above steps but only select the upper half of the boxes that are unchecked, and repeat the steps until you have selected all boxes.

Suppose the antivirus blocking PowerPoint problem persists when only one service is selected from the Service list. In that case, that is the service causing the problem, after which you can contact the program manufacturer to see if this can be resolved.

Alternatively, run System Configuration utility then click to clear the checkbox for the problem item. Reset the computer to start normally after clean boot process

10. Reset your PC

  1. Click Start.
  2. Go to the search box and type msconfig.
  3. Select System Configuration.
  4. Go to the General tab.
  5. Click Normal startup.
  6. Click Services tab.
  7. Uncheck the box beside Hide all Microsoft services.
  8. Click Enable all.
  9. Click Startup tab.
  10. Click Open Task Manager.
  11. In Task Manager, enable all your startup programs
  12. Click OK, if prompted to restart, click Restart.

Follow the steps above to reset your PC and restart it properly. Check if your presentation works now.

Did any solutions here help you fix the Presentation cannot be opened issue caused by your antivirus? Let us know in the comments section below.

Fix: Windows 10/11 update sound problems

The Windows 10 Update made millions of users worldwide excited, but many of them reported lots of issues after installing it.

Users reported various sound problems while using the latest Windows 10 build, so let’s see how to fix some of these problems.

How to fix the sound problems after installing update?

1. Reconnect your speakers or headphones

This is the simplest workaround, but few users reported that it works for them, so you might want to try it.

According to them, if there’s no sound coming from your speakers or headphones, you might want to try reconnecting them.

This is the simplest workaround but bears in mind that you’ll have to repeat it every time when the sound stops working.

2. Reinstall the Nahimic software and audio drivers

  1. Open the Settings app and go to System section.
  2. Navigate to Apps & features tab.
  3. Select Nahimic software and click the Uninstall button.

According to users, after the installation of the update, the sound became distorted.

Users reported this problem with X99A Gaming Pro Carbon motherboards, and according to them, reinstalling the audio drivers and Nahimic software fixes this problem.

After you do that, you need to uninstall your audio drivers as well. To do that, follow these steps:

  1. Press Windows Key + X shortcut to open Power User Menu and select Device Manager.
    anniversary-update-sound-problems-device-manager
  2. When Device Manager opens locate your audio driver, right-click it and choose Uninstall from the menu.
    anniversary-update-sound-problems-uninstall
  3. If available, select Delete the driver software for this device and click OK.
  4. After you’re done, restart your PC.

After you remove audio drivers and Nahimic software you need to reinstall them. To install audio drivers you need to visit your motherboard manufacturer’s website and download the latest drivers.

Users reported that this solution fixed issues with distorted audio after the Windows update, and even if you don’t use Nahimic software, you can still try reinstalling your audio drivers.

3. Update all your drivers

  1. Press the Win Key + S and search for Device Manager.
  2. Open Device Manager and search for the device you want to update.
  3. Right-click on it select Update driver.
  4. Repeat for all the devices you need to update.

Sound issues after installing the Windows Update can occur if your drivers are outdated, so we highly recommend that you update them.

Update drivers automatically

To fix this problem, be sure to update your motherboard and chipset drivers first, and then update drivers for your network card, and all other major components.

We recommend this third-party tool (100% safe and tested by us) to automatically download all the outdated drivers on your PC.

4. Reinstall DirectX

Some older games are missing audio after installing the Windows Update, and one of those games is Phantasy Star Online.

If you have issues with audio in this or in any other game, be sure to reinstall the necessary version of DirectX. After reinstalling DirectX, restart your computer, and problems with missing audio should be fixed.

5. Set the audio to 24-bit format

  1. Start your multimedia app and play any file.
  2. While music is playing, press Windows Key + S, enter the sound, and select Sound from the menu.
    anniversary-update-sound-problems-sound
  3. In the Playback tab double click the Speakers option to open its properties.
    anniversary-update-sound-problems-speakers
  4. Go to the Advanced tab and set the Default Format to a 24-bit value.
    anniversary-update-sound-problems-24-bit
  5. After you’re done, click Apply and OK to save changes.

Users reported that the quality of their audio severely dropped after installing the Windows Update. One potential workaround that was discovered by users is to set the audio to the 24-bit format.

After setting the sound to 24-bit format, the audio quality should instantly change and you should fix the Windows 10 Windows update sound not working issue.

You might have to experiment with a few different values until you find the one that works for you. Also, you’ll have to repeat it every time you start a different multimedia application.

6. Run the Audio Playback Troubleshoot

  1. Press Windows Key + S and enter troubleshoot.
  2. Select Troubleshooting from the menu.
    anniversary-update-sound-problems-troubleshooting
  3. Click Troubleshoot audio playback and wait for troubleshooter to fix the problem.
    anniversary-update-sound-problems-audio-playback

According to some users, if you have problems with the sound quality, you might be able to fix this issue by running Audio Playback Troubleshoot.

Even though the Windows Update brought many improvements, many users are complaining about sound issues.

If you’re having sound issues on your device, we advise you to try all of our solutions from this article and give us feedback regarding your experience in the comment section below.

FIX: DRIVER PORTION MUST BE NONPAGED error

Blue Screen of Death errors can be caused by both hardware and software issues, and what’s common for all these errors is that they crash Windows 10 and restart your PC in order to prevent damage.

Since these errors are serious, today we’re going to show you how to fix DRIVER_PORTION_MUST_BE_NONPAGED error.

How do I fix the DRIVER_PORTION_MUST_BE_NONPAGED BSoD error?

  1. Run the hardware troubleshooter 
  2. Run the SFC scan
  3. Update your drivers and keep Windows 10 up to date
  4. Run DISM
  5. Reset Windows 10
  6. Unnstall a problematic application or driver
  7. Check your hardware
  8. Use a repair tool

1. Run the hardware troubleshooter 

  1. Open the Settings app and go to the Update & Security section.
  2. Select Troubleshoot from the menu on the left.
  3. Select BSOD from the right pane and click Run the troubleshooter.
  4. Follow the on-screen instructions to complete the troubleshooter.

Another thing we can try is running Windows 10s built-in troubleshooting tool. This tool is designed to deal with various system issues, including BSODs. So, it might be helpful in this case, as well.

2. Run the SFC scan

  1. Right-click on the Start Menu button, and open Command Prompt (Admin).
  2. Enter the following line and press Enter:sfc/scannow
  3. Wait until the process is done (it may take a while).
  4. If the solution is found, it will automatically be applied.
  5. Now, close the Command Prompt and restart your PC.

The SFC scan is a command-line tool that basically scans your PC for potential errors and resolves them if the solution is available. Among other errors that the SFC scan can help with are the BSOD issues.

3. Update your drivers and keep Windows 10 up to date

Outdated or buggy drivers can cause Blue Screen of Death errors to appear on Windows 10, therefore it’s crucial that you keep them up to date.

Updating your drivers is relatively simple, and you can download all the necessary drivers right from your hardware manufacturer’s website.

The DRIVER_PORTION_MUST_BE_NONPAGED error sometimes can tell you which file caused the crash, and with little research, you can find what driver you need to update.

If you’re not sure which driver is causing this error, it’s usually best that you update all your drivers.

Downloading drivers is important if you want to prevent BSoD errors, but it’s also important that you download the latest Windows 10 updates.

Microsoft is constantly fixing hardware and software issues, and you can download the latest patches by using Windows Update.

Even though these patches fix many hardware and software issues, they also offer security improvements and new features.

Therefore if you wish to keep your PC safe and error-free, we strongly advise you to update Windows 10 frequently.

Update drivers automatically

Searching for drivers on your own can be time-consuming. So, we advise you to use a tool that will do this for you automatically.

Using an automatic driver updater will certainly save you from the hassle of searching for drivers manually, and it will always keep your system up to date with the latest drivers.

Our software recommendation will help you update drivers automatically and prevent PC damage caused by installing the wrong driver versions.

After several tests, our team concluded that this is the best automated solution, so be sure to give it a try.

⇒ Get Fortect Driver Updater

4. Run DISM

  • Standard way
  1. Right-click on Start and open Command Prompt (Admin).
  2. Paste the following command and press Enter:
    • DISM /Online /Cleanup-Image /RestoreHealth
  3. Wait until the scan is finished.
  4. Restart your computer and try updating again.
  • With the Windows installation media
  1. Insert your Windows installation media.
  2. Right-click the Start menu and, from the menu, choose the Command Prompt (Admin).
  3. In the command line, type the following commands and press Enter after each:
    • dism /online /cleanup-image /scanhealth
    • dism /online /cleanup-image /restorehealth
  4. Now, type the following command and press Enter:
    • DISM /Online /Cleanup-Image /RestoreHealth /source:WIM:X:SourcesInstall.wim:1 /LimitAccess
  5. Make sure to change an X value with the letter of the mounted drive with Windows 10 installation.
  6. After the procedure is finished, restart your PC.

DISM is yet another command-line troubleshooter that we can use if the previous ones failed to resolve the issue.

In fact, DISM might be the most powerful troubleshooter, because it freshly deploys the system image.

5. Reset Windows 10

  1. Hold the Shift key on your keyboard and click the Restart button. Alternatively, you can start the Automatic Repair by restarting your PC a few times during the boot sequence.
    driver-portion-must-be-nonpaged-restart
  2. Choose Troubleshoot > Reset this PC > Remove everything. During this step you might be asked to insert Windows 10 installation media, so be sure that you do that.
  3. Choose Only the drive where Windows is installed > Just remove my files. Click the Reset button to start the process.
  4. This process is similar to Windows 10 installation, and you just have to follow the instructions in order to complete it.

If this error is caused by certain software, you can easily fix it by performing Windows 10 reset. To perform Windows 10 reset, follow the above steps.

We have to warn you that Windows 10 reset is similar to clean install, therefore we urge you to back up your important files from the C partition.

To perform Windows 10 reset you might need a bootable USB flash drive with Windows 10 on it, and you can easily create one by using the Media Creation tool.

When this process is done, you should have freshly installed Windows 10 without any third-party applications. If the error appears again, it’s most likely caused by your hardware.

6. Uninstall a problematic application or driver

  1. Press the Windows Key + X, and select Device Manager from the list.
  2. Locate the driver you want to uninstall, right-click it and select Uninstall from the list.
  3. After the driver is uninstalled, restart your PC.

When your PC restarts, Windows 10 will install the default driver. If the default driver works and your system is stable, you can continue using it, or you can try to update that driver.

Software can often cause the DRIVER_PORTION_MUST_BE_NONPAGED error to appear, and it’s worth mentioning that almost any installed software can cause this error.

Therefore if you installed or updated any software recently be sure that you remove it or revert to the previous version.

A common cause for Blue Screen of Death errors can be your antivirus software or firewall, and if you want to fix this error you might have to temporarily uninstall your antivirus and firewall.

Even if you uninstall your antivirus, your PC won’t be defenseless since Windows 10 comes with its own antivirus program called Windows Defender.

In order to fix these errors, it’s not enough just to uninstall all third-party antivirus programs, you also have to remove all files related to your antivirus software.

To do so we strongly recommend you to use a dedicated removal software found below.

In addition to third-party software, Blue Screen of Death errors can be caused by certain drivers, and in order to fix this error, you’ll have to find and uninstall the problematic driver.

Few users reported that this error was fixed after uninstalling the AMD CPU driver, so you might want to try that. To uninstall a certain driver from Windows 10, follow the above steps, or let CClenaer do the job for you.

7. Use a repair tool

BSoDs affect all Windows operating systems and fixing them is quite a difficult task that requires a lot of patience, but with the right tool, you can fix it in no time.

You can therefore use efficient third-party software capable of system malfunctions troubleshooting and optimizing your PC accordingly in a few steps.

8. Check your hardware

DRIVER_PORTION_MUST_BE_NONPAGED and other Blue Screen of Death errors are often caused by faulty or incompatible hardware, so if you’re having this error, we urge you to check your hardware.

Faulty RAM is the common cause of this error, and we advise you to test your RAM modules one by one in order to find the one that is faulty.

If your RAM is working properly, be sure to check other major hardware components such as your motherboard, hard drive, network adapter, etc.

DRIVER_PORTION_MUST_BE_NONPAGED BSoD error can be a hindrance, but you can usually fix this error by updating your drivers or by replacing the faulty hardware.

We hope that our recommendations from above were helpful for your needs. For more suggestions, please access the comments section below.

Windows 10 news recap: Project Reunion gets its first release, Twitter adds Topics and Fleets, and more

Welcome back to our Windows 10 news recap, where we go over the top stories of the past week in the world of Microsoft’s flagship operating system.

Microsoft releases first production ready release of Project Reunion with version 0.5

Project Reunion was announced at Build 2020, and now it has received its first production release, starting with version 0.5. Its aim is to make it easier for developers to build apps for all Windows devices, reducing fragmentation between Windows APIs and Universal Windows Platforms.

Windows 10 Hero Image

Twitter gains new Topics menu and support for Fleets on Windows 10 and web in latest update

A new update for Twitter on Windows 10 and the web has been released, which adds a new Topics menu, as well as support for Twitter’s Fleets feature. Full Fleets support is not yet available, with Fleets being viewable via DMs, but no menu existing along the top which displays available Fleets.

Twitter
Copyright Marisa Allegra Williams (@marisa) for Twitter, Inc.

PowerToys 0.35 is now available with a bunch of improvements and bug fixes

A new version of PowerToys was released this week, version 0.35, which brings a number of improvements and bug fixes, including adding shortcuts for swapping FancyZones layouts, the ability to specify the location of the PowerToys Run tool, and more. You can read the full release notes here.

That’s it for this week. We’ll be back next week with more Windows 10 news.

Microsoft news recap: Xbox Series X Mini Fridges to be available to consumers, Microsoft Teams Bug Bounty Program launches, and more

Microsoft news recap is a weekly feature highlighting the top Microsoft news stories of the past week. Sit back, grab some coffee, and enjoy the read!

Microsoft Build scheduled for May 25 through 27, 2021

Microsoft’s annual developer conference, Build, has been announced for 2021, and will run from May 25 through May 27. The conference will be streamed online.

Microsoft delays the “full” reopening of its Redmond campus to September 7

The full reopening of Microsoft’s Redmond campus has been delayed to September 7. Originally, a full reopening was planned for July 6, but this has now been pushed back by 2 months, with Microsoft saying it is to allow employees to “make summer plans”.

Six stages of the COVID-19 hybrid workplace

Microsoft will make Xbox Series X Mini fridges available for Xbox fans

Following the successful win of Twitter’s “Best of Tweets Brand Bracket” competition, Microsoft is coming through on its promise to offer Xbox Series X Mini fridges to consumers. It was close between Xbox and Skittles, with a 1% difference, but ultimately, Xbox came out on top.

Microsoft snags potential $21.88 billion U.S. Army contract for HoloLens headset production

A new $21.88 billion U.S. Army contract for the production of HoloLens headsets has been snagged by Microsoft, building on its pre-existing relationship with the U.S. Army.

Microsoft Hololens 2 Army In The Field

This week in Microsoft Teams

Microsoft Teams native notifications support is now rolling out on Windows 10

First announced back in August, Microsoft Teams has begun to roll out support for native notifications on Windows 10. Users will be able to choose between the existing notification style that is built into Teams, or to switch to the native notification system of their operating system, in this case Windows 10.

Enable Native Notifications Microsoft Teams

Microsoft Launches Teams Bug Bounty Program

Offering between $6,000 and $30,000 per security flaw, Microsoft Teams now has a Bug Bounty Program, aimed at encouraging white hat hackers to identify security flaws in Microsoft Teams and report them to Microsoft, to help bolster the security of its communication platform.

Microsoft Teams Bounty Program 1
Microsoft has launched a bounty program for its Teams communication platform.

Microsoft Teams is adding Supervised private chats for educational institutions next month

Beginning to roll out in mid-April, Microsoft Teams is adding a new Supervised private chat feature for educational institutions. Supervised chats provides an alternative to the traditional 1:1 messaging system, allowing an educator to be present to monitor the chat between individuals, which is aimed at stopping inappropriate behaviour.

Admin policy to manage Supervised chat

Microsoft Teams phones get new meeting stage, simplified sign-in experience, and more

A host of improvements have arrived for Microsoft Teams phones, including an improved sign-in experience, a new meeting experience, as well as an option to dock the call controls. The new sign-in experience in particular aims to simplify signing in, by allowing you to enter a code on another device, such as a computer or smartphone, in order to sign in.

thumbnail image 2 of blog post titled What’s new for Teams phones | March 2021

That’s it for this week. We will be back next week with more Microsoft news.

FIX: Gears of War 4 black screen issues on PC

Gears of War is a popular game series on both Xbox and PC, and speaking of this game, many users reported black screens while trying to run Gears of War 4 on their PC.

This can be a big problem, and in today’s article, we’ll show you how to permanently fix this issue.

Gears of War 4 is a great game, but PC users reported various issues with it. Here are some of the most common problems that users reported:

  • Gears of War 4 crashes on startup, splash screen crash – Sometimes Gears of War 4 might crash on startup due to missing updates. To fix this problem, download the latest updates for Windows 10.
  • Gears of War 4 stuck on loading screen PC – Your graphics card can sometimes cause this problem to appear. To fix the issue, make sure that Gears of War 4 is set to use your dedicated graphics.
  • Gears of War 4 PC freezing – This problem can occur if your drivers aren’t up to date. To fix the issue, be sure to install the latest drivers and try to run Gears of War 4 again.
  • Gears of War 4 PC won’t start, launch – This problem can appear if you don’t have Offline Permissions feature enabled in Microsoft Store. Simply enable this feature and the problem with Gears of War 4 should be resolved.

Gears of War 4 black screen on PC, how to fix it?


  1. Make sure that you have the latest updates
  2. Update your graphics card drivers
  3. Try downloading a different game from the Microsoft Store
  4. Make sure that you’ve signed in to the Xbox app with a correct email
  5. Make sure that you’re using your dedicated graphics to run the game
  6. Enable the Offline Permissions feature
  7. Reset the Microsoft Store cache and start the required services

1. Make sure that you have the latest updates

  1. Open the Settings app. The fastest way to do that is to use Windows Key + I shortcut.
  2. After the Settings app opens, head over to the Update & Security section.
    update and security gears of war 4 black screen
  3. In the right pane, click the Check for updates button.
    check for updates gears of war 4
  4. Windows will now check for available updates and download them in the background.

If you’re getting a black screen while trying to run Gears of War 4, perhaps the problem is related to your system. Sometimes certain glitches can lead to this and many other problems.

To fix the problem, it’s advised that you update Windows 10 to the latest version. This process is quite streamlined in Windows 10.

For the most part, your OS automatically installs the missing updates. Once the updates are downloaded, restart your PC in order to reinstall them.

After you update your system to the latest version, check if the problem is still there. This simple solution worked for several users, so be sure to try it out.

Here’s a useful tutorial dedicated to fixing a black screen with cursos in Windows 10.

2. Update your graphics card drivers

  1. Go to the Settings and type Device Manager.
  2. In the Device Manager, search for the display adapter and expand it.
  3. Select your GPU, right-click on it, and click Update driver.

Sometimes a black screen can appear in Gears of War 4 due to your drivers. Your graphics card drivers are crucial for multimedia and games.

If your drivers are out of date, you might experience various issues. To fix this and other problems, users are suggesting that you update your graphics card drivers.

Update your GPU drivers automatically

Updating graphics card driver is relatively simple, and you can do it by visiting your graphics card manufacturer’s website and downloading the latest drivers for your model.

However, if this process seems a bit complicated and you don’t know how to do it properly, you can always use third-party tools to download your drivers.

3. Try downloading a different game from the Microsoft Store

  1. In the Search, bar enter store and select the Microsoft Store from the list.
    microsoft store search gears of war 4 black screen
  2. Now try to download any free game from the Microsoft Store.
  3. The download process will now start.
  4. Wait for about 10 seconds and then click the down arrow icon next to your profile picture.
  5. Now click the X button to stop the download.
    cancel download microsoft store gears of war 4 black screen

If you’re getting a black screen while trying to run Gears of War 4 on your PC, perhaps this workaround can help you.

According to users, you can temporarily fix them simply by trying to download a different game from the Microsoft Store and then cancel the download process.

After doing that, the download process will stop. Now you can try to run Gears of War 4 again and it should start without issues.

Several users reported that this method worked for them, but bear in mind that this is just a workaround.

4. Make sure that you’re signed in to the Xbox app with a correct email

  1. Press Windows Key + S and enter Xbox.
  2. Now pick Xbox from the list of results.
    xbox app gears of war 4 won't start
  3. When the Xbox app opens, sign out of it.
  4. To do that, click the Gear icon in the left pane. In the right pane, click the Sign out button.
    sign out gears of war 4 black screen
  5. Now click on Sign in If you’re asked to sign in with your Microsoft account, then click Not you option in the top left corner.
    sign in xbox app gears of war 4 not working
  6. Select Use a different account option and click Continue.
    different account gears of war 4 black screen
  7. Now enter your email and password and you should be logged in to the Xbox app.

According to users, sometimes a black screen with Gears of War 4 can occur if you aren’t signed in to the Xbox app with the correct account.

Users reported that if you’ve signed in to Xbox app with a Microsoft account instead of an Xbox account, you might encounter this problem.

5. Make sure that you’re using your dedicated graphics to run the game

  1. Open Nvidia Control Panel.
  2. In the left pane, select Manage 3D settings. In the right pane, go to the Program Settings.
    program settings nvidia gears of war 4 crash
  3. Locate Gears of War 4 on the list.
    • If it’s not available, click the Add button to add it.
  4. Now set the Select the preferred graphics processor for this program to High-performance Nvidia processor.
  5. Then, click the Apply button to save changes.

Many laptops and some PCs come with both dedicated and integrated graphics, and this can sometimes be a problem.

Your PC might be configured to run the game using the integrated graphics, and that can cause this problem to appear. To fix the problem, you need to change your graphics card settings.

After making these changes, Gears of War 4 will always run using the Nvidia graphics card and the problem should be permanently resolved.

If you’re using AMD graphics, you should be able to find all these settings in the Catalyst Control Center.


6. Enable the offline permissions feature

  1. Open the Microsoft Store.
  2. Click the More icon in the top right corner and choose Settings from the menu.
    settings microsoft store gears of war 4 crash
  3. Now locate the Offline Permissions feature and enable it.
    offline permissions gears of war 4 won't launch

According to users, if you’re getting a black screen while trying to run Gears of War 4, perhaps you can fix the problem by changing a few settings in Microsoft Store.

After doing that, the problem should be resolved and you’ll be able to run Gears of War 4 without any issues.

7. Reset the Microsoft Store cache and start the required services

  1. Press Windows Key + R to open the Run dialog.
  2. Enter wsreset.exe and press Enter.
    wsreset run dialog

According to users, sometimes problems with Microsoft Store can affect other applications and cause issues such as a black screen in Gears of War 4.

However, you can fix that problem simply by resetting Windows Store cache. To do that, follow the steps above.

After doing that, you need to enable certain services. To do that, follow these steps:

  1. Open the Run dialog and enter services.msc, then press Enter.
    run services.msc gears of war 4 black screen
  2. When the Services window opens, locate Windows PushToInstall Service, right-click it and choose Start from the menu.
    start service gears of war 4  black screen

After doing that, try to run Gears of War 4 again and check if the problem is still there.

The black screen can be a big problem and prevent from your running Gears of War 4 on your PC. However, we hope that you managed to fix this problem using one of our solutions.

Feel free to tell us how these solutions helped you, or if you have any other suggestion regarding the subject in the comment section below.

Fix: Windows 10 can’t find a restore point

The first thought that comes to the user’s mind when something goes awry with anything Windows is System Restore. This feature is as old as the Windows platform itself and it provided a safe exit for many concerned Windows users.

As you probably know, System Restore creates restore points you can use to rewind time.

But what happens when you just can’t access any restore point? Some users reported this issue in Windows 10, but it’s frequently occurring in previous iterations, as well.

How do I restore Windows 10 if there is no restore point?

1. Make sure System Restore is enabled

  1. Right-click on This PC and open Properties.windows 10 can't find restore point
  2. Click on System protection on the left side.
  3. Select Local Disk System partition, usually (C:).
  4. Click on Configure… below.windows 10 can't find restore point
  5. Click on Turn on system protection.
  6. Select the preferred disk usage limit on the scale. Once the restore points reach the limit, they’ll be deleted from older to newer. Take into consideration the available space since they tend to pile up quickly.
  7. Confirm changes and restart your PC.windows 10 can't find restore point

After that, your system will keep track of changes and create restore points accordingly. Basically, after every newly installed program or major system change, the system will create a restore point.

With Windows 10, Microsoft decided to disable the System Restore feature by default in order to preserve storage space and lower the requirements.

Restore points can take a lot of storage space and, with them running in the background, the minimum of 16GB of free space Windows 10 actually requires, would be impossible to work with.

For that reason, make sure that automatic restore maintenance is enabled. Of course, if you’re trying to repair your already damaged system, enabling System restore won’t help you too much.


2. Create restore points manually

  1. In the Windows Search bar, type restore and open Create a restore point.
  2. Under the System protection tab, click on Create….windows 10 can't find restore point
  3. Name the restore point and click on Create.windows 10 can't find restore point
  4. The system will create a restore point and you’ll be good to go when the future issues emerge.

There’s a scenario where you are certain that there were some restore points but they’re gone for no apparent reason. Sadly, that’s not unusual.

Sometimes they’re wiped out by system updates, configuration changes, or even third-party antivirus solutions. And the worst thing is that you are, most of the time, unaware of that.

And when the dire times come and you’ll need to restore PC and fix the errors – not a single restore point is there to answer your call.

If this is a repeating occurrence, your best bet is to leave the automatization behind and do it manually. You can create a restore point whenever you deem it needed, but you can’t move it from the default location which complicates things.

The only thing you can do to avoid possible absence at the time of need is to create them as often as you can.


Need more details on how to create a system restore point in Windows 10? Read this guide.


3. Check the HDD with Disk Cleanup

  1. In the Windows Search bar, type Disk and open Disk Cleanup.windows 10 can't find restore point
  2. Select the system partition (usually C:) and click on OK.windows 10 can't find restore point
  3. Click on the Clean up system files.windows 10 can't find restore point
  4. Check whatever you want but checking Temporary files is a must since those take the most space.windows 10 can't find restore point
  5. Click OK.

Of, course, you can uninstall old or unused programs or games to get even more free space.

Many users use third-party tools to delete temporary and unnecessary files, but our advice is to stick with Disk Cleanup in order to avoid critical damage.


4. Check the HDD state with command prompt

  1. Type cmd in the Windows Search bar, right-click on Command Prompt and run it as an Administrator.
  2. In the command line, type chkdsk /f C: and press Enter.
  3. In case the Check Disk utility finds any errors, it will repair them accordingly.
  4. Once the procedure ends, restart your PC and try creating a restore point manually (as explained above).

5. Rollback to previous Windows 10 version

Via Recovery

  1. Press Windows key + I to open Settings.
  2. Click on Update & security.windows 10 can't find restore point
  3. Select Recovery from the left pane.
  4. Under Go back to the previous version of Windows 10, click Get started.
  5. Follow the instructions until you roll back the Windows 10 version and, hopefully, resolve the problem that’s bothering you.

The previous steps were mainly intended to fix the issues with missing restore points. But, what to do when you’ve already bumped into a critical system issue and there’s no restore point you can turn to for help?

Luckily, there are a lot of alternative recovery options in Windows 10. It’s just like they predicted the possible problems that might occur.

The first one is mainly introduced to repair an abundance of issues that often emerge after a major update. It enables you to restore to a previous build version.

You’ll eventually update again (just Windows 10 thing, we guess), but waiting for patches with the fully functional system is a much more pleasant experience.

Via Advanced Startup

  1. Right-click Start and open Settings.
  2. Choose Update & security.windows 10 can't find restore point
  3. Highlight Recovery from the left pane.
  4. Under the Advanced Startup section, click Restart now.windows 10 can't find restore point
  5. When the Advanced Startup menu appears, click Troubleshoot.
  6. Select Advanced options.
  7. Click on the Go back to the previous version of Windows option.

If the first option is missing, there’s an alternative way to utilize this recovery tool. Follow the instructions above.


Instead of a restore, try factory-reset Windows 10. We’ll guide you through the process.


7. Reset your PC

  1. Use Windows key + I to summon the Settings app.
  2. Open the Update & security section.windows 10 can't find restore point
  3. Choose Recovery from the left pane.
  4. Click on the ”Get started” button under ”Reset this PC”.windows 10 can't find restore point
  5. Chose whether to keep or erase all your files.
  6. Continue with the steps until the system is fully restored to default values.

This recovery option enables you to reset your PC to default settings, restoring everything in the process to the default values. It’s analog to reinstallation of the system, with the exception that you can keep your files untouched.

Finally, if none of the previous steps worked for you, you can always perform a clean reinstallation. Make sure to check out our detailed explanation in our guide.

That should do it. In case you have questions or suggestions in regards to System restore and/or missing restore points, don’t forget to tell us in the comments section below.

Malwarebytes won’t open? Use this troubleshooting guide

Malwarebytes offers a plethora of amazing protective features in all their security tools. Their main suite, called Malwarebytes Anti-Malware is currently one of the most popular antimalware solutions on the market.

However, some users have had a hard time starting the tool and accessing it, as Malwarebytes won’t open after the update. For others, Malwarebytes won’t open or uninstall.

  1. Reinstall Malwarebytes Anti-Malware
  2. Run Malwarebytes Chameleon
  3. Run Malwarebytes as an administrator
  4. Try running Malwarebytes in the Safe mode
  5. Rename the mbam.exe to explorer.exe
  6. Use another antivirus

This is most likely a virus issue, where the malicious software blocks the execution of the anti-malware executable. We offer some solutions for this problem below, so make sure to check them out.

What can I do if Malwarebytes Anti-Malware won’t open?

1. Reinstall Malwarebytes Anti-Malware

  1. In the Windows Search bar, type Control, and open Control Panel.
  2. Choose Uninstall a program.Uninstall from Control panel
  3. Uninstall Malwarebytes Anti-Malware.
  4. Navigate to here and download the latest version of Malwarebytes Anti-Malware.

A clean reinstallation should provide the resolution for the problem at hand. After you successfully remove Malwarebytes Anti-Malware from your PC, download and install the latest version.

Don’t forget to keep your credentials, so you can activate them right away.

For this solution to work, you need to make sure that you trust the source from which you are about to download the program. We strongly recommend you use the official website of the manufacturer for this job.

On the other hand, you can try another antivirus solution that has Malwarebytes features or even more. You need to document first and pick the best antivirus software for Windows 10.

2. Run Malwarebytes Chameleon

  1. Open Start and scroll until you reach Malwarebytes Anti-Malware.
  2. Expand the Malwarebytes Anti-Malware.
  3. Choose Tools and then select Malwarebytes Anti-Malware Chameleon.
  4. The elevated DOS windows should appear so press Enter to continue.
  5. This should open and automatically update the stable version of the Malwarebytes Anti-Malware suite.
  6. Scan for malware immediately and restart your PC afterward.

In these unwelcome scenarios when you can’t start Malwarebytes, we can safely turn to Malwarebytes Chameleon. This built-in utility is there to start Malwarebytes when the usual ways fail you.

If Malwarebytes is unable to connect the service, this tool should work its magic. After the Malwarebytes Anti-Malware suite starts, immediately run the in-depth scan.

Usually, you’ll need to do this only once. Once Malwarebytes remove threats, everything should get back to normal.

3. Run Malwarebytes as an administrator

  1. Navigate to C:/ProgramFiles/MalwarebytesAnti-Malware
  2. Right-click on the mbam.exe and choose Properties from the contextual menu.
  3. Open the Compatibility tab.
  4. Check the Run this program as an administrator box and confirm changes.

This is a long-shot solution, especially since most of the users run their system with an administrative account already.

However, if that’s not the case (more common on earlier Windows iterations), it’s advised to run the application with administrative permission.

4. Try running Malwarebytes in the Safe mode

  1. During the startup, when the Windows logo appears, press and hold the Power button until the PC shuts down.
  2. Power on the PC and repeat the procedure 3 times.
  3. The fourth time you start the PC, the Advanced recovery menu should appear.
  4. Choose Troubleshoot.
  5. Select Advanced Options and then Startup Settings.
  6. Click Restart.
  7. Choose Safe mode with Networking from the list.
  8. Start Malwarebytes and scan for malware.
  9. Restart PC afterward and check whether the Malwarebytes start or not.

As you probably already figured out, the main goal here is to get Malwarebytes to run once. After that, the tool will remove all threats, including the ones preventing it from working.

Now, another way to do so while avoiding a third-party infliction is to boot your system into the Safe Mode with Networking.

This should vastly limit malicious software and you should be able to start Malwarebytes without major problems along the way.

5. Rename the mbam.exe to explorer.exe

  1. Navigate to C:/ProgramFiles:/MalwarebytesAnti-Malware
  2. Right-click on the mbam.exe and choose Rename from the contextual menu.
  3. Rename mbam.exe to explorer.exe and run it.

Some users managed to get the Malwarebytes Anti-Malware suite to start by renaming the executable file. There’s a high chance that its execution is prevented by a malicious presence.

You’ll need administrative permission in order to rename this file. And, after you’ve managed to start Malwarebytes, perform a scan and get the executable file its default name. It should work now.

6. Use another antivirus

The situation that caused Malwarebytes not to open may be caused by the operating system being infected with viruses or malware. We recommend you use third-party software in this regard and solve this issue.

This is a fast and light software that can be used by everyday users or dedicated gamers to protect their computers. It can be used on any Windows, Mac, and Linux devices.

Feel free to watch your favorite movies, play some of the newest games available or create amazing presentations for your work or school. Once it starts scanning and repairing your system, this software will not require a lot of your computer’s resources.

The third-party software will scan, detect and remove any viruses, spyware, worms, ransomware and all types of malware it detects. It also contains a battery saver feature, that will allow you to stay unplugged and online longer.

This software has an intuitive setup which means you can easily install it, renew it, and upgrade it. Once it has cleaned your computer of any harmful files, the Malwarebytes Anti-Malware will open without any errors.

⇒ Get TotalAV

With that said, we can conclude this article. If you have any additional questions or suggestions, feel free to tell us in the comments section.

If the problem is persistent, don’t forget to contact the official support and provide the necessary logs and screenshots.

5 Best Antivirus Applications for Windows Home Server

Keeping your system safe is important, and the same applies to Windows Server. There are many great antivirus applications for Windows Server, but in today’s guide, we’ll show you the best antivirus for Windows Home Server.

Windows Home Server 2011 is based on Windows Server 2008 R2, so in theory, any antivirus software that works on Windows Server 2008 R2 should work on Windows Home Server 2011.

In this short guide we’ll show you the best Windows Home Server antivirus software that you can use, so let’s get started, shall we?

What’s the best antivirus solution for Windows Home Server?

ESET PROTECT Advanced

ESET PROTECT Advanced works with Windows Server 2008, so it should be able to handle Windows Home Server as well. The application offers a cloud-based console so you can manage your security remotely with ease.

The application also has multilayer protection, so it can detect malware before, during, and after execution.

Of course, strong endpoint protection is available on a wide array of devices including computers, smartphones, and VMs.

ESET PROTECT Advanced also supports full disk encryption, so it will protect you from both data breaches and data theft at all times.

ESET PROTECT Advanced

Protect your Windows Home Server with multilayer protection using ESET PROTECT Advanced.
Free trial Visit Website

Bitdefender GravityZone Business Security

antivirus for cryptocurrency

If you need an antivirus for Windows Home Server, consider Bitdefender GravityZone Business Security. The software offers granular security control for websites and applications thus providing you with maximum safety.

Thanks to the single console, you can monitor the security on all devices in your network with ease. Regarding malware, the software offers protection against viruses, rootkits, phishing attacks, exploits, and ransomware.

As for additional features, the software has a two-way firewall with intrusion detection and prevention, so you can rest assured that your network and server are perfectly safe from unauthorized access.

Bitdefender GravityZone Business Security

Bitdefender GravityZone Business Security is a professional antivirus software for all versions of Windows Server.
Free trial Visit website

Avast Business Antivirus Pro

anti-mining tools

Another antivirus for Windows Home Server is Avast Business Antivirus Pro. The software offers enterprise-level security, so it will protect all of your sensitive information.

Thanks to next-generation defense and machine learning, the antivirus can detect any suspicious activities and unknown threats. Of course, the software has the ability for remote deployment and scheduled scans.

Avast Business Antivirus Pro is incredibly simple to use and set up, and even if you’re not an IT expert, you shouldn’t have any issues with it.

Avast Business Antivirus Pro

If you need easy-to-use and reliable antivirus for Windows Home Server, try Avast Business Antivirus Pro.
Free trial Visit website

VIPRE Endpoint Security Server

Another great antivirus for Windows Server is VIPRE Endpoint Security Server. This application offers an advanced security engine that will protect you against all types of zero-day threats and ransomware.

The software is easy to install and configure and it allows you to manage devices across your network with ease. It’s worth mentioning that the software is lightweight, so it won’t ever affect your performance.

VIPRE Endpoint Security Server uses real-time behavior monitoring and artificial intelligence, so it will detect and neutralize any suspicious activity with ease.

VIPRE Endpoint Security Server

For the best and easy to set up antivirus protection, use VIPRE Endpoint Security Server.
Free trial Visit website

ClamWin

Another antivirus for Windows Home Server that you might want to consider is ClamWin. This software works on all versions of Windows, and Home Server isn’t an exception.

We have to mention that this is a completely free and open-source solution, so you can use it without any restrictions. As for the features, it offers a high detection rate for both viruses and spyware.

Additional features include scheduled scans, automatic updates, standalone scanning for files, and a Microsoft Outlook add-on.

⇒ Get ClamWin

Windows Home Server has been discontinued years ago antivirus companies have stopped developing new software for it. However, most of these solutions should work with it without too much hassle.

And if they don’t, then perhaps this would be a great time to consider moving to a more modern and better-maintained version of Windows Server.

Microsoft delays the “full” reopening of its Redmond campus to September 7

If Microsoft has partially re-opened its Redmond campus this week to give more flexibility to its employees in the Puget Sound area, the company has now delayed its plan to fully reopen its headquarters on July 6. In a note sent to employees yesterday (via ZDNet), Microsoft’s head of Corporate Strategy Kurt DelBene said that the company has now chosen September 7 as the new reopening date for its Redmond campus.

The two months delay will give “flexibility for employees to make summer plans,” the exec said in the internal note. Last week, a Microsoft spokesperson told ZDNet that the company would “continue to monitor the situation” after choosing July 6 as the earliest date for a “full opening” of its Redmond campus.

The worldwide COVID-19 pandemic is far from being over, and Microsoft previously unveiled a Hybrid Workplace Dial detailing six stages of the COVID-19 hybrid workplace. The company is currently at stage 4, a “soft open” stage where employees are still encouraged to work remotely, with stage 6 being the “full opening.”

Six stages of the COVID-19 hybrid workplace Microsoft currently employs over 57,000 people in the Puget Sound area, and the company is still in the middle of a massive re-architecturing effort of its Redmond campus that will take an estimated 5 to 7 years to complete. Even though the company is now experimenting with a hybrid workplace model, the construction project will lead to the creation of 2.5 million square feet of new office space to welcome more employees at the company’s headquarters when the pandemic is over.