What to do when antivirus blocks VPN [4 tested solutions]

In order to unify all standard protective features, contemporary antivirus software solutions come with firewalls, antispam tools, and even backup and VPN tools of their own.

It’s just easier to acquire the all-in-one suite than to reach for an abundance of different programs.

However, there emerges a question of third-party firewalls usability, especially when they keep on blocking other third-party applications. Like, in this case, the VPN client.

The cooperation between the built-in Windows Firewall and third-party apps is resolved through the installation, where an exception (entry/exit point) is automatically created.

Sadly, that doesn’t work for third-party firewalls that are part of an antivirus suite. Therefore, the VPN service is blocked by default and you’ll need to unblock it manually.

For that purpose, we compiled the list of possible solutions to resolve this problem, so make sure to check them out below.


How can I stop the antivirus from blocking my VPN?

1. Switch over to another VPN client

The sign of a good VPN client is that it works with other software installed on your system without causing conflicts.

We recommend you to use a tested VPN client which has been designed to have as little impact on your system as possible.

This VPN client works alongside most antivirus software and should not cause any compatibility issues on your system.

Another advantage of using it is that in the extremely unlikely event that a problem occurs, you can always contact the support team who will guide you through diagnosing and fixing the issue.

Private Internet Access

Private Internet Access

Use a VPN client that works with third-party antiviruses so you’ll never run into compatibility issues
Free trialVisit website

2. Add an exception in the firewall

  1. Open Avast Internet Security.
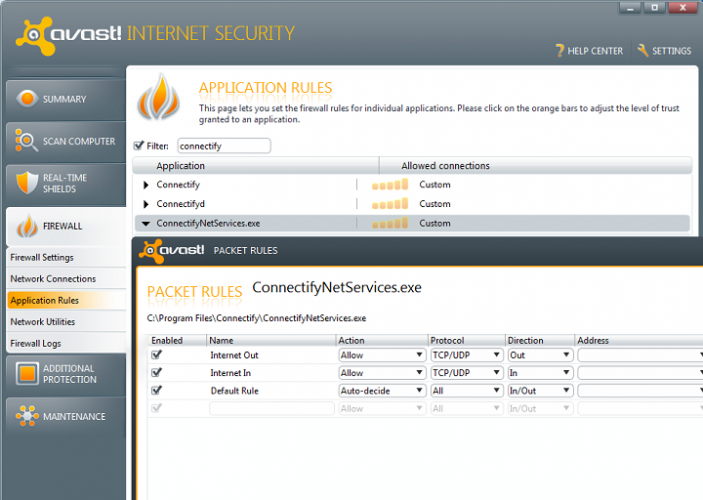
  2. Click on Protection and then on the Firewall section in the left pane.antivirus blocking vpn
  3. Select Application rules.antivirus blocking vpn
  4. Click on the New group button at the bottom.
  5. Name the new group by VPNs name and add its exe file.
  6. Set the orange scale to the maximum of 5 bars for both group and exe file.
  7. Confirm changes and start VPN again.

If Avast is blocking your VPN, we’ve explained above the procedure, and it should closely resemble with other similar solutions. With minor differences, of course.

So, what you’ll need to do is to create an exception for the VPNs executable file. This procedure varies from suite to suite, so make sure to google your version and add an exception.

After that, you should be able to use VPN in a seamless manner. A firewall should let it communicate freely.

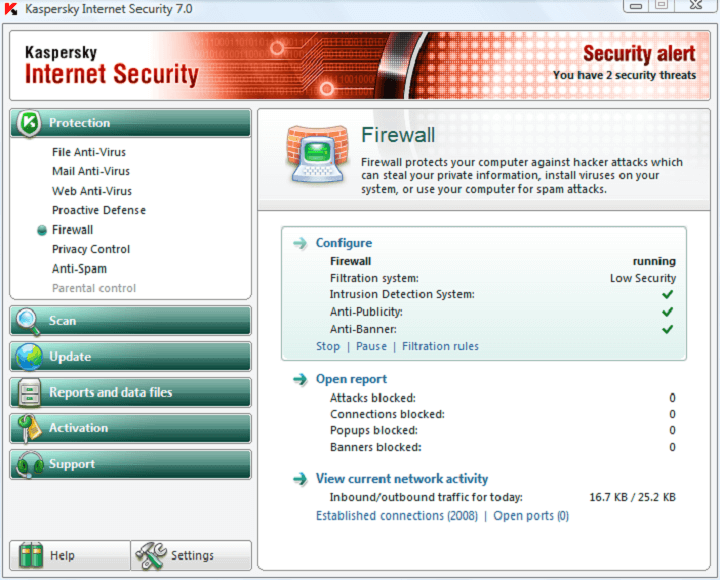
To avoid possible confusion, it’s not the antivirus that blocks your VPN, but rather a third-party firewall that comes with it.

3. Enable SSL port access (turn off monitoring)

Another thing you should consider disabling is the SSL port (443) monitoring, which most VPN services use to connect.

Some antivirus solutions that come with the web access protection, will block this port as a safety measure.

Because of that, we advise you to either disable that security measure or to disable monitoring for the aforementioned port.


4. Stick to antimalware protection and ditch the third-party firewall

Finally, an obvious step is to completely disable the firewall part of the antivirus suite and stick with the antimalware protection.

Windows already comes with a built-in Firewall that should be enough to protect your PC. Of course, it depends on your needs and, in enterprise use, Windows Firewall just won’t cut it for some users.

As a side note, make sure that your VPN is trusted. Bad VPN is more of a problem than the solution, and maybe, and just maybe, a third-party firewall blocks it for a good reason.

If your VPN is working after disabling the firewall part, you can also consider changing your security solution. Check our dedicated guide to see what are the best options.


We hope that it was a helpful read and you’re able to make antivirus and VPN coexist in the Windows shell without issues.

Make sure to share additional solutions or post a question or two in the comments section below. We’ll be glad to hear from you. 


Fix Firefox error ssl_error_weak_server_ephemeral_dh_key

Ssl_error_weak_server_ephemeral_dh_key is one of those annoying errors that pop up in the Firefox browser. The error message doesn’t come with a specific solution and it’s most likely a combination of troubleshooting steps that can cure this error.

As with all the other Firefox errors, we need to spare some time and understand why the error message is displayed in the first place.

The ssl_error_weak_server_ephemeral_dh_key error message may be displayed due to the following reasons:

  • The website you are trying to access may be vulnerable to certain attacks.
  • Certain websites secure their servers and in order to access these websites, you need to have secured server certificates.
  • If you are using Tomcat server it is most likely that you have no secure server certificate and thus the error message.

Basic checks

As per some of the users on the Firefox forums, the error message is also displayed due to an old driver in your browser and updating the same will get rid of the issue. In order to update the driver

  • Access Open menu and then click on Add-ons. Eliminate any unnecessary extensions.
  • Update the drivers if necessary

Some of the Firefox users have claimed that refreshing the browser will resolve the issue. In order to refresh Firefox follow the steps below

  1. Select Open menu, then click on the Help menu.
  2. Now select Troubleshooting Information.
  3. Click on Refresh Firefox.
Opera

Opera

Waste no more time on fixing a broken Firefox browser. Install and configure Opera in just a couple of minutes so that you can enjoy a seamless browsing experience.

How do I fix ssl_error_weak_server_ephemeral_dh_key?

1. Set Firefox to Ignore the SSL Error

Well, this might not exactly be the safest thing to do but most of the folks back in the forum have reported that this methodology works.

For this, to work you need to toggle two security codes in the Mozilla Firefox browser to false.

  1. After opening the Mozilla Firefox browser click on the Firefox icon.
  2. In the search bar type about:config.
  3. The browser will show a warning message that says This might void your warranty. Ignore it and click on I’ll be careful, I promise!.
  4. A new page will open and now you need to type security.ssl3.dhe_rsa_aes_128_sha.
  5. Check the Value tab, if it’s True, toggle it to False.
  6. Then enter the following value in the search bar security.ssl3.dhe_rsa_aes_256_sha.
  7. Again, change the value from true to false.

2. Disable SSL 2.0 in Tomcat Server

It’s quite possible that the Tomcat server might be enabled by default especially if you are using SSL 2.0.

In this case, verify that you have weak ciphers or SSL 2.0 enabled by entering your domain in this SSL Server Test.

Then, disable weak ciphers by opening the server.xml file and enter adding the following to your SSL connector:

SSLEnabled="true" sslEnabledProtocols="TLSv1,TLSv1.1,TLSv1.2" ciphers="TLS_ECDHE_RSA_WITH_AES_128_CBC_SHA256, TLS_ECDHE_RSA_WITH_AES_128_CBC_SHA,TLS_ECDHE_RSA_WITH_AES_256_CBC_SHA384, TLS_ECDHE_RSA_WITH_AES_256_CBC_SHA,TLS_ECDHE_RSA_WITH_RC4_128_SHA, TLS_RSA_WITH_AES_128_CBC_SHA256,TLS_RSA_WITH_AES_128_CBC_SHA,TLS_RSA_WITH_AES_256_CBC_SHA256, TLS_RSA_WITH_AES_256_CBC_SHA,SSL_RSA_WITH_RC4_128_SHA"

Considering that you have promptly followed the steps described above the Firefox should stop throwing the ephemeral message. Also, your web pages should load faster than before.

If you have any further tested solutions to this issue, don’t hesitate to drop us a comment below.

FIX: Wushowhide.diagcab not working [Complete Guide]

Microsoft’s wushowhide.diagcab tool is used for blocking driver updates that you have decided to not want to be installed on your device, however, many reported that wushowhide.diagcab is not working for them.

The issue that many users are encountering is that the wushowhide.diagcab no longer available and they cannot download it anymore from the Microsoft website.

This can be a problem since this is the only official tool that can block automatic updates on Windows 10, but if you want to learn how to fix this issue, make sure to keep on reading.

How can I fix the wushowhide.diagcab not working?

1. Use a specialized software

If a certain Windows Update is causing issues on your PC, there’s no need to block it. You might be able to fix it with specialized software.


2. Use the Troubleshooter tool

  1. Download the troubleshooter from the Microsoft Download Center.
  2. Click save prompted to open or save wushowhide.diagcab.
  3. Locate the folder where you saved it and click wushowhide.diagcab to open the window shown below.
  4. Press the Next button to scan for updates.
  5. Select Hide updates to open the list of available updates.
  6. Now, select the update package that’s updating the driver from the list to block it.
  7. Press the Next and Close buttons to exit Show or hide updates.

Keep in mind that wushowhide.diagcab no longer available from this link, but it has been an official link for years, and Microsoft might fix it in near future.

3. Download if from third-party sources

  1. Go to WayBack Machine website.
  2. Paste the following URL in the input field:

    https://download.microsoft.com/download/f/2/2/f22d5fdb-59cd-4275-8c95-1be17bf70b21/wushowhide.diagcab
  3. Now select one of the saved versions and you’ll be able to download the file.

If you’re looking for wushowhide.diagcab download link, then you’ll have to rely on third-party sources for the time being.

Keep in mind that the version from third-party websites might not be the same one as from Microsoft, so use it at your own risk. To be safe, be sure to download it only from reliable sources, such as WayBack Machine.


4. Feedback Hub app

  1. Press Windows Key + S and enter feedback. Now select Feedback Hub.
  2. Select Report a problem option and follow the instructions on the screen.

If none of the steps indicated above have helped you fix this issue, then we would recommend you use the Feedback Hub app to report the problem.

You can also contact Microsoft support and notify them that wushowhide.diagcab is not working.


This is about all. We hope that one of the solutions we presented in this article will help you solve the wushowhide.diagcab not working on your device.

Please let us know in the comments section below if you have additional recommendations or suggestions, we would love to hear them.

FIX: Asus bandwidth limiter not working

Most of the Asus routers come with a built-in bandwidth limiter feature out of the box. However, several users have reported the Asus bandwidth limiter not working issue when setting up the feature.

The bandwidth limiter allows the user to control and monitor Internet traffic. This issue can occur on new and existing Asus routers, and the reasons can vary, including incorrect network configuration and hardware failure.

In this article, we take a look at a few troubleshooting steps to help you resolve the Asus bandwidth limiter not working problem quickly.

How do I fix the Asus bandwidth limiter not working?

1. Use a third-party bandwidth limiter 

While the built-in bandwidth limiter offers basic network monitoring and traffic control features, specialized bandwidth limiter software like PRTG Network Monitor is an excellent tool for network monitoring and traffic management.

PRTG Network Monitor specializes in capturing networking traffic in multiple ways. It uses protocols such as SNMP, packet sniffing, and NetFlow to help you manage and monitor your network.

On the routers that support Netflow, sFlow, or jFlow, you can use PRTG Network Monitor to control bandwidth usage. Compared to packet sniffing, protocol-based bandwidth control reduces CPU loads on the server.

PRTG Network Monitor

PRTG Network Monitor

Limit your bandwidth and monitor your network like a pro with PRTG Network Monitor software.
Free trialVisit website

2. Disable IPv6 on Asus router

  1. Make sure you are connected to your router’s administrator page. To do this, open a web browser and enter the following address:
    https://192.168.1.1/
  2. Log in with your Asus credentials. If you haven’t changed the password or username, enter the default username Admin and password as the password.
  3. Once logged in, expand the Advanced Settings section from the left pane.
  4. Open the IPv6 tab under Advanced Settings.
    Asus bandwidth limiter not working
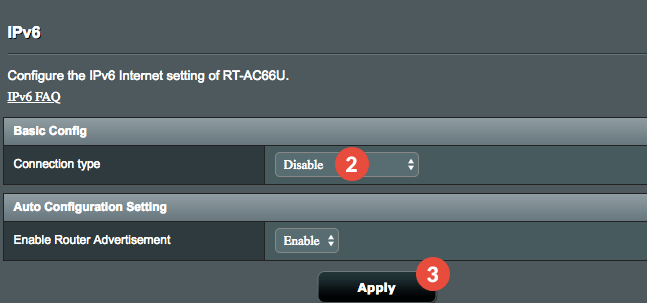
  5. Under Basic Config, and click the drop-down menu for Connection Type.
  6. Choose Disable from the drop-down menu.
  7. Click Apply to save the changes.
  8. Once the changes are applied, reboot the router. To do this, open the Reboot tab from the Asus router control panel and then click on Reboot.
  9. Confirm the action by clicking on Yes/Reboot and wait for the router to restart.

Next, restart your PC. Connect your computer to the network and check if the Asus bandwidth limiter not working issue is resolved.

According to Asus, the network bandwidth limiter stops working if you turn on IPv6. This is due to the bandwidth limiter not supporting IPv6 for the router.

3. Disable NAT Acceleration 

  1. Login to your Asus router’s admin panel. To do this, open a web browser, enter the following IP address in the address bar, and hit Enter.
    https://192.168.1.1/
  2. Once on the login page, enter your credentials and log in.
  3. From the admin panel, expand the Advanced Settings sections from the left pane.
  4. Open the LAN tab.
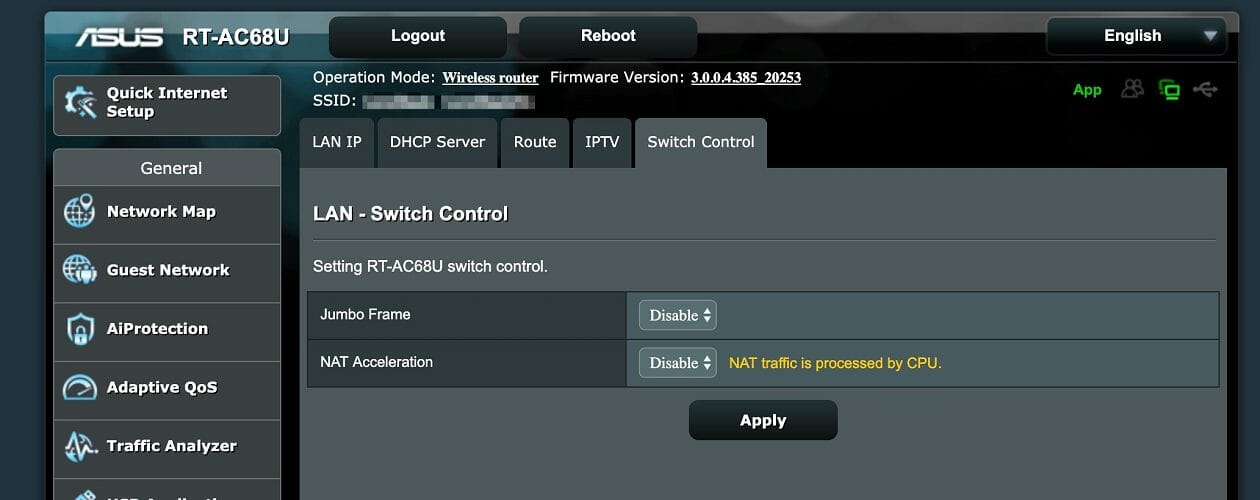
  5. Next, open the Switch Control tab.
    Asus bandwidth limiter not working
  6. Click the drop-down menu for NAT Acceleration.
  7. Choose Disable from the list of options. 
  8. Once disabled, click the Apply button to save the changes.
  9. Next, open the Reboot tab and then reboot your router.

After the reboot is complete, reconnect your router and check if the Asus bandwidth limiter not working problem is resolved.

NAT acceleration is a set of hardware tools and software features to speed up a fast Internet connection on NAT routers.

Asus routers support both QoS bandwidth limiter and NAT acceleration functions. However, these two functions cannot work at the same time. So, if you want to use a bandwidth limiter, make sure NAT acceleration is disabled.


4. Update Asus router firmware 

  1. Open your web browser and navigate to the WebGUI page.
  2. Enter your login username and password on the login page and click Sign In.
  3. A pop-up message will appear at the upper right content of your Asus admin panel if a new firmware update is available.
  4. Click the Update Now button. Or go to Administrator and open the System page.
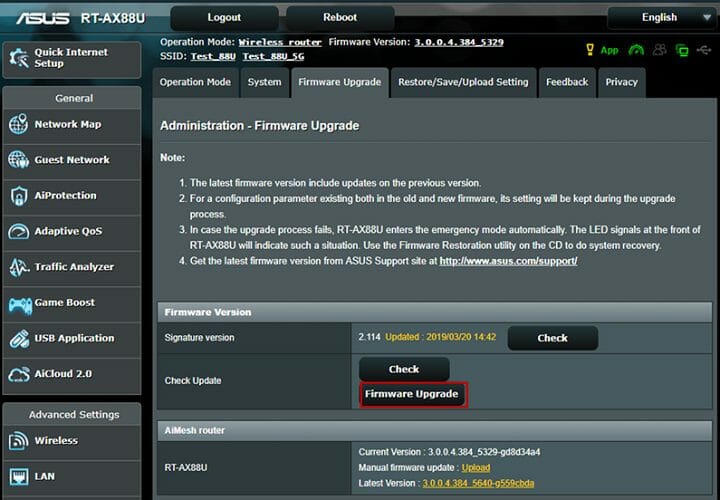
  5. Click on the Firmware Upgrade tab.
  6. Click on the Firmware Upgrade button under the Firmware Version section.
  7. The router will download and start installing the latest firmware for the device. The update may take a few minutes, so wait till it is complete.
    Asus bandwidth limiter not working
  8. Once the update is installed, you may have to sign in to the WebGUI page again.
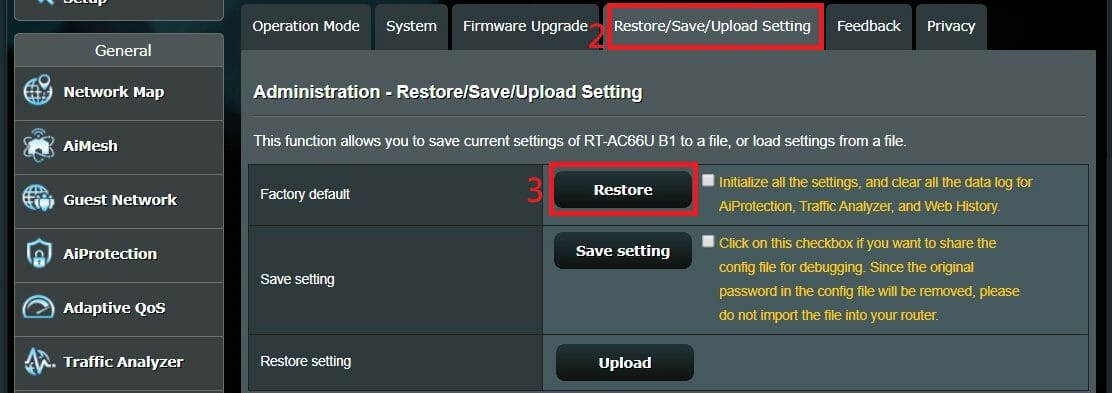
  9. Next, go to Administrator and open the Restore/Save/Upload Setting tab.
  10. Click the Restore button for Factory Default.
  11. Click OK when a pop-up appears to confirm the action.
  12. Once the Reset is complete, log in to the Asus admin panel and set up your router again.
  13. Try enabling the Bandwidth limiter and check if the feature works as intended.

The Asus bandwidth limiter not working issue in your router can occur due to several reasons. First, make sure the NAT acceleration is disabled, and turn off IPv6 as it is not supported by the bandwidth limiter feature.

Additionally, use a specialized bandwidth limiter for advanced network monitoring and control features. As a last resort, update and reset your router settings to fix the issue.

VirtualBox not detecting USB in Windows 10/11 [Full Guide]

If for example, you want to backup data to an external drive or transfer data between virtual machines that aren’t on the same subnet, then you need the USB to work with VirtualBox.

Unfortunately, this does not seem to be the case from the start, and USB doesn’t work without small adjustments which are very frustrating for users. This happens in VirtualBox but it can happen with other virtual machine software as well.

In this article we will explore how you can fix the VirtualBox not detecting USB in Windows 10 in just a few easy steps, so make sure to keep on reading.

How can I fix VirtualBox not detecting USB in Windows 10?

1. Install the latest VirtualBox

  1. Visit the VirtualBox website.
  2. Go to the Download section and click on Windows hosts.
  3. Download the new version and run the setup file.

If this method doesn’t work, you might have to remove VirtualBox. You can remove it just like any other application, or you can use a dedicated tool such as CCleaner to make sure all files an registry entries related to it are removed.

⇒ Get CCleaner

2. Install the Extension Pack

  1. Click File and go to Preferences.
  2. Here, click on the Extension tab and then click the + button.
  3. Next, navigate to the place where you saved the Extension Pack.
  4. Select the Extension Pack and click Open.
  5. Click the Install button when asked.
  6. Scroll through the EULA and then click I Agree.
  7. Allow the installation to complete.

After doing that, check if Virtualbox not detecting USB issue is still there.

3. Activate USB support

  1. Open VirtualBox and right-click on the virtual machine that needs USB access.
  2. Next, click on Settings.
  3. Locate USB in the VM window and click on it.
  4. The USB should appear as available.
  5. Click on the + button located under the USB Device Filter to add a new device.
  6. That is all, when you start the Virtual Machine it should now have access to the USB.

By following the exact steps we’ve indicated in this article you should be able to complexly solve the VirtualBox not detecting USB in Windows 10.

Which of the solutions presented above worked best for you? Please let us know in the comments section below if you have additional recommendations or suggestions.

Surface Laptop 4 prices and release date for Europe leak

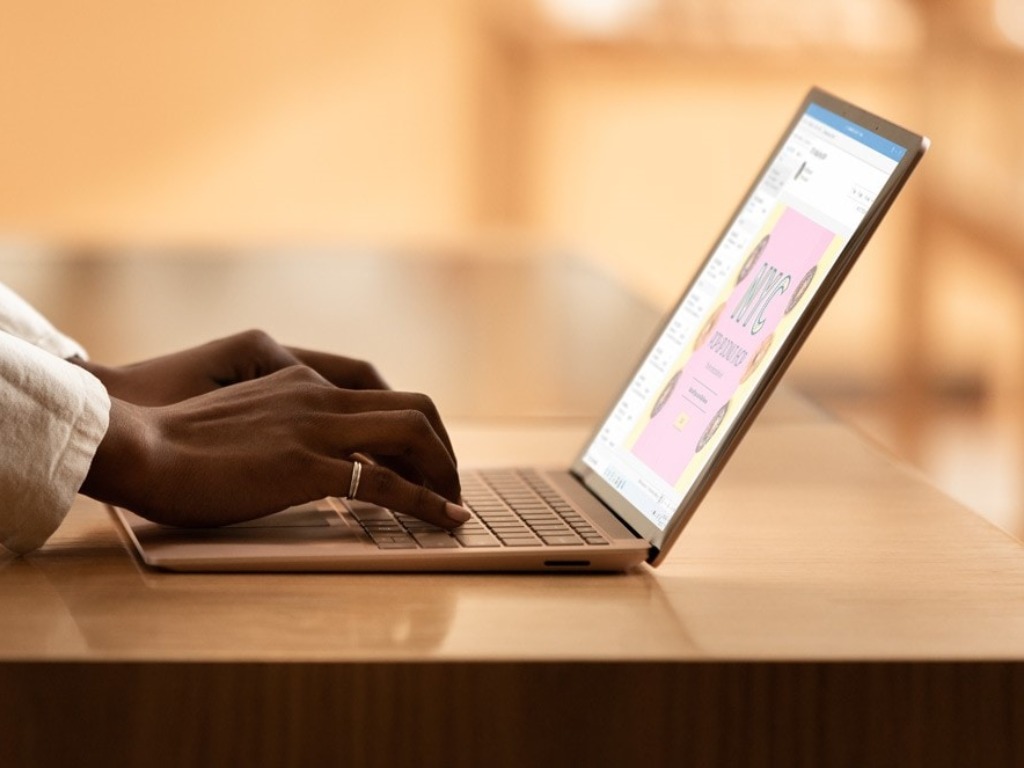
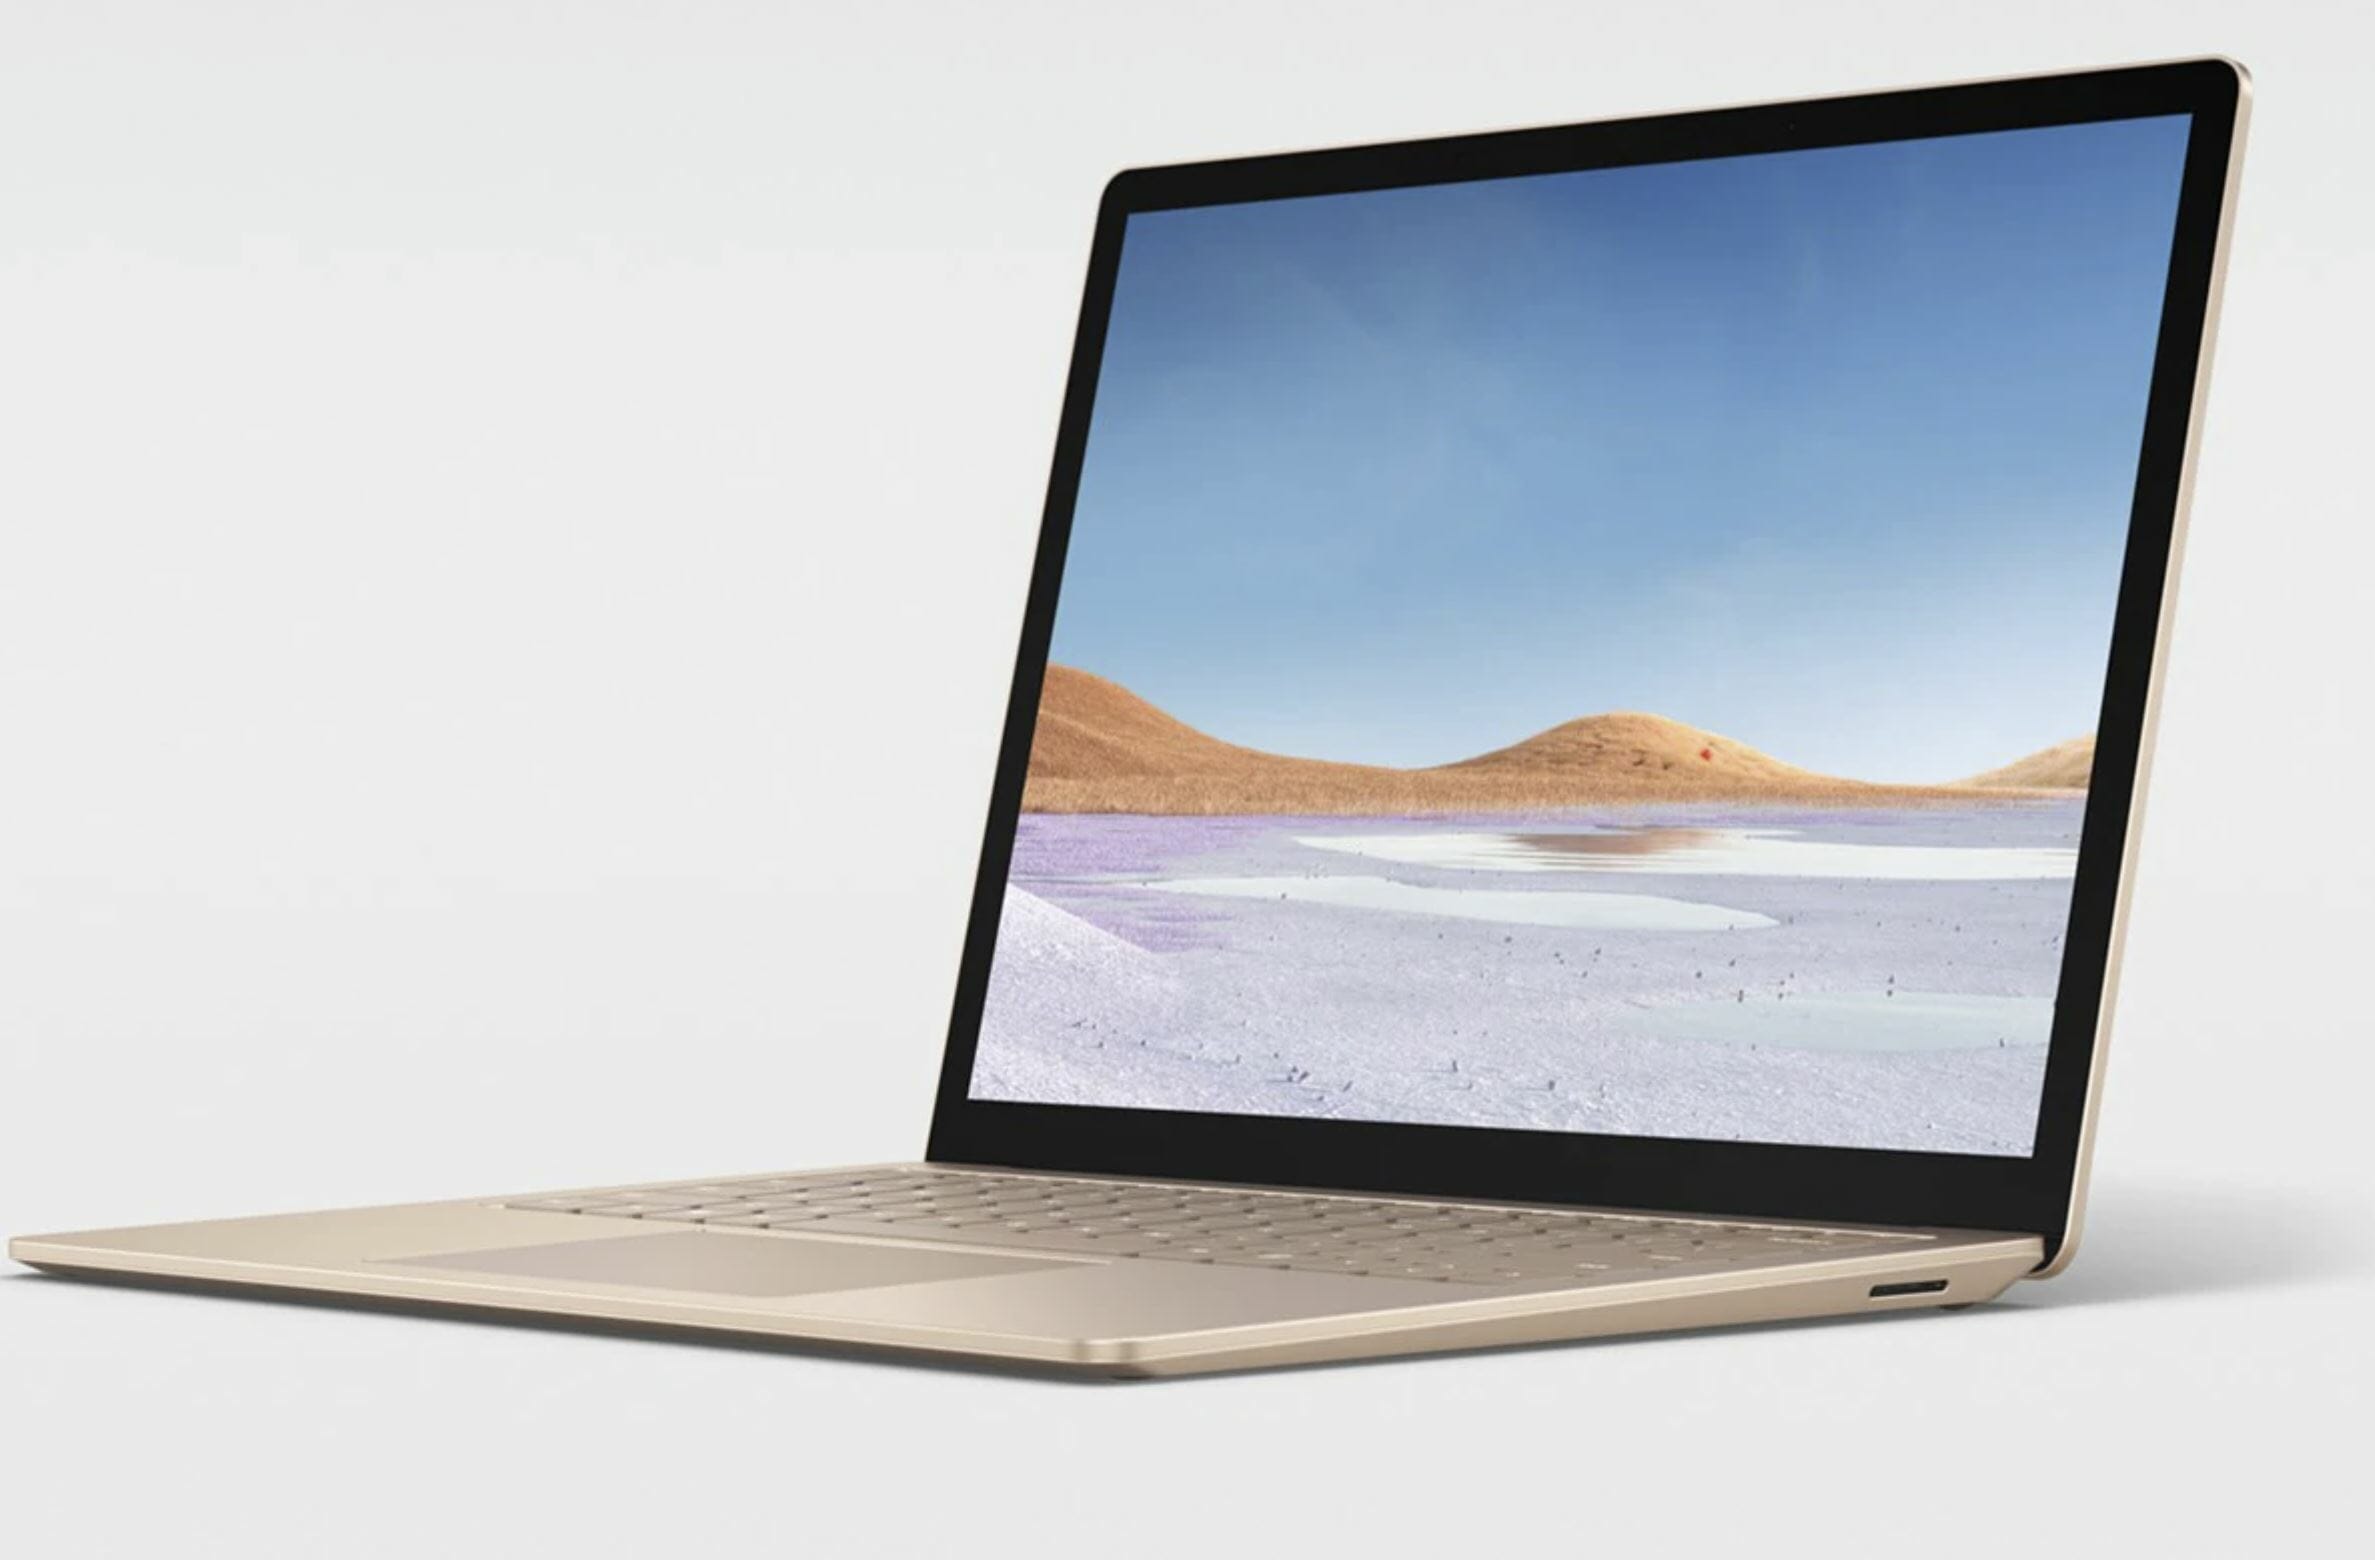
As Microsoft is expected to announce a refresh of its Surface Laptop line very soon, a new report from Winfuture’s Roland Quandt revealed the pricing details and the release date for the Surface Laptop 4 in Europe, which could start shipping in the old continent on April 27.

The report doesn’t include pricing details for all different configurations of the Surface Laptop 4, but the 13.5 model with an AMD Ryzen 5 processor, 8GB of RAM, and 256 GB of storage could start at €1,149. In the US, Quandt is reporting that the base Core i5 model with just 128GB of storage could start at $999, but European prices for this model are still unknown.

The 15” Surface Laptop 3 was the first Surface device to offer AMD processors back in October 2019, but the Surface Laptop 4 will offer the choice between Intel and AMD chips on both 13” and 15” configurations. For Intel models, Microsoft opted for 11th-gen Core i5 and i7 chips with Iris Plus Graphics 950, and not the more powerful Iris Xe Graphics found on the Surface Pro 7+ released earlier this year. For AMD models, Microsoft apparently chose Ryzen 5 4680 U and Ryzen 7 4980 U Surface Edition chips, which aren’t the newer Ryzen 5000U series we previously speculated.

According to Quandt, the Intel variants of the Surface Laptop 4 could be a bit more expensive than their Intel counterparts: As an example, there’s a $100 difference between the “15 Surface Laptop 4 with a Ryzen 7 processor, 16GB of RAM and 512GB of storage, and its Intel variant with the same amount of RAM and storage but a Core i7 processor that is apparently worth an extra $100.

It’s also worth noting that only the 15” Intel models of the Surface Laptop 4 will offer up to 1TB of SSD storage and 32 GB of RAM, with the AMD variants only allowing up to 16GB of RAM and 512 GB of storage. You can find more details about the different Surface Laptop 4 models Quandt found below:

  • Surface Laptop 4 13.5 i5 8 GB 512GB: 1499 Euro
  • Surface Laptop 4 13.5 i5 16 GB 512GB: 1699 Euro (?)
  • Surface Laptop 4 13.5 i7 16 GB 512GB: 1899 Euro
  • Surface Laptop 4 13.5 Ryzen 5 SE 8 GB 256GB: 1149 Euro
  • Surface Laptop 4 13.5 Ryzen 5 SE 16 GB 256GB: 1399 Euro
  • Surface Laptop 4 15 i7 16 GB 512GB: 1999 Euro
  • Surface Laptop 4 15 i7 32 GB 1TB: 2699 Euro (?)
  • Surface Laptop 4 15 Ryzen 7SE 8 GB 256GB: 1499 Euro
  • Surface Laptop 4 15 Ryzen 7SE 8 GB 512GB: 1699 Euro
  • Surface Laptop 4 15 Ryzen 7SE 16 GB 512GB: 1899 Euro

Compared to the Surface Laptop 3, the Surface Laptop 4 isn’t expected to introduce any design changes except for the possible addition of a new “Cobalt Blue” color. Other than that, the Surface Laptop 4 should bring a minor spec bump to the product line, and power users looking for a “Pro” version of the Laptop with a dedicated GPU will need to look at the Surface Book 3 with its optional NVIDIA GPUs.

Fix: Antivirus blocking iTunes on Windows 10/11

Securing your Windows 10 system with a specialized third-party antivirus solution is more than recommended, but when these security programs are interfering with the built-in functionality of your personal apps, you must find the best way in which to resolve software conflict.

The goal is to fix the issues caused by the security features without disabling the actual security engine.

In that matter, we can bring into our debate the iTunes example. Apparently, users reported that certain antivirus programs are blocking iTunes, which means that the Apple software is perceived as a potential security breach.

Well, we all know that we can safely use iTunes on our Windows 10 devices, so we are dealing with a Firewall false positive, or with a Firewall misinterpretation.

Antivirus blocking iTunes: what to do first

Anyway, before rushing to conclusions, you need to make sure that iTunes is indeed blocked by your antivirus, as there might be other problems in the middle of this situation.

Thus, the first thing you should do is to temporarily disable the Firewall protection (also, you can temporarily turn off the antivirus protection).

Then, initiate a system reboot and run iTunes. If the software is now running without problems it means that it was previously blocked by your security solution; otherwise, you should look for answers somewhere else.

Turn your security protection back on. Afterward, follow the next troubleshooting steps and learn how to add a Firewall exception for iTunes. That’s how you can manage to enable iTunes full functionality while still using your antivirus software.

Note: the steps from below are explained for the most common antivirus platforms that are currently available for the Windows 10 system.


How can I fix antivirus is blocking iTunes?

1. ESET HOME Security Essential

  1. Open ESET HOME Security Essential.
  2. Click Setup and navigate to Network Protection.Unblock iTunes in ESET
  3. Click on the Troubleshooting wizard option.Antivirus blocking iTunes
  4. Locate iTunes in the list and click Unblock.Fix the antivirus blocking iTunes on Windows 10 error
  5. Click Done.Fix error of antivirus blocking iTunes in Windows 10

If you notice iTunes missing from that list, then you must verify the temporary IP address blacklist. If the IP address of iTunes was blacklisted, you must allow the communication directly from that list. 

Verify the temporary IP address blacklist:

  1. Open ESET HOME Security Essential .
  2. Click Setup and choose Network Protection.Antivirus blocking iTunes on Windows 10
  3. Select and click Temporary IP address blacklist.Antivirus blocking iTunes
  4. Choose the IP address of the iTunes app that you will allow and then click on Add exception.Antivirus blocking iTunes on Windows 10
  5. The iTunes IP address is removed from the Temporary IP address blacklist and able to connect to the home network.

⇒ Get ESET HOME Security Essential

2. Avast Free Antivirus

This image has an empty alt attribute; its file name is Avast-Banner-Bun-Varianta-2-1.png
  1. You need to run Avast on your computer.
  2. Access general Settings.
  3. From the left pane click on the General tab.
  4. In the main pane scroll down until you find the Exclusions field.
  5. There add the iTunes executable file within the ‘File paths’ section.
  6. Now, Avast will be excluded from future antivirus scans so it should successfully run without other problems.

⇒ Get Avast Free Antivirus


3. Avira Antivirus

This image has an empty alt attribute; its file name is Avira-banner-3.png
  1. From your task bar click on the Avira icon.
  2. Next, from the Avira main window click on Extras and then go to Configuration.
  3. From the left pane double-click on Internet Protection.
  4. Extend Windows Firewall and then Network profiles.
  5. Pick up Application rules and set up a new rule for the iTunes client.
  6. Save your changes and reboot your Windows 10 system.
  7. Now you should be able to successfully use iTunes on your device.

⇒ Get Avira Antivirus


4. Bitdefender

  1. Run the Bitdefender main user interface on your computer.
  2. Access the Protection field from the left sidebar.
  3. Click on the View Features link.add exclusions in Bitdefender
  4. The Firewall feature can be accessed from settings – so from the upper-right corner click on the Settings icon.
  5. From Firewall switch to Rules tab.
  6. The programs that have rules already created will be displayed there.
  7. For adding a new rule for iTunes or for any other Apple-associated software you need to click on Add Rule.
  8. Enter the .exe executable file when asked and save your changes.
  9. That should be all; now iTunes should work without further issues.

⇒ Get Bitdefender


5. Kaspersky Standard

  1. Right-click on the Kaspersky icon located in the system tray.
  2. From the list that will be displayed, click on Settings.
  3. The Kaspersky Settings window will be displayed.
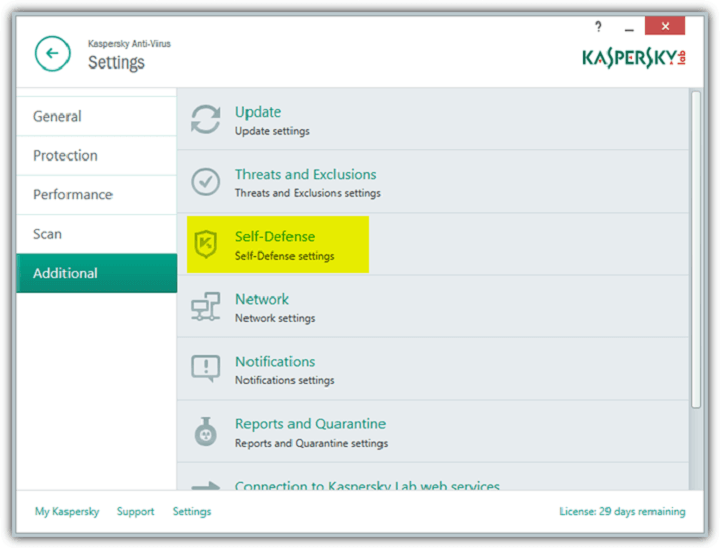
  4. From there access Threats and exclusions.add exclusions in Kaspersky
  5. Under the Exclusions field click on Settings.
  6. Select the Add button and follow on-screen prompts for picking up and settings iTunes as a new Firewall rule.

⇒ Get Kaspersky Standard


6. Norton AntiVirus Plus

  1. Open the Norton antivirus engine on your Windows 10 device.
  2. From the upper-right corner of that window click on Settings.
  3. From the Settings window go to the Smart Firewall field.
  4. Under Smart Firewall access Program Control – click on Configure.
  5. A list of options will be displayed; choose Add.
  6. Search for the iTunes executable file.
  7. Add this file to the exclusion list.
  8. Save your changes and that’s it.

⇒ Get Norton AntiVirus Plus


7. AVG Antivirus

antivirus compatible with w10
  1. Double-click on the AVG icon located on desktop.
  2. From the AVG main window click on Menu and access Settings.
  3. From Settings, click on Components – this field is located in the left pane of the main window.
  4. Locate the File shield entry (it should be the first one) and click on Customize.
  5. Next, select the Exceptions tab and browse the iTunes executable file.
  6. Click Add in the end and save everything.
  7. Reboot your computer and verify the iTunes functionality.

⇒ Get AVG Antivirus


8. Windows Defender

  1. Open Windows Defender: click on the Windows Search icon (its Cortana icon) and in the search field enter Windows Defender.
  2. From your antivirus user interface select the Virus & threat protection field.
  3. Then, navigate towards Virus & threat protection settings.
  4. Select Add or remove exclusions.
  5. Pick up Add an exclusion and follow on-screen prompts for including the iTunes apps in the exclusion list.

Additionally, allow iTunes access from built-in Firewall:

  1. Right-click on the Windows Start icon.
  2. From the list that shows up click on Control Panel.
  3. In Control Panel switch to category and then click on System and Security.
  4. From the left pane choose Windows Firewall.
  5. Click the Allow an app or feature through Windows Firewall link.
  6. Pick up Change Settings and follow other on-screen prompts for adding iTunes within your Firewall exclusion list.

So, this is how you can add a Firewall rule for iTunes for several antivirus programs that are used on a daily basis on the Windows 10 system. 

If your device is running on a different security platform try to find similar settings in order to re-enable the iTunes functionality.

If you cannot manage to fix this security malfunction, try to describe your issue in detail in the comments field available below. Based on these details, we will then try to find the perfect troubleshooting solutions for you.

Enjoy and stay close for further tutorials and Windows 10 tips and tricks.

Microsoft just killed its Windows 10 Translator app

Well, that happened quickly. Less than a month ago, Microsoft announced that it would be shutting down its Windows 10 Microsoft Translator app in favor of a web experience on April 8th and, well, the day has arrived and the app is now no longer available to download from the Microsoft Store app store (though its app page is still live.)

“The Microsoft Translator app for Windows desktop will no longer be available for download, beginning April 8, 2021,” the original statement read. “If you have already downloaded the desktop app, it will continue to work however technical support and updates to the service will no longer be provided. This does not affect any other translation features in Microsoft products that use the Microsoft Translator service.”

As stated, none of the other Microsoft Translator tools have been affected. For example, both the iOS and Android Translator apps are still functional and should continue to receive updates going forward. The relatively new web experience, which is accessible on all devices via any web browser, also supports all of the functionality of the Windows 10 app and will gain even more features going forward.

Microsoft Translator started out as a basic text translation app though has since evolved into a genuinely powerful real-time speech interpretation tool with a number of use cases.

Are you disappointed to see the Microsoft Translator app disappear? Share your thoughts with the community in the comments below and then follow us on Twitter and Pinterest for more Microsoft app news.

Norton Security Settings won’t open? Try this

Regardless of what version of Windows you are running, data safety should be the number one concern for everyone.

For example, Windows Defender is a very solid choice for Windows 10 users, but sometimes a bit of extra help can always be handy. Using a third-party antivirus tool will take you a long way.

One such antivirus program is Norton, and it is among the most popular antivirus programs available today. However, some users have been reporting that they are having issues with Norton:

I have Norton 360 running on Windows 10.  The settings option will not open.  The 30 day report does and so does help.

Given how the Settings options hold most of the antivirus‘ functionality, not being able to access it can be quite a problem.

That is why we’ve created this list of fixes that you should try in case your Norton Settings menu won’t open either.

How do I open the Norton Security Settings again?

1. Perform a PC restart

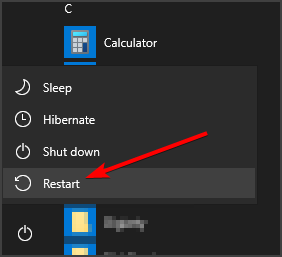
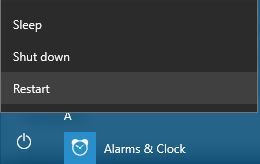
  1. Press the Start menu button.
  2. Press the Power button and choose Restart.
  3. Wait for the PC to restart.

This is the go-to solution that you should try, especially if you’ve just finished installing Norton 360. Regardless of what type of software you install, an app, or game, always restart the PC afterward.

If your Windows 10 computer doesn’t want to shut down, you might have a serious problem. In order to fix it, use the solutions from our dedicated guide.

2. Disable Fast Startup in Windows 10

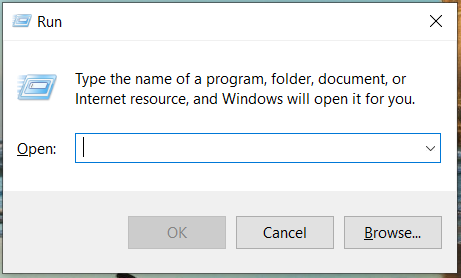
  1. Press Start and type in run. The Run window will now open.
  2. Type in control.exe and press Enter. This will open the Control Panel.
  3. Go to Power Options.
  4. Select Choose what the power buttons do .
  5. Click Change settings that are currently unavailable.Change settings that are currently unavailable
  6. If you are prompted by the User Account Control windows, press Yes.
  7. Under Shutdown settings, uncheck the Turn on fast startup box.fast startup
  8. Click the Save changes button.
  9. Restart the PC.

The Fast Startup feature is enabled by default in all Windows computers. However, it doesn’t always work as excpeted, and might interfere with some software from your computer.

If the Norton error Your computer has a fix in progress appears after you restart the PC, check our detailed guide in order to solve the issue.

3. Remove and Reinstall Norton 360

  1. Download the Norton Remove and Reinstall Tool.
  2. After you’ve read the license agreement, click Agree.
  3. Select the option Remove & Reinstall.
  4. Click Continue or Remove (varies depending on the version).
  5. Select the Restart Now option when prompted.
  6. Follow the on-screen instructions to reinstall Norton.
  7. Reboot your PC again.

Norton Remove and Reinstall is a dedicated tool that was created to help Norton users to easily reinstall the antivirus on Windows 10 computer.

Firstly, the tool uninstalls Norton and after the computer restarts, it automatically install the latest version of the software. Reinstalling the antivirus can be helpful for the error.

4. Use another reliable third-party antivirus

Norton offers great security protection for your computer. But, if you encounter multiple issues and errors, you may want to try another best antivirus software.

This tool is AI-based, meaning that it learns continuously how to offer a better security for your computer. It is also trusted by millions of users already,

This antivirus will protect your computer and other devices against all types of malware, ransomware, and other online threats you can think of.

Furthermore, you can rest assured that no other computer program or pop-ups will disturb you while playing due to its Gamer Mode.

⇒ Get TotalAV

By following the steps we described above, you should now be able to access Norton’s Security Settings menu without any more issues.

There are various other solutions to keep your computer safe from cyber threats. If you want to learn more about them, check our detailed guide.

If you’re aware of another way to solve this problem, share it in the comments section below so that other users can try it, as well.

Some updates were cancelled blocks Windows 10/11 installation

Every new Windows 10 build brings a slew of bug fixes and improvements that make the OS more stable and reliable. Unfortunately, it also brings issues of its own, as many users report.

One particular issue drew our attention, as it’s affecting quite a significant number of users and their systems.

Many users have reported that they couldn’t upgrade Windows 10 on their computers due to an annoying error message informing them that the update has been cancelled.

How can I fix the Some updates were cancelled error?

1. Delete the registry key

  1. Press the Windows key + R shortcut, type regedit, and hit the Enter key.
  2. Navigate to and select the following registry key: HKEY_LOCAL_MACHINE\SOFTWARE\Microsoft\Windows\CurrentVersion\WindowsUpdate\Auto Update\RequestedAppCategories\8b24b027-1dee-babb-9a95-3517dfb9c552

4. Delete the selected registry key.
5. Reboot your PC.
6. Re-scan for updates.

Insiders confirmed that this solution completely eliminates the update bug, allowing them to install the latest Windows 10 build.

2. Apply a .reg hack

  1. Open Notepad.
  2. Paste the following registry keys in the new file:[HKEY_LOCAL_MACHINE\SOFTWARE\Microsoft\Windows\CurrentVersion\WindowsUpdate\OSUpgrade]"AllowOSUpgrade"=dword:00000000 [HKEY_LOCAL_MACHINE\SOFTWARE\Microsoft\Windows\CurrentVersion\WindowsUpdate\OSUpgrade\State]"OSUpgradeState"=dword:00000001 [HKEY_LOCAL_MACHINE\SOFTWARE\Policies\Microsoft\Windows\WindowsUpdate]"DisableOSUpgrade"=dword:00000001
  3. Save the file as a .reg file type.
  4. Execute the reg file by right-clicking it and selecting Merge from the options.

Note: You need to apply this .reg hack after you uninstall the problematic update and before rebooting your system.

You need to know that this procedure will disable the updates so apply it only if absolutely necessary.

3. Reinstall the update

  1. Type %windir% in Windows search and hit Enter.
  2. Look for the SoftwareDistribution folder and rename it as SoftwareDistributionOld.
  3. Type update and click on Check for updates from results.
  4. Click on View updates history.
  5. In the next window you will see all the updates previously installed on your system. Click on Uninstall updates.
  6. Locate the problematic update.
  7. Go to the Microsoft Update Catalog, search for that specific build number and download it on your PC.
  8. Run the update to install it again on your computer.

This procedure will help you reinstall the update directly from the Microsoft Update Catalog and it worked for many users so try it out.

4. Uninstall the update and check for updates again

  1. View update history as indicated in the previous solution.
  2. Click on Uninstall updates.
  3. Locate the problematic update, click on it and select the Uninstall button above.
  4. Restart your PC.
  5. Type update in Windows search and click on Check for updates.
  6. Click on the Check for updates button.
  7. Install all available updates and restart your PC for the changes to take effect.

This is another way of reinstalling the problematic update and although it didn’t work for all the users, it wouldn’t hurt to try.

This is it! We hope that our solutions helped you fix the Some updates were cancelled. We’ll keep trying in case new updates become available error.

Should you have any other suggestions or solutions, don’t hesitate to leave them in a comment on the dedicated section below.

What is CCSDK.exe? How do I remove it? We have the answers

CCSDK.exe, also known as CCSDK Customer Engagement Service is bloatware that is commonly present on Lenovo computers.

However, some malware codes disguise as CCSDK.exe itself and perform unknown operations in the background such as monitoring applications or using ports to connect to either the Internet or LAN.

In addition, CCSDK.exe is not essential for Windows OS giving it a potentially unwanted program (PUP) status.

Hence, Windows Report Team highly recommends that you remove CCSDK.exe from your Windows PC.

How do I remove CCSDK.exe?

  1. Recommended tasks to perform after removing CCSDK.exe
  2. Use an Uninstaller
  3. Use an antivirus

1. Recommended tasks to perform after removing CCSDK.exe

After performing uninstall of CCSDK.exe from your Lenovo PC. We do recommend that you carry out the following operations:

Run a full system scan

Run a full system scan on your PC to remove every possible virus corruption. There are several third-party antivirus software around that you may use.

You can also use Windows’ built-in antivirus, Windows Defender.

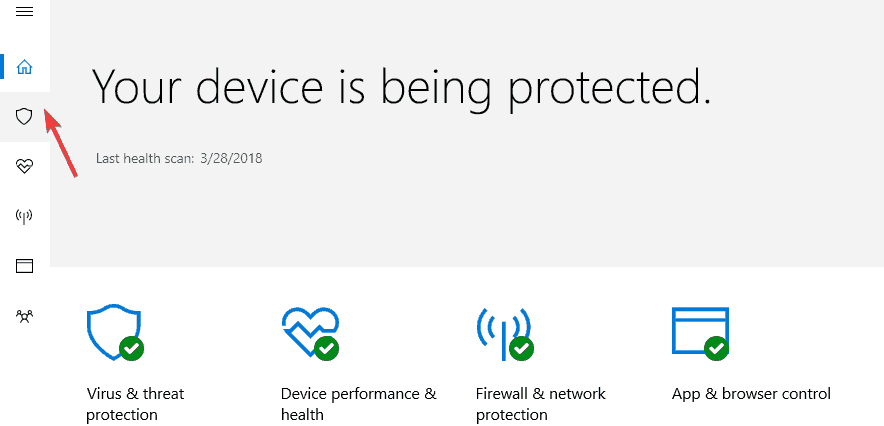
  1. Go to Start then type defender.
  2. Double click Windows Defender to launch the tool.
  3. In the left hand pane, select the shield icon.windows defender
  4. In the new window, click the Advanced scan option.
  5. Check the full scan option to launch a full system malware scan.

Alternatively, we strongly suggest you check out some of the best antivirus software for your Windows PC and install them on your computer.

Perform an SFC Scan

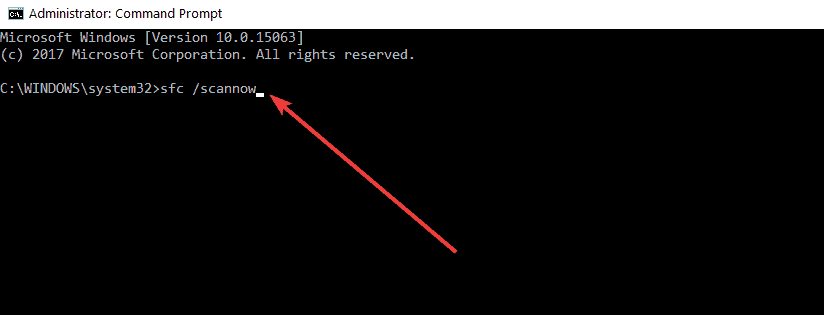
  1. Go to Start then type cmd.
  2. Right-click Command Prompt and select run as administrator.
  3. Now, type the following command: sfc /scannowSFC scan
  4. Wait for the scanning process to complete and then restart your computer.
    • All corrupted files will be replaced on reboot.

This utility program verifies the integrity of all system files and repairs files with problems when possible.

If your SFC scan stops in the middle of scanning, check out this thorough article dedicated to fixing the problem in no time.

Run Windows Update

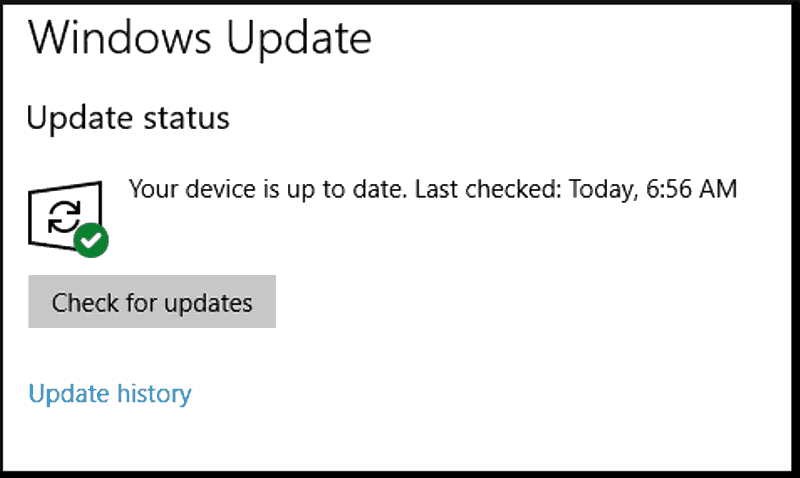
  1. Go to Start then type update in the search box.
  2. Select Windows Update to proceed.
  3. In the Windows Update window, select Check for updates and install the available updates.ccsdk exe
  4. After the update is complete, restart your Windows PC.

Microsoft constantly releases Windows updates so as to improve the system’s stability and fix various issues and errors on your PC.

2. Use an uninstaller

Since CCSDK.exe is an executable, it means that it is in many ways a program, a program that you can uninstall if you find it to be too annoying.

However, CCSDK.exe isn’t something that you will find in your list of installed software, so getting rid of it will be trickier unless of course, you are using a dedicated removal tool.

A specialized tool like an uninstaller software will detect anything on your PC, from common programs to Store apps and browser extensions, and remove them entirely.

Additionally, it will also clean your PC of any leftover files that would otherwise stay there and take up storage space.

3. Use an antivirus

Another means of removing CCSDK.exe  is by using third-party antivirus software. This program will scan and remove PUPs from your computer, especially CCSDK.exe.

The program has advanced AI that will scan your PC for malware and will find even disguised files. Next, it will quarantine or remove it accordingly.

Keep in mind that you need to use software that is known and trusted by people throughout the world. We suggest buying the best you can find.

Besides protecting your device from virus infections of all kinds, the program will also keep your data safe, and ensure nobody else has access to your sensible information.

Regarding the CCSDX.eve error, the solution is simple. Download the software, install it, then let the program do the job and run its course.

TotalAV

TotalAV has proven countless times that it will find and remove the most hidden viruses.
Check Price Visit Website

That’s about it for this article. We hope you learned how to deal with CCSDK on your Windows 10 Lenovo PC.

We’d love to hear from you. Share in the comments section below how you were able to remove the CCSDK.exe program from your PC.

Turn ON/OFF Cloud Delivered Protection in Windows

While the Windows 10 Creators Update brings a bevy of new features and improvements, not all users actually like them.

As a matter of fact, many users don’t want to use Windows Defender‘s Cloud-Based Protection and also refuse to turn on Automatic Sample Submission.

However, if you don’t enable these features, Windows Defender displays a yellow triangle with an exclamation mark in the Notifications tray.

What is Cloud-delivered protection?

If you enable cloud protection, any patches for malware problems can be sent to your device over the cloud within minutes, rather than having to wait until the next update is released.

Actually, many users have been confused by this weird yellow triangle and couldn’t find a proper explanation as to why it constantly appeared on the screen.

Now that they know why the warning occurs, many want to simply disable Cloud-Based Protection and Automatic Submission notifications.

The problem is that turning off these warnings is a challenge in itself since there is no dedicated option for that.

We’ve scoured the almighty Internet and found a few solutions to disable Windows Defender’s Cloud-delivered protection notifications.

How do I turn off cloud-based and automatic submission?

1. Disable them from Task Manager

  1. To turn off Cloud-delivered protection is off managed by your administrator, right-click on the taskbar to open the Task Manager.
  2. Go to the Start-up tab – locate these two features.
  3. Disable them.
  4. Restart your computer.

Because these features start once your computer is up and running, you should be able to find them in the StartUp tab from Task Manager.

If Task Manager is not working on your Windows 10 computer, don’t panic. Check our dedicated guide and fix the problem with ease.

2. Use the Group Policy Editor

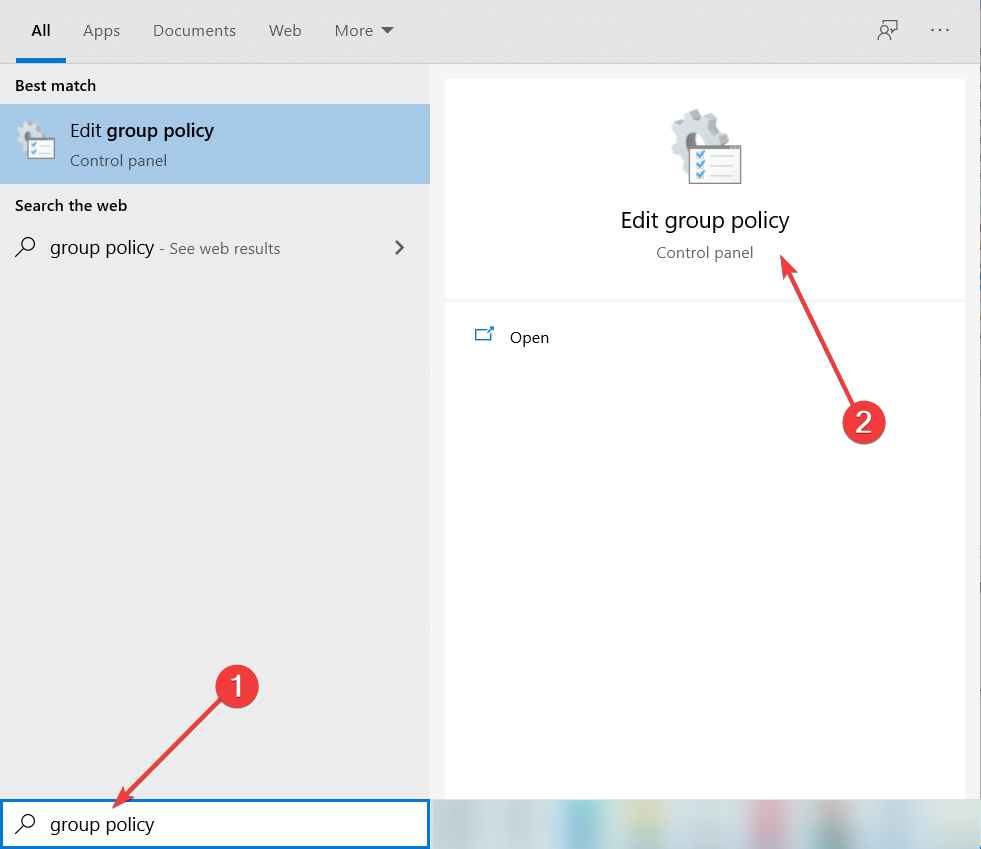
  1. Go to Start and type group policy.
  2. Select Edit Group Policy.
  3. Go to: Computer Configuration - Administrative Templates - Windows Components - Windows Defender Antivirus - MAPS
  4. Disable the following features: Join Microsoft MAPS and Send file samples when further analysis is required.
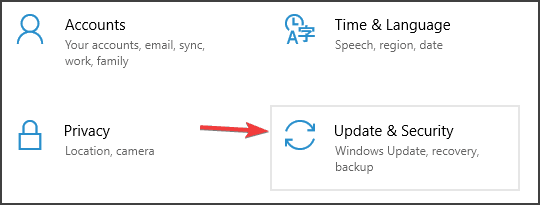
  5. Press Windows + I keys combination to open Settings.
  6. Go to Update and Security.
  7. From the left pane select Windows Security.
  8. Click on Firewall and network protection.browser working but not apps
  9. Disable Firewall profiles( domain, private and public).
  10. Restart your computer.

MAPS is the abbreviation for Microsoft Advanced Protection Service, and it is a cloud protection service, improving real-time protection. 

It is also an online community, where users sent information about malicious software, PUPs, spyware, and other details to Microsoft. The purpose is to stop the spread of computer viruses.

Group Policy is an excellent method to modify computer settings. If you want to learn more about how to edit them, check our comprehensive guide.

3. Use the Registry Editor for Windows 10 Home

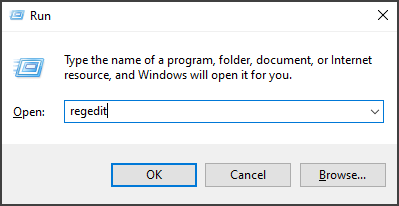
  1. Launch Run.
  2. Type regedit and hit Enter.
  3. Go to the following path: HKEY_LOCAL_MACHINE/SOFTWARE/Policies/Microsof/tWindows Defender
  4. Under the Windows Defender key, create a new key – name it Spynet.
  5. In the right-hand pane, create a new DWORD SubmitSamplesConsent – set its value to 2.
  6. Create a new DWORD SpynetReporting – set its value to 0

Windows 10 Home doesn’t support the Group Policy Editor. If you’re running this OS, use the Registry Editor for this task.

4. Prevent Defender from loading health reports

  1. Go to Start, type services, and launch Services.
  2. Locate these three services: Diagnostic Policy Service, Diagnostic Services Host, Diagnostic System Host.
  3. Right-click each service and select Properties.
  4. On each service, change Startup Type to disabled – click OK. If the services are currently running, click Stop to close the services and then disable them.
  5. Restart your computer.

These services aim to detect and troubleshoot the potential problems for the components of your Windows, and network connectivity issues.

We hope one of these solutions helps you get rid of Windows Defender’s yellow triangle warning along with the Cloud-Based and Automatic Sample Submission notifications.

Windows Defender is a great built-in security solution, but it offers only basic options. We recommend you to use any of these dedicated antiviruses compatible with Windows 10.

If you have any other solutions or suggestions that we should include in our guide, please feel free to write them in a comment below. 

How to Recover Your PC After a Malware Infection

Malware infections can be a serious problem, especially if malware spreads through your Windows 10 PC. There are many types of malware; while some are just annoying, others can be rather dangerous.

If your PC is infected, today we’re going to show you a few tips to recover your PC after a malware infection, as well as the best data recovery software that you can use.

How do I remove malware from my Windows 10 PC? The easiest solution is through Safe Mode. Usually, malware can end up on your PC from your browser or some downloaded files.

If that doesn’t work, use a live antivirus rescue disk to disable suspicious startup items.

For more information on how to do that, check the complete guide below.

How can I delete malware from my Windows 10 PC for good?

1. Enter Safe Mode

  1. Click the Start icon followed by the Power button, then hold Shift on your keyboard, and choose Restart from the menu.
    recover-pc-after-malware-infection-safe-mode-1
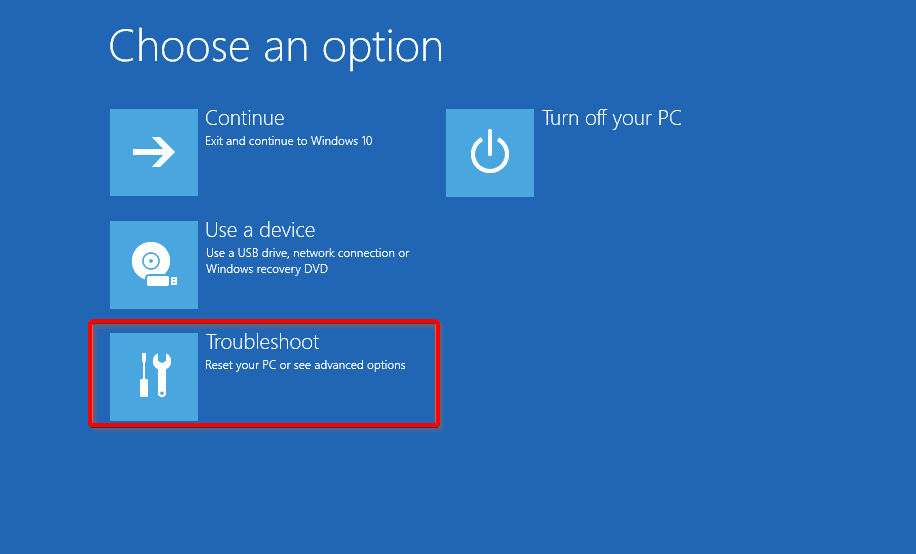
  2. Choose Troubleshooting followed by Advanced Options. troubleshoot restart to repair drive errors
  3. Select Startup Settings, then click the Restart button.startup-sett iobit folder uninstall
  4. After your PC restarts, you’ll see a list of options. Select Safe Mode by pressing the corresponding key, which is usually F4.

If you have malware issues, you might be able to solve them simply by entering Safe Mode. This mode starts with only basic services and applications, so by entering Safe Mode you can prevent the malware from running.

If you can’t enter Windows 10 at all, you can enter Safe Mode simply by restarting your PC during the boot sequence. While Windows 10 boots, simply press the restart button on your PC.

Repeat this process several times until the Automatic Repair starts. After that, simply follow the steps above to enter Safe Mode.

After you enter Safe Mode, run your antivirus tool and try to delete the malicious files. In some cases you might even have to locate the file and delete it manually.

If you decide to do that, be sure to hold Shift to permanently delete the file from your computer.

2. Delete temporary files

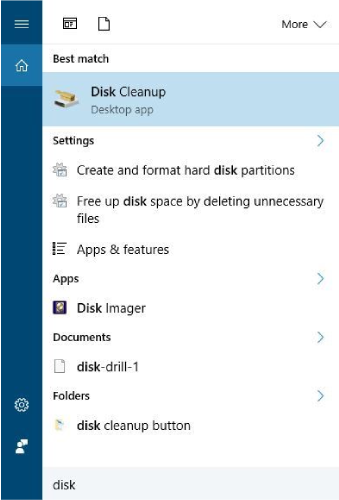
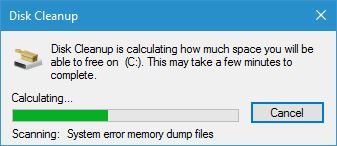
  1. Press Windows Key + S and enter disk cleanup. Select Disk Cleanup from the list of results.
    recover-pc-after-malware-infection-disk-cleanup-1
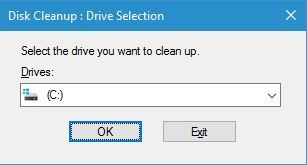
  2. Now you need to select the drive that you want to clean up. In most cases, temporary files are stored on your C drive, so be sure to select C: and click OK.
    recover-pc-after-malware-infection-disk-cleanup-2
  3. Wait for a few moments while Disk Cleanup scans the selected drive.
    recover-pc-after-malware-infection-disk-cleanup-3
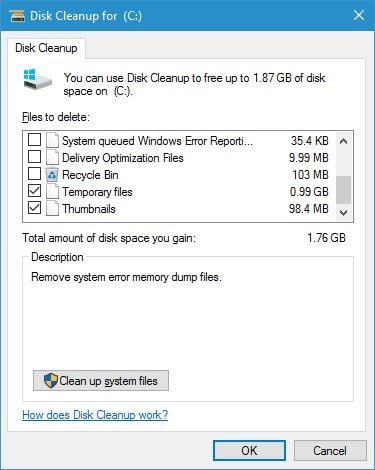
  4. Select the type of files that you want to remove. Be sure to select Temporary files from the list.
    recover-pc-after-malware-infection-disk-cleanup-4
  5. Click OK and click the Delete Files button.
  6. Wait while Disk Cleanup removes the selected files.

Users are suggesting to remove temporary files if you wish to remove malware from your PC. Malware sometimes hides itself in Temporary files folder and in order to remove it, it’s recommended to delete temporary files.

This is rather simple, and you can do it simply by using Disk Cleanup tool.

Keep in mind that removing temporary files doesn’t always fix the malware problems, but it won’t hurt you to try it.

3. Scan your PC with an antivirus tool

If you wonder how to remove a virus from your PC, you first need to perform a detailed scan with your antivirus software.

Depending on the partition size and your search options, the scanning process can take a while, so you’ll need to be patient.

We recommend a professional software package that accurately responds to the needs of every modern user. It protects your privacy when you use the Internet to work, shop, communicate, and perform online banking.

When it comes to sensitive data, passwords, online payments, webcams, and smart home devices, all of these are related to your privacy. This antivirus does a great job securing them.

It uses multilayered protection to protect your operating system from viruses, malware and ransomware. It offers you safety in online banking and purchasing, and keeps your children away from exposure to offensive online content.

TotalAV

Allow TotalAV to protect your computer from viruses, malware, and ransomware and to secure your private data.
Check Price Visit Website

4. Check your web browser

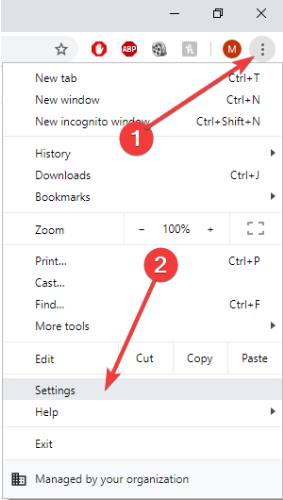
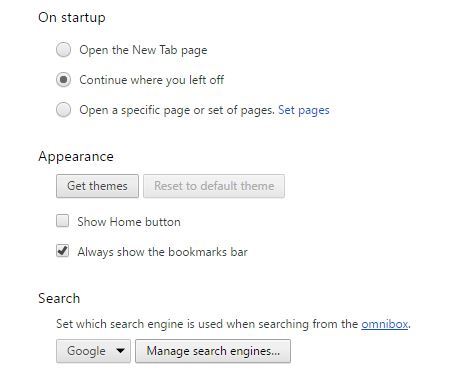
  1. Click the Menu button and choose Settings.remove malware windows 10
  2. Now click the Manage search engines button in the Search section.
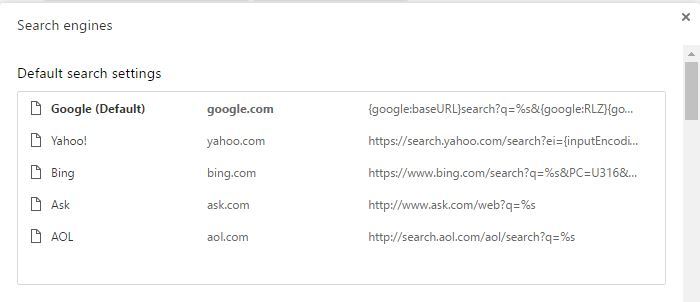
    recover-pc-after-malware-infection-settings-2
  3. A list of all available search engines will appear. Make sure to select your desired search engine and set it as default. If you see any unknown or suspicious entries on the list, be sure to remove them.
    recover-pc-after-malware-infection-settings-3
  4. After doing that, restart your browser and check if the problem is resolved.

Sometimes, malware will hijack your browser and open a certain page instead of your start page. In addition, your default search engine might be changed as well.

If this happens, you need to open your browser settings and restore them to default.

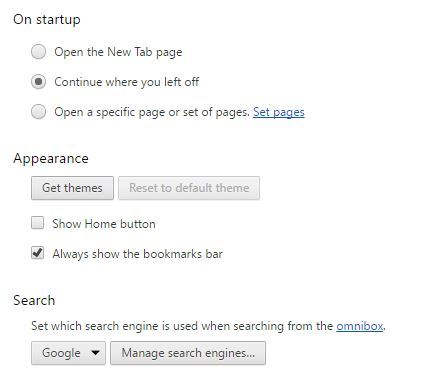
If your default search engine isn’t affected, check the startup pages. To do that, open the Settings tab and follow these steps:

  1. In On startup section make sure that Open a specific page or set of pages isn’t selected.
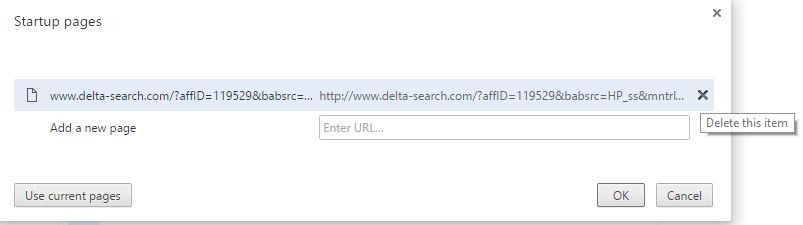
  2. Click Set pages.
    recover-pc-after-malware-infection-startup-1
  3. If you see any unknown entries, just click the X button to remove them.
    recover-pc-after-malware-infection-startup-2
  4. After that, click OK to save changes and restart your browser.

Malware can also disguise itself as a browser extension, so it’s recommended that you remove all unknown or suspicious extensions. To do that, follow these simple steps:

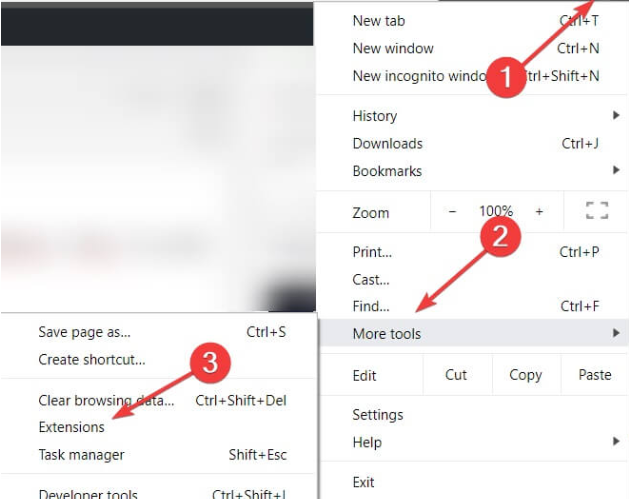
  1. Click the Menu button and choose More Tools.
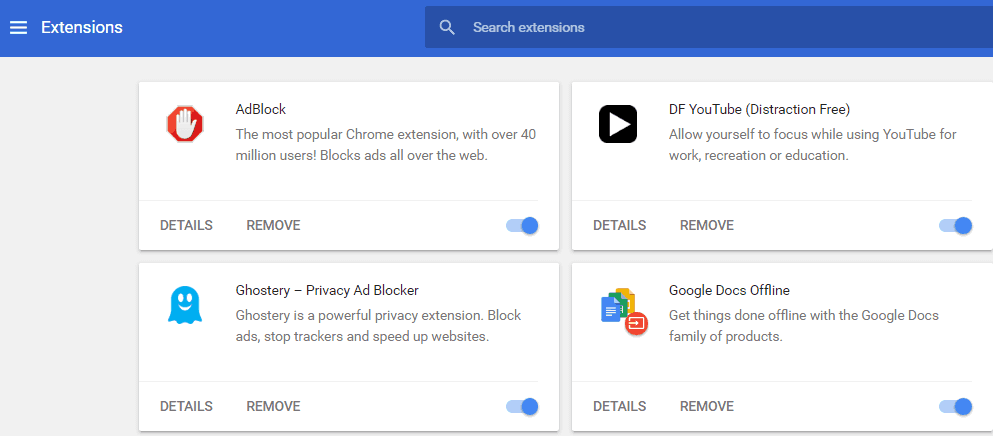
  2. Select Extensions from the list on the left.Recover your PC after a malware infection
  3. The list of all installed extensions will now appear. Locate any suspicious extensions and click the Remove button next to them to delete them from your PC.chrome extensions
  4. After removing suspicious extensions, restart your browser and check if the problem is resolved.

If the issue still persists, you might want to try resetting your browser to default settings. By resetting your browser, you’ll remove all installed extensions and revert all settings to default. To do that, follow these steps:

  1. Click the Menu button and choose Settings from the menu.
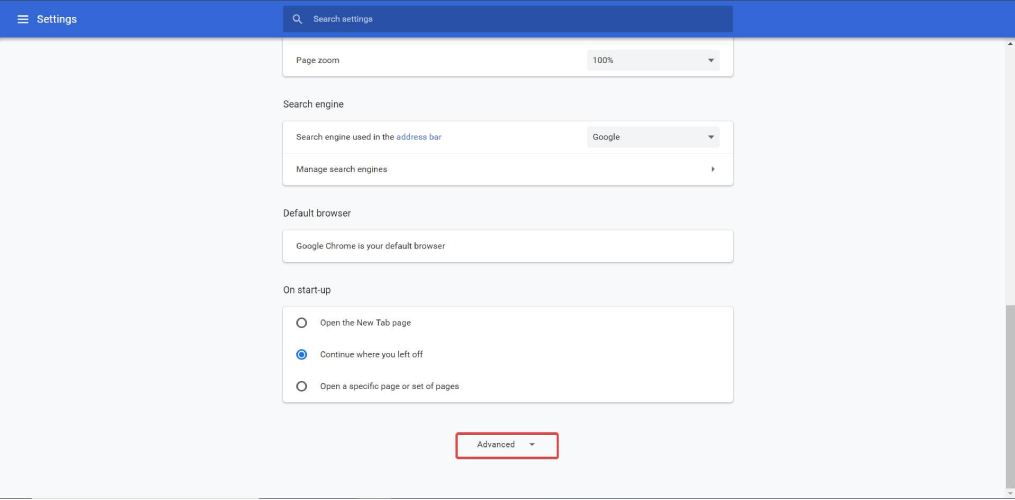
  2. When the Settings tab opens, scroll all the way down and click the Show advanced settings.delete malware in WIndows 10
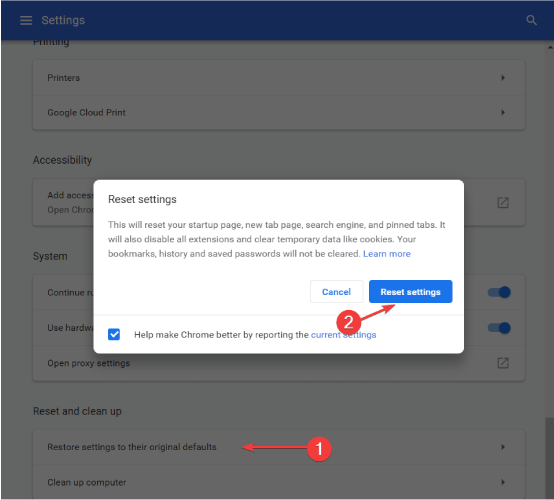
  3. Scroll all the way down and click the Reset settings button.how to remove malware from Chrome in Windows 10
  4. The confirmation menu will now appear. Click the Reset button to continue.

If you want to make this process faster, simply navigate to the following address in Chrome and you will see the reset confirmation dialog: chrome://settings/resetProfileSettings

After resetting your browser, all settings and extensions will be removed, and hopefully, the malware that infected your browser will be removed as well.

In our example, we showed you how to fix malware problems with Google Chrome, but if you use any other third-party browser, the process should be similar.

Prevent other browser malware like the waisheph adware using one of our top Chrome antivirus extensions.

5. Use a live antivirus rescue disk

If your computer can’t work properly or if you can’t boot to Windows 10, you might want to consider using a live antivirus rescue disk.

Many antivirus companies offer rescue disks for free, so you need to download one and burn it to a CD or create a bootable USB flash drive and use it to boot your PC from it.

Companies such as Kaspersky, Bitdefender, and Avira offer antivirus rescue disks, so you can download and use any of these or any other rescue disk that you want.

After booting the PC from the antivirus rescue disk, follow the instructions on the screen to scan and remove malicious files.

If you can’t access your PC and download an antivirus rescue disk, we suggest you download it using another available PC.

6. Disable suspicious startup items

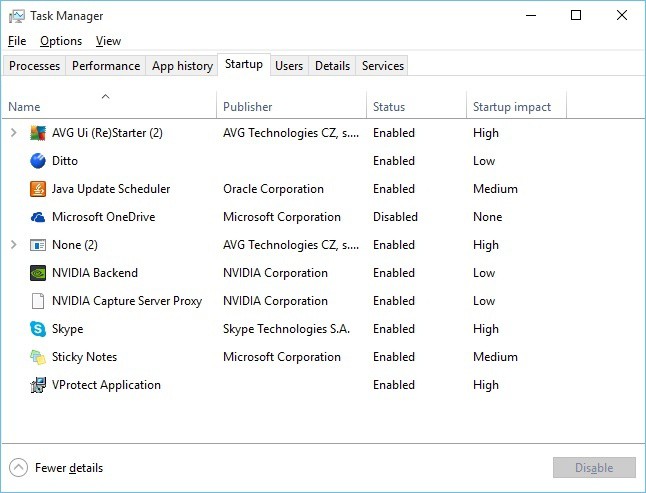
  1. Press Ctrl + Shift + Esc shortcut to open Task Manager.
  2. When Task Manager starts, go to the Startup tab.
  3. A list of all startup applications will now appear. If you notice any suspicious items, simply right-click them and choose Disable from the menu.remove startup malware in windows 10

Sometimes, malware disguises itself as a desktop application, and it will start automatically with your PC. To fix this problem, first, you need to disable the malware from automatically starting with your PC.

We also recommend that you uninstall any suspicious applications from your PC. As we already mentioned, malware can sometimes disguise itself as a regular application.

So, it’s important that you remove any suspicious applications. To do that, follow these steps:

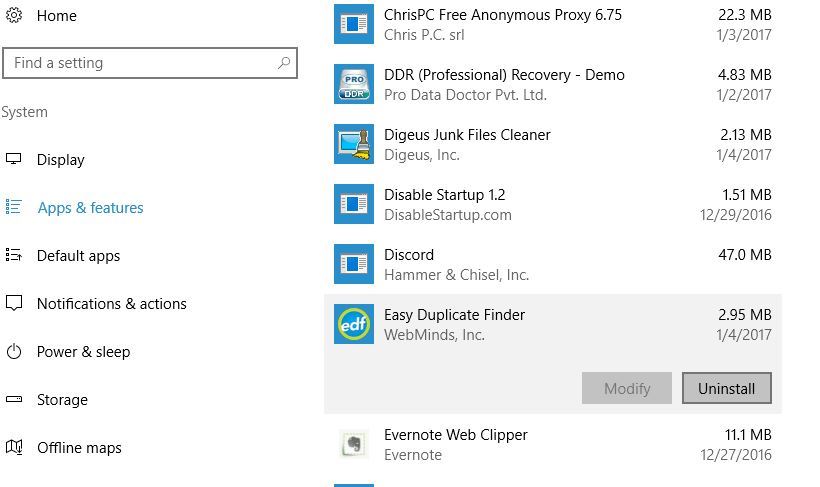
  1. Press Windows Key + I to open the Settings app.
  2. Go to System > Apps & features.
  3. The list of all installed applications will now appear.
  4. Check the list for any suspicious applications that you don’t recognize. Select the problematic application and click on Uninstall.
    recover-pc-after-malware-infection-uninstall-1

You can also uninstall applications by using Control Panel. To do that, follow these steps:

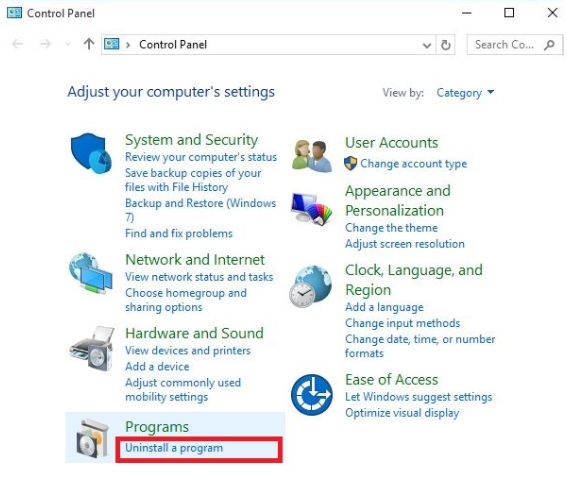
  1. Press Windows key + S and type Control Panel. Hit Enter.
  2. Go to Uninstall a program under Programs and simply select the application you want to remove and choose Uninstall/Change from the menu.delete malware control panel windows 10

7. Use Linux Live CD

If the problem with malware still persists, you might want to download any version of Linux and create a Live CD or bootable USB flash drive.

After you boot from the flash drive you’ll be able to access your system. After doing that, you can use Linux Live CD to navigate through your hard drive and delete the infected file manually.

8. Reset Windows 10

  1. Open the Start menu, click the Power button, then hold down Shift and choose Restart.
    • If you can’t access Windows 10, try restarting your PC several times during the boot sequence.
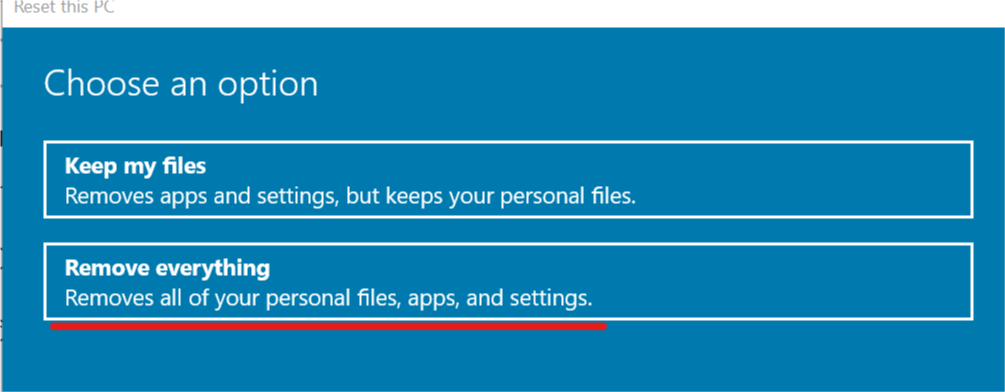
  2. You’ll see a list of options. Choose Troubleshoot > Reset this PC > Remove everything.
  3. Select your version of Windows and choose Only the drive where Windows is installed option.
  4. Now you can choose between two options.
    • Just remove my files option will delete all your files and applications from the drive and perform a quick format. Some of your files can be recovered by special software if you decide to use this option.
    • Fully clean the drive option will delete all your files and applications, but you won’t be able to recover them by using this method. In most cases, you can choose Just remove my files option to fix any problems with the malware.
  5. Now you just need to click the Reset button and the reset process will start.
  6. Follow the instructions on the screen in order to complete the reset.

If the issue still persists, you might have to reset Windows 10. By resetting Windows 10, all your files and applications will be removed, and hopefully, the malware will be removed as well.

Before you perform a Windows 10 reset we recommend to create a backup of all your important files. If you can’t access Windows 10 at all, you’ll have to use Linux Live CD to back up your important files.

Once your PC is running, be sure to download and install antivirus software and perform a system scan just in case. Before you transfer your backed-up files, be sure to scan them with your antivirus.

In order to prevent these types of problems in the future, be sure to update your antivirus frequently and download the latest Windows 10 updates.

Malware infection can be a serious problem sometimes.

There are different types of malware and while some malware might change your start page or search engine in your browser, others can cause serious problems.

If you have malware issues, be sure to try all the solutions from this article. If you have any other questions, don’t hesitate to reach for the comments section below.

FIX: Malwarebytes won’t update on Windows 10

The all-around protective nature of Malwarebytes put it at the top of the free antivirus tools market. The main Malwarebytes suite, besides dealing with those pesky viruses, also deals with PuPs and adware.

With both free and premium variations of the suite. However, the integration with Windows 10 (like with so many 3rd-party solutions) is failing users.

Namely, some of them are unable to update the Malwarebytes client, even after multiple tries.

We conveyed a search and provided you with some viable solutions. Give them a try and inform us if they work.

  1. Install updates manually
  2. Check Windows Firewall
  3. Use third-party software
  4. Update Windows
  5. Reinstall Malwarebytes

How can I fix the Malwarebytes fails to update error?

1. Install updates manually

malwarebytes won't update windows 10

Firstly, we need you to do one thing before installing updates manually. The first thing you should do is confirm that Windows Defender is disabled.

Two antimalware services with real-time protection enabled and working at the same time isn’t exactly a good idea.

With the initial installation, the system disables the Defender automatically, but that can change after a major update. Navigate to Windows Defender > Virus & threat protection > Virus & threat protection settings and disable Real-time protection.

After that, restart your PC and open Malwarebytes. Navigate to Settings and, under the Application tab, click Install application updates.

2. Check Windows Firewall

  1. In the Windows Search bar, type Allow and open Allow an app through Windows Firewall.malwarebytes won't update windows 10
  2. Click on the Change settings button.
  3. Click Allow another app.
  4. Navigate to the Malwarebytes installation folder and add the executable file.malwarebytes won't update windows 10
  5. Allow it to communicate freely with Public and Private networks.
  6. Confirm changes and restart your PC.
  7. Try updating Malwarebytes again.

Another thing worth inspecting is Windows Firewall. As we already mentioned in the preceding step, a major update can really make some essential changes to your system.

This includes meddling with your Firewall permissions. Some users reported instances when their VPN didn’t work as it was blocked by the Windows Firewall.

For that reason, we encourage you to navigate to Windows Firewall settings and allow Malwarebytes to freely communicate to an update server.

3. Use third-party software

When you encounter the issue when Malwarebytes won’t install in Windows 10, we recommend third-party software that will solve this problem.

There is a chance your operating system might be infected with viruses or malware.

Hence, using professional tools should clean your computer of any malicious apps and leave it in an optimized state.

Once the software has scanned and cleaned your Windows 10 of viruses, you are free to either use Malwarebytes again or keep using this application.

Whenever you browse the Internet, there are lots of online threats that can damage your operating system and cause your computer to have a poor performance.

Your privacy may also be compromised by unauthorized third parties.

You and all other modern users should benefit from advanced online protection against malicious software. Do not worry about your privacy when you use the online space to work, communicate, shop or do online banking with this performant solution.

⇒ Get TotalAV

4. Update Windows

  1. Open Settings.
  2. Choose Update & Security.malwarebytes won't update windows 10
  3. Click Check for updates.malwarebytes won't update windows 10
  4. Install all available updates and reboot your PC.
  5. Check whether the Malwarebytes client can update.

And, as a final note, we must remind you of the most usual cause of failing updates. Major Windows 10 updates are known for breaking third-party tools.

Most reports regarding the Malwarebytes updating issues emerged after a major update (specifically, Creators Update).

With that in mind, you should install system patches and updates as soon as possible. Hopefully, one of them should help you resolve the issue at hand.

To make sure that all updates are on point, we encourage you to check for updates manually. Follow the steps shown in this solution to check for Windows 10 updates.

5. Reinstall Malwarebytes

  1. Download Malwarebytes Cleanup Utility.
  2. Run the tool and accept the EULA terms.
  3. The tool with start with the uninstall procedure and will, eventually, ask for a reboot.
  4. Restart your PC.
  5. After the restart, choose to install the latest version of Malwarebytes.

Now, if you’ve ever installed a previous version of Malwarebytes (or any other antimalware software), the remaining associated files might corrupt the current installation.

Thus, some of the main features might not work as intended. This requires a complete reinstallation of the application.

But, as we already stated, the antivirus integrates much deeper than your usual third-party program. That’s why the good folks from Malwarebytes offer a special tool that should help you clean all the associated files.

Afterward, you can install the Malwarebytes suite and, hopefully, be able to update without any issues.

Finally, you can use the log file to share your concerns with the developer. You can post it as an attachment on the official forum. If the prior steps failed to resolve the issue, of course.

⇒ Get Malwarebytes


That’s it. If you’re still plagued by the same error and unable to retrieve the latest updates from Malwarebytes, make sure to share your concerns on their dedicated forum.

In addition, if you have any questions or suggestions, don’t shy away from posting them in the comments section below.

Microsoft Teams Rooms devices get custom backgrounds, Whiteboard integration, and more

Microsoft has announced a slew of new features for Teams Rooms devices, the dedicated calling and meeting room solutions for professional conference spaces or home offices. These updates are specifically available for the Android-powered integrated Teams Rooms devices containing speakers, mics, and a camera, as well as the optional Touch consoles providing desk controls for the meeting experience.

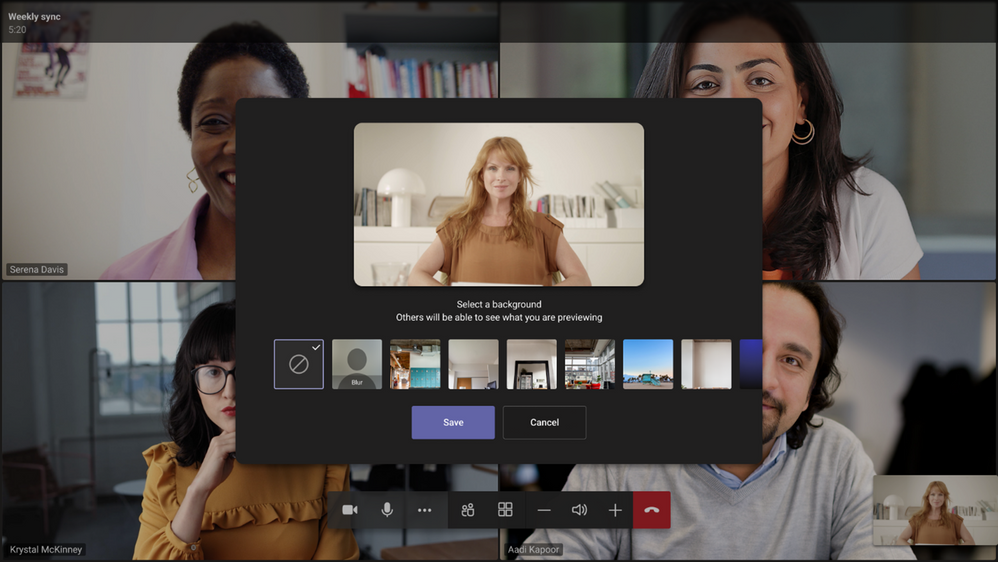
First off, Microsoft is adding some new capabilities for consumers (such as custom backgrounds and recordings) to help them better manage their meetings. Users who logged into a Teams Rooms on Android with a personal account will now be able to blur or completely replace the background of a video feed with a selection of preset images. To try out this feature, head to the ( … ) menu and choose a background image from the list. The selected background will persist across meetings.

thumbnail image 5 of blog post titled Microsoft Teams Rooms on Android | April 2021 Updates

Microsoft is also adding the ability to record meetings directly from Microsoft Teams Rooms devices. This should make it easier for users to catch up on important announcements after a meeting. In addition, the company has introduced a new whiteboard integration that enables users to start a whiteboarding session directly from their Teams devices. Currently, the recording option and whiteboard integration are only available for personal accounts, with support for the Shared account coming soon.

thumbnail image 6 of blog post titled Microsoft Teams Rooms on Android | April 2021 Updates

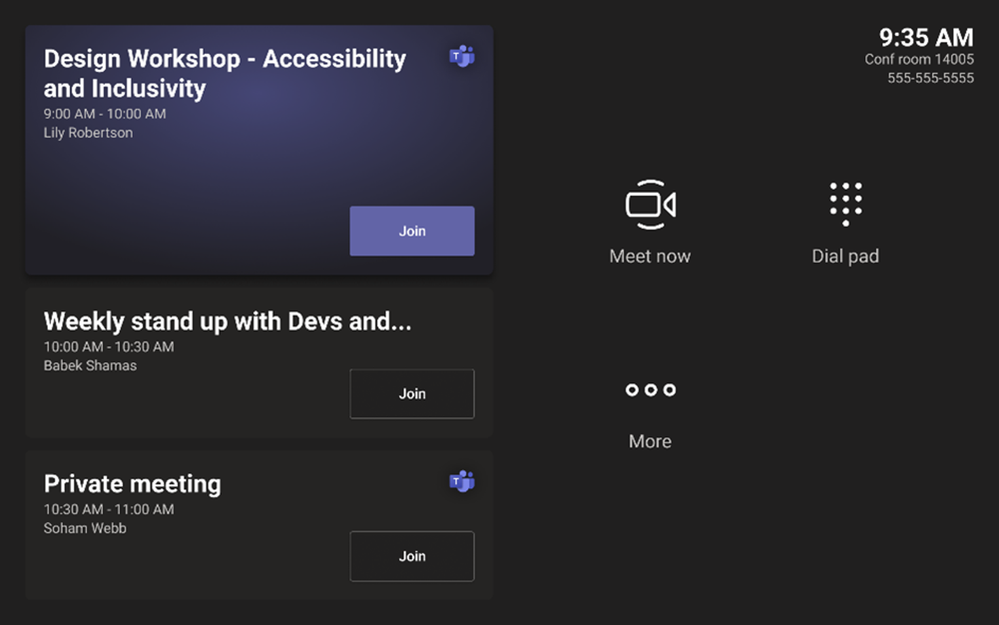
Next up is a new Calendar experience on the Home Screen, which makes it easier for users to keep track of their current and future meetings. Moreover, Microsoft has slightly changed the position of all the familiar controls (including Meet Now, Dial pad, and more), and users will now s them besides the calendar.

thumbnail image 3 of blog post titled Microsoft Teams Rooms on Android | April 2021 Updates

Finally, the touch console experience is getting some improvements. The new experience brings the ability to switch between gallery views and provides access to useful features like pinning live captions. The firm is advising users to contact their device manufacturers to check if the updated touch console experience is supported on their devices. If you’re interested to learn more on Teams Rooms devices, you can check out a list of various devices on Microsoft’s website.

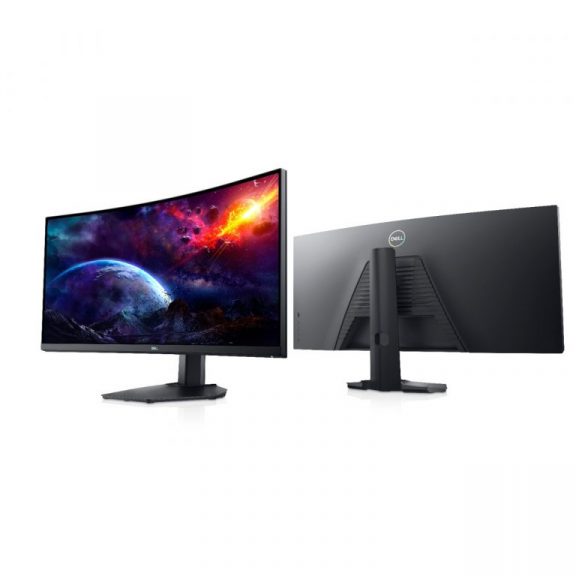
Dell 27 Video Conferencing Monitor review: The do it all Microsoft Teams monitor for any home or office setup

Back at CES 2021, Dell announced the Dell 27 Video Conferencing Monitor. If you missed it, this monitor was unlike any other in the company’s lineup. It was dubbed as the first 27-inch QHD video conferencing monitor certified for Microsoft Teams. You could simply tap the Teams button on the monitor, and pull up your chats and call, instantly.

The initial reveal happened in the middle of a pandemic, but the world hasn’t changed much since then, even with vaccines currently rolling out. Many people are still working from home, schooling from home, or depending on video calls in hybrid environments to keep in touch with family, friends, and coworkers. It’s become the new normal and the way to stay safe.

All that said, video conferencing is still important in our current times, as is having a monitor on your desk can expand your productivity, too.

That’s where the Dell 27 Video conferencing monitor comes into the picture. Dell was kind enough to send OnMSFT one for review. After spending a good two weeks with it, we’re certain it is a do-it-all monitor for work from home, and beyond.

Design

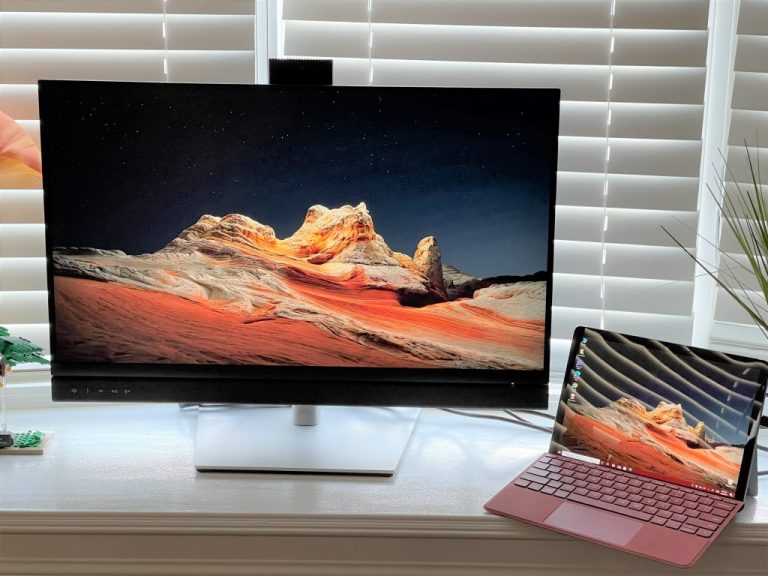
Like most modern Dell monitors, the Dell 27 Video Conferencing Monitor (which has a 2560 x 1440 resolution and 60 Hz refresh rate) sports a sleek design that fits in well with any desk or setup. I say this because the minute I took the display out of the box and set it up for our pictures, it felt quite welcoming.

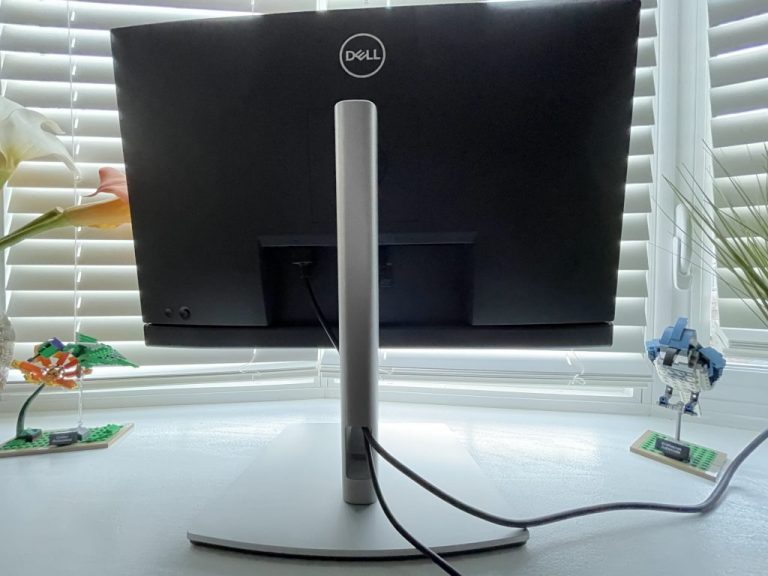
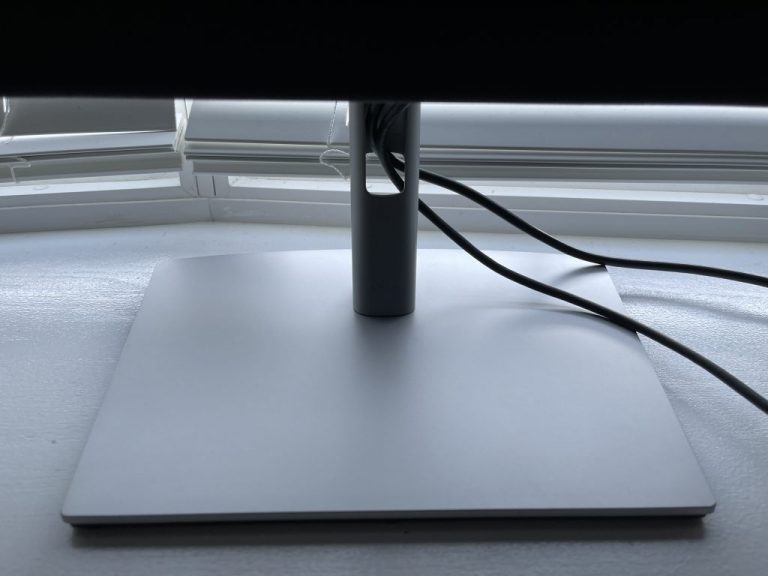
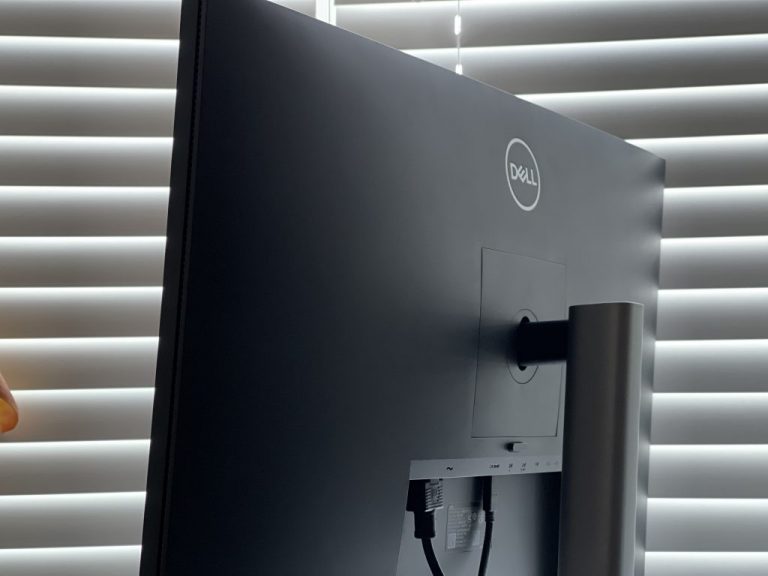
The trapezoid base is minimalistic, and the sleek (fairly thin) monitor arm snaps in easily into the back of the display during setup without any tools. There’s also a hole in the bottom of the arm so you can manage and direct your cables, too.

Note that the arm even lets you swivel the monitor left and right (from 45 degrees in each direction) or up and down-facing (5 to 21 degrees in each direction) without having to move the base itself. You can pull the arm up and down to adjust the monitor to your setup as well (up to 120 mm,) and even pivot the entire display so that it’s vertical, rather than horizontal.

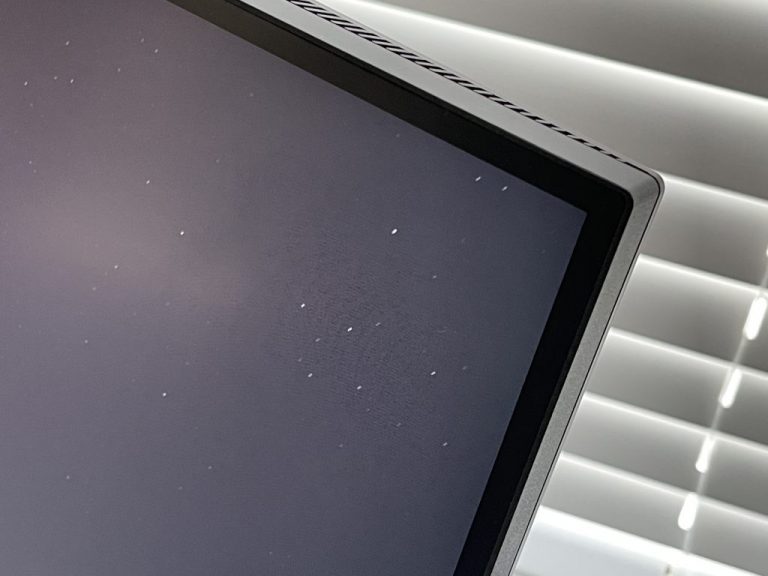
Then there are the slim bezels. These are barely noticeable on the sides, appearing just as a thin black strip. Other than the fabric speaker grills, it is one of the first things I noticed after powering the monitor on. The monitor definitely has that XPS 13 look, with three-sided narrow borders (except for its bottom chin, that is.)

Ports & buttons
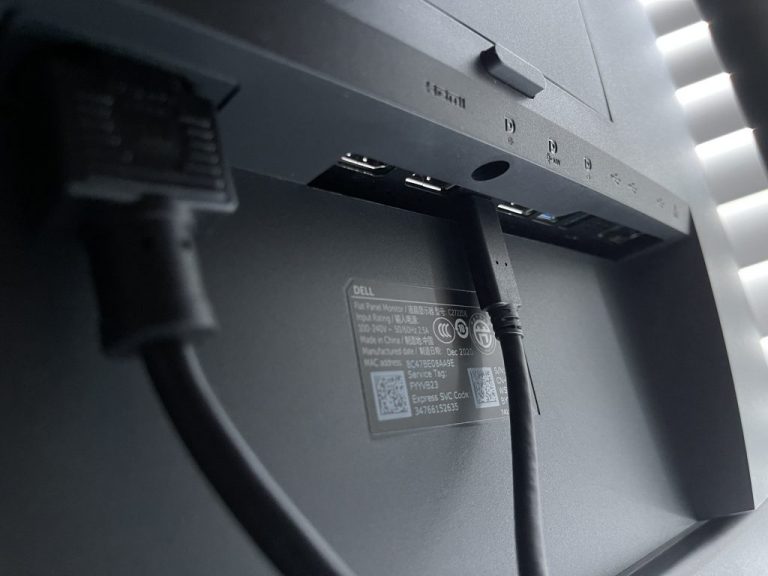
Dell 27 Monitor Rear Ports

But what about the ports? Much like the design, this monitor’s ports do not disappoint. There is a port for everything you need and in almost every corner, too. It is one of the keys to making the monitor a do-it-all hub for work from home and beyond.

Starting on the back of the monitor, you’ll find a security lock and the power connector. There’s then an HDMI 1.4 port, DisplayPort in (with an audio jack above it,) USB-C upstream, DisplayPort out, a USB-B upstream port, a Superspeed USB 3.2 Gen 1 port, another Superspeed USB 3.2 port, and an RJ45 connector.

There are two important notes here. First off, DisplayPort out can be used to daisy chain the monitor to another display if you want. The other note comes in relation to the USB-C port. It carries 90 watts of power and can charge some devices (like a Surface Pro or Go) that are attached via this cable, even when the monitor is off. The USB-C port can also be paired up with the RJ45 jack, too, so you can eliminate the need for hubs or dongles. This is what I ended up doing with my Surface Go 2.
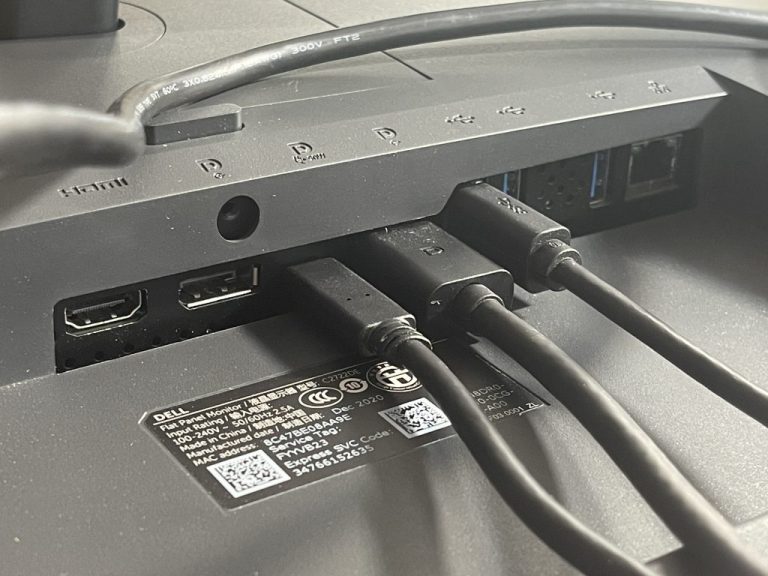
Img 5555

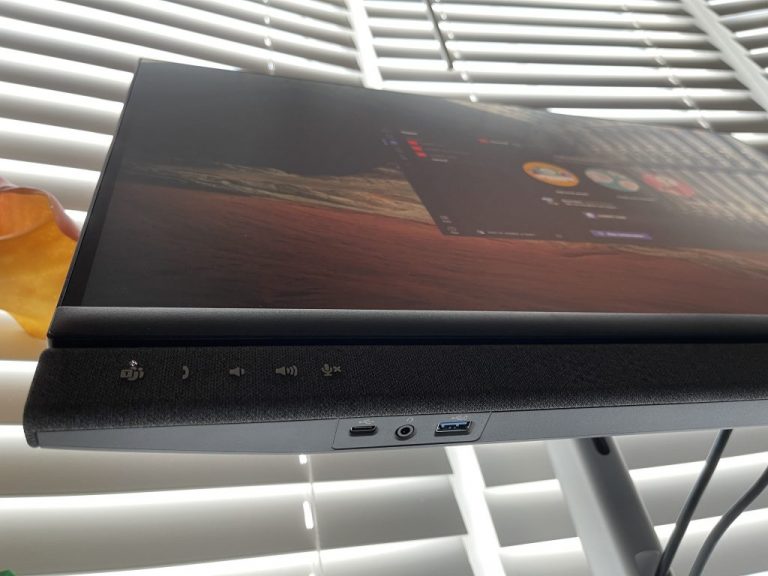
The monitor became the “hub” for my main devices, thanks to its plethora of ports, especially on the front-end. That’s where, under the chin of the monitor, you’ll find Superspeed USB, a headphone jack, as well as a USB-C downstream port.

I loved these extra ports on the front, as they proved useful for plugging in a mouse and also charging my phone when using the monitor with my Surface via USB-C. Again, another reason why the monitor functions as a hub for me. It cut out the need for my usual dongle.

This is especially important when working from home, too. No one has the time to go looking for dongles for use with a laptop or monitor in the middle of meetings.

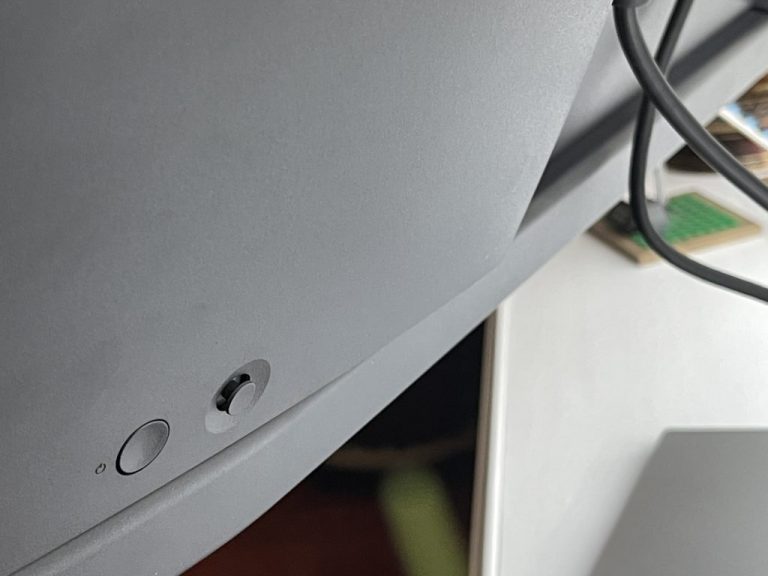
Then there are the buttons. The power and control buttons are tucked away at the bottom right corner of the monitor, right behind the LED indicator light. I like the location, as it makes it obvious where to touch to get access to the controls, especially late at night or early in the morning when lighting is poor.

The navigation button, meanwhile, is a joystick. I enjoyed this because it makes menus easy to navigate and switching between different inputs easy, without having to press multiple buttons. Note that the monitor has KVM support, too, as we’ll get into later on. This lets you connect two PC sources to the monitor and switch between them with a single keyboard and mouse.

Microsoft Teams functionality
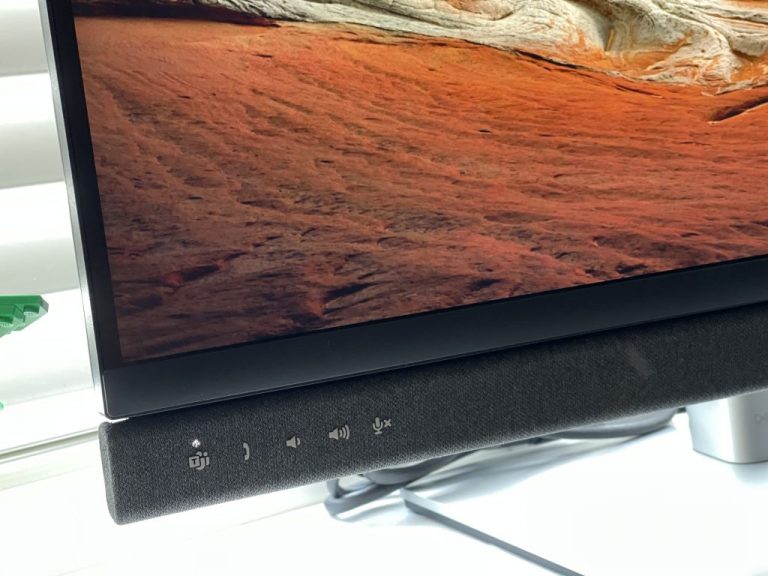
Microsoft Teams Buttons Dell Confrece Monitor

The real highlight of this monitor is the Microsoft Teams functionality. As I hinted, the monitor is one of the only certified for Microsoft Teams. That’s because of the Teams touch buttons built into the lower-left corner of the display, as well as the 5MP webcam which we’ll get into the next section. There’s a couple of ways these buttons come into play in the day-to-day use of the monitor for myself.

The first way is being able to open Teams really easily. During my workday, Teams often will get sent to the background a lot, when I am working on articles, or browsing through web pages. When a notification comes in, instead of searching for the Teams window, I just pressed the Teams button on the monitor. It instantly pulls Teams up and to my attention. The button even flashes when I have a notification, too.

A second way the Teams functionality comes into play is with the volume controls. During calls, you’d usually need to manually adjust the volume using Windows’ sliders or controls. With this monitor, you can easily control call volume without using your computer itself, even when connected via headphones on that headphone jack.

Just set your finger on the touch controls on the front, and you’re good to go. The same goes for the microphone mute switch, too, which lets you mute your mic quickly on the fly. Just be aware, for the Teams controls to work, you’ll need to be plugged into USB-C, or have your PC connected to the display’s USB-B upstream port when using Displayport or HDMI. In our testing, without that USB-C or USB-B connection to your PC, the buttons will do nothing other than standard volume control.

Webcam quality & sound quality
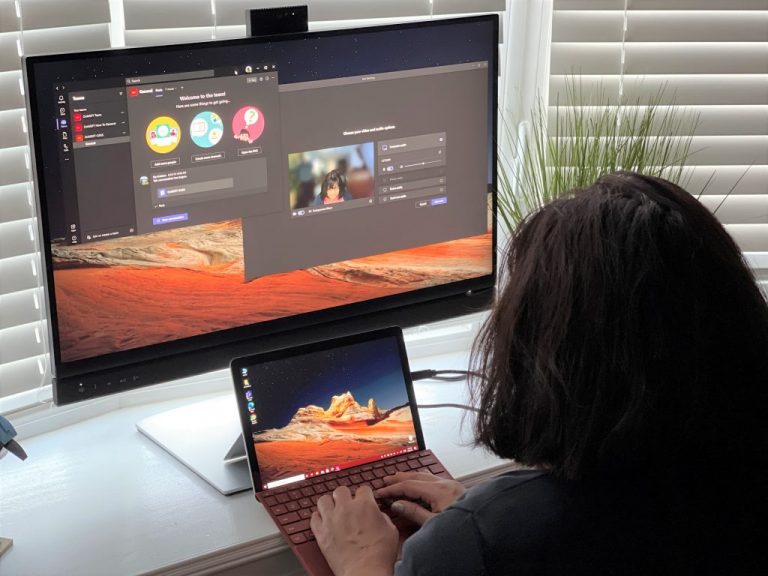
Dell 2 Display With Microsoft Teams

Other than the Teams buttons, the other big part of this Dell 27 Video Conferencing Monitor is the pop-up webcam. This webcam functions with the display via USB-C with a single cable, or when you plug the display into your PC via the HDMI or DisplayPort paired with the USB-B upstream port. You can push it into and out of the top of the monitor when you do and don’t need it.

In technical specs, it’s a 5-megapixel wide-angle webcam, with IR and Windows Hello built-in for passwordless sign-in to your PC. Dell says you get 30 frames per second and 178 degrees of view from the video feed. As a 5 megapixel camera, you’ll get more than twice the details and zoom of traditional webcams that you find on laptops and tablets.
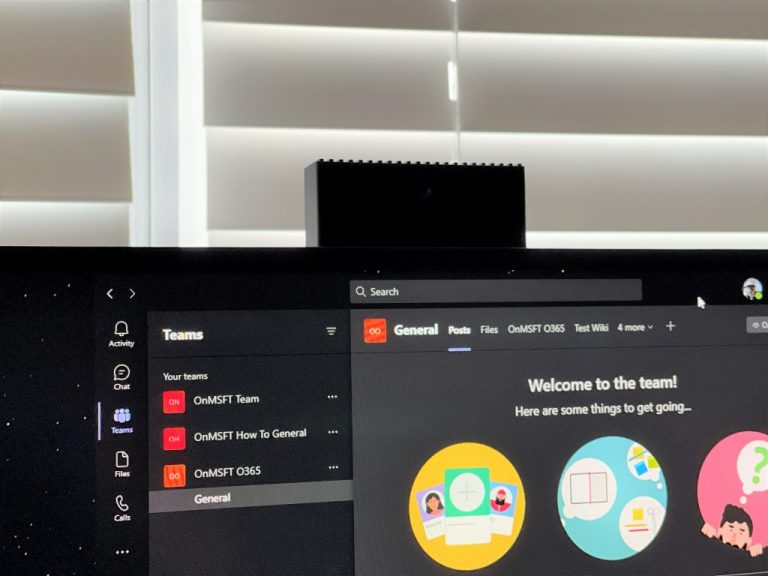
Windows Hello Webcam Microsoft Teams Webcam Dell Monitor

I tested the webcam in a Teams call, and though Teams had issues connecting to it on our main Surface Go 2 PC (it worked fine on a secondary PC,) the quality was definitely there. The person on the other end of the call could make out blemishes in my faces, as well as the colors of the brown leather sofa, and other details in the room around me thanks to the wide-angle lens. It’s hard to find a webcam of this high quality on a monitor, and I can see this monitor being useful for conference rooms for this reason. The webcam is definitely razer-sharp, as Dell puts it.

Now, for the speakers and audio. Dell includes dual 5W integrated speakers onboard the monitor, as well as a noise-canceling microphone. During calls, the speakers definitely amplified the sound of the person on the other end of the call. On a test Teams call, my friend’s voices were crisp and clear, so much so I even heard the click-clack of her partner typing on the keyboard (he was sitting in the room adjacent to her.)

The microphones, meanwhile, were able to mute out the music coming from outdoors, when I hopped on a Teams for Personal call with another friend. But don’t let that limit you to just Teams and video calls. Dell says you can use these microphones with Cortana, too, to improve your productivity as, well as other assistants like Amazon Alexa via the desktop app.

Display quality
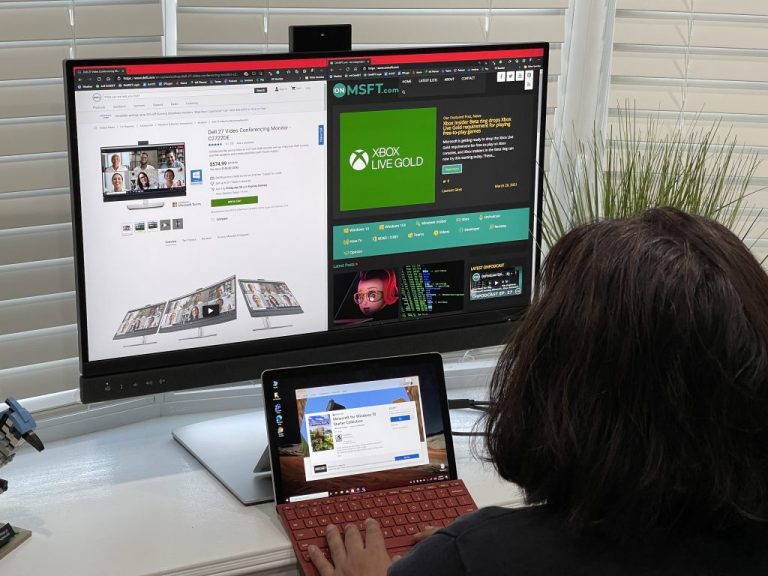
Dell Monitor Onmsft And Surface

I want to end this review by mentioning the display quality. The contrast ratio on the LED panel gets up to 1000: 1, and the color support hits up to 16.78 million. The panel also has an anti-glare coating, an 8ms normal response time, and a 5ms ray to gray fast response time.

The aspect ratio comes in at 16:9. According to our colorimeter, it also covered 99% of the Adobe sRGB spectrum and showed about 250 cd/m2 of brightness. Note that the resolution caps out 2560 x 1440, and the refresh rate at 60 Hz. For higher resolutions, you’ll have to check out the Dell 34 Curved WQHD monitor, which is the larger version of this smaller sibling.

Naturally, this all means the monitor is technically intended solely for productivity and not for gaming. I was able to stack windows side by side and multitask on this monitor. Images appeared crisp and bright, especially when it comes to web pages and black-on-white text. I really enjoyed writing articles and getting work done.

Videos, meanwhile, played nicely. I watched an episode of Spongebob Squarepants on this monitor, and the yellow in Spongebob’s skin and the blue in the sky were quite lively. Though catered for productivity, I also did hook up the monitor to my Google Chromecast Ultra and played Watch Dogs Legion. The visual experience was quite pleasing, especially with the integrated speakers. It felt like I was playing on my dedicated TV.

I can see this monitor being used as a TV, when not in the office or home if need be. There are different presets in the settings to choose from accordingly that can work for this. You can either pick Movie, Game, Warm, Cool, or choose your own custom color. Sharpness Aspect Ratio, Contrast, brightness, and other settings can be changed via the menu, too. Dell is always great with this stuff.

Extra features
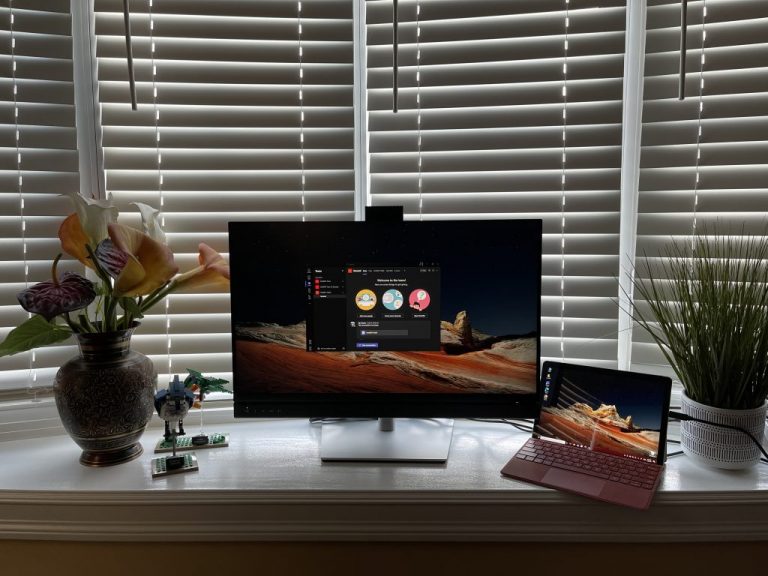
Img 5566

I mentioned multitasking multiple times throughout my review, but Dell does take things a bit further with this monitor. You can actually connect two PCs to the monitor and display the content at the same time with picture-by-picture support.

You can also use the KVM (keyboard – video – mouse) functionality to edit content from two different PCs. Not to forget, Dell also has the Dell Easy Arrange feature, too, which can organize multiple applications into up to 38 preset templates and 5 customizable layouts with a single PC.

This picture in picture support and KVM is done through Dell Display Manager and set up through a wizard. It’s quite cool to play with, especially if you own multiple PCs like me. You can plug two PCs into one, and enjoy both at the same time!

Worth the money

If you’re in need of a monitor for your home setup, then it’s hard to not suggest the Dell 27 Video Conferencing Monitor. The ease of use with Microsoft Teams, built-in high-quality webcam, sleek design, speakers, and noise-canceling microphones make it a monitor that you don’t want to pass on for work or school. Not to mention, USB-C compatibility and all the other software you can install on your PC to expand out the monitor’s use is great. You can buy it now via Dell for $719.

How to get and use Windows Media Player in Windows 10

Starting with Windows 10, Windows Media Player stopped being the default app for audio and video playback. Newer OS use Groove Music and Microsoft Movies & TV, respectively, for that purpose.

However, those that prefer the simpler interface Window Media Player displays, can still use the program by downloading it separately.

Where do I find Windows Media Player for Windows 10?

To get the Media Player version compatible with your system, head over to the official Microsoft page and get the tool.

As you’ll find out, the latest app version is Windows Media Player 12 and it was released along with Windows 7. Since then, the program’s interface or features haven’t changed.

How does Windows Media Player work?

where do i find windows media player

Windows Media Player is more than just a basic media player. As such, it supports playback of audio, video, and pictures, and comes with a wide array of advanced playback settings.

The tool also supports local playback, or streaming playback with multicast streams, and progressive downloads. Visualizations can be added during playback, from the app’s library.

For those still interested, Windows Media Player can be used for CD burning and ripping in WMA or WMA 10 Pro formats.

The tool doesn’t include DVD playback, but you can add it separately using the Add features function. On the other hand, it allows the listening to Internet radio.

If you want to make Media Player the default tool for certain audio and video files, just type default in the Search bar and then go to Default Programs. From there, you will know what you have to do.


If you are interested in alternatives, we recommend CyberLink PowerDVD. It’s a modern software compatible with Windows 7 and later that will allow you to make the best of your multimedia experience on just about any device.

The centralized dashboard helps you keep all your media files organized. Once you’ve got your library up to date, you can stream 8K, 4K, Ultra HD Blu-ray content, and more.

The exclusive TrueTheater audio and video enhancements will surely keep you glued to your device and wanting more of that rich audio and video content.

CyberLink PowerDVD

CyberLink PowerDVD

High-quality audio and video options can really make a difference when it comes to multimedia content. Use this powerful app and you’ll never go back to regular media players.
Free downloadVisit website

How do I fix Windows Media Player issues on Windows 10?

Like with any other software, Windows Media Player isn’t short of bugs. On that note, you might have trouble opening MP3 or WAV formats or AVI files.

On some occasions, Windows Media Player won’t play or display videos.

Last, but not least, if the CD ripping process won’t finish, here are a few useful troubleshooting steps.

Let us know in the comment section if you’re still using the tool and if you encountered any problem with it on your Windows 10 device.

Microsoft releases 64-bit version of OneDrive for Windows sync client in public preview

Microsoft has released today a 64-bit version of its OneDrive for Windows sync client in public preview. The new 64-bit version of the app doesn’t include any new features, but it should run more efficiently on PCs running a 64-bit version of Windows 10.

“The 64-bit version is the right choice if you plan to use large files, if you have a lot of files, and if you have a computer that’s running a 64-bit version of Windows,” the OneDrive team explained today. Be aware that the OneDrive 64-bit version is can only be installed on AMD64 devices, and for now Windows 10 on ARM PCs only support the 32-bit version of the sync client.

In the Microsoft 365 Admin center, the company also announced that the new 64-bit version of OneDrive will automatically replace the 32-version when it starts rolling out to all Windows users later this month. If you don’t want to wait, you can download the public preview of the OneDrive 64-bit client from this link.

PowerPoint for Windows adds integration with Microsoft Teams meetings in beta

Microsoft has announced a new capability that allows users to present their slides directly from PowerPoint for Windows to a Teams meeting. The feature was first announced at Spring Ignite 2021 last month, and the update is now gradually rolling out in preview to Office Insiders in the beta channel (Build 13926.20000 and later).

With PowerPoint Live in Teams, users will now be able to present their PowerPoint presentations with one click. The new tool is designed to make virtual presentations a lot easier and intuitive for both the presenter and meeting participants. It will allow presenters to see notes, slides, and a meeting chat all in a single view.

The feature also enables meeting participants to personalize their own experience by engaging with the shared slides and other content more flexibly. It’s a significant improvement for people with learning disabilities and will help them to read and learn at their own pace.

Present in Teams from PowerPoint

To try out this feature, presenters need to join a meeting or a call from the Microsoft Teams desktop app. After that, open the presentation in PowerPoint for Windows to present in a Teams meeting. There are two access points for presenters to launch a Teams session. They can either click the “Present in Teams” button in the top right corner of the screen or head to the “Start Slide Show” tab and then select the Present in Teams option.

As of this writing, the PowerPoint Live feature is currently limited to Office Insiders on Windows. Microsoft noted that it is available for people with an active Office 365 E5/A5, Office 365 E3/A3, or Microsoft 365 for Government subscription. The Microsoft 365 roadmap suggests that the company also plans to launch this capability for web users next month, though its release date is subject to change.

How to use the PowerToys Fancy Zones utility to make you more efficient on Windows 10

PowerToys has a lot of great utilities to help fix your workflow quickly. Interestingly, Windows 10 already comes with a built-in Snap Assist feature that lets you quickly snap the windows on your desktop so you can see all your windows at once.

Snap Assist is helpful when you are using a traditional monitor, but if you are using a dual monitor or ultrawide monitor setup, you want to have more options for displaying windows on your Windows 10 desktop.

PowerToys Fancy Zones

Here’s where another PowerToys utility, Fancy Zones, comes to the rescue! Fancy Zones is a window manager utility for arranging and snapping windows on your desktop. By using Fancy Zones, you will save time and improve your workflow by choosing a default template layout for your windows or by creating a custom layout that helps you work more efficiently.

Here’s what you need to do to get started.

1. Download and install PowerToys from the GitHub website.
2. Enable Fancy Zones
3. Choose Launch the layout editorPowerToys Fancy Zones

As you can see in PowerToys settings, you can change the keyboard shortcut from Windows key + ‘

Layout editor

Once you launch the layout editor, you can choose one of the default layout templates or choose to create a new layout. The default layouts include No layout, Focus, Columns, Grid, and Priority Grid. Each default layout shows how the windows will appear in each designated layout.

PowerToys Fancy Zones

The number displayed at the top of the screen indicates how many monitors Windows 10 detects. None of the default layout options are helpful to me, so I am going to create a new layout. Once you click Create new layout, you will be asked how you want your windows to be displayed, either in a Grid layout or Canvas layout.PowerToys Fancy ZonesFor this example, I chose Grid to see how many windows I can have on my desktop. When you are ready, click Create to set up how you want your windows to be displayed. Next, you will see be brought to your Windows 10 desktop to set up how and where you want your windows displayed.

While you may not need as many windows as shown, it is good to know that the option is available. If you want to add vertical splits on windows, you can do so my holding down Shift while you use your mouse to click to create more windows. If you want to merge and delete windows, simply click and drag your mouse over the zones you want to merge and/or delete. The process is really simple.

PowerToys Fancy Zones

Once you are finished configuring your the layout of your windows, click Save and apply.

PowerToys Fancy Zones

Congratulations, You have saved your first custom layout. Now, if you want to edit anything about your layout, you can use the keyboard shortcut Windows key + ‘ at any time to launch the layout editor. From the launch editor, you can click the pencil to edit any of of the layouts you have made.
PowerToys Fancy Zones

As you can see, you can change the name of your layout, change the spacing, distance to adjacent zones, and change the shortcut to bring up specific custom layouts on the fly. Once you are finished making changes, you can click Save when you are done.

Other options

In PowerToys Settings, under Fancy Zones, you will see more options, including Zone behavior and Window behavior. There are more Fancy Zones customization options, including the ability to change the color of Fancy Zones and more. The best advice I can give is to explore Fancy Zones on your own and see what works best for you. If you find that Fancy Zones is something you will use and want a more deep-dive into the settings and what they do, Microsoft provides a more in-depth explanation of all the settings here.

Would you use the Powertoys Fancy Zones utility on Windows 10? Let us know in the comments.

FIX: Wireless drivers are missing on PC

Users have reported that their wireless drivers are missing and that they can’t even see the network adapter being activated in the Taskbar.

This issue can be extremely frustrating, as it can deny you access to the Internet, even if it’s working properly.

Here is what one user had to say about this issue on Microsoft Answers:

The Wireless adapter is missing from device manager, much less the network and connections area.  In troubleshoot, the computer simply says a network cable needs to be plugged in. 

There is no wireless choice under network connections.  There is no wireless adapter tab upon right click of Network Adapter in Device Manager. Any help is appreciated. 

In this article, we will explore some of the best troubleshooting methods for dealing with Wi-Fi drivers issue. Scroll down to find out more.

What can I do if the network adapter driver has disappeared?

1. Scan for hardware changes

  1. Press Win+X keys on your keyboard and select Device Manager.
  2. Click on the View tab and select Show hidden devices.Show hidden devices - Wireless drivers are missing
  3. Click on Network Adapters, right-click on the wireless adapter and choose Scan for hardware changes.Scan for hardware changes - Wireless drivers are missing
  4. Close the Device Manager and try to see if this solves your issue.

Scanning for hardware changes on your wireless adapter can solve this problem quickly because the system will find any possible issues and fix them.

2. Update your wireless network driver

  1. Press Windows + X keys on your keyboard and select Device Manager.
  2. Right-click the wireless adapter and select Update driver.
  3. Choose the option Search automatically for updated driver software.Automatically search for drivers - Wireless drivers are missing
  4. Wait for Windows to search and download the driver.

Updating the drivers manually can be a tedious and time-consuming task and the default driver that the system installs may not be the best solution for your network adapter.

Alternatively, you can use third-party tools such as the one recommended below to update all drivers on your PC automatically with just a few clicks.

3. Troubleshoot your network connection

  1. Click on search button inside your taskbar, type troubleshooter, and click on Troubleshoot settings from the results.
  2. From the right pane, click on Additional troubleshooters.
  3. Click on Internet connections and then click on the Run the troubleshooter button.
  4. Follow the on-screen instructions to complete this action.

Although it may seem a little bit too simple, running the Internet Connections troubleshooter fixed the problem for many users so make sure you try it.

4. Reset the Winsock settings using PowerShell

  1. Press Windows+X keys and select PowerShell (Admin).
  2. Type or copy this command in PowerShell and press Enter: netsh winsock resetPowerShell Winsock command - Wireless drivers are missing
  3. Wait for the process to complete and restart your PC.
  4. Check if the adapter can now be found in Device Manager and retry the first three solutions.

The PowerShell command may help restore the driver for the network adapter and solve the problem so you should try it, nevertheless.

5. Change your PC’s power management settings

  1. Press Win+X keys on your keyboard and open Device Manager.
  2. Expand the Network adapters section and double-click the Wi-Fi network adapter.
  3. Inside the newly opened window, select the Power Management tab.
  4. Deselect the option Allow the computer to turn off this device to save power.Allow computer to turn off device to save power - Wireless drivers are missing
  5. Click the Driver tab and select Enable device, then press OK.

By changing the PCs power management settings, you can fix the problem if the Wi-Fi adapter disappears so try it out by following the steps above.

In this article, we explored some of the best troubleshooting methods for dealing with the issue caused by the no wireless network adapter issue.

For more tips, don’t miss our There might be a problem with the driver for the WiFi adapter article for more solutions.

Let us know if this guide helped you, by using the comment section below.

Windows 10/11 Preview Build 21354 improves user customization

The new Windows 10 Insider Preview Build 21354 is out for installation available for the Dev Channel insiders and it’s pretty exciting as you will see for yourself.

As you might have realized already, Paint is available in the Microsoft Store and there’s a reason for that because in the new preview build, you can uninstall it without any problems.

And as we mentioned before, the Fluent Design concept is in full swing, changing most aspects of the Windows 10 design.

But let’s take a look at the new Windows 10 enhancements and see how it will change our experience.

What is new in Windows 10 Insider Preview Build 21354?

1. New personalization options in News and interests

The biggest change comes from the new News and Interests tab that will show up when you hover over the weather info from the Taskbar.

Don’t worry, because you can change it to appear when you click it, but by default, it’s set to open when you hover over it, which might be a little intrusive.

Another new thing about it is that you now have a Manage interests button on top that will redirect you to the My interests page.

That way, you will be able to customize your preferences in detail so this window can actually become pretty useful.

The same goes for the new Tune your feed option that is available in the My interest page and will help you choose the publishers, subjects and news that you want to read.

You can also click on X on a story you don’t like and in time, the app will learn to follow your preferences to the letter.

However, you need to know that these enhancements are available first in U.S., U.K., Canada, India, and Australia followed by a global rollout in the future.


2. New display settings

Windows Insiders can now disable CABC directly in the Display settings via Settings > System > Display.

You will be happy to know that the content adaptive brightness control (CABC) us now available in the Settings > System > Display settings.

In other words, you will be able to disable that option and the automatic contrast control (only for some devices that support it) quicker.
Moreover, you will be able to see a HDR certification under the Advanced display settings if, of course, you’re using such a display.

Microsoft says that this will educate customers and raise awareness for using high-quality HDR displays.


3. New Cameras page in Settings

Nowadays, with the increased need for communication, every PC and laptop are paired with a webcam or even full-fledged cameras.

That’s probably why Microsoft included a Camera Settings page in the Devices meniu from Settings. There you can add and remove cameras and even configure their settings.

The configuration can go a long way depending on your camera but you will be able to tune the brightness, contrast and more.


4. Other notable changes

  • Microsoft Paint and Snipping Tool will be updated from the Microsoft Store now
  • Microsoft renamed the Windows Administrative Tools folder from Start to Windows Tools.
    • The Windows Accessories, Windows Administrative Tools, Windows PowerShell, and Windows System folders have been removed from Start and the apps are now in Windows Tools
  • You can toggle the compatibility settings for x64 applications on ARM64 devices
  • Microsoft also fixed an issue where certain games crashed, didn’t sync the save data when you played on another device or didn’t save when a new game was installed.

For more updates included in this Insider Build, you can check the full release notes from Microsoft. What do you think about the new changes? Drop us a line in the comments below with your thoughts.

Microsoft celebrates 46th anniversary on Twitter by looking back at previous company logos

Microsoft turned 46 on April 4th and the tech giant’s social media team has decided to celebrate this milestone on Twitter by taking a look back at the rather long and amusing history of the company’s logos in a special thread.

The Twitter thread started with a black and white image of the first company logo from 1975 which can be seen below.

Interestingly, an alternate version of this logo from 1975 with the “Micro” stacked on top of the “soft” was also used back in the day. This version has now been colorized with a 1970s color palette (see top image) and is currently the Microsoft Twitter account’s new profile photo. It’s definitely a change from the modern design aesthetic currently used by most companies.

As of the time of this writing, the Microsoft logos for 1980 and 1982 have also be posted. The next logo, that from 1987, will likely be added to the thread in a new tweet sometime later today with the 2012 logo, which is in use in today, following soon after.

In addition to the nostalgic logos, the Microsoft Twitter account has also been posting a bit about the old Altair computers which the company was involved with back in the day. Definitely worth checking out of you’re a fan of retro tech.

Do you have a favorite Microsoft logo? Let us know what your favorite is in the comments below and then follow us on Twitter for more Microsoft news.

7 Best AWS Antivirus to Protect Your Cloud Account

At the moment, Amazon Web Services is one of the most popular cloud computing platforms in the world.

In exchange for a yearly subscription fee, Amazon allows subscribers to have a wide range of virtual clusters of computers through the Internet.

Recently there have been reports of hacking into users’ cloud accounts. Meanwhile, this has placed more emphasis on the need to have an antivirus software tool that protects users’ data.

Since most of the cloud services go through browsers it is essential for your antivirus to support cloud security as hackers can exploit the weakness in users’ networks and access your cloud information.

Also, keep in mind that they are recommended to all those looking for:

  • AWS malware protection – If you like to use AWS services, then you’re clearly looking for the best malware protection
  • AWS antivirus Linux – The AWS infrastructure is also built to meet the requirements of Linus users, however, antivirus protection is mandatory for them as well
  • Antivirus AWS cloud – Real-time antivirus protection is a must for AWS cloud infrastructures, in case of being confused about all those choices out there, use our curated list from the start

So today, we will discuss top antivirus choices that offer adequate security for your Amazon Web Services.

What is the best AWS antivirus to protect your cloud account?

TotalAV – Zero-day cloud protection

TotalAV is a suitable antivirus for various security issues, including cloud protection for AWS through Zero Day cloud scanning tools.

You can utilize this antivirus to secure your digital computers from different malware types with its real-time protection that diagnose files you are downloading.

More than this, it’s possible to secure multiple virtual computers from dangerous malware threats or phishing attacks that may target your cloud devices.

It’s worth mentioning that you have full security against data breaches due to monitoring tools for emails or other online information.

In addition, the software is fully compatible with other devices so you can safeguard your cloud services on Windows, Mac, or iOS/Android.

Some important features include:

  • Stop tracking cookies
  • System boost tools
  • Disk cleaner
  • Browsing cleaning
  • In-built browsing VPN

TotalAV

Secure your AWS cloud services completely using this dynamic cloud security.
Check price Visit Website

Bitdefender Total Security – Powerful firewall shield

Bitdefender-Total-Security-Protection-features-screen

Bitdefender is a major giant in the antivirus industry with its array of products offered to consumers and rates high in customer satisfaction.

This program identifies and blocks malicious traffic from infected websites. The software also performs web filtering whereby it checks out potentially harmful websites before you access them.

The anti-phishing feature also prevents users from falling prey to phishing websites and secures users’ data.

Bitdefender has extensions for Firefox and Microsoft Edge which enables it to block phishing and infected websites.

The firewall tool works well with the default Windows firewall and gives an extra layer of protection against hackers looking to exploit gaps in your Internet and Wi-Fi connections.

Some other best features:

  • A high rate of detection of malware
  • Parental control feature
  • Extra layers of protection
  • Competitive prices

Bitdefender Total Security

Let Bitdefender Total Security protect your cloud account in real time.
Check price Get it now

ESET PROTECT Entry – Greatest cloud security

ESET PROTECT Entry, like its name, says, represents a comprehensive security solution with a cloud-based console, from where you can manage all your devices.

It features preventive protection for cloud-based applications such as email and storage, in addition to its powerful combination of spam filtering, anti‑malware scanning, and anti‑phishing capabilities.

Furthermore, the cloud security sandbox is a powerful, isolated test environment in which a suspicious program is executed, and its behavior is observed, analyzed, and reported in an automated manner.

This tool can be very useful against zero-day threats, including ransomware. You will also get real-time protection for your company’s data passing through all general servers.

Some important features include:

  • Advanced multilayered protection for computers, smartphones, and virtual machines
  • File Server Security
  • Blocks all spam and malware at the server level, before they reach users’ mailboxes
  • Full Disk Encryption
  • Custom notifications

ESET Protect Entry

Use a comprehensive solution for your cloud applications, email, storage, and accounts.
Check price Visit Website

Avira – Best detection rate

Avira Antivirus has integrated the Avira Protection Cloud solution into the free version of the software, in order to strengthen your protection.

Thus, Avira is able to deliver detection rates of 99.99%. Any suspicious file will be scanned in real-time against the Avira Cloud database, delivering enhanced security and system performance.

This technology used by Avira is located in the cloud, it is virtually impossible for criminals to analyze and bypass its defenses.

Great features included:

  • Blocks even highly sophisticated threats
  • Protects you from scams, identity theft, and financial loss
  • Secures your online activities with a free VPN
  • Speeds up and cleans your PC for peak productivity
  • Password manager included

Avira

Use a free tool to protect your AWS and other cloud accounts from cyber threats.

McAfee Antivirus – Greatest compatibility

McAfee gives you a multi-licensing option which makes it an attractive choice for those who want multiple-platform security.

McAfee has good results against phishing websites by keeping your browser away from traffic from dangerous websites.

Even more, the My Network feature displays the entire devices on your network and lists the IP address of each of them.

It also allows you to configure your network security properly and lists the devices on your network that could benefit from McAfee’s security.

Furthermore, McAfee antivirus is a good antivirus that allows you to protect multiple devices at an affordable price.

Some other best features include:

  • Cross-platform compatibility
  • Multiple licenses for a single price
  • Decent malware detection rates
  • A feature-rich tool with good firewall features
  • Good detection rates

McAfee Antivirus

Always protect your AWS with McAfee’s good detection rates and improved firewall features.
Check price Visit Website

Avast Premium Security – Most efficient protection

Avast Premium Security is a proactive next-gen antivirus solution that protects you from ransomware, exploits, and fileless attacks.

It uses artificial intelligence, behavior-based machine learning, and proactive cloud threat lab analysis capabilities to keep your business fully protected from advanced cyber threats.

Your privacy and identity are safe with Avast. It will protect your bank info, passwords, and downloads, especially while on public Wi-Fi.

Explore some more great features:

  • Includes SharePoint Server Protection and Exchange Server Protection
  • Complete online security
  • Real-time protection against ransomware and the latest cyberattacks
  • Multi-OS support covers PCs, Mac computers, iPhones, iPads, and Android mobile devices
  • Cloud protection

Avast Premium Security

Take comprehensive security for your Amazon cloud protection using this multi-layer antivirus.
Check price Visit Website

Trend Micro Antivirus Security – Malicious websites block

Trend Micro is a Japanese-based antivirus company that is respected in the antivirus field. Its premium Trend Micro Antivirus has many useful features and comes with good ratings.

This software gives effective malware protection while having good features like a firewall booster and anti-ransomware tools.

In addition, Trend Micro is quite good at preventing the browser from encountering malicious websites and has extensions for the three main browsers, Firefox, Chrome, and Microsoft Edge.

It checks all links and filters them to give protection. It also checks links that you point to and gives ratings to them before you click on them.

Furthermore, the antivirus has a firewall booster that boosts the default Windows firewall.

More great features include:

  • Excellent anti-phishing features
  • Good firewall booster
  • Extensions for main browsers
  • It detects and prevents botnet-style attacks
  • It scans your WI-FI networks to check if your network is still secured

⇒ Get Trend Micro

Do share with us your experience in using any of the antivirus software solutions we mentioned above. Feel free to comment below.

12 Best Windows 10 Games: Top 2026 Picks Ranked by Gamers

If you’re wondering what games are accessible and working on Windows 10, then you’ve come to the right place.

There are a lot of amazing titles included, some of them even cross-platform.

In this list, you’ll find some best-ofs in a particular category of games; some of them are free to download and play, and some are paid, with a lot of in-game options.

Whether you’re a fan of strategy, battle royale, or racing games, you’ll certainly find a favorite among the ones below.

So keep reading if you want to see what are your best choices when it comes to Windows 10 gaming.

What are the best games to play on Windows 10?

Cyberpunk 2077

Cyberpunk 2077  couldn’t have been missed from our list, especially after the long wait of the past two years.

Although it doesn’t work flawlessly on a Windows 10 operating system, the developers promise game patches pretty soon, plus the possibility to upgrade to next-gen hardware by the end of 2021.

Cyberpunk 2077 is an action-adventure story set in the bustling Night City, which brings some ravishing exterior and interior visual settings, allowing for an endless immersive experience.

You play a mercenary in search of an implant that is the key to immortality.  The game storyline isn’t complicated, however, the possibilities are time and life-consuming, with each action choice having an impact on the overall game plot. 

The game is one of the best of its kind, and you can play it on Windows 10, PS4, or Xbox One.

Note that on every platform, users have complained of numerous bugs, FPS, set-up glitches, and so on. So it might take a bit of patience to get the full Cyberpunk 2077 experience.

⇒ Get Cyberpunk 2077 GOG CD Key from Kinguin

⇒ Get Cyberpunk 2077 (PC) from gog.com

Witcher 3

Witcher 3 is one of the best action role-playing video games on the market right now. It works great even for the Windows 10 operating system, although it works best with next-gen hardware, for the ultimate visual experience.

Witcher 3 is an extraordinary adventure game, following a medieval storyline, in a fantastic, unique world.

You get to explore forgotten ruins, caves, and shipwrecks, trade with merchants and dwarven smiths in cities, and hunt across the open plains, mountains, and seas.

The game is developed by CD Projekt RED, the same who worked on the long-awaited Cyberpunk 2077. Fans rate it better than the newly-launched game.

⇒ Get The Witcher 3: Wild Hunt GOTY Edition GOG CD Key from Kinguin

⇒ Get The Witcher 3: Wild Hunt GOTY Edition (PC) – GLOBAL from gog.com

Microsoft Flight Simulator

By far, the best simulator game presently is the latest version of Microsoft’s Flight Simulator, launched back in 2020.

It is the longest franchise in the history of Microsoft games and last year’s edition is a revamp of the original game, with massive improvements in terms of graphics, content, and community interaction.

Once enrolled in the game, you can board an aircraft of your choice and fly all over the world, in any weather conditions (Microsoft has recently introduced snow), and land in any important airport on any continent.

What’s more, you can play the game over and over again, having a totally different experience.

⇒ Get Microsoft Flight Simulator

Forza Horizon 4

The Forza series (or their latest games) always top any racing games rankings due to their ultra-realistic graphics and challenging gameplay.

As such, Forza Horizon 4 is easily the best racing game on the market today. 

Forza Horizon 4 takes you to the world’s greatest automotive festival in the UK, where you can roam the charming English villages and enjoy breathtaking scenery with historical castles and lakes.

You can try your driving skills in one of the 450 available cars, 100 from licensed manufacturers.

⇒ Get Forza Horizon 4 Standard Edition Windows 10/XBOX One CD Key from Kinguin

⇒ Forza Horizon 4 Standard Edition (Xbox One, Windows 10) – Xbox Live Key – GLOBAL from G2A

Sekiro: Shadows Die Twice

Another captivating action game, often nominated among the best action games out there.

The plot is set in 16th century Japan, and you play a disgraced warrior whose mission is to protect a young lord who is the descendant of an ancient bloodline.

The game is extremely brutal, with a lot of bloodshed, full-on combat, and strategies meant to keep yourself alive.

Game plot progression might be too slow, for some players, with little rewards. However, there is an end to it.

The game is single-player, however asynchronous multiplayer is possible with a smooth Internet connection.

⇒ Get Sekiro: Shadows Die Twice GOTY Edition EU Steam CD Key from Kinguin

⇒ Get Sekiro: Shadows Die Twice US Steam CD Key from Kinguin

⇒ Get Sekiro : Shadows Die Twice – GOTY Edition (PC) – Steam Key – EUROPE from G2A

⇒ Get Sekiro : Shadows Die Twice – GOTY Edition (PC) – Steam Key – US from G2A

World of Tanks Blitz

World of Tanks Blitz best windows 10 games

World of Tanks Blitz is inspired by the hugely popular World of Tanks.

With stunning graphics and intuitive gameplay, the game is available on multiple platforms including phones, tablets, and Windows 10 PCs.

Here are the main features of the game:

  • Over 300 iconic vehicles from Germany, Great Britain, the United States, the USSR, and Japan 
  • 4 different vehicles classes including light tanks, medium tanks, heavy tanks, and tank destroyers 
  • Strategic 7v7 online multiplayer gameplay 
  • 26 unique battle arenas 
  • Cross-platform gameplay 
  • In-game chat functionality 
  • Innovative crew upgrade system 
  • Constant graphical enhancements and updates, as well as optimization for various devices 
  • Real-life physics to create authentic tank movement and damage mechanics 
  • Detailed tutorials 
  • Ability to invite your friends to play online 
  • In-game achievements 

Play World of Tanks Blitz in complex multiplayer games with your friends and be the last man standing.

⇒ Get it on Kinguin

⇒ Get it on Amazon

⇒ Get it on G2A

⇒ Get it on Microsoft Store

Minecraft

Minecraft is one of the few games on our list that is also suitable for children.

Placed in a world of blocks, Minecraft is hugely popular for its endless options to build your world, explore mysterious locations, download and install mods, and join other players to create worlds together.

The game works on Windows 10 and also has a Java edition. Players can get rewards when logged in with a Microsoft account.

The game has been on the market for quite some time, which has given players lots of time to also experience bugs. Luckily, there’s a solution for each of them.

⇒ Get it on Kinguin

⇒ Get it on G2A

⇒ Get it on Amazon

⇒ Get it on Microsoft Store

Apex Legends Lifeline Edition

Apex legends is a battle royale type of game in which you team up with one or two friends (Legends) to make a unique squad that will fight against other teams and gains wealth and fame.

It is very similar to PUBG since the aim of the game is also to survive together with your co-player or team.

Each character has unique special abilities so that you can experience the game in various ways if you choose to take turns in trying all of them.

The game received multiple awards, including for Best Multiplayer category. It is available for PS4, Xbox One, or PC, with a free download, and further in-game purchases.

⇒ Get it on Kinguin

⇒ Get it on G2A

⇒ Get it on Amazon

⇒ Get it on Microsoft

Fortnite

Fortnite is another popular battle royal type of game, with many fans across the globe even after several years since the release.

It comes in three modes, the all-time favourite one being Fortnite Battle Royale, a game that can take 100 players at a time.

The aim of the game is s to build your surroundings and find ways to survive among the whole bunch of 100 fighters, without much help. The last player to stand out wins.

 The game can be played among friends, regardless of the platform they’re on (PC, Xbox One, iOS, Android or PS4). 

The last addition to the Fortnite franchise if The Last Laugh, but it requires that you also have the original game installed.

⇒ Get it on Kinguin

⇒ Get it on G2A

⇒ Get it on Microsoft Store

Dota 2

Yet another classic among multiplayer games, Dota 2 is considered one of the best online battle arena free games on the market.

It is a highly competitive game, with rich content that doesn’t reveal itself from the first rounds.

On the contrary, users say that once you get to discover the secrets of the Dota realm, it becomes addictive.

Moreover, the possibility to discover something new no matter how many times you’ve entered the game makes the experience even more exciting.

The game is perfect for Windows 10 PCs, but it is also VR supported, which certainly brings fresh and more captivating nuances.

⇒ Get it on Kinguin

⇒ Get it on G2A

Path of Exile

Path of Exile is another RPG that lets you select and build a character throughout the gameplay.

The game is packed with amazing visuals and intriguing gameplay that becomes addictive at some point.

For a start, you choose if you want to play a Duelist, a Witch, a Ranger, a Templar, a Marauder, a Shadow, or a Scion.

Game progression consists of finding, collecting, and trading gems that allow you to create and customize hundreds of unique skill combinations.

The idea is to find your playstyle and stick to it. You can bring up to 7 friends to play along with you.

⇒ Get it on Kinguin

⇒ Get it on G2A

Grand Theft Auto V

Grand Theft Auto V is the latest released game in the GTA series that continues in the same storyline as its predecessors, this time is set in San Andreas, California.

You can take up the role of a bank robber, a gangster, or a drug dealer, play the game from the 1st or 3rd person’s perspective, and also invite your friends to join the party.

Together you’ll complete various missions and explore the extremely large open world the game developers have created.

The game gets regular updates that bring new and exciting content, which is why fans return over and over again for another round.

⇒ Get it on Kinguin

⇒ Get it on G2A

⇒ Get it on GreenManGaming

⇒ Get it on Microsoft Store

These are just a few of the games available and working in the Windows 10 operating system, but as soon as new titles show up, we will keep you informed.

While you’re here, you might also want to check out our exhaustive list of the best Microsoft Store free & paid online games.

If you have any other questions or suggestions, don’t hesitate to leave them in the comments section below and we’ll be sure to check them out.

FIX: Lenovo B590 sound not working on Windows 10

If you tried the Windows 10 OS for 64 bit on your Lenovo B590 (or if you’re still running Windows 8.1), then you may have stumbled upon some issues, one of them being the sound.

So, seeing that many users are having this sound problem, we will explain to you in the guide below how you can fix your sound on Lenovo B590 in just a few easy steps.

Most of the time, the audio drivers you use for the Lenovo 590 in Windows 10 (including the sound driver) are not always compatible with the newest versions of Windows available.

But we will try to update your sound driver to the latest version and also run the Audio Troubleshooter in your Windows 8.1 or Windows 10 and see how it goes from there.

How can I fix Lenovo B590 audio problems on Windows 10?

  1. Check your cable connection
  2. Update the audio driver
  3. Run the Audio troubleshooter
  4. Install Lenovo’s troubleshooting tool
  5. Use a different media player
  6. Install pending OS updates
  7. Make sure that your audio device is enabled

1. Check your cable connection

First of all, you need to check all the cable connections for the sound system. If you have any issues there, you won’t be able to continue with the steps below.

That includes checking if the jacks are plugged in correctly and if the cables are all in order. You can also try using other audio cables if you have any around.

2. Update the audio driver

  1. Right-click the Start button and select Device Manager from the list.
  2. On the left side panel, find and double click on the Sound, video and game controllers feature.
  3. In the sub-menu, check if your sound card is listed there and also if it hasn’t got any yellow exclamation mark beside it.
  4. If it isn’t, then you will have to go on the manufacturer’s website and download the latest driver from there.
  5. If you have the yellow exclamations mark next to the driver, then right-click or hold tap on the driver.
  6. Click or tap on the Properties feature from the menu.
  7. Now click on the Driver tab from the upper side of the Properties window.
  8. Select Update driver from the menu.lenovo b590 audio problem
  9. Follow the instructions on the screen to finish the update.
  10. Reboot your system and check if your sound is working.

You need to know that by updating the audio drivers, the system will find and install a default driver for your device and that doesn’t always work.

An alternative is to navigate to the manufacturer’s website and download the correct driver. However, that process can be time-consuming and tedious.

You can also try the easy method, using a dedicated third-party tool that will update and repair all your drivers in one go automatically. The tool recommended below is absolutely safe and easy to use.

It scans your PC and detects whether your drivers need to be updated. Then, using its own driver database, it finds the best version available that matches your driver.

In just a few minutes, the automatic driver updater will download and install your drivers. It can also help you repair corrupt drivers and detect if you have any missing drivers and install them as well.

⇒ Get Outbyte Driver Updater

3. Run the audio troubleshooters

3.1 Run the Playing Audio troubleshooter

  1. Type troubleshooter in Windows search and click on Troubleshoot settings from results.
  2. In the next windows, click on Additional troubleshooters.
  3. There are two audio troubleshooters but let’s start with the Playing Audio troubleshooter from the next window. Click on it and then click on the Run the troubleshooter button.
  4. In the next window, you will have to select the device that you want to troubleshoot.
  5. If you are asked if you want to turn off audio enhancements, do that also.
  6. You will also be asked if you want to set that audio device as default so you should click on Apply this fix if it shows up.
  7. The system will scan for any problems with your playback device and will fix them.

3.2 Run the Recording Audio troubleshooter

  1. In the additional troubleshooters page, scroll down to find the Recording Audio troubleshooter.
  2. Click on it, then click on the Run this troubleshooter button.
  3. Follow the steps to fix any problems with the audio recording devices, just like you did with the Playing Audio troubleshooter from the solution above.

You only need to use this troubleshooter if you have any problems with your Lenovo B590 microphone.

3.3 Use the Microsoft audio troubleshooter for older Windows versions

  1. Download the audio troubleshooting app for Windows from Microsoft’s web page.
  2. Left-click or tap on the Save File feature.
  3. Left-click or tap on the OK button.
  4. After the download is finished, you need to go to the folder where you saved the executable and run it.
  5. Follow the instructions on the screen to finish the troubleshooting for the Audio system.

Running the audio troubleshooters is a basic procedure to learn about any possible issues with your sound devices so make sure you try doing that.

4. Install Lenovo’s troubleshooting tool

  1. Download Lenovo Solution Center app for Windows.
  2. You will have to open the Readme file after the download in order to finish the installation.
  3. Follow the procedure to troubleshoot any possible issues.

After you installed the application, reboot your PC and see how the sound is working. The problem should be solved but if not, try the next solution.

5. Use a different media player

Check on several applications if your sound is working. You might have an issue with a particular application and the others might work.

We have an excellent list with the best media players for Windows 10 so it wouldn’t hurt trying to see if others don’t have this problem.

6. Install pending OS updates

  1. Type update in Windows search and select Check for updates from the results.How to check for updates
  2. Click or tap on the Check for updates button.check for updates
  3. After the check is finished, install all the available updates by following the instructions on the screen.
  4. Reboot the device after the updates have finished installing.
  5. Check again if you have your sound back.

Installing any new pending updates to your OS can also fix this problem so make sure you try the steps above. Keeping your system up to date is recommended anyway.

7. Make sure that your audio device is enable

  1. Right-click on the Volume icon in the Taskbar and go to Playback devices.
  2. Right-click the empty space and choose Show Disabled Devices.show disabled devices windows 10
  3. Check if your Playback device is on the list. If your audio device is grayed out, this indicated that it has been disabled. Right-click on it and select Enable, as shown in the screenshot below.enable audio device windows 10
  4.  Check if this workaround solved the problem.

Sometimes, third-party apps and programs automatically disable your audio devices. This may explain why there is no sound on your Lenovo B590 speakers.

If your audio device is indeed disabled, all you need to do to solve this issue is to simply re-enable your audio device. If you don’t know how to do that, we have an expert guide that will help you deal with that problem.

We also have a great guide that will help you fix any audio issues on your Windows 10 device so make sure you check it out.

If you own a Lenovo laptop, here’s another useful guide that can help you fix the sound problems.

There you go, we hope these solutions helped you fix the problem with the Lenovo B590 sound in Windows 10.

If we have any new information on this subject or further questions, for that matter, you can contact us using the comment section below.

Surface Laptop 3 vs Surface Laptop 4: is it worth the upgrade?

Yes, it’s already confirmed – the Surface Laptop 4 is a reality and it could be launched as early as next week. WinFuture was first to discover an official support page on Microsoft’s sites where you can allegedly already download AMD and Intel drivers for the upcoming device.

However, we went ahead and tried to download the actual drivers, but in the end got only an empty Notepad file. So yes, somebody in the Redmond building made a small mistake and confirmed what was already pretty much known.

Surface Laptop 4 comes with AMD and Intel versions

surface pro 4 drivers

As it was previously rumored, the new Laptop from the Surface family will be released in two versions: sporting either AMD or Intel versions. The same WinFuture hints that the device could feature the following specs:

  • AMD version -> the processors used will reportedly be from its 4000 mobile series (Ryzen 5 4680U and the Ryzen 7 4980U)
  • Intel version -> 11th-gen chips (Core 15-1145G7 and the Core i7-1185G7)

How does it fare against the Surface Laptop 3?

Naturally, the first ones to think of buying the Surface Laptop 4 will probably include also current owners of the Surface Laptop 3.

According to Winfuture, here’s a complete table featuring all of the Surface Laptop 4’s specs:

Model size13.5 inch / 15 inch
Preinstalled operating systemWindows 10 Home
Display
(13.5-inch)
13.5 inches, 2256 x 1504 pixels, 3: 2 format, 10-point multi-touch, pixelsense display, 201 ppi
Display
(15-inch)
15 inches, 2496 x 1664 pixels, 3: 2 format, 10-point multi-touch, pixelsense display, 201 ppi
CPUIntel Core 11th Generation i5-1145G7 or i7-1185G7 CPU
AMD Ryzen 5-4680U or Ryzen 7 4980U CPU
GPUIntel: Iris Plus Graphics 950
AMD: Radeon Graphics
RAM8, 16, or 32 gigabytes of RAM (32 GB only Intel)
Storage128, 256, 512 GB to 1 terabyte PCIe NVMe SSD (1 TB only Intel)
ConnectivitySurface Connect, USB A, USB C, WLAN AX, Bluetooth
Peripherals, accessories, and moreWindows Hello, Surface Pen and Dial compatible, ambient light sensor
Battery capacity6513 mAh, 49 Wh
Measurements and weight
(13.5-in
ch)
308 x 223 x 14.5 mm
Intel 1.31 kg / AMD 1.25 kg
Measurements and weight
(15-inch)
339.5 x 244 x 14.5 mm
Intel 1.54 kg / AMD? Kg
Casing typeMilled aluminum

AMD version or custom chips?

As you probably know, the Surface Laptop 3 features the 3000-series chips; and you’d think that the next logical step is the 4000 series. However, of course you want the latest and greatest – and that’s AMD’s brand new Ryzen 5000 mobile processors. 

Still, there’s hearsay that Microsoft could be getting custom chips directly from AMD ( referred to a chip as a Ryzen 7 Microsoft Surface Edition). If that happens, then the laptop’s CPU could be a mix of the 4000-series and the 5000-series. And in that situation, yes, the upgrade makes more sense. 


Same looks, same storage choices

If you are looking to make the jump hoping for better looks, you’ll be disappointed: the specs and form-factor of the Surface Laptop 4 seem to be in line with previous models. Thus, if you were hoping for narrower bezels or perhaps a larger trackpad, then this isn’t the laptop you’re looking for. 

You’ll be able to choose between 13.5- and 15-inch models available, with a 3:2 aspect ratio. The same 32GB of RAM and 1TB of storage will be present in the newest model, as well.

Thunderbolt 4 connectivity is apparently also missing, but we’ll be able to know for sure once the product is officially presented. 

Note icon NOTE
The Surface Laptop isn’t yet officially released, so we can’t yet compare the two laptops. But with so much information around, we decided to do a small roundup. When the official launch will take place, we will make sure to update with the actual specs.

Latest Microsoft Edge Dev release brings updates to password management experience

The Microsoft Edge team has just announced the release of Dev Channel branch build 91.0.845.2. This is a small build, but it does come with an improvement for the passwords manager, and the usual bug and reliability fixes. Here’s a look at what you need to know.

First things first, we’ll get into the added features. New is the ability to select and delete multiple passwords at the same time from edge://settings/passwords. Also new is the ability to quickly toggle between two tabs on Mac via a keyboard shortcut. Capping out the new features is a Certificate Management Settings page on Linux and also a message to explain that Vertical Tabs can’t be collapsed when IE mode tabs are open.

Now, for the reliability improvements and changed behaviors. This week, Microsoft has fixed crashes when closing the browser, as well as when navigating to certain websites, and when opening menus from the downloads popup menu. Other changed behaviors and fixes can be seen below.

  • Fixed an issue where sync sometimes fails with error code NETWORK_CONNECTION_UNAVAILABLE (ERR_SSL_CLIENT_AUTH_CERT_NEEDED).
  • Fixed an issue where logging into certain websites sometimes fails.
  • Fixed an issue where certain videos don’t play.
  • Fixed some issues where Application Guard windows sometimes fail to open.
  • Fixed an issue where extensions installed via management policies sometimes fail to install.
  • Fixed an issue where multiple Edge shortcuts are sometimes present on the Windows Start menu.
  • Fixed an issue where certain popups like the website permission prompt or the downloads menu appear cut off or with unexpected scroll bars to see all content.
  • Fixed an issue where Web Capture area selection doesn’t appear to work on certain websites.
  • Fixed an issue where disabling standalone IE and then navigating to a site that’s set to open in standalone IE sometimes results in an infinite loop of popups stating that “This action is restricted.”
  • Fixed an issue where the button to enter Kids Mode is sometimes missing from the profile flyout.
    Temporarily disabled Web Capture on Linux
  • Fixed an issue where signing into the browser with a personal Microsoft account (after there’s already one signed in) in order to verify it causes a crash on Linux.

Known issues are the same as previous releases, with no new ones to take note of this week. Other than that, there’s nothing else to note, but if you’re on the Canary channel, you can look forward to a new security feature that will result in the browser now requiring authentication before auto-filling passwords. Happy downloading, Edge Insiders, and remember to send your feedback to Microsoft if you come across any bugs.

New Windows 10 Insider build brings more personalization options for news and interests in the taskbar

Microsoft has just released the Windows 10 Insider build 21354 for Dev channel testers, which brings new personalization for news and interests in the taskbar and improvement to display settings. If News and Interests is still gradually rolling out to Insiders in the Dev channel, those who already have the feature will notice a “Manage interests button” at the top of the window that will allow them to choose the topics they’re interested in.

This build also introduces a new “Tune your feed” feature in the left part of the “My interests” page. “This experience makes it easy to explore and follow publishers from our partner ecosystem and select example articles that pique your interest,” the Windows Insider team said today.

News and interests on the Windows taskbar showing a new “Manage interests” button and personalization card to help new users get started with their feed.

Another new feature in this build is the ability to turn off Content adaptive brightness control (CABC) in the Display settings via Settings > System > Display. CABC can improve battery life on laptops but also lead to unexpected brightness changes, and the Windows Insider noted that disabling CABC has been a top-requested feature from Insiders.

The build 21354 also adds a new page in the settings app for managing webcams or ONVIF IP cameras connected to your local network. “Each camera has a “Configure” button that lets you make changes to the default brightness and contrast – letting you get rid of the pesky backlight that always shadows your face in your video calls,” the Windows Insider team explained. You can find this new page at Settings > Devices > Camera.

The Configure page for cameras allows you to adjust default image settings such as brightness and contrast.

Insiders installing the build 21354 will also notice that Microsoft Paint is now updated via the Microsoft Store and has a Fluent Design-inspired icon. Snipping Tool is getting the same treatment, and both Paint and Snipping Tool have been promoted out of the Windows Accessories folder in the Windows 10 Start Menu.

In other changes related to Start Menu, the Windows Accessories, Windows Administrative Tools, Windows PowerShell, and Windows System folders have now been removed from the Start Menu and all apps within these folders can now be accessed via the new Windows Tools entry point. This is all part of an ongoing effort to re-organize all the admins and system tools in Windows 10, but all these apps will still appear in Windows Search.

You can find a list of other minor changes, bug fixes, and known issues in the build 21354 below:

Changes and Improvements

  • [News and interests] As mentioned previously, we have enabled the ability to deselect “Open on hover” in the “News and interests” taskbar options. This is based on your feedback.
  • The default path to access Linux files from Windows using the Windows Subsystem for Linux has been changed from `\\wsl\\` to `\\wsl.localhost\\` to improve performance and reliability. You will still be able to access Linux files using `\\wsl$\\`.
  • Under Settings > Update & Security > Change active hours, you will find the toggle turned on for “Automatically adjust active hours for this device based on activity”, if you have never adjusted this feature. We are starting a roll out a change for Insiders that makes this setting on by default. With this setting turned on, Windows Update will be able to schedule automatic restarts when you are typically not using your device more accurately.
  • As of the latest versions of Microsoft Edge, all pinned sites (regardless of what version you were using when you pinned them), should now use the taskbar behavior described here without you first having to unpin and re-pin the site.
  • On ARM64 devices, you can now toggle compatibility settings for x64 applications.
  • Under Settings > Personalization > Device usage, you can select all the ways you plan to use your device to get customized suggestions for tips, tools, and services.

Fixes

  • [Gaming] We fixed an issue where certain games may crash, will not sync save data when a game is played on a different device, or will not save when a new game is installed.
  • [File Explorer] We fixed an issue resulting in all folders pinned to Quick Access in File Explorer disappearing if you installed Build 21343. Please note that this fix prevents the issue from occurring going forward, it will not bring back the ones that were unpinned if you installed the impacted build previously.
  • [File Explorer] We fixed an issue resulting in some Insiders experiencing that the entire folders section of Quick Access was missing after installing the previous flight.
  • We fixed an issue impacting Search reliability in the previous flight.
  • [News and interests] Fixed an issue where news and interests could occlude other content on the taskbar especially on smaller screens.
  • We fixed an issue where the tooltip text for items in Start’s Power button menu wasn’t displaying correctly.
  • We fixed an issue resulting in a crash if you entered WinPE and tried to enable Narrator using WIN + CTRL + Enter.
  • We fixed an issue resulting in some Insiders experiencing a bug check with error SYSTEM_THREAD_EXCEPTION_NOT_HANDLED when rebooting or shutting down in the previous flight.
  • We fixed an issue that could result in a bugcheck when starting WSL.
  • We fixed an issue that could result in the Windows Update Settings page showing progress dots but never loading.
  • We fixed an issue where navigating to Power and Sleep in Settings would crash Settings.
  • We fixed the issue where a random toggle that didn’t do anything was appearing under Settings > Personalization > Lock screen.
  • We fixed an error resulting in some Insiders recently seeing an error when trying to add a password to a local account that was created without a password.
  • We fixed an issue where if you opened the Pinyin IME settings via Search, the Settings page would be unexpectedly blank.
  • We fixed an issue that could result in your desktop background going black after snapping an app to the side of your screen.
  • We fixed an issue where some of the text in Snipping Tool wasn’t displaying correctly.
  • We fixed an issue causing the Handwriting Input Panel to not work for pen input on ARM64 PCs.
  • We fixed an issue impacting clipboard history reliability.
  • We fixed an issue resulting in characters being duplicated in certain apps when typing with the Korean IME.
  • We fixed an issue resulting in not being able to insert composition strings when typing with an IME after copying and pasting a text box in PowerPoint.
  • We fixed an issue resulting in key events being lost when renaming files in File Explorer while typing with an IME.
  • We fixed an issue where when typing with the Japanese or Chinese IMEs in certain apps that have their own UI for IME candidates, the IME candidates were not displayed in the app’s UI.
  • The fix we mentioned in Build 21327 to address an issue where a toggled key on the touch keyboard had the wrong background color is now rolling out to all Insiders in the Dev Channel.
  • We fixed an issue causing an increase in login time in the previous flight.
  • We fixed an issue resulting in some Insiders finding that boot time was longer in the previous flighting.
  • We fixed an issue resulting in the network button on the login screen not working and potentially crashing.
  • We fixed an issue causing some logins to hang on a black screen. If you continue to see a similar problem, please file a new feedback in Feedback Hub.
  • We fixed an issue that could result in freezes when watching videos in Chromium-based browsers in recent Dev Channel builds.

Known issues

  • We’re looking into reports of the update process hanging for extended periods of time when attempting to install a new build.
  • [News and interests] Pressing ESC key to dismiss an opened context menu in the flyout dismisses the whole flyout instead.
  • [News and interests] Sometimes the news and interests flyout cannot be dismissed with pen.
  • [ARM64] Insiders who installed the preview version of the Qualcomm Adreno graphics driver on the Surface Pro X may experience reduced brightness of the display. This issue is fixed with an updated version of the preview graphics driver at https://aka.ms/x64previewdriverprox. If you are experiencing this issue, please see the feedback collection for more information.
  • We’re investigating an issue where elements of Search (including the search box in File Explorer) are no longer displaying correctly in dark theme.
  • We’re working on a fix for an issue introduced in the previous flight impacting WSUS users where the “Check online for updates from Microsoft Update” option is greyed out. If you are impacted, you can run the following command from an elevated Command Prompt to set the reg key so that scan will check Microsoft servers:
    • reg add “HKLM\Software\Microsoft\WindowsUpdate\UX\Settings” /f /v ScanMicrosoftOnly /t REG_DWORD /d 0x01

Then click the regular “Check for updates” button in Windows Update Settings. Please note, if the scan needs to be done repeatedly the reg key will need to be re-added each time, as scanning reads and erases the key.

  • Due to an issue with migrating the shortcuts into the new Windows Tools location, This PC shows up with the display name “computer.” We already have a bug fix on the way to address this issue.
  • Some non-administrative apps, such as 3D Viewer and Print 3D, that were previously in the Windows Accessories folder are now in Windows Tools. These app shortcuts will be moved back into Start with an upcoming bug fix. They are still searchable and accessible via Windows Tools in the meantime.
  • The Windows Camera App currently does not respect the default brightness setting set via the new Camera Settings page.
  • Some cameras currently may not support adjustment in the Camera Settings App when the camera is also in use by another app.
  • Accessing the virtual GPU is broken for Windows and Linux guests, adding a vGPU to a VM will have no effect and the VM will continue running with software rendering

Last but not least, the Windows Insider team explained today the build 21354 is coming from the CO_RELEASE branch instead of the RS_PRERELEASE branch. “Just like we did back in October when we released builds from the FE_RELEASE branch, we are practicing our ability to change which branch flight builds from. As our engineers work in development cycles internally, we may prioritize work being done in a specific branch and may need to move Insiders between branches,” the blog post reads.

The Windows Insider team added that Microsoft is treating builds from the CO_RELEASE branch the same as builds from the RS_PRERELEASE branch, though this probably doesn’t tell the full story. Presumably, “CO_RELEASE” refers to the Windows 10 “Cobalt” release planned for the second half of 2021, also known as Windows 10 version 21H2. Microsoft isn’t discussing what to expect from 21H2 yet, but several reports have been suggesting a big design update for Windows 10 codenamed “Sun Valley” internally.

If you want to do a clean install of the Windows 10 Insider build 21352, ISOs are available from this page.

Halo: MCC’s Season 6 Update brings mouse and keyboard support and more for Xbox players

Halo: The Master Chief Collection is getting a new update on PC and Xbox today to celebrate the launch of Season 6 “Raven.” Players can expect unique themed armor sets, vehicle skins, weapon skins, and more customization options to unlock, with a new batch of challenges to complete for season points.

Today’s update also introduces the Exchange, a new feature allowing players to spend points on unique customizations from past Seasons or limited-time challenges. A new “Waterfall” map for Halo 3 Custom Games is also making its debut with this patch, and players can also try a new “Escalation Slayer” game variant to try in Halo: Reach, Halo 4, and Halo 2: Anniversary.

This latest patch also brings support for mouse & keyboard on Xbox consoles, as well as Field-of-View (FOV) and Crosshair Position options on Xbox One and Xbox Series X|S. Halo: MCC already supports input-based matchmaking across Xbox and PC, but support for mouse & keyboard on consoles has been a top-requested feature.

The full patch notes for Halo MCC Season 6 can be found on this page, and it’s important to note that the long-awaited Custom Game Browser isn’t included in today’s update. “We don’t have an exact timeline of when we will be able to debut it to players, but it will be coming in a future flight for players to experience and give feedback on in much better shape than where we were at,” 343 Industries in a recent Dev & Flighting update.

Halo: The Master Chief Collection is currently 50% off on the Microsoft Store and Steam, but the Xbox and PC versions of the Halo anthology are also free-to-play with Xbox Game Pass. If 343 Industries is still hard at work on Halo Infinite to be released in Fall 2021, it’s good to see that Halo: MCC keeps receiving new content as we approach the 20th anniversary of the release of Halo: Combat Evolved.


How to get the most out of video calling in Microsoft Teams

It is likely that you’re spending a lot of time inside of Microsoft Teams these days. Particularly, the bulk of your time might be dedicated to video calls, where you’re in view of the camera, or just using your microphone to chat.

We’ve covered a lot of our tips and tricks for these types of calls over the past few years here at OnMSFT, but today, we’ll bring them all together in one piece. Here’s a look at how you can get the most out of video calling in Microsoft Teams.

Use background blur, a pre-set background, or a custom background

Teams Blur Background

The first thing we want to mention is one that is quite obvious — use background blur or custom background. These features will help you preserve your privacy (or hide a mess) during a call. It also helps you look a bit more professional, too. You can enable it in two ways, either during a call or before a call on the “Join Now” page.

To enable background blur or pick a preset background during a call, just hover and hit the three dots you see in the middle or the top of your screen, then choose to Apply Background Effects. You can then click one from the list, and click Preview, and then click Apply. To do this before the call, on the “Join Now” page, click the Background filters link under your profile photo, and then select one from the list you’ll see on the right.

If you want to use a custom background, meanwhile, you’ll just want to tap the “Add new” button that you see when you go to select background blur. Looking for backgrounds? We’ve written a number of posts highlighting backgrounds you can choose from.

Raise your hand when you want to speak!

Microsoft Teams Raise Hand

Next up is one of the newest things introduced to Microsoft Teams, the “raise hand” feature. This feature works just as the name suggests it does. When you’re in a meeting with a large group of people, you can click the “raise hand” button to call out attention to yourself, so the meeting host knows you want to speak up.

To raise your hand, just hover and tap the raise hand icon in the top bar in Teams. It is the icon of a smiley face, holding up his hand. This turns your video feed box yellow, to highlight yourself in the meeting and indicate you have something you want to say. It also will show the meeting organizer a (1) on the meeting participant list to indicate someone in the meeting wants to talk.

Transfer calls across devices

Teams Join Meeting Transfer

Third up on our list is the ability to transfer calls across different devices. This might be useful for you if you have to move settings during a call. Instead of having to exit the meeting and rejoin it, you can actually transfer the meeting to another device during the call itself, without anyone knowing.

On a PC or a Mac or on Linux and the web, when you log into Teams, you’ll see a banner appear at the top letting you know that you’re a meeting on another device. You can click the purple “Join” button to transfer the meeting over, followed by Transfer from another device. On mobile, you’ll see the same banner, too, and you’ll just have to click the join button.

Try out Together Mode or Large Gallery Mode

In a mass meeting with more than 10 people? Why not try out Together Mode. This fourth Teams feature falls next in how you can get the most out of your Teams video meetings. It will help you make your meeting feel more natural, and also help reduce meeting fatigue. The feature uses AI segmentation technology to digitally place participants in a shared background, making it feel like you’re sitting in the same room with everyone else in the meeting or class.

You can enable together mode during a meeting by clicking and hovering for the three dots (. . .) and choosing Together Mode. This will then switch your view over to an auditorium-like setting where everyone is sitting in the same space.

In addition to trying Together Mode, you also might want to consider trying Large Gallery Mode too. Available from the same ( . . .) menu, this feature lets you see up to 49 people in a 7 x 7 grid. It’s for those people who might not prefer using the Together mode view in larger-scale meetings.

Suppress background noise in Teams

Microsoft Teams Noise Supression

Our final tip to get the most out of Microsoft Teams video calling comes related to your microphone. We’ve talked before about how important a good microphone is for good meetings, but if you’re in a situation where there is a lot of noise in the background, then your microphone does no good over annoying sounds. Luckily, Teams has noise suppression built right in, on Windows 10.

Select your profile picture at the top, and then click Settings from there, select Devices on the left, and then look for Noise Suppression. There are a few settings to choose from here, but it’s best to set it to Auto as this will let Teams decide the best level of noise suppression based on local noise. If you opt for High it will suppress all background noise that isn’t speech.

We’ve got more tips!

As we mentioned to start, we’re always covering Microsoft Teams here at OnMSFT. Feel free to check out our Teams hub for more articles like this one, and additional tips and tricks. Example topics we’ve covered before include how you can add Yammer to Teams, how Teams can be used for your personal life, and even how and why you might want to create Flows in Teams. Of course, we’re always listening to your feedback, too. So, let us know if you have any tips of your own by dropping us a comment below.

FIX: Kaspersky blocking or throttling VPN [NordVPN, Cisco]

Running the various applications, a common Windows 10 and Windows 11 user utilizes nowadays isn’t always simple.

For example, hundreds of users were unable to work their way around the VPN blockage suddenly imposed by the Kaspersky Antivirus solution.

This isn’t a rare issue as VPNs and third-party Firewalls (they come as the part of the antivirus suite) don’t work together very well.

Nonetheless, we provided some solutions that should set Kaspersky to allow the VPN connection and more.

How can I unblock VPN blocked by Kaspersky AV?

  1. Whitelist the VPN
  2. Reinstall the VPN
  3. Disable scanning of encrypted connections
  4. Upgrade or downgrade Kaspersky
  5. Check TAP drivers
  6. Change your antivirus

1. Whitelist the VPN

  1. Open Kaspersky from the notification area and then open Settings.
  2. Choose Protection.
  3. Select Firewall.vpn blocked by kaspersky
  4. Disable Block network connections if the user cannot be prompted.
  5. Select the VPN executable file and allow it to communicate through the firewall. Repeat this for all related applications.
  6. Save the changes and try connecting again.

Let’s make sure that the Kaspersky security suite is responsible for VPN blockage or inconsistencies in connection speeds.

Temporarily disable the antivirus by right-clicking on the icon in the Notification area and try using VPN again.

If the Kaspersky antivirus is indeed to be blamed for VPN issues, you’ll need to manually create an exclusion for the VPN client.

Now, regardless of whether you did it before, it seems that an update for Kaspersky changed settings in an unfavorable way, blocking the outgoing VPN connections.

We recommend also adding the exceptions for browsers, as the troubling patch allegedly affected the browsers the most, while other connection-related applications continued working just fine with the VPN enabled.

2. Reinstall the VPN

  1. In the Windows Search bar, type Control and open Control Panel from the list of results.
  2. From the Category view, click Uninstall a program under Programs.vpn blocked by kaspersky
  3. Right-click on your VPN solution and Uninstall it.
  4. Use the utility recommended below to clean all remaining files and registry entries left by the VPN.
  5. Restart your PC.
  6. Download the latest version of the VPN of your choice and install it.

Finally, you can try and reinstall the affected VPN. By doing so, the application itself (VPN client) should reintegrate into the system shell.

3. Disable scanning of encrypted connections

  1. Start Kaspersky, go to Settings, select Additional, click on Network and then disable Do not scan encrypted connections.
  2. Start Kaspersky, go to Settings, select Additional, click on Network and then disable Inject Script into web traffic to interact with web pages.
  3. Open Kaspersky, go to Settings, select Protection, click on Web-Antivirus settings, then select Advanced settings and disable Automatically activate Kaspersky Protection extension in browsers.
    • Prior to this, we recommend uninstalling the extension from the browser.

Some experienced users recommended disabling certain options in order to make the VPN work. One of the options that seemingly disrupts the VPN connectivity is Scanning of encrypted connections.

Also, disabling Inject Script into web traffic to interact with web pages and Automatically activate Kaspersky Protection extension in browsers options might help, as well.

If you’re not sure how to do so, we provided the steps for all 3 options above.

4. Upgrade or downgrade Kaspersky

First and foremost, make sure that you have the latest Kaspersky patch. If that’s the case, upgrading/downgrading seems applicable.

Furthermore, it seems that the version that broke the VPN is Kaspersky 2017. Change the version of the antivirus, upgrading it or downgrading it in the process.

If you have a license key, you can install almost all Kaspersky versions, so have that in mind.

The important thing is to skip on the upgrade prompts (Settings > Additional >Update, and uncheck the option to download new versions).

What you’ll need to do is to keep hold of the license key and uninstall the current Kaspersky version.

After that, navigate to the official site and download the version you deem functional. If you rely on a VPN on a daily basis, you should probably consider this option.

5. Check TAP drivers

The affected VPN can have its share in this, even though Kaspersky is the main culprit. Namely, while waiting for the solution, some users meddled with the TAP adapter and its respective driver.

For some reason, they had a much better connection after rolling back the drivers. TAP adapter is an essential part of a VPN, so the relation is obvious.

Due to the apparent differences with every system (there are no 2 identically configured PCs), we can’t say with certainty whether this is a permanent solution. Nonetheless, it’s worth a try.

6. Change your antivirus

If Kaspersky simply will not make the cut, consider switching to a more well-balanced security solution that can easily cooperate with third-party apps including your VPN.

When it comes to flexibility, the security suite recommended below is a strong contender. Plus, it cohabits with third-party solutions without compromising on security.

On the contrary, this is a well-rounded, feature-rich security solution that delivers not one, but three next-generation anti-malware protection layers to keep your system safe from old and newly emerging threats alike.

ESET offers protection against viruses, worms, Trojan Horses, spam, spyware, identity theft, hacking, phishing, fraud, and social engineering.

This solution is light, extremely fast and it offers live chat support 24/7 so you should definitely consider trying it.

⇒ Get ESET HOME Security Premium

If you still face antivirus compatibilities with your VPN, you can look at our list with the best antivirus that work best with VPNs.

Our solutions provided ways on how to disable Kaspersky and reenable the VPN and we hope that they worked for you.

In case you have any questions or suggestions regarding the VPNs inability to work when paired with Kaspersky antivirus, feel free to tell us in the comments section below.

Microsoft Teams is getting a new multi-window experience for managing Live Events

Last year, Microsoft Teams introduced the ability to pop out chats, apps, and meetings into separate windows. The company is apparently planning to expand this functionality to live events in Teams. The Microsoft 365 roadmap suggests that the feature is currently under development, and it’s coming in mid-May.

Multi-window support for live events was originally requested on the Microsoft Teams UserVoice forum back in July 2020. Currently, producers manage the live events within the primary window of the app. It’s a bit annoying for users, forcing them to switch between different windows multiple times.

Current and new experience

Fortunately, the company is aware of this limitation, and it’s finally working to address this problem. With this update, producers will see a separate window experience for managing events in Microsoft Teams. The new window will offer all functionalities and features that are currently available in the in-window user experience.

The ability to manage live events in a dedicated window should make it easier for producers to spread their workflow across the desktop and it should help them to effectively manage their event. If you have yet to try live events, we remind you that Microsoft has extended the temporary limit increase for Microsoft 365 live events until June 30, 2021.

How to use PowerToys Color Picker utility on Windows 10 to find the perfect color

PowerToys is such a handy utility that it’s hard to pick which specific utility is the most useful for your productivity. Keyboard Manager, Image Resizer, and PowerRename are all great utilities by themselves, but discovering another PowerToys utility that you didn’t know you needed is refreshing.

The PowerToys Color Picker is great because it gives you a system-wide color identifying utility on Windows 10. Color Picker allows you to get the configurable color information for photography, web and graphic design, and more.

Getting started with PowerToys Color Picker

PowerToys Color Picker
Of course, you can’t use Color Picker until you enable Color picker in PowerToys, so this is what you need to do.

1. Download and install PowerToys from the GitHub website.
2. Enable Color Picker
3. Use the Color Picker activation keyboard shortcut to find the color value of the color you want.

Color Picker Options

If you want to change the Color Picker activation shortcut to a different one, you can. Just keep in mind that whatever shortcut you use, it must use a combination of Windows key, Ctrl, Alt, and/or Shift.

Once activated, you can decide what you want for Color Picker’s activation behavior. You have three options each with their own description as shown:

1. Color Picker with editor mode enabled
2. Editor
3. Color Picker only

PowerToys Color Picker

Color Picker with editor mode enabled is on by default and is a good option to use when you are using the PowerToys utility for the first time. It is also a good idea to leave the shortcut as it is so it doesn’t interfere with other shortcuts you have for other programs to prevent a keyboard shortcut conflict.

The final options in the Color Picker settings are the ability to turn on and off different Editor color formats and change the display order of the color formats. Color Picker is such a rich PowerToys utility that it is notable that they give you the ability for more color format information options than might be needed.

Underneath the Shortcuts options is Picker behavior. Here, you choose what color format gets copied to your clipboard on Windows 10. One thing that I did enable was the checkbox to Show color name. I enabled it because I found it helpful when learning how to use Color Picker for the first time.

PowerToys Color Picker

I am by no means an expert, so I can’t claim to know what all the color values mean or what color editing options are needed for different image editing apps. However, the amount of color format options available shows that Microsoft has you covered by offering more options than you could possibly need.

PowerToys Color Picker

Once you have configured the settings to your preferences, you can close the PowerToys Settings window. Now it is time to use the Color Picker on Windows 10.

Using Color Picker on Windows 10

Once you choose all the settings you need, it’s time to use Color Picker in PowerToys on Windows 10. All you need to do is use the Color Picker activation keyboard shortcut (Windows Key + Shift + C) and you can pick anything on your Windows 10 desktop to get real-time color information. Here is an example of Color Picker in action below.

Now, you should know how to use Color Picker to find any color you want using your Windows 10 PC. If you run into any trouble, you can refer to Microsoft’s Color Picker technical documentation for more information.

What do you use to identify colors on Windows 10? Let us know in the comments.

Dell’s new Alienware m15 R5 gaming laptop comes with AMD’s speedy Ryzen 5000 chips inside for the first time ever

To lead off its spring 2021 lineup of devices, Dell has announced a plethora of new monitors and gaming laptops. At the front of the pack is the new Alienware m15 R5, which introduces AMD’s speedy Ryzen 5000 chips, as well as a 1140p and 240Hz display to Alienware’s lineup of laptops. Additionally, Dell is also launching new gaming monitors and a more budget-friendly Dell G15 Ryzen Edition laptop, too.

Alienware m15 Ryzen Edition R5

We’ll start first with the Alienware m15 Ryzen Edition R5. Though the design of this hasn’t changed over generations (Alienware is just introducing a new interior color called Dark Core,) the changes inside are what matter. The laptop can be configured all the way up to a Ryzen R9 5900HX CPU and an RTX 3080 graphics card. This makes it the first time in 14 years that Dell is introducing an AMD option to the main Alienware lineup, which is usually reserved for Intel-only chipsets.

Note that the Alienware m15 Ryzen Edition R5 also comes with up to QHD 240Hz or FHD 360Hz panels. There’s also user-upgradeable 3200Mhz DDR4 memory for the first time on an Alienware 15-inch notebook. And finally, Dell is making history as this laptop is the first gaming laptop with switches made by Cherry MX. It’s designed to make it feel like you’re using a mechanical keyboard. Prices start at $1,793.98 come April 20.

Dell G15 & G15 Ryzen Edition

For something a little cheaper, Dell is also introducing the G15 Ryzen Edition. These laptops now come with a redesigned look, featuring a two-sided, narrow-bezel screen, as well as an Alienware-inspired thermal design with a vent on the back hinge to maximize airflow for optimal cooling. Under the hood, meanwhile, there are the same Ryzen processors as the Alienware m15 Ryzen Edition R5, but with the GPU maxing out with the RTX 3070.

You’ll find the G15 Ryzen Edition in four new colors — Dark Shadow Grey, Specter, Green with Speckles, and Phantom Grey with Speckles, with Obsidian Black. Pricing on this starts at $900, with availability coming May 4. An Intel version will also come on April 12 for $900.

New Dell Gaming Monitors

To pair up with these new laptops Dell is also introducing four new gaming displays. These include the Dell 25, Dell 27, Dell 32 Curved Gaming Monitors, and the Dell 34 Curved Gaming Monitor. The Dell 25 Gaming Monitor is all about the 240Hz refresh rate and 1ms response time. It also has support for both NVIDIA GSync and AMD FreeSync for lag-free gaming.

Meanwhile, for more immersive gaming, there are the 3 new curved VA gaming monitors in either the 27-inch, 32-inch, and 34-inch sizes. The Dell 27 and 32 Curved Gaming Monitors feature QHD resolution and 165Hz refresh rate and 2ms response time. The Dell 34 Curved Gaming Monitor features WQHD resolution and a 144Hz refresh rate. These monitors sport AMD FreeSync.

All of these displays feature Variable Refresh Rate (VRR) output for gaming consoles. The Dell 25 Gaming Monitor will come to the US on May 27. The Dell 27 and 32 Curved Gaming Monitors will come on June 22, and the Dell 34 Curved Gaming Monitor on May 27. Pricing was not shared.

Microsoft Announces Preview of OpenJDK

A brief look at Java

Java has been a force to be reckoned with for nearly 25 years. It came with the promise of “write once, run anywhere”, the idea was to allow developers to compile their applications down to bytecode which could run on any platform which supported its Java virtual machine sometimes also referred to as a runtime environment.

Billions of devices and computers run Java. Although its use has declined lately, chances are in the early 2000s you were installing applications on your computer which required the deployment of the Java virtual machine. Fast forward to the year 2021 and there seems to be renewed interest in the platform. Microsoft itself runs a wide variety of Java powered systems behind their Azure cloud. In fact, some of their biggest IPs are backed by Java, a couple worth mentioning are LinkedIn, Yammer and some editions of Minecraft.

Microsoft OpenJDK

Microsoft supporting this development platform through OpenJDK is huge for developers that have invested heavily in it for the past few years and decades. it will become the default distribution for Java on Azure in the near future and the transition promises to be seamless.

My experience with Java has not been smooth from a development perspective, Although not necessarily was it directly related to writing code, I wrestled with getting SonarQube up and running on a Windows Server a few months ago. This is a tool many developers are familiar with as its used for scanning code for quality. I have been spoiled with seamless and automatic deployments of .NET runtime when deploying applications, and the process of standing up the environment which allowed SonarQube to run was a bit of a challenge. Hopefully Microsoft throwing their weight behind Java means a better and smoother experience for both developers and consumers of Java powered applications.

What are your thoughts on these investments from Microsoft into “competing” development platforms? I’d love to hear your thoughts in the comments below. For learn more about OpenJDK check out the official Microsoft website.