5 best VPNs to use with Skype to secure & improve calls

Around the world, more and more people are using Skype as the de facto VoIP service to make video and voice calls online, as it lets anyone create an account and start calling other Skype users for free.

However, there are many countries where using Skype is prohibited or has been allowed to a limited extent, as ISPs block its access for selfish gain, to avoid competition, or at the request of the ruling government (to monitor communication).

To circumvent this restriction, however, VPNs come in handy as they allow you to access Skype and some do this for free too.

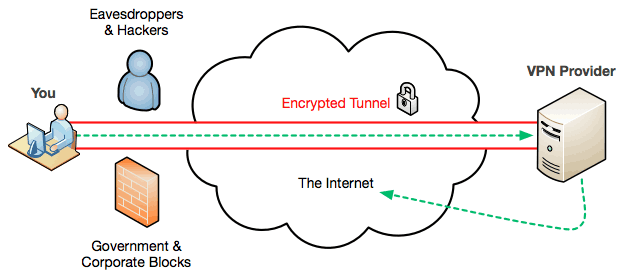
If your country has blocked Skype – like Kuwait, Libya, North Korea, Oman, UAE and others – you need to get connected to a VPN server located in a country where the service isn’t banned, and you can do this by installing a VPN. Your ISP won’t see that you’re using Skype.

Choosing the best VPN is dependent on factors such as strong encryption, fast and stable connections for clarity in VoIP communication, zero logs policy, and apps for multi-platform and multi-OS use.

If you’re not ready to pay for a VPN service, you can go for the free version, which is reliable and trusted to provide privacy and security when you’re online. Check out the best VPN for Skype to download for in 2020 below.

What are the best VPNs for using Skype?

Private Internet Access (recommended)

Private Internet AccessSkyping appropriately means that you need to have a stable Internet connection, especially if you are on a video call, so naturally, you will want a VPN that will not hinder your connectivity in any way.

One such VPN service is Private Internet Access, a tool developed by Kape Technologies, that will grant you complete security without any of the cons.

Enjoy unrestricted access to our anonymous VPN network., and unlock any geographic restrictions and protocol filters, such as watch US-based Netflix in Europe or Asia.

In addition, this feature will also block pop-ups and certain annoying ads in order to keep your browsing experience as fast as it can be.

Whether you’re browsing, streaming, of chatting with your loved ones without wanting to be monitored, Private Internet Access will deliver.

It’s worth mentioning that private Internet Access also has P2P support, and with lightning-fast speeds, it’s one of the best VPN tools out there.

Overall, this VPN offers great features, and thanks to the wide array of available servers and no logs policy, it’s one of the best VPNs on the market.

Here are some of the perks of using Private Internet Access:

  • Your Internet connection speed will be unaffected
  • A wide selection of servers (+3400)
  • Servers located in 45 countries means geo-location is next to impossible
  • Protects you from any type of surveillance, even from your ISP
  • Only no-log VPN in the world.
  • Now available at an incredible discount price

Private Internet Access

Private Internet Access

Keep your browsing habits private with this amazing VPN, now at a discounted price for a limited time only!
$2.69/mo. Buy it now

CyberGhost

Cyber Ghost VPN

This VPN has been rated as one of the best VPN for Skype in 2018, as you can enjoy tracking-free use of the internet with complete safety while you’re at it.

It offers high speeds, strong 256-bit AES encryption, completely free and secure package, plus if you want the ultimate in security, you can set up the L2TP/IPSec and PPTP protocols on your device.

Other features include the automatic kill switch that makes you less susceptible to IP address leaks when the server is down, security blocks on ads and malware, no-log policy, and it is user-friendly.

CyberGhost

CyberGhost

Keep your browsing habits private with this amazing VPN, now at a discounted price for a limited time only!
$2.75/mo. Buy it now!

NordVPN

NordVPN

Another great VPN that we want to show you is NordVPN, developed by Tefincom & Co., S.A. This VPN uses AES 256-bit encryption in order to encrypt your data thus keeping your online activity completely safe from third-parties.

Speaking of encryption protocols, this application supports both IKEv2/IPsec and OpenVPN protocols so your data will remain protected at all times.

This VPN also has CyberSec feature that can automatically detect dangerous websites and block them in order to protect your PC.

For maximum security and privacy, you’ll be pleased to know that Double VPN feature is also available. This feature will connect you to several VPN servers in order to completely hide your identity online.

If you’re concerned about your online privacy, you’ll be pleased to hear that NordVPN has a strict no-log policy, so your browsing activity won’t be stored on NordVPN’s servers.

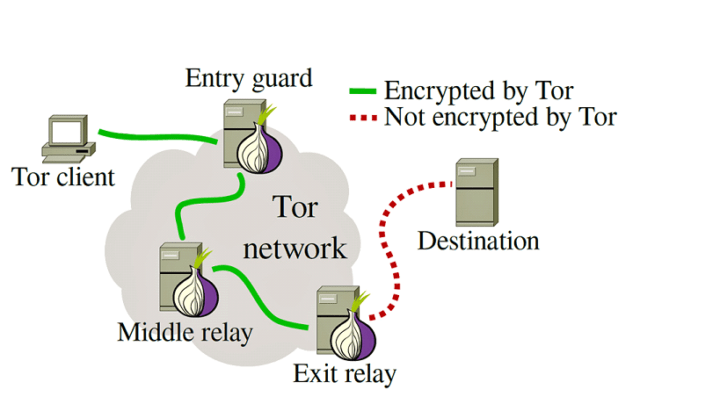
The application also has Automatic Kill Switch and DNS protection, and you can even connect to the Onion network using NordVPN.

As for the number of available servers, there are over 5000 servers available located in 62 different countries, so you should be able to access any geo-restricted content without any problems.

Overview:

  • 256-bit encryption
  • No log policy
  • Support for IKEv2/IPsec and OpenVPN protocols
  • Double VPN feature
  • Automatic Kill Switch and DNS leak protection
  • P2P support
  • Over 5000 servers in 62 countries
NordVPN

NordVPN

Keep your browsing habits private with this amazing VPN, now at a discounted price for a limited time only!
$3.71/mo. Buy it now

Hide.me VPN

This is a Malaysian VPN provider developed by eVenture Ltd. that limits users of its free version to three server locations in Singapore, Netherlands, and Canada, but serves up 2GB per month of free use of its services – a give and take really.

Its speeds are fast, plus the privacy policy is very strong, with robust encryption to keep your information and data secure, and you can find it on all popular platforms. It is very ideal for home and public Wi-Fi protection.

When it comes to Skype, you need complete anonymity while enjoying the best quality of calls at the fastest speeds, which is what Hide.me is about, though it doesn’t enable or facilitate bypassing copyright circumvention.

Once you’re online via this VPN, the data is encrypted to keep you anonymous so you can access Skype safely and privately.

Hide.me VPN

Hide.me VPN

Need a VPN to secure your Skype calls and improve their quality? Check out Hide.me VPN.
$4.99/mo. Buy now

TunnelBear

tunnelBear

Here’s another free service from McAfee, LLC that’s super cute, but also very secure and reliable.

This bear keeps no logs, but restricts the bandwidth to just 500MB per month, compared to Hotspot Shield that gives 750MB daily and it’s still free.

However, the idea behind a VPN is not just how many MBs you can get, it’s about speed and security for your online privacy, so this still counts in many respects.

Features include plenty of server locations in 20 countries, but users of the free service can use all other servers except the one in Australia. Otherwise, it works on all devices, plus if you drop a friendly tweet about them, you earn an extra 1GB monthly.

TunnelBear has its own DNS servers, and supports VoIP services like Skype, meaning you can have multimedia sessions and video communication online. It doesn’t support P2P file sharing and download though (like torrents or other sites where you can download content from such networks).

Overall, the global coverage is good, the setup is simple and easy to use, encryption is excellent, plus you can connect up to 5 devices simultaneously.

Ready to download the best VPN for Skype free of charge? Let us know which one caught your attention by leaving a comment in the section below.

TunnelBear

TunnelBear

Looking for a VPN that works great with Skype? Check out TunnelBear.
$4.17/mo. Get it now

How to fix laptop power jack without soldering [Full guide]

Laptops make our day-by-day life so much easier. We can take these miniature powerhouses with us wherever we go, stored in our backpacks. Convenience is key when it comes to modern life.

Most importantly, we need access to information on the fly. Many of us travel a lot, therefore we need to organize our time properly in order to keep up with work and deadlines.

It is so much easier to do all of these when you have access to a laptop or a notebook.

Completing tasks has never been easier since you can quickly take out your device and start working, either while traveling by train, or by bus.

However, your device must function properly. One of the worst problems that you could encounter is running out of battery.

Even more, if your power jack stops working you won’t be able to charge your laptop, consequently being unable to use it. Here is a list of solutions for such an issue.

How can I fix my laptop power jack without soldering it?

1. Check if your laptop battery is working

  1. Take the battery out of your laptop.
  2. Plug your charger in without the battery.
  3. Since your laptop is running on AC power, check to see if it works.

Sometimes the power jack is not the actual problem. Your laptop might be having a faulty battery. You can check if the battery is the problem by simply removing it and plugging in your power adapter.

Without a battery, your device will not be able to run without a constant supply of power.

Do not plug your power adapter from your outlet thinking it will still work, because you will be cutting your laptop’s power supply, thus causing it to turn off.


2. Check your battery life through CMD

  1. Right-click on Start and select Command Prompt (Admin).
  2. Type powercfg energy in the Command Prompt.

  3. A file path will appear on the screen. Open windows explorer and go to it.
  4. Scroll down until you find the Battery: Battery Information section.
  5. Check the Design Capacity and Last Full Charge.
  6. Divide the Design Capacity value with the Last Full Charge value, then multiply by 100%.

Now you should know how to check your battery’s condition. The higher the percentage, the healthier the battery.


If you’re having trouble accessing Command Prompt as an admin, then you better take a closer look at this guide.


3. Check the power adapter

  1. Plug your AC adapter in your power outlet.
  2. Set the Multimeter to 20V and into DC mode.
  3. Use the Multimeter leads and touch the metal parts of the AC adapter connector.
  4. The reading you get from your Multimeter should be close to the one written on your Ac adapter.

You need to check if your AC adapter isn’t acting up before you try to fix your power jack.

For those who don’t know, a multimeter is a tool used to measure voltages. You can buy the AstroAI Digital Multimeter right away, if you don’t have any on hand already.


4. Open up your laptop’s case

unscrew your laptop's case
  1. Take a screwdriver and unscrew your laptop’s case.
  2. Take out your battery, RAM, and storage.
  3. Make sure there are no screws left holding your case in place.
  4. Open up your case and take a look at the power jack.
  5. Take the power jack out of its designated socket and put it back in, applying pressure.
  6. Put your laptop back together carefully, screwing everything back properly.

Disassembling and fiddling with your laptop’s components by yourself is risky. Take matters into your own hands only if you are well informed about laptops.

If you’re not experienced enough, contact a specialist. This last step is the last resort before you start searching for the nearest laptop service.

You need to check the inside of your laptop and make sure that your power jack hasn’t moved. Sometimes the jack will shift its position, thus making the contact with the AC adapter difficult.

Constantly look for any physical damage to your power jack. If you find any serious damage that could be preventing a stable connection, it might mean that the power jack is compromise.

In such a case, it needs to be replaced, so do not hesitate to seek help from a specialist.


These are the ways in which you can repair your power jack if it’s faulty, without needing to solder it.

If you feel like adding a piece of your mind or giving any feedback to us, make sure to write it in the comments section below.

5 best VPNs for QuickBooks

If you’re planning to use QuickBooks on a virtual private network, there are a few things you need to consider as you check out the best VPNs.

QuickBooks is a very particular software and technology. It is optimized for use on specific networks including wired, hosted, and remote desktop (or terminal services).

There are recommended networks that Intuit, the makers of QuickBooks, have listed that will work with the software such as LAN networks with at least 40 Mbps bandwidth (workgroup or domain), terminal services, and cloud hosting.

Non-recommended networks that won’t work with QuickBooks software include remote area network, WAN, VPN, FTP, NAS, and virtual servers or machines.

While it is possible to use QuickBooks over VPNs, technically it is not supported as VPN isn’t an ideal environment for the software.

You may end up with a few issues like long wait times, and other issues beyond Intuit’s scope of support.

Before picking the best VPN for QuickBooks, consider the Internet speed and the number of users who will connect to the VPN which means you need a faster connection.

What are the best VPNs for QuickBooks?

Private Internet Access (recommended)
grab Private Internet Access

Private Internet Access checks a lot of the key boxes of what most users expect to get from their VPN solution for QuickBooks.

Logging is a common practice used to record data points from your VPN activity. However, you may rest assured that Private Internet Access has a strict no traffic logging policy.

Moreover, it combines solid privacy features with the guarantee that the IP address will be changed to a different one any time you want to hide your location and identity.

This way you’ll stop data trackers and hackers from tracking your browsing activities and financial records.

Also keep in mind that Kape Technologies, the makers of Private Internet Access, limit the number of devices you can use at the same time at no less than 10.

Check out some of the best features that are packed in Private Internet Access:

  • Great speeds for P2P torrenting and not only
  • Unlocks the greatest sites from anywhere
  • Solid security as it never keeps any records of users’ online activities
  • Various data encryption options, even for those times when you enjoy public Wi-Fi in airports, coffee shops, and hotels
  • 30-day money-back guarantee, so don’t hesitate to give it a try
Private Internet Access

Private Internet Access

Private Internet Access is your top VPN for QuickBooks. Now available at a major discount!
$2.69/mo. Buy it now

CyberGhost VPN

get CyberGhost VPN

CyberGhost protects your privacy on a multi-platform privacy solution because your personal data (including financial) is not safe as it can be hacked and accessed easily.

It features 256-bit encryption technology (the highest available), hiding of your IP, Wi-Fi protection if in a public area, and a strict no-logs policy that doesn’t track your internet activity, multiplatform apps for all your devices.

Moreover, you get security for transactions and conversations and access to over 1000 VPN servers in more than 30 of the most popular countries.

CyberGhost’s benefits include access to restricted content, protection for all your devices, ad blocking, malware blocking, and the highest possible speeds you can get on a VPN.

With this VPN for QuickBooks, you can also launch a browser session and VPN connection in one click, while anonymizing your whole online journey.

It is fully customizable and you decide on every aspect of your VPN experience from specific servers to multiple features you can combine, using the most advanced filtering and feedback options available in the market.

CyberGhost VPN

CyberGhost VPN

Looking for a VPN that's compatible with QuickBooks? CyberGhost VPN could be exactly what you need.
$2.75/mo. Buy it now

NordVPN

download NordVPN

NordVPN is everything you need to protect your privacy online. As one of the best VPN for QuickBooks, NordVPN offers double VPN combinations to encrypt your internet traffic.

You also get CyberSec technology to protect yourself from intrusive ads and malicious online threats, DNS leak protection to ensure data protection, automatic kill switch, and protection for your real IP address.

With NordVPN, you can also secure your browsing on Chrome or Firefox, enjoy a secure streaming experience with SmartPlay technology, and join the NordVPN network of over 5400 servers in 59 countries globally.

NordVPN has lightning speeds and offers ease of download and installation, plus you can connect up to 6 devices simultaneously and protect your privacy on the go with mobile apps.

Other benefits include a dedicated IP address for better connectivity and a faster VPN experience.

Plus if you need any assistance, that’s a Tefincom & Co. service, so the customer support team is on standby to assist you anytime.

NordVPN

NordVPN

NordVPN is a sturdy VPN that can protect your online privacy without too much effort.
$3.71/mo. Buy it now

PureVPN

grab PureVPN

This VPN coming from GZ Systems Limited creates encrypted tunnels, restricts malware and viruses, blocks annoying ads, and filters unwanted content.

It has advanced features that ensure preventive and complete security including antivirus/antimalware, intrusion detection and intrusion prevention for protection against malicious programs, and built-in ad-blocking.

You also get URL filtering to block malicious pages before you visit them, app filtering, and apps for most major platforms and operating systems including Windows.

Other key features that make it a great VPN for QuickBooks are the multi-logins on one single account, 256-bit data encryption, and access to all servers regardless of the package you choose.

It is compatible with more than 20 devices, on over 2000 servers in more than 140 countries, and has over 88,000 IP addresses you can use.

If you need assistance, you can contact their 24/7 year-round tech support, plus you are assured that no third parties will handle or interfere with your data.

PureVPN

PureVPN

In need of a VPN that works great even with QuickBooks? Check out PureVPN.
$3.33/mo. Buy it now

ExpressVPN

grab ExpressVPN

Express VPN International Ltd. created a trusted VPN solution for QuickBooks. High speed, ultra-secure protection, ease of use, and instant set up are all provided.

It gives you access to any content across 94 countries and helps you avoid hacking or tracking using powerful encryption, backed by 24/7 support through live chat.

ExpressVPN’s blazing-fast speeds are delivered over a huge network of over 1700 global VPN servers.

You also get 256-bit AES encryption, unlimited bandwidth, and zero restrictions on streaming and downloading from anywhere while your IP is hidden.

Other features include protection from hacking and surveillance with DNS/IPv6 leak protection, kill switch, and split tunneling.

With this VPN for QuickBooks, you can connect remotely to over 160 VPN locations in 94 countries with unlimited speeds and server switches on multiple devices simultaneously.

ExpressVPN

ExpressVPN

Check out ExpressVPN if you want top-notch privacy protection while you're online.
$8.32/mo. Buy it now

Which VPN for QuickBooks sounds good for your business? Or do you have one that’s not listed here? Let us know your choice in the comments section below.

Best ways to send files in your browser [How to]

Not being sure how to send files in your browser can give you headaches especially when the data you want to transfer is too big for your mail service.

The Internet offers various solutions to this issue but it’s always hard to tell which one is the most suitable for your particular needs and your hard drive capacity.

We prepared a guide that will give all the information you need to know in order to pick the right method and apply it accordingly, to send files in no time.

How can I send files in my browser?

1. Try WinZip for the best file transfer experience

use WinZip right aqay
  1. Open the WinZip window and click the Start a New Share option.
  2. Select the files for transfer.
  3. Opt for compressing the files and share them via email or through the cloud.
  4. Then, just send the download link to the recipient.

With WinZip you no longer need to worry about how to send files in browser, because this tool comes with various solutions for data transfer.

Thanks to the ZipSend feature you’ll be able to send files directly from the app to email, social media, or cloud storage.

WinZip comes withh poweful compression utilities and it’s able to archive formats like ZIPX or ZIP and also LHA/LZH.

One interesting feature is that it also allows 256-bit AES encryption. Take advantage of all these right away!

WinZip

WinZip

If you want to quickly send files in your browser, rest assured that WinZip is up for the task!
Free trialGet it now

2. Use some reliable transfer sites

pCloud Transfer

  1. Go to the official pCloud Transfer site in your browser.
  2. On the right side of the page write the email addresses of the recipients as well as your own.
  3. Go to Click Here to Add Files and select the data you want to transfer.
  4. Click Send Files.

pCloud Transfer is one of the best sites at the moment for sending big files in a free, safe and easy manner.

The biggest perk is that you can transfer up to 10GB if you create an account.

With pCloud you get 256-bit AES encryption for all of your files, unlimited file size and speed, and data recovery options.

A feature that is a time-saver is that you can upload directly from your camera roll and you also get a built-in audio player.


WeTransfer

  1. Go to the official WeTransfer site.
  2. On the WeTransfer webpage click on the Add Files button.
  3. Select the files you want to send.
  4. Enter the recipient email and your message.
  5. Click Transfer.

WeTransfer is a well-known third party file transfer site. You can send up to 2GB free of charge or up to 20GB with the Pro version.

Well, you don’t have to create an account in order to use and, as expected, it ensures a safe transfer process.

Another interesting aspect is that it notifies you if the recipient downloaded the files or if that person didn’t receive them at all.


TransferNow

  1. Access TransferNow on your browser.
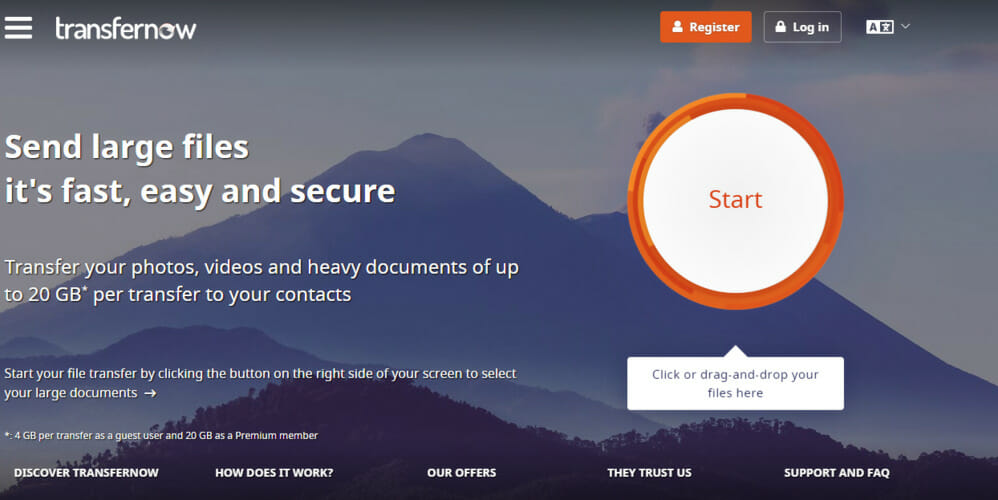
  2. Click on the big orange button Start on the right of the page.
  3. Choose the files for transfer.
  4. Click Send.

With TransferNow you can send up to 4GB of files with no extra charge or up to 20GB if you choose Premium benefits.

This site also offers a Team plan which means that it allows multiple users to send up to 50GB of files, something quite perfect for businesses.

You don’t need an account if you opt for the free version. Another practical feature is that you can send the download through social-media as well.


3. Use a cloud storage service

Google Drive

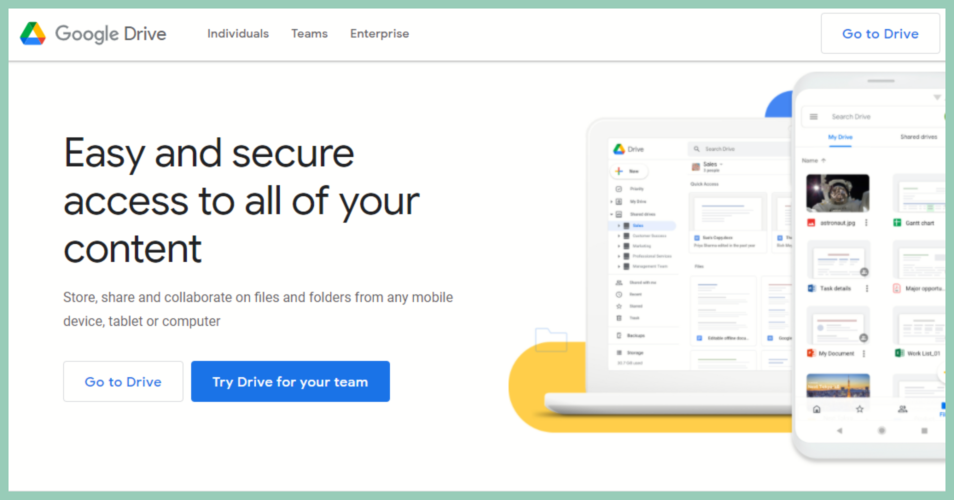
Google Drive is by far the most generous cloud storage service that allows you to send up to 15Gbfor free. All you need to do is create a Google account.

It is very complex, meaning that it lets you edit or create files. It also offers two syncing utilities for desktop, Back-up & Sync, as well as File Stream for business users.

You can make the best of Google Drive by exploring features like Docs, Sheets, Slides, and Photos.

If you need more online storage you can try the Google One versions that can store up to 200GB.


Dropbox

try out Dropbox
  1. Sign in to Dropbox.
  2. Access the file you want to transfer.
  3. Hover over the file and click on the Share button.
  4. Enter the email address of the recipient.
  5. Click Send.

Dropbox is a tool that offers cloud storage and syncing services and allows you to store up to 2GB for free. However, if you need more space, for example up to 3TB, you will have to pay for it.

This cloud service is compatible with all the essential systems of the moment, including Windows, Mac, Linux.

It provides secure methods for file transfer, it uses standard SSL/TLS and 256-bit AES. The easiest method to share files with Dropbox is to create an account. Once you do this, just follow the steps described above.


When it comes to how you can send files in your browser you have some generous alternatives and we hope that this guide was helpful in your situation.

Feel free to share your experience with us by using the comments section below.

Google Chrome Downloading Proxy Script: What It Is & How to Fix

If you are having trouble opening webpages on Google Chrome, you may want to look at the bottom left side of the browser for the words downloading proxy script.

If you are having this type of message show, and it seems that Chrome takes forever downloading the proxy script, then the information in this article will help you out.

Sometimes you temporarily fix the sluggishness of Chrome by existing the browser and starting again, but a problem like this that happens frequently is certainly frustrating.

Therefore, you may want to try this quick fix to make your Chrome browser faster and less annoying.

How can I fix the downloading proxy script error in Chrome?

1. Change automatically detect settings

  1. Go to the menu, which is located on the top right side of the Chrome browser.google chrome
  2. Once you have entered the settings page you will probably need to scroll down to find the Advance option.
  3. When you find this option, which will be located on the bottom of the page, click on it.
  4. You will need to scroll down a bit more to find an option called Open Proxy Settings. This option is found under the System category.
  5. Locate this option and click on it.
  6. This option will open up your internet properties. Make sure you are in the connections tab and locate Lan settings.
  7. Click on Lan settings.
  8. Once you open your Local Area Network Settings, uncheck the box next to the works Automatically detect settings.
  9. Press OK.

After you finished these simple steps, the problem with downloading the proxy script should be solved.

Your browsing speed should increase, and you will most likely not be stuck on any loading screens anymore. Remember to restart your Chrome browser in order for the settings you have changed to take effect.

2. Try an alternative browser

If Google Chrome is giving you a hard time with the proxy script or, in general, there’s an excellent alternative out there. We’re talking about the OperaOne browser.

It is based on Chromium, so it will share some things with Chrome, but the team behind the browser took things further and introduced a lot of useful functionalities.

We will only mention some of them: it has a built-in ad blocker, a free VPN, and a very nice user interface. You can personalize the browser however you like.

There are also over 1000 extensions available in the Opera add-on store. Plenty to do, plenty to choose from. Explore it by checking the official website or give it a show right now.

There you go, a simple and easy way to fix the downloading proxy script error in Google Chrome.

We hope that our solution was helpful for you. For more suggestions, please access the comments section below.

Fix mmres.dll corrupted files [Windows 10, Windows 7]

DLL (Dynamic Link Library) issues aren’t unusual on Windows 10, 8, and 7, and they can cause a lot of stress to users.

Software support forums get inundated with posts from users who need to fix missing or corrupted DLL file issues.

These are some of the more typical corrupted DLL error messages:

  • Mmres.dll is either not designed to run on Windows or it contains an error.
  • There was a problem starting mmres.dll.
  • Error loading mmres.dll.

What is mmres DLL?

The mmres.dll is a Microsoft Dynamic Link Library file with a General Audio Resources description.

That’s an operating system DLL that comes with Windows platforms. You can usually find it by entering mmres.dll in a Windows search utility, as in the snapshot directly below.

The mmres.dll error mmres.dll corrupted

When that file is corrupted, you’ll see a mmres.dll error message of some kind pop up for programs that need it.

Software the mmres.dll error arises for won’t usually run when that file is corrupted. These are some of the most likely fixes for mmres.dll corrupted file errors.

How can I fix mmres.dll corrupted errors?

1. Repair mmres.dll corrupted file errors with third-party software

You can fix mmres.dll corrupted errors with a general-purpose system repair utility that can fix a wide variety of issues for Windows platforms dating back to XP.

These tools will replace corrupted Windows DLL files on your PC with fresh new ones from its database during its repair process.

They will repair all missing or corrupted Windows DLLs, including any you don’t know about. Plus, they can also remove junk files to increase your PC’s health.

2. Run an SFC scan

  1. First, open the search tool in Windows with the Windows + S keyboard shortcut.
  2. Type the keyword prompt in your search box.
  3. Right-click Command Prompt to open the context menu for that utility, and click the Run as administrator option.
  4. Before running an SFC scan, type in this command for Deployment Image Servicing and press Enter: DISM.exe /Online /Cleanup-image /Restorehealth
  5. Then enter this System File Checker command and press Enter: sfc /scannow
    The sfc scan command mmres.dll corrupted
  6. Wait for the SFC to complete its scanning.
  7. Restart your desktop or laptop if the scan reports Windows Resource Protection repaired system files.

3. Register the mmres.dll

  1. Start the Run accessory, which you can do by pressing the Windows key and R at the same time.
  2. Input this Command Prompt command in Run: cmd
  3. To open an elevated Prompt window, press the Ctrl + Shift + Enter keys at the same time. Click Yes on any UAC prompt that opens.
  4. Now input this command in the Prompt’s window: regsvr32 mmres.dll
    regsvr32 command mmres.dll corrupted
  5. Press the Return key to initiate the register DLL command.

4. Roll back Windows with System Restore

  1. Open the Run window.
  2. To open System Restore, click Run’s OK button after entering this command: rstrui
  3. Select the Choose a different restore point option in System Restore, and click Next to continue.
  4. Click the Show more restore points option if it’s available.
    System Restore mmres.dll corrupted
  5. Now select a restore point that predates the mmres.dll error on your PC.
  6. Click Continue to proceed to the final confirmation step.
  7. Select the Finish option to confirm your chosen restore point and start the system rollback.

Note: Restoring Windows to an earlier date will delete software, updates, and drivers installed after the selected restore point. To check what software a restore point deletes, click the Scan for affected programs button in System Restore.

The above resolutions will surely fix the vast majority of mmres.dll corrupted errors.

If, however, they’re still not enough, reinstalling or resetting Windows platforms (with the Reset this PC utility) might an effective last resort for resolving mmres.dll file errors.

How to clear autofill data in Google Chrome [Easy Guide]

Many web browsers use auto-fill data feature that shows you all your recent inputs. This allows you to see all your previous inputs and to choose them from a menu, thus speeding up the entire process.

Although this feature is useful, it will list sensitive information such as your email address. Fortunately, there’s a way to protect your sensitive data, so today we’re going to show you how to remove auto-fill data in Chrome.

How do I delete auto-fill data in Chrome on Windows 10? The quickest way is to clear the browsing data from Chrome‘s settings. Chrome uses autofill to help you save time when you insert credentials and other personal data.

After that, you can delete specific auto-fill data or use the Manage Passwords option. To learn how to do that, check the steps below.


Quick Tip:

If you need to clear your auto-fill data because of security reasons, then maybe you should replace your browser entirely with a more secure alternative.

Here comes Opera, a web browser built using the same Chromium engine as Chrome, but with more emphasis on security.

This comes in the form of an ad-blocker, a tracking-blocker, and most importantly a VPN that has no traffic limit.

With these tools, you don’t even need to worry about cryptojacking or having to delete your auto-fill data, since everything will be safe.

”Opera”

”Opera”

”Visit
”Download”
&aff_sub2=Native?utm_medium=native&ref=” current_url=”true” button_text=”Visit website” image=”https://windowsreport.com/wp-content/uploads/2020/07/Opera-CTA-210×160.png” ]

How do I remove auto-fill data in Chrome?

  1. Clear browsing data
  2. Delete specific auto-fill data
  3. Use keyboard shortcut
  4. Use the Auto-fill Passwords option

1. Clear browsing data

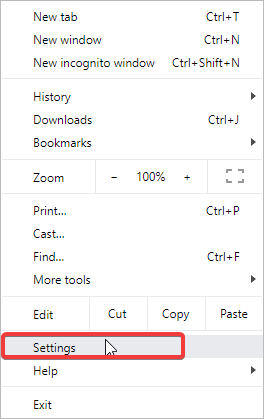
  1. Click the Menu button (3 vertical dots) in the top right corner and choose Settings from the menu.clear autofill data chrome windows 10
  2. Scroll all the way down and choose Show advanced settings.delete autofill chrome win 10
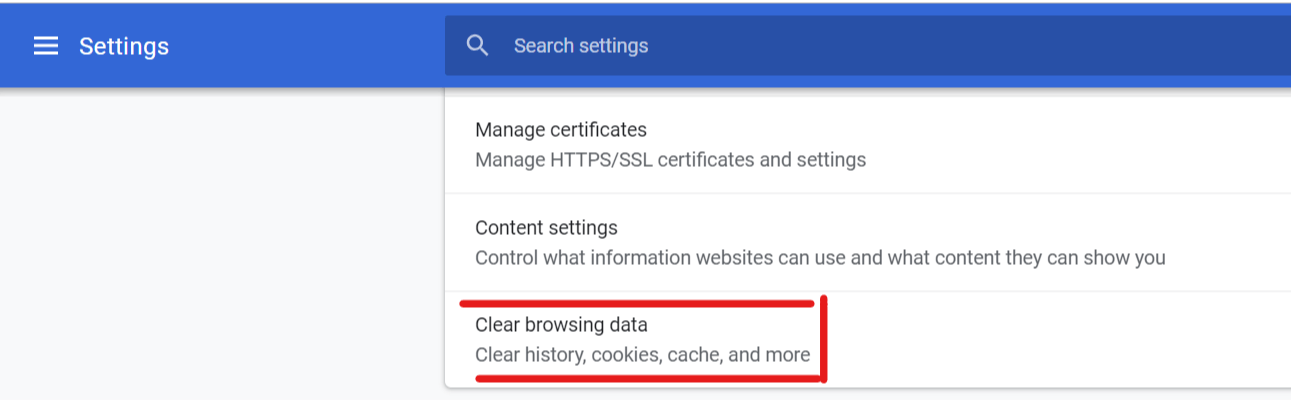
  3. Navigate to the Privacy section and click the Clear browsing data button.Clear Browsing data chrome clear autofill win 10
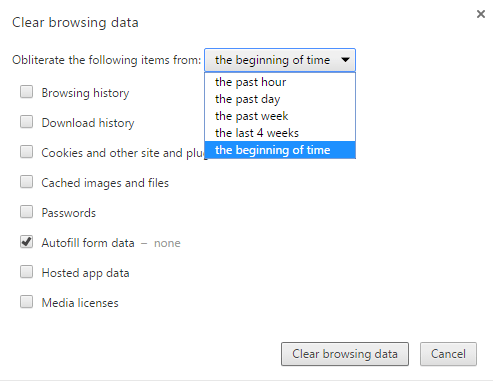
  4. Be sure to only check Auto-fill form data option, under Advanced.
  5. In the Obliterate the following items from menu select the desired time period. If you want to delete all auto-fill data, select the beginning of time option.
  6. Lastly, click the Clear browsing data button to completely remove auto-fill data.

Removing auto-fill data in Chrome is quite simple, and you can do it by clearing your browsing data. We have to mention that this method will remove all auto-fill data, so keep that in mind.

As you can see, removing auto-fill data from Chrome using this method is quite simple. Although this method is simple, it offers very limited options.

You can’t delete specific auto-fill data, and you can only delete auto-fill data from the past hour, day or week. There’s also an option to delete auto-fill data from the last 4 weeks or all auto-fill data.

This method is useful, but it offers limited options when it comes to data removal.


2. Delete specific auto-fill data

  1. Open the Settings tab. For more instructions on how to do that, follow steps 1 and 2 from the previous solution.
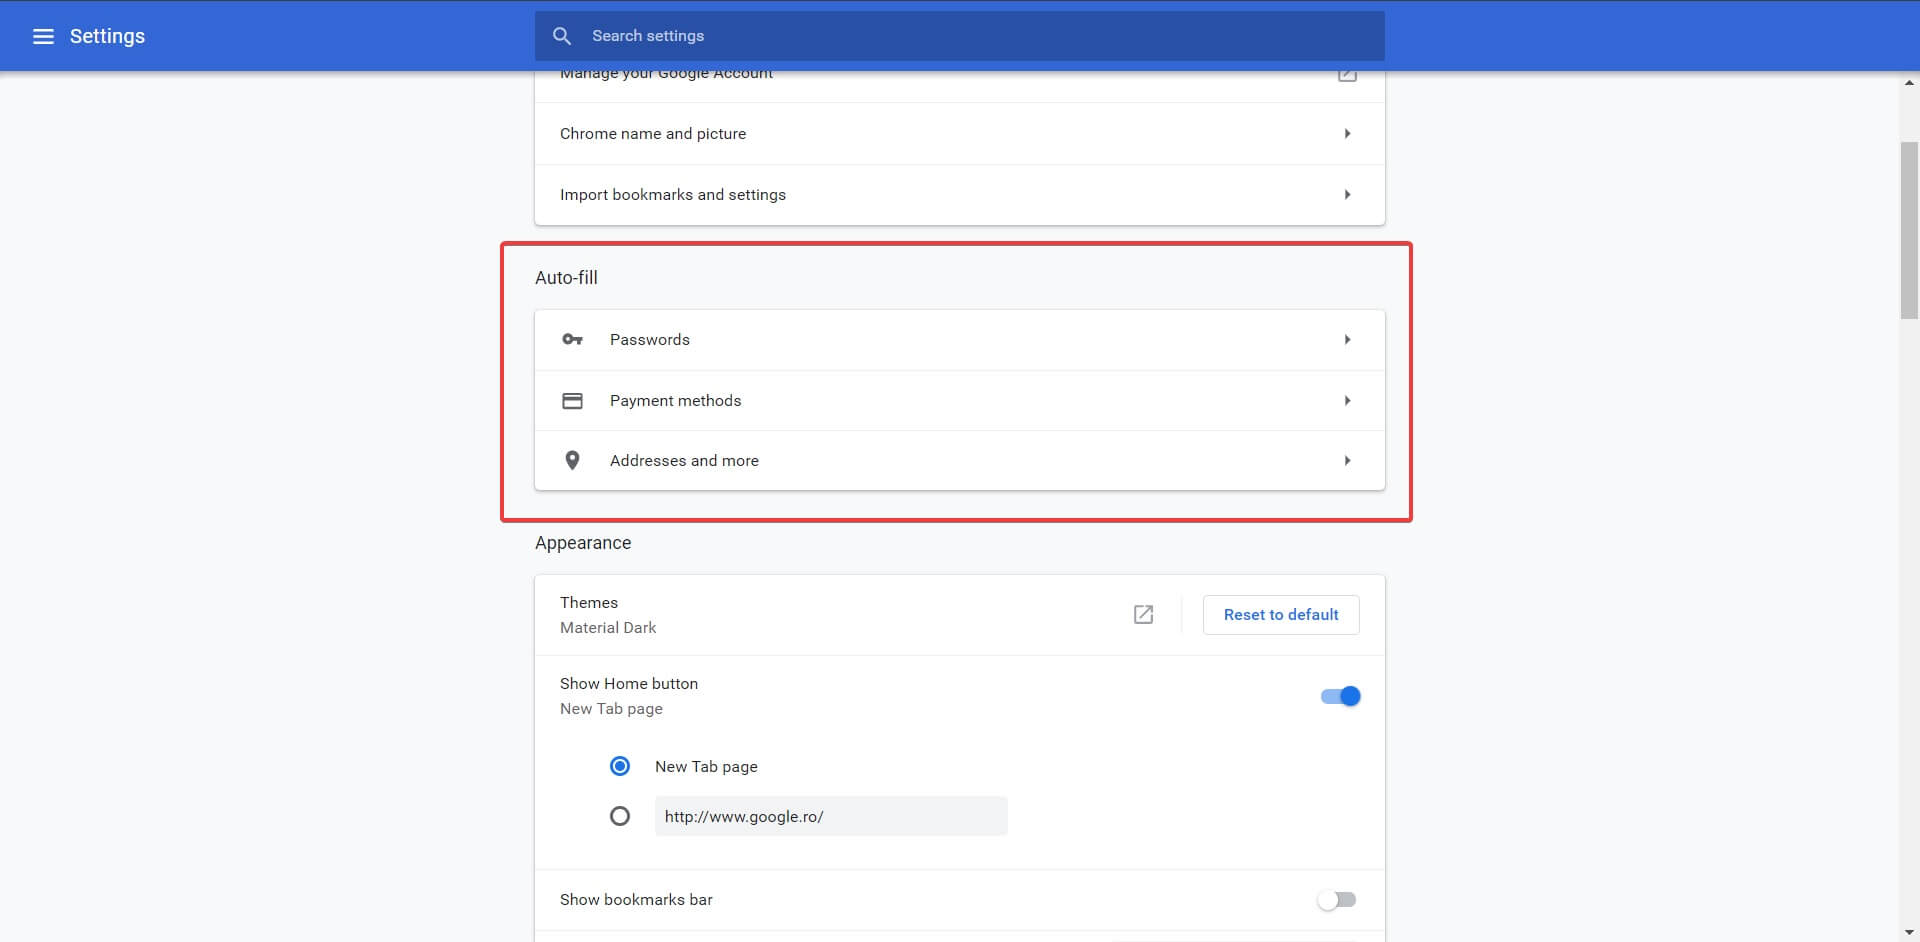
  2. Once you open settings, navigate to the Auto-fill section. delete chrome auto-fill windows 10
  3. Now you should see your auto-fill information.(Passwords, Payment methods, and Addresses).
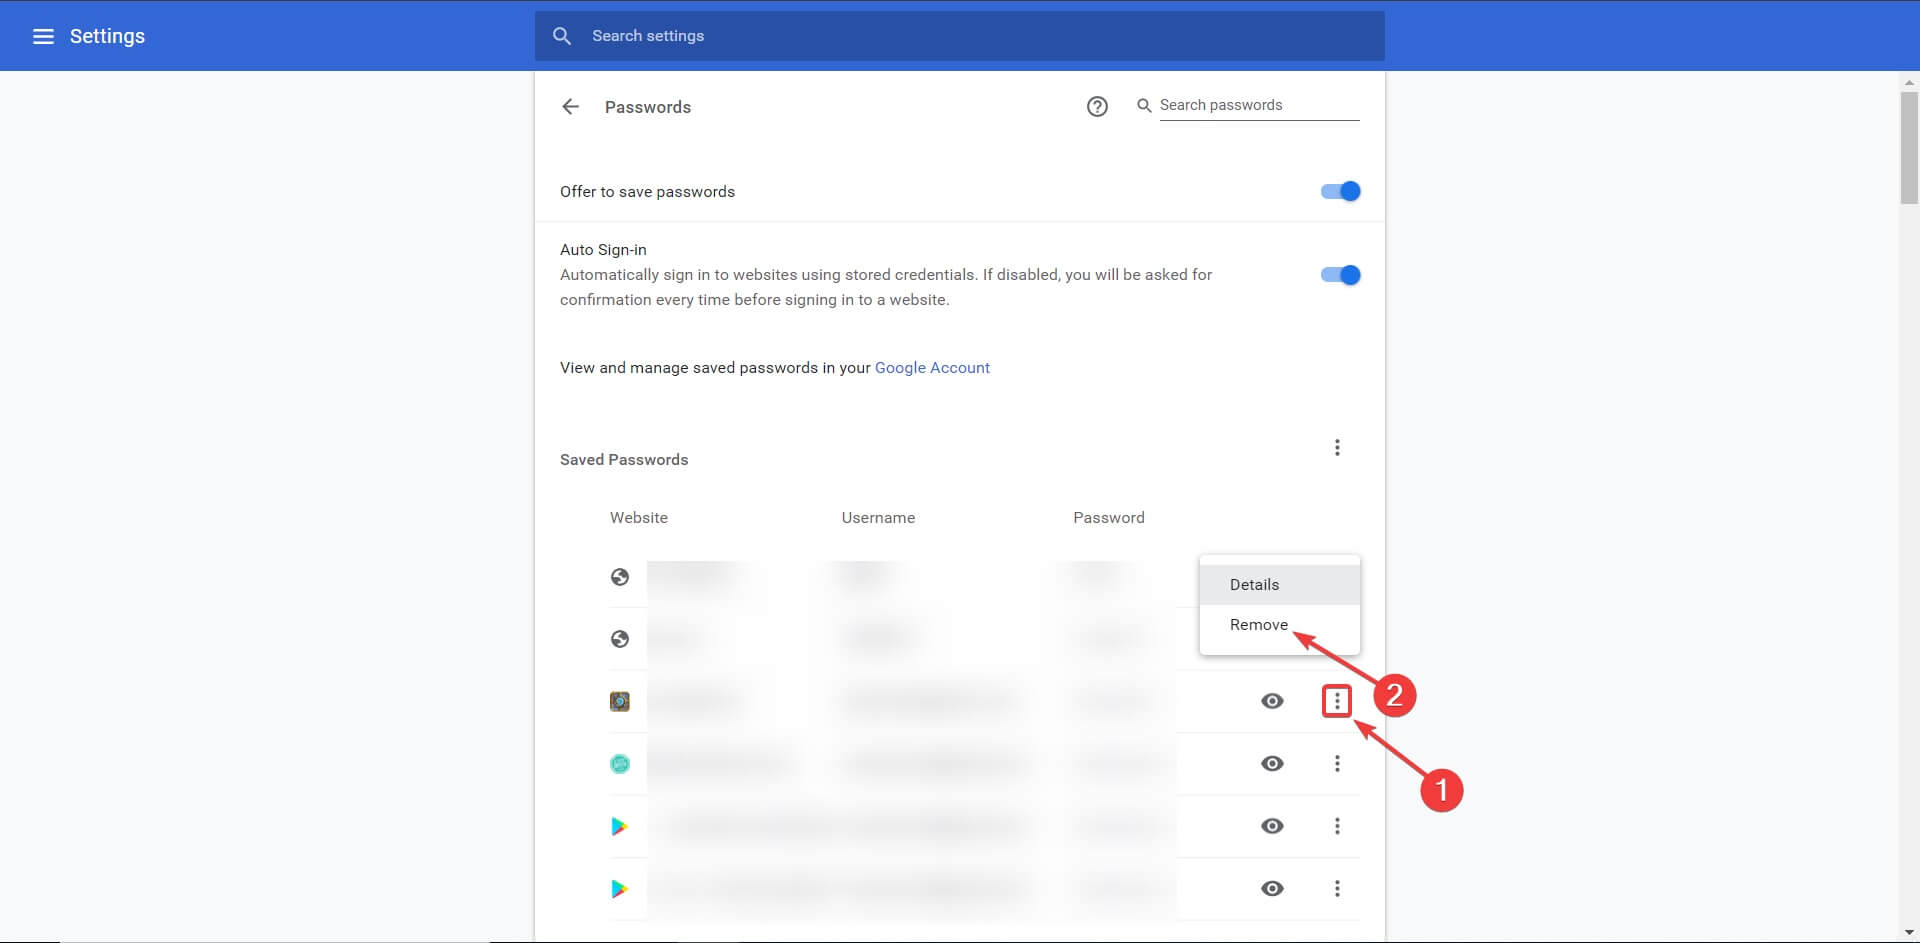
  4. In each section, each entry has 3 vertical dots at the end. Click on them and choose Remove.
  5. Repeat the previous step for all autofill entries that you want to remove.

Although the previous method is simple and fast, some users prefer a more advanced approach. If you want to see your auto-fill data and choose which entry you want to remove.

As you can see, this method allows you to see specific information before you remove it. This is quite useful if you only want to remove certain entries from auto-fill settings.

However, if you want to remove all auto-fill entries quickly, we suggest that you use the previous method.


3. Use keyboard shortcut

  1. Go to the website that gives you auto-fill suggestions.
  2. Click the input field and start typing your input.
  3. After a suggestion appears, use the arrow keys to select the input that you want to remove.
  4. Now press Ctrl + Delete or Shift + Delete shortcut. By doing so you’ll delete that entry from auto-fill suggestions.
  5. Repeat the previous step for all entries that you want to remove.

One of the easiest ways to remove certain auto-fill entries from Chrome is to use a keyboard shortcut. This method is rather simple since it doesn’t require you to change any settings.

We have to mention that this solution is quite simple, but it requires you to delete autofill entries manually. In addition to manual deleting, you’ll have to visit a specific website to delete auto-fill entries for it.

This isn’t a problem if you want to delete entries for a website or two, but if you have multiple websites and multiple entries, you might want to use a more advanced solution.


4. Use the Auto-fill Passwords option

  1. Open Chrome‘s Settings.
  2. Go to Auto-fill section.
  3. Click on Passwords.
  4. List of all saved passwords will now appear. Select the desired auto-fill entry that you want to remove and click the 3 dots at the end of the entry to get details about it or to remove it.remove auto-fill information in chrome
  5. Repeat the previous step for all auto-fill entries that you want to remove.

Just like many other browsers, Chrome can save your passwords and allow you to log in to your favorite websites quickly. This is quite useful if you don’t share your Windows 10 PC with others.

If you share it with your roommates or friends, you might want to remove your auto-fill data. This is a simple process, and you can do it by following the above steps.

Also, you have the option to choose if Chrome saves passwords or not, or even if you get auto-signed on websites that have your auto-fill information.

This method is quite simple, and it allows you to see the list of passwords and accounts that you have stored in Google Chrome.

This is quite useful if you want to remove certain accounts such as your Facebook or bank account from Chrome thus preventing unauthorized access to it.


Autofill data in Chrome on Windows 10 can be useful if you want to perform certain searches again, or if you want to quickly enter your address or login information.

If you’re sharing your Windows 10 PC with anybody else or if you’re concerned about your privacy or safety, you can easily remove autofill data by using any of our solutions.

Don’t forget lo leave any other questions or possible solutions in the comments section below.

How to use your Android phone as a webcam in Microsoft Teams on Windows 10

A dedicated webcam can do a lot for a work from home setup during quarantine and a global pandemic. The webcams on most laptops often don’t have high megapixel or HD quality, and you might end up looking blurry and out of focus in video calls when compared to the rest of your colleagues.

You can find webcams for cheap on Amazon to help you solve that problem, but did you know that you also can use your Android cell phone as a webcam in Teams?  It’s obviously easier to just start a call with your phone on Teams, (as this process will require the use of third-party apps and software,) but this is a pretty nice solution and an alternative if you’re looking for a high-quality Teams or Zoom call directly on your desktop or a laptop without buying extra hardware.

Prerequisites

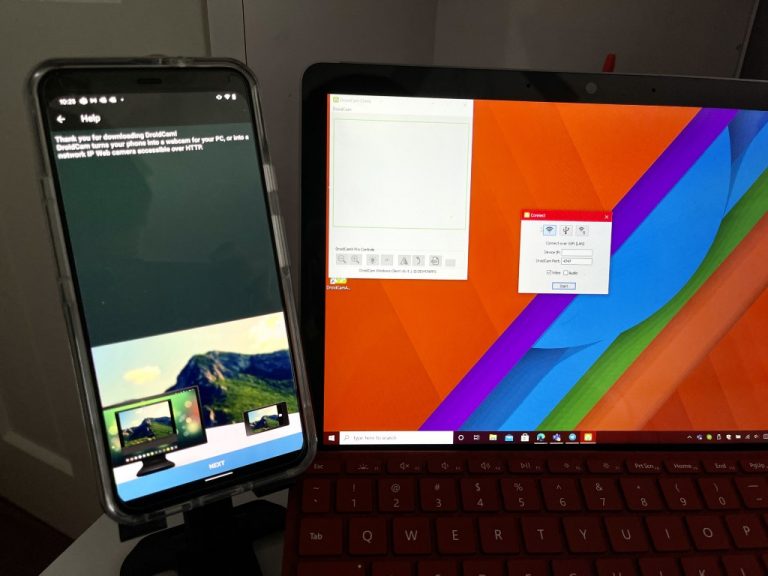
Droidcam

To get started we just want to note that our guide will focus on using an Android phone, as this is the most straightforward and easiest way to do things. If you’re looking for steps on how to use an iPhone as a webcam for Teams, we’ll be following up in a second article later on as it is a completely different process.

Anyway, on the Android side of things, you’ll need to download DroidCam. It’s free software for Windows 10. You also need to download it on your Android phone, as well. The app is compatible with all Android phones running Android 5 or higher, which should not be a problem in 2021.

Download DroidCam on Windows and Android

Droidcam Windows Android (custom)

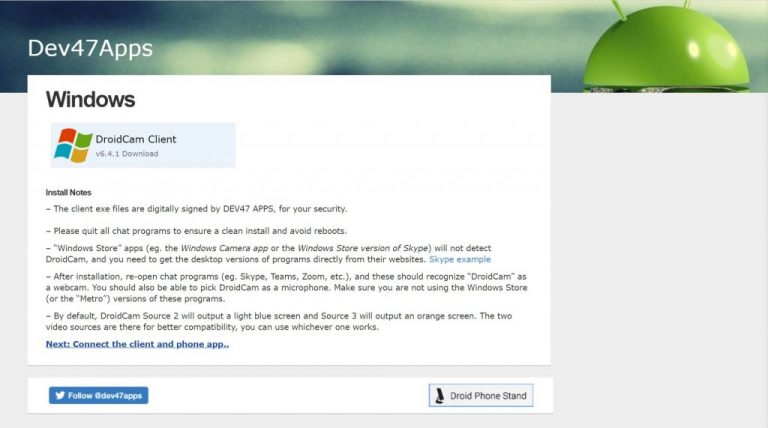
First up, download DroidCam on your Windows 10 laptop or desktop, and also on your Android phone. On Windows 10, make sure you quit all your chat applications, including Teams or Edge. Double click the installer and follow the instructions on the screen. Also, make sure that your Android phone and your PC are on the same network (either ethernet or WiFi.)

Keep in mind that there is also a caveat, too. Microsoft Store apps like the Windows Camera app or the Store version of Skype will not detect DroidCam, and you need to get the desktop versions of programs instead. It should still work fine with the .exe versions of Teams (since Teams has no Windows Store app) or Slack, too.

Keep in mind that while DroidCam is free, you’ll see ads in the Android app. These won’t get in the way of your experience, but there are some features of DroidCam that you might need to download DroidCamX (the paid version of the app) to enjoy. That includes no ads, and higher video quality and contrast and sharpness settings. It’s a $5 purchase, still cheaper than a $50 and up webcam.

DroidCam - Webcam for PC
Developer:
Dev47Apps
Price:
Free


DroidCamX - HD Webcam for PC
Developer:
Dev47Apps
Price:
$4.99

Launch the apps

Droid Cam

With the apps downloaded on both Android and Windows 10, now you can get started. Launch DroidCam on WIndows 10. Then, open the DroidCam app from your launcher or home screen on Android. There are two things you can do from here, onwards. You can connect your phone as a webcam via WiFi, or via USB cable.

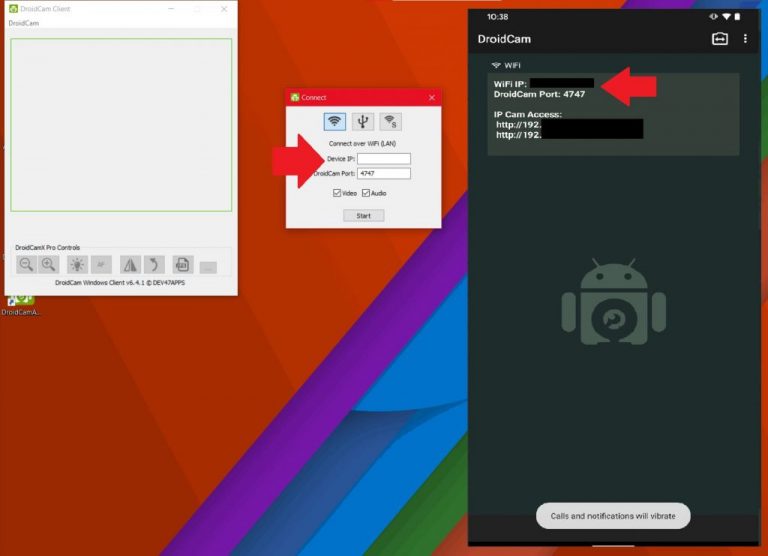
We’ll start first with connections over WiFi. Double-check that both phone and PC are on the same WiFI network. Then, open DroidCam on Android. After granting it the permissions, you should see some information on your Android phone screen. Note both the WiFi IP as well as the DroidCam Port.

Now, go back to your Windows 10 PC and enter both those numbers in the Connect window that is open. If it’s not open, launch the app again. Once both are entered in, check the boxes for both video and audio, too. Then click the Start button. You can also click the camera icon at the top right of the app on Android to switch between the front and the rear cameras if need be, before starting up the feed.

Your phone will now start showing a webcam feed! If you’re looking to do things over USB, then read on to the next step. Otherwise, skip to the last paragraph in this section.

If you prefer to use a USB connection, then the instructions are a little bit different for you. Note that you’ll have to first enable Developer Options on your Android phone by going to Settings, System, and About and then tapping on the build number seven taps. Then, go back into developer settings and enable USB debugging.

Driocam In Teams

Once that’s done, you can plug your Android phone into your PC. Then pull down from the notifications shade, and switch your Android to File Transfer mode. Then, open DroidCam on your PC again, and choose the icon in the middle, the one that’s a USB logo. Check the port numbers are the same, check the box for audio and video, and then click start!

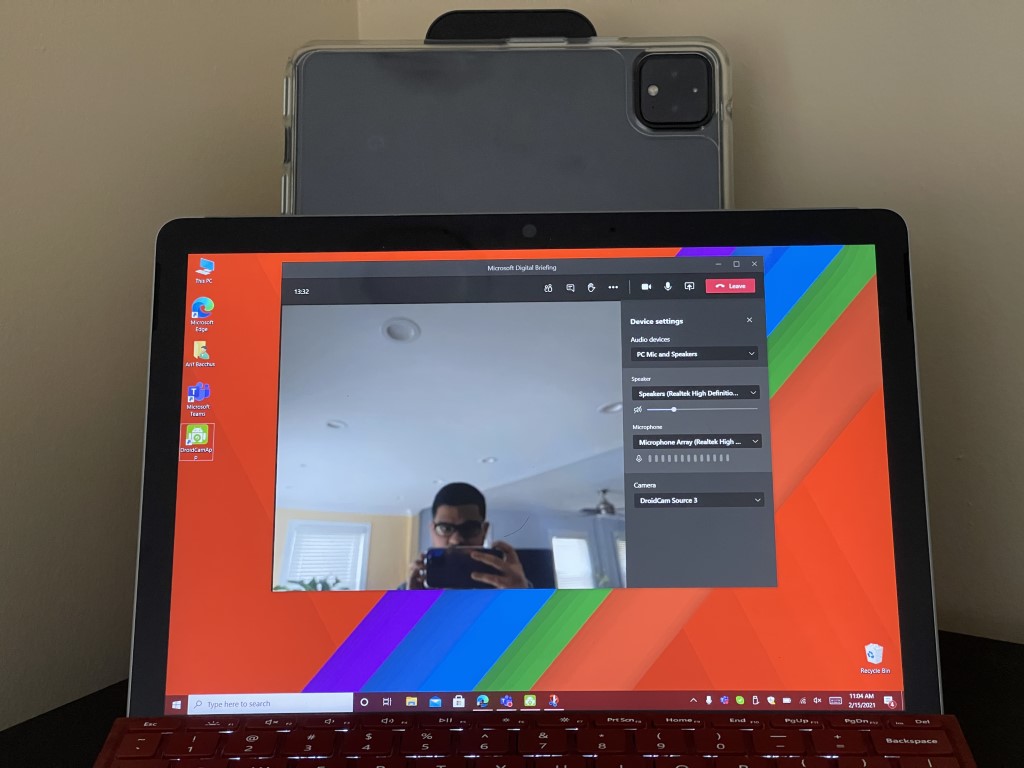
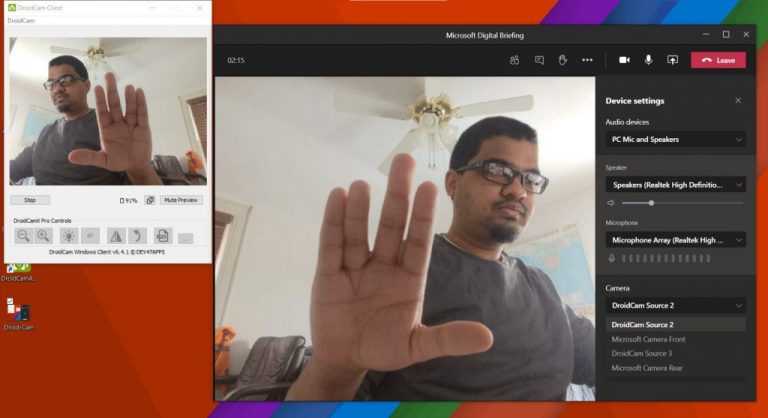
Whichever way you go, you should now have DroidCam running with the feed from your phone and on Windows 10, You can minimize this DroidCam window, and open up the video conferencing app of your choice, in this case, Teams. Join a call, and then click to change your webcam.

Click the three dots at the top of the screen, and choose Device Settings. Then, in the window that shows up, under Camera, choose DroidCam Source. You can now enjoy using your phone as a webcam in Teams! For any other app, the process is the same, just choose DroidCam as your source.

Tweaking DroidCam settings and more!

There are a lot of different settings that you can play within DroidCam, especially if you pay for the full version of the app. You’ll be able to rotate the image, change brightness, and more. All versions of the app give you full control over the ability to close the app to the system tray, stop the process on exit, or change the video settings so that it makes the maximum quality of your phone’s cameras. Note that most of these settings will require you to reboot your PC.

You can quit DroidCam at any time on your PC by clicking the main DroidCam window, and choosing stop. Most settings options will also be in this menu, too, so play around with the app to see how it works for you! And let us know your thoughts in the comments below.

How to open local files in browsers [Easy way]

Google Chrome includes a file navigator that enables you to browse folders’ contents on a hard drive.

That’s not exactly a file manager, but you can open supported image, PDF, and TXT document files within Chrome with its file navigator. There are also two other methods for opening files in Chrome.

There are numerous other browsers based on Chrome’s Chromium engine. Chromium browsers such as Microsoft Edge, Opera, and Vivaldi have the same file navigator as Chrome.

So, users can also open local files in those browsers with the same Chrome methods.

How can I open local files with Chrome, Opera, Vivaldi, and Edge?

1. Use the Chromium browsers’ file navigator

  1. First, enter file:///c:/ in the URL bar of your Chromium browser. The Index of C: file navigator shown directly below will open when you press the Return key.
    Index of C: tab use browser to open local file
  2. Click the folders to open one that includes an image (PNG or JPEG), PDF, or TXT file you need to open.
  3. Then click a file to open within the browser.
    An image open in Chrome use browser to open local file
  4. The file will open in the same tab. You can click the back button on your browser to return to the file navigator.
  5. To open a file in a new tab, right-click it to select the Open link in new tab option.
  6. If you try to open an unsupported file format, a Save As window will open. You’ll need to select a folder to download it to and click Save.

2. Add the Local Explorer extension to your Chromium browser

  1. To add the Local Explorer extension to a Chromium browser, which enhances the file navigator, click the Add to Chrome button on that add-on’s page.
  2. Press the Add extension button to confirm.
  3. Thereafter, a Local Explorer page will open on which you’ll need to click the Add to Windows Explorer button.
  4. Open the folder that includes the downloaded LocalExplorer-Setup.exe integration module.
  5. Click LocalExplorer-Setup.exe to install the integration module.
    Input type chrome://extensions in your Chromium’s browser’s URL bar and press Enter to open its extensions tab.
    The Extensions tab use browser to open local file
  6. Click the Local Explorer’s Details button to open the options shown directly below.
    Allow access to file URLs option use browser to open local file
  7. Toggle the Allow access to file URLs option on.
  8. Enter file:///c:/ in the URL bar, and press the Return key.
  9. Click any file within the browser’s file navigator. Now the file will open within its default program instead of the browser.

Note: Clicking folders within Index of C: directories will open them in File Explorer. To stop File Explorer windows from opening, right-click Local Explorer’s icon on the URL toolbar and select Options.

Deselect the Use Local Explorer to open folders checkbox, click Save Settings, and restart the browser.


3. Press the Ctrl + O hotkey

Open window use browser to open local file

Pressing the Ctrl + O hotkey is an alternative method for opening files in Chromium browsers.

Pressing that hotkey will open an Open window. Select a supported file format to open in the browser from that window, and click the Open button.


4. Drag and drop supported file formats

File dragging use browser to open local file

Alternatively, you can open PNG, JPEG, PDF, and TXT files in Chromium browsers by dragging and dropping them into their windows.

Left-click a file in File Explorer and hold the mouse button. Then drag that file into your browser’s window and release the left mouse button to open it there.

You can also analyze how Chrome loads local or online resources by generating a HAR file, which helps you review detailed network activity and diagnose loading issues.

The Index of C: tab within Chromium browsers is a handy file navigator for finding and opening supported file formats in their windows.

Adding Local Explorer to Chrome, Vivaldi, Opera, and MS Edge will also enable you to open unsupported file formats in default programs with those browsers.

For better text navigation and selection when using Chrome, Edge, or Opera, try enabling Caret Browsing. It lets you move through pages using only your keyboard; check out our Caret Browsing guide to learn how it works.

Getting your app into the Microsoft Store: tips and tricks

So you have a great idea for a Windows app, you spent many sleepless nights building it and now its ready for launch. What’s next? well glad you asked because we are going to go through the steps necessary to get your app published and in the hands of your users!

Love them or hate them app stores have given developers a vehicle to get their applications into the hands of hundreds of thousands of users with very little effort, this however comes at a cost. You are restricted to the app stores rules while also having to give them a cut of your sales if your app happens to not be free. Aside from this, the benefits most times outweigh the drawbacks.

Registering as an app developer

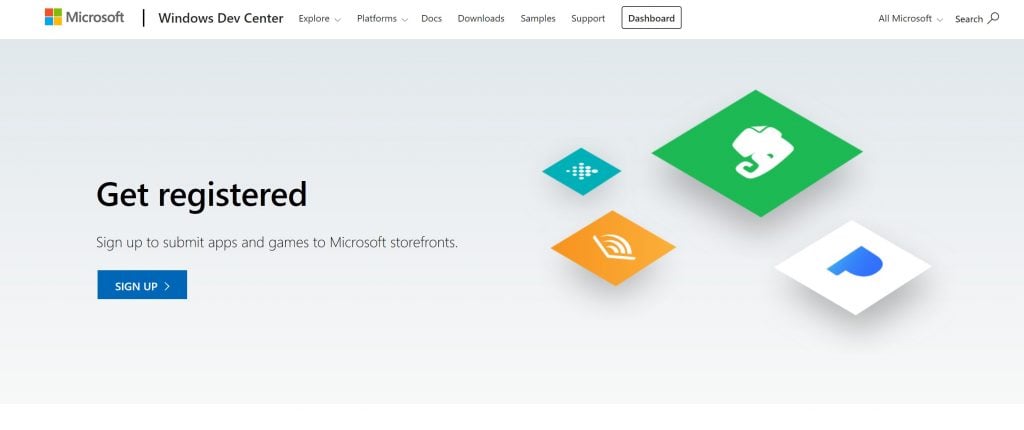
The first step is getting registered as an app developer. Microsoft has made this process extremely easy. You simply head over to their Partner Portal and register using your Microsoft account, if you don’t have one, you will have the opportunity to create one before signing up. The process after that is fairly simple, you provide your name, address and subsequently a payment method to cover your developer account cost. As for the price, well they have made the program very accessible, you pay $19USD as an individual or $99USD as a company. These prices can vary by region.

Microsoft Get Started Publishing An App

Creating a new app

After you’ve completed the registration process you will be greeted by the Create an app screen. It is at this point you get to check if your application name is available and reserve it. It is also in this section where you will define things like pricing and market availability, as well as many other properties for your app like which devices it targets, category and any other specific system requirements.

Microsoft App Submission Packages

Uploading your application package

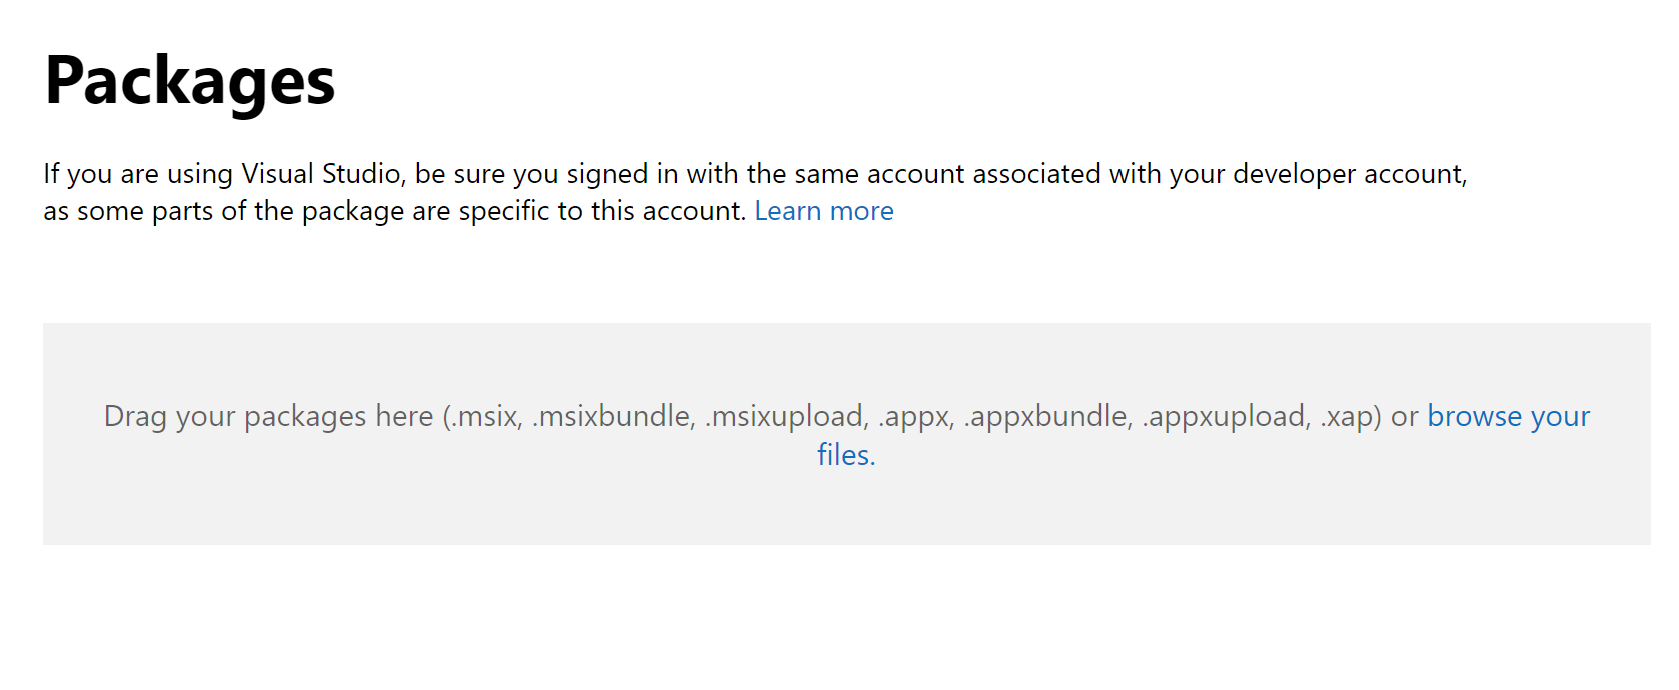
Hopefully you already have an application package ready for submission because one of the steps will require you to upload the package for review. The process is very simple, you simply upload it from your computer. If everything checks out, you will now be able to submit your app for review. This process can take anywhere between 48-72 hours on a first time submission. But subsequent releases will be approved much quicker as the initial verification would have already been, for the most part, done.

Tips and Tricks

Application Name

After you spend hours, weeks or months thinking of the perfect name, you log into the developer portal and try to register your app, only to find out the name is taken. To avoid this heartbreak, make sure you reserve your application name as soon as you figure it out. It is also a good idea to make sure you reserve a domain name to match. This is very important, a name can make or break how successful an application is, don’t risk having to settle for second best.

Pricing

The most successful applications are usually free. If you are thinking about charging for your app, make sure its unique and comparably priced. Your app could be amazing and much better than the competition, but users will usually download free apps first, if they adequately fulfill their needs, more often than not, your app will be overlooked.

In-app advertisements and In-app purchases

As mentioned above, most successful apps are usually free, however there are still ways for you to make money from your hard work. One of those is with in-app advertisements, these are not going to make you rich overnight, but they will provide a steady revenue stream which can help offset your development costs and fees. With that said, be careful, try not to go overboard with these as users tend to shy away from apps cluttered with ads.

Another approach is to provide users with extra features or perks which are activated through in-app purchases. Locking features behind paid tiers in your application can be a sound approach, provided the basic free functionality is robust enough to entice users to feel comfortable about upgrading.

I hope this information, tips and tricks can save you time and help you on your journey to building the next great universal windows application! Tell me if I missed anything in the comments below. Also check the official Microsoft documentation on getting started.

First images of Xbox Cloud Gaming working on the web leak

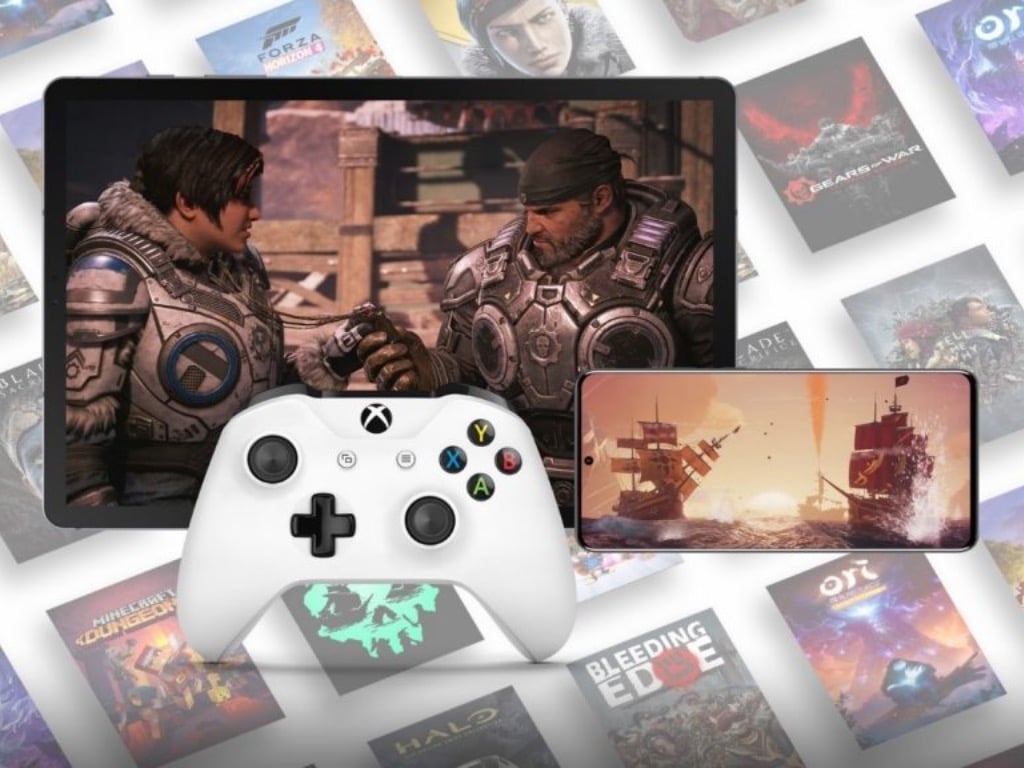
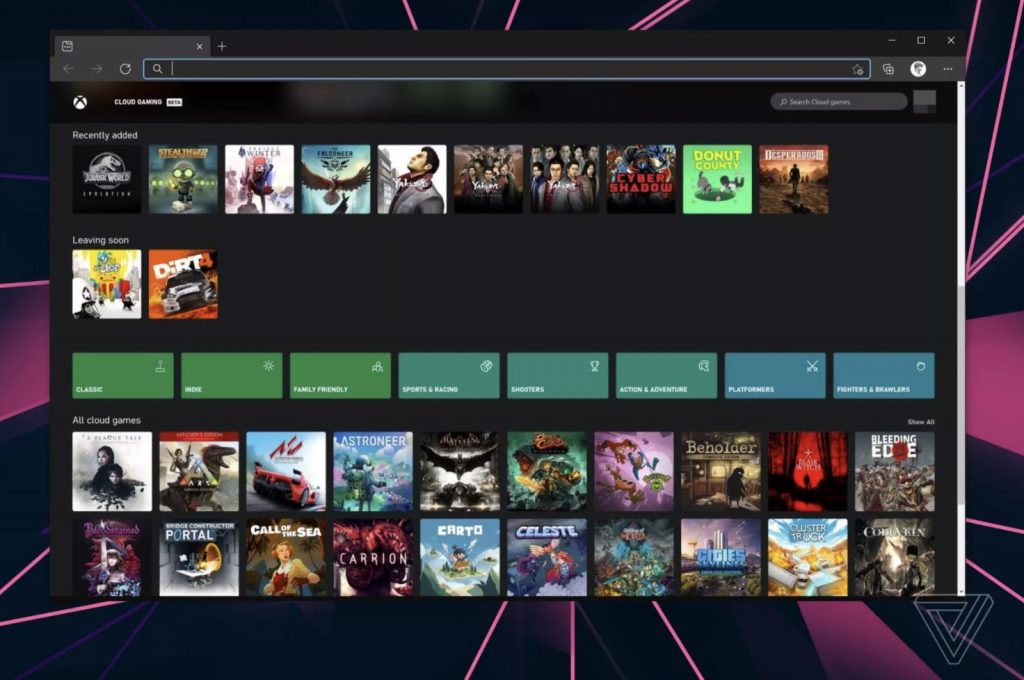
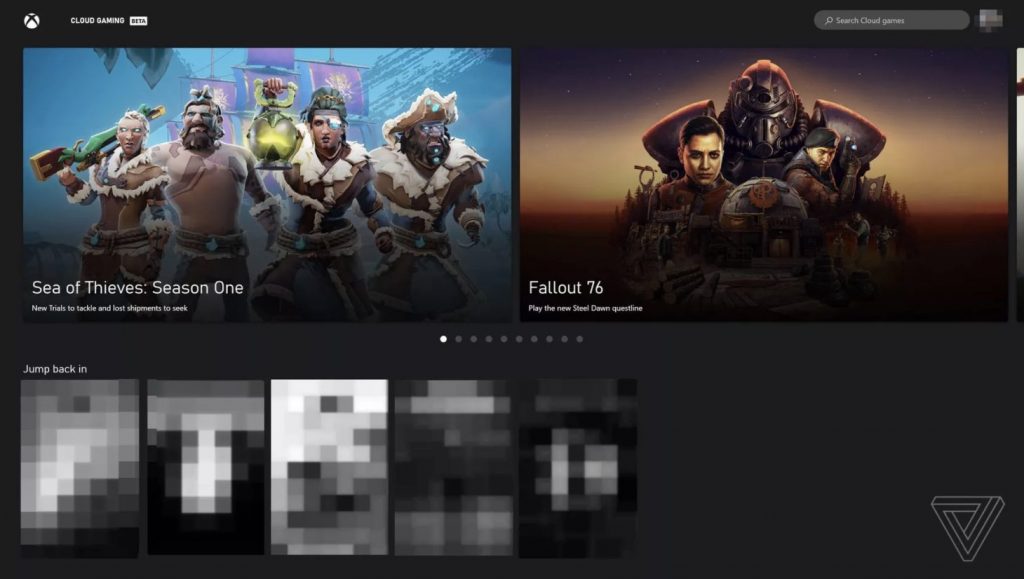
Microsoft is currently testing internally a web-based version of its Xbox Cloud Gaming service, and the first screenshots of the web client have been published by The Verge today. Xbox Cloud Gaming is currently restricted to Android phones and tablets, but a public preview of the web app could be coming later this Spring.

Similar to how the Android app works, Xbox Cloud Gaming on the web will highlight cloud-enabled games from the Xbox Game Pass for Console catalog, which will require an Xbox controller on PC. The Verge is reporting that the current web app only supports Chromium-based browsers including Google Chrome and Microsoft Edge, but Microsoft may integrate the Xbox Cloud Gaming experience to the Xbox app for Windows 10 as well.

Xbox Cloud Gaming On The Web
Image credit: The Verge.

Supporting the web will also allow Microsoft to bring Xbox Cloud Gaming to iOS and Mac devices, something that Apple’s restrictive App Store rules have made impossible so far. If Microsoft announced that Windows 10 was running on over 1 billion devices last year, Apple announced last month that the company now has an active installed base of 1.65 billion devices, which is a sizeable audience for Xbox Cloud Gaming.

Even though Microsoft is adding support touch controls for an increasing list of Xbox Game Pass games on Android, these console games remain better suited for bigger screens. It’s also easier to connect an Xbox controller to a PC or laptop compared to a smartphone, even though there are now various third-party accessories for attaching a smartphone to an Xbox controller.

Xbox Cloud Gaming Web App
Image credit: The Verge.

We’re looking forward to hearing more details about the public preview for Xbox Cloud Gaming on the web. As Google’s competing Stadia cloud gaming service has been available on the web since day one, it’s time for Microsoft to finally catch up.

Accessing Xbox Cloud Gaming on Android devices currently requires an Xbox Game Pass Ultimate subscription, though Xbox head Phil Spencer recently said that he was open to the idea of allowing consumers to purchase cloud-enabled Xbox games separately. Microsoft recently announced that it had crossed 18 million Xbox Game Pass subscribers, though we don’t know yet how many of them have tried Xbox Cloud Gaming.

Check Out Lenovo Smart Display Deals

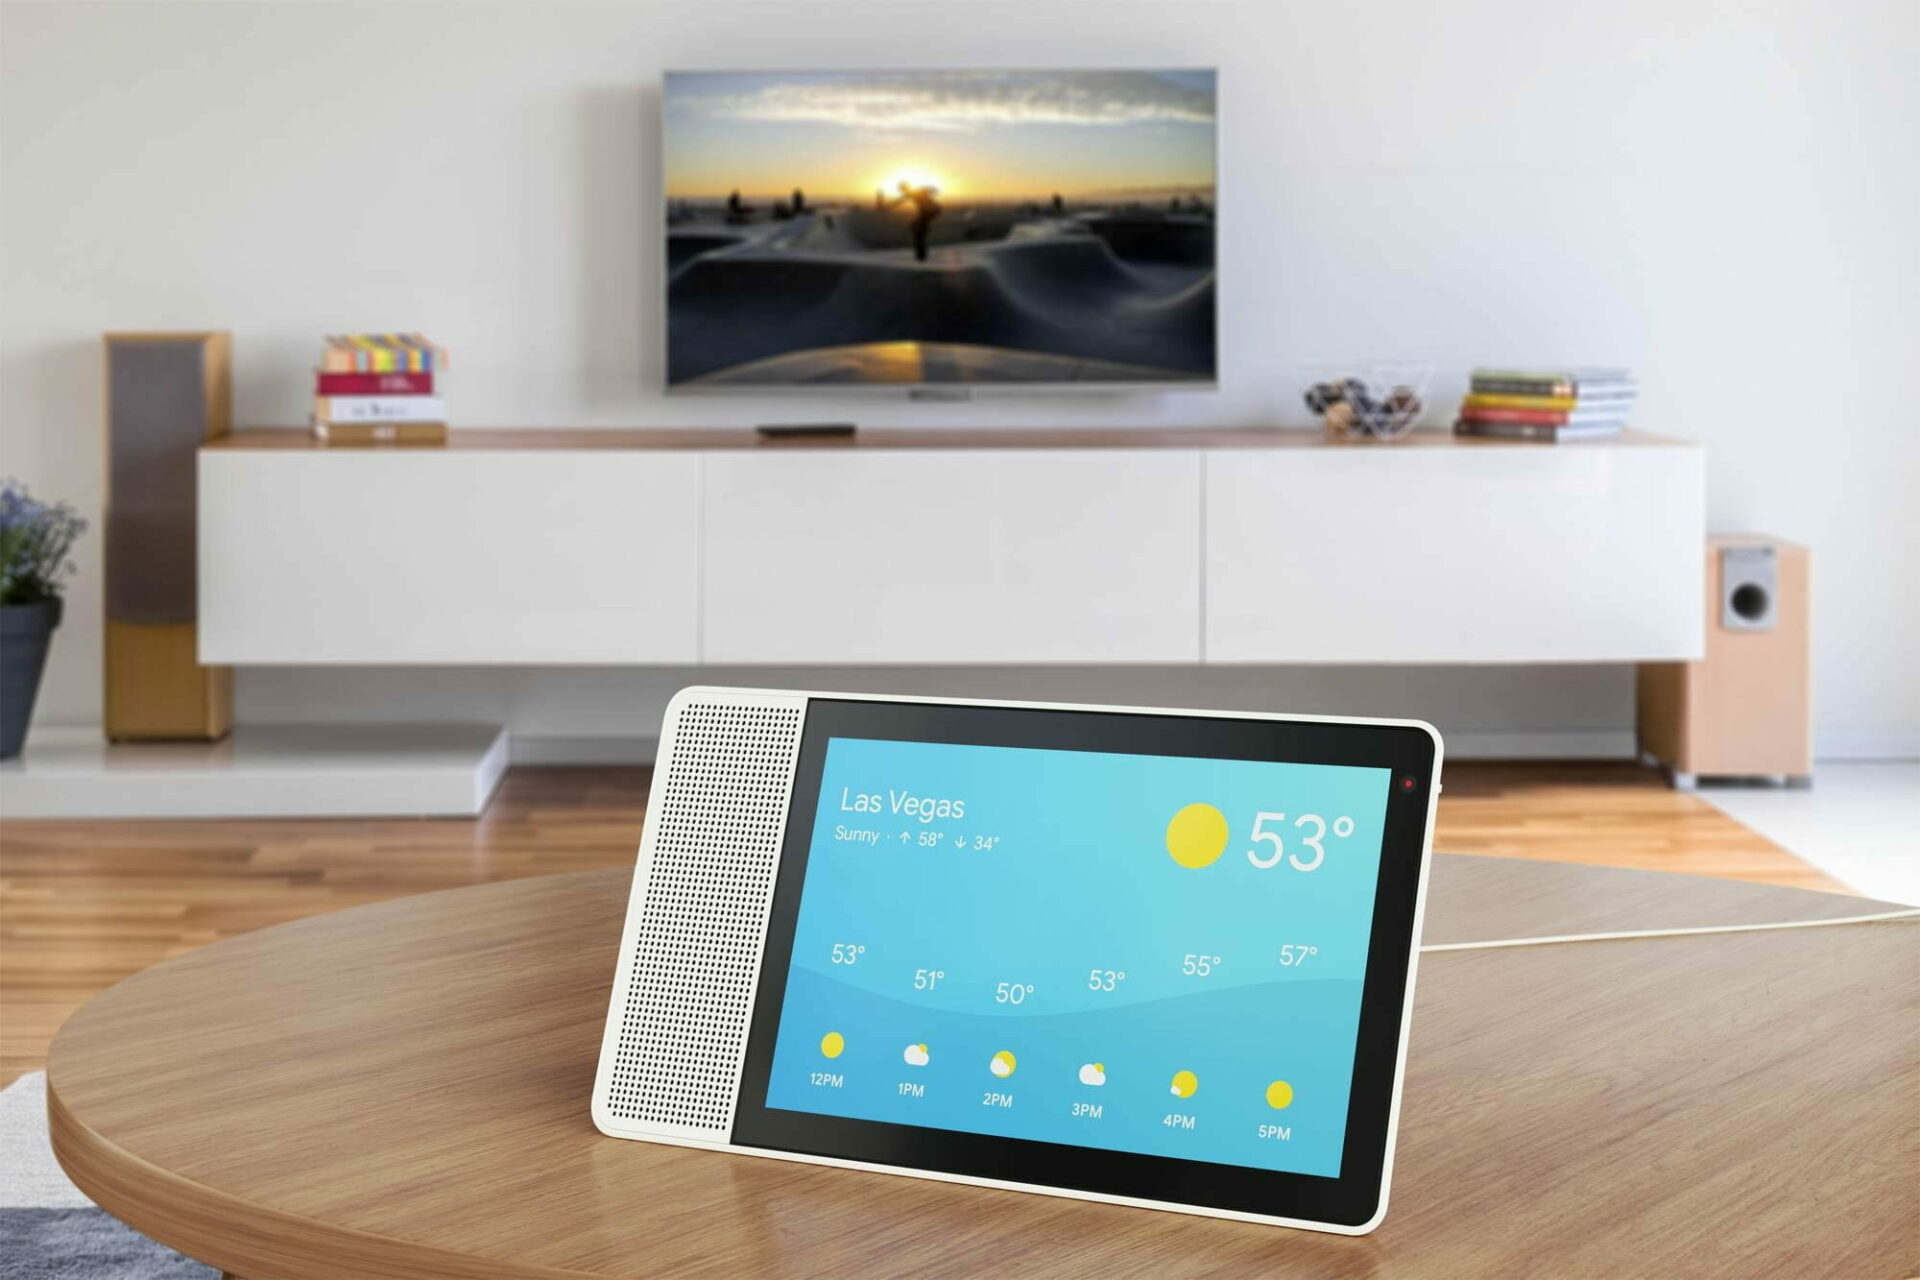
A smart display is a new kind of gadget, with a voice assistant designed for use around the home. These devices have touchscreens that can be used for more than just controls.

The difference between a tablet and a smart display is mobility. A tablet is designed to be carried with you, while a smart display is meant to occupy the same spot for a long time. The Lenovo Smart Display is the first in the smart home category with Google Assistant built-in. It combines all the capabilities of a smart speaker with a beautiful touchscreen.

In this guide, we will present you the features and capabilities of the three smart displays designed by Lenovo, and two other great gadgets.

What are the Lenovo smart displays and smart gadgets?

Lenovo Smart Display 7 – Best overall

Lenovo Smart Display 7 is the most lightweight of Lenovo’s 3 series of smart displays. At only 675 g and 176mm x 155mm, it won’t have any space issues.

Furthermore, it is built on a MediaTek 8167S processor with up to 1.5GHz, which gives you just enough performance for daily tasks.

Lenovo’s Smart Display 7 packs all the smart essentials you need into a beautiful design, making it a great companion for home or office use.

The main features of Lenovo Smart Display 7 are:

  • IPS screen
  • Bluetooth 5.0
  • 2MP Wide Angle for the front camera
  • SD resolution of 1024 x 600

Lenovo Smart Display 7

Ultra-compact and sleek, the Lenovo Smart Display 7 is ideal for any shared space in your home. 
Check price Get it now

Lenovo Smart Display 8 – Google Duo support

If you want a voice assistant with a slightly bigger display, the Lenovo Smart Display 8 has an 8-inch screen.

Google’s virtual assistant works excellently here. The device’s microphones are dual array, which works well enough if you are in the same room.

Smart Display 8 features a 5MP wide-angle front camera, and you can make a video call in 720 pixels. The video calls are excellent, but the quality varies depending on the connection strength.

Here are the main features of Lenovo Smart Display 8

  • Great video and voice quality with Google Duo
  • Snapdragon™ 624 processor
  • HD resolution of 1280 x 800
  • Not far-field microphone

Lenovo Smart Display 8

Make your everyday life easier and your smart home smarter with Lenovo Display 8.
Check price Get it now

Lenovo Smart Tab M8 – Great battery life

Lenovo Smart Tab M8 is another performant voice assistant device from Lenovo. It has the portability of a tablet and the convenience of a smart home hub.

The Smart Tab M8 can be used simply as a tablet or connected to the Smart Charging Station dock. Its Ambient Mode allows users to enjoy all the features and options of the Google Assistant.

It has a simple and modern design, with a premium metal casing and narrow bezels that boast an 83% screen-to-body ratio.

Watching and listening to videos looks and sounds excellent due to the enhanced HD IPS display with TDDI technology and dual Dolby Atmos tuned speakers.

The main features of Lenovo Smart Tab M8:

  • 2MP Fixed-focus and rear 5MP with Autofocus
  • Great battery life, up to 18 hours for web browsing
  • Dual microphones
  • Google Assistant’s Ambient Mode

Lenovo Smart Tab M8

Lenovo Smart Tab M8 makes everything easier, from watching celebrity chefs to speaking with Google Asistant.
Check price Get it now

Lenovo Smart Tab M10 Plus – Comes with large display

Lenovo Smart Tab M10 Plus is a 10″ tablet, and like the smaller one, it can be connected to the Smart Charging Station dock to use Google Assistant’s Ambient Mode.

Kids love playing with gadgets, but are they safe? No worries about the Smart Tab M10; it incorporates parental controls and built-in eye-care protection technology.

Lenovo Smart Tab M10 FHD Plus has a larger-than-average display, with narrow bezels that give you 10.3 inches of usable screen space and FHD visuals. 

The main features of Lenovo Smart tab M10 Plus:

  • Full metal body cover for a modern look
  • Dual speakers expertly tuned with Dolby Atmos
  • Facial recognition, used to unlock the tablet
  •  Google Assistant’s Ambient Mode

Lenovo Smart Tab M10

Buy one of the safest tablets for child use, with Google Assistant and a great display to watch videos.
Check price Get it now

Lenovo Smart Frame – Perfect for your wall

The Lenovo Smart Frame enables you to review every photo you want easily and stylishly.

It has a canvas-like display measuring 15 X 24 inches. It has a matte finish and a color-tone sensor that can dim and lighten depending on the light in the room. 

You can synchronize it with your Google Photos or phone, and the smart frame lets you showcase your favorite photos quickly and easily.

Here are the main features of the frame:

  • IPS Panel with Anti-Glare Coating
  • Android 10 OS
  • The exterior frame can be swapped
  • No voice assistant built-in

Lenovo Smart Frame

Brighten up any room of your house with a stylish smart frame from Lenovo.
Check price Get it now

Lenovo smart displays and the Smart Clock are some of the best gadgets for your smart home. Everything is done using Google Assistant and voice commands.

If you like voice assistant devices to help you start your day, then you will love the smart displays from Lenovo. They are very easy to use even if you have never had a voice assistant, just talk to them.

The Smart Frame will make your home look elegant and high-tech. If you’re looking for more devices from Lenovo, you might be interested in our guide on Lenovo Thinkpad L15 Gen 4 price and hardware specs.

FIX: Browser back button doesn’t reload page in JavaScript

Quite a few users, and especially programmers encountered an issue when working in JavaScript. They want to be able to reload the webpage the user is observing by using the back button inside the browser.

If the code fails to update the cached data from the initial page, the back button will show the cached data, but without the latest data updates applied.

This can cause a lot of confusion especially if the webpage you’re working on is a complex project with a lot of complicated commands.

If the browser back button persists and the page is not working, you will be able to fix it with our solutions below.

Even though each browser manages cache differently, the fix we’re discussing in this article will be using JavaScript, so it applies to any browser. Read on to find out how to do it.

The solutions also cover the Safari back button does not reload page issue so make sure you read them carefully.


What can I do if the back button doesn’t reload the page?

1. Try a different browser

Even the most famous browsers can prove to be prone to errors and bugs and the back button issue is just one of the examples.

If you got tired of your current browser and you’re looking to switch to a new and better one, try Opera One. It’s fast, secure, privacy compliant, fully customizable, and, most of all, it’s free.

More so, it is frequently updated, and therefore improved upon, so any bug you may happen to find will never stay there for long anyway.

It comes with an ad blocker, built-in social network shortcut buttons for Messenger, Instagram, and WhatsApp, and also a built-in VPN. It also brings you a built-in AI.

Opera One

Choose this browser and never have to worry about coding problems like JavaScript-related issues. Available for download for free!
Free Download Visit website

2. Create a command for the List layer

Because Maintenance applications have two pages – the List and Maintain view, we will tackle this issue focusing only on the List page.

In order to achieve reloading cached data when users press the back button of a web-page inside a browser, you will need to copy-paste this command directly before the </head> tag, inside the source view of the List layer: 

<script type="text/javascript">
       jQuery(document).ready(function()
        {
                var d = new Date();
                d = d.getTime();
                if (jQuery('#reloadValue').val().length == 0)
                {
                        jQuery('#reloadValue').val(d);
                        jQuery('body').show();
                }
                else
                {
                        jQuery('#reloadValue').val('');
                        location.reload();
                }
        });
   </script>

After this code is added to your List layer, you will also need to add a line of code after the End data Table text:

<input id =''reloadValue'' type =''hidden'' name =''reloadValue'' value=''/>

After this process is done, the user that is browsing your website will be able to reload the previous page with the updated live cache data, by simply clicking the back button.

Speaking of JavaScript issues, we recently covered Unable to get property ‘msie’ of undefined or null error, so don’t miss it.

Please feel free to let us know if this short guide helped you solve your issue in JavaScript.

There was an error downloading the file in Dropbox [SOLVED]

Dropbox is an efficient tool for storing, managing and sharing documents. The app is very popular among users because it offers a quick way to send and receive important files.

However, nothing is perfect and this tool is no exception. Several users encountered There was an error loading the file error message in Dropbox.

Not being able to download a file is a major issue in Dropbox and today we will show you how to solve this in no time.

What to do if Dropbox won’t load files?

1. Try using your web browser

If you’re having this issue, try accessing Dropbox with your web browser. You can use any browser for this purpose, but we recommend using Opera One.

Opera One is a feature-rich browser that has recently been overhauled into one of the most optimized and customizable browsers on the market. The developers included data-restriction settings and an AI.

Moreover, the browser has a free included adblocker that will keep you safe, and it barely takes a tool on your system’s hardware, so it is great for gamers and people with a low-end machine.

Let’s take a look at Opera One’s main features such as:

  • Built-in Adblocker
  • Free, unlimited VPN
  • Integrated messengers in the sidebar
  • A lot of customization options to make it truly yours
  • Highly optimized
  • Native AI

⇒ Get Opera One Browser

2. Use an alternative cloud service

If you are having issues with Dropbox and this is not the first time, then it’s a good moment to think of an alternative cloud service provider.

If you also care about privacy and if you store sensitive information using Dropbox, you should know that they aren’t very private.

There are various top cloud service providers these days that are excelling rapidly in their growth phase with a variety of current features, but each has advantages and disadvantages depending on the needs of the majority.

Nonetheless, some are superior to others because they prioritize quality above quantity and privacy and safety over public access.

Take a look at this complete list of cloud and hosting services for contrasts on ease of use, pricing, and technical support for each provider that will help you narrow down your options.

3. Clear your browser cache

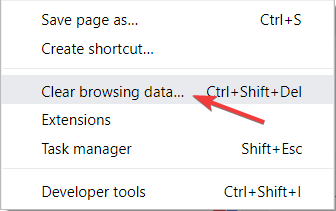
Sometimes, you can solve this issue by clearing your browser temporary files. To do that in Google Chrome, click on the three vertical dots in the upper-right corner of the window.

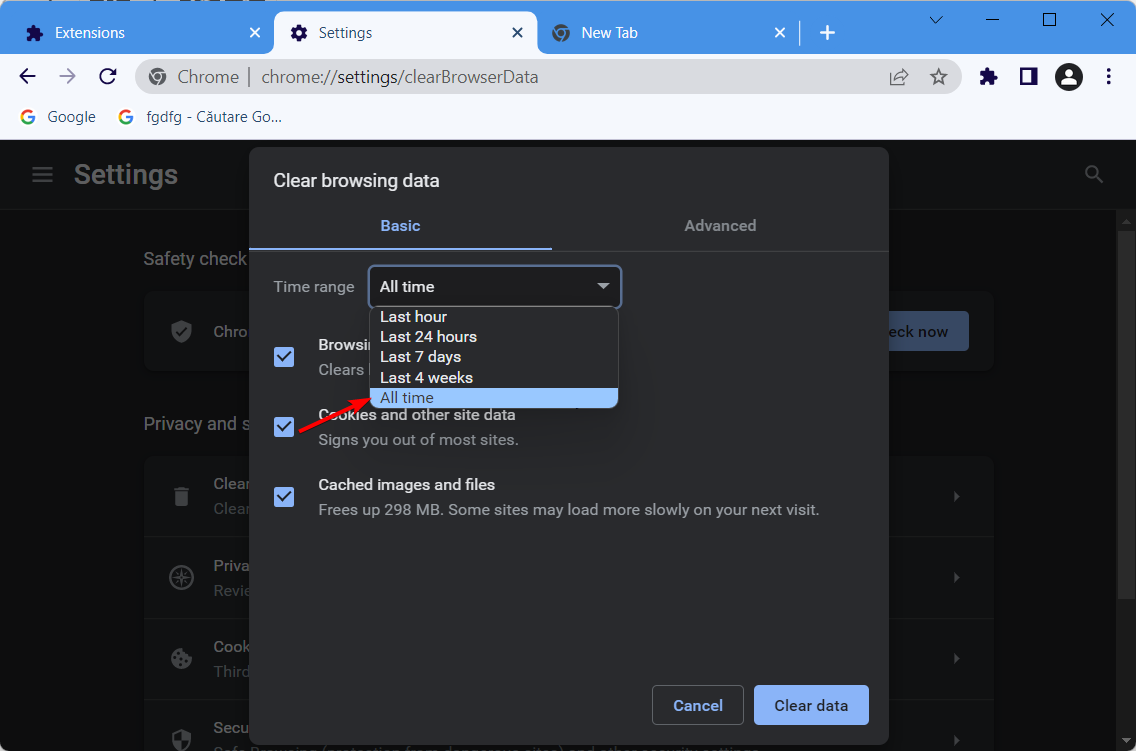
  1. Go to More tools and select Clear browsing data.clear browsing data There was an error loading the file in Dropbox
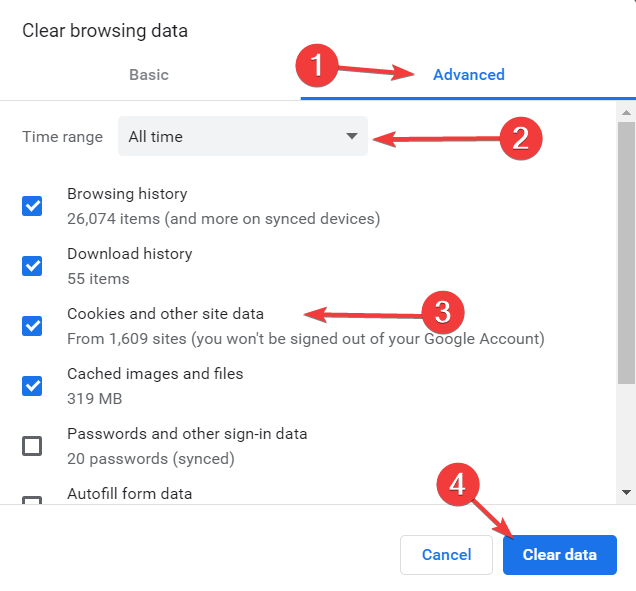
  2. Go to the Advanced tab, select All time and check the first four boxes.
  3. Click on Clear data.chrome clear browsing data There was an error loading the file in Dropbox

4. Check the names of the files

It is well known that you can’t name the files shared in Dropbox whatever you want. There are some restrictions on this app that you should take notice of.

For example, if the name of the file is too long, you might encounter There was an error loading the file error message. Also, this issue appears if the name of the document contains characters such as “#”.

So, make sure you name your files properly before you upload them in Dropbox.

As you can see, renaming your files might solve the problem. Avoid special characters and keep the names of your files and folders as simple as possible.

Note: Also, keep in mind to clear your browser cache regularly.

Luckily, this is just a simple restriction of the app and not a real issue with Dropbox that requires an update or some special fix.

Also, you can choose one of these cloud software with encryption. So, you can share documents efficiently, while your data is protected.

Did our solutions help you solve the error? Do let us know in the comments section below.

Gmail Slow/Stuck on Loading Forever: Why & How to Speed It Up

Some users have stated on Google forums that Gmail gets stuck on the load screen, or takes ages to load when they sign in.

One user stated in a forum post: Gmail is stuck on the load screen… It just sits on the load screen.  In other cases, Gmail won’t load at all in Chrome.

Thus, those users can’t open their emails with Google Mail stuck on the load screen.

There are also other issues with Gmail caused by its settings not being updated, but it can be easily resolved.

The solutions below will help you fix Gmail when it gets stuck loading.

How do I fix Gmail if it is stuck or slow?

1. Check if Gmail is down

Although unlikely, it might be the case that Gmail is down for most users. A widespread Google outage has happened before.

For example, in 2020, a Gmail outage affected millions for a few hours. And not just Gmail but almost all Google Suite services.

Google Drive was down for a while in 2017, and there has also been at least one notable Gmail outage.

Users can check if Gmail is down at downdetector.com. It currently highlights that Google Mail is not generally down. However, if Gmail was down, you would need to wait for Google to resolve the issue.

2. Have all your e-mails in one place

  1. First, open Gmail with the Load basic HTML option as outlined above.
  2. Click Settings to open the General options tab shown below.Gmail settings
  3. Then click Forwarding and POP/IMAP to open the settings below.Gmail's Enable IMAP option
  4. Select the Enable IMAP option, and press the Save Changes button.
  5. Then close the browser.
  6. Download Mailbird and install it on your PC.
  7. Click Add account.
    • This option will be prompted the first time you open Mailbird.
  8. Type in the account address and password.
  9. Click Continue.
  10. Configure your Network settings.
  11. Mailbird will detect most of them automatically.
  12. Start using Mailbird.

If you think that Gmail has an issue because of your browser, you could always try using it within a third-party email client, like Mailbird.

In the case at hand, Mailbird will be especially useful especially since importing email addresses and managing them all from within a single inbox is its specialty.

3. Clear browser data

  1. Click the Customize Google Chrome button to open the browser’s menu.
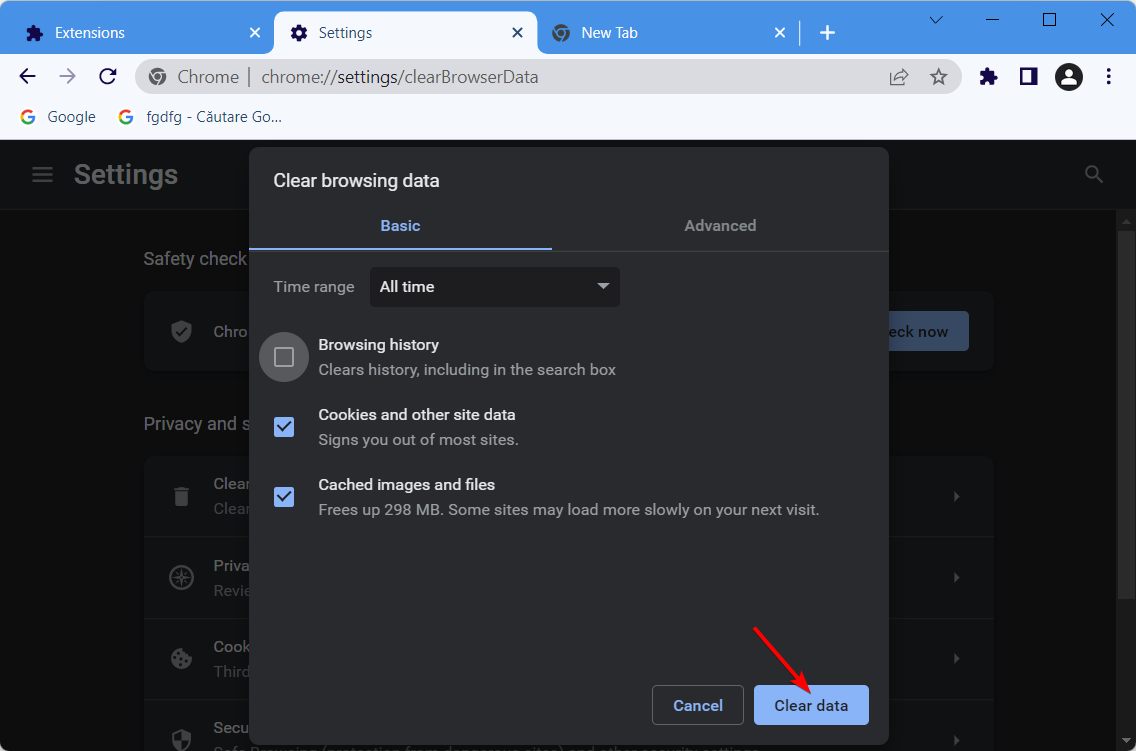
  2. Click More tools > Clear browsing data to open the window shown directly below.Clear browsing data options
  3. Select All time on the Time Range drop-down menu.
  4. Select the Browsing history, Cookies , and other site data and Cached images and files options.
  5. Click the Clear data button.

Cookies are a necessary part of web browsing, they let websites remember you, your website logins, and more. Deleting them will make the browser think you have never visited the website.

4. Turn off browser extensions

Chrome extensions

Gmail might get stuck loading because of a few browser extensions. Adblockers are among the more likely browser add-ons to break Googe’s webmail. So turning browser extensions off could fix Gmail.

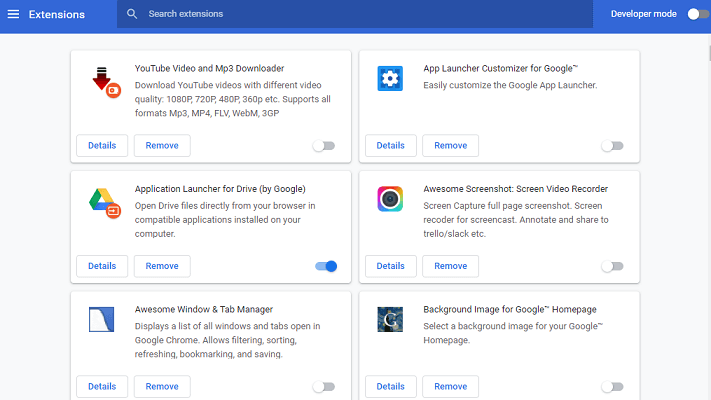
Google Chrome users can turn off extensions by entering chrome://extensions/ in the browser’s URL bar. Then users can turn off add-ons on the Extensions tab.

Alternatively, they can click Remove to eliminate them entirely.

5. Open Gmail in an alternative browser

Some users find that Gmail gets stuck loading within a specific browser. So, opening Google Mail within another browser is a potential workaround, but not exactly a fix.

One good browser alternative to whatever you may be currently using is Opera One. This web browser is built using the Chromium engine, just like Google Chrome and Microsoft Edge.

More so, it can be customized to have better integration with a variety of web services, including Gmail.

All in all, if you prefer Gmail as a web client, then Opera One is the browser that you need. plus, this browser comes with built-in AI, VPN and Ad blocker.

⇒ Get Opera One

6. Reset the browser

  1. Input chrome://settings/ in Chrome’s URL bar and press Enter to open the tab shown directly below.Chrome's Settings tab
  2. Scroll down to and press the Advanced button.
  3. Click Restore settings to their original defaults to open a dialog box window.The Reset settings button
  4. Press the Reset settings button to confirm.

7. Select the Load basic HTML option

Gmail's basic HTML view

The Load basic HTML option certainly does fix Gmail loading issues and speeds up the webmail app. However, that option also opens Gmail with a somewhat basic view as shown directly below.

So it’s not an ideal resolution, but users can at least open their emails.

Gmail’s loading page includes the Load basic HTML option at the bottom right corner of the page tab. Thus, users can click that option when they try to sign in to Gmail.

That will open Gmail as shown just above, and users can then click a Set basic HTML as default view option.

Those are a few resolutions and workarounds that will ensure Gmail users can still open their emails even when the web app gets stuck loading.

A few users reported that Gmail will not accept keyboard input, but we have a guide that addresses this issue, so don’t miss it.

Some of the resolutions might also speed up Gmail’s load times. Feel free to write us in a comment if our solutions worked for you, or there is a new one we should include.

Fix Google Chrome When Unresponsive & Relaunch Is Not Working

The Google Chrome is unresponsive, relaunch now message can appear in Chrome usually when you try to open a link.

This error will force you to restart Chrome and potentially lose your data, therefore today we’re going to show you how to solve the Google Chrome not responding issue on Windows 10.

Why is Chrome suddenly unresponsive?

If you are using an outdated version of the browser, which lacks some of the most recent and crucial patches and upgrades, and if your browser becomes sluggish, this may signal that you are using an outdated version of the browser.

It’s possible that this is the factor that contributes to your Google Chrome browser regularly being unresponsive. Another typical problem is that you have browser extensions installed, which interfere with the functionality of your browser as well as your browsing history.

What does Chrome relaunch mean?

When you restart the browser, all of the tabs and windows that you now have open will be saved and brought back up automatically, once you hit the Relaunch button.

When you restart Chrome, the Incognito windows you have open will not be restored. Click the Not now button if you’d rather not restart the computer straight away. The update will be deployed when you have restarted your browser the next time.

Quick Tip:

If you keep having problems with Chrome, consider using Opera One. The Chromium engine makes it compatible with all Chrome and Edge extensions and it includes all the standard features you need.

The built-in ad-blocker and absolutely free VPN make it hard to be rivaled by other browsers already.  It’s also well current technologies due to it’s built-in AI and social media and messaging apps integration.

Opera One

Opera One is a great overall browser that you can rely on. Install it within seconds and make it your own.
Free Download Visit website

How do I fix an unresponsive browser?

1. Update Chrome to the latest version

  1. If Google Chrome stops responding, make sure that Chrome is running then click the Menu button in the top right corner. Navigate to Help, then click on About Google Chrome.
  2. Chrome will now automatically download updates and install them.

2. Close all running Chrome processes

  1. Press Ctrl + Shift + Esc to open Task Manager then locate all Chrome processes and right-click each process and choose End Task from the menu (The Chrome processes will be located in both Apps and Background processes groups).
  2. Restart Chrome and check if the problem still persists.

Keep in mind that this is just a workaround, so you might have to repeat it in order to avoid this problem.

Can’t open Task Manager? Don’t worry, we’ve got the right solution for you.

In case Chrome is unresponsive on Windows 10, perhaps ending the Chrome process is the only way to fix it.

3. Set up a different default browser

If you still want to fix Chrome, the solution is still to temporarily set another browser as default. While you’re at it, you can do that with Opera.

  1. Press Windows + I to open the Settings app. Now navigate to the Apps section.
  2. Go to Default apps section in the left pane. In the right pane, locate the Web browser and change it from Chrome to any other browser. We strongly recommend Opera.opera-w10-set google chrome unresponsive
  3. Now click on Choose default apps by file type, locate .html and .htm and set the default application to Opera (If you already set Opera as the default browser, it’s most likely set already).choose-defautl google chrome unresponsive


By following the steps above, you’ll set a different browser as a default. Few users reported that you can fix the problem by setting Opera as a default browser and then setting Chrome as the default again.

In addition, a few users are also recommending setting your email client as a default email app instead of Chrome.

So if you’re getting Page unresponsive error in Chrome, change your default browser and check if that helps.

You can’t open Control Panel? Take a look at this step-by-step guide to find a solution.

4. Run your email client as an administrator

One time

  1. Locate your email client’s shortcut, then right-click the shortcut and choose Run as administrator from the menu.

Permanently

  1. Locate your email client’s shortcut. Right-click it and choose Properties from the menu.
  2. Navigate to the Compatibility tab and check Run this program as an administrator option. Now click OK and Apply to save changes.

After doing that, your email client will always start with administrative privileges so you won’t have to do it manually.

Several users reported that this problem occurs if Chrome is set to run with administrative privileges.

Therefore if you’re already running Chrome as an administrator, try disabling Run this program as an administrator option.

On the other hand, if Chrome isn’t running with administrator privileges, you can try running it as an administrator and check if that solves the issue.

This is a simple workaround, but it can come in handy if Chrome won’t open.

If nothing happens when you click on Run as administrator, check this expert guide to fix the problem.

5. Disable problematic extensions

  1. Click the Menu button in the top right corner and choose More Tools > Extensions.
  2. Disable all extensions by clicking on Enabled checkbox next to the extension’s name.
  3. Restart Chrome and check if the Chrome page unresponsive popup is disabled.
Note icon NOTE
If the problem doesn’t manifest, you need to go back and enable extensions one by one. After enabling each extension you need to restart Chrome and check if the problem appears again.

After you find the problematic extension, disable it or remove it. If you need to use that extension, you might have to update it to the latest version and check if that solves the issue.

Several users reported that Norton Security Toolbar extension was causing the problem for them, but after disabling it the issue was resolved.

Other users reported this problem after disabling Google Docs extension, so if you have Google Docs disabled, be sure to enable it.

If Chrome is unresponsive on Windows 10, extensions can be the main culprit, so be sure to disable them by following the steps above.

6. Turn off the Automatically send usage statistics and crash reports option

  1. Click the Menu button in the top right corner and choose Settings from the menu.
  2. Scroll all the way down and click on Show advanced settings.
  3. In the Privacy section locate the Automatically send usage statistics and crash reports to Google option and disable it.
  4. Restart Chrome and check if the problem appears again.

7. Delete your Chrome profile and create a new one

  1. Click the Menu button in the top right corner and choose Settings.
  2. In the People section locate your profile and select it. Now click the Remove button.
  3. The confirmation message will now appear. Click the Remove button.
  4. Restart Chrome and navigate back to the Settings tab.
  5. In the People section click on Add person button.
  6. Select the desired picture, enter the name and click the Add button.
  7. A new Chrome window will now appear. Click the name of your profile at the top and choose Sign in to Chrome.
  8. Now enter your email and password and you’ll have your account available again.

If you get the Profile error occurred in Chrome, you can solve it by following the simple steps from our expert guide.

Note icon NOTE
If your account isn’t synced online, you might want to back up your profile beforehand.

Modify the localappdata folder

  1. Close all Chrome processes by following the steps mentioned in the Solution 5.
  2. Press Windows + R and enter %localappdata%. Press Enter or click OK.
  3. Navigate to Google\Chrome\User Data
  4. Locate Default folder and rename it to Default backup.
  5. Start Chrome again and check if the problem is resolved.

Renaming the Default folder is one of the quickest methods that can help you if Chrome won’t open.

8. Uninstall Malwarebytes

  1. Press Windows + I to open the Settings app.
  2. Navigate to the System section.
  3. In the left pane choose Apps & features. Now select Malwarebytes in the right pane and click on Uninstall button.
  4. Follow the instructions on the screen to remove Malwarebytes.

In case you need to use Malwarebytes, we suggest that you download and install the latest version and check if that solves the problem.

If you need additional info on how to uninstall programs and apps in Windows 10, check out our article. If Chrome won’t open, the third-party apps could be a problem, so be sure to find and remove the problematic applications.

9. Close Chrome then open the link

If the Google Chrome is unresponsive, relaunch now message appears only when opening links in email messages, you can fix it by performing this workaround.

Apparently this message appears if you click a link in your email client while Chrome is running.

One simple workaround is to close Chrome completely and then click the link in the email message. After doing that, Chrome will start normally and you’ll be able to access the link without issues.

Once again, this is just a workaround, so you’ll have to repeat it every time the issue appears.

Alternatively, you can just copy and paste the link from your email client to Chrome as a temporary workaround. This isn’t the most effective solution, but it should help you with this problem, so be sure to try it.

10. Add -process-per-site parameter to Chrome

  1. Locate Chrome shortcut, right-click it, and choose Properties from the menu.
  2. Go to the Shortcut tab and in the Target field add –process-per-site. Click Apply and OK to save changes.

After doing that, Chrome won’t start any additional processes for every opened tab, and the issue should be resolved. Keep in mind that you need to use this shortcut to start Chrome every time.

By using this shortcut you’ll ensure that Chrome is running with the necessary parameters.

Keep in mind that this isn’t the best long-term solution, but it will help you with Page unresponsive error in Chrome.

11. Clear your cache

  1. In Chrome click on Menu button in the top right corner and choose Settings.
  2. Next, use the following shortcut to open the Clear browsing data menu: Shift + Ctrl + Delete. Select All time as the time range.all-time-chrome images not loading in chrome
  3. Select the Cookies other site data and Cached images and files options.
  4. Click Clear Data.clear-data images not loading in chrome
  5. Restart Chrome and check if the problem is resolved.

12. Reinstall Chrome

If the Google Chrome unresponsive issue still persists, you might be able to fix it simply by reinstalling Chrome. Sometimes the installation can become corrupted and that can cause this and many other errors.

To fix the problem, simply uninstall Chrome and then download the latest version.

If you need more info on how to uninstall Google Chrome in Windows 10, take a look at our in-depth guide.

Few users are also recommending downloading Chrome Canary, so you might want to try that as well. Keep in mind that Canary is an experimental version of the browser, so although it offers many bug fixes, it can also be unstable to use.

How often should I restart Chrome?

It is recommended that Chrome be restarted at least a couple of times each week, if not daily, for optimal performance and to avoid issues such as Google Chrome unresponsive one.

Google Chrome is unresponsive, relaunch now message can cause certain inconvenience, but you should be able to fix it by using one of our solutions.

Feel free to tell us in the comments section below what worked for you or any other solution that helped you.

5 cool Valentine’s Day gifts for the geeky girlfriend

With Valentine’s Day fast approaching, love is in the air. It’s that much-awaited time of the year, when people celebrate with their loved ones, spend quality time, and make memories.

If you’re planning something special, you might get a few ideas by using these great Valentine’s Day apps for Windows.

While it’s much easier to look for a tech gift for him, finding Valentine’s Day gifts for a geeky girlfriend is pretty challenging.

But, for those running out of Valentine’s Day tech gift ideas for her, here are some cool gadgets to choose from.

How do I pick a good Valentine’s Day gift for a geeky girlfriend?

The most important thing when picking a perfect gift is to pay attention to your loved one’s interests. If she’s into gaming, a suitable gift would be something related to her favorite video game series.

In this guide we picked a couple of great items that every nerdy girlfriend might like, so be sure to consider all of them.

What are the best Valentine Day tech gift ideas for her?

TIJN Blue Light Blocking Glasses

  • Lightweight
  • 100% efficient when blocking UV and blue light
  • Elegant design
  • Lens/bridge/arm width: 53/18/140mm
  • Available in multiple colors
  • Some users might not like the plastic look

If your significant other spends a lot of time in front of the PC, why not surprise her with a pair of geeky glasses that can block the blue light?

With the 100% efficacy in blocking the UV and blue light from your screen, this is a perfect gift for anyone that needs to protect their eyes.

The glasses are made from a super-light material, and with a low friction coefficient, you can wear them for hours without any issues.

As for the design, the transparent model looks elegant and minimalistic, but there are other colors available as well, so it’s a perfect Valentine’s Day nerd gift.

Silicone Floppy Disk Coaster

  • Made from high-quality silicone
  • Resistant to water, temperature, and sunlight
  • 3.54×3.54x 0.2 inches
  • Comes with 6 colorful coasters
  • Color might transfer to hot cups

Floppy disks are a thing of the past, but they were heavily used 30 years ago for file transfer, way before flash drives and CDs became a thing.

However, if your loved one is a computer geek, she might appreciate these Silicone Floppy Disk coasters. Each coaster measures 3.54×3.54x 0.2 inches.

There are 6 coasters in the package and they are made from high-quality silicone which makes them resistant to water, temperature, and sun. The color won’t fade away, so they will look great even after having them for years.

We also have to mention that the coasters come in several different colors, so they are a perfect gift for your geeky girlfriend for this Valentine’s Day.

Paladone Gameboy Heat Changing Coffee Mug

  • 10oz mug
  • Officially licensed
  • Has a beverage heat indicator on the side
  • Comes with a retro design
  • Minor issues with the heat indicator

Nintendo GameBoy was one of the first handheld consoles in the world, and if your significant other is a Nintendo fan or she used to own a GameBoy, then this coffee mug is one of the best nerdy Valentine’s Day gifts for her.

This is a 10oz mug and it’s not safe for microwave use, so keep that in mind. As for the design, you can find a GameBoy printer on the side, but that’s not all.

When you pour a hot drink, the side of your mug will light up, and it will look as if your GameBoy is running a game. This is a pretty awesome effect, and it allows you to keep track of how hot your drink is.

Master Yoda Force Metal Bookend

  • Attractive design
  • Anti-slip surface
  • Can hold up to 7 books
  • Perfect for Star Wars fans
  • Weighs 500gr
  • It doesn’t look too sturdy

If your geeky girlfriend is a fan of Star Wars and reading, then this Star Wars bookend might be a perfect gift for her. This bookend has a Yoda pattern and when books are placed it looks like he’s holding them with Force.

It’s important to mention that patterns are available on both sides, so you can position it any way you want. The bookend uses anti-slip material, so it won’t move when having multiple books on it.

Regarding the weight, this stand weighs around 500 grams and it can hold about 7 books or multiple DVDs, so if your significant other is a Star Wars geek, this might be the best nerdy love gift for her.

Coffee Mug Warmer

  • Three different temperature settings
  • Automatic shutdown after 4 hours
  • Incredibly simple to use
  • Measures 3.54×4.33 inches
  • Works best with flat mugs

There’s nothing better than a hot beverage, and if you’re looking for a Valentine’s Day gift for your geeky girlfriend, then this device might be right for you.

This is a simple device and to keep your drink warm, just place it on it and press the power button. There are three different heat levels, so you can adjust how hot you want your drink to be.

To prevent overheating the device will automatically turn itself off after four hours, but you can also turn it off manually if you want.

It’s important to mention that this device is heat and fire-resistant, and with a spill-proof design, you can rest assured that it will keep working even if you accidentally spill your drink.

Are nerdy love gifts expensive?

No, a good gift doesn’t have to be expensive, and the intent behind the gift is what’s more important. As for the gifts themselves, they don’t have to be expensive, and it all depends on what you’re looking for.

Some smaller and practical gifts can be more affordable, while the gifts that have a special theme might be more expensive.

While there are umpteen gadgets out there worth the attention, these are some of the most interesting Valentine’s Day nerd gifts.

If you’re looking for something different, then you might want to check the best Valentine’s Day gifts for geeky guys instead.

So, grab any of these Valentine’s Day gifts for the geeky girlfriend, and make it a memorable day for both of you.

5 nerdy Valentine’s Day gifts for geeky guys [Special offers]

Valentine’s Day is all about celebrating love. And what’s better than to gift your loved one a present that he will always remember?

Mentioned here are some cool gift ideas for that geeky guy that will become the symbol of your love for years to come.

How can I pick nerdy Valentine’s gifts for him?

First off, you need to know what your partner’s interests are. If he’s passionate about gaming, DIY, home repair. After you figure that out, you just need to think of something that he doesn’t have and it will surely use.

We compiled a list of products that most guys can find useful, so be sure to check it out for some geeky suggestions.

What are the best Valentine’s gifts for nerdy guys?

Jelly Comb electronics organRAK Multi-Tool 2Pc Pen Set

  • Multifunctional ballpoint pen
  • Built-in LED and bubble leveler
  • Bottle opener and screwdriver
  • Can work as a stylus pen
  • Aluminum metal body
  • A bottle opener could be better

If your partner isn’t into crafts and DIY, then this might be a perfect gift for him. This is a multifunctional ballpoint pen, and it comes with a strong aluminum body.

Additional features include two rulers, both metric and imperial, bubble level, and a flathead and Philips screwdriver. It’s important to mention that this pen can also work as a bottle opener, LED light, and stylus.

Overall, this is a unique ballpoint pen, and if your geeky boyfriend is into DIY, then this will be a perfect gift for him.

ONXE USB LED Clock Fan

  • PVC soft fan blades for safety, mental flexible neck.
  • Simply plug into any USB port on a notebook or PC to create a gentle refreshing breeze.
  • Gently adjust the flexible neck to position the cool breeze anywhere you wish.
  • Real-time Clock display. No driver installation required.
  • Not a gift that's meant to last

This makes for a nice gift option that your geeky partner will no doubt love to have. Basically, it’s a fan that plugs into any USB power source.

It comes with soft fan blades made of plastic while the gadget’s neck is made of flexible yet sturdy material.

However, the story does not just end here as once the blades start spinning, there is an analog clock complete with hours, mins, and seconds that becomes visible.

Overall, a trendy yet essential thing that your partner will love to add to his workplace.

Magnetic Pickup Tool

  • 3 super light LEDs
  • 360-degree soft neck
  • Magnetic base for secure mounting
  • Magnetic head for picking up metallic objects
  • Can be extended up to 22 inches
  • No major flaws

This is a must-have for your partner if he is into a home repair or PC building. This tool comes with a telescopic neck and a powerful LED battery that can help you illuminate the project you’re working on.

The neck can be rotated any way you want, so it’s perfect for those hard-to-reach places. It’s important to mention that this device has a magnetic base, so you can set it in place on any metallic surface while you work.

Regarding the size of this tool, it can be extended from 6.6 inches up to 22 inches, so it’s perfect if you need to find a screw, a bolt, or any other metal piece.

Electronic Word Clock

  • 7.75 x 1.13 inches
  • Minimalistic design
  • Powered by a single USB cable adapter
  • Sharp image
  • Tells time in 5-minute intervals

If your boyfriend is a fan of word games, perhaps he would find this unique clock interesting. Unlike regular clocks that use numbers to tell time, this one uses words.

The clock measures 7.75 x 1.13 inches, so it will fit perfectly on your desk. Regarding the design, the clock looks sleek with its dark background and white letters, so it’s a perfect choice for minimalistic.

Regarding connectivity, this model is powered by a USB cable adapter. It’s important to mention that the word clock tells time in five-minute intervals, so it’s not as accurate as a regular clock, but it’s far more stylish.

If you’re looking for unusual Valentine’s Day gifts for him, then this clock might be a perfect choice.

KLIM Wind Laptop Cooling Pad

  • Maximizes the life expectancy of your PC and boosts its performance
  • Covers the following sizes : 11 11,3 12 13 14 15 15,6 16
  • Compatible with the following sizes: 17,3 18 and 19 inches
  • 4 fans spinning up to 1400 rotations per minute
  • KLIM Wind has 2 USB ports in order to leave you with one free port.
  • The RGB lights can't be turned off

The last item on our list is yet another gaming-oriented gadget, although non-gamers will certainly find it useful as well.

The cooling pad features 4 different fans, all of which are positioned to target your laptop’s most common hot spots so that cooling is done evenly and efficiently, all thanks to the 1400 RPM speeds.

The design also makes it ideal for laptops of all sizes, from mall 11-inch models to big 17.6-inch gaming monsters, and the quality materials that it’s built from make it as long-lasting as the laptop itself.

Are nerdy Valentine’s gifts expensive?

A good Valentine’s Day gift doesn’t have to be an expensive one and sometimes casual Valentine’s gifts for guys can be a better option.

If you’re planning to purchase something gaming-related, that can be costly, but there are many gifts that you can give that won’t break the bank.

Be sure to carefully consider all the models list in this guide and pick something that you think your partner will like.

This concludes our list of best nerdy Valentine’s gifts for your boyfriend. If you need something different, we also have a guide on the best Valentine’s Day gifts for geeky girlfriends, so be sure to check it out.

Are there any more suggestions that you consider should have made this list? Let us know by answering the comments section below, and we’ll update the article accordingly.

Comcast Internet connected but not working [Fix]

Having a stable Internet connection is a must nowadays. Maybe you are trying to watch a movie, socialize on Facebook, check the news, or play a video game.

Having connection problems frequently can be a real nuisance. Comcast (also known as Xfinity) is one of America’s largest Internet providers.

If your Internet is provided by them and you are having issues with it, you shouldn’t worry. There is always a solution to these problems.

Today we will be discussing and providing quick fixes for all of those pesky issues that are stopping you from enjoying your time on the world wide web.


How do I fix my Comcast Internet connection?

1. Check for Internet outages

  1. Sign in to your Xfinity account.
  2. Navigate to the Services tab and click it.
  3. Click on Status Center.
  4. If it is an outage, a pop-up will notify you. Click on Text me when it’s resolved.

  5. Type in your phone number, then select Get a Text.

Before we dive into hardware-related stuff, we should make sure that your issue isn’t caused by your Internet provider.

Sometimes your Internet problems do not actually have anything to do with you. Outages are really common, especially during bad weather, or during construction work.

Fortunately, Xfinity has got you covered, providing with an interface that allows you to check for your service’s availability.

You can get more help confirming service interruptions by checking this detailed guide on Xfinity outages in my area for additional outage troubleshooting steps.


2. Check if you paid for the service

  1. At first, sign in to your Xfinity account.
  2. You should see Balance Due on the home screen.
  3. Tap on View bill details & history. 
  4. If you haven’t paid your bill, contact your service provider.

Sometimes you forget about paying for yourservices, which will make your provider cut your internet supply until the problem has been settled.

Use this method to make sure you pay the monthly fee to the provider, otherwise you could be charged extra for not paying in time.

For related issues, you can also check this guide on Comcast email not working.


3. Check the power and connection of your devices

  1. Check if your coax cable is properly connected to your wall outlet and to your desktop.
  2. Make sure that your Ethernet cable is properly connected to both your desktop and your wireless.
  3. See if your power cord is connected to your wall outlet.

Even if your devices are connected, it is always good to unplug and plug them again. Moreover, make sure you apply a bit of pressure when plugging them back in.


Ethernet not working even when the cable is properly connected? Count on us to solve the problem.


4. Restart your Xfinity Gateway

Xfinity Gateway
  1. Start by signing in to your Xfinity account.
  2. Scroll until you see Manage Internet and click on it.
  3. Click on Restart Modem.
  4. Select Start Troubleshooting and wait for your modem to restart.

Sometimes your modem’s information can get messed up, resulting in abnormal behavior. If this is the case, following the steps should fix the problem in no time.


5. Restart your wireless router and modem manually

restart your router manually
  1. Unplug your modem and router from their Internet and power sources.
  2. Leave them unplugged for approximately one or two minutes.
  3. Plug them back in.
  4. Wait for the modem and router to configure themselves.

Similar to the 4th step, sometimes all you need to do is just restart your router. You can do this manually, as presented above.


Internet problems are really common. Most of the time, the issue comes from your provider, or from a faulty or malfunctioning device. This article covered all these potential issues.

If you are a Telus user and face similar issues, check this full guide: Telus internet not working.

Most of them should be easily fixed. However, if the problem persists, use the official Xfinity contact form. And, as always, don’t hesitate to use the comments area to let us know which fix worked for you.

Windows 10 news recap: Intel takes on Apple’s M1 Macs, VLC Media Player teases version 4, and more

Welcome back to our Windows 10 news recap, where we go over the top stories of the past week in the world of Microsoft’s flagship operating system.

Intel reignites the PC vs Mac feud with new “Go PC” ads that take on Apple’s M1 Macs

Intel is going after Apple’s M1 Macs with its new range of “Go PC” ads which highlight the weaknesses of M1-based Mac devices.

VLC Media Player teases version 4.0 and other new projects for its 20th anniversary

VLC Media Player is having its 20th anniversary this month, and to help celebrate, it has teased its upcoming version 4 update, as well as other new projects being worked on. Of version 4, it has been noted that “we modified the interface to be a bit more modern”.

Vlc 4.0

Windows 10 November 2019 Update gets new patch to address WPA3 Wi-Fi connection issues

A new patch has been released for the Windows 10 November 2019 Update that addresses an issue that caused WiFi connection issues when connecting to a WiFi network using WPA3.

That’s it for this week. We’ll be back next week with more Windows 10 news.

Microsoft news recap: Xbox OS update adds social media profiles to Gamer Profile, attempted acquisition of Pinterest, and more

Microsoft news recap is a weekly feature highlighting the top Microsoft news stories of the past week. Sit back, grab some coffee, and enjoy the read!

Microsoft’s surprise funding of climate change denial campaigns in 2020 uncovered

Despite claiming itself as an industry leader in fighting climate change, Microsoft is coming under fire for funding climate change deniers. This comes a week after Microsoft had to change its political donations strategy over controversy of donations to Congresspeople that denied the results of the 2020 presidential election.

Climate Change

Microsoft to open new datacenter in Atlanta, Georgia area

Microsoft has announced plans to open a new datacentre in Atlanta, Georgia, its East US 3 datacentre. It will be situated in Georgia’s Fulton and Douglas counties.

Midtown Hdr Atlanta

New Xbox OS update brings linked social media accounts on Gamer Profiles

Quietly, a new Xbox OS update arrived this week. Whilst a relatively small update, one visible change is that linked social media accounts now show on Gamer Profiles. Replicating what is seen on the Xbox app for PC, where gamers can link their accounts, such as Steam or Discord, and display them on their Xbox profile.

Xbox Profile Linked Account

Microsoft reportedly tried to acquire social media platform Pinterest

A new report claims that Microsoft attempted to acquire image-based social media website Pinterest recently. But the talks are suspected to have ended with no agreement.

Pinterest

That’s it for this week. We will be back next week with more Microsoft news.

File Manager not showing files? Here’s the solution

Worried that the File Manager is not showing files? There are a few causes that might lead to this problem, and in this article, we will take a closer look at what you can do to solve it.

If you can’t find the files in their initial location, it might be due to the fact that they were modified or, worst-case scenario, you deleted them.

One solution to this problem can be recovering those missing files from a backup (this implies that you are already using Windows Backup).

Another method to recover them is by restoring the files to a previous version.

In this article, we will show you what actions you can take and how you can successfully fix this File Manager issue in no time, so keep on reading.

How do I recover a file that cannot be found?

1. Download a third-party software tool

Retrieving deleted files can be a complex operation and you want to avoid crashing your system while performing the required steps.

The best way to ensure that the process will run smoothly is to download a professional software tool like Stellar Data Recovery.

The Stellar Data Recovery tool is a DIY easy to use program with a wide range of abilities. You can use it to recover files from systems that are completely crashed or unbootable or from empty Recycle Bins

You may even get back data from partitions that were lost or deleted, as well as files from RAW hard drives, SSDs, and USB drives

Among other useful features, the Stellar Recovery Tool is able to retrieve files from partially scratched or burnt DVDs or recover deleted email files.

The Stellar software also comes with a SMART Drive Monitoring and Cloning feature that prevents any permanent data loss caused by a drive failure.

⇒ Get Stellar Data Recovery

2. Restore missing files from a backup

  1. Select the Start button and open Control Panel.
  2. Choose System Maintenance, then click Backup and Restore.
  3. Select Restore my files and follow the given steps.

As expected, it’s incredibly simple to restore all missing files from a previous backup. You only need to apply the above procedure in that regard.

Before proceeding, just make sure to check that the drive or the media that you saved your files on is in full function.

3. Restore missing files from a previous version

  1. Click the Start button then select Computer.
  2. Go to the folder where the missing files used to be and right-click it. Select Restore previous versions.
  3. If the folder was located on the top level of a drive, right-click the drive and chose Restore Previous Versions. You will notice a list of previous versions of that particular file or folder, saved on a backup (if you are using Windows Backup) or as restore points.
  4. Select the previous versions of the folder that contains the file you want to restore.
  5. Drag the folder to the location of your choice where it is automatically saved.

If the File Manager is not showing files you can also try to restore them to a previous version.

If you want to do so for a file that is included in a Library, you should restore it from the folder where that file was actually stored. Right-click on the folder and select Restore Previous Versions.

For example, you restore a file that was placed in the My Pictures folder as well as in the Picture Library by right-clicking the My Pictures folder.

You can also search for the missing file by typing part of its name in the Documents library, in case you don’t remember the exact name of that file.

We hope that our article gave you the info you needed to solve the File Manager files issue. Just let us know in the comments which solution suited you best.

16% of VPNs leak your IP address. It’s time to take action

Privacy is a big issue in today’s world. Every time you connect to the Internet, a plethora of trackers activate and watch your every move.

Many users installed various software solutions that block third-parties and prying eyes from following their online activities. VPN tools are probably the most popular privacy solution but did you know that 16% of VPNs are actually leaking your IP address?

Some VPNs fail to protect your privacy

Security researcher Paolo Stagno recently analyzed a hundred VPN providers and found that quite a significant percentage of them fail to mask your location.

16% of the tested VPNs and Proxies services disclosed the real IP address of the visitors making the users traceable.

Stagno also revealed the list of the VPN tools that fail to protect user privacy, which includes:

  • BolehVPN (USA Only)
  • ChillGlobal (Chrome and Firefox Plugin)
  • Glype (Depends on the configuration)
  • hide-me.org
  • Hola!VPN
  • Hola!VPN Chrome Extension
  • HTTP PROXY navigation in browser that support Web RTC
  • IBVPN Browser Addon
  • PHP Proxy
  • phx.piratebayproxy.co
  • psiphon3 (not leaking if using L2TP/IP)
  • SOCKS Proxy on browsers with Web RTC enabled
  • SumRando Web Proxy
  • Windscribe Addons

If your VPN is not on this list but you feel it might somehow leak your IP address, go to this page and check if the tool detects your IP and hostname. If this is the case, install better VPN software.

In case you want to be secure while surfing the internet, you will need to get a full-dedicated tool to secure your network.

Install Private Internet Access

Private Internet Access
Finding the right tool that fits your needs is not an easy task, especially when the very software that was supposed to protect your privacy, gives you away, and leaks your personal data.

A world-leading, trusted VPN provider such as PIA can deliver what it promises and that is extreme privacy, and zero records of your online activity.

Through high powered IP cloaking, your IP address is effectively masked on your entire network and up to 10 devices simultaneously. Tracking devices are thus stopped right on their track.

By hiding your IP address and proactively protecting your identity from being exposed or compromised, PIA helps to keep all unwanted access at bay including hackers, malicious software or people, phishing attacks, and more.

It does this by coupling its IP cloaking function with a huge network of globally spread secure gateway tunnels through which your data is routed, best-in-class encryption, integrated firewalls, and malware blockers.

Fully packed with a DNS Leak Test, IPv6 Leak Test, and Email Leak Test, this trusted VPN solution has nothing to hide or to share. Literally.

Due to its strict no-logs policy, you can browse, download content, stream, enjoy gaming, and any other online activity you might think of without worrying about data leaks or your activity being monitored or tracked.

Since there are no records stored, there is nothing to share, not with your ISP, not with the government, not with anyone.

Let’s quickly look at its key features:

  • Secure VPN Account
  • Encrypted WiFi
  • P2P and Streaming support
  • Supports WireGuard, PPTP, OpenVPN, L2TP/IPSec, and SOCKS5 Proxy included
  • Protects up to 10 devices simultaneously
  • Block ads, trackers, and malware
  • Multiple VPN gateways (3292 servers spread across 46 countries)
  • Unlimited Bandwidth
  • No traffic logs
  • Instant setup and easy to use interface

Private Internet Access

Private Internet Access

No data leaks, no logs, no compromise. Surf the web and experience true privacy with PIA VPN!
$2.69/mo. Buy it now

If you want to keep your private information private, then you should really use the best security software available on the market, such as Private Internet Access.

To enhance your protection, you can also use DuckDuckGo as your search engine and download the Tor browser.

What’s your weapon of choice to keep snoopers at bay? Reach out for the comment section below and share your experience with us.

Google Account Deleted? Here’s How to Recover Your Docs

Google is a part of your daily routine when surfing the Internet. You use its services and applications for different purposes, like searching for information or emailing documents.

You can access many applications like Google Drive and Google Docs by creating a Google account.

These two apps allow you to save personal documents to the Cloud to access and manage them across all your devices.

Moreover, you can share them with others, making collaboration more engaging and accessible.

Google also offers these services to companies as an integrated platform called Google Workspace. Here, employees can share and work on documents by editing them simultaneously.

That’s why recovering your docs if your account was deleted is mandatory. Do not hesitate to apply the steps below if you see the error: This account was deleted and is no longer recoverable.

How can I recover docs if my account was deleted?

1. Restore your personal Google account

  1. Go to the official Google Account Recovery page.
  2. In the box, type your email address and click Next.Google-account-recovery
  3.  Click the Next button.recover google account
  4. Type the last password you remember for your account and click the Next button.google password
  5. If you forgot your password or recovery address, click Try another way for other options, like security questions.
    try another option google recovery
  6. Once you get your password, you’ll have access to all your documents.

The only way to recover any data is to restore your Google account. Once restored, you can unarchive emails important to you and get on with your business. However, there are times when solving the problem isn’t possible.

If the message you’re getting is this one: Couldn’t find your Google Account. Try again, and if you are sure the address is correctly spelled, you can’t get it back. 

2. Restore your company Google account

  1. Sign in with the Super Administrator account.
  2. From the home page, go to Users.
  3. Above the Users’ list, click on Add filter and choose Recently deleted.
  4. Go to the user you want to recover and click Recover.
  5. Click on Continue after reviewing the confirmation note.
  6. Assign the user to an organizational unit and click on Recover.

The process can take about 24 hours. You can’t restore the account if the username has been assigned to someone else, it is used as a group email address, or you don’t have a user license.

Never forget to check the files you have uploaded to your Google account before deciding to delete it. There is a short amount of time after deletion when you can restore it and recover your lost data.

After a few weeks, all documents connected to your account are permanently deleted from Google’s servers, and there is nothing to recover anymore.

If you administrate the Google accounts for your company, consider checking the user’s documents before deleting it.

After 20 days, the account is permanently deleted, and not even Google Workspace Support can’t help out.

Have you completed the above procedures as well? Let us know if you’ve successfully recovered your docs by using the comments area below.

How to Hide Your IP Address in Windows 7 (3 Tested Methods]

Even though Windows 10 is slowly moving to the top, Windows 7 is still the most used Microsoft-produced OS.

And, due to a lack of proper support for Windows 7, tech folks are more Windows 10-oriented regarding privacy and security.

We’re not keen to overlook that, especially with the current state of internet privacy threatened like never before.

The first step to protect your privacy is to hide your IP address. That’s your trace on the World Wide Web, and you don’t want to leave it to data-thirsty ISPs or advertisement companies.

Hiding your IP address has many more benefits than mere privacy, and today, we will try to explain why it’s important to stay anonymous and how to do it in Windows 7.

Make sure to check the story below and choose one of the presented tools to stay in the clear.

But first, let us explain why exactly it is paramount to hide your IP address and why many users neglect the importance of privacy that’s condemned in the current state of the World Wide Web.

What’s your IP address? Think of it as the digital version of your home address. It’s an essential part of networking and communication, unique for every user. It’s your personal internet ID.

And, just like your ID card, your IP address contains sensitive data, like your exact location or network details that can be used for tracking by the site you visit or some third-party snoops, like government or hackers.

That also enables various advertisers to track you and create your profile. With all your interests and browsing preferences included. Moreover, the constant switching of your IP address also denies access to anyone trying to access your PC remotely.

Another valid reason for you to hide your IP address is geo-targeting imposed by specific providers and sites. The site reads your IP address and won’t let you in due to a location blockade.

Also, it’s a valid way to avoid censorship by certain governments. That should be it regarding the Why? factors. Now, let’s move to How? and try to answer how to hide your IP address in Windows 7.

How can I hide my IP address in Windows 7?

1. Use a VPN

The popularity of VPN (Virtual Private Network) solutions has reached the sky lately, especially after various whistleblower leaks informed the vast internet society of privacy infringements.

VPNs let you choose the preferred server with various geo-locations, enabling you to stay anonymous online.

Beyond that, many VPN services offer additional privacy-related tools (e.g., military-grade encryption) and can be used on various devices, both PCs and smartphones.

We gave our 2 cents on the paid vs free VPN solutions, if you are looking to get premium protection, you should consider investing in a premium tool.

Our VPN of choice is Private Internet Access, a world-class VPN that brings all those professional privacy and security-oriented features to the table without you having to break the bank to acquire a subscription. It’s actually very affordable.

Private Internet Access

Get the latest privacy features with Private Internet Access VPN service.

2. Try Proxies

While VPNs cover everything, proxies are more browser-related services. The simplest way to explain how a proxy works is to imagine it as a mediator between you and the website you want to access.

hide ip address windows 7

It changes your private IP address with a random public IP, obscuring your ID in the process. There are also various proxy solutions, both online and offline, with both proxy and reverse proxy traits.
For the IP-hiding reasons, we’ll need to look for Anonymous proxy servers and use them to hide the IP address.

Two main things you’ll need to focus on when searching a reliable proxy solution for your Windows 7 are speed (some of those slow down connections substantially) and reputation.

Performance-wise, the paid proxy solutions are also much better than the free ones, but it all depends on how often you use a proxy.

There are so many more similar solutions online and many of those offer better service for a monthly fee. Make sure to check all the related information before you decide to pay for a proxy server.

You can change your address without third-party tools. Learn how to change your IP address in Windows 7 to refresh your connection and minimize tracking risks.

3. Tor Browser

All major third-party browsers will, at some point, let you know that they care about your privacy and that it’s completely safe to use them.

No tracking, no privacy intrusion, no selling your browsing history to a higher bidder.

hide ip address windows 7

For example, Firefox Quantum uses privacy protection as its go-to card.
However, that’s not completely true. Especially if we compare any given browser out there with the Tor browser. Tor is an embodiment of safe browsing for ages, and it’s still the best way to access the Dark Web if that’s your cup of tea.

The Onion Router (TOR) got its name thanks to multi-layered encryption which it uses to grant users complete anonymity. On the other hand, Tor is best when combined with a VPN, as it doesn’t check all the boxes on its own.

Also, some sites use Anti-Tor blockers, so you won’t be able to access them using the Tor browser.

You can download the Tor browser for Windows here, free of charge. We’re certain you’ll get to know its positive sides within minutes.

That should do it. We hope this article shed some light on ways how to hide your IP in Windows 7.

You can also try using the extensions for the VPN services if you want to stay anonymous just while browsing the internet.

For additional inquiries or alternative ways to make your IP address invisible to third-party sites, reach out to the comments section. It’s just below.

How to backup your Microsoft SharePoint online

Microsoft SharePoint is the number one data-sharing tool used by countless worldwide organizations. It promotes teamwork through dynamic and productive team sites.

With SharePoint, you can share data, news, resources, and files between co-workers. For instance, you can collaborate with members of your organization across platforms such as PC, mobile devices, and Mac.

As a result, not only does SharePoint make data transfers easier but it also helps the users find information faster, thus increasing efficiency.

Unfortunately, not everything goes according to plan. Sometimes data gets corrupted, lost, or deleted by accident.

To prevent such a thing from happening in the first place, rest assured that there are ways that allow you to backup your online files and data on SharePoint.

How can I backup my Microsoft SharePoint online?

1. Give a try to a reliable third-party program

The native backing options that SharePoint offers are not the most efficient, nor the simplest ways of ensuring your data is safe.

For this reason, we recommend you try reliable Windows backup software that will save you plenty of time and hassle.

Such tools are created to make the user’s job easier and also create safe and secure backups, preventing loss of data.

Backup software are generally versatile and let you save your data to multiple platforms, such as a cloud, NAs, disks, SAN, or tapes.

They also use powerful encryption so no one will be able to open the backup and see your data without your permission.

2. Use the built-in recovery option

Versioning

  1. Navigate to Library/List settings.
  2. Modify the number of versions to the one you’d like.

Compliance Retention

  1. Go to Microsoft 365 Compliance.
  2. Navigate to Policies, then to Retention.
  3. Create a new policy and apply it to the SharePoint you want.

Alongside setting up retention policies, you may also want to learn how to move files in SharePoint so your libraries remain organized and easier to protect.

After you’ve successfully applied the new policy, it may take a while for it to take effect. When it’s done, all the files added to the specific SharePoint sites will be retained by the policy.

How many days SharePoint online sites are backed up? Assuming that’s your question too, let us tell you that versioning only supports native Office 365 formats, and data is only stored for no more than 93 days.

Also, let us tell you from the start that the search and export operations are lengthy, sometimes taking hours or even days to process.

These are the main solutions for backing your data on SharePoint. Using both methods should ensure that your files are safe, thus making work easier for both you and your colleagues.

We hope this guide helped you. Do not hesitate to tell us your opinion in the comments below.

How to hide your IP address when abroad

Protecting your privacy and anonymity is important both at home and while you’re globetrotting your way around the world. The best way to be 100% sure that you’re a ghost on the grid is to hide your IP address.

The risk of potential attacks, phishing, ransomware, or simple geo-restrictions is much higher in some countries and you’ll need to react accordingly.

That’s why we prepared an in-depth explanation and the reasoning behind why you should be hiding your IP address while traveling abroad. In addition, we enlisted a few fastest ways to protect your identity, and do so with as little effort/spending as possible. Make sure to check it out.

How can I keep my IP address hidden while traveling abroad?

1. About the IP address

Firstly, let’s explain what exactly is your IP address and why you’ll probably want to hide it while abroad. The IP address is a digital signature for every device trying to access the network.

It’s granted by your ISP (Internet Service Provider) and, to put it simply, it’s somewhat analog to your home address or unique ID number. You can have a dozen devices connected to one network, and still, every single one of them will have a different IP address.

Unable to Change Static IP Address and DNS Server in Windows 10? Check out this guide.

What’s the use of an IP address? Well, Internet Protocol addresses are the essential link between your system and various interconnected networks (also known as the Internet).

It’s used to send requests and receive wanted results. Every time you open a website, that’s really your IP address that’s communicating with the dedicated servers on the network.

However, by doing so, the IP address can present your sensitive data to the other side — third-party sites, advertisers, hackers, or government spooks. It can pinpoint your exact location with precision or create a digital trace some might use to track you on the interwebz.

Now, knowing this, there are multiple reasons why you’ll probably want to hide (or rather switch or fake) your IP address while abroad:

  • Privacy. Some countries’ laws on internet privacy allow various third-parties to track your internet activity. Google Fourteen eyes countries for better insight.
  • Safety. Hiding your IP address will make things much harder for cybercriminals.
  • Avoiding geo-location boundaries. Some content is restricted to various countries, and also there’s China and the Great Firewall of China.
  • Torrenting. We won’t endorse piracy in no manner, but it’s still your right to stay anonymous if you decide to do so.
  • Public networks. Also, if you’re using a public network (which is common while traveling and rather dangerous, for that matter), changing your IP address after some time will help you stay safe.

Those were the points. Now, here’s how to hide your IP address.

2. Use VPN

VPN is, for all intents and purposes, the best-suited tool for this job. Virtual Private Networks arise in market shares lately with all the fuss concerning the privacy controversies that marked the past years.

Why are VPNs the best for the job? Well, premium VPN solutions are much faster and more reliable than proxies or Tor browser. Furthermore, they offer a large variety of available servers spread around the world so you can choose a country or sometimes even the city with their distinctive IP addresses.hide ip address when abroad
That way, you can mask your current location. Now, there’s a distinctive difference between paid and free-to-use solutions in regards to speed and features, but your choice will heavily depend on your needs.

When abroad, you can use a VPN to access limited or inaccessible content. Moreover, you’ll avoid the marketers and prevent tracking.

As we already stated, some countries have strict policies on foreign sites. If you’re, say, spending some quality time in China — Facebook, YouTube, or Google– is a no-no.

There are many available solutions, both premium and free of charge, but our pick is PIA.

⇒ Install Private Internet Access

Private Internet Access
In a nutshell, PIA is all about unlimited bandwidth, super-fast download speeds, no online censorship, extreme privacy, best-in-class encryption, an impressive network of servers with global coverage, and genuine simplicity.

The powerful IP cloaking function that PIA comes packed with is designed to anonymize browsing and keep your identity and location hidden.

Speaking about hiding or better said changing IP addresses, this is a feature that comes very handy when traveling abroad because it also allows you to bypass restrictions of all kinds (including ISP throttling, national infringements, geo-targeting, and so on) so that you can unblock all those websites that would be otherwise off-limits in particular countries or regions.

With PIA, there is no such thing as online censorship, data tracking, or revealing your personal data.

You can try it out for 30 days completely free of any risk thanks to its money-back guarantee, and see for yourself.

Private Internet Access

Private Internet Access

Business or pleasure, the purpose of your voyage is a private matter. Trust PIA VPN with your privacy while traveling abroad.
$2.69/mo. Buy it now

3. Use Proxy

Now, a proxy is another way to hide your IP address and it works in a similar manner as a VPN does. However, Proxy is mostly run through the dedicated browser of choice, while VPN can cover one or multiple devices.

Proxy servers are there to mediate between you and the designated website, using an alternative IP address in the process. That way, the end result is that only the proxy server (hopefully, trustworthy one) will have knowledge of your real personal IP address.hide ip address when abroad
There’s a large variety of proxy servers and services out there, but for the sake of hiding our IP address, we’ll be looking for anonymous proxies. A lot of add-ons for browsers that are presented as VPNs are actually proxies you can use to switch your IP address to the one enlisted.

Most of them offer rather lackluster features and speeds for free, but with a monthly subscription, you’ll have a much better time.

We still prefer a VPN over Proxy, but if you’re bound to use it for the fairly limited amount of time — they’ll serve you justice.

4. Tor browser

Finally, another free solution that can’t be overlooked is the Tor browser. An open-source project specially designed to ensure maximum privacy and top-notch encryption.

It got its name (The Onion Router) due to onion-like multi-layered encryption and it surely upholds the standards in this dark ages of internet privacy and safety.hide ip address windows 7
Albeit, even though it’s the safest browser out there, it will affect your bandwidth speeds. Especially when compared with the rest mainstream browsers that aren’t all that privacy-friendly.

Obviously, you can use it abroad and access any geo-restricted site, including the infamous Deep web. Furthermore, it should provide you with a new IP address every time you start it, making you the ghost of the interwebz.

You can download Tor for Windows here.

When combined with a good VPN service, Tor basically offers military-grade protection against the prying eyes.


With that, we can conclude this article. We hope it gave you valuable insight on the importance of anonymity — while home or traveling abroad — and ways how to hide your IP address.

Don’t forget to share your experience or post questions in the comments section below.

How to hide IP address on Local Area Network

There’s a thin line between a technological paranoia of online surveillance and the real reasons you need to worry about your privacy while roaming online.

Things have changed, and not for the good in the privacy department, so we, users, need to take matters into our own hands and protect ourselves. Hiding your IP address on both LAN or Wi-Fi, trusted or public networks is the first step on the long road of online anonymity.

We already covered a lot of privacy-sensitive subjects, and today is the day reserved for LAN. Local Area Network or LAN is usually the safest, fastest way to access the internet.

However, there are still valid reasons why one would want to hide their IP address while surfing online, or creating, accessing, and downloading content.

We made sure to explain everything while focusing on the best ways to hide your IP address. Make sure to check out those in the continuation of the article.

Why should you hide your IP address on LAN?

In comparison to, let’s say public Wi-Fi networks, Local Area Network (wired internet connection) is much safer, faster, and more reliable. Nonetheless, don’t let that undermine the fact that hiding IP is still something you should seriously take into consideration.

You’re indeed less exposed to hackers, but there are still more than enough arguments to hide your IP address while using the trusted home network.

Here are the most common reasons why one would want to hide IP address even with the modestly-secure Local Area Network:

  • Anonymity. Your browsing history, habits, patterns, and interests should be private. Don’t let third-party sites, marketers, and government spy on you.
  • Safety. Hackers and cybercriminals can take advantage of your IP address.
  • Avoiding geo-location boundaries. A lot of online content is under geo-restrictions. Since the IP address is the only way to determine visitors’ geo-location, you can visit any site with the hidden/masked IP address.
  • Torrents and other not-exactly-legal activities. No one in their right mind will promote piracy, but if peer-2-peer multimedia downloading is your cup of tea, hiding your IP address is something you should take seriously.

Ten years ago this IP address tweaks didn’t have too much importance but in the current meta-state of the World Wide Web, things work in a different manner.

Censorship, hand-loose ISPs with access to your browsing history that’s later sold to the highest bidder, government privacy infringements, content elitism, etc. It seems that the only way to fight it is to turn to one of the steps we provided below.

How can I hide my IP address while using Local Area Network?

1. Use VPN tools

Most certainly the easiest or, at least, the most reliable and user-friendly way to stay anonymous online is using VPNs (Virtual Private Networks).

hide ip address local area network

Imagine a VPN as a mediator between you and the internet. Once active, VPN will let you change your native IP address with one of the many others available around the world.

Therefore, they mask your IP address and replace it with an alternative of your choice. Besides that, some of the VPN solutions offer encryption and extra features, but we reckon that the main differences rest between free and premium options.

Speed differences and server availability are the key differences between paid and free-of-charge solutions. For those who want real online privacy, VPNs are certainly worthwhile.

VPN clients offer easy-to-use, intuitive apps. You don’t have to be in the know to configure and use one. One of the best VPNs out there that offer high-quality servers and a simple setup is ExpressVPN.

Putting your privacy first, ExpressVPN comes packed with numerous features designed to anonymize your browsing and keep your traffic secure and encrypted as well as your data monitoring-free.

One of its most convenient features for this job is the IP cloaking function that hides your location and replaces it with an IP from its impressive network of worldwide placed gateways.

Make sure you enable the kill switch that prevents your IP from being exposed in case of the connection drops down and also pay attention to the records policy.

ExpressVPN

Mask your IP address and encrypt all your traffic data for truly private and secure LAN connections.
Free trial Visit website

2. Use Proxy services

Now proxy servers are basically browser-focused solutions. With that out of the picture, they’re fairly similar to VPN solutions. Of course, bandwidth speeds and levels of encryption are of lesser value on proxies.

hide ip address local area network

In addition, they are often countered with reverse proxies that stop the mirroring effect proxy server does in order to mimic your own IP’s activity. Which means that some sites will still remain geo-restricted. Check out the best privacy protection software for Windows 10.

Nonetheless, even if they’re not as good as VPNs, they can certainly come in handy for simple operations like avoiding geo-restrictions and retaining acceptable levels of privacy.

So, you can indeed use a proxy to hide your IP address while using LAN, but don’t expect miracles. It depends on your needs. Furthermore, some users are quite satisfied with browser extensions that are often marketed as VPN solutions.

They’re just proxy solutions (for obvious reasons), but some of those are a valid choice for undemanding users. If you’re more site-oriented, here’s the list of proxies that will temporarily hide your IP:

3. Try out Tor Browser

We can’t possibly make a list of ways how to hide your IP and avoid mentioning Tor Browser. In the era when every browser developer advertises as pro-privacy, there’s one browser that’s above and beyond the mainstream competition.

hide ip address local area network

And that’s Tor (The Onion Router) browser that offers multi-layered encryption and it’s completely free and open-source.
Check out this complete guide on how to download and use Tor Browser on Windows 10.

You can use it as your daily driver or run Tor only when you need that extra privacy and safety. It employs the DuckDuckGo search engine, albeit it slows the bandwidth speed a bit.

In addition, you can use the Tor browser to access the Deep Web, which seems to be the thing for some users. Another thing in favor of Tor is, obviously, a preferential selection of security.

hide ip address local area network

You can let it only hide your IP and work like any other browser or use its full protective potential and utilize military-grade security.
Either way, the best results will come by combining VPN and Tor, making you the ghost on the grid. You can download Tor for free by following this link.

4. Reset IP with the Command Prompt

Finally, the last way we decided to enlist doesn’t have too many similarities with the ones we presented above. Namely, it includes Command Prompt and resetting of your current IP address.

However, this solution is only there if you want to change your IP address once if your IP got banned or blocked. Should your PC not acquire IP address, here’s how to solve the issue.
It’s not a permanent privacy solution, not by a long stretch, but since it’s practically a way to hide your IP, we decided to put it with the rest. Of course, you’ll need to have a wired connection in order to perform it.

Here’s how to reset your IP address with the little help of Command Prompt:

  1. Connect your PC to a router or modem via a LAN cable.
  2. In the Windows Search bar, type cmd.
  3. Right-click on Command Prompt and run it as an administrator.
  4. In the command line, type the following commands and press Enter after each:
    • ipconfig /release
    • ipconfig /renewhide ip address local area network
  5. Restart your modem and PC and check for changes on ShowIp.net

This workaround also depends on your ISP’s policy, so some users won’t be able to repeat it too often.

With that, we can conclude this article. We hope that this was an insightful and informative read.

In case you have an alternative way to hide your IP while using LAN, or questions regarding the ones we already noted above, there’s the comments section below.

BBC iPlayer detecting/blocking VPN [How to fix]

VPNs are commonly used for security as they provide the privacy most people seek online through encrypted tunnels across the open internet architecture.

For people who travel a lot and for long periods of time, VPNs come in handy to keep data secure while being able to access geo-restricted content whenever they want to watch their favorite shows on streaming media such as Netflix, Hulu, BBC iPlayer, or Amazon Prime, among others.

The primary reason for using a VPN, however, is to bypass internet censorship and country-level filtering, where there are severe censorship regulations. VPNs do this by hiding your current location and IP address such that the website you visit only sees that of your VPN and not your real one.

If you’re a BBC fan and you’d like to access the content from a different location other than the UK, sometimes you’ll find your VPN blocked by BBC, and there are reasons why this happens.

One reason is that BBC blocks VPN connections from accessing the iPlayer application. However, it is hard to completely block out VPN access, which can involve manual intervention because a strong, well-configured VPN can go undetected.

In fact, some reports have said that about 60 million people outside the UK can access BBC’s iPlayer via VPN connections or other unblocking tools, which is a more significant population than those living in the UK.

This is probably why the BBC is actively stopping unauthorized users from accessing the content.

To resolve the VPN blocked by BBC issue, try the solutions below.

Has BBC blocked VPN? Here’s how to unblock it

1. Preliminary checks

  • Sometimes, the VPN blocked by BBC issue happens because your VPN account may have expired, so you’re unable to connect. Confirm if your account is still valid or has expired.
  • Check third-party app settings like your security software settings, which sometimes block the PPTP and L2TP protocols, especially when you set them higher than the normal level. Disable them and try connecting again, then allow PPTP, L2TP, and IPSec through your antivirus and firewall and reenable the security software.
  • Check your router settings if you’re connected to a WiFi router.
  • Check for PPTP, L2TP, and IPSec pass-through options under the Router Firewall/Security tab and enable them. If these options don’t exist, disable the router firewall and try again, then reenable the firewall.
  • Check that you entered the correct user credentials – username and password for logins.
  • If you get an error message saying: You seem to be using an unblocker or proxy or You’ll need to disable your anonymizer, contact your VPN tech support team for help.
  • Check your IP address for information, such as your city or region (country) next to your selected location. If it shows a location near you, you’re not connected to a server location associated with your VPN, so try connecting again.
  • Check your internet connection by first disconnecting from your VPN and trying to access websites normally. If you cannot access it even when disconnected from the VPN, check your internet connection.
  • Try connecting to a different UK VPN server.
  • Try switching the web browser you’re using.
  • Contact your VPN’s support team and see if they can help you bypass the VPN block.

2. Change your VPN

Private Internet Access


For guaranteed access, go for a VPN that is optimized for streaming, such as Private Internet Access.

When it comes to fighting online censorship, PIA is unmatched. According to its statement, this world-leading VPN provider has made it its mission to liberate the internet for you, as it was always intended.

With unlimited bandwidth and the highest download speeds, PIA is your best bet to unblock BBC content and enjoy all your favorite shows, buffering-free and without worrying about ISP throttling.

In addition, all the servers composing PIA‘s impressive network of worldwide gateways are streaming and P2P sharing compatible, which takes out the question of having to blindly search for a server location that the BBC does not block.

Activate your VPN, choose the server closest to you to rule out proximity-related issues, and enjoy a smooth, reliable, and stable connection for as long as you want.

Private Internet Access

Get Private Internet Access and solve this BBC iPlayer issue in no time.
Free Trial Visit Website

3. Download the latest version of your VPN

Uninstall the VPN app you’re running, sign in to your VPN account, and set up the VPN. Find the latest version for your device and reconnect, then see if you can access BBC.

To set up the VPN in Windows 10, do the following:

  • Right-click Start and select Apps and Features
VPN blocked by BBC
  • Find your VPN from the list and select Uninstall
  • Click Uninstall, then click Close to exit
  • Connect again to your VPN and see if you can access BBC

4. Get a dedicated IP address

This may cost you a bit more, but go for one if you want uninterrupted streaming. A dedicated IP address is more complicated to blacklist because the shared ones are already on BBC’s radar.

But with a dedicated IP, you won’t be sharing with many other people, just a few selected users, which makes you look like a regular household compared to a big company.

5. Download the latest version of your VPN

Uninstall the VPN you’re running, then sign in to your VPN account and run the setup again. Find the latest version for your device and reconnect.

6. Flush the DNS

Flushing your DNS cache allows your computer to automatically access your VPN’s DNS for the proper/correct entries. To do this:

  • Click Start
  • Select All Apps
  • Click Accessories
  • Right-click Start and select Command Prompt (Admin)
VPN blocked by BBC
  • Type ipconfig /flushdns and press Enter. A confirmation that says: Windows IP Configuration Successfully flushed the DNS Resolver Cache will be displayed

7. Manually configure DNS settings

Configure your computer with your VPN’s DNS servers’ IP addresses so that it automatically connects to your VPN’s DNS servers. Manually configuring your computer with other DNS server addresses helps you access BBC and enjoy faster connection speeds. To do this:

  • Open Network Connections settings by right-clicking Start and select Run
VPN blocked by BBC
  • Type ncpa.cpl and click OK
  • In the Network connections window, find your usual connection, either LAN or Wireless network connection.
  • Right-click the connection and select Properties
  • Set the DNS server addresses by double-clicking Internet Protocol Version 4 (IPv4) or just Internet Protocol
  • Select Use the following DNS server addresses
  • Type these Google DNS server addresses: Preferred DNS server 8.8.8.8; Alternate DNS server 8.8.4.4
  • If Google DNS is blocked, try the following: Neustar DNS Advantage (156.154.70.1 and 156.154.71.1) enter and press OK; Level3 DNS (4.2.2.1 and 4.2.2.2) enter and press OK
  • Once configured, flush old DNS entries again, as described in the previous solution.

8. Manually configure proxy settings

A proxy server hides your real location so you can access websites such as BBC. Ensure your browser is set to auto-detect proxy or no proxy, then use the instructions to configure proxy settings for your browser manually. To do this:

  • Click Tools
VPN blocked by BBC
  • Select Internet Options
VPN blocked by BBC
  • Go to the Connections tab
  • Click LAN settings
  • Uncheck all the options except Automatically detect settings and click OK for all

You can apply the same fixes when encountering the BBC iPlayer error code 02050 or error code 02062.

Let us know if these solutions helped fix the VPN blocked by BBC error by leaving a comment in the section below.

Windows 10 Insider build 21313 expands news and interests in the Taskbar to more markets

This is a bit unexpected, but Microsoft has just released a new Windows 10 preview build for Insiders in the Dev channel. If you’ve been unable to try news and interests in the taskbar until now, the build 21313 expands the experience to more markets and languages, with China being left out.

“News and interests will automatically detect your language and location, and deliver a localized experience consisting of content from local publishers and data providers,” the Windows Insider team explained today. Unfortunately, this is still a gradual rollout, and not all Dev Channel Insiders will see news and interests in the taskbar after installing this build.

News and interests on the Windows taskbar as seen from a Windows Insider’s PC in Japan.

Today’s build also replaces the legacy Microsoft Edge with the new Chromium-based Edge. The legacy Edge will be removed from all Windows 10 versions in April, so Dev Channel Insiders will be the first Windows users to say goodbye to the original version of Edge that shipped with Windows 10 back in 2015.

The build 21313 also introduces a redesigned IME candidate window, which is the pop up window that allows Windows users to insert characters from other languages. The updated design brings dark theme support, optimized performance, and quick access to emoji.

The new UI design will be available for a total of 17 languages including Japanese, Chinese (Simplified and Traditional), Korean, Hindi, and Tamil, though only a subset of Dev Channel Insiders will see the redesigned IME candidate window after installing the build 21313.

New Japanese IME candidate window design, in light and dark mode. Design now follows Fluent Design principles.

Today’s flight also brings other minor changes, bug fixes, and known issues, and you can check out the full list below:

Changes and Improvements

  • Based on feedback, and to align with the fact that Dev Channel builds are not matched to a specific Windows 10 release, we have updated the displayed version name to now be Dev.
  • We heard feedback that it wasn’t clear how to turn off news and interests if this was your preference. To help address this, we changed the “Hidden” option in the taskbar context menu to now say “Turn off” to make this functionality clearer.
  • Based on feedback, we’ve made some small adjustments to the new app launch animation to improve speed and make it a little smoother.
  • The improvement to the candidate bar on the touch keyboard announced last week where it displays 5 candidates maximum and centers them into position above the keyboard has begun rolling out.
  • The new voice typing experience that was announced back in September has begun rolling out to all Insiders in the Dev Channel. Press the Windows key plus H if you’d like to try it out in one of the supported languages.
  • The change to enable pinning items in our updated clipboard history design (inside the emoji picker) is now rolling out to all Insiders in the Dev Channel.
  • We’ve made a few more updates to our emoji search teams based on feedback, including that programming will now return the 3 technologist emojis and RIP will now return the tombstone emoji. We’ve also updated the search in Russian so that emoji with the letter ё in their keywords can now also be found by using the letter e. Please keep the feedback coming!
  • We are removing the capability to copy and paste a screen snip directly into a folder in File Explorer for now due to an issue discovered thanks to the feedback from Windows Insiders. We hope to re-enable this capability in a future update after we address this issue. (This change was also released to Windows Insiders in the Beta Channel as part of the recent Windows Feature Experience Pack update.)
  • As part of our continued iconography work, this build introduces a new design for our Narrator icon.

The essence of the icon is the same (a computer with a speech bubble), but now the speech bubble is brightly colored rather than just white lines on a blue background.

Fixes

  • We fixed an issue resulting in some Insiders experiencing an IRQL_NOT_LESS_OR_EQUAL bugcheck when attempting to upgrade to a newer build.
  • We fixed an issue resulting in Miracast users experiencing very low frame rates.
  • [News and interests] We fixed an issue where the taskbar button would highlight on hover and click was larger than the content being shown on the taskbar.
  • [News and interests] We fixed an issue where the text on the taskbar button could look pixelated on high resolution screens.
  • [News and interests] We fixed an issue where the flyout would show content in a single column before quickly switching to double column.
  • [News and interests] We fixed an issue where in certain situations, the flyout might not dismiss until the taskbar button was clicked or the hover effect might have appeared stuck.
  • [News and interests] We fixed multiple issues impacting performance and reliability.
  • [News and interests] We fixed an issue where the taskbar might show stale weather information immediately after signing into your Windows session.
  • [News and interests] We fixed an issue where the flyout would show an error/offline message when the device was connected to the internet.
  • [News and interests] We fixed an issue where if you attempted to share content, it would dismiss the flyout.
  • [News and interests] We fixed an issue where resizing your taskbar would cause size and alignment issues for the button.
  • [News and interests] We fixed an issue where the flyout would not close when the user pressed the Esc button.
  • [News and interests] We fixed an issue where a taskbar set to auto hide would not be shown until the news and interests flyout had opened.
  • We fixed an issue where clicking restart in the notification prompt after enabling or disabling core isolation would not actually result in your PC restarting.
  • We fixed a race condition that could result in notifications unexpectedly not appearing sometimes.
  • We fixed an issue impacting ALT + Tab reliability in the previous flight.
  • We fixed an issue resulting in acrylic disappearing on secondary monitors when the UI with the acrylic was spanned across multiple monitors.
  • We fixed an issue that could result in the taskbar becoming invisible after minimizing certain apps.
  • We fixed an issue that could result in an unexpected black area appearing at the bottom of Outlook sometimes.
  • We fixed an issue where the /remoteguard option for Remote Desktop Connection wasn’t working.
  • We fixed an issue where changing VPN profile authentication method to certificate in the VPN settings would not actually change it.
  • We fixed a handle leak in MsSense.exe, resulting in unexpected system resource usage over time.
  • We fixed an issue where if you tried to schedule a restart (for Windows Update) it might erroneously tell you “That time is in the past” even though it wasn’t.
  • We fixed an issue where a couple files might remain after cleaning up the Windows.old folder.
  • We fixed an issue where the mouse was not working on the dual boot menu.
  • We fixed an issue impacting Settings app reliability, which could also make the Settings app hang when opening Settings > Ease of Access > Narrator.
  • We fixed an issue resulting in some Insiders not seeing the search box appear in the Set Defaults by App, Set Defaults by Protocol, and Set Defaults by File Type Settings pages.
  • We fixed an issue that could result in some apps failing to launch after using the option in Settings to reset them.
  • We fixed an issue where if you searched for Meet Now, it wasn’t returning the settings for turning system icons on and off.
  • We fixed in issue from recent flights that could result in some unexpected flickering after launching the Xbox Game Bar while playing certain games.
  • We fixed an issue that could result in ctfmon.exe unexpectedly crashing while typing in certain applications.
  • We fixed an issue that could result in the text flickering in some apps while inserting text with the handwriting panel.
  • We fixed an issue where the IME candidate window, IME toolbar, touch keyboard, voice typing, emoji panel, and clipboard history might not launch well on East Asian language systems. Thank you to the Insiders who gave us detailed information and trace logging etc. to help our investigation!
  • We fixed an issue with the Japanese IME where pressing Caps Lock (Eisu) key wouldn’t switch modes according to what you’d previously used for Alphanumeric conversion, so it wouldn’t go to Full-Width Alphanumeric input mode if that’s what you preferred.
  • We fixed an issue where if you use ALT + Shift to switch the active input method, the Japanese IME wasn’t working.
  • We fixed an issue with the touch keyboard where when using the Bopomofo IME, the candidate window wouldn’t be shown if you started typing right after switching between English and Chinese modes.
  • We fixed an issue resulting in the touch keyboard hanging and crashing when typing with the Japanese IME.
  • We fixed an issue that could result in the screen unexpectedly going black while typing with the touch keyboard.
  • We fixed an issue where Narrator was reading each key in the touch keyboard twice.
  • We fixed an issue where selecting GIFs via the touch keyboard could result in unexpected flashing.
  • We fixed an issue where if you were using the touch keyboard gesture to move the text cursor in a table in OneNote it might unexpected exit out of this mode.
  • We fixed an issue where the microphone button on the touch keyboard wouldn’t work when using the traditional keyboard layout.
  • We fixed an issue where the consent dialog for enabling voice typing from the touch keyboard could show up behind the touch keyboard.
  • We fixed an issue where if you use WIN + H to pause voice typing while it was running, it could result in an infinite loading state, or could result in voice typing immediately un-pausing.
  • We fixed an issue that could result in voice typing suddenly finishing even though you were still speaking.
  • We fixed an issue where the new emoji panel didn’t work with the Xbox game bar.
  • We fixed an issue where if you closed and re-opened the emoji panel, the keyboard focus wouldn’t be on the first emoji in the list.
  • We fixed an issue where if you pressed ESC to close the emoji panel it would get passed through to the app you were using and cause other UI to unexpectedly close.
  • We fixed an issue impacting clipboard history and emoji panel launch reliability.
  • We fixed an issue where the “couple with heart” emojis unexpectedly had flesh-colored hearts instead of red.

Known issues

  • We’re investigating an issue where if you access an Azure Active Directory (AAD) joined device via Remote Desktop (RDP), it will fail to connect after updating to Build 21313. To resolve the issue, please add the following registry key:

Key: [HKEY_LOCAL_MACHINESOFTWAREMicrosoftIdentityStoreLoadParameters{B16898C6-A148-4967-9171-64D755DA8520}]

Value: “Enabled”=dword:00000001

  • Reset my PC with the Keep my files option is failing and then returning to its previous state. The Remove everything option will work as expected. We appreciate your patience as we work on a fix.
  • We’re looking into reports of the update process hanging for extended periods of time when attempting to install a new build.
  • We’re investigating an issue impacting the reliability of Start and other modern apps, which started in recent Dev Channel flights. If you are impacted, you may experience the Start menu layout resetting.
  • Live previews for pinned sites aren’t enabled for all Insiders yet, so you may see a grey window when hovering over the thumbnail in the taskbar. We’re continuing to work on polishing this experience.
  • We’re working on enabling the new taskbar experience for existing pinned sites. In the meantime, you can unpin the site from the taskbar, remove it from the edge://apps page, and then re-pin the site.
  • [News and interests] Sometimes the news and interests flyout cannot be dismissed with pen.
  • [News and interests] News and interests uses more taskbar space on the left than expected.
  • Users may notice Domain networks appearing with the wrong firewall profile which may block some local network services. As a workaround, users may configure the network as private to allow local network traffic. This will be fixed in a future release.
  • We’re investigating reports from Insiders that the Chinese text for the lunar calendar in the clock and calendar flyout is no longer displaying properly as of the previous flight.
  • After installing this build, you may notice an issue wherein it is not possible to unpin apps from the Start menu. We are working on a fix.

If you were planning to install today’s build on a Windows 10 on ARM PC, be aware that it won’t be offered on your device due to an app compatibility issue. “We hope to flight to ARM64 devices with the next flight once the issue is fixed,” the team said today.

Windows 10 network adapter is missing [Fixed]

If you have upgraded your PC to Windows 10, network problems may occur from time to time. If your PC fails to recognize the adapter, you won’t be able to see it in the Device Manager.

In the event of Internet failures or network problems, a quick check of the network adapter often helps.

This way you can rule out that this is the cause of the problem. In the following lines you will find sure ways to fix your problems with network adapters.

How do I fix the Windows 10 network adapter missing error?

1. Change the adapter settings

  1. Open the Windows Settings app.
  2. Select Network and Internet, and click on Ethernet.
  3. Look for a wireless adapter that is currently running.
  4. Right-click on it and select Properties.
  5. Search for the Internet Protocol Version 6 (TCP/IPv6).
  6. Uncheck IPv6 to disable it, and click on OK.
  7. Restart your PC.

A network adapter is an interface between the Windows operating system and a network connection.

2. Update your drivers

The error is often caused by outdated or missing drivers. In this case, you may not appear in the Device Manager panel which is why we recommend you use dedicated software to update it.

The software uses its own comprehensive database to find the newest driver version for your hardware. It is light and simple. Just let it run a scan and it will find and fix all driver-related issues on your whole PC.

⇒ Get Outbyte Driver Updater

3. Activate and deactivate network adapter

  1. Open the Windows Settings app.
  2. Select Network and Internet, and click on Status.
  3. Under Advanced network settings on the right, you will find the Change adapter options.
  4. Click on Network adapters.
  5. Choose the network adapter or Ethernet port of your Windows PC.
  6. Right-click on it and select Deactivate.
  7. For activation, right-click on the network adapter or Ethernet port, and select Activate.

Activation and deactivation is done via the context menu. If you want to disable the network adapter or Ethernet port of your Windows PC, this is possible, by following the above-mentioned steps.

4. Reset the network adapter

  1. Open the Windows Settings app, and go to Network & Internet.
  2. Click on Status.
  3. Under the Advanced network settings, click on the Network reset.
  4. Select Reset now, and click Yes.

After you complete the steps, the computer will restart automatically, and on reboot, you should now be able to connect to the internet.

5. Uninstall the network adapter

  1. Open the Windows Settings app.
  2. Select Network and Internet.
  3. Click on Status on the left.
  4. Under Advanced network settings on the right, you will find Change adapter options.
  5. Click on Network adapters.
  6. Right-click the problematic network adapter and select the Uninstall device option.
  7. Click the Uninstall button.
  8. Restart your PC.

After you complete the steps, Windows 10 should automatically detect and reinstall the driver again, fixing the network problem.

6. Use the Network troubleshooter

  1. Open the Windows Settings app.
  2. Go to Update & Security, and select Troubleshoot. 
  3. Click on Internet Connections.
  4. Go to Run the Troubleshooter.
  5. Follow further on-screen instructions and let the process finish.
  6. Restart your PC.

The first thing you are going to do is also the easiest one. You are simply going to run the network troubleshooter and let it do the job for you.

In the above lines it’s shown how to run the network troubleshooter in Windows 10.

FIX: Sorry, there was a problem communicating with Netflix

Netflix displays error messages whenever there’s something wrong with the online streaming service.

Thankfully, most errors are accompanied by a code that you can use to look up solutions in the Netflix Help Center.

Sorry, there was a problem communicating with Netflix. Please try again (T1.) is an error that occurs on Windows 10 computers.

The official website provides a few troubleshooting steps: restart your computer and router, enhance your Wi-Fi signal, switch to wired mode, and restore your default connection settings.

According to Netflix, it usually indicates a network connectivity issue. But we don’t think these instructions go deep enough to help users find a resolution to this matter.

If you have wondered how you can communicate with Netflix to solve different issues, the Help Center is the main contact point.

How do I fix the communication problem with Netflix?

1. Run an Internet speed test

Fast.com speed test without Avast VPN
  1. Make sure you’re connected to the Internet.
  2. Visit Fast.com.
  3. Wait until the website measures your connection speed.
  4. Click Show more info.
  5. Review your download speed.

Here are the Internet connection speed recommendations made by Netflix:

  • 0.5 Mbps – Required for broadband
  • 1.5 Mbps – Recommended for broadband
  • 3.0 Mbps – Recommended for SD quality
  • 5.0 Mbps – Recommended for HD quality
  • 25 Mbps – Recommended for Ultra HD quality

If your Windows 10 PC doesn’t fulfill the requirements, try these solutions:

  • Go to Task Manager and disable any unused processes and services that consume the network bandwidth (additional web browsers, torrent clients, gaming clients, etc.).
  • Update your network drivers.
  • Temporarily switch from Wi-Fi to wired mode to see if your Wi-Fi adapter or router is faulty.
  • Reboot your router.
  • Disable QoS (Quality of Service) in your router admin panel.
  • If you have a Gigabit router, connect to the 5GHz network instead of 2.4GHz (you might have to move closer to the router).

2. Check web browser settings.

Various browser settings can interfere with Internet streaming, preventing your computer from reaching Netflix.

Here’s what you can try:

  1. Disable browser extensions.
  2. Clear cache and cookies.
  3. Restore browser settings to default.
  4. Try using a different web browser.

If you’re looking for a web browser recommendation, consider using Opera.

It delivers excellent performance and comes with its own free VPN, which can sometimes unblock Netflix libraries unavailable to your region.

Opera

Use this reliable web browser with a free, built-in VPN service to watch Netflix movies and TV shows.

3. Use a VPN that won’t get blocked by Netflix.

The Netflix Help Center recommends disabling any VPN or proxy server you might be using. That’s because the streaming service is quite successful at detecting and blocking region circumvention tools.

Since most free VPNs for Netflix use public IP addresses, it’s easy to see why they fall in this category. But a premium VPN is more reliable.

Plus, if your ISP is throttling your bandwidth due to streaming, using a VPN is necessary to hide the fact that you’re watching Netflix.

Private Internet Access is a great example. You can explore more than 12 US cities to unblock the biggest Netflix regional catalog, no matter where you’re living or traveling.

Besides Windows 10, you can set up PIA on Mac, Android, iOS, Linux, and even routers. It also works with other streaming services apart from Netflix, such as HBO Max and Peacock.

If you want to subscribe, you can pay with a credit card, PayPal, or crypto. There is no free trial, but there is a 30-day money-back guarantee policy. Also, you’ll get 24/7 live chat support.

If you believe that PIA is not the VPN for you, we suggest browsing our article with the best VPNs for Windows 10 and choosing one that you prefer.

3. Update your device drivers

  1. Right-click the Windows 10 Start button and click Device Manager.
  2. Expand the Display adapters menu.
  3. Right-click your display adapter and select Update driver.
  4. Click Search automatically for updated driver software.
  5. Follow the on-screen instructions.

Netflix might be experiencing streaming issues due to your outdated graphic driver. If Microsoft fails to find a newer version for your GPU, you have to manually look it up on your manufacturer’s website.

But there’s always the risk of installing an incompatible driver, which could result in serious computer issues.

A safer way to do this is by turning to a software application that automatically finds, downloads, and installs drivers for all your devices.

A computer cannot manage video cards, computer programs, sound cards, or other hardware; they must be managed by a driver. You can manually update drivers if you have a thorough understanding of the drivers your PC requires.

The driver updater utility is the best alternative to ensure you have the most suitable drivers for your device.

4. Lower your Netflix video quality

  1. Sign in to Netflix in your web browser.
  2. Go to the Account section.
  3. Scroll down to Profile & Parental Controls.
  4. Select a profile.
  5. Find Playback settings and click Change.change Netflix playback settings
  6. Set Data usage per screen to Auto.manage Netflix data usage per screen
  7. Click Save.

Note: If the Sorry, there was a problem communicating with Netflix error is caused by network connectivity issues, you can set up a poorer quality for all Netflix videos if it doesn’t bother you.

5. Use the Netflix app


Instead of watching Netflix in your web browser, download the official app from the Microsoft Store. It should solve any streaming issues caused by your web browser.

On the other hand, if you’re encountering the Netflix communication issue on the Netflix app, you can reinstall it. It might also be necessary to update your video driver.

6. Get the latest updates for Windows 10

download Windows updates
  1. Click the Start button and type Windows Update.
  2. Open the tool and click Check for Updates;
  3. Download any available updates;

It’s essential to keep Windows 10 updated with the latest features, improvements, and security patches. Also, Netflix needs Silverlight to work properly, which is covered by Windows Update.

If Windows 10 fails to retrieve updates, we have an awesome troubleshooting guide prepared for you.

To summarize, you can repair the Sorry, there was a problem communicating with Netflix error by running an Internet speed test and troubleshooting network connectivity issues.

It’s also a good idea to check browser settings, as well as to ditch your free VPN and replace it with a premium service that won’t get blocked by Netflix.

Additionally, you can update your device drivers to the latest version, decrease the Netflix video quality, use the dedicated Netflix app instead of your web browser, and regularly use Windows Update.

Did we fail to mention something important? How did you manage to fix the Netflix communication issue on your Windows 10 computer? Let us know in the comment section below.

Volkswagen will use Microsoft’s cloud technologies to create new Automated Driving Platform

Last week, Microsoft’s business inadvertently made headlines as Ford, a previous infotainment partner opted to Google’s Cloud services over that of Azure or even AWS. Most of the headlines were drawn from conclusions of the former Microsoft and Ford Sync agreements from a few years ago.

However, Microsoft’s business is once again in the headlines in a more direct correlation as it and the Volkswagen Group announce a partnership to build out an Automated Driving Platform.

Microsoft and the Volkswagen Group have been quietly cultivating the Volkswagen Automotive Cloud since 2018, but yesterday’s announcement is new, in that, the VAC will now be officially powered by Microsoft’s Azure Cloud services.

The partnership unveiled yesterday is meant to help Volkswagen accelerate the performance and scale of its Automated Driving Platform and presumably keep it up to pace with competitors such as Ford, Tesla and Toyota.

The Group’s software company Car.Software Organisation will collaborate with Microsoft to build a cloud-based Automated Driving Platform (ADP) on Microsoft Azure and leverage its compute and data capabilities to deliver automated driving experiences even faster at global scale. With ADP running on Azure, Car.Software Organisation will increase the efficiency of the development of advanced driver assistance systems (ADAS) and AD functions for passenger cars across Volkswagen Group brands.

Aside from using generic marketing boilerplate talking points, Volkswagen is specifically looking to increase its ability to develop in-house software for its vehicles and connect car experiences. The company already implores an internal software arm called Car.Software Org and will leverage data captured and analyzed through Microsoft Azure compute and machine learning to better rapidly deploy new or updated software experiences, according to a press release.

Vwag Automated Driving Platform Microsoft En

In addition, leveraging Microsoft’s Azure, Volkswagen’s Automotive Cloud (VW.AC) wants to streamline over-the-air features updates to drivers, independent of vehicle model or year.

Volkswagen’s partnered timeline starts as early as 2021 for test fleets making use of Azure with a more concerted consumer-facing rollout in 2022

Planning for a virtual Valentine’s Day? Spread some love with these Microsoft Teams & Skype backgrounds

Valentine’s Day is just around the corner, and many people may not be able to visit their loved ones due to the travel restrictions related to the ongoing pandemic. If you’re planning on staying this Valentine’s Day indoors, it means it’s time to look for some interesting and creatives ideas to make the day stand out.

By now, a lot of people are probably a pro at Microsoft Teams and Skype events. However, while planning virtual activities, invitations, and catching up with your crush, best friends, or family, many tend to forget to decorate their personal space. To help you host your virtual party, we have compiled a list of the best Valentine’s day backgrounds currently available online.

These backdrops are published by some third-party sites, including 1-800-Flowers, POPSUGAR, C Boarding Group, and Good Housekeeping. From hearts to flowers to chocolate, there’s a Teams background to help you spread the love.

1-800-Flowers.com

DOWNLOAD HERE

C Boarding Group

DOWNLOAD HERE

Good Housekeeping

DOWNLOAD HERE

POPSUGAR

DOWNLOAD HERE

Don’t forget to bookmark this page and take votes on whose background spreads the most love. If you have not done it yet, you can check out our separate post for easy instructions on setting a virtual background in Teams. We remind you that we’ve even got some picks for some of the most exotic backgrounds, too. Check out our full list of Teams backgrounds, here.

FIX: Chrome error ERR_CERT_SYMANTEC_LEGACY

The ERR_CERT_SYMANTEC_LEGACY error can arise when users try to open website pages in Google Chrome.

In many cases, that issue is due to users trying to open webpages with Symantec certificates that more recent Chrome versions no longer support.

However, it can also be due to a few other factors that some users might be able to fix with the resolutions below.

How can I fix the NET::ERR_CERT_SYMANTEC_LEGACY error?

1. Open the page in another browser

switch to opera browser

As mentioned, if the page error arises due to antiquated Symantec certificates that Chrome (and Firefox) no longer support, there isn’t that much you can do to solve the issue.

However, the same page will probably still work just fine in Opera One, so, try opening the webpage in this browser.

Opera One is a great browser when it comes to fast browsing, online security, and customization features.

Your device will be all-time protected from malware and annoying ads with the free VPN and built-in ad blocker. Plus, it also features a built-in AI.

The way you can manage the opened tabs is pretty amazing as well. The workspace features, Search in tabs, and integrated Facebook and Instagram messenger allow you to optimize your work and keep everything only one click away.

Opera One

If you want a reliable browser, a fast connection with a flexible and easy-to-customize interface then this is your best choice!
Free Download Visit website

2. Check Windows 10’s date and time settings

  1.  Double-click the system tray clock.
    The calendar clock chrome error net err cert symantec legacy
  2. Press the Windows key + S keyboard shortcut.
  3. Enter the keyword date in the search utility.
  4. Select Date & time settings to open Settings.Date & time options chrome error net err cert symantec legacy
  5. Turn on the Set the time automatically option if that setting is off.
  6. If Set the time automatically is selected, turn off that setting.
  7. Next, click Change.
    Change the date and time window chrome error net err cert symantec legacy
  8. Enter the right time and date.
  9. Click the Change button.

3. Turn off Chrome extensions

  1. Click the Customize and Control Google Chrome button.
  2. Select More tools and Extensions.The Extensions tab chrome error net err cert symantec legacy
  3. Turn the toggle switch for each browser extension off.

4. Turn off antivirus utilities

The ERR_CERT_SYMANTEC_LEGACY error might sometimes be caused by third-party antivirus utilities.

Try temporarily turning off third-party antivirus software. You can usually do that by right-clicking the antivirus utility’s system tray icon and selecting a disable option.

Thereafter, try opening the same website page in Chrome with the antivirus utility disabled.

5. Contact the website’s webmaster

If you can open the same webpage ok in an alternative browser, get in touch with the website’s webmaster.

The website might include a contact link somewhere with which you can send an email to the webmaster.

Tell the webmaster that you can’t open his website’s pages with Google Chrome due to an ERR_CERT_SYMANTEC_LEGACY error.

Then the webmaster will probably realize that he needs to replace the certificate on the site with a new one to fix the issue.

Those are a few potential fixes for when you can’t open web pages in Google Chrome.

Do you have any other fixes for this? If so, you can state what they are in the comments section below.

Division 2 keeps crashing on PC? [Startup, Update]

The Division 2 players are facing numerous game crashes while playing it on PC, and this is a really annoying problem.

Of course, you can not really possible to find a reason or even a pattern when the game hangs, shows a black screen and crashes.

But fortunately there are solutions to solve this issue, and you only have to try the following methods one by one to resolve the problem.

How can I fix Division 2 if it keeps crashing on my PC?

1. Update graphics card drivers

Updating the drivers for your PC can be a long process in which you try to ensure that your found the right drivers, that their version is updated, and that you install them correctly.

To avoid going through this trouble, you can also use specialized software like Outbyte Driver Updater.

2. Check the game files

Check the game files in Steam

  1. Start Steam, and select the Library tab.
  2. Right-click on Division 2 on the Games List.
  3. Click Properties, and go to the Local files tab.
  4. Select the Verify integrity of game cache option.
  5. Click Close when completed.

Check the game files in the Epic Game Launcher

  1. Click Library in the Epic Game Launcher.
  2. Select the Division 2 Settings icon, and click Verify.
  3. Follow the on-screen instructions to complete the process.
  4. Start your game.

3. Change the compatibility settings

Change the compatibility Division 2 keeps crashing on PC

  1. Find the file path of Division 2.
  2. Right-click TheDivision.exe in the installation folder.
  3. Select the option from Properties.
  4. In the window go to the Compatibility tab.
  5. Click the Change High DPI Settings button.
  6. On the following window, check the Override High DPI Scaling option.
  7. Go back to the Properties window.
  8. Check the Disable Full Screen Optimization option.
  9. Start the game.

4. Change the settings from the swap file

Change the settings Division 2 keeps crashing on PC

  1. Press the Windows hey + R to open Run.
  2. Type Control, and click OK to open the Control Panel.
  3. Type Advanced in the search box, and select Show advanced system settings.
  4. In the Performance section, click on Settings.
  5. Now switch to the Advanced tab, and click on Change in the Virtual Memory section.
  6. Select the Automatically manage file size for all drives option.
  7. Click OK to save the settings, and start the game.

Outdated or faulty graphics card drivers are a common factor that causes many problems in video games.

If your Division 2 continues to crash, you need to check if there is something wrong with the driver.

You can follow the above mentioned instructions to update the driver.

Posted in PC