FIX: Unable to process your request Netflix error

Netflix is a popular online streaming service that is used by billions of users all around the world. You can use it to watch short features, movies, TV series, and documentaries.

However, issues such as the Netflix Site Error often restrict people from watching their favorite content.

This error message goes as follows:

Netflix Site Error
We were unable to process your request.
Please go to the Netflix home page by clicking the button below.

There are many reasons that can cause this error. In this guide, we are going to discuss some quick solutions that can help you solve the issue without breaking a sweat.

How can I fix the Netflix Site error?

1. Use a different browser

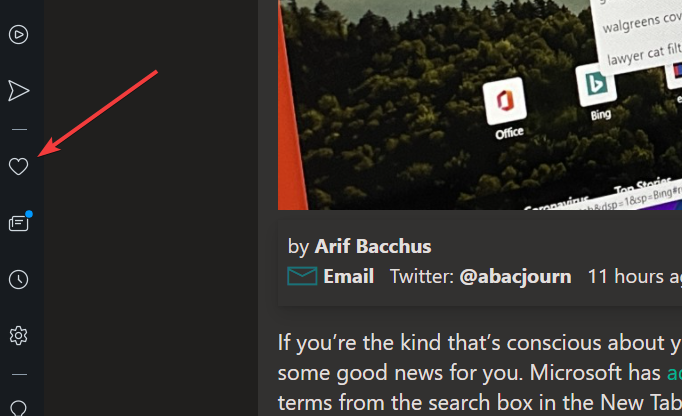
The problem can be specific to your browser itself and trying an alternate browser can resolve the issue. Before closing your existing browser, download a new one. Our suggestion is Opera One.

Why Opera One? Because it is a privacy-focused browser that comes packed with great features for users. For instance, it has video pop-outs that play in floating windows while you are browsing various other websites.

Furthermore, you use Workspaces to separate work from fun or split different project ideas. It’s a neat way to group tabs together that have something in common. Less clutter, more productivity.

It also comes with a built-in ad blocker, a free VPN and a native AI.. These are only a couple of reasons to love this browser.

⇒ Get Opera One Browser

2. Sign in on another device

  1. Use the same network to sign in to Netflix on a different device.
  2. Make sure that you sign out of Netflix and sign in again if your account is already logged on that device as well.
  3. The issue might be from the Netflix service.
  4. You will have to wait until Netflix resolves the issue.
  5. Try again after some time in that case.

You can try out these troubleshooting solutions if the error message does not appear on your screen but you are still unable to access the site properly.

3. Delete the Netflix cookie from your browser

  1. Delete the Netflix cookie by navigating to netflix.com/clearcookies.
    • Once you clear the cookie, you will be signed out of your account.
  2. Click the Sign In button and type your Netflix email and password to log in to your account.
  3. Check if the problem is solved.

Note: simply going to the website will delete your Netflix cookies and sign you out of your account. Make sure you remember the account’s password and email if you want to log back in afterward.

4. Restart your browser

  1. Log out of your Netflix account.
  2. Close the web browser that you are using to watch Netflix.
  3. Navigate to the Start menu and relaunch it.
  4. Head to Netflix.
  5. Sign in to your Netflix account again and check if the problem is solved.

Sometimes, simply restarting your browser can restore the balance of things and solve many underlying issues.

Thus, if you notice that you can’t exactly use Netflix anymore because of the pesky Netflix Site Error, just follow these steps:

5. Restart your system

  1. Close the web browser.
  2. Press the Windows Key and select restart.
  3. Wait for your system to finish restarting.
  4. Launch the browser once more.
  5. Head over to Netflix.
  6. Check if the error persists.

Sometimes your device needs a simple reboot to set things straight once again. Therefore, if you encounter any kind of issue, let alone the Netflix Site error, your first course of action should be rebooting your PC.

6. Restart the home network

  1. First and foremost, power off your system.
  2. Unplug your modem for around 30 seconds.
    • If you are using a separate wireless router, repeat the same process for the router as well.
  3. Plug the network equipment in (Modem & Router) again.
    • Wait until the indicator lights on both the devices are back to the normal state.
  4. Turn on your system, launch the browser, and try using Netflix again.

7. Check your VPN

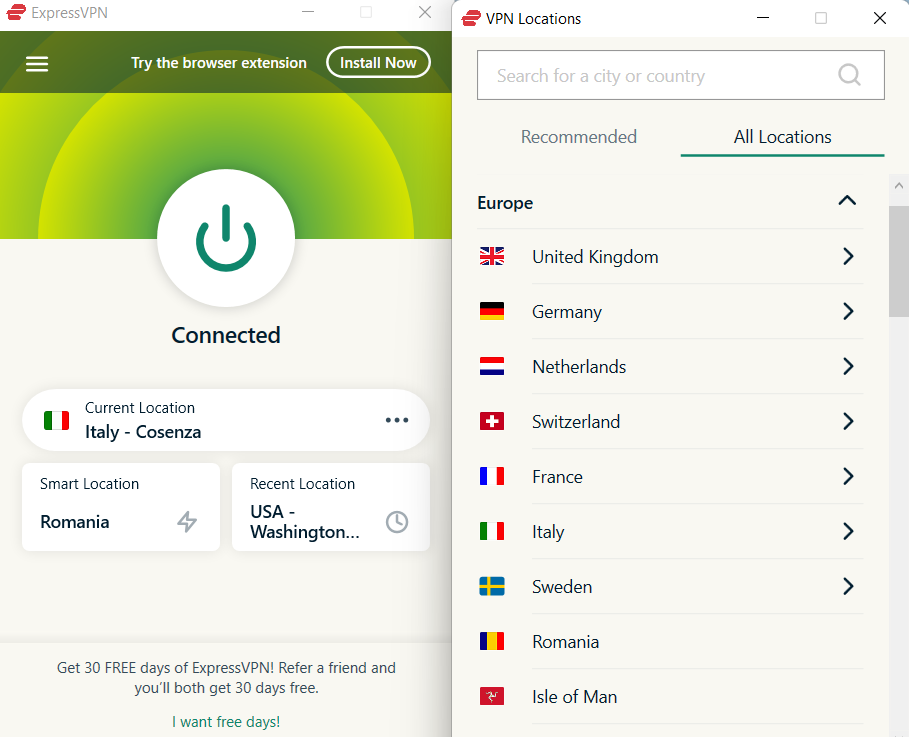
A VPN interfering with various online services is not exactly unheard of, so you may want to consider switching it off, even temporarily.

To do that, you simply need to bring the VPN client’s main window into view and disconnect from the VPN server.

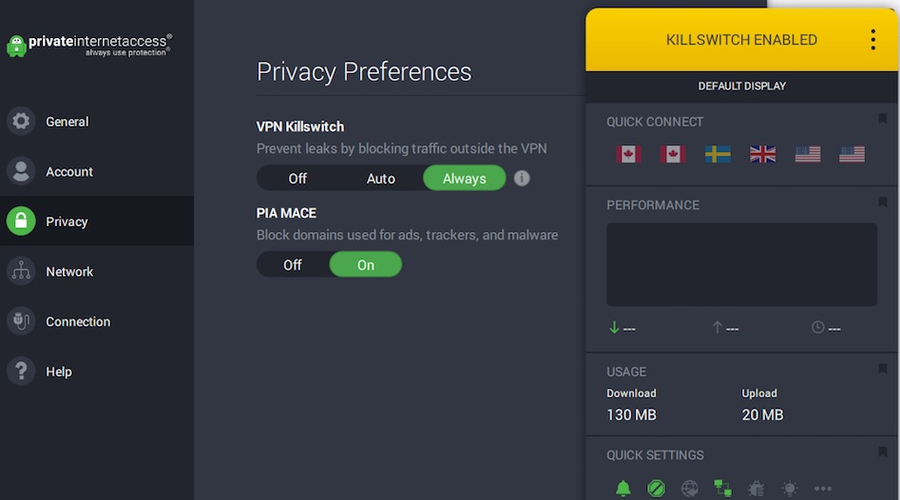
Note that some VPNs come with built-in kill switches that cut off your Internet access if no VPN traffic is detected.

So you might want to make sure that the kill switch is disabled before disabling your VPN. You may even want to try switching to a different server or using your VPN’s split tunneling feature.

To wrap things up, if you suddenly encounter the dreaded Netflix Site Error, there are many ways you can fix it, as you can see in our guide.

We hope that at least one of these solutions worked for you. Comment down below if you managed to find another working solution.
FIX: Your file system isn’t supported by Box Sync

Many users have encountered the error Your file system is not supported by Box Sync, whenever they try to upload some files to the Box servers.

This error doesn’t give you too many details that you can do research on, so users end up feeling like they are using a service that only works sometimes.

This can cause frustration in the long run, considering that the reason for using Box at all, is the need to have access to your files whenever and wherever.

The error is most likely caused due to a conflict between the Box application and some of your computer’s registry data.

In today’s fix article we will discuss the best methods you can try to solve this issue once and for all. Please follow the steps carefully to avoid any other issues.


How to fix the Your file system isn’t supported by Box Sync error?

1. Try using the web version

If you keep getting this error, try using the web version of Box Sync to upload files as a workaround.

You can do this with any browser, but we recommend using Opera One since it’s privacy and security-oriented. It also includes advanced tab management features that other browsers don’t offer.

The browser offers privacy and tracking protection features, as well as a built-in malware scanner and VPN. Plus, it also comes with a built-in AI.

Opera One

Organize your work, and manage the workspace videos with the My Flow feature.
Free Download Visit website

2. Check if the file type is actually supported

Box website community - Your file system is not supported by Box Sync

The error message Your file system is not supported by Box Sync can be caused by an actual error inside the software, but it can also happen if the file you’re trying to upload is unsupported.

The type of files that Box Sync ignores or blocks are files that are invisible in Windows Explorer (temporary or system files).

Here are some of the most common examples of files that can’t be uploaded:

  • temporary files or folders (.tmp)
  • backup copies of files (.bak)
  • shortcuts created in Windows Explorer
  • system and hidden files
  • file names that contain special characters
  • web-based documents

If you want to see a complete list of formats and file types that are compatible with the Box Sync app, you can visit the official Box community forums.

3. Uninstall and reinstall Box Sync

Box website - your file system is not supported by box sync


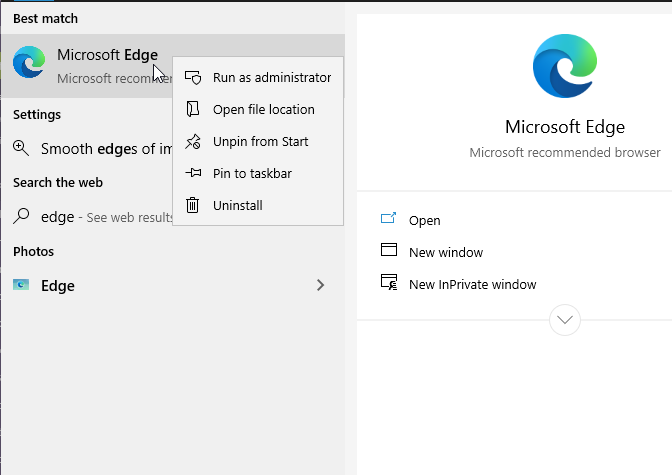
To uninstall:

  1. Press the Win+X keys.
  2. Next, select Apps and features.
  3. Search for Box Sync in the list and click on the Uninstall button.
  4. Delete the remaining Box Sync folders found at these locations on your hard-drive: C:\Users\USERNAME\BoxSync and C:\Users\USERNAME\AppData\Local\BoxSync

Note: It is recommended that you do not delete the Box Sync folder if it contains files that haven’t already been synced to the servers. If you don’t want to delete the folder, you can simply rename it as ‘Box Sync Old’ to avoid confusion.

To reinstall:

  1. Download either Box Sync 64 BIT, or the 32 BIT version.
  2. Open the installer and follow the on-screen instructions to complete the setup.

In today’s article, we explored the best troubleshooting methods to deal with the Your file system is not supported by Box Sync error. We hope that these methods managed to solve your issue.

Please feel free to let us know if it did, by using the comment section found below this article.

5 Best Software for Perspective Drawing [Online & Offline]

Digital apps are easier and easier to use for creating perspective drawing simplifying the process when compared to traditional hand drawing.

You may wonder what is perspective drawing and how such tools help you. Well, this drawing style involves shapes and horizontal or vertical lines that create 3D illusions and perception results.

This is possible thanks to how the app has evolved and the built-in features available that come to transform the process of an architectural drawing for the better.

We’ve gathered in this article a list of software that we recommend using for perspective drawing so make sure to have a look and chose the best one for you.

What is the best software for perspective drawing?

Adobe Photoshop – Creative drawings

Adobe Photoshop - Best Painting Software

Adobe Photoshop is a good tool, even if you are a beginner, that will help you create perspective drawings within a few clicks.

The interface is easy to use once you become familiar with all the built-in features and with the workflow.

The latest Adobe Photoshop comes with an improved AI that will help you color the landscape, zoom in on specific parts of the image, remove scratches from objects, and many more.

Apart from all this, you will have at your disposal masking and portrait features, and customizable brushes with different styles and textures.

Key features of Adobe Photoshop:

  • Customizable brushes and drawing tools.
  • Adobe Sensei and improved AI
  • Tutorials and introductive guides.
  • Cross-platform compatibility and cloud storage.
Adobe Photoshop

Adobe Photoshop

The best tool for perspective drawing that simplifies the entire process thanks to the available features and workflow.
Free trial Visit website

Clip Studio Paint – Concept painting tool

Clip Studio Paint is an excellent software for perspective drawings artists, especially if they are on a budget.

Although this software is low cost, it still offers plenty of vectors and tools to create professional perspective drawings.

If this is the first time you’ll be using this tool, know that the workflow and the interface are easy to use and you won’t find it difficult to work with them.

With the powerful available brush engine you can create drawings exactly as you picture them in your imagination.

Key features of Clip Studio Paint:

  • Excellent value for money with high level features.
  • Powerful software with easy to use interface.
  • Compatible with drawing tablets.
  • Highly customizable painting brushes.
Clip Studio Paint

Clip Studio Paint

An excellent choice if you are looking for a reliable and intuitive software that will help you create fantastic perspective drawings.
Free trial Visit website

Corel Painter – Natural media emulation

Corel Painter is another fantastic software that you can use in order to create perspective drawings that will stand out.

This popular program offers a large selection of drawing tools, and customizable brushes that will help your art look like the traditional one.

Moreover, with this software you can sketch, paint, illustrate, and make art without using an overcomplicated workflow process.

Corel Paint also supports drawing tablets and offers you a stylus title, pressure control and rotation bearing.

Key features of Corel Painter:

  • Easy-to-navigate user interface with improved performance
  • Customizable tools and brushes.
  • A multitude of color selections.
  • Professional blank canvas available.
Corel Painter

Corel Painter

Use this high-quality software to create one of the most complex perspective drawings you’ve ever done.
Free trial Visit website

Krita – Concept art or animations

Krita is an open-source desktop application that is designed for illustrators, painters, and texture artists.

It’s also a very affordable option if you are on a budget that offers many common and innovative features.

Krita comes with a brush engine for sketching and painting, stabilizers, and even assistants for complex scenes. You can use the canvas mode where you can draw without borders, clone layers, or filters.

This software is perfect for perspective drawings and is one of the most used tools by artists in the field.

Key features of Krita:

  • Onion skinning animation
  • Comic book tools and storyboards
  • Clone layers with layer styles
  • Python scripts
Krita

Krita

An open-source desktop application that will help you enhance your perspective drawings.
Check price Visit website

Autodesk SketchBook – Sketch to art opera

This is yet another tool preferred by artists especially those that are primarily creating perspective drawings.

Autodesk SketchBook comes with more than 190 customizable brushes and tools that will allow you to create anything you want.

This software focuses mostly on drawings and sketches as opposed to other software. You will have at your disposal a drawing engine that can handle 100Mpx canvas and a distraction-free UI.

Moreover, with this tool you can export your work in various media formats and you can also work with imported PSD files.

Key features of Autodesk Sketchbook:

  • More than 190 customizable brushes.
  • Easy to use interface and excellent UI.
  • Compatible with drawing tablets and other creative software.
  • Import hand-drawn sketches to digital conversion.
Autodesk SketchBook

Autodesk SketchBook

Autodesk SketchBook focuses on drawing and sketches which make it the perfect choice for perspective drawings.
Check price Visit website

With this software, we will conclude our recommendations of the best software for perspective drawings.

All the above-mentioned software is perfect and will help you create stunning projects.

Please let us know in the comments section below if you have additional suggestions and which of the above tool you have already tried it.

What is Driver Tonic and is it safe to use? [Windows 10]

Third-party driver updater software for Windows 10 scans for outdated drivers on your PC and updates them.

The best driver updater utilities provide a quick and straightforward way to update your drivers. However, Driver Tonic is a driver updater utility held in some suspicion.


Is Driver Tonic a virus and should I uninstall it?

Is Driver Tonic safe to use?

Driver Tonic isn’t a virus, and it most likely won’t cause any damage to your system. However, Driver Tonic is unwanted software that comes bundled with other applications.

The application basically works as an advertisement, and it requires you to purchase a license if you want to use it. Many users claim that Driver Tonic won’t fix computer problems, so it’s basically a scam.

Although the application won’t cause damage to your PC, it can become tedious with its aggressive advertising, so it’s recommended that you uninstall it using the following solutions.

Driver Tonic is system maintenance software for updating drivers and cleaning registries. It also includes a system startup manager and web protection feature.

The virus misconception surrounding Driver Tonic has largely arisen over its distribution. Some users spot Driver Tonic installed on their PCs when they didn’t install it themselves. One user said this:

I’ve tried to use the Win10 App menu from Control Panel to attempt to uninstall Driver Tonic, an adware/malware app that was accidentally installed on my Surface Pro. When I click the uninstall box, it pops a message that says, This app has been blocked for your protection.


Is Driver Tonic legitimate software?

There can be little doubt Driver Tonic is adware (sometimes confused as malware). Therefore, users who choose to install Driver Tonic get bombarded with ads recommending they install other software.

Another thing to note is that Driver Tonic’s free download is only a demo. Its demo package is not an entirely genuine system maintenance utility as it only does a 25 percent scan.

It incorporates ads that tell users to upgrade to the Pro version, which is available for a price/month.

Driver Tonic window what is driver tonic

Some reviews for Driver Tonic claim that the demo version’s pop-up alerts for outdated drivers aren’t always entirely genuine.

Such claims highlight Driver Tonic might not be entirely trustworthy, as it gives users misleading outdated driver notifications for drivers they can’t update with the trial version.

So, some users might be convinced Driver Tonic is a scam software. It’s not entirely surprising users have that conviction for a driver updater utility that includes false positive pop-up notifications along with ad banners.

Yet, Driver Tonic has been reviewed on software download websites. Softpedia rates DT at three out of five stars.

So, Driver Tonic is legitimate software that’s safe to use at least. However, it’s claimed DT’s system scanning detects items that don’t impact system performance.


How can I uninstall Driver Tonic?


  1. Press Windows Key + I to open the Settings app.
  2. Navigate to the Apps section.
    apps section what is driver tonic
  3. Select Driver Tonic from the list and click on Uninstall.
    uninstall software what is driver tonic
  4. Follow instructions on the screen to remove the software.

Few users reported that Driver Tonic blocks its uninstaller from running. If that’s the case, you need to do the following:

  1. Press Ctrl + Shift + Esc to open Task Manager.
  2. Locate Driver Tonic, right-click it, and choose End Task.
  3. Open File Explorer and go to the following folder: C:\Program Files\
  4. Locate the Driver Tonic folder and delete it.
  5. Now try to uninstall Driver Tonic again

Driver Tonic gets bundled with custom installers for other software, and it will no doubt be an unwanted program for most users who didn’t install it themselves.

If you don’t want Driver Tonic and its misguiding pop-up notifications, uninstall the demo package as follows.


Note: If you can’t uninstall Driver Tonic as outlined above, try removing the software with a third-party uninstaller utility.

So, if you never chose to install Driver Tonic, and aren’t impressed with its demo package, you might as well uninstall it to free up some HDD space.

However, don’t be alarmed if you discover Driver Tonic on your PC as it’s not a virus.

5 Valentine’s Day laptop deals for the gearheads [Special offers]

Valentine’s Day is just the right time for couples to expect their favorite gifts. There could be no better feeling than partners exchanging gifts among the fragrance of fresh flowers.

This is the time of the year when everyone is eagerly waiting for their partners to unveil the surprise. While there are hundreds of gift options out there, people can also look for the super Valentine’s Day laptop deals for the gearheads.

Whether for work purpose or for personal use, laptops are essential these days. People don’t mind having one extra either. Therefore, grabbing the latest model from the cheap Valentine’s Day laptop deals would be a smart idea.

Here we have listed some of our favorite picks from the Valentine’s Day offers on laptops.


Which are the best laptops to get this Valentine’s Day?


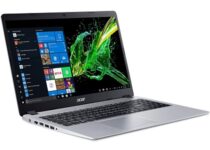
Acer Aspire 5 Slim

  • AMD Ryzen 3 3200U Dual Core Processor (Up to 3.5GHz); 4GB DDR4 Memory; 128GB PCIe NVMe SSD
  • 15.6 inches full HD (1920 x 1080) widescreen LED backlit IPS display; AMD Radeon Vega 3 Mobile Graphics
  • 1 USB 3.1 Gen 1 port, 2 USB 2.0 ports & 1 HDMI port with HDCP support
  • 802.11ac Wi-Fi; Backlit Keyboard; Up to 7.5 hours battery life
  • Windows 10 in S mode. Maximum power supply wattage: 65 Watts
  • Comes with Microsoft Windows 10 S by default

The first laptop on our list is a good overall device that will suit both his or her tastes, since it is both elegant and powerful, so watching movies, doing work, or playing games is possible.

The price is quite acceptable, and this Valentine’s Day it also benefits from a significant discount, so not taking advantage of it would be a real shame.

If you like Windows 10 S, you’ll be delighted to find out that that is the default OS for this device, although it can be changed if you wish.

Whether it’s Dell, Lenovo, or Acer, you can choose from any of them offering a pleasant surprise to the gearhead you love. So, grab these super Valentine’s Day offers on laptops this V-day and you would love that smile on your partner’s face.


MSI GL65 Leopard

  • 15.6-inch FHD IPS-Level 144Hz 72%NTSC Thin Bezel close to 100%Srgb NVIDIA GeForce RTX 2070 8G GDDR6
  • Intel Core i7-10750H 2.6-5.0GHz Intel Wi-Fi 6 AX201(2 x 2 ax)
  • 512GB NVMe SSD 16GB (8G*2) DDR4 2666MHz 2 Sockets Max Memory 64GB
  • USB 3.1 Gen2 Type C 1 USB 3.2 Gen1 3 Steel Series per-Key RGB with Anti-Ghost key+ silver lining 720p HD Webcam
  • Win10 Multi-language Giant Speakers 3W x 2 6 cell (51Wh) Li-Ion 230W
  • The battery life isn't all that long

The next entry on our list is a laptop dedicated to hardcore gamers, so if both of you share this passion, or if you just want to make your better half have better gaming performances, the MSI Leopard is indeed a monster.

Boosting a thin-bezel screen for better immersiveness, powerful i7 CPU, and  8 GB of VRAM, their gaming prowess will be taken to an entirely new level.

Another great thing about it is that it features an advanced cooling system, so even if you’re gaming with it in your bed or on your lap, you won’t feel it heat up or see it suffer from lag spikes.


Acer Nitro 5

  • 9th Generation Intel Core i7-9750H 6-Core Processor (Up to 4.5GHz)
  • 17.3-inch Full HD Widescreen IPS LED-backlit Display | 144Hz Refresh Rate | 3ms Response Time | NVIDIA GeForce RTX 2060 Graphics with 6 GB of dedicated GDDR6 VRAM
  • 16GB DDR4 2666MHz Memory | 256GB NVMe SSD (2 x PCIe M.2 Slots - 1 Slot Open for Easy Upgrades) & 1 - Available Hard Drive Bay
  • Wireless: Intel Wireless-AC 9560 802.11ac Gigabit WiFi 5 | LAN: 10/100/1000 Gigabit Ethernet LAN (RJ-45 port)
  • Prone to overheating

If the previous gaming laptop didn’t impress you, this next entry that is part of the Acer Predator family truly will, since it puts a lot of other models from the same price range to shame.

Boasting the latest 9th-generation i7 Intel CPU and 6 GB of GDR6 VRAM, this laptop will make all games, both present, and past, run as smoothly as an 8-bit Super Mario title.

The laptop can also be acquired together with a gaming backpack, a set of headphones, or with a mouse, so if you want to give your significant other a complete package deal, now’s your chance.


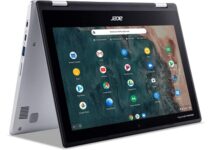
Acer Chromebook Spin 311

  • It comes with built-in virus protection
  • Updates automatically, boots up in seconds, and continues to stay fast over time
  • All the Google apps you know and love come standard on every Chromebook
  • Get access to more than 2 million Android apps from Google Play
  • Comes with 11.6-inch HD Touch and up to 10-hour battery life
  • You need to handle it gently

Moving to more down-to-Earth laptops, we also have an entry for those that are busy and need a device for work, one that can also be converted easily between tablet and laptop mode.

That’s where the Acer Chromebook Spin 311 comes into play, combining a supreme sense of elegance with surprising specs, especially when you’ll be using it in tablet mode.

Because it runs on the Chrome OS, there are more than 2 million Android apps from Google Play, but you can also perform basic tasks that can come in handy.

This includes editing, downloading, and converting Microsoft Office files in Google Docs, Sheets, and Slides.


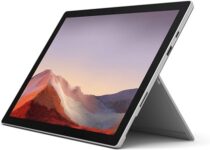
Microsoft Surface Pro 7

  • Faster than Surface Pro 6, with a 10th Gen Intel Core Processor
  • Wireless : Wi-Fi 6: 802.11ax compatible. Bluetooth Wireless 5.0 technology
  • More ways to connect, with both USB-C and USB-A ports
  • Ultra-slim and light Surface Pro 7 starts at just 1.70 pounds.
  • Aspect ratio: 3:2, and all-day battery life up to 10.5 hours
  • Comes with Windows 10 Home

One cannot make a list of best laptops, be them for Christmas or Valentine’s, without mentioning at least one Microsoft Surface product, because they make just excelent gifts, especially for the professionals in your life.

Because it can be easily converted between tablet and laptop mode, you can use it for a wide range of things. For example, you can type, touch, draw, write, work, and play more naturally.

Besides, you won’t have to worry about performance or lag-spike, because the size/ performance ratio is incredible. From a performance standpoint, suffice it to say that it is an above-average laptop, but a lightning-fast tablet.


This concludes our list of the best Valentione’s Day laptops that you can gift to your special someone. As you can see, we tried choosing laptops froma wide range of price tags, as well as laptops that can be used in various purposes.

Keep in mind that these laptops are currently up for sale, so if you’re thinking about buying them, get them now while there’s still a bargain.


Do you know of any other laptops that should have deserved a spot on our list? Let us know by leaving feedback in the comments section below.

5+ best gaming headsets for Windows 10/11

A headset can make the difference between victory and defeat during competition.

Whether it’s a shooter, a MOBA, or any other kind of game, a player must have perfect sound to fully understand the situation at hand while enjoying flawless communication with teammates.

It is hard to say what the best headset on the market is because it depends on budget, user preference, and what expectations the user has.

Despite the challenge, we made a list with the best headphones from which you can choose a headset according to your preferences.

What are the best budget and high-end gaming headsets?

SteelSeries Arctis 3

  • Recognized as the best mic in gaming
  • 48 dB microphone sensitivity and 98 dB headphone sensitivity
  • 20 to 22000 Hertz frequency response
  • High-performance fabric air weave ear cushions
  • Not too comfortable for extensive usage

The SteelSeries Arctis 3 headphones are unofficialy recognized in the gaming world as having a very good quality microphone so if you want to be heard loud and clear by your team, then this pair should be on your list.

The mic is retractable and the cable is detachable for better portability. These headphones are fully compatible with Windows 10 and Xbox native surround sound.

Razer Kraken Gaming Headset

  • Lightweight aluminum frame
  • Immersive, 7.1 surround sound
  • Cooling gel-infused cushions
  • Retractable unidirectional microphone
  • The mic can be too short for some

Razer is well known for gaming accessories so it’s easy to think highly about the Razer Kraken headphones.

Their 7.1 surround sound not only that will completely immerse you into the game but you will also be able to perfectly pinpoint any sound into the virtual space.

No matter the long hours you will stay in the game, the cooling gel-infused cushions will be extremely confortable to wear. The microphone is retractable so it won’t get in the way when you don’t need it.

HyperX Cloud Flight

  • Wireless headphones with up to 30 hours of use
  • Detachable noise-cancelling microphone
  • Comfortable memory foam cushions
  • Gaming-grade 2.4 GHz wireless connection
  • The mic can suffer after repetitive connect/ disconnect cycles

Gamers usually prefer cable headphones to counter any sound lag but HyperX Cloud Flight headphones work on a 2.4 GHz band for seamless connectivity and the 30 hours autonomy is good for any gaming session.

As you’re probably not using the mic all the time, you can simply detach it and keep it safe for later use. The only problem is that the HyperX Cloud Flight only offer stereo sound and not surround sound.

Razer Kraken Ultimate RGB USB Gaming Headset

  • THX certified 7.1 spatial surround sound
  • Chroma RGB lighting
  • Retractable active noise-cancelling mic
  • Syncs with Razer hardware, Philips Hue, and gear from 30+ partners
  • Pretty expensive

The Kraken Ultimate headphones bring THX certified 7.1 spatial surround sound to any game and that is plenty enough to give them a pretty high place on your gaming acquisition list.

If you pair that with extremely comfortable cushions, a retractable, active noise-canceling mic, and the Chroma RGB lighting that can sync with any Razer hardware, you’ve got the perfect mix for the ideal gaming session.

Razer Nari Wireless 7.1 Surround Sound Gaming Headset

  • THX 7.1 channel audio
  • Auto-adjust headband and swivel cups
  • Chroma RGB
  • Retractable mic
  • Slight problems with the mic

With THX Spatial Audio, the Razer Nari headphones deliver an amazingly immersive sound that is created in a sphere around you. This way you will experience greater spatial awareness of the virtual environment.

A plug-and-play wireless USB transceiver helps you enjoy a wireless range of up to 12 meters without disconnection and adjust controls on the fly. 

And the cooling gel-infused cushions will ensure no heating, perfect comfort experience for your ears.

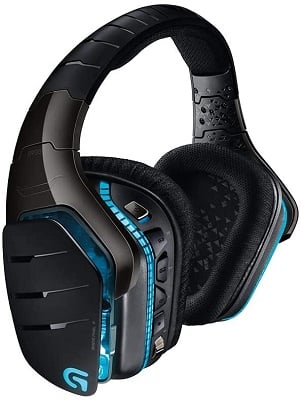
Logitech G933 Artemis Spectrum

Since it is a wireless model, many of you will say that the sound quality will be affected mid-game, but this model has passed this test easily and proved that it can maintain high sound quality in any condition.

Pro-G audio drivers provide high-quality sound playback. This product is very reliable and takes gaming to a new level as it can run on any device.

It will give you an extraordinary experience irrespective of the device on which you play: a computer or a console, or just listening to music on your smartphone.

The design is very attractive. The headset comes in two models: the standard black edition or the limited edition white pair.

Both have customizable RGB LEDs which offer you a palette of over 16 million colors. The headset is equipped with three customizable buttons, as well.

⇒ Check price

Creative Sound BlasterX H7 7.1

Choosing a gaming headset can be a huge challenge because there are many products on the market that may promise a lot but after using them, you realize the performance is not up to snuff.

In a creative and inspired move, the well-known audio card producer for computers introduced a high-performance headset to the market.

The SoundBlaster H7 model, a part of the company’s lineup of audio solutions, is intended for PC gamers.

This model combines comfort and durability with the best performance. The Blaster X comes with two ports for controlling your sound: an analog one for mobile devices and a USB one for PC.

⇒ Check price

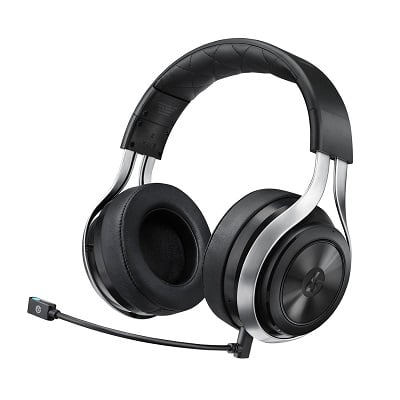
LucidSound LS30

This headset gets out of the gaming headsets line through its unique design.

The LucidSound developers used a sharp, elegant and minimalist design for this model, totally different from the design you have been used to until now.

Its revolutionary design allows easy access to several functions for sound configuration: game volume, chat volume, and microphone volume.

It is very easy to use those buttons because the volume is controlled by rotating a dial on the ear cup and the mute function is performed by pressing a button in the center of the dial.

⇒ Check price

This was our selection with the best gaming headsets for Windows 10. If you have any additions or suggestions, don’t hesitate to leave us a comment in the dedicated section below.

5 Best Software For Symmetrical Drawings [2026 Guide]

Many artist are using symmetrical drawing or mirror drawing for their projects due to the fact that human kind has always been attracted toward symmetry and art is no different.

There are many apps that you can use for symmetrical drawings but it can be time consuming testing them all to see which are the best.

So, we have already tested the available software for symmetrical drawings and in this article we will offer more details about the best of them.

What is the best software for symmetrical drawings I can use?

Adobe Photoshop CC – Great set of image manipulation tools

Adobe Photoshop CC allows you to paint symmetrically while using the paintbrush, pencil, and eraser tools.

With Paint Symmetry feature you can paint multiple brushes at once in order to create mirrored, symmetrical designs and patterns.

Thanks to the integrated process and workflow, painting with symmetry in Adobe Photoshop CC is fairly simple.

If you are a beginner you will find many tutorials and help guides that will help you get started with using the tool.

Adobe Photoshop CC comes with more features as well, which makes it not only the perfect tool for creating symmetry drawings but for pretty much any type of art.

Key features of Adobe Photoshop CC:

  • Fantastic set of image manipulation tools.
  • Highly customizable brushes and tools.
  • Adobe Sensei and improved AI.
  • Easy to use and has lots of helpful tutorials.

Adobe Photoshop CC

Enhance your creativity with this powerful tool that will take your art to the next level thanks to the symmetry drawing option.
Free trial Visit Website

Clip Studio Paint – Very easy to use and intuitive

try out Clip Studio Paint

Clip Studio Paint is our next software recommendation that has the option for symmetrical drawing.

The symmetry ruler will allow you to draw symmetrical images alongside other available tools.

What makes Clip Studio Paint a great choice is that the software is perfect when you are on a budget or just starting to work on symmetry projects.

This software also detects up to 8192 levels of pen pressure and offers over 1000 new materials monthly within the Assets section.

It’s software that allows for highly customization actions with the brushes in order to create the exact one that you need.

Key features of Clip Studio Paint:

  • Perfect if you are on a budget.
  • Symmetrical ruler feature.
  • Powerful editing tools and highly customizable.
  • Easy to use and intuitive control.

Clip Studio Paint

With the help of the symmetry rules you will create stunning works of art that will make your projects stand out from the rest.
Free trial Visit Website

CorelDRAW Graphics Suite – Browser-based vector illustration

coreldraw graphics suite

CorelDRAW Graphics Suite 2020 is another powerful tool that has been used successfully by many artists.

The software comes with a Symmetry mode that definitely makes creating symmetrical objects fairly simple and fun.

You can create objects from scratch or use the existing models and perform the desired changes to them.

Using the symmetry mode is simple, and you also have access to extensive tutorials and guides on the support page.

Moreover, CorelDRAW Graphics Suite 2020 allows you to create symmetry groups, fuse curves, and many more.

Main features of CorelDRAW:

  • Browser-based vector illustration
  • Font exploration and management
  • Vector illustration and page layout
  • Image editing and pixel-based design

CorelDRAW Graphics Suite

Use CorelDRAW Graphics Suite 2020 to benefit from the special symmetry mode that will enhance your productivity.
Check price Visit Website

Krita – Highly Customizable

pixel painting software

This open-source desktop software is another great tool for symmetry drawing thanks to the incorporated symmetry options.

The software features great brush engines for sketching and painting alongside an accurate pen pressure.

Moreover, you can also have access to features such as stabilizers, clone layers, filters, and masks.

Although this is an open-source program, it can be supported by purchasing it from the Microsoft Store.

Key features of Krita:

  • Good value for the included features.
  • Excellent brush engines and painting tools.
  • Highly customizations available.
  • Easy to use interface.

Krita

Your symmetry drawings can be created using this high-quality software that also comes with other fantastic drawing features.
Check price Visit Website

Autodesk SketchBook – Streamlined UI design

drawing software for Manga

Autodesk SketchBook is a software that offers some pretty impressive features that you can benefit of.

In terms of symmetry drawing this tool is the perfect choice for it. You can use the integrated symmetry option and have the software mirror what you draw.

There are several types of symmetry that you can choose from, depending on what you are drawing.

Autodesk SketchBook is a software that comes with a huge pallet of brushes, that include pencil, pen, and marker brush types for drawing.

Key features of Clip Studio Paint:

  • Streamlined UI design to reduce menu clutter.
  • A drawing engine that supports 100 Mpx canvas.
  • Stylus Responsiveness window for stylus pens.
  • Sketchbook’s Layer Editor includes layer tools.

Autodesk SketchBook

Autodesk SketchBook is the perfect choice for symmetrical drawings and it can also be used on tablets.
Check price Visit Website

With the increased number of digital offers, spotting the right symmetry drawing software can be challenging at times.

We hope that you will find the right software based on your needs in our article. If you have additional recommendations, please let us know about them in the comments section below.

What is TWINUI in Windows 10? [Complete Guide]

Windows 10 is filled with programs and files and data libraries that are both actively used by the OS, or just leftovers from previous incarnations, like Windows 7 or Windows 8.

Because of this, users may sometimes stumble upon programs that they can’t properly identify, and they end up wondering whether it actually serves a purpose, or whether it’s just a virus taking up memory.

One such program is TWINUI, and we will be discussing what it is, where it came from, what it does, whether it is harmful or not, and if you should remove it.


What is TWINUI?

Those of you that are more curious in nature may have stumbled upon a program called TWINUI, especially when opening links and files.

Many users often think that TWINUI may be an email client or a PDF reader, but for those of you asking yourselves What is TWINUI?, the answer is simple: It is a core component of the Windows shell.

This component has been available since Windows 8 when they first introduced the concept of tablet-mode to the Windows OS.

In fact, TWINUI actually stands for Tablet Windows User Interface.


Is TWINUI a virus?

While the question itself is understandable, the short answer would be No, TWINUI is not a virus or malware of any kind.

In fact, it is actually a system of libraries that is part of the Windows Shell, and it mainly handles the opening of files and links for other programs.

This confusion further stems from the fact that this system of libraries hasn’t been properly named, and anyone that stumbles upon it may understandibly think that it may be a virus.

Another reason why many users may mistake TWINUI for a virus is that they may end up seeing the name when opening a PDF file from their browsers.

A second scenario where a user may seem TWINUI is when they click on a mailto:, call:, or another protocol link recognized by the Windows app launcher.

The third scenario that may make users question the legitimacy of TWINUI is mostly caused by a Windows 10 UI error where all of your program defaults have been reset to show TWINUI as the file opener.

This issue is usually caused by a registry corruption, and the only way to fix it is to either perform a backup since before the corruption occurred, or use a registry repair tool.


How do I access TWINUI?

  1. Press Start.
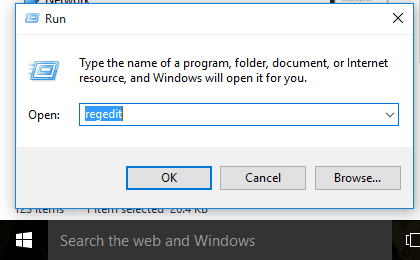
  2. Type in run to open the Run console.
  3. type in regedit and press Enter to open the Registry Editor.
  4. Look for the twinui.dll library, and check out all of its components.

By doing so, you will notice that all the function names within this library refer to Tablet Windows UI or Touch Windows UI, both of which are clear signs of the duality of Windows’ desktop and tablet mode existing side-by-side within the same PC.


Should I remove TWINUI?

If for some reason the above-mentioned solutions don’t work, removing TWINUI entirely from your PC will do the trick, and there aren’t any long-term consequences or drawbacks either.

  1. Press Start
  2. Type in PowerShell and open PowerShell with elevated rights
  3. Insert the following line:Get-AppxPackage *Maps* | Remove-AppxPackage
  4. Once this is done, press Start and open the Settings menu
  5. Go to App, and then select Default App
  6. You will notice that your file default App is now blank.
  7. Click the button and choose a new default program to take its place.

This wraps up our article about TWINUI, and we hope that after you finished reading, you know more about the app, and whether or not you should keep it on your PC.

Let us know if you found this article helpful and whether we should write more like this by leaving your feedback in the comments section below.

5 Best PS4 Gaming Headset Under 100$ [Budget-Friendly]

Having a PlayStation 4 is a great way to play games while sitting on your couch, alone or with your friends.

While a modern TV comes with built-in speakers, sometimes people want higher-quality audio, so they look for a gaming headset.

Some also want to communicate with their teammates, meaning they need a headset that has an included microphone.

Fortunately, there are many products out there suited for everyone. This article will show you a list of the best headphones you can get for under 100$.

What are the best PS4 headsets under 100$?

Turtle Beach Recon 70P

  • Lightweight design for long gaming sessions
  • High quality 40 mm speakers
  • Multiplatform compatibility with PS5, PS4, Xbox, Nintendo, and PC
  • Underwhelming bass

Our first headset is the Turtle Beach Recon 70P, that comes with an included retractable microphone, and leather earmuffs.

The headset is a solid choice if you’re on a tighter budget, offering comfortable ear cups, decent sound when gaming, and a clear-sounding microphone. These headphones are wired and have stereo mode, allowing you to hear distinct sounds from all directions.


Turtle Beach Stealth 600

  • Latest headset firmware available at Turtle Beach website
  • 15 hours of battery life
  • Amazing sound quality
  • Deep bass
  • Superhuman Hearing Function that enhances the mid and low sounds
  • Mediocre build quality

Our premium choice of this list is the Turtle Beach Stealth 600, a wireless gaming headset with a flippable microphone. The small wireless adapter doesn’t stand out, and it has low latency so there is no delay between sounds.

These headphones were made especially for PS5 and PS4, and they include rechargeable batteries. In addition, the headband is covered in a leathered cushion, and the hearing pads are covered in a mesh fabric which manages the heat well during long gaming sessions.


HyperX Cloud

  • 53mm drivers provide enhanced bass-reproduction
  • Headphone Frequency response is 15Hz–25,000 Hz
  • 50Hz-18,000 Hz microphone frequency
  • Detachable, noise-canceling microphone
  • HiFi capable
  • Absence of EQ controls

The HyperX Cloud is an extremely affordable, high-quality wired stereo headphones that are Officially Licensed for PlayStation. The set is equipped with soft memory foam cushions, and the smooth faux-leather headband fits any head.

The headset has 53mm drivers, creating an excellent sound with clear mids and highs. Moreover, the slim and minimalist design makes the headphones light, which is perfect for long gaming sessions.


ASTRO Gaming A10

  • Memory foam ear-cushions for extended comfort
  • Immersive and accurate audio
  • Durable anodized aluminum headband
  • Adjustable, noise-canceling microphone
  • No simulated surround sound

The Astro Gaming A10 is a fantastic headset for its value. Although it is an entry-level headset, it delivers powerful highs and solid low sounds. Moreover, it is great for competitive games where you need to hear your enemy’s footsteps.

The headset is relatively small and slim, so the ear cups fit on your ears, but they are comfortable even after wearing them for a long time. Lastly, the microphone is retractable.


RUNMUS Gaming Headset

  • 50mm neodymium driver built-in each ear cup
  • Large, over-ear cups
  • High-end noise-canceling
  • RGB lights can only be used with the USB adapter

The RENMUS Gaming Headset is our RGB choice, featuring a bulky and sturdy look.

These headphones are big, but they are made out of light, flexible plastic. The ear cups are made out of memory foam and the rest band sits comfortably on your head.

The headphones are equipped with a surround sound system and high-quality audio drivers for the best musical and gaming experience. In addition, the microphone is adjustable and it does not pick up random noises.


All of the aforementioned headsets will be perfect for your PS4, so make sure you check them all out and buy the one that you like the most.

If you have something to say in regards to PlayStation headphones, feel free to tell us in the comment section below.

Microsoft’s surprise funding of climate change denial campaigns in 2020 uncovered

Once again, Microsoft has been caught espousing a progressive and idealistic position while traversing in political opposition financially.

Last week Microsoft seemingly put a button on the issue of how and where it puts money in politics with its new Microsoft Corporation Stakeholders Voluntary PAC (MSVPAC). The change in strategy and policy came after the company was forced to re-evaluate donations to representatives involved or associated with the rhetoric or actions that led and resulted in the insurrection at the US Capitol on January 6, 2021.

However, journalist Emily Atkin over at HEATED points out that the change interestingly omits any acknowledgment of Microsoft’s financial culpability in aiding some of the same people into re-election who also wade in climate denial prior. While giving credit where credit is due, Microsoft may have suspended donations to individuals and parties that have publicly denied the results of the 2020 presidential election but the company was also busy funding many of those individuals’ re-election campaigns as they also denied climate change as late as November 2020.

Using data obtained from OpenSecrets.org Atkin and crew were able to uncover where Microsoft’s money went in 2020 and surprisingly $200,000 of it went to proudly outspoken climate deniers despite Microsoft championing itself as an industry leader in fighting for climate justice and sustainability.

For those interested, the breakdown is as follows:

  • $25,000 to Sen. Mitch McConnell (R-KY)
  • $12,500 to Sen. John Barrasso (R-WY)
  • $10,000 to Sen. Roger Wicker (R-MS)
  • $10,000 to Sen. Steve Daines (R-MT)
  • $10,000 to Sen. John Hoeven (R-ND)
  • $10,000 to Sen. John Thune (R-SD)
  • $10,000 to Sen. Roy Blunt (R-MO)
  • $9,000 to Sen. Mike Lee (R-UT)
  • $7,500 to Sen. Kevin Cramer (R-ND)
  • $5,000 to Sen. Todd Young (R-IN)
  • $5,000 to Sen. Rand Paul (R-KY)
  • $30,000 to Steve Scalise (R-LA)
  • $25,000 to Kevin McCarthy (R-CA)
  • $20,000 to Kevin Brady (R-TX)
  • $10,000 to Marsha Blackburn (R-TN)

When asked, on several occasions, about the issue, Microsoft has given a similar statement that echoes company president Brad Smith’s original PAC defense of essentially, they are paying to play.

We recognize that to make progress on the issues that matter to our customers and to our business, we must engage with candidates and officeholders who hold a range of views. Given the breadth of our policy agenda, it’s unlikely we’ll agree on every issue, but we’ve learned that engagement—even when individuals hold different positions—is an essential part of achieving progress.

In Microsoft’s defense, we don’t know what sort of conversations were had through this form of “engagement” and how successful Microsoft has been in advancing climate change policies with these representatives. However, it should be noted that back in 2015, several of the recipients of Microsoft “engagement contributions voted “no” on an amendment declaring climate change a reality. Since voting no, many of the listed recipients of Microsoft’s “engagement” donations continue to hold very similar beliefs and public stances against pushing a climate change agenda or even admitting that it’s a reality.

As of now, Microsoft has suspended all of its political contributions for 2020, but if and when the company lifts its ban and starts “engaging” with political parties and representatives again, will it take into consideration the lack of legislature brought forth by individuals benefiting from its 2020 re-election donations? When asked about this specific issue, the company couldn’t be reached for comment. We’ll update when there is more information from Microsoft.

100% FIX: VPN Is Not Working on Windows 7 Computers

Are you having issues with getting your VPN to work with your Windows 7 PC? We have the best solutions for you.

Windows users reported having a problem with the VPN not working with their Windows 7 PC. The reasons for this problem vary. However, we have compiled the following fixes applicable.

What to do if VPN isn’t working on Windows 7?

1. Change your VPN


While Windows 7 might not be the latest and greatest OS anymore, it is still a popular choice for users worldwide.

You will need a strong tool to protect your privacy and secure your data, and PIA VPN is perfectly suited to grant you the security you seek on Windows 7, 8, and 10 running devices.

Supporting all the major protocols like OpenVPN, PPTP, IPSEC/L2TP, and SOCKS5 (Proxy), Kape Technologies-owned Private Internet Access offers you the highest level of encryption via secure VPN tunnels.

Speaking about tunneling technology, Private Internet Access uses a global VPN Tunnel Network powered by multiple gateways with worldwide access and unlimited bandwidth for top speed.

Do not believe that this powerful VPN is all about speed – high privacy, and enhanced security are also privileged through IP cloaking, anonymous browsing, and a strict no-logs policy.

Private Internet Access

When it comes to your privacy, there is no room for compromise. Pair your Windows 7 PC with PIA VPN.
Free Trial Visit Website

2. Change your Internet connection

Windows users reported that limited/inactive internet connection can cause the VPN not to work with Windows 7. Hence, you may consider changing your Internet connection and try to use the VPN afterward.

For instance, if you are using a dialup modem internet connection, then you may need to consider changing your Internet connection mode to LAN, broadband or Wi-Fi connection, or any other internet connection modes available to you.

Furthermore, test your internet connection by disconnecting from the VPN service and try to access any website on your browser to see if it works. If the problem persists, proceed to the next method.


3. Check your regional Date and Time Settings

Windows 7 users reported that their VPN doesn’t work with their PC because of the incorrect date and time settings. Check the date and time settings to ensure they are correct.

Disable automatic update of date and time using the Internet, and set the date/time parameters manually. In addition, you should also consider changing your region/location to reflect the selected server location on your VPN settings.

4. Temporarily disable your security software

Some antivirus programs may block your VPN connection. Hence, you may need to temporarily disable your antivirus or firewall so as to be able to use it on your Windows 7 PC.

However, some Antivirus programs have a temporarily disable protection option which you can use while others do not.

Alternatively, you can also enable the VPN software in the Windows Firewall. Here’s how to do this:

  1. Go to Start > Type Allow a program through Windows firewall and then hit the Enter key
  2. Click on Change Settingsvpn not working windows 7
  3. Now, click on Allow another programvpn not working windows 7
  4. Select the program you want to add or click Browse to find the VPN software, and then click OK
  5. Check if you can connect to your VPN

Note: Check your IP address for information such as your city or region (country) next to the location you selected in the VPN windows.

You can use a web service such as IPLocation and WhatIsMyIPAddress to check your IP address location.

5. Connect using Windows feature

Another way to resolve the VPN not working with Windows 7 problem is to connect manually using the Windows VPN feature. Here’s how to do this:

  1. Press the Windows key, type VPN, and then hit the Enter key.
  2. Now, enter the address of your VPN provider in the Internet Address box. (You can enter an address like vpn.windowsreport.com or a numerical IP address, depending on the server information your VPN provider gave you.
  3. Enter a Destination name (VPN connection name).vpn not working windows 7
  4. Now, enter your VPN username and password given to you by the VPN provider.vpn not working windows 7
  5. Tick the connect now option and follow the prompts

Note: Furthermore, once connected, you can click the network icon in your system tray to view your VPN connections.

While connected to a VPN, all your network traffic will be sent over it. You can connect add more VPN connections to your VPN connection list.

6. Flush the DNS/Clear cache

Another way of fixing the VPN problem is by flushing your DNS and clearing your web browser’s cache. DNS entries from your Internet Service Provider may be wrong.

Hence, you need to flush your DNS and clear your web browser’s cache afterward. Here’s how to do this:

Step 1: Flush the DNS

  • Go to Start > Type command prompt
  • Right-click Start and select Command Prompt (Admin)
  • Type ipconfig /flushdns and press Enter. You should get a confirmation that says: Windows IP Configuration Successfully flushed the DNS Resolver Cache

Step 2: Clear Web Browser Cache

  • Launch your web browser e.g. Microsoft Edge
  • Press Ctrl + Shift + Delete to access the Clear recent history dialog box
  • Under the Time range to clear drop-down menu, select Everything
  • Make sure to check the Cache box. Click on Clear Now.

Note: Ctrl + Shift + Delete can also be used to clear the cache on other web browsers such as Google Chrome, Internet Explorer, Opera, Microsoft Edge, etc.


7. Run Windows Update

Another way of fixing the VPN not working on Windows 7 is by updating your Windows to the latest version. The latest Windows updates improve the system’s stability and fix various issues you may encounter.

Follow these steps to update any Windows OS:

  1. Go to Start > type windows update in the search box and then click on Windows Update to proceed
  2. In the Windows Update window, check for updates and install the available updates
  3. After the update is complete, restart your Windows PC

8. Reinstall the VPN client

In addition, you may consider reinstalling your VPN client, and then try to use the VPN again. Here’s how to do this:

  1. Go to Start > Control Panel
  2. Select Uninstall a program under Programs menu
  3. Find your VPN from the list of programs and select Uninstall
  4. In the Setup Wizard, click you’ll get a notification after a successful uninstall, so click Close to exit the wizard.
  5. If the VPN is still listed as available after uninstalling it, go to Start > Run
  6. Type ncpa.cpl and press Enter to open the Network Connections window
  7. Under Network Connections, right-click on the WAN Miniport labeled your VPN
  8. Select Delete
  9. Go to Start > type Network Connections, and press Enter. Right-click a VPN connection and use the Delete option.
  10. Select VPN. If you see your VPN as available, delete it.

After complete uninstall, proceed to install the VPN client on your PC, and then use it afterward.


9. Check your network connection settings

If VPN isn’t working on Windows 7, try changing your network settings. To do that, follow these steps:

  1. Open Control Panel and navigate to the Network and Internet
  2. Now click on Network and Sharing Center > Manage network connections
  3. Go to Organize > Layout > Menu Bar. Now select Advanced > Advanced Settings
  4. Navigate to the Adapters and Binding tab
  5. In the Connections list, reorganize the connections and make sure that your primary connection is on top of the list
  6. Click OK to save changes

After making these changes, check if the problem is still there.

The solutions listed above should fix your VPN not working with Windows 7 problem. However, if the problem still persists, you may consider contacting your VPN provider’s customer support center.

Let us know if any of these methods worked for you by leaving a comment in the section below.

Cisco AnyConnect install issues on Windows 10/11 [SOLVED]

While it is a good virtual private network software, many users reported that Cisco Anyconnect won’t install on their PC at all or that Cisco Anyconnect installation failed on Windows 10. This issue can occur because of the fact that the Cisco VPN service was last updated in the year 2011.

Even though the latest version of this software is not natively compatible with the Windows 10 operating system, in this article we will explore a way to make it run on your Windows 10 PC without any issues.

Please make sure to follow all the steps presented in this article in the order that they are written for the best results.

Cisco VPN Client was officially abandoned as a project in 2011, and you might find yourself unable to install Cisco Anyconnect.

To avoid any potential problems, try downloading and installing the Cisco VPN client from a third-party source.

What can I do if Cisco VPN won’t install on Windows?

How to install Cisco on your Windows 10 PC

Note: If you recently upgraded from Windows 7 or Vista to Windows 10, then it is recommended that you uninstall SonicWALL Global VPN Client and Cisco VPN Client by searching for them in Control Panel >Add or remove program window.

If you are using a clean install of Windows 10, then you are ready to start setting up the Cisco VPN.

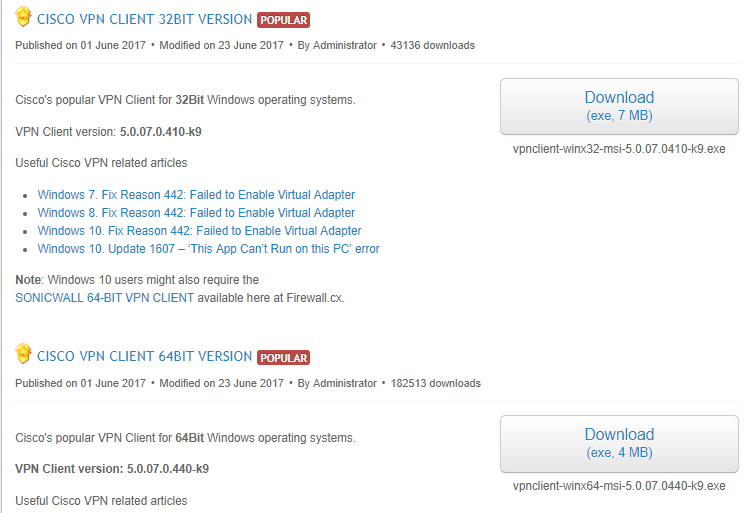
  1. Click here to download the 32bit version of the Cisco VPN Client, and here for the 64-bit version.download cisco VPN Cisco VPN won't install
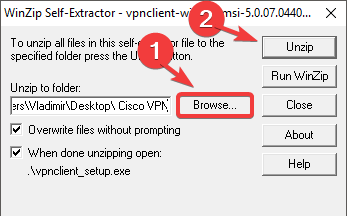
  2. Run the .exe file you downloaded, select Browse and choose a specific location on your hard-drive for the files to be extracted (in this example image, we created a folder on the Desktop called Cisco VPN to which we extracted the files from the .exe).unzip file Cisco VPN won't install
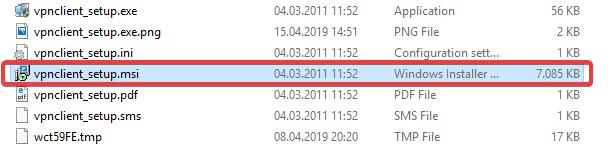
  3. Navigate to the location in which you unzipped the folder, and search for the vpnclient_setup.msi file.vpclient setup Cisco VPN can't install windows 10
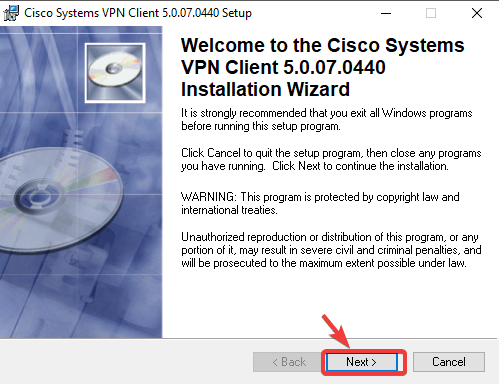
  4. Double click on the installer, and select Next.cisco systems VPN client setup Cisco VPN won't install
  5. You are now done. The installation process will start normally and you will be able to follow the on-screen instructions

Install Private Internet Access

Private Internet Access

While the Cisco VPN Client was a great solution back in the days, it is safe to declare that it is not quite cutting-edge technology nowadays.

In fact, CISCO Systems has completely shut down support for this product since 2014 and no updates were released for this product since 2012, thus it is no wonder that error messages like there is a problem with this windows installer package appear.

Running obsolete software can cause more damage than you might think, which is why we recommend a modern VPN client like Private Internet Access.

Switching to a world-leading VPN client like Kape Technologies owned PIA can significantly improve your online experience by streamlining your connection, reducing loading times, and enhancing your download speeds.

With an impressive network of global gateways, you will never have to worry about your connection to worldwide servers not being successful. Plus, your traffic data will be routed through secure VPN tunnels and protected by the best-in-class encryption technology.

Private Internet Access

Private Internet Access

Cisco Anyconnect won't install? Go for a more modern, more friendly, more performant VPN like PIA!
$2.69/mo. Buy it now

In this article we explored the best way to install Cisco VPN on your Windows 10 PC. We are sure that the solution provided here will help you bypass any installation issues with this software.

If the issues persist, you might have to remove and download Cisco AnyConnect on Windows 11 again.

Please feel free to let us know if this method worked for you by using the comment section found below.

FIX: Hulu error code BYA-403-011 [6 easy steps]

Hulu is a popular American service video subscription on-demand, owned by The Walt Disney Company, and NBC Universal.

Their subscription service and live TV are their most popular products in the United States. Recently, many users have encountered the Hulu error code BYA-403-011.

As a premium streaming service, Hulu grants its customers access to shows from every major U.S. broadcast network.

The error code we discuss in this article will cause the playback to stop because an anonymous proxy tool is used. Many users have complained precisely about this error on the Hulu forum:

I live in the United States and whenever I try to watch anything on Hulu, I get the anonymous proxy error. I have tried my Visio smart TV and my Roku.

Please help.

Read our following section as we prepared several solutions that will solve the Hulu error code BYA-403-011.

How can I fix the error code BYA-403-011 on Hulu?

1. Install a reliable VPN program

Hulu provides access to residents from the United States of America and Japan. However, this doesn’t mean you shouldn’t be able to watch your favorite movies and TV programs from another location.

If you are at a location where Hulu is not available and you want to use your customer account and watch some movies, then you can use a VPN program.

To be honest, we’ve realized that, with the world rapidly moving toward digitalization in almost every aspect of life, a reliable VPN service has become a must-have for protecting one’s identity online.

Because hackers look for any opportunity to exploit a person’s vulnerability, a VPN can safeguard you against cyberattacks, especially if you stream on a regular basis.

Of course, even if a VPN allows you to bypass the IP location, you will still need a paid membership to Netflix or Hulu to access their libraries.

In general, VPN services strive to improve your experience, and some of them can increase your download speed, so it is safe to rely on a trustworthy VPN service.

2. Restart your router

  1. Press the ON-OFF button from the back of your router.
  2. Disconnect the power cable. 
  3. Wait for one minute.
  4. Try again to stream content from Hulu.

This allows your network device to assign new TCP and IP data while keeping the custom settings you have previously set for your router. 

After you have restarted your router and have Internet access again, verify if the error code BYA-403-011 on Hulu still appears.

3. Reset your router

  1. Locate the RESET button on the back of your router, and press it for 10 seconds.
  2. Release the button when all router LEDs are flashing at the same time.

This solution is useful if restarting your router had not solved the problem, and its origin lies in one of the router’s settings. When you reset your router, this will return its settings back to the factory state.

 You must understand that whenever you restart your router, the custom settings you have applied to your device will be erased.

This means you will lose your stored PPPOE credentials, the forwarded ports, and every other setting you have previously created.

4. Disable the Proxy server

  1. Press Windows + R keyboard shortcut to enter Run, and type inetcpl.cpl inside the text box.Fix the Hulu error code BYA-403-011
  2. Press Enter for Internet Properties and access the Connections tab.
  3. Click LAN Settings and navigate to Proxy server.
  4. Uncheck the option Use a proxy server for your LAN box.Fix Hulu error
  5. Reboot your computer.

Hulu has a protection system that will treat as suspicious any software used to route the online traffic to a central server. This means that Hulu may consider that certain connections must be terminated.

In this regard, if you are using a proxy server, there are great chances Hulu will terminate that connection.

After you have used this solution and disabled that server, your error code BYA-403-011 on Hulu should not appear anymore.

5. Uninstall the VPN client

  1. Press Windows key + R to open Run, then enter appwiz.cpl in the text box.How to fix Hulu error
  2. Press Enter to open Programs and Features.
  3. Navigate to User Account Control (UAC) and click Yes.
  4. Return to Programs and Features and find the VPN client.
  5. Right-click on the VPN client and select Uninstall.
  6. Stream again content from Hulu.

You must grant administrative privileges to the UAC option and uninstall the VPN client that may be incompatible with Hulu.

After uninstalling it, make sure there are no files left in its installation folder, as they may cause the error to reappear.

Use this solution and at the end, make sure to verify if the error has disappeared.

6. Contact your Internet Service Provider

In case your ISP gives its users dynamic IP addresses from a specific set, there are chances you might have been given one that belonged to a previous Hulu user.

Also, if that user was suspected of violating Hulu’s Terms of Service, then his IP was blocked. In this case, simply contact your Internet Service Provider and ask them to assign you a new IP range.

The Hulu error code BYA-403-011 is an issue you might encounter if you use this online streaming platform.

The first possible cause for that is if your Internet Service Provider assigned you with a Dynamic IP. If you restart or reset your router, then he will provide you with a new IP address.

Also, keep in mind that Hulu has a tendency to block traffic that comes from a VPN. This detailed guide reveals that ExpressVPN users often have to deal with this issue too.

In this case, just try out our recommended tool and your problem should be solved: Private Internet Access.

You can also follow our other solutions, then leave us a comment to let us know which one worked for you.

Fix: VPN error 619 [connection failed, stuck on login]

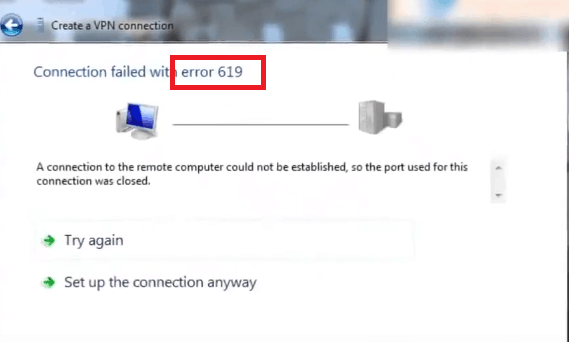
VPN PPTP error 619 happens to be the most common error encountered on Windows devices when attempting to connect to a virtual private network. The message accompanying the error code states that a connection to the remote computer could not be established.

The error is also extremely unpredictable, meaning you never know when it is going to come up.

However, the good thing is that the error isn’t all-pervasive, meaning there sure are ways to defeat the same.

However, before we get about remedying the error, lets first find out what causes it in the first place. It crops up when an active VPN suddenly gets disconnected from the VPN server, or when the computer is attempting to establish a new connection to the VPN server.

That also is the reason the error shows up after you have clicked on the Connect tab. Post the usual verifying username and password message, the 619 message appears, consequently, you get stuck on verifying username and password VPN error 619.

That is the clearest sign of things having gone awry during the sign-in process, which leaves you with the following options to help mitigate the issue.

How can I fix Windows VPN failed with error 619?

1. Re-install VPN application

One option will be to uninstall the VPN application followed by reinstalling the same again, complete with the specific configuration setting applicable to the particular VPN client.

Make sure you are installing the latest version of the software.

As an alternative, you could simply choose to replace your current solution with a premium VPN client like Private Internet Access.

Private Internet Access

While there are many free options to choose from, none of them will offer you the same kind of protection, stability, and privacy that a trustworthy, professional VPN brings.

⇒ Install Private Internet Access

You will be able to route your traffic through highly-encrypted VPN tunnels using the most secure protocols and leave no trace of your online activities whatsoever thanks to a strict no-logs policy and IP cloaking function that anonymizes your browsing.

Protect your entire network and do not compromise on the speed, bandwidth (which is unlimited, of course), or privacy with this perfectly balanced VPN that guarantees not to break the bank.

Private Internet Access

Private Internet Access

Stuck on verifying username and password? Get VPN error 619 out of your way for good with PIA!
$2.69/mo. Buy it now

2. Prevent VPN connection clashes on your computer

The error might show up if you have multiple VPN clients installed on your PC. Multiple instances of the application running simultaneously create clashes.

You can restart your PC to prevent all VPN applications from running, or, as an extreme but effective step, uninstall all those apps that you do not need, keeping only the one that provides the most reliable service.


3. Disable firewall or anti-virus programs

You might be needed to temporarily disable any firewall or antivirus programs running on your PC as these often cut off access to the VPN ports.

4. Check VPN with another PC

You can check the VPN on another computer or device that is connected to the same network. If error 619 persists, then the issue is with the network itself as it is stopping access to the VPN.

On the whole, error 619 can also be most unpredictable in that network connectivity issues too can also be the likely reason for it to appear.

The above-mentioned steps though will help you mitigate the error in most of the cases.

5. Configure PPTP

Error 619 can also be encountered when there is a misconfiguration regarding the PPTP. If you are unfamiliar with the PPTP settings, you can check out the Microsoft support page and follow the recommended steps.

Last but not least, you should also consider unplugging your router. Wait for 30 minutes and then plug it back in. This will reset your DSL line connection.


Have you already bumped into this error? If so, don’t be shy to grab one of the solutions above and fix it pronto.

Let us know how it worked for you in the comments section below.

VPN Unlimited Not Connecting [Fixed for good]

VPN Unlimited is a secure and fast VPN service that provides unlimited access to any web content, so you can stream your favorite content like shows and movies from any location you want.

This VPN, by KeepSolid, gives you the peace of knowing your browsing is encrypted and private, yet still inexpensive and flexible, with many advanced security features. Additionally, it has solid speeds and 400 servers across 67 locations.

One thing some users have queried is when they encounter the VPN Unlimited Error: No internet connection message. You could choose to restart your computer or your VPN connection, but, there are solutions listed below that could also help resolve the issue.

How can I fix VPN Unlimited error no internet connection?

1. Try connecting to another VPN Unlimited Location

If you can access the internet when disconnected from VPN Unlimited, but cannot connect to a particular server, choose a different server location from the list.

Did this fix the VPN Unlimited error? If not, try the next solution.

⇒ Install Private Internet Access

Speaking about changing servers, you could also choose to upgrade to a premium VPN like Private Internet Access that boats an impressive network of 3292+ servers strategically placed across 46 countries worldwide.

Having such a massive collection of gateways at your disposal will undoubtedly eliminate issues like buffering, slow connection, ISP throttling, or proximity to servers-triggered problems.

With PIA, you get to pick the server closest to your location, which streamlines your connection, enjoy ultra-fast download speeds, and unlimited bandwidth, while your online identity, location, and traffic data are kept anonymous, secured with the highest level of encryption and private from curious eyes including governmental agencies or your ISP.

Private Internet Access

Private Internet Access

VPN Unlimited is not connecting to servers? Don't change the server only, go for a truly limitless VPN instead!
$2.69/mo. Buy it now

2. Check your IP address

If VPN Unlimited error no internet connection is displayed on your computer, you can start by checking your IP address for information such as your country or city, next to the location you selected when you connected with VPN Unlimited.

If it shows a location near you, it means you’re not connected to a server location.

Disconnect and try to connect again and see if the error goes away.

3. Check your internet connection

You can try to access a website without VPN Unlimited being on and see if it works. If you cannot access the internet even when the VPN is disconnected, then you need to check your connection for issues.

You can also check with your internet service provider whether it is a problem from their end.

4. Change the protocol

Your device connects to VPN Unlimited servers using VPN protocols, and mostly the default one is the UDP protocol, which is usually blocked in some countries.

You can try to change the protocol, which also helps you achieve faster connection speeds, but see if this helps restore the internet connection.

If you want better performance, choose the OpenVPN TCP first, then L2TP, and finally PPTP protocols in that order. However, most VPN service providers do not recommend using PPTP unless it is very necessary to do so, as it offers little security compared to the other protocols.

5. Manually configure DNS settings

Your computer may not automatically connect to VPN Unlimited’s DNS servers, so you need to configure it with VPN Unlimited DNS servers’ IP addresses.

By manually configuring your computer with other DNS server addresses, you will be able to connect to the internet with faster speeds, and even access sites with geo-restrictions on their content.

Here’s how to do it in Windows:

1. Open Network Connections settings

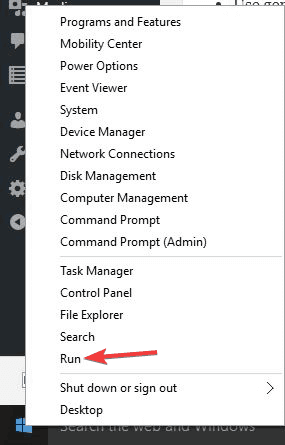
  • Right-click Start and select Run

VPN Unlimited error no internet connection

  • Type ncpa.cpl and click OK
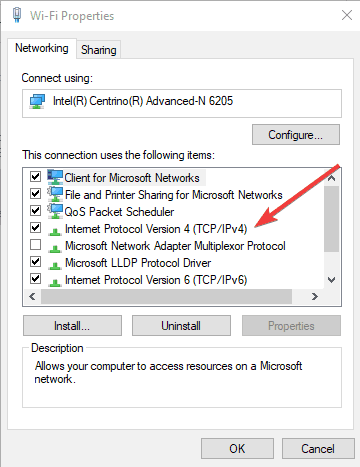
  • In the Network connections window, find your usual connection, either LAN or Wireless network connection
  • Right-click the connection and select Properties

2. Set the DNS server addresses

  • Double click Internet Protocol Version 4 (IPv4) or just Internet Protocol

VPN Unlimited error no internet connection

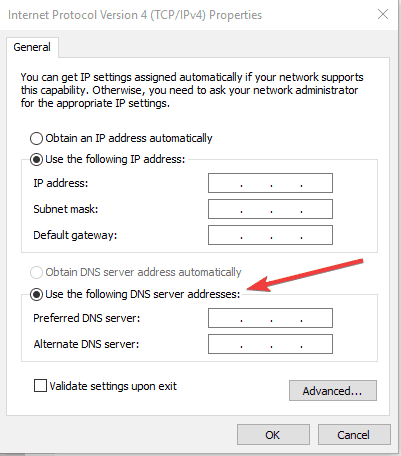
  • Select Use the following DNS server addresses

VPN Unlimited error no internet connection

  • Type these Google DNS server addresses

Preferred DNS server 8.8.8.8

Alternate DNS server 8.8.4.4

  • If Google DNS is blocked, try the following:

Neustar DNS Advantage (156.154.70.1 and 156.154.71.1) enter and press OK

Level3 DNS (4.2.2.1 and 4.2.2.2) enter and press OK

Once you have set the open network connections and DNS server addresses, you can then set the VPN Unlimited DNS settings based on the instructions or prompts.

6. Error 809

This error is usually displayed as The network connection between your computer and the VPN server could not be established. By default, Windows does not support IPSec NAT-T security associations to servers located behind a NAT device.

Because of the manner in which NAT devices translate network traffic, you may experience unexpected results when you put a server behind the NAT device and use the IPSec NAT-T environment.

Here’s how to fix this:

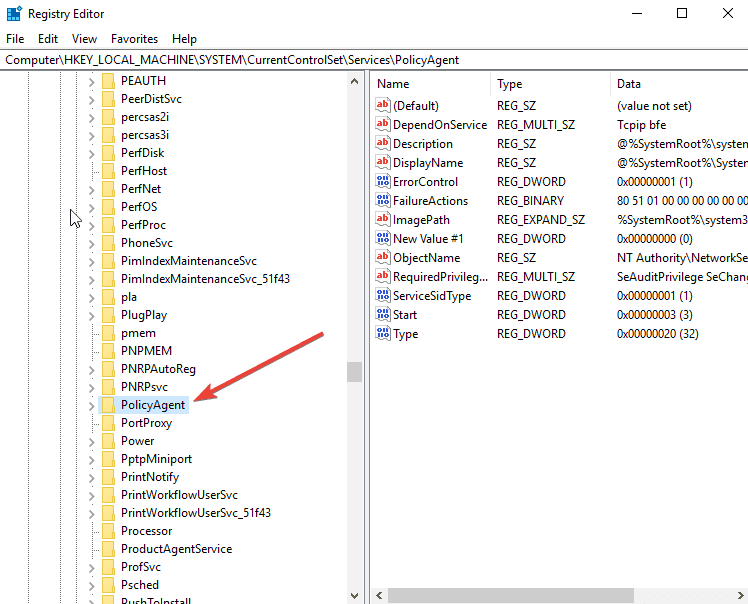
  • Right-click Start and select Run
  • Type in regedit
  • Locate the entry:
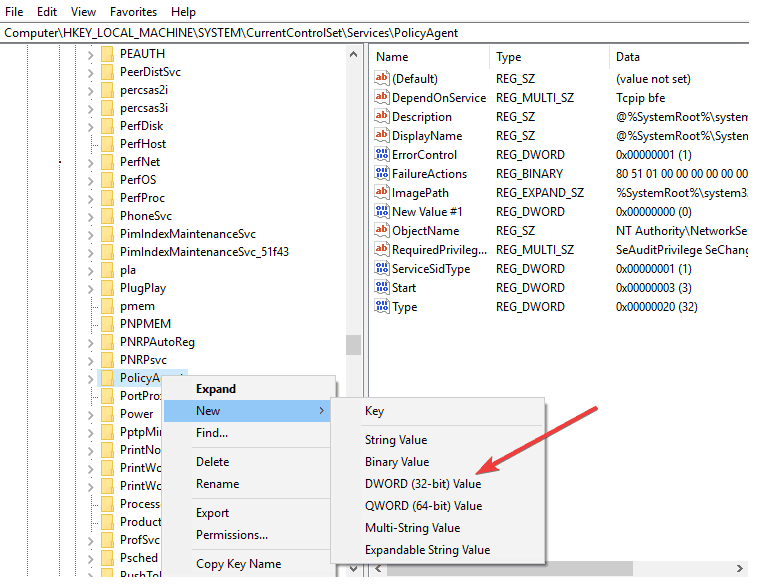
    HKEY_LOCAL_MACHINESYSTEMCurrentControlSetServicesPolicyAgent

VPN Unlimited error no internet connection

  • Right-click and create a new DWORD (32-bit) value

VPN Unlimited error no internet connection

  • Add AssumeUDPEncapsulationContextOnSendRule and save.
  • Modify the new entry and change Value Data from 0 to 2.
  • Restart your computer and test the connection

If you still cannot connect, try it with OpenVPN TCP / UDP protocols. Did this fix the VPN Unlimited error no internet connection? If not, try the final solution below.

7. Manually configure proxy settings

A proxy server is used to hide your real location so you can access the internet and other sites that would otherwise be blocked.

If you have internet connection issues, it is possible that it has been set to use a proxy server (a proxy is a go-between that is in the middle of your computer and VPN provider).

The first step is to make sure your browser is set to auto-detect proxy or no proxy, then use the instructions to manually configure proxy settings for your browser.

Here’s how to disable proxy settings for Internet Explorer:

  • Click Tools

VPN Unlimited error no internet connection

  • Select Internet Options

VPN Unlimited error no internet connection

  • Go to the Connections tab
  • Click LAN settings
  • Uncheck all the options except Automatically detect settings and click OK for all

VPN Unlimited errors can take many forms, including Protocol connection error VPN Unlimited, VPN Unlimited no internet connection, VPN Unlimited not connecting to server, VPN Unlimited connection profile missing, however, you should be able to fix them by following the steps above.

Let us know if any of these solutions helped you restore the VPN Unlimited connectivity, by leaving a comment in the section below.

Microsoft Teams Guest access comes now enabled by default

Microsoft made yet another step towards what they’re calling an inclusive meeting experience by enabling Guest access by default in Microsoft Teams.

Until a few days ago, this option was deactivated and any guest had to wait for an IT admin to enable it and allow newcomers to join.

The reason behind this move, according to Microsoft, is to align all the platform’s control settings, since this one was the only one left unmodified since the beginning.

Starting on February 8th we are turning on Guest access in Microsoft Teams by default for any customers who have not already configured this setting. This will bring the control for Teams Guest capability into alignment with the rest of the suite, where the setting is already on by default.

Not only joining Microsoft teams meeting as a guest is made easier with this move, but also collaborating on shared documents.


Security concerns over privacy

Guest Access microsoft teams

Of course, this move raised concerns among users about the security of shared documents and files within existing teams.

Consequently, Microsoft further explained that by enabling this feature, guests will indeed get access to individual teams and their SharePoint documents.

However, team manages still have to control their access to these documents, depending on their needs.

Furthermore, the change doesn’t affect users that already have the option set to On or Off. It addresses only new users and those who made no changes to the option and saw it as Service default.

If, on the contrary, admins want access disabled for guests, they can revert the change by going to Org-wide settings > Guest Access in the Teams admin center and adjust it accordingly.


How to customize guest access in the Teams admin center?

As mentioned, the recent change will only affect a guest’s general access to a team. Further on, admins will have to also set up what the guests can see or do.

So in Org-wide settings > Guest access admins need to tweak each option under Calling, Meeting, and Messaging tabs.

Consequently, the guest will only get access to the options that are turned on.

As expected, the recent change only refers to individual guests, not to entire domains.

We’d like to hear your opinion so share with us your take on this modification. Feel free to use the comments section.

FIX: Teams screen sharing not working on Windows 10/11

Microsoft Teams is a communication platform that allows people to stay connected all the time and become more organized.

In some instances, Windows 10 users have encountered the annoying Microsoft Teams desktop sharing not working error.

This means that when you use the app, you will not be able to share the desktop screen. Your audience will only see a black screen, which is far from the intended Microsoft Teams screen sharing the result.

This proves to be very annoying if you are a teacher who wants to share information with students if you work in the corporate industry, or even from home.

Several users have complained about the screen sharing issue on the Microsoft forum:

My TEAMS screen share stopped working a few weeks ago. When the desktop resolution is 3440×1440, my screen cannot be viewed. If I lower the resolution, then my screen can be viewed.

Help me, the TEAMS screen share is not working.

What can I do if Microsoft Teams screen sharing isn’t working?

1. Clear the Microsoft Teams cache

  1. Right-click on your Taskbar and choose Task Manager.
  2. Right-click on Microsoft Teams and select End Task.
  3. Click on the Start tab, then select Open the File Explorer.
  4. Copy and paste the location address in the search bar.
  5. Press Enter.
  6. Use the Ctrl + A command to select all files, right-click and choose Delete.
  7. Repeat previous steps for each of all folder locations shown below: %appdata%Microsoftteamstmp
    %appdata%Microsoftteamsdatabases
    %appdata%MicrosoftteamsGPUCache
    %appdata%MicrosoftteamsIndexedDB
    %appdata%MicrosoftteamsLocal Storage
  8. Launch Microsoft Teams and create or join a meeting.
  9. Share your screen with your chosen audience.

When your cache memory stores a lot of information, this decreases your computer speed. A corrupted Microsoft Teams cache occupies a lot of space, so it will be hard for your device to process screen-sharing data.

If you delete the cache data, then you will be able to perform troubleshooting when necessary. This operation increases the computer’s performance and decreases the web page loading time. 

2. Check for Microsoft Teams updates

  1. Click Start and open Microsoft Teams.
  2. Click on your Avatar tab, and then choose Check for updates.
  3. Launch Microsoft Teams and create or join a meeting.
  4. Perform the screen sharing procedure.

Is Microsoft Teams unable to see the shared screen? Well, the second step of this solution will perform a connection to Microsoft servers and search for any available patch updates.

If found, they are downloaded and then installed on your PC. Wait until the update procedure has been completed successfully.

You must install software updates, as they will include critical patches for security issues, improve software stability, and remove outdated features. Their purpose is to improve your user experience.

Also, an outdated MS Teams app will cause the Microsoft Teams screen sharing not working error to occur.

3. Customize Microsoft Teams Meeting Policies

  1. Open Microsoft Teams Admin Center.
    microsoft teams screen sharing freezing
  2. Type in your credentials in the login section.
  3. Navigate to Meetings. Fix issue Microsoft Teams screen sharing not working
  4. Select New Policies and then Add New Policy.
  5. Compose a new title and a concise description.
  6. Click on Next and navigate to Content sharing settings.
  7. Choose Entire screen for screen sharing mode and customize your settings.
  8. Select the Finish option.

This solution allows you to set rules for your MS Teams sessions and prevents the Microsoft Teams screen sharing issues that you’re worried about.

When you are the host that creates a meeting, this enables you to adjust the requirements for who and how can perform screen sharing. Usually, the issue appears when you try to share the desktop through the application.

For this reason, you must contact the admin to verify if the settings from MS Teams Admin Center permit you to share or not the entire desktop.

You can ask the host to create a new policy that allows you to share the entire desktop screen.

There is always a better approach to managing screen sharing, through a browser with Mikogo. There is no need to download the software; simply create an account and share your screen straight away.

Having a backup in case a program fails is always a good idea, therefore we created a guide for you with best telework software to help you further with your activities. 

The Microsoft Teams screen sharing not working issue is also reported on other operating systems. If you have this issue on Mac too, check out our dedicated guide right away.

If you clear your Microsoft Teams cache, update the app, or customize one of their Meeting Policies, this should ensure you have a pleasant and undisturbed working or teaching session.

Try out our solutions and leave us a message in the comments section to let us if they were useful to you as well.

Fix: VPN Error 734 PPP Link Control Protocol Terminated

Error 734 occurs for some users who try to utilize their VPNs with PPP dial-up connections. The full error message states, Error 734: The PPP link control protocol was terminated. Consequently, no VPN connection can be established.

That error can often be due to a misconfigured PPP dial-up connection. Below are a few Windows resolutions that might fix error 734 for most users.

How can I fix VPN error 734?

1. Deselect the Negotiate Multi-link for Single Link Connections option

This is the official Microsoft resolution for Error 734. Error 734 can often be due to the Negotiate multi-link for single link connections setting.

Thus, turning multi-link off can often fix this issue. Follow the guidelines below to disable multi-link for single link connections.

  • Press the Windows key + R keyboard shortcut to launch Run.
  • Enter ncpa.cpl in Run and click OK to open the Control Panel applet shown directly below.
  • Right-click the required dial-up connection and select Properties.
  • Select the Options tab.
  • Press the PPP button to open a PPP Settings window.
  • Deselect the Negotiate multi-link for single link connections option on the PPP Settings window.
  • Then press the OK buttons on both windows.

2. Use an alternative VPN

Speaking about Windows 10 compatible VPN clients, you might want to consider an upgrade over your current tool.

ExpressVPN is optimized for Windows 10 running devices and can handle PPP dial-up connections easily.

Beginning with the speed, Express VPN offers an impressive 83 Mbps down and 52 Mbp up on a 100 Mbps connection.

The privacy features include IP hiding, kill-switch, Netflix compatibility, the ability to download torrents over the P2P network, and servers in over 160 locations.

The company is located in the British Virgin Islands making it a safe place. It supports a highly secure AES-256 + OpenVPN protocol along with protocols like SSTP and L2Tp etc.

ExpressVPN

Enjoy using a VPN to its full potential and fix any VPN error.
Check price Visit Website

3. Select the Allow Unsecured Password option

The Error 734 error message also pops up when unsecured passwords aren’t enabled. Thus, selecting the Allow unsecured password option is another potential resolution (for XP users). This is how XP users can select that option.

  • Open the Start menu, and select Settings > Network and Dial-up Connections.
  • Then right-click the dial-up connection you need and select the Properties option.
  • Then select the Security tab, which includes a Validate my identity as follows drop-down menu.
  • Select Allow Unsecured Password from the Validate my identity drop-down menu.
  • Press the OK button to exit.

4. Adjust the Protocol Settings for (PPP) dial-up connection

  • Some users have confirmed that deselecting most of the protocol settings can fix Error 734. To do that, open the Run accessory.
  • Enter ncpa.cpl in Run, and press the Return key.
  • Next, right-click the dial-up modem and select Properties.
  • Select the Security tab on the Properties window.
  • Select Allow these protocols radio button.
  • Then deselect all the protocol checkboxes except Microsoft CHAP Version 2 (MS-CHAP v2). 
  • Windows XP users will need to click Advanced Custom Settings on the Security tab > Settings and then deselect all checkboxes except MS-CHAP v2.
  • In addition, make sure that the Type of VPN is configured to Point to Point Tunneling Protocol (PPTP).  
  • Click the OK button.

5. Switch off Windows Defender Firewall

  • In addition, switch off the Windows Defender Firewall to ensure that it isn’t blocking connections. Users can do that in all Windows platforms by entering firewall.cpl in Run’s Open text box.
  • Click Turn Windows Defender Firewall on or off to open the firewall settings below.
turn off firewall windows 10
  • Click both the Turn off Windows Defender Firewall radio buttons to switch off WDF.
  • Press the OK button to exit.

So, error 734 is more of a dial-up connection error than a VPN issue. These solutions might help you fix it so that you can utilize your VPN with PPTP.

Let us know how it worked for you in the comments section below.

How to enable full screen on Microsoft Edge? [Quick Guide]

Full screen mode is a feature that most browsers have nowadays, and it allows you better impressiveness into watching YouTube videos, or concentrating on work when using the browser.

Of course, how you access full-screen mode varies from browser to browser, with some browsers requiring a simple click of a button, while others need a combination of keys to work.

With that in mind, we will be looking over how you can toggle Microsoft Edge’s full-screen mode, so that you can enjoy using it distraction-free, with 100% of your focus directed at it.

The reason we chose Microsoft Edge is that it has a long history oh changes and overhauls, transforming from a simple Internet Explorer descendant to changing its architecture altogether.

That being the case, any possible combinations or key-strokes that you knew before therefore no longer apply.


How do I enable the full screen mode in Microsoft Edge?

Use your keyboard

  1. Open Microsoft Edge.
  2. Press F11.
    • You can toggle back to normal mode by pressing F11 again.

How do I fix Microsoft Edge if the full-screen mode doesn’t work?

1. Consider using a  different browser

As mentioned above, all browsers have a full-screen mode. So, if you can’t manage to make it work in Microsoft Edge, then maybe you should switch to a different browser.

If Chromium-based browsers are your thing, and you like modern looks and low-resource consumption, then Opera is the best choice for you.

It has all the tools Edge does, and more, including a  built-in VPN, and a far bigger extension library. To enable full-screen mode in Opera, simply open a new tab, and press F11 as well.

”Opera”

”Opera”

”Enjoy
”Download”
&aff_sub2=Native?utm_medium=native&ref=” current_url=”true” button_text=”Visit website” image=”https://windowsreport.com/wp-content/uploads/2020/07/Opera-CTA-210×160.png” ]

2. Reset Microsoft Edge

  1. Open Microsoft Edge.
  2. Press the three-dotted line in the top-right of the screen.
  3. Go to Settings.
  4. Select Reset Settings, and then choose Reset.
  5. Confirm your decision, and then restart your PC.

3. Reinstall Microsoft Edge

  1. Press Start.
  2. Type in Edge, and select the Microsoft Edge icon.
  3. Right-click the icon, and select Uninstall.
  4. Go to Microsoft Edge’s webpage, download the client and install it again.

By following these methods, you should now be able to enable full-screen mode in Microsoft Edge without any further issues.

Let us know what solution you used by leaving us your feedback in the comments section below.

[Solved] Couldn’t load plugin on Chrome error

Chrome and many other web browsers rely on plugins in order to work properly, but sometimes certain issues with plugins can appear. According to users, Couldn’t load plugin error appears in Chrome on Windows 10.

Most often, the error is caused by either the obsolete Flash plugin or by the PDF plugin. So here, we’ll be looking into solutions for these two.

Note: The Couldn’t load plugin (PDF) in Chrome on a Mac is equally frequent. Follow the same solutions as on Windows 10.


Quick tip:

The easiest way, although only a workaround, is to switch to an alternative browser.

This standalone, well-balanced, and feature-rich browser has evolved tremendously over the years and has managed to build quite a niche audience through a sleek, distinctive look and generous customization options that propel it to the higher end of the browsing segment.

It boasts countless personalization options such as themes, modes, display sidebar, an integrated VPN tool to protect data confidentiality while avoiding geo-restrictions, a battery-saver function, among others.

For sure, Opera detaches itself as a self-sufficient all-in-one app rather than just a browser.

”Opera”

”Opera”

”Struggling
”Free”
&aff_sub2=Native?utm_medium=native&ref=” current_url=”true” button_text=”Visit website” image=”https://windowsreport.com/wp-content/uploads/2019/05/Opera-1-210×160.jpg” second_button_url=”https://windowsreport.com/software/opera/” second_button_text=”Check out the full review”]

What can I do if Google Chrome couldn’t load plugin?

Couldn’t load Flash plugin

1. Disable Flash plugin completely

remove flash from chrome

As you might have heard, Flash is no longer supported by major browsers. Many video streaming services such as YouTube switched completely to HTML5.

So insisting on using Flash can actually cause errors such as the mentioned one. So the right thing to do is to disable the plugin completely.

To do that, simply go to the plugin section in Chrome and disable all instances of Adobe Flash. This will disable Flash completely on all websites.

Furthermore, you can also remove any traces of Flash using a tool from the Microsoft Catalog.


2. Check the Enhanced Mitigation Toolkit settings

Check the Enhanced Mitigation Toolkit settings
  1. Go to the Enhanced Mitigation Toolkit directory and run the EMT application.
  2. When the EMT app opens, click the Configure apps button.
  3. Locate Chrome.exe in the App Name column. Uncheck SEHOP boxes next to Chrome.exe.
  4. Click OK and close EMT. Start Google Chrome again and check if the issue is resolved.

Couldn’t load PDF plugin

1. Change Adobe Reader settings

change adobe reader settings
  1. Open Adobe Reader and go to Edit.
  2. Select Preferences, then Internet.
  3. Locate Display PDF in browser option and enable it / disable it.
  4. Refresh the page that you’re trying to view in Chrome and check if the problem is resolved.

2. Check if the PDF plugin is enabled

chrome extensions
  1. In the address bar enter chrome://extensions and press Enter.
  2. When the list of plugins appears, click on Details.
  3. Locate the Chrome PDF Viewer and make sure that it’s enabled.
  4. If you see Adobe PDF Plug-In For Firefox and Netscape in the list of plugins, make sure that you disable it by clicking the Disable button next to the plugin name.

In addition to enabling the PDF plugin, you might want to check the Always allowed to run option next to Chrome PDF Viewer plugin.

This is helpful especially if you have several PDF plugins activated.


Couldn’t load plugin error in Chrome can prevent you from viewing certain content in Google Chrome, but as you can see, this problem can be fixed by using one of our solutions.

Let us know how it worked for you by reaching for the comments section below.

5 best network topology mapper [Real time network map]

Network topology mapper software allows you to create a physical network map along with automated scanning to ensure the map is always up to date.

Getting a layout of your network is also essential for the planning and management of network infrastructure.

Apart from mapping your network automatically, a network topology mapper can also provide you with critical data and performance metrics.

What are the best network topology mapper tools?

Paessler PRTG Network Monitor

network topology mapper

PRTG Network Monitor is a well-known all-in-one network monitoring tool known for monitoring performances and reporting features and dashboards. It can map all devices and properties at a glance, create interactive maps of your network, and alerts you before problems occur on your network.

The Auto-Discovery feature detects all IT components from switches, routers, firewalls, servers, and applications, to storage systems and virtual servers. All of these components can be integrated quickly and easily into transparent networks.

Key features of PRTG Network Monitor:

  • Maps all devices and properties at a glance 
  • Creates interactive amps of your network and its devices 
  • Sends alerts before any problem occurs 
  • Create individual maps 
PRTG Network Monitor

PRTG Network Monitor

Use this powerful software to create the topology of your network with just a few clicks of the mouse.
Free trialVisit website

InterMapper

network topology mapper

InterMapper is a powerful and user-friendly map network monitoring software to map and monitor your entire distributed IT environment.

It can help you create a network map, give a live view of what’s happening on your network, and show your devices’ status with a color-coded map.

With its real-time alert via text, email, sound, and more, it maximizes your uptime by quickly finding and fixing the issues before the end users are impacted.

The automatic network mapping solution helps you discover and count every IP-enabled device in your network.

Additionally, it also comes with features like proactive network monitoring, robust network management, smart alerting, and network capacity planning. All the information is presented on an informative dashboard.

Key features of InterMapper:

  • Excellent informative dashboard views
  • Network capacity planning 
  • Smart alerting via text, email, and sound 
  • Automatic network discovery for IP-enabled devices 

⇒ Get InterMapper


Spiceworks Network Mapping Software

network topology mapper

Network Mapping Software is a popular topology mapper tool from Spiceworks. It allows you to see what’s attached to what and find out your bandwidth usage, keep a tab on network bandwidth limit and create a network map.

Apart from the usual network analyzer features, Network Mapping Software allows you to diagnose network problems and drill down into network node details. It displayed an interactive network diagram of your devices related to each other with an option to manually add, edit, move and resize devices as your preference.

All your network maps integrate directly into your Spiceworks inventory, thus eliminating the need for assembly. Additionally, it can also graphically monitor your ink and toner levels and offer direct access to device details.

Key features of Spiceworks Network Mapping Software:

  • Complete, customizable network mapping solution
  • See bandwidth usage between nodes
  • Direct access to device details 
  • Graphically monitor ink and toner levels

⇒ Get Spiceworks Network Mapping Software


netTerrain Logical

network topology mapper

netTerrain Logical is a powerful automatic network discovery software that also acts as a drawing tool to visualize everything from a centralized repository.

netTerrain Logical allows you to troubleshoot faster to reduce downtime with quick alerts, proactively manage capacity and device while ensuring data center standard and compliance. It also comes with security tools to identify vulnerabilities, apply the latest security patches and gain visibility of web accessible systems.

Key features of netTerrain Logical:

  • Network discovery and mapping for device ports and links 
  • Supports third-party network diagram tools like Visio and netViz
  • Physical and logical views of your network 
  • Manage inventory & assets and manage cabling problems 

⇒ Get netTerrain Logical


LanTopoLog

network topology mapper

LanTopoLog is a network topology and mapping solution that provides physical topology discovery, visualization, and monitoring. It can automatically discover physical networks based on SNMP.

LanTopoLog provides a detailed and searchable physical network topology map to isolate network connectivity failures quickly. You can also map the physical port connections to MAC and IP addresses of the connected devices using the Switch Port Mapper tool.

Key features of LanTopoLog:

  • Automatic physical network topology discovery based on SNMP
  • Switch Port Mapper tool to map physical port connects to connect IP-Enabled devices.
  • Monitoring invalid and dropped packets 
  • Simple and easy to use interface 

⇒ Get LanTopoLog

With in-house IT networks becoming larger and complex, you need new technologies to maintain the growth and expansion.

Network topology mappers are the tools that eliminate the process of LAN mapping manually and reduce the workloads and improve accuracy.

Explore the tools in this article to find the best network mapping tool that fits your requirements the best.

  • What is a network topology mapper?

A network topology mapper is a network mapping tool that can display live diagrams of your physical network devices, including routers, switches, firewalls, and more.

  • What is a topology diagram?

A topology diagram is the product of specialized software that offers network mapping and presents the resulted data in an easy to understand diagram.

Subscription storage is full in Edge? Here’s how to fix that

While the majority of users are happy with the dedicated Edge extensions, there are some who actually got headaches using some of the buggy add-ons.

AdBlock Plus is by far the most popular extension for Microsoft Edge, but it still has to be polished to work flawlessly.

So far, that’s not the case: both AdBlock’s and Microsoft’s forums are full of complaints about the issue with overloaded subscription storage.

Users said that they’re being bombarded with the error message Subscription storage is full. Please remove some subscriptions and try again.

This happens because AdBlock Plus for Microsoft Edge currently supports a maximum of only two filter lists, so if you have three or more, you’re going to get this error message.

What’s illogical here is that when you install AdBlock Plus on your Microsoft Edge browser, it gives you additional options to block malware, remove social media buttons, and disable tracking.

If you decide to use all these additions, you’ll have a total of five filtered lists in your AdBlock Plus extension, and the error message will make it impossible for you to use the browser normally.

As many users want to take full advantage of AdBlock Plus, they enable all three additions and the problem then occurs.

Since Adblock is one of the most used extensions, today we’re going to troubleshoot the subscription storage full error message in Edge.


What do I do if subscription storage is full in Microsoft Edge?

1. Try a different browser

If you keep getting the Subscription storage is full message in Microsoft Edge, perhaps the problem is related to your browser.

To fix the problem, perhaps you can try switching to a different browser, such as Opera. After doing so, install Adblock, and check if the problem is still there.

Even if this comes as a temporary workaround, many users have decided to quit fixing the problem with Edge.

They’ve been motivated by Opera’s low impact on system resources, one-click bookmarking, mouse gestures, and built-in free VPN that guarantees high-end security.

”Opera”

”Opera”

”If
”Get
&aff_sub2=Native?utm_medium=native&ref=” current_url=”true” button_text=”Visit website” image=”https://windowsreport.com/wp-content/uploads/2020/07/Opera-logo-210×160.png” ]

Note: If the problem is present in Opera as well, then the issue is related to the extension. Your option is to wait for the developer to fix it or keep on applying the below tips.


2. Reinstall Adblock Plus

  1. Open Microsoft Edge.
  2. Click on the three dotted-menu, and go to Extensions.
  3. Choose AdBlock Plus, click on it, and go to Uninstall.adblock plus limit1
  4. Wait for the extension to uninstall.
  5. Now, get back to the three dotted-menu > Extensions, and go to Get extensions from the Store.
  6. Find AdBlock Plus in the Store, and install it once again.adblock plus limit2
  7. Once you install it, just make sure you chose to use block malware, remove social media buttons, and disable tracking, and you’re good to go.

After performing this action, you should be able to use AdBlock Plus in Microsoft Edge once again.

This issue is quite odd because you basically can’t use any of AdBlock Plus’s additional features even if they’re theoretically available.


3. Remove Fanboy’s Social Blocking list

  1. Click the Menu icon in the top-right corner. Choose Extensions from the menu.
    Adblock subscription storage is full
  2. Locate Adblock Plus and click the gear icon next to it.
  3. Choose Options.
  4. Locate Fanboy’s Social Blocking List and click the red X next to it.

After doing that, the problem should be resolved. Keep in mind that by removing this list you might not block certain ads, which can be a problem.

However, you can choose a different list from Adblock Plus’s website and use it instead.


4. Try using a different addon

use different addon
  1. Press Windows Key + S and enter store. Now choose Microsoft Store from the list.
  2. Search for the desired Adblock extension in the search field and install it.

Microsoft Store has a dozen Adblock extensions available, but many users are suggesting to try out Betafish, so you can do that.

Basically, you can use any other Adblock addon instead of Adblock Plus and the problem should be resolved.

Before you install a new addon, disable Adblock or remove it in order to stop the two add-ons from interfering with one another.


5. Install the latest version of Adblock

install latest version of Adblock

If you keep getting the Subscription storage is full message, perhaps the issue is related to your version of Adblock.

Sometimes this problem can occur due to various glitches with the addon, and in order to fix them, it’s advised that you update the addon to the latest version.

Sometimes add-ons can have certain glitches, and if the developers are aware of this, they’ll release a new patch soon.

If you’re having this problem with Adblock Plus, make sure that your addon is up to date.

If the problem is still there, the developers are probably aware of this issue, and they should release an update soon, so you’ll probably have to wait just a bit more.


6. Update your system

  1. Open Settings. You can do that quickly by using Windows Key + I shortcut.
  2. When the Settings app opens, navigate to the Update & Security section.
    Adblock subscription storage is full
  3. Now click the Check for updates button in the right pane.
    Adblock subscription storage is full

If any updates are available, they’ll be downloaded automatically and installed. Once your system is up to date, be sure to check if the problem is still there.

So these are our suggestions to get rid of the Subscription storage is full error in Edge. If you know another method, share it with us in the comments, so we can update the list.

Fix xapofx1_1.dll Problem [Missing/Not found]

Xapofx1_1.dll is a Dynamic Link Library file associated with Microsoft DirectX. So, xapofx1_1.dll problems (errors) can arise when some players try to run games that need that DLL file.

Some players have said this error message pops up when they try to play certain games:

The program can’t start because XAPOFX1_1.dll is missing from your computer. Try reinstalling the program to fix this problem.

That error message makes it clear xapofx1_1.dll is not accessible for the game, and it even suggests one resolution for the issue.

There are various xapofx1_1.dll error messages, but most usually mean that DLL has been deleted or is corrupted. This is how you can fix xapofx1_1.dll problems.

How can I fix xapofx1_1.dll problems?

1. Run a third-party DLL fixer

For fixing DLL errors and many other Windows issues the perfect option is to use the best system maintenance utilities.

These tools will comprehensively scan your PC when you start it. They will replace both missing and corrupted DLL files with fresh and updated ones. Thus, you can utilize such software to repair all DLL files that come with Windows.

2. Scan system files

  1. Press the Windows and S keys simultaneously.
  2. Enter Command Prompt in the search box.
  3. Right-click the Command Prompt search result and select Run as administrator.
  4. Press the Return key after entering this command: DISM.exe /Online /Cleanup-image /Restorehealth
  5. Then type in this System File Checker command and hit Enter: sfc /scannow
    System File Checker command xapofx1_1.dll problem
  6. Wait for the SFC scan to do its stuff. When it’s finished, restart Windows if the scan repaired system files.

3. Update your PC’s drivers

Xapofx1_1.dll errors can arise due to certain outdated system drivers. So, updating device drivers on your PC with Outbyte Driver Updater might resolve a xapofx1_1.dll issue.

Outbyte is highly-rated driver update software with which you can quickly and easily update drivers on your PC.

The software will automatically scan for and list devices with outdated drivers upon launch.

So, instead of updating your drivers manually and putting your system at risk with the wrong drivers, it’s better to employ specialized driver update software for the job.

That being said, enhance your system performance with the latest driver versions on your PC and avoid functionality issues.

4. Update Windows 10 to ensure your PC has the latest DirectX version

  1. Open Settings by pressing the Windows + I hotkey.
  2. Click Update & Security to open the options shown directly below.
    The Check for updates option xapofx1_1.dll problem
  3. Press the Check for updates button to download and install all available patch updates.
  4. If you’re not utilizing the latest Windows 10 build version, click the Download and Install option for an available feature update.

Note: You can also install missing DirectX DLL files with the third-party DX Installer utility.

5. Reinstall games and software the xapofx1_1.dll issue arises for

  1. Press the Windows + X hotkey, and select Run on the Win + X menu.
  2. Click OK after you’ve entered this command in Run’s Open box: appwiz.cpl
  3. Select the game or software you need to fix the xapofx1_1.dll error for in the Programs and Features applet.
    Programs and Features applet xapofx1_1.dll problem
  4. Click the Uninstall option (and Yes on any confirmation prompts) to remove the selected game.
  5. Restart your desktop or laptop before reinstalling the game.
  6. Thereafter, reinstall the latest version of the game you uninstalled.

So, there are a few ways you can feasibly fix xapofx1_1.dll errors. Some of the resolutions in our How to fix DLL files missing guide might also help resolve xapofx1_1.dll issues in Windows.

Block Ads in Opera & Stop Them From Appearing [How to]

Opera has an adblocker and if you want to block ads in Opera, you just just need to enable this feature, and in this guide, we’ll show you how to do it.

How do I block ads in Opera One?

1. Use Opera settings

  1. Open Opera.
  2. Click the Opera menu in the top left and choose Settings.
    opera settings menu
  3. Locate Block ads and surf the web up to three times faster setting and enable it.
    Block ads and surf the web up to three times faster enable in Opera

2. Use extensions

  1. Go to uBlock extension page.
  2. Click on Add to Opera.
    add to opera ublock origin extension
  3. Wait for the extension to install, it will be enabled automatically.

Why am I getting ads on Opera?

If your adblocker isn’t enabled, you’ll encounter this issue. Sometimes the built-in adblocker can fail to block ads, and a few users reported that Opera GX adblock isn’t working on YouTube, but that can be fixed easily.

What is the best ad blocker for Opera?

uBlock Origin is the best ad blocker for web browsers, but the built-in one is decent as well. We have an in-depth comparison between Opera Adblock and uBlock Origin, so don’t miss it.

If you want to learn more, we have a guide dedicated to analyzing Opera GX adblocker that will answer all your questions.

How do I export bookmarks from Opera browser?

Bookmarking your favorite pages and web resources for later use of study is pretty handy especially if you want to avoid cluttering too many tabs in one window. Or not to lose important information, for that matter.

One of the details that make users think twice when switching or adopting a new browser is the fear of losing their bookmarks.

To respond to that need, browser developers have implemented easy options of importing or exporting bookmarks.

In this article, we’ll talk about exporting bookmark from Opera to your browser of choice.

Opera

Opera

Keep using Opera as an alternative browser for the plethora of exclusive features it has that always add to your everyday productivity target.

How do I export bookmarks from Opera to another browser?

  1. In Opera, open the bookmarks menu from the side menu bar.
  2. Click on Open full Bookmarks view in the lower part of the tab.
  3. Click on the Import/Export menu, in the same area.
  4. Choose Export.
  5. You’ll be able to save your bookmarks as a .HTML file. Name it as you wish and save it in a preferred location.
  6. The next step would be to import this file into your browsers of choice by following a similar pattern, only choosing an Import option.

The bookmark Import/Export process is quite similar in all browsers. What differs is perhaps only where the bookmarks are located.

A more direct way in Opera is to open the browser and type the following URL, which will take you straight into the bookmarrs menu:

opera://bookmarks

If your bookmarks folder has become too hard to manage, consider using a bookmark organizer. They conveniently come in several versions compatible with more browsers.

This way, you will order your bookmarks in various customizable categories, for easier access and use.

We hope that this article was helpful. Don’t hesitate to look into our Opera section for more useful tips on working in this amazing browser.

How to install JAR Files on Windows 10

Many of us enjoy playing games on Windows 10, and sometimes you might want to install an a.jar file in order to play games on Windows 10.

If you haven’t done this before, today we’re going to tell you how to install .jar files to play games on Windows 10.


How can I play JAR games on Windows 10?

Users report that .jar files don’t come with a standard icon and apparently they don’t work on Windows 10. If you want to play games such as Minecraft you’ll have to work with .jar files.

If you can’t run .jar files at all, then you have some problems with Java.

Before we start fixing this issue we have to mention that it’s a good idea that you run Windows Update in order to update your Windows 10 with the latest patches.

Windows 10 Update Check

By updating Windows 10 you’ll prevent any potential incompatibility issues that you might have.

In order to run .jar files and Java games, you’ll need to have the latest version of Java. If you already have Java installed you should uninstall the version you have installed. To do so do the following:

  1. Open Control Panel and go to Programs and Features.
  2. On the list of installed software find Java and uninstall it.

After you’ve uninstalled Java you need to go to this site and download Java for your operating system. Make sure to download the right Java version for your Windows 10 version.

First of all, verify if you’re running a 32-bit or 64-bit Windows OS version. For more information, go to Java’s support page to learn what are the steps to follow.


2. Install Java on browsers

  1. Launch Internet Explorer
  2. Click on the Tools button (it looks like a cogwheel)
  3. Select Internet options
  4. Go to the Security tab, and select Custom level
  5. In the new pop-up menu, scroll down the list until you find Scripting of Java applet, and enable it
  6. Restart Internet Explorer.

Unfortunately, all other major web browsers no longer support Java, so Internet Explorer is your only chance as of now to run Java content on your browser.


After you’ve installed Java you should be able to run .jar files and play Java games on Windows 10.

We have to mention that this isn’t the best solution, but some users have reported that reinstalling and installing the latest version of Java on Windows 10 solved this issue.

If you’re experiencing any Java-related issues, here are some troubleshooting guides that you can use:

Minecraft won’t open/launch in Windows 10/11 [Fixed Now]

Some Minecraft players have posted on Microsoft’s forum about startup issues for that game.

These users can’t play Minecraft when it doesn’t launch as expected. In one Microsoft forum post, a user stated:

I bought Minecraft Java a while ago. Two days ago I updated my PC to the new Windows. After doing this, I can no longer open the Minecraft Java launcher. So I am not able to play.

We discuss some of the best ways to deal with this issue once and for all, so make sure to read through this guide.

How do I fix Minecraft not opening on Windows 10?

1. Update your graphic card’s driver

You can check if your graphics card’s driver needs updating with specialized driver updating software.

These powerful tools allow you to run an in-depth scan of your computer, identify the needed driver and allow you to quickly download and install them.

2. Run Minecraft in compatibility mode (and as an administrator)

  1. Click the button for File Explorer on Windows 10’s taskbar.
  2. Open your Minecraft folder in File Explorer.
  3. Click the Game subfolder in your Minecraft folder.
  4. Right-click Launcher.jar and select Properties.
  5. Select the Compatibility tab shown in the snapshot directly below.
    Compatibility tab minecraft won't open windows 10
  6. Select the Run this program in compatibility mode option.
  7. Select Windows 7 on the Compatibility mode drop-down menu.
  8. Then click the Run this program as an administrator checkbox to select that option.
  9. Click the Apply option to save the new settings.
  10. Click OK to leave the window.

Note: If you can’t find a Launcher.jar file, apply the above resolution to your Minecraft Launcher.exe file.


3. Delete Minecraft mods

  1. Click the Type here to search button on your Windows 10 taskbar to open a search utility.
  2. Input the keyword %appdata% in the search box.
  3. Next, click %appdata% to open the folder in the screenshot directly below.
    Roaming folder minecraft won't open windows 10
  4. Click the .minecraft folder to open it.
  5. Then open the mods subfolder.
  6. Press the Ctrl + A hotkey to select all the Minecraft mods in the folder.
  7. Click the Home tab shown directly below.
    Delete button minecraft won't open windows 10
  8. Then click the Delete button to erase the selected mod files.

4. Turn off third-party antivirus software

Avast shields controls minecraft won't open windows 10

Try disabling any third-party antivirus utility you have installed by right-clicking its system tray icon.

That will open a context menu for the software that will probably include a disable setting of some kind you can select to temporarily disable the antivirus utility.

Then try playing Minecraft with your antivirus software disabled.


5. Reinstall Minecraft

  1. Press the Windows and X keys at the same time to open the Win + X menu.
  2. Click Run on the Win + X menu to open that accessory.
  3. Type appwiz.cpl in the text box and press Enter to open Windows 10’s uninstaller utility. 
    The Programs and Features window minecraft won't open windows 10
  4. Select Minecraft within the Programs and Features Control Panel applet.
  5. Click Uninstall (and Yes on any confirmation prompts) to remove Minecraft.
  6. After uninstalling Minecraft, open the search box in Windows 10.
  7. Enter %appdata% in the search box, and click %appdata% to open that folder.
  8. Right-click the .minecraft folder and select Delete.
  9. Then open the Minecraft website in a browser.
    Minecraft webpage minecraft won't open windows 10
  10. Download the latest Minecraft version from there.
  11. Open Minecraft’s installer to reinstall the game.

Those are some of the more probable fixes for kick-starting a Minecraft game that doesn’t launch.

Players with the MS Store Minecraft app can also try running the Windows Store Apps troubleshooter and resetting MS Store (with the wsreset.exe Run command).

YouTube Error 400: Malformed or illegal request [FIX]

YouTube is the most popular video-sharing site in the world. It’s accessed by millions of users every day that upload and search all sorts of video content. Thus, we can say it’s one of the biggest search engines, too.

YouTube was created in 2005, and in October 2006 Google acquired it and transformed it in the giant that is today.

Even though the site is constantly being developed and improved, sometimes some unexpected errors can show up. That’s the case with the Error 400: your client has issued a malformed or illegal request and today we’ll take a look at it.

A lot of users reported Error 400 in YouTube, and although is an old and known issue, the cause is still a mystery to Google. Let’s find out how to fix it.

Fixing YouTube error 400: Your client has issued a malformed or illegal request, which usually involves clearing all the cookies. The error is mainly caused by shared cookies between YouTube and other extensions. If this action doesn’t solve the problem, you need to clear the specific faulty cookies from Developer tools or use Incognito mode.

It seems that the error is caused by an extension called The Great Suspender. This extension shares the cookies with YouTube and sometimes alters them, leading to the appearance of Error 400.

How can I fix error 400 on YouTube?

1. Use Opera

Opera is one of the most popular browsers of the moment due to the fact that it’s a fast search engine with a built-in ad blocker and a free VPN that keeps your internet experience safe and productive.

One important aspect of the Opera platform is that it uses less processing capacity than any other browser, this way you are guaranteed to always enjoy smooth online surfing.

You’ll be delighted with the user-friendly interface that makes it possible to chat and browse at the same time thanks to the built-in messenger on the sidebar of the page.

Another fun characteristic is the customizing feature that allows you to choose from a variety of themes. You can keep your favorite sites one click away by bookmarking them and saving loads of time.

Opera

Enjoy safe and fast online browsing sessions with a search engine built to make your workflow easy and fun!

2. Clear the cookies from Chrome’s settings

  1. Open Chrome.
  2. Go to Settings, click Advanced, access Content settings.
  3. Click Cookies, then pick See all cookies and site data.
  4. Type youtube, in the search-bar from the top-right of the page
  5. All the cookies related to YouTube should appear. Click on Remove all shown or choose only the faulty ones called gsScrollPos-[4-digit number].

Alternatively, you can do the same process by opening a new tab in Chrome and by typing in the address bar: chrome://settings/siteData

After doing that, check if Malformed or illegal request message still appears.

3. Clear cookies using Developer Tools

  1. Open Chrome, go to YouTube site.
  2. On your keyboard press Ctrl + Shift + I.
  3. In the Developer Tools click More and then Application.

4. In the left panel, under Storage, expand Cookies, all the cookies should appear.

5. Delete the gsScrollPos-[4-digit number] and the error should be gone.

After following these steps, check if YouTube error 400 your client has issued a malformed or illegal request message is gone.

4. Other general fixes

  1. Use Incognito Mode.
  2. Replace the direct link with the video id.
  3. Clear the full cache and cookies from Clear browsing data in Chrome.

4. Reinstall Chrome.

You can also try these easy and general fixes that fixed YouTube error 400 for some users.

These solutions are relatively simple and you should have no problem-solving Error 400: your client has issued a malformed or illegal request. Remember that The Great Suspender extension is the main cause, but it’s not the only one.

We’d like to know your thoughts on this subject so feel free to share them in the comments section below.

9 Best File Recovery Software For PC [2026 Guide]

This nightmare can happen to anyone: we’re working on some critical files when suddenly the files accidentally get deleted, corrupted, the PC dies, or anything of this sort.

Many unfortunate events can keep us from gaining access to our file(s). Not having a backup for these files – this is the true apocalypse.

However, you should know that you’re not deleting or losing your data in such cases. The system marks the specific area where those files reside as reusable, removing that file from the index.

This means that there is a certain period of time in which you are still able to restore that file.

In order to help you with your data loss dilemmas, we have gathered a collection of data recovery tools for Windows 10, which will become your best friends during the harsh moment of data loss.

These can truly help you in areas ranging from simple file recovery to a more complex total partition rescue.

Note: We’ve talked about other open-source file recovery data here.

What are the best data recovery tools I can find?

Stellar Data Recovery – Encrypted drive recovery

Home users are usually left out when it comes to the design and development of data recovery tools. However, that isn’t the case with Stellar Data Recovery.

It was designed with efficiency and accessibility in mind. This means anyone can use it, and you don’t need to be an expert to use it efficiently.

Of course, its tools are extremely advanced and well-thought, as they allow even hidden files to be discovered and recovered.

This program recovers data for all kinds of data loss, including accidental removal, drive formatting with no backup, drive corruption, disk and system issues, and many more.

Other best features include:

  • Encrypted drive recovery
  • 4K hard drive recovery
  • Unlimited file-type support
  • File sorting

Stellar Data Recovery

Recover deleted data from HDDs, SD cards, USBs, cameras, and formatted partitions with this amazing tool.
Free Trial Visit Website

MiniTool Power Data Recovery – Easy to use

MiniTool Power Data Recovery scan

This program can be best summarized as easy to use because of the way it looks, feels, and how handles data recovery.

Of course, this doesn’t make it a second-hand program, since it is perfectly capable of recovering file systems such as FAT 12/16/32 and NTFS.

Any type of data recovery is done via a 4-step method where you scan the location of the data that needs to be recovered, select the type of data you want, preview the file, and perform the actual data recovery.

It supports Dynamic Volume: Simple Volume, Spanned Volume, Stripe Volume, Mirror Volume, and Raid-5 Volume, and it can resume the last recovery result.

Other best features include:

  • Recover files from crashed OS
  • Partition loss recovery
  • Easy to use
  • Intuitive interface

Minitool Power Data Recovery

This tool is so easy to use that you will look like a pro when you will recover the apparently lost data.
Free trial Visit Website

Recoverit – Corrupted video repair

The best word that can be used to describe Recoverit would be universal. This tool can recover over 700 unique file formats, including documents, emails, photos, videos, audio, and more.

Another reason this program is so versatile is that it supports eight different file-loss recovery types, each directly countering some of the most common file-loss causes, such as deleted files, formatted drives, lost partitions, and many others.

This may make the program seem a bit too complicated for the casual user, but running it is extremely simple.

The recovery times are equally fast, the only variable being the amount of data that needs recovery and the way it was lost in the first place.

Other best features include:

  • Corrupted video repair
  • Recovery data from 2000+ storage devices
  • Restore data in 500+ scenarios
  • Intuitive UI

Recoverit

Recoverit can recover over 700 unique file formats and features 8 different file-loss recovery types!
Free trial Visit Website

Recuva – Deep scan

This tool features a very simple wizard, and it offers deep scans, which is essential in case of emergency.

This software makes things as easy and as stress-free as possible, as you are able to target your search to a specific location. You can also search all your drives and opt for a quick or full scan.

Recuva can help you recover all types of files, including pictures, music, documents, videos, emails, memory cards, and many more.

The Pro version gives you access to updates, premium support, virtual HDD support, and other advanced features.

Other best features include:

  • Deep scan
  • Securely delete files
  • Automatic updates
  • Simple interface

Recuva

Recuva is the best emergency response tool in case of lost files and you can target your search precisely.

Orion File Recovery Software – Filter search result

If your main issue is deleted data that needs urgent recovery, then you need a fast and efficient data recovery tool for the job, and Orion File Recovery Software definitely fits that description.

Thanks to its advanced toolset, you can use this program to permanently remove deleted files for additional security and recover data from your hard drive, external drive, or flash drive.

You can also run a deep scan to find additional files and recover deleted files, music, photos, and other important data.

Orion File Recovery Software has a Wizard that guides you through the search and recovery process, making recovery and deletion easy.

Other best features include:

  • Supports both FAT and NTFS file systems
  • Scan hard drives, flash drives, or memory cards
  • Overwrite deleted files to prevent future recovery
  • Filter search results by folder, file type, name, and more

Orion File Recovery Software

Recover safely more than 550 file formats from all your drives, even the external ones, with ease.
Check price Visit Website

DMDE Free Edition – Thorough search

This tool is unfortunately often overlooked and it’s a pity because it is capable of recovering data from a huge array of drives, including 2 TB+ drives that have been rescued from a fried external drive.

DMDE helps you reconstruct the directory structure and recover your files after various complex system damages thanks to its thorough search and analysis features.

Moreover, it can find and restore partitions that have been removed accidentally by using information from boot sectors or superblocks of FAT, NTFS, exFAT, Ext2/3/4, HFS, and from their backup copies as well.

It’s one of the most effective tools out there. The tools are compatible with Windows, Mac, and Linux.

Other best features include:

  • Disk clone
  • Simple partition manager
  • RAID constructor
  • Multiple file support

⇒ Get DMDE

PhotoRec – Additional safety

Using this software, you can recover files from any storage media in various file formats (over 200).

Despite its name, you can recover more than just photos. It works with a vast range of file systems and media, from hard drives to CDs or DVDs and also USB flash drives and memory cards.

PhotoRec uses read-only access to control the drive or memory card from where you want to recover the lost files for additional safety.

Moreover, it ignores the file system and follows the underlying data, so it can still work in case your media’s file system has been damaged or reformatted.

Other best features include:

  • Additional safety
  • Special optimization feature
  • Consistency check
  • Simple design

⇒ Get PhotoRec

Remo Recover – Sophisticated tool

This sophisticated data recovery software is perfect for recovering lost data from hard disk partitions.

Remo Recover also supports a large number of devices including the old school CD/DVD. Its three options listed on the main interface (Recover Files, Recover Photos, Recover Drives) are very intuitive.

It is created with deep scan technology to recover more than 500 file types from over 100 tested scenarios.

Remo Recover helps you recover deleted files, deleted or lost partitions, lost media files, and many more even after a crashed system.

Other best features include:

  • Save as you scan
  • Save recovery session
  • Evaluate recovery results
  • Powerful recovery technology

⇒ Get Remo Recover

Paragon Rescue Kit Free Edition – Strong rescue wizards

In case you’re not able to boot to Windows anymore, you won’t lose everything thanks to the excellent Paragon Rescue kit.

So it will recover data when your operating system crashes and fails to start, but note that you can only use the kit as a trial, not as a permanent solution.

The best time to install this tool is while your PC is still running. Otherwise, you’re going to have to use a working PC. Then, you’ll need a blank CD, DVD, or flash drive, and the setup wizard will do all the hard work.

You just have to insert the disc or the flash media into the non-booting PC and restart. Select the media from the boot menu. You’ll have tons of options for fixing boot issues.

Other best features include:

  • Reliable backup
  • Fast and easy recovery
  • Strong rescue wizards
  • Great functionality

⇒ Get Paragon Rescue Kit

All of the above solutions can truly help you recover your data from any worst-case scenario because these programs use advanced technology with additional safety features.

These are all great tools, and they can be used when you need to access a GPT protective partition on your PC. If you are on Windows 8, check our dedicated guide on the best data recovery software for Windows 8 to ensure compatibility and higher success rates.

To ensure the best chance of getting your files back, make sure to use trusted solutions. Our detailed roundup of data recovery software for Windows 7 covers the most reliable tools you can safely try today.

We hope that at least one of these tools has proved helpful in your particular situation.

If so, we’d like to hear your feedback, so feel free to use the comments section below.

How to draw on a PDF [Online / Software solutions]

The characteristics of a PDF file are known to be quite versatile, from writing and editing to printing or sharing, it’s understandable why this type of document is prefered by many users.

Many have also wondered whether it’s possible to draw on a PDF online, and the truth is that the fastest way to do that is with the help of a specialized software that you don’t even need to download.

In this article we’re going to give the best tool recommendations that you can use for drawing on a PDF document.


How do I easily draw on a PDF file?

Adobe Acrobat Reader

When it comes to editing or simply dealing with PDF files of any kind, Adobe Acrobat Reader is probably the most resounding name in terms of software choices, and for good reason.

The program is available in multiple versions, from more lightweight to more feature-rich, and they all allow editing of PDF files to a lesser or greater detail, including the inclusion of drawings.

Even if you’re not satisfied with what Adobe Acrobat Reader has to offer, you can still use it to turn the PDF into an image file, draw it using professional drawing software, and convert it back to PDF for later editing.

Adobe Acrobat

Adobe Acrobat

Edit your PDF files in whatever manner you see fit with the help of this amazing editor from Adobe.
Free trialVisit website

This smart tool makes editing a PDF easier by allowing you to customize elements like watermarks, images, texts, logos or imprint stamps. It is also great if you want to draw on that particular document.

With this software you can benefit from various drawing tools for PDF files that include the pencil feature or the possibility to add shapes such as rectangles, oval, polygon, cloud, arrow and more.

  • High-Quality PDF Reader for converting a variety of format files into PDFs
  • Excellent security mechanism
  • Mac and Windows compatibility

⇒ Get PDF4ME


Pdfzorro

An online app that allows you to edit text and draw in your PDF file without having to download any third party software, is exactly what you need if you want to get the job done quickly.

You can secure your PDF files with htaccess through a SSL connection. If you want even more privacy you can remove any tracks of your document by deleting it from the cloud.

  • Compatible with any operating system
  • PDF Merger and Editor for GDrive
  • User-friendly, edit documents with just one click

⇒ Get PDFzorro


Small PDF

With this online editor you can draw in PDF, but also compress and convert documents. Every action you perform is completely secured thanks to state-of-the-art SSL encryption that protects your data.

This great tool gives you the possibility to edit your PDF documents effortlessly and is also suited for professionals or entrepreneurs.

Make a variety of changes to your file by adding annotations, circling certain part of the text or by adding pointers. This tool works with every type of device whether is an android, tablet, or a laptop, all you need to do is use your stylus, mouse or finger to start drawing in your PDF file.

  • Compatible with any platform
  • No installation or registration is necessary
  • Excellent data security

⇒ Get Small PDF


Chrome PDF

A complex online editing tool for Adobe Acrobat Reader Pro files that comes with a friendly interface which will make your job much faster and easier. All you have to is access the site, upload your PDF file and start drawing in your PDF document selecting an editing feature from the sidebar.

You can create a variety of shapes such as circles and rectangles or you can choose to use the pencil feature for more freedom. If you want to make slight alterations to your work, simply use the modify feature to change the position, color, or linewidth.

  • Completely free online pdf editor
  • Compatibility with every system platform, including Windows, MAC and Linux
  • As efficient as a third party software without taking up space

⇒ Get ChromePDF


PDF filler

This is definitely a perfect tool that you should definitely try whenever you need to draw in your PDF file online. All you have to do is access the site and upload your document, in no time you’ll be able to edit your PDF document and draw anything you’d like to.

Besides the pencil feature, you can draw perfectly straight lines or other geometric shapes thanks to its versatile functionalities. With this tool, you can edit your PDF fast without wasting precious time on downloading third party software.

  • Cloud capacity of up to 25 MB
  • Compatible with any system platform
  • Request document via email feature

⇒ Get PDF filler


As you can see there are various tools that you can use to edit and especially draw in a PDF document and we presented you with the best options available.

They also come with other useful perks such as powerful security features and conversion abilities.

We want to hear more from you on this subject so feel free to share your thought with us in the comment section below.


  • How do I make my PDF editable?

In order to allow editing for your PDF you need to use a program that creates editable PDF formats, check out the best softwares fort his issue.

  • How do I change an editable PDF to a non editable PDF?

Restrict access to your PDF files by using some of the greatest security softwares of the moment.

How to fix Avast SecureLine VPN not working

Avast SecureLine VPN is a client software that usually connects to Avast VPN servers. However, sometimes SecureLine might not be able to perform this task.

A SecureLine VPN connection failed error message will pop up when SecureLine is unable to establish a connection. Luckily, there are a few potential resolutions.

What to do if Avast SecureLine VPN connection failed?

1. Check your internet connection

First, check that your internet connection is working without the SecureLine VPN. So turn off the SecureLine VPN. Then open a few websites in your browser.

If you do need to fix the general connection, check out the Internet Connections troubleshooter in Windows. That might fix the connection, or at least provide some hints in that direction. Follow the guidelines below to open the troubleshooter.

  • Open Run with the Windows key + R keyboard shortcut.
  • Enter Control Panel and click OK to open the window.
  • Click Troubleshooting to open the Control Panel applet shown directly below.troubleshooting control panel
  • Click View all to open the troubleshooter list below.
  • Right-click Internet Connections and select Run as administrator to open the troubleshooter’s window.

  • Click Advanced and select Apply repairs automatically if that option isn’t already selected.
  • Click Next to initiate the troubleshooter, and select the Troubleshoot my connection to the internet option.

2. Select an alternative server location

Avast SecureLine doesn’t have a huge amount of servers for its millions of users. So the server you’re trying to connect to might be overloaded. As such, connecting to an alternative server location could fix the SecureLine VPN connection.

To do that, click the Change Location button on the main Avast window. Then select another server location to connect to.

Install Private Internet Access

Alternatively, you can install a VPN client with a more generous collection of servers. For instance, Private Internet Access boasts an impressive network of 3292 + spread across 46 countries worldwide.

Private Internet Access

This world-leading VPN can do more for your connection that you can even imagine – by choosing the server closest to you, you will enjoy ultra-fast speeds, bypass ISP throttling, get stable and reliable internet flow and unlimited bandwidth to support you in all your online endeavors.

Plus, your traffic data will be routed through secure VPN tunnels that are highly encrypted, and your online activity will never be traced back to you thanks to the strict no-logs policy and IP cloaking function that anonymizes your browsing.

Private Internet Access

Private Internet Access

Don't settle for failed VPN connection errors, pick a VPN that never fails instead!
$2.69/mo. Buy it now

3 Turn off Windows Defender Firewall

Firewalls can get in the way of VPN connections. VPN clients need to be on Windows Defender Firewall’s exclusion list. Thus, turning off Windows Defender Firewall might fix Avast SecureLine’s connection. Users can turn off the WDF as follows.

  • Open the Run accessory in Windows.
  • Input firewall.cpl in Run and click OK to open the Windows Defender Firewall Control Panel applet.

  • Click Turn Windows Defender Firewall on or off to open the options shown in the snapshot directly below.

  • Select both the Turn off Windows Defender Firewall options.
  • Press the OK button.

4. Turn off third-party antivirus software

Third-party antivirus software can also block VPN connections. So turning off third-party antivirus software before connecting with the VPN might fix the issue.

Users can usually switch off antivirus software by right-clicking antivirus utilities’ system tray icons and selecting a disable or turn off button. Alternatively, users can also set up exceptions that exclude their VPN clients from the antivirus software firewalls.

5. Close conflicting VPN services

SecureLine not connecting might be due to other conflicting VPN services. Those who also utilize other VPN clients will need to ensure there aren’t any other VPN services running.

One way to ensure there are no conflicting services or software is to clean boot Windows. This is how users can clean boot Windows.

  • Right-click the Start button and click Run to open that accessory.
  • Open the System Configuration utility by entering msconfig in Run and clicking OK.
  • Click the Selective startup radio button on the General tab.selective startup
  • Deselect the Load startup items checkbox.
  • Select the Load System Services and Use original boot configuration options.
  • Click the Services tab.
  • Select the Hide all Microsoft services option to exclude those services.hide all microsoft services
  • Then select the Disable all button to deselect the third-party services.
  • Press the Apply and OK buttons, and then click Restart to reboot Windows.

6. Check the Avast SecureLine subscription

Avast SecureLine won’t connect for users with invalid or expired subscriptions. So users should check their SecureLine subscriptions.

To do that, click Settings, Subscription, SecureLine VPN, and Validity within the Avast software. Avast emails might also tell users if they need to renew their subscriptions.

7. Reinstall Avast SecureLine

Reinstalling the Avast SecureLine VPN software is another potential resolution for its connection failed error. Then users can at least be sure that they have the very latest version of the client software. Follow the guidelines below to reinstall Avast SecureLine.

  • Open the Control Panel in Windows.
  • Click Programs and Features to open the Control Panel applet in the snapshot directly below.

  • Select Avast SecureLine VPN and click Uninstall.
  • Press the Yes button on the UAC dialog to confirm.
  • Click Yes again on the software’s uninstaller window.
  • Restart Windows after uninstalling the software.
  • Press the Download for PC button on the Avast SecureLine page to download the installer. Then open that installer to reinstall the software.
  • To remove the SecureLine VPN component from Avast Antivirus, open that software’s window and click Menu > Settings.
  • Then select the Components tab on the left of the window.
  • Click SecureLine VPN and select the Uninstall Component option.
  • Press the OK button to provide further confirmation.
  • Then click the Restart computer > Restart Now options.
  • Users can reinstall the SecureLine component by clicking Install Component on the SecureLine VPN panel within the Avast Antivirus software.

These troubleshooting tips should fix SureLine VPN connections. You can also check out this guide containing more general resolutions for fixing VPN connections.

If you know other alternatives to addressing this connection error, feel free to share the steps with the rest of the Windows community via the comments section below.

Reason 442: Failed to enable virtual adapter [Solved]

The Failed to enable Virtual Adapter error message is one that pops up for some Cisco VPN client software users. The exact error message states: Secure VPN Connection terminated locally by the Client. Reason 442: Failed to enable Virtual Adapter.

As a result, the Cisco VPN users can’t connect to the VPN server. There are, however, a few confirmed resolutions for that error message.

This is how you can fix virtual adapter errors

How to fix Cisco VPN client failed to enable virtual adapter

1. Turn Off the Internet Connection Sharing (ICS) Service

The Virtual Adapter error can be due to the Internet Connection Sharing (ICS) service. Some users have stated that they’ve fixed the error by turning that service off. This is how users can disable Internet Connection Sharing (ICS).

  1. Open Run by pressing the Windows key + R keys simultaneously.
  2. Enter services.msc in the Open text box, and press the Return key (or click OK).
  3. Double-click Cisco Systems, Inc. VPN Service on the Services window.
  4. Click the Stop button.
  5. Press the Apply and OK buttons to close the Cisco Systems, Inc.VPN Properties window.
  6. Double-click Internet Connection Sharing (ICS) to open the window shown directly below.
  7. Click the Stop button to terminate it.
  8. Select Disabled from the Startup type drop-down menu.
  9. Click the Apply button to apply the new settings.
  10. Select the OK option to close the window.
  11. Then right-click the Cisco System, Inc. VPN Service and select Start.
  12. Now try connecting with the Cisco VPN client.

Note: It is important to mention that the Cisco VPN Client is no longer supported by CISCO Systems since 2014 and that no updates were released for this product since 2012.

Running obsolete software can cause more damage than you might think, which is why we recommend a modern VPN client like Private Internet Access.

Private Internet Access

Switching to a world-leading VPN client like Kape Technologies owned PIA can significantly improve your online experience by streamlining your connection, reducing loading times, and enhancing your download speeds.

⇒ Install Private Internet Access

With an impressive network of global gateways, you will never have to worry about your connection to worldwide servers not being successful. Plus, your traffic data will be routed through secure VPN tunnels and protected by the best-in-class encryption technology.

Security-oriented features are complimented by PIA’s absolute privacy guarantee: between IP cloaking, anonymous browsing, and a strict no-log policy, your identity, location, and data including your online activity will never risk falling into the wrong hands.

Private Internet Access

Private Internet Access

Still using the Cisco VPN client? It's time to explore the modern face of online privacy with PIA!
$2.69/mo. Buy it now

2. Edit the Registry

This resolution is more specifically for Windows 10, 8.1, and 8. Lots of Cisco VPN users have stated that editing the DisplayName string value for CVirtA with the Registry Editor fixed the Virtual Adapter error for them. Cisco VPN users should edit the registry as follows.

  1. First, open the Registry Editor by entering regedit in Run and clicking OK.
  2. Copy this registry path with the Ctrl + C hotkey:
    HKEY_LOCAL_MACHINESYSTEMCurrentControlSetServicesCVirtA.

    Then paste the path into the Registry Editor’s address bar with the Ctrl + V hotkey, and press the Return key.

  3. Right-click DisplayName and select Modify to open its Edit String window.
  4. Next, erase @oem8.inf,%CVirtA_Desc% from the Value data box. Then the Value data box should include either Cisco Systems VPN Adapter for 64-bit Windows or Cisco Systems VPN Adapter depending on whether Windows is a 32 or 64-bit platform.
  5. Press the OK button to close the Edit String window.
  6. Close the Registry Editor.

3. Turn Off Internet Connection Sharing

  1. Some users have also confirmed that turning internet sharing off for the network adapter that provides internet for Cisco VPN fixes the issue. To do that, enter ncpa.cpl in Run and click OK.
  2. Right-click the internet network adapter and select Properties to open the window below.
  3. Click the Sharing tab shown directly below.
  4. Deselect the Allow other network users to connect through this computer’s Internet connection option on the Sharing tab.
  5. Press the OK button to close the properties window.

Those are three confirmed resolutions that fix the Failed to enable Virtual Adapter error in Windows 10, 8.1, 8, and 7.

Note that Windows 10 doesn’t officially support Cisco VPN, so it’s fairly essential to edit the registry as outlined above to get the client up and running on that platform. Ready to tackle this issue? Let us know how it worked in the comments section.

FIX: NVIDIA high definition audio not plugged in Windows 10/11

The NVIDIA output not plugged in Windows 10 message appears to plenty of users. The NVIDIA audio output is shown as unplugged if you check the Playback tab from the Sound settings, in the Control Panel.

Besides this error, many users could enable the sound of their HDMI output. Why is my Nvidia output not plugged in? That’s most likely a question that you have in mind as well.

Even though this error appears in the Sound section of the Control Panel, the real cause is the NVIDIA Graphics Driver that needs to be replaced. Here’s what one concerned user says:

My audio shows that is not plugged in. I can hear the sound in my headphones, but when I go to Sound, I do a right click and go to Playback, I receive the following error: NVIDIA high definition audio not plugged in.

I get zero sound and I need help.

We have prepared three solutions that will help you solve the NVIDIA output not plugged in Windows 10 error. Read our following section in this regard.


How do I fix NVIDIA not plugged in?

1. Update the NVIDIA graphics driver

  1. Press Windows key +R to open Run.
  2. Then, type in devmgmt.msc, and click OK.
  3. Navigate to Display adapters, click the graphic card and select Uninstall Device.
  4. Go through the uninstallation process, then visit the NVIDIA website.The NVIDIA high definition audio not plugged in Windows 10 issue
  5. While here, type in your card and operating system information, and click Search.
  6. Verify the list with available drivers, click on your driver name, and select Download.
  7. Save the file on your computer, then open it, and install the driver.
  8. At the Installation Options screen, select Custom (Advanced), and click Next.
  9. Check the box from Perform a clean installation, click Next, and install your required driver.

After you have followed all steps mentioned above, verify if the NVIDIAhigh definition audio not plugged in Windows 10 error has been solved.

This solution is the answer to this error caused by outdated drivers or the newest ones that don’t function well with your computer.

You can also try using a third-party tool to automatically update all your drivers. This software will scan your PC for missing or outdated drivers and update all of them if possible.

2. Use the Roll Back Driver option

use the Roll Back Driver option
  1. Uninstall your current driver.
  2. Press the Windows + R keyboard shortcut to open Run, then type in devmgmt.msc, and click OK.
  3. Navigate to Display Adapters and choose the adapter for rollback.
  4. Choose Properties, open the Driver tab, and click on Roll Back Driver.
  5. Follow the necessary steps to perform the rollback process.

This solution is ideal if you have installed the latest drivers for your graphics card. It is an alternative to the previous one, which was for updating your graphics driver.

It is a process that searches for the backup files of the driver you have installed before your latest updates. It will cause that driver to be installed instead.

3. Enable the NVIDIA output device in Control Panel

  1. Right-click the desktop, choose NVIDIA Control Panel.
  2. Click the + button from the Display section.
  3. Select Set up digital audio.
  4. Navigate under your graphic card name section and search for HDMI.
  5. Right-click the Volume icon in the bottom right of your screen.
  6. Set View by to Large icons, then click the Sound tab, and Playback.NVIDIA output not plugged in Windows 10 error
  7. In the Playback tab, right-click to check the boxes.
  8. Click on the new device and select Set Default.

If after using the fifth step of this solution you will find the NVIDIA output device, then you must set it as default. After that, steps 6 and 7 will not be necessary.

If the opposite case is true, then check the boxes near the Show Disabled Devices and Show Disconnected Devices options.

If incorrect settings were performed in the NVIDIAControl panel, that will cause your HDMI port to be set in the wrong manner. As a consequence, the port will not broadcast audio.

This will display the NVIDIA output not plugged in Windows 10 error when you want to check the playback devices that are connected to your computer.

Enable the NVIDIA output by using this solution and solve the error in no time.

The NVIDIA high definition audio not plugged error message is one that you and other users may encounter.

In this case, just use one of the following solutions: update the NVIDIA graphics drivers, perform a rollback driver operation, or navigate to Control Panel and enable output device.

Take your time to test them and leave us a comment to let us know how they worked in your situation.

How to fix Amazon error code 5004 (4 steps)

Amazon Prime is a popular online streaming service that offers a great variety of movies and TV shows for users worldwide.

While many of them enjoy watching good-quality online content, some of them have repeatedly encountered the Amazon error code 5004 on Xbox One, PS4, and not only.

What is Amazon error code 5004? Well, this is an issue that occurs only when several titles are streamed. Here’s exactly what one user says:

I have been enjoying videos on Amazon Prime for a long period of time. I have watched several seasons on Amazon Prime, but I am witnessing an error code 5004 for the past few days.

It pops up every time I try to open any video on my Amazon Prime account. I am desperately looking for short step solutions to solve this problem.

There are several causes related to this Amazon error code 5004, so we have prepared a few solutions that will help you get rid of it in no time. Read the following section to learn all about them.


How do I fix Amazon Prime Video errors?

1. Use a reliable VPN client

Amazon Prime Video will verify the location of all users. If there is a geographical restriction from where you use their service, the Amazon error code 5004 will launch.

If your device supports their app, then you can use a reliable VPN. This will allow you to use the Amazon Prime just like you are in a location that allows streaming from this app.

It’s clear that watching high-quality content is a great way to recreate yourself. If you want to have a great experience, we recommend a great VPN software such as Private Internet Access.

This is a performant tool that offers leak protection for DNS and IPV6. Using this VPN will also offer you unlimited port forwarding and bandwidth, so give it a try too!

Private Internet Access

Private Internet Access

If you want to avoid Amazon errors, PIA is exactly what you need! With encrypted Wi-Fi and P2P support, it cannot disappoint you.
Check priceGet it now

2. Verify the server issue

There are great chances that Amazon has encountered a widespread server issue. This means that Amazon error 5004 has activated from a streaming issue that is beyond your control.

What you must do in this regard is to patiently wait for Amazon developers to verify the server problem and take appropriate measures to solve it.

Additionally, you can use a dedicated service that shows you if this issue affected other users from your location.


3. Re-activate your Amazon Prime Video account

  1. Navigate to the Prime Video login page.
  2. Press Sign In and type in your username and password.Amazon error code 5004 login screen
  3. After logging in, re-activate your Amazon account. Amazon error code 5004 credentials
  4. Verify if the problem has been solved.

You may encounter the annoying Amazon Prime error code 5004 on a smart TV too. Things are no different if you use certain devices such as Nvidia Shield or Roku.

These situations share a common origin: your account on Amazon has become inactive.

If you have logged in with your Prime account on a device without using that account for a long period of time, the Amazon Prime error code 5004 may appear.

There are certain devices that will notify you to reactivate your account if you will sign in from a mobile or desktop browser.


4. Reset your Nvidia Shield TV to default

  1. Open your Nvidia Shield.
  2. Access Settings and select Storage & reset.Amazon error code 5004 fix
  3. Select Factory data reset, click on it again for confirmation, then choose Erase everything.Fix Amazon Prime error code 5004: reset Nvidia Shield device

When the Amazon error code 5004 launches on your Nvidia Shield device, this may be an old error that Amazon Prime has not solved in a few years.

It may be caused by temporary data belonging to Amazon that remains on your device even after you uninstall and reinstall the app.

Note tha it is important to backup your data before using this solution, as it will erase all data present in your device. 


The Amazon error code 5004 is disturbing when you want to relax and enjoy a good movie on Amazon Prime.

Check if the origin of this error is at Amazon by using a dedicated service that tracks down these issues. Whenever the error code is generated on their servers, the Amazon developers team will solve it.

You could also try to re-activate your Amazon user account. If you use an Nvidia Shield TV, we recommend you reset this device to its factory settings.

No less important, to benefit from your Amazon user subscription, use a fast, professional, and friendly VPN such as the one mentioned above.

We invite you to test our solutions and verify if the Amazon error code 5004 has disappeared after applying them. Don’t forget to leave us a comment about your experience in this regard.

FIX: Vivaldi update check fails

Vivaldi is a freeware browser developed by Vivaldi Technologies. It has a plethora of features and is one of the most secure browsers that block ads and trackers.

Were you trying to update your browser and you got the error Vivaldi update failed? If so, you came to the right place.

In this article, we will explore some of the best methods to solve this update issue with Vivaldi and make it run as fast as it once used to.


How can I fix Vivaldi’s update failed error?

1. Switch to a different browser

If you can’t update Vivaldi and enjoy the optimized version, switching to a different browser clearly is the quickest solution.

Since you’re using Vivaldi, we assume that privacy is a matter of great importance to you. As a result, we recommend installing a privacy-focused browser such as Opera One.

Just like Vivaldi, Opera One lets you fully customize the user interface so as to bring forth the information that matters to you, not to mention that it includes unlimited VPN and a native AI.

Opera One

When Vivaldi update check fails, consider downloading Opera One. Your problems will get instantly solved!
Free Download Visit website

2. Check for remaining Vivaldi files on your hard-drive

  1. Open Windows Explorer.
  2. Click on This PC from the folder tree.this PC vivaldi update failed
  3. Type vivaldi.exe inside the search bar.search bar vivaldi update failed
  4. Delete any files found by the search.

Sometimes leftover files can cause Vivaldi update failed errors to occur. To fix it, follow the above steps.


3. Wipe temporary folders from Windows

  1. Press Windows Key + R keys on your keyboard.
  2. In the pop-up that appears, write TEMP, and press Enter.temp run window vivaldi update failed
  3. This will open up the first temp folder. Simply delete all the files found there.
  4. In the Run window, type in %TEMP% and press Enter.temp window vivaldi can't update
  5. A window will open with your temporary files. Delete all of them.
  6. Try updating Vivaldi once again.

Windows stores temporary files in two folders on your PC. The first one is a system folder and it is used by Windows to store temporary files.

The second Temp folder is used to store data by the applications you use on your PC. Use the above steps to clean up both of them.


4. Check Windows registry for broken files

  1. Press the Windows Key + R key.
  2. Type in regedit and press Enter.regedit vivaldi update failed
  3. Choose Yes if a window pops up asking if you want to perform changes (you will need administrator privileges).
  4. This will open up the Registry Editor.
  5. Navigate to the following key: 
    Computer\HKEY_CURRENT_USER\Software\Microsoft\Windows\CurrentVersion\Uninstall
  6. Delete the Vivaldi folder found there.vivaldi registry vivaldi update failed
  7. Restart your PC, and then try updating Vivaldi again.

5. Remove Vivaldi Update Notifier from the registry

  1. Open Registry Editor.
  2. By using the navigation tree to your right, navigate to: 
    Computer\HKEY_CURRENT_USER\Software\Microsoft\Windows\CurrentVersion\Run
    vivaldi update notifier vivaldi update failed
  3. If you can see Vivaldi Update Notifier in the list to your left, delete it, and restart your PC.

Sometimes certain registry values can cause Vivaldi update failed. However, we can fix that by doing as described above.


In this article, we explored a few very useful methods that have been proved to solve the Vivaldi update failed error. Please make sure to follow the steps presented in this guide closely for the best results.

Also, feel free to let us know how these methods worked for you, and if you have any suggestions, use the comments section found below.