BIOS-related errors in the Windows system are not common. One such error is The current BIOS setting do not fully support the boot device.
This can be a serious issue, and your PC can end up stuck on the motherboard boot screen, so it’s important to fix it, and today we’re going to show you how to do it.
Why does the current BIOS setting not fully support the boot device message appear?
Issues with hard drives, such as loose connections, can cause this and other problems.
Incorrect boot order will cause this issue to appear on your PC.
Problems with startup can sometimes lead to this problem.
Certain BIOS settings will cause this issue to appear.
How can I fix the current BIOS setting do not fully support the boot device?
1. Check your HDD
Assuming you are having a problem with a new or relatively new build, check the HDD for connection issues.
Open the computer and disconnect the SATA cable from the HDD and motherboard.
Also, disconnect all the power from the HDD and leave the components idle for a few minutes.
Now plug all the cables and connect the hard drive to your motherboard.
Turn on the computer and check for any improvements.
If that does not work, try plugin the HDD to a different SATA port on the motherboard to see if that helps.
This solution requires you to open the computer and disconnect and reconnect the hardware inside. Proceed only if you know what you are doing.
2. Run Startup Repair
Insert the System Repair Disc or Windows DVD in the DVD/ USB flash drive.
Restart your computer. The computer will boot using the inserted DVD drive.
When the Press any key to boot from CD or DVD appears, press any key.
Select the correct time and Keyboard type.
Select the Repair your computer option in the lower-left corner.
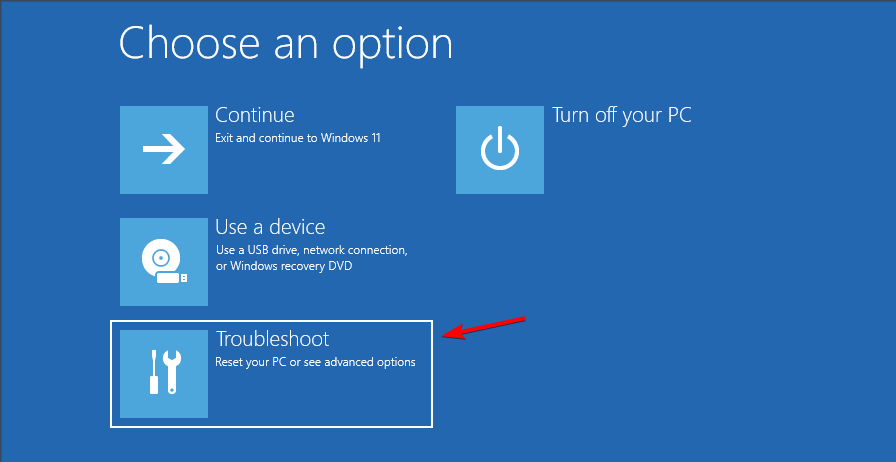
Select the Troubleshoot option under the Choose an option screen.
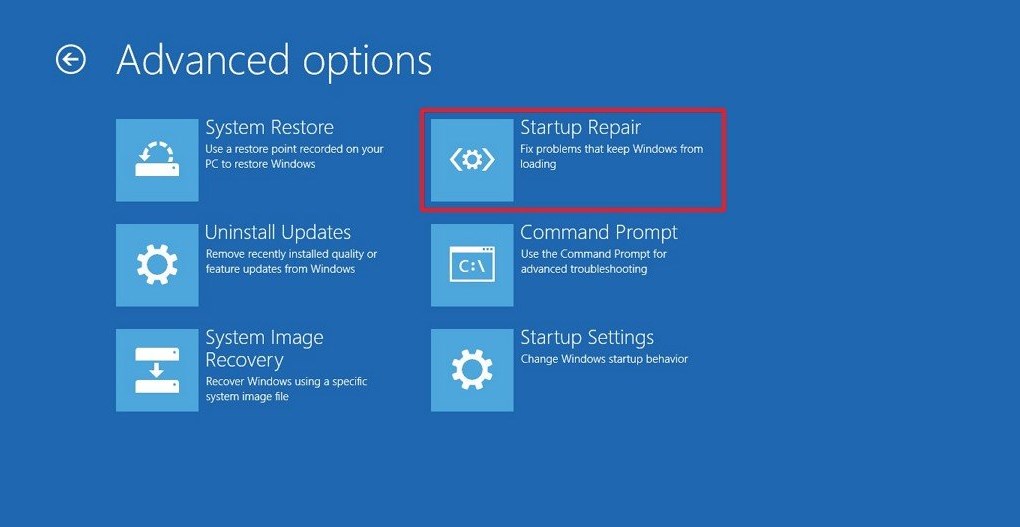
Under the Troubleshoot screen, click on Advanced Options.
Click on Startup Repair.
Windows will now scan for any issues with the system that is causing issues during the startup and fix them.
If you don’t have a Windows DVD, you can create one using Windows 10 ISO. Here is how to create a Windows 10 bootable drive.
Start the computer and press ESC/F1/F2/F8 or F10 during the initial startup screen.
Choose enter BIOS setup option.
Since the mouse does not work, use the arrow keys to navigate.
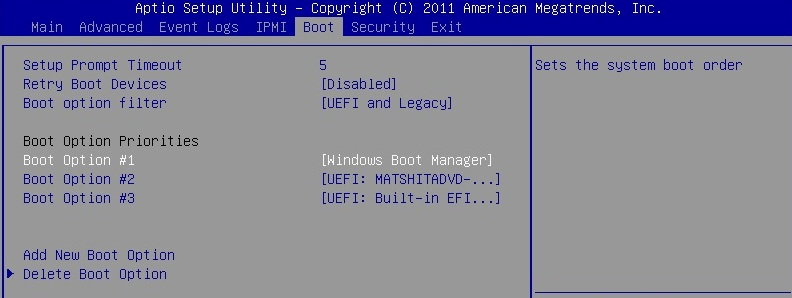
Go to the Boot tab.
Now check the boot device order. Make sure your HDD is selected as the priority device.
Exit and restart the computer. Check if the error is resolved.
4. Reset BIOS settings
Restart your computer and repeatedly pressESC/F1/F2/F8 or F10 during the startup to get into BIOS.
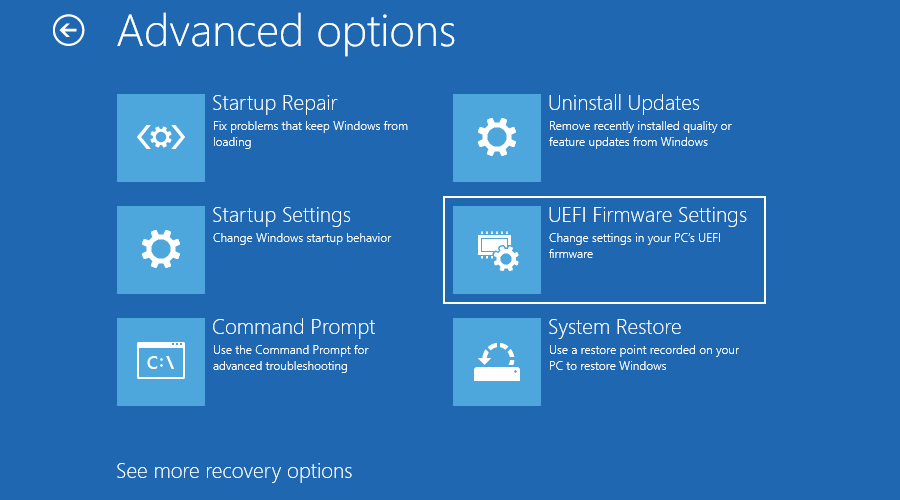
If you are using Windows 10, click on Start and select Power. Now press and hold the Shift key and press Restart. Go to Troubleshoot > Advanced Options > UEFI Firmware Settings and click on Restart.
Once you are in BIOS, press F9 to open the Load Default Options dialogue box.
Select Yes using the arrow keys to reset BIOS settings to factory default.
Exit and restart the computer and check for any improvements.
The current BIOS settings do not fully support the boot device error that occurs due to issues with the BIOS. Follow all the fixes in this article to resolve the issues and get your system back online.
In some rare cases, there might be BIOS corruption present, but we have a guide that can help you fix that.
If you have any other questions or suggestions, leave them in the comments section below and we’ll surely check them out.
According to a report from the Wall Street Journal, officials in Washington are looking to circumvent a China-led push to 5G infrastructure by scrambling some of the best and biggest North American based tech companies to create alternative software and hardware 5G telecommunications technologies and networks.
As the Journal puts it, after speaking to White House Officials on the matter,
The plan would build on efforts by some U.S. telecom and technology companies to agree on common engineering standards that would allow 5G software developers to run code atop machines that come from nearly any hardware manufacturer. That would reduce, if not eliminate, reliance on Huawei equipment.
Companies including Microsoft Corp., Dell Inc. and AT&T Inc. are part of the effort, White House economic adviser Larry Kudlow said.
The big-picture concept is to have all of the U.S. 5G architecture and infrastructure done by American firms, principally,” Mr. Kudlow said in an interview. “That also could include Nokia and Ericsson because they have big U.S. presences.”
While most nations would like to own their 5G networks full stop, the reality is that in an interconnected global community, some nations have a headstart in development and often share their progress through partnerships, collaborations or sales, and current US trade foe, Huawei Technologies Co, happens to be part of a nation sitting atop the 5G hill.
More specifically, White House economic adviser Larry Kudlow is depending on companies such as Dell and Microsoft to “rapidly develop software and cloud capabilities,” to not only replace Huawei licensed technologies, but also unseat the dominant place the China-based company currently retains.
In addition to positive mindshare, Huawei will remain a tough competitor to the US companies working on 5G networks as the Chinese giant has been heavily investing in the standard. If the US cannot find a way to workaround Huawei’s “intellectual property,” they may end up playing catch up for one to two years with Huawei and its partners.
The problem is you’re starting late in the game to fix this problem,” Mr. Triolo said of the U.S. effort. He added that the initiative could also threaten Finland’s Nokia and Sweden’s Ericsson by making their machines a commodity, Mr. Triolo said.
Moving into the second year of an ongoing trade war, the US continues to vilify Huawei by levying security concerns as a reason to halt business between North American companies and the China-based software and hardware provider. However, US partners such as the UK are no longer following suit in their banishment of Huawei technologies over concerns about the company having direct ties to the Chinese military. Instead, as of last week, the UK has agreed to allow Huawei to build part of the country’s 5G network.
The UK’s agreement to partner with Huawei on its new 5G infrastructure is now being met with a resolution formed by House Republicans condemning the nation’s acceptance of advance network help from Huawei. As with most partisan efforts as of late, the new resolution includes top Republican official sponsors including Rep. Michael McCaul (R-Tex), Rep. Ted Yoho (R-Fla), Rep Michael Turner (R-Ohio), Rep Mike Gallaher (R-Wash), and Rep Lix Chene, who all expressed how “extremely disappointed” they were in the UK’s decision to forgo the White House’s imposed trading ban with Huawei.
The US’ concerns over a potential Huawei dominance in the subsequent IoT markets 5G enables isn’t limited to one political party in North America: A bipartisan gathering of senators are looking to recirculating funds from the Federal Trade Communications Commissions spectrum license auctions to stimulate 5G open standards research and development through a series of grants. Other options that were up for consideration include the White House subsidizing hardware efforts from would-be Huawei competitors while Dell, Microsoft and the rest attempt to build out a 5G infrastructure.
As it stands, shifting proceeds from the FTC auctions is only a proposition and the White House is only reviewing the options with no clear indication of acting on it anytime soon, instead opting to apply continued pressure to allies and remaining partners to ban Huawei technologies. There has been no official word from Dell or Microsoft on the matter and the White House has yet to unveil its final plan going forward for a Huawei-free 5G network.
If you are still running the Windows XP OS and considering upgrading to Windows 7, Microsoft’s Windows 7 Upgrade Advisor tool can make the process simpler.
The users can download and run the Windows 7 Upgrade Advisor to see if their PC is ready for Windows 7. The tool scans the hardware, connected devices, and installed programs for compatibility issues.
It also guides you on how to resolve potential issues found with a few recommendations that you should perform before upgrading to Windows 7.
In this article, we show you how to download and install Windows 7 Upgrade Advisor for your Windows PC.
How can I download and run the Windows 7 Upgrade Advisor?
To change the language, click the drop-down menu and select your preferred language.
Click the Download button.
Windows 7 Upgrade Advisor will download.
Prepare the system
Once you have downloaded the Windows 7 Upgrade Advisor, you need to prepare your system to run the tool.
Make sure you have connected all the devices like a printer to your computer.
This is important, as you would want the tool to check external devices to be scanned for compatibility issues as well.
Run Windows 7 Upgrade Advisor
Run the Windows 7 Upgrade Advisor installer.
It may prompt you to download additional files, including .NET Framework 2.5 / 3.5.
Download the required files to proceed.
You may have to reboot the computer to apply the changes.
Once the scanning process is complete, the Windows 7 Upgrade Advisor will display a detailed report divided into three parts: System Requirements: It will show if you can do an in-place upgrade to 32-bit or 64-bit Windows 7. It will also show the new programs that you would require to download, including Windows Mail, Parental Controls, and extras. Devices: This section shows if the connected devices and other hardware components are compatible with the new OS. Programs: This section shows if any of the installed applications are incompatible with the new OS.
The green tick in the report means the software/hardware is compatible with the OS. A Yellow triangle with an exclamation mark indicates the issue requires your attention to resolve.
If the Windows 7 Upgrade Advisor does not find any issues with the system, you can proceed to upgrade to Windows 7. You can install Windows 7 by downloading an ISO and burning it to either a USB flash drive or a DVD.
For any other questions or suggestions, don’t hesitate to reach for the comments section below.
Microsoft announced today that it’s revamping Xbox Game Pass quests on Xbox One to give gamers even more opportunities to earn Microsoft Rewards points. With the new system, there will be daily, weekly, and monthly quests, with some quests also being exclusive for Xbox Game Pass Ultimate members.
“We heard your feedback about improving Quests and making this a better experience while gaming, so you can now play any Xbox Game Pass console game to earn points. We’ll still have Quests around specific games, so Quests will continue to be a great way for you to discover games you may not have tried yet. You will also get notified in real time when you complete a Quest,” the Xbox team explained today.
Until now, Xbox Game Pass quests required you to unlock a specific number of achievements in select games to unlock some Microsoft Rewards points. Following today’s update, quests are becoming more complex and some of them will require completing specific tasks in games. Here is the list of daily, weekly, and monthly Xbox Game Pass quests that will be available until March 2:
Daily:
All Xbox Game Pass console games: Earn 15 points by playing any Xbox Game Pass console Game
Mobile app: Earn 15 points by logging in to the Xbox Game Pass mobile app
Weekly:
All Xbox Game Pass games: Earn 50 points by earning an achievement in any Xbox Game Pass console game this week
(For Ultimate members only) Payday 2: Complete 3 heists in Payday 2: Crimewave Edition to earn 75 points
Monthly:
Earn 1,000 points by completing 45 daily Quests and 15 weekly Quests this month
Grand Theft Auto V: Earn 100 points by stealing 35 cars in GTA: V
You can still find Xbox Game Quests on your console or the Xbox Game Pass app for iOS and Android. Microsoft says that you can expect around 90 quests every month, so if you’re looking to earn more Microsoft Rewards points to spend on digital gifts cards or other things, that should be a great incentive to play more games on your Xbox.
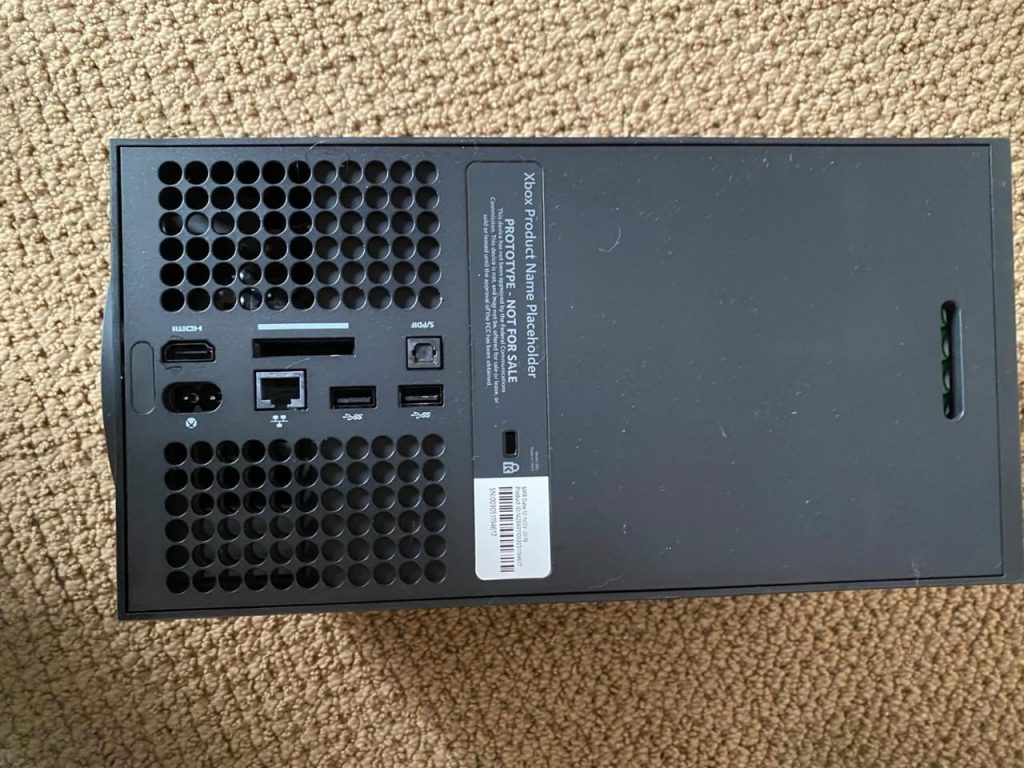
Less than a couple weeks ago, a peek at the ports on the upcoming Xbox Series X were leaked online. The photo showed most of the same ports as on the Xbox One series of consoles—two USB-A, only one HDMI, an ethernet, an audio, and power.
Besides these ports, the photo also showed a long rectangular one that sits in the middle between the HDMI and audio ports. As it turns out, the port seems to be a storage expansion slot, according to sources familiar with Microsoft’s plans (via Thurrott).
Providing easy access to storage expansion makes a lot of sense, especially as the Series X’s 4K ultra HD capable hardware will likely equate to much larger game sizes. The technology behind the expandable storage is still unknown—the hope is that it can provide a balance of high storage capacity as well as speedy read access.
Microsoft has also included options to expand storage in its latest Surface Devices—the Laptop 3 and Pro X. Although unlike that of the Xbox Series X, expanding the storage in these Surface devices requires a total replacement of the included SSD, as opposed to inserting an additional drive.
It’s important to keep in mind that, as can be seen in the photo, that the device is only a prototype at this point. Until its release in the holiday season later this year, Microsoft can continue to tweak the device as it sees fit, including adding/removing any of the ports shown above.
What do you think about a storage expansion slot of the Xbox Series X? Let us know in the comments area below.
Sony announced its FY2019 Q3 results yesterday for the three months period ending on December 31, 2019, and unlike Microsoft, the company isn’t shying away from revealing hard data about its PlayStation business. Even though Sony only sold 6.1M PlayStation 4 units during the holiday season (down 2M YoY), PS4 cumulative sales have reached 108.9M units, and PS Plus subscribers also reached a record 38.8M subscribers.
“We aim to leverage this large community and network services revenue stream to affect a smooth transition from the current console generation to the next, unlike in the past when profitability deteriorated significantly due to development and marketing costs,” Sony’s CFO Hiroki Totoki explained during its earning calls. When asked to share more about Sony’s plans for a “smooth transition” to next-gen consoles, Totoki said that PlayStation 5 pricing is still up in the air, and hinted that Microsoft’s Xbox Series X should be the main factor of adjustment.
“First, we must absolutely control the labour cost, the personnel cost, it must be controlled,” Totoki said. “And the initial ramp up, how much can we prepare initially, we will work on the production and the sales and we will have to prepare the right volume as we launch this.
“What is not very clear or visible is because we are competing in the space, so it’s very difficult to discuss anything about the price at this point of time, and depending upon the price level, we may have to determine the promotion that we are going to deploy and how much costs we are prepared to pay.
“So it’s a question of balance,” Totoki continued, “and because it’s a balancing act it’s very difficult to say anything concrete at this point of time, but when I said smooth transition, we mean that we will definitely choose the optimal approach and that we will try to have the best balance so that we will be profitable in the life, during the life of this product.”
If Microsoft was first to reveal the design of the next-gen Xbox, the company has yet to reveal the full specs and pricing details for Xbox Series X. The software giant is also rumored to be working on a cheaper “Lockhart” SKU, but the existence of this second device is still unconfirmed.
Back in 2013, Sony’s PlayStation 4 easily took the advantage over Microsoft’s Xbox One which was $100 more expensive with its bundled Kinect, and also slightly less powerful than the PS4. Things apparently got so bad that Microsoft quickly stopped sharing Xbox One sales numbers.
Thanks to its 100+ million PS4 install base and ecosystem lock-in, Sony may still be able to become the market leader during the next console generation, even if Microsoft is able to match the pricing of the PS5. Even though the console wars are still very much a thing, Microsoft is now looking beyond pure console sales and working to bring the Xbox ecosystem to more devices with Project xCloud. “The business isn’t how many consoles you sell. The business is how many players are playing the games that they buy, how they play,” Xbox head Phil Spencer explained in an interview with The Verge last year.
Do you remember Clippy? The anthropomorphic paperclip-shaped assistant once was a key feature in Microsoft’s Office suite of products and often helped users with suggestions about writing letters, and more.
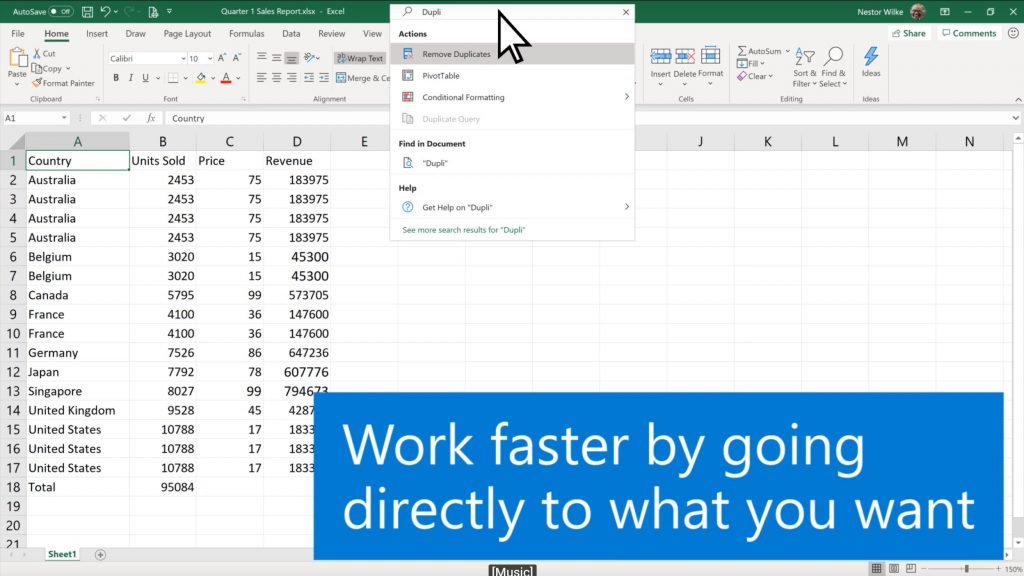
While Clippy has long been dead, Microsoft in most recent times replaced him with a feature in Office 2016 known as “Tell Me.” Or, if you’re up and running with the latest version of Office 365 and Office 2019, a feature known as the Microsoft Search Box. In this Office 365 guide, we’ll be taking a look at what the Microsoft Search Box can do for you.
A quick explanation about the Microsoft Search box
The Microsoft Search Box is universal across Office 365 apps like Word, PowerPoint, and Excel. It lives at the top of the ribbon and is out of your way. That’s much different from Clippy, who was known to show up in the most inconvenient times. Anyway, there are more than a few things that the Microsoft Search box can help you do. It’s designed so you can enter words or phrases about what you want to do next, and will help you get to those features. You can even save time summon it with the Alt+Q buttons on your keyboard.
Features of the Microsoft Search box in Office 365
When you click the Microsoft Search box, search will remember what you last asked it to do. It also might suggest actions that you might want to take based on what you’re working on. Additionally, if you’re up and running with a business version of Office 365, you’ll also see a list of people that you collaborate with, and files that you’ve recently worked on in this search box as well. Lastly, if you’re lost and you’re not sure where to find a specific functionality of the Office 365 app you’re in, the search box can help you find what you’re looking for.
The Microsoft Search box is also smart enough to help you find a definition of a word. Simply type the word into the Microsoft Search box, and Bing will tell you what it means. But, if you’re looking for expanded results, you also can always click the definition and open the search pane to see more details on Bing.
This pane will have tabs for Knowledge, Files, Web, and Pictures. Knowledge will give you a definition or more information about a topic. Files will search through the files in your organization for the word you searched for. Web will show you a list of web results. Pictures, meanwhile, will run a Bing image search for your query.
Just the start of what Office 365 can do for you
The Microsoft Search box is just one of the many features of how Office 365 can help you out. So far, in our coverage, we’ve highlighted how you can use it in your small business, stay healthy at work, and even improve your workflow. Keep it tuned to OnMSFT for all your Office 365 news and information, and feel free to let us know if you’ve ever used Microsoft Search in Office 365 by dropping us a comment below.
Are you used to simply close the lid on your laptop and leave your office for a snack? Do you have a favorite coffee shop where you work from, but the best bagels are sold across the street? Or do you simply need to use the toilet? You might be used to close the lid and be on your way. But wait! Danger lurks in unexpected shapes and sizes! Anyone can reopen that lid and access your laptop, unless you lock it.
Do you work from home and need to make sure that your toddler does not send a mangled email to the whole organization while you fix yourself a snack? Do you have a prank-prone team around your desk, like I do?
Then you need to make sure your laptop does lock when you close the lid, and this can be an issue, especially for some Windows 10 users.
Follow these simple steps to identify the root of your problem and fix it.
FIX: Laptop not locking when closed
First, you need to check the default settings that establish what happens when you close the lid. Follow these steps to modify the System Settings:
1. Modify the Power Options
Access System Settings > Hardware and Sound > Power Options.
Notice you can change the predefined actions of the power buttons. On the Change what closing the lid does drop-down menu, choose Sleep or Hibernate.
If your laptop is still unlocked when it wakes up from sleep, you should make sure you have the right Sign-in options enabled. Here is how to do that:
2. Modify the Sign-in options
Press the Windows key and X, to bring up the side menu.
From the side menu, choose Settings.
On Windows Settings, choose Accounts > Sign-in options.
Set the laptop to require sign-in when it recovers from sleep, using the options from the drop-down menu.
3. Edit the Screen Saver options
If the above steps did not help, have a look at your screen saving settings:
From Windows Settings, choose Personalization.
On the Personalization window left-hand menu, choose Lock screen.
Scroll down to bottom of the Lock screen window and click Screen Saver settings.
On the Screen Saver Settings window, make sure this checkbox is enabled: On resume, display logon screen.
4. Run the Troubleshooter
Sometimes you need a thorough system check and that’s when the Windows built-in troubleshooter comes in handy. Here is how to access it:
In the Windows search menu, type Troubleshooter to bring up the System Settings > Troubleshooter menu.
On the Troubleshooter menu, select Power, then click Run the troubleshooter.
What if I just want the laptop to lock?
Windows 10 has had mixed reports about its abilities to recover from sleep. What if you simply want to lock the laptop when closing the lid, without entering a Sleep or Hibernate state?
There is a third party software that can help with that, called Lid Lock. It is free to use and although the original developer website location is currently unavailable, you have a safe download source on Softpedia.
After you install the tool, you can access it from System Tray. As long as you make sure Lid Lock loads at the same time with Windows, you don’t need to further configure it.
SharePoint is a collaborative software tool that is part of the Microsoft Office Suite. As a collaborative tool, user connections are to be expected. Once added, you will also need to update, import and sync their information accordingly to stay updated.
There are plenty of methods one can use to add, import or sync users into SharePoint, but the fastest and simplest way is through the use of Active Directory (AD).
It can be used as an alternative to using Microsoft Identity Manager (MIM) to import user profile data from Active Directory Domain Services (AD DS) in your domain.
One limitation is that AD import only works with Active Directory Domain Services (AD DS) and does not work with other directory services. More so, if you use AD Import, MIM or other external identity managers are not available for connections to other data sources such as business applications.
Despite being the fasted sync and import method, Active Directory does have a few situations when it won’t do its job properly.
Why won’t my SharePoint user profile sync with AD?
Here is a list of when and why Active Directory Sync and import may not work:
Things to know about Active Directory
Referential integrity among users and groups is only maintained within a single Active Directory forest
The AD import option lets you configure and use only a single, farm-wide property mapping
Things that Active Directory cannot do
The AD import option does not:
Automatically synchronize photos from Active Directory to SharePoint Server 2016
Filter user interface to create complex Boolean expressions
Provide object filtering based on object property values
Ensure single-master of each object property
Perform per-tenant property mapping
Provide Logon and Resource Forest support
That is, custom joins of data from multiple sources
Property mappings for complex types like pictures and special AD types
Exporting data from SharePoint to Directory Sources
Upgrading/Translating FIM based connections or synchronizing configuration to AD import
Bidirectional synchronization
Changes made to SharePoint user profiles will not be synchronized back to the domain controller
Multi-Forest scenarios such as:
If you have a trust between two forests, the trusted forest objects will not be imported
AD import does support importing users from multiple forests provided you create one synchronization connection per forest
As an alternative, consider using Microsoft Identity Manager
Conclusion
By using this checklist, you should be able to avoid situations that ould otherwise prevent you from using Active Directory efficiently. However, if none of them can be avoided, remember that there are other methods of importing and syncing user profiles into SharePoint, albeit maybe more complicated.
Do you use Active Directory as an import method, or do you prefer a different one? Share your opinion with us in the comments section below.
Windows File Server can be very handy when used accordingly, however, many reported that home folder is not mapping.
This can be a problem and make access to files a lot harder than it needs to be. Speaking of which, we have a great guide on how to map a network drive that you should check out.
However, there is a way to fix this problem, and in today’s guide, we will show you how to properly fix it.
Why is home folder not mapping?
Antivirus or its folder protection feature might be interfering with folder mapping.
The Fast Logon Optimization feature is enabled in Group Policy.
How do I make profile home folders map again?
1. Disable your antivirus or firewall
Open your antivirus software.
Disable the folder protection feature.
If this feature isn’t available, disable the antivirus altogether.
Remember that disabling antivirus will jeopardize your system, so use this only for troubleshooting. To ensure your system is safe, use a reliable antivirus for Windows Server.
2. Disable the Fast Logon Optimization feature
Press Windows + R and type in gpedit.msc.
Go to Computer Configuration.
Select Administrative Tools.
Choose System.
Select Logon.
Double-click the Always wait for the network at computer startup and logon.
Set it to Enabled.
Reboot the PC.
Once the PC has rebooted, try to see if your user’s home folder encounters any more difficulties while mapping.
The fast logon feature may affect the display and drive letter assignment of a mapped network drive. As such, the drive may have been mapped, but the user on the client cannot see it in Windows Explorer.
As with the case at hand, he may even recognize it as a failed network drive mapping. This is why disabling fast logon via the Group Policy Objects is the best solution.
In case you’re having additional problems, we have a great guide on what to do if you can’t map network drive.
If you know of any other solution to this problem, tell us more about it in the comments section below.
However, as is applicable to just about anything, the VMware isn’t immune to errors, and a common one is that of VMware not working on Windows 10.
However, the same can also be rectified easily and effectively. Hang on!.
Easy fix when VMware is not working on Windows 10
1. Disable Hyper-V listing
Launch Task Manager. You can do this by typing Task Manager in the Cortana search box and selecting from the results shown. Alternately, right click on the taskbar. From the shortcut menu that shows, select Task Manager.
In the Task Manager window that opens, select the Services
Under Services, locate Hyper-V listing, if it’s there.
Once you have found Hyper-V listing, see if its Status is shown to be as Running.
If its running, right click on the same and select Stop.
Close Task Manager.
2. Stop Hyper-V services
Open the Services The simplest way to do that is to type Services in the Cortana search box and selecting from the search result shown.
In the Services window, there likely are several listings for Hyper-V.
Check if their Status is shown as Stopped.
If not, right click on each and select Stop.
3. Stop Hypervisor
Launch PowerShell. Again, this can be done by typing PowerShell in the Cortana box and selecting from the results. Or, right click on Start and select PowerShell(Admin) from the menu that opens up.
In the PowerShell window, type the following command: bcdedit /set hypervisorlaunchtype off
Press Enter.
Reboot your PC.
Just in case Hypervisor is needed for any other application, you can always re-enable the same. For re-enabling Hypervisor, launch PowerShell
In the PowerShell window, type the following command: bcdedit /set hypervisorlaunchtype auto
Press Enter.
Reboot your PC.
4. Turn off Memory Integrity
Launch Windows Security. The shortcut to this should already be in the Taskbar or you can just type Windows Security in the Cortana box and select from the results shows.
In Windows Security, choose Device Security from the options on the left.
Under Device Security, click on Core isolation details under Core isolation.
You should get to see the Memory integrity toggle switch. Ensure it is turned off.
If the option is grayed out, you will have to make necessary modifications in the registry to turn it off.
Launch Registry Editor by typing regedit in the Cortana Search box and selecting from the search results shown.
From the options on the left, select: Computer\HKEY_LOCAL_MACHINE\SYSTEM\CurrentControlSet\ControlDevice\GuardScenarios\Hypervisor\EnforcedCodeIntegrity
Change value of Enabled REG_DWORD to 0 if it is set to 1, which should be the case if Memory integrity is set to On. Close Registry Editor.
The above steps should be all you need to do if VMware is not working on Windows 10.
Meanwhile, here are some additional resources for your reading.
Windows 10 is known for a variety of things, both good and bad, but depending on who you ask, the cons more than outweigh the pros.
For example, Windows 10 isn’t in a very good spot when it comes to privacy. The telemetry services that it uses have always been the source of scandal when it comes to user privacy.
Users want more control over what data Microsoft collects
The efforts of privacy watchdogs have started paying off, as they continuously rally against Microsoft in an effort to make them surrender more control over to users when it comes to what data they can offer.
One good example is that of the Bayerischen Landesamts für Datenschutzaufsicht. This German watchdog regulates data protection in the country and found a way to disable the telemetry completely on Windows 10.
The only catch is that it needs to be done in version 1909. Additionally, the method only works on the Enterprise and Education editions of the OS.
You can finally disable Windows 10’s telemetry
Tests done by the agency showed that Windows 10‘s telemetry could be completely disabled. The only catch is that this cannot be done using Windows 10‘s native tools.
However, some control can be gained over the telemetry if users make use of third party applications. These apps give you several options that would technically make it possible to reduce the data collection to a minimum level.
Additionally, certain PowerShell commands can also be used to block telemetry data.
Microsoft defends the telemetry feature stating that it is necessary to run in the background. Its main purpose is to gather information on bugs and crashes.
More so, they stated that the feature is crucial for allowing Microsoft to further refine and improve Windows 10. As for the safety of their data, Microsoft claims that they gather no personal information. Finally, they said that all the data collected is safely transferred to their servers.
Do you think Microsoft’stelemetry is good or is it something that needs disabling as soon as possible? Let us know what you think in the comments section below.
There’s no reason to deny that PowerShell is much more powerful than the Command Prompt, so what can you do when it’s not working properly? If you also run into an annoying problem and don’t know what to do, this is the guide for you.
Trying to run PowerShell gives you this error instead: PowerShell is not recognized as an internal or external command. Or maybe you are seeing one of the simplest yet widely spread PowerShell errors: Term not recognized.
In one case or another, we’ve got solutions for you. Check them out one by one in the lines below.
What can I do when PowerShell is not recognized?
1. Make a few changes to the path environment variable
Experienced users brag about solving the problem by easily adding this to their path environment variable: %SYSTEMROOT%System32WindowsPowerShellv1.0
Try the same too in case of missing an environment variable. If it makes no difference, you could also change your script to this: %SYSTEMROOT%System32WindowsPowerShellv1.0powershell.exe
2. Change COMMAND constant
On the other hand, if you cannot resolve the issues with the previous two quick fixes, this should be your next obvious step.
Find your way to the win32.js at say/platform/win32.js. While there, change the COMMAND constant from powershell to start /b powershell.
3. Evoke the 64-bit version from Visual Studio when PowerShell commands are not recognized
If you’re dealing with PowerShell commands not recognized when called from Visual Studio 2017, start from here: Visual Studio 2017 is 32-bit, therefore it evokes the 32-bit version of PowerShell.
Starting PowerShell manually on 64-bit Windows means using the 64-bit version of PowerShell, so that’s the root of the problem itself.
In this case, evoke specifically the 64-bit version from Visual Studio by using this syntax: %WINDIR%SysNativeWindowsPowerShellv1.0PowerShell.exe
4. Check spelling when getting the Term not recognized error
When the error you are seeing states that a term is not recognized as the name of a cmdlet, function, script file, or operable program, things are a lot easier.
All you need to do is further check the name’s spelling. If a path was included, then make sure the path is correct and try again.
Moreover, adding PowerShell to the path seems to fix the issue. However, there’s a downside to take into consideration. Not everyone is interested in adding PowerShell to the path; you might look for a way to install and use the package.
Since Microsoft’s Edge browser made the switch to the Chromium open source project, the company has been making various contributions that should eventually benefit all Chromium-based web browsers. Recently, we wrote about Microsoft proposing a change to bring Title Bar customization options for Progressive Web Apps, but Windows Latest has since noticed another interesting proposition from Microsoft aiming to make PWAs behave more like native apps.
In an explainer document on GitHub, the Microsoft Edge team revealed its plan to allow PWAs to be registered as handlers for URL protocols, so that clicking on links such as mailto:// , ms-word:// or web+music:// from the web or an app would open registered PWAs that have been installed on a PC.Here are three use cases detailed by the Edge team:
Cross app integration. A user opens a document using a PWA. The document contains a link to a presentation (ms-powerpoint://deck2378465). When the user clicks on it, the presentation PWA automatically opens in the correct scope and shows the slide deck.
In a native chat app, the user receives a link to some magnet:// URL. When she clicks the link, an installed torrent PWA is launched.
A user has installed a PWA for a music app. When a friend shares a link to a song and she clicks on it (web+music://songid=1234&time=0:13) the PWA will automatically launch instead of opening a new tab in the browser.
Replacing websites or desktop apps by PWAs is definitely something only power users would do, but as the Edge team explained, this proposition is all about making PWAs a “more engaging native-like experience.” It certainly could have its merits, especially since the new Chromium-based Edge now makes it pretty easy to install PWAs from the web. And truth be told, some PWAs like Outlook.com or Spotify are now just as good or better than their desktop counterparts.
It remains to be seen if this proposition from the Microsoft Edge team ends up in Chromium, but after Microsoft abandoned its plan to bring PWAs to the Windows 10 Microsoft Store, the new Edge seems to be an interesting new gateway to bring more “apps” to Windows.
Let us explore in the guide the Windows Watchdog.sys crash.
Even though the transition to Windows 10 from previous iterations is relatively seamless, specific issues can force you to reconsider the upgrade.
Especially if the error at hand is a critical system error that results in BSoD (Blue Screen of Death).
In this case, we’ll try to focus on the watchdog.sys error in Windows 10 that seems to bother a lot of folks recently.
Since it’s related to GPU/Display drivers, predominantly Nvidia graphics, our main concern goes to false generic drivers provided by Windows updates.
What is a watchdog error?
A watchdog error is a type of error that occurs when a system’s watchdog timer detects that the system is not responding or functioning correctly.
A watchdog timer is a hardware or software component that monitors the system’s activity and triggers a reset or shutdown if the system fails to respond within a specific time frame.
Here are some possible causes of a watchdog error:
Overheating – When a system overheats, it can become unresponsive or crash, triggering a watchdog error. A malfunctioning cooling system, a blocked air vent, or excessive dust buildup can cause this.
Hardware failure – A malfunctioning or defective hardware component, such as a hard drive, RAM module, or motherboard, can cause a system to freeze or crash, triggering a watchdog error.
Driver issues – Outdated or corrupted drivers can cause a system to malfunction or crash, triggering a watchdog error. This can be caused by incompatible software updates or malware.
Software conflicts- When two or more software programs conflict, they can cause a system to freeze or crash, triggering a watchdog error.
Power supply issues – A failing or inadequate power supply can cause a system to behave erratically or crash, triggering a watchdog error.
BIOS settings – Incorrect or incompatible settings can cause a system to malfunction or crash, triggering a watchdog error.
Malware infection – Malware such as viruses or trojans can cause a system to malfunction or crash, triggering a watchdog error. This can be caused by browsing unsecured websites or downloading untrusted software.
Overclocking – Overclocking hardware components such as the CPU or GPU beyond their recommended specifications can cause instability in the system.
How can I fix watchdog.sys on BSOD on Windows 10?
1. Reinstall GPU drivers
Press Windows + X, and select Device Manager.
Right-click on your driver and select Uninstall device.
Confirm your choice.
Restart the computer.
The driver updating process can be automated with the help of specialized software such as Fortect Driver Updater. This tool allows you to scan and update all your drivers, and you can set up automatic scans so that you will be notified when your drivers are going out of date.
Amid possible troubleshooting steps regarding software, we strongly encourage you to check the hardware, too.
Even though system errors are rarely provoked by constant overheating, high working temperatures are something you can’t neglect.
The easiest way to determine whether your GPU is suffering from hellish temperatures is to install third-party software like SpeedFan.
Besides the monitoring, this nifty and free application can regulate the speed of cooling fans.
Download and install SpeedFan, check the temperature, and optimize the cooling intensity to reduce the heating.
In addition, if you’re up to the task, you can unplug the graphics card from the motherboard and power supply and clean it thoroughly.
This process should help you fix the watchdog driver blue screen error on your Windows 10. However, you can also try the following options.
3. Reset BIOS settings
Press the Windows key + I to open the Settings app.
Select the Update & security section.
Click Recovery on the left pane then hit Restart now.
Select Troubleshoot.
Click on Advanced Options.
Choose UEFI Firmware Settings and then Restart.
Your PC should boot into BIOS Settings now.
Reset the configuration and save changes.
If you’re unable to reset BIOS settings for some unknown reason, you can also change something and change it back. But unfortunately, even the slightest change will force the firmware to rebuild from scratch.
This seems to be a rare but occurring issue for users with an older motherboard that upgraded to Windows 10.
Specific BIOS/UEFI settings might work like a charm on Windows 7, but, on the other hand, they can wreak havoc on Windows 10.
Especially regarding an already-mentioned collision between old motherboard sound drivers and GPU drivers.
So, you’ll need to reset the BIOS settings and let the BIOS rebuild from scratch.
These actions should help you fix the watchdog.sys error that causes the blue screen of death on your Windows 10.
Press the Windows key + I to open the Settings app.
Select the Update & security section.
Click Recovery on the left pane, then hit Restart now.
Select Troubleshoot.
Click on Advanced Options.
Select Startup Settings and then Restart.
Press F4 to boot in safe mode.
Press Windows + X, and select Device Manager.
Navigate to Sound, video, and game controllers.
Right-click on the Nvidia High Definition Audio Controler and uninstall it.
Restart your PC but don’t let it perform the updating process.
Download the Show or Hide Updates Troubleshooter.
Then, run the Show or Hide Updates Troubleshooter for Windows 10.
Block all updates related to Audio Drivers, and you should be in the clear.
With that, we can conclude this article. Unfortunately, this is a rare but resilient error that is occasionally hard to resolve.
Hopefully, with the provided solutions, you can restore the full functionality to Windows 10. However, if you have any further questions or an alternative solution, feel free to tell us in the comments below. We look forward to hearing from you.
Finally, as we already stated above, this problem predominately occurs with Nvidia graphics due to the incompatibility of Nvidia sound drivers and motherboard generic sound drivers.
To address this, you’ll need to eliminate the Nvidia High Definition sound driver and use the generic sound drivers exclusively.
That’s easier said than done because Windows 10 will still install missing drivers, nonetheless. So, that’s a reason to use the Show or Hide Updates Tool and prevent further updates.
As you can see, there are various ways to fix the watchdog.sys error, and in this article, we offer the best and easiest solutions to solve this issue yourself.
Microsoft is starting the week on a bad note this morning as Microsoft Teams, the company’s communication hub for Office 365 went down earlier today. We’ve been unable to access the app for 30 minutes now, and Microsoft has just acknowledged the issue on Twitter. The good news is that the rest of the Office 365 apps seem to be working as usual, for now at least.
We're investigating an issue where users may be unable to access Microsoft Teams. We're reviewing systems data to determine the cause of the issue. More information can be found in the Admin center under TM202916
“We’re reviewing systems data to determine the cause of the issue,” the company explained. The company should share more details soon on the Office 365 portal (restricted to Office 365 admins), but we also invite you to follow the Microsoft 365 Status Twitter account for upcoming public announcements.
It’s been quite some time since Microsoft Teams was affected by an outage, but Microsoft will hopefully be quick to fix the issue. The app crossed 20 million daily active users back in November, and it’s already being used by many Fortune 500 companies. Obviously, Microsoft employees also use Teams to communicate internally, so that’s another reason to get it back up and running asap.
Update 7:36AM PDT: As Teams is still now, the company has now explained that the issue is due to an authentication certificate that has expired. “We’re developing a fix to apply a new certificate to the service which will remediate impact,” Microsoft said.
We've determined that an authentication certificate has expired causing, users to have issues using the service. We're developing a fix to apply a new certificate to the service which will remediate impact. Further updates can be found under TM202916 in the admin center.
Update 8:25 AM PDT: After 2 hours of service interruption, Microsoft Teams is now getting back up after Microsoft deployed the updated certificate. “Affected users should start to see recovering in the next hour,” the company noted on the Microsoft 365 portal.
We've initiated the deployment of the updated certificate and are monitoring service health as the fix progresses. Additional information can be found under TM202916 in the admin center.
Office 365 is the cloud-based version of the Microsoft Office Suite and offers all the tools an organization may ever need to manage itself efficiently.
What makes Office 365 so great is that it is constantly updated with new features that make it even greater. One such feature is Office 365 Video.
Office 365 Video is a great place to view and share videos among members of your organization. It works as a video streaming service for your organization that’s available with SharePoint Online in Office 365.
However, some users have reported having problems accessing Office 365 Video:
Unable to open the video on the home page of the portal. Getting the Below Error Message. All the users are getting the below error message except admins (tenant/site collection). ” Office 365 Video isn’t available, your organization has turned Office 365 Video off for you. “
This is an issue that is frequently met by organizations that use Office 365. That is why we have created this step-by-step guide so that you and your workgroup can use Office 365 Video efficiently.
How do I enable Office 365 Video?
One thing you must remember is that this issue can only be fixed by your Office 365 administrator. He must add the affected users to the Viewers group for the SharePoint Online hub site collection. To do this, follow these steps:
As an administrator, go to the Office 365 Video Home page
Look at your browser address bar and delete everything after this string:
Enter the name of the user or group that you want to add in the Invite people dialog box
Additionally, you can simply select the Everyone except external users group, which will make it part of the Viewers group. There are cases where the Everyone except external users group may not be available if you removed this group from your organization.
By following these steps, all users that you’ve added should now be able to use Office 365 Video, but keep in mind that Microsoft announced that Office 365 Video will soon be replaced by Microsoft Stream.
Did you find this guide to be useful? Let us know what you think in the comments section below.
RELATED ARTICLES YOU SHOULD CHECK OUT:
Microsoft Search in Chrome coming soon in Office 365 ProPlus
If you’ve ever worked with programs like Typinator, Tableau, or (especially) MapInfo, you may have come across a file with the .tab extension. Because it’s fairly uncommon to come across these file types, users may be doubtful of how safe they are.
Through this guide, you’ll learn exactly what .tab files are and how to open them.
What are .tab files?
TAB files are essentially tab-delimited text or data files. This means they contain tab-separated values. For software developers and app writers, they can be an easy way to store input received from the front end without using a database. The tab spaces act as column separators.
This means that it is an easy and quick way to create tabulated data. As a matter of fact, you can create your own .tab file through the use of Notepad. After adding your tab-separated figures in Notepad, save your file with a .tab extension instead of a .txt.
A reason as to why they may be unpopular or rare is that they become a little harder to maintain and organize when you’re working with large chunks of information. Nevertheless, applications like MapInfo use .tab files to store graphical information system (GIS) data.
Now the question is if you encounter a TAB file, how do you open it?
How do I open a .tab file?
1. Using Notepad
Since you’re able to create .tab files using Notepad, you should be able to open them too. Run Notepad – the easiest way to do this for any version of Windows is by opening a run dialog (win+R), typing in “notepad” into the Run dialog, and then clicking on okay.
Once you have Notepad open, click on the File menu item near the top left corner and then select open.
Make sure that “All Files (.)” is selected under the file-type dropdown menu and then use the Open dialog to navigate to your .tab file. Once you’ve found it, select it and then click on the button marked “Open“.
2. Using Microsoft Excel
As previously stated, working with .tab files with large data sets can be a bit tricky. While Notepad is serviceable for smaller files, you need something a little more powerful for larger files.
Run MicrosoftExcel – any version of Excel post-2000 should do.
Click on File (FILE), select Open, click on Computer and then the Browse button (FILE > Open > Computer > Browse).
Make sure you have the All Files option selected from the filetype dropdown menu, then navigate to where your .tab file is stored, select it and then click on open. This will bring up the Text Import Wizard.
On the first screen of the Text Import Wizard, make sure the radio button marked ‘Delimited‘ is selected. If your data has headers, ensure that the ‘My data has headers’ checkbox is ticked. Once you are certain that all the settings on this screen are correct, click on the Next button.
On the next screen, ensure that the only delimiter selected from the ‘Delimiters‘ panel is Tab and then click on next.
The next step allows you to set the data format for each of your columns. Use the Data preview panel to select which column you’d like to format and then select the data format type from the Column data format panel. Alternatively, you can leave all columns set to General. You can also choose which columns you’d like to skip. Once you’re satisfied with the settings on this screen, you can click on the button marked ‘Finish‘.
If you’re the curious type, then the above steps should allow you to see what type of data a program is saving into a .tab file. Hopefully, you’ve also been inspired to create tab-delimited files of your own.
Before you go, you might be interested to learn more about AADL3inscription2024.dz, so don’t miss our guide on it.
If you have any other questions or suggestions, don’t hesitate to reach for the comments section below.
Most browser-based malware detectors may not always deal with the cryptojacking threat that Windows 10 PC users continue to face while surfing the web. Microsoft is trying to solve that problem with Edge, the chromium-based browser it launched recently.
Edge to detect and stop stealth crypto miners
Microsoft Edge users will soon be able to navigate the web without the risk of unintentionally downloading crypto miners. This feature targets the “less reputable” sources that infect sites or online ads with crypto-mining code, which executes stealthily after loading in the victim’s browser.
Eric Lawrence, principal program manager, Microsoft, said in a Tweet that the upcoming feature would be more advanced than SmartScreen and Safe Browsing, both of which are malware-blockers. He was responding to an earlier Tweet by Amitai Rotten, who had announced the existence of the anti-crapware tool in a beta version of Edge.
Wait, what is this new setting in Edge? Is Edge trying to save me from downloading potentially unwanted apps, such as toolbar/adware? Why, yes it is! What used to be a enterprise Windows Defender Antivirus feature is making its way to consumers. Now in beta. pic.twitter.com/D4lYLKqAWL
According to Lawrence, Google Safe Browsing (available on Chrome) doesn’t do a great job handling unwanted applications that do not necessarily harm your PC. Edge’s SmartScreen has the same limitation.
The anticipated crapware blocker for Edge will still be able to prevent other unwanted apps from downloading automatically on your PC. These include annoying adware and toolbars that deploy on your browser without your permission.
The upcoming feature is optional, though, meaning that you may turn it off/on as you wish. Based on the screenshot Rotten posted on Tweeter, you can activate the anti-crapware utility on Edge by going to the browser’s privacy and services settings and activating the “Block potentially unwanted apps” option.
Earlier this month, Microsoft announced design improvements it was considering for Edge to enhance the user experience. But browser security was not among the issues the company said it was looking at then.
While the ability of Edge to detect and thwart crypto miners is welcome, users should still watch out for non-browser-based ways to infect a Windows 10 PC with such code.
I recently sat down with CD PROJEKT Red’s John Mamais to talk about the studio’s highly-anticipated Cyberpunk 2077 video game which is due out later this year on Xbox One, PC, and PS4.
We talked about the creation of the futuristic world in which the game is set, cyberpunk inspirations, possible third-person perspectives, immersive sound design, censorship issues in Australia, and the potential (or lack thereof) for a Cyberpunk 2077 release on Nintendo Switch and a VR version.
When did development on Cyberpunk 2077 start exactly? It’s been planned for a while now.
We had a team going when we were working on The Witcher 3 actually. We built two teams to do the two games in parallel then we cannibalised the second team to come back and work on Witcher 3 before putting everyone on this project.
So Cyberpunk 2077 has been in development for a while then?
Yeah, for a little while. In pre-production. We had about 75 guys working on it at that time.
Was it always planned to come out this year? Because the original roleplaying game, which it’s based on, is called Cyberpunk 2020 and now the video game is coming out in 2020… Is that a coincidence?
No, I think we wanted to get the game out earlier in 2019 actually. But it kind of makes sense that it’s 2020, right? [laughs]
Yeah. [laughs]
But, yeah. The original intention was to get it out earlier.
It’s funny because I’ve seen people saying on Twitter and elsewhere that the release date was very carefully planned because of the year 2020.
Speaking of the source material, is there much from the original roleplaying game that fans can expect to find in the Cyberpunk 2077 video game?
Yeah, a lot of the lore is going into it. Johnny Silverman comes from that. And Night City. And the factions, districts, the names of items, and the corporation names. Also the skill system, in a way, and the class system. All that stuff.
Has the interpretation of the technology changed in this world since the creation of the roleplaying game?
We had to bring it forward, you know? The way I think about it is that you go back to 1990 and think of what the technology would be like in 2077. It’s kind of like a splinter reality from 1990.
Kind of like The Jetsons I guess. How that was a vision of the future as seen from that time.
The Jetsons got it wrong I suppose. [laughs] Or maybe we’re still going to look like The Jetsons one day.
I hope so. I want those houses on the stilts. [laughs]
Rosie and the robotic dog… That stuffs kind of coming true isn’t it?
And treadmills? [laughs]
[laughs]
The original video that you guys released had this very attractive woman with knives coming out of her forearms.
Yeah that was more like a teaser to show what we think this game should look like but we hadn’t locked in everything yet.
I remember thinking that, after watching that video, that Cyberpunk 2077 would then be a kind of Tomb Raider game but with a hot woman with cybernetic implants taking out baddies but it’s actually pretty different.
But those mantis blades are still in it, right? So some things have carried over.
Was that the original vision for what the game was going to be or more of a proof of concept?
I think that was actually the original vision at that point but it has evolved from that a lot. It’s changed a lot from that.
Interesting. How would you say Cyberpunk 2077 is going to differ from The Witcher? Obviously, it’s cyberpunk and not fantasy but, for those that are coming into this who have played The Witcher video games…
It kind of feels similar I think because, at its heart, it’s still a RPG, right? But the main difference will be the combat element.
Which looks really cool from the footage I’ve seen.
Yeah, it looks good in that demo that we showed. Also the camera perspective changes, which is controversial, having the first-person instead of the third-person camera.
I was wondering about that because I’m one of those people who rarely plays first-person video games because, within minutes, I’ll get violent motion sickness.
There’s stuff planned so you’ll be able to change your depth of field, reduce the head-bobbing effect, and some other stuff that we want to do to make sure that people don’t get sick.
I noticed in the demo that there’s a shot where the main protagonist is riding a motorcycle and then he stops and the camera shifts to a third-person perspective. Any chance of this meaning a third-person option might be available?
Yeah, in the vehicles you can but just in the vehicles.
The character customization is something that also sets Cyberpunk 2077 apart from The Witcher video games as you can fully create a character from scratch. What I find interesting about the approach that you’ve taken is that the game won’t have a gender option but players will be able to craft a body using male and female attributes.
Yeah, you choose a body type, not necessarily a boy or girl.
Yeah, it’s really cyberpunk. Actually building a person. How wild can the customization get? Can you make hilariously disfigured characters?
No, there are limits to it because it needs to fit the skeletal rig.
How do the cutscenes work with the custom characters? I’m guessing with them all being in first-person, there’s not too many challenges.
Yeah, I don’t think there are any third-person cutscenes in the game as far as I know. There might be some at the beginning and at the end but I’m not sure on that.
The cutscene system is a very ground-breaking RMD thing for us to get it very seamless. So that you stay in the game.
Right.
For example, narrative sequences are happening in front of you and you have some control over the character so you don’t feel like you’re watching a movie.
Tell me about the non-fatal gameplay option that’s been showcased recently. Players can truly explore the entire Cyberpunk 2077 world and storyline without killing anyone?
Yeah but you have to hurt them though, right? You can knock them out.
I was wondering about that in the boss fight I saw where there was definitely a lot of shooting but still the option to leave the opponents breathing.
We’re balancing it specifically so that you can get through it without killing anyone. There’s a non-lethal route.
Is it harder if you’re not killing anyone?
Yeah. It takes a lot longer to play too.
It’s like real life, I guess, in that regard.
The easiest way [to play the game] is to just gun right through it.
How open is Cyberpunk 2077 in terms of gameplay and experience? It looks so immersive. I just want to set up a coffee shop or something in it.
We don’t have any simulator stuff or gameplay. In Witcher 3, we did the open-world elements very late in the development process when we only had two or three people working on it or something. Now there’s, like, 15 people doing these open-world quests.
There’s a couple of layers. There’s a passive layer, which is the vendors, then there’s the STSs, which are the street stories. I think there’s around 75 street stories. Then there’s minor activities as well.
The street stories are like little quests. There’s story but there’s not, like, advanced cinematic storytelling sequences so much. They’re a way to explore the world and level-up your character.
Are these randomly generated or is it possible to work through and complete them all?
They’re all custom done. There’s nothing like that that’s automatically generated. There are set templates that the guys can use but each one is customized to make them feel unique. The world’s going to be filled with that stuff. It should feel really good.
Do you know what the estimated gameplay length is to complete the whole game?
We’re not sure… yet. We’re still finishing the game now and there are different ways to play through it. There’s different character builds and it’s very non-linear. Because you can play through it in so many different ways, it’s a little but risky to state the length of time. How do you figure that out? Especially when there’s open-world and all of the other content.
When you finish the campaign, is that Game Over or do you still get access to the open-world?
Oh, I don’t know the answer to that. That’s a good question.
So, cyberspace.
We’re not talking too much about cyberspace just yet.
I guess that’s something we’ll hear more about closer to release?
That’s something you’ll hear more about on release. [laughs]
Have you had any issues with Australian censorship at all?
That was the big question for me when I came here. We have a big list of things that could be bad for us in Australia. The two big things are sexualized violence and drugs with rewards but you can’t really do cyberpunk without drugs, right?
Yeah and the steroids, I think they were called Juice in the demo, are pretty prominent in the game too.
It’s to do with how you interpret that I think.
Just call them vitamins. [laughs]
We’re not going to water it down but I don’t think there are any situations where you can take any real street-named drug and get a reward from it. And there definitely aren’t going to be any tasteless sexualized violence either.
In the real-world, there’s lots of sexualized violence, right? It happens. So it might exist in this world but the player will never be involved with something like that.
The restrictions are pretty controversial but I guess these were bound to happen with video games becoming more realistic and movie-like. Movies cover these sort of themes and it makes sense that video games would also cover them.
Yeah, we’re trying to make it more mature, right? It’s an art form, or we want it to be an art form, and we want to talk about difficult subjects like that but, yeah, we won’t. We’re not going to make a game where the player can do those kinds of things. It would be awful and tasteless.
I think everyone has faith in you guys to be tasteful, we just don’t want the game to be banned.
I don’t think that’s going to happen. I think we’re going to be okay here.
A Cyberpunk 2077 multiplayer mode has been teased recently. Is it still planned to be its own release well after the launch of the main game?
We’re not mixing the two things. Totally focusing on single-player.
Any chance you can tell us what kind of multiplayer mode it will be?
No.
No?
No. That’s going to be talked about a year from now or something. I wish I could say more.
Are you guys planning much in the way of additional content post-launch?
We are. Yeah. There’ll be stuff that comes out after. The Witcher model kind of worked for us.
Kind of like the DLC story packs?
I’m not allowed to say what it will be but it’ll probably be something like The Witcher. I wish I could talk about it more because, for us, it’s very interesting. But we can’t.
Any plans for Cyberpunk 2077 on Nintendo Switch?
Not as far as I know. Not yet. I don’t know if Cyberpunk 2077 would work on the Nintendo Switch. It might be too heavy for it. But then, we did put Witcher 3 on it and we thought that would be too heavy too but somehow we pulled it off.
One of the first thoughts I had after seeing the initial E3 presentation was how much Cyberpunk 2077 looks like it would be suited for VR. Have you guys thought about bringing the game to VR platforms in the future?
We tried. We were thinking about VR but, yeah, we’re not doing anything with VR. We got the VR dev kits but…
Wasn’t a good fit?
Some things would work in VR but, I think, it’s not really viable yet. You’re not making a lot of money in VR yet. It’s very experimental and niche, yeah. I would like to. I like VR but we’re not doing anything with it yet.
Cyberpunk 2077 will run in 4K Ultra HD when played on an Xbox One X console. Has there been any discussion about improvements for when the game’s played on the upcoming Xbox Series X?
Most AAA developers have that stuff [Xbox Series X dev tools] but we’re not focusing on that yet. We’re focusing on current gen.
Cyberpunk 2077 has had a heavy association with Microsoft and Xbox since its proper reveal at E3. How has it been for CD PROJEKT Red collaborating with Microsoft?
We’ve had a long relationship with Microsoft. We had the Witcher 3 announcement at E3 at the Microsoft conference, so I think, given that existing relationship, it’s been easier for us to move forward with those guys.
After Witcher 3, we got more famous in a way. More reputable as a game developer. People knew who we were so it was easier for us to work with Microsoft who helped us establish certain conditions for how we would present the game at these conferences.
Any cool merchandise you’re planning to release to tie-into the game?
You know, we have a shop! Have you seen it?
Yeah, it looks awesome. Some of the stuff you guys are putting out is fantastic. I have to say, I love the look of the samurai jackets with the lights in the collar. If you guys were planning to actually make those and sell them for real, I’d buy one immediately.
I don’t know if they’re going to do the jackets or not but there’s a lot of stuff they’re planning to do.
What’s your favorite bit of Cyberpunk 2077 merch that you’ve seen?
Most people are aware that Cyberpunk 2077 is based on a roleplaying game but cyberpunk in general is also an incredibly popular film genre. What cyberpunk movies do you think fans should check out to get them hyped for the launch of the Cyberpunk 2077 game?
That’s a really good question. I’ve watched all of the Ghost in the Shell stuff. I wouldn’t say the latest Ghost in the Shell is a good representation of cyberpunk but it’s still cool. Akira is interesting to watch but it’s more psionics.
True. It’s more supernatural almost.
We don’t get into supernatural too much but with the motorcycle in Tokyo, the feeling’s there. Blade Runner is kind of a reference but that’s dark and gloomy and wet and doesn’t really fit so much. I think Ghost in the Shell is the best reference as it’s that kind of technology. All of those cybernetics and all that.
Anything you want gamers to know about Cyberpunk 2077 that’s being overlooked?
There is some stuff that hasn’t been talked about such as the way that it’s been lit. Our director keeps talking about the real-time global illumination system which we haven’t really seen in its full beauty yet. No one in the public has seen how it’s finally going to look. It’s going to look more breathtaking than we’ve seen so far.
Also, the sound. The acoustic system that one of our sound programmers came up with is going to sound really realistic because of the way they’re using the geometry. It creates this reverb effect so that changes as the space changes. If I were a rich gamer, I’d definitely go out and buy a Dolby Atmos system to listen to this game. It’s going to be very immersive, deep, and beautiful-sounding.
And with the 4K and the lighting, better get a good TV as well, right? It’s going to look and sound great.
It definitely looks impressive so far.
Thank you.
Thank you for taking the time to talk about Cyberpunk 2077. It’s been a pleasure.
The Microarchitectural Data Sampling (MDS) vulnerability in Intel CPUs does not seem to go away. Both Microsoft and Intel have been releasing regular OS and firmware updates to fix the problem that exposes on-premises and cloud-based Windows 10 machines to cyber attacks.
The KB4494174 security update includes Intel firmware
You may refer to this guide for a list of Intel processors compatible with the microcode update. Targeted operating systems are Windows 10, version 1809 and Windows Server 2019.
The security update supports these Windows CPUs: Denverton, Sandy Bridge, Sandy Bridge E, EP, Valley View, and Whiskey Lake U. It is critical to install the latest fix now, even if you have downloaded an Intel microcode update before to fix this problem.
According to a Microsoft security advisory last year, MDS vulnerabilities may let an attacker access sensitive information in a Windows 10, Intel PC without authorization. Organizations that share computing resources in the cloud, such as, to enhance collaboration, are particularly susceptible to this cyber threat.
These vulnerabilities are known as:
CVE-2018-12126 – Microarchitectural Store Buffer Data Sampling (MSBDS)
CVE-2018-12130 – Microarchitectural Fill Buffer Data Sampling (MFBDS)
CVE-2018-12127 – Microarchitectural Load Port Data Sampling (MLPDS)
CVE-2019-11091 – Microarchitectural Data Sampling Uncacheable Memory (MDSUM)
Unprotected offline or standalone PCs are not free of the hacking risk either. That’s because a malicious local actor with access to them can exploit MDS weaknesses and access privileged files. Hackers can also use specially designed system requests to breach on-premises IT infrastructure this way.
While Microsoft and Intel have known about the MDS threat for a while, no customers had reported such an attack by the time the security advisory went online. If the corporations are responding by issuing regular firmware and OS updates, it’s because they’ve assessed the threat to be real.
When a security researcher pointed out a Windows 10 task scheduler vulnerability in 2018, Microsoft moved swiftly to address the issue.
There is no telling when Intel will come up with a processor design that fixes the MDS problem once and for all. Meanwhile, Windows 10 users on vulnerable devices have to keep installing the latest OS and microcode updates to keep their information systems safe.
While browsing the web, you can get Your TLS security settings aren’t set to the defaults, which could also be causing this error.
This can cause various issues, so it’s important to fix it as soon as possible, and one what to do it is to enable TLS 1.2.
Since this can affect the privacy and integrity of your data, we’ve created this step-by-step guide to help you set the settings to how they should be.
How do I change my TLS security settings to defaults?
Press Windows key + S and type internet options. Select Internet Options from the menu.
Next, click on Reset.
Lastly, click on Reset again to confirm.
How to fix your TLS security settings aren’t set to the defaults error?
1. Enable TLS the regular way
Launch Internet Explorer.
Click the Tools button.
Click Internet Option.
Go to the Advanced tab.
Under Security section and check Use TLS 1.0, TLS 1.1, and TLS 1.2.
By following these steps, you should enable the settings for security protocols and trusted sites. Of course, this is just one small step that you need to take to improve the security of your PC.
We hope this guide helped you fix the Your TLS security settings aren’t set to the defaults which could also be causing this error for good.
Windows Server comes across as a fairly robust platform to host other programs or sites. That said, it isn’t entirely immune to errors as well, and a quite common error to be faced here is when the Windows Server is stuck in an endless boot loop.
Then again, getting around the issue isn’t too big of a deal either as there sure are ways to tackle the situation and setting things right again when Windows fails to boot completely.
Fix Windows Server reboot loop
1. Re-seat your memory
Open the cabinet to reveal the internals of your PC.
Locate where the memory cards are installed on the motherboard.
Unhook each of the memory card and pluck it out from the slot.
Re-insert it again and try restarting your PC.
A corrupted or damaged memory is also often the reason for the server refusing to boot.
In the latter case, there obviously is no other option but to replace the memory.
2. Check the motherboard
When the server is not getting past the POST (Power On Self Test) state during booting (the visual cue to this is there is just the black screen that gets loaded and nothing happens beyond it), that is the biggest sign of things being wrong with the hardware and not the Windows OS.
And the worst-case scenario here is that the entire motherboard might have become dysfunctional.
You might look for signs such as bulging capacitors which might have busted out.
Similarly, failure of other components installed on the motherboard can also be the reason the server does not boot.
You can also track the diagnostic LED on your motherboard if it comes with any such feature. Match those with the company manual to find out what might have gone wrong.
Pursue the same with the company officials to rectify errors, if any.
Anything getting loose on the motherboard also leads to the server not booting correctly. Check for such instances and remedy the same.
Some systems have been found to encounter booting issues when there is a USB drive attached to the PC.
Try removing other USB devices and see if this works. This way, single out the USB device that might be preventing the PC from booting.
Update the driver for the particular USB device and see if this works.
If the USB drive is used to boot your PC, you might have to make necessary changes to ensure the HDD is above the USB drive in the device boot priority order in BIOS.
This should be all you need to deal with the situation when the Windows server does not boot up properly.
Meanwhile, here are some additional resources that might be of interest to you.
DNS over HTTPS can be useful in protecting your online privacy, and in today’s guide, we’re going to show you how to check your DNS over HTTPS settings in Opera.
How do I check my DNS over HTTPS settings on Opera?
Use Opera settings
Open the Opera menu and select Settings.
Click on Advanced.
Locate Use DNS-over-HTTPS instead of the system’s DNS settings and enable it.
Select the DNS you want to use.
Should I choose DNS over HTTPS?
DNS over HTTPS encrypts your requests, making them private, so it’s good if you’re concerned about your privacy.
However, this feature can make it harder for administrators to block malicious traffic, so if you’re a part of the organization, you should better check with your network administrator.
To make sure you’re completely anonymous, you should use a VPN along with this feature. Speaking of which, many are wondering if Opera VPN can be tracked, and we have an article that answers this question.
Microsoft stopped supporting Windows Live Mail in November 2014. However, if you have it installed, it should continue to do its job. The truth is that not everything has run very smoothly for the last years and it’s terrible to find that your Live Mail email links are not currently working.
If you’re trying to use your Windows Live Mail client and suddenly no email links are working, then you’ve got an annoying problem on your hands. Besides the final box that asks you to kill the page or wait for it to respond, opening any of the links makes the browser’s page load indefinitely.
Waiting for a couple of minutes or even more doesn’t change the situation. That’s why the only logical next step is to take the matter into your own hands. So, don’t hesitate to go through the following steps in order to make email links work again.
What can I do if Windows Live Mail email links are not working?
1. Change default programs associations
Click on the Start button and type Default Programs in the search.
Right-click on the taskbar start button to get a pop-out menu.
Choose and click on Control Panel.
The control panel items box should pop up next, with titles in alphabetical order.
Look for Default Programs. After finding it, click it.
Select Set your default programs on the next screen.
Then, choose your Internet browser.
Select set this program as default, then click OK.
Return to Default Programs.
Choose the option that says Set program access and computer defaults at the bottom.
Hit Continue if you get a User Account Control prompt.
Select the Custom option.
Click on the double arrow to the right of Custom> Choose a default web browser.
Select your default browser.
Tick the box next to Enable access to this program.
Then, choose a default e-mail program.
Set Use my current e-mail program.
Don’t forget to also tick the box next to Enable access to this program.
Confirm by finally clicking OK.
Errors in program associations could stop Live Mail email links from working. Feel free to change the default program associations by following the procedure detailed above.
You can’t open Control Panel? Take a look at this step-by-step guide to find a solution.
2. Disable antivirus/firewall functions
The next troubleshooting path to follow is a classic one. The firewall you’re using could be blocking a port used by the email client.
This is usually caused by 3rd party antivirus suites and firewalls, while the Windows built-in firewall is configured to allow the port through if not configured manually to block it.
That’s why you should temporarily deactivate antivirus/firewall functions.
3. Run a repair of Windows Essentials
Type Control in the Windows Search bar.
Open Control Panel.
From the Category view, select Uninstall a program.
Double-click on Windows Essentials.
Click Uninstall/Change from the top bar.
Click on the Repair all Windows Essential programs and wait for the procedure to end.
Finally, restart your PC and confirm any changes related to the issue.
If none of the previous methods have resolved the problem for you, we recommend trying to repair Windows Live Mail. You could also use the executable responsible for the uninstall procedure (wlarp.exe).
Make sure not to choose t Remove one or more Windows Essentials programs.
If you need more info on how to uninstall programs and apps on Windows 10, check out this detailed article.
While working with Windows Live Mail, users often face issues, and the problems became more frequent after it was discontinued, though you can still use Windows Live Mail. A common problem that seems to affect several users is when the Windows Live Mail inbox is missing.
This makes the situation complicated as you no longer have access to your Inbox emails while all other folders remain intact. Losing emails is one of the dreaded nightmares, so we have compiled a list of solutions that should work for you.
Why is Windows Live Mail not showing emails?
Here are a few reasons your Windows Live Mail emails are missing:
Issues with the server: Sometimes, it could be a temporary issue with the server of your email service provider. So check that first using the dedicated status page or a service like Downdetector.
Database compacted on shutdown: The email client is, by default, configured to compact the database every 100 shutdowns, which could be why the Windows Live Mail account disappeared.
User inadvertently deleted the email: Many times, users inadvertently delete the emails or the account, but a warning is usually displayed in such cases.
What can I do if Windows Live Mail inbox is missing?
Before we start with the complex changes, here are a few quick things you can try:
Restart the computer and the router.
Wait for a few hours and verify whether the emails in Windows Live Mail reappear since it could be a server-related issue.
Check the Deleted items folder in Windows Live Mail.
If none work, move to the solutions listed next.
1. Help IMAP client to configure itself
Go to Accounts, and click on Properties.
Head to the IMAP tab, and leave the Root folder path empty.
Confirm when seeing a popup window regarding resetting the folders list.
Your Inbox should next appear.
Then, in the Special folder section, add INBOX. to the start of each path (e.g. INBOX.Sent, INBOX.Drafts).
Click on the checkbox beside Check for new messages in all folders and Store special folders on IMAP server.
Users often describe how entering Inbox as the root folder path works. When prompted to refresh the folder list, it seems to update successfully. The so-called success is for a short while. Right-click your account and select Download all folders.
You’ll see once more that Inbox is nowhere to be found. Chances are your IMAP client is no longer able to configure itself accordingly. Explicitly naming the paths INBOX.foldername solves the problem when Windows Live Mail is missing inbox.
2. Enable Compact View to restore Inbox
Open Windows Live Mail, click on View in the taskbar, and select Compact View.
Now, click on the green plus sign.
Tick the checkbox for Inbox and click OK.
Now, disable Compact View by again clicking on the icon.
When the Windows Live Mail inbox is missing even after performing the procedure above, using the Compact View feature might help. This offers access to a list of all Windows Live Mail email folders on your computer, so choose the missing Inbox and restore it.
3. Use the import feature from the default directory
Press Windows + R to open Run, type %appdata%, and hit Enter.
Now, check the following paths for the Inbox folder:AppData\Local\Microsoft\Windows Live MailAppData\Roaming\Microsoft\Windows Live Mail
When you see Inbox in one of those directories, copy the data stored there to a new folder on the desktop, which will act as the backup
Now, open Windows Live Mail, click the File menu, and then choose Import messages.
Choose Windows Live Mail, and click Next.
Click Browse.
Navigate to the desktop, select the folder you created earlier, and click OK.
Click Next to proceed.
When you are done, you can safely click Finish.
When Windows Live Mail inbox is missing, it’s likely that the folder is stored in AppData and can always be imported to the email client. The process, though a bit complex, has worked for a lot of users.
Microsoft may have cancelled or delayed the release of its Surface Hub 2X digital whiteboard according to a new report from Brad Sams on Petri.com. The news follows the release of the Surface Hub 2S last year, which succeeded to the original Surface Hub released in 2015.
Microsoft unveiled the Surface Hub 2 back in May 2018, but we later learned that Microsoft was working on two different devices, the Surface Hub 2S shipping in 2019 and the Surface Hub 2X expected for 2020. The company also revealed that Surface Hub 2S would use a cartridge system that would allow companies to upgrade it to Surface Hub 2X in 2020.
According to Sams, “people familiar with the company’s plans have indicated that Microsoft has cancelled or significantly delayed the Surface Hub 2X and that it will not be shipping as previously announced.” Sams also noted that Microsoft removed the Surface Hub 2 video from YouTube and other information related to Surface 2X from its website.
“One potential reason cited by those familiar with the company’s plans for the cancellation is that the development of WCOS, Windows Core OS, is not going as smoothly as expected which is causing delays for some implementations,” Sams said today. Back in December, Zac Bowden from Windows Central reported that Surface Hub 2X may actually ship with Windows 10X, the new OS that Microsoft is developing for Surface Neo and other dual-screen PCs. However, Sams didn’t confirm this today.
Microsoft never went into details about what operating system Surface Hub 2X would be running. The Surface Hub 2S, which shipped last year, still runs the Windows 10 Teams OS that shipped on the original Surface Hub. In the original Surface Hub 2 video, Microsoft showed the Surface Hub 2X OS (presumably powered by Windows Core OS) which brought support for new features including display rotation and the ability to combine four different Surface Hub 2X displays together. Last year, The Verge’s Tom Warren also reported that Microsoft was exploring bringing support for Win32 apps on the Surface Hub 2X.
imagine if your tablet display just rotated like the Surface Hub 2. This is Windows Core OS in action pic.twitter.com/d4ZDwIg0Gf
Microsoft provided the following statement to Brad Sams, which doesn’t clarify if Surface Hub 2X is still being actively developed:
We have an ongoing dialogue with our customers on Hub and are working to align the roadmap to best meet their needs. The top two priorities for Hub in 2020 are deploying the 85” device and rolling out an OS update that includes many top features customers have been requesting since Surface Hub 2S launched, including improving IT integration, deployment and management capabilities at no cost for all version 1 Hubs and Hub 2S devices. We’ll have more to share in the coming months.”
If Sams’ sources are correct and complications with Windows Core OS forced Microsoft to change its plans for Windows 10X, that wouldn’t be completely surprising. HoloLens 2, the first Microsoft device powered by Windows Core OS only started shipping back in November, nine months after Microsoft revealed it at Mobile World Congress. Windows 10X, which is also based on Windows Core OS, is still far from being ready and we didn’t see any Windows 10X PCs at CES earlier this month, except for a prototype from Lenovo.
Windows Core OS definitely seems to be a huge undertaking, and even though the Surface Hub 2X demos we saw in 2018 looked very promising, it may have been too early for Microsoft to talk about Surface 2X and show these new features.
In what will surely feed the ongoing “UWP is dead” narrative, Microsoft has quietly announced its plan to shut down its Ad Monetization platform for UWP apps on June 1, 2020. The announcement was made yesterday on the Windows Dev Center (via MSPoweruser), and a Microsoft moderator explained that this decision was made primarily because it is no longer viable for us to continue operating the product at the current levels.”
Microsoft’s Ad Monetization platform managed to get various ad network partners on board including AppNexus or Oath (now Verizon Media), but the company notes that “(c)ertain underperforming Ad networks will be shut down between now and June 1, 2020.” Microsoft now recommends UWP developers to move on to other ad platforms, but the process may well be too much of a hassle for most developers. The Microsoft Ad Monetization platform also had the advantage of offering dedicated APIs for running ad campaigns on the Microsoft Store.
While Microsoft taking away app monetization options for app developers is certainly bad news, it doesn’t mean that UWP developers can no longer make money on the Microsoft Store. Indeed, ads are just one way to monetize free apps, but there are other solutions like subscriptions or in-app purchases. On Twitter, the developer of the third-party Spotify client Spotimo claimed that ads represent just 10% of app revenue for developers, the rest being in-app purchases.
After checking with community members, monetization is usually around 90% IAP and 10% ads
Still, the upcoming shutdown of the Microsoft Ad Monetization platform for UWP isn’t the only bad news that developers will have to deal with. Earlier this month, we learned the Microsoft had quietly removed its pledge to share 95% of app revenue on the Microsoft Store. A recent report from ZDNet’s Mary Jo Foley also revealed that Microsoft was planning to shut down its Microsoft Store for business. Foley’s sources also said that Microsoft officials have been debating internally about a new “concerted strategy” for the company’s digital storefront, and that the future of the Microsoft Store on Windows 10 was “uncertain.”
Even though the writing seems to be on the wall, UWP apps still allow developers to create apps that can run on Windows 10 PCs, Xbox One consoles, Surface Hub devices, or HoloLens headsets. UWP apps should also play a big role on dual-screen devices running Windows 10X, though it’s hard to imagine many developers starting to build UWP apps for this new platform. We’ll see what happens, but for now, it’s still too early to say that UWP apps are dead.
The Microsoft To Do app updated on Windows 10 devices with a variety of changes and fixes today. This latest update brings the productivity app to Version 2.10.2001.28002 and fixes a bug that was affecting printing, improves accessibility, and added new announcements for certain functions.
Here’s the full release notes:
In this update we worked on a few small fixes such as fixing an issue with printing when your list was off screen and making sure you can add tasks to your new list as soon as you create it.
We also made lots of accessibility fixes:
We added announcements for actions such as list deletion, list group creation and list emoji change.
We fixed some dark mode contrast issues.
We improved the announcements of search results.
Microsoft To Do is a free task management app that’s also available on iOS and Android devices in addition to the web.
Earlier today, Microsoft announced the Xbox Bounty program which, like most similar bounty systems, will reward those who discover security vulnerabilities on the platform with cash prizes ranging from $500 up to $20,000.
“The Xbox bounty program invites gamers, security researchers, and technologists around the world to help identify security vulnerabilities in the Xbox network and services, and share them with the Microsoft Xbox team through Coordinated Vulnerability Disclosure (CVD),” Microsoft’s Chloé Brown said in an official blog post. “Eligible submissions with a clear and concise proof of concept (POC) are eligible for awards up to US$20,000.”
An official website has been set up which, while basic in appearance, does show who can submit vulnerabilities, how much each sort of discovery can earn, and how to get in contact with Microsoft to participate.
Bounty programs such as this one are fairly common in the tech-oriented companies as they allow organizations to significantly expand their testing and increase their odds of discovering major vulnerabilities before they’re made public. They also provide an incentive for those that do discover major flaws to privately report them to a company instead of taking to social media and online forums to let the entire world know of their discovery and take advantage of it.
Dell is probably one of the biggest names in the PC industry. It produces PCs that are great for pretty much any environment, from servers to elegant business laptops and powerful gaming rigs.
However, Dell machines also come with some of their own software, and it doesn’t always comply with the OS you have installed, resulting in errors.
One good example is a frequent error message that plenty of users have reported getting when updating or installing the BIOS on their PCs, which states that:
Your security settings could not be detected. Try restarting your system and running the update again.
Several devices have been known to cause issues when updating or installing the BIOS.
Here’s a list of these devices, and their affected BIOS versions:
Dell Model
BIOS version
Latitude 7275
1.1.29
Latitude 5175/5179
1.0.22
Latitude 7370
1.11.4
Latitude E7270/E7470
1.14.3
Latitude E5270/E5470/E5570
1.13.3
Precision 3510
1.13.3
Precision 7510/7710
1.11.4
This error message prevents users from updating or even installing their BIOS, meaning that it basically nullifies the use of the PC.
Given the seriousness of the issue, we’ve decided to create this step-by-step guide that will show you how to bypass it with no further problems.
How do I fix the security settings issues on my Dell?
1. Perform your BIOS update from outside of Windows
Required materials:
Blank USB thumb drive
Rufus
Other options include HP USB Disk Storage Format Tool, MSI DOS Tool, UNetbootin, etc
Updated BIOS + update utility
Working Dell PC
Internet Connection to download BIOS update from manufacturer’s company website
Once you have all the materials, proceed with the following steps:
1.1 Check your current BIOS version
Press Windows + R
Type in msinfo32 and press Enter
View the version from the BIOS Version/Date tab
1.2 Update your Bios
Download the appropriate version from the motherboard manufacturer’s website
Copy the update on the USB flash drive, and plug it in the PC
Restart the PC, and open the BIOS when it boots
Go to the Bios Update tab, select your USB flash drive as the source
As touchscreen devices are becoming more and more a part of our life, it is only natural that we look for a way to improve their functionality even further.
That is precisely how an app like Stardock TouchTasks comes into the picture, as it promises to improve productivity when working with touchscreen devices.
How does TouchTasks work?
TouchTasks improves touchscreen functionality by adding zones to the border of the screen that users may interact with. It does this by adding zones in the left, top and right borders which will act as tack launchers. This is somewhat similar to other apps Stardock is known for among PC users.
The app is fairly easy-to-use and features an extensive tutorial system. Additionally, you can go back to the tutorial at any time in case you missed anything.
The added zones will already have default functionalities attributed to them, but they can be changed at any time. Gaining access to a zone’s functionality is done by simply tapping the area, and then selecting from the menu that appears.
One thing you should remember is that a zone’s functionality and size may be changed, but not it’s positioning. This means that if you frequently work with a program that has UI elements placed where the zones are as well, miss-tapping can happen.
When part of a corporate environment, managing all PCs in order to be updated, synced and at the same standards can be hard. That is why administrators usually opt for Group Policies, which are basically network-wide standards that apply to all PCs.
In simple terms, it is a simple (relatively) set of commands that apply to all PCs that belong to a particular network. One of the best uses for Group Policies is when you use them for mass updating all PCs, or when performing a mass-migration from one OS to another.
However, Group Policies may not always work as smoothly as you may want them to be. For example, some users have reported that they are encountering an error message stating that:
The group policy security settings that apply to this machine could not be determined
Since this is a problem that can be quite damaging if left unattended, we’ve decided to create this step-by-step guide that will show you how to reset your Group Policies to a functioning state.
How do I restore my Group Policy settings to a working state?
Most of the time, this issue can be fixed by updating your PC to the latest version, including cumulative updates. This is because Group-policy-related issues are the first to be fixed when a new update is launched.
For more information on how to keep your Windows 10 computer updated, check out this in-depth guide.
By following these methods, your PC’s settings should now work with the Group Policies that are applied throughout your network. This means your PC will follow the same parameters as everybody else’s and no more errors should appear.
If you know of any other way to solve this problem, share it in the comments section below so that other users can try it, as well.
Printers often make a loud clicking noise, which naturally is the early sign of something not quite good with the device.
This, again, may affect the quality of prints, though not always the case. Still, experts advise to get it fixed before things take a turn for the worse. Fortunately, it isn’t too big of a deal to remedy things when a Canon or Epson printer is making a clicking noise!
Why is my printer making a clicking noise?
Here are the reasons your printer is making clicking, even when not in use:
Connection issues: When the various components inside the printer are improperly connected, it may lead to noise.
Malfunctioning components: A damaged component or one worn out after excessive use may cause a clicking noise, which is a sign that the printer must be checked.
Paper not placed properly: If the paper is not correctly positioned and is brushing against the stack at the rear end, you may face the problem.
What can I do if the printer is making clicking noise?
Tip
When executing the solutions listed here, we recommend that you practice extreme caution. If unsure of the components and connections, it’s best that you seek professional help.
1. Check if the drum or toner is the culprit
Power the printer off. For an added precaution, disconnect the power chord from the rear of the printer.
Open the front cover to access the drum and toner unit. Remove both.
Connect the power cord and power on the printer again.
If there is no clicking noise this time, the drum and toners are at fault. Replace both. However, if the noise persists even with the drum and toner unit removed, there is something else that is causing the noise.
2. Check for obstruction in the paper feed and clean the rollers
Remove the paper feed and check if there is anything that is obstructing the free flow of the papers, including papers that might have got curled up. If possible, clean the area with a lint-free cloth to remove dust or other foreign particles.
You will also do good to clean the rollers with a lint-free cloth or a swab dipped in isopropyl alcohol. Be gentle with the rollers, as those are extremely delicate and can easily get damaged.
Also, make sure you are using the right quality and size of paper, as mentioned in the manual The paper feed tray, too, should be properly inserted. It shouldn’t be too tight or too loose. Once done, verify whether the loud clicking noise from the printer is fixed.
While the printer is turned on, disconnect the power cord from the rear of the printer.
Disconnect from the wall outlet as well.
Wait for at least 15 seconds.
Reconnect the power chord to the wall outlet and then to the rear of the printer.
Turn the printer on.
See if the clicking noise is gone.
This should be all you need to do to deal with printers making a loud clicking noise. However, if all the steps mentioned above fail to address the issue effectively, it’s best that get in touch with the company’s support division for repair.
For a very long time, Windows Live Mail has been the go-to email client for Microsoft Windows users. However, no application is entirely stable, as you’ve seen in the past few years. At times, Windows Live Mail’s spam filter might be the one not working.
You’ve probably faced certain problems while using the Windows Live Mail application and there’s nothing out of the ordinary in this error. However, you do know your filtering options and they used to work great.
When receiving unsolicited junk emails in your Inbox that’s clearly not the case any longer. So, to help you out, we are going to discuss some reliable ways to deal with this Windows Live Mail error.
What can I do when Live Mail’s Spam filter is not working?
1. Remember the basics
As a quick recap, carefully read the lines below:
Don’t hesitate to remove your email address from mailing lists that aren’t on your safe senders list.
Clicking Unsubscribe is time-consuming but beneficial per long term.
When an email appears to come from a company, it never hurts to contact customer service via phone or web browser to confirm it’s indeed legitimate.
Scammers often use a technique called spoofing to disguise their real email address.
When dealing with this case, right-click on the email, and select the Junk email submenu, then click Mark as junk.
Give a try to one of those latest email scanning software programs to further filter your emails.
If you added your email account as IMAP or Microsoft Exchange ActiveSync, you may have another spam folder in addition to Windows Live Mail’s own junk email folder.
Try finding it in the folder tree (left pane) and see if it’s active or not.
3. Try to repair the installation
The quickest remedy now is the Repair option that waits to be used. With all programs closed, just type wlarp into the start search box and press Enter.
Select Repair on the next page. When it’s finished, reboot the computer for the changes to take place and launch Windows Live Mail.
4. Customize your spam filters
Click on the dropdown arrow of the Junk / Not junk button, then choose Safety options from the menu. The general Options tab keeps tabs on your junk filter.
By default, Windows Live Mail has it set to:
Low
This lets you move the most obvious junk email to the Junk Email folder
For a much higher level of protection, you could go for:
Safe List Only
Only mail from people or domains on your Safe Senders List will be delivered to your inbox.
Receiving countless junk emails every day is no joy, but you know how to stop that now. Windows Live Mail has these adaptive spam filters built right in.
This means that your junk filter gets better with time at recognizing what you see as junk emails.
If you have any other suggestions that can help with Windows Live Mail’s spam filter issue, share them with the other users in the comment section below.