Crash + Spyro Triple Play Bundle launches on Xbox One consoles just in time for Christmas

The Crash + Spyro Triple Play Bundle is now live and available to play on all of Microsoft’s Xbox One consoles.

While this bundle does include three main titles, hence the Triple in the title, the Crash + Spyro Triple Play Bundle actually contains seven video games due to Crash Bandicoot N. Sane Trilogy featuring three titles and Spyro Reignited Trilogy containing another three.

The Crash + Spyro Triple Play Bundle retails for $99 which is rather good value for the amount of content contained in it. Given its release so close to Christmas, this could make for a pretty good family-friendly present for the household’s resident gamer.

Here’s the full game description, trailers, and shopping link:

Get seven full games in one amazing package with the Crash + Spyro Triple Play Bundle.
Includes:

Crash Bandicoot N. Sane Trilogy:

Take on the epic challenges through the three games that started it all, Crash Bandicoot, Crash Bandicoot 2: Cortex Strikes Back and Crash Bandicoot: Warped. Relive all your favorite moments in their fully-remastered glory.

Spyro Reignited Trilogy:

Rekindle the fire with Spyro the Dragon, Spyro 2: Ripto’s Rage! and Spyro: Year of the Dragon. Same sick burns, same smoldering attitude, now fully remastered and all scaled up.

Crash Team Racing Nitro-Fueled:

It’s the authentic CTR experience plus a whole lot more, now fully-remastered and revved up. Start your engines with the original game modes, characters and tracks. Race to glory with additional characters, karts, tracks and arenas from beyond CTR. Crash the competition with online play.

Are you a fan of the Spyro and Crash video game franchises? Share your favorite with the community in the comments below and then follow us on Pinterest, Facebook, and Twitter for more Xbox gaming content.

What is Microsoft Assessment and Planning Toolkit?

If you are an IT administrator that is running a network, then you will be facing quite a lot of challenges.

One good example is when trying to migrate to a new OS, and you need to determine if the current infrastructure can handle the change. This can be anything from a particular Windows infrastructure to a software application or user’s device.

While in theory, you could do this using basic tools, having a program or utility that can make things easier and faster can be extremely useful. In this case, the Microsoft Assessment and Planning Toolkit (MAP) is the best resource an IT administrator could have at hand.

What does the Microsoft Assessment and Planning Toolkit do?

The Microsoft Assessment and Planning Toolkit is a completely free software utility that can help facilitate the migration process in the scenario mentioned above.

It does this by providing detailed readiness assessment reports and executive proposals with extensive hardware and software information.

It also comes with actionable recommendations to help organizations accelerate their IT infrastructure planning process. The Microsoft Assessment and Planning Toolkit also provides server utilization data for Hyper-V server virtualization planning.

In essence, it lets you determine whether or not the hardware can support a lossless migration.

How do I get the MAP?

This utility can be downloaded from the official Microsoft webpage, and using it is extremely simple. One thing you should notice is that the download does not contain a single file, but multiple components.

These include the setup kit for the utility, as well as some useful material that will make using the MAP a lot easier.

These components are the following:

  • MAPSetup.exe.
    • This is the installation package containing the tool and SQL LocalDB
  • MAP_Sample_Documents.zip.
    • This package contains some sample reports and proposals
  • MAP_Training_Kit.zip.
    • This package contains some sample databases and instructions for completing various exercises
  • readme_en.htm.
    • Give you information to read before installing the MAP Toolkit, including installation requirements and known issues

Closing thoughts

If you’re an IT administrator and are planning on migrating the entire network that you are running to a new OS, then having the Microsoft Assessment and Planning Toolkit can make things a lot easier.

Not only will you know whether or not the operation is possible (or even worth it), but it will also help you with the migration itself. All things considered, it is a great utility to have.

Have you ever used the Microsoft Assessment and Planning Toolkit? Lets us know what you think about the product in the comment section below.

RELATED ARTICLES YOU SHOULD CHECK OUT:

  • LinkedIn’s migration to Azure means faster services and improved security

What are Microsoft’s Slow, Fast and Release Preview rings?

A lot of us are interested in finding out what are the latest features that Microsoft plans on releasing update after update. Those of us that want to also have an active role in the development process can also be part of the Windows Insider program.

It is an open software testing program by Microsoft that allows users who own a valid license of Windows to register for pre-release builds of the operating system. These builds were previously only accessible to software developers.

While this in itself seems like something very exclusive, even here Microsoft delivers the content based on categories on rankings, also known as Rings.

The different Rings in the Windows Insider program

Microsoft currently has multiple Rings, and these are the following:

  • Canary
  • Selfhost
  • Fast 
  • Microsoft
  • Slow
  • Release Preview

However, the Fast, Slow and Release Preview Rings are the only ones where users are the ones that test out the builds.

1. The Fast Ring

Those that are part of the Fast Ring are the first users to receive the pre-release builds after testing from Microsoft. Windows Insiders in the Fast Ring receive updates prior to Windows Insiders in the Slow Ring but might experience more bugs and other issues.

However, those in the Fast Ring may receive updates at around once per week, up to twice per week at the end of the build’s development cycle.

2. The Slow Ring

Those that are part of the Slow Ring are usually users that want to test out the latest features that Microsoft introduced, but also hate facing bugs and issues.

Since the build was previously tested by those in the Fast Ring and then again for a period by Microsoft employees, this build is a bit more stable. The only downside is that Insiders in the Slow Ring receive updates less often.

3. The Release Preview Ring

The content that Insiders in the Release Preview Ring receive is nearly identical to what the average customer receives upon official release. Like the retail version, this one receives monthly updates, security fixes, bug fixes. These are by far the most stable builds that feature the fewest bugs possible.

Closing thoughts

As you may have noticed, Windows builds go through a wide variety of stages before reaching the general public. This ensures a sense of quality control from both Microsoft employees and customer feedback. And the best part is that joining the Windows Insider program is completely free.

Do you now have a better understanding of what the Windows Insider Rings are? If you are part of one, tell us about your experience in the comment section below.

RELATED ARTICLES YOU SHOULD CHECK OUT:

How to indent the second line in Google Docs

If you’re a fan of using the free alternative of software without losing much functionality, then you probably know already what Google Docs is. For those of you that don’t know, Google Docs is a web-based service that acts as a free office suite, and it is part of the Google Drive service.

This suite is comprised of a word editor, a presentation creator, a spreadsheet, and a survey creator.

Each of these 4 components is modeled to look and behave almost exactly like their commercial counterparts (Microsoft Word, Excel, PowerPoint, etc). Additionally, all you need to have in order to access them is a Google account, a web browser, and an Internet connection.

Google Docs is the word editing component of the suite and features all the tools you may need when creating a professional text document. This includes text formatting features such as line indenting.

If you want to learn how to perform indenting of the second line in Google Docs, continue reading on the article below.


If you want to use Google Docs efficiently, make sure you are using an appropriate browser!


How do I indent the second line in Google Docs?

  1. Go to Google Docs
  2. You will need to be logged into your Google account first
  3. Create a new document by clicking the page labeled Blank
  4. Write down a few paragraphs of text
  5. In the top-left, click on View
  6. Make sure Show ruler is checked
  7. Select the paragraph that you need indenting
  8. Look over the ruler and observe a blue rectangle
    • This represents the starting point of the first line indent
  9. You will also observe an inverted blue triangle on the ruler
    • This represents the location of the left indent
  10. Slide the rectangle and the triangle along the ruler until the text has the desired indenting

Google docs indenting

By doing this, the paragraphs should now be indented independently from each other.

Remember that indenting done in Google Docs transfers over to other text editors as well, such as WPS or Microsoft word, and vice versa. This makes documents edited and created in either of them cross-compatible with the others.

Additionally, you may notice that indenting in Google docs is identical to how you do it in other professional text editors as well.

What other things do you want to learn how to do in Google Docs? Let us know what your requests are in the comment section below.

RELATED ARTICLES YOU SHOULD CHECK OUT:

Windows 7’s KB4530734 generates endless reboot loops

December 2019 is the last full month Microsoft will support Windows 7 for. The big M will pull the plug on Windows 7 update support on 14 January, 2020. Microsoft recently rolled out a December 10 update for Windows 7, which will be among the last patch updates for that platform (for users without Extended Security Update). However, some users have reported a few issues with that patch update.

Microsoft rolled out KB4530734 as a Patch Tuesday update for Windows 7. This is a security update for Windows Input Composition, Windows Peripherals, Windows Server, Windows Virtualization, and the scripting engine. That update also brings further end of support notifications for users who still need reminding about January 14.

Users have now posted on the Microsoft forum about a reboot loop that arises when they apply the KB4530734 update. Windows 7 keeps on restarting when those users try to install KB4530734. One user stated:

I applied the December Windows Update patches. My computer went into a reboot loop at the end of the installation, so I reverted back to the previous restore point. Upon investigation, all patches had applied except KP4530734 (December Security Monthly Quality Rollup for Win 7)… I then tried reinstalling that one and again it went into a reboot loop, restarting about every six minutes.

It is not uncommon, however, for Windows 7 Patch Tuesday updates to generate issues. A 2018 KB4093118 update for Windows 7 had a similar reboot effect. Thus, there is a certain amount of déjà vu about the KB4530734 update’s reboot loop.

Some users have also said that recent December updates generate system freezes. Again, it is certainly not the first time users have posted on forums about Windows 7 patch update crashes. So, Windows 7 Patch Tuesday updates have a history of generating issues even though they fix things.

At any rate, Windows 7 users will stop getting patch updates soon. Then the new notification will state:

As of January 14, 2020, help for Home Windows 7 has come to a finish. Your PC is extra weak to viruses and malware as a consequence of:

No safety updates
No software program updates
No tech help

Users who prefer not to upgrade from Windows 7 to 10 can get the Extended Security Update package. Alternatively, you can install a supported third-party antivirus utility to ensure your Windows 7 PC includes updated antivirus software. That might be sufficient enough for a lot of users to stick with Windows 7 until more third-party software publishers stop supporting the platform.

RELATED ARTICLES TO CHECK OUT: 

How to get rid of the header and footer in Google Docs

If you’re looking for an alternative to the Microsoft Office Suite, then you should know about the Google Docs office suite. It is a web-based software office suite offered by Google within its Google Drive service.

Not only does it contain 4 very important programs (a word editor, a spreadsheet and a presentation maker and a survey administration app), but it is also free of charge. Additionally, all you need to access it is a Google account and a web browser.

Google Docs is the word editor of this office suite, and it has pretty much all the features of all other popular word editors, such as Microsoft Word.

For example, you can also insert, edit and remove headers and footers however you see fit. If you don’t know how to get rid of a header or footer in Google Docs, then check out our detailed guide below.


If you want to use Google Docs efficiently, then you need a very good browser!


How can I remove headers and footers in Google Docs?

  1. Go to Google Docs
    • You will need to log into your Google account
  2. Select the folder-shaped icon named Open file picker
  3. Select Upload
  4. Click Select a file from your device
  5. Upload whatever text document you need that has a header or a footer
  6. Click the header or footer you want to remove
  7. At the top, click Format
  8. Select Headers & Footers
  9. Click Remove header or Remove footer

Remove header footer

By following these steps you should be able to remove headers and footers without any further issue. You can now save the document without any headers or footers, or choose to insert new ones.

One thing you must know is that headers and footers from pretty much any type of text document that WPS or Microsoft Word can open can be opened by Google Docs as well.

This makes Google Docs a great choice when trying to perform some last-minute editing on a PC that doesn’t have any text editor. Just remember that in order to work, you will need to have an Internet connection.

Did you find this guide to be useful? Let us know what other Google Docs-related articles you would like to read in the comment section below.

RELATED ARTICLES YOU SHOULD CHECK OUT:

Microsoft releases Edge Dev build 80.0.361.5 with native ARM64 support, teases new features

Microsoft today, December 17, announced the release of the latest update for the Edge Dev channel. Coming in at version 80.0.361.5, this release is the final for version 80, and will eventually become the candidate for the next Beta channel update. Also the final Dev channel update for the year, the build introduces native ARM64 support, Dolby Vision playback as well as some new reliability improvements.

We’ll be starting first with the new features and reliability improvements. Importantly, Microsoft is now bringing native ARM64 support to the Dev channel today, with the caveat of certain DRM video on websites not playing properly. As you may recall, ARM users only previously had access to a native version in the Canary channel.

On top that is new support for Dolby Vision playback and a new ability for users of Windows Mixed Reality to view 360° videos on VR headsets. The reliability has also been improved for when opening PDFs, and using the Collections feature. Have a look below for the full list of changes:

  • Fixed an issue where clicking on the Feedback button crashes the browser
  • Fixed a crash when closing the browser.
  • Fixed an issue where typing passwords into password fields sometimes causes a tab crash.
  • Fixed a crash when playing the Surf game.
  • Fixed an issue where certain websites don’t load properly.
  • Fixed an issue where Netflix playback fails for certain videos with error D7381.

In the changelog of today’s release, Microsoft’s Josh Bodner also teased some new features coming ahead in the new year once new releases resume. These include a new “pinning wizard” which will appear in the Task Bar and suggest for you to pin the most frequently visited websites. Here are some other new features coming soon.

  • For users of high contrast themes in Windows, Edge now supports high contrast themes as well! It will follow the theme you’ve chosen in the OS Settings and brings us back to parity with the support offered in Edge Legacy.
  • And for users of Immersive Reader (formerly known as Reading View), we’ve greatly expanded the number of color themes you can choose from. Many of these are specially designed to reduce eye strain and increase reading comprehension.

Microsoft also reminds users that in this release, favorites sync will be disabled by default. It is recommended for you to manually export favorites as a file, and import them manually. The company says it is working on on a deduplication mechanism once favorites sync is re-enabled, which should prevent new duplicates from coming in. You can check below for some new known issues and changed behaviors, and check out the full list here.

  • Navigation in new tabs sometimes fails, either showing an error that the connection is closed, or crashing the tab. In some cases, subsequent navigations in the tab are okay.
  • After an initial fix for it recently, some users are still experiencing Edge windows becoming all black. UI popups like menus are not affected, and opening the Browser Task Manager (keyboard shortcut is shift+esc) and killing the GPU process fixes it.
  • Highlighting text in the address bar then clicking on webpages sometimes causes black-on-dark text when the browser is in Dark Theme.
  • ixed an issue where the search engine can’t be edited because the Save button doesn’t work.
    Fixed an issue where the current display language can be removed from Edge even though it shouldn’t be.
  • Fixed an issue where Edge installations on Azure Active Directory domain-joined machines get signed into the wrong account on first run.
  • Fixed an issue where some webpages aren’t able to be translated, and instead show an error saying that the source language and target language are the same.

In related news, the Microsoft Chredge browser will officially be coming out of beta next month on January 15. Microsoft will also be shipping out the browser through Windows Update to all users running the Windows 10 April 2018 update or newer.

WinSxS Folder: What is it and how to Clean it up

Some users have spotted the WinSxS folder within the Windows folder in File Explorer. That much makes it clear that WinSxS is a Windows system folder (or subfolder).

However, users are looking to clean this folder, as it is usually huge and consumes a considerable amount of memory. In this guide, we will explain everything you need to know about the folder and how to manage it.

What is the purpose of WinSxS?

Vista was the first Windows platform to include that folder, which is also in 7, 8, 8.1, and Windows 10.

The WinSxS folder is a depository for all Windows system components. To be more specific, it primarily consists of different versions of DLL, CSD, DLL.MUI, IMD, and other system files. The WinSxS folder is a native assembly cache for Windows.

WinSxS is a massive folder that takes up a lot of hard drive space. It might hog more than 16 GB of hard drive space for some users as it retains older Windows components that aren’t needed alongside new component files.

Some users might then wonder what they can do to reduce WinSxS folder size. NEVER try to delete the folder. However, there are a couple of safe ways users can clean it up to free up some disk storage space.

How do I clear down WinSxS?

1. Clean WinSxS with Disk Cleanup

  1. Enter the keyword Disk Cleanup in the Windows search box on your Taskbar.
  2. Click Disk Cleanup to open the window in the snapshot directly below.
  3. Select the C: drive, and click the OK button there.
    select disk
  4. Press the Clean up system files button.
  5. Then you’ll need to select the C: drive again and click OK to open the Disk Clean-up utility as in the shot directly below.
  6. Click the Windows Update Clean-up check box.
  7. Press the OK button.
    win update

WinSxS retains old Windows update versions that you can erase and compress with the Disk Clean-up utility.

2. Clean WinSxS with the Deployment Image utility

  1. Press the Windows key + S hotkey.
  2. Type cmd into the search box, right-click Command Prompt, and select Run as administrator.
  3. Then input this command in the Prompt’s window and press Enter to run it:Dism.exe /online /Cleanup-Image /StartComponentCleanupStartComponentCleanup command what is windows winsxs
  4. To remove outdated component versions, run this command: DISM.exe /online /Cleanup-Image /StartComponentCleanup /ResetBaseThe ResetBase what is windows winsxs

Alternatively, you can clean up WinSxS with the Deployment Image command-line utility.

The above cleanup methods will reduce the amount of hard drive space WinSxS hogs. Then you’ll have more HDD space for software, documents, images, music, videos, etc.

You might be able to find some third-party disk cleanup software that professes to clean up WinSxS, but it’s best to stick with Windows’ built-in utilities.

If you have any more questions or suggestions, don’t hesitate to leave them in the comments section below, and we’ll be sure to check them out.

How to change the default Adobe installation directory

Adobe apps, like any other Windows apps, are installed on the root directory by default. This allows the developers to have all the files related to installation at a secure place which is less frequently accessed by the users. However, what if you want to change the adobe installation directory?

Unlike other Windows software that allows you to select the installation directory during installation, the Adobe Creative Cloud app does not offer this option. But you can still install individual Adobe apps like Photoshop and Premiere on your preferred location.

In this article, we will show you how to change the Adobe installation directory for newer as well as existing installation.

How do I change where Adobe installs to?

1. Change from the Adobe Creative Cloud interface

  1. If you want to change the installation directory for the Adobe apps, you can do it from the Creative Cloud interface.
  2. Launch Creative Cloud if not already open.
  3. Make sure you are signed in with your Adobe account.
  4. Click on the three dots (top right corner) and select Preferences.change adobe installation directory
  5. Under “Installation Location” click the Default drop-down menu.change adobe installation directory
  6. Select Change.
  7. Now navigate to the directory where you want to install the Adobe apps.
  8. Click on Select Folder. Wait for the Creative Cloud to refresh the apps.

Creative Cloud will automatically install all the fresh installation of Adobe files in the newly selected directory. If you already have the apps installed, you need to uninstall and reinstall the Adobe apps one by one to move it to the new directory.


Adobe Creative Cloud installer failed to initialize? Follow the simple steps from this guide and fix the problem in no time. 


2. Use Robocopy to move installed files

Note: Before trying this step, create a System Restore point. This will allow you to undo any changes if things go wrong.

  1. If you don’t want to reinstall the Adobe apps just to change the installation directory, you can use Robocopy to move the existing files. This requires working with the command prompt.
  2. Type cmd in the search bar.
  3. Right-click on Command Prompt and select Run as Administrator.change adobe installation directory
  4. In the command prompt type the following command and press enter:
    robocopy  “C:Program Files (x86)Adobe” “D:Program Files (x86)Adobe” /E /COPYALL  /XJ
  5. In the above command make sure you change the destination directory as per your requirement.
  6. Now you need to remove the Adobe installation directory from the C: drive. Type the following command: rmdir “C:Program Files (x86)Adobe” /S /Q
  7. Next, you need to create a symbolic link that will allow Adobe to find the required files from the newly created directory to run the apps. Enter the following command:
    mklink /d “C:Program Files (x86)Adobe” “D:Program Files (x86)Adobe“
  8. If you everything went right you should see a “Symbolic created” message on the screen.
  9. That’s it. Now all your Adobe apps files are in the new directory thus offering more space on your default Windows installation partition.
  10. However, you need to repeat the steps again after installing future Adobe updates.

If you’re having trouble accessing Command Prompt as an admin, then you better take a closer look at this guide.


Conclusion

Adobe by default does not offer the custom install option to the users, thus making it harder for you to install the files on a secondary partition or a hard drive. By following the steps in this article, you can overcome the limitation and change the Adobe installation directory with ease.

For any more questions or suggestions, feel free to reach for the comments section below.

RELATED STORIES YOU MAY LIKE:

Creative Cloud app trial has expired message in Windows 10

Adobe offers 30 days trial for its Creative Cloud suite to evaluate the software before making a purchase. However, some users have reported a “trial has expired or still in trial mode” error while launching the Adobe apps. The error occurs even if you have an active Adobe CC subscription.

Adobe Creative Cloud app trial has expired is a common error and usually occurs due to software glitches and temporary login issues.

In this article, we have listed a couple of ways to troubleshoot the Creative Cloud app trial has expired message in Windows.

How can I stop the Creative Cloud trial has expired messages?

1. Install new updates

Creative Cloud app trial has expired

  1. This error can occur due to a glitch in the installation files. If the error is widespread, Adobe will release an update to fix the bug. Check if any update is available and install it to fix the error.
  2. Open the Adobe Creative Cloud app.
  3. Creative Cloud will download any pending update and install it. Make sure you restart the PC.
  4. Launch Adobe CC and sign in with your Adobe ID.
  5. Open an Adobe application like Photoshop.
  6. If prompted, click on License this Software option and click on Sign in.
  7. This should help you resolve the “Adobe Creative Cloud trial has expired” issue.

Want to upgrade to complete Creative Cloud from an Adobe app? Check out this guide and fond out how to do it. 


2. Logout and login

Creative Cloud app trial has expired

  1. If the issue persists, a quick log out and login can help you fix the problem. However, you may also need to logout from the Adobe website completely through your browser first.
  2. Close any Adobe application running on your computer.
  3. Open any browser and logout from creative.adobe.com.
  4. Now login again at creative.adobe.com.
  5. Launch the Creative Cloud software on your computer.
  6. When you see the trial has expired error, click on the “License this software” option.
  7. Enter your credentials and click Next.
  8. Your Adobe software should activate successfully now.

3. Clean the hosts file

Software that requires activation over the Internet adds some entries to the host file of your system. Cleaning the entries in the host file can help you fix any issues with Adobe’s activation server.

Clean host files automatically

  1. Download the Limited Access Repair tool for Windows.
  2. Extract the zip file to extract the contents.
  3. Open the extracted folder.
    Creative Cloud app trial has expired
  4. Right-click on Adobe Limited Access Repair Tool and select Run as Administrator.
  5. Agree to the license agreement and click Continue.
  6. The tool will automatically fix any issues with the host file and its entries.
  7. Try launching Adobe Creative Cloud and check for any improvements.

Nothing happens when you click on Run as administrator? Don’t worry, we’ve got the right fix for you.


Clean host files manually

  1. Open File Explorer.
  2. Navigate to the following location:
    C:\WINDOWS\System32\drivers\etc
  3. Right-click on the hosts file and select Open With.
  4. Select Notepad from the list applications
  5. Now check for all the Adobe related entries in the host file. If no Adobe related entries found, you don’t need to perform further steps.
    Creative Cloud app trial has expired
  6. In case you find Adobe related entries, it must be cleaned.
  7. Make sure first you copy all the entries in the host file and save it in a separate notepad file, as a backup.
  8. Once done, remove all the Adobe related entries from the original Hosts file.
  9. Press Windows key + S to save the file.
  10. In case you are unable to save the changes to file. Move it to your desktop or any other location apart from its current location.
  11. Move it back to C:\WINDOWS\System32\drivers\etc once the entries are cleaned.

Conclusion

Adobe Creative Cloud’s this trial has expired error message usually occurs due to software glitches, wrong hosts file entries, or even simple login problems. Follow the solutions in this article to fix this issue with your Adobe suite.

If you have any other suggestions or questions, feel free to leave them in the comments section below.

RELATED STORIES YOU MAY LIKE:

Welcome to the new Windows Insider Fast Ring – a look at what’s changing and why

Microsoft has been promising changes to the Windows Insider program, and we’re starting to see some details of what will be different in 2020. Last month, the company announced that it was eliminating the Skip Ahead Ring, and now more news came out yesterday, with news of a new direction for the Fast Ring.

Basically, now instead of the Fast Ring being tied to a specific release, it will be used to test new features from the “Active Development Branch.” Fast Ring Insiders will still be testing the latest features (even more so now with the demise of Skip Ahead), but these features won’t necessarily be tied to a specific release. In other words, next year’s Fast Ring won’t be “20H2,”, or even “21H1.” Instead it will include features in testing, features that may or may not even make it to future releases.

So how is that different than what we’ve seen in the past? Features have come and gone from Insider builds before, and been announced as “coming in a future release.” Zac Bowden has some interesting information on why Microsoft might be making this move:

According to sources, many of the changes coming into play also tie into Windows 10X. Since Windows 10X will only be available on new devices, Microsoft can’t test it with Insiders. What it can do, however, is test specific features built for Windows 10X on desktop builds. Now that the Fast ring isn’t tied to any particular release, Microsoft can essentially use it as an experimental ring for features that aren’t intended to ever ship on desktop.

The Windows 10X angle is significant. Microsoft isn’t going to be able to pull off a “Windows 10X Insider Program,” these devices simply don’t yet exist (aside from a few internal test machines), and even when they do, there won’t be time or scope for testing. But with a Fast Ring capability to test out some of the new features of 10X before these dual screen devices launch next holiday season, Microsoft can move ahead with putting the finishing touches on Windows 10X without too many surprises.


Will Fast Ring Insiders test the new Start Menu, or other UI features coming with Windows 10X? Introducing a new sleek Start Menu and then pulling it away seems like a recipe for disappointment. It’s a bit of a conundrum: if Windows 10X features can work in testing on Windows 10 machines, then why not release them to Windows 10, instead of tying them to dual screen devices, as Microsoft has said it will do? We’ll have to wait and see, but at least Windows Insider builds in 2020 should be interesting!

In addition, although they’re not yet saying it publicly (so much for transparency!), Microsoft appears to be ready to stick to a major/minor release schedule for Windows 10. Mary Jo Foley has more:

I’m hearing from my contacts that Microsoft actually has decided already to adhere to the same major/minor release schedule in 2020 that it has used in 2019. That means Windows 10 20H1 is considered a “major” Windows 10 feature update, but 20H2 will be a very minor one that will look and act like a Cumulative Update when it is released in the fall of 2020. Microsoft’s blog post today asserts that the company may or may not pursue this path.

Windows Insiders have been testing the next “major” release, 20H1 for a year, and according to reports it’s nearly ready, but not slated for release until Spring of 2020. This new Fast Ring system could allow developers to get early feedback on potential 21H1 features, and spread them out over time, without preparing a full 21H1 build for testing and then having to sit on it, as we are with 20H1 now for months between RTM and launch.

Should we expect features to pop in and out of next year’s Fast Ring willy-nilly? My guess is probably not, although there may be some of that with Windows 10X features. Will we see very early glimpses at important new changes coming to Windows 10? Again, probably not, for as much as Microsoft likes to tout their transparency, there are still competitive advantage issues to deal with: Microsoft won’t want to give away its hand too early. For the most part, the new Fast Ring allows Microsoft to test Windows 10X with no promises that these features will come to Windows 10, cleans up the long lag time between testing for major vs. minor release cycles, and allows the company to pull back on new feature ideas that don’t resonate with Windows Insiders (think Paint 3D, etc.). Think of the new Fast Ring as Fast Ring with tweaks, rather than a whole new way of working.


Life is Strange 2 episode 5, The Witcher 3, Untitled Goose Game to join Xbox Game Pass for console

Microsoft is adding four new games to the Xbox Game Pass library for consoles this week. Available today is the Untitled Goose Game that was recently announced for Xbox One and PS4, so subscribers will be able to play it immediately without an additional purchase.

Starting on Thursday, December 19, three additional games will also be available on Game Pass for consoles. Perhaps the most surprising of the titles announced is episode 5 of Life is Strange 2, which was released earlier this month. The company previously revealed that new episodes would be available on Game Pass three months after their initial releases.

Also available on Thursday are a couple of role-playing games from 2015—The Witcher 3: Wild Hunt, an open-world RPG with enhanced visuals perfect for the Xbox One X, as well as Pillars of Eternity, a fantasy RPG from Paradox Interactive.

Microsoft has been working hard to push its Xbox Game Pass Ultimate subscription service in recent months. The company recently added more than fifty games last month, and is still offering three months for just $1 for new subscribers.

Xbox Game Pass Ultimate

What do you think about these new games? Which one are you most excited for? Feel free to drop a comment down below.

Star Wars characters finally come to the Disney Magic Kingdoms video game on Windows 10

It’s taken a few years but Star Wars characters have finally been added to the free-to-play Disney Magic Kingdoms video game on Windows 10, iOS, and Android devices.

As part of today’s update, a new Galaxy’s Edge-inspired land area has been added to the bottom of players’ theme parks and C3P0 and R2D2 have been added as permanent game characters. In two days, a special limited time event for The Rise of Skywalker will begin which will give everyone the opportunity to unlock Finn, Poe, Rey, BB-8, Kylo Ren, General Hux, and a First Order Stormtrooper.

Note that R2D2, BB-8, and the Stormtrooper are premium characters that need to be unlocked with gems.

In addition to the new area and characters, several Star Wars rides have also been added, as have several concession stands which will allow park visitors to obtain lightsabers.

Here’s the short release notes for this update:

A GALAXY FAR, FAR AWAY HAS ARRIVED!

STAR WARS™ content arrives in Disney Magic Kingdoms as the biggest update of the year. Collect STAR WARS characters and expand your Kingdom with a new STAR WARS themed land!

THE RESISTANCE NEEDS YOU!

Join Rey, Finn, Poe and BB-8 in their fight against the First Order—Kylo Ren’s forces are regrouping and the Resistance needs your help! Just in time for STAR WARS™: The Rise of Skywalker, don’t miss this limited-time event starting on December 19, 2019!

Disney Magic Kingdoms is a theme park simulation game based on the real-world Disney theme parks. The game is completely free to play and updates on a very regular basis with new characters and other content from Disney properties. It also continues to work on Windows phones running Windows 10 Mobile.

Disney Magic Kingdoms isn’t the only video game getting new Star Wars content this month. Both Fortnite and Star Wars Battlefront II have each received updates inspired by The Rise of Skywalker to help promote the new movie.

Do you play Disney Magic Kingdoms? Let us know if you’re happy to see Star Wars content in the game in the comments below and then like us on Facebook for more Windows 10 gaming news.

Disney Magic Kingdoms
Developer:
Gameloft SE
Price:
Free

Microsoft Whiteboard app updates on Windows 10 with new inking improvements

The Windows 10 Microsoft Whiteboard app updated this week with some improvements for the user inking experience.

Among the improvements are a smaller pen size, thicker highlights, a color picker, and visual improvements for some languages.

Here’s the full release notes:

This release has updates that will help you manage your ink

  • Step up your color-coding game using the ink color picker. Select some ink and hit the color palette button to change the ink color.
  • The smallest pen size is now thinner, making it easier to write small.
  • Highlighter sizes are now thicker, making it easier to highlight your notes.
  • Ink beautification improvements for several languages including German, Spanish, and Dutch.
  • More bug fixes and improvements!

Do you use Microsoft Whiteboard on your Windows 10 device? Let us know which of the above improvements you appreciate the most on the comments below and then follow us on Twitter for more Windows 10 app news.

Microsoft Whiteboard

How to Add a Page Break in Google Docs

If you need to write a text document, the first program that pops your mind is Microsoft Word.

However, one cannot deny how much of a downside the cost of the software is. That is why there are plenty of less costly or even free alternatives on the market, one of which is Google Docs.

For those who don’t know yet, Google Docs is a word processor included in the software office suite offered by Google within its Google Drive service. It comes with a simplified version of Microsoft Word’s UI, while still maintaining enough features and tools to make it viable as an alternative.

One good example is the ability to insert a page break right. A page break is a point at which a piece of continuous text is split into two pages. It is used for printing services so that they know exactly where to end a page and where to start a new one.

Not many users know how to do this though, so we’ve created this guide to show you how to insert page break easily.

How do I add a page break in Google Docs?

  1. Go to Google Docs
    • Make sure you’re logged into your Google account
  2. Create a new Google Docs document
  3. Place the cursor where you want to insert the page break
  4. Click Insert
  5. Move your mouse over Break
  6. Select Page Break
    • Additionally, you can press Alt + Enter right after placing the cursor
    • Press Backspace if you accidentally include any unnecessary blank spaces before your page break
google docs page break

By following these steps, you can easily insert page break throughout your text. You can repeat this process as many times as you need without any issues.

Moreover, page breaks inserted with Google Docs will also work in other text editors. These include Microsoft Word, WPS, or Libre Office.

If you’ve changed your mind, here’s our guide on how to remove page breaks in Word.

Do you have issues performing any other tasks within Google Docs? Let us know in the comments section below.

Microsoft corrects the record on “Xbox Series X” naming

Despite arguably having its finger on the pulse of next-generation gaming and ticking most of the boxes gamers have been clamoring for, Microsoft still found a way to muff up an aspect of its upcoming console release by tossing out a new naming convention that left many fans initially scratching their heads.

Last week during The Game Awards, Microsoft unveiled the name of its Project Scarlett next-gen console, dubbed Xbox Series X, to which the internet offered a collective “what?”

Perhaps, now that the dust has settled, the meme machines have cooled, and the internet has had its fun, executives within Microsoft are now out in force attempting to redirect the narrative it seems.

According to a report from Business Insider (France), Microsoft intends for fans and customers to refer to the upcoming Xbox Series X as simply Xbox. Last week’s name reveal was set as a marker to “help” buyers differentiate between the umbrella gaming experience in which Xbox Series X represents and the top-tier feature sets that will come with new versions of the consoles.

Microsoft seems to want to draw a divide between tiers of offerings down the road, similar to Apple and its iPad, where the iPad Pro represents a tablet with the company’s best feature sets and its Air or Mini offer fewer and different features.

Microsoft is using the Xbox Series X title to help broaden gamers’ view of the family of consoles and experiences.

Similar to what fans have seen with previous generations, the name ‘Xbox Series X’ allows room for additional consoles in the future, the Microsoft rep told Business Insider.

From an early interpretation of Microsoft’s new rebranding effort, it appears the company is setting the stage for a refresh in naming that could see separate upcoming consoles identified in groupings based on features, hardware specs, and compatibility.

Presumably, the Xbox Series X will represent a top tier model of the Xbox console being offered at the time like the One X, and eventually a Series S like the One S and maybe even a Series C designed specifically for xCloud gaming.

At the end of the day, Microsoft’s Xbox naming may not be as streamlined a Sony’s Playstation + version number, but at least the company appears to be ironing out a plan for future console releases that should help customers identify the best value proposition for each potential purchase.

How to Add Document Outlines in Google Docs

Google Docs is the foremost word-processing web app. Anybody with a Google account can fully utilize it without the need for a subscription.

It includes many of the features you’ll find in Word, including an outline tool. That enables users to navigate longer documents by clicking headings and formatted text in an Outline sidebar, similar to Word’s Outline View.

How do you get the outline on Google Docs?

  1. First, open Google Docs in a sidebar.
  2. Then, open either a blank or a saved document to add an outline to.
  3. Click the View menu.The View menu google docs how to add outline
  4. Then select the Show document outline option if it’s not selected. That option will open the Outline sidebar shown directly below.The Outline sidebar google docs how to add outline
  5. Then you can add outlines to documents with the heading formatting options. To do so, select some text within the document with the cursor to include in the Outline sidebar.
  6. Click the Styles drop-down menu shown directly below.The Styles drop-down menu google docs how to add outline
  7. Select Heading 1 on the Styles drop-down menu. That will format the selected text with the selected heading and add it to the Outline sidebar as shown below.heading 1 formatting google docs how to add outline
  8. You can add different outline layers by selecting smaller subheadings. Select a second text string to apply heading formatting to.
  9. Then click Styles, and select Heading 2 on the menu. Heading 2 will add a secondary outline level to the sidebar as shown directly below.heading 2 formatting google docs how to add outline
  10. In addition, you can add outline text to the Outline sidebar by applying bold, italic, and underline formatting. To do so, select some text in the document; and then click the Bold, Italic, or Underline button.outline heading with bold formatting google docs how to add outline
  11. Then you can click the headings in the Outline sidebar to jump to that text in the document.
  12. To remove a heading within the Outline sidebar, select it and click the Remove from outline option.
  13. You can close the Outline sidebar by clicking the Close document outline button shown directly below.
    Close document outline button google docs how to add outline
  14. You can click the Show document outline button to show the sidebar.Show document outline button google docs how to add outline

So, that’s how you can add an outline to a Google Docs document. Then you can navigate through the document more quickly by clicking the outline headings in the sidebar instead of scrolling through it with the scrollbar.

You can also enable or disable Strikethrough on a document on Google Docs, to highlight corrections to know more, read this guide.

If you have any further questions or suggestions, you can leave them in the comments section below.

What file formats Blender support?

Animation movies are the latest rage at the box office, so it is no wonder that more and more designers are flocking towards creating their own IPs.

Of course, you do need a good program to help you out, if it doesn’t break the bank, then it is all for the better. Such would be the case of users that are using Blender more and more.

Blender is a 3D computer graphics software toolset used for creating animated films, visual effects, art, 3D printed models, motion graphics, interactive 3D applications, and computer games.

What makes this program incredibly sought after is the fact that it is free and open-source.

Given how anyone can contribute to its development, it isn’t hard to image why some may be wondering just how many file formats it can handle.


Not much of a Blender fan? Check out these neat alternatives!


What kind of files can I open with Blender?

Because Blender is an open-source program, it supports a wide variety of file formats. These include formats that may be specific to commercial software, such as AutoCAD.

Luckily, Blender offers a wide range of file formats, such as OBJ, FBX, 3DS, PLY, STL, etc. that can be used to import and export.

Blender also features a proprietary file format called .BLEND, which is cross-compatible with all versions of Blender, newer or older. Additionally, the list of supported file formats can be expanded through the use of add-ons.

Because of the wide variety of supported file formats, Blender is an excellent tool to use in conjunction with other popular applications. Thus, you can create the 3D model in one program, and animate it using Blender, or vice-versa.

Other programs that open the same files as Blender

Just like Blender, there are plenty of other software tools that offer the same functionality and open the same files.

Here’s a list of them in case you are considering something else other than Blender:

All things considered, if you plan on building a career in 3D animations, or are just doing it as a hobby, you might as well use a program that won’t empty your wallet as a starter.

Do you like using Blender for 3D animations, or do you prefer other tools? Please let us know your preferences in the comments section below.

Blender does have its share of issues, and many reported that Blender crashes when opening files, but we have an entire guide dedicated to this issue, so don’t miss it.

RELATED ARTICLES YOU SHOULD CHECK OUT:

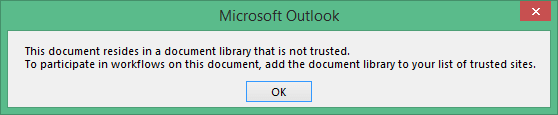
This document resides in a library that is not trusted

Tired of getting the same This document resides in a document library that is not trusted error message? Users face this problem when trying to open a task from Outlook or while testing the SharePoint workflow process.

Receiving SharePoint workflow emails into your Office Outlook is nothing out of the ordinary. However, attempting to edit the task created by the workflow from the email through the “Edit this Task” button becomes impossible at one point.

Well, needless to say, trying to access a task generated by an approval workflow is mandatory for any work-related action you’re trying to complete. The good news is that you are in pole position to solve this issue, thanks to all approaches described below.

How can I fix the SharePoint library not trusted error?

1. Add site’s path into Internet Explorer trusted sites list

Trusted sites list

  1. Open Internet Explorer.
  2. Go to Settings icon > Internet Options.
  3. Click Security tab.
  4. Up next, click on Trusted sites.
  5. Click Sites button.
  6. Here’s where you need to input your site’s URL.
  7. Hit Add > Close > OK.

Note: You may also ask the network security admin to trust it from the proxy policies.


If you’re on Windows 10 and don’t know where your Internet Explorer is, check out this detailed article.


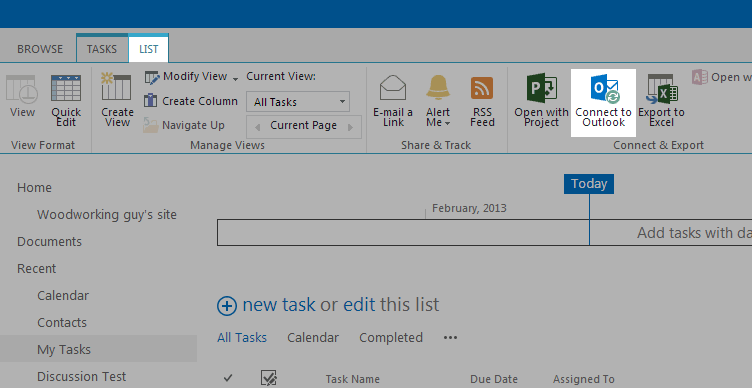
2. Establish connection between SharePoint Tasks and Outlook

Connect To Outlook

  1. Go to Tasks list in SharePoint.
  2. Check the option to Connect To Outlook.
  3. With the list now connected to Outlook, the Edit this Task button finally takes you to the SharePoint Workflow task completion page.

While for most users adding the site’s URL into Internet Explorer trusted site list works like a treat, others see no improvement after following the previously mentioned procedure.

Chances are the cause of their issue is the lack of connection between the SharePoint Tasks and Outlook. In case of being one of them, apply the above steps.


3. Add base URL to the list of Local Intranet Zone sites

Local Intranet Zone sites

  1. Open Internet Explorer.
  2. Click on Settings > Internet Options.
  3. Select Security tab Local Intranet Zone Sites.
  4. Then, click Advanced.
  5. Add the base URL for your site to the list.
  6. Click OK.
  7. Then, click OK again to confirm your action.

Adding the site’s path to the list of Local Intranet Zone sites may also help fixing the error. Just don’t forget to configure Internet Explorer to automatically log in using current username and password for sites in the Intranet Zone.


Internet Explorer is too slow on Windows 10? Don’t worry, we’ve got the right solution for you.


Conclusion

This document resides in a document library that is not trusted SharePoint error might be hard to fix sometimes. Despite of that, we do hope that you managed to get to the bottom of it by using one of our solutions.

If you have any other questions or suggestions, feel free to leave them in the comments section below.

RELATED ARTICLES TO CHECK OUT:

You should remove KB4532441 if you installed it on your PC

Microsoft accidentally released KB4532441 that contains the AutoPilot update earlier than it had originally planned.

Despite pulling away the update as soon as possible, users that got the update notification and took advantage of it are now stuck with a feature that doesn’t work. More so, some users have reported that they keep getting the update notification, even after installing the update.

Microsoft released a statement on their official support page claiming that:

This update was available through Windows Update. However, we have removed it because it was being offered incorrectly. When an organization registers or configures a device for Windows Autopilot deployment, the device setup automatically updates Windows Autopilot to the latest version.

Note There is no effect on Windows Autopilot being offered to Windows 10 devices. If you were offered this update and do not use Autopilot, installing this update will not affect you. Windows Autopilot update should not be offered to Windows 10 Home, it added further.

Is Autopilot dangerous for my PC?

Fortunately enough, Microsoft seems to assure users that no harm will come to their PC because of Autopilot.

However, there is no use having an update if it will bring no improvements to your system since it will only take up space. That is why Microsoft recommends that you uninstall KB4532441 if you are among the few that got the chance to get it.

You can uninstall this update the same way you can with all other Windows updates, by visiting the Control Panel and navigating to Installed Updates where all other updates will be listed.

remove autopilot

Did you find this article useful? Let us know in the comment section below.

RELATED ARTICLES YOU SHOULD CHECK OUT:

What File Formats Can Microsoft Excel Open?

Anyone who uses a PC for school or work will eventually need to use a spreadsheet. While there are plenty of spreadsheet programs out there, few can rival Microsoft’s Excel in terms of popularity and versatility.

This neat little tool is part of the Microsoft Office Suite and contains all the tools you will need to create and manage spreadsheets that you can later use in databases.

Of course, no matter how popular a program is, everyone cannot know everything about it. That is why there are still plenty of users out there who don’t know what supported file formats Microsoft Excel can handle.

What file types can Microsoft Excel handle?

1. Excel file formats

Excel has several proprietary file formats, which stem from the various spreadsheet types it can create. Additionally, new formats appeared as newer versions of Excel were launched.

Excel Workbook
.xlsx
XML Spreadsheet 2003
.xml
Excel Macro-Enabled Workbook (code)
.xlsm
XML Data
.xml
Excel Binary Workbook
.xlsb
XML Data format.
.xlam
Template
.xltx
Excel 97-2003 Add-In
.xla
Template (code)
.xltm
Excel 4.0 Workbook
.xlw
Excel 97- Excel 2003 Workbook or Template
.xls
.xlt
Works 6.0-9.0 spreadsheet
.xlr
Microsoft Excel 5.0/95 Workbook
.xls

2. Text file formats

As you know, you cannot create a spreadsheet without any text, so Excel is designed to handle several very popular text file types.

Formatted Text (Space-delimited)
.prn
Text (Tab-delimited, Macintosh, MS-DOS)
.txt
Unicode Text
.txt
CSV (Comma delimited, Macintosh, and MS-DOS)
.csv
DIF
.dif
SYLK
.slk

3. Other file formats

Microsoft Excel is made to handle other popular file formats as well. PDFs can be opened and placed within a spreadsheet.

Additionally, a lot of times, you may want to print your spreadsheet, so XPS files are also supported.

DBF 3, DBF 4
.dbf
OpenDocument Spreadsheet
.ods
PDF
.pdf
XPS Document
.xps

Other software tools that are similar to Microsoft Excel

Regarding PDF files, Microsoft Excel is pretty good, but it isn’t the best available. For better alternatives for opening PDF files, check out these neat tools:

In addition to these formats, Excel supports even more file formats, but only for use in the clipboard, such as when you Copy-Paste an image file inside your document. These include JPG, BMP, HTML, and more.

If you try to launch a spreadsheet but get the Excel file format is not valid error, it probably has to do with the extension so try converting it.

The software also has compatibility with Microsoft Forms, and you can learn all about it in our Excel meets Microsoft Forms: A game-changing combination for productivity article.

Are you surprised by just how many file formats Microsoft Excel can support? Let us know what you think in the comments section below.

What File Format can Rhinoceros Open?

Rhinoceros, also known as Rhino or Rhino3D, is ideal for those into 3D design out of passion, educational, or work-related reasons. It has plenty of uses in pretty much any domain where precise 3D design is required.

One thing that sets Rhinoceros apart is that its geometry is based on the NURBS mathematical model, which focuses on producing a mathematically precise representation of curves and freeform surfaces in computer graphics.

This is different from typical CAD programs, which use polygon meshes. One of Rhinoceros’s other key selling points is its versatility regarding the file formats it can support.

What are the file formats supported by Rhino?

Rhino 3D Model (except Rhino 1.x save/export)
.3dm
E57
.e57
MotionBuilder
.fbx
SketchUp
.skp
Rhino 3D Model Backup
.3dmbak
Embroidery
.dst, .exp
NextEngine Scan
.scn
SLC
.slc
Rhino Worksession
.rws
Enhanced Metafile
.emf
OBJ
.obj
SOLIDWORKS
.sldprt, .sldasm
3MF
.3mf
Encapsulated PostScript
.eps
Object Properties
.csv
STEP
.stp, .step
3D Studio
.3ds
Geomview OFF
.off
Parasolid
.x_t
STL (Stereolithography)
.stl
AMF
.amf
GHS Geometry
.gf, .gft
PDF
.pdf
VDA
.vda
ACIS
.sat
GHS Part Maker
.pm
PLY
.ply
VRML/Open Inventor
.wrl, .vrml, .vi
Adobe Illustrator
.ai
Google Earth
.kmz
Points
.asc, .csv, .xyz, .cgo_ascii,.cgo_asci, .pts 1
WAMIT
.gdf
AutoCAD Drawing
.dwg
GTS (GNU Triangulated Surface)
.gts
Points
.txt
Windows Metafile
.wmf
AutoCAD Drawing Exchange
.dxf
IGES
.igs, .iges
Raw Triangles
.raw
X3D
.x3dv
COLLADA
.dae
Lightwave
.lwo
Recon M
.m
XAML
.xaml
Cult3D
.cd
Microstation
.dgn
RenderMan
.rib
XGL
.xgl
DirectX
.x
Moray UDO
.udo
Scalable Vector Graphics
.svg
Zcorp
.zpr

While this already extended list can be expanded even more with plugins, what it can handle on its own is more than enough for the casual user.

Of course, if you do decide on including plugins for Rhinoceros, then the library of compatible formats will also contain the following:

  • 3DPDF
  • ACIS
  • CATIA V4, v5 and v6
  • CGR
  • Inventor
  • JT
  • Parasolid
  • PLMXML
  • Creo Parametric
  • Solid Edge
  • Siemens NX

Other programs that can open the files that Rhino can

Since Rhino can open plenty of file formats that are more or less specific to CAD tools, it goes without saying that other programs can pretty much do the same job.

If you don’t like using Rhinoceros for one reason or another, try checking out these alternatives:

As you can see, Rhinoceros is very good at handling a wide variety of CAD and even non-CAD file formats. As such, as long as you learn how to use it efficiently, It can become a universal CAD format.

Did you find the format you need in Rhinoceros’s list of supported formats? In the comments section below, let us know what other formats it should support.

And if you happen to be looking for convenient ways to open ADOC files too, rest assured that our dedicated guide can help.

Windows Search is getting a new Bing Visual Search feature that’s rolling out first in the US

Microsoft is improving its Windows Search Bar and Windows 10 with a new Bing Visual Search feature that is now rolling out to users in the US. This feature will allow Windows Search users running the Windows 10 May 2019 Update or newer to search the web using a screenshot, with the Bing-powered Windows Search surfacing similar items or shopping suggestions.

Bing Visual Search has its own dedicated button in the bottom right corner of the Windows Search window, and clicking it will bring up the Windows 10 snipping tool. You can see how it works in the GIF below:

GIF showing how Visual Search works, using searching for a blue couch as an example, with similar results popping up after sniping a screenshot of the couch

“We found people also wanted to search with screenshots, so we brought searching with screen snips to the Windows search bar,” says Nektarios Ioannides, Bing Image Search lead. Microsoft has already built similar visual search features in other places such as the Windows 10 Photos App, Microsoft Edge, the Bing App, the Microsoft Launcher on Android phones. Bringing Bing Visual Search to Windows Search seems like a welcome addition, and the tool can actually identify celebrities, landmarks, animals, as well as text in images.

It was just earlier this year that Microsoft finally separated Windows Search from Cortana in the Windows 10 May 2019 Update. “This will enable each experience to innovate independently to best serve their target audiences and use cases,” the company explained in a blog post for Windows Insiders. It’s nice that we’re now starting to see the results of these changes, though if you’re not in the US the company says that Bing Visual Search in Windows Search will be available soon in other international markets.

Here’s how you can praise your coworkers and bring happiness to the workplace in Teams

Microsoft Teams is the central hub for everything work and teamwork related for many people and organizations across the world. You’re able to use the service to chat with coworkers, set up meetings, voice calls, and so much more. However, nothing boosts team confidence more than sending some praise. In this guide, we’ll show how you can use Microsoft Teams’ praise features, and help your coworkers feel accomplished!

Step 1: Find the praise feature in Teams

The praise feature in Microsoft Teams is on by default as an app. To get started with using it, you’ll need to head to the message compose box at the bottom of the screen in Microsoft Teams. Typically, it’s not pinned by default, and you’ll need to tap on the “…” icon first. Once you do that, you can search for praise in the list and open it up. If you want to access it more easily, you can click the Pin button to pin it to the bottom menu of the compose box.

Step 2: Select a Badge to send

Once you’ve found the praise feature, you can select it. You’ll be greeted by a card. There are quite a few praise options you can choose from. Achiever, Awesome, Coach, Creative, Kind heart, Leadership, Problem solver, Team player, and Thank You are just a few examples. Once you’ve chosen one that fits your situation, feel free to click it.

Step 3: Edit the description, and preview and send

Now that you’ve chosen a badge, you can add the name of the people you want to praise, or even add a description to it. You’ll also be able to select the option to preview it, so you’ll see what it looks like before it heads to your recipient. Once you’re happy with it, press send. The message will show up inside Microsoft Teams, with the recipient being @’ed to bring it to their attention.

One of the many cool features in Microsoft Teams!

Although a bit hidden, the Praise feature is just one of the many cool elements in Microsoft Teams. As we’ve previously covered, some other cool features include support for apps that can boost your productivity, a Wiki tab to help you communicate effectively, and Microsoft OneNote integration. All these features, and the many others in Teams,, might even make Microsoft Teams better than Slack for your needs. Keep it tuned to OnMSFT as we continue to dive deeper into Microsoft Teams, and all the other Office 365 apps.

Fix: Document has insufficient permission for this operation

Portable Data Files (PDF) are a very common file format that you will meet in pretty much any environment. They can be used in home PCs, office groups, school and more.

Of course, one of the things that make this file format especially special is how secure they can be made.

When you create a PDF file, you can restrict the number of things that can be done to it, you can make them only viewable, or you can restrict them for good via password.

The problem is when you are the one trying to open such a PDF file, and you encounter an error message stating that:

Document has insufficient permission for this operation

How can I remove document permissions from a PDF file?

1. Download the Document

You may not be able to edit a PDF document when you are viewing it online through your browser. That is why downloading it on your PC and then trying to edit it again may be the right solution.

This process varies from browser to browser, so check out each developer’s documentation on how you can do this.

2. Get the password from the PDF’s creator

Permission restrictions are usually hidden behind passwords. Once you’ve inputted the right password, you may do with the PDF document whatever you please.

As such, contact the creator of the PDf file and ask them for the password.

3. Use a third-party PDF unlocker

If the creator of the PDF cannot be contacted, you can try using third-party PDF unlocking software. These usually come in the form of downloadable programs or even online services.

PDF password remover tools have proven themselves efficient at removing any type of restriction from PDF files, and some of them even offer PDF viewing and editing tools.

Keep in mind that these programs are either usually hidden behind a paywall, or they offer a free version that has limited functionality.

By following these steps, you should be able to get full access to a PDF and use it however you see fit.

Did you ever have to deal with a restricted PDF file? Tell us how you manage to bypass the problem in the comment section below.

A Problem Prevented the Document from being Scanned [Fixed]

Windows 10 includes a scanning tool that is helpful to scan documents and pictures, which can be download from the store. However, some users have reported a problem prevented the document from being scanned error while trying to use the tool.

If you too are getting this error message, try following this step-by-step guide that we’ve compiled for you, and you will be able to scan your documents in no time.

How do I fix a problem prevented the document from being scanned?

Before proceeding to the solutions in this section, try the following troubleshooting steps:

If this does not work, you can now proceed to the fixes below:

1. Remove and then add the scanner or printer

  1. Press Start.
  2. Click on Settings.
  3. Select Devices.
  4. Go to Printers & scanners.
    printers a problem prevented the document from being scanned
  5. Click on the device you have problems with and select Remove device.
  6. Click Yes.
  7. Stay on the same page, and then click Add a printer or scanner.
    add a
  8. When the device is detected, click  Add device.

One of the first things to do if you are getting a problem prevented the document from being scanned error is to remove and add the scanner or printer again. This will clear the glitches that might be causing the problem.

2. Reinstall the printer driver

  1. Go to the device manufacturer’s website and download the latest driver.
  2. Press Windows + X and select Device Manager
  3. Select either the Print queues, Imaging devices, or Scanners trees.
    print queues
  4. Right-click your device and choose Uninstall.
  5. Check the box next to Delete the driver software for this device.
  6. Click OK and restart your PC.
  7. Reboot
  8. Install the driver you downloaded earlier
  9. Once this is done, you need to add the printer or scanner, as described in the previous steps.

By applying the solutions above carefully, you should be able to fix the a problem prevented the document from being scanned. Please try again, or for troubleshooting information, see help error on Windows 10.

If you are dealing with a similar issue in Windows Fax and Scan fatal error, check our detailed guide to fix it.

Did you run into this error before? Tell us about your experiences in the comments section below.

Microsoft news recap: Xbox Series X revealed, new Xbox support website launches, and more

Microsoft news recap is a weekly feature highlighting the top Microsoft news stories of the past week. Sit back, grab some coffee, and enjoy the read!

Microsoft reveals Xbox Series X, the next-gen Xbox console coming in holiday 2020

In a surprise announcement, Microsoft revealed its next-gen Xbox at the Game Awards – the Xbox Series X.

3 million gamers played Halo: Reach on PC and Xbox One during launch week

During Halo: Reach’s launch week, 3 million players took to the game across PC and Xbox One, as well as becoming the #1 top-selling game on Steam during the week.

Microsoft jumps in Glassdoor’s “Best Places to Work” list as Facebook and Google drop out of top 10

Beating out Facebook and Google, Microsoft has risen up the charts on Glasdoor’s “Best Places to Work” list.

Microsoft launches new Xbox support website

A new Xbox Support website has been launched that offers a simpler and faster experience that works better on mobile, whilst also making it easier to get in touch with a support representative.

That’s it for this week. We’ll be back next week with more Microsoft news.

Sorry this Document can’t be Opened for Editing: How to Fix

Since SharePoint handles more or less complex business processes, providing a certain workflow allows more efficient handling of all onboard projects. Thankfully enough, Microsoft has released a new app as part of the Microsoft 365 Suite called Microsoft Flow.

However, things are not really straightforward, as users experience sorry this document can’t be opened for editing error. It all boils down to users not being able to open and edit documents that are already in Sharepoint.

How can I open documents for editing in SharePoint?

1. Ensure you have the right permissions

permission sorry this document cannot be opened for editing

Before all else, make sure that you have the right to edit the file in the first place.

For example, if you belong to a workgroup and it was uploaded to SharePoint by someone else, make sure you have all the access and editing privileges granted to you.

2. Make sure the file is editable even when not on SharePoint

Furthermore, make sure the file is not marked as read-only, as these types of files can only be viewed but not edited. In some extreme cases, read-only files can’t even be accessed at all.

So, change it accordingly, and sorry, this document cannot be opened for editing error should be fixed for good.

3. Make sure you use Flow appropriately

Flow is filled with commands and actions that need to be properly applied to each step in order to function correctly. Consider looking over Flow documentation to make sure you’ve taken the right steps.

Additionally, make sure that flow can support whatever it is that you are trying to do.

In the case presented above, the Convert Word Document to PDF action needs to use File Browse to specify the file, which is something the user did not do. As it stands, Dynamic content and Expression are not supported by Flow to configure file paths.

By following these steps, you should be able to avoid running into the sorry, this document can’t be opened for editing error in SharePoint.

If you can’t edit any Word document on your PC, quickly go through our detailed guide to fix it.

Did our article help you get past your issue? Let us know in the comment section below.

Fix: Nvidia Kernel Mode Driver has stopped responding

Nvidia is well-known for its ultra-powerful graphics cards, especially in the gaming community.

However, some users have been complaining that they have been having issues with some of their devices:

I am having a problem where if I use my graphics extensively, playing video, music, or any other graphics intensive activity, my computer will, more often than not, black screen for about 3-8 minutes and then come back. A system message pops up saying:

Display driver Nvidia Windows Kernel Mode driver, (whatever driver version I have) has stopped responding and has successfully recovered.

This issue is not that uncommon, so a lot of users have tried a lot of solutions until eventually, some stood out as being able to fix this issue.

We’ve compiled a list of all of these solutions, and arranged them in a step-by-step manner so you can understand them easier.

How can I fix the Nvidia Kernel Mode Driver error?

1. Reinstall your Nvidia drivers

  1. Download DDU (Display Driver Uninstaller)
    • You should create a restore point in case things go wrong
    • If you don’t know how to create a restore point, check out this detailed guide
  2. Run Display Driver Uninstaller.exe
    • It is preferable if your launch in Safe Mode
  3. Click Reboot to Safe mode and follow the instructions
  4. Reboot your PC
  5. Go to Nvidia and download the latest compatible video drivers available
  6. Install them by following the on-screen instructionsUninstall Nvidia

Alternatively, we recommend using a third-party tool that is specialized in identifying drivers that need an update and proceeds to download and install them automatically.

This is a time-saving solution that will stabilize your operating system and help it reach peak performance.

⇒ Get Fortect Driver Updater

2. Disable Windows Visual Enhancements

  1. Press Windows + R
  2. Type in sysdm.cpl and press Enter
    • This will open System Properties
  3. Go to the Advanced tab
  4. Under Performance, click Settings
  5. Check next to Adjust for best performance
  6. All sub-entries will be unchecked, go and check these 3 entries again:
    • Smooth edges of screen fonts
    • Smooth-scroll list boxes
    • Use drop shadows for icon labels on the desktop
  7. Click Apply, then OK
  8. Reboot your PC
visual enhancements

3. Set PhysX configuration

  1. Right-click an empty area of your desktop
  2. Select the Nvidia Control Panel from the menu
  3. Expand 3D settings
  4. Select Set PhysX configuration
  5. Look over the PhysX Settings dropdown
  6. Change Auto-select with your Graphics Card 
  7. Reboot your PCSet PhysX configuration

4. Turn off Vertical Sync

  1. Right-click an empty area of your desktop
  2. Select the Nvidia Control Panel from the menu
  3. Expand Manage 3D settings
  4. Look under I would like to use the following 3D settings
  5. Find the Vertical sync settings
  6. Click on it, and then select Off or Force Off
  7. Reboot your PCturn of fVS

5. Registry Fix

  1. Press Windows + R
  2. Type in regedit, and press Enter
    • This will open the Registry Editor
  3. Go to the following Registry Key
    • HKEY_LOCAL_MACHINESYSTEMCurrentControlSetControlGraphicsDrivers
  4. Right-click on GraphicsDrivers 
  5. Select New > DWORD (32-bit) value
  6. Give this DWORD the name TdrDelay
  7. Set the value to 8
  8. Click OK
  9. RebootRegistry Edit

6. Tweak Internet Explorer

You receive the error while browsing with Internet Explorer, then you need to make some tweaks.

  1. Launch Internet Explorer
  2. Click on Settings (the cog button)
  3. Select Internet Options
  4. Go to Advanced
  5. Check the Use software rendering instead of GPU checkbox
  6. Click on ApplyIE

By following these steps, you should be able to get rid of any Nvidia Kernel Mode Driver errors.

Did you find this article useful? Let us know in the comment section below.

How to debug Windows kernel

A kernel can be considered one of the building blocks of Windows as an operating system. This is mainly because it controls all the processes running on the system.

That being said, any problems and issues with the kernels can result in crippling functionality issues for your PC, which includes Blue Screen of Death errors.

Unfortunately, not even Windows 10, the latest version of the Windows OS is not safe from such issues. One piece of good news is that kernel code can be debugged, as long as you know how.

Fortunately, kernel debugging is possible and made easier through the presence of kernel debuggers.

How can I start Kernel debugging?

The answer to that question is quite complex, but suffice it to say that you need to follow a set of predefined steps before you can start:

1. Determine what PC is the host, and what PC is the target

The most basic thing that you need to know is that you cannot start debugging without a kernel debugger. The kernel debugger will run on the host system, while the code that needs debugging will run on the target system.

The two systems can be one and the same, but certain conditions need to be met beforehand.

2. Determine if you’ll do a kernel-mode or a user-mode debugging

Choosing what type of debugging isn’t that hard. All you need to do is determine what type of debugging will be more efficient.

  • Kernel-mode code has permission to access any part of the system and can gain access to any part of any other process running in either user mode or kernel mode
  • User-mode has more restrictions applied to it, but it has the benefit of not being able to tamper with actual system resources if things go wrong

3. Choose a debugging environment

The Debugging environment is basically the program you will be using to do the debugging with. WinDbg works well in most situations, but there are times when others may work better, such as console debuggers for automation or Visual Studio.

4. Figure out how you’ll connect the target and host

Usually, both target and host systems are connected by an Ethernet network. If you are doing early bring-up work, or you lack an Ethernet connection on a device, other network connectivity options can be used.

5. Choose between 32-bit or 64-bit debugging tools

This is probably the easiest step of them all since it depends on what version of Windows the host and target are running, and whether or not the code that needs debugging is 32-bit or 64-bit code.

6. Configure your symbols

If you are using an environment like WinDbg , you’ll need to configure the right symbols if you’ll want to use all of its advanced functionalities. If you don’t configure them, you won’t be able to use any of the debugger’s features that depend on those symbols.

7. Configure the source code

The path to the source code needs to be defined, even in the eventuality of it being your own source code. Thus, configuring a path to it in all cases is mandatory.

8. Become familiar with debugging

Debugger operations and techniques aren’t all that hard once you get used to them. This is thanks to the extensive documentation that comes with each operation, all of which is described in a step-by-step manner.

9. Use the debugger reference commands

You can’t know it all, and you can’t remember anything forever, but what you can do is look for the debugger reference commands that are there to help.

One good example is the .hh command, which will display help documentation about every single command available.

10. Use debugging extensions

Code can be extremely complex and it branches out in a variety of ways. Because of that, your environments may not be enough to perform the debugging.

Thus, using debugging extensions that provide parsing of domain-specific data structures can be very useful.

Closing thoughts

The steps mentioned above are all the basic procedures that you need to go through when attempting a kernel debugging.

Of course, there are many specific situations where these steps may vary, but the bottom line is all of them involve more or less these basic 10 steps.

Did our article help you better understand how you can start kernel debugging? Let us know what your opinions are in the comment section below.


FIX: This document has certain edit capabilities that are locked

This document has certain edit capabilities that have been locked error message can appear while trying to edit Word and Excel documents on Mac. The issue usually occurs when trying to edit citations, and in this article, we’ll show you how to fix that.

How do I unlock a document for editing on Mac?

1. Update Word to the latest version

If you’re getting This document has certain edit capabilities that have been locked error, try updating Word. You can do that by following these steps:

  1. Open Word.
  2. From the ribbon bar select Help > Check for updates.
  3. Microsoft AutoUpdate screen will appear. Select Automatically Download and install. Now click on the Check for updates button.
  4. If the update is available, you’ll see a new window. Just follow the instructions on the screen to update it.

2. Try copying the contents of the file

Few users reported that copying the contents of the file fixed the This document has certain edit capabilities that have been locked error.

Simply create a new document and paste the contents of the file that’s giving you the error to it. This is a simple workaround, but it might help you out.


3. Create a new administrator account

new administrator account This document has certain edit capabilities that has been locked

  1. Go to the Apple menu and select System Preferences.
  2. Now choose Users & Groups.
  3. Click the Lock icon in the bottom left corner. Now click the Plus icon.
  4. Set New Account to Administrator.
  5. Enter the required information and click the Create User button.
  6. Switch to a new account and check if the problem is resolved.

4. Reinstall Office

Sometimes, there might be a glitch with Office that is causing the This document has certain edit capabilities that have been locked error. To fix it, you need to reinstall Office by following these steps:

  1. Open Finder and go to Applications.
  2. Press and hold the Command button and select all Office applications.
  3. Ctrl + click the applications you selected and choose Move to Trash.

After doing that, you need to remove the files from the user Library folder by doing the following:

  1. In Finder press the Command button + Shift + G.
  2. A new window will appear. Enter ~//Library and click Go.
  3. Navigate to the Containers folder and Ctrl + click the following folders and move them to Trash:
    • microsoft.errorreporting
    • microsoft.Excel
    • microsoft.netlib.shipassertprocess
    • microsoft.Office365ServiceV2
    • microsoft.Outlook
    • microsoft.Powerpoint
    • microsoft.RMS-XPCService
    • microsoft.Word
    • microsoft.onenote.mac
  4. Go back to the Library folder and navigate to the Group Containers.
  5. Select the following folders and move them to Trash:
    • UBF8T346G9.ms
    • UBF8T346G9.Office
    • UBF8T346G9.OfficeOsfWebHost

Lastly, you need to remove Office applications from the Dock by doing this:

  1. Ctrl + click the application in the Dock.
  2. Choose Options > Remove from Dock.
  3. Restart your Mac.

There you go, these are the best ways to fix This document has certain edit capabilities that has been locked error, so be sure to try them all.

If you have other questions or suggestions, don’t hesitate to leave them in the comment section below.

FIX: This document could not be autosaved on Mac

Many users have reported This document could not be autosaved error on their Mac. This can be an annoying issue, but in this article, we’re going to show you how to fix it once and for all.

How can I fix This document could not be autosaved error?

1. Duplicate the keynote and save the copy

If you’re getting This document could not be autosaved error, try duplicating the keynote and save the copy. This is just a workaround, but several users reported that it works, so be sure to try it out.

2. Check for corrupted files

Sometimes, This document could not be autosaved message will appear if your file is corrupted. Few users reported that one of the tabs in Numbers was corrupted and that caused the problem.

One way to fix this is to copy all uncorrupted data from that file to a new one and save it. Bear in mind that corrupted data won’t be saved by this process.

If you’re using Pages, you can choose the Duplicate option and check if that solves the issue.

3. Clear Open Recent menu in Pages

It seems that This document could not be autosaved message appears due to certain permission issues. However, users managed to fix this problem simply by clearing the Open Recent menu in Pages. After doing that, the issue was completely resolved.

4. Paste data to a different application

You might be able to fix This document could not be autosaved error by using this little workaround. You just need to follow these steps:

  1. Open Numbers and choose Merge all
  2. Now copy the section of the spreadsheet that won’t save and paste it to Numbers.
  3. Quit the Pages document. Now open it again.
  4. Paste the data from Numbers back to Pages document and save it.

This is a workaround, but several users reported that it worked for them, so be sure to try it.

There you go, these are the several methods that you can try if you ever encounter This document could not be autosaved error on your Mac.

If you have any other questions or suggestions, leave them in the comments section below and we’ll be sure to check them out.

Microsoft’s Surface Hub 2X, expected for 2020, may run Windows 10X according to new report

Even as 2019 comes to a close with Microsoft putting out some relatively exciting hardware with a refreshed Surface Pro 7, Surface Laptop 3 in two variants, and the Surface Pro X, it now seems 2020 is shaping up to be another blockbuster year for the company’s hardware offerings.

Aside from the eventual release of the coveted Surface Neo, Duo, Earbuds and, Xbox Series X, Microsoft also has on the docket a wider release an update to its digital conference board in the Surface Hub 2X. The Surface Hub saw a refresh in late 2018 with the unveiling of the Surface Hub 2S and the announcement of the Surface Hub 2X.

While the Surface Hub 2S was eventually released in Q2 2019, Surface Hub 2X devices are road mapped for general release sometime in 2020 and as such, details of the devices are now beginning to come to light such as the Hub 2X differing from its Hub 2S cousin and possibly shipping with Windows 10X out of the box.

According to a report from Windows Central’s Zac Bowden, Surface Hub 2X could ship with a variant of the Windows Core OS that it was originally unveiled with back in late 2018 alongside the Surface Hub 2S. The Hub 2S has been on the market for much of 2019 and runs on the same OS as older Surface Hubs for compatibility reasons. Yet, the Surface Hub 2X has been arguably shelved by Microsoft from public view since it’s late 2018 showcase, and according to Bowden’s sources, it’s because the company has been working on a tweaked version of the Windows Core OS to ship on the Hub 2X that’s taking longer than expected.

The Surface Hub 2X was originally held back from general release in 2019 because Microsoft wanted to ship a slightly beefier experience with the device and fully utilize its Windows Core OS by enabling dynamic rotation, faster Windows Updates, tiling and more. But now it seems based on codenames, the Windows Core OS flavor destined for the Surface Hub 2X is dubbed Santorini and is basically a shell experience that differs slightly from the original Aruba or Windows Core OS proper that was demoed on the Hub 2X last year.

How different is Santorini from Aruba and what new features will be coming to the Surface Hub 2X, Bowden and his sources seem to have no answers regarding those details, however, if Santorini is closer in nature to the dual-screen Windows 10 X experience demonstrated on the Surface Neo and Duo, there could be a future in which the Surface Hub 2X digitally bonds screens through some advanced mira casting techniques embedded in Widows 10X.

Between now and Microsoft’s targeted June 2020 development date of Windows 10 X, the company has several developer conferences and events lined up to slow leak more details about its next flagship operating system.

Smite gets full keyboard and mouse support in latest Xbox One update

There is a new update to Smite, the free-to-play, MOBA (Multiplayer Online Battle Arena) game for Xbox One. As noted in a post on Xbox Wire, the newest Smite update, “The Vigilant,” is now available and adds full keyboard and mouse support for Xbox One, including a new character, Heimdallr, a Norse Hunter god.

Here’s a video look at Heimdallr in SMITE’s The Vigilant update.

Among the more notable changes available in SMITE’s The Vigilant update include the introduction of Heimdallr and his new Hunter abilities:

  • His basic attacks have a longer animation time and higher damage scaling
  • These attacks rotate between ranged cleaves vs higher damage single target, following an A-A-B chain.
  • His base stats are on the tankier side for hunters, or similar to the lower end of Warriors.
  • He has no ability that temporarily boosts his attack speed or power
  • Can gain vision of areas of the map in ways other than wards, as many as 3 of of his abilities can grant him vision bonuses, and some can even see stealthed enemies.
  • Has a movement ability, but one that requires planning and functions unlike any other ability in SMITE
  • An Ultimate that features new tech and visuals to create a unique experience, especially for the enemy hit by it.

Get Smite on Xbox One

SMITE
SMITE
Developer:
Hi-Rez Studios
Price:
Free

Do you play SMITE? What new features would you like to see in a future SMITE update? Let us know in the comments!

Mortal Kombat 11 is getting cross-play support between Xbox One and PlayStation 4

Mortal Kombat 11 is likely to get cross-play support soon, allowing Xbox One and PS4 players to play head-to-head. As noted in a post on the Mortal Kombat FAQ page, the game developers are working on a way to bring “Xbox One and PS4 players into the same matchmaking pool for Online Kasual game modes.”

Here’s a look at how cross-play (dubbed KrossPlay in Mortal Kombat 11) will work :

  • Whenever players are in matchmaking in Online Kasual modes, the game will now look for the best match across prospective PlayStation 4 and Xbox One players.
  • Designated Krossplay Online Rooms will provide a central location for PlayStation 4 and Xbox One players to manually meet up and fight against other players on opposite platforms in Online Kasual game modes. Please note, friends on opposite platforms will need coordinate outside of the game ecosystem, then meet up in a specific Krossplay Online Room to play against each other.

As far as Mortal Kombat 11 players playing beyond Xbox One and PS4 consoles, there are no plans to extend cross-play to Windows 10 PC, Nintendo Switch, or Google Stadia. No word yet on the exact date that cross-play will be available, so stay tuned.

Senua’s Saga: Hellblade II announced for Microsoft’s Xbox Series X video game console

Senua’s Saga: Hellblade II was officially announced during The Game Awards 2019 earlier today with a rather impressive trailer featuring entirely in-engine footage rendered on an Xbox Series X, Microsoft’s upcoming Xbox console that was also unveiled today.

Little is known about the game beyond it being a sequel to the hit Hellblade: Senua’s Sacrifice title and that it will be releasing on the Xbox Series X. It’s unclear if it will be a launch title or one that will debut several months or even a year after the Xbox Series X hits store shelves.

Here’s the trailer that’s got everyone talking:

The Xbox Series X will be the beginning of the fourth generation of Xbox consoles following the Xbox, Xbox 360, and the Xbox One. It will be four times more powerful than the Xbox One X and will support backwards compatibility for all Xbox One games and accessories. Read more about Xbox Series X here.
Are you excited for Senua’s Saga: Hellblade II? Let us know in the comments below and then follow us on Pinterest for more Xbox gaming content.