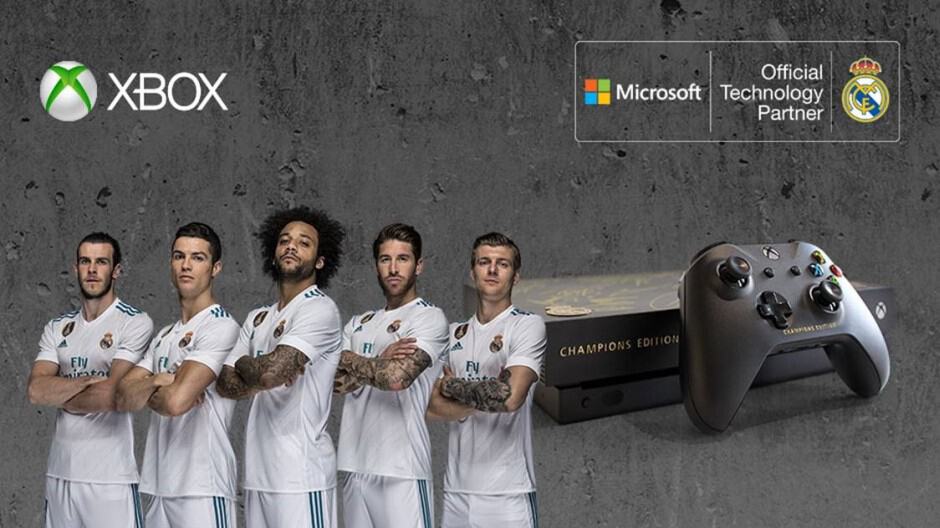
Enter now to win a custom Real Madrid Xbox One X

Microsoft announced today they have created a unique custom console as part of their partnership with 12-time UEFA Champions League winners, Real Madrid. You can enter now to win the one of a kind console for yourself, and complete the ultimate football collection.

To enter to win this console, all you need to do is follow Xbox on Twitter, and Retweet a special promotional tweet anytime between April 27 to May 4th. The custom Xbox One X features the Real Madrid logo, and it also signed by each player on the famed soccer team It is also similar the consoles which each player on the team received, which features their jersey number and initials.

Microsoft has given away custom Xbox consoles in the past, including a custom Xbox One S for the Chainsmokers, and two special consoles for Vin Diesel, and The Rock. Do you think you have what it takes to win? Try your luck and let us know your thoughts in the comments below.


How to fix BATTLETECH issues on Windows 10/11 computers

BATTLETECH is one of the hottest games on Steam right now. The title throws players in the middle of an interstellar civil war of epic proportions.

Before you take command of your BattleMechs, you need to first get the game to work. Many players reported that BATTLETECH is affected by quite a long list of bugs that limit the gaming experience.

In this post, we’re going to list a series of workarounds that you can use to fix common BATTLETECH technical issues.

Fix BATTLETECH bugs [Best solutions]

 1. Have a little patience when redeeming unlock codes

Redeeming a valid unlock code may temporarily freeze the loading screen. Rest assured, everything’s running smoothly in the background and the loading screen will disappear after a few minutes.

2. If graphics settings won’t apply

Close the game and re-apply them. Keep in mind that particular video settings won’t apply during combat.

3. If you’re getting infinite loading screens

Simply restart the game a few times if necessary. Also, it is worth mentioning that creating multiple profiles in the same game session causes infinite loading screen issues, so avoid that.

4. Low game performance

After several consecutive hours of gameplay is normal. Restarting the game should fix this problem.

fix BATTLETECH issues bugs

5. Temporary FPS drops

It may occur when spam-clicking certain menus or game areas, so you should avoid doing that. If you’re getting random FPS drops, follow the instructions available in the troubleshooting guides listed below:

6. If your game save files disappear

Simply restart the game. BATTLETECH already confirmed this is only a minor glitch as the saves are available after restart. Hopefully, a permanent fix will be deployed in the coming weeks.

If BATTLETECH crashes here are some solutions to fix the problem:

  • Update your display drivers. If your computer is equipped with a Nvidia card, make sure you’ve installed Geforce Driver 397.31 which brings dedicated optimization features for BATTLETECH.
  • Check your antivirus and make sure it doesn’t interfere with the game
  • Install the latest Windows 10 updates
  • Run BATTLETECH in window mode
  • Remove overclock settings
  • Reinstall the game from scratch if the problem persists.

We hope that these quick solutions helped you fix some of the BATTLETECH bugs that you encountered during gameplay. As always, if you come across other workarounds to fix these issues or other similar bugs for that matter, feel free to list the troubleshooting steps in the comments below.

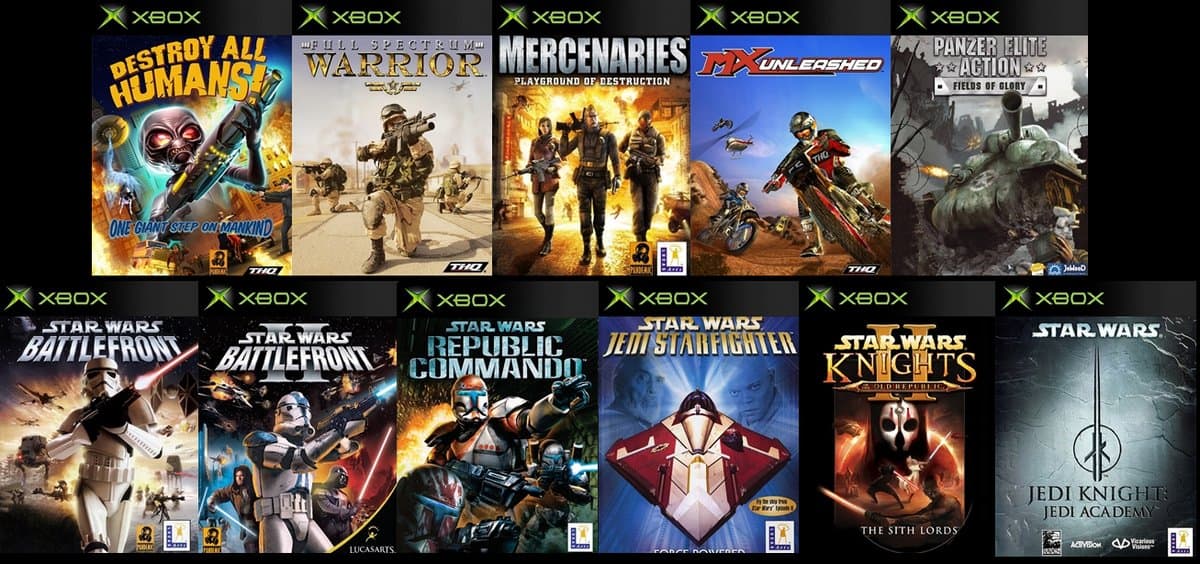
Star Wars Battlefront, 10 other Original Xbox titles come to Xbox One Back Compatibility today

Microsoft’s Major Nelson announced today that the second wave of original Xbox games is now available for download on Xbox One. These games include Star Wars Battlefront, Destroy All Humans! Full Spectrum Warrior, and eight more titles. We’ve included download links and descriptions for these three hit titles below and remind you to check out the download links for the remaining titles (MX Unleashed, Panzer Elite Action, and Battlefront II, Jedi Academy, Jedi Starfighter, Knights of the Old Republic II & Republic Commando) here on Major Nelson’s blog.

Star Wars Battlefront:

Fight as a soldier on the front lines where every weapon and vehicle you see is yours. Take the Empire head on or crush the Rebellion – by yourself or with an army behind you!

Destroy All Humans:

Take on the role of alien Cryptosporidium 137 and terrorize the people of Earth to harvest their DNA in the most brazen action-adventure you’ve ever played. Take over all of humanity using a variety of alien weaponry on land or in the air. Take over all of humanity using a variety of alien weaponry such as a ray gun, an anal probe gun, the Ion Detonator, the Zap-O-Matic, the Sonic Boom, the Quantum Deconstructor, a powerful nuclear weapon that can launch radioactive bombs, and more

Full Spectrum Warrior:

Full Spectrum Warrior began as a training aid for the U.S. Army to reinforce Army doctrine and team effort within the troops. It is the most realistic portrayal of Infantry-level urban warfare via unique tactical action gameplay. Players become the Squad Leader, commanding Alpha and Bravo squads. There is potential for danger down every alley, behind every window. Watch those angles folks, we’ve got a job to do here. Hooah! Unique combination of tactical and action gameplay.

Major Nelson also announced today that Breakdown, which was part of the first wave of Xbox Backward Compat titles, is now available for digital download in 41 Xbox One markets. Let us know in the comments below if you already own any of these titles, or plan to buy an original Xbox game soon.

Microsoft Teams now supports more than 300 file type previews

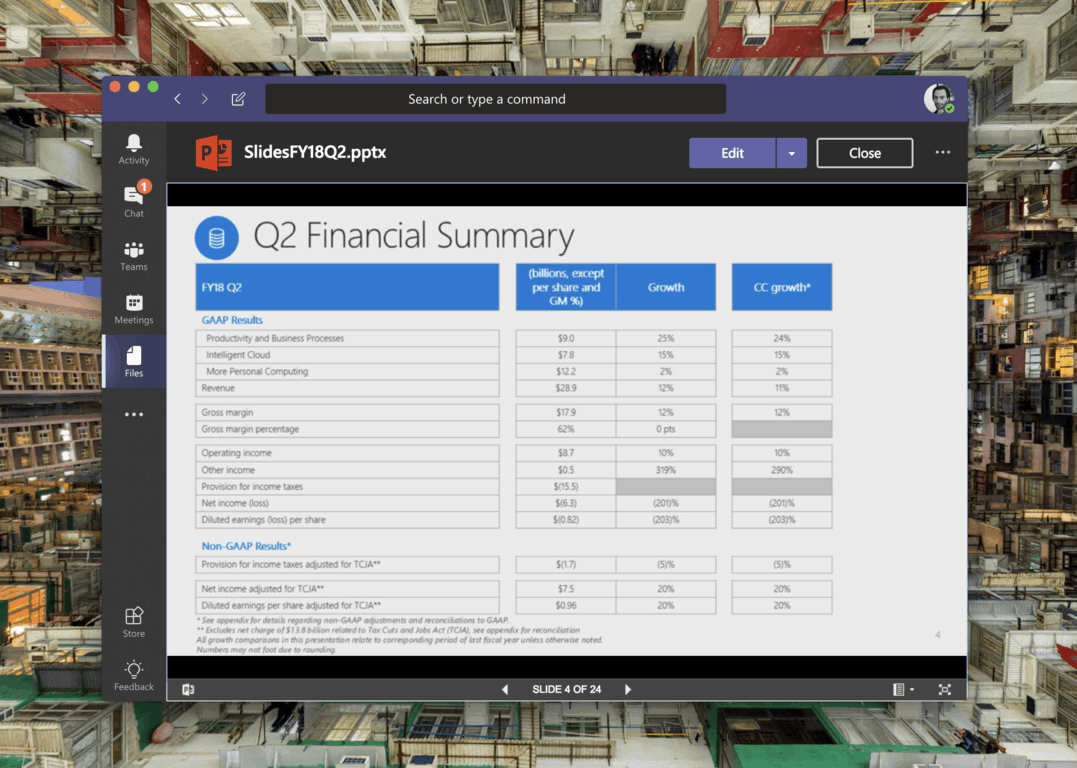
Microsoft Teams has been updated this week to support more than 300 file type previews including Office documents, PDFs, video and audio, zip, 3D files and many more. This is a great addition that should make the Files section of Microsoft Teams much more useful.

On Twitter, Microsoft’s Omar Shahine said that Microsoft ran into some issues with SVG files, so that’s why they’re not supported as of today. As a reminder, the Files section in Microsoft Teams lets you access local files, OneDrive for Business as well as third-party cloud storage services including Box, Dropbox and Google Drive. Thanks to the Office Online integration, you can also edit Office files right within Microsoft Teams, which is pretty handy.

Microsoft deserves credit for iterating fast on the team collaboration app, and the Planner app in Microsoft Teams also received an update this week. Unfortunately, we also learned some bad for Windows Phone users as the service won’t work anymore on Microsoft’s mobile platform after May 20.

Windows 10 Fall Creators Update reaches 92.1% install base in latest AdDuplex stats

As we’re all waiting for Microsoft to release the next major Windows 10 release, the propagation of the Fall Creators Update is still ongoing according to the AdDuplex report for April 2018. This month, the cross-promotion network for Windows Store apps and games says that 92.1% of Windows 10 PCs are running the latest version of Windows 10, up 1.7% points.

As you know, AdDuplex’s data is based on 5,000 Windows Store apps running AdDuplex SDK, so it’s not a perfect reflection of the Windows 10 ecosystem. Indeed, Microsoft’s Kevin Gallo said last month that only 60% of the 600 million active Windows 10 devices were running the Fall Creators Update in March, which is much lower than AdDuplex’s numbers.

Unfortunately, Microsoft still doesn’t share detailed data about Windows 10 adoption, so AdDuplex’s data is pretty much the best we have as of today. Moreover, we’ve also noticed that the Windows and Microsoft Store trends page, which Microsoft initially published to help devs draw their own insights has now disappeared, even though Microsoft still mentions it on its developer website.

Since Microsoft announced 600 million active Windows devices last month, it’s unlikely that we’ll get an update at Build 2018 next month, though you never know. It also remains to be seen if Microsoft will wait for the developer conference to release the much-anticipated April Update, which would be a first for the company.

Register today for Microsoft Build Live to enhance your Build-viewing experience

If you’ve found yourself unable to attend Build 2018 in person, there’s no reason to worry as you can now register to stream it all online with the Microsoft Build Live digital experience. By registering. you will get access to three days of Microsoft Build and hear about the many ways to connect, spark ideas, and engage with the cloud, AI, mixed reality, and Windows.

Registration is free, and you can watch all keynotes from Microsoft experts like Satya Nadella, Joe Belfiore, Scott Hanselman, Elaine Chang, and Cindy Alvarez. The experience is also personal, and you can select your favorite topics and receive content recommendations, or even tailor your feed based on the speakers and sessions you want to see. You’ll also be able to save sessions for on-demand viewing and participate in Q&A’s with developers.

As a reminder, the Build 2018 schedule is now up for those who have successfully registered to attend. We’ll also be covering Build 2018 live, so be sure to keep it tuned to OnMSFT.com for more throughout the next few weeks.

343 Industries, Xbox execs tease “classic Halo experience” on Windows

Earlier this week, Halo developer 343 Industries announced that it has initiated actions to take down the rogue “Halo Online” project from ElDerito, citing the need to protect its intellectual property. The developer did acknowledge in the blog post that the “the community really wants more Halo on PC,” and there are reasons to be hopeful that 343 Industries could finally deliver.

“As we look ahead, we’re very excited about the prospects of an official classic Halo experience making its way to PC and we hope to be able to partner with the ElDewrito team and broader mod and content creation community to help inform the types of experiences and features our fans desire,” 343 Industries explained in the blog post. Xbox head Phil Spencer took the time to highlight this specific point on Twitter yesterday:

Bonnie Ross, Founder and head of 343 Industries has since echoed this, adding that PC gamers and classic Halo games are two current areas of focus for the developer:

As you may recall, both Halo: Combat Evolved and its sequel Halo 2 were released on Windows in the last decade, with the second one using Microsoft’s infamous Games for Windows Live online service. However, what PC gamers probably want today is a port of the Xbox One anthology Halo: The Master Chief Collection on Windows 10. Hopefully, this is what 343 Industries and Phil Spencer are reffering to when talking about the “classic Halo experience.”

In retrospect, Halo: The Master Chief Collection was pretty much a botched release on the Xbox One, forcing 343 Industries to apologize for all the matchmaking issues plaguing the anthology. Nearly four years later, 343 Industries announced that it would upgrade the game later this year with Xbox One X enhancements, multiplayer fixes and more, and the collection could also soon be added to the Xbox Games Pass catalog.

With E3 2018 now just a few weeks away, we’re wondering if Microsoft could have a cool Halo surprise for PC gamers. Do you think releasing Halo: The Master Chief Collection on Windows 10 could finally give the anthology the audience it deserves? Let us know below.

Microsoft’s Cortana adds support for the GLAS thermostat ahead of release

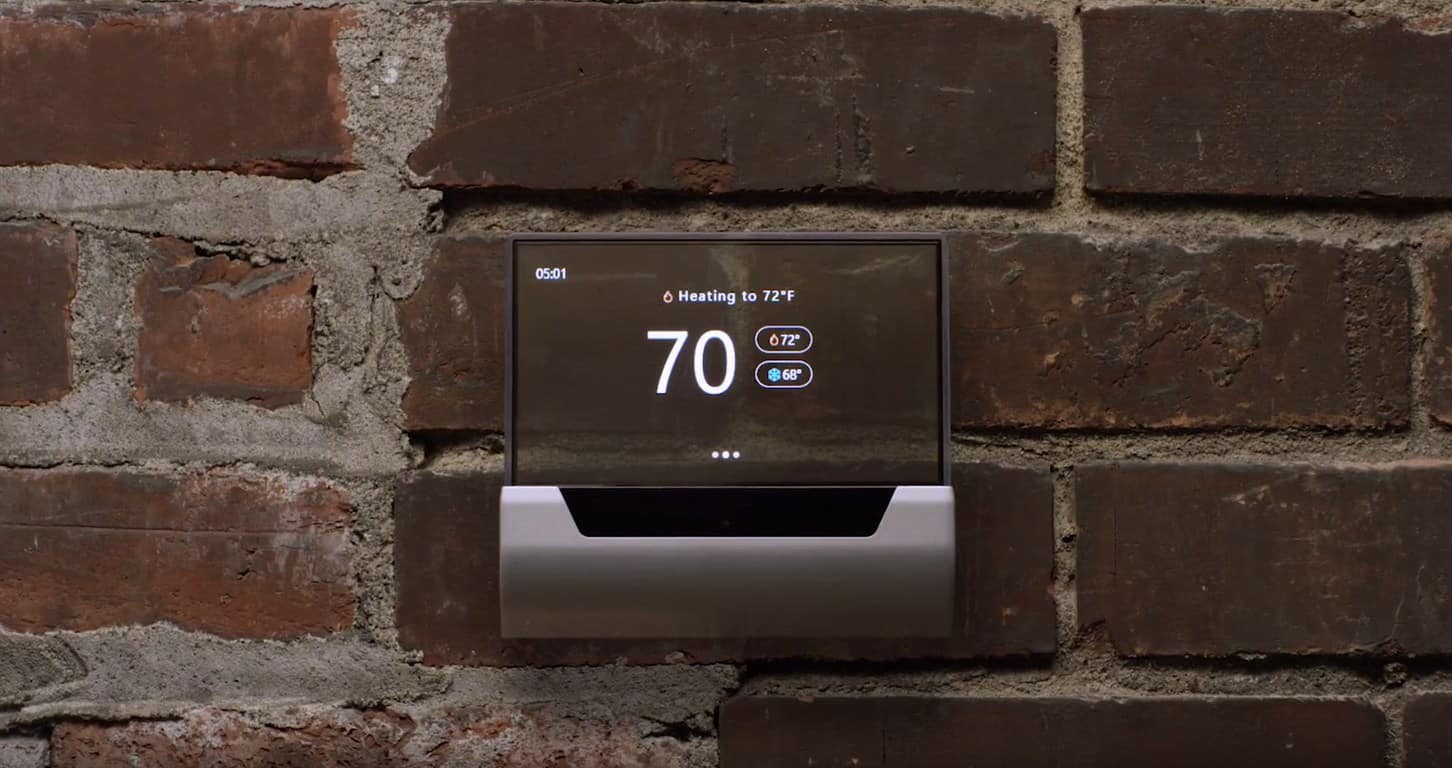
Microsoft’s digital assistant, Cortana, appears to have added support for the upcoming GLAS thermostat. This new device was announced several months ago but has yet to be given a concrete release date. The addition of support for the thermostat in Cortana though could mean that its release is on the horizon.

The GLAS thermostat is a digital thermostat that boasts a transparent display which can show the temperature, traffic, and forecasts among other data and will also be able to detect when someone is in the room and the quality of the air.

This update to Cortana is still apparently rolling out to users.

Do you use Cortana to control any devices in your home? Do you even use it with your Windows 10 PC or Windows phone? Let us know in the comments below and make sure to follow us on Pinterest for more Cortana news.

Minecraft Final Fantasy XV Skin Pack now available on Xbox One & Windows 10

The Final Fantasy XV Skin Pack is now available to download for Minecraft gamers on Windows 10 and Xbox One. This downloadable content contains 43 character skins inspired by the Final Fantasy XV video game with a mix of heroes, villains, and monsters to decorate Minecraft creations with. Here’s the official store description for the pack.

Join Noctis, Gladio, Ignis and Prompto once again as they venture beyond the world of Eos and into the untold realms of Minecraft with this fantastic skin pack. Be it friend or foe, the cast of FINAL FANTASY XV follows, including Cindy, Aranea, Ardyn, the Astrals and many more.

Minecraft frequently releases skin packs inspired by popular movie and game franchises such as Star Wars, Halo, and Power Rangers. Players are also free to create their own skins if they choose.

Do you prefer to buy or create your Minecraft skins? Share your thoughts with the community in the comments below and makes sure to like us on Facebook for more Minecraft news.

Marvel movies discounted on Windows 10 & Xbox One for a limited time

In celebration of 10 years of Marvel movies (and to help promote the premiere of Avengers Infinity War in cinemas) almost all of the Marvel Cinematic Universe films have been heavily discounted within the Microsoft Store.

Three films are missing from this campaign though. Black Panther and Spider-man Homecoming are notably absent from this Marvel 10th anniversary sale which is to be expected as both are relatively new movies. Black Panther is still a digital pre-order. An odd exclusion though is The Incredible Hulk, the second film released in the Marvel Cinematic Universe, which may disappoint those wanting to buy all their Marvel movies on the cheap. These three missing films are still available in the Microsoft Store though, just at a slightly higher price.

The Marvel 10th anniversary sale runs until May 5th. All movies purchased from the Microsoft Store are playable on Xbox 360 and Xbox One consoles, Windows phones, and Windows 10 devices.

Are you a Marvel fan and have you purchased any of the MCU films from the Microsoft Store? Let us know how much content you buy from Microsoft’s digital storefront in the comments below and make sure to follow us on Pinterest for more Windows and Xbox content.

FIX: OneDrive on Android is not syncing

There are a variety of cloud storage packages today, and most of these are now offered with mobile devices, whose manufacturers have the challenge of having more storage capacity for their new products as storing content locally isn’t as popular anymore.

Mobile device users simply select a cloud storage provider they like, install the app, and set it up on their devices, and they’re in the cloud. Each of these apps has its own pros and cons though, the popular ones today being Dropbox, Google Drive, and Microsoft’s OneDrive.

OneDrive’s cloud solutions offers 5GB of space with a free account, but this can be expanded by recommending the service to one’s friends, which rewards you with 30GB of space, though you can also get this by connecting and syncing your photos with the cloud.

The good thing is OneDrive integrates seamlessly with your mobile device, and allows you to back up your files automatically. If you’re using Android device(s), OneDrive is easy to set up and install. However, there are users who have raised concerns over OneDrive on Android not syncing.

There are many reasons why this happens, including running an old version of the app, or running out of space on the cloud, an unreliable connection, bad operating system update, or permission denials, can cause OneDrive on Android not syncing issue.

Whatever the nature of the problem, try the solutions listed below to fix OneDrive Android not syncing issue.

How to fix OneDrive on Android sync issues

  1. Check your internet connection
  2. Re-install the app
  3. Check the file size
  4. Update to the latest OneDrive version
  5. Mark files as Offline on your Android device
  6. Stay within the storage limit

1. Check your internet connection

If your OneDrive for Android is not syncing, ensure that it happens on both your mobile network and WiFi, because if it only happens on one, you need to check your ISP or mobile service carrier as they may be blocking something that won’t allow OneDrive to sync or work properly.

2. Re-install the app

If you find OneDrive for Android not syncing, the app may not be launching or is crashing, so you can re-install the app. To do this:

  • Open Settings.

onedrive android not syncing

  • Select Apps.

onedrive android not syncing

  • Tap Manage Applications.
  • Find and tap OneDrive.

onedrive android not syncing

  • Tap Force Stop and then tap Clear data and Clear cache.
  • Once all done, un-install the app.
  • Re-install the app from the Google Play Store.

— RELATED: Fix: Windows 10 Doesn’t Recognize Android Phone

3. Check the file size

OneDrive for Android not syncing can also be caused by the size of the file, if it is larger than 15GB. You can fix this by trying to reduce the size of the file, by zipping the file or folder. To transfer large files or batch files, add them to the OneDrive desktop app instead of using Upload on the website. If you saved to a location you didn’t intend, or moved the files by error, use the Search everything box in OneDrive website, save the file with a unique name and stop the sync, then restart it again.

How to pause and resume sync in OneDrive

  • Select the OneDrive cloud icon in the notification area on the taskbar.
  • In the activity center, select More (three vertical dots)
  • Select Pause syncing and choose how long you want to paus for
  • Check that the OneDrive cloud icons show Paused
  • Once the pause time is complete, the syncing will resume or you can do it manually at any time
  • In the activity center, select More and select Resume syncing

4. Update to the latest OneDrive version

This can help resolve sync problems on your Android device. OneDrive is frequently updated so ensure you download the latest version and install it. If you already have it, the installer will set up and end automatically.

Check that you’re not syncing too many files. If your OneDrive for Android is not syncing, it may be because you have too many files on OneDrive or many new files waiting to be uploaded and this can take a long time. Add the files instead to your desktop app than using the Upload on the site or on your device.

5. Mark files as Offline on your Android device

You can do this on your Android device to read the files anytime, even when offline. Online edits made will sync next time you’re connected to the web. Files marked offline are read-only but you can edit the file when you get back online.

6. Stay within the storage limit

Check the size of your OneDrive Android storage and that of OneDrive storage available. If you don’t have enough space, you will have to move or delete files or reduce them. You can also buy more storage, or free up OneDrive storage by choosing which folders to sync.

Are you now able to sync OneDrive Android? If so, let us know what worked for you from the solutions above by leaving a comment in the section below.

RELATED STORIES TO CHECK OUT:

New Internet Explorer zero-day exploit sneaks malware into PCs

A Chinese cybersecurity firm has discovered a zero-day vulnerability in Microsoft’s Internet Explorer, which they say is already being used by cyber criminals to infect machines. Qihoo 360, the company that released the shocking discovery, revealed in its report that the bug, dubbed ‘double kill’ due to the fact that it targets both Internet Explorer and any apps using the IE kernel, is currently in use by an advanced persistent threat often known to be sponsored by a government.

Internet Explorer comes pre-installed on each Windows computer, despite it being overtaken by the new Microsoft Edge browser, but because many organizations still use Internet Explorer, Microsoft decided to let it stay though the firm doesn’t give it as much focus in terms of improving the browser as it does with Edge.

There is a  new, serious flaw now leaves IE open to malware attacks, as the bug uses a Microsoft Office document with a pre-installed vulnerability, which opens a web page that then downloads a piece of malware. Researchers say the malware takes advantage of a UAC (User Account Control) bypass while using embedding technology, such that a message, image or file can be embedded within another message, image or file.

Although the news about the bug has spread widely, Microsoft is yet to issue a response with regards to the vulnerability, and so far, a patch is not yet available for it. However, users of Internet Explorer are cautioned against opening any Office attachments from sources unknown to them, because the bug requires that the ‘victim’ opens a malicious Microsoft Office document that has a link to a website which delivers the malware payload.

According to Qihoo 360, once infected, attackers can install backdoor Trojans or gain total control over the machine. Qihoo 360’s report doesn’t mention what the actual zero-day vulnerability is, and how the software is delivered, neither does it reveal the APT actor or government sponsors that may be behind the attack. What the report does mention, however, is the sequence with which the attack functions, and the firm has requested for an urgent release of a patch, though this is left at Microsoft’s discretion for now.

To stay protected from the zero-day exploit, here are some tips to avoid infection:

  • Don’t open attachments from unfamiliar sources
  • Insist that your team or other acquaintances share documents via cloud services such as OneDrive or Google Cloud
  • Ensure all antivirus and security software on your machines are updated
  • Don’t use Internet Explorer, instead, use Microsoft Edge browser which is more secure
  • Make sure your systems are all updated with the latest security patches, as outdated machines are more vulnerable to attack.

You can secure 100% of all your internet access with a good VPN. We recommend CyberGhost, trusted by 15milion users over the world for the enhanced protection of browsing experience.
Download now CyberGhost (currently 77% off).


Currently, it seems all Internet Explorer versions are vulnerable to this and other attacks, regardless of the version of Windows operating system being used, which means documents opened with any version of Office will trigger the vulnerability thus an attack. This extends to Windows 10 and Office 2016 as well, which are said to be vulnerable.

Microsoft is expected to release a new batch of security updates in the first weeks of May 2018, on Patch Tuesday, but, this is dependent on how many attacks this new flaw will come with, meaning a quick fix could be released before then.

RELATED STORIES TO CHECK OUT:

Explorer.exe crashes in Windows 10 April Update 1803/1804 [FIX]

Slow and Release Preview Insiders can now test Windows 10 build 17134 and check if Dona Sarkar’s team managed to fix the annoying bugs that blocked the initial Spring Creators Update release. Insiders already reported that this build version comes with a few issues of its own, but these are not severe bugs.

However, recent user reports revealed that the current Windows 10 April 2018 Update build also brings some major bugs as well. More specifically, Explorer.exe crashes every 3-5 seconds and this triggers a series of additional issues, including Start Menu issues, app and program launch problems, and more. Here’s how one Insider describes this major bug:

I know Windows 10 1803/1804 update was delayed due to a “blocking bug” – think I know what this bug is as I’ve experienced it on 3 different computers running the Slow/Fast ring updates. The bug I’ve experienced causes Explorer.exe to crash every 3-5 seconds – the start menu does not work, the task bar keeps resetting and the computer is near enough un-usable.

Microsoft has yet to officially acknowledge this problem but, as Redditors point out, the fact that the company delayed the release of the April update suggests the Redmong giant is aware of this bug. Most likely, Microsoft’s engineers are already working on a fix.

Meanwhile, there is a temporary solution that you can use to fix this problem. Go to Settings > Privacy > Activity History > uncheck the option “Let Windows sync my activities from this PC to the cloud“. Once you’ve done this, simply switch to another Settings page, and then return to the previous one. Go to “Clear Activity History” and hit the “Clear” button. Explorer.exe should stop crashing now.

Have you encounter other Windows 10 version 1803/1804 bugs? Tell us more about your experience in the comments below.

RELATED STORIES TO CHECK OUT:

Microsoft is ditching the pistol emoji in Windows 10 in favor of a water gun

Following both Google and Facebook, Microsoft announced in a Tweet today that they will be changing the gun emoji on Windows 10. The company provided a picture of a new water gun styled emoji and mentioned that they are in the process of evolving their emojis to better reflect values and feedback they’ve received.

In the heat of the gun control battle here in the US, many tech giants have followed Apple’s 2016 move to change their traditional gun emojis to water pistols or toy guns. Since WhatsApp, Samsung, and Twitter also switched in recent years, Microsoft was left as the only company which didn’t yet change the traditional gun emoji on their respected platform.

Anyway, Microsoft actually once used an alien-gun styled emoji up until 2016, which is the same year when they switched to a pistol emoji. That said, it is definitely interesting to see the company follow other tech giants in removing guns and addressing the concerns of society. It is not clear when Microsoft will implement the new emojis, or how, though one can assume it may come with a Windows 10 featured update.

Warning: SquirtDanger malware takes screenshots and steals your passwords

Palo Alto Networks Unit 42 researchers have discovered a new currency stealer which targets cryptocurrencies and online wallets. Hackers can take action screenshots and steal passwords, download files and even steal the content of cryptocurrency wallets through a new malware from the ComboJack malware family.

Cryptocurrencies are increasing in popularity and value, therefore we can expect such malware to pop up in the near future. This calls out users to gain more security for online crypto wallets.

The Swiss Army Knife Malware called SquirtDanger

Researchers have related this attack to the prolific Russian malware author aka ‘TheBottle’. Investigating his online activities, researchers found traces that lead to unraveling the actions of a malware family called The Swiss Army Knife. SquirtDanger is a botnet malware and belongs to this malware family.

The attacks are using a DLL file, SquirtDanger.dll, written in C Sharp and come with multiple layers of embedded code. Once SquirtDanger infected a system, a ‘scheduled task’ is set to perform every minute and obtain as much information as possible. The wealth of its functionality allows the malware to do the following:

  • Take screenshots
  • Send file
  • Clear browser cookies
  • List processes
  • Kill process
  • List drives
  • Get directory information
  • Download file
  • Upload file
  • Delete file
  • Steal wallets
  • Steal browser passwords
  • Swap identified wallets in the victim’s clipboard
  • Execute file

SquirtDanger used ‘raw TCP connections’ for initiating network communications to a remote C&C server and researchers were able to extract an embedded identifier from roughly 400 SquirtDanger samples. Digging in, they’ve discovered a code repository which coincided with the capabilities and style of the samples observed.
SquirtDanger botnet malware can drain crypto wallets and steal passwords
You can read full information based on the in-depth analysis of Palo Alto Networks Unit 42.

This malware can steal cryptocurrency wallets

SquirtDanger has already infected individuals and organizations around the world, including a Turkish university, an African telecommunications company, and a Singaporean internet service provider. This smartly developed malware has the ability to seek out wallets for various cryptocurrencies, including the following:

  • Bitcoin
  • Ethereum
  • Monero
  • Litecoin
  • Bytecoin
  • Dash

Best ways to secure your crypto-trading

Keeping your system updated is probably the first most important step to secure your digital work. After several attacks, most companies have developed anti-malware tools and updates to protect from or remove malicious attacks.
If you consider using crypto-trading, it’s impetuous to install a high-quality security software. You can choose one of the best tools available at the moment by reading this article: 5 best security software for crypto-trading to secure your wallet.

We also advise to use strong passwords, keep your valuable data safe on a physical device, like a USB drive that is not connected to the internet. Use two-factor authentication and the enhanced security protocols for your email address, like Gmail’s new confidentiality features.

Bitdefender is using more advanced behavior-based technologies, and this helps the software detect 99% of unknown threats. Bitdefender GravityZone offers high-quality business security, and it’s the ideal tool for your crypto trading.

A highly reliable VPN can hide your IP and replace it with another one from its own network this way preventing third parties to track you online while you are doing your transactions. CyberGhost is one of the leaders in the VPN market and the effective solution that will successfully secure your crypto trading online.

Nevertheless, keep your eyes open and increase your level of awareness for cryptocurrency scams that take advantage of small things to step into your account. Stay informed and updated with cyber-security news.
RELATED STORIES TO CHECK OUT:

Young American OEM I-Life introduces a series of Windows 10 laptops and convertibles in India

Miami-based OEM I-Life has landed in India introducing affordable Windows 10 laptops and convertibles. Founded in 2012, I-Life is currently one of the largest vendors in the Middle East, Africa, and CIS countries.

The company has launched its flagship ZED series of affordable notebooks and tablets. There are three products – ZEDBook, ZED Air laptop, and ZED Air Pro. The ZED series is powered by the latest Intel Atom Quad Core processor with 2GB of DDR3L RAM, and packs in 32GB of internal storage. All three devices are powered by Windows 10 Home.

I-Life has tied up with Flipkart to retail its devices exclusively in India. The company will start delivering orders from May 3 onwards. For after-sale service, I-Life has signed up with F1 Info solutions and will service more than 4500 pin codes within 40 km of service centers.

The ZED Book, available in gold and grey, is a 2-in-1 detachable laptop and priced a ₹9,990 ($149) while the ZED Air Pro, in silver, is an ultra-slim notebook priced at ₹10,990 ($164). The top of the line device is the ZED Air, available in silver and grey, a laptop priced at ₹12,990 ($194).

I-Life is clearly targeted at entry-level and first-time buyers and the affordable range of PCs could attract a lot of customers allowing the company to replicate the success it has seen in the Middle East and African countries.

If You Change a File Name Extension, It May Become Unusable [Fix]

When you edit a file title in Windows, a dialog window might open stating that the file may become unusable. The dialog box window more specifically states, If you change a file name extension, the file may become unusable.

That dialog box pops up when File (or Windows) Explorer is configured to show file extensions. If you change the extension in a file title, you’ll modify its format. You can edit file titles without that dialog box popping up.

What happens if you rename a file extension?

There are a few things you may expect, including:

  • The file may open with the wrong program.
  • The file may not open at all.
  • Renaming a file extension can corrupt the file if the file extension is important for the file’s structure.
  • The file may become invisible.

You may read our other extensive guide on changing a file type on your Windows devices.

How do I fix the If you change a filename extension error?

1. Deselect the file name extensions check box in File Explorer

  1. Press Windows + E to open File Explorer.
  2. Navigate and select the file.
  3. Click the View menu and in the Show/hide section deselect File name and extension.

2. Select the Hide extensions for known file types Option

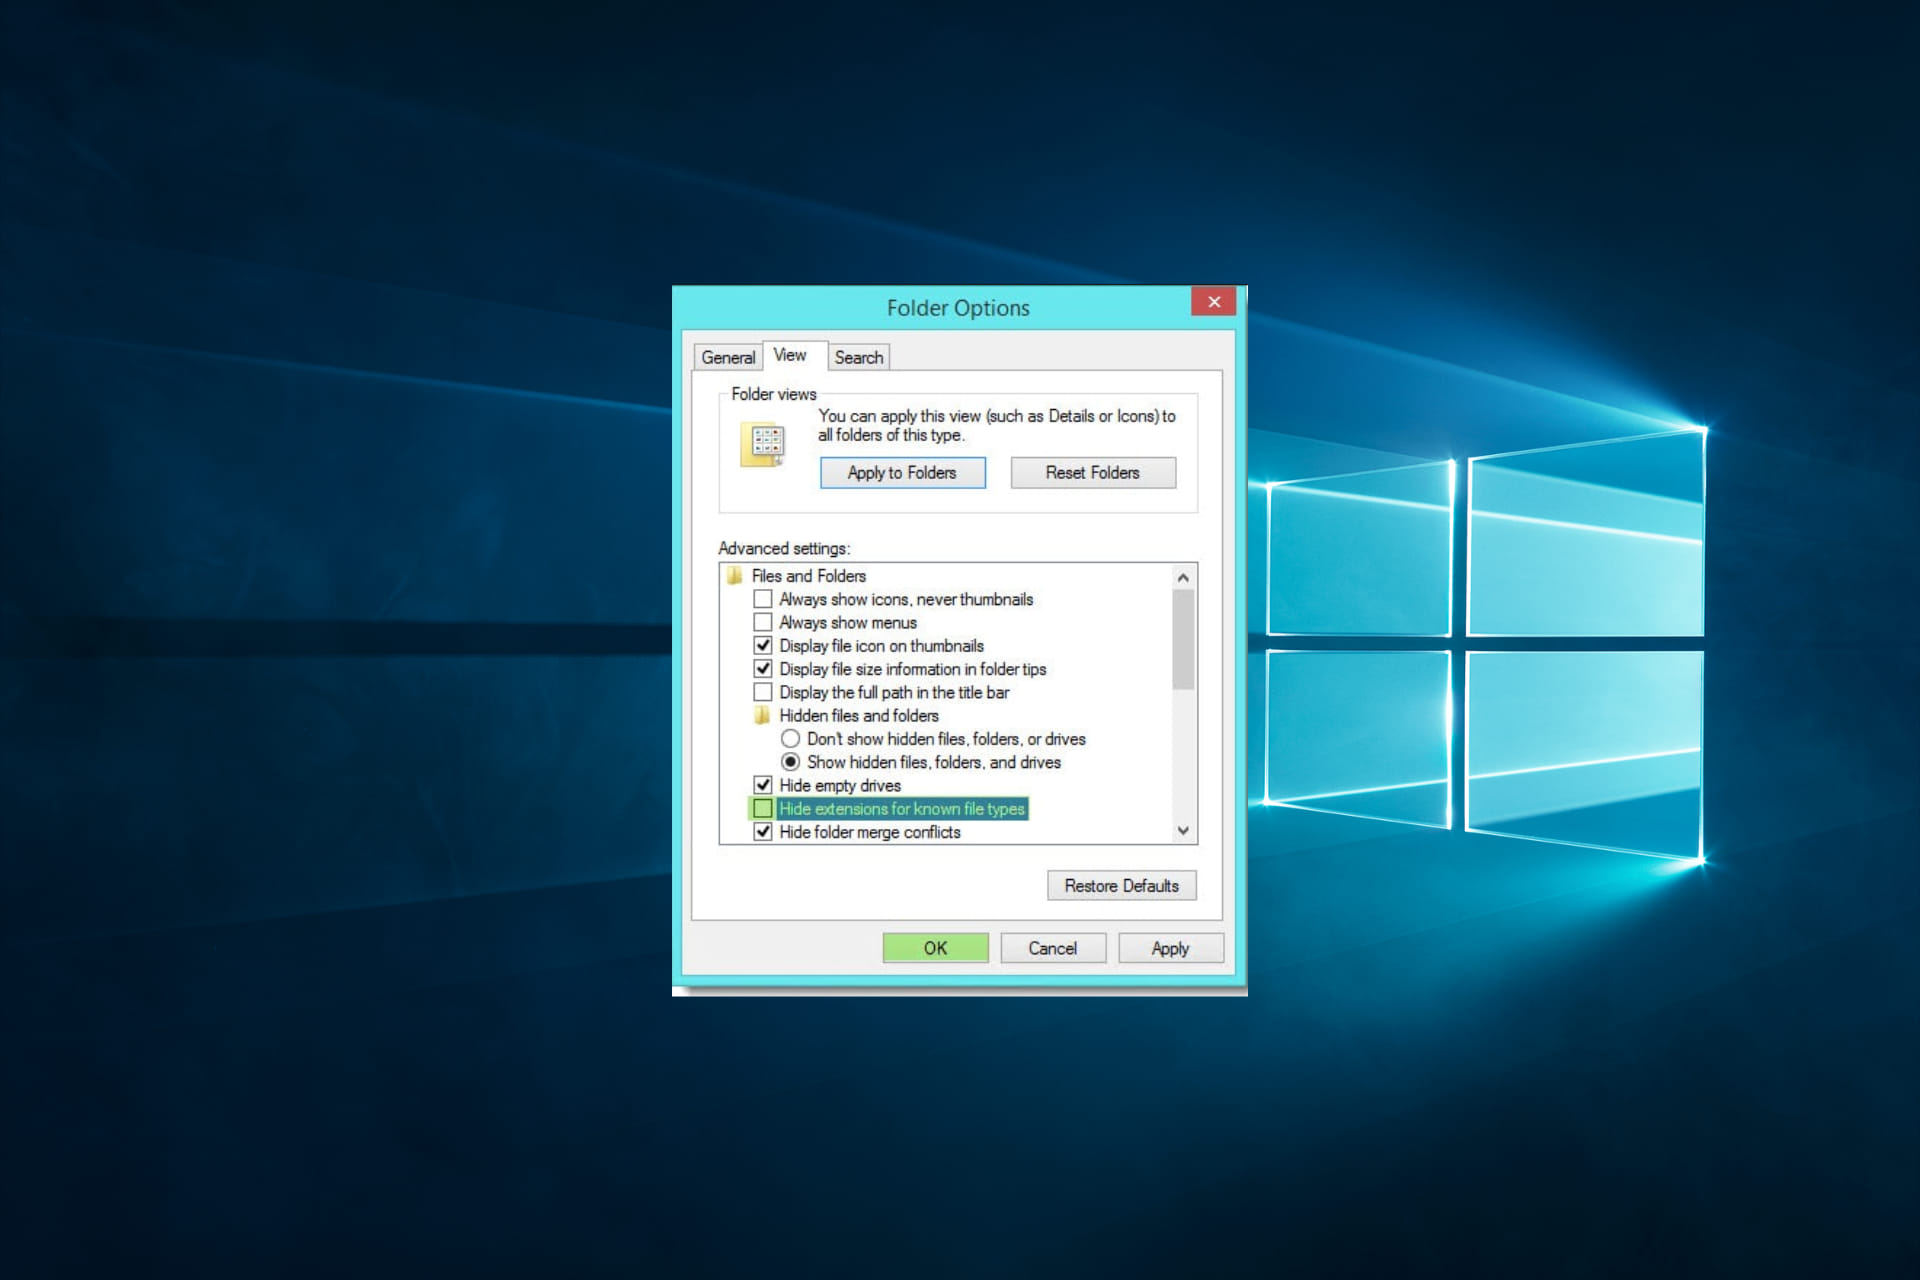
  1. Press the Start button on the Taskbar, type folder options in the search box, and select the File Explorer Options item.
    change a file name extension
  2. Select the View tab, and select the Hide extensions for known file types option.
    change a file name extension
  3. Press the OK button.

3. Don’t edit the file’s extension

Note that you don’t need to deselect the File name extensions option to change file titles without the Rename dialog window opening. The Rename dialog box only opens if you alter the file’s format in any way. So don’t change the format at the end of the file title.

Never delete a file format without replacing it with an alternative extension. Then the file will have no format at all! A new format must also be compatible with the file. For example, a JPG format is not much good for a DOC Word document.

4. Set up an AutoHotkey Script that automatically selects yes on the rename dialog box

  1. Navigate to the Autokey webpage and click the Download button.
    change a file name extension
  2. Then open the software’s setup wizard to install it.
  3. Launch Notepad or any favorite text editor, copy the script below, and paste it into it.
    While, 1
    {
    WinWaitActive, Rename ahk_class #32770
    send y
    }

  4. Click File then Save As.
  5. Select the All Files option from the Save as type drop-down menu, and enter a title in the File name box that includes the .ahk format as shown below, then save the file.
  6. Finally, click the AutoHotkey file to run the script.

5. Add File Extension Changer to Windows

  1. Navigate to the File Extension Changer resource and hit Download Now.
  2. Extract the download and run the setup. During the setup, make sure to tick the options under Registration Entries.
  3. Right-click a file and select Change Extension, then enter the New Extension.
  4. Lastly, press the Change and Exit button to convert the file format.

So removing the Rename dialog box is straightforward if you don’t need to change a file’s format. You may want to check out our other guide, where we highlight some of the best ways to change file extensions on Windows 10.

Lastly. if you have any questions, please let us know using the comment section below.

Microsoft adds a ‘Switch out of S Mode’ option in the Store

Windows 10 S flaunts really high-security features, and Microsoft believes everybody should take advantage of them. So, the company decided to rebrand the operating system to Windows 10 in S Mode. Last month, Joe Belfiore confirmed that all Windows 10 PCs would get the locked down Windows 10 S mode. This means that you can choose to buy a new Windows 10 Home or Windows 10 Pro computer with the S mode enabled on it.

Don’t freak out because Microsoft also explained that the new computers would have the locked down OS, but there will also be an option available for users who prefer switching to regular Windows 10 Home or Pro without any costs.

Windows Insiders are currently checking out the “Switch out of S mode”

Now, Windows Insiders have the chance to take a look at this option that’s included in the Micorost Store. Richard Hey is the one who just announced the new option that allows you to switch to the unrestricted version of Windows via a simple trip to the Store.

Here is the “Switch out of S Mode” page in the Microsoft Store on Build 17134. Shows the free switching option that was previously announced.

Benefits of switching out of S mode

switch out of windows 10 S mode

There are a few benefits for choosing to switch out of S mode, and one of them is obtaining the flexibility of installing more apps that are not verified by the company.

Users need a full re-imaging to get back into the S Mode

As we already said, thankfully this option if free for the moment and it’s also important to note that you’ll require a full re-imaging in order to get back into the S Mode once you switch out of it and you change your mind later. In other words, you’ll only be able to go back to the S Mode after you update to Pro or Home if you’re using a restore point from a recovery drive.

Either way, the news comes in handy, and it shows that Microsoft is not forcing users anymore to stick with Windows 10 in S Mode.

RELATED STORIES TO CHECK OUT:

How to use OneDrive diagnostic tools for Windows 7/10

OneDrive and other Microsoft cloud-based applications got a lot of attention in the past couple of years. However, even though OneDrive stands fairly against other similar solutions, it is frequently plagued with a large variety of errors and bugs. For the majority of users who put the functionality over everything else, these issues are hard to cope with. Especially since the troubleshooting is complex. That’s where the diagnostic/troubleshooting tools come into play.

Today, we made sure to check for available tools strictly provided by Microsoft. If you have interest in troubleshooting OneDrive with a pre-made tool, make sure to continue reading.

How to utilize OneDrive Diagnostic tools for Windows 10/7

Or rather tools. Since the introduction of One Drive as an integral part of Windows 10, Microsoft had to introduce the troubleshooting tool.

Why? Well, the numerous issues emerged and the conventional fixes either required some adept knowledge or a lot of time. And when the competition is stiff, and it is in the cloud file-storing market, they had to do something.

There’s a diagnostic tool which dates from the Windows 7 era, and it’s still functional to some extent. When you download OneDrive for Windows 7, you may encounter some issues so this tool will come in handy.

That’s, basically. the only available troubleshooter for the standard, pre-installed version of OneDrive.

Other tools are mainly built and presented to the premium users who run the OneDrive for Business iteration.

The idea is that the OneDrive on Windows 10 will be used as an app, and thus the unified troubleshooter should be used to address the possible issues. Desktop client-wise, you’ll need to make do.

Available diagnostic/troubleshooting tools

onedrive diagnostic tool windows 10, 7 how to use

Nonetheless, if you have issues with the Windows 7, Windows 8, or even Windows 10 version (not quite remedial) of OneDrive, you can download this OneDrive troubleshooter.It should address some minor bugs, connection, and syncing issues. Once you download the tool, here, just run it and follow the further steps.

onedrive diagnostic tool windows 10, 7 how to use

For the OneDrive for Bussines, we managed to find two tools. The first one is just an EasyFix troubleshooter which is primarily there to clear the cache.

Once you run it, it should reset the cache stack in OneDrive for Bussines and, hopefully, resolve the issue. You can find it here. The procedure is simple. Just run it and follow the provided instructions.

onedrive diagnostic tool windows 10, 7 how to use

And the last tool was introduced back in 2016 and it is a part of the Office365 troubleshooting suite. This troubleshooter requires installation and it’s the most vibrant and efficient tool you can use to address OneDrive issues. However, as you can assume on your own, this tool covers only premium business users. You can download it here. Once you install it, just click on the OneDrive for Business in the menu and follow the steps. Also, you can, directly through the application, reach Microsoft support and ask for assistance.

With that said, we can conclude this article. It seems that the number of tools is inversely proportional to a number of issues users had with OneDrive over years. Nonetheless, we have numerous articles dedicated to resolving OneDrive issues so do check them out. Also, don’t shy away from commenting on the subject. You can do so in the comments section just below.

Microsoft releases the Edge Dev Tools Preview app

Microsoft announced its plans to overhaul Microsoft Edge’s DevTools last year at the Edge Web Summit, and the company has started to deliver today with a new Edge DevTools Preview app. This standalone web app is available today from the Microsoft Store, and it will allow developers to use the most up to date version the Microsoft Edge DevTools to debug their apps without having to install the latest Windows 10 Insider build.

This new Preview app will allow developers to diagnose JavaScript issues on applications running the Microsoft Edge layout engine, including the new Progressive Web Apps coming with the Redstone 4 update. Moreover, the new DevTools app can also be used for debugging remote devices connected to the same network or via USB. To try that feature, developers will have to enable Device Portal in the Windows 10 Settings app.

“We’re previewing this with support for JS debugging of another instance of Microsoft Edge on another desktop device or VM, the Microsoft Edge team explained today. Over time, we’ll add support for the full set of DevTools against any EdgeHTML instance on any Windows 10 device.”

The new DevTools app also uses the new Edge DevTools Protocol, which has been designed to align closely with the Chrome DevTools Protocol. “Previously, the Microsoft Edge DevTools worked via invasive native hooks into the EdgeHTML and Chakra engines.  This made it hard for other tools like VS, VS Code, Sonarwhal, and other open source tools in the ecosystem to support Microsoft Edge,” the team explained.

You can try this new DevTools Preview on any PC running the Windows 10 Fall Creators Update or newer. The team says it will add many new features over the coming months, but in the meantime, you’re invited to share your feedback by clicking the Smile emoji in the top right corner of the app.

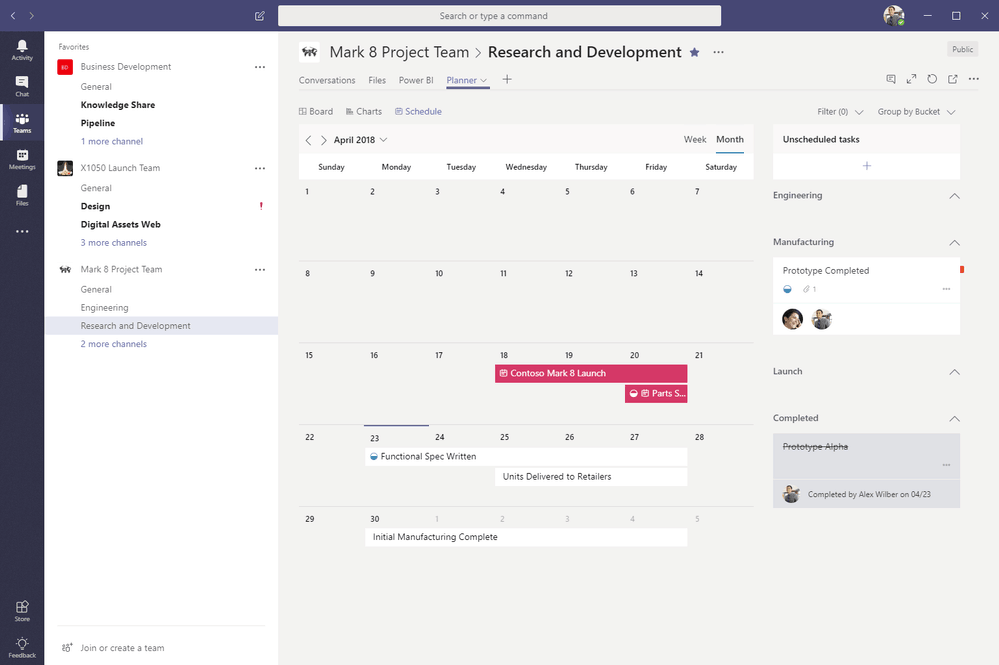
Planner tab in Teams gets Schedule, Charts views

If you do like to use the Planner tab in Microsoft Teams, the company has just announced that the Planner Teams app has just gained more features from the web version. The first new feature is Schedule view (as seen in the featured image above), which lets you see all upcoming tasks and move them around in the calendar.

The second new feature added to the Planner Teams app is Charts view, which gives you a complete overview of the current status of your plans. You’ll also notice Filter and Group by Buckets options on the right in case you need to surface certain tasks.

All these new features should now be available for everyone using the Planner tab in Microsoft Teams. If you have yet to try using Planner within the team communication hub, you can get learn how to add a Planner tab to a team channel on this support page.

4 best decentralized apps and platforms to use on Windows 10

Decentralized applications, also known as Dapps, are apps that have their backend code running on a decentralized peer-to-peer network. Contrary to common apps, where the backend code is running on centralized servers, Dapps rely on blockchain codes and ledgers that are not stored in a centralized location. Moreover, there is no single entity managing this code.

Dapps are only at the beginning but the future is bright. There are many real-word applications of this technology and the first are already available for users. For example, in a not so far away future, people across the world may access and use your computer’s free space while you’re actively using it.

In this post, we’re going to list some of the best decentralized apps and platforms that you can use directly on your Windows 10 computer. Most of these Dapps run on the Ethereum platform, so you’ll need a tool such as Meta Mask to access them.

Meta Mask is a browser extension that acts like a bridge linking the distributed web of tomorrow and your browser. With the help of this tool, you can run Ethereum Dapps on your browser without running a full Ethereum node.

Decentralized apps to run on your Windows 10 computer

Ethlance

ethlance

Ethlance is an interesting freelance platforms where you can become a freelancer or an employer and use Ethereum to make and receive payments. The platform is similar to other freelance platforms, such as UpWork, but the major difference is the payment method used.

It is worth mentioning that unlike other services, Ethlance doesn’t take a percentage of your earned Ether. In other words, the amount that the employer pays you is actually the amount that you get.

As far as decentralization is concerned, the platorm runs on the Ethereum public blockchain and is controlled by nobody.

The Ethlance database is distributed on the Ethereum public blockchain and the source files are on IPFS. Ethlance is accessible to everyone forever, without any central authority having control over it.

Of course, in order to create a job or apply for one, you need to pay the Ethereum gas fees associated with the respective actions but that’s pretty much all you’re going to pay for using the platform.

For more information, go to Ethlance’s official website.

OpenBazaar

openbazaar decentralized app

As the official description reads, OpenBazaar is a free online market place where there are absolutely no platform fees. You can think about it as a cryptocurrency-powered eBay.

You can sell any items you want. All you need to do is create your won store, add the items that you want to sell, reach your audience, complete the transaction and get paid in cryptocurrency. It’s that simple.

OpenBazaar is a fully decentralized platform that also comes with a dedicated Windows 10 app you can download and install on your computer. OpenBazaar is based on a peer to peer network where data is distributed across the network. There is no central database and nobody has control over the platform.

One of the main advantages of using OpenBazaar is that you can pay with more than 50 cryptocurrencies. At the same time, the seller gets to pick in which cryptocurrency to receive the payment. So, OpenBazaar acts like a small scale cryptocurrency exchange as well.

For more information, go to OpenBazaar’s official webpage.

Decentraland

decentraland

Decentraland is another interesting blockchain platform that really got our attention. This platform successfully blends VR and blockchain technology so that you can actually own the virtual world.

All you need is a VR headset and some Ethereum. You can then explore the VR universe and change it as you like. Yes, you can create your own piece of the universe or buy existing land if you really like a particular area. Your record of ownership is then available on the blockchain and nobody can take it away from you.

There are various activities that you can engage in: you can listen to live music, go shopping, go to the seaside and more.

As its name suggests, Decentraland is fully peer-to-peer based:

A public virtual world should be ruled by open standards, shielded from the agenda of any central organization.

For more information about what this platform can offer, check out the video below and then go to the official Decentraland page.

Aragon

Aragon

In today’s world, businesses face many challenges and perhaps the most difficult one consists in keeping up with all the factors outside their influence such as unnecessary complex regulations.

Aragon aims to offer everyone, and business in particular, a platform where people can create value without borders or intermediaries. The main idea behind this project is to create a management tool that companies can use for their everyday activities, including accounting, bylaws, fundraising, payroll and more.

Aragon Network will be the first community governed decentralized organization whose goal is to act as a digital jurisdiction, an online decentralized court system that isn’t bound by traditional artificial barriers such as national jurisdictions or the borders of a single country

You can already try aragonOS and check if the app suits your business’ needs. For more information, check out the video below:

There are plenty of decentralized app, platforms and services that are currently being developed. The decentralization journey has only just begun but it’s clear that blockchain technology is heading to mass adoption.

RELATED STORIES TO CHECK OUT:

Avengers Infinity War content is now live in LEGO Marvel Superheroes 2 on Xbox One

The Avengers Infinity War downloadable content (DLC) for LEGO Marvel Superheroes 2 is now live on Xbox One consoles and can be downloaded either by the DLC in-game menu or by checking for content in the Xbox One’s My games & apps section.

This new DLC pack is inspired by the latest Avengers film yet features a slightly original storyline that sees Thanos attacking Attilan, the floating city of the Inhumans. Players will get to play as Thanos himself during this mini chapter as well as some additional characters such as Teenage Groot and members of the Black Order. A trailer was released for the DLC which you can watch right here.

LEGO Marvel Superheroes 2 has released a variety of DLC based on Marvel movies like Thor Ragnarok, Guardians of the Galaxy Vol.2, and Black Panther but has also based some on Marvel TV series such as Runaways and Cloak and Dagger. Each DLC pack can be purchased individually or as part of the Season Pass.

Are you enjoying the LEGO Marvel Superheroes 2? Let us know which one is your favorite in the comments below.

KB4093105 bugs: Install errors and random reboots

The latest Windows 10 Fall Creators Update patch, KB4093105, brings a plethora of useful bug fixes and improvements. The update fixes a series of bugs that caused apps, games and browsers to crash. So, if you’ve been experiencing similar issues lately, download and install KB4093105 through Windows Update.

Microsoft added only one known problem on the list of known issues. The Windows Update History reports that KB4054517 failed to install because of error 0x80070643. However, this is a false alert and you can check if the installation has completed by selecting the ‘Check for Updates’ option. If your system is up to date, this means that the install process completed successfully.

On the other hand, users have encountered new technical issues after installing the latest Windows 10 v1709 update on their computers. In this post, we’re going to quickly list the most important ones so that you know what to expect in terms of bugs.

KB4093105 reported issues

1. PC randomly reboots

Many Windows 10 users decided to uninstall this update due to random computer reboots. Everything got back to normal as soon as they removed the patch.

Never had an issue with updates until this one. System randomly rebooted after the update once it was installed. Had event id error 1101. Rolled back and everything is good.

2. Install fails

Other users couldn’t install the update as their computers reverted the changes shortly before the final restart and displayed the following error message on the screen: ‘We couldn’t complete the updates. Undoing changes. Don’t turn off your computer‘.

Fortunately, we have a dedicated troubleshooting guide on how to fix this error. Follow the instructions listed in the guide and hopefully you’ll be able to install the update.

Another common update error that users experienced is 0x800f0922. For more information on how to fix 0x800f0922, check out this guide.

These are the most frequent KB4093105 issues reported by Windows 10 users. As you can see, this update is quite stable. If you encountered other issues than the two listed above, tell us more about your experience in the comments below.

RELATED STORIES TO CHECK OUT:

Microsoft’s working on the design of the upcoming Xbox One model

There are already quite a few Xbox models available on the market: the good old Xbox 360, the Xbox One, Xbox One S or the Xbox One X. Microsoft is reportedly working on a new Xbox One model and is already looking for
a Senior Electrical Engineer to join the team working on ‘future Xbox design projects‘.

The company recently posted a new job listing on its Careers webpage publishing a series of interesting details pointing to a future Xbox One model. Microsoft is looking for a ‘Electrical Engineer DRAM Memory Lead’ capable of working on the existing Xbox technologies as well as on future Xbox design projects.

We are seeking a qualified candidate for a Senior Engineer to lead the DRAM solutions for the Xbox console hardware development team. DRAM solutions include DDR3, GDDR5, GDDR6 and future DRAM technologies. The successful candidate will be the primary technical focal point for existing and leading-edge memory technologies on currently shipping and future Xbox design projects.

Microsoft is developing new memory solutions for the Xbox One

As far as the job tasks are concerned, Microsoft revealed that one of the main tasks involves integrating the right memory solutions into the console. This is not an easy task since there is a series of constraints such as power, cost, reliability, performance requirements that need to be taken into account.

Other job tasks involve defining the system requirements for each memory technology, working within an internal team to thoroughly test the new technologies before integrating them into the final product, and collaborating with partner teams and external vendors to identify specific components and validate the chosen technology.

You can read the job listing on Microsoft’s Career webpage. Of course, if your qualifications match the description, go ahead and apply for this job.

RELATED STORIES TO CHECK OUT:

Prevent computer from sleeping automatically when display is off

Making the best of the power-management modes at your disposal is a way to go. Windows 10 offers a standard sleep mode which is there for ages, a hibernation mode (not as immediate as the sleep but better for extended periods of time), and a crossover of the two called Hybrid mode. Also, if you’re not in need to use a power-saving mode, you can just turn off the display (with the timer and after some time of inactivity) to preserve the power.

If you’re interested in doing so without letting PC to enter the sleep mode, we provided the explanation below. Make sure to check it out.

How to disable automatic Sleep mode when the display is off on Windows 10

Customization-wise, one has a lot of different options when it comes to power-saving in Windows 10. There are a lot of variations you can apply to your currently active Power plan, choosing between the sleep mode, hybrid mode, and hibernation. Now, as you already know in regards to laptops and mobile computers in general, the largest power consumer is the display itself. Therefore, a lot of users try to preserve the battery power by setting the turn-off timer after some time of inactivity.

On the other hand, some of them don’t want to put the PC to sleep at all. Especially when the AC cord is plugged in.  This, of course, can be done with relative ease. There are two things you should check up and we brought them up below.

General Power plan settings

  1. Right-click on the Battery icon in the notification area and open Power Options.prevent computer from sleeping automatically when the display is off
  2. Beside your preferred Power plan section, click on “Change plan settings“.prevent computer from sleeping automatically when the display is off
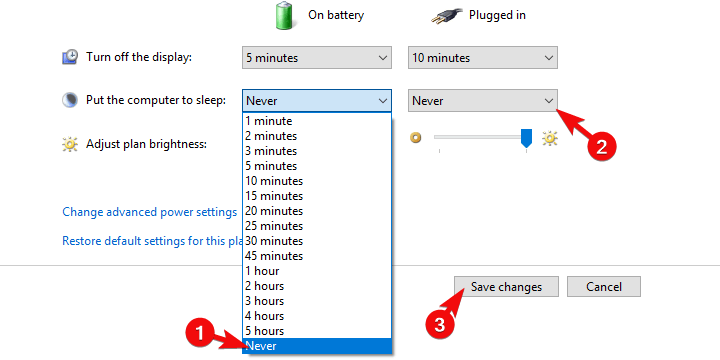
  3. Under the “Turn off the display” section, select the preferred time for both battery and plugged-in options.prevent computer from sleeping automatically when the display is off
  4. Now, under the “Put the computer to sleep“, choose Never for both options (in the end, it’s your choice).prevent computer from sleeping automatically when the display is off
  5. Confirm changes. With these settings, your system will first dim and then completely turn off the display while it won’t enter the Sleep mode.

Advanced power settings

    1. Navigate to Power Options > Change plan settings.
    2. Click on the “Change advanced power settings” link to open the Advanced power settings dialog box.
    3. In the menu, expand Sleep.
    4. Disable for both battery and AC:
      • Sleep after
      • Allow hybrid sleep
      • Hibernate afterprevent computer from sleeping automatically when the display is off
    5. Now, expand the Display section and set the preferred turn-off time under the “Turn off display after“.prevent computer from sleeping automatically when the display is off
    6. Click OK to confirm the selection and close the Power Options.

That should do it. As a side note worth mentioning is the Function key which, in combination with one of the F keys (F1 to F12) will turn off the display manually. This can come in handy. Finally, don’t forget to post your questions or suggestions in the comments section below. We’ll look forward to hearing from you.

RELATED STORIES YOU SHOULD CHECK OUT:

You can enable automatic updates for side-loaded apps in Windows 10

Microsoft Store offers a high security level to users when it comes to curating and checking the apps that enter here. You can definitely lay your head more comfortably at night, knowing that you have access to such a secure source of apps.

Another significant positive aspect of Microsoft Store is the fact that the apps that you get from here are updated automatically without the constant hassle of checking and installing updates manually all the time.

Automatic updates will be available for side-loaded apps

There’s a new feature of Windows 10 Redstone 4 App installer that makes it possible to enable automatic updates for side-loaded apps as well. Microsoft’s Matteo Pagani made the announcement on the company’s official blog telling users that if they have already worked with UWP or Desktop Bridge, then they must surely be familiar with the App installer. This is a new tool that comes with Windows 10 and makes it much more comfortable handling the side loading of app packages.

You can make sure that a side loaded app will always be updated to the most recent version without even using the Store. All you have to do is publish a new .appinstaller file and a new package with a higher version number in the same web location or file share, and that’s all. Thanks to Visual Studio 2017 15.7, this can be done extremely easily.

Expanding the deployment opportunities with the App installer

The blog’s notes say that the upcoming RS4 update for Windwos will expand the deployment opportunities with the App installer by introducing the option to install a package from a remote source.

Additionally, Windows now supports .appinstaller files, which contain the definition of an app package that you want to install on your machine. This format is quite powerful since it allows you to specify: The main package / Optional packages, which are packages linked to the main one that can be installed together as a bundle / Dependencies, which are packages that are required by the main one to work properly

You can read the entire blog post and find out more details on handling auto updates for side-loaded apps.

RELATED STORIES TO CHECK OUT:

Fix: “Oops, something went wrong” while logging in to Windows 10

Since the introduction of Windows 8/8.1, Microsoft made a norm of using Microsoft Account as a Profile. Yes, you can use a local profile, but there’s a lot of benefits (including syncing between the devices and Microsoft Store purchases) with the Microsoft Account in play. However, there are also some errors. And strange ones, to say the least. Namely, some users casually bumped into an error bearing the even more casual “Oops, something went wrong” prompt while trying to log in with the Microsoft Account on Windows 10.

Now, depending on the place you tried to log in (welcome screen, Microsoft Store, e-mail, Skype etc.), there are different ways to tackle this. We made sure to enlist them below, so if you’re unable to move past the sign-in screen, make sure to check them out.

How to address “Oops, something went wrong” login error in Windows 10

  1. Make sure you get it right
  2. Create the temporary account
  3. Check the Group Policy Editor
  4. Create a new account and switch to the old one later on
  5. Delete Credentials
  6. Update Windows
  7. Reset your PC to factory settings

1: Make sure you get it right

You’re probably well-aware of this, but it’s always worth to double or even triple-check the entered password. Make sure the keyboard/language are appropriate and that Caps Lock is off. This is obvious but, we mostly noted this for those users who have issues logging-in into the system with the Microsoft Account. And there’s only so much you can do in those unwanted scenarios.

It’s really hard for any kind of system error, including updates or even malware, to change your Microsoft Account’s password. And if you’ve recently changed it online, make sure to enable network on the initial screen to allow PC to refresh. Nonetheless, if you can’t do it after numerous tries and even after resetting the password, move to the second step on the list.

2: Create the temporary account

In order to do so, we’ll need an installation media. You can create the Windows 10 installation media with the Media Creation tool. Once you have a bootable drive or DVD, we’ll need to access the command prompt and create a new user account. That way, you’ll be able to access your system and delete or re-establish the faulty error-provoking account.

These instructions should show you what to do, so make sure to follow them closely and prepare for a lengthy workaround:

    1. Plug in the bootable USB flash drive.
    2. Press Windows key + I to open Settings and open Update & Security.oops something went wrong windows 10
    3. Choose Recovery from the left pane and click on Restart Now under the Advanced Startup.oops something went wrong windows 10
    4. Select Troubleshoot and then Advanced Options.
    5. Click on Startup settings and then on Restart.
    6. Press F10, F11, or F9 to summon the Boot menu. This can differ depending on your PC motherboard.
    7. Boot from USB and wait for it to load the installation files.
    8. Now, when the installation screen appears, press Shift + F10 to open the elevated Command Prompt.
    9. In the command line, type the following commands and press Enter after each:
      • move d:\windows\system32\utilman.exe d:\windows\system32\utilman.exe.bak
      • copy d:\windows\system32\cmd.exe d:\windows\system32\utilman.exe
      • wpeutil reboot
    10. The PC should restart so wait until it reaches the log-in screen and the Command Prompt should launch.
    11. In the command line, type the following commands and press Enter (don’t forget to replace Username with the username of your choice):
      • net user Username /add
      • net localgroup administrators Username /add
    12. Reboot after that and choose the new account.
    13. From there, you can navigate to Accounts to delete the old account and re-establish it again or just change its password.

3: Check the Group Policy Editor

If you’re, on the other hand, using an alternative log-in protection method (or don’t have any protection), but unable to log into the Microsoft Store or use Microsoft Account for various other things, there are solutions for that as well. And there are so many reasons why this is the case. Firstly, try resetting the password online. If you’re still unable to sign in, make sure to check the Policy Editor.

There’s a policy in the Policy Editor which concerns Accounts. It should be disabled by default, but we’ve seen everything in Windows 10, so just in case check it out.

Here’s where to find it and how to disable it if needed:

    1. In the Windows Search bar, type Group Policy and open Edit group policy from the list of the results.oops something went wrong windows 10
    2. Go to this path:
      • Computer Configuration\Windows Settings\Security Settings\Local Policies\Security Options\Accounts: Block Microsoft Accounts
    3. Right-click on the “Accounts: Block Microsoft Accounts” in the right pane and open Properties.oops something went wrong windows 10
    4. Make sure that the policy is disabled and apply changes.oops something went wrong windows 10
    5. Restart your PC and try logging in with the same account again.

4: Use a local and switch to the old one later on

Some users managed to resolve the issue at hand and avoid “Oops, something went wrong” error by switching back and forth between the Microsoft Account and local account. Apparently, they were able to sign into the online-based one later on.

Using a local account is simple, but have in mind that, if the affected account is the only one with the Administrative permissions, you’ll be limited. This concerns usage of Microsoft Store apps mostly.

In case you are not sure how to sign in with the local account in Windows 10, follow the instructions we provided below:

  1. Press Windows key + I to summon the Settings app.
  2. Choose Accounts.oops something went wrong windows 10
  3. Choose Your info from the left pane.
  4. Click on the “Sign in with the local account instead“.oops something went wrong windows 10
  5. Enter the password for the current (troublesome) Microsoft Account.oops something went wrong windows 10
  6. Name the local account and, optionally, add a password.oops something went wrong windows 10
  7. Confirm changes and sign out.oops something went wrong windows 10
  8. Later you can try signing in with the Microsoft Account again. It worked out for some folks.

5: Delete Credentials

Your credentials (and all Windows-stored credentials) are saved in a dedicated folder. As the case has shown so many times, a lot of important system files can get corrupted and thus the issues emerge. What you’ll need to do in order to address this is to delete the content of the Credentials folder. After that, you can re-establish your account.

Here’s how to do it in Windows 10:

  1. In the Windows Search bar, type %localappdata% and press Enter.
  2. Open Microsoft folder and delete the Credentials folder.oops something went wrong windows 10
  3. Restart your PC and try logging in again.

6: Update Windows

Windows updates can be the cause of many issues, especially if you’re Microsoft Insider in a Fast Ring. Seemingly, various improvements come at a price and that price is, in this case, not worth paying. However, for every faulty update, we get another which fixes the majority of issues. That’s what you’ll expect from a mandatory update distribution. So, make sure to keep your system up to date, as there’s probably a fix/patch on the way.

The system checks for updates on its own, but it won’t cost you to check for the updates manually. You can do it this way:

  1. In Windows Search, type check and choose “Check for updates“.oops something went wrong windows 10
  2. Click on the “Check for updates” button.oops something went wrong windows 10
  3. If there are updates available for download, make sure to get and install them accordingly.

7: Reset your PC to factory settings

Finally, if none of the aforementioned steps haven’t resolved the “Oops, something went wrong” error, we can only recommend resetting your PC to factory settings. Some users tried System restore and it helped them against this persistent error, as well. Nonetheless, by resetting the PC, you get to keep all applications and settings with a, basically, a brand new Windows 10.

If you’re uncertain how to do so, follow the steps we provided below but don’t forget to back up your data, just in case:

  1. Press Windows key + I to open Settings.
  2. Choose Update & Security.oops something went wrong windows 10
  3. Select Recovery.
  4. Click ”Get started” under Reset this PC.oops something went wrong windows 10
  5. Choose to keep the files and continue with the resetting procedure.oops something went wrong windows 10

With that said, we can conclude this article. We hope it was a helpful read and the “Oops, something went wrong” error is addressed properly with one of the solutions. And for the sake of other readers, if you’re aware of an alternative solution, we encourage you to post it in the comments section below.

RELATED STORIES YOU SHOULD CHECK OUT:

Celebrate Westworld Season 2 with these free Xbox Avatar items

Westworld is one of the most-popular shows on TV right now and to help promote the premiere of its second season, new, free Xbox Avatar items have been made available to help gamers express their love of the show on their consoles.

Among the newly added Westworld Avatar items are drone host bodysuits, Teddy’s suit, Dolore’s dress, and a technician suit. All of them can be claimed for free on this page here or by searching the Avatar items on an Xbox One or Xbox 360 console.

Xbox Avatars are digital representation of users on Microsoft’s Xbox 360 and Xbox One consoles and those who play Xbox-enabled video games on Windows 10 PCs. The entire Avatar system is set to get a major revamp in the very near future however no launch date has been announced for the redesign.

Do you enjoy dressing up your Xbox Avatar? Let us know what your favorite item is in the comments below and make sure to follow us on Pinterest for more Xbox content.

Job listing hints at next Xbox console generation tech

While there is wild speculation that Microsoft is set to move away from console hardware and take up stake in a more cloud-backed software solution that could span platforms and physical game boxes, a peak at a new job listing undercuts those theories just a bit.

According to job posting on the company’s internal job boards, Microsoft is looking for someone to handle memory management of what seemingly will be the next piece of hardware to come from the software giant.

We are seeking a qualified candidate for a Senior Engineer to lead the DRAM solutions for the Xbox console hardware development team. DRAM solutions include DDR3, GDDR5, GDDR6 and future DRAM technologies. The successful candidate will be the primary technical focal point for existing and leading-edge memory technologies on currently shipping and future Xbox design projects. The focus will be integrating the right memory solutions into the console based on a variety of constraints such as power, cost, reliability, signal integrity and performance requirements. Integration includes defining the system requirements for each memory technology, creating specifications, working within an internal team, partner teams and external vendors to identify specific components that meet the requirements and then completing a characterization, qualification and validation of the chosen technology.

With GDDR6 on the market, it seems like a no brainer that Microsoft is looking to hire someone to lead the charge in building a working understanding of how to implement it with partners such as NVIDIA and AMD next go around for the Xbox memory and GPU upgrades.

So fans of the Xbox console or business can at look forward to at least one more piece of hardware in the near future.

“Switch out of S Mode” page appears in Microsoft Store for Redstone 4 devices with Windows 10 S installed

Citing the initial success of the streamlined and secure Windows 10 S, Microsoft recently said they would rebrand of the OS to “Windows 10 in S mode.” The company explained new PCs would ship with the locked down OS and also an option to switch to regular Windows 10 Home or Pro for free. Well, noted by Richard Hay on Twitter, Windows Insiders with Windows 10 S devices are now getting the first look at the “Switch out of S mode” option in the Microsoft Store.

The page shows up in the latest Windows Insider build, which just so happens to be the RTM for the Redstone 4 featured update. It also explains the benefits of switching out of S mode, which is mainly getting the flexibility of installing more apps that are not verified by Microsoft. Importantly, the page also points out that the switch is one-way, and you won’t be able to go back to S mode once updated to Pro or Home unless using a restore from a recovery drive.

This is not anything new, and it is exactly as it is right now, since one can already switch out of Windows 10 S from Windows 10 Pro. The only thing new here it the naming which is now “S-mode” instead of Windows 10 S. Anyway, it’s still nice to see that Microsoft isn’t forcing Windows 10 in S Mode into users, though there still might be some security concerns with the OS for the company to deal with.

YouthSpark Summer Camps coming to Microsoft Stores this summer

Starting next month, students in the US, Canada and Porto Rico will be able to participate to free YouthSpark Summer Camps to learn coding, movie making and other digital skills. Camps will be available at Microsoft Store locations and will welcome students ages 8 and up, though the sessions will also be opened to siblings, parents and teachers.

“These summer camps provide real-world opportunities for students looking to translate their passions and 21st century skills into something tangible for their communities and futures,” Microsoft explained on its Education blog today. Activities will include learning code with Minecraft, programming an expressive robot and making movies with 3D and Mixed Reality.

Summer camps will be available from May through June, and you can register online or at your local Microsoft Store. The company notes that it’s also offering five new Summer Camp curriculums this year, including a first philanthropy camp to help students develop solutions for local issues they care about.

Test your gaming knowledge with Microsoft’s new Trivia with Fangs Skype bot

If you’re a pro at the popular quiz game HQ Trivia on iOS or Android, you might also want to try out Microsoft’s new Trivia with Fangs Skype bot. The fun quiz bot is the result of a partnership with pro-gamer Jesse Fangs, and tasks you with answering gaming related questions— with the ultimate chance of winning an Xbox One S as a prize.

To get started with the Trivia with Fangs Skype bot all you need to do is click here to add it to your contacts on Skype on desktop, iOS, or Android. You can then type a “Hello” message to get one of three trivia challenges started— 80’s the foundation, ’90s the revolution, and 2000s and beyond: the final level.

Each of the challenges consists of a series short 5-second video questions from Jesse Fangs. There is no time limit, and after watching, you can type out your answer to keep proceeding through the round.  If you complete a full section of trivia challenge questions, you will be entered to win an Xbox One S and will be notified via Skype if you’re the winner.

You can also use the Trivia with Fangs bot to learn more about Jesse Fangs. She can also be found on Twitch, Instagram, and Twitter. Do you think you have what it takes to be a Trivia with Fangs champion? Let us know your thoughts below.

Get Madden NFL 18 free with any Xbox One purchase

The NFL Draft season is coming up here the United States, and there are still some ways you can enjoy ahead of the big moment, especially if you’re also looking to buy an Xbox. Indeed, Microsoft is now offering a digital copy of Madden NFL 18 free with any Xbox One purchase, ensuring that you football fans can get your fix in during the offseason.

The offer is valid starting today, but Microsoft does not make it clear how long it will last. Anyway, it is still something to look forward to, especially since Madden 18 is the most comprehensive Madden game to date. Features of the game include an all-new Longshot story mode and photorealistic graphics.

Madden NFL 18 is also Xbox One X enhanced, running in full 4K UHD and at 60fps, making it a nice option for football fans looking to pick up the words most powerful console. You can check out all models of the Xbox One here at the Microsoft Store.

Convert OneNote 2016 to OneNote for Windows 10 [How to]

Microsoft will only support OneNote 2016 until October 2025, and many are wondering how to convert OneNote 2016 to OneNote for Windows 10.

The two versions aren’t fully compatible, so it’s important to find a way to continue using your old notes on a new version of OneNote.

So if you want to keep all your notes intact, we suggest reading and finding the best ways to keep them.

Is OneNote 2016 compatible with OneNote for Windows 10?

The two versions have several differences that you should know about. OneNote for Windows 10 only supports notebooks stored on OneDrive, SharePoint or OneDrive for Business.

You can’t use it to open local notebooks. However, that doesn’t mean that the versions aren’t compatible.

What you can do instead is another thing as OneNote for Windows 10 will be able to move local notebooks to OneDrive on your behalf.

How can I convert OneNote 2016 to OneNote for Windows 10?

Upload local notebooks to the cloud

  1. Open OneNote for Windows 10.
  2. Click on your notebooks and choose More Notebooks.
     
  3. Select your local notebooks.
  4. Click on Open.
  5. After that, click on Select cloud account and choose the desired account.
  6. Lastly, click on Upload.

After you’re done, your local OneNote notebooks will be uploaded to your OneDrive account, and the transition process will be complete.

In case you missed any files, we have a great guide on recovering deleted files in OneNote, so be sure to check it out.

Do you know a different method to perform OneNote 2016 sync to OneDrive? If so, let us know in the comments below.

Fix: On-Screen Keyboard Not Working in Windows 10/11

We have seen technology move towards mobile computing in the last few years.

Windows tablets have become more common, and the market is filled with these kinds of devices from top manufacturers and low-end ones.

Today, we will go through some methods of bringing up the Windows 10 On-Screen Keyboard in situations where it doesn’t come up automatically as it should.

What to do if the on-screen keyboard isn’t working on Windows 10?

The on-screen keyboard can be rather useful, but many users reported certain issues. Speaking of issues, these are some of the most common problems that users reported:

  • On screen keyboard not typing – If the on-screen keyboard won’t type, you might be able to fix the problem by running the keyboard troubleshooter.
  • Keyboard and onscreen keyboard not working (Windows 10) – Several users reported that both their physical and on-screen keyboard aren’t working. If this happens, you might want to consider buying a new keyboard.
  • Could not start on-screen keyboard (Windows 10) – If On-screen keyboard won’t start on your PC, the problem might be its service. To use the on-screen keyboard, make sure that the necessary services are running.
  • Windows 10 on-screen keyboard not working login – Sometimes your on-screen keyboard won’t even work on the login screen. If this happens, the issue might be caused by a corrupted Windows installation.
  • Surface Pro onscreen keyboard not working – Several users reported issues with the on-screen keyboard on their Surface Pro. However, you should be able to fix the problem by using one of our solutions.
  • On-screen keyboard not working after update – According to users, problems with on-screen keyboard started appearing after a certain update. If that’s the case, you need to find and remove the problematic update and check if that solves the issue.
  • On-screen keyboard not appearing (Windows 10) – This is one of the most common problems that you can encounter on Windows 10. If you’re having this problem, create a new user account and check if that solves the issue.
  • Windows 10 on-screen keyboard not working in tablet mode – Tablet Mode is a useful feature, but some users reported that the on-screen keyboard isn’t working while using their PC in Tablet Mode. This is an annoying problem, but you should be able to fix it by using one of our solutions.

1. Change your settings

The first place to look for is the Settings panel. Click on the Start menu and select Settings, or do a search for it and open it from there. Then head over to Devices and select Typing from the left side menu.

In the resulting window, ensure that Automatically show the touch keyboard in windowed apps when no keyboard is attached to your device is Enabled.

Fix On-Screen Keyboard not working in Windows 10

Some Windows 10 users have reported that even though this option was already activated, disabling it and then re-enabling solved the problem.

Make sure you also do a reboot of the system before dismissing this solution as a possible fix.

2. Check if the on-screen keyboard is enabled

The On-Screen Keyboard in Windows 10 can also be brought up from the Settings menu. Access it from the Start menu and select the Ease of Access category.

Select Keyboard from the left side menu and enable it by switching on Turn on the On-Screen Keyboard option.

Fix On-Screen Keyboard not working in Windows 10

3. Add the on-screen keyboard to the Taskbar

One of the best solutions for quickly accessing the On-Screen Keyboard in Windows 10 is adding a dedicated button in the Taskbar.

This can be achieved by right-clicking on the taskbar and enabling Show touch keyboard button.

Fix On-Screen Keyboard not working in Windows 10

This will add a button next to the clock in the taskbar, which can be used for fast access to the On-Screen Keyboard.

4. Start on-screen keyboard from the application list

The On-Screen Keyboard in Windows 10 can also be accessed from the All apps list. Scroll down to the Windows Ease of Access folder, expand it and select On-Screen Keyboard.

Fix On-Screen Keyboard not working in Windows 10

5. Create a new user account

If the on-screen keyboard isn’t working on your PC, the problem might be your user profile. Sometimes, a user profile can become corrupted, and that can cause this and many other errors to appear.

Profile corruption can occur for various reasons, and since there’s no way to repair your profile, the best solution would be to create a new one.

This is relatively simple, and if you need to create a new profile, you can do that by following these steps:

  1. Open the Settings app. You can do that quickly by pressing Windows Key + I shortcut.
  2. When Settings app opens, navigate to the Accounts section.
    Windows 10 on screen keyboard not working login
  3. In the left pane, select Family & other people. In the right pane, choose Add someone else to this PC.
    Surface Pro onscreen keyboard not working
  4. Choose I don’t have this person’s sign-in information.
    On screen keyboard not working after update
  5. Now select Add a user without a Microsoft account.
    On screen keyboard not appearing Windows 10
  6. Enter the desired user name and click on Next.
    Windows 10 on screen keyboard not working in tablet mode

After creating a new user profile, switch to it and check if the problem still persists. If not, it means that the issue was caused by profile corruption.

As we already mentioned, there’s no way to repair the corrupted profile, so your only solution is to move your personal files to a new profile and start using it as your main one.

6. Check if the necessary services are running

Many users reported that on-screen keyboard isn’t working on their PC. If you’re having this problem, the reason might be your services.

In order for the on-screen keyboard to work, you need to have certain services enabled.

To enable these services, just follow these steps:

  1. Press Windows Key + R and enter services.msc. Now press Enter or click OK.
    Surface Pro onscreen keyboard not working
  2. Now locate Touch Keyboard and Handwriting Panel service and double click it to open its properties.
    On screen keyboard not working after update
  3. Set Startup type to Automatic or Automatic (Delayed Start). If the service isn’t running, click the Start button to enable it. Now click on Apply and OK to save changes.
    On screen keyboard not typing

For more ways to enable this service, visit our guide on how to enable Touch Keyboard and Handwriting Panel service.

After doing that, check if the problem is resolved. If the issue still persists, the cause might be dependent services.

Touch Keyboard and Handwriting Panel service depends on various services, and if those services aren’t running, you won’t be able to use the on-screen keyboard.

However, you can enable dependent services by doing the following:

  1. Open the Services window and double click Touch Keyboard and Handwriting Panel service.
  2. Now go Dependencies tab. Now check This service depends on the following system components field. Write down the available services and make sure that they are running and that their Startup type is set to Automatic.
    Keyboard and onscreen keyboard not working Windows 10

After doing that, your on-screen keyboard should start working again without any problems. Many users reported that this solution worked for them, so feel free to try it out.

7. Remove the problematic updates

If on-screen keyboard isn’t working, the problem might be a certain Windows update.

Windows 10 tends to download updates automatically without your knowledge, and sometimes, a new update can cause certain issues to appear.

If you started having this problem recently, it’s rather likely that a Windows update caused the issue.

However, you can fix the problem simply by removing the update. To do that, you need to follow these steps:

  1. Open the Settings app and go to Update & Security section.
    Could not start on screen keyboard Windows 10
  2. Now click on View installed update history.
    Keyboard and onscreen keyboard not working Windows 10
  3. Check the list of recent updates and write down few of the latest updates. Now click on Uninstall updates.
    Could not start on screen keyboard Windows 10
  4. A list of installed updates will now appear. Double-click on an update in order to remove it.
    Windows 10 on screen keyboard not working login

Once you remove the update, check if the problem reappears. If not, the update caused the problem with your on-screen keyboard.

As we already mentioned, Windows 10 tends to install updates automatically, and it will install the problematic update again on your PC.

To prevent this update from being installed, be sure to check our guide on how to block automatic Windows updates.

8. Modify your registry

Another way to fix on-screen keyboard is to modify your registry. To do that, you need to start Registry Editor and make the following changes:

  1. Press Windows Key + R and enter regedit. Now press Enter or click OK.
    On screen keyboard not typing
  2. When Registry Editor opens, go to HKEY_LOCAL_MACHINESOFTWAREMicrosoftWindowsCurrentVersionExplorerScaling in the left pane. In the right pane, double-click on MonitorSize.
  3. Set the Value data to 22.5 and click on OK to save changes.

After making the changes, check if the problem with the on-screen keyboard is resolved. Remember that this solution works only with computers with touchscreen functionality.

If you can’t find the key from Step 2, then this solution doesn’t apply to you.

9. Try using a third-party software

If the on-screen keyboard isn’t working on your PC, you might consider using a third-party virtual keyboard software as a replacement.

In the past, we covered the best virtual keyboard software, and If your on-screen keyboard isn’t working, we encourage you to try one of these applications as a workaround.

You can switch to virtual keyboard software easily if you experience troubles with your physical or virtual keyboard. Also, in case you want to protect confidential data from keylogger threats.

More so, it is likely to choose from multiple layouts or styles that will customize your keyboard precisely how you need it.

I hope these solutions fix your problems with the Windows 10 on-screen keyboard or at least give you other options for accessing it quickly.

If you’re facing additional problems, please let us know in the comment section below.