Released in 2021, Biomutantis an action RPG video game that was developed by Experiment 101, a Swedish gaming developer, and published by THQ Nordic.
It’s set in a post-apocalyptic world where players can explore vast underground areas and miniature galaxies. Players can customize their characters by adding bionic body parts and you can even mutate your body for new abilities; hence the name Biomutant.
The game is available on console and Steam, and it has seen a moderate level of success. However, not long after the release of the game, players started to complain that the game crashes while playing, especially on Windows 11.
For whatever reason, the problems increased when players upgraded their computers to Windows 11.
What issues does Biomutant have and why?
According to gamers across the internet, some of the more common issues include the game randomly crashing, freezing, the audio disappearing, or blurry visuals.
And these are issues that plague both PC players and console gamers equally. By and large, the problems seem minimal on Windows 10 and exasperated on Windows 11.
It’s still unknown whether or not Biomutant can even properly run on Windows 11. It probably could just be how intense the game is on CPUs.
It’s a well-optimized title, but the game still requires a lot of resources from your computer. It must be mentioned that if any of these solutions ultimately do not work, then you’ll have to downgrade back to Windows 10.
This guide will show you how to run Biomutant on Windows 11. Unfortunately for console gamers, they’re out of luck.
They’ll have to wait until the developer rolls out a patch to fix the crashing problems affecting Biomutant. Windows 11 solutions are luckily straightforward to understand.
How do I solve my Biomutant problem on Windows 11?
1. Check the game file integrity
Open the Steam app.
Click on Library in the top bar.
Right-click Biomutant and select Properties.
Click Local File.
Select Verify integrity of game files…
Give Steam some time to verify the files.
If the Biomutant files show no problems, then the Steam will state all files are successfully validated. If not, follow one of the solutions below.
2. Change overlay settings
Like before, right-click on Biomutant in your Steam Library.
Select Properties.
Click the General tab on the left.
Untick the box next to Enable Steam overlay while-in game.
Launch the game and see if the problem persists.
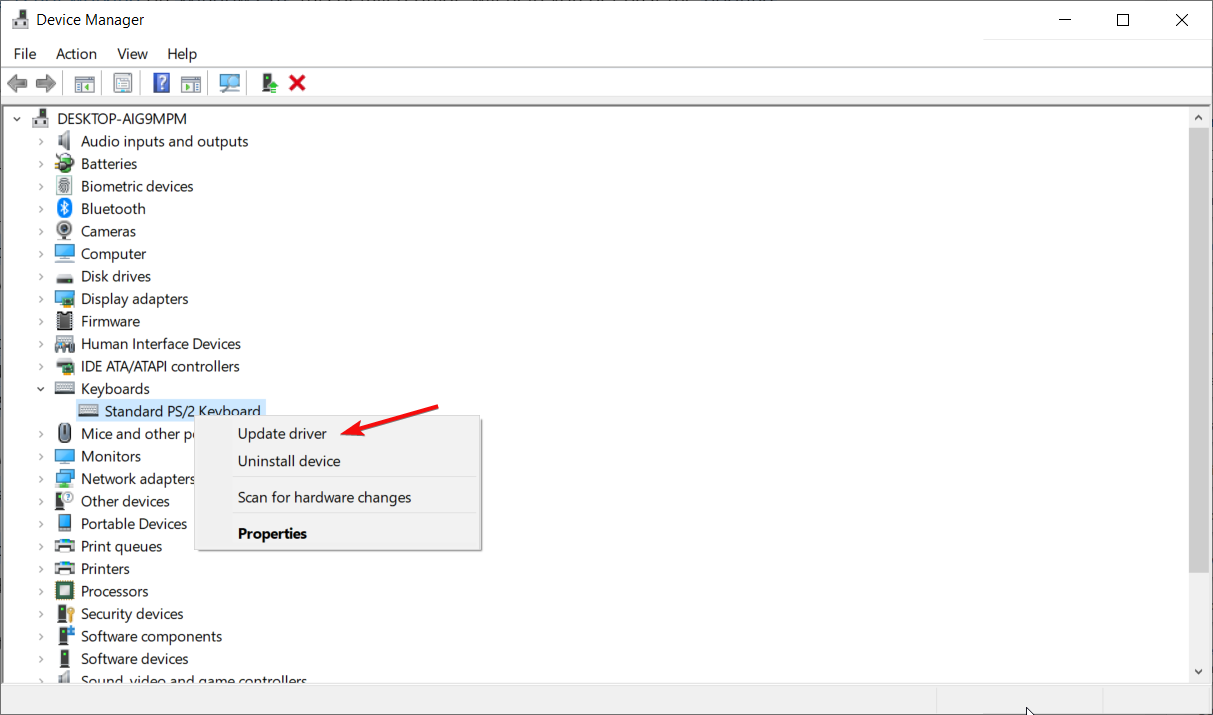
3. Install the latest graphics drivers
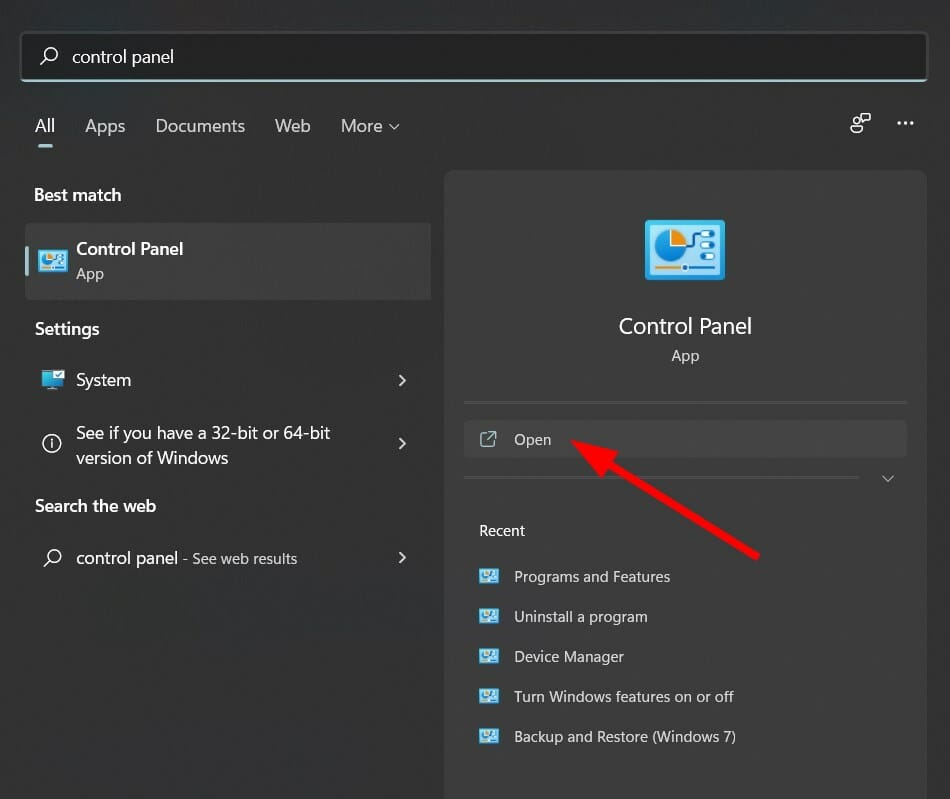
Click on the magnifying glass icon in the taskbar to bring up the Windows 11 search bar.
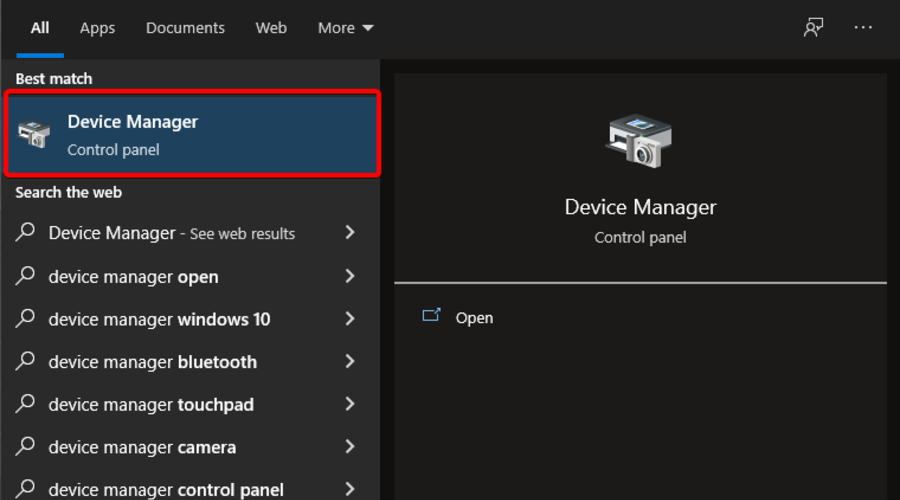
Search for the Device Manager and click the first entry you see.
Click on Display adapters.
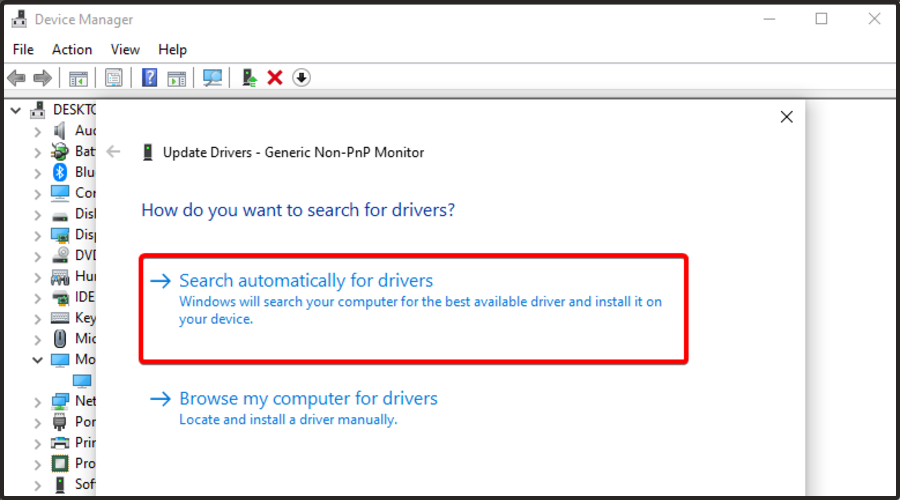
Right-click on a graphics card and select Update driver.
Select Search automatically for drivers.
Windows 11 will automatically download and install any drivers available.
Another option is to set up an automated driver updater such as Outbyte Driver Updater. This tool is light, easy to use, and requires little to no effort on your part.
You can either pick specific drivers you want it to check, or let it take care of all of them, in bulk. It will automatically install new versions whenever they become available.
4. Run Biomutant as high priority
Press the ALT+CTRL+DEL keys on your keyboard.
Select Task Manager.
In the Task Manager, go to the Detail tab.
Locate Biomutant in the app list and right click the entry.
Select Set priority.
Select High in the drop down menu.
A window will appear asking if you want to change the priority of Biomutant. Select Change priority.
5. Limiting down to 30 Frames-per-second
Open the search bar and look for NVIDIA Control Panel. This only works if you have a NVIDIA graphics card.
Click 3D Settings.
Click Manage 3D settings.
Click on the Program Settings tab.
Under Select a program to customize, locate and select Biomutant (biomutant.exe).
Under Specify the settings for this program, locate and select Max Frame Rate.
Click the drop-down menu next to Max Frame Rate.
Click On and adjust the frame rate to 30 FPS.
Then click on OK.
6. Installing Visual C++ Redistributable
In a web browser, search for visual studio redistributable and click the entry that states Latest supported Visual C++ Redistributable downloads.
Under Visual Studio 2015, 2017, 2019, and 2022, select the file that is applicable for your version of Windows. In this example, this guide will select x64.
Click Save File in the small window that appears.
Locate the file and double click it.
This will be begin the installation process. Click the box next to I agree to the license terms and conditions.
Click Install.
After installation, click Restart to restart your computer.
7. Reverting back to Windows 10
You can start this last ditch effort by clicking on the Start menu and selecting the Settings icon.
Click on the System tab.
Scroll down and locate the Recovery tab.
Under Recovery options, click on the Go back button to revert your Windows 11 computer back to Windows 10.
A blue window will appear asking you why you want to go back. Select an answer and click Next.
Afterwards, the blue window will let you know that it will take some time before you can use your PC as it reverts back to Windows 11. Click Next to start the process.
Are there other things I should know about Steam?
Earlier, it was stated that one of the solutions to solving Biomutant problems was to downgrade back to Windows 10. If you decide to do this, it’s recommended that you learn how to fix FPS issues that plague the game on Windows 10.
The solutions for fixing this issue are similar to those in the earlier guide, however, the menus are different and it would be helpful to see how it differs.
There have also been issues with certain titles not launching in Steam. The problems include error code 80, executables missing, launching loops, or simply the game not appearing. To fix games not launching, you may have to move your games to a different location on your computer, delete certain files, or adjust your antivirus (a common problem).
You see, certain require features like DirectX to function properly, and for the most part, developers include these missing parts. But if you feel the need to changes things yourself, then it’s a good idea to learn about Steam Common Redistributables.
Feel free to leave a comment below if you have any questions on other Windows 11 apps. Also, leave comments about guides that you’d like to see or information on other Windows 11 features or guides like this.
Alienware is a brand that’s synonymous with trying out all kinds of cool things for gamers to enjoy. 2019’s Alienware AW3420DW monitor was the perfect example of how. Back in 2019, it was one of the best monitors to buy. Now, three years later, a proper sequel is finally here.
Enter the Alienware 34 Curved QD-OLED Gaming Monitor, which was sent to us by Dell for review. This product once again tries to set a new standard as the world’s first quantum-dot OLED gaming monitor. After trying out for a week ahead of release, it’s safe to say that this is a gaming monitor that’ll make your games look life-like, & feel truly immersive.
As the name suggests, this is a 34-inch curved display (1800R curvature.) It has an aspect ratio of 21:9, a viewable display size of 34.18 inches, and sports Quantum Dot OLED technology. Note that the panel also has an anti-reflective coating and OLED backlight. The display refresh rates depend on which cable you use. Opting for DisplayPort (as we tested,) you’ll get 3440 x 1440 at 175Hz but with HDMI you’ll get 3440 x 1440 at 100Hz. Nvidia G-Sync Ultimate is also supported.
In testing with our colorimeter, brightness is rated at 250 cd/m2 typical, and 1000 cd/m2 peak. As far as gamut, it covers 99.3% of the DCI-P3 color gamut and 149% of the sRGB gamut for a total of 1.07 billion colors and a 1 million to 1 contrast ratio. Response time is rated at 0.1 ms gray to gray and the display supports VESA DisplayHDR True Black 400.
Design
If you’ve ever used an Alienware product, then you know the deal here. The new Legend 2.0 design brings together geometric beauty and a clean simplistic look. You’ll notice that as soon as you take the monitor out of the box for setup. The middle rear portion of the display is colored in Lunar White, and so is the base up in the front. The left and right sides of the rear of the monitor are pure black, where the display panel extends its reach out. This is a new design over 2019’s Alienware AW33420DW which was pure white.
This is a welcome color choice, not overly distracting so it fits well with any setup. In particular, I especially liked how sleek the stand looks, as even though this is a massive 34-inch display, the stand is quite slim, leaving plenty of room below it on the desk. This fits well with the overall profile of the actual display panel itself, which sports super slim bezels. When I measured, is just as thick as what you get when you stack two quarters stacked on top of each other.
As far as actually fitting to your setup, Alienware has you covered. There’s a height-adjustable stand, with height markers so you can tilt, swivel, and slant the monitor. The tilt goes from -5 to 21 degrees, and the height can go up to 110 mm. But that’s not all. If you look closer to the rear, you’ll see that Alienware has a pop-out cover, to help you hide your cables and ports. It keeps things sleek and slim.
Also on the rear are black-colored 360-degree vents. The vents run along the middle in a paperclip-like shape where the stand connects, allowing for heat dissipation. Of course, it also has seamless integration with AlienFX lighting. In my week with the monitor, I did hear a lot of fan noise coming from these vents, but it’s expected as a lot is going on under the hood to pump out all those pixels and colors.
Display Performance & Accuracy
The Alienware 34 Curved QD-OLED Gaming Monitor is the world’s first quantum-dot OLED gaming monitor. But you might be wondering, what does that mean? Well, after using it for a week, and coming from using LCD monitors, I’ll tell you this. It means for highly accurate colors, life-like gaming, and really immersive multimedia experiences.
Quantum Dot Display Technology works like this. It takes the qualities of OLED, like true black and a deeper contrast ratio, and enhances the color performance by converting blue light into the primary colors of red and green through a Quantum Dot pixel layer. The result is high color uniformity and wider colors and increased brightness. You can see this in the factory reports below, taken straight out of the box.
That’s what it is on paper, but in my tests, I did a couple of different things to test it out. First up with flying the skies in Microsoft Flight Simulator 2020. In this simulator which is known to push hardware to its limits, I could see how the Nvidia G-Sync kicked in, as well as the 175Hz refresh rates, as well as the ultra-wide 3440 x 1440 resolution.
The quantum dot OLED panel meant that noticed every single instrument movement on the dashboard of a fighter jet when flying the skies over Manhattan. And, when switching to an external view, the reflection of the sun over the Hudson River when flying just north of Manhattan bounced off the side of the airplane in beautiful fashion. The ultra-wide resolution also means that I could have seen more of the world under my plane in the sky. It doesn’t get any better, as the tech on the monitor makes everything in Flight Simulator more lifelike, compared to the duller colors when playing on an LCD monitor.
In other games like Fortnite and Project Cars 2, which are more fast-paced than Flight Simulator, things performed just as well. I was never good at Fortnite, but the color accuracy of the monitor brought out extra attention to detail in the game. Even picking up a sniper rifle, staring down the scope, and shooting at a player from a distance was enjoyable in Fortnite. There wasn’t the usual lag or screen tear coming from using my standard LCD Dell monitor.
My second test is the usual multimedia and productivity test. For multimedia, I pulled up a YouTube video showcasing the world in HDR. In looking at beaches, scenes with water, and sand, I could not help but notice fine details, like ripples in the puddles, or the tiny pebbles in the sand. Even the aqua-colored waters looked vibrant.
As for productivity, I was able to stack three Microsoft Edge windows side by side and get a fuller view of the web. Windows 11 also came to life, with animations looking smooth and fast. Even scrolling through Twitter and Teams chats was butter smooth. Trust me when I say it, once you go past 120Hz refresh rates, it’s hard to go back, and this monitor was perfect for work, too.
If you’re worried about the performance of the monitor, and possible OLED burn-in issues, then don’t panic. Dell is backing the Alienware 34 Curved QD-OLED with a 3-year service coverage so that if a replacement becomes necessary, it’ll be shipped to you the next business day. Dell’s Comfort View Plus also means you can game longer, thanks to always-on built-in low-blue light screen technology that reduces blue light emissions without impacting color accuracy.
Ports
Looking at the ports on this monitor, there’s plenty. Going from left to right, on the front, there’s a SuperSpeed USB 3.2 Gen 1 Type-A downstream port with power charging, a headphone port, another SuperSpeed USB 3.2 Gen 1 Type-A downstream port. To use these, you need to connect the upstream cable to your PC.
Elsewhere, left from right, you’ll find a SuperSpeed USB 3.2 Gen 1 Type-A upstream port, two SuperSpeed USB 3.2 Gen 1 Type-A downstream ports. There are then two HDMI ports, a DisplayPort 1.4, and a Line-out port. Note that these HDMI ports are HDMI 2.0 ports. Alienware suggests Display Port for the best performance of the monitor since it supports for 175Hz at the WQHD resolution. Alienware also says the panel is Nvidia G-Sync Ultimate certified, so this means Nvidia scalers won’t support HDMI 2.1.
If you opt to use this monitor with Xbox Series X, Xbox Series S, or a PlayStation, you’ll run into restrictions. You can use the HDMI 2.0 port on this monitor with the consoles, but there’s a catch. The consoles only support the 16:9 aspect ratio and 120Hz. This means QHD (2650 x 1440) is the only resolution that can be supported on Xbox on PlayStation. I found it slightly annoying, as I got black boxes at the side of the display when I connected my gaming consoles. See the image below as an example.
Again, it’s a limit by the console and not the monitor, so you’ll want to keep it in mind. There won’t be HDR on Xbox, either, as this is only supported on 4K on the console. Alienware suggests choosing the 24 bits per pixel video fidelity option with the Xbox Series X. This is more of a monitor for gaming PCs than it is for consoles which is why you don’t see the 4K resolution or features like built-in speakers.
Buttons & functions & modes
2019’s Alienware AW3420DW sported buttons and a joystick at the rear of the monitor, but this year’s AW3423DW ditches all buttons for a joystick instead. The joystick is in the center of the display on the bottom, right within reach. A single touch brings up the OSD menu, which is simple, as always. Moving left and right from that one touch gets you to brightness, contrast, volume, preset modes, dark stabilizer, options. Moving up gives you deeper options for game setting, brightness, input sources, AlienFX, personalization, and more.
There’s a total of six different OSD modes. These include creator, FPS, MOBA/RTS, RPG, Sports. You also can customize three other modes, if you see fit. Alienware promises that the Creator Mode is best for content creators and game developers who need the best color accuracy. The OSD menu also lets you switch between native DCI-P3, or sRGB, and even change the gamma settings. For productivity, I spent most of my time with the monitor in the standard mode, tweaked to HDR Peak 1000 for better brightness.
AlienFX lighting
With AlienFX Lighting, you have some fun controls over it to control how your monitor looks at night. This is thanks to the OSD menus. Five clicks of the joystick in the middle of the monitor gets you to the lighting menus, and you can tweak the RGB lighting as you see fit. There’s a total of four zones of lights, including the Alienware logo, the power button, the ring on the vents, and the downlights. Each zone has 17 colors you can choose from, or three effects. The pre-set effects include Spectrum, Comet, or Rainbow Cycle. When I used the lighting effects at night, my desk was lit up in an amazing glow of colors. It’s really cool to see, and I’m sure serious gamers will enjoy this.
A monitor that’ll make your games look lifelike & feel truly immersive
If you’re considering the Alienware 34 Curved QD-OLED Gaming Monitor, then it is a must-buy. QD-OLED technology is unlike any other in the market right now, and, in this case, will be much cheaper than a $3,000 competing OLED monitor from LG, or a $1,500 Quantum Dot monitor from Samsung. Buying this monitor means your games will look and feel different, and it’s hard to not pass it up.
Netflix UK has amazing movies and TV series worth watching, but you might not be able to access them outside of the United Kingdom. Even if you’re a UK citizen who is living or traveling abroad, Netflix UK is off-limits.
But you can get around this problem by using a VPN to connect to a UK server. By hiding your IP address and gaining a new UK online identity, you can reach the English library of Netflix.
However, few VPNs work with Netflix UK, especially since they typically focus on unblocking Netflix US. But we did some digging around, thoroughly tested the following VPNs, and found out that they can unlock Netflix UK.
ExpressVPN needs no introduction since it’s one of the most popular virtual private network solutions on the web.
Owned by Express VPN International, it can be used to unblock Netflix UK, US, and other libraries.
The app uses 256-bit AES military-grade encryption to secure your data traffic so no third party can access any information about your activity or identity.
It runs a zero-knowledge DNS and doesn’t write any VPN-related data on a hard drive, thanks to its TrustedServer technology that keeps you anonymous.
What else you should know about ExpressVPN:
+3,000 VPN servers in over 94 countries, including the UK
Compatible with all major devices
6 simultaneous connections
No leaks or logs
30-day money-back guarantee (no free trial)
Moreover, ExpressVPN has an integrated kill switch and a speed tester. You can use this VPN to not only unblock Netflix UK but also bypass ISP throttling and defeat censorship.
ExpressVPN
Start watching exclusive movies and TV shows on Netflix UK, no matter where you are, thanks to this VPN.
NordVPN gives you the possibility to configure custom DNS servers. It uses CyberSec to protect all your web browsers from malware and block ads. And it has an emergency kill switch, as well.
Additionally, NordVPN has obfuscated VPN servers to anonymize your VPN connection in case it gets rejected by the remote server.
What else you should know about NordVPN:
+5,100 VPN servers in 59 countries, including the UK
Can be installed on all major platforms
Up to 6 connections at once
No IP leaks and a no-logs policy
NordVPN is a subscription-based VPN service. All plans include a 30-day money-back guarantee.
NordVPN
Watch Netflix UK movies and TV shows from any part of the world using this trustworthy VPN.
Surfshark is one of the best VPNs for watching UK Netflix, thanks to its low costs and top-notch security features.
It’s a virtual private network service operated by Surfshark LTD that can unblock multiple Netflix libraries, including the UK and the US.
Surfshark runs private DNS on each VPN server. It supports the OpenVPN, IKEv2, WireGuard, and L2TP protocols, Shadowsocks proxy server, along with an ad and malware blocker.
Besides unblocking websites, you can set up split-tunneling mode to reroute browser traffic through a VPN to watch Netflix UK while the remaining applications can stay directly connected to the Internet.
What else you should know about Surfshark:
+1,700 VPN servers in over 63 countries, including the UK
Works with all major operating systems
An unlimited number of simultaneous connections
No leaks or logs
30-day money-back guarantee (no free trial)
Surfshark
Easily gain access to Netflix UK using this low-cost VPN with unlimited connections.
Designed by Kape Technologies, CyberGhost VPN is a premium VPN solution optimized for streaming. It can quickly evade geoblocks and unlock Netflix UK so that you can start watching exclusive movies and TV shows.
CyberGhost VPN supports private DNS servers to preserve your online anonymity, together with DNS leak protection. It uses the OpenVPN protocol to encrypt your streaming traffic, making sure that it doesn’t sacrifice connection speed.
Furthermore, the tool has a built-in ad and malware blocker to secure your browsing sessions from phishing and other Internet dangers. Plus, it has one of the best VPN extensions for Chrome.
What else you should know about CyberGhost VPN:
+6,500 VPNs in 89 countries, including the UK
Compatible with all major devices
7 simultaneous connections
No leaks, no logs
45-day money-back guarantee (1-day free trial)
CyberGhost
Unlock Netflix UK with minimum effort by turning to this reliable VPN.
ProtonVPN is one of the most high-performing VPNs that come with a free version.
The service promises a strict no-logs policy regardless of the plan you decide to get (free or paid).
ProtonVPN is suitable for Netflix because it has large server coverage with over 1,600 servers in 63 countries.
Not only that, but it implements technologies meant to let you surpass even the most advanced VPN-blocking technologies.
With ProtonVPN you can enjoy hours’ worth of Netflix content without the risk of being detected and blocked.
Users of this VPN can also enjoy high-quality, buffer-free content as the VPN is very fast. It offers 1-Gbps server networks combined with its own VPN accelerator technology that has the potential to improve speed by over 400%.
As mentioned, this service does have a free version. It does of course come with certain limitations (access to a limited number of servers and lower speed rates).
What else you should know about ProtonVPN:
Native applications for all major device platforms
Unlimited bandwidth
P2P support
Adblocker
ProtonVPN offers three paid plans, each with a different package and feature set. The above-mentioned benefits are included in all three plans.
ProtonVPN
Enjoy Netflix shows all around the globe at exceptional speeds.
In conclusion, you can use a reliable VPN to unblock Netflix UK from any part of the world. You just need a virtual private network solution that works.
As mentioned at the beginning of this article, we tested the 5 VPNs above to make sure that: they unlock Netflix UK + aren’t blocked by Netflix UK.
If you have trouble deciding what VPN to purchase between these options, we suggest going with NordVPN since it can be used for a wide range of activities, not only Netflix streaming.
Since everyone is talking about the latest Patch Tuesday rollout, which happened today, March 8th, 2022, we’re going to show you another vulnerability that you can scratch off your list.
Microsoft Exchange Server is a mail and calendaring server developed by the Redmond tech company, and it runs exclusively on Windows Server operating systems, in case you were wondering.
And if you ever dealt with this issue, or simply heard about it and prayed you would never get affected, the Microsoft Exchange Server Remote Code Execution Vulnerability is gone forever.
Another Critical RCE vulnerability safely removed
Needless to say, no software is 100% safe, no matter how many guarantees developers are willing to make. Attacks can happen at any minute and nobody is safe in this everchanging online environment.
Now, we know that Microsoft’s operating systems are full of traps and dangerous bugs, but many of you might not have been aware of this problem.
Experts state that the vulnerability would actually allow an authenticated third party to execute their code with elevated privileges through a network call.
It goes without saying that this could have quickly turned into a perilous situation for the victim of such vicious cyber-attacks.
And yes, this can be done by attackers, despite the authentication requirement, so keep that in mind if you were thinking about postponing adding this software to your device.
Security experts advise users to immediately test and deploy this to their Exchange servers quickly, lowering the risk of an actual attack.
Adobe also released a brand new batch of Patch Tuesday updates today, but only for three of its products, which is a much smaller rollout than last month’s.
Are you aware of other vulnerabilities that Microsoft might have missed? Share your thoughts with us in the comments section below.
Everything that everyone can talk about nowadays is Microsoft’s new Patch Tuesday release which, as you know, happens every second Tuesday of each month.
Today, Mach 8 2022, the Redmond-based tech giant rolled out a total of 71 CVEs, with three marked as Critical, and we have the download links ready for you.
And among those 71 CVEs released this month, is one that targetted Xbox players on the Windows operating system, but thankfully Microsoft already got that covered (CVE-2022-21967).
Another vulnerability scratched off the list by Microsoft
Indeed, this appears to be the first security patch impacting Xbox specifically, so we can understand all the raised eyebrows and confused coughing.
But this isn’t a joke, as Microsoft acknowledged the potential harm this vulnerability could do if it would be exploited by malicious third parties.
Obviously, there was an advisory for an inadvertently disclosed Xbox Live certificate that was released way back in 2015, but this seems to be the first security-specific update for the device itself.
Microsoft is aware of an SSL/TLS digital certificate for *.xboxlive.com for which the private keys were inadvertently disclosed. The certificate could be used in attempts to perform man-in-the-middle attacks. It cannot be used to issue other certificates, impersonate other domains, or sign code. This issue affects all supported releases of Microsoft Windows. Microsoft is not currently aware of attacks related to this issue.
The tech giant even notes that other Windows operating systems are not even affected by this bug.
It still remains a bit unclear how cybercriminals could escalate privileges using this vulnerability, but the Auth Manager component is listed as affected.
This service handles interacting with the Xbox Live service, so if you know that you are reliant on Xbox or Xbox Live, make sure this patch doesn’t go unnoticed.
So, that’s that, we can add another annoying bug to the list of problems will hopefully never have to deal with again in the future.
Did you know about the existence of this vulnerability? Share your thoughts with us in the comments section below.
It’s that time of the month again, and everyone is looking towards Microsoft, in hopes that some of the flaws they’ve been struggling with will finally get fixed.
We’ve already provided the direct download links for the cumulative updates released today for Windows 10 and 11, but now it’s time to talk about Critical Vulnerabilities and Exposures again.
In terms of heft, this month’s release coincides with Merch releases from previous years, which are usually around 60-70 CVEs.
Let’s dive right into it and see what vulnerabilities are completely gone from our lives, now that these patches are live.
Three critical bugs dealt with this month
For the third month of 2022, Microsoft released 71 new patches. This is in addition to the 21 CVEs patched by Microsoft Edge (Chromium-based) earlier this month, which brings the March total to 92 CVEs.
So, the 71 new patches that became available today address CVEs in:
.NET and Visual Studio
Azure Site Recovery
Microsoft Defender for Endpoint
Microsoft Defender for IoT
Microsoft Edge (Chromium-based)
Microsoft Exchange Server
Microsoft Intune
Microsoft Office Visio
Microsoft Office Word
Microsoft Windows ALPC
Microsoft Windows Codecs Library
Paint 3D
Role: Windows Hyper-V
Skype Extension for Chrome
Tablet Windows User Interface
Visual Studio Code
Windows Ancillary Function Driver for WinSock
Windows CD-ROM Driver
Windows Cloud Files Mini Filter Driver
Windows COM
Windows Common Log File System Driver
Windows DWM Core Library
Windows Event Tracing
Windows Fastfat Driver
Windows Fax and Scan Service
Windows HTML Platform
Windows Installer
Windows Kernel
Windows Media
Windows PDEV
Windows Point-to-Point Tunneling Protocol
Windows Print Spooler Components
Windows Remote Desktop
Windows Security Support Provider Interface
Windows SMB Server
Windows Update Stack
XBox
What’s also important to mention is that, out of the 71 CVEs released today, three are rated Critical and 68 are rated Important in severity.
The number of Critical-rated patches is again strangely low for this number of bugs, according to experts and some of the more tech-savvy users.
Furthermore, it is still uncertain if this low percentage of bugs is just a coincidence or if Microsoft might be evaluating the severity using different calculus than in the past.
Keep in mind that none of the bugs is listed as under active exploit this month, while three are listed as publicly known at the time of release.
These are all the CVEs addressed with this month’s Patch Tuesday release. Overall, this was a pretty hefty but secure month, compared to previous situations.
The next Patch Tuesday batch of software will come on April 12 and we’re all curious to see what Microsoft comes up with until then.
Let’s all hope that we won’t have to deal with critical problems, and that’s it will only be smooth sailing from now on.
Was this article helpful to you? Share your opinion in the comments section below.
We know that many of you are eagerly waiting for the Patch Tuesday monthly batch of updates and we’re here to make it easier for you to find them
And, as you surely know, Microsoft isn’t the only company that releases software during this day. So, in this article, we’re going to talk about Adobe and some of the patches for their products.
As always, we will include links to the download source, so you don’t have to scout the internet to find them.
Adobe addresses only two critical-rated bugs this month
This month, Adobe only released three patches addressing six CVEs in Adobe Photoshop, Illustrator, and After Effects.
We’ll start with the update for Illustrator, which is rated Critical, and it addresses a single buffer overflow that could lead to arbitrary code execution.
As far as the updates for Photoshop go, this month we only get one that fixes a single Important-rated memory leak.
And, since we were on the topic of critical-rated code execution bugs, let’s continue the list with the fix for Adobe’s After Effects.
The patch for After Effects is the largest of the three. It fixes four Critical-rated, stacked-based buffer overflows that could result in arbitrary code execution.
As we said, a pretty slow month for Adobe, which is not necessarily bad. Remember that updates released during Patch Tuesday are security ones, which means that the software is getting safer to use.
Also worth noting is that none of the bugs fixed by Adobe this month are listed as publicly known or under active attack at the time of release.
Spotify is one of the most popular music streaming applications, but several users reported Spotify error code 18 while using it.
This error can freeze or slow down your PC, which can be a major problem, so today we’re going to show you how to fix it once and for all.
These are the two error messages that you may see:
The installer is unable to install Spotify error code 18
The installer is unable to install Spotify because the files to write are in use by another process. Please make sure Spotify is not running and retry.
These two are the main errors that users claimed they usually receive when trying to install Spotify or running the program. If you are also facing this problem before or right now, this article is perfect for you.
The causes behind this error are not too many. However, they need to be exposed as they include corrupted or failed installation files, faulty drivers, or antivirus programs.
The list further extends to malware that also can harm Spotify from running properly and corrupt the Windows registry when you’re trying to install or uninstall the application Spotify.
We’ll explain to you why this happens and also, we’ll help you to fix this Spotify Error Code 18.
1. Delete the Spotify folder from the AppData directory
First, to open a Run dialog, use the Windows Key + Rshortcut.
Write the text %appdata% and hit Enter.
Find the Spotify folder in the App Data folder, right-click on it and choose Delete.
A pop-up will appear. Press on Yes to confirm and wait for Spotify to delete.
You’ll have to Restart your computer for the process to be complete.
After this, try to install Spotify again. That’s how you’ll see if you receive the error message again.
The deletion of the AppData folder will refresh Spotify and will clear this problem so make sure you perform the steps above.
2. Scan your computer for malware with an antivirus
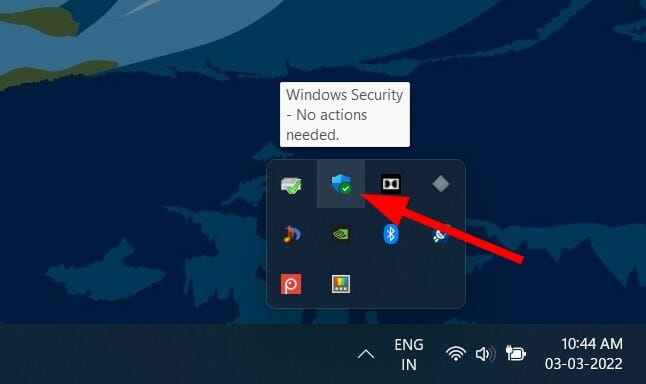
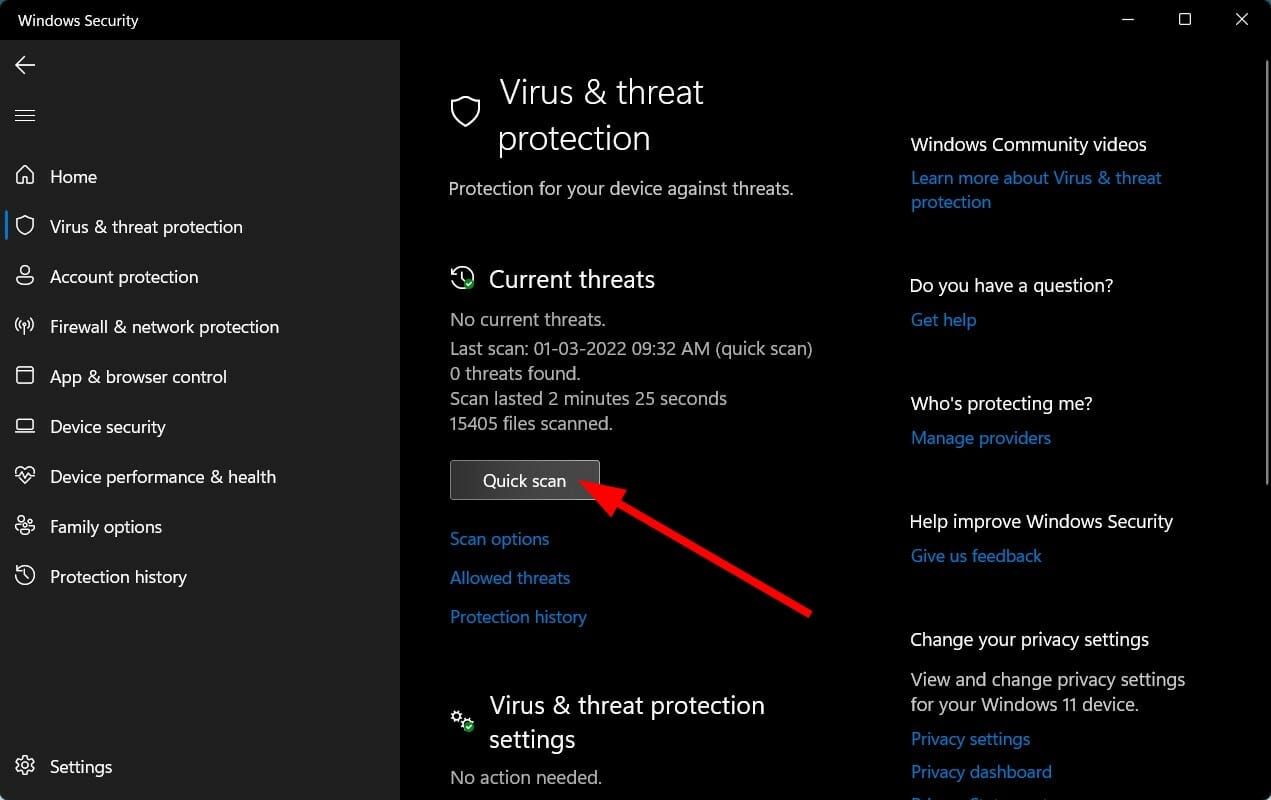
Open Windows Security by clicking the shield from the notification area.
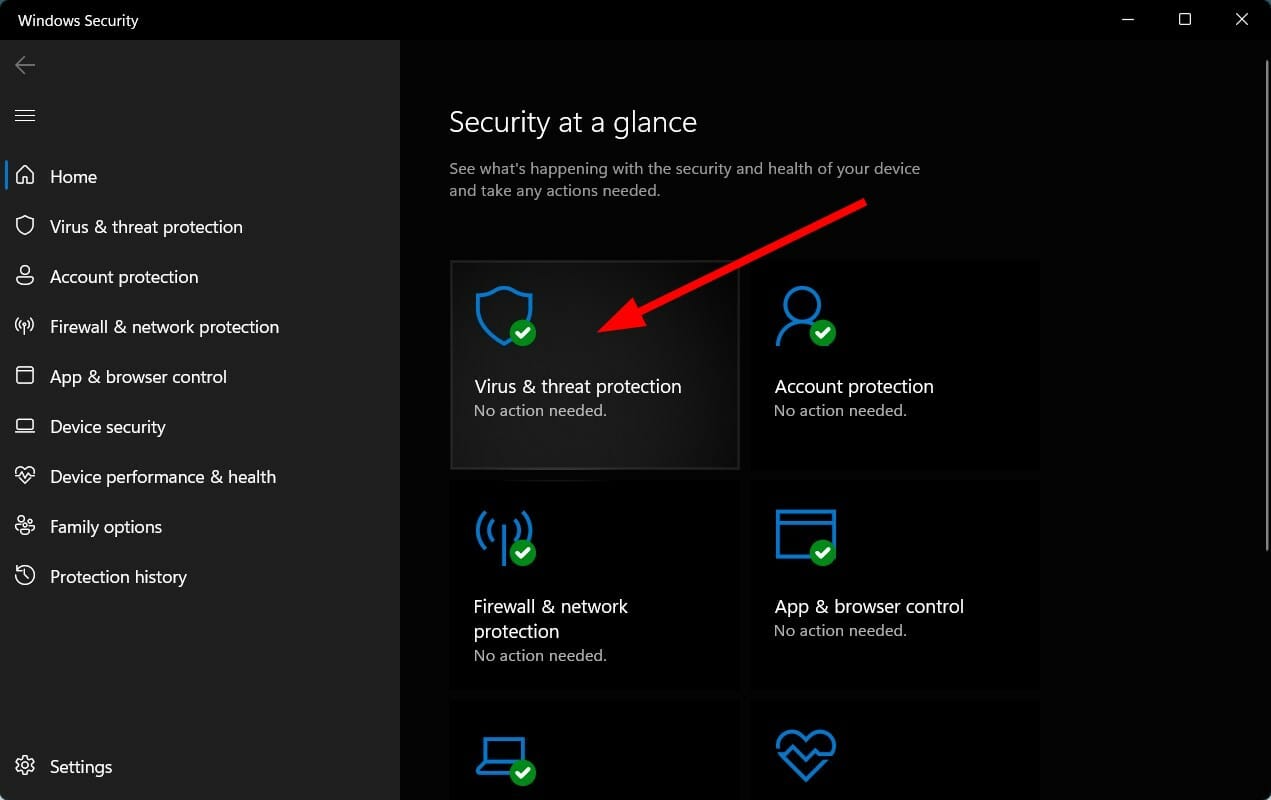
Click on Virus & threat protection.
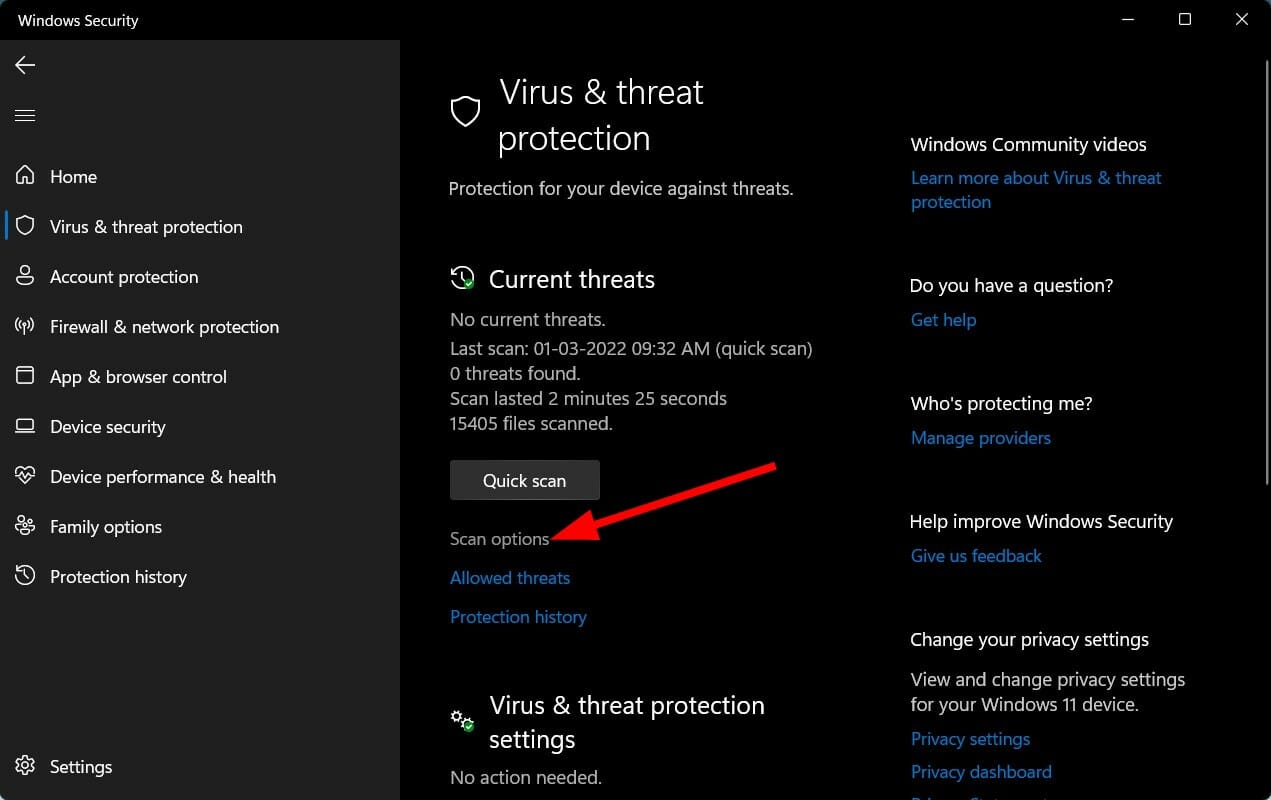
Select Scan options.
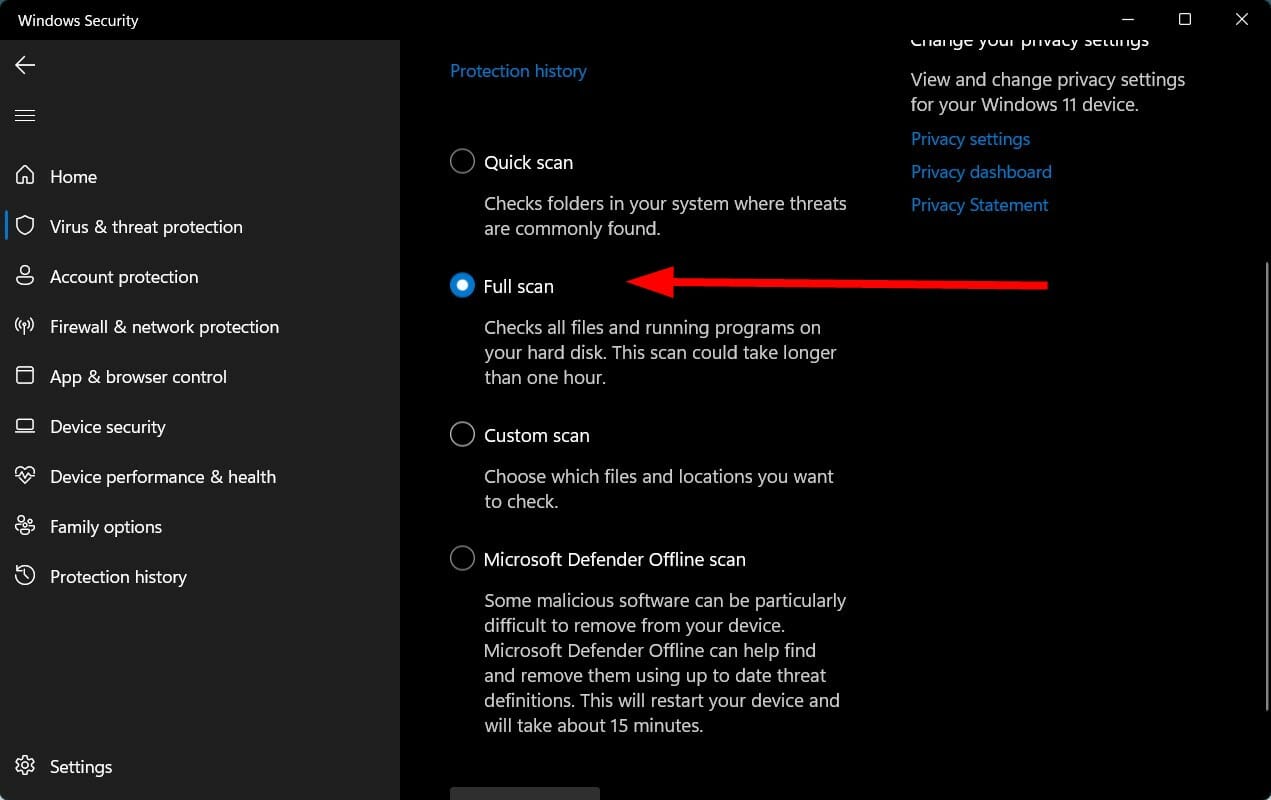
Click on the Full scan option and then hit the Scan now button.
Wait for the scan to complete.
The Spotify error code 18 is also suspected to be caused by malware, so it’s better to take precautions and perform a full scan on your system to eliminate that possibility.
You can use any antivirus that you have installed on your computer, launch it, and then select the Full Scan option.
If you’re looking for a reliable antivirus software tool that can detect almost any threat, be sure to try out the tool recommended below.
This powerful antivirus can easily eliminate spyware, and malware, along with other types of cyber-threats, while it also includes features designed specifically for unlimited encrypted traffic.
That’s your chance to secure your Wi-Fi hotspots and avoid risking the safety of your system or facing repeated Spotify issues.
Enter CTRL + F to open the Search box. Enter Spotify and press Enter.
Enter CTRL + A to select all the files from the folder, right-click on it, and choose Delete.
A pop-up will appear asking you to confirm the action, so press on Yes.
Now Restart your computer to complete the deleting process.
After this, try to install Spotify again and see if the error message will appear.
You can also remove all Spotify files and registry by using an uninstaller software utility because you have some great options to chose from to make sure you remove also remnants of Spotify.
Do note that it automatically performs a deep cleaning procedure to remove not only these files but also all changes Spotify has ever made during its installation.
If you’re not convinced yet, keep in mind that it can even uninstall apps under a non-administrative account. Once you remove all files with this tool, install Spotify again and confirm that the issue is fixed.
4. Uninstall any programs that can interfere with Spotify
Look for iTunes, Comodo, or any other program that you know that can interfere with Spotify, right-click on it and select Uninstall.
After the programs selected have been uninstalled, restart your computer.
Now you’ll have to install Spotify again to see if the error code 18 will appear again or not.
After this, if the Spotify app is installed with no problem, you can reinstall the other programs that you have just uninstalled.
There are some applications that are known to interfere with Spotify. They also may lead to error code 18. Usually, iTunes and Comodo are the most common programs that interfere with Spotify.
So, if you know that you have these two programs installed on your computer, you can uninstall them. If you suspect that other programs can also interfere with Spotify, you’ll have to uninstall them too.
We hope these solutions helped you fix the Spotify error code 18 on your PC. If these solutions worked, let us know in the comments section below.
Google Smart Lock is Google’s password manager that will automatically log you into a website or an app that you want to use.
Although this feature sounds great, few users reported issues while using Google Smart Lock and Spotify. Apparently, Smart Lock can’t log users into Spotify, but there’s a way to fix that.
How do I turn off Google Smart Lock on Spotify?
1. Remove your Spotify password from Google Smart Lock
Enter spotify in the search field and click on Spotify from the search results.
Click the Delete button.
Now open Spotify again, and enter your password.
2. Turn off Smart Lock and change your Spotify password
Go to Google’s Smart Lock page.
Click the cogwheel icon in the top-right corner.
Now disable Auto sign-in feature.
After doing that, log in to Spotify in your browser.
Go to the Account section and change the password.
After changing the password, enable Auto sign-in in Google Smart Lock.
Several users reported that this method worked for them, so be sure to try it out.
3. Change your location
Log in to your Spotify account in a web browser.
Click the Edit profile button.
Now scroll down to the Country section and change it so it matches your current country. Click on Save profile.
Keep in mind that this applies only if you’re using a free Spotify account. With a free Spotify account, you can use the service 14 days in a different country.
4. Check your email
Check your email for any Spotify security messages.
If you got a message asking you to reset your password, be sure to open it and follow the instructions.
Sometimes there might be unrecognized attempts to access your account, and your account would then be temporarily locked, so it’s advised to check your emails and reset your password.
Google Smart Lock is a solid password manager, but users reported issues with it and Spotify.
To fix these issues, try removing Spotify from the Google Smart Lock, or disable Smart Lock temporarily and change your Spotify password.
No doubt playing Lost Ark is an experience worth exploring at least once in our lifetimes if gaming is one of those things that make us happy.
And, from what we can tell so far, people really do enjoy this title a lot, proven by the growing fan base. We remind you that Lost Ark was released back in December 2019.
Ever since its official launch, gamers have flagged a lot of problems that affected gameplay, whether by in-game bugs or errors that prevented booting.
One of the issues that drive layers insane are the ones generated by the Easy Anti Cheat software, which interferes with a large number of games, not only Lost Ark.
Elden Ring players are also dealing with a similar error, one that didn’t yet receive an official fix patch, so everyone had to get inventive and figure out some workarounds.
The same goes for Lost Ark we’re afraid, as the community is also pointing out that Easy Anti Cheat is causing a lot of trouble.
But, thankfully, there are temporary solutions that can fix the problem and restore game functionality.
How can I fix the Lost Ark Easi Anti Cheat error codes 14, 23, 25
So what can we do when everything around us shouts critical bugs and errors? The first thing we’re definitely not going to do is give up.
Even though we mentioned that an official solution isn’t yet available, we’re about to provide some steps that have proved to work for the great majority of the players.
Everything is pretty easy and we will guide you through the process so, buckle up and let’s fix the Easy Andi Cheat error codes 14, 23, and 25 in Lost Ark.
Restart Lost Ark and PC.
Verify Steam game file integrity.
Disable Easy Anti Cheat and run game in offline mode.
Update GPU DriversUsing a 3rd party driver updater to get the latest PC drivers, for GPU as well as other components, is necessary for the overall functioning of your system, our recommendation is to try Outbyte Driver Updater which has a big database of drivers and is safe to use.
It seems that the Easy Anti Cheat software is causing problems for more games than we initially thought so take that into consideration next time you install a game and can’t run it because of errors.
Lost Ark is a masterpiece and it’s a pity for players to not be able to enjoy their favorite title because of third-party software that gets in the way.
Was this guide useful to you? Share your experience with us in the comments section below.
Lost Ark is by far one of the biggest games out there at the moment, with a huge chunk of players opting to play this game instead of Elden Ring or Horizon Forbidden West.
Even if the title did not get off to a great start, failing to download for the entire Steam community on the early access day, it has become a go-to for a lot of gamers lately.
Now, Lost Ark players reported the Server Authentication Failed 10010 error, which can prove to be quite a nuisance and ruin your entire experience.
Thankfully, there are ways in which you can actually fix this annoying error and carry on leveling your favorite character.
How can I fix Authentication Error 10010?
As of this moment, Smilegate did not provide an official fix for this error, but there are certain solutions that have proven to work for the large majority of players.
These temporary workarounds include verifying the integrity of the game’s files on Steam and refreshing your game credentials, among others.
Verify game file integrity on Steam.
Disable Internet Protocol Version 6 (TCP/IPv6).
Refresh game credentials (relog).
Try to play Lost Ark over mobile internet.
Use a VPN.
We recommend giving a try to Private Internet Access that has a lot of servers around the world and is highly likely to have your needed one.
Set Google DNS Servers.
Relink Amazon and Twitch from Steam.
These are pretty much the temporary solutions that worked for most of the Lost Ark players that reported dealing with a server authentication failure.
If you also find yourself in a similar situation, follow the above-mentioned steps and keep on playing your favorite game.
Remember that the server you choose is extremely important, as friends must select the same server to play together, or you can all transfer to another server.
Which of these guide’s steps has worked for you? Share your experience with us in the comments section below.
The process of activating the Windows 11 operating system has become very simple. There’s also the case when the key is pre-programmed into the BIOS and you do not need to enter any information. However, users reported getting the Windows 11 activation error 0xc004f213 message.
License keys help to confirm that your copy of the operating system is genuine and that it has not been installed on more devices than the Microsoft Software License Terms allow.
Follow along as we will show you how to fix the Windows 11 activation error 0xc004f213, right after we see why it is important to activate your copy of Windows as soon as you get a new laptop/computer. Keep up with us!
Why is it important to activate Windows?
Activate Windows will continue to appear in the bottom-right corner of your screen as long as you have a Windows PC running on it. Despite the fact that there are several methods for removing the watermark, it is possible that it will reappear if there are any problems with the Registry files.
Alternatively, if you do not wish to make changes to files in the Registry Editor, you will have to accept this watermark as a part of your computing experience.
If your copy of Windows is not activated, a message similar to Activate Windows appears in the Windows Settings window all of the time.
You will see the same message regardless of whether you are using Windows 11 or Windows 10. When you click on the appropriate link, you will be taken to the Windows activation panel in the Windows Settings.
However, if you do not activate Windows 11, you will be unable to make any changes to your Personalization options. In other words, you will be unable to change your wallpaper, theme, title color, Start Menu color, transparency, or any other aspect of your computer.
Numerous notifications, delivered at regular intervals, may prompt you to activate your Windows installation with a product key that is not in use by anyone else. This popup message may appear while you are watching a movie or reading an article on the internet, depending on your location.
If you intend to use Windows 11 indefinitely, it is highly advised that you obtain a product key to activate the operating system. Otherwise, you may encounter difficulties in the future due to the fact that the official license agreement does not correspond to your Windows usage.
How can I fix the Windows 11 activation error 0xc004f213?
1. Verify the license key
Unofficial licensing keys, as we will cover in further detail later in this post, are not permitted and should not be used. For years, Microsoft has been removing and banning all unrecognized keys from the market.
However, it is possible that you will use a hacked key that will work for a short period of time before being taken down.
Only purchase Microsoft-certified license keys, and double-check the code before activating it to ensure that you haven’t misspelled it.
2. Check if the computer key is activated
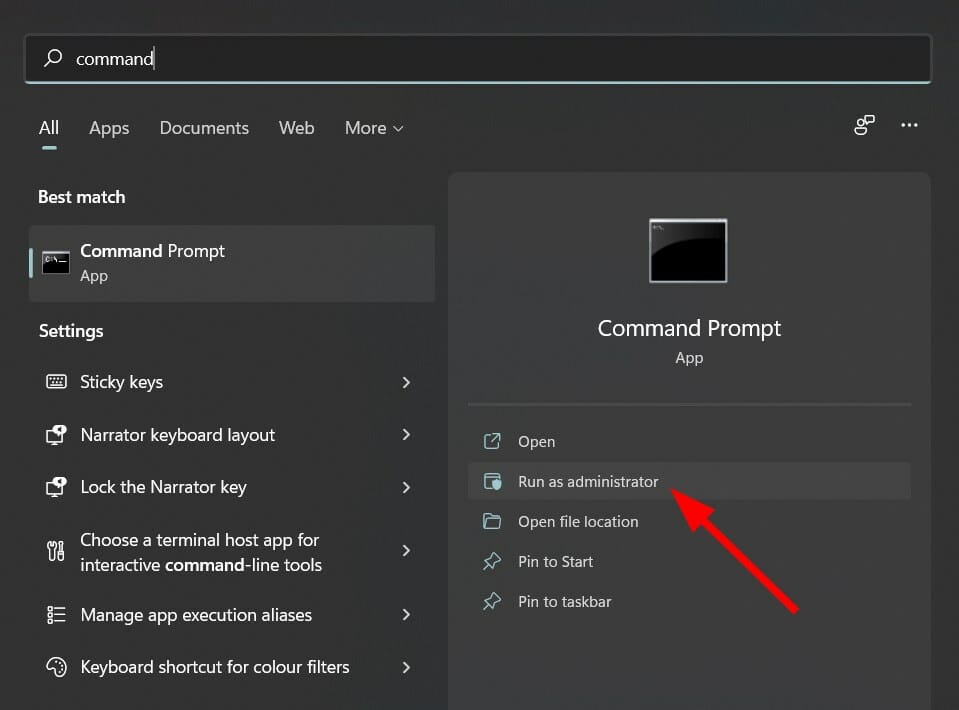
Press Windows + S to open the search bar and enter cmd, then right-click on it and tap on Run as administrator.
Type or copy-paste the following command inside the Command Prompt window and let it run. You will be shown a new window that either says The machine is permanently activated or the opposite: slmgr /xpr
If it is activated, you can stop here and ignore the 0xc004f213 error as it is a bug. Otherwise continue with the 4th step.
Right-click on the Start icon and choose Windows Terminal (Admin).
Enter the following command and let it run: wmic path softwarelicensingservice get OA3xOriginalProductKey
Copy the key, then head to the Activation section inside the Settings app and paste it in there.
3. Check the Internet connection
Another possibility for why you are receiving the Windows 11 activation error 0xc004f213 message is that your internet connection has been interrupted for various reasons.
To discover if you are linked to any networks, click on the Wi-Fi icon in your Taskbar and verify whether or not you are connected to any networks.
Choose one of them if you are not already using one, and then proceed with the Windows activation process. And note that you can also your hotspot connections if you don’t have any available Wi-Fi near you.
It is possible to find various websites on the internet that offer to sell genuine Windows product keys for a low cost. How do they acquire such low-cost Windows 11 product keys and is it legal and safe to use such grey market keys?
Although these Windows keys appear to be legitimate, they are not. Microsoft has priced Windows OS at varying rates in different nations.
There are a variety of factors at play in why Microsoft charges various prices in different countries. These explanations are based on the relative strength of the currencies of the countries in question, as well as other considerations.
The law of digital purchasing is also varying from one country to the next in different countries. Such websites are not legitimate sources for purchasing a low-cost Windows 11 key.
Microsoft does not support it and will launch a lawsuit against the individuals responsible for such websites if it discovers the websites that sell such keys. Additionally, it will deactivate all of the leaked keys in bulk.
It is possible that a cheap key will not work right away, or that it will function for a short period of time and then quit, or that it could operate for an extended period of time if you are lucky!
However, you should be aware that the key you are using may not be legitimate. We recommend that you always purchase genuine Windows product keys from the Microsoft Store or one of their authorized Partners for these reasons.
Don’t be taken in by such ruses. The low-cost Windows key you got from a third-party website is almost certainly not legal. These grey market keys come with the risk of being discovered, and if discovered, it’s game over for them. If luck favors you, you may get some time to use it.
You may go undiscovered for a week, a month, or a year, or you may go undetected for a lifetime – and you will have to make a decision about that.
The 9th of March is finally here, and for those of you that like keeping your PC updated with the latest and greatest changes this means only one thing: Patch Tuesday is here!
Like all other Patch Tuesday updates since the beginning of the Windows OS, they are aimed at improving your PC’s performance by tweaking the system, fixing any errors, adding new features, and providing better security against digital threats.
That’s what everyone is expecting this month as well, and we will be looking over what might arrive this week.
What the March Patch Tuesday updates might bring
Besides the security improvements, one focus of the Patch Tuesday updates is to fix whatever might have been broken in the past updates.
For example, the February Patch Tuesday updates were riddled with vulnerabilities that rapidly needed to be dealt with.
So, the 51 new patches that became available last month, addressed CVEs in:
Microsoft Windows and Windows Components
Azure Data Explorer
Kestrel Web Server
Microsoft Edge (Chromium-based)
Windows Codecs Library
Microsoft Dynamics
Microsoft Dynamics GP
Microsoft Office and Office Components
Windows Hyper-V Server
SQL Server
Visual Studio Code
Microsoft Teams
Through the February 2022 Path Tuesday event, the Redmond-based tech company has managed to finally fix CVE-2022-23280, which is related to an Outlook for MAC vulnerability.
Not only did we see record low numbers of vulnerabilities addressed across all of Microsoft’s operating systems last month, but we also saw for the first time in my experience that all the updates were only rated Important.
After the reissuing of updates in January, we expected fewer CVEs would be addressed as Microsoft focused on stable updates in February, but this was unprecedented.
It’s safe to say we can expect a much larger set of CVEs addressed this month as Microsoft digs into the backlog after a small February release.
A lot of these CVEs may be rated Critical as they focus on vulnerabilities more open to attack. The usual set of updates will be available for all operating systems, Office, and probably Exchange Server.
What are your expectations for this month’s Patch Tuesday updates?
Let us know what you hope to see by leaving your feedback in the comments section below.
Microsoft just launched Startups Founders Hub, a platform that is in place to help entrepreneurs execute their business strategies effectively and efficiently through cloud resources, mentoring, and personal training regardless of your starting point.
The platform is now open to all, as Microsoft aims to create an enabling environment that will help bring out the best in both their clients and partners. Through the support, Microsoft hopes to promote the longevity of some of these businesses and turn them into successes by addressing some of the common challenges that prevent startups from reaching their full potential.
Microsoft for Startups Founders Hub revolves around three key areas:
• Unlocking Innovation for All: The platform eliminates traditional barriers founders face when getting started, such as venture capital requirements or third-party validation to help any founder regardless of background, location or access be successful.
• Technology Benefits that Grow: Keeping pace with a startup’s lifecycle, the platform helps founders speed development with free access to GitHub and the Microsoft Cloud with the ability to unlock additional benefits over time. To address the unique needs of startups, we are also partnering with innovative companies like OpenAI, a global leader in AI research and deployment, that develops AI systems such as GPT-3 and Codex to provide startups with exclusive benefits and discounts.
• Access to mentorship and guidance: Becoming a founder is no longer about “who you know.” Through the platform, startups can connect with industry veterans, access tailored startup-centric training and innovate quickly with expert technical guidance.
“The platform provides free access to over $100.000 in powerful development and productivity tools including GitHub, Microsoft 365 and more.” Microsoft has also partnered with OpenAI API to provide members with exclusive benefits and features, that is, “exclusive access to $1000 of credits, 3 free months OpenAI API Innovation License and free consultation with an OpenAI expert.” Thanks to the new update even more people will get support from Microsoft as the eligibility score has been reduced significantly. With that, said it is now easier for you to pitch an idea and get support.
Furthermore, these technology benefits come in different packages which will allow you to select one that suits you best as compared to the previous arrangement, that is Ideate, Develop, Grow and Scale. Moreover, the platform not only provides entrepreneurs with the opportunity to expand their businesses but also the opportunity to sell their ideas and solutions through the Microsoft go-to-market channels and services. As such, you should make sure that you sign up to take full advantage of these benefits.
Microsoft Teams for Education remains a key part of the curriculum and lifestyle for many schools across the world. That’s why Microsoft is always adding new features, and this past month, there were a lot. Here’s a recap of some of those top features.
New features for Assignments
The assignments features in Teams for Education picked up five new features. The first of those is the ability for educators to turn in and upload documents in Assignments for their students. Second, up, is the ability for educators to get notified when a student turns in a late assignment. Tying in with that is the ability to customize notifications associated with assignments. Capping things out is the ability to collapse or expand the grading view, and the ability to Edpuzzle and GoConqr in the assignments tab.
New features for Whiteboard in Teams
With Whiteboard in Teams for Education, there were a couple of different updates. Students can now “like” ideas in sticky notes in Whiteboard, add photos and files to the whiteboard on mobile devices. Also in this same area were some more effective ways to hold class sessions with Teams Rooms and OneNote & Teams Meetings. The following features were added.
Front row layout for Microsoft Teams Rooms on Windows
Switch between multiple video cameras in Teams Rooms on Windows
OneNote Live Captions allow inclusive note-taking
Word cloud poll for Teams meeting, along with the ability to mirror video, use music mode, and a new order of raised hands feature
In addition to the above, Microsoft is working to add zoom controls, Bing image search, and OneDrive storage to Whiteboard, too.
Updates to Reading Progress
As for the Reading Progress feature, there are a couple of things that were added. The most notable are actionable insights and personalized reading progress assignments. Then, there’s return for revision, a customizable report to return details to students, video recording for reading progress on iOS and Android. Capping out the list is the ability to pick a passage from a OneNote Class Notebook, new languages in auto-detect, and school or district-wide fluency reports.
Other features
We hit the highlights above, but there were some additional features that we didn’t touch on. Of those is a new Parent Connection feature, which helps educators involve parents and guardians to support their student’s achievements. You can learn more about these features and other Teams for Education features over on Microsoft’s Tech Community.
If you’re a music aficionado in this modern technical era, there’s a good reason to believe that you’ve crossed your path with Spotify. This music streaming service is the champion in the niche with more than 150 million users.
However, the service is still geo-restricted for certain regions and thus unavailable for certain countries. This can be avoided by employing a VPN solution, but too often, the two won’t work well together.
A lot of user reports concern issues with Spotify unable to comply with Virtual Private Networks or proxies, for that matter. In order to address this, we prepared a list of possible solutions.
Make sure to check them out below and, hopefully, we’ll succeed resolving the issue in a glorious manner and you’ll be able to play your favorite tracks.
What can I do if VPN won’t work with Spotify?
1. Use a different VPN
First things first. If the problem is persistent, we advise you to try out an alternative VPN. Most of the free solutions will get the job done, but if you’re keen to spend some extra money on better privacy protection, it’s well recommended to go premium.
We suggest Private Internet Access which excels in reliability and ease of use. Also, in comparison to some other premium solutions, it comes for less price which can be a factor, too.
PIA is a trusted, world-leading VPN provider that works seamlessly with Spotify and is perfectly optimized for streaming.
Boasting an impressive network of 3292 servers with global coverage, this VPN guarantees to unblock your streaming, help you bypass geo-restrictions, and streamline your connection, thus allowing you to enjoy a buffering-free Spotify session each and every time.
Unlimited bandwidth and ultra-fast download speeds complete the picture or should we say, the tune?
When it comes to security features, PIA provides best-in-class encryption to keep your data secure and routes all your traffic through encrypted VPN tunnels.
Privacy-wise, you can rest assured that you are as anonymous and track-free as you need for your Spotify sessions thanks to the IP cloaking function that practically makes you invisible on the grid.
Private Internet Access
Music sets you free? It's your turn to free music. Take your Spotify sessions up a notch with PIA VPN.
Let’s eliminate the non-related cause which is commonly affecting Spotify connection. Namely, for some unapparent reason, Windows Firewall tends to block Spotify.
In order to address this, you can either disable the Firewall (not recommended due to security liability) or let Spotify communicate through Windows Firewall.
Also, if you’re using a third-party antivirus suite with the dedicated firewall, make sure to whitelist both VPN and Spotify there, as well.
If you’re not sure how to let the third-party application communicate through Windows Firewall, follow these instructions:
In the Windows Search bar, type Allow and open Allow an app through Windows Firewall from the list of the results.
Click on the Change settings button. You’ll need administrative permission in order to do so.
Locate the Spotify Music and check the box beside it.
Check both Private and Public boxes and confirm changes.
3. Change the server
The good thing about modern VPN solutions is that you have a large choice of available servers in different countries around the globe. If one is failing you due to temporary issues or the slow speeds due to overcrowding, you can always switch to another one.
The important thing is to use the same country which you used for the account creation and the same credentials. Don’t log in with Facebook integration.
Therefore, close your Spotify desktop client, open the VPN, then change the server and restart Spotify. You don’t have to use a VPN every time you log in. You can use it once every 14 days and you won’t have any issues whatsoever.
This doesn’t apply to Premium subscription as you’ll need to provide the details about the paying account. This can make the server-switching an issue for some users.
4. Sign out and sign in again on all devices
If you use Spotify on multiple devices, both PC and handheld ones (as most of the users do), the combination with the VPN can create issues.
When things go awry, it’s recommended to sign out of every used device and move from there. After that, you can log in on one by one and try running Spotify. With VPN enabled, of course.
You can access every device individually or you can access the web-based player and the account settings. From there, you can sign out of all devices at once.
5. Check the connection
The connection can be another possible reason for the issues. If you’re unable to access the Spotify‘s dedicated servers via the VPN, maybe the problem isn’t in the VPN.
Make sure to check your connection, restart your equipment, and disable/re-enable DNS and proxy if you’re using those, too.
Here are some troubleshooting steps you can take concerning the overall connectivity issues:
Restart your router/modem and PC/phone/tablet.
Flush DNS:
Press Windows key + S to summon the Search bar.
Type cmd, right-click Command prompt and run it as an administrator.
In the command line, type the following commands and press Enter after each:
ipconfig /release
ipconfig /renew
After the process ends, type in this command and press Enter:
ipconfig /flushdns
Close the Command Prompt, enable VPN, and open Spotify again.
Reset Winshock:
Type cmd in the Windows Search bar, right-click Command Prompt and run it as admin.
In the command line, enter the following command and press Enter:
netsh winsock reset catalog
After that, insert these commands to reset IPv4 and IPv6 stacks and press Enter after each:
netsh int ipv4 reset reset.log
netsh int ipv6 reset reset.log
Close the elevated command line and restart your PC.
Reset your modem/router to factory settings.
Update router’s firmware.
6. Enable Port Forwarding
Most VPNs need a specific port forwarded for various uses. This especially applies to media streaming, and Spotify is a media streaming application.
In order to enable this, you should open VPN and look for the Port Forwarding option. Make sure that it’s enabled. Also, google your router in order to find out how to open ports within the router itself and enable UPnP.
You should open these IP ranges in the 4070 port: 78.31.8.0/21, 193.182.8.0/21.
As we already stated, you don’t need the VPN to be active throughout the use of Spotify. It’s required, for the sake of avoiding the geo-restrictions, only at the logging. Later on, you can enable it on every 14 days when the new log-in prompt appears.
7. Reinstall Spotify desktop client
When it comes to Windows 10 and Spotify, you have two options to stream music from the largest music media in the world. The first one includes the Spotify app from the Microsoft Store, the second relies on the browser-based web players.
If you decide to use the former and it won’t work with the VPN, you can try the alternative option or update/reinstall the desktop client.
Here’s how to reinstall the Spotify desktop client app in Windows 10:
Press Windows key + I to open Settings.
Choose Apps.
In the Search bar, type Spotify.
Expand Spotify and click Uninstall.
Open Microsoft Store and search for Spotify.
Install the client app again.
Start the VPN and then open the newly-installed Spotify.
Try to log in with your credentials.
That should do it. In case you have an alternative method of resolution for the ache at hand or a question regarding the aforementioned solutions, we encourage you to post them in the comments section below.
March 2022 Update: it seems that there’s currently a number of various problems Spotify, as follows:
Certain users are getting the annoying “Something went wrong error” here’s our guide on how to fix that
Facebook login errors appear for Spotify users; follow these steps to fix it
Seeing a Windows 11 ISO download failed error while trying to grab the installation image? This issue usually happens due to browser limitations, server-side interruptions, antivirus conflicts, or corrupted downloads. Here’s how to fix it and successfully download the ISO file without issues.
For devices to be able to install or upgrade to Windows 11, they must match the following minimum hardware specifications:
Processor: 1 GHz and higher with two or more cores on a compatible 64-bit processor or system on a chip.
RAM: 4 (GB) or more.
Storage: 64 GB or more available storage is required to install Windows 11.
Additional storage space may be required to download updates and enable certain functions.
Graphics card: Needs to be compatible with DirectX 12 or later, with a WDDM 2.0 driver.
System firmware: UEFI, Secure Boot capable.
TPM: Trusted Platform Module (TPM) version 2.0.
Display: High definition (720p) display, 9″ or greater monitor, 8 bits per color channel.
Internet connection: Internet access is required to perform updates, as well as to download and use various functions, such as video streaming.
There may be additional requirements in the future for upgrades and to enable certain functionality inside the operating system as the operating system evolves. More information can be found in the Windows 11 specifications.
A list of requirements will appear. Verify that your system meets each one.
If your system lacks TPM or Secure Boot support, you can still install Windows 11 without TPM by following a simple bypass method.
2. Disable your antivirus
1. Click the expand arrow in the taskbar, right-click your antivirus, and choose Disable for 10 minutes. 2. If using other antivirus software, follow its specific steps to temporarily disable protection.
3. Run Disk Cleanup
Press Windows + R, type cleanmgr /VERYLOWDISK, then press Enter.
You’ll receive a report of how much space was cleared.
To choose what gets deleted, use cleanmgr /LOWDISK in the Run window. For minimal cleanup with more options, try cleanmgr /sageset:1.
4. Clear browser cache
Cached data can prevent files from downloading properly. In Chrome or Edge, go to Settings → Privacy → Clear browsing data. Delete cached files and cookies, then retry. If you’re not sure how browser data affects downloads, our guide on downloading the Windows 11 ISO has additional instructions.
5. Switch to another browser
Sometimes the browser itself causes issues. Use another browser like Firefox or Edge. Try downloading in Incognito or Private mode to avoid cached data and extension conflicts. If your current browser consistently fails, the problem could also indicate deeper compatibility issues, as seen in our Windows 10 ISO troubleshooting guide.
6. Use the Media Creation Tool
If the ISO fails directly, try downloading via the Media Creation Tool. Choose “Create installation media,” then either save the ISO or build a bootable USB drive. This method is also ideal if the download is stuck midway or freezing completely.
If the issue persists, use another PC or switch to a different network, such as a mobile hotspot or wired Ethernet — to avoid local restrictions or bandwidth issues. If your device lacks BIOS access to enable TPM, here’s how to enable TPM 2.0 without BIOS and continue setup.
Was this guide helpful for you? Don’t hesitate to tell us in the comments section below so that we can improve our future posts for you. Thanks for reading!
If you’re reading this, it’s likely that you’ve encountered the Windows boot error 0xc000000f at some point in time. The good news is that, if you follow our instructions, you will be able to resolve the issue in no time.
Computers are a staple of our food and a necessary component of our existence today. Windows errors are typically disruptive and might take a significant amount of time to resolve. Furthermore, handling the demands of work while also troubleshooting may appear to be a demanding task.
The Error code 0xc000000f a required device isn’t connected or can’t be accessed message is typically caused by a corrupted file, a damaged hard drive, or a malware or virus infection, among other things.
Let us examine in more detail what the causes of this issue are, and then jump into the solutions. Follow along!
What causes the 0xc00000f error to occur?
It is possible that the Your PC needs to be fixed 0xc000000f error is caused by a problem with the Windows Boot Manager on your machine.
This will make your operating system unable to read the booting configuration data and will prompt you to perform a system recovery procedure. Furthermore, there are three significant explanations for this error code, which are as follows:
➡ Boot Configuration Data (BCD) is missing or damaged – According to the message on the error code screen, the first and most important reason is that the BCD is missing or corrupted. Viruses in the boot sector, power failures, disk write issues are all possible causes. ➡ Damaged system files – If your computer shuts down unexpectedly due to a power failure while it is in the middle of upgrading Windows or writing critical information to the boot sector, system files may become corrupted, which may cause the error to occur. ➡ A faulty data cable – If you have been using the same data cable for several years, it is possible that it has degraded. Then the damaged cable can create read and write errors, which can interfere with the process of loading the operating system.
There is no single solution to the 0xc000000f error code. For your convenience, we’ve compiled a list of various possible approaches. Which one is the most effective is determined by the precise source of the issue on your machine. Thus, try each one at a time until the problem is resolved.
How can I fix the 0xc000000f error code in Windows 11?
1. Check for faulty cables
In the event that your PC is on, shut it down entirely and unplug it from all electrical sources. Then take a look at the wiring by opening it up. Check to see that all of the cables are securely secured, and if any of the cables are exhibiting signs of wear and tear, replace those wires.
Whenever possible, avoid using a cleaning chemical or another liquid to clean the wiring or other internal components of your computer. Instead, a dry cloth should be used.
Some Windows devices are unable to be accessed. Surfaces that have been opened may have their warranties revoked. When it comes to desktop computers, they are usually good for inspection, but it is important to double-check the user manual and warranty paperwork before.
2. Repair system files with a dedicated utility
As mentioned, this error may appear as a result of corrupt or missing system files. If you want to effectively fix your system files, we suggest you do so with the help of a reputable system repair utility.
3. Use the CHKDSK utility
Tap the Windows key + S to open the search bar, type in cmd, and right-click on the top result and run it as an admin.
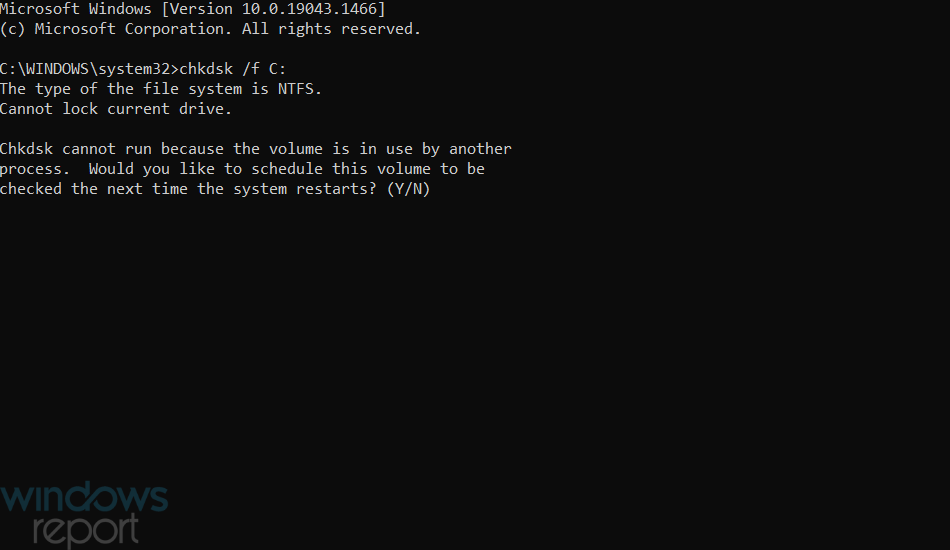
After the Command Prompt launches, type or paste in the below command and tap on Enter: chkdsk C: /f /r /x
Another option is to use Check Disk to check for faulty files, which is a free program. The scan will take longer to finish due to the fact that it is more comprehensive. Once the process is complete, restart your computer to bring everything to a conclusion.
4. Repair BCD through Command Prompt
Press the Windows key + I to open the Settings app, and navigate to System in the left panel followed by Recovery from the right side.
Now click on the Restart Now button next to Advanced Startup.
Your PC will now boot to the Windows Recovery screen. Select Troubleshoot from there.
Then click on Advanced Options followed by Command Prompt.
Once you’re inside the prompt, type or paste in the following command and hit Enter. If the program finds a Windows installation and asks Add installation to the boot list?, press Y on your keyboard: bootrec /rebuildbcd
What does BCD do?
On BIOS-based and EFI-based computers, the Boot Configuration Data store contains the boot settings for Windows that are used during the boot process.
BCD is a common boot option interface that is independent of the firmware used by all computers running Windows 11, Windows 10, Windows Server 2012, Windows 7, and Windows Server 2008.
For this reason, it is more secure than prior boot option storage configurations since it allows administrators to give privileges for managing boot options while still allowing secure lockout of the BCD store.
It is accessible at all times during the runtime and during all steps of the setup process. If you want to set the boot procedure for resuming after hibernation, you can even invoke it during power state changes.
The BCD store can be managed remotely, and it can also be managed if the system boots from a media other than the one on which the store is located. It is especially useful for debugging and troubleshooting purposes when a BCD store needs to be restored while running Startup Repair from a DVD.
To precisely identify boot-related apps, the BCD store, which has a typical object-and-element design, makes use of GUIDs and names such as Default to identify them.
You can adjust the boot settings in Windows by interacting with the Windows Management Instrument (WMI) interface to boot options. This BCD WMI interface is the most effective means of changing the boot settings.
Power Virtual Agents (PVA) is a chatbot service built on Microsoft Power Platform, which includes PVA, Power Apps, Power BI, and Power Automate. The PVA on Teams development process uses a guided, no-code, and graphical interface approach that allows users to create and delete chatbots at will.
PVA allows you to build and deploy chatbots via the web or by adding the app directly to Teams. If you are using the PVA web app, you can use supported browsers including Microsoft Edge, Firefox, and Chrome. Keep in mind that you need a work, school, or organization Microsoft account. Unfortunately, there is no option currently available for personal Microsoft accounts.
Add Power Virtual Agents app to Teams
Once installed, you can create bots in the PVA app on Teams and share them across your team, company, or organization. The very first step is to install the PVA app, then you can move on to make bots.
1. Go to the Microsoft Teams Apps store and search for “power virtual agents.” 2. Select the Power Virtual Agents app and click Add. The app will be added to the side pane in Teams and the app automatically opens to PVA interface. This is where Teams users can come to create, edit, and delete bots. This is the perfect time to pin the app to Teams so you don’t have to search for it later.
Create a bot
When you are ready, you have two options available to create a bot:
1a. Click Start now to quickly create a bot.
1b. Go to the Chatbots tab, select the team you want to use, and select New chatbot.
2. Choose the Teams channel name you want to use and click Continue. 3. Name your bot and choose what language you want your bot to speak. 4. Click Create to create your bot.
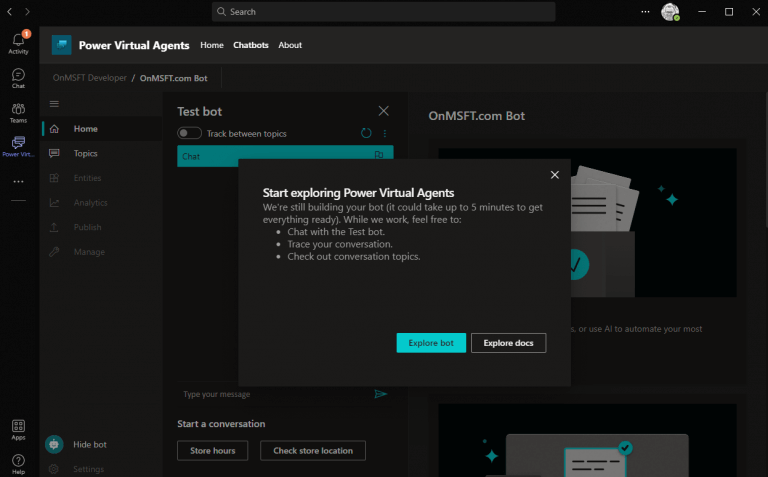
Once the PVA app animation is complete, you are finished. If this is the first time a bot is being created in your team, you’ll see a notice explaining that it will take up to 10 minutes for the bot to be fully created. If you try to edit any topics or entities within your bot too early, you may find yourself getting errors.
Congratulations! You’ve successfully created a Power Virtual Agents bot on Microsoft Teams!
Now you can choose to Explore bot to view and manage the contents of your bot or Explore docs to browse through Microsoft’s extensive PVA documentation.
Delete a bot
If you decide you don’t need or want your bot, you can delete it just as easily from Teams. Here’s what to do.
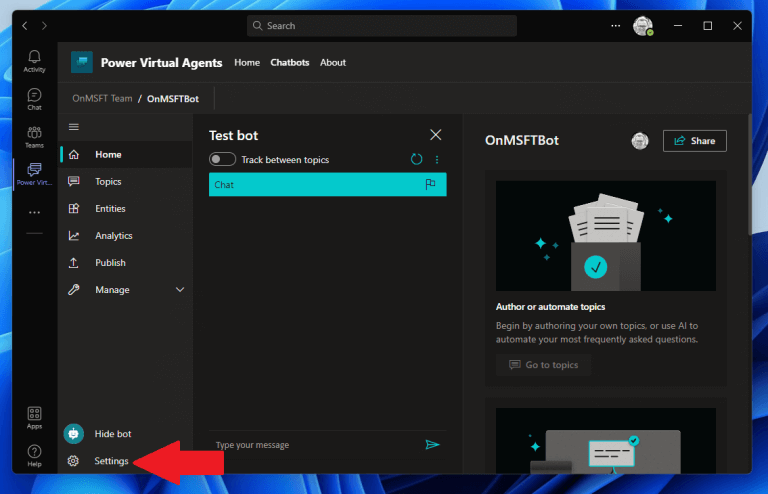
1. In the Power Virtual Agents (PVA) Teams app, click Settings ⚙️.
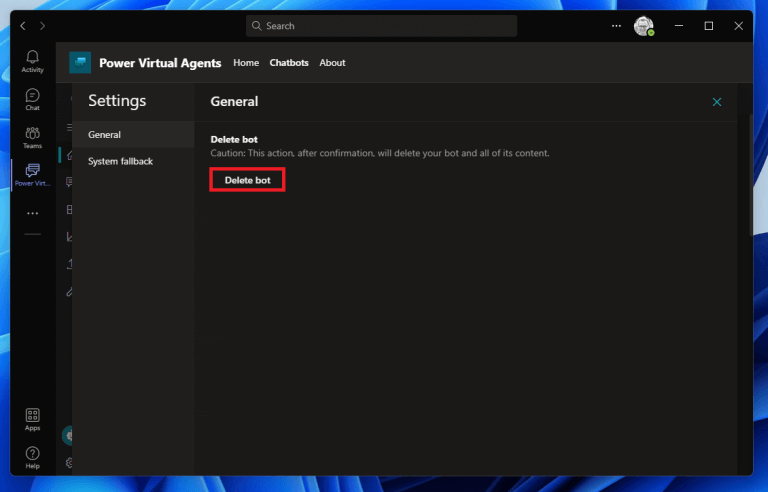
2. Click the Delete Bot button.
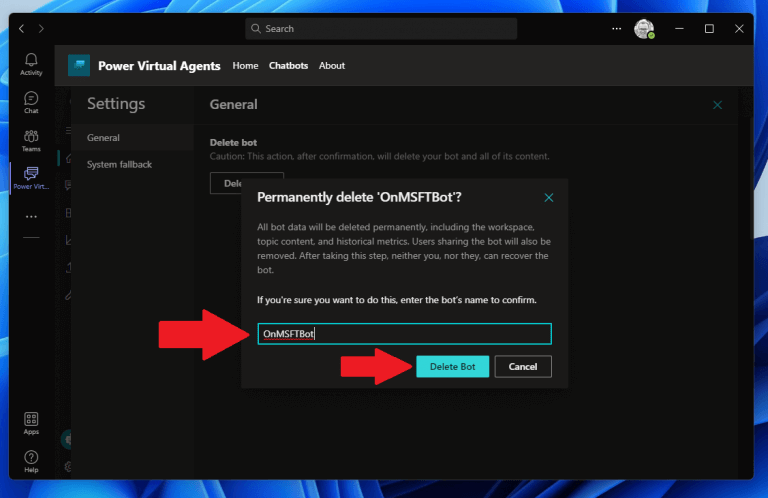
3. Type out the name of the bot and click Delete Bot to confirm bot deletion.
Add content to your Teams bot
Of course, besides naming the bot and choosing which language you want the bot is hardly the beginning. As you’ll soon discover, the ability to create and manage Power Virtual Agents (PVA) bots without leaving Microsoft Teams is just the beginning of functionality available.
Interested in the next steps? Stay tuned, as we’ll walk through the steps required to add content to your Power Virtual Agents (PVA) chatbot in Teams. We’ll learn how to create, edit and manage topics, enable enhanced AI features and share and publish your bot with your colleagues at your organization and beyond on Microsoft Teams.
Got a Microsoft 365-related question you want to see answered? Let us know in the comments!
Many PC users want to increase VRAM on Windows 11 to boost performance, primarily when gaming. More VRAM can help with graphically demanding software, but increasing it isn’t as simple as you think.
Today’s guide will show you how to increase the VRAM and answer some of the most asked questions about it.
How do I change VRAM on Windows 11?
NOTE
Before increasing VRAM, note that this guide is for PCs with integrated graphics using shared RAM; a dedicated GPU is the only real upgrade for more power, these tips only offer a slight boost .
1. Use BIOS
Restart your PC and press the BIOS key repeatedly during the bootup. F2, F5, F8, or the Del key can be used to access the BIOS.
In the BIOS menu, look for an option called Advanced Features. After that, look for Graphics Settings, Video Settings or VGA Share Memory Size options.
This section should give you the option to change the amount of memory allocated to your GPU. The default value here is 128 MB. If you have enough memory, you can increase this amount to 256 or 512 MB.
Finally, Save the changes and restart your computer.
This feature is present on all CPUs and BIOS; however, if this method does not work, proceed to the next solution.
2. Use Registry Editor
To launch the Run app, go to the Start menu, type Run, and then hit Enter.
Then type regedit to open Registry Editor.
Navigate to the following path: HKEY_LOCAL_MACHINE\Software\Intel
In the left panel, right-click on the Intel folder, hover mouse over New, and then select Key.
Name the key as GMM then click on it.
After that, right-click inside the right panel, select New, thenclick on DWORD (32-bit) Value.
Then name it DedicatedSegmentSize. Note that, the initial letter of each word should be capitalized, and no spaces should be used in between the words as you type them.
Double-click it, choose Hexadecimal, then enter the recommended value data using your system RAM information and hit OK: 1GB – 128MB; 2GB – 256MB; 4GB – 512MB; 6GB – 1024MB; 8GB – 2048MB; 16GB – 4096MB; 32GB – 8192MB.
Now restart your computer to have the modifications take effect, and then test the software or games to see how they function.
NOTE
Making incorrect changes to the registry can cause problems with your computer’s operating system, so you need to be careful.
How do I check my VRAM capacity?
Use the Windows + Ikey combination to open the Settings.
Select the Display option from the left pane and choose Advanced Display option.
Then select Display adapter properties.
In the new window, next to the Dedicated Video Memory, you’ll see the amount of video memory in your computer.
Is it safe to increase virtual memory?
Changing VRAM value from BIOS is perfectly safe since you can only use the values that are supported by your processor.
Modifying VRAM value from the registry can lead to some performance issues if you don’t set the correct values.
Improper modifications of the registry can cause additional problems with the PC.
It’s pretty simple to increase VRAM in Windows 11, but all the solutions from above only work if you’re using a dedicated graphics card.
You’ve been playing Elden Ring for almost two weeks now, or you just started, and there are plenty of things that you still want to know about the game.
It’s understandable, considering that this is a pretty new title and there’s still a lot to learn about all there is, as well as all there is to come.
A lot of Elden Ring players have also been asking how exactly they are supposed to download the game’s DLC. We are about to show you just that, making it easier for you to quickly access everything.
What do I have to do in order to get the Elden Ring DLC on PC?
Elden Ring’s Adventure Guide is one of the pre-order bonuses that come along with The Ring bonus gesture.
Just as you expected, the Adventure Guide includes tips and tricks for Elden Ring players taking on an adventure in the Lands Between for the first time.
It’s a great little bonus for all players who pre-purchased the game or bought deluxe and collector’s editions.
Players who have pre-ordered the Elden Ring on Steam can find the Adventure Guide in the DLC section. Simply right-click the Elden Ring icon in your Steam library, select “Properties…” and then the “DLC” tab. You’ll find all of your Elden Ring pre-order content there.
Right-click the Elden Ring icon in your Steam library and select Properties.
Select the DLC tab and find all of your Elden Ring pre-order content there.
How can I get the Elden Ring DLC on Xbox?
Gamers that purchased a digital copy of Bandai Namco’s latest title for Xbox consoles automatically found their content after Elden Ring was officially launched.
However, if you purchased a physical copy of the Elden Ring, you’ll receive a code in exchange for the Adventure Guide and other pre-order bonuses.
Access the Xbox Store on your console.
Scroll down and select Change.
Select Redeem Code
Insert code
How do I get the DLC on PlayStation?
All of the above applies to players that decided to go with Sony’s hardware when it comes to gaming rigs. Depending on what type of copy you bought, the content will be delivered the same way.
And the process of actually getting your hands on it is as easy as for their Microsoft rivals.
Open the PlaySation Store, select your avatar and press X.
Select Redeem Code from the drop-down menu
Enter your pre-order code and select Redeem.
Have you managed to find all the available downloadable content for your Elden Ring game? Share your experience with us in the comments section below.
Back in February, it became apparent that Microsoft was likely to acquire the cybersecurity firm Mandiant. Reports then indicated that the talks might not have resulted in an offer, but a fresh scoop from The Information also now claims that Google might have dipped into the market, and is now also in talks to buy Mandiant.
This new report doesn’t disclose the monetary side of any offers Google might be putting in to buy Mandiant. It cites “a person with knowledge of the discussion.” and is more about how buying the firm could benefit Google’s business. Officially, Google and Microsoft also “did not immediately have a comment,” either.
For Google Though, Mandiant could fit in well with the need for boosting security in their cloud computing business beyond Google Chronicle. That’s a product designed for enterprises to privately retain, analyze, and search the massive amounts of security and network telemetry they generate. It’s a contrast from Microsoft, which was rumored to be interested in Mandiant because it partnered with SentinelOne, whose incident response products competes with Microsoft Defender for Endpoint.
It’s been said that bids for Mandiant were due at the end of February, so it might not be too long until we find out who wins out. It could be a tough one for Microsoft, though, as Microsoft has a solid footing in the cyber security fields, and the FTC might want to scrutinize any potential deal.
Mandiant is most famous for discovering the SolarWinds hack, which changed the face of the cyber security industry.
Have you also jumped on the Elden Ring bandwagon? We ask that because it seems that everybody is only playing Elden Ring nowadays, so the fan base grew dramatically since release.
Even though Bandai Namco’s latest dark fantasy RPG came with quite a number of critical errors and in-game bugs, players won’t turn down an opportunity to get immersed in this virtual world.
Whether killing tough bosses, farming items and runes, or visiting your surroundings is your thing, Elden Ring will surely accommodate your taste.
But what can you do when the game simply won’t collaborate, refusing to launch, or crashing mid-game? The answer is simple: you fix it, either by using specialized software like Outbyte Driver Updater that will update your drivers or by following manual steps depending on your type of error.
How? Don’t worry, as we’re about to show you some tips that will put all this nonsense behind you and allow you to resume your adventure.
How can I fix the Steam Restart required loop error for Elden Ring?
Were you wondering what Elden Ring players are up to nowadays? Simple, they are finding themselves stuck in an endless Steam Restart Required loop when booting up Elden Ring.
Don’t worry, it’s not the end of the world no matter how annoying this is, as we can show you how to move past it and forget it ever happened.
You will firstly you will have to restart the Steam and once it re-opens, but don’t go for opening the game again, you will need to perform a few tasks in order to ensure this won’t happen again.
It will only take a couple of minutes, but in exchange, it will offer you unlimited Elden Ring game time, so let’s get right into it.
Click Steam in the right-hand corner of the application, then select the Check for Steam Client Updates.
Open Steam Settings, go to Account and press change.
Change current setting to Steam Beta Update and press Ok.
Restart Steam completely and Elden Ring should boot up again without a restart.
We know how annoying these issues can be, especially when you spent all that money on a new game and expect it to perform accordingly.
However, software doesn’t always agree with what we want it to do and we end up in this kind of situations. Now that you know how to fix it, nothing can stand in your way, champion.
We also have a great article that explains how to play Elden Ring with DX11, so you might want to visit it.
Was this guide useful to you? Share your experience with us in the comments section below.
There are many topics in the Microsoft Community around Surface Pro issues and the problems with installing Windows 10, updating or upgrading, are also frequent.
Many worldwide users reported that Windows 10/11 setup failed on their Surface Pro 3, so it can be pretty annoying.
Now, we’re discussing a more widespread problem that is affecting Surface Pro 3 owners.
What are the most popular Surface Pro 3 set up issues?
We recently covered various problems that one might encounter when installing Windows 10 on Surface Pro 3 hybrids.
It has been brought to our attention that the latest build of Windows 10 fails to install for a good deal of users. Here’s what one of the affected users has been saying:
installed Windows 10 preview on Surface pro 3 – setup went smooth no issues and or errors, after first boot – surface became very unstable – complete hang during log on screen, or auto reboot after log on. I noticed that before the auto -reboot the screen is flickering – black and normal, system hangs, next auto reboot. I’m up to the level of resetting my surface – have the feeling this is taking hours …. wonder if all will be good in the morning. reboot/clean W8.1 pro install from USB failed with strange bios related error. I hope this is just a single surface pro 3 issue
Several forum moderators hinted that the issue might be related to Connected Standby, therefore you are advised to disable that and see if the setup will work as it’s supposed to.
He then said he was able to get into safe mode, went into the event viewer, and found that the application host was crashing. Here’s another user saying that his screen flickers and that refresh/repair doesn’t work either:
Similar problems as above. I can log in, but the screen flickers every 10-15 seconds or so and is very unresponsive. Will ultimately reboot. Refresh/repair doesn’t work, nor does windows rollback. I’m currently SOL and holding off on a clean install of 8.1 hoping someone comes up with a fix.
The problem is still affecting Surface Pro 3 owners, so if you happen to know a working solution to this temporary problem, do leave your comment below and we’ll be sure to look into it and inform others.
How can I prperly install Windows 10/11 on Surface Pro 3?
Press simultaneously on the Windows and R keys, then type cmd, and hit Enter.
Enter the following command into the command line and press Enter: rundll32.exe pnpclean.dll,RunDLL_PnpClean /DRIVERS /MAXCLEAN
Let the process finish and restart your device
After some time, we finally managed to find a solution for Windows 10 installation problem on Surface Pro 3 devices.
If Windows 10/11 setup failed on your Surface Pro 3, you’ll have to execute one simple command in the Command Prompt, and the above steps show exactly what you need to do.
How do I reinstall Windows 10/11 on my Surface Pro 3?
Turn off your Surface Pro.
Insert the USB recovery drive into the USB port on the Surface Laptop.
Hold at the same time the volume-down button and power button.
Release the buttons when the Surface logo appears.
Select your language and keyboard settings.
Click on Troubleshoot.
Select Recover from a drive. If prompted for a recovery key, select Skip this drive.
Select Just remove my files.
Select Recover. This will take some time and will restart your Surface Laptop. Wait for the proccess to finalize, and Windows 10 S is reinstalled on your Surface Laptop.
If youre device supports the Power Mode, move the related slider to either the Better performance or Best performance setting.
Newer devices have an adjustable power mode to allow you to balance your preference between best battery life and best performance. To view this setting, follow the above steps.
2. Plug in and let your Surface cool down
Because your Surface may be too hot, try moving it to a cooler spot, wait five minutes, and see if it runs faster. When possible, plug in your Surface.
If you are running a memory-intensive app, such as streaming video or playing a game, try closing it for a few minutes. That may cool your Surface down.
Use the following keyboard shortcut to open Windows Settings: Windows + I.
Navigate to System.
From the left window pane, go to Storage, then choose to Configure Storage sense or run it now.
Make sure that Delete temporary files that my apps aren’t using option is checked.
In the Run Storage Sense menu, choose how often you want Storage Sense to run.
Now, choose how often you want to Delete my files in my recycle bin if they have been there for over: Also, in the Delete files in my Downloads folder if they haven’t been opened for more than: choose the option the fits you the best.
Scroll down and under the Free up space now option, click on the Clean now button.
Keep in mind that when you turn on your PC, some programs start automatically and run in the background. You can disable these programs so they don’t run when your PC starts.
As many programs are designed to start automatically when Windows does, you might not even be realizing they’re running.
This is helpful for programs you use a lot, but not for programs you don’t use often because it increases the time it takes Windows to start.
4. Update and fix your drivers
4.1 Manually
Hit the Windows key, type Device Manager, then open the first result.
Expand the section that is directly related to your damaged drivers.
Right-click on the needed driver, the choose to Update driver.
Now, click on Search automatically for drivers.
If there are any compatible available options, you’ll be notified.
4.2 Automatically
To always keep your Surface Pro optimized, we strongly recommend using dedicated software that will take care of your components in a specialized way.
Outbyte Driver Updater is a driver monitoring and updating software package for Windows. It will scan all your device drivers and searches the web for the most recent updates.
For those of you who are beginners, keep in mind that its interface is extremely user-friendly, so it won’t give you headaches.
Outbyte Driver Updater automatically scans your entire computer for missing or outdated drivers at any time. Afterward, you can update the outdated ones or download the missing ones afresh.
Outbyte Driver Updater scans your drivers against a vast database of over 18 million driver files. Hence, you’re always likely to find the correct drivers on that database.
Outbyte Driver Updater
Outbyte Driver Updater will always keep your Sruface Pro 3 drivers clean and up to date.
It seems like many users are extremely interested in discovering some efficient ways to optimize their Surface Pro 3 and if it happens to be in the same boat, we’re here to help you!
If you carefully follow the steps below, your device will surely be optimized and you’ll be able to use it without any issues.
What other related issues can I encounter on Surface Pro 3?
Of course, because it is always important to be aware of and prevent any related issues, we’ve compiled a list of some of the most popular related issues that you can face on Surface Pro 3.
Surface Pro 3 won’t boot – Testers of Windows 10 Insider Build 16288 might have noticed that it left Surface Pro 3 laptops in an unbootable state and stuck on the spinning dots screen, and it seems like more Surface Pro 3 laptops feature the same issue.
The Surface Pro 3 fails to update to new builds – In this case, Surface Pro 3 and Surface 3 devices won’t install the new builds if a SD memory card is inserted. Fortunately, if you ever encounter this problem, you can always access and follow some useful solutions.
Surface Pro Heat and Fan Issues After Windows 10 Install – Surface Pro 3 owners have reported various problems related to the install of Windows 10, meaning that the setup failed to complete properly. Luckly, this issue can be easily solved if you choose the right steps to go around with.
That would be all, if Windows 10/11 setup failed on your Surface Pro 3, after running this simple command in the Command Prompt, you should be able to install Windows 10 on your Surface Pro 3 normally.
Let us know if you face any additional questions, by leaving a comment in the section below.
What is the most valuable asset in Elden Ring? Many will say that the rewards dropped by defeated bosses are, in fact, it.
Yes, we can all agree that getting that new piece of armor and adding another notch to your belt is pretty valuable, but it still isn’t what you should focus on, especially early-game.
As a matter of fact, gamers that already deciphered Elden Ring understood that without runes you simply can’t advance or level up, therefore making them the most valuable asset.
Runes are the main currency of Elden Ring, and much like Souls in previous souls titles, Runes act as the XP and purchase currency at vendors within The Lands Between.
Players can actually lose their Runes upon death, and a bloodstain is generated at the place of defeat. Returning to this place and reclaiming your runes will allow you to re-acquire them.
However, if you perish a second time before getting there, the Runes will be lost forever and you’ll have a much harder time besting your foes.
How can I get more runes in Elden Ring?
Rune farming has been quite a discussed topic during these last few weeks, as players wanted to go know exactly where they have to go and what they have to do in order to obtain more runes.
There are ways in which you can farm literally millions of runes in mearly a few hours, provided you know how the process works.
Gamers also reporting losing a lot of runes in Stormveil Castle, because of an NPC named Gatekeeper Gostoc, that actually steals Runes from you.
Any Elden Ring players that want their stolen runes back simply need to kill Gatekeeper Gostoc to claim them.
We’re about to show you one of the fastest way to get Runes, a process that can ammount to 2.4 million Runes per hour, if you are fast enough.
Obtain the Golden Scarab item in-game.
Return to the first in-game Point of Grace and inspect the message, after defeating Godrick.
Return to the Rose Church, talk to the NPC and complete a small questline.
Obtain the Pureblood’s Knight Medal and use it to teleport to Mohgwyn Pallace to begin the farm.
Locate a point of Grace nearby, to make it easier to respawn and keep farming.
Keep killing the big cluster of mobs next to the Point of Grace repeatedly.
By repeatedly killing these NPCs, you can get 2000, or even 2400 souls, if you have the Golden Scarab. How’s that for some pretty easy and efficient farming?
Have you managed to increase your Elden Ring Rune farm output? Share your experience with us in the comments section below.
Virtual keyboards can be quite useful, especially if you have a keylogger that can steal your sensitive information such as login details.
Some users tend to use virtual keyboards because they have problems using their keyboard or because their keyboard isn’t working properly.
Windows 10 has its own virtual keyboard, but if you’re looking for a third-party solution, today we’re going to show you the best virtual keyboard software that you can download.
If you’re looking for advanced virtual keyboard software, you might be interested in Hot Virtual Keyboard. The keyboard is customizable and you can choose from many different looks and styles.
Regarding customization, there are more than 70 styles available, but you can also create your unique style if you want. In addition, there’s support for multiple languages and layouts. We also have to mention that this keyboard supports an auto-complete function that will make typing easier and faster than before.
Additional features include programmable keys and shortcuts so you can easily launch applications or open certain web pages with a single click. The keyboard also supports macros, so you can record them and use them with just a few clicks.
It’s worth mentioning that this keyboard also supports gestures, so you can add spaces or change the case of the letters with a single gesture.
As for additional features, this application supports different Windows actions, so you can change the volume, control the playback, turn off your monitor and perform all sorts of other actions simply by clicking the dedicated button on your virtual keyboard.
Hot Virtual Keyboard is an advanced virtual keyboard, and it offers great customization and an array of different features. This tool isn’t free, but you can download the evaluation version and use it for 30 days.
Hot Virtual Keyboard
Have a try with this fresh-looking virtual keyboard for faster and more accurate typing.
Comfort Screen Keyboard Pro is a universal on-screen keyboard created to help the users of portable PCs, tablets, or Surface devices.
With this practical virtual keyboard, you have universal support for multiple types of devices. You can utilize it on your PC with pointing devices like a mouse, touch screen, or a pen in order to type without effort.
It’s possible to fully customize the keyboard aspect with various colors and skins, change the size of keys or numbers, modify strokes positions, and more.
Using this on-screen keyboard offers multi-language support. That means you can write in multiple languages with characters that are available for most languages, without any localization settings.
In addition, this software can display Windows-specific shortcut icons on the keys to help you move faster on your device.
With Developer support, you have helpful functionalities to control the on-screen keyboard when you’re writing software code.
Comfort Screen Keyboard Pro
Write using this on-screen keyboard to have maximum productivity on all your devices.
This virtual keyboard will work on any Windows device that has a touchscreen display, so it’s perfect if you can’t adjust to your device’s physical keyboard.
The keyboard has large keys so you can easily type with your fingertips. It’s worth mentioning that this keyboard supports pointing devices, so users with mobility impairments can use it as well.
Also, this keyboard supports customization, so you can easily change the size, color, or transparency of the keyboard with a single click. We have to mention that changing the color is relatively simple, but you can’t use a custom color, instead, you can toggle between a couple of available presets.
The keyboard supports the auto-repeat function and you can repeat the keystrokes simply by keeping the certain button clicked.
Free Virtual Keyboard is a simple tool, and it offers all the necessary features. We have to mention that a portable version is also available, so you can easily run Free Virtual Keyboard on any PC without installation.
Click-N-Type is a simple virtual keyboard that can be useful to users that have problems using a physical keyboard. The keyboard supports word prediction which makes typing faster and simpler. The keyboard also supports macros, which can be rather useful. In addition to macros, the keyboard offers support for AutoClick and Scanning Modes.
This tool offers support for multiple languages and it has many languages and keyboard packs available. We have to mention that there’s a Keyboard Designer feature that allows you to make your own keyboard designs.
Of course, there are custom user-created designs available as well. The tool offers audible and visible feedback thanks to the Spoken Keys feature. Click-N-Type works with all pointing devices including a head mouse, and it even works with virtual mouse programs.
Click-N-Type offers decent features, but we have to admit that the application has a humble user interface that might not appeal to certain users.
Despite the user interface, this is still a great application, so you might want to try it out. Click-N-Type is available for free, and you can download and use the portable version on any PC without installation.
If you’re looking for a virtual keyboard that supports a wide range of features, you might want to consider Touch-It Virtual Keyboard. This virtual keyboard supports both desktop and Winlogon, so it’s perfect for all your needs. The keyboard works on demand and you can start it simply by clicking its floating icon in the bottom right corner.
Touch-It Virtual Keyboard works with multiple languages and it supports multiple monitors and remote desktops. The keyboard is fully customizable and it supports an unlimited number of actions by key. In addition, it also supports Pascal scripting. The keyboard has a modern design, so it will match the look of Universal apps with ease. The keyboard can also appear whenever you select an input field, which is rather useful. This virtual keyboard is customizable and you can even design your own keyboard if you want.
Touch-It Virtual Keyboard is a great tool, and our only complaint is the size of the keyboard. Although it might be easier for some users to use the full-width keyboards on their PC, we found that the full-width version is taking too much space for our liking. Despite this minor flaw, this is still a great application and you can download and try the evaluation version for free.
Another simple and free virtual keyboard for your PC is VirtualKeyboard. This tool has a humble user interface, and it supports self-training predictive text. Thanks to this feature you can quickly and easily enter words.
Additional features include color coding, multiple dictionaries, and user-made macros. The keyboard also supports an effective sweep scanning mode thus allowing you to control the keyboard with a single click.
The keyboard also has common functions available such as copy, cut, and paste, which is rather useful.
Changing the dictionary is quite simple, and you can do it right from the dropdown menu with just a few clicks.
VirtualKeyboard is a decent tool, but its humble user interface might turn away some users. If you want to try this tool, you can download it and use it for free.
Virtual keyboards can be useful especially if you’re concerned that your computer is infected with malware or a keylogger. Keyloggers will monitor your keyboard input and send it to malicious users without your knowledge. If you want to protect your personal information, you might want to use Neo’s SafeKeys v3.
This application allows you to enter your login information without using a physical keyboard. This is one of the safest ways to protect your login information from malicious users. The tool also has screen logger protection that will protect your sensitive information at all times.
We have to mention that this virtual keyboard supports Injection Mode so you can use this tool with programs that don’t accept the drag and drop methods. The tool also supports transparency and auto-hiding thus making your passwords secure from malicious users. Neo’s SafeKeys v3 also supports hover entry, so you can enter your password without even clicking your mouse.
Neo’s SafeKeys v3 is a great tool if you want to protect your login information from malicious users. This is a decent virtual keyboard, and it’s available for free. In addition to being free, this tool is also portable, and it will work on any PC without installation.
This tool is designed to work with any Windows device that has a touchscreen display. We have to mention that this keyboard supports Windows logon screen so you can easily log in to Windows by using this tool.
The keyboard is multi-lingual and the key layout will adapt to the current input locale. To make switching between different inputs easier, the tool has a dedicated button that allows you to switch inputs instantly.
This virtual keyboard can be resized and moved freely so you can easily adjust it. In addition to a standard keyboard, you can also use numeric keyboard and function keys.
The application supports special shortcuts such as multimedia player, web browser, etc. The tool also has a floating icon, so you can easily open the virtual keyboard at any time. EyesBoard virtual keyboard has Caps Lock and Num Lock indicators and it even supports Ctrl+Alt+Del and Win+L shortcuts.
Regarding customization, this tool supports different color schemes and several levels of transparency. If you want, you can even lock the keyboard at the bottom of your screen so that it doesn’t interfere with any open windows.
If you’re a developer, you’ll be pleased to hear that there’s an API available for third-party integration, so you can expand the functionality of the keyboard even further.
As for customization, all keys and keypads are defined in XML so you can easily modify them if you want.
EyesBoard is a decent virtual keyboard and it offers all the features that basic users will need. This application isn’t free, but you can download the evaluation version and use it for 15 days.
My-T-Soft Virtual Keyboard comes with over 200 international layouts, so it will support almost any language. The application supports up to 2000 keystrokes on each button, and you can also group up to 15 buttons on a panel. Using this tool you can assign any of the 63 functions to any button thus allowing a great level of customization.
This virtual keyboard has its own 4-function calculator that will always remain on top of all other windows. This allows you to enter the desired input right into the open document or input field. There’s also a built-in Magnifier tool that allows you to magnify a certain part of your screen in order to see it better.
My-T-Soft Virtual Keyboard supports customization and you can change the background color or the color of the open panel. In addition, you can change the color of the button text, button face, button highlight, button shadow, and keyboard background. If you want to customize your keyboard even further, you can use the Developer Kit to do so.
This application is fully compatible with touchscreens, but it also works with trackballs, pens, or any other pointing device. The keyboard supports infinite sizing and allows you to show and hide certain keys.
In addition, there are 11 panels available, and you can also create your own panels if you want to. Just like many other virtual keyboards, this one also supports macros so you can start certain programs simply by pressing the appropriate shortcuts.
My-T-Soft Virtual Keyboard supports a wide range of features, so it will be perfect for basic and advanced users alike. We have to mention that this application has a humble and slightly outdated user interface that might turn away some users.
The free demo is available for download, but if you want to continue using this application, you’ll need to purchase a full version.
This virtual keyboard is a keyboard replacement, and it comes with smart word prediction that will allow you to enter words quickly.
A virtual keyboard memorizes your words as you enter them so the more you use it the more suggestion you’ll get while typing.
We also have to mention that the word prediction can also predict the next word that you’ll enter, thus making typing process faster and streamlined. Regarding the predictions, they are available in 23 different languages.
This virtual keyboard supports customization and you can easily change the size of the keyboard, button size, the distance between buttons, font size, etc. Plus, this keyboard is optimized for single clicks, but it also supports hover mode that lets you enter words without a single click.
The tool also supports different skins and levels of transparency and it even allows you to create text macros. There are also special keys for frequently used tasks and scanning modes for 1 or 2 switches.
BeKey On-Screen Keyboard is a great tool and you can use the trial version for 30 days. If you want to continue using this tool, you’ll need to purchase a license.
Are you struggling to complete your work because of a typing lag or slow keyboard response? If you tried restarting your computer or installing any pending updates, and it didn’t work, try these tried and tested solutions to help resolve the typing issue in Windows 10.
Why is my keyboard typing very slow?
If you’re having Bluetooth keyboard lag, something may be interfering with your device, so it’s advised to move closer to the adapter or find the source of the problem. Here are some other possible issues:
Keyboard damage – It’s possible that your keyboard isn’t typing because it’s damaged, so pay attention to any unusual sounds coming from the keyboard, especially when typing. This is often the reason behind keyboard delay on Windows 11.
Driver mismatchor conflict – If you install a new keyboard and still have the old one installed, the two drivers may conflict.
Software interference – Some software installed lately that has something to do with typing might interfere with the normal usage of your device.
If you’re using a laptop, you might want to check our laptop keyboard not working guide for more solutions. Our reader reported a Dell laptop keyboard with a slow response, but it can happen on any device brand.
Now that we know where the problems arise let’s go to the actual solutions to fix the keyboard’s delayed response.
How do I fix the keyboard’s slow response?
Before starting any advanced procedures, let’s go through some easy-to-follow preliminary measures:
Restart your PC and see if there are any changes.
If you’re using a wireless keyboard, use a wired mouse or keyboard to restart your computer, then plug in the USB receiver directly into your computer instead of using a hub.
Disable any startup programs from starting upon boot, as they may be causing the typing lag or slow keyboard response.
If nothing has changed after these steps, try the solutions below to fix the problem.
1. Run the Keyboard troubleshooter
Click the Start button and select Settings.
Choose Update & security from the available options.
Pick the Troubleshoot tab from the left, then select Additional troubleshooters from the right.
Click the Keyboard option to expand it and hit the Run the troubleshooter button.
Follow the on-screen instructions to perform the troubleshooting.
Running the Keyboard troubleshooting is the easiest thing you can do to find if there are any problems with the hardware or driver, and many of our readers have managed to fix the keyboard lag problem with this solution.
2. Run the Hardware and Devices troubleshooter
Press the Windows + R key combination to start the Run console.
Type the following command and press Enter: msdt.exe -id DeviceDiagnostic
Select Recovery from the left pane, go to Advanced startup and click the Restart now button.
Select Troubleshoot from the Choose an option screen.
Click Advanced options.
Go to Startup Settings.
Click Restart.
Once your computer restarts, a list of options will come up.
Choose 4 or F4 to start your computer in Safe Mode.
Safe Mode starts up your computer with limited files and drivers, but Windows will still run. To know whether you’re on Safe mode, you’ll see the words at the corners of your screen.
If Safe mode is not working on Windows 10, this detailed guide will help you get past the booting problems.
If the problem isn’t there while in Safe mode, then your default settings and basic drivers are not contributing to the issue.
4. Run DISM and SFC scans
Click the Start button, type cmd and select Run as administrator from the results.
Type this command to scan for missing components and press Enter: Dism /Online /Cleanup-Image /ScanHealth
Type this command to check for missing or broken files and press Enter to run it: Dism /Online /Cleanup-Image /CheckHealth
Type this command to scan and correct any causes of the Windows 10 desktop is slow to load issues, and press Enter to run it: Dism /Online /Cleanup-Image /RestoreHealth
Wait for all the DISM scans to finish, then type the following command to run a SFC scan and press Enter: sfc/scannow
The DISM and SFC tools will help you fix Windows corruption and disk errors.
This happens when Windows Updates and service packs fail to install due to corruption errors, like if you have a damaged system file.
Expand the Keyboards category, right-click your device, and select Update driver.
Select Search automatically for drivers.
If the system finds any new drivers, it will install them. Also, if you find more than one devices in the section that you don’t know about, right-click on them and select Uninstall device.
In case Windows does not find a new driver, you can look for one on your device’s manufacturer’s website and follow the details of the instructions.
Note that manually downloading and updating drivers can damage your system when you choose and install the wrong version. You can always rely on a professional driver updater for this task.
6. Perform a Clean boot
Press the Windows key + R to start the Run console, type msconfig, and press Enter or click OK.
Find the Services tab.
Select Hide all Microsoft services box.
Click Disable all.
Go to the Startup tab and click Open Task Manager.
Close Task Manager, then click OK.
Reboot your computer.
This reduces conflicts related to software that can bring up the root causes of the typing lag/slow keyboard response.
These conflicts can be caused by applications and services that start up and run in the background whenever you start Windows normally.
7. Create a new user profile
Click Start and select Settings.
Select Accounts.
Click Family and other users, then choose Add someone else to this PC from the right pane.
Fill in the form with the user name and password. Your new user account will be created.
Click on the Change account type option.
Click the drop down arrow and choose Administrator to set the account to the administrator level.
Restart your computer.
Login to the new account you just created.
Create a new user profile, then change settings to administrator privileges, and check if the problem persists.
8. Install drivers in compatibility mode
Download the latest driver from the manufacturer’s website and save it on your local disk.
Press the Windows key + E to start File Explorer and navigate to where you stored the downloaded file. By default, you will find it in the Downloads folder.
Right-click on the setup file of the downloaded driver and select Properties.
Click the Compatibility tab.
Check the box next to Run this program in Compatibility mode and select the Operating System from the drop-down list.
Hit Apply and OK, then double-click the file to launch it. The driver will install, then check its functionality.
9. Run System Maintenance Troubleshooter
Click Start, type control panel and click on Control Panel from the results.
Make sure you select Large icons under the View by option, then click on Troubleshooting.
Click on System and Security.
Click on System Maintenance.
Click Next and follow the instructions to run the System Maintenance Troubleshooter.
If prompted, click on Try troubleshooting as an administrator.
We hope our guide helped you fix the keyboard lag or responsiveness issues, and now everything is working correctly.
As most of you remember, Windows 11 officially began its life on the 5th of October 2021, when the Redmond-based tech giant deemed it public-ready.
Nothing further from the truth, unfortunately, as lots of users avoided making the transition because of all the bugs and the overall bad experience.
When talking about the new OS, Microsoft stated it plans to release a single feature update per year for Windows 11 and 10 going forward.
Now, we’re more than pleased to announce that the first feature update for Windows 11 has been declared as feature complete.
Windows 11 22H2 could begin its rollout this summer
Microsoft just released Insider Preview build 22567 for Windows 11 and a cumulative update build, which brings the build number to 22567.100.
The KB included no new features or changes, as its main purpose was to test the servicing pipeline for builds in the Dev channel according to Microsoft.
Thus, this latest update confirms the version of the next feature update, as Microsoft lists it as Windows 11 version 22H2 in Windows Update.
You might also like to know that the version indicates the timeline in which the new version will be released, which in this case is the second half of 2022.
Although many of you were still hoping for extra additions, no new features are going to be added to Windows 11 versions once they are declared feature complete.
The tech giant will continue to work on new features for the next feature update, one that is scheduled for release in 2023.
The information came from Zac Mendez on Friday, when he announced on Telegram that the Feature Complete for Windows 11 22H2 is actually real.
As far as Windows 10 is concerned, work on version 22H2 will continue over the upcoming weeks and months.
Microsoft developers will use this time to also fix some of the pending issues and also improve features that have been added already to the new feature update.
Windows 11 Insiders are already expecting the tech giant to send this new version to the Beta development channel soon, in order to increase the number of devices that participate in testing.
Developers have yet to announce a release date for Windows 11 version 22H2, but rumors suggest that it may be released this summer.
In other words, Windows 11 version 22H2 could be finished in May 2022, and released between June 21 and September 23 of 2022 according to internet speculations.
Let’s not forget this is Microsoft and, even with development still underway, we also have to consider that delays may occur, pushing the release date to October 2022 or even later than that.
The developer build versions of Windows 11 may receive new features in the coming builds as these are active development builds.
All of the Dev builds will move to a new build number eventually that distinguishes it from beta and stable versions of the operating system.
When do you think Microsoft will be ready to start rolling out this first huge update for Windows 11? Share your thoughts with us in the comments section below.
Piping design is the detailed specification of the physical piping layout within a process plant or commercial building. In earlier days, this was sometimes called drafting, technical drawing, engineering drawing, and design.
Today this task is commonly performed by designers that have learned to use automated computer-aided drawing or computer-aided design (CAD) software.
However, it’s much easier to design complicated piping schemes and develop detailed projects using automated software that offers all the tools you need.
Given that these 3D designing tools are prevalent in the industry, they can be used in different areas for piping or plant designs. Plus, even large companies use this kind of software in order to build ambitious projects.
You can also confidently pick one of these 2D or 3D piping tools for more support on your engineering schemes.
In this article, we will list the best options for piping design CAD software available on the market.
CorelCAD is an affordable CAD solution for professional 2D drafting and 3D design. It offersindustry-standard file compatibility with .DWG, .STL, PDF and .CDR.
CorelCAD has a new user interface that enhances time-saving and offers a more intuitive way to design professional 2D or 3D drafts.
The 2D drafting feature offers new helix tools for 2D spirals, advanced table tools, and a MultiLeader tool to configure and adjust callouts as your drawings evolve.
The 3D capabilities offered in CoredCAD offer you a simple way to transform your 2D designs into 3D layouts with a wide array of intuitive tools – EntityGrips, Properties palette.
ColedCAD is fully compatible with AutoCAD R2018 .DWG file format that ensures easy collaboration with your business partners.
Features:
Native .DWG files – easy sharing with bot internal teams and external suppliers
Compatibility with all major CAD programs
3D solid editing and modeling tools
Table supports – allows you to export and import tables in CSV format (Microsoft Excel)
Edit 3D objects by using smart tools
BlockAttribute properties and settings
Quick InputPlay – brings commands directly to the cursor to easily input coordinate positions, lengths, angles, lines, etc.
Auto-completion function for easy predictive typing
Ability to add drawing constraints
Dynamic blocks
Easy file sharing
CorelCAD
Get this 2D drafting software for manufacturing professionals who need to upscale their designing projects.
Edraw P&ID Designer is a professional tool that enables you to instantly generate piping and instrumentation diagrams. It can help you create professional-looking p&id, plant p&id, chemical p&id, distribution p&id, and also power P&ID.
Even beginners can easily use Edraw P&ID designer because of its predefined shapes and easy drag-and-drop creation process. All the shapes included in this powerful program are vectors allowing you to design high-resolution plans.
Edraw also bolsters a set of powerful and very useful tools called ‘auto-connection that helps you connect pipe shapes quickly. Some of the shapes used in the process of creation have text boxes attached so labeling is convenient.
The wide array of standard and smart shapes can also be used in many kinds of engineering diagrams. Shapes are constructed with a floating action button for flexible modifications and one shape has many varieties that users can change easily either by changing the theme or changing the font color and lines.
It is 100% integrated with MS programs and supports 18 formats of export. It was designed to work together with your colleagues, easily share designs with stakeholders and run design presentations.
The images created can be either simplified with black and white symbols or colorful photo-realistic images. One other great feature is the fact that the images are fully editable – you can change color, resize, separate.
You can find a full ‘How-to’ guide on the tool’s official page.
Edraw P&ID Designer
If you want efficient piping design software for building anything, do it facile with Edraw P&ID Designer.
Cadmatic 3D Plant Design is a powerful database-driven tool that gives you tools for creating 3D layouts, piping, HVAC, cable tray, and structural designs of plants in shaded and colored views. It also produces information for installation and ordering materials.
The piping design feature includes unique tools for piping designers to easily create complex piping designs. The design process is fully integrated with diagrams and pipe routing that ensure your design is intuitive and easy to understand.
Cadmatic Plant Design assures you that the correct components from the standards library are being used when creating a piping design. This program takes advantage of the suggested connection points according to the diagram and online collision control, allowing you to create piping designs without errors.
With each software update, extensive standards are provided (DIN, ANSI, ASME, EN, and others). The powerful piping design modification tools give you the possibility to change the pipe routing geometry, the nominal sizes of pipes, and separate components, checking pipe connection compatibility automatically.
Cadmatic Plant Design 3D viewing technique and model database structure keep your designs extremely light and user-friendly even in the most complicated plant models.
The pipe and cable tray routing is constructed so it is driven by your specifications, ensuring that the correct materials, sizes, and components are being used.
Other features include:
Component Manager – allows you to model different kinds of components such as pumps, tanks, etc.
Integration with P&ID
Ability to share data between the diagram and 3D models
CADWorx is an integrated complete AutoCAD and BricsCAD based software that provides intelligent drawing and database connectivity, a professional level of automation, and easy-to-use drafting tools.
This software is quick and easy to set up and use. The bi-directional links between CADWorx and analysis programs for pipes and vessels enable you to easily share information while keeping the entire information database synchronized.
You can as well use this drawing design tool to improve collaboration with instruments such as markups, design comments, or redlining. With CADWorx Review you can review models by designers or other stakeholders anytime.
Moreover, using CADWorx P&ID Professional drawing piping or instrumentation diagrams becomes easy and fast enough to meet your workflow standards. Also, it provides flexibility in sharing your results with the stakeholders, constant support with plant project execution, and so on.
The main idea is that with such an integrated suite of benefits you can maximize your piping projects and easily create impressive designs.
Therefore, this platform provides complex piping and design instrumentation services, using intelligent features made to help you design successful projects.
Key features include:
Intelligent design – easily create diagrams and share data with stakeholders
Supports different industries – chemical, offshore, piping, power, etc.
Link information to P&ID components
Place P&ID components accurately by piping specifications
Aveva Everything3D is another software option for pipe designing offering you complete support for migrating from AVEVA PDMS projects reducing cost, timescale, and project risks.
AVEVA 3D has the ability to shorten project stages, reduce efforts and eliminating errors and rework while offering options for more efficient collaboration.
At the same time, this advanced 3D design solution can boost your engineering drawing reports exponentially thus generating a time-effort balance. The multi-disciplinarity of this software can guide anyone to create 3D designs regardless of the industry.
Other important features imply fast deployment and project start, easier regulatory compliance to ensure your drawings or clash-free design efficiency.
Besides all, such potent software can be used in power industries as well, such as the marine sector, plant projecting.
Hence choosing this solution to design your buildings of any infrastructure you assure designing productivity and design successful outcomes.
Key features include:
Rapid project star-up
Design efficiency
Easy to adhere to regulatory, industry , company and project standards
Side-panel that lists all related available documentation in the Digital Asset relating to a selected object
Universal viewer – presents information directly inside AVEVA
In this article, we listed some of the best options of piping design software offering you a wide range of features to cover all your piping design needs. These options give you the tools you need to create 2D and 3D models at a professional level.
Let us know what you think about these tools in the comment section below.
Are you unable to access Microsoft Office 365 after a recent update? And it is showing a “Cannot open any more databases (error 3048)” error message.
If so, then you have landed on the right page. Because in this guide, we will explain what could be the reason behind cannot open any more databases error 3048, and give you a set of solutions that would hopefully fix the error at hand.
To give you a brief overview of this issue, the Microsoft Office 365 error 3048 which shows cannot open any more databases error message is a bug that is found at the runtime.
When this error occurs, Microsoft Office 365 fails to run properly or crashes while it is running. This issue has been reported by multiple users on Microsoft’s official support pages as well as other forums.
This cannot open any more databases error 3048 is not a new problem. However, it seems like, after a recent update, this error has accelerated and is troubling more users than before.
The fact of the matter is that even though this is not a new problem, it has been overlooked by the developers of Microsoft Office 365. As there isn’t a permanent solution or fix for this cannot open any more databases error 3048, as of yet.
Whatever the case may be, in this guide, we will list down all the solutions that you can try and apply and possibly fix the cannot open any more databases error 3048 issue in the process.
What actually are the reasons behind cannot open any more databases error 3048 in Microsoft Office 365?
Before we take a look at the solutions, it is important to understand the reasons that are causing that particular issue.
The cannot open any more databases error 3048 in Microsoft Office 365 is a runtime error. As already mentioned, when it surfaces, you will face trouble opening or operating the Office 365 software.
However, this error does not mean that the software is corrupt in any way. There is a possibility that it is caused by a virus or malware, but this is not always the case.
It could be that the underlying code did not work during the Microsoft Office 365 runtime. And if that happens, you will see this annoying pop-up on your screen.
There isn’t a specific error message for this error either. You will see different types of error messages, which are all related to error 3048.
Here is a list of some of the error messages for the cannot open any more databases error 3048 issue, you could come across:
Microsoft Access Error 3048 Application Error.
Microsoft Access Error 3048 not valid.
Sorry, Microsoft Access Error 3048 encountered a problem.
Cannot find Microsoft Access Error 3048.
Microsoft Access Error 3048 can’t be found.
Problem starting application: Microsoft Access Error 3048.
Microsoft Access Error 3048 not working.
Microsoft Access Error 3048 failed.
Microsoft Access Error 3048: App Path is Faulting.
There are chances that this error could pop up because of a virus infection, or because of a sudden drop in internet connection. Moreover, it could be because of important file deletion or faulty installation also.
An important point to note is that these error messages could pop up with any of the Microsoft Office 365 related apps, including MS Word, MS Excel, MS OneNote, MS Access, or MS Publisher.
Now that you have some idea about Microsoft Office 365 cannot open any more databases error 3048, let us check out the solutions that could help you resolve it.
How can I fix cannot open any more databases error 3048 in Microsoft Office 365?
1. Close the affected program
Press Ctrl + Alt + Del and open Task Manager.
Select the affected program from the list.
Click the End process button at the bottom of the window.
This method gives you some extra information about this error. Notably, when you close programs one by one, you will see the cannot open any more databases error 3048 message appear for the program that is affected by this bug.
So, this method lets you identify the affected program. You can then proceed with the other solutions listed below as it has now narrowed down the problem.
2. Re-install affected program
Open the Start menu from the Taskbar below.
Search for Control Panel and open it.
Select Programs and Features.
From the application manager, select the affected program.
Hit the Uninstall button.
A faulty installation could also be the reason behind this being unable to open any more databases error 3048 with Microsoft Office. In such a case, you can follow the above steps to completely uninstall the product from your PC.
After the process is complete, re-install Microsoft Office on your PC, Make sure there are no interruptions while the installation process is going on, and check if this fixes the issue or not.
3. Perform a virus scan
Click on the upward arrow button on the bottom-right taskbar.
Select Windows Security.
Click on Virus & threat protection.
HIt the Quick Scan button and let Windows Security scan your PC for virus and malware.
You can also select the Scan options button.
Under Scan Options, you can also choose Full scan to deeply scan your PC for virus or malware.
While we don’t have any third-party antivirus applications installed on our PC, we made use of the Windows Security Defender.
But the above steps would give you an idea that you need to perform a scan to check for any viruses or malware.
4. Clear system junk files
Click the Start menu.
Search for Command Prompt and open it as an administrator.
Type in cleanmgr and hit Enter.
Select the drive from where you wish to clean the junk files. Preferrably select the drive where you have installed Microsoft Office.
Disk Cleanup will now begin calculating the amount of storage space you can reclaim.
Check the boxes of the categories you want to clear, and hit OK.
Over time, your PC accumulates several temporary files from various apps and games that you install. These files may have become redundant as you may have uninstalled much of that software.
So, one of the best ways to clean out junk files from your PC is to make use of the Disk Cleanup tool, which comes in-built with the Windows OS.
Most likely, these temporary or junk files are corrupt and conflict with Microsoft Office, resulting in the error. Check if this resolves your issue or not.
You will see three configuration files along with a setup.exe file.
According your PC configuration right-click on the appropriate configuration file and select Edit. Notably, for 64-bit OS select configuration-Office365-x64.xml, and for 32-bit OS, choose configuration-Office365-x86.xml.
Select Notepad to edit the file.
As far as what changes you need to do, visit this official Microsoft website to decide a previous version you wish to revert back to.
Now edit as shown in the image below:
You can change the Channel from Monthly to Broad for Semi-Annual Channel or Targeted for Semi-Annual Channel (Targeted). Additionaly, change the Version to the appropriate previous version.
Once that is done, save changes and close the file.
Again open Command Prompt and run it as an administrator.
Switch from the default C:\WINDOWS\system32 and enter the below command to the ODT folder in desktop.cd C:\Users\hugol2\Desktop\ODT Do note that hugol2 is the username of the PC showing this procedure. You need to change it as per your PC’s username.
Enter the below command line to download the Office 365 package. setup.exe /download configuration-Office365-x64.xml
A new folder will appear inside the ODT folder.
After the office installation package is downloaded, you can now uninstall the Microsoft Office 365 from your PC.
Now, to install the previous version of Office 365, open Command Prompt and run it as an administrator.
Switch from the default C:\WINDOWS\system32 and enter the below command to the ODT folder in desktop.cd C:\Users\hugol2\Desktop\ODT Do note that hugol2 is the username of the PC showing this procedure. You need to change it as per your PC’s username.
Type the below command and press Enter. setup.exe /download configuration-Office365-x64.xml
Open the Microsoft Office app with which you are facing the cannot open any more databases error.
Click on the File menu option.
Hit Options.
Select Trust Center from the left side pane.
Choose Trust Center Settings.
Click on Trusted Locations from the left pane.
Select Add new location.
Add a new trusted location and hit OK.
Save the changes and exit.
For several users, adding a new trusted location has fixed the cannot connect any more databases error 3048 on Microsoft Office.
7. Run a SFC Scan
Click the Start menu.
Search for Command Prompt and open it as an administrator.
Type the below command and hit Enter.sfc /scanow
You PC will start scanning for error code 3048 and in the process, will try to fix the issue as well.
8. Run Check Disk utility
Click the Start menu.
Search for Command Prompt and open it as an administrator.
Type the below command and press Enter.chkdsk /f
If the check disk utility says that it cannot run because the volume is being used by another process, you can simply type in Y to schedule a scan, next time the system restarts.
9. Reinstall Runtime Libraries
Open the Start menu from the Taskbar below.
Search for Control Panel and open it.
Select Programs and Features.
Uninstall all Microsoft Visual C++ Redistributable Package applications one by one.
Under Product Information, click on Update Options button.
From the drop-down menu, select Update Now.
If a new update is available, follow the onscreen process to install it.
Since this issue was reported extensively very recently, Microsoft released a new update on February 8, 2022. The new update arrives with build number 14827.20192.
According to Microsoft, the update includes a fix for the problem of being unable to open any more databases error 3048.
There are chances that the update hasn’t downloaded and installed automatically for you. So in such a case, you need to manually check for the update, and if available, download and install it by yourself.
We hope that this guide helped you fix the “can not open any more databases error 3048” in Microsoft Office.
Let us know in the comments below which methods did the job for you. If you have any other solutions to this problem, you can share them as well.
In January, Microsoft’s Sea of Thieves video game had indicated that it had big plans for 2022. Later on, in February, we saw the pirate-themed video game release its first action-packed adventure dubbed Shrouded Islands.
As spotted by the folks at Pure Xbox, Rare provided a detailed account of what gamers should expect of the sixth season. “The headline addition to Sea Of Thieves’ sixth season is Sea Forts, a new type of ‘mini raid’ intended for single teams. ” It will also come with emporium content, three new adventures, a new plunder pass, as well as a new mystery.
Sea of Thieves released a video on their YouTube channel, on March 7, a few days before the official launch, which walks you through the game in terms of the adventures and improvements expect upon release.
Are you a Sea of Thieves player? What do you think of Season 6? Let us know in the comments below.
A total of 13 games are set to be released on Xbox Consoles this week. While none of them are blockbuster, triple A titles, there is a good lineup here, with something to suite just about any type of gamer. Let’s have a look.
Things start out a little slow for the week, with only two games lined up for the first half, those being Dawn of the Monsters on Tuesday and Splash Cars on Wednesday.
Things really ramp up on Thursday, though, with 9 games releasing on the 10th. Here’s the list.
The week in Xbox releases closes out with two more titles coming on Friday: WWE 2K22 and Cosmos Bit.
In all it looks like another good week for Xbox owners, as these games are playable on either the Xbox One or the Series X/S. And there is a good variety here, too, with everything from sports sims to role playing games to retro-inspired indie side-scrollers.
In a press event at the Microsoft India Development Center in Hyderabad today, Microsoft announced its intent to establish its latest datacenter region in India. The Hyderabad datacenter region will be an addition to the existing network of three regions in India across Pune, Mumbai, and Chennai. It will offer the entire Microsoft portfolio across the cloud, data solutions, AI, productivity tools, and customer relationship management (CRM).
There’s no definite timeline for the datacenter to be operational, but at the launch, Anant Maheshwari, President of Microsoft India, shared that it typically takes 24 months to setup a datacenter region. Across India, the demand for cloud as a platform for digital transformation, driving economic growth and societal progress, is increasing. The new datacenter region in Hyderabad will play an important role in meeting India’s burgeoning cloud requirements.
Microsoft has a long history with Hyderabad (and the state of Telangana) which hosts the company’s largest development center outside of the Redmond headquarters. This will also be one of the largest foreign direct investments (FDIs) the state has attracted. Microsoft is also partnering closely with the government of Telangana to accelerate the adoption of cloud, AI, IoT and cybersecurity solutions for governance with a variety of skilling programs.
From left to right: Rajiv Kumar (Managing Director, Microsoft IDC), Anant Maheshwari (President, Microsoft India), and Rajiv Sodhi (Chief Operating Officer, Microsoft India)
According to IDC, Microsoft datacenter regions in India contributed $9.5B revenue to the economy between 2016 and 2020. Beyond GDP impact, the IDC report estimated 1.5 million jobs were added to the economy, including 169,000 new skilled IT jobs.
The new datacenter region will be built with sustainable design and operations in mind, enabling Microsoft to responsibly deliver cloud services at scale. The company has already committed to have a 100 percent renewable energy supply equivalent to the electricity consumed by Microsoft datacenters by 2025.
If you want to get back the customization options Windows 10 had, you should download and install StartAllBack. Don’t worry, we’ll walk you through all the steps to set it up perfectly.
In the page, scroll down and click the Download button with the latest version of StartAllBack.
Click Save File in the new window that appears.
Locate the file’s location and double-click it to begin installation. Then select Install For Me.
Next, a window will asking you if you want to stick with Windows 11 look or switch to a Windows 7 or Windows 10 appearance.
As an example, this guide will choose the Windows 10 option.
As you can see from the taskbar, the style has changed to look similar to Windows 10.
To change the layout, right-click the Start menu and select Properties.
StartAllBack appears and you can continue customizing.
In case you’re wondering, StartAllBack is safe to use, and it doesn’t come with any hidden malawre.
2. Customize the settings
The settings options for StartAllBack appears in the left hand menu.
The Start Menu allows you to customize the Start menu.
You change the visual with the drop-down menu at the top. You can change it to match Windows 7, 8, or the default.
You can also change how big the icon should be, what is displayed on the right, and what is highlighted.
After configuring the settings, click the Start menu to see how it looks like.
Taskbar, as the name suggest, allows you to change the taskbar.
You change the Start menu icon, where the taskbar sits, and how big the icons should be.
Customize the settings however you like.
Explorer customizes the File Explorer.
Options include three different styles, context menus, and a details pane.
The File Explorer options are admittedly a little difficult to gage.
Advanced allows you to change the color of the Start menu and taskbar.
It also includes options on how to store and display recently opened files.
Once done, the Start menu and taskbar look very different.
About doesn’t offer any customization options other than giving the opportunity to purchase the full version and tell you how long you have in the free trial.
3. Create a new Start menu
To create your own Start menu, begin by selecting what style and how many icons you want.
For example, the Start menu will be in a Windows 7 style with 20 small icons.
You can allow what the Search function finds under Search and have the menu highlight new apps.
Under Right Side Items, you can select which apps and feature appear in the Start menu. Selecting Link adds them to the left side and Menu adds them to the right side.
Open your Start menu and see how it all looks.
4. Create a new taskbar
Say for example, you want a segmented taskbar that sits at the top with its icons centered in a Windows 7 style with large icons.
In the Taskbar section, go to the Tweak behavior and superpowers section.
Make the changes you want like having the taskbar sit at the top segmented with dynamic transparency.
Underneath Choose Taskbar style, select the changes you want like the visual style, icon size, and margins.
Once done, the changes will appear immediatedly.
How can I get rid of StartAllBack?
You have two options when it comes to removing StartAllBack and getting back to the original version of Windows 11:
Disabling the app – the quickest method from the two, and it also allows you to activate it with ease at any point in time if your choose to do so
Uninstalling the app – this process can take a bit more time, and the process of re-installing the app again will also take extra time.
If you’re not sure which of these options suits you best, think about it like this: If you’re still undecided if you will want to use the app in the future, disable it, and then enable it whenever you need to.
In case you don’t plan on using the app anymore, simply uninstall it and remove the app entirely from your hard drive.
Below, you will find both of these methods described in a step-by-step fashion:
➡ Disable the app
Go to the Advanced tab on StartAllBack.
At the bottom of the window will be a box with text that reads Disable program for current user. Click it.
Next, open the Start menu and click the arrow next to Shut down.
Select Sign out.
Sign back in to your Windows 11 computer.
You will find that all the changes you made have now been disabled.
To learn more, we also have an in-depth guide on how to disable StartAllBack, so don’t miss it.
➡ Re-enable the app
To enable StartAllBack again, go to the Control Panel.
Click StartAllBar and the app will open again.
If StartAllBar isn’t in the Control Panel, open the file explorer.
In the address bar, type in C:\Users\USERNAME\AppData\Local\StartAllBack\StartAllBackCfg.exe. Where it says USERNAME, type the name of your own.
StartAllBack will appear. Return to Advanced and deselect the Disable option at the bottom.
Sign out and back in again. The changes you made previously are now back.
Conversely, you can uninstall StartAllBack.
➡ Uninstall the app entirely
Start by opening the Settings menu.
Select Apps on the left hand side.
Click Apps & features.
Locate StartAllBack in the Apps list.
Click the three dots on the right and select Uninstall.
If you want to avoid going through all these steps to uninstall software and want to ensure that all pieces of any software are removed from your device, we recommend that you use a specialized software uninstaller like CCleaner.
What is the StartAllBack feature?
StartAllBack is a user interface app that intends to “fix” everything that’s wrong with the Windows 11 user interface. It does this by giving people the option to revert things to a Windows 10 style, or even a Windows 7 style for those who miss the old interface.
And it doesn’t stop there as there are a lot of customization options on StartAllBack. You can even make the user interface look like something straight out of a Chromebook.
Other customization options include an improved File Explorer, Control Panel, the ability to move the taskbar to the top of the screen, new menus, new fonts, fast search, and so much more. There’s something it for everyone.
Now, this isn’t a free app that you can download. You do have to purchase a license to get yourself a copy, and there are even Business versions for purchase that allow you to change up to 400 different PCs.
Fortunately, StartAllBack is cheap and there is a free trial available if you want to try out the app.
This guide will show you how to download the free trial of StartAllBack and take you through some of the key features available on that particular version, so you can decide for yourself if you want the full version. The guide will also show how to access the settings and how to uninstall them.
Are there other ways that I can customize my Windows 11 computer?
There are a lot of different ways to customize your machine. For example, you can customize what your Function Keys do thanks to an app called Microsoft PowerToys. After opening the app, you go to the Keyboard option, select which Function Key you want to change, and type in the command. Although, you can’t add CTRL+ALT+DEL to the app.
It’s also recommended that you purchase yourself a remote control software for your computer. It’s a useful app that gives you the ability to control another computer and certain aspects of it from anywhere, so long as the main computer has access to the host.
As for the future, a leak on Twitter has revealed that Windows 11 desktop stickers are making their way to the system. They’re stickers that allow you to pick and place decorative images of cute animals over your desktop. Nothing crazy or life-changing, but it’s certainly a cute way to change your computer’s look.
Summary
Why did Microsoft undo Windows 10’s user interface? People liked that version. It does appear that Microsoft took inspiration from macOS when it was developing Windows 11 and got rid of a lot of the customization options people expect to have.
The changes made to the Start menu, right-click context menu, taskbar, and others have rubbed people the wrong way. People started to raise the question of why fix what wasn’t broken.
If you’re looking to install StartAllBack on ARM version of Windows, you’ll be pleased to hear that the software is fully compatible with it. Moreover, if you’d like to look into viable alternatives, we’ve got you covered.
Feel free to leave a comment below if you have any questions on other Windows 11 apps. Also, leave comments about guides that you’d like to see or information on other Windows 11 features or list guides like this.
There are a few ways to get around the YouTube Kids is not available in your region error. Whether you are outside of the supported areas or there’s a geolocation error, the steps below will help you access it.
How can I fix the Sorry, YouTube Kids isn’t available in your country error?
Fill up your payment information and follow the on-screen instructions to complete your purchase and create an account.
After that, launch Chrome, then select the three-dot icon in the top-right corner of the window.
Then, with your mouse hovered over More Tools, click Extensions.
Click the humberger menu in the top left corner of the window, then select Open Chrome Web Store at the bottom left.
Then, in the search box, type PIA VPN and hit Enter.
Click on Private Internet Access from the search results.
Following that, select Add to Chrome on the next page.
You’ll get a message asking if you want to add “Private Internet Access”? To add it to Chrome, select Yes and wait a few seconds.
The PIA icon can now be found in the Chrome extensions section. If you don’t see it, click the puzzle icon and select the pin next to the PIA extension to add it to the bar.
Click on PIA VPN, then enter your credentials.
Once you’ve signed in, select a country where YT Kids is available, then refresh the YouTube Kids website and enjoy the vids.
You can mask your location and trick the YouTube Kids into believing you’re from somewhere other than where you are by using VPN. PIA has a huge server base, covering all YouTube Kids countries.
Click on the three-dot on the top right corner of the Chrome browser.
Hover your mouse over History and choose History from the list that appears.
On the left side of the browser, select Clear browsing data.
Change the time range to All time from the menu that opens, then select the Cookies and other site data and Cached images and files check boxes.
Following that, click on Clear data.
Check to see if the Error YouTube Kids Is Not Available In Your Country has been resolved. If not, move on to the next solution.
It’s not uncommon for adblockers and privacy extensions to interfere with YouTube’s scripts. Follow the instructions below to disable browser extensions.
If you’re using Chrome, click the three-dot menu in the upper right corner of the browser.
Then, by hovering your mouse over More Tools, select Extensions.
You’ll now see a list of the extensions installed on your browser. Toggle the slider under each extension off to disable them.
After you’ve disabled all of the extensions, visit YouTube Kids and check to see if it’s working properly.
4. Check your internet connection
Unplug your router’s power cable and wait for two minutes. Then plug the power cord back in, power up your router, and check the results. If you don’t have enough bandwidth, switch to a cable connection and disconnect all the other devices using the connection.
Enable Airplane mode for a few seconds and then re-enable it if you’re using cellular data. Alternatively, switch to a Wi-Fi connection and check if YouTube Kids videos are playing now.
5. Create a new Apple ID (iOS users)
If you have a Mac, go to the Apple menu, select Sign in, and then Create New Apple ID; if you have a Windows PC, open iTunes and select Accounts, then Sign In.
Fill in all the required fields and select a new country, where YouTube Kids is available then click on Continue.
Next, you’ll get an email with a verification code. Enter the code on your device to complete the account creation procedure.
Now, on your iPhone, go to the App Store.
Click on the human icon which you will find at the top right corner of the page.
Then scroll down to Sign Out option and tap on it.
After you’ve entered your new Apple ID account credentials in the Username and Password fields, touch Sign In, and then Done.
Next, in the Apple Store’s bottom right corner, hit the magnifier icon, and then type YouTube Kids into the search field.
Tap the Get button next to the YouTube Kids app.
Now a pop-up will open, tap Install, then you’ll be prompted to sign in with your Apple ID. Don’t forget to use your new Apple ID account to sign in.
After signing in with your new credentials, you’ll be required to enter details about account billing information to complete the process.
Open the app and have fun with it.
NOTE
To create an Apple ID, you must provide a valid payment method. In addition, if you want to access YouTube Kids, you’ll need to use a VPN to hide your current location if it’s not one of the supported countries.
Now check to see if the Sorry Youtube Kids isn’t available in this country yet error on your iOS device has been fixed. If not, move on to the next step.
6. Update the App (iOS & Android)
iOS:
Go to App Store.
After that, tap on magnifier icon and type YouTube Kids into the search box.
Select the Update option next to the YouTube Kids app.
Android:
Open Google Play Store.
Search for YouTubee Kids and open the app.
If you have an update button next to it, tap it and wait for the process to complete. If you don’t it means the app is up to date.
YouTube kids is a good app if you want your kids to watch age-appropriate content, without the like/comment focus of standard YouTube. You can create profiles based on age groups (Preschool: 4 and under, Younger: 5-8, Older: 9-12) to filter content.
With a reliable VPN you can watch YouTube Kids even if it’s not available in your country. Remember, while they bypass geo locks, using VPNs can limit some of the other functions in your device, so make sure to turn the VPN off when you are done.
Microsoft news recap is a weekly feature highlighting the top Microsoft news stories of the past week. Sit back, grab some coffee, and enjoy the read!
2.3 million Xbox consoles have been sold in Japan all time, according to new report
According to a new report, 2.3 million Xbox consoles have been sold in Japan, with the majority of those sales being during the Xbox 360 era, though it looks like the Xbox Series X|S is off to a good start. The breakdown of reported sales figures by console is as follows:
Xbox – 472,992
Xbox 360 – 1,616,128
Xbox One – 114,831
Xbox Series X/S – 142,024
Microsoft has suspended new sales in Russia in response to attack on Ukraine
It will soon be easier to switch between multiple accounts in Microsoft 365 online apps
Using multiple accounts in Microsoft 365 web apps can be tedious, as they only support being logged into one account at a time, whereas Google allows multiple accounts and easy switching between them within each app. But that might be about to change, as Microsoft is now working on account switching within Microsoft 365 web apps.
Microsoft Flight Simulator comes to Xbox Cloud Gaming
If the thought of having to download Microsoft Flight Simulator gives you nightmares of the amount of storage required, fear not, as the game has now arrived on Xbox Cloud Gaming. This allows gamers to stream the game via the cloud, removing the need for a large download and storage space. It also means the game is available on any device in which you can access Xbox Cloud Gaming, including mobile.
That’s it for this week. We will be back next week with more Microsoft news.

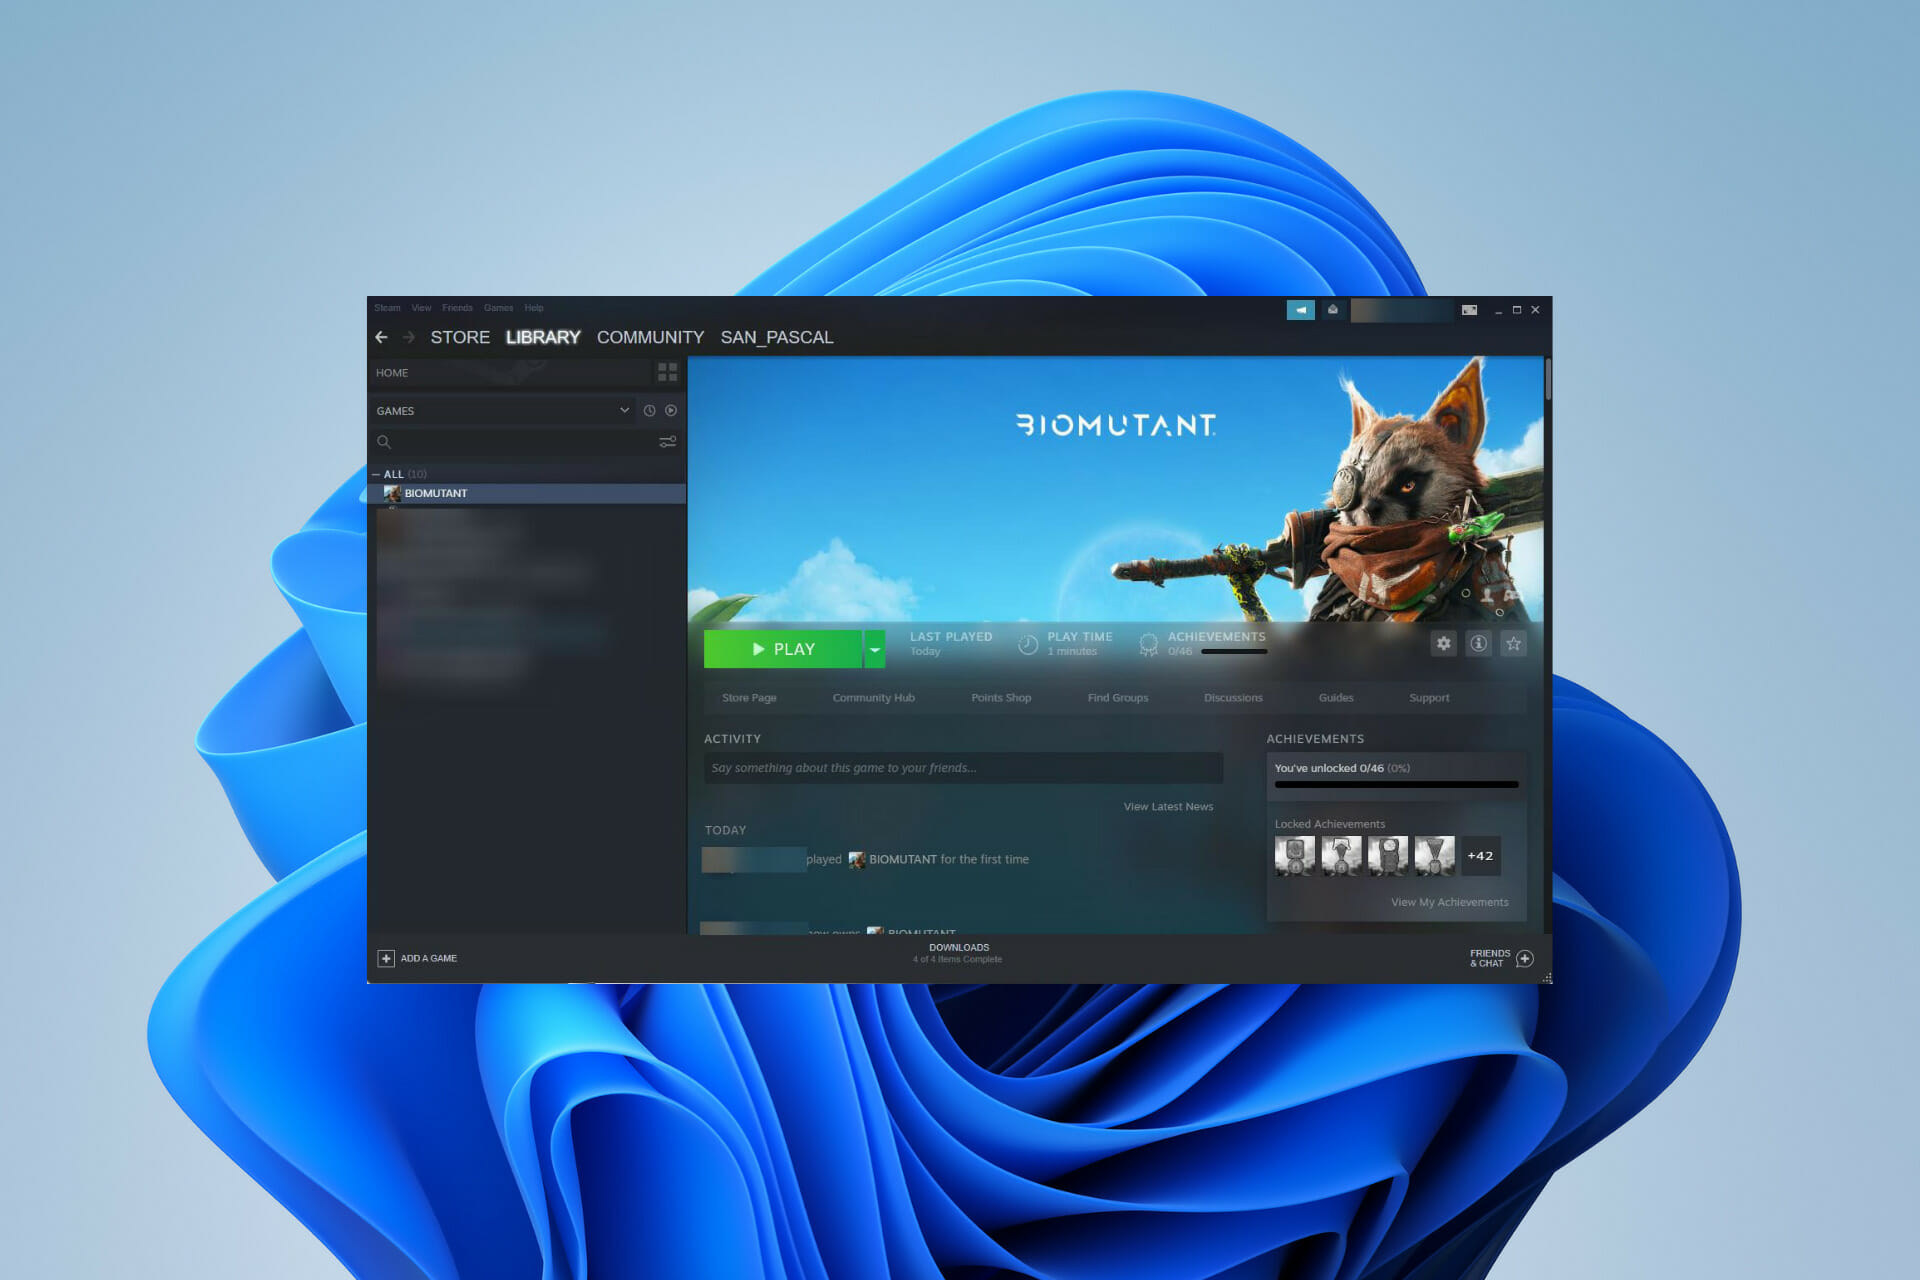
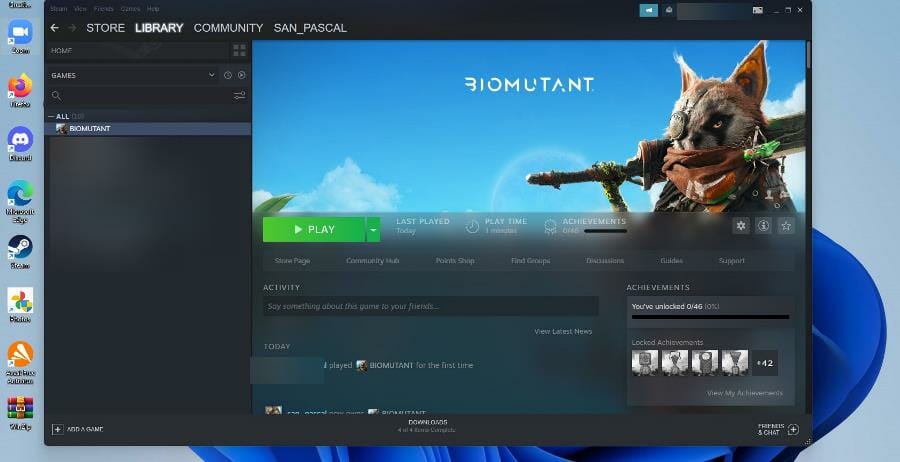
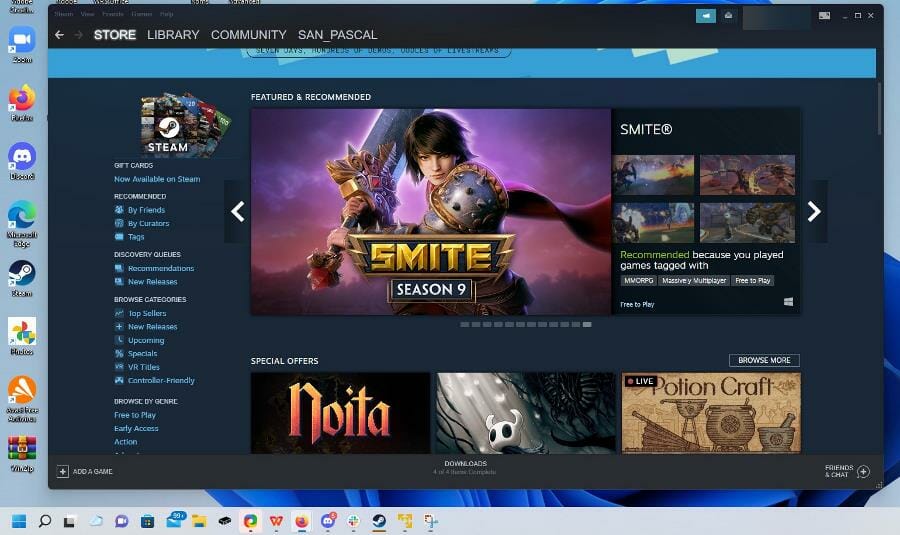
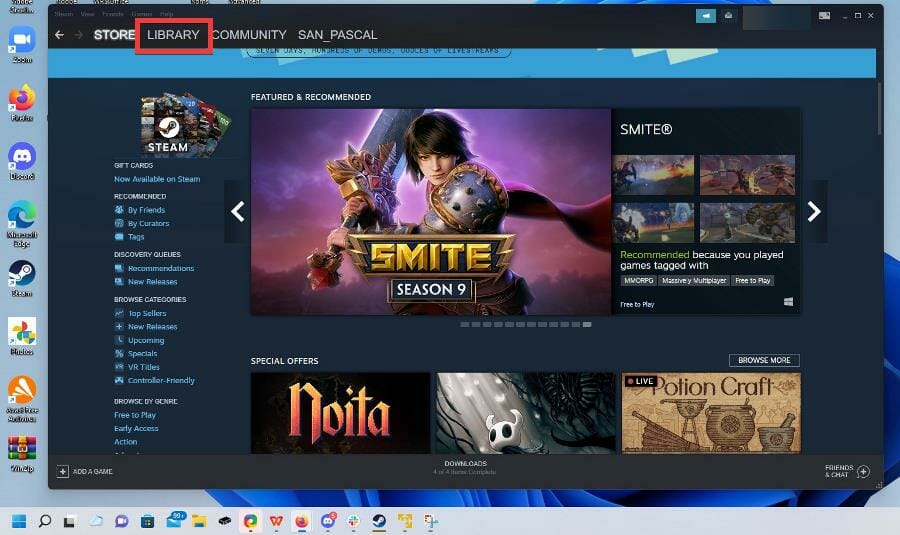
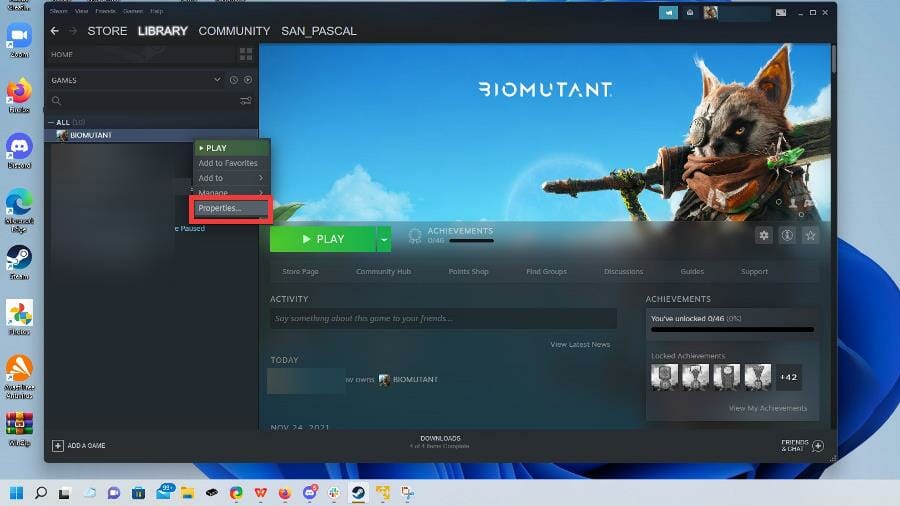
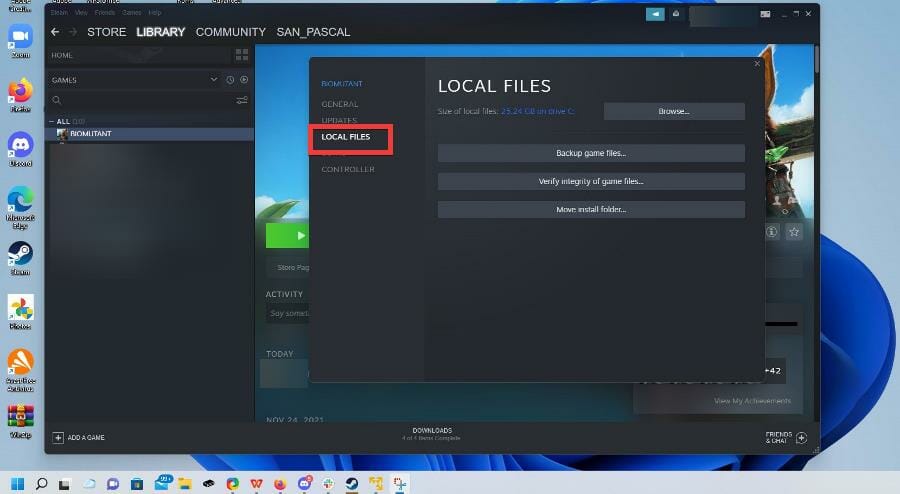
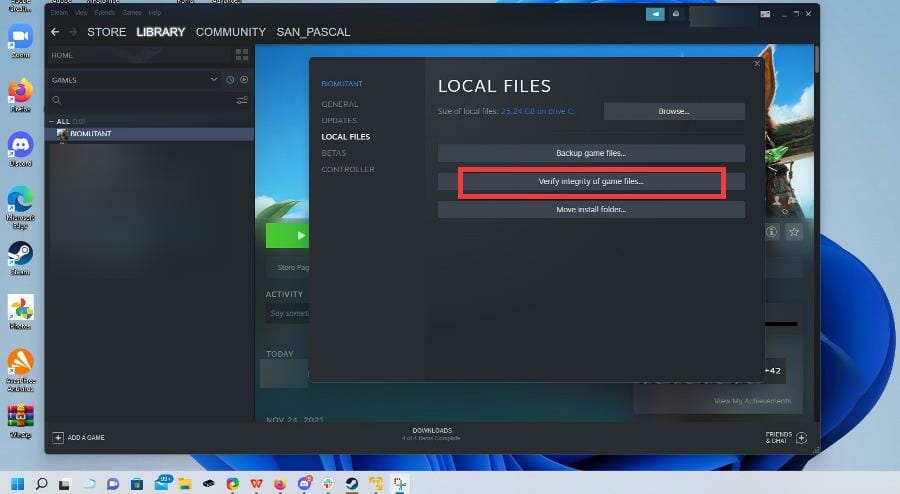
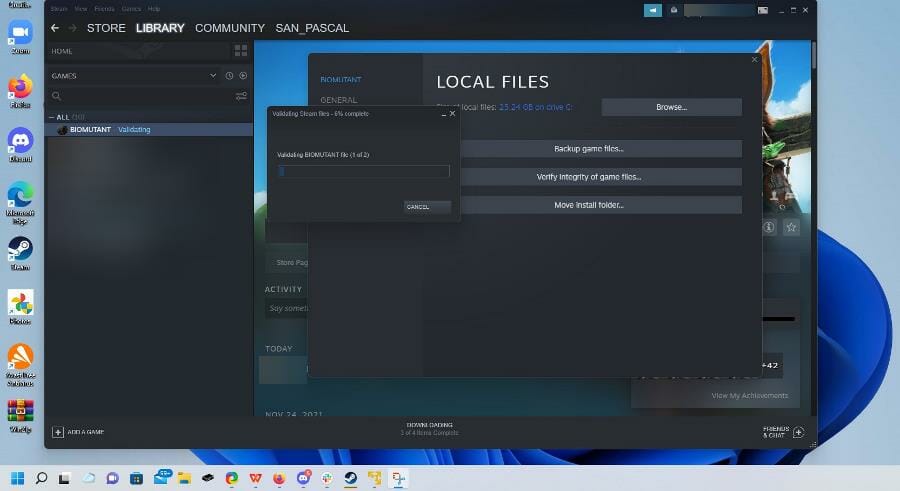
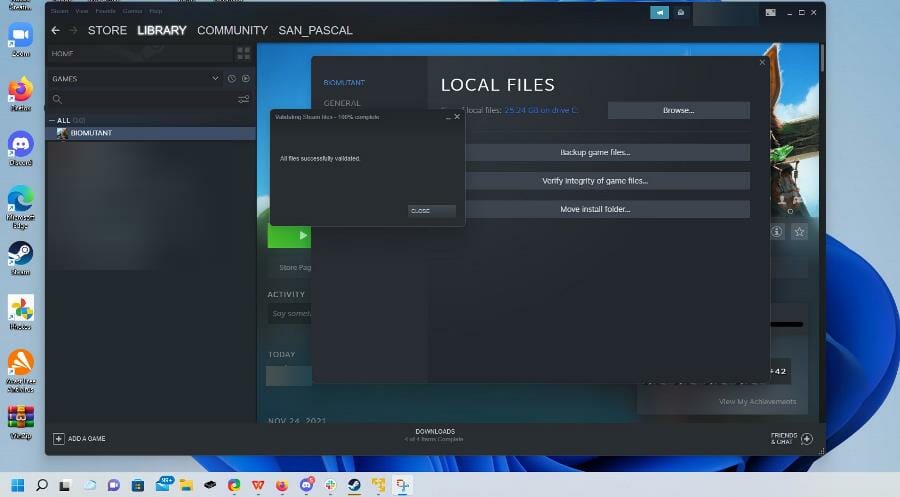
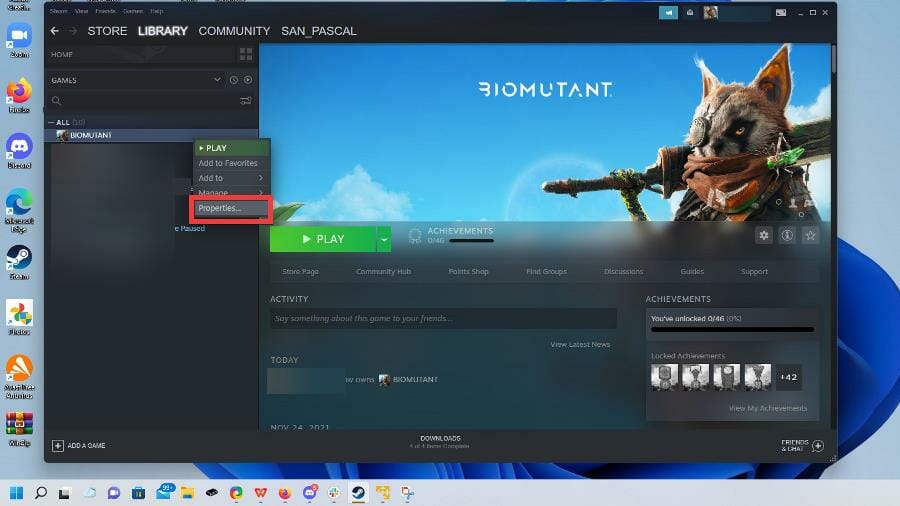
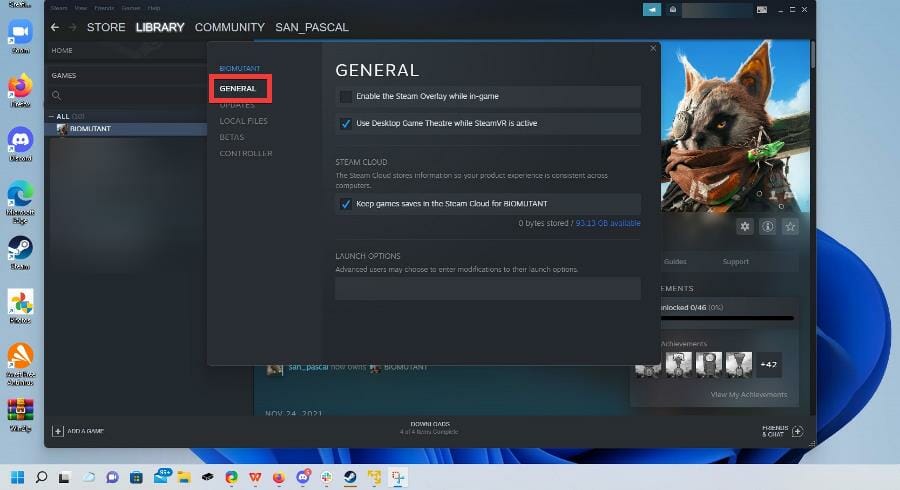
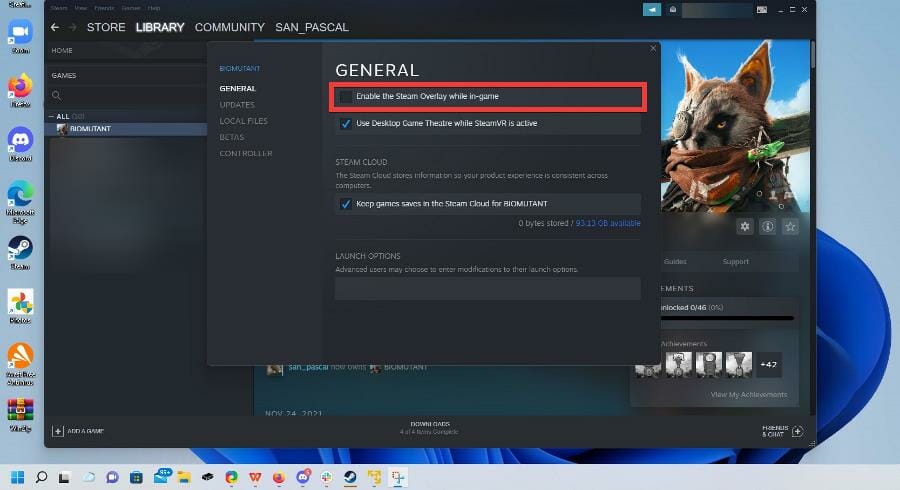
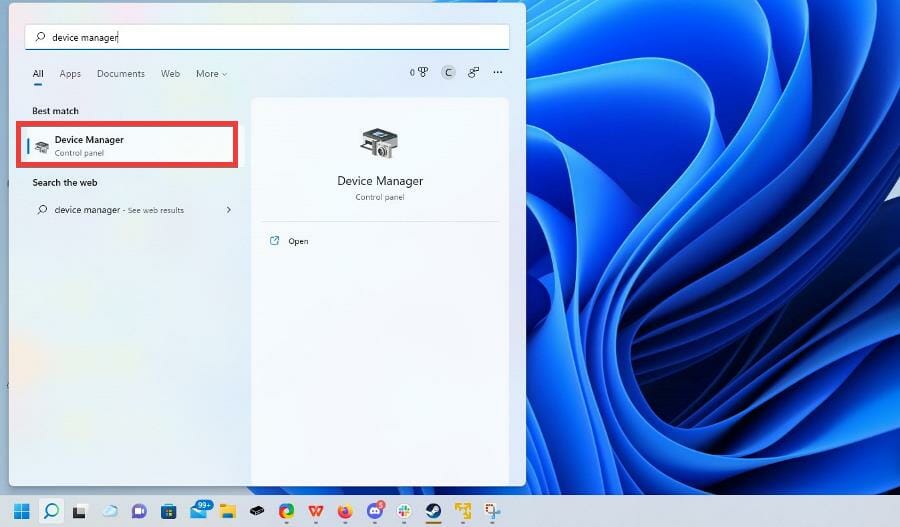
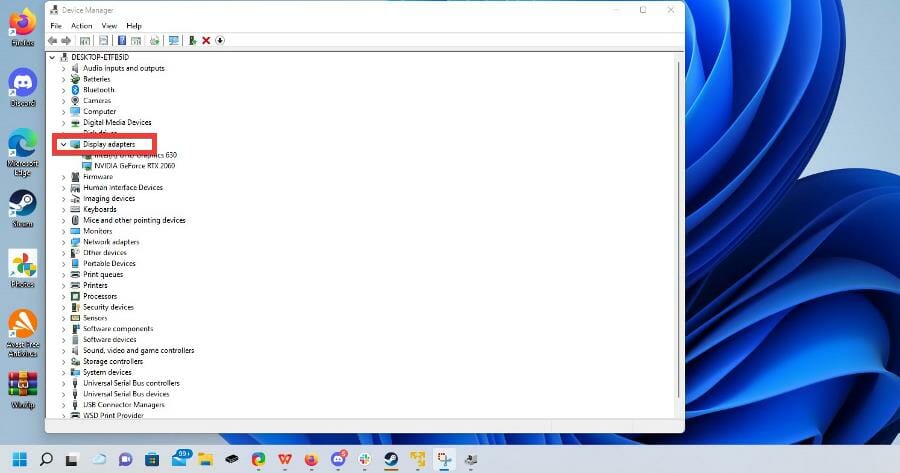
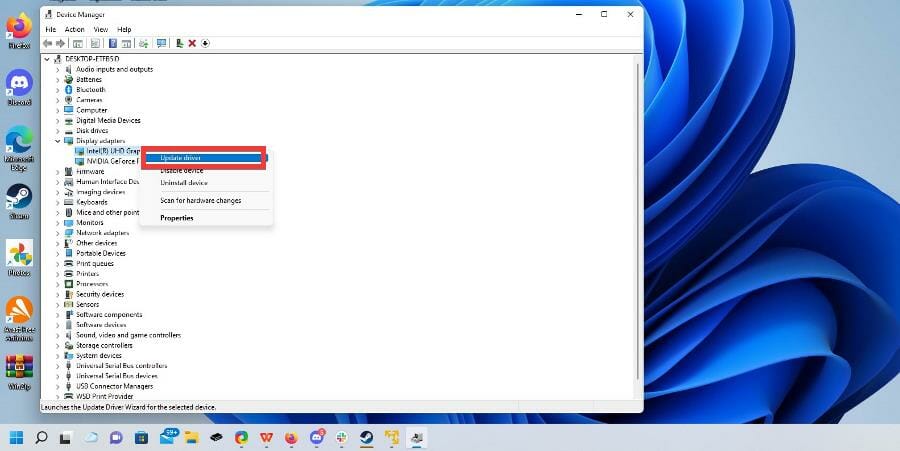
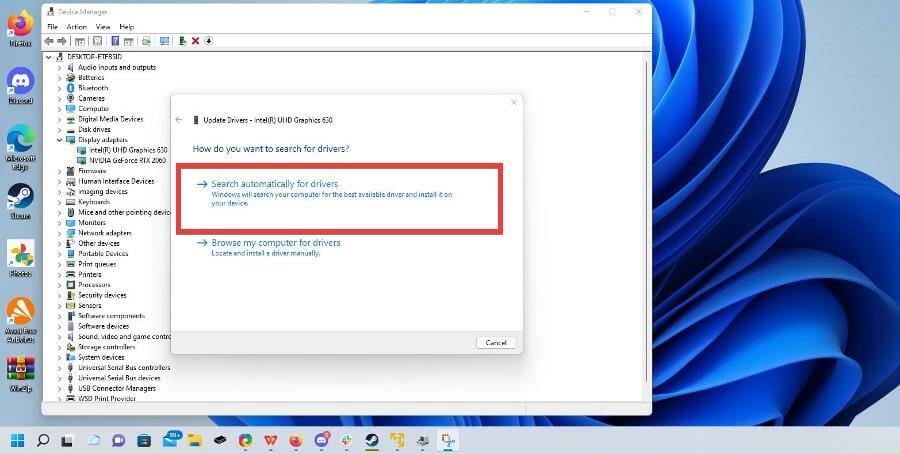
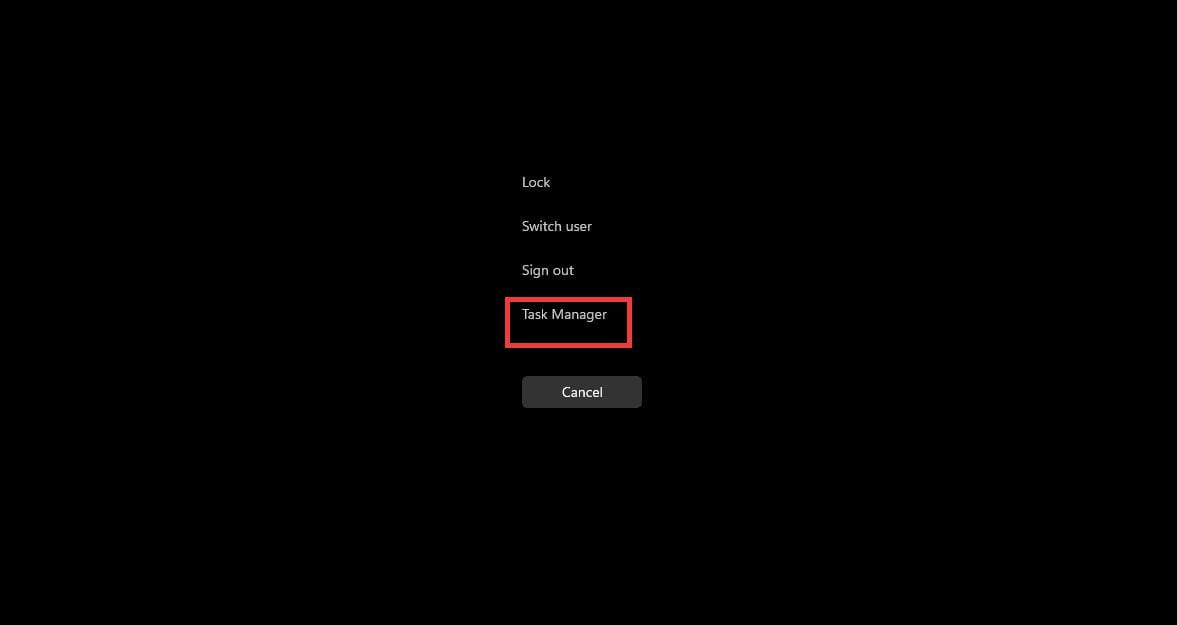
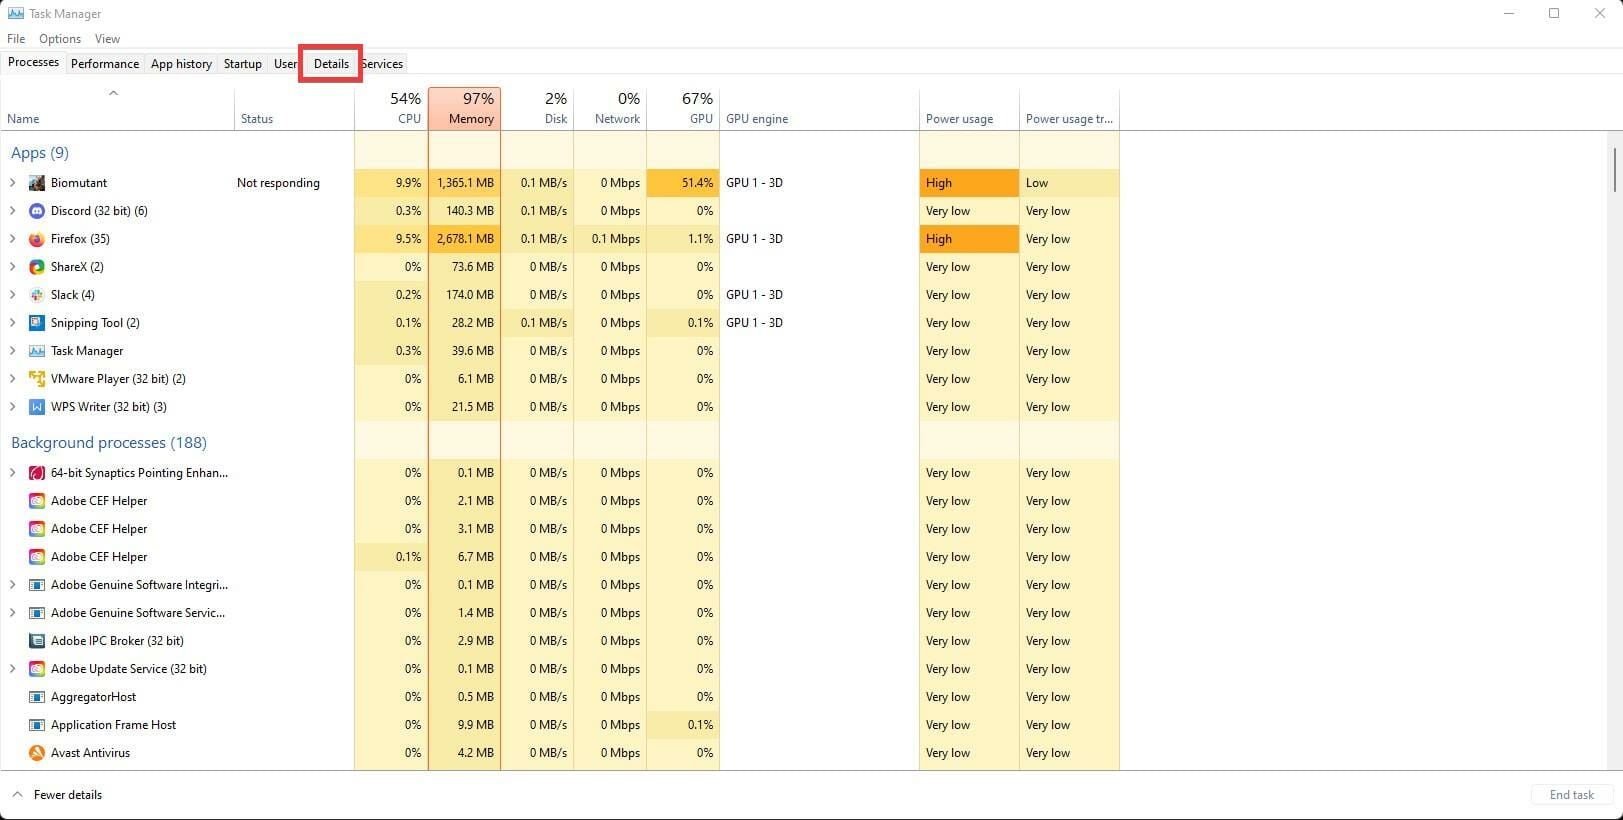
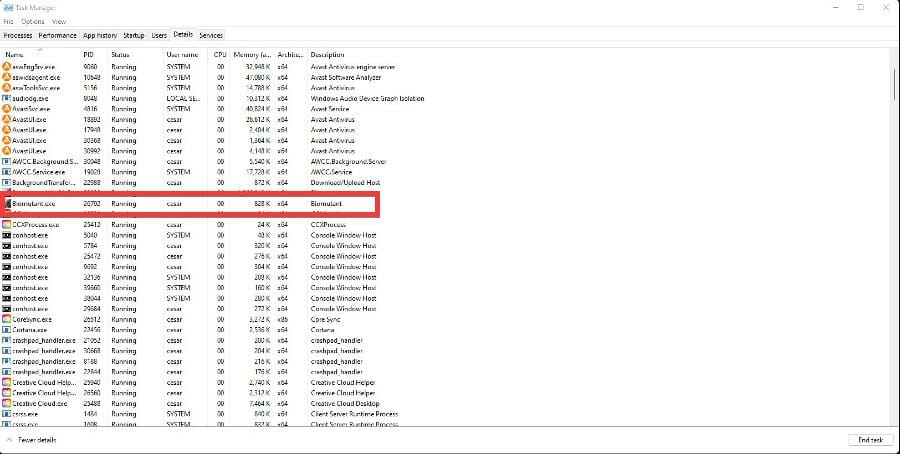
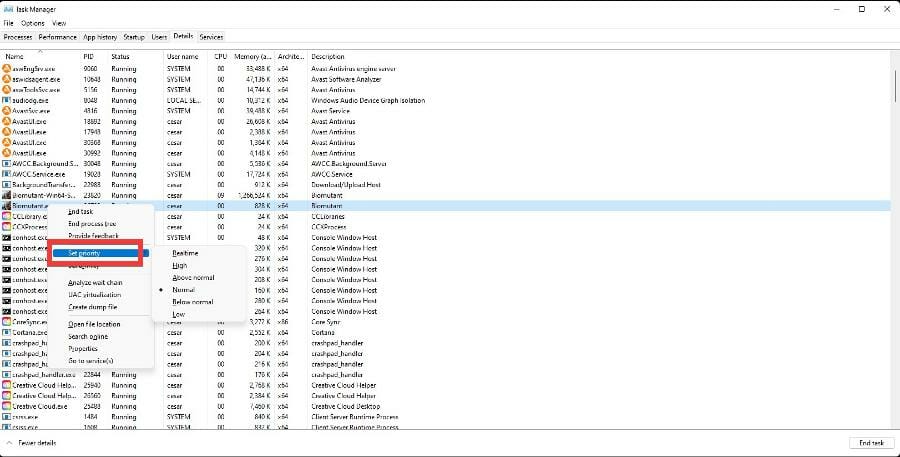
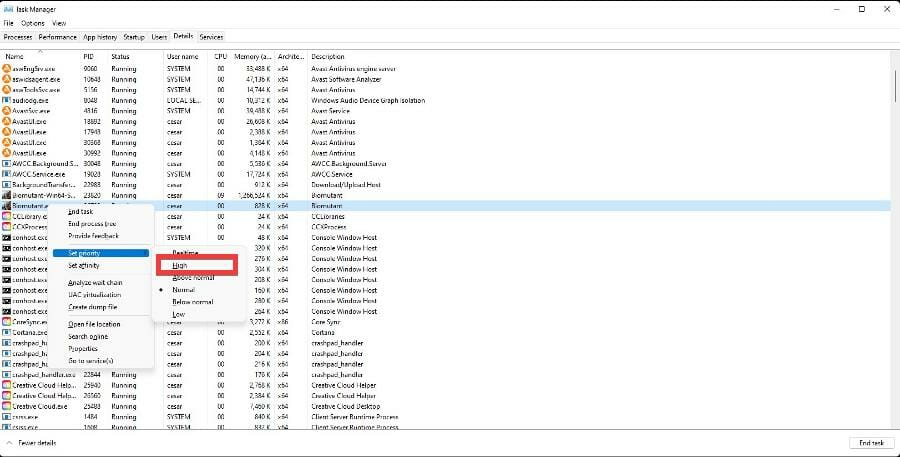
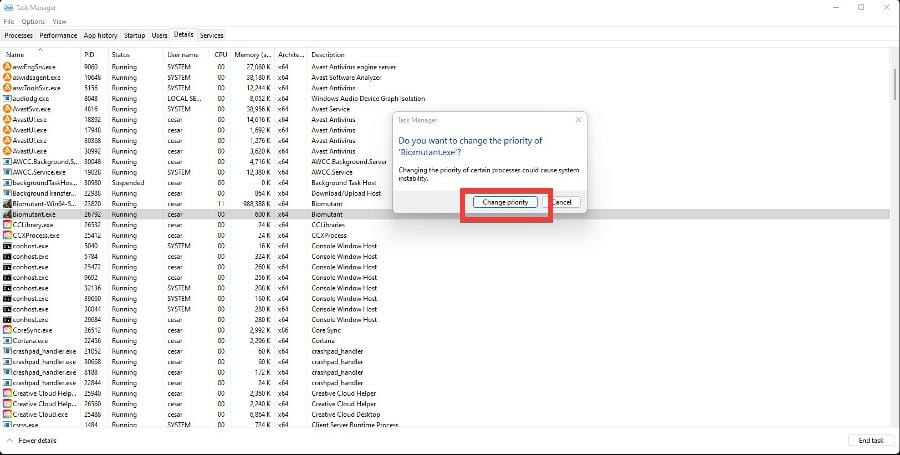
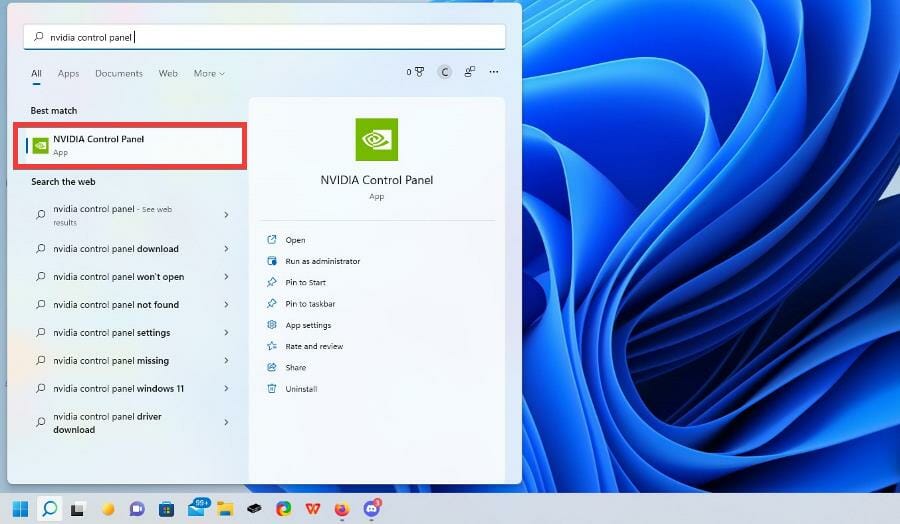
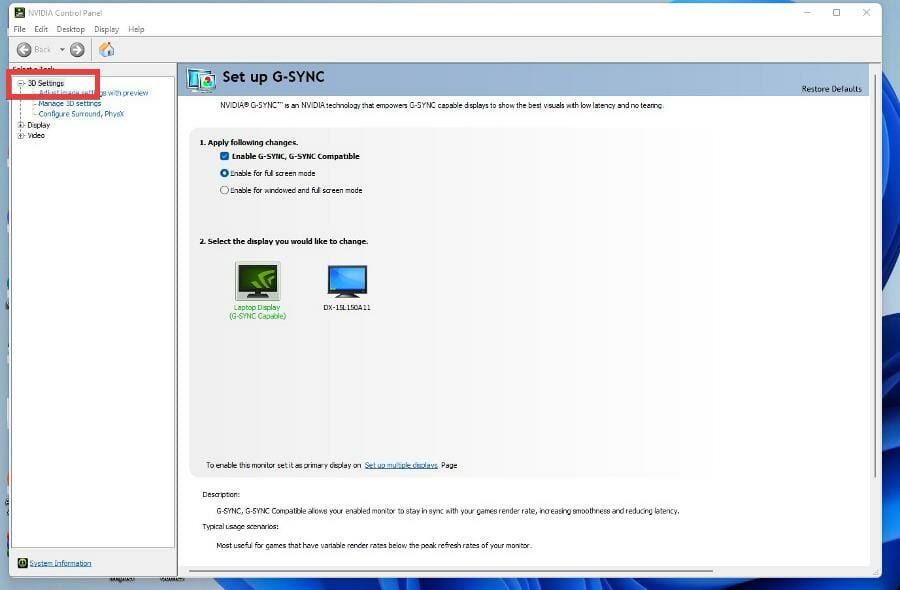
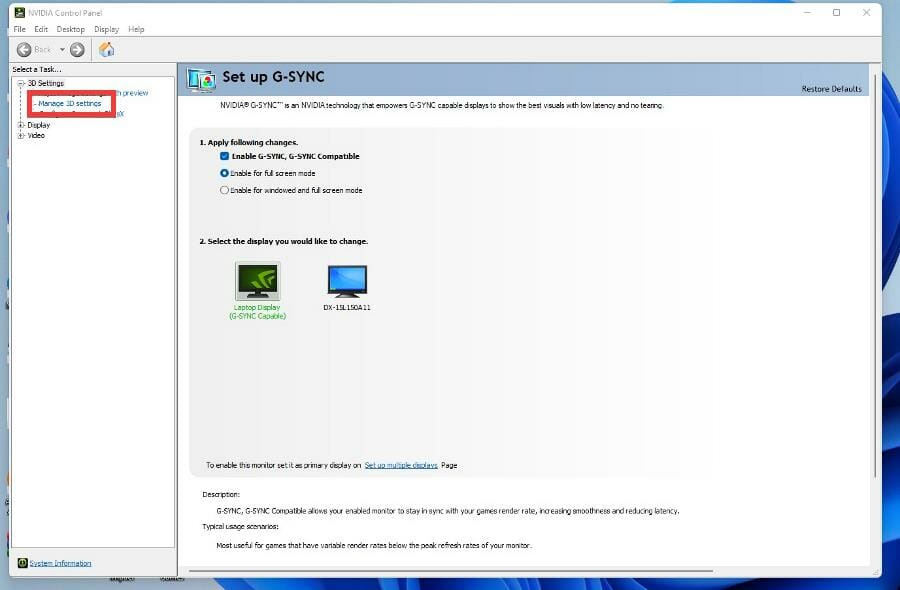
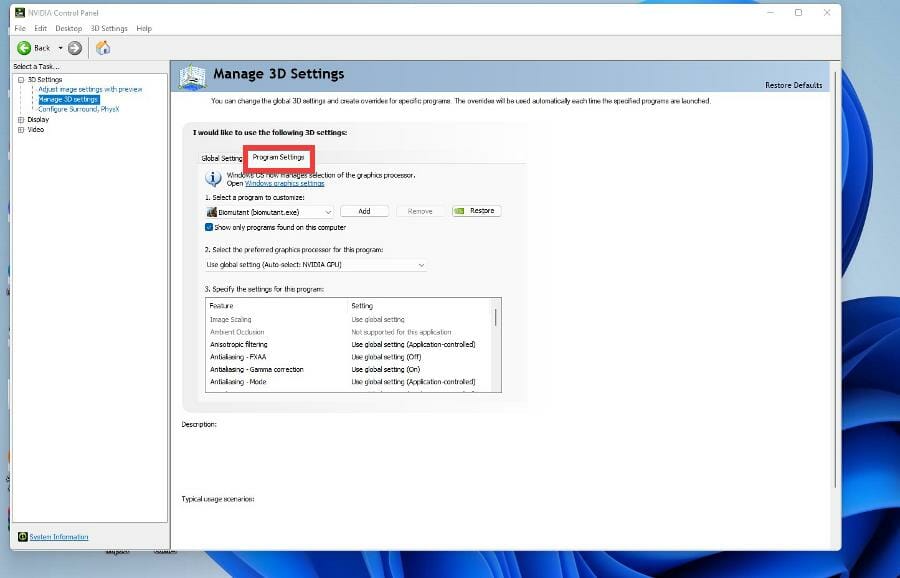
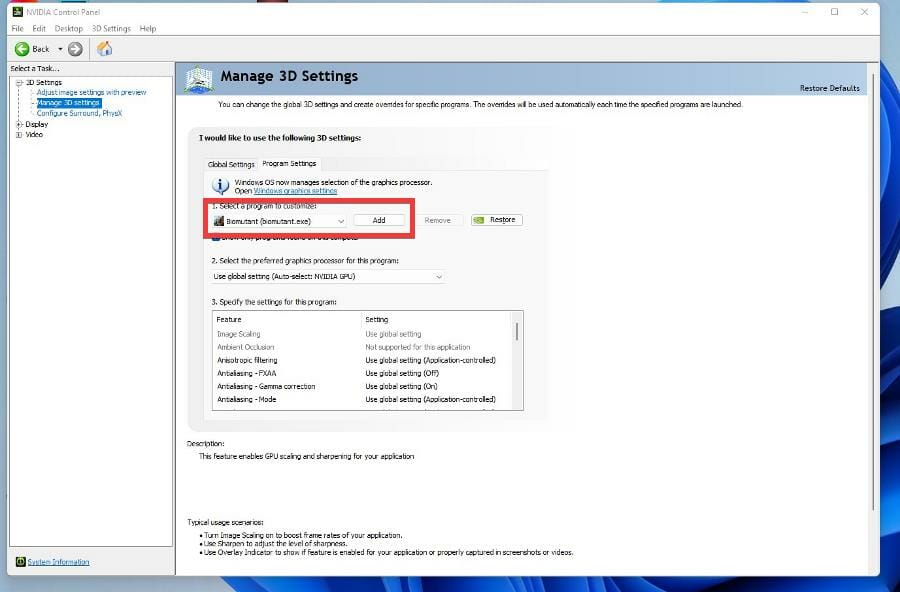
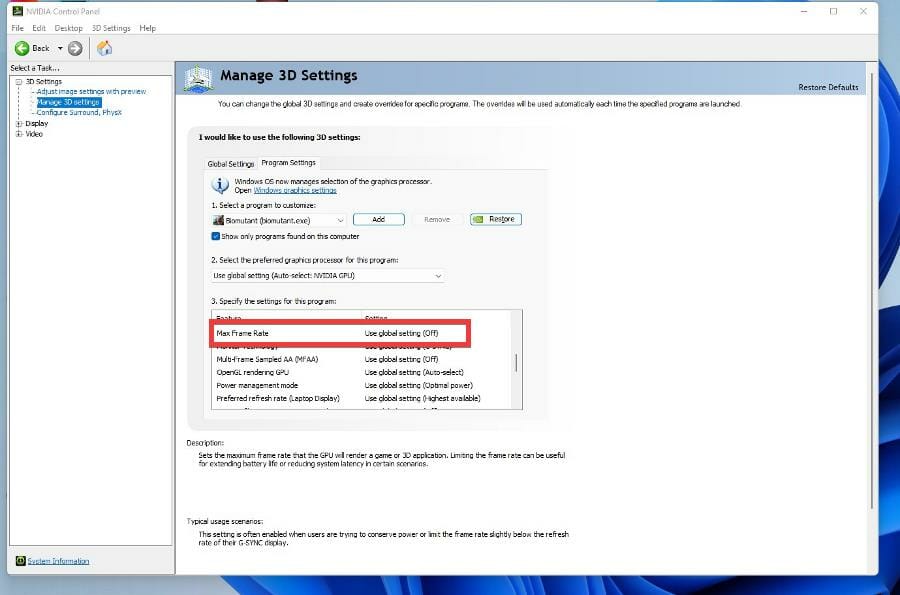
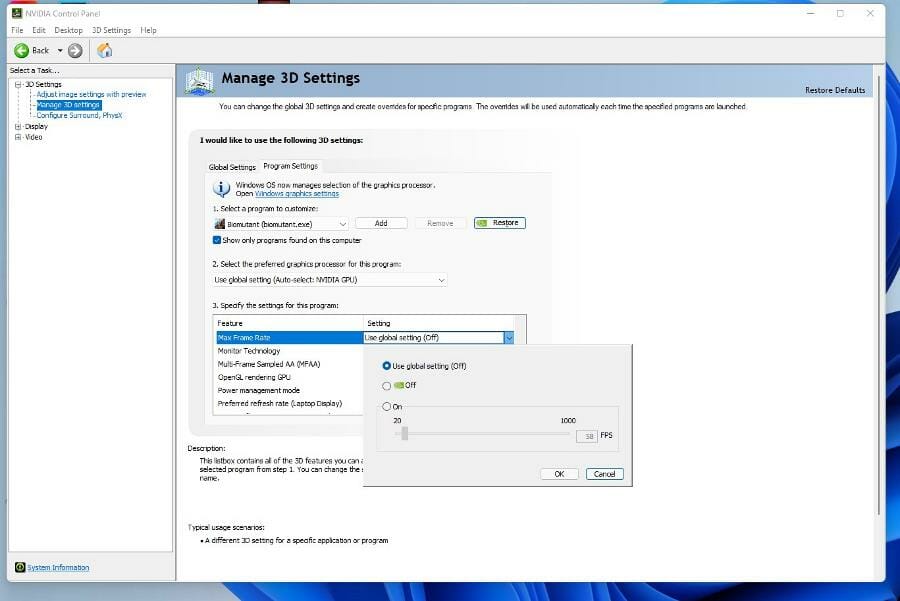
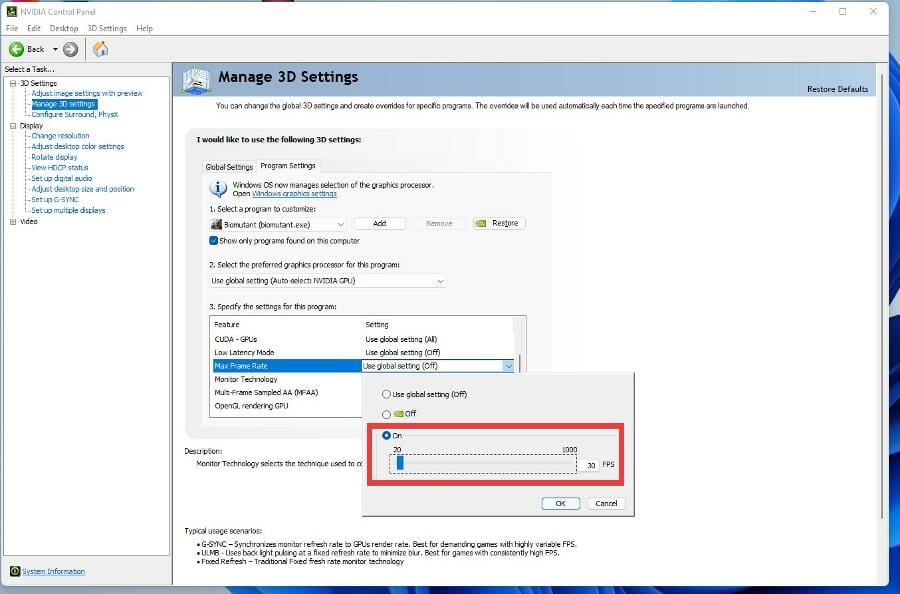
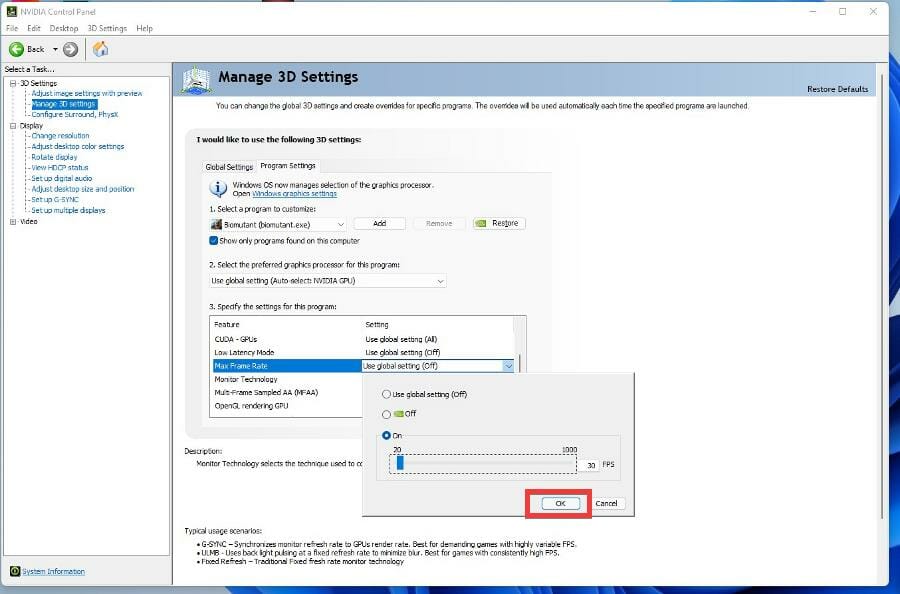
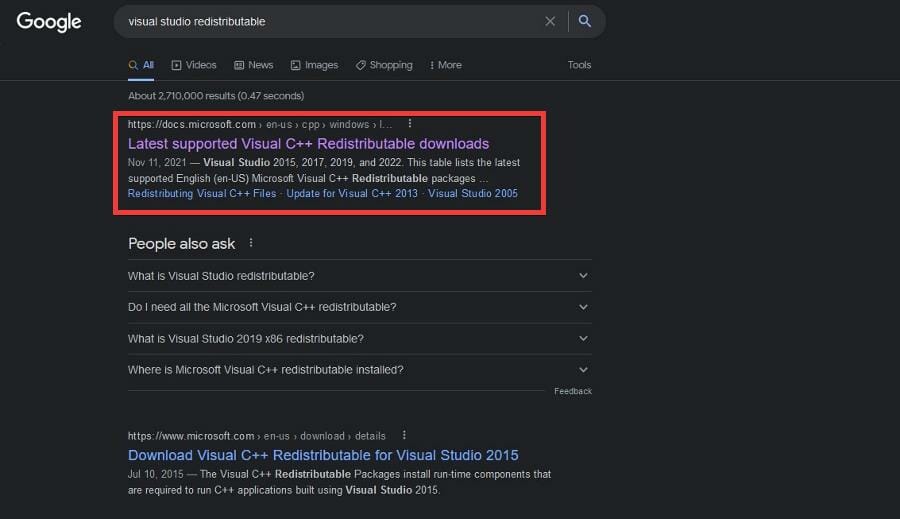
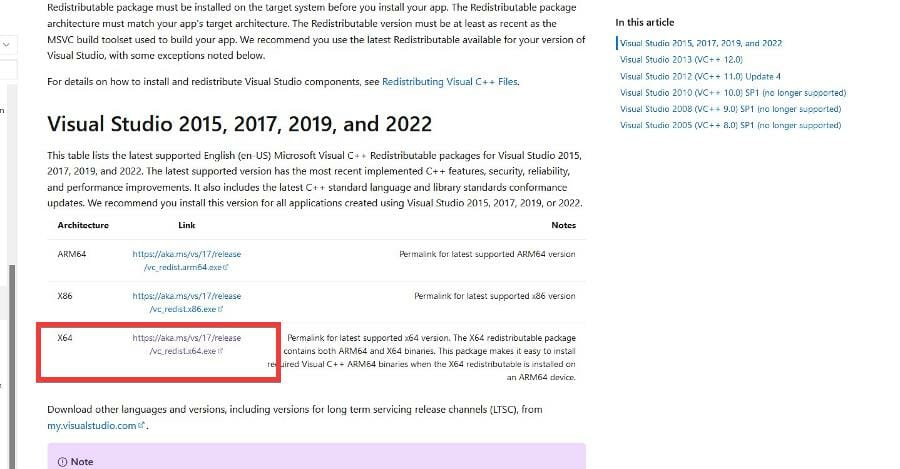
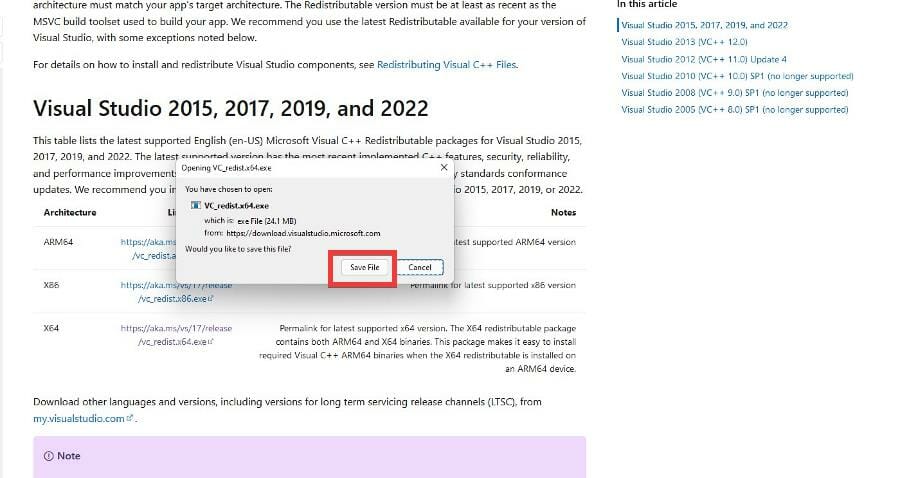
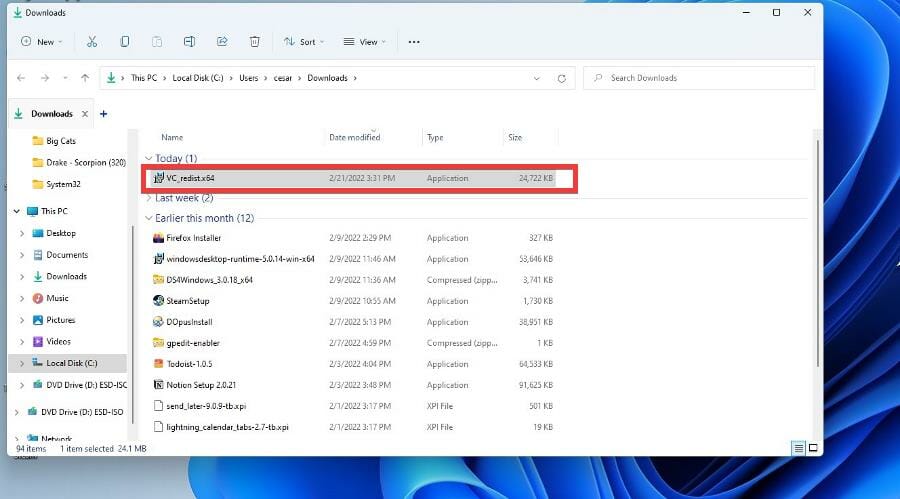
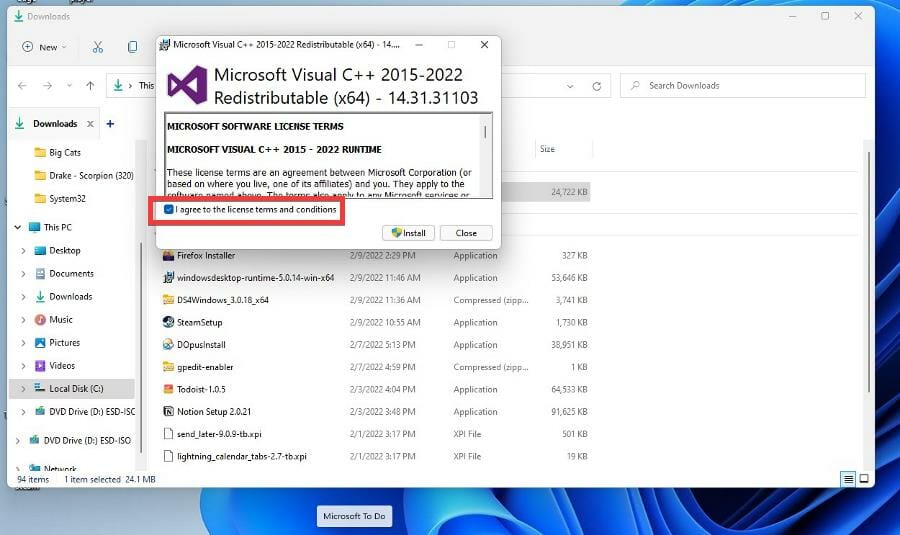
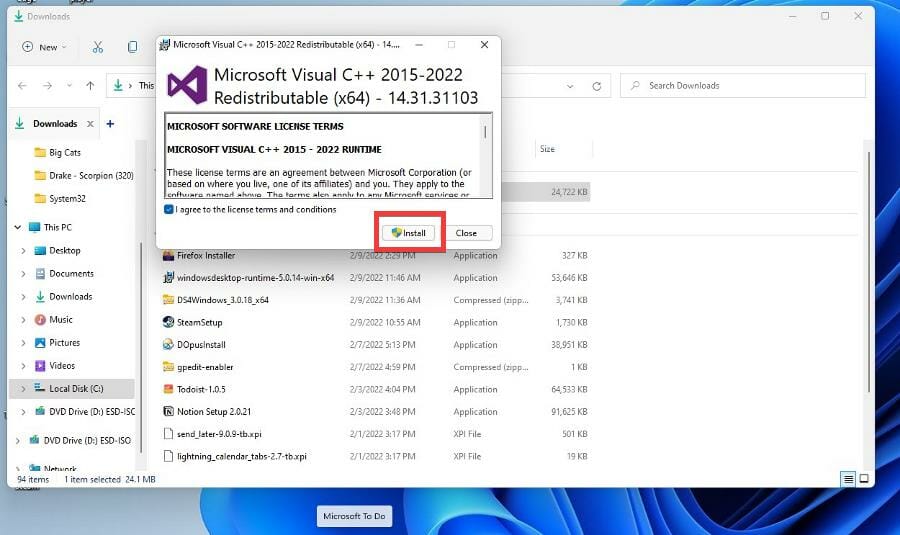
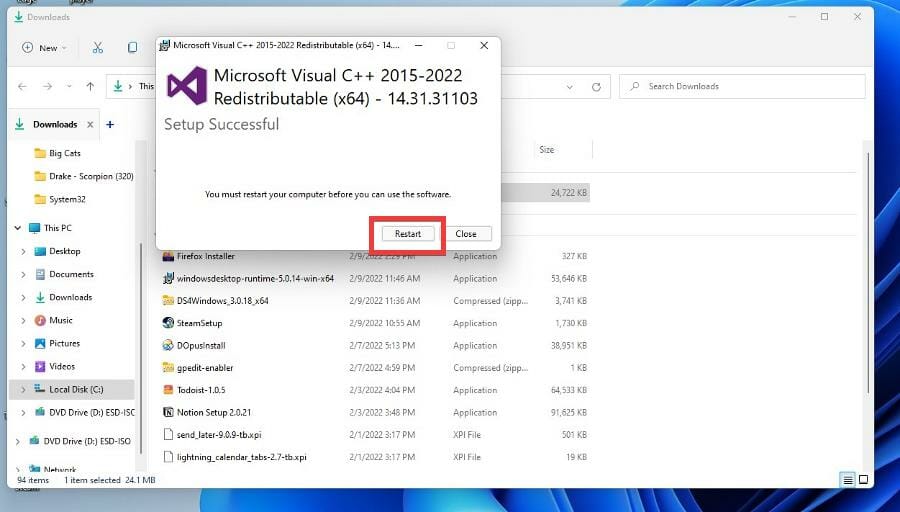
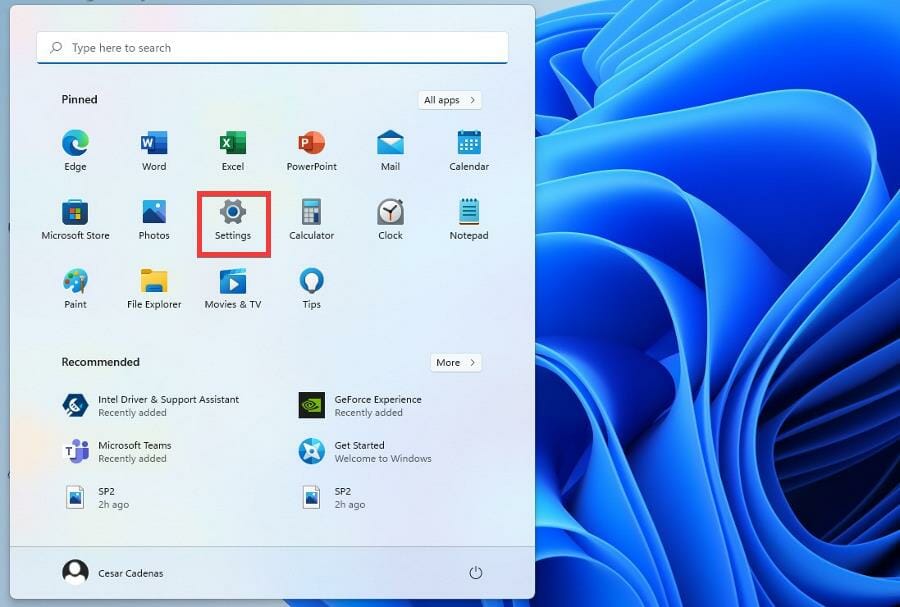
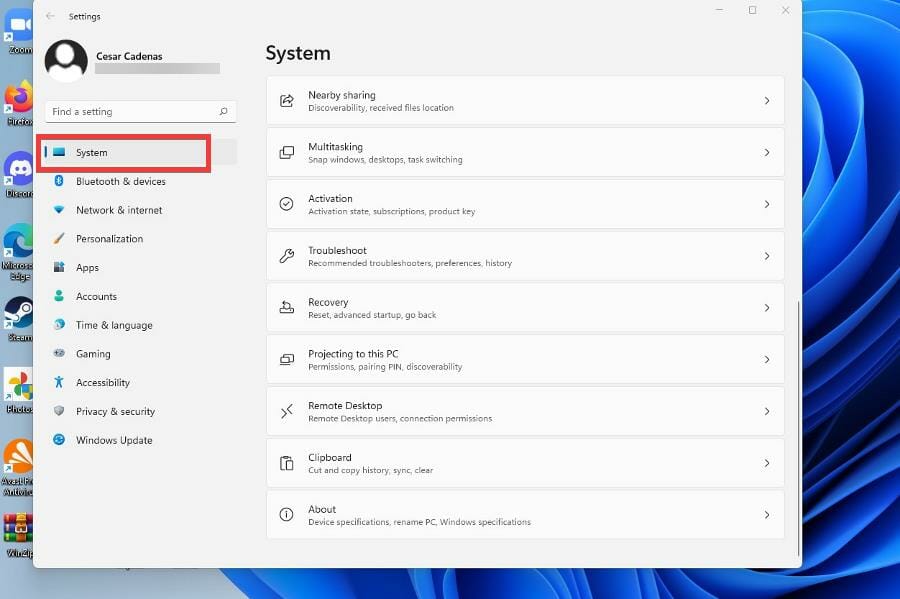
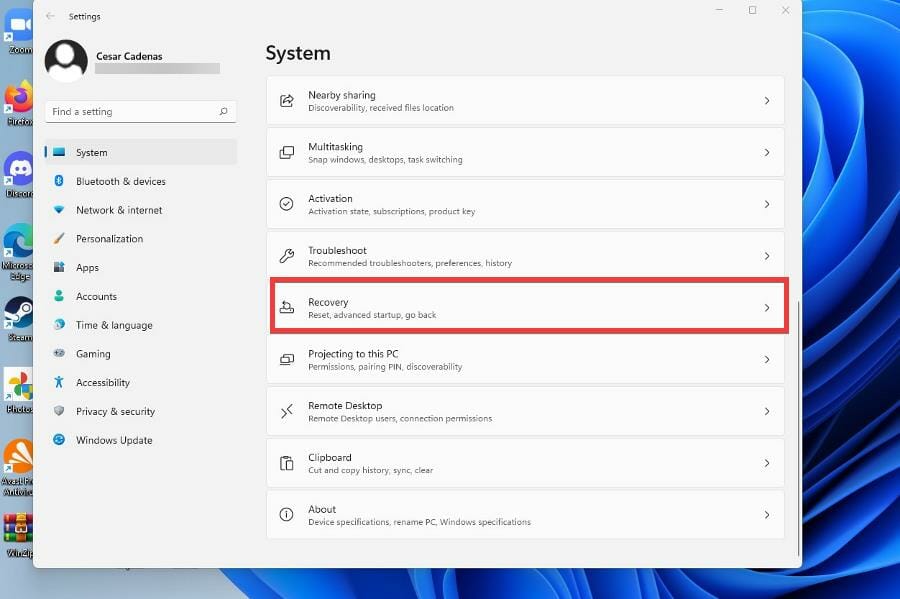
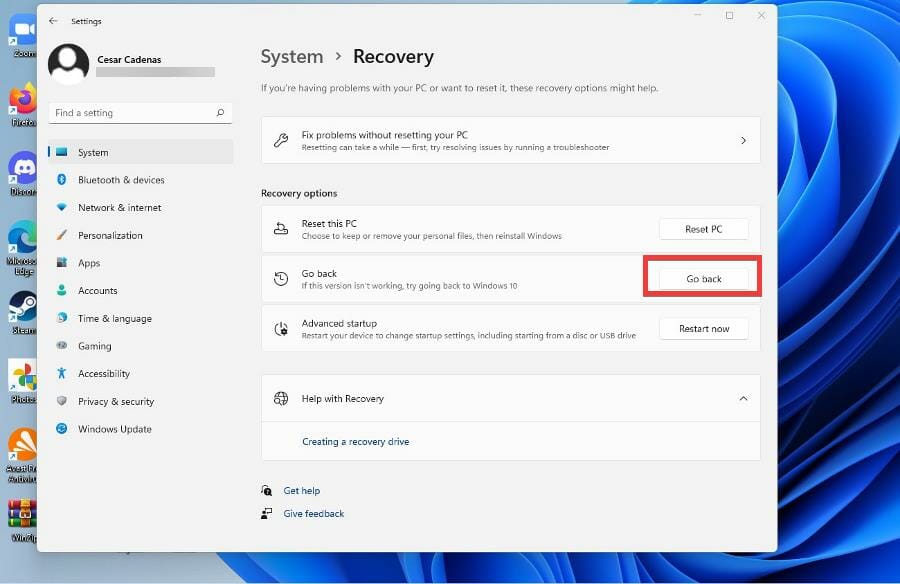
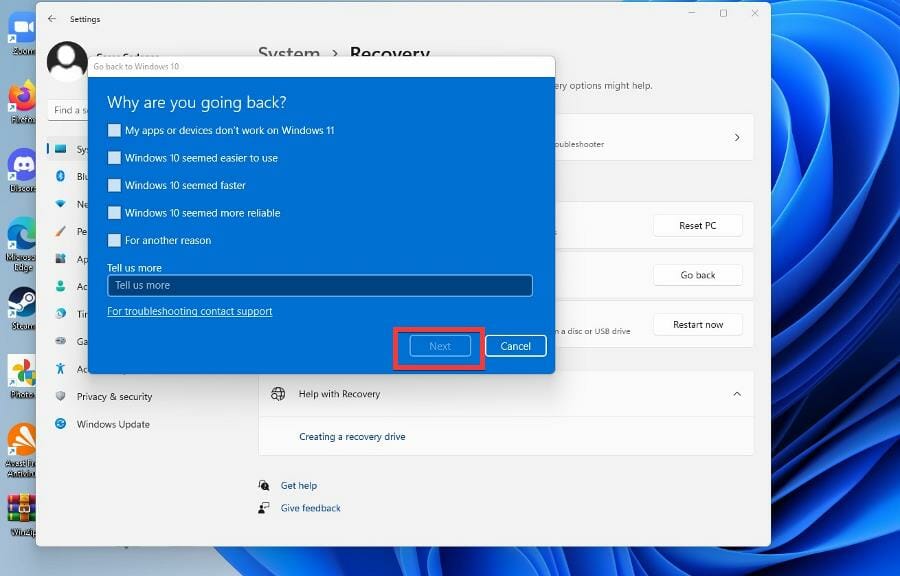
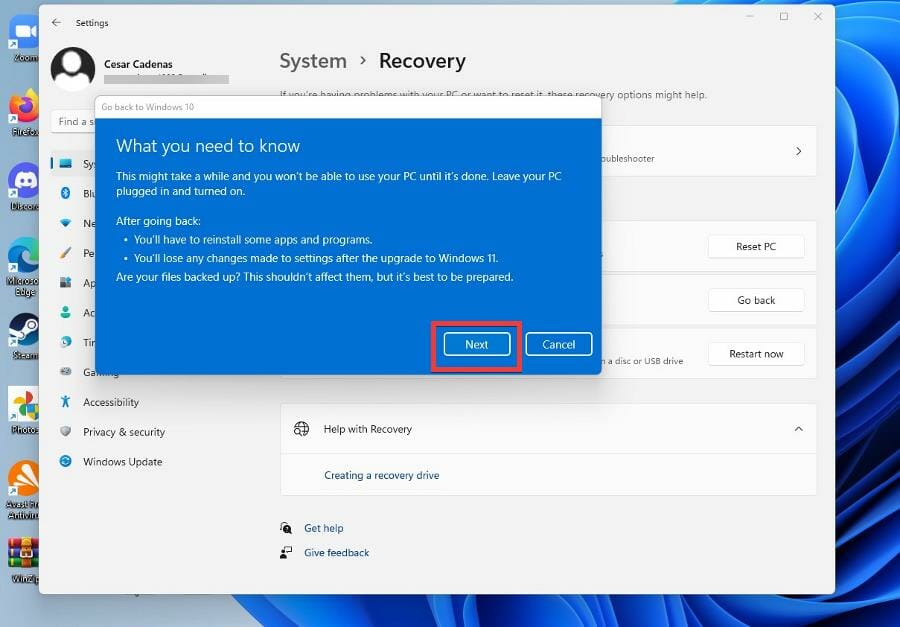
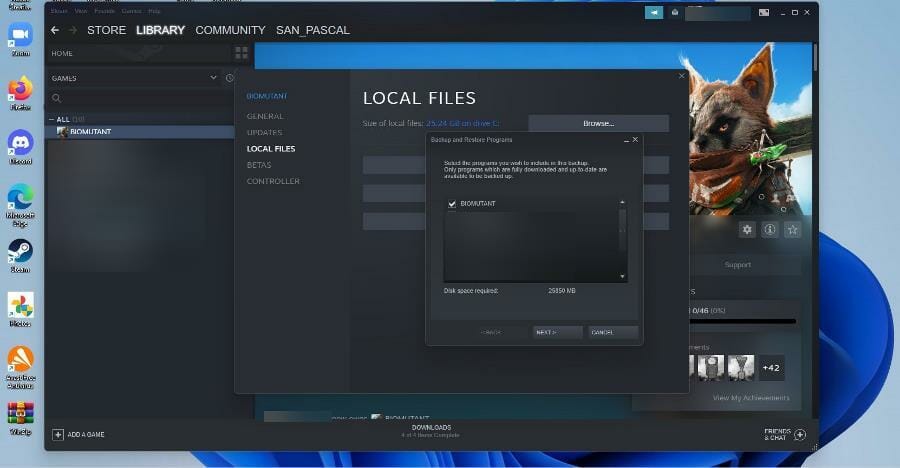
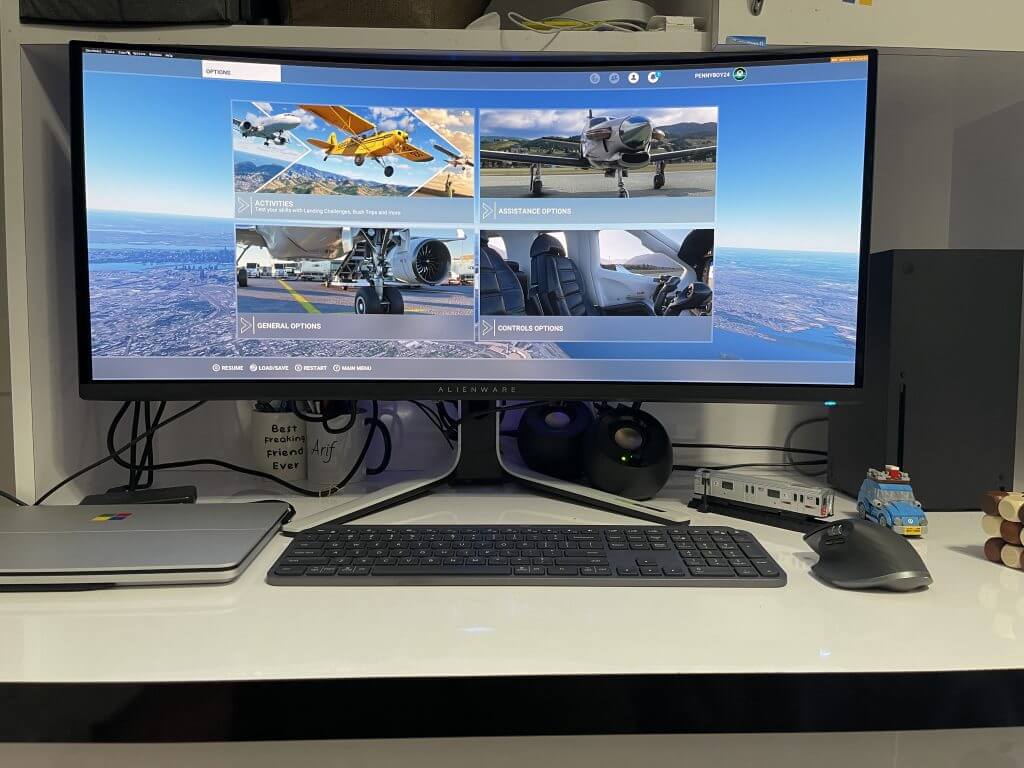
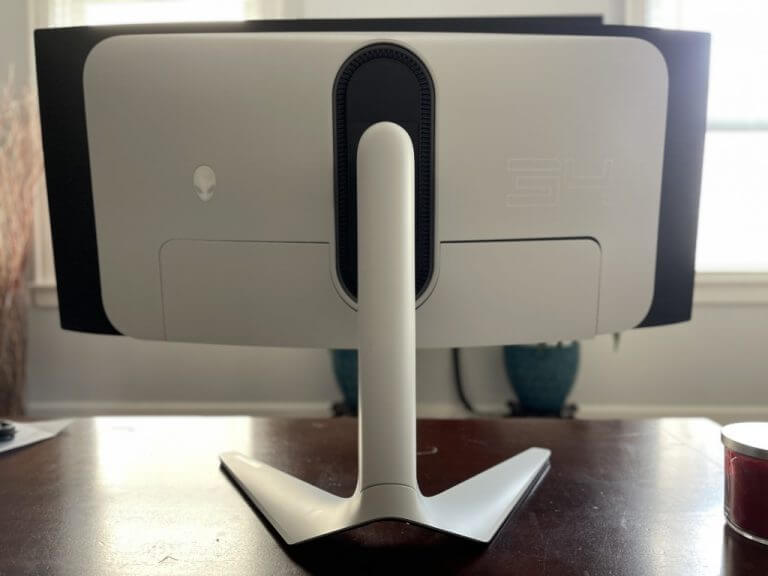
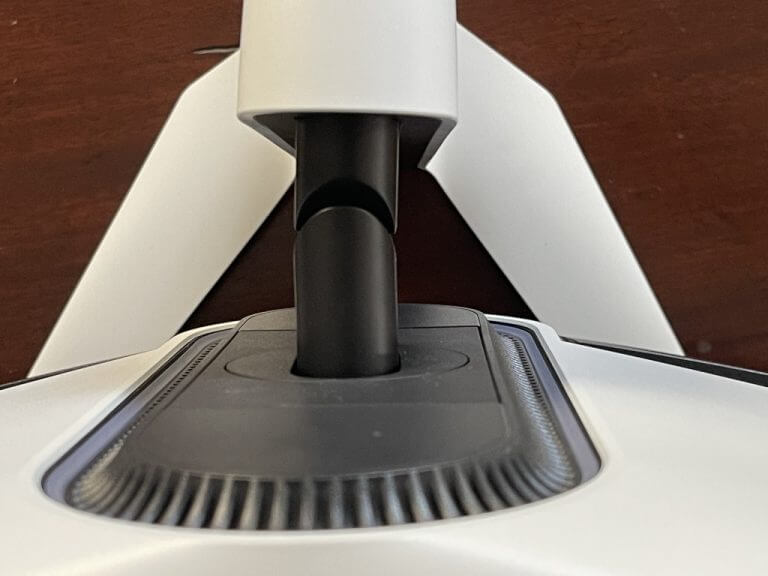
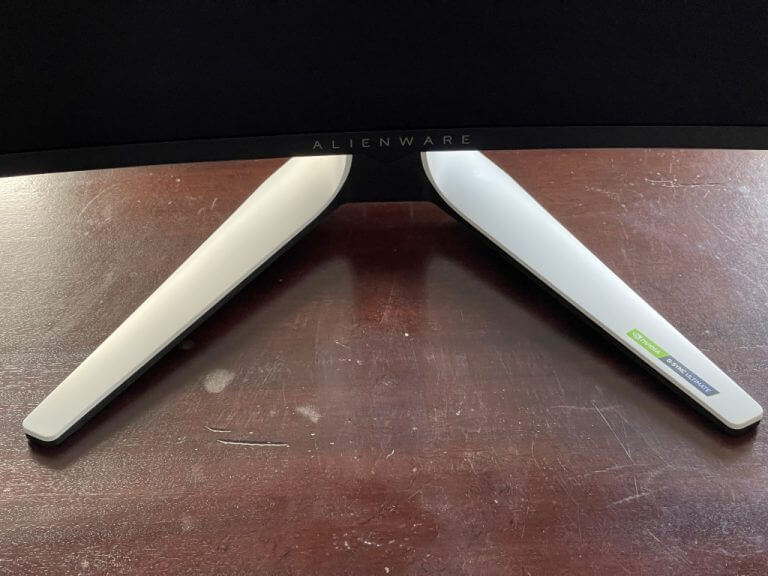
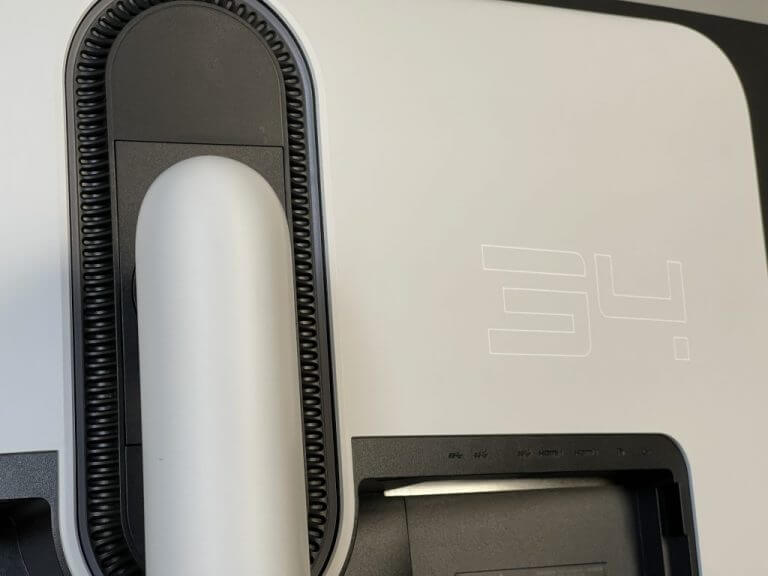
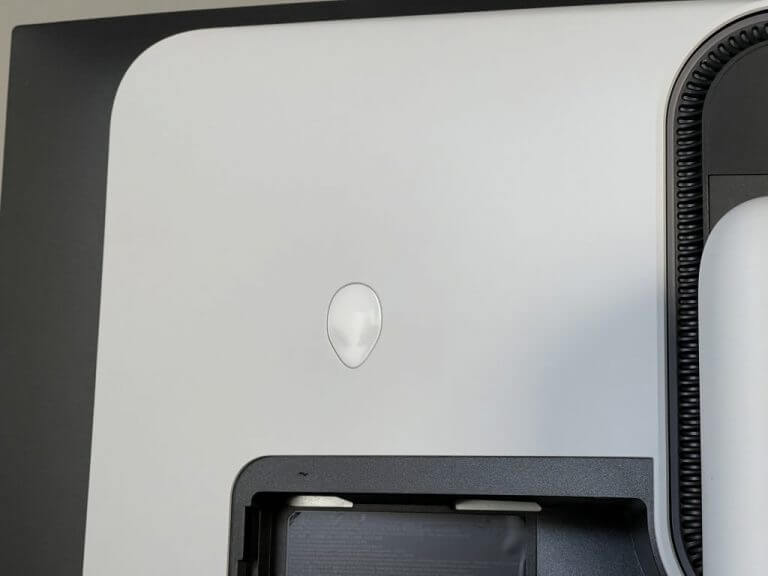
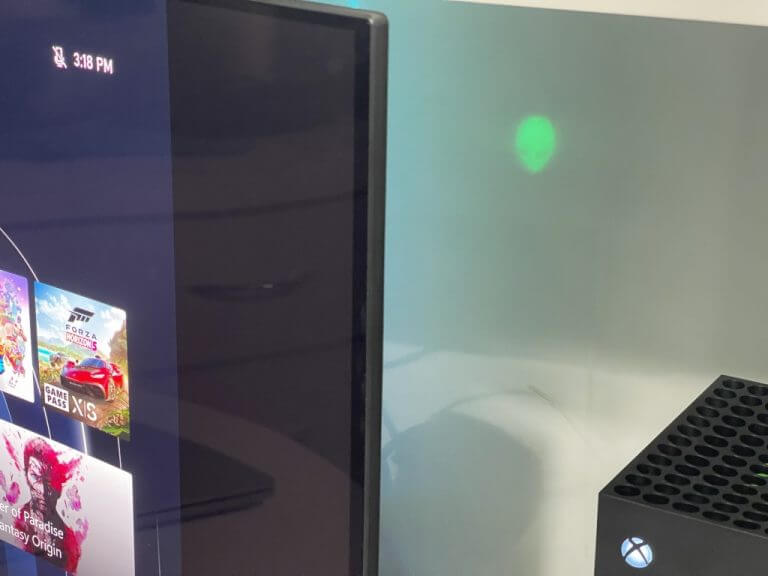
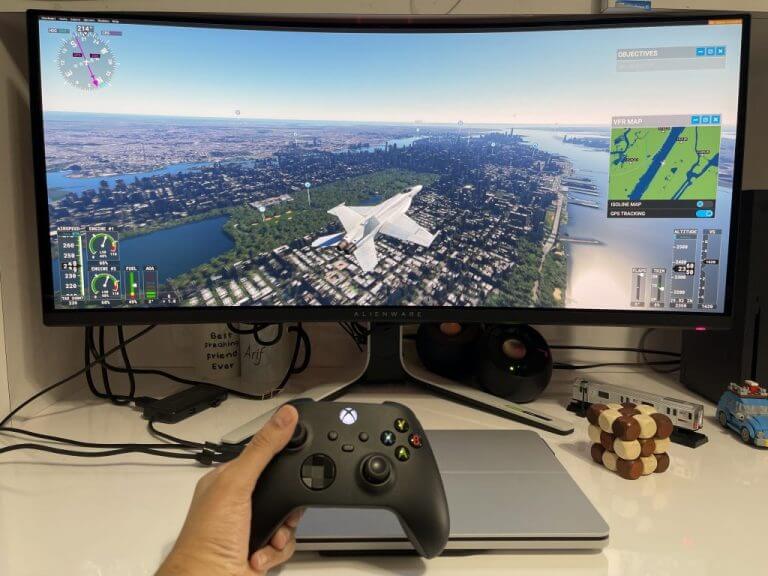




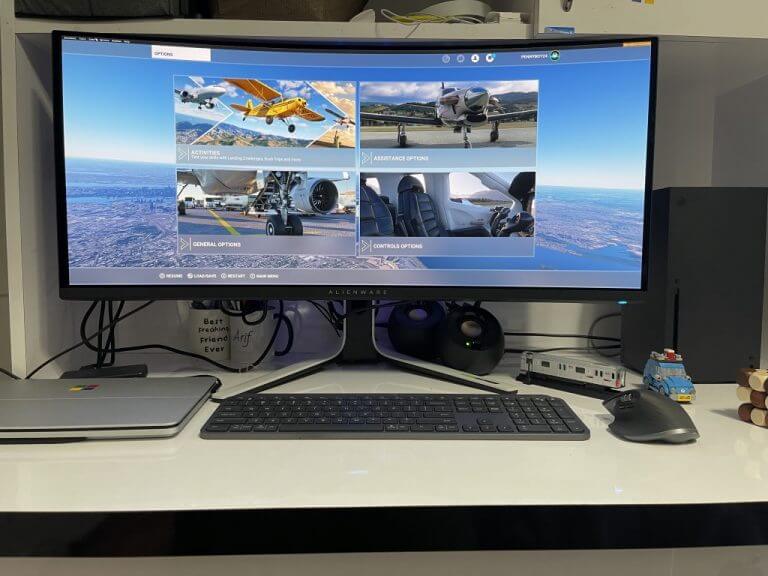
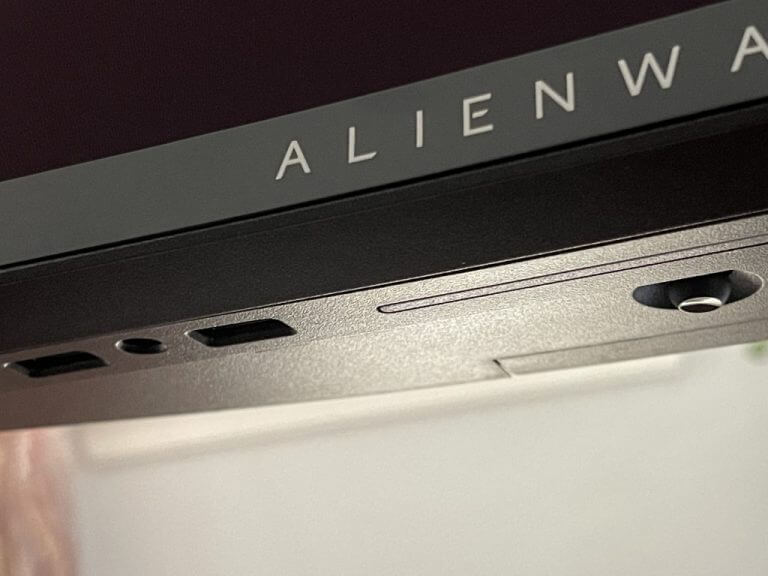
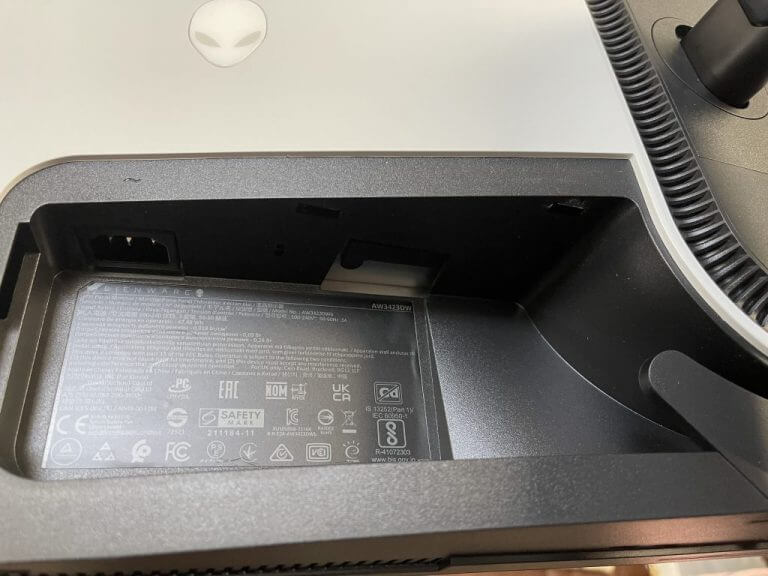
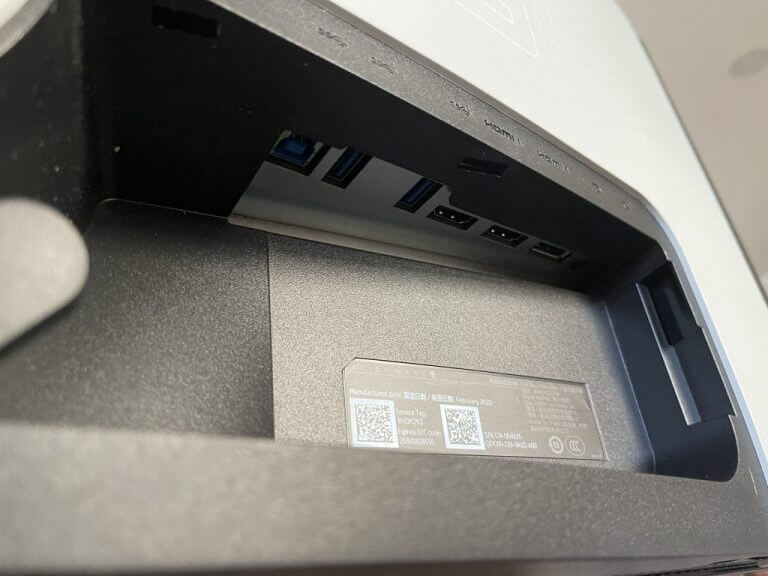

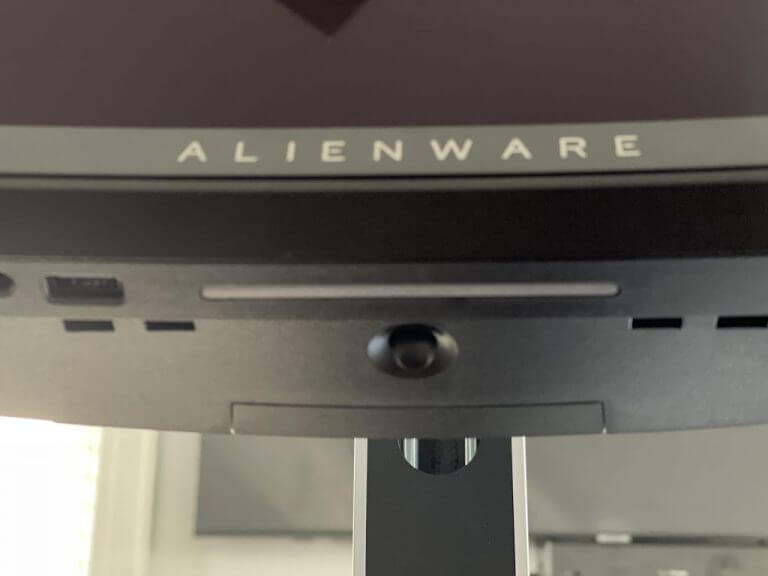
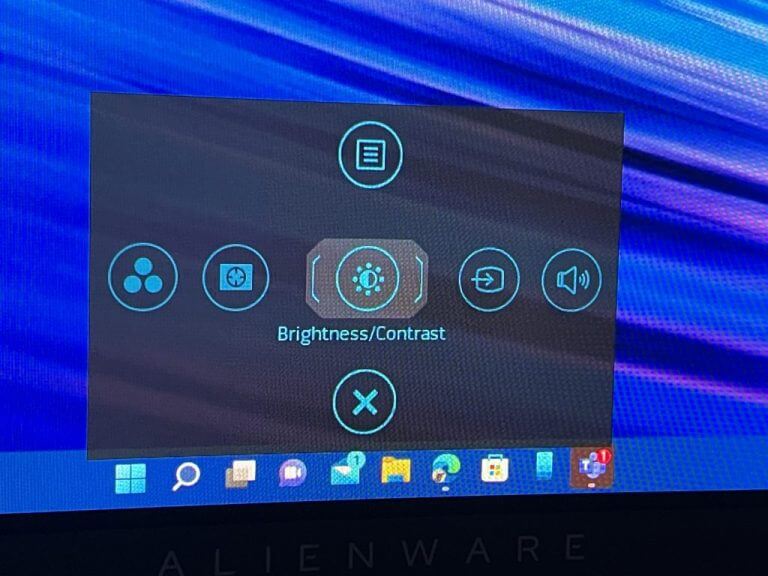
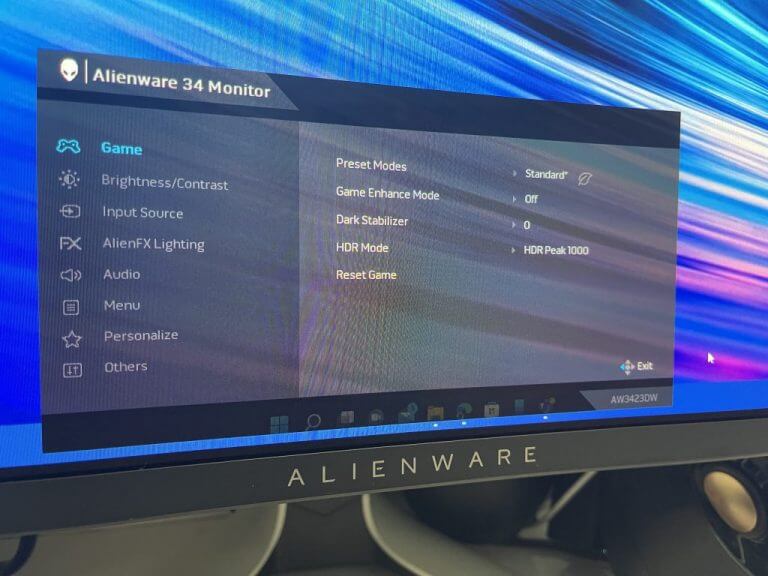
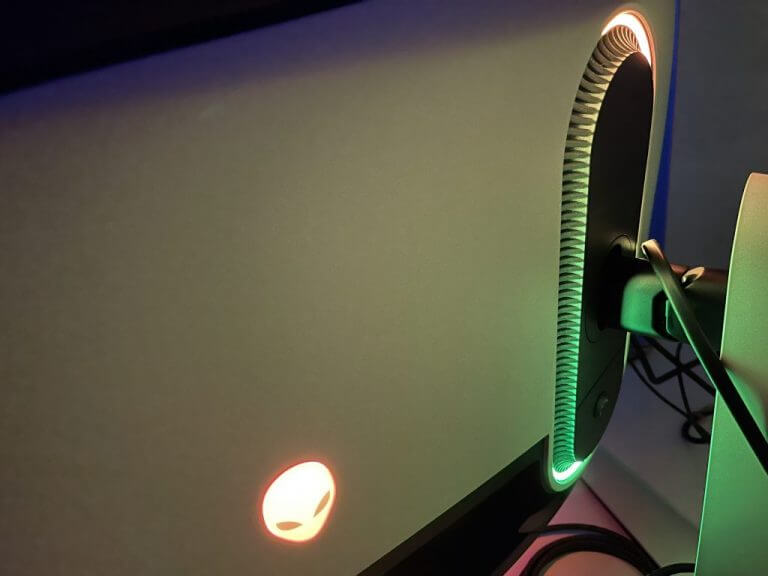

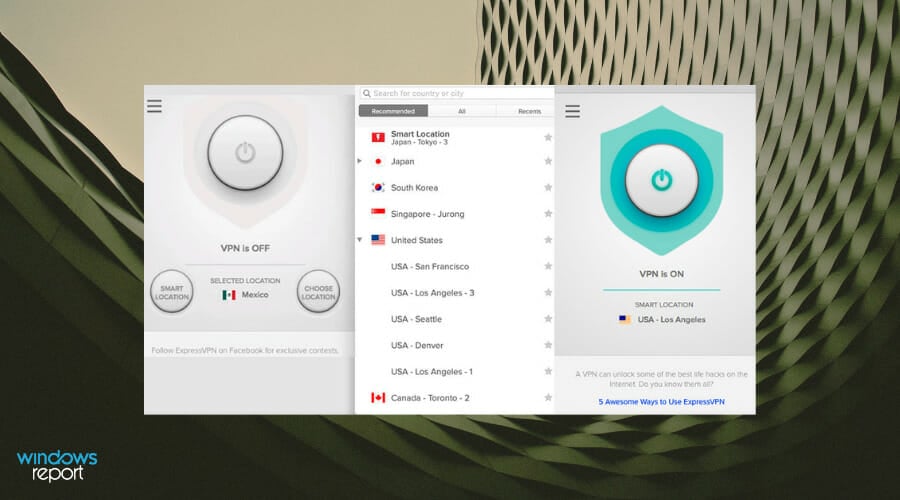

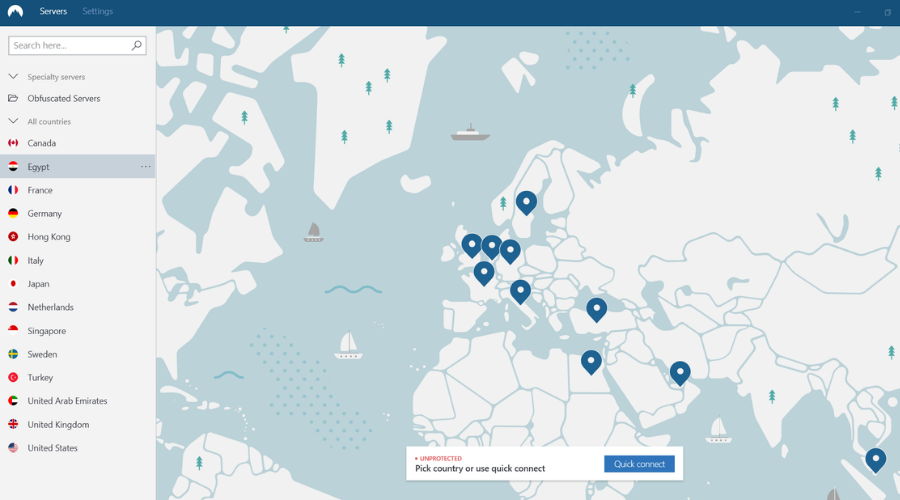

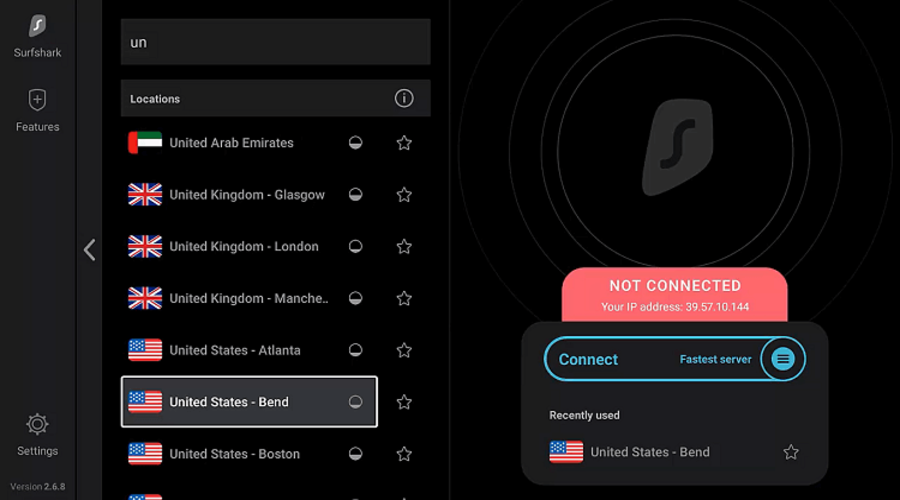












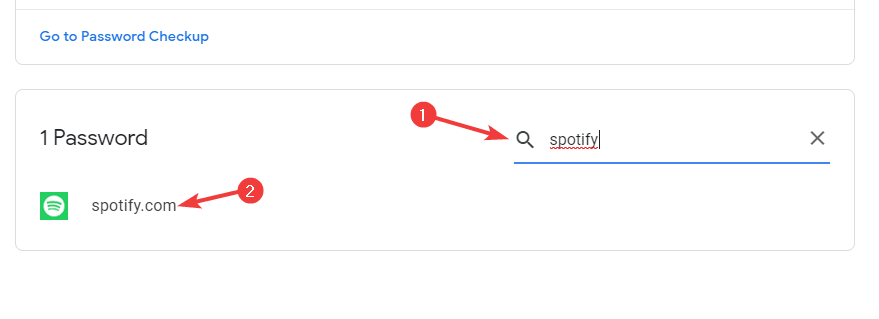
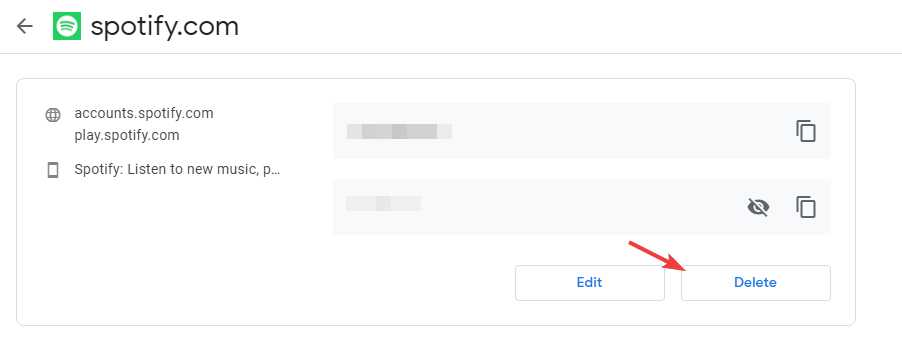
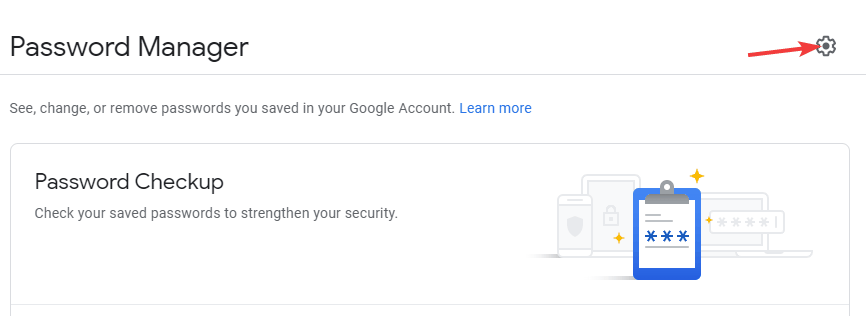
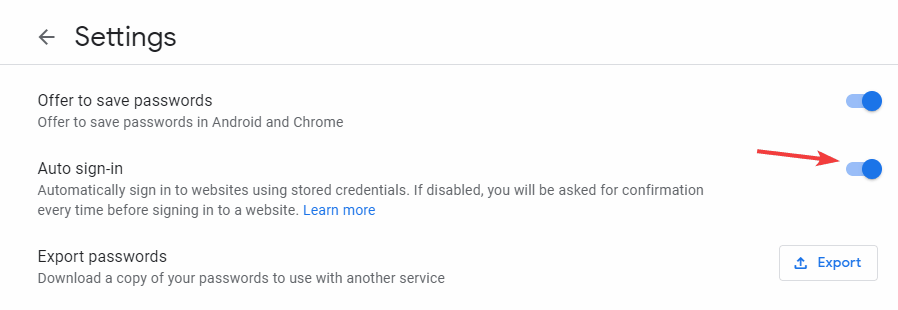

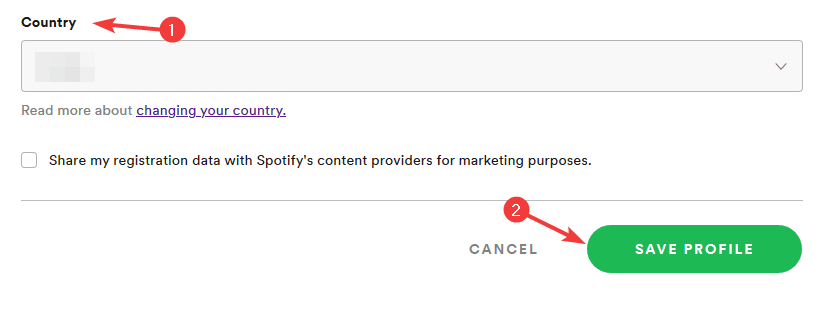


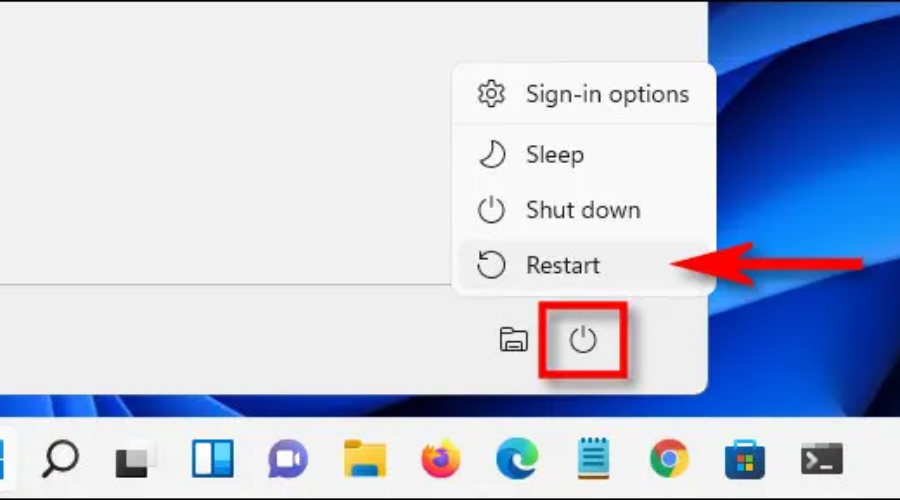
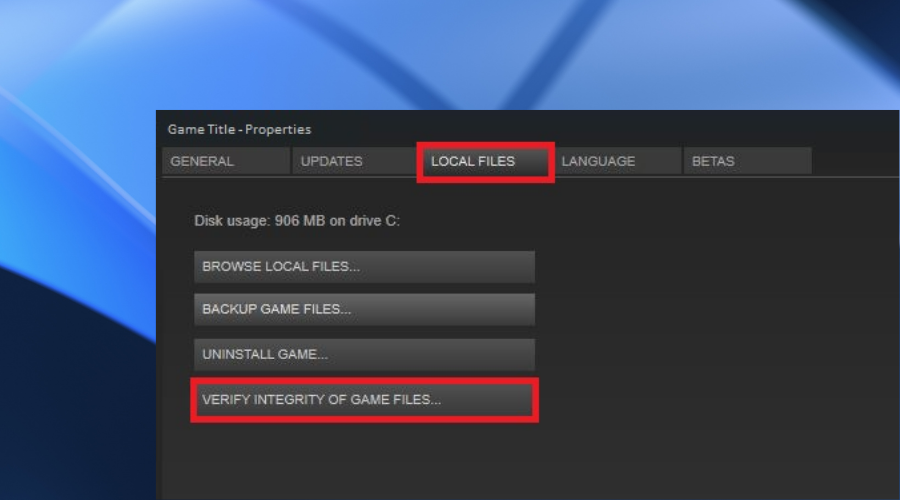
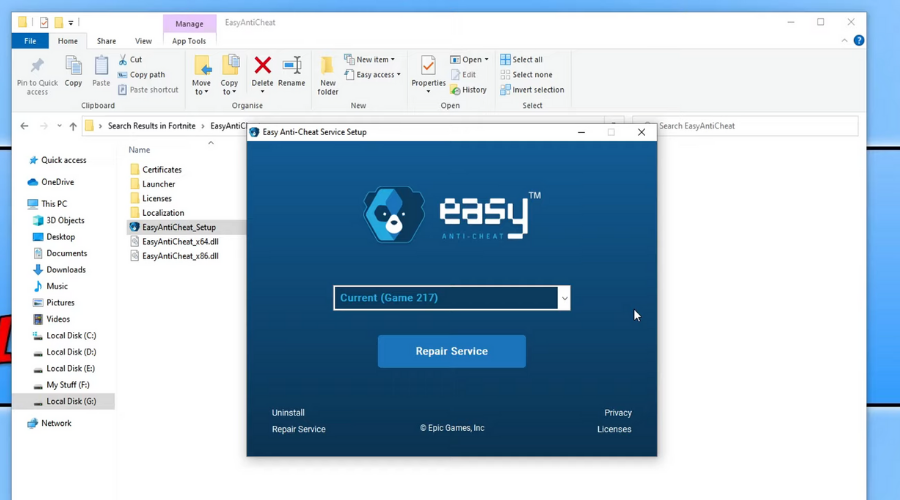
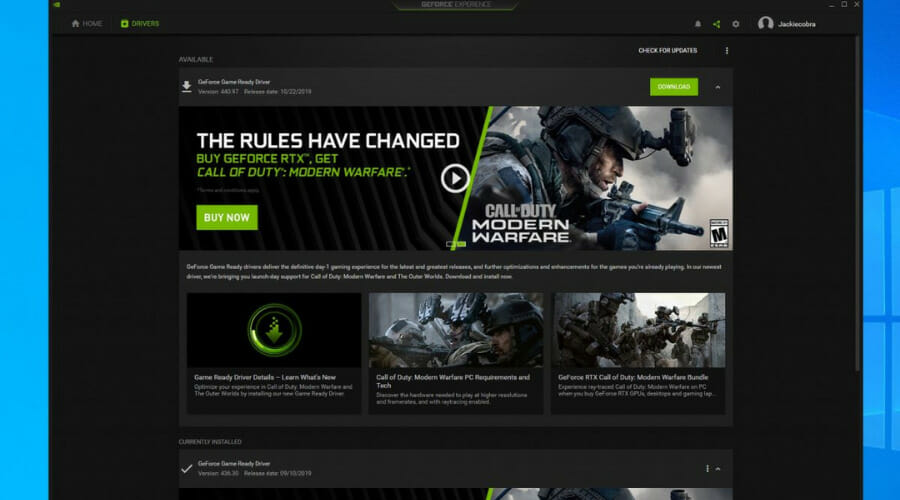


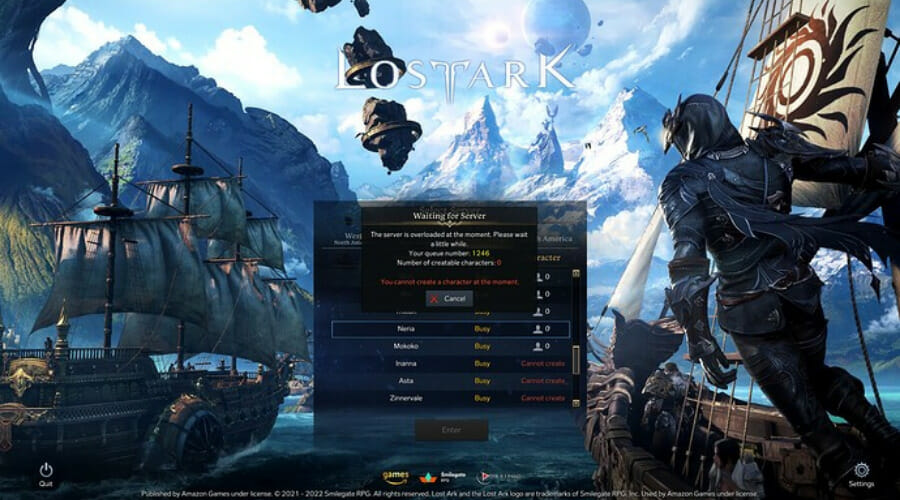


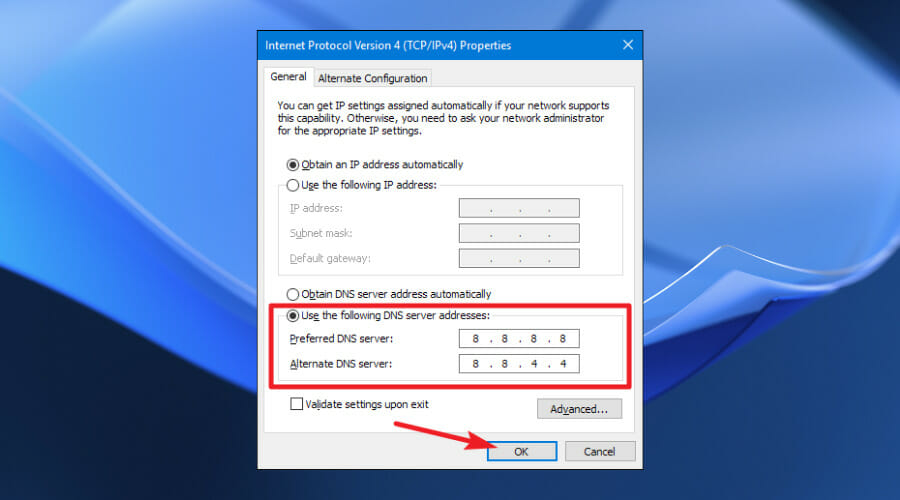


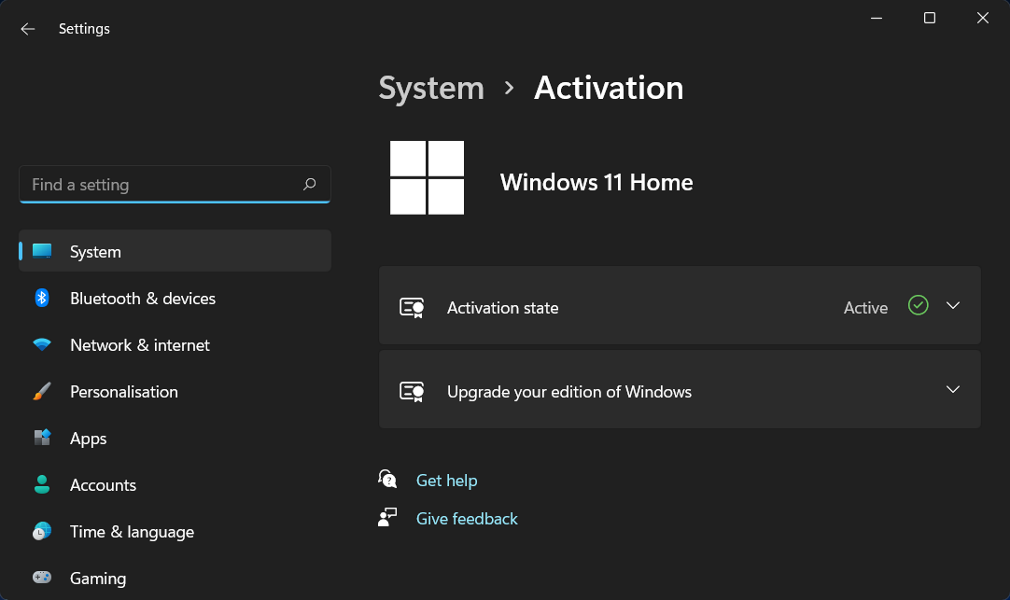


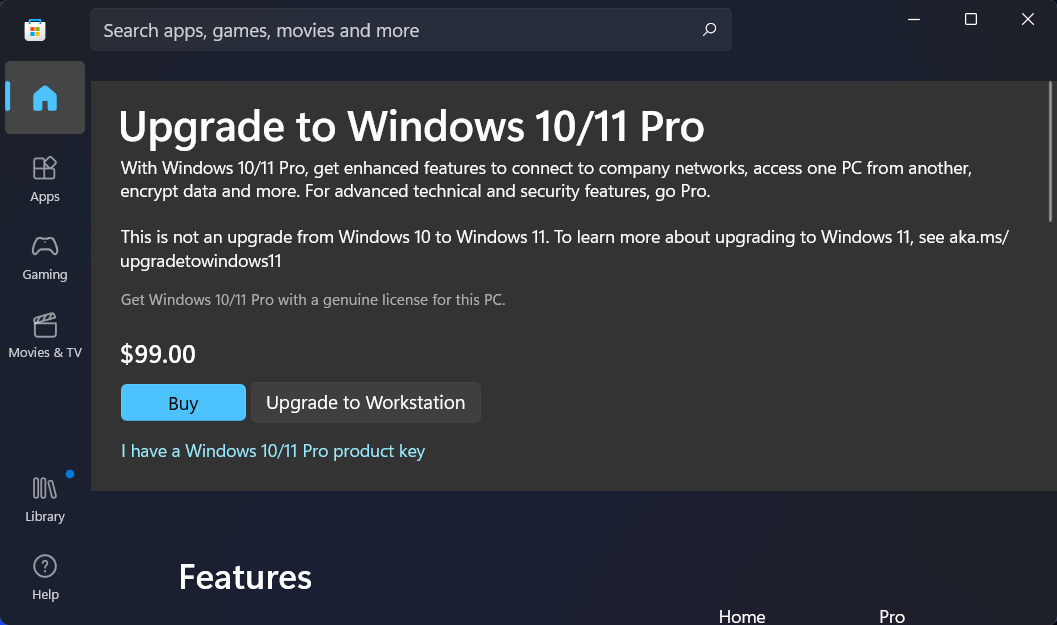



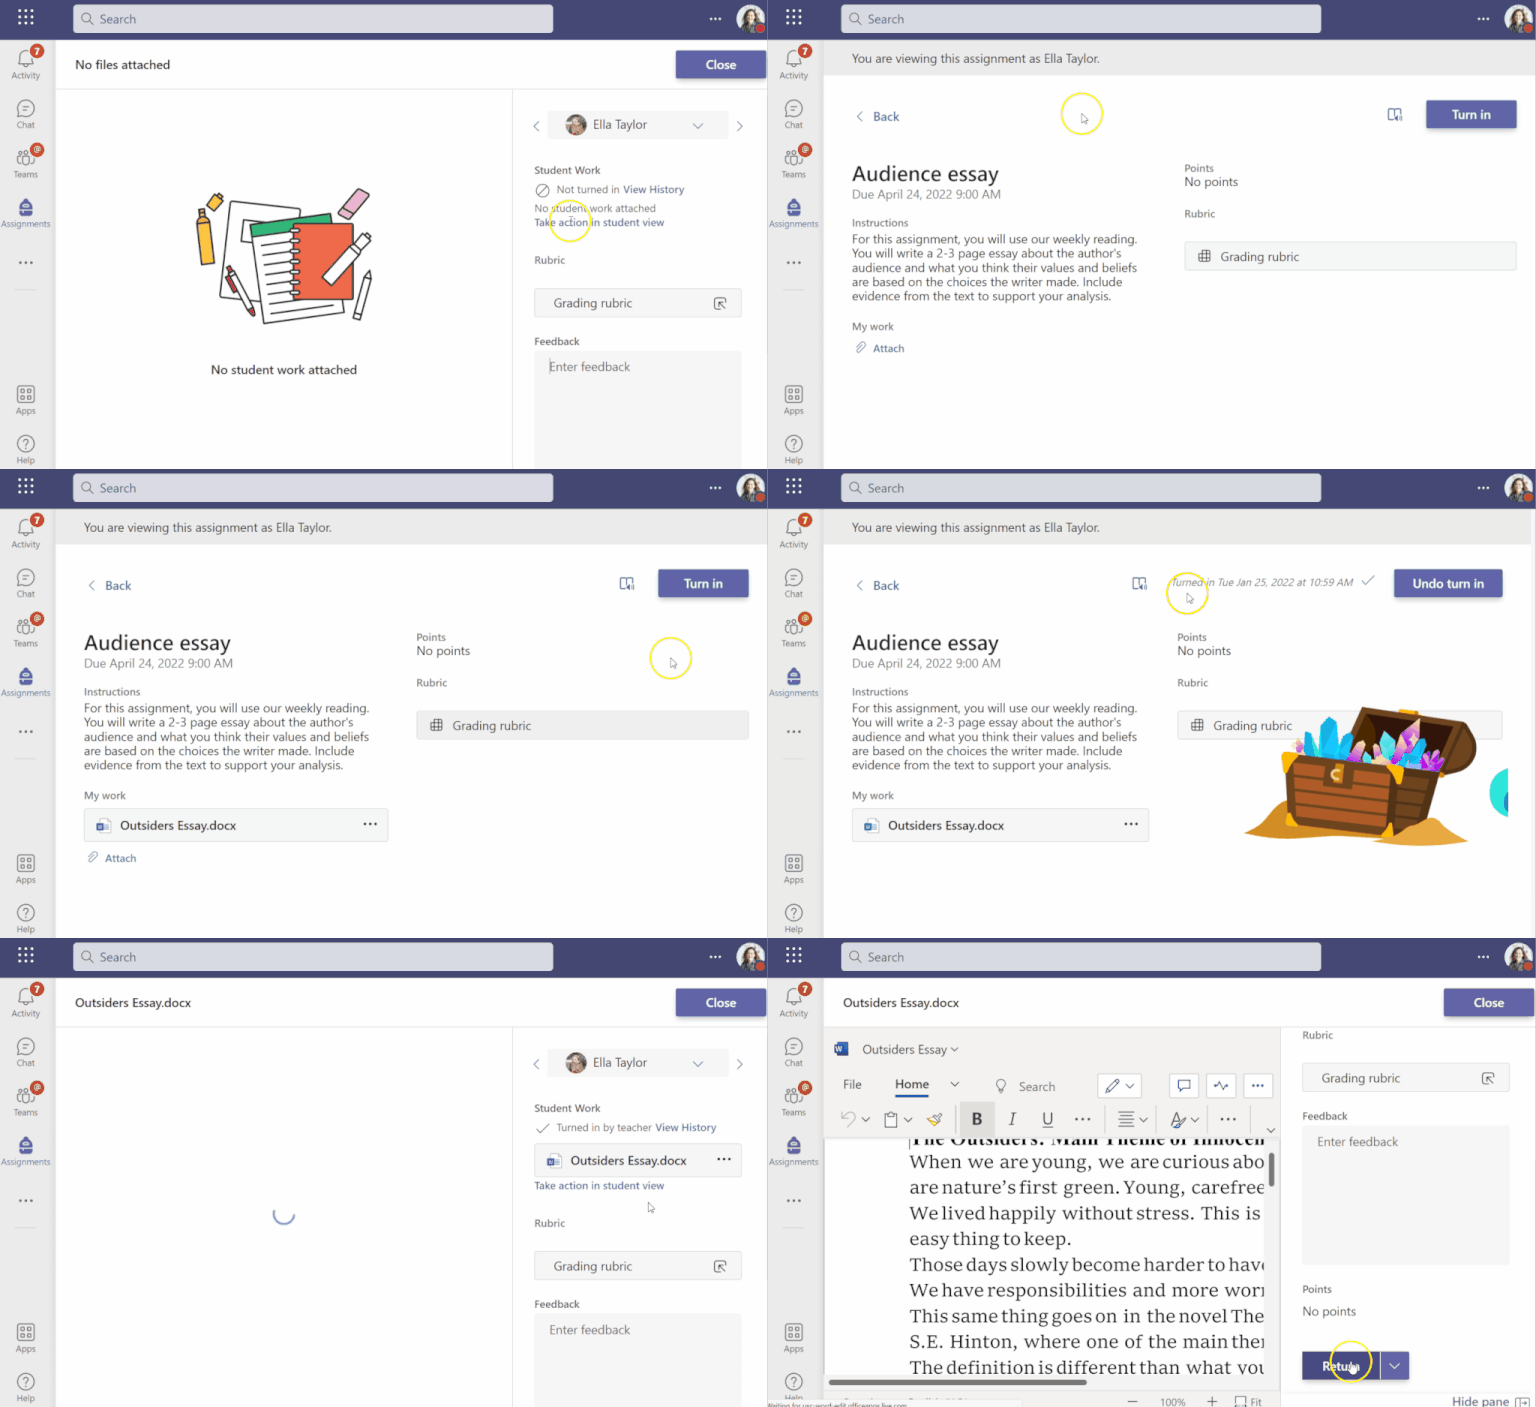

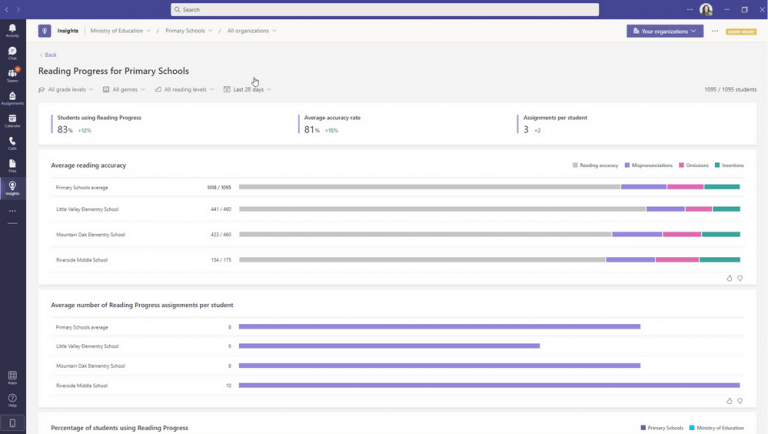





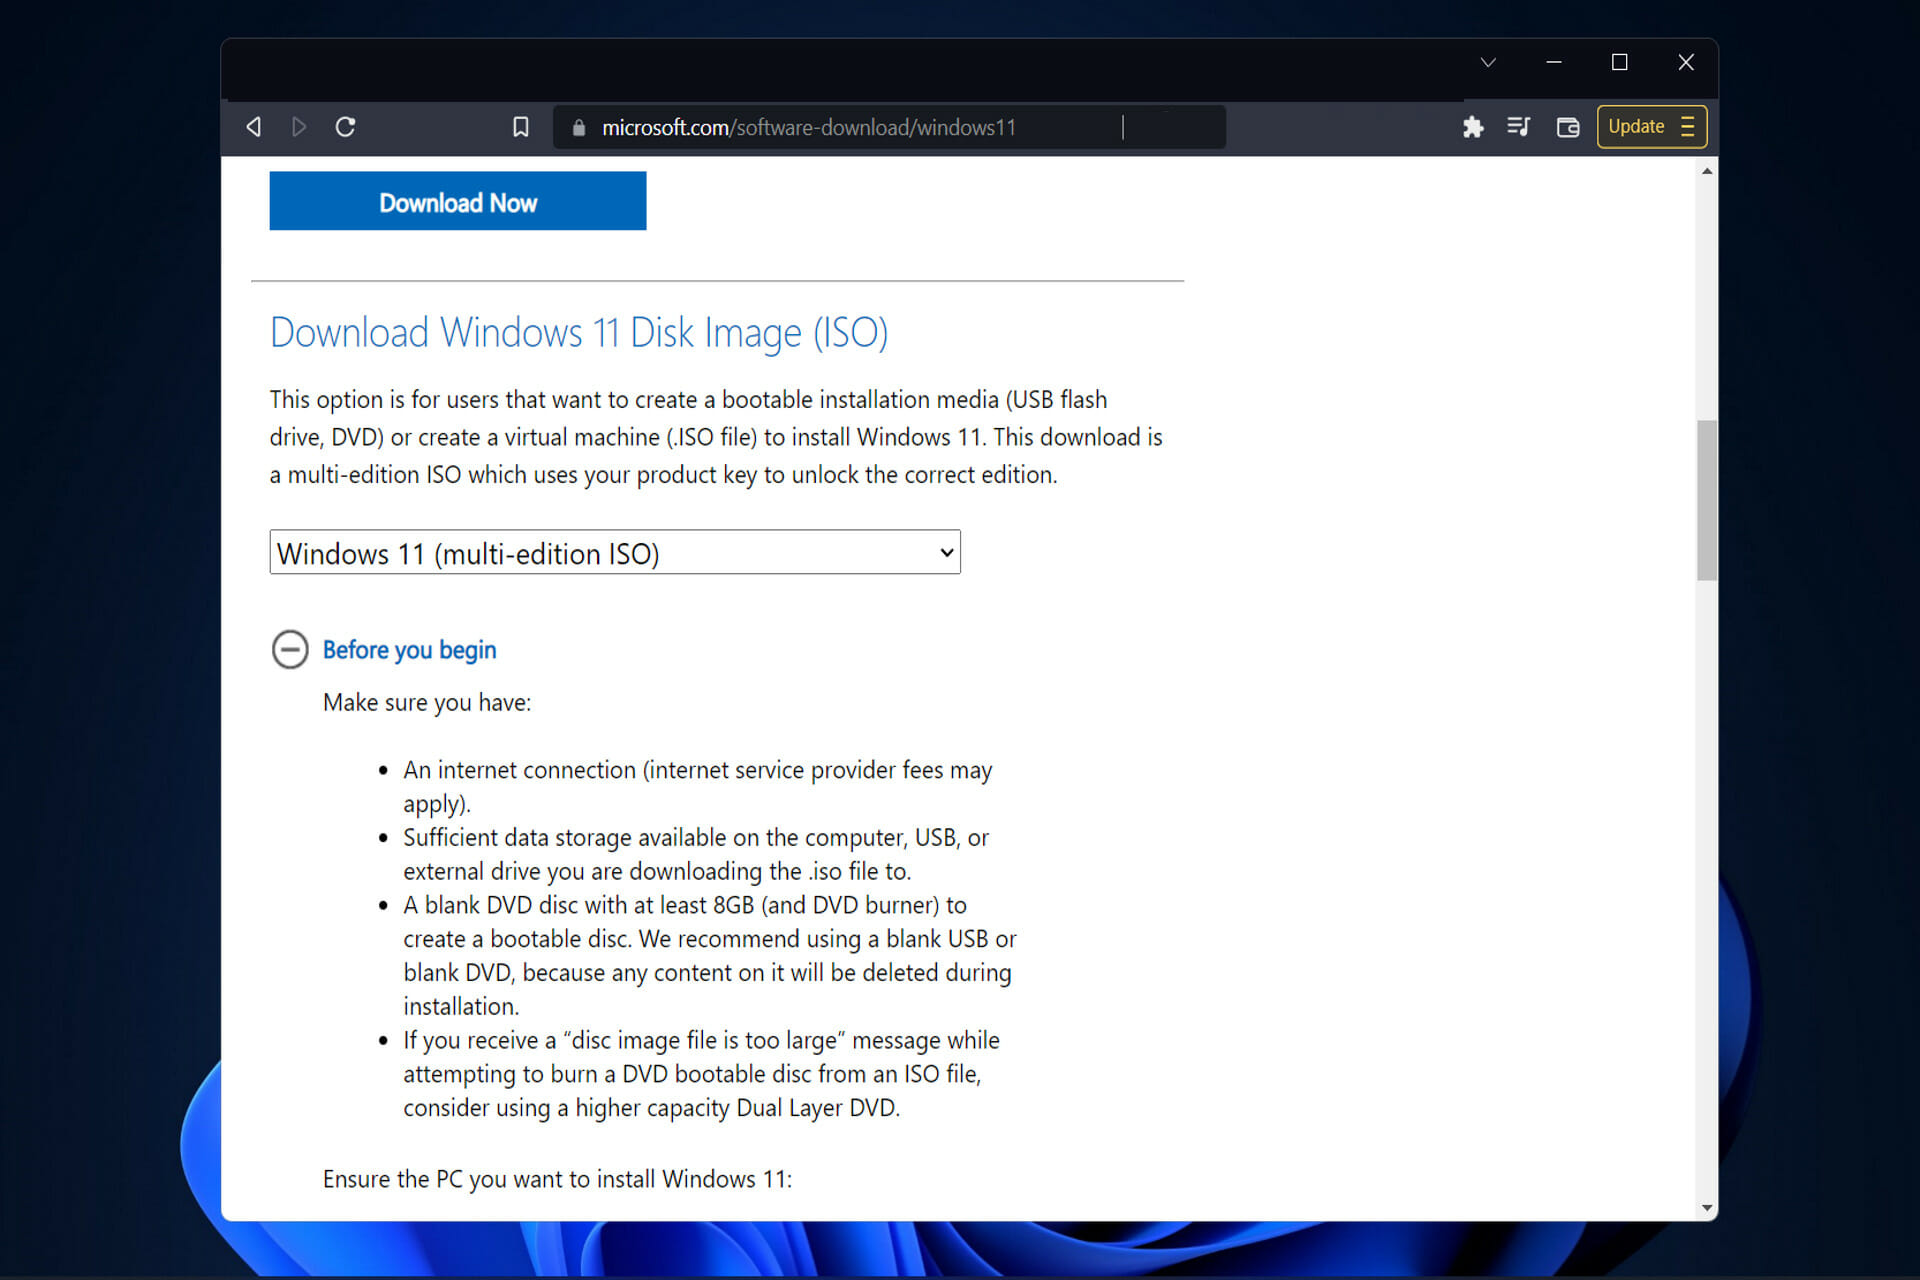


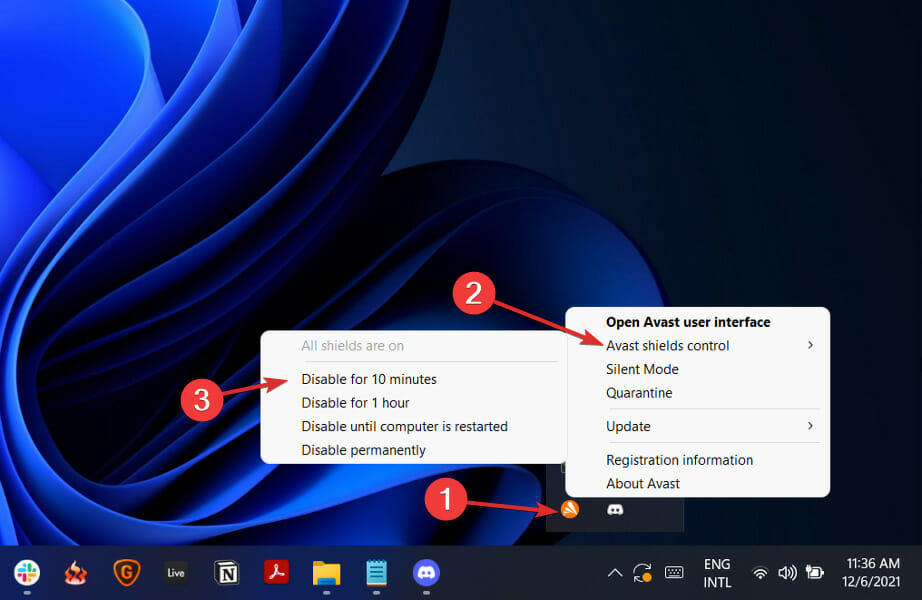
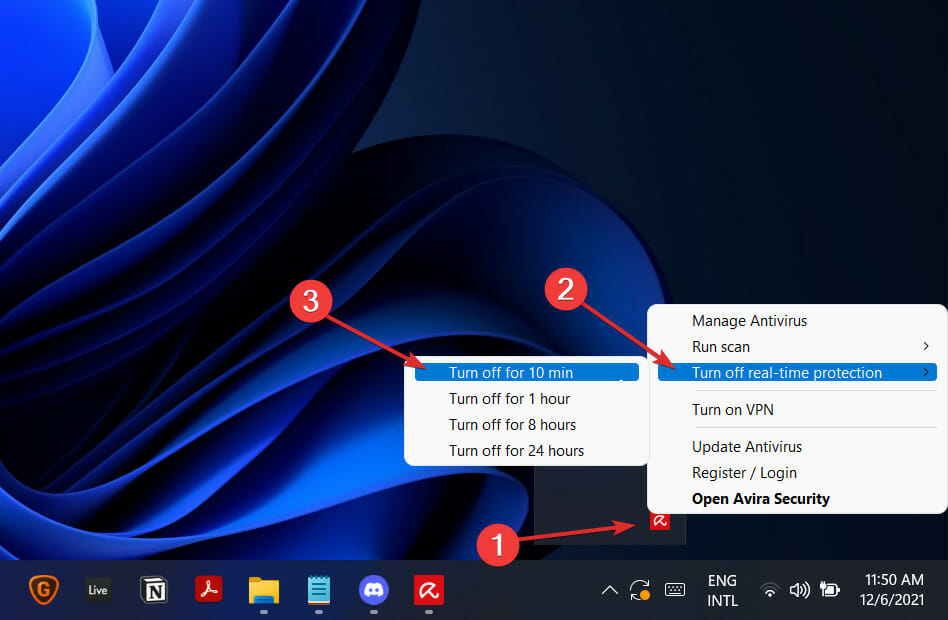


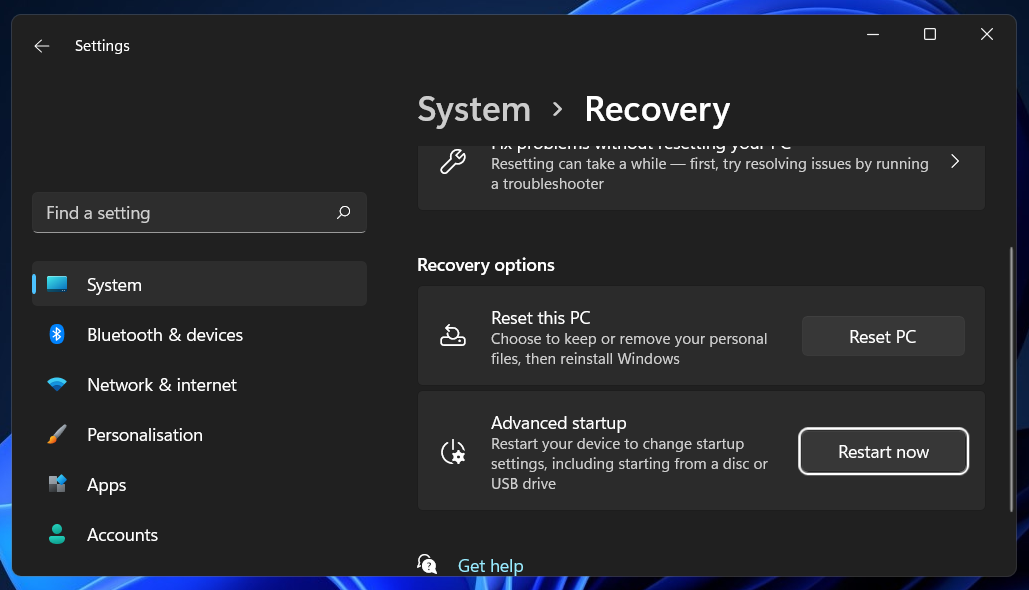
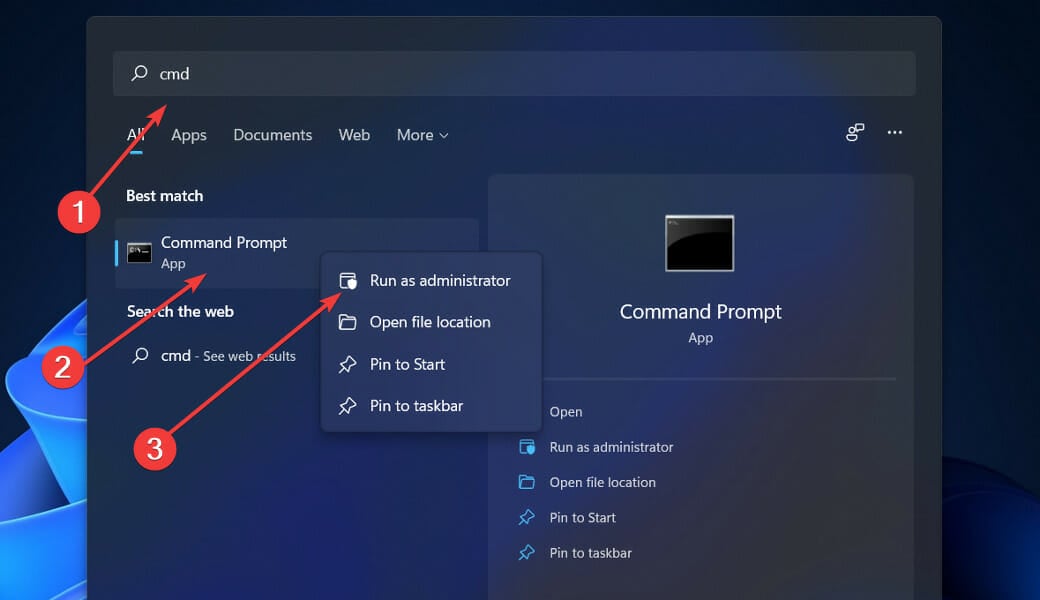
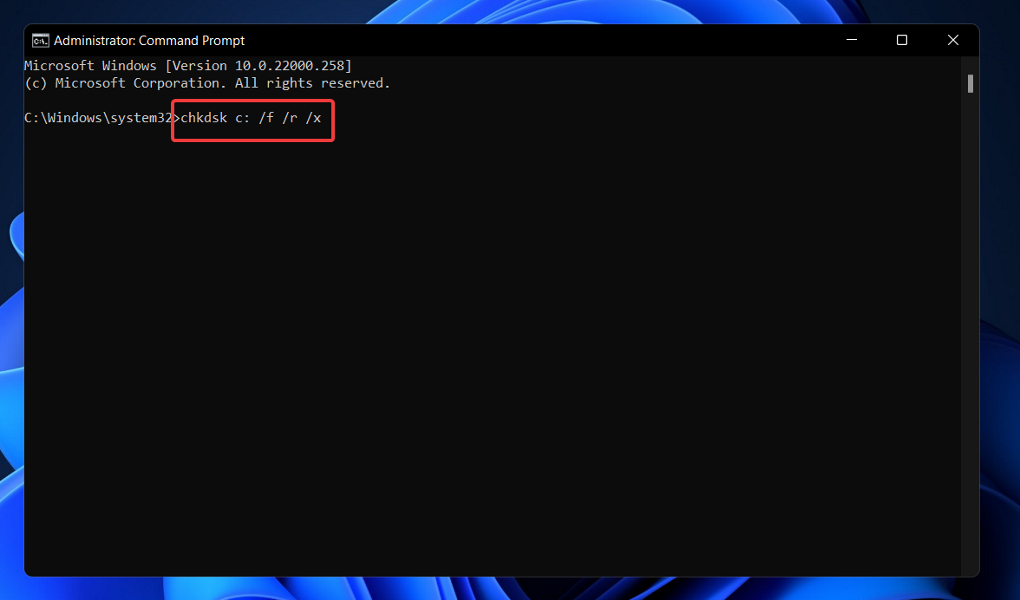
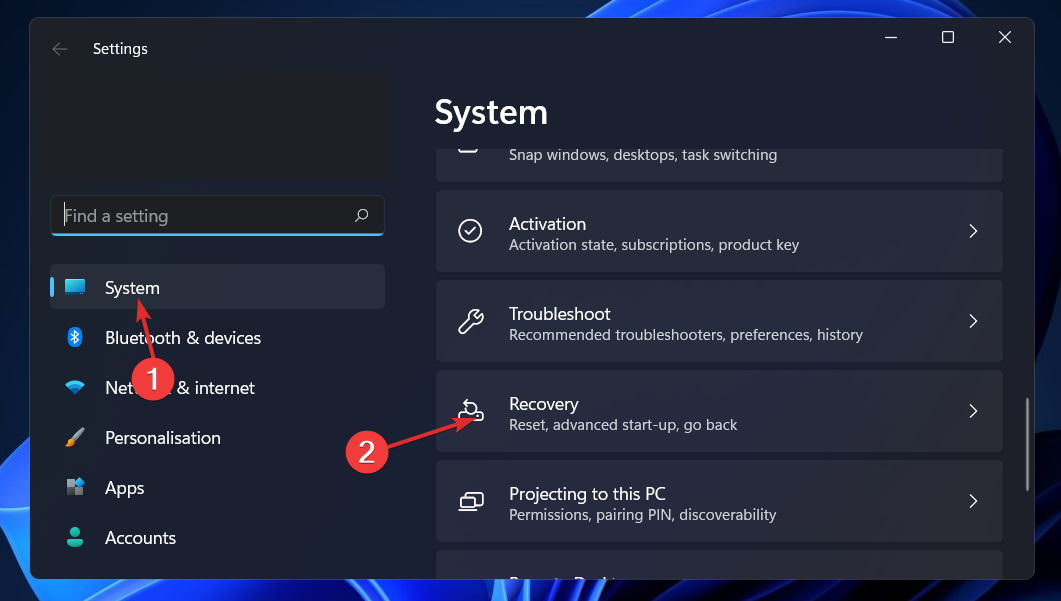
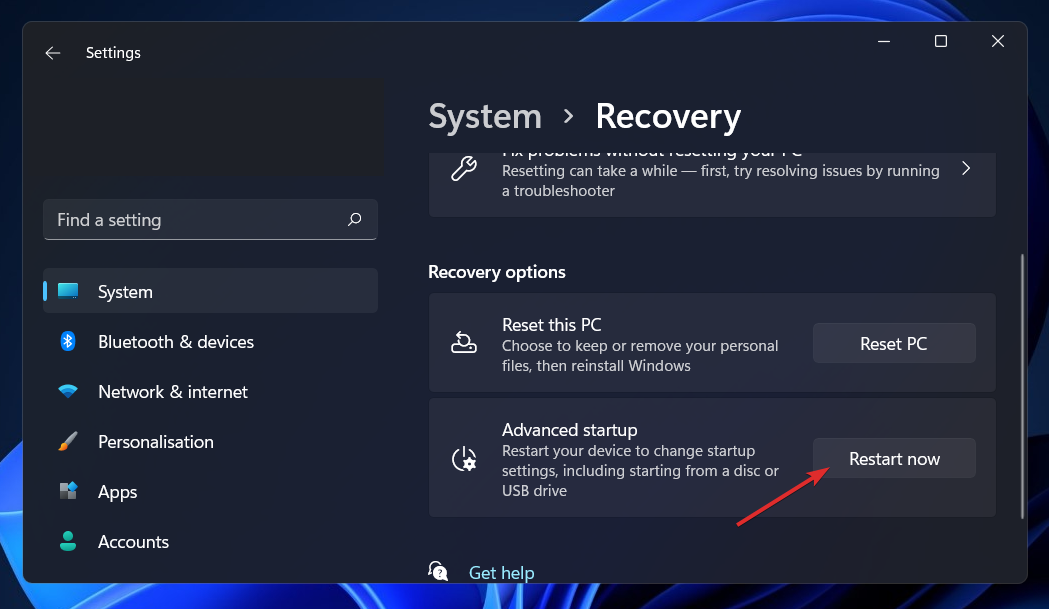
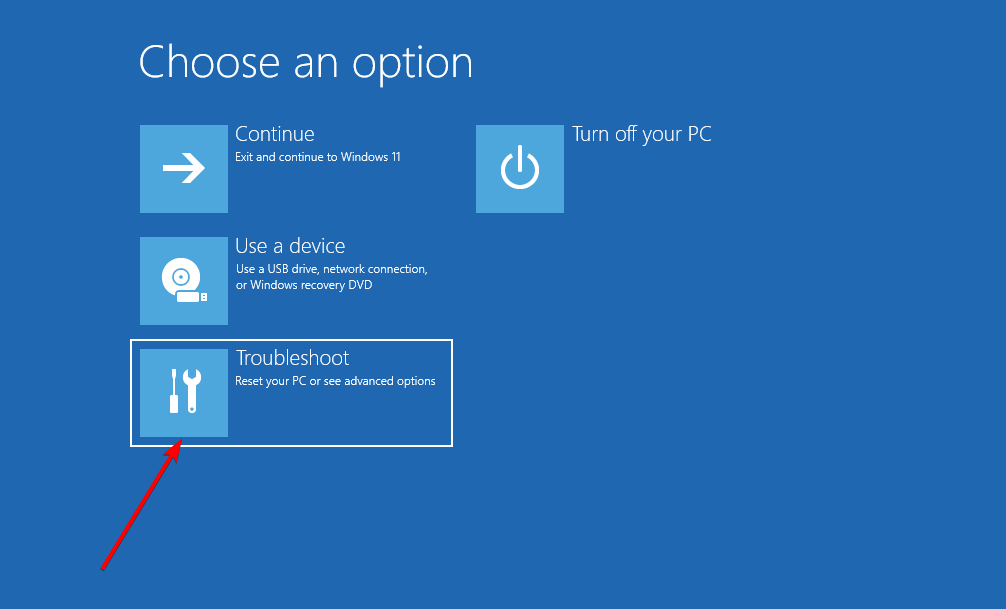
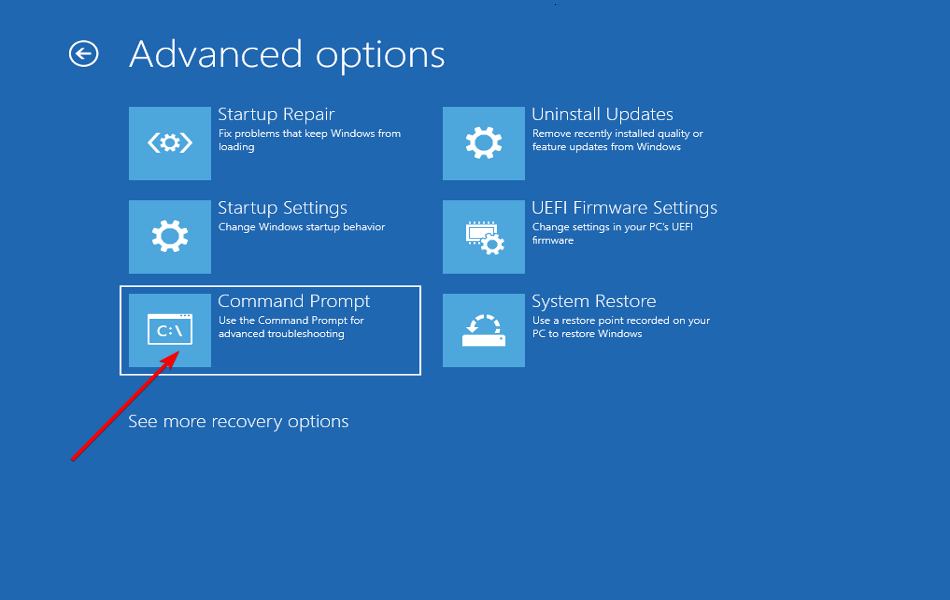
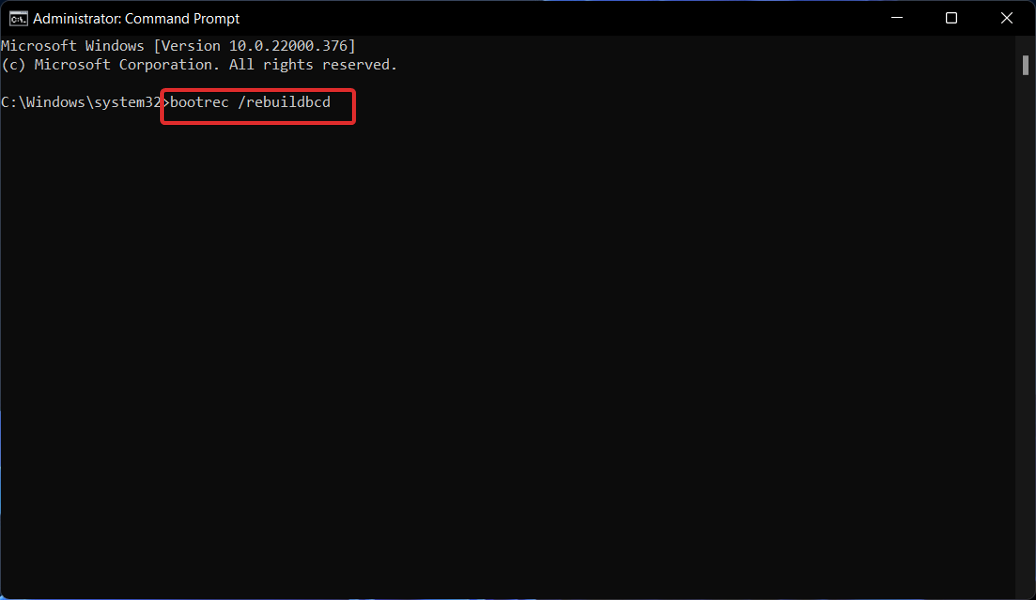
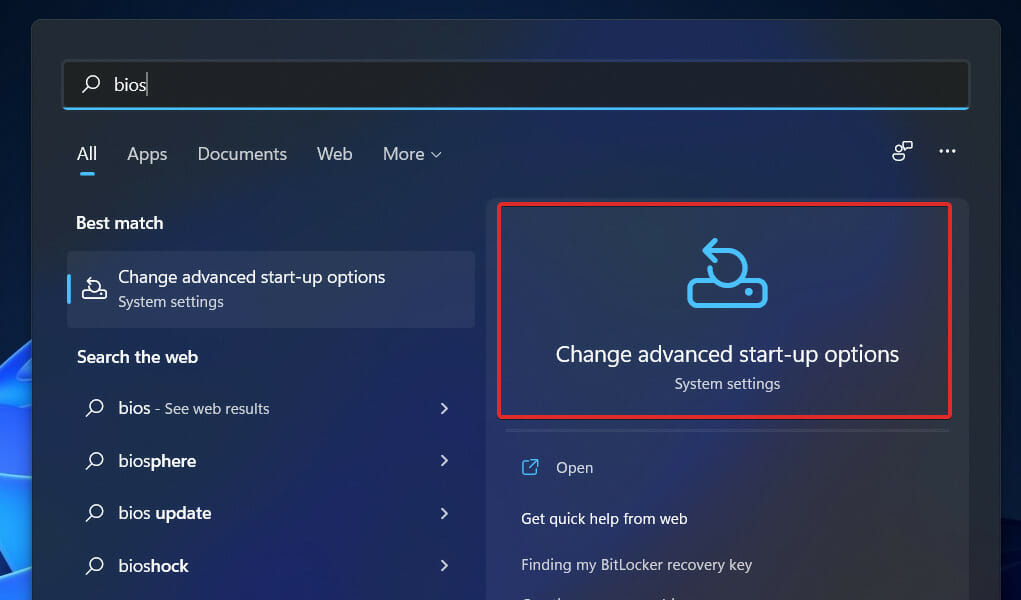

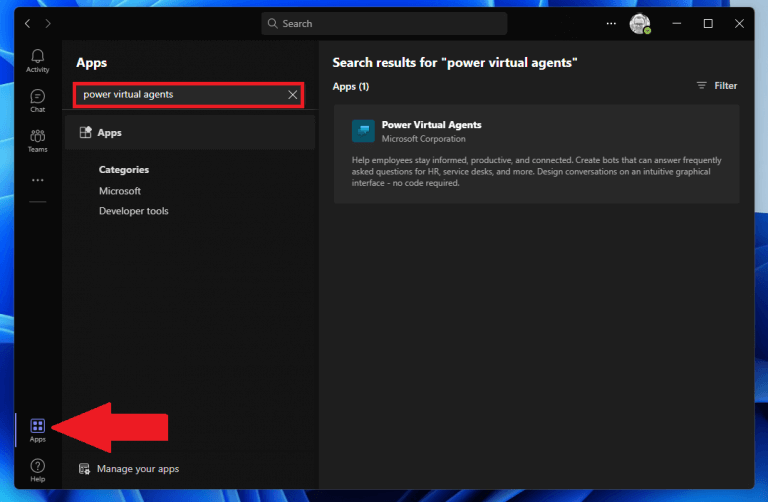 2. Select the Power Virtual Agents app and click Add.
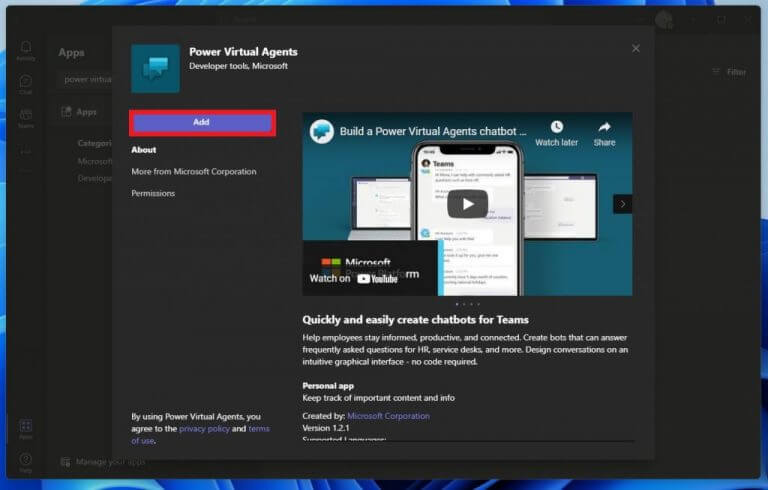 The app will be added to the side pane in Teams and the app automatically opens to PVA interface. This is where Teams users can come to create, edit, and delete bots. This is the perfect time to
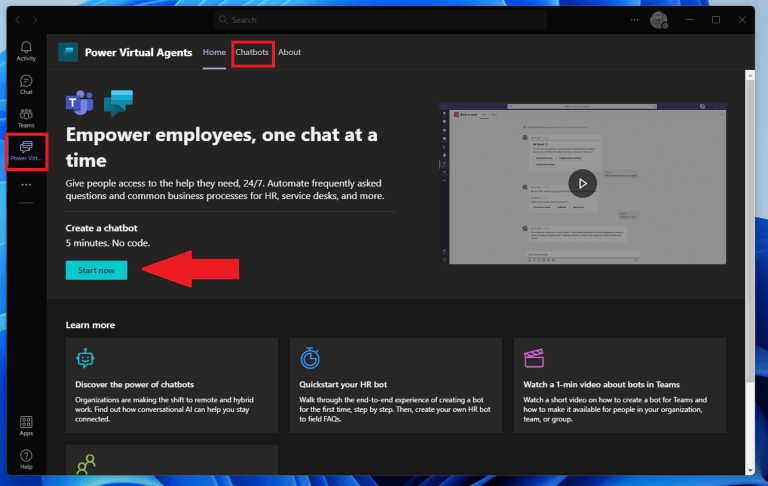
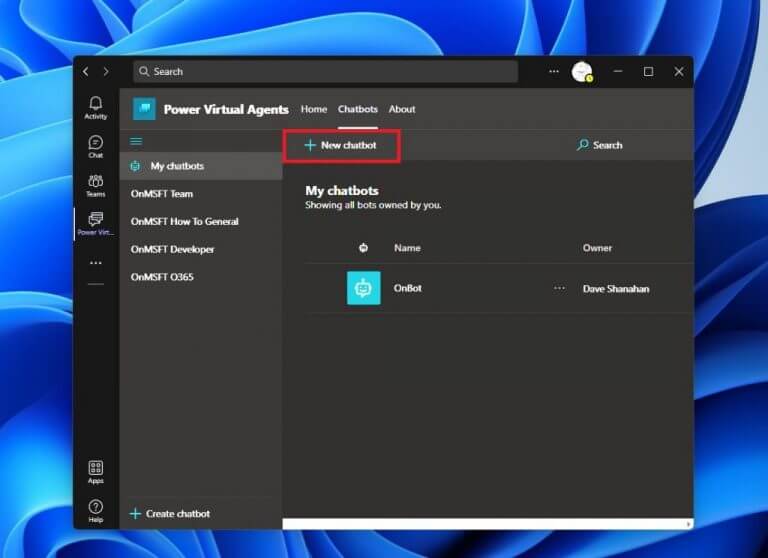
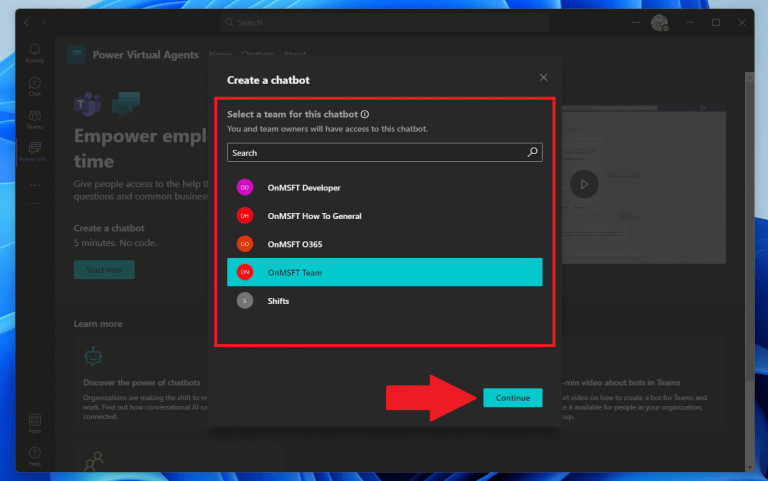 3. Name your bot and choose what language you want your bot to speak.
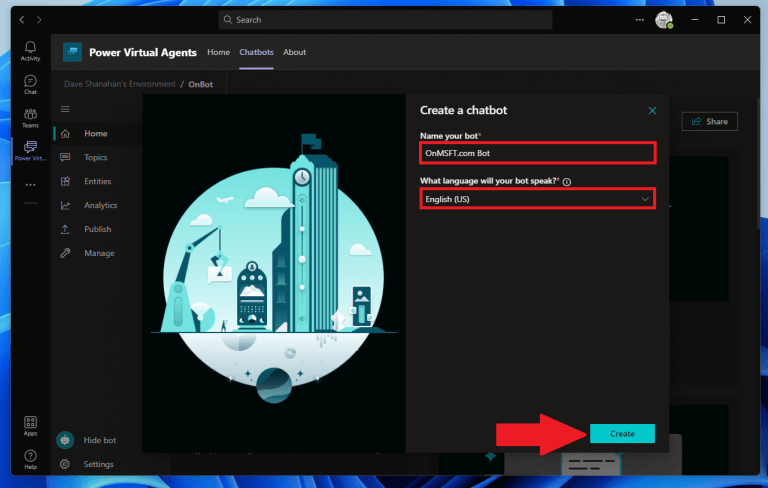 4. Click Create to create your bot.