Watch out for fake Windows 11 downloads

An attack, which was spotted recently and reported to Microsoft, began with a series of phishing emails that impersonated Microsoft. 

The emails were cleverly crafted to convince recipients that they were part of the Windows 11 upgrade program, and instructed them to click a link in the email to start their upgrade.

The link led to a fake Microsoft website that asked users for their email addresses. Once entered, it then proceeded to ask for a phone number and the model of their PCs.

The goal of this step is to allow the attackers to create an account on the fake website using the email address provided by the user.

Attack discovery

HP detected a fake Microsoft website that was distributing malware to those who visited and has outlined this discovery on its threat research blog.

The site had a number of features that appeared legitimate, including social media links, a countdown clock for the upcoming announcement date, and even an embedded video featuring a fake Microsoft report about the operating system.

Microsoft cybersecurity team details the malware campaign that surfaced recently, pointing to the underlying motives behind it. 

The group was capitalizing on massive anticipation surrounding Microsoft’s rumored Windows 11 launch particularly among everyday computer users, who were looking for ways to update their machines before the final release.

The thing to note is that these malicious actors take advantage of trending topics to get people to open email attachments and download malware onto their PCs.

Fake website

The fake website mimicked Microsoft’s layout and design. It is likely the creators of the site using Microsoft’s own iconography and images.

It also uses fake news reports from major media outlets with quotes about the new operating system to fool victims into believing this is real.

Anyone who clicks the “download” button is taken to another site that prompts them to fill out a survey before downloading the so-called Windows 11 update.

Unfortunately, it’s not a new version of Microsoft’s OS that people are getting; it’s malware.

If you want to buy Windows 11 outright, you can head over to Microsoft’s site and purchase a copy there. You’ll end up with a digital license that will get you access to the OS.

It’s important to remember that Microsoft isn’t pushing out Windows 11 today, so if you’re not seeing any updates in the Settings app, it means that the new OS just isn’t ready for your PC yet.

Similar attacks

Microsoft also outlines that In December 2021, a similar campaign to the one described above was discovered.

A redline stealer campaign was discovered that used fake versions of discord’s website and other messaging services in order to distribute malicious software.

Have you been tricked in downloading malware in the hope of upgrading your PC to Windows 11? Please share your experience in the comments section.

Here’s another reminder that your PC doesn’t qualify for Windows 11

Microsoft is using a new feature in the latest Windows 11 builds to let users know when their PCs don’t meet a specific requirement for the latest version of Windows.

You might recall that Windows 11 doesn’t support a bunch of processors, which means that many older PCs don’t qualify for the new OS.

But as we’ve seen over the past few months since the OS’s release, users have been able to run the OS optimally with no hiccups despite several warnings to withhold security updates.

The first is that Windows 11 was never meant to run on your PC. As such, you should really not expect it to work well at all, even if your computer does meet the minimum system requirements for Windows 11.

Updates won’t be forever

Whereas unsupported PCs have still been getting updates just like other official supported PCs, Microsoft wants you to remember that this will not be forever.

That is why you will be constantly reminded that your PC does not meet the minimum system requirements.

The old PCs have pitifully low RAM and ROM that cannot be expected to run modern apps and services. You may be able to install the OS but you will be limited in the number of operations you can perform.

You are likely to experience a slowed-down performance which can be frustrating.

Reminder on settings

Now, the reminder is about to be more prominent. Previously, such messages would only make an appearance before or during the installation of the OS.

Microsoft appears to be experimenting with a new message in Windows 11 that reminds customers that their PC doesn’t qualify for the latest version of Windows

It now seems that the message has been brought closer and will appear on top of the Settings app. You surely visit the Settings app at least once or twice a day so you will be constantly reminded that your PC does not meet minimum requirements.

This is a feature that Microsoft is testing with a small group of Insiders — as one of several “experiments” built into the operating system. 

Remember, you can download PC Health Check App to see if your device meets the requirements.

Apart from the reminder, there are also a bunch of new features rumored to be on the way.

Does your PC meet the system requirements? Are you still getting important updates? Let us know in the comment section below.

5 beautiful Valentine’s Day themes to install on your PC

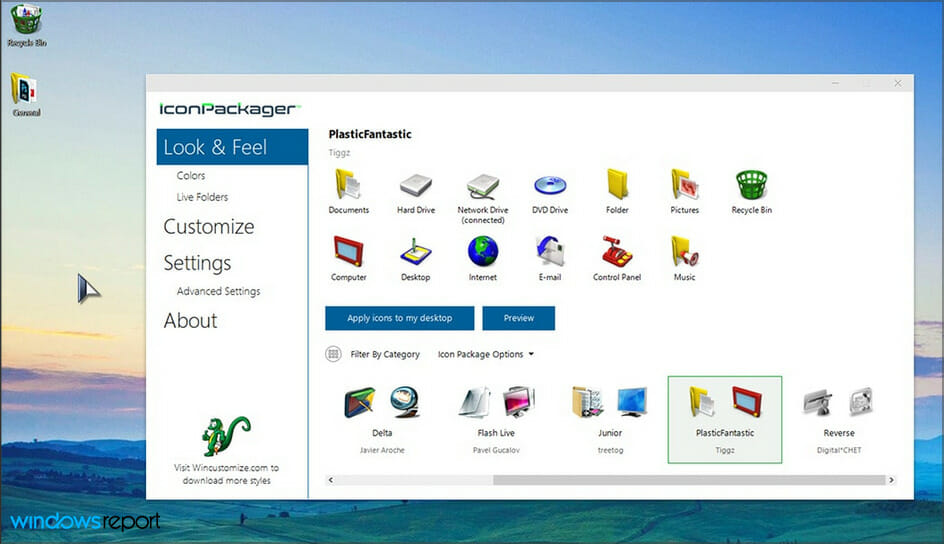
Your Windows computer should celebrate Valentine’s Day as well. For this reason, we suggest you install a special theme and decorate your app icons and desktop with love symbols.

There are all sorts of themes that you can use on your PC, but today we’re going to show you a couple of ones that are perfect for the upcoming holiday.

All of these beautiful themes look great, and they will help you set the right mood for Valentine’s Day. So without further ado, let’s get started.

How does a Windows theme work?

Windows themes will change the desktop wallpaper as well as the current color scheme so it can match your wallpaper better.

Many themes come with a set of wallpapers that will be changed automatically every day or so. Of course, you can still customize the theme any way you want.

What are the best Valentine’s Day desktop themes?

Object Desktop

Valentine’s Day is indeed a special day but you can personalize your system’s appearance for every event or just for a different mood.

You can do that easily by using Object Desktop, a huge collection of apps that will help you customize your virtual space in a myriad of ways.

Stardock’s Object Desktop includes a lot of visual customization apps including DeskScapes, Fences, Groupy, Start10, Multiplicity KM, WindowBlinds, SpaceMonger, Start8, and many more.

With this great solution, you will not only tune your system to Valentine’s Day, but you will always have all the tools to personalize your desk space to any occasion.

Object Desktop

This Windows 10 visual tune-up tool will definitely help you personalize your virtual space.
Check price Visit website

Windows Valentine

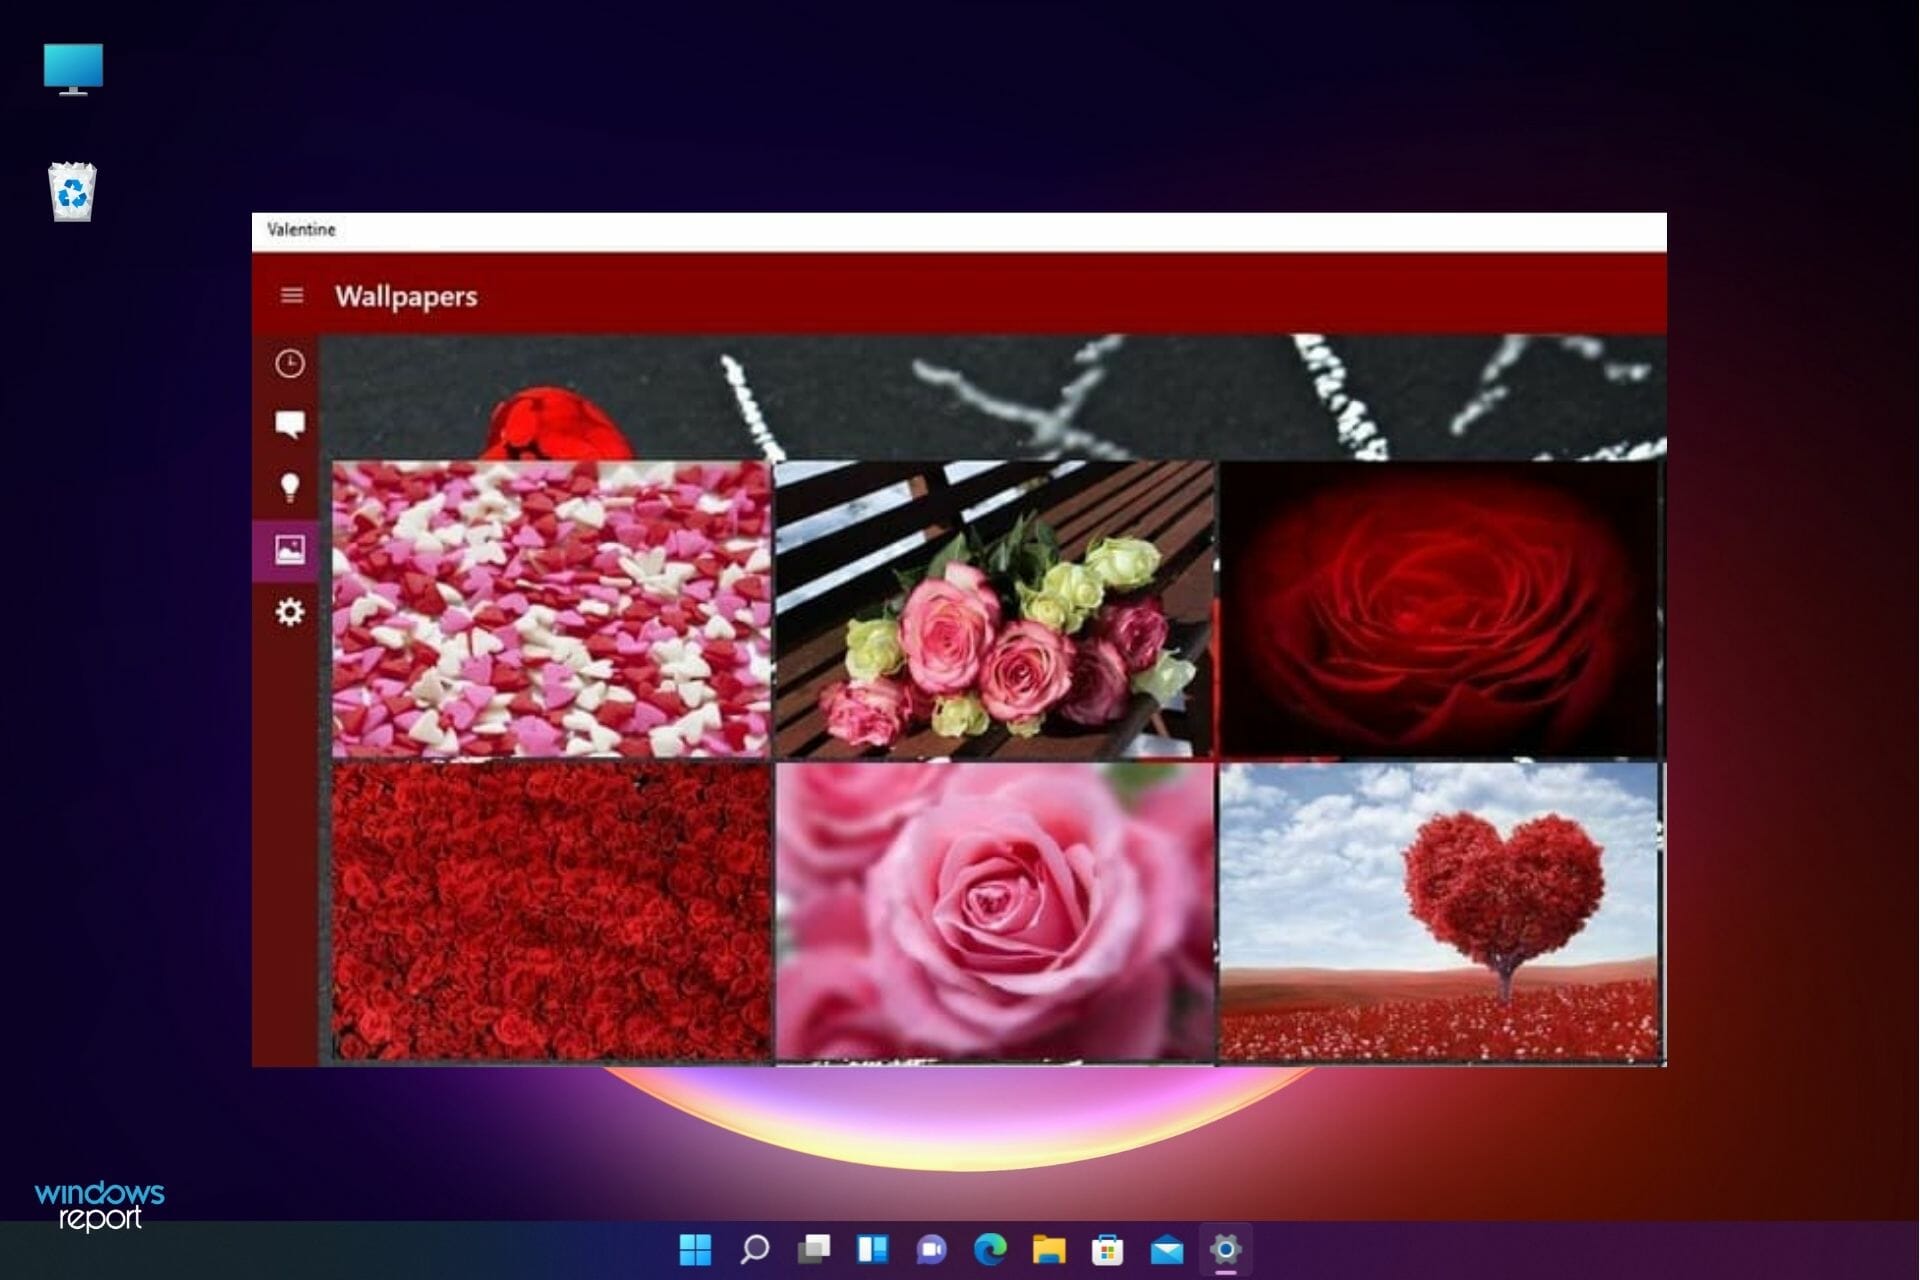
Microsoft offers you a dedicated Valentine’s Day theme that you can download and enjoy on your Windows 10 computer. Install it and every app and icon will turn pink.

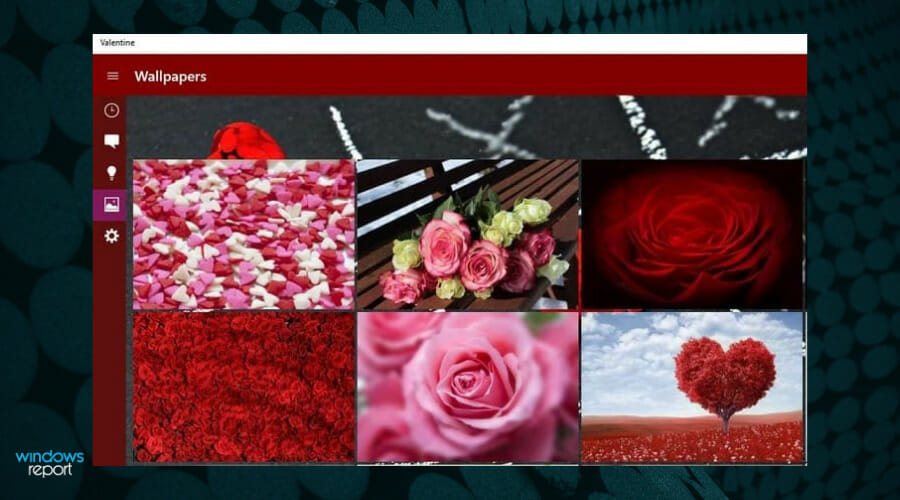
The theme also adds 4 beautiful wallpapers on your desktop, depicting beautifully decorated hearts, such as the one below.

This is probably one of the best-known Windows Valentine’s themes, so it’s worth checking out.

⇒ Download Microsoft’s Valentine

Baby Animals

What can be more romantic than installing a cute animal theme on your computer? Microsoft offers you a wonderful theme depicting baby animals that you can use on Valentine’s Day.

The wallpapers with cute fluffy kittens could melt any heart and bring a moment of soft embrace with your loved one.

⇒ Download Baby Animals

Try a Little Tenderness

Excessive hugging alert! There is no such thing, right? Whatever your mood, this Try a Little Tenderness collection of desktop wallpapers for Windows 10 will bring you 14 images with beautiful animals showing their affection.

Every single image is a perfect Awwwww moment for you and your loved one.

⇒ Download Try a Little Tenderness

Pretty in Pink

Pink is the color of love, right? So, make this your color for Valentine’s Day with this Windows 10 desktop wallpapers pack with 18 images where pink is the queen color.

Flamingos, cookies, flowers, and other wonderful pink things will provide you with a nice frame for expressing your feelings for your partner.

⇒ Download Pretty in Pink

How can I switch my Windows theme?

  1. Press Windows key + I to open the Settings app.
  2. Navigate to the Personalization section.
  3. Select Themes in the left pane and pick the desired theme.

We hope you’ll be able to download and install these Valentine’s Day themes for Windows 10 after reading this guide.

In case you’re looking for something more simplistic, we suggest reading our article on the best Valentine’s Day wallpapers for Windows.

And don’t forget, when you love, every day is Valentine’s Day, so you may keep them on your computer all year round.

5 best Valentine’s Day smartwatch gifts [Wereable gadgets]

Timepieces have always served as nice gift ideas ever since those evolved. No wonder these make for an excellent choice when it comes to expressing your love for your partner.

After all, a finely crafted watch has that timeless appeal to it and hence is just right to convey the deep liking you have for your partner.

That said, times have changed so that it is smartwatches that are more in vogue these days. Chances are, your partner would also rather like to have a smartwatch as a gift than watches of yore.

Mentioned here are a few such watches that can be the perfect Valentine’s Day gift for him or her.

What are smartwatches used for?

Smartwatches connect with your phone and they are used to keep a close eye on all your phone notifications. They also provide you with various health information which makes them perfect if you want to stay in shape.

Another use for a smartwatch is playback control, so you can pause the music while working out. Lastly, it’s possible to use your watch for contactless payment, so you won’t ever have to carry your card with you again.

To learn more about different models and their functionalities, keep reading our Valentine’s Day gift watch guide below.

What are the best Valentine’s Day smartwatches?

Amazfit GTS 2

  • 1.65 inch AMOLED display
  • Built-In GPS
  • 7-day battery life
  • 90 sports modes
  • Health tracking
  • No ECG measurements

Amazfit GTS 2 is an amazing watch that can be used for both sport and daily wear and it has a unisex design that can make it appealing for him but also for her.

It comes with a 1.65 inch AMOLED display, built-in GPS, Bluetooth phone calls feature, and no less than 90 sports modes. It also offers health tracking, and it’s water-resistant.

However, one of its greatest features is the 7-day battery autonomy that can make you forget about the charger. And if you’re wearing it while jogging, you also have 3 GB of space for some awesome playlists.

TicWatch Pro 3

  • Layered display
  • NFC Payment
  • Google Assistant
  • Wear OS by Google
  • Battery life is not so great as advertised

Apart from the usual goodies usually associated with smartwatches, one of the biggest positives with the TiCWatch Pro 3 smartwatch is its excellent battery life, which can reach 3 days on a single charge.

This is possible thanks to the two Smart and Essential Modes it comes with. With the Smart Mode, you get two days of battery life while Essential Mode will allow for up to a month of usage.

The watch is powered by Google’s Wear OS and offers functionalities such as a heart rate monitor, steps counter, calorie burned counter. Plus, the watch can also be used to make NFC payments as well.

SAMSUNG Galaxy Watch 4 R860

  • 40mm diameter
  • LTE, Bluetooth, Wi-Fi, NFC, GPS support
  • 247mAh battery
  • 1.5GB RAM + 16GB storage
  • 8 different sensors
  • Battery life could be better

Galaxy Watch series is well-known among smartwatch fans for its quality, and the latest model doesn’t disappoint.

Just like its predecessor, this model allows you to take calls, stream, and send texts without having to reach for your phone.

Google’s services are available as well, allowing you to easily access Google Pay, Assistant, and YouTube Music.

The design of this smartwatch is luxurious, so it will look rather stylish on your wrist. As for available colors, you can get them in three different colors.

With its design, it’s one of the better Valentine’s Day watches for her, so be sure to consider it.

Fitbit Versa 3

  • GPS tracking
  • 24/7 heart rate monitoring
  • Alexa built-in
  • 6+ days of battery life
  • Slight problems with charging

Everybody knows about Amazon’s Fitbit brand because it has a lot of good fitness products like the Pebble, the bands, and, right here, the Versa.

It would be a great gift for Valentine’s Day for him, but also for her as it has a unisex, sporty design. This watch excels with 6+ days of battery autonomy and comes with a built-in Alexa for private Q&A sessions.

Like you would expect from a good smartwatch, Versa 3 tracks you with the GPS feature and your heart rate with the built-in sensor.

If you need Valentine’s Day gift smartwatches for Android phones, we encourage you to consider this model.

Garmin Venu Sq

  • Bright 1.3-inch LCD display
  • Battery life up to 6 days
  • 5 ATM swim rating
  • Corning Gorilla Glass 3
  • Weighs only 37.6g
  • Sleep tracking needs improvement

This smartwatch comes with a simplistic but elegant design and it can fit on wrists that are up to 190mm in circumference.

Monitor your health with ease and enjoy 20 different sports activities presets. In addition to health monitoring, it also lets you see all your texts and social media notifications without having to reach for your phone.

Wireless payment is an option too with Garmin Venu Sq, and the built-in battery will last up to 6 days on a single charge.

Are Android smartwatches affordable?

This depends on the model, but there are many smartwatches that won’t break the bank. However, you need to keep in mind that cheaper models might not have certain features.

Also, the build quality can differ depending on your budget, so if you want a smartwatch that looks luxurious with advanced features, you’ll have to save up a bit.

These are some of the best smartwatches that you can get this season, so be sure to closely consider all the models listed in this guide.

If you need more suggestions, we suggest reading our guide about best Valentine’s Day gifts for geeky guys.

Did you enjoy our Valentine’s Day smartwatch suggestions? Tell us which one you preferred in the comments section below.

Best Antivirus for TV Boxes to Stream Like Nobody’s Watching

A TV box or more specifically an Android-based TV box is pretty much an entertainment wizard. Your very own prestidigitator gives you direct access to all the content you can gulp down and that is simply awesome.

You can use it by itself or pair it with the highly popular media center software to unblock an entirely new universe of multimedia possibilities.

Take it online or go through a dedicated device such as Roku or the wonderfully friendly Kodi boxes – whatever you fancy, there are endless opportunities and the world is your oyster.

It’s a bummer…

As always, good things don’t last forever or if they do, there has to be a catch somewhere, in the small fonts of the infamous Terms & Conditions or even between the lines.

Security and privacy seem to be on the line here and it turns out all that media indulgence comes at the expense of your personal data.

Is your Smart TV spying on you?

research trust icon
Microphones
research trust icon
Targeted ads
research trust icon
Cameras
research trust icon
ACR

From targeted ads to the overcollection of your details, ACR is the omnipresent big brother that makes privacy redundant. Speaking of which, you might want to block ads on your Smart TV, so don’t be shy to help yourself to this step-by-step guide.

To put it short, if it can go online, it can go down, which is what drives us to remain adamant advocates of security measures, including the usage of antivirus for TV boxes. Let’s take a closer look to see what is that all about, shall we?

Can an Android TV Box get a virus?

TV boxes running on Android present two major loopholes that act as genuine portals for both malware propagation and exploits: a web browser and an app store.

What we’re saying is that every single device with Internet connectivity capabilities is exposed, vulnerable, and susceptible to infections and hacking attacks.

Here are the most common scenarios:

  • Streaming and gaming increase the risk of widespread virus infections across all your Android gadgets not just your TV box or even worse, across all the devices (IoT included) hosted under your home network.
  • Torrenting and downloading content files from suspicious websites (An interesting case here is the Kodi box. Can I use a TV box without Internet? You can, but… (and bear with us here). Many voices claim that taking your TV box offline and running through a different device such as Kodi or Roku eliminates the risks altogether. Well, there are at least two sides to any story and the ugly face of this one is that Kodi boxes can be hacked through compromised subtitle text files.
  • Crooked by default (Built-in features are not exempt from violations. From manipulated chips to compromised microphones that pry on your conversations and spying webcams, nothing is intangible).
  • Removable media and peripherals such as USB flash drives compromised by man-in-the-middle attacks (They can contain installation packages replaced by ransomware).
  • Google Play Store apps are also not immune to ill-intended tampering and they can just as well be injected with hidden malware or hide bloatware and PUPs.
  • Jailbreaking or sideloading APKs (external apps or extensions that are not vetted as legitimate software and did not pass Google’s certification audit).
Note icon NOTE
The road to hell is always paved with good intentions…

Jailbreaking or rooting generates from users’ need to attain a certain degree of customization for their TV boxes and other Android-based gadgets.

The process essentially gives you full access to root system files, thus allowing you to tweak settings and install software outside the dedicated app store.

While the intent itself is not condemnable, there is a thin line between wanting to introduce a bit of diversity on the menu and opening the door to mayhem, once the Google Play software legitimacy filter comes off.

Whether you’re already sideloading APKs other than the manufacturer made available or you’re merely considering this prospect, we advise you to act with caution in order to avoid the potential backlashes that come with circumventing locked environment infringements.

How do you know if you have a virus on your TV box?

Smart TVs run on OSs that cannot decypher contaminated EXE files. But does that mean they cannot get viruses or that you do not need an antivirus for the Android TV Box?

Are Android boxes secure? They are, but they are not infallible and there are numerous ways in which you, as a TV box user, can fall victim to exploits or otherwise suffer from ill intentions.

It’s not always easy or straightforward to detect a virus comfortably nestled in your TV box. Even if your smart TV was hacked, how would you know?

As always, there are a few red flags that can give away a virus or malware attack. Here are the most common symptoms:

  • Extreme drowsiness at the network level or abnormal slowness in your TV box’ reactivity
  • Random, intrusive pop-ups, warnings, or adware that you cannot control (including screen messages accompanied by the Android robot icon for increased plausibility)
  • Impossibility to upgrade the firmware or install updates once they become available
  • Website and webpage redirections
  • Unsolicited or unauthorized actions (volume adjustment, playing content, switching channels, and so on)
  • Device lock-up (usually associated with ransomware attacks)
  • Private or sensitive data theft or leaks
Tip icon Tip
Can my Android box be hacked?

Out of all the symptoms mentioned above, data theft is potentially the most dangerous one since it often does not present any visible signs of intrusion.

Your Android TV Box can be dead silent while hackers pump out the information they need.

What would that be, you ask? Contrary to mainstream belief, your TV box stores a lot of confidential and high-profile data including account passwords for your streaming apps, financial or banking credentials registered upon activating a subscription, and even network access.

Deploying the best antivirus for Android TV boxes is slowly becoming a mandatory step if you wish to preserve your data intact and prevent its tampering or theft.

Is an antivirus necessary on Android TV boxes?

Android devices are as prone to virus infections and hacking techniques as any other device. Thus, installing an antivirus for TV boxes simply makes sense for better malware protection.

Here’s the million-dollar question: Can I install antivirus on my Android TV Box?

Every software security developer that counts includes specific apps and programs designed to work with Android-based systems. Whether you download it from the Google Play Store or transfer it from a USB stick, it’s simply a matter of preference.

Now, that does not mean that all solutions are equally effective. As always, our objective is to provide top-notch recommendations that have what it takes to make for the best antivirus for Android TV.

Here are some of the criteria that motivated our selection process:

  • Multi-layered protection (this includes vermin as well as sophisticated fraud attempts such as ransomware, Man-in-the-Middle attacks, network-targeted exploits, and so on)
  • Advanced anti-hacking tools to secure your device, your data, your privacy as well as your connection
  • Affordability (why spend more when you can get the same or even better protection for a smaller fee?)
  • Web protection (spoofed sites filtering, boosted defense for browsing, downloading content, streaming)
  • Regular and automatic updates
  • Advanced recovery and remediation modules

Which antivirus is best for Android TV boxes?

Users, beware! Not all antiviruses that boast cross-platform compatibility make a good match for your TV box. Don’t worry, we’ll explain everything.

Let’s take Android TV boxes as an example since they are so widely adopted. Now, we already mentioned that most major antivirus providers also have editions suitable for Android.

But here’s the catch! Even though they advertise their products as suitable for Android devices (which is a deliberately vague term implying a variety of gadgets), in reality, they only cater to smartphones and tablets running on Android.

The Android TV platform is a tweaked version of the Android OS specifically designed for set-top boxes, digital media players and so on that operators can customize with their specific launchers (including home screen and services).

Here’s where the plot thickens. There are AOSP-based TV boxes that basically run on the same OS version as mobile Android gadgets and there are boxes running on the forked Android version specifically intended for TV usage.

Both can technically connect to the Google Play Store, and run software from there. However, not all Google Play apps are compatible with Android TV boxes and antivirus apps make no exception.

Here are some awesome options for antivirus software for Android TV boxes that will not fail you.

TotalAV

  • Android app covers Android TV boxes
  • Real-time malware protection
  • WebShield blocks malicious and phishing sites
  • Simple, light interface
  • One licence for Windows, Mac, Android and iOS
  • The Android app is built for phones, so the TV box experience is basic.

TotalAV is a simple, lightweight antivirus with real-time protection, WebShield browsing protection and built-in clean-up tools. One licence covers Windows, Mac, Android and iOS.


Bitdefender Smart Home

  • High-performance hardware for streamlined connectivity
  • VPN included for extra privacy
  • Protects all IoT devices connected to your home network
  • Phishing, fraud, and vulnerability detector
  • Network intrusion and exploit prevention system
  • Not quite easy to install.

Do you need antivirus on the Android TV box? You do if you run it online, for sure. Pretty much anything that can connect to the Internet can also get hacked.

Introducing the one and only Bitdefender Smart Home that delivers complete and easy-to-use protection for your network and all your devices. And we do mean every single one of the gadgets nestled under your home network, IoT included.

Of course, you can use it as standalone equipment to secure your WiFi network, but you can also make the most of the Bitdefender Smart Home and deploy an iron-cast environment at your router or gateway level.

This particular method offers you unprecedented security leverage since you will be able to also protect devices that do not come with native antivirus support.

And the best part is yet to come. This unique security ecosystem encapsulates an equally unique combo made of the Bitdefender Total Security antivirus and Bitdefender VPN for extra privacy to cover all your needs.

Advanced protection against viruses, malware, phishing, and other fraudulent techniques are guaranteed together with sensitive data protection and safe browsing.

But instant reaction capacities are just one side of the multi-faceted security incorporated by the Bitdefender Smart Home.

We particularly enjoyed its proactive defense that can anticipate and prevent vulnerability exploits, brute force attacks, network intrusions, and other anomalies with the utmost accuracy.

As you already know, Bitdefender is a resourceful and considerate manufacturer that cares deeply about users’ needs.

Worried that the Bitdefender Smart Home might not be the right solution for you at this point? You can also try an antivirus for Android TV box APK and see if your TV box can run it.

If so, even better, the product is entirely free and it does justice to the developer’s name and reputation. Feel free to check out more information about the Antivirus Free for Android straight from the source.


Avast Antivirus

  • Block unauthorized connections to your network
  • Unified overview with granular controls over your smart home
  • Extensive protection for all your IoT devices
  • Real-time threat detection and instant alerts
  • Only works with compatible routers (Make sure you research your model first).

Is Avast antivirus good for Android TV boxes? You wanted to know and we’re here to help out.

It is. But more often than not, compatibility proves to be a somewhat volatile concept depending on the version of Android OS your TV box encompasses.

So, we figured you might want to try something completely different and we are thrilled to present you with an entirely new proposition.

Avast Antivirus is like a breath of fresh air and we guarantee it works with your Android TV box 100%.

This piece of equipment brings a completely new approach to security and it covers your connected life end to end while granting you full visibility of your smart home.

Similar to the Bitdefender Smart Home, you can connect Avast Antivirus to your router and protect your home and your entire network from both online and offline threats.

The set-up process takes no more than a couple of minutes and it provides a lifetime of rewards in return such as a centralized security overview of all your devices at home or on the go with easy-to-use protection controls.

Avast looks beyond our PCs and smartphones to detect vulnerabilities in every smart device and thus prevents potential exploits and security breaches that can have a tremendously negative and irreversible impact on our lives.

Smart TVs are particularly prone to exploits in regards to their ACR (automatic content recognition) capabilities and they can be easily used to spy on you, Avast study reals.

Avast Antivirus will instantly block intruders, indicate the gadgets currently using your network, and block any unrecognized device by immediately shutting down your home network.

This best free antivirus for Android TV boxes will secure your Smart TV and all the IoT devices hosted under your network.


We hope you enjoyed exploring these apps just as much as we did testing them. Still in doubt?

Say no more! If the perfect antivirus for a TV box has not popped out yet, you might want to take a look at these excellent IoT antivirus and anti-malware software options. Who knows, your match can be no further than a click away.


4 best mirrorless cameras for streaming [YouTube / Twitch]

If streaming is your full-time job, you must invest in a good camera. While DSLRs are also a great option for streaming, mirrorless cameras with their advantages are an obvious choice. This stands up, especially if you are going for an all-new streaming setup.

There are plenty of mirrorless cameras to choose from. However, finding the best mirrorless camera for streaming can be tricky.

As you will be using it for an extended period, consider the price, features, and overall durability.

In this article, we have listed the best mirrorless camera for streaming on YouTube, Twitch, and Facebook.

Why should I use a mirrorless camera for YouTube/Twitch streaming?

If you aspire to the same image quality as a DSLR, consider using a mirrorless camera. It will be great for your live stream on platforms like Twitch or YouTube.

Being lighter, compact, faster, and better for videos, a mirrorless camera becomes a perfect device to complete your streaming experience.

Your camera should also be connected to a video encoder, so it can send the HDMI output to online platforms.

What is the best mirrorless camera for YouTube/Twitch livestreaming?

Fujifilm X-T30 

  • Excellent 4K video quality
  • Great touchscreen with tilt functionality
  • Super slow motion 120FPS at 1080
  • USB Type-C port
  • 10 minute limit for 4K capture

Fujifilm X-T30 brings the identical 26MP sensor, processor, and features to its high-end sibling X-T3 at a more affordable price. This mirrorless camera can be used for streaming via its USB-C port and Fujifilm’s X Webcam app.

With the Fujifilm X-T30, you get the company’s latest AF system, 3″ tilting touchscreen, and plenty of direct controls all in a smaller body, making it ideal for streaming and video logging.

The X-T30 can record 4K video at 30 frames per second and 1080p videos in 120FPS, offering the flexibility of slow-motion effects when required.

For connectivity, it comes packed with Wi-Fi and Bluetooth 4.2. You can remotely access the camera using the Fujifilm Remote app.


Sony a7 III ILCE7M3/B 

  • Advanced 24 megapixel BSI sensor
  • Great low ISO dynamic range
  • Excellent autofocus performance
  • 4K video recording support
  • No external battery charger

Sony’s a7 III ILCE7M3/B is the most accessible full-frame system camera on the market.

Apart from its incredible shooting performances, you can also use it to stream online with Sony’s official Imaging Edge Webcam software.

While it is not the most affordable mirrorless camera on this list, it is a competent full-frame camera in the segment that offers a well-judged mix of resolution, speed, and features.

Talking about the camera’s technical specifications, it features a 24.2MP BSI full-frame image sensor, can connect to a smartphone over Bluetooth, 4K video recording, in-body image stabilization, dual SD card slot, touchscreen, and USB 3.1 Type-C port.


Nikon Z 5 

  • Build quality feels solid and durable
  • Good EVF and tilting screen
  • Dual memory card slots
  • 4K video recording
  • Only 4.5fps continuous shooting

For an entry-level full-frame mirrorless camera, Nikon Z 5 is surprisingly well specced. With its superior video recording capability and Nikon’s in-house Webcam Utility, it is one of the best mirrorless cameras for YouTube streaming.

It’s built around a 24MP CMOS sensor, which is not the latest BSI sensor. However, it shares the 273-point hybrid AF system, Expeed 6 processor, and 3.69M-dot OLED viewfinder.

Although cropped, Nikon Z 5 can record 4K video at 30fps, which is more than enough to generate an awesome streaming experience.

It comes with dual SD card slots, USB powering while the camera is in use, VR image stabilization, and some creative features like time-lapse, multiple exposures, creative picture controls, etc.


Canon EOS RP

  • Very good image quality
  • Great high ISO performance
  • Fast Dual PIXEL CMOS AF system
  • 4K video recording
  • Poor battery life

The Canon EOS RP mirrorless camera is among the smallest and lightest full-frame device on the market.

It is one of the best cameras for Twitch streaming and can be used with Canon’s EPS Webcam Utility software to turn your camera into a high-quality webcam.

Featuring a 26MP sensor, Dual Pixel CMOS AF, and 4K video recording, the Canon EOS RP offers an excellent value for money product. The camera’s image quality is excellent for casual users or those already in the Canon ecosystem.


Canon EOS M6 Mark II 

  • Excellent image quality in RAW and JPEG
  • Good level of direct control
  • Good user interface
  • 4K video recording
  • Eye detection works in only close range

Resembling the original M6, Canon EOS M6 Mark II brings a host of speed and feature upgrades. This mirrorless camera features 32.5MP APS-C built around the company’s EF-M mount system.

For live streaming, you have to consider the compatibility with Canon’s EOS Utility Webcam software. It can record 4K videos at 30 FPS and Full HD videos at 129FPS.

Other features offered by Canon EOS M6 Mark II include the high-speed continuous shooting of up to 14 fps with AF/AE tracking, good low-light performance, and selectable AF positions.

What other support should I use for YouTube/Twitch streaming?

To get the best out of the live streaming experience, we also recommend using additional hardware and software support, as in the following list:

  • Game capture cards – These can transform your old sources of movies like DVDs into HD format. Thus, do not hesitate to check the best game capture cards for Twitch.
  • Extensions – Keep in mind that the greater the extensions the more interactive will be the streaming experiences you’ll be able to create. Thus, we strongly recommend discovering the best Twitch extensions anybody should use.
  • Browsers – To prevent any related problems, you should definitely try a streaming dedicated browser, so make sure you take a look at the best browsers for Twitch.
  • Emote makers – For a cool, funny, and interesting live streaming experience, feel free to verify what are the best Twitch emote makers.

Mirrorless cameras provide the very best in the image capturing technology and are usually a very good option for vloggers and streamers due to being ultraportable and compact in size.

With the camera OEM’s also releasing their official streaming and webcam software, all the cameras listed in this article can be used for Twitch and YouTube streaming without requiring an additional adapter.

Twitch addon install error: Try out these simple methods

Minecraft and Twitch are among the most popular sandbox video game and streaming platforms, respectively. However, while using these two, you may encounter the Twitch addon install error.

Some users have reported similar issues on several community pages as well.

I  was fine all the way through about noon yesterday and now I can’t update any mod packs that I was playing hours before and I am also unable to download any new ones.

This error can occur due to a glitch in the client or incorrect Twitch configuration for addons and Minecraft.

In this article, we have listed a couple of troubleshooting tips to help you if you encounter the Twitch addon install error.

How can I fix the Twitch addon install error?

1. Increase memory allocation

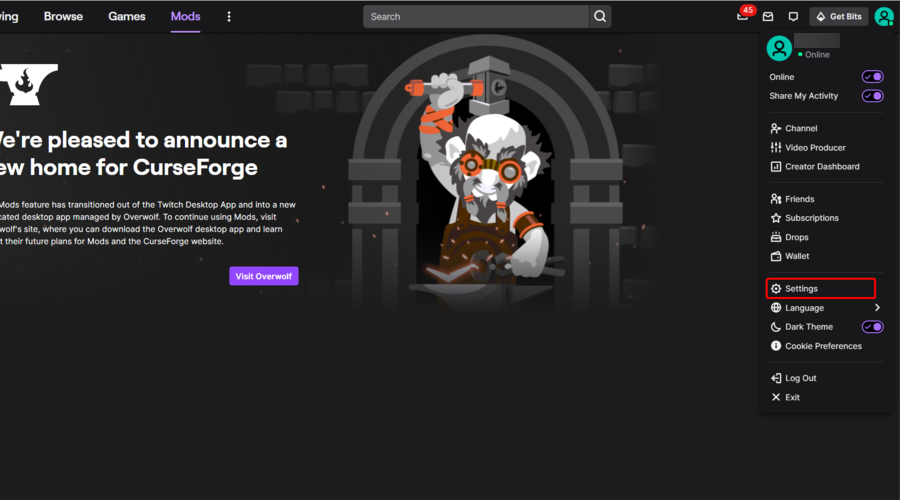
  1. Hit the Windows key, type Twitch, then open the app.
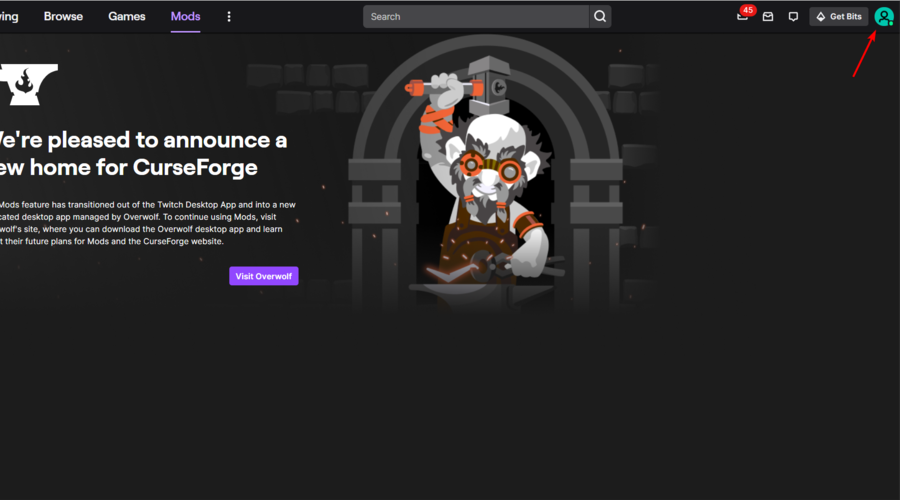
  2. Click on your avatar, from the upper-right corner of the window.
  3. Navigate to Settings.
  4. Open the Minecraft tab.
  5. Go to Java Settings > Max Memory Allocation.
  6. Set it to 7500MB and click OK to save the changes.
  7. Next, go to File >  Settings again and open Addons.
  8. For Backup Space, set it to 10MB.
  9. Save the changes and restart the Twitch client.

The addon install error can occur if the Twitch client is incorrectly configured. Several users have reported that changing the memory allocation size and Addon backup settings have helped them resolve the issue.

If the issue persists, try changing the launcher method in Twitch.

  1. Hit the Windows key, type Twitch, then open the app.
  2. Click on your avatar, from the upper-right corner of the window.
  3. Navigate to Settings.
  4. Open the Minecraft tab.
  5. Change launcher method from JAR to Native.

2. Uninstall and change Twitch file path

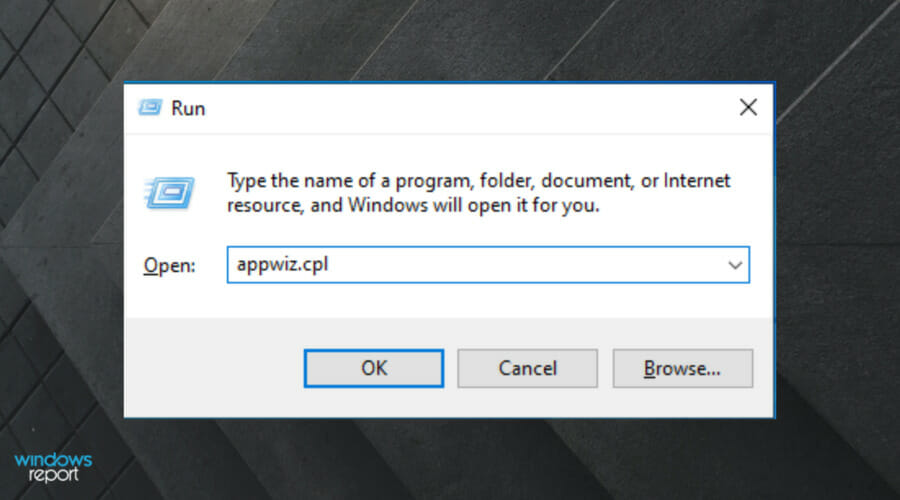
  1. Use the following keyboard shortcut: Windows + R.
  2. Type appwiz.cpl, then click on OK to open Control Panel.
  3. From the installed apps, click on Twitch, then choose to Uninstall it.
  4. Confirm by clicking on Yes.

2.1 Reinstall the Twitch client

  1. Navigate to the Twitch download page.
  2. Click on Download for Windows.
  3. Right-click on the Twitch installer and select Run as administrator.
  4. Follow the on-screen instructions to install the software.
  5. Once installed, we need to change the file path.

2.2 Change Twitch file path

  1. Press on the Windows key, type Twitch, then open the app.
  2. From the top-left corner of the window, click on your avatar.
  3. Navigate to Settings.
  4. Open the Minecraft tab, then click on the Change button.
  5. Navigate to the Twitch installation path and select the Twitch folder.
  6. Click on Select Folder.
  7. Now open the Mods tab and install Minecraft.

The Twitch addon error and Minecraft installation error can be resolved by increasing the memory allocation for Minecraft and Addon. However, if the issue persists, try reinstalling the Twitch client and changing the file path.

Windows 7 February Patch Tuesday update now available

We know, lots of years passed since most of us left Windows 7 behind and moved on to newer, safer, more performant versions of the operating system.

And, seeing how we’re already using Windows 11 now, you can understand just how much time has actually passed ever since.

But Microsoft hasn’t forgotten about Windows 7 and Windows Server 2008 R2, Windows Embedded Standard 7, or Windows Embedded POS Ready 7, even though they have reached the end of mainstream support and are now in extended security update (ESU) support.

Thus, during this month’s Patch Tuesday rollout, the Redmond tech company also provided a cumulative update for users will on these versions.

What does KB5010404 bring to the table for Windows 7 users?

Anyone using the above-mentioned versions can now install the latest Patch Tuesday update, KB5010404, via the Windows Update tool.

Similar to the Windows 8.1 update, the Windows 7 update includes quite a number of improvements and fixes and a few known issues.

But, before we dive into some of the known issues plaguing this version of the operating system, let’s take a look at the improvements and fixes first:

  • Updates daylight savings time to start in February 2022 instead of March 2022 in Jordan.
  • Addresses SHA1 deprecation by removing specific SHA1-signed security and non-security fixes and resigned those fixes with SHA2 in this release.
  • Addresses an issue in which a Lightweight Directory Access Protocol (LDAP) modify operation that contains the SamAccountName together with the UserAccountControl attributes fails with “Error: 0x20EF The directory service encountered an unknown failure.”
  • Addresses an issue in which Windows Server 2008 R2 domain controllers (DCs) fail to process NTLM pass-through authentication.
  • Adds an audit event on Active Directory domain controllers that identifies clients that are not RFC-4456 compliant. For more information, see KB5005408—Smart card authentication might cause print and scan failures.

Known issues

Symptom Workaround 
After installing this update and restarting your device, you might receive the error, “Failure to configure Windows updates. Reverting Changes. Do not turn off your computer”, and the update might show as Failed in Update History.This is expected in the following circumstances:If you are installing this update on a device that is running an edition that is not supported for ESU. For a complete list of which editions are supported, see KB4497181.If you do not have an ESU MAK add-on key installed and activated.If you have purchased an ESU key and have encountered this issue, please verify you have applied all prerequisites and that your key is activated. For information on activation, please see this blog post. For information on the prerequisites, see the How to get this update section of this article.
Certain operations, such as rename, that you perform on files or folders that are on a Cluster Shared Volume (CSV) may fail with the error, “STATUS_BAD_IMPERSONATION_LEVEL (0xC00000A5)”. This occurs when you perform the operation on a CSV owner node from a process that doesn’t have administrator privilege.Do one of the following: Perform the operation from a process that has administrator privilege.Perform the operation from a node that doesn’t have CSV ownership.Microsoft is working on a resolution and will provide an update in an upcoming release. 

This is pretty much what we have to work with this month, in terms of Windows 7 security updates and fixes.

Now, provided your system is fairly up-to-date, you should be OK grabbing the update from the Windows Update default tool on your PC.

However, keep in mind that there’s quite a long list of prerequisites that you can check out on Microsoft Support under the section about how to get the update.

Are you still using one of the OS versions described in this article? Share your experience with us in the comments section below.

New Windows 8.1 Patch Tuesday update tackles Windows Server VM bug

Yes, we are back with another Patch Tuesday bag of goodies, but this time we’re going to talk about Windows 8.1, instead of the usual Windows 10 or 11.

And, if you were wondering if these obsolete versions of the OS still receive security fixes and updates, the answer is yes, they still do.

While we’re talking about Patch Tuesday and updates, don’t forget to check out the Adobe batch of monthly software, the list of addressed Windows 10 CVEs, the Windows 11 section, and also the article with direct download links.

Whar’s new on Windows 8.1?

During this month’s security fix rollout, Microsoft has also announced the launch of KB5010419, which is the cumulative update for Windows 8.1 and Windows Server 2012 R2.

However, unlike the Windows 11 Patch Tuesday update, which has a slender set of release notes, the Windows 8.1 update has quite a long list of notes and issues.

In many users’ opinions, the highlight of this release is the patch that addresses an issue in which Virtual Machines (VMs) on a Windows server that has Unified Extensible Firmware Interface (UEFI) enabled fail to start after installing the January 11, 2022 Windows update.

The rest of the improvements and fixes added this month are as follows:

  • Updates daylight savings time to start in February 2022 instead of March 2022 in Jordan.
  • Addresses an issue in which Windows stops running with an IRQL_NOT_LESS_OR_EQUAL error.
  • Addresses an issue in which a Lightweight Directory Access Protocol (LDAP) modify operation that contains the SamAccountName together with the UserAccountControl attributes fails with “Error: 0x20EF The directory service encountered an unknown failure.”

Known issues

SymptomWorkaround
Certain operations, such as rename, that you perform on files or folders that are on a Cluster Shared Volume (CSV) may fail with the error, “STATUS_BAD_IMPERSONATION_LEVEL (0xC00000A5)”. This occurs when you perform the operation on a CSV owner node from a process that doesn’t have administrator privilege.Do one of the following:Perform the operation from a process that has administrator privilege.Perform the operation from a node that doesn’t have CSV ownership.Microsoft is working on a resolution and will provide an update in an upcoming release.
After installing updates released January 11, 2022 or later updates, apps using Microsoft .NET Framework to acquire or set Active Directory Forest Trust Information might fail, close, or you might receive an error from the app or Windows. You might also receive an access violation (0xc0000005) error.Note for developers: Affected apps use the System.DirectoryServices API.To resolve this issue manually, apply the out-of-band updates for the version of .NET Framework used by the app.Note These out-of-band updates are not available from Windows Update and will not install automatically. To get the standalone package, search for the KB number for your version of Windows and .NET Framework in the Microsoft Update Catalog.You can manually import these updates into Windows Server Update Services (WSUS) and Microsoft Endpoint Configuration Manager. For WSUS instructions, see WSUS and the Catalog Site. For Configuration Manger instructions, see Import updates from the Microsoft Update Catalog.For instructions on how to install this update for your operating system, see the KB articles listed below:Windows Server 2022: .NET Framework 4.8 KB5011258Windows Server 2019: .NET Framework 4.8 KB5011257.NET Framework 4.7.2 KB5011259Windows Server 2016: .NET Framework 4.8 KB5011264.NET Framework 4.6.2, 4.7, 4.7.1 or 4.7.2 KB5011329Windows Server 2012 R2: .NET Framework 4.8 KB5011266.NET Framework 4.6, 4.6.1, 4.6.2, 4.7, 4.7.1 or 4.7.2 KB5011263.NET Framework 4.5.2 KB5011261Windows Server 2012:.NET Framework 4.8 KB5011265.NET Framework 4.6, 4.6.1, 4.6.2, 4.7, 4.7.1 or 4.7.2 KB5011262.NET Framework 4.5.2 KB5011260

If you are still running Windows 8.1 and you want to install this update, just open up Windows Update and apply any available updates.

You will also automatically be offered the latest servicing stack update (KB5001403) which should improve the reliability of the update install process.

Have you already downloaded your Patch Tuesday-specific security update? Let us know in the comments section below.

Avast Security Unable to Scan: How to Fix It in 5 Steps

Is your Avast security program or Antivirus unable to scan your system? If yes, this article will help you by featuring the reasons behind this problem and the practical solutions.

This scanning problem can appear on both free and paid editions of Avast antivirus. You may see the Avast smart scan stuck at 99 or, sometimes, after the scan is complete. Before learning how to solve this error, we should know the reasons.

Why is Avast antivirus unable to scan certain files?

If your Avast Antivirus, Premium Security, or Ultimate edition show unable to scan message, it may have the following reasons:

  • Corrupted files: Some files may be corrupted. So, Avast antivirus cannot read them properly.
  • Password-protected files: You cannot scan any password-protected files or folders using AV, as no other persons or companies know these passwords.
  • Outdated version of AV: If you are using a very old version of Avast security, it may be the reason you find Avast smart scan stuck at 90, so it’s time to take action, as described below.
  • Outdated OS: Is your operating system very old? If yes, it may not be fully compatible with the recent versions of Avast.
  • Corrupted antivirus software: It is also possible that your antivirus installation files have been corrupted. So it cannot scan all files properly.
  • Conflict with other software: If you have more than one Antivirus program installed on your PC, interference may happen in their operations.

What can I do if Avast security is unable to scan?

Before going through the main solutions, we suggest you take some steps. These may save you time in troubleshooting this problem:

1. Exclude file

  1. Open Avast security.
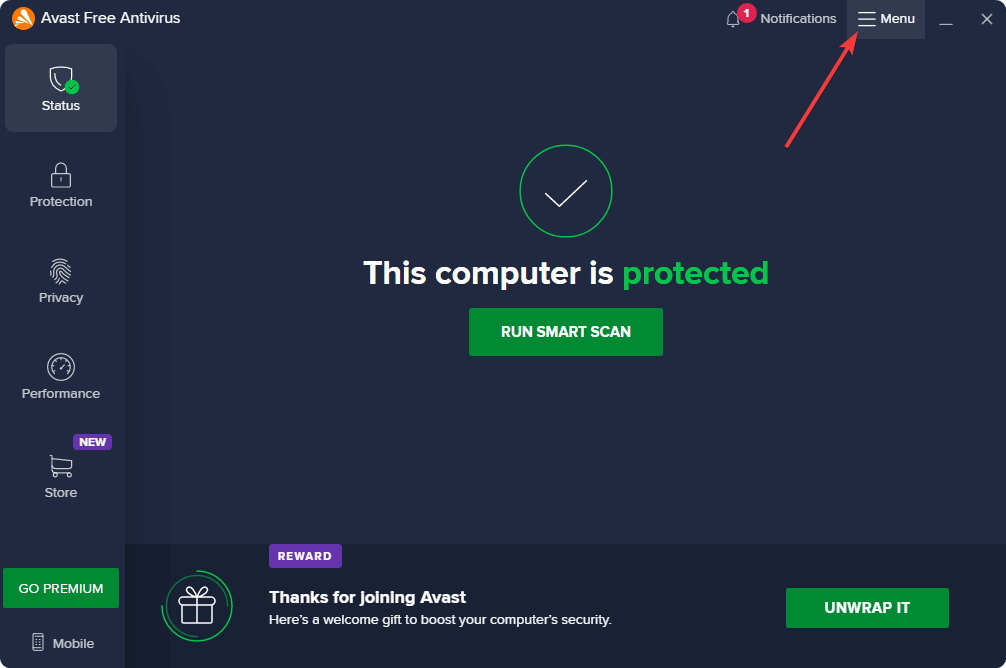
  2. Click on Menu.clicking menu avast
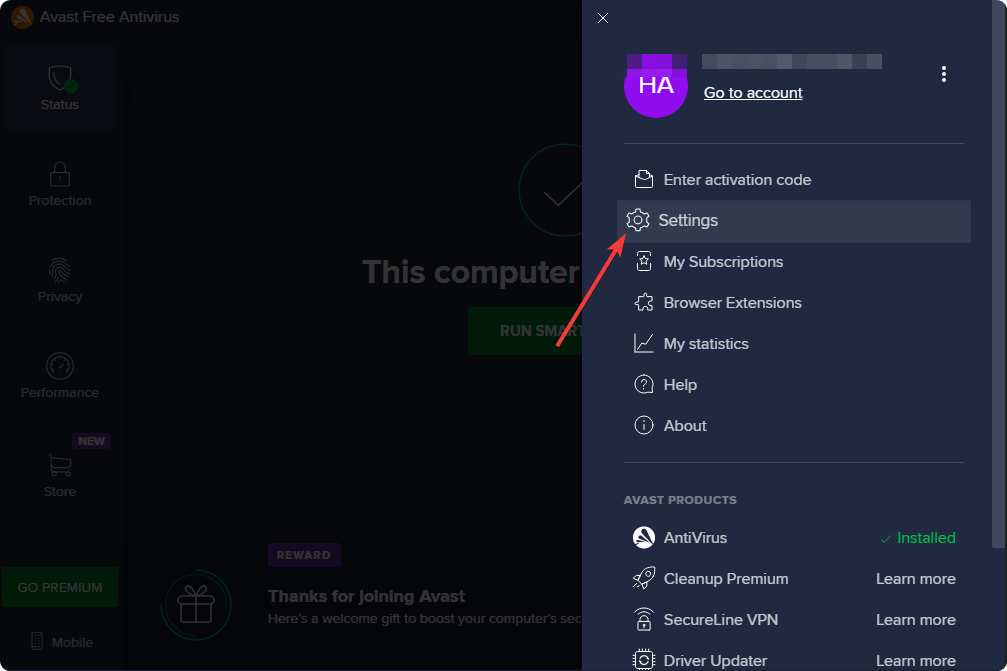
  3. Go to Settings.going avast settings
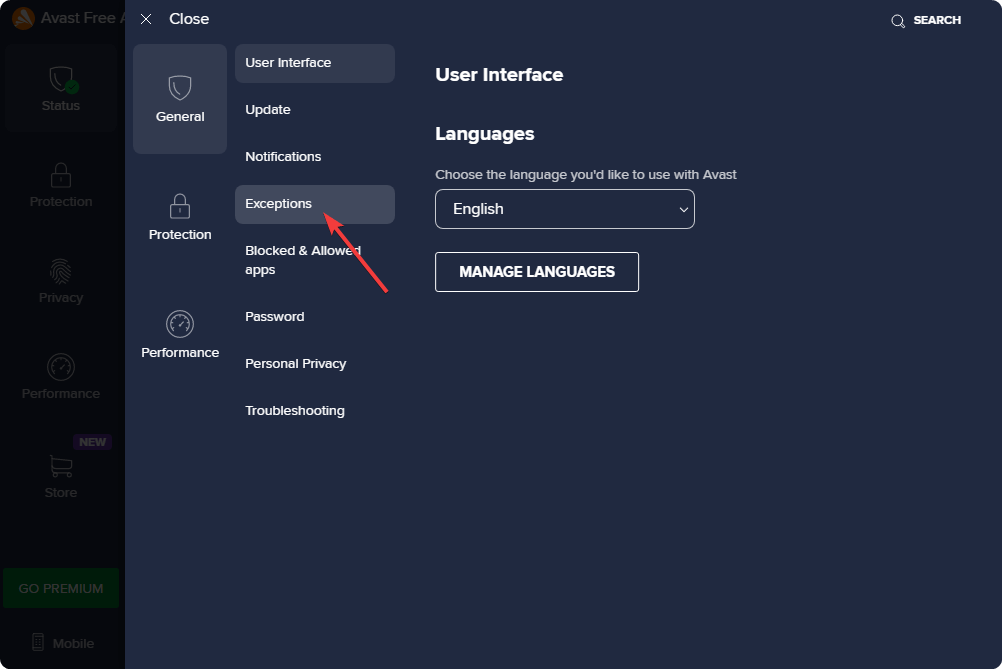
  4. Go to Exceptions.going exceptions avast
  5. Now, add the files or folders which should not be scanned.

You should expect that some files cannot be scanned. If there are such files, it doesn’t mean these are threats. Some of them can be your system file or files related to the software you are using. Excluding these items from scanning will help to avoid seeing unwanted unable-to-scan messages.

2. Update Avast

  1. Go to Avast settings as shown in the previous method.
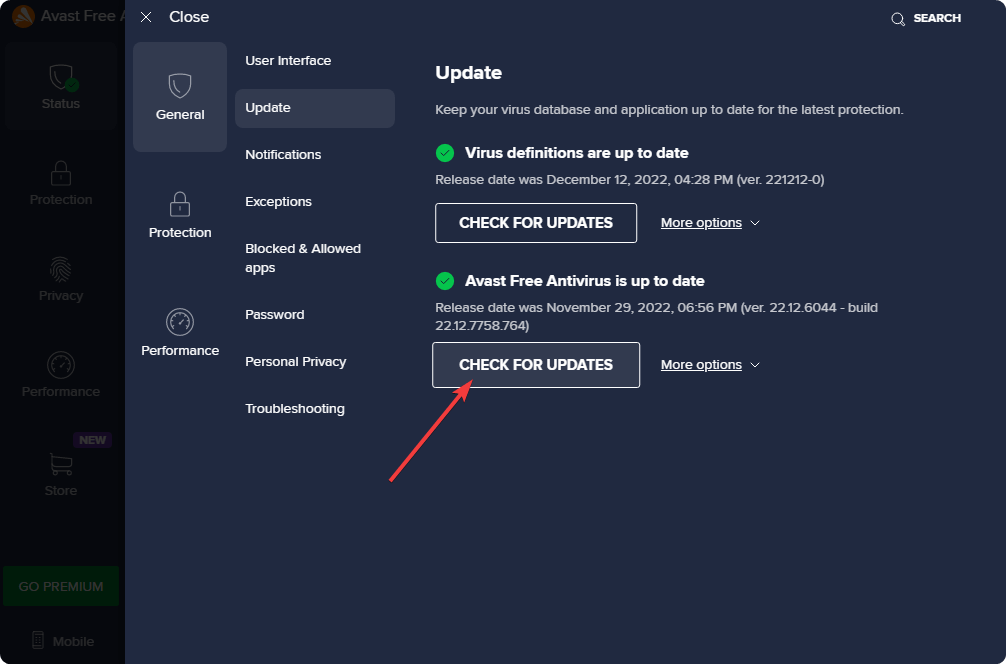
  2. Go to Update.
  3. Click on Check for the update under the Avast Antivirus/Premium Security/Ultimate section.clicking check for update avast antivirus
  4. Update your AV software.

Updating the Avast antivirus to the latest version will solve any incompatibility issues. If compatibility is the reason you were getting the error, it will help to fix Avast security’s inability to scan issue.

3. Uninstall the second antivirus

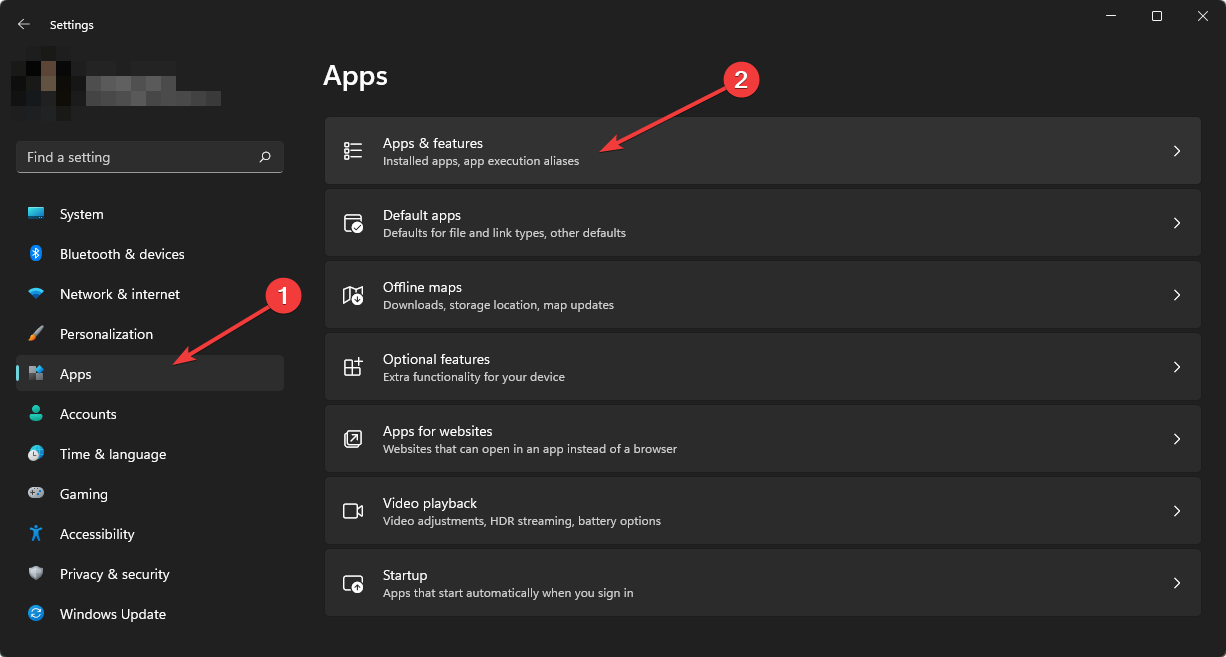
  1. Press Win + I on the keyboard to go to Windows Settings.
  2. Navigate to Apps and then Installed apps.going apps & features Microsoft windows 11
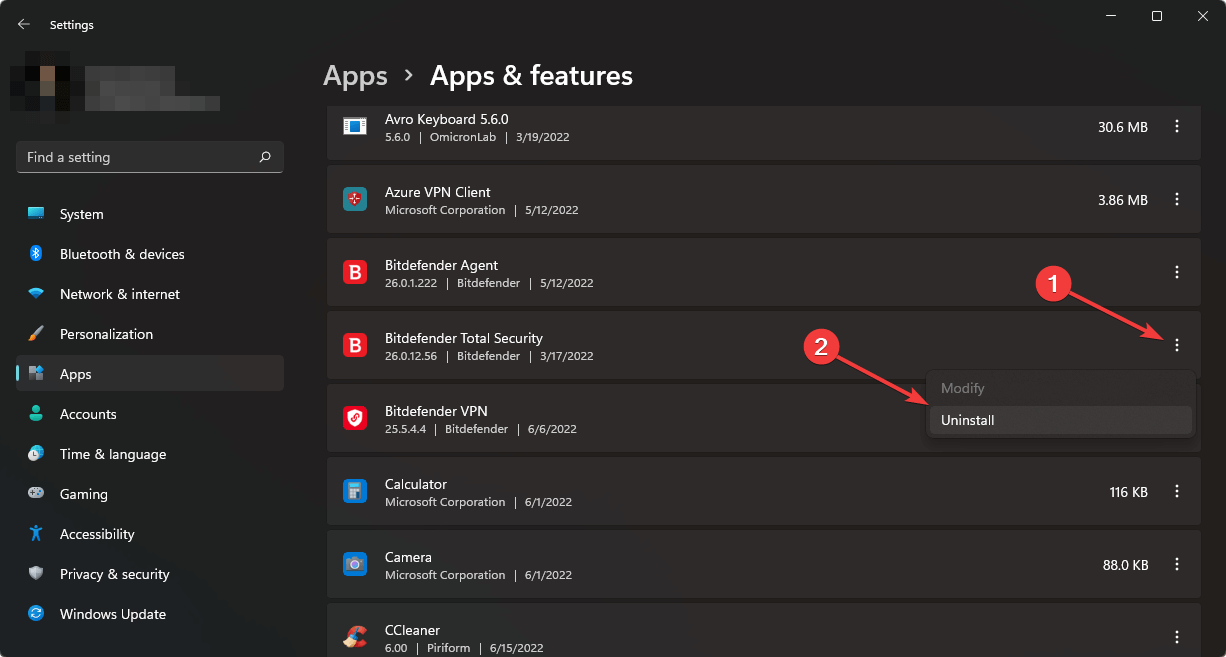
  3. Click on the three horizontal dots next to an additional antivirus program and choose Uninstall.uninstalling antivirus windows 11
  4. Restart your PC.

As other AV programs can interrupt the scanning process of Avast, it is safe to uninstall them. Then, see if Avast security is still unable to scan some files or not.

4. Verify all required background services are active

4.1 Using services windows

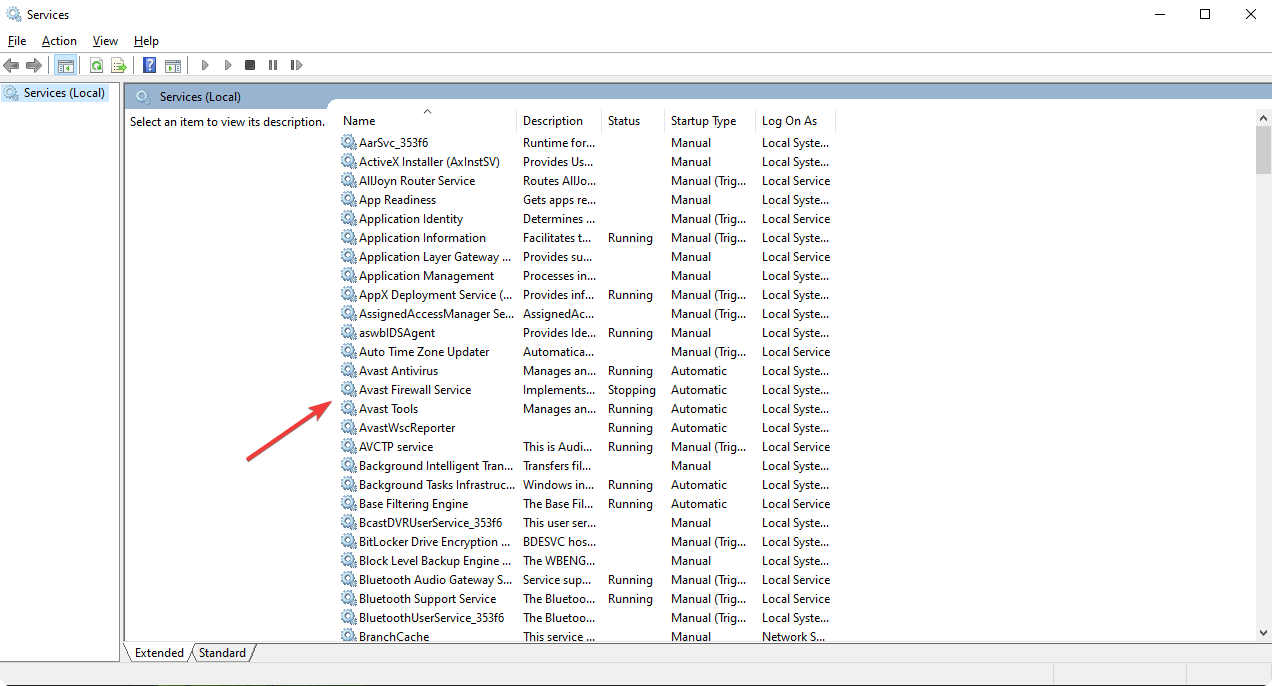
  1. Open the Start Menu, type services.msc, and hit Enter.
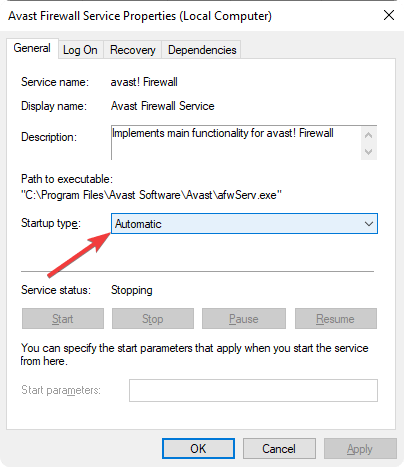
  2. Now, find the services related to the Avast antivirus.avast services in windows
  3. Double-click on any inactive Avast-related service.
  4. Set the Startup type to Automatic.avast service startup type automatic
  5. Restart your PC.

4.2 Using system configuration

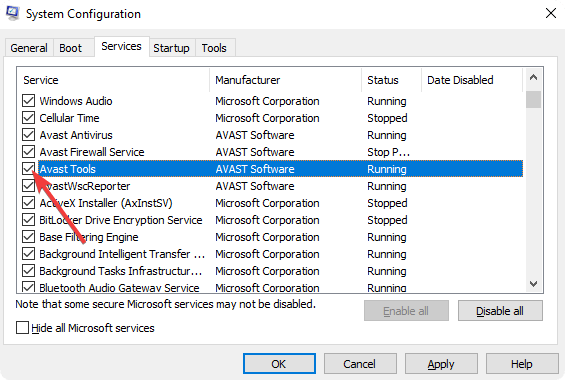
  1. On the Start Menu, type msconfig and hit Enter.
  2. Go to the Services tab.
  3. Find any avast-related items and enable them.enabling avast services msconfig windows
  4. Click on Apply and OK.
  5. Restart Windows.

Sometimes, some PC optimization software or you may have disabled some required services that Avast uses to operate properly. Re-enabling them will help to get rid of any related problems.

5. Re-install Avast

  1. Uninstall Avast antivirus as shown in method 3.
  2. Restart your PC.
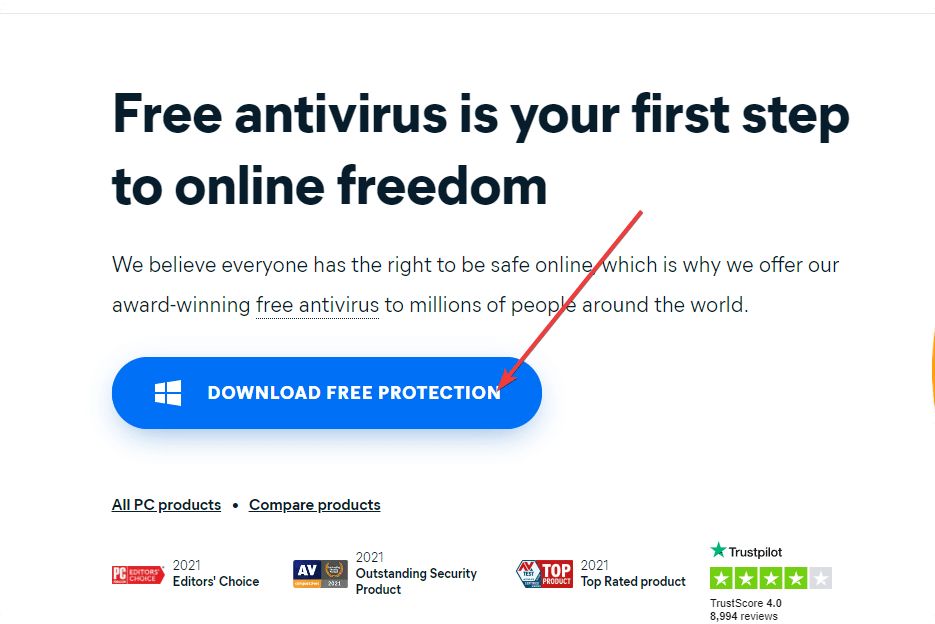
  3. Go to Avast’s official website.
  4. Download the latest version.downloading avast antivirus
  5. Install it on your PC.
  6. Activate it if there is a license key.
  7. Start scanning your system again and see if it helps.

Re-installing the Avast security program will help if the previous installation files are corrupted. After installing the fresh copy, you should no longer encounter unable to scan problem with Avast AV.

Following the above methods will surely help. Also, these would work if you find the Avast One smart scan not working.

However, if you still face the issue or want to try other programs, you can do it. For this, we suggest you check out these best Antivirus programs.

This article has shown how to fix Avast Security unable to scan problems. If you know other better ways to troubleshoot this problem, feel free to let us know in the comment box.

Oops! We encountered an unexpected error on Twitch [Fix]

Twitch is a popular streaming platform for content creators. However, at times when trying to login into your account, you may encounter the Oops! We encountered an unexpected error – please try again message.

The error can also occur if you are trying to reset your Twitch password. This error can occur due to multiple reasons including account deactivation, browser issues as well third-party extensions creating conflict.

If you are also troubled by this error, here are a couple of troubleshooting tips to help you resolve the oops! We encountered an unexpected error, please try again the error on Twitch.

How do I fix the unexpected error message on Twitch?

1. Disable third-party extensions

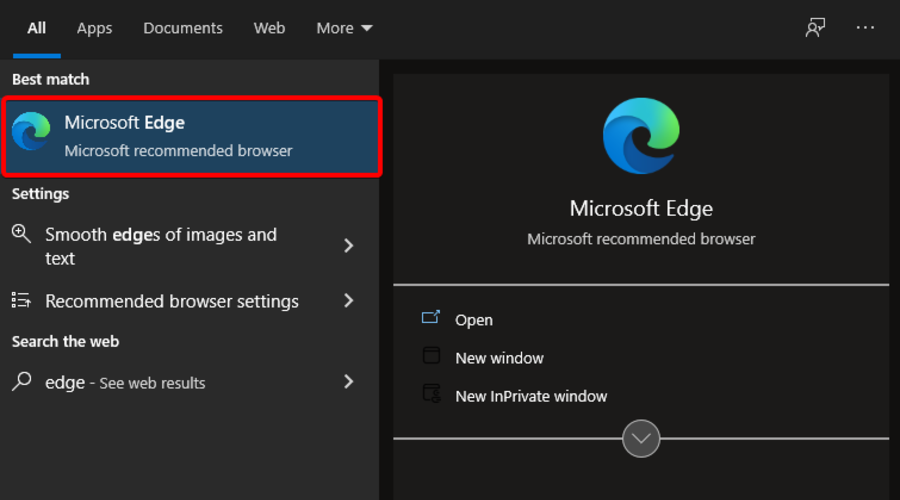
  1. Hit the Windows key, type your main browser’s name, then click on the first result, as in the example below.
  2. Use the following keyboard shortcut to open an incognito tab: Ctrl + Shift + N.
  3. Navigate to the Twitch website.
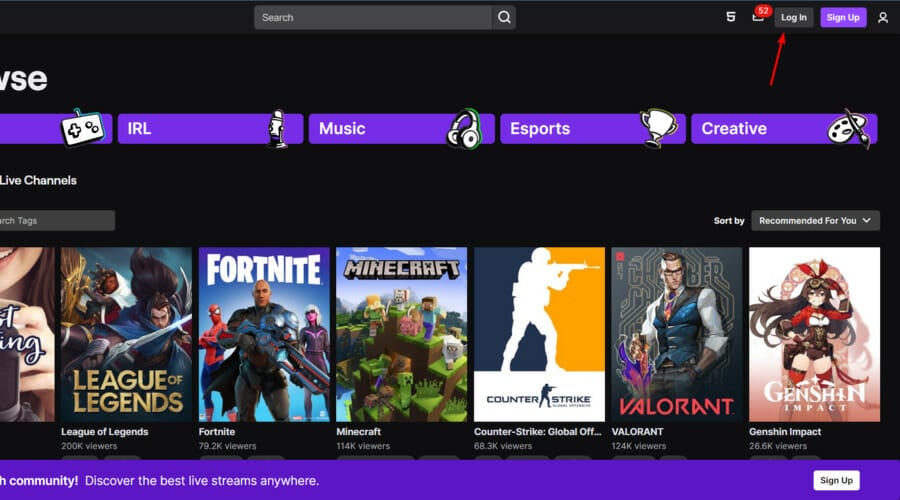
  4. In the upper-right corner of the page, click on Log in.
  5. Enter your Twitch credentials, then click on Log in and check if you’re able to login there.

If Twitch works in incognito mode, check if any third-party extension is causing the issue. Disabling extensions like html5 autoplay has helped users resolve the error, and this is how you can do it:

  1. Launch again your main web browser.
  2. Click the Menu icon (This is usually marked as 3 dots or lines, in the upper-right corner of the page).
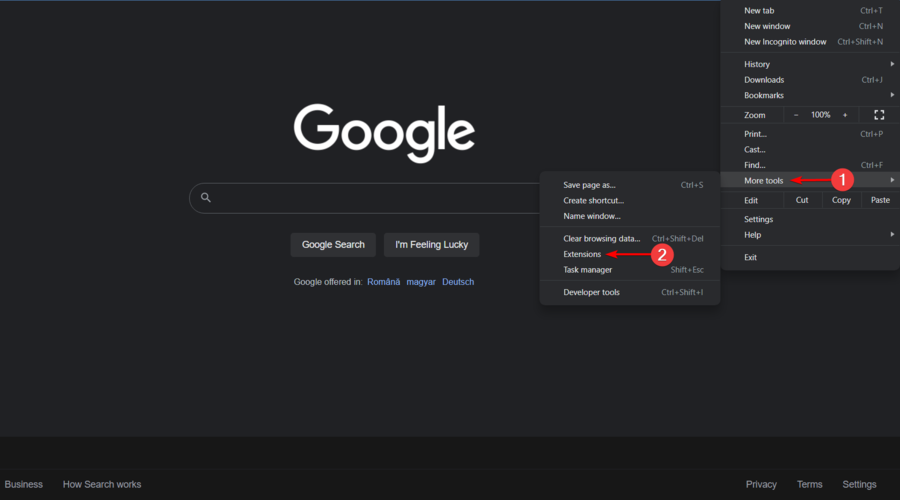
  3. If you’re using Chrome, hover the mouse over More Tools, then navigate to Extensions.
  4. If you’re using Firefox, click on Add-ons and themes, then select Extensions from the left window pane.
  5. Disable HTML5 autoplay extension if you have it installed.
  6. If not, toggle the near button and disable any recently installed extensions.
  7. Once disabled, relaunch your browser.
  8. Log in to Twitch to see if the error occurs with the extensions disabled.

If the error is resolved, start enabling all the extensions one by one and accessing the Twitch page to find the conflicting extension.

2. Change your browser

If the issue persists, try accessing your Twitch account using a different browser. One of the best options is Opera GX.

It lets you manage how many resources your browser can access. You can decide exactly how much CPU power, RAM, and bandwidth your Opera GX will use.

Also, its built-in ad blocker will keep away any ads, as the video loading speed is further boosted by blocking tracking scripts.

This browser is designed especially for streaming and chatting apps, so you won’t have to worry again about Twitch-related errors.

Take a look at some other great features of this browser:

  • Free VPN
  • Easy to use and user-friendly interface
  • Twitch integration

⇒ Get Opera GX

3. Clear browser cache

3.1 Google Chrome

  1. Hit the Windows key, type Chrome, then open the first result.
  2. Use the following keyboard shortcut to open the Clear browsing data menu: Shift + Ctrl + Delete.
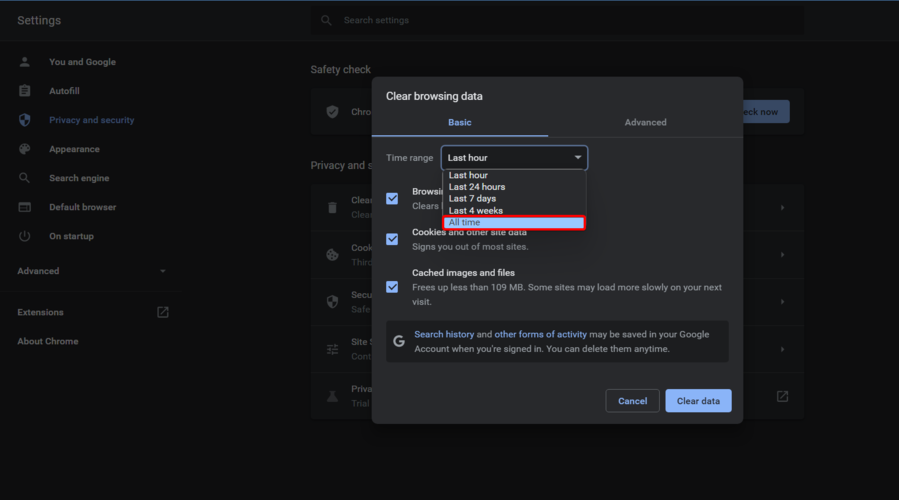
  3. Choose All time as the Time Range.
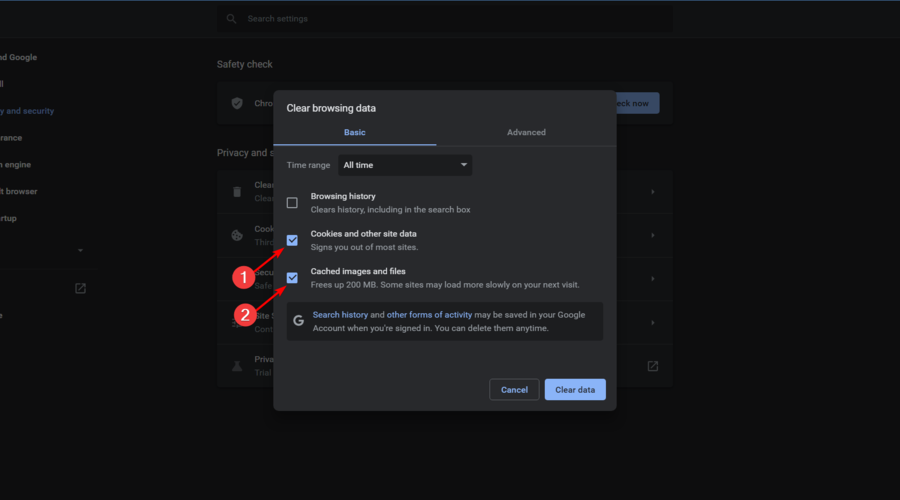
  4. Focus on deleting Cookies and other site data and Cached Images and files.
  5. Finally, click on the Clear Data button.

3.2 Mozilla Firefox

  1. Use the following keyboard shortcut to open the Windows search box: Windows + S.
  2. Type Firefox, then click on the first result.
  3. Once your browser is opened, press simultaneously on the following keys: Shift + Ctrl + Delete.
  4. Set the Time range on Everything.
  5. Now, checkmark only the Cookies and Cache options, then click on Ok.

3.3 Microsoft Edge

  1. Press on the Windows key, type Edge, then open the first result.
  2. Use the following keyboard shortcut to open the Clear browsing data section: Ctrl + Shift + Delete.
  3. Check the Cookies and other site data and Cached images and files section, then click on Clear now.

Once the cache and site data are cleared, relaunch the browser to see if the Twitch error is resolved.

4. Reset Twitch password

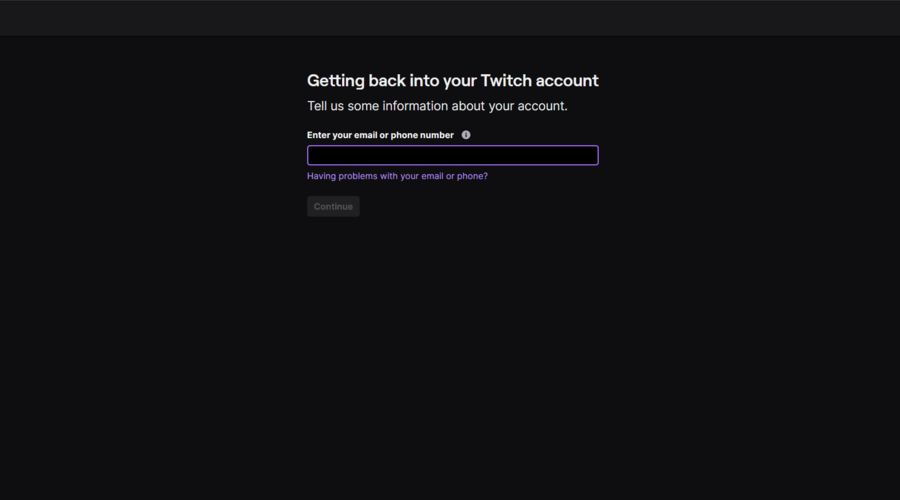
  1. Open the Twitch password reset request page.
  2. Enter your email or phone number, then click on Continue.
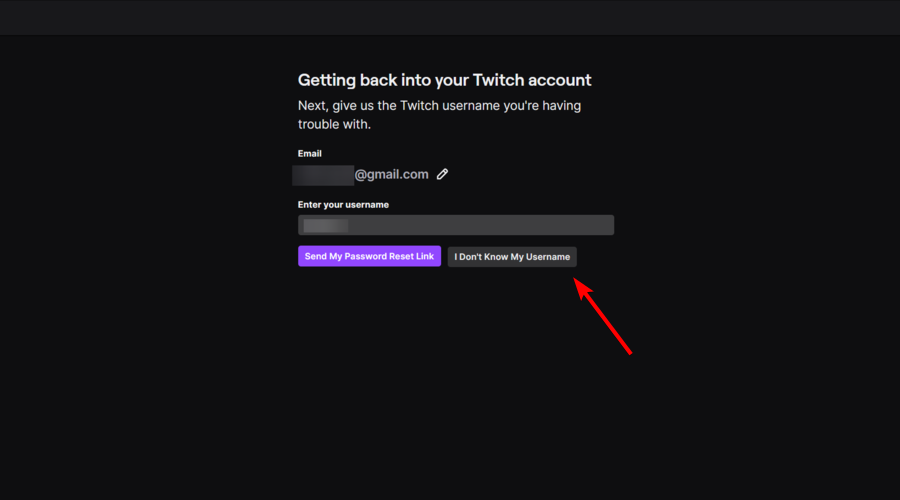
  3. Now, enter your Twitch username, then click on Send My Password Reset Link.
  4. Open the link that you received in your email or on your phone.
  5. Enter a new password and confirm it.
  6. Try to login to your Twitch account with the new password.
  7. If you don’t know your Twitch username at the step 3, click on the I Don’t Know My Username button, then follow the on-screen instructions.

If you are unable to reset the Twitch password or opening the password reset link shows the oops! we encountered an unexpected error, please try again error, check if your Twitch account is deactivated.

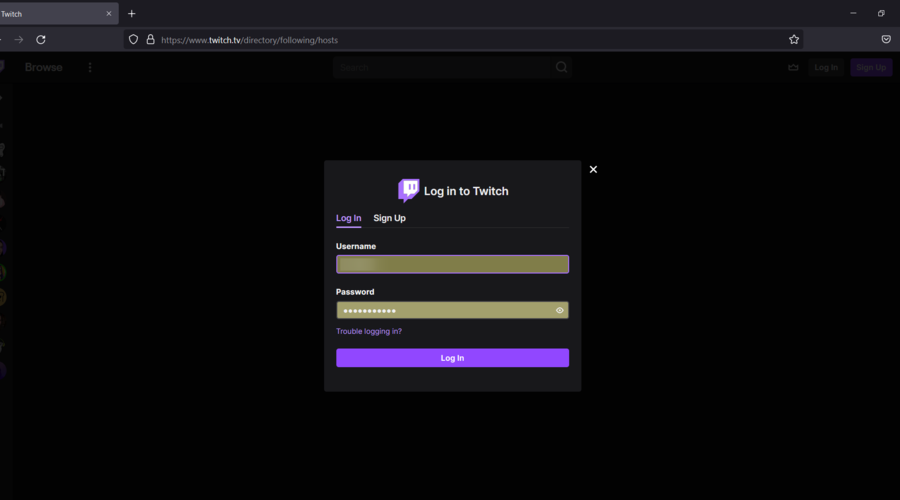
5. Reactivate Twitch account

  1. Navigate to the Twitch web version.
  2. From the upper-right corner of the page, click on Log in.
  3. Enter you Twitch account username and password.
  4. If your account is deactivated, you’ll be notified by a message as in the picture below.
  5. Click on Reactivate, then follow the on-screen instructions to complete the process.

However, if you are unable to log in due to the oops! we encountered an unexpected error, contact Twitch support and request for your account to be restored.

The oops! We encountered an unexpected error, please try again usually occurs due to third-party extensions conflict, browser incompatibility, or account deactivation reasons.

Follow the steps in the article, and you should be able to resolve the error and gain access to your account.

Windows 11 Patch Tuesday update fixes LDAP issue

As we’re sure you probably heard by now, Microsoft just released its monthly batch of security updates and fixes.

Yes, this was a part of the highly popular Patch Tuesday, an event that many users are eager to witness every second Tuesday of each month.

And as much as we are used to only Windows 10 receiving these software patches, the new operating system, Windows 11, has also started getting its own for a few months now.

Windows 11 receives another cumulative update this month

So, now that KB5010386 is out for Windows 11, it brings the young OS to build 22000.493, and the experience seems to get more stable with each passing day, even though there still are some wrinkles left to iron out.

This update also introduces Windows 11 servicing stack update 22000.460 which improves the reliability of the component that delivers Windows updates.

Redmond developers stated that this new cumulative update addresses an issue that causes a Lightweight Directory Access Protocol (LDAP) Modify operation to fail.

This happens if the operation contains the SamAccountName and UserAccountControl attributes. The error message is Error: 0x20EF. The directory service encountered an unknown failure.

Even though we are used to these monthly updates coming with some known issues also, some find it a bit peculiar to have new bug-free software.

Microsoft said that it’s not currently aware of issues with this update so there shouldn’t be any workarounds you need to apply.

Generally, the Windows Update utility will install this update in a timely manner so you don’t really need to do anything, however, you can head to Windows Update if you want to check whether it has been installed already.

Don’t forget to also check out the Adobe Patch Tuesday updates, the full list of CVEs addressed this month for Windows 10, and the article with the direct download links.

Have you already read up about the February 2022 Patch Tuesday set of fix patches? Share your thoughts with us in the comments section below.

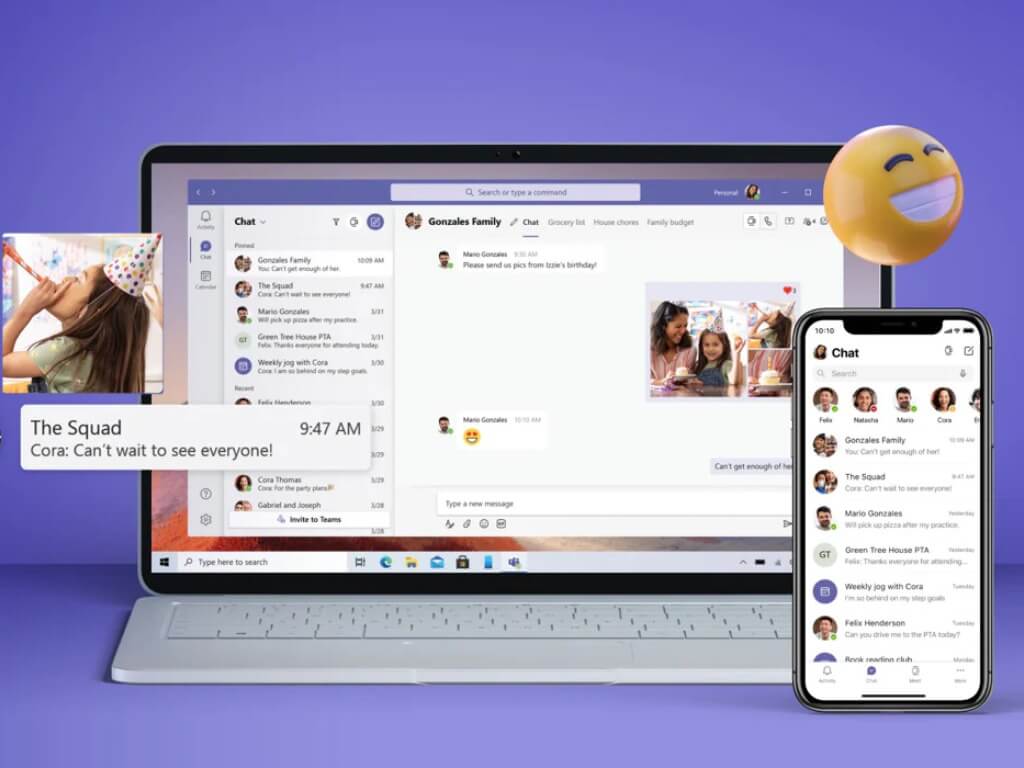
Here’s how Microsoft Teams optimized device power consumption by up to 50%

Have you felt in recent times that Microsoft Teams is using less battery on your laptop during your video calls? Well, you’re not mistaken, as Microsoft has steadily improved on Teams’ battery usage over the years. In a recent tech community post, the company described just the reasons why, and how it has reduced power consumption in meetings by up to 50%.

On the technical side, Microsoft says it accomplished this by first creating a test framework to measure power consumption during video calls and screen sharing. After getting results, Microsoft focused on camera optimizations to reduce demands on the CPU during video meetings as well as power draw from the camera itself. These include reducing code complexity for auto-exposure, auto-white balance, auto-aliasing.

In addition, Microsoft also worked to focus on video rendering, It says that Teams now combs video strands and composes them into a single video, which is consolidating operations in video rending and reducing power requirements for each device. Other optimizations include focusing on using the native resources of operating systems to improve how image fragments are transferred during the rendering.

Per Microsoft, there were a couple of factors in helping reduce Team’s energy consumption. At the front is lowering the strain on IT admins to buy hardware. Another is also ensuring that both folks with low-end hardware and those with high-end hardware have the same great Teams experience.

Heading into the future, more optimizations are on the way. Microsoft noted it’s planning to work with CPU and GPU vendors to ensure that next-gen chips are optimized for Teams and video conferencing. We’ve already seen the first of that with Snapdragon 8cX Gen 3 ARM-based chips, which includes improved camera start-up time (15% faster), support for autofocus, auto white balance, and auto exposure, as well as noise cancellation all on the SoC.
Telnet on Windows 11: How to Download, Install & Enable it

Telnet is the short form of ‘Terminal Network’. It is a protocol that a user can use to connect one computer to a local computer.

Here, the local computer means the device that starts the connection, whereas the computer that is connected to the local computer is called a remote computer.

Telnet operates on a client/server principal, and although it is outdated, it is still used by many people in 2022 as well. Many people have already shifted over to the Windows 11 OS, the latest OS offering from Microsoft.

The good thing is that Windows 11 comes with Telnet in it. However, it is disabled by default. That is, you must enable it manually.

The same principle applies in the case of Windows 10, even though there are some differences when it comes to the steps required to activate the service.

This is where this guide comes into the picture. Because in this post, we will share with you all the information that you need to install and enable Telnet on your Windows 11 PC.

So, without any further ado, let us take a look at our guide on how to install and enable Telnet on Windows 11.

What is Telnet?

Telnet, as already mentioned, uses a client/server protocol to access remote servers. You can use Telnet to check connectivity to a remote server.

Moreover, you can make use of Telnet to run commands on a remote server. The output of this will be returned to the Telnet client.

It uses the Transmission Control Protocol/Internet Protocol (TCP/IP) networking protocol to create remote sessions. When connected to a remote system, users can log in to the remote computer by entering their username and password.

Since Telnet doesn’t offer a secure medium of communication with remote servers, you can use it if strong authentication and encryption over the network aren’t critical.

Telnet can be used for a variety of tasks. This includes carrying out activities on a server, including editing files, running various programs on a remote computer, or even checking mail, if you wish.

Notably, even though Telnet isn’t a secure medium of communication anymore, the Telnet client is still available on Windows 11 and Windows Server 2022. You need to, however, enable it manually.

Let us now take a look at how to enable Telnet in Windows 11.

How can I install and enable the Telnet client on Windows 11?

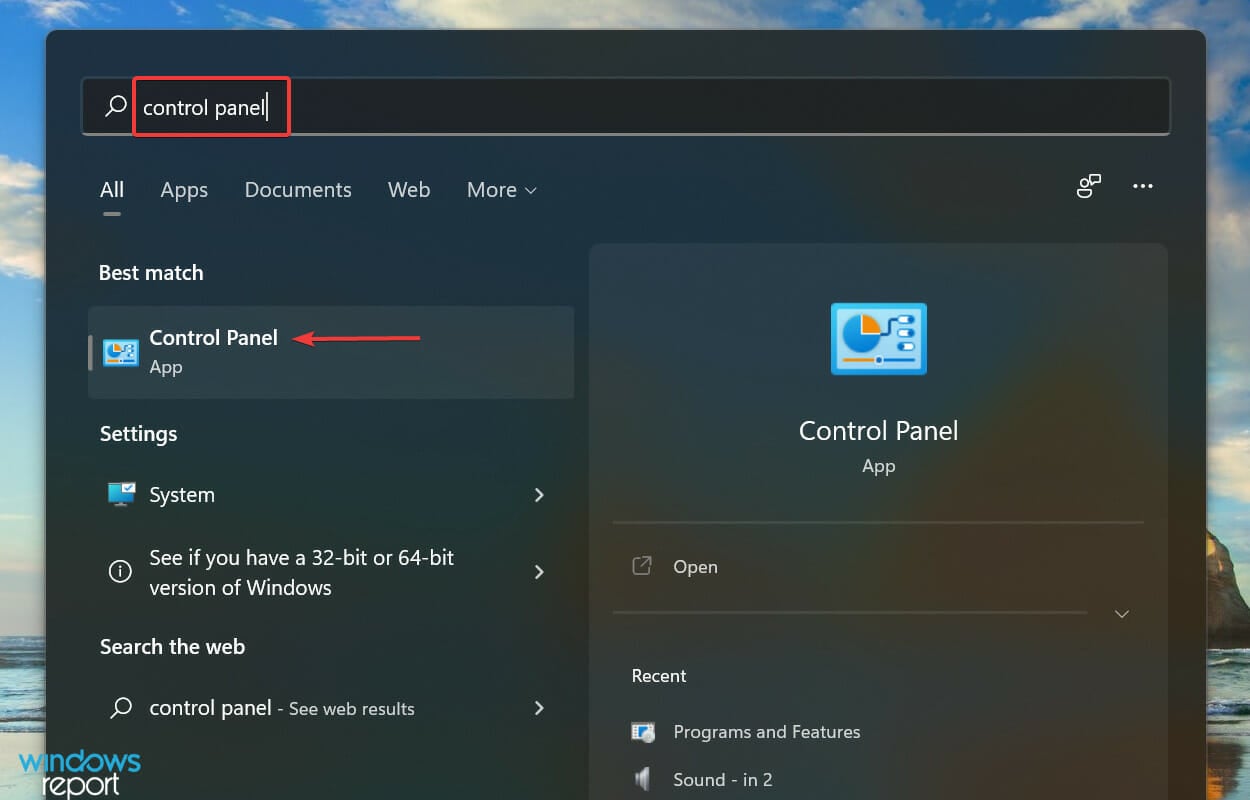
1. Use Control Panel

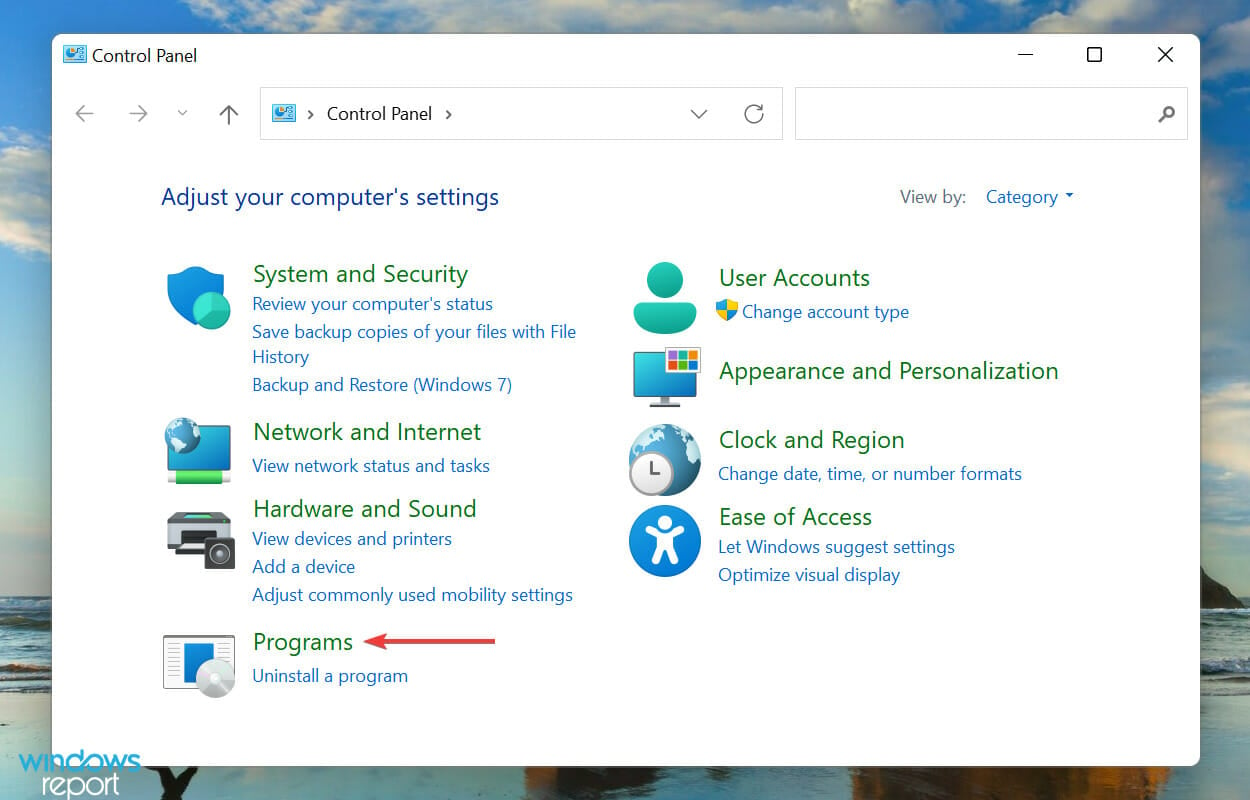
  1. Press the Start menu and search for Control Panel.Control Panel Windows 11 Telnet
  2. Click on Programs (If you weren’t able to find Programs option, then change the View by option to Category).Programs telnet windows 11
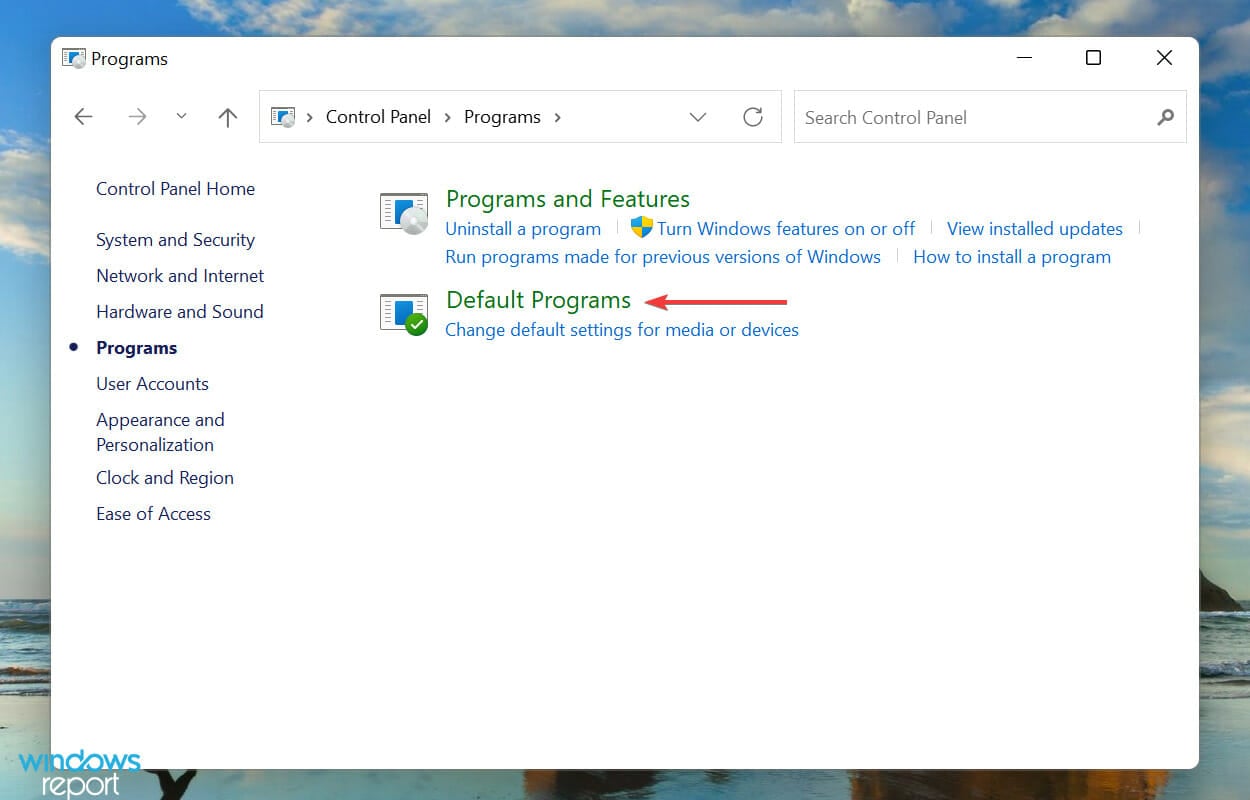
  3. Under Programs and features section, click on Turn Windows features on or off.Windows features telnet windows 11
  4. Check the box beside the Telnet client, and hit OK to begin installation.Telnet client

Your system will look for resources and install the Telnet client on your Windows 11 PC. To access Telnet, follow the simple steps below.

  1. Search for command prompt in the Start menu and open it as an administrator.Command prompt
  2. Type in the following command and press Enter: telnetcmd telnet windows 11

2. Use Command Prompt

  1. Open the Start menu and search for Command Prompt. Run it as an administrator.Command prompt
  2. In the newly opened command prompt window, type in the below command and press Enter:
    dism /online /Enable-Feature /FeatureName:TelnetClienttelnet install cmd

3. Use Windows PowerShell

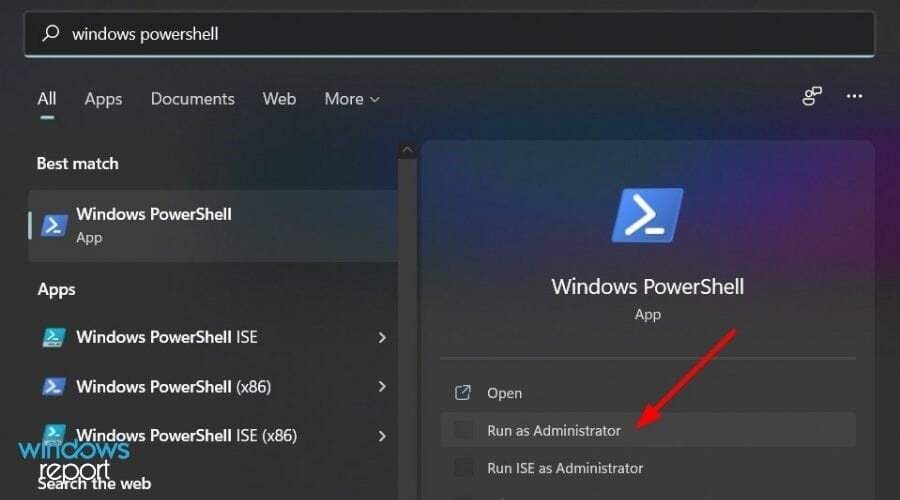
  1. Open the Start menu and search for Windows PowerShell. Open it as an administrator.Windows 11 powershell
  2. In the newly opened Powershell window, type in the below command and hit the Enter button:
    Enable-WindowsOptionalFeature -Online -FeatureName TelnetClientWindows Powershell Telnet

Your PC will scan for required changes and will remove the Telnet client from your Windows 11 PC. To be on the safe side, you can reboot your PC for the changes to take effect.

What are the safety concerns with using the Telnet client?

The main reason why Telnet was replaced by the SSH protocol in most modern systems is the security flaws of the Terminal Network.

We will try to explain the safety concerns of using Telnet clients in simple words. All your data and information travels over an unencrypted network.

This gives easy access to hackers and spies to access important information such as usernames and passwords. This is the reason why SSH (Secure Shell) came into existence, which is kind of an encrypted Telnet.

The SSH protocol encrypts your data before sending it over the network and also authenticates the remote computer. In return, the SSH protocol requires some extra resources to run smoothly. In simple terms, a network that makes use of the SSH protocol should have powerful machines.

Moreover, the Telnet protocol is text-based. This limits the use case scenarios of this protocol. Telnet uses port 23, which is designed for local area networks. On the other hand, the SSH protocol uses port 22.

We hope that this guide helped you with all the information related to Telnet and how to install the Telnet client on your Windows 11 PC.

If you still run Windows 10 on your PC and want to know how you can use Telnet in Windows 10, then you can check out our guide on What is Telnet and how to use it in Windows 10.

You can share your doubts regarding this topic in the comments section below.

Twitch full-screen not working: Fix it now

If you noticed that your Twitch full-screen doesn’t work, you can rest assured that you’re not the only one experiencing this issue.

A large number of users have stormed the online forums asking for a fix for this issue. Unfortunately, the developers at Twitch didn’t release an official solution.

It is only a matter of time until this happens, and until then, you will be able to use the workarounds found in this article.

Read on to find out what you can to do temporarily bypass the issue, and get back to watching your favorite streams in full-screen mode.

Why is Twitch full-screen not working?

The problem seems to be caused by the BTTV extension. Even though this tool is very useful when managing emotes, having it installed will impair your ability to watch streams on full screen.

However, this is not the only cause that can lead to our today’s problem. It can also appear due to some random and temporary glitches or because of browser-related problems.

In the first place, we suggest logging out of Twitch, restarting your PC, then logging back in.

You’re going to discover how to perform all of the necessary processes to easily solve this annoying error, so make sure you read this article completely.

How to fix full-screen issue on Twitch?

1. Log out and log back in

  1. To log out from your Twitch Desktop App, hit the Windows key, search for Twitch, then click on it.
  2. If you’re already logged in, look at the upper-right corner of the page, then click on your avatar.
  3. Select Log Out, then close the app.
  4. We also recommend logging out of the Twitch web version.
  5. Look at the same top-right corner of the window, click on your profile image, then select Log Out.
  6. Now, restart your PC, by using this keyboard shortcut: Alt + F4.
  7. From the drop-down menu, choose Restart.
  8. Wait until your PC is restarted, then open again Twitch.
  9. From the top-right corner of the window, click on Log In.
  10. Enter your Twitch credentials, then click on Log In.
  11. Access a live stream, then try going full screen.

2. Try a different browser

If the full screen isn’t working in Twitch, your browser may be the issue. To check that, you need to switch to a different browser, such as the one recommended below.

Opera GX is built on the Chromium engine, so it’s quite similar to Chrome. In fact, all your Chrome extensions will continue working in this tool as well.

Unlike Chrome, this one focuses highly on user privacy and security, and it comes with tracking and malware protection. In addition, the browser has a built-in VPN, for an extra layer of security.

Take a look at more amazing features of Opera GX:

  • Built-in AdBlocker
  • Low resources consuming
  • User-friendly interface

If you’re not convinced by the power of Opera GX, we also recommend checking the best browsers for Twitch. There, you’ll definitely find a perfect option for your needs.

Opera GX

Watch Twitch in full screen with no interruptions with this performant gaming-oriented browser.

3. Disable the BTTV extension

  1. To open the desktop app, hit the Windows key, type Twitch, then open the first result.
  2. Click on the Extension Manager tab.
  3. Find the BTTV extension in the Installed extensions panel.
  4. Select it and click Uninstall.
  5. Check to see if the full-screen mode is working properly.
Note icon NOTE
This method is useful if you don’t want to keep the BTTV extension installed. In the case that you want to keep the extension, please try the next solution.

4. Use the theatre mode workaround

  1. Hit the Windows key, search for Twitch, then open the first result.
  2. Navigate to your favorite streamers.
  3. Once there, open any stream.
  4. Inside the video player, press on the Theatre Mode button.
  5. Double-click the screen to make it go into full-screen mode.
  6. Repeat these steps every time you see this problem appear.


If you are convinced that you want to keep the BTTV extension, you can try this workaround. Even though it is not an official fix, it proved effective in the case of most of the users encountering this issue.

In today’s article, we explored the best ways of dealing with the Twitch app not allowing you to watch your favorite streams in full-screen mode.

Even though the methods presented in this list are not official fixes for this issue, you will be able to work around it by trying out these ideas.

Some users also claimed that Twitch is giving a black screen in Chrome. If it’s ever happening to you as well, make sure you check some useful solutions to solve it in a few minutes.

Please feel free to let us know if you have any suggestions, and if you found this guide helpful.

You can do so by using the comment section found below this article.

Microsoft lays out new open App Store principles

Perhaps attempting to soften the blow with regulators over concerns about Microsoft’s announced acquisition of Activision, President Brad Smith took to the Microsoft on the Issues blog today to lay out a new set of open guidelines for Microsoft’s app stores.

Federal approval of the acquisition isn’t a slam dunk, and the company is already working to position itself as one of the good guys, with Smith saying “(w)e want regulators and the public to know that as a company, Microsoft is committed to adapting to these new laws, and with these principles, we’re moving to do so,” noting that Microsoft has been adapting to regulations for two decades after its antitrust issues, and that “we believe it’s possible to adapt to new rules and innovate successfully. And we believe it’s possible for governments to adopt new tech regulation that promotes competition while also protecting fundamental values like privacy and national and cyber security”

Smith then goes on to say that there’s currently too much friction between creators and gamers, and perhaps takes a bit of a shot at Apple: “app store policies and practices on mobile devices restrict what and how creators can offer games and what and how gamers can play them.”

To help to ease that friction (and to butter up government regulators), Smith announced  a set of Open App Store Principles for “Microsoft Store on Windows and to the next-generation marketplaces we will build for games,”  in four main areas:

Quality, Safety, Security & Privacy

We will enable all developers to access our app store as long as they meet reasonable and transparent standards for quality and safety.
We will continue to protect the consumers and gamers who use our app store, ensuring that developers meet our standards for security.
We will continue to respect the privacy of consumers in our app stores, giving them controls to manage their data and how it is used.

Accountability

We will hold our own apps to the same standards we hold competing apps.
We will not use any non-public information or data from our app store to compete with developers’ apps.

Fairness and Transparency

We will treat apps equally in our app store without unreasonable preferencing or ranking of our apps or our business partners’ apps over others.
We will be transparent about rules for promotion and marketing in our app store and apply these consistently and objectively.

Developer Choice

We will not require developers in our app store to use our payment system to process in-app payments.
We will not require developers in our app store to provide more favorable terms in our app store than in other app stores.
We will not disadvantage developers if they choose to use a payment processing system other than ours or if they offer different terms and conditions in other app stores.
We will not prevent developers from communicating directly with their customers through their apps for legitimate business purposes, such as pricing terms and product or service offerings.

In addition, Microsoft is making a further and broader set of commitments:

  • We will continue to enable developers to choose whether they want to deliver their apps for Windows though our app store, from someone else’s store, or “sideloaded” directly from the internet.
  • We will continue to give developers timely access to
  • We will enable Windows users to use alternative app stores and third-party apps, including by changing default settings in appropriate categories.

Finally, Smith addresses a couple of questions regulators and consumers may have about the Activision acquisition. First, he commits to making “Call of Duty and other popular Activision Blizzard titles” available on Playstation not only through Sony’s current agreements with Activision, but “beyond the existing agreement and into the future so that Sony fans can continue to enjoy the games they love,” and says they are working to support Nintendo in the same way.
He then notes that these open app store policies, while they apply specifically to mobile app stores, will at least in part apply to the store on the Xbox console, as well: “beginning today, we will move forward to apply Principles 1 through 7 to the store on the Xbox console. We’re committed to closing the gap on the remaining principles over time. ”

Microsoft appears to know full well it’s facing a tough challenge to get the Activision acquisition approved by regulators, and is already pushing to plead its case. Whether it will be enough to appease those regulators remains to be seen.


How to create PowerShell scripts on Windows 10 and Windows 11 with Visual Studio Code

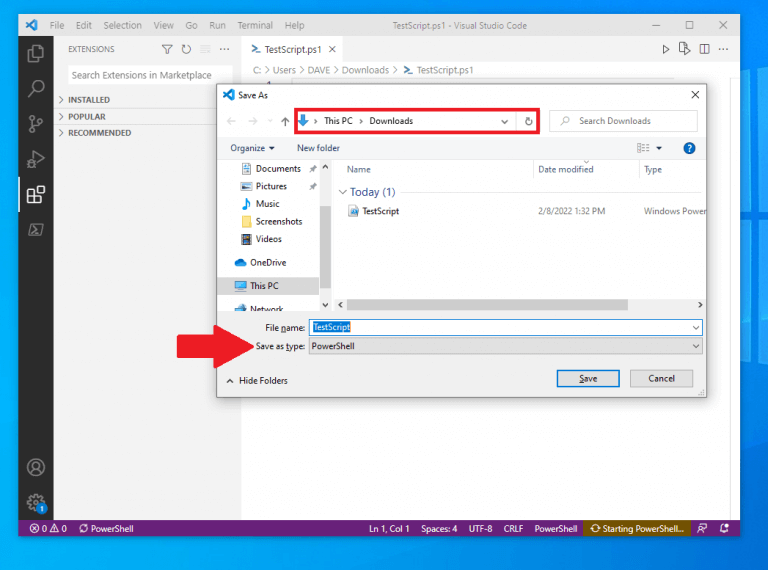
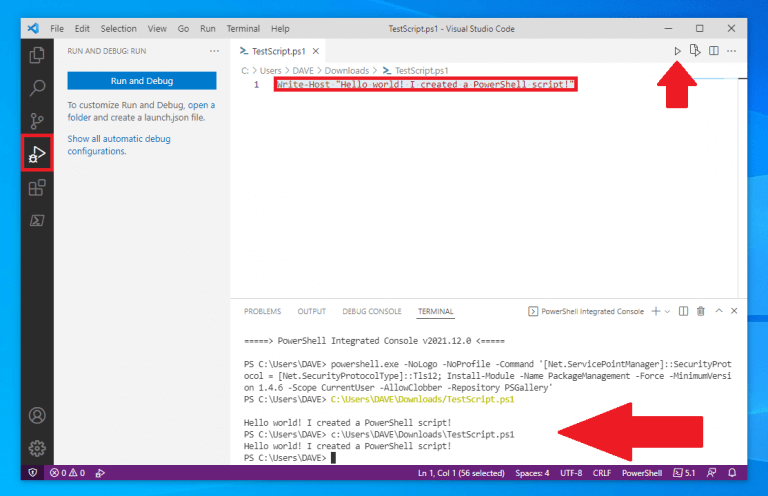
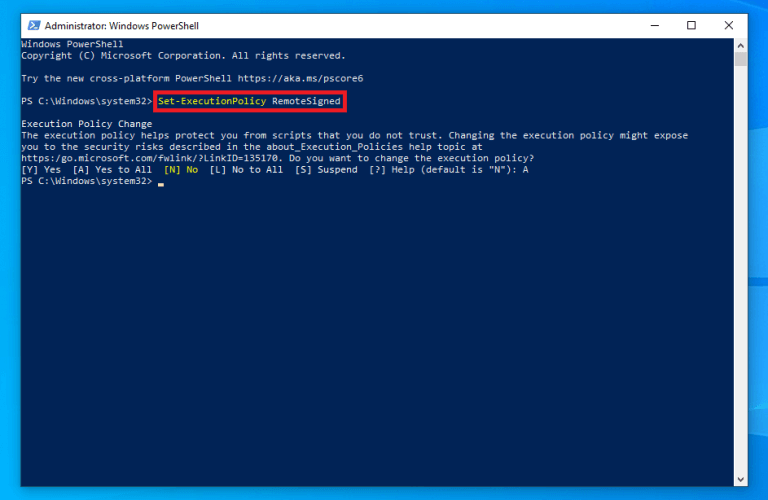
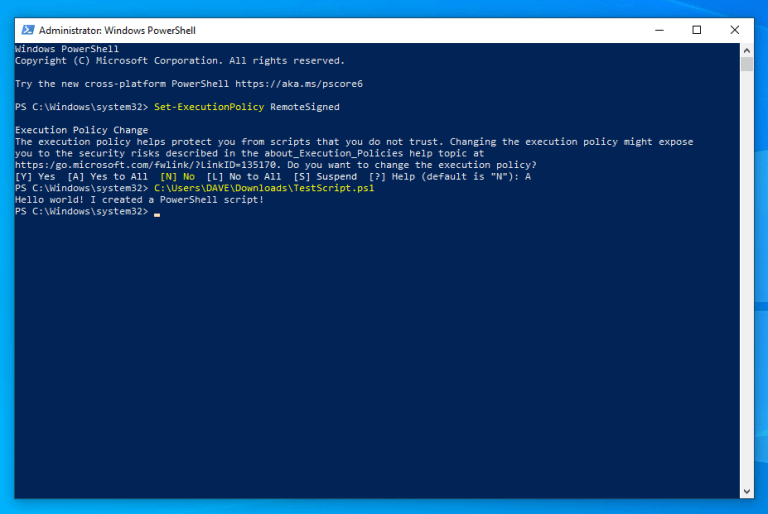
Did you know that you can create PowerShell scripts on Windows 10 and Windows 11? Now that you installed PowerShell on Windows, you might want to know what you can do with it on your PC. In this guide, we will show you how to create a simple script file using Visual Studio Code and run the script file in PowerShell on Windows 10 and Windows 11.

First, you need to learn how to create a basic PowerShell script. Once you learn that, you will be able to create and run PowerShell scripts on Windows 10 and Windows 11 to make your workflow more efficient thus making you more productive.

How to create PowerShell scripts on Windows 10 and Windows 11

Previously, you could create scripts using almost any text editor. However, Microsoft’s preferred option moving forward is to use the Visual Studio Code editor with the PowerShell extension.

Visual Studio Code (VS Code) is a powerful, but lightweight source code editor that runs on your desktop and is available on Windows, macOS, and Linux.

VS Code comes with built-in support for JavaScript, TypeScript and Node.js. As an added benefit, you get a rich ecosystem of extensions for other development languages, including C++, C#, Java, Python, PHP, Go, as well as and runtimes, such as .NET and Unity.
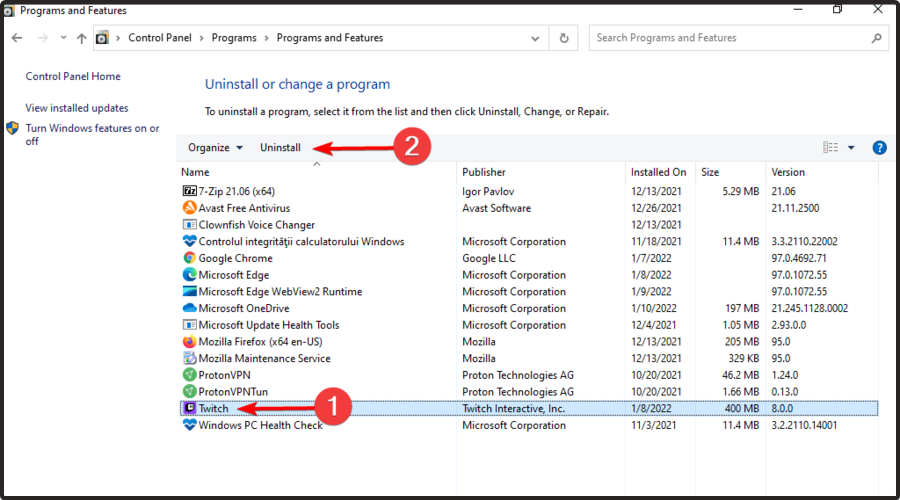
In this guide, we will concentrate on what to do to prepare your PC to create PowerShell scripts on Windows 10.
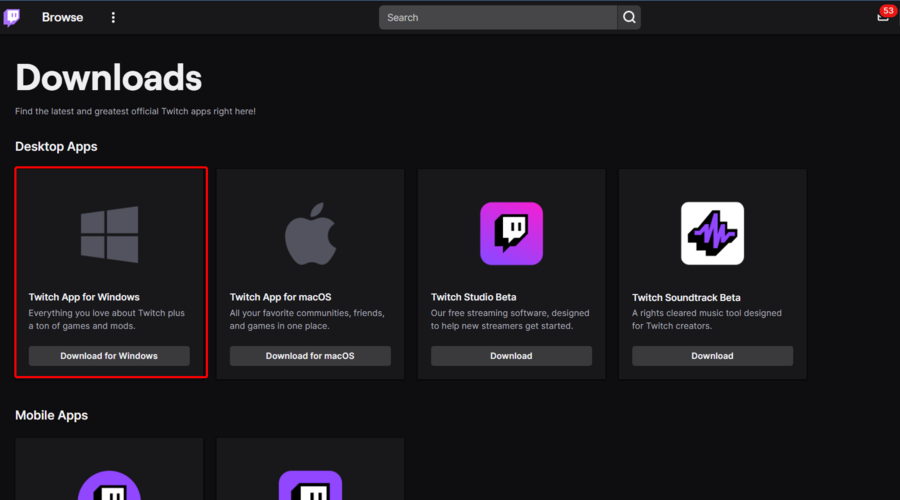
Install VS Code

1. Download the VS Code installer on Windows
2. Once downloaded, run the installer (VSCodeUserSetup-{version}.exe) to install VS Code

Alternatively, you can also download a Zip archive, extract it, and run the VS Code installer from there.

Once VS Code is installed, the PowerShell extension needs to be installed to allow for PowerShell scripts to be created.

Install PowerShell extension on VS Code

Here’s how to open VS Code and install the PowerShell extension

powershell scripts on windows 10 and windows 11

1. Open VS Code
2. Click Extensions from the left pane (arrow indicator)
3. Search for and select “PowerShell”
4. Click Install button to install the PowerShell (or PowerShell Preview) extension on VS Code

After you complete the steps, you can start creating PowerShell scripts on Windows 10 with VS Code.

If you want to install other extensions in the future, use the keyboard shortcut Ctrl + Shift + X to be taken directly to the VS Code extensions. If you have the time, you can familiarize with other keyboard shortcuts available by using “Showing All Commands” in VS Code, Ctrl + Shift + P keyboard shortcut.

Create PowerShell scripts with VS Code

Here’s what to do to create a script:

powershell scripts on windows 10 and windows 11

1. Open VS Code
2. Click the File menu and select the New File option. Alternatively,
use the Ctrl + N keyboard shortcut

3. From here, you can go to File menu again, then select Save As to change the file type. Alternatively, use the keyboard shortcut Ctrl + Shift + S
4. Change the File name and location as you wish on your PC. Change the “Save as type” to PowerShell as shown

5. Click Save to save the file

You can also explore ways to package your script for easier distribution by reading how to convert PowerShell to EXE, which can be useful once your file is ready.

Now that a PowerShell script file is created, it should appear in your files as a Windows Powershell file, with a .ps1 file extension. With the newly created “TestScript” PowerShell file, we can add a command for the file to run in PowerShell. Here’s what to do.

powershell scripts on windows 10 and windows 11

1. Open the file you created in VS Code
2. Write a new or paste a script that you want to run:
Write-Host "Hello world! I created a PowerShell script!"
The script above will output the phrase: “Hello world! I created a PowerShell script!”
3. (Optional) You can use the Run in the upper right or press F5 to run the script in an integrated PowerShell window and see the output below as shown

4. Click the File menu and click Save when you are finished to save the file

Change the Windows execution policy in PowerShell

Once you complete the steps using VS Code, the PowerShell script will be ready to run. But before you run your script file, you need to change the execution policy on Windows 10. By default, scripts are not authorized to run in PowerShell.

Here’s how to change that.

powershell scripts on windows 10 and windows 11

1. Open PowerShell and Run as Administrator
2. Copy and paste the following command to run PowerShell scripts:
Set-ExecutionPolicy RemoteSigned
3. Press Enter to run the command
4. Type A and Press Enter

Now that the Windows 10 execution policy has been changed in PowerShell, it’s time to run the PowerShell script.
1. Open PowerShell and Run as Administrator
2. Paste the file path to the PowerShell script file that was created
C:\Users\DAVE\Downloads\TestScript.ps1
3. Press Enter to run the script

powershell on windows 10

After you complete the steps, the PowerShell script will run. If the script was written correctly, you should see its output in PowerShell.

More Windows 10 and Windows 11 resources

For more helpful articles, coverage, and answers to frequent questions about Windows 10, visit the OnMSFT resources available below.

Windows 10 on OnMSFT – All you need to know

Windows 11 on OnMSFT – All you need to know

OnPodcast: the OnMSFT Podcast on YouTube

Have any suggestions for Windows 10 and Windows 11 tips and tricks? Let us know in the comments!

5 Ways to Record Gameplay on Windows 11 [Quick Guide]

Who doesn’t love playing video games? They are the favorite past time of millions of people across the globe. Some of them have turned their favorite past-time into their primary source of income.

How did they do that? Well, they followed the trend of creating videos online on various streaming platforms such as YouTube and Twitch.

If you’re still using an older version of the OS, you can always check out the best screen recorder for Windows 10.

If you are also interested, then the first thing you should know is how to record gameplay on Windows 11. Since Windows 11 is the latest operating system, many users who have installed it would like to know how you can record your gameplay on it.

Once you are done recording your gameplay, you can simply edit it or live-stream it onto different platforms and grow your subscriber base.

You can improve your recordings by editing them before uploading, and the guide at how to edit Xbox clips on PC shows you the steps you need.

Not everyone will make it big in this league, but it is worth giving a shot. And if you are intrigued by it, then you have landed in the right place.

In this guide, we will show you how you can record gameplay on Windows 11 using the in-built tool and third-party apps.

How is Windows 11 better for gaming than Windows 10?

Microsoft is one of the big names in the gaming space. Along with games for their desktops, Microsoft also has a lineup of Xbox consoles for those who want dedicated beasts for gaming.

Since we are focused here on Windows 11, some of you would like to know if Windows 11 is better than the previous version of the OS, i.e. Windows 10.

It all started with Windows 8, where Microsoft included the Xbox companion. This tool came with features such as access to the live Xbox community, remote control, second screen, and more.

Then, with Windows 10, Microsoft added some more features to the Xbox companion, including a Game Bar, screen capturing, broadcasting, and even a dedicated settings page for the game you are running on your PC.

With the new Windows 11, Microsoft has added a bunch of cool features that will take your gaming experience to a new level.

Windows 11 gets the Auto HDR feature. This will enhance your gaming experience by converting the SDR content into HDR using machine learning available in Windows 11.

Moreover, the new OS also gets the Direct Storage option. This enables the API to allow the GPU (Graphics Processing Unit) to directly load the data from the SSD. Previously, this process also involved CPU processing, which is now not needed, as a result, saving a lot of power.

Though these are not groundbreaking changes, they are good enough to make Windows 11 a better OS than Windows 10 for gaming and coupled with a great gaming laptop, you’re ready to explore some of the latest titles.

How to record your screen with audio on Windows 11

    Record your screen with Xbox Game Bar

    Before you jump into record your screen while gaming, make sure that you have all settings in place as this will help you improve the overall experience of your recording. Here’s what you need to do:

  1. 1. Open the Gaming Settings page.

    Press the Windows + I buttons together on your keyboard to open the Settings page. Under the Settings page, select Gaming from the left side panel.

    Gaming settings how to record gameplay in Windows 11
  2. 2. Click on Captures

    Inside the Gaming page, you need to click on Captures.

    Captures how to record gameplay in Windows 11
  3. 3. Set up your desired recording settings

    You will see under the  Captures settings page, there are several options that you can change and tweak for recording videos. Here is a quick glance at what options you can tweak from the Captures settings page:

    • You can change the location where you wish to save your recorded videos
    • Enable or disable the option to press Win + Alt+ G key to record your gameplay
    • You can limit the maximum record length
    • Option to record video with or without audio
    • Select the video recording framerate
    • Select video quality

  4. 4. Open the Start menu and type in Xbox Game Bar

    After you finish setting everything up, in order to record gameplay video, all you need to do is open the Start menu. Then search for the Xbox Game Bar. Alternatively, if you have enabled the toggle next to Record what happened simply press Windows + Alt + G. This will show you the Xbox console.

  5. 5. Open Xbox Game Bar and start recording

    You can either hit the record button available on the console or use the below shortcuts:

    • To start recording a video: Windows + Alt + R
    • To turn on your mic: Windows + Alt + M

Your recorded video will be stored at the selected location. As mentioned, there are a bunch of options to explore inside the Xbox Game Bar. Feel free to use them.

Do keep in mind that sometimes Windows Alt R won’t work, but that can be easily fixed, and we have a special guide that addresses that.

Use third-party apps

Well, you don’t need to rely on the in-built screen recording tool to record your gameplay on your Windows 11 PC. There are a plethora of options to choose from.

However, do note that you might get confused with which app to opt for or which would be the best app that you should download to record your gameplay.

We have already compiled a list of some of the best screen recorder software for Windows 10. You can check out the list and download the app as per your preference.

To demonstrate how you can use a third-party app to record your gameplay, we will make use of the Bandicam screen recording app.

It is one of the best and most popular names when it comes to screen recording and editing. The interface is nice and clean. You get the option to save the recorded file in MP4, AVI, or even image files.

Let us take a look at how you can use Bandicam to screen record on Windows 11 with audio.

  1. First, you need to download Bandicam from its official website and install it on your Windows 11 PC.
  2. Now, launch the screen recording app on your PC.
  3. You will be greeted with the Bandicam interface. Here, you will see different options such as Rectangle area, Fullscreen, Around mouse, and more.Bandicam Interface best screen recording Windows 11
  4. If you want to record a certain section of your screen, then you can opt for the Rectangle area option. Otherwise, you can go for the Fullscreen mode.
  5. Once you have selected your preferred recording choice, simply press the red REC button at the top of the menu bar or press teh F12 shortcut key. Bandicam start recording
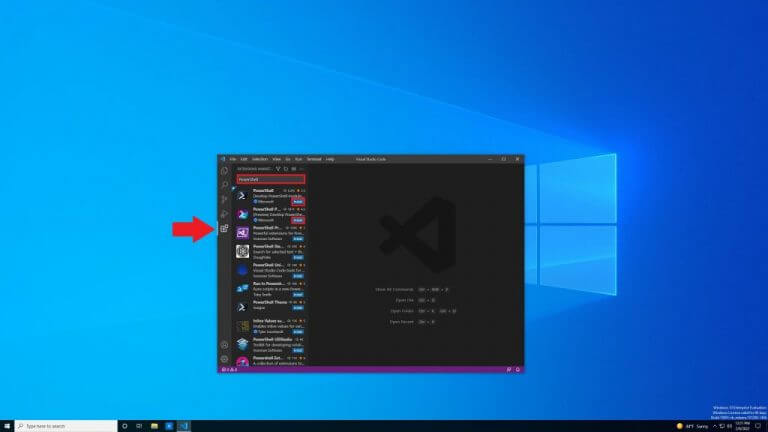
  6. That’s it! The screen recording of your screen will start. You can proceed to begin recording your gameplay. You can find your recordings under the Videos tab.Saved videos Bandicam
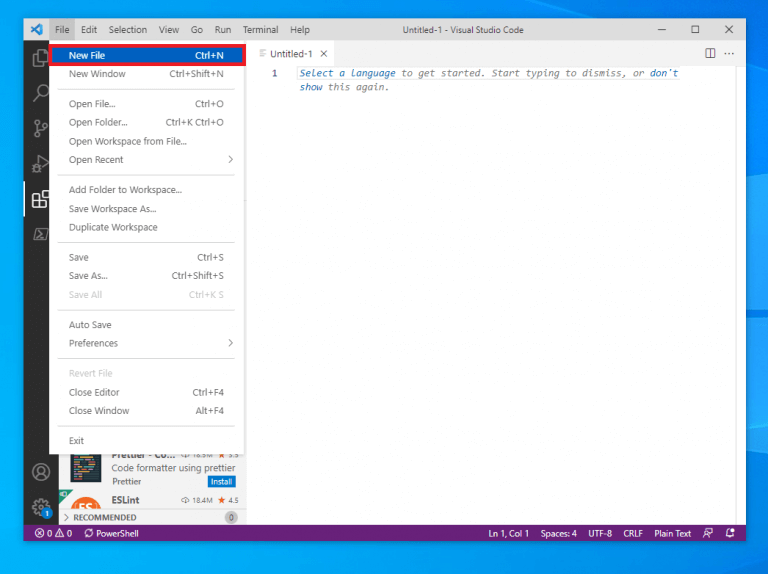
Use other options

We have just given an example of the Bandicam video recording app, but several other apps may even provide you with more advanced options.

Besides, you need to unlock the Bandicam app to unlock all of its features. In such a case, you can make use of the free video recording app available for download from the Microsoft Store. It is called the Free Screen Recorder.

It is a pretty straightforward screen recording app. Some of the features of this software include no watermark, unlimited screen recording, a simple interface, a browser recorder, and more.

How to take screenshots of your gameplay?

While video recording is a nice way to stream your gameplay online or store it for uploading at a later stage, you may require a thumbnail for the video or you may want to highlight a special moment during your gameplay.

In such cases, screenshots can come in handy. Screenshots simply mean a still image of what’s happening on your Windows 11 home screen.

You can opt for different software to take a screenshot, but for such a simple task, we would advise you to make use of the PrtSc or Print Screen key on your keyboard.

When you press this key, your PC immediately takes a screenshot of the home screen. But once you press the PrtSc button, you immediately need to paste it into an image editing app or drawing app such as Paint It. Only then you will be able to save it.

Otherwise, if you are using Xbox Game Bar, then there is a screenshot icon on the top-left menu bar. You can either press it or use the shortcut Windows + Alt + PrtScr to capture the screenshot. Here, you will be able to locate your captured screenshots inside the Videos>Captures folder.

You can check out our guide where we have compiled a list of all the different ways which you can use to take screenshots on your Windows 11 PC.

Let us know in the comments section below which option mentioned in this post is used by you to record your gameplay videos on Windows 11.

How to Remove File Association in Windows 11

There are times when you install a new program more suited for a particular file type. Maybe, you install a photo editor and want to open all .jpg or .png files with it for editing. Under the current system settings, these formats will be opened using the default file associations.

This is why it’s imperative that you understand how to change, remove, or reset file association in Windows 11. In the following guide, we will tell you how to do that.

How do I remove file associations in Windows 11?

1. Via Settings

  1. Press Windows + I to launch the Settings, and select Apps from the list of tabs in the navigation pane on the left.Apps to remove windows 11 remove file association
  2. Next, click on Default apps on the right.Default apps
  3. Scroll down to the bottom and select Choose defaults by file type under Related settings.Choose defaults by file type to windows 11 remove file association
  4. Now, select a file type to remove the present and create new file associations in Windows 11.Click file type to windows 11 remove file association
  5. Select the desired app that you want to use to open this particular file type from now on and click on OK.Select a different app to windows 11 remove file association
  6. The changes should reflect right away.windows 11 remove file association

Using Settings is probably one of the easiest ways to remove and create new file associations in Windows 11. But, it’s certainly not the only one. We have listed the other ways in the following sections, go through them all and use the one that suits you best.

2. Via Control Panel

  1. Press Windows + S to launch the Search menu, enter Control Panel in the text field at the top, and click on the relevant search result that appears.Launch Control panel
  2. Select Programs from the list of options here.Click programs to windows 11 remove file association
  3. Next, click on Default Programs.Default programs
  4. Now, click on the Associate a file type or protocol with a program option.Associate a file type or protocol with a program to windows 11 remove file association

You will now be redirected to the Settings window and can follow the steps listed in the previous method to remove file associations in Windows 11.

The Control Panel previously had a built-in option to remove file associations but it’s been removed and you are now redirected to Settings.

3. Via Registry

  1. Press Windows + R to launch the Run command, enter regedit in the text field, and either click on OK or hit Enter to launch the Registry Editor.Launch Registry Editor
  2. Click Yes on the UAC (User Account Control) prompt that pops up.Click Yes
  3. Paste the following path in the address bar at the top, and hit Enter. Alternatively, you can navigate your way to it using the navigation pane on the left.HKEY_CURRENT_USER\Software\Microsoft\Windows\CurrentVersion\Explorer\FileExtsNavigate path to windows 11 remove file association
  4. All the file types will be listed in the navigation pane. Select the one for which you want to remove the file association, right-click on it, and select Delete from the context menu.Delete key to windows 11 remove file association
  5. Click Yes on the confirmation prompt to delete the key. Confirm deletion
  6. Now, press Ctrl + Shift + Esc to launch the Task Manager, locate the Windows Explorer (explorer.exe) process, right-click on it and select Restart.Restart Windows Explorer

Once done, the changes will start to reflect and the file associations will revert to the default configurations. If you want to change the file association for that particular format in the future, follow the steps listed in the first method.

How can I reset file associations in Windows 11?

  1. Press Windows + I to launch Settings, and select the Apps tab from the navigation pane on the left.Apps
  2. Click on the Default apps option on the right.Default apps
  3. Next, click on the Reset button next to the Reset all default apps option.Reset all default apps to windows 11 remove file association
  4. Click on OK in the confirmation prompt that pops up.Confirm reset

After you have reset file associations in Windows 11, they will revert to the apps recommended by Microsoft. If you want to change the file association for a particular format, we recommend changing it individually, rather than resetting the whole lot.

These were all the ways you can remove file associations in Windows 11, along with resetting them in case they are misconfigured.

Also, check how to set the default applications on your Windows 11 system. Besides, if you find the File Association Helper software on your computer, learn all about it and the process to uninstall it.

Do not hesitate to tell us which of these methods you prefer to remove file associations in the comments section below.

Microsoft looks to help IT admins cut down their response time to inappropiate Teams messages

When an employee breaks company policies on services like Teams or Yammer, an IT admin usually has to step in and take charge. That process is usually a lengthy one, but Microsoft is now making moves to help admins cut down their response time to said issues (via TechRadar.)

According to a listing on the Microsoft 365 roadmap, with some incoming changes to the compliance center, the detection and investigation time of said compliance issues will soon be reduced from 24 hours to 1 hour. It’s not clear what the specific changes are, but Microsoft hopes it can help admins “respond to communication compliance alerts promptly.” A separate document from Microsoft looks into the risks of these issues, like scanning emails, and potential messages that might pose human resources issues.

This isn’t the first move Microsoft has taken to help with compliance issues, especially in Teams. Previously, Microsoft worked on a feature to let chat supervisors delete irrelevant and inappropriate chat messages in Teams channels.

Epson setup cannot find the printer? Here’s what to do

Some users fail to register the Epson printer setup correctly when installing Epson printers on their systems. This makes them not have the best user experience. 

Whether it’s a wired or wireless printer not connecting to your Windows PC, the problem can be due to technical issues during the setup. 

Additionally, you can experience this inconvenience while setting up a connection, and some users might wonder why they can’t use it on Windows 11. Luckily, there are several ways you can resolve the issue.

Why does the Epson printer setup cannot find the printer on Windows 11?

The reasons why your printer setup is not connecting to the printer can range from technical to network issues and here we are to show you how to fix them. Here are some of them:

➡ The Epson printer is not connected

Perhaps it’s a simple solution that we always ignore. Your printer might be turned off, or it’s not correctly connected to the power source. 

The best way to know if the printer is connected is a green light that it illuminates, or if it’s locally shared, you will see the connection icon on your Windows 11’s taskbar. 

➡ Outdated or corrupted software

The print software is a communication conduit between your printer and the computer. Note that it tells the printer which documents to print. This software can be a problem, especially for network printers. 

Without the printer software driver, you can’t send document data for printing. Therefore, it is crucial to check the printer driver and see if it’s updated. If you recently updated your OS, you must also update the printer driver.

➡ Disabled File and printer sharing option

The File and printer sharing option is disabled on Windows 11. So, you need to enable it to allow Epson printer setup to detect the printer – there is no way a computer can access the printer if this option is disabled. 

To turn on File and printer sharing option, use the following steps:

  1. Click on the Search box, then type Control panel and press Enter.
  1. On the left side of the window, you will see View by. Just choose Category from the drop-down menu.
  2. Select Network and Internet.
  3. Double click on the Network and Sharing Center, then Change Advanced Sharing Settings.
  4. On this page, navigate to Private.
  5. Under the private option, click on the File and printer sharing to enable it. 

Do not enable File and printer sharing for the public network. This will expose your computer data to other users on the same shared network, inviting malicious attacks and data theft. 

➡ Not connected to the local network

Maybe the reason why your Epson printer setup cannot find a printer is disconnected WiFi or cables. Ensure all cables are correctly connected, your Wi-Fi is on, and that your password hasn’t changed. 

What can I do if the Epson printer setup cannot find the printer?

1. Uninstall and reinstall your printer

  1. Click on the Start button and select Settings.
  2. Choose Bluetooth and Devices on the Settings window.
  3. On the left side, select Printers & Scanners. 
  4. Select your printer on the Printers and Scanners window and click on Remove device. 

To reinstall your wireless printer on Windows 11 PC:

  1. Click on the Start button. Select  Settings and then choose Bluetooth and Devices.
  2. Select Printers & Scanners on the left side of your screen. 
  1. Select Add a printer or scanner. Wait for your PC to find available printers. Choose the one you want and click on Add device. 

Your Windows 11 PC should find all the printers that are turned on and connected to your network. The available printers on your network include wireless printers, Bluetooth printers, or those connected to a computer on the shared network.

However, you might need permission to install some printers on the network connection. 

Make sure your computer is connected to the same network as the printer, especially if you use wireless access points, multiple wireless routers, or extenders with different SSIDs. To test if your printer is working, you can print a test page to ensure it’s working correctly. 

To reinstall your local printer on Windows 11 PC:

  1. Click on the Start button. Select  Settings and then choose Bluetooth and Devices.
  2. Select Printers & Scanners on the left side of your screen. 
  3. Select Add a printer or scanner. Wait for your PC to find available printers. Choose the one you want and click on Add device. 

2. Clear and reset the print spooler

  1. Type Services on the search box. Select Services on the search results.
  2. Click on the Standards tab, then double-click on the Print spooler on the list. 
  3. Click Stop and then choose OK.
  4. Enter the following in the search and then select the correct result: %WINDIR%\system32\spool\printers
  5. Type Services on the search box. Select Services on the search results.
  6. Click on the Standards tab, then double-click on the Print spooler on the list.
  7. Click Start and select Automatic in the Startup type dialog box. Click OK.

Find out more about the Epson printer setup on Windows 11

As we mentioned earlier, some users have had problems with the Epson printer setup because they didn’t install the software correctly. Here is the best way to correct that:

  1. Ensure the Epson printer is connected to the Wi-Fi or Ethernet before proceeding with this setup. 
  2. Press the power button on your printer to switch it on, then open the official Epson website to download the Epson printer setup utility. 
  3. Once the file is downloaded, open and run it. The End-User Licence Agreement will show up— check the box against I accept the terms in the License Agreement button. Click Next to continue. 
  4. Click Install, then Finish. Once the installation is over, open the program. 
  5. On the setup window, choose Epson product from Select a Printer.
  6. Click Next and then Printer Registration on the new window. Click Next.
  7. Accept the License agreement and privacy statement by clicking Agree. Hit on Next.
  8. Follow the onscreen direction by clicking Next and Finish.
  9. Epson Connect setup will search for all available printers on your network. Click on your preferred printer from the list then Next to connect and start printing.

You may also be interested in knowing why your printer is not working on Windows 11 or what to do if the printer is not responding. 

We hope the solutions in this article solved your problem. We would love to hear from you so don’t hesitate to use the comments section below. 

Samsung’s rumored “Second Screen” app for Windows to help you use Galaxy tablets as an external display

You already can use any Windows PC as a secondary display for a primary computer, but Samsung is looking to take that to another step. According to the notable leaker Aggiornamenti Lumia, the smartphone giant is possibly working on a new app for Windows known as “Second Screen” that can help you use Galaxy tablets on PCs as an external display (via Neowin.)

Naturally, details on said app are scarce at the moment, as the leaker only shared a list of devices that it would work with. On the Android side, the list ranges from the Galaxy Tab S7, FE, and Plus, to the Galaxy Tab S8, Plus, and Ultra. Over on Windows, you’ll need a Galaxy Book that’s running Windows 10 version 2004 or higher. This means that the experience will likely be locked in to Galaxy owners only despite the app being on Windows.

It is worth noting that Samsung already has an experience that lets you mirror your computer’s screen to a Galaxy tablet. This can be done on select Android devices by choosing the Second Screen icon from the Quick Settings panel and then connecting to it as a wireless display from the Windows Connect menu. It is unknown how different this new app for Windows will be, but with Galaxy Unpacked coming up, it won’t be too long before we find out.

WhatsApp Beta on Windows 10 and 11 gets a clean dark mode

Earlier on, we got the chance to have a look at the Whatsapp Beta app when it made its way to Microsoft Store. In an update, Whatsapp Beta version 2.2205.2.0 received a clean dark mode for Windows 11 and Windows 10. (via Windows Central)

All you need to do to switch to the dark mode is to find the General option, which will then provide you with an array of options to choose from Light, Dark, or System default.

Note: If your system is already configured to dark mode settings, you can switch to dark mode by either selecting Dark or System Default.

Besides, the application also allows its users to link multiple devices (up to 4 devices). Additionally, you now get to access WhatsApp regardless of whether your phone is offline. The new WhatsApp Beta UWP has an additional mode of communication, inking. Users can draw images on the inking pad and send them over to family and friends. As opposed to the conventional regular chat messages and pictures from the gallery.

Download WhatsApp Beta here:

WhatsApp Beta
WhatsApp Beta
Developer:
WhatsApp Inc.
Price:
Free


5+ best Valentine’s Day apps to install on Windows devices

Valentine’s Day is coming, reminding people how important is it to love and be loved. In this article, we’re going to list the best Valentine’s Day apps available in the Microsoft Store.

These apps will offer you some interesting gift ideas, beautiful romantic messages that you can send to your significant one, while others will bring your beautiful Valentine’s Day wallpapers to install on your desktop.

Are there any Valentine’s Day apps available for free?

Of course, there are a lot of free Valentine’s Day apps and we make sure we’ve included the best of them in our selection.

Check our list and you will discover a lot of lovely ways to surprise your loved one, from greeting cards to messages and picture frames to the best recipes for Valentine’s Day meals and sweets.

What are te best Valentine’s Day apps for Windows?

Valentine

Valentine is one of the most popular Valentine’s Day apps in the Microsoft Store and it’s free so you should definitely check it out.

It offers a countdown in days, hours, minutes, and seconds to Valentine’s Day. If you don’t have any poetic inspiration, you can use one of the 40 pre-set SMS to express your love.

The app also offers you over 30 romantic wallpapers to set on your Windows PC or phone, as well as over 30 romantic ideas to make this Valentine’s Day unforgettable.

Last but not least, if you’ve run out of ideas and you don’t know what present to buy, launch the Valentine’s app and browse through the list of gift suggestions.

⇒ Get Valentine

Love & Valentine Cards

This app allows you to send personalized love cards on Valentine’s Day and let your significant other know how much he/ she means to you.

Well, this is the perfect tool to bring a smile to your beloved’s face. You can choose from various love messages templates or add your own custom message.

Love & Valentine Cards offers various designed frames, on which you can add your photo through your photo album, internal camera, and gallery.

Social media support is also available, as you can save and share your creations through Facebook and Twitter.

⇒ Get Love & Valentine Cards

Valentine’s Day Messages

This is a Valentine’s Day SMS app that allows you to send beautiful messages from your Windows-powered mobile device.

The program is free and it includes a large collection of beautiful SMS with share options or you can copy the messages and paste them into other applications.

It’s important to know that this app doesn’t only contain messages for Valentine’s Day but also for different other occasions like anniversaries, birthdays, and even exams.

Sign your name at the end of the message to let your loved ones know it’s really you. You can send the messages as SMS, directly through Facebook, or copy them to your favorite communication app.

The app is available only on Windows Mobile so, unfortunately, you won’t be able to use it on your PC or laptop.

⇒ Get Valentine’s Day Messages

Love Tests Calculator

Love Tests Calculator checks the level of love compatibility in your couple. If you’re in a relationship, this app will tell you if you and your partner are indeed compatible.

If you’re single, the app can check who your perfect love match is so you can look for that significant other.

Enter the name, birthday, height, eye color, and hair color of the girl or boy you like and launch the love test. The love meter will calculate your level of love compatibility. You can share the results by email or through Facebook.

The app is available only on Windows Mobile and it’s as close as it can get to Valentine’s Day dating apps category.

⇒ Get Love Tests Calculator

Valentines Day Recipes

Is there a better way to say I love you than baking a delicious batch of cupcakes for your better half?

Then this Valentine’s Day Recipes Cupcake app is just what you were looking for to surprise your partner with some cunning baking skills.

You can learn lots of things about how to make very tasty cupcakes, cakes, cake rolls, and other recipes even for kids on this occasion.

There are lots of ideas and tips inside on what to cook and how to decorate your desserts with style and that makes it a great contender for the happy Valentine’s Day apps genre.

You will get insights on the most common food served for this occasion and their recipes, dinner ideas, and even surprises for vegans.

⇒ Get Valentines Day Recipes

Romantic Photo Frames

This app lets you create a variety of beautiful photo frames for Valentine’s Day. You can create HQ photo collages and then set them up as your wallpaper.

There are plenty of photo effects and filters that you can choose from. You can rotate, scale, zoom in, zoom out or drag images to create funky pictures.

Next, you can choose from various picture frames for baby photos, love, birthday, cartoons for kids, and many more!

This app also allows you to save your beautiful selfies and beautify them with natural picture frames or wedding photo frames of your liking.

And when you’re done, use the Social share button to enjoy the pics with your best friends instantly via Facebook, Twitter, or Instagram.

⇒ Get Romantic Photo Frames

We hope that our selection of the best Valentine’s Day apps downloads offered a lot of alternatives on how to impress your loved one.

You can also check out our Windows 10 apps for Valentine’s Day to create romantic memories and add another romantic chapter to your life.

Have you tested out other Valentine’s Day apps? Share your thoughts and suggestions in the comments section below.

Scalebound video game devs want to finish it for Microsoft’s Xbox consoles

While development on Scalebound has been dead ever since the title was canned way back in 2017, there still seems to be a lot of interest in the title both from gamers who were excited for it back when it was first announced and the creatives involved in its development.

In a conversation with IGN Japan, PlatinumGames’ president, Atsushi Inaba, flat-out states that the studio is legitimately interested in picking the title back up again if Microsoft gives them the go-ahead.

“Often in an interview you might hear a developer politely saying, ‘Yes, if we had the opportunity we’d love to work on that again’, but we don’t mean it that way,” Inaba says. “Both Kamiya and I are serious – we really would love to work on Scalebound again. I’d like to discuss it with Microsoft properly.”

The Kamiya he mentions is Hideki Kamiya, the director of Scalebound. Kamiya was also present during the conversation with IGN Japan and echoed what Inaba said.

“I’d like to appeal to Phil Spencer directly! Let’s do it, Phil!” Kamiya enthused. “Development had progressed a fair way, and it seems pointless for Microsoft to just hold on to that and not do anything with it.”

Scalebound’s development began for the Xbox One console and Windows in 2013 and was announced to the public in 2014. The title was an action roleplaying game set in a world that was a mix of fantasy and Sci-Fi. It had garnered a lot of interest from gamers and the media though was eventually cancelled in 2017.

If development were to continue, it’d likely be for a release on Microsoft’s newer Xbox Series X generation of Xbox consoles in addition to Windows PCs.

Would you like to see work on Scalebound continue? Let us know in the comments below and then follow us on Twitter and Facebook for more Xbox gaming news.

Microsoft’s Xbox Gear Shop adds Valentine’s Day gaming merch

In the spirit of Valentine’s Day (Which is just around the corner. Don’t forget!) Microsoft has added a massive number of new romance-themed items to their online Xbox Gear Shop storefront.

Among the fresh merch available from this week are new mugs, T-shirts, hoodies, stickers, and cushions boasting a stylised heart design with an Xbox logo, a collection of colorful heart candies with romance and gaming phrases, a red Xbox Series X design with the phrase “We Belong Together,” an Xbox controller with a red rose and the phrase “mi amor,” and a pink design with Halo’s Master Chief and the words “Be Kind.”

Xbox Gear Shop Valentine's Day products
Xbox Gear Shop Valentine’s Day products

In addition to the above Valentine’s Day items, the Xbox Gear Shop has also recently added a number of Halo novels. This is likely do to an expected increase in Halo popularity with the looming debut of the new live-action Halo TV series.

The Xbox Gear Shop is an official store run by Microsoft that’s designed to distribute high quality products based on the Xbox consoles and the various Xbox gaming properties. The store ships to most major regions around the globe and updates on a very regular basis with new products.

After more Xbox news? Follow us on Pinterest, Twitter, and Facebook.

Microsoft to block VBA macros by default

Microsoft is planning to disable macros by default in Office, which should help protect users from malicious attacks. The ability to run macros has been a staple of Microsoft’s Office suite for a long time, but it has also been a way for attackers to execute malicious code on computers. 

Macros allow people to automate common tasks by having scripts run when a document is opened, and they are often used by businesses to speed up the execution of repetitive jobs.

In macro security, Microsoft explains how and why it will be changing its policy on how macros are handled in Office. The reason for the move is the widespread exploitation of VBA macros by bad actors to spread malware.

Once you enable macros and run them, malicious code can access your system and start downloading malware. It’s a simple technique that can be very effective if it reaches enough people.

Macros security risk

The recent increase in the numbers of people working remotely and the general reliance on the cloud makes companies more vulnerable than ever to security problems resulting from macros.

Microsoft warns that the prevalence of remote work and the cloud exacerbates the problem of macros as a security threat. Previously, Office files included active content such as macros that users could choose to enable or disable. 

Malicious actors now send end users Office files containing macros enabled by default; users with malicious payloads are delivered and the impact can be severe including malware, compromised identity, data loss, and remote access.

Security boost

The default setting for VBA macros obtained from the internet is now disabled. A message bar will appear for users notifying them of this change. 

This is expected to help keep more Microsoft users safer, including home users and information workers at managed organizations.

The update will first be available for users running Windows home and enterprise editions and then it will make its way to other channels.

This is where the new security measure comes in. As Microsoft explains in a blog post, Office VBA macros will now be disabled by default. A user who wants to run them will have to enable them manually from within the application’s settings.

Good news

The news has been received perfectly well by the security community who according to them macros have been a cyber security threat for quite some time.

The small number of users who must run macros will still have to do so as a legitimate business function. 

However, the default behavior will change so that other people won’t be affected. This change is expected to greatly reduce the chances of harmful malware being delivered via phishing emails.

Microsoft plans to make the same change to its other Office products, though it has not yet announced a timeline for implementation.

What do you think about this plan by Microsoft disabling macros in office by default? Share your thoughts in the comment section.

A total of 51 CVEs were addressed by Microsoft this month

It’s that time of the month again, and everyone is looking towards Microsoft, in hopes that some of the flaws they’ve been struggling with will finally get fixed.

We’ve already provided the direct download links for the cumulative updates released today for Windows 10, but now it’s time to talk about Critical Vulnerabilities and Exposures again.

In terms of heft, this month’s release coincides with February releases from previous years, which are usually around 50 CVEs.

Let’s dive right into it and see what vulnerabilities are completely gone from our lives, now that these patches are live.

There were no Critical CVEs to fix for February 2022

The silver lining for the month of February 2022, is the complete lack of Critical-rated patches. Out of the ones released today, 50 are rated as Important and one is rated as Moderate in severity.

So, the 51 new patches that became available today address CVEs in:

  • Microsoft Windows and Windows Components
  • Azure Data Explorer
  • Kestrel Web Server
  • Microsoft Edge (Chromium-based)
  • Windows Codecs Library
  • Microsoft Dynamics
  • Microsoft Dynamics GP
  • Microsoft Office and Office Components
  • Windows Hyper-V Server
  • SQL Server
  • Visual Studio Code
  • Microsoft Teams

Some more good news is that none of the bugs that were addressed this month are listed as being under active exploit, except for one, which is listed as publicly known at the time of release.

We know you’re curious and would like to explore each and every single one of the patches, so we are going to present them to you.

CVE TitleSeverityCVSSPublicExploitedType
CVE-2022-21989Windows Kernel Elevation of Privilege VulnerabilityImportant7.8YesNoEoP
CVE-2022-21984Windows DNS Server Remote Code Execution VulnerabilityImportant8.8NoNoRCE
CVE-2022-23280Microsoft Outlook for Mac Security Feature Bypass VulnerabilityImportant5.3NoNoSFB
CVE-2022-21995Windows Hyper-V Remote Code Execution VulnerabilityImportant7.9NoNoRCE
CVE-2022-22005Microsoft SharePoint Server Remote Code Execution VulnerabilityImportant8.8NoNoRCE
CVE-2022-21986.NET Denial of Service VulnerabilityImportant7.5NoNoDoS
CVE-2022-23256Azure Data Explorer Spoofing VulnerabilityImportant8.1NoNoSpoofing
CVE-2022-21844HEVC Video Extensions Remote Code Execution VulnerabilityImportant7.8NoNoRCE
CVE-2022-21926HEVC Video Extensions Remote Code Execution VulnerabilityImportant7.8NoNoRCE
CVE-2022-21927HEVC Video Extensions Remote Code Execution VulnerabilityImportant7.8NoNoRCE
CVE-2022-21957Microsoft Dynamics 365 (on-premises) Remote Code Execution VulnerabilityImportant7.2NoNoRCE
CVE-2022-23271Microsoft Dynamics GP Elevation Of Privilege VulnerabilityImportant6.5NoNoEoP
CVE-2022-23272Microsoft Dynamics GP Elevation Of Privilege VulnerabilityImportant8.1NoNoEoP
CVE-2022-23273Microsoft Dynamics GP Elevation Of Privilege VulnerabilityImportant7.1NoNoEoP
CVE-2022-23274Microsoft Dynamics GP Remote Code Execution VulnerabilityImportant8.3NoNoRCE
CVE-2022-23269Microsoft Dynamics GP Spoofing VulnerabilityImportant6.9NoNoSpoofing
CVE-2022-23262Microsoft Edge (Chromium-based) Elevation of Privilege VulnerabilityImportant6.3NoNoEoP
CVE-2022-23263Microsoft Edge (Chromium-based) Elevation of Privilege VulnerabilityImportant7.7NoNoEoP
CVE-2022-22716Microsoft Excel Information Disclosure VulnerabilityImportant5.5NoNoInfo
CVE-2022-22004Microsoft Office ClickToRun Remote Code Execution VulnerabilityImportant7.8NoNoRCE
CVE-2022-22003Microsoft Office Graphics Remote Code Execution VulnerabilityImportant7.8NoNoRCE
CVE-2022-23252Microsoft Office Information Disclosure VulnerabilityImportant5.5NoNoInfo
CVE-2022-21988Microsoft Office Visio Remote Code Execution VulnerabilityImportant7.8NoNoRCE
CVE-2022-23255Microsoft OneDrive for Android Security Feature Bypass VulnerabilityImportant5.9NoNoSFB
CVE-2022-23254Microsoft Power BI Elevation of Privilege VulnerabilityImportant4.9NoNoEoP
CVE-2022-21968Microsoft SharePoint Server Security Feature BypassVulnerabilityImportant4.3NoNoSFB
CVE-2022-21987Microsoft SharePoint Server Spoofing VulnerabilityImportant8NoNoSpoofing
CVE-2022-21965Microsoft Teams Denial of Service VulnerabilityImportant7.5NoNoDoS
CVE-2022-22715Named Pipe File System Elevation of Privilege VulnerabilityImportant7.8NoNoEoP
CVE-2022-21974Roaming Security Rights Management Services Remote Code Execution VulnerabilityImportant7.8NoNoRCE
CVE-2022-23276SQL Server for Linux Containers Elevation of Privilege VulnerabilityImportant7.8NoNoEoP
CVE-2022-21991Visual Studio Code Remote Development Extension Remote Code Execution VulnerabilityImportant8.1NoNoRCE
CVE-2022-22709VP9 Video Extensions Remote Code Execution VulnerabilityImportant7.8NoNoRCE
CVE-2022-21996Win32k Elevation of Privilege VulnerabilityImportant7.8NoNoEoP
CVE-2022-22710Windows Common Log File System Driver Denial of Service VulnerabilityImportant5.5NoNoDoS
CVE-2022-21981Windows Common Log File System Driver Elevation of Privilege VulnerabilityImportant7.8NoNoEoP
CVE-2022-22000Windows Common Log File System Driver Elevation of Privilege VulnerabilityImportant7.8NoNoEoP
CVE-2022-21998Windows Common Log File System Driver Information Disclosure VulnerabilityImportant5.5NoNoInfo
CVE-2022-21994Windows DWM Core Library Elevation of Privilege VulnerabilityImportant7.8NoNoEoP
CVE-2022-22712Windows Hyper-V Denial of Service VulnerabilityImportant5.6NoNoDoS
CVE-2022-21992Windows Mobile Device Management Remote Code Execution VulnerabilityImportant7.8NoNoRCE
CVE-2022-21997Windows Print Spooler Elevation of Privilege VulnerabilityImportant7.1NoNoEoP
CVE-2022-21999Windows Print Spooler Elevation of Privilege VulnerabilityImportant7.8NoNoEoP
CVE-2022-22717Windows Print Spooler Elevation of Privilege VulnerabilityImportant7NoNoEoP
CVE-2022-22718Windows Print Spooler Elevation of Privilege VulnerabilityImportant7.8NoNoEoP
CVE-2022-22001Windows Remote Access Connection Manager Elevation of Privilege VulnerabilityImportant7.8NoNoEoP
CVE-2022-21985Windows Remote Access Connection Manager Information Disclosure VulnerabilityImportant5.5NoNoInfo
CVE-2022-21971Windows Runtime Remote Code Execution VulnerabilityImportant7.8NoNoRCE
CVE-2022-21993Windows Services for NFS ONCRPC XDR Driver Information Disclosure VulnerabilityImportant7.5NoNoInfo
CVE-2022-22002Windows User Account Profile Picture Denial of Service VulnerabilityImportant5.5NoNoDoS
CVE-2022-23261Microsoft Edge (Chromium-based) Tampering VulnerabilityModerate5.3NoNoTampering
CVE-2022-0452Chromium: CVE-2022-0452 Use after free in Safe BrowsingHighN/ANoNoN/A
CVE-2022-0453 Chromium: CVE-2022-0453 Use after free in Reader ModeHighN/ANoNoN/A
CVE-2022-0454Chromium: CVE-2022-0454 Heap buffer overflow in ANGLEHighN/ANoNoN/A
CVE-2022-0455Chromium: CVE-2022-0455 Inappropriate implementation in Full Screen ModeHighN/ANoNoN/A
CVE-2022-0456Chromium: CVE-2022-0456 Use after free in Web SearchHighN/ANoNoN/A
CVE-2022-0457Chromium: CVE-2022-0457 Type Confusion in V8HighN/ANoNoN/A
CVE-2022-0458Chromium: CVE-2022-0458 Use after free in Thumbnail Tab StripHighN/ANoNoN/A
CVE-2022-0459Chromium: CVE-2022-0459 Use after free in Screen CaptureHighN/ANoNoN/A
CVE-2022-0460Chromium: CVE-2022-0460 Use after free in Window DialogMediumN/ANoNoN/A
CVE-2022-0461Chromium: CVE-2022-0461 Policy bypass in COOPMediumN/ANoNoN/A
CVE-2022-0462Chromium: CVE-2022-0462 Inappropriate implementation in ScrollMediumN/ANoNoN/A
CVE-2022-0463Chromium: CVE-2022-0463 Use after free in AccessibilityMediumN/ANoNoN/A
CVE-2022-0464Chromium: CVE-2022-0464 Use after free in AccessibilityMediumN/ANoNoN/A
CVE-2022-0465Chromium: CVE-2022-0465 Use after free in ExtensionsMediumN/ANoNoN/A
CVE-2022-0466Chromium: CVE-2022-0466 Inappropriate implementation in Extensions PlatformMediumN/ANoNoN/A
CVE-2022-0467Chromium: CVE-2022-0467 Inappropriate implementation in Pointer LockMediumN/ANoNoN/A
CVE-2022-0468Chromium: CVE-2022-0468 Use after free in PaymentsMediumN/ANoNoN/A
CVE-2022-0469Chromium: CVE-2022-0469 Use after free in CastMediumN/ANoNoN/A
CVE-2022-0470Chromium: CVE-2022-0470 Out of bounds memory access in V8LowN/ANoNoN/A

These are all the CVEs addressed with this month’s Patch Tuesday release. Overall, this was a pretty light and secure month, compared to previous situations.

The next Patch Tuesday batch of software will come on March 8 and we’re all curious to see what Microsoft comes up with until then.

Let’s all hope that we won’t have to deal with critical problems, and that’s it will only be smooth sailing from now on.

Was this article helpful to you? Share your opinion in the comments section below.

Another important feature is coming to Microsoft Teams

It looks like Microsoft is working on some important updates for its Teams collaboration service. The Redmond giant is planning to release a new LinkedIn integration for one-on-one chats in Microsoft Teams that should make it easier for users to learn more about their coworkers, according to sources familiar with the company’s plans.

When Microsoft launched Teams, the company hoped that it would be used for more than just conversations. The company wanted to make it easy for people to do their work in Teams as well. 

Now, Microsoft continues to expand with each passing day. The collaboration app is now more than just a workspace. With more tools and features it is no doubt it is scaling new heights. 

New LinkedIn tab

Microsoft is continuing to add new features to its Teams collaboration platform. The company made sure to beef up security to ensure safe browsing and now the latest addition will allow you to quickly pull up the contact information of people stored in LinkedIn.

It seems that Microsoft is planning to bring LinkedIn integration to its collaboration platform, as the company is testing a new LinkedIn tab for 1:1 chat in the desktop app.

It’s a relatively minor feature, but it could be helpful for keeping track of who you work with and where they came from.

At this point, we don’t know when exactly the new feature will start rolling out, but it’s possible that the first builds of Microsoft Teams with the new LinkedIn integration are currently being tested internally at Microsoft.

Coming soon

According to the roadmap, the feature will be here sooner than expected as the rollout will be by March 2022. The new integration aims to improve the collaboration experience for remote teams by showing information about team members directly within the app. 

The report indicates that the LinkedIn integration will allow users to view information like work history, employment details, technical expertise, and background information of the team member directly within Microsoft Teams.

Your Teams on OneDrive now

Another important feature is coming to Microsoft Teams is the ability to quickly find your shared files from OneDrive.

The introduction of this new feature suggests that Microsoft wants to make it easier for its Office 365 customers to access their shared Teams files according to the Microsoft 365 roadmap. Currently, if you want to access these files, you have to go to your OneDrive on a browser and then click on the ‘Shared with me section.

These are not the only updates as the tech giant also has new features on the horizon so stay put as it is likely to be a packed year.

What do you think of the LinkedIn integration to Teams? Share your thoughts in the comment section below.

Fix: Video Scheduler Internal Error BSoD on Windows 10

Blue Screen of Death errors are the most serious ones that you can encounter. These errors will crash your PC and cause you to lose your data.

Therefore, it is crucial that you know how to fix issues such as the Nvidia Video Scheduler Internal Error error.

This can cause many problems on your computer, including crashes and loss of data, but there are ways to fix it, and today we’re going to show you the best ways to do it.

Why does Video Scheduler Internal Error appear?

In most cases, this error can appear if you have issues with your drivers. You can usually fix that by installing the latest graphics card drivers.

Your BIOS and graphics card settings can also cause this problem, so make sure that they are properly set.

What are other Video Scheduler Internal Error issues that used reported?

  • Video Scheduler Internal Error Nvidia, Ryzen – The most common cause for this error is your graphics card and both Nvidia and AMD users reported this problem.
  • Video Scheduler Internal Error overclock – This error can also appear after overclocking your device. If you overclocked your device recently, be sure to remove overclock settings and check if that fixes the problem.
  • Video Scheduler Internal Error while gaming – Many users reported this problem only while gaming. If you have the same problem, there’s probably an issue with your graphics card.
  • Video Scheduler Internal Error graphics card – Your graphics card can cause this error to appear, and if you’re having this issue, you might want to try updating your graphics card driver and check if that helps.
  • Video Scheduler Internal Error after sleep – In some cases, this error can appear after your PC wakes up from sleep. If this happens, be sure to check your computer settings.
  • Video Scheduler Internal Error Surface Pro – This error can occur on every Windows device, and Surface Pro is no exception. If you’re having this error on your Surface Pro, be sure to try some of our solutions.
  • Blue Screen of Death Video Scheduler Internal Error – This error always comes with a Blue Screen of Death message that will cause your PC to restart. To fix the issue, you might have to check your hardware.
  • Video scheduler internal error Chrome – Several users reported this issue in Google Chrome. However, you can fix this problem simply by disabling hardware acceleration in Chrome.

How can I fix Video Scheduler Internal Error BSoD?

  1. Download the latest Windows 10 updates
  2. Download the latest drivers
  3. Install the older version of AMD drivers
  4. Change your graphics card settings
  5. Disable hardware acceleration in Chrome
  6. Change the size of graphics memory in BIOS
  7. Reset Windows 10
  8. Check for faulty hardware

1. Download the latest Windows 10 updates

  1. Press Windows key + I to open the Settings app.
  2. When Settings app opens, go to Update & security section.
  3. Now click on Check for updates button.

If you can’t open the Setting app, visit our Settings app won’t open guide to see how to fix this issue.

2. Download the latest drivers

  1. Type device in the Search bar and select Device Manger from the list of results.
  2. Search for the device you want updated and right-click on it.
  3. Select Update driver and let windows download the drivers.
  4. Repeat for all the devices you want to update.

Updating drivers manually can be a tedious task, and if a driver is causing the Video Scheduler Internal Error, especially after overclock, it might be better to use a specialized driver updater software such as DriverFix to quickly update all your drivers.

3. Install the older version of AMD drivers

  1. Press the Windows key + X and choose Device Manager from the list.
  2. Right-click the driver that you want to remove and select Uninstall device.
  3. Check Delete the driver software for this device and click on Uninstall.
  4. Your Windows will automatically install the default driver for that device.

If installing the older driver fixes the problem, you should block Windows 10 from automatically updating drivers and prevent the system from installing it again.

You can also use uninstaller software to make sure that the driver software and all its files and entries are completely removed.

4. Change your graphics card settings

  1. Open Intel Control Panel or Nvidia Control Panel.
  2. If you’re using Nvidia graphics, locate Physx and set it to Default.
  3. You should also set the the settings to Performance instead of quality. This applies to both Nvidia and Intel Control Panel.

This is a simple solution, and it will surely help you if you’re getting Video Scheduler Internal Error on Windows 10 when using Nvidia graphics.

Similar options are available in the AMD software, so be sure to check it as well. If you have problems with it, visit our Catalyst Control Center won’t open guide.

5. Disable hardware acceleration in Chrome

  1. Click the Menu button in Chrome and choose Settings.
  2. Click on Advanced and choose System.
  3. Navigate to System section and uncheck Use hardware acceleration when available.
  4. Restart Chrome to apply changes.

Chrome can cause issues on your PC, and if you’re having more problems, we suggest visiting our Chrome is causing BSOD errors guide for more solutions.

6. Change the size of graphics memory in BIOS

  1. Restart your PC and keep pressing F2 during to boot.
  2. Now locate your integrated graphics settings.
  3. Adjust the size of the virtual memory. Usually the more is better.
  4. Save changes.

Users reported that setting the graphics memory to 128MB for Intel graphics fixed the problem, so be sure to try this solution, even if you don’t have integrated Intel graphics.

This solution is also useful if the Video Scheduler Internal Error appears while using the Ryzen APUs, so we encourage you to try it.

If you weren’t able to follow our instructions, you should read our guide on how to access BIOS for detailed instructions.

7. Reset Windows 10

Note icon NOTE
During this procedure, you might also need a bootable USB flash drive with Windows 10, so be sure to create one.
  1. Go to your Settings.
  2. Select Update & security.
  3. Go to Recovery, then select Get started in the Recovery section.
  4. Now, choose if you want to Keep your files or Remove everything.
  5. Let Windows run its course.

We have to warn you that this procedure is similar to clean install and it will delete all files from your C partition, so be sure to back them up.

8. Check for faulty hardware

Your hardware can often cause these types of errors to occur, therefore you need to find and replace the faulty device. Few users reported that a faulty graphic card caused this error, and replacing the card fixed the problem.

It’s not uncommon to get Video Scheduler Internal Error while using Nicehash, and if that happens, it’s possible that there are issues with it.

Bear in mind that sometimes certain hardware isn’t compatible with your current configuration, or with Windows 10, and that can cause this and many other errors to appear.

Few users reported issues with old TV cards, and according to them, removing the TV card fixed the error permanently.

Is Video Scheduler Internal Error error serious?

This depends on the cause of the error. If the issue is caused by a bad driver, it can be fixed easily, but you need to know which driver version to use.

In case the problem is hardware-related, it’s advised to remove any overclock settings and check your graphics card.

How does Video Scheduler Internal Error affect my PC?

Since this is a BSOD error, your PC will crash whenever you encounter it. This means that you’ll lose any unsaved work on your PC.

Since these crashes are random, you’ll encounter a loss of productivity. If your graphics card is faulty, you’ll need to replace it as soon as possible because it will eventually stop working and you won’t be able to boot your PC at all.

The Video Scheduler Internal Error BSoD error is usually related to your graphic card, but you can easily fix it by using one of our solutions.

In case the problem is still there and it’s not caused by hardware, you might want to try using the BSOD repair software.

If you have any other suggestions or questions, don’t hesitate to leave them in the comments section below and we’ll be sure to take a look.

8 Best Note-Taking Apps For Windows 11

Whether we’re jotting down a random thought or having a long-standing piece filled with important passwords and log-in information, note-taking apps are vital in today’s busy world.

There are two main types of note-taking apps: cloud and offline. Cloud apps, also known as web-based apps, store your notes on the company’s server, which is what Google does. This makes accessing your notes very easy as you can use different devices to access them, plus they enable good collaboration.

However, these services tend to have privacy issues. On the other hand, offline apps are way more secure, as notes are stored on the device. However, you lose out on easy access. Third-party sharing services like Dropbox do exist that solve this issue.

What are the best note-taking apps?

Todoist – Best note-taking app

Todoist is another note-taking app for the creatively minded. It sees frequent support from its developer as the team frequently rolls out updates that add new features for both the free and paid versions. With an easy-to-use interface, Todoist is an attractive app.

One of the more recent additions is the Boards feature, which creates a board view of all the notes you created. It’s the same Kanban style that Notion incorporates in its service, although this one is optional.

A major feature for Todoist is Karma, which incorporates a type of video game into note-taking. You add tasks to the app’s scheduling tool, and Karma encourages you to meet those goals and achieve streaks. In addition, Karma rewards you for using more advanced features like reminders and labels.

The reward isn’t super crazy. It’s the self-satisfaction that you’re achieving your goals and working hard towards success. The free version of Todoist is enough for most users as a personal app, but if you want more, the paid version unlocks additional features.

Todoist

Enjoy the process of taking notes and take advantage of useful features by trying out this app today.
Check price Visit Website

Notion – Unique approach

Notion takes a unique approach to note-taking, incorporating the design and some features from Kanban development frameworks and company wikis. Its philosophy is to replace apps and centralize everything on one app.

For one to do the job of many. Other apps have sought to do this, too, but Notion achieves it. It has a stand-alone app and a browser version if you prefer a different method. The app comes with boilerplate templates that you can use to create blocks in Notion.

These blocks can include text, images, tables, or a video, and from there, string other blocks together to create a unique ecosystem for your business. Notion can integrate with other work-related apps like Slack and GitHub, plus important files in various formats. This includes a plaintext file or an Excel sheet.

There is a free version meant for personal use, but Notion truly shines when used in teams rather than individual users. In addition to the Free version, the Team and Enterprise versions must be bought.

Aside from the occasional errors like Notion 502 error, it’s a pretty solid app.

⇒ Get Notion

Evernote – Complex handwritten notes app Windows

Evernote is a note-taking app that takes its service to the next level. It accepts various formats and has a pretty complex organization method.

In addition to taking notes, Evernote can accept different kinds of files that can be attached to said notes, like URLs, PDFs, and images. And those attachments can then be searched for in the app. To make everything even easier, notes can be organized with specific tags.

The app has an advanced AI too as it can identify 28 typed and 11 handwritten languages. You can scan and digitize documents to create notes that store contact information. Evernote can sync on any Windows, Mac, Android, and iOS device you can access offline.

Other features include audio support and different kinds of formatting tools like the ability to add tables. Evernote is truly remarkable. These extra features are locked behind subscription plans, but you can try out a free trial before purchase.

⇒ Get Evernote

OneNote – Cross-platform app

OneNote is a free cross-platform note app from Microsoft. It can be used on practically every device on the market, from PCs to smartphones and even Mircosoft’s HoloLens, the company’s own VR headset.

You can draw on it, write, jot down quick notes, and more in a variety of different colors. The background can be changed to fit your desires, including a ruled notebook style. Admittedly, the user interface can be a bit of a mess and a bit disorganized.

As popular as it is, OneNote can get out of control pretty quickly. For example, the app utilizes notebooks and dividers to help you organize, but these features are all over the place. The notebook feature appears on the left as a separate menu, dividers on the top, and the regular note page on the right.

But its ubiquity is still something to be commended. You can add images, source links, videos, and even audio recordings. Then, it syncs to the cloud, where you can share with friends and family who have access.

⇒ Get OneNote

Google Keep – Simple note app

The main benefit is that since it isn’t a standalone app but part of a browser, you have access to it all the time without having to sacrifice storage on your device. This service works a lot like Post-It notes: You type in whatever short you want and have it posted for all to see.

It’s a pretty barebones app, but that simplicity is what makes it so good. If you don’t want all the bells and whistles that some of the other apps have, Google Keep is the right choice for you. It’s light on features and organizing.

In addition to writing notes, you can sketch your ideas there to share with others. You can add images, color-code the notes, and set timed reminders. It even syncs with Google Docs, so you can easily move between there and Keep.

Remember that Keep isn’t the most private of note-taking apps. There’s no way to make private notes, and everyone can see them. Plus, there’s no way to reformat the notes. What’s there is there.

⇒ Get Google Keep

Simplenote – Lightweight option

Simplenote truly lives up to its name. It’s a lightweight note-taking app with a clean and simple user interface that works on multiple platforms. There’s a mobile version for Android and iOS and desktop apps for Windows, Mac, and Linux.

Notes taken on this app are automatically saved and synced across all other devices that share the same account, so you never have to worry about retyping notes. Simplenote writes and posts in the Markdown format, which is just plain text. Think of Notepad on Windows computers.

Like other apps, you can invite people into your account to collaborate on notes and lists on Simplenote. Desktop users will enjoy Focus Mode, which enables a distraction-free experience so you can stick to writing. It hides all the sidebars and makes the app full-width, so all you see is the white screen and a few other tools.

Some people may not like Simplenote’s simplicity and bare-bones nature. After all, the app only has two separate themes at the time of this writing. But if you don’t want anything crazy, Simplenote is the way to go.

⇒ Get Simplenote

Milanote – Nice-looking interface

On the opposite side of the spectrum is Milanote, a note-taking app focused on creatives. The app’s Milanote Web Clipper feature allows users to combine files and web pages they find on the Internet under one roof.

You can snip out different pieces and pin them on Milanote. In that sense, Milanote is less of a note-taking app and more of a digital pinboard you can mess around with. You can add text, images, videos, and other digital elements and organize them. Plus, it supports common file types like PDFs and JPGs.

As such, Milanote has a nice-looking user interface that conforms to the person’s creativity. It becomes your own very quickly. You have the opportunity to keep your notes private or public with a team.

If Milanote has any downsides, it’s that the font size or color can’t be changed, which is strange for a creatively minded app. The free version allows you to create up to 100 separate noteboards, while the paid version offers an unlimited amount.

⇒ Get Milanote

Scrble – Easy to use

Last but certainly not least is Scrble, the premiere note-taking app for Windows tablets. It’s simple and easy to use, with a freehand writing feature. You can use a stylus or just your finger to write notes, and you can use those fingers to enlarge the screen or move the page around.

Scrble’s storage limit is however much room you have on your tablet. It has unlimited “paper” which can scroll endlessly for uninterrupted writing. The app can be configured to best fit your writing style. There are two versions of the app: Scrble Lite and Scrble Ink.

Scrble Lite is the free version of the service that adds creative features like a drawing sheet and the ability to recognize languages. Scrble Ink is the version that you’ll have to pay for and add on new exclusive features.

These features include changing the style of “paper” in the app, custom colors and shapes, and the ability to import and export PDFs. All in all, a great app for the creatively minded to use on Windows tablets.

⇒ Get Scrble

What should I look for in a note-taking app?

Well, the first thing that you should ask yourself is what kind of app you want: a cloud-based one or an offline one. Is privacy more important to you or is having as much access as possible what you’re looking for?

Some come built-in like the Teams note-taker. Once you answer that question, you can then decide what kind of features you want.

Many note-taking apps do more than just handle text. You need to look for one that has a good text editor so you can properly format your notes with different colors and fonts, plus support for images, tables, and hyperlinks.

Some apps even have a web clipper that takes down text, images, and videos from the internet and saves it. It’s great at making sure context stays in the notes. Or perhaps all you want is a simple note-taking app; nothing fancy.

This guide will show you different kinds of note-taking apps, all of which are different from one another with unique features. Read through them and decide which one suits your lifestyle the best.

Many of them share compatibility with Windows 10, which goes to show how well made they are if little has been changed.

Are there other apps and services I should try on Windows 11?

Antivirus software is a must-have for any computer and it’s recently come out that Microsoft Defender is one of the best anti-malware software. German IT security research institute AV-TEST ran an assessment one 20 different programs to see who stood out on the app.

Microsoft Defender won the crown, followed by BullGuard and Norton 360. Staying with Microsoft apps, the company has announced it is offering online courses in Azure, Office 365, and other Windows apps.

You may also be interested to know that the latest Windows 11 update came out recently on the Dev Channel.

The update adds two new voice options for voice narrations, simply known as Jenny and Aria. In addition to the voice, Microsoft added some fixes and changes, like making sure the Task Manager doesn’t suddenly close when switching to the performance tab.

Feel free to leave a comment below if you have any questions about other Windows 11 apps. Also, leave comments about guides that you’d like to see, information on other Windows 11 features, or list guides like this.

How to Install & Run Windows 11 Natively on Your POCO F1

Since the introduction of Windows 11, we’ve pretty much talked about it behaving in any sort of way, bugging, lagging, glitching, and crashing.

However, the experience is a lot smoother after four months of existence. We’ve also seen the new OS installed and working on all sorts of devices.

Now, users have even managed to install Microsoft’s latest operating system on a POCO F1 smartphone, which means that Windows 11 is a lot more versatile than you thought.

POCO smartphones are Windows 11 compatible

Although we’re pretty sure most of you have heard about it already, POCO, formerly known as POCO by Xiaomi and Pocophone, is a Chinese smartphone company.

Fellow Redditors were absolutely shocked when they saw this latest post depicting Windows 11 actually installed and running on the above-mentioned smartphone.

Sure, we’ve seen the OS function on other smartphones as well, but nobody was expecting it to work on the Chinese manufacturer’s device.

Reddit user Similar-Director-483 mentioned that achieving this feat was pretty challenging, but it was possible with the priceless help of The Renegade Project.

Why is this such an impressive feat, you ask? Well, because even though it might seem pretty easy to the naked eye, installing the OS on such a device isn’t like installing it on your laptop.

Firstly, due to the fact that whoever did this had to create new drivers for OS, allowing it to use features like audio, WiFi, and others.

Not to mention that, for calling, creators had to make and package custom software that is able to perform the task.

So, if you also have one of these smartphones and you would like to experiment with Microsoft’s new operating system, you can find all the information you need on the GitHub link above.

What other interesting gadgets have you managed to install and run Windows 11? Share your experience with us in the comments section below.

Windows 11 Error Sound: 9 Most Common You Should Know About

Windows 11 is a great improvement from the previous version, and it comes with some massive changes, most notably in terms of the user interface.

However, that’s not the only change, and besides a fresh new look, we got an array of sounds that make the user experience different.

There are many new sounds, but in today’s guide, we’re going to show you the most important Windows 11 error sounds and explain to you what they mean.

What are these Windows 11 system sounds used for?

System sounds have been present since the first versions of Windows, and they are used to provide an audio signal that certain even has occurred.

There’s a wide array of available sound events, but in most cases, they will play when a certain notification appears or if you encounter an error or a warning.

Where are system sounds located?

To locate system sounds, you need to visit the following directory: C:\Windows\Sounds

In there, you should be able to see all the sounds that Windows uses. And yes, you can move files to this directory, but you’ll need administrative privileges.

What Windows 11 error sounds should I know about?

1. Asterisk

Asterisk is probably the most common error sound that you’ll hear on your PC. This appears whenever an alert window is displayed on your screen.

This can be a dialog window that requires your confirmation or an error message stating which problem has occurred.

2. Critical Stop

Problems on your PC and bound to happen, and some problems may cause your applications to crash. If this happens, you’ll hear the Critical Stop sound.

This sound is followed by a dialog box stating which error occur and why, and you can use that information to troubleshoot the issue further.

3. Default Beep

Default Beep sound isn’t necessarily an error, but it’s often mistaken for one. If you have a window open and it creates a dialog box, you might hear this sound if you try to click the original window.

This is because the dialog window requires action, and you can’t go back to the application until you close it. So, if you hear this sound, don’t worry, because most likely you have a dialog box open in the background.

4. Device Disconnect

We all have all sorts of USB devices connected to our PCs, such as printers, gamepads, flash drives, phones, and more.

The disconnect sound is a normal occurrence, and it will appear when you disconnect your device from the PC. However, the sound can appear randomly at times.

If this happens, you might have an issue with your device, such as a broken cable or a driver problem that causes it to randomly disconnect.

5. Device Failed to Connect

In some cases, your devices won’t work at all with your PC. This can happen because the device is damaged or because the computer can’t recognize it.

If this happens, you’ll hear a sound indicating that the device wasn’t able to connect to your PC properly. In case you’re having problems with this, we have a guide that will help you fix USB devices that aren’t recognized in Windows 11.

6. Exclamation

This sound appears when you try to perform an action that isn’t allowed. For example, you can hear this sound when you want to perform an action that you don’t have permission to do.

If this happens, you’ll be stopped, get a warning and you’ll hear the Exclamation sound. In addition, this sound can appear in certain applications, most notably Outlook when deleting emails.

7. Notification

Windows 11 uses notifications to display important information to you, and while this sound isn’t associated with errors, sometimes it can be.

For example, when your VPN client suddenly disconnects, you might get a notification stating what happen, and this is when the sound will be played.

Even though it’s not always error-related, you should keep your eyes open for any notifications since they may give you information about potential errors.

If you don’t want to deal with notifications, you should read our guide on how to disable notifications on Windows 11 completely.

8. System Notification

Similar to the notification sound, there’s a special sound for system notifications. These notifications can be harmless and not associated with any error, but that’s not always the case.

For example, you can get a system notification if there are any issues with your Microsoft account or if you’re having issues while activating Windows.

9. Windows User Account Control

In case you’re not familiar, Windows User Account Control allows you to control privileges that users on your PC have.

For example, if you don’t have administrative privileges and you try to perform a certain action, you’ll get a warning window followed by this sound.

This usually isn’t an error, but it will prevent you from accessing certain locations and files on your PC.

How can I change specific system sounds?

  1. Press Windows key + S and type sounds. Now select Change system sounds.
  2. The Sound window will now appear.
  3. Select the sound that you want to change and pick one from the dropdown list. Alternatively, you can use the Browse button to select any sound from your PC.

Keep in mind that only .wav format is supported, so if you’re using audio editing software, be sure to save files in the correct format.

Alternatively, you can always convert any format to .wav with a proper tool. To learn more, visit our audio converter software guide for more information.

Can I turn off the system sounds on Windows 11?

  1. Open Search and type sounds. Select Change system sounds.
  2. Set the Sound scheme to No sounds. Click Apply and OK to save changes.
  3. All system sounds will be turned off at this point.

These are some of the most common Windows 11 error sounds that you should know about. Although not all of these sounds are associated with errors, it’s always good to know what they represent.

System sounds are a big part of the new version of Windows, but in case you’re having any issues with it, you should read our article on what to do if there’s no sound on Windows 11.

We hope you found this guide useful, and if you have any additional questions, feel free to ask them in the comments section below.

Desktop Window Manager High Memory Usage: 4 Tested Fixes

Many have complained regarding Desktop Window Manager and high memory usage, and since this is a core Windows process, this can be a problem. However, the solution is simpler than you think.

Why is Desktop Window Manager using so much memory?

Bugs with File Explorer or driver issues can cause this problem. Certain performance settings can also cause this problem.

How do I fix the Desktop Windows Manager high memory usage?

Before trying anything else, restart your PC. You can also try keeping your system up to date. In some cases, a malware scan can also help with this problem.

1. Restart File Explorer from Task Manager

  1. 1. Right-click on a free space from your taskbar, and select Task Manager.

    desktop-window-manager-high-memory
  2. 2. Locate the Windows Explorer process and click on the Restart button from the lower right part of your screen.

    desktop-window-manager-high-memory
  3. 3. Now check for Desktop Window Manager’s high memory.

2. Update the Intel graphics driver

  1. Press Windows + X to open the Power User menu, and select Device Manager.device manager
  2. Expand Display adapters, right-click on the graphics driver, and select Update driver from the menu.update driver to fix Desktop Window Manager high memory
  3. Select Search automatically for drivers and wait for Windows to install the best one.search automatically for drivers

Though Windows is more than capable of keeping the drivers up-to-date, you may have to manually install the driver in cases like these. Also, the problem has been acknowledged by Intel, and the recommended solution is to update the graphics driver.

To avoid any driver issues, we recommend you use an automated driver updater utility, such as Fortect Driver Updater. This lightweight tool uses a frequently updated driver database to find the perfect version for your hardware.

It is easy to use, and you can set it up and let it run in the background. It can update, install, and fix corrupt drivers individually and in bulk.

⇒ Get Fortect Driver Updater

3. Change the performance options

  1. Press Windows + S, type Adjust the appearance and performance of Windows, and click on the relevant search result.performance and appearance
  2. Now, either choose Adjust for best performance or Custom, and then click OK to save the changes. If you go with the latter, make sure to select the features that you want, though try to keep it minimal.adjust for best performance Desktop Window Manager high memory

4. Disable Fast Startup

  1. Press Windows + R to open Run, type control panel, and hit Enter.control panel
  2. Click on System and Security.system and security
  3. Now, click on Change what the power buttons do under Power Options.change what the power buttons do to fix Desktop Window Manager high memory
  4. Choose the Change settings that are currently unavailable option.change settings that are currently unavailable
  5. Untick the checkbox for Turn on fast startup (recommended), and click on Save changes.disable fast startup to fix Desktop Window Manager high memory

What is the purpose of DWM?

The (DWM) Desktop Window Manager handles desktop composition. DWM makes visual effects and capabilities like glass window frames, Windows Flip and Windows Flip3D, 3-D window transition animations, and high-resolution support available on the desktop through desktop composition.

That’s it! By now, you should have fixed high memory usage or memory leak for Desktop Windows Manager and would have things up and running.

Problems with this process can appear on any version of Windows, and we covered DWM.exe crashes on Windows 11, as well as DWM.exe crashes on Windows 10.

A few users also reported that Desktop Window Manager stopped working, but we have a guide for that as well. It’s worth mentioning that this service can also use other resources, and many have encountered Desktop Window Manager high GPU usage.

Once done with it, we recommend you check some easy ways to improve the performance of Windows 10.

Leave them in the comments section for other viable solutions, so everybody can benefit from that knowledge.

Windows 11 makes gains with gamers account to latest Steam report

We finally get to know the hardware and software at the top of the list, that is, the most used by PC gamers, thanks to Steam’s annual survey. Based on January’s 2022 results, Windows 11 rose by 3.41% to 13.56% total usage. Windows 10, meanwhile, experienced a 3.92% drop to 77.82% usage on Steam, and Windows 7 rose by 0.49% leading it to take up 3.73% of share on Steam.

On the other hand, Intel has since lost its 69.27% CPU share, which saw it drop down to 68.93%. AMD managed to take up 31.07%. NVIDIA also experienced a slight drop from last year’s 76.83% to 75.4% GPU control.

VR Headset

Oculus Quest 2 remains at the top of the chain taking up 46.02% of Steam’s population headset hardware share, on the other hand, Windows Mixed Reality has dropped since December’s report from 5.69% to 4.99%. Oculus Rift S takes up 13.1% and Valve Index HMD takes 14.36% of the pool.

Meta is deeply rooted in winning a huge chunk of the share, which will allow for the establishment of a Metaverse. In that regard, its Oculus Quest 2 is expected to take up even more of Steam’s population headset hardware pool.

What are your thoughts concerning the released report? Let us know in the comment section below.

29 year Microsoft and Xbox veteran Shannon Loftis to retire

In a post on the Age of Empires blog (via Neowin), Shannon Loftis, VP at World’s Edge Studio, the home of Age of Empires, has announced her retirement. Loftis spent almost her entire career at Microsoft in gaming, working on racing games and then Kinect before becoming the General Manager of Global Games Publishing, and leading the revival of Age of Empires.

Loftis says in the blog post that she planned to leave Microsoft only at a high point, “and there has been no higher point than this,” with the successful launch of Age of Empires IV last October.

Loftis announced that Michael Mann, executive producer of Age of Empires IV, will be taking over as acting head of World’s Edge Studio, and that she will “be around for some time” to assist in the transition.

Loftis also noted that there’s more to come for Age of Empires, with the first major update to Age of Empires IV coming in the spring, with “features that will enhance the Age of Empires IV experience as well as creating new ways to play,” and more work on earlier versions of Age of Empires:

The teams working on Age of Empires II: Definitive Edition and Age of Empires III: Definitive Edition are also hard at work on expanding those titles, with exciting plans they’ll be sharing in the coming months. With Age of Empires’ 25th anniversary this year, the future is bright for the franchise and history is being made!

Are you an Age of Empires player? let us know in the comments below.