Turn Off and Disable Ad Blocker on Windows 10 [How to]

While AdBlock is useful it can often interfere with certain web pages, and this is why many users want to know how to turn off ad blocker on Windows 10.

In today’s guide, we’re going to show you how to disable AdBlock for all major browsers correctly, so make sure to keep on reading.

Does Windows 10 have an ad blocker?

  • No, Windows 10 doesn’t come with a built-in ad blocker.
  • Ad blocker is a browser add-on that is manually downloaded and enabled.

How do I disable Adblock on Windows 10?

1. Google Chrome

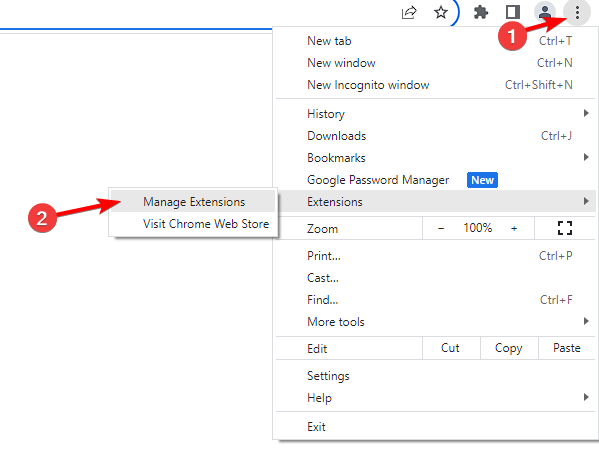
  1. Click the Menu button in the top right corner.
  2. Select Extensions and then navigate to Manage Extensions.
  3. Locate AdBlock on the list and click the little switch next to it.

If you’re having problems opening the extensions page, you can use these methods as well:

  • Click the Extensions icon and choose Manage extensions.
     
  • In the address bar, enter the following and press Enter: chrome://extensions/

After that, you should be able to find and disable the AdBlock extension.

2. Mozilla Firefox

  1. In the top right corner, click the Menu button.
  2. Select Add-ons and themes.
  3. Locate your adblocker and click the switch next to it to disable it.

You can also access the extensions page quickly by doing the following:

  • Use Ctrl + Shift + A keyboard shortcut.
  • In the address bar, enter the following and press the Enter key: about:addons

3. Microsoft Edge

  1. Click the Extensions button in the toolbar.
  2. Choose Manage extensions.
  3. Locate your adblocker and click the switch next to it to turn it off.

You can access the extensions page quickly by entering the following address in the address bar and pressing Enter: edge://extensions/

How do I completely remove ad blocker?

  1. Repeat the steps from above to open the extensions window.
  2. Locate your ad block extensions.
  3. Click Remove next to it.
  4. Confirm that you want to remove it.

As you can see, it’s pretty simple to turn off ad blocker on Windows 10, and the steps are the same for Windows 11.

While Adblock is useful, it has its share of issues, and many reported that Adblock is not blocking ads. Many websites can also detect Adblock, but there is a way to make Adblock undetectable.

If you don’t prefer using extensions, there are many browsers with Adblock, so you can try them instead. Do you use AdBlock, and what is your favorite one? Let us know in the comments.

Fix Google Chrome high memory usage [Easy Guide]

Google and Microsoft are currently working together to reduce the overall memory strain that Chrome puts on computers.

There is no doubt that Chrome is the favorite browser of many Internet users.  However, most of them don’t have any idea about the amount of processing power the browser chews up. 

Most importantly, users with low-end, old devices complain that the browser takes a few seconds to start. However, you don’t need to worry because this is about to change very soon.

How can I fix Google Chrome’s high memory usage?

Microsoft’s engineers managed to trace the cause behind the bug and suggested a fix.

The delay is triggered by the manner in which the browser uses ImagePreReader to pre-read its DLL files i.e Chrome.dll and chrome_child.dll. 

Microsoft suggests that Google needs to improve the DLL prefetcher for Chrome to avoid memory management issues.

The tech giant even made some changes to overcome memory and CPU usage issues.

However, it should be noted that Microsoft is currently working on the fix. The company may take some time to release it to the general public.

Until then, it is very common to find malicious extensions and shady themes that need to be removed. 

Instead of compromising on extensions and themes, a browser known to use the least amount of PC memory can save precious time and effort.

Quick Tip:

If you don’t want to wait until Microsoft and Google solve this problem for good, you can try an alternative browser. Based on your needs, we recommend Opera One this time.

Even when it comes to those media-rich sites that consume a good chunk of CPU and memory, Opera One doesn’t disappoint users. It also comes with a built-in AI and modular AI-ready design.

Opera One

Enjoy a smooth and fast browsing experience on your Windows computer.
Free Download Visit website

New Chrome features coming your way

Google is working very hard to introduce some brand new features to Chrome. Some of these features are tabs groups and warnings for malicious URLs.

It is interesting to see how both companies work together to come up with enhanced browsers versions.

The Redmond giant is currently surprising users with its Chromium-based Edge version too. First made available to Windows 10 Insiders, Chromium Edge was officially released.

Have you ever noticed a delay while starting your Chrome browser? Share your experience in the comments section below.

This isn’t the only issue and many encountered Chrome Helper Renderer high CPU usage problem, but we have an entire guide dedicated to this issue.

Also, do note that Opera One is a trustworthy alternative to all those looking for ways to deal with these issues:

  • Google Chrome memory usage fix – Chrome crashes caused by low memory are common these days. You can forget all about them when using Opera One.
  • Google Chrome high memory usage fix – When encountering this issue, you can enable GPU Acceleration, remove themes and malicious extensions, or start using a different browser all together.
  • Google Chrome memory issues – Poorly designed extensions and themes often cause the PC to become slow, freeze or even crash. Get rid of them with no hesitation or try out Opera One or UR Browser instead.

FIX: Edge doesn’t display search and website suggestions

Microsoft has successfully replaced Internet Explorer with the Edge Browser, which debuted with Windows 10. The browser has been subjected to a timely makeover and feature update.

However, a recent update to the Edge Browser seems to be exhibiting some peculiar problems.

One common problem to the users was about the search and website suggestions not being displayed in Edge’s address bar.

This is pretty annoying considering that you have already bookmarked the website and have to type it all over again.

If you are suffering from a similar problem on Windows 10, then let us have a look at the possible solution to the problem so you can again start using the Edge Browser without any glitches.

Windows update usually updates different files to their newer versions which are the most secure, and at times these files interrupt the working of the browser.

Let us try to troubleshoot the same with a host of different methods, which are as follows.

How can I get back website suggestions in Edge?

  1. Try out a different browser
  2. Run the Windows Apps Troubleshooter
  3. Run SFC Scan
  4. Run DISM Tool
  5. Clean Boot

1. Try out a different browser

Issues with subpar Microsoft Edge might be resolved by the introduction of Edge Chromium.

However, considering how long it took Microsoft to deal with the simplest of UI and performance optimization, we’re not really keen to believe it’ll be worth it at all.

Instead of Edge, why don’t you try a browser which is already great and tends to be even better?

Opera Browser brings all you need from the get-go. Even though you can install all Chrome extensions, it comes with so many built-in features so there’s really no particular need to do so.

It will help you avoid tracking and ad-targeting, it comes with a built-in VPN and ad-blocker, not to mention that it’s wrapped up in an intuitive UI design.

Opera

If Edge doesn’t display search and website suggestions, Opera steps in as a great alternative. Ready to try it out?

2. Run the Windows Apps Troubleshooter

  1. Go to Settings > Update & Security > Troubleshoot.
  2. Scroll all the way down and run the Windows Store App Troubleshooter which is designed to automatically check for issues and rectify the same.
windows app troubleshooter

3. Run SFC Scan

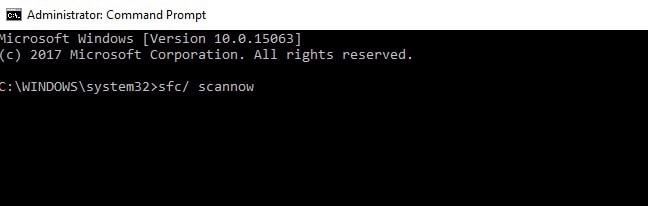
  1. Open Command Prompt as Administrator either from Start Menu or the Run dialogue box.
  2. Type SFC /scannow.sfc scannow
  3. Hit Enter
  4. The commands will initiate the scanner, and the scanner will start working right away without any prompt or confirmation from your side. The Scanner is automatic hence you are not going to get any status updates also.

4. Run DISM Tool

  1. Open Command Prompt as Administrator either from Start Menu or the Run dialogue box.
  2. Type the following commands:
    DISM.exe /Online /Cleanup-image /scan health
    DISM.exe /Online /Cleanup-image /restore healthDISM in CMD
  3. DISM might take time to finish the scan from a few minutes to a couple of hr depending on the hardware.

If DISM failed on Windows 10, this quick guide will help you out.

5. Clean Boot

perform a Clean Boot

Clean Boot is somewhat similar to the Safe Mode which just loads a definite number of drivers and programs which are essential to make the windows work without any problem.

This is expected to solve all types of software conflict if by any chance you would be suffering from one. Learn how to perform a Clean Boot here.

These are a few steps that you must perform to get rid of the search bar and website issue you were facing with the Edge browser.

These types of problems might be most likely to occur due to updates or clashes with other software installations.

That apart, the Microsoft Edge browser has improved by miles since it first came out, and users seem to love the slick user interface offered by the browser.

What about you? Let us know your opinion in the comments section below.

FIX: Message+ keeps stopping [Google Play]

Verizon’s Message+ is a quite popular text app among the career users. That said, some users have reported the Message+ keep stopping issues when trying to access the app.

The Message+ crash can be triggered due to temporary glitches, cache problems, or even software issues.

If you are also troubled by this issue, here are a couple of troubleshooting steps to help you fix Message+ crash issues.

Before trying the steps mentioned below, perform a restart of your device. At times, a simple restart can fix temporary issues. If the issue persists, continue reading.

Why does message+ keep stopping and how to fix it for good?

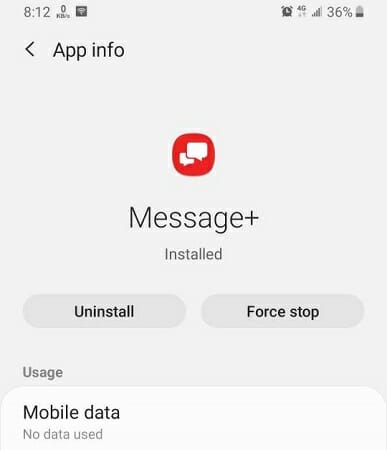
1. Clear cache and data

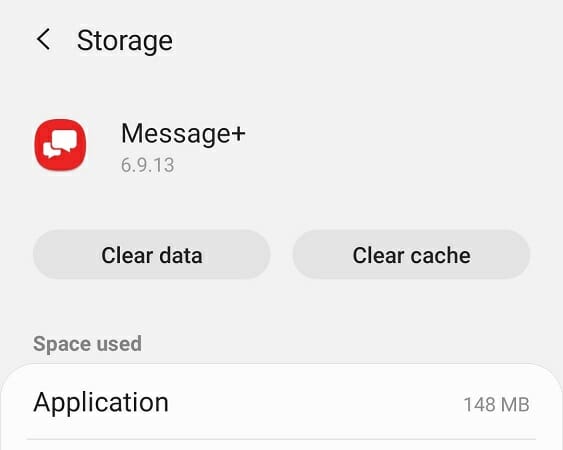
Message+ keeps stopping

  1. On your Android device, tap on Settings.
  2. Go to Apps. In some devices, you may have to tap on the Application Manager.
  3. Search and open Message+ from the list of installed apps.
  4. Tap on Storage.
  5. Tap on Clear cache. Then tap on Yes to confirm the action.
  6. Next, tap on Clear Data. Tap again on Clear Data to confirm the action.
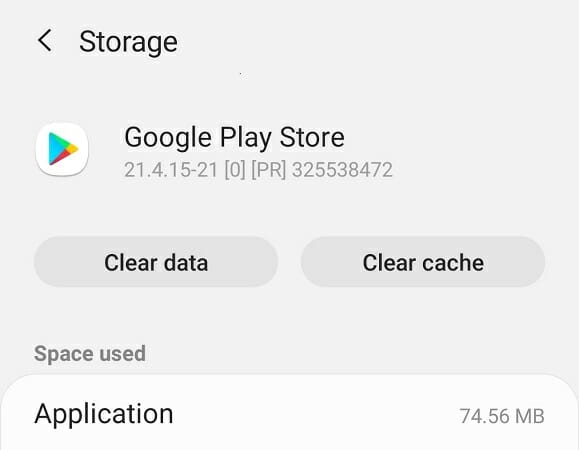
  7. Go back to Apps and choose Google Play Store.
    Message+ keeps stopping
  8. Tap on Storage.
  9. Select Clear Cache and Clear Data.

Once the data is cleared, restart your Android device. You may have to enter your login credentials if required before using the app. Launch the Message+ app and check if the crashing issue is resolved.


2. Update the app and system software

Update Message+

Message+ keeps stopping

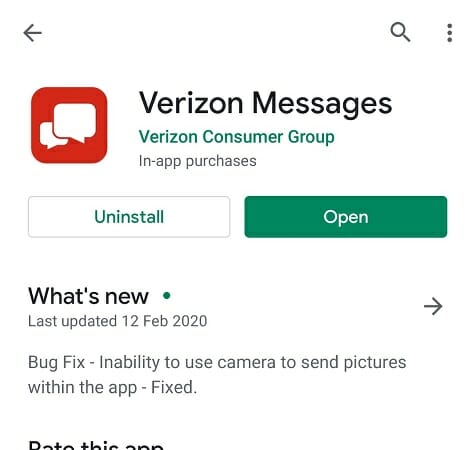
  1. Open Play Store.
  2. Search for Message+ or Verizon Messages.
  3. Open the app and then tap on Update.

Wait till the app is updated. Once done, relaunch the app and check for any improvements.

Update system software

Message+ keeps stopping

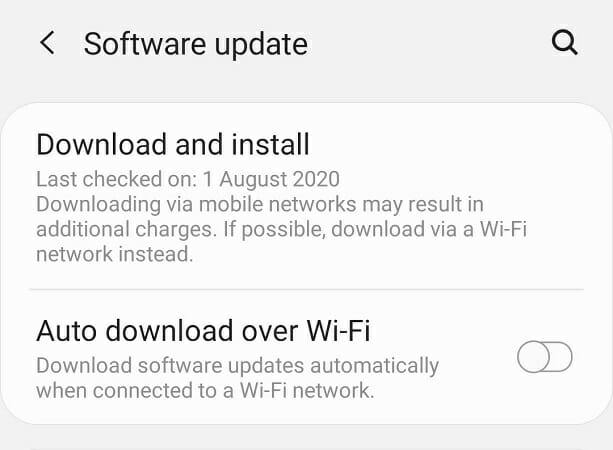
  1. Tap Settings on your Android phone.
  2. Scroll down and tap on About Phone.
  3. Select Software Update.
  4. Tap on Download and Install software updates.
  5. Let the device download and install all the pending firmware updates.

After the device reboots, relaunch the Message+ app and check for any improvements.

Reinstall Message+

Message+ crash issue

  1. Tap on Settings.
  2. Tap on Apps/ Application Manager.
  3. Search and open Message+.
  4. Tap on Uninstall. Tap Yes to confirm.
  5. Open Play Store.
  6. Search and install the Message+ app again.

This should help you fix any issue triggered due to a bug.


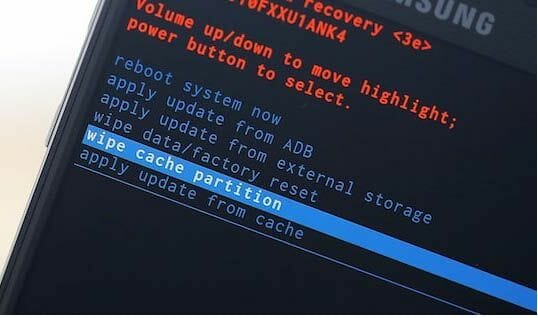
3. Wipe Cache Partition

Message+ keeps stopping

  1. Press and hold the Power button and turn off your device.
  2. Next, press and hold the Volume Up + Volume Down + Power buttons simultaneously to boot into Recovery Mode.
  3. For a Samsung device with a Bixby button press Volume Up + Bixby + Power button.
  4. Use the volume buttons to navigate the Recovery Mode menu.
  5. Highlight Wipe Cache Partition and press the power button to select it.
  6. Wait for the system cache partition to clear and you should see a success message.
  7. Once done, go to Reboot and press the Power key to restart the device.

After the device restarts, launch Message+ and check if the crashing issue is resolved.

Before proceeding with the next step, try to contact Verizon support and wait for a reply. The support can help you fix the problem if it is related to the app and not your device.


4. Factory reset your Android device

Note: A factory reset will erase all the data include apps, media, and messages from your internal storage. Create a backup before resetting your device.

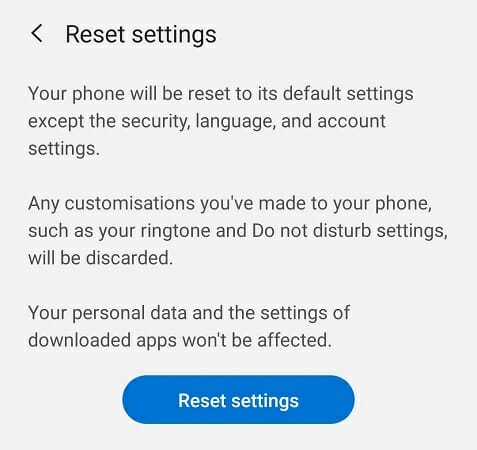
Reset Settings only

Message+ crash issue

  1. Tap on Settings.
  2. Go to General Management.
  3. Tap on Reset.
  4. Select Reset Settings. Reset Setting will not delete any data but reset the device to its default setting.

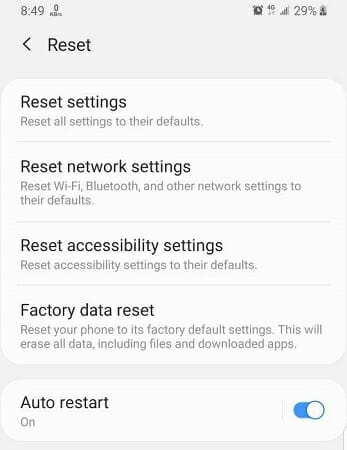
Factory data reset

Message+ crash issue

  1. Tap on Settings.
  2. Select General Management.
  3. Tap on Reset.
  4. Select Factory data reset.
  5. Tap on Reset and then enter your password.
  6. Tap on Delete all.

The Message+ keeps stopping issue can occur due to several reasons. However, in most cases, clearing the app cache and data has resolved the crashing problem.

[wl_navigator]

How to Make Adblock Undetectable [Full Guide]

Adblock is an adblocking extension for Google Chrome (and other Chromium browsers) and Mozilla Firefox that can effectively speed up your browsing as it removes ads from website pages.

In the case of some websites, they use anti-adblocking scripts that detect Adblock (and other ad blockers). This doesn’t allow you to use the extension as it was intended.

Those websites will display messages requesting that you whitelist them to unblock their ads, and for this reason, it is very important to know how to make your ad blocker undetectable.

In today’s guide, we will explore the best options to use in this case, so ensure you’ll read through it.

How can I make Adblock undetectable?

1. Turn off JavaScript in Chrome and Firefox

Google Chrome

  1. To turn off JavaScript in Chrome, open the website that detects Adblock.
  2. Click the padlock icon on the left side of Chrome’s URL bar.
    Padlock button make adblock undetectable
  3. Next, click Site settings to open the options shown directly below.
    The content block options make adblock undetectable
  4. Then select Block on the drop-down menu for JavaScript.
    Block option for JavaScript make adblock undetectable
  5. Thereafter, restart your Chrome browser and open the website for which you just turned off JavaScript.

Mozilla Firefox

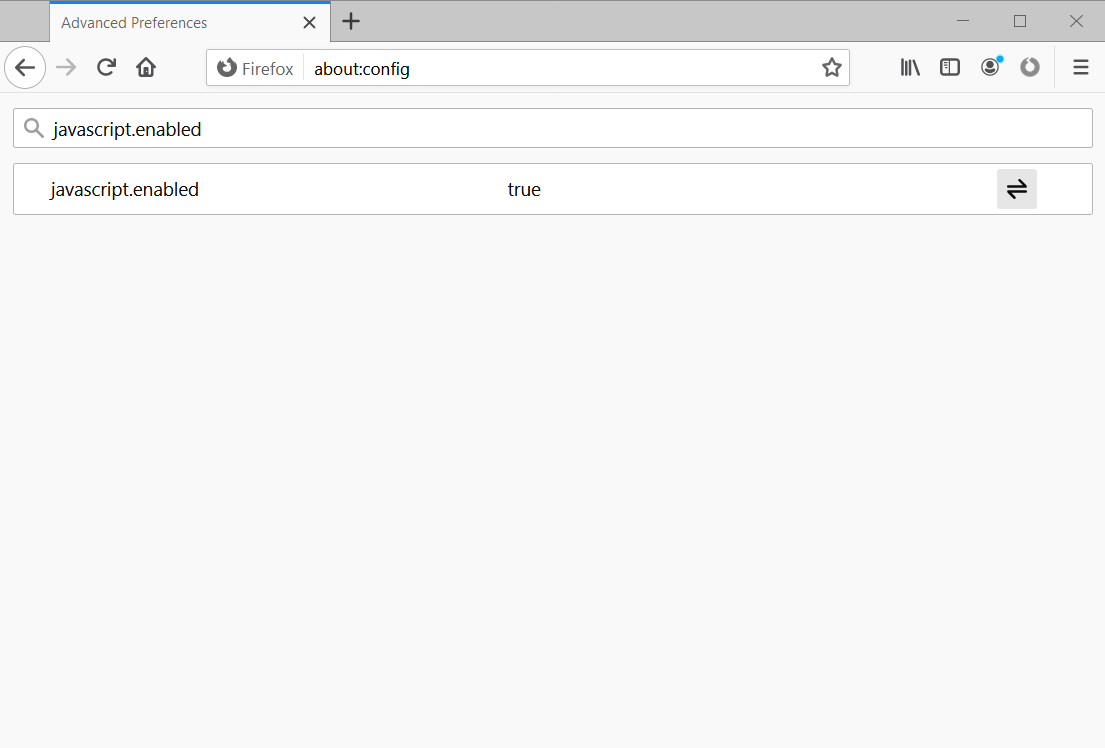
  1. Enter about:config in Firefox’s URL bar, and press the Return key.
  2. Click the Accept button.
  3. Type javascript.enabled in the search bar at the top of the about:config page.
    about:config page make adblock undetectable
  4. Next, double-click the javascript.enabled setting to change it to false.
  5. Then restart Mozilla Firefox, and try opening a page that detected Adblock.
Note icon NOTE
Disabling the javascript.enabled setting will turn off JavaScript for all websites.

2. Add Tampermonkey to your browser

  1. Open the Tapermonkey website.
  2. Select your browser’s tab on the Tampermonkey website.
    Tampermonkey website make adblock undetectable
  3. Click the Download button for the Tampermonkey stable.
  4. Install Tampermonkey by following the on-screen instructions.
  5. Open the Anti-Adblock Killer script page.
    The Anti-Adblock Killer script page make adblock undetectable
  6. Click the Install button there to install that script.
  7. Press the Subscribe button on the Anti-Adblock Killer page.
  8. Thereafter, you’ll see a message that asks if you want to add the filter list for your ad blocker extension. Click OK to confirm that you do.

Tapermonkey can also be used to make inspect element changes permanent.

3. Open the cached version of a website

  1. Open the Google search engine in the browser you utilize Adblock for.
  2. Enter the URL for the website that detects Adblock in the Google search box.
  3. Click the down arrow for the URL you see just above the top page listed in Google’s search results. That down arrow will open the small drop-down menu shown directly below.
    cached option make adblock undetectable
  4. Then click the Cached option there to open a cached version of the website instead.

4. Use a browser with privacy-oriented features

Switching to a browser with a suite of features designed to secure your privacy while you navigate online is another viable option.

Opera One is a browser that provides you with high levels of privacy and excellent speed scores to ensure the websites will load way faster, without ads or any pop-up messages related to them, as well as without any trackers or cookies that affect their loading speed.

⇒ Get Opera One

Those are some of the best methods for making Adblock and other ad-blocker extensions undetectable. These tips also come in handy when you want to play YouTube Music on your desktop ad-free. Then, you can bypass websites’ whitelist messages to open their pages without ads.

Yakuza Kiwami 2 video game launches on Xbox One, Windows 10, and Xbox Game Pass

Yakuza Kiwami 2 is now available to play on Microsoft’s family of Xbox One consoles and Windows 10 PCs.

The game is a remake of the original Yakuza 2 video game that came out back in 2006 and features improved visuals and gameplay plus additional story content. Yakuza Kiwami 2 can be purchased outright on Xbox One and Windows or played for free for those with an active Xbox Game Pass subscription.

Here’s the official game description:

One year after the 10 billion yen incident, Kazuma Kiryu begins to build a peaceful life with Haruka Sawamura. Tearing him away, an assassination threatens to erupt in an all-out war between the Tojo Clan and the Omi Alliance. Kiryu, the Dragon of Dojima, must travel to Sotenbori, Osaka in an attempt to broker peace between the rival clans, but Ryuji Goda, known as the Dragon of Kansai, will stop at nothing to get his war. In this world, there can only be one dragon.

Rebuilt from the ground up, Yakuza Kiwami 2 uses the Dragon Engine to update one of the series stand-out titles into a modern classic. Play fan favorite minigames including updated versions of the Cabaret Club simulator and Clan Creator, or check out all new additions like an arcade port of Virtual On, golf bingo, and Toylets. Also new to Kiwami 2 is the ‘Majima Saga’ which features Goro Majima in his own playable adventure revealing events that occur prior to the game.

A remake of the original Yakuza game, Yakuza Kiwami, was also released on Xbox One earlier this year. You can read more about that video game here.

Are you going to buy Yakuza Kiwami 2 or will you be playing with Xbox Game Pass? Let us know in the comments below and then follow us on Pinterest and Twitter for more Xbox gaming news.

Yakuza Kiwami 2
Yakuza Kiwami 2
Developer:
SEGA
Price:
Free


Yakuza Kiwami 2 for Windows 10
Developer:
SEGA
Price:
Free


PC Game Pass
PC Game Pass
Price:
$1.00

FIX: You do not have sufficient privileges for this resource

Some internet users reported encountering an issue when trying to access different links.

You do not have sufficient privileges for this resource or its parent to perform this action. Click your browser‘s Back button to continue

This is an error message that displays when trying to load a page, blocking access to the link.

This is a common issue that occurs when attempting to access forum threads.

In order to have a better understanding as to why this error occurs, we made a list with the root causes of this issue, along with solutions to help you avoid encountering the error.

How do I fix the privilege browser issue?

1. Try using a different browser


If you already have an account for the specific forum you want to access and you are sure that the thread still exists, try using a different browser.

There are plenty of internet browsers to choose from: Google Chrome, Mozilla Firefox or Edge. But the browser of our choice is none of those. It’s Opera One, another Chromium-based browser packed with plenty of tools and features.

This nifty piece of software, based on the Chromium platform certainly has a lot of things going for it.

Let’s start by saying that this Opera One is basically the privacy-oriented Chrome, with support for all extensions and features that Chrome uses, while keeping you anonymous and safe online.

If there’s a chance of geo-restriction causing the error at hand and preventing you from accessing a certain webpage, use the built-in VPN service, change your IP, and access it with ease. not only that but Opera One also comes with it’s own built-in AI.

Opera One

Check it out today and see the flexibility of the privileges it can provide.
Free Download Visit website

2. Create a forum account

Access restrictions could be set by forum moderators. Certain forums only allow their registered members to view threads on their platform.

Registered members also have the ability to post on the forum and send private messages to other users.

If you’re not able to access specific forum content, become a member of that forum by creating an account and logging in to access the forum privileges.

3. Manually search for the desired thread

Sometimes moderators change existing thread links for different reasons. If you have a thread link saved and you want to access it, the access will be denied, as your specific link doesn’t exist anymore.

In order for you to find the thread you wanted to open, you would have to perform a manual search.

Go to the main forum page and find the search box allowing you to find results within the forum. Type in specific keywords from the thread title and hit the Search button. If there are no search results, then the thread that you are looking for might have been removed.

4. Thread was removed

Getting forwarded to the error page might as well mean that the link is now missing. For different reasons, the forum mods sometimes delete threads, making the initial link nonexistent.
Therefore trying to access that specific link would be impossible. But, the webpage is still cached in the search engine, thus it appears like it’s there, while obviously, it isn’t.

We hope that you found useful our quick guide on fixing the browser restriction error. If you liked this article, leave a comment in the comments section below.

Your browser must have Userdata Persistence setting enabled [SOLVED]

Some users need to download device drivers, and other updates, from the Microsoft Update Catalog.

However, a few users have stated that a Your browser must have the user data persistence setting enabled error message appears in Internet Explorer when they try to open Microsoft Update Catalog. Consequently, they can’t download from that website.

What to do if you’re unable to access Microsoft Update Catalog via Internet Explorer due to Userdata Persistence error? Obviously, start by enabling the Userdata Persistence option. This, on its own, should deal with the problem. As an alternative, try disabling Protected Mode or re-registering MicrosoftUpdateCatalogWebControl.dll.

Look for the step-by-step explanations below.

Can’t access Microsoft Update Catalog with Internet Explorer

  1. Try opening the Microsoft Update Catalog with another browser
  2. Enable Userdata Persistence
  3. Deselect the Enable Protected Mode option
  4. Re-register MicrosoftUpdateCatalogWebControl.dll

1. Try opening the Microsoft Update Catalog with another browser

It used to the case that Microsoft Update Catalog relied on Internet Explorer ActiveX controls. However, users don’t need to utilize IE to download from Microsoft Update Catalog any longer.

Thus, users can download what they need from MUC with Chrome or Firefox and other browsers. So, try opening the Microsoft Update Catalog with an alternative browser.

Our alternative browser of choice, which slowly grew to be the daily driver, is Opera. This browser is as expedient and reliable as one would expect, with a variety of both practical and aesthetic features.

And it certainly does work with Microsoft Update Catalog.

Some points that distinguish Opera from the rest are built-in VPN and virus scanner, strict privacy modes that keep you anonymous online, a news curation to avoid fake news sources, and much more.

Opera

When having issues with IE, Opera is your best alternative call.

2. Enable Userdata Persistence

  1. Open Internet Explorer.
  2. Click Tools > Internet options to open the window in the image directly below.internet properties
  3. Click the Security tab.
  4. Press the Custom Level button to open the window shown directly below.
  5. Select Enable for the Userdata persistence option.enable userdata persistence
  6. Then click Ok to apply the new setting.

The error message tells users that Userdata Persistence needs to be enabled for Microsoft Update Catalog. Thus, enabling that option, if it’s off, usually resolves the issue.


3. Deselect the Enable Protected Mode option

  1. Click Tools in Internet Explorer to open the browser’s menu.
  2. Select Internet options to open the Internet Properties window.
  3. Then select the Security tab on that window.
  4. Deselect the Enable Protected Mode check box on that tab.security internet properties
  5. Press the Apply button, and click OK to close the window.
  6. Then restart Internet Explorer.

However, some users might find that the Userdata persistence option is already selected. If so, those users might also need to deselect an Enable Protected Mode option.


4. Re-register MicrosoftUpdateCatalogWebControl.dll

  1. To do that, press the Windows key + R keyboard shortcut.
  2. Enter cmd in Run’s Open text box.
  3. Press the Ctrl + Shift + Enter keyboard shortcut to open the Command Prompt as administrator.
  4. Then enter either cdWindowsSysWOW64 or cdWindowsSystem32 in the Command Prompt, and press the Return key.
  5. Enter regsvr32 MicrosoftUpdateCatalogWebControl.dll in the Prompt, and press the Return key.regsvr32 MicrosoftUpdateCatalogWebControl.dll cmd

Windows Server users have also confirmed they’ve resolved the Your browser must have the user data persistence setting enabled error by registering the MicrosoftUpdateCatalogWebControl.dll file in the SysWOW64 or System32 folder for 32-bit platforms.

Those are some of the resolutions that have fixed the Your browser must have the user data persistence setting enabled error for some users. Users who have fixed that error with other resolutions are welcome to share them below.


[wl_navigator]

Make colored signs in Minecraft – Windows 10/11 [Simple Codes]

Minecraft is a popular open-world game that has some of the most loyal user bases even after a decade of its release.

Some credit for its popularity has to go for the new things that the players can learn and do to customize their world. One of which is learning how to make colored signs in Minecraft.

Minecraft allows you to make signs out of woods, be it of any type. However, the default color for the sign text is always black.

Now if you are using a dark wood type, it would be difficult to read the sign.

In this article, we walk you through a step by step guide on how to make colored signs in Minecraft.

How to change the text color for sign in Minecraft

Color codes

Before we learn how to make colored text in Minecraft, let’s have a look at the colors and their respective codes that you can use to make a sign in Minecraft.

Color Code
Dark Red §4
Red §c
Gold §6
Yellow §e
Dark Green §2
Green §a
Aqua §b
Dark Aqua §3
Dark Blue §1
Blue §9
Light Purple §d
Dark Purple §5
White §f
Gray §7
Dark Gray §8
Black §0

To type the Section symbol (§), press Alt + 0167 on your keyboard.

Style code

Style Code
Bold §l
Strikethrough §m
Underline §n
Italic §o

How to make colored text in Minecraft

make colored signs Minecraft

  1. In Minecraft, create a new sign.
  2. Enter the text for your sign with the Section symbol and the color code.
  3. Let’s say you want to color the sign in Blue, then enter the following code:
    §9test sign
  4. If your sign overflows to the second line, then you have to enter the color code before the second line as well.
    §9this is a long §9test sign
  5. If you want to add both the color and style to your text, then enter the code as follows:
    §9§osign text
  6. The above code will give you purple sign text in Italic style.

Needless to say, you have to again add the color code if you decided to get creative with the sign name and it becomes a two-line poem.

Minecraft is a fun sandbox video game that allows you to create dirt home to fully-atomized metropolises in the virtual world.

With this guide, you can make colored signs in Minecraft in your favorite color with ease. Do let us know your favorite Minecraft sign-color codes in the comments below.

[wl_navigator]

Can Free VPN Be Trusted? Is it Safe to Use a Free VPN?

VPNs are great for protecting your connection’s security and online privacy. However, most reputable services require you to purchase monthly subscription plans so you can use them.

And it totally makes sense since running a VPN operation can be quite expensive. Just imagine the sheer power required to power servers, let alone purchasing them or hiring specialized personnel to operate and maintain them.

However, a pretty thick slice of the pie is owned by free VPNs.

Why do users prefer free VPNs?

As a new VPN user, you might not fully understand why you need to pay for a service that can keep your connection private, the way it’s supposed to be from the start.

Well, many fool themselves into thinking that their default connection is private. It’s widely known that if the need arises, your ISP could easily provide authorities with specific details on your online whereabouts.

Thus, they do not understand how things really are and how a VPN can improve their privacy, so they decide to try it. Only they’re not exactly ready to commit to purchasing a subscription plan.

So, many users stick to free VPN services, which are, most of the time, not exactly what they advertise themselves to be.

How does a VPN work?

A VPN essentially generates a secure, encrypted tunnel that passes your traffic. No matter the destination, a VPN will always encrypt your traffic and pass it through until it reaches the service you want to access.

However, it’s not as simple as it sounds. VPNs require a lot of power to be able to pull this kind of heist right under your ISP’s nose.

Usually, this kind of money comes from loyal subscribers. You pay for a secure, stable, and private service.

In turn, the VPN provider puts your money to good use, investing in server development, software improvement, patching things up, and even expanding the network of servers. Or that’s how it should be.

How is a free VPN different than a premium one?

For once, you may never find a free VPN that offers you the same level of privacy protection and security as a premium one. Most advanced features are limited, and you’re only given a taste of what the service can do.

For instance, you may be able to use advanced features but only connect to a bunch of non-premium servers.

You can find some premium VPNs that offer limited trials. These are either limited in functionality, or they have full functionality, but you can only use them for a short while.

Last but not least, you can find VPN services that are entirely free. These are generally the worst since they generate revenue from running ads while you use the service or collect and sell your data to whoever bids the most.

As we like to say, there’s no such thing as a free VPN; you don’t pay with money. It’s either your privacy or your security, and believe us, those two are far from being the same thing.

Can free VPN be trusted?

Look, we don’t say that ALL free VPNs are pure evil, but most of them are, and it’s easier to steer away from something that has a 50% chance of messing with your data.

Supposedly you decide to bite the bullet and get on board the free VPN bandwagon. Some things should tip you off right on the spot. Let’s call them red flags if you will.

1. The country the service is headquartered in

Generally speaking, if the VPN is based in a country popular for Internet freedom censorship, abuse, or heavy monitoring of its citizens, you should back away as soon as possible.

If you don’t know how to keep track of countries where you risk your data to be seized, you should look up 5, 9, 14 Eyes.

It might also be an eye-opener if you weren’t aware of intelligence-sharing alliances.

2. Poorly written Privacy Policy

We know, everyone wants just to skip the reading part and hope for the best. However, if you’re a responsible individual, you’ll take a few minutes and give the Terms of Use and Privacy Policy a thorough read.

If you spot contradictory claims, broken language (some non-English providers actually use Google Translate for their policies), or statements about private data collection, that’s your red flag right there.

A trusted and respected VPN will never monitor or log your online activity or record personally identifiable information from their customers. You can dodge this bullet easily by knowing your rights before using the program.

3. Data leaks while using the VPN

This might be tough if you’re not tech-savvy, but we’ll make it easy for you. Data leaks are a phenomenon that should never occur, lest the whole purpose of using a VPN is ruined.

Essentially, your VPN should be able to grab all your traffic and encrypt it. Air-tight. Absolutely no leaks.

Just for reference, since you’re using it to connect to the world wide web, your ISP is ever-listening to your connection. Even a second’s worth of leaking your real IP address, location, WebRTC, or DNS can jeopardize your privacy.

You’ll flare up like a Christmas tree, and show on your ISP’s metaphorical radar. The bad news is that you can’t ever know you’re leaking data without specialized tools.

The great news is that we’ve prepared a list of online services that could test your VPN‘s ability not to leak your data.

Running a simple test on either one of those services can easily assess if your VPN is safe enough and doesn’t leak important data. However, if you’ve decided to use a free VPN, we suggest testing it on multiple platforms.

It so happened that the same test came out negative on two of these services, but data leaks were picked up during our third test. Stay safe.

4. Poor customer support

Check out their customer support if you plan to use a free VPN service in the long run. It’s your right, after all, to know how customer support handles things when there’s an issue.

More so, don’t be afraid to ask tough questions, such as:

  • What’s your policy on collecting personally identifiable data? (especially if there’s little or no mention of it in the privacy policy)
  • Do you monitor online activities such as traffic, visited websites?
  • Under what circumstances will you share data you hold with third parties?
  • How do you handle DMCA takedown notices?
  • Do you allow torrenting?

You get the point. A competent customer support agent should be able to answer these questions on the fly, without checking with their superiors or beating it around the bush.

If you notice that the customer support stalls you or avoids the question, you may consider switching to another service.

What’s the best VPN without registration?

If you’ve decided to stick with a free VPN service but are in no mood for further investigation, you should do it right.

We’ve checked for the best VPNs you can use without registration, and the ones on our list should be good enough for your needs.

Note that these services won’t be as good as their premium counterparts.

However, they’re good enough if you need occasional VPN service. And if you’re not worried too much about having a vast selection of servers, you can choose from.

Plus, they won’t collect your data and run away with it.

Some free VPNs could be trusted

To sum it up, we’re not entirely sure using a free VPN is altogether safe. It definitely isn’t if you don’t perform thorough background checks before deciding to stick with a certain service.

However, we’ve given you some solid indicators for detecting whether a service is trustworthy. More so, we’ve included a list of curated free VPN services that you won’t be disappointed in. And if you happen to have an Arris router that supports VPN client mode, feel free to set up a VPN account so that all your household devices can take advantage of secure VPN connections.

Why Can’t I Connect to VPN From Home? Do I Need a Home VPN?

VPNs have a solid reputation as one of the most efficient ways to protect online privacy. Some of the best ones offer many security and privacy features, and, to top it all, they won’t even log or monitor your data.

Therefore, it makes sense that more and more people started to embrace this tool as part of their daily routines.

For instance, they enjoy streaming content from their favorite entertainment platforms, spending time on social media, or even shopping online. As for router VPNs, they let you use VPN traffic for all devices on your network.

All the abovementioned activities can be much safer and more convenient from behind a VPN.

Keep in mind that VPNs don’t only protect your online privacy. They can also be used to bypass ISP restrictions such as geoblocking or bandwidth throttling.

If you didn’t know, limiting the bandwidth can lead to packet loss and increased in-game ping.

Well, now you know that VPN can take care of those.

Do I need a VPN at home?

A popular misconception described VPNs as only useful to companies that want to protect their data or those with remote employees who need to share their resources with them.

But riddle us this:

  • Do you spend quite some time online from either one of your Internet-enabled devices?
  • Are you growing desperate with ads that seem to read your mind?
  • Is your ISP limiting your bandwidth and slowing down your connection speed?
  • Do you wish to find cheaper flight tickets?
  • Have you ever wanted to watch a show that’s only on the US version of Netflix?
  • Do you fear you’re being closely watched by your ISP?
  • Does your country’s government impose heavy censorship and restrict social media?
  • Do you wish your online whereabouts were private, as they should always be?

Well, if you answered yes to most of these, we’ve got some news for you. You might desperately need a VPN at home to make sure your privacy stays, well, private.

However, installing and using a VPN from home can sometimes be troublesome. You might encounter some errors, the service might refuse to connect, you know, the usual.

If you’re far from tech-savvy, troubleshooting these issues can be a hassle. So let’s see what we can do about them.

What can I do if the VPN doesn’t work as it should?

1. VPN not connecting from home

This is one of the most common situations when your VPN refuses to work from home. You can use it on public WiFi, from your workplace, and even from your friend’s house, but not from the comfort of your own home.

Since the only thing changing in this equation is your location and perhaps your ISP, you might want to check if your ISP is not actively blocking your VPN.


Having VPN connection issues on your PC? Check out our guide and see how you can fix them. 


Try using another VPN and see if the problem persists. Alternatively, you might want to restart your router/modem, and see if you can find any blacklist/whitelist rules on it.

2. VPN stopped working

Another common issue is when your VPN simply decides to give up. It may have worked flawlessly up until a few hours ago, but suddenly it refuses to load on your PC, or even connect to the server of your choice.

If you’ve recently performed some changes in your network/PC configuration, we suggest you revert them and see if your VPN situation has improved.

Your ISP might’ve blocked your VPN in the meantime, so checking up with them is also a good idea.

You should also try restarting your modem/router, and your PC. Last but not least, update the VPN client if possible, as some VPN providers render older versions of their service unusable after releasing an update.

3. VPN blocked on Windows 10?

It appears that Windows 10 has a mind of its own when it comes to VPN. Mostly because you might encounter Windows 10-specific VPN errors while you’re using this operating system. The good news is that you can most easily fix them.

It so happens that Windows 10 has a habit of occasionally blocking your VPN access. The unblocking process might have a lot of steps, but usually, you don’t have to go to the end of the list.

Most of the time, simply reinstalling the VPN client, installing Windows’ latest updates, or choosing a better VPN can easily solve the problem.

Make sure to check our guide above, and don’t give up if the first couple of suggestions don’t bring your VPN back to life. Windows 10 can be stubborn like that sometimes.

VPN not working at home can be easily fixed

More often than not, a VPN that doesn’t work at home can be tricked by restarting, reinstalling, or updating the VPN client. Restarting your computer and modem/router also yields great results.

However, it’s not the end of the world if your home VPN suddenly stops working. Ensure you try our suggested fixes mentioned above, and don’t give up if they don’t work right from the start.

And keep in mind that certain governments and organizations can restrict you from accessing VPNs from official websites, yet there are some tips that you can apply in such cases too.

Internet Explorer Crashes When Playing YouTube Videos [Fix]

There are plenty of Internet Explorer 11 related problems, and some of them include browser freezing issues, proxy and printing issues. Now, some users complain about video playback problems, including Youtube. Here’s what they have been saying:

IE freezes won’t play videos or do anything. I have to shut it off to close it ! Help ! I have a brand new HP 500-a60 A AMD A6-5200 Accelerted Processor 8GB DDR 3 System Memory 1TB Hard Drive It has HD 84oo Graphics A Windows 8 with 8.1 Added Windows 8.1 IE 11
Firefox 29.1 I have no idea what any of it does . I wrote it down it case you needed to know . Please Help ! Thank You !

At the moment, there hasn’t been provided an official fix by a Microsoft representative, but by the looks of it, this seems to be a problem related to the graphics card. However, here are some suggestions to fix this problem.

How do I solve YouTube video playback problems on IE 11?

  1. Use a better browser
  2. Check IE add-ons and settings
  3. Check your graphics driver
  4. Close multiple tabs
  5. Reset or reinstall IE 11

1. Use a better browser


We are not big fans of Internet Explorer. In fact, even Microsoft decided enough is enough.

They went back to the drawing board and released Microsoft Edge. But even Edge has problems with Youtube. So what can you do about it? Use a real browser: Opera One.

There are many things that we like about it. Having users in mind, Opera One is a browser that protects your privacy while offering numerous exciting functionalities.

Some of them are:

  • Free, unlimited proxy VPN
  • Integrated messengers right in the sidebar: Facebook Messenger and WhatsApp included
  • Video pop-up
  • Adblockers and crypto-mining blockers
  • Native AI and a modular AI-ready design

And that’s just scratching the surface. Find out more by hitting the Read more button below.

Opera One

The best alternative to Internet Explorer. Download now and benefit from a much-improved browsing experience.
Free Download Visit website

2. Check IE add-ons and settings


I would suggest to try out is to go ahead and check whether you might be using an add-on that is causing the problem. Simply put, disable all your add-ons and browser extensions that you may be using and check if the problem persists.

If you can play videos on IE 11 after having removed your add-ons and browser extensions, try to enable the respective tools one by one in order to identify the culprit. Also, you could try and reset the Internet Explorer settings, as well.

If the browser keeps crashing randomly then check this IE 11 Crashes guide.


3. Check your graphics driver

update graphics drivers


Of course, it goes without saying that you need to perform the graphics drivers check, as well. Don’t forget to update your graphics drivers using Device Manager. You can also download the latest GPU updates directly from your manufacturer’s website.


Most Windows 10 users have outdated drivers. Be a step ahead using this guide.


4. Close multiple tabs


As we can see, the affected user has quite a machine, so there can’t be talk of low-performance gear. But if you’re having too many tabs open, closing them might also be an idea, as well.


5. Reset or reinstall IE 11

If the issue persists, you can try to reset your browser. Here are the steps to follow:

  1. Go to the Tools menu > Internet Options
  2. Click on the Advanced tab > hit Reset > confirm your choice.
add on for the website failed to run


If nothing worked, you should try to completely reinstall IE 11. In this manner, you’ll install a fresh browser version which will hopefully fix this issue.

We know that some of you are stuck with this browser because of IT policy or because you need to visit certain websites or applications that only work with Internet Explorer. If that weren’t the case, switching browsers would have been the best choice altogether.

We hope that the rest of the solutions presented have been of assistance. Leave us a comment below about what worked out for you.

This Plugin is Vulnerable and Should be Updated

Microsoft, Google, and Mozilla have all been abandoning NPAPI plug-ins in their browsers.

Thus, plug-ins are increasingly becoming history on the web. Adobe Flash is one notable exception as Google Chrome and Firefox still actively support that plug-in. Consequently, plug-in-related error messages are also becoming rarer.

However, This plug-in is vulnerable and should be updated as a plug-in error message that might still appear on some pages open in the Firefox browser.

As you can see, dealing with these types of plug-in-related errors can be frustrating, so we compiled a list of steps that can help you fix the issue. 

How can I fix This plug-in is vulnerable and should be updated?

1. Use a different browser

If you’re inclined towards a seamless browsing experience without anything to bother you, consider switching to Opera One. The moment you start using it, we’re sure you’ll know to appreciate what it has to offer.

This privacy-oriented browser is, just like all the iterations of Chrome, built on the open-source Chromium platform with a lot of nifty built-in additions.

Once you install Opera One, the built-in VPN will ensure that your IP address is hidden and that all the files you download will be virus-free.

Another great thing about Opera One is that it comes with various built-in packages, enhanced resource consumption, and a modular AI-ready Design.

As for solving the plug-in error all you need to do is enable the Flash Player.

Opera One’s video pop-out functionality has enhanced users’ experience. If, let’s say you want to continue browsing but don’t want to close the video, it will simply remain on the ground while you access other sites.

Opera One

Opera One is an excellent web browser that offers a free VPN and fast ad blocker with high customizations available.
Free Download Visit website

2. Update the Flash Plug-in

  1. Open the Flash Player website page.
  2. Check if you need to install or update Flash.
  3. Go to the Flash Player download page.
  4. Deselect the optional offers checkboxes.
  5. Press the Install Now button.
  6. Save the Flash installer.
  7. Open the Adobe Installer.
  8. Press the Next button to update the plug-in.
update flash player preferences

3. Update Firefox

  1. Click the Open menu button at the top right of Firefox.
  2. Select Open Help Menu.
  3. Select About Firefox.firefox about
  4. Firefox will now check for updates.
  5. Press Restart Firefox to Update button.

4. Check the Flash Plug-in is enabled

  1. Press the Open menu.
  2. Click Add-ons to open the tab directly below.
  3. Next, click Plug-ins on the left of the tab.
shockwave player firefox

If Shockwave Flash is configured to Never Activate, click its drop-down menu and select Ask to Activate. Then the browser asks permission to activate Flash.

5. Allow Flash on Trusted Sites

If you’re still getting the This plug-in is vulnerable and should be updated error on pages, click the Activate Adobe Flash link just below it.

Then a pop-up menu opens at the top left of the browser with two options to select from.

Press the Allow and Remember button there to activate Flash on the website page every time you open it. Selecting Allow now will activate the plug-in only one time, but block it again the next time you visit the site.

6. Disable the extensions

  1. Enter about:config in the Firefox URL bar.
  2. Next, enter extensions.blocklist.enabled in the search box.
  3. Double-click extensions.blocklist.enabled.
  4. Switch it to false.extensions.blocklist.enabled firefox flags settings
  5. Restart Firefox browser.

Mozilla Firefox, like all other major browsers, removed third-party flash players as extensions, so they’re not a necessity in order to play the Flash and video content anymore.

They switched to a built-in flash player, while still supporting Adobe Flash Player until 2020.

Before you leave, find out how to fix the An error was encountered while trying to load this plugin message in BetterDiscord.

That’s about it. If you follow all the steps indicated above, you should have no problem-solving plug-in error. Let us know in the comments section below which one worked for you.

New Windows 10 Insider build 20180 enables theme-aware tiles, other new features for more Dev channel Insiders

Microsoft has released today the Windows 10 Preview build 20180 for Insiders in the Dev channel. The previous build 20161 released on July 1 came with several changes that were only available for select Insiders, such as theme-aware tiles, but that’s changing with the new build released today.

“We are turning on much of the new features mentioned on July 1st in Build 20161 including theme-aware tiles on Start. The new pinned sites capability mentioned with last week’s flight of Build 20175 is still only available to a subset of Insiders,” the Windows Insider team explained today.

Today’s build also includes minor changes for the new tablet posture logic for 2-in-1 devices, as well as the search box in the Default Apps settings pages. You can learn more about other quality fixes and known issues below:

Changes and Improvements

  • Based on feedback, we’re changing the tablet posture logic for 2-in-1 devices to now only apply when using a single screen.
  • Based on feedback we’re updating the new folder icon in the Start menu’s All app’s list to be a little smaller so it better aligns with the size of the other icons.
  • We’ve updated the search box in the Default Apps settings pages to improve performance.

Fixes

  • We fixed an issue in the last flight where Magnifier wasn’t following the curser in the previous build when the zoom was higher than 100%.
  • We fixed an issue where Task Manager wasn’t showing the Publisher name for UWP apps.
  • We fixed an issue when using the Pinyin IME where tapping “/” on the keyboard wouldn’t produce the right character when using full width mode.
  • We fixed a couple issues that could result in crashes when using Alt+Tab to switch to browser tabs.

Known issues

  • We’re working on a fix for an issue where some Microsoft Store games protected with Easy Anti-Cheat may fail to launch.
  • We’re looking into reports of the update process hanging for extended periods of time when attempting to install a new build.
  • We’re working on a fix for an issue where the min/max/close buttons are stuck in their original positions after resizing a UWP app. If you move the app window the position should update.
  • We’re investigating reports that the new taskbar experience described above isn’t working for some pinned sites.
  • We’re working on a fix for an issue where sometimes the “close all windows” action in the taskbar doesn’t close not all of the open tabs
  • We’re working on a fix to enable live preview for pinned site tabs.
  • We’re working on enabling the new taskbar experience for existing pinned sites. In the meantime, you can unpin the site from the taskbar, remove it from the edge://apps page, and then re-pin the site.
  • We’re working on a fix for an issue where pinned sites don’t show all open tabs for a domain. In the meantime, you can fix this by pinning the site’s homepage rather than a specific page (e.g. pin microsoft.com rather than microsoft.com/windows).
  • We’re working on a fix for an issue where Alt + Tabbing to a browser tab sometimes moves the previously active browser tab to the front of the Alt + Tab list as well.
  • Opening a WSL 1 distribution can result in the error: ‘The I/O operation has been aborted because of either a thread exit or an application request’. Please check out this Github issue for the latest updates.

Following the close of Mixer last week, the Windows Insider team also announced that it will move the Windows Insider webcast to the Windows Insider YouTube channel. “We also have some new videos about making the most of the program, and we’ll continue to use this channel for webcasts and how-to content,” the team said today.

That’s it for today’s Windows Insider news. If you’re still running the preview Build 20161 or older on your PC, be aware that these builds will expire on July 31. It’s highly recommended to update to the preview 20170 or newer before that date. Lastly, if you’re on the Beta channel (previously Slow Ring), we remind you that Microsoft released the 20H2 build 19042.421 last week which includes Start Menu, Taskbar, and notifications improvements.

Windows 10 is 5 years old today, but has it really matured?

Windows 10, Microsoft’s latest desktop operating system is celebrating its fifth anniversary today. The OS is now running on more than 1 billion devices, and it doesn’t look like it’s going to be replaced by “Windows 11” anytime soon.

As we’ve been following the development of Windows 10 since the beginning, it’s clear that a lot of things changed since the release of the first Windows 10 Insider builds in fall 2014. Last year, Dona Sarkar, the previous head of the Windows Insider program, said that there now more than 16.5 million Insiders testing preview builds for the OS, which is massive.

In this “Windows as a service” era, following what’s happening in the Windows 10 world is not always easy. In recent years, we’ve gone from two major updates every year, to a new system with one major update in the spring followed by a minor one in the Fall. Things could once again change with the upcoming launch of Windows 10X, a new lightweight version of Windows that may not be able to run Win32 apps natively at launch.

Windows 10x start
Windows 10x start

Windows 10 has definitely improved as an OS since launch, though with some hits and misses. Some new features like the revamped Start Menu, Snip & Sketch, and the Xbox Game Bar are great improvements, but others additions like Timeline, Cortana, or UWP apps in general (the Microsoft Store included) still don’t get a lot of love. There are also design inconsistencies all over the place, and persisting legacy components such as the Control Panel which hasn’t been fully replaced yet by the new Settings app.

Back in 2015, Microsoft’s new CEO Satya Nadella said ahead of the launch of Windows 10 that “We want to move from people needing Windows, to choosing Windows and loving Windows. That is our bold goal with Windows.” Since then, Windows seems to have become just another product in the Microsoft portfolio, with no real public face.

Who’s the real head of Windows at Microsoft these days? The answer is definitely not obvious, though Chief Product Officer did become the leader of a new Devices + Windows team earlier this year, effectively rolling up the Windows Experience (client) and the hardware teams. It’s easy to find similarities between Panay’s trajectory and the one from Jony Ive, Apple’s former lead designer who went to overlook the design of iOS and macOS before leaving the company last year.

Panos Panay introduces the Surface tablet during the Microsoft Surface unveiling.
CREDIT: Andrew White

We do hope that Panay will have a good influence on the various teams working on Windows 10, though we may have some reasons to worry. A good example is Windows 10X, a new OS that was initially demoed on a premium dual-screen device, the Surface Neo. This device has now been delayed while Microsoft is now repurposing Windows 10X for single-screen Chromebook-like devices, though that new effort may come too late and with some big compromises. According to recent reports, Windows 10X could be able to stream legacy Win32 apps, but the primary focus at launch should be web apps powered by the new Chromium-based Edge browser.

Microsoft has been trying to adapt Windows for new form factors for many years now, but previous attempts such as Windows RT that skipped support for legacy Win32 apps failed. It took nearly five years for Windows 10 to reach 1 billion users, and Windows 10X is never going to achieve that without solid support for legacy apps. In the meantime, Windows 10 on ARM PCs such as the Surface Pro X aren’t in a much better shape, and the persisting app and driver compatibility issues on these devices make them a no-go for most consumers.

Windows 10 is 5 years old today, but it seems that it’s still exactly not where it needs to be, or where it could have been. Microsoft probably wasted a lot of time on experiments that never got any traction, including its EdgeHTML browser that could only gain new features with major OS releases. The company also wasted years on trying to make UWP apps replace Win32 apps, only to finally allow developers to update their legacy apps with UWP components.

For the next five years, we hope that Microsoft will go back to fundamentals. There are still a lot of room for improvement on core features like File Explorer, the Microsoft Store, the Action Center, and more. It’s been reported before that UI improvements from Windows 10X will eventually make the transition to Windows 10, though it would be nice if Microsoft could implement consistent design guidelines first. “Fluent Design” was expected to be the next big thing until it became something that few people actually understand, and Microsoft could probably learn a thing or two from what Apple did on macOS in recent years.

The late Steve Jobs once said that “Microsoft has no taste,” and it’s sometimes hard to disagree with this. Design may not be Microsoft’s biggest strength, but that’s not really something that’s been hurting Windows in any significant way. People who need Windows will continue to use it, and new features like the Windows Subsystem for Linux are also making Windows 10 increasingly appealing for developers. New form factors like Microsoft’s Surface Pro and the Surface Book are also leveraging Windows 10’s unique features, and the OS still provides plenty of room for other PC OEMs to innovate.

Windows 10 may not replace Windows 7 or Windows XP in the hearts of some Windows fans, but that’s ok. We may never “love” Windows 10 like CEO Satya Nadella wanted us to, but the free updates Microsoft releases every year are a good thing to keep PC enthusiasts interested. Importantly, Windows 10 in the first version of Windows that Microsoft isn’t developing behind closed doors, and we hope the Windows Insider program is here to stay.

5 best cable management accessories to organize your space

If you’re using a desktop computer, you know how messy dealing with cables can get, and this is why many computer owners work hard on cable management. Speaking of which, in today’s article we’re going to show you the best cable management accessories that you can get, so let’s get started.

What are the best PC cable management accessories?

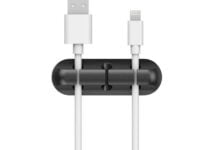
2 Pack Cable Clips

2 Pack Cable Clips best cable management accesories

If you need to organize your cables, 2 Pack Cable Clips might be just what you need. The clips work with different types of surfaces, and you can easily attach them to a wall, plastic, wood, glass, metal, or rubber surface.

The cable clips work with all sorts of cables, including both USB cables, power cords, HDMI cables, and many more. There’s an adhesive surface on the back, and you just need to remove the protective layer and place the cable clip on the desired surface.

  • Adhesive surface on the back
  • Can be placed on any plastic, wooden, glass, or metal surface
  • Can be placed on walls
  • Works with a wide array of cables
  • Easy to use
  • Can only hold 3 cables

PASOW Cable Ties

PASOW Cable Ties best cable management accesories

Organizing your cables is easy, as long as you have the proper cable ties for the job. These ties are made from a flexible fabric material, and they are completely reusable.

Thanks to their detachable hoop and loop design, you can easily detach them and move them to a different location or tighten them.

Overall, PASOW Cable Ties are light and easy to use, and they are a must-have when organizing your cables.

  • Easy to use
  • Light
  • Detachable hoop and loop design
  • 50 ties available in a set
  • Not indented for heavy use

JOTO Cord Management System

JOTO Cord Management System best cable management accesories

To organize multiple cables, the best and the tidiest solution is the cable sleeve. This sleeve comes with a zip-up solution and thanks to the neoprene material, it’s quite stretchy.

As for the number of cables, this sleeve can hold up to 8-10 cables. The sleeve is simple to use, and you just need to gather your cables, wrap the sleeve, and zip-up.

If you need to manage multiple cables, then JOTO Cord Management System is the perfect choice for you.

  • Made from flexible neoprene material
  • Can hold up to 8-10 cables
  • Zip-up design
  • 4 sleeves available in a set
  • 19 inches long with a 1.2-inch diameter
  • Incredibly simple to use
  • Can’t branch your cables

Rustark Adjustable Self-Adhesive Nylon Cable Straps

Rustark Adjustable Self-Adhesive Nylon Cable Straps best cable management accesories

These cable straps come with adhesive pad, so they should stick to plastic, wood, glass, metal, and rubber surfaces. If needs be, you can always remove the straps without any residue.

The straps also have a hole in them, so you can screw them to any surface. As for the material, the product is made from high-quality durable nylon.

It’s worth mentioning that the straps have a zipper design, so you can easily release or tighten your cables if needed.

  • 25 large and 25 small straps in the set
  • Adhesive material that works with metal, plastic, glass, wood, and other surfaces
  • Zipper design that lets you tighten or loosen your cables
  • Can be tightened with a screw
  • Adhesive might not be strong enough for some users

OneLeaf Reusable Fastening Cable Ties

OneLeaf Reusable Fastening Cable Ties best cable management accesories

If you need to organize your cables, these cable ties will be perfect for you. There are different colors and sizes available in the set, so you can find a perfect cable tie for every need.

The ties have hook and loop attachment, so they should be able to hold your cables tightly. Of course, you can easily loosen them and reuse them when needed.

The zip ties are incredibly simple to use, and if you need to organize your workspace, these zip ties are a must-have.

  • 60 cable ties available in set
  • 20x 8-inch, 20x 6-inch, 20x 4-inch ties
  • Available in 5 different colors
  • Hook and loop attachment
  • Reusable
  • Not as tight as other models

If you’re looking for the best cable management accessories for your PC, we encourage you to consider the models from our list.

In case you found our guide helpful, please let us know in the comments below.

[wl_navigator]

How to use the Time Clock in Shifts in Teams on iOS and Android

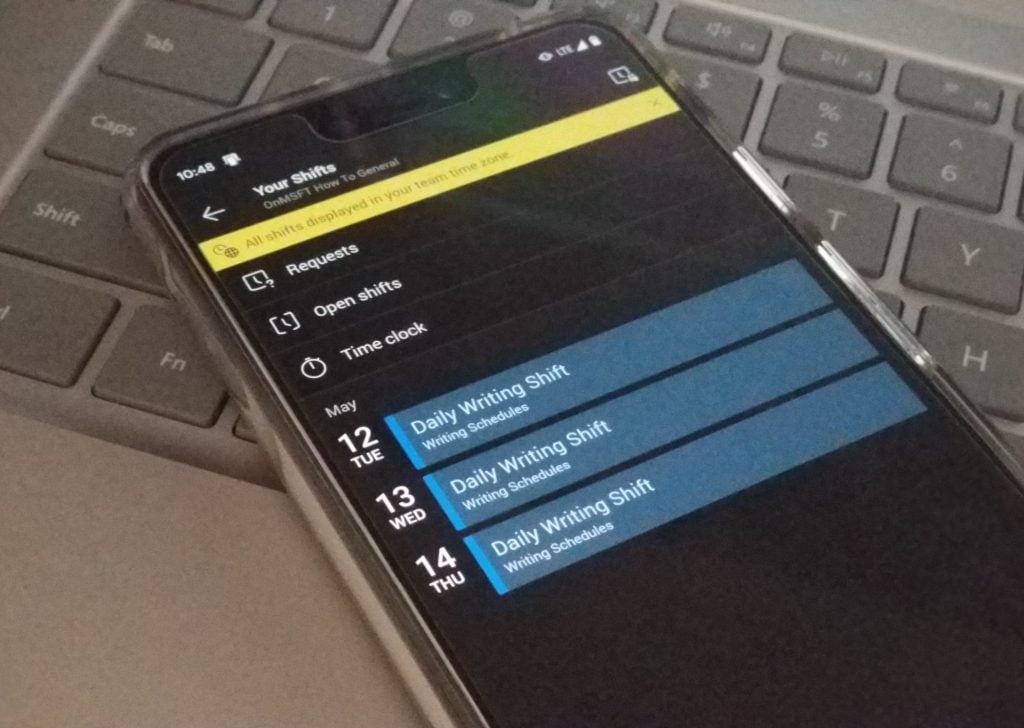
One of the built-in features of Microsoft Teams is known as Shifts. When enabled by your IT admin, managers and employees can use Shifts to manage work hours, schedules, and even use a Time Clock. We’ve already showcased how Shifts can be used on the desktop version of Teams, but now we’ll turn our attention to the Time Clock, too. Here’s how to use Time Clock in Shifts on Microsoft Teams on iOS and Android.

Getting to the Time Clock

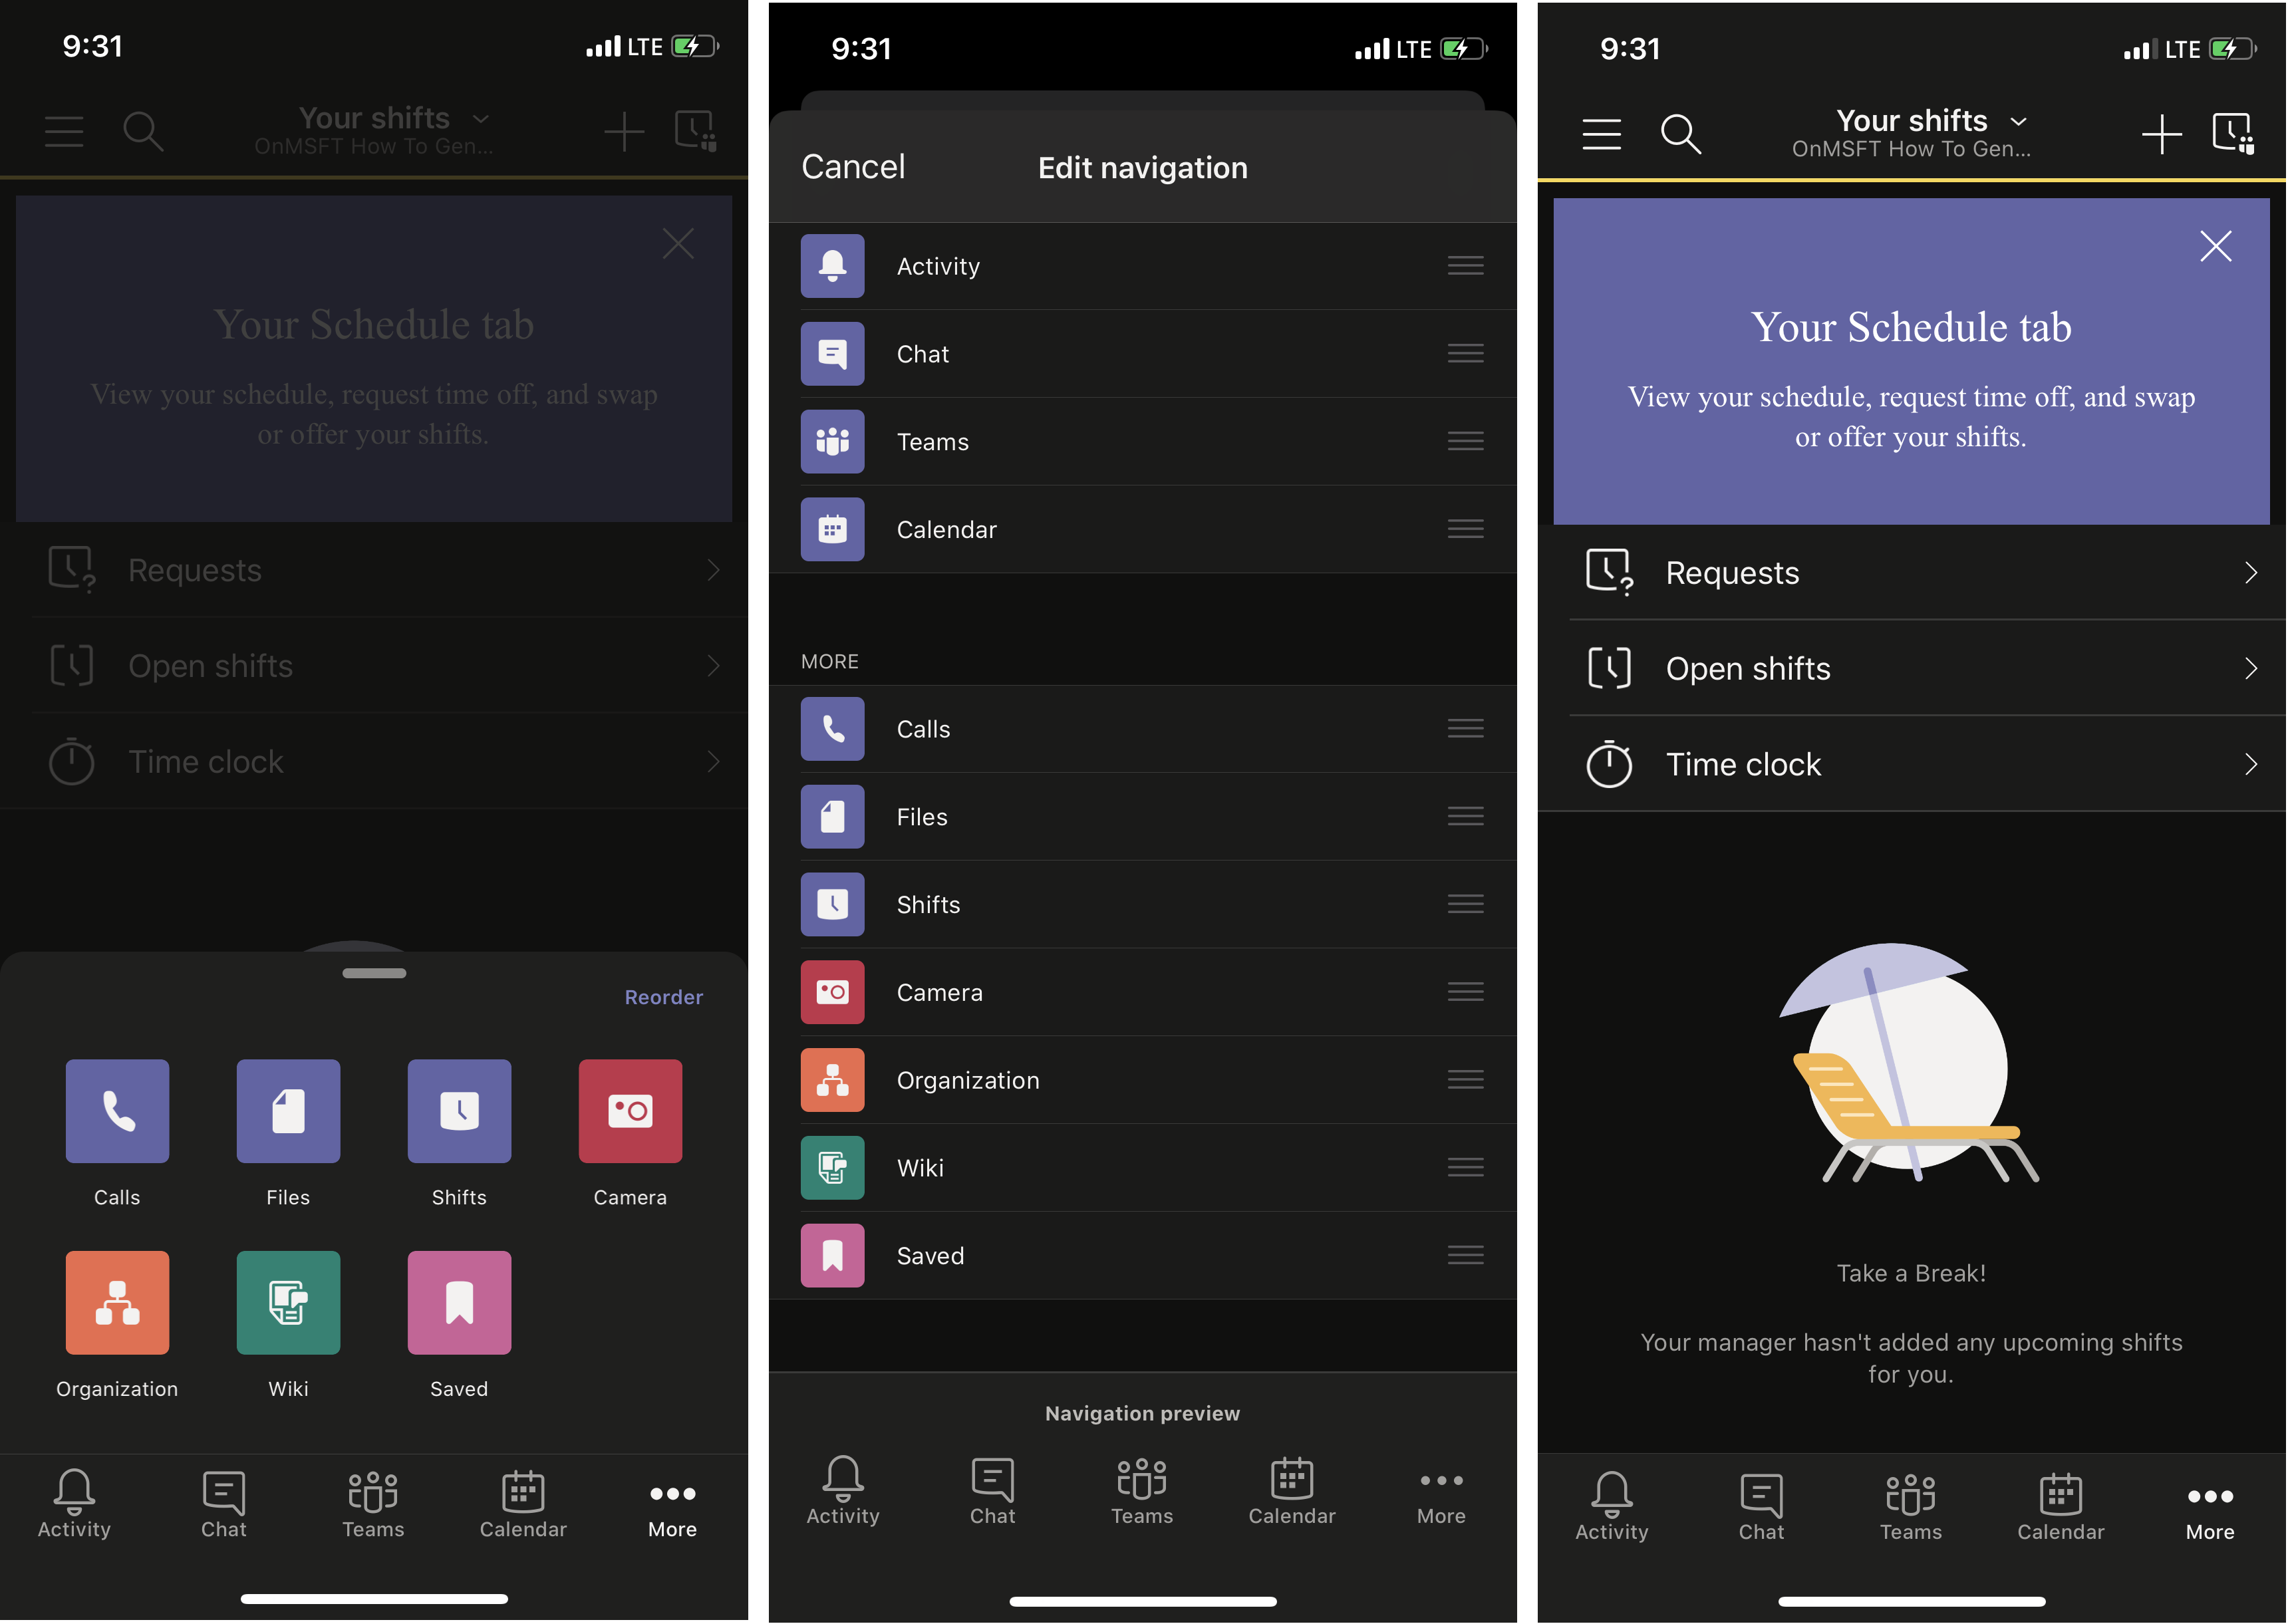
To get to the Time Clock on Teams on iOS or Android, you will first need to open up Shifts. To do this, click the … More button at the bottom of the screen. From there, you will need to click Shifts. If you want, you also can click the Reorder button at the top of the screen to change the navigation, and add Shifts to the main bar.

Once you find Shifts, tap it to open it. You should see some things like Requests, Open Shifts. Then, below it will be Time Clock. You will want to click this to proceed to the next step.

Using the Time Clock

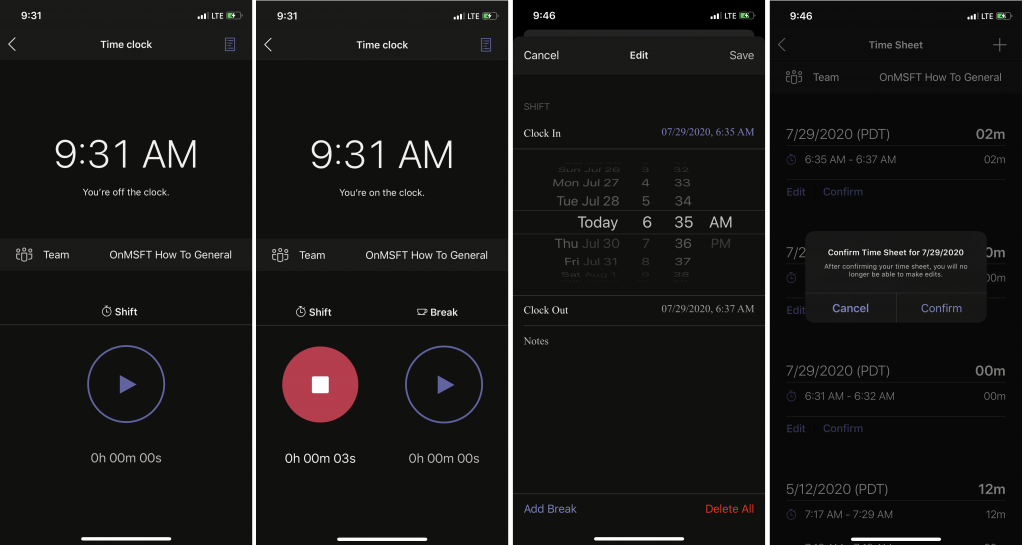
Keep in mind that to proceed, you will only be able to use the Time Clock if it has been set up by a manager and an IT admin for you through Teams. Anyway, now that the Time Clock is open, you should see a message on the screen alerting you that you are off the clock. Do not be alarmed.

You can clock in by tapping the play button. This will start a timer, and a circle will appear around the play icon. Once it stops spinning, Teams will begin reporting your shift for work. It will run in the background, even when the app is closed. If you are finished working or going for lunch, or a break, you can tap the stop icon to pause and end the timer.

Once you tap the stop timer, you’ll see a list of your shifts on a timesheet. You will see everything listed by your local Time Zone. You can either edit or confirm each of your Shifts. Just click the Edit or the Confirm button to proceed. The edit button will let you add notes to your Shift, about incidents or other issues.  You also can change the specific time, delete the entire shift and add a break if needed, or add more Shifts by clicking the + icon at the top of the screen. Once done, you can submit and your manager will be able to approve it.

Other features

With the TIme Clock explained, there’s still a lot more that can be done with Shifts on Teams. You can use the search function to look through old shifts, put in new requests, or view open shifts across your organization. Of course, you also enjoy the full experience in the desktop version of Teams, too.

Do you find the Shifts app useful in Teams? Check it out now, and let us know in the comments below. And, keep tuned to our Microsoft 365 news hub for more.

[Solved] Setup initialization error: Install stuck

While trying to download and install Windows 10 software, you may have run into an error that partially reads: setup initialization error.

It may be accompanied by text that refers to a missing file and further informs you that it was unable to complete the download or installation.

Running into errors like these can be frustrating so in this guide, we’ve provided you with a few simple yet comprehensive solutions designed to eradicate this problem.

How can I fix a setup initialization error on Windows 10?

1. Make sure the installer is running with administrator privileges

  1. Right-click on the setup file.
  2. Select Run as administrator from the context menu.
  3. Click on the Yes button from the UAC confirmation dialog.

2. Clean out the temp folder to solve setup initialization errors

clean-out-temp-folder-fix-setup-init-error

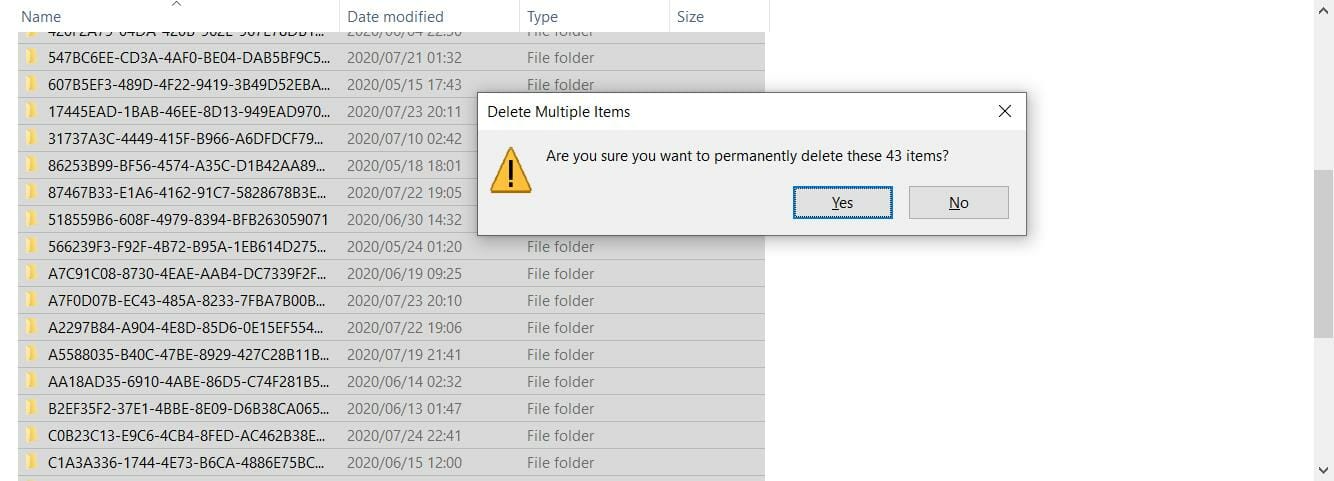
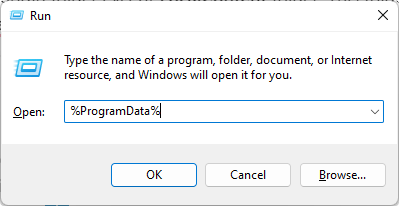
  1. Open the Windows Run Dialog (Winkey + R).
  2. Type %TEMP% into the open text field.
    open-temp-folder-setup-initialization-error
  3. Select everything in this folder and delete it.
  4. The system will ask you to confirm the deletion. Click on the Yes button.
    temp-files-setup-initialization-error
  5. Skip over any files that may be in use by other programs.

For the best results, make sure that you reboot before you purge the Temp folder. The Temp folder contains transient swap files and files used by program installers (among other things).

Sometimes older temp files conflict with newer ones. It’s also possible that the data in the Temp folder is corrupt.

Cleaning it out is good practice and will solve most setup initialization errors.


3. Download offline/standalone installer

download-alternative-stand-alone-installer-setup-init-errorApplications like Google Chrome and Bitcomet use an online installer.

When you download the installation package from the website, it doesn’t give you all the installation files.

In most cases, what you get is a download management tool for the software you’re trying to install.

If you’re running into a setup initialization error while trying to use an online installer, you should try using the offline installer instead.

The offline installer isn’t as well highlighted as the online option. You just need to pay careful attention while reading through the download page.

If you need help, contact the software vendor.

Once you find the offline installer, run it and see if it solves your setup initialization error.


4. Temporarily disable your antivirus to solve setup initialization errors

anti-viruse-banner-setup-init-error

Antiviruses are known to block executables, and yours may be interfering with the installer, preventing it from moving files to and from the temp folder.

The best way to rectify this without setting up unnecessary exceptions is to temporarily disable your antivirus.

Different antiviruses require different steps to achieve this.

For Windows Defender, you can follow these steps:

  1. Open the Start menu.
  2. Type in Windows Security.
    windows-security-start-menu-initialization-setup-error
  3. Hit the Enter key.
  4. Select Virus & threat protection from the left panel.
    virus-threat-protection-setup-initialization-error
  5. Click on Manage settings from the main panel.
  6. Set the Real-time protection switch on the off position.
  7. If Windows asks you to confirm, click on Yes.

Once you’ve (successfully) installed the software that was causing the setup initialization error, turn your anti-virus back on.


5. Modify the amount of allotted virtual memory

  1. Open Windows Control Panel. To do this, open the Windows Run Dialog, type in Control Panel, and press the Enter key.
  2. Make sure that you’re viewing all Control Panel items as either large or small icons.
  3. Click on System.
  4. On the left side panel, click on Advanced system settings.
  5. Under the Performance section, click on the Settings button.
  6. Click on the Advanced tab.
  7.  Under Virtual Memory, click on the Change… button.
  8. Ensure that the checkbox labeled Automatically manage paging file size for all drives is unticked.
  9. Click on the Custom size radio button.
  10. Set your minimum page size to the amount of RAM you have on your system multiplied by 1.5 eg. 8GB x 1.5  = 12GB (12000MB).
  11. Set your maximum page size to the amount of RAM you have on your system multiplied by 4 eg. 8GB x 4 = 32GB (32000MB).

It’s important to ensure that you have more than enough virtual memory so your computer can run as smoothly as possible.

Windows reaching a 100% page file usage may be what’s causing the setup initialization error.


6. Turn off User Account Control to solve setup initialization errors

disable-uac-windows

  1. Open the Start Menu.
  2. Type in UAC and press enter.
  3. Move the slider down until it reaches Never Notify.
  4. Click OK and confirm your choice.
  5. Restart your computer.

Sometimes Windows UAC can cause an application to time out or interfere with installations. Remember to turn it back on once you’ve installed your software. I

t’s an important part of Windows’ security features.


7. Sign in to Windows 10 using the administrator account

administrator-account-windows-fix-setup-init-error

  1. Open the Run Dialog.
  2. Type in CMD and press Ctrl+Shift+Enter on your keyboard to run command prompt with administrator privileges.
  3. Type the following command into the console screen: net user administrator /active:yes
  4.  Hit Enter.
  5. You may be asked to confirm the change, click on Yes/OK.
  6. Save and close everything then sign out of your account.
  7. Select Administrator from the Windows sign-in screen.
  8. Follow the prompts until the account is set up.
  9. Try running the installation once again.

These six solutions should be enough to help you resolve the setup initialization error. We’d also suggest cleaning your registry through the use of reputable software.

If your expertise or experience allows, you can go into the registry yourself and manually delete any errant keys.

Nevertheless, we hope you’ve found this guide to be helpful. How did you solve the setup initialization error? Let everyone know by leaving a comment down below.

[wl_navigator]

Download Chromium Edge builds on Windows 10

In 2018, Microsoft announced it would convert Edge into a Chromium web browser. This means Edge will incorporate Chrome’s open-source Chromium engine.

Microsoft has already released Chromium Edge preview versions for users to try out on Windows 10. Now the big M has just announced the release of the first Chromium Edge preview versions for Windows, 8.1, 8, and 7.

The Microsoft Edge Team announced the first Chromium Edge preview builds for Windows10,  8.1, 8, and 7 on Windows blogs. There the Edge Team states:

Today we are excited to make preview builds from the Microsoft Edge Canary channel available on Windows 7, Windows 8, and Windows 8.1. This rounds out the initial set of platforms that we began to roll out back in April, so developers and users alike can try out the next version of Microsoft Edge on every major desktop platform.

Thus, users can now try out Chromium Edge preview versions from the Canary Channel on Win  8.1, 8, and 7.

This article is also useful if you are interested in the following topics:

  • Microsoft Edge Chromium download Windows 7
  • Microsoft Edge chromium windows 7
  • Download Chromium

Quick tip:

If you are not sure about Microsoft Edge, why not try with a more reliable browser, like Opera One?

This browsing solution is built on the same Chromium engine as the new Edge Browser. Opera One packs a series of must-have privacy features in today’s online world where hackers can’t wait to get their hands on your data. Plus, it comes with a built-in AI.

Opera One

Noteworthy for the Chromium engine but packed but super efficient features.
Free Download Visit website

How do I download Chromium Edge builds?

Steps to download Chromium Edge

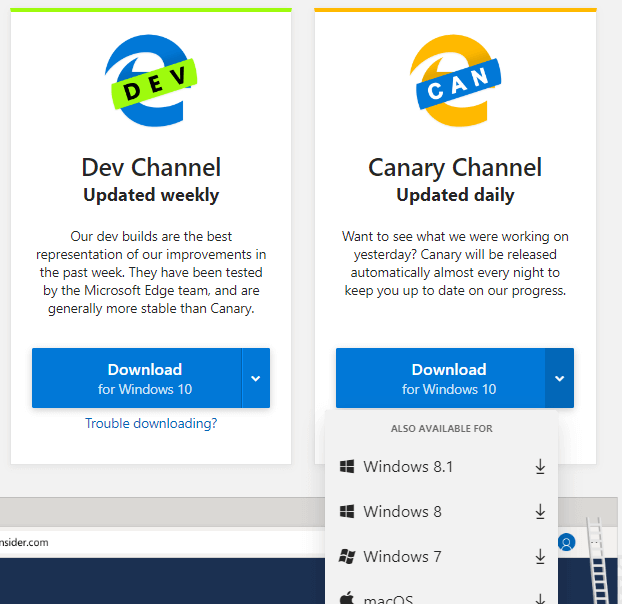
The Microsoft Edge Insider Channels page includes the download options for the Edge preview builds.

Click the small arrow on the Canary Channel’s Download button to open a drop-down menu that includes other platforms.

Then users can select to download an Edge preview build for Windows 8.1, 8, 7, or macOS platforms.

When users download a preview version, they will discover a new kind of Edge browser. Chromium Edge has a redesigned UI that mixes in some design elements from Google Chrome.

Its New Tab page includes Bing background images. The best thing about Chromium Edge, however, is that users can add Chrome extensions to the browser.

In May, Microsoft unveiled Collections for Chromium Edge. Collections enable Edge users to gather together text snippets and images from websites.

Thus, users can collect, organize, and share smaller amounts of page content with Collections.

Then users can open older websites with Internet Explorer’s rendering engine and utilize more outdated apps within IE Mode. The new version of Edge will also offer better streaming support and support for 4K content natively.

In addition, the new version of Edge will support Microsoft voices, SpeechSynthesis API and Microsoft Account and Azure Active Directory authentication. Another incredibly useful feature is the ability to mute tabs with a single click.

It’s worth noting that Microsoft Edge will have Windows Defender SmartScreen integration that should provide solid protection against malware.

The big M has also confirmed that Chromium Edge will include an Internet Explorer Mode for Enterprise users. That mode basically loads Internet Explorer 11 within Edge.

Nevertheless, users can now try out the Chromium Edge preview builds for Windows 8.1, 8, and 7.

Tip icon Tip
If want to learn more about using Edge, check out our Microsoft Guides Hub. To read about tools that you can get for Windows 10, visit our Windows 10 page.

Microsoft also plans to remove a wide range of Google’s services and replace them with its own services in Edge. Lastly, there’s support for extensions, and in addition to extensions from Chrome Web Store, users will be able to download exclusive extensions from Microsoft Store as well.

How did the installation of the Chromium Edge build work for you? Leave us a comment in the dedicated area below.

Netflix Dvds Website is Temporarily Unavailable [SOLVED]

Don’t we all love a good movie night? This brings up a core feature of Netflix, and namely renting out DVD’s, from their monthly plan. But there are reported instances when their website couldn’t be reached, as the Netflix DVDs website is temporarily unavailable.

First of all, make sure that the service is available in your country. If it is and the website is still unavailable, continue reading.

Here’s how one user described the issue on the Netflix-dedicated subreddit.

so i tried to go to the dvd.com website and i saw that it says that “The Netflix DVDs website is temporarily unavailable.” is it like that only for me? thanks

Access the website successfully by following the instructions below.

Is the DVD.com website down?

1. Switch to an alternative browser

When it comes to streaming websites such as Netflix DVDs, few browsers can even come close to how optimized they are for the job the way Opera One is.

Simply go online, start watching your favorite show, and notice the perfect image clarity and 60 FPS movements that seem impeccable.

More so, if you want to access geo-blocked content, you can also make great use of Opera One’s built-in VPN service.

Given all the features, it goes without saying that simple issues such as the Netflix website appearing to be down will be a thing of the past. The browser also features a native AI.

Opera One

A specialized web browser that is optimized for streaming content from all kinds of websites, including Netflix
Free Download Visit website

2. Clear your browser data

Chrome

  1. From your computer, open Chrome.
  2. At the top right, click More.
  3. Click More tools then click Clear browsing data.
  4. Choose a time range, might be Last hour or All time.
    clear chrome cache Netflix Dvds Website is Temporarily Unavailable
  5. Select the types of information you want to remove.
  6. Click Clear data.
  7. You’re all set.

Mozilla Firefox

  1. Firstly, click on the menu button and choose Options.
  2. Select the Privacy & Security panel and go to the Cookies and Site Data section.
  3. Click the Manage Data… button, now the Manage Cookies and Site Data dialog will appear.
  4. In the Search websites field, type the name of the site whose cookies you want to remove.
    clear Firefox browsing data Netflix Dvds Website is Temporarily Unavailable
  5. To remove all cookies and storage data for the website, click Remove All Shown.
  6. To remove selected items, select an entry and click Remove Selected.
  7. Click on Save Changes.
  8. Click OK in the Removing Cookies and Site Data confirmation button, then close the Options menu.
  9. You’re good to go now.

Microsoft Edge

  1. To view your browsing history, select Favorites then History.
  2. Select Clear history.
  3. Choose the types of data you want to remove from your browser, then select Clear.
    clear Edge browsing history Netflix Dvds Website is Temporarily Unavailable
  4. If you are using Cortana and wish to clear browsing history that’s stored in the cloud, select Change what Microsoft Edge knows about me in the cloud, then select Clear activity.

If you want to be sure that you’ve eliminated all files and data that may be interfering with your Netflix DVDs connectivity, you should try a professional PC cleaner instead.

A dedicated memory cleaner will free your PC from pretty much anything residual, such as cache data from your browsers, and perform other PC optimizations along the way as well.

Many memory cleaners also include at least some basic optimization tools that will help your PC perform better. Some of them are able to detect whether you have any faulty system files and automatically fix them.

Plus, if you want to eliminate this issue in the future, you can automate regular PC cleaning sessions because most of these tools include a scheduling feature.

2. Access the website with Incognito mode

  1. Open your browser and click on the Menu (in the top right corner).
  2. Open Incognito/Private mode in a new window.incognito mode Netflix Dvds Website is Temporarily Unavailable
  3. Navigate to dvd.com and look for improvements.

By following these steps, you should be able to connect to Netflix DVDs without any more issues.

Let us know which solution you used by leaving us your opinions in the comments section below.

OG Xbox video game Psychonauts is now free to download and play on Xbox One consoles

The Psychonauts video game, which originally came out on the original Xbox console way back in 2005, is now (spotted by Wario64) available to play for free on the current gen Xbox One family of consoles.

The game can be grabbed right here and sent to your Xbox One console by clicking on the blue Get button. Note that no Xbox Live or Game Pass subscription is needed. This is a completely free title.

Update: It looks like this game being free may have been a glitch or a premature launch of a promotion as it’s currently switching between free and paid. Cheers to Will for alerting us in the comments.

Here’s its official store listing:

A PSYCHIC ODYSSEY THROUGH THE MINDS OF MISFITS, MONSTERS, AND MADMEN. Is everything right in your head? Raz, a young psychic cadet discovers that someone is stealing brains. Using clairvoyance, astral projection, telekinesis and levitation help Raz foil this evil plot by entering their minds and smacking around a whole bunch of personal demons.

The likely reason for this free giveaway is that a sequel to Psychonauts, Psychonauts 2, was recently announced for the Xbox One and Xbox Series X consoles in addition to Windows 10. You can watch its reveal trailer below.

Are you a fan of Psychonauts or will this be your first time playing this classic game? Let us know in the comments below and then follow us on Pinterest for more Xbox content.

Psychonauts
Psychonauts
Price:
Free

Internet Explorer running slow in Windows 10? [Easy Fix]

While Windows 10 was still in the form of Technical Preview, Microsoft was advising users that glitches and problems were to be expected. One of them was the slow performance of the default Internet Explorer browser.

Microsoft confirmed that IE 11 is the last version of Internet Explorer. Therefore, if you want to make it work, read this article and find out how.

Windows 10 users have used the Feedback app in Windows 10 TP build 9860 to complain about the existing Internet Explorer version. Here’s what one of them has been saying:

Can’t say why. Page loading super slow. Even already visited pages opened in new tab

Some have been saying that the Internet Explorer 11 browser also crashes all of a sudden, does not show all letters after an update, does not display web pages correctly, and performance with JavaScript is really slow.

Internet Explorer 11 has aimed to be the first browser to make Internet connections more secure and reliable by reducing the use of vulnerable cipher suites (ex. RC4) and by using the latest security standards, TLS 1.2, by default.

One reason might be that many web pages are not officially supporting Internet Explorer anymore. Internet Explorer 11 is hardly being maintained and is merely used for Intranet websites and apps that require ActiveX controls.

Some users consider that TLS 1.2 is actually causing IE 12 to work slow, but secured. By any means, if you enjoy IE 11 and want to make it work on your device, check out the following tips and fixes to apply now.

How do I speed up Internet Explorer?

1. Opt for a faster browser

Internet Explorer is no longer officially updated by Microsoft, having been replaced with Microsoft Edge as the default browser. That being the case, replacing it with any other browser is pretty much an upgrade.

That is why, if you’re are to replace Internet Explorer, might s well go for the best alternative on the market, and it is called Opera One.

Just like Internet Explorer’s descendent, Opera One is also Chromium-based, making it faster, more reliable, and with plenty of extension support.

What’s more, you can customize Opera One however you want, with toolbars and shortcuts, night mode, themes, tab islands and AI.

Opera One

Surf the Internet like never before with this ultra-lightweight and incredibly modern-looking web browser.
Free Download Visit website

2. Scan your system for errors

Another solution would be to run SFC/scannow command in the Command Prompt to check your system for errors. And you can scan your system with good antivirus software.

We recommend you use a security tool that is stable and has a detection rate. Some of the best antivirus software available are optimized for browsing and they can actually help improve your speed rates while keeping your PC secure.

You can also run a scan with Windows Defender, but third-party tools are generally able to detect more threats and have a lower false-positive rate.

3. Clear IE Cache regularly

The first thing you can do is to clear Internet Explorer Cache. You can do that from browser‘s Settings following the steps below, or with some third-party cleaning tool, like Advanced System Care or CCleaner.

  • Launch Internet Explorer 11
  • On the right-hand side of the browser, click on the gear icon – the Tools icon
  • Go to Safety and select Delete Browsing History
  • Uncheck all options except the Temporary Internet files and website files
  • Click the “Delete” button.
  • The Delete Browsing History window will disappear and your mouse icon might go busy for a while.

4. Disable Add-ons

  • Open Internet Explorer and select the Tools button
  • Click on Manage add-ons
    How to disable Add-ons in Internet Explorer 11
  • From the drop-down menu choose “All add-ons”
  • Select each add-on that you want to remove and click on Disable.

5. Reset IE to default level

Finally, go to Internet Explorer, click Tools > Internet Options > Security > Reset all Zones to Default level.

These tweaks should help you fix your slow Internet Explorer and improve your browsing experience.

The solutions listed above are also good if you are interested in the following topics:

  • Internet Explorer 11 slow to load the first page – Users reported that usually the first tab that IE opens usually loads very slowly
  • Internet Explorer takes forever to open – Some reported that the IE browser in general moves very slowly

[Solved] Parsec error code 15000

Parsec enables users to remotely connect to other PCs to play games. However, some Parsec users might encounter a Parsec error 15000 issues on host PCs.

Here is what a full error message looks like:

We couldn’t initialize the hosting functionality on the computer you’re connecting to. Try changing the monitor Parsec is capturing in hosting settings or check out this support article for more information. Code: -15000.

In today’s guide we will discuss the best ways to resolve this issue once and for all, so make sure to read on.

How can I fix the error 15000 Parsec?

1. Disable streaming apps

  1. Right-click the taskbar to select Task Manager.
  2. Select the Processes tab.
  3. Right-click any streaming app listed under Apps and select End task.

    Task Manager Parsec Error 15000
  4. Disable all streaming apps listed under Background processes.

2. Update the graphics card driver

Make sure you’re using the latest versions of your drivers. For a manual update of the graphics driver follow the steps below:

  1. In the search bar for Windows, type Device Manager.
  2. Open Device Manager
  3. Select Display Adapters in the list of Drivers to unfold the options.
  4. Right-click on your graphics card driver.
  5. Select Update Driver.
  6. Click on Search automatically for drivers

The driver is responsible for allowing a computer to independently control video cards, computer applications, sound cards, and other hardware. You can manually update your PC’s drivers if you have a good understanding of what they are.

However, the driver updater and installation software is the best alternative for ensuring that there are no more missing links. A tool like Fortect Driver Updater not only downloads and installs drivers, but also helps you manage them by resolving problems, backing up, and restoring them. For many reasons, it is worthwhile to use it!

⇒ Get Fortect Driver Updater

3. Clean-boot Windows

  1. Press the Windows key + R keyboard shortcut, which opens Run.
  2. Type msconfig into Run, and click the OK option.

    MSConfig Parsec Error 15000
  3. Click the Selective startup radio button.
  4. Uncheck the Load startup items option.
  5. Click Load system services and Use original boot configuration to select those options.
  6. On the Services tab, click Hide all Microsoft services to select that setting.

    The Services tab Parsec Error 15000
  7. Click the Disable all option to turn off remaining third-party services.
  8. Select the Apply option.
  9. Click OK to exit.
  10. Select the Restart option on the dialog box window that opens.
  11. Try running Parsec after clean-booting Windows.

Note: You can restore the original boot configuration by selecting your original Selective Startup settings and enabling all services again via the MSConfig window.

4. Turn off the Game bar

  1. Click Windows 10’s Type here to search button on the left side of the taskbar.
  2. Input the keyword Game bar in the search text box.
  3. Click Game bar settings to open the window shown directly below.

    The Record game clips option Parsec Error 15000
  4. Toggle the Record game clips, screenshots and broadcast using Game bar option off if it’s one.

5. Turn off NVIDIA Shadowplay

  1. Open Windows 10’s search utility.
  2. Input NVIDIA GeForce in the search box.
  3. Open it.

    GeForce Experience Parsec Error 15000
  4. Click the Get started button, and log in to GeForce if required.
  5. Click the Settings button in NVIDIA GeForce.

    Share option Parsec Error 15000
  6. Toggle the Share button off if it’s on.

6. Turn off background recording

  1. Press the Windows key + S key at the same time.
  2. Enter the keyword background recording in Windows 10’s search box.
  3. Click Game Captures maximum recording length to open Settings as shown in the shot directly below.

    Captures tab Parsec Error 15000
  4. Then toggle the Record in the background while I’m playing a game option off.

7. Lower the resolution on the host PC

  1. Open the search utility in Windows 10.
  2. Type resolution in the search box.
  3. Click Change the resolution of the display in the search results to open the Settings tab in the shot directly below.

    Display tab Parsec Error 15000
  4. Select a resolution of approx 1,280 x 800 (or 1280 x 960) on the Display resolution drop-down menu.

    Display resolution drop-down menu Parsec Error 15000
  5. Note: This fix is more specifically for PCs with AMD APUs that might not be able to handle the highest resolutions.

The above resolutions could fix Parsec error code 15000 for a lot of users. However, error 15000 can also arise for users with unsupported GPUs.

To ensure that this is not the case for you, check if Parsec supports your GPU on its Hardware page.

Which of these solutions were best suited for your particular scenario? Leave us a comment in the dedicated area below.

Tumblr blog only opens in dashboard [Quick Fix]

Tumblr blog only opening up on the dashboard is not a fault from your end or Tumblr’s; it’s by design.

The great thing about the Tumblr dashboard is that you can do anything from there.

You can publish new posts right from the dashboard, view images, message other users, and explore your feed.

However, one can feel that Tumblr is asking too much of its dashboard. When scrolling down your feed, if you try to open a blog, you see it open also on the dashboard instead of a new screen. You cannot modify any setting to change this.

But we’ll show you some workarounds to avoid Tumblr blogs only opening in your dashboard.

Why do some Tumblr blogs open in the dashboard and how to fix it?

The primary reason why Tumblr blogs only show up on the dashboard is that the developers wanted to keep everything within the dashboard.

Blogs only opening up in the dashboard sidebar is also useful if you only want to glance through the blog.

However, it gets annoying if you want to read the blog because there’s insufficient real estate on the dashboard sidebar, and the page is not responsive.

This is a recipe for poor user experience.

To stop this from happening, you don’t need to use Safe Mode. Simply open the blog in a separate tab or window.

How to open Tumblr blogs in a new tab or window

1. Using the context menu

tumblr-blog-only-opens-in-dashboard-context-menu

You can stop Tumblr blogs from showing up on the dashboard by opening them in separate tabs or windows.

To do this, instead of clicking away on the blog, right-click on it and select Open link in new tab from the context menu.

If you’d prefer to open blogs in entirely new windows, right-click the blog and hit Open link in new window.


2. Open in new tab with the middle mouse button

tumblr-blog-only-opens-in-dashboard-middle-mouse-button

Stopping Tumblr blogs from only coming up on the dashboard is easiest if you have a mouse with the middle wheel/button.

Place the cursor on the blog and press the middle button to open the blog in a separate tab.


3. How to open Tumblr blogs in new tab on mobile

tumblr-blog-only-opens-in-dashboard-safari-new-tab

If you’re browsing Tumblr from a smartphone, tap and hold the post. Then tap on Open in New Tab (Chrome browser) or Open in Background for Safari browser.


4. Force every link to open in a new tab (Chrome)

tumblr-blog-only-opens-in-dashboard-extension-fix

  1. Open the Chrome browser.
  2. Add the Long press new tab extension to Chrome.
  3. Open the extension page and configure it how you like for Tumblr.

Tumblr blogs only showing up on the dashboard was intended to improve user experience.

However, if the complaints are anything to go by, this feature has done quite the opposite.

The good news that this simple quick fix will get Tumblr working how you want it to.

[wl_navigator]

How to factory reset Amazon Firestick [Quick Guide]

Factory resetting your Firestick resolves lagging issues and eliminates bugs. However, it also erases your settings and data.

Therefore, if you are only looking to speed improve the device’s performance, you can try out other options first.

For example, clearing your cache, data, and cookies are recommended steps to take before going ahead to factory reset the Firestick.

If these don’t work, or you want to factory reset the device for other reasons, continue to the next section.

How do I factory reset the Amazon Firestick?

1. Factory reset Firestick with remote

factory-reset-firestick-with-remote

  1. Eject all connected external storage devices.
  2. Press the Back button and the right directional button.
  3. Hold both buttons for around 10 seconds.
  4. Select the Continue option on your TV screen.

By default, if you don’t click on Continue in step 4 above, the device proceeds with the factory reset on your Firestick.


2. Factory reset Firestick with computer

factory-reset-firestick-with-compter

  1. Download and install an Android emulator on your PC.
  2. Launch the emulator.
  3. Open Google Play Store.
  4. Search for the Fire TV remote app and download it.
  5. Configure the downloaded app.
  6. Specify the device that you want to factory reset.
  7. Click on the gear icon on the left-hand side of your screen.
  8. Click on the system.

3. Factory reset Firestick without pin

factory-reset-firestick-without-pin

  1. Visit www.amazon.com/pin.
  2. Log in to your Amazon account.
  3. Switch to the Parental Controls tab.
  4. If you’ve never set a PIN, enter one under Prime Video PIN.
  5. Otherwise, click on the Change button beside your hidden PIN.
  6. Enter a new PIN.
  7. Hit Save.

Note: At the end of the Parental Controls page, ensure to choose your Firestick to apply the parental control settings. Without doing this, the PIN won’t change for the Fire TV Stick.


4. Factory reset Firestick without remote

 factory-reset-firestick-without-remote

You can factory reset Firestick without remote with either a USB mouse or smartphone app acting as the remote. If you have a USB mouse, connect it to your device and continue from step 3 below.

Otherwise, download the Fire TV app on Android. For iOS devices, get it from this link. Follow the steps below to use the Fire TV app.

  1. Download the Fire TV app on your smartphone.
  2. Connect your smartphone and your Firestick to the same network.
  3. Tap on the Fire TV Stick when you see it in the app.
  4. Find the 4-digit code that shows up on your TV screen.
  5. Enter the 4-digit code on the app.
  6. Use the app as a remote controller for the next steps.
  7. Navigate to Settings.
  8. Go to System.
  9. Select Reset to Factory Defaults.

To avoid having to do a factory reset on Firestick, it’s best you limit the number of apps you download onto the device. The more free space, the smoother the Firestick runs, and the fewer errors you incur.

Also, if your Fire TV Stick has an SD card slot, you may want to make use of that when storing data.

[wl_navigator]

NTT creating security tool for virtual workplaces in Teams 

COVID-19 continues to negatively impact various aspects of social, school, and business life. Speaking of business, the pandemic has contributed to the rise in cyber attacks aimed at enterprise computing systems, especially the cloud-based ones, such as Microsoft Teams.

In response to such threats, London-based NTT Data announced plans to deliver a security solution for Microsoft Teams users in physical offices and virtual workplaces.

Microsoft Teams security solution by NTT

The use of remote working or collaborative tools rose sharply a few months after the onset of COVID-19.

Of course, as we speak, organizations are now planning for life back in physical offices. Nonetheless, many have discovered new possibilities with remote workforce collaboration.

So, we don’t expect a sharp decline in the use of platforms like Microsoft Teams once workers return to physical offices.  Instead, you’ll most likely witness the rise of the distributed workforce.

A recent NTT survey of workers backs this notion up. According to the study, 56% of office-based workers expect remote working to remain an option even after physical offices reopen.

That’s why companies like NTT Data are building security solutions for physical office use cases and remote working in Teams.

There is currently unprecedented demand for Microsoft Teams expertise as companies have transitioned to remote working. The next step is to build infrastructure to support the future workplace, a framework that will allow companies to return to the office and seamlessly blend remote working with working in the office.

Since Teams is a Microsoft 365-based app, it comes with several security features out of the box. These include at-rest and in-transit data encryption and Advanced Threat Protection.

However, enterprises may opt to engage third-parties to help with the implementation or reinforcement of Microsoft Teams security. This is where providers like NTT come in.

Is your organization ready for the transition to a distributed workforce? Let us know how well prepared you are in the comments box below.

[wl_navigator]

Tweet is unavailable: What does it mean and how to fix it?

Reading tweets on your timeline, you must have come across tweets that are unavailable.

Unlike the Twitter internal server error, the tweet is unavailable placeholder message is mostly not an issue with your account or the tweet.

In most cases, the message is Twitter protecting your privacy or that of the Twitter user who sent the tweet.

What does this message mean and how do you make tweets available? Read this article to the end to find out.

Why does the tweet is unavailable error appear?

You are trying to view a deleted tweet

The most common instance when you see this tweet is unavailable placeholder message is when the tweet has already been deleted.

Twitter doesn’t just delete the tweet; users will know that something was tweeted but won’t know what it was.


The poster of the tweet blocked you

this-tweet-is-unavailable-blocked-user

Another instance when Twitter hides a tweet from you is when you’re blocked by the Twitter account from which the tweet was sent.

When the Twitter user blocks you, the placeholder message says This account owner limits who can view their Tweets. 

Unlike in the case of Facebook blocks, you can find their profile, but that’s as far as you can go.


You blocked the poster of the tweet

Blocking a Twitter user means that you no longer want to see their content. Hence, Twitter restricts both users from viewing each other’s content.


The tweet is from a private profile

The microblogging platform, Twitter, has around 321 million active users so, it sometimes gets too noisy.

Thankfully, you can set your account as private.

When you operate a private account, your content is only shown to users that follow you.


A blocked user is tagged in the tweet

Hiding the content of blocked users isn’t enough to keep them from showing up on your timeline.

If someone you blocked is tagged on a tweet, the tweet will be unavailable to you.

This is Twitter‘s way of protecting your privacy from users you blocked.


How can I remove the tweet is unavailable message?

1. Ask the poster of the tweet to unblock you

this-tweet-is-unavailable-ask-to-unblock

If the tweet is unavailable meaning that the Twitter user blocked you, you can reach out to them to ask them to unblock you.

When they do unblock you, their content will become available to you.

Since you can send them a direct message or post on their timeline, you can go through a mutual friend or follower.


2. Unblock the Twitter user who posted the tweet

If you realize that the reason why the tweet is unavailable to you is that you blocked the Twitter user, you have to unblock them to see the content.

Not only will this tweet be available to you; you can see all their content if they’re not blocked.

When you block a Twitter user, the follow button says Blocked. Simply tap or click on this button to unblock the account.


3. Send the Twitter user a follow request

This solution will make the tweet available if the user protects their tweets. To follow a public profile, hit the Follow button.

But when it comes to private profiles, after clicking Follow, you have to wait until they approve your request.

When you finally follow them, you will no longer see unavailable tweets from the Twitter user.


4. Contact Twitter support

this-tweet-is-unavailable-twitter-support

Finally, if none of these work, it could mean that your account is being penalized by Twitter. The platform limits your account especially when tweets from several users all show as unavailable.

You can either visit help.twitter.com, call 415-222-9670 (toll-free), or tweet @TwitterSupport, stating your case.

If a resolution is possible, then it’s only a matter of time before tweets become available to you.

This unavailable tweet placeholder only applies to tweets that have no interactions (retweets, likes, or replies).

An example is when a user quotes a tweet, which got deleted after the quoting. Twitter tells you that this quoted tweet is unavailable if you want to view the original tweet.

The same applies to replies and retweets.

[wl_navigator]

Microsoft 365 users: beware of SharePoint phishing attacks

If you’re a Microsoft 365 user, chances are you’ve used SharePoint to share and manage official documents and content.

The app, which recently received a Yammer integration update, comes in handy when you need to remotely collaborate on business files. Sadly though, threat actors know this too. So they’re now sending spoofed SharePoint emails to unsuspecting employees as part of a phishing campaign.

Microsoft 365 user credentials targeted in phishing attacks

The folks at Abnormal Security uncovered a phishing campaign that targets corporate SharePoint users. Unfortunately, the end game for the attackers is to collect unsuspecting users’ Microsoft 365 credentials.

They start by sending spoofed SharePoint emails addressed to no specific person. By not naming any individual as the recipient, the threat actors aim at tricking as many victims as possible into supplying their Microsoft 365 login details.

This attack impersonates an automated message from Sharepoint to send phishing emails. The email itself is not addressed to any specific individual, and is meant to cast a wide net to phish for employees credentials.

However, unlike previous similar attacks, this phishing campaign doesn’t create any sense of urgency to get the target to act quickly.

According to Abnormal Security, the attackers designed the phishing emails to appear to originate from within the target organization.

As you may expect, each email has a malicious link. And if you click on the link, you end up on a fake Microsoft 365 landing page. The link may take the user to a PDF download page that redirects to another site, in other cases.

Whichever way the link goes, the user ends up on a site that requires Microsoft 365 security credentials to sign in.

Phishing attacks targeting the users of Microsoft 365 or other cloud-based or on-premises computing tools are a persistent cybersecurity issue. Be sure to guard your IT systems with all you’ve got, from antivirus solutions to Microsoft Defender ATP.

For any cybersecurity-related problem or question, write us a message in the comments box below.

[wl_navigator]

How to restore previous session on Internet Explorer

Resuming browsing from the last session is extremely useful and time-saving. Most popular browsers have a restore or history button to help you, although the initial session still opens in a new page.

This tutorial, on the other hand, is helpful to force Internet Explorer to start from the last session.

This should restrict all users on the same PC, so that they can’t change the settings on their own, and start Internet Explorer from the previous session.


How do I restore the last IE session?

  1. Use Group Policy
  2. Edit Windows Registry key
  3. Use Internet Properties

1. Use Group Policy

  1. Press Windows Key + R, type gpedit.msc in the Run dialog box and hit Enter to open the Local Group Policy Editor.
  2. In the left pane navigate to: User Configuration /Administrative Templates /Windows Components /Explorer /Internet Control Panel /General Pageinternet explorer group policy
  3. In the right pane of Local Group Policy Editor, go to Start Internet Explorer and double-click it.
  4. Now select Enabled and click Apply then OK.
  5. Close the Local Group Policy Editor and see the changes you’ve made by running Internet Explorer.

2. Use the Registry

  1. Press Windows Key + R, type put regedit in the dialog box and hit Enter to open the Registry Editor.
  2. In Registry Editor in the left pane go to: HKEY_CURRENT_USER\Software\Policies\Microsoft\Internet Explorerinternet explorer regedit
  3. In the left pane again, right-click on the Internet Explorer key, select New -> Key. Name the new key ContinousBrowsing.
  4. Now select it and come to its right pane.
  5. Right-click and select New -> DWORD Value, name the DWORD as Enable.
  6. Double-click on it, and you’ll get Edit DWORD Value box:
  7. In the Value data field enter 1 in order to force Internet Explorer to start from the previous session.
  8. Click OK and close the Registry Editor and restart your computer to apply the changes.

3. Use Internet Properties

  1. Type internet properties in the home screen search box and double-click on the first result.
  2. Now, go to the General tab and locate the Startup feature.
  3. Check the option Start with tabs from the last session.
internet explorer restore last session

If you consider switching to an alternative browser and replace the outdated Internet Explorer, we strongly recommend Opera One.

This is a free lightweight and fully-customized browser, that you can download and set up in just a couple of minutes.

It comes with a multitude of features to help you navigate between various tabs, workspaces, and built-in social media chat apps. The dedicated add on library contains tens of other options that you can get for and use for free.

Opera One is available for PC, mobile (including older phones), Mac, or Linux. Besides, you can synchronize the browser across all your devices, to easily manage all the settings.

Starting from the basic version, you can bring your own flavor to the browser, adding icons, sidebars, workspaces, and bookmarks for ease of access and a better-organized workflow.

Add the incorporated VPN and the built-in AI, and you have the perfect browser.

Opera One

Take your browsing experience to the next level with this amazingly fast and highly customizable browser. You won’t regret it!
Free Download Visit website

Keyboard shortcuts not working in VLC [Mac, Windows 10/11]

VLC is a popular video player available on the Windows and Mac platforms. The VLC shortcuts, also known as hotkeys, allows the users to perform quick actions without using the mouse.

That being said, some users have reported having encountered the keyboard shortcuts not working issue in VLC.

VLC player may ignore your shortcut keys if the keys are not assigned correctly. In some instances, it can also happen due to a glitch in the media player.

In this article, we explore a few troubleshooting steps to help you resolve the keyboard shortcuts not working in the VLC issue on your Windows and Mac systems.

How can I fix the hotkeys not working in VLC?

1. Check VLC hotkeys preference

Keyboard shortcuts not working VLC

  1. Launch the VLC player on your computer.
  2. Click on Tools.
  3. Select Preference from the options.
  4. At the bottom, make sure the Simple option is selected under Show settings.
  5. In the Preference window, open the Hotkeys tab.
  6. Go through the assigned hotkeys and check if you have correctly assigned the keyboard shortcut for the function you want to execute.
  7. Click on Save.

Once you have saved the hotkey changes, close the VLC player. Use Ctrl + Q for Windows, and Cmd + Q for Mac.

Right-click on the taskbar and select Task Manager. Find any and all instances of VLC player and end the process.

Relaunch the VLC player and check if you can use the keyboard shortcuts are working.

At times, not quitting the VLC player after making changes can prevent the changes from being applied. Simply relaunch the app and check for any improvements.


2. Update VLC player

Keyboard shortcuts not working VLC

  1. Launch the VLC media player.
  2. Click on Help.
  3. Select Check for Updates.
  4. VLC will scan for pending updates and prompt you to install if an update is available.
  5. Read the description and click on Yes.
  6. VLC player will download the update and prompt you to install it.
  7. Click on Install.
  8. Play any media file and check if the VLC shortcuts are working.

VLC releases new update fixing minor bugs periodically that can resolve glitches and bugs reported by the users.


3. Check your keyboard layout

Windows 10

Keyboard shortcuts not working VLC

  1. Click the keyboard layout button from the notification area. Keyboard icon or ENG
  2. If you are in the US, select English (United States) US Keyboard.
  3. English (United States) US Keyboard and English (United States) US International Keyboard has a different layout.
  4. Once you have selected the right layout, open the VLC player.
  5. Play any media file and check if the shortcuts are working.

For many users, changing the keyboard layout has fixed the VLC hotkeys issue. Different keyboard layouts also have different hotkey functions. If you have multiple keyboard layouts installed, check if you are using the correct layout to fix the issue.

Mac

Keyboard shortcuts not working VLC

  1. Open the Apple menu.
  2. Select Preferences.
  3. Select the Keyboard.
  4. Open the Input Setting tab.
  5. Check the box ‘Show input menu in menu bar’.
  6. From your menu bar, click the Input icon and select your regular layout.

 4. Run keyboard troubleshooter

VLC hotkeys not working

  1. Press the Windows key + I.
  2. Choose Windows Update & Security.
  3. Scroll down and select Troubleshoot from the left panel.
  4. Scroll down and choose Keyboard.
  5. Click on the Run the troubleshooter button.
  6. Let windows troubleshooter find and fix any issue with the keyboard.

Running the Windows 10 keyboard troubleshooter can fix any compatibility issues with the keyboard and computer.


5. Reinstall VLC media player

VLC hotkeys not working

  1. Press the Windows key + R.
  2. Type appwiz.cpl and click OK.
  3. Select VLC from the list of installed apps.
  4. Select Uninstall.
  5. Click Next to complete the process.
  6. Once uninstalled, download and install the VLC media player from the website.

The keyboard shortcuts not working in the VLC issue usually occur due to incorrect hotkey assignment or wrong keyboard layout selection. Follow the steps in the article to troubleshoot the issue.

[wl_navigator]

FIX: Crunchyroll Server Error on Xbox One

Crunchyroll is a popular American anime, manga, and dorama streaming platform available on Xbox One and other platforms.

However, several Xbox users have reported the Crunchyroll server error when trying to open the app on their console.

The Crunchyroll is experiencing a server error that seems to be triggered by a bug in the app. Users have suggested that force closing the app seems to have resolved the issue.

In this article, we explore a few known solutions to help you resolve the Crunchyroll server error on your Xbox One.

How can I fix Crunchyroll experienced a server error on Xbox One?

1. Force close and restart the app

Crunchyroll server error
  1. Make sure the Crunchyroll app is open.
  2. Press the Xbox button on your controller.
  3. Make sure the Crunchyroll app tile is highlighted.
  4. Press the Menu
  5. Scroll down and select Quit.
  6. Relaunch Crunchyroll and check if the server is resolved.

When the user closes the game or app on Xbox, the console pauses the game or media to be able to resume without having to restart the app again.

However, Crunchyroll seems to have an issue with the pause/resume functionality. So, force closing the app is a working workaround to resolve the error.

Make sure to quit the Crunchyroll app before turning off your Xbox to avoid getting the error.

2.  Check for an app update

Crunchyroll server error
  1. From your Xbox home screen, open My games and apps.
  2. Under Games & apps, select Updates.
  3. Download and install any update pending for Crunchyroll.
  4. If no update available, press the B button go back to My games and apps.
  5. Select the Apps tab.
  6. Highlight the Crunchyroll app.
  7. Press the Start button and select Manage.
  8. Scroll down to Updates.
  9. Download and install any pending updates for the app.

Crunchyroll seems to have released an update to fix the Crunchyroll is experiencing a server error. Download and install the update and check for any improvement.

3. Use VRV app on Xbox One

Crunchyroll server error

If the issue persists, you can download and install the VRV app on your Xbox One. VRV is a fan-first streaming service that offers anime, sci-fi, tech, and more. Crunchyroll develops VRV, thus allows you to link your Crunchyroll account to the app to maintain premium access.

Download and install the VRV app on your Xbox One. Link your Crunchyroll account to VRV, and you can watch your favorite manga or anime series without the server error.

⇒ Get VRV

4. Check for network issues

Perform a network restart

crunchyroll experienced a server error xbox one
  1. Make sure the router and modem is powered on.
  2. Pull the power cable to turn off the router.
  3. Leave the modem idle for a minute.
  4. Connect the power cable and turn the router on.
  5. Connect your Xbox One to the network and launch the Crunchyroll app.

If the issue persists after performing a network restart, try a network reset to fix the issue.

Reset router to factory default

crunchyroll experienced a server error xbox one
  1. Locate the reset button on the back of your router.
  2. Make sure the router is powered on.
  3. Use a paper clip or similar object to press and hold the Reset button for 15 seconds.
  4. Wait for the router to reset and power back on fully.

This should reset the router to its default factory setting. Connect your Xbox One to the router and check if the Crunchyroll experience a server error is resolved.

Note that resetting your router will wipe out off of your customized settings, including the router username and password.  You may have to configure port forwarding and proxy setting from scratch after resetting the router.

The Crunchyroll server error on Xbox One occurs due to a bug in the app. To fix the error, make sure always to force quit Crunchyroll before shutting down your Xbox One.

The new Tasks app is now rolling out in Microsoft Teams

After a delay, and three months after an initial announcement, Microsoft is finally rolling out the new Tasks app in Microsoft Teams. The new experience is powered by both Planner and Microsoft To Do and is essentially a rebrand of the pre-existing Planner app inside of Microsoft Teams, creating one central hub for all things teamwork.

According to Microsoft, today’s rollout is a bit of a gradual one. The company says that it will be coming to a small group of users starting today, with a continued rollout through September. Tasks for Teams mobile, meanwhile, will not be available until the desktop rollout is finished.

Please be aware that, currently, the name of the Planner app inside Microsoft Teams will not change. Microsoft says that as they continue to roll out the new Planner experience in Teams desktop, the app name will initially remain Planner, then change to Tasks by Planner and To Do, and then change to Tasks. Mobile users, meanwhile, will always see the app as Tasks.

As a reminder, some features in the new Tasks app include a new list view, and the ability to edit multiple tasks at once. The list view includes a traditional board, charts, and schedule view from Planner, with the option for Lists, too. It also adds a bulk editing capability, where you can edit multiple tasks simultaneously, for changing progress, priority, due dates, and more.

Users of Power Automate can also enjoy integrations in the new Task app, to surface tasks created in other apps in Tasks in Teams. Finally, companies can use task publishing to create tasks at the corporate level and push those tasks to targeted locations of their Firstline Workforce.

You can check to see if Tasks is available for you by clicking the ellipses in the Teams sidebar and choosing Planner. This all part of a new movement by Microsoft dubbed as “Tasks in Microsoft 365.” With it, Microsoft is aiming at the coherence, intelligence, and integration principles.

Hit ID@Xbox video game Cuphead gets surprise PlayStation 4 release

Cuphead, one of the most successful ID@Xbox titles in recent years is being released on PlayStation 4 today. The run and gun adventure left a big mark since its release on Xbox One and Windows in 2017 and sold more than 5 millions copies to date. This is quite exceptional for an indie studio to get so much success with their first game, though Cuphead is a true work of art with its unique art style that pays homage to old-school cartoons.

Sony’s PlayStation 4 went to sell more than 100 million units during this console generation, so skipping the lead platform would have been a big missed opportunity for developer Studio MDHR. Before its PlayStation 4 release today, Cuphead has been previously ported on macOS and the Nintendo Switch as well. The indie studio also said today that it’s still working on Cuphead’s first DLC, The Delicious Last Course, which still has no released date.

Last but not least, it was announced today that the Xbox One version of Cuphead will receive a free update that will add a digital art gallery, behind-the-scenes commentary features, and playable soundtrack to the game. “This update is still in the early planning stages, and we’ll be taking the time to get things just right, but we will be sure to share more when we have something for you that meets the level of care and quality we always strive for,” the developers said today.

If you have yet to play it, Cuphead is just $19.99 on the Microsoft Store and it includes Xbox Play Anywhere support. It’s definitely a game that we would like to see coming to Xbox Game Pass one day, especially since it used to be a console exclusive on Xbox.

Cuphead
Cuphead
Developer:
Studio MDHR
Price:
$19.99

iCloud Keeps Popping up on Windows 11? How to Turn it Off

Many reported that iCloud keeps popping up on Windows 11, and this can be rather tiresome because the window starts appearing as soon as your PC starts.

Luckily, there are a couple of solutions that you can use to fix this problem on your PC, so keep on reading.

Why does my computer keep asking me to log into iCloud?

This is most likely due to iCloud configuration files. The software might not be properly configured, and this is why it’s asking you to log in constantly.

How do I stop the iCloud window from popping up?

Before we start:

  • You might be able to fix the problem by updating Windows or by entering your iCloud credentials into the prompt.

1. Disable iCloud from startup

  1. Press Ctrl + Shift + Esc to open Task Manager.
  2. Navigate to the Startup tab.
     
  3. Locate iCloud on the list, select it, and choose Disable.
    disable to fix hmonitor.exe issue

2. Reinstall iCloud

  1. Press the Windows key + X and choose Installed apps.
  2. Next, select iCloud, click the three dots next to it, and choose Uninstall.
  3. Follow the instructions on the screen to complete the process.
  4. If there are any more iCloud apps available, remove them as well.
  5. Press Windows key + R and enter %programdata% programdata run command
  6. Locate and remove all iTunes and iCloud folders. If you don’t have other Apple software, remove Apple folders as well.
  7. Optional: Delete any iCloud folders from the following directories:
    C:\Users\[YourUser]\
    C:\Users\[YourUser]\Pictures
  8. After that, install the application again.

To see how to do that, visit our guide on how to download and install iCloud for Windows 11.

What happens if I delete iCloud from my computer?

All files that are already synced will remain in the cloud. However, files from iCloud Drive Folder will get deleted, so be sure to copy them to another location.

If iCloud keeps popping up on Windows 11, you can try signing in or removing the application and all its associated files.

This isn’t the only issue, and many reported that iCloud is not syncing. To learn more about iCloud, don’t forget to check our guide on how to download all photos from iCloud.

Did you find these solutions helpful? Share your solutions with us in the comments section.

Common Microsoft Word problems and how to fix them

Microsoft Word is one of the most commonly used Microsoft 365 programs. It not only has some cool templates, but it’s also used to type up important documents, letters, and a whole lot more. Sometimes, though, Word might not work as expected, and you might end up getting an error code or an error message. Here’s a look at some of the most common Word problems, and how you can fix them.

My file won’t open

Trying to open a file but Word isn’t getting along? In this case, Microsoft Word might give you a message saying that it experienced an error while trying to open the file. This usually occurs when you don’t have the permission to open the file, or if the file has moved from its original location or has been deleted.

To fix this, check in the File Explorer or run a search in Windows 10 to see where the file has gone. To unlock the file and get the permission to open it, meanwhile, go to the location where it is saved, right-click the file, and then choose properties. From there, you’ll want to click the unblock option.

Microsoft Word crashes or freezes

Another common issue with Microsoft Word is that it might crash or freeze when opening a document. This might occur when Word is having some trouble reading the contents of a document, or if the document has a lot of images and text.

In most cases, it’s best to wait and let Word try to resolve the problem on its own. At the risk of losing your document, you also can try to force quit word using the task manager by pressing CTRL+ALT+DEL, and clicking Task Manager, looking for Microsoft Word, and then clicking End Task. This will give the program a fresh start. In most cases, Word will try to auto recover the document as you last had it and will open the Document Recovery task pane. Again, though, this is the last resort.

If Word continues to have a problem and still gives you error messages, you get a message saying that the document caused a serious error. In this case, you might need to reset Microsoft Word completely. To do this, head to the Windows 10 Start Menu and type Add or Remove Programs. Then, choose Office or Microsoft 365 from the list, followed by Modify. You should get the option for Quick Repair. Choose, this, and Word Will be reset.

Microsoft Word is running slow

The final issue on our list has to do with Microsoft Word running slow. This could be it not picking up your keyboard input in time, or images or other menu items taking a while to load. In most situations, we recommend to use the Quick Repair option we described above.

However, as an alternate, you also might want to try to disable extra add-ins. These are meant to boost your experience, but can also slow things down. You can disable these by clicking the File menu, followed by Options, and then Adds Ins. Click an add-in, and then the Go button. You’ll then be able to disable it by clicking Remove.

Contact Microsoft Support for help!

If all else fails, and you run into a problem with Word, Microsoft is here to help you. As covered under the Microsoft 365 subscription, you always can contact Microsoft for help. Simply visit this support page, and start a chat.

FIX: Instagram action was blocked, try again later

The Action Blocked message appears on Instagram accounts that have been blocked for suspected spam. Whether you are a spammer or not, the error message can be equally annoying to every Instagram user.

The Action Blocked message usually prevents users from performing a specific action such as liking a picture or sharing Instagram posts.

In this article, we explore a few troubleshooting steps to help you resolve the Instagram action blocked message so that you can continue using your favorite social media app without any issues.

How can I fix the action blocked error on Instagram?

1. Change your network preference

Instagram action blocked

If you experience this action is blocked Instagram error when on Wi-Fi, try changing the network preference.

Switching to mobile data seems to have helped many users bypass the restrictions. This should work in case Instagram has blocked your IP address and not your account.

Disable VPN

Instagram action blocked

If you are using a VPN, try disabling it. Due to the change of location, Instagram may suspect the account to be spam and block some actions temporarily.

Stop all Instagram activities temporarily

If switching to mobile data did not help, maybe time to reconsider your Instagram usage. Stop performing some Instagram activities such as liking and commenting for 24 hours.

Giving some rest to your account will reinstate the account standing and allows you to carry on with your usual Instagram activities.


2. Link to Facebook and other social media account

Instagram action blocked

  1. Launch the Instagram app.
  2. Tap on your Profile icon.
  3. Tap on three horizontal lines.
  4. Select Settings.
    instagram action blocked creating account
  5. Tap on Account.
    instagram action blocked creating account
  6. Select Linked Accounts.
  7. Tap on Facebook.

Login with your Facebook credentials and then authorize Facebook to access your Instagram account. Once done, relaunch the app and check if the Instagram follow action blocked error is resolved.

Uninstall third-party apps

One of the common reasons for Instagram account action block is the use of third-party apps to automate likes or get followers. Uninstall any such third-party app and revoke the authorization if you have given it to any app or service to manage your account.

Try accessing the account from another device

If you haven’t tried already, it is worth a shot. Sign out of your Instagram account on your current device. Log in to your Instagram account on another device. Try performing the blocked action to see it works.


3. Reinstall Instagram

instagram action error

  1. Open Settings.
  2. Select All Apps.
  3. Search and open Instagram.
  4. Tap on Uninstall and confirm the action.
  5. Open Play Store and search for Instagram.
  6. Install the app and check for any improvements.

If you can access the account without error on a secondary device, try to reinstall the app to resolve Instagram won’t let me change my username action blocked issue.

Report to Instagram

Instagram action blocked

  1. Launch the app.
  2. Take a screenshot of the error you are seeing and save it.
  3. Tap on your Profile.
  4. Tap on three horizontal lines.
  5. Select Settings.
  6. Select Help.
  7. Tap on Report a Problem.
  8. Select Report a Problem.
  9. Explain your issue and attach the screenshot.
  10. Tap on Submit to send your appeal.

If you think your account is flagged by mistake, you can report to Instagram to get your account reinstated. You can appeal to Instagram from your account’s settings menu.

Instagram will review the request and reply to the same in a few days to a few weeks.

Instagram action blocked can occur when creating an account, or changing usernames. Follow the steps in this article, and hopefully, you can fully restore your Instagram account in no time.

[wl_navigator]