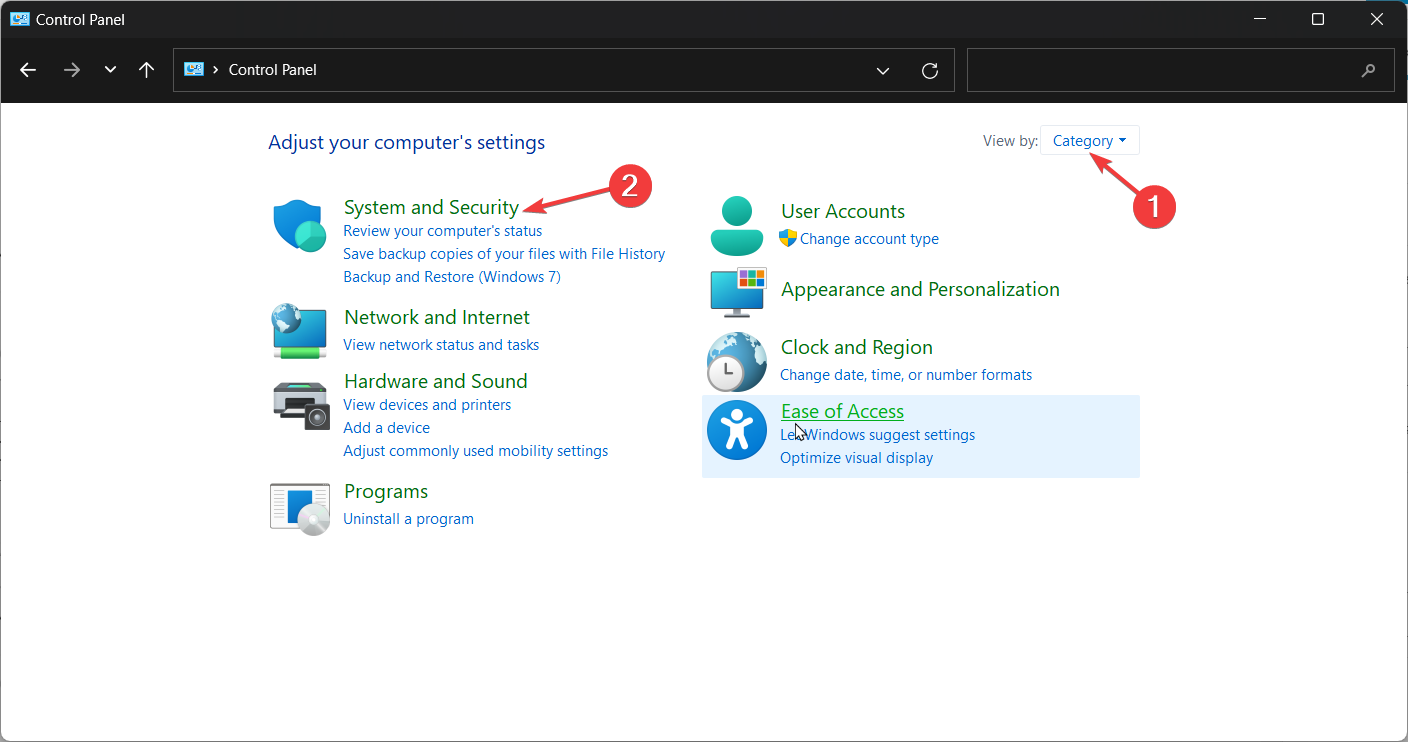
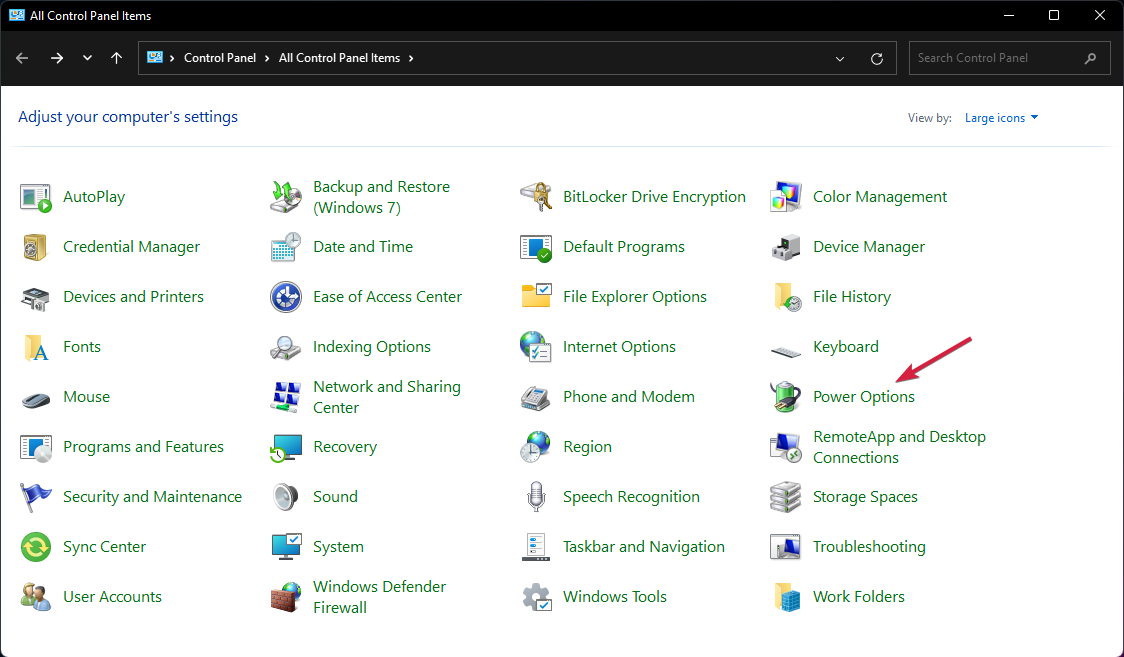
If you see the Wi-Fi logo with an exclamation symbol on the taskbar and then you notice in the connection details the message Connected, no internet or No internet, secured, that means you can connect to the hotspot but the router cannot reach the internet to establish the connection with your PC. In case you didn’t already block the hotspot on Windows 11, check if other devices can access the hotspot to determine if the problem is from your Windows 11 device or the router.
How do I fix a hotspot without internet on Windows 11?
1. Check the router and contact your ISP
First, restart the router. Turn it off from the dedicated button or remove the power cable, wait at least 10 seconds, then turn it back on.
Watch the router after restart and see if there are any red lights blinking under LOS or any other.
If any red lights are blinking, check if the cables are connected properly.
In case the problem persists, contact your ISP to see if there are any disruptions in your area.
Also, check if your data plan is still active.
2. Turn off the VPN
If you’re using a VPN on Windows 11, turn it off temporarily to see if the connection is restored. Sometimes, they can interfere and block your connection.
In case you’ve set up a VPN software for the router, disable that too temporarily and check whether other devices are able to connect through the same hotspot.
3. Run the network troubleshooter
Press Win + I to start Settings.
Go to System > Troubleshoot > Other troubleshooters.
Find Network and Internet and click Run to start the troubleshooter. Follow the prompts to diagnose and fix network issues.
The network troubleshooter will diagnose your connection and suggest proper solutions based on the found issues.
4. Check the hosted network settings
Type cmd in Windows Search and select Run as administrator in the search results to start Command Prompt with elevated privileges.
Type the following command and press Enter: netsh wlan show hostednetwork
Ensure that the hosted network mode is set to Allowed. If not, enable it using: netsh wlan set hostednetwork mode=allow
5. Reset the network settings
Press the Win + I keys to open Settings.
Go to Network & Internet > Advanced network settings > Network reset.
Click Reset now and confirm. This will reset all network adapters and settings to default.
This method will restore the network settings to default for all the adapter in case they were changed by mistake or by a third-party software.
6. Flush the DNS and reset TCP/IP
Open Command Prompt as an administrator by typing cmd in the Start menu, right-clicking Command Prompt, and selecting Run as administrator.
Type the following commands one by one and press Enter after each:
ipconfig /flushdns
ipconfig /release
ipconfig /renew
netsh int ip reset
netsh winsock reset
Flushing the DNS is another way of resetting the network settings and renewing your IP, giving your PC for a fresh connection.
That’s it, if your router is working fine, with the solutions above you will be able to clear the Windows 11 hotspot without internet issue on your PC. However, this is typically a router or ISP connection issue and you should resolve it by applying the first solution.
Applications use various DLLs, and if api-ms-win-core-localization-l1-2-0.dll is missing, applications that depend on it won’t be able to run at all. Luckily, there are ways to fix this problem, and this guide will show you how to do it.
What can I do if api-ms-win-core-localization-l1-2-0.dll is missing?
Api-ms-win-core-localization-l1-2-0.dll error will prevent applications from running, but in most cases, it can be fixed by installing the missing components.
The libvorbisfile.dll is an error that may occur when you try to install a game. It may also prevent you from launching the specific game because the game files are corrupt and you’ll experience game crashes during startup.
How do I fix the libvorbisfile.dll error?
1. Use a third-party DLL fixer
The libvorbisfile.dll being a non-system file will most likely be triggered by a mismatch in files that causes compatibility errors.
In most cases, the DLL file is incompatible with your system so always ensure that when downloading especially from third-party sites, that you check whether it is the 32-bit or 64-bit version.
Unfortunately, you’ll have to scan through your game files and locate the missing DLL file. Because this may be time consuming, we recommend using a DLL-repair tool. They have the ability to scan and locate the problematic files and ensure the files are in sync.
2. Verify game files and clear cache run the game as admin
Launch Steam on your PC.
Click Library in Steam.
Right-click on problematic game, then select Properties.
Select the Local files tab then hit Verify integrity of game files.
Restart Steam.
Press the Windows + R to open the Run dialog box. Type %ProgramData%/ in the text field and go to the specific game folder.
Next, in the opened directory, delete all the folders except for the LocalContent folder.
Then, open the Run command dialog box again. Type %AppData% in the text field, and clear the game folder.
Alternatively, open the Run command dialog again, and type %userprofile% in the box.
Open the AppData folder, navigate to the Local folder, and delete the game folder.
Restart your PC.
3. Re-register the DLL file and run the game as admin
Hit the Windows key, type Command Prompt right-click on it, and select Run as administrator.
Type the following command and press Enter: regsvr32 libvorbisfile.dll
This command registers the missing DLL file. However, if more than one DLL file is not registered, you can use the following command: for %1 in (*.dll) do regsvr32 /s %1
Press the Windows key + S keyboard shortcut to open the search tool. Search for the problematic game in the search box, right-click it and select Open file location.
Next, right-click the game’s EXE file to select Properties.
Click the Compatibility tab then select the Run this program as administrator setting and select the Disable fullscreen optimizations option.
Click the Apply option and press OK to exit the window.
4. Disable antivirus temporarily
Hit the Windows button, type Windows Security in the search bar, and click Open.
Click on Firewall & network protection then select Public network.
Locate Microsoft Defender Firewall and toggle the off button.
An overzealous antivirus can quarantine the game installation files and interfere with the process. Temporarily disabling your antivirus will allow a seamless installation.
5. Scan for viruses
Press the Windows key, search Windows Security and click Open.
Select Virus & threat protection.
Next, press Quick scan under Current threats.
If you don’t find any threats, perform a full scan by clicking on Scan options just below Quick scan.
Click on Full scan to perform a deep scan of your PC.
Wait for the process to finish and restart your system.
Open the Steam client and go to Settings under the View menu.
Click Downloads under the Settings window.
Select Steam Library Folders and click Add Library Folder.
Choose a new destination folder or another drive for your Steam games.
Right-click on any installed game and open Properties from the context menu.
Under the Properties window, switch to the Local Files tab and click on the new install folder option.
Select the Steam Library location you have previously set as the destination folder for your games and click on the move folder button.
If all else fails, try reinstalling your game. There may have been issues with the previous installation that corrupted the installation files and caused the libvorbisfile.dll error. Also, as a point of caution, keep your mods to a minimum especially if they are from an unverified source.
However, if everything is okay but your games keep crashing or your game installer is taking forever, you’ll have to find the root cause and fix it. Alternatively, now would be a good time to play offline games. They don’t require the Internet to play and rarely experience such issues.
Many reported that jsonrpcserver.dll is missing, but we have a guide that addresses this issue, so don’t miss it. We also have a new guide on cncs32.dll is missing issue, so don’t hesitate to check it out.
That’s it from us but if you have any additional solutions, leave them in the comment section below.
Google Chrome now offers a solution for the Cluttered tab interface by allowing you to ‘declutter’ and fix the Tab bar when so many tabs are open. We’ve been able to get the “TabStripdeclutter” feature working in Canary.
If you’re a Chrome user struggling with an overwhelming number of tabs and can’t decide which ones to close, Google is testing a new feature for this. It seems they are using the same code as they did for the TabDeclutter feature for Chrome on Android.
We first noticed this last month when we saw a new commit message about ‘[TabstripDeclutter] Add feature flag.’ Today, we managed to make the feature work.
Here is how Chrome’s TabstripDeclutter feature works:
Chrome treats tabs that have been open for more than 7 days as inactive and allows you to close them through a prompt in the Tab Search menu. You can review and use the “Close tabs” option to remove them and enjoy using Chrome with fewer tabs that consume fewer resources when unused tabs are excluded.
This requires the Tab Organizer feature we reported sometime back to be available and enabled.
Here is how to declutter the Tab bar in Chrome:
Launch Chrome.
Click the Tab Search icon.
Select “Organize Tabs.”
In addition to Group Tab suggestions, you’ll notice the “Close unused tabs” option. You can review and decide which tabs to close. You can click the “Close tabs” button to close all or selectively close certain tabs.
Like Android, Google may allow users to choose the inactivity period, i.e., close tabs after 14, 30, or 60 days instead of 7 days, so that they are in control and don’t lose tabs that contain valuable work.
Desktop Chrome’s built-in feature, Task Manager, which displays and lets you control processes running in the browser, is getting a redesign after a long time.
Google Chrome on desktop platforms such as Windows, Mac, Linux, and ChromeOS comes with a built-in Task Manager that shows information about processes running in the Chrome browser, including tabs and extensions with details about their Memory footprint, CPU, Network, and Process ID under respective columns.
Just like the Windows 11 Task Manager, Chrome Task Manager allows users to “End process”es that consume more resources to make Chrome more responsive and stable. To open Chrome Task Manager on Windows 11, use the Shift+Esc shortcut or click on Menu > More Tools and select “Task Manager”.
Google Chrome’s Task Manager getting a new look
Chrome supports dark mode for Task Manager. Google is now refreshing the Task Manager design on all desktop platforms. The commit message spotted by WindowsReport reveals the “TaskManagerDekstopRefresh” flag which will be avaialble soon, “Enables a refreshed design for the Task Manager on Desktop platforms”.
The details about the Task Manager refreshed design are vague at the moment. But we can expect a modern interface that aligns with the aesthetic of Chrome with improved dark mode. If Google can update Task Manager visualizations with charts or graphs to represent usage over time with integration of processes into Settings and extensions, that would be a welcome addition.
Task Manager is not only the feature getting facelift; Chrome is also updating Picture in Picture as well PDF Viewer.
Microsoft continues to improve Edge browser performance. To the latest, the company is testing showing alerts to users in the Canary version when the browser detects extensions impacting “page load time”.
Microsoft Edge has several measures to ensure it doesn’t slow down when too many tabs are open. It tackles huge memory and CPU consumption by Edge via Sleeping tabs and Efficiency mode. Edge also allows you to control its RAM usage to control resources.
Microsoft Edge gets Extension Performance Detector
So everything is baked into Edge, but it’s not enough. Microsoft is newly testing the “Extension Performance Detector,” as the name implies. It triggers alerts when extensions impact browser speed and allows users to disable some of the extensions to ensure Edge gets back to normal browsing without affecting Page loading.
The feature of showing how too many extensions may impact browser performance has been A/B tested before. Microsoft is now experimenting widely for Canary users behind a flag. When enabled, if it finds too many extensions slowing down, it suggests disabling some from Browser Essentials itself without needing to visit the Extension manager.
The “Enables detection and optional disabling of user-added extensions if they impact page load time. Alerts will appear in browser essentials” flag describes this feature.
Launch the latest Edge Canary and enable the flag, then relaunch the Edge browser. If you have some extensions installed, check Browser Essentials to see if a warning similar to the one included in the article. This error may be different for you.
In case you don’t know, Browser Essentials in Microsoft Edge shows performance and security information. For instance, it informs you about the memory savings your device has gotten with Sleeping Tabs and recommends you keep Efficiency mode on to improve the device’s battery life. It also shows the number of sites, files, and downloads that Edge’s built-in Smart Screen Protection has scanned over the last 30 days.
If you’ve few or limited Extensions, Edge may not show a warning. Keep an eye on Browser Essentials for other performance and safety insights.
Looking for the best and most affordable Google Voice alternative? Here, you’ll find the top five services suitable for various personal and professional uses.
Google Voice is a great way to call personal and business contacts in local and global locations. However, it packs various limitations, like higher calling rates, learning curve, and limited availability. Sometimes, it’s just not the right telephony product for your needs.
So, check out this ultimate list to reduce telephony costs and enhance your user experience.
5 Best Google Voice Alternatives
Now, let’s check out the features, functionalities, and pricing of these internet-based calling apps:
WhatsApp is the best free Google Voice alternative when considering the international calling feature. You can call anywhere in the world if you know their linked mobile number.
Additionally, figuring out whether someone is using the app is easy. You just look up the availability in the Connected apps section of the contact details. Besides phone calls, you can also send rich text messages, images, documents, videos, Google Maps locations, phone book contacts, and more.
Moreover, WhatsApp ensures stringent privacy for all data shared with friends or professional contacts. Your telephony or messaging with the other party goes through an end-to-end encryption process. So, it’s challenging for various hackers and agencies to learn what content or audio you share with the recipient.
If you’re a business in need of automated communication with leads and customers, you can upgrade to WhatsApp Business. Already many commercial entities from e-commerce, banking, finance, etc., are also using this too. Moreover, it gives you priority access to WhatsApp API so you can affordably run a full-fledged contact center using a few telecallers and email executives.
Pricing: WhatsApp for personal use is completely free. If you need to make calls and send marketing messages, you can get WhatsApp Business for as low as $0.025/ Marketing conversions, $0.004/ Utility conversions, $0.0135/ Authentication conversions, and $0.0088/ Service conversions. It follows a usage-based billing with up to 1,000 free conversions per month.
Pros
Cons
Free for personal and limited business use.
The recipient must be using the app and connect online so you can call them.
Available for desktop PCs and smartphones.
Integration with advanced telephony hardware is limited, and highly dependent on the manufacturer.
Virtually no learning curve.
Setting up WhatsApp as a VoIP service is complicated and requires assistance from technical experts.
Protects user privacy and security with stringent encryption policies.
It might suffer downtime due to authorities in various countries banning the app for various reasons.
If you’re looking for a Google Voice alternative for personal telephony, Signal is the best choice from the privacy and security point of view. It creates end-to-end encryption for all calls and texts using an open-source encryption protocol.
Also, it’s virtually immune to bans by authorities because you can connect to its servers using Proxy IP addresses. Furthermore, the Proxy service providers won’t learn about you or the data you share.
Another great privacy feature is the option to limit the visibility of your mobile number to third parties. Therefore, a stranger can’t know whether you’re using the app. It helps you escape telecallers and marketers.
Furthermore, Signal follows a donations-based development system. It’s funded by its users and patrons across the world. So, there’s very little chance of it being acquired by tech giants. Privacy-concerned internet users consider it the best platform for personal phone calls and chats.
Pricing: It’s free for everyone. You can donate if you like.
Pros
Cons
Free for personal use.
Both the caller and recipient must be online.
Stringent encryption system to protect your data.
Doesn’t easily integrate with home or business phone hardware.
Works on all platforms, like smartphones, Windows, macOS, Linux, etc.
Not the most suitable for business marketing and sales calls.
You can create encrypted stickers.
It doesn’t permit dual-SIM usage.
Supports message scheduling on Android.
Integrates with business marketing platforms and CRMs with limited features. Often, such integration requires technical expertise.
Telegram is a free messaging app that lets you make and receive calls, send texts, and even share files, all from your phone or computer. But unlike Google Voice, Telegram offers a few extra features.
First, Telegram is incredibly private. It’s really hard and often impossible for hackers and agencies to intercept your messages and calls in this app. Second, it’s lightning-fast. It uses a sophisticated data delivery system to send messages from one corner to another of the earth in milliseconds.
Finally, there are advanced functionalities, like secret chats, self-destructing texts, file sharing, voice, video calls, and bots that can play games or deliver trending news.
Pricing: Telegram is free. However, you can upgrade to the Premium plan for faster downloads, greater file upload quota, doubled limits for chats, channels, links, and more. It costs $4.99 per user per month.
Pros
Cons
All short and long-distance calls are free.
Doesn’t integrate seamlessly with Google Workspace apps.
You can create a community consisting of up to 200,000 members.
Spammers and scammers can use Telegram to cause you harm.
It’s source code is open to everyone. You can develop custom apps to suit your personal or business needs.
It’s not natively suitable for business marketing and operations. You must hire a few expert developers to customize the Telegram source code and develop a custom app.
You can configure messages to destroy after some time.
Mobile data or broadband internet connection is mandatory for real-time calling and messaging.
Telegram is cloud-based so nothing is stored on your device. You can access messages and calls from any device simultaneously.
Its device verification system often breaks. The automatic call often doesn’t verify the mobile or the SMS activation code never arrives.
WeChat is a popular private communication app in mainland China and in many other countries. It’s a great app to make calls, send texts, share videos, send stickers, pay bills, shop online, etc.
If you’re outside mainland China, you can also use its VoIP feature. It offers international calling at the most affordable rate compared to any other provider. Currently, you can use WeChat international and local calling to landlines from Hong Kong, the United States, Macao, Italy, Malaysia, Thailand, Singapore, Laos, Saudi Arabia, Australia, Vietnam, and Myanmar.
Moreover, you can automate bulk calling and messaging with customers, users, leads, and more via the API feature. It allows you to operate WeChat Login, Pay, Messaging, Mini Programs, and Open Platform, from third-party CRMs.
Pricing: WeChat is completely free for international and regional calls. However, if you wish to call someone who’s not on the platform or a home phone, you can buy WeChat Out credits. For $1, you get almost 100 minutes of calling credits. For business marketing and sales, you can get the WeChat Official service for a minimal fee.
Pros
Cons
It’s popular in the mainland China.
Some users, specifically in Europe and North America, are concerned about its data privacy and security practices.
It’s not just for calling and texting. You can use it as a social media platform for personal or business brands.
It restricts various payments and social media features outside mainland China.
WeChat offers affordable API services and development tools for customer service, sales, marketing, and e-commerce.
Stringent internet restrictions in mainland China often reduce user experience for calling and messaging.
You can send texts offline and WeChat will deliver that when you and the recipient go online.
It might suffer from surveillance by Chinese authorities.
You can use the mini apps without downloading them.
Integrating with VoIP hardware is challenging due to its limited presence in the Western hemisphere.
If you’re already a Microsoft 365 subscriber or operate your business online using its domain solutions, you can also check out Skype and Skype for Business as a Google Voice alternative. It allows you to send texts, make calls, and share files online with Skype contacts for free.
Additionally, you can use its web, desktop, and mobile app platforms to host online meetings. You can invite people to connect with you for free with a simple link. Users can quickly enter a virtual meeting even without installing Skype. The free version allows up to 99 participants per virtual conference.
Skype also offers a more elaborate package for local and international calls than most other popular VoIP apps like Google Voice. For example, you can buy a US calling plan forjust $3. Calls to any mobile or home phone number will be free for the subscription period. Moreover, you can buy a Skype number from popular business destinations, like the USA, the UK, Canada, Germany, Hong Kong, Brazil, Ireland, and more.
Pricing: You can use Skype for free, or you can purchase a calling plan for international calls.
Pros
Cons
Skype integrates easily with VoIP phones, softphones, SIPs, etc.
International calling costs are higher than Google Voice.
Skype-to-Skype calling is free.
Skype’s VoIP calling quality is often poor compared to Google Voice.
Skype international calling is available as a package for various destinations and as a pay-as-you-go plan.
The desktop and mobile app consumes extensive system resources, like CPU, memory, and storage space.
Skype number is available for up to 25 countries.
You can own up to 10 Skype numbers as an individual user.
It also offers local and international SMS texting.
Here are the most important factors I considered while making my selection:
Affordability: The above services offer free app-to-app calling. Some of these products offer VoIP calling as well at the lowest possible rates.
Data security: I’ve listed only options that care about user data privacy and security.
End-to-end encryption: All of the products mentioned above come with standard to enterprise-level encryption systems so your calls and texts stay private.
Availability: Apps like Telegram, Signal, and WhatsApp are accessible from most countries around the world. For communications within mainland China, WeChat is highly reliable.
User experience and interface: All the apps listed above offer easy-to-use interfaces. Hence, you rarely go through any learning curve except when you need to use API services for automation.
Summary
So, now you know which Google Voice alternative to go for if you don’t find the service suitable.
If your calling and texting needs are limited to personal use cases, go for apps like WhatsApp, Signal, Telegram, WeChat, etc. These require the Internet for direct messaging and calling.
For bulk messaging and calling, you can try WhatsApp Business, Skype, WeChat, and Telegram.
Do you know a better alternative to Google Voice than the ones listed here? Feel free to write about that in the comment box.
ERROR_TOO_MANY_CMDS, or Windows System Error 56, as Microsoft calls it, is a frustrating error that occurs on Windows devices. Its message states, “The network BIOS command limit has been reached.”, and it usually doesn’t help, as we all know every issue related to the BIOS tends to be serious.
ERROR_TOO_MANY_CMDS: What is it?
Windows System Error 56 or ERROR_TOO_MANY_CMDS happens when the network BIOS command limit is reached. This error can manifest in various scenarios, from BSODs to system freezes. Repairing it can be complex, but multiple methods exist to address it.
ERROR_TOO_MANY_CMDS: What causes it?
The symptoms of Windows System Error 56 can be subtle or severe, depending on the root cause. The issues are diverse, ranging from erratic hardware behaviour to software refusing to launch. These problems can be attributed to various issues, including failing hardware, bad drivers, and corrupted system software.
ERROR_TOO_MANY_CMDS: How to fix it?
1. Run a SFC Scan to repair missing or corrupted files
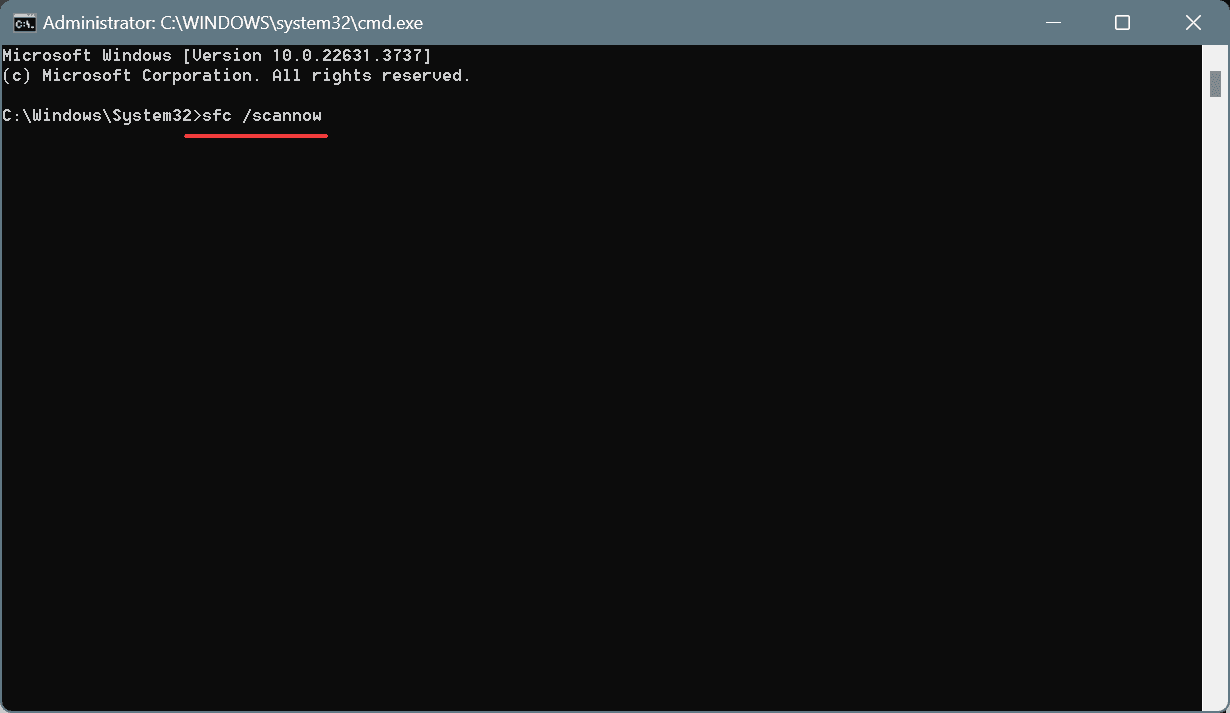
Open Command Prompt with Admin Rights.
Type in the following command: sfc /scannow
Let Windows run the process, and then restart your PC.
2. Update or reinstall your driver
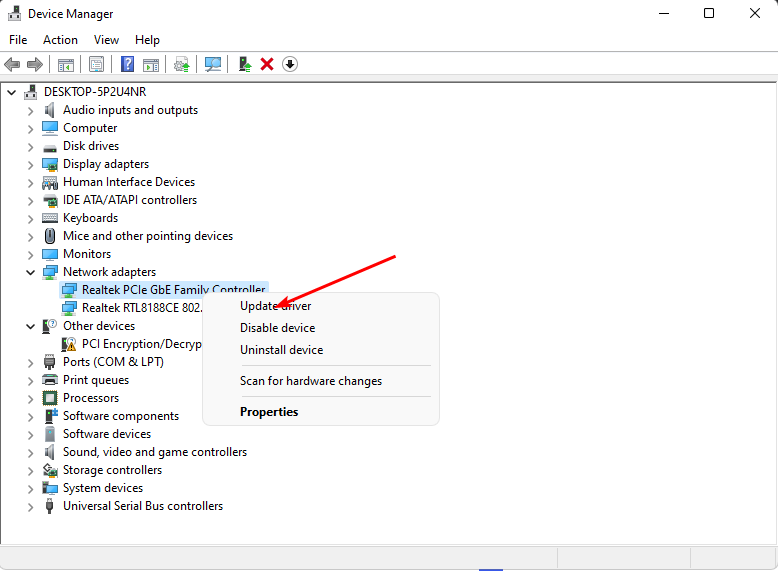
In the Search box, type in Device Manager and click on it.
Click on Display Adapters, right-click on your native display adapter and select Update driver.
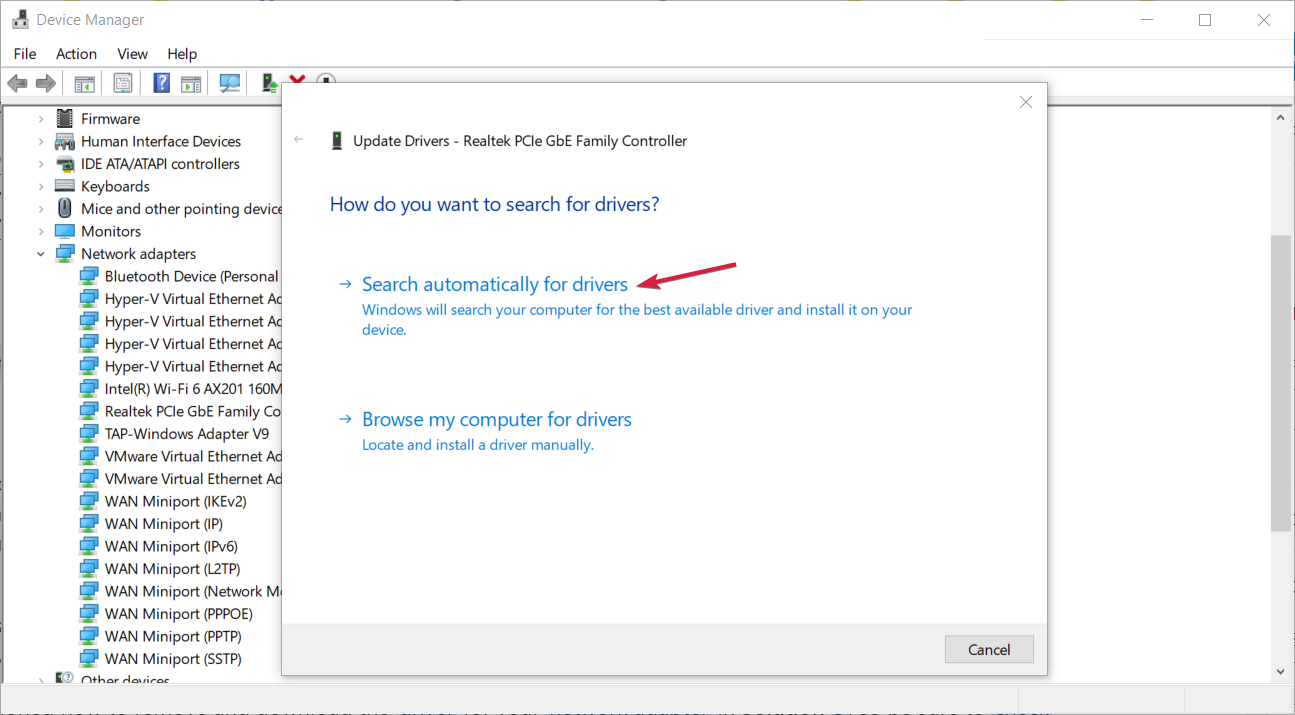
Select your preferred choice, and let Windows run the updating process.
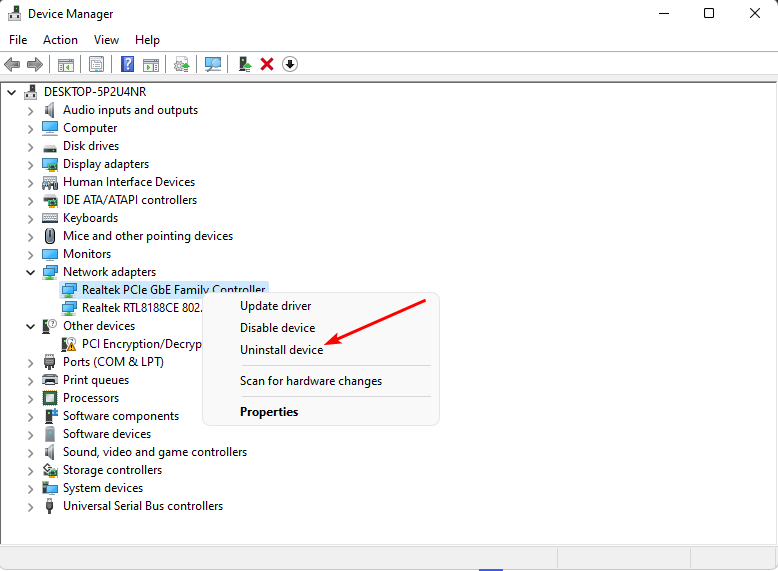
Alternatively, you can also reinstall your driver entirely. Follow the same steps, but choose Uninstall Device instead of selecting Update driver, and follow the steps.
Then reboot your PC. Windows will automatically download drivers for your adapter. However, you can also do it manually by downloading the specific driver for your adapter and initiating the installation process yourself.
3. Roll back your driver
If ERROR_TOO_MANY_CMDS appears after you recently updated your drivers, you might want to roll back. This will not only fix the issue but also tell you exactly what caused it: driver updates.
Open Device Manager again and identify the guilty driver.
Select it, right-click on the native adapter, and then hit Properties.
Go to the Driver panel and click on Roll Back Driver.
Follow the instructions, and after you’re done, reboot the PC.
4. Use System Restore or Recovery to fix Windows 11
You also have the option to restore your system to a previous version of Windows without this issue. To do this, you must choose between a System Restore and a Recovery.
In Windows 11, Recovery lets you reset Windows while keeping all of your files. It reinstalls the operating system without deleting your documents. This method can quickly fix the ERROR_TOO_MANY_CMDS and other similar bugs.
Open Settings, and click on the System panel.
Scroll down to Recovery and open it.
Click on Reset PC.
Select Keep My Files, and follow the instructions.
Alternatively, you can Remove Everything and restore your PC to a clean state, eliminating this annoying bug. However, it should be a last resort.
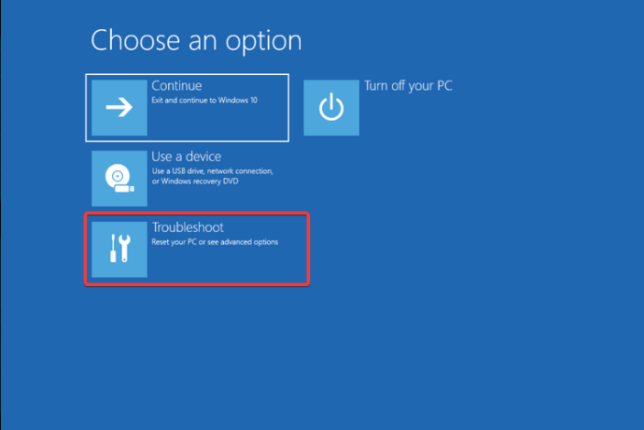
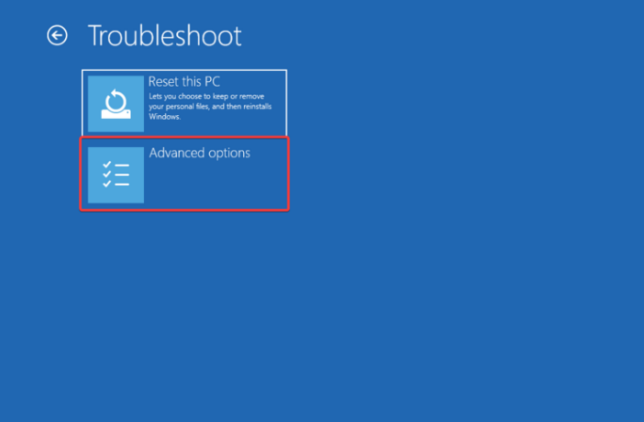
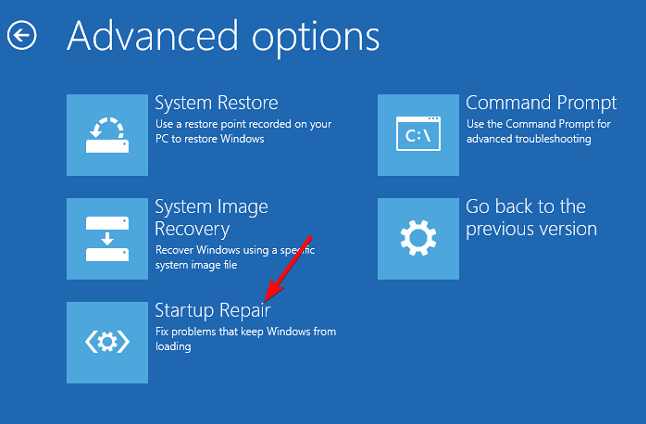
To perform a System Restore, hit the Restart Now button from the Advanced Startup pane and follow the instructions.
This step is not difficult, but it’s not easy either, and you’ll need some more detailed guidance, which you can find here.
This is how you can fix the ERROR_TOO_MANY_CMDS or Windows 56 error. While these fixes are mostly focused on repairs, it’s better to try to repair the drivers first before thinking about clean installing Windows. This way, you can keep your files, and you won’t waste time backing them up.
Let us know which of these solutions fixed the ERROR_TOO_MANY_CMDS for you, and if you have your workaround for this annoying bug, let us know.
If you recently launched Mozilla Firefox and got an error message saying, The program can’t start because mozglue.dll is missing from your computer. Try reinstalling the program to fix this problem, it’s a common problem.
The mozglue.dll DLL file is, by default, stored in Firefox’s folder under one of the following paths: C:\Program Files\Mozilla FirefoxC:\Program Files (x86)\Mozilla Firefox
As for the mozglue.dll missing error in Windows, it usually appears when you inadvertently delete the DLL, a security program or antivirus blocks access to it, or there are issues with the current version of Firefox.
These will scan the PC, identify the missing DLLs, fetch them from their database, and add the DLLs to the relevant directories.
2. Eliminate conflicts triggered by third-party antiviruses
In 4 out of 5 cases of the missing mozglue.dll file, the installed third-party antivirus was to blame. To verify this, boot Windows into Safe Mode or safely perform a clean boot, and verify whether Firefox now runs. If it does, an installed third-party antivirus or security software is blocking the DLL file.
In recent times, we have seen such errors being triggered by AVG, Malwarebytes, and Trend Micro Application Control, amongst others, especially after an update to Firefox. In such a case, you have the following options:
Update your antivirus: If there are any updates for the antivirus, install them because an outdated antivirus often inadvertently identifies legitimate files as a threat.
Unquarantine the mozglue.dll file: In the antivirus solution’s dashboard, verify whether mozglue.dll is quarantined, and if yes, remove it from the list. This will move the DLL back to its original directory.
Whitelist the Firefox folder in your antivirus: Every antivirus allows you to create exceptions for apps and folders that you trust. So, do that for the Mozilla Firefox folder under Program Files in the C: drive.
Uninstall the third-party antivirus and switch to a reliable alternative: If your current antivirus frequently blocks critical files, it’s time you uninstall the app and switch to a reliable antivirus solution.
Adding an exception for Mozilla Firefox in Windows Security
3. Install a newer/older version of the affected program
When Windows can not find mozglue.dll after an update to Firefox, it could be due to a bug in the currently installed version. Antivirus solutions sometimes block apps for this reason!
Besides, if you see the mozglue.dll error with Thunderbird, simply reinstalling it from the dedicated website will do the trick without leading to data loss!
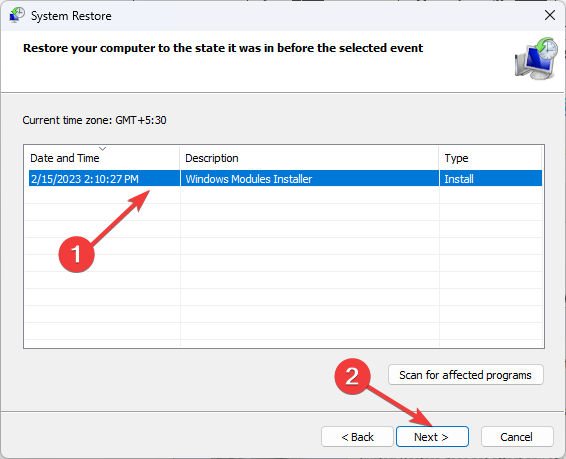
4. Perform a system restore
Press Windows + S to open Search, type Create a restore point in the text field, and click on the relevant result.
Click on the System Restore button.
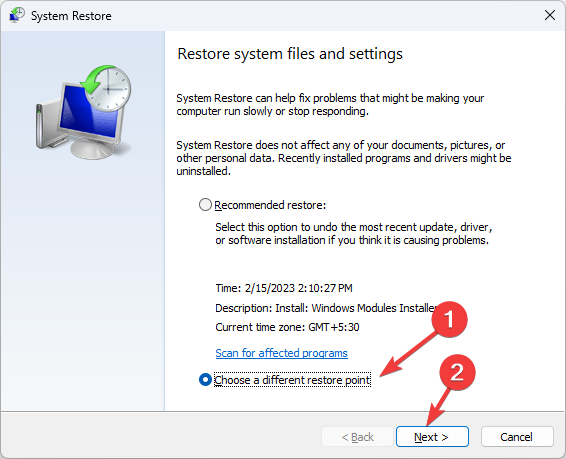
Select the Choose a different restore point option and click Next.
Pick the oldest restore point from the list and then click on Next.
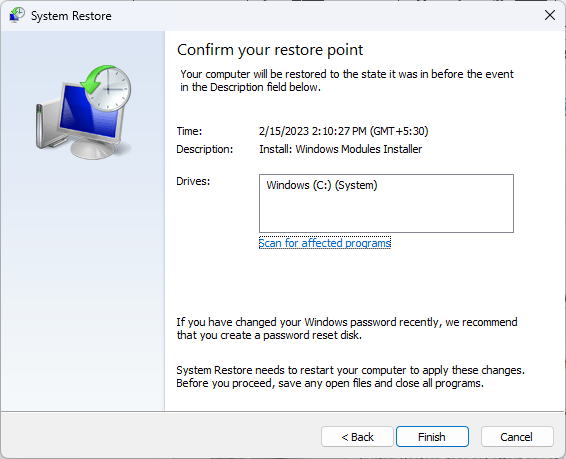
Verify the restore details, and click on Finish.
If a recent change to the PC, say installing a new app, triggered the mozglue.dll Firefox error, performing a system restore will fix things. All you have to do is pick a restore point created before the issue first appeared!
5. Contact support
When nothing else works, the last option is to contact Mozilla support. Apprise them of the issue and share details of any third-party antiviruses installed on the PC, and they should get back with a response.
If the underlying cause lies with Mozilla Firebox, it should be fixed in the subsequent updates.
Remember, mozglue.dll is not malware but a legitimate file developed by Mozilla and used by a wide array of its products, including Firefox and Thunderbird. So, your antivirus blocking it should be a call for concern and immediate resolution.
Microsoft admin centers might be getting too many updates for admins to keep up with, as shown by this Reddit thread, where admins collectively criticise (understandably) the Redmond-based tech giant’s fast ways of updating its platforms.
Dear Microsoft, please stop updating admin centers. I’m just trying to do my job and I’m tired of having relearn complete UI overhauls on the fly. Thank you!
They’re not wrong, at least not entirely. While the updates to admin centers are necessary and part of Microsoft’s continuous effort to combat cyber threats (after all, the company is the most targeted in the world), they happen at a rate that requires admins to keep track of everything in a very short time.
Take, for instance, the recent Copilot update to Microsoft 365, which lets the AI model choose and designate Copilot candidates. That requires a bit of training to make it work best. SharePoint, for instance, will also introduce a Site Ownership Policy that will give organizations new ways to find site admins, but it will also take time to learn how to use it best.
Best we can do is give you a whole different admin center. Sorry!
How about a unified admin center? It has 1/2 the functionality of all the admin centers in one spot, but gives no indication of what might be hidden away in the other admin centers.
But they aren’t going to update the documentation to reflect the changes or any of the learn materials.
Some other admins have come up with solutions, suggesting PowerShell as an alternative. PowerShell is a task automation and configuration management framework that comes as a command line. It is based on the .NET framework, and you can use it to perform advanced tasks. PowerShell is far superior to Command Prompt and might eventually replace it, so it’s always good to learn how to use it. You can do so by following our guide here.
However, some say PowerShell is as complicated as the often-updated Microsoft admin center.
Just use powershell… Oh wait, the cmdlets change all the time too. And, Graph Powershell is about as unwelcoming of a module that I’ve ever worked with. I consider myself a powershell expert but the Graph module makes me feel like a novice again.
Would you like to use our PowerShell API instead? Ope! Just kidding. That old thing? Please transition all your scripts to our new and different PowerShell API! About half of the functions are present! And we’re also deprecating the old one in 6 months. And the new one in three months! Byeee!
When using certain applications you might encounter Error_Bad_Net_Resp. This error is followed by a message The specified server cannot perform the requested operation, and in this guide, we’ll show you how to fix it.
How can I fix Error_Bad_Net_Resp?
Before we start, ensure that the software you’re running is up to date. Many reported this issue while using FreeFileSync software, so update it if you’re using it.
1. Update Samba
If you have Samba running, update it.
Once it’s up to date, start the application that is giving you this error.
Check if the problem is gone.
2. Disable your antivirus software
Press Windows key + S and type windows security. Select Open.
Go to Virus & threat protection and then Manage settings.
Locate Real-time protection and disable it.
If you’re using a third-party antivirus, the steps will be different. Keep in mind that disabling antivirus isn’t recommended, but if disabling antivirus helps, you need to adjust its settings to fix this issue.
The 0x000000DF IMPERSONATING_WORKER_THREAD error occurs when a worker thread fails to properly stop impersonating another process before completing its task. This issue can arise from driver conflicts, malware, or misconfigurations in Windows settings.
Fortunately, I’ll show you how to restore your system’s stability. But before we start, try the quick fixes below:
Unplug all external hardware, then restart your PC.
Check and update Windows. Press Windows + I > Windows Update > Check for updates > Download and install.
If the issue persists, don’t panic. There are more detailed solutions.
5 Ways To Fix IMPERSONATING_WORKER_THREAD
Here’s what you can do:
Turn off Fast Startup
Fast Startup is a Windows feature that allows your system to boot up faster by putting your computer into a hibernation state when you shut it down. However, it can sometimes cause system errors like IMPERSONATING_WORKER_THREAD. Here’s how to disable it:
Press the Windows icon + X, then select Power Options.
Tap Additional Power Settings on the top right.
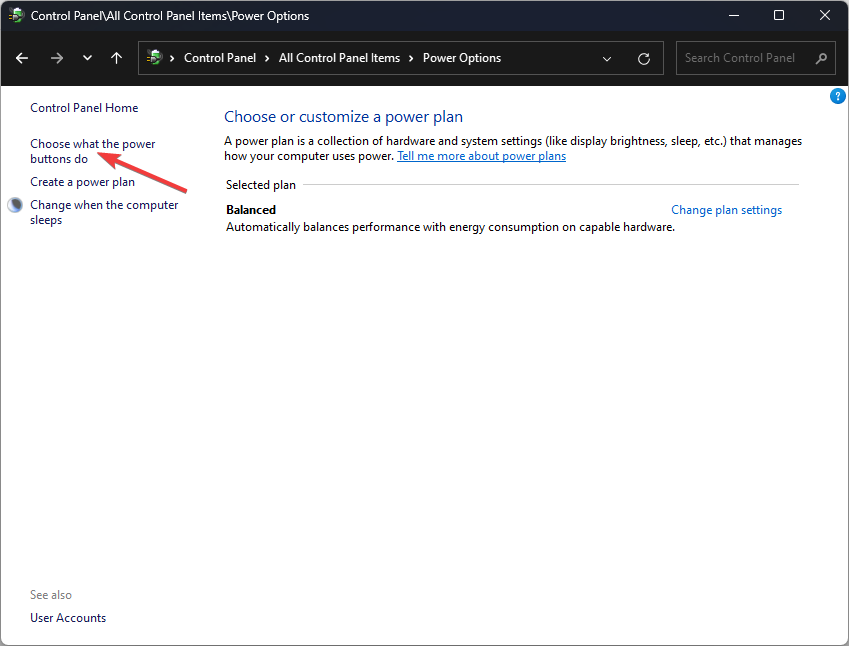
On the left panel, click Choose what the power buttons do.
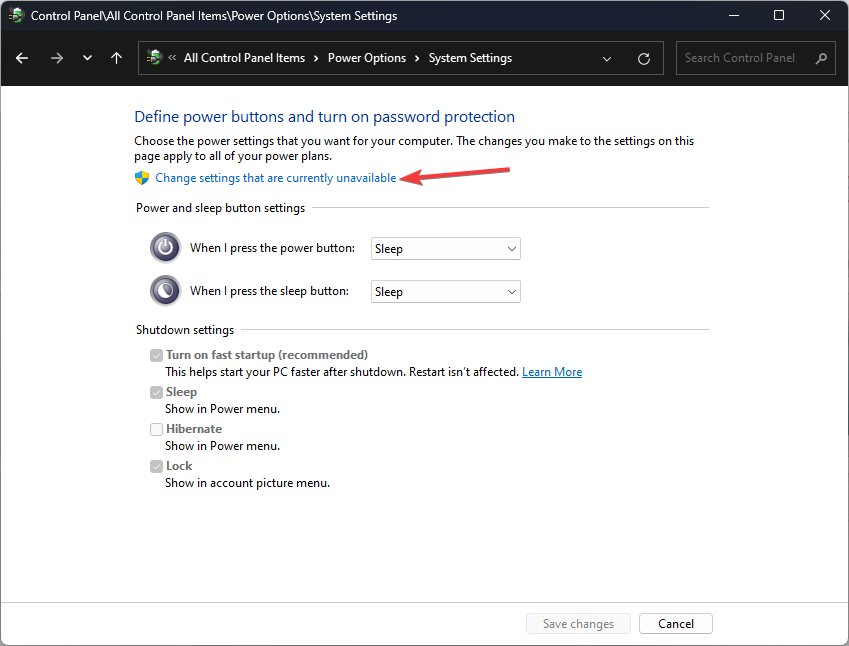
Click on Change settings that are currently unavailable.
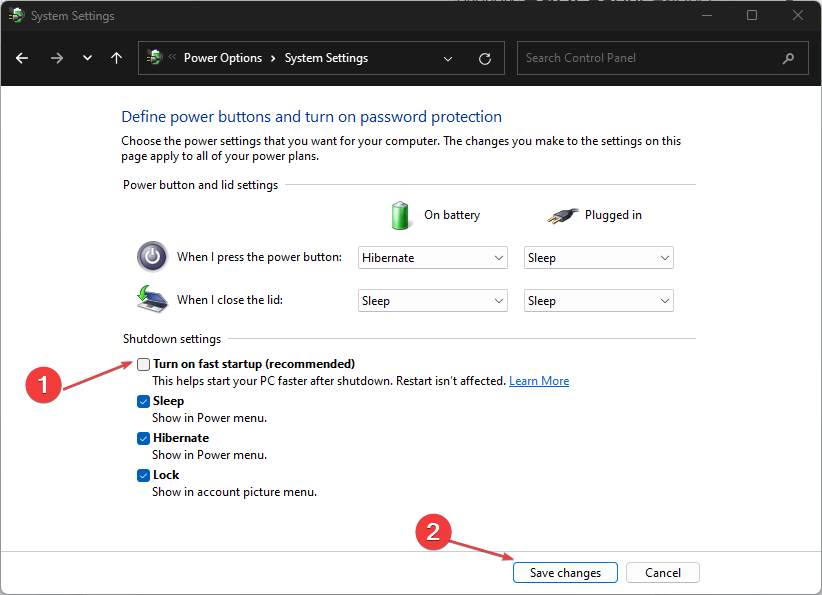
Under the Shutdown settings section, uncheck the box next to Turn on fast startup. Then click Save Changes and restart your computer.
Scan Device Performance and Health
Windows has built-in diagnostic tools to assess your system’s overall health. A Device Performance and Health scan can help detect and fix underlying issues contributing to the IMPERSONATING_WORKER_THREAD error. Here are the steps to follow:
Press Windows + I to open Settings. Click Update & Security.
Select Windows Security from the left pane. In the right-hand panel, click Device Performance & health.
Check your Health report. If any issues are found, follow the recommended actions to resolve them.
Run Windows Defender Offline
Malware infections can sometimes interfere with worker threads, leading to errors such as IMPERSONATING_WORKER_THREAD. You can run a Windows Defender Offline scan to identify and remove persistent malware. Follow the steps below:
Press Windows + I to open Settings and click Update & Security.
Choose Windows Security from the left panel, then tap Virus & threat protection.
Click on Scan options.
Scroll down and select Microsoft Defender Offline scan, then tap Scan Now.
Your PC will restart, and Windows Defender will run a deep scan for malware before booting.
Uninstall Recently Installed Software
If the IMPERSONATING_WORKER_THREAD error began after installing new software or drivers, that could be the cause. Uninstalling it may restore system stability.
Press Windows + X, then select Apps and Features.
Scroll down and find the recently installed program. Click on it and choose Uninstall.
After uninstalling, restart your system to see if the error has been resolved.
Run System Restore
If none of the above steps work, try using System Restore to roll back your system to a point before the error. This can undo recent changes to system files, drivers, and settings. Here’s how:
Press Windows + S, type System Restore, and hit Open.
Click System Restore.
Choose a restore point created before the error started and click Next.
Click Finish to confirm it.
Your PC will revert to the previous state which was working without the error.
Dealing with IMPERSONATING_WORKER_THREAD can be challenging, but these five methods can help you fix the issue and prevent further disruptions. You may encounter similar problems with ACTIVE_EX_WORKER_THREAD_TERMINATION. However, staying proactive with system maintenance can also help you avoid these in the future.
The DRIVER_CORRUPTED_SYSPTES blue screen error, with code 0x000000DB, usually appears during startup, while running resource-intensive applications, or after an update, and crashes Windows.
The Driver Corrupted SysPTEs error highlights corrupted system Page Table Entries (PTEs) or an invalid IRQL. Common causes include outdated or buggy drivers, corrupt system files, misconfigured Registry, malware infection, and hardware malfunction.
Before you start troubleshooting, install all pending Windows updates, disconnect the non-critical peripherals, and clear any overclocking. For many of you, these basic checks should fix the BSOD!
How do I fix DRIVER_CORRUPTED_SYSPTES blue screen error?
Press Windows + X to open the Power User menu, and select Device Manager.
If a device has a warning sign next to the icon, right-click on it, and then select Update driver. Otherwise, expand all the entries and update each device driver individually.
Click on Search automatically for drivers and wait for Windows to install the best locally available version.
Reboot the PC to apply the changes.
For corrupted/outdated drivers causing the DRIVER_CORRUPTED_SYSPTES Windows BSOD, updating the drivers is the quickest fix. If the PC can’t find a better version, head to the manufacturer’s website, find the latest releases, and then manually install the driver!
2. Roll back the driver update
Press Windows + R to open Run, type devmgmt.msc in the text field, and hit Enter.
Expand all the entries, right-click on the devices listed underneath individually, and select Properties.
Go to the Driver tab, and click on Roll Back Driver.
Choose a reason for the roll back, and click on Yes to confirm.
Restart the computer and check for improvements.
3. Delete TrackPtes in Registry Editor
Tip
Before editing the Registry, I recommend you create a restore point. This will allow you to revert the PC to the previous stable configuration in case things don’t go as planned.
Press Windows + R to open Run, type regedit in the text field, and hit Enter.
Click Yes in the UAC prompt.
Paste the following path in the address bar and hit Enter: HKEY_LOCAL_MACHINE\SYSTEM\CurrentControlSet\Control\Session Manager\Memory Management
Right-click on the TrackPtes DWORD on the right, and select Delete.
Click Yes in the confirmation prompt.
Reboot the PC and verify whether the DRIVER_CORRUPTED_SYSPTES BSOD error is fixed.
Press Windows + S to open Search, type Command Prompt, and click on Run as administrator.
Click Yes in the UAC prompt.
Paste the following DISM commands individually and hit Enter after each: DISM /Online /Cleanup-Image /CheckHealthDISM /Online /Cleanup-Image /ScanHealthDISM /Online /Cleanup-Image /RestoreHealth
Next, run this command for the SFC scan: sfc /scannow
Once done, restart the PC for the changes to come into effect.
Press Windows + R to open Run, type cmd, and hit Ctrl + Shift + Enter.
Click Yes in the UAC prompt.
Paste the following command and hit Enter: chkdsk /r
If asked to run the scan on the text restart, press Y, hit Enter, and then reboot the PC.
If hard drive errors are the reason behind DRIVER_CORRUPTED_SYSPTES Windows blue screen, running the built-in Check Disk utility will allow you to repair bad sectors and other trivial issues!
5.2 Checking the RAM for issues
Press Windows + S to open Search, type Windows Memory Diagnostic, and click on the relevant result.
If no issues are found, I recommend you use Memtest86+, an open-source memory testing tool that runs a series of advanced tests on individual RAM modules and detects even the smallest of problems.
6. Scan the PC for malware
Press Windows + S to open Search, type Windows Security in the text field, and click on the relevant result.
Click on Virus & threat protection.
Click on Scan options.
Select the Full scan entry and click on Scan now.
Wait for the scan to complete. It may take 10-30 minutes.
7. Reinstall Windows
If nothing so far fixed the DRIVER_CORRUPTED_SYSPTES blue screen error, you can always reinstall Windows. While the process is time-consuming, it effectively eliminates all software-based conflicts!
Installing Windows from a bootable USB
To reinstall Windows, plug a formatted flash drive into another PC > go to Microsoft’s official website > download the Media Creation Tool > use it to create a bootable USB drive > connect the USB drive to the affected PC > change the boot order to the flash drive > follow the on-screen instructions to install Windows.
In case a reinstall also fails to solve the DRIVER_CORRUPTED_SYSPTES Windows blue screen error, visit a local repair shop and get the PC’s hardware inspected. Because with BSODs, we can never rule out hardware malfunction as an underlying cause!
You can access Microsoft Copilot for Mac as a web app, a standalone app, and as a plug-in in the Microsoft 365 suite.
Compared to Windows, the user experience is slightly different as you must manually enable a few settings or features. However, I can guide you through these adjustments.
Let’s get into it!
How To Get Microsoft Copilot for Mac
There are a few different ways to integrate the tool into your Mac. You can use it as an AI chatbot for quick answers and ideas. Or, you might want to integrate it further into other Microsoft Office apps to enhance your productivity.
However, Microsoft Copilot might not work as an integration or plug-in Microsoft 365 app for Mac if you don’t satisfy the following requirements:
At the moment, it only works on work and school accounts.
You need hotmail.com, outlook.com, msn.com, and live.com domain email addresses.
iCloud, Yahoo, Gmail, etc., accounts won’t work.
You must subscribe to Copilot Pro or Copilot for Microsoft 365.
Also, a Microsoft 365 Family or Personal subscription for individuals and Microsoft 365 Business Basic or better for organization users is mandatory.
You must log in to Microsoft 365 apps using the same Microsoft Account used for the Copilot subscription.
Outlook for Mac only supports the Copilot plug-in for the web app, not the desktop app.
The Copilot feature is unavailable on the web or desktop app for OneNote.
I’ll cover workaround methods, so don’t worry.
Safari Web App for Copilot
The web app version is the best way to use the chat feature along with image and audio-based searches. Here’s how to get it:
You can now start using the AI chatbot the way you like.
Or, you can click the Sign in button in the top right corner.
Log in with a Microsoft Account.
From now on, the AI web app will save all of your interactions for future reference.
However, if you like to get an app-based experience, you can install the Microsoft Bing for Safari from the App Store for free.
This is a Safari extension. The icon should show up on the Dock. Click on that to enable the extension in the Safari Extensions dialog box.
Now, relaunch Safari to find the Bing icon to the left of the Safari Address Bar Shield. You can click on that to open a sleek view of the Microsoft Bing updates widget.
Upon clicking the logo, the Bing search web app will open. Near the Search field, you should find the Microsoft Copilot icon. Click on that to navigate to Microsoft AI.
Microsoft Copilot App on the App Store
If you wish to launch the AI chatbot from the Dock, follow these steps instead:
You might need to authenticate the download with an Apple ID password or by touching the Touch ID key of the device.
Click Open to launch the app.
You’ll also find it in the Launchpad.
However, a big drawback of this method is the Microsoft Copilot macOS app isn’t available on all regional App Stores.
Microsoft Outlook Apps Library
If you can’t integrate it normally, you can install specialized Microsoft Copilot plug-ins from Microsoft AppSource instead. The installed AI chatbot will become available in all the Microsoft Office web apps that support plug-ins from AppSource.
The Deploy New App Flyout will show up on the right side.
Click Next.
You should arrive on the Add users page. Here, you can select the following user groups:
Just yourself
Entire organization
Specific users/ groups.
Click Next.
You should see the Accept permissions button and click Next.
Hit the Finish deployment button. Click Done to close the Flyout.
So far, you’ve added Copilot for Sales as an integrated app in your Microsoft 365 admin center.
How To Test the New Plugin
You can now test this plug-in on a compatible Microsoft 365 app, like Outlook Web by following these steps:
Click on the Menu icon in the top-right corner of the Microsoft 365 admin center.
Select the Outlook app.
You should see the More apps icon on the right side. Click on that to find the Copilot for Sales in the Add apps overlay.
Now, hit the New mail button.
You should see the Copilot for Sales app icon in the toolbar on top of the blank email draft.
Click on that to find the following options:
Search Copilot for Sales
Copilot for Sales
Select Copilot for Sales and an AI chat assistance will open on the right side.
Click Sign in to integrate compatible sales CRMs.
Hit Draft an email to start using the Copilot AI for email writing, summarizing CRM data, or creating pitch decks for instant presentation.
You should see a text processing interface after clicking Draft an email.
For most of the other Office apps, Copilot will automatically show in their Home tab.
If you don’t see the plug-in but think it should be there, you can try these basic checks:
Log out of the currently logged-in Microsoft Account and sign in again with the appropriate account through which you purchased Copilot Pro.
Go to the About Microsoft Excel card by clicking on the Excel menu in the top-right corner, near the Apple icon. Click on the More info link and hit the Refresh License button.
Go to the Excel Preferences dialog box on the Mac and click on the Privacy shield in the Sharing and Privacy section. Ensure that Turn on optional connected experiences is checked.
How To Use Microsoft Copilot for Mac
So, now that you know how to enable the service, it’s time to have some fun with it:
Open Copilot.
Use the carousel to browse automatic suggestions, like the ones outlined below:
Create a pop song about the beauty of the earth.
Write a JavaScript code.
Invent a new gadget.
The above suggestions change regularly depending on your usage and trending topics.
Alternatively, click on the Ask me anything field at the bottom and type in your prompt.
It can be any text written in natural language.
Click on Add an image to generate responses based on the content in the attached graphics.
For voice-based AI search, you can click on the Use microphone button and record your audio as an AI prompt.
To start a new chat, click on the New topic button on the left side of the texting interface.
You can change the input language by clicking on the English drop-down menu on the top of the page, near your profile name, or the Sign in button.
Summary
Now you know all the steps to access, install, and use Microsoft Copilot for Mac. You can choose from several methods. Check out this comparison with GitHub Copilot if you’re having second thoughts about the service.
If the article helped you use the app effectively, feel free to comment below. Alternatively, if you know any better methods, do share.
The new Outlook will soon support the automatic display of auto-mapped calendars, allowing users to have a clear sight of schedules, meetings, events, webinars, etc.
According to the latest entry in the Microsoft 365 Roadmap, the Redmond-based tech giant will enhance the platform in December 2024, most likely encouraging people to migrate to the new Outlook version.
Users will be able to automatically see their auto-mapped calendars when toggling from classic Outlook to the new.
The enhancement will undoubtedly create a seamless environment for work, and it will encourage more users to use the new Outlook toggle.
The new Outlook was recently made generally available to users everywhere, and the Redmond-based tech giant has started to add dozens of features to it, including the ability to finally drag and drop emails into the Calendar icon in the app bar to create an event. Believe it or not, this hasn’t been available yet.
The ERROR_BAD_REM_ADAP (0x3C) is associated with Error Code 60 in Windows and sometimes with the message The remote adapter is not compatible. So, this occurs when a network adapter comes across compatibility issues with a remote network.
How do I fix the ERROR_BAD_REM_ADAP?
1. Check the network adapter settings
Open Device Manager by pressing Win + X and selecting Device Manager.
Expand the Network adapters section.
Right-click on your network adapter and select Properties.
Ensure that the adapter type and network protocols (e.g., TCP/IP) are compatible with the network you are trying to connect to.
2. Update the network adapter drivers
In Device Manager, right-click on your network adapter and select Update driver.
Choose Search automatically for drivers and follow the prompts.
If no updates are found, visit the manufacturer’s website to download and install the latest drivers.
3. Reset WINSOCK
Open Command Prompt as an administrator by typing cmd in the Start menu, right-clicking Command Prompt, and selecting Run as administrator.
Type the following command and press Enter: netsh winsock reset
Restart your computer.
4. Disable TCP Offloading
Open Device Manager and expand the Network adapters section.
Right-click on your network adapter and select Properties.
Go to the Advanced tab.
Under Large Send Offload and Large Send Offload IPv4 (IPv6), select Disable.
Click OK and restart your computer.
5. Manually assign IP addresses
Open Network and Sharing Center by right-clicking the network icon in the system tray and selecting Open Network & Internet settings.
Click on Change adapter options.
Right-click on your network adapter and select Properties.
Double-click on Internet Protocol Version 4 (TCP/IPv4).
Select Use the following IP address and manually assign compatible IP addresses, subnet masks, and default gateways.
if the methods above don’t work, inspect the network adapter physically for any loose connections or damage. Also, try using a different network cable or port to eliminate cable or port-related issues. You should also consider replacing the network adapter or try with a different one if possible.
Lenovo Innovation World 2024 is in full swing at IFA 2024, and the company previewed a new 2-in-1 PC concept. It’s called the Lenovo Auto Twist, and it seems like a regular 2-in-1 PC until you move around a room.
The Lenovo Auto Twist has several features that help it move with you. For starters, it has movement-tracking sensors that detect when you shift so the screen can rotate to the best position for your view. Lenovo says this feature is handy when you’re in a meeting or giving a presentation to ensure everyone can see the content on the screen.
In addition, the Auto Twist has special voice commands that can be used to control the PC. Commands like “laptop mode,” “tablet mode,” and “close laptop” dismiss the screen so you don’t have to interact with the PC as much. When you stop using the PC, the display will automatically close to protect the screen and keyboard.
The Lenovo Auto Twist is a concept, so its fate is uncertain. That said, Lenovo often uses its concept products to test new ideas, so it won’t be surprising if we see some of its features in Lenovo PCs in the future.
Outlook Lite, Microsoft’s “lightweight” email and calendar app, has gained quite a following in just under two years. In a blog post, the Redmond-based tech giant announced that the application, designed for users with less powerful devices, such as those in developing countries, has now been downloaded over 10 million times.
That’s a tremendous achievement if you consider that Outlook Lite reached 5 million users just eight months after its inception. It doubled that number in just eight months, and we think we know why.
The Outlook Lite app, available on Android, is just 5MB. This makes it easier to install on devices with lower storage and uses less data—useful in regions where data plans are more limited.
Microsoft says it’s also worked to ensure Outlook Lite runs smoothly on devices with less processing power — something that can’t always be said for the more extensive original Outlook app.
The app was updated earlier this year with multi-account support and SMS integration, which added basic text messaging features to the email app. The app now supports a range of email providers, including Google and Yahoo, and can be used with or without a Microsoft account.
As we wrote then, Microsoft’s strategy with Outlook Lite seems to be twofold. The company hopes to attract users in growth markets like India, where smartphone ownership is increasing rapidly. But at the same time, it’s also trying to win over users in more developed markets who are fed up with heavy, cluttered email apps.
Microsoft hasn’t said whether it plans to bring Outlook Lite to other platforms like iOS. Still, if the app’s performance on Android is anything to go by, it seems like a solid alternative to other email apps, even if you’re not using a budget device.
Have you tried Outlook Lite? Let us know what you think in the comments.
The mfc90.dll file, developed by Microsoft and a part of the Visual C++ library, is used by several programs for effective functioning. This includes MSI Afterburner, TortoiseSVN, or the Verizon app, amongst others!
As for the mfc90.dll location, it can be found in a related program’s directory or within the WinSxS folder. The path for the latter is: C:\Windows\WinSxS
When the mfc90.dll file is corrupt, missing, or an app says that it was not found, corrupt system files, missing Visual C++ Redistributables, improper app or OS installation, or malware infection are to blame.
What can I do if MFC90.dll is missing in Windows?
Tip
Before you start with the troubleshooting, reboot the computer and install any available Windows updates. As for issues connecting your phone to a Windows PC after you discover that mfc90.dll is missing, make sure you are using a cable provided/manufactured by the OEM.
These scan the PC, automatically identify any missing or corrupt DLLs, and get you a version compatible with the system architecture, all within minutes.
2. Install Visual C++ Redistributables
Go to Microsoft’s official website and download the latest Visual C++ Redistributables. Make sure you get both the x64 and x86 versions.
Run both the downloaded setups (.exe files) individually and follow the on-screen instructions to complete the installation.
Once done, reboot the PC and verify whether the app missing mfc90.dll can now run.
3. Repair the corrupt system files
Press Windows + S to open Search, type Command Prompt in the text field, and click on Run as administrator.
Click Yes in the UAC prompt.
Paste the following DISM commands individually and hit Enter after each: DISM /Online /Cleanup-Image /CheckHealthDISM /Online /Cleanup-Image /ScanHealthDISM /Online /Cleanup-Image /RestoreHealth
Execute this command to run the SFC scan: sfc /scannow
Reboot the PC and then check for improvements.
Often, when an app installer reads, Error writing to the file: mfc90.dll. Verify that you have access to that directory, it is the corrupted system files to blame. In this case, running the SFC (System File Checker) and DISM (Deployment Image Servicing and Management) scans will replace all such files with their cached copy!
4. Reinstall the affected app
Press Windows + R to open Run, type appwiz.cpl in the text field, and hit Enter.
Select the affected application from the list, and click Uninstall.
Follow the on-screen instructions to complete the process.
Reboot the PC, and then reinstall the app from an official source.
In most cases, apps that require a specific DLL add it to the PC during installation. So, when mfc90.dll can’t be loaded, it’s likely that the DLL wasn’t added in the first place, and a quick reinstall should fix things!
If that doesn’t work, use a dedicated software uninstaller to clear all app-related leftover files and Registry entries and then reinstall the app.
5. Disable the startup app throwing the error (if unused)
NOTE
You should only use this solution if a rarely used app throws the mfc90.dll missing error during startup. The steps below won’t download the missing DLL but simply get rid of the error message.
Press Ctrl + Shift + Esc to open the Task Manager, and go to the Startup apps tab from the left pane.
Select the affected application from the list, and click on Disable.
Reboot the PC, and the error message shouldn’t appear again.
6. Download Visual Studio Express
For many users, downloading and installing Visual Studio Express got things up and running when Windows read, mfc90.dll missing or not found.
InstallingVisual Studio Express
To get Visual Studio Express, go to Microsoft’s website > download the program’s setup > run the .exe file > follow the on-screen instructions to complete the installation.
7. Perform an in-place upgrade
Tip
The steps listed here are for Windows 11. If you are running the previous iteration, check our dedicated guide on performing an in-place upgrade on Windows 10.
Go to Microsoft’s download page, select OS edition and language, and then download the Windows 11 ISO.
Right-click on the ISO file, select Mount, and then click Open in the confirmation prompt.
Run the setup.exe file.
Click Yes in the UAC prompt.
Click on Next to proceed.
Read Microsoft’s license terms and click on Accept.
Verify that the setup reads, Keep personal files and apps, and click Install.
Wait for the process to complete. It may take 30-90 minutes.
When nothing else helps with the missing mfc90.dll DLL error, an in-place upgrade will do the trick. It’s akin to reinstalling Windows, but you don’t lose the stored files and apps!
If you regularly face such issues, discover expert fixes for missing DLLs in Windows and boost the system’s stability.
We also have a guide on missing jsonrpcserver.dll so you might want to check it out for more information.
For any queries or to share which fix worked for you, drop a comment below.
The ERROR_NO_SPOOL_SPACE error comes with the code 62 (0x3E) and it means that you don’t have storage space for printed files on your server. So, typically, it occurs when the system runs out of space in the spool directory, which is used for temporary storage during printing operations. If you’ve set up a limited storage space for the Spool directory, you may either provide more space or delete the pending printing jobs.
How do I fix ERROR_NO_SPOOL_SPACE?
1. Check the disk space and clear the Spool directory
Ensure that your system drive (usually C:) has enough free space. You can do this by opening File Explorer (Win + E), right-clicking on the drive, and selecting Properties.
Open the Run dialog by pressing Win + R, type services.msc, and press Enter.
In the Services window, scroll down to find Print Spooler, right-click on it and select Stop.
Now, go back to File Explorer and navigate to the following folder: C:\Windows\System32\spool\PRINTER
Select all (Ctrl + A) and hit the Delete button. This is a temporary folder so it won’t do any harm to delete its contents.
Go back to the Services window.
Right-click on Print Spooler again and select Start.
You might fix the problem just by restarting the Print Spooler service, but if you also clean out the Spooler folder, you increase the chances to fix the ERROR_NO_SPOOL_SPACE issue. If you still don’t have enough space, we have a guide on how to free it up on Windows 10 and 11.
2. Update or reinstall the printer drivers
Open Device Manager by pressing Win + X and selecting Device Manager.
Expand the Printers section, right-click your printer, and select Update driver.
Select Search automatically for drivers, or Browse my computer for drivers if you already downloaded the right printer driver on your PC.
Follow the prompts to update the driver. If updating doesn’t work, try uninstalling the driver and reinstalling it from the manufacturer’s website.
The ERROR_NO_SPOOL_SPACE bug check may also occur due to a corrupted printer driver, especially if we’re talking about a network printer and it produces the error on all the endpoints that are using it. In this case, reinstalling the driver and the printer software will most likely fix the problem.
Open Command Prompt as an administrator by typing cmd in the Start menu, right-clicking Command Prompt, and selecting Run as administrator.
Type sfc /scannow and press Enter. This will scan and repair any corrupted system files.
Although it’s unlikely, this error can also be caused by corrupted system files that can be fixed by using the SFC scan in a command line software.
4. Increase virtual memory
Open the Run dialog by pressing Win + R, type sysdm.cpl, and press Enter.
Go to the Advanced tab and click on Settings under the Performance section.
In the Performance Options window, go to the Advanced tab and click on Change under Virtual Memory.
Uncheck Automatically manage paging file size for all drives, select your system drive, and choose Custom size.
Set the initial size and maximum size to values recommended by Windows or higher, then click Set and OK.
The issue might be that the system doesn’t have enough memory to complete all the print jobs and increasing the virtual memory might solve that problem.
By following these steps, you should be able to resolve the ERROR_NO_SPOOL_SPACE issue on your Windows system. If the problem persists, it might be worth consulting with a professional technician for further assistance.
Many users reported that api-ms-win-crt-math-l1-1-0.dll is missing from their PC which makes them unable to run certain applications. However, this issue can be easily fixed, and today we’re going to show you how to do it.
What is API MS Win Crt Math l1 1 0 dll?
This DLL file is a part of C runtime libraries and it’s used by various applications for performing mathematical operations.
What can I do if api-ms-win-crt-math-l1-1-0.dll is missing?
Before we start, ensure that both Windows and the application you’re trying to run are up to date.
1. Ensure you have the correct C++ Redistributables installed
Missing DLL files in Windows 11 can cause a lot of problems, and if api-ms-win-crt-math-l1-1-0.dll is missing, in most cases you just need to install the necessary redistributables.
The ERROR_ADAP_HDW_ERR system error, with code 57 (0x39), appears when Windows can’t communicate with the network adapter. The error message reads, A network adapter hardware error occurred.
Common causes for the error include driver issues, misconfigured network settings, conflicts triggered by third-party apps, loose connections, and hardware malfunction.
Before you start troubleshooting, install all pending Windows updates, inspect the adapter for damage, reconnect the network adapter (if using an external one), and make sure the connections are in order. For 2 out of 5 users, these basic checks should fix ERROR_ADAP_HDW_ERR.
How do I fix ERROR_ADAP_HDW_ERR?
Tip
If you are seeing the A network adapter hardware error occurred error message while developing or running a code, double-check everything: the function, flag, target and API. The solutions listed below are for the Windows system error code ERROR_ADAP_HDW_ERR.
1. Update the network adapter’s driver
Press Windows + X to open the Power User menu, and select Device Manager.
Expand the Network adapters entry, right-click on the active adapter, and select Update driver.
Click on Search automatically for drivers and wait for Windows to install the best locally available version.
Press Windows + R to open Run, type appwiz.cpl in the text field, and hit Enter.
Select any app downloaded or updated around the same time the issue first appeared, and click on Uninstall.
Follow the on-screen instructions to complete the process.
Restart the computer and check for improvements.
Often, a quick app removal doesn’t fix ERROR_ADAP_HDW_ERR due to the files and cache left behind post-installation. In this case, it’s best to use a top-rated software uninstaller which will clear all leftover files and Registry entries.
Remember, for some users seeing the A network adapter hardware error occurred message in SonicWALL Connect Tunnel VPN, completely uninstalling the program, clearing out its Registry entries, and then reinstalling it fixed things in no time!
3. Reset the network settings
Press Windows + I to open Settings, go to Network & Internet from the navigation pane, and click on Advanced network settings on the right.
Scroll down and click on Network reset.
Click the Reset now button.
Click Yes in the confirmation prompt, wait for the process to complete, and verify whether the error is fixed.
4. Perform a system restore
Press Windows + S to open Search, type Create a restore point, and click on the relevant result.
Click the System Restore button.
Select the Choose a different restore point option, and click on Next.
Pick the oldest restore point from the list and click Next.
Check the restore details, click on Finish, and then confirm the change.
Wait for the restore to complete. It may take 15-30 minutes.
5. Contact the dedicated support
When nothing else works, it’s best to contact the support. If a third-party app is throwing the ERROR_ADAP_HDW_ERR Windows system error, contact their dedicated support team. For built-in applications, you can get in touch with Microsoft support.
In the likelihood that the 57 (0x39) A network adapter hardware error occurred message still appears, visit a local PC repair shop and get the network adapter inspected for faults.
The DRIVER PAGE FAULT IN FREED SPECIAL POOL is a fairly common issue in Windows that can be of concern to users when it happens, primarily due to the worrying Blue Screen of Death (BSOD) error that this bug causes.
What is the DRIVER PAGE FAULT IN FREED SPECIAL POOL error?
The DRIVER PAGE FAULT IN FREED SPECIAL POOL error occurs when a driver references earlier freed memory. The driver then enters a conflict that causes the BSOD error. According to Microsoft, the error has a value of 0x000000C6.
What’s causing the DRIVER PAGE FAULT IN FREED SPECIAL POOL error?
The error is mainly triggered by software or hardware issues. Other possible causes include faulty hardware components, outdated or problematic drivers, corrupted system files, and conflicting software.
You’ve come to the right place if you’re dealing with it. We have a list of solutions that will solve this error.
7 Fixes for DRIVER PAGE FAULT IN FREED SPECIAL POOL
1. Update Device Drivers
In the Search box, type in Device Manager and open it.
Go to the Display Adapters and click on it.
Right-click on your device’s display adapter, and choose Update Driver.
You can Search automatically for drivers or Browse my computer for drivers.
The first option will have Windows automatically update the display drivers for you; the second option will have you manually provide the correct drivers for your display adapters.
Either way, make sure to restart your PC after you update the drivers. The error should not show up again.
2. Update Windows
Open up Settings, and then go to Windows Update.
There, click on Check for Updates.
Let Windows run the updating process.
Due to this process, your device might restart a few times, but it will update everything on your Device, including missing drivers.
3. Run the Hardware and Devices Troubleshooter
The hardware and Devices Troubleshooter can also fix the DRIVER PAGE FAULT IN FREED SPECIAL POOL error.
Press Win + R to open up the Run tool, and type in the following command: msdt.exe -id DeviceDiagnostic.
Click on Next, and then follow the on-screen instructions.
4. Run an SFC scan to repair corrupted files
Open Command Prompt with Admin rights.
Type in the following command: sfc /scannow, and press Enter.
After the scan is complete, restart your PC.
The SFC scan will look for any corrupted files in your device and try to repair them, effectively solving any issues your drivers might have.
5. Run DISM for advanced repairing
The DISM (Deployment Image & Servicing Management) scan follows almost the same steps as the previous solution, but this one is more advanced. You’ll need to:
Open Command Prompt with Admin Rights.
Type in the following commands separately: DISM /Online /Cleanup-Image /ScanHealth and DISM /Online /Cleanup-Image /RestoreHealth
Restart your PC.
This scan will detect any corrupted files and repair them effectively.
6. Disable the Conflicting Program
Conflicts created by specific Windows programs might also cause the DRIVER PAGE FAULT IN FREED SPECIAL POOL error. To fix this bug, you’ll need to disable the conflicting program. To do that, you’ll need to perform a clean booting of your PC first. You can easily do so by following our guide.
Then, when you’re done, and you’ve identified the conflicting program, you’ll need to uninstall it.
Go to Control Panel > Programs and Features.
Uninstall the said programs.
Restart your PC.
7. Reset Windows
This is a last resort if neither of the previous solutions worked. Resetting Windows will remove all the corrupted files, effectively fixing the DRIVER PAGE FAULT IN FREED SPECIAL POOL error.
In Windows 11, you can reset the operating system easily, safely, and quickly. You’ll need to:
Go to Settings, and then access the System panel.
Scroll down to the Recovery option and click it.
Select Reset PC, and choose your preferred option.
Follow the rest of the instructions to reset Windows.
As you can see, the DRIVER PAGE FAULT IN FREED SPECIAL POOL error can be pretty annoying. But you can try resolving it using the methods above. Let us know which of them worked for you, and if you have any other solution for this bug, drop it down in the comments section.
The DRIVER_USED_EXCESSIVE_PTES blue screen error, with code 0x000000D8, appears when the system runs out of PTEs (Page Table Entries). For the unversed, PTEs are key to effective memory management and contain information about mapping between physical and virtual memory!
Common causes behind Driver Used Excessive PTES include outdated or corrupt drivers, resource-intensive applications, corrupt system files, and malfunctioning hardware.
Before you start troubleshooting, install any pending Windows updates, disconnect all non-critical peripherals, and terminate inactive applications.
How do I fix DRIVER_USED_EXCESSIVE_PTES blue screen error?
Tip
If the blue screen error page lists the name of the problematic driver, you only have to update or roll back that particular driver using the first two solutions. But if it’s not detected, execute the solutions in the listed sequence.
1. Update the problematic drivers
Press Windows + X to open the Power User menu, and select Device Manager from the list.
Expand the different categories, right-click on the device using the problematic driver, and select Update driver.
Click on Search automatically for drivers and wait for Windows to install the best locally available version.
Finally, restart the computer.
If the Windows blue screen doesn’t tell you anything about the driver not cleaning up its memory use or triggering the bug check, update all the drivers. If a newer version is not available locally, head to the manufacturer’s website, locate the latest version, and then manually install the driver.
For many, windrvr6 was the reason behind DRIVER_USED_EXCESSIVE_PTES and updating it did the trick!
2. Roll back driver update
Press Windows + S to open Search, type Device Manager in the text field, and click on the relevant result.
Expand all the entries here, right-click on the individual devices, and select Properties.
Now, go to the Driver tab, and click on Roll Back Driver.
Choose a reason for rolling back the update, and click Yes to confirm.
Restart the computer to apply the changes.
If the Roll Back Driver option is greyed out, but you are certain that the driver was recently updated, explore other ways to manually roll back drivers.
3. Uninstall recently added apps
Press Windows + R to open Run, type appwiz.cpl in the text field, and hit Enter.
Select any application that was recently added or updated, and click on Uninstall.
Follow the on-screen instructions to complete the process.
Similarly, uninstall other recently updated/downloaded apps, then restart the PC and check for improvements.
If the DRIVER_USED_EXCESSIVE_PTES Windows BSOD still appears, it’s possible that the app(s) left behind some files that are triggering the error. For this, use a top-rated software uninstaller, which automatically deletes all the leftover files and Registry entries, thus effectively clearing every trace of the app.
4. Repair the corrupt system files
Press Windows + S to open Search, type Command Prompt, and click on Run as administrator.
Click Yes in the UAC prompt.
Paste the following DISM commands individually and hit Enter after each: DISM /Online /Cleanup-Image /CheckHealthDISM /Online /Cleanup-Image /ScanHealthDISM /Online /Cleanup-Image /RestoreHealth
Next, run this command for the SFC scan: sfc /scannow
Restart the PC and check for improvements.
5. Check for disk and RAM issues
5.1 Repair the disk
Press Windows + R to open Run, type cmd, and hit Ctrl + Shift + Enter.
If asked to schedule the scan for the next restart, press Y, hit Enter, and then reboot the PC.
5.2 Inspect the RAM
Press Windows + S to open Search, type Windows Memory Diagnostic, and click on the relevant result.
Click on Restart now and check for problems.
When the PC restarts, inspect the mdsched.exe logs and look for any issues.
If Windows Memory Diagnostic doesn’t detect any problems triggering the DRIVER_USED_EXCESSIVE_PTES blue screen error, use Memtest86+, an open-source memory testing tool, to run advanced scans on individual RAM modules and identify even the smallest of the issues.
6. Perform a system restore
Press Windows + S to open Search, type Create a restore point, and click on the relevant result.
Click the System Restore button.
Select the Choose a different restore point option and click Next.
Pick the oldest restore point from the list and click on Next.
Verify the restore details, and click on Finish to start the process.
Wait for the restore to complete and check whether the error is fixed. It typically takes 10-30 minutes.
7. Reinstall Windows
When nothing else works, the last option is to reinstall Windows. The process is time-consuming but will fix almost every software-based underlying cause behind the DRIVER_USED_EXCESSIVE_PTES Windows BSOD!
When it comes to DRIVER_USED_EXCESSIVE_PTES, in 4 out of 5 cases, updating or rolling back the driver does the trick. Or if an app is triggering the error, uninstalling it will fix things. Remember, no matter what someone tells you, never manually increase the number of PTEs, as it may cause major system instability!
A Microsoft Word business card template can help you create professional contact cards that drive online engagement and business inquiries.
However, creating one from scratch is time-consuming if you don’t possess the technical and creative skills. Contrarily, if you go to a professional corporate card maker, they’ll charge you heavily for the concept, design, and final product.
That’s where the Microsoft 365 templates library steps in at your rescue. You simply need to select a style you like, type in your content, and print. I’ll show you how!
How To Get a Microsoft Word Business Card Template
Now, let me guide you through various ways to source the right contact card for free from Microsoft’s template library:
Using the Microsoft Word Desktop App
If you’re using Word on a PC or Mac and have access to the internet, follow these steps:
Launch the Word desktop app to see the Home or the Backstage view.
Click New on the left-side navigation panel.
Select the Cards menu in the Suggested searches: toolbar.
You’ll see all freely available card designs.
This library usually contains all sorts of cards, from greetings to business. So, choose a design that resembles contact cards.
A preview of the card document will open along with technical details, like printable sizes, related card designs, and more.
Click on the Create button if you’re ready to import the document to the Word app.
The imported document should open instantly.
It should automatically import your name from the WindowsLocal Accountor Mac’s Apple ID.
Click on the [Company Address] [City, ST ZIP Code] placeholder text and start typing your business’s address.
Once done, press the Down Arrow key on the keyboard. This will update the [Company Address] [City, ST ZIP Code] texts on all the copies.
Follow the same steps for the text placeholders, like [email address] and [web address].
The business name at the bottom left corner is a picture object which you can change by right-clicking on it and choosing Change Picture.
Depending on the Microsoft Word edition you’re using, you should get a mix of the following image sources:
This Device
From Mobile Device
From Stock Images
From Online Sources
From Icons
From Clipboard.
Select any option and follow on-screen instructions to replace the brand logo.
You must repeat these steps for the rest of the logos.
Once done, press Ctrl + P to enter the Print Preview mode.
You can print them without further editing since Microsoft has formatted them according to standard USA business card configuration.
Using the Microsoft Word Web App
Do you prefer to create a contact card from a Microsoft Word business card template on the web app? You can follow along with these steps:
Log in with your free or paid Microsoft Account to conveniently save the chosen template to a supported Microsoft 365 web or desktop app.
Now, click on the Search template field and type Business Cards.
Hover the cursor over the preferred app below the search field, like Designer, Word, Excel, PowerPoint, and more.
First, click on the Browse templates button on the floating context menu.
You’ll enter the template library.
Click on the Color button in the Search bar.
Scroll through the list to select a design.
When the document details page opens, click on the Customize in Word button.
Now, follow the editing steps mentioned in the previous section to personalize and print your contact cards.
Summary
So far, you’ve gone through the tried and tested methods to import and edit a Microsoft Word business card template.
You’ve also seen how you can do so in the Word desktop and web app. Furthermore, you’ve learned how to navigate the Microsoft Create portal to browse and create professional contact cards. You can also learn how to make index cards and create different headers.
If you’ve got any suggestions for improvements, feel free to comment below.
Are you struggling with various technical issues with Microsoft Office? We can help you fix Office 365 and Outlook.
0x000000DC DRIVER_INVALID_STACK_ACCESS is a blue screen error that occurs when a device driver attempts to reach a memory location that it can’t access. It can result in unexpected crashes, making your computer unstable.
Luckily, it’s easy to resolve — with the right steps. I’ll show you how.
But before we start, try these simple solutions first:
Scan for viruses and malware. Press the Windows icon + I > Update & Security > Windows Security > Open > Virus & Threat Protection > Scan options > Full scan > Scan.
Update Windows. Press Windows + I > Windows Update > Check for updates > Download and install.
These quick fixes should solve the error, but if they don’t, read on!
7 Ways To Fix the DRIVER_INVALID_STACK_ACCESS Error
Simply follow these steps:
Boot Into Safe Mode
Safe Mode lets you run your system with minimal drivers and processes, which makes troubleshooting easier. Here’s how to activate it:
Restart your PC several times to trigger Automatic Repair Mode.
Tap Troubleshoot from the options.
Select Advanced options.
Click Startup Settings.
Tap Restart.
Hit F5 to boot Windows into Safe Mode with Networking.
Disable Fast Startup
Fast Startup is a feature designed to speed up boot time, but it can sometimes cause driver-related issues, leading to the DRIVER_INVALID_STACK_ACCESS error. Here’s how to disable it:
Press the Windows icon + S, type Control Panel, and then hit Open.
Select Power Options.
Tap Choose what the power buttons do.
Click Change settings that are currently unavailable.
Uncheck the Turn on fast startup box, then tap Save changes.
Update Drivers
Outdated or corrupted drivers can often cause the DRIVER_INVALID_STACK_ACCESS error. Updating them can resolve these compatibility issues. Here’s what to do:
Locate a device with a yellow exclamation mark. Right-click it, and tap “Update driver.“
Tap “Search automatically for drivers,” then follow the prompts.
Uninstall Recent Programs
If you recently installed a program that may be conflicting with your system, uninstalling it should resolve the issue. Here’s how to do it:
Click the Start Menu Icon and tap the Settings.
Click Apps.
Locate any program you installed recently, tap on it, and select Uninstall.
Restart your computer and check if the DRIVER_INVALID_STACK_ACCESS error is solved.
Run SFC and DISM
System File Checker (SFC) and Deployment Imaging Service and Management (DISM) can repair corrupted system files that may be causing the issue. Here are the steps to follow:
The ERROR_NETWORK_BUSY system error, with code 54 (0x36), is encountered when performing network-intensive tasks, such as downloading an app from Microsoft Store. The error message reads, The network is busy.
Common causes for Error Network Busy54 (0x36) include issues with the network adapter, a malfunctioning driver, corrupt system files, misconfigured network settings, and malware infection.
Before you move to troubleshooting, install all pending Windows updates, switch to another network (preferably a mobile hotspot), and reconnect the network adapter if using an external one!
How can I fix ERROR_NETWORK_BUSY (The network is busy)?
1. Re-enable the network adapter
Press Windows + S to open Search, type Control Panel in the text field, and click on the relevant result.
Click on Network and Internet.
Click on Network and Sharing Center.
Now, select Change adapter settings from the left pane.
Right-click on the active network adapter, be it Wi-Fi or Ethernet, and select Disable.
Again, right-click on the network adapter, and then select Enable.
Verify whether the ERROR_NETWORK_BUSY message is fixed.
2. Reinstall the network adapter driver
Press Windows + X to open the Power User menu, and select Device Manager.
Expand the Network adapters entry, right-click on the active adapter, and select Uninstall device.
Tick the checkbox for Attempt to remove the driver for this device, and click Uninstall.
Finally, restart the PC, and Windows will automatically install a fresh copy of the driver.
3. Update the network adapter driver
Press Windows + R to open Run, type devmgmt.msc in the text field, and hit Enter.
Double-click on Network adapters, right-click on the active adapter, and select Update driver.
Click on Search automatically for drivers and wait for Windows to install the best locally available version.
Restart the computer for the changes to come into effect.
Press Windows + S to open Search, type Command Prompt, and click on Run as administrator.
Click Yes in the UAC prompt.
Paste the following DISM commands individually and hit Enter after each: DISM /Online /Cleanup-Image /CheckHealthDISM /Online /Cleanup-Image /ScanHealthDISM /Online /Cleanup-Image /RestoreHealth
Now, run this command for the SFC scan: sfc /scannow
Press Windows + R to open Run, type cmd, and hit Ctrl + Shift + Enter.
Click Yes in the UAC prompt.
Now, paste all these commands one at a time and hit Enter after each: ipconfig /releaseipconfig /flushdnsipconfig /renewnetsh int ip resetnetsh winsock reset
Restart the PC and verify whether the ERROR_NETWORK_BUSY system error is fixed.
6. Scan the PC for malware
Press Windows + S to open Search, type Windows Security, and click on the relevant result.
Click on Virus & threat protection.
Click on Scan options.
Select the Full scan entry and then click on Scan now.
Wait for the scan to complete. It may take 15-45 minutes.
If Windows Security can’t detect any threats triggering ERROR_NETWORK_BUSY, I recommend using a top-rated antivirus solution to run deeper scans across all drives on the hard disk.
7. Reinstall Windows
When nothing else works, the last option is to reinstall Windows. Although, for most of you, it shouldn’t come down to that!
Installing Windows via bootable USB
To reinstall Windows 11, connect a USB flash drive to another PC > go to Microsoft’s official website > download the Media Creation Tool > use it to create a bootable USB drive > plug the flash drive into the affected PC > change the boot order to the bootable Windows USB > follow the on-screen setup instructions to complete the installation.
Since ERROR_NETWORK_BUSY is a network-related issue, you know that the fault usually lies with the adapter or its driver. However, if there are multiple adapters, check the Windows errors log to identify the malfunctioning one, and then proceed with the troubleshooting!
We have covered a similar issue in our latest Error_Path_Busy 148 (0x94) article, so go ahead and check it out for more information. We also have an article dedicated to Error_Busy, so don’t miss it.
For any queries or to share which fix worked for you, drop a comment below.
When developing software you might encounter Error_Handle_Disk_Full error that will prevent your project from working properly. Luckily, there are a few solutions you can use that can help you with that.
How can I fix the Error_Handle_Disk_Full error?
Check the HResult
Open your code.
Now use the HRresult like this: static bool IsDiskFull(Exception ex) { const int HR_ERROR_HANDLE_DISK_FULL = unchecked((int)0x80070027); const int HR_ERROR_DISK_FULL = unchecked((int)0x80070070);
This error also comes with its code 39 (0x27) and a description stating The disk is full. However, this issue only affects developers, so if you’re not a developer, it’s not likely that you’ll ever encounter it.
ERROR_DEV_NOT_EXIST is also known as code 55 and may sometimes display The specified network resource or device is no longer available message.
Network drive sharing can be interrupted or disconnected due to connection issues. It is also possible that the set permissions have been updated and locking out other users. If the file location remains unchanged, you may be able to salvage the situation.
How do I fix ERROR_DEV_NOT_EXIST?
1. Enable File and printer sharing and update sharing permissions
Open Settings by clicking the Start menu and selecting the gear icon.
Click on Network & Internet, scroll down and click on Advanced network settings.
Next, click on Advanced sharing settings.
In the the Private networks section, toggle to on Network discovery and File and printer sharing.
Also check the box for Set up network connected devices automatically and click on Save changes.
Open File Explorer by clicking on the folder icon on the Taskbar or pressing Windows + E.
Navigate to the folder you want to share, right-click on the folder and select Properties.
Click on the Sharing tab and hit the Share button.
In the Network access window, either type in the username you want to share with or select Everyone.
Click on the Add button and choose the permission level (Read or Read/Write) from the drop-down menu next to the username.
Click on Share, and then Done.
2. Disable your antivirus temporarily
Hit the Start menu icon, type Windows Security in the search bar and click Open.
Click on Firewall & network protection, then select Public network.
Locate Microsoft Defender Firewall and toggle the off button.
3. Address driver issues
3.1 Update your network drivers
Hit the Windows key, type Device Manager in the search bar, and click Open.
Navigate to your Network adapter, right-click on it, and select Update driver.
Select Search automatically for updated drivers.
3.2 Reinstall your network drivers
Click on the Start Menu icon, type Device Manager in the search bar, and click Open.
Navigate to your Network adapter, right-click on it, and select Uninstall device.
Confirm Uninstall in the next confirmation dialog.
Restart your PC, and your drivers will be automatically reinstalled.
3.3 Roll back to a previous network driver
Click on the Search icon, type Device Manager in the search bar, and click Open.
Navigate to Network adapter to expand, right-click on your network card and select Properties.
Click on the Driver tab, and select Roll Back Driver.
Select a reason for rolling back in the next prompt, then click Yes.
Restart your PC, and the previously installed drivers for your device will be loaded.
4. Map the network drive
Press Win + E to open File Explorer.
Right-click on This PC and select Map network drive.
Choose a drive letter from the drop-down menu.
In the Folder field, type the shared folder path in the form \\ComputerName\SharedFolder.
Check Reconnect at sign-in if you want the drive to be mapped automatically each time you log in.
Click Finish.
It is possible to lose connection to your network drive especially in cases where the Internet connection is unstable. When you attempt to reconnect to your network drive, it may fail but we know how to force a reconnection.
Because these issues can appear at any time, it is essential to have a reliable backup system. This cushions you against data loss and eliminates the back and forth as you can always restore your copy that was originally shared.
Before you go, don’t miss our article on Error_Label_Too_Long and see how to fix this issue on your PC.
Do let us know of any other solutions that may be missing from our list in the comment section below.
SharePoint will introduce a Site ownership policy later this year, starting in October 2024. This policy will see the platform provide a one-stop solution to effectively manage the ownership needs of all SharePoint sites in a tenancy.
According to the latest entry in the Microsoft 365 Roadmap, the new site ownership policy will help users define their organizations’ ownership criteria and identify sites that are no longer compliant.
The policy allows admins to notify selected users to find the next best site owner or admin, thus ensuring the site’s safety.
Site ownership policy is a one-stop solution to effectively manage ownership needs of all SharePoint sites in your tenant. It helps you to define your organization’s ownership criteria and identify sites that are not compliant. You can further notify predefined set of users of your choice to find the next best site owner or admin. You can also choose to automate actions on sites that remain ownerless for more than 3 months to prevent risks of data mismanagement.
This enhancement is part of a larger set of improvements for SharePoint. For instance, earlier this summer, the Redmond-based tech giant announced that a content pane, a central hub for organization-related news and content, would be gradually released to the platform in September.
The 0x000000D0 DRIVER_CORRUPTED_MMPOOL error is a blue screen of death (BSOD) issue that indicates that a driver has corrupted the Memory Management Pool (MMP). It can disrupt your workflow, leading to system crashes and data loss. Luckily, I can show you how to fix it.
But before we go to more detailed solutions, try these quick ones:
Unplug all external hardware, and then restart your PC.
Restart your system. Tap the Start button > Power button > Restart.
Update Windows. Press Windows + I > Windows Update > Check for updates > Download and install.
If none of these help, let’s move on to more in-depth fixes below.
6 Ways To Resolve DRIVER_CORRUPTED_MMPOOL
Let’s check them out one by one:
Boot Windows in Safe Mode
Safe Mode is a diagnostic mode that starts your computer with minimal drivers and services. This can help isolate and identify the source of the DRIVER_CORRUPTED_MMPOOL error. Follow the below steps:
Press the Windows logo key + R. Type msconfig, and hit Enter.
The System Configuration window will open. Select the Boot tab.
Check the Safe boot option, then select Network for Safe Mode with Networking.
Tap OK. The system configuration will ask you to restart your computer.Click Restart.
Your PC will reboot and go into Safe Mode.
Uninstall Faulty Drivers
Faulty drivers are often the root cause of the DRIVER_CORRUPTED_MMPOOL error. Here’s how to remove them:
Locate the device with the problematic driver (usually marked with a yellow triangle). Right-click it and choose Uninstall device.
Confirm you want to uninstall the device.
Restart your computer to apply the changes.
Update Drivers
Outdated drivers can cause compatibility issues, leading to the DRIVER_CORRUPTED_MMPOOL error. Keeping your drivers up-to-date can help avoid this problem. Follow the below steps:
Open Device Manager by pressing Windows + X.
Find the device you need to update, right-click, and choose Update driver.
Select Search automatically for drivers.
Follow the prompts to complete the update, and then restart your computer.
Uninstall Recent Windows Updates
Recent Windows updates can also cause conflicts, leading to the DRIVER_CORRUPTED_MMPOOL error. Uninstalling them might resolve the issue. Here’s what you need to do:
Press Windows + I to open the system Settings >Update & Security.
Select View update history.
Click on Uninstall updates at the top. Select the most recent one and click Uninstall.
Restart your computer to see if the issue is resolved.
Uninstall Recent Applications
Newly installed applications might interfere with system processes, leading to the DRIVER_CORRUPTED_MMPOOL error. Here’s how to remove them:
Open the Control Panel by searching for it in the Start menu.
Click on Uninstall a program under Programs.
Find the recently installed application, right-click on it, and choose Uninstall.
Follow the prompts to remove the application, then restart your system.
Restore System
If the DRIVER_CORRUPTED_MMPOOL error persists, you might need to restore your Windows system to a previous state. This can undo recent changes that may have caused the problem. Here are the steps:
Press Windows + R, type rstrui, and tap Enter.
Hit Next.
Pick a restore point, then click Next.
Click Finish.
Your PC will reboot to start the restoration process.
The DRIVER_CORRUPTED_MMPOOL error can be disruptive, but you can resolve it with the right steps. Now you know how to restore your system to regular operation and prevent further BSOD occurrences.
Microsoft announced a new solution for syncing responses from Forms to Excel. The new solution improves reliability and performance. The older syncing method, currently available in some Forms, will be entirely replaced by the new solution by January 13th, 2025.
After January 13th, 2025, the older syncing solution will not update your Excel workbook with new responses. However, any existing workbooks and their data will be retained.
You’ll need to upgrade to the new syncing solution to ensure your workbooks continue to receive new form responses.
For instance, if you have an Excel for the web workbook that uses the older syncing solution, you’ll see a pane on the right side prompting you to update the workbook to continue syncing new responses.
Clicking on the Update sync button will begin the updating process. Using the new syncing solution, a new sheet will be created in the same workbook connected to the Form. All previous responses will be resynced to this new sheet, and any new reactions will be synced.
The new solution for syncing form responses to Microsoft Excel is available for Excel for the web, OneDrive for Business and SharePoint Online customers. You can read more about it here.
In other news, Copilot was recently made available in Microsoft Forms. The AI tool can generate quizzes, forms, and other surveys using the data you provide within seconds. Regarding Copilot, Microsoft also plans to announce a series of new capabilities later this month, focusing on a deeper integration with the 365 platform.
The LOCKED_PAGES_TRACKER_CORRUPTION is a type of BSoD that may or may not be accompanied by the stop code 0x000000D9.
BSoD errors can be triggered by hardware failure or software conflicts but in this case, it is a corruption of the locked pages. Locked pages are essential in memory management especially in scenarios where critical data is involved and ensure this information remains locked in the physical memory.
Also, by staying locked in physical memory, they ensure the speedy and efficient access to data and prevent system slowdowns. If these files are corrupted, you might encounter this BSoD. Another trigger could be a recent hardware change that is incompatible with your system.
How do I fix the LOCKED_PAGES_TRACKER_CORRUPTION error?
Press the Windows + I keys simultaneously to open Settings.
Navigate to Windows Update, then go to Update history.
Click on Uninstall updates.
Select the most recent update, then click Uninstall.
5. Disable Fast startup
Hit the Windows key, type Control Panel in the search bar, and click Open.
Click on System and Security.
Next, select Power Options.
Click on Choose what the power buttons do from the list of options on the left.
Select Change settings that are currently unavailable.
Now, untick the checkbox for Turn on fast startup and then click on Save changes.
Disabling Fast Startup forces the system to perform a full reinitialization. If the loading pages tracker memory was corrupt, it will be reconfigured from scratch and resolve any inconsistencies.
6. Perform a System Restore
Press the Windows key, type Control Panel, and click Open.
Select Large icons as View by and click Recovery.
Click Open System Restore.
Select Choose a different restore point and click Next.
Now select the restore point and click Next.
Click Finish to restore the previous settings, and Windows will restart.
If the LOCKED_PAGES_TRACKER_CORRUPTION error persists, you may have to perform an in-place upgrade. This can repair the corrupt system files and address the issue while keeping all your files and apps intact.
To minimize the occurrence of such errors in future, keep your software up-to-date. Also conduct regular hardware checks and maintenance schedules to ensure their reliability.
Other like errors like the INVALID_HIBERNATED_STATE could also use the same fixes and get you out of a continuous loop of BSoD errors.
That’s it from us but do share with us any suggestions or additional comments in relation to this topic.
Microsoft has announced that it will hold a virtual event, Microsoft 365 Copilot: Wave 2, on September 16 to provide more details about the next phase of the Copilot AI feature. The event will start at 8:00 AM PT / 11:00 AM ET.
The event will be hosted on LinkedIn, and Microsoft promises that CEO Satya Nadella and Jared Spataro, the corporate vice president of Microsoft 365, will attend to discuss the future of Copilot.
According to the latest reports, Microsoft plans to release a new version of Copilot with a different branding. The event’s title, which Microsoft only partially revealed, suggests that the company will, at the very least, discuss new features for Copilot and the AI-powered Copilot+ PCs that work with Copilot.
Microsoft has already detailed several features in the pipeline for Copilot on the Microsoft 365 roadmap. For instance, Microsoft says it’s planning to add support for generating images in the chat with a version of Copilot for Microsoft 365, a subscription.
While we don’t know what direction Microsoft is planning to take with Copilot, we have some clues: the Redmond-based tech giant might probably want to integrate it even further with Microsoft 365 apps, and in fact, the company launched a version of Copilot for Word, PowerPoint and Excel in a private preview for a small group of users at the end of August.
At Microsoft 365 Copilot: Wave 2, we might better understand when the feature will become more widely available.
There are many errors you can encounter while developing, and one of them is Invalid_Cancel_Of_File_Open. In today’s guide, we’re going to take a closer look and show you how to fix it, so let’s get started.
How can I fix the Invalid_Cancel_Of_File_Open error?
If you have antivirus running, you might want to temporarily disable it or if you have third-party antivirus, uninstall it and check if that helps.
1. Install the latest Cumulative Update
If you’re using SQL server download the latest Cumulative Update.
Microsoft has confirmed that there are issues with Python and certain updates.
By keeping the server up to date, you’ll avoid those issues.
Alternatively, if the issue appears after the latest update, roll it back.
2. Try using an older version of Python
Uninstall your Python installation.
Install the older version of Python. Users reported that Python 3.5.2 worked for them.
Check if that solves the problem.
Invalid_Cancel_Of_File_Open is a developer error and it mostly affects SQL server and Python but you can encounter it in other environments.
Microsoft has unveiled the Surface Pro 11th Edition and Surface Laptop 7 for Business, designed for enterprise customers. They are available for preorder now and will launch on September 10.
As their names suggest, the Surface Pro 11th Edition and Surface Laptop 7 for Business are aimed at business users and come with a few features that could make them more appealing to that market. The Pro 11 for Business has up to a 12-core Snapdragon X Elite processor and a 13-inch 2880×1920 OLED display with a 120Hz refresh rate. Customers can also get up to 32GB of RAM and up to 1TB of storage, and the device supports Wi-Fi 6E and Bluetooth 5.2.
The Surface Laptop 7 for Business is powered by the 12-core Qualcomm Snapdragon X Elite (X1E80100), and the 13-inch version can be optionally specced with the 10-core Snapdragon X Plus (X1P64100). Memory options include either 16GB or 32GB of LPDDR5x. As for storage, the Surface Laptop 7 for Business has a user-removable PCIe Gen 4 SSD with 256GB, 512GB, and 1TB capacities.
Microsoft also touts the “enterprise-grade security” of the Pro 11 for Business, which includes a TPM 2.0 chip, BitLocker support, and a Microsoft Pluton security processor. The device ships with Microsoft 365 apps preinstalled and a 30-day trial to Microsoft 365 Business Standard, Microsoft 365 Business Premium, or Microsoft 365 Apps. The Pro 11th Edition for Business runs Windows 11 Pro, the business-focused version of Microsoft’s latest operating system.
On the other hand, the Surface Laptop 7 for Business ships with Windows 11 Pro. Spec-wise, it is identical to its regular variant with the exact technicalities: Wi-Fi 6E, 5G connectivity, a 1080p IR camera, and a 3D-sensing time-of-flight (ToF) camera for Windows Hello. On the audio front, the Surface Laptop 7 for Business features dual far-field studio mics and Dolby Atmos-tuned speakers.
Microsoft says it’s made the Pro 11th Edition for Business “highly repairable” and that the device has the highest repairability score of any Surface product. The list of components that can be repaired and replaced in the Pro 11 for Business includes the display module, removable solid-state drive, battery, motherboard (including central processor and main memory), Surface Connect, thermal module, microphone module, solid-state drive door, speakers, enclosure (bucket), front camera, rear camera, power and volume buttons, kickstand, device entry kit, and SIM card connector.
Customers can get the Surface Pro 11th Edition for Business in either Platinum or Black. Starting September 26, Microsoft will offer a 5G model of the Pro 11 for Business for an additional $100.
The Surface Pro 11th Edition for Business is now available for preorder from Microsoft’s website. It will launch on September 10 and cost $999.99. The device will also be available at Microsoft Stores and Best Buy. The Surface Laptop 7 for Business will be available through Microsoft’s commercial device resellers, starting at $1,399.
Microsoft also announced a new Surface Keyboard for the Surface Pro 11th Edition and other Surface devices. It includes a Copilot key to access Microsoft’s Copilot+ AI features, with improved tactility and quieter keys. The keyboard also includes dedicated Windows 11 shortcut keys for actions like calling and muting and a snip and sketch key for quickly taking screenshots and opening Microsoft’s Snip & Sketch app.
The Surface Keyboard is compatible with the Surface Pro 11th Edition, Surface Pro 7+, Surface Pro 7, Surface Pro X, Surface Laptop 4, and Surface Laptop Go. Microsoft will offer the Surface Keyboard in Glacier, Platinium, and Graphite colours starting October 3, but it’s not yet sharing pricing.

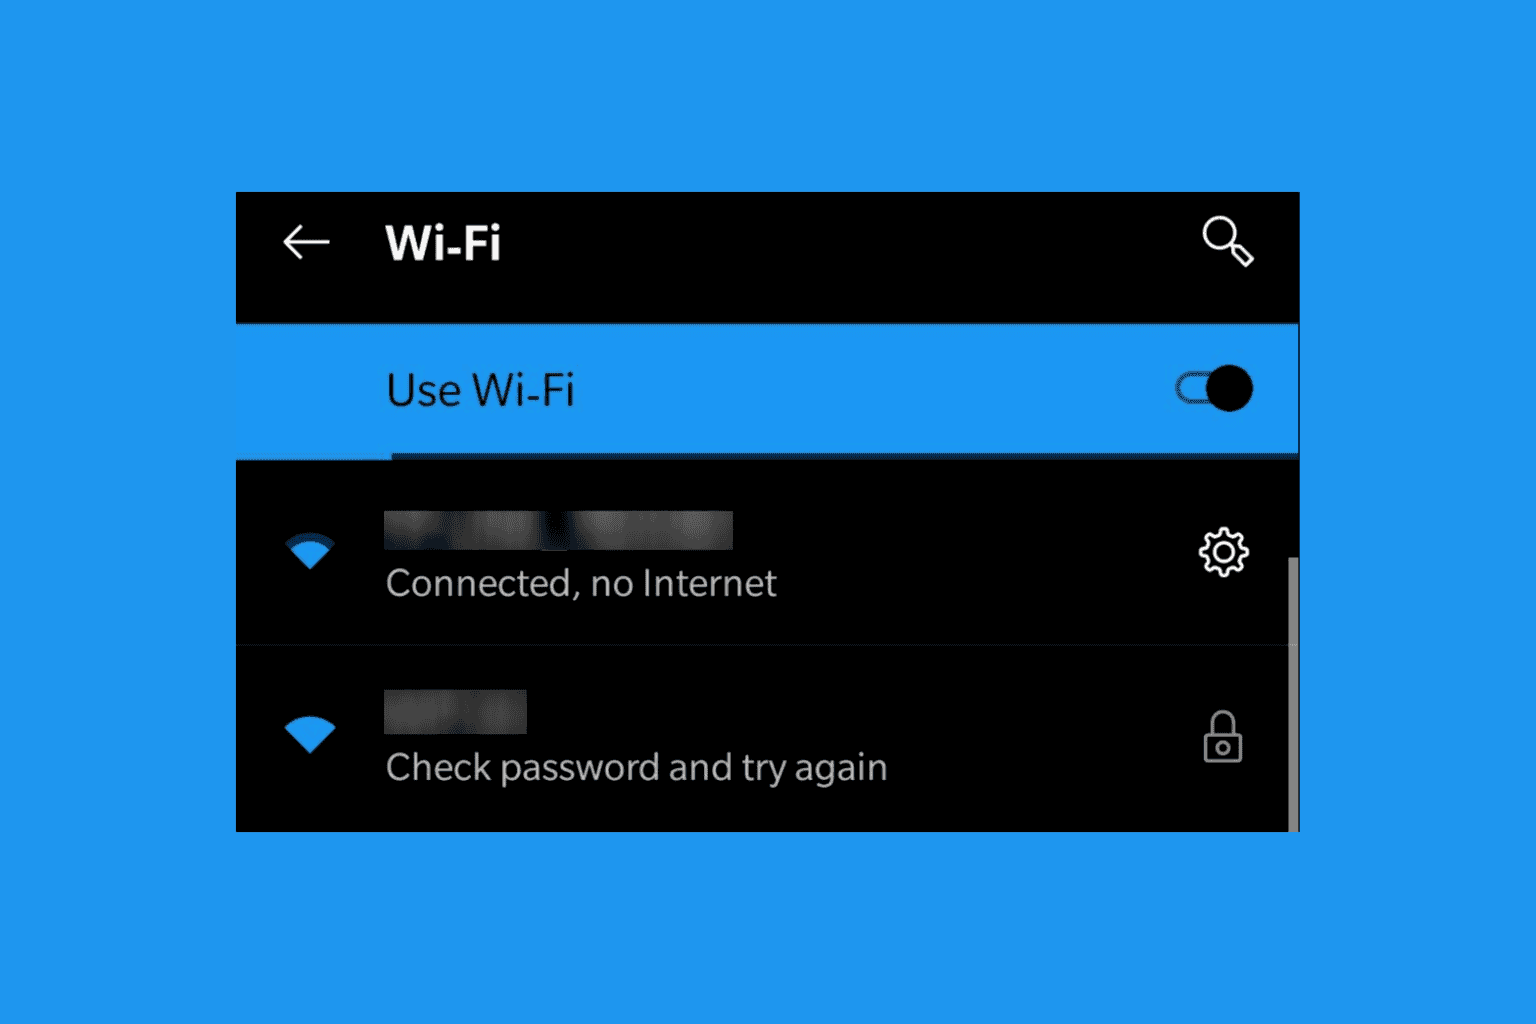


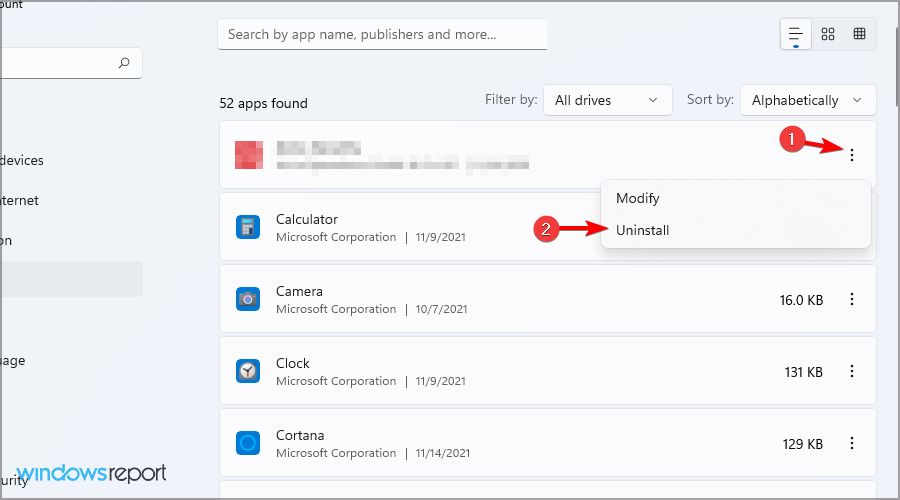






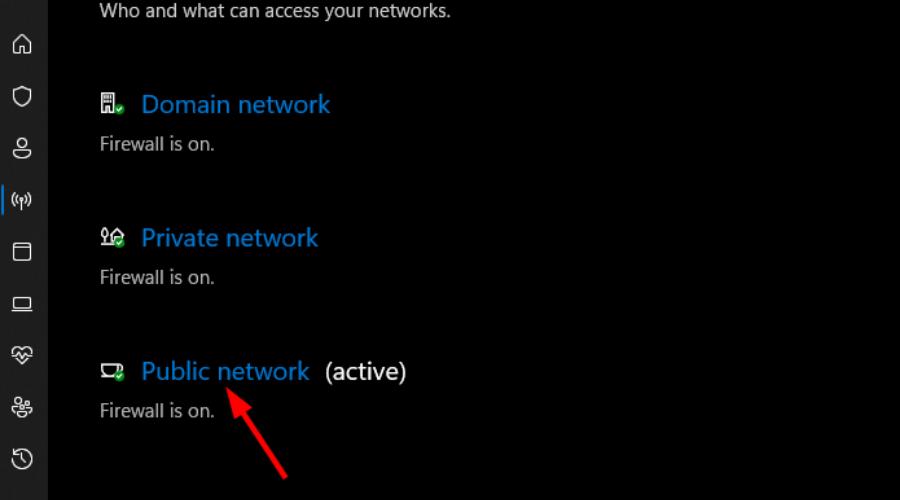




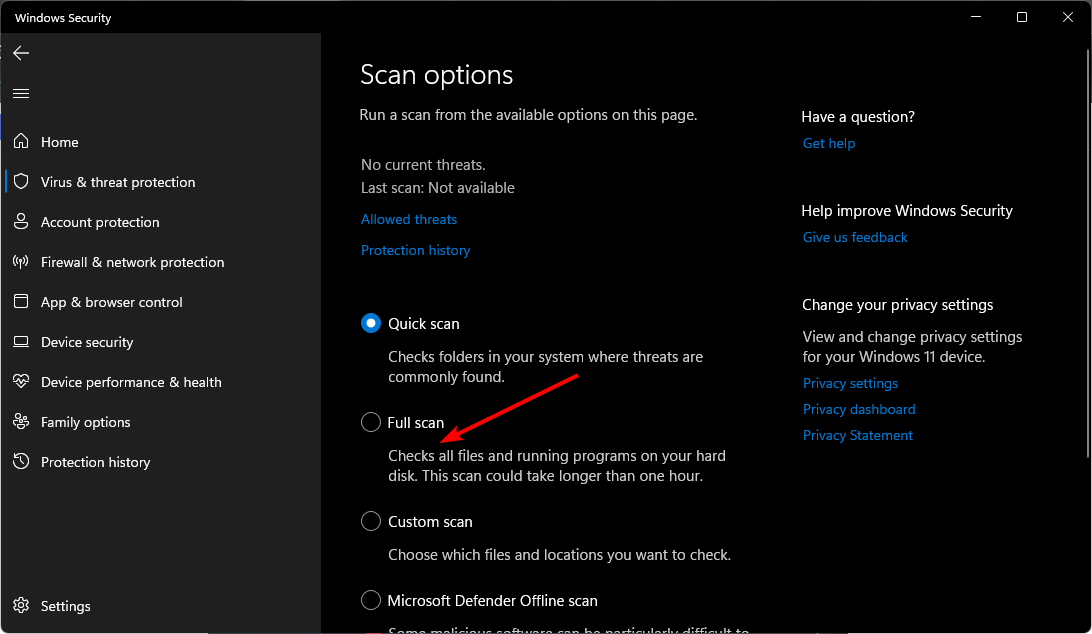


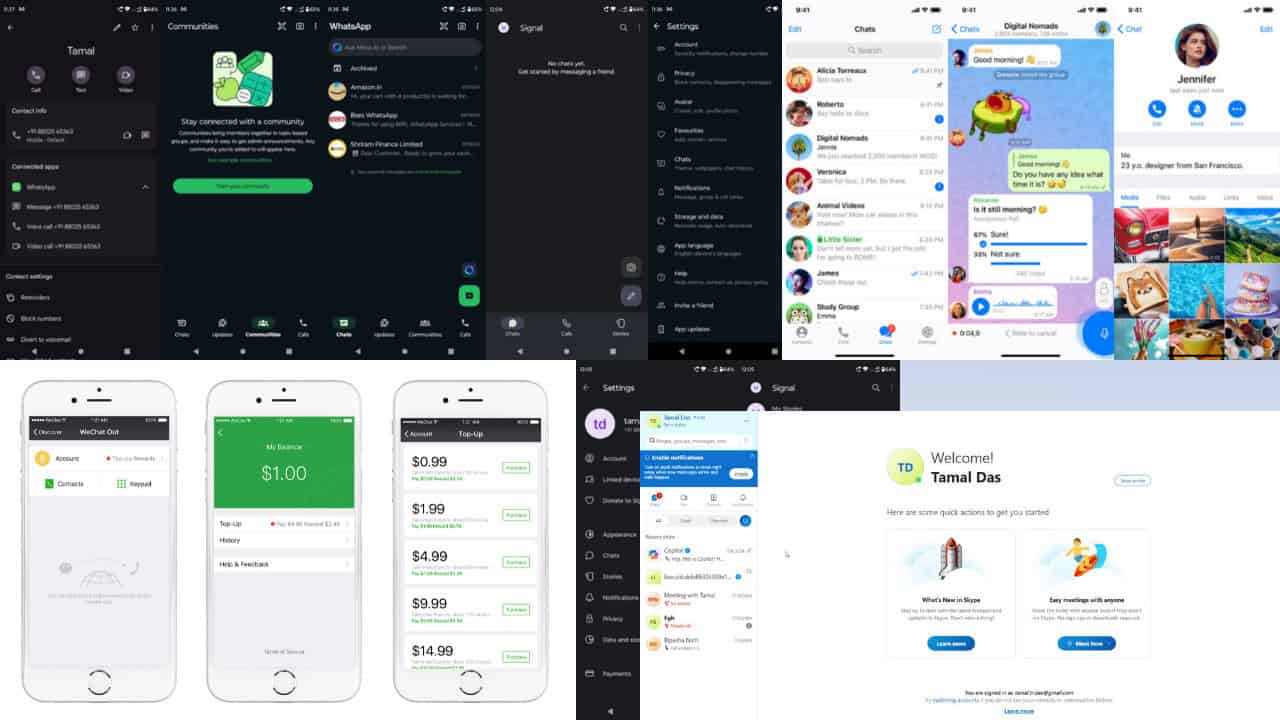


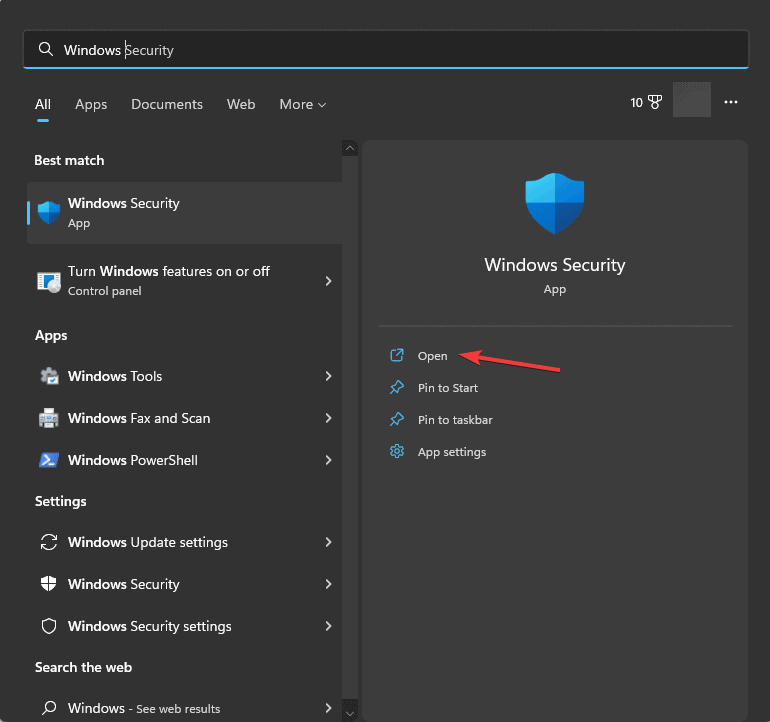
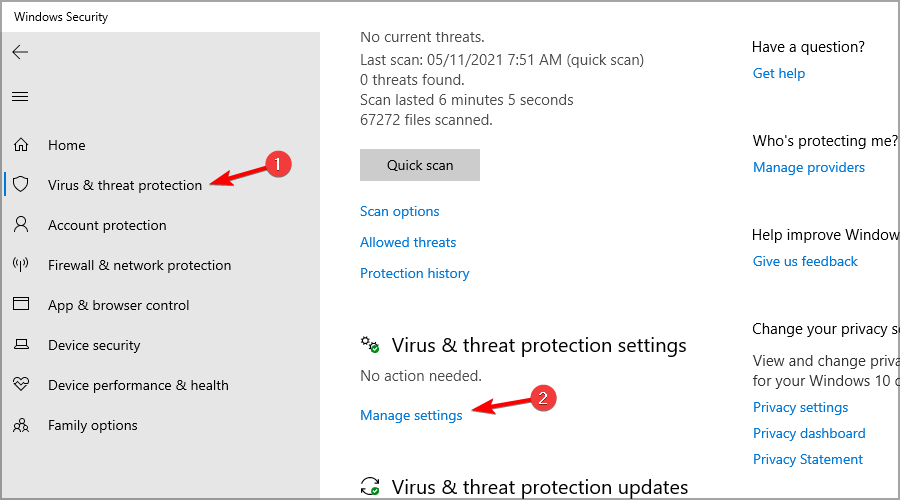
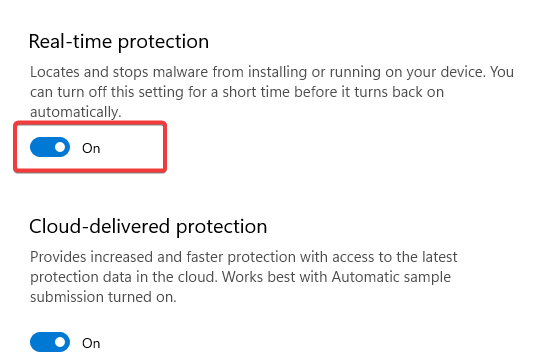


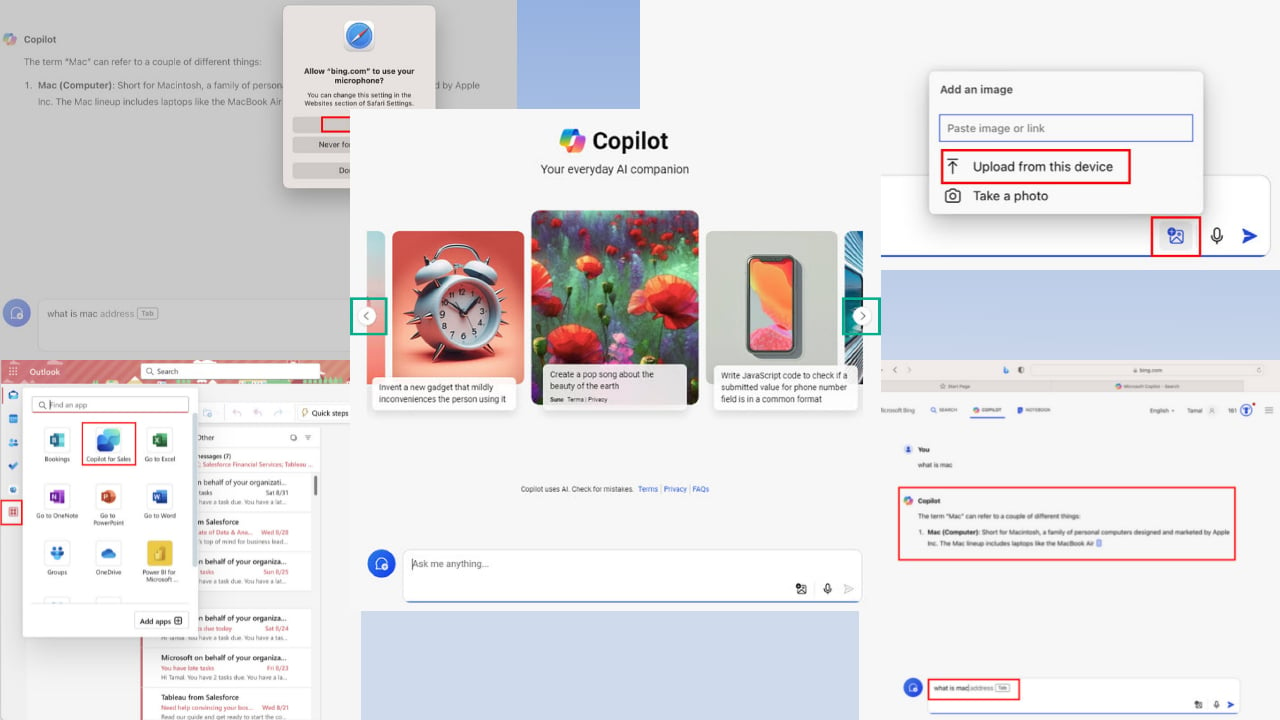


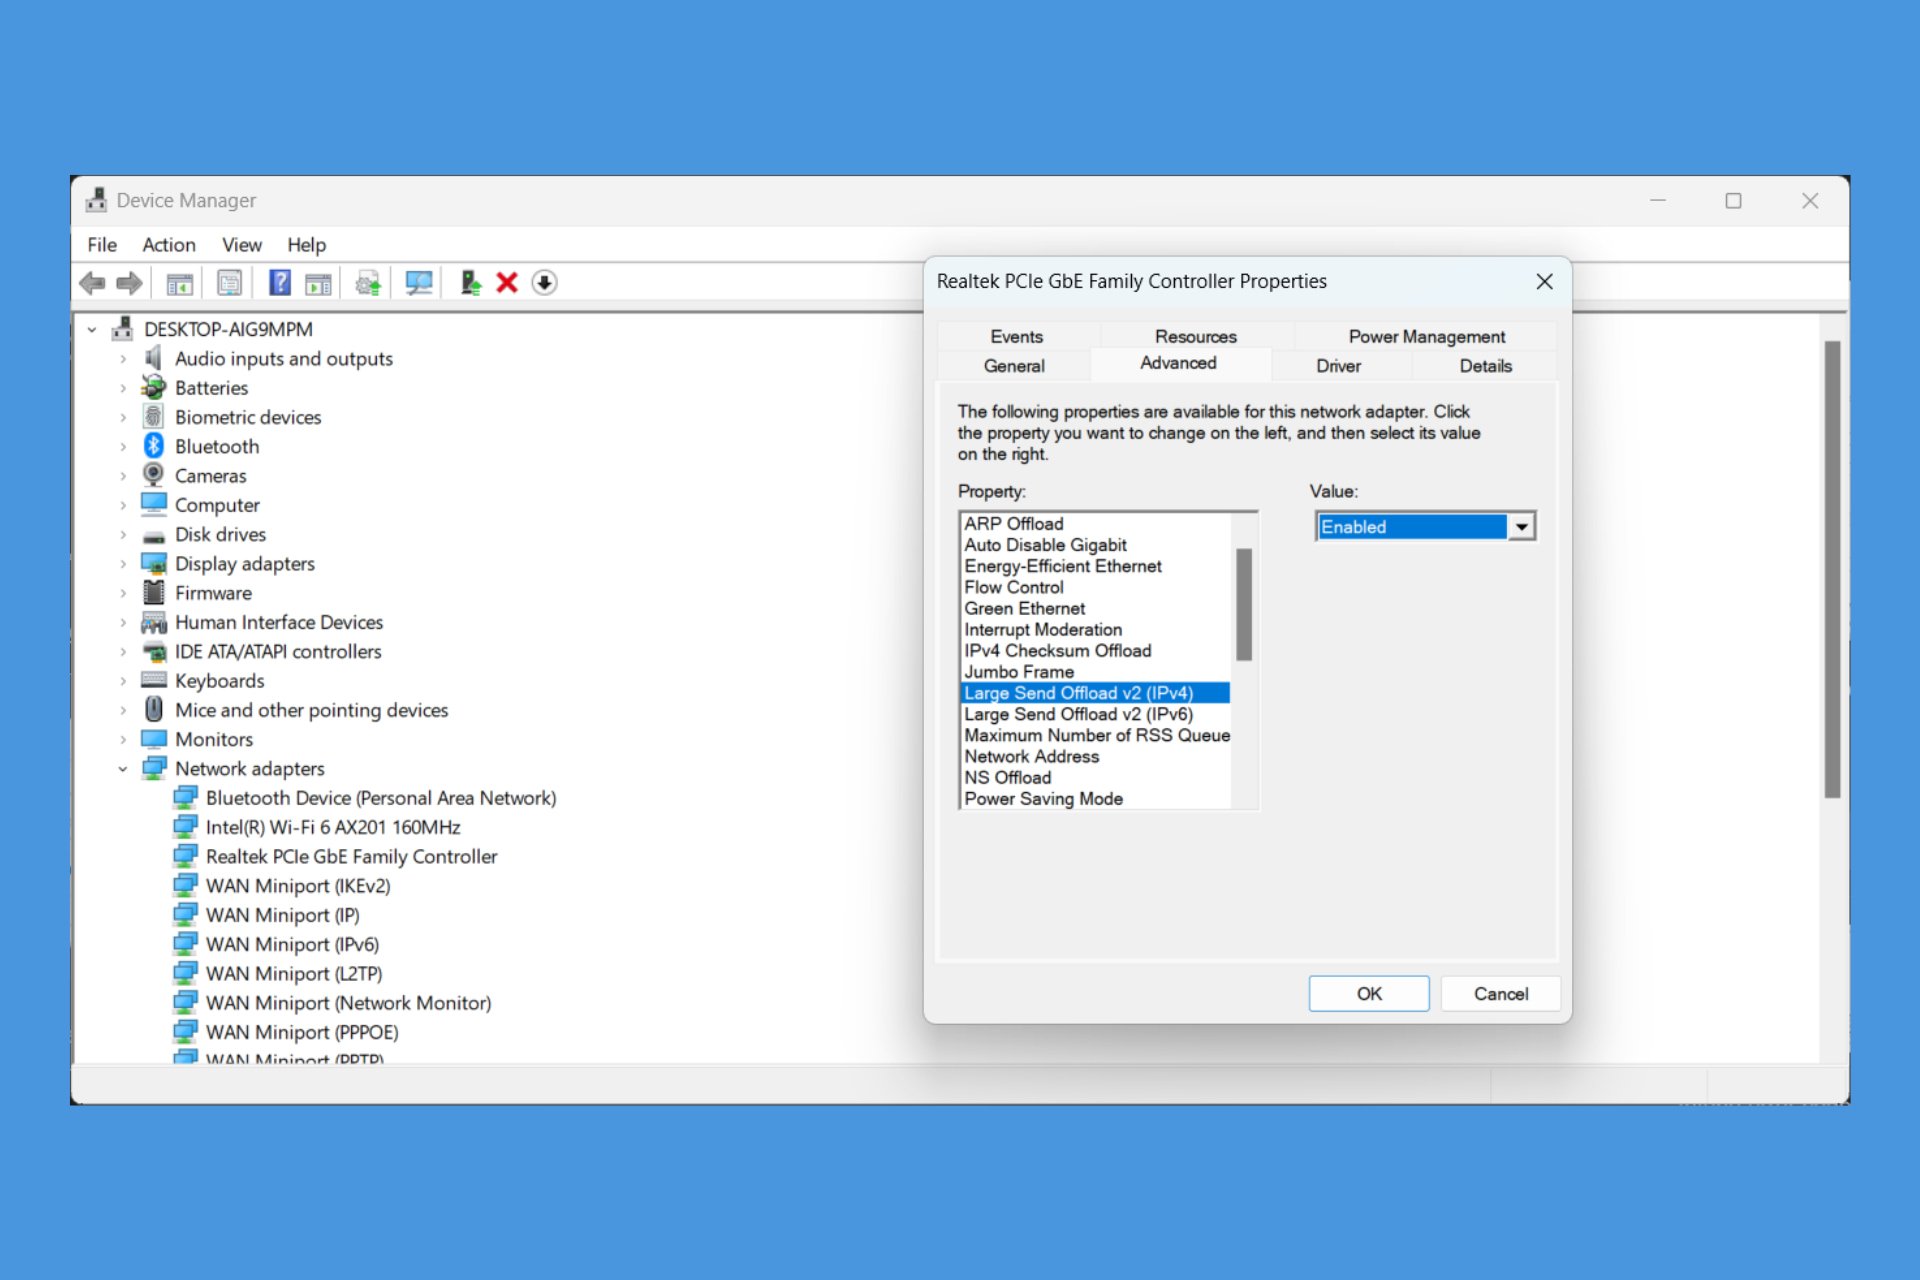


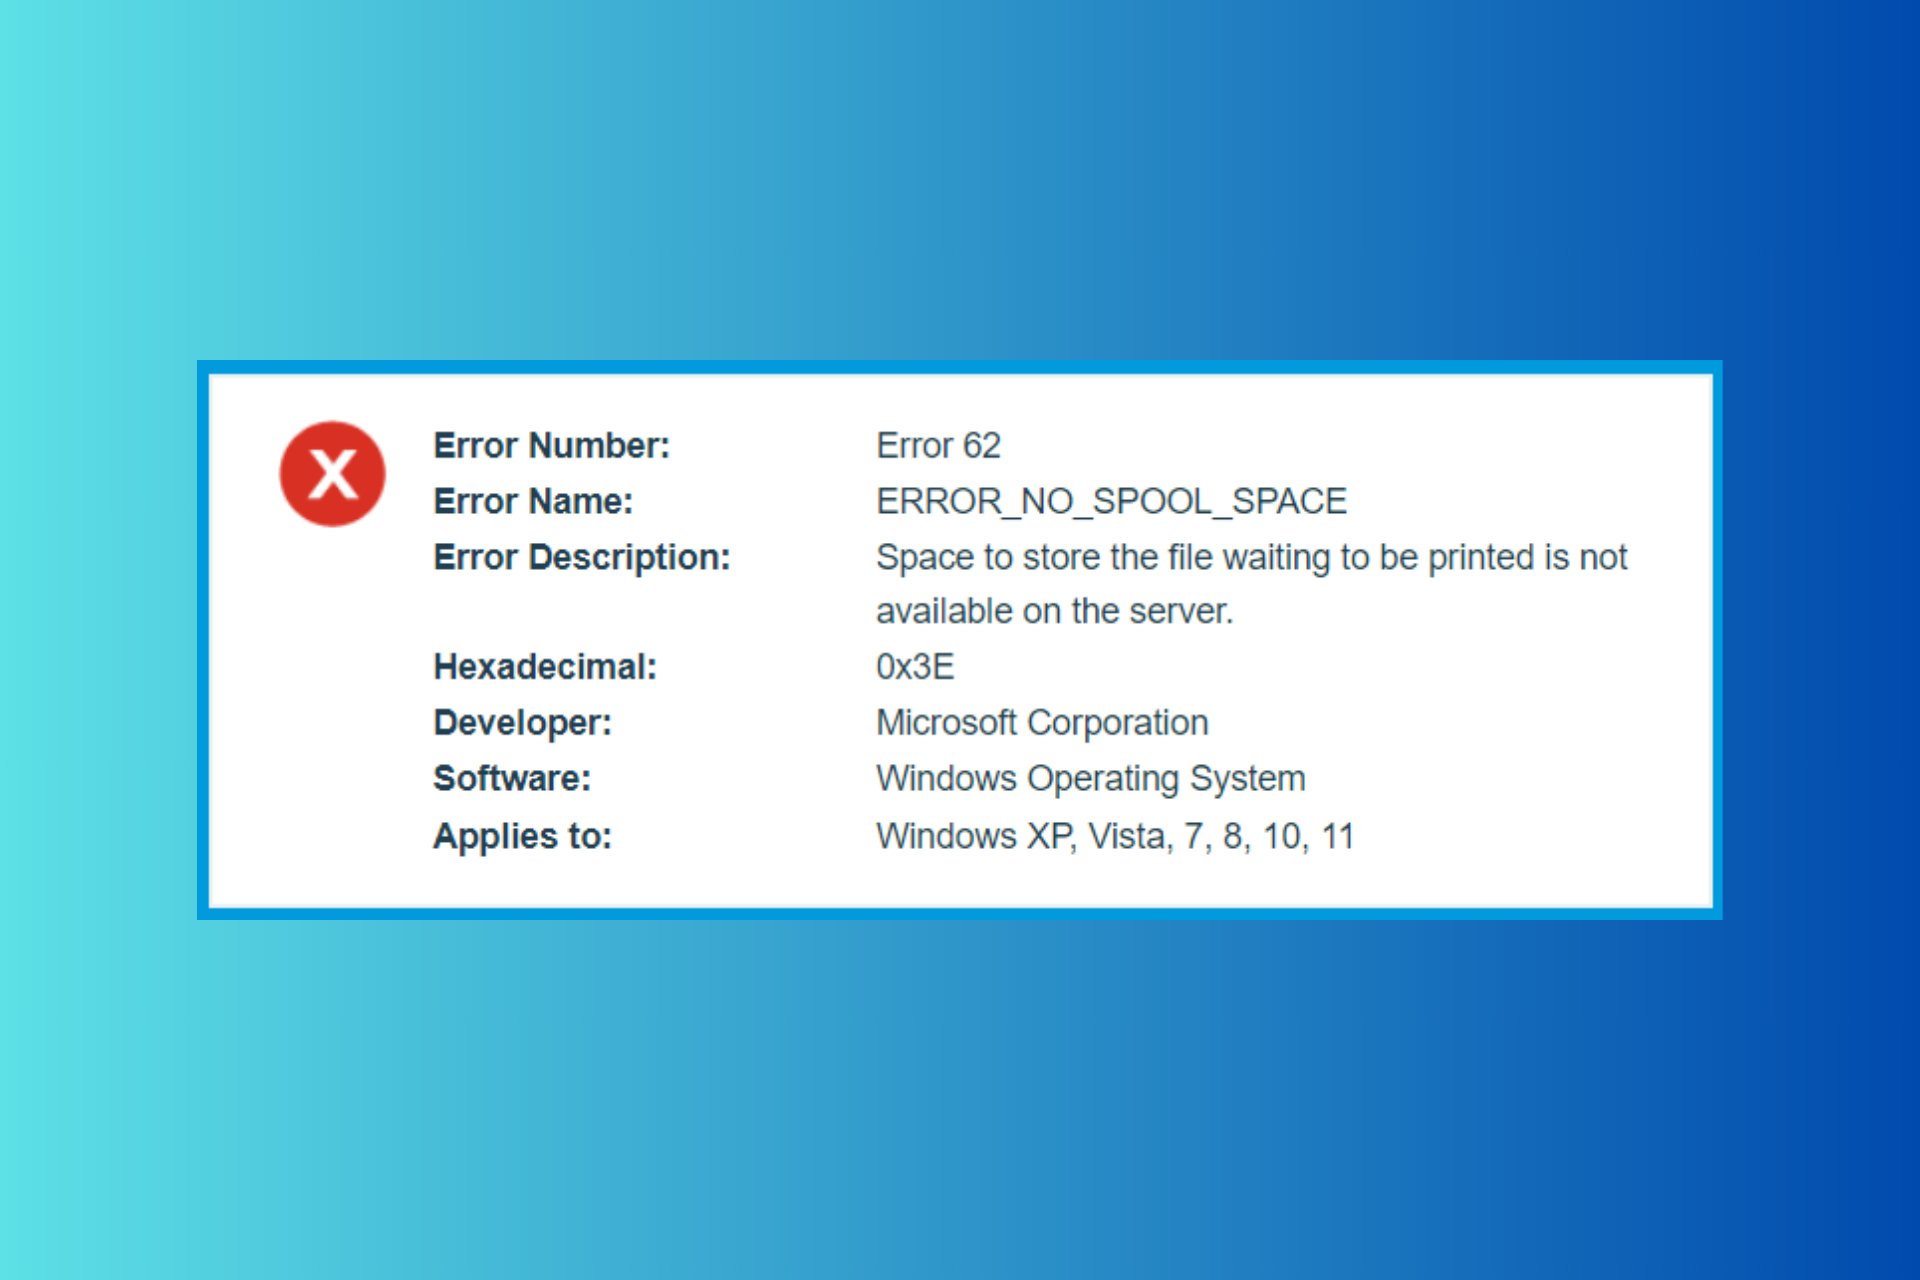

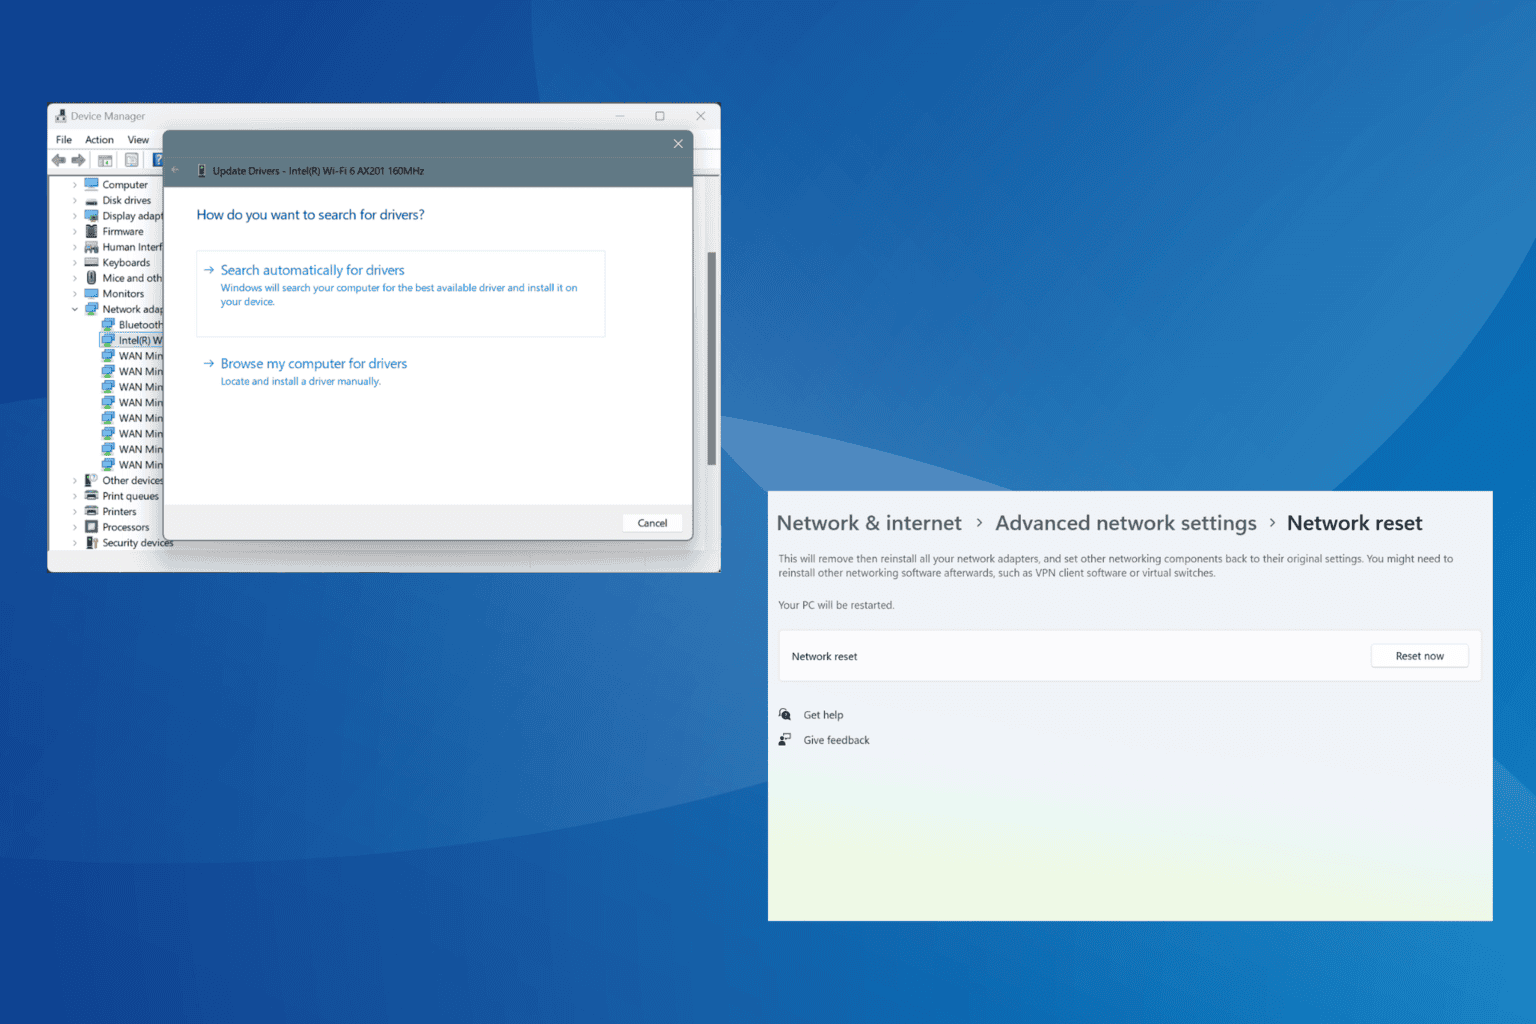


 and