Is 2026 really the year of PC AI? Some still cling to Windows 7

Windows 11 is focusing heavily on AI thanks to the built-in Copilot, but despite this feature, many are still using Windows 7 in 2024!

According to Windows user statistics from StatCounter, 3.35% are still on Windows 7 and refusing to upgrade. Why would someone still use Windows 7 in 2024, you ask? Buckle up while we try to find out!

Is AI integration enough for users to make a switch?

Copilot AI is built into Windows 11 and it can generate AI summaries for Word documents among many other things. There are also rumors that you might be able to run Copilot locally on your PC.

While Copilot is available in the browser, it’s unknown whether users can access it on Windows 7. The service requires a modern browser to work, and with developers dropping support for Windows 7, running Copilot online seems unlikely.

Is Windows 7 still OK to use?

Using this version comes with several drawbacks, with the following being the most prominent:

  • Obtaining Windows 7 ISO is impossible through legitimate means, meaning you can’t reinstall it if any issues occur.
  • No security updates since the extended support period has ended last year. This means new threats can cause havoc on your PC if you’re not careful.
  • Many applications, including antivirus software and browsers, don’t work on Windows 7 anymore. This affects both your security and everyday use.

Why do many still refuse to move on from Windows 7?

We did some research and found a post from Reddit users on why they still use Windows 7.  

Some are familiar with the risks, but despite that, they want to keep using it, most likely due to familiarity:

There’s no point arguing or trying to convince people. We all know the risks. Just use it and if anyone asks why then just tell them.

Many users aren’t pleased with the complexity of newer systems and the potential issues that come with it:

Meanwhile Microsoft adds more complexity and attack surface and bugs to Windows 10 and 11.

Others are concerned about telemetry features and data collecting.

And it irks me when Microsoft was OK injecting telemetry into Windows 7 and the horrible UI decisions in Win10 are still something I notice on a regular basis.

If you’re concerned about this as well, we have a great guide on how to disable Windows 11 telemetry that can help you get your privacy back.

It seems that many have major gripes regarding the UI and telemetry features on Windows 10 and Windows 11, and the introduction of AI support won’t make them switch.

If you’re one of those users, we have a great guide on how to stay on Windows 7 that you might find interesting. However, if you want to make a switch, don’t miss our Windows 11 vs Windows 7 comparison guide to learn more.

Are you still on Windows 7, and if so, why? Let us know in the comments.

Got an older Intel CPU? You might want to avoid Windows’ latest updates

The latest updates to Windows 10 22H2 (KB5034203) and Windows 11 23H2 (KB5034204) might cause serious issues to those devices running these Windows versions while geared up with Core 2 Duos & Quads processors, as well as earlier Intel Series CPUs, as several users complained native Windows apps, such as Calculator, Calander, Feedback Hub, Groove Music, Movies & TV, Paint 3D, People, Photos, Tips, Voice Recorder were rendered unusable after installing these updates.

One user, in particular, found out that these apps, and possibly even more, are no longer working on machines equipped with these processors, and without a warning, installing the updates on them made them unusable.

Calculator, Calander, Feedback Hub, Groove Music, Movies & TV, Paint 3D, People, Photos, Tips, Voice Recorder and possibly some others remain broken. By trying to open them one receives a quick black window that closes directly.

Windows user

From the user’s research the Core 2 Duos & Quads processors, and some of the earlier Intel Series CPUs, although they don’t specify which ones exactly, are potentially affected.

After further research on older generation CPU`S such as the CORE 2 DUOS & QUADS plus some of the earlier gen I SERIES CPU`S. I feel that the Microsoft Developers of these Updates have not included the INSTRUCTION SWITCHES within these updates to continue full functionality with the CPU`S EMBEDDED INSTRUCTION SETS.

Windows user

While Microsoft hasn’t commented on the issue, the Redmond-based tech giant is constantly updating the list of supported processors for the latest Windows updates.

For example, for Windows 10 22H2, you can find the list of the supported processors here.

  • For Intel processors, check this list.
  • For AMD processors, check this list.

For Windows 11, 23H2, you can find the list of the supported processors, as follows:

  • For Intel processors, check this list.
  • For AMD processors, check this list.

Before installing any new Windows updates on older CPUs, make sure to check the lists, to see if your device is supported, especially if you have an older device.

And for now, the best solution would be to avoid installing new Windows updates, until Microsoft confirms the issues.

This could be a singular case because only a few users have been complaining about this issue, but if you notice the issue on your devices, be sure to let us know, in the comments section below.

Huge Xbox Lunar New Year Sale 2026 brings 700+ game discounts

If you’re a gamer like us, the next two weeks you’re just going to love the Xbox Lunar New Year Sale 2024! It features discounts on over 700 game titles including some major ones like Diablo 4, EA Sports FC 24, Alan Wake 2.

Older games are up to 90% off while most go with 67% discounts so we’re talking about really good deals here!

In addition, there are some pretty nice discounts for Xbox Game Pass members each month, so here’s what’s coming on February:

DateGamePlatform
February 2Persona 3 ReloadConsole, PC, Cloud
February 6AnuchardConsole, PC, Cloud
February 15PlateUp!Console, PC, Cloud

What are the best deals on Xbox Lunar New Year Sale 2024?

We’ve sorted some of the top 10 price cuts from the game discounts on this sale:

GameOld priceLunar Sale Price
XCOM 2$59.99$2.99
Mortal Kombat 11 Ultimate Add-On Bundle$49.99$4.99
Just Cause 4 – Gold Edition$59.99$8.99
Fallout 76: Atlantic City – Boardwalk Paradise Deluxe Edition$59.99$23.99
Call of Duty: Modern Warfare III – Cross-Gen Bundle$69.99$48.99
Alan Wake 2$59.99$47.99
Ghostrunner 2$39.99$23.99
Gord – Deluxe Edition$36.99$18.49
EA SPORTS FC™ 24 Standard Edition Xbox One & Xbox Series X|S$69.99$24.49
ARMORED CORE VI FIRES OF RUBICON – Deluxe Edition$69.99$48.99

So, as you can see, there are lots of discounts on new titles to choose from so feel free to rummage through them and start the year as a happy gamer.

Do you have a Steam Deck in your hands right now? Take a look at this bundle of new games for 2024.

What did you put in the sale basket? Tell us all about your favorite titles in the comments section below.

How to Download The YouTube Music App For PC

The YouTube Music app is primarily designed for mobile devices, but if you’re looking for a similar experience on your PC, you can still access it in various ways.

There is currently no dedicated YouTube Music app available for PC but with a few tweaks, you can listen to music as you would on your smartphone. While you can access YouTube Music on your PC, it does not offer the same offline playback features as the mobile app.

How do I download YouTube Music on my PC?

1. By using a browser

  1. Open your preferred web browser on your PC. (We’ll be using Chrome for this step).
  2. Go to the YouTube Music website by typing music.youtube.com in the address bar and pressing Enter.
  3. If prompted, sign in to your Google account. If you don’t have an account, you’ll need to create one.
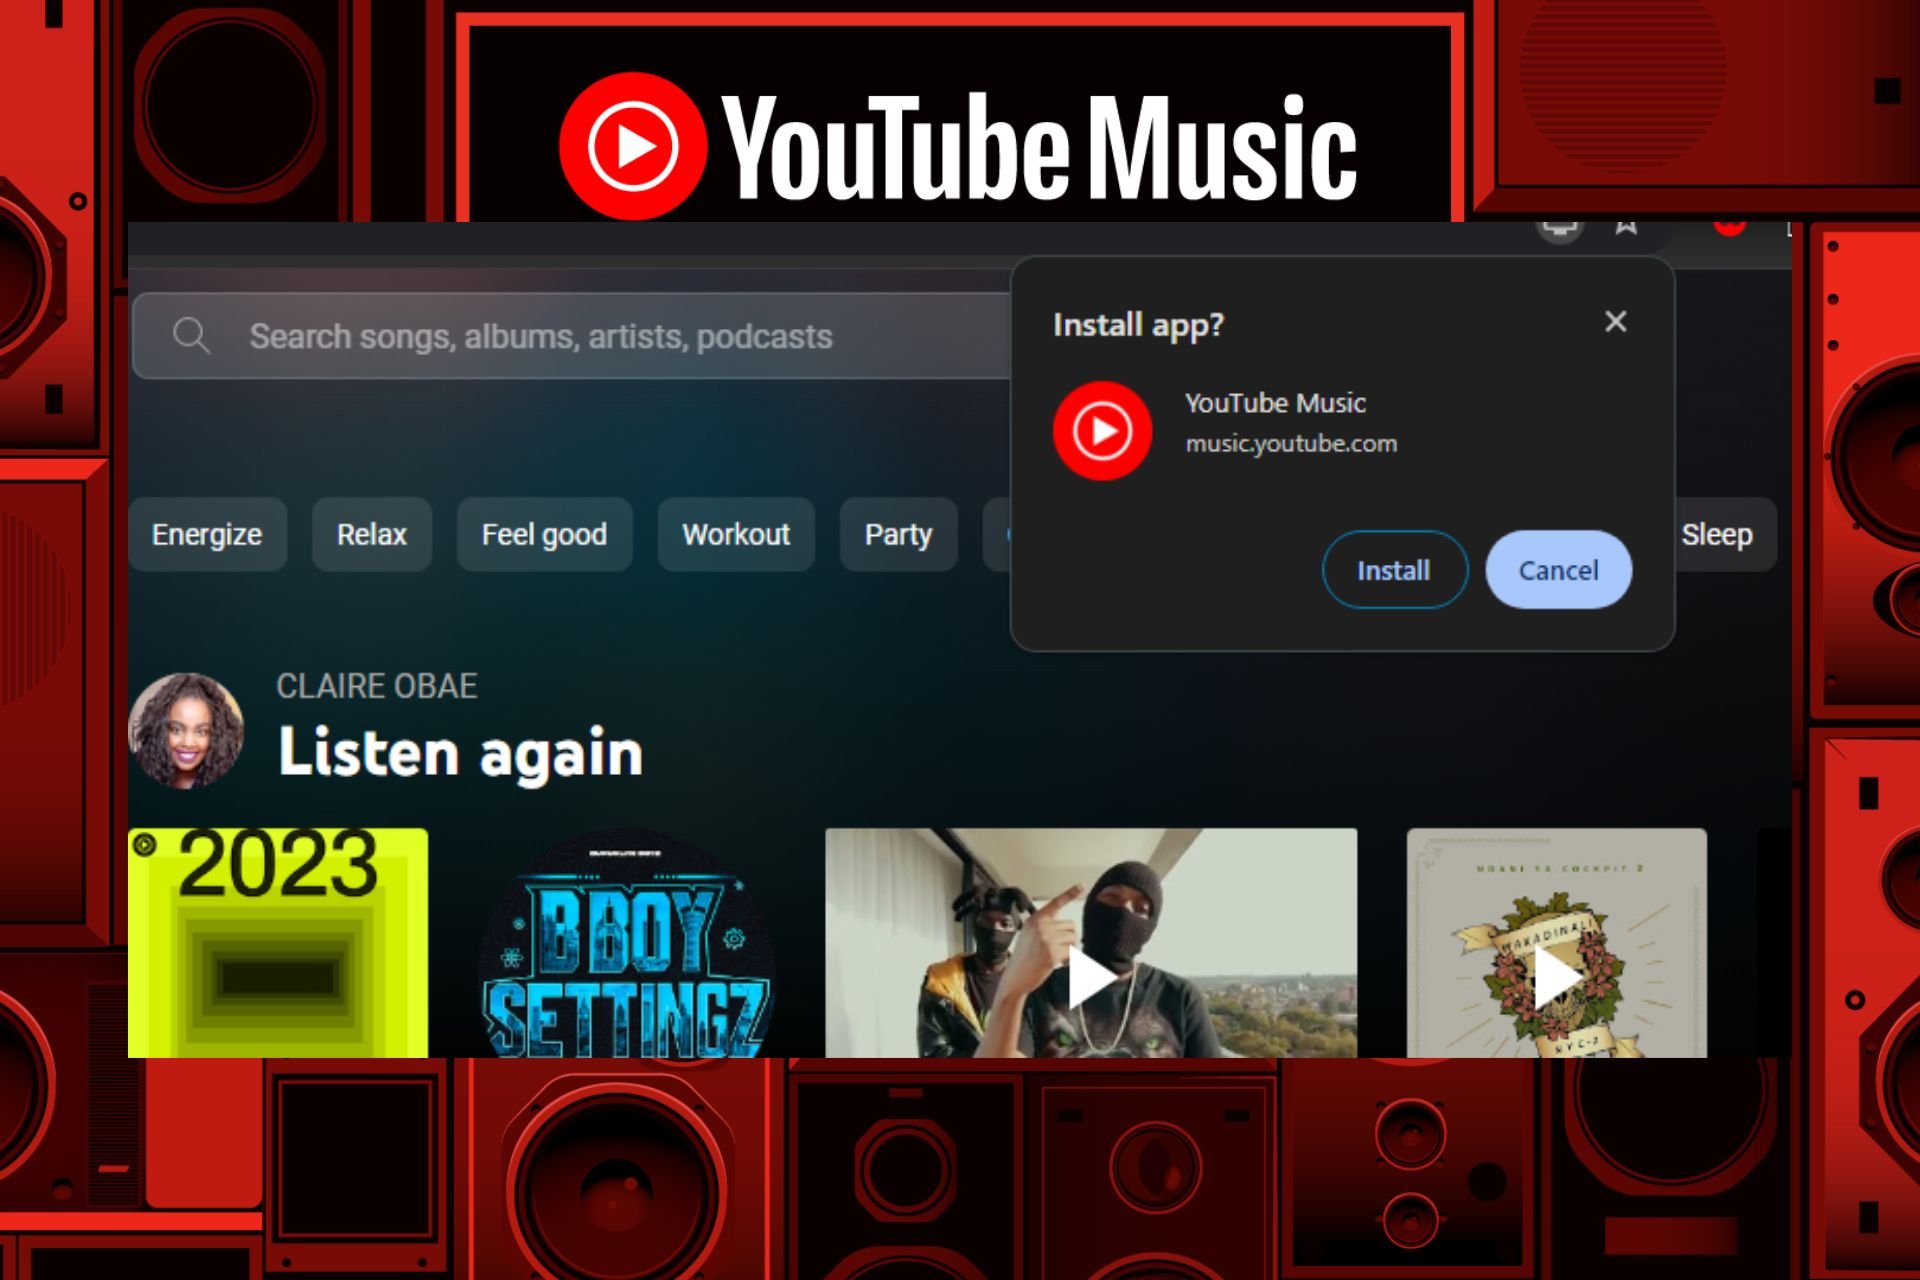
  4. Click on the download icon and hit Install when prompted. You should now have access to YouTube Music through the web version.
  5. To make accessing YouTube Music more convenient, a shortcut will be automatically created on your PC’s desktop or taskbar.
  6. If it doesn’t, with the YouTube Music website open in your web browser, click on the three-dot menu icon located in the upper-right corner of the browser window.
  7. From the dropdown menu, hover over More tools>Create shortcut (the wording may vary depending on the browser you’re using).
  8. A dialog box will appear, asking you to confirm the creation of the shortcut. Check the box to Open as a window and click Create.
  9. The YouTube Music shortcut should now appear on your desktop or taskbar. You can simply click on it to access YouTube Music quickly.
Note icon NOTE
Installing the same app using different browsers will have multiple shortcuts of the same app so stick to only one browser.

You can use the web version of YouTube Music on any browser that supports HTML5 and has JavaScript enabled. To check for compatibility, Google lists the system requirements and compatible browsers.

2. By using an Android emulator

  1. Download and install LDPlayer.
  2. Open LDPlayer and select LD Store.
  3. Use the search bar in the top left to find the YouTube Music app on the Google Play Store and install it.
  4. The Android emulator will download and install the YouTube Music app on your PC.
  5. Once the installation is complete, locate the YouTube Music app in the emulator’s app drawer, and click on it to launch the app. Sign in with your YouTube account, and you’ll have access to YouTube Music on your PC.

Using an Android emulator allows you to run Android apps on your PC, providing a mobile-like experience. However, remember that running an emulator may require a system with higher specifications, and the performance may vary depending on your PC’s capabilities.

3. By downloading the unofficial app

You can download the YouTube Music Desktop app and set it up if you prefer a standalone app. Though not affiliated with Google, it works just as the real thing. Github also has an unofficial YouTube Music app that you can download and use on your PC like any other.

Its main advantage over the official app is that it is free, open-source, has built-in adblockers, and keeps the original interface of the app.

It is also cross-platform so whatever OS you’re on, you get to enjoy unlimited music. With all these pros, we cannot forget to mention that unofficial apps may not include all the features or regular updates provided by the official YouTube Music app.

Additionally, there may be potential risks such as malware, security vulnerabilities, or compatibility issues when downloading and using unofficial apps from third-party sources. We recommend you exercise caution by installing a comprehensive antivirus solution.

Note icon NOTE
WindowsReport is not affiliated with GitHub.com or ytmdesktop.app, so do your due diligence before installing it from either source. We recommend downloading and using official apps whenever possible.

Can YouTube Music play offline on a PC?

Offline YouTube Music is only available for mobile devices. However, you can enjoy such perks with a premium subscription or when using the unofficial version on your PC.

Another thing you can also enjoy with YouTube Music on desktop is ad-free listening especially when NewPipe encounters a network error.

Remember that YouTube Music is not available in all countries yet so even after downloading it, it may not work if you’re not in a whitelisted region. If you’ve checked and fulfilled all conditions but YouTube Music is still not working, we have answers in our detailed guide.

Hopefully, you’ve found a way to enjoy YouTube Music on your PC. However, if it seems like too much work, you can always try alternative music apps for your PC.

That’s it from us but we’d love to hear from you. Have you tried YouTube Music on your PC and which method did you use to install it? Any complaints so far? Let us know in the comment section below.

Moreover, if you’d like to install the YouTube app on your Windows 7 PC, we’ve got you covered. To explore another useful option for downloading and managing YouTube content on desktop, check out this detailed iTubeGo YouTube Downloader guide.

Palworld Disk Write Error During Launch on Steam [Solved]

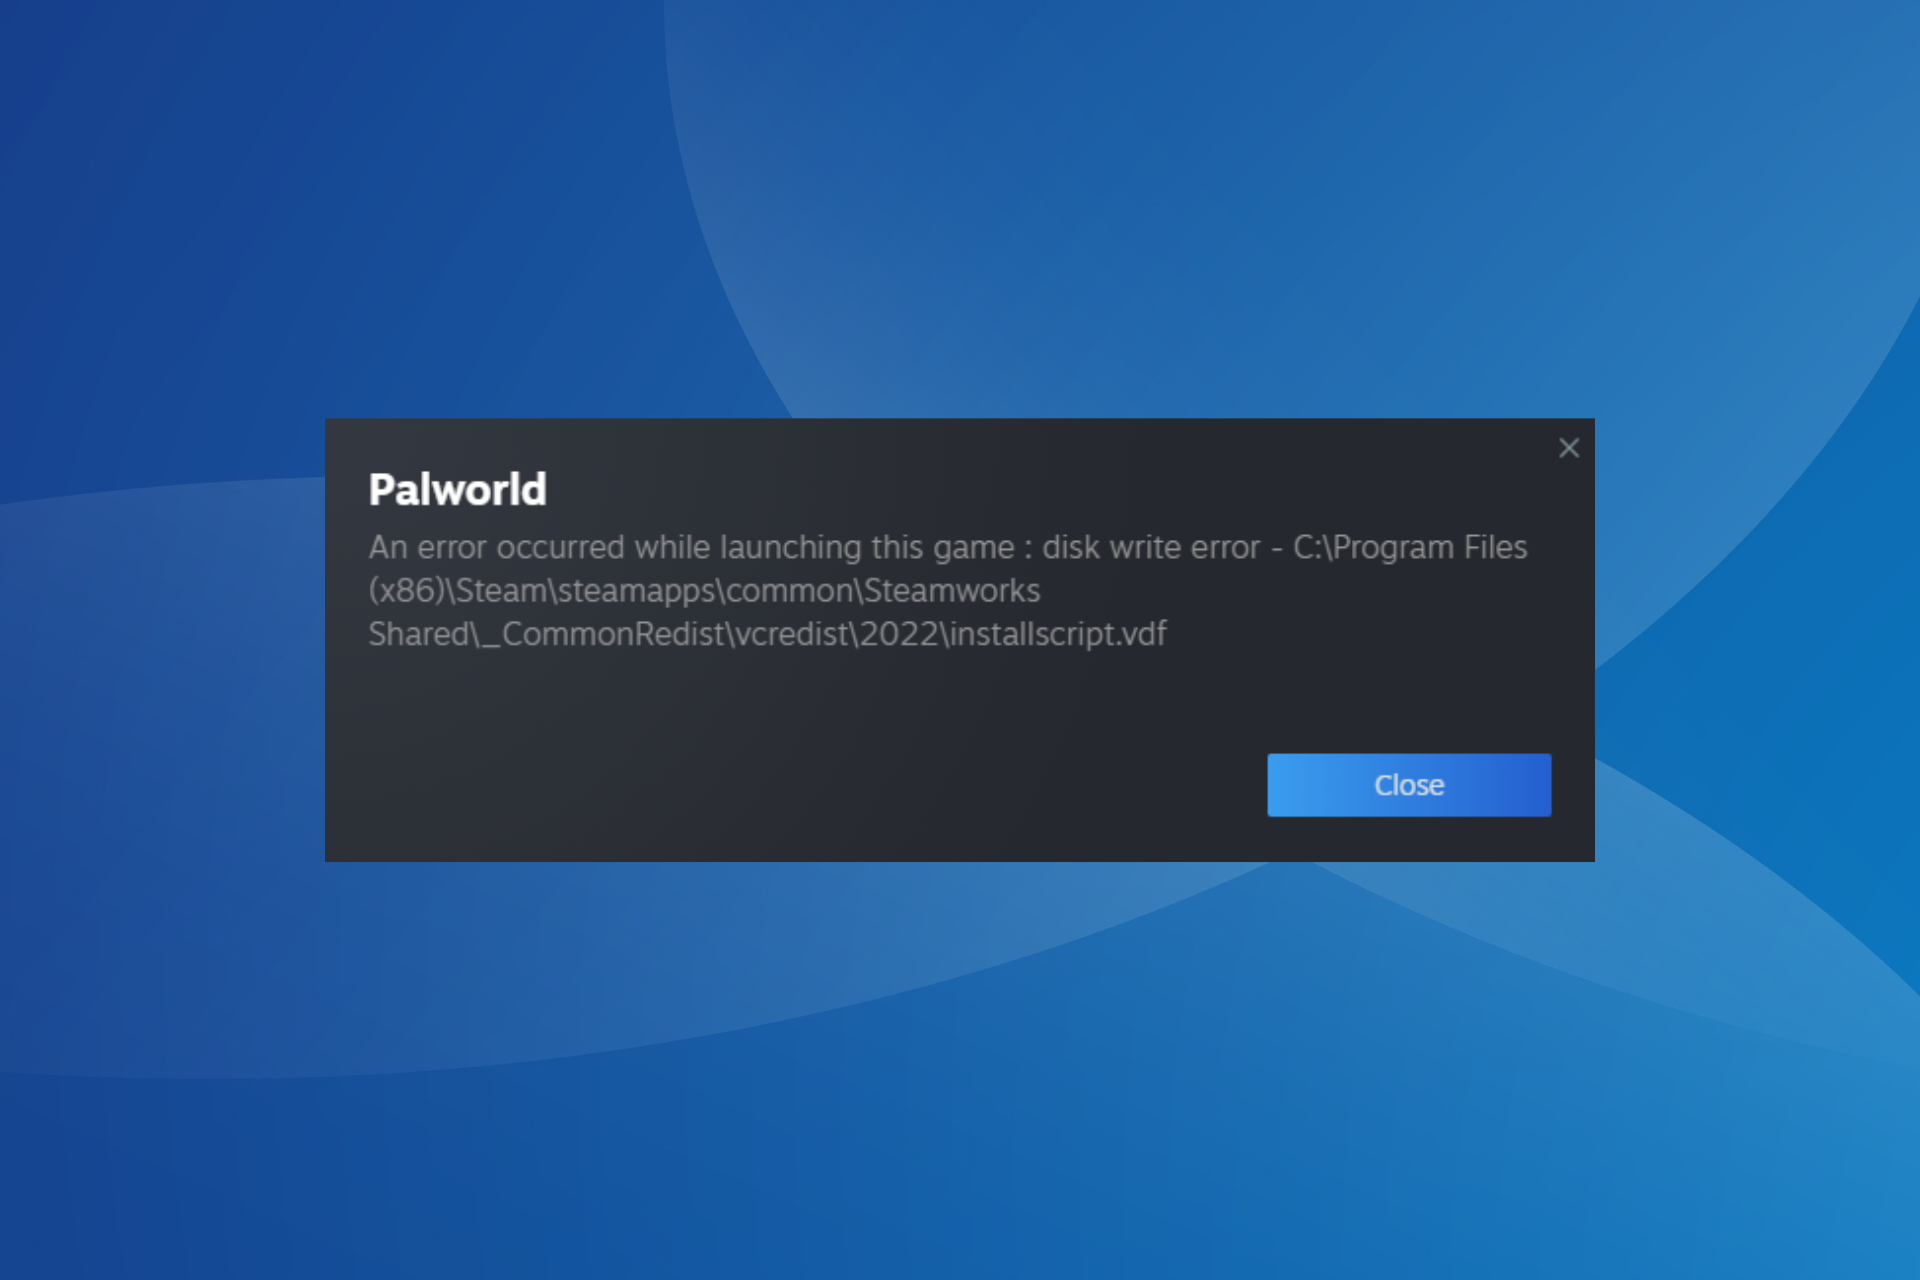
We installed Palworld on Steam after release, but on launching the game, it kept throwing a disk write error.

The message read, An error occurred while launching this game: disk write error – C:\program files(x86)\steam\steamapps\common\palworld\pal\binaries\win64\palworld-win64-shipping.exe.

When we tried it on other PCs, Palworld threw an error during the second launch or after a few hours of gameplay. So, let’s find out how you can fix the Palworld disk write error on your PC.

How do I fix the disk write error on Palworld?

1. Recover the game’s executable and whitelist it in the antivirus

Tip icon Tip
The steps listed here are for the Avast antivirus, though the idea applies throughout. If you are using another antivirus, execute the equivalent steps.

1.1 Restore the game files

  1. Launch the antivirus, then select Protection from the left pane, and click on Virus Chest.virus chest
  2. Copy the path for the quarantined Palworld file. We will need it later.
  3. Now, tick the checkbox for the quarantined Palworld file, click the ellipsis near the bottom, and choose Restore.restore to fix palworld disk write error

After the file is restored, the game should launch fine but it’s likely that the antivirus will again quarantine it. So, it’s best that you add it as an exception.

1.2 Add an exception for Palworld

  1. In the antivirus, click the Menu icon near the top right, and select Settings.
  2. Go to Exceptions in the General tab, and click on Add Exception.exceptions
  3. Now, paste the path we copied earlier in the text field, and click on Add Exception.exception to fix palworld disk write error

Third-party antiviruses like Avast, Kaspersky, and AVG were found to inadvertently identify Palworld files as a threat and automatically quarantine them, which led to the disk write error. In our case, the quarantined file’s path was:Steam\Steamapps\common\palworld\pal\Binaries\Win64\Palworld-Win64-Shipping.exe

For this reason, we recommend you switch to a Windows-friendly antivirus solution and prevent such errors from arising.

2. Set Steam to always run as administrator

  1. Press Windows + S to open Search, type Steam, right-click on the relevant result, and select Open file location.open file location
  2. Right-click on the Steam file, and select Properties from the context menu.
  3. Go to the Compatibility tab, tick the checkbox for Run this program as an administrator, and click OK to save the changes.administrator to fix palworld disk write error

3. Verify the integrity of game files

  1. Launch Steam, and go to the Library from the top.
  2. Now, right-click on Palworld and select Properties from the context menu.properties
  3. Go to the Installed Files tab, and click on Verify integrity of game files.verify game files to fix palworld disk write error
  4. Once the process is complete and all missing files are replaced, relaunch Palworld and check whether the disk write error is fixed.

4. Delete the Steamworks Shared folder

  1. Press Windows + E to open File Explorer, then navigate the following path or paste it in the address bar and hit Enter: C:\Program Files (x86)\Steam\steamapps\common
  2. Now, select the Steamworks Shared folder and hit the Delete key.  steamworks shared
  3. Choose the appropriate response in case a confirmation prompt appears.

Deleting it also helps fix the Steam disk write error.

5. Move Palworld to another drive

5.1 Adding another drive

  1. Launch the gaming client, click the Steam menu, and select Settings.settings
  2. Go to the Storage tab, click on the dropdown menu at the top, and select Add Drive.add drive to fix palworld disk write error
  3. Now, choose another drive on the PC and click on Select Folder. If there isn’t one, create a new drive first.

5.2 Transferring the game

  1. In the Storage tab of Steam Settings, select the drive where Palworld is stored.
  2. Now, tick the checkbox for Palworld and click Move at the bottom.move
  3. Select the drive you created earlier, and again click on Move.move to fix palworld disk write error
  4. Wait for the process to complete, and then try relaunching Palworld.

If this, too, doesn’t work, uninstall the game, and then download it to the other drive. A better option is to use an effective software uninstaller to delete all related game files and Registry entries. This approach eliminates any conflicts that might later arise during reinstallation.

You now know how to fix the Palworld disk write error quickly. Remember, more often than not, it’s a trivial misconfiguration to blame. And given that the game was released recently, these things and others like Palworld constantly crashing are bound to happen.

Before you leave, discover some quick tips to improve game performance on Windows and enjoy a superior experience! Also, don’t forget our guide on Palworld crossplay to learn how to play the game with your friends.

For any queries or to share what worked for you, drop a comment below.

Microsoft Teams could know if you’re not paying attention during online meetings, according to new attention-tracking technology

Microsoft Teams might soon debut an attention-tracking technology that will intelligently find out if someone is not paying attention in online meetings, according to a patent developed internally by Microsoft researchers and published recently.

For now, Microsoft Teams doesn’t have any attention-tracking technology on the platform, and there are no ways to tell if participants pay attention to what’s being discussed in online meetings.

The patent describes a technology that uses an AI-based system to find out if someone is not paying attention during an online meeting. The system gets information from the online meeting, such as what is being said and shown, who is in the meeting, and how they are using their devices.

Then, it checks if someone is not paying attention by looking at their camera or what they are doing on their device. If the system finds someone who is not paying attention, it will send a message to that person to get their attention back.

The system also gets a sign that the person is back in the online meeting, and it shows them a summary of what they missed, similar to the existing Intelligent Recap feature on Microsoft Teams, which shows the summary of a meeting, and task suggestions.microsoft teams attention tracking

As we mentioned earlier, Teams doesn’t have an attention-tracking system for online meetings, but managers can track users’ activity in Teams through other means.

However, the paper argues that the technology should not be used to prove employees’ lack of activity, but rather to provide essential highlights for those participants who are engaged in multiple online meetings during a single day.

There is a need for improved systems and methods of intelligently managing meetings by monitoring meeting content and providing meetings highlights that enable context retention, when needed.

Either way, the technology would make use of the web camera, as well as the user’s independent activity on the device they’re participating from. In other words, the system would record your movements within the context of the meeting, and it will also track all of your activity made on that device during the meeting.

So, for instance, if you are to browse the Internet searching non-work related information while participating in a Teams meeting, the system would know about it.

Zoom and the fate of its attention-tracking feature: could Microsoft Teams face the same outcome?

A similar attention-tracking technology was employed by Zoom, several years ago, called Attendee attention tracking, so the concept is not entirely new.

Teachers would use the feature to know if students were paying attention to the classes, amid the global pandemic back in 2020.

However, following a string of complaints from users who were worried about their privacy being invaded, Zoom decided to deprecate the feature indefinitely, stating:

As of April 2, 2020, we have removed the attendee attention tracker feature as part of our commitment to the security and privacy of our customers. For more background on this change and how we are pivoting during these unprecedented times, please see a note from our CEO, Eric S. Yuan.

Zoom

On the other hand, the attention-tracking technology developed by Microsoft would make use of intelligent systems (aka AI) to work, so these systems could unintentionally cross privacy boundaries, and potentially access sensitive information outside of Microsoft Teams without users’ consent. microsoft teams attention tracking

If we consider the volatility of AI and the way it could potentially hallucinate false information about activity, the tool could also be a frustrating and stressful system to deal with.

So this technology could face the same backlash on Teams, similar to the backlash received by Zoom, 4 years ago.

But what do you think, though? Should Microsoft Teams implement such a feature, or not?

Edge isn’t playing fair, and many have privacy concerns

Many users have reported an unsettling experience after installing the latest Windows 11 update (KB5034204). Following the update, their computers rebooted, and Microsoft Edge opened with all the Chrome tabs.

People are surprised even when they don’t actively use or open Edge for browsing; how can it have all the browsing data? This, indeed, is concerning and has raised a lot of eyebrows.

The first person to highlight this on X (previously known as Twitter) was Tom Warren, Senior Editor at The Verge said:

I installed the latest Windows 11 update (KB5034204) and it rebooted and automatically opened Microsoft Edge with all the Chrome tabs I had open before installing the update couldn’t believe my eyes. Anyone else had this?

Following his post, a lot of comments came pouring in; some expressed their concerns & annoyance about this move by Microsoft and called it a marketing gimmick. However, others came in support of Microsoft Edge, denied the event occurrence, and called it better than Chrome.

We at WR also encountered the same issue after updating our Windows 11 PCs and found it happened on most of our machines.

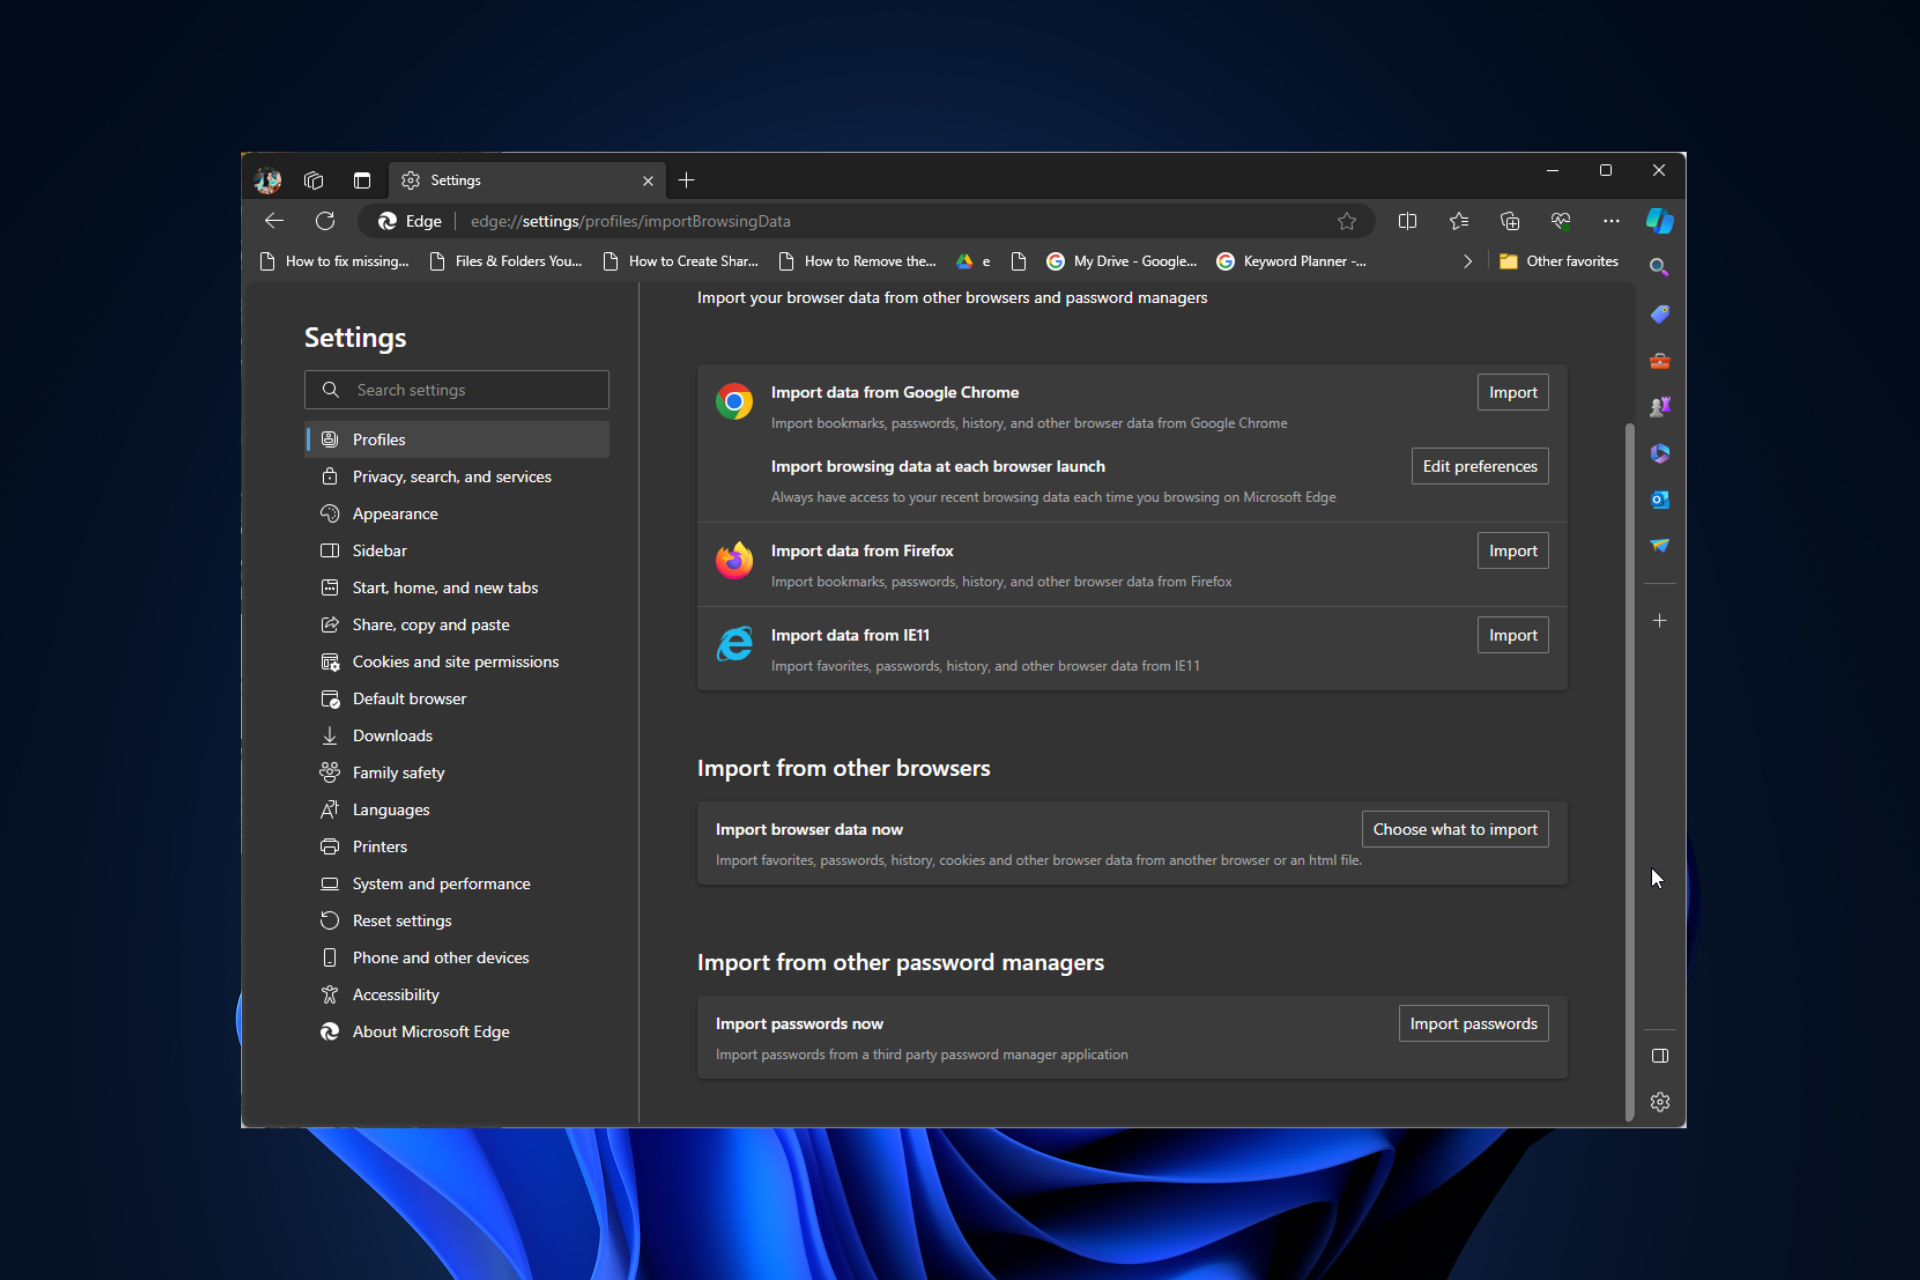
First, we thought we might have enabled the Always have access to your recent browsing data each time you browse on Microsoft Edge setting by mistake. However, when we checked, it was disabled.

If you want to ensure that this setting is disabled on your Edge browser, type this address in the address bar and click Edit preferences: edge://settings/profiles/importBrowsingData

Further investigation led us to a post by Zach Edwards, Privacy and data supply chain researcher on X, who reinstalled Windows to understand the issue, then shared the images of OOBE, which stated:

With your confirmation, Microsoft Edge will regularly bring in data from other browsers available on your Windows device. This data includes your favorites, browsing history, cookies, autofill data, extensions, settings, and other browsing data.

Accept or not now

According to Microsoft, the data import is done & stored locally; however, if you have signed in using Microsoft and synced your browsing data, it will be sent to Microsoft.

On one of the OOBE pages related to Edge, you will see a light blue Accept button and a darker Not Now button, indicating Microsoft encourages you to opt for the former.

Another explanation for inadvertently enabling this feature could be the common practice of clicking on positive responses during any software or OS installation, influenced by color and UI design.

A Windows user on Reddit said:

To be completely honest I don’t think any of these options switch back automatically, it’s just that they pester you so often and so slyly (and occasionally bundle data collection consent in innocuous looking options) that it’s nearly impossible not to accidentally opt in.

Opinions of people on this matter vary, but it is still uncertain whether the issue is the result of pestering notifications, a glitch, or a marketing gimmick to promote Edge.

However, we believe that Microsoft should deal with this matter with great concern, given its implications for user privacy, and maintain transparency while handling such issues.

What’s your take on this? Tell us in the comments section below.

Microsoft’s AI Image Generator is free, but should you use it?

Image Creator from Microsoft Designer, formerly known as Bing Image Creator is a free AI tool to create unique images, but is it any good? We have tested and played with it and here’s what we’ve found.

Microsoft’s AI Image Generator is using DALL-E 3

First of all, Image Creator from Designer is extremely simple to use and it’s free for anyone with a Microsoft account.

The tool is using the AI DALL-E 3 image generator to create the images and you just need to enter a detailed description of the scene you want to generate. For instance, to get the image below, we entered: draw an image with a Windows logo and a high tech robot.

However, you can be a lot more specific in your description, adding elements, actions, background, or even the colors to use.

Image Generator draws quality images

The best part is that you may think of every possible and unnatural things like an animal writing or working on a computer and the drawings will look natural, imaginative. It’s not just overlaying a pen over a dog’s paw like some other AI image generators.

All the colors look vivid, every pixel looks like it belongs there, but sometimes, the creative part is a bit awkward. We asked for a dog writing and we got one writing with both front paws. Although it made us laugh, it’s not something you can use in a children’s book.

Its features are pretty limited

After you enter the text and hit the Create button, you actually get 4 different images, not one, which is great because you have something to choose from. However, you can’t select one and ask DALL-E to modify it in any way.

For instance, if you embed DALL-E to ChatGPT, you can easily type in the modifications you need: change the background, make the image more realistic, take out a certain element from the image and so on.

With, Image Generator, if you don’t like any image that was generated, you have no other option than to write a different description and cross your fingers.

There is, however, the option of selecting an image and hit the Customize button to open it in the Microsoft Designer editor for adjustments.

Another limitation is the resolution. Image Creator from Designer generates only 1024×1024 pixels images even if you specify any other resolution. That means you will need to edit it if you want any other aspect.

Lastly, if you’re a new user, you will get only 15 boosted generations. When you run out of boosts, you will still be able to use it but the process will become a lot slower. While boosted generations take about 20 seconds, the regular ones will require over a minute of processing.

Image Creator from Designer vs other AI image generators

If you really want to generate quality images, AI image generators such as Midjourney and NightCafe have a lot more features and settings you can play with. You can select characters and preexisting models or even adding your own images to change using the artificial intelligence engine.

However, these tools are free only for a few tries and then you need to opt for a paid plan or buy extra credits to generate more images.

ProsCons
Completely freeLimited features
Very creative and fastIt doesn’t let you further change the composition
Great colors and compositionIt only generates 1024×1024 pixels images
It generates 4 images to choose fromAfter the credits run out, image generation is slowed down

Should I use Image Creator from Microsoft Designer?

If you want to have some fun and need some nice images to show to your friends on social media, Image Creator is excellent. It will feast your eyes with great coloring and composition, but if you need a solid tool for image creation, you should stick to more traditional art generation tools instead.

You can give a try to some AI open source content generators if you don’t just want to create images.

The bottom line is that Image Creator from Designer is a simple and fun AI tool that you should definitely try. You have nothing to lose anyway, because it’s free, right?

Have you tried Image Creator from Designer? Let us know your thoughts about it in the comments section below.

Cisco, Microsoft, and Samsung to bring AI-powered 5K meetings

During the Integrated Systems Europe in Barcelona, Cisco, Microsoft, and Samsung announced a new meeting room solution for hybrid meetings.

With the combined collaboration, the three companies aim to deliver seamless and inclusive video meetings for products from the Cisco Room Series.

Cisco, Microsoft, and Samsung will make 5K, AI-powered meetings more accessible

The vast majority of meetings have remote participants and less than 15% are equipped with video conferencing technology. The market is demanding for easy to set up collaboration experiences and this is exactly what this project plans to address.

“Through our collaboration with these industry leaders, we’re delivering something we call Distance Zero, eliminating second-class experiences no matter where you are working.”

Jeetu Patel, EVP and General Manager, Security & Collaboration, Cisco

The companies plan to equip the conference rooms with a smart video system that will deliver immersive collaboration to all participants.

To achieve this, the companies are utilizing the Front Row feature from Microsoft Teams Rooms, with Samsung’s newly announced 105-inch Smart Signage or Samsung 4K Smart Signage screens.

These features will be combined with certified Cisco RoomOS collaboration appliances to eliminate the distance between participants.

So, what does this mean for users?

  • Immersive views thanks to Samsung’s 5K and 4K displays.
  • Advanced camera, audio, and speech features thanks to the power of AI.
  • Easier management and deployment for administrators with Microsoft Teams Admin Center and Cisco Control Hub.
  • Improved scalability that allows companies to easily deploy hybrid work meeting environments.
  • The ability for users to join Microsoft Teams or Webex meetings without extra configuration or rebooting.

Cisco still doesn’t have support for 21:9 displays, but that should change starting from March this year. If you’re visiting ISE, you can try integrated video solutions on the show floor.

This seems like a great step forward for hybrid work and immersive meetings, and we can’t wait to see it in action. Speaking of hybrid meetings, Microsoft announced a Content Camera feature for more immersive Teams meetings that should be available soon.

Microsoft Mesh is now available as well, so you might want to give it a try if you’re not opposed to such a feature. What are your thoughts on this collab? Hit us up in the comments section and let us know!

Is Xbox going digital? 90% of game sales last year were digital downloads

Last week, we reported that Xbox fired 1900 employees, and it turns out that most of them were associated with physical games or games released on disc. Recent figures give us a clear picture of what led to the decision.

In 2023, almost 90% of Microsoft’s sales were from digital titles. This marks a clear shift in user preferences, and Microsoft is adjusting to market demands.

It can be attributed to the fact that more users now have access to a stable Internet connection and prefer downloading games rather than going to a shop and purchasing a disc. Even if bought online, the delivery time acts as a deterrent.

The Covid pandemic also has played a significant role in this change in user behaviour.

A similar trend is witnessed across regions and markets. As per reports, in 2022, 89.5% of the game sales in the UK were digital copies, which includes 30% of the mobile app sales.

If we were to look at PlayStation, digital purchases were 5x the physical ones. For Nintendo, the percentage is somewhat lower, but digital sales still outperform physical ones by almost 300%.

Don Mattrick, almost a decade ago, in 2013, had envisaged an all-digital future for Xbox where you would purchase game licenses instead of the game itself. While the idea was ridiculed back then, we may be headed in the same direction if reports are to be believed.

Xbox statistics also tell us a lot about this!

What’s your take on the whole digital vs physical ownership debate? Do let us know in the comments section.

7 Simple Ways to Fix the PUBG Anti-Cheat Error

Many users have encountered Your client will close in 10 seconds due to the failure of initializing anti-cheat solution issue while launching or playing PUBG. To begin with, ensure there are no unwanted third-party apps installed, and use an ethernet cable instead of a Wi-Fi connection.

This anti-cheat error could occur due to antivirus software interference, corrupted/missing game files, or outdated app.

How can I fix the Anti-Cheat error in PUBG?

  1. Press Ctrl + Shift + Esc to open Task Manager.
  2. Go to the Processes tab, locate all processes related to PUBG and your gaming client, select them one by one and click End Processes.End processes - pubg anti cheat error

Once you have ended all the processes related to PUBG, consider using a VPN to play the game. If you are already using one, try disabling it.

Some of the users have also reported that switching from Proxifier to another VPN helped them resolve the issue.

2. Delete the anti-cheat file

  1. Press Ctrl + Shift + Esc to open Task Manager.
  2. Navigate to the Details tab, locate zksvc.exe, right-click it and select Open file location.Open file location - pubg anti cheat error
  3. You will redirected to the file location, select zksvc and click the Delete icon.
  4. Now try opening Steam or your game client and run PUBG.

3. Disable Overlay on the game client

  1. These steps will vary from one game client to another; here, we are using Steam to demonstrate the steps. Press the Windows key, type steam and click Open.
  2. Click Steam, then select Settings from the drop-down menu.Settings - pubg anti cheat error
  3. Go to the In-Game tab, and turn off the toggle for the Enable the Steam Overlay while in-game option.Disable overlay

4. Verify the game files’ integrity

  1. Press the Windows key, type steam and click Open.Steam  - pubg anti cheat error
  2. Go to Library, select the game and click Properties.Properties
  3. Now select the Installed files option, and click Verify the integrity of game files.Installed files - verify integrity of game files
  4. Wait for the process to complete; the scan will repair or replace the missing game files to fix the issue.

Keeping game files intact prevents the anti-cheat error and related issues like the matchmaking failed error PUBG crashing Windows 11.

5. Disable the Windows Firewall temporarily

  1. Press the Windows key, type control panel and click Open.Control Panel start menu - pubg anti cheat error
  2. Select Category for View by, then click System and Security.System and security - pubg anti cheat error
  3. Click Windows Defender Firewall.Windows Defender - pubg anti cheat error
  4. From the left side of the following window, click the Turn Windows Defender Firewall on or off setting.Turn on or off defender
  5. Select Turn off Windows Defender Firewall (not recommended) for both Public and Private network settings, then click OK.Turn on or off, click OK

Now try playing PUBG, and if you don’t encounter any errors, follow these steps to add the game to the allowed apps list:

  1. In the Control Panel window, go to Windows Defender Firewall again using the steps mentioned above.
  2. From the left side, select the Allow an app or feature through Windows Defender Firewall option.Allow an app
  3. Scroll through the list to check if PUBG is listed; if not, then click Allow another app.Allow another app
  4. Click Browse, locate the application file from the Program Files folder, and click Open.Browse
  5. Select Add.ADD
  6. Now, the app will be added to the Allowed apps list. Checkmark the Private and Public options, then click OK to save the changes.

Allowing the game to communicate freely on your computer is important to avoid other issues like the Black screen at launch on PUBG; check out this guide to learn more.

Remember to reverse engineer the steps mentioned to turn on the Firewall to ensure your Windows is protected.

6. Reinstall the game

  1. Press Windows + I to open Settings.
  2. Go to Apps, then click Installed apps.Apps, installed apps - pubg anti cheat error
  3. Locate PUBG, click the three dots icon, and select Uninstall.Uninstall the app
  4. Click Uninstall to confirm.
  5. Press Windows + E to open File Explorer; navigate to this path after replacing username with your user account name: C:\Users\username\AppData\Local\
  6. Select the TslGame and WELLBIA folders, and click the Delete icon to remove them.
  7. Next, go to this path: C:\Program Files (x86)\Steam\steamapps\common\PUBG
  8. Select the PUBG and click Delete.
  9. Now locate and open the BattlEye folder, select & delete the BEService_pubg.exe file
  10. Navigate to this path and delete the PUBG and UNCHEATER folder: C:\Program Files\Common Files
  11. Press the Windows key, type steam and click Open.Steam - pubg anti cheat error
  12. Go to Library, select the game, and click Install.Library - Install

7. Change your DNS address to Google DNS

  1. Press Windows + R to open the Run window.NCPA run command 1 - PUBG Anticheat error
  2. Type ncpa.cpl and click OK to open the Active Connections window.
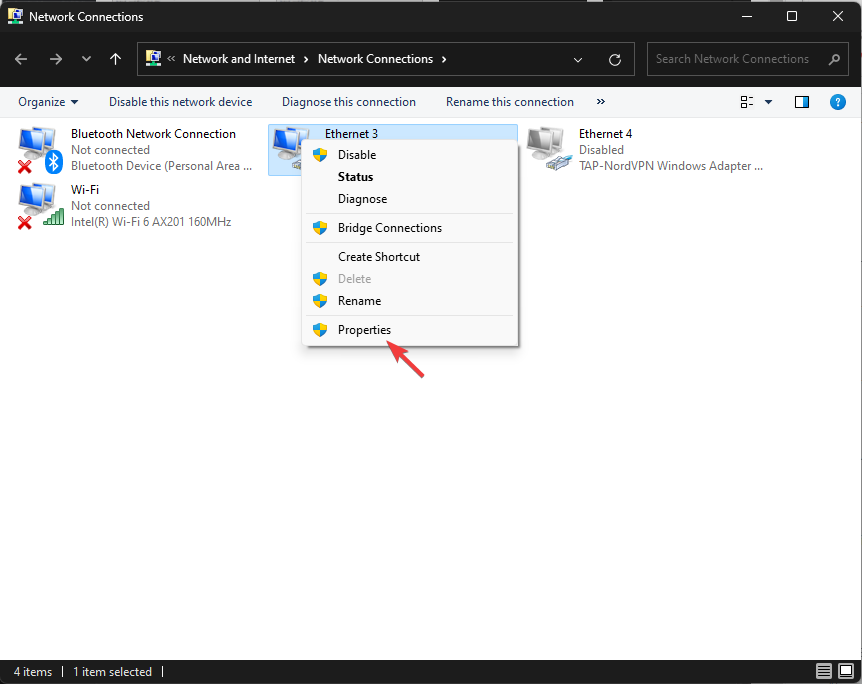
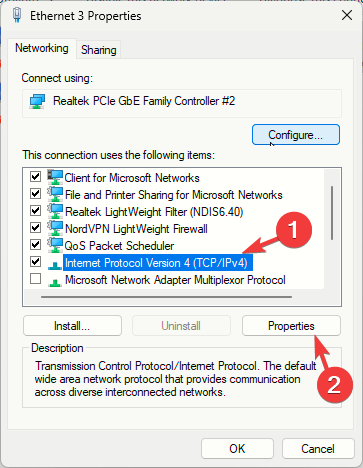
  3. Right-click the active connection and select Properties.
  4. From This connection uses the following items box, select Internet Protocol Version 4 (TCP/IP), and click the Properties button.
  5. Select Use the following DNS addresses.
  6. For Preferred DNS, type 8.8.8.8, and for Alternate DNS, type 8.8.4.4.
  7. Click OK, then click Close.

Changing the DNS address can help you fix other launching errors, like PUBG won’t start after the update; check out the detailed guide to learn more.

If nothing works for you, try changing the gaming client and installing PUBG again. In conclusion, to fix PUBG anti-cheat errors, display game overlay, verify game files’ integrity, or disable Windows Firewall temporarily.

WR experts also recommend you opt for Google DNS, choose a different VPN service if using Proxifier, or reinstall the PUBG app to fix this issue once and for all.

In case PUBG crashes on launch, it could be due to outdated drivers; read this guide to learn more about the issue.

If you have any questions or suggestions about the PUBG anti-cheat error, feel free to mention them in the comments section below.

Microsoft is developing an AI-based multi-device cross-experience system that connects to other devices on its own

We reported a while ago that Microsoft is thinking about developing a multi-device cross-experience system that would include Windows-based devices, smartphones, tablets, smart houses, smart cars, and so on.

Now, according to a patent filed by the Redmond-based tech giant and recently published to the world, it seems that the company is taking the concept very seriously, but with a twist: the multi-device cross-experience could be an AI-based system that enables ads from one device to another on its own, without the input of the user.

However, with another twist, the patent describes the notion of advertisement as being any signal transmission coming from an initial device to a plethora of connected devices.

So, in other words, while this technology can be used to seamlessly display ads from one device to another, it can also be repurposed for a variety of other actions such as:

  • Initiating an installation setup from one device to another.
  • Call to various actions, such as being alerted to close the door of the smart car through the phone, or laptop.
  • Other complex multi-device use cases, such as using the phone to input one’s signature.

As used herein, “advertisement” describes signal transmission from a first device for receipt by at least one other devic in which the signal publishes a state so that other devices listening for that state may react.

In a concept different from the existing multi-device cross-experience systems, such as the Snapdragon Seamless, or Samsung Galaxy Connected experience, the MDE system envisioned by Microsoft is AI-based, so it will intelligently decide on its own when to act, and what to display.

How would it do it? Quite easy:

  • Basically, the AI-based multi-device cross-experience system encompasses devices that can work together to show smart ads that are better for the users. The system allows a connected device to decide if a situation needs another device.
  • The device then gets signals from the other devices that are related to the situation. The device can check the signals using some rules based on the situation.
  • The device can find out if the other device is willing to join the situation. If the other device is willing, the device can send or receive an ad from the other device.

Microsoft would build the AI-based multi-device cross-experience system to support continuous connection through means such as Bluetooth, near field communication (NFC), Wi-Fi, Wi-Fi Direct, ultra-wideband, various networks (cellular, satellite, cable), and even cloud connections.

However, one big disadvantage is the enormous power usage, so devices carrying out this AI-based cross-experience system would quickly deplete their battery life.

Is Microsoft intending to release an AI multi-device cross-experience system soon?

Well, yes. The technology presented by Microsoft in the patent is a sign of the upcoming features coming to Microsoft products and services.

The Redmond-based tech giant recently released Copilot on Windows 11, and Windows 10, and has recently declared that 2024 will be the year of AI. The Copilot key is also slated for a spring release, meaning Microsoft is fully embracing AI as an essential feature of its upcoming products and services.

Even more, it has been reported the future version of Windows will be heavily AI-based, with Copilot becoming an essential tool to properly experience the new operating system. We’ll find out more about that later this year, when Microsoft is going to announce and, hopefully, release this AI-based Windows version.microsoft AI multi device cross experience

The company is also making small steps towards multi-device experiences: for example, Windows Copilot will become the hub for all Microsoft 365 Copilots out there, meaning mobile Copilot users will be able to access those conversations on desktop-based Windows devices.

The idea of an AI-based multi-device cross-experience system on future Windows versions shouldn’t be a surprise. The MDE concept is a hot topic right now. So adding AI to the mix is obvious.

But are people ready for such as system?

Windows 3.1 and MS-DOS are still in use by German railway

You thought that Windows 3.11 and MS-DOS were gone? Well, think again! It seems that Windows 3.11 is still used by the German railway.

The German railway is looking for an IT administrator who has experience with the decades-old operating system.

The latest job posting from German railway looks for Windows 3.1 administrator

In a recent job posting by a German railway company, they are looking for an administrator who will manage an old system and update drivers on it.

Among the necessary skills is the knowledge of Windows 3.1, MS-DOS, and Windows for Workgroups. After further research, it seems that the company is using Windows 3.1 to manage railway display boards for most of Germany.

The system also powers the cab display on high-speed trains and shows the driver crucial technical data in real time.

It’s bizarre to see that the German railway is relying on an operating system that was discontinued in late 2001 for such important real-time information, but if it’s not broken, why fix it?

There are a few benefits to these legacy systems, such as reliability and security since there are only a few malware applications that can infect these legacy systems.

This is a really strange fact about Windows, and for more facts like this, we suggest reading our guide on interesting facts about Windows.

The job posting was taken down for unknown reasons, but we hope that the German railway will find a suitable candidate or at least consider upgrading to a more reliable operating system.

Phishing attacks on Microsoft 365 accounts are peaking right now; users advised to pay close attention to emails

This shouldn’t come as a surprise, but phishing attacks on Microsoft 365 accounts are peaking right now, according to a recent report published by the cybersecurity company Trustware, where researchers there agreed that the platform is targeted by accounts using the Greatness phishing kit, which is known to be fairly easy to use, cheap, and efficient.

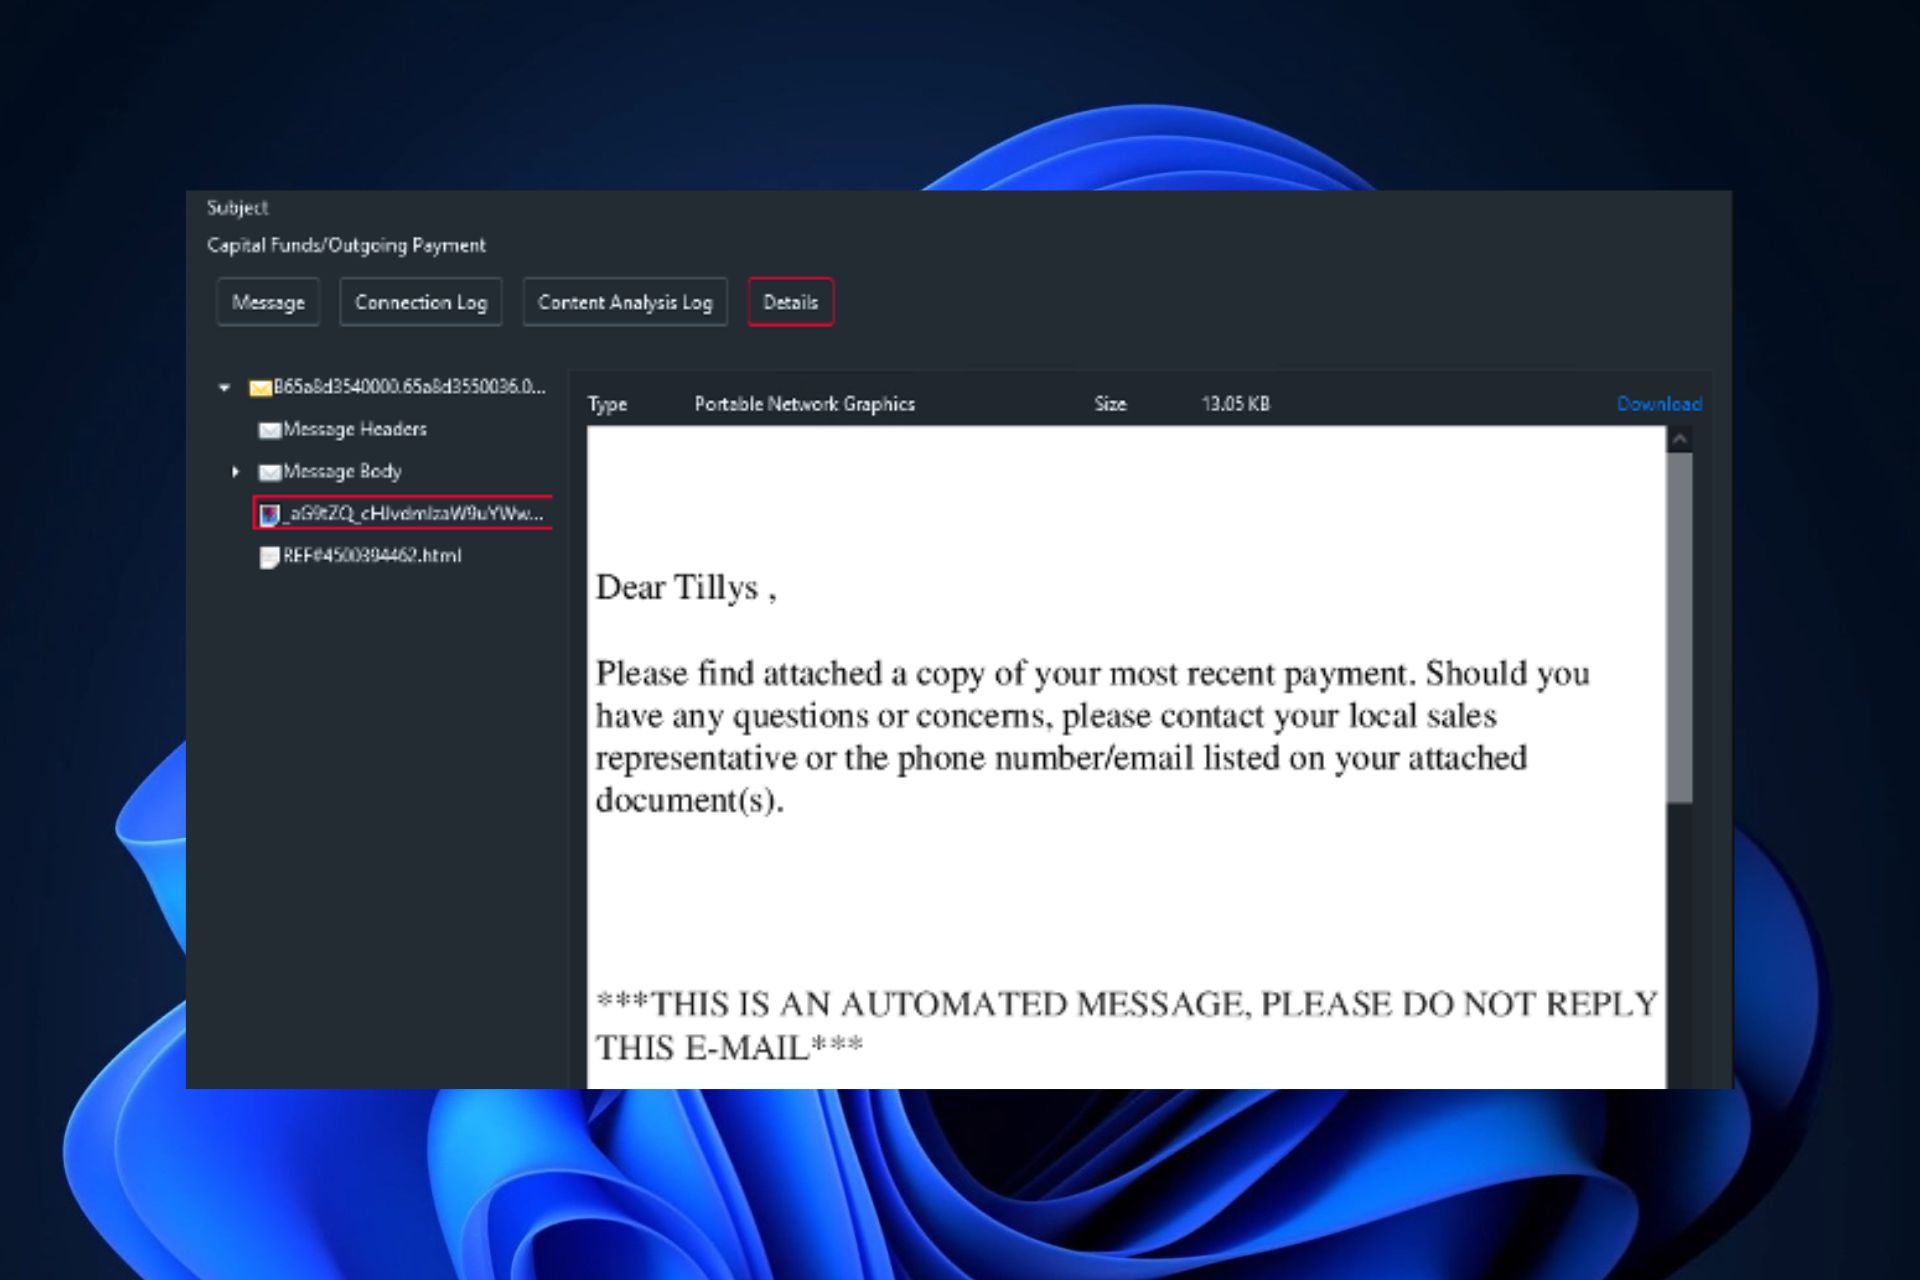
Trustwave SpiderLabs is tracking a spike in usage of the Greatness phishing kit to attack Microsoft 365 users to distribute malicious HTML attachments that steal login credentials.

Trustware

The Greatness phishing kit is a relatively new platform developed by a threat actor known as “fisherstell”. It has been around since 2022, but the cybersecurity company has noticed the spike in its usage to sabotage Microsoft 365 accounts over December 2023, and January 2023.

Microsoft 365 has always been one of the most popular platforms for cybersecurity attacks, and in 2022, over 80% of the accounts on the platform were the subject of some sort of phishing attack. So, while this is not a surprise for the users, they are advised to pay close attention to any suspicious-looking emails, as the kit’s easy-to-use method might have made thousands of victims already.

The number of victims is unknown at this time, but Greatness is widely used and well-supported, with its own Telegram community providing information on how to operate the kit, along with additional tips and tricks. The Greatness kit being used during this recent surge in attacks represents the latest HTML phishing iteration we’ve observed deployed.

Trustware

How to recognize a Microsoft 365 Greatness phishing attack?

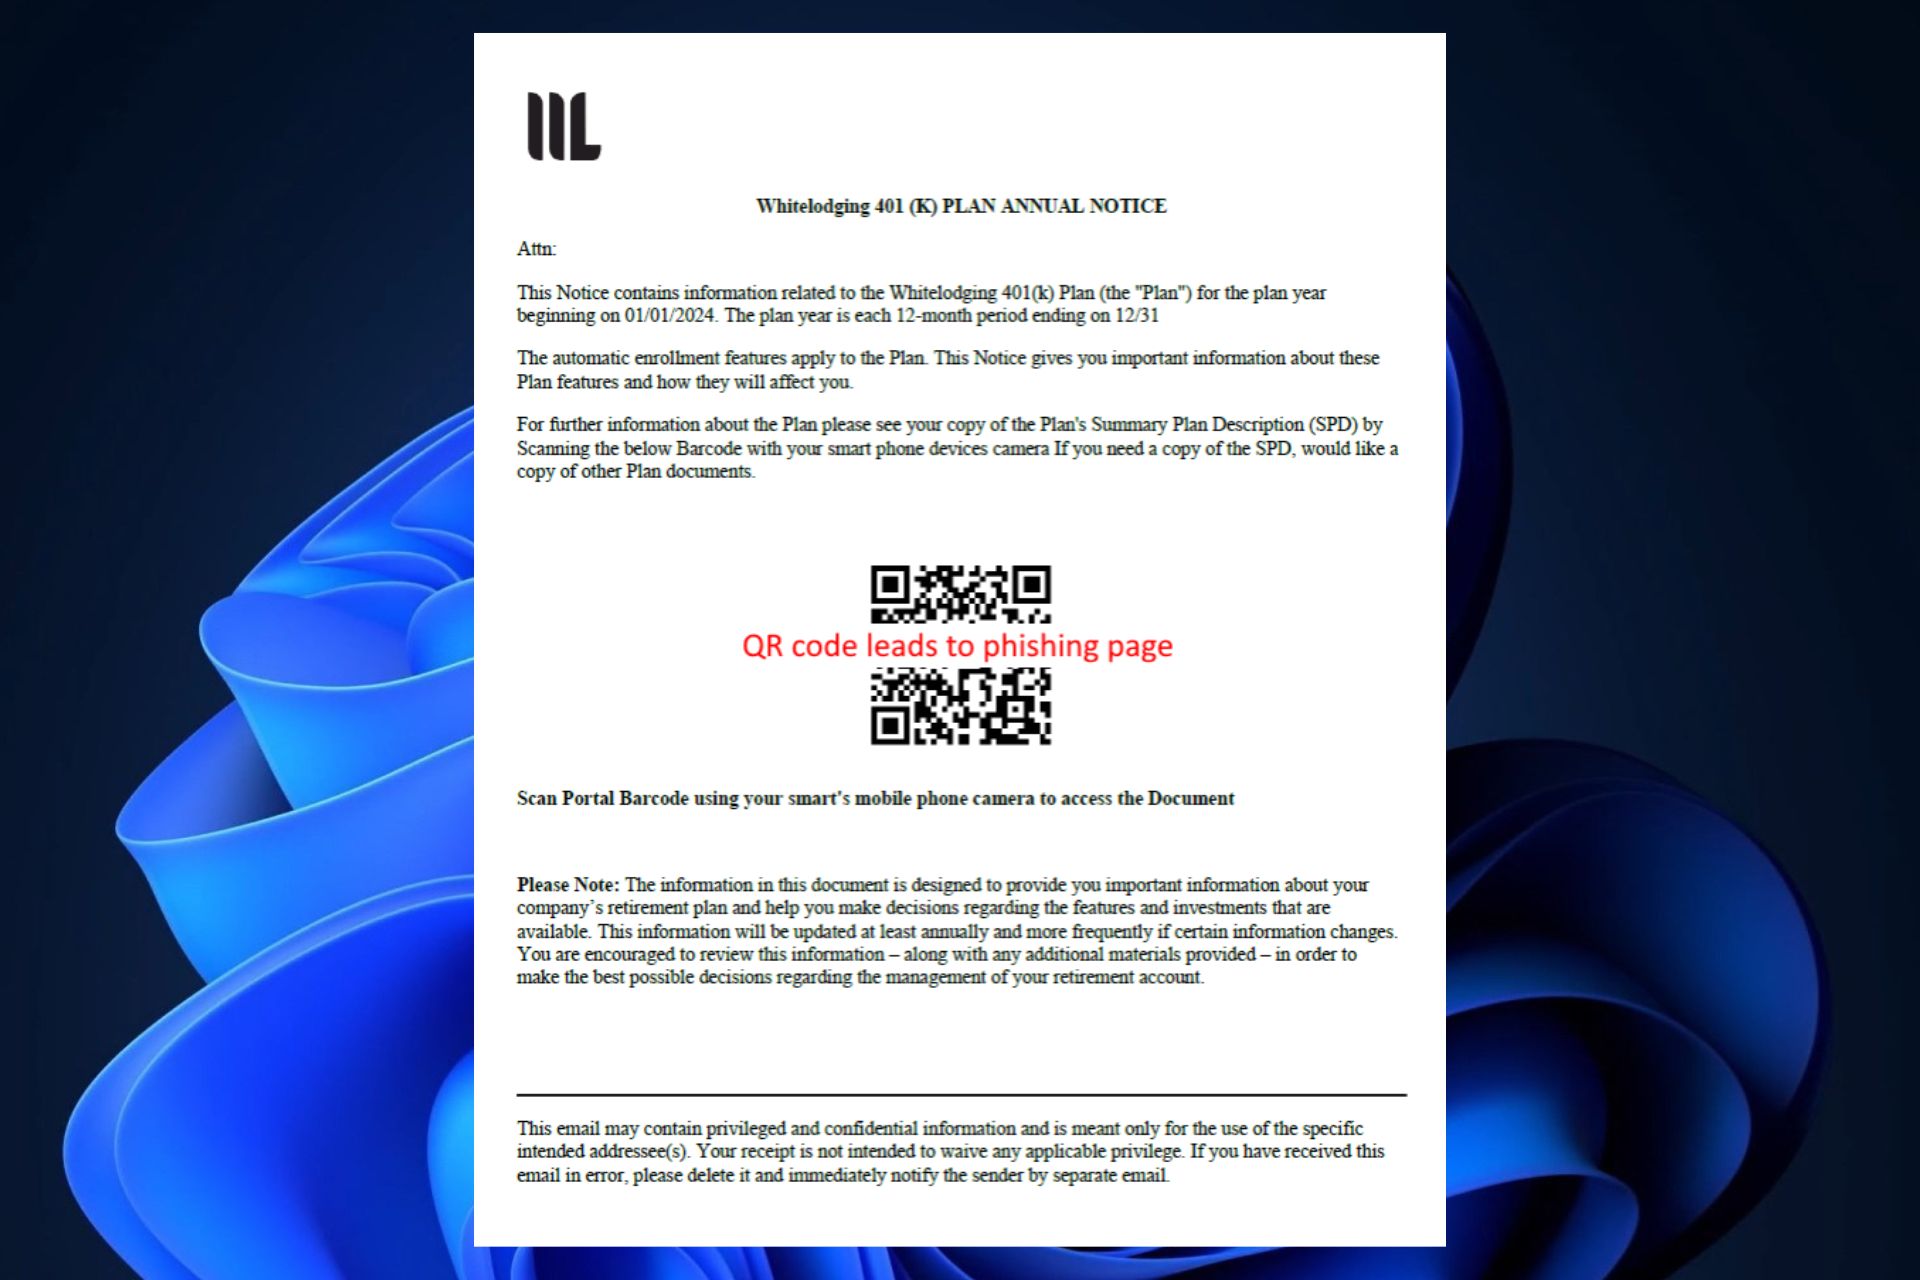
The Greatness kit allows for customizable email elements, such as names, email addresses, subjects, messages, attachments, QR codes, and engagement metrics. Plus, the kit also has systems that allow it to bypass detection measures.

Hackers are paying approximately $120 per month to use the kit, which allows for an effective emulation of various reputable services, such as imitating official Microsoft accounts.

So, users will have to pay attention to:

  • Any sort of suspicious email.
  • Emails that have attachments, especially HTML attachments, including, PDF, Excel, Word, archives, and executables. microsoft 365 greatness phishing
  • Suspicious QR codes inside emails.
  • A sense of urgency in the email format. If the email asks you to do something urgently, consider it suspicious, and talk to your supervisors or management about it.
  • Any sort of mentions that include access to a confidential list, or employment bonuses.
  • Emails that are coming from official institutions, such as banks, partners, and so on, and the kit allows for a near-perfect emulation.

In any case, users shouldn’t open attachments in suspicious emails. Verifying and validating them with upper management is the best solution. Organizations should also consider adding an extra layer of protection by using cybersecurity tools.

Was Xbox One called Xbox 720, priced at $299? It would have been the ultimate console

While we have previously talked about Xbox 720 and Kinect 2.0, a recent explosive leak sheds more light on the subject. Microsoft originally planned to launch the Xbox One as Xbox 720, priced at $299, but the plan got shelved, and it instead released Xbox One at $499.

Back when it was released, Xbox One faced a lot of criticism, owing to Microsoft’s plans to make it the one-stop solution for entertainment, be it full XTV Support or online web content.

An Xbox console at $299 would surely have been more competitive pricing and should have placed Microsoft in a better position in the market. Besides, this would have attracted customers across the globe.

What does the recent leak tell us about the Xbox 720?

The leaked document, a PDF file, was first posted on Reddit, and was promptly removed by the moderators. But by then, it was downloaded by thousands of users, and we, too, managed to get a copy of the confidential document.

A few slides from the leaked document

The most significant aspect, as gathered from the leak, is the pricing. With a COGS (Cost of Goods Sold) of $225, Microsoft planned to sell the Xbox 720 at $299. This is in line with Microsoft’s approach of earning profits through additional services and not the console (hardware).

The document explains the vision for the Xbox 720, compares the console to the existing competition, and lays out the plans for consumers, developers, operators, and OEMs, amongst other things.

For consumers, the Xbox 720 was meant to be The only box you need for premium living room entertainment, as per the document.

Besides, Microsoft was focused on increasing the customer base, providing an exclusive experience, creating more monetization opportunities, building a unified ecosystem to increase customer lifetime value, and targeting multiple platforms.

Value Proposition for Xbox 720, as per the leaked document

We have seen all these happening sooner or later. Microsoft offered the Xbox app on Windows, and it tried to integrate as many features into the later Xbox consoles.

But it seems like the only thing users wanted was a captivating gaming experience, which sort of didn’t see a massive upgrade over the years. As a result, the PlayStation outsold Xbox, and the trend continues to date. Though, Xbox is slowly catching up!

The recent leak also led users to question Don Mattrick’s role and his vision for Xbox during the period. He was criticized back then, and Microsoft replaced him with Phil Spencer as the CEO. That’s a story for another day!

Do share your take on the leak and whether the Xbox 720 would have been a better choice over Xbox One.

Microsoft criticizes Apple’s download fees for developers

Apple plans to comply with the European Union’s tech regulations by allowing users to sideload apps from third-party stores. While this is good for end users, it seems that developers will be hit with additional fees.

This move has sparked criticism from Epic Games, Spotify, and now Microsoft. So, what is this criticism about and is it justified?

Apple’s new policy is a step in the wrong direction according to Microsoft

With the support for sideloading, Apple has also introduced a Core Technology Fee for developers that host their apps on third-party stores.

This means that the developers will be forced to pay €0.50 per app install after one million downloads. Of course, there’s still a 17% tax on app developers using third-party payment processors.

Microsoft’s Xbox president Sarah Bond commented on these changes in a recent tweet criticizing this decision.

Daniel Ek, Spotify CEO also criticized this change in a recent post calling this change “an extortion” that will impact startups and free app developers. The change could also increase the costs of major companies, up to 10 times:

With our EU Apple install base in the 100 million user range, this new tax on downloads and updates could skyrocket our customer acquisition costs, potentially increasing them tenfold. This, as we have to pay on every install or update to our free or paid app, even for those who no longer use the service.

Many aren’t happy with this change, and it seems that Apple is forcing developers to exclusively distribute their apps on the App Store or face additional costs.
It remains to be seen how Apple will handle this criticism, especially after Apple opened its store to Xbox Cloud Gaming recently.

Hopefully, Apple will back down from Core Technology Fee thus allowing the software market to be open and fair. What are your thoughts on this? Let us know in the comments!

The new Windows installation setup doesn’t support automatic drive formatting to ReFS

Last week, Microsoft debuted a new Windows installation setup with a new UI, with the release of the Build 26040 to the Canary Channel.

The build was one of the largest of its kind in a long while and it debuted instant access to new photos from mobile devices connected to Windows 11, and LAPS received new paraphrases and better readability capabilities. The 80GB USB support also made its way to the operating system.

However, the build also came with hidden and undocumented features and changes. For instance, it was discovered that the Live captions were moved directly to the forefront of Quick Settings, allowing users to enable them with just a couple of clicks.

But the new Windows installation setup also comes with a change. It doesn’t support drive formatting to ReFS, according to Windows Insider enthusiast, @XenoPanther, who first spotted it. Users who want to assign Windows to a ReFS drive will need to manually format that drive first. Windows refs format

ReFS is a relatively new format, and it stands for Resilient File System. It debuted sometime around the release of Windows 8, back in 2011-2012, and installing Windows on such a drive can be quite beneficial for you, as you can see in this article, as it can improve performance, support scalability, and, as its name suggests, it’s much more resilient to corruptions of any kind.

So, for those who choose to install Windows on such a drive, you’ll need to format it to ReFS first.

How to format a drive to ReFS?

You can format a drive to ReFS through Disk Management, or File Explorer. Both options should be fairly easy to follow.

If you choose to go through Disk Management, you’ll need to:

  1. Open Disk Management, by typing Create and format disk partitions in the Search bar.
  2. Once there, select the preferred drive (which is usually the one you want to install your Windows), right-click on it, and then select Format.Windows refs format
  3. Open the File System, choose ReFS, as the format, then check the Perform a quick format option, and hit OK.

If you choose to go through File Explorer, you’ll need to:

  1. Right-click on the preferred drive.
  2. Select the Format option.
  3. Click on the File System, then select ReFS.
  4. Check the Quick format option, and then hit Start.Windows refs format

It’s worth mentioning that the ReFS format is available only on certain editions of Windows 10/Windows 11, as Microsoft states:

Applies to: Windows Server 2022, Windows Server 2019, Windows Server 2016, Windows Server 2012 R2, Windows Server 2012

Microsoft

So, if you can’t find the ReFS format option while following the steps above, it means your Windows version does not support the format. For you to be able to format your drives to ReFS, you’ll need to enlist your device with the Windows versions mentioned above.

Port 443 Error Code: How to Fix it

You may often see The server is not reachable on Port 443 or Could not open a connection to host on port 443: Connect failed messages. All these error codes are related to Port 443 being closed or used by another process/application.

You could encounter this while accessing websites that use Port 443, configuring SCCM, or even when trying to set up a web server with Firewalla.

To start with, restart the PC and make sure the revocation list server is not offline. Also, if you are facing an issue with Nextcloud AIO container installation, try to install it in Normal Mode.

How can I fix the Port 443 error code?

1. Add Port 443 to the Firewall

  1. Press Windows + S to open Search, type Control Panel in the text field, and click the relevant result.
  2. Click on System and Security.system and security
  3. Click on Windows Defender Firewall.
  4. Now, select Advanced settings from the left pane.advanced settings
  5. Select Inbound Rules from the navigation pane, and click New Rule on the right.new rule
  6. Choose Port and click on Next.
  7. Select TCP, choose Specific local ports, then enter 443 in the text field, and click Next. rule to fix 443 error code
  8. Choose Allow the connection, click Next, and then set the rule to apply on all three network types: Domain, Private and Public.
  9. Enter the desired name for the rule, say, Inbound rule 443 TCP, and click Finish.rule name
  10. Finally, reboot the device and verify whether the 443 error code is fixed.

If you have a dedicated third-party firewall or one bundled with an antivirus, make sure to add a rule for Port 443 to it.

2. Terminate the process using the port

  1. Press Ctrl + Shift + Esc to open the Task Manager, go to the Performance tab, click the ellipsis near the top right, and select Resource Monitor.resource monitor
  2. Under Listening Ports, identify which process (through PID) is using Port 443.port 443
  3. Once found, locate the same PID under Processes with Network Activity, right-click on it, and select End Process.end process to fix 443 error code

If this works, but the process/app keeps using Port 443 on successive reboots, and you get an error code each time, it’s best to uninstall the app.

3. Uninstall conflicting applications

  1. Press Windows + R to open Run, type appwiz.cpl in the text field, and hit Enter.appwiz.cpl
  2. Select the application that’s using Port 443, and click Uninstall.uninstall to fix 443 error code
  3. Follow the on-screen instructions to complete the process.
  4. Reboot the device for the changes to apply.

If this doesn’t work, use an effective software uninstaller to remove all leftover files and Registry entries in case these are triggering conflicts.

4. Create a new subdomain

If the 443 error code is seen while installing Nextcloud from the official GitHub page on a VPS (Virtual Private Server) where there are no software conflicts or the firewall blocking to blame, you may create a new subdomain.

It doesn’t matter whether the encryption rate limit is hit or not. Creating an entirely new subdomain from scratch will do the trick!

5. Contact your ISP

In some of the cases we examined, it was the Internet Service Provider (ISP) that was blocking Port 443, and as a result, you were getting the error code. This is often done for security reasons.

So, check with them, and if it turns out that Port 443 is blocked, ask for it to be unblocked.

These fixes and workarounds should help get rid of the 443 error code. Remember, some work in specific situations while others are generally accessible. For instance, adding Port 443 to the firewall will work across setups, while creating a new subdomain is specific to Nextcloud.

Also, issues with Port 443 can cause the Could not open connection to the host Telnet error, and if the problem with your PC is related to it, check our fixes!

For any queries or to share what worked in your case, drop a comment below.

Edge may get its own Circle to Search gesture for Copilot, rivaling Google’s feature

Circle to search could be the new way to search and get AI answers and responses with Copilot in the Microsoft Edge browser. Yes, Microsoft has added mouse gesture support for Circle to Copilot in the Edge browser Canary version. Though the feature is not working yet, a setting can be seen that hints the Circle to Copilot feature is coming to the Edge browser. Here is more on the feature and how to enable the experience in the Edge browser.

Update: Find any object that could be the latest smartphone or something you’re curious to know about. Draw a circle around it, and voila! It will be added to the chat box in the Copilot Sidebar. You can then ask Copilot about it and get an answer. See the Circle to Copilot working in the video added below.

Circle to search with Copilot may arrive in the Edge browser

Microsoft Edge is taking a page out of Google’s playbook by introducing a new mouse gesture feature dubbed Circle to Search with Copilot. This feature may allow you to launch web searches directly from highlighted text or images, all with a simple circular motion of the mouse.

Here’s how it may work:

When you highlight text or an image, use your mouse to draw a circle around the selected content. Copilot takes over and initiates a web search based on the highlighted information, presenting relevant search results in the sidebar as usual.

It’s worth noting that the Ask Copilot context menu option already gives instant answers and saves time without you needing to manually submit highlighted text to Copilot in the chat box. This could be expanded with the Circle to Search gesture.

How do I enable Circle to Search with Copilot in Microsoft Edge?

  1. Ensure you’re using the latest Edge Canary.
  2. Right-click on its shortcut on the desktop and select Properties.
  3. In the Target field, add the following commands after giving a space:
    --enable-features=msEdgeCircleToSearchDefaultEnabled,msEdgeCircleToSearchSupported,
  4. Click Apply and OK.
  5. Open Edge, visit Settings and select Appearance.
  6. Enable Mouse Gesture Setting.
  7. Click Configure Mouse Gesture.
  8. Ensure the Enable Circle to Copilot setting is turned on.

Availability:
Microsoft hasn’t yet officially announced Circle to Search with Copilot. Wait for further updates to Edge Canary to see the progress on the feature. We’ll let you know when it works.

Edge browser’s Circle to Copilot in Action Video:

On the other hand, Google’s Circle to Search and Edge’s Circle to Search with Copilot are completely different experiences designed for different devices, though they both use AI to produce results.

For instance, the former is catered for mobile devices, while the latter is yet to be available on desktop browsers. However, by integrating the Circle gesture for Copilot, Edge may provide a more efficient browsing experience to users.

Do you think Circle to Search is coming to the Microsoft Edge browser? Let us know your thoughts in the comments below.

Windows 11 makes it easier to enable live captions with just two clicks

Microsoft released Build 26040 to the Canary Channel, last Friday, and needless to say, it was one of the biggest builds to the channel in a long while. The build came with big changes to the Windows installation setup, including UI changes.

It debuted instant access to new photos from mobile devices connected to Windows 11, and LAPS received new paraphrases and better readability capabilities. Plus, the faster 80GB USB support made its way to the operating system.

In other words, a very big build, and as with any build, besides the obvious documented changes, there are also hidden, undocumented changes coming with it.

Such change, which allows Windows 11 users to quickly enable live captions right from Quick Settings with just two clicks, was discovered by Windows Insider, @PhantomOfEarth, a few days ago.

The hidden change moves the live captions settings from the Accessibility panel, right up front of the Quick Settings, for faster enabling. This way, Windows 11 users won’t have to waste precious time looking for the settings in time-sensitive situations.

For now, the change is hidden, meaning Microsoft didn’t mean to reveal it just yet, but it can be enabled in the Canary Channel by using a third-party app, such as ViveTool, to enable hidden Windows 11 settings.

As the feature is currently hidden, Microsoft will most likely unveil it in a future build, in the following weeks, and the Redmond-based tech giant will release it to the general public in the next updates.

With this being said, the decision to move the live caption setting right at the forefront of the Quick Settings panel will greatly be of use to those Windows users relying on it for work, or daily tasks.

However, if you don’t have the patience to wait until Microsoft makes the change in the stable version of Windows 11 if you’re enlisted in the Canary Channel within the Windows Insider Program, you can enable it now.

How to enable the Windows 11 live captions to show at the forefront of Quick Settings?

  1. Open ViveTool.
  2. Run this command: vivetool /enable /id:45799111

If you don’t know how to use ViveTool to uncover hidden Windows 11 features, we have a comprehensive guide on how to use it.

After you enable it, opening Quick Settings should allow you to enable Live Captions with just two clicks, as you can see in the picture below.Windows 11 live captions

What do you think about this change?

Best Tekken 8 Settings for Xbox Series X/S

Tekken, the beloved fighting game franchise, has been entertaining players since 1994, and the legacy continues with the latest release of Tekken 8.

This installment brings the next level of intense battles, & immersive storytelling, making the gaming experience more exhilarating. Let’s talk about the best settings that you can apply for Tekken 8 on your console.

What are the best settings for Tekken 8 on Xbox?

1. Controller setup

ActionButton
Left PunchSquare
Right PunchTriangle
Left KickCross
Right Kick Circle
Throw (LP+LK)L2
Throw (RP+RK)R2
RAGE ARTR3
Heat Burst/Heat SmashL3
LP+RK L1
Character MovementsD-pad
RP+LKR1

In case you have the default PS5 controller, it is recommended to disable the Special Style feature. For that, go to the control setup & deactivate the button. However, if you are a beginner, keep the Special Style option turned on.

Use the D-pad instead of the analog stick to use the Backdashing/Korean Backdashing technique on Tekken 8 properly.

Moreover, with custom control settings, you can assign any action to any button on the controller as per your preferences, thereby impacting the overall gaming experience and adding comfort and enjoyment to the game.

2. Sound settings

Settings Value
Master volume8
SubtitlesOn
Voice volume5
BGM volume5
SFX volume5
Environmental volume5

3. Avatar camera settings

Settings Value
Vertical camera controlsNormal
Camera speed5
Horizontal camera controlsNormal
Camera tracking speed5
Automatic camera trackingOn

4. Graphics settings

SettingsValue
Screen ModeFull screen
Variable Rate ShadingOff
Rendering Scale80
Resolution Ultra (for 8GB or higher VRAM), Medium (up to 6 GB ), Low (4GB or lower)
Anti-Aliasing QualityLow or Off (to reduce GPU load)
Background QualityLow
Post-Processing QualityLow
Texture QualityUltra (for 8GB or higher VRAM), Medium (up to 6 GB ), Low (4GB or lower)
Rendering Quality PresetCustom
UpscalingDLSS Performance (NVIDIA GPU), TAAU (AMD GPU), and for others set it to TSR
Shadow QualityLow
Effect QualityLow
Measure/Display FPSOff
V-SyncOff

5. Game option settings

SettingsValue
No. of rounds (VS)3
Notification settingsOn
Controller vibration settingsOn
No. of rounds (Tekken Ball)2
Round duration (Ghost battle)60
Round duration (Tekken Ball)60
Round duration (VS)60
Rollback settingPrioritize Response
No. of rounds (Ghost battle)3
Tournament settingsOff
Cross-platform playOn

6. Screen settings

SettingsValue
Dynamic range settingsYou can set it at your convenience
Effect saturation settingsLow
Battle HUD position settingsYou can set it at your convenience
Show online status:On
Tekken ball HUD position settingsYou can set it at your convenience

Other tips to play Tekken 8 at its best

  • Before moving to the complex moves, master the Bread and Butter combos, like hitting with a crouching jab or landing a jumping attack.
  • Check the All Techniques and Main Techniques tabs to understand the Heat Moves and combos for mixing up your strategies.
  • Ensure you enable frame data in training mode to comprehend the attack startup frames and frame advantages.
  • Work on defensive skills by taking part in Punishment Training scenarios.
  • To learn and improve your skills, engage in Super Ghost Battle to train against AI opponents.
  • Fight your Ghost to find the gameplay traps you may fall into.

Remember that these Tekken 8 settings are suggestions to elevate your gaming experience, but they aren’t setting stones. However, once you start playing the game, you might want to tweak the controller and your game settings according to your will.

In case you are playing Tekken 8 on a low-end PC, wait; first, check the best Tekken 8 settings for that machine; read this to learn more.

You might also want to look at the general graphics settings that you can apply for gaming; check out this detailed guide to learn more.

If you have any questions or suggestions about the settings, feel free to mention them in the comments section below.

The new Xbox Series S, Ellewood, will deliver performances compared to X, at the same price

2024 will be the year Microsoft releases new versions of its popular current-gen consoles, Xbox Series S and X. These new versions are codenamed Ellewood, for Series S, and Brooklin for Series X, and the Redmond-based tech giant is expected to announce them in the summer, most probably June/July, with a potential release date for September/October.

The roadmap for the Xbox has been known for several months now, as back in 2023, FTC mistakenly uploaded dozens of confidential documents revealing the new prototypes for the Xbox Series consoles.

While several months have passed, we don’t know for sure if Microsoft has changed the plans. There is a chance these new versions won’t be released the way they were described in the documents, back in 2023.

For example, we all know that 2024 will be the year of AI for Microsoft, as the Redmond-based tech giant is getting ready to launch the new Copilot key this spring. What if the new Xbox consoles might also integrate some AI features? It’s a thought, yes, but it could be possible.

Either way, below you’ll see all the new specs coming with the Series S Ellewood.

Xbox Series S Ellewood: This is what we know so far

Xbox Series S Ellewood
GPU TF + Target Res4TF + 1440p
RAM10GB
Physical Storage512GB/1TB
Content deliveryEntirely Digital
Connectivity portsXbox Wireless 2.0
Bluetooth 5.1
Wi-Fi 6E
3 x USB-A
In-box accessoriesSebile Controller
USB-C to A cable (0.5m)
HDMI cable
Power cable
SustainabilityEnhanced
ID RefreshLight
Price$299 (Expected)
Release dateSeptember/October 2024

All these additions will make the new Series S console similar to the current Series X, in terms of performance. While the design will stay the same, Microsoft will debut Ellewood with a white carcass made from recyclable material.

The new version will come with 1TB of storage, more than enough for casual gamers, and it also boosts stronger connections, as well, with the new Xbox Wireless 2.0, Bluetooth 5.1 (the current standard), and the Wi-Fi 6E, and it makes sense since this console has always been entirely digital.

The stronger connections will also mitigate lags and users will be able to download games faster, and play them without worrying about latency. It will effectively bring it closer to performance in Series X while having a lower price than it.

Bluetooth 5.1 is also an awesome addition, as users will now be able to connect their desired headphones and other controllers to the console, while the USB-C to A will allow for faster transfer speeds and a wider array of displays to connect it to.Xbox Series S Ellewood

Ellewood will reportedly be released with a new controller, the Xbox Sibile controller, which will have lift-to-wake capabilities, Xbox Wireless 2.0 and Bluetooth 5.2 connectivity, and special features, such as connecting itself to the Xbox app. It will also have replaceable buttons, and a replaceable battery, so Microsoft puts all the bets on longevity.

And speaking of longevity, Xbox Series S Ellewood should last longer, as the console will be 20% more efficient during standby mode.

What’s your opinion on this new console?

If your screen has black spots while browsing on Chrome/Edge, here’s what you need to do

Google Chrome and Microsoft Edge might both cause Windows devices to show black spots on displays while browsing the Internet on them. The issue is quite common, and as this Reddit user captured it, it can leave users quite distressed about the state of their hardware.

Posted with the image you can see above, the user said black spots appeared on their screen while browsing on Chrome, on a Windows device:

I had this show up on my Chrome page just now. This happened once before and was also on Chrome. No other program has had this happen. Its a brand new GPU (ASUS RTX 4090), 1.5 months old. Should I be worried?

Reddit user

While many common issues involve the screen turning to black while browsing on Chrome or Edge, you should know one important thing: if the issue only occurs while using Chrome, or Edge, then these browsers are causing the problem.

So your hardware should be all fine. However, as the issue is distressing, and it could be annoying, there are a few workarounds for it.

Are there black spots on your screen while browsing on Chrome? Here’s what you need to do

Turning Hardware Acceleration off

Hardware acceleration tries to make Chrome faster by transferring some of CPU power to other available places, such as GPU, audio cards, and so on.

As GPU memory is impacted, it can leave the video card unable to perform at its best when browsing, which sometimes creates issues such as the appearance of black spots.

Turning it off usually solves this problem, as many Reddit users agree.

Hardware Acceleration is such a funny thing. For years I follow the same guide in chrome: When something doesnt work, I toggle Hardware Acceleration. Either I turn it on or I turn it off, but in the end it mostly solves the problem

Reddit user

We have a comprehensive guide on how to turn it off, here.

Switch the graphic backend to OpenGL

  1. In Chrome, open up Chrome://flags.
  2. Once there, type in Choose ANGLE graphics backend.
  3. Select the panel, and change it from Default to OpenGL.black spots on chrome
  4. Restart Chrome.

Since the issue is affecting Chromium-based browsers, Microsoft Edge will be affected by it too, but you can try these workarounds on Edge, as well, since its infrastructure is similar to Chrome.

However, it’s important to remember that in these cases the browsers are at fault, and if the problem persists even if you tried these solutions, maybe it would be time to try another browser.

Opera GX maybe?

Amazon Alexa is no longer on the Microsoft Store, but you can still get it

Since March 2023, Amazon Alexa has bid farewell to Microsoft Store and Cortana has also left its digital abode, making a notable transformation in the virtual assistant landscape. Speaking of change, we also witnessed the emergence of Microsoft Copilot on Windows 11 machines.

However if you still want to get hands on Amazon Alexa app, here is a workaround you can use:

  1. Launch your preferred browser and visit the Microsoft Apps website.
  2. Click Install.Install the app
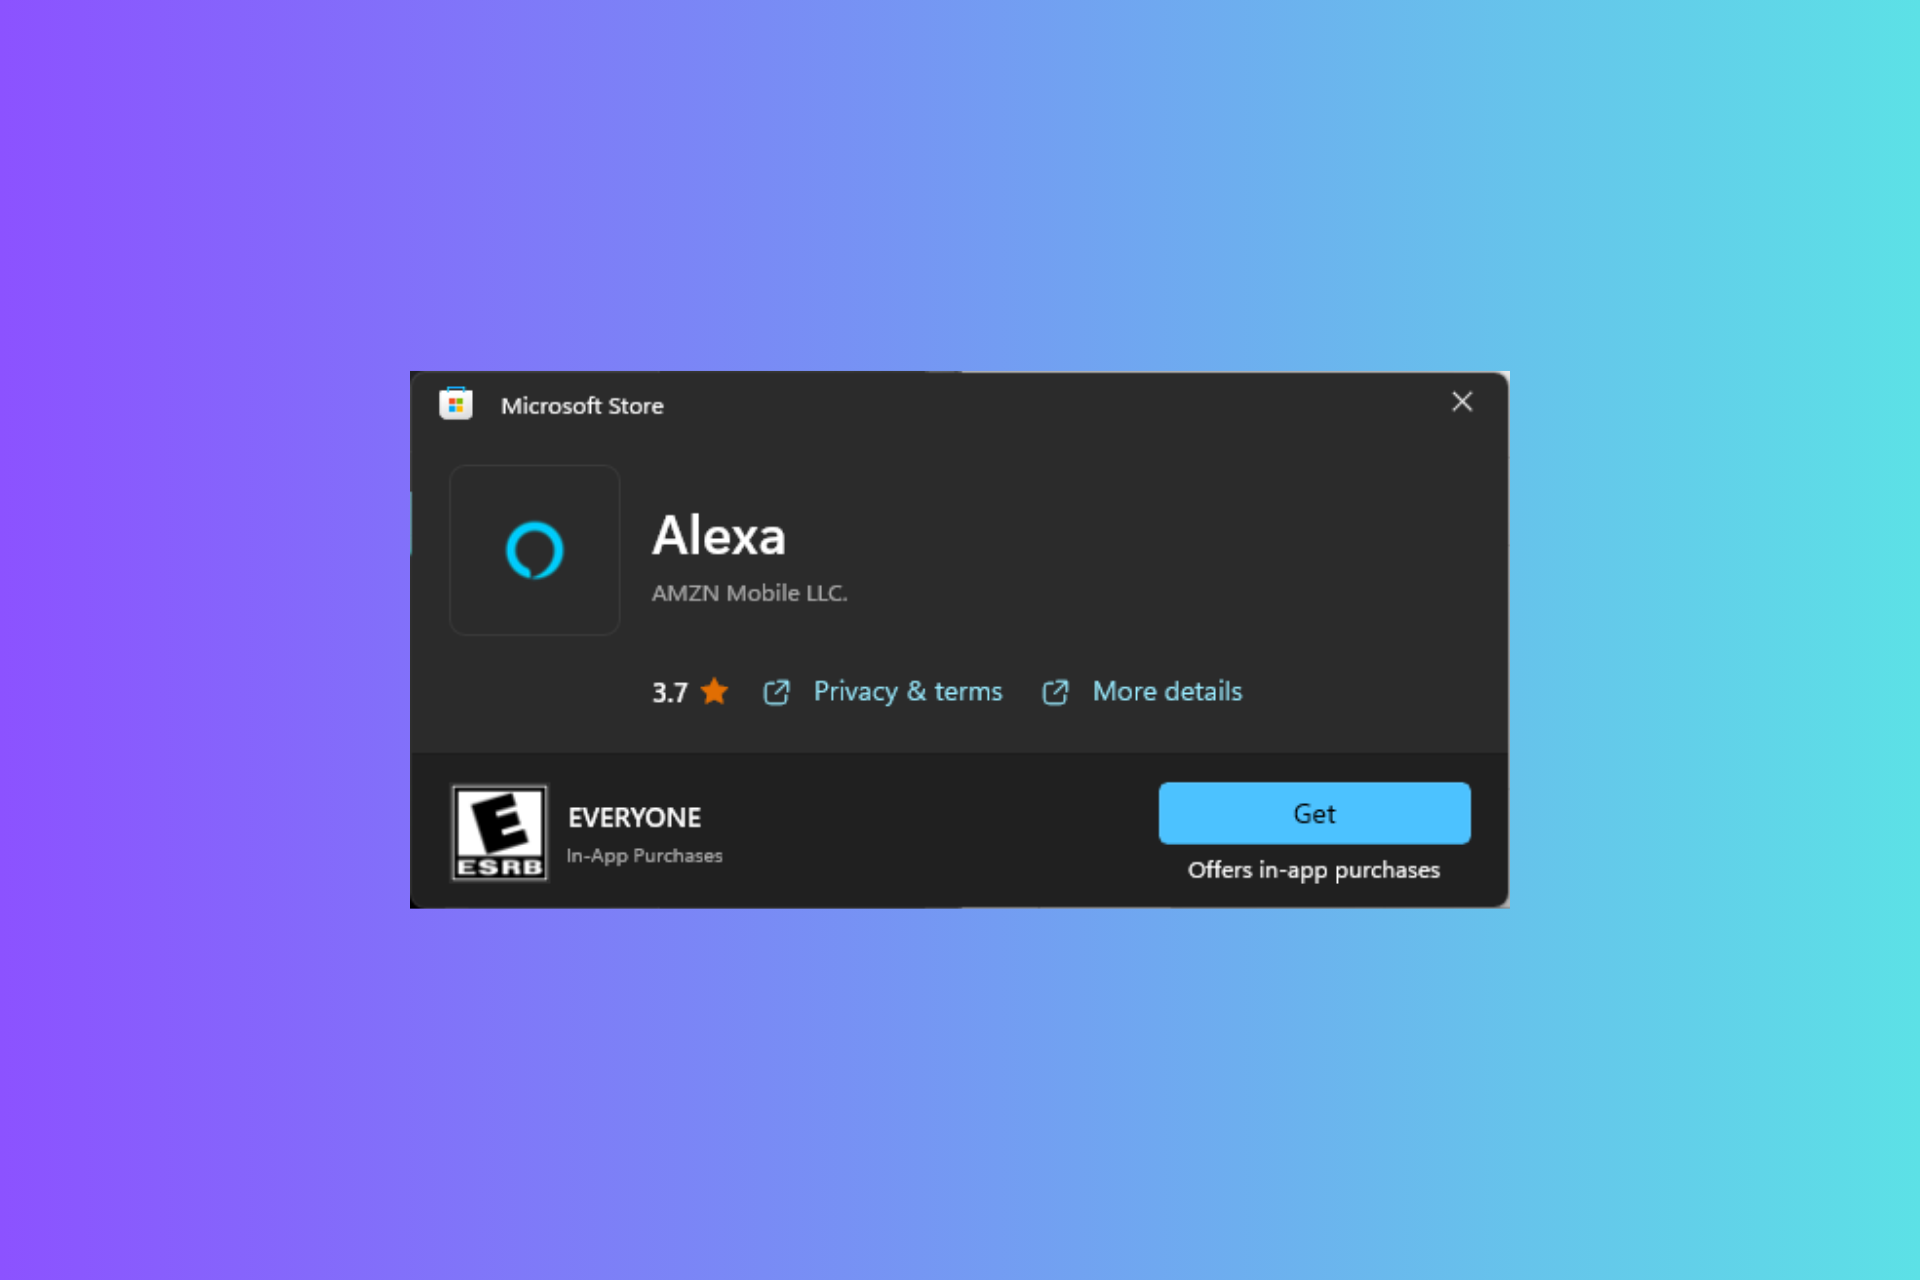
  3. You will be redirected to the Microsoft Store, where you will find Amazon Alexa. Click Get to install it.Get
  4. If you can’t see Get, click More details, and it will lead you to the full store app. Click Get to install the app now. More details

If this does not work for some of you guys, then you might have to rely on offline installer link. Go to this link, enter the Amazon Alexa Store URL and click on the tick button; you will get the Amazon Alexa working link list for Windows 11, click the one on top to download the app.

Once downloaded, it will show up in Microsoft Store list and can be updated from there as well.

Did this workaround help you get Alexa on your Windows machine? Tell us in the comments section below.

Microsoft Graveyard lists all the deprecated Microsoft products, but it could be inaccurate. Here’s why

If you’ve been wondering where the Microsoft products go once they’re deprecated, we have an answer: Microsoft Graveyard.

Spotted by folks over at Neowin, Microsoft Graveyard is a designated open-source space for all the software, apps, and products Microsoft has deprecated since its inception.

According to the project’s official site, Microsoft Graveyard is an open-source project, meaning everyone fascinated by the deprecation of Microsoft products can join and contribute their input.

Microsoft Graveyard is the virtual graveyard for all products killed by Microsoft; a free and open source collection of dead Microsoft products built by a passionate and nostalgic community. Our objective as a community is to provide factual, historic information for the products listed here. If something is missing, inaccurate, or you have a suggestion, visit and contribute to the project on GitHub.

Microsoft Graveyard

The project is not affiliated with Microsoft, and the founders behind it say that it is heavily influenced by another similar independent project called Killed by Google. We don’t have to explain that one as the name speaks for itself. The two projects are very similar in design, easy to follow, and will get visitors acquitted with every project deprecated by Microsoft.

For instance, Microsoft Graveyard added the recently deprecated Windows Mixed Reality and Cortana to the opening page.

Microsoft Graveyard: Is it necessary?

The project is a comprehensive list of all the products Microsoft has deprecated so far, plus, and this is the plot twist, the upcoming projects, services, and apps the Redmond-based tech giant will deprecate in the following months.

As you can see in the image below, Microsoft Graveyard shows an insight into the upcoming products to be deprecated up to July 2026, more than 2 years from now.Microsoft Graveyard

The project displays a description below each item, the date of deprecation, and a link to more details about the project, software, or app.

However, there is an important question: Microsoft already has a dedicated page for deprecated products, so is this project necessary? The list of Windows 11 deprecated software can be found here, and the list is more than comprehensive: it offers users everything they need to know to prepare for the deprecation.

Microsoft Graveyard, while an intriguing project, is just an encyclopedia of the deprecated Microsoft products. Plus, its open-source quality makes it vulnerable to faulty edits, and the spread of false information, as the project is not affiliated with Microsoft, so it can be edited at will.

The founders behind the project say that the goal is to provide objective information, however, some of the information could end up being inaccurate and could confuse those who are interested in the topic.

So, in the end, people should be careful, and verify information from official sources, first.

Windows 10 KB5034441 0x80070643 error still causes issues for many, despite Microsoft releasing temporary solutions

Those Windows 10 users who want to install the KB5034441 security update will fail to do so, due to the frustrating 0x80070643 error appearing at the beginning of the installation process.

KB5034441 which was released earlier this month, applies Safe OS Dynamic Update (KB5034232) to the Windows Recovery Environment (WinRE) on a running PC to address a security vulnerability that could allow attackers to bypass BitLocker encryption by using WinRE, according to Microsoft.

However, many users encountered the 0x80070643 error which rendered their Windows 10 unable to install the security update.

After countless attempts to fix the issue, some Windows users found out that the error appeared when Windows detected insufficient free space in the recovery drive.

As recovery drives need to have at least 250 MB of free space, many users tried to allocate more space to these drives by using the method Microsoft released a while ago.

Using this method many users were able to fix the annoying issue and allow Windows 10 to install the KB5034441 security update, however, the fix is not generally working for everybody, and there are users who, despite following the fix step by step, were not able to fix the error.

I followed the instructions to resize Win RE. Goes as should but at the end list vol displays the partition is still its original size. Disk management shows 250mb I shrank off the primary volume at the end of the drive and the empty 529 at the start of the drive. They never combine. When in the steps to ID/Format the partition GPT format here, it only selects the same 529 leaving the 250 at the end, and I am back where I started. Not sure what I am missing here, thank you for your guidance.

Windows 10 user

What to do then? If you’re not a technical person, by any means, trying to implement the fix linked above, will be quite a challenge, and it might not even work at all.

Fortunately, Microsoft has already acknowledged the issue, and the Redmond-based tech giant will release a permanent solution to it in the following weeks, as it states in the official blog post.

Microsoft says users can safely ignore installing the KB5034441 update, especially if their Windows 10 devices don’t have a recovery partition. But if you want to install the update without waiting for the official solution, then you might want to check these threads, here and here.

However, proceed with caution.

Show Windows 11 Performance Overlay [How to]

Keeping an eye on your performance, especially during resource-intensive tasks is important and to do that, you can use Windows 11 performance overlay.

If you’re not familiar with this feature, this guide will show you everything you need to know about it.

How do I get performance overlay on my computer?

Use the Game Bar

  1. Press the Windows key + G to open the Game Bar.
  2. If the Performance window isn’t showing, click the Performance button.
  3. Click the Performance options icon.
  4. Select which information you want to display, transparency as well as graph position.
  5. Once done, move the Performance overlay to the desired location and click the Pin icon.
  6. Press the Windows key + G to hide the Game Bar.
  7. Click on the Collapse chart.
  8. Now you will have a minimized performance overlay on your PC.

Where is the Performance tab in Windows 11?

  1. Press Ctrl + Shift + Esc to open Task Manager.
  2. Next, click on the Performance tab.
  3. Once opened, you should be able to view your performance at a glance.

What is the shortcut for Windows Performance overlay?

Windows doesn’t have a shortcut for performance overlay, but you can use the Game Bar shortcut to view your performance.

Other performance monitor software, such as Nvidia Experience allow you to open performance overlay with Alt + R if enabled.

Windows 11 does have a performance overlay, but to use it, you first need to pin in from the Game Bar. After that, it should stay on until you turn off your PC.

Speaking of performance, we have great guides on how to make Windows 11 faster as well as the best performance settings for Windows 11.

If you’re a gamer, we also have a guide on the best Windows 11 graphics settings for gaming, so don’t miss it.

Have you ever used performance overlay in Windows 11? Let us know in the comments!

6 Best Tekken 8 Settings For A Low-end PC

By adjusting some settings, you can enhance the performance of your Tekken 8 game while still enjoying the thrilling battles and smooth gameplay that it is known for even for low-end hardware.

While adjusting game settings can help optimize performance on a low-end PC, it’s important to note that these alone may not compensate for hardware limitations. Your PC still needs to pass the compatibility test by meeting the minimum system requirements.

What are the best Tekken 8 settings for a low-end PC?

1. Kill background programs

  1. Start Task Manager by pressing the Windows key + X combination and selecting it from the list.
  2. Inside the Processes tab, select the one you want closed, and click on the End task button from the bottom right.

Killing superfluous processes from the Task Manager may not be sufficient, especially if you must allocate more resources to the game. You can check the average number of processes that are supposed to be running, then proceed to other ways of killing background processes.

2. Lower the resolution

  1. Hit the Start menu icon and select Settings.settings windows 11
  2. Click on System then select Display.
  3. Navigate to the Scale & layout section then under Display resolution, click on the drop-down menu and pick a lower resolution setting than your current one.

Running games at a lower resolution can reduce the strain on the GPU. By decreasing the resolution, the GPU has to render fewer pixels, allowing it to allocate more resources to other aspects of the game for an improved overall performance.

3. Graphics

3.1 Update the graphics driver

  1. Press Windows + R to open Run, type devmgmt.msc in the text field, and hit Enter.devmgmt.msc
  2. Expand the Display adapters entry, right-click on the active graphics adapter, and select Update driver.update driver to fix black screen after changing refresh rate
  3. Click on Search automatically for drivers and let Windows locate and install best locally available version.search automatically
  4. If a new driver is installed, reboot the device.

3.2 Turn up the graphic settings

  1. Press Windows + I to open Settings.settings windows 11
  2. Click on System on the left pane then select Display.System - Display- Photoshop not using GPU
  3. Under Related settings, click on Graphics.
  4. Select Tekken 8 from the list, and click on Options.
  5. Now, choose High Performance and click Save.

Low-end PCs typically have limited hardware capabilities, such as slower processors. That’s why high-performance graphics settings are recommended for low-end PCs because they prioritize frame rates over visuals, maximizing the system’s performance.

Additionally, if you have a dedicated GPU, you’ll be able to get a better performance than anyone with an integrated GPU. If you can afford to upgrade to a high-performance graphics card, it’s better than purchasing a new PC.

4. Adjust power settings

  1. Click on the Start button, type power plan, then select Choose power plan.
  2. Checkmark the High Performance section, then select Change Plan Settings.
  3. If you can’t see it on the list of plans, click on Show additional plans.
  4. Click on Turn off the display and Put the computer to sleep drop-down menus and set them to Never.
  5. Next, click on Change Advanced Power Settings.
  6. Go to Turn off hard disk time for the On battery field and also for the Plugged in field. Ensure the setting is Never.

Turning off the hard disk setting typically limits the use of the hard disk drive during gameplay. By minimizing the load on the hard disk drive, you may experience faster loading times, reduced stuttering, and improved overall responsiveness in the game.

5. Turn off the Anti aliasing feature

  1. Right-click the space on the desktop and select NVIDIA Control Panel.
  2. Click Manage 3D settings from the left pane, and go to the Global Settings tab.
  3. Locate Antialiasing and select Off from the drop-down.Manage 3D settings DXGI ERROR DEVICE REMOVED
  4. Switch to Program Settings and turn off Antialiasing.
  5. Click Apply to save the changes and reboot your computer.

Generally, antialiasing is a great performance booster. However, on low-end PCs with limited processing power, it can be resource-intensive and may impact performance negatively.

Disabling anti-aliasing can free up VRAM for other graphical elements, such as textures, which can help improve overall performance.

6. V-Sync

Note icon NOTE
These steps only apply to users running the NVIDIA Control Panel. If you are not, move to the next solution.
  1. Open the NVIDIA Control Panel, and go to Manage 3D settings from the left pane.
  2. In the Global Settings tab, expand the dropdown menu next to Vertical sync and select Off.disable to fix black screen after changing refresh rate
  3. Now, go to the Program Settings tab, select an app from the dropdown menu, expand the Monitor Technology dropdown menu, and select Fixed Refresh.disable g-sync
  4. Similarly, disable G-Sync for all applications.
  5. Once done, click Apply to save the changes.

V-Sync is a setting that synchronizes the game’s frame rate with the refresh rate of your monitor. Enabling it on low-end PCs can lead to screen tearing.

By disabling V-Sync, the game is not locked to the monitor’s refresh rate. This allows the graphics card to render frames at a higher rate which in turn can result in smoother gameplay

Remember that these particular adjustments are not set in stone. Optimal settings can vary based on your specific PC hardware and preferences so feel free to tweak them as you please. And if they’re not enough, you can try with other settings to optimize your gaming experience.

Having older or sub-par hardware does not mean you should not enjoy Tekken 8. With our recommended settings, you can now experience Tekken 8 on your low-end PC without compromising performance.

If you are playing Tekken 8 on Xbox, wait; first, check the best Tekken 8 settings for that machine to learn more.

By lowering the resolution, adjusting graphics quality, disabling resource-intensive effects, and optimizing other settings, you’ll be able to enjoy smooth gameplay and responsive controls. Remember also to close unnecessary background programs to free up system resources.

Now, go forth and put your low-end PC to the test as you engage in epic battles. While you’re at it, feel free to leave us your review in the comment section below on the before and after for any improvements.

Finally, Windows Share includes X, WhatsApp & Facebook. Thanks, Microsoft.

Earlier, Microsoft released a very useful feature to Windows 11’s File Explorer: the ability to quickly share links to files on other apps. The feature would allow users to email files to themselves, as well, as effectively changing the ways of sharing files and making them accessible right away.

In line with it, Microsoft rolled out a series of changes in the latest Windows 11 Insider Preview Build 26040 (Canary Channel), and Windows Share has gotten a massive upgrade. It will now have a dedicated sharing option for X (formerly Twitter), WhatsApp, Facebook, Gmail, and LinkedIn.

The recent changes will also improve nearby file sharing, making it much quicker with increased transfer speeds. Besides, users no longer need to be on the same private network for file sharing to work. Any network type (Private or Public) will do!

Microsoft earlier allowed users to share files on Teams through Windows Share. This, too, will see improvements in the latest version.

These changes will effectively allow users to share links and files files on their most used apps, making it easier, faster, and overall more usable than ever. And if you don’t know how to use this feature, come along. We’ll show you below.

How to share links in Windows 11?

For Microsoft’s native browser, Edge, click the ellipsis near the top right > select More tools from the flyout menu > choose Share > click on Windows share options > then select the desired sharing option.

Sharing in Microsoft Edge

As you can see, you’ll have plenty of options, from WhatsApp to Facebook, to X, and many more. And if this improvement tells us something, then Microsoft will add more options in the future. This feature will take into account your most used communication apps, and it will propose them to you.

If any of the sharing options (apps) are unavailable, you will be asked to install them.

Source: Microsoft

As for benefiting from changes to file sharing, you will first need to enable Nearby sharing in the System settings. Then, right-click on any file in the File Explorer > choose Share > and select the relevant device from under Nearby devices. Recent updates should also minimize issues with Nearby sharing.

Lastly, if you use a Microsoft Entra ID, Windows Share will offer an option to share in any Microsoft Teams channel or group chat, thereby improving the workflow.

All these improvements and additions align with Microsoft’s efforts to make Windows 11 the most user-friendly OS to date. Whether or not it succeeds, only time will tell!

If you are on the Insider Build, do let us know your experience with the improved Windows Share in the comments section.

Voice Clarity will boost audio quality on Windows 11 using AI

After Microsoft released Voice Clarity in Windows 11 Insider Preview Build 26040 (Canary Channel), enthusiasts are all thrilled, and so should you! The audio enhancement feature was previously available only on Surface devices.

According to the official blog post, Voice Clarity is a feature that enhances your audio experience on Windows with state-of-the-art AI technology. It filters out background noise, minimizes reverberation, and eliminates echo in real time.

How does Voice Clarity work on Windows 11?

Voice Clarity, an AI-based feature, is enabled by default on devices and can be used to improve the audio experience on applications that utilize Communications Signal Processing Mode, such as Phone Link and WhatsApp.

Besides, the feature has minimal system requirements and doesn’t require any additional hardware. Just x64 and Arm64 CPUs should do!

The introduction of Voice Clarity on Windows 11 is set to improve the video calling experience, in addition to providing enhanced audio while gaming.

So, on Zoom or Team meetings, other participants should be able to hear your voice clearly, and the background sounds, either from your end or someone else’s, should be filtered out. Video calls will become more like a one-to-one interaction in terms of audio quality!

The same goes for games, where Voice Clarity will refine the built-in voice chat.

Voice Clarity will truly be a game changer for regular users, once rolled out, and may effectively replace noise cancellation software, thus saving you a few bucks every month.

Some reports suggest that Voice Clarity may not be released for all devices in the stable channel, but that’s yet to be confirmed. For now, if you want to test out the feature, download the Windows Insider Build.

Do not forget to share your review of Voice Clarity in the comments section.

Other notable new features from Build 26040:

Mozilla Firefox finally supports tab hover previews

After Chromium browsers, Firefox joined the party, a bit late though. But, better late than never, Mozilla has finally added Tab Previews support to Firefox. The feature is now available in Nightly and we will show you how to enable it.

What is Tab Preview?
When you hover over a background tab in the browser, a thumbnail shows the content of the page including URL and domain. You can find this useful when you have many tabs open and then, you can able to switch between tabs based on visual content instead of just titles.

Microsoft Edge, Opera and Google Chrome modern browsers already have built-in tab previews. Until now, if you used Firefox, you had to rely on third-party add-ons to bring Tab hover Previews to pages in the browser. Those will no longer be needed in the future.

Firefox finally gets Tab Previews

Firefox generally shows the Tab title when you hover over it. It would be useful if Firefox showed the URL, domain, and Page thumbnail name like Chrome and Edge.
The day has come. Mozilla has been quietly working on Tab Hover Preview for the last 6 months, the feature is recently available in Nightly and can be enabled.

How do I enable Tab Hover Previews in Firefox?

  1. Open the latest Firefox Nightly and visit about:config.
  2. With the tick mark checked, click Accept the Risk and Continue.
  3. Copy and paste below pref browser.tabs.cardPreview.enabled pref and toggle its value to true from false.
    browser.tabs.cardPreview.enabled
  4. Hover over any tab, (not the active tab), to notice the Page thumbnail.

Mozilla is still working on the feature and ironing out the bugs, no specific version has been set as a Target as of now.

It’s too early to request Mozilla to offer a setting to control the visibility of Tab Previews in the Firefox browser, but it should be there as Chrome and Microsoft Edge offer that control through an option in the respective browser settings.

Mozilla Firefox’s market share is continuously declining and the organization eyes over profits from other Mozilla products than improving Firefox. Let us hope, that Tab Previews addition may help Firefox users to stay with it and not switch to Chrome or Microsoft Edge.

If you use Nighly, give the Tab Previews feature a try, and let us know your thoughts in the comments below.

Narrator’s big leap: Enhanced image interaction & voice commands

Narrator is not the new kid in town; it has been part of Windows for a whopping 23 years. With the release of the Windows 11 Insider Preview Build 26040 to the Canary Channel, the app is set to transform the way users interact with images, making it more inclusive and user-friendly.

Here are the key enhancements:

Seamless image navigation

With the keyboard command G or Shift + G in Scan mode, you can effortlessly navigate forward or backward between images on a page.

Enhanced image recognition

Recognizing text in images, even the handwritten ones, has become better than ever. You can access this feature by directing your focus to an image and then pressing the Narrator key(Caps lock or Insert)+ Ctrl+ Del.

However, to use this feature, you need to enable the Image Descriptions feature from Narrator Settings and should have a reliable internet connection.

Word integration

Not only this, the Narrator will be announcing the existence of draft comments, resolved comments, bookmarks, and accessibility suggestions’ availability while reading text in a document.

Voice commands

  • The Narrator now understands voice commands. You can use them to navigate apps, dictate text, and interact with on-screen elements.
  • You can just say the phrases like, read the next line or speak faster, and the Narrator will do just that. To enable it, you can search for voice access in Windows search and follow the instructions to set it up.

Other changes

  • Fixed issues with combo boxes, wherein the Narrator was not accurately announcing the selected item when trying to change the combo box value.
  • Improved accuracy when announcing dialog names on web pages.
  • Addresses the issue with an auto-complete list, wherein the Narrator was not reading any item in the list when writing a formula.
  • Improved the table navigation commands for web tables for more accurate control role announcements.
  • Addressing Narrator not announcing the selected state of menu items in apps like Device Manager.
  • Fixed the issue where the Narrator was announcing both unselected and newly selected values in elements like date fields.

The introduction of features and fixes, Narrator is revolutionizing how people with visual disabilities use their Windows computers.

As of now, it is available on the Canary Channel, which means it will take a little longer before being released to regular users. If you want to look at other noticeable features of Windows 11 Insider Preview Build 26040, download the Windows Insider Build.

What’s your take on this matter? Tell us in the comments section below.

Other notable new features from Windows 11 Insider Preview Build 26040:

A year after release, you can finally integrate Loop components in OneNote

Microsoft Loop, made publicly available on November 15, 2023, now allows you to integrate Loop components in OneNote on Windows and the web app.

The collaboration platform had a mixed set of reviews, but we expected its integration with other Microsoft apps, as was the case with Loops components on Microsoft Teams.

With Loop components finally integrated into OneNote, real-time collaboration is expected to become all the more seamless. Though you may expect some issues in the early days.

How will the Loop component’s integration with OneNote work?

Loop components, as we know from the Microsoft Loops starter guide, are pieces of content that can be edited and shared amongst peers. And OneNote is an advanced note-taking app where all the information can be stored and presented in one place.

So, as you would expect, integrating the two will allow OneNote users to seamlessly add tables and tasks to their notebook, and any changes to them will reflect in real-time. Besides, this eliminates the need to switch between different apps.

To add a new Loop component in OneNote, move the cursor to the position where you want to add the component > click the Insert menu > select Loop Components > then choose the component you want to add.

Adding Loop components to OneNote (Source: Microsoft 365)

To add an existing Loop component, you can directly paste the link. While doing so, make sure that you are adding the component’s link and note the page link.

The improvements to OneNote will make collaborations much simpler, and all it requires is a decent Internet connection and a Microsoft 365 subscription.

While you can start integrating Loop components to OneNote on the web app right away, the feature is under Beta testing in the Windows app and requires version 2401 or later.

However, as we said earlier, there are some known issues. After integrating a Loop component, you may get a lag when scrolling or changing the zoom levels. But Microsoft is working to fix such problems, and they should be eliminated soon.

We expect Loop and its components to be integrated into more Microsoft apps in the coming days. Also, CoPilot in Microsoft Loop was surely a great step!

To read more about Loop components in OneNote, read Microsoft’s official blog.

Do not forget to share your experience with Loop components in OneNote in the comments section!

Palworld Black Screen on Launch: 7 Fixes for Xbox and PC

If you are facing issues with Palworld and it’s stuck on the Unreal Engine screen, followed by a black screen on Xbox, don’t worry. It’s the same for many. Problems seem to have appeared after the latest update. Even the Steam version of Palworld is throwing errors.

For Palworld issues on Xbox, power cycle the console. To do that, press the Xbox button on the console for 10-15 seconds to power it down, disconnect the power cable, wait for a minute, reconnect the power supply, and turn it on.

Besides, you could clear the Xbox cache (clear local Xbox 360 storage) or install the game on the console’s built-in storage.

What can I do if Palworld is stuck on a black screen during launch?

Tip icon Tip
The solutions listed below are for Palworld’s black screen on a PC. For Xbox, the three fixes listed above should work.

1. Install the correct graphics driver

  1. Press Windows + X to open the Power User menu, and select Device Manager from the list of options.
  2. Expand the Display adapters entry, right-click on the active graphics card, and select Update driver.update driver to fix palworld black screen on launch xbox
  3. Choose Search automatically for drivers and wait for Windows to install the best available version.search automatically
  4. Restart the PC and check for improvements.

In case the Device Manager can’t find a better version, roll back the driver update and verify whether the Palworld black screen during launch on PC via Xbox Game Pass is fixed.

If the error still persists, you may head to the manufacturer’s website, locate the latest version, and manually install the driver. Here are the direct links to the driver download page for different manufacturers:

Alternatively, you can speed up the process by using specialized driver updating software. If the black screen was caused by your drivers being out of date, a tool like Fortect Driver Updater will help you fix your game in just a few minutes and you can return to enjoying your gaming time.

⇒ Get Fortect Driver Updater

2. Create a desktop shortcut and run it as an administrator

  1. Launch the Xbox app, go to the My Library, right-click on Palworld, and select Manage. manage
  2. Click the Create Desktop Shortcut button.
  3. Now, right-click on Palworld’s desktop shortcut, and select Properties.
  4. Go to the Compatibility tab, tick the checkbox for Run this program as an administrator, and click OK to save the changes.run as administrator to fix palworld black screen on launch xbox

3. Run the Xbox services

  1. Press Windows + R to open Run, type services.msc in the text field, and hit Enter.services.msc
  2. Scroll down, right-click on the Xbox Live Auth Manager service, and select Properties.properties
  3. Select Automatic from the Startup type dropdown menu, and then click the Start button under Service status.run to fix palworld black screen on launch xbox
  4. Click Apply and OK to save the changes.
  5. Similarly, change the startup type and run the following services:
    • Xbox Live Game Save
    • Xbox Live Networking Service

In addition to the Palworld black screen issue on launch, running the Xbox services also helps when the Xbox app is not launching games.

4. Use the Gaming Services Repair tool (for PC)

  1. Go to the official Xbox support page, expand the Downloadable version entry, and then click the Download the Gaming Services Repair Tool for PC option.download
  2. Double-click the tool, and then click Yes in the UAC prompt.
  3. Let the Gaming Services Repair Tool run uninterrupted. In our case, it took less than a minute.Gaming Services Repair Tool for PC tp fix palworld black screen on launch xbox
  4. If it solves the problem, press Y and hit Enter. Otherwise, go with N and share the issue in the Feedback Hub.

5. Change the network’s profile type

  1. Press Windows + I to open Settings, go to Network & Internet from the navigation pane, and then click on Wi-Fi on the right. If you are using Ethernet, choose that option instead.wi-fi
  2. Select the presently connected network to change its properties.
  3. Now, select the Private network option.private network to fix palworld black screen on launch xbox
  4. Finally, relaunch Palworld from the Xbox app and check if it’s still stuck on a black screen during launch on PC.

Changing the network type to private also helps when Server Connectivity says Blocked while using Xbox Console Companion.

6. Delete the credential and cache

  1. Press Windows + S to open Search, type Control Panel in the text field, and click the relevant result.
  2. Click on User Accounts.user accounts
  3. Now, click on Manage Windows Credentials under Credential Manager.
  4. Locate and expand the XblGrts|DeviceKey entry, then click on Remove.remove to fix palworld black screen on launch xbox
  5. Click Yes in the confirmation prompt.
  6. Now, press Windows + E to open File Explorer, and navigate the following path where Username is your active profile’s name (the Microsoft.XboxIdentityProvider_cw5n1h2txyewy folder’s name may vary):C:\Users\Username\AppData\Local\Packages\Microsoft.XboxIdentityProvider_cw5n1h2txyewy\AC\TokenBroker
  7. Select both the Accounts and Cache folder, and hit Delete to remove them. delete folders to fix palworld black screen on launch xbox
  8. Choose the appropriate response in case a confirmation prompt appears.
  9. Relaunch Palworld and verify whether it now runs fine.
  1. Press Ctrl + Shift + Esc to open the Task Manager.
  2. Locate the Xbox Game Bar process, select it, and click on End task.end task
  3. Similarly, terminate the Gaming services and any Xbox or EA-related processes.
  4. Press Windows + R to open Run, type appwiz.cpl in the text field, and hit Enter.
  5. Select Palworld from the list of applications, and click Uninstall.uninstall to fix palworld black screen on launch xbox
  6. Follow the on-screen instructions to complete the process.
  7. You can now reinstall Palworld from the Xbox Game Store.

If this doesn’t work, consider using a software uninstaller tool to delete any leftover files and Registry entries since these often trigger conflicts later.

One of these solutions should have helped fix the Palworld black screen issue during the launch on Xbox and PC. Remember, your primary approach should be to clear the corrupt cache or check the network settings because these are often the underlying causes.

Before you leave, discover the best Windows 11 graphic settings for gaming and enjoy superior gameplay! We also have a great guide on the Palworld crossplay feature that you might want to check out or learn what to do when you can’t login to Palworld.

Many users also reported a Palworld save error on Xbox, but we have a separate guide that addresses this issue, so don’t miss it.

For any queries or to share what worked for you, comment below.

Windows 11 KB5034204 might not install, but it isn’t your fault

In the last few days, we came across several reports of users being unable to install the latest Windows 11 KB5034204 update. Troubleshooting things with the native tools and scans, say SFC and Windows Update troubleshooter, didn’t yield any positive results.

Besides, for users who did manage to install Windows 11 KB5034204, certain components broke down, or third-party apps failed to load. Even Copilot stopped working for a few. If this happens, you will have to uninstall the Windows 11 update to get things up and running!

What are the issues with Windows 11 KB5034204?

So far, Microsoft hasn’t confirmed any issues with Windows 11 KB5034204, but based on user reports, it appears that the update is buggy.

Even if you download it, restarting the PC to install the update may result in boot issues, or the system may automatically roll back the update. This is after the screen reads, Something didn’t go as planned. No need to worry – undoing changes. Please keep your computer on.

In this case, or if faced with a similar Windows 11 update issue in the future, it’s best that you pause Windows updates for the time being and check back after a week or two.

Pausing updates in Windows 11

By then, Microsoft should roll out a patch that will allow for Windows 11 KB5034204 installation as well as fix any issues the update may have caused.

Do share any problems you faced with Windows 11 KB5034204 in the comments section.

Is Auto HDR worth upgrading to Windows 11? According to most, yes

Windows 11 brought some interesting features with its release, one of them being the Auto HDR feature.

It seems that this feature is quite popular with the gaming community, and it’s one of the features that made many users switch to Windows 11.

Auto HDR is the reason for switching to Windows 11, according to many gamers

Auto HDR feature allows you to experience improved color range and brightness when gaming thus giving you a more immersive experience.

This is especially important when playing older games that don’t have native HDR support. In case you haven’t tried it yet, we have a great guide on how to enable Windows 11 Auto HDR, so don’t hesitate to give it a go.

Don’t take our word for it, here’s what gamers had to say on Reddit regarding Windows 11 Auto HDR:

I literally just switched back to Windows 11 the other day just for Auto HDR. I had tried to switch last summer but I thought that Windows 11 was making my games crash. Turns out it was a driver issue that I just solved a few weeks ago. That makes Final Fantasy XIV & Persona 5 (Royal) look amazing.

But what about newer games? This feature isn’t made just for older games, it can enhance newer titles as well:

I use Auto HDR on Warhammer 40k: Darktide. I’ve found it works very well on my LG C2.

Sea of Stars with auto-HDR blew my mind, other than that I didn’t tried it much

It’s also worth mentioning that AutoHDR works great and is bug-free, and many gamers agree with that:

Yes, I switched to 11 for this reason and it has worked flawlessly.

Many are encouraging others to switch to Windows 11 for this and other features:

Abandon w10, not just for auto-hdr, which works great btw

Another feature that makes users upgrade to Windows 11 is the ability to quickly toggle HDR on and off with a keyboard shortcut:

never mind auto HDR, Win + Alt + B is worth the upgrade alone if you’re into HDR gaming 🙂

And for some games, it seems that Auto HDR works better than the native HDR support:

Auto HDR literally works better than the native HDR in a lot of games. Several games I’ve been unable to stop the native HDR implementation from washing out highlights or any scene with direct sunlight but forcing auto HDR fixed the issue.

Compared to the HDR support on the previous version, Windows 11 Auto HDR is miles ahead according to some:

I just upgraded today. Windows 10 HDR is literally trash

Speaking of which, we have a great guide that compares Windows 11 HDR and Windows 10 HDR, so you might want to check it out for additional research.

Windows 11 is great, and for many gamers, the selling point is the Auto HDR feature. To get the best results from it, be sure to visit our guide on how to configure Windows 11 HDR settings.

What are your thoughts on Windows 11 Auto HDR, have you used it? Let us know in the comments!