3 best virtual guitar apps and software

If you are looking to transform your Windows 10 tablet, or desktop device into a guitar player, you should know that there are apps that you can use for that.

We have featured below three such apps that we consider to be the best for Windows 10 guitar aficionados.

The guitar is one of the greatest instruments you can play. It allows anyone to create great music and to play almost any possible song, but, like most musical instruments, it takes some time to master.


Adobe Audition (recommended)

Adobe Audition - Sound voice recorder

Adobe Audition is the best tool for designing sound effects, including a virtual guitar instrument effect.

After creating your own artwork of music sound using instruments and vocals, you will have to improve the sound of the audio for a more precise effect.

Adobe Audition can be the right choice to craft smooth and textured effects by modifying vocals and drums from the Guitar Suite panel.

As well, you have the possibility to improve the sound of the guitar that you already created by optimizing or altering it, in order to achieve high-quality audio.

Moreover, there are a lot of features for virtual instruments like guitars, so you are free to create a tighter sound effect or to reduce dynamic mixture in the Compressor tab.

As well, the guitar sound can be improved by applying filters, modelers, and by using Distortion features for the professional and expressive performance of the artist.

You will be able to filter frequency, set the resonance, to amplify, and to mix the audio. Adobe Audition will ease the overall process of mixing and editing audio.

The tool allows you to work on more layers and effects at the same time, especially if you use more instruments and want to improve aspects of the vocal in the audio file.

Besides editing sound effects, Adobe Audition gives you the option to record and mix podcasts, to remix the songs effortlessly and automatically, and to fix audio files with the help of frequency display and Diagnostics features.

Adobe Spark

Adobe Spark

Adobe Spark is the best tool for audio effect design, so feel free to try it out!
Free trialVisit website

Play Guitar! app

play guitar! windows 10 app

With the Play Guitar! app for Windows, you can practice playing in a virtual environment, when you can’t pick up the real thing.

The Play Guitar! app for Windows is an awesome way to learn a few chords also, so you can give it a try if you are only now starting to learn to play guitar.

The app is in a sense similar to Piano8, which we reviewed a while back, and if you liked that one, then you cannot like Play Guitar!

This freely downloadable app can be found in the Windows 8, Windows 10 Store and it can be a great way to learn the basic chords, which is the first step if you want to learn how to play guitar.

The app is very similar to the Android guitar app that so many loved, and therefore, I think that those who have moved to Windows 10, Windows 8 will like just the same.

The app itself is fairly simple, as it opens straight to the “playing area”, where users can simply start clicking or tapping the cords to create sounds.

The fact that the guitar itself has very nice graphics and it looks awesome also adds to the app’s quality. The decision of the developer to not add any ads within the app is great, as it allows the user to focus on the music.

The user has two possibilities to use the app:

  • Free Play – where you can play just by clicking or tapping to the cords
  • Chord Play – where users can drag and drop different chords in the special box that appears on the bottom of the screen

In Chord Play, you can also see where you have to press in order to create the specific sound of each chord. This can be a great way to memorize them before moving to a real guitar, or for practicing.

The guitar that is used in this app is an acoustic guitar, but if you want to learn how to play an electric guitar, there is a specialized app for that as well.

⇒ Download Play Guitar!


Rock Guitar! app

rock-guitar-windows-8-app-electric-guitar (2)

If you click on the Other Apps button and you will see the Rock Guitar! download button.

Rock Guitar! app  has the same interface as Play Guitar!, with the same buttons and features. This makes it very easy to use by anyone.

Also, the sensitivity of both apps is awesome, so you won’t ruin your song by pressing multiple cords at once. I salute the developer of these two apps for a fantastic job!

Rock Guitar!’s developer recently updated the app adding a series of interesting new features, such as virtual guitar support, a new chord viewer, and chord editor.

Both Play Guitar! and Rock Guitar! are awesome apps that should not miss from the device of anyone who likes music. The apps are both simple, the sound is great and the difference between the chords is audible.

The app received mostly positive reviews and many users confirmed that using it feels like using a real guitar:

⇒ Download Rock Guitar!


Those were some cool virtual guitar apps that you can try out. Feel free to tell us if you enjoyed them in the comment section below.


PhotoDonut for Windows 10/11 [Review and Download Link]

Are you looking for a powerful photo editor that lets you create stunning images? PhotoDonut is a reliable Windows 10 app that you may use to turn your visions into interesting artistic creations.

PhotoDonut lets you enhance your pictures with an array of sight-pleasing filters and presets.

Each of them offers a unique take on a picture’s lighting and presets such as Gold Sun to really make a photo pop.

After you’re done, you will be required to save your work and PhotoDonut allows you to do so in a number of formats.

The available format list includes popular formats such as PNG, JPG, as well as PSD. That’s why professional artists and enthusiastic art fans alike may find PhotoDonut useful.


What’s so great about PhotoDonut?

try out PhotoDonut

The best part about PhotoDonut? It’s cross-platform, bringing a whole other dynamic to the table and making the software that more versatile.

Lighting is just a tip of the iceberg when it comes to the array of options offered by PhotoDonut.

If you’re looking for more editing-based features, tap into the software’s texture altering capabilities where single solutions and combinations of effects are mashed together to bring out the very best in every photo.

Versatility is one of the program’s top strengths. Just as you can apply great effects and photo enhancements on the fly and perform what can be referred to as one-click wonders.

You may also apply different layers in such a way that emphasizes all of the picture’s strengths. Another great thing is the fact that some people call upon expensive photo editing studios that milk you for money.

That won’t be necessary since PhotoDonut comes as a healthy, not so expensive choice — challenging the way you look at everyday photo editors.

⇒ Download PhotoDonut here


Adobe Photoshop – a great alternative to PhotoDonut

You can’t talk about the most powerful photo editor at the moment without a name like Adobe Photoshop crossing your mind.

Whether it’s photo editing, animation, digital painting, or graphic design that you’re after, there’s virtually no limit on what you can express creatively with Photoshop.

If you’re not sure what’s possible, you can get inspiration by viewing what other people have created.

And since the creative power of Photoshop has reached to iPad as well, you may now work even while on the go.

Adobe Photoshop

Adobe Photoshop

Adobe Photoshop is the best animation, photo editing, and digital paining app that you can get right now.
Free trialVisit website

Alien’s Ripley and Xenomorph come to the Fortnite video game on Xbox and other platforms

Epic Games really aren’t holding back with their crossover characters this year. Players have already been given the opportunity to add Green Arrow, The Flash, The Terminator, Sarah Connor, The Predator, and The Walking Dead’s Michonne and Daryl to their collections and now Ripley and the Xenomorph from the popular Alien franchise have arrived.

Both characters were added to Fortnite earlier today on Xbox One, Xbox Series X, and all other supported platforms. Each character was also accompanied by a variety of accessories including a Xenomorph tail back bling and a Fortnite llama chest-burst emote.

An official trailer for the Alien content was also released today. You can check it out below.

Fortnite’s current season, which has the hunters theme, is set to run until the end of March so it’s likely that at least a couple more special crossover characters could be making an appearance. Some file leaks seem to be hinting at some Family Guy content being added in the near future though it’s unclear how that would fit in with the season theme.

In other Fortnite news, after being teased earlier in the week, the Fortnite Crew Pack content for March has now been officially revealed. Subscribers of the add-on membership can look forward to the Llambro outfit (shown below) along with some similarly-themed pickaxe, back bling, and wrap accessories in addition to the usual 1,000 V-Bucks.

Fortnite March Crew Pack Llambro

Are you excited for all of this new Fortnite content or are you ready for the next season to begin? Let us know in the comments below and then follow us on Pinterest and Twitter for more gaming content.

Fortnite
Fortnite
Developer:
Epic Games Inc.
Price:
Free


Fortnite - 1,000 V-Bucks


What kind of files can Adobe Illustrator open?

Adobe is well-known for the host of products that it provides to users worldwide. This also includes their line of programs aimed at graphics design, such as Adobe Illustrator, or Adobe Photoshop.

Adobe Illustrator is Adobe’s de-facto vector graphics editor, and many people use it in order to create intricate drawings.

These can be both artistic in nature or precise designs used in real-life applications, such as architecture. However, no matter how popular Adobe Illustrator is, not a lot of people know just what kind of files it can open.

Normally you would probably think that it supports all standard image formats, such as JPG, BMP, etc, and some of Adobe’s proprietary formats, such as Photoshop’s PSD.

Of course, you couldn’t be further away from the truth, since the list goes way beyond that.


What are the supported file formats for Adobe Illustrator?

Depending on what exactly you want to do with Adobe illustrator, the list of supported file formats varies.

1. File formats supported for opening

Adobe Idea file (idea)CorelDRAW 5, 6, 7, 8, 9, 10 (cdr)PCX (pcx)
Adobe Illustrator (ai, ait)Encapsulated PostScript (eps, epsf, ps)Photoshop (psd, pdd)
Adobe Illustrator Draw (draw)Enhanced Metafile (emf)Pixar (pxr)
Adobe Illustrator Line (line)GIF89a (gif)PNG (png, pns)
Adobe PDF (pdf)Illustrator EPS (eps, epsf, ps)SVG (svg)
Adobe Photoshop Sketch (sket)JPEG (jpg, jpe, jpeg)SVG Compressed (svgz)
AutoCAD Drawing (dwg)JPEG2000 (jpf, jpx, jp2, j2k, j2c, jpc)Targa (tga, vda, icb, vst)
AutoCAD Interchange File (dxf)Macintosh PICT (pic, pct)Text (txt)
BMP (bmp, rle, dib)Microsoft RTF (rtf)TIFF (tif, tiff)
Computer Graphics Metafile (cgm)Microsoft Word (doc, docx)Windows Metafile (wmf)

2. File formats supported for placing

Adobe Illustrator (ai, ait)GIF89a (gif)PNG (png, pns)
Adobe PDF (pdf)JPEG (jpg, jpe, jpeg)SVG (svg)
AutoCAD Drawing (dwg)JPEG2000 (jpf, jpx, jp2, j2k, j2c, jpc)SVG Compressed (svgz)
AutoCAD Interchange File (dxf)Macintosh PICT (pic, pct)Targa (tga, vda, icb, vst)
BMP (bmp, rle, dib)Microsoft RTF (rtf)Text (txt)
Computer Graphics Metafile (cgm)Microsoft Word (doc, docx)TIFF (tif, tiff)
CorelDRAW 5, 6, 7, 8, 9, 10 (cdr)PCX (pcx)Windows Metafile (wmf)
Encapsulated PostScript (eps, epsf, ps)Photoshop (psd, pdd)
Enhanced Metafile (emf)Pixar (pxr)

3. File formats supported for saving

Adobe Illustrator (ai)AutoCAD Interchange File (dxf)PNG (png)
Adobe PDF (pdf)BMP (bmp)SVG (svg)
Illustrator EPS(eps)CSS (css)Targa (tga)
Illustrator Template (ait)Enhanced Metafile (emf)Text Format (txt)
SVG (svg)Flash (swf)TIFF (tif)
SVG Compressed (svgz)JPEG (jpg)Windows Metafile (wmf)
File formats supported for exportingMacintosh PICT (pct)
AutoCAD Drawing (dwg)Photoshop (psd)

4. File formats supported for saving for web

GIF (gif)
JPEG (jpg)
PNG (png)
File formats supported for saving for screens
Adobe PDF (pdf)
JPEG (jpg)
PNG (png)

SVG (svg)

All in all, if you’re into graphic design, then Adobe Illustrator is a must-have in your toolkit, as it is an industry-standard with pretty much everybody using it.

Adobe Illustrator

Open a wide variety of files with the industry-leading goliath, Adobe Illustrator.
Free trial Visit website

Other software tools that are similar to Adobe Illustrator

As far as supported file formats go, there are plenty of other software solutions that do pretty much the same job as Adobe Illustrator.

Here are our suggestions for Adobe Illustrator alternatives:

As you can see, Adobe Illustrator is quite handy at opening a wide variety of formats. While it is a bit more limited when it comes to formats that it can place or save, they are more than enough for the common user.

Do you think Adobe Illustrator supports enough file formats, or should the list be expanded? Let us know what you think in the comment section below.


Star Wars: Squadrons and NFL 21 coming to Xbox Game Pass and EA Play next month

March is going to be a good month for EA fans with both Star Wars: Squadrons and Madden NFL 21 coming to the EA Play subscription service and, as a result of EA Play being part of Xbox Game Pass, to Xbox Game Pass as well.

The Madden NFL 21 video game is set to be added to the EA Play/Game Pass library on March 2nd while no set date has been locked in for Star Wars: Squadrons just yet.

NHL 21 was also announced to be coming to EA Play today though it won’t join the library until April.

All three titles are fairly new which makes their addition to EA Play and Xbox Game Pass a bit of a boon for subscribers. Let us know which one you’re looking forward to playing in the comments below and then follow us on Pinterest and Twitter for more Xbox gaming news.

STAR WARS™: Squadrons
Developer:
Electronic Arts
Price:
Free


Madden NFL 21 Xbox One
Developer:
Electronic Arts
Price:
Free


NHL® 21
NHL® 21
Developer:
Electronic Arts
Price:
Free

How to remove Logitech Download Assistant from Startup

Logitech Download Assistant is one of those pesky applications that usually don’t do much on your PC, and many users are wondering if they can remove Logitech Download Assistant.

The answer to this question is yes, and in this guide, we’ll show you a couple of quick and easy methods that can help you remove this software from your PC.

How do I get rid of Logitech Download Assistant?

1. Disable the app from running

  1. Press Ctrl + Shift + Esc to start Task Manager.
  2. Choose the Startup tab and search for Logitech Download Assistant.
  3. Right-click on the Logitech file and choose Disable.

If you want to disable Logitech Download Assistant, this is the simplest and the fastest method to use.

2. Uninstall Logitech Download Assistant

  1. Press simultaneously Windows key + I to open Settings.  
  2. Navigate to the Apps section.
  3. Select Logitech Download Assistant on that list.
  4. Click on Uninstall to remove it.
  5. Follow instructions on the screen to complete the process.

This is one way to uninstall Logitech Download Assistant but to make sure that it’s completely removed, we suggest using dedicated uninstaller software.

It will delete any application along with all of its files and registry entries from your PC with ease. It will save up some memory space and also prevent these files from causing reinstall errors.

After using this software, it will be as if Logitech Download Assistant was never installed on your PC. Uninstaller software are also able to force-uninstall malicious and stubborn software.

Regardless of the type of app you want to remove, these tools will do the job in just a few minutes. They are similar to the Add or remove programs utility within Windows.

They display a list of all your software and you select what you want to remove, in this case, the Logitech Download Assistant. Wait for the process to complete and reboot your PC.

3. Delete LogiLDA.dll from System32

  1. Press Windows key + E at the same time to open File Explorer.
  2. Find LogiLDA.dll in the location
    C:WindowsSystem32
  3. Right-click the Logitech dll file and select Delete.
  4. Restart your system.

To disable Logitech Download Assistant removing LogiLDA.dll from your System32 folder might be the simplest method that you can use.

Note: After trying out this solution, the automatic update feature will not work anymore. As a consequence, you will simply have to manually update your Logitech product in the future.

These are just a couple of solutions that can help you remove Logitech Download Assistant.

Be sure to try all of our solutions and let us know if they worked for you.

FIX: Oblivion crashes on startup or when launching a new game

The Elder Scrolls IV: Oblivion was a popular RPG, but many users reported that they experienced Oblivion crash on startup.

This issue will prevent you from playing the game, but fortunately, there’s a way to fix this problem once and for all using our solutions.

How do I fix Oblivion crashing on startup?

1. Delete the game folder from My Games

  1. Click on My Computer.
  2. Select and click on Documents.
  3. Click on My Games.
  4. Open the folder named Oblivion.
  5. Skip the Save folder.
  6. Select everything else.
  7. Right-click and choose the Delete option.
  8. Restart the game.

When you delete the Oblivion folder, this overwrites and resets any possible wrong configurations you have previously made or the improper ones after the game was installed.

Although simple, this solution will help you prevent Oblivion crashes on startup.

2. Uninstall problematic software

  1. Log into your admin account.
  2. Open the Settings app and go to the Apps section.
  3. Identify and select Cyberlink Power DVD 5.
  4. Click the Uninstall button to remove it.

Even though it is a reliable application available for users in different formats, Cyberlink Power DVD 5 can cause Oblivion to crash on startup.

If you want to continue using this software, you can just update it to the latest version from the link below.

Cyberlink Power DVD

Cyberlink Power DVD

Cyberlink Power DVD is an advanced multimedia player that can easily any file type or disc.
Free trialVisit website

3. Install K Lite Codec Pack

  1. Visit our best codec packs for Windows 10 article. 
  2. Go to the K-Lite codec packs section.
  3. From there, download the K-Lite codec pack.
  4. Choose the Basic version.
  5. Click on Download Basic.
  6. Now run the downloaded file to install the codecs.

Installing a good quality pack on your computer is a necessary strategy that prevents Oblivion crash on startup.

After using this solution, restart your computer to apply these changes and run Elder Scrolls: Oblivion to check if the issue has disappeared.

Just like many other popular RPG games from the past, Elder Scrolls: Oblivion will sometimes encounter issues when played on Windows 10.

Unpleasant as it may be, the Oblivion crash on startup is not something that can’t be solved.

If you found our solutions helpful, do let us know in the comments section below.

Here’s how to use Magic Select in Paint 3D

If you started using Paint 3D, and you’re curious about how to use the Magic Select tool, you have found the best answer by visiting Windows Report.

Paint 3D offers you the ability to use advanced-grade tools easily by taking advantage of its user-friendly interface and simple commands.

The Magic Select tool from Microsoft’s Paint 3D also allows you to easily remove any background, and create your desired project without much of a learning curve.

In today’s article, we will discuss how you can use the Magic Select tool to get professional-looking results easily. Read on to find out how to do it.

How can I use Magic Select in Paint 3D?


1. Open Paint 3D and click the New button to create a new project.
2. Click the Menu icon found at the top-left side of your screen.
3. Choose the Insert option and select the image you want to remove the background of.
4. Click the Magic Select tool from the upper menu.
5. Drag the corners of the blue box to fit the part you want to keep from the image.
6. Click the Next button.
7. Use the Add and Remove buttons to fine-tune the selection.
8. Click Done when you’re finished to have the subject cut out and the background removed.

In this guide, we discussed what the Magic Select tool does, and also how to use it efficiently for great results.

Please feel free to let us know if you found this article helpful by leaving a comment for us. You can do so by typing inside the comment section below.

5+ Best Cross-platform Code Editors for Programmers

Having a reliable cross-platform code editor is of utmost importance for programmers.

Most programmers work on multiple computer platforms, so being able to switch from one platform to the other quickly is very important.

In this article, we’ll list the best cross-platform code editors that you can use to make writing and revising code easier.


What are the best cross-platform code editors?

Adobe Dreamweaver – Best cross-platform code editor

Topping out our list is a software tool that is famous for taking out the code editing part for code editing, allowing users of all experience levels to create pretty much anything.

The UI is extremely intuitive, which helps users easily navigate through the entire tool set. More so, the program helps you with various tips and tricks through the use of auto-complete functions and suggestions.

Finally, you don’t have to worry at the end whether your code works or not since Dreamweaver tests it out in real-time, alerting you if something is ever wrong.

All of these wonderful tools are available for both Windows and Mac users, so cross-platform work is also an option.

Here are some of the perks of using Adobe Dreamweaver:

  • Autocomplete and suggestions help users compile faster
  • Great synergy with other Adobe products
  • Intuitive interface
  • UI makes it an excellent entry-level product
  • You benefit from a free 7-day trial

Adobe Dreamweaver

Get rid of code editing and create whatever you want with Adobe Dreamweaver even if you are a beginner or a pro.
Free trial Visit Website

Visual Studio Code – Versatile option

visual studio code

Visual Studio Code is Microsoft’s source code editor for Windows, Linux, and macOS.

This powerful and versatile cross-platform code editor supports a series of features such as debugging, syntax highlighting, intelligent code completion, embedded Git control, code refactoring, and more.

If the standard version of the tool doesn’t meet all your needs, you can always install more extensions to add new languages, debuggers, and other additional services.

You can install as many extensions as you need – they run in a separate process and won’t affect the editor’s speed. As a quick reminder, Microsoft recently added a new JavaScript debugging extension to VSC.

VS Code also comes with built-in Git commands, allowing you to review code right from the editor and push and pull from any hosted SCM service.

The editor features a very interesting and useful feature called IntelliSense, which provides smart completions based on variable types, function definitions, and imported modules.

⇒ Get Visual Studio Code


SlickEdit – Over 60 languages support

slickedit cross platform code editor

SlickEdit is a very interesting cross-platform, multi-language code editor that supports over 60 languages on 9 platforms.

SlickEdit brings a bevy of tools into a single program: it’s a text editor, C++, C# editor, Groovy, Go, Java, Verilog, COBOL editor, Hex, HTML, PHP, JavaScript editor, etc.

If you’re looking for a powerful and fast code editor, then SlickEdit is the right choice for you. It can load large files within seconds. Its smart editing features help you boost your productivity.

The software comes in two variants:

  • SlickEdit Standard: ideal for single file oriented operations and one-off scripts.
  • SlickEdit Pro: perfect for large or complex projects. It supports features such as instant sync with version control integration, tagged symbols for quick and easy lookup, analysis, and navigation.

If you buy licenses for a team of 4 developers or more, you can also get an interesting Team Bundle Discount.

⇒ Get SlickEdit


Sublime Text – Highly customizable

sublime text code editor

Sublime Text is a complex yet highly customizable code editor for programmers. It’s one of the best cross-platform code editors available on the market, and it can handle anything you throw at it.

One of its most interesting features is the multi-caret editing. This option allows you to type the same code in several places at the same time.

The Split editing feature helps you get the most out of your wide-screen monitor. You can enable split editing support and edit files side by side, or edit two locations in one file.

You can use multiple windows, as well as multiple splits in each window. It is available on Windows, Mac, and Linux. One license allows you to use the tool on every computer you own.

You can download and evaluate the software for free. However, a license is required for continued use.

⇒ Get Sublime Text


UltraEdit – Great interface

UltraEdit is a fast, powerful, and versatile Windows, MacOS, and Linux code editor.

It’s highly customizable, enabling different themes so the editor’s interface looks exactly how you’d like it to. You can set one of the themes available in the library or create your own.

Key features include:

  • Column mode – this feature allows you to edit along the Y axis anywhere in your document.
  • Multi-caret/multi-select – the multi-selection and editing feature helps you to the job faster and be more productive.
  • Integrated FTP, SSH & Telnet – UltraEdit is perfect for both quick edits to a file on a server and uploading huge codebases.
  • 4k UHD support – the tool’s interface looks great on Retina and other ultra high-definition displays.
  • 3 for 1 licenses – you can use the tool on up to 3 machines on any combination of platforms.

⇒ Get UltraEdit


ICEcoder – Browser-based code editor

ICEcoder is a browser-based code editor specialized in website-building tasks. This tool allows you to code directly within the web browser, online or offline. You can test your product in mid-development on actual web servers.

When the website is ready, you can then easily provide maintenance services using the same tool.

You can use ICEcoder on any computer with a modern browser and customize it to your liking. You can also use ICEcode as a desktop code editor with PHP 5.0+ (ideally PHP 5.3+). You can run it on Linux and PC via WAMP, XAMPP, and Mac via MAMP.

ICEcode runs great on Windows, Linux, Mac, Android, Google Chrome, Mozilla Firefox, Microsoft Edge or Safari.

⇒ Get ICEcoder


In case you are looking for the best code editors for your low-end PC, read this guide to check out the options.

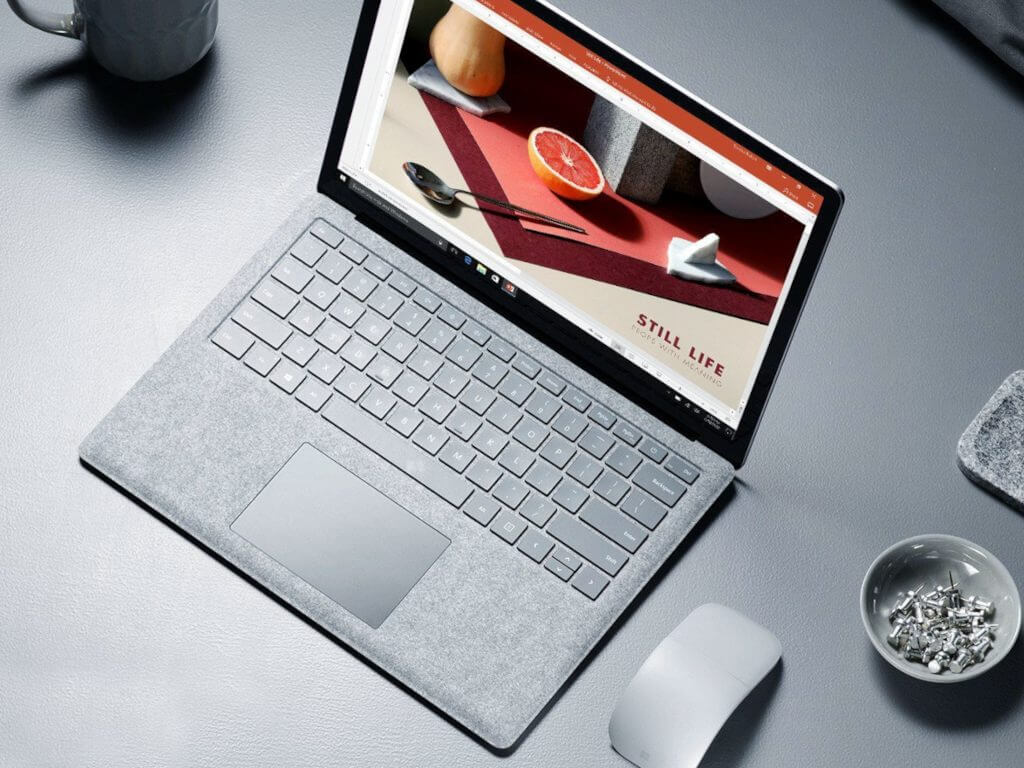
Microsoft rumored to be getting cozier with AMD for Surface Laptop 4 release

Microsoft has been mum on the release of a Surface Laptop 4, let alone the existence of the device at all. The global pandemic had put traditional hardware release schedules on their heads in 2020 and as a result, some companies delayed or outright canceled the release of some devices slated for distribution last year.

While Microsoft’s Surface hardware is normally on an unconventional cadence regarding product releases, with some devices coming in late Spring, early Fall, or spec bumps in mid-summer, presumably a missing Surface Laptop 4 announcement the entirety of 2020 was some part, a result of the pandemic.

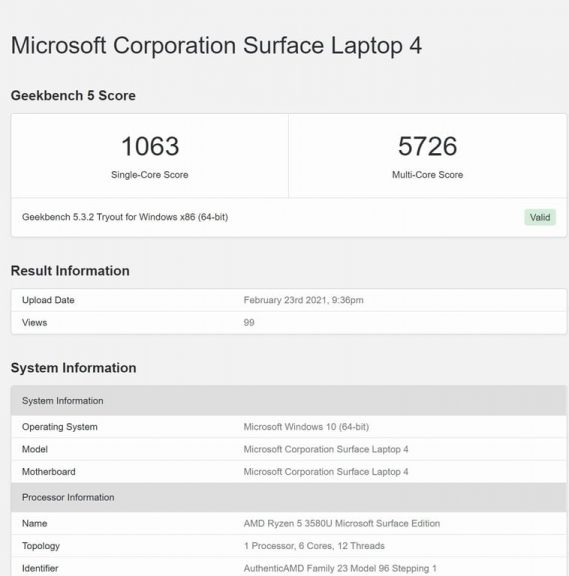
However, there are hints that Microsoft could be set to release its year-delayed flagship follow-up sometime in 2020 and also unveil a variant powered by a custom AMD Ryzen 5 3590 U Surface Edition CPU with 6 cores, 12 threads, and clocked at 2.20GHz.

The rumors follow a Geekbench benchmarking listing that’s surfaced with the above specs codename Renoir and based on the Zen 2 CPU and Vega GPU microarchitectures. The site Windows Latest backs the finding with a report that clarifies that the AMD Ryzen 5 listed in the Geekbench finding is most likely a placeholder. An AMD Ryzen 5 chipset already exists in the current Surface Laptop 3 with the exact same title but does not come with the same sort of specs as recently discovered.

According to the new listing, Microsoft has based the Surface Laptop 4 on the Renoir platform, although the Ryzen 5 3580U Microsoft Surface Edition is listed as the processor name. Inevitably, the latter is a placeholder, as the Ryzen 5 3580U does not have six cores and twelve threads.Geekebch Results Surface Laptop 4 768x768

Presumably, if and when this Surface Laptop 4 does ship, it will come with a more modern Ryzen 5 4600U, 550U, or even the Ryzen 7 3780U onboard given the state of chips being dropped into current devices powered by AMD.

Regarding the actual performance gains from a potentially more advanced AMD chipset in the latest Surface Laptop, it appears to be more a spec bump than an all-out-processing revolution. Given the deficit AMD chips have customarily had when compared to Intel-powered devices, the fact this new chip is charting above its predecessor shows the valley between Intel and AMD is shrinking.

Once again, it should be noted, Microsoft has not confirmed that it’s going to sell a Surface Laptop 4, any time soon, so please take the above speculations, and theories with a huge grain of salt and keep your fingers crossed for a 2022 release if you’re in the market for a new Microsoft laptop.

FIX: Video could not be decoded on Windows 10/11

It’s arguable whether Windows 10 is an upgrade over Windows 7/8.1, but we can all agree that the transition process wasn’t exactly the best.

A lot of users which switched from the older Windows iterations to Windows 10 had a hard time with video playback.

To be more precise, most of them weren’t able to play DVDs with the system built-in player. They only get prompted with the Video could not be decoded error in Windows 10.

This might be a grave problem, especially if you like your movies on physical copies in the well-known format. For that reason, we prepared some solutions which should come in handy.

In case you have issues with the aforementioned error, make sure to check them out.

What to do if the video could not be decoded on Windows 10?

  1. Install an industry-leading Adobe product
  2. Download a third-party codec pack
  3. Install an alternative player
  4. Update Windows

1. Install an industry-leading Adobe product

Perhaps you have had enough struggles for a short amount of time. Video editing should be exciting and fun and that’s precisely what you are getting from Adobe Premiere Pro.

Aren’t you sure that you need this video editing software tool? Firstly, that’s your chance to put an end to this error for good. Moreover, consider that it can serve all of your editing purposes at once.

You’re getting countless creative features, the app’s own export options along with the Adobe Media Encoder package, as well as integration with other services.

That being said, you should benefit from best-class video editing services and consider Adobe Premiere.

2. Download a third-party codec pack

  1. Download the K-Lite Codec Pack Standard version.
  2. Run the installer.
  3. Follow the instructions and skip on the complex customization. You don’t need it.windows 10 error video could not be decoded
  4. After the installation ends, restart your PC and try playing videos or movies again.

This is an obvious omission made by Microsoft when the transition from Windows 7/8.1 to Windows 10 was made.

Namely, don’t hold our word on this, but it seems that they skipped on older formats and codex, which renders the default video player completely unusable for certain video files.

Most reports state that the affected users are unable to play DVD’s, which mostly come in AVI format. These a bit of outdated formats just won’t run on the Movies & TV built-in player.

Now, this might be addressed in various ways, and the first way is to, in lack of pre-installed codecs, you download a third-party codec package. This should enable even the built-in player to run the nowadays scarce video formats.

There’s a lot of different codec packs, all of them free. We had the best time with the K-Lite Codec pack, which is fairly light in comparison to some other similar packs.

3. Install an alternative player

windows 10 error video could not be decoded

This is as apparent as it can be. If you’re not a purist and want to use exclusively system-provided apps for your multimedia dosage, the best you can do is give a try some other multimedia player.

And there’s a lot of those available for free. The first one which crosses our mind is the Master of utility, VLC media player.

There’s probably not a single video format that can’t be played with VLC. The interface is indeed obscure, but all in all, this is probably the best all-in-one video player you’ll ever find.

Some alternatives you can try out are BS Player, GOM Player, or KM Player. All free and, mostly, paired with adequate audio and video codecs.

This means that all of them should perform much better with video files, and you’ll most certainly avoid the above-mentioned error.

4. Update Windows

Finally, if you’re determined to use Windows resources for the DVD reproduction’s sake, but the error is omnipresent, the only remaining thing you can do is to update your system.

Some users reported that the error even speeded on the browser’s video streaming, but it was resolved by updating the system.

So, make sure that your system is up to date and maybe, and just maybe, the error will be gone. Furthermore, you can navigate to Store and update the Movies & TV app from there.

Changes are frequent and there’s a chance that there’s a resolution for the issue at hand.

That should do it. We hope that this was a helpful read and encourage you to share your experience in the comments section below.

President Biden wants to investigate semiconductor shortage affecting PS5 and Xbox Series X|S production

US President Joe Biden is willing to address the semiconductor shortage that has been affecting various industries since the beginning of the worldwide COVID-19 pandemic (via Reuters). AMD, the company that manufactures the SoCs found in the Xbox Series X|S and PlayStation 5 consoles, previously warned that chip shortages should continue until mid-2021, and NVIDIA is also struggling to manufacture its brand new NVIDIA RTX 3000 Series GPUs.

The US President has now signed an executive order to start a 100-day review of the semiconductor production pipeline. The executive order will cover four critical products: semiconductor chips, large-capacity batteries for electric vehicles, rare earth minerals and pharmaceuticals. “Make no mistake, we’re not simply planning to order up reports. We are planning to take actions to close gaps as we identify them,” an administration official said.

President Biden also said yesterday that he would be seeking $37 billion to fund legislation to boost chip manufacturing in the US. “I’m directing senior officials in my administration to work with industrial leaders to identify solutions to the semiconductor shortfall,” the US President said on Wednesday. “Congress has authorized a bill but they need … $37 billion to make sure that we have this capacity. I’ll push for that as well.”

According to the Semiconductor Industry Association, the current shortage is “a reminder of the essential role semiconductors play in so many critical areas of society, including transportation. This trend will only continue as demand for electronics and connectivity grows.” The U.S. semiconductor industry remains the worldwide leader with a 47% global market share, though only 12% of global manufacturing is actually done in the US.

Microsoft Teams meetings will now prioritize participants with video feeds

Microsoft announced today via the Microsoft 365 Admin Center that a recent update has enabled a new Video only Meeting stage experience in Teams. This new view automatically fills the meeting layout with video-only participants even if they aren’t active speakers. The company explained that this feature is now generally available in Microsoft Teams.

Previously in Teams, the meeting window used to show the video feeds of up to 9 participants on screen in a mixed grid view. It contained a mix of both audio-only and video-only participants. However, people who had turned off their video feed appeared as avatars, resulting in occupying a significant space on the screen.

Microsoft says that the new view has been optimized for video experience in Teams. This means that the app will now prioritize meeting participants who have turned on their video, and participants with audio will be shown under the videos. The change will only impact meetings with more than 9 participants.

The new experience will allow the app to utilize all the extra space to show more video participants on the screen, and it will eventually encourage more people to turn on their video feeds. On the flip side, this can also cause meeting fatigue during longer meetings with small breaks.

Here’s how to fix Abbyy Finereader activation failed error

Abbyy Finereader is a great tool, however, many users reported Abbyy Finereader activation failed error. Most commonly, this issue is caused by misconfigured antivirus and firewall software.

Therefore, the software can’t connect to the Abbyy servers. In this article, we will explore several methods to solve this issue in order for you to be able to use Abbyy Finereader again.

How to fix Abbyy Finereader’s activation failed error? First off, check your Internet connection, since Abbyy Finereader requires a stable Internet connection for activation.

In case there’s any problem with your connection, restart the router. If that doesn’t work, change Windows Firewall settings, and make sure that Abbyy Finereader is allowed to access the Internet.

How can I fix Abbyy Finereader activation failed error?

1. Make sure you are connected to the Internet

Even though this might sound like logical advice, a lot of the issues of this type that were reported by users were solved simply by restarting the router or re-connecting your Internet connection.

In order to restart your router, you will need to locate it in your house first. After you’ve done this, you need to press the Power button, wait for 30 seconds and turn the router back on again.

After the connection is established, check if the Abbyy Finereader activation failed error is still there.

internet icon taskbar Abbyy Finereader activation failed

To verify if your Internet connection is working on your PC, you can simply check the Network Connectivity icon found in the Taskbar, near the clock.

If the Internet connection icon found in the Taskbar has an exclamation sign next to it, it means that there are issues with your Internet connectivity.

To solve the issue, right-click on the Wi-Fi/Ethernet connection icon, and choose to Troubleshoot problems.

Windows will open a troubleshooting window that will take you through a step-by-step guide. Follow the on-screen instructions and then check to see if the problem is resolved.

2. Change the firewall settings

Change the settings for Windows Defender

  1. Rick-click on Start button > Settings.settings win + X menu Abbyy Finereader activation failed
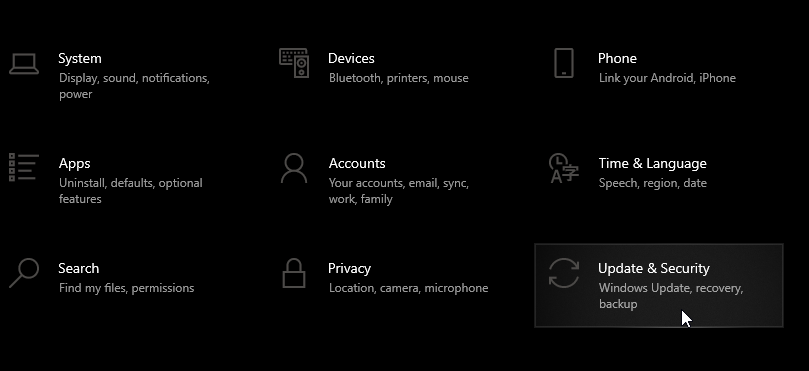
  2. Choose Update and Security.update & security Abbyy Finereader activation failed
  3. Choose Windows Security.windows security Abbyy Finereader can't activate
  4. Click on Firewall & network protection.
  5. In the Windows Defender Security settings window, click on Allow an app through firewall.allow an app through firewall Abbyy Finereader activation failed
  6. Click on Change Settings.change settings Abbyy Finereader activation failed
  7. Search for AbbyyFinereaderin the list, click on it, and check both boxes for Private and Public.

Note: If you can’t find Abbyy Finereader in the list above, choose the option Allow another app.., and then browse your PC for the executable file.

Change the settings in third-party antivirus software

Depending on which brand and version of antivirus you’re using, the activation process of Abby Finereader can be affected.

To eliminate the possibility of this causing the issue, you can simply right-click the antivirus icon found in your Taskbar, and stop the protection services for a small amount of time.

After you’ve done this, it is recommended that you try activating Abby Finereader again, and see if the problem is solved.

If you’re looking for a fast and reliable antivirus that won’t interfere with your system in any way, you might want to try out the following antivirus

⇒ Get TotalAV

3. Use an alternative third-party reader software

Every once in a while it happens to regret your decisions. Abbyy Finereader was your first OCR application choice, yet you may also try out Adobe Acrobat OCR.

Acrobat easily turns any of your scanned documents into editable PDFs. You just need to open the file for editing and Acrobat will instantly do its magic and run OCR in the background.

Using this document management software instead will make the difference and help you see, edit or convert official files just in minutes.

⇒ Get Adobe Acrobat Reader

In this article we explored two methods that can help you fix Abbyy Finereader activation failed error for good, so be sure to try them both.

Also, feel free to let us know if these methods helped you by using the comment section below.

FIX: Adobe scanner doesn’t support presets

A wide range of users has reported encountering issues when trying to use presets for scanning files with Acrobat DC and their scanner hardware.

In some cases, the program freezes on one screen while loading the preset. In other cases, it automatically goes back to the default option, after the preset has been selected.

This can be frustrating, as you can’t take advantage fully of the services offered by Adobe Acrobat. This problem can cause even more stress if you need to scan and process a large batch of files.

In this article, we will explore some of the best troubleshooting methods to try and solve this issue. Please follow the steps provided in this guide carefully in order to avoid causing any other issues.

What can I do if Adobe scanner does not support presets?

1. Make sure you run an up-to-date version

Before going through any troubleshooting steps, make sure that your issue isn’t caused by you having an outdated version of Adobe Acrobat Reader.

This is a common mistake, but it happens far too often to be ignored, so the best thing to try before attempting any fixes is to make sure that you are indeed updated.

More so, it is best if you uninstall the old version and perform a clean install of the latest Adobe Acrobat version.

2. Check if the scanner works properly in other software

In order to check if the issue is coming from your scanner hardware, try scanning your document using another application from your PC (like Microsoft Word).

If the issue persists, you will need to contact the manufacturer of the scanner device and ask them for help.

3. Install the latest driver version for your scanner

  1. Visit the scanner manufacturer website and download the latest driver.
  2. Navigate to Windows (or Winnt) folder on your PC.
  3. Delete all files that contain twain in their name (ex. twain_32.dll).
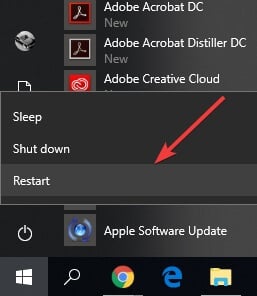
  4. Restart your PC.Windows restart button - Adobe scanner doesn't support presets
  5. Install the latest scanner driver version by following the on-screen instructions.

You can also automatically download the latest drivers for your scanner and other hardware by using third-party driver updater software.

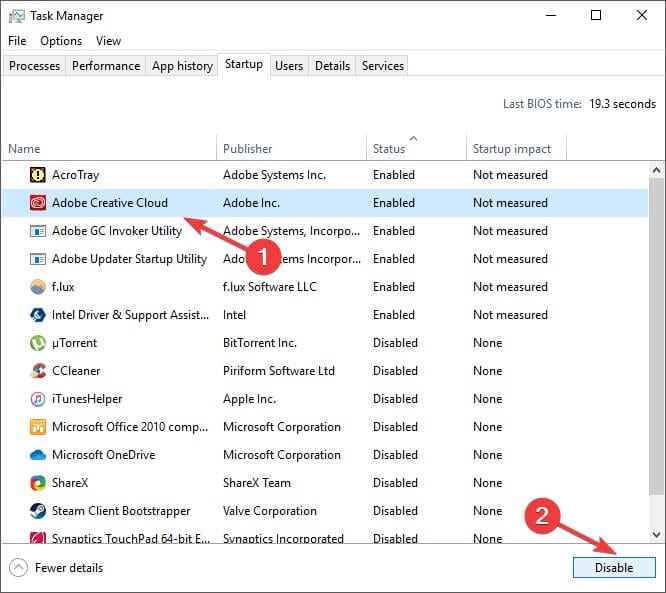
4. Restart your PC after disabling all startup items

  1. Close all running applications.
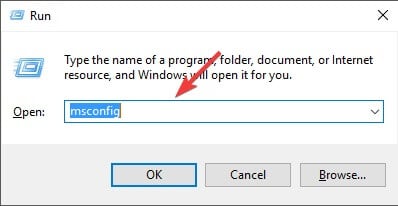
  2. Press Win + R keys on your keyboard and type msconfig, then press Enter.run window with msconfig command - adobe scanner doesn't support presets
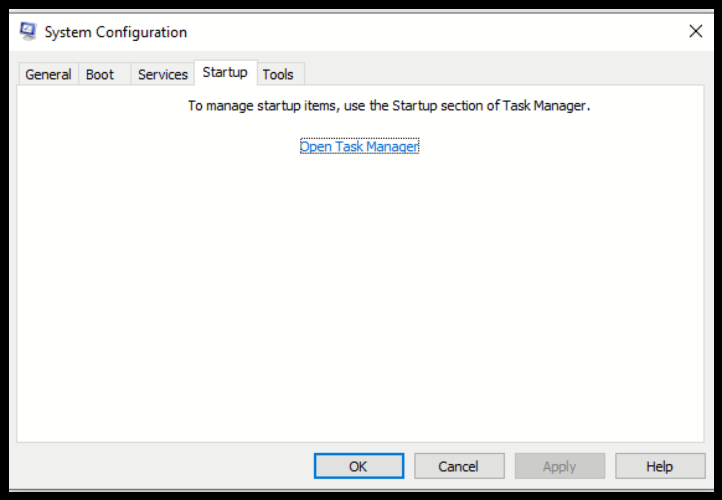
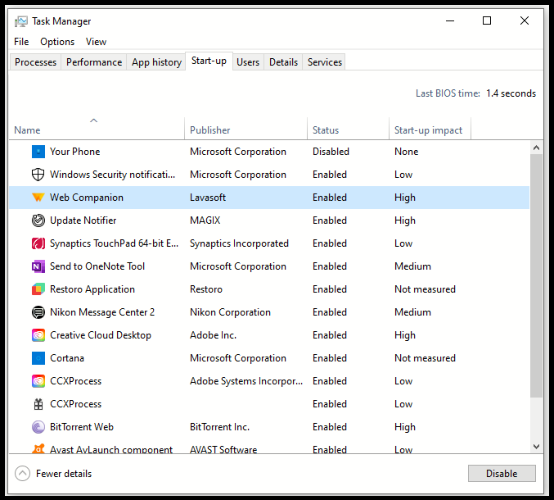
  3. Inside the newly opened window, select the Startup tab ->select Open Task Manager -> Disable all startup apps.Task manager disable button - Adobe scanner doesn't support presets
  4. Click Ok and restart Windows.
  5. Check to see if the issue persists.

Note: Follow the steps from method 3 and enable all start-up options to restore the Startup applications to normal mode.

In this article, we explored some of the best troubleshooting methods to try and solve the issue caused by Adobe presets not working properly in Adobe Acrobat.

Please feel free to let us know if this guide helped you solve your issue by using the comment section below.

FIX: Windows Voice Recorder couldn’t save this recording

Windows 10 comes with a handy built-in voice recorder app. It works fine most of the time.

However, some users have reported that the voice recorder deletes the recording and shows couldn’t save this recording error while recording the audio.

As soon as the user completes the recording, an error appears and the audio recording is deleted:

We couldn’t save this recording. It looks like the autosaved file was deleted before you finished recording it

If you are facing these errors, or the Windows voice recorder crashes, here is a guide explaining how to fix it on your computer.


What can I do if Voice Recorder app won’t save recordings?

1. Use a third-party audio recorder

While Windows 10 is indeed great for having so many built-in apps, we have to admit that they aren’t as good as the real deal.

Thus, if audio recordings are important for you, you’d be better off using third-party software for the job.

For example, a very good audio-recording tool that you can try is Adobe Audition, which is pretty much an audiophile’s dream come true.

Not only does it let you record your own sounds and music, but the extensive tools that it has will allow you to edit the recordings in whatever direction you see fit.

Adobe Audition

Adobe Audition

Use one of the best software available for audio recording that can be also used to edit your audio.
Free trialVisit website

2. Run the Recording Audio troubleshooter

  1. Click on Start and select Settings.
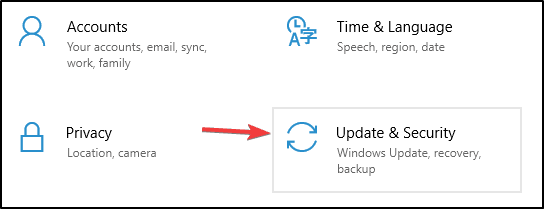
  2. In the Settings window, click on Update and Security.
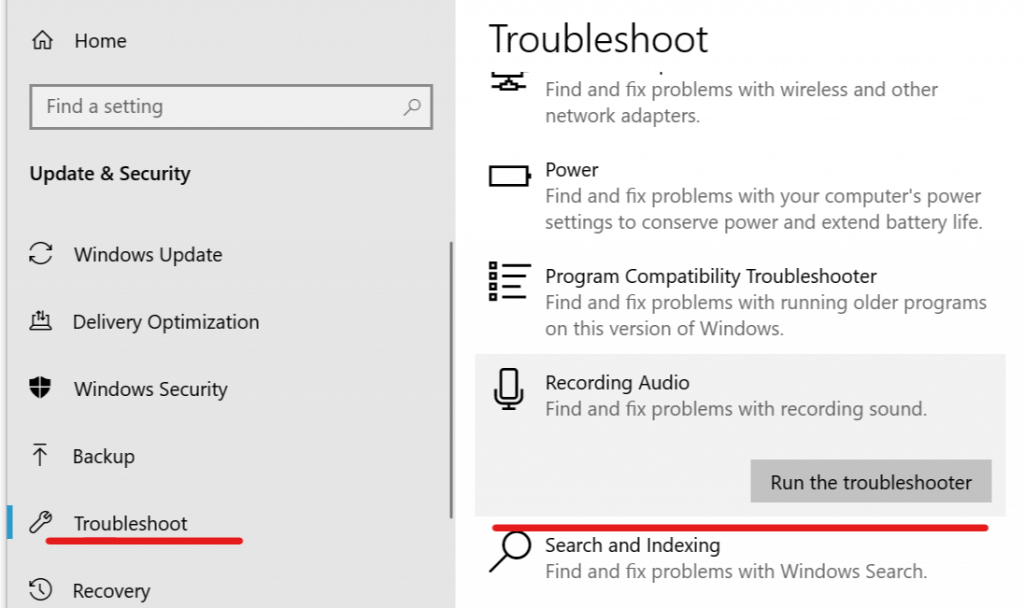
  3. From the left pane click on Troubleshoot.
    Troubleshoot - Recording Audio
  4. Under Find and fix other problems section, look for Recording Audio.
  5. Click on Recording Audio and select Run the Troubleshooter.
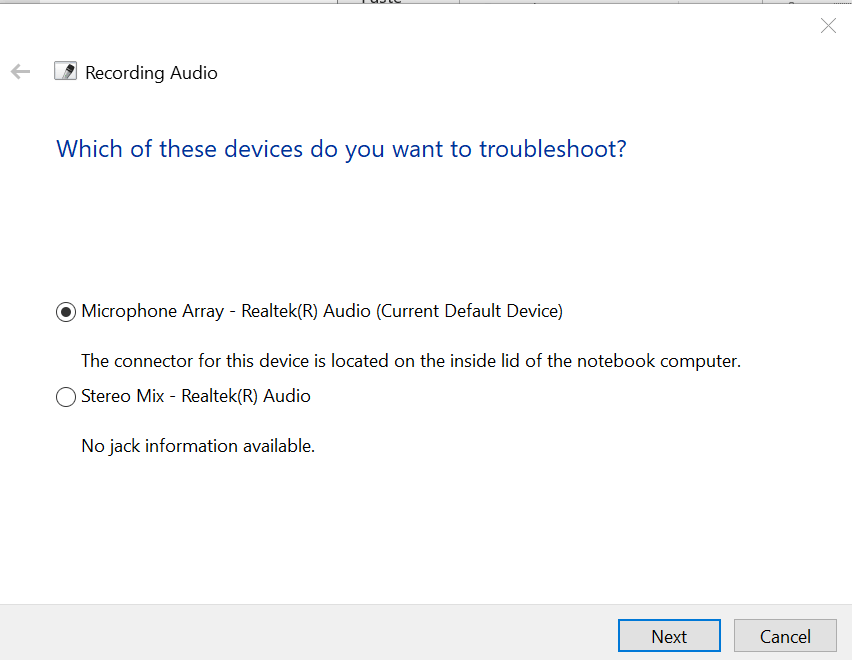
  6. The Troubleshooter will scan the PC for the problem and ask you to choose an audio device to troubleshoot.
  7. Select your default microphone and click on Next.Troubleshoot - Recording Audio - select Microphone
  8. The troubleshooter will run the scan and again and suggest some fixes if found any. Apply the fix to see if that resolves the error.
  9. Close the troubleshooter and check for any improvements.

Windows OS comes with a built-in troubleshooter for recording and audio. Run the troubleshooter to scan and fix any audio recording-related errors automatically.


3. Update the audio drivers

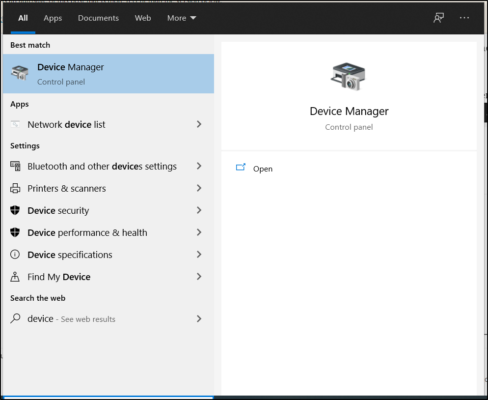
  1. Type Device in the Cortana/Search bar and open Device Manager.
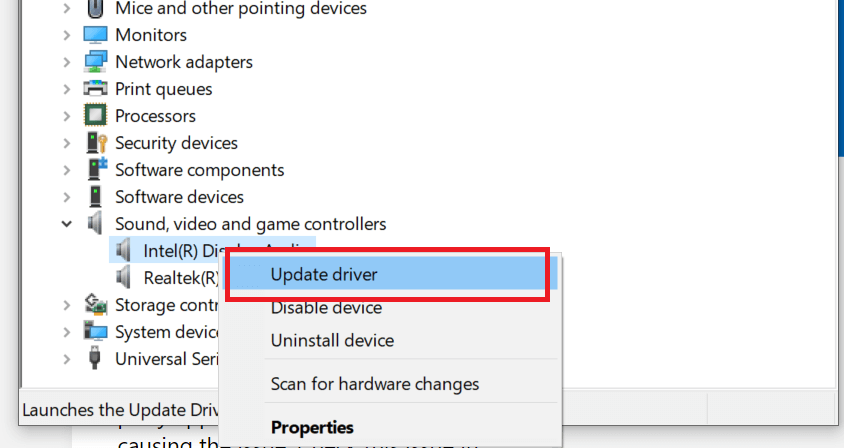
  2. From the Device Manager, click and expand Sound, video and game controllers.
    Audio Recording - Update Intel Audio Driver
  3. Right-click on Intel Display Audio and select Update Driver.
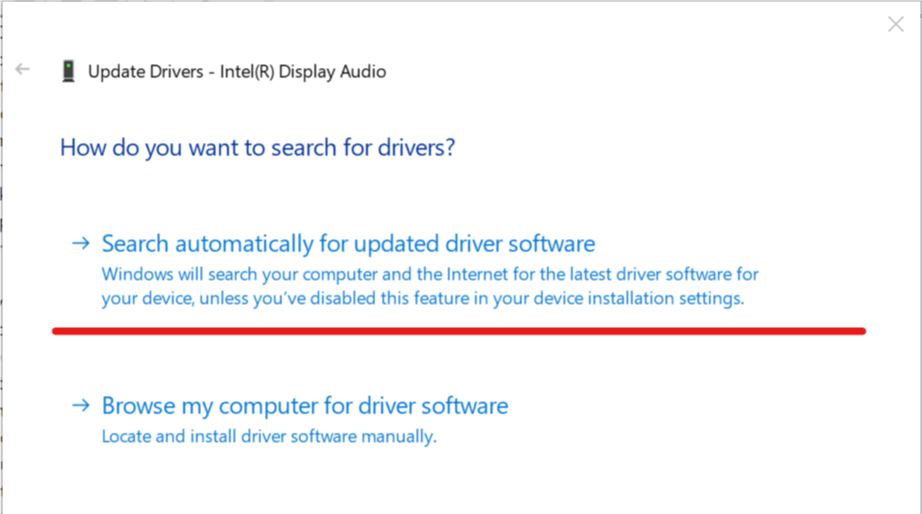
  4. Select Search Automatically for Update Driver software option.
  5. Windows will now look for any pending updates, download and install it.
  6. Next, right-click on Realtek Audio and select Update Driver.
    Update driver Intel Audio - Search Automatically
  7. Select Search Automatically for Update Driver software option.
    • Wait for Windows to download and install the updates.
  8. Repeat the steps if there are more audio devices installed.
  9. Restart the PC and check for any improvements.

Microsoft supplies generic, as well as vendor-supplied drivers through Windows updates. The audio device might malfunction if the drivers are outdated.


4. Perform a Clean Boot

  1. Press Windows Key + R to open the Run dialog box.
  2. Type msconfig and hit enter to open System Configuration.
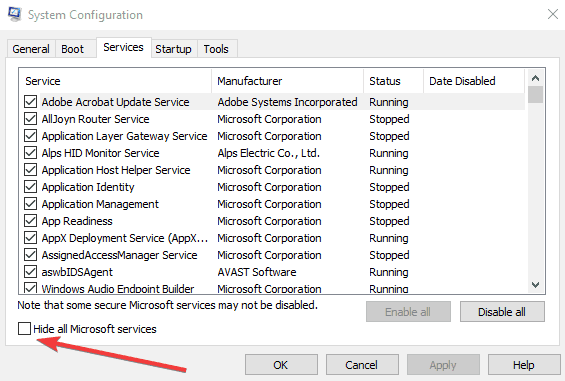
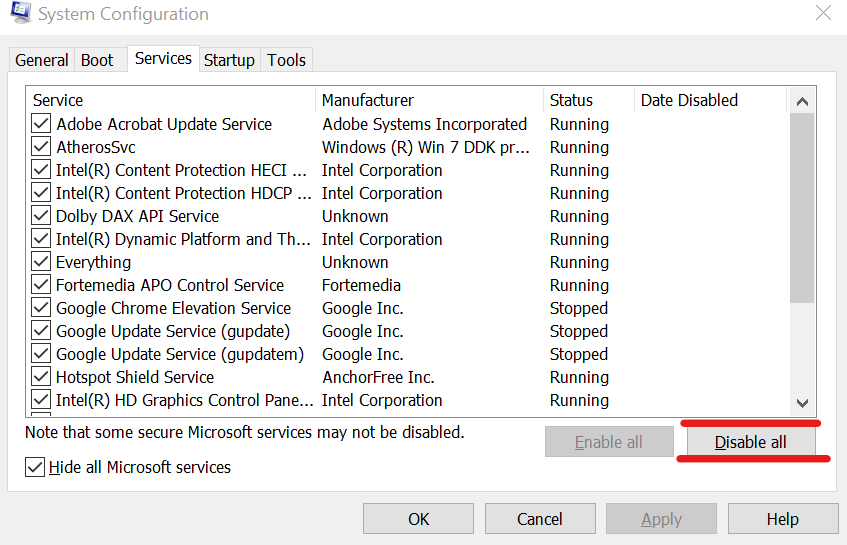
  3. In the System Configuration window, click on Services tab.
    hide all microsoft services
  4. Under the Services tab, click on Hide all Microsoft services box.
    • This will hide all the core Microsoft services.
  5. Once all the Microsoft services are hidden, click on Disable all button.
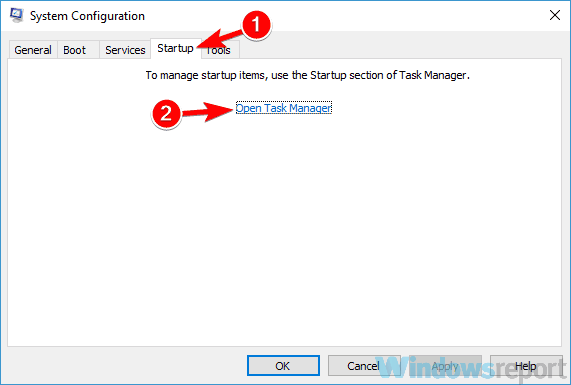
  6. Go to the Startup tab and click Open Task Manager.
    open task manager slow windows 10
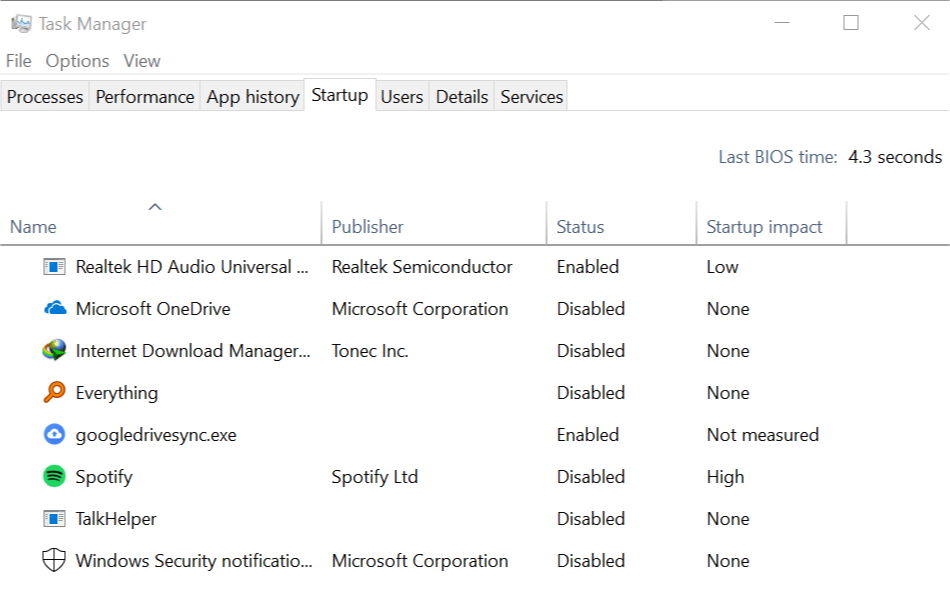
  7. Open the Startup tab.
    Disable All Startup apps
  8. Select each startup item and click on Disable.
    • Close the Task Manager after disabling all the startup items.
  9. In the System Configuration window click OK and close the window.
  10. Restart your system and try to re-record the audio.
    • If the recording saves successfully, you may have third-party software installed on your PC that is creating the conflict.

Rebooting your computer in Clean Boot state allows you to determine if the problem is caused by third-party software.

In the Clean Boot state, you disable all the third-party services and restart the PC with only core Microsoft services running. 

Try to uninstall any of the recently installed software that may be causing the error. Makes sure that you enable all the disabled services again from System Configuration > Services > Enable all.


4. Perform System Restore using Restore Point

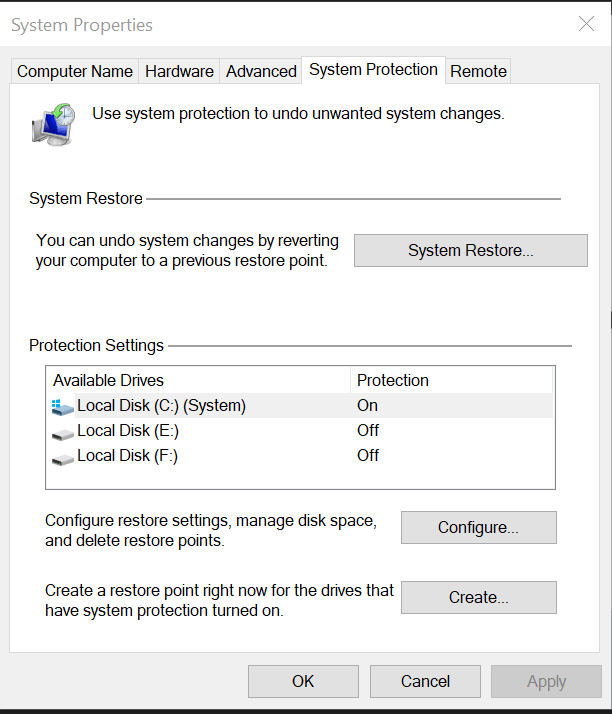
  1. In the Cortana/Search bar type Restore.
    • Click on Create a Restore Point option.
      System Restore - System Properties
  2. Click on System Restore button in System Protection tab.
    System Restore - Choose a different REstore Point
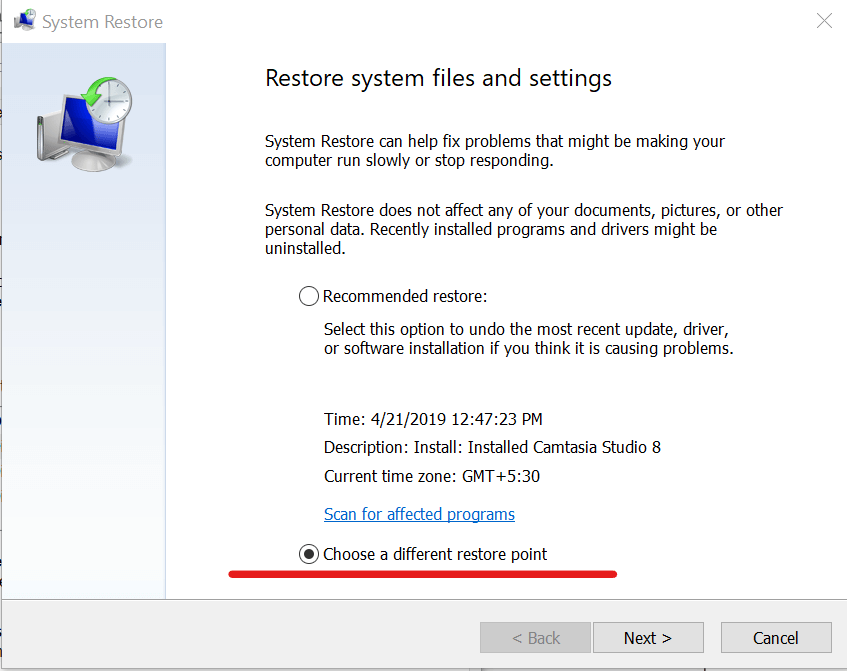
  3. In the System Restore window click on Choose a different restore point and click Next.
    show more restore points
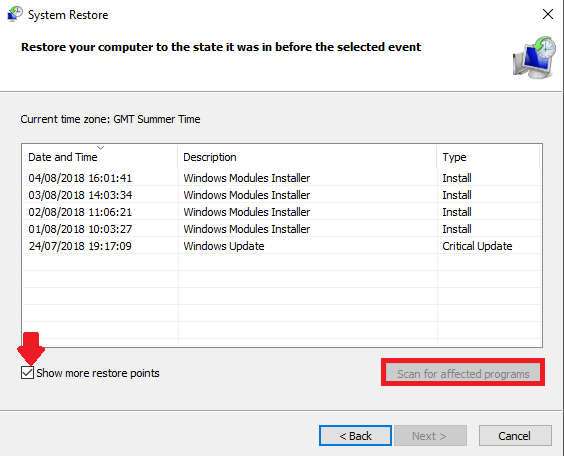
  4. Check the Show more restore points box at the bottom.
  5. Select any one of the Restore Point and click Next.
  6. Click on Finish button to begin the system restore process.
    • System Restore will restart your computer to apply the changes.

Note: System Restore does not delete any data on your computer during the restore process. However, any program installed after Restore Point date will be uninstalled.

Windows OS  when enabled creates Restore Points whenever the user makes major changes to the system like installing a new app or updating the OS.

Using the Restore Point, you can restore your system to an earlier point when it was working without any errors.  


[Full Fix] HTTP_driver_corrupted error on Windows OS

There are myriad BSOD (Blue Screen of Death) issues that can arise on Windows platforms.

The HTTP_driver_corrupted error, which has a 0x000000FA bug check code, is among the BSOD issues some users need to fix.

When that BSOD error arises, users have to restart Windows.

How can I fix a recurring HTTP_driver_corrupted error?

1. Update drivers using a dedicated tool

Outbyte Driver Updater is a third-party system maintenance utility that can feasibly resolve the HTTP_driver_corrupted error and other BSOD issues.

The Outbyte Driver Updater driver updater software will quickly scan your PC and identify any outdated, corrupted, or incompatible drivers on it.

Outbyte Driver Updater Pro users can quickly download and install new drivers for ones that need updating or replacing.

This software will automatically install drivers when users select its Automatically Install option. Although users can manually update drivers, it’s much quicker to utilize Outbyte Driver Updater Pro.

Plus, the tool has a very small footprint and you can let it run in the background and keep your drivers in check at all times. You won’t have to worry about manually checking or updating them in the future.

Outbyte Driver Updater is easy to use. Just let it scan your PC and approve all new driver installs/repairs. Once the process is completed, reboot your PC and see if the issue persists.

⇒ Get Outbyte Driver Updater

2. Uninstall faulty drivers with Device Manager

  1. Right-click the Start menu button and select the Device Manager option.
  2. Have a look through the listed devices to see if there are any with yellow exclamation marks beside them.
  3. Right-click a device with a yellow exclamation mark and select Uninstall device.Device Manager http driver corrupted
  4. Then click Uninstall to provide further confirmation.
  5. Uninstall all devices with yellow exclamation marks, and then restart Windows.

3. Roll Windows back to a restore point

  1. Press the Win + X keyboard shortcut, and click Run on the menu that appears.
  2. To open the System Restore window, input this Run command and click OK: rstrui
  3. Click the Choose a different restore point radio button if System Restore recommends a restore point.
  4. Press the Next button to open a restore point list.
    System Restore http driver corrupted
  5. If the System Restore list doesn’t display a full list of available restore points, select the Show more restore points checkbox.
  6. Select a date that will restore Windows to a time that predates the HTTP_driver_corrupted error on your desktop or laptop.
  7. Click Next to continue.
  8. Then select the Finish option to start the system rollback.

Note: System restore points delete software installed after their dates. You can check what software gets uninstalled for a chosen restore point by clicking Scan for affected programs in System Restore.

4. Uninstall recent Windows patch updates

  1. Press the Windows + I keyboard shortcut for Settings.
  2. Select Update & Security to open the Settings tab shown directly below.
    Window Update http driver corrupted
  3. Click the View update history option to open a list of installed patch updates.
  4. Then click the Uninstall updates option to open the Control Panel window in the snapshot directly below.
    The Installed Updates applet http driver corrupted
  5. Right-click the most recently installed patch update and select the Uninstall option. If there are multiple patches with the same date, uninstall all the most recently installed ones.

Note: You can stop the uninstalled Windows update patches from reinstalling with the Show or Hide Updates Troubleshooter. Alternatively, you can disable automatic updates as outlined within our Disable Windows 10 automatic updates guide.

5. Reset Windows

  1. To open the search utility, press the Windows + S hotkey.
  2. Type the keyword recovery in the search box.
  3. Click Recovery options to open Settingsas in the snapshot directly below.The Recovery tab http driver corrupted
  4. Press the Get started button to open the Reset this PC utility.
    Reset this PC utility http driver corrupted
  5. Select the Keep my files option.
  6. Select the Next option, and then click Reset to restart Windows.

There’s a pretty good chance the resolutions above will fix the HTTP_driver_corrupted issue.

If you still need more potential fixes, check out Microsoft’s Troubleshoot blue screen errors troubleshooter page. Answering the troubleshooting questions on that page might also help you fix the error.

How to Create Your Own Fonts for Free

Fonts are a great way of expressing yourself through text, as the different graphics styles can emphasize the message that you are trying to transmit.

However, we can’t always find the fonts that we like, so sometimes we may think of making them for ourselves. With that thought in mind, here are some ways you can create your own fonts for free.

How do I create my own fonts for free?

1. Use Adobe Fonts

If you’re not the artistic type, or if time is simply not one of your strong points, then maybe you would prefer you have access to an almost unlimited supply of fonts that are already created from head to toe.

That being said, a service like Adobe Fonts will come in handy, as it is an online service that offers a subscription library of high-quality fonts.

The service is extremely efficient in that it delivers the fonts in an extremely simple manner:

  • You can use them directly on websites
  • You can sync them via Adobe Creative Cloud to applications on the subscriber’s computers

Fortunately enough, this service is usually available as a subscription-based service, but you can now test it for free for 7 days, and download all the fonts that you want.

⇒ Try Now Adobe Fonts

2. Use Microsoft’s Font Maker app

Microsoft has updated its new Font Maker app for Windows 10 users, which is available for free in the Microsoft Store. You can download and use the app for free on any Windows 10 PCs.

The Font Maker App from Microsoft is a basic tool that comes with many options, allowing users create their own font. The great thing about it is that they can install that font on their device and use it for everything.

Another important thing with the app is that it supports pens, meaning that users can use the Surface Pen to create a special font and then use it in Windows 10.

The app doesn’t have many requirements, but it does ask for a few things. For example, it will only work on Windows 10 PCs and tablets that can support Integrated Touch.

If you’re not sure if your device has the Integrated Touch feature, you can download the app and see if it works. The app has an approximate size of 15.59 MB, according to the information in the Microsoft Store.

Microsoft has brought some features related to pen options in the previous updates, so the Font Maker app should get some more improvements in the following months.

⇒ Download Microsoft Font Maker

By following these steps, you should be able to create, or at least gain access to a wide variety of font styles. And if you’re looking to add more cheer, check out our recommended Christmas fonts for the season. Make sure to give us any feedback regarding the subject in the comment section below.

How to Transfer Windows 7 Files to Windows 10

Upgrading to Windows 10 from Windows 7 or Windows 8.1 is easy. Simply download the ISO, create a bootable drive and upgrade to the best OS yet.

However, what’s not so easy is to transfer Windows 7 files to a Windows 10 PC, especially if you have a brand new Windows 10 system.

Windows 10 had the Easy Transfer functionality in the earlier version which made it easy to transfer files from Windows 7 to Windows 10.

Sadly, the option is not included in the latest versions of Windows OS. But worry not, there is a way out.

In this article, we will show you exactly how to transfer data from Windows 7 to Windows 10.

How to transfer Windows 7 files to Windows 10?

1. Use FastMove

FastMove not only can transfer files easily between Windows 7 to Windows 10 but it can also migrate them from a 32-bit system to a 64-bit system just like that.

And the process is extremely simple and straightforward. Just connect the two PCs to the same network, select the files that you want to transfer, and let FastMove perform the magic move.

Anybody can move files with a USB stick but this solution can also move programs from one computer to another so you can forget about redownloading and reinstalling them on your new device.

In fact, it will do the same with the user accounts and settings and even your device drivers, passwords, desktop settings, and more. With FastMove, transferring any data from one PC to another becomes a breeze.

Let’s see what are the best features of FastMove:

  • Easy-to-use interface and usage
  • Lossless transfer for any files and even drivers and settings
  • Can move files between different versions of OS
  • Can move programs from one PC to another
  • Perform all the actions in one quick move

FastMove

Forget about external drives and Flash drives because FastMove will move any files in a quick action.
Check price Visit Website

2. Use Laplink PCmover Professional

Microsoft has partnered with Laplink, and they brought you a powerful tool called PCmover that can easily help you move your files without omitting your apps and settings.

Let’s quickly go through PCmover Professional’s key features:

  • All features from the Express version
  • Ability to transfer hard drive contents from old PC
  • Support for In-Place Windows upgrade
  • Ability to restore old PC image to a new operating system
  • Can transfer selected applications

PCmover Professional

Transfer all your precious assets – files, settings, and apps – in one go with this exceptional software.
Check price Visit Website

3. Use Easy Transfer

 3.1. Copy Migwiz folder

  1. On your Windows 7 machine, insert a USB drive.
    Transfer Files from Windows 7 to Windows 10
  2. Open the File Explorer and navigate to the following location:
    C:WindowsSystem32
  3. Find the migwiz folder and copy it to the connected USB flash drive. You can also upload it to your cloud drive account, and download it later on.
  4. Disconnect the USB flash drive.

 3.2. Run Easy Transfer on an Old Computer

  1. On your Windows 7 computer, launch Windows Easy Transfer.
  2. Search for Windows Easy Transfer in the search bar and open it.
    Transfer Files from Windows 7 to Windows 10
  3. The Window Easy Transfer Welcome window will show all the data that will be transferred to your new system.
  4. Click the Next button.
  5. Select A Network option for What do you want to use to transfer items to your new computer?. This option will transfer data between the new and old PC via the network.
  6. However, if you are upgrading your Windows 7 PC to Windows 10, select An external hard disk or USB Flash drive option and follow the on-screen instructions.
    Transfer Files from Windows 7 to Windows 10
  7. Click on the This is my old computer option.
  8. In the next window, you will see a Windows Easy Transfer key. Note down the key and keep it somewhere safe, you will need it on your new computer.

3.3. Run Easy Transfer on the new computer

  1. Now on your new Windows 10 computer, insert the USB disk on which the migwiz folder was moved.
  2. Move the Migwiz folder to your computer’s hard disk.
  3. Open the Migwiz folder and double-click on Migwiz.exe.
  4. Click Next and then select This is my new PC.
  5. Select My old computer is running Windows 7.Transfer Files from Windows 7 to Windows 10
  6. Click Next.
    Transfer Files from Windows 7 to Windows 10
  7. Now it will ask you to enter the Windows Easy Transfer Key.
  8. Enter the key and click Next.
  9. Make sure both systems are connected to the same network before you begin the transfer.
  10. The system will scan your Windows 7 system for files. If you want, you can customize which data to transfer and which data to exclude.
  11. Click on the Transfer button to begin the process.
  12. This may take a few minutes to hours depending on the size of the data.

4. Use the Backup and Restore feature

4.1. Backup your files

  1. Open Control Panel.
  2. Navigate to System and Security and select Backup and Restore.
  3. Now select Set up backup.
    setup backup transfer files windows 7 to windows 10
  4. Connect your external storage device and choose Refresh.
  5. In back Backup Destination, choose your storage device and then choose Next.
    set up backup copy files from windwos 7 to windows 10
  6. Select Let me choose and click Next.
  7. Navigate to the Computer section and select the folders you want to back up (Bear in mind that all files in Documents, Music, Pictures, and Videos will be backed up automatically).
  8. Uncheck Include a system image of drives checkbox and click Next.
  9. Choose the Change schedule.
  10. Disable Run backup on a schedule checkbox and click OK.
  11. Now click on Save settings and run backup.
  12. Once the backup is complete, remove the external storage drive.

4.2. Restore the files

  1. Connect the external storage drive that you used in the previous section on a Windows 10 PC.
  2. Now go to the Settings app > Update & security.
  3. Select Backup from the menu on the left. Now choose Go to Backup and Restore (Windows 7).
    go to backup and restore transfer files windows 7 to windows 10
  4. Choose Select another backup to restore files from.
    select another backup how to transfer files from windwos 7 to windows 10
  5. Select the backup that you created on Windows 7 and click Next.
  6. Now choose Select all files from this backup and click Next.
  7. The files will now be backed up to their original location. If you want to change that, you can select In the following location option and set the location manually.
  8. Click Restore to start the restoration process.

In order to use the Backup and Restore feature, you need to have an external storage device ready.

5. Use OneDrive

sending large files in outlook with one drive
  1. Download and install OneDrive on Windows 7.
  2. Start the application and login with your Microsoft account. Use the same account that you use on Windows 10.
  3. Once the OneDrive opens, go to the Backup tab and click Manage backup.
  4. Select the folders that you want to back up and click on Start Backup. If a certain folder isn’t available, simply select it from the File Explorer and drag and drop it to the OneDrive window.
  5. The folders will be uploaded to the cloud automatically. Bear in mind that this process can take a while, depending on the size of your files and your upload speed.

Now switch to your Windows 10 PC, sign in to OneDrive with the same Microsoft account and your files should be there. Just copy them to your PC, and that’s it.

If you have a fast network connection and you don’t want to deal with external storage, OneDrive might be the most streamlined way to transfer files from Windows 7 to Windows 10.

Note: Although this method is pretty simple, it can be slow, especially if you’re using a connection with a slow upload speed.

In addition, OneDrive is limited to 5GB, so if you have more data, you’ll need to transfer it in batches or purchase additional space for OneDrive.

That should do it – feel free to try any solution mentioned here and let us know the outcome.

Should you happen to know about other methods to transfer data from Windows 7 to Windows 10, feel free to share your expertise with us via the comments section below.

FIX: Fresh Paint app keeps crashing in Windows 10

Have you recently upgraded to Windows 10 and your Fresh Paint application keeps crashing in the middle of your work?

Well, you don’t need to be alarmed because there are some tips you can use to fix your Fresh Paint app if it keeps crashing in Windows 10.

Upgrading to Windows 10 always has a strong impact on your Fresh Paint application. Once you’ve hit the Update button, you either need to upgrade your graphics driver or update the Fresh Paint app.

You need to transform yet another ordinary image into a painting full of realism. Time is of the essence and it’s only natural to get frustrated when the Fresh Paint app keeps crashing.

In this tutorial, you will learn how to do both and fix your issue on Windows 10 for good.

How can I fix Fresh Paint crashes on Windows 10?

  1. Reinstall Display adapter drivers
  2. Reinstall the Fresh Pain app
  3. Run the Microsoft Store troubleshooter
  4. Update your OS

1. Reinstall Display adapter drivers

  1. Click on Search on your taskbar.
  2. In the Search box write Device manager then press Enter.
  3. If prompt by a user account controls window you will need to left-click on the Yes button.
  4. You will need to select the Display adapter feature on the left side of the screen.
  5. Right-click on the name of your display adapter and click on Uninstall.reinstall display drivers windows 10
  6. Then press Ok on the window that pops up.
  7. Now after the uninstall process is finished you will need to restart your computer.
  8. After the restart, it should install the latest driver automatically.
  9. Check and see if your Fresh Paint application is still crashing after using this solution.

Note: If your PC doesn’t install the driver you need to go on the manufacturer’s website and download the latest version from there that is compatible with your Windows 10 device.

2. Reinstall the Fresh Pain app

  1. Go to Control Panel.
  2. Select Uninstall a program.
  3. Then select Fresh Paint.
  4. Right-click on it and press uninstall.
  5. Reboot your PC.
  6. Install the same Fresh Paint application.
  7. Reboot your computer again.
  8. Check and see if your Fresh Paint application still crashes.

3. Run the Microsoft Store troubleshooter

  1. Go to Settings.
  2. Then go to Update & Security.

  3. Lastly, go to Troubleshoot.
  4. Scroll down to locate the troubleshooter.
  5. Select it then let it run its course.

Windows 10 features a very useful app troubleshooter that helps you to quickly fix the app that you downloaded from the Store.

4. Update your OS

  1. Go to Settings.
  2. Then go to Update & Security.
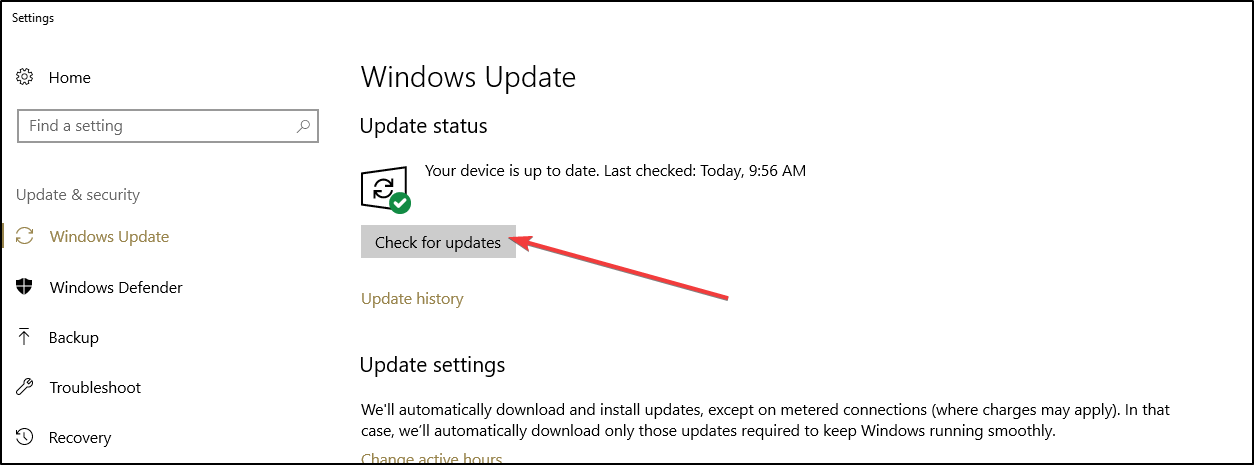
  3. Click on Windows Update.
  4. Let windows check for updates.
  5. Update to the newest available version if there is one.

If you want to make sure your apps and programs run smoothly on your computer, make sure to install the latest OS updates. Microsoft rolls out new OS updates at least twice a month in order to fix the bugs reported by users.

We hope that the solutions listed above helped you fixed your  Fresh Paint app issues on Windows 10.

If you have any questions regarding this post, let us know in the comments below and we will try to find additional solutions for you.

Fix tinted screenshots on Windows 10/11 with these methods

Sometimes, Windows 10 users may report that their screenshot has an orange tint to them, regardless of the screen capturing method they are using.

Some reported that the screen turns red when they try to capture a screenshot. They also claimed that they tried using different snipping tools, and the regular PrtSc button, but the issue persisted.

In this article, we’re going to analyze what solution you can resort to when the F.lux screenshots are tinted.

How can I fix tinted screenshot issues in Windows 10?

1. Use Acrobat Reader DC

Acrobat Reader DC is a popular document management system with lots of powerful features appreciated by users all over the world.

Chances are you’ve heard of its ability to export to other formats, render text into speech, sign PDFs, and track responses in real-time.

However, not many users know about the Snapshot tool. This basically copies an area as an image and you may easily paste into other applications.

Simply select Edit then click Take a Snapshot, and then drag a rectangle around the area you intend to copy. Up next, feel free to release the mouse button and exit Snapshot mode.

While in another application at your choice, simply paste the copied image. No tinted screenshots will ever bother you again.

Acrobat Reader DC

Acrobat Reader DC

Don’t miss out on the best PDF reader that comes with a myriad of advanced features!

2. Troubleshoot your display driver

  1. Press Windows Key + X.
  2. Click Device Manager.
  3. Expand Display Adapter.

From here on out, you can choose to right-click on one of the two options listed below:

2.1. Rollback the driver

  1. Click Properties.
  2. Navigate to Driver tab.
  3. Click the rollback option if available.


2.2. Update driver from manufacturer’s website

  1. Go to the website of the driver’s manufacturer or computer’s manufacturer.
  2. Download the latest available drivers for your graphics card.
  3. Uninstall your old driver and install the new one.
Uninstall video driver

You will need to restart your computer after the above steps. This troubleshooting process may solve the problem with the snipping tool displaying a yellow tint.

3. Adjust F.lux or any similar apps when taking screenshots

  1. Press Start.
  2. Type in Power & sleep Settings.
  3. Right under Related Settings select Additional Power settings.
  4. Select Choose what the Power buttons do.
  5. Choose Change settings that are currently unavailable.
  6. Uncheck  the Turn on faster Startup box.Adjust screen settings for tinted screenshots
  7. Click Save Changes.
  8. Restart your computer.

If these changes don’t fix the issue, you should consider turning f.lux off altogether when taking screenshots, and turning it back on after you are done.

Certain previous updates seem to have generated some issues with F.lux v4.104 running in the background, that’s why is so important to keep your apps and system up to date.

This problem leads to tinted screenshots regardless of the means of taking the screenshot, even when using third-party screen recording tools.

In this article, we analyzed the most efficient methods that you can apply when the Flux screenshots are tinted.

While using Acrobat Reader can be a great way to solve the problem you can also go for manual troubleshooting, and if you follow our steps you’ll fix the issue in no time.

Are things any better now? Let us know your opinion in the comments section below.


Best File Encryption Software For Windows 10 [2026 Guide]

If you are searching for software to encrypt your files, you’ve come to the right place. In this guide, you will find useful information about products that encrypt files, not a full drive tool like Microsoft’s Bitlocker.

Full disk encryption is an efficient data protection feature, but it is not helpful when you wish to share encrypted documents.

When you encrypt your confidential files, they become unreachable to various users of your computer or even hackers. Let’s see what file encryption tools you can install on your PC.

Best free file encryption tools you can use on Windows 10

WinZip – Bank-level encryption methods

encrypt password protect winzip

WinZip is probably not the first software you may be thinking of when you talk about file encryption, but it has evolved throughout the years to the point where we consider it to deserve the top spot on this list.

Starting off as a typical WinRAR-like file compressor, WinZip has become one of the most reliable tools when it comes to keeping data stored privately, and in a way that doesn’t take up too much storage space.

It features bank-level encryption methods, so all of your archives will not only be easier to send but also protected from outside view.

Speaking of sending, WinZip features built-in integrations that make it an excellent choice to use alongside cloud services like OneDrive or Google Drive, and it has integrated sharing options with social media platforms.

Other key features of Winzip:

  • Safe share
  • Automatically detect duplicate files
  • Secure Backup

WinZip

Compress your files and encrypt them using the highest security standards.
Free trial Visit Website

Easy File Shredder – Powerful performance

If you fear that your data will end up in the wrong hand, another way of keeping it safe besides encryption is making sure that you delete all traces of it from all locations.

That’s precisely why we recommend that you use a tool like Easy File Shredder, since it will make quick work of any file on your PC, and not even a professional data recovery tool will be able to bring it back.

Besides just deleting the data itself, the program also overwrites all traces of it with random data patterns, making leftover data even harder to recognize.

If you’re looking to create a clean slate, then know that Easy File Shredder can also format entire hard drives, so make sure you use it to its full potential.

The methods through which Easy File Shredder gets rid of all data on your PC are Bruce Schneier’s Algorithm, German VSITR, ITSG2006, Random algorithm, and more.

Other key features of Easy File Shredder:

  • Securely shred confidential files
  • Clean-wipe hard drive space
  • Remove all traces of already deleted files

Easy File Shredder

Easy File Shredder will delete any data from your PC, and make it impossible to recover as well!
Check price Visit Website

DoGoodSoft Best Encryption Expert – Strongest encryption algorithm

DoGoodSoft Best Encryption Expert is a powerful software that adopts the strongest and most advanced encryption algorithm to offer you the highest security.

With this app, you can encrypt your files and folders that ultimately cannot be decrypted or opened without the correct password.

After you finish using the specific file, you don’t have to worry about its possible leakage because it will be re-encrypted automatically.

Furthermore, besides password-protecting and hiding your folders, you can disguise them as well which means the original content won’t be shown and will appear like a disguised object.

Best Encryption Expert can help you shred all the unwanted files from your computer so that it can’t be recovered by common data recovery software.

Other key features of Best Encryption Expert:

  • Protect Local Disk and USB storage device
  • Enhanced security
  • Improved cryptographic infrastructure

DoGoodSoft Best Encryption Expert

Get the strongest encryption algorithm and protect your files, folders, and more.
Free Trial Visit Website

Gilisoft File Lock Pro – Invisible mode

GiliSoft File Lock Pro is a Military Grade Encryption Tool for your confidential files. It is available in 7 languages.

This tool uses different data protection levels. The main functions are hiding data, read and write locking, and encryption.

This applies to your files, folders, and drives from the local disk or external USB drives. Those files can become completely invisible to anyone or any program even in Windows Safe Mode.

You can hide the program itself in Invisible Mode. This software also secures your folders shared on a network, but the free trial version can be applied just to files.  It features an appealing interface.

You can encrypt a file by right-clicking on it, or just drag-and-drop it into the program’s window.

Actually, you can select multiple files at once. But this isn’t an option for multiple folders, and some users consider that an issue.

When you start installing the software, you can set up the main password. Also, you can provide an email address, which will help you retrieve your keyword.

Every time you attempt to access or modify a protected file, you must enter the password. And if someone enters a repeatedly false password, Gilisoft File Lock Pro will send you notifications.

Other key features of Gilisoft File Lock Pro:

  • Portable encryption
  • Folder/disk monitoring
  • Self-protection mode

Gilisoft File Lock Pro

Add a powerful layer of security and control your files better.
Free Trial Visit Website

File Lock Lite – File modifications monitoring

File Lock Lite is one of the best-rated encryption software because it is secure and easy to use. It has more than 54 million downloads and counting.

This program protects your files, folders and drives, USBs and CD drives, email attachments, pictures, and documents with a simple drag-and-drop.

The File Lock encrypted files are hidden and secured from kids, friends, other users of your computer, viruses, and hackers. Also, it helps you set up virtual encrypted wallets, where you can save confidential banking details.

All these encrypted files cannot be lost because File Locker back up data to a secured cloud. You can always simply recover your files from your online account. This requires users to make an account.

The price of this software is a bit higher than other similar programs, but it features a lot of applications including Stealth Mode, Hacker Attempt Monitoring, Shred files, AutoLock, Auto Shutdown PC, Lock your PC, and Erases PC tracks.

File Lock includes a virtual keyboard and password strength meter, which helps you create strong passwords for your encrypted files. Furthermore, it allows you to recover your password, in case you forget it.

Other key features of Gilisoft File Lock Lite:

  • Make files completely invisible
  • Watch file modifications or changes
  • Easy to lock folders

Gilisoft File Lock Lite

Protect your information by encrypting it with this great program.
Free Trial Visit Website

Privacy Drive – Easy to use

Privacy Drive is another solution to help you lock, hide, and encrypt your data. This software can create virtual encrypted disks on which you can store your files.

All the data on these virtual disks are encrypted automatically before it’s saved.

You don’t have to encrypt or decrypt each file individually. And once you have finished with your files, just dismount the virtual disk and all the files will be instantly secured.

With Privacy Drive, you can securely transfer your encrypted files to email attachments, USB equipment, external HDD, different portable devices, and cloud servers (like Microsoft OneDrive, Dropbox, or Google Drive).

Other key features of Privacy Drive:

  • Lock, hide, encrypt, and password-protect all kinds of documents
  • Drag-and-drop functionality
  • Easy to use

⇒ Get Privacy Drive

idoo File Encryption – Simple design

idoo File Encryption program is suitable for various types of files. It is fairly easy to use and there is an online help manual.

This software helps you secure your confidential data.  All you have to do is right-click on a file, folder, or hard drive, and choose one of the options: hide, deny write, lock, encrypt or shred.

When someone using a false password tries to repeatedly access your Idoo encrypted files, you receive an email notification and the program shuts down.

Password recovery is a useful tool. Some users report it to be, at the same time, a bit worrisome, because the keyword is sent in plain text to the email address provided, which indicates that anybody can find it in some idoo servers.

⇒ Get idoo File Encryption

AxCrypt – Password generator

AxCrypt has been designed for home and small business users.  It uses either 128-bit or 256-bit AES encryption. And it is available in 11 languages.

This program works perfectly with individual files, but cannot encrypt multiple files.

Still, you can build secured folders that will individually encrypt the files that you store there. AxCrypt applies also to uploaded cloud files that are stored in cloud services (such as Google Drive and Dropbox).

It features also passport management and an AxCrypt password generator.

There is a free version, but some features and 256-bit AES encryption are available with the paid version. Being a rather simple program, the price for AxCrypt is more accessible than other software presented in this article.

⇒ Get AxCrypt

VeraCrypt – Three different encryption algorithms

Although VeraCrypt does not apply to individual files, it’s worth mentioning that it’s a free encryption tool.

Most of the users that are familiar with TrueCrypt should know that VeraCrypt is an updated and improved version of it.

Using 3 different encryption algorithms such as AES, TwoFish, and Serpent, VeraCrypt has been developed to fix many of the security issues in TrueCrypt. And it is available in 37 languages.

While VeraCrypt cannot be used to encrypt single files, it is a powerful tool for partitions or entire drives and we decided to include it in this list.

⇒ Get VeraCrypt

And now let’s see what are the best premium paid PC file encryption software versions available on the market.

These tools bring additional features and options compared to the free software listed above.

Most of them have a free trial period, so be sure to check them out.

Best file encryption software for Windows 10 (Paid Version)

EasyLock – Cross-platform solution

 EasyLock encrypt files

EasyLock is a cross-platform solution that integrates with Endpoint Protector for Enforced Encryption. It uses the AES 256bits mode encryption, just like other solutions presented in this article.

It secures confidential information stored on your computer, on USB storage equipment, burned on CDs and DVDs, or even uploaded to cloud services (like Dropbox, iCloud, or Ubuntu One).

This software is an easy-to-use tool, featuring an intuitive interface. Simply Drag-and-Drop or Copy-Paste your files. And just double-click, when you want to open the encrypted files.

When you have finished editing the files, Easylock encrypts them.

Confidential data can safely be transferred on encrypted USB portable devices. Then you can access it on any computer, by providing the correct password. This way, the risk of data loss or data theft is eliminated.

⇒ Get EasyLock

Secure IT – Simple interface

secure IT file encryption

Secure IT is another good file encryption software. You can just right-click on the file and choose the option to encrypt it. Secure IT uses AES 256-bit encryption or a 448-bit BLOWFISH algorithm.

Being an older code, encryption with 448-bit BLOWFISH works fine with small-size files (less than 32GB).  Still, the users report security issues when used for larger files.

Secure IT has a file shredder to help you erase all remains of the information, but it doesn’t have a password recovery process. It is a bit more costly than other file encryption software, but it comes with three licenses.

⇒ Get Secure IT

CryptoForge – Top-rated software

CryptoForge is a high-rated encryption program.  It is simple to use, such as right-clicking the file, choosing “encrypt” and then entering the password. Decrypting and shredding your files is just as simple.

This encryption software offers AES 256-bit, the most secure encryption algorithm. It also uses 3 other codes (448-bit Blowfish, 168-bit Triple DES, and 256-bit GOST), but those work fine just with small files (less than 32 GB).

CryptoForge includes a helpful application that allows you to send encrypted files by email attachment to other users, without having to install CryptoForge on their computer.

You can also use this application from a USB drive or memory card.

Although is not as fast as other similar programs, CryptoForge is still a top-rated file encryption software. And it features a password meter to help you choose stronger keywords.

⇒ Get CryptoForge

Digital Safety Deposit Box (CertainSafe) – Good for small businesses

certainsafe

Certainsafe is developed as a secure cloud service that helps small and medium businesses to secure their confidential information.

Built as a responsive HTML website, Certainsafe encrypts your private files and splits them into pieces that are saved on different servers. This considerably reduces the risks of various hacking attacks.

You can store, access, and share your files using any browser on any platform or device (like tablet and smartphone), not having to download or install the program.

Still, there is no recovery password and average users find CertainSafe overpriced if you just consider it a cloud storage service.

But CertainSafe works like a safe deposit box for your files, using AES 256-bit code. Furthermore, CertainSafe highlights security over all else and it’s just as easy to use as a website.

⇒ Get Certainsafe

We hope this guide provided you with all the information you need to decide what file encryption tool to install on your computer.

If you have any other questions, don’t hesitate to leave them in the comments section below.

The software solutions presented above are also good if you are interested in the following topics:

Best hard drive encryption software – All the products listed here can protect all of the data that is stored on one’s hard drive.

FIX: Error opening file message in Paint.NET

A large number of users have seen the Error opening file message in Paint.NET. This error is more common than you might think.

This issue can be caused either by a faulty installation of Paint.net, a conflict between your antivirus or firewall software and Paint, or using a wrong image format for the specific project.

Seeing this error message every time you want to open an image inside Paint can become extremely annoying over time.

We compiled the best solutions in this article, so please read this guide carefully. It is also recommended that after you try each method, you try to check if the issue is still there or not.

How can I fix the Paint.NET opening file error?

1. Try saving the file in another format

  1. Download and Install Gimp.
  2. Right-click the image with issues.
  3. Select Open with, then choose Gimp from the application list.
  4. Inside the Gimp window click File, then Save as.
  5. In the newly opened pop-up window -> choose a name for your file and also a location on your hard-drive.
  6. Click on the drop-down list next to Format choose JPEG, BMP, or PNG (depending on your needs and original file format), then click Save.

In the case of some users, the issue was caused by the extremely big size of the file they were working on.

This can be caused by saving the image either in a format that doesn’t exist or in the wrong format for your circumstances. To save the file that’s causing trouble in another format, you can follow these steps:

Change file format manually:

  1. Right-click the image file you’re trying to modify then choose Rename.
  2. Type a name for your file.
  3. Delete the .jpg, or .png format next to the name.
  4. Type the desired new format.
  5. Click anywhere on the screen to de-select the image and save it in a new format.

2. Disable antivirus and firewall software

How to disable windows firewall:

  1. Open Start button.
  2. Click on Settings, then Update & Security.
  3. Choose Firewall & Network protection.
  4. Select a Network profile.
  5. Then, under Microsoft Defender Firewall toggle the option On/Off.

In some cases, the conflict that generated the Paint.net error opening file issue on Windows 10 was caused by a third-party antivirus and firewall software.

Simply un-install or stop the protection of these two software options, and check to see if the issue persists. If it does, please follow the next method presented in this article.

Note icon NOTE
Each Antivirus software has its own interface so there are different ways of disabling or turning them off depending on which one you use.

3. Reinstall Paint.Net

  1. Press Win+X keys then select Programs and Features.
  2. Find Paint.NET in the list
  3. Select it then click Uninstall.
  4. Download the latest Paint.NET version.
  5. Open it and follow the on-screen instructions.

4. Use an alternative third-party app

You may end up losing a lot of time while dealing with this issue, so our team has taken the initiative to perform in-depth online research about the best alternative.

If you like the sound of it, try this great tool coming from Adobe. Photoshop has a long history of providing amazing imaging and graphic design results while being mostly error-free and really optimized.

Use the best graphic design tool on the market and explore its vast library of features of Adobe Photoshop!

⇒ Get Adobe Photoshop

We hope these methods helped you solve your issue with Paint.NET not opening the file.

Please feel free to let us know if you have any suggestions, by using the comments section found below.

Xbox Game Pass apps update on iOS and Android with improved language labelling

The iOS and Android version of Microsoft’s Xbox Game Pass apps both updated this week with some changes that make it easier to find titles and tell what languages each video game supports.

Here’s the full release notes for the update which are identical for both iOS and Android devices:

  • We’re making more improvements to the app so it’s easier for you to discover and play your next favorite game!
  • Games now list supported languages on their details page, so you can easily see if a game supports your language of choice.
  • Days since new bugs found: 0

Do you use the Game Pass mobile apps or do you prefer to stick to the Xbox console or PC? Let us know in the comments below and then follow us on Twitter and Facebook for more Xbox news.

‎Xbox Game Pass
‎Xbox Game Pass
Price:
Free


Xbox Game Pass
Xbox Game Pass
Price:
Free

How can I download fonts to Windows 10/11? [Quick Guide]

Fonts are a great way of changing the way a text looks without actually modifying the content or the page arrangement.

More so, due to the different graphical styles, they can be used to further enhance a text, depending on the purpose.

These can range from funny and downright wacky fonts to serious and stylized fonts that you can use in formal letters. Whichever the case, here are some of the ways you can get new fonts on your Windows 10 PC.


How do I download more fonts on Windows 10?

1. Use a third-party font repository

Fonts can be easily downloaded online from websites, but most of them come with restrictions. That being the case, an almost limitless library of fonts of all kinds can be a God-send.

That is where a service like Adobe Fonts can definitely come in handy. This online service offers a subscription library of high-quality fonts of all kinds and styles that you can use freely.

More so, this service is usually subscription-based, but you can now test it out for free for 7 days without any limitation, and without needing any credit card information.

Adobe Fonts

Adobe Fonts

Download and use the best high-quality fonts with the Adobe Fonts online service.
Free trialVisit website

2. Install fonts directly from Microsoft Store

Instead of downloading font files and then installing them from all kinds of websites, you can download Arial font for Windows 10 and other fonts straight from Microsoft Store with just a simple click.

The Arial Nova font was already spotted in Microsoft Store. You can check it out for yourself, and you’ll notice that it’s a subtle redesign of the traditional Arial family.

This is most likely suitable for document headings and paragraphs. The Arial Nova font description also states that these fonts are designed for languages that use the Latin script.

Regarding the introduction of language packs in the Store, Microsoft uploaded a series of language packs included Catalan, Russian, Valencian and more.

Note: Users are advised that after they install the language app, they select the Launch button to navigate to Windows’ Settings app.


By following these steps, you should be able to now download fonts on Windows 10 easily and without restrictions. If you know of other methods as well, let us know by leaving us a message in the comments section below.


Fix Photoshop CS2 installation error 1926 in Windows 10

When trying to install Photoshop CS2 in your new Windows 10 you might have gotten the error message 1926 Could not set security for file C:windows Error:0.

Although this is not a common issue for the Photoshop CS2 app you will get a detailed explanation and how to fix it with ease.

Even if you run this installation using the administrator account it still won’t work. Therefore, we will be doing the installation first with the Run as Administrator feature in Windows 10.

Make sure to follow these solutions thoroughly if you want to get the best results, and you will surely solve the problem.

How can I fix Photoshop CS2 installation error 1926?

  1. Download the latest Adobe Photoshop version
  2. Run Photoshop CS2 as Administrator
  3. Change owner settings from Advanced Settings

1. Download the latest Adobe Photoshop version

Photoshop users brag about amazing results while using this tool. Therefore, it is frustrating to be one of those who don’t even get the chance to get to that point.

If the installation itself seems impossible, let us help you out. In most cases, grabbing the most recent version is all it takes for you to avoid the installation error 1926.

While on the official page, you just need to click Download. If you are not signed in, you will be asked to do so with your Adobe ID and password.

Your app should immediately begin to download. Launch the installer and follow each prompt. Wait for the process to complete.

At this point, you should be able to open the app and start using it right away. If you need assistance on how to use it, Adobe has extensive documentation and also community-based tutorials for various types of projects.

2. Run Photoshop CS2 as Administrator

  1. Go to the directory where you have the Photoshop CS2 executable file.
  2. Right-click on the file.
  3. From the menu that pops up left click or tap on the Run as Administrator feature.
  4. Left-click or tap on the Yes button if you are prompt by a user account control message.
  5. Follow the instructions on the screen to finish the installation process.
  6. Reboot your computer.
  7. Check to see if your Photoshop CS2 application is working in your Windows 10 now.

3. Change owner settings from Advanced Settings

  1. First make sure you’re logged in as administrator.
  2. Right-Click on Photoshop‘s app then select Properties.

  3. Then go to the Security section.
  4. Then, go to Advanced Security.

  5. You will see the owner of the app. Click Change.
  6. Then click on Edit, then Other users of groups.
  7. Select the user you wish to have permission to use the app.
  8. Then, select Ok on everything until the window is gone.

This is all you have to do in order to get your Photoshop CS2 app installed on your Windows 10 device.

If you run into any more trouble along the way you can write us below in the comments section of the page and we will help you further with this issue.

Google’s ChromeOS slid pass macOS as it encroached on Windows market share in 2020

The rising tide of PC sales during the pandemic helped lift the boats for Windows PC manufacturers, Apple MacBook sales, and even the adoption of ChromeOS.

According to market research firm IDC, Google’s 10-year old operating system just surpassed Apple’s macOS to claim the number two spot in user install base behind Microsoft’s Windows platform.

Geekwire obtained visualizations from the IDC report showing the shift from Apple in the second spot to Google’s ChromeOS.

Screenshot 2021 02 24 221734

While ChromeOS has recently beaten out macOS in various quarters, last year’s overall market share gains gave Google’s operating system 10.8 percent of the market over Apple’s 7.5 percent in 2020.

Despite slipping behind ChromeOS, Apple’s 2020 did end on positive gain where its macOS went from 6.7 percent in 2019 to7.5 percent the following year.

With both ChromeOS and macOS seeing gains in 2020, the flip side of things is the understandable slippage of Widows market share which dropped from 85.4 percent of the market to 80.5 percent by the end of 2020.

Even though Microsoft still commands a significant amount of market share for operating systems, a five percent loss here and there ends up adding up to a trend that may be difficult to subvert as workflows and buying patterns permanently shift.

The pandemic has been an accelerant for many trends and it would seem that the adoption of ChromeOS was among those aided by the very particular circumstances of 2020 pandemic life.

Perhaps, thanks in large part to educational discounts awarded to schools to accommodate at-home student learning many took advantage of steeper than usual Chromebook discount deals in the US that have had a net positive on increasing the adoption of ChromeOS. It’ll be interesting to see if ChromeOS can maintain the same levels of adoption throughout 2021 as circumstances ideally shift once again.

Microsoft’s new Digital Marketing Center is a free alternative to Squarespace for small businesses

Microsoft announced today that it’s launching a new website creation service intended to help small businesses “expand their digital marketing efforts, allowing them to grow their business.”

The Digital Marketing Center isn’t necessarily a new idea coming from Microsoft and in many ways its intended use undercuts current industry resources such as Wix or Squarespace. Microsoft’s new resource allows small to medium-sized businesses who may lack the expertise or budget for a design department, to drag and drop information into a templated website structure for free.

Blog 1775 Image 1

Microsoft will do most of the heavy lifting design-wise, but users will be able to add certain information to the sites that include:

  • Headline and description
  • Customer action button (Call now, Send email, Get quote, etc.)
  • Cover image
  • Business summary
  • Social posts
  • Reviews
  • Gallery
  • Business contact information
  • Social links

In addition to static information on the site, users will also be able to draft and schedule content from their site to be published on sites such as Facebook and Twitter.

Perhaps, more compelling than the ease of use in creating a new website or storefront is the integrated stack of data that can accompany the site.

Here is where Microsoft pulls the ol’ bait and switch. The company’s benevolent website creation agenda dovetails into its ultimate goal of getting more people onto its advertising platform. Once a site is created, users interested in backend data such as impressions, clicks, conversions, engagement, and audience growth will need to link their website to a Microsoft Ads account.

Blog 1775 Image 3

Sites aren’t required to use Microsoft Ads, and the company notes that during the creation of the site.

If you choose to onboard to Digital Marketing Center without an advertising campaign, you can still create your website by onboarding through our social media management option.

Still, the deep analytics that comes with managing and optimizes a website for growth are essentially behind a Microsoft Ads paywall. As someone who uses Microsoft Ads daily, the lead quality is definitely noticeable between it and Google Ads but so are the budgets needed for leads. For a quarter of a Google budget, a Microsoft ad could return up to 2x revenue for some markets.

Microsoft’s Digital Marketing Center is yet another integrated service in the Microsoft 365 stack that’s intended to encourage adoption of its other services while also fostering lock-in creep. Whether or not it will be successful is entirely up to the value it offers over industry stalwarts such as Squarespace and WordPress. But at the low-low price of free, Microsoft is off to a great start.

[Fixed] Overwatch black screen on launch / while playing

Overwatch is a popular team-based shooter, but many users reported a black screen in Overwatch.

This can be a problem and prevent you from playing the game, but we have a couple of solutions that will surely fix your problem.

How can I fix Overwatch black screen issues?

1. Lower your graphics settings

  1. Enter Overwatch main menu.
  2. Use the dropdown or slider and set the graphics quality to Low.
  3. Select Options.
  4. Lower the details and resolution.
  5. Test each one of the previous steps if you notice an improvement in-game performance.
  6. Disable the ones that reduced performance.

This is a pretty simple solution, but it should fix black screen in Overwatch while playing.

2. Change the game settings

  1. Open the GeForce Experience app.
  2. Select and click on Games.
  3. From the left pane, choose Overwatch.
  4. From the right side, select the Custom Setting icon.
  5. From Display Mode, choose Borderless Window.
  6. Click on Apply.
  7. Ensure your monitor runs at his correct response rate.

After changing these settings check if Overwatch black screen on launch still appears.

3. Scan and repair game files

  1. Open the Blizard Client app.
  2. Select Games.
  3. Choose Overwatch from the right pane.
  4. Click on Options on the top left side.
  5. Choose Scan and Repair from the available options.
  6. Click on the Begin Scan tab.
  7. Wait for the scanning process to end.
  8. Open the game and verify if the error has gone.

This short procedure prevents Overwatch black screen, so we encourage you to try it.

4. Delete game cache

  1. Press Ctrl + Shift + Esc to open Task Manager.
  2. Select the Processes tab.
  3. Verify for the presence of agent.exe or Blizzard Update Client.
  4. Select one of these two processes if available.
  5. Press the End Process button from the bottom of the application.
  6. Press the Windows key + R button and open Run window.
  7. Type %Programdata%
  8. Search inside the directory for the folder named Blizzard Entertainment.
  9. Delete the Blizzard Entertainment folder.
  10. Restart the Blizzard client.
  11. Run the game.
  12. Verify if the issue persists.

This is a simple solution and could help you fix Overwatch black screen issues on launch.

5. Disable the game DVR

  1. Open the Start menu.
  2. Click on Settings.
  3. Click on Gaming.
  4. Choose the Game Bar option located in the sidebar.
  5. Disable every option from the Game Bar.
  6. Click on Game DVR.
  7. Disable every option from Game DVR.
  8. Choose True Play.
  9. Turn off True Play.
  10. Run the game.
  11. Verify if the solution works.

These features can interfere with certain games, and after disabling them the black screen while playing Overwatch should be gone.

Overwatch black screen issues can negatively impact your gaming experience, but we hope that our short guide helped you fix them.

Did you find a different solution for this issue? Share it with us in the comments below!

How to install the Valheim Plus mod on Windows 10

Valheim developers officially announced in the game’s FAQ that it won’t support mods. And yet, here we are showing you how to install Valheim Plus mod because game well-wishers were eager to bring some improvements and took the bull by the horns by creating this mod.

The mod is meant to improve gameplay quality, especially in terms of changing game difficulty, altering the in-game quality of life, or bettering the game’s overall experience.

Among notable improvements are the ability to easily modify your character’s carry weight, food duration, and stamina usage.

You can customize your character’s strength and constitution under a different name. The mod also adds easier map sharing between players in co-op.


How can I install the Valheim Plus mod?

install valheim plus mod
  1. Download the mod from Nexus Mods.
  2. Unzip the file using a file compression tool.
  3. Copy all the files in the folder.
  4. Go to your Valheim dedicated folder and paste the files there.
  5. Then, open the BepInEx file.
  6. Next, open valheim_plus.cfg using a text reader such as Notepad.
  7. Here, you can modify various values such as your character’s weight, time, and day details, or make item changes. Make sure that for the details you change the value is set to true.
  8. The changes should immediately reflect in your game.

Disclaimer: WindowsReport is not responsible for the integrity of the downloaded file.

Note that the files need to be installed both locally, on the client, and on the dedicated server. For the server, the unzipping part takes place in your root server folder.

If you have enforceConfiguration and enforceMod enabled, only people with the same configuration and mod version can join your server and you can only join servers with the same mod and configuration.

More information on how to use Valheim+ is provided on the Nexus Mods page. Also, the mod developer mentions that future game updates might break this mod, however, you should be able to fix this by verifying the game files’ integrity.

Perhaps knowing that the game can be improved a little with such a mod is encourraging enough for your to try it. So get your official Valheim version:

Valheim

Valheim

Start your Valheim game for countless hours of multiplayer collaboration and exploring the unknown.
Check priceVisit website

Don’t worry if you’re faced with server lag or low FPS. Gamers find useful workarounds every day and the developers are also working on stable fixes.

If you’ve already tried the Valheim Plus mod, tell us how it improved your gameplay. Feel free to use the comments section.

[Fix] Could not find or load main class error in Java

Could not find or load main class in a programming error, and it usually appears when you write your applications in Java.

Fixing this issue might be hard, especially if you’re new to Java, but hopefully this guide should be able to help you with this problem.


How can I fix could not find or load main class?

1. Check the class name

check class name could not find or load main class
  1. Open your Java program and check how you spelled the class name.
  2. Look at the compiler to see if the class matches.
  3. The class name typed on the compiler has to be an exact match with what you typed in the program.

Note: The most common mistake is when you declare a class name in the wrong format when running it from the compiler.

Also, the correct command to run a .class file generated by the Java compiler is java <class filename> You don’t have to provide the .class extension: java HelloWorld.class.

This is is an obvious solution, but it might work if you’re getting Could not find or load main class in Eclipse.


2. Check the package name

check package name could not find or load main class
  1. Check the package name where you have included your class.
  2. Use the correct form to run the class: Java packagename.classname. In our example, it will be dto.HelloHP.
  3. In the compiler, run the class from the parent folder of the package and not from the folder where the class is.

Note: If your class is included in a package, then to run it you must provide its fully qualified name.

Also, when you create a package, you actually create a folder structure like C:\Java\classes\packagename\classname.java

After checking your code, the Could not find or load main class Java message should be gone.


3. Remove class references

code could not find or load main class
  1. Go to the Run configurations in Eclipse.
  2. Click the Green Play Button and select Run Configurations.
  3. Remove all references to the class.

If you go now to Run As and select Java application, Eclipse will write a new configuration for the class you moved. Therefore, it won’t display the error anymore.

These are some simple guidelines, and they should come in handy if you encounter Could not find or load main class in Eclipse.


Troubleshooting and debugging is an important part of any Java application you create. This guide provides you solutions for a common error you might meet while running a java class.

If you run it from a Linux terminal and encounter this error, the first two solutions will work for you too. Check the class name and the directory from where you run your program.

How to Change PDF Security Settings: 2 Ways

PDF files are extremely versatile in terms of what you can use them for. They can be text documents, they can hold pictures, they support hyperlinks, and more.

However, given the versatility of the format, you can end up using it as a support for more sensitive data. As such, you may want to limit the access that certain individuals have or simply lock the PDF to stop copying.

This includes blocking the possibility of editing, printing, or even opening them together. On the other end of the spectrum, maybe you want to make a PDF file more accessible to everyone.

Whichever the case, we’ve created a step-by-step guide that will show you exactly how to change the security settings of your PDF files easily.

How can I change the security settings of a PDF file?

1. Using Soda PDF Editor

  1. Open the PDF file with Soda PDF.
  2. Go to File and choose Restrict permissions.
  3. Choose to protect either opening or editing the file by checking the corresponding option.
  1. Click OK.

And that’s it. Next time the document is opened or edited (by you or anyone else), a password will be required.

This way, you can restrict full access to a file or simply edit PDF security settings the way you need to secure sensitive documents.

If you’re not familiar with Icecream PDF Editor, we should say that this is an intuitive PDF management tool that you can use on Windows-based devices.

It is equipped with an array of editing actions such as annotating, stamping, password-protecting, new file creation, and more.

Soda PDF

Secure your PDF documents and password-protect them with the Soda PDF software.
Free Trial Visit Website

2. Using Adobe Acrobat Reader

  1. Open the PDF file with Adobe Acrobat Reader.
  2. Go to the Tools pane, and select Protection.
  3. Choose Encrypt, and select Encrypt with Password.
    • If you want to change other security settings, select Manage instead.
  4. A new window will appear containing all the settings that can be switched on and off.
  5. Select the settings you want to modify, for example:
    • Set or remove passwords.
    • Encrypt only portions of the document or the entire thing.
    • Modify access permissions to limit or enable editing and printing of the document.adobe restrictions
  6. When finished changing the settings, click OK.
  7. Click on File, and select Save.
  8. Additionally, you could also press Ctrl + S.

How to change PDF security settings without password?

If you’re looking to change your PDF security settings or edit a secured file without a password, you can try using Adobe Acrobat.

All you have to do is to open Adobe, go to the Advanced option, select Security, and simply click on Remove Security then press OK to confirm the action, further removing the encryption.

How can I change PDF security settings online?

It’s also possible to change the PDF security settings more efficiently using online dedicated tools. There are various options to choose from, but you can perform it right away using the pdfFiller online tool.

With this platform, you can simply upload your file and edit it freely within a few moments, without other limitations or free trials.

By following these steps, you should be able to make a PDF file more or less restrictive. This ensures that your document cannot be edited, printed, or even opened, even if unauthorized users get their hands on it.

On the flip side, changing security settings can allow you to make a PDF document more flexible for a wider audience. Before you leave, don’t miss our latest guide on how to download Bytescout PDF Suite on Windows 10 if you’re looking for new PDF editing software.

If you have any other questions regarding the matter or are interested in similar articles tailored for programs other than Adobe Acrobat, leave us a message in the comments section below.

Acrotray has Stopped Working Error [Quick Fix]

AcroTray.exe is an Adobe Acrobat Distiller application that is an essential part of Adobe Acrobat, but many reported that Acrotray has stopped working.

This can be a big problem since you won’t be able to work with PDF files, but in this guide, we’ll show you how to fix that.

What can I do if Acrotray has stopped working?

1. Disable AcroTray

  1. Go to Search icon and, type msconfig to open System Configuration window.
  2. Select the Startup tab, click the AcroTray icon, and then click on the Disable button.
  3. Select Apply and then OK.

This is a straightforward solution, but it won’t work if acrotray.exe is missing, so keeps that in mind.

2. Use malware removal software

Find out whether ActroTray.exe is a malicious file or if it’s generating unwanted ads that are slowing down your PC with the help of an antivirus.

You can use the built-in Windows Defender to perform a PC scan and see whether it detects any potential threats. For higher accuracy, however, we recommend you use third-party antivirus software.

While the built-in security utility is very powerful, dedicated tools are typically equipped with a larger set of anti-threat features and they have higher detection rates.

If you want an up-to-date, light, and quick antivirus that secures your device with no interruption, we suggest you take a look at what TotalAV has to offer.

This is a very powerful security tool presented under a simple and intuitive UI. The scanner feature is very straightforward, you just have to select whether you want to scan your whole PC or certain files/drivers, and then wait for the process to complete.

TotalAV uses a constantly updated threat database to be able to keep up with all emerging threats that may attack your system.

It has a well-implemented anti-phishing system to protect your sensitive data. With this tool, you will be able to make online transactions without any risk.

TotalAV uses Multilayered protection, which means it uses several types of security features to detect and block threats.

This will ensure that your system is protected on all fronts, leaving no weak spot for malicious apps.

TotalAV

Use this simple tool to scan your PC and shield it against all types of threats, secure your browsing, and more.
Free trial Visit website

3. Stop startup

  1. Type Services in the Windows start-menu, choose Run as Administrator from the pop-up window.
  2. Select Adobe Acrobat Update and Adobe Genuine Software Integrity, change it to Manual.
  3. Go to Task Manager, access the Startup tab, terminate AcroTray.exe.
  4. Restart Windows.

As we’ve shown you in this article AcroTray can be a tricky app that can confuse even an antivirus to mistake it as a malicious file because of the .exe extension

However, AcroTray is also an important component of the Adobe Acrobat software and we presented you some of its main attributes in addition to some quick fixes you should try when the app stops working.

To learn more about this software, our what is AcroTray guide is a great place to start.

We want to hear what are your opinions on this subject and maybe share your experiences with us, so drop us a comment using the comment section below.

Knife Design Software: 5 Best to Use in 2026

The best knife design software in the world is capable of making your knife designing task easy. It is a platform where you can seamlessly create your own knife design and get a 3D view of your progress.

This kind of software is equipped with all the tools and means to perfect your craft through the automated process.

This software usually comes in a package, where you can design your home and everything inside, including knives. There are templates to choose from, and the instruction is fairly easy to follow.

You can hone your skills in home design and knife making at the same time. And you get to do that in less amount of time compared to manually crafting your designs.

The best thing is, you don’t need technical experience to use the knife design software. You only need basic computer knowledge, and wisdom to follow instructions.


What’s the best software for knife making?

Adobe Illustrator CC

Topping out our list is a software tool that has become synonymous with the idea of graphics design, especially in the world of professionals.

Adobe Illustrator CC is a vector-based graphics editor that you can use to create pretty much anything you can think of, as long as it is visually-related.

For example, designing something as simple as a knife is not a problem at all for Illustrator, regardless of whether we are talking about 2D or 3D design.

You have all the tools that you may ever need at your disposal, from free-hand drawing tools to shapes based on precise geometric measurements, all within the same UI.

More so, you can expand Illustrator’s functionality thanks to its extensive plug-in support for both official and community-created resources.

Here are some of the perks of using Adobe Illustrator CC:

  • Complete synergy with several other Adobe products, such as Photoshop or Spark
  • Professional-level graphics design capabilities limited only by your imagination
  • The UI is extremely familiar if you’ve ever used an image editor before
  • A never ending supply of online tutorials thanks to its popularity
  • You can test it out for free for 7 days
Adobe Illustrator CC

Adobe Illustrator CC

Easily create your own knife design that stands out with Adobe Illustrator, so be sure to try it out now!
Free trialVisit website

Adobe Photoshop

The second entry on our list is a software tool that is very similar to Adobe Illustrator: Adobe Photoshop.

In fact, as far as the UI is concerned, the two programs are nearly identical, so anyone used to Illustrator will instantly know how to use Photoshop and vice-versa.

However, Adobe Photoshop is a raster-based image editor, and it focuses a bit more on the photo editing and doctoring aspects of graphic design.

However, that doesn’t make it any less good at designing knives, since al the basic drawing tools are present here as well.

Besides, anything you create in Photoshop can then be easily exported to Illustrator if you want to use that for the finishing touches

Here are some of the perks of using Adobe Photoshop:

  • Works well with other programs that work with images, such as Illustrator or Spark
  • The program has been around for so long that everyone knows the UI
  • Offers support for graphics tablets and other freehand tools.
  • Great for designing knives from scratch
  • You can test it out for free for 7 days

⇒ Get Adobe Photoshop for Free


Autodesk Inventor

While the two entries from above support 3D design as well, maybe you’d feel better with a tool that has a long history of being good at it.

If that is the case, then maybe you should give Autodesk Inventor a shot, since this is one of the simplest programs you could ever use for product design, rendering, and simulation.

Of course, this program’s extensive toolset makes it suited for the design of incredibly complex machinery, so something as simple as a common kitchen, combat or hunting knife should be easy to pull off.

More so, the program is great since you have plenty of presets already present, so starting off from scratch with a design is never an actual requirement.

Here are some of the perks of using Autodesk Inventor:

  • Extremely easy to use compared to other Autodesk tools
  • A short learning curve
  • Great for manufacturing parts, and even objects
  • Works with DWG files that are supported by most CAD software
  • Animation and annotated exploded views

⇒ Get Autodesk Inventor


Autodesk Fusion 360

The 4th entry on our list is another Autodesk product, only this time we are talking about Autodesk Fusion 360.

Fusion 360 set out to be the best-integrated CAD and design software and judging by how it evolved compared to other CAD tools, it is certainly on the right track.

What makes Autodesk Fusion 360particularly good at designing knives is that since the task itself is quite simple, Autodesk Fusion 360’s intuitive interface will go along just fine.

Of course, this ease-of-access does come as a trade-off for some functionality but considering that you are planning to design knives and not rocket engines, this program will suffice.

Here are some of the perks of using Autodesk Fusion 360:

  • Projects can be stored on the cloud and accessed from any machine
  • One of the most well-seen CAD programs
  • Easy learning curve
  • Intuitive UI
  • Free for home users

⇒ Get Autodesk Fusion 360


CorelDraw Graphics Suite

The last entry on our list is most certainly not least, and it is yet another graphics design tool that a lot of you may already recognize: the CorelDraw Graphics Suite.

This entire suite of programs will bring you everything you may ever need in order to design anything, let alone something as simple as a knife.

The CorelDraw Graphics Suite contains the following 7 programs:

  • CorelDRAW
  • Corel PHOTO-PAINT
  • Corel Font Manager
  • PowerTRACE
  • CorelDRAW.app
  • CAPTURE
  • AfterShot 3 HDR

If you’re already familiar with the program, then you probably know that the first two programs are enough by themselves for this particular job, but if you can get all 7 of them at a decent price, why not take advantage?

⇒ Get the CorelDraw Graphics Suite


Without a doubt, knife design software is greatly helpful for knife craftsmen and serious hobbyists. It is a powerful tool to create unique designs without worrying about making mistakes.

You can easily modify what you need to change through the simple tools included in the software.

The five best knife design software we have chosen for you are the best in the market. We collated them to help you decide the most suitable knife design software for your personal or professional use.

The chosen products we listed are perfect for overall interior design and individual knife designs.


Needlepoint Design Software [5 Best for 2026]

Needlepoint design software is a computer-aided design (CAD) tool that makes designing seamless. You no longer need to stress your mind about manual drafting and meeting deadlines.

With a reliable needlepoint design platform, you can create your embroidery design using digital tools. Plus you can view your creation in a 3D display.

You have access to numerous templates and designs to follow to complete your task. And even if you are not a computer genius, a guide is provided for you to master.


What are the best needlepoint design software tools?

Adobe Illustrator CC – Easily integrates with other art software

Adobe Illustrator is at the top of our list because it is by far the best tool that money can buy when it comes to graphics design, especially creating visual elements from scratch.

This vector-based image editor has all the tools both a beginner and an experienced user may ever need, so you don’t need to worry about spending money on other third-party tools.

This means that you can customize the way your Illustrator behaves based on your needs at any given moment, and this includes adding patterns and brushes that will help you with needlepoint design.

Take a look at its key features:

  • Widespread popularity means the file formats it works with are commonly used
  • Guides for using it are easy to find on YouTube
  • Integrates well with other Adobe tools, such as Spark or Photoshop
  • Versatile due to plug-in support
  • Can be tested for free by anyone with an Adobe account for 7 days

Adobe Illustrator CC

Illustrator can be enriched with a wide variety of plug-ins and library enhancements for all your needlepoint designs.
Free trial Visit website

Adobe Photoshop Elements 2020 & Premiere Elements 2020 – Very Intuitive

Adobe Photoshop Elements 2020 & Premiere Elements 2020 use Adobe Sensei AI technology that makes this software very intuitive and smart.

You can find automated choices that allow you to customize the designs, as well as add your personal style. It includes a guided edit instruction that has 78 steps. With this software, you can create needlepoint masterpieces.

The images are absolutely clear, and you can create your own modifications to make your designs perfect.

Take a look at its key features:

  • Object removal feature
  • Pattern brush
  • Frame fill option
  • Adobe Sensei AI technology
  • Intelligent software

⇒ Get Adobe Photoshop Elements 2020 & Premiere Elements


Embrilliance Essentials – Comes with stitch simulator

The Embrilliance Essentials, Embroidery Software for Mac & PC allows you to merge your needlework patterns with nearly all formats. You can use the stitch recalculation feature in order to modify the size of the needlework designs.

And if you wish to add lettering in your designs, you can easily do so through three different modes of Circle, Monogram, and Multi-line.

Take a look at its key features:

  • Compatible with MAC and Windows OS
  • Merge embroidery patterns
  • Stitch stimulator
  • Printable applique templates
  • Add additional letterings
  • Excellent formatting texts
  • Multiple selections of elements and stock shapes

⇒ Get Embrilliance Essentials, Embroidery Software


Cross Stitch on CD-ROM – Perfect for beginners

The Cross Stitch on CD-ROM is designed for beginners, and it is available in multiple languages of English Spanish, Francais, and Espanol French. This software is equipped with a color guide for easy navigation, as well as DMC products.

It includes tips and hints of stitching that are conveniently animated and interactive. Plus, you will surely love the 100 designs included in this software.

And it helps that it is very affordable compared to other needlepoint software.

Take a look at its key features:

  • Very easy to use
  • Friendly to the budget
  • 100 designs

⇒ Get Cross Stitch on CD-ROM


LETTER IT! – Embroidery Machine Software

The Amazing Designs LETTER IT! Embroidery Machine Software allows you to make one or multiple line designs in numerous fonts. You can easily customize your embroidery designs using this software.

It is quite seamless to add your own lettering design or utilize the embroidery of fashionable layouts such as the Vertical Text or Circle.

Whatever letter you want to create or embroidery pattern you desire, you can accomplish what you want through this software. Plus you save your designs in different formats.

Take a look at its key features:

  • 35 fonts
  • Advanced color options
  • Realistic preview
  • 19 thread charts

⇒ Get LETTER IT! Embroidery Machine


The needlepoint design software differs in many ways, especially their compatibility with the operating systems. You need to make sure that the product you buy is suitable for the computer in your home or office.

Take note that software with multiple compatibles is more expensive than those that fit one OS only. That is also true with a platform that caters to a higher OS version of Windows PC.

In your purchasing decision, always factor in the compatibility, functionality, reliability, ratings, and price of the needlepoint design software. Select a design software product that suits your every need, especially your budget.


VCE to PDF Converter Tools: 7 Best We Tested in 2026

Using the VCE file extension is not always practical, because Visual CertExam suite is required for accessing the files, and not all computers have it installed.

But if you need to access VCE files, there’s one better way of doing so – converting it to PDF. And in order to convert VCE to PDF in Windows 10, you’ll need a VCE to PDF conversion tool.

VCE is a file extension we associate with the Visual CertExam Suite. This simulator uses many of the leading companies for IT certifications.

This tool is quite useful for regular users as well because it allows them to create an examination environment wherever they are.

When you convert a VCE file you’ll be able to access it on practically any device, share it with others, or store it in the cloud. Converting VCE to PDF might look like a complex task, but it’s far from that.

There are tons of online and offline tools for converting VCE to PDF. We created the list of the very best VCE to PDF converter tools, you can use to convert your examination files in just a few moments.

So, check out our list, and pick the best VCE converter for you.

ProductConvert PDF toDescription
pdfFillerVCE, Word, PPT, JPEG, PNG, TEXTExcellent online converter
Wondershare PDF ElementVCE, Word, Excel, PPT, TEXT, JPG, PNG, TIFF, BMPFast usage
doPDFVCE, DOCX, XLSX, PPTX, HTML, TXT, PDF, EPUB, PNG, BMP, GIF, JPG, ODD, SVG, SWF, TIFF, CSVReliable free option
Convert VCE to PDFVCESimple online app
VCE to PDFVCEEasy to use
VCEPlusVCEUnlimited conversion
CutePDFVCE, Word, Excel, PowerPointIntuitive interface

What’s the best VCE to PDF converter for Windows 10?

pdfFiller – Excellent online converter

pdfFiller is an outstanding converter that you can use to convert VCE to PDF online and execute other editing actions.

You can upload your documents using its drag-and-drop feature and convert them to PDF, edit, sign, and share them easily.

Besides VCE, it also supports PDF, Word, PowerPoint, JPEG, PNG, and TEXT formats so you don’t have to worry if you have different file types to edit and convert.

Furthermore, pdfFiller lets you email documents or request them via mail from any device to simplify your sharing experience.

pdfFiller

Convert your VCE files with ease and give pdfFiller a try.
Free Trial Visit Website

Wondershare PDF Element – Fast usage

Another handy option is Wondershare PDF Element with which you can convert, edit, and print your VCE files.

It is a convenient converter, especially for our non-technical users, so everyone can use it with minimal effort.

PDF Element can convert files very fast and at the highest quality while keeping your documents safe and secure.

Moreover, you can batch-convert your files in multiple formats, including Word, Excel, PowerPoint, and text.

Wondershare PDF Element

Get this AI-powered PDF tool and convert your VCE files in no time.
Free Trial Visit Website

doPDF – Reliable free option

dopdf windows

doPDF is a great VCE to PDF free converter tool that helps you convert various file types to PDF, including VCE. When you install doPDF on your computer, it acts as a virtual printer, which you can use for printing PDF files.

As soon as you install it on your computer, it will appear in your Printers and Faxes list, as well as All Programs.

To convert VCE files to PDF using doPDF, you’ll actually need one more tool called VCE Designer. This basically is a VCE player that allows you to view, and print VCE files.

So, after you install both doPDF, and VCE Designer on your computer, open the VCE file you want to convert with VCE Designer, go to File > Print, select the doPDF virtual printer, follow further on-screen instructions, and you’ll have your VCE file converted to PDF in seconds.

Both doPDF and VCE Designer are available for free, and you can download them from these links:

⇒ Get doPDF

⇒ Get VCE Designer

Convert VCE to PDF – Simple online app

With this one, you can convert VCE files into PDF files online. However, it doesn’t offer free services, as each conversion is charged an amount of money.

So, if you don’t mind paying for your VCE files to be converted, you should definitely consider using this tool.

All you have to do is to visit their website, upload your VCE file, purchase the service, and give your email address. As soon as you complete the payment, a freshly converted PDF file will be sent to your email address.

The site often offers limited-time deals, like getting the 2nd conversion free, and more. Considering there are other paid services that charge more, this is actually the best option available.

But if you don’t want to pay for converting your files, make sure to check other tools from this list.

⇒ Get Convert VCE to PDF

VCE to PDF – Easy to use

vce to pdf windows

VCE to PDF is perhaps the fastest way to convert your VCE files to PDF. It’s a freeware software that takes very little on your hard drive, so all you need to do is to install it and start converting.

The tool is as simple as it can get, just browse for the VCE file and convert it right away. VCE to PDF also needs VCE Designer to be installed on your computer, so keep that in mind.

Don’t confuse VCE to PDF with an online tool of the same name. The online tool can also be a decent converter, but it allows you to convert a limited number of VCE files for free.

⇒ Get VCE to PDF

VCEPlus – Unlimited conversions

VCEPlus is a web-based tool that converts VCE files to PDF for free. It is one of the best online tools for converting files because it allows you to convert an unlimited number of files for free.

However, VCEPlus is not an instant tool, as it takes 12-24 hours to finish converting.

Using VCEPlus might be a little complicated, and requires more effort than using other tools from this list.

To be able to convert a VCE file with VCEPlus, you need to upload that file to any cloud service (OneDrive, Google Drive, Dropbox, etc.), send the link to that file to VCEPlus, and the guys behind it will email you the PDF file, once it’s done.

So, if you don’t need your VCE files to be converted immediately, you can try this VCE to PDF converter free of any charge.

⇒ Get VCEPlus

CutePDF – Intuitive interface

cutepdf windows

CutePDF serves as a virtual PDF printer, just like doPDF does. You just need to download it, install it on your computer, and it will show up along with other printers.

CutePDF also requires a VCE Designer and the procedure of printing is identical to doPDF.

You just open the VCE file you want to convert with VCE Designer, go to Print, select CutePDF, and the file will be converted.

⇒ Get CutePDF

That’s about it for our list of the best VCE to PDF converters for Windows.

If you use a lot of VCE files you know that sometimes they can give out errors, check out our solution for when A+ VCE is not working, now that you no longer need to wonder ‘How do I convert VCE to PDF files?

What do you think about these choices? Is there any VCE to PDF converter tool you’d like to add to the list? Let us know in the comments below.