Microsoft has released another build, KB5041871, for Windows 11 Insider Program members in the Dev Channel. This new build, also known as number 26120.1350, introduces an interesting feature where users can share content straight from the Windows share window to their Android device. But it’s not only this; there are also some bug fixes and handling of specific known issues as part of the update.
To start, Microsoft is developing security with MSIX packages. They’re introducing a modification where Microsoft SmartScreen will examine the origin of MSIX packages. This is significant because it increases another level of protection for verifying whether they are safe to install.
Now, let’s turn to the star of this update—sharing content on an Android device has become much more straightforward. First, you must pair your Android device with a Windows PC. This is done via the Link to Windows app on Android and the Phone Link available on your PC. The updated UI for sharing content displays a revised icon in the Nearby Share section, simplifying file exchanges further.
Also improved is the Timeline feature, which allows for better synchronization across devices that have their users signed in with Microsoft accounts; now, it can display more activities from the past 30 days instead of just four days before, as was previously possible.
The system settings pages now use new symbols for better accessibility and comprehension. Another alteration involves the addition of notification badges on specific system icons located within the taskbar, such as Power, Input Method Editor, and Network. These badges will convey how many unseen alerts are active at a glance without opening any specific application window or flyout.
Microsoft made some adjustments to improve the user experience when accessing certain parts of the Settings application quickly from the Start menu’s left-aligned list view; this includes adding new categories like System & Applications Management into the main grouping area alongside existing groups such as Personalization or Accounts section. The display name for the Your Phone application has been changed to meet consistency standards between different parts within the Settings app: “Your Phone” is now “Phone.”
And what about the fixes? KB5041871 addresses a problem with Task Manager, where graphs on the Performance page didn’t display accurate colors when dark mode was enabled. It also fixes a problem with Windows Sandbox that could not start and solves an issue with Voice Access commands that didn’t function for non-English-supported languages.
But there are still some problems. For instance, Windows Insiders who join the Dev Channel on PCs using Windows 11, version 24H2 Build 26100.xxxx might see “(repair version)” next to the latest Dev Channel build from Windows Update. However, do not fret; switching to the Dev Channel will initiate an upgrade to update your computer with the most recent build. Moreover, attempting to include more languages or optional functions can produce a failure accompanied by error code 0x800f081f (also known as “feature installation failed”), and moving between various pages within Task Manager might cause it to collapse.
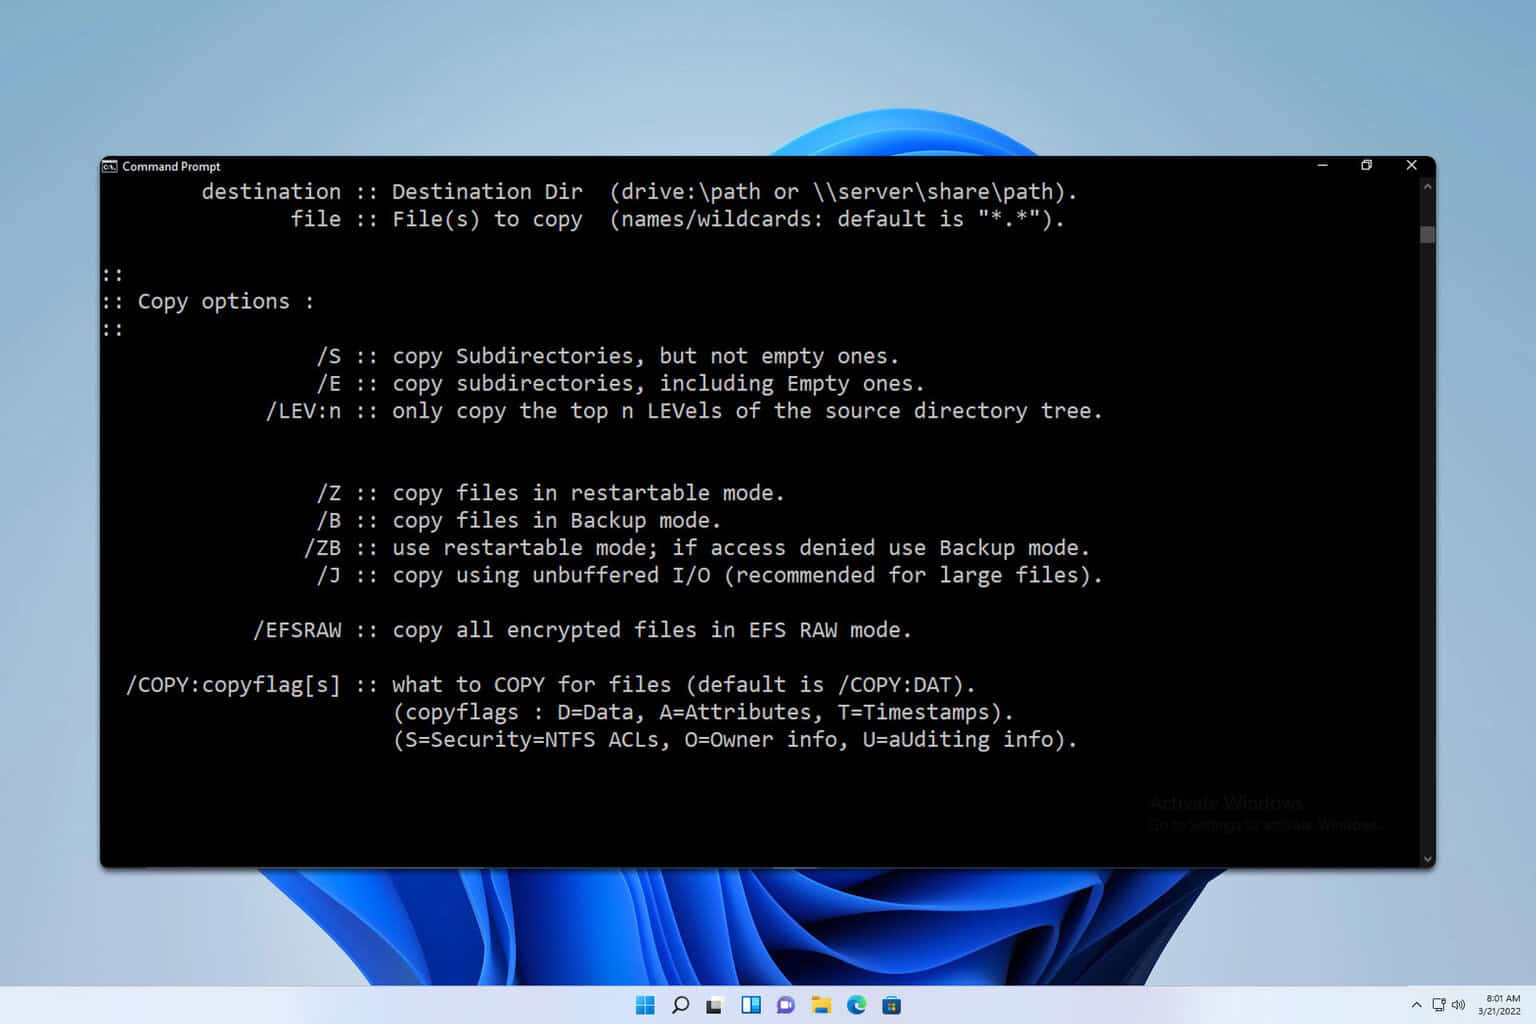
When it comes to copying files in Windows, users often find themselves choosing between copy, xcopy, and robocopy. Each tool has its unique strengths and is suitable for different scenarios. Let’s dive into the ultimate guide for these file-copying tools.
Copy vs xcopy vs robocopy, which one should I use?
1. Using the copy command
Press Win + R, type cmd, and press Enter.
Use the following command to copy files: copy C:\Documents\file.txt E:\Backup
The file will now be copied to a different location.
This is a basic command and it can copy only one file or multiple files using a wildcard. It doesn’t support directories or subdirectories and other advanced features such as error handling, logging, or resuming.
2. Using the xcopy command
Open the command line again.
Type xcopy C:\source_folder E:\destination_folder /E /I
It also supports various options, such as the following:
/E: Copies all subdirectories, including empty ones.
/I: Treats the destination as a directory.
/D: Copies files changed on or after the specified date.
/H: Copies hidden and system files.
/C: Continues copying even if errors occur.
/exclude:excludedfileslist.txt: Excludes all files that are in excludedfileslist.txt
Unlike copy, xcopy allows you to copy directories and subdirectories, and thanks to the various options it can copy hidden files, exclude files, copy changed files, and more.
Keep in mind that this command can encounter issues, and several users reported xcopy access denied message on their PCs.
Type the following to copy all files and subdirectories: robocopy C:\source_folder E:\destination_folder /E
Use robocopy C:\source E:\destination /MIR /Z /R:5 /W:10
/MIR: Mirrors a directory tree (deletes files in the destination that are not in the source).
/Z: Copies files in restartable mode, useful for network interruptions.
/R:5: Retries 5 times on failed copies.
/W:10: Waits 10 seconds between retries.
Other robocopy options:
/S: Copies all subdirectories, excluding empty ones
/MOV: Moves files and deletes them from the source directory
/MOVE: Moves files and directories and deletes them from the source directory
/LOG:file: Writes the output to a specific file
/LOG+:file: Appends the output log to a specific file
/MAXAGE:n: Doesn’t include files older than n days.
/MINAGE:n: Excludes files newer than n days.
/MAX:n: Copies only files that are smaller than n bytes.
/MIN:n: Copies only files that are larger than n bytes.
Robocopy is perfect for large-scale and complex copying tasks. It offers robust monitoring, retry mechanisms, and advanced options like multithreading and mirroring.
If we encounter any issues with robocopy, you might want to check our dedicated article and see what to do if robocopy is not copying files, so don’t miss it.
Which is better, xcopy or robocopy?
Robocopy offers more features, and as such is a better option than xcopy. If you’re performing simple tasks, then xcopy might be a better choice if you’re already familiar with it, but in terms of functionality, robocopy is a better choice.
Is xcopy obsolete?
Yes, xcopy is deprecated and replaced by robocopy. While you can still use xcopy, the latter offers better functionality.
What are the disadvantages Robocopy?
Robocopy has issues with larger files and it can’t handle them properly. Windows has limited memory that it can allocate to Robocopy, and if it uses all the memory issues will occur.
Should I use copy or xcopy?
Copy is a basic tool, and it doesn’t even copy directories, as such it offers extremely limited functionality, and it shouldn’t be used except for copying individual files.
If you’re looking for an advanced tool, you might want to learn what is rsync and how to use it properly.
Understanding the strengths of each command can help you choose the right tool for your specific needs, and you can even use them to transfer data from one disk to another.
Regularly updating your backup routines and using the appropriate commands can save you from data loss and ensure smooth file management.
The PHASE0_INITIALIZATION_FAILED BSOD (Blue Screen of Death) has a value (bug check) of 0x00000031 and is usually encountered during the startup phase of the PC. While its occurrences are limited, I have seen several reports of the error over the years, all of which were easily fixable!
The PHASE0_INITIALIZATION_FAILED is usually caused by corrupt system files, buggy startup programs, outdated drivers, major OS misconfiguration, and faulty hardware.
To start with, install pending Windows updates, disconnect non-critical peripherals from the PC, and check for overheating. If none work, move to the solutions listed next!
How can I fix PHASE0_INITIALIZATION_FAILED?
1. Perform a Startup Repair
Turn on the PC, and as soon as the Windows logo appears, power it off. Repeat this thrice, and on the fourth attempt, Windows should initiate an Automatic Repair. If it doesn’t, repeat the process a few more times.
In all likelihood, Automatic Repair won’t be able to fix the problem. Click on Advanced options to proceed.
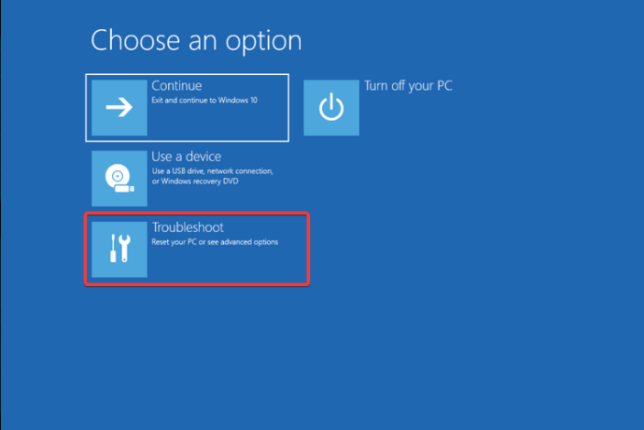
Click on Troubleshoot.
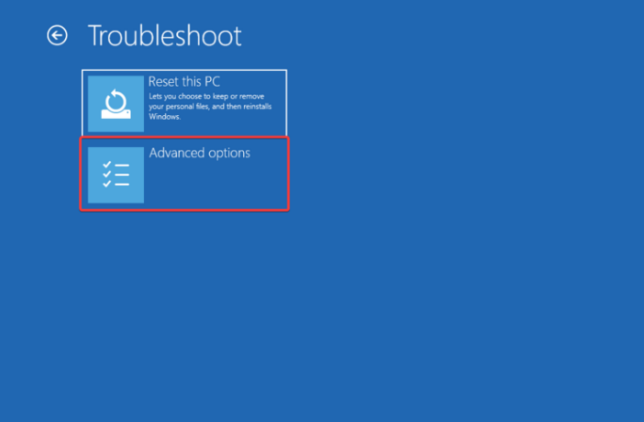
Again, click on Advanced options.
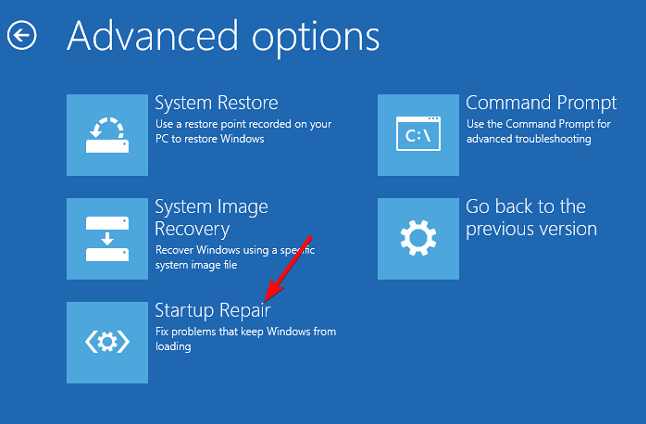
Now, choose Startup Repair.
Enter the password for your user account, and click on Continue.
Let Startup Repair diagnose and fix problems. Once it’s complete, restart the PC normally and check for improvements.
Since the PHASE0_INITIALIZATION_FAILED error is encountered at startup, the built-in Startup Repair utility, accessible via the Windows Recovery Environment, helps fix it in 7 out of 10 cases!
2. Repair the corrupt system files
Tip
For the solutions listed below, if you can’t access the system components, boot into Safe Mode and then proceed with the troubleshooting.
Press Windows + S to open Search, type Command Prompt in the text field, and click on Run as administrator.
Click Yes in the UAC prompt.
Paste the DISM commands individually and hit Enter after each: DISM /Online /Cleanup-Image /CheckHealthDISM /Online /Cleanup-Image /ScanHealthDISM /Online /Cleanup-Image /RestoreHealth
Next, paste the following command and hit Enter: sfc /scannow
Finally, reboot the PC to fully apply the changes.
Or, to automate the process, you can get a top-rated driver updater tool, which will automatically identify the connected devices, search the web for the latest drivers, and install them.
4. Disable startup programs
Press Ctrl + Shift + Esc to open the Task Manager, and go to the Startup apps tab from the left pane.
Now, identify any apps that read Enabled under the Status column, select them individually, and click on Disable.
Restart the computer and check whether you still encounter the PHASE0_INITIALIZATION_FAILED BSOD.
If not, re-enable the startup apps one by one, reboot the PC after each, and as soon as the error re-appears, the app enabled last was the culprit. You can now safely uninstall the app.
5. Modify the Registry
Editor’s tip
Before you start editing the Registry, create a restore point. This will allow you to revert the changes in case things don’t go as planned. Also, do not edit or delete any keys other than the ones listed below.
Press Windows + R to open Run, type regedit in the text field, and hit Enter.
Click Yes in the UAC prompt.
Paste the following path in the address bar and hit Enter:HKEY_LOCAL_MACHINE\SYSTEM\CurrentControlSet\Services\Processor
Double-click the Start DWORD on the right.
Enter 4 under the Value data field, and click OK to save the changes.
Now, go to this path: HKEY_LOCAL_MACHINE\SYSTEM\CurrentControlSet\Services\Intelppm
Again, select the Start DWORD, enter 4 under Value data, and click OK to save the changes.
Restart the PC and check for improvements.
If the PHASE0_INITIALIZATION_FAILED error is faced alongside IRQL_NOT_LESS_OR_EQUAL and the problematic file is intelppm.sys, modifying the Registry Editor fixes them all in one go!
6. Reset Windows to factory defaults
As a last resort to fix software-based issues, you can always reset Windows to factory defaults. I recommend you let it delete all the stored data, both files and apps, to eliminate even the smallest of the conflicts. As for the critical files, you can move them to an external drive before the reset.
7. Check for faulty hardware or visit a repair shop
If nothing works, it’s likely a malfunctioning hardware to blame for the PHASE0_INITIALIZATION_FAILED blue screen error in Windows. So, if you can, check for faulty hardware.
However, I recommend taking the PC to a repair shop at this point, having all the components thoroughly inspected for issues, and getting the faulty one repaired or replaced!
One of these solutions should have helped fix the BSOD. In my experience, the PHASE0_INITIALIZATION_FAILED error usually has to do with a software or driver conflict unless it starts to appear right after a Windows reinstall or reset, in which case, it’s the improper OS installation at fault.
If the problem persists, check the BSOD error logs, try identifying the underlying cause, and then manually rectify it!
For any queries or to share what worked for you, drop a comment below.
Moving your Downloads folder to another drive can help free up space on your primary drive and keep your files better organized. Here are some easy steps to make this transition smooth and hassle-free.
How do I move the Downloads folder in Windows?
1. Using File Explorer
Press Win + E on your keyboard to open File Explorer.
On the left sidebar, locate and right-click on the Downloads folder.
From the right-click menu, select Properties.
In the Properties window, click on the Location tab, then on the Move button.
Then, select the new drive and folder where you want to move your Downloads folder. Click Select Folder once you’ve chosen the destination.
Click Apply and then OK. You will be prompted to move all existing files from the old location to the new location. Confirm by clicking Yes.
Changing the location through File Explorer allows you to seamlessly move all your current downloads to a new location without losing any files.
2. Using Windows Settings
Press Win + I to open the Settings app.
Click on System, then select Storage.
Click on Where new content is saved under Advanced storage settings.
Under New documents will save to, select the new drive for your Downloads folder from the drop-down menu. You can do the same for apps, media and other file types.
Using the Settings app provides a clear way to specify where new downloads should be saved, ensuring you won’t clutter your primary drive.
3. Move the Downloads folder on Windows using Command Prompt
Press Win + R, type cmd, and press Enter.
Type the following command and change the D drive letter to the actual drive letter of your destination, then press Enter: move %USERPROFILE%\Downloads D:\Downloads
Ensure that the Downloads folder has been successfully moved to the new location.
Using Command Prompt is a quick method for users comfortable with command-line operations to move folders efficiently.
4. Change the default Download folder for your browser
Click on the three vertical dots in the upper-right corner of Chrome and select Settings.
Scroll to the bottom and click Advanced.
Under the Downloads section, click Change and select the new folder on your desired drive. Click OK to confirm.
Here, you may also toggle the Ask where to save each file before downloading option. As the name suggests, this will offer you the opportunity to provide a different destination path to every file you download.
Changing the default download folder in your browser ensures that all future downloads are saved in the new location, making it easier to manage your files. We have provided the instructions for Chrome because it’s the most popular browser, but the method is similar for all the major browsers.
By following these steps, you can easily move your Downloads folder to another drive, ensuring better organization and more free space on your primary drive. Remember to regularly check your storage settings to avoid clutter and keep your system running smoothly.
If your file stops copying halfway the first thing to check is whether the destination drive has enough available storage or has any integrity issues. There are many other potential causes, but we’ve got some quick and effective solutions to help you get back on track.
What do I do if a file stops copying halfway in Windows?
1. Check the drive storage space
Right-click the target drive in File Explorer (Win + E) and select Properties.
Verify the free storage space to see if it’s enough for the file you’re trying to copy.
If it’s insufficient, delete some files to free up space.
Ensuring enough space on the target drive helps avoid interruptions during file copying.
2. Optimize the drive
Press the Windows key and type defragment.
Click on Defragment and Optimize Drives.
Select the drive and click Optimize.
Disk defragmentation consolidates free space and enhances performance, reducing the chance of the copying process stopping midway. Defragmentation is only recommended for HDD. The procedure for SDD is optimization, but it’s less effective.
3. Update the disk drivers
Right-click the Start button and select Device Manager.
Expand Disk drives, right-click the target drive, and select Update driver.
Follow the on-screen instructions to update the driver.
Updating drivers ensures compatibility and performance, preventing potential interruptions during file transfers. With the help of professional software, such as Fortect Driver Updater, this can be done safely and with minimal effort.
Right-click the target drive in File Explorer and select Properties.
Go to the Tools tab and click Check under Error checking.
Follow the prompts to scan and fix any errors.
Error checking resolves file system issues that might be causing the copying to stop.
5. Perform a Clean Boot
Press the Windows key, type msconfig, and press Enter.
In the System Configuration window, go to the Services tab.
Check Hide all Microsoft services, then click Disable all.
Go to the Startup tab and click Open Task Manager.
Disable all startup items.
Restart your PC and try copying the file again.
A clean boot eliminates software conflicts that could interrupt the copying process.
6. Format the destination drive to NTFS
Back up any important files from the target drive.
Right-click the destination drive in File Explorer and select Format.
Choose NTFS as the file system.
Uncheck Quick Format and click Start.
If the file you’re trying to copy is larger than 4 GB, you won’t be able to copy it on a FAT 32 drive. Formatting to NTFS accommodates larger files and resolves format-related interruptions.
7. Disable Remote Differential Compression
Press the Windows key and type Turn Windows features on or off.
In the Windows Features dialog, uncheck Remote Differential Compression API Support.
Click OK and restart your computer.
Disabling RDC can help speed up file transfers by minimizing network-related delays.
8. Temporarily disable indexing of your drives
Press Win + R, type services.msc, and press Enter.
Find the Windows Search service, right-click, and select Stop.
Try to copy your file again. If that doesn’t work, start the service again.
Stopping the indexing service can prevent it from interfering with file copy operations.
9. Temporarily turn off the antivirus
Open your antivirus program.
Disable real-time protection or active scanning features temporarily.
Attempt the file transfer again.
Antivirus software might interfere with large file transfers. Disabling it temporarily can allow the transfer to complete.
10. Allow your external hard drive to cool down
Unplug the external hard drive.
Wait for at least 10 minutes.
Plug it back in and resume the file transfer.
Overheating can throttle the drive performance. Letting it cool down can prevent interruptions during the transfer.
By following these steps, you should be able to resolve the issue of your file stopping halfway during copying. To avoid such problems in the future, regularly check your drive’s health and keep your system updated.
Following file download warnings, Google is tweaking Chrome’s “Not Secure” warning (Soft of). The company is currently testing a redefined security warning in Chrome for users navigating to websites that don’t support HTTPS. This new warning aims to provide users with more information to make informed decisions. Let’s explore what we know and why this matters.
In recent years, there has been a strong push toward HTTPS adoption by major browsers and website owners due to growing concerns about online security and privacy. Chrome, in particular, has implemented various measures to encourage HTTPS usage, including the well-known “Not Secure” warning.
Chrome displays the following warning when you encounter a site that doesn’t connect over a secure connection:
“The connection to this (website) is not secure. You are seeing this warning because this site does not support HTTPS. Learn more about this warning.” Chrome provides options to navigate away from the page or continue to the site at your own risk.
The connection to the site is not secure warning. Image Credit: WindowsReport
It means the website you’re visiting is using the HTTP protocol instead of HTTPS. In other words, data transmitted over HTTP is sent in plain text, making it easily readable by anyone intercepting the connection.
Google tests new Security warnings for insecure sites in Chrome
Now, Google is introducing a new feature called” Balanced mode Ask Before HTTP” that shows a few warningsfor insecure sites. This feature will replace the existing warning with the following message:
Here is the new warning as spotted by WindowsReport.
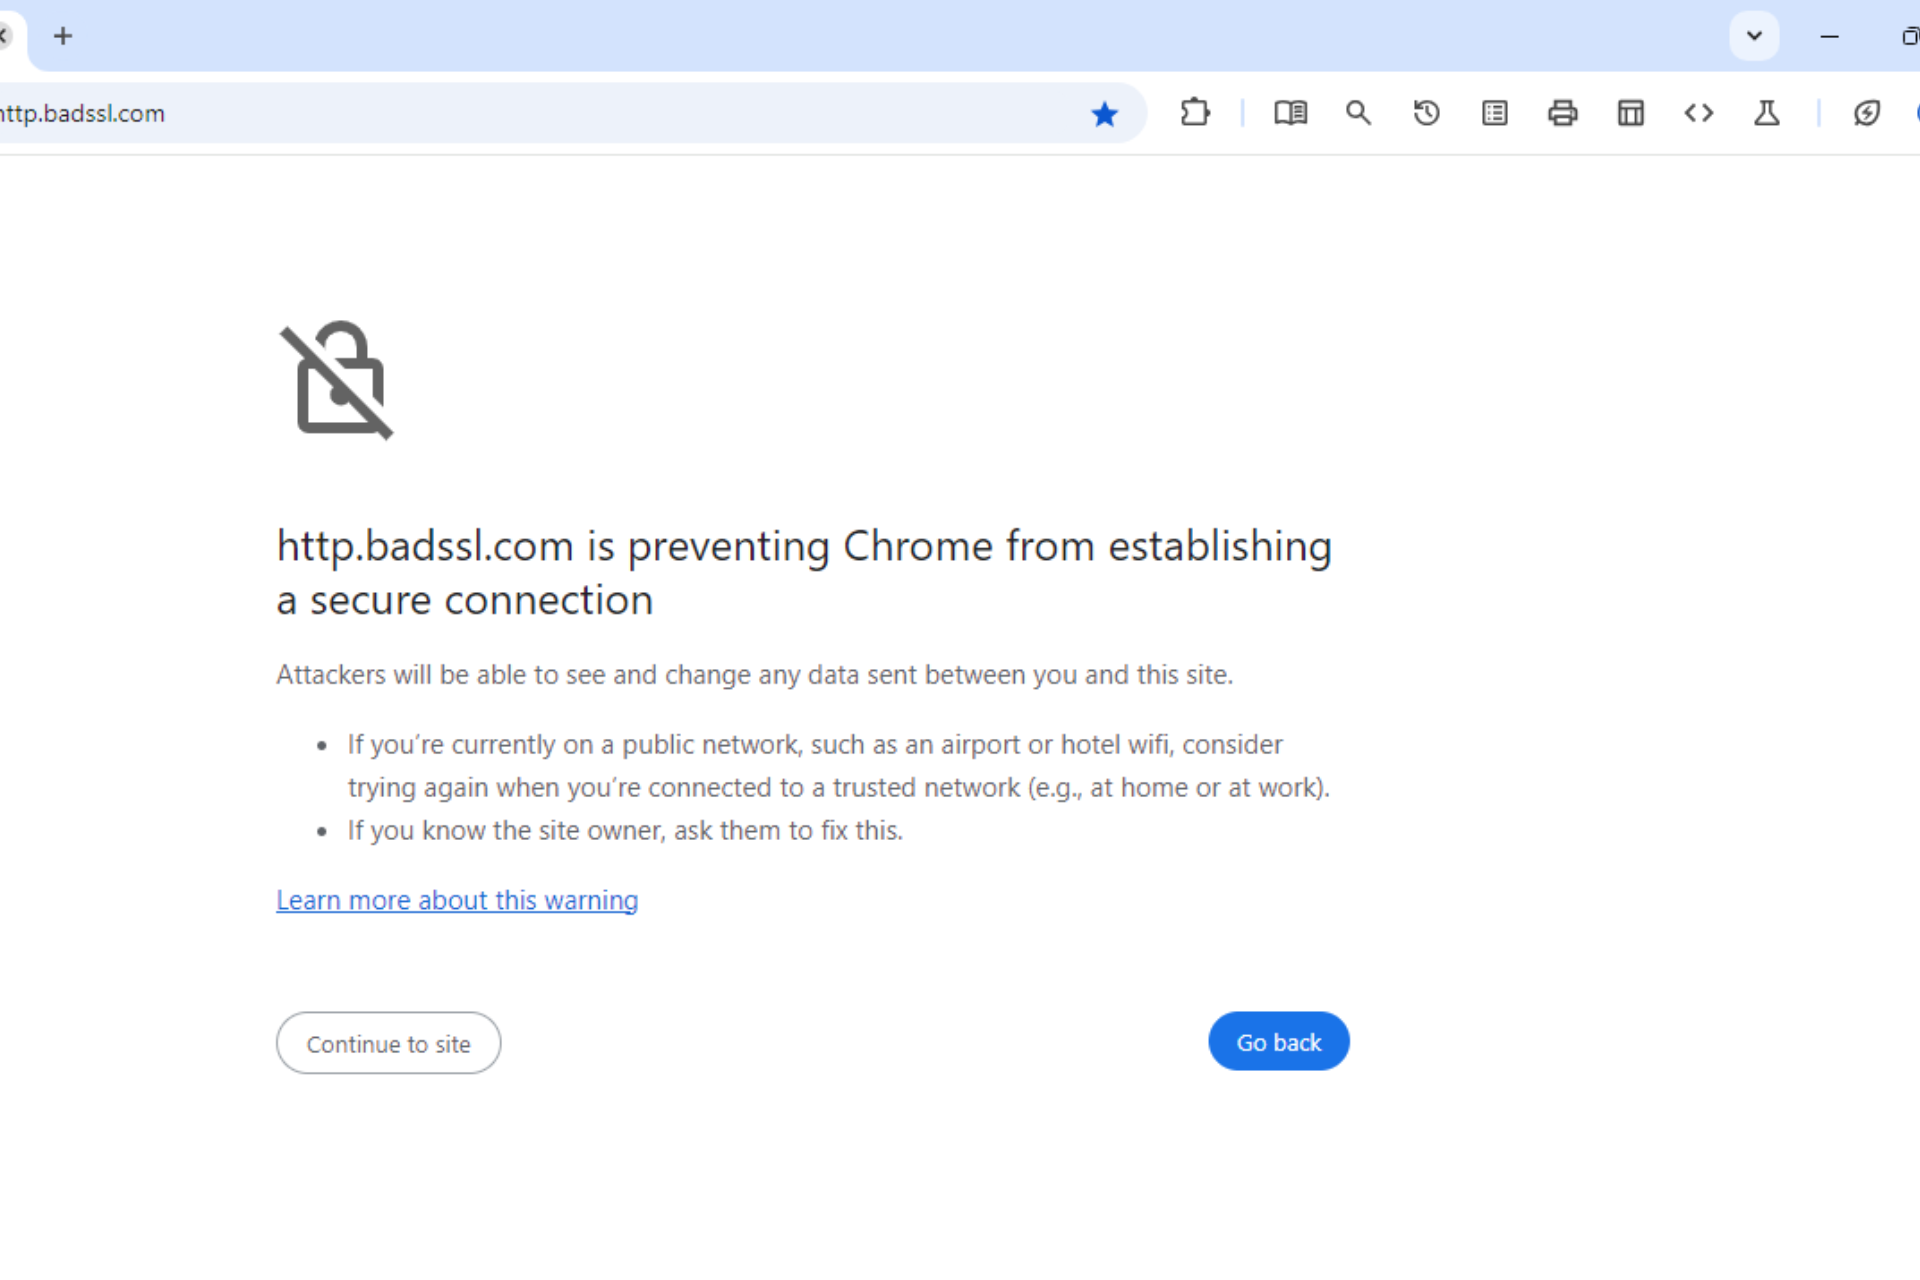
“Website is preventing Chrome from establishing a secure connection. Attackers will be able to see and change any data sent between you and this site. If you’re currently on a public network, such as an airport or hotel Wi-Fi, consider trying again when you’re connected to a trusted network (e.g., at home or at work). If you know the site owner, ask them to fix this.”
The Site is preventing Chrome from establishing a secure connection, new warning. Image Credit: WindowsReport
Both warnings convey a similar meaning: the site lacks proper security measures. Google has also updated the text and icons in this new warning, tentatively named “HTTPS First Mode Interstitial August 2024 Refresh ” available behind a flag named “Use the new interstitial for HTTPS-First Modes”
Image Credit: WindowsReport
Keep in mind that this warning may not be finalized, as Google could tweak or change the text. However, Google is actively testing this feature in Chrome.
INCONSISTENT_IRP is a Blue Screen of Death (BSOD) error with a bug check value of 0x0000002A, caused when the IRP (I/O Request Packets), used for communication between the device and drivers, contains incorrect information.
Over the years, there have been only a handful of encounters of the BSOD. Microsoft’s official website states that the error doesn’t affect systems anymore and is used for debugging!
In case you encounter the INCONSISTENT_IRP blue screen error, it’s likely due to corrupt system files, outdated or buggy drivers, malware infection, disk issues, and conflicting third-party apps. Before you begin troubleshooting, install any pending Windows updates and disconnect any peripheral prone to hardware failure, as this, too, might fix things!
How can I fix the INCONSISTENT_IRP BSOD?
1. Repair the corrupt system files
Press Windows + S to open Search, type Command Prompt in the text field, and click on Run as administrator.
Click Yes in the UAC prompt.
Paste the following DISM commands individually and hit Enter after each: DISM /Online /Cleanup-Image /CheckHealthDISM /Online /Cleanup-Image /ScanHealthDISM /Online /Cleanup-Image /RestoreHealth
Next, execute this command to run the SFC scan: sfc /scannow
Once done, reboot the PC for the changes to come into effect.
If it’s the corrupt system files to blame for the INCONSISTENT_IRP blue screen error in Windows 11, your primary approach should be to run the DISM commands and SFC scan. This will replace all corrupt system files with their cached copy stored on the system.
2. Update all the drivers
Press Windows + X to open the Power User menu, and select Device Manager.
Individually expand all the entries, right-click on the devices underneath, and choose Update driver.
Next, select Search automatically for drivers and let Windows install the best locally available driver version.
If a newer version with a patch is unavailable, you can always roll back the driver and revert to a previous stable version.
3. Scan the PC for malware
Press Windows + S to open Search, type Windows Security in the text field, and click on the relevant result.
Click on Virus & threat protection.
Now, click Scan options.
Select Full scan and then click on Scan now.
Wait for the scan to complete and see if any threats were eliminated during the course of it.
While Windows Security is a reliable antivirus solution, if it’s unable to detect malware, I recommend you get a top-rated antivirus solution to run a more extensive scan!
4. Repair the disk drive
Press Windows + R to open Run, type cmd, and hit Ctrl + Shift + Enter.
Click Yes in the UAC prompt.
Paste the following command and hit Enter: chkdsk /r
If asked to schedule the scan during the next reboot, press Y and hit Enter to confirm.
Finally, restart the computer and let Check Disk run tests.
If the built-in Check Disk utility fails to find any issues with the drive, try an effective disk repair tool. It will locate and mark bad sectors on the drive, preventing further data storage on them and, subsequently, eliminating the INCONSISTENT_IRP BSOD.
5. Uninstall conflicting apps
Press Windows + R to open Run, type appwiz.cpl in the text field, and hit Enter.
Select any recently installed app which might conflict with the core functioning of the OS, and click Uninstall.
Follow the on-screen instructions to complete the process.
If the problem remains unresolved, uninstall more apps until you identify the problematic one. You can then reinstall other apps that were removed during the process.
For most users affected by the INCONSISTENT_IRP Blue Screen of Death error, uninstalling apps with too many privileges did the trick!
If this doesn’t work, use a reliable software uninstaller tool to get rid of any app-related leftover files and Registry entries which might still be causing the error.
6. Perform an in-place upgrade
NOTE
The steps to perform an in-place upgrade listed below are for Windows 11. If you are running the previous iteration, check our dedicated guide for repair upgrade on Windows 10.
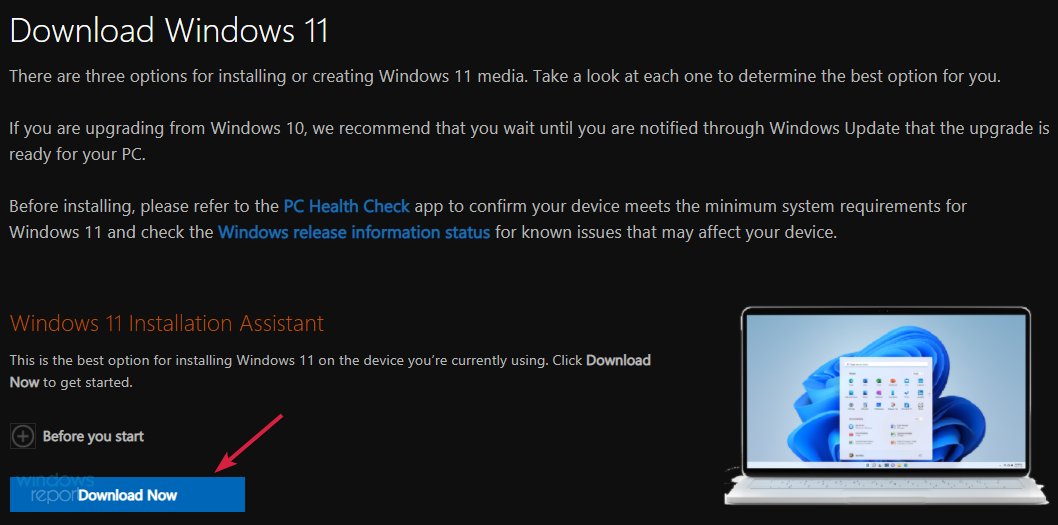
Go to Microsoft’s official website, pick the OS edition and production language, and then download the Windows 11 ISO.
Right-click on the downloaded ISO file, choose Mount, and then click Open in the confirmation prompt.
Run the setup.exe file.
Click on Next to proceed.
Click Yes to accept Microsoft’s license terms.
Make sure the setup reads, Keep personal files and apps, and then click on Install.
When nothing else works, an in-place upgrade will effectively fix all software-related issues and help you get rid of the INCONSISTENT_IRP error. A key benefit of performing an in-place upgrade is that all your personal files and apps remain safe while the Windows components get fixed!
If this, too, fails, it’s most likely a hardware issue triggering the INCONSISTENT_IRP blue screen error in Windows. In this case, you must contact the manufacturer or visit a repair shop.
Think about being on a video call, but the lighting in your room is not helpful. You appear like a silhouette or too bright because of excessive light. Now, think about what would have been possible if your computer had solved this situation. You would have ideal lighting regardless of any circumstances.
According to one of the latest patents, Microsoft is working on precisely that. The Redmond-based tech giant is developing technology focused on improving facial illumination based on your screen’s content, ensuring you are visually appealing when participating in video meetings.
This is how it works: Your computer collects images from your webcam and directly decides if there is insufficient light on your face by checking whether it appears too bright or too dark. Then, it recognizes what is shown on the screen and adjusts that accordingly.
The tech will also show different graphic elements, such as a ring of light that encircles the window you are currently on to illuminate your face in the video. Depending on your video meetings, these could differ in color, size, and placement.
But the system can do more. It can also shift the content on your display, like moving application windows around or changing their size, to help make your face more straightforward. If all of this is not enough, it can also alter the settings on your webcam to depict you optimally.
The tech uses a neural network (AI) model to oversee everything. It gets the images from your webcam and what’s on your screen and determines how to light up your face.
When sitting in a dim room or opposite a window with too much backlight during a video call, imagine this: your computer automatically adjusts its screen content to light you up perfectly. This could be a total game-changer.
Wondering how to stop syncing mail? Email synchronization across devices is a convenient feature. Still, there are times when you may want to disable it, whether to save data, reduce distractions, or manage multiple accounts separately.
I’ll show you the steps on various devices to help you take control of your email management.
Let’s get into it!
How To Stop Syncing Mail
Several services, including Outlook, Yahoo, Gmail, etc., can help you sync emails. For this illustration, I’ll use Gmail. You can perform this procedure on your PC or mobile. I’ll show you the steps for both devices.
On PC
Follow the below steps:
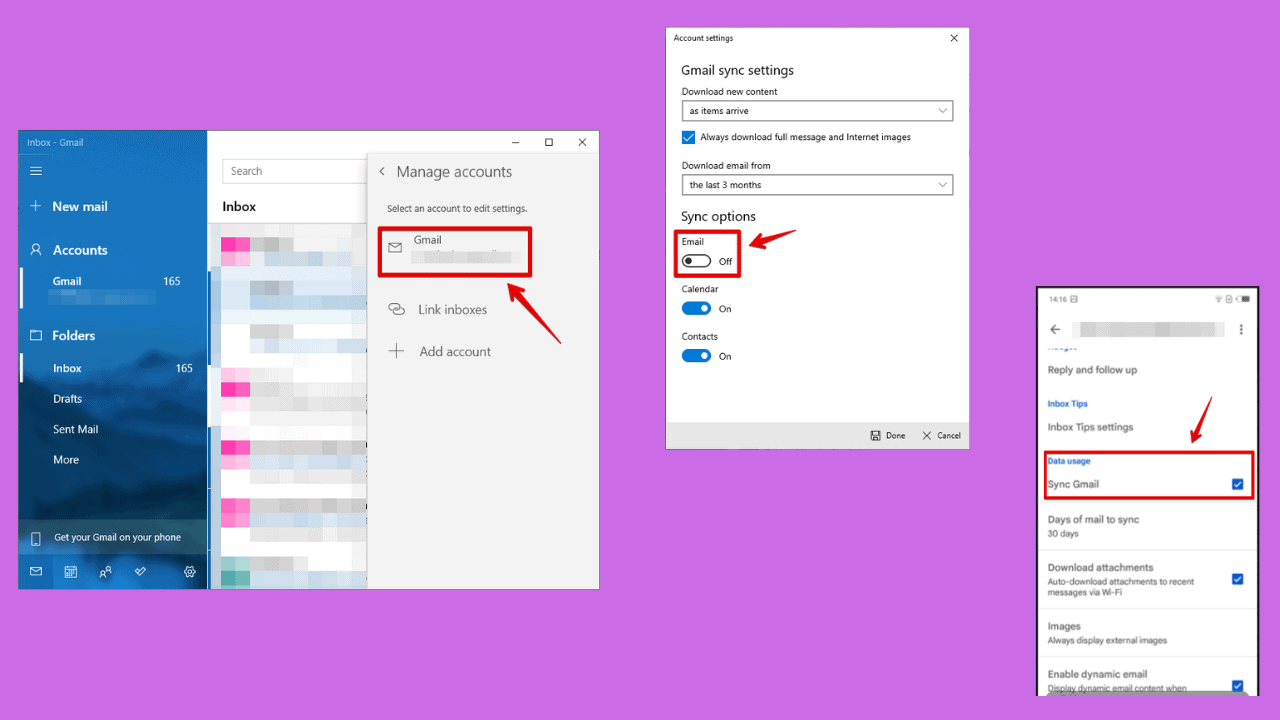
Open the Windows Mail app on your PC.
Click on the Settings gear icon in the lower-left corner.
Select Manage accounts from the settings menu.
Click on the Gmail account you wish to stop syncing or tap on your account if you have one.
In the account settings, click on Change mailbox sync settings.
Toggle off the Email switch under Sync options to stop syncing.
On Mobile
Follow these instructions:
Open the Gmail app and tap the hamburger menu in the top left corner.
Scroll down and tap Settings.
Select the Gmail account you want to stop syncing.
Scroll down to locate Data usage and uncheck the box next to Sync Gmail to stop syncing. Confirm by tapping OK.
It’s that simple.
So, now you know how to stop syncing mail to manage your email experience better, reduce unnecessary notifications, and save data. The above steps will help you gain control over synchronization, ensuring you only receive messages on the devices you choose.
Many readers have complained about the PORT_DRIVER_INTERNAL (0x0000002C) error on their Windows 11 devices. It usually occurs due to corrupt or outdated drivers, hardware issues like failing RAM, or third-party software interference.
To fix it, first, ensure your Windows is up to date, then run a malware scan using the Windows Security app or any third-party security software of your choice.
How can I fix the PORT_DRIVER_INTERNAL (0x0000002C) on Windows 11?
NOTE
First, press Windows + I to open Settings, then head to System>Recovery>Advanced Startup>Restart now. On the blue screen, select Troubleshoot, then Advanced options> Startup Settings. Press 4 or 5 to enter Safe mode, then click Restart. Now, follow the methods given below.
1. Turn off the Windows Firewall
Press the Windows key, type control panel, and click Open.
Select View by as Category, then click System and Security.
Click Windows Defender Firewall.
Locate and click the Turn Windows Defender Firewall on or off option from the left pane.
Next, under Private and Public network settings, choose Turn off Windows Defender Firewall (not recommended), then click OK.
You can also temporarily disable your security software to resolve this problem. Once you can access the mail, don’t forget to reverse engineer these steps to turn on the Windows Defender Firewall and enable the security software you have disabled.
2. Update the outdated drivers
Press Windows + R to open the Run window.
Type devmgmt.msc and click OK to open the Device Manager app.
Go through all the categories by clicking and expanding them. If you find a yellow triangle with an exclamation mark on any of the components in a category, right-click it to open the context menu and choose Update driver.
On the following pop-up, select Search automatically for drivers.
Follow the on-screen instructions to complete the process.
If you encounter any BSoD errors after an upgrade, updating the drivers on your computer is a good way to fix the problem. Read this guide to learn more.
Press the Windows key and type windows memory diagnostic in the search box. Click the first result to open it.
Choose Restart now and check for problems (recommended).
Your PC will restart, and the memory diagnostic scan will begin automatically. Wait for the process to finish.
Once done, your PC will reboot automatically, and after logging in, you will see results on the desktop.
However, if you don’t see the results, you can check them in Event Viewer. Press Windows and type event viewer in the search box. Click the first result to open it.
Click and expand the Windows Logs section from the left pane, and click System.
Now, on the right pane, choose the Actions menu and expand the System section.
Click Find.
In the text field, type memory diagnostic and click Find Next to get the scan logs.
It will take you to the results; click the General tab to see the information.
5. Uninstall unwanted apps
Press Windows + I to open the Settings app.
Go to Apps, then click Installed apps.
You will get a list of apps, to remove any of them, click three-dot icon, then select Uninstall.
Follow the on-screen instructions to complete the process.
6. Run the CHKDSK scan
Press the Windows key, type cmd in the search bar, and click Run as administrator.
Type the following command and hit Enter: chkdsk /f
Click Y if prompted and wait for the process to complete.
Reboot your computer to save the changes.
7. Perform a system restore
Press Windows + R to open the Run window.
Type rstrui and click OK to open the System Restore window.
On the System Restore window, click Next.
Select the restore point from the list, then click Next.
To conclude, to fix the PORT_DRIVER_INTERNAL error, you can run a malware scan, temporarily disable the Windows Defender Firewall, update drivers, recover missing files using an SFC scan, check your disk for file system errors or physical damage to memory modules.
If you have any suggestions or concerns about this error, feel free to mention them in the comments section below.
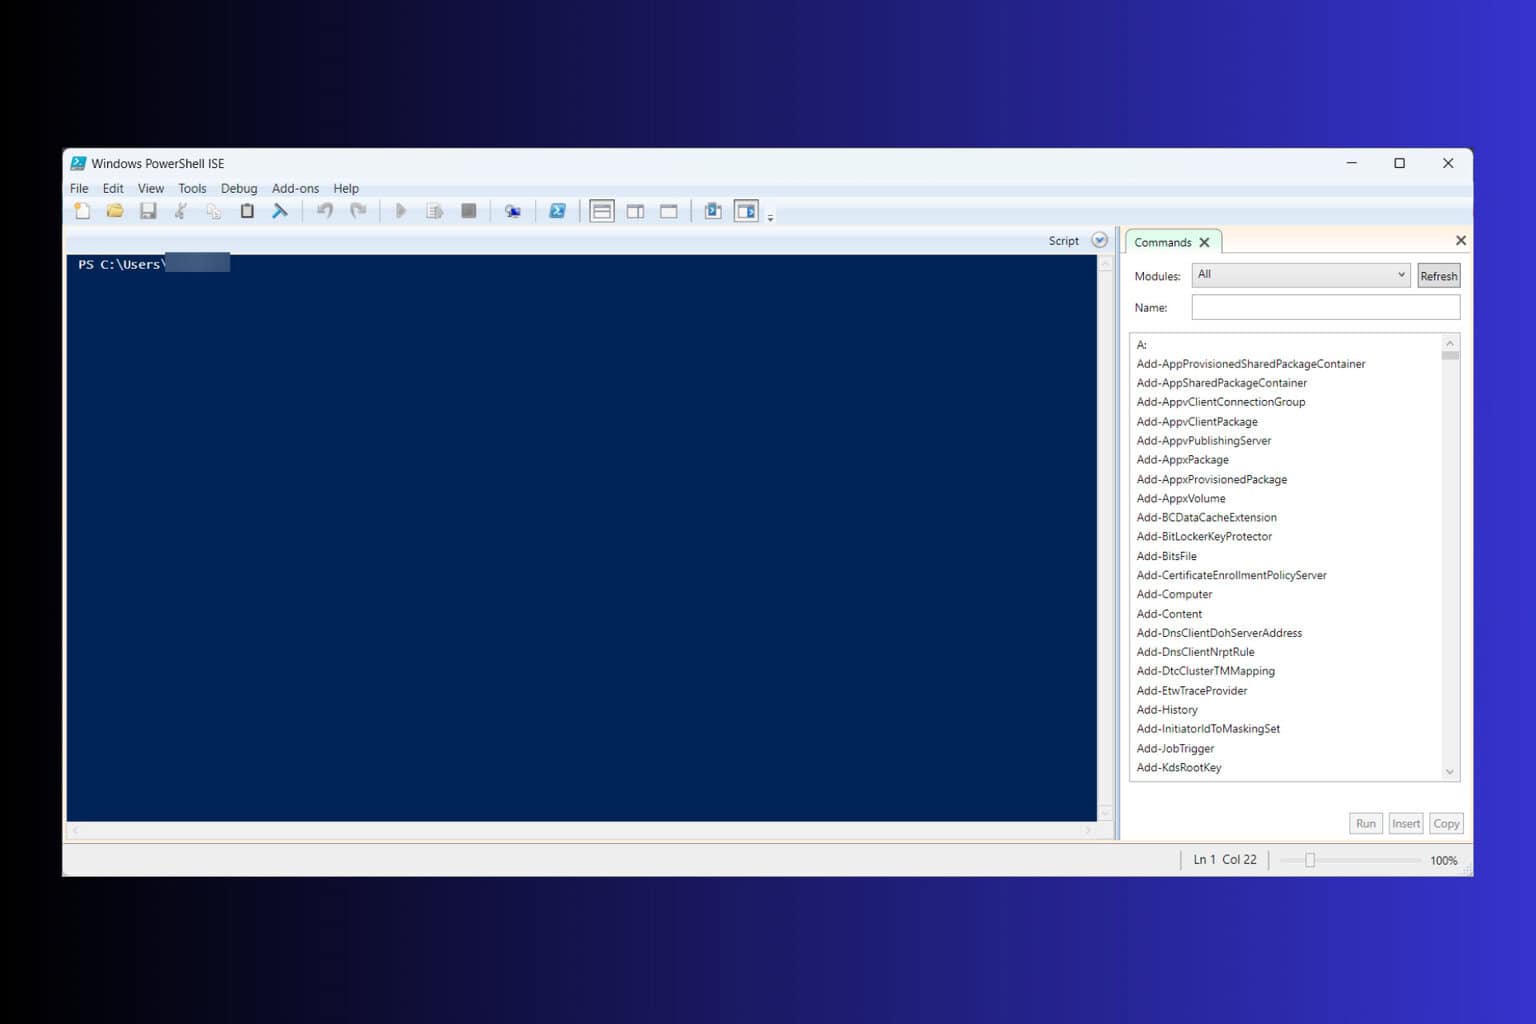
PowerShell ISE (Integrated Scripting Environment) is a powerful tool for writing, running, and debugging PowerShell scripts. It provides a graphical interface that simplifies script development, making it an essential tool for both beginners and seasoned scripters. Let’s dive into some practical solutions to help you master PowerShell ISE.
How do I access and use PowerShell ISE?
1. Accessing PowerShell ISE
Click on the Start menu type PowerShell ISE in the search bar.
From the list of results, click on Windows PowerShell ISE to open the application.
PowerShell ISE is preinstalled in Windows and it provides a user-friendly interface for script development, making it easier to write and debug scripts compared to the command line.
2. Installing PowerShell ISE
Click on the Start menu, type cmd in the search bar.
Right-click on Command Prompt and select Run as administrator.
In the Command Prompt, type the following command and press Enter: DISM /Online /Add-Capability /CapabilityName:Microsoft.Windows.PowerShell.ISE~~~~0.0.1.0
This command installs PowerShell ISE if it’s not already present on your system. Once installed, you can access it by searching for PowerShell ISE in the Start menu, as we explained in the first solution.
3. Debugging in PowerShell ISE
Open your script in PowerShell ISE.
Click on the line number where you want to set a breakpoint or press F9.
Click on the Run Script button or press F5.
When execution stops at the breakpoint, hover over variables to inspect them.
Use the Console Pane to type commands and inspect variable values manually.
This feature helps you to pause execution, check variable states, and troubleshoot issues effectively within your scripts.
4. Using the Command Add-on
Click on View in the menu bar.
Select Show Command Add-on.
Use the search bar in the Command Add-on pane to find commands and cmdlets.
Fill in the parameters and options in the form provided.
Click Insert to add the command to your script.
The Command Add-on simplifies the process of finding and using PowerShell commands, making script writing more efficient.
5. Multi-line editing in PowerShell ISE
Press Shift + Enter to create a new line below the current line.
Press Alt + Shift and use the arrow keys to select multiple lines.
Make your changes across all selected lines at once.
Multi-line editing allows you to manage and modify complex scripts easily, reducing errors and saving time.
6. Creating and running a simple script
Click on the New Script icon in the toolbar.
A new tab opens for the untitled file.
Start writing your script. For example: Write-Host "This is a test output to the monitor"
Click on the Save Script icon or go to File > Save As.
Name the script (e.g., testscript1.ps1) and save it.
Click on the Run Script icon or press F5.
Running your script in PowerShell ISE allows you to see output and debug issues immediately, making development more interactive and efficient.
7. Using Selective Execution
Select the portion of the script you want to run.
Press F8 or click Run Selection from the toolbar.
Selective execution lets you test parts of your script individually, which is useful for debugging and iterative development.
8. Managing breakpoints
Click on the line number or press F9.
Click on the breakpoint symbol or press F9 again.
Manage breakpoints through the Debug menu.
Using breakpoints helps you control script execution, allowing you to troubleshoot and verify each step of your script.
What are the differences between PowerShell, PowerShell ISE, and PowerShell x86?
PowerShell
Description: A command-line shell and scripting language.
Usage: Suitable for quick command execution and automation scripts.
Platform: Available on Windows, Linux, and macOS.
PowerShell ISE
Description: A graphical user interface for scripting and debugging.
Usage: Best for writing, testing, and debugging scripts with features like syntax coloring and multiline editing.
Platform: Available only on Windows.
PowerShell x86
Description: A 32-bit version of PowerShell.
Usage: Used for compatibility with 32-bit applications and scripts.
Platform: Available on 64-bit versions of Windows to run 32-bit scripts.
Understanding these differences ensures you use the right tool for your specific task, whether it’s simple script execution or complex script development.
These solutions collectively enhance your scripting experience in PowerShell ISE, whether you are automating tasks, managing systems, or developing complex scripts. Remember to regularly update your PowerShell ISE and scripts to maintain compatibility and security.
Microsoft Clipchamp, the Redmond-based tech giant’s native video editor, does not work in Firefox. While this isn’t exactly news, considering it has been known for a while, and Microsoft acknowledged it, it seems that the topic has gained renewed interest lately thanks to a Reddit post, where users, unsurprisingly, would love Microsoft Clipchamp on Firefox.
Some tickets to Mozilla have been open for more than two years, with Clipchamp users asking the company to support the video editing tool in the Firefox browser.
Microsoft, on the other hand, has published a blog post explaining why Firefox doesn’t support Clipchamp. Apparently, the video editor tool pushes browser tech to the limits, and some, like the Chromium-based Edge and Chrome, are managing it, while others, such as Firefox and Safari, don’t.
Our service pushes web browsers to their limits by using many newer technologies. Different browsers support these technologies to a varying degree, sometimes not at all. This is why Clipchamp doesn’t work in some browsers such as Safari and Firefox.
Unfortunately, we also tried to open Clipchamp in Firefox to no avail. You can access the site, but when you click the Try for Free button, it will take you to a page that says the video editor is not supported on this browser.
Ironically, it advises users to download Chrome or Edge if they want to use the web version of Microsoft Clipchamp.
The Redmond-based tech giant advises users to open Clipchamp in Edge or Chrome. However, many people are using Firefox. The browser has a modest 6.64% market share, but according to the latest stats, it’s the fourth most used browser in the world.
And it’s 2024: Web services such as Clipchamp should be available to all browsers. This would benefit users and Microsoft, too.
Some users have unofficial ways to get Clipchamp to work on Firefox, with one Redditor saying that you can get it to work if you change the user agent on Firefox. Changing the user agent on Firefox is possible, but it’s not accessible for regular people. If you want to give it a try, though, you can follow our extensive guide.
Switching off and switching on your Windows 11 PC should be a seamless process but if you consistently get a blue screen accompanied by the it looks like Windows didn’t load correctly message, you’ll need to address underlying issues before it becomes catastrophic.
Like many BSoD errors, incorrect or sudden shutdowns, corrupt system files, and outdated or incompatible drivers are the main causes of this error.
Connect a USB drive with at least 8GB storage and above.
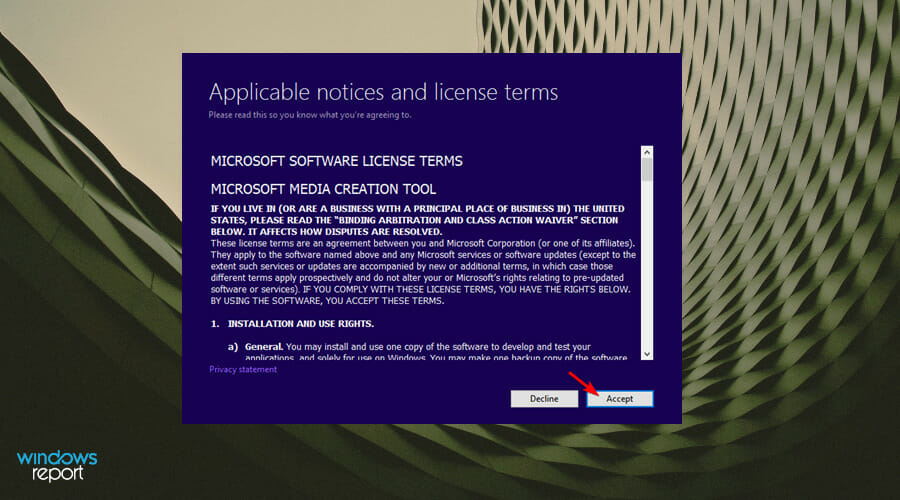
Run the Media Creation Tool and click on Accept for the terms and agreement, then proceed.
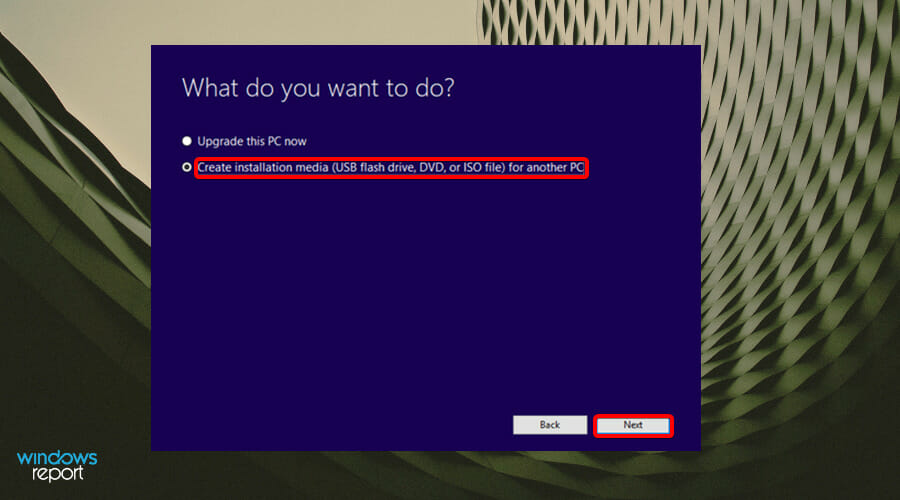
Choose the Create installation media (USB flash drive, DVD, or ISO File) option and click Next to proceed.
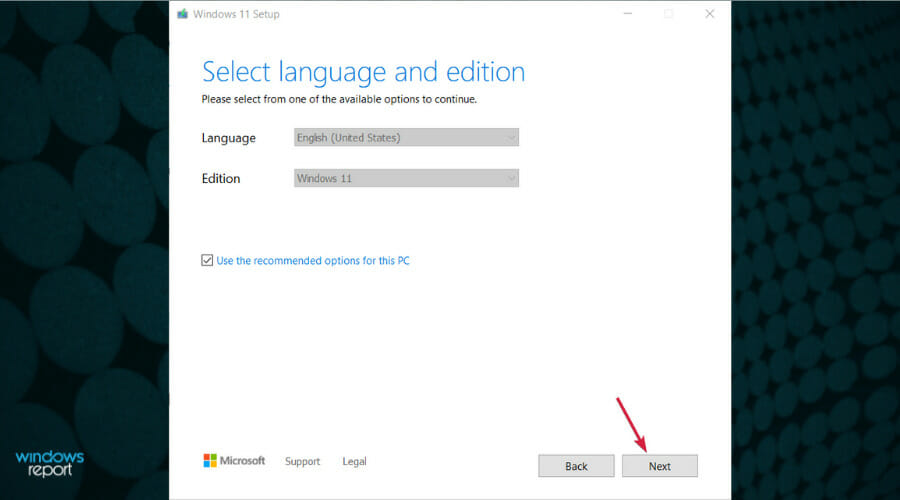
Select language, architecture, and edition from the drop-down menus then click Next.
Choose USB flash drive as the media to use.
Wait for the process to be completed.
1.2 Rebuild BCD
Connect the bootable USB to one of the available ports.
Select the Windows key and press the Power button, then click on Restartto start the troubleshooting via the Advanced Startup option.
A new window will appear with a set of options. SelectTroubleshoot.
Select Advanced options.
Next, select Command Prompt.
In the command window, type the following command prompt and press Enterwhen done: bootrec /rebuildbcd
After typing the command prompt, one of two screens will appear.
If this screen appears, type the following command prompts pressing Enterafter each one: attrib c:\boot\bcd -s -h -rren c:\boot\bcd bcd.oldbootrec /rebuildbcd
If this screen appears, you will have to restart your PC.
2. Run the necessary troubleshooters
2.1 Run the Hardware and Devices troubleshooter
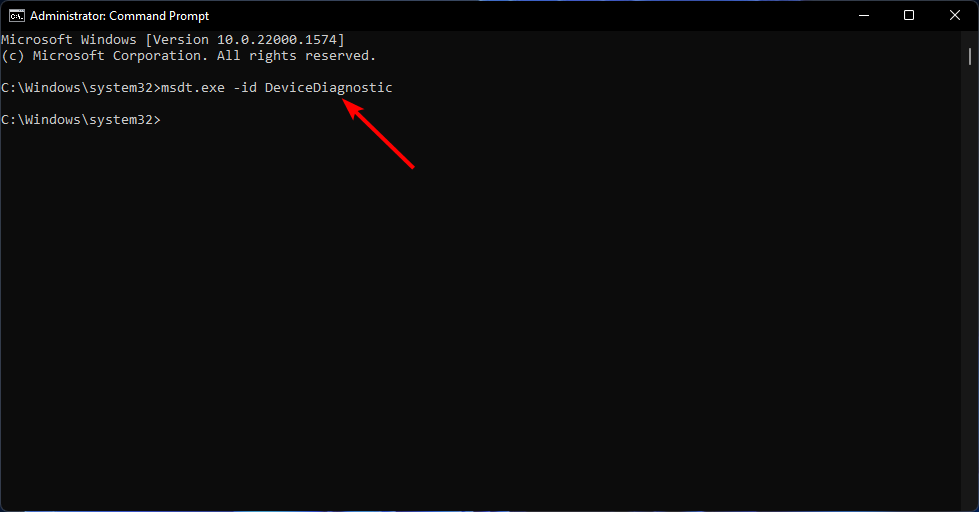
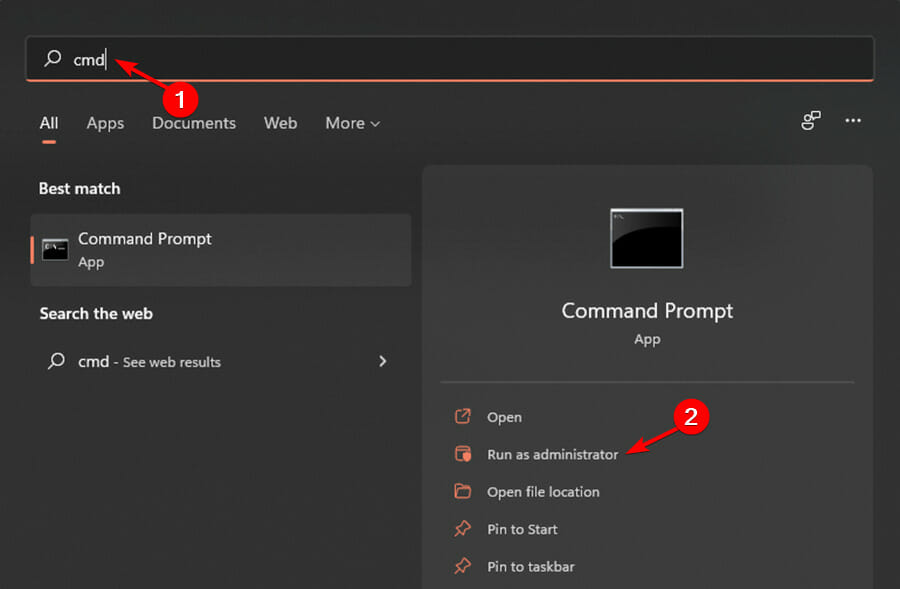
Hit the Windows key, type cmd, and select Run as administrator.
Type the following command and hit Enter: msdt.exe -id DeviceDiagnostic
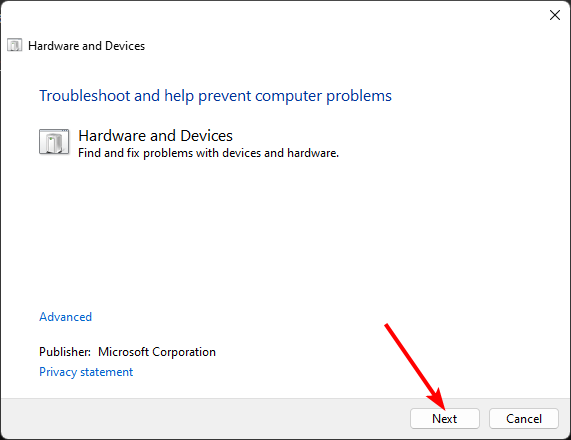
In the Hardware and Devices dialog that appears, click Next.
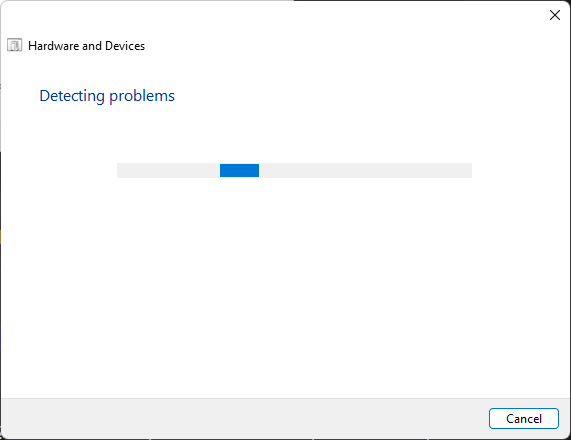
The tool will start scanning for any problems with your hardware and recommend a fix. After it is done, try again with Windows update and check if the error persists.
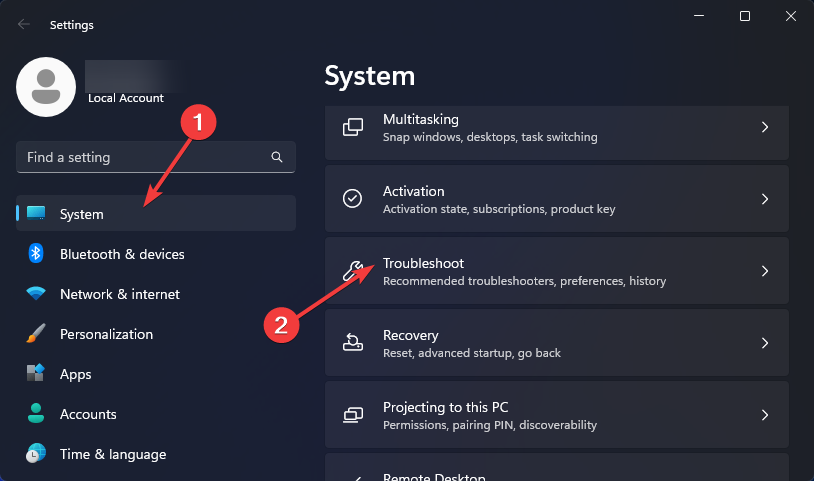
Press the Windows + I on your keyboard to open Settings, select the System tile, and scroll down to choose Troubleshoot on the right pane.
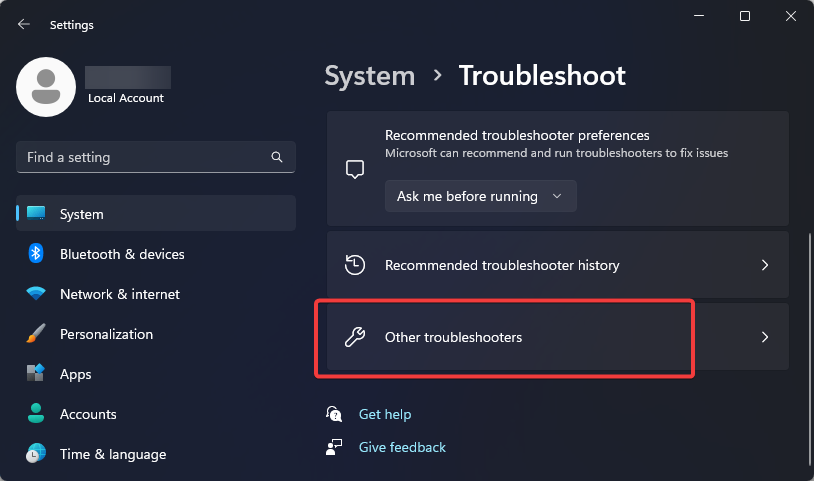
Next, select Other troubleshooters.
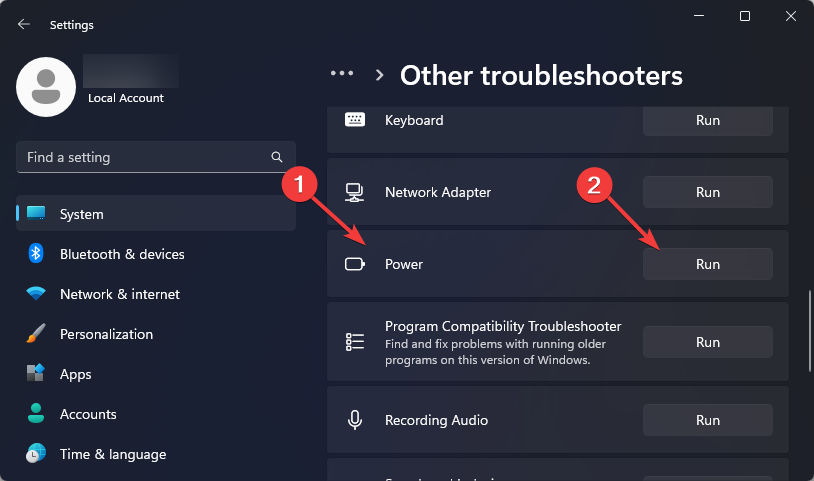
Scroll down to locate Power and click on the Run button to start the troubleshooting.
Wait for Windows to detect the issue, then follow the on-screen instructions to apply the fixes.
Restart your PC.
Your power settings may have been misconfigured causing random shutdowns. For the best power efficiency settings, check out our article for improved overall performance.
2.3 Run the RAM health test
Hit the Windows key, type cmd in the search bar, and click Run as administrator.
Type in the following command and hit Enter: MdSched
The Windows Memory Diagnostic prompt will appear, then select between Restart now and check for problems or Check for problems the next time I start my computer to run the test.
If the built-in Windows test is insufficient, you can opt for an advanced RAM stress test software to do a thorough test and recommend solutions.
3. Perform DISM and SFC scans
Hit the Start Menu icon, type cmd in the search bar, and click Run as administrator.
Type the following commands and press Enter after each one:DISM.exe /Online /Cleanup-Image /Restorehealthsfc /scannow
4. Run CHKDSK
Press the Windows key, type cmd on the search bar, and click Run as administrator.
Type in the following command, then press Enter: chkdsk:/f
For more advanced results, use hard drive health test tools. They can do a more in-depth diagnosis and find errors that may be too complex for Windows built-in utility to find.
5. Perform a clean boot
Hit the Windows key, type msconfig, and open System Configuration.
Switch to the Services tab and select Hide all Microsoft services.
Click on the Disable all button, then hit the Apply button to save the changes.
Go back and click on the Startup tab, select Open Task Manager then click OK.
In the Startup tab of the Task Manager, Disable all the Enabled startup items.
Start your PC in Safe Mode, then navigate to the Advanced option from the blue screen and press the Enter key.
Press theTroubleshoot button.
Select Advanced options.
Choose the Startup Repair option.
7. Perform a System Restore
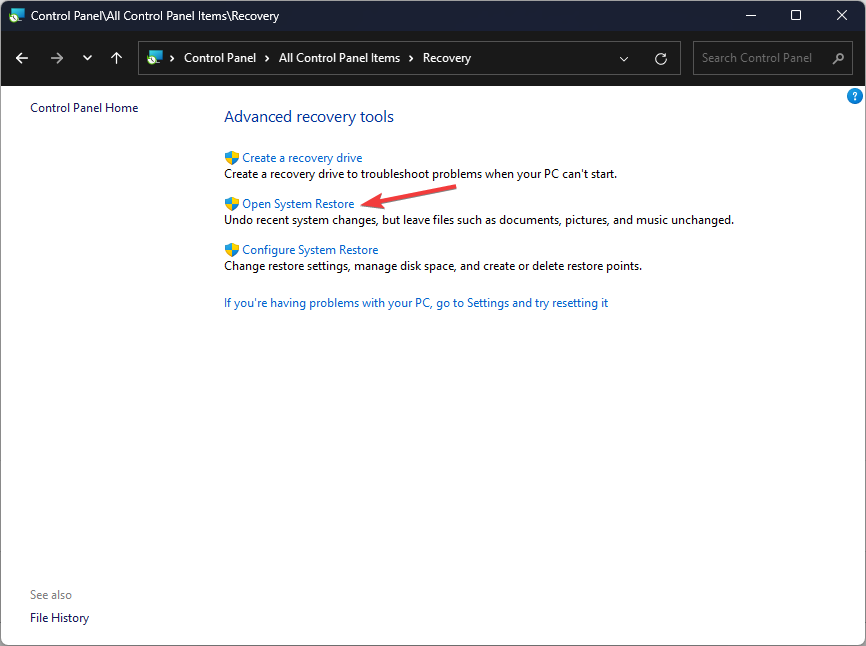
Press the Windows key, type Control Panel, and click Open.
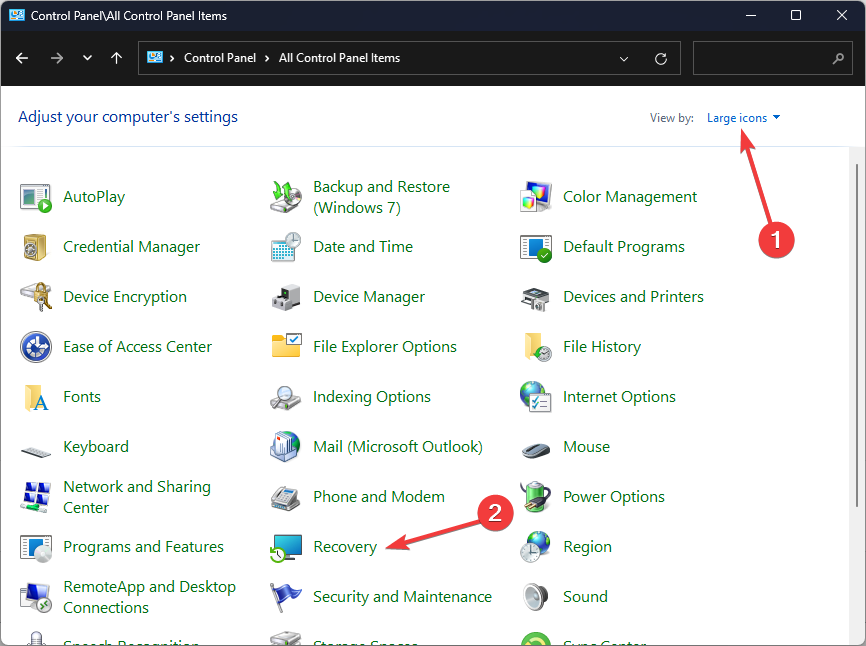
Select Large icons as View by and click Recovery.
Click Open System Restore.
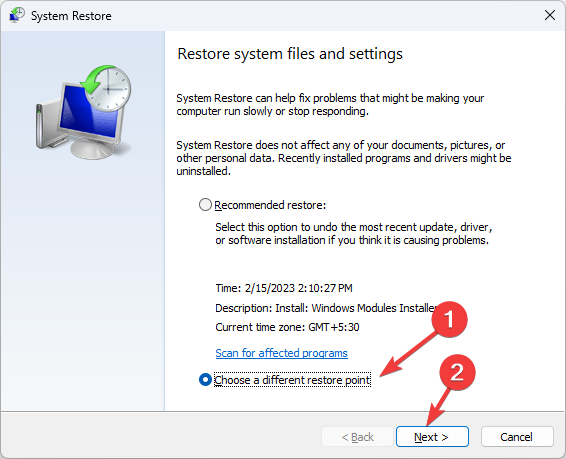
Select Choose a different restore point and click Next.
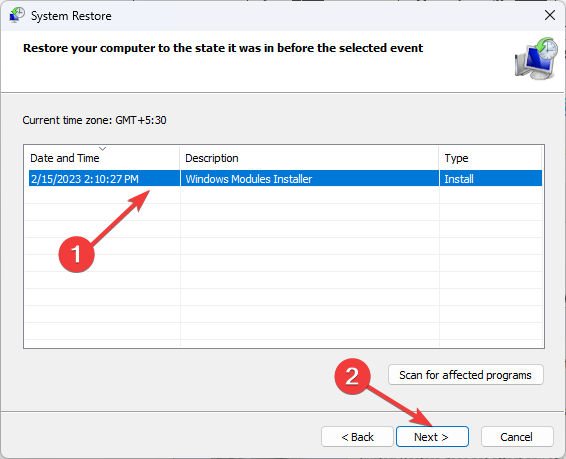
Now select the restore point and click Next.
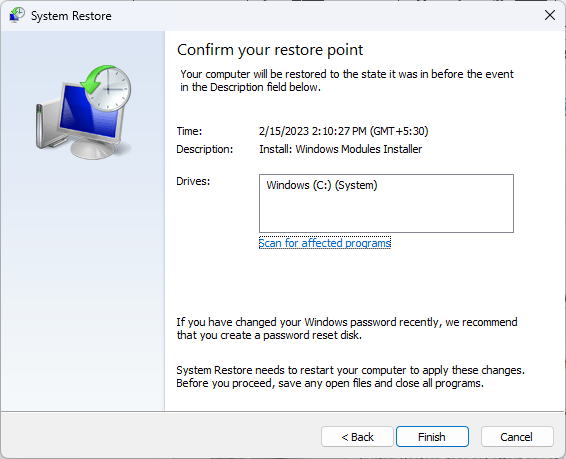
Click Finish to restore the previous settings, and Windows will restart.
Unfortunately, these solutions are a trial and error and you might have to go through all of them to find a fix for the it looks like Windows didn’t load correctly error. Still, your issue may remain unresolved. For a more thorough and sure way of addressing this BSoD error, try a tailored BSOD fixer.
Though unorthodox, we also recommend triggering a BSoD once in a while to detect these issues in their early stages. As always, keep your PC in great shape to minimize the occurrence of such errors.
That’s a wrap from us but do let us know if you managed to address this issue. And if you have any other solution that is missing from our list, feel free to share it with us in the comment section..
When it comes to choosing between the Ryzen 5 5600X and the Ryzen 7 5700X, many users find themselves torn. Both CPUs offer impressive performance, but they cater to slightly different needs. Let’s dive into the ultimate Ryzen performance showdown to help you decide which one suits you best.
5700x vs 5600x, which one is better?
Hardware comparison
When it comes to hardware, the first thing you’ll notice is the different number of CPU cores and threads, as follows:
Ryzen 7 5700X: 8 cores, 16 threads
Ryzen 5 5600X: 6 cores, 12 threads
The Ryzen 7 5700X has more cores and threads, making it better suited for multitasking and applications that can utilize multiple cores.
In terms of speed, both models have the same boost speed, while 5600X has a slightly higher base frequency.
Ryzen 7 5700X: 3.4 GHz base, 4.6 GHz boost
Ryzen 5 5600X: 3.7 GHz base, 4.6 GHz boost
Regarding the cache, both models have the same amount of L3 cache, while 5700X has slightly more L2 cache which can impact the performance.
Ryzen 7 5700X: 32 MB L3, 4 MB L2
Ryzen 5 5600X: 32 MB L3, 3 MB L2
Last but not least is the TDP, and both models use 65W so you can expect similar power consumption levels from both models.
Benchmark results
According to CPU Benchmark 5700X offers almost 18% better performance than 5600X.
Regarding the single-thread performance, 5700X had negligible advantage.
As for other tests, 5700X outperformed 5600X in every multicore test with ease. However, 5600X offered negligible advantage during single core benchmarks.
5600X
5700X
Cinebench R23 Multi Core
11838
13184
Cinebench R23 Single Core
1541
1499
Cinebench R20 CPU (Multi Core)
4567
5405
Cinebench R20 CPU (Single Core)
601
595
Geekbench 5.1 – 5.4 64 Bit Multi-Core
8980
9353
Geekbench 5.1 – 5.4 64 Bit Single-Core
1657
1647
This comparison helps users choose the best CPU based on their needs. The Ryzen 7 5700X is superior for tasks that benefit from more cores.
As for gaming, both CPUs have similar single-core performance, making them both excellent choices for gaming where single-thread performance is critical.
We’d say that 5700X has the advantage when it comes to streaming and multitasking due to the additional cores and threads.
In our opinion, the Ryzen 7 5700X outperforms 5600X in almost every regard and even though it’s slightly more expensive, it’s worth investing in if you want a high-performance and reliable CPU.
For users who are looking to get the new generation of CPUs, don’t miss our Ryzen 5900X vs 7900X guide for more information.
The SET_OF_INVALID_CONTEXT BSOD with a bug check value of 0x00000030 is extremely uncommon, and only a few cases have been reported in years. Common underlying causes of the Windows error include conflicting third-party software, outdated drivers, misconfigured boot settings, problematic OS updates, and failing hardware!
Microsoft’s official website tells us very little about the error. It only mentions, This indicates that the stack pointer in a trap frame had an invalid value.
Before we move to advanced troubleshooting, disconnect any non-critical external peripherals, install all available Windows updates, and make sure the PC is not overheating. If none work, head to the next section.
How do I fix the SET_OF_INVALID_CONTEXT BSOD?
1. Scan the PC for malware
Press Windows + S to open Search, type Windows Security in the text field, and click on the relevant result.
Click on Virus & threat protection.
Now, click on Scan options.
Choose the Full scan entry and click on Scan now.
Wait for the antivirus to identify and eliminate any malware on the PC.
If Windows Security couldn’t find any threats triggering the SET_OF_INVALID_CONTEXT BSOD in Windows 11, I recommend you use a top-rated antivirus solution to run a deeper scan.
2. Update all the drivers
Press Windows + X to open the Power User menu, and select Device Manager.
Expand the Display adapters entry, right-click on the active adapter, and choose Update driver.
Select Search automatically for drivers and let Windows install the best locally available version.
If asked to schedule the scan upon the next reboot, press Y and hit Enter to confirm.
Finally, restart the computer and let the Check Disk utility run.
4.2 Run tests on RAM
Press Windows + S to open Search, type Windows Memory Diagnostics, and click on the relevant result.
Now, click on Restart now and check for problems, and let the built-in utility check for RAM issues.
If Windows Memory Diagnostic is unable to find any issues, I recommend you use a more comprehensive tool like MemTest86. The tool performs an extensive set of tests on the RAM and identifies even the most intricate problems. So, it’s best that you let MemTest86 run overnight.
5. Uninstall recent Windows updates
Press Windows + I to open Settings, go to Windows Update from the left pane, and click on Update history.
Scroll down and click on Uninstall updates.
Now, click the Uninstall option next to the recently installed update.
Again, click Uninstall in the confirmation prompt.
Finally, restart the computer and verify whether the SET_OF_INVALID_CONTEXT BSOD still appears.
Often, BSOD errors are triggered by misconfigurations introduced in the PC after a recent Windows update. In such cases, simply uninstalling the Windows update will get things up and running!
6. Uninstall conflicting apps
Press Windows + R to open Run, type appwiz.cpl in the text field, and hit Enter.
Select any recently installed app that might be triggering the BSOD, and click on Uninstall.
Follow the on-screen instructions to complete the process.
Restart the computer and check for improvements.
A few reported the BSOD error due to WinDbg and other debugging tools. So, check those as well.
If a quick removal doesn’t work, get an effective software uninstaller tool to clear all app-related leftover files and Registry entries which might still be causing the SET_OF_INVALID_CONTEXT blue screen error.
7. Perform a system restore
Press Windows + S to open Search, type Create a restore point, and click on the relevant result.
Click on System Restore.
Select the Choose a different restore point option, and click Next.
Pick the oldest restore point from the list, and click on Next.
Verify the restore details and click Finish to start the process.
When nothing else works, a system restore comes to aid by reverting the change triggering the SET_OF_INVALID_CONTEXT BSOD. Just pick a restore point created before the error first appeared.
Remember, a system restore will only fix software-related issues. As for hardware problems, you will have to contact the manufacturer’s support or visit a repair shop.
If you are an advanced user, you can also check the BSOD log file, identify what’s causing the error, and take suitable steps.
For any queries or to share which fix worked for you, drop a comment below.
The DEVICE_REFERENCE_COUNT_NOT_ZERO error has a value of 0x00000036 and it’s pretty infrequent. It usually indicates that a driver attempted to delete a device object that is still active.
How do I fix the DEVICE_REFERENCE_COUNT_NOT_ZERO error?
1. Restore your system to a previous state
Click the Start button, type System Restore and click on Create a restore point.
Follow the prompts to select a restore point before the issue began. Click Next and then Finish.
Your computer will restart and attempt to restore to the selected point, which may fix the error if it was caused by recent changes.
Restarting your computer with a restore point can roll back any recent problematic changes, which might resolve the error if caused by recent updates or installations.
2. Use Safe Mode
Reboot your computer and continuously press F8 before the Windows logo appears.
From the options on the screen, select Safe Mode and press Enter.
Once in Safe Mode, go to Control Panel > Programs and Features. Uninstall any recent programs or drivers that might have caused the issue.
Restart your computer to see if the issue is resolved.
Running your computer in Safe Mode with minimal drivers and programs can help isolate and resolve issues caused by recent changes or incompatible software.
3. Update Drivers via Device Manager
Right-click the Start button and select Device Manager.
In Device Manager, find the category of the device you want to update (e.g., Network adapters, Display adapters).
Click the arrow next to the category to expand it, then check if one of the drivers has a yellow exclamation mark next to it.
Right-click the specific device needing an update and select Update driver.
Click on Search automatically for updated driver software.
Windows will search online for the latest driver and install it if available.
Follow any on-screen prompts to complete the installation.
Restart your computer if prompted to finalize the update.
This solution helps by ensuring that the device drivers are up-to-date, potentially fixing hardware issues and improving system performance. If needed, you may also go to the manufacturer’s website and download the driver straight from the source. This way, you will have control over what driver you install.
4. Use a third-party driver update tool
Manually updating drivers can be time consuming and pretty complicated because you need to get the right ones for your system. A driver updater software will scan your system and determine which drivers need an update and installs it automatically.
For this task Fortect Driver Updater is an excellent choice. You can scan your computer, identify outdated drivers, and replace them, all in just a few minutes.
5. Check for incomplete installations or applications
Think about any recent changes or new installations before the error appeared.
Go to Control Panel > Programs and Features. Uninstall any newly added applications that may be causing the problem.
If necessary, reinstall the software ensuring it completes successfully.
Uninstalling recently added software can help you identify and remove the source of the problem, resolving the error if caused by an incomplete installation.
By following these steps, you should be able to fix the DEVICE_REFERENCE_COUNT_NOT_ZERO error and get back to your tasks. To prevent future issues, regularly update your drivers and be cautious with new software installations.
Outlook for Mobile, including Android and iOS, will receive a significant update this month. According to the latest entry in Microsoft 356, the app will be enhanced with move menu improvements that will allow mobile users to expand and collapse folders within the move menu and see folder hierarchy when searching in the move menu.
The entry says this improvement will be introduced to Outlook this month, although it doesn’t specify when.
Two improvements are coming to the move menu on Outlook for iOS and Android. Users will now be able to expand and collapse folders within the move menu and see folder hierarchy when searching in the move menu.
These new improvements will allow mobile users of Outlook to easily navigate the app and access everything faster and more seamlessly.
In other news, Microsoft recently updated Outlook for Mobile to allow users to add accounts to the platform by scanning QR codes.
Knowing how to save a Google Maps route on a PC can help you access it later. Still, there’s no save button for the route. Instead, you can copy its link and save or share it for future access.
I’ll show you how to do so below, so you’ll always have your preferred routes at your fingertips.
Tap on the directions icon beside the search button.
Add your starting point and the destination.
After adding your starting point and destination, Google Maps will create the route automatically.
Ensure you pick your preferred mode of transport. Google Maps will usually select the driving option, so it’s important to check.
You can customize your route by adding destinations, avoiding tolls, highways, and ferries, and selecting the distance unit.
Once you create and customize your route, tap the copy link to save it in a text file. Alternatively, click Send directions to your phone. For this example, I’ll send directions to my phone.
I’ll select the email option.
Check your email and access the route.
It’ll be available on any device logged in with your email address.
So, now you know how to save a Google Maps route on your PC. You can quickly revisit or share your journeys by copying and saving the route link. This method simplifies travel planning.
There’s nothing worse than getting kicked out of a game server while playing but this is the fate of many Modern Warfare fanatics who are getting the travis rilea error.
This error is mostly a connection error so it can be an issue with the CoD servers or your internet connection. Sometimes, Steam has issues going online but for the most part, it’s a system maintenance so you may have to wait it out.
How do I fix the Travis Rilea error on Call of Duty?
1. Run the Steam client as an administrator
Right-click the Steam client icon on your desktop and select Properties from the drop-down.
On the Steam properties window, go to Compatibility and check the box for Run this program as an administrator, then click OK.
Restart your PC and launch Steam to see if the issue persists.
2. Resolve connection issues
2.1 Flush the DNS cache
Press Windows + R to open Run, type cmd, and hit Ctrl + Shift + Enter.
Click Yes in the UAC prompt.
Now, paste the following command and hit Enter:ipconfig /flushdns
Once done, restart the computer for the changes to come into effect.
2.2 Reset your network
Hit the Windows key and click on Settings.
Navigate to Network & internet.
Select Advanced network settings.
Click on Network reset.
Next, hit the Reset now button.
3. Verify game files
3.1 Steam
Press the Windows key, type steam or in the search box, and click Open.
Go to Library, right-click the game, then select Properties from the context menu.
From the left pane, click Installed files, then click Verify Integrity of Game Files.
The scan will start, and all the missing or damaged game files will be replaced with healthy files.
3.2 Battlenet
Press the Windows key, type battlenet in the search box, and click Open.
Go to the Games tab, select Call of Duty, and click the Settings button located next to the Play button.
Now choose Scan and Repair.
Click Begin scan and wait for the process to complete. This scan will repair the damaged game files, and it may take some time.
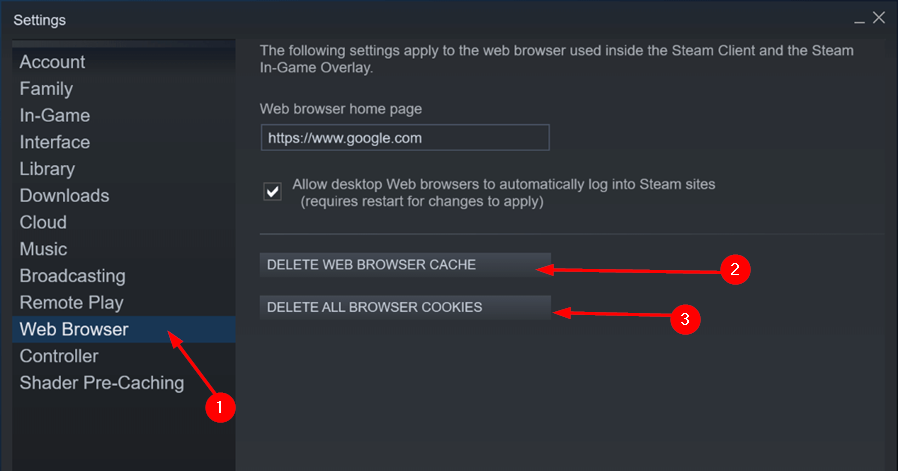
Click on Web Browser, select delete web browser cookies and delete all browser cache then click OK.
Exit and restart Steam again.
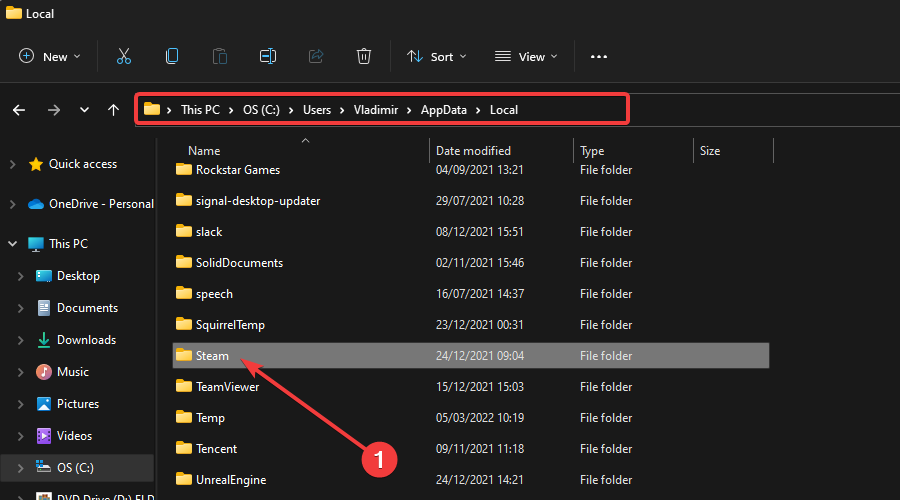
4.2 Delete the Steam local folder
Use the following keyboard shortcut to open File Explorer: Windows + E.
In the search bar, input this location: C:\Users\YOURUSER\AppData\Local. Make sure to replace YOURUSER with the username registered of your PC.
Once you reach this location, select and delete the Steam folder.
5. Change your Privacy Settings
Hit the Windows key, type Steam, and then open the desktop client.
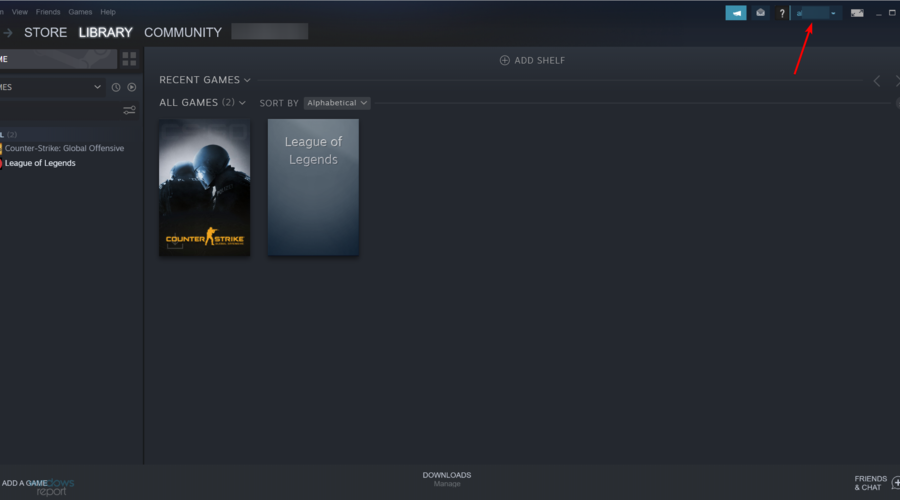
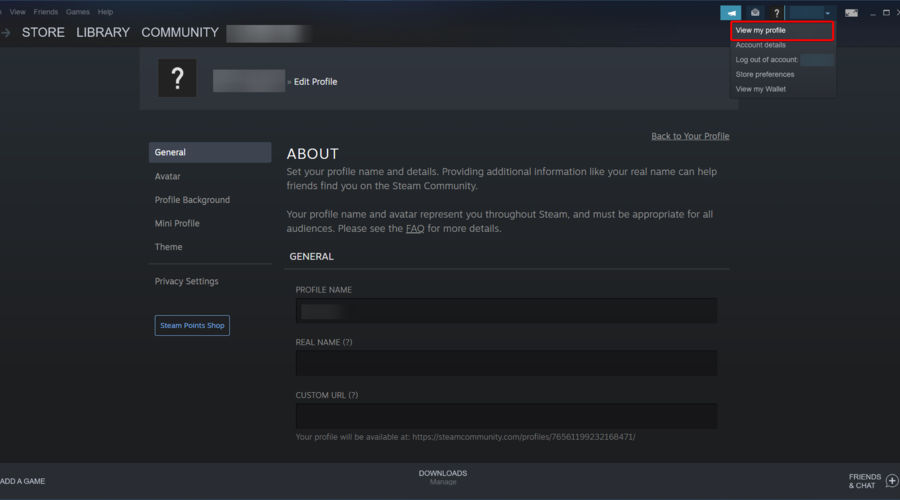
From the top-right corner of the window, click on your Steam profile.
Now, choose to View my profile.
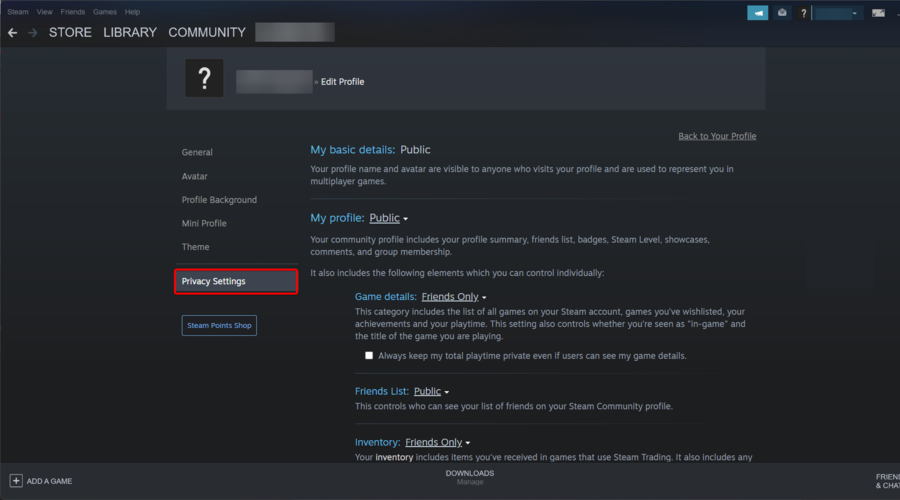
From the left window pane, go to Privacy Settings.
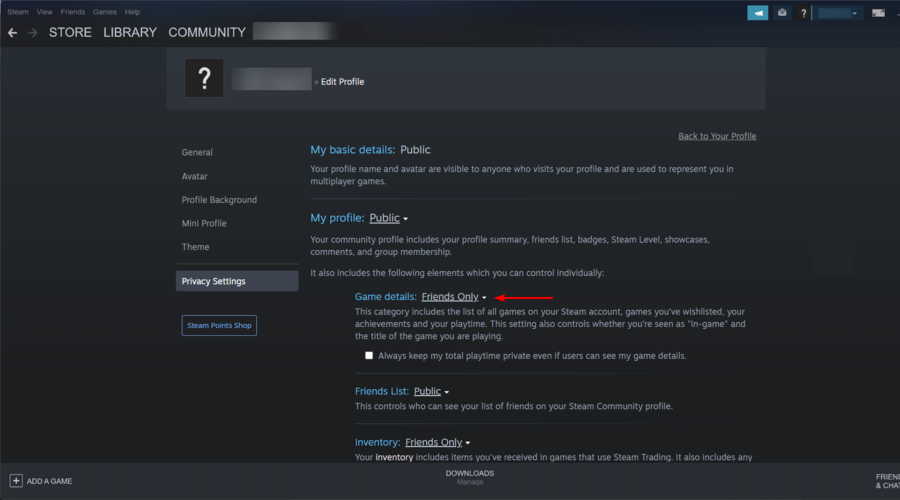
Under My Profile, find Game Details, if you have it set as Private, change it to Friends Only.
Next, go to Friends> Invisible and save changes.
Going invisible is an attempt to reduce the server load. Keep in mind that going offline will reduce the number of games you can play as some games require an internet connection.
We’ve got a basic troubleshooting guide on Steam connection errors so pass by and see if you’ll get any tips for common problems. In other instances where Steam can’t remember your password, we’ve already addressed how to bypass this error.
If none of these solutions have been helpful, the next step is to contact Steam support for additional troubleshooting.
Let us know if you’ve been able to log into your Steam account and gotten rid of the travis rilea error in the comment section below.
Time for another reminder: Windows 11 21H2 and 22H2’s support will end in 60 days. On October 8th, 2024, these two types will no longer receive critical security updates that help protect them against new dangers.
To those who might ask, “Is my computer affected by this change?” — no need to fret. If you use Windows 10 as an everyday user, your system will probably have shifted to Windows 11 version 23H2. This self-operating update method is meant to ensure your computer works appropriately without needing any effort.
However, if you are interested or want to confirm it, you can find the Windows 11 version on your computer by exploring the Settings menu.
A point of interest is that Windows 11 versions 21H2 and 22H2 had two years of active support for Home and Pro editions. This period aligns with the typical life cycle seen in technology, where software swiftly progresses.
Enterprise and Education versions received one more year under the light, receiving three years’ worth of support. This method also gives businesses and educational institutions enough time to prepare for the changes without causing disturbances in their daily activities.
On the other hand, Windows 11 version 23H2, which came out last year, will be retired, and its life will end on November 11th, 2025.
Recovering data from RAID 1 sounds complicated but it’s really not. The whole point of a RAID configuration is that two disk drives work in tandem to store the same data. If one of them fails, you still have the other one with the information intact. So, you only need to treat them as individual drives and identify the working one. With the right tools and methods, you can make the process much more manageable.
How do I recover data from a RAID 1 disk pair?
1. Clone the drives
Disconnect both RAID drives from the NAS or server carefully.
Connect one of the RAID drives to a computer using a SATA-to-USB adapter.
Download and install a cloning tool on your computer. We have a list of the best cloning software so you’re covered.
Use the app to clone the RAID drive to a new, empty drive to ensure the original data remains untouched.
Connect the cloned drive to a computer running Windows.
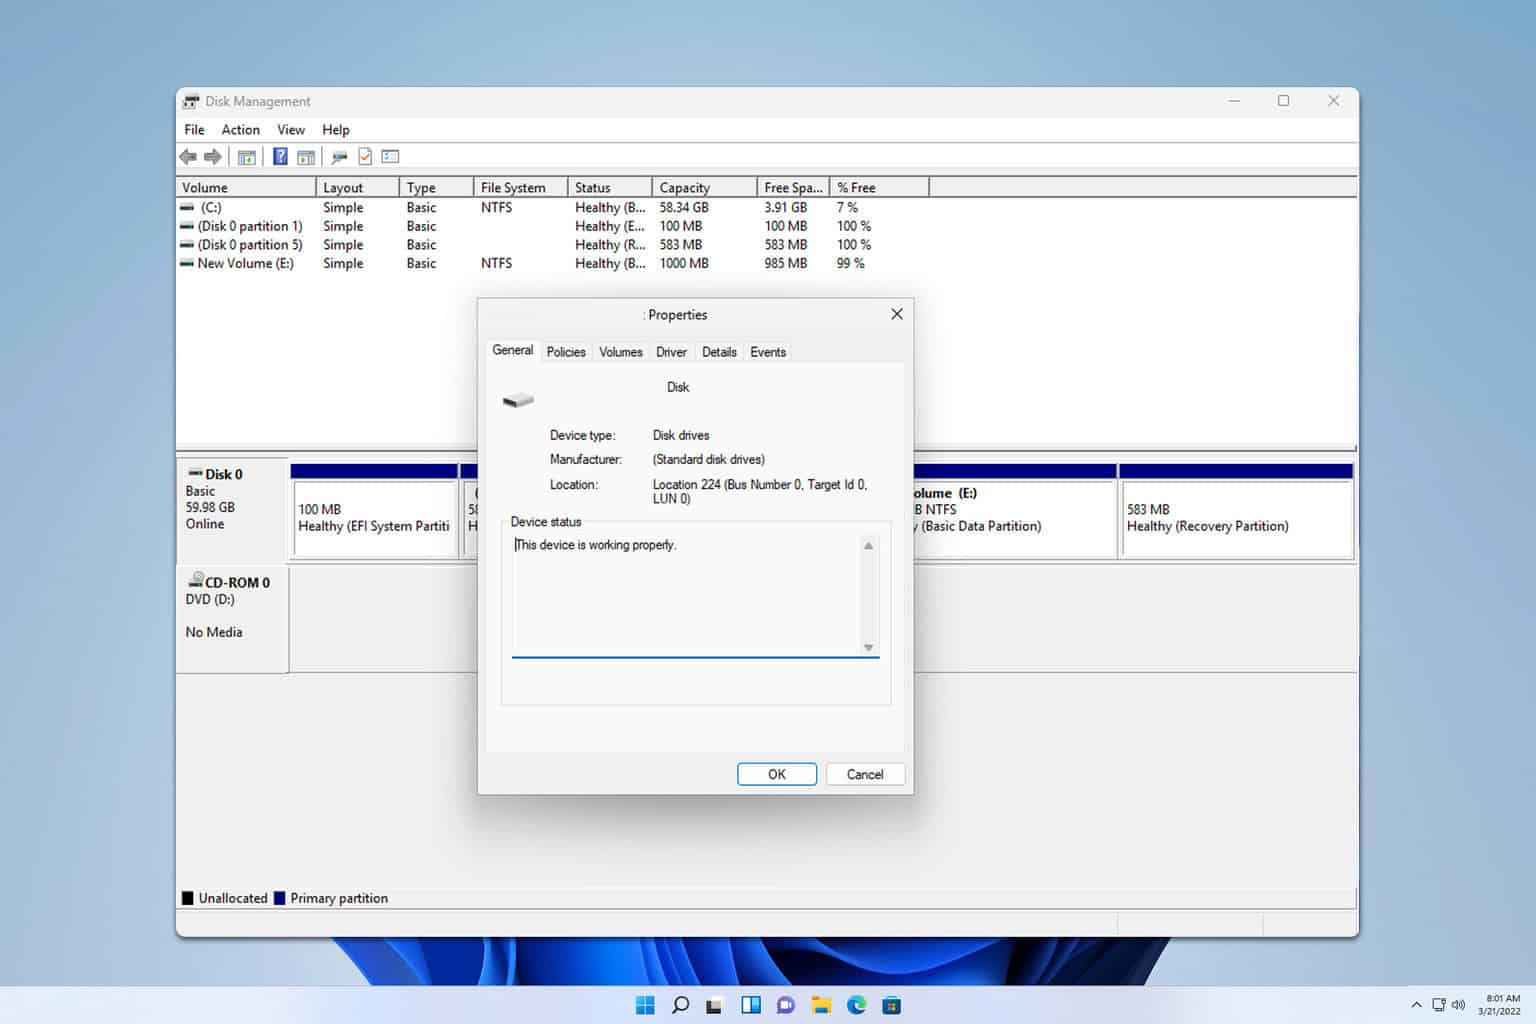
Check the cloned drive in Disk Management for any partitions and assign drive letters if needed.
Use Windows File Explorer to see if the files are accessible.
If so, create another RAID 1 configuration with the existing data or with a new disk pair.
Cloning the drives ensures that you do not accidentally damage the original data. By working on the cloned drives, you mitigate the risk of data loss from any errors during the recovery process.
2. Use a Linux Live CD
Burn a Linux Live CD (like Ubuntu or Linux Mint) onto a USB drive.
Boot the computer from the USB drive into the live Linux environment.
Connect one of the RAID drives to the computer.
Open the Terminal and install necessary tools by running the following commands: sudo apt update and sudo apt install gparted gpart
Mount the RAID drive:
First, identify the drive using the lsblk command.
Then, create a mount point by running sudo mkdir /mnt/raid
Mount the drive with the following command (replace sdX1 with your actual device identifier) sudo mount /dev/sdX1 /mnt/raid
Use File Manager to browse and copy files from the mounted RAID drive to another storage.
Using a Linux Live CD can help access file systems like EXT4 or Btrfs that Windows cannot read natively. This method is invaluable if the RAID was initially set up using a Linux-based NAS.
3. Try data recovery software
Professional data recovery software can bypass various software-level issues preventing access to your data. These tools are designed specifically to handle RAID configurations.
Luckily, we prepared a list of the best data recovery software that can make this process as easy as making a few clicks.
If you’d like to get straight to it, we advise using Stellar Data Recovery. This software is very easy to use and it is quite renowned for its capabilities.
Launch Disk2VHD and create a virtual hard drive (VHD) file from the RAID drive.
Once the VHD file is created, mount it on any Windows 10 or Windows Server system by double-clicking the VHD file.
Access and recover files from the mounted virtual hard drive.
Creating a virtual hard drive enables you to work with a full backup copy of your RAID data in a controlled environment, reducing any risks associated with direct recovery attempts.
5. Seek professional data recovery services
If the data is extremely valuable and DIY methods do not yield results, consider sending the RAID drives to a professional data recovery service.
Secure the drives in anti-static bags and use appropriate packaging to prevent physical damage during transit.
Consult with the data recovery service for a free evaluation.
Professional services have specialized tools and experience to recover data from even the most challenging RAID failures. This should be considered if all other methods fail or if you are not comfortable executing advanced recovery techniques yourself.
By following these methods, you can cover various angles and approaches to recover data from broken RAID 1 arrays efficiently and safely. Always remember to back up your data regularly to prevent future data loss.
Wondering if you can run Windows 11 on an MBR partition? The short answer is no. Windows 11 requires a GPT partition, but don’t worry—I’ve got you covered with some straightforward solutions to help you convert your MBR partition to GPT and get Windows 11 up and running.
How can I run Windows 11 on an MBR Partition?
1. Use MBR2GPT command
Press the Windows key + S and type cmd. Choose Run as administrator.
Run the diskpart command and then run the list disk. Check the number of your disk and then enter exit.
Run the following command, but be sure to replace 0 with the number of your disk: mbr2gpt /convert /disk:0 /allowfullos
Wait for the process to finish.
For more information, we have an entire guide dedicated to the MBR2GPT tool, so check it out for more information.
2 Convert MBR to GPT Using DiskPart
Start your computer with the bootable USB drive.
In the Windows setup screen, press Shift + F10 to open Command Prompt.
Type diskpart and press Enter.
Type list disk and press Enter.
Identify the MBR disk and select it by typing select disk X (replace X with the disk number).
Type clean (this will erase all data on the disk).
After that run the convert gpt command.
Type exit.
NOTE
Keep in mind that this method will remove all your files from the disk, so back them up beforehand.
Press the Windows key + X and choose Disk Management.
Locate the disk where Windows is installed, right-click it, and choose Properties.
Go to the Volumes tab and there you’ll find the Partition style.
Which is better, GPT or MBR?
MBR is an older partition table system and it’s designed to work with older PCs. MBR has a limit of 2TB per disk, so if you’re using a PC with a large drive, GPT is always a better choice.
For more information, don’t hesitate to check our latest guide on MBR vs GPT.
Windows 11 can’t run on an MBR partition, but if you can convert it using our solutions, you will be able to smoothly transition to Windows 11.
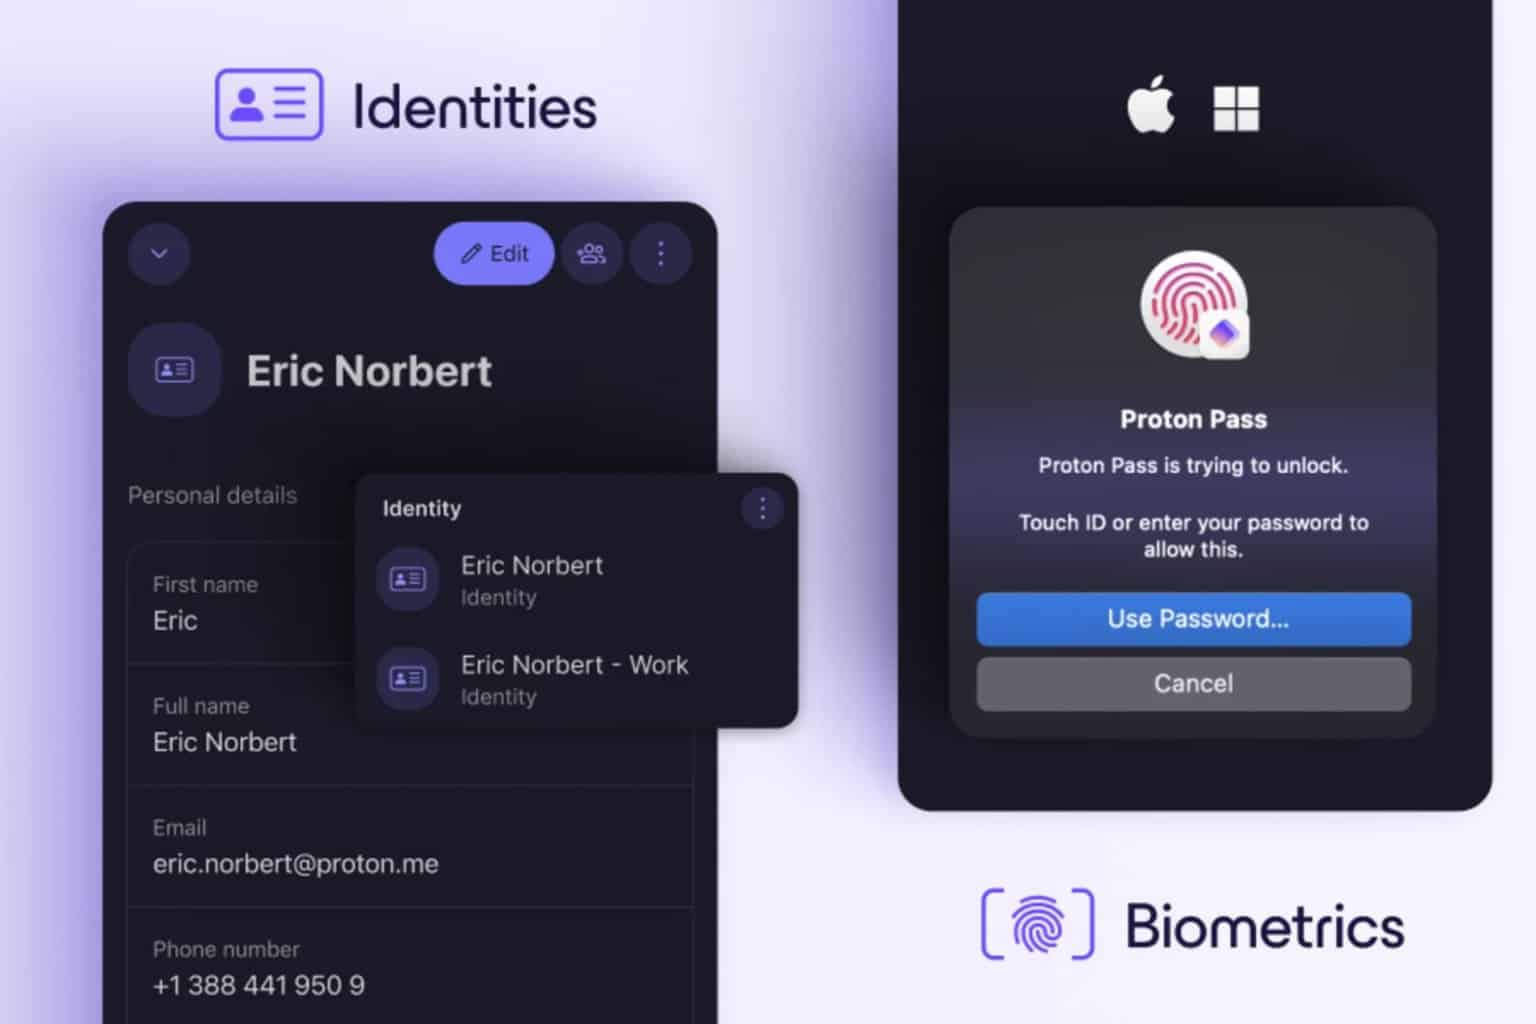
Proton Pass, a popular cross-platform password manager, was recently updated to support biometric authentication for Windows and macOS users.
Imagine logging into Proton Pass without typing passwords, only using your face or fingerprint—if on Windows, then a PIN, too. Yes, Windows Hello has joined the chat for Proton Pass users. It makes access more accessible and safer.
This update is particularly delightful for those who have chosen to step up by paying for a plan. Biometric authentication on desktop apps has become possible now, and users have long requested this feature.
According to the official announcement, Proton Pass also introduces “identities,” a neat privacy feature where you can create your own sets of personal information to fit various purposes. You must have a premium subscription to use the biometric authentication feature.
People who use the free version do not get this benefit but can still lock their vaults with shared passwords.
However, the identity function is for all Proton Pass users, regardless of their subscription. It’s being introduced slowly and assures to simplify life by assisting you in filling out forms more quickly using separate sets of information for various parts of your existence.
Navigating the world of power supplies and connectors can be daunting, especially when dealing with the ATX 12V standard. This guide will walk you through the essentials, ensuring your PC build is both stable and efficient.
How do I choose the right ATX 12V PSU?
Understanding the 8-pin ATX 12V power connector
The 8-pin ATX 12V power connector is primarily meant to provide additional power to the CPU. This connector typically consists of two 4-pin connectors that can be used together (as an 8-pin) or separately (as a 4-pin). The 20+4 pin connector on the other hand is designed to provide power to the motherboard and its peripherals.
Using the 8-pin connector properly ensures that your CPU receives the necessary power for optimal performance. This prevents system instability and potential hardware damage
2. Extension cables for the ATX 12V power connector
If the 8-pin ATX 12V cable from your PSU is too short to reach the connector on your motherboard, you can use an extension cable. Here’s how to do it:
Connect the male end of the extension cable to the female end of the PSU’s 8-pin connector.
Route the extension cable through the back of the case for better cable management.
Plug the female end of the extension cable into the 8-pin connector on the motherboard.
Using an extension cable allows you to maintain a clean build with proper cable management, reducing clutter and improving airflow within your case.
3. Identifying correct connectors
When dealing with modern power supplies, the 8-pin connector might be split into two separate 4-pin connectors. Here’s how to ensure you’re using the correct connector:
Locate the 4+4 CPU power connector on your PSU.
Join the two 4-pin connectors together to form an 8-pin connector.
Match the shape of the pins to the corresponding 8-pin socket on the motherboard.
Plug the unified 8-pin connector into the 8-pin ATX 12V socket on the motherboard.
Ensuring each connector is correctly identified and connected prevents improper installation that can cause power delivery issues or damage components.
4. Upgrading to a compatible PSU
If your current PSU lacks the necessary connectors or does not meet the power requirements of your new build, consider upgrading to a compatible PSU:
Identify a PSU that meets your system’s power requirements (at least 500 watts recommended).
Make sure the PSU has an ATX 12V 2.3 or later version which typically includes the necessary 8-pin connectors.
Purchase from reputable brands like Corsair, EVGA, or Seasonic.
Upgrading to a modern and compatible PSU ensures reliable power delivery to all components, ensuring system stability and longevity.
5. Using an adapter for older PSUs
If you have an older PSU and need to connect to a more modern motherboard, adapters may help. Here’s how:
If needed, purchase a 4-pin to 8-pin CPU power adapter.
Connect the adapters to the corresponding connectors on your PSU.
Plug the adapted connectors into the motherboard.
Using adapters allows older PSUs to be compatible with newer motherboards, saving cost on immediate PSU replacement while still powering your system correctly.
However, we don’t recommend this approach because most likely, the older PSU doesn’t have enough power to distribute the necessary resources to your CPU. Our advice is to change the PSU with one that comes with the 12V 8-pin cable and sufficient power.
By following these solutions and guidelines, you can ensure that your ATX 12V power connections are properly managed, which will help maintain the stability and performance of your PC build. Always double-check connections and consider future upgrades to keep your system running smoothly.
The Surface Pro X SQ2 has received a firmware update focusing on improving user experience. This particular update, made for SQ2 models running Windows 11 version 22H2 or newer, provides full support for the Surface Pro Flex Keyboard and Surface Slim Pen stylus.
The update goes further than simply improving the keyboard and stylus. It also deals with data collection mandates and adjusts the consent for data transmission experience, offering users a more transparent and reliable interaction on their devices. But an update wouldn’t be complete without various technical advancements. The firmware incorporates a range of fresh drivers, such as Surface Hot Plug and Surface System Telemetry Driver. This guarantees that each element within the Surface Pro X SQ2 operates uniformly and effectively.
If you’re interested in the details, the update includes drivers for system devices, human interface devices, and even firmware updates for the Surface Type Cover and the Surface G7 Touchpad.
However, it’s worth mentioning that there is a known error with the Eye Contact characteristic. The capability doesn’t work correctly, and there is a temporary solution, which involves repeatedly turning it off within settings. But Microsoft is working to fix this in an upcoming update.
The backing for SQ2-based Surface Pro X goes up until August 10, 2025. You can read more about it here.
In the last few years, I have seen countless reports of MSN Games not working on any web browser. For some, the website or individual MSN games keep loading, while for others, an error message like Stage3D error: Context3D not available comes up.
As to why you can’t get into MSN Games, it likely has to do with corrupt browsing data, the website is blocked by your antivirus, the presence of conflicting extensions, misconfigured browser settings, or an outdated graphics driver.
Before we move to the slightly complex solutions, check whether MSN Games is facing downtime using a third-party service and make sure you are running the latest version of the browser.
What can I do if MSN Games is not working?
1. Clear the browsing data
NOTE
The steps listed here are for clearing the browsing data on Google Chrome. However, it works the same way across all Chromium-based browsers like Microsoft Edge and Opera.
Launch your browser and press Ctrl + Shift + Del to open the Clear browsing data utility.
Select All time from the Time range dropdown menu, then tick the checkboxes for Browsing history, Cookies and other site data, and Cached images and files, and finally click on the Delete data button.
Verify whether the MSN Game Zone now loads on your browser.
In 4 out of 5 cases, clearing the corrupt browsing data fixes things when MSN Games is not working. Also, you could delete the MSN Games-specific browsing data instead of it all. Besides, this helps if MSN Games doesn’t have a sign-in option.
2. Enable/disable hardware acceleration
Launch Google Chrome, paste the following path in the address bar and hit Enter: chrome://settings/system
Now, change the state of the Use graphics acceleration when available toggle, i.e., enable it if the feature is disabled and vice-versa.
Relaunch the browser and check for improvements.
3. Disable any new extension
Launch Google Chrome, paste the following path in the address bar and hit Enter:chrome://extensions/
Now, turn off the toggle under any recently added extension to disable it.
Check for improvements.
If MSN Games now loads fine, again go to the Extensions tab, click on Remove under the problematic extension, and confirm the change.
4. Try a different browser
Often, switching to a different browser could help when MSN Games is not loading or working. This usually happens when the current browser is no longer supported.
So, download one of the top-rated gaming browsers for PC and set it up. You should now be able to play MSN Games without facing any issues.
5. Update the graphics driver
Press Windows + X to open the Power User menu, and select Device Manager from the list of options.
Expand the Display adapters entry, right-click on the active graphics adapter, and choose Update driver.
Now, click on Search automatically for drivers and let Windows install the best locally available driver version.
Finally, reboot the PC for the changes to come into effect.
I have previously seen cases where Malwarebytes suddenly started to block MSN Games. Also, allowing it from the initial prompt didn’t work. Subsequently, affected users had to manually whitelist the MSN Games website in Malwarebytes.
Similarly, the issue could arise with other antivirus solutions. So, I recommend you check this and whitelist the website. Also, check for any available software updates and install them. But in no case should you disable the antivirus or web protection!
7. Contact MSN support
If nothing else works, the last option is to contact MSN support and submit your complaint. They shall look into it and revert with a resolution.
It would be really nice to remove the background from an image or get rid of all that bothersome background noise in our videos, right? Well, guess what: Microsoft’s Clipchamp video editor seems to be getting ready to launch some interesting AI-based abilities that aim to do precisely those things.
In a blog post, Microsoft added background image removal in Clipchamp. Picture this: You possess a wonderful picture, but the background is not as good. With a basic right-click, you can delete that background and change it to anything you desire. Place videos or pictures behind your picture without its previous background to make new visuals. You can modify objects in the front into stickers.
The company has also enhanced Clipchamp with noise suppression. You make a video, and everything looks fine, but there’s too much noise in the background. This feature from Clipchamp assures us that this audio untidiness will be straightened out. All you need to do is click on the Audio tab.
These new features are accessible for both Personal and Work accounts. As you might already know, Clipchamp will bring in Copilot generative AI support. The AI model will completely change video editing by assisting with scriptwriting, locating stock footage, and putting together projects through only a handful of text cues.
Read more about the new background image removal that’s coming to Microsoft Clipchamp here.
After redesigning the Progressive Web App install dialog in Edge, Microsoft is now making it more visually appealing by adding screenshots. This feature is currently being tested in Edge Canary.
Microsoft Edge, based on Chromium, supports PWAs. Committed to making PWAs more native app-like on Windows, Microsoft and Google have introduced several improvements for PWAs on Windows, Mac, and Linux.
Microsoft updates PWA install dialog in Edge with Screenshots
Previously, Microsoft revamped the install dialog, highlighting benefits like focused windows, taskbar pins, and cross-device sync for frequent site users. Now, Microsoft is following Chrome by making PWAs to provide visual info while installation.
Edge current PWA install dialog. Image credit: WindowsReport
Edge’s new feature, “Enables the display of PWA Manifest Sourced Screenshots in the PWA install dialog,” allows PWAs to showcase screenshots directly from their manifest during installation.
To enable this experimental feature, navigate to edge://flags, find “Display PWA Source Screenshots,” and enable it. Relaunch Edge and visit a PWA like Squoosh to see screenshots in the install dialog.
Display PWA Manifest sourced screenshots flag. Image Credit: WindowsReportEdge new PWA install dialog with Screenshots. Image Credit: WindowsReport
Apart from screenshots, Microsoft is introducing additional PWA improvements:
Switch Web App Icon: Replaces the install icon with a “Switch” icon.
Reduced PWA Icon Visibility: To declutter the address bar, Edge will reduce the frequency of the PWA icon in the address bar display to ten times per session.
Image Credit: WindowsReport
PWA Icon Animation: Hovering over the PWA install icon displays an animation, drawing attention to the installation option.
These features can be enabled through additional flags in edge://flags.
Keeping your C drive clutter-free is essential for maintaining optimal performance on your Windows 11 system. If you’re wondering how to clean your C drive without formatting it, you’re in the right place. Here are some practical solutions to help you free up space and keep your system running smoothly.
How do I clean the C drive in Windows 11 without formatting?
Before using more complex methods, try clearing the browser cache in all browsers that you use to free up some space. Also, empty your Recycle Bin to remove deleted files.
1. Run Disk Cleanup
Press the Windows key + R type cleanmgr and click OK.
Click OK to delete the selected files. If prompted, confirm by clicking Delete Files.
For system files cleanup, click on Clean up system files, select the files, and then click OK.
For more information, check our guide on how to use the Disk Cleanup tool.
2. Use Storage Sense
Open Settings by pressing Windows + I.
Go to System and then Storage.
Turn on Storage Sense if it’s not already on.
Click on Configure Storage Sense or run it now.
Set your preferences for how often you want to delete temporary files, Recycle Bin content, etc.
Click on Clean now to immediately run Storage Sense.
To learn more about this feature, don’t miss our guide on how to enable Storage Sense.
3. Uninstall unnecessary applications
Press Windows key + R and type appwiz.cpl. Click OK.
In the search bar, type size: >1GB to find files larger than 1GB.
Review the search results and delete the files you no longer need by right-clicking and selecting Delete.
Keep in mind that not all files are safe to delete, so delete only ones that you know what they do. There are other methods to find large files on Windows 11, so don’t hesitate to try them.
5. Move installed applications to another drive
Open Settings by pressing Windows + I.
Go to Apps and then Installed apps.
Select the app you want to move, click on it, and then click Move.
Choose the destination drive and click Move again.
Moving apps to another drive can free up space on your C drive while keeping your applications intact.
By following these methods, you can efficiently clean your C drive in Windows 11 without formatting it.
As you might already know, God of War Ragnarök is finally coming to PC, and Sony has released the official system requirements. A first hint? They’re quite friendly.
Even a simple combination like GTX 1060 and AMD Ryzen 3 1200 allows you to play this game at 1080p and 30FPS on low settings. If you want a gentle experience at 1080p and 60FPS on medium settings, you require something similar to an NVIDIA RTX 2060 Super or AMD RX 5700.
However, it is even more fascinating that the game isn’t only focused on power. It’s looking toward the future, supporting Nvidia DLSS 3.7, AMD FSR 3.1, Intel XeSS 1.3 technologies, and hardware-agnostic frame generation. This means improved framerates and greater resolutions in a broader range of hardware. And for those who enjoy using a mouse and keyboard, you have something exciting coming with complete backing up.
Remember the date, September 19. But, there is one thing you need – a PlayStation Network account to get started. If you buy early, there are particular things for you: Kratos Risen Snow Armor and Atreus Risen Snow Tunic from the beginning.
Now, it is time for you to venture back into the Nine Realms. Ready with these system requirements? Make sure your PC is prepared for a memorable adventure.
Microsoft and Palantir are joining forces in a bold move that will change how we view national security. This partnership is a significant step forward in integrating complex cloud, AI, and analytics abilities within the U.S. Defense and Intelligence Community’s infrastructure.
Boost for Microsoft’s government and classified cloud environments. Palantir intends to introduce its suite of products, such as Foundry, Gotham, Apollo, and AIP, into these safe spaces. This means utilizing Azure’s OpenAI Service for Large Language Models in areas having the highest secrecy levels.
In a press release, Shyam Sankar, Palantir’s Chief Technology Officer, expressed his enthusiasm by saying this is a game-changer for assisting the defense and intelligence communities. Palantir’s AIP is at the forefront regarding operationalizing AI value throughout the enterprise, and now they’re ready to put Microsoft Azure OpenAI Service into operation in classified environments.
Deb Cupp, the President of Microsoft Americas, expressed similar views. She emphasized that this collaboration speeds up the use of high-level AI features for the U.S. government. Palantir specializes in providing usable understanding, and now they can use Microsoft’s robust cloud environments along with Azure OpenAI models. The goal? To drive AI innovations that bolster national security missions.
Additionally, the Palantir Federal Cloud Service, consisting of Gotham, Foundry, AIP, Apollo, and FedStart Mission Manager Platforms, has received approval for deployment on Microsoft Azure for IL5 environments. This highlights the dedication of both firms to maintaining elevated levels in every aspect—from responsible privacy practices to ethical AI standards. These actions align with similar principles towards product engineering and dealing with intricate problems that institutions encounter nowadays. Palantir and Microsoft offer boot camp experiences for the Defense and Intelligence Community.
In other news, Microsoft recently announced it made a $25 million investment in Neon, an emerging tech startup. The Redmond-based tech giant seems to be seeking to expand in as many areas as possible.
Why is a Shenzhen device connected to your WiFi? If you discover a new addition to your network, don’t panic – it could be one of your smart devices.
Still, unrecognized WiFi devices are the most common source of privacy intrusion that may trigger a ransomware attack or personal information breach. Not to mention, they can siphon off your WiFi bandwidth for unauthorized cryptocurrency mining, pirated content downloading, and other activities.
I’ve explained below what to do if you detect an unknown WiFi device in your router, so let’s jump right in!
Why Is a Shenzhen Device Connected to My WiFi?
Many tech devices, like smartphones, routers, optical network terminals (ONTs), IoT devices, home appliances, and more, are made in the Shenzhen city of the Guangdong province of China.
Additionally, most manufacturers in Shenzhen use their own business names to identify them.
So, when you connect one such smart device to your WiFi network, you may see any of the following notifications in the router app:
Shenzhen Hualistone Technology.
Shenzhen RF-Link Technology Co., Ltd.
Shenzhen ViewAt.
Shenzhen Bilian Electronic Limited.
Shenzhen Sed Industry Co., Ltd.
Shenzhen SOF Lighting Technology Co., Ltd.
Shenzhen Inovance Technology Co., Ltd.
Shenzhen Skyworth-RGB Electronics Co., Ltd.
This is highly common with IoT devices, like smart lights, air purifiers, humidifiers, kitchen appliances, electric sockets, ceiling fans, etc.
So, let’s say you’ve plugged in a new smart light in your living room. You’ve installed the required mobile app, which automatically connects it with the home WiFi.
Later, when you log into the router app, you’ll see an “unknown” WiFi device with a generic name beginning or ending in the word Shenzhen.
What To Do When a Shenzhen Device Is Connected to Your WiFi
Find below various proven ways to verify if a Shenzhen-branded smart device is yours:
Perform These Basic Checks
Before trying anything advanced, do these quick checks first:
Reboot the WiFi router: Restart the router and check if the device is still there.
Change the WiFi router’s SSID: You can change it using the router app. After logging in, go to Basic > Wireless and you’ll see the field for Network Name (SSID). Delete the existing name and enter a new one. Now, connect to this new network from all of the known WiFi devices. If you find a home appliance or IoT device not working, that’s the one with the generic name Shenzhen.
Reset the WiFi network password: You’ll also see the WiFi network password field just below the SSID box. Enter the new password on all devices except your smartphone. Now, if you see a smart light isn’t working or the thermostat isn’t connecting, those are the devices with Shenzhen in their name.
Reset the WiFi router log-in password: Go to the System Tools, Settings, or a relevant menu in the left-side navigation panel. Now, navigate to the Advanced tab to find the Account Management menu. Here, you can enter the old router console password to change it. Click Save to implement this modification.
Check the WPA2 encryption status: Go to Wireless > Advanced > Wireless Settings section. Click on the Security drop-down menu and choose WPA/WPA2-Personal, WPA2/WPA3-Personal, or a better encryption system. Now, restart the router. All connected devices will ask for the WPA/WPA2 encryption pass key (WiFi password) for reconnecting.
Deactivate UPnP: Go to Advanced > NAT Forwarding > UPnP > toggle off the UPnP button.
Deactivate WPS: Visit the Advanced tab and select System Tools or Settings from the left-side navigation panel. Select the System Parameters option to see more items on the right side menu. Scroll down until you find the WPS section. Uncheck the WPS checkbox and click Save.
Disable guest access to WiFi: Go to the Advanced tab and click on the Guest Network tab in the left-side navigation panel. Now, uncheck the boxes for the Enable Guest Network for both the 2.4 GHz and 5.0 GHz WiFi radio transmitters. Click the Save button.
Seeing a smart bulb show up as a Shenzhen device and it will not respond? Follow this guide on Sengled not working to fix pairing and Wi-Fi issues quickly.
Block the Rogue Device’s MAC Address
Open the router configuration console on your PC or smartphone.
Navigate to the Advanced tab and select Security from the left-side navigation panel.
Now, go to the Access Control menu.
Enable the Access Control toggle button.
Set Access Mode to Blacklist.
Block the target device from the table of Online Devices.
You should now see the its Mac Address in the Devices in Blacklist table.
Click the Save button to apply the changes.
Now, even if the device still stays in the network, it won’t be able to access any bandwidth as you’ve blocked its MAC address.
Disable DHCP on the Router
By default, a WiFi router will assign an IP address to a new device due to the DHCP server configuration. So, you can disable this to ensure no new rogue WiFi devices can connect.
Click on the Advanced tab and choose Network from the left-side panel.
Now, click on the DHCP Server option.
Uncheck the Enable DHCP Server box on the right.
Hit the Save button.
Factory Reset the WiFi Router
Ensure you know the appropriate ISP-side configurations before trying the following steps. If you don’t talk to the ISP’s support team first, collect configuration data, and then proceed with resetting the router.
Select the Advanced tab in the router configuration console.
Find and access the Settings or System Tools menu on the left side navigation panel.
In System Settings, select the Backup & Restore option.
You’ll see the Restore section and its options on the right.
Click the Factory Restore button and follow the onscreen instructions to complete the reset process.
Update the Router Firmware
Sometimes, a router might show phantom devices due to corrupted or outdated firmware versions.
Before performing any firmware upgrade, connect the PC and WiFi router to an uninterrupted power supply. If there are any interruptions between firmware flashing, the router might get bricked and function no more. Here’s how you can do that:
Go to the Firmware Update menu from Advanced > System Tools.
Most modern routers come with an automatic firmware update option.
You should see the latest version below the Online Upgrade section.
This is an over-the-air (OTA) firmware updating system managed and provided by the router manufacturer.
Click the Upgrade button.
If you don’t see the Online Upgrade option, you can perform a Local Upgrade. Download the latest firmware file from the manufacturer’s website. Now, use the Browse button to select the firmware and click Upgrade to start the process.
Use a WiFi Security Tool to Prevent Reaver Attacks
Hackers and bots might use the Reaver attack to exploit weaknesses in the WPA/WPA2 encryption system. By an extremely fast trial and error method, attackers discover the WiFi encryption key or password to gain access to your network.
If you use the Private Wi-Fi Address feature on your Apple devices, you’ll see many unknown MAC addresses on the router console.
Here’s how you can disable this feature on an iPhone. Please note that an active Private Wi-Fi Address functionality is the default setting for all Apple-shipped iOS devices.
Open the iOS Settings app.
Tap on the Wi-Fi setting menu.
Inside Wi-Fi settings, you’ll see the active network name or SSID.
Tap on the (i) icon on the right edge of the SSID.
Toggle off the Private Wi-Fi Address button.
Tap Continue on the confirmation pop-up.
Contact the Technical Support Team
If none of the above helps, it’s time to contact the technical support team of the router or ISP. Since most ISPs ship a router with the internet subscription plan, sometimes you only need to contact them. Here are the customer support resources for popular ISPs in the US:
Sometimes, when you turn on the PC, the hard drive shows 0 bytes of free available storage space. This directly affects the computer’s performance, preventing you from creating new folders and downloading files/apps. I, too, faced this problem once!
There are several reasons why the hard drive shows 0 bytes, including issues with the drive letter, problems with the drive configuration or bad sectors, automatic downloads, outdated or corrupt drivers, malware infection, or hardware failure.
Although if your hard drive shows 0 bytes free in Diskpart, there’s nothing to be concerned about. The Diskpart utility lists the unpartitioned space on the drive and not the free storage. So, open File Explorer and verify whether you have actually run out of free storage!
What can I do if my hard drive shows 0 bytes of free space?
Tip
Before we begin with the slightly complex solutions, restart the computer, reconnect the hard drive (in case it’s an external one), or plug it into another PC, and then check for improvements.
1. Manually delete files on your PC
In many cases, I observed that when the hard drive shows 0 bytes, you won’t be able to use the Search menu or perform advanced troubleshooting. So, manually delete the non-critical files on the affected drive/volume.
Before you do that, disconnect the PC from the Internet to prevent any downloads. Both malware and cloud storage services often resume downloads when storage space is freed. In my case, it was the cloud storage service which downloaded all the data to the C: drive on the PC, leaving no space for any other operations. So, perhaps check that!
After clearing some storage space, you should be able to try all our solutions.
2. Change the drive letter
Press Windows + R to open Run, type diskmgmt.msc in the text field, and hit Enter.
Right-click on the hard drive volume that shows 0 bytes free, and choose Change Drive Letter and Paths.
Click on Change.
Now, pick another drive letter from the dropdown menu, and click OK on all active windows to save the changes.
Restart the PC and check for improvements.
3. Run Check Disk
Press Windows + S to open Search, type Command Prompt in the text field, and click on Run as administrator.
Click Yes in the UAC prompt.
Paste the following command while replacing X with the affected drive letter and hit Enter: chkdsk X /f /r
For instance, if it’s the C: drive, the command becomes: chkdsk C: /f /r
If asked to schedule the scan for the next reboot, press Y and hit Enter to confirm.
Most of the disk issues can be fixed by running the built-in Check Disk utility. And it becomes all the more important in this case because you, most likely, won’t be able to download any of the top-rated disk repair tools. If you can, go with one of these instead!
4. Run Disk Cleanup
Press Windows + S to open Search, type Disk Cleanup in the text field, and click on the relevant result.
Choose the affected drive/volume from the dropdown menu, and click OK.
Tick the checkboxes for all the non-critical files, and click OK.
Click on Delete Files in the confirmation prompt.
Sometimes, due to a bug in the OS or third-party software, the temporary cache or log files may increase exponentially in size, forcing the hard drive to show 0 bytes as free space on Windows 11. In this case, Disk Cleanup will come to your aid!
Also, if you frequently run into low free space issues, set up Storage Sense to automatically clear non-critical files on a periodic basis.
5. Update the hard drive’s driver
Press Windows + X to open the Power User menu, and select Device Manager from the list.
Expand the Disk drives entry, right-click on the affected drive, and choose Update driver.
Choose Search automatically for drivers and wait for Windows to install the best locally available driver version.
Finally, restart the computer and check for improvements.
Often, due to corrupt or outdated driver software, the hard drive or C: drive will show 0 bytes of free space on the PC. In this case, updating the drivers will work. If Windows can’t find a better version, head to the manufacturer’s website and manually install the driver.
6. Scan the PC for malware
Press Windows + S to open Search, type Windows Security in the text field, and click on the relevant result.
Click on Virus & threat protection.
Now, click on Scan options.
Choose Full scan and click on Scan now.
Wait for Windows Security to detect and eliminate any active threats.
7. Visit a repair shop
When nothing else works, the last option is to visit a repair shop and get the hard drive inspected. Showing incorrect free storage space is a common sign of hardware failure!
Before you waste any time, move all the data on the affected drive to another external storage. Also, if required, get a top-rated data recovery solution for Windows.
That’s how you can fix things when the hard drive shows 0 bytes on your PC. While it doesn’t always have to do with malware infection and hardware failure, these two remain a common underlying cause and can’t be ignored!
Samsung Display, it appears, has won a contract to provide micro OLED displays for Microsoft’s new mixed reality (MR) headset. MicroOLED, or OLEDoS (organic light-emitting diode on silicon), is a new advancement in display technology. It has many advantages compared to regular OLED displays. These include better power efficiency, improved luminance, infinite contrast, and higher refresh rate.
For example, imagine a screen with over 4000 ppi resolution in only 1 inch. Apple Vision Pro already uses micro-OLED displays, which give clear pictures with good color. Samsung Display also participated in MWC 2024 and presented micro OLED displays designed for XR headsets.
As per The Elec, Samsung Display is getting ready to provide these advanced displays to Microsoft. It is believed that they will be used in a mixed-reality headset. The agreement covers hundreds of thousands of units, giving an idea of how big Microsoft’s plans are for their MR area. Microsoft is said to be working on an MR device emphasizing games and media, separating from its HoloLens range centered around productivity. Yet, this new MR gadget for entertainment purposes might not be ready for the commercial market before 2026.
This advancement is surprising, particularly when considering Microsoft’s large deal with the US Department of Defense for HoloLens-based headsets. How will Microsoft manage its military duties while shifting towards an entertainment-oriented path?
Additionally, the cooperation between Samsung Display and Microsoft in micro OLED technology might alter the balance in the display market and mixed reality (MR) tech. The focus now turns towards the future of Microsoft’s HoloLens and its dedication to progressing MR technology.
If you’re a tech fan or game player or are amazed by how fast display technology and mixed reality are changing, this development shows that we have even more exciting things coming up. The partnership between Samsung Display and Microsoft might change the MR experience and establish fresh norms for what’s achievable in immersive entertainment and other areas.
Many readers have complained about getting the blue screen error NPFS_FILE_SYSTEM with error code 0x00000025. In this guide, we will discuss the error and its causes in detail, along with a few solutions to fix the problem.
What is NPFS_FILE_SYSTEM (0x00000025) error?
The NPFS_FILE_SYSTEM (0x00000025) error is a Blue Screen of Death (BSoD) error code on Windows operating systems. It indicates a problem with the Named Pipe File System (NPFS) driver, which handles named pipes, a method for inter-process communication (IPC) on Windows.
According to Microsoft Learn, the probable cause for the issue is the depletion of nonpaged pool memory. Nonpaged pool memory is a part of system memory used by the operating system and drivers that can be replaced with the disk, which makes it vital for system stability. The first step is to check Microsoft’s Troubleshoot blue screen page for a resolution of BSOD errors, then follow the steps given below.
How can I fix the NPFS_FILE_SYSTEM (0x00000025) error?
1. Check and increase physical memory if needed
Press Ctrl + Shift + Esc to open the Task Manager.
Go to the Performance tab, then choose Memory.
You will see the total amount of RAM installed, the amount that is currently in use, and the amount available.
You can also see the type of RAM, speed, and number of RAM slots used.
If your RAM usage is high, it could indicate that your system needs more memory. You can check the device manual or the manufacturer’s website to find the maximum RAM capacity your device supports; then you can replace or upgrade it accordingly.
3. Update outdated drivers
Press Windows + R to open the Run window.
Type devmgmt.msc and click OK to open the Device Manager app.
Inspect all the categories by clicking and expanding them. If you find a yellow triangle with an exclamation mark on any of the components in a category, right-click it to open the context menu and select Update driver.
On the next page, select Search automatically for drivers.
Follow the on-screen instructions to complete the process.
If you encounter BSoD errors after an upgrade, updating the drivers on your PC is a good way to fix the problem. Read this guide to learn more.
Press the Windows key and type windows memory diagnostic in the search bar. Click the first result to open it.
Choose Restart now and check for problems (recommended).
Your PC will restart, and the memory diagnostic scan will begin automatically. Wait for the process to finish.
Once done, your PC will reboot automatically, and after logging in, you will see results on the desktop.
However, if you don’t see the results, you can check them in Event Viewer. Press Windows and type event viewer in the search bar. Click the first result to open it.
Click and expand the Windows Logs section from the left pane, and click System.
Now, on the right pane, choose the Actions menu and expand the System section.
Click Find.
In the text field, type memory diagnostic and click Find Next to get the scan logs.
It will take you to the results; click General to see the information.
Type msconfig and click OK to open System Configuration.
On the System Configuration window, go to the Services tab, place a checkmark next to Hide all Microsoft services, and click Disable all. This will ensure only non-Microsoft services are disabled.
Switch to the Startup tab and click the Open Task Manager link to launch Task Manager.
On the Task Manager window, select each Enabled item and click Disable. Remember all the startup items you have disabled so you can turn them back on later if needed.
Close Task Manager.
On the System Configuration window, click Apply, then OK.
Click Restart to reboot your computer.
5. Run the CHKDSK scan
Press the Windows key, type cmd in the search bar, and click Run as administrator.
Type the following command and hit Enter: chkdsk /f
Click Y if prompted and wait for the process to complete.
Restart your computer to save the changes.
6. Perform a clean installation
NOTE
Remember to create a backup of important data and ensure you have the product key or access to the Microsoft account for Windows activation. Also, ensure you have an 8 GB USB drive to create a bootable installation media.
On the first screen, select language and other suitable options, and click Next.
Click Install now, and place a checkmark next to the I accept box.
Click Next, then choose Custom: Install Windows only (advanced)
Next, you will get a list of drives and partitions. You can select them and click Delete to remove them. Once done, click OK if you see Windows Setup notification.
Click Next.
The installation will start now; once complete, your device will restart.
Follow the on-screen prompts to complete the process.
6.3 Configure Windows settings
Once the installation is done, choose your region and keyboard layout.
Connect to the Wi-Fi network when prompted.
Next, sign in with a Microsoft account or create if needed.
Choose the privacy settings per your preferences, then follow other prompts to set up other features.
Once the setup is complete, go to Windows + I to open Settings and go to Windows Update.
Click Check for updates to install the latest updates.
To conclude, to fix the NPFS_FILE_SYSTEM (0x00000025) error, you need to update outdated drivers, check the RAM, and perform a clean boot or clean installation of Windows 11.
You can also try using the BSoD repair tool. It scans your operating system and replaces any damaged Windows files it detects.
If you have any suggestions or concerns about this BSoD error, feel free to mention them in the comments section below. We’re happy to help!
Read this in-depth Panda Antivirus review to learn if it’s a trusted tool to protect your devices from malware.
A reliable antivirus is a must-have for your PC and smartphone. However, choosing the right one can be a bit tricky. If you’re considering buying a Panda subscription, this review will help you make the right choice.
I tested it for more than a week and assessed it against real-world malware programs. Let’s look at my findings below!
A Quick Look Into Panda Antivirus
Panda Free Antivirus and Panda Dome are two PC and smartphone security solutions from the WatchGuard Technologies brand. They work on Windows, Mac, iOS, and Android devices.
It has a promising antivirus trust test score from AV-Comparatives, the leading malware protection tool assessment agency. For example, in the Real-World Protection Test category for February-May 2024, AV-Comparatives assigned it 2 out of 3 stars.
In the Performance Test category for April 2024, it got a star rating of 3/3. AV-Comparatives has also submitted it to the Malware Protection Test in March 2024.
Pros
Cons
Firewall and antivirus protection for Windows PCs.
It advertises and promotes the Opera browser.
Real-time device protection for Android, iOS, and Mac.
The free version offers limited functionalities, like real-time scanning for viruses, USB protection, and Process monitoring.
Free high-speed VPN.
In-app news and content promotions might distract you.
Complementary Wi-Fi protection.
The app user interface comes with fixed dimensions. You won’t be able to maximize the window for a better view.
External device scanning against viruses and malware.
It often shows advertisements for the premium plan above the System tray.
Scans stolen credentials and emails on the Dark Web.
Performance mode for 4K streaming and PC gaming events.
Panda Antivirus Features
Find below the major functionalities of Panda Dome that protect you from online dangers and USB stick-based viruses, rootkits, and malware:
Scan
Scan is an automatic feature that constantly runs in the background. It monitors existing files, processes, programs, newly installed apps, newly connected USB devices, new websites, and so on. The aim is to protect the system from all sorts of new and old viruses or malware infections.
Although it’s fully automated, you can also use it for ad-hoc scans if you suspect a virus might have infected your device. Here are the manual scanning options you get:
Critical areas: This is the fastest virus-scanning tool. It monitors all the active processes, background apps, cookies, websites, etc.
Full scan: If your Windows OS was installed many years ago or you’re facing intermittent system performance issues that hint at an infection, you should try Full scan. Also, when the Critical areas scan doesn’t work, the Full scan is recommended. It scans the whole system including critical operating system files. The process could take up to 4 to 5 hours depending on the volume of data.
Custom scan: If you’ve downloaded an archived file, a folder, or connected an external storage drive and want to specifically check a selected directory, this tool comes in handy.
AntiVirus
AntiVirus and its cloud database are at the core of the Panda Dome PC security app. It safeguards your Windows PC, Mac, iOS, and Android devices in real-time against a broad range of malicious programs.
It constantly pulls updated software signature data from a cloud database. Then it scans the running apps and processes against that database to figure out if a certain app is malicious or not.
Furthermore, it uses a behavior-based scanning technique to detect and remove suspicious programs. Those apps might escape the signature database scan protocol due to a lack of sufficient signatures. However, heuristic scanning ensures such apps are detected when they try to access system resources that they shouldn’t.
The Panda Dome Antivirus window offers the following insights:
Last scan: It shows if you’ve done any ad-hoc scans.
Add scheduled scan: You can use this tool to create an antivirus scanning schedule. Here, you can customize items, like Frequency, Scan Areas, Scan Frequency, and Exclusions. You can also use the Advanced tab to enable or disable antivirus protections, like Scan compressed files, Detect viruses, Detcet spyware, etc.
Quarantine: It shows the antiviruses that have been quarantined in a vault and a View details button to explore those malicious tools.
Events: This section displays the count of virus detection events.
VPN
If you need to browse anonymously you can use the VPN feature. It offers different regional servers in 23 locations. You can manually choose the VPN server from top destinations, like the USA, the UK, Canada, Singapore, Germany, Denmark, and more.
However, you’re restricted to 150 MB per day. The limit is the same for the Free, Essential, Advanced, and Complete subscriptions. For unlimited high-speed VPN browsing, you must upgrade to Panda Premium.
Panda Dome offers VPN services through Hotspot Shield, which is one of the leading VPN providers. It can efficiently mask your original IP address and location for accessing restricted or country-specific online content.
Dark Web Scanner
If a web service becomes compromised, hackers can steal user data and sell it on the Dark Web. Such data includes user names, passwords, date of birth data, personally identifiable information, demographics data, and so on. Cybercriminals often buy it to impersonate you or steal your money. But here comes the Panda Dome Dark Web Scanner at your rescue.
You can access its portal to check if any breaches have compromised your personal data. With a premium subscription, you can get automated notifications for up to five email accounts.
I used a previously compromised email to test if the Dark Web Scanner really works . It’s promising to see that the tool works as expected.
After cross-checking the same scan results with Google One’s Dark Web scanning tool, I ensured that the email was really subjected to a data breach back in 2019.
USB Protection
USB sticks and removable storage are the most common external devices that infect Windows PCs. To defend against this, Panda Dome devised a state-of-the-art USB Protection technology. It automatically scans all the USB-based storage devices. Also, you can customize it to disable auto-scanning for trusted USB sticks.
The Windows Explorer tool doesn’t get access to the USB until the scan is over. Also, autorun won’t work.
Moreover, Panda Antivirus offers a USB stick vaccination technology. You can vaccinate a new or existing stick to prevent future infections.
Process Monitor
Panda Dome’s Process Monitor is a great feature that checks for rogue or disguised malicious programs. The tool constantly scans and assesses all the processes currently running on your PC.
It works automatically and consumes negligible memory and CPU bandwidth. However, you can disable the feature if you want to. When running, the tool shows the following statistics:
Process executed
Processes accessing the Internet
Medium/ high threat level processes
Blocked processes.
The View detailed report button allows you to open the Executed process report dialog box.
If you click on a process, Panda Antivirus will show a detailed description of the program.
Rescue Kit
The Rescue Kit lets you create a bootable USB device. If your PC experiences any lockout event due to a virus infection, you can use that USB to boot it up.
Then, you can use the Panda Cloud Cleaner service to scan and remove viruses and malware from the PC. Thus, you don’t need to go through a time-consuming Windows OS installation process.
You can also use the Detect advanced viruses tool to scan viruses that often get past conventional antivirus programs.
Panda Antivirus Pricing
Panda Dome Security Suite is available in four different licensing tiers. You’ll find a detailed comparison of these subscription packages in the following table:
Panda Essential
Panda Advanced
Panda Complete
Panda Premium
$29.99 for 3 devices
$ 39.99 for 3 devices
$ 49.99 for 3 devices
$ 79.99 for 3 devices
1-year protection
1-year protection
1-year protection
1-year protection
Antivirus + firewall
Antivirus + firewall
Antivirus + firewall
Antivirus + firewall
150 MB/day VPN browsing
150 MB/day VPN browsing
150 MB/day VPN browsing
Unlimited VPN browsing
Wi-Fi network security
Wi-Fi network security
Wi-Fi network security
Wi-Fi network security
Secure transactions
Secure transactions
Secure transactions
Secure transactions
Scans the Dark Web
Scans the Dark Web
Scans the Dark Web
Scans the Dark Web
Protection from ransomware
Protection from ransomware
Protection from ransomware
Parental control
Parental control
Parental control
Password manager
Password manager
PC optimization
PC optimization
PC update manager
24/7 dedicated technical support
Panda Antivirus offers a 30-day money-back guarantee. However, its refund conditions are vague. So, I recommend you download the free trial software. Use it for a few days before making the final purchase decision.
Panda Antivirus Support
Panda Dome offers both in-app and web-based technical support. The in-app method saves you time by directly redirecting you to the right resources, like the Support Forum, Contact Technical Support, FAQs, and Premium Services.
If you’re using the antivirus at home as an individual, you can use the Contact Technical Support hyperlink in the app.
As the support site opens, you should see a chat icon in the bottom right corner. You can use that to send your query to a live support team.
I’ve used this channel to assess the efficiency and responsiveness of the chat support system. It was pretty impressive. A technical support specialist responded to my text in less than 5 minutes in odd hours. According to the support staff, the team works 24/7.
If you require to speak to a support staff member, you can call the following numbers from your respective country of residence:
Overall, you can rely on the Panda Antivirus to protect your PC and handheld devices at home, school, or work. The tool is maintenance-free so you don’t need to invest much time in scanning, detecting, and removing malicious programs.
It automates most of the tasks and runs silently so you won’t feel its presence. If you’re an avid gamer or multimedia content producer, you can use it without compromising your PC performance. Still, it should be more transparent regarding the refund policy.