Security researcher Alin Leviev used a tool called Windows Downdater to bypass protective steps and permanently lower versions of Windows 10 and 11 systems. This intelligent software can hijack the Windows Update procedure and make completely undetectable, invisible, constant, and irreversible downgrades on important OS parts.
In a blog post, Leviev explains the consequences of this tool, which are, as you might have figured out already, significant. Windows Downdate can expose a system to thousands of previous vulnerabilities, reverting fixed security holes into wide-open vulnerabilities.
During the Black Hat and DEF CON events, Leviev’s presentation clarified that a system might be unable to install forthcoming updates or identify issues with help from recovery tools after a downgrade.
Windows Downdate’s technical details are captivating for cybersecurity enthusiasts. Leviev aimed to make the downgrade entirely unnoticeable, unseen, lasting, and unchangeable. This required extensive comprehension of the Windows Update process and the skill to control it effectively. Leviev found a way to circumvent the security actions made to safeguard critical OS parts from unauthorized changes by aiming at the updating process.
Here’s how it works:
First, the downgrade must be fully undetectable, so that endpoint detection and response (EDR) solutions cannot block the downgrade. Thus, I aimed to perform the downgrade in the most legitimate way possible.
Second, the downgrade must be invisible. The downgraded components should appear up-to-date, even if they have technically been downgraded.
Third, the downgrade must be persistent, so that future software updates do not overwrite it.
Finally, the downgrade must be irreversible, so that scanning and repairing tools will not be able to detect or repair the downgrade.
Even though Microsoft knows about this problem and is trying to lessen its effects, the fact that there are tools such as Windows Downdates shows how difficult it can be to achieve complete safety in our digital world, especially for the Redmond-based tech giant, a company that is constatly attacked by hackers.
The Microsoft Windows Search Filter Host process or SearchFilterHost.exe is a vital component of the search functionality in Windows and has been a part of the OS since Windows XP. But over the years, many discovered high CPU usage by SearchFilterHost.exe or the process kept crashing!
The key reasons for SearchFilterHost.exe’s high CPU usage and crashes are corrupt search index, issues with active indexing, problems with Windows Search service, corrupt system files, or an incomplete Windows installation.
Before we begin with the slightly complex troubleshooting, reboot the PC, install all pending Windows updates, and switch to the high performance power plan. If the high CPU usage or crashes persist, head to the solutions listed next.
How do I fix high CPU usage by SearchFilterHost.exe?
1. Check the SearchFilterHost.exe file’s authenticity
Often, threat actors disguise a virus by using the name of a critical system file, which prevents early detection. So, it’s important to verify that SearchFilterHost.exe is not malware.
To do that, check the file location. The SearchFilterHost.exe file is, by default, stored in: C:\Windows\System32
SearchFilterHost.exe in the System32 folder
If it’s stored elsewhere, scan the PC for malware using the built-in Windows Security or another top-rated antivirus solution.
2. Rebuild the search index
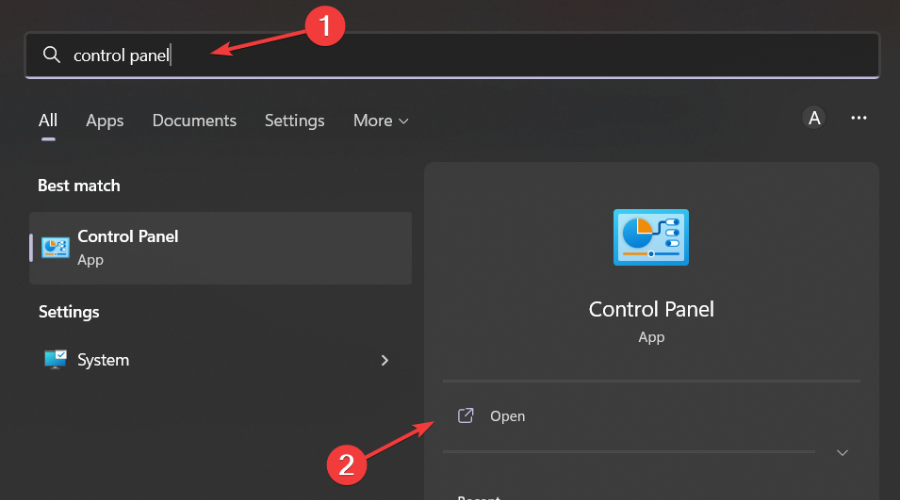
Press Windows + S to open Search, type Control Panel in the text field, and click on the relevant result.
Select Large icons from the View by dropdown menu near the top right.
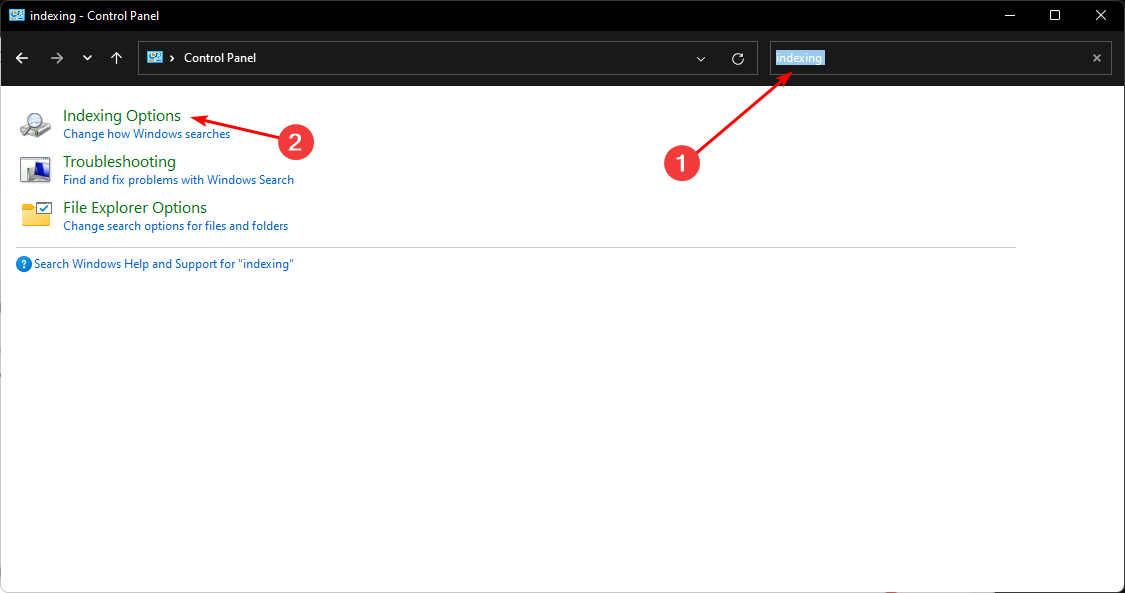
Locate and select Indexing Options.
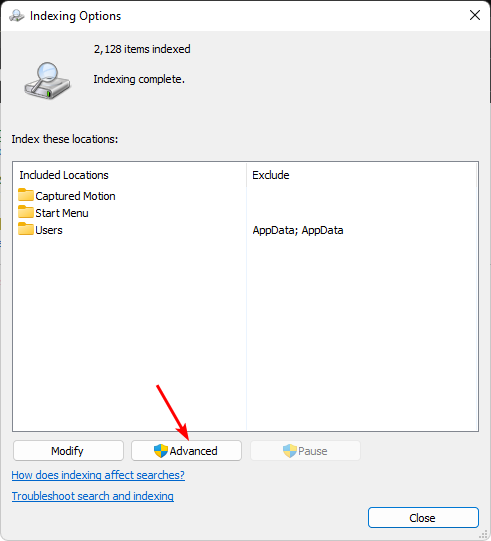
Now, click the Advanced button.
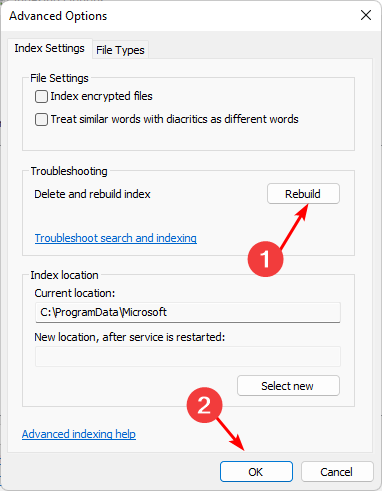
Click on Rebuild under Troubleshooting.
Click OK in the prompt that appears.
For 9 out of 10 users (including me), rebuilding the index did the trick when SearchFilterHost.exe had a high CPU usage in Windows 11. Here, it was likely some issue with the existing search index, which made it difficult for Windows to fetch files and, subsequently, led to increased resource consumption.
3. Exclude OneDrive from indexing
Open the Control Panel, select Large icons from the View by menu, and click on Indexing options.
Click on Modify.
Now, look through the various paths, identify the OneDrive folder, untick the checkbox before it, and click OK to save the changes. The OneDrive folder is usually stored under the following path, where Username is the active profile’s name: C:\Users\Username
In the past, OneDrive and other similar cloud storage services have triggered high CPU usage by SearchFilterHost.exe due to issues with file indexing. So, the easiest way out is to exclude these from the search index!
4. Run the Search and Indexing troubleshooter
Press Windows + R to open Run, paste the following in the text field, and hit Enter: msdt.exe -ep WindowsHelp id SearchDiagnostic
Now, follow the on-screen instructions in the Search and Indexing troubleshooter and make the recommended changes, if any.
5. Disable the Windows Search service
Press Windows + R to open Run, type services.msc in the text field, and hit Enter.
Scroll down, right-click on the Windows Search service, and select Properties.
Choose Disabled from the Startup type dropdown menu, and then click on Stop under Service status.
Once the service stops running, click Apply and OK to save the changes.
Disabling Windows Search doesn’t affect the core functioning of the OS. The only downside is that future searches may take longer since the OS won’t update the index and would rely on the one created previously.
6. Repair the corrupt system files
Press Windows + S to open Search, type Command Prompt in the text field, and click on Run as administrator.
Click Yes in the UAC prompt.
Paste the following DISM commands individually and hit Enter after each: DISM /Online /Cleanup-Image /CheckHealthDISM /Online /Cleanup-Image /ScanHealthDISM /Online /Cleanup-Image /RestoreHealth
Next, run the following command for the SFC (System File Checker) scan: sfc /scannow
The steps listed below are to perform an in-place upgrade on Windows 11. If you are on the previous iteration, check our guide detailing the process for repair upgrade on Windows 10.
Go to Microsoft’s official website, choose the OS edition and product language, and then download the Windows 11 ISO.
Once downloaded, right-click on the ISO file, choose Mount, and then click Open in the confirmation prompt.
Run the setup.exe file.
Click on Next.
Now, click Accept to agree to Microsoft’s license terms.
Verify that the setup reads, Keep personal files and apps, and click on Install.
Wait for the in-place upgrade to complete. It typically takes 1-3 hours.
An in-place upgrade is almost as good as reinstalling Windows and gets rid of problems like SearchFilterHost.exe crashing or showing high CPU usage. The best part about it is that you don’t lose stored files and installed apps during the process.
Running out of battery on your Chromebook can be a real hassle, especially when you’re in the middle of something important. Luckily, enabling Battery Saver mode can help you extend your device’s battery life significantly. Let’s dive into the different ways you can turn on Battery Saver on your Chromebook.
How do I enable battery saver on Chromebook?
1. Use Chrome flags
Open Google Chrome on your Chromebook.
In the address bar, type the following: chrome://flags/#battery-saver-mode-available
On the Battery Saver Mode flag, use the drop-down menu to select Enabled.
Click Restart to apply the changes and restart Chrome.
Once reloaded, you’ll have access to the Battery Saver feature in your Chrome settings.
2. Activate battery saver
Click the System Tray (bottom-right corner of your screen) and then click the Settings gear icon.
In the menu on the left, select Performance.
In the search results, click on Power.
Toggle the Energy Saver switch to On.
This allows you to enable Battery Saver mode any time you prefer, not just when the battery is low. This is especially useful for long trips or heavy workdays.
Keep in mind that when Battery Saver is active, you might notice a decrease in gaming and video performance.
Following these steps will ensure that your Chromebook runs more efficiently and extends battery life when unplugged.
Speaking of battery, some users reported that Chromebook is not charging beyond 1% so if you’re having this issue don’t miss our dedicated guide.
This isn’t the only issue, and many reported that Chromebook keeps restarting, but we have an entire article dedicated to this issue, so don’t miss it.
Wondering how to measure distance on Google Maps on PC? It’s pretty simple.
This feature is helpful for planning trips, determining property boundaries, or just satisfying your curiosity about the distance between locations. I’ll show you how below, so let’s get into it!
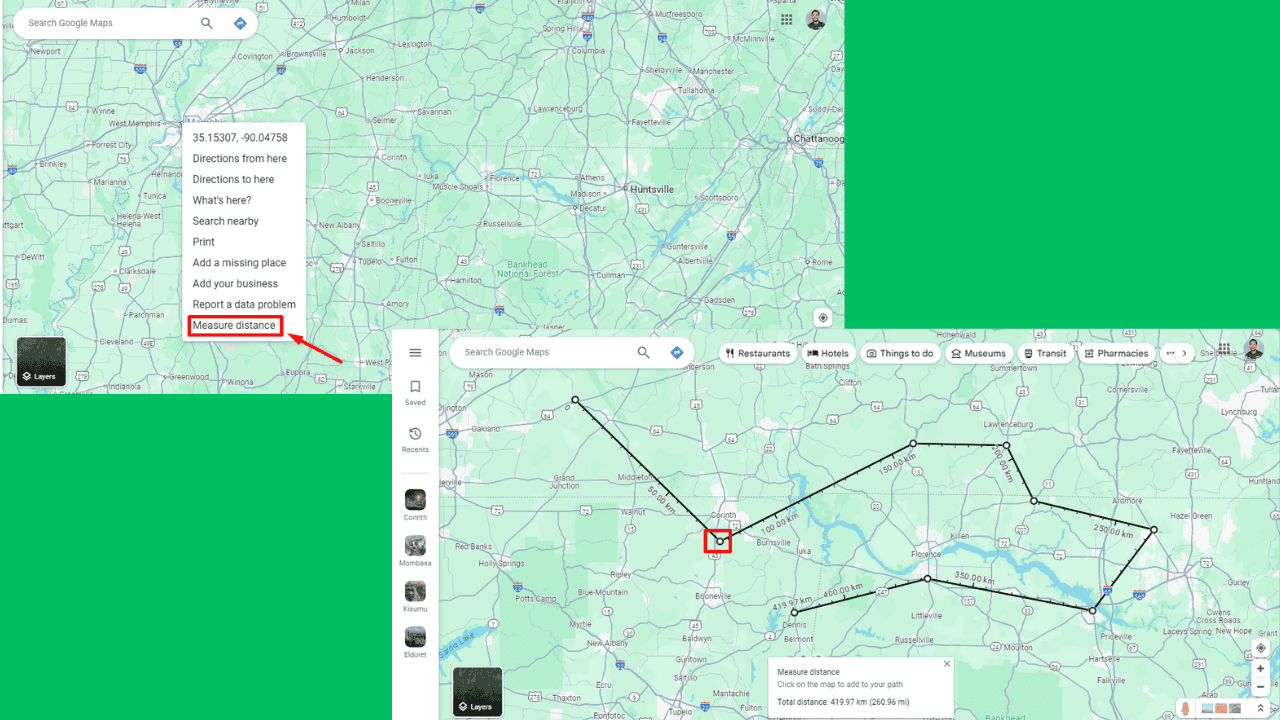
Right-click on the point where you want to start measuring. From the context menu that appears, select “Measure distance” to set your starting point.
Click on the map to add points and create a path. Google Maps will record the distance automatically.
As you add points, Google Maps will automatically calculate and display the total distance between them. It shows the distance in miles and kilometers at the bottom of the screen.
To adjust your measurement, click and drag any of the points to a new location. The total distance will also change.
To remove a point, click on it, and it’ll be deleted from your path. As you remove points, the distance will reduce.
Once done, you can clear the measurement by right-clicking on the map and selecting “Clear measurement” from the context menu.
So, now you know how to measure distance on Google Maps on PC. You can plan a workout, assess property boundaries, or organize travel plans. This tool provides accurate and easy-to-understand measurements for your route.
Choosing between the XMP 1 or XMP 2 profiles can be a bit confusing, especially if you’re looking to boost your system’s performance without compromising stability. Choosing the right XMP profile depends on the configuration of your PC, so we will also explain how to make your own assessment.
XMP 1 and XMP 2 – Differences and the right choice
1. What are the differences between XMP 1 and XMP 2
XMP 1 typically offers a stable, board-validated profile optimized for compatibility. This makes it ideal for most users, especially those focused on system stability.
XMP 2 uses the memory module’s default XMP timings, which might offer higher performance but can introduce instability in some systems. If you’re into tweaking and fine-tuning, this profile could be beneficial.
In some BIOS software, you don’t even have the choice to change between the XMP profiles so that will be the end of this conundrum. If you do have the choice, read below to learn how to determine which is the right one for you. But first, here’s how to change the XMP profile in BIOS.
2. Change the XMP profile from BIOS
Restart your computer and press the designated key (usually DEL or F2) to enter BIOS.
Navigate to the memory or DRAM settings section.
Choose XMP 1 or XMP 2 from the available profiles.
Confirm the changes and exit BIOS. Usually, you will need to press F10.
Take note of the timings and frequency for both XMP 1 and XMP 2.
Reboot into BIOS and choose the profile with the preferred timings.
Confirm the changes and exit BIOS.
By comparing the timings, you can select the profile that better suits your performance and stability needs. This method ensures you’re making an informed decision.
4. Check for stability issues
Follow previous steps to enable XMP 1 or XMP 2.
Use software like MemTest64 or Prime95 to test for stability.
Look for any crashes, stutters, or errors during the test.
If you encounter issues, try switching to the other XMP profile and repeat the tests.
This method helps you determine which profile runs more stable on your specific setup, ensuring reliable performance.
5. Manual overclocking for advanced users
Enter BIOS and disable the XMP profiles.
In the DRAM settings, manually set the memory timings and frequency based on the desired performance (if this feature is available).
Confirm the changes and exit BIOS.
Run stability tests like Prime95 or MemTest64 to ensure the system is stable.
For advanced users, manual overclocking allows for fine-tuned adjustments beyond what pre-set XMP profiles offer. This can achieve optimal performance tailored to your needs but requires thorough testing to ensure stability.
If you get the wrong RAM speed in the tests, check the highlighted guide to learn how to fix this issue. For beginner overlockers, we also have a guide on DRAM frequency and how to set it up properly.
Remember, always back up your settings before making changes in BIOS, and keep your system drivers up to date to avoid potential conflicts.
For any other questions or suggestions, feel free to use the dedicated comments section below.
Microsoft released the new Sticky Notes app for all users a while ago, and the app received many enhancements, new features, and a new design altogether. However, if it’s not broken, don’t fix it. The new Sticky Notes was not received with much enthusiasm from users.
The app is still in preview mode, which can be a little confusing. Why would Microsoft make an unfinished product available to users, particularly if it’s intended to substitute for something as basic as Sticky Notes?
Also, this new app is attached to OneNote. It doesn’t matter if you like it or not; if you have OneNote, then your device will automatically receive these recent Sticky Notes. If you are not interested in it, bad news. The only way out of this is to remove OneNote or even the complete Office package.
But the twist is that even with some new shiny features and a fancy UI, the refreshed Sticky Notes app is a slowpoke. Yeah, it’s true. Sticky Notes’ original purpose was to be fast and light, but this upgrade appears to have not received that message, according to some Reddit users.
However, it’s not entirely hopeless. The old Sticky Notes application is still on the Microsoft Store for people who like the traditional experience. It runs quicker, is easier to use, and does exactly what you expect from a sticky note app.
You can also synchronize your notes on different devices—that is always a plus point. And for those who like things in their original form, the “old, old” Sticky Notes, a simple widget-like app, can be brought back to life.
What do you think about the new Sticky Notes? Would you try the new version or stick to the old one?
When it comes to squeezing every bit of extra boost from your Ryzen 7 5800X3D, choosing the right RAM is crucial. Ryzen 7 5800X3D makes a great pair with 3600MHz CL16 or CL18 RAM modules. Below, you will find the best general recommendations and a few options to consider.
How do I choose the best RAM for Ryzen 7 5800X3D?
1. General recommendations
Check your motherboard’s compatibility: Ensure your motherboard can handle 3600MHz RAM.
Choose a reputable brand: Consider RAM kits from Corsair, G.Skill, Patriot, or TEAMGROUP.
Select RAM with heatsinks: Opt for RAM that features built-in heatsinks, such as Corsair Dominator Platinum RGB.
Buy 2 sticks of 16GB: This configuration ensures lower stress on the memory controller.
Install the RAM: Insert your RAM sticks into the appropriate slots as per your motherboard manual.
Enable XMP Profile: Go to your BIOS settings and enable the XMP profile to automatically configure the RAM to its advertised speeds.
Choosing 3600MHz CL16 RAM provides an optimal balance between speed and latency, ensuring smooth performance for gaming and multitasking on the Ryzen 7 5800X3D.
2. Best RAM options for AMD Ryzen 7 5800X3D
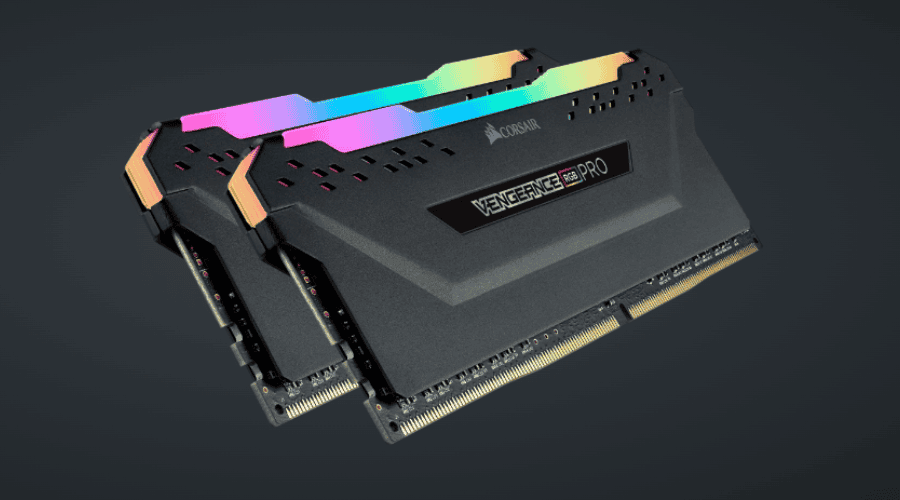
1. Corsair Vengeance RGB Pro 32GB (2x16GB) 3600MHz CL18
This specific kit is well-regarded for its compatibility with Ryzen processors and offers both performance and aesthetic value with its RGB lighting.
Besides the iCue light bling, the Corsair kit offers XMP 2.0 compatibility and a very good hear dissipation.
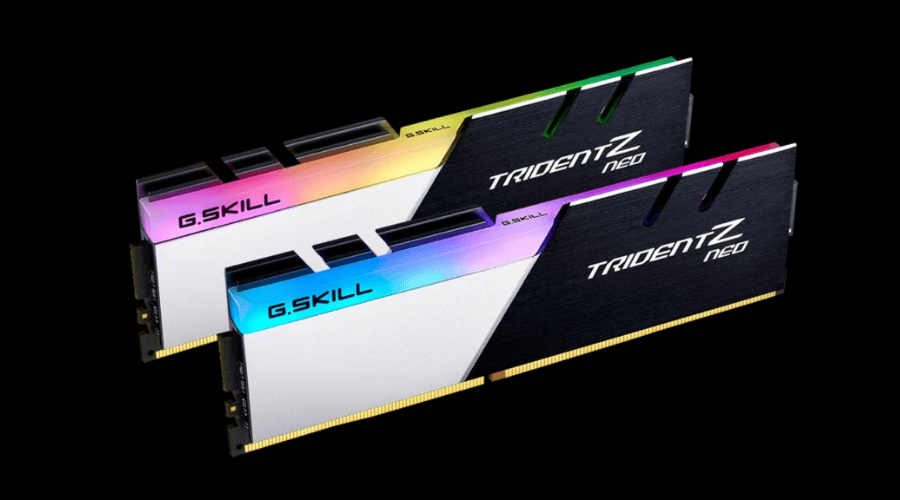
2. G.Skill Trident Z Neo 32GB (2x16GB) 3600MHz CL16
G.Skill Trident Z Neo is designed specifically for AMD Ryzen platforms, providing excellent performance and stability.
Besides that, it is compatible with Asus Aura Sync, Gigabyte RGB Fusion, MSI Mystic Light, or ASRock Polychrome Sync for that extra RGB shine.
We have found the G.Skill Trident Z Neo pack on Amazon for $78 at the moment when writing this guide. Things might have changed so check it out.
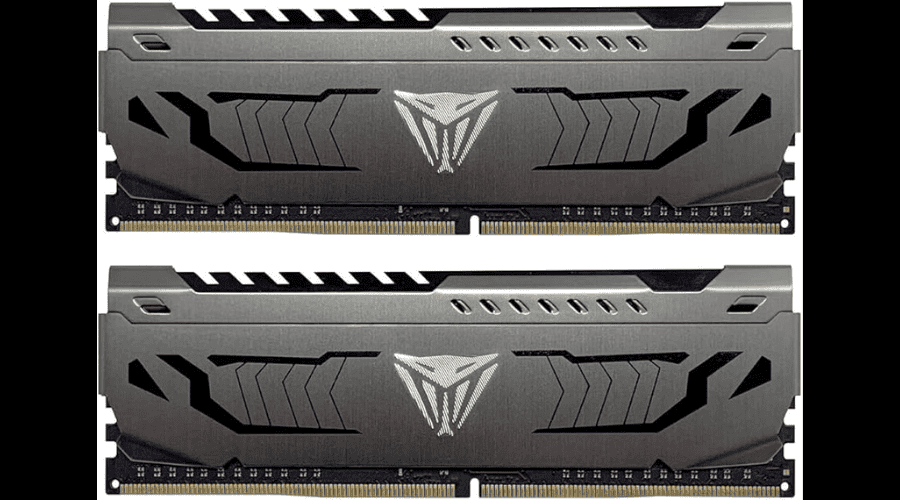
3. Patriot Viper Steel Series DDR4 16GB (2x8GB) 3600MHz CL18
Patriot Viper Steel offers a good balance of performance and cost, making it an excellent choice for budget-conscious users.
This kit is by far one of the cheapest choices out there, but that doesn’t mean that is worse than the ones above. At only $33 on Amazon, the pack still offers the XMP 2.0 support and a good heatsink. Yeah, it doesn’t have any RGB lighting, but it does the job and it can even keep up with overclocking.
We hope that our guide offers you enough information to maximize the performance of your Ryzen 7 5800X3D with the best-suited RAM configuration for your specific needs. To keep your system running smoothly, regularly check for BIOS updates and ensure your cooling solutions are up to the task.
Microsoft is putting $25 million into Neon, an open-source database startup. This investment comes as part of the bigger funding round for Neon, bringing the total raised funds to $104 million from top investors like Menlo Ventures and Khosla Ventures.
What sets Neon apart? Their serverless Postgres platform allows developers to create steadfast applications that can be stretched without difficulty. Like AWS Aurora, Neon splits computing from storage. It offers many features that developers adore: automatic scaling, branching, restoring a point in time, etc.
With Microsoft’s investment, Neon has a solid plan to broaden its services to Microsoft Azure. This is significant because it indicates that Neon isn’t only centered on AWS but is diversifying, too—this will make its platform reachable to more kinds of developers.
Andrew Smyth, who works as Managing Partner at M12 (that’s Microsoft’s Venture Fund), highlighted how Postgres is quickly becoming the leading choice for databases among developers and that supporting this ecosystem aligns with Microsoft’s strategies completely. Neons are at the forefront, and Microsoft wants to ensure Azure is integrated with it.
Postgres is rapidly becoming the database of choice for developers, and we are investing heavily in that ecosystem. Neon is a leading Postgres platform, and this strategic investment emphasizes our commitment to deeply integrate Neon into Azure.
Microsoft is not a newcomer to the development game. They have been shaping the modern development stack with tools like GitHub, VS Code, TypeScript, OpenAI, and Copilot. Neon’s goal to provide a better developer experience matches Microsoft’s strategy well—especially when powering next-generation AI apps. Neons have png vector, a vector store built in Postgres that is very good for vector databases. This has special serverless abilities, offering scalable answers for index builds and queries.
However, considering OpenAI’s recent partnership with Apple and the latter’s investment in the former, Microsoft might feel threatened by it, so the company might be looking to expand as much as it can.
If you’re interested, consider joining the waitlist. This way, you will be notified when Neon is accessible on Azure.
Having trouble getting the 3D view in Google Maps to work on your PC? You’re not alone. Many users face this issue, but the good news is that there are several solutions you can try to get it working again.
Why won’t my Google Maps show 3D?
This usually happens if Globe mode isn’t enabled or due to disabled hardware acceleration.
What can I do if 3D is not working in the PC version of Google Maps?
You can try updating your browser or using the Incognito mode to check if that helps.
1. Enable Globe view
Open Google Maps.
Open Layers and click on More.
Set Map type to Satellite and check Globe view.
On the right side, you’ll now have the 3D view available.
A black screen on Hulu when you launch the app can be a sign of a network issue or in-app glitches. For most users, a simple restart of your device or logging out and back in can be a quick fix but if not, the issue may be more advanced.
If you’re trying to screen-record a show and Hulu detects this action, the screen might go black. This is a protection measure for copyrighted content. However, if you’re not doing anything wrong, it could be a server outage, built-up cache or outdated software.
How do I fix the black screen on Hulu?
1. Clear cache
1.1 Android app cache
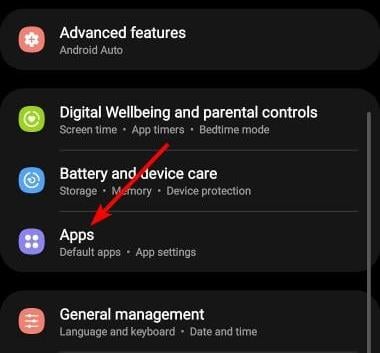
Tap on settings on your phone.
Next, tap on Apps.
Find the Hulu app and tap on it.
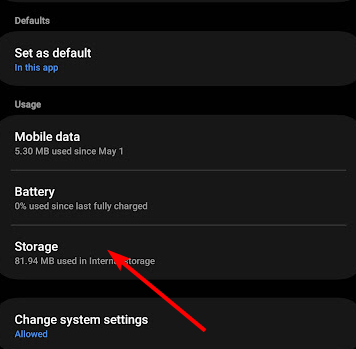
Scroll down and select Storage.
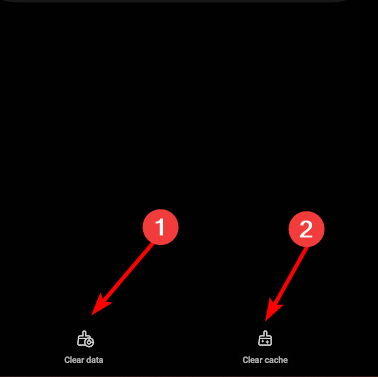
Tap on Clear data and Clear cache,then try again.
1.2 Android TV cache
On your TV, find your Settings.
Go to Apps and select Hulu.
Scroll down and hit Clear data and Clear cache.
1.3 Browser cache
Open Opera GX and click the Opera icon in the upper left corner to open Settings.
Select Privacy and Security.
Scroll down to Clear browsing data.
Select the type of data you want to clear, and the time range, then click Clear data.
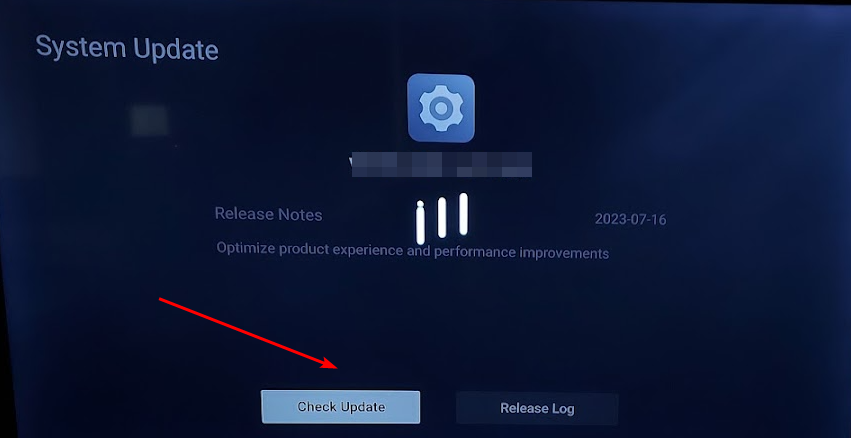
2. Update your TV’s firmware
For this solution, we shall be using the TCL model.
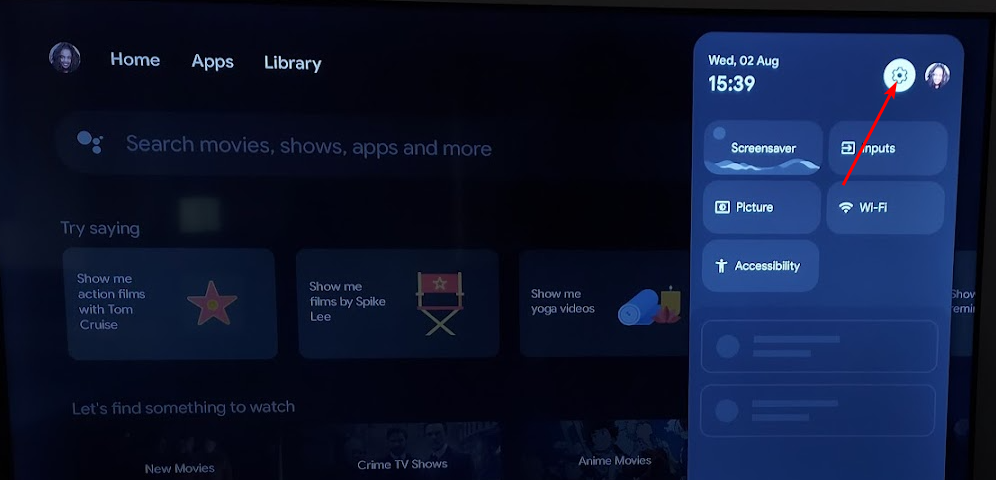
On your TV, find your Settings.
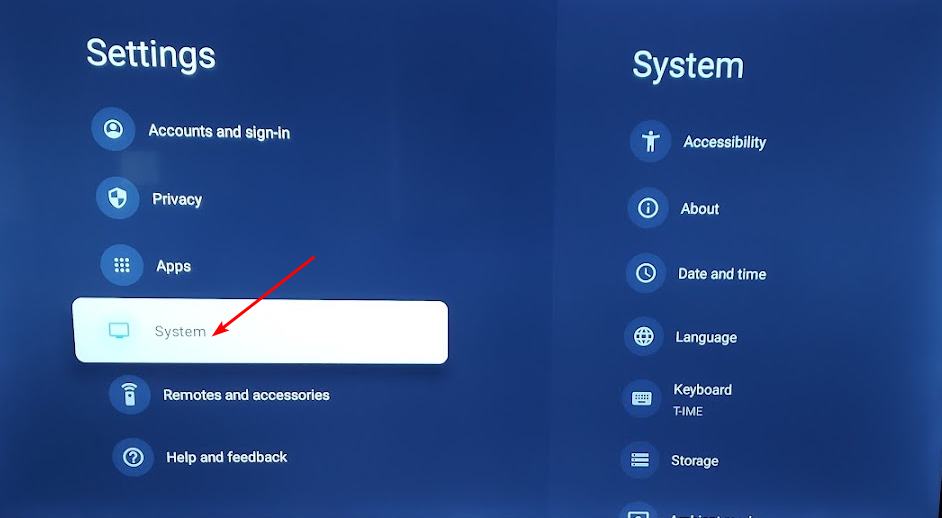
Go to System.
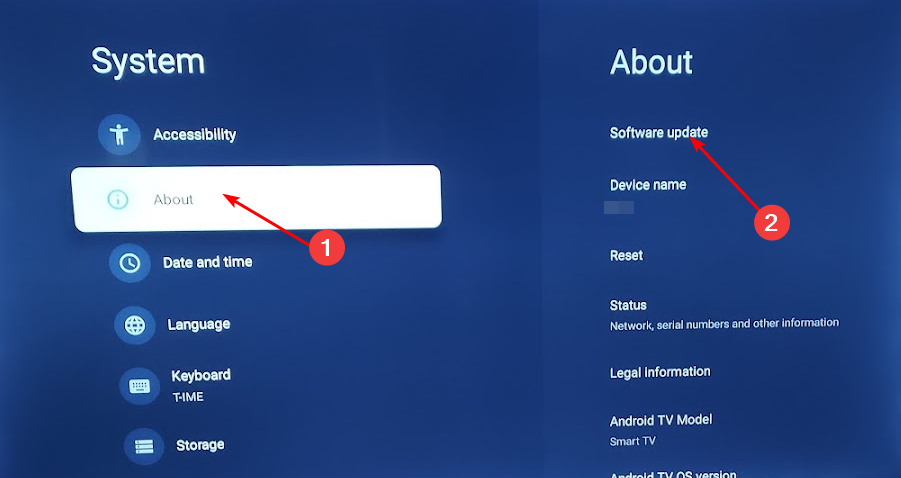
Click on About then select Software update.
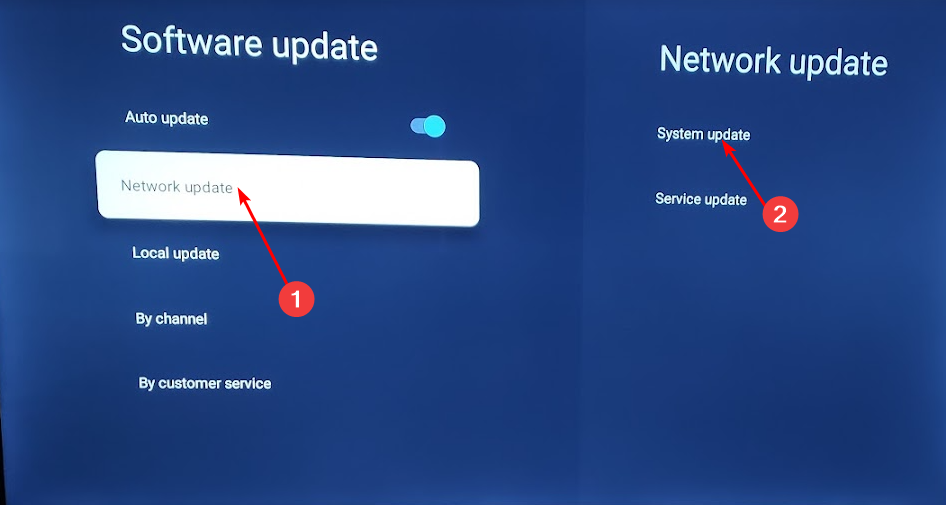
Select Network update and click on System update.
Now click on Check Update. Your system will scan for any available updates.
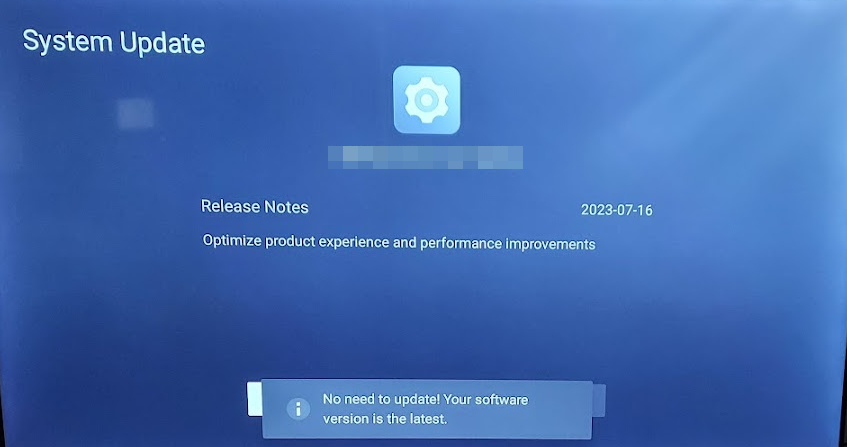
You’ll either start downloading updates or get a message that your TV is already up to date.
3. Enable hardware acceleration
3.1 PC app
Hit the Windows key and select Settings.
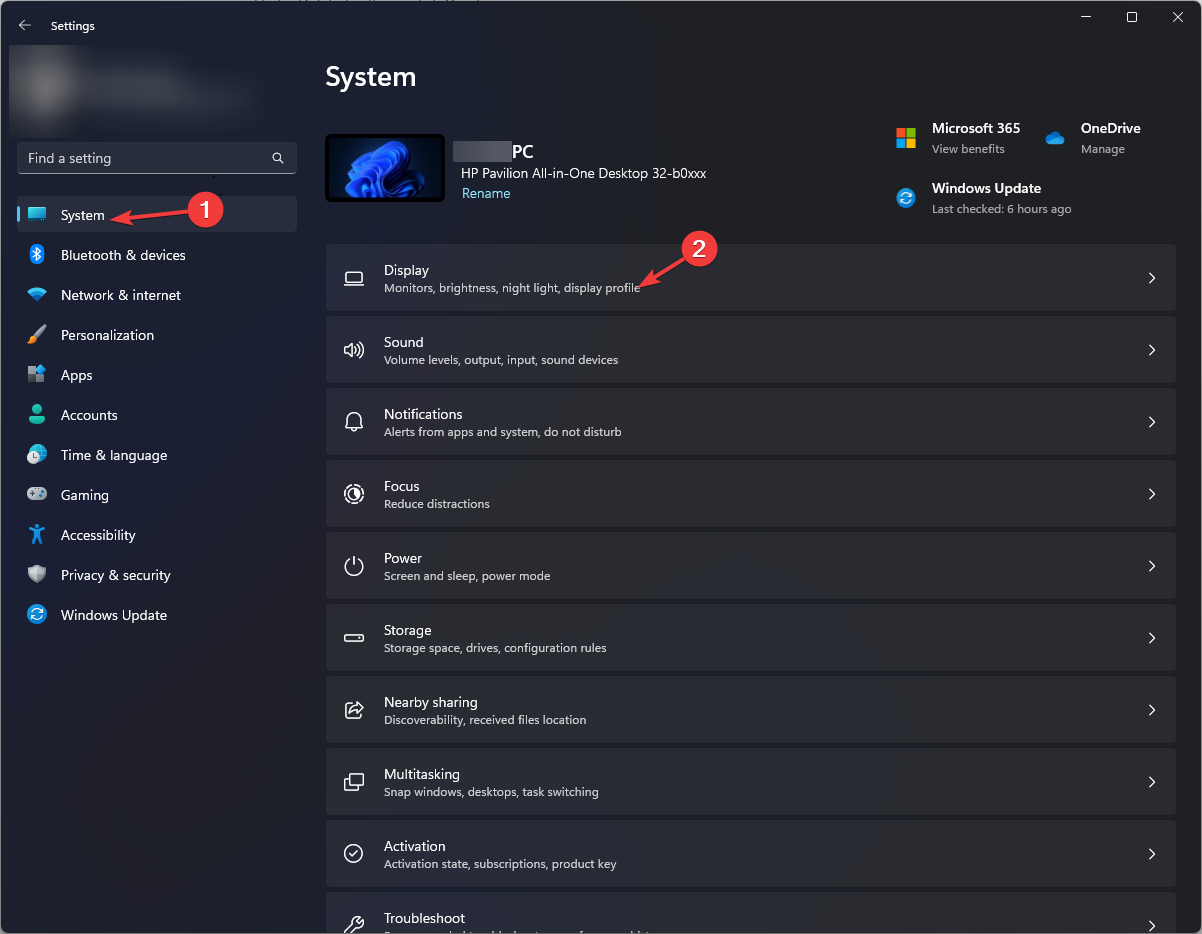
Click on System on the left pane, then Display on the right pane.
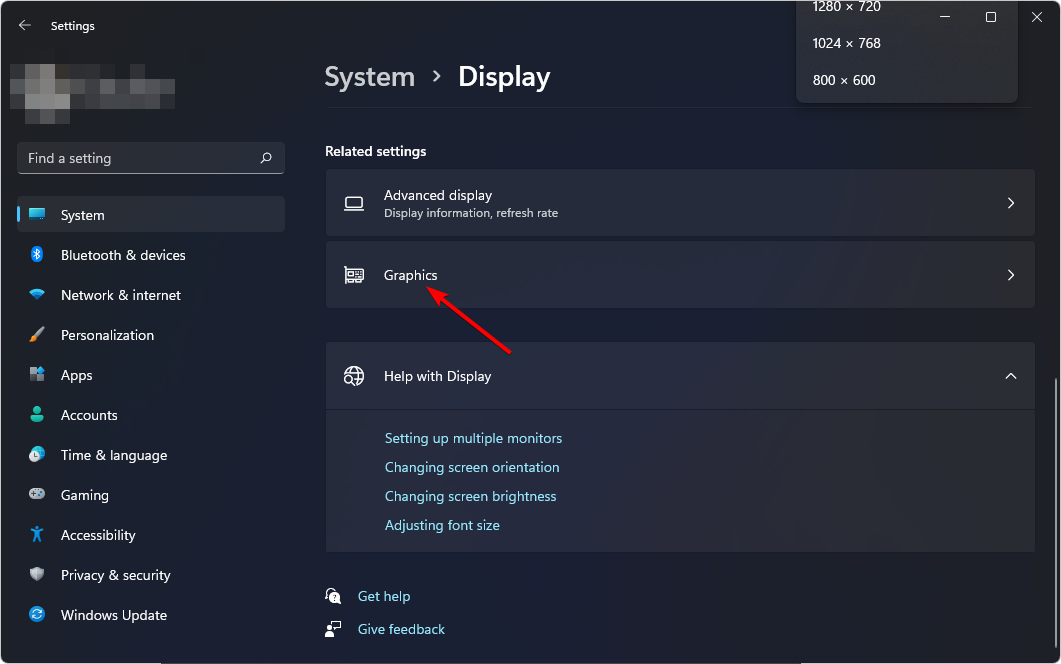
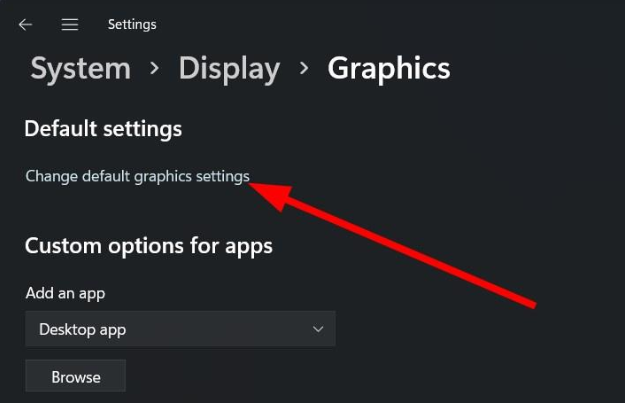
Scroll down and select Graphics.
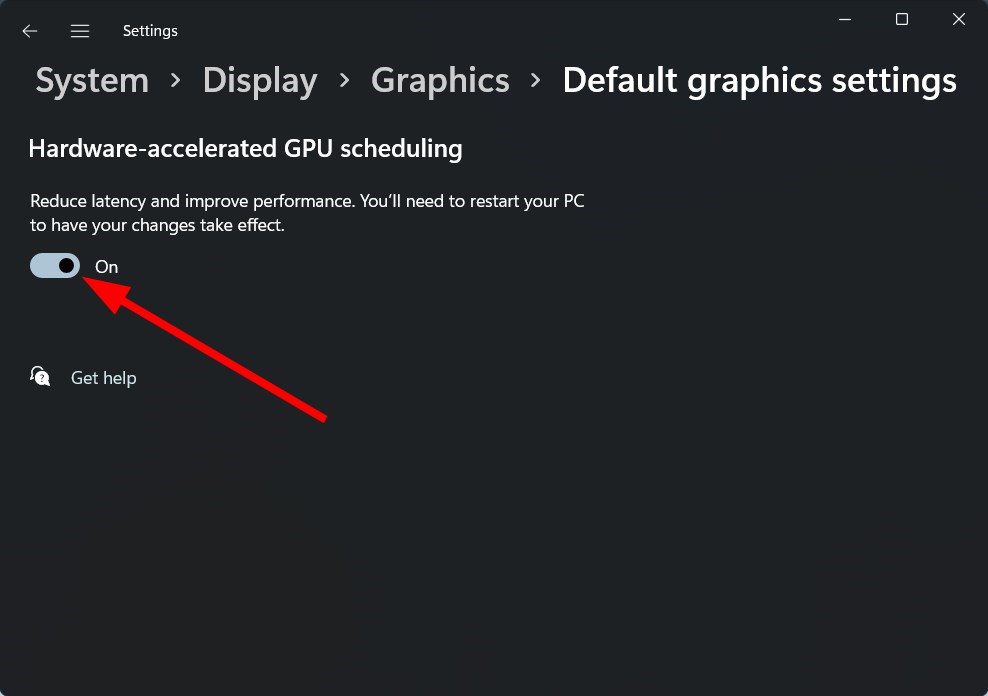
Select the Change default graphics settings option.
Now, toggle on the Hardware-accelerated GPU scheduling option.
3.2 Browser
Launch Opera GX, click the Opera icon in the top left corner, and choose Settings from the menu.
Scroll to the bottom of the page and click on Advanced.
Go to the System section and toggle off Use hardware acceleration when available.
Restart your browser and check if the black screen issue on Hulu is still there.
If you have older or lower-end hardware, the video processing load may fall solely on your CPU and strain your system resources. Enabling hardware acceleration shifts this load to your GPU and allows for smoother video playback since the GPUs main role is to render videos.
Next, select Audio from the TV menu and make sure Dolby Digital Plus is set to OFF.
4.2 Windows app
Click Start and type sound to open the Sound window. (You can also right-click on the sound icon in the tray area and select Sounds).
Navigate to the Advanced tab and click on Restore Default button.
Now click OK to save changes.
Go back to the Enhancements tab
Uncheck Disable all sound effects (or any similar option you see there).
Restart your computer and see if it works better now.
Some sound settings may conflict with video decoding hence causing the black screen on Hulu. Older hardware may be incompatible with advanced sound settings like Dolby so try reverting to default settings and see if this fixes the issue.
5. Reset the Hulu app
Hit the Start Menu icon on the Taskbar and click on Settings.
Click on Apps on the left pane, then select Apps & features on the right pane.
Navigate to Hulu app, click on the three ellipses and select Advanced options.
Scroll down and select Reset.
Follow the on-screen prompts and try again.
6. Reinstall the Hulu app
Hit the Start Menu icon on the Taskbar and click on Settings.
Click on Apps on the left pane, then select Apps & features on the right pane.
Navigate to Hulu app, click on the three ellipses and select Uninstall.
Launch the Microsoft Store, search for the Hulu app, and click Install.
Follow the on-screen prompts and try again.
7. Factory reset your TV
Press the Home button on your remote control.
Now go to Settings.
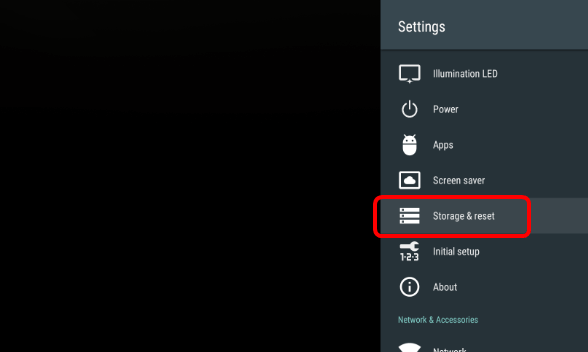
Under Storage & Reset select Factory data reset.
Choose Erase everything and confirm by selecting Yes.
If you’re out of luck with all these steps, the Hulu support page may come in handy in helping you understand this issue and come up with additional assistance.
Unfortunately, these issues are quite common so you may run into another black screen on HBO but we’ve already covered fixes for that.
If you have any other fix that worked for you that we’ve not mentioned, feel free to share it with us in the comment section below.
Microsoft Store users should be excited because Microsoft has just updated the platform with two big features that should greatly improve users’ general experience with it. The Redmond-based tech giant announced in a blog post, that these features will be available to Windows Insiders first.
To begin with, the library experience is improving. You won’t need to click through many screens to find apps and games that you possess but haven’t installed yet. A fresh search box is also coming up to help you locate the programs you want to download swiftly. Microsoft actually teased it a while ago, when Insiders found the feature was hidden in earlier Windows 11 builds.
The next thing is a new “Updates & downloads” page in the Microsoft Store that breaks away from the Library section. This means you can view your current downloads and pending updates all in one spot now, along with those frequently requested release notes. You can now view what is fresh or repaired without searching the web for it. But remember that this feature only works if developers have provided these changelogs.
Aside from the separate download page and official changelog, the update brings an experimental area to the Microsoft Store for short-term in-app events. This is a place where you can find out which games are having these particular events because of their partnerships with different game developers.
We are experimenting with a new section on the Games page in some regions that will showcase select partners with in-app events. We have partnered with game publishers to highlight real events that will be occurring during the test period.
Also, if you’re a developer too – the Microsoft Store badges have been updated to enhance trust and encourage users to download your app.
These updates will be introduced one by one, so if you don’t see them yet, there’s no need to worry. Microsoft wants to collect feedback before making them accessible to all users.
If you’re enrolled in the Windows Insider Program, the Dev and Canary Channels will be the first to receive these features. Please let us know your experience with them.
Also, don’t forget about the 2024 Microsoft Store Apps Awards: nominate your favorite app or even participate in the contest with your own app, and you might win a brand new Surface laptop—the Copilot+ PC version.
Following the ability to switch between different search engines from the Address bar, In Nightly, Firefox has an AI feature that can automatically generate image descriptions in PDF documents when users manually add images. The feature isn’t perfect, but it shows promise.
Every major browser is incorporating AI features and services, including chatbots. Google Chrome, Microsoft Edge, Opera, and Brave lead the charge. Google Chrome has announced and is testing new AI features powered by Gemini, including History search, Tab Organization, Tab compare, and more. Microsoft Edge has integrated the AI assistant, Copilot, into its sidebar. Opera has Aria, and Brave has Leo.
Mozilla, primarily reliant on revenue from the Google search deal, has started allowing users to access different chatbots like Gemini, ChatGPT, HuggingChat, and Le Chat Mistral through its Sidebar.
The company isn’t stopping there, aiming to bring “AI-generated alt-text for images inserted into PDFs” – an accessibility feature addressing the needs of the visually impaired and other users with learning disabilities.
Mozilla said the new AI feature will use a fully private on-device AI model. Firefox will add alt text to images in PDFs locally on-device. This feature will be available within Firefox’s built-in PDF Editor and could be expanded for general browsing with screen readers.
Mozilla aims to use AI based on small open-source models for this. This approach requires minimal computing resources.
WindowsReport has tested Firefox’s local alt text generation feature for images in PDF Editor. Here’s how it works:
. Open Firefox and a PDF in the browser.
Click the >> button in the toolbar and select “Image Alt Settings.“
Download the 180 MB AI model and enable “Create alt text automatically.”
Click “Close.”
Add an image using the toolbar. The AI generates alt text.
Edit the description if needed and click “Save.”
Review and save the changes to the PDF.
Image alt text settings dialog. Image credit: WindowsReportImage Credit: WindowsReportImage Credit: WindowsReport
While the feature is in its initial stages and uses a small model, it can generate descriptions that are sometimes accurate. Check the attached examples for details.
image Credit: WindowsReport
Mozilla aims to improve accessibility with this feature, making inaccessible PDF images usable for those who need them most.
Image Credit:WindowsReport.
What’s your take on Mozilla integrating AI into Firefox PDF Editor to generate alt text for Images? Let us know in the comments below.
Blue Screen of Death (BSOD) errors are not uncommon, but a few are encountered so rarely that there’s very little information available. One such is SHARED_RESOURCE_CONV_ERROR, a BSOD with a bug check value of 0x0000001F!
Based on data collected from past occurrences, incompatible hardware, misconfigured connections, outdated driver software, corrupt system files, disk issues, RAM problems, malware infection, or a corrupt user profile are all possible reasons for BSOD.
Before we proceed to the slightly complex fixes, restart the computer, disconnect all non-critical peripherals (including printers), rectify any loose connections, and uninstall any recently installed conflicting apps.
How can I fix the SHARED_RESOURCE_CONV_ERROR BSOD?
1. Update all the outdated drivers
Press Windows + X to open the Power User menu, and select Device Manager from the list.
Expand the Display adapters entry, right-click on the active graphics adapter, and choose Update driver.
Select the Search automatically for drivers option and wait for Windows to install the best locally available driver.
Once done, restart the computer.
Apart from the graphics adapter, you have to update the drivers for every other critical hardware. If Windows can’t find a better version, head to the manufacturer’s official website and manually install the driver!
2. Repair the corrupt system files
Press Windows + R to open Run, type cmd, and hit Ctrl + Shift + Enter.
Click Yes in the UAC prompt.
Paste the following DISM commands individually and hit Enter after each: DISM /Online /Cleanup-Image /CheckHealthDISM /Online /Cleanup-Image /ScanHealthDISM /Online /Cleanup-Image /RestoreHealth
Now, execute this command for the SFC scan: sfc /scannow
Finally, restart the computer to apply the changes.
Corrupted files can cause all sorts of damage to your computer and in many cases, they lead to loss of data. A good way to identify and fix any corrupted files is with the help of professional repair software that will scan and repair your computer in just a few minutes.
Press Windows + S to open Search, type Windows Security, and click on the relevant result.
Click on Virus & threat protection.
Click on Scan options.
Now, choose Full scan and then click on Scan now.
Wait for the built-in antivirus to identify and eliminate any threats.
If Windows Security can’t find any threats, I recommend you get a top-rated antivirus solution and scan for malware. These often prove more effective at the job!
5. Run Windows Memory Diagnostic
Press Windows + R to open Run, type mdsched.exe in the text field, and hit Enter.
Click on Restart now and check for problems and let the utility identify and repair any trivial issues for the RAM.
If the built-in Windows Memory Diagnostic can’t find any issues, you can go with a more advanced tool like MemTest86. It runs a wide array of tests on the RAM and identifies even the most intricate of the issues. For this reason, MemTest86 takes 4-8 hours to complete. So, it’s best you let it run overnight!
6. Increase the virtual memory
Press Windows + S to open Search, type View Advanced System Settings, and click on the relevant result.
In the Advanced tab, click the Settings button under Performance.
Again, go to the Advanced tab, and click on Change under Virtual memory.
Untick the checkbox for Automatically manage paging file size for all drives at the top, and then choose Custom size.
Now, based on the available physical RAM, fill out the fields underneath (screenshot is from a PC with 4 GB RAM):
Initial size: 1.5 x Available RAM x 1024
Maximum size: 3 x Available RAM x 1024
Once done, click Set and then OK on all windows to save the changes.
If you are getting the SHARED_RESOURCE_CONV_ERROR BSOD in Windows 10 due to low memory issues, a viable solution is to increase the virtual memory without having to spend on physical RAM modules. Although, when it comes to performance, virtual memory is no match for physical memory!
7. Create a new user profile
Press Windows + R to open Run, type netplwiz in the text field, and hit Enter.
Click the Add button.
Select the Sign in without a Microsoft account option.
Click on Local account.
Now, enter a username and password (not mandatory for local accounts) for the new account, click Next and then on Finish.
Once done, select the new account from the list, and click on Properties.
Head to the Group Membership tab, choose Administrator, and click OK to save the changes.
Finally, sign into the new profile, and verify whether the BSOD is fixed. If it is, transfer all files to the new account using an external USB drive. As for the apps, you can always have programs available to all users.
One of these solutions should have helped fix SHARED_RESOURCE_CONV_ERROR. In case the BSOD persists, reset the PC to factory defaults to get rid of it for good!
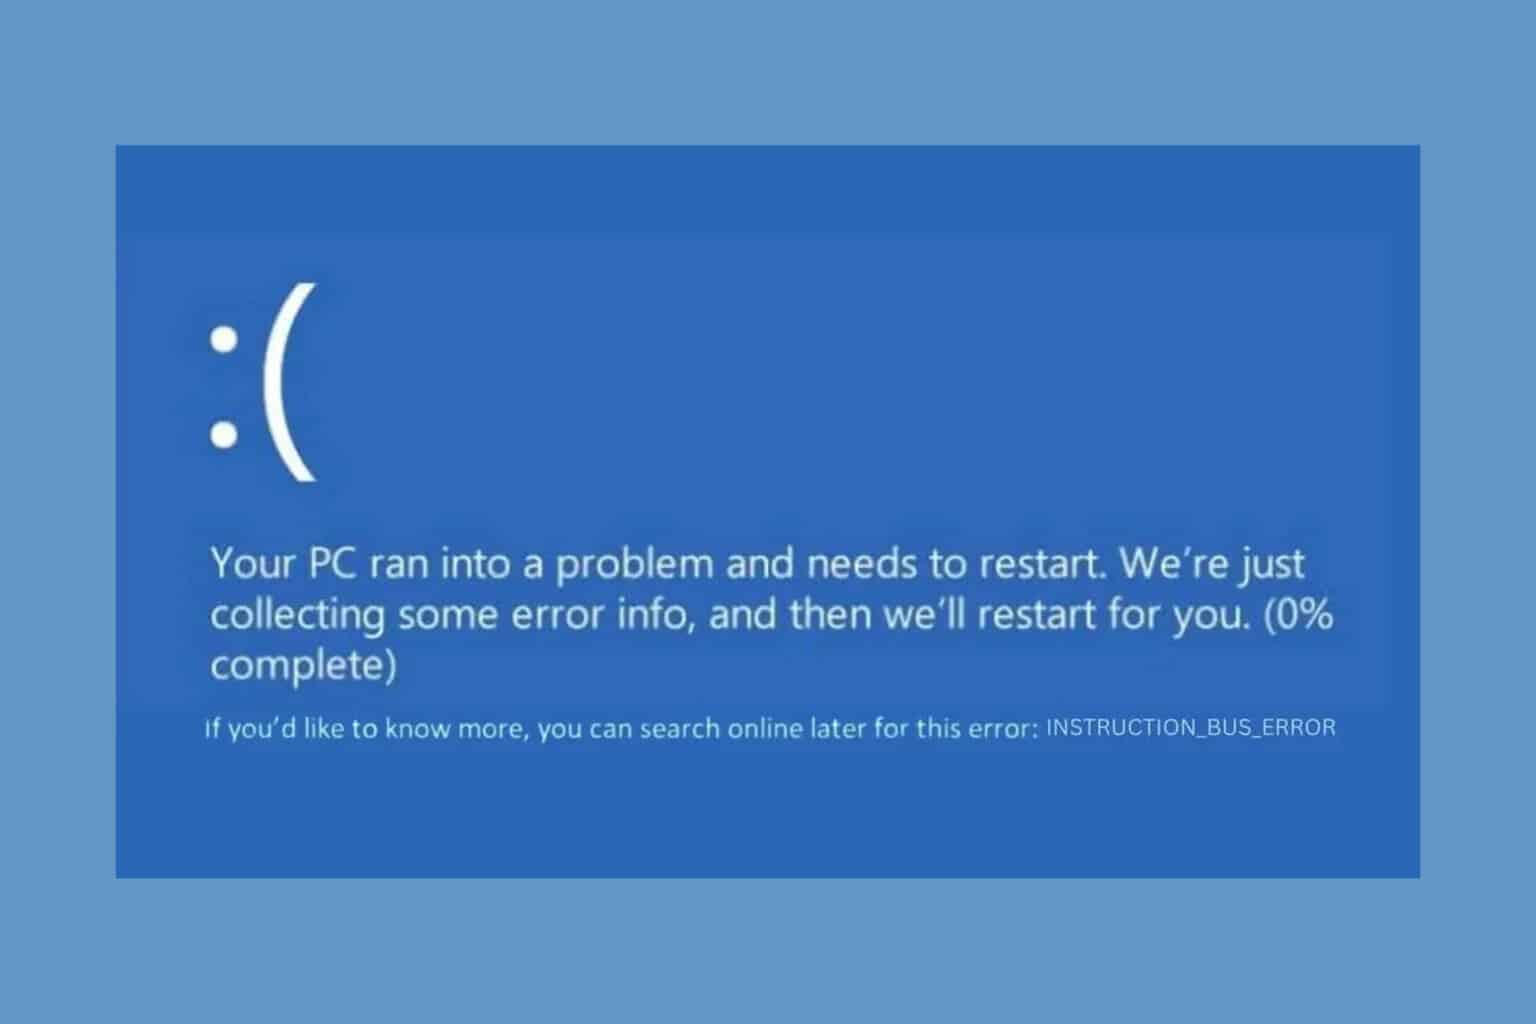
Dealing with the INSTRUCTION_BUS_ERROR can be incredibly frustrating, because it only provides the value of 0x0000002F. This guide will walk you through various solutions to help you resolve this pesky issue on your Windows PC.
How do I fix the INSTRUCTION_BUS_ERROR?
1. Restart your PC in Safe Mode
Open the Start Menu by clicking on the Windows icon on the Taskbar.
Press and hold the Shift key, then click on the Power icon and select Restart.
After your PC restarts, you will see a Choose an option screen. Select Troubleshoot.
Go to Advanced options, then select Startup Settings.
Click the Restart button. Your PC will restart again.
Press F5 on your keyboard to boot Windows in Safe Mode with Networking.
Running your PC in Safe Mode helps to start the system with minimal drivers and services, making it easier to troubleshoot issues.
2. Run SFC and DISM commands
Open the Start menu, type cmd, right-click Command Prompt and choose Run as administrator.
Type sfc /scannow and press Enter. Wait for the System File Checker to scan and repair corrupted system files.
After the SFC scan is complete, type or paste this command and press Enter: DISM /Online /Cleanup-Image /RestoreHealth
Restart your computer to ensure all changes are applied.
Using SFC and DISM commands can repair corrupt system files that may cause the INSTRUCTION_BUS_ERROR.
3. Uninstall corrupted drivers
Right-click on the Start button and select Device Manager.
In the Device Manager window, locate drivers with yellow exclamation marks (!).
Right-click on the problematic driver and select Uninstall device.
Confirm the uninstallation on the pop-up window.
Restart your PC to allow the system to install the correct driver.
Uninstalling corrupted drivers can prevent BSoD errors caused by driver conflicts.
4. Update essential drivers
Right-click on the Start button and choose Device Manager from the menu.
In Device Manager, find critical drivers such as display, firmware, and disk drives.
Right-click on each driver and select Update driver.
Choose Search automatically for drivers and let Windows update them.
Restart your computer to ensure the updates take effect.
Updating essential drivers ensures your hardware works correctly and can prevent INSTRUCTION_BUS_ERROR issues. You can also get the latest drivers when you install the latest Windows updates, so you should also do that.
Driver updates can be easily handled with the help of professional software such as Fortect Driver Updater. With this tool, you can identify and update any drivers in just a few minutes.
Open the Start menu, type Control Panel and open it.
Navigate to the Programs section and click on Uninstall a program.
On the left, select View installed updates.
Find and select recent updates, then click the Uninstall button.
Confirm the uninstallation when prompted.
Sometimes recent updates can cause system instabilities, leading to BSoDs. Removing recent updates can resolve this issue.
6. Scan for malware
Press Windows + I to open the Windows Settings menu.
Go to Privacy & security, then click on Windows Security.
In Windows Security, select Virus & threat protection.
Click on Scan options, then select Full scan and click Scan now.
Scans for malware to ensure your system is clean from infections that might cause the INSTRUCTION_BUS_ERROR. Of course, if you installed a third-party antivirus, you can use that instead.
7. Perform a System Restore
Restart your system several times until it enters Automatic Repair Mode.
In Automatic Repair Mode, go to Advanced options and select System Restore.
Click Next to begin the restoration process.
Select a restore point from a date before the error appeared.
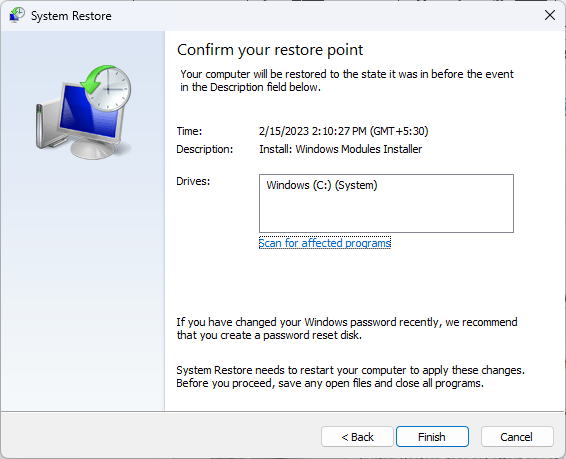
Confirm the restore point and click Finish.
Performing a System Restore can revert your system back to a stable state before the error occurred.
8. Reset Windows (last resort)
Keep restarting your PC until it boots into Automatic Repair Mode.
In Automatic Repair Mode, go to Troubleshoot.
Select Reset this PC.
Choose to Keep my files or Remove everything depending on your preference.
Follow the on-screen instructions to complete the reset process.
Resetting Windows reinstalls the operating system, which can solve persistent issues causing the INSTRUCTION_BUS_ERROR.
By following these solutions, you can troubleshoot and resolve the INSTRUCTION_BUS_ERROR BSOD on your Windows PC. To avoid future issues, keep your system updated and regularly scan for malware.
If you want to read more, check our guide that explains the causes of BSoD errors on Windows. Right after it happens, sometimes it’s very useful to check the crash logs and get more detail about the error.
Hopefully, our guide helped you fix the INSTRUCTION_BUS_ERROR BSoD, but if you have any questions, you can address them in the comments below.
Microsoft released the KB5041178 update for Windows 11 version 24H2, focusing on enhancing users’ setup experience. It’s not just an ordinary update; it’s part of what Microsoft calls Dynamic Update—a feature designed to improve setup binaries and other important files to make the upgrading process smoother.
Dynamic Updates are a big deal, especially when upgrading your system. Picture this: You’re ready to shift to the newest version of Windows 11, and Microsoft has done all the work in advance so that your setup goes as smoothly as butter. The update called KB5041178 is mainly for refining those setup files, making sure that when you click on that upgrade button, everything happens without any disturbance or problem.
This update makes improvements to Windows setup binaries or any files that setup uses for feature updates in Windows 11, version 24H2.
However, Dynamic Updates offer more than just setup improvements. They also incorporate rectifications for the Safe OS, which is crucial for the Windows Recovery Environment. Servicing stack updates are included to correct any base matters that might influence the update procedure. Additionally, the newest cumulative and driver updates ensure your system gets updated and runs with the most recent and superior drivers available.
It’s worth mentioning that Dynamic Updates don’t just pop up magically via Windows Update. Instead, you can manually download them from the Windows Update Catalog website, so you have time to decide if and when to get KB5041178.
If you already own a Copilot+ PC, KB5041178 is for you. Also, consider downloading and installing the KB5041979 update, as well.
Adding a location to Google Maps on your PC can be a real game-changer, especially if you want to ensure your favorite spots or your own business are easily found by others. Whether you’re adding a missing place, updating business info, or troubleshooting common issues, here’s a quick guide to get you started.
How can I add a location to Google Maps on a PC?
1. Use the Add a missing place option
Go to Google Maps using your web browser and sign in if you already haven’t.
In the top-left corner, click the Menu icon.
In the sidebar that appears, click Add a missing place.
Fill in the necessary information including name, category, address, etc.
Click Submit at the bottom right. Google will review your submission, and you should get an email notification within a couple of weeks.
By adding detailed information, you help Google quickly verify the place, making it easier for others to find it on the map.
After adding a place, you can also explore it visually. Learn how to use Google Maps Street View to check the area and ensure the details appear correctly on the map.
This can occur if you have a proxy or VPN enabled. We have an entire guide dedicated to what to do if Google Maps has the wrong location on your PC, so we encourage you to visit it for more information.
As you can see, it’s pretty simple to add a location to Google Maps on a PC, and it takes just a few moments to fill out the form.
Everyone uses the Windows Search feature on the taskbar so if you spot the searchapp.exe process, no need for alarm as it is a legitimate system app.
The searchapp.exe process is responsible for searching files, folders, and system data within Windows as well as indexing. How fast and accurate your search results appear is thanks to this process so you should not remove it.
And while it is a legitimate process, cybercriminals are notorious for creating similar processes and bundling them up in software. If you notice any anomalies with this process, such as high CPU spikes, it’s best to check it out and verify it is indeed the legitimate one.
How do I remove the searchapp.exe process?
1. End process from Task Manager
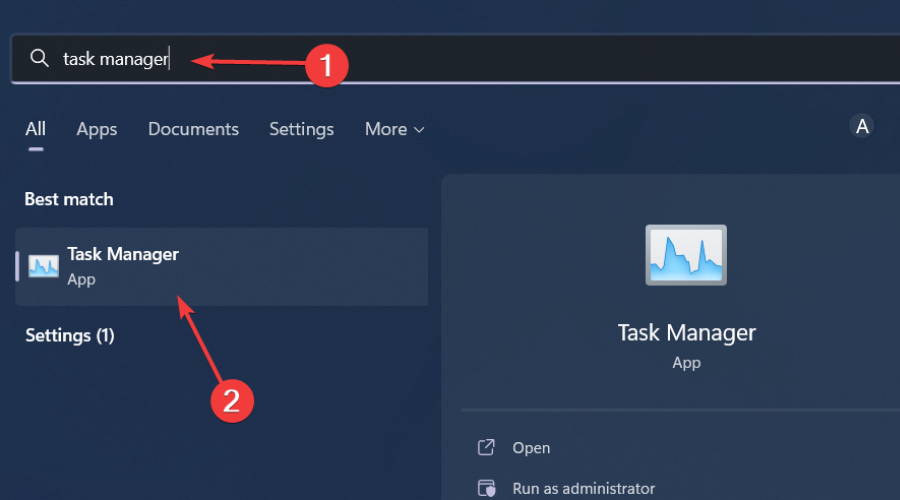
Hit the Windows key, type Task Manager in the search bar, and click Open.
Navigate to the Processes tab, and find the Searchapp.exe process.
Right-click on it and select End task.
2. Restart the Windows Search service
Press Windows + R to open Run, type services.msc in the text field, and click OK.
Next, double-click the Windows Search service.
Select Automatic on the Startup type drop-down menu.
If the service is not running, click on the Start button under Service status.
Finally, click OK to save the changes and exit the window.
Once done, restart the computer.
3. Run the Indexing troubleshooter
Hit the Windows key and select Settings.
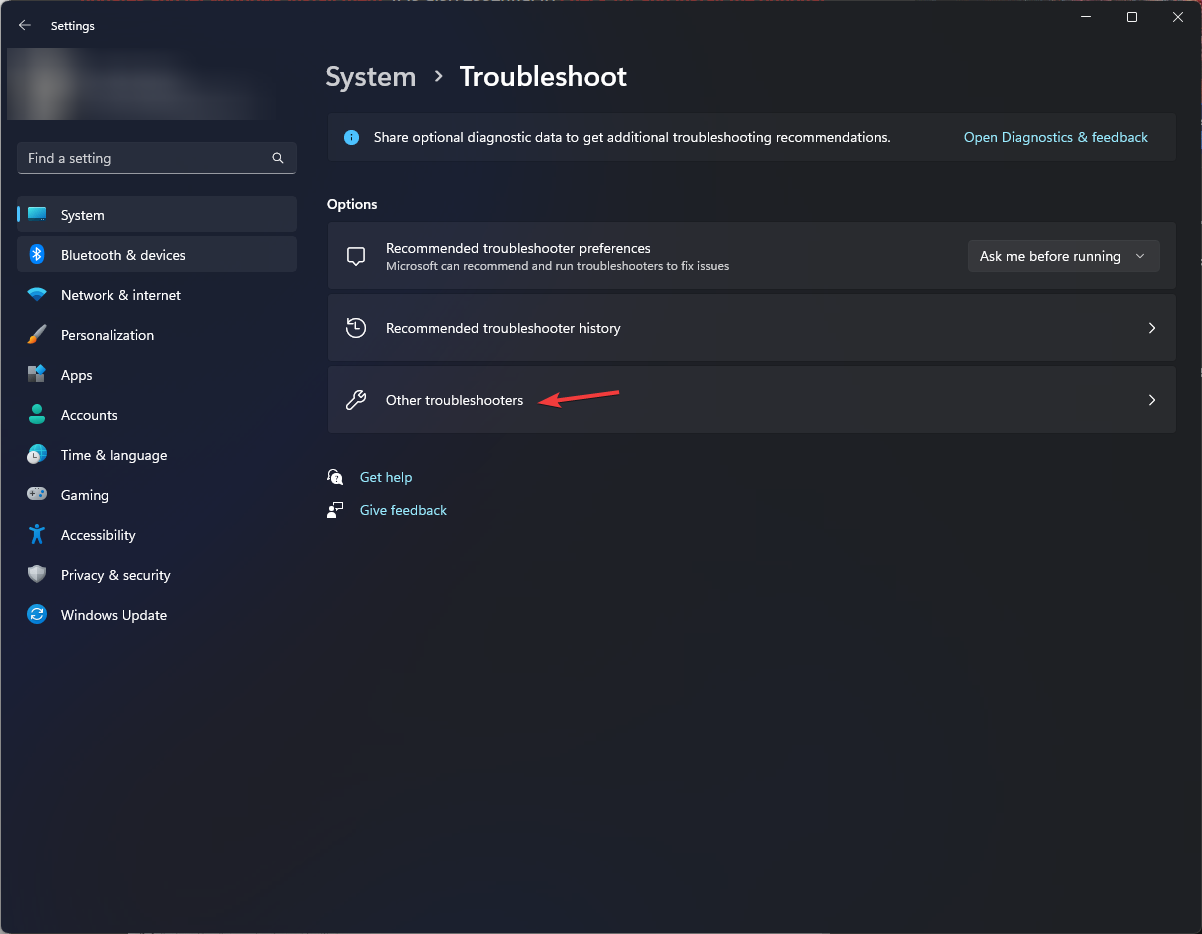
Select System and click on Troubleshoot.
Click on Other troubleshooters.
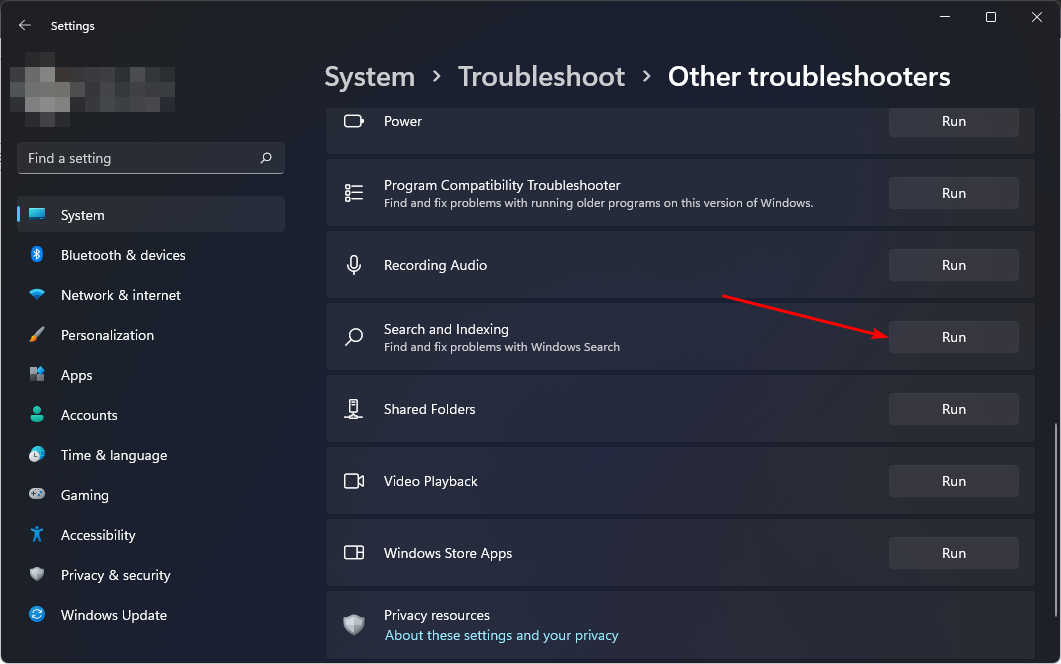
Navigate to Search and Indexing troubleshooter and click the Run button next to it.
4. Rebuild the search index
Hit the Windows key, type Control Panel in the search bar, and click Open.
Search for Indexing Options in the Control Panel search bar and click to Open.
In the Indexing Options dialog box that opens, select the Advanced option.
Click Rebuild under Troubleshooting in the Advanced Options dialog box that pops up.
Press OK to confirm that you want to rebuild. Note that it may take a while, so ensure you don’t have any pressing matters when performing this step.
If the searchapp.exe is consuming too much CPU or causing a system slowdown, use the above steps. However, if you have verified that it is not a legitimate process by checking the digital signature and its location, proceed with the next steps.
Click on Windows Update and select Update history on the right pane.
Scroll down, and under Related settings, click on Uninstall updates.
This will take you to the most recent installed updates.
Select the topmost update and click on Uninstall.
Restart your PC and check if the problem persists.
7. Run a malware scan
Press the Windows key, search Windows Security, and click Open.
Select Virus & threat protection.
Next, press Quick scan under Current threats.
If you don’t find any threats, proceed to perform a full scan by clicking on Scan options just below Quick scan.
Click on Full scan, then Scan now to perform a deep scan of your PC.
Wait for the process to finish and restart your system.
8. Perform a System Restore
Press the Windows key, type Control Panel, and click Open.
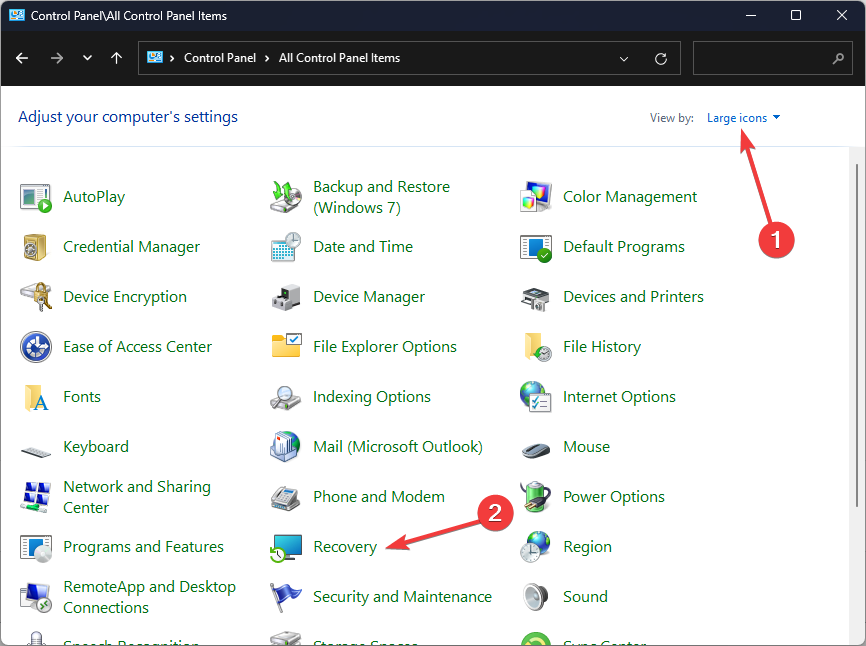
Select Large icons as View by and click Recovery.
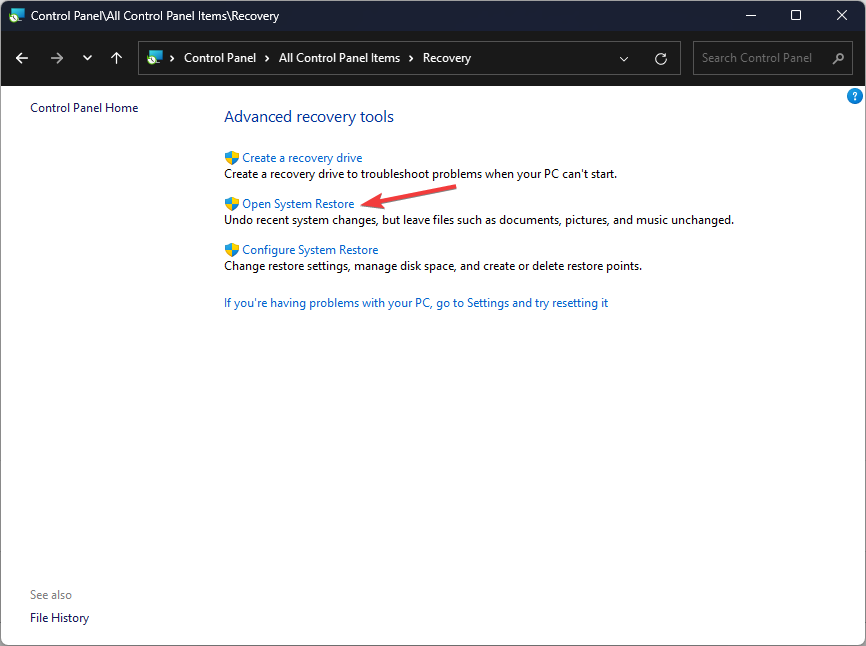
Click Open System Restore.
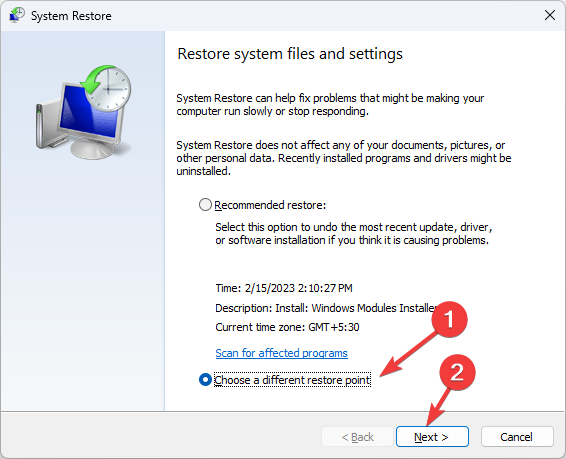
Select Choose a different restore point and click Next.
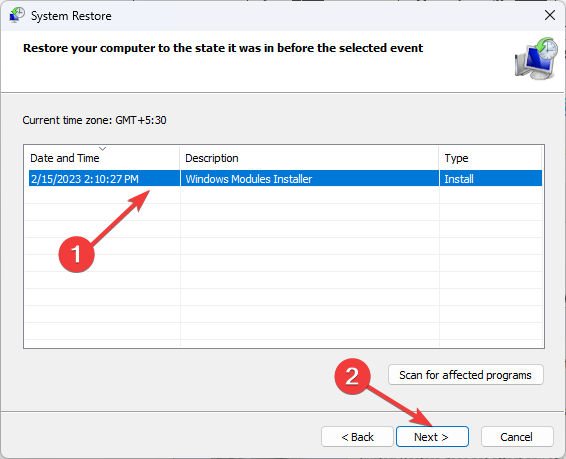
Now select the restore point and click Next.
Click Finish to restore the previous settings, and Windows will restart.
Other processes that can help make your search queries easier include the findstr.exe which is a fast way to search in directories, especially for files that have been moved.
The searchindexer.exe also makes sure your search results are always available so if it is competing for system resources, check out our article on how to bring it back in line. Aside from consuming system resources, these utilities like the search protocol may stop working at times but we know just the fix for it.
And if the built-in search is experiencing a myriad of issues, feel free to explore more search tools. These come with more advanced features so check out our comprehensive list and select one that meets your needs.
Have you come across this process before? Did it cause any problems and if so, which ones? Let us know in the comment section below.
Installing Windows on an SD card can be a game-changer, especially if you have a readily available slot on your laptop. Make sure that you have an SD card with a reasonable IOPS value. In other words, it has to have a decent read/write speed. Of course, it also need to have the right necessary storage space for the OS you choose (at least 16 GB, 32 GB recommended).
How do I install a bootable Windows on an SD card?
1. Format the SD card
Connect the SD card to your computer.
Open the Disk Management tool by right-clicking on This PC or My Computer, selecting Manage, and then choosing Disk Management.
Locate your SD card, right-click on it, and choose Format.
Select the NTFS file system and click OK.
Formatting the SD card ensures it is ready for the Windows installation process.
2. Download Windows Installation Media
Go to the Microsoft website and download the Windows Installation Media Creation Tool.
Run the tool and choose Create installation media (USB flash drive, DVD, or ISO file) for another PC.
The Media Creation Tool will prepare the necessary files to install Windows. The example is for Windows 11, but you can also get the one for Windows 10.
3. Create the bootable SD card and change the boot order in BIOS
Select the language, Windows version, and architecture you need.
Choose USB flash drive and select your SD card from the list.
Restart your computer and enter the BIOS/UEFI settings (usually by pressing a key like F2, DEL, or ESC during boot).
Disable UEFI boot mode and enable Legacy Support/BIOS.
Change the boot order to prioritize the SD card.
Save the BIOS settings and exit.
Changing the boot order ensures the computer boots from the SD card first.
4. Install Windows
Your computer will restart and boot from the SD card, starting the Windows installation process. Follow the on-screen instructions to complete the Windows installation.
This step-by-step guide helps you turn your SD card into a bootable device and install Windows on it, making it a portable operating system you can use on various computers.
Basically, there is no notable difference from making a bootable SD card or a bootable USB flash drive.
After installing Windows on your system, don’t forget to change back the boot order in BIOS.
Using a third-party tool to install Windows on an SD card
There are lot of tools out there such as EaseUS OS2Go, AOMEI Partition Assistant, or Rufus that can help you create a bootable Windows SD card. They guide you through the whole process a bit easier, but you still need to enter BIOS and change the boot order by yourself.
How do I install Windows on a MicroSD card for Steam Deck?
Format the MicroSD card to NTFS using the Diskpart tool or Disk Management.
Download Windows ISO and Steam Deck drivers. Click on the highlighted links for the appropriate guides if you don’t know how to perform the operations.
Use a tool like Rufus to burn the Windows ISO to the MicroSD card.
Select the MicroSD card as the device, choose the ISO file, and click Start.
Rufus simplifies creating bootable media, which is necessary for installation.
Insert the MicroSD card into the Steam Deck.
Restart the Steam Deck and access the boot selection menu (usually by pressing a button during startup).
Select the MicroSD card as the boot device and install Windows.
Following these steps, you can successfully install and run Windows on your Steam Deck via a microSD card. This method lets you easily switch between SteamOS and Windows on your Steam Deck, providing flexibility for gaming and other tasks. We also have a complete guide on how to install Windows on Steam Deck if you need more information.
Troubleshooting common issues
SD card not recognized by Windows Creation Tool – Try using a dedicated tool to create the bootable Windows SD card. For instance, EaseUS OS2Go provides an alternative method when the standard Windows creation tool fails.
BIOS doesn’t recognize the SD card – Update your computer’s BIOS to the latest version. Also, ensure the SD card is properly inserted and compatible.
By following these steps, you can address common problems and ensure a smooth installation process for Windows on an SD card.
Each solution offers a detailed, user-friendly approach to installing Windows on an SD card, catering to different needs and technical proficiencies. To avoid future issues, always ensure your SD card is compatible with your device and keep your BIOS updated.
It can be incredibly frustrating when Google Maps shows the wrong location on your PC, especially when you rely on it for accurate directions. Fortunately, there are several steps you can take to fix this issue and ensure that Google Maps accurately pinpoints your location.
Why is Google Maps showing my location wrong on my PC?
You might be having temporary glitches with your browser. Not allowing Maps to access your location will also cause this. VPN and proxy will almost always cause this issue.
What can I do if Google Maps location is wrong on my PC?
Before trying anything else, make sure you have a stable Internet connection. Restarting the browser or your PC can sometimes help with this issue.
1. Turn off VPN and proxy
Click on the Start Menu, then go to Settings and select Network & Internet.
Under the VPN tab, turn off any active VPN connections.
Go to the Proxy tab and ensure that the switch under Use a proxy server is turned off.
If you have proxy or VPN client running, be sure to disconnect and close it.
2. Enable location permissions
Press the Windows key + I to open Settings.
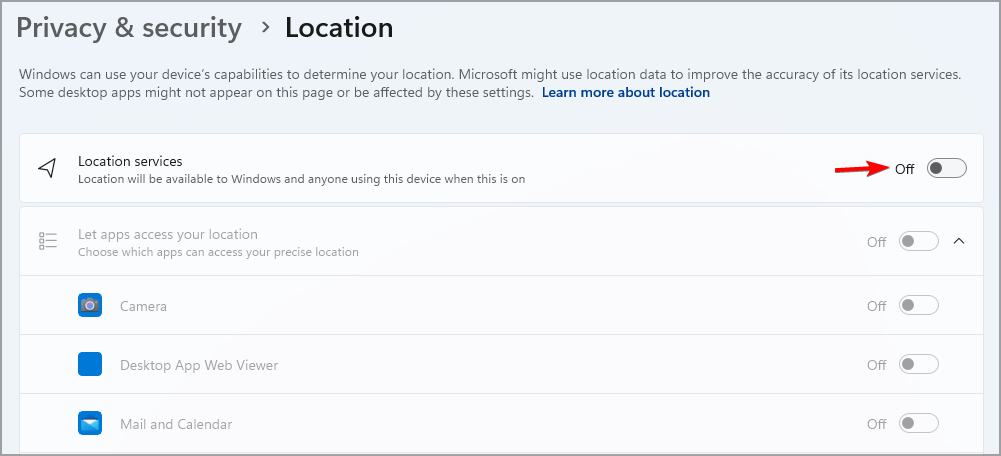
In the Settings window, click on Privacy and then select Location from the left-hand menu.
Make sure that the toggle switch next to Allow apps to access your location is turned on.
3. Clear browser cache
In your browser, click on the menu icon (usually three dots or lines) and go to Settings.
Go to More tools and click on Clear browsing data.
Choose All time as the Time range to delete everything.
Make sure that Cached images and files are selected, then click on Clear data.
Go to Google Maps and click on the blue dot showing your current location.
Click on Allow to allow Google Maps to access your location.
Your location will now be updated.
5. Set a default location in Windows
Go to Settings on your computer.
Click on Privacy, then select Location from the menu.
Scroll down to the Default location and click on Set default. Enter your correct location.
Setting a default location ensures that Windows will use this as a fallback when it can’t detect your location accurately.
By following these steps, you can troubleshoot and fix issues with Google Maps showing the wrong location on your PC, ensuring your maps and directions are accurate and helpful.
In case you encounter any issues, we have a great guide on what to do if Google Maps is not working on your PC. If Google Maps is slow on your PC, we have a dedicated article that can fix that.
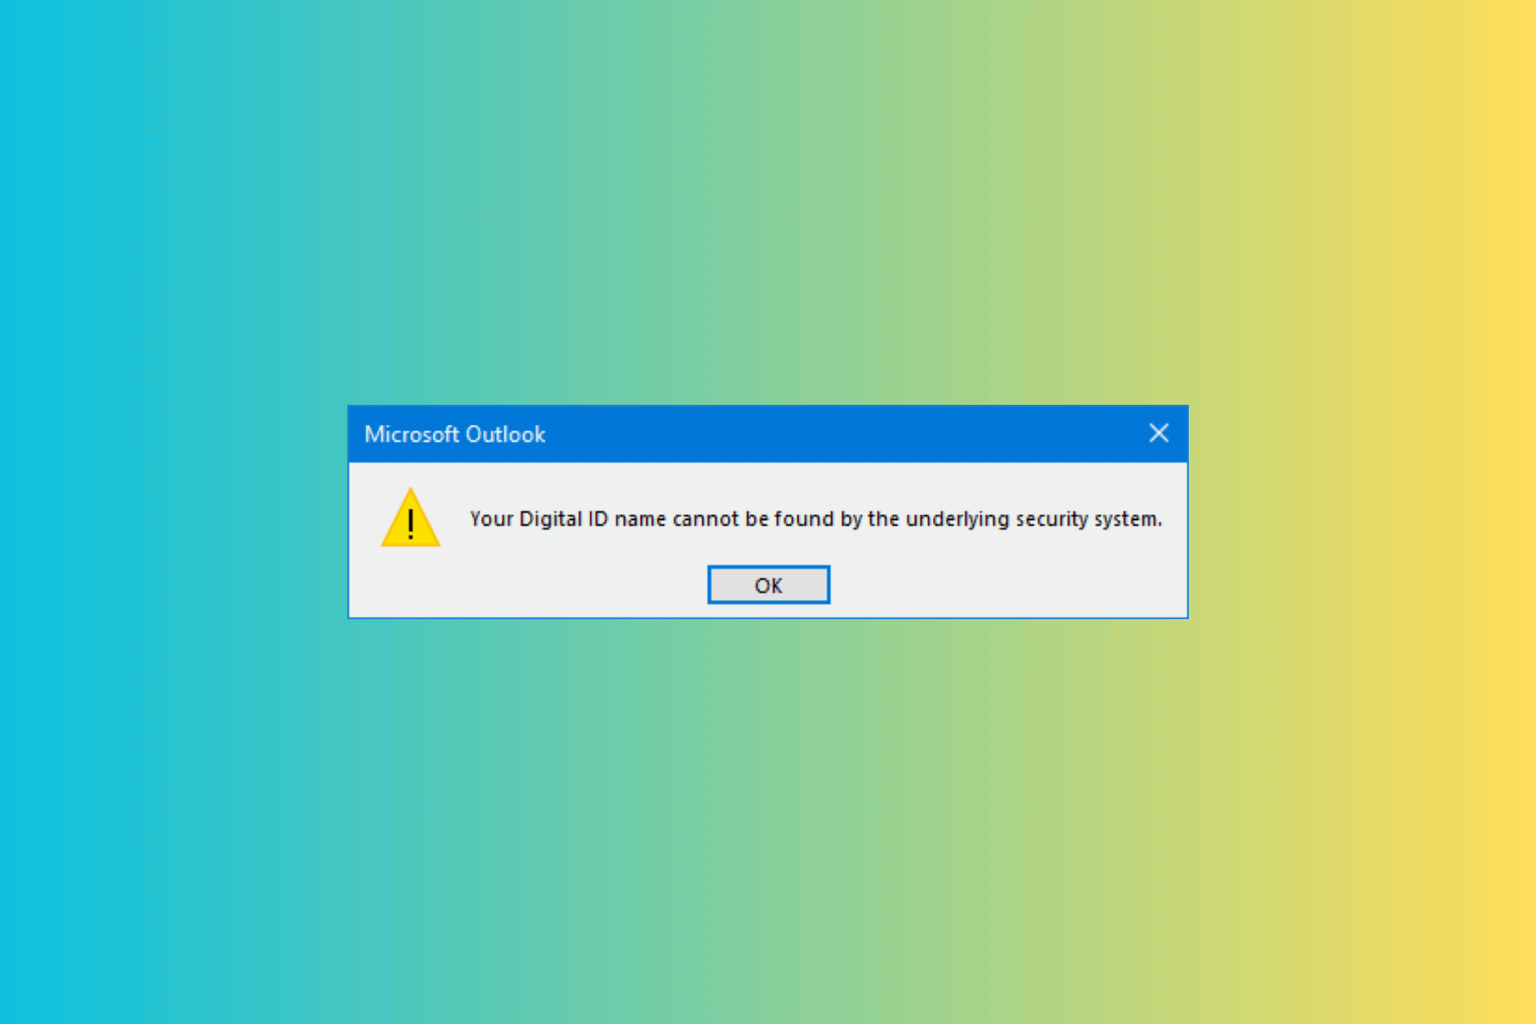
Many readers have complained about getting the Your Digital ID name cannot be found by the underlying security system issue while opening S/MIME encrypted emails. The error usually occurs when Outlook users try to decrypt an encrypted message. Let’s discuss how to fix the problem in a few minutes.
How can I fix the Your Digital ID name cannot be found by the underlying security system issue?
1. End all Outlook processes
Press Ctrl + Shift + Esc to open the Task Manager app.
Under the Processes tab, look for Outlook-related processes, then select them one by one and click End task.
Restart your computer.
2. Outlook in Safe mode
Press Windows + R to open the Run window.
Type the following command and click OK: Outlook.exe /safe
From the Choose Profile pop-up, select Outlook and click OK.
3. Check the Outlook certificate
Press the Windows key, type outlook, and click Open.
Go to File.
Select Options.
From the Outlook Options window, click Trust Center.
Click Trust Center Settings.
Go to the Email Security tab on the left pane.
Locate Encrypted mail, select a certificate, then click Settings.
Go to the Certifications and Algorthrims section, click the Choose button.
You will see a certificate, then click OK. And, click OK three times to close the window.
If they are blank, then you need to buy a new certificate.
4. Modify the server timeout setting
Press the Windows key, type outlook, and click Open.
Go to File.
Select Account Settings, and click Account Settings from the drop-down.
Click Change.
Now click the More Settings option.
Go to the Advanced tab and move the slider to the right to adjust the server timeout time.
Click OK to save the changes.
Click Next, then Finish to close the window. Restart Outlook to let the changes take effect.
Press the Windows key, type control panel, and click Open.
Select View by as Category, then click System and Security.
Click Windows Defender Firewall.
From the left side, click the Turn Windows Defender Firewall on or off option.
Next, under Private and Public network settings, select Turn off Windows Defender Firewall (not recommended), then click OK.
You can also temporarily disable your security software to resolve this problem. Once you can access the mail, don’t forget to reverse engineer these steps to turn on the Windows Defender Firewall and enable security software if it is disabled.
6. Enable Client authentication and Secure Email
Press the Windows key, type internet options, and click Open.
Go to the Content tab and click the Certificates button.
Click the Advanced button.
On the Advanced Options window, under Certificate purposes, look for Client Authentication & Secure Email.
Click the checkbox next to it, then click OK to save the changes.
7. Delete unwanted certificates
Press the Windows key, type mmc, and click Open to open Microsoft Management Console.
Click Yes on the UAC prompt.
Go to File, then select Add/Remove Snap-in.
Under Available snap-ins, double-click Certificates.
On the next window, select My user account and click Finish.
Under Select snap-ins, select any unwanted certificate, then click Remove.
Click OK to close the window.
8. Using the Registry Editor
8.1 Add a registry entry
Press Windows + R to open the Run window.
Type regedit and click OK to open the Registry Editor.
Before making any changes, you should backup registry entries. Go to File, then click Export. Save the .reg file
Navigate to this path: Computer\HKEY_CURRENT_USER\Software\Microsoft\Office\16.0\Outlook\Security
Right-click the right side of the screen, and choose New>DWORD(32-bit) Value.
Name the newly created DWORD as UseAlternateDefualtEncryptionAlg.
Double-click it, change the Value data from 0 to 1, then click OK.
Right-click the right side of the screen again, and choose New>DWORD(32-bit) Value.
Name the newly created DWORD as DefaultEncryptionAlgOID.
Double-click it, change the Value data to 1.2.840.113549.3.7, and then click OK.
Close Registry Editor and reboot your PC.
Enable Encrypt message contents and attachments
Once your computer is up, open Outlook and follow these steps:
Locate the email that has encrypted content and double-click it to open it in a separate window.
Go to File.
From the left pane, select Info, then click Properties.
On the Properties window, remove the checkmark next to Encrypt message contents and attachments.
Click Close and save the changes if prompted.
To conclude, the Your Digital ID name cannot be found by the underlying security system issue can be resolved quickly by checking the certificates, running Outlook in safe mode, turning the firewall off or changing the Registry Entries.
If you are unable to open Outlook in Windows 11, the problem could be the outdated Outlook app, third-party interference, corrupted Outlook data files, or other issues; read this to learn the solutions.
The latest patch to the Beta Insider Channel is breaking things up with the Link to Windows app. According to tech enthusiast XenoPanther, the patch might have affected the app, as it quickly drains the battery of mobile devices when they’re on 5G.
Apparently, Link to Windows can drain the phone’s battery from 100% to 6% in just 8 hours, says the enthusiast:
I think the latest beta update to the Link to Windows app on my phone is causing the battery to quickly drain when on 5G. Usually my phone lasts the entire day, but I went from 100% to 6% in 8 hours, with most of that time being spent idling
Aside from draining the battery while the phone is idle, the app might also increase the phone’s temperature, so whatever Microsoft has done to the Link to Windows app could affect mobile devices.
I think the latest beta update to the Link to Windows app on my phone is causing the battery to quickly drain when on 5G. Usually my phone lasts the entire day, but I went from 100% to 6% in 8 hours, with most of that time being spent idling
After Microsoft noticed the enthusiast’s update, the company might have fixed it, only to return a few days later, when the enthusiast reported the issue was not fixed.
If you’re enlisted in the Windows Insider Program within the Beta Channel and you’re testing the Link to Windows app, make sure to do so with a spare mobile device instead of your main one, as the issue can potentially permanently harm your device’s battery.
If you’ve come back to using Skype (especially after last week’s big news about getting rid of all the ads on the platform) but found yourself receiving notifications from blocked Skype groups, you should not worry: Microsoft has acknowledged the issue and is working on a fix.
In a blog post, the Redmond-based tech giant says all Skype users are affected, and you might receive ghost notifications from unwanted groups, even after these groups have been blocked.
The company says a permanent solution is coming, but until then, there are a few workarounds that you should try. And it’s also easy.
Instead of blocking the group, leave the group from your chat list.
Leave the Group Instead of Blocking: To prevent receiving unwanted notifications from such groups, we recommend leaving the group from your chat list.
Open Skype, go to the chat list and select the group you want to block. Right-click the group, and then select Leave. Confirm your action, and you’re done. You should no longer receive ghost notifications from it.
Microsoft hasn’t given a definite date for fixing the issue, but it will most likely be fixed with the next update.
Select the extension and tap Add to Chrome. Confirm by tapping Add extension.
After installing it, go to Google Maps.
Tap on the Extensions icon, then select Dark Reader.
Google Maps will automatically switch to dark mode.
That’s it!
Although Google Maps on PC doesn’t support dark mode, you can bypass this with the right Chrome extension. Whether planning a road trip or navigating daily routes, a darker interface can make it much easier on the eyes. You can also enable system-wide dark mode on Windows 11.
Microsoft has just made it easier for people with artistic skills but lack proficiency in digital technology to draw lines and shapes with ink in Word. In a recent blog post, the Redmond-based tech giant says it enhanced Microsoft Word with the Draw and Hold gesture, a capability already present in OneNote.
This particular feature can prove revolutionary when creating straight lines and neat shapes with a simple flick of your pen. Microsoft will also release the capability with two more shapes for users to enjoy: a heart and a star.
To use the feature, you only need to open a document in Word, take your pen, and start sketching. Pick a straight line or smooth circle. Draw it and keep your pen still for a bit. You should be able to form a shape.
You can make circles, ellipses, triangles, squares, rectangles, rhombuses (or diamonds), trapezoids (like a pyramid turned upside down), pentagons, and hexagons. And hearts and stars are there now, too. If your shape does not look exactly right, do not worry. You can change its size or turn it around by dragging it on the screen.
If you are excited to test the Draw and Hold feature, make sure your Word version is at least Version 2406 (Build 17726.20016) or newer.
Is the Microsoft Edge News Feed not working properly? In my experience, it’s usually due to corrupted browser data or misconfigured settings.
I’ll guide you through several troubleshooting steps to resolve this problem so you can stay updated with the latest news.
Let’s get your news feed up and running again!
4 Ways To Fix Microsoft Edge News Feed Not Working
Follow these steps in the order they appear in:
Enable News Feed
Sometimes, the news feed may be disabled in the browser settings. To enable it again:
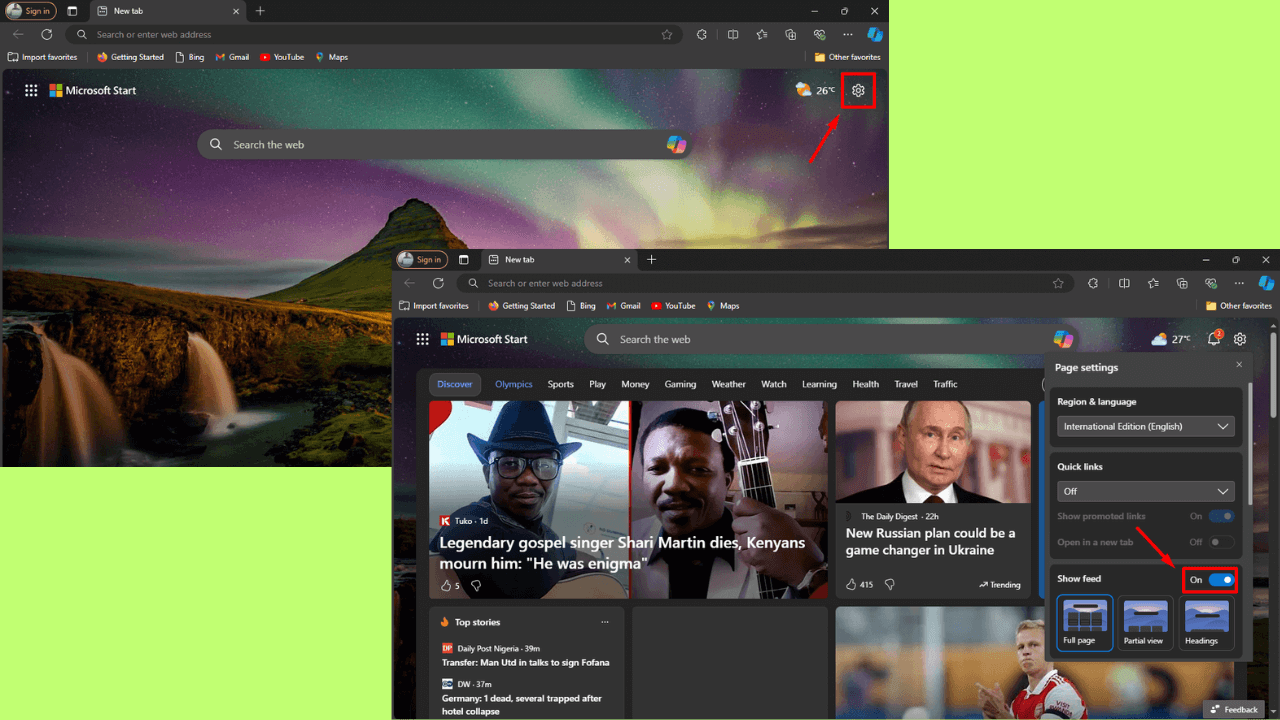
Open Microsoft Edge and tap on the settings gear in the top right corner of the screen.
Scroll to locate the Show feed option, then toggle the button on. The news feed will appear automatically on the browser.
Repair Edge
Repairing Microsoft Edge can fix issues without affecting your browser settings or data. This method can address deeper software problems that might be causing your news feed to malfunction.
Here’s how:
Press Windows Icon + I to open settings.
Tap Apps.
In the app list, tap Microsoft Edge and then select Modify. If the Modify button is missing, it indicates that your organization may be managing the browser for you. Reach out to your system administrator for guidance.
When prompted, select Yes to allow the app to make changes to your device.
Ensure you’re connected to the Internet and select Repair.
After the repair, open the browser and confirm whether the news feed works.
Check if Edge Is Up to Date
Your browser needs to be up to date to function properly. Updates often include bug fixes and improvements that can resolve many common problems.
Here’s how to check Microsoft Edge’s status:
Tap on the three dots on the top right corner of your screen and select Settings.
Scroll down and tap About Microsoft Edge.
It’ll automatically check for updates. You’ll be instructed to restart Microsoft Edge if an update is available. Tap Restart.
Clear Browsing History and Cached Data
Over time, your browser accumulates temporary internet files that can cause news feed issues. Clearing your browsing history and cache often resolves these problems and improves performance.
To do so in Microsoft Edge:
Open the browser, tap the three dots on the top right, and select Settings.
Tap Privacy, search, and services, then click Choose what to clear under Delete browsing data.
Click the drop-down menu to select the Time Range. Check the Browsing history and Cached files and images, then select Clear Now.
Note that this action will clear all data on your synced devices. Once done, check the news feed.
So, now you know how to troubleshoot and deal with Microsoft Edge news feed not working. Updating your browser, enabling your news feed, repairing it when necessary, and regularly clearing cached data usually does the trick.
At times, some of us have found the number keys not working in Windows 10 and 11, while the other keys worked fine. In this exact situation, it’s usually the misconfigured settings or keyboard drivers to blame!
In a few cases, all number keys on the keyboard stopped working except 5 and 6, while for others, the Numeric Keypad was unresponsive. For the latter, check the Num Lock key.
Also, reconnect the keyboard, clear any dust accumulation under the non-working keys, and look for jammed keys. For instance, if the Alt key is jammed, pressing number keys won’t register a response.
What can I do if the number keys are not working?
1. Turn off mouse keys
Press Windows + I to open Settings, go to Accessibility from the navigation pane, and then click on Mouse under Interaction.
Disable the toggle for Mouse keys.
Reboot the computer to apply the changes and check for improvements.
In 4 out of 5 cases, disabling Mouse keysdid the trick when the number keys on the right (Numeric Keypad) were not working!
2. Terminate/uninstall conflicting apps
2.1. Terminating the app
Press Ctrl + Shift + Esc to open the Task Manager and identify the conflicting app.
Select the app(s), click on End task, and check for improvements.
2.2. Uninstalling the app
Press Windows + R to open Run, type appwiz.cpl in the text field, and hit Enter.
Select the conflicting app from the list and click on Uninstall.
Follow the on-screen instructions to complete the process.
In the past, Microsoft PowerToys (specifically FancyZones) and Adobe Flash Player were found to be the underlying cause when number keys were not working on an HP or Lenovo laptop.
Press Windows + X to open the Power User menu and select Device Manager from the list of options.
Expand the Keyboards entry, right-click on the active keyboard, and select Uninstall device.
Click on Uninstall in the confirmation prompt.
Finally, reboot the computer, and Windows will automatically install a fresh copy of the driver.
4. Update the keyboard driver
Press Windows + S to open Search, type Device Manager in the text field, and click on the relevant result.
Double-click on the Keyboards entry, right-click on your keyboard, and select Update driver.
Choose Search automatically for drivers and wait for Windows to install the best locally available driver.
Once done, reboot the computer.
In some cases, updating the keyboard driver got the number keys working again on Windows 11. Although, you may sometimes have to check the manufacturer’s website for the latest version and then manually install the driver!
When it comes to drivers the best option is to use professional software. That way you will not only be able to update all your drivers in just a few minutes, but also keep them up to date in the long term.
When nothing helps, you can be fairly certain that it’s a hardware issue to blame. To confirm the same, connect the problematic keyboard to another PC and verify whether it starts working. If not, you should visit a local repair shop or contact the manufacturer’s support team.
AMD has finally revealed the prices for its much-anticipated Ryzen 9000 processor family. On August 8, AMD will introduce the first units of its newest processor series. The first to debut are Ryzen 7 9700X and Ryzen 5 9600X, costing $359 and $279 respectively.
On August 15th, the Ryzen 9 9950X and Ryzen 9 9900X will come out with more power. These new processors are priced at $649 and $499, respectively. Notably, these two models are being released at lower prices compared to their previous versions in the 7000 Series; this could make them even more appealing for people who play games or create content, as they offer good performance without breaking your budget.
AMD Ryzen 9000 Series processors are ready to deliver world class gaming and creator performance.
Ryzen 9000 Series firmly claims to provide top performance worldwide, not only for gaming but also when doing creative tasks. From processors with 16 cores and 32 threads to ones with a maximum clock speed of up to 5.7 GHz, it is clear that AMD has brought out everything it can offer.
The cache sizes go as high as 80 MB, while TDP (Thermal Design Power) ratings keep things under control for efficient power use; these features show how well this series has been designed to handle any task you give.
Another way to look at AMD’s pricing strategy in the Ryzen 9000 Series is that it shows they are well aware of how competitive the market can be. For instance, the new models of Ryzen 9 are priced $50 less than similar versions from the 7000 Series.
In addition, Ryzen 7 (9700X) and Ryzen 5 (9600X) became cheaper by $40 and $20, respectively. Some might think this aggressive price setting comes from the gaming performance of Ryzen 9700X not being better than what we see with R7-7800X3D—a detail for AMD enthusiasts to ponder.
These new AMD processors claim top-notch performance while being less expensive—they are all set to change the market soon enough. If you are a gamer, content maker, or simply enthusiastic about new technology, the Ryzen 9000 Series appears to be something to anticipate. However, you should know that these processors will only support Windows 11.
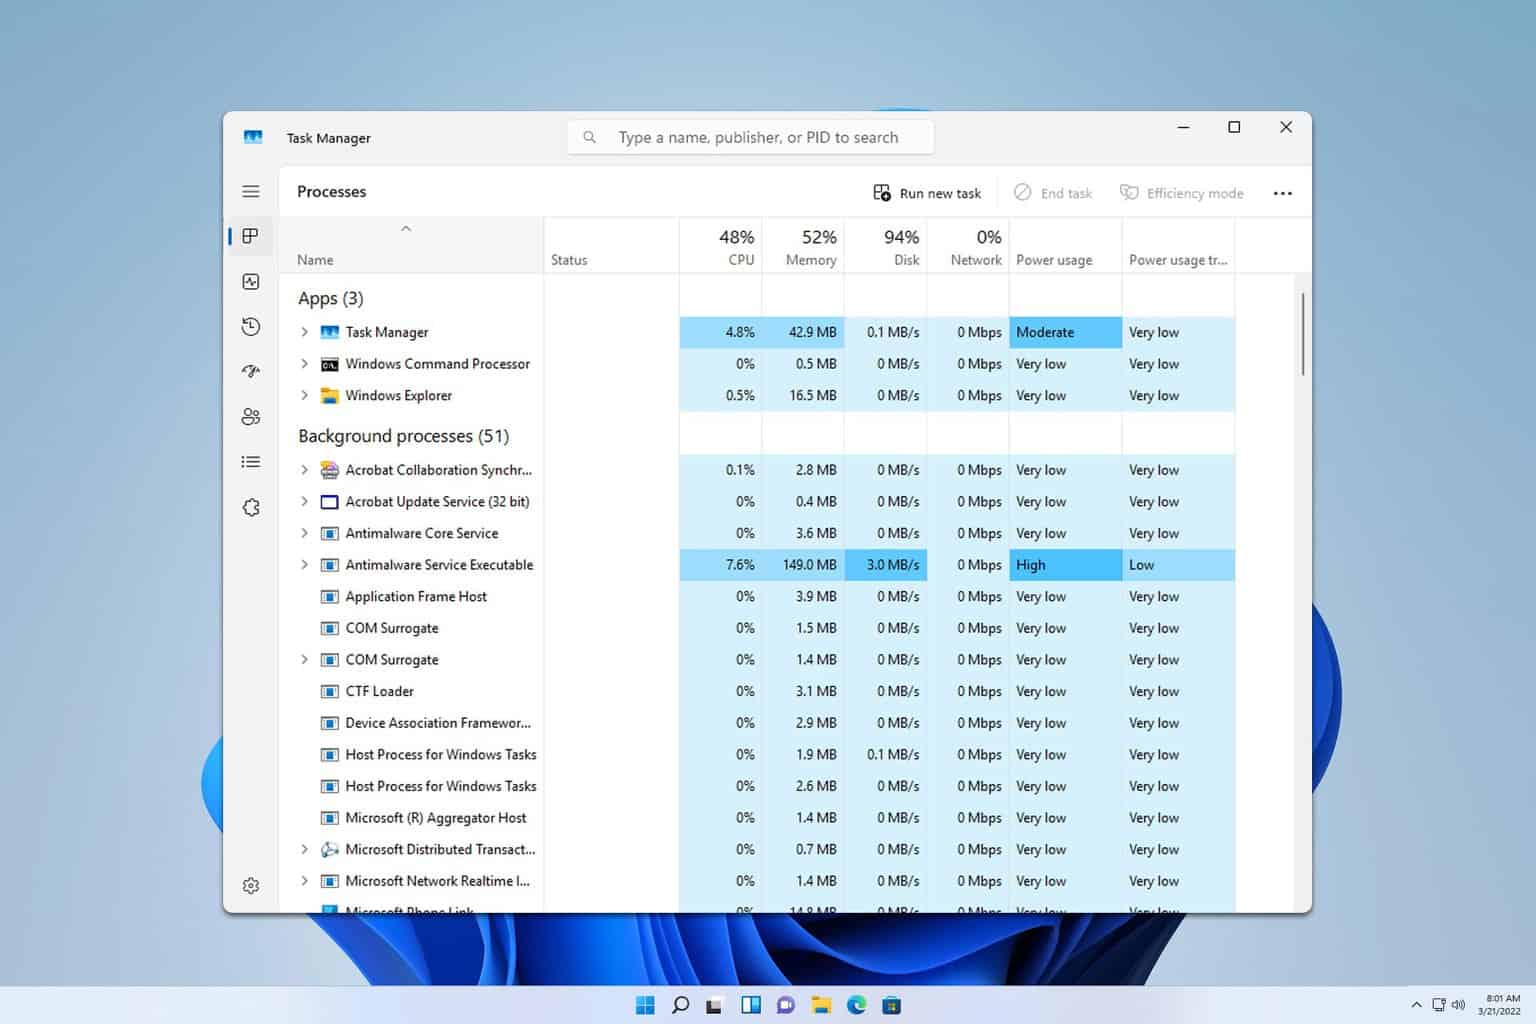
Running Task Manager as an admin can be essential for troubleshooting and managing system processes effectively, and this guide will show you several ways to do that.
How do I run Task Manager as a local admin?
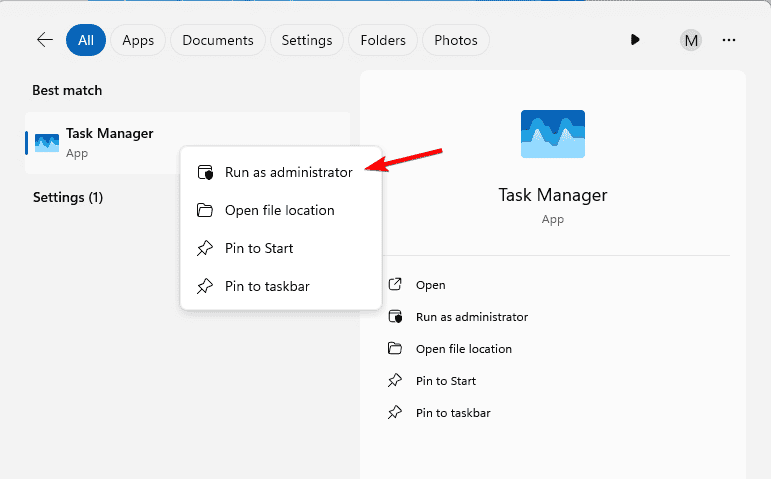
1. Use the Start Menu
Press the Win + S keys to open the Search box.
Type Task Manager in it.
Right-click on the Task Manager and select Run as administrator.
Want to learn how to make an attendance sheet in Excel for school or work purposes?
If you’re looking to upgrade your attendance tracking process, Microsoft Excel is a great choice. It allows you to store spreadsheets offline and online.
Below, I’ve explained methods to create a tracking sheet using manual, script, and template-based approaches. You can pick the one that suits you the most!
How To Make an Attendance Sheet in Excel Manually
Follow these steps in the order they appear in:
Create the Necessary Columns and Rows and Enter the Data
Create a blank Excel workbook where you’ll record attendance data.
Populate the following column headers in the order they appear here:
Employee ID
Name
Clock-In Time
Clock-Out Time
Total Worked Hours
Standard Hours
Overtime
Work Status.
For now, just enter the data for the Employee ID and the Name columns.
Now, select the dataset only with the required rows and columns.
Go to the Styles command block in the Home tab.
Click on the Cell Styles drop-down arrow and choose a style from the list.
Implement Data Validation Rules
In this step, you’ll use the Excel Data Validation tool to restrict the type of content that you can add to the attendance sheet. Here’s how:
Select the Clock-In Time and Clock-Out Time columns with as many rows as you need.
Go to the Data tab and select the Data Validation rule button.
In the Settings tab, enter the following values in their respective fields:
Allow: Time
Data: Between
Start time: 00:00
End time: 23:59
In the Input message field of the Input Message tab insert a text to guide users on how to enter data.
Enter a text in the Error Alert tab’s Error message field to show a warning if someone enters invalid data.
Click OK to apply the changes you’ve made.
Now, select the Work Status column.
Bring up the same Data Validation tool.
Choose List in the Allow drop-down menu in the Settings tab.
Go to the Input Message tab and enter instructions so the employees or students know what to type in this field.
Click OK to enforce the Data Validation rules.
At this stage, you’ll also need to enter the minimum working hours required for a full workday in the Standard Hours column.
To accomplish this, select the entire column below the header and select the Time formatting from the Number drop-down menu of the Home tab.
You can now enter the workday hours, like 08:00 in one cell, and copy the value in all the rows below the column.
Select all cells except the column header again, press Ctrl + 1, and select the [h]:mm:ss custom number formatting code. Click OK to apply the formatting style.
This will transform the 08:00:00 AM format of working hour value to a 8:00:00 format.
Enter Formulas To Calculate Totals
Now, you’ll learn which formulas to use and the syntaxes to automatically calculate working hours, overtime, etc.
In the first cell below the Total Worked Hours enter the following formula to calculate the working hour:
=D2-C2
Use the fill handle from the first cell to drag down to copy the same formula to the rest.
You should see the calculated time entries as 9:00:00 AM, 12:00:00 AM, etc.
Select the cell values below the column header, press Ctrl + 1, and choose the [h]:mm:ss formatting code in the Custom Category menu.
Click OK to apply the formatting style.
The calculated values of the Total Worked Hours column will now show as 9:00:00, 0:00:00, etc., which clearly indicates hours, minutes, and seconds.
To calculate overtime, enter the following formula into the first cell below the header of column G:
=IF(E2>F2,(E2-F2),(F2-E2))
Hit Enter to check if the formula is working.
Now, use the fill handle to copy the formula across the whole column.
Apply the [h]:mm:ss formatting code from the Format Cells dialog box.
Now, you’ll get overtime values in the HH:MM:SS format.
So far, the attendance sheet should look like the one shown below:
Replicate the Worksheet
Right-click on the worksheet tab at the bottom.
Choose the MoveorCopy option.
On the Move or Copy dialog, select the (move to end) option.
Checkmark the Create a copy checkbox.
Click OK.
This should create a copy of the existing worksheet.
Repeat the above steps to create copies when necessary.
Now, rename the first worksheet to the first date of the month.
You can create copies and rename those with the appropriate date for workdays.
Share the Worksheet With the Team
You’ve successfully created an attendance sheet in Excel.
For offline sharing, put the Excel workbook in a shared drive. Now, all the employees with access to the shared drive, can open and mark their attendance in the workbook.
For online sharing, upload the Excel workbook to your OneDrive account.
Create a shareable link for the document. Then, email the link to all employees who need to mark their attendance.
How To Make an Attendance Sheet in Excel Using Excel VBA
Find below a simple Excel VBA script to create an attendance sheet:
Open the target worksheet where you want the attendance sheet.
Press Alt + F11 to launch the Excel VBA tool.
Click the Insert button in the toolbar area and choose Module.
Into the blank module field, enter the following script:
Sub CreateAttendanceSheet()
    Dim ws As Worksheet
    Dim lastRow As Long
    Dim empIDs As Range
    Dim empNames As Range
    Dim clockInCol As Range
    Dim clockOutCol As Range
    Dim totalHoursCol As Range
    Dim standardHoursCol As Range
    Dim overtimeCol As Range
    Dim workStatusCol As Range

    Set ws = ActiveSheet

    Set empIDs = Application.InputBox("Select Employee IDs range:", Type:=8)
    Set empNames = Application.InputBox("Select Employee Names range:", Type:=8)
    Set clockInCol = ws.Range("C2:C100")  ' Adjust the range as needed
    Set clockOutCol = ws.Range("D2:D100")  ' Adjust the range as needed
    Set totalHoursCol = ws.Range("E2:E100")  ' Adjust the range as needed
    Set standardHoursCol = ws.Range("F2:F100")  ' Adjust the range as needed
    Set overtimeCol = ws.Range("G2:G100")  ' Adjust the range as needed
    Set workStatusCol = ws.Range("H2:H100")  ' Adjust the range as needed

    With workStatusCol.Validation
        .Delete
        .Add Type:=xlValidateList, AlertStyle:=xlValidAlertStop, Operator:= _
            xlBetween, Formula1:="Present,Absent,Planned Leave,Sick Leave,Casual Leave,Partial Hours"
        .IgnoreBlank = True
        .InCellDropdown = True
        .ShowInput = True
        .ShowError = True
    End With

    ws.Cells(1, 1).Value = "Employee ID"
    ws.Cells(1, 2).Value = "Name"
    ws.Cells(1, 3).Value = "Clock-In Time"
    ws.Cells(1, 4).Value = "Clock-Out Time"
    ws.Cells(1, 5).Value = "Total Worked Hours"
    ws.Cells(1, 6).Value = "Standard Hours"
    ws.Cells(1, 7).Value = "Overtime"
    ws.Cells(1, 8).Value = "Work Status"

    lastRow = empIDs.Rows.Count
    ws.Range("A2:A" & lastRow + 1).Value = empIDs.Value
    ws.Range("B2:B" & lastRow + 1).Value = empNames.Value

    ws.Range("E2:E" & lastRow + 1).Formula = "=TEXT(D2-C2, ""hh:mm:ss"")"
    ws.Range("G2:G" & lastRow + 1).Formula = "=IF(E2>F2, E2-F2, 0)"

    clockInCol.NumberFormat = "hh:mm"
    clockOutCol.NumberFormat = "hh:mm"
    overtimeCol.NumberFormat = "hh:mm:ss"  ' Add this line for HH:MM:SS format

    ws.Cells.EntireColumn.AutoFit
End Sub
Click the Save button and choose Save in the dialog box that appears.
Hit the Run Sub button in the toolbar to execute the script.
A dialog box will ask you to choose a cell range for employee IDs.
Similarly, select another cell range for the employee names.
Excel VBA will create the attendance sheet instantly.
Here are some tips on how to use this Excel attendance sheet effectively:
Input any values between 00:00 and 23:59 in the Clock-In Time and Clock-Out Time columns.
Enter the standard workday hour in the Standard Hours column in 08:00:00 format and copy the value across the column.
How To Make an Attendance Sheet in Excel With Templates
If you’re okay starting off from a ready-to-use template, I recommend these options:
Microsoft released a recovery patch to improve Windows 11 24H2. KB5041979, a recovery update, is now available to refine the Windows Recovery Environment (WinRE).
KB5041979 focuses on the Safe OS Dynamic Update of Windows 11, version 24H2. It was created to enhance the Windows recovery environment, and it will resolve booting problems.
You might ask, what does the term “Safe OS Dynamic Update” mean? It is a part of Microsoft’s Dynamic Updates that functions importantly when carrying out Windows feature updates. These updates involve corrections to Setup.exe binaries, SafeOS updates for Windows Recovery Environment (WinRE), and other elements. Essentially, they’re about making the update process smooth and trouble-free.
Another good thing about this update is that it can be used with Arm64 and AMD64 Copilot+ PCs. More devices can enjoy these advantages, giving a better experience to many Windows 11 users in general. Also, these dynamic updates are not delivered by Windows Update. They can be manually obtained from the Windows Update Catalog website.
If you are using Windows 11, version 24H2, this update mainly enhances your system’s recovery abilities.
If you can’t remind your login credentials for a website or apps, you will have to regain access through all the multi-factor authentication verification steps and reset them. However, Windows already stores the passwords in the Credential Manager, a database for all your Windows-related accounts. The website passwords are stored in your browser.
How do I find my stored passwords on Windows 10?
1. By using the Control Panel
Click on the Windows Search bar, type Control Panel, and click Open.
Select User Accounts.
Click on Windows Credentials.
Next, select MicrosoftAccount and click on it to expand and reveal your password.
Take advantage of Windows Hello – Windows Hello allows you to log in with just your face or fingerprint instead of typing the password.
Craft unique passwords – This is important because if someone gains access to one account, they could easily access others by trying those same login details on other sites.
Given how easy it is, if you’re using a shared PC, someone else might also check them out. Therefore, you should take the necessary precautions to keep them safe. Sign out of your accounts after using the PC or enable password expiry, because that will help you secure them.
The 2024 Microsoft Store App Awards will take place later this year, and Microsoft wants everyone to participate. You can nominate your favorite app or submit your own app to win fantastic prizes.
According to the official announcement, nominations are now open and will close on September 15, 2024. So, everyone has enough time to ponder which apps have genuinely impressed them. If you are a developer, this is the time to present your brilliant creation. The winners will be declared in October 2024.
The rewards? The Redmond-based tech giant will give the 2024 App Awards winners special badges in the Microsoft Store, free promotions, and some exclusive Surface hardware. The winning developers might also receive Surface Pro Limited Edition Copilot+ PCs.
Microsoft also recognizes new developers with a special “Rising Star” award for publishing their projects within the nomination time frame.
Rising Star recognition: We’re introducing a special category for new developers who publish their app during the awards nomination period. Don’t forget to fill in the nomination form after publishing your app to participate.
So, you might wonder: what makes an application worthy of an award? The answer is not easy, but it is mainly a mix of excellent user experience, creativity, distinctiveness, and compatibility with the latest hardware and technologies.
And you know what makes it even better? Every app in the Microsoft Store is open for consideration, excluding those created by Microsoft workers, for obvious reasons, of course.
Now, we’d like to know what apps you would choose. Please share your suggestions and recommendations. Don’t keep them hidden, especially if they are useful.
Dealing with the dreaded PFN_REFERENCE_COUNT error often leads to the infamous Blue Screen of Death (BSOD), disrupting your workflow and causing potential data loss. It has the value of 0x0000001C and it can be caused by counter overflows, underflows, or an object that is used after it has been freed.
How do I fix the PFN_REFERENCE_COUNT error?
1. Roll back or update the network drivers
Right-click on the Windows icon and select Device Manager.
Expand the Network adapters category in the pop-up window.
Right-click on your network device and select Properties.
Navigate to the Driver tab and click on Roll Back Driver.
Follow the on-screen instructions to revert to the previous driver version.
If you installed a new network driver recently, try to roll back to the previous one first. If that doesn’t work, update it instead.
Navigate to Device Manager > Network adapters.
Right-click on your network device and select Update Driver.
Choose Search automatically for updated driver software.
Follow the on-screen instructions to complete the update.
Updating or rolling back your network drivers can resolve issues caused by incompatible or outdated drivers, potentially preventing the PFN_REFERENCE_COUNT error.
2. Scan the system for malware
Open Settings by pressing Win + I.
Go to Update & Security.
Select Windows Security from the left panel.
Click on Virus & threat protection.
In the new window, click on Scan options and choose Full scan.
Click Scan now and wait for the scan to complete.
If any threats are detected, follow the instructions to remove them.
Malware infections can corrupt system files, leading to BSOD errors like PFN_REFERENCE_COUNT. Running a full system scan can help identify and remove harmful software.
3. Run the System File Checker (SFC)
Press Win + R to open the Run dialog box.
Type cmd and press Ctrl + Shift + Enter to open Command Prompt as administrator.
In the Command Prompt window, type sfc /scannow and press Enter.
Wait for the scan to finish.
If the error persists, run the Deployment Imaging Service and Management Tool (DISM):
Open Command Prompt as administrator.
Type the following commands and press Enter after each:
DISM /Online /Cleanup-Image /CheckHealth
DISM /Online /Cleanup-Image /ScanHealth
DISM /Online /Cleanup-Image /RestoreHealth
After the scans are complete, restart your PC.
Running SFC and DISM can repair corrupted or missing system files, which may resolve the PFN_REFERENCE_COUNT error.
4. Check the disk for errors
Access the Windows Recovery Environment (WinRE) by rebooting and pressing F8, or the appropriate key for your system.
Navigate to Troubleshoot > Advanced options > Command Prompt.
In the Command Prompt, type CHKDSK C: /F /R and press Enter (replace C with your system drive letter if different).
Checking for disk errors can identify and resolve issues with your hard drive, which could be causing the PFN_REFERENCE_COUNT error.
5. Check the RAM
Enter Safe Mode.
Open Windows Memory Diagnostic by searching it in the Windows Search tool.
Click Restart now and check for problems in the prompted box.
Let the system reboot and run the diagnostic test.
This tool will diagnose and report any issues with your RAM. If it finds errors, consider replacing the faulty RAM.
Additional possible fixes
Perform a Windows Restore
Enter WinRE and navigate to Troubleshoot >Advanced options > System Restore.
Follow the on-screen instructions to choose a restore point before the issue began.
Check for Windows Updates
Go to Settings > Update & Security > Windows Update.
Click Check for updates and install any available updates.
Perform a Clean Boot
Press Win + R, type msconfig, and press Enter.
Go to the Services tab, check Hide all Microsoft services, and click Disable all.
Go to the Startup tab and click Open Task Manager.
Disable all startup items, close Task Manager, and click OK in the System Configuration window.
Restart your computer.
Performing a Windows restore, checking for updates, and doing a clean boot can help resolve underlying software issues causing the PFN_REFERENCE_COUNT error.
By following these steps, you should be able to resolve the PFN_REFERENCE_COUNT error and get your system back to normal. To avoid future issues, keep your drivers updated and regularly scan your system for malware.
When it comes to portable storage devices, people often use Jump Drive and Thumb Drive interchangeably. They serve a similar function of storing and transferring data; however, they are different in terms of size and portability. In this guide, we will discuss the design, functionality, and practical applications of Jump Drive vs Thumb Drive to help you choose the right tool.
What is Jump Drive?
A Jump Drive, commonly known as a pen drive or thumb drive, is a portable USB storage device. It originated when Lexar introduced a range of USB flash drives called Jump Drive. With time and due to its increasing popularity, people started using it as a synonym for USB flash drives.
What is Thumb Drive?
A Thumb Drive is a small portable device usually less than 2 inches in length. It stores data via a solid-state drive and flash memory.
Often, you have to work with a Microsoft Access database, which uses the relatively new and default database format, .accdb. Opening such files in Microsoft Excel, an excellent spreadsheet editor, seems like the most viable choice. But accessing .accdb format in Excel is not as seamless!
You have to either convert the .accdb file into an Excel-supported format or import the data in Excel using the built-in methods. Once you understand how to do both, pick one that works best.
How can I convert .accdb files to .xlsx?
1. Via a free online converter
If you are looking for a free accdb to Excel converter online, RebaseData is one of the best options right now.
File conversion using RebaseData
All you have to do is go to RebaseData > drop the ACCDB file in the dedicated box > wait for the upload and conversion to complete > and finally, download the Excel-supported file.
The online tool isn’t perfect and often takes minutes to convert .accdb file to .xlsx or even throws an error at times. Of the two files I tried, RebaseData could convert only one. For the other, I kept getting an error!
2. Via Export to Microsoft Excel option
Launch Microsoft Access, and open the .accdb file that you want to convert.
Now, right-click on the table you want to open in Microsoft Excel, choose Export from the context menu, and then select Excel from the list of options.
Choose a file name and format, then tick the checkboxes for Export data with formatting and layout and Open the destination file after the export operation is complete, and finally click OK.
Within a few seconds, a new Excel file should open up with the data (table) you exported.
If the online converter doesn’t work, you can always export the .accdb Microsoft Access Database to Microsoft Excel and view/modify the data. The entire process didn’t take more than a minute for me!
How do I open .accdb files in Microsoft Excel?
Launch Microsoft Excel on your PC, go to the Data tab, click on Get Data, choose the From Database option, and then select From Microsoft Access Database.
Locate the ACCDB file, select it, and then click on Open.
Pick the individual table you want to open in Excel or tick the checkbox for Select multiple items and pick a number of them, and then click on Transform Data.
Click on the Close & Load dropdown menu, and select Close & Load To from the options.
Go with the default data view for best results, and click on OK. Although, you can choose the Pivot Table Report and further explore and experiment with things.
These are all the ways you can convert the ACCDB file to an Excel-supported .xlsx format for free and open .accdb directly in Microsoft Excel without conversion. While the first option allows easy data retrieval from multiple files at once, the latter minimizes the likelihood of errors. As I said earlier, pick the one that works best for you!
A Microsoft Planner Gantt chart can help you get a timeline view of a project’s tasks and sub-tasks. That way, you can effortlessly visualize the progress compared to the overall timeline planned for the project.
However, doing so in the Microsoft Planner app is a tricky task. The new tool makes it a bit easier but its accessibility and adoption are minimal.
In this detailed guide, I’ll show you various methods to create a Gantt chart in the Planner app. Let’s get started!
How To Create a Microsoft Planner Gantt Chart
I’ve covered four methods in total:
In the New Planner App
The new Planner app might not be available in the Microsoft 365 Home portal’s Apps menu. You’ll have to access it from Microsoft Teams. Find below the complete steps:
Open the Microsoft 365 Teams app or the New Teams app.
If you’re using an unpaid Microsoft 365 or Office plan, you might not see the new Planner at all.
Click on View more apps or the three dots menu icon in the left side navigation panel.
You should see the New Planner at the top of the list of additional Teams apps.
Click on that to open Planner in Teams.
Select the New plan button on the home screen or the left-side navigation panel.
Choose Premium on the New plan page.
Now, select an appropriate project structure from the Templates library, like Project Management, Software Development, Sprint Planning, Marketing Campaign, etc.
Follow onscreen instructions to set up the project in the Planner app.
At this stage, if you wish to use the app in a separate browser tab, click on the Project Tasks drop-down list on the menubar.
Choose Go to website from the context menu.
Let’s say you’ve chosen the Sprint Planning template.
It’ll create a list of example tasks.
Click on a task and add dependencies as you need.
Repeat this for a few other tasks as well.
You should see the Timeline tab on top of the task list.
Click on that to create the Gantt chart view.
Limitations
There are some limitations to the Timeline feature though:
Not available if you choose the Basic plan option.
Timeline is also not available in the legacy Planner app.
Subscribing to a premium subscription for the new Planner app as an individual user is a complicated process. It often fails too. You can try to get the 1-month free subscription. However, Microsoft takes you through a 20 minutes long sign-up process. In the end, you’ll discover that it has given you access to the Microsoft Project and not the new Planner app. For example, look at the screenshot below:
The Planner premium subscription however shows Planner Plan 1 Trial according to this screenshot:
You might only be able to use the new app through an organization’s Microsoft domain with E5 or better subscription packages. The Microsoft 365 admin might need to set it up for you.
Considering this, you may need to learn how to set up the Gantt chart in the legacy app.
In the Legacy Planner App
The Timeline or Gantt chart view isn’t natively available in the legacy Planner. Find below some workarounds you can use:
You’ll see all your projects and task lists on the home screen or Planner Hub.
Click on a project card, like Project Management in this exercise.
Select the Charts tab on the top.
You’ll see a page of four charts. The configurations of the charts will depend on the project you’ve selected.
At the bottom, you’ll find the Members or Plan chart showing a timeline-like visualization of the tasks.
You can further enhance this timeline view workaround by choosing different items from the Filter drop-down menu in the top-right corner.
To get a project progression view for the selected task list, go to the Schedule tab on the top.
There, you can switch to a Week or Month view to get a closer and better timeline view.
Using Power Apps
You can also use a Power Apps solution to convert board or grid views to a Gantt chart. You’ll be using the no-code app development platform to set it up.
You should see the Download raw file button on the right edge of the Code ribbon. Click on that.
You’ll download the ZIP file on your PC.
Now, go back to the Import package portal of Microsoft Power Apps.
Click on the Upload button.
Select the PlannerGanttChart file you downloaded earlier and hit the Open button in the file browser.
Wait until you see the Your package was uploaded successfully notification.
Under the Review Package Content section, you should see the Planner Gantt Chart app package.
Click on the red warning sign.
The Import setup navigation panel will open on the right side.
Click on the Setup drop-down and choose the Create as new option.
Press the Save button.
The Import button on the Import package screen will become active. Click on that.
Once done, you should see the All package resources were successfully imported notification.
Click on the Open app hyperlink below the Next steps … section.
The app package will automatically try to fetch data from the Planner app and Office 365 Users portal.
These items should show the same MSFT login emails.
If the emails are different, click the Switch account buttons to select the appropriate ones. Both the MSFT log-in emails must be the same.
Once confirmed, click the Allow button.
The Planner Gantt Chart will open in Editing mode on Power Apps.
Click F5 or Preview the app button in the top right corner.
The app will become online.
Its user interface will show all of the task lists and projects from your Planner app profile.
Click on a task list, like the Project Management in this example.
You should now see the Gantt chart.
In this custom app, you can use the Filter by status, Filter by bucket, and Filter by label options to further customize your Gantt chart.
Click the Close icon in the top-right corner.
To share the app with collaborators, click on the Share button.
Using a Third-Party App
The Apps4.Pro Planner tool allows you to create Gantt charts from Microsoft Planner data, like projects, task boards, etc. It automatically imports, configures, and visualizes tasks in a timeline provided there are sufficient start times, date times, and statuses in the imported task boards.
When I used it to create the timeline view, it offered a 14-day free trial. You can download the free trial app from the Apps4.Pro Planner official portal.
It might download additional Microsoft .Net packages if the compatible resources aren’t available on your Windows PC.
Once installed and ready, follow these steps to import your Planner account into the app and create the Gantt charts you need:
Launch the Apps4.Pro Planner using the Desktop or Start menu icon.
Click on the Login button.
The tool will launch the Microsoft log-in API.
You should see all of your MSFT sign-on credentials in the API window.
Select the account with which you’d like to log in.
The app should log you in momentarily.
You might need to authenticate the sign-in using the Microsoft Authenticator or mobile phone OTPs.
The tool will load its home screen where you should see all your previous Planner boards.
Select a Planner board on the left-side navigation panel.
You should instantly see the Gantt chart on the right side of the app screen.
Use the toolbar items, like Columns, Reports, Filter, and Groupby to customize the Gantt chart.
Click on the Print button to start the export process as a PDF.
You should see the PDF Settings dialog.
Here, you can customize the visible items, like Range, Sort By, Columns, Display, etc.
If required, also customize the Paper Size settings.
Click Export to download a PDF copy of the Gantt chart.
Summary
So, these are all the tried and tested methods to create a Microsoft Planner Gantt chart in the new or legacy app.