Getting your favorite apps on your Chromebook’s desktop can significantly streamline your workflow and make your device more user-friendly. Whether you’re a seasoned Chromebook user or just getting started, these methods will help you customize your Shelf to suit your needs.
How do I put apps on my Chromebook desktop?
1. Use Pin to the shelf
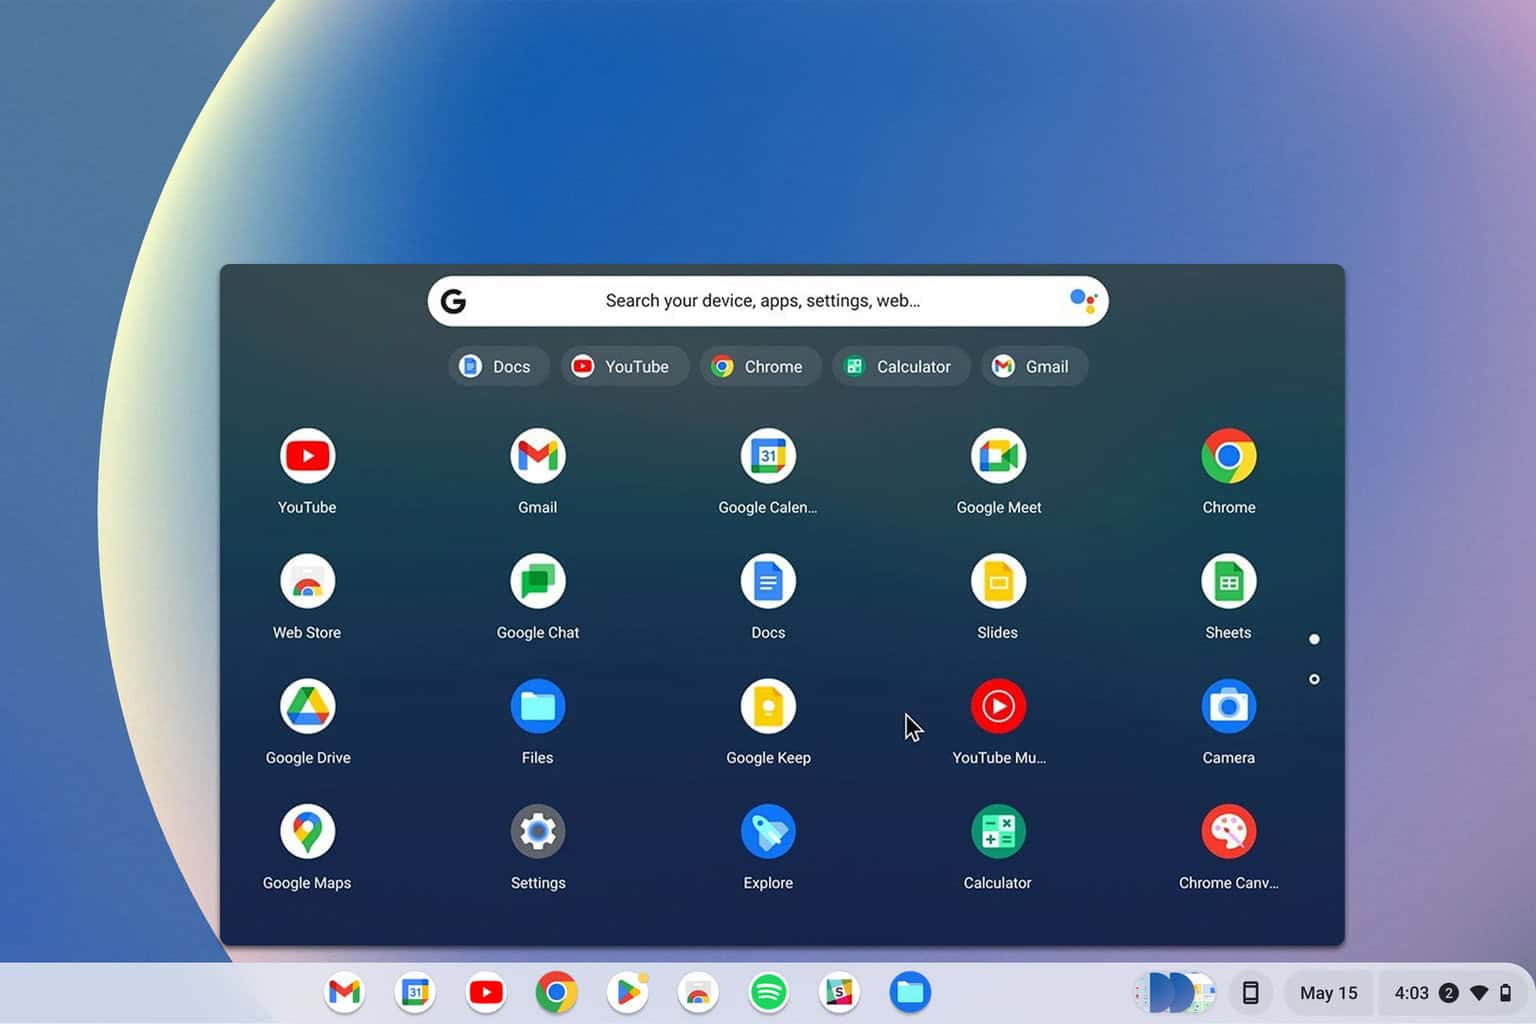
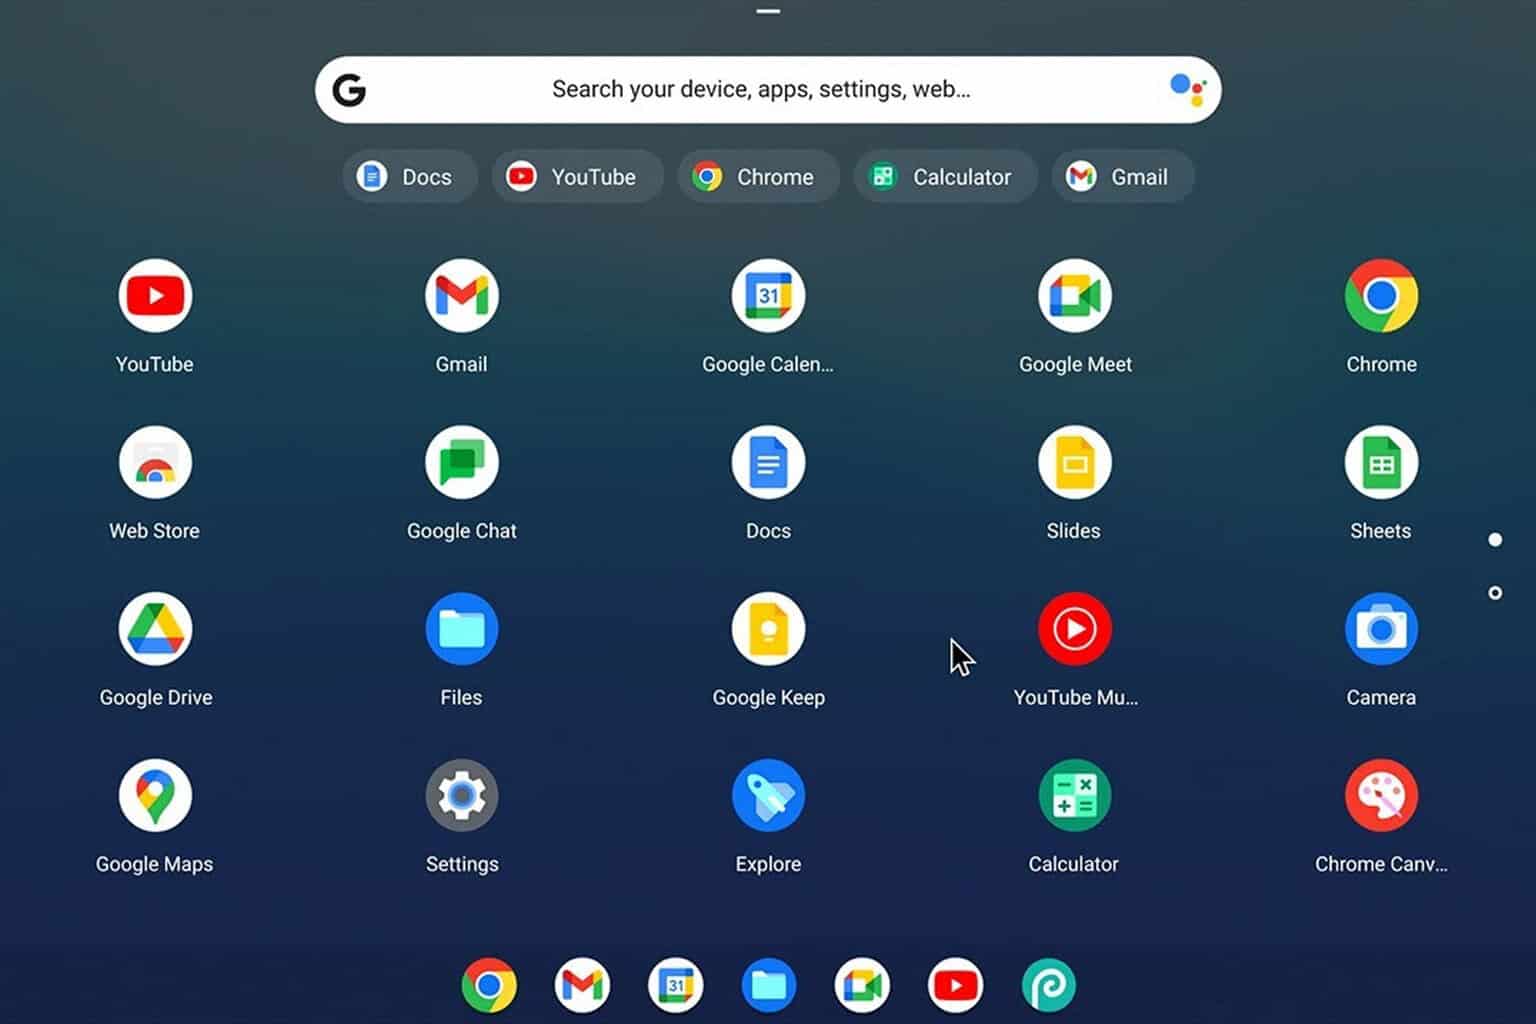
Click on the Launcher icon of the Chromebook (it looks like a circle with a dot in the center) in the lower-left corner of the desktop screen.
Find the app you want to pin.
Right-click on the app icon.
Select the Pin to shelf option from the context menu.
Optional: Instead of pinning, you can simply drag and drop the application to the shelf.
2. Put apps into the shelf from ChromeOS settings
Click on the digital time display on the Shelf (bottom right corner of the screen).
Click on the gear icon to open Settings.
In the Settings menu, click on Apps from the left-side navigation pane. Click on Manage your apps.
Once the app is open, right-click its icon on the shelf.
Choose the Pin option from the context menu.
By following these detailed steps, you can effectively manage and customize the apps on your Chromebook’s Shelf, making your device more tailored to your needs.
Did you know that you can run EXE files on a Chromebook? That’s right, and we have a special guide that will show you how to do that.
Dealing with the NO_SPIN_LOCK_AVAILABLE blue screen error can be quite a puzzle because it only provides the value of 0x0000001D. This error is very infrequent and it might disappear after a simple PC restart so that’s the first thing to try. If it persists, apply the solutions below.
How do I fix the NO_SPIN_LOCK_AVAILABLE BSoD?
1. Update the hardware drivers
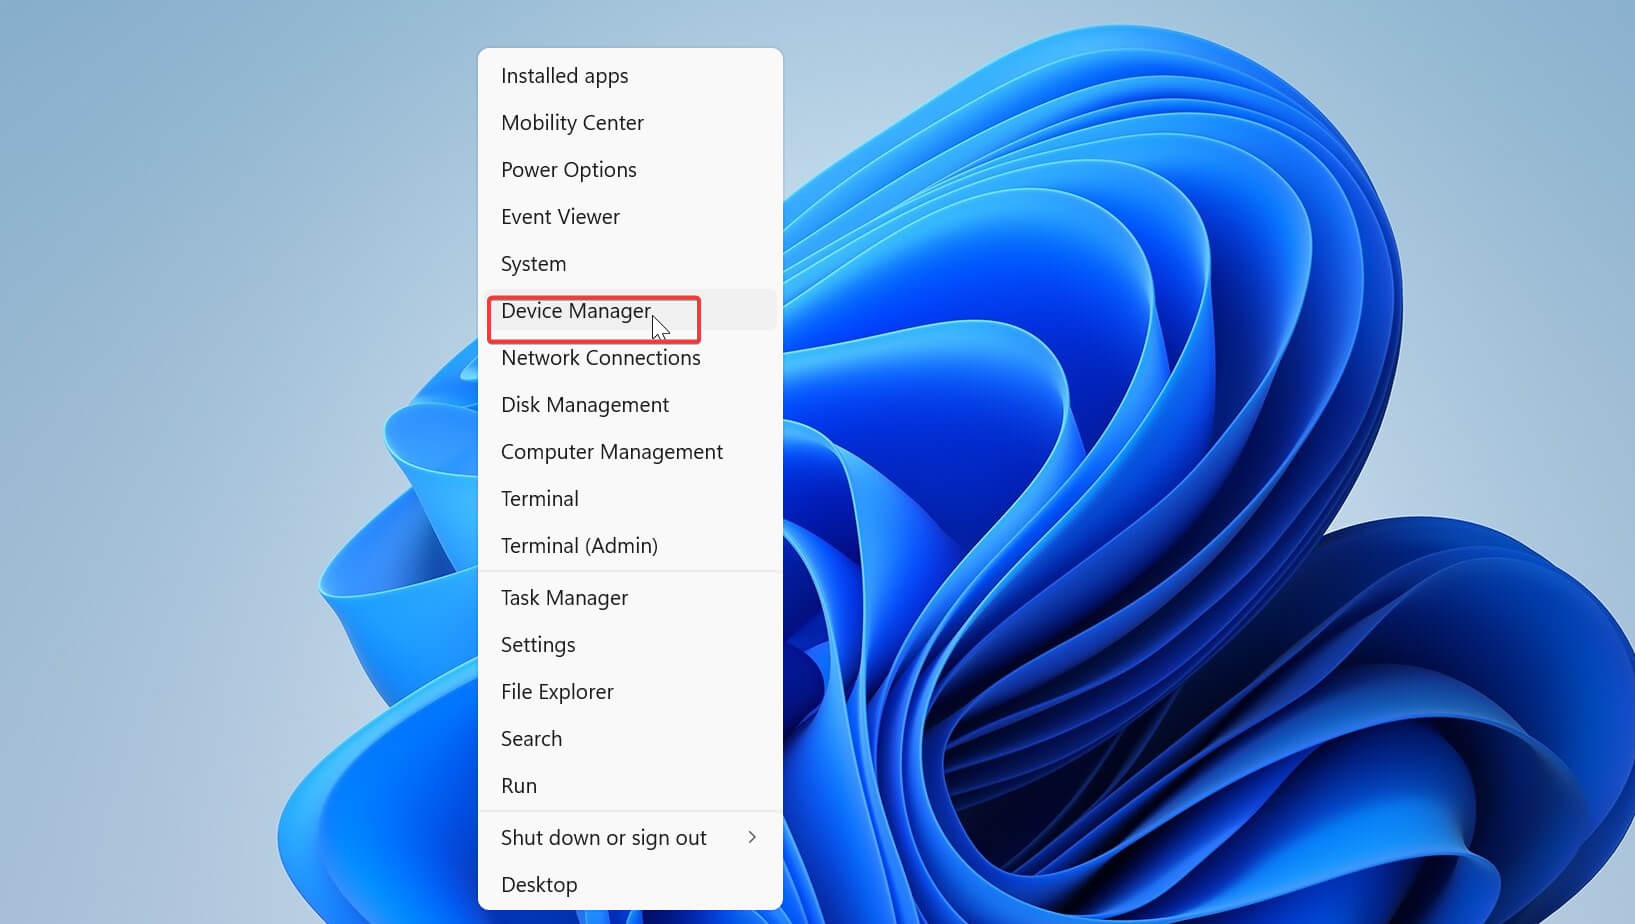
Press Win + X and select Device Manager.
Locate devices with a yellow triangle (indicating driver issues).
Right-click on the device and select Update driver.
Choose Search automatically for updated driver software.
Outdated or corrupted drivers often cause BSOD errors. Ensuring all drivers are up-to-date can prevent recurring issues.
With the help of professional driver updating software, you can ensure that your drivers are not causing any problems.
Navigate to Update & Security and click on Check for updates.
Allow Windows to download and install any pending updates.
Restart your computer to apply the changes.
Windows updates can include essential patches that fix blue screen errors and improve system stability.
3. Use Driver Verifier Manager
Press Win + R, type verifier, and press Enter.
Select Create standard settings and click Next.
Choose Automatically select unsigned drivers or Select driver names from a list.
Restart your computer.
Driver Verifier stresses drivers to identify faulty ones. This tool can help pinpoint problematic drivers causing the blue screen.
4. Check for malware
Open Windows Security by pressing Win + I and selecting Update & Security.
Click on Virus & threat protection.
Choose Quick scan or Full scan.
Malware can cause various system issues, including blue screens. Scanning for and removing malware can help stabilize your system.
5. Test your RAM
Press Win + R, type mdsched.exe, and press Enter.
Choose Restart now and check for problems.
Faulty RAM is a common cause of BSODs. Windows Memory Diagnostic Tool can help identify and address memory issues.
6. Check for disk errors
Click the Start button, type cmd and click on Run as administrator from the results.
Typechkdsk /f /r and press Enter.
Schedule the check for the next restart if prompted.
Restart your computer.
Disk errors can cause blue screen errors. Running a disk check helps to find and fix issues with your hard drive.
7. Perform a System Restore
Press Win + R, type rstrui.exe, and press Enter.
Select a restore point before the problem occurred.
Follow the prompts to restore your system.
System Restore can revert your system to a stable state, eliminating recent changes that may have triggered the error.
8. Uninstall recently installed software
Press Win + I to open Settings.
Navigate to Apps.
Find the recently installed software, click on it, and select Uninstall.
Restart your computer.
New software can introduce compatibility issues. Removing recent installs can help resolve conflicts causing the blue screen error.
9. Adjust virtual memory settings
Press Win + R, type sysdm.cpl, and press Enter.
Go to the Advanced tab and click on Settings under Performance.
Navigate to the Advanced tab and click on Change under Virtual Memory.
Uncheck Automatically manage paging file size.
Select Custom size and enter Initial size and Maximum size (typically 1.5 times and 3 times your RAM, respectively).
Click Set, then OK, and restart your computer.
Adjusting virtual memory can resolve issues related to insufficient paging file size, preventing the blue screen error.
By following these steps, you can diagnose and fix the NO_SPIN_LOCK_AVAILABLE blue screen error, ensuring your system runs smoothly again. To prevent future issues, regularly update your drivers and run system scans to keep your computer in top shape.
If you want to know more about the causes of BSoD errors, click the highlighted link. When the BSoD error doesn’t offer to much information about the error, you can check the crash code logs in Windows.
Hopefully, you managed to fix the NO_SPIN_LOCK_AVAILABLE error on your PC. For other questions, hit the comments section below.
The new Nvidia App has received one of the major updates so far, with the latest patch bringing support for RTX Super Resolution, HDR, and a group of display settings that promise to boost user experience in unprecedented ways.
In February, Nvidia first released the app to combine Control Panel, GeForce Experience, and RTX Experience into one program. But now, the app has received a significant update with many new elements.
The System tab now includes a separate display section, allowing users to adjust their refresh rate, display orientation, and resolution as much as they desire. However, it should be mentioned that a few features of the old Nvidia Control Panel are still being developed, such as G-SYNC control and multi-monitor support.
Another intriguing feature in this update is the inclusion of RTX Video improvements. You can now modify your video experience with sliders for RTX Video HDR. This tool will automatically convert SDR videos to HDR, making colors more vibrant and heightening the general visual quality.
Supported sliders include peak brightness, middle gray, contrast, and saturation. For those interested in knowing how these sliders work in detail, Nvidia provides a comprehensive article in its knowledge base.
But there is more. The update also contains many enhancements from customer suggestions like arranging and filtering apps, increased localizations for users who don’t speak English as their first language, plus a better Statistics Overlay that can display FPS 1% low when possible.
For those with suitable systems, the Nvidia app beta version can be downloaded on Windows 10 or 11 PCs. Beta stage: The program is still in beta, meaning it’s not ready to replace other Nvidia apps yet.
Nvidia’s promise to finish the migration procedure before this year concludes is evident. They are also working to incorporate multi-monitor support for RTX HDR. If you have a computer that can be used with it, looking at the Nvidia app may change everything.
Whether you are a gamer wanting to improve your arrangement or creating content requiring precise color settings, this new update from Nvidia aims to boost your digital experience. You can read more about it here.
Encountering a SECURITY_SYSTEM bug check error can be daunting because it only offers the value of 0x00000029. This error often indicates a critical system issue that needs immediate attention. Let’s dive into some practical solutions to resolve this problem.
How do I fix the SECURITY_SYSTEM bug check?
1. Update the device drivers
Right click the Start button and select Device Manager.
Look for any devices with a yellow exclamation mark (!) indicating a problem.
Right-click the problematic device and select Update driver.
Choose Search automatically for updated driver software to let Windows find the latest driver.
Follow the on-screen instructions to complete the driver update.
Restart your computer to apply the changes.
Updating your device drivers ensures that your hardware components communicate effectively with the operating system, potentially resolving the SECURITY_SYSTEM bug check issue.
Updating drivers can be easily done with the help of professional software such as Fortect Driver Updater. This tool can scan for broken or missing drivers and fix them in just a few minutes.
Open the Start menu and type cmd in the search bar.
Right-click on Command Prompt and select Run as Administrator.
In the Command Prompt window, type sfc /scannow and press Enter.
Wait for the scan to complete. It will automatically fix any corrupted system files it finds.
Restart your computer to see if the issue is resolved.
Running SFC can repair corrupted or missing system files that might be causing the SECURITY_SYSTEM bug check, ensuring system stability.
3. Check for Windows updates
Open the Start menu and type Windows Update in the search bar.
Click on Check for updates.
If updates are available, click Download and install.
Follow the on-screen instructions to complete the update process.
Restart your computer after the updates are installed.
Keeping Windows up-to-date fixes bugs and vulnerabilities that could lead to the SECURITY_SYSTEM error, enhancing system performance and security.
4. Perform a Memory Diagnostic
Open the Start menu and type Windows Memory Diagnostic in the search bar.
Click on Windows Memory Diagnostic to open the tool.
Choose Restart now and check for problems.
Your computer will reboot and perform a memory test.
Once the test is complete, the system will boot back into Windows and display the test results.
Running a memory diagnostic can identify and fix issues with your RAM, which could be contributing to the SECURITY_SYSTEM bug check.
5. Analyze the crash dumps
Open the Start Menu and type Event Viewer in the search bar.
Click on Event Viewer to open it.
In the left pane, navigate to Windows Logs > System.
Look for recent entries labeled as Error or Critical around the time of the SECURITY_SYSTEM bug check.
Note down the error codes and messages for further analysis.
Visit forums or seek expert help using the error codes for specific troubleshooting steps.
Analyzing crash dumps in Event Viewer can help you understand the underlying cause of the SECURITY_SYSTEM bug check, making it easier to find a targeted solution.
6. Disable hardware acceleration
Right-click on the desktop and select Display settings.
Scroll down and click on Advanced display settings.
Click on Display adapter properties for Display 1.
Go to the Troubleshoot tab and click on Change settings.
Move the hardware acceleration slider to None and click OK.
Restart your computer.
Disabling hardware acceleration can help if the SECURITY_SYSTEM bug check is related to graphics or other hardware issues.
7. Uninstall recently added software or drivers
Open the Start menu and type Control Panel in the search bar.
Click on Control Panel and then Uninstall a program.
Sort the list by Installed On to find recent installations.
Select any recently added software or drivers and click Uninstall.
Follow the on-screen instructions to complete the uninstallation process.
Restart your computer.
Uninstalling recently added software or drivers can roll back changes that might have triggered the SECURITY_SYSTEM bug check, restoring system stability.
By following these steps, you should be able to resolve the SECURITY_SYSTEM bug check error and get back to a smooth computing experience. To prevent future issues, regularly update your drivers and Windows, and avoid installing unverified software.
In a surprise twist, OpenAI has cut down on the prices of its GPT-4o model and introduced Structured Outputs. The move escalates a continuous price competition with Google, and OpenAI’s GPT-4o, recognized for its capacity to handle multimodal tasks by merging linguistic and visual inputs, now arrives at a cost that is cheaper than ever before.
The new pricing of $2.50 for every 1 million input tokens and $10.00 for each 1 million output tokens shows a price decrease by half in the case of input tokens and around 33% less expensive for output ones. This makes it more appealing compared to its former prices, especially when we compare it against the costs of the Gemini 1.5 Pro model’s pricing structure.
However, the most exciting development is the arrival of Structured Outputs. This feature ensures that the model’s outputs match exactly with JSON Schemes given by developers, improving its usefulness and ability to be used in real-life situations.
Structured Outputs are now included in the API and available for use across different OpenAI models, such as the newly priced GPT-4o and its mini version, along with older ones like GPT-3.5 Turbo.
However, structured outputs come with difficulties and limits. For example, the JSON Schemes used in this feature might not be suitable for Zero Data Retention, a policy guaranteeing data deletion to keep users’ privacy intact. Also, developers must handle certain limitations when using structured outputs.
But it’s refreshing to see companies fighting for their place at the top of the AI industry. The GPT-4o price cut and new features like Structured Outputs show that competition is speeding up tech advancements.
This is good news for developers and tech companies: better tools at a lower price. And what’s not to love about it? What’s your opinion? Let us know in the comments section below.
Having trouble with your Chromebook keyboard not working and only the touchscreen being active? You’re not alone. This issue can be quite frustrating, but don’t worry—I’ve got a few solutions that might just get you back on track.
What can I do if the Chromebook keyboard is not working only the touchscreen?
Before trying anything else, try using a different account such as a guest one. Try updating Chrome OS to the latest version. Also, clean your keys and make sure they aren’t stuck.
1. Reboot your Chromebook
Click on the Time at the bottom right to open the status tray.
Select the Power icon to shut down your Chromebook.
Wait for 10-30 seconds.
Press the Power button to turn your Chromebook back on.
Rebooting can fix minor software glitches that may be causing keyboard issues.
2. Perform a hard reset
Turn off your Chromebook by holding the Power button.
Press and hold the Refresh button, then press the Power button.
Release the Power button while still holding the Refresh button.
Release the Refresh button when your Chromebook starts up.
A hard reset can resolve hardware and software issues by refreshing the system.
Type the following and press Enter: chrome://flags/#ash-debug-shortcuts
Enable Debugging keyboard shortcuts.
Press Ctrl + Shift + Alt + T to toggle between tablet and laptop modes.
Toggling between tablet and laptop modes can resolve issues where the keyboard is stuck in tablet mode.
4. Factory reset your Chromebook
Open Settings.
Navigate to Advanced. Select Reset settings.
Next to Powerwash, click on Reset.
Follow the on-screen instructions.
A factory reset can resolve persistent issues by restoring your Chromebook to its original settings. Ensure you back up important files before proceeding.
These solutions provide a comprehensive approach to fixing keyboard issues on a Chromebook, allowing you to get back to using your device smoothly.
Google Maps on PC can change the language if the default one doesn’t suit your needs. Whether you prefer to use Google Maps in your native language or need to switch for travel or study purposes, the process is fairly simple.
I’ll show you the steps right now, so let’s go!
How To Change Google Maps Language on PC
Follow the below steps:
Go to Google Maps in your web browser. Ensure you’re logged into your Google account to save your language settings for future use.
Click on the three horizontal lines in the top-left corner of the screen to open the main menu.
Scroll down the menu and click on Language.
A list of available options will appear. Scroll through the list and select the language you want to use. For this example, I’ll choose Italian.
Once you’ve selected it, Google Maps will automatically update and display everything in that language.
Overall, changing the language on Google Maps for your PC is straightforward. By following these simple steps, you can ensure that all information is presented in the language you’re most comfortable with.
You can also customize Google Maps in other ways, such as rotating or viewing it in satellite mode.
Dealing with the CORRUPT_ACCESS_TOKEN error can be frustrating because it doesn’t offer details except for the 0x00000028 value. However, the BSoD has a direct connection to a malfunctioning or corrupt driver, or a hardware issue. Here’s what to do to fix it!
How do I fix the CORRUPT_ACCESS_TOKEN error?
1. Analyze the Memory Dump with WinDbg
Download and install the Windows SDK, which includes the Debugging Tools for Windows. You can get it from the Microsoft website.
After installing, open WinDbg. You can find it in the Start menu.
Set the symbol path for debugging. Open Command Prompt and type: set _NT_SYMBOL_PATH=srv*c:\Symbols*https://msdl.microsoft.com/download/symbols
Launch WinDbg.
Open the crash dump file by selecting File > Open Crash Dump and then select the appropriate .dmp file.
Type !analyze -v in the command window and press Enter to analyze the crash dump.
This solution allows you to identify the root cause of the CORRUPT_ACCESS_TOKEN error by providing detailed debugging information. Once identified, you can take the necessary steps to fix the problem.
2. Check for driver Issues
Open Device Manager by pressing Windows + X and selecting Device Manager from the menu.
Look for any devices with a yellow triangle, indicating a driver issue.
Right-click on the problematic device and select Update driver.
Follow the on-screen instructions to either search automatically for updated driver software or browse your computer for driver software.
Ensuring that all drivers are up to date can resolve conflicts that may cause the CORRUPT_ACCESS_TOKEN error, leading to a more stable system.
3. Run Windows Memory Diagnostic
Press Windows + R to open the Run dialog.
Type mdsched.exe and press Enter.
Choose Restart now and check for problems or Check for problems the next time I start my computer.
Your computer will restart and run the Windows Memory Diagnostic.
Memory issues can often cause system instability. Running this diagnostic will help you identify if faulty RAM is the cause of the CORRUPT_ACCESS_TOKEN error.
4. Perform a System Restore
Open the Start Menu and type System Restore in the search bar.
Select Create a restore point from the results.
In the System Properties window, click on the System Restore button.
Follow the on-screen instructions to choose a restore point before the issue started.
Using System Restore can revert your system to a previous state before the CORRUPT_ACCESS_TOKEN error occurred, potentially resolving the issue.
5. Scan for malware
Open your preferred antivirus software.
Run a full system scan.
Follow the instructions provided by the software to remove any detected malware.
Malware can corrupt essential system files and tokens. Scanning for and removing malware can help in resolving the CORRUPT_ACCESS_TOKEN error.
6. Run the CHKDSK utility
Open Command Prompt as an administrator by typing cmd in the Start menu, right-clicking Command Prompt, and selecting Run as administrator.
Type chkdsk /f /r and press Enter.
Follow the on-screen instructions to schedule a check disk on the next system restart.
The CHKDSK utility will identify and fix file system issues, which may be causing the CORRUPT_ACCESS_TOKEN error.
7. Reinstall the problematic software
Open Settings by pressing Windows + I.
Go to Apps.
Locate the software that might be causing the issue.
Click on it and select Uninstall.
Follow the on-screen instructions to remove the software.
Reinstall the software from a trusted source.
Sometimes, software can interfere with system processes and tokens. Reinstalling the problematic software can resolve conflicts and fix the error.
Regularly updating your drivers and running system diagnostics can help prevent CORRUPT_ACCESS_TOKEN errors in the future. Stay proactive with system maintenance to keep your Windows environment running smoothly.
Encountering ADP error code 100 can be frustrating, especially when you need to access your payroll or HR information quickly. This guide will walk you through several effective solutions to resolve this issue promptly.
How can I fix ADP error code 100?
Before we try anything else, make sure that your Internet connection is stable and that you’re using a modern browser.
1. Verify your login credentials
Go to the ADP login page.
Enter your User ID and Password.
Double-check for typos or errors in your password.
If you can’t remember your password, click on the Forgot Your Password link.
Follow the instructions to reset your password.
2. Clear browser cache and cookies
Open your web browser.
Press Ctrl + Shift + Delete (Windows).
Choose the time range (select All time for thorough cleaning).
Check the boxes for Cookies and other site data and Cached images and files.
If you get error code 100 and can’t log in, your account might be locked.
Contact your Company Payroll or HR contact for assistance in unlocking your account.
Alternatively, they can reset your password if needed.
If none of the above solutions work, contacting ADP support will help resolve more complex issues. They may provide specific guidance or fix backend issues that are not user-resolvable.
By following these steps, you should be able to resolve ADP error code 100 effectively. Remember to always use a browser that is compatible with ADP to avoid any potential issues.
Do you remember the Microsoft 365 Copilot Usage report that debuted in the admin center earlier this year? Well, it seems that the Redmond-based tech giant is looking to enhance it by allowing users to suggest candidates for Copilot.
In other words, according to the entry in the Microsoft 365 Roadmap, the new column is intended to help admins with licensing decisions quickly identify users or candidates who are most likely to get the most value from using Copilot.
The entry doesn’t describe how this new feature will be decided, but it will examine each user’s Microsoft 365 app usage. If it’s relevant, the users will be appointed as suggestions to the admins.
A new column will be added to the Readiness section of the Microsoft 365 Copilot Usage report showing suggested candidates for Microsoft 365 Copilot. This new column is intended to help admins with licensing decisions by quickly identifying users who are in a strong position to get the most value from Microsoft 365 Copilot based on their relevant Microsoft 365 app usage.
In other news, Copilot users should get excited about the AI model, as the Redmond-based tech giant is enhancing it to generate video drafts for users with only a single input.
For anyone still running Windows XP, the antivirus options are limited. Most of the popular ones stopped supporting the iteration long ago, after the operating system’s end of support on April 8, 2014. However, one of the last few, Panda antivirus, continues to support Windows XP!
As for compatibility with Windows XP, the Panda antivirus will run with Service Pack 3 or higher and .NET Framework 4.0 installed. The Panda VPN, however, requires Windows 7 or higher, but you can always go with another compatible VPN for Windows XP.
Is Panda antivirus good for Windows XP?
NOTE
In the following sections, I have listed my honest assessment of the Panda Dome Essential antivirus on various critical parameters after three days of use on a virtual machine (VM) running Windows XP.
1. Security and protection
When it comes to security and protection, Panda Dome does the job well. It delivers a high level of protection without compromising on speed.
Both these aspects are critical for Windows XP, given the lack of official support and the fact that most devices running the OS are outdated and have minimal hardware configuration!
With built-in features like Wi-Fi Protection, Application Control, and USB Protection in the Panda Dome antivirus, your device isn’t left exposed to threats. Also, the antivirus receives regular updates to keep your device up-to-date with the latest vulnerabilities.
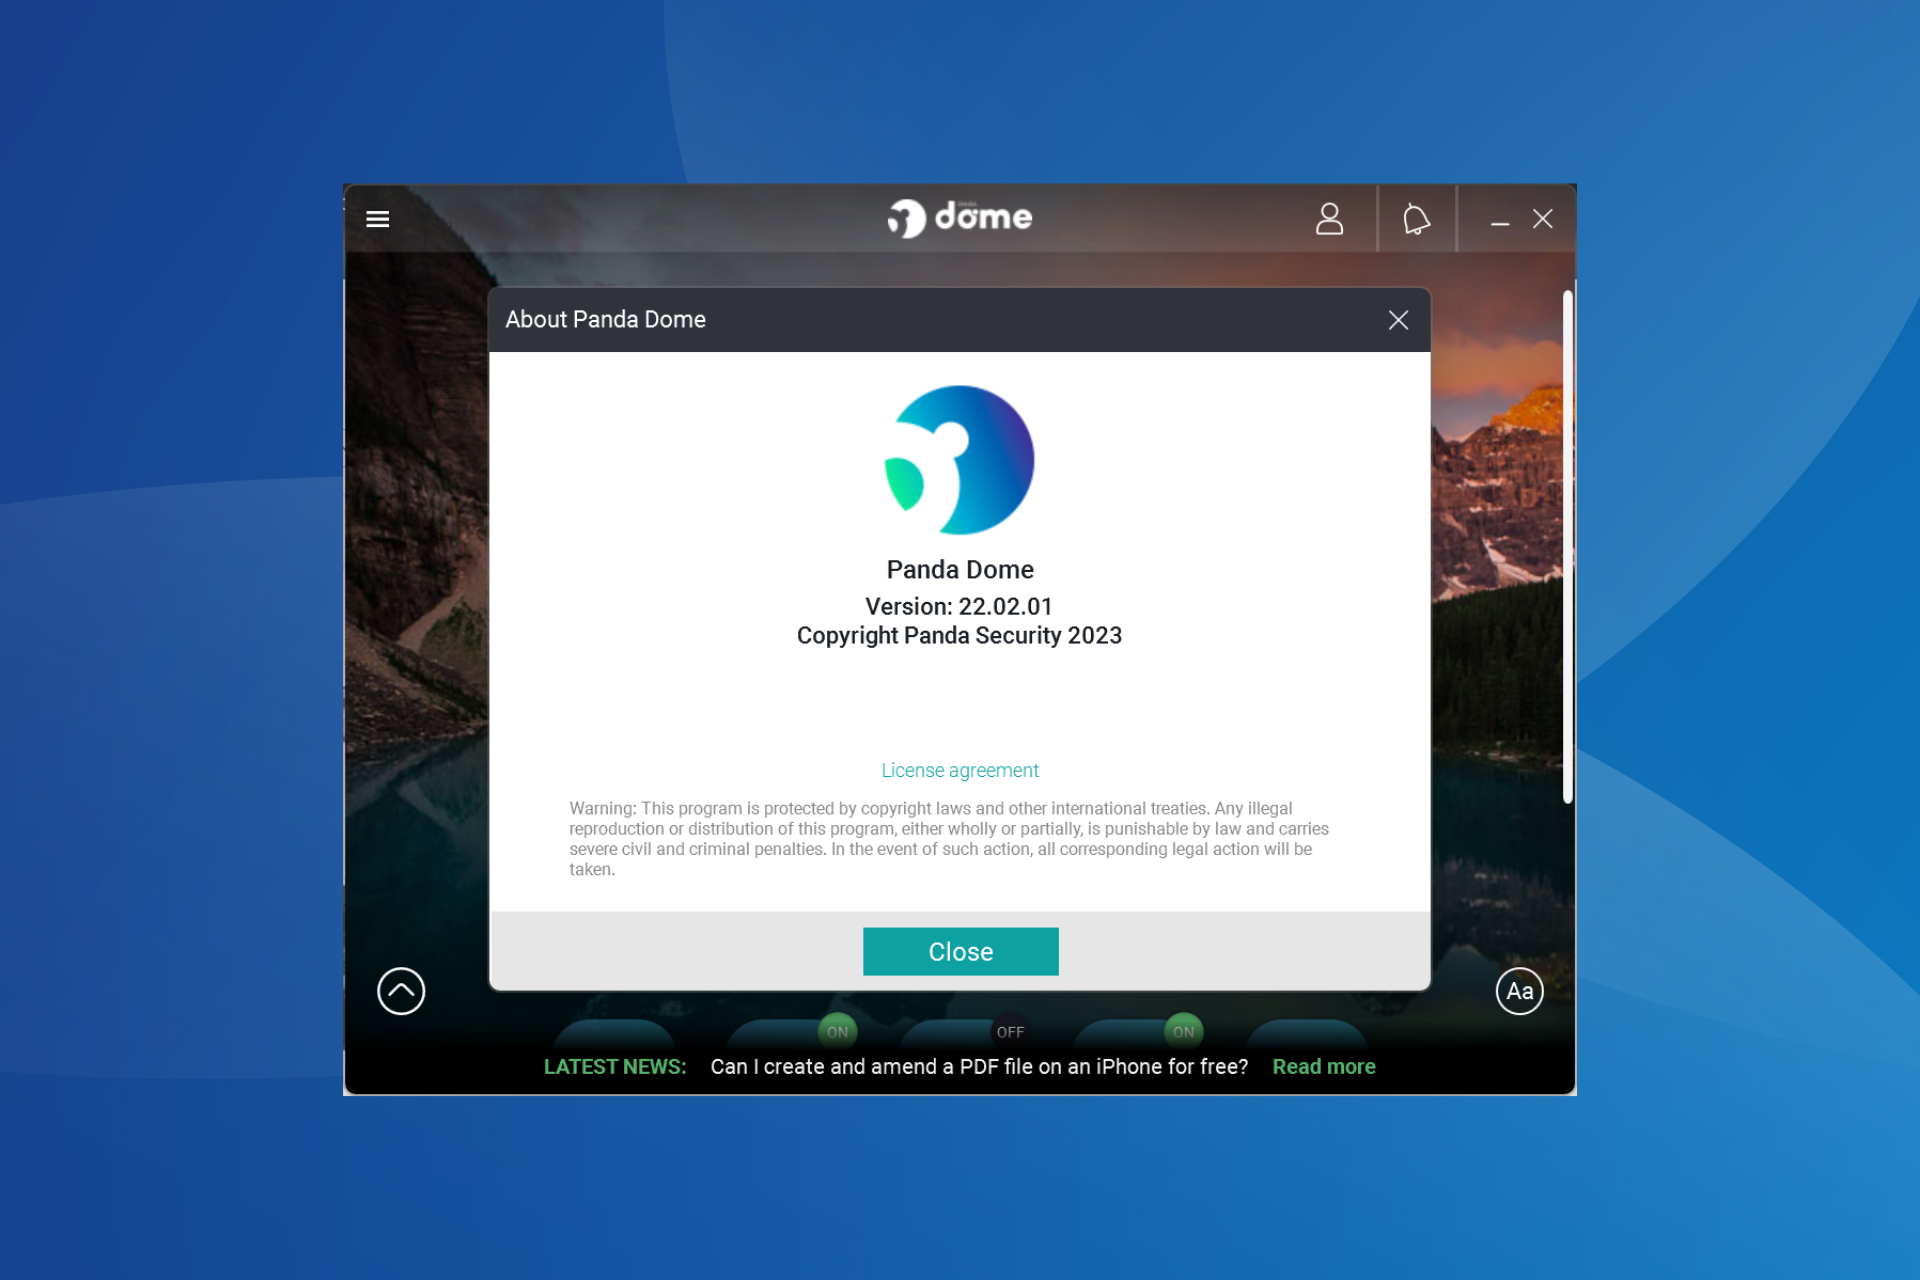
Panda Dome antivirus
Although, with Panda Dome on Windows XP, you will miss out on some security and privacy features that are only available on newer iterations of the OS. For instance, the built-in VPN. So, that’s a major downside!
2. User-friendliness
Of all the third-party antiviruses I have tested for Windows, Panda Dome remains one of the most user-friendly options. All the key antivirus functionalities can be accessed from the software’s home screen. The secondary ones, say Settings, Support, and Account, are available in the navigation pane.
The user interface is really straightforward, and navigating through the different sections remains seamless.
Even the software’s dedicated settings are simple to understand, unlike a few other antivirus solutions where things might be a bit confusing. And the fact that there are not too many settings to configure makes things all the more easier for Panda Dome antivirus users on Windows XP!
3. Compatibility and installation
Windows XP has been out of support for over a decade, and the available antivirus options for the iteration are extremely limited. Most popular options stopped supporting the OS years ago. In these times, Panda Dome emerged as a viable alternative and has captured a significant market amongst Windows XP users.
Although, not all Windows XP users will be able to install the Panda Dome antivirus. It requires Service Pack 3, which must be pre-installed on the device. As for the other system requirements, you can check Panda Security’s official website.
Coming to the installation, I was able to download and install Panda Dome without any hiccups. You can get the free trial version from the dedicated Panda Security Downloads page.
Panda Dome installation
But a few have reported getting error messages, the most common being, There was an error during the process and it failed to complete successfully. In this case, completely removing the antivirus using the Panda Antivirus Uninstaller and then reinstalling Panda Dome does the trick!
Given that it’s a rare occurrence, I would rate the Panda Dome antivirus installation experience on Windows XP as 8/10.
4. Resource consumption
Panda Dome is a light-weight antivirus solution and doesn’t consume too many resources on your PC. All three, RAM, CPU, and Disk consumption, remain low while running Panda Dome.
This is all the more important on Windows XP PCs, which often use outdated hardware, minimal RAM, and low storage.
Even user reviews on forums suggest low resource consumption by Panda Dome. A user recently said on Reddit,
I also use Panda Free Antivirus, seems to work well and it’s definitely much less resource intensive than Avast.
So, if you are looking for a low-resource-intensive, lightweight antivirus for Windows XP, Panda Dome would be a good choice!
5. Pricing
For years, you could download the free version of the Panda Dome antivirus for all iterations of Windows, including XP. But not long ago, this changed, and Panda now only offers a 1-month free trial of all its antivirus solutions, i.e., Essential, Advanced, Complete, and Premium.
Upon the completion of the month-long free trial, you are asked to purchase an annual subscription to Panda Dome.
The lack of a free version may be a problem for many, but the fact that Panda Dome remains one of the very few antiviruses supporting Windows XP is a good enough reason to shell out a small sum to protect your device against online and localized threats. As for the pricing, I would say it’s on the higher side!
That’s my honest review of the Panda Dome antivirus for Windows XP. Remember, although it delivers decent protection against threats, you may consider coupling the antivirus with a reliable VPN solution and a secure third-party firewall for improved security and privacy. You can also check out this review for Windows 10/11.
Transferring your Firefox profile to a new computer can seem daunting, but with the right steps, it’s a breeze. Whether you’re using a Firefox Sync or manual file transfer each method has its perks. Let’s dive into the solutions.
How do I transfer my old Firefox profile to my new computer?
1. Transfer Firefox profile manually
In Firefox, go to about:profiles in the address bar.
Locate your profile in use and find its location.
Press Windows + R to open the Run dialog.
Type %APPDATA%\Mozilla\Firefox\Profiles\
Locate your profile. It will have the same folder name as the profile in Step 2.
Paste it to a removable device.
On the new device navigate to %APPDATA%\Mozilla\Firefox\Profiles\
Paste your profile there.
To learn more, we have a great guide on Firefox profile location, so check it out for more information.
2. Use Firefox Sync
Open Firefox on the old computer.
Click the Firefox menu (three horizontal lines) and select Settings.
Go to the Sync section and sign in or create a new account.
Under Sync Settings, select what you want to sync (bookmarks, passwords, history, add-ons, etc.).
Open Firefox on the new computer.
Repeat the steps from above and sign in with the same account.
Microsoft is making a huge change (or rather an improvement, we’d say) to its Viva Amplify platform: users will be able to automatically seek approval for their campaign from managers or higher-ups without having to interact with them directly.
According to the latest entry in the Microsoft 365 Roadmap, the new required approval, which is set to be released to Microsoft Viva this month, will greatly streamline workflows, permissions, and compliances in Viva.
As Microsoft mentions, the new required approval feature will ensure that skateholders can easily give their consent and approval to the way a content campaign adheres to organizational standards. This, on the other hand, will ensure that there are no risks and errors with any campaign.
The best thing about this new setting coming this month to Microsoft Viva is that it is optional, so a user can choose to apply it to a campaign or not. However, the Redmond-based tech giant recommends keeping it on to ensure your organization reaches a significant level of quality and security when it comes to the content you’re putting out.
Coming soon, you’ll be able to require approval at the campaign level for all your Amplify publications. The require approval feature brings compliance, accountability, and workflows to Lightweight Approvals in Amplify. By enabling required approval for a campaign, stakeholders can ensure that all campaign content adheres to organizational standards and receive the necessary approval before publishing, thus minimizing risks and errors. You can require approval at the campaign level so that all Amplify publications within the campaign go through the approval process before the content is published. This is an optional setting that a user can choose to apply to a campaign. By requiring approval, organizations can apply a significant level of quality and security to their content, ensuring every piece of content aligns perfectly with their standards and expectations before it is published.
Adding new members to your Slack conversations is a basic way to collaborate. Whether you’re using the desktop app, mobile app, or inviting someone via email, the process is straightforward and efficient. Let’s dive into the detailed steps for each method.
1. Adding someone to an existing Slack conversation
Navigate to the specific conversation where you want to add the new member.
Click on the conversation name at the top of the screen.
Once the conversation is open, locate and click on the arrow down on the top of the window, next to the participants names.
Enter the name or email address of the person you wish to add.
A menu will appear, select the Add people option.
Input the person’s name or email address accurately to find their account.
From the list of matching results, click on the person’s name to select them.
Click the Add button to formally include the chosen person in the conversation.
A confirmation message or notification will appear.
Acknowledgment of the successful addition will appear, confirming the new member’s integration.
It’s advisable to notify the new member about their inclusion in the conversation.
This solution is straightforward and helps you quickly add someone to a conversation on Slack.
2. Adding someone to a Slack conversation on mobile
Launch the Slack app on your mobile device.
Navigate to the specific conversation or channel where you want to add a new member.
Tap on the three dots or the conversation name to access the options.
Select the Add people option from the menu.
Enter the email address or name of the individual you wish to add.
From the suggested list, tap on the person’s name to add them to the conversation.
Adding members via mobile is convenient for maintaining team connectivity and fostering inclusive communication, even on the go.
3. Inviting via email address
In the message settings, click the Add people button.
Input the correct email address of the person you want to invite.
After entering the email, send the invitation.
The recipient will receive an email notification to join the conversation.
Make sure the email entered is correct to avoid any miscommunication.
Inviting members via email ensures they receive a prompt notification to join the conversation, facilitating easy onboarding.
FAQs about adding someone to a Slack conversation
How do I add someone to an existing Slack conversation?
Open the conversation, click the conversation name at the top, select Add people, enter their name or email, and confirm.
Can I add someone to a private Slack channel?
Yes, but only if you are a member of that private channel. Workspace admins or channel owners may need to approve the addition.
How do I add someone to a Slack conversation on mobile?
Open the Slack app, go to the conversation, tap the three dots or channel name, select Add people, then choose the person from the list.
Can I invite someone via email instead of adding directly?
Yes. Click Add people, enter their email address, and Slack will send them an invitation to join the conversation.
Why can’t I add someone to a Slack conversation?
If the channel is restricted or you lack permissions, you may not see the option to add people. In that case, contact your workspace admin.
These solutions provide various methods on how to add someone to a Slack conversation, ensuring seamless integration and effective team collaboration. For future reference, always double-check the details you enter to avoid any errors and keep your team communication streamlined.
Apart from speed and low latency, visuals are everything in a game so you would understand why enabling V-Sync enhances the appearance.
While vsync has its benefits like preventing screen tearing and overall appearance, it has its downsides which could also tank the performance of your game. To optimize your gaming, you need to get the right balance and tweak these settings for the best performance.
Does V-Sync ruin FPS?
V-Sync works hand in hand with your monitor’s refresh rate. So whenever you’re playing a game and you want to enable V-Sync, you can only go as far as your monitor’s refresh rate will let you.
If you’re trying to max out your refresh rate, your monitor must be capable of running the desired rate otherwise, you’ll just end up with a black screen.
For instance, my display’s maximum refresh rate is 60Hz. This means any game I play will be capped at an FPS of 60 regardless of whether it can go higher. So if a game has a higher FPS, enabling V-Sync forces it to remain at a lower FPS and even if my monitor is capable of going up, it cannot.
The game’s output will in turn be affected because its FPS has been forced to drop. The consequences of this may manifest in widespread lagging and stuttering in games.
How do I enable V-sync?
1. Nvidia graphics
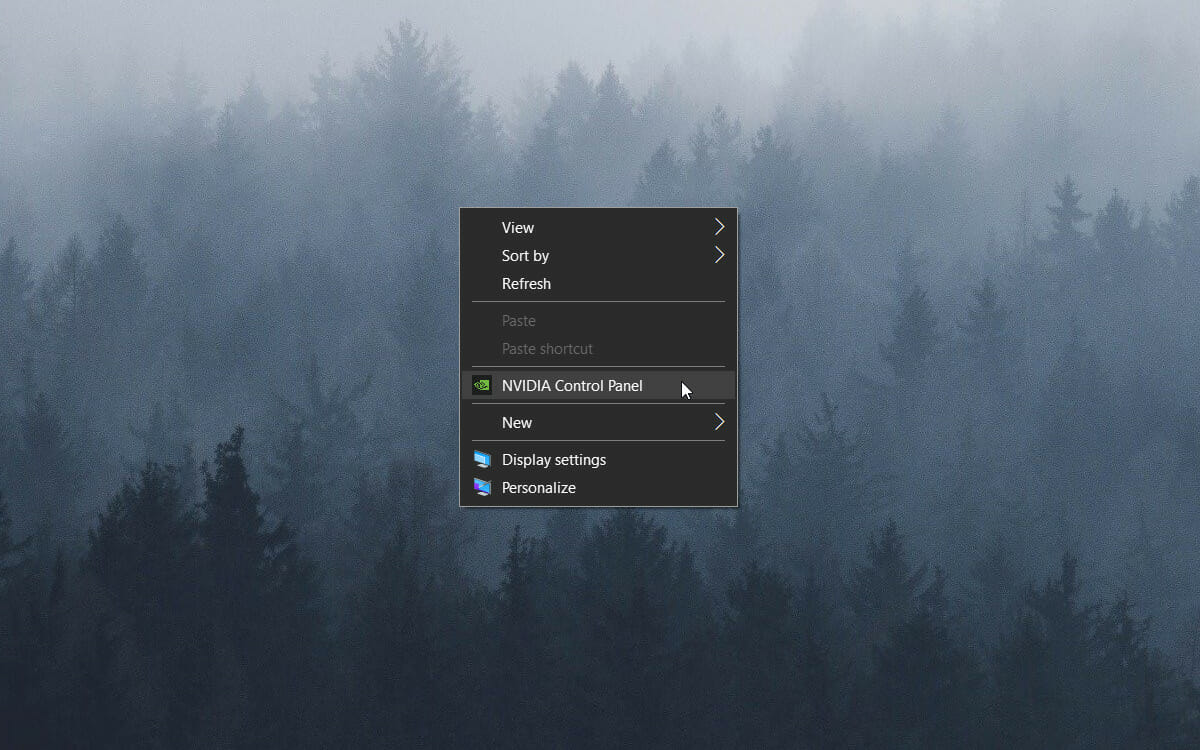
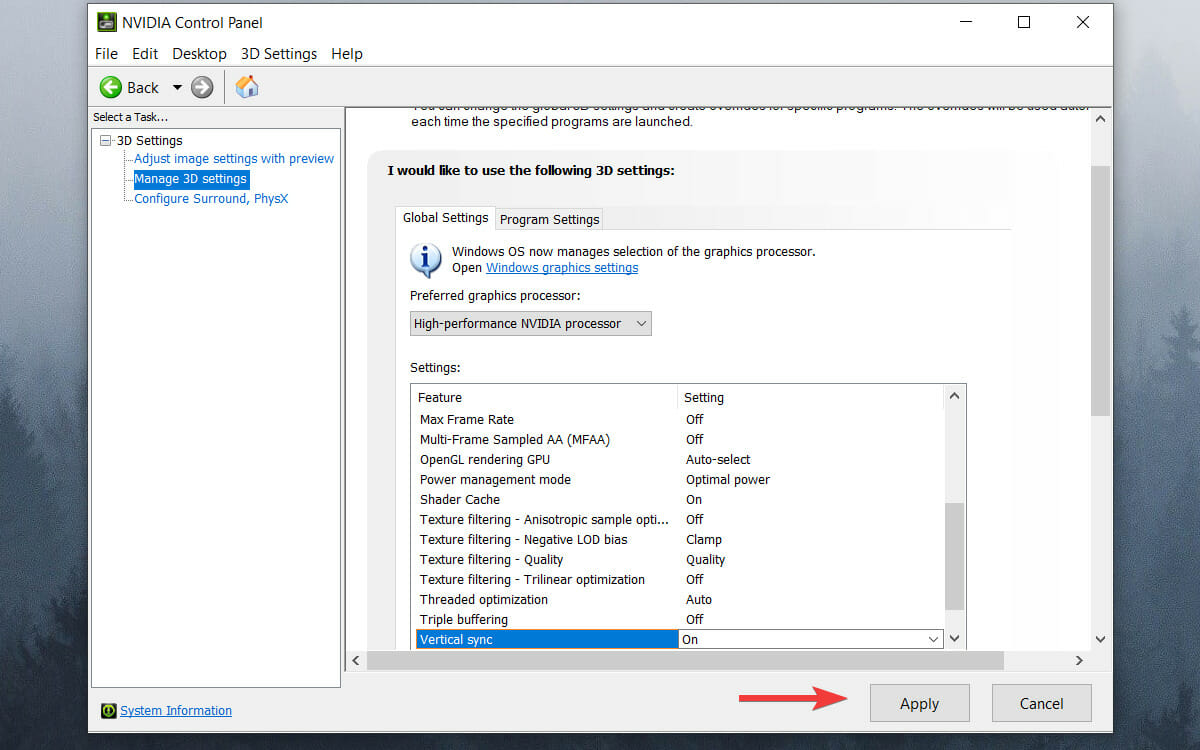
Right-click the desktop and select NVIDIA Control Panel.
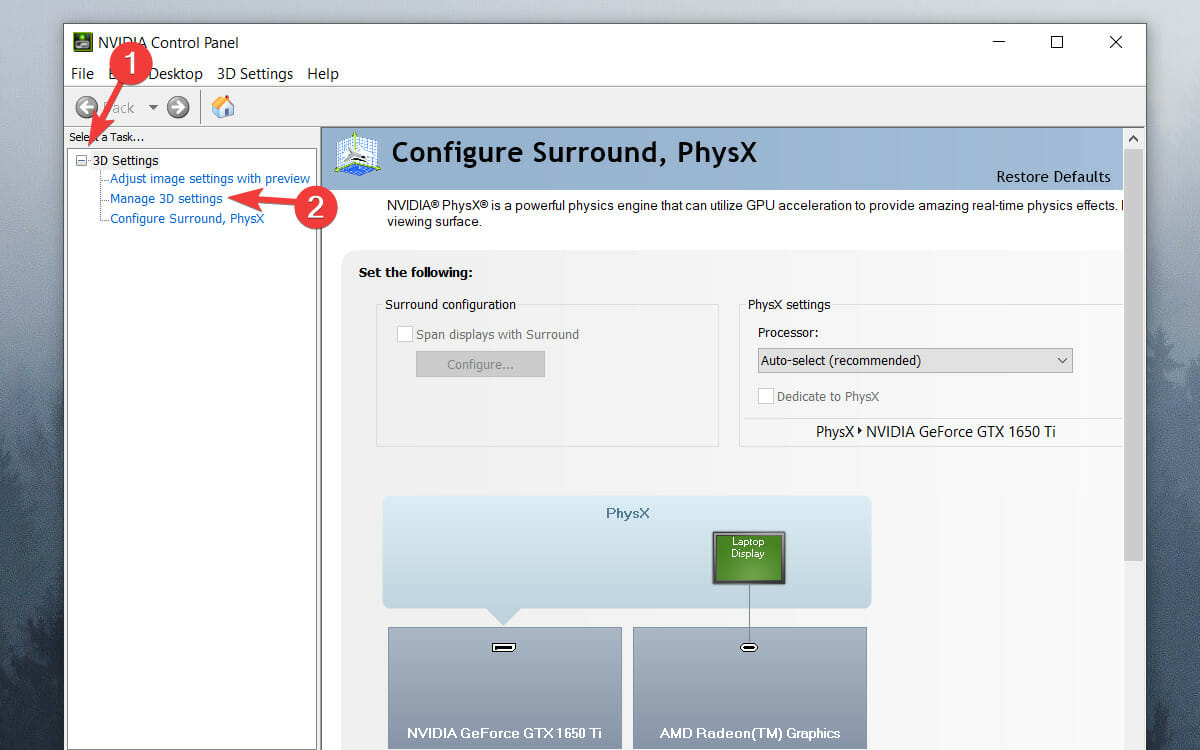
Click3D Settings and select Manage 3D Settings.
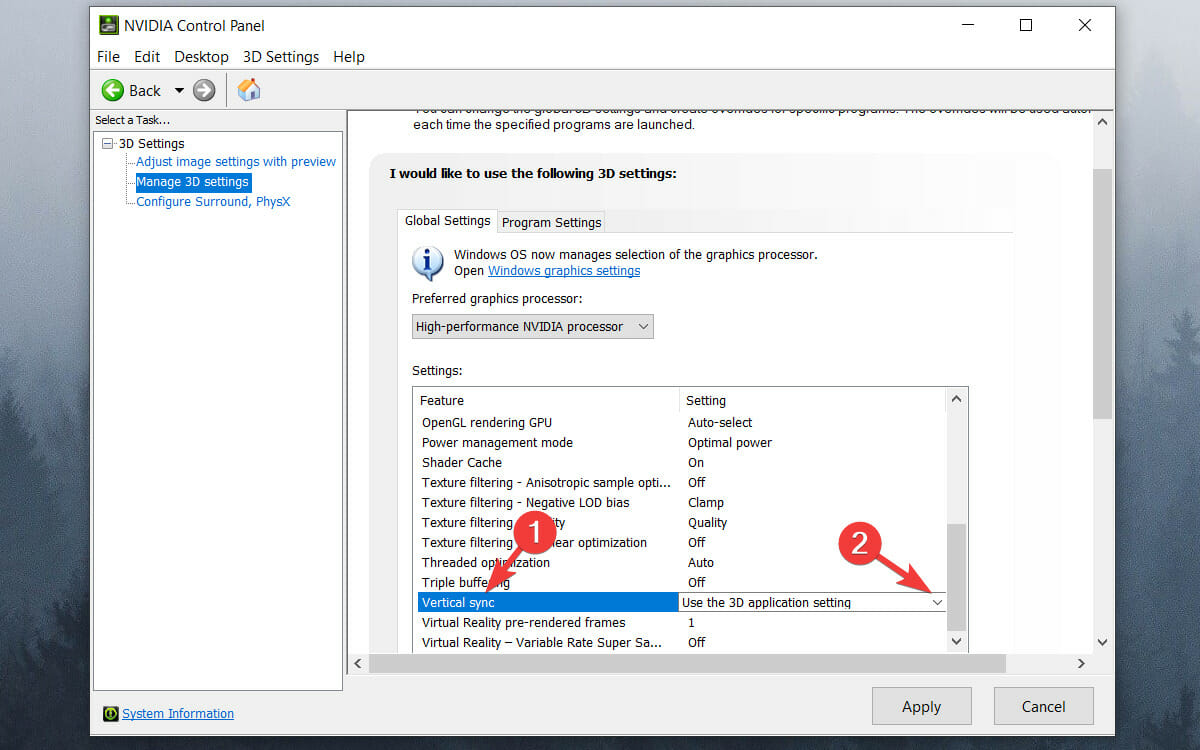
Scroll down through the list, click on Vertical sync, and click the drop-down menu.
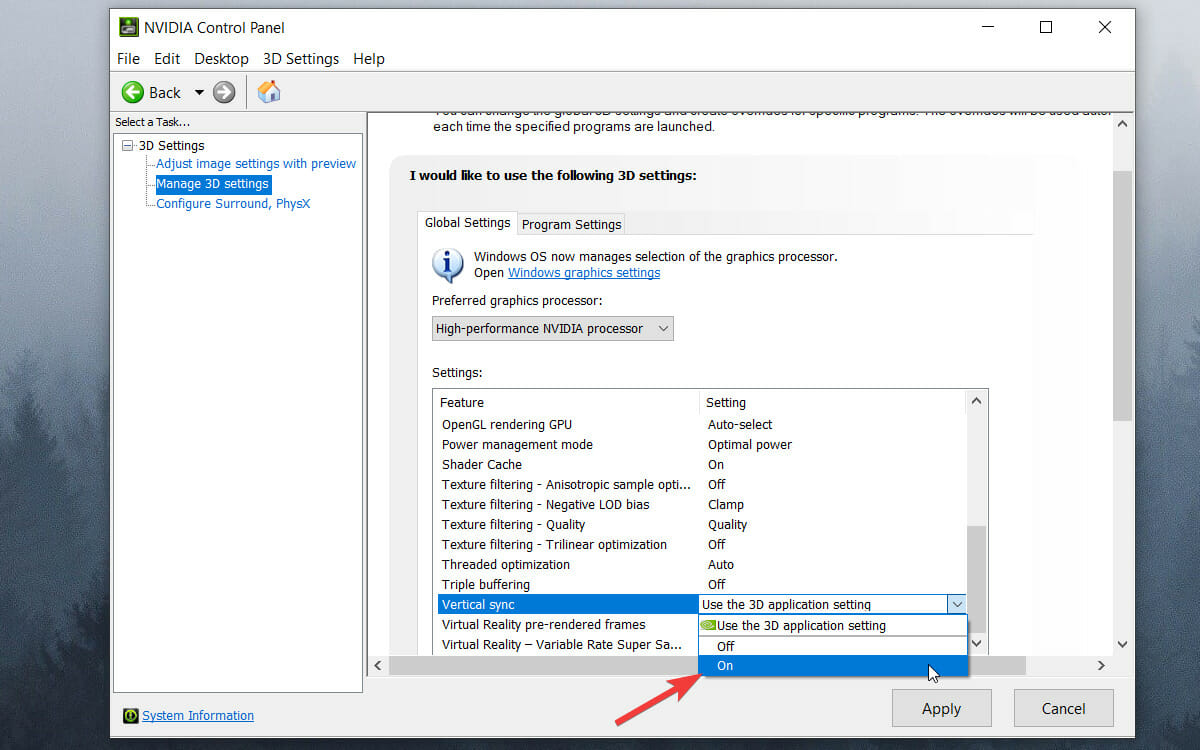
Choose On from the drop-down menu.
Press the Apply button.
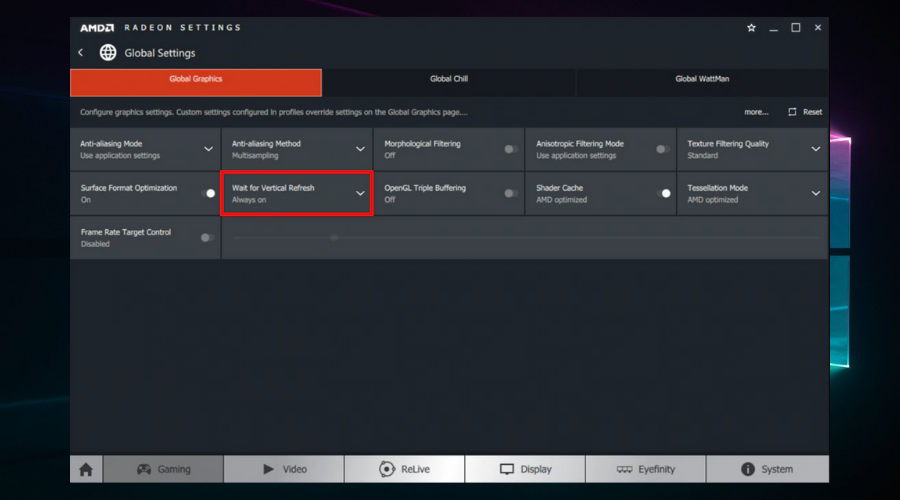
2. AMD graphics
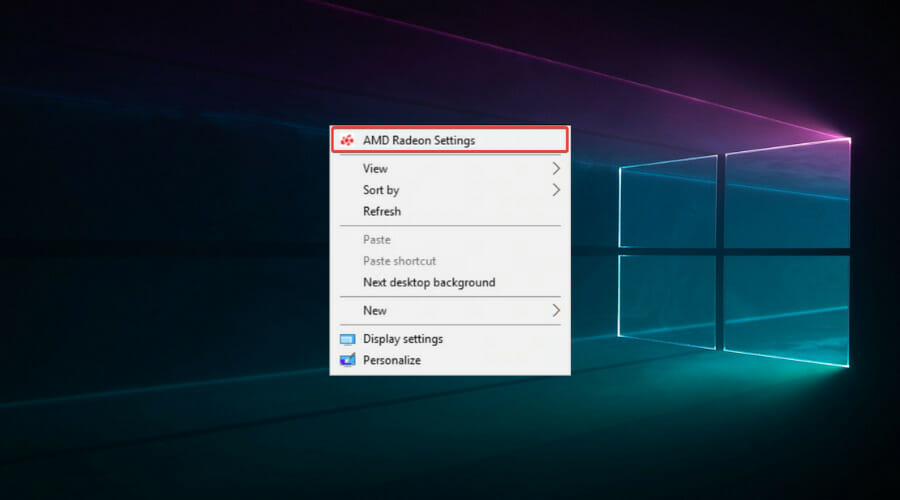
Right-click the desktop and select the AMD Radeon Settings option.
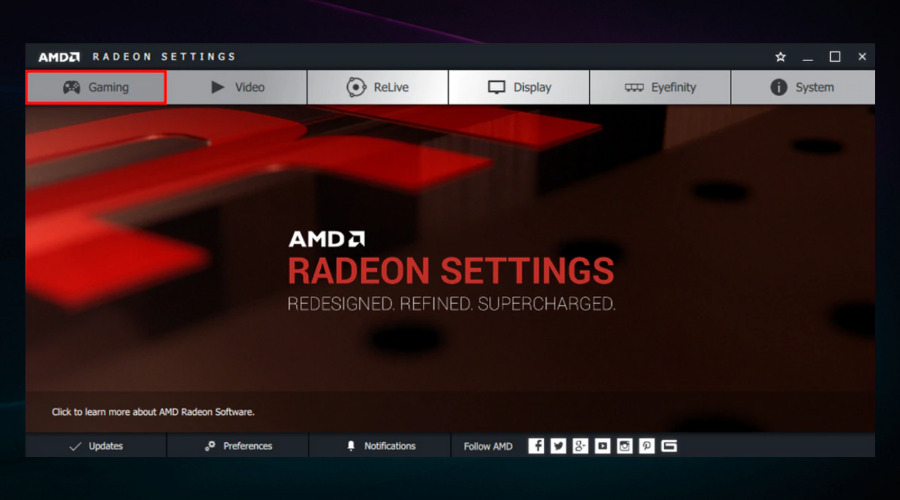
Click the Gaming tab.
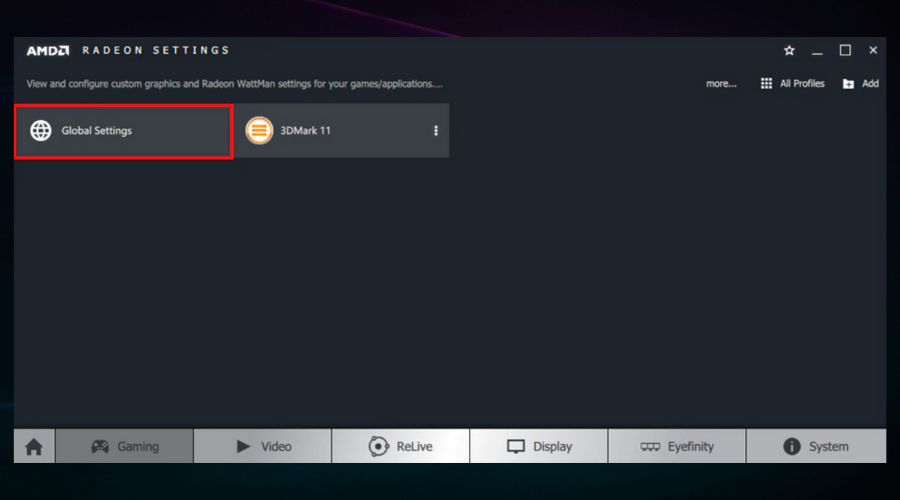
Choose Global Settings.
Click Wait for Vertical Refresh and select the Always on option.
What can I do to improve FPS with V-Sync enabled?
1. Update your graphics card driver
Press the Windows key + S, type in Device Manager, and hit Enter.
In the Device Manager window, locate and click on the Display adapters tab. Select your graphics card, right-click, and select Update driver.
In the next popup window, select Search automatically for updated driver software.
Close the Device Manager window and restart your PC.
2. Lower the resolution
Hit the Start menu icon and select Settings.
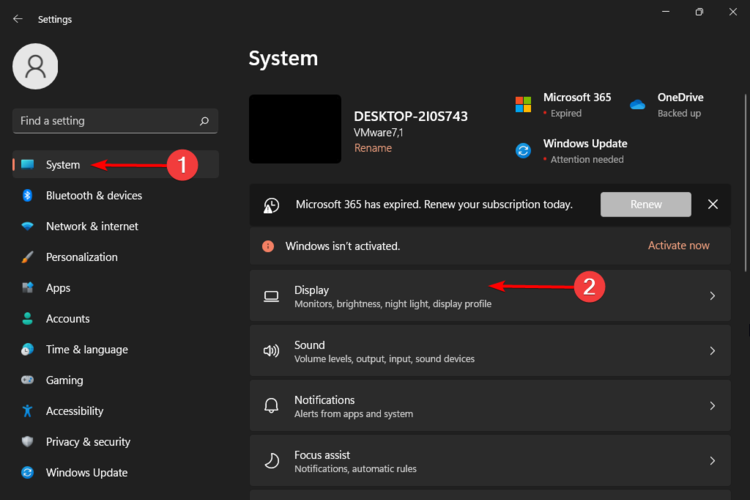
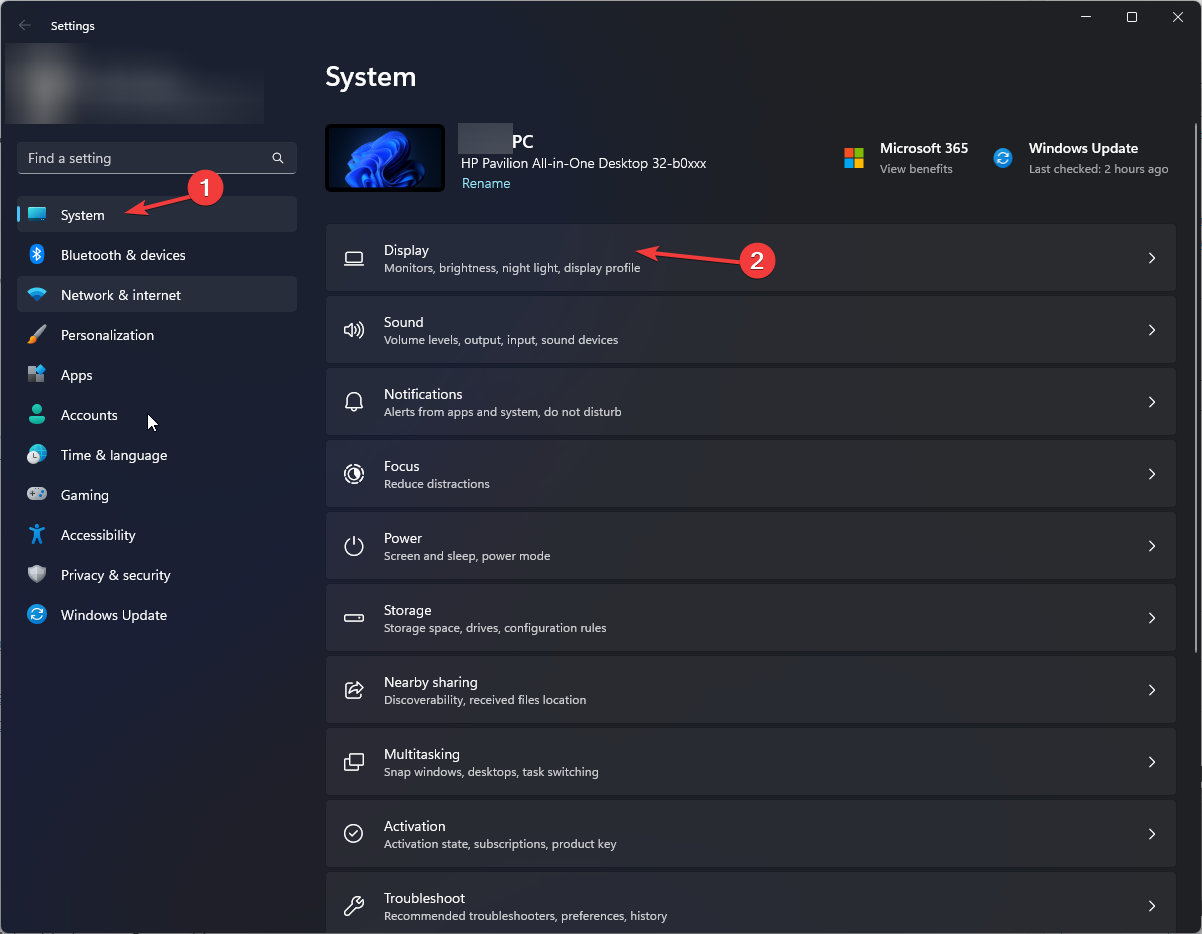
Click on System then select Display.
Navigate to the Scale & layout section then under Display resolution, click on the drop-down menu and pick a lower resolution setting than your current one.
The lower the resolution, the fewer the pixels that the GPU has to handle which in turn means less visual data to be processed hence higher FPS.
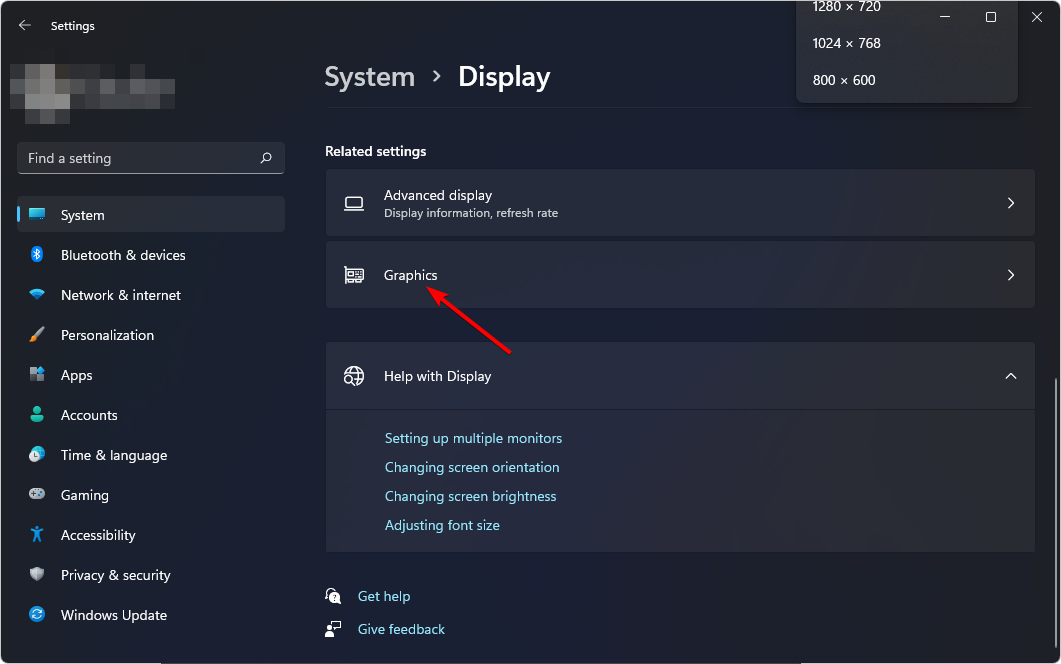
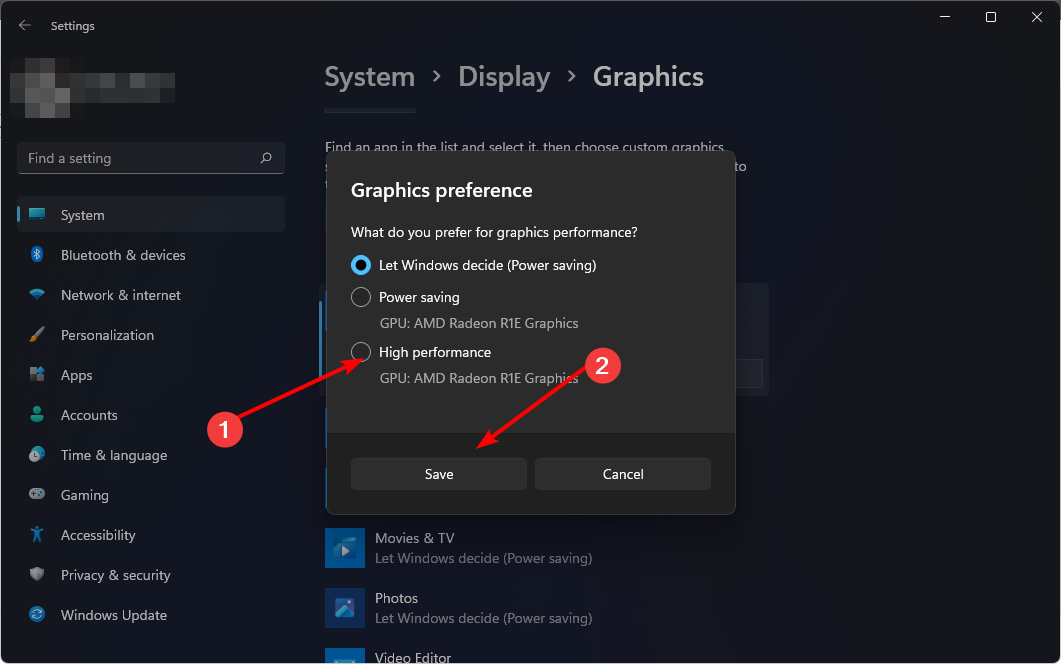
Click on System on the left pane then select Display.
Under Related settings, click on Graphics.
Select your game from the list, and click on Options.
Now, choose Let Windows decide and click Save.
Letting Windows decide your graphics preference will optimize your game as it will adjust based on your system resources and hardware capabilities.
A high-end GPU will probably go well with the high-performance setting while a lower-end or older hardware will go with power-saving mode so as not to put too much strain on your GPU by prioritizing frame rates over visuals.
In conclusion, V-Sync is not the enemy here. It does its job pretty well by improving your visual experience but if you don’t have the right hardware to match, you may experience more disadvantages than benefits.
Granted, you will experience reduced FPS in situations where your game exceeds your display’s refresh rate but you can always turn it off to accommodate such cases.
It’s all about understanding your gaming needs and hardware capabilities and then using V-Sync when it best suits the situation at hand.
If you’re looking to harness the power of real-time data in Excel, Microsoft Data Streamer is your go-to tool. This guide will walk you through setting up the Data Streamer add-in, connecting your microcontroller, troubleshooting common issues, and customizing settings for optimal performance.
How do I set up Microsoft Data Streamer for Excel?
1. Enabling the Data Streamer add-in
Start Excel by clicking on its icon.
Click on File in the top-left corner, then select Options from the dropdown menu.
In the Excel Options window, click on Add-Ins on the left pane.
At the bottom, you’ll see a box that says Manage. Choose COM Add-ins from the dropdown menu and click Go.
In the COM Add-ins dialog box, find Microsoft Data Streamer for Excel add-in. Check the box next to it and click OK.
Now, the Data Streamer tab should appear in your Excel ribbon, ready to help you connect live data to Excel.
2. Connecting a microcontroller to your PC
Make sure your microcontroller (like an Arduino or micro:bit) is correctly set up with the necessary code flashed onto it.
Use a USB cable to connect the microcontroller to a USB port on your Windows 10 or Windows 11 PC.
Start a new workbook or open an existing one in Excel.
Click on the Data Streamer tab in the Excel ribbon.
Within the Data Streamer tab, select Connect a Device. Choose the correct USB port (e.g., USB Port 5) your microcontroller is connected to.
By following these steps, real-time data from your microcontroller should now stream into Excel, allowing you to visualize and analyze it.
3. Troubleshooting Data Streamer connection issues
Check the serial data stream: Use a serial terminal program to ensure that your microcontroller is sending a valid CSV data stream via the USB port.
Verify the parameters: Double-check that all parameters for the serial data stream in the Data Streamer settings match those in your microcontroller’s code.
Reconnect the device: Go to the Data Streamer tab and attempt to reconnect your device by selecting Connect a Device and choosing the correct port.
Start Data Streaming: Click on Start Data in the Data Streamer tab to begin capturing the data stream into Excel.
If the data still isn’t captured, confirming the data’s validity using serial terminal programs can help pinpoint the issue. This ensures that the problem isn’t with your microcontroller’s setup.
4. Understanding the platform support
Windows Requirement: Note that the Data Streamer add-in is currently only supported on Windows versions of Excel, specifically Windows 10 and Windows 11.
Check your Office version: Ensure you have the latest version of Office 365 installed, as older versions may not include the Data Streamer add-in.
By knowing these limitations, you can avoid frustration if you’re attempting to use Data Streamer on unsupported platforms like macOS.
5. Advanced Data Streamer settings
Go to the Data Streamer tab and select Settings to adjust how data is displayed in your workbook.
For more detailed adjustments, use the Advanced Settings option within the same tab. This can include changing terminator characters for data streams or altering the data display configuration.
Customizing these settings allows you to configure the Data Streamer environment to better fit your specific data analysis needs.
By following these comprehensive steps, you can effectively set up and use Microsoft Data Streamer in Excel, making it easier to capture, visualize, and analyze real-time data from your microcontroller. Always keep your software updated and regularly check your connections to ensure smooth data streaming.
Presentations can be stressful enough without having to manually advance your slides. Luckily, PowerPoint offers several ways to automate this process, ensuring your presentation flows smoothly. Here’s how you can set up your PowerPoint slides to automatically advance with ease.
How do I set PowerPoint to auto advance slides?
1. Set up Auto Advance in PowerPoint desktop version
Launch the desktop version of PowerPoint.
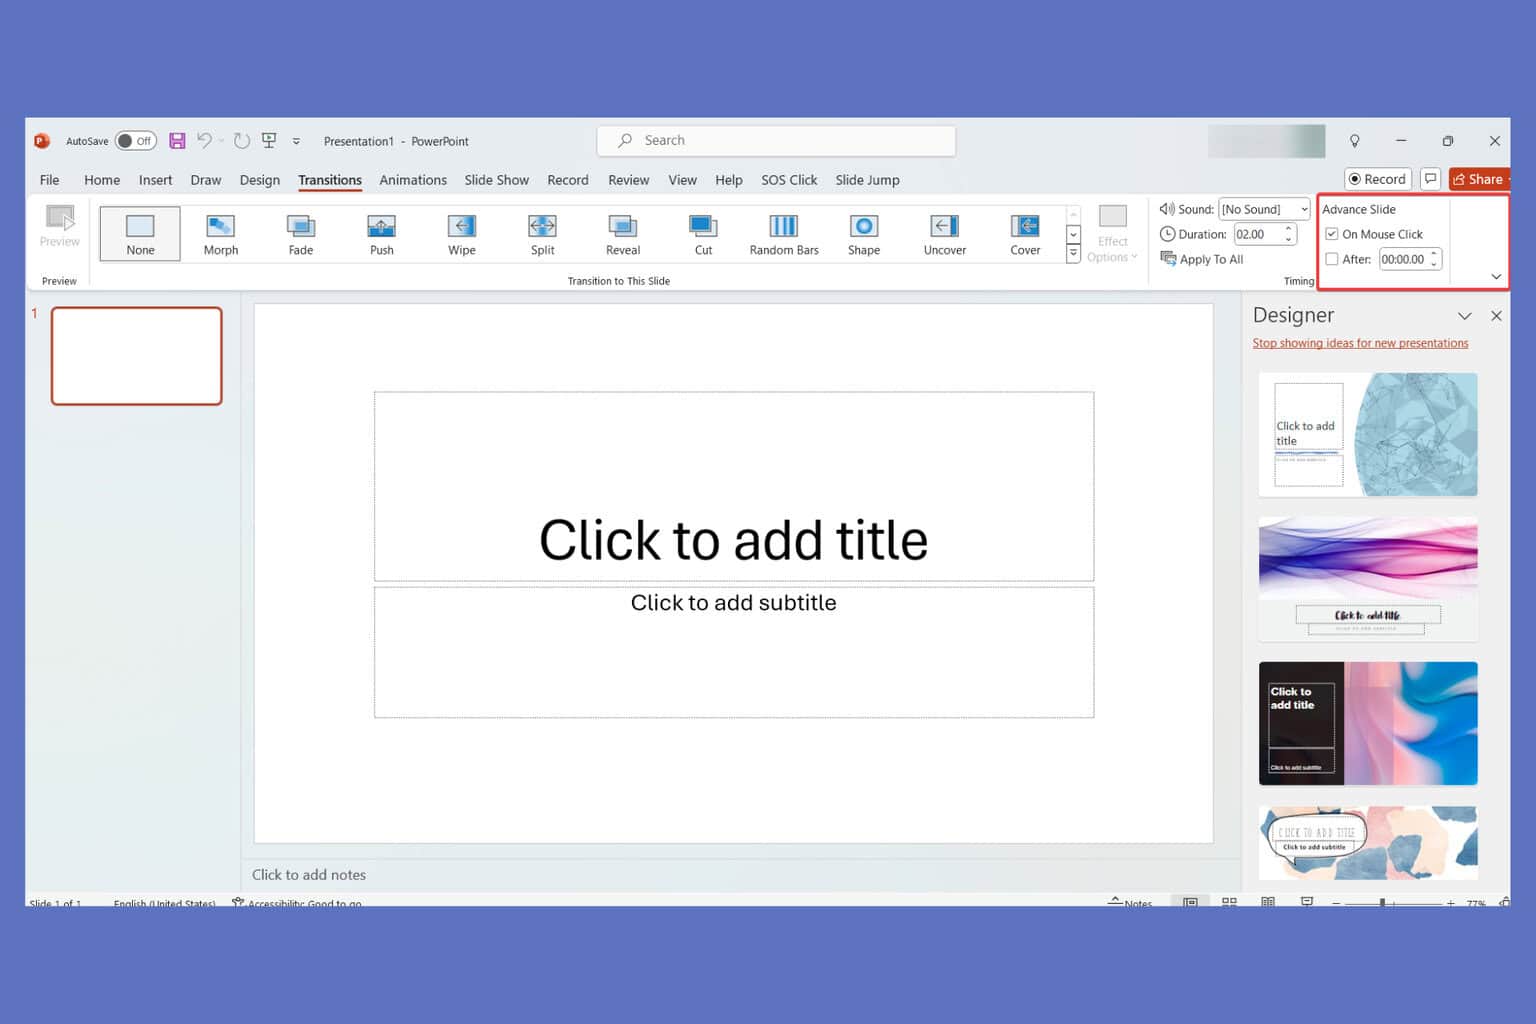
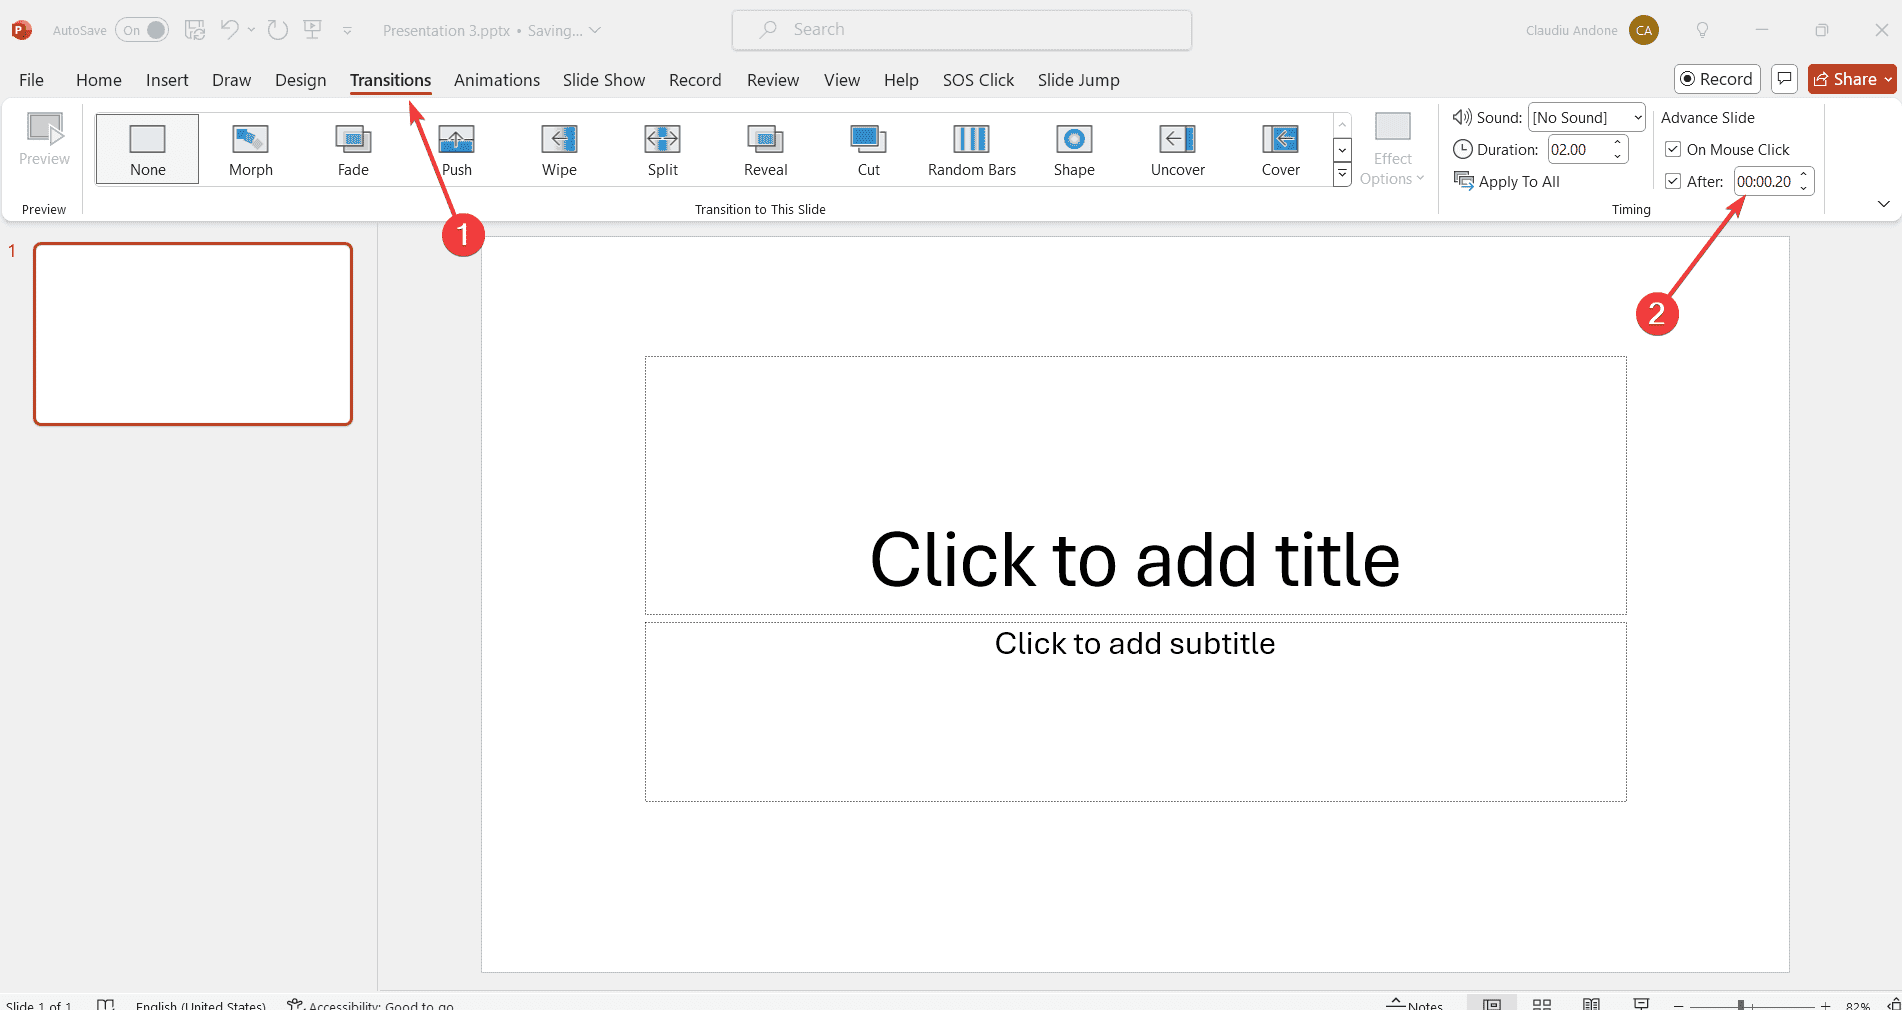
Click on the Transitions tab on the toolbar.
In the Timing group, click the checkbox next to After.
Enter the desired interval (e.g., 10 seconds).
Click Apply to All in the Timing group to ensure all slides will follow the same timing.
If you want to have different timing for each slide, follow the first 4 steps for each one.
Setting up auto advance in PowerPoint ensures your slides move on their own, perfect for a smooth, unattended presentation.
1. Rehearse and record slide timings
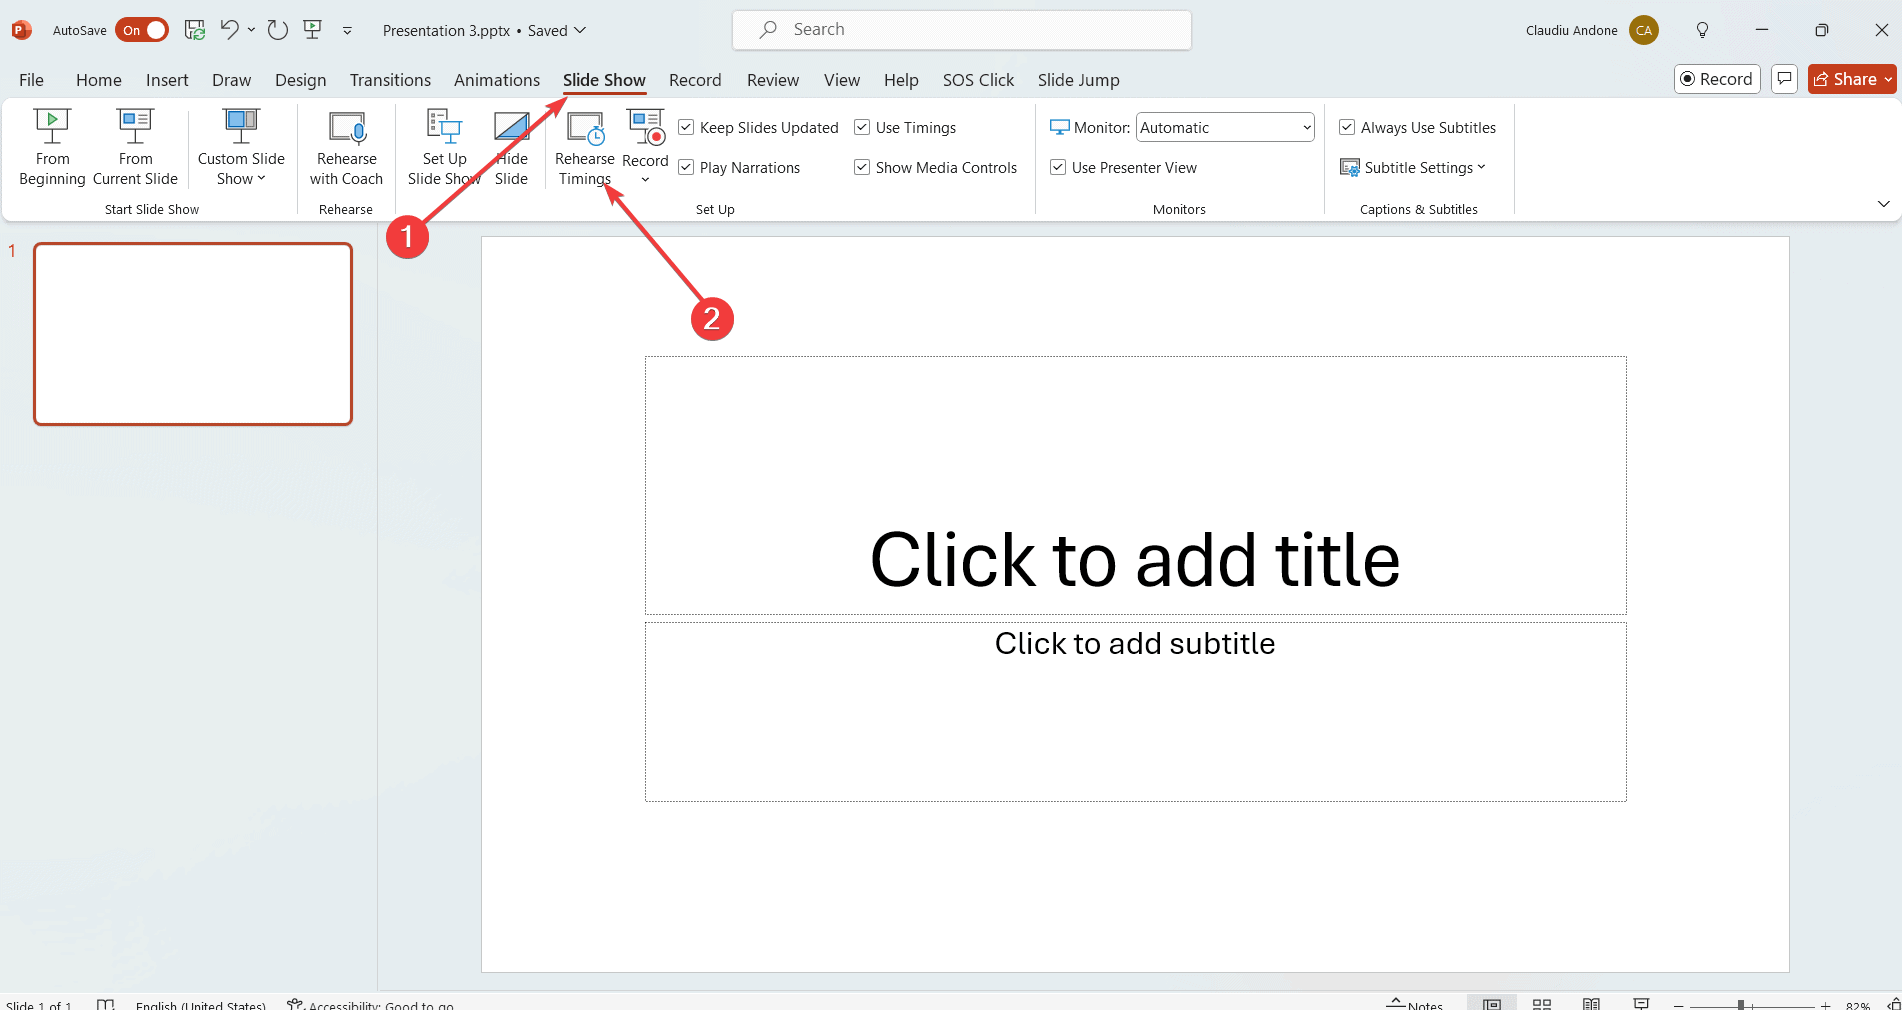
Click on the Slide Show tab.
Click Rehearse Timings. This will open a toolbar with options to play, pause, and record timings for each slide.
Play your presentation and set the timing for each slide by clicking Next to go to the next slide when you’re ready.
Pause and repeat as necessary until all timings are set.
Once done, you will be prompted to save the slide timings. Click Yes.
This method allows you to meticulously control how long each slide is shown, ensuring precise flow for your presentation.
3. Configure Slide Show to Loop
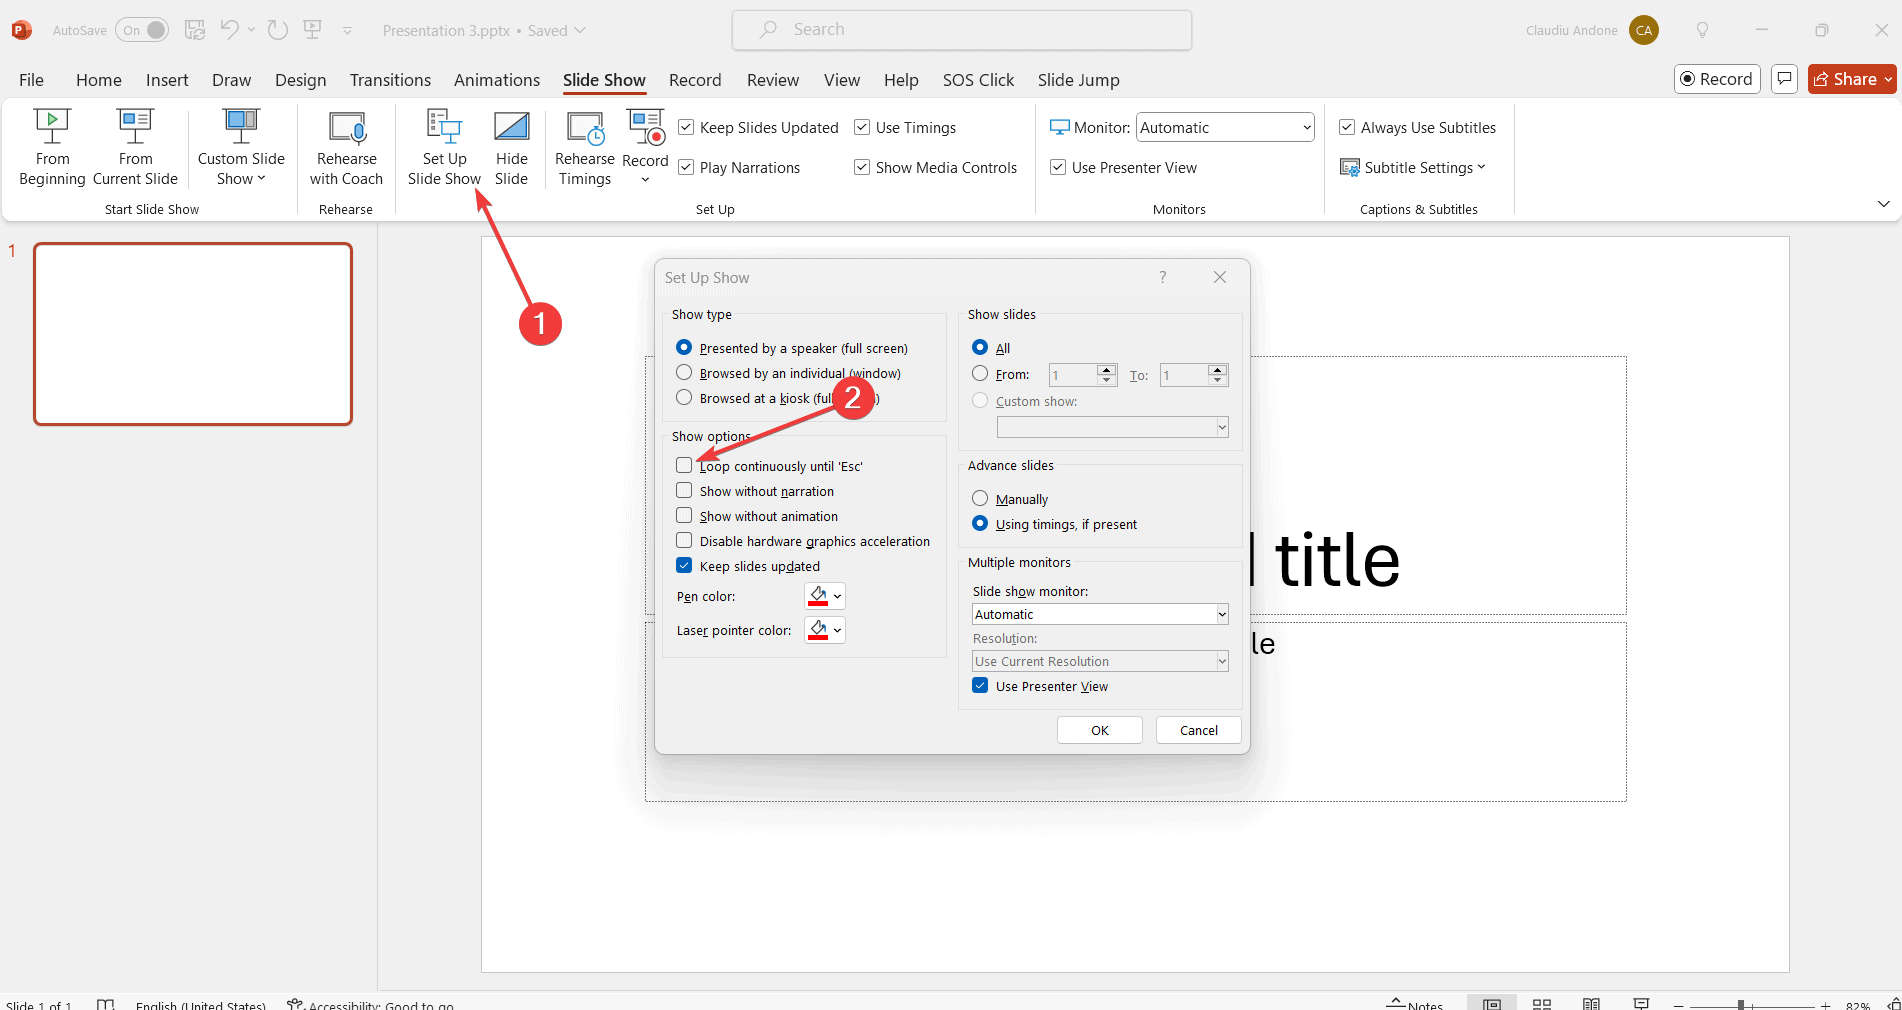
Go to the Slide Show tab.
In the Set Up group, click Set Up Slide Show.
Check Loop continuously until ‘Esc’ under the Show options section.
Click OK.
By configuring your slide show to loop, your presentation will continue to run seamlessly until manually stopped. This setting is ideal for trade shows or kiosks if you run a presentation without any input from anyone.
4. Export the presentation as a video
Click on File in the top-left corner and select Export.
Choose Create a Video and set the desired quality and timing for each slide.
Click Create Video and save it.
Exporting your presentation as a video guarantees that all timings are preserved and the presentation runs as intended on any device.
By following these steps, you can ensure your PowerPoint slides will advance automatically, creating a professional and smooth presentation experience. For future presentations, always rehearse and double-check your settings to avoid any last-minute hiccups.
Dealing with driver issues can be a real headache, especially when it comes to power management components like the ACPI ATK0110 driver. This guide will walk you through various methods to download and install the ATK0110 ACPI driver, ensuring your system runs smoothly.
How do I download the ACPI ATK0110 driver?
1. Install the driver from the ASUS support page
Open your web browser and navigate to the ASUS Support page. Select the desired type of device.
Select your device model. Navigate to the Driver & Utility section. Here you will see various driver categories.
Select your operating system from the dropdown menu to filter the drivers available.
Look for the Utilities section and find the ATK0110 ACPI driver.
Click the Download button next to the driver to download it.
Once the download is complete, open the downloaded file and follow the on-screen instructions to install the driver.
2. Manually the driver via Device Manager
Press Win + X and select Device Manager from the menu.
In Device Manager, locate the unknown device that needs the driver (usually listed under Other devices with a yellow exclamation mark).
Right-click on the unknown device and select Update Driver.
Choose Browse my computer for drivers and then click on Let me pick from a list of available drivers on my computer.
Scroll down and select System devices, then click Next.
Choose Have Disk… and then navigate to the folder where you downloaded the ATK0110 driver or the CD that came with your motherboard.
Select the INF file for the ATK0110 driver and click Open, then OK.
Follow the remaining on-screen instructions to complete the driver installation.
This process can be greatly simplified with the help of professional tools such as Fortect Driver Updater. This software is able to scan for missing or outdated drivers and replace them in just a few moments.
Open the Start Menu and type Windows Update in the search bar, then press Enter to open Windows Update settings.
Click on Check for updates. Windows will now search for available updates, including hardware drivers.
If a driver for ATK0110 is found, it will be listed under optional updates. Click on Advanced options and then Optional updates.
In the optional updates section, look for the ATK0110 ACPI utility and check the checkbox next to it.
Click Download and install to install the driver.
Keeping your drivers up-to-date is crucial for maintaining system stability and performance. Regularly check for updates and use trusted sources to download drivers to avoid potential issues.
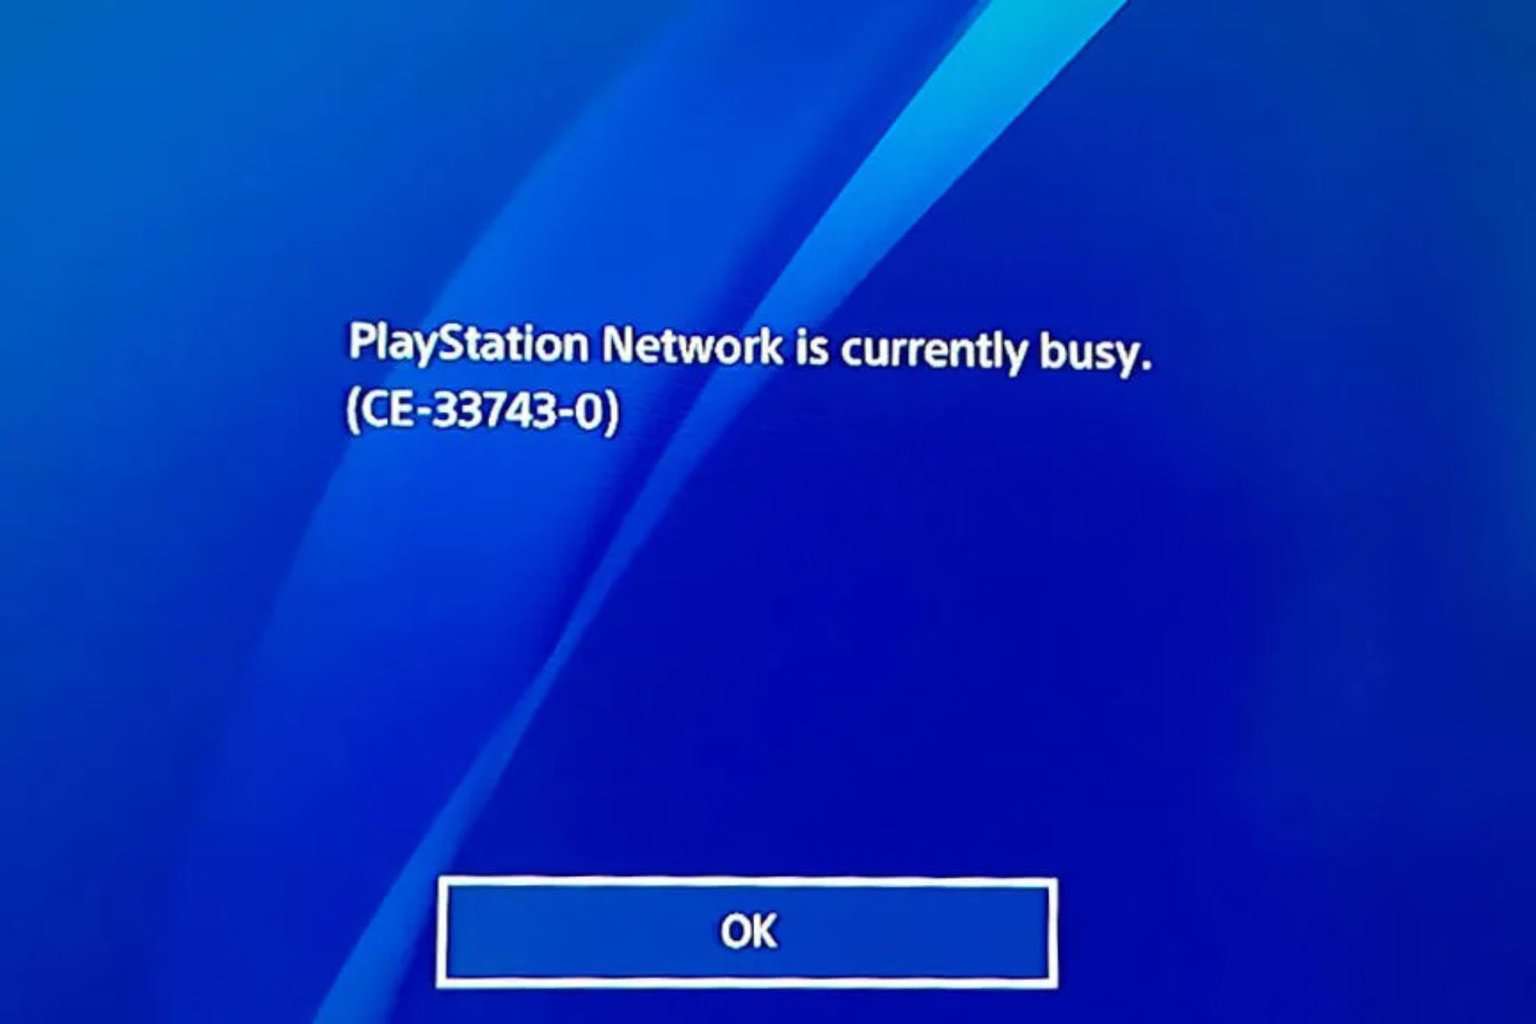
If you’re seeing error CE-33743-0 on your PlayStation, it means your console can’t connect to the internet or the PlayStation Network (PSN). This is usually caused by DNS settings, temporary network outages, or Wi-Fi instability.
This guide walks you through quick fixes and deeper troubleshooting steps to help you reconnect and get back online.
How do I fix the ce-33743-0 PlayStation network error?
Press the PS button on your controller and select the Power option.
Choose Restart PS4.
Once the console is rebooted, check if the error still shows up.
2. Test the console’s Internet connection
Select Settings from the console’s Home Menu.
Click on Network from the drop-down window.
Select Test Internet Connection and wait till the test completes.
Follow the on-screen instructions and check if the ce-33743-0 error persists.
3. Power cycle your router and re-enable the SSID broadcast
Switch off your router and disconnect it from its power source. This includes removing batteries if it uses any.
Wait a minute before hooking it up on power and switching it on again.
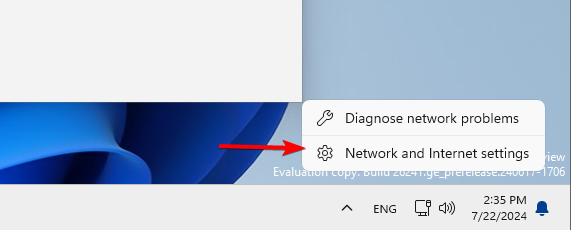
Right-click the network icon in your Taskbar and choose Network & Internet settings.
When the new window appears, click on Network and Sharing Center.
Network and Sharing Center window will now appear. Click on Set up a new connection or network.
Now select Manually connect to a wireless network and click Next.
Enter the required information such as Network name, Security type, and Security Key. Keep in mind that you need to enter the correct information or else you won’t be able to find and access your network.
Also, be sure to enable Connect even if the network is not broadcasting and Start this connection automatically options. Once you’re done, click Next to proceed.
Try connecting your PS4 with an ethernet cable this time around and see if it works.
4. Change DNS on the console
Go to Settings on the home screen.
Select Network.
Click Set Up Internet Connection.
Choose Wi-Fi or LAN Cable, depending on the option you are using.
Click Custom, choose Automatic for IP address settings, then choose Do Not Specify for DHCP host name.
On the DNS Settings screen, select Manual.
For Primary DNS, type 8.8.8.8, and for the Secondary DNS, type 8.8.4.4.
Once done, test the network connection.
It is possible that your current DNS is slow and hence any connection request is timed out. Changing to a more reliable DNS can improve the speed and reduce the latency hence minimizing connection errors like the wc-40383-8-ps4 error code.
Download the update file from the PS4 System Software Update page.
Connect the USB flash drive on your computer and press Windows + E to open File Explorer.
Navigate to the USB drive, click New, then Folder from the drop-down menu, and name it PS4.
Double-click the PS4 folder to open it, then click New Folder, and name it UPDATE.
Double-click the UPDATE folder and copy & paste the file you downloaded in the first step in the folder. Ensure the name of the file is PS4UPDATE.PUP
Go to the system tray, right-click the pen, and choose to Eject it safely.
Now plug the USB drive into your PS4 console.
Press and hold the power button, and release it after you hear a second beep to start the PS4 in safe mode.
Connect the DualShock 4 controller to the console with its USB cable, and press its PS pairing button.
Choose System Software Update.
Select Update from USB Storage Device, then click OK.
Choose Next to continue and follow the on-screen instructions to complete the process.
You may perform all these steps but the ce-33743-0 network error may still be persistent. If this is the case, there’s a high likelihood of it being a server error. You can get in touch with PlayStation support for further assistance.
6. Use a Mobile Hotspot to Bypass Local Network Issues
If your router or ISP is causing the problem, you can test with a mobile hotspot.
On your smartphone, enable Mobile Hotspot
Connect your PlayStation to it via Settings > Network > Set Up Internet Connection
Choose Wi-Fi > your phone’s network > enter password
If CE-33743-0 disappears, the issue is with your home internet, not the console.
7. Rebuild the Database in Safe Mode
This clears cached configuration issues that may block network access.
Turn off the PlayStation completely
Press and hold the Power button until you hear two beeps
Connect the controller via USB and press the PS button
Select Rebuild Database
This won’t delete games or saves, but it will refresh system data that could fix persistent PSN errors.
8. Disable IPv6 in Your Router Settings
Some routers create conflicts with PSN when IPv6 is enabled.
Log in to your router’s admin panel (typically 192.168.1.1 or 192.168.0.1)
Go to Advanced Settings or Internet Settings
Disable IPv6, keeping IPv4 active
Save and reboot your router
Every router interface is different, so consult your router manual if needed.
9. Place the Console in a DMZ Zone
This gives your console unrestricted access through the firewall.
Log in to your router settings
Locate the DMZ settings
Add your PlayStation’s IP address to the DMZ field
You can find the IP in Settings > Network > View Connection Status
Save and restart the router
While generally safe for consoles, avoid using DMZ on PCs or other sensitive devices.
10. Check PSN Status for Ongoing Outages
If the servers are down, no network fix on your end will work.
In future, to avoid such errors, ensure you regularly check for firmware updates, stay on top of scheduled maintenance and perform routine checks on your network status to ensure it is fast and stable.
Dealing with unexpected spaces between words in Microsoft Word is a common issue when you’re formatting the text. Fortunately, there are several effective solutions to tackle this issue and ensure your document looks just right.
How do I get rid of the space between words in Word?
1. Adjust font spacing
Highlight the text with the spacing problem.
Right-click the highlighted text and choose Font.
In the Font dialog box, go to the Advanced tab.
In the Spacing box, choose Condensed and enter a small value (like 0.1 pt) in the By field.
Click OK to apply the changes.
This solution tweaks the spacing between characters, which can help reduce large gaps between words. However, if you condense the text too much, you might see difference between the paragraphs you condensed and the others. The technique is great if you want to fit a paragraph within a certain space.
2. Check justification settings
Select the text with the spacing issues.
Go to the Home tab on the Ribbon.
Look at the paragraph alignment options in the Paragraph group.
Ensure the text is not set to Justify. If it is, change it to Left Align by clicking the left-align button or pressing Ctrl + L.
Switching from justified text to left-aligned text can help eliminate large gaps created by Word’s justification settings.
3. Optimize character positioning
Open the Word document where you are experiencing the issue.
Go to the File tab in the top-left corner and click on Options at the bottom.
In the Word Options dialog box, choose Advanced from the left-hand menu.
Scroll down to the Display section.
Check the box labeled Optimize character positioning for layout rather than readability.
Click OK to apply the changes.
This method helps by optimizing the spacing between words for layout purposes, ensuring your text looks consistent and more like it did in older versions of Word.
3. Adjust the header size
Open the Word document with the spacing issues.
Double-click the header area of your document to activate the header section.
Look for any text or objects (like page numbers) within the header that might be pushing your text down.
Drag the bottom line of the header upwards to decrease its size.
Click anywhere outside the header to save the changes.
By adjusting the header size, you allow more space on the page for your text, which can help eliminate unwanted gaps.
4. Cut and Paste with special formatting
Select the entire text of your document by pressing Ctrl + A.
Copy the selected text by pressing Ctrl + C.
Go to a new Word document.
Click on the Home tab, then click the arrow under the Paste button.
Choose Paste Special and select Formatted Text (RTF) or Unformatted Text.
Apply the necessary formatting to get your original look back if you chose Unformatted Text.
This process strips the original formatting that might be causing the issue and re-applies a cleaner format.
5. Use Find and Replace to adjust spaces
Press Ctrl + H to open the Find and Replace dialog box.
In the Find what field, press the Space bar twice.
Check the Use Wildcards box from the More section.
In the Replace with field, press the Space bar once.
Now click on Replace all.
If you have double spaces between any words, this will remove the extra space automatically.
By following these detailed and user-friendly instructions, you can easily remove unwanted spaces between words in your Word documents and ensure a clean, professional presentation of your text. Remember to regularly check your document settings to prevent such issues from recurring.
Creating different headers for each page on a Microsoft Word document can enhance its clarity, especially if you are working on complex reports, manuscripts, or other complex documents. In this guide, we will discuss the easy steps to set up a different header on each page in Microsoft Word; read on!
How can I create a different header on each page of Microsoft Word?
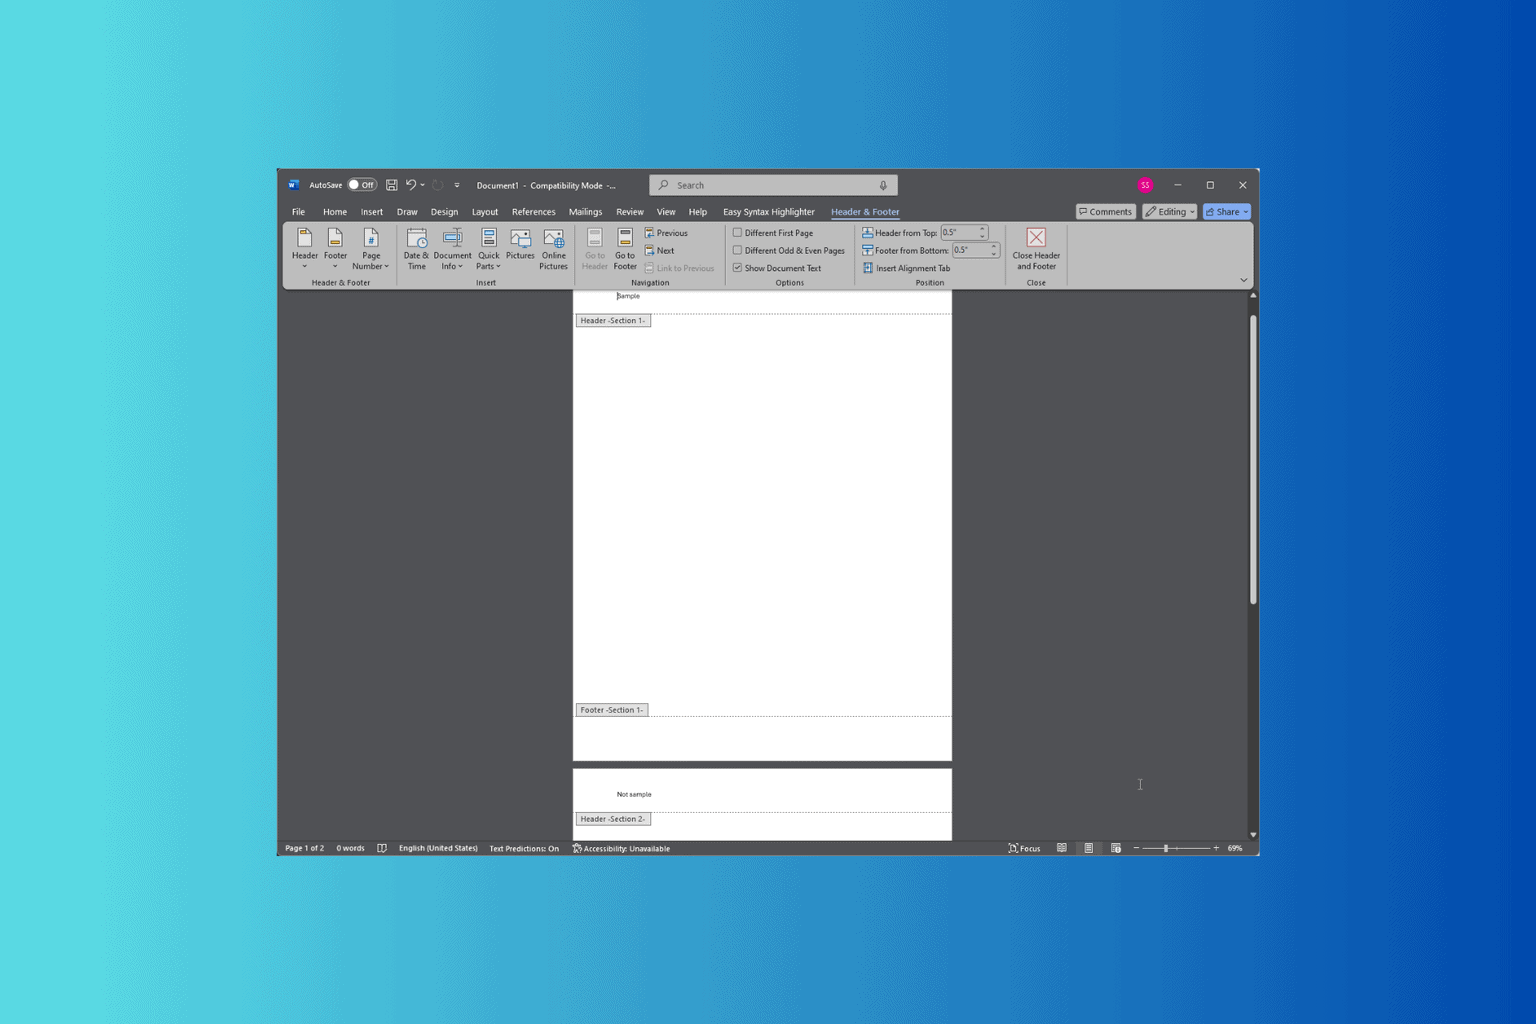
Launch Microsoft Word, and click New to create a new document.
On the document, go to the Insert tab in the main menu.
Under the Header & Footer section, click the Header drop-down and choose an appropriate one.
Now click in the body part of the document, and go to the Layout tab from the main menu.
Select Breaks to open the context menu, then from the drop-down menu, choose Next Page.
Now, go to the next page, double-click the header to open the Headers & Footers tab on the main menu, and click it.
Under Navigation, look for Link to Previous and click it to disable it.
Next, click Close Header and Footer. This will disconnect the header and you can rename it according to the context of your page.
Similarly, you can also have a different footer for each page in your Word document. All you need to do is double-click the Footer to select it, then follow the same process.
If you find your Microsoft Teams meeting’s background image boring, we have some good news. According to the latest entry in the Microsoft 365 Roadmap, the company will be enhanced to support custom background images for the new VDI solutions.
What does this mean? Well, you’ll be able to change your background with Teams virtual templates or have it branded with your company’s logo, especially if you have a Teams Premium license. But you can also replace the background entirely with any image you want by uploading it through the Video Effects and Settings option.
This way, you can personalize your Teams experience and make the meetings more bearable. Here’s what the entry says:
If users want to change what appears behind them in their video meeting or call, they can either blur their background, use Teams virtual background templates, or with a Teams Premium license, they can change their Teams meeting background to a branded logo or image specific to their company. With this new feature, now users on the new VDI solution for Teams can also replace their background entirely with any image they want by uploading it through the ‘Video effects and Settings’ option.
Speaking of personalizing the Teams experience, alongside choosing your own background image, Microsoft reportedly allows people to show/hide their Discover feed in the platform, meaning you’ll no longer have to be bombarded by content and tasks you don’t want to see.
Picture a world where transferring ownership of your high-tech gadgets, such as a smartphone or laptop, is as simple as passing over a physical key from one person to another. Microsoft appears poised to make this futuristic notion a reality with its new method, which essentially permits a computing device (imagine something like a system-on-a-chip) to be securely transferred from one owner to another through the magic of a security processor.
How does it work? In the recently published patent, Microsoft says the security processor becomes active when the device starts. It loads and runs a boot code that checks for an owner switch request. If this code confirms ownership transfer, it loads firmware authorized explicitly by the current owner.
When this firmware is executed, it tells the security processor to program a group of fuses with the public key belonging to the new owner. Moreover, it invalidates or renders useless the public key from the original owner to secure the transition.
Why is this important? In today’s digital era, it is crucial to guarantee computing devices’ security, mainly when switching from one person to another.
Old-fashioned methods of transferring ownership—such as just resetting a device—do not always fulfill the necessary security requirements. However, this new method adds an extra layer of protection, making it very difficult for attackers to take control of the device when transferring ownership. This method also removes the requirement of a big flash memory device to hold public keys, decreasing both the size and risk of attacks on the CPU.
If you purchase a used device, this technology ensures the device has been safely transferred to your possession. And if you are selling it, there is no need to worry about your data going into unauthorized hands.
Microsoft’s patent application concerns not only shifting possession but also making this process secure, effective, and unable to be tricked. This provides us with a vision of what the future could look like—one where transferring our digital belongings is as safe as doing so for physical items. Considering the Redmond-based tech giant is investing dozens of financial and human resources into cybersecurity, this device ownership technology would only strengthen the company’s ambition to offer the best security tools.
If you’re curious about how to get satellite view on Google Maps PC, you’re in the right place. Satellite view offers a unique way to explore the world from a bird’s-eye perspective. I’ll show you how to switch to it on Google Maps using your PC.
Tap the Layers button and select More from the options available.
Scroll down and tap Satellite under map type.
Your map will change to the Satellite view.
Zooming allows you to get a better view of the street. Use the mouse’s scroll button or the map’s “+” icon.
That’s it! Simple, right?
Exploring the world through Google Maps’ satellite view is both fun and informative. These steps will help you switch to satellite view and see detailed images of any place you’re interested in. Whether you’re planning a journey, researching a location, or just satisfying your curiosity, this feature offers a unique and engaging way to see the world.
For an even closer look at places, learn how to use Google Maps Street View to explore streets and landmarks in 360° detail right from your PC.
Now that you know how to view satellite images in Google Maps, why not try to add a location to Google Maps? It’s simpler than you think!
Converting ACCDB files to PDF can be a hassle, but with the right tools, it becomes a breeze. Whether you need to share your database content or simply want a more accessible format, this guide will walk you through several methods to convert ACCDB to PDF effortlessly.
How do I convert ACCDB to PDF?
1. Using Microsoft Access to print ACCDB as a PDF
Open Microsoft Access and load the ACCDB file you wish to convert.
In the Navigation Pane, click the report (or form) you wish to export to PDF.
Click the File tab in the Ribbon.
Select Save and Publish.
Under File Types, choose Save Object As.
Under Database File Types, choose PDF or XPS.
Click the Save As button and choose the location to save the PDF file.
2. Use virtual printer
Open the Microsoft Access database and load the ACCDB file.
Double-click on the type of object you want converted (e.g., Report).
Wait for the conversion process to complete; this may take a few moments depending on the size of your file.
Once the conversion is finished, the PDF version of your ACCDB file will be available for download.
Click on the Download button to save the converted PDF file to your device.
You can now open and view the converted PDF file using any PDF reader software.
By following these methods, you can easily convert your ACCDB files to PDF, making them more versatile and easier to share. To avoid future conversion hassles, consider regularly exporting your important ACCDB files to PDF.
Microsoft has just made a notable modification to its performance review system for workers. Engineers or executives are now required to consider security as one of their main focuses regarding these systems.
This transition is happening after different security events, which have shown that more robust protection from cyber dangers is needed.
Microsoft employees won’t have to worry only about coding or marketing. Their performance review also covers how well they integrate security into their everyday duties. This is very important because it impacts promotions, salary raises, and bonuses.
But what does this imply for technical personnel? It means that products should be secure from the beginning, incorporating security at the initial design stage and following best practices. For others, it is about maintaining a mentality of security first, being alert, and continuously seeking methods to improve their work’s security.
According to The Verge, Kathleen Hogan, Microsoft’s CPO (Chief People Officer), shared a note with all Microsoft employees letting them know their performance review will include a security check-up.
At Microsoft, we deliver mission-critical infrastructure that the world depends on to achieve more. With that trust in us comes a great responsibility: to protect our customers, our company, and our world from cyber threats. As Microsoft employees, we all have a role in that responsibility.
As Satya referenced in his May 3 email and again during his FY25 kick off on July 9, security is our number-one priority, and everyone at Microsoft will have security as a Core Priority. When faced with a tradeoff, the answer is clear and simple: security above all else. Our commitment to security is enduring. New and novel attacks will require us to continue to learn, innovate, and defend. Yet working together, we will make nonlinear improvements, stay alert, and meet the expectations of our customers. They are counting on us, and our future depends on their trust.
Our new Security Core Priority reinforces our commitment to security and holds us accountable for building secure products and services. It is now available in the Connect tool for most employees, and we are partnering with geo HR teams to expand access to all employees globally. The Security Core Priority is not a check-the-box compliance exercise; it is a way for every employee and manager to commit to—and be accountable for—prioritizing security, and a way for us to codify your contributions and to recognize you for your impact. We all must act with a security-first mindset, speak up, and proactively look for opportunities to ensure security in everything we do.
The core priority will have two parts:
Core and common elements that apply to all employees
An optional section for employees to further specify how they will activate the Security Core Priority based on their role, team, org, etc.
All employees will set their Security Core Priority as part their first FY25 Connect, with the intent that during regular Connect conversations, you and your manager will discuss your Security Core Priority progress and impact. This process will follow the same approach as our other company-wide core priorities for Diversity & Inclusion and Managers. You can learn more about the Security Core Priority here, including FAQs and Security Core Priority activation examples for three main types of roles: technical, customer and partner-facing, and all other roles.
As we kick off our 50th year as a company, I know we all feel honored and humbled that we are still here—as a relevant and consequential company—pursuing our mission together. When we empower every person and organization on the planet to achieve more, we take on society’s biggest challenges and empower the world. What a big, bold, and meaningful mission we have, and yet none of us can take this for granted. We are here because our customers trust us, and we must continue to earn their trust every day.
Thank you for your commitment to our Security Core Priority that will help protect Microsoft, our customers, and our partners.
Kathleen
This is not merely a check-the-box exercise. Microsoft is known in the tech industry as the top company with many security issues; in fact, the Redmond-based tech giant has been constantly criticized for not taking action sooner to prevent. Take, for example, the Black Basta incident.
So, why does this matter to you and me? In a world that depends increasingly on digital infrastructure, the safety of the products and services we use every day becomes paramount. Microsoft’s action marks an important progress towards making sure its offerings are as secure as possible.
The Microsoft Planner export to Excel feature lets you transfer tasks and projects to an Excel workbook for data analytics and visualization.
However, the Planner app offers limited options for charts and graphs for project data visualizations. So, you might need to analyze Microsoft Planner data in Excel for advanced analytics. Also, it’s the best way to migrate task boards to another project management tool.
I’ve tested the new and legacy apps to explore their export capabilities, so let’s have a look!
Microsoft Planner Export to Excel
You can try several methods:
Using the New App
Follow these steps:
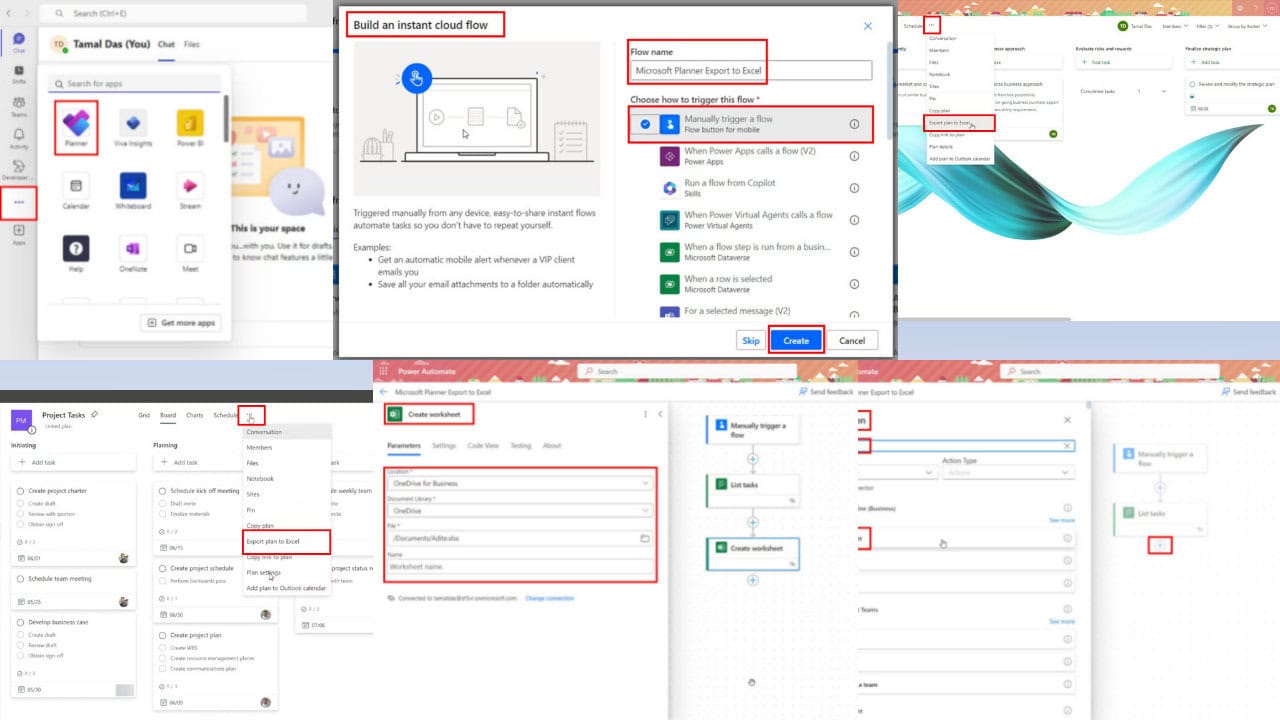
Open Teams and click on the View more apps icon on the left-side panel.
Select the Planner app icon on the menu that opens.
Choose a plan to export to Excel from the My Plans tab.
You should see the plan name on the top menubar.
Click on the plan name drop-down arrow and choose the Go to website option.
The Planner task board will open on Edge or Chrome browser.
Now, click on the three dots menu located on the toolbar of the selected task board, like Project Task in this example.
Select the Export plan to Excel option in the context menu that opens.
A Microsoft Excel workbook file will download onto your PC.
Open the file to access your Planner task board in Excel.
The file would contain most of the content of the imported project.
You’ll find separate columns for Task ID, Task Name, Bucket Name, Progress, Created By, and so on.
The above columns should be available in the first worksheet, named Tasks.
If you go to the second worksheet, named Plan name, you’ll find the plan details, date of import, plan ID, etc.
A big drawback of this method is that you can’t apply a filter to the Planner task board to narrow down the content for exporting. It’ll send the whole project board without the filter.
Also, if you’re using an unpaid or free version of Planner, you might not see the Go to website option on the Planner Teams app. You’ll have to use the legacy Microsoft Planner tool.
Pick the Manually trigger a flow option for the Choose how to trigger this flow field.
Click on the Create button to enter the Power Automate designer canvas.
Click on the plus icon below the Manually trigger a flow action.
Click the Add an action button.
On the left side, the Add an action panel will show up.
There, type Planner list tasks.
When results pop up, select the List tasks option.
Enter the appropriate data for the List tasks parameters:
Group Id: The main group under which you created the plan, like Test 1 in this case.
Plan Id: Choose a plan from the group, like Business.
Click on the plus icon below List tasks on the canvas.
Select Add an action.
On the Add an action navigation panel, search Create worksheet.
Choose the Create worksheet connector for Excel Online (Business).
For the Create worksheet action, you must define the following parameters:
Location: OneDrive for Business.
Document Library: OneDrive.
File: Choose an existing Excel online template for worksheet creation.
Name: Enter a name for the new worksheet.
Click Save on the top menubar of Power Automate canvas.
Select Test to start testing the flow.
On the Test Flow navigation panel, select Manually and click on the Test button at the bottom.
Click Continue on the Run flow navigation panel.
Finally hit the Run Flow button.
You’ll see green tick marks on each action if the flow is successful.
Open the Excel online file from your OneDrive for Business profile to get the task details in columns and rows.
You can now download this Excel worksheet from the File tab > Export > Download this sheet as CSV (.csv).
The flow might not work if you choose incorrect actions or permissions:
Selecting Excel Online instead of Excel Online (Business).
You’re logged into different MSFT emails for the Planner, PowerAutomate, and Excel Online.
Summary
So far, you’ve learned three different methods to use the Microsoft Planner export to Excel feature.
If you occasionally export Planner data to Excel, you can use the manual methods for the new and legacy Planner app.
Contrarily, if you frequently do this, you can use Power Automate-based automation. You can also learn how to create a Gantt chart.
Did the article help you to seamlessly export Microsoft Planner data to Excel? You can let us know by commenting below. If you know a better method, feel free to share!
If your Firefox search bar is not working, it can be incredibly frustrating, especially when you rely on it for quick searches. Don’t worry, though – we got you covered with some easy troubleshooting steps to get it back up and running.
Why can’t I search for anything in Firefox?
This usually happens due to hidden settings or problems with extensions.
What can I do if the Firefox search bar not working?
1. Adjust the about:config preferences
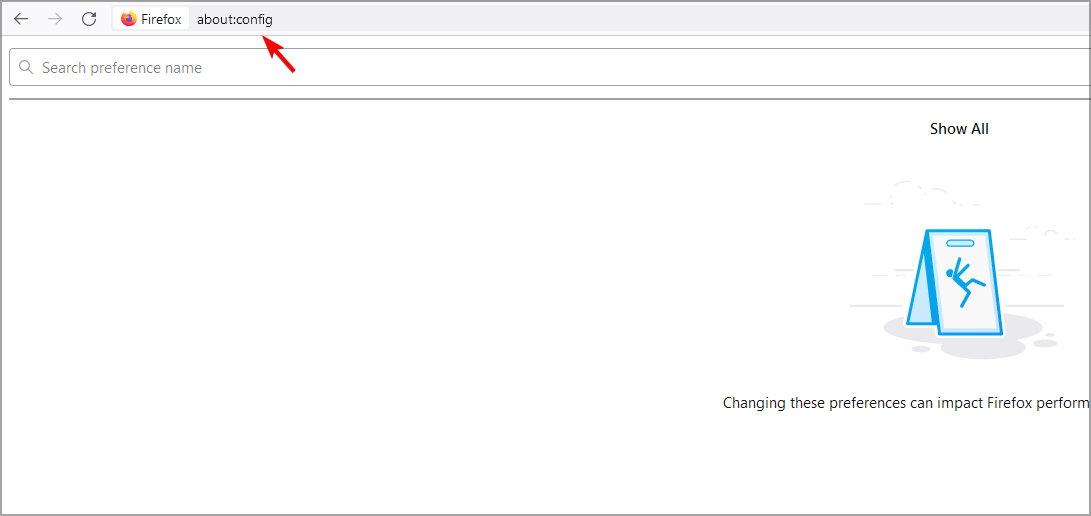
Open a new tab in Firefox and type about:config in the address bar, then press Enter.
Click the button that says Accept the Risk and Continue.
In the search box on the page, type handoff and pause while the list is filtered. Double-click the browser.newtabpage.activity-stream.improvesearch.handoffToAwesomebar preference to switch the value from true to false.
If that doesn’t work, in the search box, type keyword.enabled and set it to false.
2. Start Firefox in Troubleshoot mode
Open Firefox and click the menu button (three horizontal lines) in the upper-right corner.
Select Help and then click on Troubleshoot mode.
A confirmation message will appear. Click Restart.
In the dialog that appears, click Start in Troubleshoot mode.
By starting Firefox in Safe Mode, you can determine if an extension is causing your search bar issues. If the search bar works in Safe Mode, you can identify and disable the problematic extension.
3. Disable AdBlocker ultimate extension
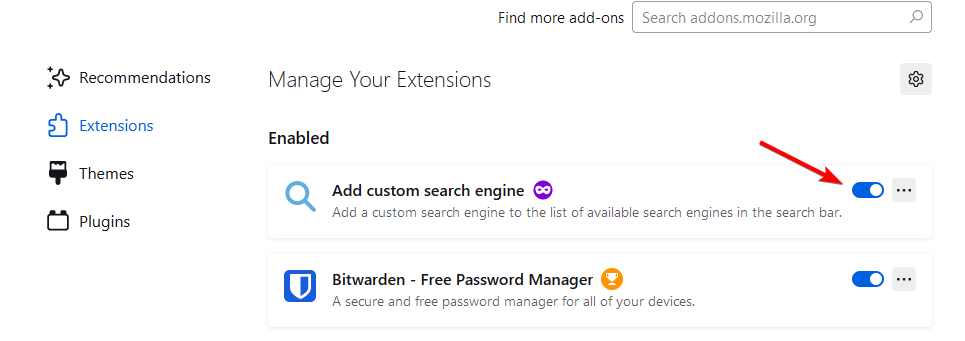
Click the menu button (three horizontal lines) and choose Add-ons and themes.
Click on Extensions in the left sidebar.
Find the AdBlocker Ultimate extension and toggle the switch to disable it.
Other extensions can cause this issue as well, so try disabling all of them.
Getting Zoom to work within a Virtual Desktop Infrastructure (VDI) can be a bit daunting, but it doesn’t have to be. Whether you’re on Windows, Mac, or using Citrix Workspace, this guide will walk you through the effortless download and installation of the Zoom VDI Plugin.
How do I download and install the VDI plugin for Zoom?
On the download page, locate and click on the right plugin for your system. In our case, the Windows Universal Plugin.
Once the download is complete, double-click the downloaded file, usually named something like ZoomVDIUniversalPluginx64.msi.
Click through the installation prompts, accepting the terms and conditions and following any on-screen instructions.
After the installation is complete, restart your computer to apply the changes.
Installing the Zoom VDI plugin will allow you to use Zoom within a Virtual Desktop Infrastructure (VDI), improving your video, audio, and screen sharing experience.
2. Downloading the Zoom VDI Plugin on Mac
Open your web browser and go to the Zoom VDI Plugin download page (the same link as for the previous solution).
On the download page, locate and click on the Download Zoom plugin for MAC link (ensure your macOS is 10.15 or later).
Once the download is complete, double-click the downloaded file, usually named something like ZoomVDIUniversalPlugin.dmg.
Click through the installation prompts, accepting the terms and conditions and following any on-screen instructions.
After the installation is complete, restart your computer to apply the changes.
By installing the Zoom VDI plugin on your Mac, you ensure that Zoom runs smoothly within a Virtual Desktop Infrastructure, enhancing your virtual meeting experience.
3. Installing the Zoom plugin with PCoIP software client
First, ensure you have administrator privileges and that the Zoom VDI Client is already installed on the agent machine.
Access the VDI releases and downloads page in your web browser and download the ZoomVDIUniversalPlugin.msi file.
Ensure that any PCoIP session is disconnected and quit the Software Client.
Double-click the downloaded installer to start the installation. Select Custom installation type and check the HP Anyware Plugin box.
Complete the installation by following the steps in the installation wizard.
Installing the Zoom Plugin with PCoIP Software Client ensures enhanced audio and video synchronization for virtual meetings within the VDI environment.
How do I ensure plugin compatibility and manage updates?
Periodically visit the Zoom VDI Plugin download page or use the SupportAssist feature to check for the latest driver updates.
Ensure the Zoom Plugin version matches the Zoom VDI Client version on the agent machine for optimal performance.
Download the latest compatible Zoom VDI Plugin version from the release notes or support page.
Follow the installation instructions for your specific operating system and restart your computer after installation.
Keeping your Zoom VDI Plugin up-to-date ensures compatibility with the VDI Client and optimal performance for your Zoom meetings.
By following these steps, you can ensure a smooth and efficient installation of the Zoom VDI Plugin, enhancing your virtual meeting experience. Remember to periodically check for updates to keep your plugin and client in sync for the best performance.
Hopefully, you managed to install the Zoom VDI plugin and everything is fine. Head over to the comments section below if you want to ask any questions.
A while ago, Microsoft wanted to release a special operating system called Midori. It wasn’t just any project; this new OS could run millions of Windows apps without relying on old Windows code, meaning that, ultimately, it could have become a reliable alternative to Windows.
This project, which had been running for some years, was officially discontinued by Microsoft in 2015. Microsoft chose to incorporate the knowledge and understanding gained from Midori into other software endeavors.
Not long ago, hidden videos from 2013 emerged thanks to WalkingCat, a famous tech enthusiast known for leaking Microsoft secrets. These videos were from a private Microsoft gathering, and they gave us an unusual look at Midori OS’s objectives and growth.
so its weekend again! today let's hear a young @funcOfJoe from 2013 talk about The Midori Operating System ! 1, Project Overview pic.twitter.com/gpUWeaZ3oV
The videos showed Joe Duffy, who was part of the Midori team and is now the creator of the software company Pulumi. He gave us an understanding of how Midori came into being, focusing on its design from scratch and compatibility goals.
Even though it was canceled, Microsoft continues to make Midori-like advancements in its operating system, Windows 11. They have been putting efforts into enhancing Windows 11 Arm OS, which is specially made for Qualcomm’s Snapdragon X processors.
But why did Microsoft end Midori? The official statement was to use the knowledge from this project in other places, yet it is difficult not to think about how much effect Midori might have had on the technology world.
The videos being released now don’t just reveal an exciting part of Microsoft’s past; they also make us wonder about what might have happened. In this way, as Microsoft keeps moving ahead, the mark of Midori remains like a symbol showing how the company is ready to examine new possibilities and create fresh things while also being prepared to release them.
Days after teasing Windows on Arm users with the possibility of accessing Illustrator, Adobe has made a giant leap by allowing Premiere Pro to run on Arm gadgets. This step opens up new opportunities for people using ARM-based Windows computers like those with Snapdragon X series chips.
However, unlike Photoshop and Illustrator, Premiere Pro, which has become ARM-native, runs through Microsoft’s emulation layer. This point might surprise some because emulation could affect performance compared to the native operations of Intel or AMD systems.
Adobe planned to release an ARM-native version of Premiere Pro in July, but the schedule changed, and users still have to use the emulated version.
It’s worth noting that running Premiere Pro on ARM-based Windows devices was impossible before this. For people who are ready to try it out, installing Premiere Pro is simple and can be done through the Creative Cloud app if a subscription is available.
According to reports, however, Premiere Pro does an average job when run on Snapdragon X-based PCs. This would be good enough for tasks that aren’t very demanding. For more powerful editing, the newest beta of DaVinci Resolve, which is entirely ARM-native, might work better.
Available in black or silver, the Innocn 32M2V is a 32-inch widescreen 4K MiniLED gaming monitor, capable of HDR1000 and 144Hz. At $800 on Amazon, it offers great value for money and a fantastic set of features.
All about the Innocn 32M2V MiniLED gaming monitor
The Innocn 32M2V offers incredible contrast and black levels thanks to local dimming, while the increased number of LEDs results in higher peak brightness, making this a fantastic for HDR content—both movies and gaming.
Although some will argue the image quality isn’t as good as OLED—notably, black levels aren’t as true black—the key difference is that MiniLED monitors don’t suffer from burn-in, where part of the image is permanently burnt into the display. For me, that longevity is certainly worth any tradeoff.
Who is Innocn?
Operating now for around a decade, Innocn started out making generic monitors for other companies to rebrand, but soon realized they could offer better value by marketing directly to consumers. Over the past few years, I’ve had the pleasure of testing their monitors, and I’ve never been disappointed by the quality or value offered.
I was already using an Innocn monitor prior to this review as my daily driver, happily spending upwards of eight hours a day staring at it. I can’t offer higher praise than that.
First impressions
The design is a bit generic. You get a few degrees of tilt and a few inches of vertical adjustment, but nothing crazy; you can’t spin it around to use it vertically.
There’s about half an inch of black bezel on the top and sides, and an inch on the bottom, so it’s it’s not an edge-to-edge display. The base is large and sturdy, so there are no issues with stability.
There are also four LED panels on the back—one in each corner. You can adjust the color, make them flash, or just disable them completely from the Game section on the menu. They don’t reflect on-screen content.
Once you turn the Innocn 32M2V on it’ll blow you away—quite literally in the case of the PS5 peak white HDR adjustment screen. My eyes were not ready for that level of blinding. It’s clear from the offset that sharpness, brightness, and vivid colors are unmatched.
If I’m honest, I was a little skeptical coming into this review. I didn’t think MiniLED was worth that much of a fuss about. Now I’ll find it hard to go back to a regular LCD.
Content testing and HDR
Most of my testing was done on Windows 10, though I also used it as my Mac desktop for a week.
I started testing with HDR—both movies and gaming—from within Windows. Anything I threw at it looked stunning, with neon colors that popped and incredible contrast. Of course, that assumes you have the power to run games at 4K HDR and a decent refresh; I don’t, and the stutter was unbearable in Cyberpunk 2077 on my lowly RTX3060. I had to drop it to 1440p just to get a solid 45fps, but it still looked sharp. Your experience may vary.
While I wouldn’t watch a movie sitting at my desktop, if your living situation doesn’t allow room for a big TV or home cinema, then you won’t be disappointed by watching movies on this.
I tried the same content again with HDR disabled, and frankly, I preferred it. Colors felt more saturated—perhaps oversaturated—but that sutis my preference, and can of course, be adjusted.
Unlike a lot of monitors which use jargon like HDR 600, without any real certification behind them, the Innocn 32M2V has a VESA-Certified DisplayHDR 1000 rating, which means it’s capable of 1000 nits of peak brightness, and has been tested in a standardised way.
Eizo testing
I ran it through a standard battery of Eizo tests and while most of the tests were as expected, when looking at the 256-level black to white gradient, there were clear inaccuracies or variations in the mid-grey lines.
It wasn’t as smooth a transition, appearing to brighten and darken from one strip to the next. I should note however that this is an artificial test and that in actual daily use, I didn’t notice it.
Connectivity
A stingy number of ports is always frustrating, especially on a monitor that’s so capable, so thankfully you won’t be disappointed on that front. The Innocn 32M2V features USB-C with 90W of power delivery, so a single cable can connect and charge most laptops and portable gaming systems like the SteamDeck.
In addition, you’ll find a single DisplayPort 1.4 for 144Hz full 4K gaming, two full bandwidth HDMI 2.1 ports, and a couple of USB-A ports for accessories (you’ll need to use the USB-B connector port for these to function, they don’t connect to the USB-C device).
In the box you get a generous selection of USB-C to C cable, USB-A to B, DisplayPort, and an HDMI cable. The stand and base are separate, requiring a little assembly, but nothing you couldn’t handle alone.
Resolution and pixel density
At 32 inches, the 4K resolution produces a pixel density of 140DPI for incredibly sharp details; you won’t see any pixelation. It’s a Goldilocks size for desktop and gaming use. I’ve had comically bigger screens and ultra-widescreens, and while they have their place, 32 inches means you can have the entire screen within your field of view at all times, no matter how close you want to sit, which is not true with anything bigger or wider.
The underlying panel here is an AU Optronics IPS, a similar one to the one used in the $3000 ASUS PG32UQX.
LED, Mini LED, LCD, OLED… what does it all mean?
LED and LCD aren’t all that different. In fact, it’s more appropriately called LED backlit LCD versus a CCFL cold cathode fluorescent panel backlit LCD.
LED and LCD monitors use basically the same LCD as the front layer—the bit that makes details—although nowadays it’s called IPS, which is a just type of LCD. The difference between LED and LCD is mostly in the lighting technology. While old-school LCD panels use a fluorescent panel combined with a mask, some LED monitors use a matrix of LEDs to make light. This means they have something called local dimming, so you can separately control the brightness on different parts of the image.
Mini LED is the evolution of LED backlighting, and as the name suggests, it uses a smaller matrix of LEDs, giving better brightness and finer control of the contrast. Specifically the FALD (full-array local dimming) in the Innocn 32M2V has 1,152 lighting zones. That’s about to about 7,000 pixels per lighting zone
Local dimming must be enabled before use through the menu system; it’s not on by default. In some scenes, local dimming is known to create a blooming or halo effect, which is more noticeable when looking on from the sides than head-on.
If you have a large zone of bright colors, it looks stunning and really makes them pop out compared to darker areas of the image. But if you have small points of light it can lead to that brightness zone spreading to the surrounding pixels.
OLED screens don’t suffer from blooming because each pixel provides its own light, without requiring a rear light source. They offer the ultimate in local dimming, and that’s why their black levels are deeper.
That said, I ran some local dimming stress test videos at night, and for the most part, with a line or single point on the screen, I couldn’t see what the fuss was about. It was only during a cloud of stars—tiny white dots everywhere—that it was painfully obvious, like a murky grey cloud. But outside of this one very specific circumstance, I’m not sure it would be noticeable.
Colors
While I don’t have a colorimeter to confirm any accuracy, I can tell you by the data they quote, and with each purchase, Innocn includes their own lab test results. The 32M2V uses an A+ rated IPS panel offering 99% of DCI-P3, 100% sRGB, and 99% of the Adobe RGB color range, with a maximum delta E of 2—though in most results, a lot less (closer to 0 is better; a score of 100 would mean the colors displayed are the complete opposite of what they should be).
Other gaming features
The 32M2V supports Ultrafast pixel refresh mode, which can result in a little ghosting, especially when combined with Adaptive Sync (NVIDIA GSync and AMD FreeSync). Both must be enabled from the menu before use.
Though I assume Windows will be your primary gaming platform, I also tried with the SteamDeck and can confirm it works seamlessly; the Power Delivery keeps your deck charged, and the video stream switches on instantly. Of course, the resolution is quite blocky because of the SteamDeck processing power, but that’s to be expected.
I also tried a PlayStation 5 with HDR enabled, and the spell effects in Hogwarts Legacy were as stunning as expected. However, the system is limited to 4KHDR 60Hz, not VRR or 120Hz. That’s not uncommon for PC monitors, and I’ve yet to come across one that did support higher outputs, but worth noting in case you were hoping this would be your primary display for your PlayStation as well. You’ll need to use the DisplayPort and a PC to get the highest quality possible.
Should you buy the Innocn 32M2V?
At $800 (and frequently discounted), the Innocn 32M2V offers outstanding value for money with features and performance you would need to pay well over $1,000 normally, and often upwards of $2,000.
At a similar price point, the Samsung Odyssey Neo G7 is a 4K 32-inch display featuring a strongly curved 1000R VA panel at up to 165Hz. But by all accounts the quality is substandard, with bad color reproduction and plenty of user reports of screen problems. Curved displays can be divisive, but if you did want that curve and could up the budget a little, the Dell Alienware AW3223QF retails for around $1,000, offering an OLED screen at up to 240Hz, and very highly rated.
I do have a few complaints about the Innocn 32M2V. The menu system is annoying to navigate with four physical buttons rather than a joystick, and the auto input switching mode didn’t seem particularly useful to me. I would have expected it to switch whenever an input was activated, but it seemed to only switch if the previous input was turned off.
As the first MiniLED I’ve tested, I will say that the arguments of why to avoid MiniLED in favor of OLED seem completely overblown, especially when the alternative is the much worse possibility of permanent screen burn-in. In my mind, MiniLED is a fantastic compromise—and the 32M2V is an excellent MiniLED 4K HDR 144Hz option.
Do you already own an Innocn 32M2V gaming monitor? Tell us about your experience in the comments below.
Navigating through toll roads can be a hassle when you’re trying to budget for your trip. Fortunately, Google Maps can help you see toll prices on your route, making travel planning much easier. However, you should know that Google Maps for PC (in the browser) doesn’t offer that feature and toll prices are only available in certain areas of the world like the U.S. and India.
How do I see the toll prices on Google Maps ?
Enable toll price visibility in Google Maps
Launch the Google Maps app on your iOS or Android device.
Tap on your profile picture or initials in the upper-right corner to open the menu.
Scroll down and select Settings from the menu options.
Within Settings, find and tap on Navigation.
Scroll down to the Driving Options section and toggle the switch next to See Toll Prices.
By following these steps, you’ll be able to see the estimated toll costs for your route, helping you decide whether to take a toll-free alternative.
How do I avoid toll roads in Google Maps?
Launch the Google Maps app on your device.
Type your destination in the search bar and tap on the directions button.
Tap on the three vertical dots or the menu button for more options.
Choose Route Options or Avoid from the menu.
Check the box next to Avoid tolls and then go back to see the updated route.
By setting the app to avoid toll roads, you can plan your journey without incurring additional toll costs.
These solutions will help you effectively manage and view toll prices on Google Maps, whether you’re using the app or integrating it into a development project. To avoid unexpected toll costs in the future, always check your route settings and keep your app updated.
Choosing the right privacy browser can be a daunting task, especially when you have great options like DuckDuckGo and Brave. Both browsers are designed to protect your privacy, but they do so in different ways. Let’s dive into the features and performance of each to help you decide which one reigns supreme.
DuckDuckGo vs Brave, which one should you use?
Privacy and security
Brave
Brave blocks privacy-invasive ads and trackers by default, making it faster and more private, it also automatically upgrades web connections to secure HTTPS to protect your data.
The browser also prevents websites from identifying you through fingerprinting techniques. It’s built on the Chromium engine but with significant privacy-focused and since it’s open-source its code is available for everyone to inspect.
Lastly, the browser offers the option to earn BAT tokens by opting into privacy-respecting, first-party ads.
Using Brave ensures a fast, secure, and ad-free browsing experience by default, perfect for users who want comprehensive privacy protections without much configuration.
DuckDuckGo
The DuckDuckGo browser blocks third-party trackers and enforces encrypted HTTPS connections similar to Brave.
The browser doesn’t bring you personalized searches, so there’s no data mining involved It will also assign a privacy grade to websites based on the number of trackers and the site’s privacy policy.
In addition, it will also scan and rank the site’s privacy policies and it does not store IP addresses or other personal information.
It’s worth mentioning that DuckDuckGo uses its search engine, so you’re free from Google’s tracking.
DuckDuckGo is focused on providing privacy by not tracking user activity, making it ideal for users who prioritize data privacy and simple, uniform search results.
Performance and resource usage
Brave
Thanks to ad and tracker blocking, Brave loads web pages 3x to 6x faster than traditional browsers.
It also uses 33% less memory and up to 50% less energy and it works well across all major operating systems without compromising performance.
It’s designed to save mobile data and battery life, which makes it perfect for mobile devices.
Brave provides a faster browsing experience, particularly effective for users who want a swift and efficient browser while saving on resources like RAM and battery.
DuckDuckGo
The first thing you’ll notice about the DuckDuckGo browser is a simpler interface and fewer built-in features mean lower resource consumption.
The browser uses a privacy-first design to enhance performance by reducing unnecessary data handling.
DuckDuckGo’s minimalist approach ensures essential privacy features without heavy resource usage, suitable for users with lower-end devices or those who prefer a lightweight browser.
However, this may lead to many users lacking certain features.
Usability and features
Brave
Just like many modern browsers, Brave lets you sync bookmarks and settings across devices. Since it’s a Chromium browser, it also works with all Chrome extensions.
Another feature that it has is the full support for PWAs that allows you to turn any website into a desktop application.
Lastly, there’s a built-in VPN, but it requires an additional subscription.
Ideal for users who need a customizable browser with advanced features like data sync and extensions.
DuckDuckGo
DuckDuckGo focuses on ease of use with a straightforward design, allowing you to find all the desired features with just a few clicks.
To protect your privacy, the browser also has automatic data cleaning, so your browsing sessions will be removed once you close the browser.
Speaking of privacy, the browser can also make a throwaway email alias, so you don’t have to sign up to websites with your real email address.
As you can see, DuckDuckGo is perfect for users who prefer a straightforward, no-frills browser with automatic privacy features.
Is Brave browser better than DuckDuckGo?
In our opinion, DuckDuckGo focuses only on essentials while protecting user privacy, and the lack of customization and extensions makes Brave browser a better choice in our opinion.
Is DuckDuckGo a trusted browser?
Yes, DuckDuckGo is a trusted browser since it focuses on user privacy and security. In the past, there were some issues with the browser not blocking tracking scripts from Microsoft, but that has been resolved.
By comparing Brave and DuckDuckGo, users can choose the browser that best aligns with their needs, whether they prioritize extensive features and performance (Brave) or simplicity and straightforward privacy (DuckDuckGo).
To learn how the browser compares against others, don’t miss our Opera One vs DuckDuckGo article for more information.
We also have a guide that answers the question of whether DuckDuckGo is a VPN, so don’t miss it to learn the difference between the two.
When it comes to PCs, things are ever-evolving. Newer, better technologies are rendering certain components redundant. This also leads to confusion, especially when it comes to CPUs and microprocessors, two critical components of the PC!
The two terms, CPU and microprocessor, are often used interchangeably, but at the core, they are different from one another. Neither all CPUs are microprocessors, nor all microprocessors are CPUs, no matter what others tell you.
What are the differences between CPU and microprocessor?
CPU (Central Processing Unit)
Microprocessor
Design
Also called the computer’s brain, it executes all user commands and helps manage the connected devices.
CPU is part of a single, multi-function silicon chip alongside other key components like transistors and
Function
Performs operations, controls hardware, and facilitates user-PC interaction.
In addition to the functions of a CPU, it performs a wide array of other tasks, depending on the integrated components.
Use case
Used in older computers.
Used in modern-day computers, smartphones, and other smart devices.
Size
Larger
Smaller
Efficiency
Lower
Higher
Power consumption
Higher
Lower
Remember, a microprocessor (in most cases) features a CPU. It’s just a miniaturized form of the latter that fits into a single silicon chip. Similarly, a microprocessor may also feature a GPU (Graphics Processing Unit) for rendering images and processing graphics.
Are microprocessors an advancement in CPUs over the years?
Microprocessors integrate the CPU and other key components and circuits into a single chip, reducing the size and increasing the efficiency. So, yes, they are an improvement over traditional CPUs, achieved in the last few decades.
These are the basic differences between a CPU and a microprocessor. Major manufacturers of microprocessors today include Intel and AMD, amongst other smaller players!
Microsoft decided to make some changes to the Teams platform, emphasizing personalization on its Discover feed. According to the latest Insider blog post, the platform has given users the power to show or hide the Discover feed in Teams. The feed, which improves information finding by displaying personalized content from different channels and subjects, can now be turned on or off according to the user’s liking.
This change might appear small to Microsoft Teams users who like using the Discover feed to keep themselves informed. But it is refreshing for those who want a less cluttered and smoother Team experience.
Microsoft’s choice to provide this customization option emphasizes its focus on user-centered design, enabling people to adjust their digital settings as they prefer.
The Discover feed aims to make it easier for you to stay informed and engaged with the content that matters most to you in Microsoft Teams. Its purpose is to improve information discovery and awareness by delivering a personalized, relevance-based feed of Teams channel content. This feed helps you stay on top of important conversations you might otherwise miss due to information overload.
To make these changes, users will need to go to the “Settings and more” button next to their picture in Teams and then select Settings. On the General page, you should see a new option named “Show Discover in your channel list.” This is where you can decide to turn on or off the Discover feed.
This update is being released to Teams Public Preview or Microsoft 365 Targeted release users using the new Teams app for Windows and macOS. It forms part of a range of improvements designed to make the Team’s experience more enjoyable. For example, Microsoft added features last month, such as uploading custom emojis and better handling notifications related to channel posts.