Microsoft’s big idea to start a mobile game store for Xbox has been widely discussed in the fast-paced realm of tech and gaming. The company’s timeline for its launch in July has passed without much noise, but now the Redmond-based tech giant has begun to tease the official testing phase, according to The Verge.
This gives gamers more chances to play their preferred games directly on their mobile phones. Microsoft’s choice of a platform based on a browser indicates a tactic to broaden its reach and attract a larger audience beyond the boundaries of usual app stores.
The idea was to begin with Microsoft’s collection of games, which already includes titles such as Minecraft and Call of Duty Mobile. However, the vision does not end here: by welcoming other developers, the store could become a lively market for mobile gaming. But, like all things tech, timing is critical. Whether the wider public can access this digital game store remains a mystery.
Microsoft’s action is not merely confined to expanding its gaming network; it also serves as a strategic move within the competitive technology sphere. Building a space that could embrace games from other developers places Microsoft as an open platform, not solely for business advantages but also for creating a community and experience available worldwide to gamers, no matter what their device may be.
If you are a gamer, the idea of an additional and possibly oversized mobile gaming shop is thrilling. For developers, too, it brings fresh chances to access audiences.
In the technology sector, new possibilities for inventiveness and advancement are never-ending. Microsoft’s entry into mobile gaming is only the start of a journey, but it is an area worth paying attention to.
Let’s not forget Microsoft is planning to release the next Xbox console sometime later this year, and the new Xbox mobile store could definitely come in handy.
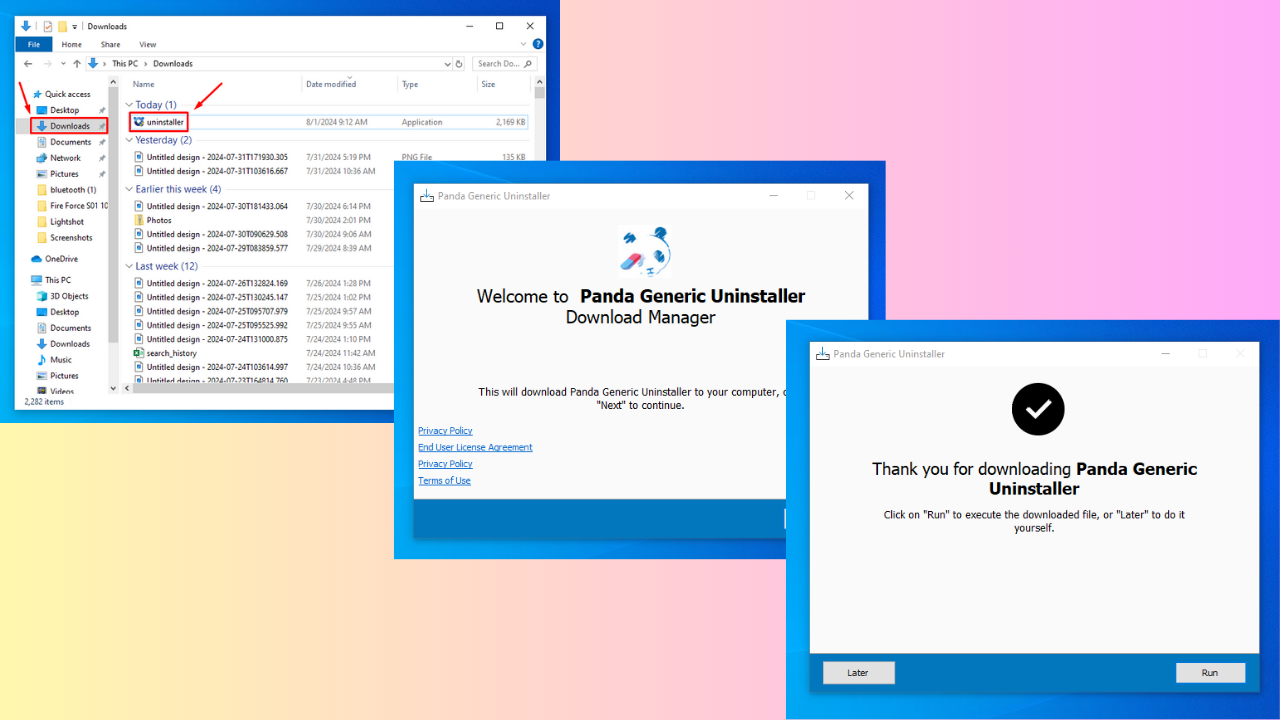
Locate the file in the Downloads folder on your computer.
Right-click on the uninstaller executable file and select “Run as administrator” to ensure it has the necessary permissions.
Tap Yes to allow the app to make changes on your computer.
The Panda Antivirus uninstaller will launch. Follow the on-screen instructions to proceed with the installation.
After completing the onscreen instructions, you’ll be asked to click “Run” to execute the downloaded file or “Later” to do it yourself.
If you run it, it’ll automatically restart your PC for a clean uninstallation of the antivirus.
Using a Third-Party Website
I recommend always downloading the uninstaller from the official Panda Security website. But you can also find it on third-party websites. In that case, use a reputableone like Softonic to avoid infecting your computer with malware.
Overall, the Panda antivirus uninstaller can remove all traces of this software from your system. Whether you download it from the official file or a trusted third-party source like Softonic, these steps guarantee a clean uninstallation.
Microsoft reportedly formed a fresh team within Blizzard to create smaller-sized ‘AA’ games that explore deep into the story world of Blizzard’s current IPs. This news follows significant staff reductions within Microsoft’s gaming department, which resulted in almost 1,900 team members leaving, including Mike Ybarra, president at Blizzard Entertainment. However, Microsoft appears to be recovering from these difficulties and wants to move ahead by creating new departments.
This suggests a shift towards mobile platforms, but it’s apparent that Microsoft doesn’t limit itself to this path; it could release on other platforms, too. The intention here is clear: developing games that are not just financially successful but have a significant impact in the gaming domain – similar to how Palworld made waves when it became an enormous success on Xbox Game Pass earlier this year.
Microsoft is adjusting its plan towards less expensive and more experimental games, which can be created without requiring the substantial budget associated with AAA titles. The company won’t be moving away from high-budget games (in fact, The War Within, World of Warcraft’s upcoming expansion, is set to be released later this month). Still, they’re looking into ways to utilize their vast collection of game franchises intelligently.
Such an approach might result in new games that, although smaller in size, could provide fresh and captivating experiences for players on different platforms.
But think about this: What might these outcomes imply for Microsoft’s gaming future? The emphasis on smaller and agile teams working with well-liked series possibly suggests a comeback of old games or new ones that delve into the extensive storylines within Blizzard’s universes. This is a thrilling period for gamers, particularly those who have been fans of these franchises since they were young and are excited to see what Microsoft does with them in the future.
Switching between screens on multiple monitors can be a game-changer for productivity, but it can also be a bit tricky if you’re not familiar with the shortcuts, so today we’re going to show you how to do that.
How can I toggle between screens?
1. Using Win + Tab
Press and hold the Windows + Tab key.
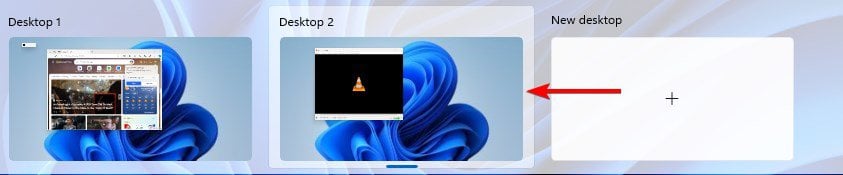
You’ll now see all available desktops.
Click on the screen that you want to use.
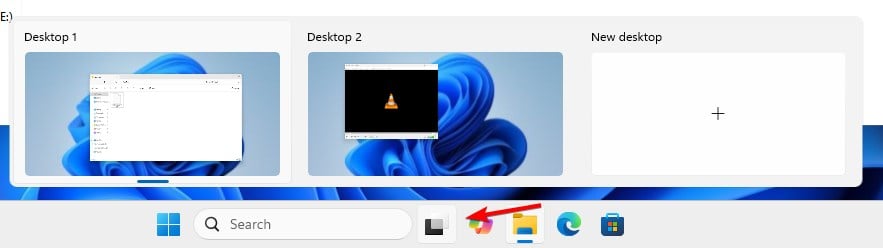
Optional: Use the Task View icon to switch between screens.
2. Using Win + Shift + arrow
Press and hold the Windows + Shift keys.
Press the Left or Right arrow key. Release all 3 keys.
This will move the active window to the left or right monitor.
3. Using Win + P
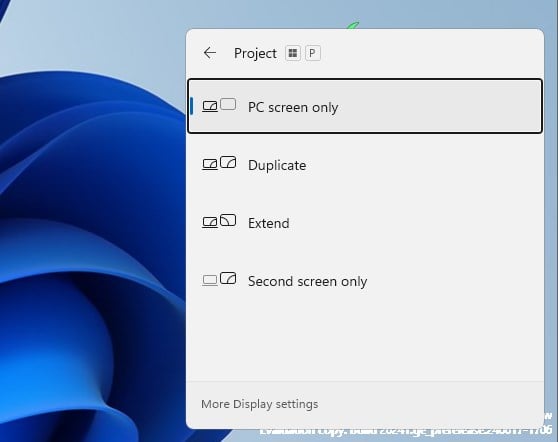
Press the Windows key + P.
Select the display mode from the menu:
PC screen only
Duplicate
Extend
Second screen only
Utilize this for managing your multi-monitor setup preferences directly from the keyboard.
Microsoft has made a notable change in cloud computing by making GPU-supported Windows 365 Cloud PCs available. This advancement is substantial because users can now handle tasks that require more graphics capacity from anywhere, and they are not limited by their local hardware. Think about rendering high-quality 3D models or processing big datasets without being restricted to your personal computer’s capabilities. This makes these new Cloud PCs a game-changer for professionals in different fields.
Windows 365 is a cloud service that gives end-users access to virtual Windows machines (Cloud PCs). It’s meant to be available from anywhere, on every device, and thus very flexible. The new addition of GPU capabilities elevates this flexibility even more. Tasks that previously required high-end, local machines can now be done in the cloud, resulting in quicker and more effective work.
We are happy to announce that GPU-enabled Cloud PCs are now generally available for Windows 365 Enterprise and Frontline editions. Users can now handle advanced workloads—that were traditionally limited by the constraints of local hardware—in the cloud with increased speed and efficiency. Sensitive data and high-value digital assets can be processed and stored securely in the cloud, mitigating the risks associated with local storage.
The different setups for these GPU Cloud PCs are great. They start with the Standard edition, which has four vCPUs, 16GB RAM, 4GB vRAM, and 512GB storage. Then there’s also a Max edition, which provides high-end power with 16 vCPUs,110 GB RAM,16 GB vRAM, and ample space to store up to 1 TB. The configurations are driven by NVIDIA and AMD, which guarantees excellent performance.
Remember that these Cloud PCs with GPUs are unique offerings. You cannot add or remove a GPU from your present Cloud PC. They come set up with the correct drivers to get the best possible performance out of the GPU, and it is worth noting that other GPU drivers are not supported on these particular cloud computers.
If your work requires intense graphics processing or data analysis like mine does, these Cloud PCs with GPU could significantly improve productivity. You can securely process and store sensitive data in the cloud, lowering local storage risks. Plus, the flexibility to work from anywhere, on any device, can’t be overstated.
Interested customers can buy these Cloud PCs with GPUs from Windows365.com or a Microsoft Account representative. This is a thrilling period for cloud computing, and Microsoft’s fresh products are certain to create more opportunities for professionals and businesses.
If you get the you need to activate Windows before you can personalize your PC message, you cannot customize your PC to your preferences.
Activating Windows may not be a top priority for some users but active users can attest to the fact that to unlock and enjoy the complete suite of features that Windows 11 has to offer, you have to activate your copy of Windows.
This message could be due to an expired or ingenuine copy of the Windows license, a change in hardware or a host of other activation errors.
How do I remove the you need to activate Windows before you can personalize your PC message?
1. Run the Activation troubleshooter
First, you must link your digital license to your Microsoft account. The Microsoft account linked should also be an administrator account.
Hit the Windows key and select Settings.
Click on System and scroll down to Activation.
Select Troubleshoot, and you should see the following message: Windows can’t be activated on your device.
Click on I changed hardware on this device recently, then select Next.
Type and enter the credentials associated with your Microsoft account.
From the list of devices linked to your Microsoft account page, place a checkmark beside This is the device I’m using right now.
2. Reactivate Windows
Press the Windows key to open the Start menu.
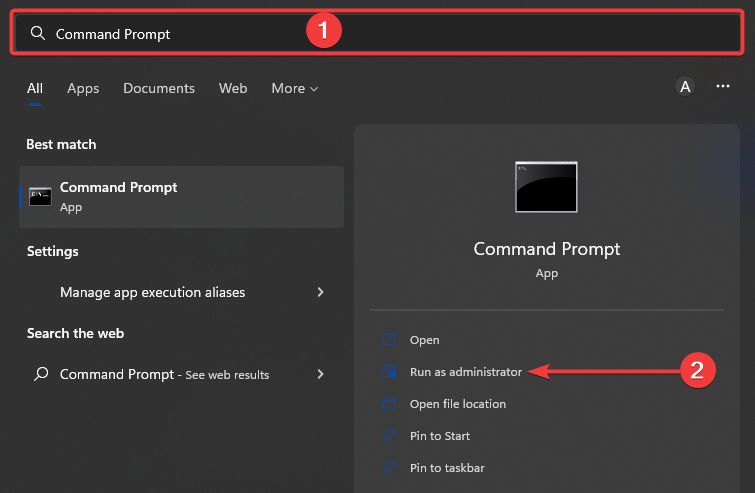
Type Command Prompt and run it as an administrator.
Execute the below command: slmgr.vbs –rearm
The process will begin, and once the success prompt is displayed, click OK.
Find the device you want to remove from the list and select the Remove device option.
From the pop-up warning page, check the I’m ready to remove this device box and click on Remove.
A new confirmation page will show details about the device you remove, then click Back to Device.
Hit the Windows key, type Powershell in the search bar, and click Run as administrator.
Type and Enter the following command: slmgr -ipk <Your product key here>
Next, type the following command, then hit Enter. Don’t worry if nothing happens immediately, as it can take a bit of time: slmgr -ato
For most Windows licenses, Microsoft puts a cap on the number of devices that can use the activation code.
If you’ve recently changed your hardware and your old device is still listed on your Microsoft account, this may be the reason why your license is not recognized and you can’t personalize your PC.
If none of the above solutions works and you’re sure your copy of Windows is genuine, contact Microsoft support for further assistance. In the meantime, feel free to explore other customization options with more advanced features.
Should you run into problems with your activation and can’t purchase another one, try your luck by generating activation keys with AI. You might just land a free one.
Getting the best picture quality from your 4K TV can be a game-changer for your viewing experience. Whether you’re watching movies, sports, or gaming, fine-tuning your TV settings can make a huge difference. However, please note that the picture quality also depends on the lighting in your room. A darker environment will also bring the best viewing results.
How do I set up my 4K TV for best picture quality?
1. Best TV picture settings for Samsung 4K TV
Press the Menu or Settings button on your remote control.
Navigate to Picture Settings.
Adjust the following settings:
Backlight: 15
Contrast: 45
Brightness: 0
Sharpness: 0
Color: 25
Tint (G/R): 0
Color Temperature: Warm
Dynamic Contrast: Off
Black Tone: Off
Flesh Tone: 0
Gamma: 0
Motion Lighting: Off
Digital Clean View: Off
Smart LED: Off
Sports Mode: Turn on if watching sports and adjust: Backlight (15), Contrast (50), Brightness (50), Sharpness (10), Color (45), Tint (G/R) (0).
Game Mode: Turn on if gaming and adjust: Backlight (17), Contrast (90), Brightness (47), Sharpness (0), Color (50), Tint (G/R) (0).
These settings will give you a bright and accurate picture, and turning on specific modes like Sports or Game can enhance your viewing experience for those activities.
2. Best picture settings for LG 4K TV
Press the Menu button on your remote control.
Go to Picture Settings.
Adjust the settings based on your environment:
Natural Light (Vivid):
Backlight/OLED light: 100
Contrast: 100
Brightness: 50
Sharpness: 30
Color: 70
Tint: 0
Color Temperature: C50
Artificial Light (Standard):
Backlight/OLED light: 80
Contrast: 85
Brightness: 50
Sharpness: 25
Color: 50
Tint: 0
Color Temperature: C20
Dark Room (Cinema):
Backlight/OLED light: 80
Contrast: 85
Brightness: 50
Sharpness: 10
Color: 50
Tint: 0
Color Temperature: 0
Turn off these options: Super Resolution, Dynamic Color, Clear White, Motion Eye Care, TruMotion, Real Cinema.
These settings adjust for different lighting conditions and ensure that your TV performs well in any environment while preserving the intended picture quality.
3. Best picture settings for Sony Bravia 4K TV
Press the Home button on your remote control.
Navigate to Settings > Display > Picture.
Adjust the following settings:
Picture Mode: Cinema or Movie
Sharpness: 50%
Contrast: 50%
Hue/Tint: 0%
Screen Fit: Wide Mode (Full)
Gamma: 2.2
Backlight: 100%
Advanced Settings: Go to Menu > Settings > Display Settings >
Noise Reduction: Off
MPEG Noise Reduction: Off
Dot Noise Reduction: Off
Reality Creation: Off
Smooth Gradation: Off
Motionflow: Off
CineMotion: Off
Black Corrector: Off
Auto Light Limiter: Off
Clear White: Off
Live Color: Off
Detail Enhancer: Off
Edge Enhancer: Off
SBM: Off
Using these settings will provide a balanced and authentic viewing experience, preserving the detail and color accuracy of the original content.
4. Best picture settings for Vizio 4K TV
Press the Menu button on your remote.
Go to Picture settings.
Adjust the following settings:
Picture Mode: Movie or Natural
Sharpness: 0
Contrast: 50
Brightness: 50
Color: 50-60
Hue/Tint: 0
Gamma: 1.8-2.0
Color Temperature: Warm
Black Detail: Off
Active LED Zones: Off
Clear Action: Off
Local Contrast: Off
Auto-Motion: Off
Dynamic Contrast: Off
Dynamic Color: Off
These settings reduce artificial enhancements and provide clear and natural images, perfect for watching movies or TV shows with a cinematic feel.
5. Best picture settings for TCL 4K TV
Press the Settings button on your remote.
Navigate to Picture settings.
Adjust the following settings:
Picture Mode: Movie
Brightness: 50
Contrast: 90
Sharpness: 0
Color: 45
Tint: 0
Color Temperature: Warm
These settings will help you achieve a warm and accurate picture, replicating the experience of watching films in a theater.
Each of these solutions focuses on achieving the best possible picture quality for different brands of 4K TVs. Adjusting these settings will ensure a vibrant, clear, and accurate viewing experience that aligns with the content creator’s intent. Remember to periodically check for firmware updates to keep your TV performing at its best.
Microsoft released a fresh update called KB5001716 for Windows 11 and 10 users. It’s intended to keep your PC up-to-date with recent feature updates, especially if your present version is nearing the end of its service life.
KB5001716 improves the Windows Update service components. Why is it essential, you might wonder? It’s like a relay race to keep your system secure and full of the latest features. If your version of Windows is about to say goodbye (reach the end of servicing status), this update takes over and downloads a new one automatically for you—either Windows 11 or 10.
It’s not just a change in the technical workings but also brings a fresh function to the user interface (UI) of Windows Update. Picture receiving a kind reminder message about possible troubles that could prevent Windows Update from working properly; these might include using an older version of Windows nearing its end or having difficulties with hardware compatibility when upgrading to the newest one.
For tech followers curious about the details, this update covers various versions of Windows 11 and Windows 10. Microsoft has handled everyone’s needs from Windows 11 version 21H2 to Windows 10 version 2004, with some in-between iterations.
Speaking about small but vital patches, Microsoft unveiled the latest build to the Beta Channel, which includes some fixes and improvements that are essential to the well-being of Windows 11.
The MSI Driver Utility Installer is a quick and interactive option to install the latest drivers for all available devices, but many often wonder whether the utility can be used without an Internet connection!
The ability to run the utility without an Internet makes the driver update process all the more seamless and hassle-free, given that not all of us have access to the Internet all day round.
So, let’s find out whether you can use the MSI Driver Utility Installer without an Internet connection and the other ways to update the installed drivers offline!
Can I use the MSI Driver Utility Installer without Internet?
According to MSI’s official website, you can’t run the MSI Driver Utility Installer(and MSI Center Live Update) without an Internet connection. An Internet connection is required to locate and download the latest driver version.
Press Windows + X to open the Power User menu, and select Device Manager from the list.
Expand the relevant entry, right-click on the device for which you want to install the latest driver, and select Update driver. I am updating the graphics driver in this case.
Click on Browse my computer for drivers.
Choose the Let me pick from a list of available drivers on my computer option.
Tick the checkbox for Show compatible hardware, then select the latest driver version from the list, and click on Next.
Wait for the installation to complete, and then proceed to the next driver.
For some devices, you get a CD (or another media storage device) loaded with the driver software at the time of purchase. If that’s the case, simply plug it in, run the driver setup, and follow the on-screen instructions to complete the installation process.
This is the easiest way to install drivers without the Internet and the MSI Driver Utility Installer!
3. Download on another PC with Internet access
If these two don’t work, perhaps you can download the latest drivers from the web on another PC with stable Internet access, then load the driver setup (.exe file) on an external USB drive, and finally, install them on the affected PC.
Although slightly time-consuming, this method allows you to update drivers without Internet and the driver’s CD.
That’s all about using the MSI Driver Utility Installer without Internet and installing the latest drivers offline.
AI is the future, and Google continues to lead the way. After integrating AI features like History Search, Tab Organizer, Help Me Write, and Tab Compare into Chrome, they’re now introducing an AI-powered solution for Chromebooks to troubleshoot Bluetooth issues.
Google recently announced Chromebook Plus devices featuring integrated Google AI like Gemini and HelpMeWrite, even AI-generated wallpapers. And, the company confirmed plans to incorporate more Android into ChromeOS, paving the way for rapid integration of new AI features for faster and smarter Chromebooks. Building on this, a new AI feature is being prepared.
How will BlueBuddy fix Chromebooks Bluetooth issues?
Most Chromebooks support Bluetooth for devices like keyboards, mice, gaming consoles, and Android phones. However, troubleshooting Bluetooth problems can be frustrating. Google is addressing this with a new AI assistant called BlueBuddy, coming to ChromeOS.
Imagine the frustration of trying to connect wireless headphones that won’t work. Meet Google’s new AI feature is designed to understand and resolve Bluetooth problems, which could be from pairing issues to audio dropouts.
WindowsReport has discovered hints of this AI assistant in commit messages, suggesting it will be accessible from the chrome://bluetooth-internals page.
The tool, dubbed BlueBuddy, will prompt users to Enter an Issue and I will recommend a fix. The new page itself might be titled Troubleshoot with AI. along with other options available like Adapter, Devices, and Debug logs.
To check if your Chromebook has Bluetooth, click on the status bar and look for the Bluetooth icon. While it’s unclear if BlueBuddy will be available on all Chromebooks or just Chromebook Plus models, visiting chrome://bluetooth-internals will provide clarity once the feature is released. So, the next time you encounter Bluetooth woes, BlueBuddy, your AI companion, will be there to assist you.
Chrome’s Bluetooth internals page for representation
Microsoft released the latest update to the Insider Beta Channel, but KB5040555 is a small patch with a few improvements here and there. It brings bug fixes, general improvements, and a few known issues to explore.
Firstly, the Redmond-based tech giant has resolved a problem that is causing intermittent explorer.exe crashes for certain people.
Regarding issues, KB5040555 does fix a few of the taskbar topics; there is a fresh one where if you close apps, explorer.exe could crash for some insiders.
People who use updated Recent, Favorites and Shared sections in File Explorer should also prepare for a probable loss of keyboard focus.
Lastly, there is a problem where the emoji panel closes independently. This can be unpleasant if you attempt to add some style to your digital talks with others.
This release might not be the best hype for Windows Insider Program members, but it nudges that even subtle changes can alter the overall user experience.
Windows XP has been gone for a while, but many users are still wondering if they can use Windows XP Black Edition, and in this guide, we’re going to show you what this edition is and how to install it.
What is Windows XP Black Edition and how do I install it?
What is Windows XP Black Edition?
Windows XP Black Edition is an unofficial version of Windows XP that is customized by the community to include a custom look, drivers, and applications.
While Windows XP Black Edition hasn’t been updated since 2015, the community is still working on this project under the name of Windows XP Integral Edition.
What features does Windows XP Black Edition offer?
Firstly, it adds the latest hotfixes for Windows XP from 2015, as well as the latest .NET Framework hotfixes. It also includes a built-in K-Lite Codec Pack, ImDisk Virtual Disk Driver, and more.
Since this version is outdated, we’ll focus on Integral Edition since it’s actively maintained by Zone94 and it got the latest update a few months ago.
This version includes Windows XP Service Pack 3 as well as POSReady 2009 hotfixes until May 2019. It also has support for the exFAT file system, the latest .NET Framework, and more.
It comes with some built-in applications including BitLocker To Go Reader, PowerShell, Outlook Express, and more.
This edition has built-in software as well, including 7-Zip, MyPal, Thorium, XP Codec Pack, Unlocker, HashCheck, PC Tools Firewall Plus, Sandboxie, and others.
You can also find various improvements, patches, and drivers for Windows XP. Certain components have been removed such as Address Book, Internet Games, Movie Maker, MSN Explorer, Messenger, Outlook Express, etc.
Overall, this edition has certain components removed and various hotfixes, drivers, and applications added instead.
It’s worth mentioning that the third-party editions of Windows aren’t considered safe, since you can’t know if the ISO file is modified in any way or if it includes any malware.
Therefore, if you’re planning to use it, you’re doing so at your own risk.
Can you legally download Windows XP?
Windows XP has been discontinued, and you can’t download it legally anymore. This also means that downloading Windows XP Black Edition is violating Microsoft’s terms of use.
Does anyone still run Windows XP?
There are less than 1% of Windows XP users worldwide. This comes as no surprise since the operating system reached its end of life in 2014, and it hasn’t been getting any updates since.
As you can see, Windows XP Black Edition is a heavily modified version of Windows XP and it’s maintained by the community.
As such, it comes with certain security risks, so using it isn’t recommended. Instead, you’ll be better off with a more modern version of Windows.
If you want to still use Windows XP, we have a great guide on it that might help you, so don’t miss it. We also have a Windows XP comparison guide that will help you familiarize yourself with it, so you might want to check it out.
When it comes to gaming, having the right TV settings can make a world of difference in your experience. Whether you’re a casual gamer or a competitive player, optimizing your TV settings can enhance your gameplay and make those victories even sweeter. Let’s dive into the best TV settings for gaming mastery.
How do I set up my TV for gaming?
1. Enabling Game Mode
Open your TV’s settings menu.
Navigate to the Picture or General settings, depending on your TV model.
Locate Game Mode and enable it.
A lot of TVs nowadays have a gaming mode or an action mode. Activating the Game Mode reduces input lag, which ensures that your actions on the controller sync more closely with the on-screen action. If your TV doesn’t have a game mode, you may also try the Sports mode. That is also tailored for fast action movement on the screen.
2. Adjusting the picture settings
Open your TV’s settings menu and go to Picture settings.
Adjust the following parameters:
Color: Set to 50% or according to your preference.
Brightness: Set to 50% or based on your room’s lighting conditions.
Backlight: Adjust based on the room lighting. Higher in bright rooms, lower in dark rooms.
Tint (G/R): Set to 0 or 50%, depending on your TV model.
Sharpness: Set to 0% to avoid unnecessary edge enhancement.
Contrast: Set between 70-80%. Start at 100% and decrease until details are visible in bright areas.
These settings ensure balanced colors, prevent eye strain, and provide clear visibility of game details. Adjust them based on your personal preference and room conditions.
3. Disable any unnecessary features
Open your TV settings menu and navigate to Advanced settings.
Turn off the following features:
MotionFlow/TrueCinema: Off
Noise Reduction: Off
Super Resolution: Off
Dynamic Contrast: Off
Edge Enhancer: Off
Disabling these features reduces the processing workload on your TV, which minimizes input lag and provides a more direct and responsive gaming experience. Of course, if you want a high quality image, you can use those settings, but they might slow down the game.
4. Using the Input Signal Plus (Samsung TVs)
Navigate to Settings on your Samsung TV.
Select General and then External Device Manager.
If available, enable Input Signal Plus for the HDMI port connected to your console.
Enabling Input Signal Plus enhances the input signal range for HDMI connections, providing clearer graphics and improving overall game visuals.
5. Adjusting the audio settings
Open your TV’s settings menu and navigate to Audio settings.
Adjust the overall volume to a comfortable level.
Fine-tune the individual volume levels of music and sound effects to balance them.
Select the appropriate surround sound mode (stereo, 5.1, or 7.1 channels, based on your setup).
Optimizing audio settings ensures that in-game sounds are immersive, enhancing the overall gaming experience by providing clearer cues and ambient sounds.
6. Calibrating your TV
Use a TV calibration tool or a reference image to adjust color temperature, hue, and saturation.
Set contrast and brightness to clear visibility without harshness.
Experiment with different picture modes like Game, Cinema, or Sports to find the best one for your gaming needs.
Calibrating your TV improves color accuracy and overall picture quality, making games appear more vibrant and realistic. Calibration tools or online guides can help achieve the best results.
By following these steps, you can ensure your TV is optimized for the best gaming experience. Keep your TV firmware updated and periodically check for new settings or features that can further enhance your gameplay.
We also have a list of the best OLED gaming TVs and pick one that is designed with gaming features.
If you want to share how you set up your TV for gaming, the other readers will appreciate. Just hit the comments below and drop a line.
If your GPU isn’t turning on, that is usually because it’s not connected properly, or it doesn’t have sufficient power. The first thing to do is to doublecheck if the power supply has enough power to support the GPU. If the GPU is not powering, check if it comes with a separate power supply and connect it using the indications from the manufacturer.
1. Check power connections
Turn off your computer and unplug it from the power source to avoid any electrical hazards.
Open your computer case by unscrewing or sliding off the side panel. Make sure you follow any specific instructions for your case model.
Locate the GPU (Graphics Processing Unit). It’s usually situated in one of the PCIe slots on the motherboard.
Check the power connectors. Ensure that the 6-pin or 8-pin power connectors are firmly plugged into the GPU. Some GPUs require multiple connectors, so ensure all necessary connections are made.
Inspect the motherboard connection. Ensure the PCIe slot is seated correctly in the motherboard and that the retention clip is locked.
Turn your computer back on and check if the GPU fans start spinning and if the GPU is detected.
Ensuring the power connections are secure can resolve the issue if the GPU wasn’t receiving adequate power initially. If the GPU powers up but it’s not detected, click on the highlighted link to fix it.
2. Reset the BIOS/UEFI settings
Turn off the computer and unplug it from the power source.
Open the computer case to access the motherboard.
Locate the CMOS battery. This is a small, round, silver battery on the motherboard.
Remove the CMOS battery by gently pressing the retaining clip and lifting the battery out.
Wait for about 5-10 minutes to ensure the BIOS/UEFI settings reset.
Reinsert the CMOS battery and ensure it is securely in place.
Close the computer case, plug in the computer, and turn it back on.
Resetting the BIOS/UEFI can help if incorrect settings were preventing the GPU from being detected.
3. Test with another GPU or slot
Turn off the computer and unplug it from the power source.
Open the computer case to access the GPU and motherboard.
Remove the current GPU from the PCIe slot by unscrewing the bracket and gently pulling the card out while pressing the retention clip.
Insert a different GPU (one that you know works) into the same PCIe slot.
Turn on the computer to see if the new GPU is detected and if its fans spin.
If the new GPU works, place the original GPU in a different PCIe slot (if available).
Turn on the computer again to see if the original GPU is detected.
Testing with another GPU or slot can help determine if the issue is with the GPU, the slot, or another component of the system.
4. Inspect and clean the GPU
Turn off the computer and unplug it from the power source.
Open the computer case to access the GPU.
Remove the GPU from the PCIe slot.
Inspect the GPU for any visible signs of damage, such as burnt components or discolored areas.
Clean the GPU and PCIe slot using compressed air to remove any dust or debris.
Re-insert the GPU into the PCIe slot, ensuring it is seated correctly.
Turn on the computer to see if the problem is resolved.
Cleaning the GPU and the PCIe slot can help if dust or debris was causing connectivity issues.
5. Update or reinstall drivers
Turn on the computer using the integrated graphics or another functional GPU.
Go to the official website of your GPU’s manufacturer (NVIDIA, AMD, etc.)
Download the latest drivers for your specific GPU model.
Uninstall the current GPU drivers through the Device Manager:
Press Win + X and select Device Manager.
Find your GPU under Display Adapters, right-click, and select Uninstall device.
Install the new drivers you downloaded.
Restart your computer and check if the GPU is now detected.
Updating or reinstalling the drivers can resolve software-related issues that might prevent the GPU from functioning correctly.
6. Check for Overheating
Turn off the computer and unplug it from the power source.
Open the computer case and inspect the GPU.
Check for signs of overheating such as burnt components or warping.
Ensure proper airflow by making sure all fans are functioning and there is no dust blocking airflow.
Apply new thermal paste to the GPU if you suspect it might be overheating:
Carefully remove the GPU cooler.
Clean the old thermal paste with isopropyl alcohol.
Apply a small amount of new thermal paste to the GPU core.
Reattach the cooler and ensure everything is secure.
Preventing overheating can ensure the GPU operates within safe temperature ranges, thus avoiding performance issues.
7. Test with a different power supply
Turn off the computer and unplug it from the power source.
Open the computer case and locate the power connectors to the GPU and motherboard.
Disconnect the current power supply and remove it from the case.
Install a different power supply (one you know works and has sufficient wattage).
Connect the new power supply to the GPU and motherboard.
Turn on the computer and check if the GPU fans start spinning and if the GPU is detected.
A failing or insufficient power supply can cause GPUs not to operate correctly.
8. RMA the GPU
Contact the GPU manufacturer or the retailer where you purchased the GPU.
Explain the issue you are experiencing with the GPU not powering on.
Request an RMA (Return Merchandise Authorization) if the GPU is still under warranty.
Follow the instructions provided by the manufacturer/retailer to return the GPU for a replacement or repair.
If all else fails, utilizing your warranty and getting a replacement might be the best option.
Regularly cleaning your PC and ensuring proper airflow can prevent many hardware issues. Always keep your drivers updated to avoid software-related problems.
Ensuring your OpenSSL version is up-to-date is crucial for maintaining system security and functionality. Whether you’re a developer or a system administrator, knowing how to quickly check your OpenSSL version can save you a lot of headaches. Here’s a quick guide to help you effortlessly check your OpenSSL version.
How do I check the version of OpenSSL?
1. Using the openssl version command
Open the Terminal/Command Prompt:
For Windows: click on the Start menu, type cmd, and press Enter.
For Linux/macOS: Press Ctrl + Alt + T to open the terminal.
Run the Command:
Type openssl version and press Enter.
For detailed information with flags, type openssl version -a instead.
You will see the OpenSSL version number and the date of its release. This command is straightforward and gives you the necessary details immediately. It also works the same in PowerShell if you prefer it.
This solution is the quickest way to check your OpenSSL version and is useful for ensuring that your software is up-to-date or for troubleshooting.
2. Checking via Package Manager (Linux)
Press Ctrl + Alt + T to open the terminal.
Run the following command to check the installed packages:
For Debian/Ubuntu: apt list -a openssl
For RedHat/CentOS: dnf list --all openssl
This will list all installed versions of OpenSSL managed by your package manager. This solution helps you understand which versions are available in your distribution’s repository and which one you have installed.
3. Using the strings command on Libraries (Linux)
Press Ctrl + Alt + T to open the terminal.
Run the Command:
Navigate to the directory where your OpenSSL libraries are located, usually /usr/lib/ssl
Run strings libcrypto.so | grep "^OpenSSL \S\+ [0-9]\+ \S\+ [0-9]\+"
This will output the version of the OpenSSL library directly from the binary. This solution is useful if you have multiple OpenSSL installations or need to verify the OpenSSL version bundled with an application.
4. Programmatic check in C++
Include the necessary OpenSSL headers in your C++ code.
Compile your program with an OpenSSL-linked compiler and run the executable.
This program will print the OpenSSL version used in your C++ application. This solution helps developers programmatically check the OpenSSL version used in their applications, which is particularly useful during development and debugging.
By following these solutions, you can easily check the OpenSSL version on various systems and contexts. Regularly checking your OpenSSL version helps ensure your system’s security and functionality. Always keep your software updated to protect against vulnerabilities.
Google Chrome’s built-in Password Manager can automatically generate strong and random passwords for you while you’re creating a new account on a website.
Here’s why Google is disabling the Automatic Password Generation in the Chrome browser
Google recently noticed that automatic password generation was causing too many prompts for users due to server errors in identifying fields. To fix this, the company is disabling the feature on “server predicted fields.”
This change will be implemented along with other related updates to Password Manager “handling password generation on <input type=text”>password fields”.
“[Passwords] Stop automatic password generation on text fields There were numerous reports of users getting overprompted by password generation suggestions. This behavior happened due to server-side misclassification of fields. This CL disables automatic generation on server predicted fields.” Google says in a commit message spotted by WindowsReport.
While automatic password suggestions may not be available, you can still get password suggestions by right-clicking on the password field, which brings up the context menu. Select “suggest a password” to get a strong password.
“In short, always disable automatic password generation on text fields, but still allow to generate a password using the context menu (‘Suggest password…’ option on right-clicking the field),” Google says about the workaround for the Bug.
Excessive password generation prompts can be frustrating and time-consuming. By limiting these prompts, Chrome can help reduce user fatigue and improve the overall browsing experience. Users will no longer feel overwhelmed by constant password suggestions and will have more control over when to generate passwords.
It’s important to note that this change does not affect the functionality of Chrome’s Google password manager. You can still save, manage, and autofill your passwords as before.
After working on making dangerous file download warnings clearly visible in Chrome, Google is set to introduce new HTTPS security options in Chrome, giving users more control over their browsing experience. These changes aim to simplify existing settings and offer greater choice.
Google Chrome prioritizes secure connections (HTTPS) to safeguard user data. At present, Chrome by default shows warnings when visiting insecure sites.
Always use secure connections Setting. Image Credit: Windows Report
Chrome also has three experimental options to manage these warnings. Google has readied these to for “HTTPS First Mode in Incognito”. Chrome to simplify these choices with two new modes: Strict and Balanced.
Chrome’s Experimental HTTPS First Mode in Incognito Settings. Image Credit: Windows Report.
By integrating HTTPS First Balanced mode into the new settings, Google aims to show fewer warnings for insecure sites.
Strict mode: “Chrome will always ask you before loading a site using an insecure connection.”
Balanced mode: “Chrome will ask you before loading public sites using an insecure connection but will allow HTTP connections for private networks.”
The new settings will replace the current tri-state settings with a toggle to enable or disable these modes, along with radio buttons to select between Strict and Balanced. This simplified interface gives users more control over their security preferences.
“Update HTTPS-First Mode settings to include Balanced Mode
This replaces the previously prototyped HFM-in-Incognito tri-state settings UI with a new toggle+selection UI. A main toggle button controls whether to show a group of radio buttons that allow the user to choose between “Strict Mode” (the existing HFM) and the new “Balanced Mode” (where we try to show fewer warnings).
When the main toggle is off, the radio buttons are hidden and both strict and balanced mode prefs are disabled. The new settings UI includes new strings (although they are not finalized yet).” Google notes in a commit spotted by Windows Report.
Chrome will assess website security and determine if a warning is necessary based on the chosen mode.
The “Balanced Mode” is designed to reduce the number of warnings for trusted networks while maintaining a high level of security.
By simplifying the HTTPS settings, Chrome aims to improve user experience and security. Users can confidently choose the level of protection that best suits their needs.
Microsoft To Do is a great replacement for the Planner app within the Microsoft 365 workspace environment. It lets you create and maintain a list of tasks and sub-steps in Gridor List view. You can:
Export to the Add to My Day dashboard so you can see all your tasks in one place
Use the Group feature to group actions in different color-coded sections.
Additionally, you can’t share your tasks with someone or invite a collaborator to work with you on small projects in To Do. Therefore, it’s suitable for highly sensitive lists and tasks that you don’t want to share with someone accidentally.
Pros
Cons
Lightweight desktop, web, and mobile app for task management.
There’s no task card. Only Grid and List views are available.
Integrated into Microsoft Outlook for easy retrieval of tasks when emailing someone.
You can’t begin with a template.
Provides quick links to visit Outlook, Microsoft Contacts, and Calendar.
There’s no option to share individual tasks or a dashboard of many tasks.
Included with all Microsoft 365 subscriptions for free.
Not suitable for large projects or tasks with dependency management.
Simple user interface.
Pricing: Freely available for Microsoft 365 subscriptions.
Do you primarily use Google Workspace and you’re looking for apps like Microsoft Planner? Google Tasks is available as a web app or integration for Google Email, Google Calendar, Google Assistant, Google Docs, Google Chat, and Google Drive.
If you’re logged in to multiple devices using the same Google Account, the tasks will sync and update automatically. Besides creating multiple lists, you can also add sub-tasks.
A regular task can contain dates, details, sub-tasks, and mentions in Google Chats. Using Google Chat Spaces and Google Docs, you can also assign tasks to collaborators in the same Workspace domain.
Pros
Cons
Easily integrates with multiple Google Workspace services.
The sharing feature is only available for paid Google Workspace users.
Free for all Google Workspace users.
There’s no dedicated app interface. A separate app is only available for Android devices.
Excellent user interface and experience.
Not suitable for projects with many tasks and sub-task dependencies.
Apple Reminders is the default task management app for most Apple devices. It’s a simple to-do app for quick note-taking, task generation, sub-task management, and reminders. Additionally, it syncs automatically with the Apple ID so you’ll regularly receive task updates.
It comes with the default task lists, like Today, Scheduled, All, Flagged, and Completed. You can add more under the My Lists section. You can also use the New Reminder button for new tasks.
Pros
Cons
No need to install any app. Comes pre-installed with all compatible Apple devices.
You can’t modify the default views.
Highly secured and trusted for data privacy.
The templates library doesn’t hold any free templates. You’ll have to create them manually.
Premium and swift user experience.
There are no Kanban or Gantt chart views for projects and tasks.
Integrates with various Apple apps.
Not suitable for large projects.
Lightweight app that doesn’t slow down device performance.
Managing subtasks is tricky.
Pricing: Free for all Apple ID users and iCloud subscribers.
Notion resembles Microsoft Planner in many ways but is a better project management app overall. It’s actually a relational database tool in the backend of the visual user interface. Therefore, you can customize its views for various use cases, like:
Creating a brand wiki
A static website for short-term events
Apps for frontline users on mobile or tablets
Project management
Calendar management.
To update the status of a task in a project, you can just drag and drop the task card on sections, like Assigned, In Progress, Bottleneck, Done, and so on. Besides the Board view, you can also select By assignee, Timeline (similar to a Gantt Chart), Mine, Calendar, Gallery (shows previews of attachments), and All tasks.
To look into individual tasks and sub-tasks, you can switch to the By project view as well.
All the projects and boards are shareable with advanced features, like access control, edit control, attachment restrictions, etc.
Pros
Cons
Integrates with various content, conversation, and code resource sites like Canva, Slack, GitHub, Dropbox, and more.
Comes with a moderate-level learning curve.
Offers basic to advanced page analytics.
Professional templates are often costly.
You can invite collaborators or guests with stringent content restrictions.
More expensive than the Planner app.
Free page history service.
Allows database syncing with third-party apps.
Pricing: A basic plan with workspace shareability is free for all. The Plus plan starts at $10 per user/month.
Trello is a board or card-based task management app that closely resembles Planner. However, it packs more features so you can manage complex projects seamlessly. The primary Trello dashboard contains all the workspaces. One workspace can contain multiple task lists.
From here, you can also navigate to free templates for professional projects, like New Hire Onboarding, Design Project, Kanban Template, and more.
Once you’re inside a task board, you can see the classic Kanban-style list. You can create exactly four task lists as suggested by the original Kanban board theory. These lists could be New Tasks, Doing, In Review, and Done, but you can also create more. The headers signify the statuses of the tasks.
You can also change the view of task lists to Table, Calendar, Timeline, Dashboard, and Map. Furthermore, you can access files and documents by using quick links for task boards, like Google Drive, Confluence, and Power-Ups. Moreover, you can use the Automation feature to set up rule-based automation, email reports, and custom board buttons.
Pros
Cons
It offers a large library of free templates created by the in-house specialists and the community.
Views other than the Board view are behind a paywall.
You can easily add your teammates to your task boards by adding them in the Members area.
The attachment size per upload is limited in affordable subscription tiers.
The Calendar view creates a Gantt chart-like timeline by analyzing the progress of all tasks and sub-tasks, including dependencies.
You might need to go through a few training lessons before you can use the tool effectively.
Available as web, desktop, and mobile apps for all major platforms.
Offers a basic free plan for small remote teams.
Pricing: The basic subscription tier is the Free plan, which is free forever. Paid subscriptions start from $6 per user/month.
Todoist is another viable Microsoft Planner alternative. With it, you can use most moderate to advanced-level features without going through a steep learning curve. Best of all, it also includes custom task actions, quick task organization into projects, task integrations for automation, etc.
The user interface is very minimalistic, just like on Planner. The sidebar contains most functional items like Add task, Add project, Filters & Labels, Today, and Inbox. You can also use the Search option to look up specific tasks and sub-tasks.
Moreover, you can use Board view for project tasks, together with List and Calendar.
Pros
Cons
The user interface is clutter-free.
It can’t create timelines or Gantt charts.
You can try the free plan for as long as you need before upgrading for professional and business projects.
Most of the useful features are behind a paywall.
Includes an AI Assistant extension to speed up research, content creation, and automation tasks.
Attachment size is limited.
Extensions allow you to automatically perform tasks considering the current task status, like exporting data to a Google Sheet worksheet.
Pricing: The Beginner plan is free forever. If you wish to use advanced productivity features, upgrade to Pro for $5 per user/month.
How I Chose the Best Microsoft Planner Alternative
While making my list, I considered the following factors:
Pricing: I prioritized freemium to-do list apps. So, you can use the basic version for free or upgrade with a nominal fee to access advanced features.
Data security and privacy: All my picks are developed by reputed software developers, including giant tech companies. I ensured they encrypt inward and outward data.
Ease of use: All of the apps listed above are similar to Microsoft Planner. They’re accessible as web, desktop, or mobile apps. Also, it’s easy to get started with any of them using freely available templates and interactive in-app tutorials.
Functionalities: All the alternatives include features either similar or better than the Planner app.
Syncing and sharing: I’ve included apps that offer sharing and syncing as well as those that don’t. You can choose depending on your to-list management requirements.
Platform support: You can use these apps on a Windows PC, Mac, Chromebook, Android, iOS, and other devices.
Summary
So, now you’re much closer to finding the ideal Microsoft Planner alternative.
You should try the above apps in their free trial period to see if they meet your requirements. If they do, you can go for a freemium or paid subscription.
Feel free to share your thoughts and suggestions in the comments below!
Windows has a search feature that allows it to perform an internet search if the result is not available but if you run into a search results aren’t quite ready yet message, it could be a network issue or indexing failed.
More often than not, system files may be corrupt that affects search functionality but recent changes like a Windows Update may also play a part especially if there are known bugs or glitches in the update.
What can I do if the search results aren’t quite ready yet?
1. Run the Indexing troubleshooter
Hit the Windows key and select Settings.
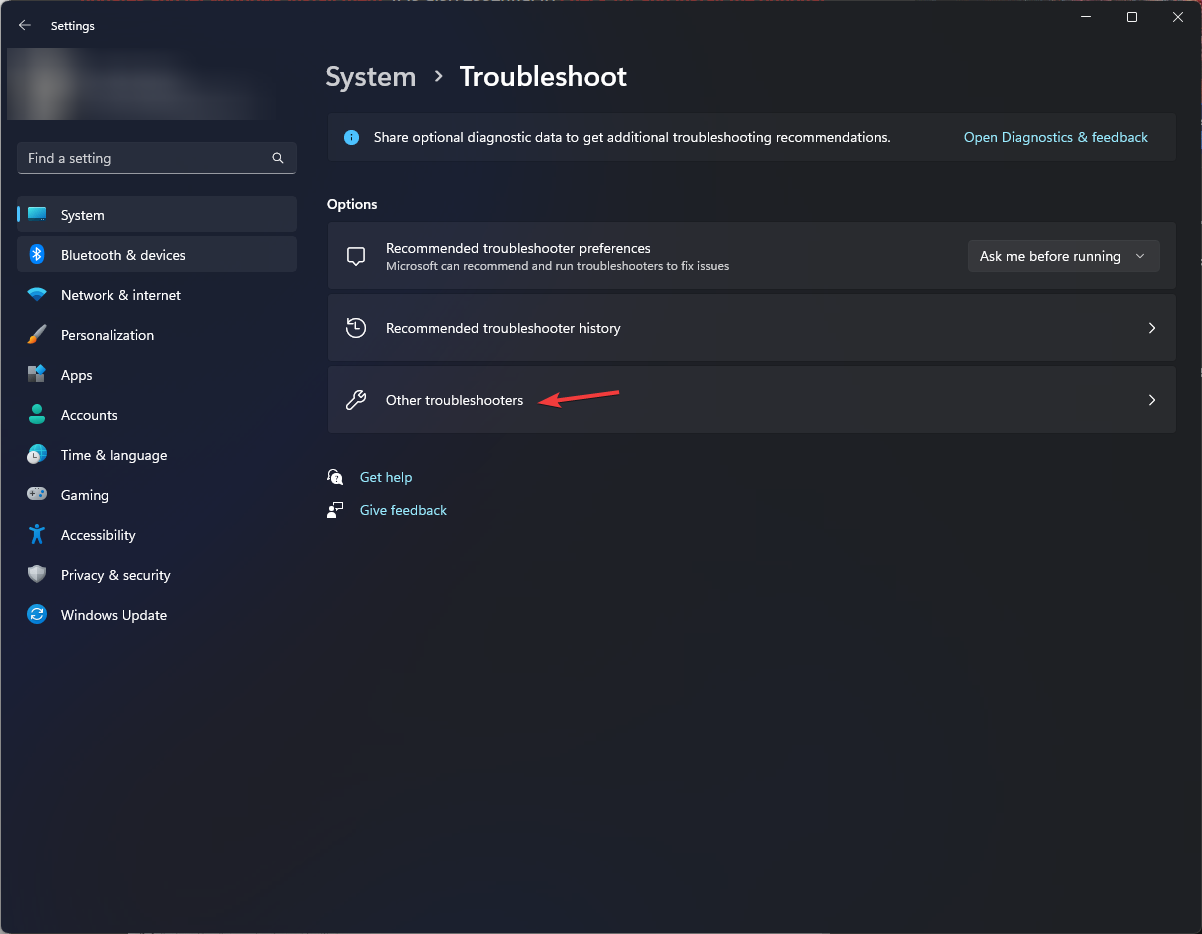
Select System and click on Troubleshoot.
Click on Other troubleshooters.
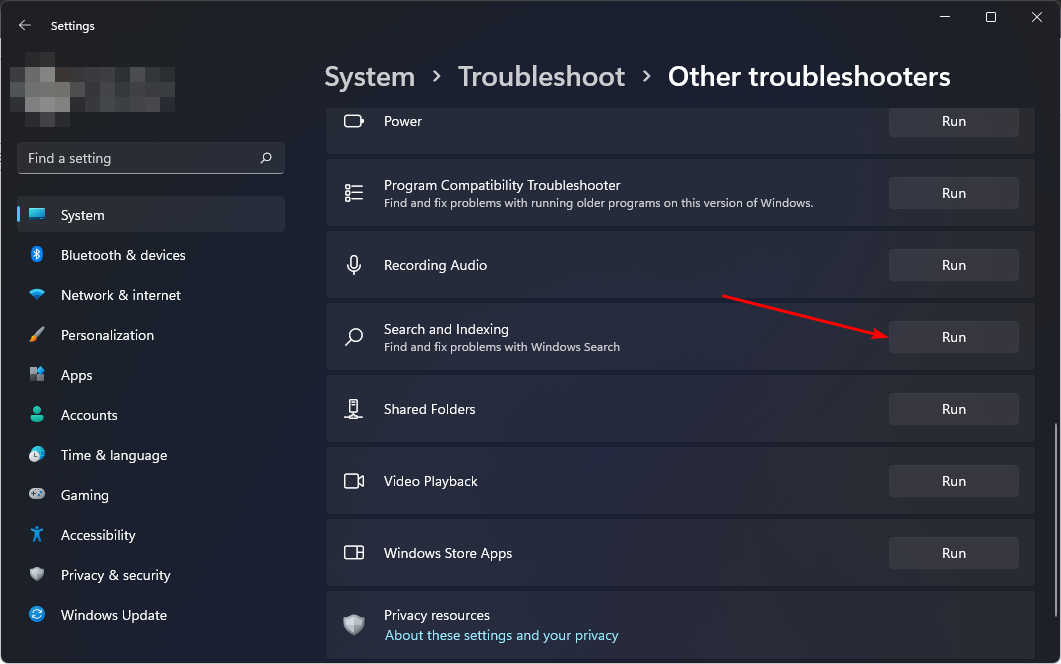
Navigate to Search and Indexing troubleshooter and click the Run button next to it.
2. Restart the Windows Search service
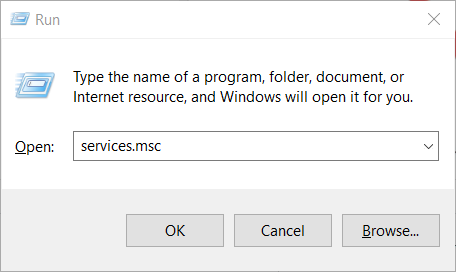
Hit the Windows + R keys to open the Run command.
Type services.msc in the dialog box and hit Enter.
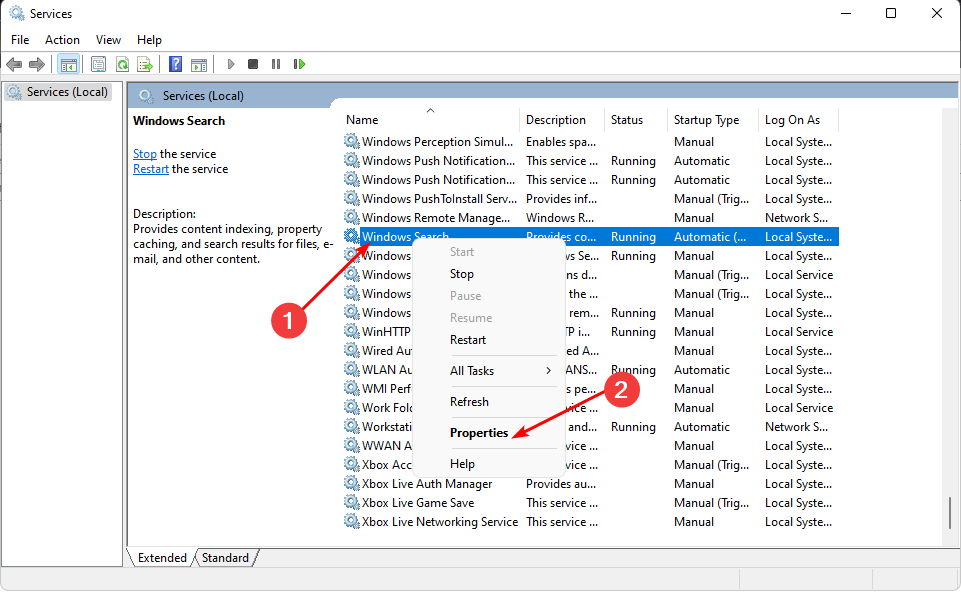
Locate Windows Search, right-click on it, and select Properties.
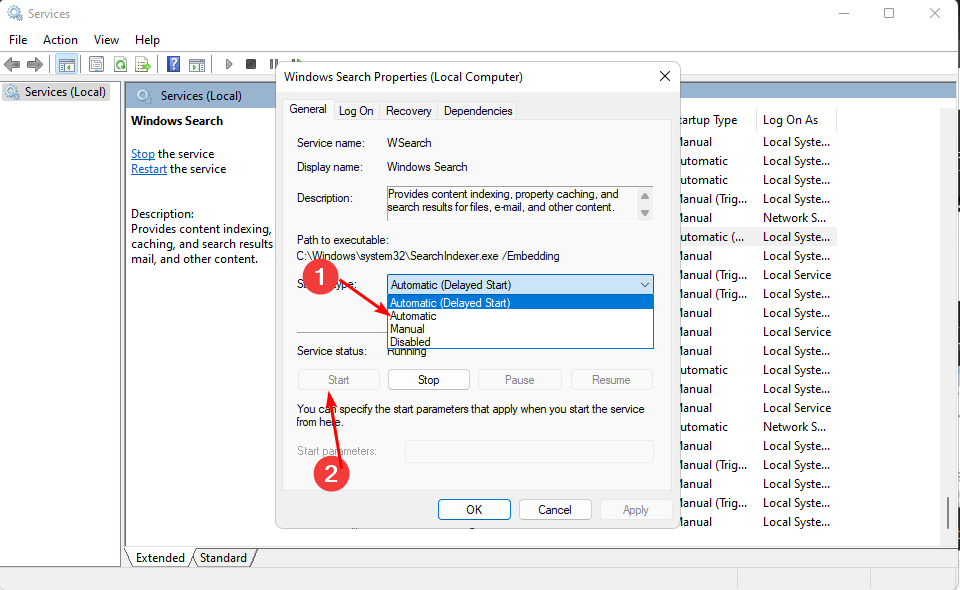
Go to Startup type,and in the drop-down menu, select Automatic, then click Start.
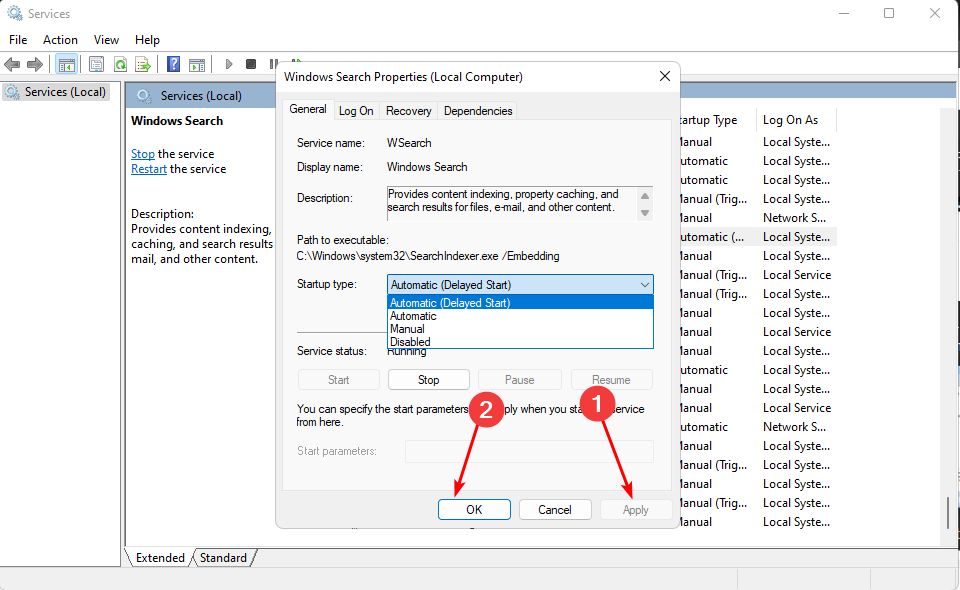
Click Apply, then OK to save changes.
Restart your PC and see if the issue persists.
3. Rebuild the search index
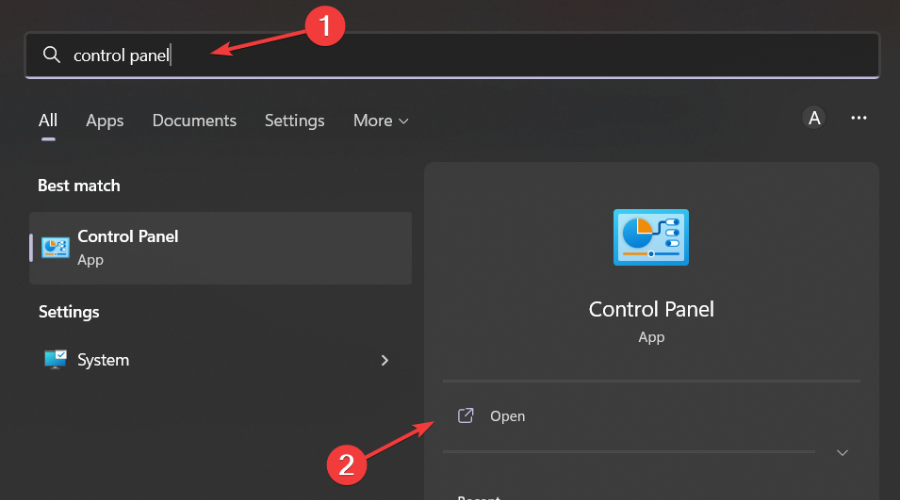
Hit the Windows key, type Control Panel in the search bar, and click Open.
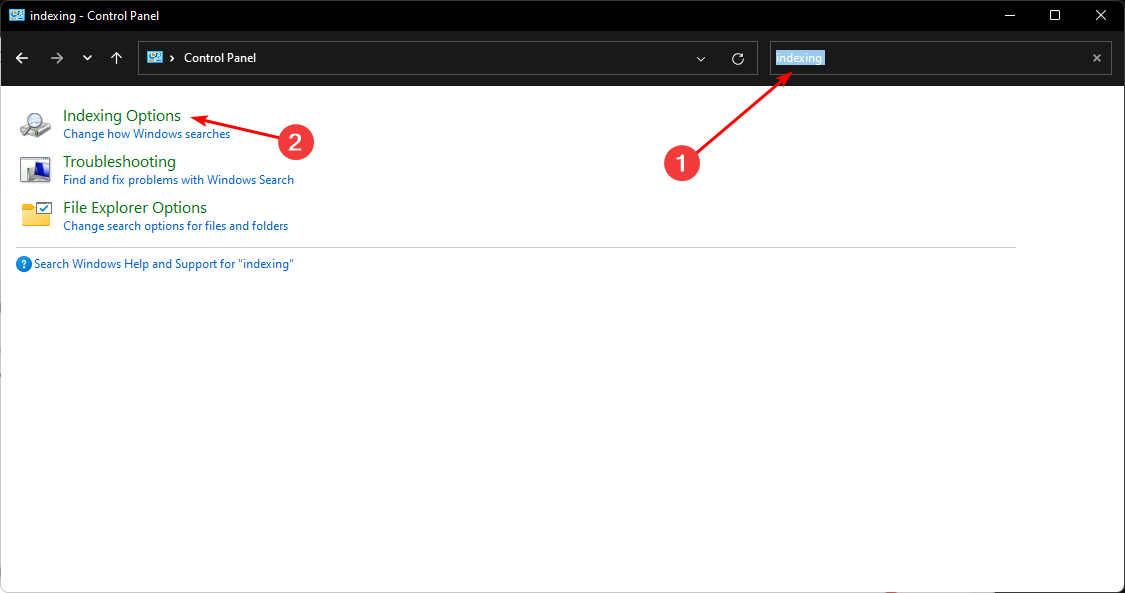
Search for Indexing Options in the Control Panel search bar and click to Open.
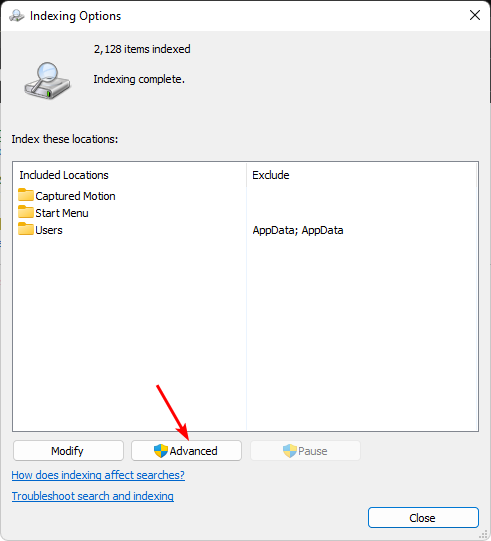
In the Indexing Options dialog box that opens, select the Advanced option.
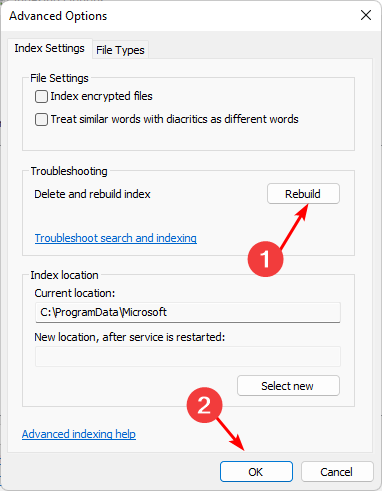
Click Rebuild under Troubleshooting in the Advanced Options dialog box that pops up.
Press OK to confirm that you want to rebuild. Note that it may take a while, so ensure you don’t have any pressing matters when performing this step.
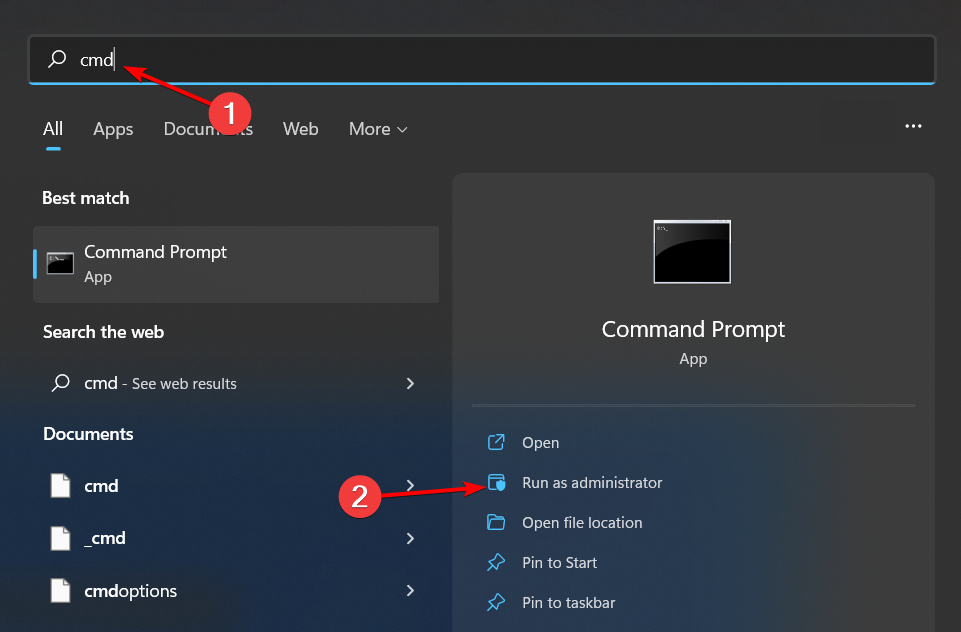
Hit the Start Menu icon, type cmd in the search bar, and click Run as administrator.
Type the following commands and press Enter after each one: DISM.exe /Online /Cleanup-Image /Restorehealthsfc /scannow
Restart your PC.
5. Change your system display language
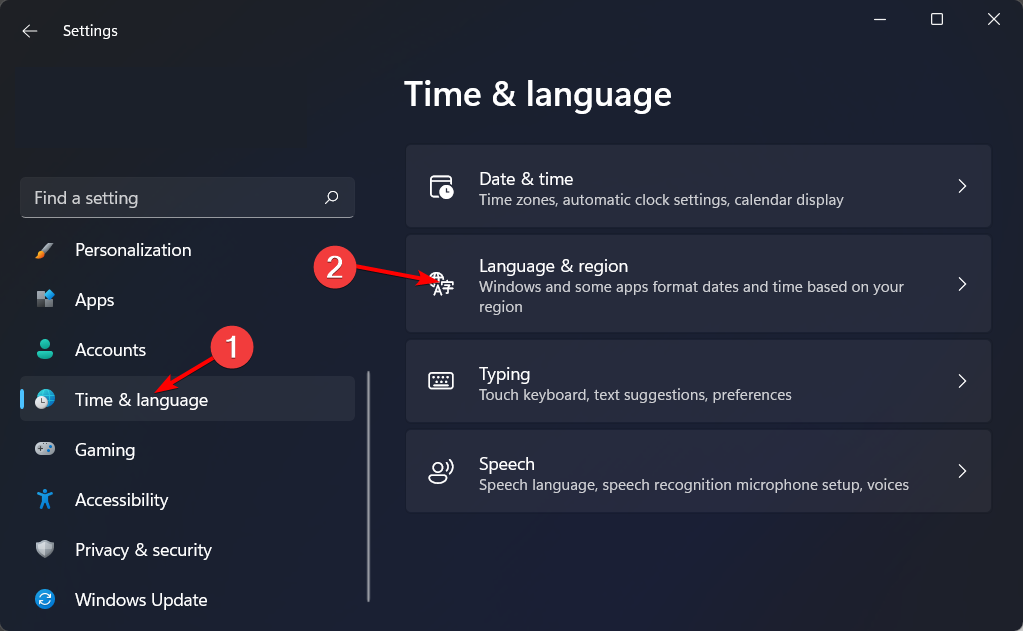
Press Windows + I to open Settings and navigate to Time & language followed by Language & region.
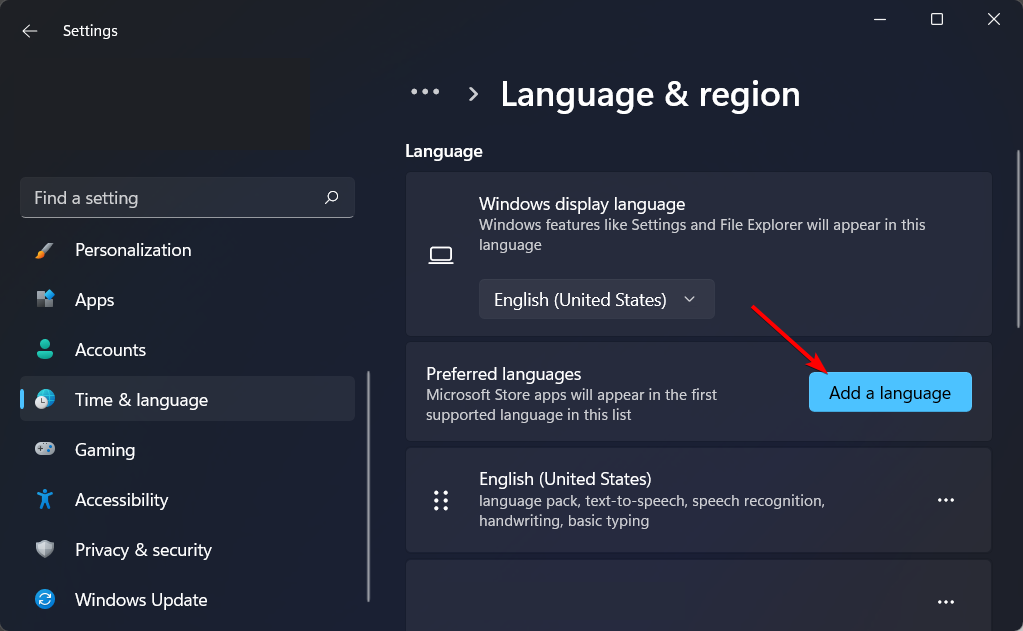
Next, click on the Add a language button.
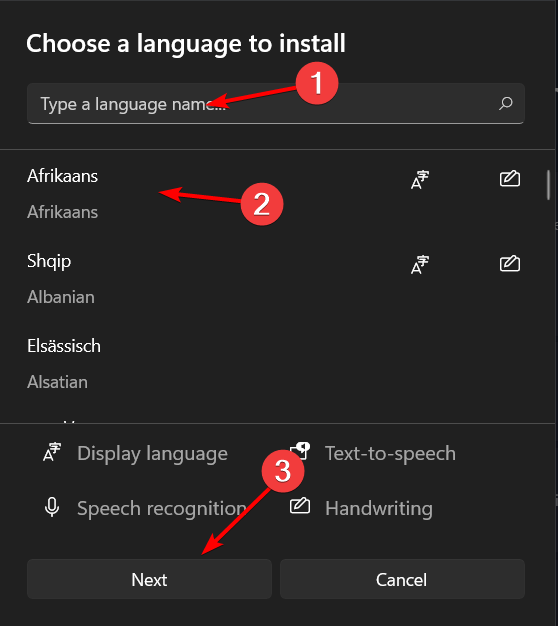
Now, search for the desired language, click on it and select Next.
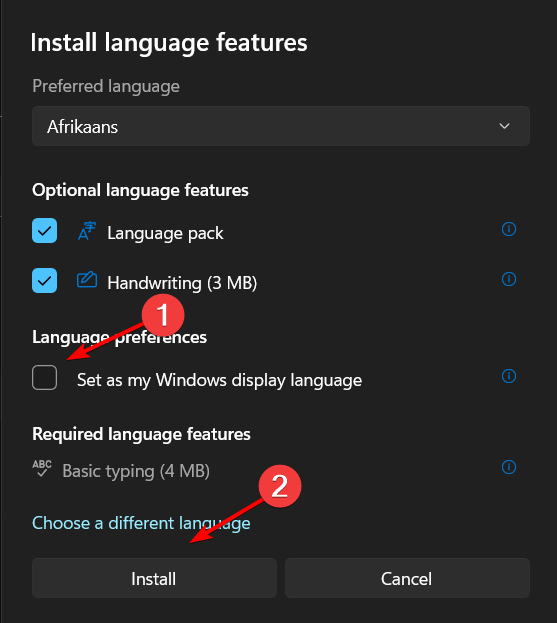
Check the Set as my Windows display language and select Install.
Indexing and your system language are interconnected and if the current language settings have some compatibility issues, there may be a need to adjust it to language-specific configurations. Sometimes, setting it to one language and switching back can also do the trick as it will force an update.
6. Uninstall recent Windows update
Hit the Windows key and select Settings.
Click on Windows Update and select Update history on the right pane.
Scroll down, and under Related settings, click on Uninstall updates.
This will take you to the most recent installed updates.
Select the topmost update and click on Uninstall.
Restart your PC and check if the problem persists.
7. Create a new user profile
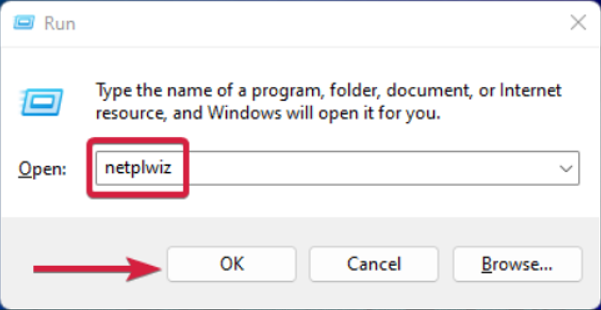
Press Windows + R to launch the Run console, enter netplwiz in the text field, and click OK.
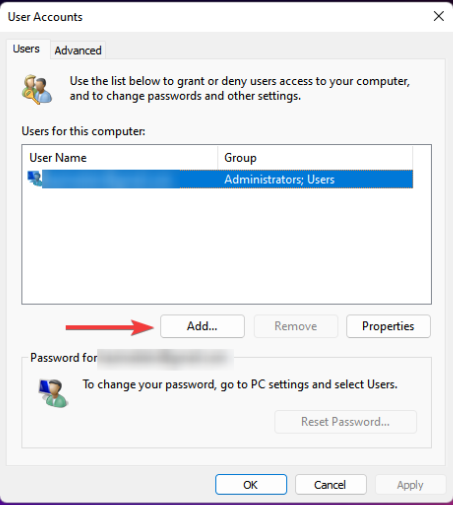
Click Add in the User Accounts window.
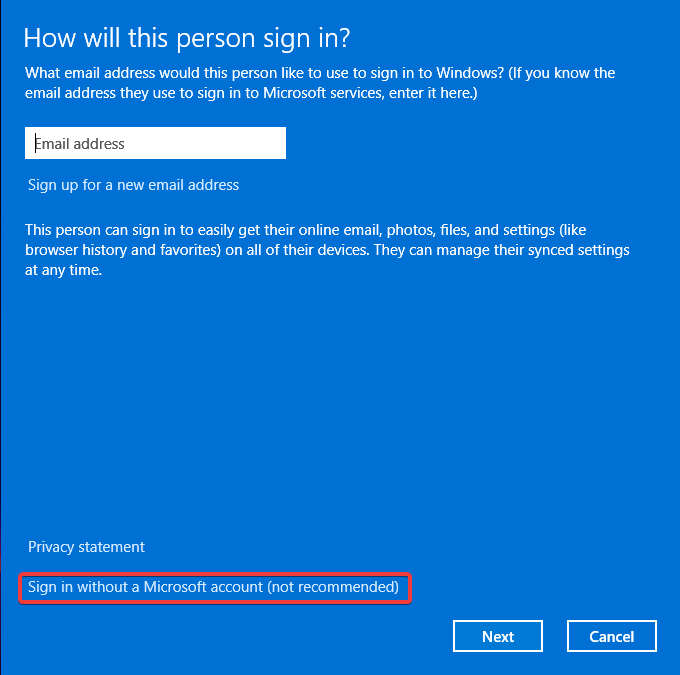
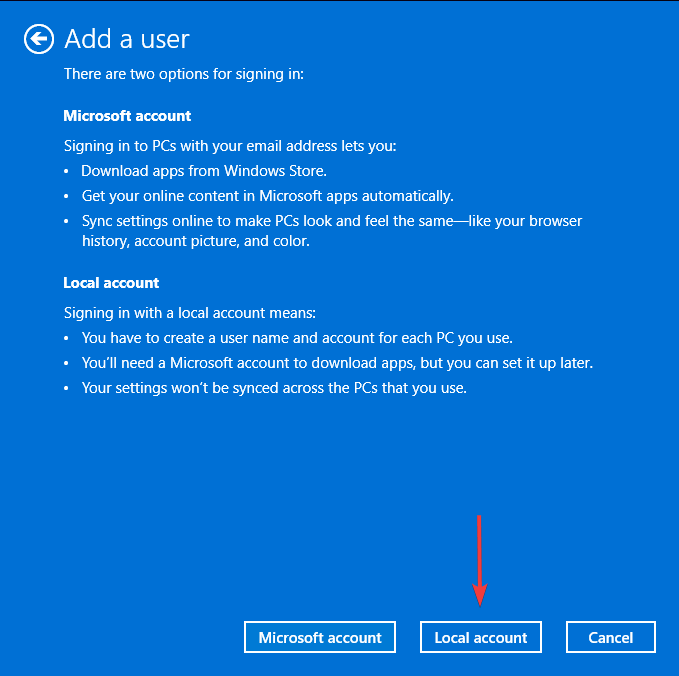
Select Sign in without a Microsoft account (not recommended).
Click on Local account button.
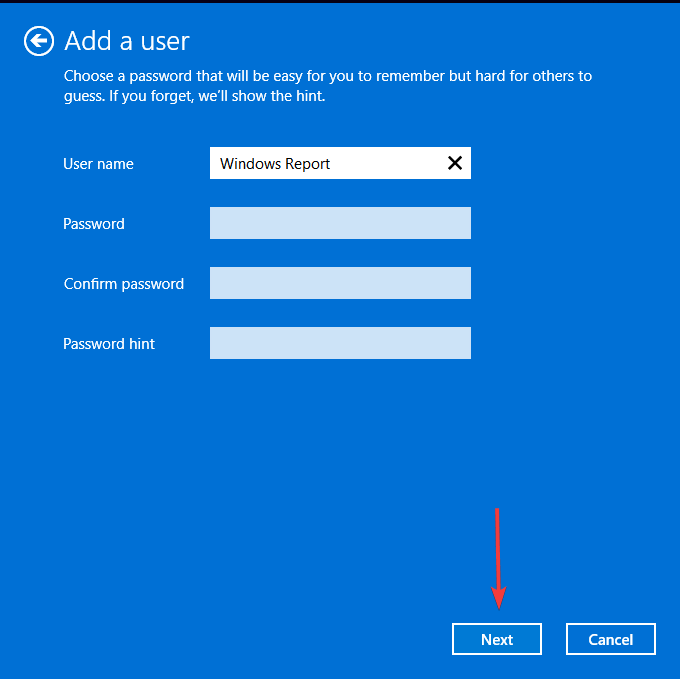
Enter a username and password (optional) for the new user account, and a hint, in case you set a password. Once done, click on Next.
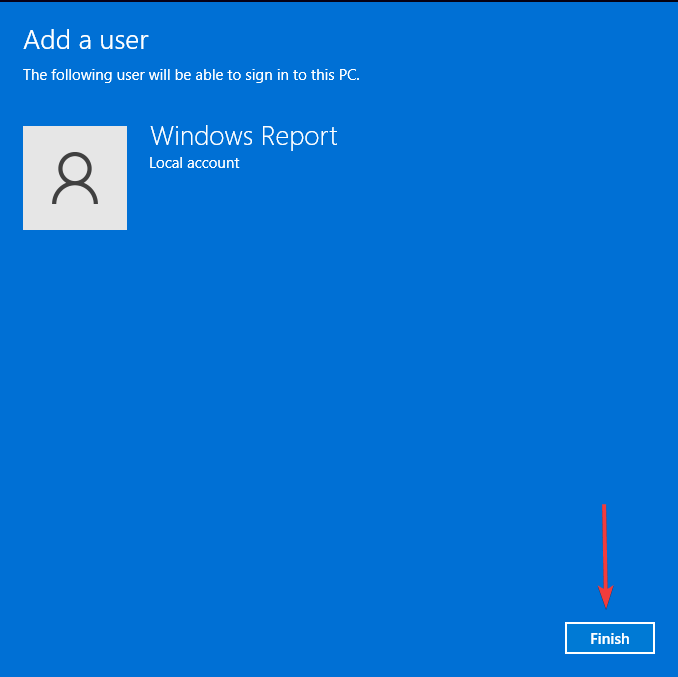
Click on Finish to create the Local account.
Additional tips to enhance search indexing and results
Rebuild search index – Your search cache can accumulate and become corrupt. Rebuilding it regularly ensures you get rid of outdated indexes.
Clean up your system – Regular virus scans, system file checks and Disk Cleanup can help get rid of corrupt files and ensure they don’t appear in searches or interfere with indexing.
Ever found yourself staring at a cluttered Command Prompt screen and wished you could clear it up quickly? You’re not alone. Let’s dive into some straightforward methods to clear the CMD screen and make your command line experience smoother.
How do I clear in CMD?
1. Use the CLS Command
Open Command Prompt by pressing Windows + R, typing cmd, and hitting Enter.
Once in the Command Prompt, type cls and press Enter.
Add the following lines to the script: #IfWinActive ahk_class ConsoleWindowClass ^l::SendInput cls{Enter} #IfWinActive
Run the script.
Now, pressing Ctrl + L will send the cls command to the Command Prompt, clearing the screen.
There is no built-in keyboard shortcut to clear the Command Prompt screen directly in Windows. However, you can use an AutoHotkey script to achieve this.
Running PHP files locally can be a breeze with XAMPP. If you’re new to this, don’t worry, we’ll guide you through the process step-by-step. Let’s dive into how to run a PHP file in XAMPP quickly and easily.
Open the downloaded installer file. Follow the installation instructions, selecting the required components, including Apache, MySQL, PHP, and phpMyAdmin.
Select the directory where you want to install XAMPP. The default directory is usually C:\xampp.
Click Next and complete the installation process.
Installing XAMPP sets up a local web server environment, allowing you to run and test PHP scripts on your machine without needing an external web server.
2. Starting XAMPP and Apache
Locate and open the XAMPP control panel (on Windows, search for XAMPP Control Panel in the Start menu).
In the control panel, click the Start button next to Apache and MySQL. Ensure that the modules turn green, indicating they are running.
3. Creating and saving a PHP File
Open a text editor such as Notepad, Notepad++, or any Integrated Development Environment (IDE) of your choice.
Write your PHP script. For example, type the following code: <?php echo "Hello, this is PHP."; ?>
Save the file with a .php extension. For instance, save it as index.php.
Copy or move the saved PHP file to the htdocs directory inside the XAMPP installation folder (e.g., C:\xampp\htdocs).
Saving your PHP file in the htdocs directory is important because this directory is the root folder for your local server, enabling the server to locate and run your scripts.
In the address bar, type the following URL: https://localhost/index.php
Replace index.php with your file name if different and press Enter.
If everything is set up correctly, you should see the output of your PHP script in the browser.
Running your PHP file through the browser ensures that the PHP code is executed on the server side and the result is displayed on the client side.
5. Using phpMyAdmin with XAMPP
Ensure MySQL is running in the XAMPP control panel.
Open your web browser and navigate to https://localhost/phpmyadmin/
Use the default credentials (usually username: root, password: blank) to log in.
Click on the Import tab, browse and select your SQL file, then click Go to execute the SQL commands.
Using phpMyAdmin provides a graphical interface for managing your MySQL databases, making it easier to perform database operations without needing to write SQL commands manually.
Additional tips and troubleshooting
Always verify that Apache and MySQL are running from the XAMPP control panel.
If you encounter issues loading your PHP files, try accessing https://localhost in Incognito mode to avoid browser cache problems.
Create separate folders inside htdocs for different projects. Access these folders through https://localhost/your_project_folder/index.php
These additional tips help ensure a smoother development experience and resolve common issues encountered while running PHP files using XAMPP.
By following these steps, you can install, set up, and run PHP files using XAMPP, making local web development easier and more efficient. Always keep your XAMPP updated and regularly back up your projects to prevent data loss.
Did you know that you can install Windows 11 on a 10-year-old Celeron laptop? I know what you’re thinking. That couldn’t be possible, considering Microsoft updated the OS to ask for TPM 2.0 (Trusted Platform Module).
The Trusted Platform Module 2.0 console has only been around since 2016-2017, and older PCs are usually not equipped with them, which automatically and officially renders them unable to support Windows 11.
However, unofficially, there are ways to install Windows 11 on those devices that are not equipped with TPM 2.0. And those devices are usually quite old. As this Reddit user said, Windows 11 even runs great on them.
The user installed Windows 11 on a laptop from 2014, Acer E5-411, equipped with an Intel N2940. How? Bypassing the TPM 2.0 using a Windows installation with Rufus.
The result? A fully functional Windows 11 device that runs even better than Windows 10; according to the user, they can play games on it, it boots up in 7 seconds, and it can even render a 25-second video in 17 minutes—which is quite impressive if you ask us.
Everything loads approximately 50% faster than on Windows 10, including the notification center, Wi-Fi, or the Settings panel.
The user made some modifications to the device, though: they updated the Celeron Laptop with 4 GB of RAM instead of the native 2 GB, and added an SSD. But that was all.
ive been using my moms laptop from 2014. its an acer aspire e5-411 running intel celeron n2940. been playing a few games on it and it still runs great. doesnt heat up at all even a bit of warmth. i installed windows 11 last month and i did not even need to optimize it at all (performance balanced, just fixed svchost with regedit for 4gbs ram) and it just runs absolutely great. i upgraded it from 2gbs of ram to 4 since i only had that and installed a 128gb skhynix ssd. this laptop boots up with fast startup on by default at 7secs and 14 from a whole reboot. this is the only laptop i have rn and i gotta say… this is definitely beyond usable.
The other Reddit users quickly pointed out that Microsoft should somehow enhance Windows 11 to be officially supported on older devices, citing sustainability as the main reason behind this, and frankly, they’re not wrong.
In an era where there manufacturers have troubles due to chips shortages, sustainability is a big concern of not only the tech industry, but the world. Rendering laptops obsolete in a few years, doesn’t help the cause. Sure, there is the Right to Repair movement, and Microsoft has proudly stated that its newest Surface laptops are the most serviceable devices in the world right now: you can easily replace broken parts and repair them.
So why not making Windows 11, or any future version of Windows a bit less demanding, and a bit more open to devices, whether we’re talking about new or old ones?
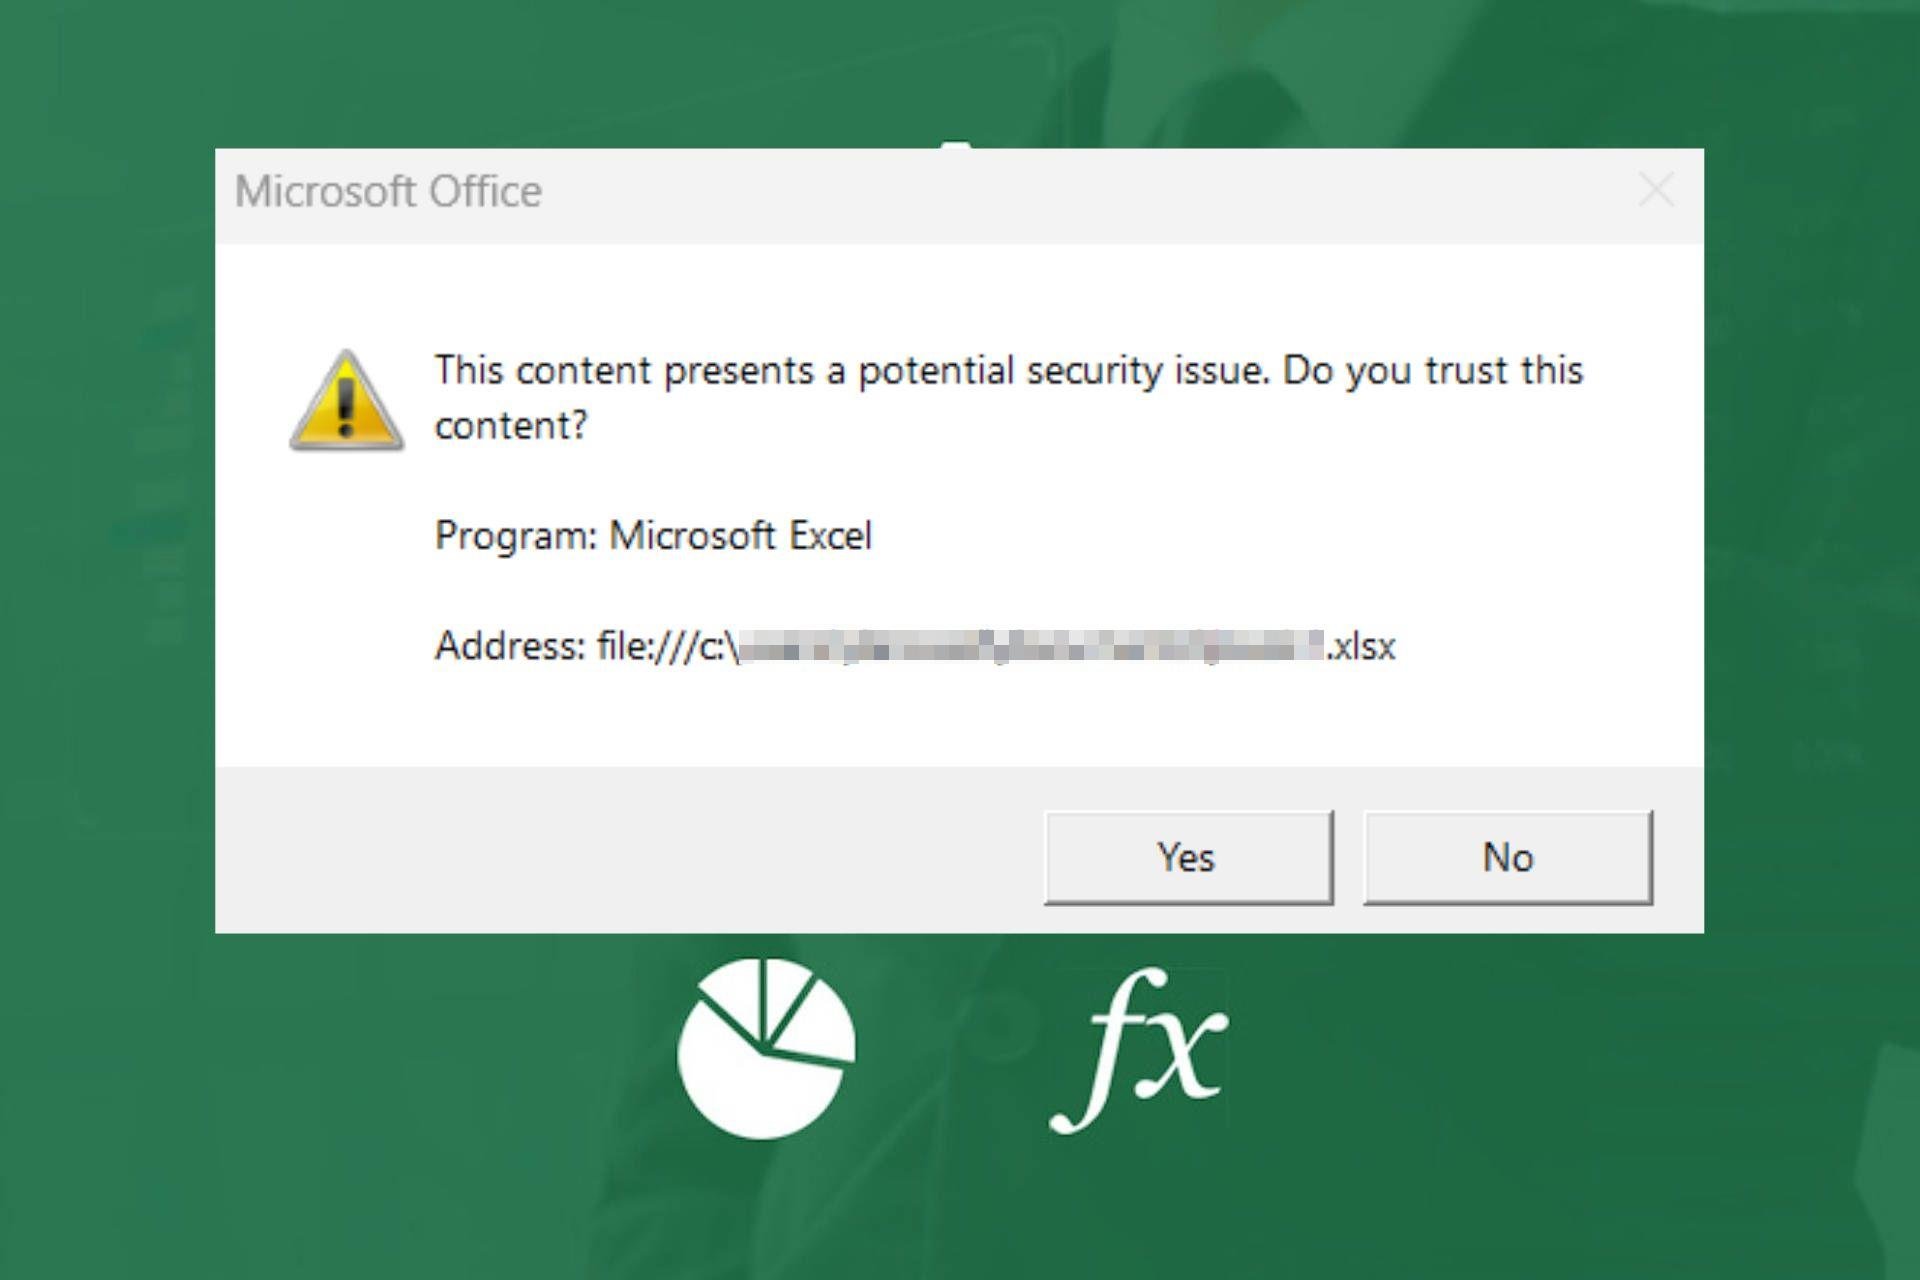
Opening files whether on Microsoft Word, Excel or PowerPoint should be as easy as clicking and opening but some users are getting the this content presents a potential security issue message.
When you get such a message, it implies the Excel file you’re trying to open may be from an untrusted source, the file is corrupted and contains content flagged by your antivirus.
What can I do if Microsoft has identified a potential security concern?
1. Adjust Trusted site settings
1.1 Add SharePoint to Trusted Sites
Press Windows+S, enter Internet Options, and click on the relevant result.
Navigate to the Security tab, click on Trusted sites, and then click the Sites button.
Enter the URL of your SharePoint websites in the Add this website to the zone section and click the Add button. Once you’re done, click Close and OK to save changes.
Some users recommend unchecking Enable Protected Mode for Internet Zone, so you might want to try that as well.
Several users suggest adding the following entries to the Trusted zone:
https://*.outlook.com
https://*.sharepoint.com
https://*.microsoftonline.com
https://*.lync.com
*.microsoftonline.com
*.sharepoint.com
*.outlook.com
*.lync.com
1.2 Change your Internet options
Press the Windows + I keys and enter Internet options. Select Internet Options from the list of results.
When the Internet Properties window opens, go to the Security tab and click on the Custom Level button.
A list of settings will appear. Locate Launching applications and unsafe files and select Enable. Now click OK to save changes.
2. Enable macros
Launch MS Excel and click on File.
Select Options.
Click on Trust Center, then select Trust Center Settings.
Under Macro settings, check the Enable all macros box then hit OK.
Macros are disabled by default in Excel because they present a pathway to vulnerabilities and anyone can enter malicious code to take control of your file and system.
3. Adjust the Group Policy settings
Hit the Windows + R to launch the Run command.
Type gpedit.msc in the dialog box and hit Enter to open the Group Policy Editor.
Navigate to the following location: Computer Configuration\Administrative Templates\Windows Components\Internet Explorer\Internet Control Panel\Security Page >> Site to Zone Assignment List
Double-click on Site to Zone Assignment List, check the Enabled button to activate the options then click on Show more under Enter the Zone assignments here.
Enter the corresponding values in their respective boxes then click OK.
Finally, click on Apply and OK to save the changes.
Next, refresh the Group Policy settings by hitting the Windows key, type cmd and select Run as administrator.
Type in the following command and press Enter: GPupdate/force
4. Run a virus scan
Click on the Start Menu icon, search Windows Security, and click Open.
Select Virus & threat protection.
Next, press Quick scan under Current threats.
If you don’t find any threats, proceed to perform a full scan by clicking on Scan options just below Quick scan.
Click on Full scan, then Scan now to perform a deep scan of your PC.
Wait for the process to finish and restart your system.
Locate the problematic file, select it, and click on the drop-down icon next to Open.
Select Open and Repair.
5.2 Repair app
Press Windows + I to open the Settings window.
Go to Apps, then Installed Apps.
Locate Microsoft Office and click on three dots. Then, from the context menu, select Modify.
On the UAC prompt, click Yes.
On the next page, select Quick Repair, then click Repair and follow the on-screen instructions.
Best practices for securing Excel files
Protected view – Launch your Excel app, click on the File menu then go to Options > Trust Center > Trust Center options > ProtectedView then check all three options listed to enable Protected View. This minimizes the risk of executing malicious code or compromising sensitive data.
Disable macros – Macros can inject malicious code and alter your data when enabled. Only enable macros from files you trust.
Built-in security – Excel has built-in security settings to prevent unauthorized document changes. This means you have control and can track who can make changes to the file.
From making AI features such as Tab organizer avaialble to improving support for Chrome with various hardware, Google continues to improve user experience. The company is bringing Stylus handwriting support to Chrome on Windows, allowing users to write directly into text fields with a stylus. This will useful for users with devices like Surface, Lenovo Yoga, and Galaxy Tab S. Google to use existing work from Samsung’s Android Stylus Handwriting feature with some adjustments for this.
According to commit titled “Add stylus handwriting feature flag for Windows” and bug titled “Bug to track implementation of Windows TSF Shell Handwriting integration in Chromium”, spotted by Windows Report reveals, Google is developing a new feature to let users write with a stylus directly into text boxes in Chrome on Windows.
Chrome will use Windows’ Text Services Framework (TSF) Shell Handwriting API to recognize handwritten text and insert it into input fields.
“Windows Text Services Framework (TSF) Shell Handwriting API is a feature that recognizes handwritten text with stylus and commits to input fields on Windows devices. This bug is created to track feature implementation progress in Chromium to support the Shell Handwriting feature in HTML input fields for Chrome and WebView.” The bug description reads.
You can write directly on editable text fields with a stylus.
Chrome determines where you’re writing and sends it to a tool for conversion.
The converted text appears in the text box.
While Android directly handles stylus gestures, Windows will process them internally, with Chrome receiving information for actions like deleting text. Chrome will also introduce a new HTML attribute to control handwriting support for specific elements.
Devices like Microsoft Surface, Lenovo Yoga, HP Spectre x360, and Samsung Galaxy Tab S (when used with Windows) will benefit from this feature, improving note-taking and form filling. Essentially, any Windows device with stylus support can use this new Chrome feature.
Worried that someone might be remotely accessing your computer? It’s a common concern, especially with the rise of cyber threats. Here are some practical steps to help you determine if your PC is being accessed without your permission and how to secure it. If your device is part of an organization’s network environment, check out the situation with the IT manager.
How do I know if someone is controlling my PC remotely?
1. Disconnect from the Internet
Turn off your router or Wi-Fi to prevent any ongoing remote access.
Remove any Ethernet cables from your computer.
Forget the network from Wi-Fi settings to ensure you’re completely offline.
Disconnecting your computer from the internet ensures that no one can access it remotely. This gives you time to check for any suspicious activities.
2. Check for signs of intrusion
Look for unusual activity like unauthorized logins, new user accounts, or changes to personal information.
Observe the mouse for phantom movements or unexpected cursor activity. (only when you are online)
Check if the device is slow or unresponsive, indicating background tasks.
Look for persistent pop-ups, error messages, or command prompts.
Monitor if the microphone or camera activates without your permission.
Spotting these signs can help you identify if someone is trying to control your computer remotely.
3. Inspect recent activity on your device
Press the Windows key + E to open File Explorer.
Check the Recent files section at the bottom or go to the Start menu and look at recently opened apps.
Review browser history for unfamiliar websites or downloads.
Check login events. To do that, in Windows, search for Event Viewer and select it from the results.
There, you can see all the logs to look for suspicious activity.
This helps to detect if any unfamiliar actions have occurred on your computer recently.
4. Check for remote access software
Open Task Manager by pressing Ctrl + Shift + Esc.
Look for any remote access programs like TeamViewer, LogMeIn, or AnyDesk.
If you don’t know anything about them or their installation, uninstall them immediately.
Finding remote access software that you didn’t install indicates unauthorized access.
5. Review Firewall settings
Click the Start button, type firewall and open Windows Defender Firewall.
Next, click on Advanced Settings.
Examine Inbound and Outbound Rules for suspicious activities.
Right-click on any dubious rules and select Disable Rule.
If your PC is in a controlled environment of an organization, ask your IT admin about these policies.
Changing firewall settings back to default can block unauthorized access.
Perform a full system scan to detect and remove malware or remote access tools.
Quarantine any items that are found during the scan.
Regular antivirus scans can help detect and eliminate malicious software that allows remote access.
7. Update passwords using a secure device
Use another device, like a smartphone or a friend’s computer, to change your passwords.
Update passwords for all online accounts, including email, social media, and banking.
Changing passwords ensures that anyone who had your old passwords can no longer access your accounts.
8. Secure your Wi-Fi router
Change the default login credentials to something strong and unique.
Disable remote administration settings on your router.
Enable WPA3 (or WPA2) encryption for your Wi-Fi.
Update the firmware of your router to the latest version.
Securing your router prevents hackers from gaining access through your home network.
9. Perform a full system wipe (Only as a last resort)
Backup your important files to an external hard drive or cloud storage.
Go to Settings > Update & Security > Recovery > Reset this PC.
Choose Remove everything.
A full system wipe removes any hidden malware and restores your computer to factory settings.
What can I do to avoid the remote controlling of my PC?
Keep antivirus and antimalware software up-to-date to detect most attacks.
Configure your firewall properly to prevent unauthorized access.
Be careful with email attachments and links to avoid phishing scams.
Use strong, unique passwords for each service and consider a password manager.
Avoid public Wi-Fi or use a VPN to encrypt your connection.
These proactive measures will help you maintain the security of your computer and prevent future unauthorized access.
By following these steps, you can ensure your PC remains secure and free from unwanted intrusions. Stay vigilant and regularly update your security measures to keep your data safe.
There are ways to control your work PC from home so make sure you deactivate that feature when you’re not using it. There is also a Windows 11 Remote Assistance tool that you might have enabled. Therefore, check if someone is actually using that feature.
We hope that our guide on how to check if someone is remotely accessing your computer has paid off and now your device is safe from unauthorized access.
For any other questions or suggestions, hit the comments section below and let us know.
Microsoft released another version of the Edge 128 build to the Beta Channel, and it’s already causing a stir by demanding the SSE3 instruction set. As we already told you, if your computer is an antique from twenty years ago, you must say goodbye to using this browser.
However, the build comes with many other capabilities, such as the quick update mechanism. Just think: You leave your computer for a coffee break, and when you come back, Edge has been updated to its newest version. This feature is gradually rolling out, promising a seamless browsing experience for everyone.
Get the latest updates effortlessly with instant update. Instant update in Microsoft Edge ensures you get the latest browser updates automatically, when you step away from your computer. So you can just keep browsing, knowing you already have the latest updates to keep you safe online. For more information, see Get instant updates in Microsoft Edge – Microsoft Support. Note: This feature is a controlled feature rollout to consumer customers. A release to enterprise users is TBD. If you don’t see this feature, check back as we continue our rollout.
Edge 128 is also enhancing policies. It adds fresh policies that provide administrators with increased governance on how Copilot interacts with browser data, especially in the context of the Copilot browser.
Copilot browser Context Policies. The DiscoverPageContextEnabled policy is obsoleted in Edge version 128 and doesn’t work after Microsoft Edge 127.
However, the update bid farewell to followable web features and policies, thus making the browser simpler in function. And for those who worry about safety issues, a new policy for insecure downloads over HTTP is coming soon. This policy alerts you if you are going to download something risky from less reliable sites.
Deprecation of the followable web feature. To improve end user experience, the followable web feature is deprecated. The EdgeFollowEnabled policy is also obsolete.
You can read Microsoft Edge 128’s full changelog here.
If you’re diving into Japanese text online and need a reliable tool to help with translations, the Rikaikun Firefox extension and its alternatives are your best bet, so here’s everything you need to know about it.
If you’re learning Japanese, you might be interested in how to use a Japanese keyboard in Windows, and we have a perfect guide to help you.
For more language learning extensions, don’t miss our best dictionary extensions article. If you’re looking to organize your tabs on Firefox, you might also want to learn more about the OneTab Firefox extension.
Seeing the MSI Driver Utility Installer pop-up can be a bit annoying, especially if you’re not sure why it’s there or what to do with it. Let’s dive into understanding and managing this pop-up effectively.
What can I do about the MSI Driver Utility Installer pop-up?
1. What is the MSI Driver Utility Installer?
First, we need to understand a little bit about this app. The MSI Driver Utility Installer often appears after installing or updating BIOS on an MSI motherboard. It may also pop up when you install a fresh Windows copy.
It is designed to help install various MSI utilities and drivers, so it can be very helpful. However, it can become a bit annoying if the MSI Driver Utility Installer pop-up keeps showing up on your screen. This setting is set up in your BIOS so read on to learn how to install the app and how to get rid of this pop-up.
2. Disable MSI Center auto-install from BIOS
Click on the Start Menu, select the Power icon, and choose Restart.
As your computer restarts, repeatedly press the Delete key (or F2 key depending on your motherboard) to enter the BIOS setup.
Use the arrow keys to select the Advanced tab and press Enter.
Look for an option related to MSI Center Auto-Install or MSI Utilities Auto-Install.
Use the arrow keys to select the auto-install setting, then change it from Enabled to Disabled. This can usually be done by pressing Enter and choosing Disabled from the list.
Press F10 to save your changes and exit the BIOS. Your computer will restart.
By following these steps, you avoid the automatic installation of MSI Center and other utilities. Thus, the MSI Driver Utility Installer pop-up will not show up anymore.
3. Decide what to install
The installer may propose several utilities such as Norton 360, MSI Wallpaper, MSI Center, CPU-Z, MSI Gaming, and AIDA64 Extreme MSI Edition.
Evaluate each utility for its necessity and benefits. For example, utilities like Norton 360 and MSI Wallpaper may be unnecessary bloatware.
Only install utilities if they serve a specific purpose for your use case.
If you decide to keep the app, this approach saves you from installing unnecessary bloatware and keeps your system clutter-free.
By understanding the MSI Driver Utility Installer and managing its pop-up effectively, you can keep your system running smoothly without unnecessary interruptions. Always remember to review and install only the utilities that genuinely benefit your setup.
There is a lot of talk about Microsoft, and it’s all because they are introducing the new Windows app that will make accessing cloud PCs very easy. This fall, you can expect this application on nearly every platform possible.
Microsoft has pledged this for its forthcoming Windows App. In a blog post, the Redmond-based tech giant says this is not solely designed for Windows users; the company is also extending this ease to macOS, iOS, and even the web.
Connecting with cloud-based Windows desktops should be easier, as the Windows App will support many services, such as Windows 365, Azure Virtual Desktop, and others. In other words, you will have a single client that allows you to access your Windows workspace securely from any device.
Consider the increase in your work efficiency with characteristics such as personalized home screens, the ability to use multiple monitors, and USB redirection. Also, knowing that you are working on a safe connection due to enhanced security features like multifactor authentication will provide peace of mind.
If you use Windows 10 or 11, Microsoft is preparing to swap the present Windows 365 app with this fresh Windows App. On iOS and MacOS, the Remote Desktop application will also shift into the Windows App. As for web users?
You go to the fresh Windows App URL. For those using Android, Microsoft has something for you, too. They are preparing to release a public preview of the Windows App for Android in the Google Play Store this autumn.
The most thrilling part is that Microsoft guarantees a uniform experience on every platform without function problems. This matters because it ensures you can work as effectively, whether using your device or sitting at home/office in front of your personal computer.
Diving into driver development on Windows 11 can seem daunting, but with the right tools and setup, it becomes a smooth journey. Whether you’re a seasoned developer or just starting, getting the Windows Driver Development Kit (WDK) up and running is essential. Let’s walk through the steps to master this setup.
How do I Download and Install the WDK for Windows 11?
1. Download the Windows Driver Kit (WDK) using Visual Studio
Note: The WDK installs a Visual Studio extension by default. If you don’t see driver project templates in Visual Studio, run the WDK.vsix file located at C:\Program Files (x86)\Windows Kits\10\Vsix\VS2022\10.0.26100.1\WDK.vsix.
By following these steps, you will have the Windows Driver Kit set up and ready for developing drivers on Windows 11.
Download the latest EWDK version 10.0.26100.1. The EWDK is a standalone, command-line environment that includes Visual Studio Build Tools, the SDK, and the WDK.
Right-click the downloaded ISO file and select Mount. This will make the contents of the ISO accessible as a virtual drive.
Open a Command Prompt with administrative privileges.
Navigate to the mounted ISO drive.
Run LaunchBuildEnv.cmd. This command sets up the build environment with all the required tools and paths.
In the Command Prompt, type SetupVSEnv and press Enter.
Launch Visual Studio by typing the full path to devenv.exe. For example: "C:\Program Files\Microsoft Visual Studio\2022\Enterprise\Common7\IDE\devenv.exe"
With the EWDK, you can develop drivers using a command-line interface, which can be integrated into automated build systems.
3. Using NuGet Packages for the WDK
Follow the steps mentioned in Solution 1 to install Visual Studio 2022.
Open Visual Studio and create a new driver project.
Go to Tools > NuGet Package Manager > Manage NuGet Packages for Solution….
Search for Microsoft.Windows.Wdk and install the package.
Using NuGet simplifies the management of WDK dependencies and keeps your development environment up to date.
By using these steps, you ensure that your development environment is well-equipped for driver development in Windows 11 using the Windows Driver Kit.
Remember to keep your tools updated and regularly check for new versions of the WDK to ensure compatibility and access to the latest features.
Knowing how to copy a GIF is important when sharing animated images in chats, social media posts, or presentations. That way, you can express emotions, reactions, and humor in different conversations.
I’ll walk you through the steps to find, copy, and paste GIFs easily, so let’s get started!
How To Copy a GIF and Paste It
You can save an HTML page containing the GIF, which you can copy and paste into an email, Word document, or webpage. Alternatively, you can save it to File Explorer.
Tap on the three dots at the top right corner, select Save and Share, and hit Save page as…
Name the file and hit Save.
Open the file you saved, type *.gif in the search bar, and hit Enter. You’ll see all the GIFs.
Right-click one and tap Copy.
Paste your GIF in an email or a Word document.
Copy the GIF and Paste It from File Explorer
You can copy and paste a single GIF without saving it on an HTML page. Here’s what to do:
Go to the page with GIFs.
Right-click on a GIF of your choice, tap Save image as… and name it.
Open File Explorer and tap on the folder where you saved the GIF. Right-click and copy it.
Paste the GIF in the email.
So, now you know how to copy a GIF, whether you’re communicating with friends or adding flair to your presentations. Follow these steps and start sharing GIFs with ease.
Microsoft released Edge 127 to the Stable Channel, which includes not one but three critical security updates and an exciting feature known as organizational branding customization.
The security updates come from Chrome and are minor adjustments and vital corrections to fix possible weaknesses. One of these, CVE-2024-6990, has been labeled as critical because it can let remote attackers do out-of-bounds memory access via a crafted HTML page. The remaining two, CVE-2024-7255 and CVE-2024-7256, confront comparable dangers but are seen as high severity. This highlights the ongoing chase between software creators and cyber dangers.
The organizational branding customization will allow users to brand Edge with their organization’s logo and marketing visuals. Picture this scenario: when you log into your browser at work, it appears as part of your workspace. You can recognize it by visual hints such as the company logo and color scheme—precisely what this characteristic provides.
It’s made for users to quickly tell apart their personal and professional profiles, making it less likely they’ll mix work with private browsing. The customization covers profile pill, profile flyout, and Edge for Business taskbar icon.
But why is this important? For IT admins, it’s like a dream come true. It makes the control of company-branded items on Edge for Business simpler and better at the same time. And for all of us, it’s a glimpse into the future where browsers are becoming more than just entry points to the Internet but also important parts of a company’s digital environment.
This is not the first time Microsoft has released something like this. Last year, the Redmond-based tech giant released Branded Meetings within Microsoft Teams, which acts similarly to this. Companies could brand their meetings, webinars, or events held with Teams with their own logos.
Microsoft is introducing new features for Windows 365, aiming to make remote working more straightforward and secure. This action will guide businesses and their staff who depend on cloud servers to access Windows desktops from anywhere, using any gadget.
In a blog post, the company says Windows App will simplify logging into your Cloud PC. Think of it as easy as checking email to access your work desktop. GPU-based cloud PCs are also becoming available for those requiring extra power in their home office setup.
But the exciting part comes now. Ample power comes with a significant duty to safeguard users from possible security and identity dangers. What does Microsoft do? Fresh security elements were created to protect Windows 365 from these dangers.
Single sign-on (SSO) comes first. It provides a better user experience by reducing the need for repeated credential requests and enhancing safety with its ability to support passwordless confirmation. You can now discard the annoyance of remembering passwords; this new method offers a more secure login.
In-session passwordless authentication exists whenever you are immersed in your cloud PC session and a new authentication is needed. It permits using passkeys for extra security without interrupting your work activities.
Microsoft also added the Purview Customer Key. This gives businesses control over their encryption keys and guarantees that data in Microsoft’s data centers remains tightly locked.
Moving on to IT admins, the Redmond-based tech giant is trying out mobile application management (MAM) in a public preview for Windows 365 users with Android and iOS devices. This includes enhancing the security of real gadgets that may connect to Windows 365 results, which can be managed and unmanaged.
Microsoft hasn’t determined when these features will be generally available, but the company wants to ensure that working remotely remains secure and practical.
Running into the An unhandled error has occurred message on YouTube TV, first, check if YouTube is working on other devices. You may also restart your device and router as preliminary troubleshooting. Check to see whether you have a stable Internet connection as well.
How do I fix An unhandled error has occurred on YouTube TV?
Review the current status and any reported problems to see if YouTube TV servers are down for maintenance or experiencing issues.
Checking YouTube TV’s server status ensures that the problem isn’t on your end but rather due to a service outage that affects all users. If the servers are down, waiting for them to come back online is all you need to do.
2. Update the location settings on your smart TV
Open the YouTube TV app on your smart TV.
Select your Location settings.
Review the info listed under Home Area and Current playback location to ensure they are correct.
If the details are not accurate, select Current Playback Area.
Using a mobile device, go to the YouTube TV website and verify and allow access to your device’s location to update your current playback area.
Updating your location settings ensures that YouTube TV recognizes your current location, which can resolve playback issues related to incorrect location details.
3. Update the YouTube TV app and device software
Open the app store on your device (Google Play Store or Apple App Store).
Search for YouTube TV.
If an update is available, select Update.
Check your device’s system settings and update the operating system to the latest version.
Keeping your app and system software updated ensures that you have the latest bug fixes and compatibility improvements, which can resolve many streaming issues.
4. Clear the cache and cookies
For browsers:
Open your web browser.
Click on the three dots (menu) at the top right corner and select Settings.
Go to Privacy and security.
Click on Clear browsing data and select both Cookies and other site data and Cached images and files.
The indications are for Google Chrome, but most of the browsers have a similar way of clearing the cookies.
For mobile devices:
Go to Settings on your mobile device.
Select Apps or Application Manager.
Find and select YouTube TV.
Tap on Storage and then tap on Clear Cache and Clear Data.
Clearing cache and cookies helps in resolving performance issues by removing temporary data that might be causing conflicts or holding onto outdated information.
5. Disable the VPN and proxy
Go to your device settings and find the VPN or proxy settings.
Disable the VPN or proxy.
Restart your device.
Open the YouTube TV app and try streaming again.
Disabling VPN and proxy settings can help in resolving streaming issues as these can interfere with your device’s ability to connect to YouTube TV’s servers efficiently.
6. Uninstall and reinstall the YouTube TV app
Go to Settings on your device.
Select Apps and find YouTube TV.
Tap or select Uninstall.
Go to your app store and search for YouTube TV.
Download and install the YouTube TV app again.
Reinstalling the app can remove any corrupted files and ensure you have the latest version, which can fix various issues.
7. Check for browser updates and/or try with another browser
Open your web browser.
Click on the three dots (menu) at the top right corner.
Select Help and then About [Browser Name]. If there is any new update, it will automatically start the download and installation.
After an update, you will be prompted to restart the browser.
Using an up-to-date browser ensures compatibility with YouTube TV, resolving issues that might be caused by outdated software. Also, you should try using a different browser to use YouTube TV.
8. Reset the network settings
Go to Settings on your device.
Select System and then tap or select Reset.
Choose Reset Network Settings, confirm the action and restart your device.
Resetting network settings can resolve connectivity issues by restoring the original network configurations, helping your device to connect to the internet efficiently again.
Browse through the support topics or use the search bar to find relevant solutions.
If unresolved, contact support via the available options to get specialized assistance.
When all else fails, contacting support ensures that you receive guidance specific to your account and device, often resolving issues that general troubleshooting cannot.
By following these steps, you should be able to resolve most issues with YouTube TV An unhandled error has occurred. Each solution addresses common problems and provides clear, actionable steps to get your streaming service back on track. To prevent future issues, keep your app and device software updated regularly and maintain a stable internet connection.
Many users are wondering if is it possible to download MSI Driver Utility Installer, and in today’s guide, we’re going to answer this and all other questions related to it.
How can I download MSI Driver Utility Installer?
Does MSI have a driver update tool?
Yes, MSI does have its driver update tool, and you can use it to quickly update drivers when you first install Windows or to download other useful software.
How do I install MSI Driver Utility?
MSI Driver Utility Installer isn’t available for download, so you can’t download and install it on your own. It’s embedded in your motherboard and it will run automatically after you clean install Windows.
If you encounter any errors while updating drivers, we also have a guide on what to do if MSI Driver and Software setup gets stuck, so don’t miss it for more solutions.
Microsoft might be making a big move to smoother communication within its Teams platform. Imagine a space where text chats and channels come together in one place to form an integrated interface that makes interaction easier.
The Redmond-based tech giant is reportedly trying (via Tom Warren of The Verge) this to improve the user experience for businesses and organizations. The current system, with separate sections for individual messages and small group chats compared to big meeting channels, often causes the channels feature to be less used.
Yet Microsoft wants to change this by gathering everything in one place. This idea aims to make it faster and simpler for people to reach what’s most important.
The core of this update is to improve communication efficiency by removing the distinction between chats and channels. Potentially, it could answer one of the criticisms about Teams as a messaging tool compared with other competitive options.
The merging of these features in one user interface means Microsoft is not only adjusting design but also improving how they work, making it easier for users to manage their conversations and team projects more naturally.
Before you get too excited, though, you should know that there is no official release date. However, Microsoft plans to give participants in the Teams Public Preview a chance first, which will help it gather helpful feedback before making it available more broadly.
The latest improvements in Teams demonstrate Microsoft’s commitment to enhancing the platform. Custom emojis, reactions, notification control, and improved speaker identification are already here. These updates and future chat and channel integration highlight a more unified digital workspace that Microsoft envisions for its users.