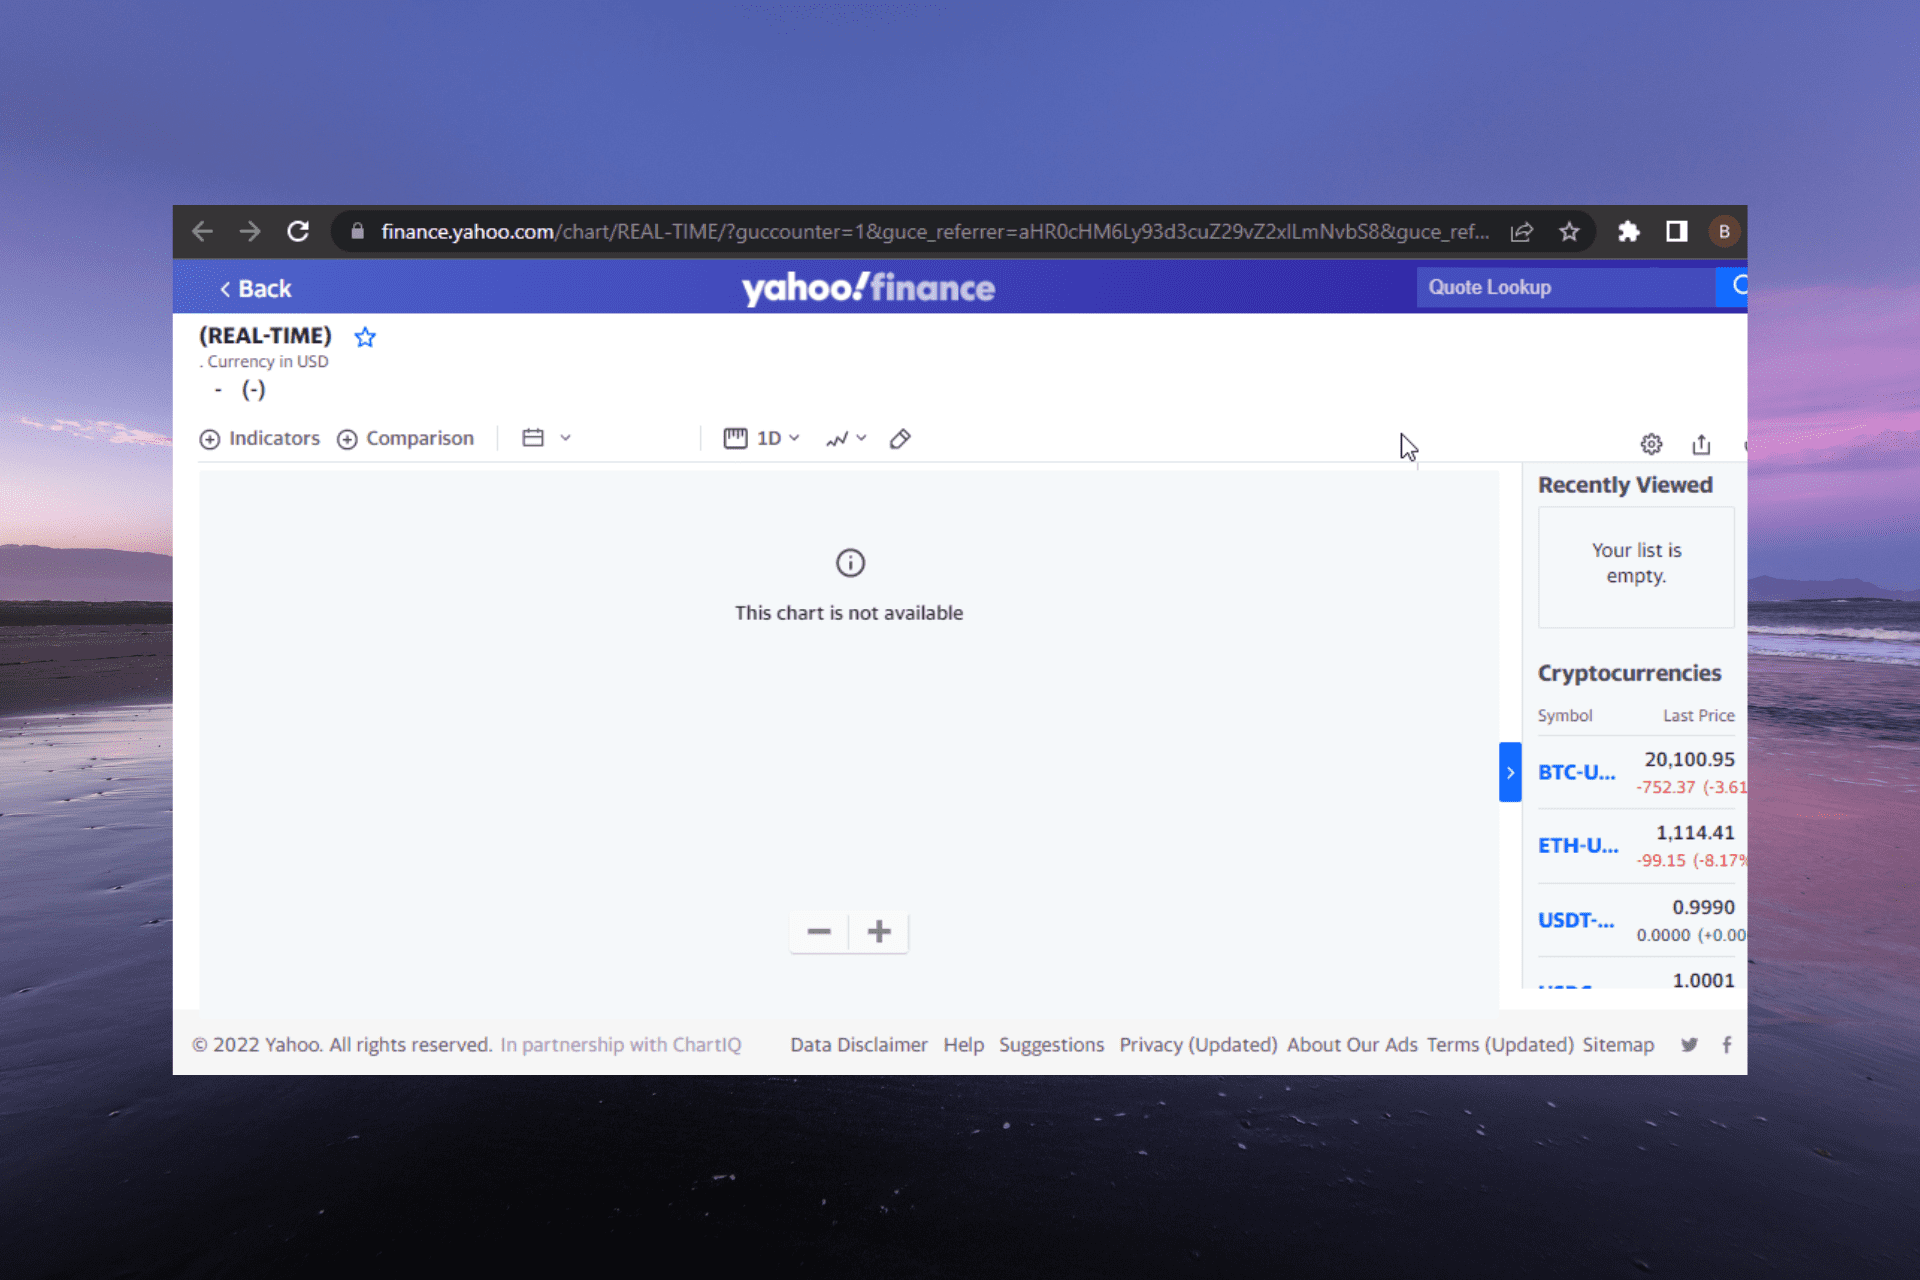
Tools like the Yahoo Finance charts are important in the ever-revolving financial world. It allows you to keep track of the live events, plan, or take advantage of opportunities.
Unfortunately, the Yahoo Finance charts fail to show on one of the best browsers in Chrome. This could be due to your chosen chart settings or a browser problem.
Irrespective of the cause of the problem, this guide contains the solution to fit it effectively.
Why aren’t Yahoo Finance charts working?
The outdated browser is the major reason Yahoo Finance charts are not working or updating on Chrome. This is especially true if the charts are working on other browsers.
Another notable cause is a buggy browser causing the Finance page not to load properly.
What can I do if Yahoo Finance charts aren’t working in Chrome?
1. Update Chrome
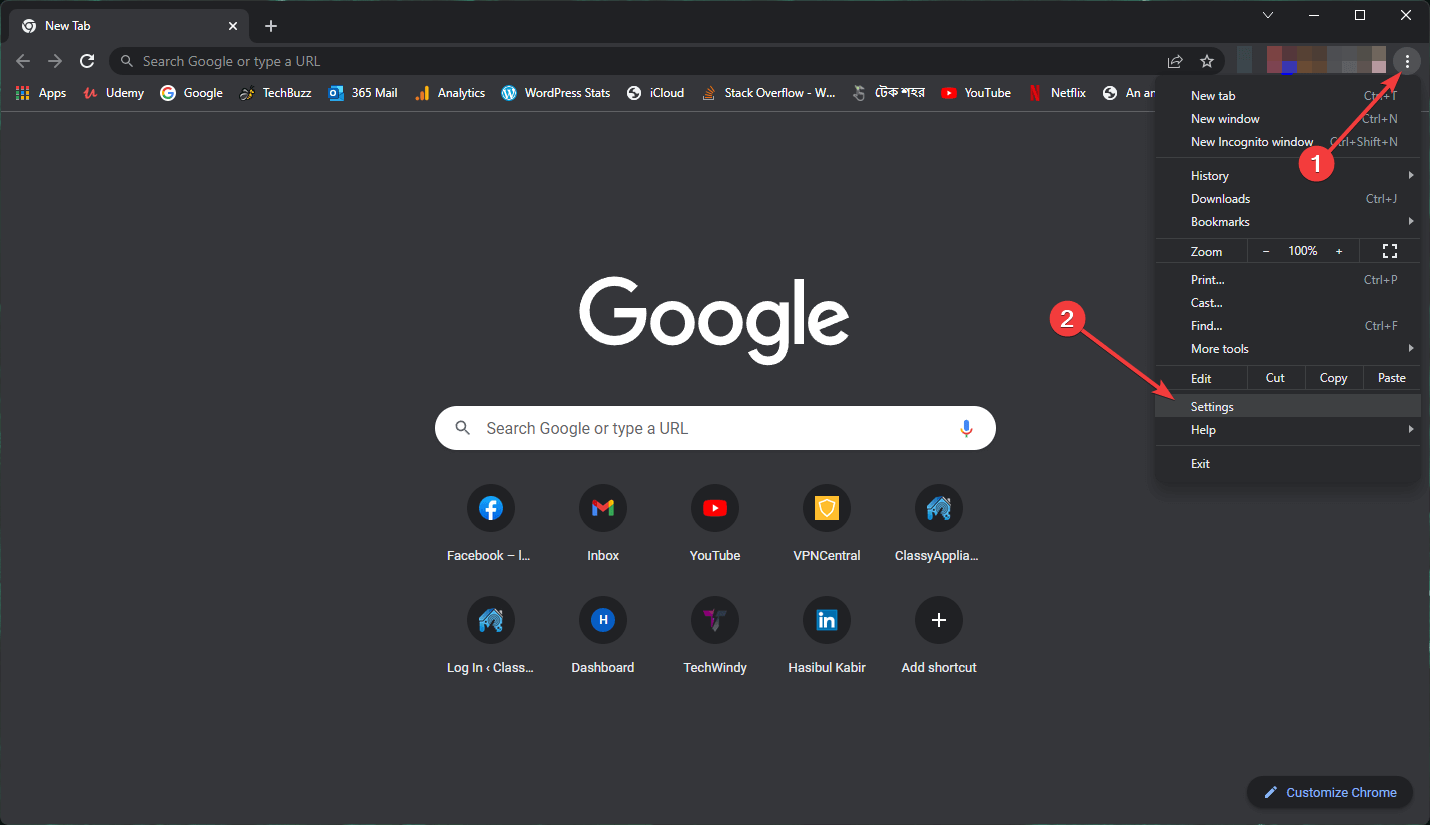
Launch Chrome and click the menu button at the top right corner.
Select the Settings option.
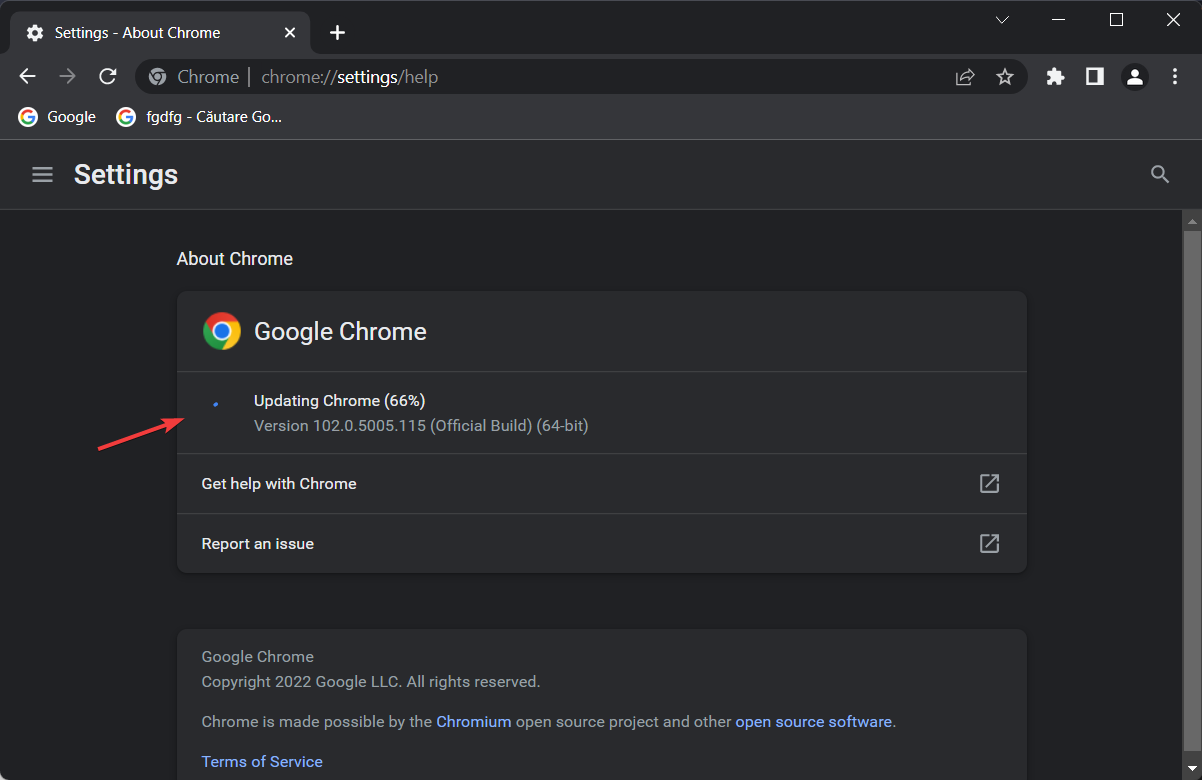
Choose About Chrome on the left pane.
The browser will check and recommend available updates.
Google claims that the Yahoo Finance chart not working issue has been resolved as late as the Chrome Version 10.0.648.205. So, if you face this issue on Chrome alone, your best bet is to update and restart your browser.
If the Yahoo Finance page is still not displaying correctly after updating Chrome, you might need to use another browser Opera One for a change.
Opera One is a fast browser with excellent loading speed. It displays the Yahoo Finance charts clearly with its superb and clean interface. Lastly, while it is not averse to errors, it is not as error-strewn as most modern browsers.
Opera One
The Yahoo Finance management is neatly organized and displays everything on this modern browser.
The Yahoo Finance charts not working on Chrome issue can be annoying, as it might cause you to miss out on important live updates. Fortunately, it is an issue that you can fix without fuss, as we have shown.
Do you need a list of the best Yahoo Mail supported browsers? Check our top selection of browsers that provides online security and speed.
Feel free to let us know if you were able to solve the issue in the comments below.
The new Samsung Gaming Hub, an app designed to bring together various gaming services including Xbox Game Pass, rolls out today for 2022 Samsung smart TVs. Models receiving this update include the Neo QLED 8K, Neo QLED 4K, QLEDs (above BU8000 models) and 2022 Smart Monitor Series products.
Samsung has hinted that they may bring the Gaming Hub to older 2021 smart TVs as well.
What is the Gaming Hub, exactly? It includes Google Stadia, NVIDIA GeForce Now, and as already mentioned, Xbox Game Pass with Xbox Cloud Gaming. Twitch and Amazon Luna will also be coming to Gaming Hub in the near future according to Samsung.
Samsung’s gaming TV hub on 2022 models launches today with Xbox Cloud Gaming. I like the future where you can simply play Xbox directly on your TV — no console or PC required.
You may recall that we reported that Xbox would be coming to Samsung smart TVs, as part of an ongoing effort to bring Xbox to as many screens as possible with or without an actual Xbox console.
Xbox head Phil Spencer spoke on this in a press statement, saying:
We’re on a quest to bring the joy and community of gaming to everyone on the planet, and bringing the Xbox app to smart TVs is another step in making our vision a reality. That’s why we’re excited to partner with Samsung, a global leader in TVs, on bringing Xbox to more players. Working with Samsung has helped us provide more access to gaming and enabled us to welcome new players into our thriving community.
Bringing Xbox (and Game Pass) to smart TVs – no console required – provides an excellent entry point for new gamers, and is a great option for those looking to declutter their living room entertainment setups without having to sacrifice their Xbox gaming.
Due to security reasons, whenever the safety shield of a blocked website is compromised, you may get the message The site is not secure or DLG_FLAGS_SEC_CERT_CN_INVALID.
This error may also occur due to missing a trusted root certificate or because the website contains malicious ads, codes, and links.
However, you may proceed by clicking on the Go on to the website (Not Recommended) button if you have visited the website before and your web browser did not block it.
In order to solve this intimidating problem, we have compiled universal solutions to fix it in various web browsers such as Microsoft Edge, Google Chrome, Mozilla Firefox, Opera One, and Internet Explorer.
Ignoring this warning may expose your PC to malware. Use the workarounds listed below at your own risk.
Why does my browser say the HTTPS site is not secure?
Usually, this issue occurs if there’s a problem with the security certificate of the website you’re trying to visit.
It’s possible that a website owner hasn’t updated or purchased a security certificate, or the certificate might not be properly configured.
Issues on your PC, such as an incorrect date and time can cause this problem as well, and if this happens, you might see This site is not secure dlg_flags_invalid_ca error.
Quick tip:
Before continuing, if you’re looking for a privacy-compliant browser that’s less prone to glitches, we recommend downloading Opera One.
Equipped with an adblocker, an anti-tracking feature, and a VPN for increased privacy, Opera One offers everything you need, including tons of secure extensions, add-ons, social-media integrations, and more.
Opera One
Modular design new browser that offers many useful tools, including the ability to save and print your web pages.
When the message appears, click on the Continue to this website (not recommended) option at the very bottom of it.
Click on the More Information for the Certificate Error option next to the red Address Bar.
Then, click View Certificates on the information window.
Select Install Certificate and follow the on-screen instructions.
Finally, click Yes on the dialog to proceed.
After doing that, the This site is not secure error code 0 should be gone.
NOTE
Manual installation of certificates is not recommended on strange websites or websites with a low reputation. Furthermore, manually installing the certificate should fix the This site is not secure error pop-up.
2. Clear web browser cache, data, logs, and bookmarks
The fastest way to clear browsing data in any web browser is via the Ctrl+Shift+Del keyboard shortcut.
Manually deleting cookies and cache is rather simple, no matter the browser you have and it should help you with Your connection is not private error. We’re detailing the process below.
Click on the detailed option to tick the delete the entire cache option.
Click on the Clear data option to clear the entire browsing data.
If you ever wondered how to fix Your connection to this site is not secure in Opera One, you should know that this is one of the fastest methods.
NOTE
For detailed instructions on how to clear the cache in Opera One, check out their official documentation.
Google Chrome
From the Menu button in the upper-right corner of the Chrome window, choose More Tools, then Clear browsing data.
Using the Clear the following items menu, you can select the beginning of time to delete all the cached information using the drop-down menu.
From there, you can select Cached images and files.
Select the Clear data button, and Chrome will clear your cache.
Once you clear the cache, This site is not secure message should be gone from Chrome.
Internet Explorer 11
On the right-hand side of the browser, click on the Tools (gear) icon.
Select Safety, then Delete browsing history.
Uncheck all options except the one labeled Temporary Internet files and website files.
Then, click the Delete button at the bottom of the window.
The Delete browsing history window will disappear and your mouse icon might go busy for a while.
For IE lower versions, if the Menu bar is enabled, click the Tools menu and then delete browsing history. Keyboard shortcut Ctrl-Shift-Del can be used as well to clear browser cache.
Once the cache is cleared, check if This site is not secure message is gone in Internet Explorer.
Microsoft Edge
While in Microsoft Edge, click the History icon.
Go to the three-dot menu and select Clear browsing data.
Check the data that is going to be deleted.
Then, click the Clear now button.
The message All Clear! will appear after the data has been erased.
After doing that, the The connection for this site is not secure in Edge should be gone.
Mozilla Firefox
In Firefox, click the Menu button (the hamburger icon) and then select Settings.
Click on the Privacy tab on the left. On the right click Clear History.
In the Clear Recent History window that appears, set the Time range to clear: to Everything.
Uncheck everything in the list except for Cache.
Proceed by clicking on the Clear Now button.
If the pop-up message about your website not being secure still appears after clearing browsing data, proceed with the next step.
3. Disable the Certificate address mismatch option
Select the start button and go to Control Panel.
Then Open Internet Options and click the Advanced tab at the top.
Scroll down to the Security section.
Identify the Warn about certificate address mismatch option.
If the box right beside it is checked with a tick, you can unmark it to disable the option.
Click Apply and OK to save the changes and close everything.
How do I know if HTTPS is enabled?
Open the desired web page.
Check the address bar.
If the URL starts with https, it means that HTTPS is enabled for that website.
If the error This site is not secure DLG_FLAGS_SEC_CERT_CN_INVALID still persists on the website, it is advisable that you do not attempt to visit the website.
You can also contact the site administrators and ask them to look into this issue. They may check the website certificate and fix the error from their end.
Yammer is an excellent tool that helps to keep an organized workflow. It has a desktop app but you can also use it on a web browser.
It is especially enticing on Chrome, thanks to the Yammer extension that allows you to improve the website’s functionality. But, it is not all roses, as users complain that the site is not working on Chrome.
Fortunately, we have gathered three effective fixes for this issue as we did with the Yammer app not opening on PC problem.
Why is my Yammer not working?
There are several reasons why Yammer might not work, from network issues to problems with the Chrome browser. Another notable cause might be the wrong browser setting.
Do you need Microsoft 365 to use Yammer?
If you want only to use the Basic Yammer without any Admin tools, there is no need to register it with Microsoft Office 365. The only condition is that you must register with a valid company email.
What can I do if Yammer doesn’t work in Chrome?
1. Check if Yammer is not blocked
Press the Windows+ Rkeys to open the Run utility.
Type control panel and press Enter.
Select the Network and Internet option.
Select Internet Options.
Click the Security tab at the top.
Now, click the Restricted sites option.
Click the Sites button and check whether Yammer.com or portal.office.com is inside the Websites section.
If any of them is there, click on it, followed by the Remove button next to the Websites block.
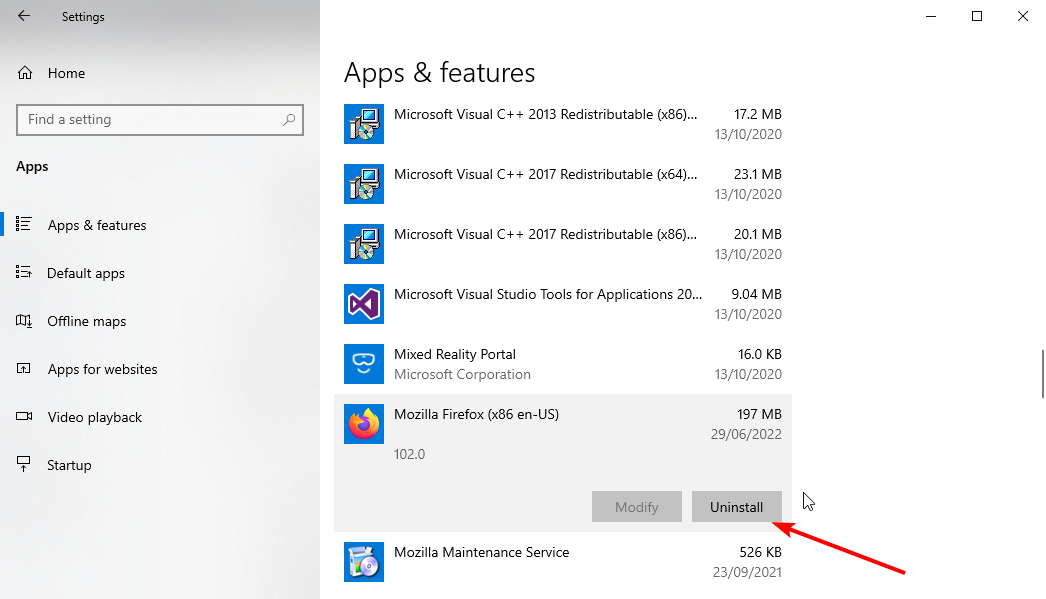
2. Uninstall and reinstall Chrome
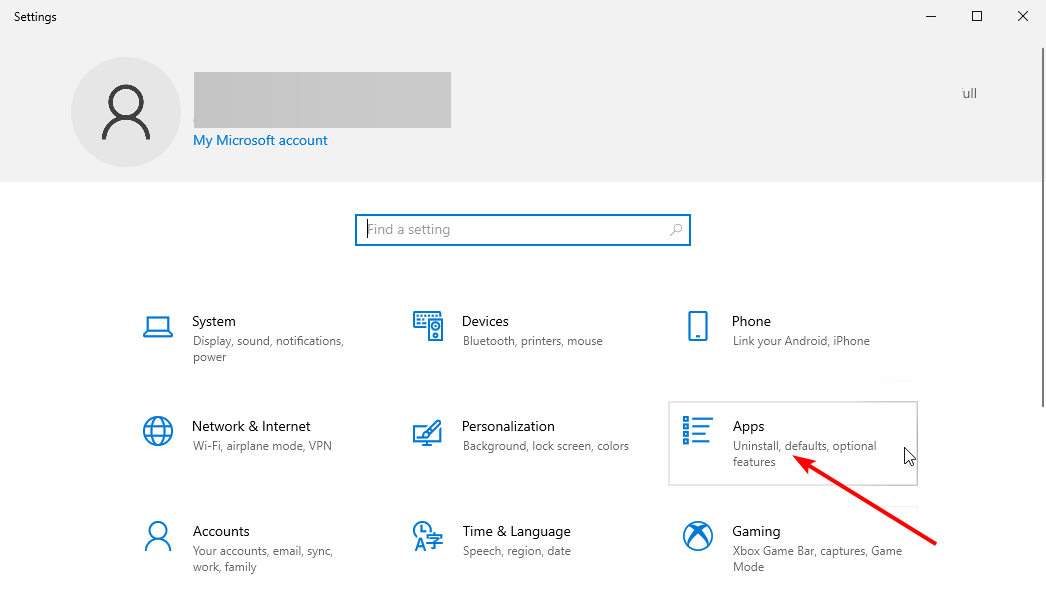
Press the Windows+ I keys to open the Settings app.
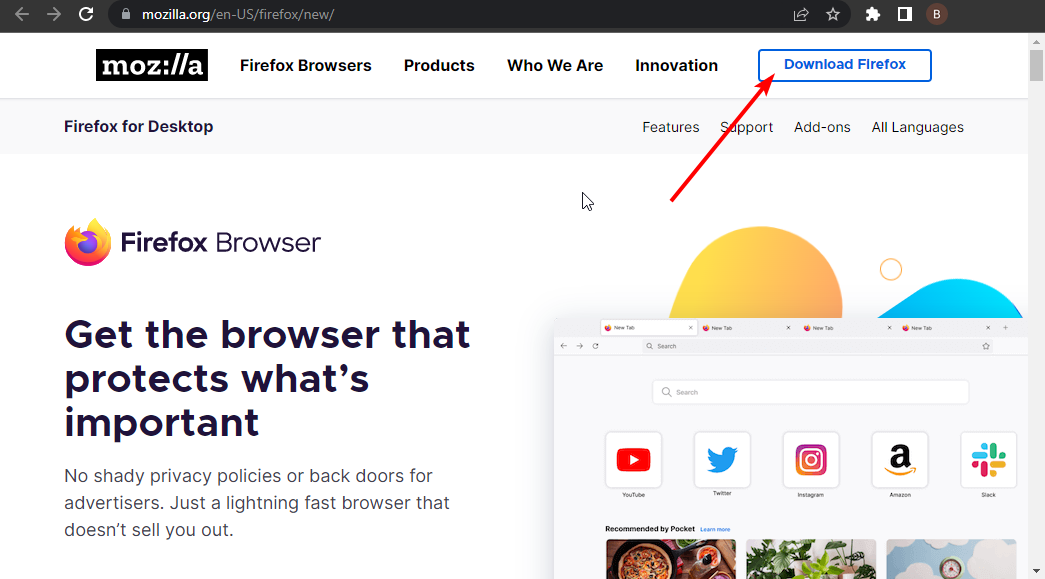
Click on the downloaded installer and follow the simple onscreen instructions to complete the process.
If Yammer is not working in Chrome or not showing users, images, and other vital information, the problem might be with your browser. Reinstalling the app should help get things back to normal.
You should switch to an alternative browser if the fixes above prove abortive. Presently, Microsoft Edge, Firefox, and Chrome are the only supported browsers for Yammer. So, you can switch to either of the two remaining browsers.
Yammer not working on Chrome could lead to problems, as people use it as the social network of big companies. With the fixes in this guide, you should be able to solve any underlying issues causing the problem.
Feel free to let us know the fix that got Yammer working on your browser in the comments section below.
Browsing the internet can be a rewarding experience, but this process can be tainted by increasing privacy violations and security breaches.
It would help if you were sure that you are protected whenever you use the internet, and the Trusteer Rapport is one way to guarantee this.
A powerful endpoint security solution, IBM Security Trusteer Rapport, is intended to shield users against phishing and financial malware, especially while using bank applications. Sadly it may not always work on your browser.
This article shows you what to do when Trusteer Rapport is not working in Chrome.
Why has Trusteer Rapport stopped working?
There are a few reasons, but a common one is that the extension is not enabled. Also, if you are using an outdated Chrome browser it may not work.
How do I enable Trusteer Rapport in Chrome?
The extension is enabled just like any other Chrome extension, and we will be given details in the next section.
Quick Tip:
Install the Trusteer Rapport extension to another browser and try again. Opera One browser supports all Google extensions, including this one. Open the Chrome Web Store page and select Add to Opera.
This browser is faster than Chrome and scores very well when it comes to error rates. It’s safe and smart due to build-ins such as VPN, Ad Blocker and AI.
Opera One
Keep web attackers at bay by incorporating the Trusteer Rapport extension in this fast and secure browser!
What can I do if Trusteer Rapport doesn’t work in Chrome?
1. Enable the Trusteer Rapport extension
Launch the Chrome browser.
Paste the link to Chrome extensions shown below in your URL locator and hit Enter: chrome://extensions/
Lastly, search for the Trusteer Rapport extension and toggle on the switch.
Note that if the Trusteer Rapport icon is not showing in Chrome, it means it has not been installed in the first place, and you will have to install the Trusteer Rapport Chrome extension.
2. Update your Chrome browser
Launch Chrome.
Paste the link to Chrome Settings shown below in your URL locator and hit Enter: chrome://settings/
Click the About Chrome option.
Here, you will have the opportunity to update Chrome if one is available.
That is what you need to know about troubleshooting the IBM Trusteer Rapport extension on Chrome. These are easy fixes that you will be able to apply on your own.
Microsoft Teams is an incredible platform that makes virtual meetings seamless. While it has a PC and mobile version, users can also use the web app on a handful of browsers.
However, users are starting to encounter problems loading Teams on Chrome, one of the few browsers compatible browsers.
Thankfully, just like we did with the Microsoft Teams crashes during launch issue, we have gathered five solutions to solve this problem effectively.
Why is Teams not working in the browser?
There are various reasons why Teams might not be working on Chrome or other browsers. Below are the most common ones:
Outdated browser.
Wrong Chrome settings.
Antivirus app blocking Teams.
Corrupt browser cache.
How do I join Microsoft Teams meeting via browser?
Open the email invite and choose the Join Microsoft Teams meeting option.
Choose the Continue on this browser option when prompted.
Enter your name and choose the right video and audio settings.
Finally, click the Join Now button.
Quick Tip:
If you keep having trouble accessing Teams from Chrome, try logging in from another browser. A fast option with a low impact on resources is Opera One.
The browser is often updated and has a very low error rate, so you might have better luck connecting to MS Teams. It includes a battery saver mode that can increase performance even more.
Opera One
Enjoy seamless collaboration with dedicated support for fast and uninterrupted connections.
Launch Chrome and click the menu button in the top right corner.
Select the Settings option.
Choose About Chrome on the left pane.
Your browser will show if there is any update available.
2. Enable cookies for Teams
Click the menu button on Chrome and select the Settings option.
Choose Privacy and security on the left pane.
Click the Cookies and other site data option.
Ensure the radio for Block third-party cookies in Incognito is marked.
Click the Add button in the Sites that can always use cookies section.
Enter the address below and check the checkbox for Including third-party cookies on this site.teams.microsoft.com
Finally, click the Add button to effect the change.
Microsoft Teams might not work on Chrome if you don’t have the third-party cookies enabled. Ensure to restart your browser to sync the changes.
3. Clear cache
Open Chrome Settings.
Select the Privacy and security option on the left pane.
Choose the Clear browsing data option.
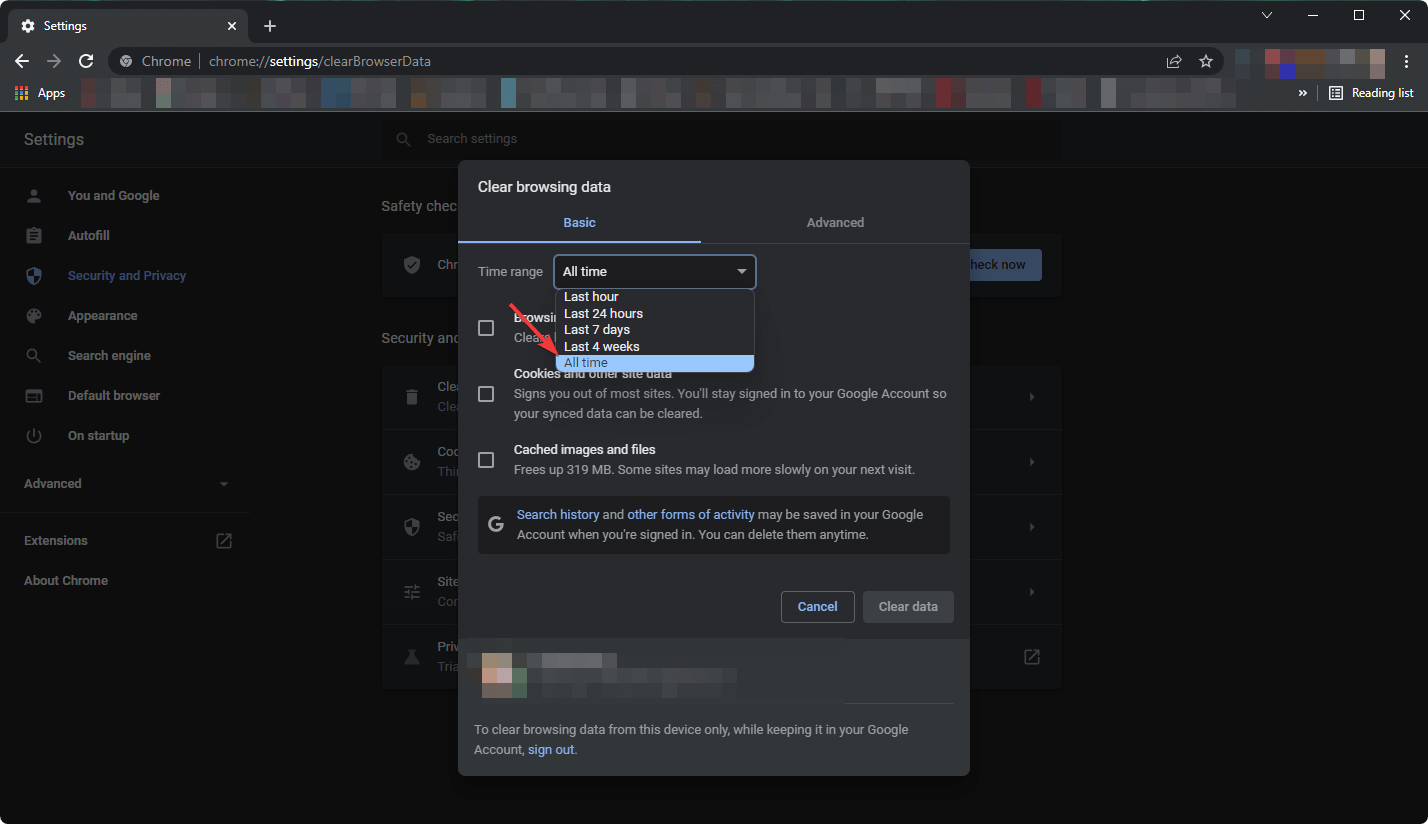
Click the dropdown before Time range and choose All time.
Check the checkbox for Cached images and files.
Finally, click the Clear data button.
As much as caches help improve your browsing experience, they can be why Teams is not working on the Chrome browser. This might be because the data is corrupt, or it might contain a file affecting Teams.
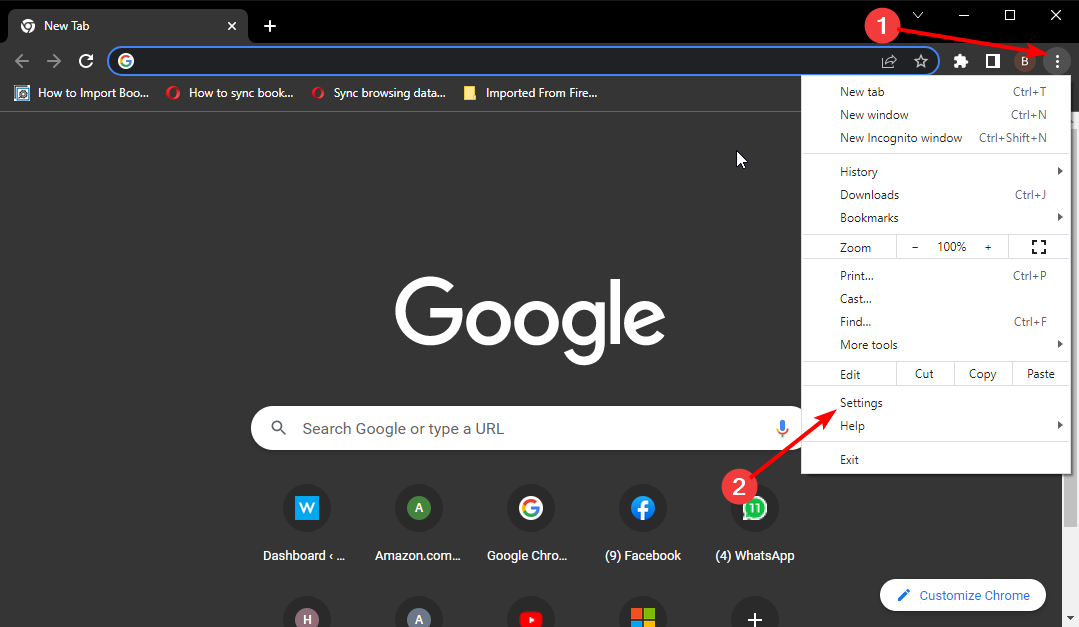
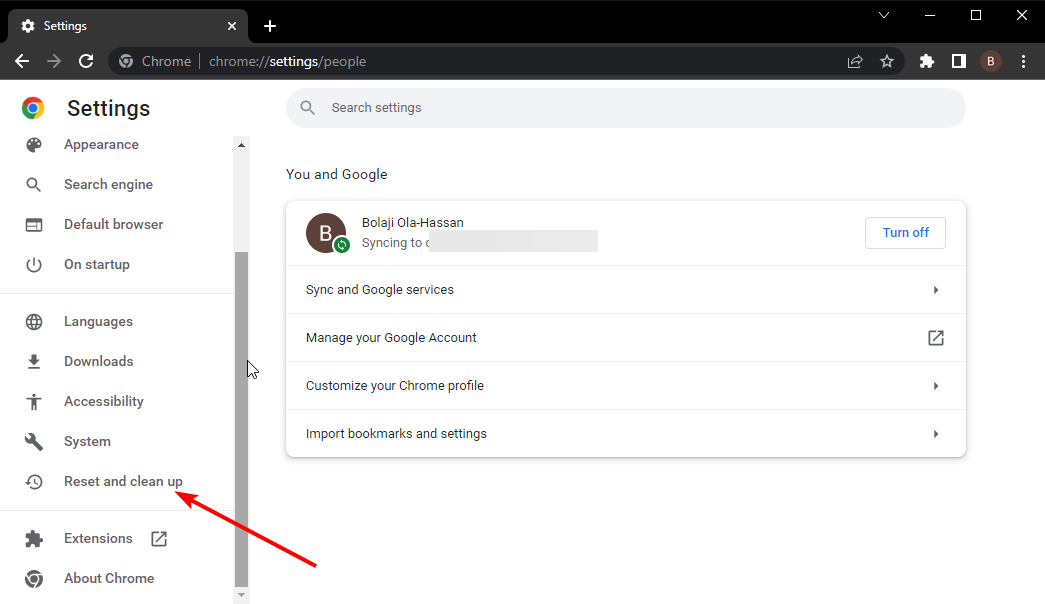
Go to Chrome Settings and click the Reset and clean up option on the left pane.
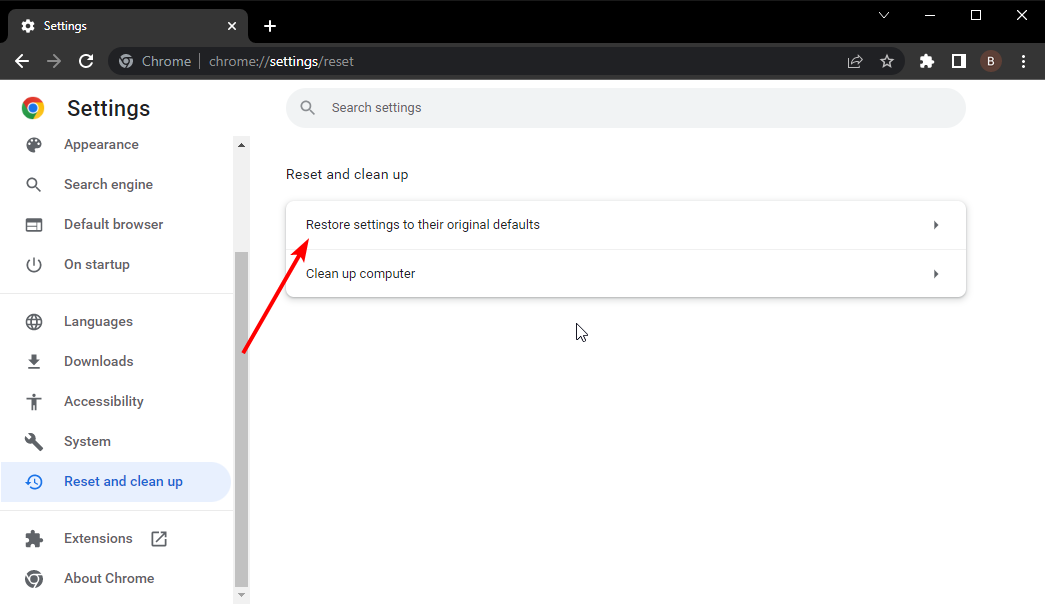
Select Restore settings to their original defaults.
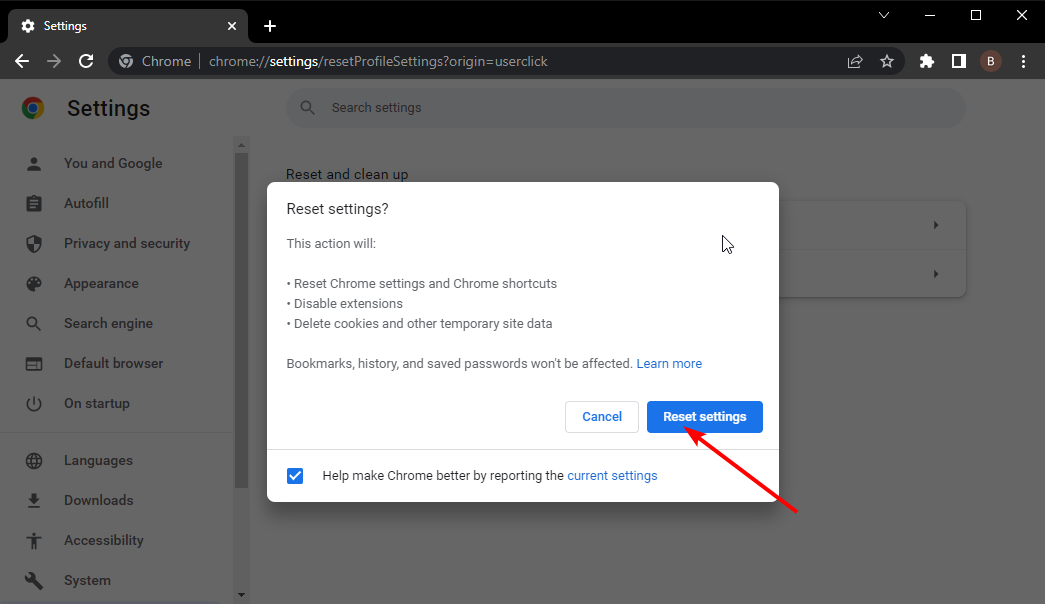
Now, click the Reset settings button.
If the Teams web app still doesn’t load on Chrome after the fixes above, you need to restore Chrome to the default to make things work.
5. Disable antivirus temporarily
Antivirus software on your PC might be causing the Teams web app not to load, as some users noticed. In this case, you need to disable the software temporarily and try to access Teams on Chrome again.
The Teams not working on Chrome issue can be frustrating, as it might cause you to miss an important meeting. Thankfully, it is not impossible to solve, as we have shown.
You might know Microsoft programs like Edge Insider, Windows Insider, and Office Insider, but there’s a new one in town. Microsoft recently announced the launch of the Microsoft Family Insider program.
This program is designed for you to preview new family-related products and experiences before general availability, and share feedback with Microsoft. You can sign up with this link, and connect with folks at Microsoft who are making new family-related offerings. What can you expect other than that? Well, Microsoft offers the following benefits.
Connect with Microsoft teams to improve product experiences for families everywhere.
Preview new designs and test upcoming features before general release.
Get tips and tutorials for making the most of your Microsoft products.
Receive email newsletters with research opportunities and educational resources.
Earn Microsoft swag for engaging with the community and sharing your feedback!
In the past, Family Insiders have been involved in several Microsoft projects. The list includes Microsoft Defender for Individuals and the Family Widget on Windows 11. Other things Family Insiders have tested include Famly Safety, Lists, and more.
You could use image-editing applications to erase watermarks from images, but it’s easier to use a dedicated watermark remover softwawre.
In this list, you’ll find the best apps that obliterate watermarks. Some are paid, but all of them include a free trial period or free versions with limited features.
What are the best watermark removal tools available?
If you’re looking to remove a watermark, stamp, or even a whole person from a photo, inPixio Photo Studio Pro 12 makes it easy.
Simply use the Eraser tool to highlight the watermark, and with a click, it disappears as if it was never there. This tool simplifies watermark removal, making it accessible even for beginners.
Plus, you can easily handle other photo edits like removing wrinkles or restoring old photos.
Photo Studio Pro 12
Vanish any watermark or any other unwanted elements in seconds!
SoftOrbits Watermark Remover efficiently removes watermarks and date stamps from images. The software offers three editions with varying features and a one-month trial. The Lite edition provides basic selection tools but lacks batch processing. Photo Stamp Remover detects surrounding textures to seamlessly refill areas. The software includes rectangular, marker, and free-form selection tools, along with three object removal modes. The Standard and Pro editions support batch processing, while the Pro edition also features advanced restoration tools for cleaning cracks and dust spots.
Key Features of SoftOrbits Watermark Remover:
Advanced Restoration: Pro edition offers tools for cleaning cracks and dust spots in old photos.
Three Editions: Lite, Standard, and Pro, each with different features.
Basic Selection Tools: Includes rectangular, marker, and free-form selection.
Texture Detection: Seamlessly fills areas by detecting surrounding textures.
Batch Processing: Available in Standard and Pro editions for removing watermarks from multiple images.
Photoupz is a graphic editor designed to remove watermarks, stamps, logos, and other objects from photos.
The software is available for purchase at a reasonable price, with a trial version also offered. Photoupz features a marker tool to paint over and remove watermarks.
The inpaint option erases the marked areas and reconstructs the image, preserving edges for a seamless result.
Key Features of Photoupz:
Marker Tool: Paint over watermarks to erase them.
Inpaint Option: Reconstructs erased areas and preserves object edges.
Inpaint is a graphic editor designed to remove watermarks, date stamps, and other unwanted elements from JPG, PNG, TIFF, and BMP images.
It includes versions such as BatchInpaint for batch-editing, Multi-View Inpaint, and a comprehensive Inpaint Bundle.
Compatible with both Windows and Mac OS, Inpaint offers tools like the Marker tool for selecting watermarks, Guide Lines, Magic Wand, and Lasso for precise editing.
After selecting the watermark, users press the Erase button to remove it. Inpaint also supports photo retouching and object removal.
Key Features of Inpaint:
Watermark Removal: Effectively eliminates watermarks, date stamps, and other elements.
Marker Tool: Paint over watermarks for easy selection.
Guide Lines, Magic Wand, and Lasso: Provides precision in editing.
Erase Button: Initiates restoration to remove selected watermarks.
Batch and Multi-View Options: Available in BatchInpaint and Multi-View Inpaint.
Compatibility: Works with both Windows and Mac OS platforms.
So, those are thewatermark removing software with which you can erase watermarks from images and videos. The graphic editors can also erase other details.
If you have other suggestions or questions, feel free to reach for the comments section below.
Snapped the perfect photo—maybe of a birthday party or a selfie—only to find those dreaded red eyes ruining it? Don’t hit delete just yet! We found the best tools to help you fix it!
With advanced red-eye removal apps, you can fix the creepy glow that appears when the flash bounces off your eyes.
Check them out:
What is the best software to remove red-eye effects from photos?
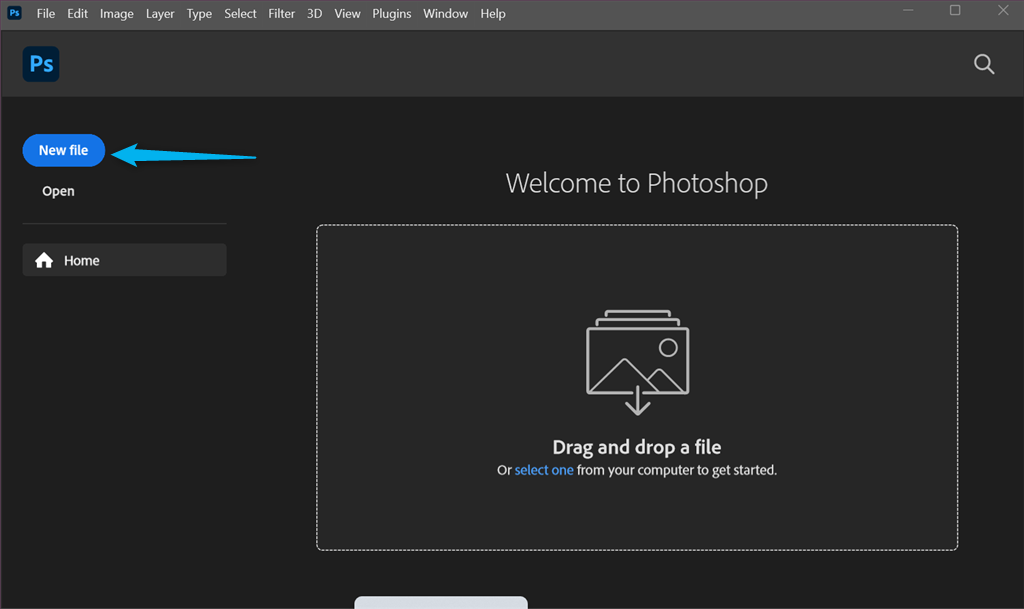
Adobe Photoshop is a top tool for removing red-eye from photos.
To fix red-eye, use the Red Eye Tool: select it from the toolbar and click on the red-eye spots in your photo. Photoshop will automatically correct the red-eye, ensuring your images look natural and polished.
This feature simplifies the process, making it quick and effective. Beyond red-eye removal, Photoshop offers extensive editing capabilities.
Adobe Photoshop
Edit and remove the red-eye effect from your photos with the industry-leading software solution.
Adobe Lightroom Classic makes removing red-eye and pet-eye easy with its Red Eye Correction tool.
Open your photo in the Develop module and zoom in to the affected area. Select the Red Eye Correction tool from the Develop panel, choose “Red Eye” or “Pet Eye,” and click and drag over the eye.
Adjust the circle size and position as needed, then apply to the other eye. Click Done to save your corrected image, ensuring a natural and polished look.
Adobe Lightroom
Edit your photos and remove the red-eye effect with one of the best software tools.
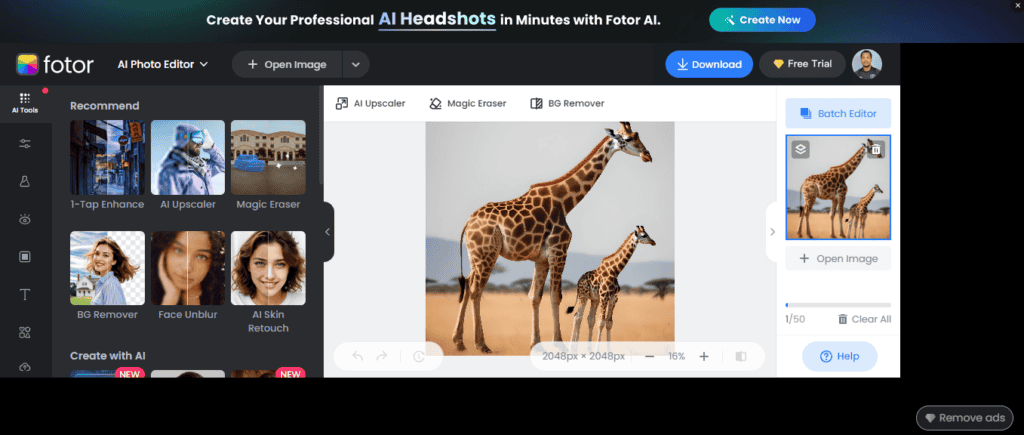
Fotor’s red-eye removal software does away with such errors forever in three simple steps and a few clicks so you never have to worry about it ruining your perfect shots again.
Simply open the photo, use the Red Eye Remove and click to fix the red-eye, then finish modifying and save your work in the format, and desired quality.
Fotor not only offers red-eye removal, but also photo editor, photo effects, stickers, text, and other features such as retouching, collage making and graphic design.
So when you’re done removing the red-eye, you can also try other features including photo filters for free, and bring out the best in your photos.
Fotor
Remove the red-eye with one of the great tools available, that will also has multiple editing features.
With iPiccy’s red-eye removal software, the process is also as simple as a couple of clicks within minutes of uploading your photo to the program, and your unexpected red eyes are fixed in a jiffy.
Red-eye can be annoying and a nuisance, but with iPiccy’s Red Eye Corrector, you can deal with the error easily, regardless of your age or experience with a computer.
Simply upload your photo to the iPiccy Photo Editor, open the retouch tab, select Red Eye Remover, then apply to the select eyes. Once you’re done, save your image and voila!
Red-eye is just a part of what iPiccy can do for you, but its retouch tab can do much more than just correcting red-eye errors.
You can experiment with other tools and do stuff like slimming a face, or whitening teeth, and so much more.
GIMP, or GNU Image Manipulation Program, is a free photo editing tool that comes with the red-eye removal software.
While GIMP doesn’t have a magic red-eye removal button, it has tools that you can use to achieve the desired effect.
You must do a selection (lasso or elliptical) of the boundary of the iris of the eye or eyes having a red-eye pupil.
Once you select the area, apply the filter by activating it in the image window menu under Filters>Enhance>Red Eye Removal.
The Preview window lets you see the modifications in real-time and you can choose the good value of threshold compared with what is displayed, then validate it.
PicMonkey’s red-eye remover is one of its touch-up tools, which you can use to polish up your photos.
In order to use this tool, click on it, then select either the Human or Furball (for animals) button. Drag your cursor over the area of the red-eye, and the tool will detect the errors and remedy the issues it finds.
Depending on the amount of red-eye in your photo, you may need to apply the red-eye removal effect more than once so as to achieve the desired results.
Once you’re done, you can get your photos off your desktop and into your hands by printing it from the PicMonkey Print Shop.
Pixlr was launched almost a decade ago to provide an easy and free tool for creating, editing, and sharing images online, but it was acquired three years later by Autodesk, who added new features to it.
To remove the red-eye error on your photos, you can use the Pixlr Editor found on its website, which is free to use and has the power and advantage of Photoshop and accompanying elements for free.
Simply open the image, and you’ll notice that Pixlr’s prebuilt red-eye tool gives you an adjustable tolerance control between 0 and 100 percent, with a default setting of 50 percent.
Once you set tolerance level, click the middle of each red pupil, and Pixlr adjusts automatically.
Have you settled on which of these photo editors with red-eye removal you’ll use this festive season? Let us know your choice in the comments section below.
The free meme generator feature by inPixio offers a straightforward way to create memes.
You start by uploading an image, whether it’s a funny portrait or a casual snapshot. The tool’s AI features help you remove backgrounds, add custom text, and place stickers with ease.
Its user-friendly design ensures you can craft memes quickly. After finishing your meme, you can download it in various formats and share it on social media, directly from inPixio.
inPixio
Express your fun ideas quickly and easily with inPixio’s resourceful meme generator!
Canva’s free meme generator offers a versatile tool for crafting viral content with ease.
You can access thousands of customizable templates and millions of stock photos to create unique memes.
Simply drag and drop your images, GIFs, or videos into the editor, and add text with any font or color you like. Adjust layout and design without restrictions.
Once your meme is ready, download it in various formats or share it directly to social media.
iMeme is a free meme generator with over 100 built-in templates.
While it lacks the latest meme trends, it provides a solid selection of popular templates. Users can also upload their own images and templates, making it versatile for custom memes.
The app lets you to add and adjust headers and footers but lacks options to change text color or font. You can save memes to your PC, copy them to your clipboard, print, or upload to Reddit or Imgur.
Another meme generator you might want to try is Meme Maker. This Universal app offers a humble and slightly outdated user interface that some users might not like along with about 40 available templates.
If that’s not enough, you can always add your own images and use them as templates. Meme Maker offers four input fields for text and each input field represents a different location on your template.
Unfortunately, you can’t change the offset of your text, which is a major flaw in our opinion. Regarding text, you can easily change the font, color, and size, all of which is a major plus.
However, there’s no support for text outlines, so your text might not be visible on certain templates.
Adobe Lightroom is a cloud-based tool that gives you ultimate control and helps you quickly sort out and organize thousands of files using machine learning algorithms.
After you enhance the colors, add filters and effects, and create the best version of your photo, you can also use the sharing function to share them with your friends and family.
You have all the right tools to adjust black levels and exposure, work with HDR images, improve shadows, and more.
Here are the key features of Adobe Lightroom:
Great at performing photo enhancements
Non-destructive changes can be made
Profiles and presets that you can import
Available on all platforms (Windows, macOS, iOS, Android) to take your work everywhere with you
Adobe Lightroom
Enhance your Nikon RAW images effortlessly—try Lightroom’s powerful tools today!
Using this massive software pack, you can edit your photos just like a pro using a complete set of professional image editing tools for photo composition and adjustments.
The interface is straightforward to use and easy to understand for the best overall experience.
It also packs a faster, more comfortable PaintShop Pro and an exclusive bonus collection of premium software.
Take a look at just a few of its best features and functionalities:
Budget-friendly
Automatically correct your images and edit the raw Nikon files with Corel AfterShot 3
Find everything that you need to produce a variety of fabulous graphic design projects
Restore color, details, and more
PaintShop Pro
Transform your Nikon RAW files with professional-grade editing tools.
DxO PhotoLab is another software that works great with Nikon RAW files. This tool uses the revolutionary PRIME denoising technology, and it manages to push the limits of high ISO photography further.
The PRIME technology stands for Probabilistic Raw Image Enhancement, and this fantastic technology analyzes the structure of raw images in depth in order to be able to differentiate fine details from noise
This noise reduction technology offers spectacular performance that will result in detailed and vividly-colored images taken under the most extreme shooting conditions.
Check out the best features that are packed into this software:
Precise optical and geometric corrections
Intelligent optimization for exposure and contrast
RawTherapee is another option that you have available to work on your raw Nikon files.
This light but powerful software features batch processing, copy/paste editing parameters, parallel editing, basic tools, the opportunity to use an optional secondary display, and more.
RawTherapee is a free and open-source software that is also available in 25 languages.
Check out its best features:
The software is really versatile and supports lots of cameras
It can, of course, load most RAW files
There is also a command-line besides the standard graphics interface
There are various layouts included in the software
Advanced color handling, non-destructive editing, enhanced exposure, and tonality tools
Multiple denoising methods, various tools to enhance details, and more
All these tools are ideal for Nikon editing software. Take a look at their sets of features just to make sure that you’re getting the right tools for both your needs and skills.
If you have any other suggestions or questions, feel free to reach for the comments section below.
Protecting devices and accounts is a priority for us. The problem is that it is hard to keep up with all the new accounts after the first few. And that’s where a password manager like RoboForm comes into the picture. But for many, RoboForm is not working in Chrome and other browsers.
Roboform is a downloadable program and a browser extension in Chrome, Firefox, and most other popular browsers. So, while many could go with the RoboForm extension for Chrome, others can download the program version.
And for those wondering if RoboForm works with Chrome. And you don’t need the desktop version of it. Just the browser extension would do the job. And let’s now find out why the password manager is not working and the solutions for it.
Why is RoboForm not working?
If the password manager stops working, it could be due to any of the following:
Disabled or outdated extension: When RoboForm is not working in Firefox, your primary approach should be to check whether the extension is disabled or outdated.
An outdated browser: Even running an outdated version can trigger various issues with Roboform.
Misconfigured settings: Frequently, the misconfigured program or extension settings were to blame for the problem.
A buggy update: If you start facing the problem after an update, check the RoboForm download page for any newer versions.
Whatever the case is, we will bring you the best fixes.
What browsers does RoboForm work with?
RoboForm works with major browsers like Chrome, Firefox, Edge and Opera One, as well as some less popular browsers like Avant Browser, SlimBrowser, and MSN browser.
To verify whether it’s compatible with other browsers, you can always check the official website or contact RoboForm support.
What can I do if RoboForm is not working in Chrome?
Before we proceed, perform the following checks first:
Relaunch the browser. Or even better, restart the computer. This should help when RoboForm is not working in Safari.
Make sure the RoboForm extension is enabled and you are running the latest version of it, though the browser usually does this automatically.
Re-enable the extensions
1. Get the browser extension via the downloaded program
Press Windows + E to open File Explorer, paste the following path in the address bar, and hit Enter:C:\Program Files (x86)\Siber Systems\AI RoboForm
Double-click on the installed version of the program.
Choose Chrome from the folders listed here.
Double-click on the rf-chrome.crx file.
Select Google Chrome from the list of options and click Just once to run the file using the browser.
Wait for the extension to install. If it doesn’t do so automatically, click on Add to Chrome button, and choose the appropriate response to confirm.
Once done, sign in with the account created earlier.
You should now check whether RoboForm is working fine in Chrome or if there are still issues.
2. Pin the extension
Launch Chrome, select the Extensions option in the toolbar, and then click on the Pin icon next to the RoboForm Password Manager entry.
Now, check whether the extension starts working in Chrome.
Launch Chrome, click on the ellipsis near the top-right, hover the cursor over Help, and select About Chrome.
If a newer version of Chrome is available, it will automatically be installed. Just make sure to restart the browser for the changes to come into effect.
One of these solutions should have helped fix the problem when RoboForm is not working in Chrome. Besides, reinstalling the app from the App Store should do the trick when RoboForm is not working on iPhone.
It doesn’t matter if you want to remove someone from a group photo, or multiple people who got in the way while you were shooting a historical monument, inPixio Photo Studio Pro 12 will make it look like it was never there.
Its advanced AI technology simplifies complex tasks like adding or removing objects with natural results, ensuring that your edits blend seamlessly with the background.
The software offers intuitive controls for easy object integration and includes automated features to adjust new elements, making your montages look polished and genuine.
With quick social media sharing options, you can effortlessly showcase your stunning creations.
✅ Pros:
Advanced AI for seamless edits
Effortless object removal and addition
Automated adjustments for perfect integration
❌ Cons:
Some advanced features may require practice
Lacks a few professional-level tools
Photo Studio Pro 12
Achieve flawless montages with AI-powered precision and ease!
Photo editing is what the world’s best imaging and graphic design software does best. Besides the standard edits like crop, objects, and retouching, you can seamlessly combine photos with Adobe Photoshop.
To create a montage in Photoshop simply add each new image to the collage as a separate layer. This process allows you to manipulate each photo individually.
Resize, reposition, and rotate the images or layers in the collage or rearrange the stacking order of the layers to craft the perfect montage.
✅ Pros:
Comprehensive toolkit with over 1,000 plugins
Advanced layering, masking, and selection tools
Cross-platform compatibility and cloud storage
❌ Cons:
Steep learning curve for new users
Requires a subscription for full access
Adobe Photoshop
Create stunning image montages and edit your photos with endless possibilities!
Movavi Photo Editor excels in making photo montages both accessible and professional.
The software supports essential photo editing tasks, including color adjustment and retouching, enabling you to create montages that look natural and polished.
Movavi’s automatic enhancement and neural network restoration tools streamline your editing process for impressive results.
The most striking feature here is fragment migration, which is the transfer of picture parts from one photo to another. Movavi blends everything together and makes such a photo look like a natural – unaltered – shot.
✅ Pros:
Simple background removal and replacement
Advanced fragment migration for realistic results
Automatic enhancement and image restoration
❌ Cons:
Basic editing features in lower tiers
Some advanced options require upgrades
Movavi Photo Editor
Create professional montages with ease and precision using Movavi!
Fotor is another popular photo montage software, which is basically designed for rookie (and professional) creative artists, to facilitate photo montage creation.
The software is cloud-based — hence, it can be used on any web-enabled platform, including laptops, desktops, smartphones, and tablets.
With tools designed for both creative and technical adjustments, Fotor makes it easy to craft and personalize montages.
Its ability to work across devices ensures that you can start and finish your projects from anywhere.
✅ Pros:
User-friendly interface with intuitive tools
Cloud-based access and cross-platform support
Customizable presets and one-click enhancements
❌ Cons:
Limited advanced editing capabilities
Free version includes watermarks
Fotor Photo Montage
Pick from a variety of photo templates and albums with this trustworthy editor.
Photo Manager Deluxe, from Magix, is an all-inclusive photo montage software, specially designed for Windows PC. It is supported on all 64-bit Windows PCs, from Windows Vista to Windows 11.
This software supports multi-format images and provides tools for customizable templates, background removal, and advanced photo effects.
Its comprehensive design capabilities extend beyond montages, including text effects and 3D design.
With features aimed at speeding up and refining your montage creation process, Magic Photo Manager Deluxe is perfect for professionals seeking versatile graphic design tools.
✅ Pros:
Extensive graphic design and montage tools
Customizable templates and advanced photo effects
Multi-format support and color correction
❌ Cons:
Complex interface may be overwhelming for beginners
Premium features are behind a paywall
Magix Photo Manager Deluxe
Create detailed montages and more with Magic Photo Manager Deluxe!
Photo Montage Guide is basically designed to alter the shape, color pattern, and sizes of photos, and then import solid images or fragments into the mix, to create photo montages.
It offers preset natural backgrounds like greenery scenes, water bodies, snow covers, and so on. This makes it ideal for creative artists with environmental/nature awareness.
Furthermore, it hosts a flexible design and can be installed as a plug-in on prominent photo manipulation tools like PaintShop Pro, Photoshop, PhotoPaint, and others.
With this, it can easily work in sync with any of this software to create photo montages.
✅ Pros:
Beginner-friendly interface and natural background templates
You can simply create a professional-looking photo montage by following the steps below:
Upload your picture in the reliable photo editor and find the Tools option.
Go to the Remove Background settings to modify the current background.
Edit the background with brushes or opacity tools.
Add a different background for your picture or other graphics.
Save the montage on your desktop.
Above is the top-recommended photo montage software for Windows PCs. They have been selected and rated based on individual adherence to factors like affordability, compatibility, features, and pricing.
Therefore, if you are in need of durable photo montage software, simply go for any of the above-listed ones, provided you have a system (laptop or desktop) that runs on Windows.
After extensively testing various photo editing software, we understand what photographers need for top-notch results.
From refining raw files to crafting stunning composites, the right tools can elevate your work. Keep reading to check our top picks that will simplify your workflow and enhance your images.
Adobe Photoshop – Leading Choice for Professional Image Enhancements
Let’s just skip the introduction since Photoshop is already the most popular photo editor in the world.
It offers a robust toolkit for basic adjustments like cropping to advanced features such as layers and masks.
With cross-platform compatibility and touch support, Photoshop is designed for seamless creativity. Plus, enjoy automatic cloud saving and precise selection tools to enhance your workflow.
✅ Pros:
Industry-leading tools with over 1,000 plugins
Advanced layers and masks
Cross-platform compatibility
Touch and stylus support
Cloud storage integration
Precise object selection tools
❌ Cons:
Steep learning curve for beginners
Requires a subscription for full features
Adobe Photoshop
Create stunning artwork with the world’s best imaging software!
CorelDraw – Perfect for Creative Design and Illustration
Loaded with cutting-edge photo editing and vector illustration tools, CorelDraw is a world-cherished graphic design software that professionals cannot get enough of.
It combines cutting-edge vector illustration and photo-editing tools with AI-powered enhancements for stunning visuals.
The software’s Smart Selection tool ensures fast, accurate edits, while its extensive clipart library provides endless creative possibilities. It’s ideal for those seeking high-quality design capabilities.
✅ Pros:
Advanced vector illustration and photo editing tools
AI-powered image enhancements
Smart Selection tool for precise edits
Extensive clipart and stock image library
❌ Cons:
Higher learning curve for beginners
Subscription-based pricing
Corel Draw
Experience AI-powered bitmap-to-vector trace technology and create impressive images that speak for themselves!
Adobe Lightroom – Best for Efficient Workflow and Organization
Meet Lightroom, a more lightweight alternative to Photoshop, but with equally impressive features. This is also an advanced photo editor that can help you, capture, polish, and even organize your stunning pictures.
With intuitive sliders, filters, and templates, Lightroom is perfect for capturing, polishing, and organizing your photos.
Its interactive tutorials and preset combination features make it easy to recreate stunning effects. Enjoy full RAW support and easy sharing across devices.
✅ Pros:
User-friendly interface
Comprehensive editing toolkit
Supports RAW and HDR images
Interactive in-app tutorials
Easy sharing features
❌ Cons:
Limited graphic design tools
Requires a subscription
Adobe Lightroom
Bring life to your photography projects without hogging your system with Lightroom!
Full-equipped with the latest tools, presets, and incredible photo retouching features all wrapped in an uncluttered, user-focused interface, Skylum Luminar will make your daily edits and total image transformations equally easy.
From routine edits to total image transformations, Luminar makes complex tasks simple.
It supports non-destructive editing, RAW support, and cross-platform compatibility
✅ Pros:
AI-powered editing tools
Non-destructive, layered editing
RAW image support
Cross-platform compatibility
❌ Cons:
May lack some advanced features of competitors
Can be resource-intensive
Luminar
Get stunning, professional results using this AI-driven tool!
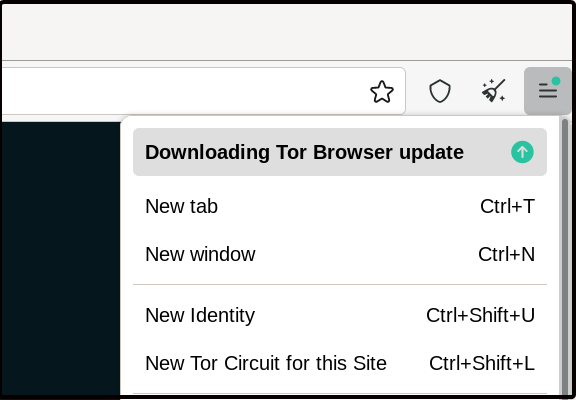
Tor browser has been around for a long time and has been used by millions of people all over the world. However, it has some issues that users may encounter from time to time. Sometimes, you may have trouble installing the Tor browser but we have a guide for the same.
One common issue with Tor browser is high CPU usage. Many users have reported that their CPU usage goes up to 100% when they use this application.
This can be very frustrating especially if you have an older PC or laptop which doesn’t have powerful CPUs like those found in modern laptops and desktops.
Why is Tor browser using so much CPU?
If you are using the Tor browser, you may notice that it uses a lot more CPU than other browsers. The reason is that it has to do more work than other browsers in order to protect your privacy.
Some of the common reasons why it uses so much CPU include:
Encryption – Tor browser is a great browser for privacy, but it can be a bit on the slow side. It is constantly performing encryption and decryption tasks in an effort to keep your browsing private.
Old computer – If your computer is old or has low-power hardware, it might not be able to run Tor browser at its full speed without slowing down your PC or using more than the normal CPU.
Old version of Tor browser – It is possible that you are using an old version of the browser which may not function well with most sites hence hogging up your CPU.
Can I limit Tor browser’s CPU usage? Yes. You can close all other applications that may be running in the background. These other programs can slow down your computer and cause it to use more resources than necessary when they are running at the same time as Tor browser.
Quick Tip:
This is not a problem with the Opera GX Control Panel, which displays the CPU and RAM utilization of a specific opened tab or multiple tabs.
It also allows restrictions over the resources that the Opera GX browser will use, and it will keep to those limits until you further change them.
Opera GX
While this browser is used, it does not consume a lot of RAM and CPU resources.
What can I do if Tor browser is using too many resources?
1. Disable Javascript
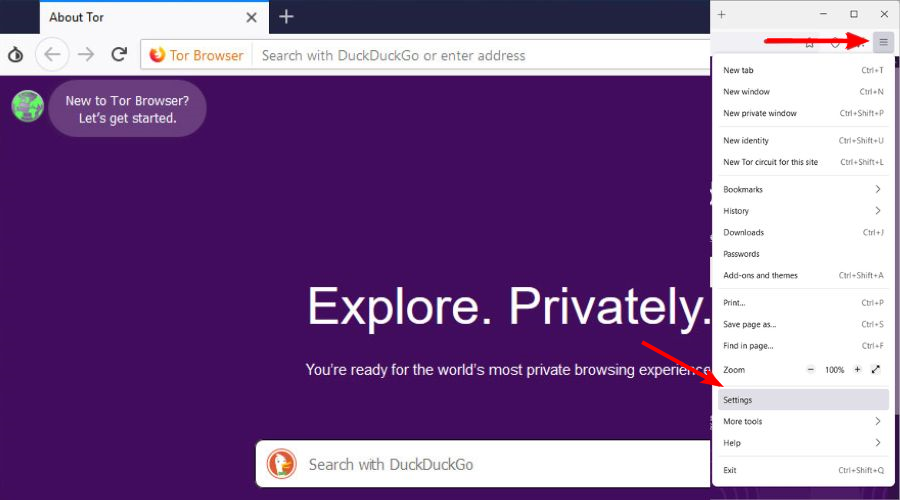
Launch the Tor browser and click on the menu icon at the top right corner.
Select Settings.
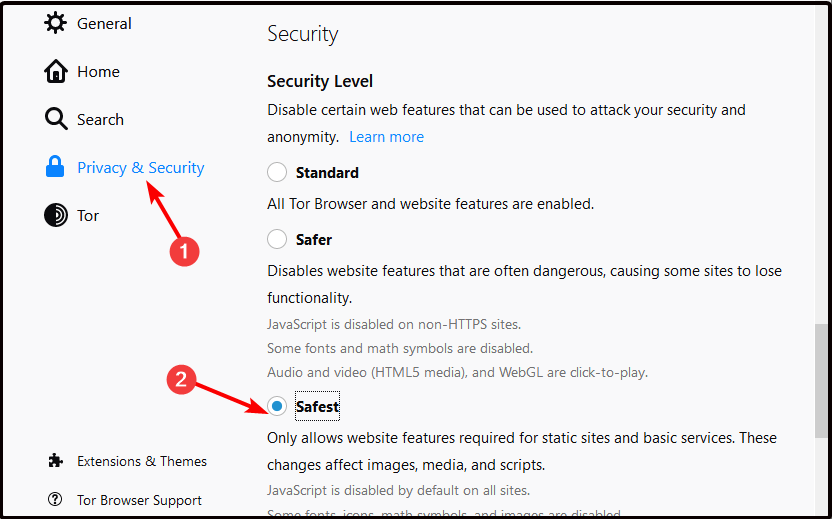
Click on Privacy & Security and under Security, select Safest.
It’s not uncommon for the Tor browser to use 100% CPU on computers with older processors and/or limited RAM. This can cause the computer to run very slowly and even crash.
2. Disable HTTPS Everywhere
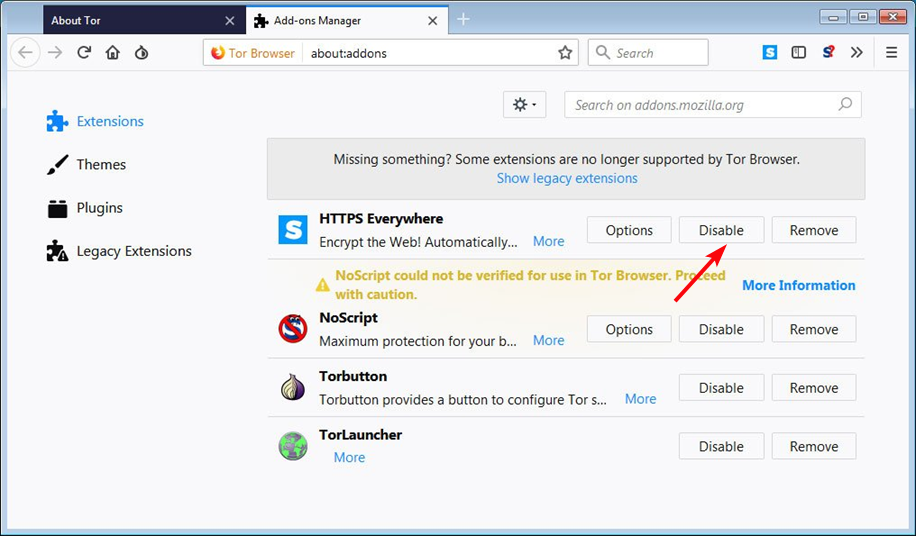
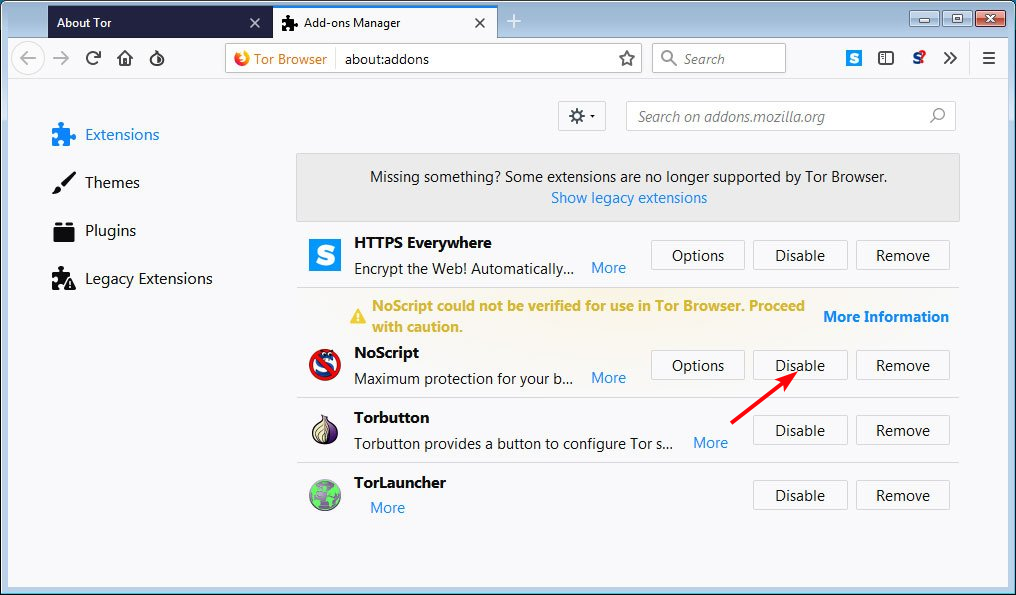
Launch your Tor browser and on a new tab, navigate to the following address: about:addons
Locate HTTPS Everywhere and click the Disable button.
Tor Browser also has built-in HTTPS Everywhere, which automatically makes secure connections whenever possible. This can make your Tor browser use high CPU while browsing or during startup. Once disabled, you should see significant changes.
Browsers are one of the most important apps on PCs. However, they shouldn’t be using too many valuable resources.
While it’s true that there are browsers with low memory usage, some are known to use high CPU either on startup or during browsing sessions.
This slows down your PC considerably and causes a series of problems. This guide will show you how to solve the problem effectively on different browsers.
Why is my browser taking up so much CPU?
Most times, your browser records high CPU usage due to its activities. For example, if you open too many tabs at once, it will result in resource hogging.
Also, video streaming activities and using too many browser extensions can be the cause of the problem.
Finally, it can be purely down to your browser either by default requirement, wrong settings, or the presence of corrupt files, especially the high resource usage at startup.
Which browser uses the least CPU?
The best modern browser with the least CPU usage is undoubtedly OperaGX. The browser consumes fewer resources despite packing a series of excellent features.
The app is lightweight, to begin with, but it has intuitive CPU and RAM limiters to lower usage even more. You can set a custom limit for each tab.
Not only that, but you can also customize how much bandwidth your browser is allowed to use. Enabling these features will result in peak browser performance with minimal impact.
This little resource usage is why it is one of the best browsers for old and slow PCs. Microsoft Edge is another browser that comes close on Windows PC for minimal CPU usage.
Opera GX
Load pages fast by tweaking your memory and bandwidth usage!
1. How to stop Firefox’s high CPU usage on startup
1.1. Restart Firefox in Troubleshoot Mode
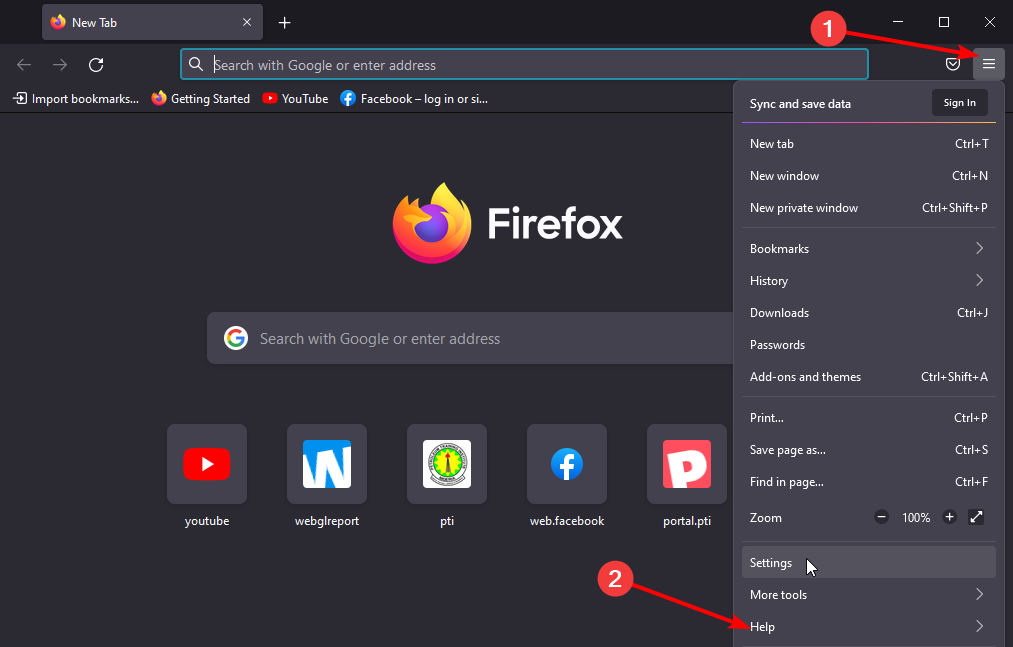
Launch Firefox and click the menu button (three horizontal lines) at the top right corner.
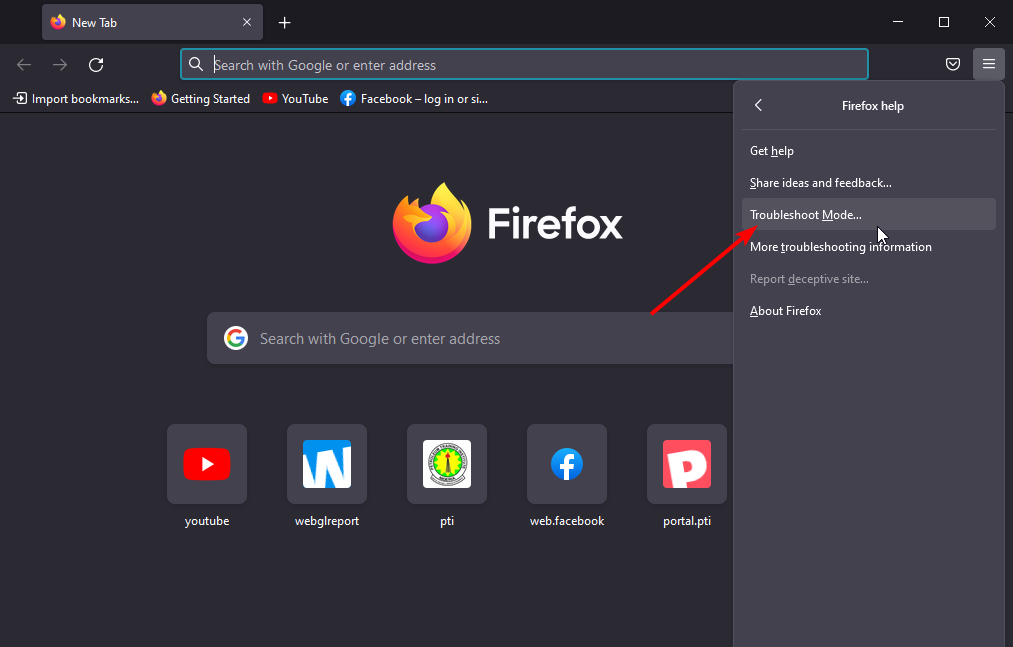
Select the Help option.
Choose the Troubleshoot Mode… option.
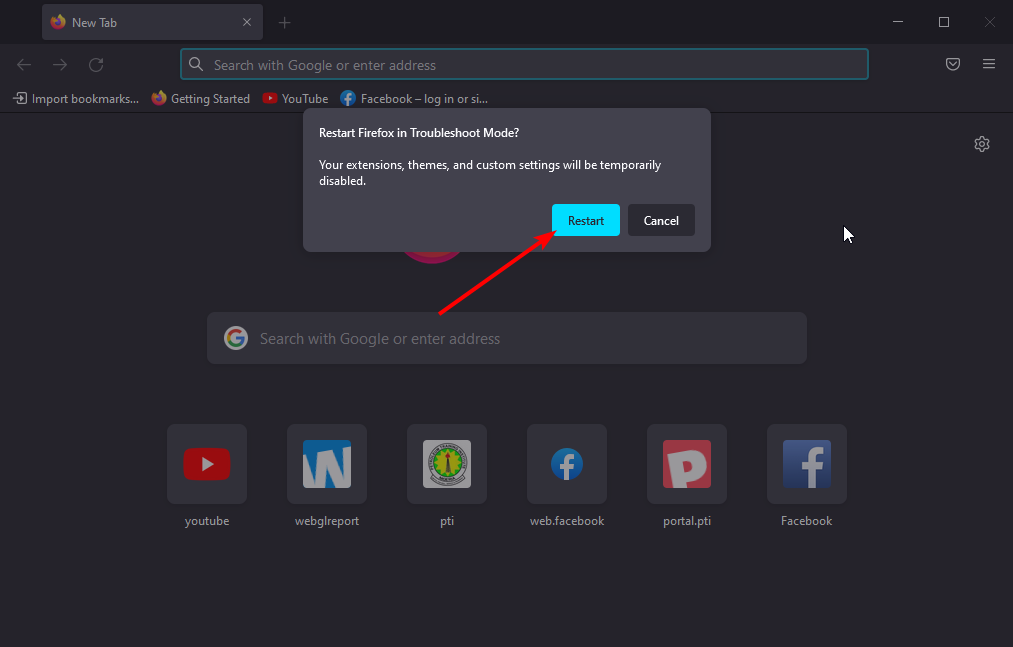
Now, click the Restart button when prompted to confirm the action.
Corrupt extensions or downloaded themes might be the reason for high CPU usage on startup on the Firefox browser.
Restarting Firefox in Troubleshoot Mode will help you launch the browser with all themes, extensions, and custom settings disabled. Now, you can check if the issue is fixed.
Click on the downloaded file and follow the simple onscreen instructions to complete the process.
If the Firefox browser is still recording high CPU usage on startup on Windows 11/10 after restarting it in the troubleshooting mode, maybe the browser or some of its files are corrupt.
In this case, your best bet is to uninstall and reinstall the browser.
2. How to stop Google Chrome’s high CPU usage on Windows 11/10?
2.1. Disable/remove unnecessary extensions
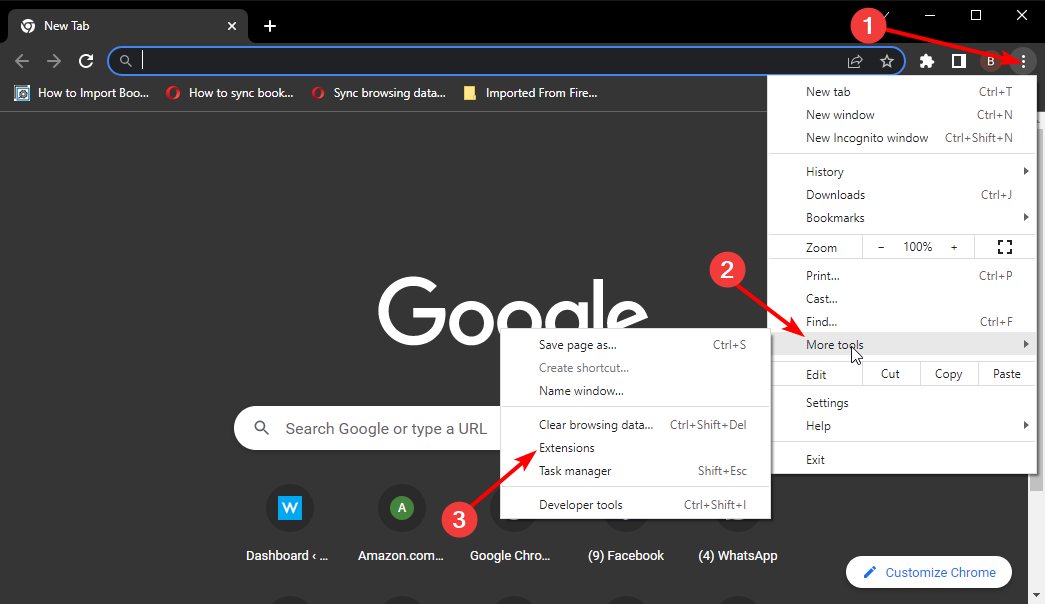
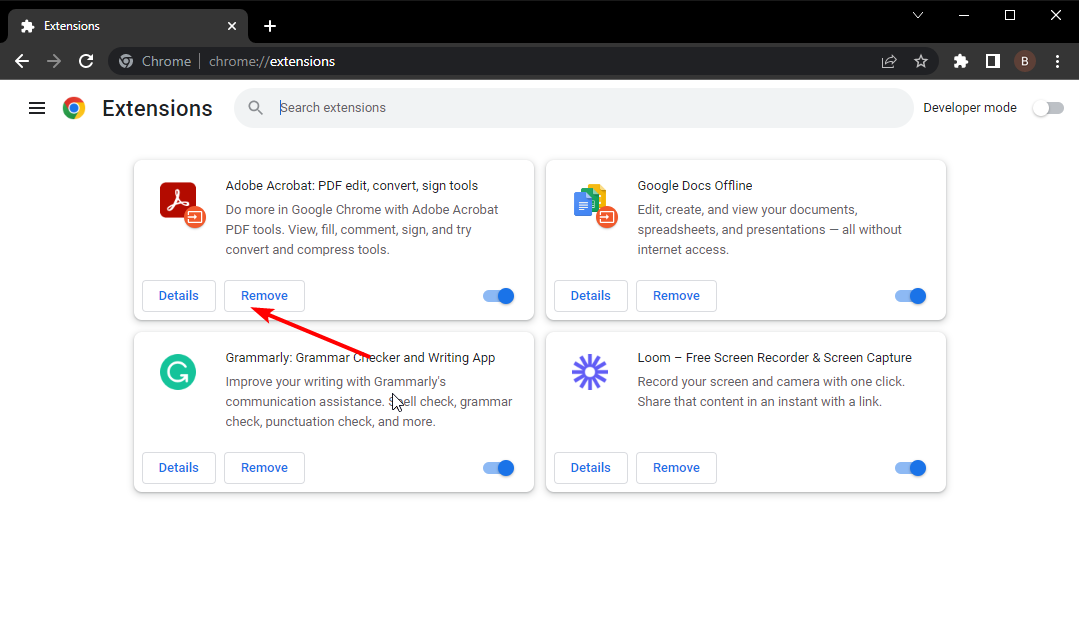
Launch Chrome and click the menu button (three vertical dots) in the top right corner.
Select the More tools option.
Choose Extensions.
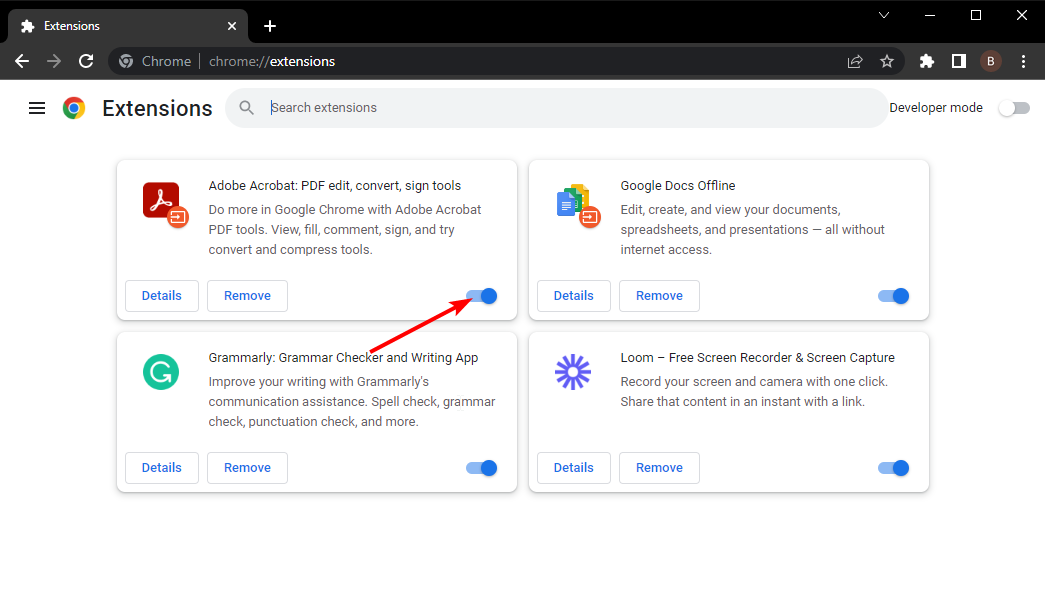
Toggle the switch in front of the extensions backward to disable them.
Click the Remove button to delete them completely.
As much as extensions help improve a browser’s functionality, they only add to its resource usage. And this could be why Chrome uses a lot of your CPU resources.
2.2. Disable hardware acceleration
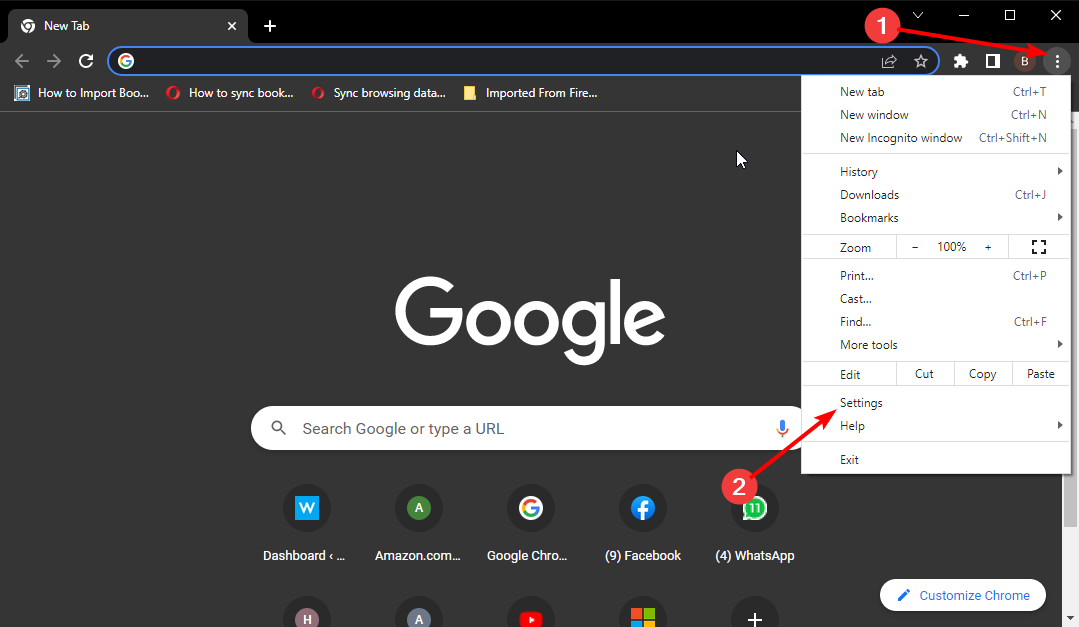
Launch Chrome and click the menu button.
Select the Settings option.
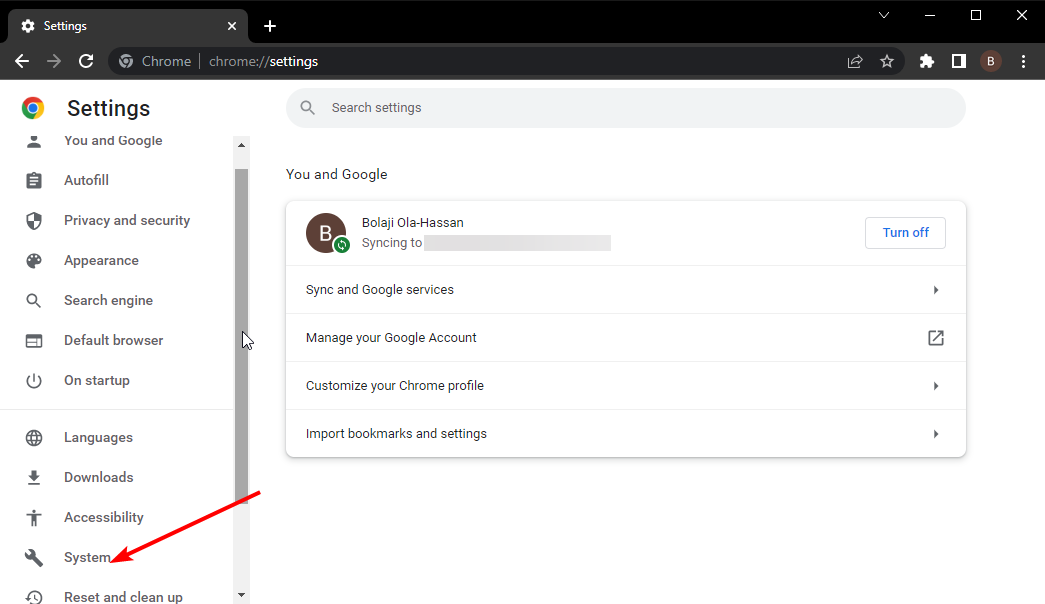
Click the System option on the left pane.
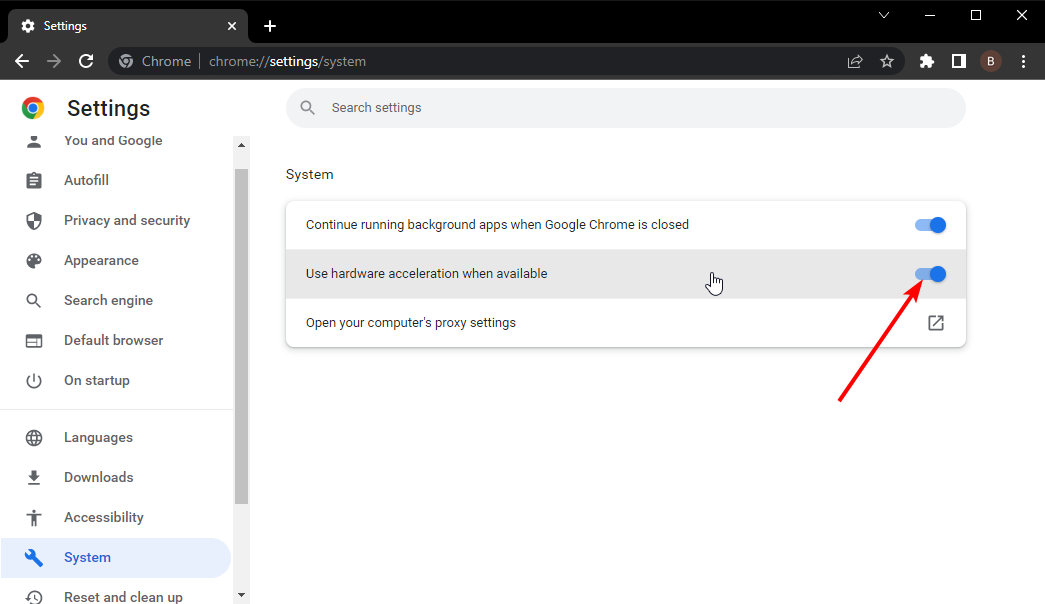
Finally, toggle the switch before Use hardware acceleration when available backward to disable it.
Click the menu button in the top right corner on Chrome.
Choose the Settings option.
Click the Reset and clean up option on the left pane.
Select Restore settings to their original defaults.
Finally, click the Reset settings button when prompted.
If all fixes fail to stop high CPU usage on the Chrome browser, you should consider restoring the settings. This will help reverse any changes you might have made causing the problem.
Why is my CPU usage at 100 with nothing running?
There are different reasons CPU usage could be maximum without running any program. A notable cause is a virus or malicious software using the resources in the background.
When a browser uses a high CPU, it consumes the valuable resources that your PC needs for other processes. With the fixes above, you should be able to restore normalcy on the computer.
Note that fixes like disabling extensions and uninstalling your browser solve the high CPU usage issue on other modern browsers like Brave.
The high contrast mode is a nice feature that enhances the legibility and clarity of your browser. When used correctly, it can take the visuals of your browsing to a new level not seen before.
Some of the best modern browsers have this feature built-in, while you need to install extensions on some to increase the contrast. Also, some adjust automatically to the high contrast setting on your PC.
This guide will show you how to quickly turn on and off the high contrast mode on your browser. You only need to follow the instructions, and the process will be effortless.
What is high contrast mode for?
The main purpose of the high contrast mode is to maximize legibility. It changes the colors on your operating system, browser, and other apps to ensure the contents show clearly.
It is ideal for people with low vision problems or some photosensitivity issues.
Is high contrast good for the eyes?
High contrast could be good or dangerous to the eyes, depending on who and where you use it. It is safe for the eyes if used in an environment with bright light.
However, if you use it in an environment with low background light, the glare and bright colors could strain your eyes.
Is high contrast good for gaming?
High contrast is generally good for gaming. This is because it shows the details of every aspect of the game clearly.
Also, it adds more color to your gaming and ensures things are not dull and boring.
High contrast mode vs dark mode
The Dark mode is a change from the usual light and gray colors common in most user interfaces. With this mode, you will use darker colors like black and dark gray.
This dark mode is preferred for reducing eye strain in an environment with low or no light. Also, it is ideal for users with low vision or photosensitive conditions.
The high contrast mode, on the other hand, makes content legibility the priority. This mode maximizes the contrast between the operating system content and the background.
It is best for users struggling with low vision or some photosensitive condition. Also, people in an environment with bright light and glare will find it useful. And you can always use a high-contrast theme in Windows 11.
How do I change the contrast on my browser?
How do I turn on high contrast mode on Chrome?
Go to the Chrome Web Store to download the High Contrast extension.
Click on the Add to Chrome button.
Click the Add extension button when prompted to confirm the action.
Wait for the installation to complete and click on the Extensions icon beside the address bar.
Select the High Contrast option.
Now, you choose the settings you want.
The High Contrast extension is recommended for increasing the contrast on Chrome. Once the extension is installed, adjusting your browser contrast will make it easy.
To turn it off, you only need to disable the extension.
How do I turn on high contrast mode on Edge?
Launch Edge and type the command below in the address bar. edge://extensions
Select the Allow Extensions from other stores option in the bottom left corner.
Now, visit the Chrome Web Store to download the High Contrast extension.
Click the Add to Chrome button.
When prompted, click the Add extension button, and it will be added to Edge.
Click the Extensions icon next to the Address bar and select High Contrast.
Finally, choose the contrast settings to implement.
Edge, a Chromium-based browser, can use extensions from the Chrome Web Store. Hence, with this extension installed, you can set the high contrast to your taste on your browser.
Change the high contrast mode in the Samsung browser
Launch the Samsung browser and click the More Menu button in the bottom right corner.
Select the Settings option.
Toggle the switch for High contrast mode forward to enable it.
One of the standout features of the Samsung Internet browser is that it allows you to use the high contrast mode without enabling it in your phone settings. To undo the setting, repeat the steps above and toggle the switch backward instead in Step 4.
How do I change my browser color in Opera?
Launch Opera and click the Settings icon on the sidebar.
Scroll to the appearance section.
Click the dropdown in front of Theme.
Select the suitable option.
Opera allows you to customize your browser to your taste. One of the options is to choose whether to use the browser in light or dark mode. Also, you can tailor it to the activity of the system.
Lastly, you can change the wallpaper or add one of your choices to add more style to your browser.
How do I turn off the high contrast mode in Firefox?
Click the menu button (three horizontal lines) at the top right corner.
Select the Settings option.
Choose the General option from the left pane.
Scroll down to the Language and Appearance section and click the Manage Colors… button.
Click the dropdown under Override the colors specified by the page with your selections above and select Never.
Finally, click the OK button to effect the changes.
This method is especially useful for disabling high contrast mode on your browser if it is set from your PC accessibility settings. Also, it can disable high contrast enabled through a theme.
Changing the contrast on your Mac should also help do the trick for your Safari browser. This can be done by using the Accessibility Shortcuts panel.
To open this panel, press Option+ Command +F5keys. You can now invert colors, reduce transparency, and increase the contrast as much as you want.
Why can’t I turn off the high contrast mode?
If you use a computer with restricted access, like a school PC, and mistakenly turn on the high contrast mode with the shortcut, you might find it hard to turn it off.
Your personalization has been disabled, and you can’t change the theme and related features.
There are numerous benefits to using your browser in high contrast mode, provided you do it right. We have shown the way to do it on different browsers in this guide. So, you can always take advantage of the feature.
With a variety of web browsers available, users may have a hard time figuring out which one to opt for.
Google Chrome is the most used browser across the globe. Thanks to the simple and clean UI, fast loading speed, and tonnes of extension support, Google Chrome is the go-to browser for many.
However, there are various other browsers that give you way more features and functionalities than Google Chrome.
In such a case, if you have installed multiple browsers on your PC, then every browser would like to be the default browser on your PC.
This guide will show you how you can disable the annoying Google Chrome isn’t your default browser pop-up. Let us check out the guide.
What does Google Chrome isn’t your default browser mean?
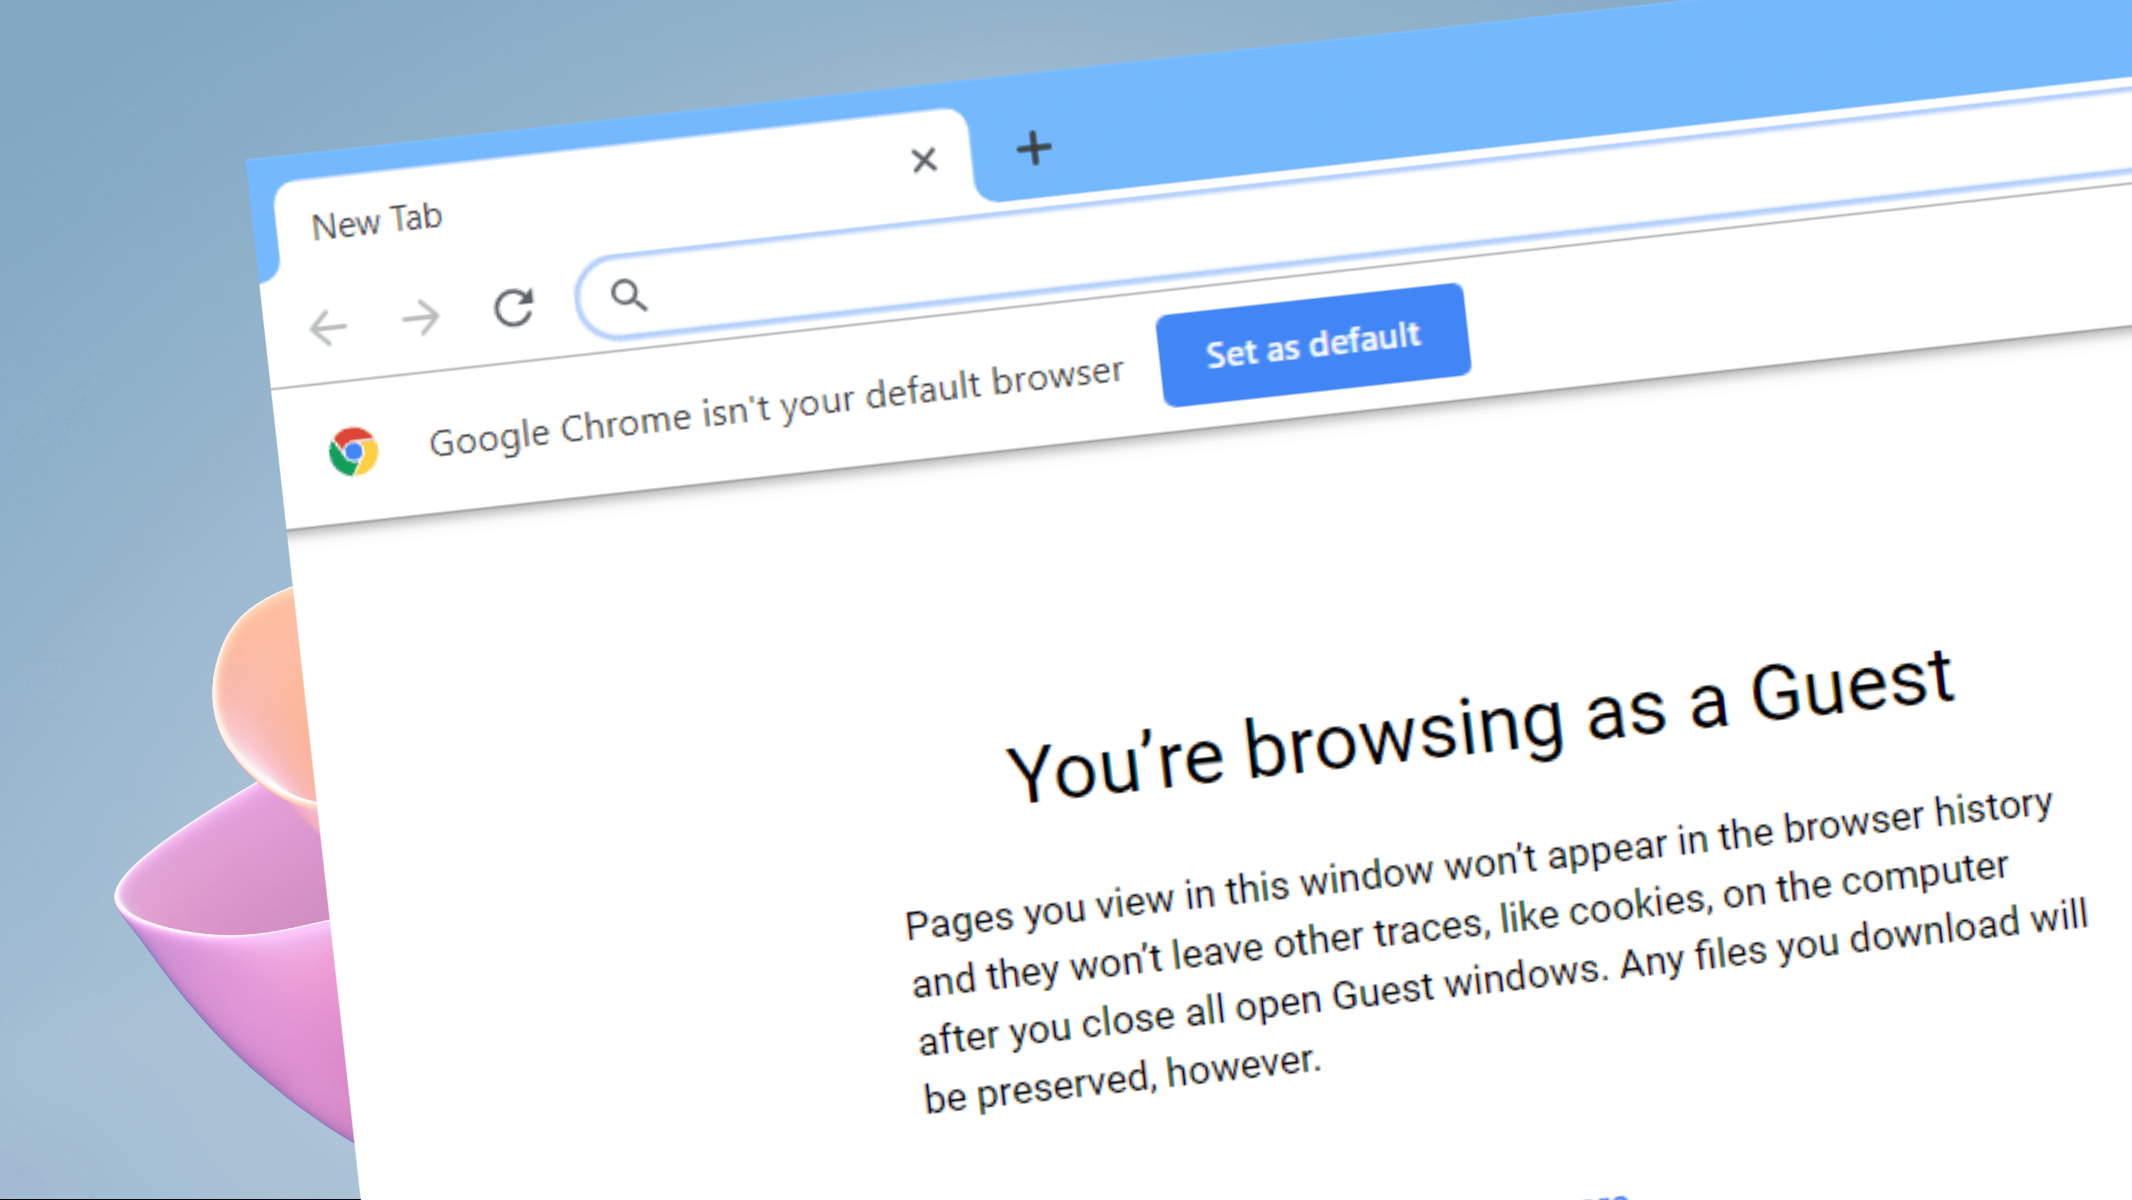
Uses are also coming across an annoying pop-up that says Google Chrome isn’t your default browser. This means you have set a different default browser on your PC, and Google Chrome wants to take that place.
When this Google Chrome isn’t your default browser pop-up message shows up in the browser, there is just an X or close sign, which when pressed closes the pop-up.
However, that is not a permanent solution, it only stops bugging you for a while. One simple solution is to actually set Google Chrome as your default browser. The below section explains exactly that.
How do I change my default web browser?
Press the Win + I buttons to open the Settings menu.
From the left pane, select Apps.
Click on Default apps.
Under the Set defaults for applications section, locate Google Chrome.
On top, click on Set default for Make Google Chrome your default browser.
You can also select Google Chrome to open a specific type of link or file type. If it is not selected then, your PC will use Microsoft Edge to open those types of links or files.
Below, we have explained how you can disable Google Chrome isn’t your default browser message pop up, on your Windows 11, Windows 10, and macOS PC.
How do I get rid of Google Chrome’s default browser message?
1. Get rid of Google Chrome’s default browser message on Windows 11
Open Google Chrome.
Click on the 3-dot icon on top.
Select Settings.
From the left pane, select You and Google.
Select Sync and Google services.
Turn off the toggle for Help improve Chrome’s features and performance.
This trick has helped many users get rid of the annoying Set Chrome as the default browser pop-up. Unfortunately, apart from this, there is no option to permanently disable or get rid of the Google Chrome isn’t your default browser pop-up.
As mentioned above, when this pop-up shows, there is just an X or cross button that will temporarily get rid of the annoying pop-up from disturbing you during the session. However, that is not a permanent solution, and as soon as you open another instance of Chrome, it will appear.
Some users have reported that closing the pop-up a few times makes the annoying pop-up disappear. So, since there is no permanent solution to this, you can try closing the pop-up a few times and hope that it does not appear again.
2. Get rid of Google Chrome’s default browser message on Windows 10
Similar to Windows 11, there is no option to disable the Google Chrome isn’t your default browser pop up on Windows 10 as well.
You can follow the tip mentioned above for Windows 11 and hopefully get rid of this annoying message, or else actually set it as the default browser if the message is annoying you.
3. Get rid of Google Chrome’s default browser message on macOS
Exit or close any instances of Google Chrome running on your macOS PC.
Open Finder.
From the Go menu, you need to select Go to Folder and paste the below and press Enter.~/Library/Application Support/Google/Chrome/Default
Open the Preferences file and open it in TextEdit.
Search for “browser”:{ (complete with quotes and bracket).
Once located, you need to replace it with “browser”:{“check_default_browser”:false, (don’t forget the comma at the end).
Save the file.
In contrast to Windows OS, there is an effective solution to disable the Google Chrome isn’t your default browser pop up in macOS.
Notably, this solution has helped several users to disable this annoying pop-up and allowed them to continue using Chrome without setting it as their default browser.
Now, when you will open Google Chrome on your macOS PC, you won’t see the annoying message to set it as your default browser.
There you have it from us in this guide. The above solutions are effective and have helped many users disable the annoying default browser pop-up in Google Chrome, and we hope that you were also able to disable the message.
Google Chrome is often referred to as one of the best browsers, but it does lack certain useful features. For some reason, Google Chrome doesn’t offer the option to auto hide the address bar.
Though there’s no native built-in option, it doesn’t necessarily mean that you can’t hide the address bar. There are still a few workarounds and third-party extensions available that would help.
So, go through the following sections to find out how you can hide the address bar in Chrome.
Is there a shortcut to hide the address bar in Chrome?
While there’s no absolute keyboard shortcut to hide the address bar in Chrome, there’s one that will help switch to full-screen mode. To find out the keyboard shortcut, check the solutions below.
In the full-screen mode, the address bar would be hidden, along with the other options. It is designed to help users stay focussed on one tab and have it spread out across the screen.
How do I turn on & off auto hide in address bar?
While there earlier was a Compact Navigation flag in Google Chrome that allowed users to auto-hide the address bar, it doesn’t exist anymore. So, now there’s no way to that.
If Google Chrome releases an option for it in the future, we will update the guide and add the steps for it. So, make sure to bookmark this page and keep checking it regularly. Until then, you can try out the methods listed here to hide the address bar in Chrome.
Quick Tip:
If you’re looking for a distraction-free browsing experience, then you’ll probably get used to Opera One in no time. It comes with many advanced features – such as a built-in VPN – but it doesn’t forget the basics, either.
This lightweight browser lets you keep tabs in separate workspaces, hide the address bar, and organize your browsing the way you want.
Opera One
Whenever easily using Google Chrome becomes a challenge, Opera is a great alternative worthy of your interest.
Launch Chrome, and navigate to the website for which you want to create a shortcut (hide the address bar).
Click the ellipsis near the top-right, hover the cursor over More tools, and select Create shortcut.
Use a different name for the shortcut if you want, tick the checkbox for Open as window, and then click on Create.
Now, every time you launch the website from the shortcut, the address bar would be hidden.
This is a viable way to hide the toolbar and address bar in Chrome but comes with its fair share of limitations. For instance, you can’t create a desktop shortcut for every website that you visit. Check out the other methods here to find out if these work alright for you.
2. Switch to full-screen mode
Another simple way to hide the URL bar in Chrome is to go full-screen by pressing F11 or Fn + F11, depending on whether the Function (Fn) key is locked or unlocked.
Remember that this method will hide the tabs as well and only open the current tab in full-screen mode. So, navigating might be an issue here for a few users. But, it also helps hide the Toolbar in Google Chrome.
3. Modify the properties
NOTE
Since this method affects the way the Shortcut behaves, we recommend creating a new one.
Right-click on the Chrome shortcut, and select Properties from the context menu.
Now, enter the following at the end of the Target field, while replacing windowsreport.com with the website that you want to open:--app="https://windowsreport.com"
Once done, click on Apply and then on OK to save the changes.
The configured website would now open without the address bar or the toolbar.
This is another way to remove the address bar in Chrome, but just like the second method, it would require a shortcut for every website. The last method works well in this case.
Open Google Chrome, navigate to Open-as-Popup extension’s official page, and click on the Add to Chrome button.
Click on Add extension in the confirmation prompt that appears.
Once done, simply right-click on any website and select Toggle Open-as-Popup.
It will then open without the address bar or toolbar.
Using a third-party extension is an effective way to hide the address bar in Chrome since it doesn’t create unnecessary shortcuts and clutter the desktop.
How do I make Chrome compact?
Apart from removing the address bar, you can also hide the bookmarks bar in Chrome. In addition to that, there’s the option to hide the Home button placed right before the address bar.
Reading List in Chrome
Besides, categorizing tabs under different groups is an effective way to declutter Google Chrome and make it compact. Also, instead of adding everything to Bookmarks, you could make use of the Reading list in the Side Panel.
How do I hide the bookmark bar?
Launch Chrome, enter the following path in the address bar, and hit Enter:chrome://settings/appearance
Now, turn off the toggle for Show bookmarks bar.
How do you hide tabs?
Again, Chrome does not offer a built-in option to hide tabs but you can simply press F11 or Fn + F11 to go full-screen.
Besides, if the objective is to have them occupy less space, grouping multiple tabs together could do the trick.
How do I hide the address bar in full screen Chrome?
As discussed earlier, hitting the F11 or Fn + F11 key will automatically switch Chrome to full-screen mode to auto hide the address bar, and the bookmarks and tabs.
So, if you had been wondering how to hide the search bar in Chrome, these are all the ways you can do it, along with making your browser more compact.
Hopefully, Google Chrome developers will hear the people out and provide us with a built-in option in future releases to hide the address bar.
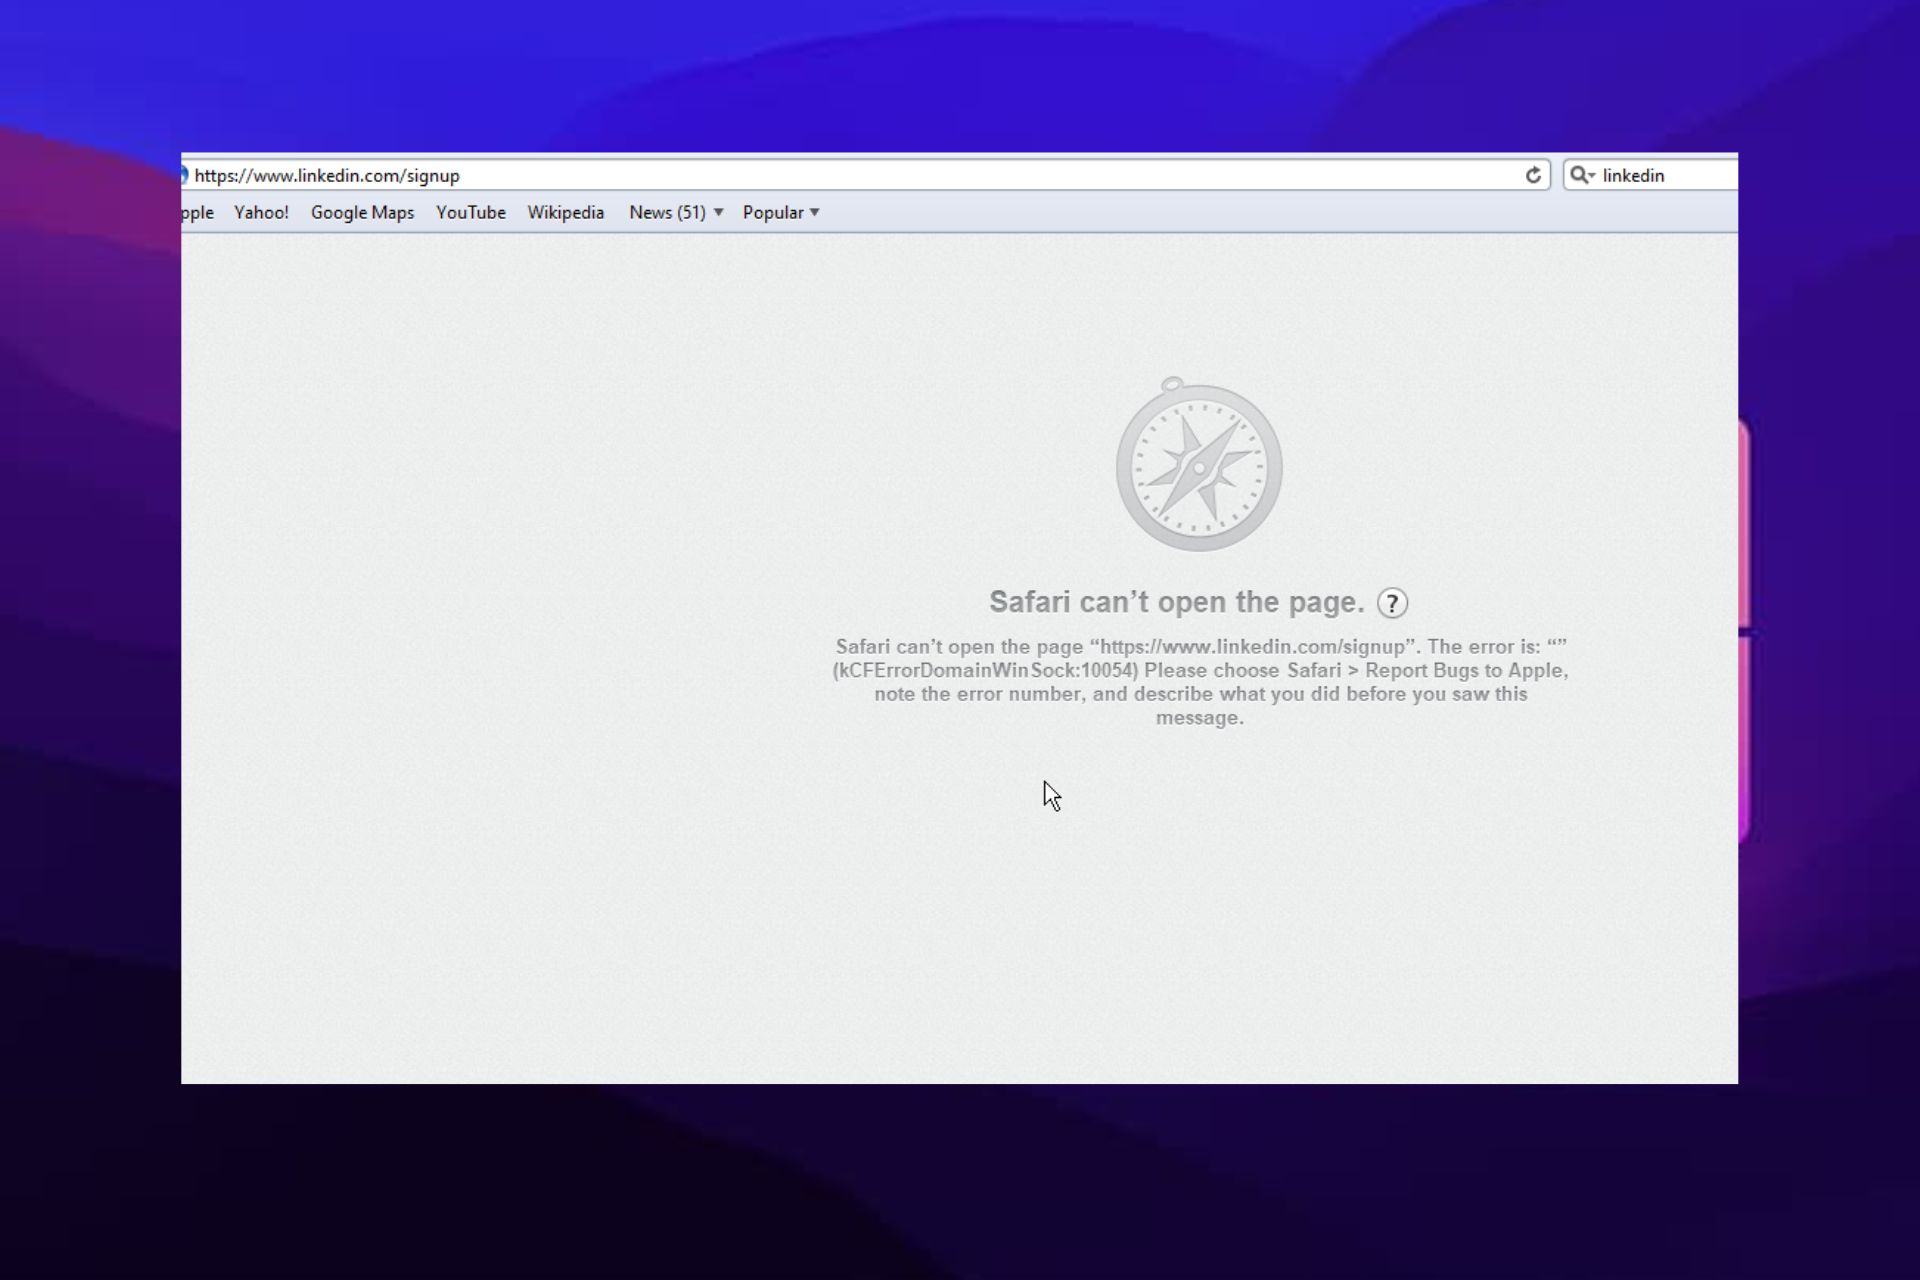
LinkedIn not loading or not opening certain pages on Chrome is usually easy to fix by making a few adjustments to your browser.
Today we’ll take you through a few easy tricks, explained step-by-step to get back on LinkedIn as soon as possible.
How do I fix LinkedIn if it doesn’t load on Chrome?
Before we start, check LinkedIn’s status page to make sure there are no outages or server issues on the platform. If that’s the case, all you can do is wait. But if all looks fine on their end, follow the steps below:
1. Clear browser cache and data
Launch your Chrome browser, click on the Menu icon, and select Settings.
SelectPrivacy and Security.
Click on Clear browsing data.
Check the box for browsing history, Cookies & site data, and Cached images and files.
Click Clear data and confirm it.
By clearing these, all corrupted files and cookies will be removed and your browser should access LinkedIn.
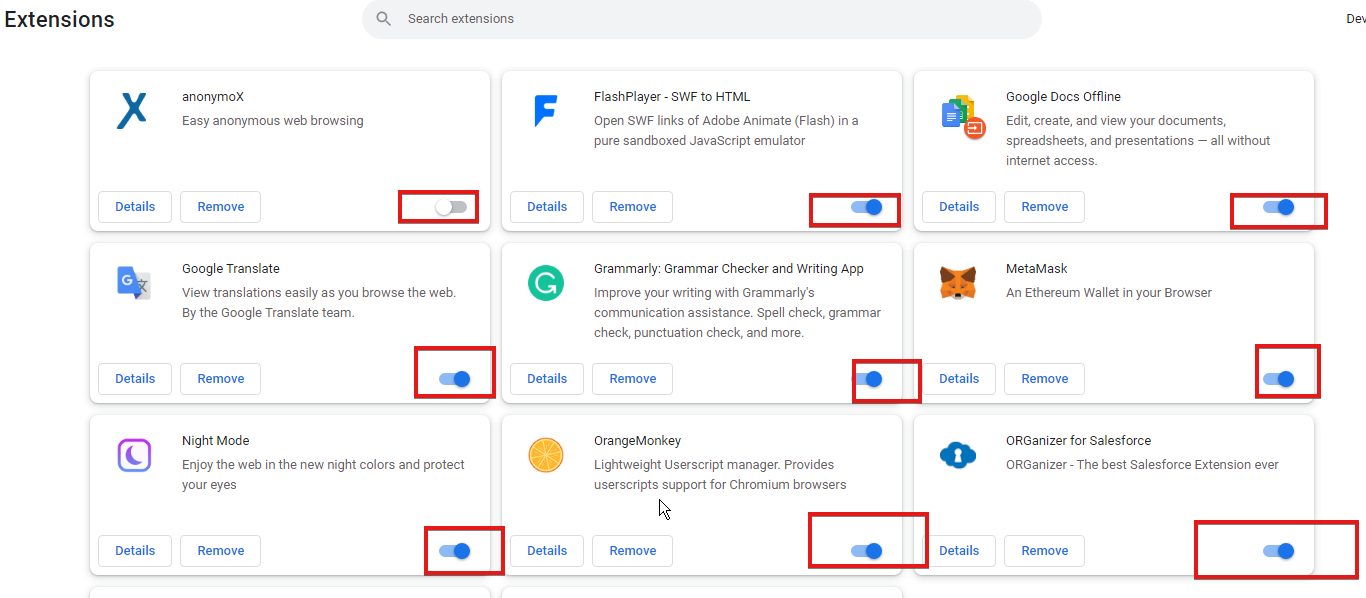
2. Disable browser extensions
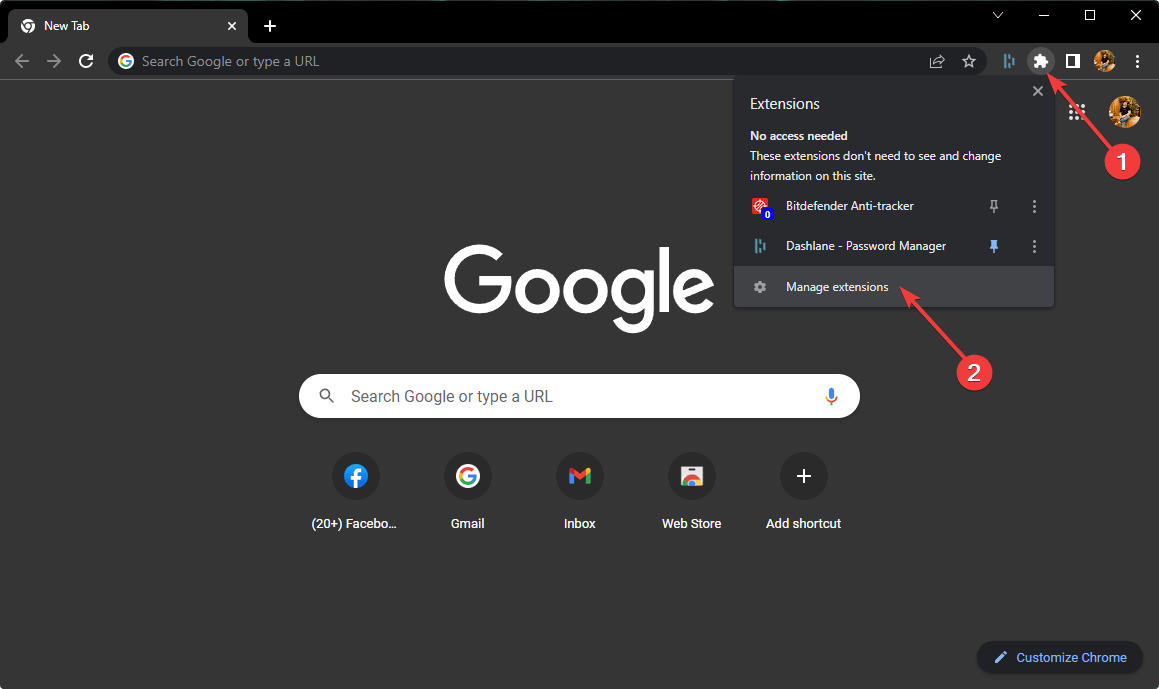
Launch Google Chrome and click the extension icon.
Select Manage Extensions.
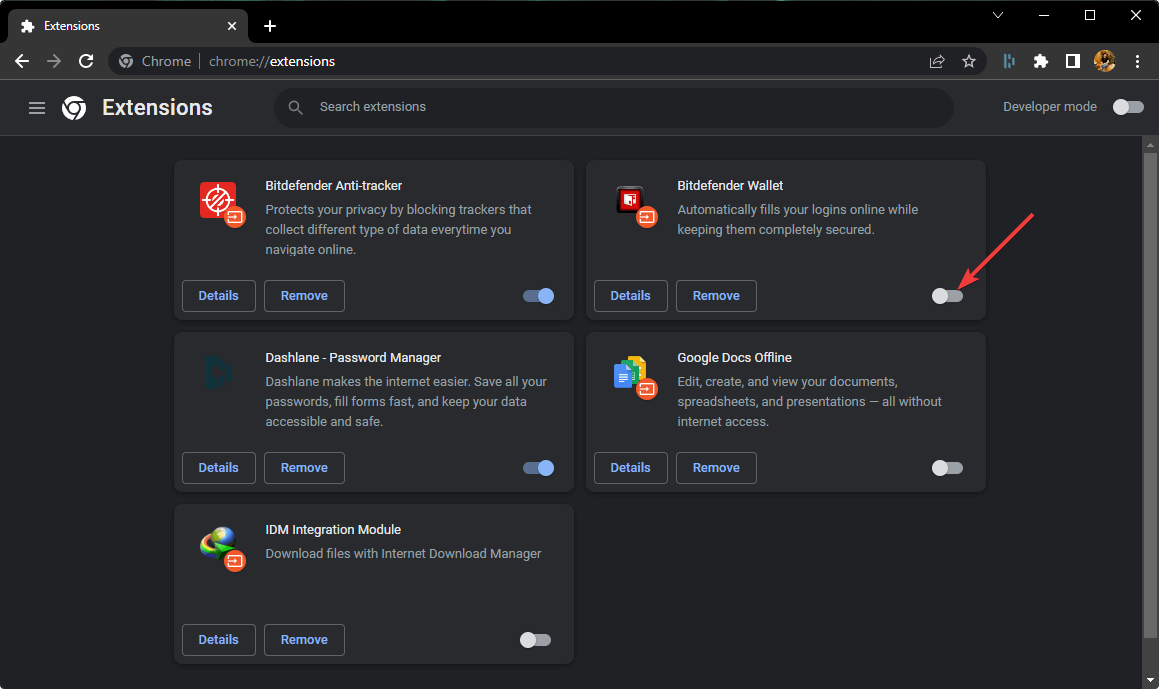
Toggle off the blue icons beside the extensions.
You can start re-enabling the extensions one by one and see which one causes the LinkedIn issue. Consider replacing it with an alternative that works better.
3. Update Chrome
Launch Chrome, click the Menu icon, and choose Settings.
Locate About Chrome on the left pane and expand it.
Chrome will automatically update itself if there’s an update.
4. Reset Chrome
Open Google Chrome, type chrome://settings/resetProfileSettings in the search bar and press Enter.
Click on the Reset settings button to confirm you want to restore Chrome to default settings.
This will restore Chrome to the state it was when you first downloaded it, removing potential settings, plugins, and extensions that could cause LinkedIn not to work.
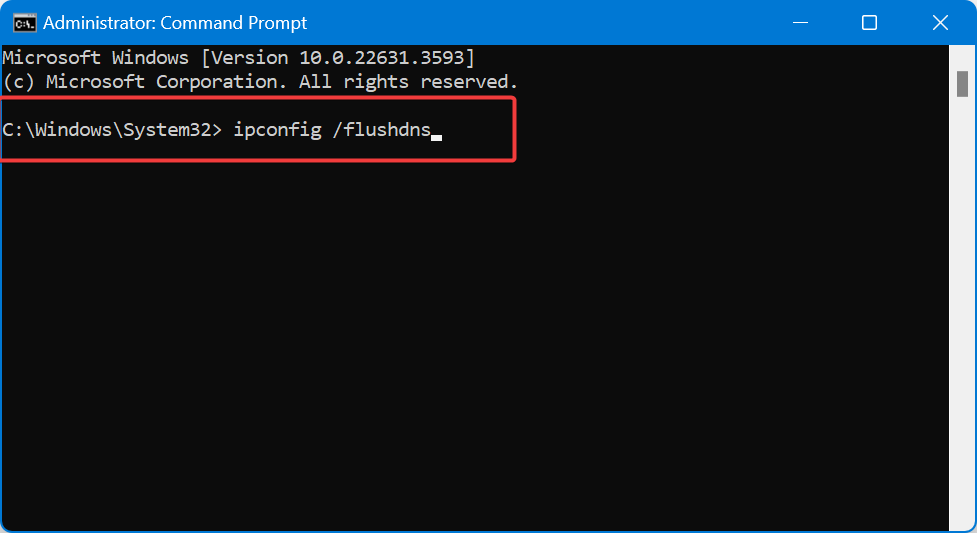
Typecmd in the Start bar and select Open as administrator.
Type ipconfig /flushdns and press Enter.
Wait and confirm the process was successful.
Go back to Chrome and try to access LinkedIn again.
Bottom Line
Though LinkedIn has its fair share of errors, from Something went wrong to Unknown hosts, LinkedIn not loading on Chrome is usually caused by problems with your browser, not the platform itself.
This gives you the power to address and fix it right away instead of having to wait for LinkedIn’s customer support team. Just follow the steps above and you’re all set.
If you managed to fix this issue, you can go ahead and give LinkedIn Games a try.
If you stumble upon any issues along the way, let us know in the comments and we’ll assist.
Using animation software is not that complicated. If you have absolutely zero experience using animation tools, but you’d like to animate your presentations or create animated video resumes or advertisements, we have a few solutions for you.
There are many animation software solutions for beginners that are very intuitive and easy to use.
Many of these tools offer pre-set animations and all you need to do is add some text to customize the video and that’s it.
Windows Report did the homework for you and compiled this list of the best animation software for beginners. Enjoy it!
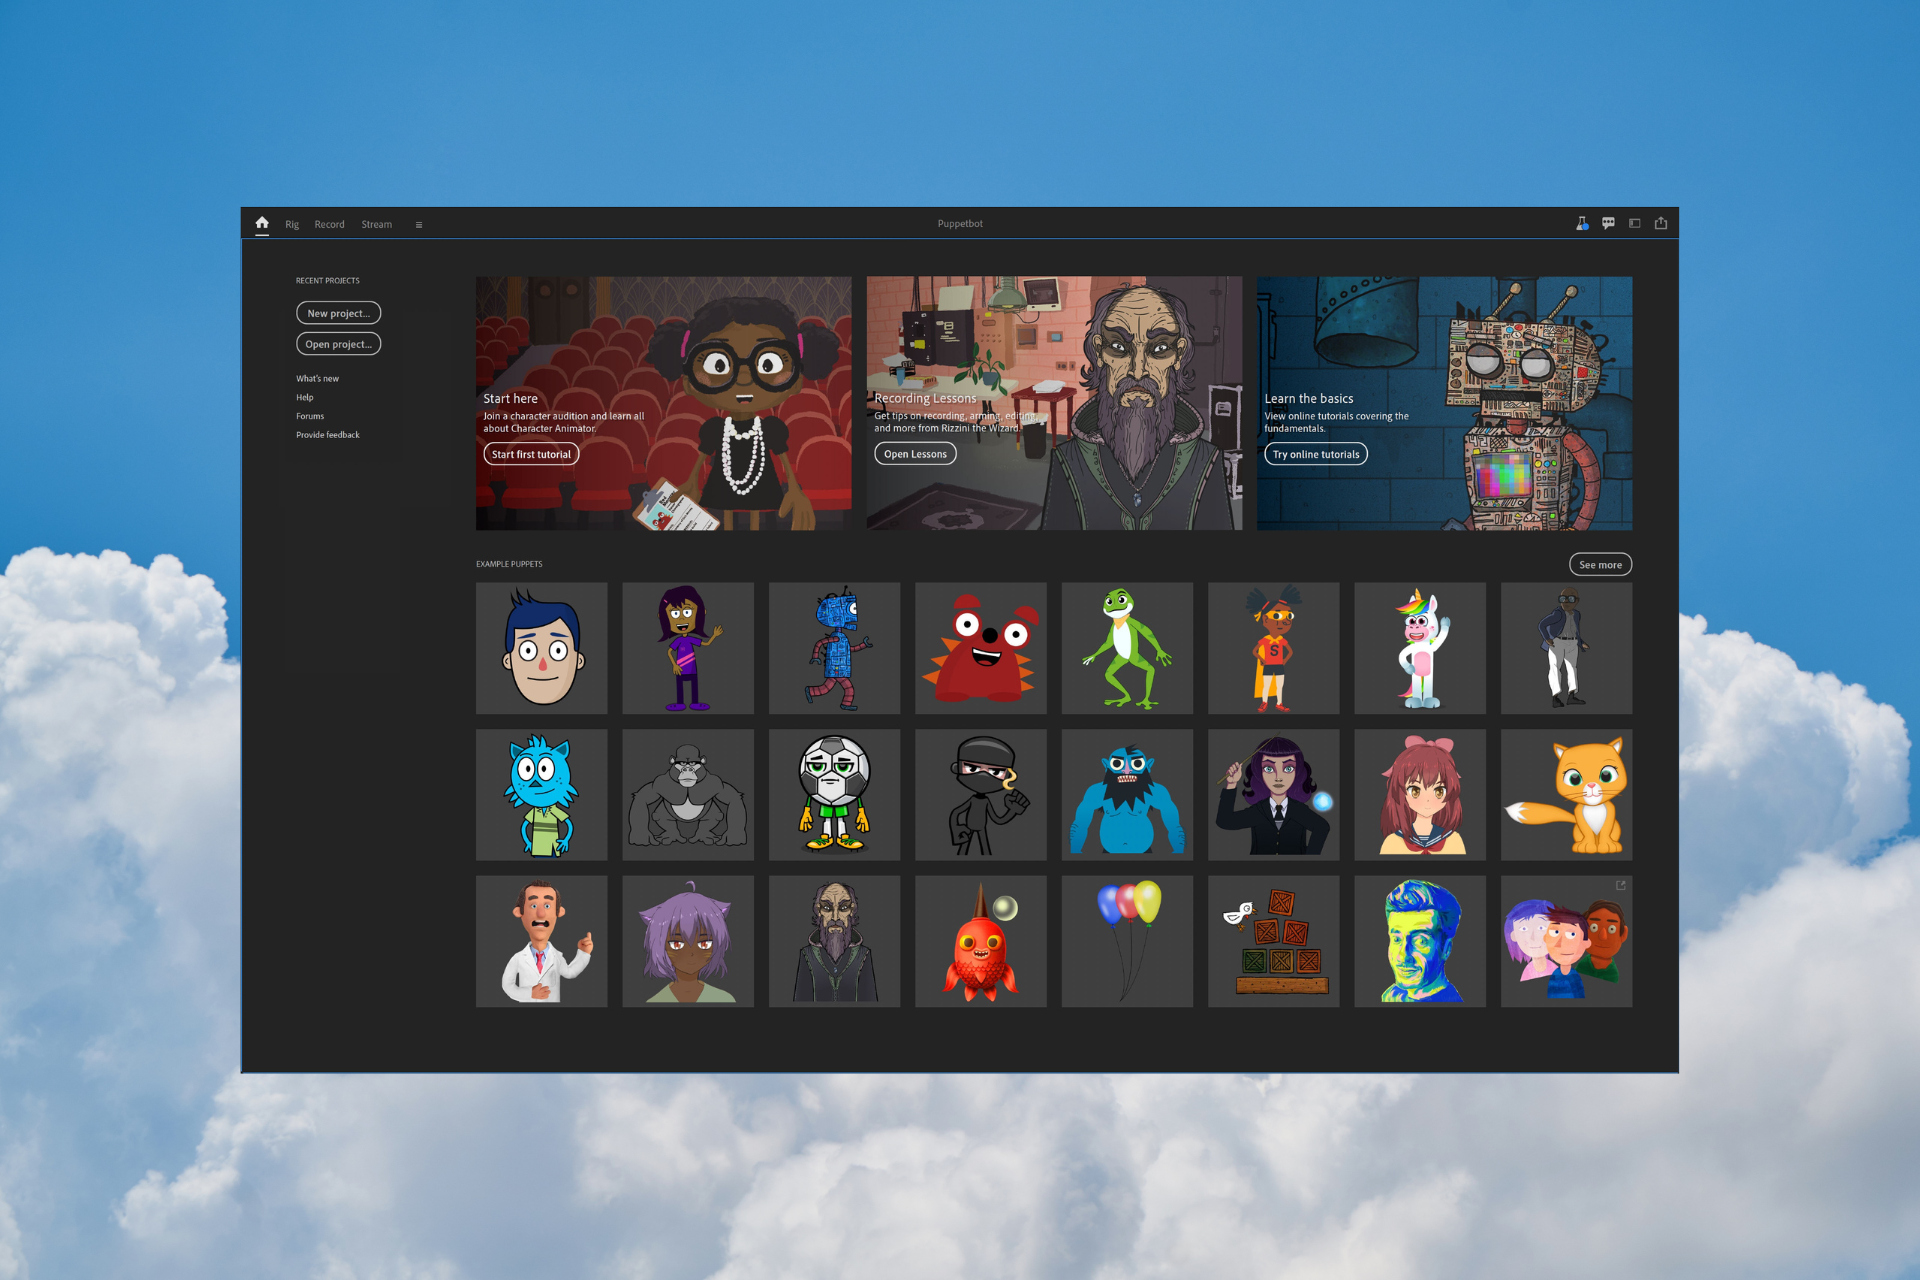
The revolutionary Adobe is now an industry-standard synonymous with image editing, so expect to get the best from Adobe Character Animator.
This powerful tool helps you quickly animate cartoon characters in real-time, without any complicated tools or previous experience.
If you want to master animation, Adobe Character Animator will help you out. The tool requires you to plug in your mic and cam, then import a character or start with one of the built-in character templates.
Up next, let the fun begin. The software further uses your expressions and movements to animate in real-time.
Walk cycles, breathing, blinking and other animation options assure diversity and you may choose to control gestures with your keyboard or MIDI device.
The most surprising movements may even be saved as buttons, so they’re more convenient than key commands. As for the lip-syncing feature, it incredibly matches the voice with the animations.
Last but not least, don’t keep the joy to yourself. Adobe Character Animator supports live streaming to amaze audiences and keep the entertainment going nonstop.
Adobe Character Animator is an easy animation software with amazing features and an intuitive user interface, so don’t hesitate to try it out.
Other great features:
Ability to quickly create characters
Motion tracking support
Offers integration with other Adobe products
Powered by Adobe Sensei AI
Adobe Character Animator
If you’re looking for easy to use but professional animation software, there’s no better choice than Adobe Character Animator.
DP Animation Maker is a simple and powerful animation tool that can help you make stunning animation without tech skills.
You can use it for business or personal projects. This program has an easy-to-use interface, and also can offer complex editing tools for your desired outcome.
Besides selecting special effects, you can also fine-tune the height or speed from settings.
It comes with prebuilt animations and plenty of features to support your ideas to transform static photos or slideshows into captivating animation.
DP Animation Maker is simple animation software, but it’s packed with features, so be sure to try it yourself.
Here’s what you can create with minimum knowledge and effort:
Animated pictures for multimedia products
Animated videos
Animated Backgrounds
Digital greeting cards
Web banners
Music videos/YouTube videos
Animated introductions for games
DP Animation Maker
DP Animation Maker is animation software suitable for both beginners and advanced users alike.
Animaker is a really useful animation tool that offers you tons of video templates that you can use as such or customize to your liking.
The best part is that these videos are already filtered under a series of categories such as video greeting, info-graphics, travel, sports, birthday, intro, outro, etc.
Using Animaker is very simple: just click and choose, drag and drop, edit and play and that’s it.
Once you select your favorite animation template, you can play the video and get a glimpse at the final product. Then you can click on the Use button to open the dashboard and start customizing the animation.
In the dashboard, you can add and edit the scenes, add text to personalize your animation, add various animation effects to draw your audience’s attention, and more.
You can even record your own voice and add it to the animation video. How cool is that? Once you’re happy with the result, you can save your animation video and export it.
Once you’ve got comfortable using the free features of the software, you can step up the game by getting one of the three pricing plans available, ranging from $12 to $39 per month.
Animaker is the easiest-to-use animation software that we used, and if you’re a beginner, be sure to check it out.
Other great features:
Cloud-based
Comes with various templates
Character builder
Automatic lip-sync
Incredibly simple to use
Animaker
Animaker is a simple and user-friendly animation software, so it’s perfect for beginners.
Flipsnack is a cloud-based flipbook animation software, that can help you create and publish realistic page flip animations.
Whether you’re a skilled designer or a non-technical person, due to Flipsnack’s intuitive user interface along with its integrated library of fully customizable templates, within a few clicks you can create all sorts of interactive publications.
From flipbooks, and magazines to catalogs, brochures, and many more, you can transform all of them into interactive content materials by using features such as photo-slideshows; GIFs; audio and video elements, social media buttons, and map embedding.
Moreover, if you want to share your animated content, you have various options to do so: public; unlisted (not indexed by any search engines, access through direct link only); password-protected, and private.
In conclusion, Flipsnack is a tool that can help you easily create or fine-tune static documents into engaging animated publications.
Take a look at its key features:
Turns any PDF document into a brochure
Cloud-based dashboard accessible from any location
If you’re looking for an online animation tool for beginners, try Wideo. This animation platform is perfect for business use as it focuses mainly on marketing video templates.
Using Wideo is very easy, all you need to do is drag and drop elements or simply upload your own images and start animating.
The platform also features a ‘Learn’ section where you can learn the basics and create your very first animation video.
Once you’ve got some experience using Wideo, you can go to the advanced section and learn how to implement a series of advanced features in your videos.
Users upload millions of photos and other media on Facebook daily to showcase their latest happenings. Moreover, users also use Facebook to connect with their friends and family members using the Facebook Messenger platform.
However, nowadays, Facebook has sort of become a marketplace, where you will come across multiple ads for different products, that companies are trying to sell on Facebook.
Some products may be of interest to you, while some may not. Whenever you click on such ads, you will be directed to either their official website or the Facebook page, where you can interact and purchase the product if you like.
Occasionally, products that looked great in the Facebook ad turn out to be completely different when you click on the link.
When you click on such links, Facebook tracks your interaction and, based on that, will show you future ads. In such a case, clearing your Facebook browser history is a good step, as this will prevent you from seeing those unwanted ads, again and again, in your feed.
Here are the different methods via which you can view your Facebook Messenger browser history:
Viewing recent ad activity
Checking the activity log
By viewing the browser history
Let us go through the steps that you need to follow to check the Facebook Messenger browser history on different devices.
How do I view Facebook Messenger browser history?
1. View Facebook Messenger browser history on a PC
1.1 View Facebook Messenger browser history on Windows 11
1.1.1 By viewing recent Ad activity
Visit the Facebook website.
Click on your profile icon.
Select Settings and privacy.
Click on Settings.
From the left side, select Ads.
This will list down all the ads that you see.
Recent ad activity will list down all the ads that are currently being displayed on Facebook. It will also show you all the links and sponsored content that you have viewed. It is a nice place to know about your Facebook browser history.
1.1.2. Check the Activity log
Log in to Facebook.
Go to your profile page.
Click on the 3-dot button and select Activity log.
Here you will see videos you have searched for, videos you have watched, search history, comments, and much more.
Using the activity log, you literally get every bit of detail about your Facebook footprint. That is, you can see which posts you liked, commented on, which videos you watched, which posts you are tagged in, and much more.
1.1.3. View browser history
Open the web browser, for our case we are using Google Chrome.
Press the 3-dot icon.
Select History.
Here you will see all pages you have visited on Facebook.
You won’t be able to go through your Facebook history on your smartphone, sadly, as you will be making use of the Facebook app.
However, if you use the browser to log in to your account on your smartphone, then you can check out the history and go through your Facebook browser history.
1.2. View Facebook Messenger browser history on Windows 10
1.2.1. By viewing recent Ad activity
Visit the Facebook website.
Click on your profile icon.
Select Settings and privacy.
Rest all steps are the same as mentioned for Windows 11 above.
1.2.2. Check the Activity log
Log in to Facebook.
Go to your profile page.
Click on the 3-dot button and select Activity log.
Rest everything is the same as mentioned for Windows 11 above.
1.2.3. View browser history
Open the web browser, for our case we are using Google Chrome.
Press the 3-dot icon.
Select History.
Here you will see all pages you have visited on Facebook.
2. How do I see my Facebook mobile browser history?
NOTE
Here, we will discuss the steps that you need to follow in order to view your Facebook account’s mobile browser history.
2.1. How to check Facebook Messenger browser history on Android and iPhone
2.1.1. View recent Ad activity
Open the Facebook app.
Click on the hamburger menu.
Scroll down and tap on Privacy shortcuts.
Locate Ad preferences.
Tap on Review your ad preferences.
Here you can view all of the ads that you are being targeted.
2.1.2. View the Activity log
Open the Facebook app.
Click on the hamburger menu.
Scroll down and expand Settings & Privacy.
Tap on Settings.
Scroll down and tap on the Activity log.
Here, you will see the posts you have liked, your comments, the posts you are tagged in, and much more.
How do I delete my Facebook browser history?
In 2020, Facebook introduced what is one of the most crucial settings of its platform. The feature is called Off-Facebook Activity.
Using the Off-Facebook Activity tool, Facebook users can conveniently delete their Facebook Messenger browser history. Do note that this feature is available on all devices irrespective of their operating systems.
This means that you can delete your Facebook Messenger browser history from your Android or iPhone devices, or even PCs and laptops.
This feature helps you delete all of your browsing data and clears all the information that businesses and organizations share with Facebook about your interactions, when you click on a link, visit a website, etc.
Here are the steps to view and delete your Facebook Messenger browser history.
On Android
Open the Facebook app.
Tap on the hamburger menu.
Select Settings and privacy.
Tap on Settings.
Tap on Off-Facebook activity.
From here, you can manage, view, and even clear your activities.
On iPhone
Open the Facebook app.
Tap on the 3-line icon at the bottom.
Select Settings & Privacy.
Tap on Settings.
Scroll down and select Security.
Tap on Off-Facebook activity to review.
On PC
Open the Facebook website.
Click on your profile icon.
Select Settings and privacy.
Click on Settings.
From the left pane, select Your Facebook information.
Next to Off-Facebook activity, click on View.
So, what happens when you access the Off-Facebook activity tool on your Android, iPhone, or desktop?
Well, in official Facebook terms, Off-Facebook activity is a summary of activities that businesses and organizations share with us about your interactions, such as visiting their apps or websites. They use our business tools, such as Facebook Login or Facebook pixel, to share this information with us.
When you access the off-Facebook activity control panel, you will see the below information:
How does Facebook receive your activity information? This is usually done by businesses using business tools such as Facebook pixel, the Facebook SDK, and Facebook login.
The number of interactions Facebook receives of yours. This information is obtained by Facebook by:
When you open an app
When you log in to Facebook
View content
Search for anything on the Facebook platform
Add an item to your shopping basket
Make a purchase or make a donation
Activities via the apps your access.
Considering all this information that Facebook collects about you, it would be a wise choice to clear your Facebook browser history using the off-Facebook activity tool.
How do I delete Facebook Messenger search history?
While using Facebook, there are instances when you would want to check in with one of your friends whom you have not heard from in a long time. For that, you would go ahead and use the search bar and search for the profile.
Now, whatever searches that you do, as mentioned in the above example, get stored and will show up on the search bar at the top of the Facebook app.
While this could be good to have quick access to your searches, from a personal point of view, you may not find it great if anyone using your phone knows what searches you have made on Facebook.
If you want to know how you can delete your Facebook browser searches, then you can follow the steps below for Android, iPhone, and PC.
On Android
Open the Facebook app.
Tap on the search bar at the top.
Tap on the Edit button next to Recent searches.
Tap on the X button next to searches to clear your search history, one by one.
Tap on Clear all to clear all of your search histories.
On iPhone or iPad
Launch the Facebook app.
Tap on the search bar on the top.
Tap on the Edit button next to Recent Searches.
Tap the X button next to searches to clear your search history, one by one.
Hit the Clear Searches button to clear all your searches.
On PC
Log in to Facebook.
Head to your profile page.
Click on the 3-dot button and select Activity log.
Click on Search history.
Hit the Clear Searches button or delete searches one by one by clicking on the X button next to your searches.
There you have it from our side in this guide. Let us know in the comments below if you come across any issues while following the above steps.
For every business, managing customer relationships effectively is crucial for success. That’s where automated CRM software comes into play.
By harnessing the power of technology, these tools streamline and automate various aspects of customer relationship management, empowering businesses to enhance efficiency, track sales, boost productivity, and drive growth.
In this guide, we will explore the best automated CRM software that can help you revolutionize your business with enhanced customer satisfaction.
What is sales tracking software?
Practically, sales tracking software is an automated program that can manage and track your sales process in real time.
Nowadays, companies utilize this technology to organize all the sales stages or specific deals at a certain moment in time.
This software is used mostly by the sales team because it requires an overview of all the prospects and sales workflow for particular deals.
In comparison with other weak methods like whiteboard sale tracking, software like this can maximize your leads to their best potential and thus close the deal.
What to consider for a good sales tracking software platform?
Using sales tracking software can certainly help you improve the whole process of sales and offer you improved business performance.
In any case, you still need to analyze your objectives and look for sales lead-tracking software or features that help you close the deals.
So there are different characteristics in your platform to look for, and they are as follows:
➡️ Pipeline dashboard
➡️ Customer journey management
➡️ Integration with the company website
➡️ Social media support
➡️ Content managing tools
That being said, in case you’re searching what are the best applications for tracking sales, keep going with this guide and find out.
What are the best automated CRM tools for your business?
Monday.com is the most used productivity and CRM platform by all professionals in order to set effective workflows and achieve long-term goals.
This flexible software is actually a marketing solution designed for teams or managers that need to prioritize tasks and generate more sales using efficient CRM.
It’s possible to configure your dashboard easily and customize it based on your needs. You can add multiple columns or manage different deals using workflow tools.
On top of that, you can use automation to streamline your tasks and take action. All you need to do is set up recurrent tasks automatically and assign different actions for your team members.
This will certainly boost your CRM results and bring valuable income to expand your business. Hence, this complete software can improve your decision-making on essential deals.
More than CRM productive results, you have practical features like insights dashboards, task automation, a Kanban system to prioritize work, integrations with email, and other collaboration tools.
In addition, getting this platform will bring an overview of all deals and the sales data organized in structured dashboards.
Along the key features of Monday.com we can find:
Customizable dashboards
Instant overview of all business deals
Emails sync with Gmail or Outlook
Email leads tracking
Sales forecast
Import data from Excel reports
Activity tracking tools for every team
Monday.com
Level up your CRM system and final results by choosing this software with an amazing design.
Freshsales CRM is a great lightweight CRM software option that allows small businesses to manage all aspects of their company’s customer service.
The solution was designed to be very easy to use. This allows you to use this software without a steep learning curve.
Even though this CRM software is lightweight, it still has a wide range of features that can help you run your business more efficiently.
This software automates a lot of manual tasks, like logging phone calls, tracking emails, and doing customer research.
Compared to the other software options presented in this article, Freshsales doesn’t have the same third-party integration power as Zoho CRM but is still a very useful tool.
Freshsales CRM was released in 5 versions: Sprout, Blossom, Garden, Estate, and Forest so that you can choose the right one for your business.
All the plans offered with Freshsales CRM include 24/7 email support and also 24-hour phone support during weekdays.
The features found in FreshSales CRM cover a wide range of topics such as Leads, Sales, Email, and Reports.
Some key features of Freshsales CRM include:
Detailed analytics and reporting features to gain insights into sales performance
Record calls, log call notes, and automatically update contact and deal information
Offers mobile apps for iOS and Android devices
Provides insights on email opens, link clicks, and attachment views
Capture leads from various sources, track their interactions, and segment them
Freshsales
Increase your business results using this structured sales platform that will streamline your sales process.
PipeDrive is a complete CRM solution that offers practical tools specially created to help you close deals in no time.
The software is very simple to use due to its user-friendly platform that includes customizable pipeline stages or drag-and-drop actions.
By choosing this effective tool, you can increase your sales by 28%, according to the developers and over 100,000 companies that use it.
You can also benefit from task automation or AI assistant support to enhance your deals. Thus, repetitive tasks will disappear, and you concentrate on data collection or webhooks processes.
Besides the CRM benefit, you have a complete sales funnel that includes email contact management, customizable reports for successful deals, and many more.
It’s notable that you can integrate PipeDrive with other sales tools and include phone contacts or leads in one single view.
With all said, it only remains to try out all the helpful marketing tools with CRM benefits and automation tools.
Key features of PipeDrive:
Integrations with chatbots, accounting tools, and email marketing
Lead generation tools
Phone deals solution
Scheduler tool
Smart docs functionality
PipeDrive
Raise your sales by double-digits using this complete marketing automation and CRM platform.
Zoho CRM is another great software that allows you to manage your company’s customer relations, your employees, and customer data that you acquired in time. This software was designed to be used by small teams.
Zoho CRM offers a wide range of step-by-step tutorials that take you through the setup process with little to no experience needed.
The user interface of Zoho CRM is very intuitive, and the fact that this software is offered as a SaaS (software-as-a-service) solution makes it a lightweight option that packs a wide range of powerful features and customization options.
Because Zoho CRM is part of the Zoho Saas family, this software is fully compatible with all Zoho apps.
This means that you can extend the powers of the basic Zoho CRM with ease, you can use cloud storage to keep your data safe, and it also offers you the possibility to manage every aspect of your business from one screen.
Zoho products can be purchased as a single product or as a bundle that offers a wider range of features on the Zoho Marketplace.
All of the products that can be found on the Marketplace can integrate or extend the capabilities of your basic Zoho CRM software.
Downloading and using features from the Zoho Store allows you to customize your experience to your specific needs without the use of third-party software.
Some of the most notable products found on Zoho Marketplace include Workplace (replacement for Office Suite), Finance Plus (expense tracking, inventory software, subscription management, accounting, etc), IT management suite (for SMB help-desks), HR products, and more.
You can also customize your Zoho CRM software at different levels, depending on the type of license you acquire. For the free version of Zoho, you have limited customization possibilities.
With the Enterprise license, you get the power to customize advanced features of this software — change page layouts, and views, add buttons and conditional fields, etc.
With the Ultimate license, you can get access to sandbox features that allow you to do dev testing and a greater customer supports experience.
Zoho CRM license options also have different features depending on how you want to use the software.
Salesforce is another incredibly powerful CRM software that can be easily customized to fit your company’s needs.
Salesforce offers a third-party app marketplace that makes it easier than ever to add or remove features.
This software has a steep learning curve compared to Freshsales CRM, but it also offers a wider range of features.
The new version of Salesforce CRM has a beautiful new user interface (UI), supports sales pipelines, instant alerts, recommendation pop-ups, and drag-and-drop capabilities, and with the addition of SalesforceIQ, you can easily analyze sales data.
You can also add Salesforce Eistein Analytics which gives this program AI (artificial intelligence), which can be used to automate most of the processes of the software.
The best features of Salesforce CRM include the following:
Lightning service console with a 360-degree view of each customer
Combines processes for easy access to full customer details, context, history, etc.
Customize and automate processes with drag-and-drop features
Automatically matches cases with agents/clients
Service analytics and telephony integration
Automate repetitive or multistep tasks to streamline customer services
Track orders, support history, customer assets, etc.
Apptivo is a great app that allows you to manage the customer service department. This software is perfect for small to midsize businesses.
It is incredibly easy to customize your software depending on your company’s processes and branding needs by using the wide range of tools offered in Apptivo’s online store.
The CRM module enables businesses to manage customer relationships effectively as it provides a centralized database for storing customer information, tracking interactions, and managing leads.
With features like contact management, deal tracking, and activity management, businesses can nurture leads, close deals, and deliver personalized customer experiences.
Apptivo has invoicing features that support multiple currencies, tax calculations, and payment integrations.
It provides financial management tools, including expense tracking, financial reports, and budgeting, to help businesses maintain financial visibility and control.
CRM.io is a platform designed to enhance and streamline your business’s interactions with customers.
It is an integrated solution that helps you effectively manage customer relationships, sales processes, and customer data all in one centralized system.
CRM.io offers robust tools to manage your sales pipeline effectively. You can track leads, assign tasks, set reminders, and monitor progress at each stage of the sales cycle.
This platform enables businesses to optimize their sales and marketing efforts, increase customer satisfaction, and drive overall business growth.
You can track customer inquiries, manage tickets, and prioritize support tasks to ensure timely and effective resolution of customer issues, leading to increased customer satisfaction and loyalty.
Key features of CRM.io include:
Store, track, manage, maintain, and update your contact information
Capture leads and categorize them using tags to track their history
Organize, prioritize, decide, & track deals
Drag-and-drop flow builder to increase sales through automation
Intuitive dashboard to track and monitor all sales reports
Advantages of sales tracking software for small business
Most companies of different sizes can use sales tracking tools to manage and structure the entire sales process.
You can have multiple benefits using sales conversion tracking software. Hence, these are the advantages of this essential software for small businesses:
? Enhance the customer satisfaction
? Supports the entire marketing plan
? Repetitive tasks automation
? More leads conversion
? Increase the loyalty of customers
In this article, we explored some of the best customer service management software options that you need to try.
At this point, we would also recommend CRM.io from 500apps. It is a CRM tool included in a 39 software package that will help you streamline sales processes and business workflows.
The solution offers contact management, deal management, and sales automation but also features electronic signatures and a visual workflow drag-and-drop designer
It generates leads at scale with the built-in Out Reachly (SDR Software), Voxdesk (Call Center Dialer), and Finder.io (450M Leads) so you should definitely check it out.
This list covers the needs of both small and medium-sized businesses and contains a wide range of features that will surely streamline the workflow of your company.
You can use these software options to automate most of the processes you need in order to offer an exemplary level of customer service, manage data about customers, start and manage campaigns, etc.
LinkedIn is a platform wherein you can search for that dream job of yours. Or should you’re looking to connect with like-minded professionals, LinkedIn is the best place virtual place to visit.
It also allows you to stay up to date with the newest trends in the job market and is a place for recruiters and candidates alike.
Although, Linkedin is an essential tool for professionals, what can be done when we are experiencing difficulties in loading the site or accessing our account?
We’ve come across a number of threads from users regarding this issue. However, there is a prevalence of the occurrence that LinkedIn is not loading on Safari.
Not to worry, this article is set to provide users with proven ways to fix LinkedIn not loading on Safari.
Does LinkedIn not work on Safari?
LinkedIn works very well on Safari. Safari is a great browser, but like all software applications, has its share of bugs and other issues.
However, developers make sure to remove such issues as soon as possible via updates. So, do not think LinkedIn does not work on Safari after your first trial. You probably need the fixes we’ll provide you with.
Why is LinkedIn blocked on Safari?
LinkedIn can be blocked on Safari if the site is unsafe at that moment. Safari attempts to protect you from visiting fraudulent sites on the web that may be trying to obtain personal information through phishing. For these, LinkedIn may be blocked on Safari.
Quick Tip:
Another practical method to bypass LinkedIn not loading error is to access it from another browser.
Opera One is offering an optimized browsing environment. This browser offers a lot of features that can help keep your browsing organized and safe, like built-in VPN, Ad Blocker, AI and social media and messaging buttons on the sidebar.
Opera One
Don’t miss any LinkedIn news or job updates with this optimized navigation.
How do I fix LinkedIn if it doesn’t load on Safari?
1. Clear browsing history and cache
Launch Safari on your device and click the Settings icon in the upper right corner.
Select the Reset Safari from the dropdown menu.
Tick the Clear History and Remove all website data.
Then click on Reset to confirm and clear all history.
By clearing the history and also sites data, you should be able to fix this problem and remove all cookies-related problems also.
Alternatively, it’s more efficient to erase useless browsing data automatically using a cleaning software, such as CCleaner.
2. Turn off Safari extensions
Open Safari and select the Settings icon.
Choose Preferences.
Click on Extensions.
Deselect each extension you want to disable.
It isn’t uncommon for browser extensions to alter the accessibility of some sites. Hence, by turning off your browser extensions, it should fix the problem of LinkedIn not loading on your Safari.
3. Update your browser
Launch Safari, choose the Settings icon, and selectPreferences.
In the System Preferences window, click Software Update.
If you have been delaying a Safari update, please complete it to fix any bug that might be stopping LinkedIn and other websites.
Unfortunately, Apple has stopped publishing the Windows-compatible version of Safari since 2012. Thus, you can’t download the latest version for Windows.
These are the best fixes to solve Linkedin not loading on safari. Alternatively, you can also try to use a VPN, incognito browsing mode, or fix network connections if these options failed.
We hope that this article is helpful enough regarding loading LinkedIn on Safari. However, you can check for more Safari fixes.
For more details on new features and how it could impact networking, see the complete article on LinkedIn Games.
Let us know in the comments section below which method worked for you to solve the problem of Safari not working.
Just in case you weren’t already aware of what is happening at Redmond, Microsoft has just announced some new features that are coming to the Edge browser.
Through these changes, the company wants to improve the Collection feature and allow users to store more content and collaborate with other people.
If you are ready to find out more about this topic, let’s dive in together and see what the tech giant has prepared for Edge users.
New upgrades coming to Collections in Microsoft Edge
If you are an Edge user you surely know that the current version of the browser allows the creation of Collections with various content.
Without beating around the bush, we’re talking entire web pages, pins from Pinterest, sticky notes, and many more.
Thus, Microsoft acknowledged the fact that users want to store more files in their Collections, so future updates will bring the ability to add images and videos using a simple right-click.
The Redmond-based tech giant will also let users work together in future updates, letting them share, collaborate, and brainstorm together using the feature.
Please note that people using Collections in Microsoft Edge should prepare for the influx of recommended content.
Now, you can save images and videos to your Collections as you browse the web, by simply hovering over or right-click the item on a webpage and click the add button to save it to a Collection.
Soon, you will also be able to share your collections with others so you can collaborate and brainstorm together, whether it be planning your next vacation or remodeling your home office.
Microsoft will soon start displaying an inspiration feed with content related to the things you store in a particular Collection.
That being said, for the time being, there is no information on whether the company will let users disable this recommended content.
Don’t forget to also check out Edge 103 and all the new features it comes with. Share your opinion about this latest announcement with us in the comments section below.
HBO Max is a subscription streaming platform by Warner Bros. It includes all the HBO TV shows and some new features.
However, HBO Max has an app that allows users to access their favorite shows and movies. In addition, a web app version was launched, allowing them to use their HBO Max subscription over the browsers. Furthermore, it will enable switching conveniently between using the mobile app or the browser app.
However, users complain about difficulties in taking advantage of HBO Max through their browsers. So we’ll discuss a common issue today: the browser not supported by HBO Max.
Why is HBO Max saying my browser is not supported?
1. Outdated browser
A web app needs some features to help it work smoothly on a browser. Thus, if these features are not available on your browser, it’ll encounter difficulties when running it.
2. Connection speed
Your internet speed can determine whether HBO Max will work on your browsers. So, poor internet connection or connection speed can prompt the browser not supported error.
3. HBO Max server is down
Another cause of this error is problems with HBO Max servers. If the servers are down, it won’t be able to receive or send back responses from its client. So, it can show in the form of the browser not supported error.
4. VPN or third-party app interference
Using a VPN service on the device or as an extension on your browser can cause HBO Max not to work.
Unplug your router from the power source and wait for a while before plugging it back in. It will restart your router and help it sync better. Alternatively, you can switch to a wired connection for a more stable and faster internet speed.
Fixing connection issues can help resolve HBO Max browser not supported on Safari.
3. Check HBO Max Servers
When you encounter an HBO Max browser error, visit their social media platforms like Twitter and forums for updates on the situation. On their pages, they’ll note if there is a server or upgrade problem.
These are the best fixes for the HBO Max compatibility issues with your browsers. However, you can also learn why HBO Max is slow on your device by checking out our article.
Another way to fix this HBO Max browser not supported issue is by switching browsers.
Were our tips helpful? Let us know in the comments section.
We haven’t spoken about Teams in quite a while, so it was about time to hear some new details about Microsoft’s highly popular communications app.
In fact, through a recent blog post, the company has introduced quite a few new features for Microsoft Teams for the web.
All of these latest functionalities are pretty basic and are already available on Teams desktop clients, so the novelty here is that they’ve also been added to the web version of the app.
Live Captions are coming to the web version of Teams
Shortly after announcing the new host of improved AI features coming to everyone’s favorite conferencing app, Microsoft comes with new features for the web version as well.
Users that rely on Microsoft Teams for the web will finally be able to use features such as background effects for the first time ever.
Furthermore, Teams for the web now give users the ability to blur their background or use a Microsoft-provided background during a meeting.
If you remember, this is a promise that Microsoft made back in 2021, so people are pretty psyched to see it being delivered so soon.
The Redmond-based tech company has also highlighted another great function that will make its way to the web version of Teams.
That being said, know that the Teams web client will now allow users to view captions coming from a CART provider (real-time captioning) within the Microsoft Teams meeting window instead of a secondary window.
You should also know that you can enable the CART caption from the meeting options on the web version of your Teams app.
But wait, there’s more. Support for Live Captions is yet another useful feature that Teams users on the web have been asking for.
Now, Microsoft has finally added it, giving users the opportunity to see who is speaking along with what’s being said.
It’s important to note that Live Captions support is currently available in several spoken languages, including German, Portuguese (Brazil), Japanese, Hindi, and more.
And, last but not least, Microsoft added Live Transcript support, which allows all users to follow and review conversations alongside the meeting video or audio in real-time.
We’re going to keep an eye out and inform you on any other new features being added to either the web or desktop/mobile app versions of Microsoft Teams.
Out of all the features being added to Teams for web, which one is your favorite? Share your thoughts with us in the comments section below.
Microsoft has some explaining to do for its customers making use of Synapse Analytics with its cloud services or those exposed when using Azure Data Factory recently, as companies look for transparency on over five-month long response times to critical vulnerability patches.
According to a report from Ars Technica, Microsoft is facing criticism over its handling of two previously discovered vulnerabilities that took over five months and several botched attempts to address.
A botched attempt at securing a vulnerability, in and of itself is understandable at times, but Orca Security researcher Tzah Pahima documented the responses as well as the timeline in which it took Microsoft to address his concerns about a flaw in the Synapse Analytics component in Azure Data Factory, and it doesn’t look good for Microsoft’s Security Response Center.
January 4 – The Orca Security research team disclosed the vulnerability to the Microsoft Security Response Center (MSRC), along with keys and certificates we were able to extract.
February 19 & March 4 – MSRC requested additional details to aid its investigation. Each time, we responded the next day.
Late March – MSRC deployed the initial patch.
March 30 – Orca was able to bypass the patch. Synapse remained vulnerable.
March 31 – Azure awards us $60,000 for our discovery.
April 4 (90 days after disclosure) – Orca Security notifies Microsoft that keys and certificates are still valid. Orca still had Synapse management server access.
April 7 – Orca met with MSRC to clarify the implications of the vulnerability and the required steps to fix it in its entirety.
April 10 – MSRC patches the bypass, and finally revokes the Synapse management server certificate. Orca was able to bypass the patch yet again. Synapse remained vulnerable.
April 15 – MSRC deploys the 3rd patch, fixing the RCE and reported attack vectors.
May 9 – Both Orca Security and MSRC publish blogs outlining vulnerability, mitigations, and recommendations for customers.
End of May – Microsoft deploys more comprehensive tenant isolation including ephemeral instances and scoped tokens for the shared Azure Integration Runtimes.
While Microsoft was able to release a patch roughly two months after the initial discovery, it still took its Security Response Center well over five months to implement a fix that would stick as well as alert customers to the existence of the vulnerability as well as offer mitigations and recommendations for addressing potential issues.
If that wasn’t bad enough, Orca’s discovery came on the heels of another security firm discovering a similar exploit involving Azure Synapse as well. The security firm Tenable was less amenable to Microsoft’s sluggish response time and lack of customer transparency regarding the vulnerability in its publishing of Microsoft’s Vulnerability Practices Put Customers at Risk LinkedIn post.
Unlike the situation with Orca, Microsoft has yet to alert customers to Tenable’s SynLapse discovery despite a 90-day window of vulnerability due to the time it took the company to issue a patch to one of the problems.
The Azure Synapse vulnerabilities represent the latest mishandlings by Microsoft to address critical security issues in a timely manner following concerns about Windows exploits identified in a 2020 academic paper.
The ongoing spam exploit had gone formally unaddressed by Microsoft until Tuesday of this week, which promoted researchers from Shadow Chaser Group to take to Twitter to sound alarm bells in regards to the company’s inaction on the matter.
Interesting maldoc was submitted from Belarus. It uses Word's external link to load the HTML and then uses the "ms-msdt" scheme to execute PowerShell code.https://t.co/hTdAfHOUx3pic.twitter.com/rVSb02ZTwt
Due to the sheer size and breadth of the company’s service offerings, Microsoft’s Security Response Center is undoubtedly working overtime to put out fires, but when exploits are hand wrapped by well-intentioned researchers, the company may want to prioritize their communications addressing those findings in the future.
It’s time to get a bit technical and discuss one f the latest features announced by the Redmond tech giant. No, it’s not a Windows 11 Insider Build, it has to do with Microsoft 365.
Some studies conducted in relation to remote work have indicated that people actually use both unmanaged and managed devices to access corporate resources.
By far, the most common reported scenarios involve signing in with the Microsoft work account to access company files.
The bad part about what we just said is that users that handle unmanaged devices usually forget to sign out when they are done.
In an unmanaged/shared device access scenario, users often forget to sign out, exposing sensitive data to unauthorized access. This behavior has continued despite security training and corporate policy in place. It results in more work for IT admins of these organizations who want to keep their company data safe.
But don’t worry, as Redmond developers have worked tirelessly to come up with a solution to the above-mentioned problem.
Idle session timeout
The tech giant specified the fact that it has realized that firms want a predictable implementation that allows them to configure a timeout policy across all Microsoft 365 apps.
Thus, idle session timeout is the solution that solves this problem, with several benefits of configuring this setting.
Among these benefits are the prevention of data leakage, compliance, and a consistent user experience across all Microsoft 365 web apps.
Keep in mind that, even though the idle session timeout feature is already generally available, it will be rolled out in a staggered manner from June to August 2022.
Also worth mentioning is the fact that it will encompass Office, Word, Excel, PowerPoint for the web, Outlook on the web, OneDrive for the web, SharePoint, and Microsoft 365 admin center.
That being said, note that Microsoft also has big plans to roll this feature out to Government clouds later in the year.
We will keep an eye out for any new details regarding this new security feature and keep you informed as fresh information rolls in.
Have you already tested this idle session timeout feature on any of your Microsoft 365 apps? Share your experience with us in the comments section below.
In the words of several famous or important people, the time has come again. No, we’re not talking about any blockbuster scenes that are about to happen, just about the latest Windows 10 cumulative update.
Indeed, Microsoft has just released new optional updates for those users that are currently running Windows 10 versions 21H2, 21H1, and Windows Server 20H2.
We’re about to take a much closer look and see exactly what new features, fixes, and known issues KB5014666 comes with.
What’s new with KB5014666 for Windows 10?
This new update, which brings the build versions to 19042.1806, 19043.1806, and 19044.1806, comes with a lot of bug fixes and minor improvements, plus a couple of new printing features.
The first thing you should know about this build i21H2, 21H1, and Windows Server 20H2s that it adds IP address auditing for incoming Windows Remote Management (WinRM) connections in security event 4262 and WinRM event 91.
Know that this addresses an issue that fails to log the source IP address and machine name for a remote PowerShell connection.
Besides that, it also adds Server Message Block (SMB) redirector (RDR) specific public File System Control (FSCTL) code FSCTL_LMR_QUERY_INFO.
Furthermore, via KB5014666, the Redmond tech giant is also introducing the following Print and Scan features:
IPP over USB support – Microsoft has supported Internet Print Protocol (IPP) for network printers starting in 2018 with the release of Windows 10, version 1809. We are now expanding IPP support to USB printers.
Print support app (PSA) APIs – Using the PSA framework, printer manufacturers can extend printer functionalities and user experience. For more information, see Print support app design guide.
PIN-protected printing for IPP and Universal Print – Standard print dialogs now include a user interface to enter a PIN code.
eSCL Mopria Scan protocol – Windows now supports the eSCL Mopria Scan protocol. It can be used with Mopria certified scanner devices.
With that in mind, if you consider yourself a regular user and don’t really care about enterprise-related features and improvements, KB5014666 comes with the following notable changes:
Addresses an issue that affects the Cloud Clipboard service and prevents syncing between machines after a period of inactivity.
Addresses an issue that prevents the Pashto language from appearing in the language list.
Addresses an issue that affects the touchpad area that responds to a right-click (the right-click zone). For more information, see Right-click zone.
Addresses an issue that affects some certificates chains to Root Certification Authorities that are members of the Microsoft Root Certification Program. For these certificates, the certificate chain status can be, “This certificate was revoked by its certification authority”.
Addresses an issue that leads to a false negative when you run scripts while Windows Defender Application Control (WDAC) is turned on. This might generate AppLocker events 8029, 8028, or 8037 to appear in the log when they should not.
Addresses an issue that prevents the use of Encrypted File System (EFS) files over a Web-based Distributed Authoring and Versioning (WebDAV) connection.
Addresses an issue that causes a domain controller to incorrectly write Key Distribution Center (KDC) event 21 in the System event log. This occurs when the KDC successfully processes a Kerberos Public Key Cryptography for Initial Authentication (PKINIT) authentication request with a self-signed certificate for key trust scenarios (Windows Hello for Business and Device Authentication).
Addresses an issue that causes the LocalUsersAndGroups configuration service provider (CSP) policy to fail when you modify the built-in Administrators group. This issue occurs if the local Administrator account isn’t specified in the membership list when you perform a replace operation.
Addresses an issue in which malformed XML inputs might cause an error in DeviceEnroller.exe. This prevents CSPs from being delivered to the device until you restart the device or correct the XML.
Addresses an issue that causes Microsoft NTLM authentication using an external trust to fail. This issue occurs when a domain controller that contains the January 11, 2022 or later Windows update services the authentication request, is not in a root domain, and does not hold the Global Catalog role. The affected operations might log the following errors:
The security database has not been started.
The domain was in the wrong state to perform the security operation.
0xc00000dd (STATUS_INVALID_DOMAIN_STATE).
Addresses an issue that affects devices enrolled in Update Compliance and have installed the April 2022 Windows non-security or later updates. For more information, see Monitor Windows Updates with Update Compliance. Devices that are enrolled in other Windows diagnostic data processor configuration programs or have a combined enrollment with any of these programs and Update Compliance are not affected.
Addresses a known issue that might prevent you from using the Wi-Fi hotspot feature. When attempting to use the hotspot feature, the host device might lose the connection to the internet after a client device connects.
Windows 10 21H2 and 21H1 users can download KB5014666 from Windows Update or the Windows Update Catalog.
Have you noticed any issues after installing this latest cumulative update for Windows 10? Share your experience with us in the comments section below.
Jira is software designed to help teams across different professions manage their work. It serves as a tool to manage agile software test case development. With Jira, you can create, track, update, plan, report, and access the progress of any scrum.
Jira has a web app version that allows users to access it through their mobile browsers. It is available across different operating systems, and it is a cross-browser platform.
However, users encounter issues like browsers not being supported by Jira when trying to access Jira on some browsers. The Jira web app version has requirements and features that allow browsers to run it.
What browsers does Jira support?
1. Google Chrome
It is a Chromium-based browser owned by Google, and it has a lot of features. These features allow it to access web apps like Jira smoothly. It makes use of extensions that you can add to improve these functionalities. Also, it has lots of workspaces that you can assign to different projects.
Mozilla Firefox is a browser with amazing functionalities. It allows users to access vast amounts of extensions and features. Firefox has a stable security system and prevents internet attacks. It is strong and reliable to run web apps like Jira.
Safari is a browser by Apple, and it is the default browser for all Apple devices. However, it is fast and uses a stable internet speed for heavy project managers like Jira. It has a simple interface that allows users to access it easily.
Edge is one of the best browsers for speed and productivity. It uses a high intelligence code to provide the best internet experiences for its users. It is a good browser for Jira.
When your internet connection is poor, it can affect Jira and sometimes can prompt the browser not support error. Also, your network might be blocking access also.
So, restarting your internet connection source might be helpful in getting a better sync and connection.
Reinstalling your browser can also be an alternative to fix this problem. However, it should be the last thing to do after trying all other solutions. Although, the solutions above should solve the browser not supported by Jira issue.
SEO is a term that everybody keeps on hearing since its importance in developing and managing a website is undeniable, but without specialized SEO software, things wouldn’t have gotten so far today.
SEMrush, TrafficTravis, and SEO PowerSuite are only a few of the best tools that can help users maintain a healthy relationship between their websites and search engines by optimizing the content effectively.
SEMrush is one of the power players when it comes to SEO (Search Engine Optimization) and for good reason, too.
Instead of embracing the role of just another SEO tool, SEMrush took it to the next level and developed an all-in-one suite of tools that could benefit anyone who’s even remotely interested in SEO, regardless of their needs.
This tool’s inventory holds an impressive number of assets that are specialized not only for SEO, but also for PPC (Pay Per Click), social media, content, and competitive research.
SEMrush will help you take a look at your competitors’ best keywords and observing how domains’ position shifts.
You will also discover organic competitors, engage in marketing in a more active manner by localizing ad campaigns, using Audience Insights to target the right consumer group, conduct deep link analysis, gather keywords and phrase matches, analyze markets and niches, and get insights regarding in-market audiences.
The tool suite can be tried for free during its 7-day trial period, but the trial comes to an abrupt stop which automatically continues with a premium subscription plan, turning card credit info into a necessity when registering for a free test run.
SEMrush
Improve your marketing results with a powerful and complex suite that helps you analyze your competition.
Affilorama is an SEO-specialized software solution for Windows computers that can help its users build or improve their website’s online presence by providing them with a wide variety of useful tools.
This utility can be used for free, but it has limited functionality. Even so, it requires registering for an account, which comes with a registration code, which must be input before launching the application for the first time.
Beginners can quickly catch up on how to use Affilorama, as instructional videos and helpful dialogs are available right from the start.
Initially, the program will ask if it should perform a quick analysis of the desired website and will prompt users to select the search engines (along with their edition, if possible) they want to run the scan against.
Among the data that Affilorama will come up with about the desired website, it is possible to find domain authority, Alexa traffic rank, page warnings, XML sitemap, keyword count, potential traffic average, rankings for specified search engine-country combinations, backlinks, and a top of the best five backlinks.
Although users will probably get to meet Affilorama as a free tool, this version comes with some limitations.
SEO PowerSuite is, as its name boldly indicates, a powerful suite that can help users interested in promoting their website or SEO companies yield promising results with their projects.
The thing about SEO PowerSuite is that it’s actually a suite of individual software solutions that can be used on Windows computers, each of which comprises its own set of features and controls.
Long story short, SEO PowerSuite holds four different programs, each of them specialized in another SEO fragment than the other.
SEO PowerSuite can be downloaded and tested for free, but only for the duration of its 7-day trial, after which a subscription plan must be purchased.
Here is a rundown on some of its included tools:
SEO SpyGlass can help users take a sneak-peek at their competitors and see how well they do in terms of ranking
Rank Tracker can be a trustworthy ally for users who want to keep a close eye on their website’s ranking and the ranking of their keywords
WebSite Auditor performs a complete rundown of one’s website by crawling each page and analyzing the findings in terms of Alexa ranking, content type, or broken links
LinkAssistant enables users to increase the online presence of one’s website by helping them bring it closer to Google’s first page
SEO SpyGlass is a nifty SEO-specialized software solution that can give its users the upper hand when it comes to optimizing their websites in order to rank better in search engine results by providing them with handy details about their and their competitors’ websites.
The combination of this program’s user-friendly interface and its intuitive controls should make it possible that virtually anyone could use it without significant effort. Technically, what SEO SpyGlass does is analyze what one’s competitors are doing to snag the top places in major search engines such as Google, Bing, and Yahoo and give users hints of how to reach the same results.
After performing a thorough scan of the input website, SEO SpyGlass generates a list of results that hold clickable links, minimizing the work that needs to be done by checking the URLs manually.
SEO SpyGlass can be downloaded and tried for a maximum of 7 (seven) days after which a premium subscription plan needs to be purchased.
Rank Tracker’s name is highly suggestive already to mention that it’s a software solution specialized in SEO.
With the help of this program, users can keep an eye on their website’s ranking on various search engines, and also take a look at how well their keywords rank in the same environments.
Rank Tracker can be understood and used even by computer novices or SEO beginners, given that it packs a user-friendly interface and controls that are easy to figure out.
All that needs to be done in order to perform an analysis with this tool is inputting a valid website address when prompted to do so and letting the program work its magic.
Although users might grow impatient (because it could take a while to process all the keywords), Rank Tracker is actually pretty adamant in its scanning process.
After the scanning process is completed, users can view the ranking for each of their keywords, regardless that they might not even be in the first 100 results.
Rank Tracker can be downloaded and tried for 7 (seven) days but needs a paid subscription to work afterward.
WebSite Auditor does SEO at its highest form by making sure that its users’ websites get as close to the top as possible in terms of search engine rankings.
Even though the intro might be a bit off-putting for novices who might have no idea what’s happening, the program is easy to use even by inexperienced Windows PC users or people who have no previous experience with SEO-specialized software.
What makes WebSite Auditor really stand out in the crowd is its ability to optimize websites on two different levels: on-site and on-page, thus giving users the possibility of performing on-domain or on-content enhancements.
The program needs to perform a full assessment of the website it will be working with, to understand if there are any issues with it, such as broken links, duplicate content, unindexed pages, HTML errors, missing meta descriptions, or titles that might be too long.
During the initial scan, there’s pretty much nothing that can be done, since WebSite Auditor needs to complete this analysis before it can get to work in detail.
WebSite Auditor can be downloaded and used for free, but only for 7 (seven) days, after which a premium subscription plan must be purchased in order to use it.
LinkAssistant is an SEO software solution that can help users build a strong online presence for their websites by providing them with all the means to identify link partners and team up with them.
Given that link exchanging is no longer seen as an essential component in SEO due to it being considered an artificial means of promoting one’s content or website, it can still be pretty helpful in boosting websites’ presence if webmasters are careful enough and use specialized software such as LinkAssistant.
The program performs an online lookup based on various criteria, including but not limited to competitor links, relevant keywords, and link submission forms, and then provides users the capability of organizing the results under various categories, for easier management.
LinkAssistant will display only results that rank up high in Google and Alexa rankings, making it difficult to miss top-tier allies.
It is possible to download and try LinkAssistant for free, but only during its 7 (seven) day trial. After that, a premium subscription plan must be purchased in order to use this tool.
No matter what you plan on using from this list, having any of these on your Windows computer can boost your chances of having a popular website on major search engines through SEO magic.
You should also look at our best local SEO software list because you might also find some interesting ideas as well. If you prefer browser addons, check out the Mozbar extension.
For any other suggestions or insights, don’t hesitate to use our comments section below.
Being one of the most popular brands of embroidery machines on the market, Brother is an incredibly user-friendly machine that can give you the possibility to create incredible professional-level complex embroideries.
There is a wide range of embroidery machines available from Brother, and each of them comes with different features and options.
The wide variety of machine options allows you to choose the perfect one for your needs.
Where do I find great embroidery ideas?
In order to use any of the Brother embroidery machines, you will need to use specialized software that allows you to design custom patterns, drawings, etc.
However, if you don’t want to lose any more time creating your own designs, you can find lots of websites with users that share their work.
In this article, we will explore some of the best software options that can create, edit, and manage embroidery designs for your Brother machine.
If we are talking about Brother embroidery machine software, it is natural that at the top of the list we will have the official software released from them.
This software is called PE Design and allows you to simplify the process of creating complex embroidery patterns with ease, can transform different file formats into compatible design formats, and then start the embroidery process.
The PE Design software from Brother can be used by all users no matter their proficiency level by using this type of software.
Every part of the menu and sub-menu is sorted in such a way that it becomes easier than ever to access the options and tools you need. This software can be used by hobbyists and businesses alike.
Once you buy a model of the Brother embroidery machine, you will get a USB dongle that runs the software.
It is worth mentioning that in order to use the software, the USB stick needs to be inserted in your PC’s USB port.
You can use this software to create, modify, embellish, and then transform the digital file into a beautiful embroidery pattern.
It is incredibly easy to transform an image into embroidery because of the easy-to-use customization tools, but what helps the process, even more, is its ability to preview the design before you start stitching.
SewArt is another great software option that allows you to design, modify, and then transform your designs or photos into beautiful-looking embroidery designs.
This software option is compatible with a wide range of embroidery machines, including any model from Brother.
SewArt can easily transform raster image files (.jpg, .png,) , vector images (.svg, .emf), and also clipart into compatible embroidery file formats.
You also get access to a wide range of image processing tools and also a step-by-step wizard that takes you through the entire process of setting up your images to be embroidered.
In order to access the Getting Started wizard, you will need to click on the Help button once you open up the software.
As we mentioned above, SewArt has a few image-processing tools that can help you customize your design, and reduce color content.
Once you obtained a result you’re happy with, you can click on the Convert toolbar button.
This will start the process of auto-digitizing and will automatically open up the Sewing mode screen. You can now change a wide range of presets – pattern fills, stitch angles, choose only a single color to be processed, etc.
Here are some of the best features found in SewArt:
Supports a wide range of both raster and vector formats – .bmp, .png, .jpg, .gif, .svg, .wmf, and .emf
Allows you to paste unsupported file formats into the workspace
Embird is another great embroidery software option that offers you access to a wide range of useful tools and features.
This software supports more than 70 embroidery file formats, and another 20 embroidery machine brands.
You can use this software to digitize, edit, customize, convert, lettering, and cross-stitch your project with ease. Also, EMbird allows you to resize, split, edit, display, print, and also convert embroidery designs to the required format.
The features found in this software can be extended even more by using additional plug-ins.
Embird can be used in two modes – Embird Manager and Embird Editor. Here are some of the features found in each of these modes:
Embird Manager can convert your designs to a big number of embroidery and even quilting file formats, supports a wide range of hoop types and sizes, can process designs in both ZIP and RAR files, and also provides you with a great-looking 3D preview of your design.
Another feature that’s worth mentioning is that the Embird Manager supports both Amazon and Azure cloud storage.
The Embird Editor can be used to insert/modify/delete colors or pattern trims in the design, can join designs for a seamless effect, and also offers you with a wide range of image editing options – move, resize density, centers, mirrors, rotates, etc.
You can also choose if you want to edit individual stitches, or an entire part of your design can simulate the final result in 3D mode, and can also print templates in a 1:1 scale on multiple sheets of paper.
In this article, we explored some of the best software options that are compatible with the Brother embroidery machine.
The tools we presented in this list cover all the areas of creation, customization, editing, and embroidering processes, with some great tutorials and easy-to-understand interfaces.
And while we’re on this subject, you might also consider reading our selection of the best hat design software to start your own line.
Please feel free to share your opinion on this software with us, by using the comment section below.
During the meeting Booty stated “The challenge with a lot of these articles is that they look backwards, sometimes pretty far back in time.” He added,
Crunch culture is…if you go back 10 years ago, it’s a little unfair to put that on one studio,” said Booty. “It was just part of the industry. I don’t say that to justify it, I’m just saying it was part of the culture of the industry. I literally slept under my desk early in my career. And we looked at that like a badge of honor.
However, as reported also by Kotaku earlier this month, allegations of crunch culture during development of 2018’s Fallout 76 have surfaced, with the list of grievances including constant, mandatory overtime in addition to low pay.
The development of Fallout 76 is alleged to have occurred under crunch working conditions
The QA team – that is, the game testers, who are often seen as the “bottom rung” of a development team – often got the worst treatment, according to the allegations. Often the QA team would get called in to work through the weekend with the promise of free pizza and overtime pay.
It has also been alleged that QA staff were surveilled, with their breaks being timed. In some cases it is even reported that staff would be followed into restrooms by other non-management employees designated as “coordinators.”
If these stories seem familiar, it is likely because you’ve heard them before in Activision Blizzard-related news over the past few years. Activision Blizzard was also acquired by Microsoft back in February.
Booty stated that “I know from talking to Bethesda leadership that we do not have a situation where people are crunching and we’ve got this bullying atmosphere…I’m confident about that.”
However, he also acknowledged that such working conditions could occur without his knowledge. He also neglected to specify what actions Xbox would take toward its studios which failed to comply with its stated stance on the matter.
Instead he referred to the Xbox Human Resources department, saying “There’s avenues for them to report that anonymously back to us that goes through HR. We have to rely on those independent systems of checks and balances.”
It is hard to consider the Xbox HR department independent, however, considering it is employed by Xbox.
Are you encountering the problem: browser not supported in BINGE? This article will show how you can fix this type of error.
Binge is an Australian streaming platform that is a source of entertainment for a significant number of users. Though this service is available in Australia only, people around the world use it using top-class VPNs.
A significant number of users have talked about a problem with browser compatibility with BINGE. Only this problem has ruined the experience for a large number of users. It doesn’t matter if you are using any of the best browsers or not, the problem may appear in any situation.
Please note that BINGE error 008 is related to browser compatibility too. So, if you see such error codes, the solutions from this article will still work.
Can you watch BINGE in a browser?
Yes. You can easily watch BINGE in any compatible web browser from a computer or supported device.
Even though BINGE has apps for smartphones, tabs, and TVs, many people prefer to watch on desktop browsers for their convenience.
What browsers does BINGE support?
To watch on BINGE, you must use any of these recommended browsers as these are officially supported.
Google Chrome
Safari
Firefox
Microsoft Edge
You will not generally face any problems watching videos on this platform from a desktop browser. The following methods will solve the issue if it shows any incompatibility or browser support-related error.
What to do when a browser is not supported by BINGE?
1. Update the browser
1.1 Update Chrome
Open the Google Chrome.
Click on three vertical dots and Settings as shown in the screenshot.
Go to About Chrome.
Google Chrome will check for the update and install any available one automatically.
Relaunch the browser.
1.2 Update Firefox
Click on three vertical lines and go to Help.
Go to About Firefox.
Firefox will automatically check for updates and install if any update is available.
You may face BINGE not working on Chrome or Firefox even though these are compatible browsers. Updating these browsers may fix the problem.
2. Clear browsing data
Open your browser.
Press CTRL + Shift + Del on your keyboard to go to the appropriate page.
Set All time as the time range.
Tick Cache images and files and then click on Clear data.
Now, try to watch anything on Binge and see if it fixes the browser support issue or not.
3. Disable third-party extension
3.1 Disable in Chrome
Open the Google Chrome.
Click on the extension icon and then on Manage extensions.
Toggle the switch off next to the extensions you want to disable.
3.2 Disable in Firefox
Type the following address on the Firefox address bar and hit Enter. about: add-ons
Go to Extensions and then toggle the switch off for the add-ons you want to disable.
Some extensions tend to interfere with the BINGE platform, which may cause playback problems on your browser. As a result, you will see not supported or not compatible type errors. Disabling the extensions will solve the issue.
Extra tips to fix browser not supported error on Binge
The problem can also be a result of your internet connectivity issue, which may show various error codes that are similar to the ones that indicate browser incompatibilities. In this case, contact your ISP to improve the connection.
Additionally, you can use a VPN like Private Internet Access (PIA) to see if it helps. In many cases, this VPN can give you a better experience if your existing connection routing has some issues.
Even though you are using a BINGE-supported browser, you may still get the error. In this case, you may consider using a different browser like Opera One to see if it helps.
These are the best ways to fix the browser not supported BINGE problem. If you know any better way, feel free to let us know in the comment box.
With Wix, you may construct your own website with the aid of its user-friendly drag-and-drop tools and over 500 ready-made templates. Sounds tempting, right? Today we will show you the best browser for Wix that you can use.
This allows you to do so without the need for specialized skills or the assistance of a web professional. Wix shortens the time it takes to design a website and allows you complete freedom of expression in the process of creating the website you want.
Wix is an excellent choice as a website builder for eCommerce retailers operating on a small or medium scale. It is accessible in 17 different languages and has more than 200 million users that are registered all around the globe.
Why is Wix so laggy?
Wix websites will load more slowly if they include a lot of material, such as many huge photos, videos, or animations. Or if you’re using the wrong browser.
It may also slow down due to sites that are difficult to navigate, an excessive quantity of text and material, third-party applications, the use of a large number of typefaces, and/or a sluggish Internet connection.
Does Wix work on Safari?
Yes, Wix works and supports Safari, version 12 and above. Keep your web browser updated to the most current version available to guarantee that both your Editor and your live site will function faultlessly.
Does Wix work on Microsoft Edge?
As stated on their official website, Wix support Microsoft Edge, version 79 and above. Wix also strongly suggests that you maintain the zoom level of your browser at 100 percent to get the most out of its features and to have complete access to the Editor interface.
Chrome now gives priority to your currently active tabs rather than everything else that is now open, which may decrease CPU consumption by up to five times and increase battery life by up to one-quarter of an hour (based on our internal benchmarks). Thus, it is the best browser for Wix.
Moreover, it now launches up to 25 percent more quickly, loads websites up to 7 percent more quickly, and does all of this while using less power and RAM than it did in the past.
Chrome for Android now loads sites almost instantly when you go backward and forth, making these often time-consuming activities very quickly.
Microsoft decided not to upgrade Internet Explorer but rather to construct Edge from the ground up, not once but twice. This is one of the reasons why Edge is so much superior to its predecessor.
Because of this rebuilding, Microsoft could eliminate support for earlier technologies and code, which resulted in Edge being far more streamlined than the bloated version of Internet Explorer.
Essential to this process was a range of under-the-hood adjustments that assist the pages of the browser load quicker and respond more responsively while also keeping the software from exhausting the system resources of your machine, making it the second-best browser for Wix.
Nobody loves a program that takes up too much space on the computer. Firefox is a streamlined and efficient web browser. Because it requires less RAM than Chrome does, your other apps will be able to continue operating at their full potential.
Managing many tabs and windows simultaneously is now much more straightforward. Because Firefox is a multi-process browser, your tabs will always be up to date, and it won’t take an eternity for new content to load. This is another strong contestant and one of the best browsers to build responsive Wix sites.
Apple brags that they have the world’s fastest desktop browser in addition to a JavaScript engine that is lightning quick.
It also claims that using Safari would extend the life of your battery up to three more hours’ worth of surfing time compared to Chrome and Firefox, thus making it another excellent browser for Wix.
Large graphics might be a significant obstacle when trying to improve page performance. Image quality is essential; nevertheless, it must not be prioritized above overall performance. Images may be compressed in various methods, which is necessary for accomplishing this goal.
Because of this, it is essential to choose a website builder that already has all of these features. In this manner, you may avoid the delicate and sometimes difficult dance of acquiring as much information as possible about users’ actions while maximizing your site’s performance.