Microsoft Money for Windows 11: Download all Versions

Even though Microsoft Money was discontinued, the Microsoft Money Plus Sunset version still lets you access and edit Money files, though without online features or support.

Today, we’ll show you where to download it and how to set it up.

How can I download and install Microsoft Money Plus Sunset Home & Business on Windows 11?

  1. Download the 2010 version of Microsoft Money. 
  2. Double click on the downloaded file for the installation to begin. 
  3. On the next page, read through the whole license terms and when you do that, click on I Accept for the installation to begin.MS Money Sunset install begin
  4. Wait until the installation is over. Here click on Finish, and you should be good to go.MS Money Sunset install complete
  1. The Microsoft Money icon will appear when you click the Start button and type money in the search box. To continue, simply click on Microsoft Money.search MS Money
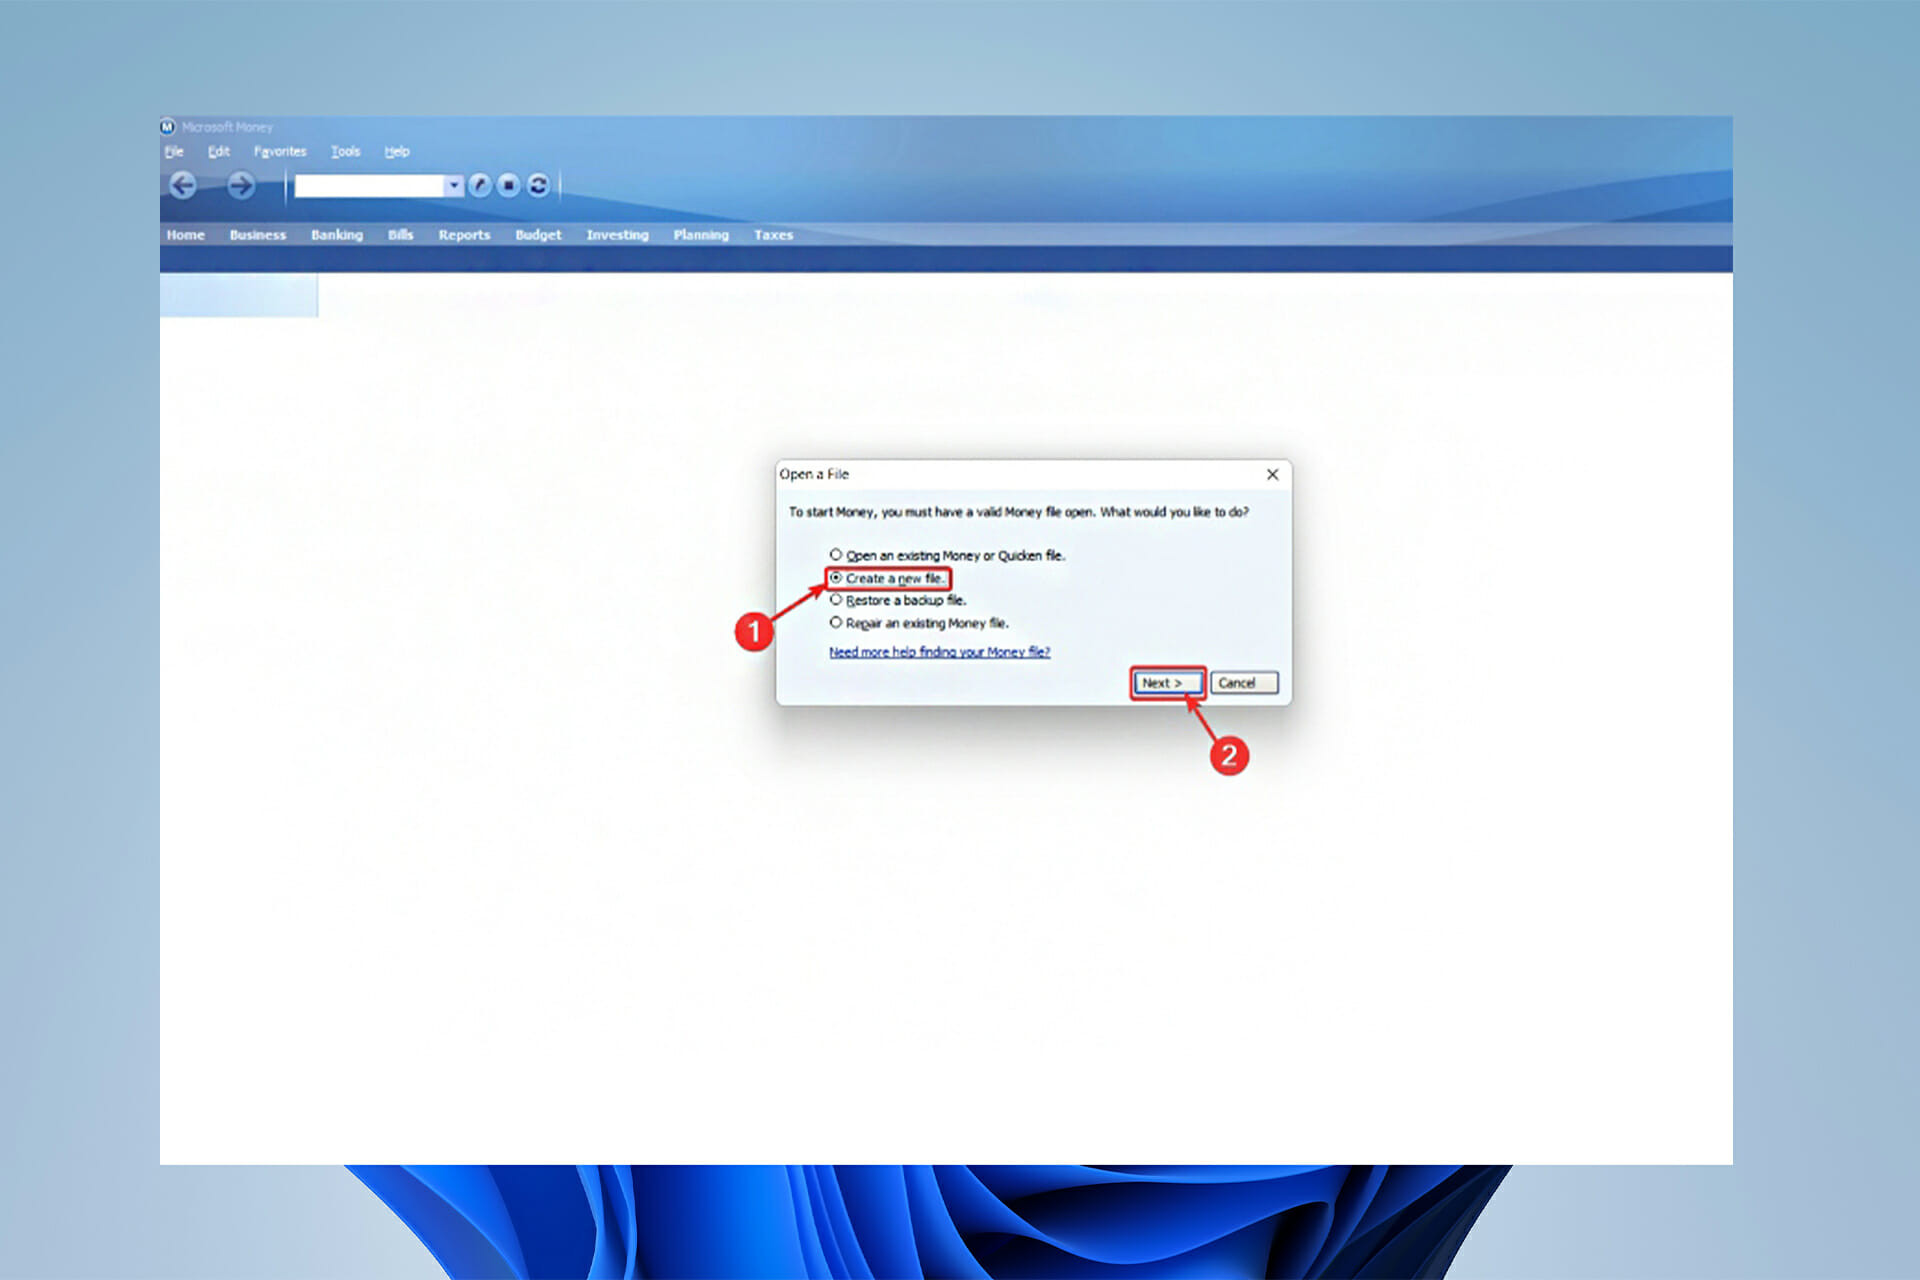
  1. If the page below shows up, select Create a New File and click on Next. Then choose a location for the money file and click OK.Launching MS Money step 1
  1. Microsoft Money will now give you guarantees concerning keeping track of your finances over the internet, but none of them are valid any longer. Continue by pressing the Next button. Launching Microsoft Money step 2
  1. Money promises to make your financial records more secure by adding a password to the data file. Feel free to add one or check the box that says I don’t want to use a password then click Next.Launching MS Money step 3
  1. Next, they ask you to enter your personal information for better customization of your money file. You better just click on Skip and move on.Launching MS Money step 4
  1. Money used to be able to connect straight to bank accounts and work its wonders by taking in transactional data.
    Banking security has advanced, and we are pretty sure that no financial organization allows this anymore.
    However, if your bank still does allow you to export.qif or .ofx files, you can import them into Microsoft Money Sunset. Otherwise, just click on Skip Account Setup.Launching Microsoft Money step 5
  1. Finally, you can see the message You have successfully created your money file. your money file is ready and you can click Finish.Launching Microsoft Money step 6
  1. Here it is. Microsoft Money is on your Windows 11 and you’re good to go. Launching ms money completed

What to do if Microsoft Money Sunset doesn’t launch on Windows 11?

  1. Click on the search button in your Windows 11 taskbar and type Registry Editor and hit Enter.
  1. Follow this path to find the Internet Explorer file: HKEY_LOCAL_MACHINE\SOFTWARE\Wow6432Node\Microsoft\Internet Explorer
  2. When you find the folder, on the right side, click on Version and change the value to 9.11.10240.0 and click OK.Locate internet explorer folder and change version value
  3. Then exit the registry and restart your computer. Now you should be good to go.

MS Money’s version releases

  • Microsoft Money 2007, version 16.0 of the program, was the first version to require product activation for copies installed from downloaded installation files.
  • Microsoft Money Plus, version 17.0.150.1415 of the program was the final retail release. The first and only version to require product activation on those copies installed from a CD.
  • Microsoft later released Money Plus Sunset, version 17.0.150.3817 of the program, an edition of Money Plus that did not require activation.
  • Then came the Windows 8 edition released back in 2012, which is version 18.0 of the program, and it was at this time when they decided to introduce the MSN: Money as the replacement for the main software.
  • And last but not least is the Windows 10 edition, which is basically the aforementioned MSN: Money, only optimized for Windows 10.

What should I know about different versions of Microsoft Money?

Microsoft Money has localized editions for the UK, France, Japan, and Canada, as well as an International English edition for additional English-speaking nations.

Other countries, such as Russia, Brazil, Germany, and Italy, have their own editions. However, these editions were phased out.

Later, Microsoft provided a free, time-limited trial version of Microsoft Money Plus that could be downloaded.

Data files from the Canadian edition of Money could be imported into this trial version but not from other non-US editions.

Users upgrading from non-US editions must manually export and reimport their accounts, and some information may need to be re-entered.

And now, for the main part, you’re here for the solutions. Below you can see a couple of different ways to install Microsoft Money on your Windows 11 and fix any possible issues and errors.

Summary

Microsoft Money is an outdated software that works with other old software, most notably the now-retired Internet Explorer.

Many Money users have noticed that the software occasionally fails to open, necessitating a short registry adjustment. To fix the issues you should follow the steps above.

However, Microsoft Money continues to maintain a large user base, despite the fact that it is over a decade old.

So, in case you don’t mind doing some manual data entry or import, it’s still an excellent way to keep track of your personal finances. 

How to fix the Logitech G305 mouse cursor stuttering

Problems with the mouse can happen from time to time, but a simple restart should suffice in most cases. However, several users encountered the stuttering issue with Logitech G305 and were unable to eliminate it.

Though Logitech manufactures some of the best mouse models available, there is always a chance of one running into an error. And after going through several forums where users shared the issues, we found out that it’s not always the mouse to be blamed.

Sometimes, it was an issue with the system that caused the mouse to stutter. In such cases, even replacing the mouse wouldn’t help. So, let’s now go through the underlying causes and most effective fixes for Logitech G305 stuttering issues.

Why is the Logitech G305 mouse cursor stuttering?

The primary reason behind the issue is problems with the connections. Say, the mouse is kept too far from the receiver or there’s another object between the two that is affecting the signal strength.

Apart from that, issues with the system itself can cause the Logitech G305 stuttering problem. If you have overclocked the system, it could cause the mouse to stutter. Or, even an improper power supply can lead to the issue.

Besides, an outdated driver or misconfigured system settings are just as likely to cause problems with the Logitech G305 mouse. Also, running an older version of the OS is known to cause the Logitech G305 stuttering issue.

Now that you have a basic understanding of the underlying causes, let’s walk you through the most effective fixes for them.

How do I fix Logitech G305 stuttering issue?

1. Some basic checks

In most cases, the issue lies with the USB port. So, if you have the USB receiver connected to a USB 3.0 port, remove and reconnect it to a USB 2.0 port. Besides, plug the receiver directly into the USB port on the computer and not an extender or hub.

Also, make sure that the surface you are using it on is mouse-friendly and that the mouse is fully charged. Low battery levels can also cause stuttering in some cases.

If these don’t get the Logitech G305 stuttering issue fixed, try the next method. Before changing ports or settings, review this quick guide to connect a Logitech mouse to a laptop to confirm pairing, receiver placement, and power are set up correctly.

2. Restart the computer

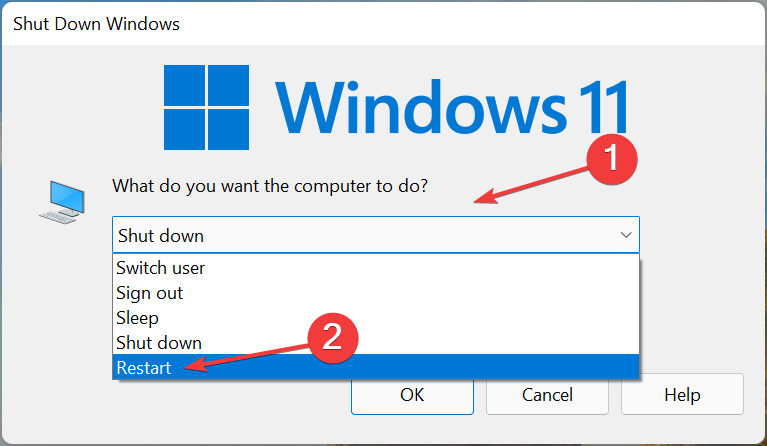
  1. Go to the desktop, press Alt + F4 to launch the Shut Down Windows box, and select Restart from the dropdown menu.
    Restart to fix Logitech G305 stuttering
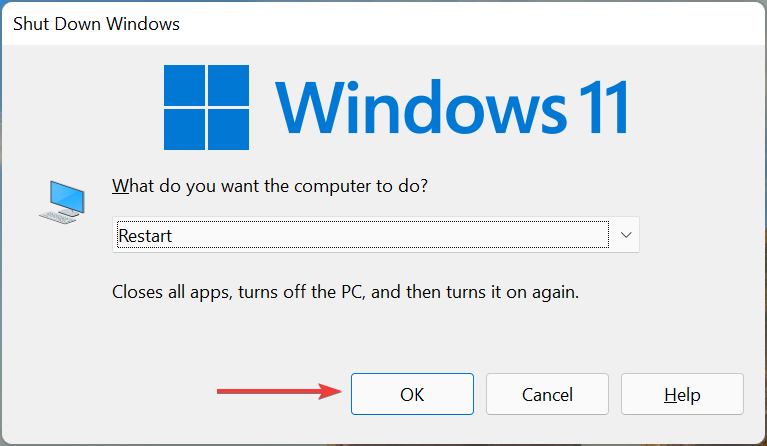
  2. Click on OK at the bottom to restart the computer.
    Ok

Most minor issues with the system can be fixed by a simple restart. When you restart the computer, the OS is rebooted, and any bug that might be causing the error will be eliminated right away. After restarting the computer, verify if the Logitech G305 stuttering issue is fixed.

3. Remove non-critical external devices

Various external pieces of hardware can often conflict with Logitech G305 and lead to the stuttering issue. In this case, it’s best that you remove all non-critical external peripherals and then identify the one behind the problem.

To do that, first, turn off the computer, and remove all the non-critical hardware with just the mouse and keyboard connected. Now, connect the devices that you removed one at a time, restart the computer after each, and check if the stuttering issue is there.

The moment stuttering with the Logitech G305 mouse cursor starts, the device that you connected last is to be blamed. Just keep it removed until you find a solution. You can contact the device manufacturer for help, or go through the FAQ section on their website.

4. Update the mouse driver

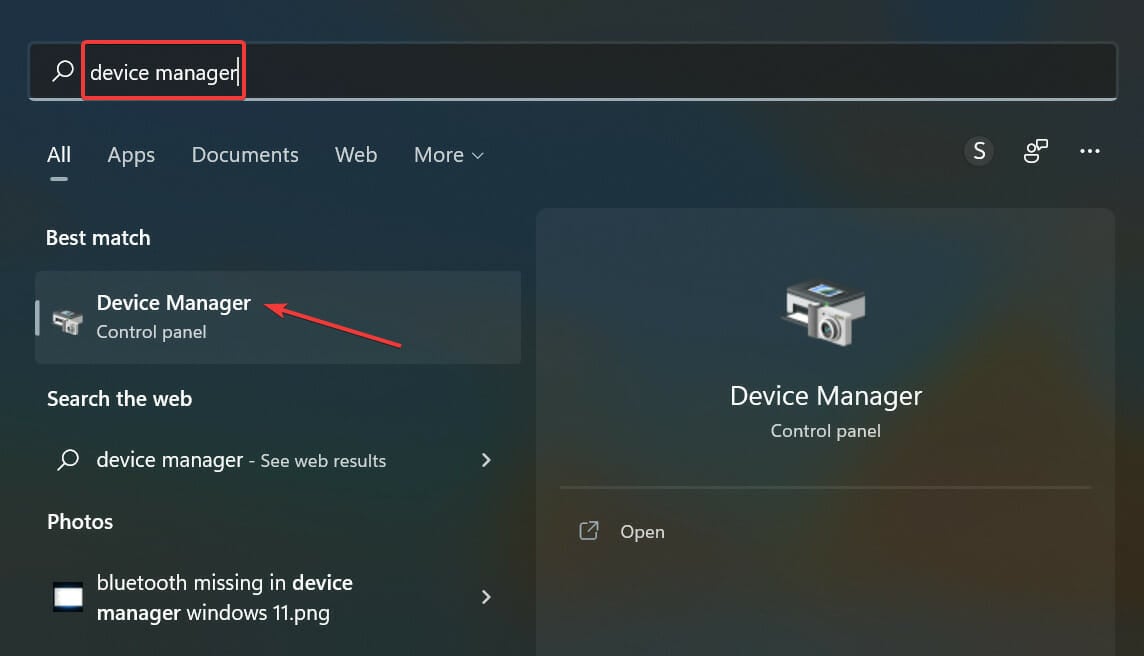
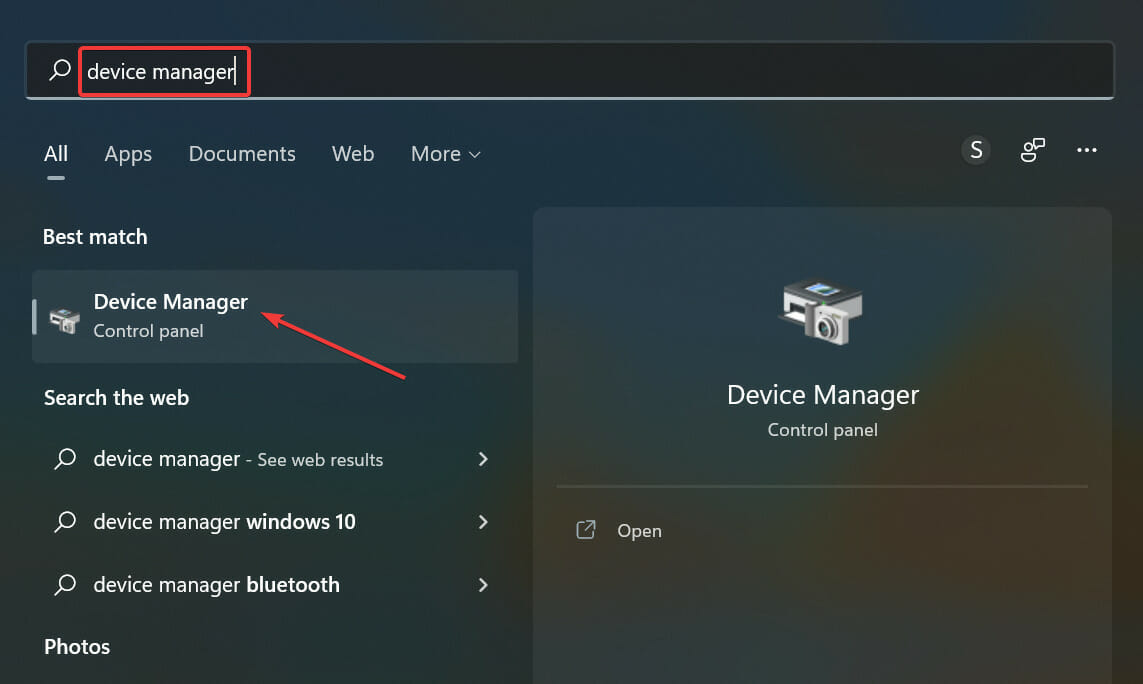
  1. Press Windows + S to launch the Search menu, enter Device Manager in the text field at the top, and click on the relevant search result that appears.
    Device manager to fix logitech g305 stuttering
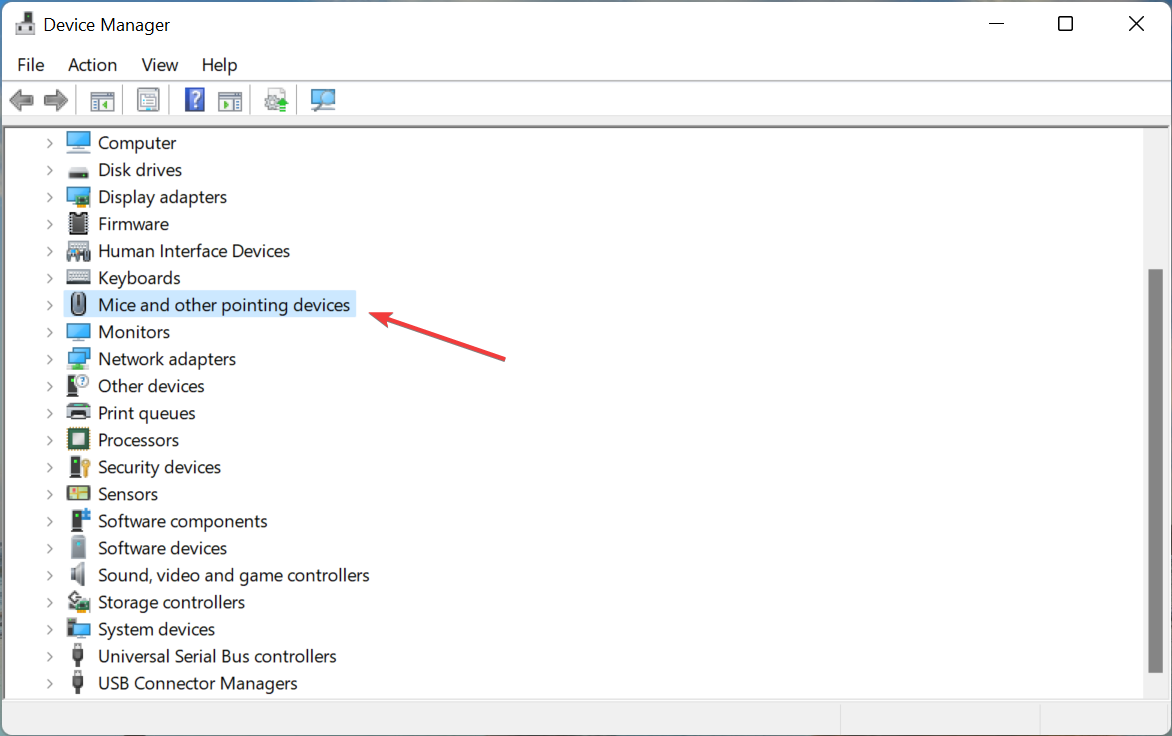
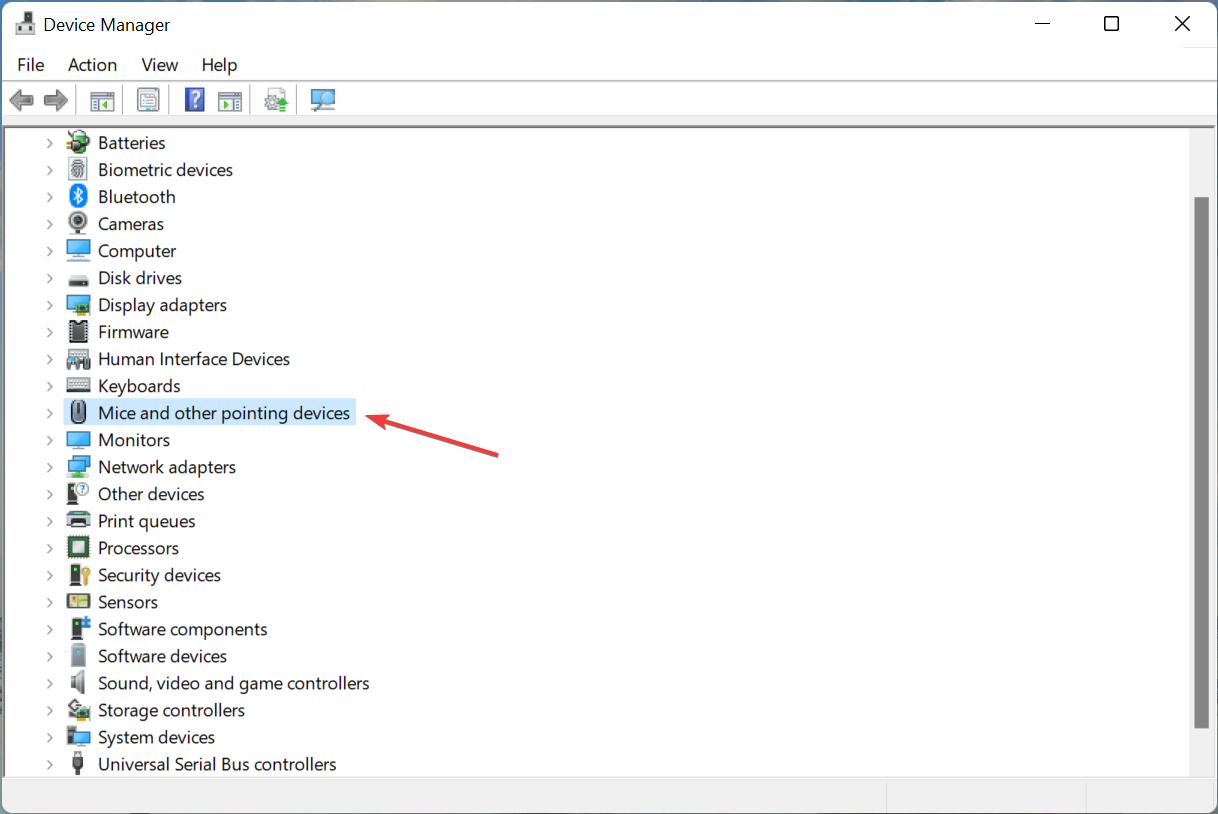
  2. Now, double-click on the Mice and other pointing devices entry.
    Mice and other pointing devices
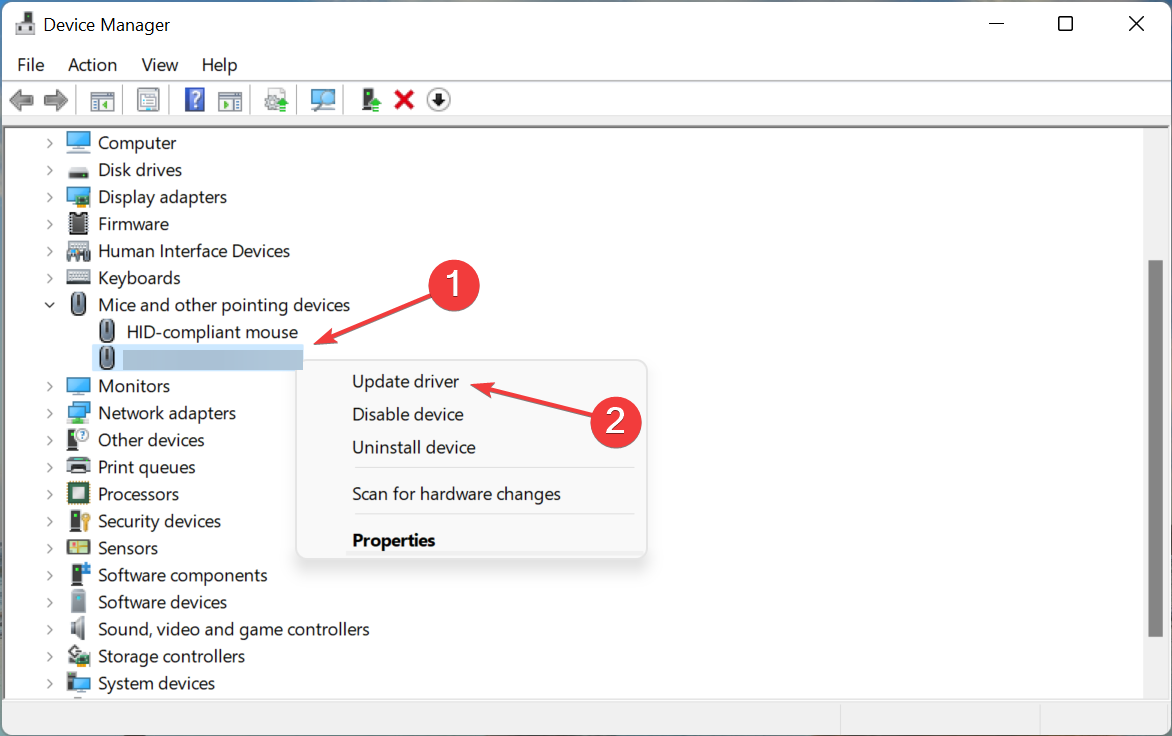
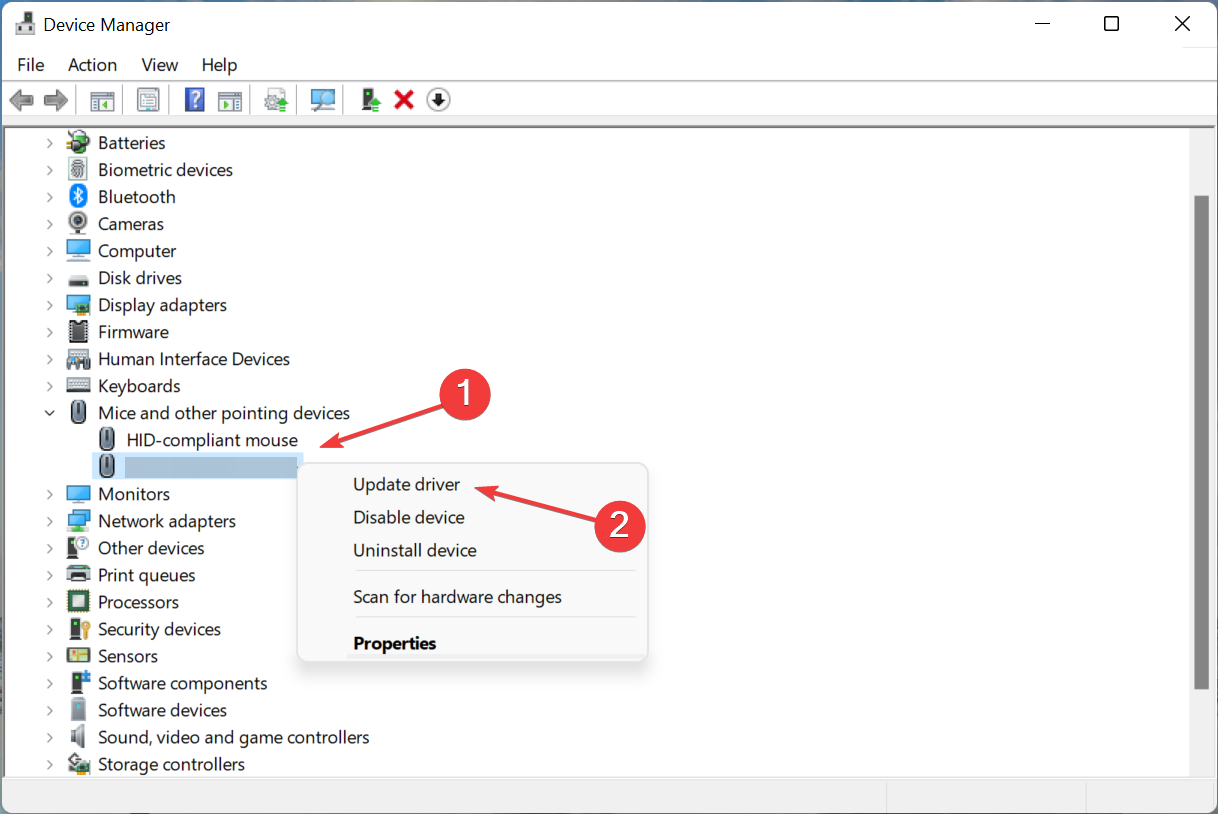
  3. Right-click on the malfunctioning mouse, and select Update driver from the context menu.
    Update driver to fix logitech g305 stuttering
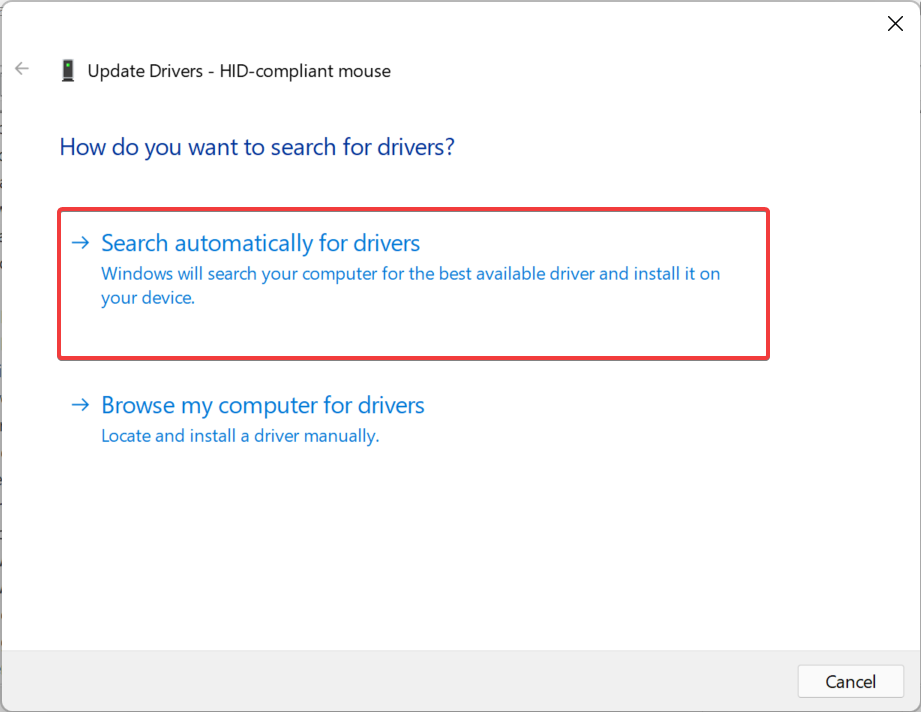
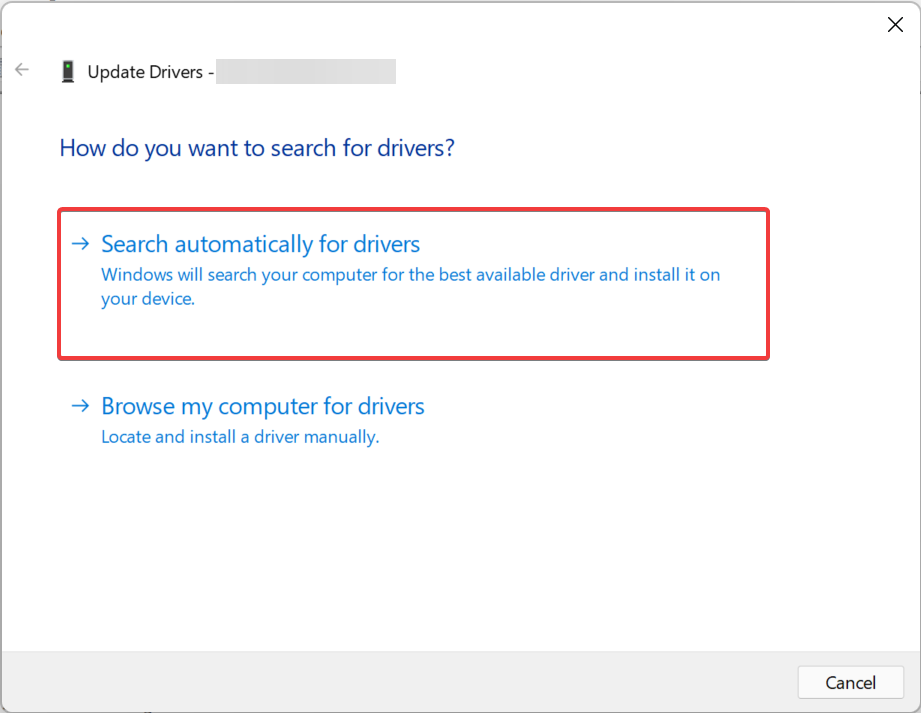
  4. Next, select Search automatically for drivers in the Update Drivers window.
    Search automatically for drivers

Wait for the update process to go through and check if the Logitech G305 stuttering issue is fixed.

A driver is a critical piece of software that relays commands between the OS and the device. And an outdated or corrupt driver is likely to throw errors. So, you must always have the latest driver version installed.

If the Device Manager was unable to find a newer version, try the other ways to update the driver in Windows 11.

Or, you can use a reliable third-party app that will update all the drivers in one go. We recommend Outbyte Driver Updater, a dedicated tool that automatically locates the latest version and installs it for the drivers installed on the PC, thus keeping them all up-to-date.

⇒ Get Outbyte Driver Updater

5. Run Hardware and Devices troubleshooter

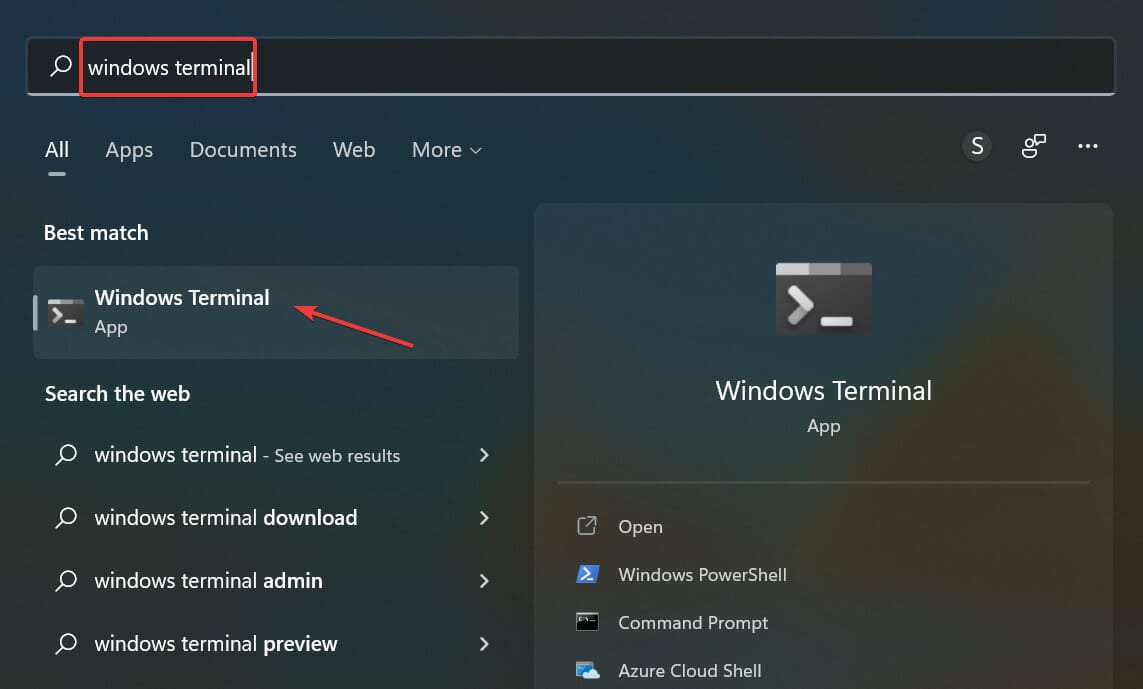
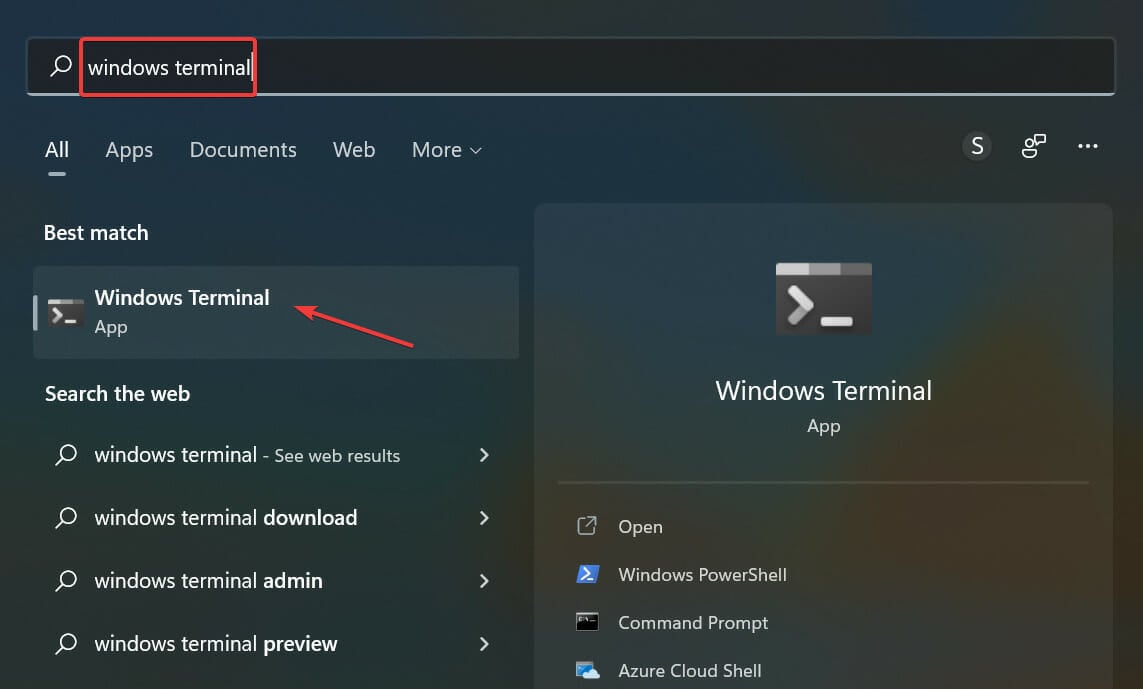
  1. Press Windows + S to launch the Search menu, enter Windows Terminal in the text field at the top, and click on the relevant search result.
    Windows Terminal
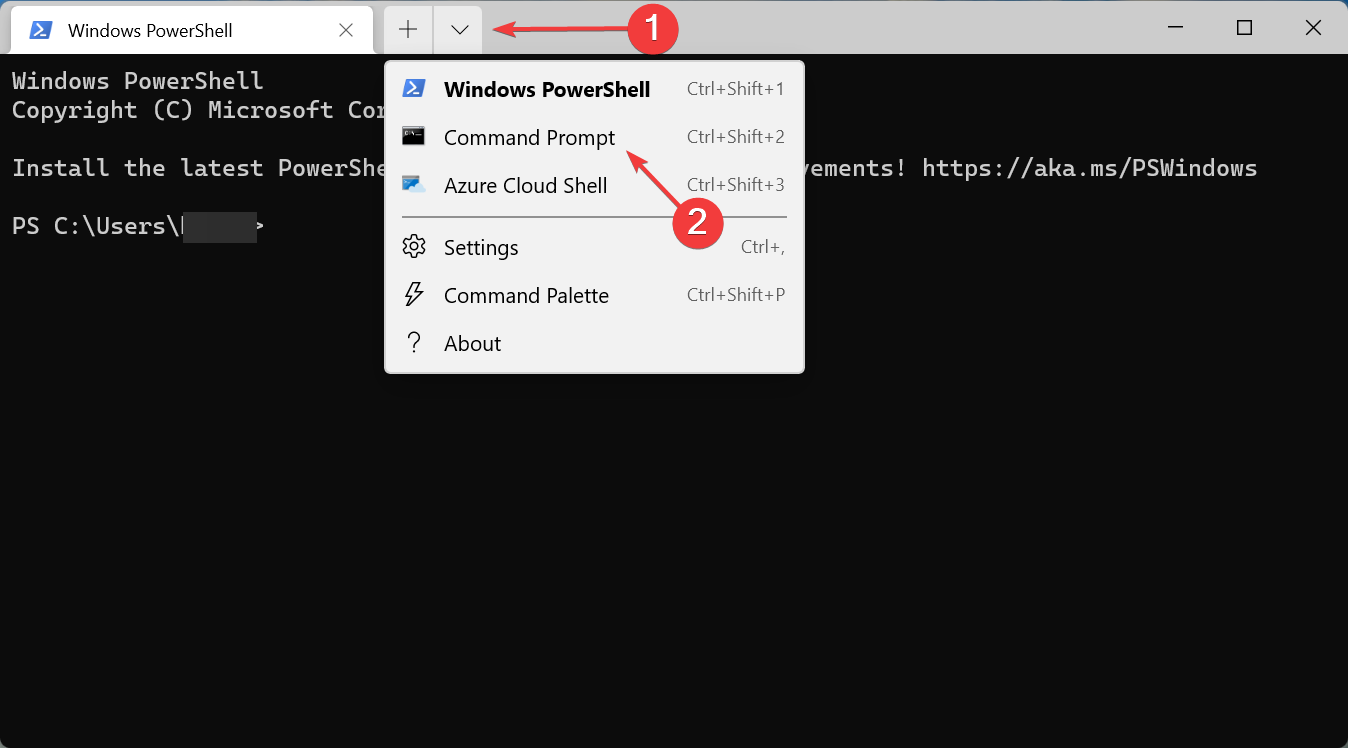
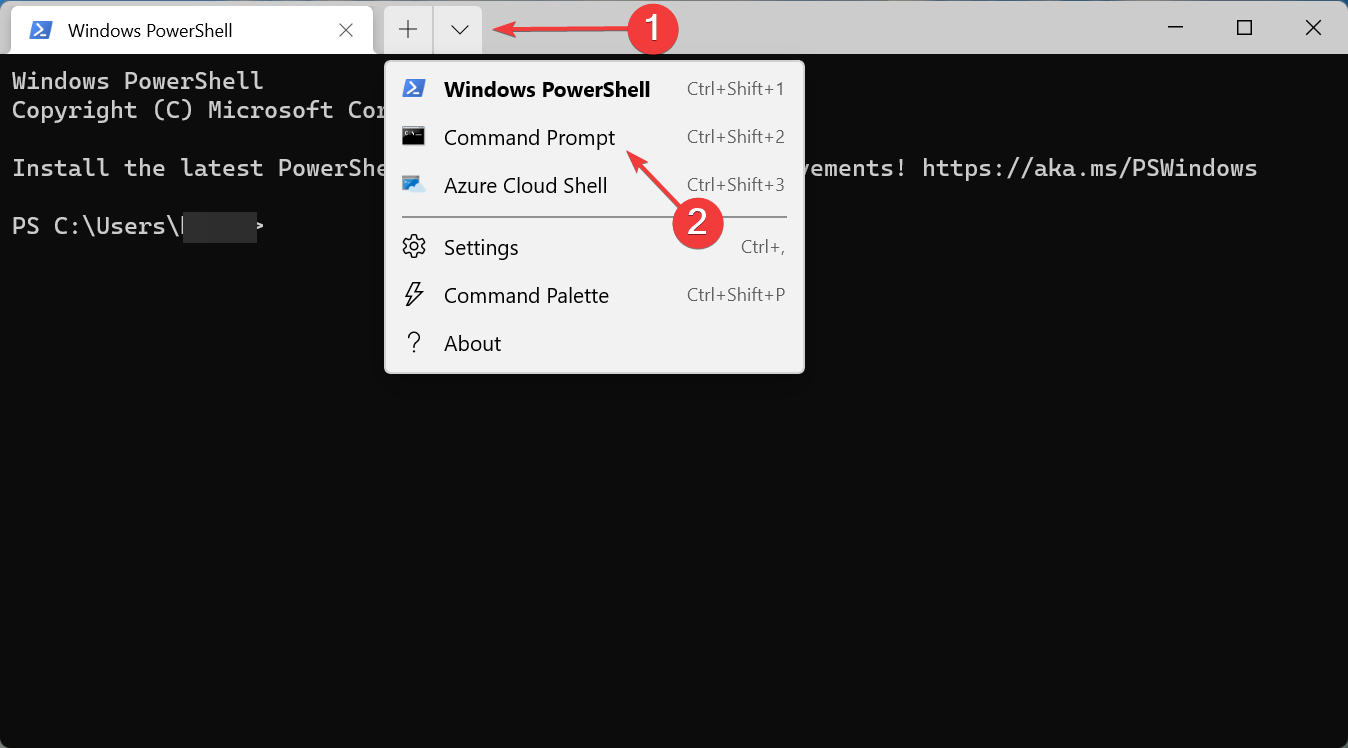
  2. Click on the arrow at the top, and select Command Prompt from the menu. Alternatively, you can press Ctrl + Shift + 2 to launch Command Prompt in a new tab.
    Cmd to fix logitech g305 stuttering
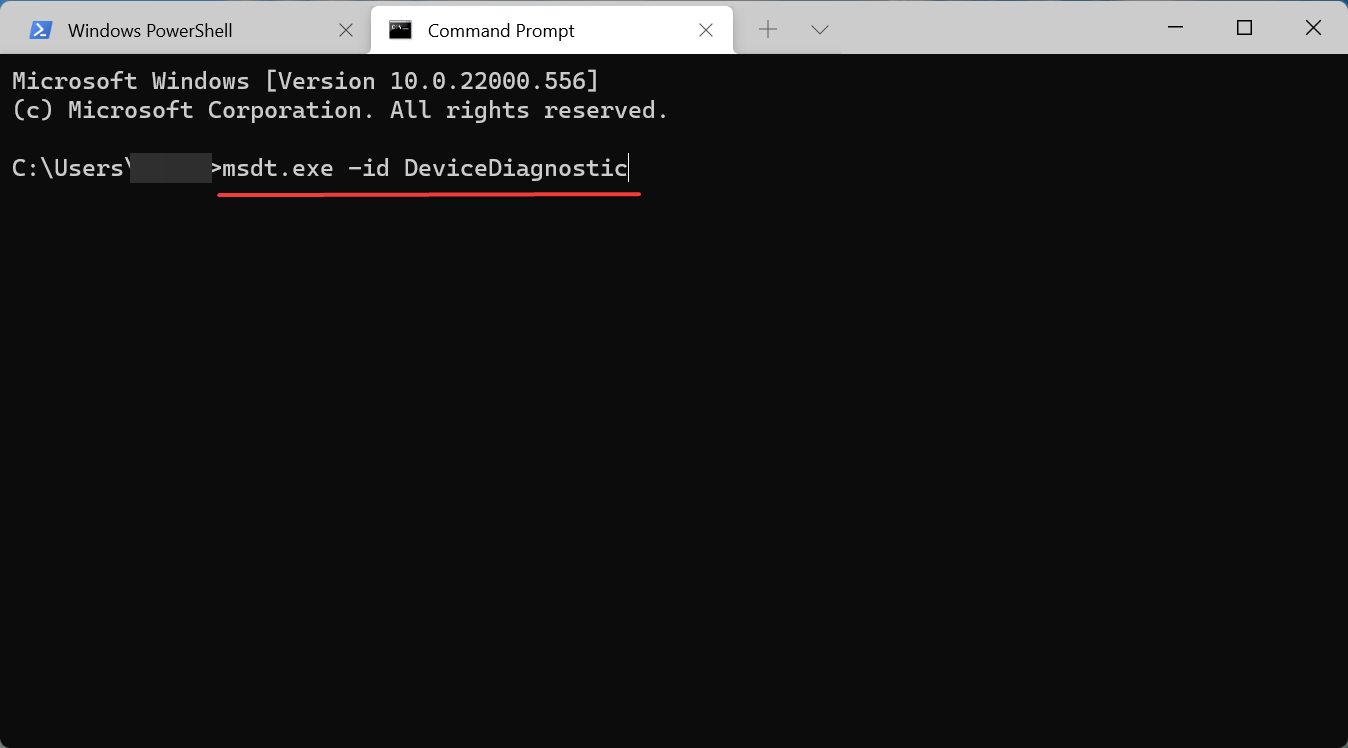
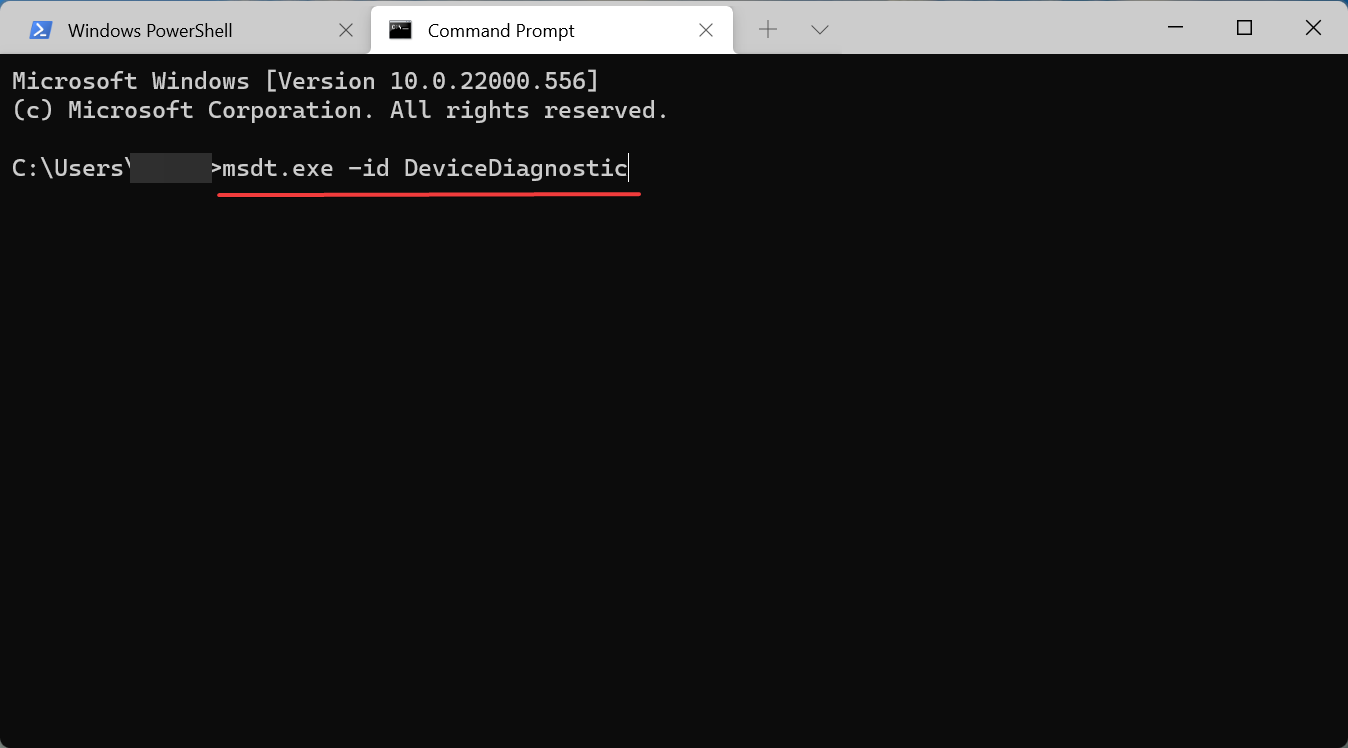
  3. Now, paste the following command and hit Enter to run the Hardware and Devices troubleshooter.msdt.exe -id DeviceDiagnostic
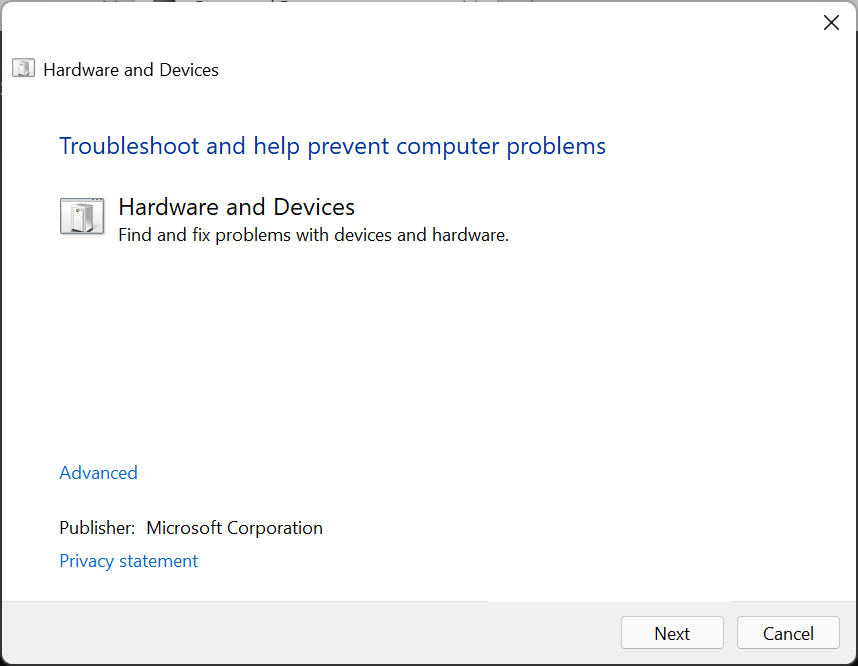
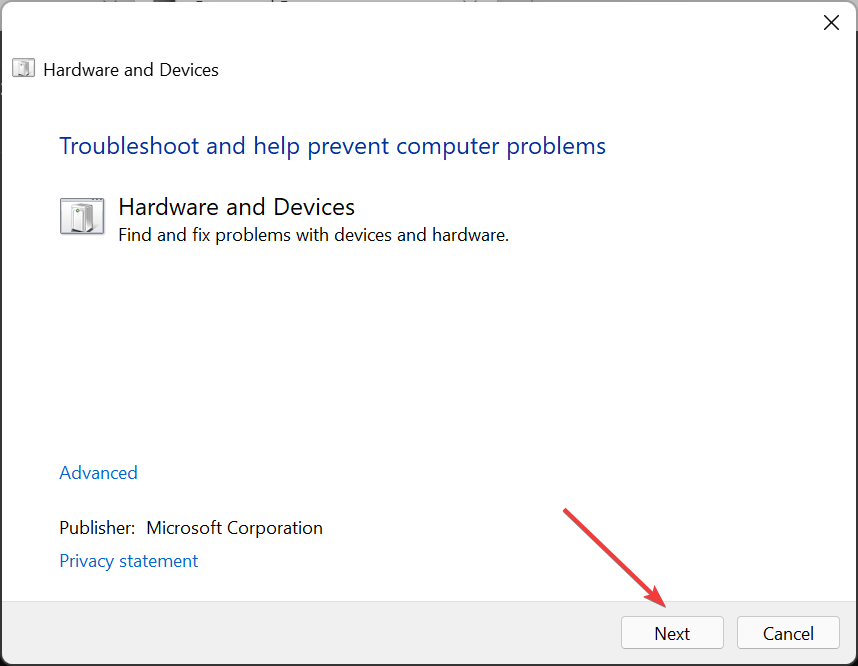
    Hardware and Devices troubleshooter to fix logitech g305 stuttering
  4. Follow the on-screen instructions to complete the troubleshooting process.
    Run

One of the best ways to fix issues with the mouse is to run the Hardware and Devices troubleshooter. It will take care of the misconfigured settings, check the connections, and make the required changes to fix the Logitech G305 stuttering issue.

6. Modify mouse settings

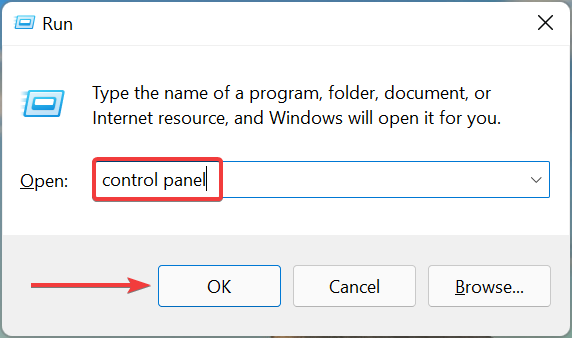
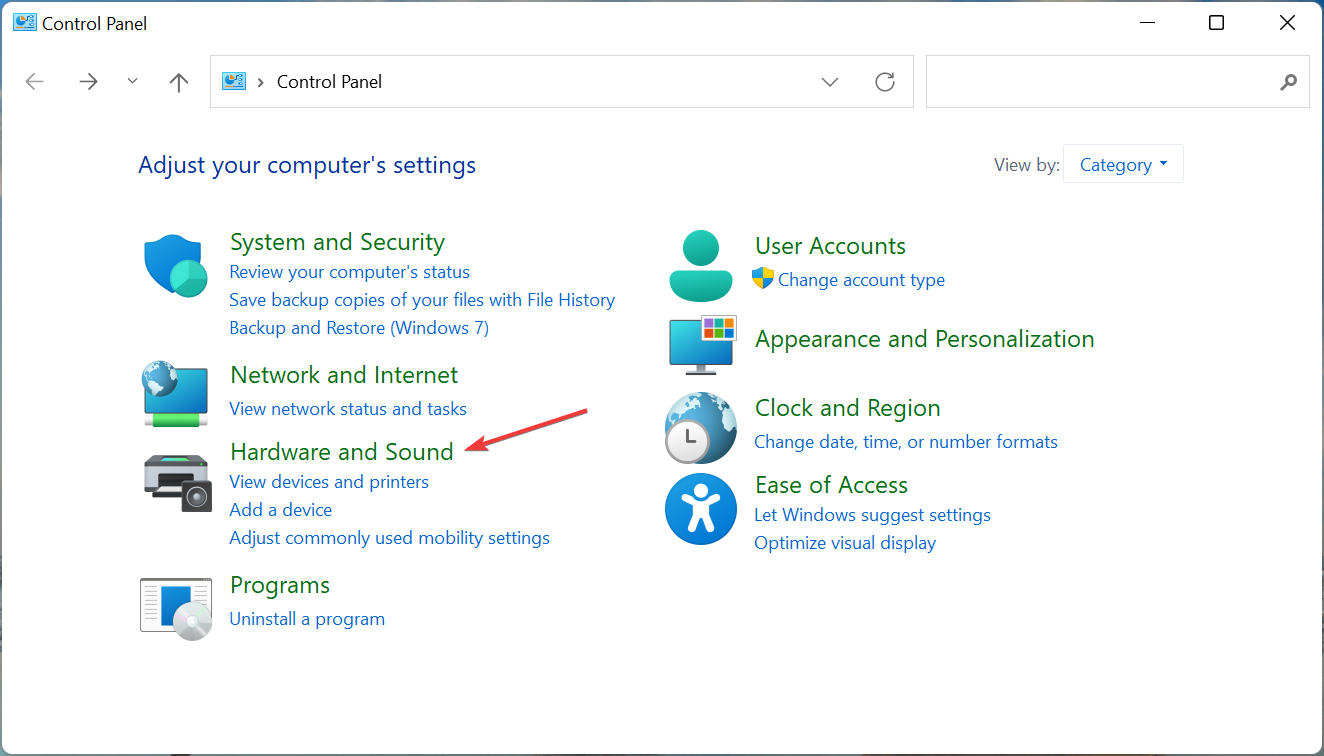
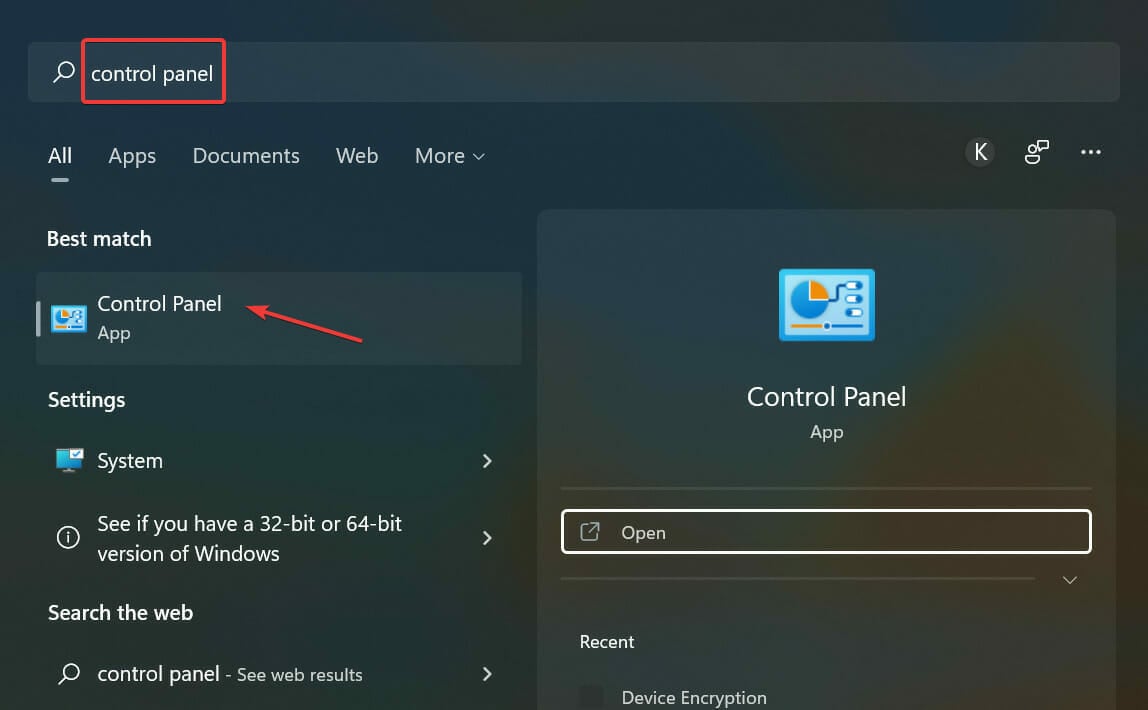
  1. Press Windows + R to launch the Run command, enter control panel in the text field, and either click on OK or hit Enter to launch the Control Panel window.
    Control Panel
  2. Click on Hardware and Sound here.
    Hardware and Sound
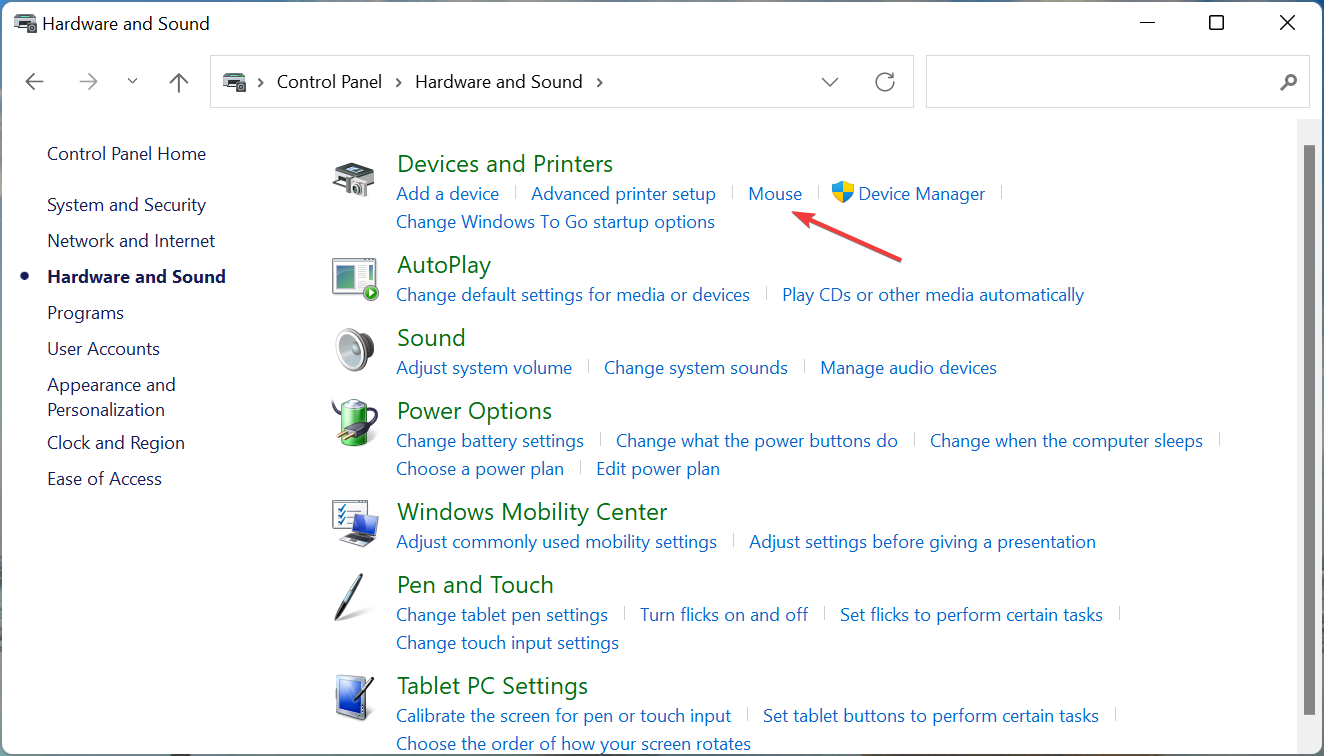
  3. Click on the Mouse option under Devices and Printers.
    Mouse to fix logitech g305 stuttering
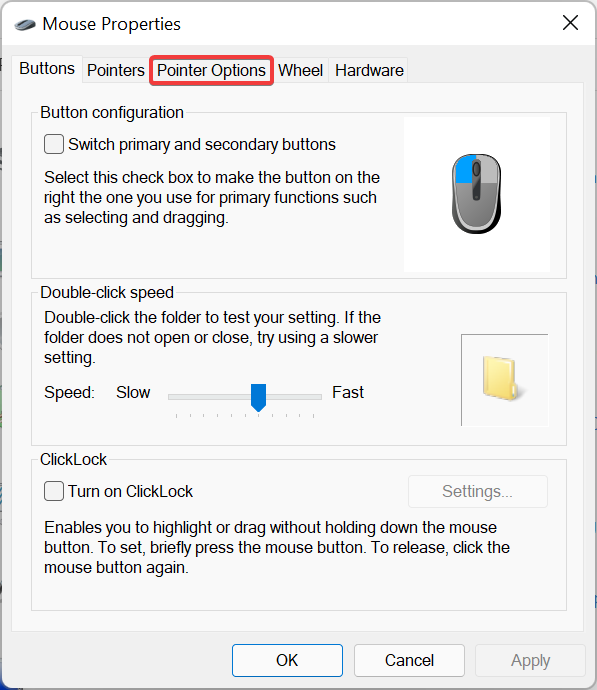
  4. Navigate to the Pointer Options tab from the top.
    Pointer Options
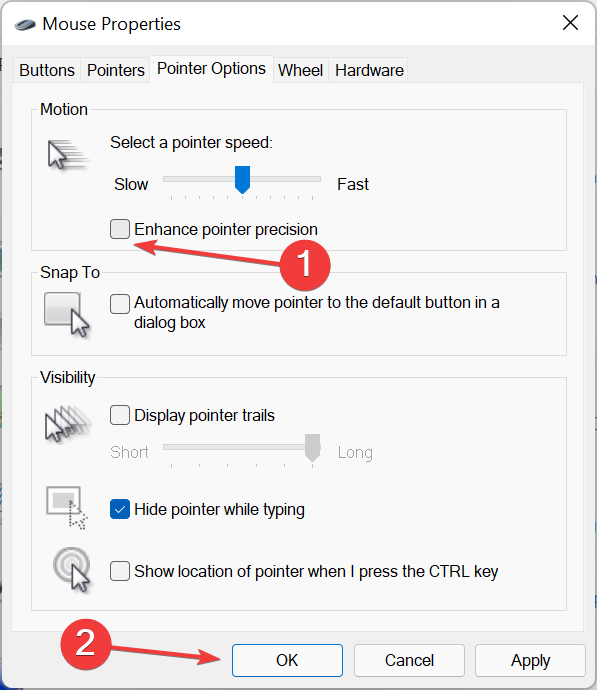
  5. Next, untick the checkbox for Enhance pointer precision and click on OK at the bottom to save the changes.
    Disable enhance pointer precision to fix logitech g305 stuttering

7. Update Windows

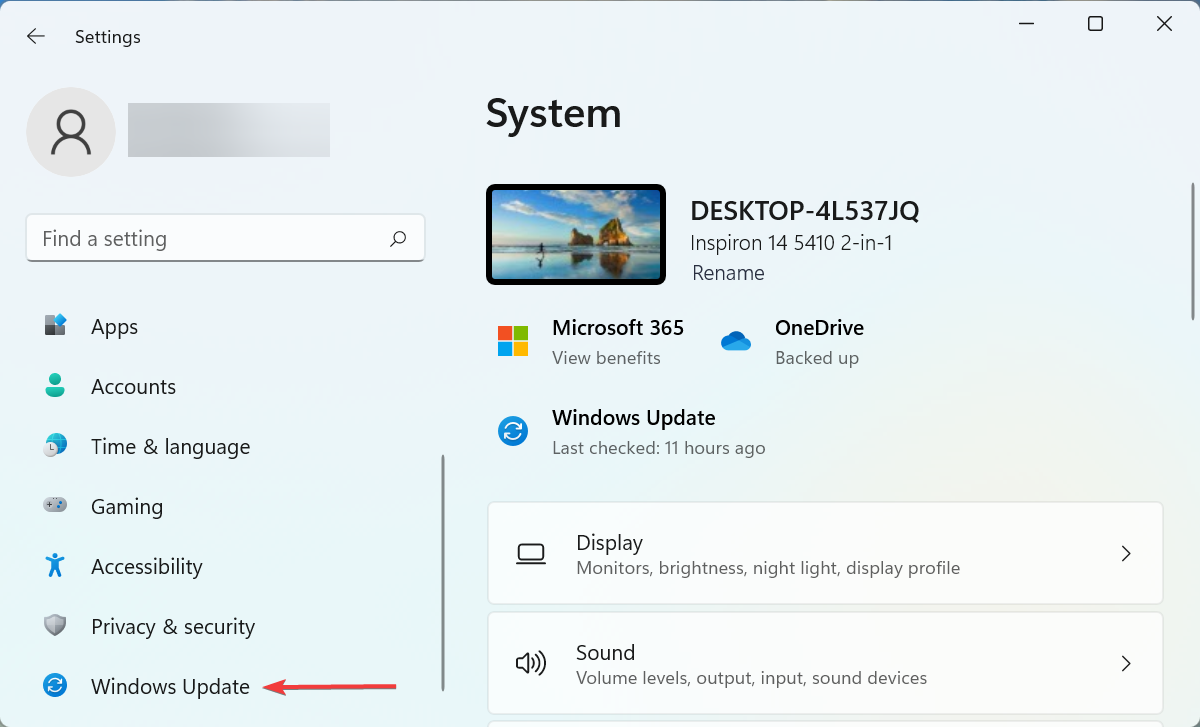
  1. Press Windows + I to launch the Settings app, and select Windows Update from the tabs listed in the navigation pane on the left.
    Windows Update
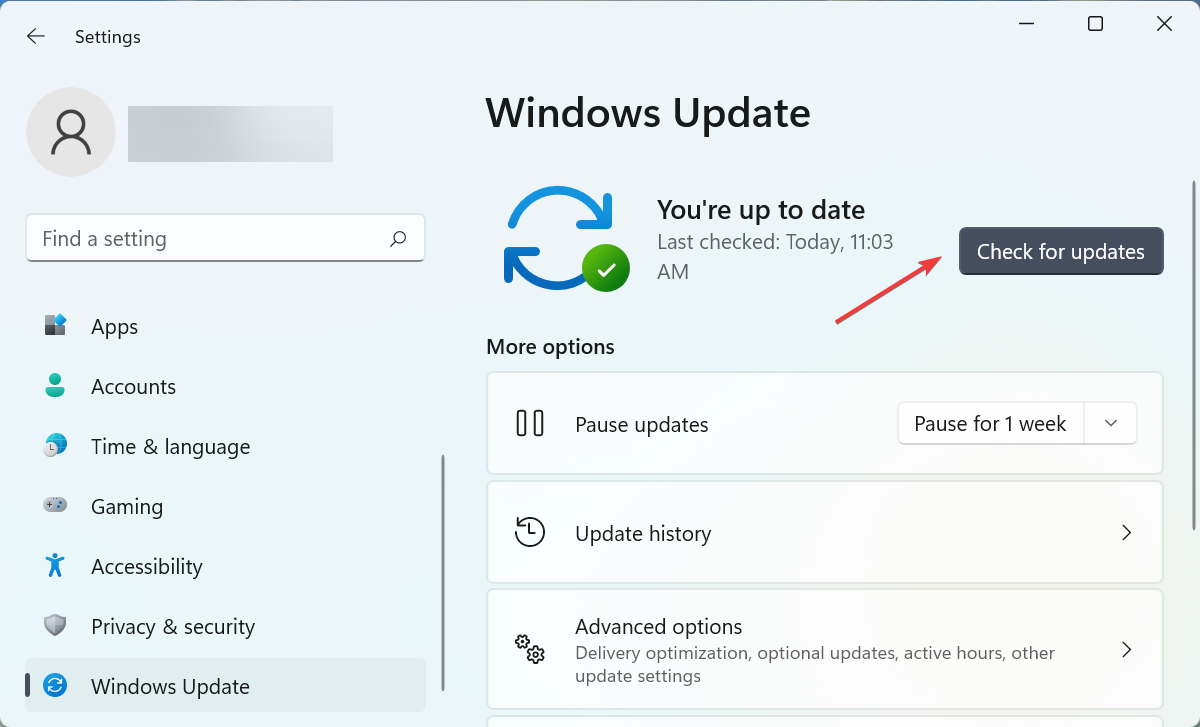
  2. Click on the Check for updates button on the right to scan for any available newer versions of the OS.
    Check for updates to fix logitech g305 stuttering
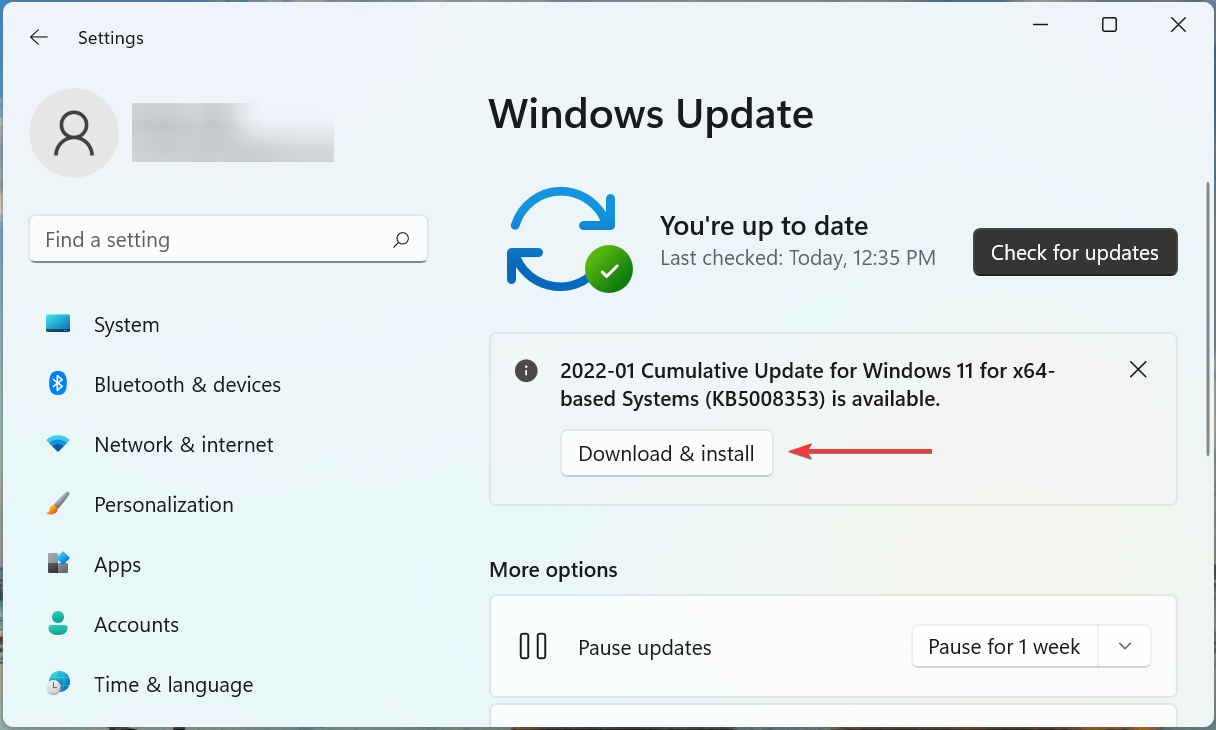
  3. Now, if an update is listed after the scan, click Download & install.
    Download & install

Oftentimes, running an outdated version of the OS can lead to a bunch of issues including the Logitech G305 stuttering problem. If there is a bug in the OS or it is simply too outdated, updating Windows could help fix the problem.

What are the best mouse options for my Windows PC?

A mouse is a critical piece of hardware, since it ensures quick and easy navigation across the system and allows the user to perform quick functions. But, due to a plethora of options available in the market, buyers often get confused between them.

So, if you are planning to buy a mouse for a Windows 11 PC, check our curated list. Also, here are some of the best mice available at discounted prices. Just, pick the one that meets your requirements and fits into your budget.

These are all the ways you can fix the Logitech G305 mouse cursor stuttering problem. In case it persists, remove overclocking if there’s any, and reset Windows to its factory settings. Overlocking is often found to affect effective functioning, and removing it should help.

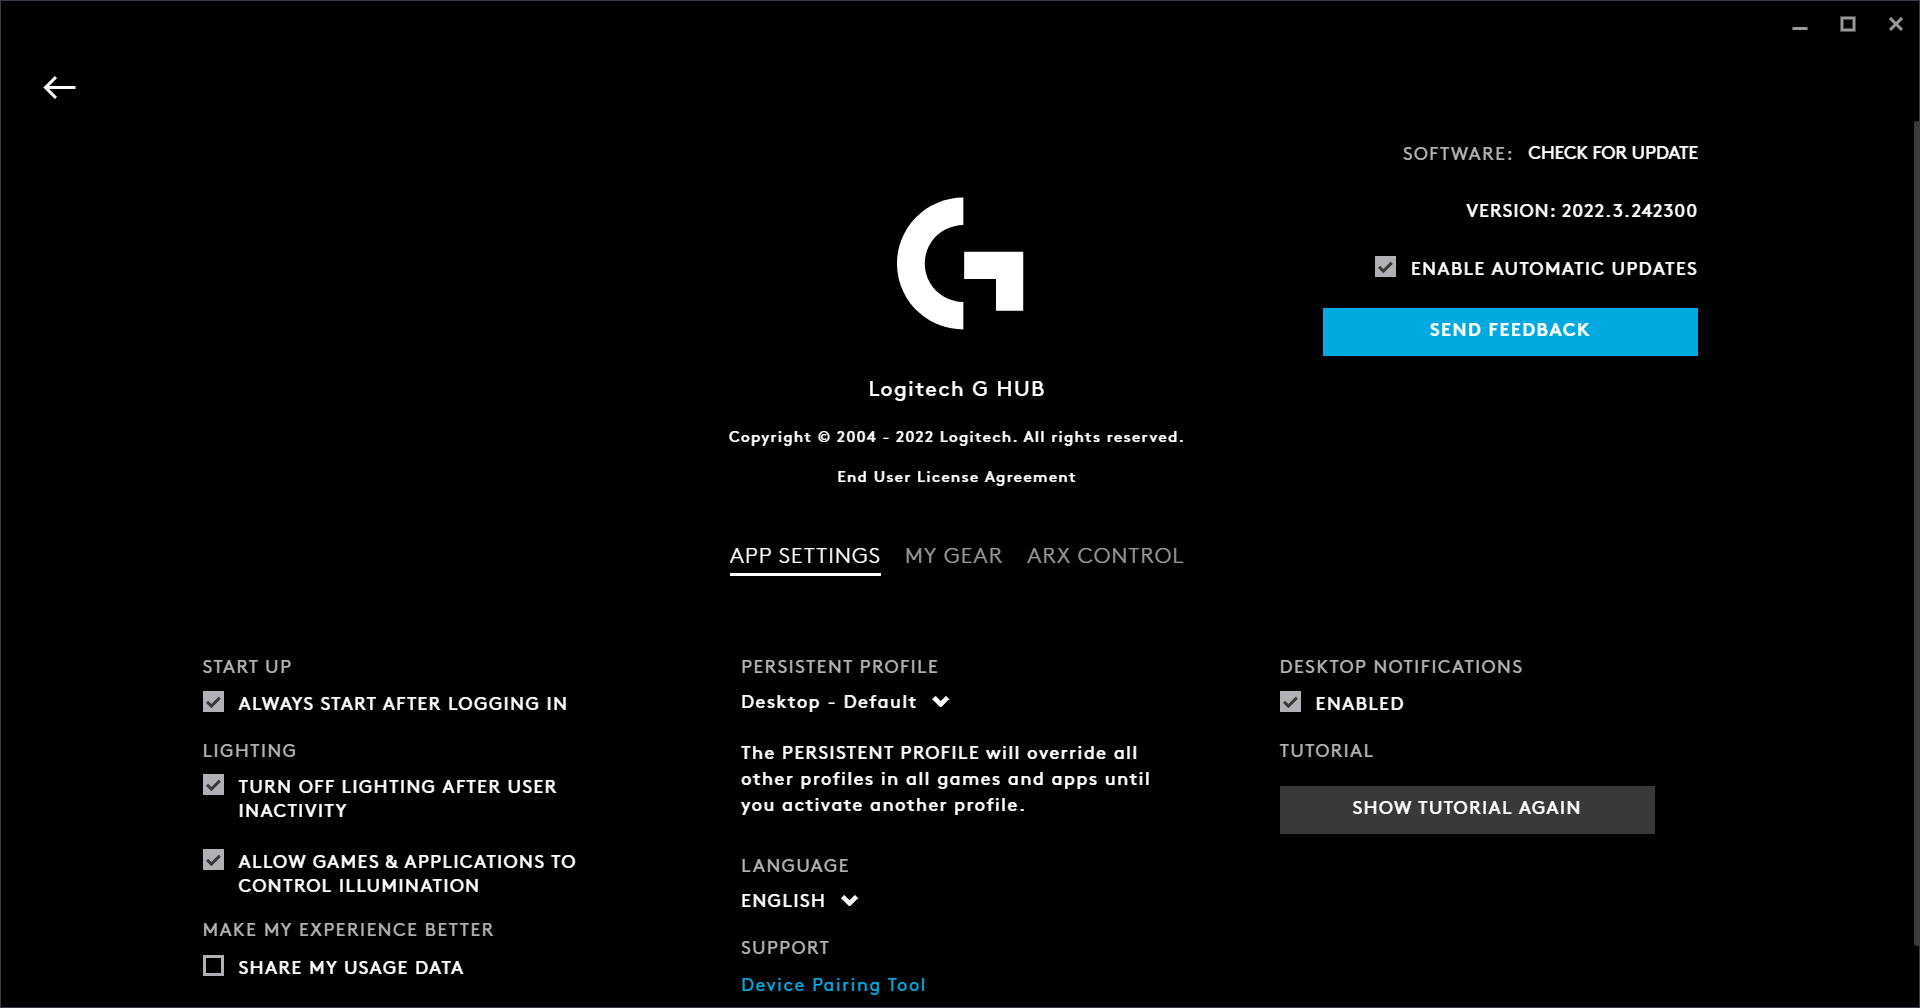
Also, find out how to download the Logitech G HUB in Windows 11, since it would help you establish stable and secure connections, and troubleshoot issues as well.

Tell us which fix worked and your experience with Logitech G305, in the comments section below.

Lenovo 5i Gaming Tower Review: NVIDIA GTX GPUs for cheap

Starting at $999.99

While the end of the GPU shortage is on the horizon, there are still plenty of games to be played today, and Lenovo’s 5i Gaming Tower is an affordable pre-built system that offers NVIDIA GPUs for relatively cheap.

Now in its 6th generation, the Lenovo 5i Gaming Tower improves upon a few key elements while oddly skimping on others in an effort to presumably hit that sub $1,000 price tag.

At the end of the day, the question gamers will need to ask themselves is a pre-built system with moderately performative specs, something that will satiate them until the price of GPUs comes down and specs drastically improve?

Legion Tower 5i Gen 6 (Intel)
Processor Up to 11th Generation Intel® Core™ i7-11700F Processor (2.50 GHz, up to 4.90 GHz with Turbo Boost, 8 Cores, 16 Threads, 16 MB Cache)
Operating System Windows 11 Home

Windows 10 Home

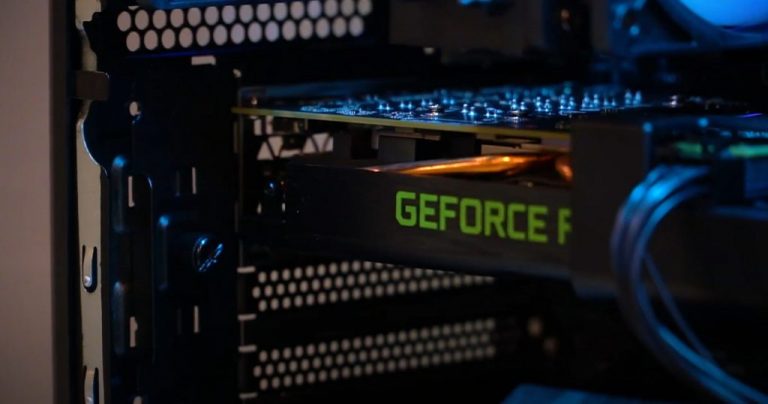
Graphics NVIDIA® GeForce® RTX™ 3060 12GB

NVIDIA® GeForce® RTX™ 3070 LHR 8GB

NVIDIA® GeForce® GTX 1660 Super 6GB

Storage 1 TB 7200 RPM HDD

Up to 1 TB PCIe SSD

Optional: Dual Hard drive configuration available

Weight Less than 14kg / 30.9lbs
Display Legion Vantage

McAfee LiveSafe™ (trial)

Office 365 (trial)

XBOX Game Pass

Storage Removable solid-state drive (SSD)6 options: 256 GB, 512 GB, 1TB, 2TB
Preloaded Software Windows Hello face authentication camera (front-facing)
1080p resolution front facing camera.
Dual far-field Studio Mics
Quad Omnisonic™ speakers with Dolby Atmos®
Memory 16GB or 32GB LPDDR4x RAM
Dimensions 205mm x 395.4mm x 420mm / 8.07″ x 15.57″ x 16.54″
Wireless 802.11AX (2 x 2)

Bluetooth® 5.1

Battery 650W: ES Gold

400W: ES Gold

Color Raven Black
Ports/Slots Front:

2 x USB-A 3.2 Gen 1

2 x headphone/mic combo

Rear:

USB-C 3.2 Gen 2

2 x USB-A 3.2 Gen 1

2 x USB-A 2.0

RJ45

3 x audio jack

USB port transfer speeds are approximate and depend on many factors, such as processing capability of host/peripheral devices, file attributes, system configuration and operating environments; actual speeds will vary and may be less than expected.

What’s in the box Legion 5i Gen 6 Tower

USB Keyboard

USB Mouse

Quick Start Guide


Look and Feel

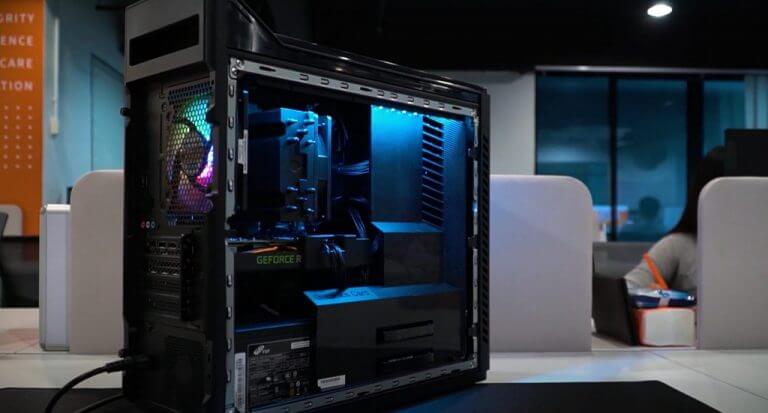
It’s a black box. Not much to report here for folks who will toss the Legion Tower 5i under a desk. However, for the gamers who like to display their towers, the 5i presents a mild showing of flare over its 5th Gen predecessor while also trimming the size down a bit.

The Raven Black aesthetic pairs well with most desktop color schemes and Lenovo continues to opt for more subdued designs for its gaming rigs with a subtle powder coating on parts of the outer box alongside 70 percent of plastic for the remaining parts of the rig.

The side panels are aligned with screws towards the rear of the tower, and a tempered glass cut out allows for a view of the inside of the tower on the right side. Instead of a flush level top there is a “fin” that raises the back of the tower to help hide a handle for transporting the box if necessary.

Lenovo Legion 5i Tower - side

The front of the Intel-powered model has a faux mesh look to it while the AMD model apparently comes with actual plastic mesh for possible additional cooling.

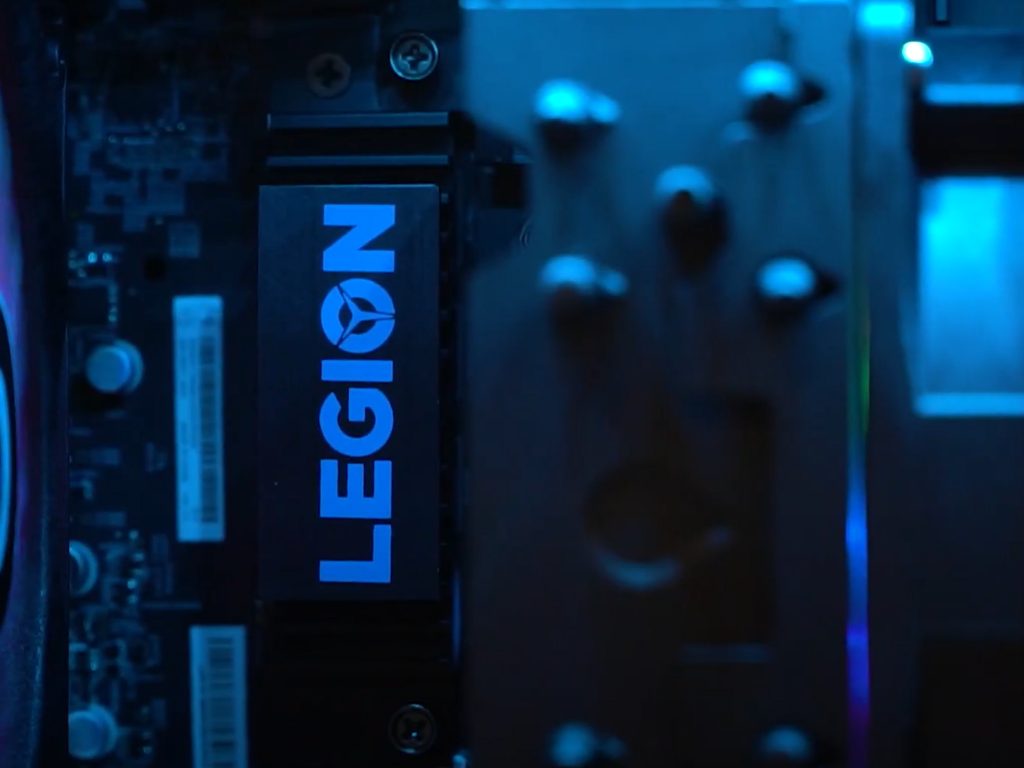
The only other notable design features on the Tower come by way of an RGB controller mounted tucked behind the motherboard for a cool light show that can be programmed via the Lenovo Vantage app on PCs.

As for the more important aspects of the tower’s design, Lenovo opted to put in a 120mm ARGB fan towards the front of the rig for cool air intake that occurs via slot neat the base of the tower as well as an additional one in the rear for hot air exhaust. Rather than placing vents along the bottom and top of the box, Lenovo is pushing air in unilateral vertical pattern through the base of the device.

Lenovo Legion 5i fans

Another issue that will arise over time is that there is very little to no dust filtration applied to any part of the rig. The sections where air flow occurs are open enough to collect dust and without the mesh design found on the AMD models, there is little natural filtration that will occur.

Gamers will need to regularly clean the unit to keep it from breaking down over time.

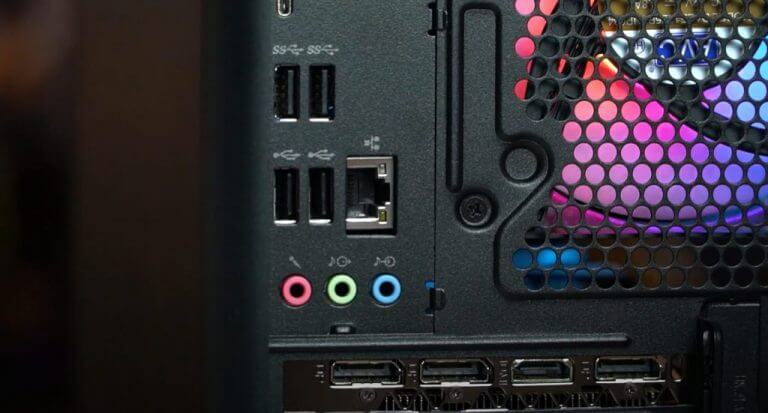
The port selection on the 5i Tower includes 2 USB-A 3.2 ports, 2 USB-A 2.0 ports, Ethernet and 3.5mm audio jack for 5.1 surround support. Also, on the back of the 5i, there is DisplayPort, HDMI, and DVI ports. Regarding cable management inside the box, it’s a mess. Between some proprietary parts and the odd placing of thermal pads on memory boards, randomly placed foam parts and zip bundling, the 5i could be a bit annoying for gamers who have a standardized process for taking apart their Towers or accessing cables.

Lenovo Legion 5i ports

Lenovo tosses a lot of the cabling behind the left side of the box which is meant to face away from the tempered glass viewing portal but once open owners are privy to some haphazard cable placement.

As for upgradeability, the PSU is manufactured by 80 Plus Gold and consists of 400W of power, the cradles inside house two slots for M.2 SSDs with support for PCIe 4.0 (despite not adding additional RAM).

The mATX motherboard comes with a B560 chipset in a pretty regular mount even though Lenovo adds its own customizations on top that surprisingly omits a VRM heatsink, presumably in the name of cost.

To that end, the first upgrade to the 5i Tower will most likely be a memory one that adds to the 8GB of single-channel performance out of the box. With the custom Lenovo motherboard not supporting XMP, the RAM installed will actually run at a lower 2933MHz than its advertised 3200MHz on the box.

Lenovo Legion 5i side panel

Performance

Without having multiple tower setups to run actual test side by side, I did the most I could with a standard stress test as well as pairing data from benchmarks of other recorded rigs.

Running a combination of HWMonitor, Prime 95, Intel’s Processor Diagnostic Tool, CPU-Z, Cinebench, AIDA64, and other free tools I was able to measure fan noise, CPU throttling, heat output, and clock speeds.

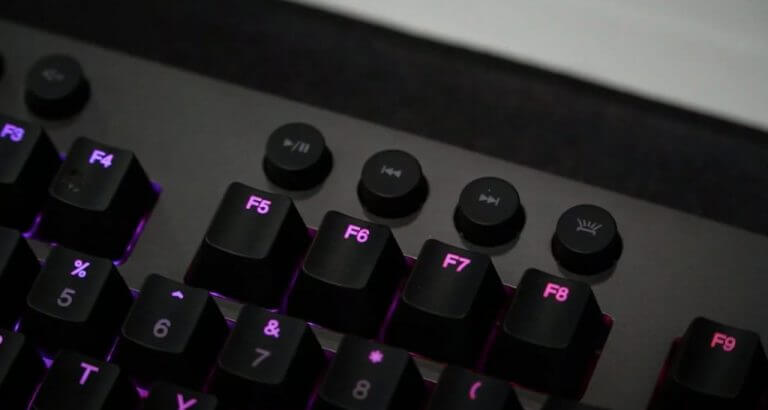
Lenovo Legion 5i Keyboard

When fully stressed the 5i Tower remained relatively quiet even when the fans were running between 1140 and 1550 RPMs and the CPU sat between 80 C and 86 C, using 65W power. GPU wise the heat was around 64 C to 68 C at 1.89GHz.

When using Lenovo’s pre calibrated modes such as “Balanced” and “Performance” thermal throttling was non-existent despite the fan speeds ramping up and down respectively. The only apparent changes in gaming modes occurred when the CPU clock dropped to 3.09GHz under “Balanced Mode”.

As for synthetic benchmark competition:

Gaming

I tried to throw what I could at the machine to choke it up, but even games such as Red Dead Redemption 2 played decently at medium settings for 47 FPS at 1440p resolution and at 65 FPS on Balanced Mode with 1080p.

Another semi-demanding game that performed decently was Cyberpunk 2077 which was played at 1440p resolution and still produced plus 65 FPS and when the resolution was dropped to a crisp 1080p the FPS ramped up to high 90’s low 100’s.

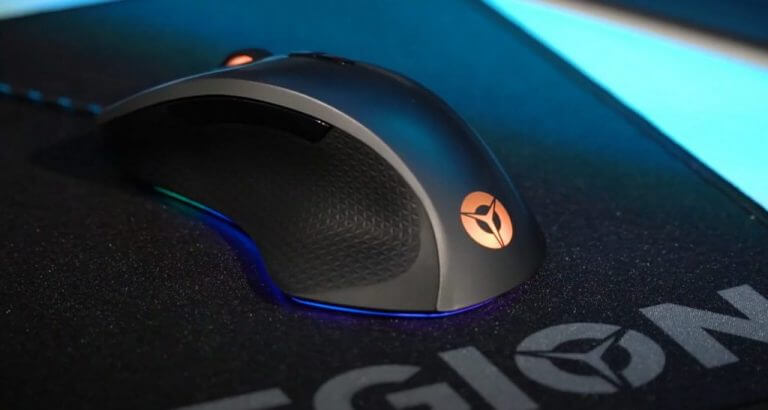
Lenovo Legion 5i -mouse

One of the last games tested was Rainbow Six Siege which got upwards of 200 FPS on settings at its peak but averaged around 80 FPS more consistently.

Summary

All of the moves Lenovo makes to package this pre-built system work for parents looking to appease their kids first foray into PC gaming, content editors looking for a relatively cheap workstation replacement and moderate gamers struggling to decently priced GPUs in the market now.

There are things the company could have done that were of seemingly no cost to the process as well as some that would have inevitably raised the price but overall, the Legion 5i Tower is a solid rig for beginners.

Windows 10 apps close when minimized? Here’s what to do

The ability to minimize and maximize programs allows you to clean your Windows 10 desktop and concentrate on the applications you’re currently using. Sounds important, right? Indeed it is, thus we will show you how to quickly fix the apps close when minimized error.

When maximizing or minimizing a window, there are a variety of options available, some of which are as simple as clicking or touching a button, while others necessitate the use of a keyboard. It’s up to you to pick which one to employ depending on the circumstances.
If you minimize an application, it conceals its window from your desktop without quitting the application. On the taskbar, you’ll see an icon for the application in question.

You may quickly restore the minimized window to its previous state and bring it back into view so that you can continue to use it while it is minimized.

While, if you maximize an application, its window expands to fill the entire screen of your desktop computer. A maximized application takes up the full available screen space, with the exception of the taskbar.

Follow along as we will see how to minimize or maximize an app and then jump into the list of solutions to fix the Windows 10 apps close when minimized issue.

How can I minimize or maximize apps in Windows 10?

Minimizing and increasing applications may appear to be diametrically opposed tasks. However, it’s important to remember that there is a transitional state between them: when the app window is displayed but does not take up the entire screen and you have the ability to move and resize it.

The option to minimize or maximize windows is no longer available while using Windows 10 in Tablet mode because all apps launch and remain completely extended.

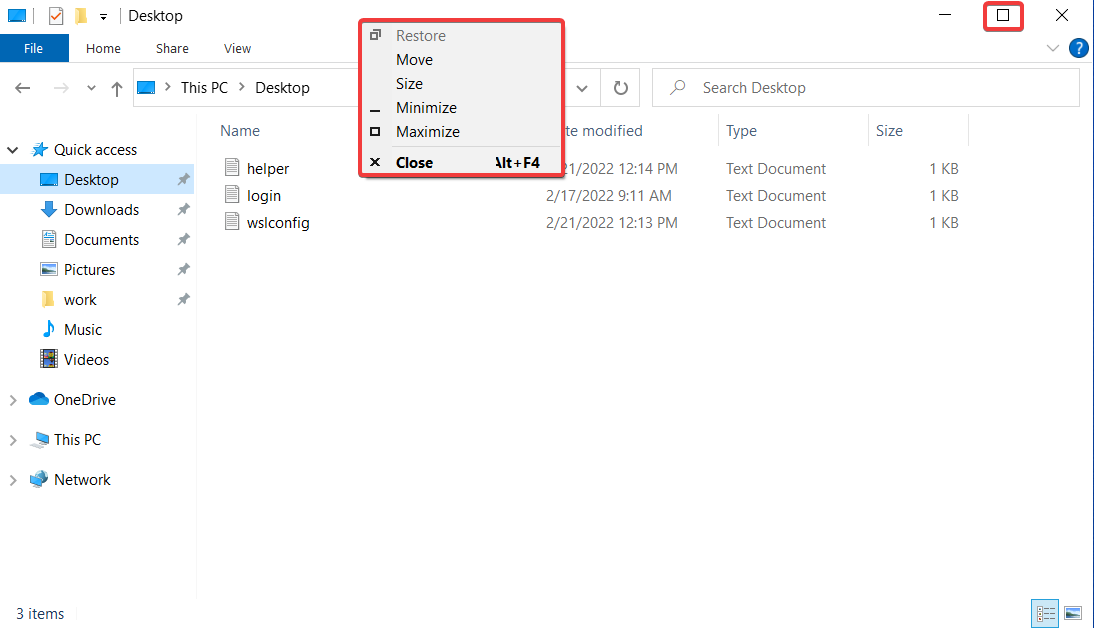
In order to minimize or maximize an app window, the most well-known approach is to click on the Minimize or Maximize button located in the title bar of the program.

 restore windows 10 apps close when minimized


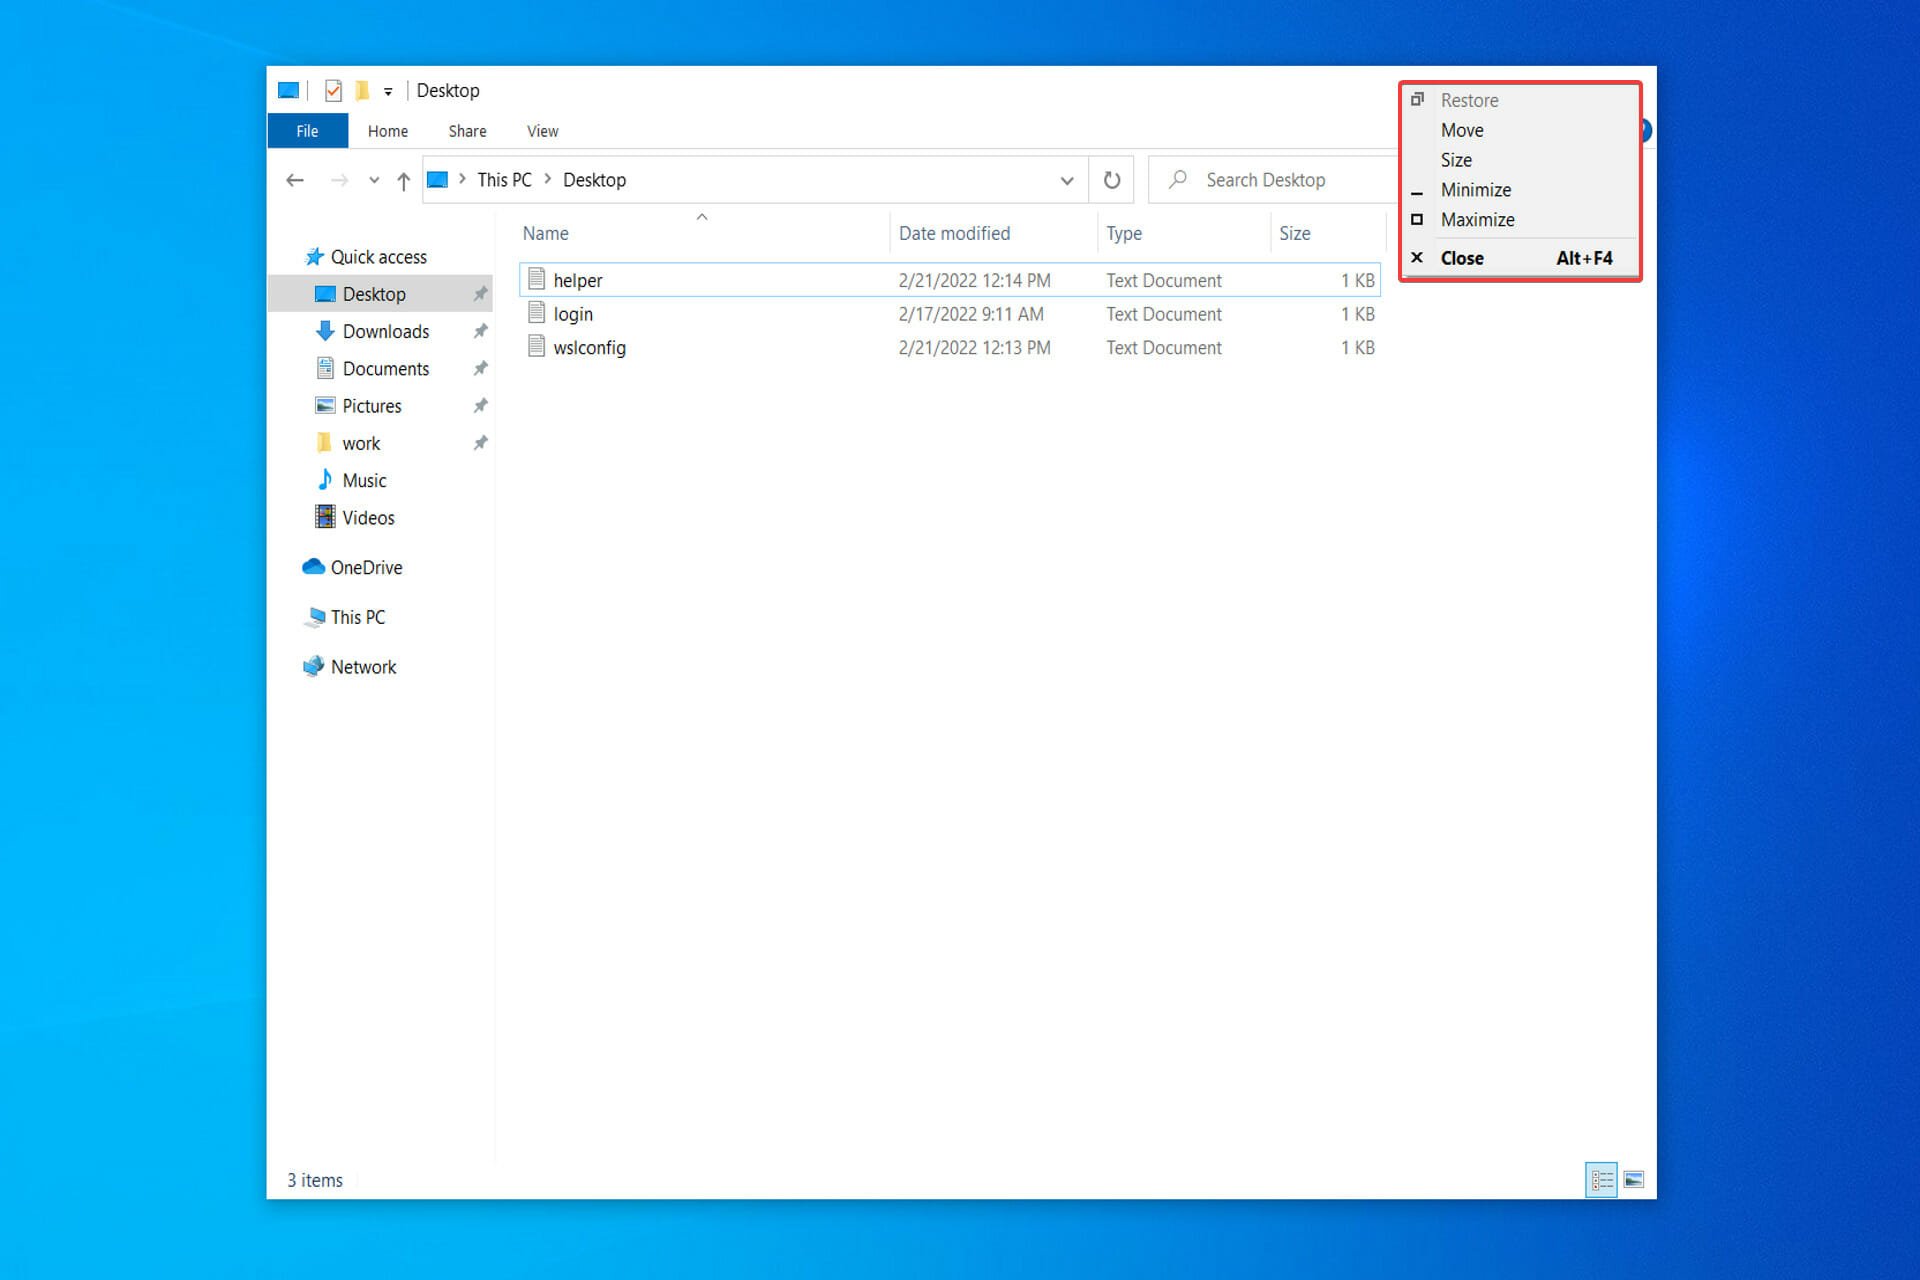
All Windows 10 apps, as well as the vast majority of desktop applications, display those buttons in the top-right corner of the window’s title bar, near the X that is used to close windows.

You may also reduce and maximize apps by selecting them from the title bar menu. If you prefer to use the mouse, right-click on the title bar of a window to bring up the menu. Then, depending on what you want to accomplish, select an option from the drop-down menu.

The Restore button in this menu can also be used to bring back a window to its previous size and location on your screen if it has been modified in the previous step.

The Alt + Spacebar keyboard shortcut can also be used to open the title bar menu as an alternative.

If you want to minimize or maximize the window immediately after the title bar menu appears, simply press the N or X keys on your keyboard. If the window has been extended, hit the R key on your keyboard to bring it back to its original size.

How can I fix Windows 10 apps close when minimized?

1. Run the Windows Store App troubleshooter

  1. Open Settings by pressing the Windows + I keys and navigate to Update & Security.update-security windows 10 apps close when minimized
  2. Next, choose Troubleshoot from the left menu and then click on Additional troubleshooters.troubleshoot-others windows 10 apps close when minimized
  3. Scroll down until you meet the Windows Store App troubleshooter, click on it then select Run the troubleshooter.additional-troubleshooters windows 10 apps close when minimized

2. Update your drivers

  1. Open Settings by pressing the Windows + I keys and navigate to Update & Security.update-security windows 10 apps close when minimized
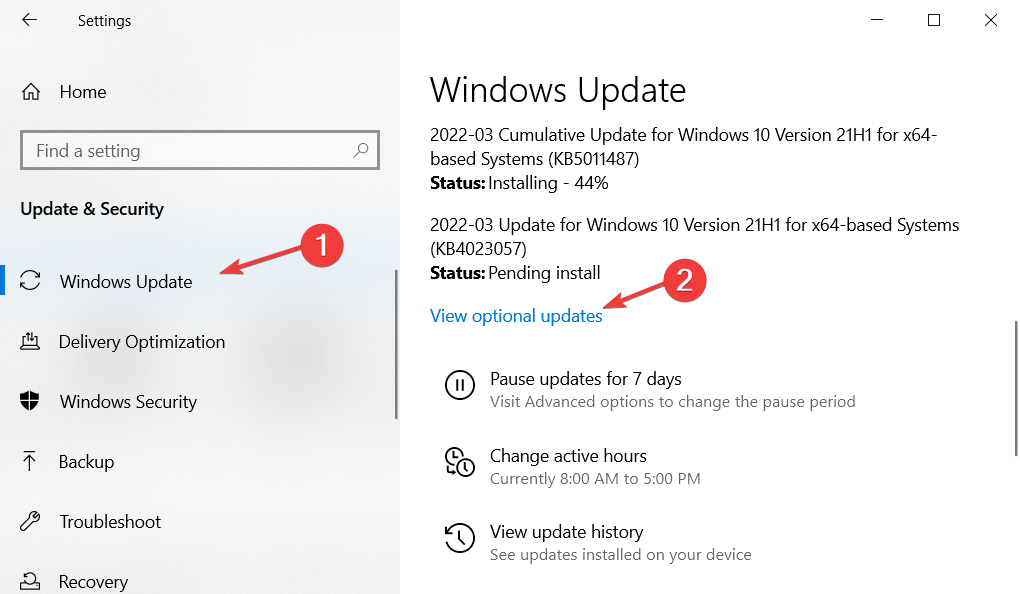
  2. Next, navigate to Windows Update followed by View optional updates.windows-update-optional windows 10 apps close when minimized
  3. Expand the Driver update section and select all the available ones then click Download and install.driver-update windows 10 apps close when minimized

Keeping your drivers up to date is as important as having an antivirus installed on your computer. But if you find yourself reluctant to update them on a regular basis, you can use third-party software that automatically updates and fixes any driver-related issues.

Such is Outbyte Driver Updater, a lightweight software solution developed specifically for you to keep your PC in peak operating condition without wasting any time. It will update, fix and replace your drivers without you even noticing.

⇒ Get Outbyte Driver Updater

3. Update Windows

  1. Open Settings by pressing the Windows + I keys and navigate to Update & Security.update-security windows 10 apps close when minimized
  2. Next, go to Windows Update and check whether you have any available Windows updates to perform. Here I get the option to upgrade to Windows 11, and under it, I have Windows 10 updates that I can install without upgrading to the former OS.windows-update-w11 windows 10 apps close when minimized

If you decide to upgrade to Windows 11, check out our post on the 11 best features in Windows 11 that you need to know.

Alternatively, you should take a look at 10+ best Windows 11 tips and tricks to streamline your OS and get the best out of it.

4. Run DISM

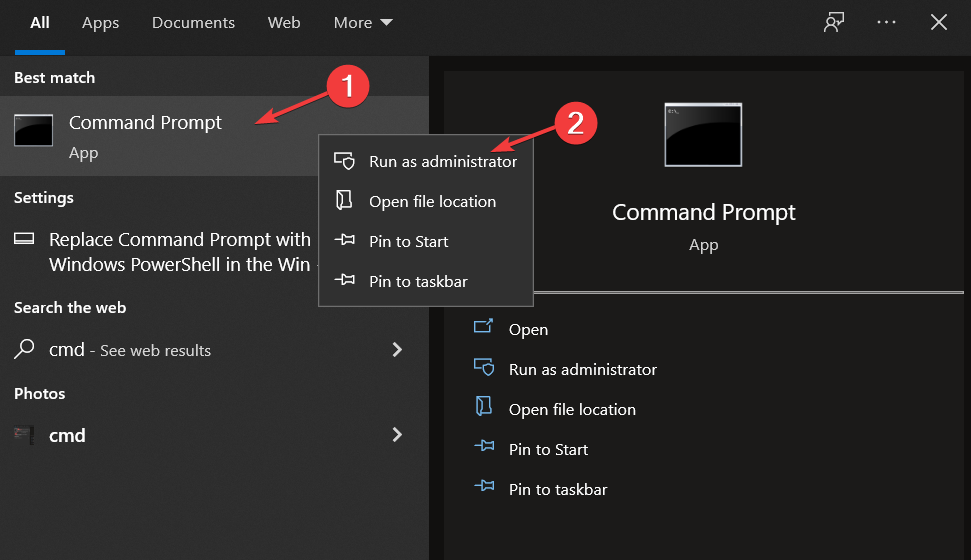
  1. Open the Windows search function and type in cmd. Right-click on the top result and choose Run as administrator.cmd-admin windows 10 apps close when minimized
  2. Now type or paste the following command in order to fix any Windows corruption error, if there are any, and hit Enter: DISM.exe /Online /Cleanup-image /Restorehealthdism windows 10 apps close when minimized

If you need further assistance in resolving the Windows 10 apps close when minimized, check out our guide on how to stop Windows 10 from closing programs without warning.

Was this guide helpful for you? Leave us a comment in the section below and tell us what you think. Thanks for reading!

Pazu Netflix Video Downloader review: grab all your movies and shows quickly

Netflix is definitely one of the top on-demand media platforms with a huge database of shows and movies to choose from.

And as long as you have a subscription, it’s easy to download and view them later but you can only keep the videos for a limited period of time.

Also, it’s impossible to share the media or transfer the files to an external drive to take them with you.

That’s where Pazu Netflix Video Downloader comes into play, a smart app for Windows or Mac that will help you do that with just a few clicks.

We’ve tested the software and in this article, we’ll highlight some of its best features and explain how to use it on your Windows machine.

How can Pazu Netflix Video Downloader help you?

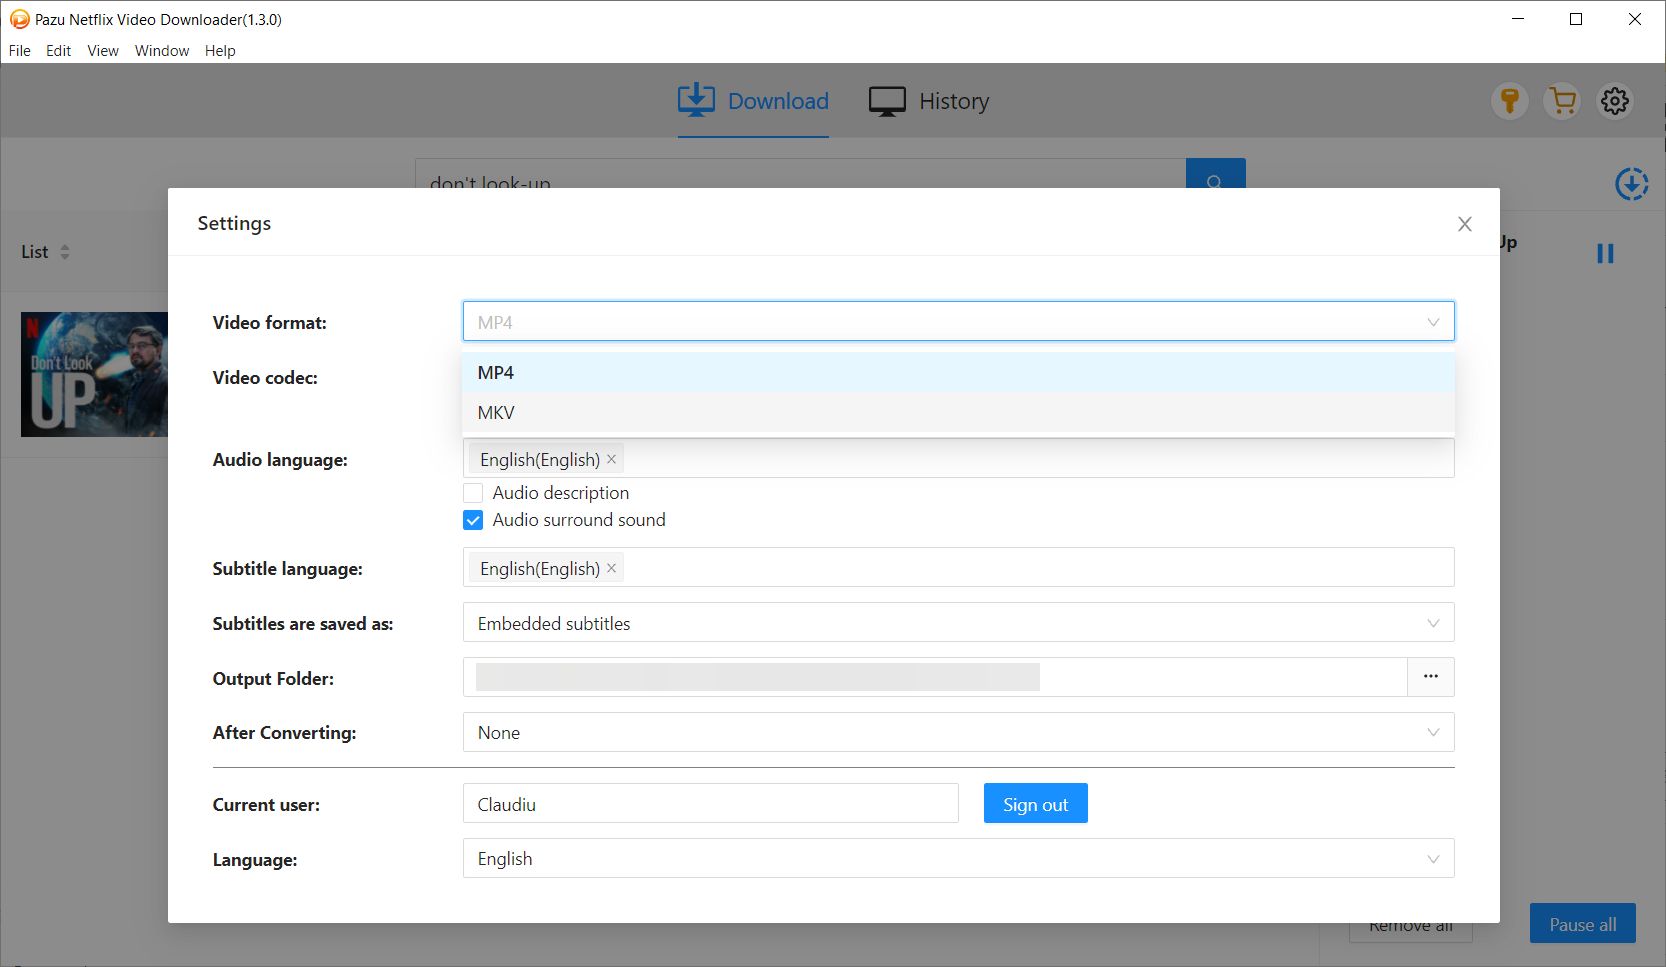
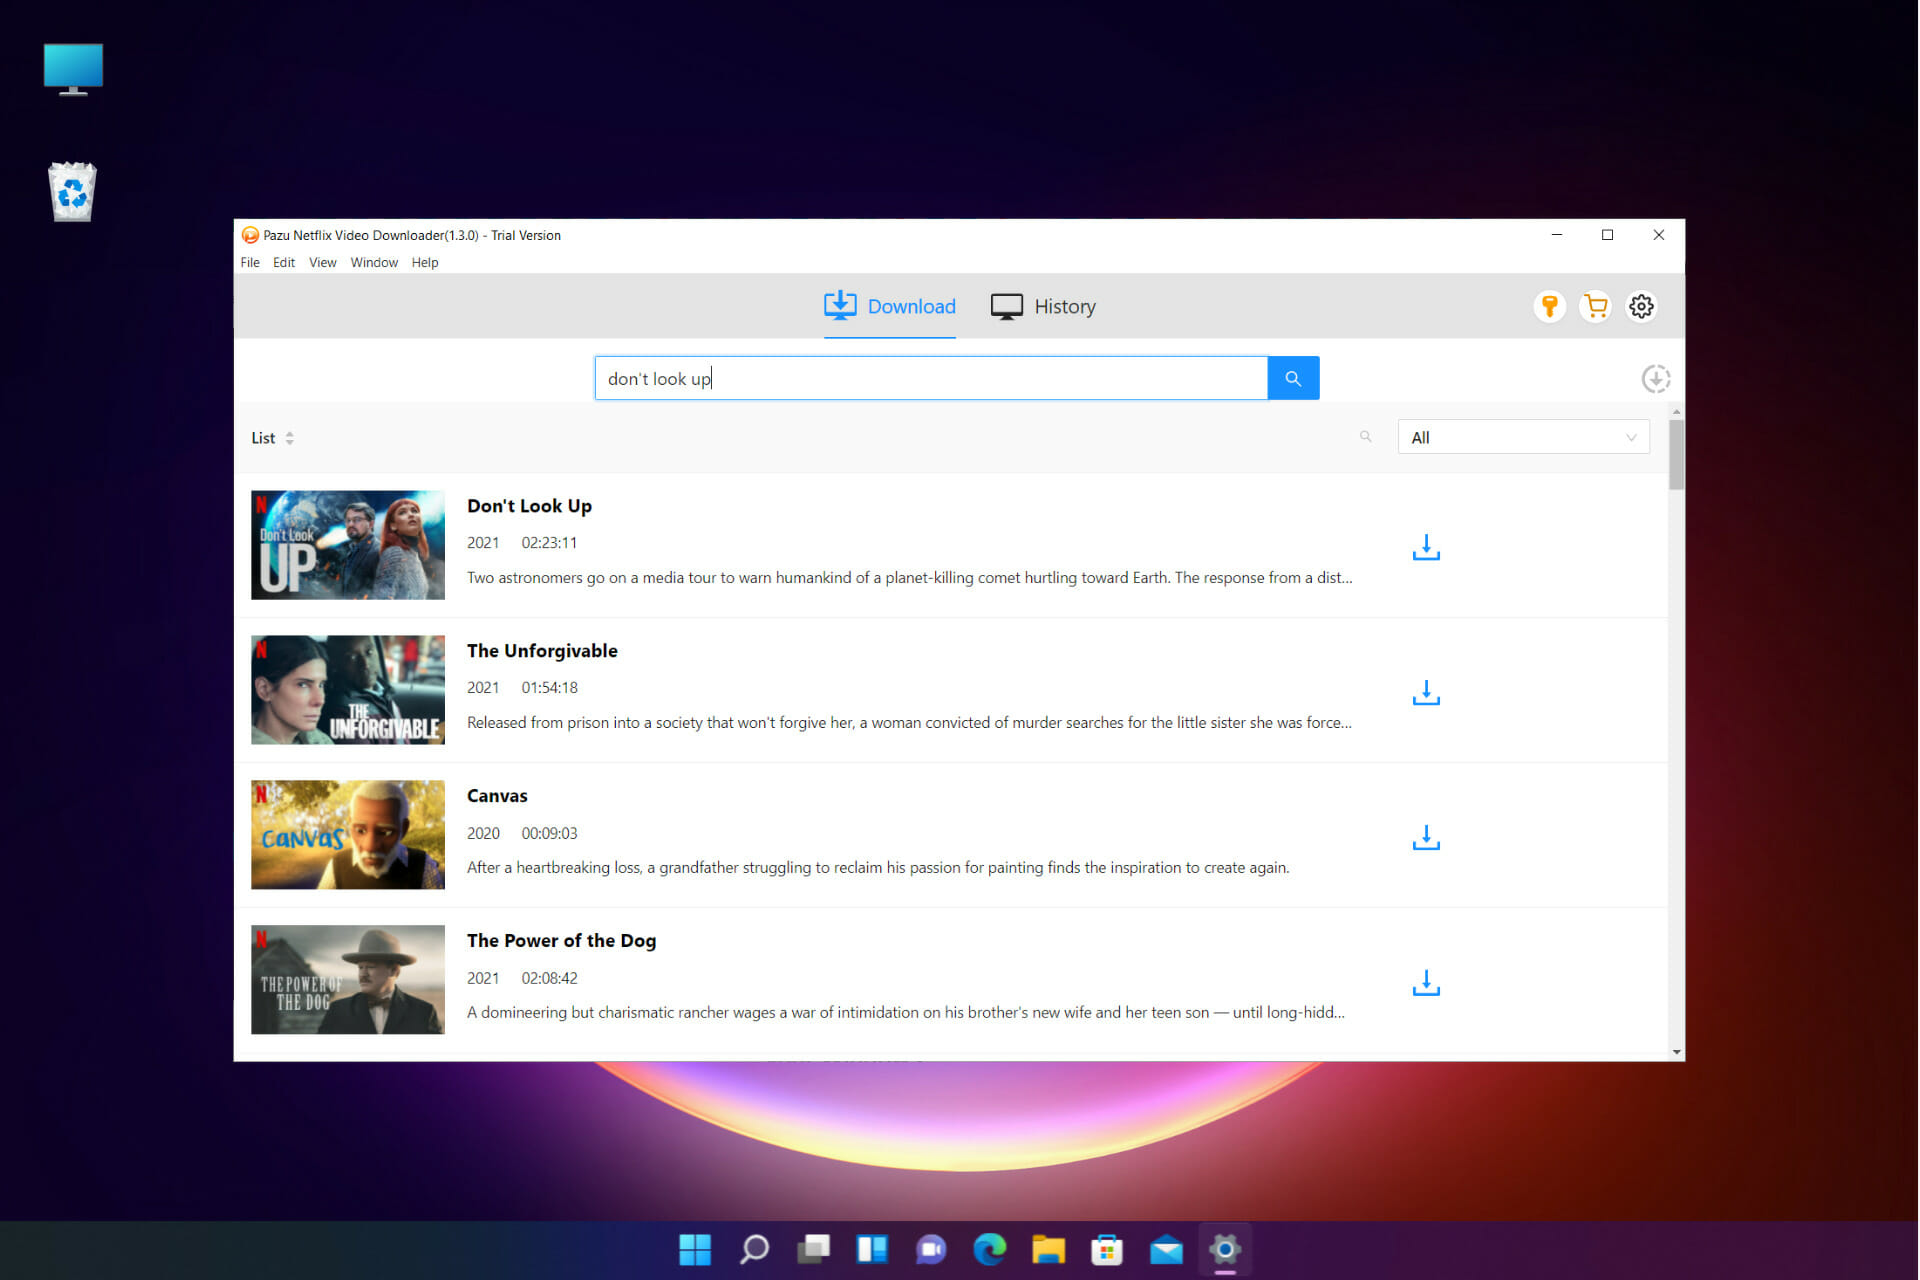
As its name suggests, Pazu Netflix Video Downloader helps you download your favorite Netflix shows and movies in MP4 or MKV format directly on your drive.

And after you save the files in Full HD (1080p) resolution, you can transfer them onto any media or simply share them very easily.

So, as long as you have an active Netflix account, the app will log on to it and with a simple search tool, you will find your favorite videos and download them quickly.

What are the best features of Pazu Netflix Video Downloader?

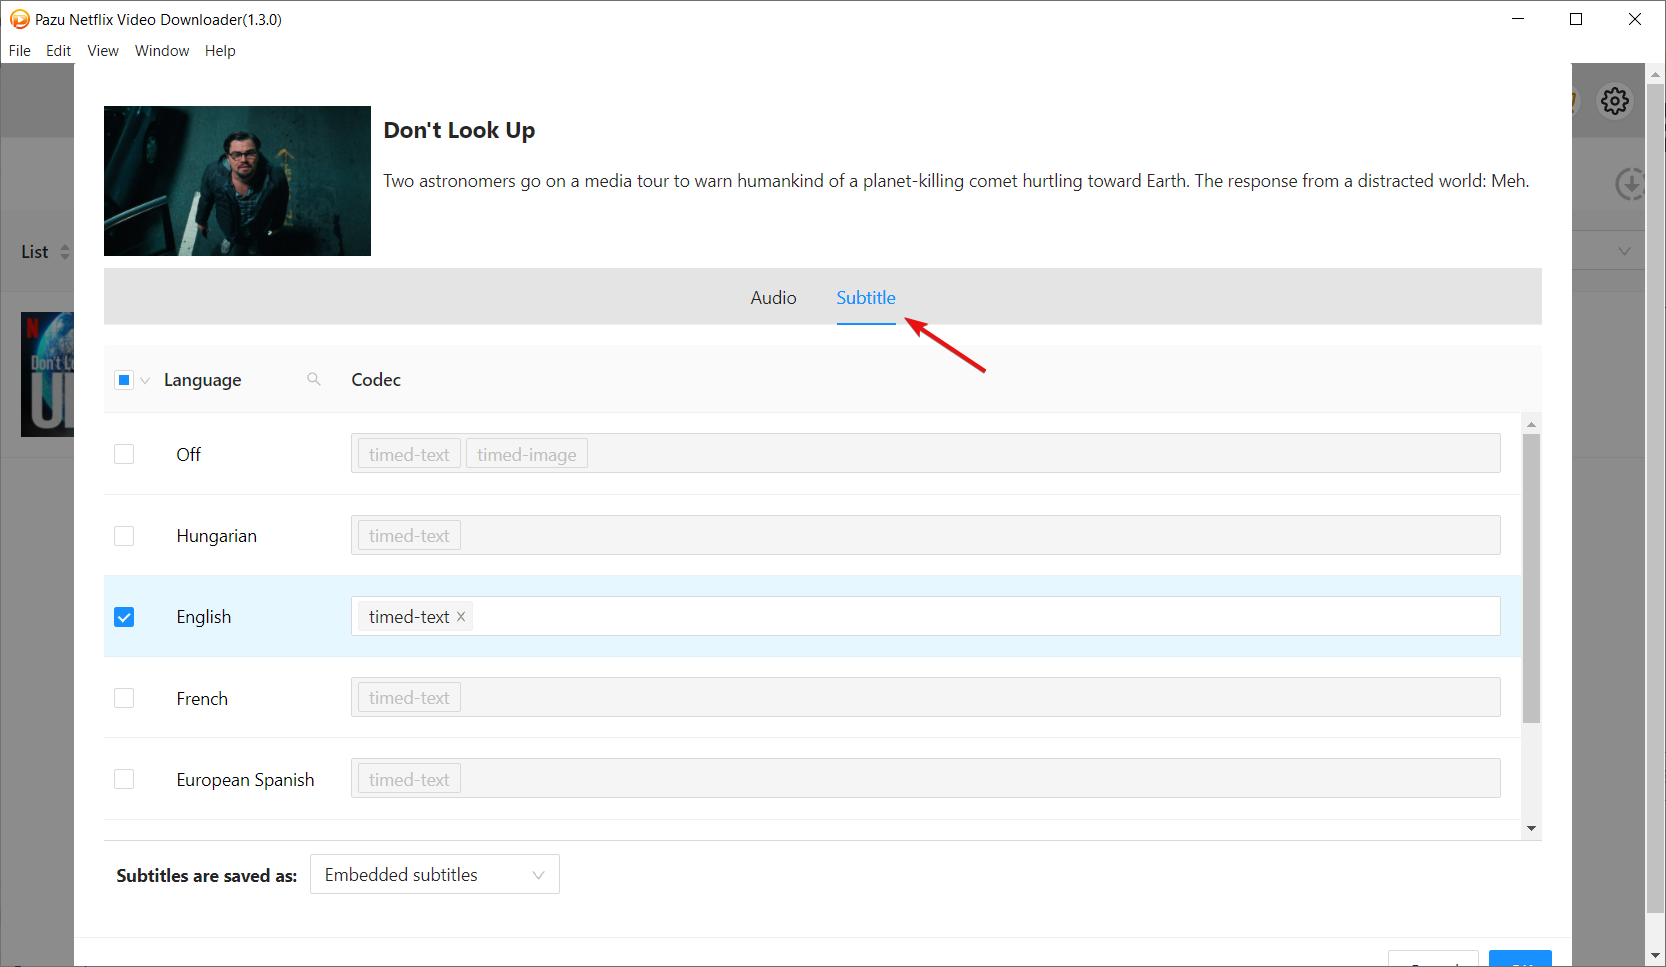
1. Preserve multilingual audio and subtitle

One of the best features of Pazu Netflix Video Downloader is the fact that you can download the video together with the subtitle and preserve the audio.

Not only that, but you can set it as an embedded subtitle or a separate file so you can disable it if you want at any time.

Also, Netflix shows the 5-7 most relevant languages based on your location and language settings but it only shows the 2 most relevant languages for downloads.

With this clever app, you can download movies and TV shows with any audio and subtitles you want.

Even more, from the Settings menu, you can select more subtitles to download independently if you so desire.

2. High quality and fast download

Another great feature is downloading the videos as high-quality, 1080p resolution files in MP4 or MKV format.

You may also select the video codec as H264 or H265 and the audio codec, depending on the video you’re downloading.

Then, in the download manager, you will see the progress of your download so you don’t need to keep your eyes on the counter.

Depending on your Internet connection and the video length, a movie will be downloaded in just a couple of minutes.

If you just hover your mouse over the download, you will see all the data you’ve set up for the video like resolution, speed, language, and subtitle.

3. Friendly interface

You will probably be amazed, just as we were, by how easy it is to use Pazu Netflix Video Downloader.

After you log into your Netflix account it’s just a matter of setting up how you want to save the video and hitting the Download button.

We were also impressed by the History tab that will show you all your downloads in a very comprehensive list.

You will see the title of all the movies with their duration and if it’s an episode from a show, it will also provide the name of the show to keep things neat and to find the right episode quickly.

How can I use Pazu Netflix Video Downloader?

  1. Go to the Pazu Netflix Video Downloader dedicated website and click on the Free Download button.
  2. Run the executable file, select the location for the program, then hit the Install button.
  3. In just a couple of seconds, the installation will be over so just click the Finish button and the app will start right away.
  4. After it opens, you need to log into your Netflix account with your credentials.
  5. Now, select the Netflix profile you want to use.
  6. That’s it! Now, you can either enter the name of the movie or show you want to download it or enter the Netflix link to find it.
  7. Next, hit the Settings button from the top-right corner of the window to adjust the general options.
  8. Select the Video format menu to choose between MP4 and MKV.
  9. Do the same for the Video codec menu to pick H264 or H265.
  10. Next, click on Audio language if you want to change it and select from the available options and you can do the same for the subtitles.
  11. You also have automation features to choose from. When the video finishes downloading you may trigger the app to open its location or put your PC to sleep.
  12. Now, close the window and click the Download button for the media you want to get.
  13. If you pick a series, as we did, you will see a list with all the available episodes. On the left, you can check the individual episodes you need and on the right, you can set up additional settings.
  14. For each episode, you will be able to select the audio codec and the subtitles. And once you’re done, click OK to close the Settings window.
  15. It’s time to hit the Download button and Pazu will do the rest.
  16. On the main menu, on the right, you will find the download manager with all the episodes and if you hover your mouse over any of them, you will see their settings. If you change your mind about downloading, you can remove all or pause them.
  17. You don’t have to monitor the process and after a video is downloaded, you will see it in the History tab. Just hit the folder icon to go straight to its location on your drive.
  18. When you download many movies and shows, it’s easy to search through them by date, title, or series to find what you’re looking for instantly.

We remind you that Pazu Netflix Video Downloader is also available for Mac but the install and usage processes are identical so it’s very easy to use it on Mac machines as well.

We hope that we convinced you about how simple it is to download your favorite Netflix shows and movies.

Regarding pricing, Pazu Netflix Video Downloader is a very affordable tool, available for only $16.96/ month.

You can cancel your subscription at any time and within 30 days, you will get the money back guaranteed.

⇒ Get Pazu Netflix Video Downloader

Pros
Friendly user interface
Download all your videos quickly in 1080P quality
Preserve multilingual audio and subtitles
Download entire shows in bulk
Available for Windows and Mc
Cons
No 4K support

Final notes

Whether you want to leave on a trip and have some movies to enjoy along the way or want to create your own library to watch on your own terms, Pazu Netflix Video Downloader will do a great job.

Almost any device can play MP4 files so just transferring them to an external flash drive will ensure that you will be able to watch the content almost anywhere.

We were surprised at how quickly it managed to download the movies and not only that there were no errors, but the quality of the video was preserved perfectly.

Also, the fact that we were able to select the audio language and subtitles made it all a lot more convenient.

You should know that Pasu also has a Disney+ Video Downloader app that does the same for the content on your Disney+ on-demand platform.

If you’ve already used Pazu Netflix Video Downloader tell us all about your experience in the comments section below.

How to fix issues with Brave browser not syncing

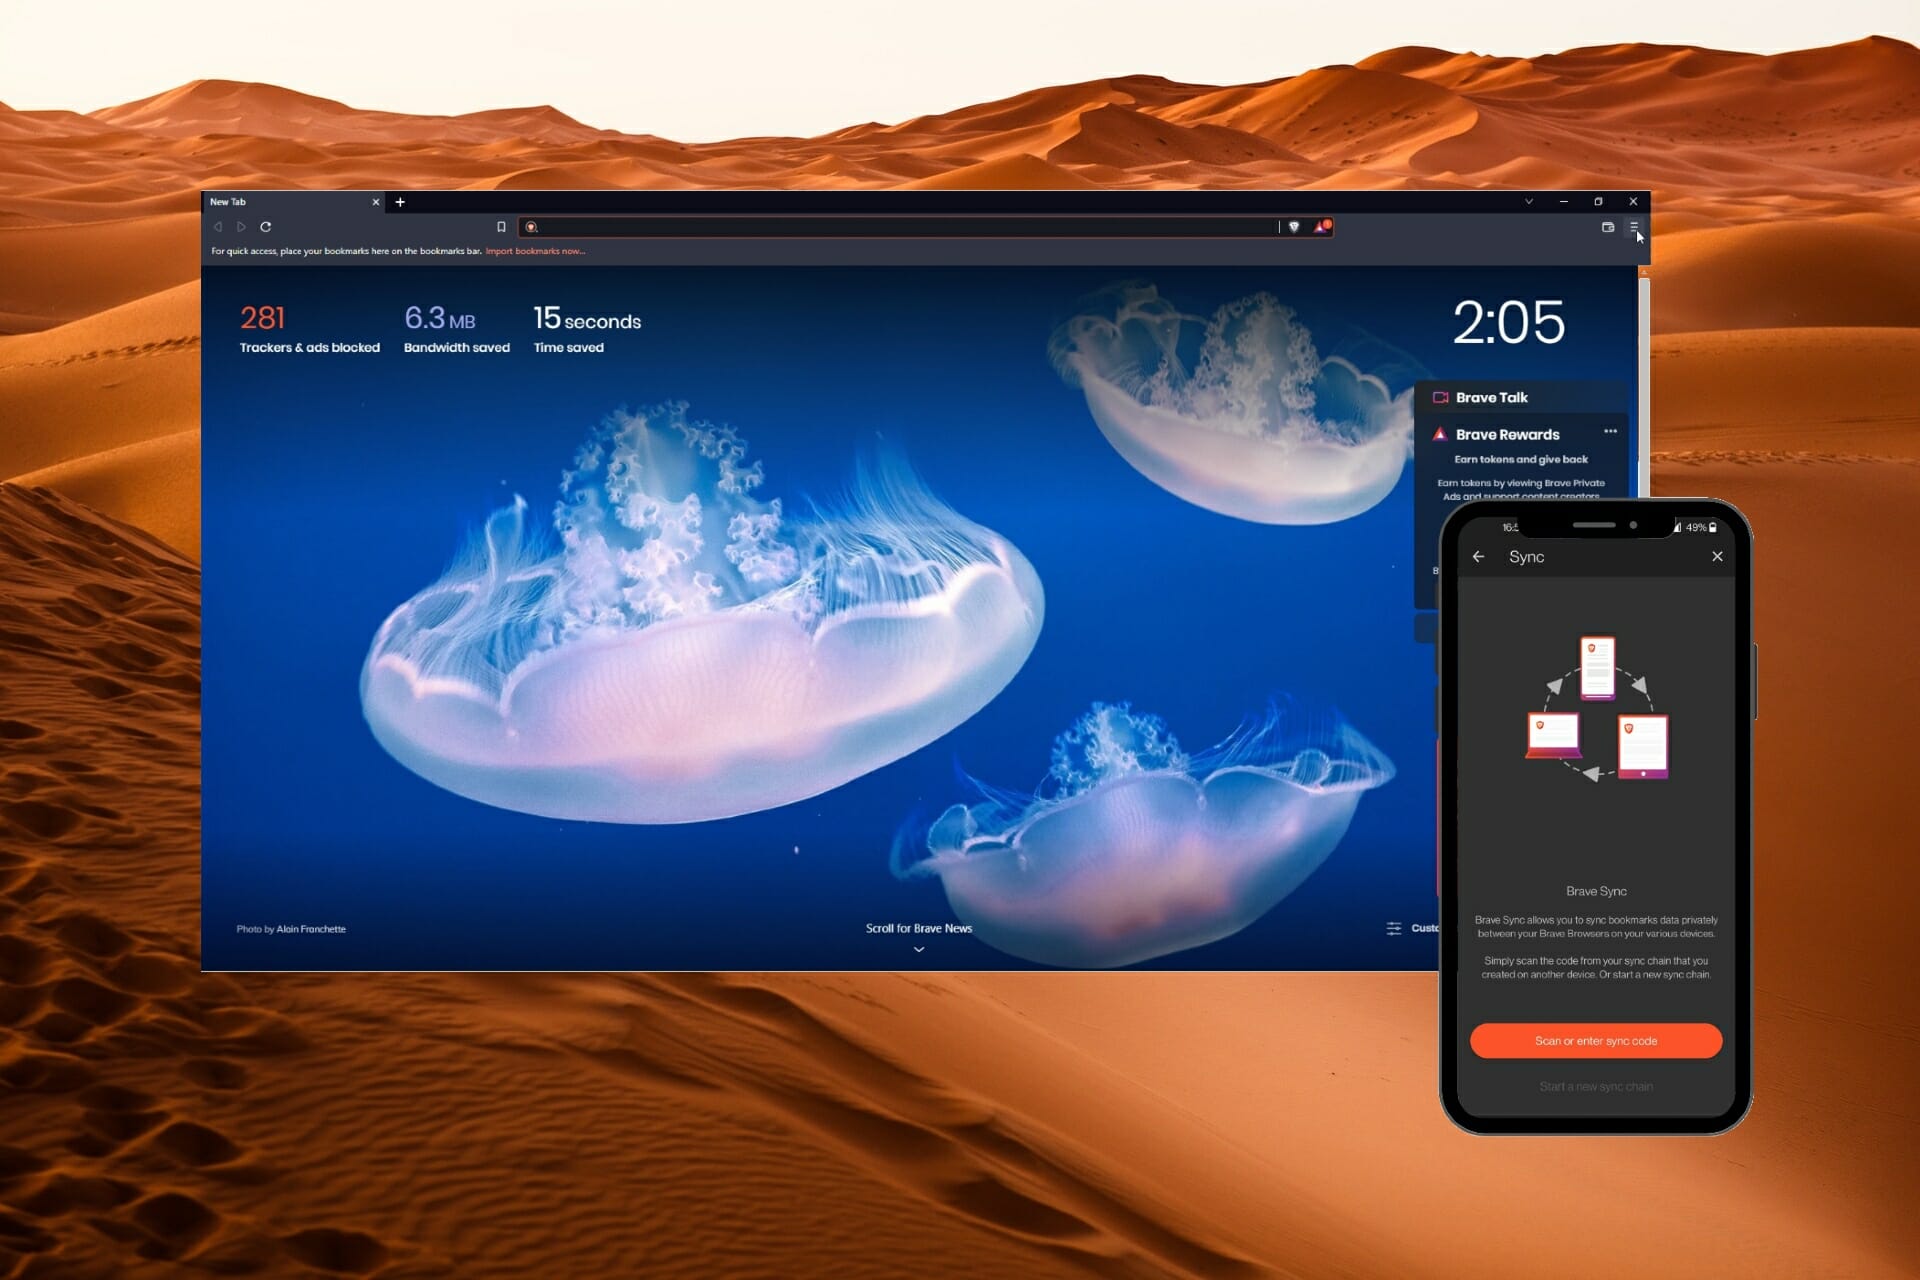
Brave Sync allows users to synchronize data across all their devices. This feature applies to bookmarks, history, passwords, and more. Many users rely on this feature so it can be frustrating if it’s not working properly. Keep reading to fix issues with the Brave browser not syncing.

Sync is designed to work across all devices including Android and iOS. This feature makes it easy to switch to Brave from another browser. It also automatically changes any added or removed data across all connected devices.

If you’re looking to sync all your PC files and data, try using syncing software for Windows 10/11. Follow the guide below if your information and passwords are not syncing in Brave across your devices.

How do I set up Brave Sync?

  1. In the Brave browser, click on the three lines in the corner and open Settings. In Brave click on settings.
  2. Select Sync and then Start using sync. Select start using sync
  3. Click Add New Device and select the type of device you want to add.
  4. A QR code will be displayed on the screen.
  5. On your mobile device, open Brave and select Settings. Open settings in Brave on mobile.
  6. Tap on Sync then select Scan or enter sync code. Tap on sync in Brave on mobile.
  7. Allow Brave access to your camera and scan the QR from your PC.

Now your device is added to the same sync chain as the Brave browser on your PC. You can add more devices to the same sync chain by repeating the process.

Another great browser that has seamless syncing is Opera One. With this browser, users can securely synchronize their browsing data across all devices. Opera One syncing is customizable and extremely simple to set up and manage.

⇒ Get Opera One

How do I fix Brave Sync?

1. Adjust settings

  1. In Brave, click on Settings found under the three lines in the corner.
  2. Select Sync and then open Manage your synced devices. Under sync select manage synced devices
  3. Under Sync Settings, select Sync everything. customize sync settings
  4. If you don’t want everything synced, select Customize sync and under Sync data choose the features you would like synced.
  5. On your mobile device, open Brave and go to Settings.
  6. Tap on Sync, then select Data Preferences. Data preferences
  7. Enable Sync everything, or customize your syncing preferences.Sync everything mobile Brave

2. Clear Data and Restart

  1. First, backup your data just in case. To backup bookmarks, click on the three lines in the corner and hover over Bookmarks then select Bookmark manager. open bookmark manager
  2. Click on the three dots in the corner and select Export bookmarks then save them to your PC. Export bookmarks
  3. Repeat step three for all of your bookmark folders if you have more.
  4. Open the Settings tab from the option bar then extend Additional settings.Click on settings then additional settings
  5. Click on Autofill then click Passwords.Open password manager
  6. Select the three dots located next to Saved Passwords and then click Export passwords.
  7. Save them to your PC.
  8. After backing up your data, type brave://sync-internals into your URL bar and hit enter.Brave sync internals
  9. Select the Disable Sync (Clear Data) button.Disable sync
  10. Return to Brave Settings and go to Sync where you will have the option to Start a new Sync Chain. Start new sync chain
  11. Re-add your devices to the sync chain.
  12. If any data was cleared you can restore it by importing the data that was saved to your PC.

3. Manually enable Sync v2

  1. Follow the steps from the previous solution to backup your data if you haven’t done so already.
  2. Type brave://flags in your URL bar and hit enter. type brave://flags
  3. In the search type sync and hit enter, and then find Brave Sync v2. Search sync in the search bar
  4. In the dropdown menu select Enable then relaunch Brave. Enable sync then relaunch

It should be mentioned that the feature to manually enable Brave Sync v2 is still in its experimental phase. The user risks losing their browser data with this step so be sure to have any files or data backed up.

We hope one of these solutions helped fix issues with syncing in your Brave browser. Cross-device syncing has revolutionized browsing and productivity. It can be annoying when syncing doesn’t work the way it’s meant to.

Brave is a great browser and many users have made it their default. However, just like with any powerful browser, Brave can have issues with crashing.

Let us know in the comments below if any of these solutions worked for you.

Here’s what you need to know about the newly redesigned Windows 11 File Explorer

One of the big highlights for most Microsoft fans out of Microsoft’s “Windows Powers The Future of Hybrid Work” event was the news about a redesigned File Explorer in Windows 11. Panos Panay mentioned in a blog post that it is intended to help make it easier to find what you’re looking for in Windows. He didn’t get into when this to be available for everyone to try out. Yet, if you missed it, here’s a recap of what you can expect once Microsoft decides to bring out the big redesign in either a featured update or in a monthly Windows 11 feature drop.

File Explorer Tabs

The biggest change in the redesigned File Explorer in Windows 11 is the addition of tabs. This was previously “leaked” and discovered by Windows Insiders, so it’s not exactly a “new” experience, but the April 5 event was the first time that Microsoft acknowledged it. From what we can tell, not much has changed from the leaked version to the final announced version, but there are a couple things you can expect.

First of all, these new tabs live in a new area at the top of the title bar in File Explorer. There, you’ll see a “plus” button that lets you create a new tab. Opening a new tab brings you to a redesigned home page, which we get into next. But you can open any of your core folders from this new tab, like Documents, Pictures, Videos, Downloads. You can even drag the tabs around if you see fit. It’s pretty simple and straight forward, to say the least.

New home page

Another big change in the File Explorer app is a new home page section, as seen at the 1:22 mark in the above video. This is what shows up when you first open the File Explorer. The new Home page has three sections. Up top is the traditional Quick Access area with your key folders, the second is the favorites area, where you can find your favorite files (we get into that next,) and the third is the recent section. Note that these two final sections have new activity areas in three columns, showing you when the file was last modified, where the file is located, and what was the last collaboration activity on the file. These collaborative suggestions are powered by the cloud, and Microsoft’s Context IQ technology, which is based on Dynamics 365.

Contextual suggestions

Also new in File Explorer are contextual suggestions. As the name of the feature suggests, when you click the share button for a specific file or item in the File Explorer, you get a cleaner share menu. There will be better suggestions in the menu to share with a contact, nearby people, or share with an app. All of this with the goal of reducing the number of clicks you have to make to get that important file to the right person.

File Explorer Favorites

The final change in the File Explorer is the “Favorites” option. Favorites lets you right-click a file and mark is as a favorite item. This lets you see it in the “Favorites” section of the new home page section we mentioned above. It can save you a few clicks if you really need to access this specific file often, say a presentation, or an invoice. This builds on the ability to “pin” files in File Explorer sidebar, which was previously tested in the Windows Insider Program.

Other Windows 11 Features

These are all the features coming to the File Explorer in Windows 11, but there are additional features coming to the operating system, too which were previously tested with Windows Insiders. These include Live Captions, the ability to put apps into folders on the Start Menu, as well as Focus and Do Not Disturb options in the Notification Center. Not to forget, the improvements to Snap Layouts so it works better with touch screen devices. We talked about these in our hands-on when the feature first hit the Windows Insider program, so go back and check it out!

Unannounced Windows 11 features

We’ve saved the best for last, and based on some of the breakout sessions from the April 5 event, there were some additional Windows 11 features that Microsoft didn’t announce, but showed up in videos. Spotted by Windows Central, those include App folders on the desktop, as well as an improved Widgets panel.

With app folders on the desktop, we can spot a square gray-colored box in the desktop, with four apps inside, with the box being titled “social media.” This suggests that in addition to creating app folders on the Start Menu, you might also soon be able to create app folders on the desktop, too. Of course, that is if it’s not just a concept.

Finally, there’s a full-screen widgets panel. This has been teased by Microsoft many times, but it never made the final version of Windows 11. A screen grab from the breakout session shows the full-screen Widgets panel in action, beyond the left side of the screen like it currently is. In addition, Microsoft also talked about signing into Widgets with a work account. There’s a chance that these unannounced features can be talked about more at Build, but for now, there’s still plenty to look forward to if you’re a Windows fan!

10 best free in-browser meme-makers to have fun with friends

If you’ve spent more than ten minutes online, then you probably know what a meme is. What started as an obscure way to tell jokes became an internet phenomenon.

While some memes go in and out of style, the concept of memes will probably live on forever. And if you can’t find the meme to perfectly convey your joke, why not just make one?

If you prefer to make memes from your desktop, then have a look at the best meme generators for your PC. Here are some of the best in-browser meme makers.

What is the best browser for making memes?

Opera One is our top pick for a browser to create memes. With data compression features, this browser is one of the fastest browsers on the market. It also has a very customizable interface in addition to being user-friendly.
With My Flow and syncing, the connection between Opera One browser on desktop and Opera One on mobile is encrypted. Also the browser comes with an integrated AI.

Another great feature that makes Opera One the best browser for making memes is the Easy Files function. This allows users to crank out memes easily and quickly.

Opera One

Exchange memes securely between your computer and phone using My Flow.
Free Download Visit website

What are the best in-browser meme-makers?

Adobe Creative Cloud Express

Adobe Creative Cloud Express for generating memes.

Adobe Creative Cloud Express is graphic design software that gives users the creative freedom to make anything. It has a great meme maker that allows users to start from scratch or use one of their templates
Creative Cloud is free to use and offers an array of tools to fully customize a meme. The only downside is that there may be too many tools for those looking for a simple meme-making experience.

There is a learning curve when it comes to using Creative Cloud. However, the array of options allows for full creative freedom.

Key features of Creative Cloud Express:

  • Start with a blank canvas or use a template
  • An array of customization tools
  • Free to use
  • No watermark

Adobe Creative Cloud Express

Explore your creativity and take meme-making to the next level with Adobe Creative Cloud Express.

Filmora

Filmora for making memes

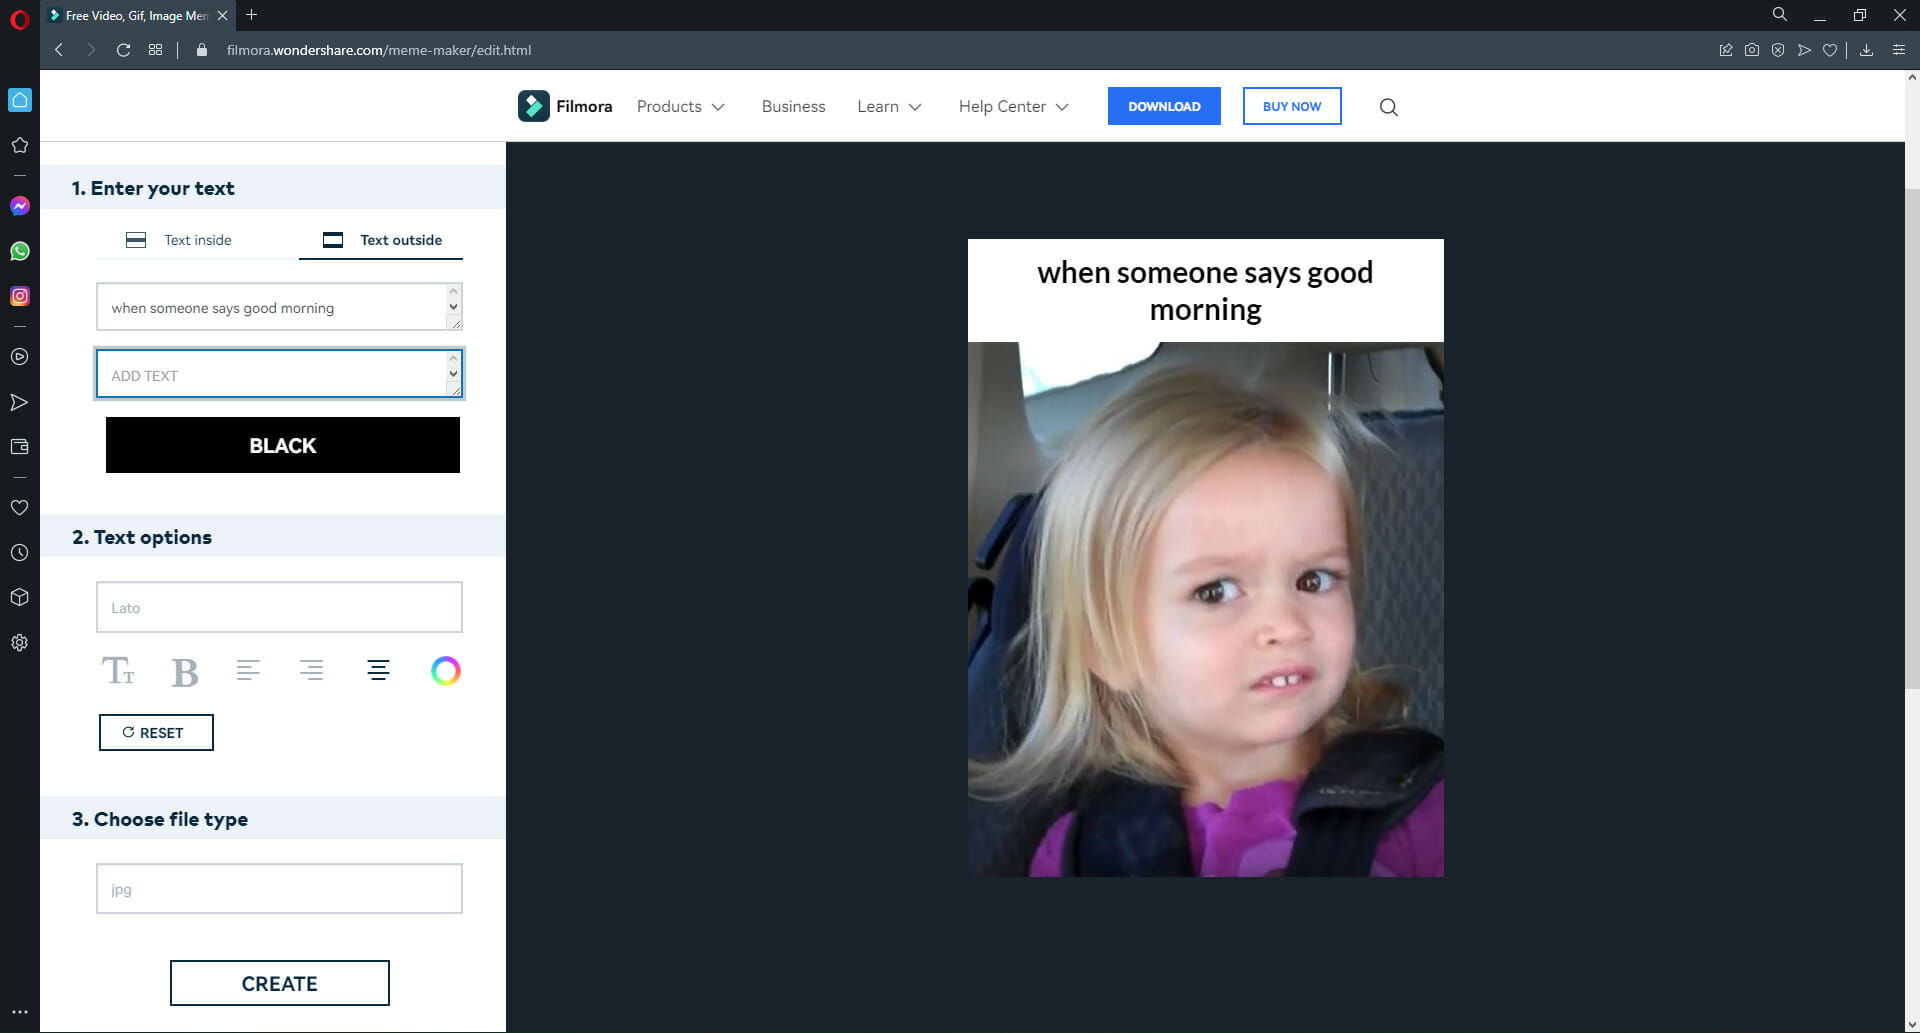
Filmora by Wondershare offers a free meme generator that allows users to create memes without the need to make an account. Users can also download their memes without a watermark.

Filmora accepts image, gif, and video uploads. The font and text position is customizable and easy to use. Memes can be exported in different formats, including png, gif, and mp4.

Key features of Filmora:

  • No need to create an account
  • Download without a watermark
  • Accepts image, gif, and video formats
  • Customizable font and text position

Filmora Meme Maker

Create the best memes with Filmora’s sleek and user-friendly interface.

Canva

Canva perfect for making memes.

Canva is known for its extensive graphic design tools and is the most popular graphic design software. Users can design anything and everything with Canva, including memes.

It’s free to use but users need to make an account first. There is a Pro upgrade for $9.95 / month that offers higher-resolution downloads and more graphic design features.

However, while Canva offers a ton of features and tools for making memes, there is a learning curve. This might not be ideal for those looking to make quick and simple memes and who don’t want to take the time to learn all the tools.

Key features of Canva:

  • Extensive graphic design tools
  • Library of templates and images
  • Fully customizable fonts and text
  • Watermark-free downloads

Canva

Take advantage of Canva’s extensive tools and options to create top-notch memes.

Kapwing

Kapwing meme maker.

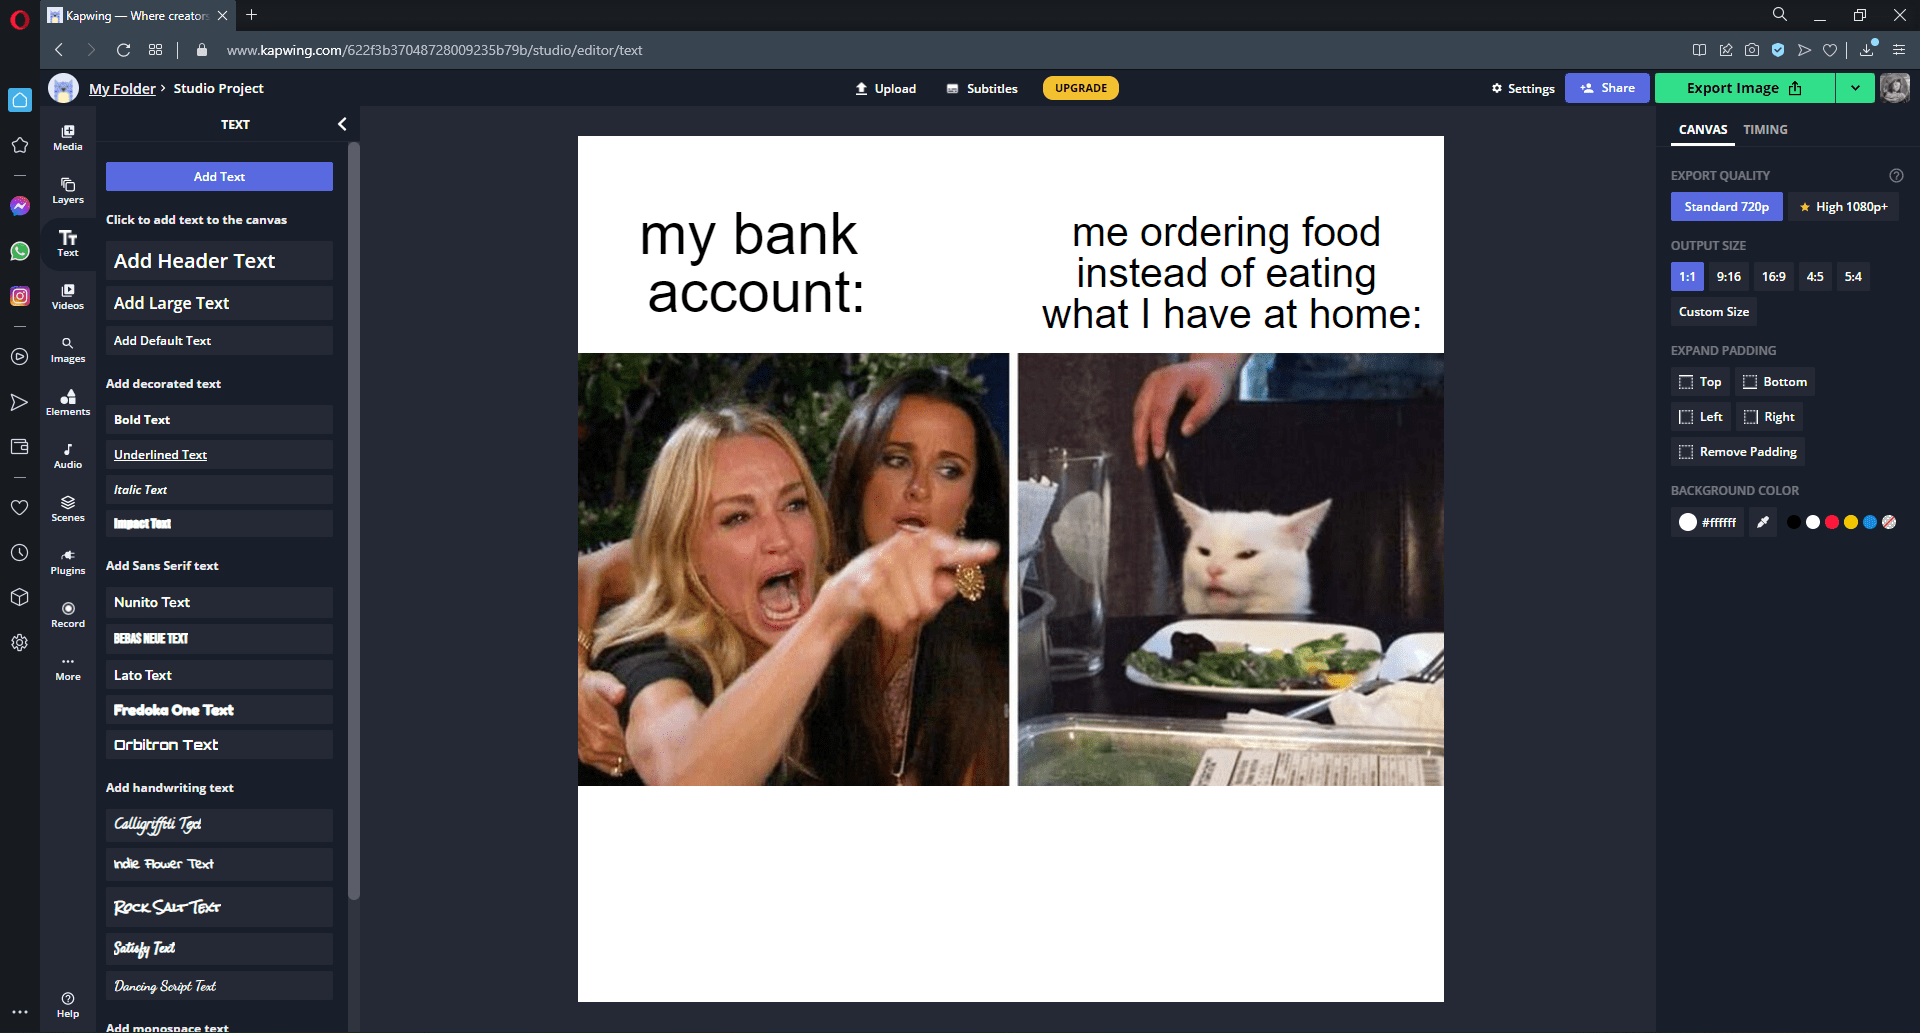
Kapwing is another great site for making memes. It’s not only for memes, but users can also make videos, ads, YouTube thumbnails, and more.

Users do have to sign up to create, but it is free and gives creators access to several features. Users can download their projects without a watermark for free. There is a pro version that allows users to export larger projects and download them in higher quality.

Key features of Kapwing:

  • Not just for memes
  • Download without a watermark
  • Wide range of tools
  • Customizable fonts and text position

Kapwing

Explore Kapwing’s extensive meme library or customize your images.

iLoveIMG

iLoveIMG for creating memes in browser.

iLoveIMG is a versatile website with image editing tools. Users can convert to or from JPG, compress images, resize, and more. iLoveIMG also has a great free-to-use meme maker. They offer a library of templates to choose from or creators can upload their images.

Creators do not need to make an account to download their meme and they do not have a watermark. It offers a lot of options without being complicated, making it the perfect site for making quick memes.

Key features of iLoveIMG:

  • Offers other image editing tools
  • Library of memes to choose from
  • Extensive customization
  • No watermark

⇒ Get iLoveIMG

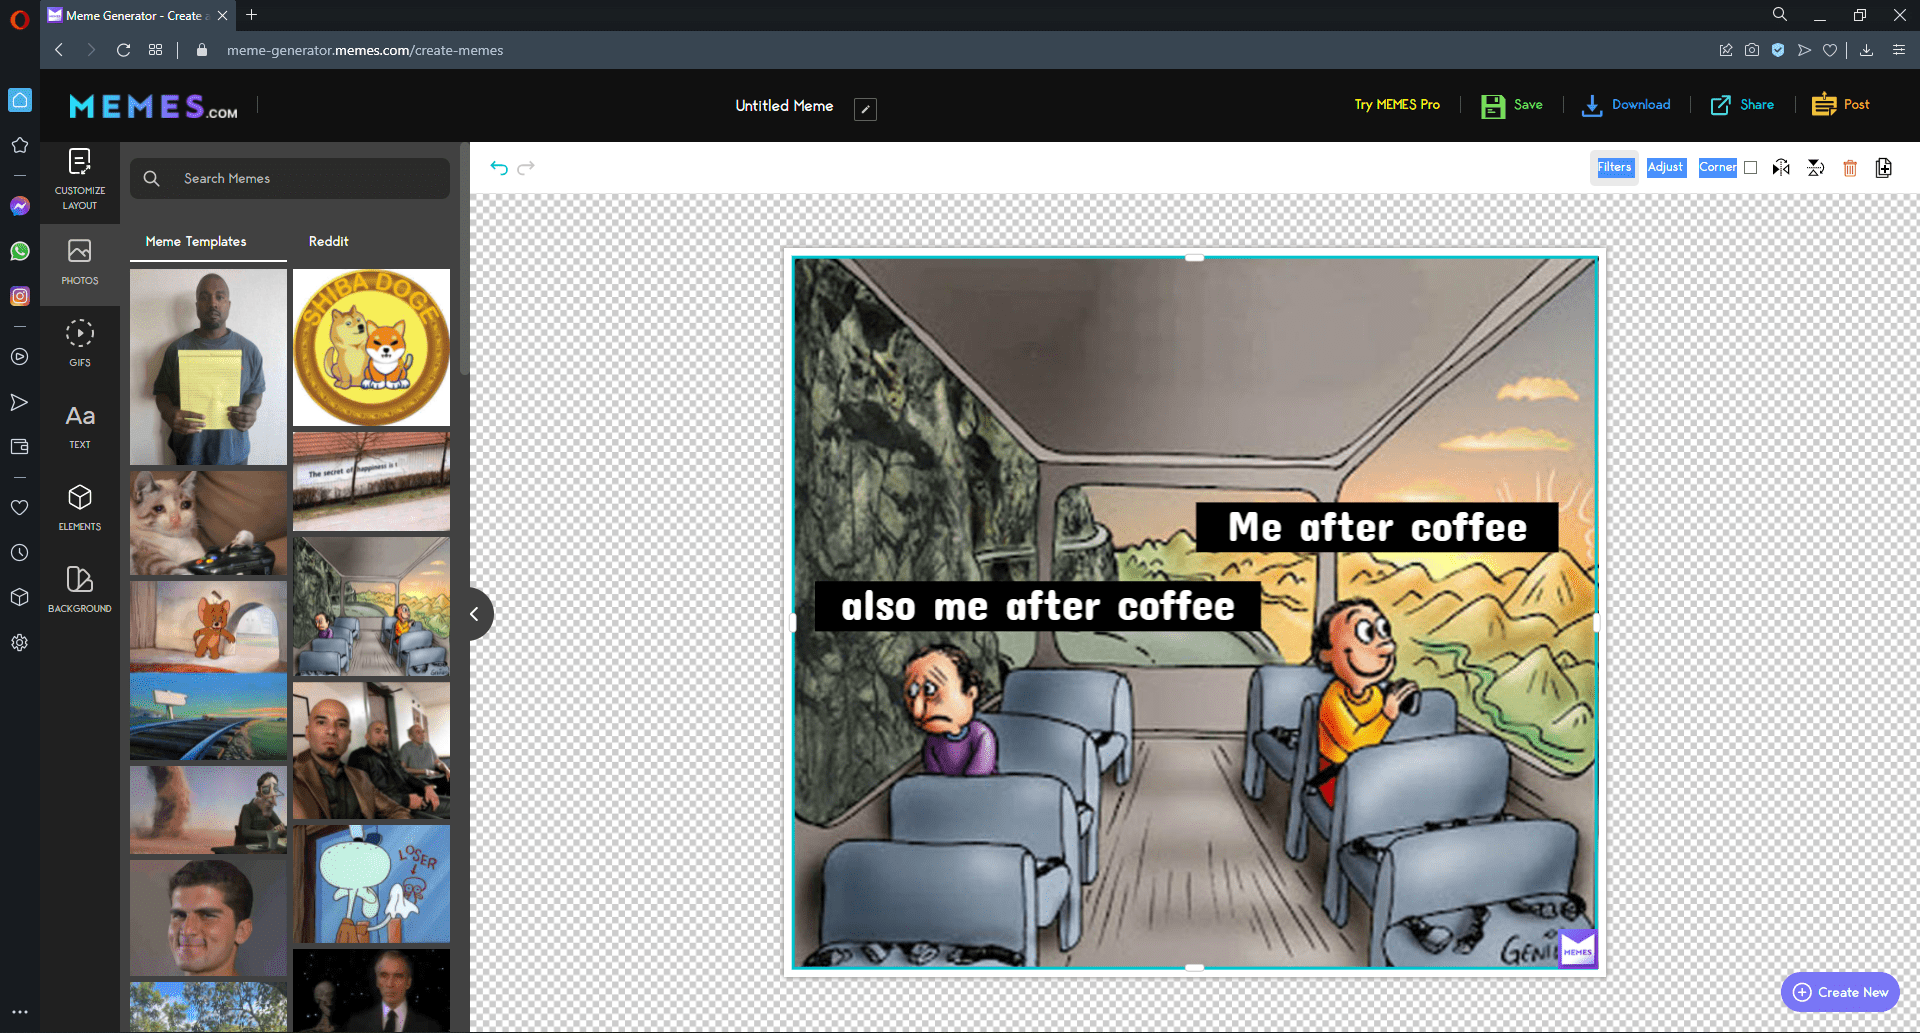
Memes.com

Memes.com

Memes.com is one of the most popular websites for making memes. Creators can customize the meme layout as well as the font and colors. They have a library of images to choose from, but they also have a Redditt tab that allows users to get images from Redditt.

If users want to make a meme from their images, they can upload them directly and customize them.

Users can create memes without an account, but they will be limited in what features they have. With a free account, creators can save memes and edit them later, share them on social media platforms, and post them on Memes.com.

Any memes created on Memes.com will also have a watermark which can only be removed with a Memes pro account for $6.99 / month.

Key features of Memes.com:

  • Customize meme layout
  • Library of images to choose from
  • Redditt tab
  • Change font and text placement

⇒ Get Memes.com

Clideo

Clideo meme generator.

Clideo is a well-known video editing website, but it also has a tool for making memes. Users can upload a photo, gif, or video and choose one of Clideo’s meme templates. Its interface is simple and easy to use for fast meme-making.

With secure encryption, creators can make memes knowing their files are protected. Clideo is also compatible on all devices so users can create memes on the go.

Key features of Clideo:

  • Also a video editing software
  • Accepts photos, gifs, or videos
  • Simple interface
  • Secure encryption

⇒ Get Clideo

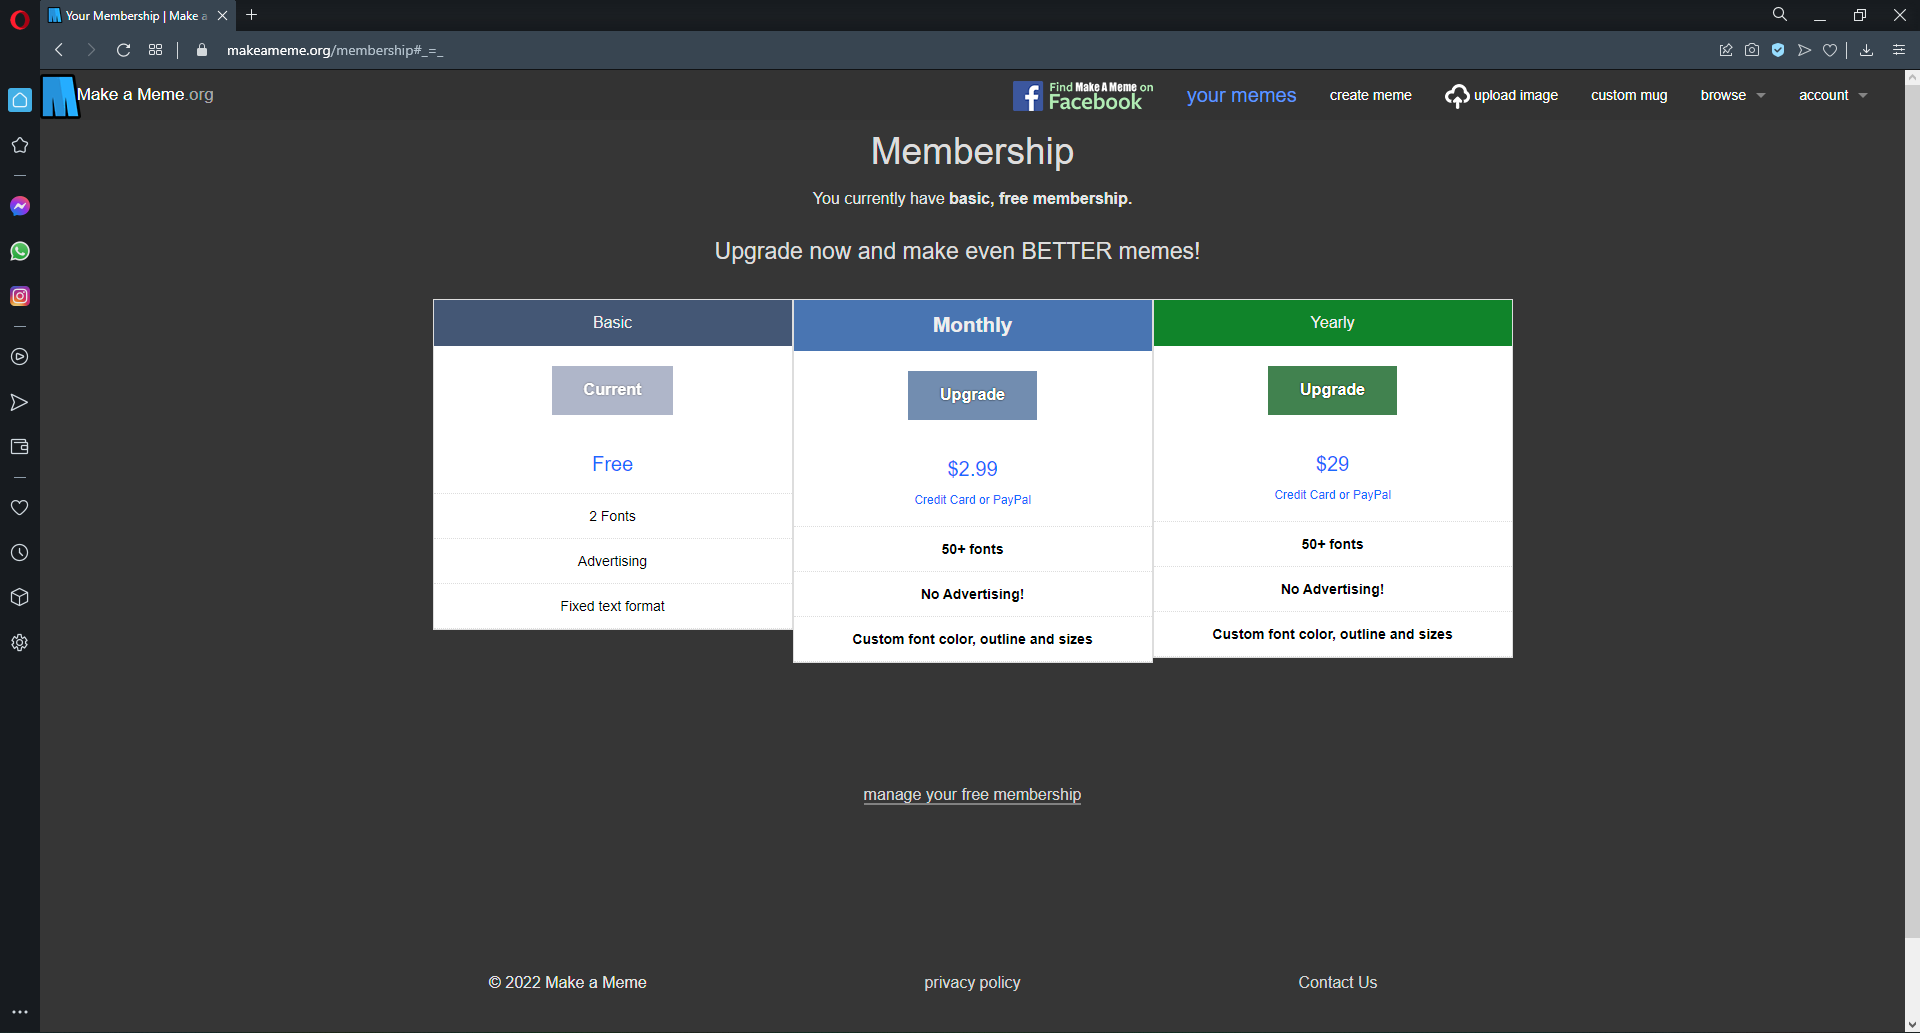
Make a Meme

Make a Meme.

Make a Meme is another simple option for making memes. Users upload a photo and can add top text or bottom text. However, without upgrading to a monthly subscription, users are limited to only two font options and fixed text positions.

Users are also required to make an account to make a meme but have access to their template library. Make a Meme features popular images used for memes that creators can choose from.

Key features of Make a Meme:

  • Simple design
  • Options for top text and bottom text
  • Showcase trending images for memes

⇒ Get Make a Meme

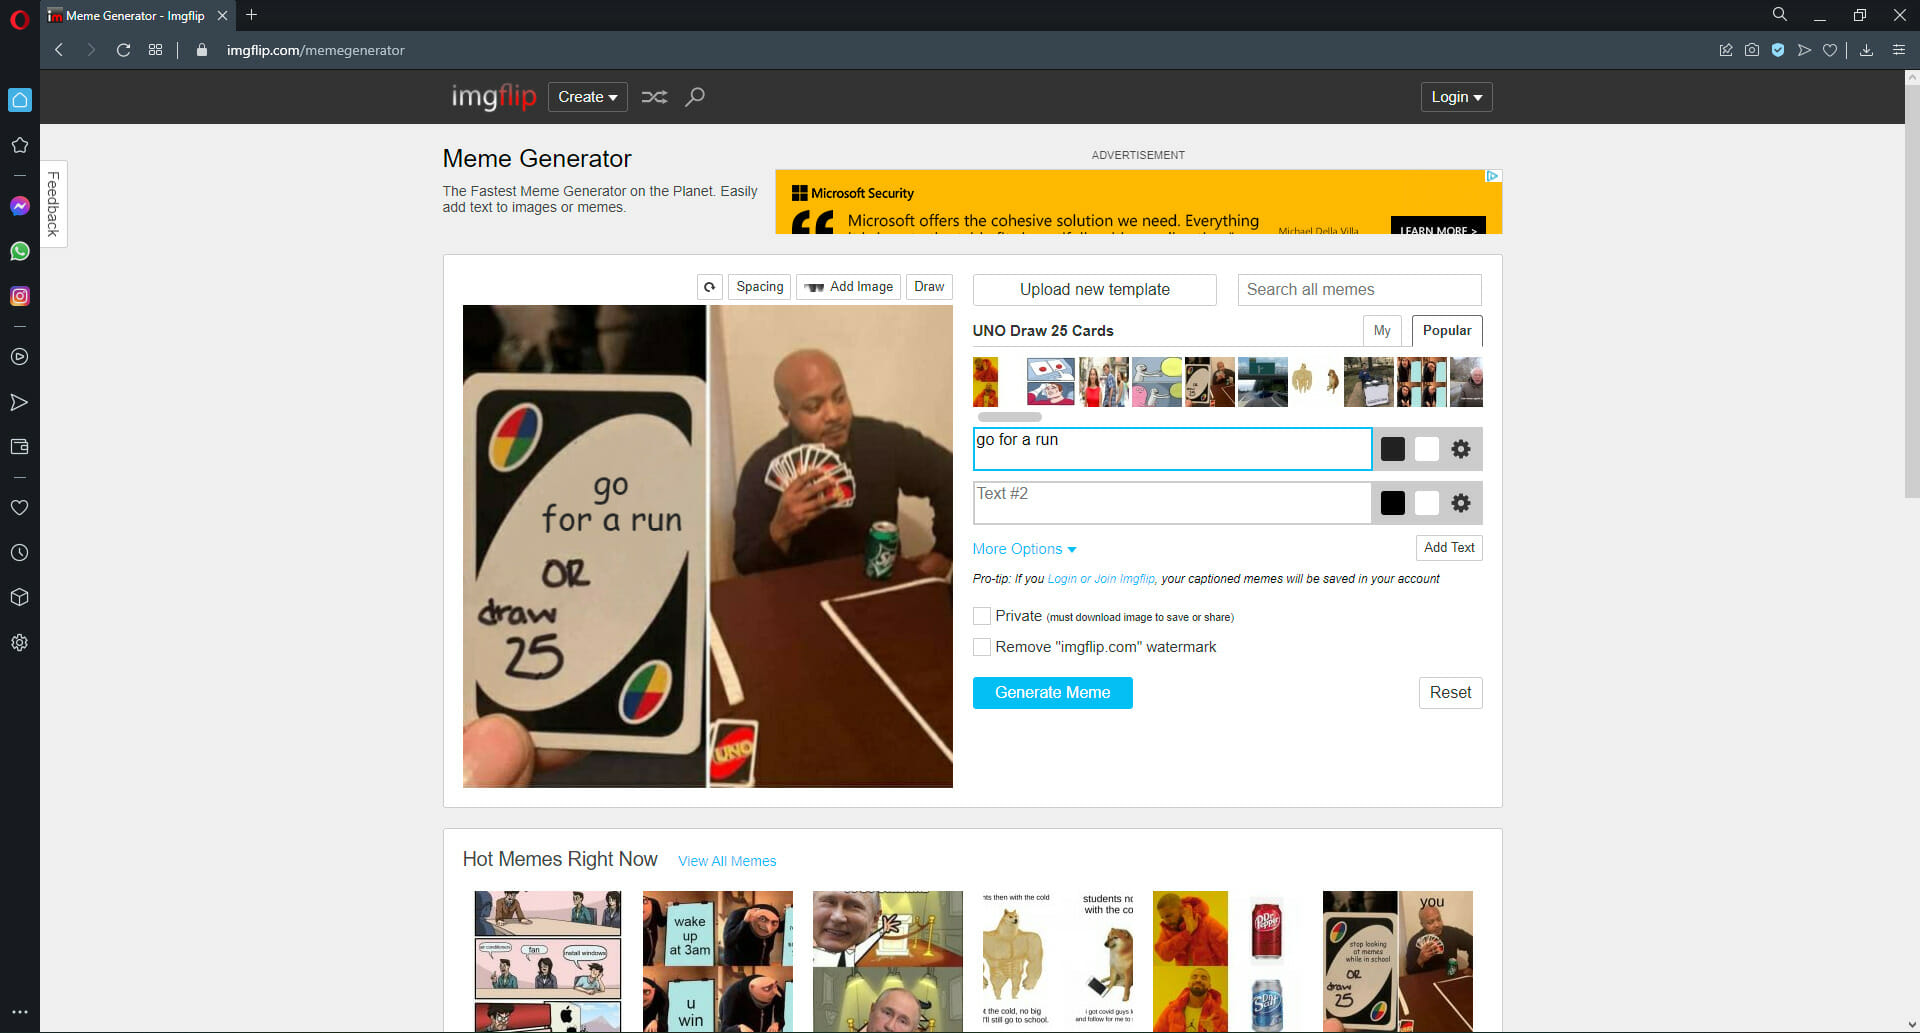
Imgflip

Imgflip.

This is another straightforward in-browser meme maker. Imgflip offers a wide range of popular meme templates to choose from or the option to upload your own.

Users can download their memes for free and without needing an account, but it does have a watermark. Creators will need a monthly subscription to be able to download memes without the watermark.

Key features of Imgflip:

  • Straightforward interface
  • Don’t need to make an account
  • Offers a wide range of meme templates

⇒ Get Imgflip

Livememe

LiveMeme.

Livememe is extremely simple to use. While it lacks a lot of customization features, it’s probably the quickest meme maker out there.

Simply pick an image from their catalog, or upload your own, then type in your witty joke and that’s it. Users can save their creations to their PC or share them through the website.

Users don’t need to create an account or pay anything.

Key features of Livememe:

  • Simple and quick to use
  • Offers image catalog of popular memes
  • Share memes through the website
  • Don’t need an account

⇒ Get Livememe

We hope you enjoyed this list of the best in-browser meme makers. Whether you’re looking for a complex meme-making website that offers a ton of tools, or a simple and quick meme design website, we’ve got you covered.

Online meme-makers allow users to create their memes whenever they want. If you’ve got a great idea for a meme or a witty caption, bring your idea to life with one of these websites.

If you’re looking to take your meme-making skills to the next level, then check out our picks for the best software for making memes.

Let us know in the comments what website you use to make memes.

Download Opera on Windows 11 [How to]

Opera is a great browser with unique features, and today we’ll show you how to download and install Opera for Windows 11.

How to download Opera in Windows 11?

Use the official website

  1. Go to Opera’s homepage. Opera browser download page
  2. Click Download Opera. opera browser download screen
  3. Open OperaSetup and follow the prompts to install Opera. Opera setup main screen

Yes, it’s that simple. Users can import their data from another browser to Opera for a seamless transition. Opera is not as heavy on PC resources and RAM as other browsers, but it remains one of the fastest browsers out there.

Opera

Download and install Opera to explore its features for the most seamless browser experience.

Is Opera free to use?

Opera is 100% free to download and use. All of its features are available to everyone without any hidden subscriptions or fees. There is no premium version and users will never need to pay for upgrades or updates.

Is Opera a safe browser?

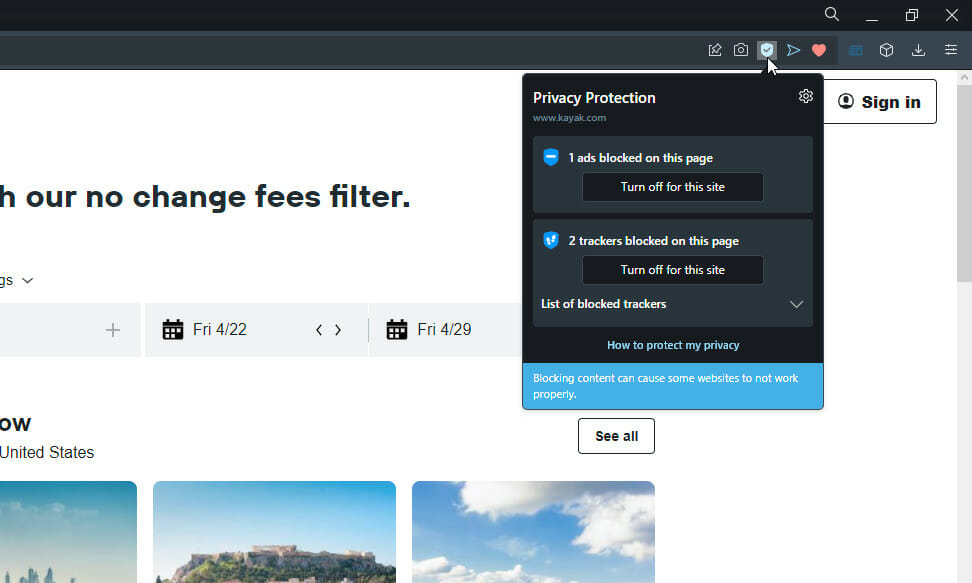
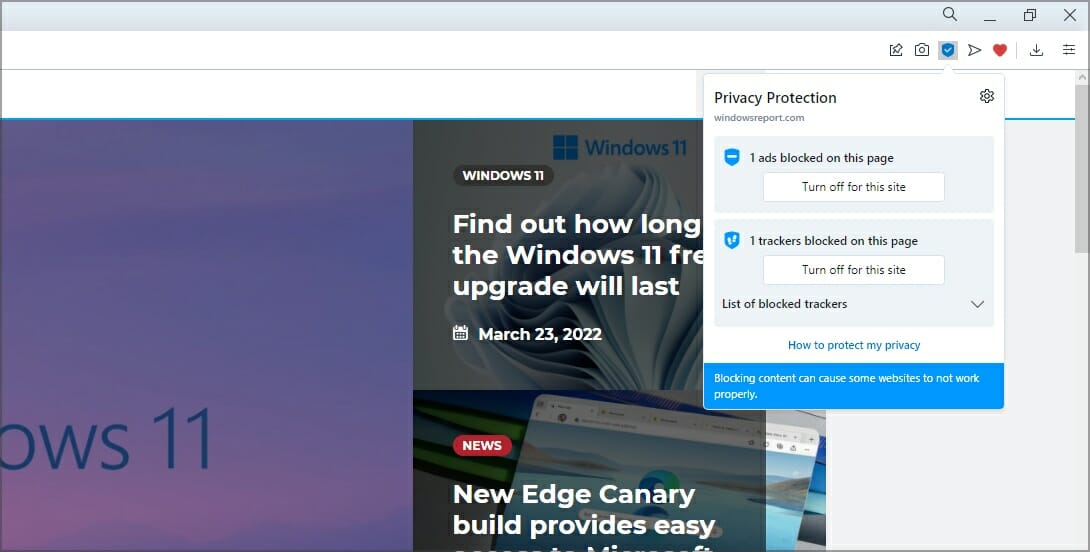
Opera is one of the most secure browsers out there. In addition to its built-in ad-blocker and VPN, it also has a tracker blocker and Cryptojacking protection.

Privacy Protection using Opera.

Users can adjust their security preferences depending on the website with the site settings control function. This feature is perfect for those who want to block ads on some sites but not on others.

Does Opera have a built-in VPN?

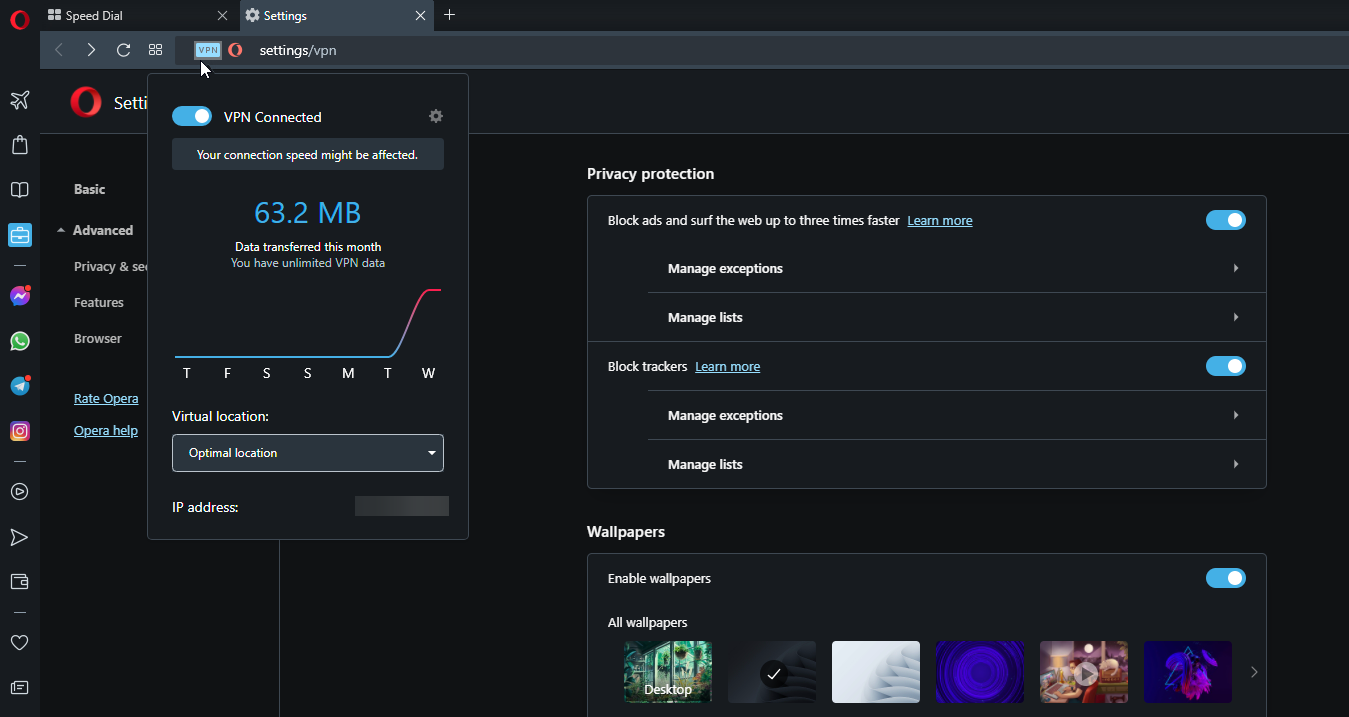
Opera has a built-in Virtual Private Network (VPN) that users can use for free and without any limitations. Users can toggle their location between Europe, the Americas, and Asia, and enabling the VPN doesn’t affect browsing speed.

Built-in VPV enabled Opera.

Is Opera better than Chrome?

This depends on your personal preference, but Opera has more unique features than Chrome, and it’s constantly being improved. For more information, check our Opera vs Chrome guide.

If you’re more of a gamer and looking for a browser to fit your needs, then check out our review of the Opera GX gaming browser.

It’s worth mentioning that the Opera offline installer is also available, so you don’t need an active Internet connection to install it.

We also have to mention that you can install Opera without losing data, so all your saved bookmarks and cookies will remain.

If you’re using other platforms, we also have a guide that answers if it’s possible to run Opera on Raspberry Pi, so don’t miss it for more information.

Speaking of different platforms, we also have a great guide on how to download the Opera News app on PC, so don’t miss it.

These are just some of the best reasons why we prefer Opera over other big-name browsers. Download and install Opera for Windows 11 to find out why so many users have switched and never looked back.

Windows 11 Sandbox Has no Internet: How to Easily Fix it

Windows Sandbox is a desktop environment app that enables users to try out untrusted software without installing anything within the actual Windows OS. It’s a similar feature to virtual machine software that’s more straightforward to set up and consumes less drive space.

However, some users have needed to fix Windows Sandbox not connecting to the internet. When that issue arises, Windows Sandbox starts ok but doesn’t connect to the internet. Consequently, users can’t browse the web and download software in Windows Sandbox.

Windows Sandbox is a rather redundant feature when users can’t browse the web within it. If you need to resolve a similar Windows Sandbox no internet connection issue, one or more of the potential resolutions below might fix it.

How come Windows Sandbox isn’t connecting with the internet?

Windows Sandbox might not be connecting with the internet because of a more general connection issue on your PC. So, checking your internet connection with some of Windows 11’s troubleshooting tools might help resolve the issue.

Some VPN (Virtual Private Network) protocols can cause Windows Sandbox connection issues to arise. If your host PC is connected to VPN, there’s a pretty good chance that’s the reason Windows Sandbox isn’t connecting with the internet.

Firewalls monitor network traffic to and from your PC. Some users have reported that enhanced third-party firewalls can block Windows Sandbox from connecting to the internet. So, a third-party firewall could be causing this issue on your PC if you have firewall/antivirus software installed.

How can I fix the Windows Sandbox no internet connection error?

1. Run the Internet Connections troubleshooter

  1. Open the Start menu to select the pinned Settings app shortcut.
  2. Scroll down the System tab to click Troubleshoot.
    Troubleshoot option windows 11 sandbox no internet
  3. Click Other trouble-shooters to bring up a list of Windows 11’s troubleshooters.
  4. Select Run for the Internet Connections troubleshooter.
    The Run option windows 11 sandbox no internet
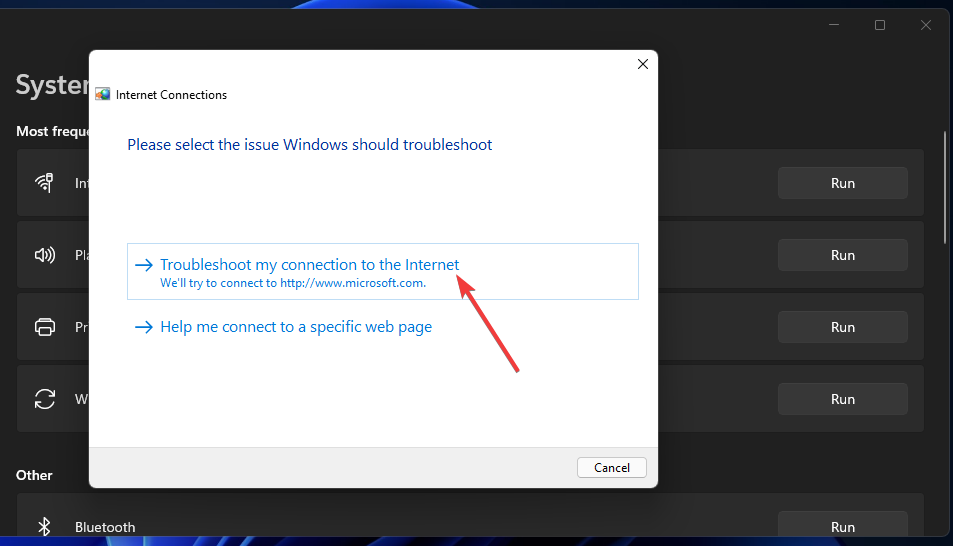
  5. Click the Troubleshoot my connection to the internet option.
    Troubleshoot my connection to the Internet
  6. Apply any fixes suggested by that troubleshooter.
  7. The Network Adapter troubleshooter might also help fix this issue. Click the Run button for that troubleshooter to open it.

2. Flush the Domain Name System cache

  1. Launch Windows 11’s search box by pressing the magnifying glass button beside the Start taskbar icon.
  2. Enter cmd in Windows 11’s search utility.
  3. To open Command Prompt with elevated rights, select the Run as administrator option for its search result.
    Run as administrator option windows 11 sandbox no internet
  4. Now input this command: ipconfig /flushdns
  5. Press Enter to execute the flush DNS command.
    ipconfig command windows 11 sandbox no internet

3. Bridge Connections

  1. Bring up Windows 11’s file search tool by clicking the button directly below.
    The search button windows 11 sandbox no internet
  2. Enter the keyword network connections in the Type here to search box.
  3. Then select the View network connections search result.
    View network connections search result windows 11 sandbox no internet
  4. Hold the Ctrl key to select both vEthernet (Default) and your internet connection there.
  5. Click the right mouse button to select the Bridge Connections option.
    Bridge Connections windows 11 sandbox no internet
  6. Wait for the network bridge to be established.

4. Uninstall third-party firewall and antivirus software

  1. Select the Run shortcut on the Power User menu by pressing the Windows + X hotkey.
    Run option windows 11 sandbox no internet
  2. To open Windows 11’s uninstaller utility, input this Run command and press Enter: appwiz.cpl
  3. Select any third-party firewall or antivirus software listed there, and click its Uninstall option.
    Uninstall option windows 11 sandbox no internet
  4. If a confirmation prompt opens, select Yes to confirm.

You can also remove third-party firewalls or antivirus software with a third-party uninstaller. The freeware IObit Uninstaller is an uninstaller utility with which you can eradicate leftover residual files after removing antivirus or firewall software.

Alternatively, you can try disabling third-party firewalls with their software options first. Have a look for a disable firewall option in your firewall or antivirus utility software. You might find an option for disabling the firewall within its settings tab or system tray icon’s context menu.

5. Disconnect VPN connections

  1. Open Settings (the Windows + I hotkey opens it).
  2. Select Network & internet on the left of Settings.
    The Network & internet tab
  3. Click the VPN category. 
    VPN windows 11 sandbox no internet
  4. Then select a listed VPN connection on that tab.
    VPN optionswindows 11 sandbox no internet
  5. Click the Disconnect button for your VPN.
  6. Thereafter, open Windows Sandbox with your VPN disconnected.

6. Reinstall Windows Sandbox

  1. First, open Programs and Features as covered within the first couple of steps of resolution four.
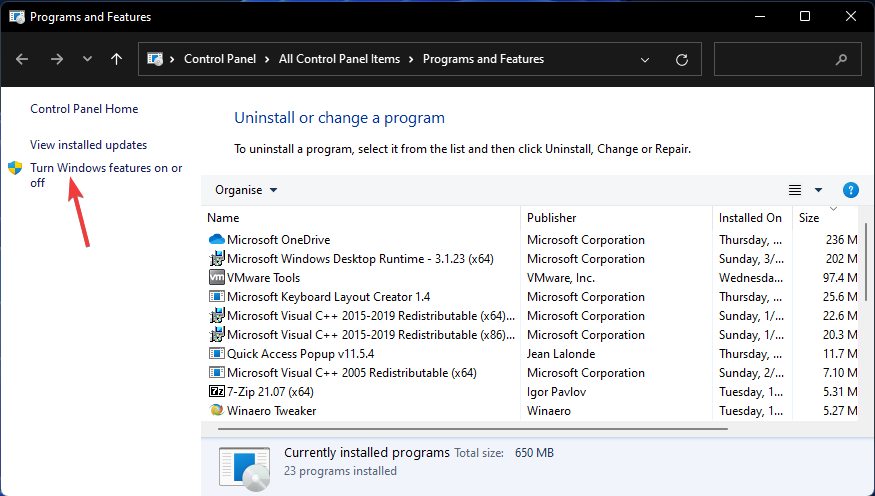
  2. Select the Turn Windows features on or off option in the Programs and Features applet.
    Turn Windows features on or off option windows 11 sandbox no internet
  3. Deselect the Windows Sandbox checkbox in Windows Features.
  4. Click the OK button to disable (uninstall) that feature.
    Windows Features window windows 11 sandbox no internet
  5. Press the Power button on your Start menu. Select the Restart option from there.
    Restart option windows 11 sandbox no internet
  6. Next, open Windows Features again.
  7. Then select the Windows Sandbox checkbox, and click the OK option.The OK button windows 11 sandbox no internet
  8. Thereafter, you’ll need to restart Windows again.
  9. It’s also recommended that users activate some additional virtualized environment Windows 11 features. Select the checkboxes for these features to enable them:
  • Virtual Machine Platform
  • Containers
  • Windows Hypervisor Platform
  • Hyper-V

Those are some of the most likely fixes for Windows Sandbox not connecting to the internet. It can’t be said the above resolutions are 100 percent guaranteed to resolve that issue for everybody, but they’ll probably fix it on your PC.

If the above resolutions don’t fix the Windows Sandbox internet connection, there are other sandbox alternatives you can try. Virtualization software packages like VMWare and Enigma Virtual box have suitable sandbox environments. Check out our 10+ best sandbox software guide for further details.

You can chat about the Windows Sandbox with no internet connection error within the comments box section below. Have you found another way to fix Windows Sandbox not connecting with the internet? If so, you’re most welcome to share it below.

Best way to install a Wi-Fi driver in CentOS 7

You may use a Wi-Fi driver to configure wireless settings or adjust Internet connection settings on a laptop or PC. Wi-Fi drivers are used to set up WLAN devices or routers on a computer.

Computers may connect to wireless signals via wireless Internet adapters and wireless cards. It is paramount for computers running on CentOS 7 or any other network to have your drivers well installed and working to gain access to the internet.

In this article, we will show you how you can install your Wi-Fi driver on a computer running on CentOS 7.

What wireless options does CentOS 7 support?

The kernel that comes with CentOS isn’t the most advanced, but it’s a proven and tested kernel that’s a few years old (depending on your release). As a result, even when Red Hat backports newer wireless drivers to their stable kernel, you may discover that more recent drivers are not available for this kernel.

You can learn more about your specific wireless hardware by visiting Linux’ Wireless page, which includes information about drivers and device support.

How can I install a Wi-Fi driver on my CentOS 7 computer?

1. Install GCC

  1. Log in with the root credential or with an account that has administrative privileges.
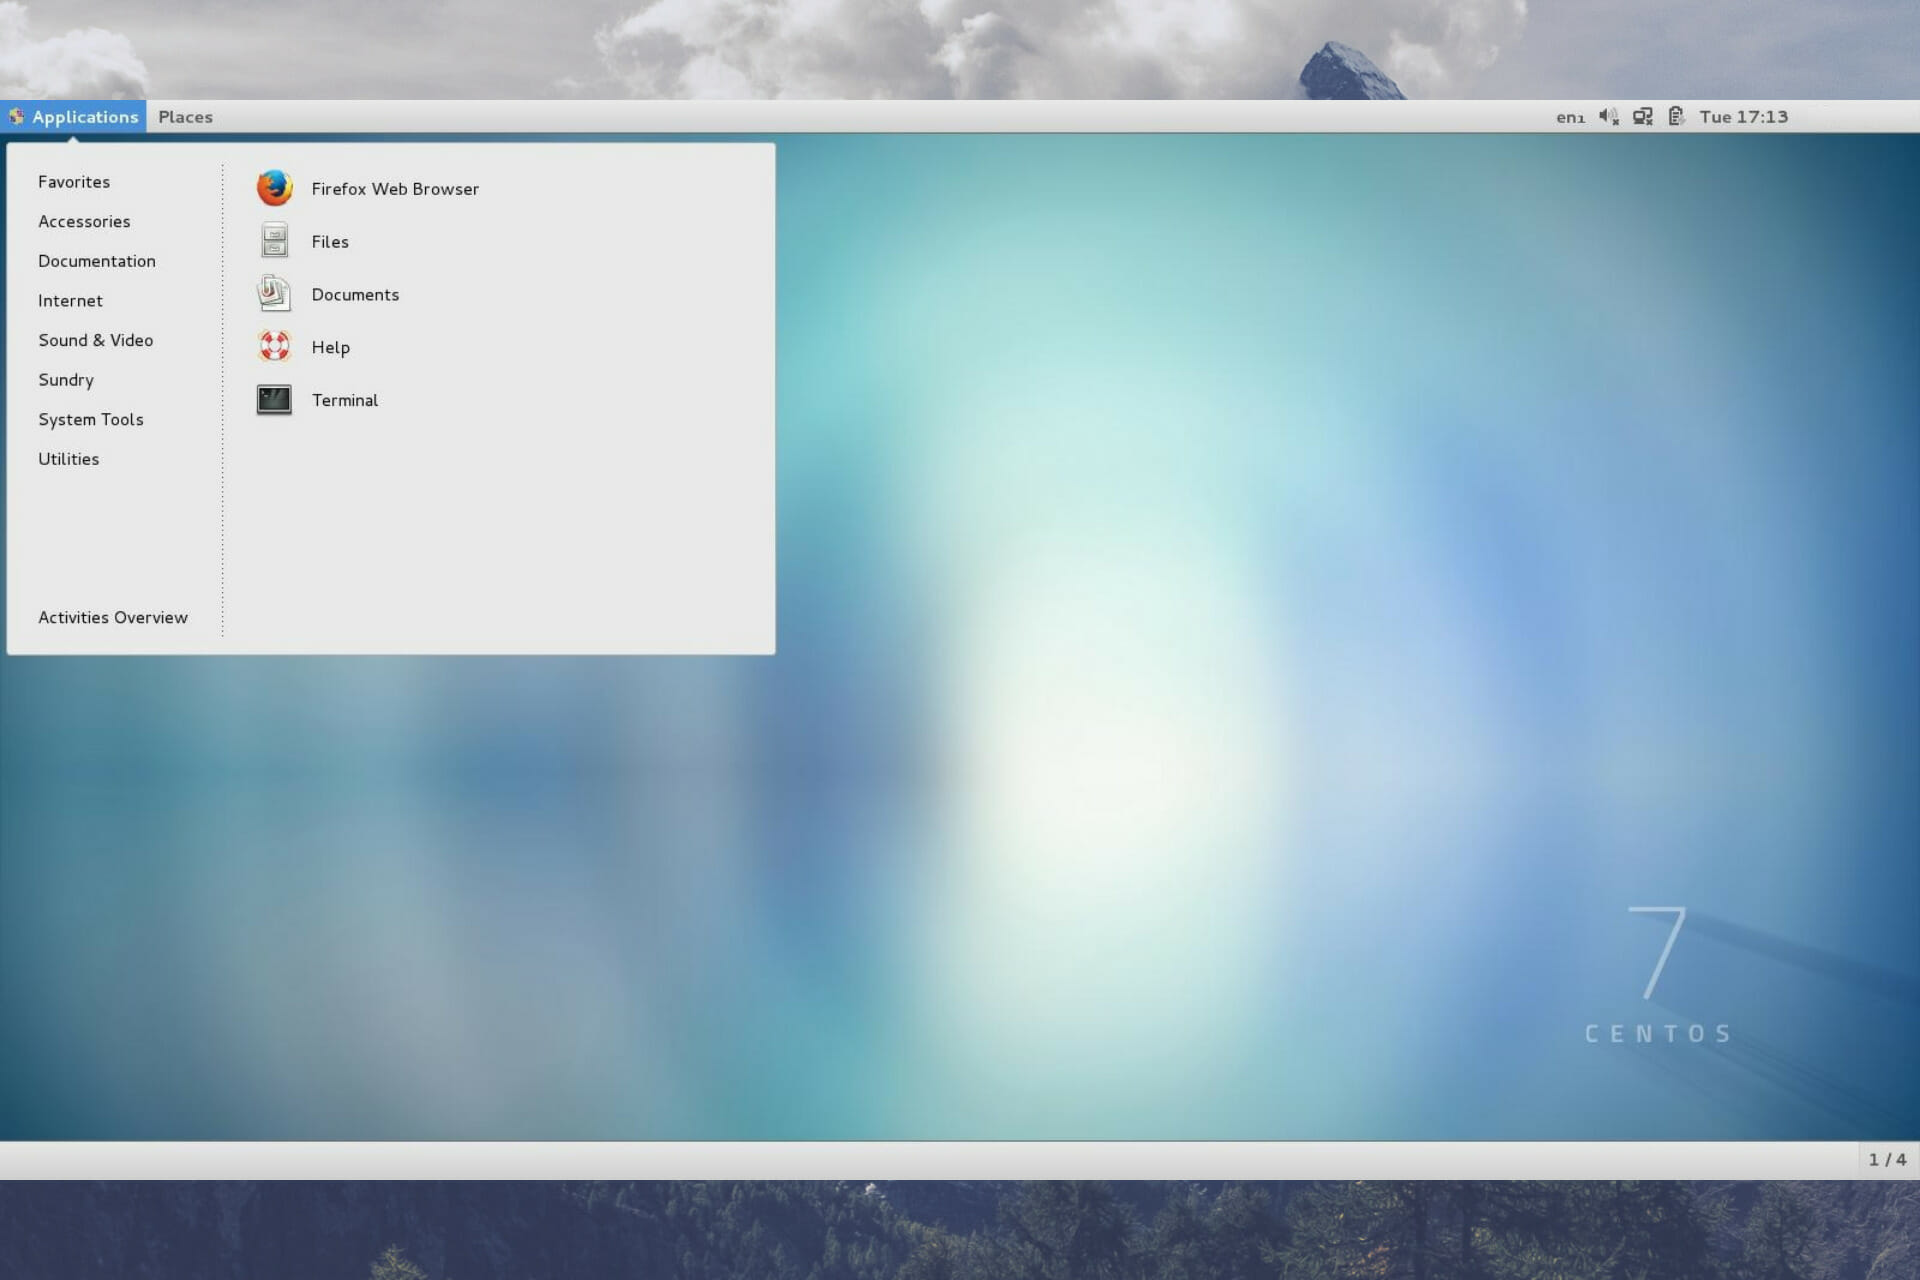
  2. Launch your terminal by right-clicking on your desktop and selecting the terminal option.
    install driver wifi centos 7
  3. Type in the following script and hit enter: yum group install "Development Tools"
    install driver wifi centos 7
    This script will install GCC and Development Tools on your CentOS 7 or a RHEL 7 server. Optionally you can use the sudo command: sudo yum group install “Development Tools”
  4. Close the terminal, and move to the next step.

2. Download and launch Wi-Fi driver

  1. Visit the official page of of your linux drivers, and download a driver corresponding to your card from the device lists.
    install driver wifi centos 7
    Bear in mind that the driver for the Framework laptop is Wi-Fi 6 AX210.
  2. Extract the tarball files to your system’s download folder.
  3. Relaunch the terminal (Same process as in step 2).
  4. Use the following command to change directory to your downloads folder: # cd /Home/Downloads
  5. Type in this command and hit enter: sudo cp iwlwifi-ty-a0-gf-a0-XXX.gcode /lib/firmware
    Please replace XXX with your driver version number.
  6. Reboot your computer.

3. Check you connection status

  1. Type in the following command followed by hitting enter: $ nmcli device status
    install driver wifi centos 7

You should see a result similar to the image above displaying your connection status, if your drivers have been properly installed. Note that the Device name may differ depending on the drivers you have downloaded.

This guide is written for the Intel 6E Wireless chip that came with the Framework laptop, but it will also work for other Intel wireless processors. You should identify your wireless chip before going ahead with any installation solutions for CentOS 7.

If you have followed the process and still can not use the installed Wi-Fi drivers, reboot your computer and retry connecting to the internet.

Journal, once a Microsoft Garage inking app, graduates to a full Microsoft app

Roughly a year after it first hit the experimental scene of the Microsoft garage for all Windows users to try, Journal, is now an official Microsoft product, appropriately called Microsoft Journal. Just like always, the newly named app promises to be a more personal freeform note taking experience that puts your personal inking and your stylus first.

The news of the graduation to an official Microsoft product was first announced in a blog post by Renee Malone, who is a lead technical instructional designer at Microsoft. In the post, Malone explains that the new Journal release is coming out between April 5 and 8, and available through the Microsoft Store. This latest release also brings a design based on Windows 11 and new colors and materials. This builds on existing features that lets you scratch phrases out to erase them off the page with a pen, or even circle words to select them in the text.

Interestingly enough, Microsoft shared in today’s announcement some stats behind the app. Since the app first launched, a lot of people have been using the app for inking on PDFs or importing from PDF format. Data shows that 41% of pages in the app were a blank canvas, and 59% were PDFs.

Being a full-on Microsoft product means that Microsoft Journal will now get some bigger updates moving forward. Oz Solomon, the principal engineering manager of the Journal team, mentioned that being a supported app means that the team can address common requests and “a big backlog of new features.”

If you didn’t already try it, check out Microsoft Journal now via the link below. And, check out our hands-on in an older episode of OnPodcast.

Microsoft Journal
Microsoft Journal
Price:
Free

DriverPack for Windows 11: How to Download & Install

In this article, we’ll show you how to download and install the Windows 11 DriverPack to ensure your system has the correct drivers for hardware like printers.

This tool helps find and install the necessary drivers, maintaining compatibility and functionality. Sounds good? Let’s get started:

How can I install DriverPack for Windows 11?

1. Download and install from the browser

  1. To download DriverPack, launch any browser of your choice.
  2. Next, visit the DriverPack official website.
  3. Select Install all required drivers. Certain anti-virus scanners will flag this action as malicious. Select Accept the risk. If the download fails to start automatically, click the hyperlinked Download option.
  4. Open the Installation file. Next, follow the prompts until finish.

2. Download similar solutions from Microsoft Store

Note icon NOTE
At the time of writing, DriverPack Solution is not available on Microsoft Store. In place of it, there are other driver options to download but they are paid versions.
  1. Search Microsoft Store using the search icon. Open Microsoft Store.
  2. Type Driver or DriverPack in the search box at the top of the displayed window. Select your preferred driver and click Get to download. Next, Install the new driver.

3. Direct HP Driver Packs download

  1. Visit Client Management Solutions – HP Driver Packs.
  2. Check for your Notebooks and Tablets Model. Next, select the corresponding Windows 11 installation link.
  3. Download the installation file.
  4. Open File Explorer.
  5. Locate the file.
  6. Open the set-up file and follow the on-screen prompts to install the driver.

Officially, HP recommends the use of HP Image Assistant (HPIA) to build a driver pack. The only drawback is that at the time of writing, the available HPIA is only compatible with Windows 8.1 and 10.

How can I fix driver issues?

Sometimes, a driver file may be present on the PC but either corrupt or needs an update. Below are some steps to fix it:

1. Use Windows Update

  1. Search for Windows Update settings.
  2. Check for updates. Download and install. Next restart to effect the changes.

2. Use Device Manager

  1. Press Windows key + X. Next, select Device Manager.
  2. Locate the device you will like to update its driver. Right-click it. After that, select Update driver.

Is DriverPack safe to use?

We observed it shows in a lot of scanners as malicious:

However, its publisher Artur Kuzyakov said DriverPack officially cooperates with antivirus software manufacturers and protects your computer.

Summary

As you can see, you can easily download driver packs, but keep in mind that your antivirus software may see them as unwanted software.

For more information and detailed instructions, we suggest reading our guide on how to manually install drivers on Windows 11.

In case these methods didn’t work for you, you might want to try using one of the best free Windows 11 driver updater software instead.

What is your experience with driver packs? Let us know in the comments section below.

Windows 11 Screen Not Turning Off: How to Fix it

Windows 11 has the option to turn off the display after a set duration of inactivity. This feature saves power when users are away from their computer and don’t manually put it to sleep.

Users have reported issues with their display not turning off even after the set duration. Luckily, there are some simple solutions to this problem.

If you are having issues with your Windows 11 display not turning off after the set time, it could result from a faulty application or external device. Keep reading this article to find the solution.

How do I adjust sleep and screen settings?

  1. Click on Start and go to Settings (or press Windows + I). In Start menu, open settings.
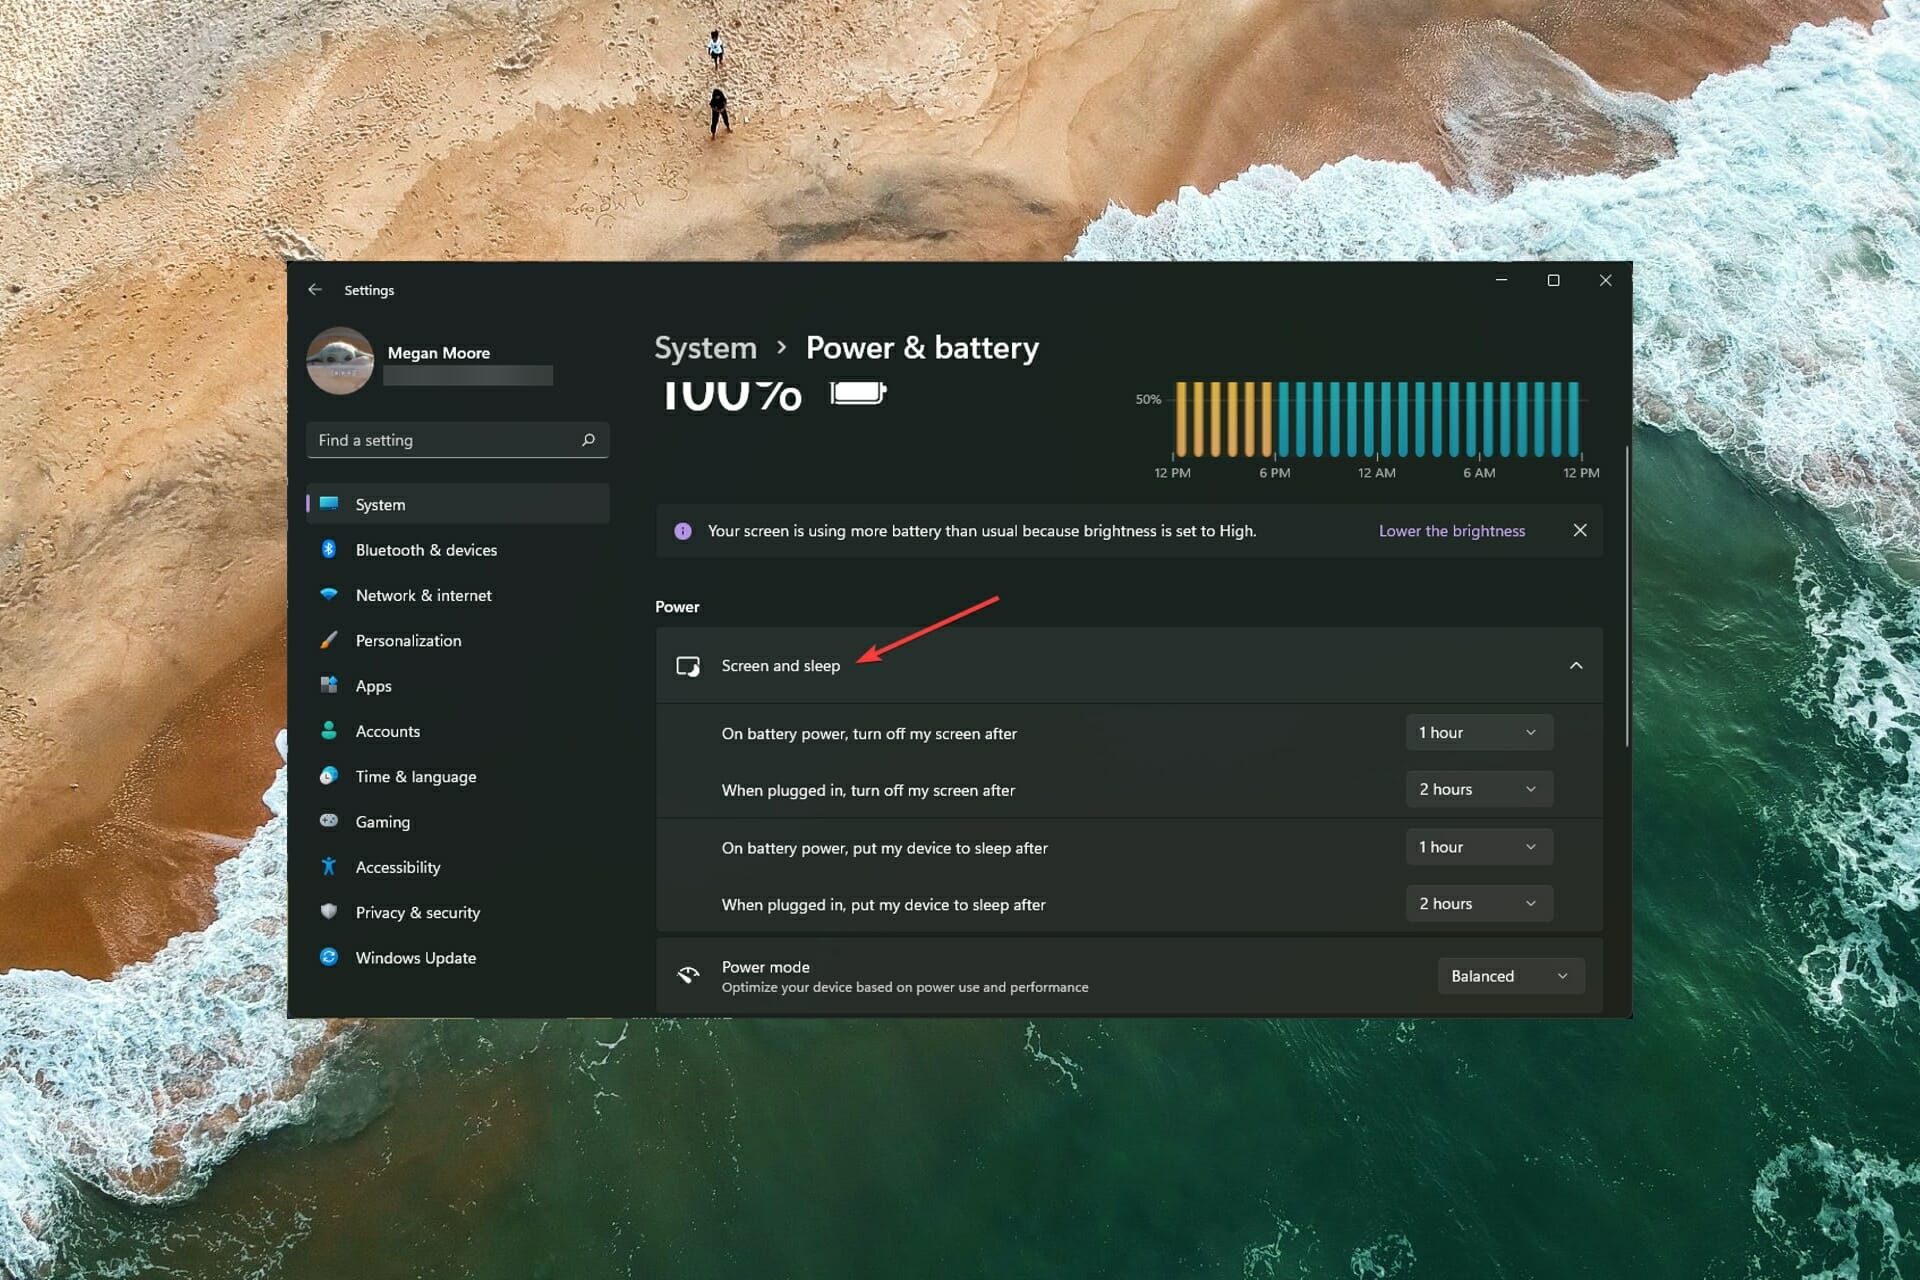
  2. Under System go to Power & battery. Under system, open power and battery.
  3. Under Screen and sleep, adjust the times you want your display to go to sleep or turn off. Adjust screen and sleep settings.

Users can adjust the time their device goes to sleep when plugged in and on battery power. They can also adjust the duration for their screen to turn off.

There is a difference between turning the screen off and going to sleep. Sleep mode turns off unused programs and applications to save energy after the set duration of inactivity. Turning the screen off does just as it states and only turns off the monitor, but all used programs or applications are still running.

For some of our readers, a background app such as Steam, was running in the background preventing the screen from turning off. Therefore, make sure that you close these apps or adjust their settings to allow this option.

In Steam, go to Desktop mode, and set the Display Properties to turn off the display after a suitable amount of time.

If you’re having issues with sleep mode not working in Windows 11, there are some quick solutions for that problem.

How do I fix Windows 11 not turning off display?

1. Check screen settings

  1. Click on Start and go to Settings (or press Windows + I).
  2. Under System go to Power & battery. Under system, open power and battery.
  3. Under Power, expand Screen and sleep.
  4. Ensure that the screen and sleep settings are not set to Never. Make sure the duration is not set to never.

If the screen and sleep options are set to never, then that will prevent your display from turning off. Check to ensure you have set times selected for your screen and sleep settings.

2. Remove USBs

  1. Unplug any external devices (keyboard, controllers, etc.).
  2. Shut down your PC. Shut down your PC.
  3. If you’re using a PC with a monitor, unplug the display cable.
  4. After five minutes, plug the display cable back in and turn on your PC.

Sometimes, external devices connected to your PC via USB or Bluetooth can keep your monitor from turning off even after set sleep times. Remove any devices and restart your PC to see if that solves the issue.

Many users have reported the issue to be caused by an external controller. Disconnecting the device can fix the problem of your display not turning off.

3. Run hardware and device troubleshooter

  1. Click on Start and search Command Prompt.
  2. Right-click and select Run as administrator. Run as administrator.
  3. Type msdt.exe -id DeviceDiagnostic and hit enter. Type the follow and hit enter.
  4. Select Next to run the troubleshooter. Run the hardware and devices troubleshooter.
  5. Any issues with your devices will be displayed.

If solution 2 didn’t solve the issue, running the troubleshooter can give you a more detailed look at your devices and which might be causing the problem.

4. Check applications that hinder the display

  1. Click on Start and search Command Prompt.
  2. Right-click and select Run as administrator. Right-click and select run as administrator.
  3. Type powercfg -requests and hit enter.
  4. If there is an application listed under Display that means that the app is affecting your display and preventing it from turning off. Check for problematic programs under display.
  5. Uninstall the problematic application from Control Panel. Uninstall program from Control Panel.
  6. If you don’t want to uninstall the program, open Task Manager.
  7. Select the program and click End task. End task.

An application running in the background that affects your display may be the culprit. After identifying the culprit, users can remove the application if it’s not a necessary program.

If it is a necessary application, users can end the task in Task Manager which will allow the PC display to turn off.

5. Run power troubleshooter

  1. Click Start and open Settings (or press Windows + I).
  2. In System, scroll down to Troubleshoot and select it. Run troubleshoot.
  3. Click Other troubleshooters. Click on other troubleshooters.
  4. Find Power and select Run. Run power troubleshooter.
  5. Locate any issues.

Issues with the screen not turning off may be related to issues with your PC’s power. Running the troubleshooter will quickly help you locate any found issues and make the necessary adjustments.

6. Adjust power plan

  1. Right-click on Start and select Run (or press Windows + R). Right-click start menu and select run.
  2. Type control.exe powercfg.cpl,,3 and click OK. Type the following then hit OK.
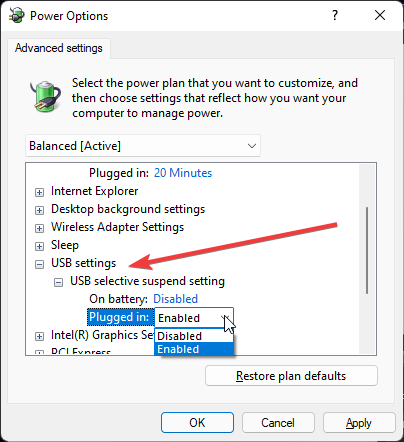
  3. Expand USB settings, then expand USB selective suspend setting.
  4. In the drop-down menu, next to On battery and Plugged in select disabled for both. Adjust USB settings to fix Windows 11 not turning off display.
  5. Click Apply, then OK.

Hopefully, one of the solutions above helped solve the issue of your screen not turning off after the set duration in Windows 11. Ensure that your sleep and screen duration is not set to never, so you don’t run into the issue again.

If you’re having difficulties connecting a wireless monitor to your PC, then we have solutions for that issue as well.

Let us know which solution worked for you in the comments below.

Miracast for Windows 11: How to Install & Set Up

If your devices are compatible with Miracast, you can easily download and use it on your Windows 11 PC. Today we’ll walk you through the whole process: from checking compatibility to downloading the drivers and projection methods.

How do I add Miracast to Windows 11?

1. Check to see if your PC supports Miracast

  1. First, press Windows + R keys to open the Run dialog box on your computer.
  2. Type dxdiag in the box, and hit Enter to open DirectX Diagnostic Tool.DirectX Diagnostic Tool
  3. Wait for it to finish analyzing your PC.
  4. Then, click on Save All Information.Save All Information
  5. Following that, choose the location you want to save the information. Select Desktop for more comfort, and click on Save to save the file.Saving dxdiag
  6. Open the text file with the text editor of your choice, e.g., Notepad.
  7. Press Ctrl + F and type Miracast to see if it is available.Checking Miracast availablity

Although there are a few ways to check for Miracast’s availability, this method is the most convenient to see if your PC supports this feature.

2. Get the Latest Miracast Drivers

  1. Search for Settings in the Start Menu and open it.Open Settings
  2. After that, click on Windows Update on the left-hand panel, then on Check for Updates, and finally on Download and Install.Installing Windows update
  3. Click on Advanced Options, then head over to Optional Updates, and download and install them as well.Advanced options
  1. Restart your computer afterward.

If using the Device Manager looks like too much trouble, you can alternatively install them using Fortect Driver Updater. This tool automates the task so there’s no effort on your end.

If your display does not support Miracast, you can use USB transmitters such as Actiontec ScreenBeam USB Transmitter to cast your screen on your TV.

3. Wirelessly Project Your Windows 11 to an HDTV

  1. Plug in the Miracast adapter into your TV’s HDMI port.
  2. Select the right HDMI channel on your TV.
  3. Press Windows + I keys to open Settings.
  4. Select Bluetooth & Devices on the left-side panel, then click on Add Device.Add Your TV from Device List
  5. Your Windows 11 PC will now look for new displays within the range.
  1. Choose your TV from the list of devices that appear. If you are using a Miracast adapter, click on it.

What should I know after downloading Miracast for Windows 11?

Another benefit of using Miracast is securing your connection with WPA2 encryption. As a result, you do not need to worry about the privacy of your protected/private content.

If your graphics card does not support Miracast, check our article. You can verify Miracast compatibility with your graphics card.

Also, if you face other issues, you might need to try reinstalling your network drivers.

Why doesn’t my computer support Miracast?

  • You don’t have a Miracast adapter on your PC. Many PCs and TVs don’t have this adapter built-in, so you’ll need to purchase them separately.
  • Miracast isn’t properly installed on your PC.
  • Issues with the network connection.

Furthermore, you may have forgotten to turn on your Wi-Fi, or your adapter may not be connected.

Sometimes, the issue can be resolved by unplugging and replugging the adapter and restarting your devices.
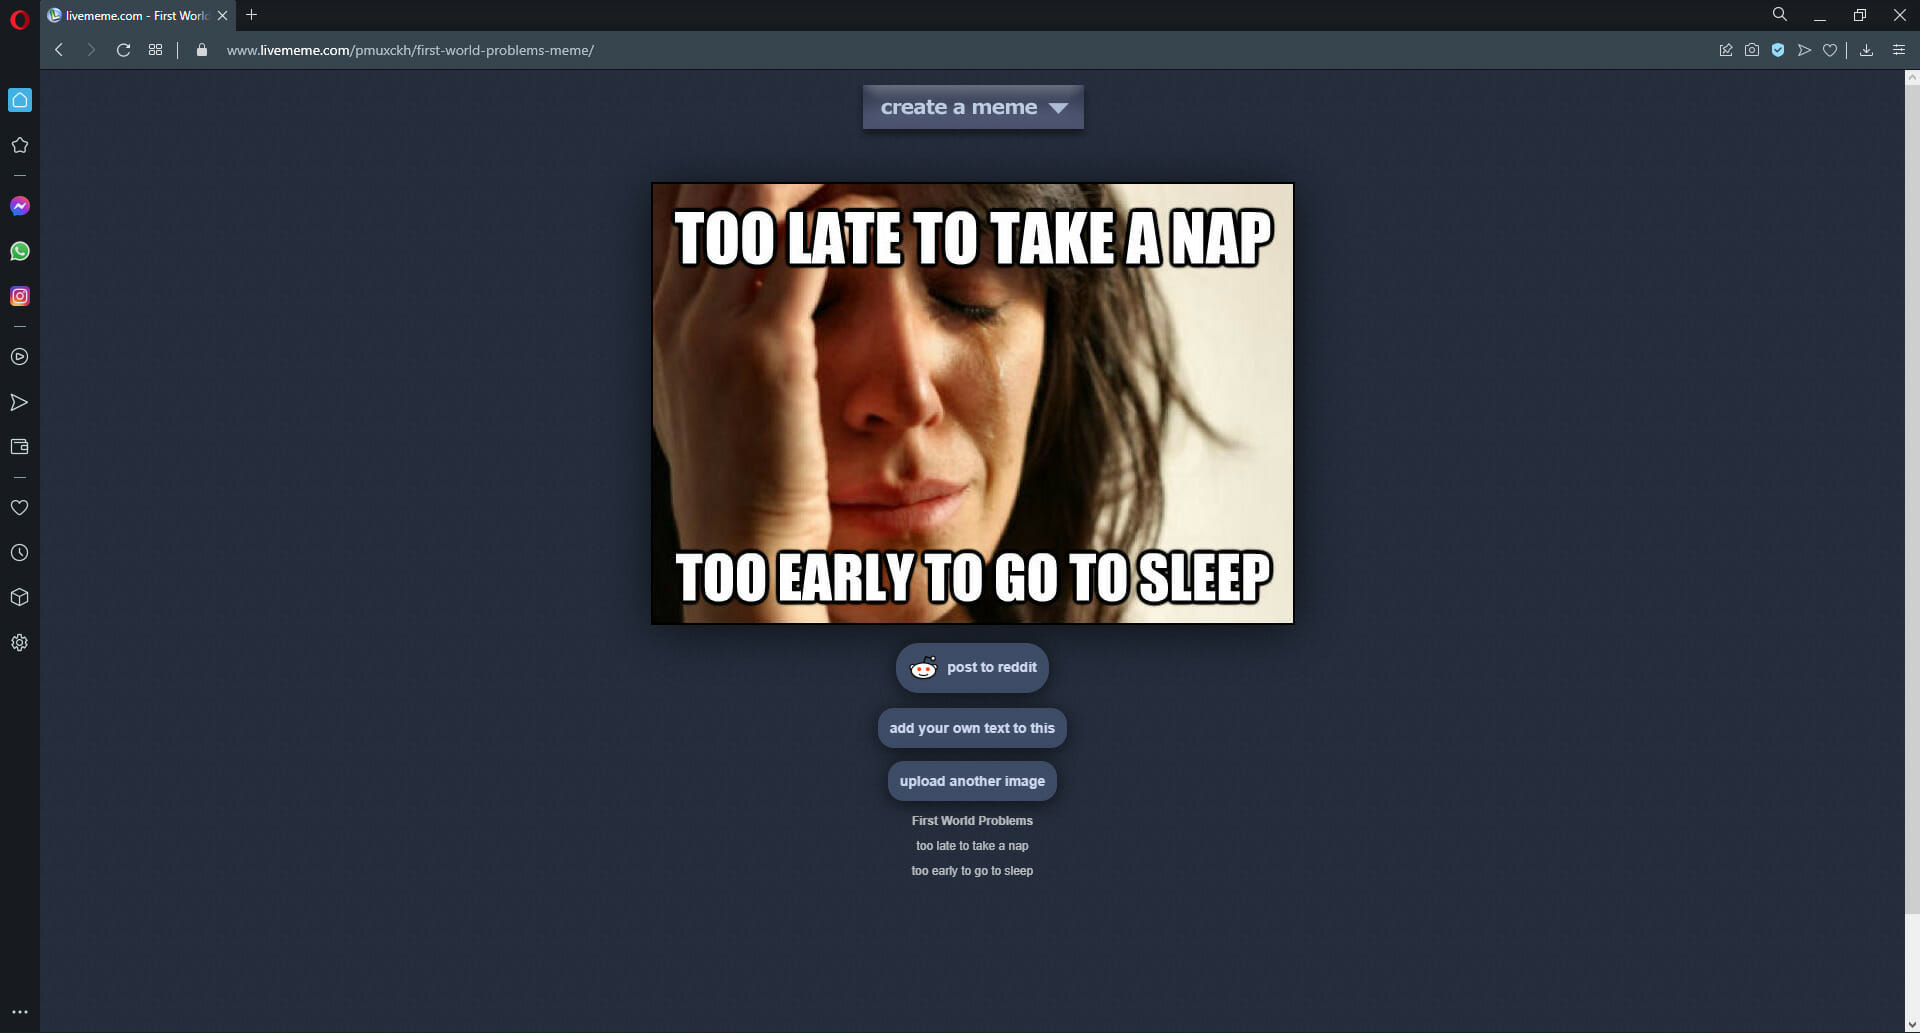
Wrapping up

That’s about it. If you’re having any problems with Miracast, check our guide on how to fix Miracast not working on Windows 11. And if you use the older operating system, learn how to set it up on Windows 10.

Windows 11 All-in-One Computer: 5 Best Picks for 2026

The market for all-in-one computers is booming. Maybe you’ve been on the fence about buying one. If so, you’ll find this resource both informative and helpful.

AIO computers offer features that make them attractive for home and small business use. They are compact, with all components built into one unit, thus saving space on your office desk.

Moreover, these devices have some extra features that traditional desktop computers lack, such as the ability to print from the front of the machine, or built-in security cameras.

They have the same convenient all-in-one design as a desktop, but with the portability of a laptop. It’s a great way to save space without sacrificing power or design.

The best AIO computers are those that have a high-quality processor for fast performance and graphics cards for high-quality media playback. Those with a touchscreen display also tend to be more expensive than their counterparts with regular displays, so keep this in mind when buying your next computer.

If you’re looking for an AIP PC with the highest performance, then you’ve come to the right place. Here we review the 5 best Windows 11 all-in-one computers.

What are the advantages of switching to AIO computers?

With the rise of smartphones, laptops, and tablets, the desktop computer has been relegated to a few specific use cases.

If you are not using a desktop for heavy-duty gaming or video editing, then you should consider switching to an all-in-one computer.

These computers provide all the benefits of a regular laptop with the bonus of being able to plug in any peripheral that you might need. You can even connect it to your TV and use it as a monitor for your home theater system.

All-in-one computers are also beneficial for businesses who want to save money on office space, as they can be used as both a desktop and laptop.

The screen can be detached from the keyboard and be used as a tablet when needed. This means that you don’t need to buy two separate devices which saves you a lot of money.

Things to consider when buying an AIO computer

When looking for an AIO PC, you should look at the following features:

  • Processor: The processor determines how quickly your computer will run when performing tasks such as playing games or editing photos
  • Memory: The memory determines how much data your computer can store at a given time
  • Screen size: The size will determine how much space it will take up, which is a consideration if you have limited space.

What are the best Windows 11 all-in-one computers?

1 HP 24″ All-in-One Desktop

  • Comes with pre-installed Windows 11 Home
  • Dual front-facing speakers
  • HP privacy camera
  • Average webcam quality

Work, play, and more with a sleek all-in-one desktop that fits perfectly in any space. The stylish HP AIO computer delivers value and style with impressive picture quality, premium sound, and smooth performance.

The preinstalled Windows 11 Home ensures effortless compatibility with apps and programs you already use. Its sleek design includes an edge-to-edge display and an easy stand-up hinge for easy access to ports

It features a 24-inch display with a cinematic wide-view panel. The AMD Radeon graphics makes it ideal for viewing your favorite media or multitasking between apps. Plus, you get plenty of ports for connecting to peripherals.
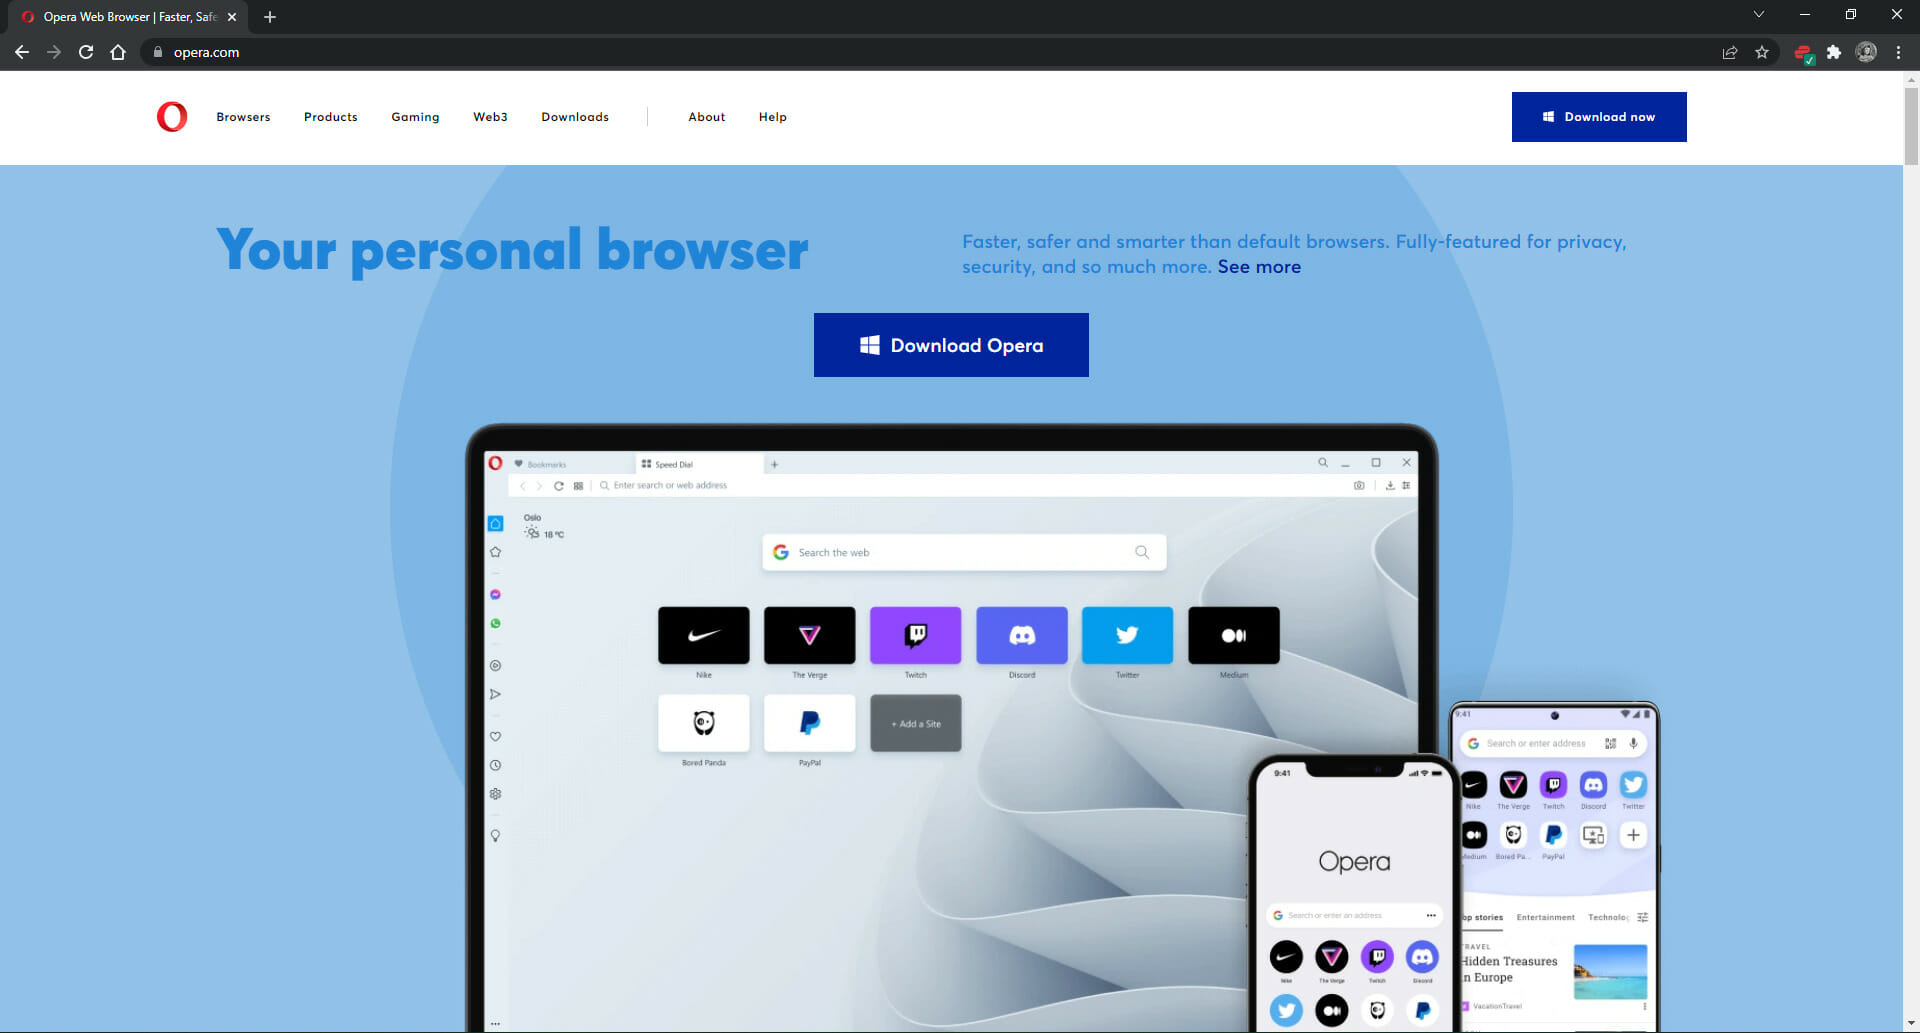
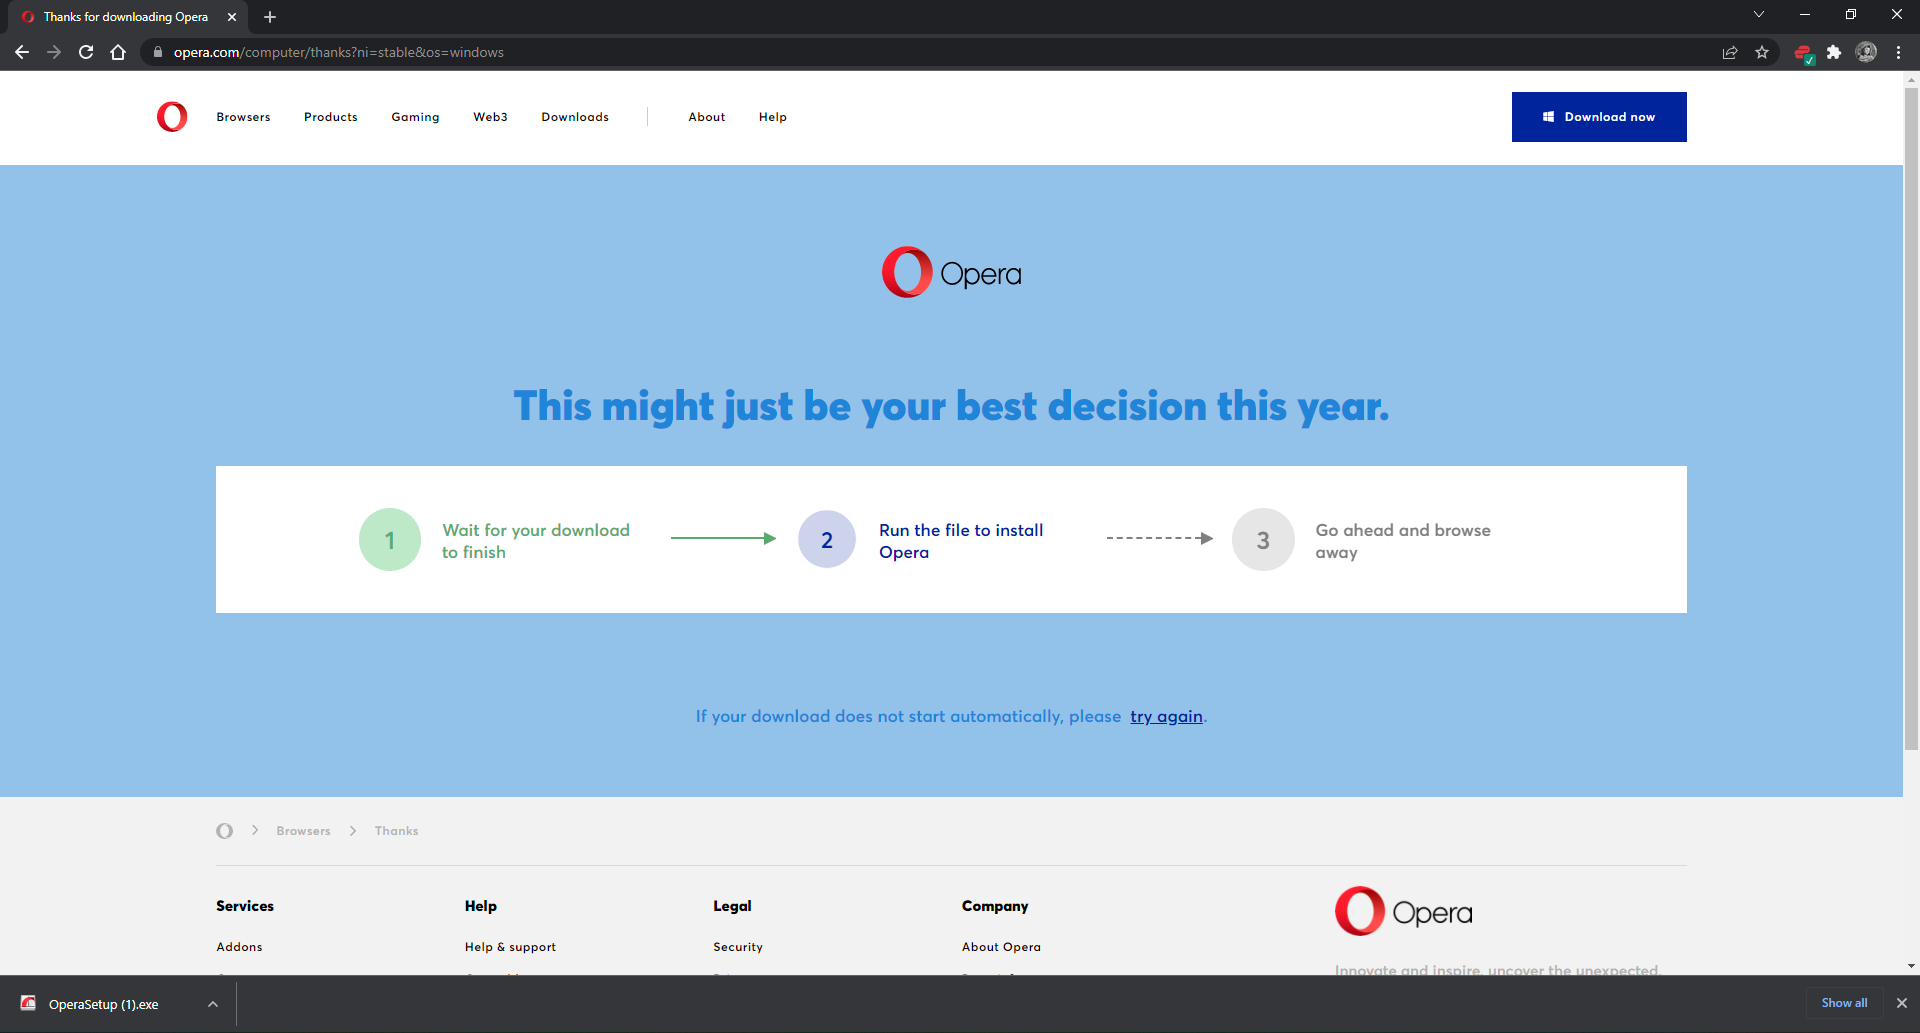
Boasting a clean and fresh design, this stylish PC delivers great performance with an AMD Athlon Silver 3050U processor, 4 GB of memory, and 256 GB of SSD storage.

It also comes with a wireless mouse and keyboard, so you can use it as a desktop without reaching for a separate pair of peripherals.

2 Acer Aspire C27-1655-UA91 AIO Desktop

  • Free upgrade to Windows 11
  • Features the latest 11th Gen Intel Core i5 processor
  • Wi-Fi 6 connectivity
  • Only has 2 USB ports

The Aspire C27 All-in-One PC has all the essential features and packs them into a slim, space-saving design that is easy on the eyes.

It features the latest Intel Core i5 11th Gen processor and Intel Iris Xe graphics. Plus, the Bluetooth 6.0 wireless connectivity offers a seamless computing experience. 

The full HD display and impressively thin bezels are a bonus that makes the Aspire C27 truly stand out. The keyboard and mouse are included for an easy setup.

Its massive 512GB NVMe M.2 SSD provides accelerated speeds to make all of your apps run smoother and respond quicker. Plus, you can install up to 12GB of DDR4 memory using the 2 available slots on this desktop PC. 

3 HP All-in-One 22″ Desktop Computer

  • Ultra stylish
  • 4 USB ports
  • Connects to almost every printer
  • Not ideal for heavy gaming

With the HP All-in-One 22” Desktop Computer, you’re always ready to tackle your everyday tasks. This fully-featured system delivers premium performance and reliability at an affordable price.

Enjoy easy access to all of your files, photos, and other data with the 22″ display. The AMD Athlon Gold 3150U processor with AMD Radeon Graphics powers through everyday tasks and delivers exceptional performance for graphics-intensive programs like photo editing and video editing software.

The 256 GB solid-state drive includes enough storage space for your documents, multimedia files, applications, and more.

With an all-metal chassis, the HP all-in-One has incredibly thin bezels and a gorgeous 1920 x 1080 Full HD touch display.

4 Dell Inspiron 7700 27-inch Desktop Computer

  • Latest 11th Gen Intel Core processors
  • Wi-Fi 6 technology
  • Windows 11 Pro
  • Pricey

The Dell Inspiron all-in-one desktop has a 27-inch full HD anti-glare display that includes a pop-up webcam for instant privacy. Instantly start working and playing with the stunning graphic capabilities offered by the newest Intel Iris Xe graphics card.

Its display has a narrow border of 8mm which makes the screen looks beautiful from any angle. It also includes the latest 11th generation Intel Core processor to ensure lightning-fast speeds no matter what you’re doing.

It has the power to run multiple applications at once with its 12GB DDR4 and 256GB Solid State Drive (Boot) + 1TB 5400 rpm 2.5″ SATA Hard Drive (Storage).

5 Lenovo IdeaCentre AIO 3 AMD Computer

  • A 30-day trial of Microsoft Office is included
  • Stylish and slim design
  • Pre-installed Windows 11
  • May not be compatible with certain games

The Lenovo IdeaCentre AIO 3 desktop computer has a sleek and compact frame, housed in a chassis that’s perfect for both home and office.

With AMD Ryzen™ 5000U Series processors, it has enough horsepower to complete your work or school projects.

The 23.8-inch wide FHD display includes crisp bold colors that are viewable from any angle, plus rich powerful stereo speakers. The SSD offers plenty of storage for all of your media libraries, with quick boot and data transfers.

Not only does it come with 10G USB 3.2 Gen 2 speeds, but it also has a built-in microphone and earphone combo. Plus, one LAN (1000) port, one HDMI-out port, and two USB 2.0 ports.

Are all-one-computers a better alternative?

All-in-one computers can be good or bad, depending on how you look at them. They tend to be good for entertainment, but not as good when it comes to ergonomics and computing power.

These all-in-one computers are easy to use, powerful, and have little to no issues. Please check our guide on the best Windows 11 ready laptops that you can buy right now.

If you found this article helpful, do let us know in the comments section below.

That’s how you can change DPI on Logitech G Pro wireless

Logitech G Pro wireless is one of the best gaming mice that combines the click-to-spec feel of a mechanical switch with the convenience and reliability of optical technology. It is designed for gamers who demand wireless freedom without sacrificing pro-grade performance, durability, and comfort.

Although it’s quite a bit heavier than other mice on the market, its high-quality sensor makes it worth using. It is one of the first wireless gaming mice to have customizable colors, which is a great feature as well.

However, a lot of people are having issues with it being too sensitive and not accurate enough. If you are also struggling with the same problem, then this guide should help.

What is DPI and why should you change it?

The DPI (dots per inch) on a mouse is the number of dots that the mouse can detect when it moves a single inch. A higher DPI setting means there are more dots, which in turn translates to a finer level of control over your cursor on the screen.

Ultra-high DPI settings are generally reserved for gamers and power users who need to make precision movements on their screens.

When you change your DPI setting, you need to calculate how many pixels you need to move on the screen before your cursor moves one inch.

If you want to change DPI on Logitech G Pro wireless, simply follow the instructions below.

How can I change DPI on Logitech G Pro wireless?

  1. Open the G Hub software.
  2. Click on the G symbol on your mouse to run G Hub software. logitech g pro
  3. Go to the Sensitivity tab on the left panel.
  4. In the right pane, you can see all the DPI speeds. The underlined DPI speed is the current DPI speed of your mouse. The Orange DPI is your shift speed.
  5. Change the DPI speed by selecting a different point in the right pane.
  6. You can also double-click on a value and type in a new speed. Hit Enter after changing the settings.
  7. If you want to delete a DPI level, do it by right-clicking on the point and selecting Delete
  8. Close the G Hub software.

What is the ideal DPI for your Logitech G Pro wireless?

Did you know that the mouse pointer movement on your computer screen is not based on a regular grid? A pointer movement is based on dot-by-dot scanning. To achieve smooth movements, you need a high DPI number, which stands for dots per inch and is also referred to as PPI (pixels per inch).

Since the screen resolution is also measured in pixels per inch, the higher the DPI number, the smoother the mouse pointer movement will be.

The best part of the Logitech G Pro Wireless mouse is that it allows users to customize options that wouldn’t be available otherwise. One such case was with the procedure mentioned in this guide. To make things easier, Logitech offers the switch to open the G Hub tool on the mouse itself.

If you are looking for the best Logitech mouse in 2022, please go through our guide on the same.

In case you have any questions, please let us know in the comments section below.

Fix: AirPods microphone is not working [Mac, Windows 10/11]

AirPods earphones are great, but many users are having issues, and according to them, AirPods microphone is not working properly.

This issue can happen only for one AirPod or for both headphones. We also have a solution for the first scenario.

This can be a problem on both Mac and PC, and in today’s article, we’re going to show you how to fix this problem once and for all.

Why is AirPod mic not working on calls?

It’s not uncommon to experience issues with these earbuds, and many have reported that AirPods are not working in Windows 11.

These issues can result in low AirPods volume on Windows 11 and other operating systems, therefore it’s crucial that you fix that.

For more information, be sure to read our can’t connect Bluetooth headphones to PC guide, or check the solutions below.

How can I fix the AirPods microphone issues?

1. Update your Bluetooth drivers

If AirPods microphone isn’t working properly, it’s advised that you update your Bluetooth adapter driver.

Apparently, you need to download Bluetooth Headset Helper from 2013 for Broadcom devices to fix this problem.

If you don’t want to do that manually, you can always use specialized driver updating tools to update your drivers automatically.

2. Use a Bluetooth adapter

Sometimes your built-in Bluetooth adapter can’t handle AirPods, and that can lead to issues such as AirPods microphone not working.

To fix that, you might want to consider buying a new Bluetooth adapter. Many users reported that they fixed this issue on Windows 10 by buying a Bluetooth adapter, so be sure to consider that.

3. Continue using the microphone

  1. Tap your headphones to activate the microphone.
  2. Keep talking and AirPods will pick up your voice after a second or two.

This is a simple workaround, but few Mac users reported that it worked for them, so you might want to try it.

4. Check your firmware

  1. Check your firmware version. Several users claim that the 3A283 version caused the problem.
  2. If you don’t have the latest firmware, try updating it and check if that solves the problem.
  3. In case the issue persists, it would be best to contact the Apple-certified repair center.

Some users managed to clear this problem by updating the firmware for the AirPods so do that right now.

To do that, you only need to start charging your AirPods while still connected to your iPhone. Of course, the smartphone should also be connected to the Internet.

5. Verify the Active Microphone Settings

  1. Go to the Settings menu on your device.
  2. Tap the Bluetooth option.
  3. Tap on the Info icon from your AirPods.
  4. Then tap the Microphone and enable the Automatically Switch AirPods option. That will enable the AirPods to use the most suitable microphone.

This solution is only if the microphone is working on only one AirPod so make sure you perform the steps above.

For single AirPod audio or connection problems, see our step-by-step guide on why one AirPod is not working to quickly restore sound on both earbuds.

6. Restart your smartphone

This issue can be simply caused by a connectivity issue from the iPhone that is not recognizing any inputs so you should restart the device.

To do that, just hold the Side button and Volume Down button pressed together at the same time for a couple of seconds.

If your iPhone has a home button, you only need to keep the Side button pressed to reset the device.

AirPods are great, but if the AirPods microphone isn’t working for you, be sure that your drivers are up to date, or try our other solutions.

If you also have problems connecting your AirPods to your MacBook, we have an excellent guide to fix that problem quickly.

If you have any other suggestions to get rid of this problem, leave us the solution in a comment from the section below.

7 Best Windows Hosting With SQL Server [2026 Guide]

If you want to use Windows hosting for your personal or business website, there are specific technologies that work with Windows such as ASP, .NET, Microsoft Access, and Microsoft SQL Server.

Windows hosting is simple, convenient to use, manage, and update. Moreover, it seamlessly integrates with Microsoft products, is stable and reliable, and ensures full security and safety from hackers.

It can even handle content management systems, and you can use it if you don’t have hosting experience.

How can an SQL server help my website?

The SQL (Structured Query Language) server is a database management system developed by Microsoft.

It is meant for storing and/or retrieving data when it is requested by other software apps that run either on the same or another computer in the network, as well as on the Internet.

In other words, it’s a software product that offers better management of your databases, and it’s exclusively designed for Windows.

Do you need an SQL server? As it’s a database management system, if you have a lot of client or product data stored, then yes, an SQL server will help a lot.

If you have a small website and no complicated databases to host, then you shouldn’t think about this solution.

Which is the best Windows hosting with SQL server?

A2 Hosting

A2 Hosting is known for its blazing-fast features and fine-tuned servers that deliver up to 20 times faster performance as compared to other competing Windows hosting provider options.

It is reliable and can integrate with other web building tools in Windows such as the .NET Framework, or ASP, backed by 24/7 Guru Crew support plus a wide variety of tools to get your Windows hosting up and running.

As one of the top names in the best Windows hosting with SQL servers, A2 Hosting integrates elements you need under one roof such as the ASP, .NET framework, C#, MSSQL, and Visual Basic.

You also get scalability, ease of use and updating, and the Plesk control panel – a complete range of tools to ensure and enable you to succeed.

A2 offers a SiteBuilder that you can take advantage of to start your website from scratch and install your favorite CMS system or migrate your existing website to A2. And that is free.

You even get free SSL certificates and with just one certificate, you will be able to protect an unlimited number of domains.

Let’s see the key features you’ll benefit from:

  • Free SSL Certificates
  • Protect an unlimited number of subdomains with a single SSL certificate
  • Support for ASP, .NET framework, C#, MSSQL, and Visual Basic
  • Ultra-fast speed
  • 24/7 Guru Crew support

A2 Hosting

Fastest hosting, free automatic backups, and 99.9% uptime commitment – A2 Hosting delivers all of these and more!
Check price Get it now

HostGator

HostGator makes Windows hosting simple and easy for you to use which is why it ranks among the best Windows hosting with SQL servers.

Features include MSSQL Server 2008 R2, MySQL, Access Databases, FTP accounts, Plesk control panel, and site-building tools.

This solution has over 4000 free website templates, email addresses, administrative tools, one-click installs, and programming features including ASP and ASP.NET.

HostGator is known for its award-winning tech support and highly extensible Windows Server 2012 R2, and its hosting plans let you draw as much as you can from the hosting accounts at the lowest cost possible.

Enjoy a 99.9% uptime guarantee, unlimited sub-domains, plus extra perks with each hosting plan.

Bonus features include a free website builder from HostGator, free website transfer, domain transfer, MySQL transfer, and script transfer, plus 38 free scripts.

Check out its best features:

  • Over 4000 free website templates
  • Free website and domain transfer
  • Free website builder with advanced creation tools
  • Support for MSSQL Server 2008 R2 and MySQL
  • 99,9% guaranteed uptime

HostGator

This hosting service will provide you with all the tools to create a modern website and offers free transfer.
Check price Get it now

GoDaddy

If you’re looking for great Windows hosting with SQL Server, perhaps you might be interested in GoDaddy. The basic plan allows you to host a single website and use 100GB of storage.

In addition, there’s support for up to 50 FTP users. This plan is for SQL 2012 and 2014 hosting and it offers 1x200MB for MSSQL. As for MySQL, you’re limited to up to 10 1GB databases.

Standard features such as database backup and restore are available, and you can directly access the database if you want.

This package supports an unlimited number of external domains, subdomains, and alias domains. Windows Server 2012 R2 and Plesk 12 are part of the package too, as well as ASP .NET MVC3, Silverlight 5, and 4.

Perl, Python, CGI, Classic ASP, and CMS services such as WordPress, Drupal, and Joomla are part of the list too.

Overall, GoDaddy offers great service, and with support for SQL Server, it will be a perfect choice for you.

You should also consider the best web hosting deals from GoDaddy and you could get a great offer right now.

Take a look at its best features below:

  • Support for Perl, Python, CGI, Classic ASP, and CMS
  • Unlimited number of external domains
  • Improved site speed, security, and support
  • Fast and reliable support team
  • Protection against malware attacks

GoDaddy

Award-winning hosting with easy setup, generous storage, and automatic upgrades – experience the most trusted web host on the planet!
Check price Get it now

TMD Hosting

With this Windows hosting provider, you enjoy exceptionally fast speeds and superior performance, in an environment that supports the latest ASP .NET framework, Windows Server 2012 R2, and SQL server.

TMD Hosting offers a high level of security. It features daily updates plus a web-based firewall to ensure your site is guarded against online threats.

If you’re worried about the data on your website, this solution daily automatic backups of your site database, and if something happens, the restoration is free.

However, that shouldn’t be a concern because the hosting service has a 99.999% uptime record, and it also comes with anti-spam protection.

And if you want your website to be fast, it certainly will because the servers only use SSDs, so the access times are minimal.

Should you have any problems or questions, you will have a dedicated technical support contact so that you can sort things out as fast as saying loading time.

Let’s quickly look at its key features:

  • Dedicated technical support
  • Daily automatic and constant backups of your site’s database and files with free restoration
  • Up to 20 times faster load time owing to the use of Solid State Drives on all servers
  • Unlimited email accounts and free Let’s Encrypt SSL certificate installation
  • Fully cloud-managed servers
  • 99.999% uptime, anti-spam protection, and a dedicated yet isolated VPN

TMD Hosting

Blazing fast speeds, end-to-end protection, and an extensive data center network with global coverage – what more can you ask?
Check price Get it now

Miles Web

Miles Web provides superfast Windows hosting at an affordable price so you can give it a shot.

Ideally, Windows hosting integrates Microsoft apps such as MSSQL, ASP, .NET, Visual Basic, Access, and FrontPage, so this hosting provider gives you just that.

Features include MSSQL server, Plesk Control panel, multiple domain hosting and databases, unlimited emails, 24/7 uninterrupted support, unbeatable reliability, and 99.95% uptime needed to run your website at any point in time.

You also get a free domain name (or transfer yours for free), an SSD drive for faster loading time and performance, and a one-click installer for WordPress, Joomla, shopping carts, and other apps.

Secure email, programming features as mentioned, free website transfers at no added cost, and daily automated backups for optimal security are also included.

You will benefit from these key features:

  • 24/7 uninterrupted support
  • Free domain for a new hosting account
  • SSD drives for fast access time
  • Secure e-mail service
  • Free website transfer

Miles Web

Just focus on your online business and leave the hosting task to the experts from Miles Web.
Check price Get it now

Cloudzy VPS

Cloudzy Windows hosting provides a user-friendly environment that is also geared for performance, supporting the Microsoft .NET Framework, MS-SQL, WFP, and other developer tools for Windows.

With high-performance server hardware, including NVMe storage and DDR4 RAM, creating and deploying SQL databases and servers will be faster than with any other provider.

NVMe is several times faster than even the best SSD storage devices used by almost all other providers and DDR4 RAMs are in a class of their own.

So, when it comes to SQL databases, Cloudzy’s Windows VPS, with full administrator access and minimal latency connections is the way to go.

With a 7-day money-back guarantee, there is no risk involved. You’ll get a full refund if you’re not satisfied for any reason.

Take a look at Cloudzy’s best features:

  • 1 Gbps bandwidth for ultra-fast connection speed
  • Latest generation NVMe storage with DDR4 RAM technology
  • Ultra low latency with 14+ data centers all over the globe
  • Full administrator access to your Windows system
  • Smart DDoS protection
  • 99.95% uptime on all plans
  • 7-day money-back guarantee
  • 24/7 customer support

Cloudzy VPS

Get this great hosting solution that guarantees a top storage solution and excellent uptime.
Check price Get it now

SmarterASP.NET

best Windows hosting with SQL server

For world-class quality hosting services, this is the best Windows hosting with SQL server, which also has a shared hosting package renowned for its speed and reliability.

SmarterASP.NET features a one-click installer, tech support to optimize your experience, and award-winning customer service.

There is also a built-in CloudFlare content delivery network that makes your website 4 times faster, and a 99.9% uptime guarantee.

You also get different features based on the option you pick from either the MSSQL database, Windows 2012 hosting, or MySQL database.

Unlike other providers, this one guarantees the same quality of service and offerings for free trial users and paid users alike.

Let’s review its most important features:

  • 99,9% uptime
  • Support for MSSQL and MySQL databases
  • CloudFlare content delivery network
  • Super-fast access
  • Management and administrative tools

⇒ Get SmarterASP.NET

We hope that you have found the perfect match for your needs for hosting with SQL servers.

When you are looking for such a solution, also consider the volumes of your databases. Then you can decide whether you need a dedicated solution or to share it.

Of course, a dedicated SQL server will only be available to you while a shared one will be also accessed by other websites or domains.

If you decided on an SQL server, you could definitely be interested in our list including the best SQL server backup software.

Now that you know the best Windows hosting with SQL server, let us know your favorite pick, or share with us the one you use in the comments section below.

Issues continue to mount as Microsoft’s Undead Labs hash out State of Decay 3

As stockholders and Activision Blizzard executives await the fallout from several pending lawsuits of discrimination and sexual harassment ahead of a $68B buyout, another Microsoft owned studio may be about to wade through similar waters.

Kotaku is reporting that Microsoft’s Undead Lab Studios, the brainchild behind State of Decay and platform exclusive sequel State of Decay 2, is also facing allegations of “sexism, bullying and burnout.”

In a lengthy expose by Kotaku writer Ethan Gach, Undead Labs transition from small-time studio to Microsoft backed game developer is put under the microscope to reveal a studio plagued with the same industry issues of misogyny, mismanagement and burnout as any other.

Kotaku interviewed 12 current and former employees for this article, all of whom requested anonymity because they feared sharing their concerns publicly would doom their careers in the video game industry. Many felt very positive about certain aspects of the studio. A few said it still has room to improve but has overall been a very good place to work. Most considered the last few years since the acquisition a period of crisis, and are worried management hasn’t learned the right lessons.

At first, some employees were worried the Microsoft acquisition would change the indie studio for the worse. Now they worry the $2 trillion company’s incredibly “hands-off” approach allowed dysfunction to fester, leaving some of the studio’s more vulnerable employees to fend for themselves. As one former developer put it, “We were afraid they would come in and change our culture but our collapse came from within, and we could have used [Microsoft’s] help.”

Gach lays forth a story of a studio dragged into success by Microsoft’s acquisition and as such, drowning from lack of direction, sabotage, poor leadership and excessive turnover.

State of Decay 2 video game on Xbox One and Windows 10

On top of all the managerial mishaps, additional friction arose from discriminatory practices against women, non-binary and “other marginalized employees.”

One former developer recalled men asking women to take notes during meetings, ignoring their expertise, and even making sexist remarks like, “You don’t look as pretty as normal today,” and “I’m surprised a girl like you has this job.”

While Undead Labs sold itself as a studio in transition, welcoming of diversity, equity and inclusion, it may have done so as mostly a facade to keep head of Microsoft Gaming Phil Spencer appeased during acquisition negotiations.

Despite a change at the head of the studio with co-founder Jeff Strain leaving in 2019 and head of development Philip Holt getting promoted, the fissures within the company seemed to only deepen as Holt began favoring nepotism over the needs of the studio.

Holt has been accused of “fast-tracking” his friends and partners from outside studios as a way to help solidify his role within Microsoft’s ambitious play for a larger Xbox studio-network narrative.

In favoring his own buddies to leadership positions Holt ostensibly railroaded “two-director level women at the studio by not giving them the support needed to succeed and hiring men over top of them in the hierarchy to absorb their roles,” according to current and former Labs employees.

Even when staffed with a credited HR professional with Anne Schlosser to help address developer concerns, Labs persisted with its rampant culture of sexism, discrimination and incompetence. Employees claim Schlosser did nothing against blatant sexism or even a Tech Art manager who almost drove the entire Tech Art team to quiet, but instead dismissed complaints as “pandemic driven.”

Of course, Schlosser denies the allegations and offered the following statement:

Before I left Undead Labs in a routine reorganization, I implemented new hiring practices that increased workforce diversity by more than 30 percent. Women, LGBTQ+, and BIPOC colleagues thrived in both leadership and individual contributor roles while I was at Undead Labs. No two people have the same perspective on or insights into events and outcomes in the workplace. However, the company’s decisions and direction on all topics related to its HR functions while I worked at Undead were a daily, even hourly, collaboration among its leaders.

Schlosser goes on to lay any questions about equitable treatment at the doorsteps of Undead Labs and Microsoft, as her parting gift after Microsoft HR got involved and Schlosser departed shortly thereafter.


Beyond the management struggles at Labs lay the issues with the game itself, State of Decay 3 remained underbaked a year after its preview during the Microsoft’s 2020 Xbox exclusive showcase. Aside from a zombie deer, Labs had very little to show for its development other than a botched internal demo in 2021.

The schedule to showcase more demos to the Microsoft teams was upended when developers revolted and forced Holt to subdue his unrealistic ambitions to present half-baked “prototypes” to their parent company.

After a litany of interviews and firsthand accounts from employees in the trenches have surfaced, it begs the question of Microsoft’s role in overseeing studio behavior. While there is an argument for Microsoft being hands-off with a scrappy young studio that produced one of its flagship properties, there is another one for it addressing Labs as a reflection of a larger industry-wide problem.

Microsoft has its own fair share of discriminatory allegations. However, the gaming industry at large seems infected with similar stories, sexism, harassment and bigotry across the board, and as the company embarks on taking ownership of storied Activision Blizzard and its stable of studios, will Microsoft continue to let ambivalence hamper accessible working conditions for enthusiastic developers?

Could Microsoft’s desire to foster similar working conditions that produced hits such as Call of Duty, Guitar Hero, World of Warcraft, or Tony Hawk backfire and leave them with a bunch of wasted potential because of inaction, similar to how the company fumbled away Skype?

11 Best Enterprise Hosting Services for Blazing Speed [2026]

There are lots of companies that are looking out for your business, and they’re packed with enterprise-level features.

And if you also host the clients’ data and accounts, you can’t be too cautious in providing the best security for your company.

You should carefully plan every step in securing your business and finding the right enterprise hosting service for your needs.

What to look for in an enterprise hosting service?

The best enterprise hosting services will first get to know the specific customer’s needs and only after that, the team will craft a whole infrastructure based on the client’s needs.

So, here’s what are the main aspects you should consider when selecting the best enterprise hosting service:

➡ Server uptime – Uninterrupted service is the most important aspect of hosting so make sure that you make no compromises on downtime.

➡ Fast access – Reliable servers and SSD storage will ensure fast access to your data and services.

➡ Great customer support – If something happens, the first concern is to get back to working conditions so having a fast responsive client support team to communicate is paramount.

It should also offer the best combination of features, bandwidth, storage, and customer support.

In order to make your choice a bit easier, we gathered the top enterprise web hosting out there, and we’ll show you their best features to help you make up your mind.

What is the best enterprise hosting provider?

Bluehost – Highly popular hosting

Bluehost is a great hosting service that is especially focused on WordPress. In fact, this solution includes a robust platform for website building. It’s thus ideal for WordPress hosting services for business.

First of all, you will benefit from great speeds thanks to the VPS platform and the usage of SSDs for storage.

The hosting tools are cloud-based and very easy to use. However, if you need assistance, you can count on 24/7 expert support.

With VPS hosting, you will always have access to the dedicated resources like RAM, CPU, and Disk Space you’ve chosen.

BlueHost also offers storage for automated backups for your sites and dynamic upgrades to add more resources to your account easily.

After you decide on your resources, they are yours to use, and host unlimited domains and websites on your account to manage them from one place.

Bluehost automatically creates daily, weekly, and monthly backups of the entire account so that you will be able to easily restore your complete data with a single click of a mouse.

You can check out the whole set of features that are packed in Bluehost and start using the service from its official website.

Check out the best features of Bluehost:

  • Fast access with SSD storage
  • 99.99% uptime guaranteed
  • Automatic backup of your websites
  • Dedicated resources to your account
  • Dynamic upgrades with a single click
  • Host an unlimited number of websites and domains

Bluehost

Bluehost is the ultimate VPS hosting solution with SQL servers and it’s perfect for WordPress.
Check price Get it now

WP Engine – Great enterprise solutions

wp engine web page


WP Engine is one of the best enterprise hosting providers for WordPress users. It supports plug-ins and all sorts of WordPress installations. It comes pre-installed so you don’t have to install WordPress.

Just type your credentials and log into the service to easily create and manage content like posts, pages, and galleries.

It also has an interesting billing transfer feature. You can create a site for your client in WP Engine without managing the client’s hosting account.

You will have to choose between a personal, professional, business, or premium plan.

While the Personal plan is for beginners, the rest are for advanced professionals who need specific features in order to manage their sites.

If you are looking for secure, fast, and friendly WordPress hosting, WP Engine is the tool you need.

Here are some of WP Engine’s most important features:

  • Easily migrate your WordPress site to the WP engine from any other host
  • Staging sites: create a clone of your site to check the latest changes
  • Copy sites: you can copy a site’s structure in order to create a new one
  • Reach WP experts’ support anytime you want
  • Managed security: keep your site safe starting from the kernel level
  • Immediate disaster recovery: be safe with the latest backup and recovery procedures from WP professionals

WP Engine

Take your enterprise hosting to the next level by using the powerful WP Engine today!
Check price Visit Website

eUKhost – Ideal for European customers

eUKhost is one of the most popular hosting consoles of more than 35,000 businesses worldwide, and the newest hyper-converged technology powers it for fantastic reliability.

You will be able to choose between shared and premium cPanel hosting to activate a website, managed and easy-to-use VPS, but also a reseller and critical enterprise hosting.

There have been 17 years since the service has been helping businesses with reliable and secure hosting and an awardee customer support team and that tells you something about its reliability.

Plus, the company promises a 99.95% uptime, exactly what you need from an enterprise hosting solution.

The service offers email hosting and the latest-generation dedicated servers for ultimate performance. You can get the best plan for your needs on the eUKhost official website.

Check out the service’s most important features below:

  • eUKhost has four ultra-modern Tier 4 data centers in Reading, Maidenhead, Manchester, and Nottingham
  • The service’s web hosting plans are for both Linux and Windows platforms
  • You will get a 99.95% uptime
  • 30-days money-back guarantee
  • The service provides advanced cPanel for account administration and website management
  • Amazing customer support of the company delivered via email, toll-free phone, and online chat as well
  • There is also a lively support forum and a knowledge base resource

eUKhost

Use eUKhost to gain access to a plethora of useful features for easy enterprise hosting services.
Check price Visit Website

A2 Hosting – Greatest WordPress business hosting

A2 Hosting is a natural and best-matching solution for extremely fast web hosting and website uptime no matter your experience.

If you’re fully interested in succeeding with your online business or kind of business, your website needs to have strong and reliable support. For this matter, this hosting service is a reputable choice for your victory.

To give you an idea, there are plenty of security and speed benefits you will use for your business. Thus, you have free site migration and easy-to-use tools to manage your enterprise website.

Not only that, there is 99.9 uptime for your business website so you don’t have to ever worry about server issues. Plus, the Guru Crew Support is everything you need to create and manage it.

It is also important to mention that such acclaimed web hosting will help your business expand and become a recognized brand no matter the sector you’re activating in.

So, even if you’re starting a personal blog project, an online publication, or creating a web application, this hosting company is and will stay the best.

Check out the best features:

  • High-speed managed WP hosting
  • VPS hosting and dedicated resources
  • Customized and flexible dedicated servers
  • Custom email domain for professional communication
  • Turbo hosting plans
  • Unlimited WordPress website plans

A2 Hosting

Make a living from your online business by taking this expert-confirmed hosting.
Check price Visit website

TMD Hosting – Intel and SSD-powered servers

This 100% Intel and SSD-powered service provides blazing-fast Windows hosting at enterprise levels. You will get fantastic speeds and superior performance.

TMD Hosting allows you to choose between three Windows hosting plans including the starter plan, business plan, and enterprise plan.

You will be able to make amazing websites and apps with ASP.NET, MSSQL, and five different versions of PHP, Perl, Python, and SSI.

The company is automatically and continuously snapping five copies of the website’s databases and files just to make sure that you will always have a way back.

Simplify the deployment process with Web Deploy and the Plesk control panel. Try the TMD Hosting enterprise plan from the official website.

Check out the best features that you’ll be able to enjoy with the enterprise plan:

  • Unlimited SSD space, bandwidth, MSQL databases, and websites hosted
  • Unlimited dedicated app pools
  • Free domain, spam experts, and more essential tools
  • 60-days money-back guarantee
  • The technical support team will help you get started free of charge and effortlessly
  • Restoration is free of charges
  • Solid State Drives for fast access to your data
  • Up to 20 times faster load time for your website
  • Unlimited email accounts

TMD Hosting

TMD Hosting is one of the best web hosting providers at an enterprise level, featuring customization and stability.
Check price Get it now

AccuWebHosting – Affordable offers

AccuWebHosting is one of the best web hosting platforms on the market, having more than 18 years of providing Cloud, VPS, and Dedicated servers throughout the world.

The company provides top-notch speeds and stable connections, allowing your Enterprise business to prosper and run smoothly without problems.

Benefit from fast processing speeds thanks to AccuWebHosting’s full SSD storage system, a user-friendly Control Panel, and many more features.

You should know that if you’re looking for Windows Server 2016, 2012, and SQL 2012, this solution supports the implementation.

Note that you can host servers for multiple operating systems, including Windows and Linux, and the price plans are affordable. Additionally, the company provides lots of flash sales and deals.

Let’s take a look at its core features:

  • User-friendly Control Panel
  • Cloud-based plans available
  • 100% Pure SSD storage
  • Fast setup
  • WordPress server hosting
  • Fully manageable and highly secured
  • Low latency
  • Uninterrupted, 24/7 Forex Trading

AccuWebHosting

AccuWebHosting is a fast, reliable, and extremely secure web hosting app. Give it a try now!
Check price Get it now

Hostwinds Enterprise Windows Hosting – High uptime

If you want to benefit from unrivaled support and state-of-the-art hardware, Enterprise Windows Hosting is one of your best choices.

You will be able to get the experience of Windows on your virtual server, and this dedicated Enterprise Windows Hosting service will provide you with it.

Additionally, the service has incredibly fast, secure, and customizable tools for managing all of your business’ data.

Hostwinds deploys nothing but the best hardware for their VPS nodes, and you can try out the service from their official website.

With a managed Windows server, you will be running your own copy of Windows so that you will be in full control at all times.

Plus, the flexible system allows SSD Windows VPS clients to upgrade the servers’ specs at any time efficiently.

Take a look at the essential features of the Enterprise Windows Hosting service:

  • World-class reliability with 99.99% uptime guarantee
  • Your server will meet and exceed security protocol in addition to providing you full control
  • 24/7/365 system monitoring
  • 5 minute guaranteed incident response time
  • One-hour automatic hardware replacement
  • Instant, new VPS setups, upgrades, and nightly backup of all data
  • Restore individual files at any time

Hostwinds Enterprise Windows Hosting

Explore unparalleled features that are sure to improve your enterprise hosting experience with just a few clicks of the mouse.
Check price Get it now

Liquid Web – Flexible configurations

Liquid Web provides professional hosting services with high-performance cluster servers for your Linux and Windows projects.

What makes this service stand out is the fact that you can actually talk to a highly trained person to get a quote for your needs and adapt the plan to your actual needs.

Liquid Web can provide virtual private servers, WordPress server packages, hosting for Windows and SQL databases, and anything else you might think of.

If you’re hosting multiple servers, you can opt for a load balancer between web nodes to minimize latency and prevent downtime even if you’re in a high-traffic situation.

The services include nightly backups to safeguard your data if your site suffers massive damage.

When your business grows, you may scale up with a separate database server, private switch, and a firewall for improved security.

For enterprise solutions, Liquid Web will assign you a direct contact whom they call a Customer Success Manager who will not only monitor the performance but also align internal resources with your growth.

Check out the service’s best features below:

  • Managed, sophisticated solutions to multi-node configurations
  • 24/7 monitoring of managed solutions and customer service
  • Documented, customized configurations
  • The servers are targeted at businesses that want sharp website performance
  • Firewalls, SSL, virtual private networks, malware scanning, and removal for increased security
  • 30-day-money back guarantee

Liquid Web

Trust your services to a professional hosting solution that adapts to your growing business.
Check price Visit website

Cloudzy – Premium VPS solutions

Cloudzy is a trusted VPS provider with almost a decade of experience in offering high-performance, ultrafast hosting at affordable prices.

The VPS solutions come with all the necessary ingredients for creating a fast experience, including NVMe storage, DDR4 RAM tech, and 1 Gbps bandwidth.

There are safe servers available at 15 convenient locations in North America, Europe, Asia, and more so you will get coverage everywhere in the world.

Any problems you might encounter will be dealt with by a professional support team available 24/7 for your questions or requests.

So, go ahead and buy VPS with Bitcoin from Cloudzy, and don’t worry about taking a risk. They provide a 7-day money-back guarantee that gives you a full refund

What’s more, the provider supports different payment methods so you may allocate your budget from any source that may be available.

Whether you buy Cloudzy’s VPS with Bitcoin or PayPal, however, you’ll get the following enterprise features:

  • Latest NVMe storage tech and DDR4 RAMs for ultimate performance speed
  • Ultrafast 1 Gbps bandwidth
  • Secure, private payment with cryptocurrencies, including Bitcoin and Privacy Coins
  • 14+ server locations in North America, Europe, and East Asia
  • Take the reins with full admin access to your Windows
  • Technical customer support
  • Smart DDoS protection
  • Completely reliable performance with 99.95% uptime
  • 7-day money-back guarantee

Cloudzy

Get dedicated resources excellent bandwidth and servers all over the world with this affordable solution.
Check price Get it now

Armor Cloud – High security

Armor Cloud is one of the most secure hosting services out there, and the company managed to attract large corporations, reputable healthcare organizations, and banking institutions.

They have grown to rely on the service’s highly scalable and stable infrastructure. The service is recommended primarily for enterprise business hosting and institutional hosting.

Note that it was able to grow while also maintaining a notably high level of security that will assure consistent performance with virtually no downtime.

The company’s cloud-based solutions provide incredibly high-traffic hosting solutions that rely on extensive networks for load balancing and content delivery.

Armor Cloud comes with an impressive track record, and it’s used by a high number of high-profile clients, so it’s an excellent choice for quality, speed, security, and reliability.

The extra level of security for VPN server access to redundant DoS/DDoS migration is targeted at maintaining a hack-proof business environment.

Check out the most impressive features that are packed in this service below:

  • Its level of security eliminates vulnerabilities during PCI scans
  • Hosting Add-ons
  • Extended features for enterprise security
  • Autoscaling, API access, data encryption, server cloning, and more
  • Customizable control panel

⇒ Get Armor Cloud

RackSpace – Good cloud hosting

RackSpace was founded back in 1998, and it’s currently based in San Antonio. It also has eight data centers in the US and internationally.

The service is known for managed hosting, cloud hosting, and email and apps. RackSpace provides flexibility, focus, and significant expertise.

RackSpace comes with a lot of options for its customers and the plans that these services offer are numerous, offering fanatic customer support dedicated to helping you out.

As a fun fact, their customer support is called Fanatical Support, and it includes more than 4,500 staff members available to assist customers all over the world.

The service ranks high for reliability, security, and customer support. You can try it out now from the RackSpace official website.

Check out more impressive features of the service:

  • Professional and highly trained support staff to assist customers with the most complex issues
  • The service offers great flexibility for customer requirements
  • Extremely reliable, and the servers are not interrupted
  • Cloud Hosting, Managed Hosting, and Hybrid Hosting
  • Three different categories with multiple plans, and the most popular category is the Cloud option
  • Dedicated Hosting option, as well as a hosted email and application service

⇒ Get RackSpace

These are the top enterprise hosting services that you can get today and hopefully, you will settle on the best one for your business needs.

The solutions from our list are top-notch but getting the right one for your requirements will require customization.

Most of the hosting services have flexible plans and solutions so it’s a matter of communicating with them prior to reaching a deal.

We recommend making a list of all your demands and taking the time to check them with the service provider.

If you’re looking for some attractive deals, take a closer look at these website hosting plans at a great discount.

Check out their detailed features and pick the best one according to your needs. Then, let us know your choice in the comments area below.

Logitech G Pro Wireless Not Working: How to Fix It Fast

When the Logitech G Pro Wireless is not working, it generally has to do with connectivity issues. For instance, the USB port to which the receiver has been connected could be malfunctioning or the mouse is simply kept too far from the receiver.

A recent firmware update or issues with outdated or corrupt drivers can also disrupt its functionality. Additionally, the Windows Fast Startup feature can sometimes cause problems with external devices.

Let’s see how you can fix it

What do I do if Logitech G Pro Wireless is not working?

Start by disconnecting and re-connecting the receiver and see if it helps. You can also try using a different USB receiver and make sure the surface underneath the mouse isn’t causing issues with its functionality.

If none of these work, keep reading:

1. Update the mouse driver

  1. Press Windows + S to launch the Search menu, enter Device Manager in the text field, and click on the relevant search result.Device Manager
  2. Now, double-click on the Mice and other pointing devices entry to expand and view the devices under it.Mice and other pointing devices to fix logitech g pro wireless not working
  3. Right-click on the Logitech G Pro Wireless mouse, and select Update driver from the context menu.Update driver to fix logitech g pro wireless not working
  4. Now, select Search automatically for drivers from the two options that appear in the Update Drivers window.Search automatically for drivers
  5. Wait for Windows to automatically locate the best available driver on the system and install it.

Alternatively, you can use a reliable third-party app. We recommend Fortect Driver Updater a dedicated tool that will automatically scan for the latest version, and install it for the drivers on your computer, thus keeping them all up-to-date and eliminating such errors.

⇒ Get Outbyte Driver Updater

2. Logitech G Pro Wireless not working after firmware update

In some cases, the G Pro Wireless not working issue started after a firmware update. If that’s the case, the device manufacturer would have released a patch for it in the subsequent updates. So, download the Logitech G HUP app and update the firmware through it.

Logitech G HUB app

Though firmware updates are critical, you should not install every one of them since these may introduce instability. It’s recommended that you only download firmware updates if there’s an issue with that particular device and that too from the official manufacturer.

3. Run Logitech Unifying Software

  1. Go to the Logitech Support page, and click on the Download Now button to get the Logitech Unifying Software. You wouldn’t be able to find a version for Windows 11, but the one for Windows 10 works fine on the latest iteration.Download to fix logitech g pro wireless not working
  2. Now, double-click on the downloaded file to launch the installer.Installer
  3. Click Yes on the UAC (User Account Control) prompt that pops up.Click Yes
  4. Now, follow the on-screen instructions to complete the installation process.
  5. Once the installation is complete, re-pair the mouse using the instructions on the Logitech Unifying Software window.Use Logitech Unifying Software to fix logitech g pro wireless not working

Once done, check if the Logitech G Pro Wireless not working issue is fixed. If not, head to the next method here.

4. Run the Hardware and Devices troubleshooter

  1. Press Windows + S to launch the Search menu, enter Windows Terminal in the text field at the top, and click on the relevant search result that appears.Windows Terminal
  2. Click on the download facing arrow and select Command Prompt from the list of options. Alternatively, you can hit Ctrl + Shift + 2 to launch Command Prompt in a new tab.Command Prompt to fix logitech g pro wireless not working
  3. Now, paste the following command and hit Enter:msdt.exe -id DeviceDiagnosticHardware and devices troubleshooter to fix logitech g pro wireless not working
  4. Once the Hardware and Devices troubleshooter is launched, follow the on-screen instructions to complete the process and eliminate the issue.run troubleshooter

5. Disable Fast Startup

  1. Press Windows + S to launch the Search menu, enter Control Panel in the text field at the top, and click on the relevant search result.Control panel
  2. Click on System and Security from the options here.System and Security
  3. Now, click on Change what the power buttons do under Power Options.Change what the power buttons do to fix logitech g pro wireless not working
  4. Click Change settings that are currently unavailable at the top.Change settings that are currently unavailable to fix logitech g pro wireless not working
  5. Untick the checkbox for Turn on fast startup (recommended) and then click on Save changes at the bottom.Disable fast startup

Fast startup is a feature that helps quickly boot Windows by keeping certain files active. But, this often leads to issues with the connected devices if their respective drivers don’t receive the command that the system has been turned on.

So, you can try disabling fast startup and check if it fixes the Logitech G Pro Wireless not working issue. In case this doesn’t work, re-enable fast startup and head to the last method.

6. Perform a system restore

Performing a system restore

If none of the methods listed here have worked, you can try performing a system restore. It’s highly effective against most underlying causes, whether it has to do with misconfigured settings, or conflicting apps, among other issues.

When you perform a system restore, the computer is taken back into time to a state when the error didn’t exist. Here, just make sure to choose a restore point created before you first encountered the issue. Otherwise, the whole exercise would prove futile.

These are all the ways you can fix issues with Logitech G Pro Wireless not working on the computer. And once you have it up and running, make sure to not commit the same mistake again that caused the error this time.

Also, find out what to do if Logitech G HUB is not working, since it lets you manage the connected peripherals and can help you troubleshoot a bunch of issues with these.

We also have a guide on how to reset Logitech G Pro Wireless, so don’t miss it for more useful information.

Tell us which fix worked and your experience with Logitech G Pro Wireless, in the comments section below.

Guild Wars 2: End of Dragons graphics update [Gamer Guide]

There is no wonder that Guild Wars 2: End of Dragons is one of the most popular sail masterpieces, as it places you on an incredibly emotional journey, but many worldwide users are interested in discovering more about its graphics update.

Since last year, ArenaNet was preparing for a long future of visual enhancements and performance improvements with upcoming support for DirectX11.

For those of you who don’t already know, keep in mind that, starting with an open beta on September 21, 2021, Guild Wars 2 allows you to test a DX11 build of the MMORPG (which only supported DX9).

This improvement is one of the best the game and you, players, could ever get, as the senior engine programmer also reported:

Client performance is a priority for us, and we want everyone to be able to play with the highest possible framerate – James Fulop

If you’re interested in discovering how to easily perform this process, you can follow just a few steps, just like we show you below.

How can I update Guild Wars 2: End of Dragons graphics?

  1. Open the game.
  2. Go to Options.
  3. There, you’ll find the Enable DX11 Rendering (Beta) box. Check it.
  4. This basically means that the game will now take more efficiency of your whole PC.

Of course, gamers’ feedback didn’t wait to come up and this is how one user described his experience with the new DX11 improvement:

On a 980TI and i7 6700 I noticed a big improvement. Both in fps and overall smoothness (much less stuttering if any)! They should have gotten DirectX 11 much sooner but better late than never

In order to get the best out of your favorite game’s experience, it is always important to keep your graphics drivers up to date and the easiest way is by using a dedicated tool.

Outbyte Driver Updater will automatically scan, recommend and apply the latest updates for all of your drivers (so, not only for the graphics-related ones).

This is only possible through its generous database of 18 million driver files. In this case, you won’t have to worry about not finding what you need.

In case you’re dealing with corrupted or outdated drivers, this tool will allow you to be aware of where the issues may come from. Thus, it will provide a detailed report of all of your out-of-date device drivers.

Plus, it offers an engaging and user-friendly interface. So, do not worry if you’re a beginner at using this kind of software.

⇒ Get Outbyte Driver Updater

So, if you were wondering what it is all about with the Guild Wars 2: End of Dragons graphics update, we hope that this guide helped you get a better perspective.

Because your opinion really matters to us, do not hesitate to share it by leaving a comment in the section below.

What is Windows Hello: Everything you need to get started

Tired of the same boring, old ways of Windows sign-in? Thankfully, we’ve since long had an alternate method to do that. Known as Windows Hello, you can use this method to sign in to your Windows without any hassles. Here’s everything you need to get started.

What is Windows Hello?

Windows Hello is a way to sign in into Windows computer with the help of PIN, facial recognition, or fingerprint. First introduced in 2015, the method has become famous for the ease of login it gives its users using built-in camera and fingerprint sensors.

As Microsoft puts it on their blog:

Windows Hello is a more personal, more secure way to get instant access to your Windows 11 devices using a PIN, facial recognition, or fingerprint. You’ll need to set up a PIN as part of setting up fingerprint or facial recognition sign-in, but you can also sign in with just your PIN.

These options help make it easier and safer to sign into your PC because your PIN is only associated with one device and it’s backed up for recovery with your Microsoft account.  

How to set up Windows Hello on your PC?

To enable or set up Windows Hello on your PC, you first have to apply a PIN on your device, which then makes your PC compatible with Windows Hello. You can then store this PIN either in your Microsoft account or somewhere safe in the physical world, say, a handy notepad.

Here’s how you can set up Windows Hello on your PC:

  1. Go to the Start menu search bar, type in ‘settings,’ and select the Best match.
  2. Head to Accounts > Sign-in options.
  3. Under Ways to sign in, you’ll see different methods to log in to your Windows.

Windows 11 account sign in

Of these, Facial recognition, fingerprint recognition and PIN, are the methods relevant in Windows Hello that we can rely on to sign in to the Windows system.

Setting up a PIN

Let’s first learn how to set up a PIN. Expand the PIN tab by clicking on the downward arrow, and click on Set up. If you’d set up a password for your Windows computer, then a new dialog box asking for a password will pop up. Enter your login password and hit Enter.

Now in the next dialog box, enter and confirm a strong PIN, and hit OK. As soon as you do that, a new dialog box will pop up. You’ll then get asked to verify your Microsoft school or work account. Do this and your account will be successfully set up.

Logging in through a fingerprint

You can also create a Fingerprint login through Windows Hello. For this, you’ll need a solid fingerprint sense reader though. If you’ve that you’re all set. Similar to how you set up the PIN above, head to the Sign-in menu in your Account Settings and from there, follow the steps below. Here’s how:

  1. Click on the Fingerprint recognition tab. When it expands, click on Set up.
  2. In the Windows Hello set up, click on Get started.
  3. In the Windows Security dialog box, enter the PIN you set up earlier for verification.
  4. Now put your finger on the sensor. Do this repeatedly until the setup is complete.
  5. Click on Next to get different angles for your finger.
  6. Your fingerprint will be set up in a few minutes. Finally, click on Close.

Set up facial recognition

Last but not the least, you have the facial recognition feature of Windows Hello. For this to work, you’ll need to have a special camera customized for infrared imaging(IR).

Once again, to set it up, you have to head to the Sign-in options as we did above. Once you’re there, follow the steps below:

  • Expand the Facial recognition option and click on Set up.
  • Click on Get Started to being the facial recognition set up.
  • Look straight in the camera while it begins scanning your face.
  • Finally, click on Close.

That’s it. Your PC will now look for facial recognition the next time you turn on your PC or wake it up from sleep.

Remove the Windows Hello

You can easily remove your Windows Hello log-in. Simply click on the relevant Windows Hello method you’re using, and click on Remove. Do this, and the Windows Hello login settings will be removed from your Windows.

All about Windows Hello

We hope this short guide helped you get familiar with Windows Hello. If you are or know someone who has trouble with remembering or dealing with passwords, then Windows Hello is just what you’re looking for: a handy and secure substitute for the usual password-based sign-ins.

Future of Hybrid Work: Microsoft eats its own dogfood, runs on Windows 11

At today’s Future of Hybrid Work event, Microsoft detailed how it has recently deployed Windows 11 to some 190,000 devices across the company. In a five week deployment, which the company calls “the fastest deployment of and operating system in company history,” Microsoft says the upgrade was “so straightforward and fast is was almost a non event.”

The upgrade was handled by the Microsoft Digital Employee Experience org, using the same processes it supplies to customers, including the Windows Update for Business Deployment Service. Like most companies, all of Microsoft’s computers don’t meet the heightened system requirements for Windows 11, and not all computers were upgraded. Microsoft was able to communicate the system requirements early, and plans to upgrade its older computers on a regular replacement schedule, managing both Windows 11 and Windows 10 devices until the upgrade is complete.

Microsoft used the Feedback Hub internally as well as the company’s support teams to monitor feedback and resolve issues, but even though “employees are very vocal when it comes to giving us feedback about our products and features,” the company didn’t see an uptick in support contacts.

If anyone should deploy Windows 11, it’s Microsoft, of course, but it’s interesting to see that they have made the transition internally for the most part, and done it without significant issues.


The Future of Hybrid Work: Microsoft expands cloud based Windows 365 capabilities

Microsoft introduced Windows 365, its cloud based version of Windows running in the cloud, back in August of last year. Today, in a Future of Hybrid Work presentation, the company introduced a number of improvements to Windows 365. Centered around ways to make it easier to log in to Windows 365 and manage both a local and cloud based version of Windows, these improvements include Windows 365 Boot, Windows 365 Switch, a new Windows 365 app, and Windows 365 offline.

Windows 365 Boot

For temporary front-line worker scenarios, allowing users to be able to seamlessly log in to their cloud PCs, or to be able to have a dedicated machine set to log in to Windows 365, Windows 365 Boot makes it possible to designate a Windows 365 Cloud PC as a primary Windows experience, and be able to log in directly to the cloud version of Windows. Similar, apparently, to being able to dual boot a machine, Windows 365 Boot provides direct access at startup to Windows 365.

Windows 365 Switch

For users who need to use both a local Windows machine and a cloud based Windows 365 instance, Windows 365 Switch will act similar to how Task Switcher does today, allowing users to move between local and Cloud PC desktops using familiar keyboard commands or mouse-click or swipe gestures.

Windows 365 app

A new Windows 365 app will allow users to begin the Cloud PC experience just by opening an app in Windows, and to be able to tailor settings, profile, and work style from within the app.

Windows 365 Offline

For some user scenarios, internet connectivity isn’t always possible, and Windows 365 Offline will allow users to continue to work even when disconnected, and then have their work automatically synced back to Windows 365 once connectivity is re-enabled.

Microsoft is currently offering Business and Enterprise plans for Windows 365, starting from about $31/mo per user. These new entry points for Windows 365 could make it easier to get up and running with a Cloud PC for users in a number of different scenarios.

Future of Hybrid Work: Microsoft promotes Windows 11, more security improvements, endpoint manager

Microsoft is holding a Future of Hybrid Work event today, building on the 2022 Work Trend Index announcements they made a few weeks ago. While the future of work may have been already trending toward a hybrid workplace, where workers not only come in to an office but frequently work from home or on the road, the pandemic has greatly accelerated the pace of that adoption. According to Microsoft some 73% of employees want flexible or remote options, and want them as permanent options. Clearly, a hybrid work environment is here to stay.

At the event, Microsoft is promoting Windows 365, a cloud based version of Windows with new easier ways to log in and use, and Windows 11 itself. Taking time to promote a number of features already announced for Windows 11 Insiders, the company is promoting a number of new and upcoming features, including app folders, live captions, improvements for Focus, and touch snap layouts, along with official recognition of Tabs for File Explorer.

Microsoft is taking steps to double down on the heightened security requirements for Windows 11, pointing out upcoming new security enhancements including the Microsoft Pluton security processor, enabling HVCI by default on a broader set of devices, Smart App Control, Credential Guard on by default for Windows 11 Enterprise, Personal Data Encryption, and Config Lock.

Microsoft is also announcing plans for improvements to Microsoft Endpoint Manager, to make it easier for organizations to manage hybrid work with new cloud based Microsoft 365 plan, which will include remote help (available now), and new ways to optimized the digital endpoint experience.

If you were expecting a number of new announcements on long expected Microsoft offerings like the Microsoft Loop app or One Outlook, this apparently is not the event for that. Microsoft is beginning to take the next steps toward selling Windows 11 to the enterprise, and is doing so with increased security, a new focus on hybrid work where workers are just as likely to work from home as from the office, and promotion of some of the features that make Windows 11 stand out from Windows 10


Opera vs Torch: Here’s Everything You Need to Know

Several major web browsers dominate the market, but many other browsers offer some unique features you don’t know about.

One of these applications is Torch, an interesting web browser with several unique features. If you haven’t heard about it, this is an excellent chance to familiarize yourself.

In today’s guide, we will compare Opera and Torch browsers and find out which is better for you.

How do I download Torch on PC?

Note icon NOTE
Torch browser is not available for download from the official source. You may still download old versions of the browser from third-party websites, but it’s not recommended to do so.

Opera vs Torch, which one should you use?

Visual appearance

Opera has a sleek user interface, and all of its features are easily accessible. If needed, you can easily customize the start page and remove news, weather, and suggestion widgets if you don’t want to use them.

The interface also has a sidebar that is used to access certain features quickly, but if you don’t plan to use it, you can easily hide it.

On the other hand, Torch is more similar to Chrome in appearance, so some users might feel more familiar with it.

Both browsers are based on the Chromium engine, and when it comes to the user interface, we think that Opera has a more streamlined and overall better user interface than Torch.

➡ Feature comparison

Opera: Optimized for productivity and security

Opera browser is well-known for its features, and unlike many browsers, Opera comes with a built-in ad blocker, so you can browse the web freely without any annoying ads.

When it comes to tab management, Opera achieves this thanks to the Workspaces feature. By using it, you can easily separate your work and personal tabs and make your tabs neatly organized.

Of course, you can move the tabs between workspaces as you wish. All workspaces are available in the sidebar, so you can access them with a single click.

Another useful productivity feature is the ability to search open tabs. You can easily find any tab simply by typing its name or by searching for its content.

If you like browsing the web and organizing pages, you might be interested in the new Pinboards feature. With it, you can organize your favorite websites for quick access.

This feature works similarly to bookmarks, but one significant difference is the ability to add thumbnails, titles, and descriptions to saved pages. By doing so, you can easily find any page that you have saved.

The Pinboards feature also works with images, and it’s fully compatible with Opera’s built-in Snapshot feature. Using this feature, you can easily screenshot any part of a web page.

Basic editing is supported, so you can turn your screenshot into a meme, blur elements, add arrows, add text or emojis or highlight various segments.

Once you’re done, you can save the page to Pinboards, copy the image to the clipboard, or save it on your PC.

The browser also has integration with various messaging services, such as Facebook Messanger, WhatsApp, VK, and Telegram.

Opera also offers integration with social networks, so you can use Twitter and Instagram in the sidebar if you want to.

If you want to browse the web while listening to music, we’re happy to inform you that a built-in player lets you stream music from Apple Music, Deezer, Spotify, and YouTube Music.

In case you need to quickly share a link, note, or file between your PC and phone, you can do that seamlessly with the Flow feature.

To use it, you must have Opera installed on your PC and phone and scan the QR code to authorize the connection. After doing that, you can seamlessly send data between the devices.

Lastly, we must mention the built-in VPN allowing you to browse the web securely without fearing third parties viewing your data.

Overall, Opera offers some exciting features, and it’s perfect if you’re multitasking and need to organize your tabs or if you want to keep up with your social networks at all times.

VPN and built-in adblocker make the whole experience more secure and streamlined, so Opera might be the right choice if you want a feature-rich browser.

Opera

Browse the web privately without ever dealing with ads with the Opera browser.
Get it now Visit website

Torch: Interesting but unnecessary features

Although not as familiar as Opera, Torch makes it up with extensive functionality. The browser supports the drag-and-drop feature, which you can use to perform web searches and search for images or YouTube videos.

Sharing is also a big part of this application, and thanks to the integrated sharing feature, you can share links on Facebook and Twitter with just a single click.

Speaking of social media, this browser has a Facelift feature that will redesign your Facebook page with a unique and new look.

By using this feature, you can change the background, fonts, and colors of your Facebook profile. You can also pick one of many available themes. Remember that these changes are only visible to other Torch users.

The browser also has built-in games, and all games are sorted into different categories. We felt that this feature was unnecessary and it might be appealing only to a younger audience.

The software also offers a built-in download accelerator to speed up your downloads. This is achieved by splitting the files and downloading them at the same time using multiple connections.

As a result, your download speed should be faster. Speaking of which, the software also has a Media Grabber feature that you can use to download streaming audio and video with a single click.

Besides media downloads, Torch also has built-in torrent support, allowing you to download torrents right from your browser without relying on additional software.

We have to mention that there’s also a built-in Torch Player that can be used to play multimedia files, and it can even play torrent files while they are downloading.

Lastly, the Torch Music feature allows you to create music playlists and play all sorts of audio files right in your browser.

Torch browser offers some unique features, but we can’t shake the feeling that some seem unnecessary, such as Facebook Facelift and games. Overall, it’s a decent browser but filled with unessential features.

Does the Torch browser still exist?

We have to mention that Torch Browser seems discontinued, and the download link on its website leads to Avast Secure Browser download, so you might not get the chance to try it.

If you want to know more about this software, visit our Avast Secure Browser vs Opera guide to find out which is better.

Conclusion

Opera has been present in the browser market for decades, and it’s known as a trusted and reliable browser. It has excellent productivity features that allow you to organize your tabs with ease.

It’s also a great choice if you’re a social network user and you want to keep up with your friends and followers on social networks.

Thanks to the features such as built-in AdBlock you can enjoy an ad-free browsing experience and with a free and unlimited VPN, you can rest assured that your online activity is completely private.

On the other hand, the Torch browser doesn’t have too many features, and the available ones can be useful, but it’s not something that users are going to use on a daily basis.

There were also complaints in the past that the browser comes bundled with unwanted software that can affect your browsing experience, so you should keep that in mind before installing it.

If we had to pick between the two, our choice would be Opera because it offers a better interface and great productivity features, plus there are a built-in VPN and adblocker to top it off.

Do you want to learn more about web browsers? If so, we suggest reading our best browsers for Windows 11 guide for more information.

What is your browser of choice? Let us know in the comments section below.

How to completely remove the annoying “Let’s finish setting up your device” message on Windows 10 and Windows 11

Windows 10 and Windows 11 come packed with features designed to make your work and life easier, including Microsoft 365 and Windows Hello. But if you don’t take the time to set them up, Windows will constantly remind you with a “Let’s finish setting up your device” message. If you want to turn this message off on Windows 10 and Windows 11, here’s what to do.

Let’s finish setting up your device

Typically, you will see the “Let’s finish setting up your device” message after you install a Windows Update and restart your PC. If you haven’t done so already, Windows will point out that you haven’t set up Microsoft 365, Windows Hello, OneDrive, Phone Link, or synchronized your activity data between your Windows PCs.

If you ever find yourself in this situation, don’t worry! You have two options; you can choose to “Continue” to proceed to setup those services you have not yet set up, or “Remind me in 3 days” to remind you to set up these services later.

At this time, there is no option to decline the “Let’s finish setting up your device” message on either Windows 10 or Windows 11.

Shut off reminders on Windows 10

In order to shut off these “Let’s finish setting up your device” reminders on Windows 10, here’s what to do.

1. Go to Settings > System > Notifications & actions

2. Uncheck the checkboxes as shown

It might be a good idea to uncheck all of the boxes or toggle off Get notifications from apps and other senders. Even after you save these settings, a future Windows Update may be pushed to your device and revert everything back to the Windows “preferred” default settings.

Shut off reminders on Windows 11

Microsoft may have learned from its mistakes on Windows 10 and provided an easier option to disable the reminder messages from appearing on your Windows 11 PC. Here’s what to do.

1. Go to Settings > System > Notifications
2. Uncheck both checkboxes at the bottom of the Notifications menu

If you are an experienced Windows 10 and 11 user, these pop-ups can be infuriating. Equally infuriating is that even after you choose and save your settings, a future Windows Update can (and probably will) revert your Windows 10 and Windows 11 settings back to Microsoft’s “preferred” setting.

So if you are sick and tired of being overwhelmed with extra Windows notifications that you don’t want or need, follow this guide after your next Windows Update just in case. Of course, that annoying pop up won’t aggravate you anymore, but there is no guarantee that it won’t re-enable it in a future Windows Update? to completely get rid of it yet.

Here’s April’s Xbox Game Pass titles, including MLB The Show 22, Life is Strange: True Colors

The list of new games coming to Xbox Game Pass in 2022 are now out, and it’s a pretty good lineup. Big games include MLB: The Show 22, Life is Strange: True Colors and more.

Available today, for Game Pass subscribers on April 5 are two new titles, Cricket 22, and MLB the Show 22. These are sports simulators, with Cricket 22 being called the most comprehensive cricket game ever, with 4K visuals, and hyper-realistic cricket action. MLB The Show 22. meanwhile, is the latest entry to the popular baseball game. It’s a follow-up to MLB The Show 21 which made its debut on Xbox for the first time last year. Both these games are on Cloud and Console.

Other games coming soon to Xbox Game Pass include cyber noir point and click adventure, Chinatown Detective Agency, which will be available on Cloud, Console, and PC on April 7. That’s then followed up by some EA Play Titles, which are coming to Cloud on April 7. These include Dragon Age 2, Plants vs. Zombies: Garden Warfare, Star Wars: Squadrons. See below for the other Game Pass titles for April.

  • Life Is Strange: True Colors (Cloud, Console, and PC) – April 12
  • Panzer Corps 2 (PC) ID@Xbox – April 12
  • The Dungeon of Naheulbeuk (PC) ID@Xbox – April 12
  • Lost In Random (Cloud, Console, and PC) EA Play – April 14

With the addition of these new games, several other titles will be leaving the Xbox Game Pass catalog this month. MLB The Show 21, Rain On Your Parade, F1 2019, as well as The Long Dark and Pathway are scheduled to be removed soon. If you want to keep playing these games by April 18, you can buy them for 20% off.


Opera VPN Vs. NordVPN: Which Is The Better Choice For 2026?

As the Internet continues to grow and evolve, people are valuing their online privacy and security more and more. One of the best ways to keep your data safe while browsing the web is with a Virtual Private Network (VPN).

A VPN encrypts your web traffic by creating a secure connection between your device and a private VPN server. This connection shields users from third-party tracking and cyber-attacks.

Not only do VPNs protect browsing activity, but it also allows users to change their location to anywhere in the world for access to geo-restricted content.

However, every VPN service offers different features and functions. This article will take a look at Opera VPN and NordVPN and compare their features so you can determine which is the best for your needs.

Is VPN safe?

Reputable VPNs are entirely safe and secure. A good VPN will protect user data and include the highest level of security so even the most skilled hackers can’t breakthrough.

A great VPN will ensure that the tunnel between a user’s IP address and the remote VPN server is impenetrable. The browsing data and downloads that take place on a user’s PC are completely secured and protected with a VPN.

VPNs safe.

However, users must be careful with what VPN they choose as fake VPNs are circulating that are scams and compromise user data. Users should make sure that the VPN they’re using is reputable and high-quality. Check out our top suggestions for the best VPNs for Windows 10.

Opera VPN vs. NordVPN: Which is better?

➡ Features

NordVPN is a leading VPN service and for good reason. With its Threat Protection feature, cyber-attacks are prevented before anything malicious can happen. NordVPN identifies malware, prevents users from accessing malicious web pages, and blocks trackers and ads.

With Double VPN, users’ data is routed through two VPN servers instead of one for an extra layer of encryption. This feature makes devices secure and is recommended for users who work with sensitive information. However, enabling Double VPN can slow down web surfing speed.

The VPN Kill Switch with NordVPN is a security measure that will automatically block internet access on devices if users lose connection for any reason. The connection will remain blocked until the encryption is restored.

NordVPN threat protection feature.

Opera VPN is a fast and free VPN service that’s already built into Opera browsers. There is no registration required and users can access it straight from their browser.

When enabled, Opera VPN will automatically connect users to the fastest server relative to their location for an optimal browsing experience. However, Opera VPN only works with Opera browsers and will not protect users outside of their browser.

Opera VPN features.

➡ Accessibility

Opera VPN is free for all and offers unlimited bandwidth. Anyone with an Opera browser has access to the VPN without needing to sign-up or pay hidden fees.

Opera VPN is also available for mobile devices with an Opera browser installed. Users can also customize the VPN to only work on private tabs.

Opera VPN for mobile devices.

With the NordVPN mobile app, users can ensure their mobile devices are secure. The app is available for both Android and iOS. NordVPN protects users whether they’re using a home network, public Wi-Fi, or a mobile network.

NordVPN allows users to connect up to 6 devices at once with one account. Users can even use the VPN on smart TVs. However, NordVPN is not free and operates on a monthly subscription basis of $11.95 / month.

NordVPN mobile app.

➡ User privacy

NordVPN is known for its top-notch security and privacy and ensures total anonymity while browsing. With its strict no-logs policy, NordVPN never collects user traffic as it passes through its servers.

NordVPN security

With military-grade encryption, users can trust that their data is secure with NordVPN. This VPN is not free, but that means the company doesn’t get revenue from anything but its subscription. So users can rest easy in the fact that NordVPN never sells user data.

Opera VPN never asks for a login, email, or any personal information to use. While Opera VPN states they never log any browsing-related information from users, they do access user locations to display targeted news and ads.

Even though it’s a free service, Opera VPN is secure, but NordVPN offers a higher level of privacy protection.

➡ Performance

Opera VPN doesn’t offer as many servers as NordVPN meaning it doesn’t have access to as many countries. Opera VPN only allows users to choose from three regions: the Americas, Europe, and Asia. That means Opera VPN isn’t the best for targeting a specific country to get past any geo-restrictions.

Because Opera VPN isn’t weighed down by a ton of servers, it runs a lot faster than other VPNs and doesn’t affect browsing performance as much.

Opera VPN regions available.

NordVPN, on the other hand, offers servers in 59 countries and is much more successful at bypassing geo-restrictions. Users can pick a server based on the country rather than region.

Browsing and download speed is reduced slightly with any VPN, and NordVPN is no exception. Most users, however, don’t notice the speed decrease unless they are on a fast network. NordVPN is ranked as one of the fastest VPNs and doesn’t affect video streaming.

NordVPN advanced options.

➡ Opera VPN vs. NordVPN: Final verdict

While Opera VPN has smaller servers and less extensive features, it’s a great option for those on a budget and only does casual browsing. It’s light and simple for everyday browsing using Opera. Because Opera VPN is free, it only offers the bare minimum when it comes to security.

Users cannot pick specific locations with Opera VPN, so if you’re trying to access UK Netflix from France, Opera VPN can’t help you with that. However, Opera VPN is significantly faster than the average VPN and doesn’t affect surfing speeds.

Opera VPN vs. NordVPN.

If you’re someone who deals with sensitive information and needs extra layers of protection and security, then NordVPN is the way to go. It requires a monthly fee, but it goes above and beyond to ensure your entire device is protected.

With access to servers in 59 countries, users can use NordVPN to get past geo-restrictions and access content only available in certain countries. It does slow browsing speed, but not significantly.

So, the decision is up to the user and their needs to determine the best VPN. Opera VPN is free, fast, and secure, but doesn’t offer the same level of protection and features as NordVPN.

Leave a comment down below with what VPN you prefer to use.

LEGO Star Wars: The Skywalker Saga is now live on Windows and Xbox

After numerous delays, the LEGO Star Wars: The Skywalker Saga video game has finally launched on Microsoft’s Xbox One and Xbox Series X console families, Windows PC, and all other supported platforms.

This latest LEGO video game is the first one in the long-running franchise to feature a version built for the newer current-gen Xbox Series X console generation and supports both 4K and HDR when played on that console. LEGO Star Wars: The Skywalker Saga supports Microsoft’s Smart Delivery initiative, however, which means that buying it on either Xbox One or Xbox Series X console generation will unlock the other version for free.

LEGO Star Wars: The Skywalker Saga features characters and story content from all nine of the main Star Wars episodic films and also supports a series of downloadable content (DLC) packs which feature characters from the various Star Wars film and TV spin-offs.

The Solo: A Star Wars Story and The Mandalorian Season One DLC character packs are currently available to purchase on Xbox consoles though owners of the LEGO Star Wars: The Skywalker Saga Deluxe Edition will receive these and all future DLC packs (seven packs in total) for free.

The Mandalorian Season One character pack includes Din Djarin, Cara Dune, Greef Karga, IG-11, and Kuiil while the Solo: A Star Wars Story DLC unlocks Han Solo (Young), Chewbacca (Young), Lando (Young), Qi’ra, Tobias Beckett, and Enfys Nest.

Owners of the LEGO Star Wars: The Skywalker Saga Deluxe Edition will also receive an exclusive Classic Obi-Wan Kenobi character that isn’t available anywhere else.

Want more Xbox gaming news? Give us a follow on Twitter and Facebook.

Fortnite and Xbox raised over $144 million for Ukraine

Late last month, Epic Game announced a fundraising initiative for Ukraine that would see them and Microsoft’s Xbox donating all revenue from the Fortnite video game earned from March 20th through to April 3rd.

Within the first 24 hours, the initiative raised over $36 million dollars and now, with the fundraising period ended, the total amount of money raised for Ukraine sits at over $144 million. Definitely an impressive amount.

As promised in the initial announcement, all of the raised funds will be divvied up between Direct Relief, UNICEF, World Food Programme (WFP), the UN Refugee Agency, and World Central Kitchen.

“Our deepest thanks to everyone who joined us in supporting humanitarian relief efforts for people affected by the war in Ukraine,” Epic Games posted on their official Fortnite Twitter account earlier this week.

Microsoft’s head of Xbox, Phil Spencer, also shared a response to the fundraising efforts on his own account. “Really incredible to see how the gaming community can have impact beyond the playing of games,” his tweet reads. “Thank you Fortnite for putting this together, inspiring to see the results.”

Those wishing to donate money to help Ukraine now that the campaign has ended are encouraged to donate directly to the above mentioned organizations directly.

In other Fortnite news, the game’s April Crew Pack is now live for Fortnite Crew subscribers to claim in-game and a major content update is set to roll out today which will add a variety of new outfits and the special Chapter 3 Season 2 Battle Pass appearances for those who are already over Level 100 to unlock.

That’s How You can Use the Opera Browser for Roku

Roku is one of the most used streaming devices for TVs. Roku connects to a TV through HDMI or is pre-installed within smart TVs. The device allows users to stream content through downloadable channels, such as Netflix or Hulu.

Most digital media players, like Roku, don’t offer a built-in browser even though it would be convenient for many users to have the option of one. While there is no way to download and install Opera to Roku, there are some loopholes to get around this.

For Roku users, Opera One is the ideal browser because it’s lightweight and fast. Keep reading for methods on how to use Opera One on Roku devices.

Can I download browsers on Roku?

There is no native built-in browser for Roku and there is no option for users to download their favorite browser. In the channel store, there are only two web browsers offered: Web Browser X and Poprism Web Browser.

While these two browsers are readily available on Roku, they are not ideal. Many users have reported that both Web Browser X and Poprism have clunky and outdated user interfaces and page formatting is wonky.

For a more in-depth look at browsers for Roku, check out our recommendations for the best browser for Roku devices.

Despite not offering native support for Roku, it has some features that are worth the hassle. Opera One uses very few CPU and RAM resources and has a few speed-boosting features like a battery saver.

For those of you who access Roku from your computer, the setup is much simpler, just install the app. You will be able to stream buffer-free and access geo-blocked content if you enable the VPN.

Opera One

Watch your favorite shows seamlessly using this lightning-fast browser.

How do I use Opera One browser for Roku?

1. Cast from Android smartphone

  1. On your Android device, open Settings.
  2. Open Bluetooth & Device Connection. Open bluetooth and device connection.
  3. Tap on Cast. Tap on cast.
  4. Toggle Enable wireless display. Enable wireless display.
  5. Select Roku from under Nearby Devices.
  6. Browse using Opera One.

If you don’t have a PC handy, you can cast Opera One directly from your smartphone. Make sure your mobile device is connected to the same network as Roku in order to connect properly.

2. Cast from Opera One

  1. Open Opera One on your PC and go to a web page.
  2. Right-click anywhere on the screen and select Cast. Cast from Opera browser for Roku
  3. From the devices shown, select Roku. Connect to devices.

Users can use this method to cast Opera One to Roku and control the browser from their PC while displaying on the big screen. This is a quick and easy method to use Opera One on Roku, but only if there is a laptop or PC on hand.

3. Screen mirroring

  1. Ensure the screen mirroring setting is enabled on Roku.
  2. On your PC, click on Start then Settings.
  3. In System, click Display. Under system click display.
  4. Under Scale & Layout, select Multiple Displays. Select multiple displays.
  5. Click on Connect located next to Connect to a wireless display. Connect Roku.
  6. Select Roku Player from the list of devices.
  7. Open Opera One and start browsing.

This method is similar to casting straight from your Opera One browser only now everything on your screen will be cast onto your Roku. Like with the other methods listed above, make sure your Roku device is connected to the same network as your PC.

Opera One is a lightweight browser that doesn’t use up a ton of resources. It’s also one of the most secure browsers, with an integrated VPN and ad-blocker. The unlimited VPN not only keeps data secure but also allows users to stream from anywhere in the world.

Before you go, if you ever want to use Opera on Samsung TV, we have a great guide that can help you with that.

This guide is geared towards Windows 11 users; however, you can cast to Roku with Windows 10. Comment down below which method worked for you, or let us know if you had any issues connecting the Opera One browser to your Roku device.

5+ fixes for the Logitech G Pro wireless double click error

Logitech makes computer accessories that are used all over the globe, and they are recognized for excellent quality without the high cost. Even though the company is famed to have a very experienced mouse and keyboard manufacturing team, consumers have reported that the mouse double-clicks instead of a single click while in use.

This tendency may be seen in older models as well as new ones. Logitech has acknowledged the issue and has supplied soft fixes to resolve it.

We’ll go through all possible repairs in this post and show you all our recommended solutions. 

What makes my Logitech G pro wireless mouse double click?

Double-clicking is a typical issue, especially if you’ve been using your mouse for a long time. To summarize, below are a few reasons why the Logitech mouse may double-click rather than a single click.

  • Driver issues: It’s possible that the drivers on the PC aren’t functioning correctly. They could be outdated or corrupt, which can cause this problem, and it could also stop your Logitech program from starting.
  • Hardware issues: We’ve seen multiple cases where a mouse would double-click instead of single-clicking due to hardware issues. In this case, you should attempt a physical repair, but there are no promises, especially if you have no experience in taking apart gadgets.
  • Static charge accumulation: If your mouse is used often for long periods, a static charge may build, causing the problem.
  • Bad spring: Due to usage, the spring within the clicking mechanism may become loose with time. You can attempt to correct this, but there are no assurances that it will be successful.
  • Mouse settings: Your mouse may be configured to double-click rather than a single click. This functionality has been in Windows PCs for a long time and can give the impression that the mouse is malfunctioning.

Note: Before continuing, try connecting the mouse to different computers. This will you determine if the issue is related to Windows settings or a hardware issue.

How can I correct a Logitech G Pro Wireless mouse double click problem?

1. Restart your computer

  1. Click the Start icon, click the input/output button, and select restart.
    g pro wireless not showing up in logitech gaming software

This is the simplest solution. Restarting your computer frees up RAM and removes any background programs interfering with your hardware or mouse.

It may improve the performance of your computer in by removing minor faults. Before going on to anything more sophisticated, this is an excellent remedy.

Skip to the following step if you’ve restarted many times and the problem persists.

2. Update the mouse drivers

  1. Click on the start menu, type device manager, and select the Device Manager app.
    g pro wireless double click
  2. Expand the option for Mice and other pointing devices, right-click on your mouse, and select the Update Driver option.
    g pro wireless double click

You may also use third-party tools to simplify the process of driver updates and maintenance. Outbyte Driver Updater is a trusted option and comes highly recommended.

Outbyte Driver Updater allows you to check your whole PC for missing or obsolete drivers. After that, you may choose to either update outdated drivers or re-download missing drivers. This tool is very efficient and compares your drivers to a database of more than 18 million files.

⇒ Get Outbyte Driver Updater

3. Check for static charge

You should turn off the mouse and remove the batteries, then click a few times on the mouse without batteries.

Logitech G Pro Wireless mouse is rechargeable and has a battery life of 60 hours when the RGB is turned off. After being used for a long time, it may build a static charge, and removing the batteries will fix the double-clicking problem.

Note that removing the battery is more complicated than changing AA batteries, especially since the batteries are soldered inside the mouse. Therefore, you should skip this solution if you have no experience soldering.

4. Check your mouse settings

  1. Press Window + R, type control in the Run dialog, and click enter.
    g pro wireless double click
  2. Under the category menu, select large icons.
    g pro wireless double click
  3. Select the mouse menu from the list of categories.
    g pro wireless double click
  4. Adjust the double-click slider to the lowest setting.
    g pro wireless double click
  5. Next, click the start menu, type single click, and select the single click or double click to open the option.
    g pro wireless double click
  6. Click on the General tab and check Double-click to open an item (single click to select) under the Click items as follow section, click Apply, and OK.
    g pro wireless double click
  7. Restart your computer.

5. Uninstall and reinstall the mouse driver

  1. Click on the start menu, type device manager, and select the Device Manager app.
    g pro wireless double click
  2. Expand the option for Mice and other pointing devices, right-click on your mouse, and select the Uninstall device option.
    g pro wireless double click
  3. Close the Device Manager.
  4. Reopen the device manager and click on the Action tab, and select the scan for hardware changes option.
  5. Restart your computer.

6. Claim your warranty with Logitech

To register your warranty claim, go to the support website and fill out an application form with your device’s product specifications and serial numbers.

You may submit a warranty claim if the previous actions don’t solve the double-clicking problem and your mouse is still under warranty. Several people claimed that their mouse began double-clicking almost immediately after turning it on. This seems to be a common issue with Logitech mice.

7. Try repairing the mouse spring

If your mouse’s warranty has expired, you might try replacing the spring on the clicking mechanism. 

Each button contains a tiny click mechanism located beneath the mouse that activates whenever the button is pressed. It’s conceivable that the mechanism’s spring is either damaged or loose.

If you have little expertise in dismantling gadgets, this may disassemble and make your mouse unusable.

These solutions are mainly easy-to-follow fixes, and hopefully, they should help resolve any problem of double-clicking on your G Pro mouse.

While we have not written these fixes in any particular order, we recommend you start by restarting your PC. It is a huge time saver when memory usage is the reason for your mouse malfunction. If everything else fails, visit our guide on how to reset Logitech G Pro Wireless for more useful information.

Let us know what solution worked for you in the comments.

If you are searching for a reliable mouse for your PC, you will find our 8 best Windows 10/11 PC mouse 2022 Guide very useful.

Posted in Fix

5 Best Hard Drives for Windows 11 [Price & Capacity]

Finding the best hard drive requires more than just Windows 11 support; it must also suit your needs in terms of storage space, speed, and other factors.

Many users praise HDD (hard disk drive) for its significantly high capacity and low price. Despite being slightly sluggish compared to SSD, HDD comes in handy when you need sizable storage.

You easily keep various files, including video, images, and programs, in a single HDD without worrying about space shortage.

So, if you are looking for a suitable HDD for Windows 11 PC on the market, it is very time-consuming. Therefore, we picked out the best ones for you.

What should you know before buying a hard drive for Windows 11 PC?

Before buying the best hard drive, many factors such as transfer rate speed, capacity, and a reasonable price are essential.

For instance, the hard disk spin speed rate, measured by RPM (Revolutions Per Minute), varies between 1200 to 10000. The lower the disk rotation rate is, the slower the reading/writing process is.

Another critical factor to consider before buying an HDD for a Windows 11 PC is the capacity. HDDs have a higher storage capacity than SSDs.

If you want to buy HDD for gaming or archiving large files, the right choice is to pick up HDDs with higher capacities. However, if you are a regular desktop user, you should consider HDDs with lower capacities.

What are the best hard drives for Windows 11?

Seagate BarraCuda 8TB HDD

  • Proven reliability
  • Multi-tier caching
  • 5400 RPM
  • Limited cache

If you are a keen gamer, you probably won’t ignore Seagate BarraCuda 8TB HDD. This hard drive comes with an astonishing capacity of 8 TB.

In terms of speed, it is enough to say that Seagate BarraCuda 190MB/s has a sustained transfer rate speed, which is above an average HDD speed.

Apart from the above competitive advantages, this HDD has some downsides, as received by buyers’ feedback.

It is not a complete dead silent hard drive and makes some low-pitched whirring noise after working for quite a while. So, from the users’ perspective, it’s a huge shortcoming.

Also, you may face some locks up when HDD writes some files. As a result, overall performance might drop because of this issue.

Western Digital Black 4TB 3.5 inch

  • Using Dynamic Cache technology
  • User-friendly setup
  • 5-year warranty
  • Can get hot

This hard disk, somewhat faster than Seagate BarraCuda 8TB HDD (7200 RPM), is superb turbo-like for many uses such as personal, gaming, and business uses.

Considering the capacity, it is a bit lower than giants like the 20 TB WD Enterprise Class HDD series, though its actual capacity varies depending on the operating environment.

The HDD design looks slightly bulky (measuring 5.79 x 4 x 1.03 inches) compared to the 2.5-inch version. This, however, did not prevent it from being ranked second on the list of best hard drives for Windows 11.

Apart from the above hallmarks, it has some cons. Western Digital Black 4TB can get hot because of rotating at a very rapid rate.

So, if there is not enough ventilation or airflow, it runs hot and becomes noisy. Also, it’s significantly pricier (nearly $180) than WD Blue 4TB series.

Western Digital VelociRaptor 1TB

  • High Average drive ready time (8 seconds)
  • Good power usage
  • 5-year warranty
  • Low storage
  • Expensive

Although it is a low-storage HDD, Western Digital VelociRaptor has 10,000 RPM. This HDD is one of the front runners of the Western Digital production line.

Because of its high writing speed, the VelociRaptor is neck and neck with SSDs in reading-writing performance.

Using a SATA 6Gb/s interface backward, the challenger can also transfer large amounts of data at the 500-550MB/s rate in no time.

However, as reported by a few buyers’ reviews, it has compatibility problems with some laptops, especially Dell. Also, VelociRaptor is quite expensive compared to several WD product families.

The cooling system outperforms Western Black 4TB with its icepack kit. Western company has decided to replace the heatsink with an icepack in this HDD series. The icepack acts as a buffer to absorb the heat, making it cool faster.

Seagate IronWolf 6TB NAS

  • IronWolf Health Management monitoring system
  • Superior one million hours MTBF
  • Pricier than non-NAS drives

If you are looking for a 1 to 8-bay NAS-tech storage, IronWolf 6TB NAS is the right choice. It allows you to keep your files online in a centralized disk accessible to multiple users.

Therefore, you don’t fret about files being lost. It is also suitable for NAS professionals and individuals craving to stockpile big files.

However, based on buyers’ reviews, there have been issues with putting the drive into NAS servers such as Synology DS413j. Also, a few buyers reported that access time was higher than standard.

Contrary to Seagate BarraCuda 8TB, it has no vibration. Additionally, its spindle speed reaches 7200 RPM, making it a fuel-injected hard disk.

Also, a powerful 256MB Cache SATA turns it into a world-class HDD and one of the best hard drives for Windows 11.

WD Blue 2TB

  • 2-Year manufacturer’s limited
  • Free backup with Acronis True Image WD Edition software
  • Low power consumption
  • Less value from smaller drives

WD Blue 2TB is one of the popular hard drives. Like most HDDs, WD Blue 2TB is valuable when you want to archive many files. Also, it is helpful for desktop users because of its remarkable storage capacity.

It enjoys a 5400 RPM speed that helps your PC run programs faster. When you compare WP Blue to its competitors, it is more affordable, costing nearly 60 dollars.

The recording head never comes into contact with the disk media, resulting in much less wear on both the recording head and the media, as well as improved drive protection during transport.

Importantly, a free version of Acronis True Image can be downloaded from the Western Digital Support site to backup all of your important data to your new WD drive.

Are HDDs worth buying?

To answer this question, we have to say it depends on what purposes you want to buy HDDs. If you are into storing multiple large files or gaming, undoubtedly, you opt for HDDs.

The only drawbacks of internal hard disks are their mechanical parts, and the time it takes to read and write data. So, if speed is your top priority, we suggest you go for SSDs.

Although HDDs are outpaced by SSDs today, being budget-friendly is one of the perks of hard disk drives.

As a result, it’s best to install the operating system and software on an SSD and keep your data on HDDs. Check out this article if your SSD isn’t performing as well as it should.

If you’re looking for a high-capacity HDD at a fair price, or in other words, the best hard drive for Windows 11, we recommend the Seagate BarraCuda 8TB HDD.