5 Best Software For Joomla Templates [2026 Guide]

Creating Joomla templates is not always the easiest task, especially if you are a design and coding newbie. Don’t despair because there’s also some good news for you.

You will finally be able to create amazing Joomla templates without having to know any web design language.

Joomla template software helps you create professional templates whether you are new to all this or you’re a more advanced user. All you have to do is set some features, choose a bunch of options, and you will be good to go.

Below, you can see a collection of six of the best tools for creating Joomla templates so make sure to check out their sets of features.


What are the best tools to create Joomla templates?

Adobe Dreamweaver

Topping out our list is a leader in web-development tools, Adobe Dreamweaver. This tool has all the tools that you may ever need in order to create professional-looking web pages.

The best part is that you don’t need to know coding at all, since everything is handled internally and automatically.

Just drag and drop elements, set their interactions, import files from other Adobe products such as Photoshop, Audition or After Effects, and let everything blend by itself.

The abundance of tools together with the intuitive interface is what makes Adobe Dreamweaver a borderline product for both professionals and amateurs alike.

And the best part is that you can try it for free during a 7-day trial, and then decide on whether to buy it or not.

Here are some of Adobe Dreamweaver’s best features:

  • Code Completion
  • Developer Workspace
  • Real-Time Browser Preview
  • Code Introspection
  • Code Themes
  • Starter Templates
Adobe Dreamweaver

Adobe Dreamweaver

Create intricate and and unique templates with the help of Adobe Dreamweaver’s abundance of tools!
Free trialVisit website

Artisteer – Automated Web Designer

Artisteer claims to be the first and only Web design automation product that is able to instantly create a fantastic looking and unique website templates and blog these as well.

Check out the most important features that you’ll get the chance to try out if you decide to use this tool:

  • You will be able to design some pretty awesome blogs and cool web templates in just a few minutes.
  • Using this tool will turn out fun and easy.
  • You will be able to export the final result to Blogger, Joomla, WordPress and more CMS products.
  • There’s no need to learn Photoshop, HTML CSS or other languages.
  • You can preview, download and edit online websites and template samples as well.
  • Using Artisteer, you can instantly become a web-design expert, with coding, editing graphics and creating Joomla templates abilities.

⇒ Download Artisteer


Themler – Visual Template Designer

Using Themler, you will be able to create amazing CMS themes and templates and as well.

The program has lots of customization options and a large set of functionalities, while also being versatile because it works on multiple platforms.

There’s more to this software so check out other exciting features that are packed in it below:

  • You can also create content for websites, Landing pages, and eCommers pages as well.
  • In order to be able to use this software, you have to install the CMS template or run it on the desktop.
  • Add the sections included in the library or use the suggested ones.
  • The software’s interface is a drag-and-drop one, and you’ll enjoy some vibrant components.
  • You will get the chance to edit texts, images, buttons, and components.
  • You can also edit pages, layouts, templates, and styles.
  • After you’re done, you can publish the finished result Live, or you can export it as a .zip with content.

⇒ Download Themler


Template Creator

Template Creator lets you easily create amazing Joomla templates in under 10 minutes. The software is great for beginners and professionals alike, and it has a comprehensive interface.

It’s really worth taking a look at some of its best features:

  • You will be able to use various layout with editable columns, widgets, and color schemes as well.
  • Most customization is based on point-and-click.
  • You will also get the chance to use a CSS custom code section in order to style your favorite template if you’re a web designer.
  • This tool is ideal for users who don’t have any web development experience, but who also have a strong desire to create Joomla templates for professional and personal use as well.

⇒ Download Template Creator


Linelabox

If you want to easily create a Joomla template, perhaps you might be interested in this online tool.

This tool allows you to create a completely responsive layout and add use unlimited grid layouts. In addition to layouts, you can choose from an abundance of menu styles, colors, headers, and footer styles.

Another great feature is the unlimited number of undo steps that you can take, so you won’t cause any irreversible changes to your projects.

In addition, this tool offers advanced typography features so you can easily customize your text any way you want. Speaking of typography, you can choose between 850+ available fonts.

Linelabox also has many pre-built blocks and templates to choose from, and you can also pick between many module styles and variations.

We also have to mention that there are over 1,000,000 images available that you can use as your background.

The service also has a mobile editor as well, so you can ensure that your Joomla template will work perfectly on mobile devices. There’s also live editing feature available, so you can easily adjust your CSS or HTML.

We also have to mention that every module is fully customizable and thanks to the drag and drop interface you should be able to create Joomla templates with ease.

Linelabox is a great tool, and thanks to the drag and drop interface and abundance of modules, you should be able to create Joomla templates with ease.

Here you can find some of it’s key features:

  • Simple to use drag and drop interface
  • Over 1,000,000 images available to use
  • Responsive layout
  • Unlimited grid layouts, menu styles, and colors
  • Advanced typography with over 850 fonts available
  • CSS3 animations
  • Live editing

⇒ Try Linelabox now


These were our top five picks for tools that allow you to create Joomla templates effortlessly. Make sure to check out their sets of features in order to make the most informed decision for your skills and needs.

Here’s How to Open RW2 Files in Windows

An RW2 file is a raw image file format, specifically a camera RAW file created by a Panasonic digital camera like the LX3 or LX5. If you’re wondering how to open an RW2 file, continue reading.

This type of file has a RAW raster image just as the camera’s sensor captured it, and you can edit it to adjust color, exposure, and other properties by using an image or photo editor.

The RW2 file stores uncompressed image data from the sensor and is ready for print and view. Photographers can decide how to use and/or develop the images via a special program, but access to the raw data also gives them the flexibility to process them or completely alter them.

To open RW2 files, you will need a program that can help you open it, whether it is free software or a paid-for program. Using a dedicated app is also recommended when looking for convenient methods to open SDR Files on Windows.

How to open RW2 files in Windows 10?

Adobe Photoshop – Best RW2 file opener

Photoshop CC 2020 - best Fuji RAW viewer and converter software

Adobe Photoshop is the undisputed king of photo editors, known and used by so many that its name has become a verb.

There’s no need for an introduction to Adobe Photoshop because we all know what it’s capable of and how many features it offers.

While it does have a bit of a learning curve, you will find a plethora of training materials online, thanks to its widespread use in the photo industry.

From professional photographers to hobbyists, Photoshop caters to all, and the satisfaction you get when you master it is enormous.

Once more, when you’re working with RAW files, like the RW2 format, you can use the power of Adobe Lightroom to change highlights, shadows, focus, and more.

One can even make an entire career out of Photoshop, so you should jump on board and get Photoshop and start learning its powerful tools:

  • State of the art content-aware fill
  • GPU-based effects (blur, bokeh, highlights, etc.)
  • Cross-platform support
  • 3D support
  • Intelligent selection and masks

Adobe Photoshop

Explore the vast library of features and customization options with Adobe Photoshop!
Free trial Visit Website

2. FileViewer Plus – Universal file viewer

file viewer plus 2 - recommended software

Raw files are well supported with this program; you can open photos from 600 camera models. The Panasonic RAW image RW2 is on the list of over 300 file types supported by File Viewer Plus.

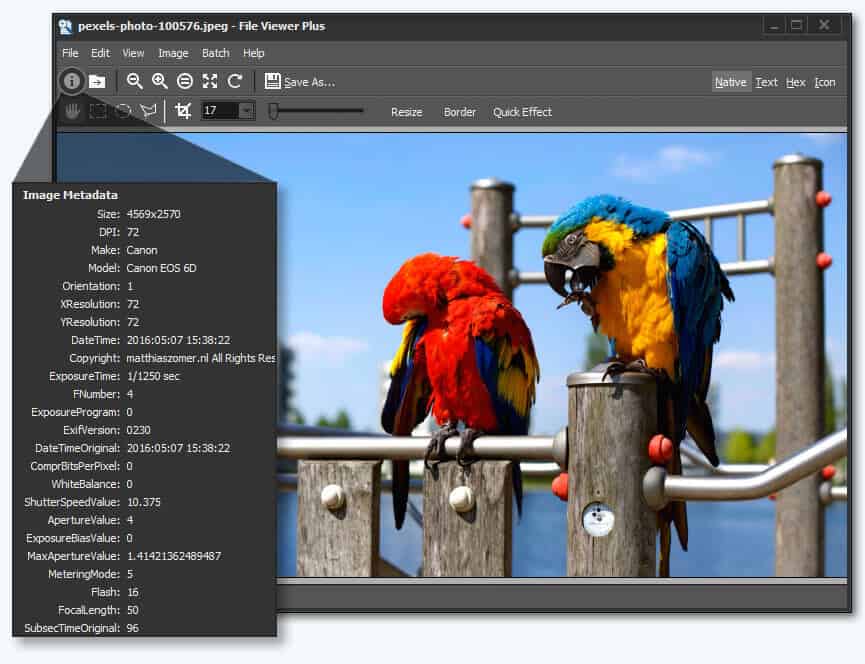
One feature of this software is the ability to view EXIF data for digital photos and camera raw files.

File Viewer Plus 5 is a universal file viewer for Windows that can open and display over 300 different file types.

The new version brings extra features and focuses on support for viewing and converting over 50 new file formats, including over 25 additional image, audio, and video formats.

The new batch conversion feature works very quickly, and you can save settings to use it again for different jobs.

The application has a simple, smart layout and is as easy as drag-and-drop files. We happily recommend this program to open RW2 files and almost all file types without hassle.

A fully functional free trial is available for download, so you can try it straight away, or you can buy it at an affordable price.

File Viewer Plus

Open and convert any raw image files with this complete file-viewing software.
Free Trial Visit Website

3. RawTherapee – Instantly preview changes

This is a cross-platform program for processing RAW images or photos and comes with tools that deliver high-quality and efficient development of the images.

The program is free and open-source software written in C++ and uses a patched version of dcraw to read the RAW files.

This tool gives you advanced control over the demosaicing and developing process, with a subset of image editing features focused on improving your workflow by handling volumes of images.

It uses a non-destructive editing concept for the post-production of photos, and the edits or adjustments are reflected in the preview image instantly.

However, they are not applied to the opened image in the actual sense, as this happens during the export process.

This software supports most raw formats and non-RAW image formats like PNG, TIFF and JPEG, plus raw DNG images.

You can tweak photos, use the color histogram, make adjustments, and revert changes at any time, as well as use its many photo opening and processing features.

⇒ Get RawTherapee

4. FastStone Image Viewer – Stable and user friendly

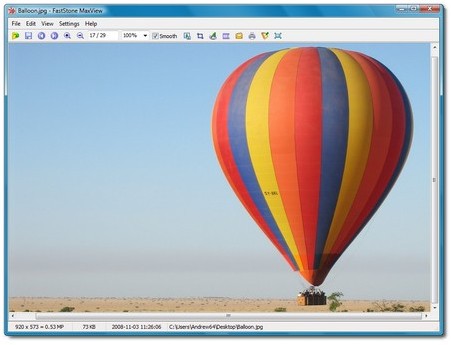
This tool is fast, stable, and user friendly, and comes with an advanced editor and converter. It is an intuitive software with a full-screen mode and a thumbnail browser.

It also has other options available through hidden toolbars that display when your mouse touches your computer screen.

It supports major graphic formats such as BMP, JPEG, TIFF, PNG, WMF, TGA, NEF, and DNG. It also has a high-quality magnifier, image annotation, scanner support, drop shadow effects, and more.

⇒ Get FastStone Image viewer

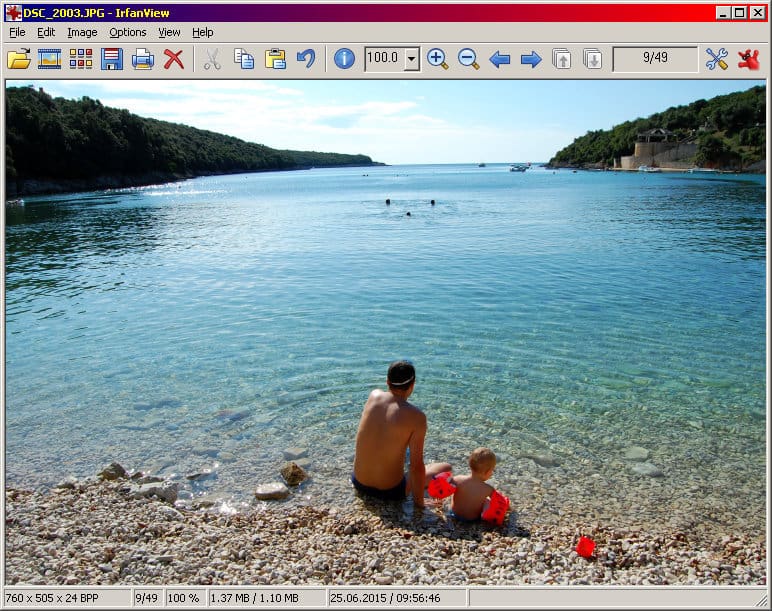
5. IrfanView – Feature-packed editor

Irfanview windows 7 photo viewer

This free software for opening RW2 files in Windows 10 lets you view and open images, manage multiple media, and edit them.

Its editor is feature-packed, with a fast converter for batch images and easy photo or image organization and tagging.

It is an excellent image viewer. You can watch your images via slideshow or browse through them quickly, and you can expand it via plugins.

Despite being dated, it is easy to master, and the interface is practical. its tiny size makes it blazingly fast for viewing your RW2 files.

⇒ Get IrfanView

6. XNView – Highly customizable

This free tool acts as both an image organizer and a file manager. You can view, convert, organize, or edit your RW2 raster images and manage the files, too.

Features include batch renaming and screen capturing tools. It’s licensed for private, educational, and not-for-profit use; otherwise, there’s one for commercial use.

It is customizable and multi-lingual, supports over 500 image file formats (including audio and video), and can write 50 image file formats.

It is fast, easy to use, and free! You can apply filters and effects, adjust brightness or contrast, and use its vast array of editing features to modify your RW2 files and open them for viewing.

You can also open RW2 files in Windows 10 using paid programs, including FastRawViewer and Canvas X by ACD Systems Canvas.

⇒ Get XNView

If you’d like to convert an RW2 file before opening it in Windows 10, you can use programs such as Adobe DNG converter. This program works with many RAW image file formats besides DNG. You can also convert your RW2 file to DNG and open it via this program.

What to do when you cannot open RW2 files in Windows 10?

One of the reasons you may not be able to open RW2 files in Windows 10 is that the file extension is misread and is opening in the wrong program.

While extensions may look the same, they don’t necessarily open with the same programs, and they cannot be used or converted using similar programs or software. Ensure you download and install the appropriate program or app to open RW2 files in Windows 10.

Are there other ways, not mentioned here, that you use to open RW2 files in Windows 10? Please share what tools or methods you use by leaving a comment in the section below.

Windows 10 news recap: 21H1 arrives for “seekers” in Beta, Outlook for Windows gains “Meet Now” button, and more

Welcome back to our Windows 10 news recap, where we go over the top stories of the past week in the world of Microsoft’s flagship operating system.

New optional patches are available for Windows 10 versions 1909 and 1809

Windows 10 versions 1909 and 1809 have received some optional updates this week that focus on resolving some bugs. If you’re running either of those versions of Windows 10, it’s recommended that you update.

Windows 10 Hero Image

Outlook for Windows adds “Meet Now” button to start Teams meeting even faster

To make it easier to start a meeting in Microsoft Teams, Outlook for Windows has a new “Meet Now” button to make it faster to start a meeting.

Windows 10 version 21H1 is now available for “seekers” in the Beta Channel

For those on the Beta Channel of the Windows 10 Insider program, Windows 10 version 21H1 is now available to ‘seekers’. It’s a small update, but if you’re part of the Beta Channel, head over to Windows Update within Settings in order to download and install the update.

Windows 10 2 In 1 Pc

That’s it for this week. We will be back next week with more Windows 10 news.

Microsoft news recap: Xbox gains FPS Boost feature for backwards compatible games, Microsoft Flight Simulator gets UK & Ireland update, and more

Microsoft news recap is a weekly feature highlighting the top Microsoft news stories of the past week. Sit back, grab some coffee, and enjoy the read!

New FPS Boost feature on Xbox Series X|S brings frame rate improvements to select backwards compatible games

Backwards compatible games on Xbox Series X|S are getting some additional enhancements, thanks to a new feature called FPS Boost. Whilst only a small selection of games will support the feature at first, games that do benefit will often see their framerate doubled, in some cases to 120 FPS.

Xbox Series X|s Fps Boost

Microsoft Garage announces Journal, a new ink first note-taker with AI super powers

A new app has been introduced through the Microsoft Garage. Called Journal, it’s a note-taking app that provides an ink-first experience, whilst utilising AI to supercharge your note taking. It’s ideal for Surface device owners.

Microsoft Garage Journal

Microsoft Flight Simulator World Update III: United Kingdom & Ireland is now available

The latest world update for Microsoft Flight Simulator has been released, focusing on the United Kingdom and Ireland, providing enhanced visuals and more detail to the world. Included within the update is hand-crafted airports, such as Barra, Liverpool, and others.

Microsoft’s new $99 Xbox Wireless headset to launch on March 16, pre-order it now

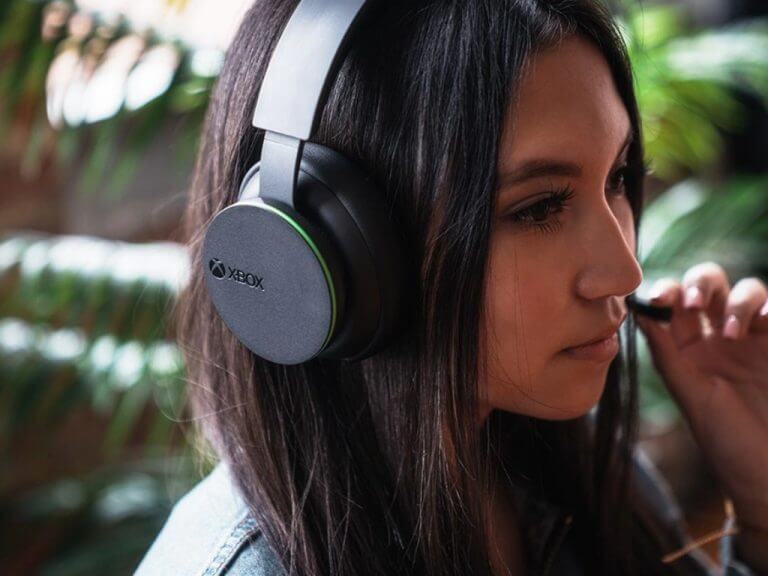
Out of the middle of nowhere, Microsoft has announced its latest Xbox accessory, the Xbox Wireless Headset. Launching on March 16 for $99, the new headset packs a punch, with a range of features, including multiple surround sound audio formats including Dolby Atmos, as well as mic indicator lighting, and more. It will use the same wireless connectivity as Xbox wireless controllers, to provide low-latency audio, whilst also having support for Bluetooth to connect to non-Xbox devices.

New Xbox Wireless Headset

That’s it for this week. We’ll be back next week with more Microsoft news.

Getting started with LinkedIn Part 4 – content sharing for employees

Need more visibility on LinkedIn for your business? As a business owner, wondering how to get your employees involved with your business LinkedIn content strategy?

Discover five ways to help your employees share more company content with their networks on LinkedIn.

Apply the LinkedIn Employee Notifications feature to Company Page posts

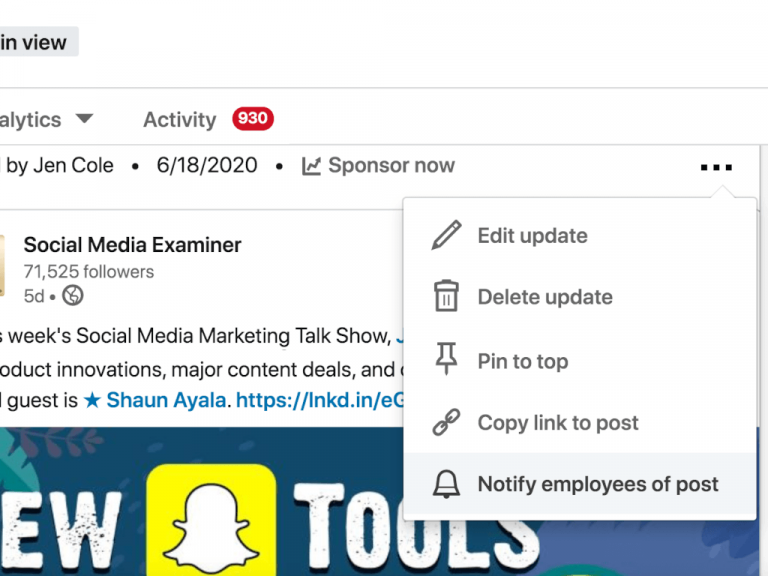
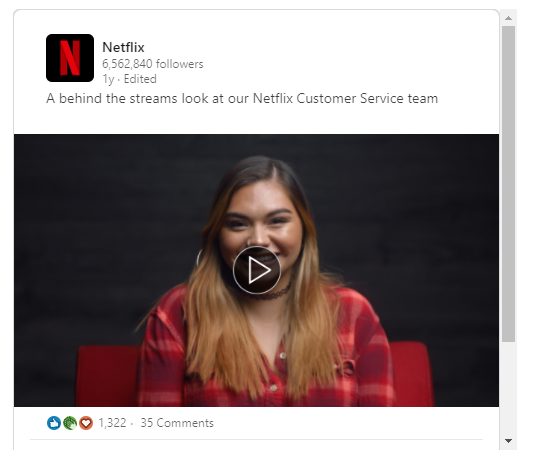
As a LinkedIn page admin, you can let your colleagues know when you’ve posted an update to your company page using the LinkedIn Employee Notifications feature. All employees need to do is react such as like, add a comment, or share it within their own network.

Linkedin1

Note that page admins can only notify employees once a day. Some employees, including admins, won’t receive a notification if the relevance model determines the update isn’t content they’re likely to engage with based on their history with the page.

Within your LinkedIn company page analytics, updates will be labelled with “Employees Notified” so you can gauge the reach and engagement generated by notifying your colleagues about page updates.

Help employees optimize their LinkedIn profiles

Linkedin2

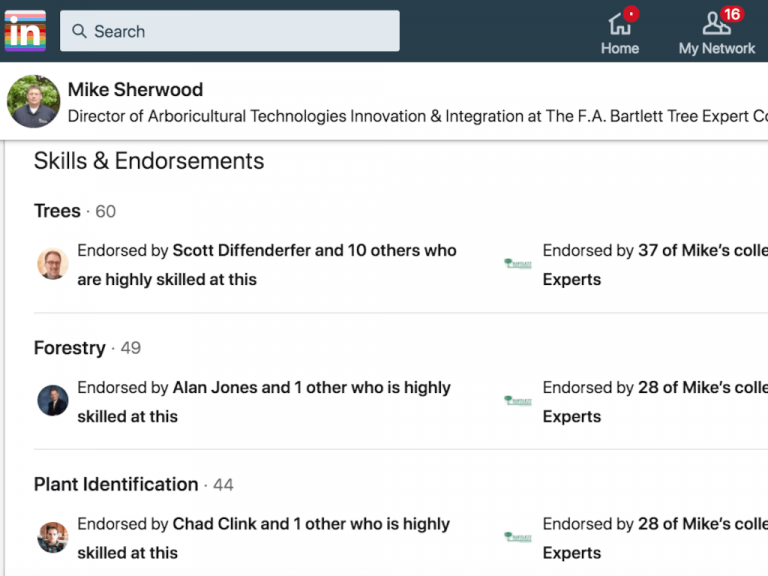
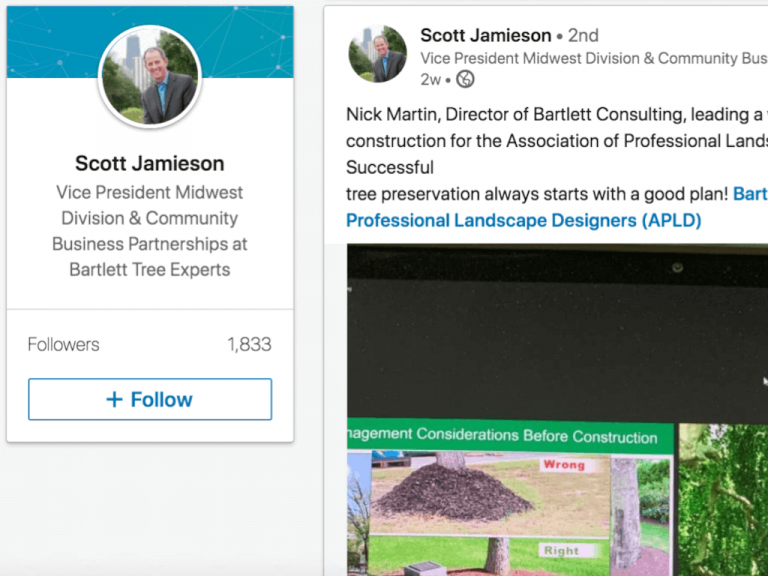
Provide a list of applicable skills that relate to your industry and business. LinkedIn members can add up to 50 keywords on their profile to help their profile show up in search results. You can also provide sources of rich media for individuals to include in the Experience section such as web pages to link to and provide PDFs, presentations and video etc.

Use LinkedIn Teammates feature to prioritize content from Company Contacts in the LinkedIn Feed

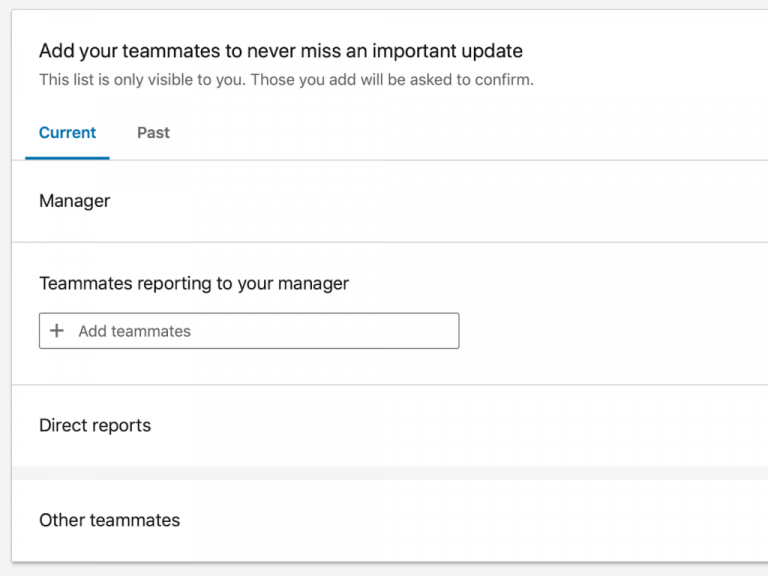
Encourage employees to use the Teammates feature for further intenral collaboration in the organisation. This feature ensure that employees see LinkedIn updates from their current team such as their manager, teammates reporting to their manager, other teammmates, and direct reports.

Linkedin3

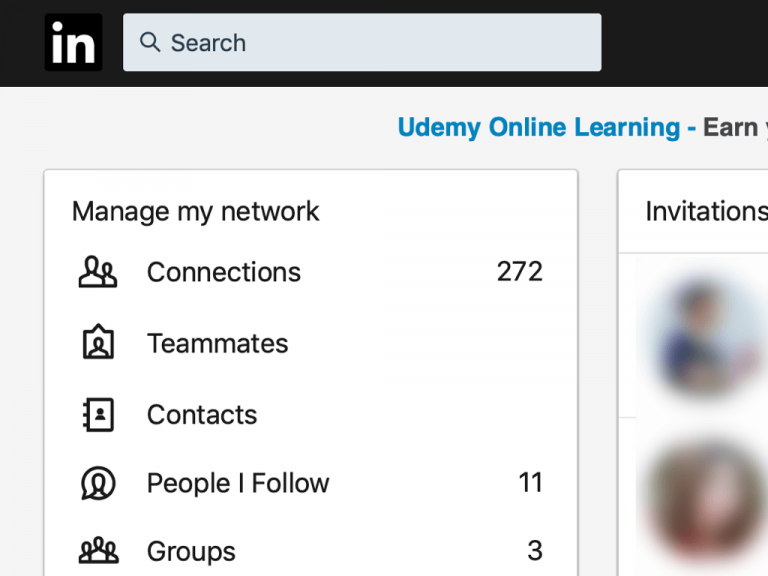
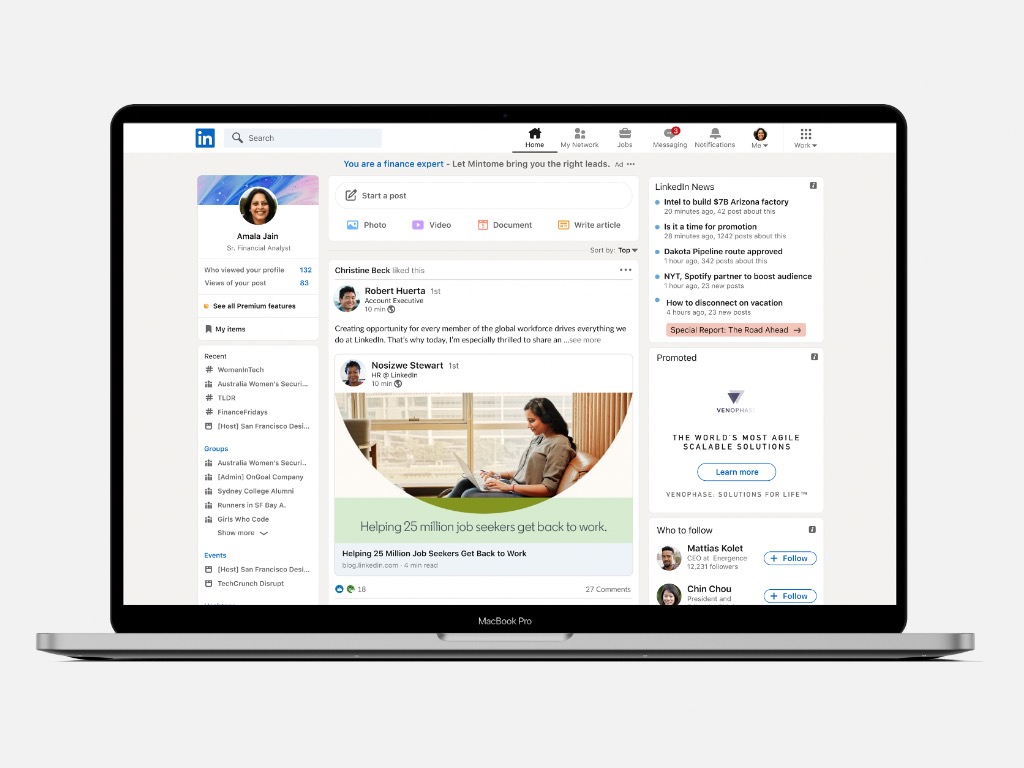
To use the LinkedIn Teammates feature, click the My Network icon at the top of your LinkedIn homepage and click Teammates on the left.

Linkedin4

In the Add Teammates field, type the name of a teammate you’d like to add and then click Add next to your teammate’s name. If you’re not connected to your teammate on LinkedIn, you’ll have to click Connect next to their name before you can add them to your team.

Solicit employee content for your LinkedIn Company Page

As a marketer, you need to collect relevant news from within your company to share on LinkedIn. You’ll want to keep tabs on what employees are working on and solicit content that reflects your company culture. And if you’re not a subject matter expert, you may need assistance from employees to create some of your content for LinkedIn.

These challenges aren’t unique to social media, but with the requirement to produce regular and timely content, you need to setup internal processes to garner support from employees.

Linkedin5

Guide and support employees in posting their own LinkedIn profile updates

While having employees share content from your LinkedIn page is great support, you may also wish to support your non-marketing colleagues in creating their own content for LinkedIn posts that can be shared by teammates and other network connections

Some employees will be able to dive right in, knowing what they want to post on their profiles, but others may need a few suggestions.

Linkedin6

In addition to sharing these ideas, consider providing technical how-to support from employees who lack the condidence to post on LinkedIn. Include best practices such as the best LinkedIn hashtags to use. Offering training and ongoing guidance can help ensure consistency across the business.

It’s also important to share some do’s and don’ts for posting on LinkedIn such as don’t violate client confidentiality. You could provide a detailed social media policy or an internal document with examples.

The easier you make it for non-marketers to support your LinkedIn marketing, the better. You can also encourage them to measure their individual success by analysing their LinkedIn profile using the LinkedIn dashboard.

Summary

Asking for help from colleagues and peers is never easy, but when it comes to getting results from your LinkedIn marketing efforts, it’s hugely valuable to get them involved. Marketers might have all of the technical skills for social media management and lots of content ideas; however, they might not always be the subject matter expert within the business. And they may not have the largest network of clients and prospects among their own connection lists.

That’s why you should consider getting employees involved in your LinkedIn marketing. Show them how their profile can be a tool that can support your wider business strategy.

If you’re just getting started with LinkedIn, check out our Part One, Part Two and Part Three of our series, and learn more about LinkedIn from Microsoft. Which of these tactics will you try to get your colleagues involved in your LinkedIn content marketing? Please share your business strategy with LinkedIn as an employer, as a business owner in the comments below!

Getting started with LinkedIn Part 3 – for workers/employees

Your company, or any company on LinkedIn for that matter, will have the most of its interactions with users through employee profiles. This means your organisation is already getting lots of clicks on LinkedIn, even though these clicks goes to employee profiles. How you as an employee and your organisation can capitalize on these impressions.

Here are some benefits of having strong employee profiles on the world’s largest professional network.

Employee advocacy

LinkedIn profile can be seen as the platform where the employee share the latest news, happenings, and achievements of your company and show how much they care. This will not only show what a dedicated employee they are, but it will actively advocate  for the employer brand and culture in the process.

Showcase credibility

One of the greatest benefits of LinkedIn is that it is seen as one of the most, if not the most credible professional business websites. If a user’s previous companies, clients, suppliers etc. acknowledge the fact that they worked together and even gives the user a recommendation, this adds to your entire company’s credibility.

People want to know people, and not necessarily just a ‘position’. You as an employee, your profile will showcase your career path and what led to work for the organisation you are in. It will also show what type of work you are hired to do and the standards you set for the company as a whole. The same skills that are typically transferable from one job to another will help showcase the experience of your work and ultimately reflect well on the company brand.

Trust

Employees promoting themselves and discussing the company brand online shows their employers fully trust them. Having LinkedIn, gives employees opportunity to represent themselves online and show that they trust the ‘company message’ they are conveying to the world via the platform. Good communication between employees and employers will lead to a boost of morale and employees would gain confidence in their voice and skills.

Strengthening of online presence

Employees list themselves as working for an organisation, then employers create a link from their profiles to the organisation. Their profile will then drive traffic to the company’s page which in effect will draw attention to the website and its services or products, and ultimately the brand.

This is a clever way in which LinkedIn can be used as a marketing tool for the company you work for. Employees who are brand ambassadors would create more opinion, content and influence within the industry and will definitely benefit the organisation as a whole.

Summary

LinkedIn is more than just a career-focused platform, and if used strategically, efficient employee profiles are in effect free online advertising space for the brand, the organisation. Like building up an online army, with every employee are on the same page in the organisation, ready to take the world by storm. Having a strong employee profiles on the world’s largest professional network brings benefits for long career path prospect for your future as a employee.

If you’re just getting started with LinkedIn, check out our Part One and Part Two of our series, and learn more about LinkedIn from Microsoft. Please share your work experience working with LinkedIn as an employee for an organisation in the comments below!

Microsoft suggest companies “adopt a zero trust mindset” as it closes SolarWinds internal investigation

Microsoft is closing the book on its internal investigation of the now infamous SolarWinds phishing attack that’s affected hundreds of US companies. While early on it had been identified that the nation-state attack first wormed its way through the use of Microsoft’s Outlook service as a well-planned phishing attack, the company defended the use of its products by reassuring its customers that none of its services were used to directly attack others.

Not only has Microsoft’s internal investigation reaffirmed the claim but it also allows the company to boast that “there was also no evidence of access to our production services of customer data.”

After a figurative pat on the back, Microsoft does advise that going forward its clients and customers adhere to a few fundamental changes to their approach to security.

First, “Adopt a Zero Trust mindset,” which Microsoft describes as “all activity–even by trusted users–could be an attempt to breach systems.” Secondly, is to embrace the cloud. Perhaps, initially counter-intuitive given the way the SolarWinds attack spread, but Microsoft believes by embracing the cloud, companies can “layer up” on security leveraging real-time advancements in threat protection from cloud service providers such as themselves.

The not-so-subtle plug for Azure by Microsoft does have its merits by dovetailing into the company’s last suggested approach to security which is to “strengthen the community of defenders.” Embracing the cloud also helps a business more quickly crowdsource security solutions and Microsoft would like it if more companies would soften to the idea.

Ultimately, the approach to security comes down to businesses’ own core competency with the latest threat analysis. Obviously, Microsoft would love for companies to double upon security by making use of Azure and Microsoft 365 Defender, but it’s a big unsecured world out there and it seems at this point the company would simply settle on its clients being more proactive to potential online threats.

How to install and use Recipe Browser in Terraria

Terraria is a great game, but it lacks certain features such as a recipe browser. Luckily, there’s an active community that tries to bring this and other missing features.

In today’s guide, we’re going to show you how to use the recipe browser in Terraria and how to fix any potential issues that you might experience with it.


How can I use the Recipe Browser in Terraria?

Use Recipe Browser mod

recepie mod download recipe browser terraria
  1. Download Recipe Browser mod.
  2. Install the mod.
  3. Once the mod is installed, you need to assign a hotkey to it to access it.

With this mod you can do the following:

  • Filter items by placing them in a slot
  • Click on recipes to see details
  • Search for any recipe by its name
  • Double-click on ingredients for further filtering
  • Highlighting for craftable items
  • Easily craft complex recipes
  • Check NPC item drops
  • Pin favorite recipes
  • Filter recipes by owned ingredients
  • Highlight recipes for recently obtained items

The mod is great, but it also suffers from certain issues, and we’ll list the most common ones:

Stuck on Rebuilding Loot Cache

rebuild loot cache Recipe Browser Terraria
  1. Close the game.
  2. Start it again and hold the Shift key until you see the main menu.
  3. Go to the Mods menu and disable all mods except Recipe Browser.
  4. Restart the game again.
  5. Enable mods one by one until you find the mod that is causing the issue.

After following these steps, the issue with the Recipe Browser in Terraria will be resolved.


Error message with Could not convert

JSON file Recipe Browser Terraria
  1. Navigate to the following directory: \Documents\My Games\Terraria\ModLoader\Mods\Cache\
  2. Delete the LootCache.json file.
  3. Now check if the problem is resolved.

This issue is caused by a corrupted json file, but once you delete it, the mod should start working again.


OutOfMemoryException

memory RAM Recipe Browser Terraria
  1. Increase the amount of RAM or disable certain mods.
  2. Alternatively, switch to unofficial 64-bit Tmodloader.

This error message appears if you have a lack of RAM. If adding more RAM isn’t an option, using a 64-bit Tmodloader should be a decent workaround.


Mod not working at all

keyboard shortcut Recipe Browser Terraria
  1. Check your keyboard controls and make sure that you have a key assigned to Recipe Browser.
  2. Alternatively, reload all your mods.

Note: For the Recipe Browser to work in Terraria, you need to assign a key to open the Recipe Browser.

Alternatively, check if other mods are interfering with this mod.


There you go, there’s everything you need to know about Recipe Browser in Terraria. Have you tried this mod? Let us know in the comments section below.

FIX: Try refreshing the Soundsource browser

Soundsource browser is a file browser in Omnisphere 2 software. However, many users reported Try refreshing the Soundsource browser message while using the Omnisphere 2.

This can be a big problem for some users, and in today’s article, we’re going to show you how to fix this.


How do I fix try refreshing the Soundsource browser error?

1. Reinstall the soundset or the STEAM folder

reinstall soundset try refreshing the soundsource browser

If you’re getting Try refreshing the Soundsource browser error, you might be able to fix that by reinstalling the soundset.

This problem is somewhat common with third-party soundsets, and reinstalling the soundset usually helps. If that doesn’t help, you’ll have to reinstall your STEAM folder.


2. Verify structure and updates

verify structure try refreshing the soundsource browser

Another way to fix this problem is to verify the structure of the STEAM folder. In addition, be sure to verify the latest Omnisphere updates.

You can try refreshing patches, multis, and soundsources in their respective browser. To do that, just click the circular arrow button next to the Play button.

Keep in mind that there are 3 browsers that you need to use, one for each of the aforementioned categories. Few users reported that the issue was resolved after downloading the Library Soundsource update.


3. Delete zmap.index

zmap index try refreshing the soundsource browser
  1. Navigate to C:\ProgramData\Spectrasonics\STEAM\Omnisphere\Soundsources\Factory\Core Library
  2. Delete zmap.index.
  3. Apply the soundsource update.
  4. Start Omnisphere and Keyscape and the zmap.index will be recreated.

Some users are also suggesting to delete zmap.index from the following subfolders in the STEAM folder:

  • Keyscape
  • Soundsources
  • Factory
  • Keyscape library
  • Keyscape>Soundsources>User

4. Make sure that STEAM folder isn’t set to read-only

  1. Go to C:\ProgramData\Spectrasonics
  2. Right-click STEAM directory and choose Properties.
  3. Uncheck Read-only option and click on Apply and OK to save changes.

Try refreshing the Soundsource browser message can be a problem while working with Omnisphere 2, but we hope that you fixed the issue using our solutions.

Paint by Numbers Software: 5 Best Picks for 2026

Based on numbers, anyone can create amazing works of art by simply following the number and color indication.

With using software that allows you to use it you can emerge in the amazing world of art creation and grow your skills in the area.

There is software to create paint-by-number in Windows 10 and Mac and in this article we will present you the best of them, so make sure to keep on reading.

What are the best software to create paint-by-number in Windows 10 and Mac?

Adobe Illustrator Draw – 3D effects and objects

Adobe Illustrator Draw is one of the most used and appreciated software by anyone that is interested in the art field.

Thanks to the Image Trace function you can turn an image into paths and add a corresponding number for each color.

Adobe Illustrator Draw is a versatile tool that has many great features that you can count on to make your drawing stand out.

Also, since Adobe Illustrator Draw is part of the Adobe Creative Cloud subscription model you will find it easier to integrate it with other Adobe programs.

Adobe Illustrator Draw

Create amazing paint-by-number masterpieces thanks to the image trace function this software offers.
Free trial Visit website

CorelDRAW Graphics Suite – Vector illustration tools

Another powerful software that allows you to create paint-by-number is CorelDRAW Graphics Suite.

This software comes with pretty much all the tools needed to image editing, illustration, logos, and many more.

You can share your work in the Cloud which will ensure a neat collaboration between you and other members of the team.

The software also offers some pretty amazing variable fonts and an easy-to-use workflow between the web and desktop.

The CorelDRAW Graphics Suite is perfect for creating all sorts of art projects and will definitely help you make an awesome paint-by-number product.

CorelDRAW Graphics Suite

Create paint-by-number art projects with this fantastic and easy-to-use software. Get the best deal now!
Free trial Visit website

Paint by Numbers – Dinosaurs – Interactive coloring designs

Paint by Numbers – Dinosaurs is an interactive coloring software, designed especially for kids.

Since many of them are passionate about dinosaurs and their existence is no wonder that this paint0by-number software is also one of their favorite choices.

The coloring is not difficult, since it has been specially created for younger children. Moreover, the program will help develop their memory, attention, imagination, and logical abilities.

If you want to make the coloring process different, then you can easily change the preset colors, kids will love the diversity and you’ll avoid having them feel bored.

⇒ Get Paint by Color Dinosaurs

Diamond Art – Shimmering diamond paintings

Diamond Art is the perfect software for games and relaxation at the same time that allows you to create different categories by following the displayed numbers.

This software is extremely easy to use, and it is intuitive as well which makes it the perfect choice. And at the end, you will have created a work of art with mosaic paint.

With Diamond Art, you can connect many pictures from the ones it contains, be it animals, vehicles, or jewelry.

The software will easily help you enhance your creativity and imagination while allowing you to take a break from daily stress.

⇒ Get Diamond Art

Candy Art – Intuitive drawing indications

Our last recommendation goes to the Candy Art software and it will definitely help you make interesting art.

This software is perfect to paint by colors, comes with easy-to-follow indications, and in the end, you will see amazing results.

It is a playful and relaxing app, and you will have to paint based on the indicated numbers but using different candies and jellies.

Of course, you can choose the palette of colors since they contain multiple variants of shades and tints.

⇒ Get Candy Art

Hopefully, the information we offered in this list will help you make an informed decision about which is the best software to create paint-by-number in Windows 10 and Mac.

If you have additional recommendations or if you have used any of the above software, please let us know in the comments section below.

Windows 10 Insider build 21318 adds “Paste as plain text” option to Clipboard History

Microsoft has just released the Windows 10 build 21318 for Insiders in the Dev channel, which comes with a single new feature related to Clipboard History. After installing this build, a subset of Dev Channel Insiders will be see a new “Paste as plain text” option in Clipboard History, alongside the pin and delete options.

What this new action does is pasting text in the clipboard without its original formatting, so the text won’t appear with a weird font, color or size when pasted in the destination document. This is a welcome addition, and the Windows Insider team will ship it to the rest of Dev Channel Insiders once potential issues have been addressed.

Displaying the new Paste as Text option in clipboard history.

The build 21318 also introduces minor improvements for Magnifier and the notification that appears when pairing Bluetooth supported devices. Additionally, the touch keyboard improvements that previously shipped to select Insiders with the build 21301 will now be available for all Dev Channel Insiders who install today’s build 21318.

You can find the full list of changes, bug fixes, and known issues for this build below:

Changes and Improvements

  • Insiders using x64 apps on ARM64 will no longer need to download and install a separate preview version of the ARM64 C++ redistributable package.
  • We’re making a change so that the notification when pairing supported Bluetooth devices will now stay on the screen a little longer, given you the chance to interact with it before it goes away. If you’d like to dismiss it before then, you can still do so at any point by clicking the X in the notification, middle clicking the notification, or sliding the notification off the screen.
  • Touch keyboard improvements as mentioned in Build 21301 such as updates to the default keyboard layout on 12” or larger screens and the candidate bar are now rolling out to all Insiders in the Dev Channel.
  • We’ve improved the smoothness of motion while using Magnifier – for the scenario where you are transitioning between mouse and keyboard focus.

Fixes

  • [News and interests] Thank you for your feedback about the space used by news and interests on the taskbar. We’ve been hard at work on a solution that allows you to make the most of the space available. This build adds functionality that dynamically changes the size of the button, depending on the space available on your taskbar.
  • [News and interests] We fixed an issue where updating the Windows accent color would not immediately update in the flyout.
  • [News and interests] We fixed an issue where if you attempt to share news via email from the flyout would dismiss the flyout without opening the Mail app.
  • [News and interests] We fixed an issue where the flyout was appearing quicker than other elements on the taskbar when hovering.
  • [News and interests] We fixed multiple issues impacting explorer.exe performance and reliability, as well as impacting the sign in experience.
  • We fixed an issue where the right side of the quick actions area of the Action Center was truncated.
  • We fixed an issue where Netflix and other apps on ARM64 were unable to play DRM content.
  • We fixed an issue where x64 apps like OBS Studio were unable to activate the camera on ARM64.
  • We fixed an issue that was preventing Azure Data Studio, and by extension, SQL Server Management Studio, from installing on ARM64.
  • We fixed several PowerShell cmdlets running in x64 PowerShell on ARM64. Examples of some PowerShell cmdlets that now work: Enable-PSRemoting, Enable-WindowsOptionalFeature, Get-VpnConnection.
  • We fixed an issue where your active keyboard layout would be reset to the default after connecting to the PC via Remote Desktop.
  • We fixed an issue with the Quick and Changjie IMEs where pressing CTRL + / while the IME was in Off mode would unexpectedly insert an ellipsis.
  • We fixed an issue where it wasn’t possible to find the Pinyin IME Settings with search. With this update, if you are a Pinyin IME user, typing Pinyin into search will now return these Settings pages.
  • We fixed an issue where the touch keyboard could become unexpectedly large after disconnecting an external monitor.
  • We fixed an issue where the tooltips in the emoji panel displayed an unexpectedly thick border when using Windows in high contrast.
  • We fixed an issue where choosing Reset my PC with the Keep my files option was failing.
  • We fixed an issue that could result in elements of the Open dialog being unexpectedly small when invoked from certain apps and moved across monitors with different scaling.
  • We fixed an issue that could result in Narrator unexpectedly saying “No item in view” as you used the arrow keys to move through the apps list in the Start menu.
  • We fixed an issue where it was not possible to unpin apps from the Start menu in the previous flight.
  • We fixed and issue where, in previous builds, Domain networks would appear with the wrong firewall profile resulting in some local network services being blocked.
  • Some Insiders reported seeing an issue with the text “Don’t turn off your computer” when upgrading to the previous flight. This will no longer be an issue with this flight, as we have changed the text to “Please keep your computer on and plugged in”.

Known issues

  • We’re investigating an issue where if you access an Azure Active Directory (AAD) joined device via Remote Desktop (RDP), it will fail after updating to Build 21313. To resolve the issue, please add the following registry key:

Key: [HKEY_LOCAL_MACHINESOFTWAREMicrosoftIdentityStoreLoadParameters{B16898C6-A148-4967-9171-64D755DA8520}]

Value: “Enabled”=dword:00000001

  • We’re looking into reports of the update process hanging for extended periods of time when attempting to install a new build.
  • We’re investigating an issue impacting the reliability of Start and other modern apps, which started in recent Dev Channel flights. If you are impacted, you may experience the Start menu layout resetting.
  • Live previews for pinned sites aren’t enabled for all Insiders yet, so you may see a grey window when hovering over the thumbnail in the taskbar. We’re continuing to work on polishing this experience.
  • We’re working on enabling the new taskbar experience for existing pinned sites. In the meantime, you can unpin the site from the taskbar, remove it from the edge://apps page, and then re-pin the site.
  • [News and interests] We’re investigating an issue where the taskbar button might show no content after the primary monitor is changed.
  • [News and interests] We’re addressing an issue where news and interests may not be available when signing into Windows without internet access.
  • [News and interests] Sometimes the news and interests flyout cannot be dismissed with pen.
  • [ARM64] Insiders who installed the preview version of the Qualcomm Adreno graphics driver on the Surface Pro X may experience reduced brightness of the display. This will be addressed in a future update. If you are experiencing this issue, please see the feedback collection for more information.
  • We’re investigating reports from Insiders that the Chinese text for the lunar calendar in the clock and calendar flyout is no longer displaying properly as of the previous flight.

That’s for the Dev Channel this week, and in case you missed it, we remind you that Microsoft released the first 21H1 build for “seekers” in the Beta Channel on Wednesday. As expected, 21H1 is a minor update that brings multi-camera support for Windows Hello, as well as performance improvements for Windows Defender Application Guard. The update will be generally available later this Spring, and we hope the Windows Insider team will soon have its hands free to share more details about the 21H2 update coming in the second half of 2021.

Apisetschema.dll Missing From Windows 10 [Complete Fix]

Apisetschema.dll is one of Windows 10’s many Dynamic Link Library files. That’s a DLL needed to run ApiSet Schema DLL-based software.

When the apisetschema.dll has been removed or corrupted, software that needs that DLL won’t operate properly and display an error message like this one:

The program can’t start because apisetschema.dll is missing from your computer. Try reinstalling the program to fix this problem.

There are numerous apisetschema.dll missing error message variations. However, they all mean the apisetschema.dll file is not accessible for software.

The required DLL might be deleted, corrupted, or have an incorrect location (a called path might not match the real DLL path).

How can I fix an apisetschema.dll missing error?

1. Use third-party repairing DLL files software

A dedicated tool is one of the most surefire resolutions for fixing the apisetschema.dll missing error.

A system repair utility tool can detect and fix Windows, BSOD, freezing, and missing/damaged DLL issues. It restores missing or damaged DLL system files with fresh new ones and purges malware.

Although there are other ways you can fix an apisetschema.dll missing error, this kind of software undoubtedly provides the quickest and most straightforward resolution.

2. Scan system files

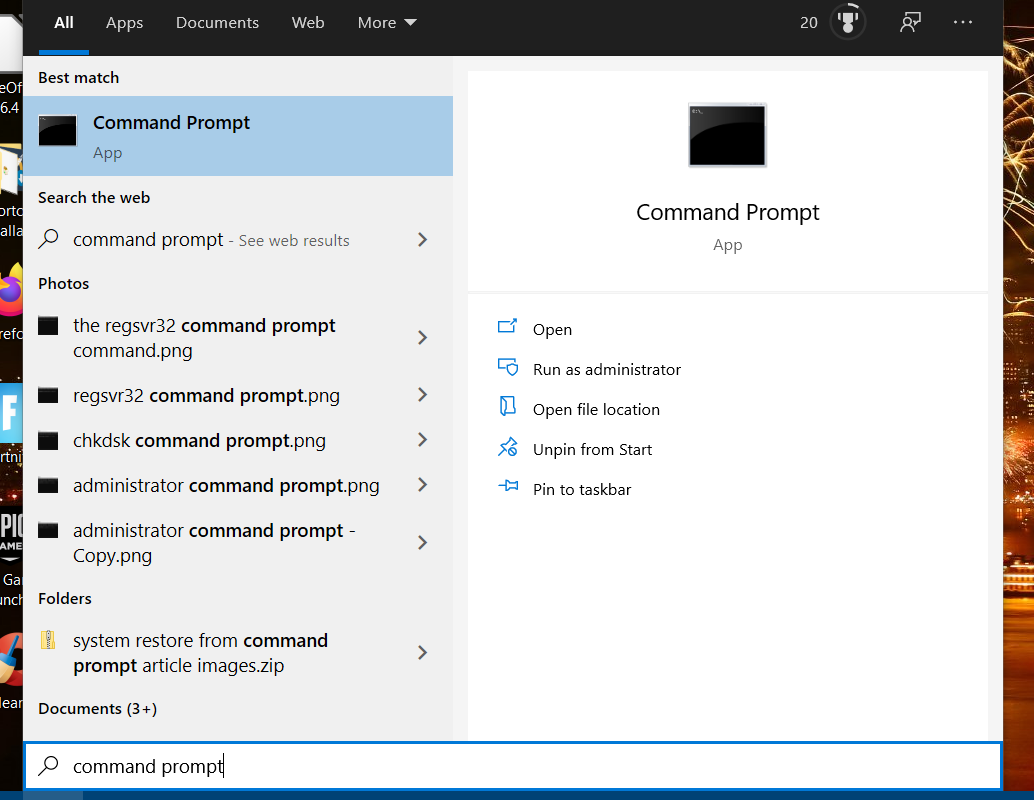
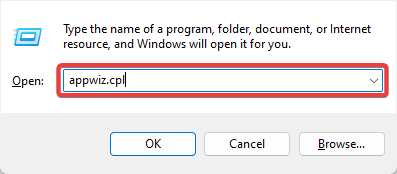
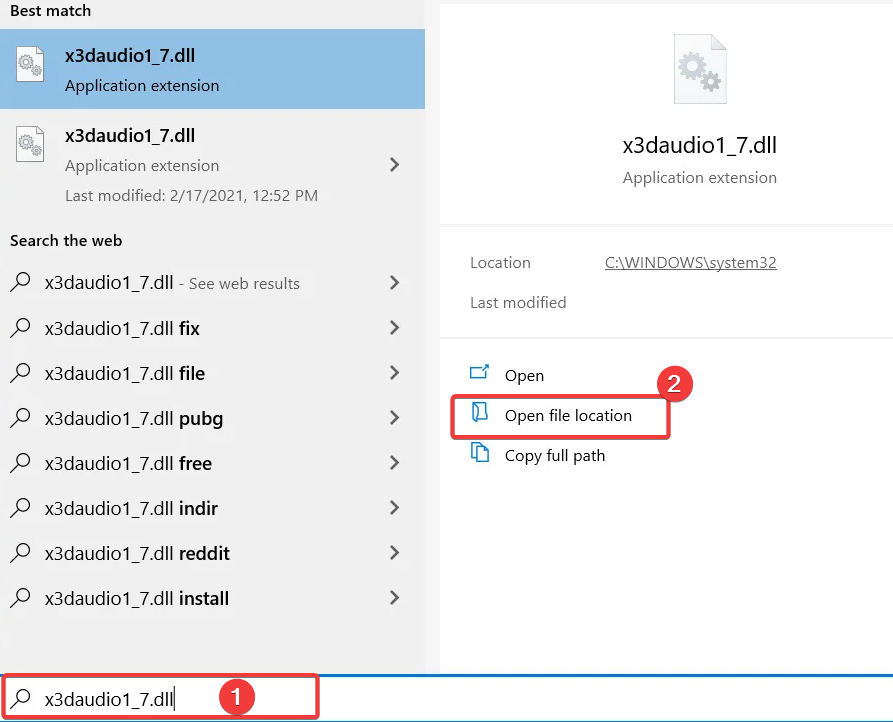
  1. Click the magnifying glass button nestled between Cortana and the Start menu to open Windows 10’s search box.
  2. Enter the search keyword Command Prompt in the text box.
  3. Click the Run as administrator option on the right side of Windows 10’s search utility.
    Run as administrator option apisetschema dll
  4. Press the Enter key after typing in this command: DISM.exe /Online /Cleanup-image /Restorehealth
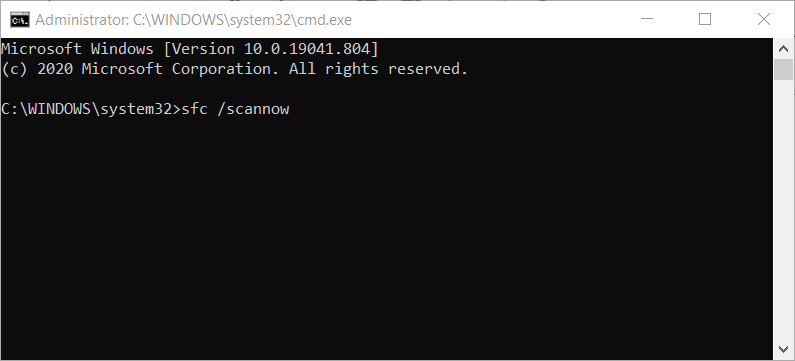
  5. Wait for the Deployment Image Servicing scan to finish, and then input this command: sfc /scannow
    The sfc command apisetschema dll
  6. Don’t forget to press the Enter key to start the SFC scan.
  7. Thereafter, wait for the System File Scan to display its outcome within the Command Prompt.
  8. Restart your laptop or desktop if the scan reports it repaired files.

3. Register the apisetschema.dll

  1. Right-click the Start button to open the Win + X menu.
  2. Select Run on the menu.
  3. Type this command in Run’s Open box: cmd
  4. Press the Ctrl, Shift, and Enter keys simultaneously to open an elevated Command Prompt.
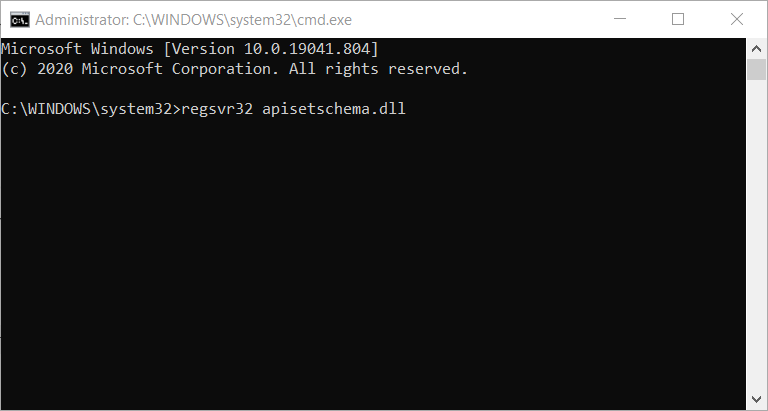
  5. Then enter this command and press Return to register the DLL: regsvr32 apisetschema.dll
    The regsver32 command apisetschema.dll
  6. Restart your desktop or laptop after registering the DLL.

4. Reinstall software you need to fix the apisetschema.dll error for

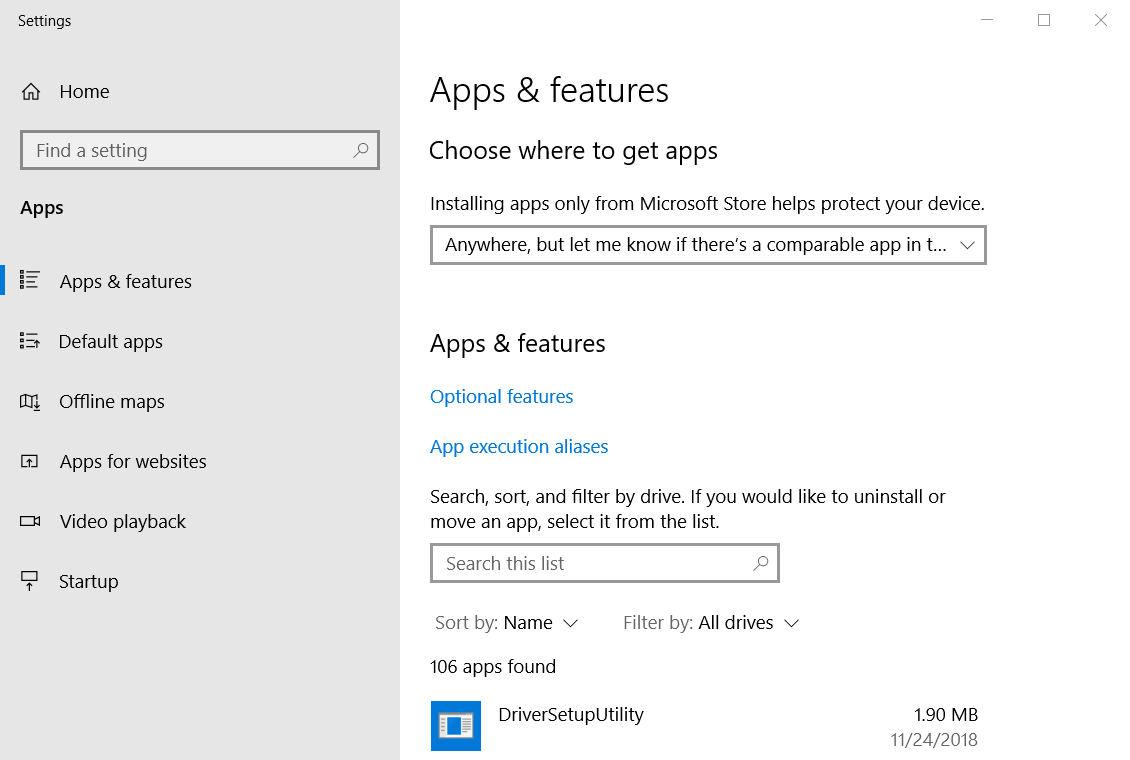
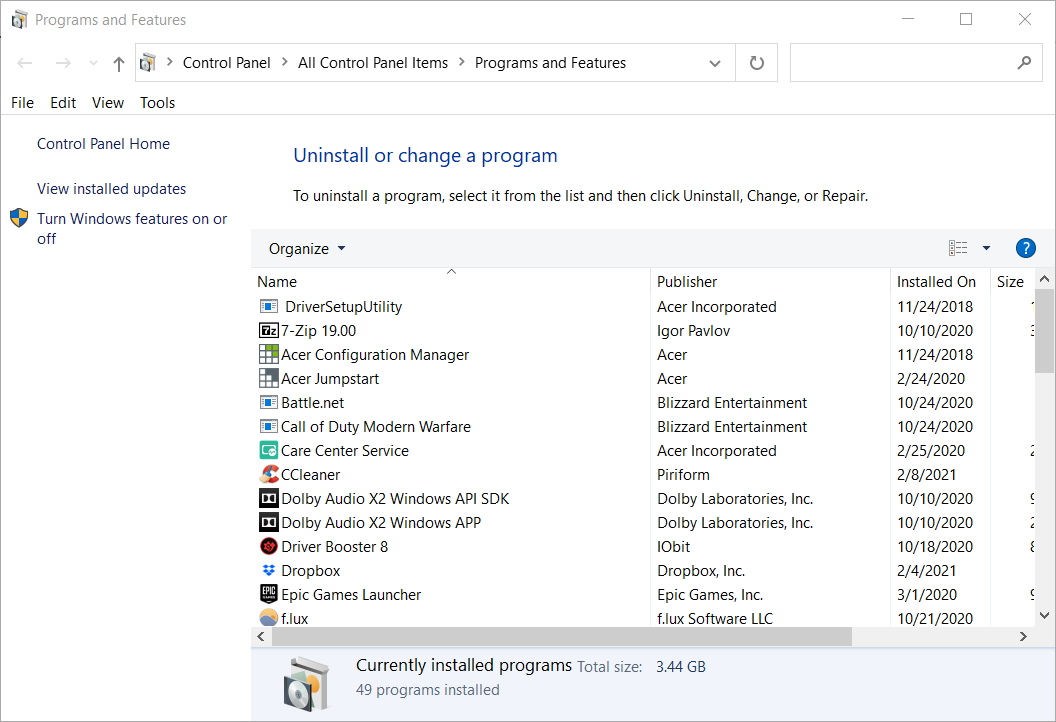
  1. Open the search utility in Windows 10.
  2. Enter apps in the search box.
  3. Click Apps & features to open Settings as shown directly below.
     apisetschema.dll
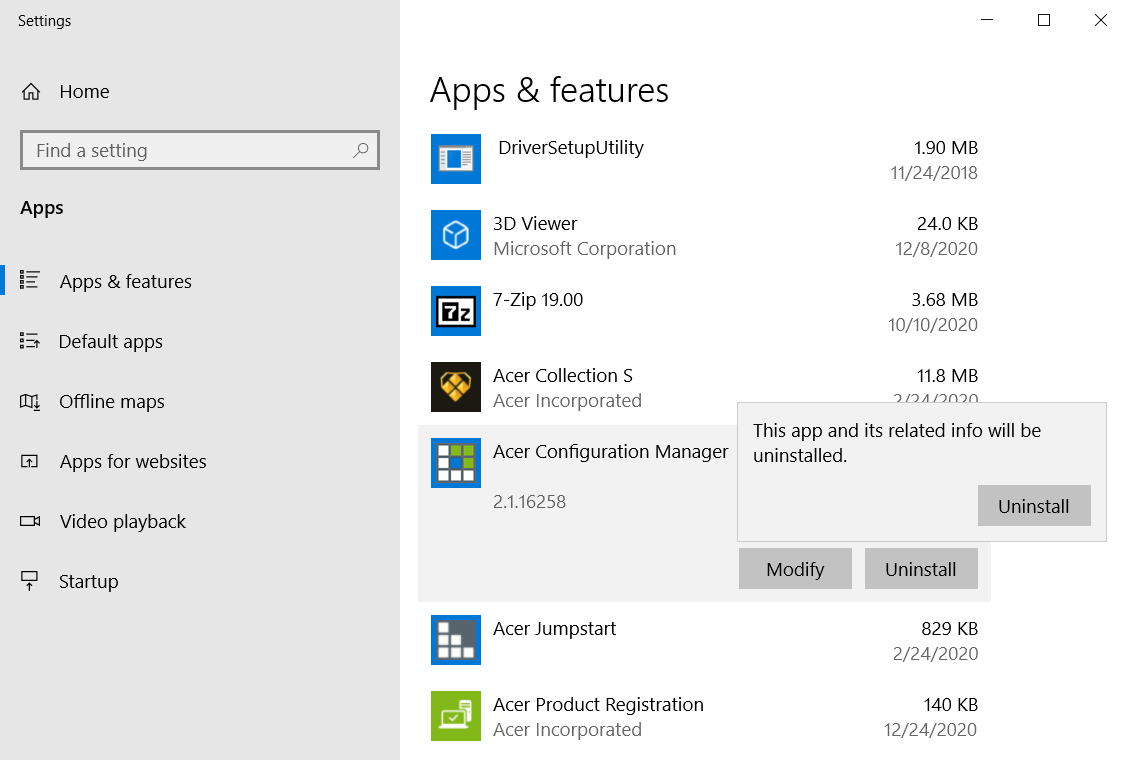
  4. Now select the program that the apisetschema.dll missing error occurs for.
  5. Click Uninstall (and Uninstall again) to remove the selected software.
  6. Reboot your PC before reinstalling the software.
  7. Then reinstall the software you just uninstalled with its installation DVD or downloaded setup wizard. Make sure you install the latest software version.

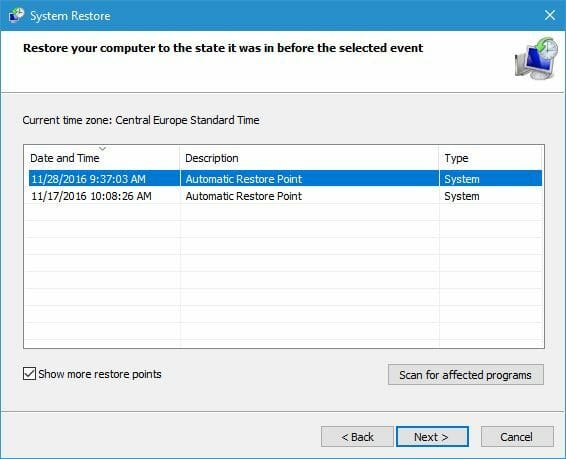
5. Roll back Windows 10 with System Restore

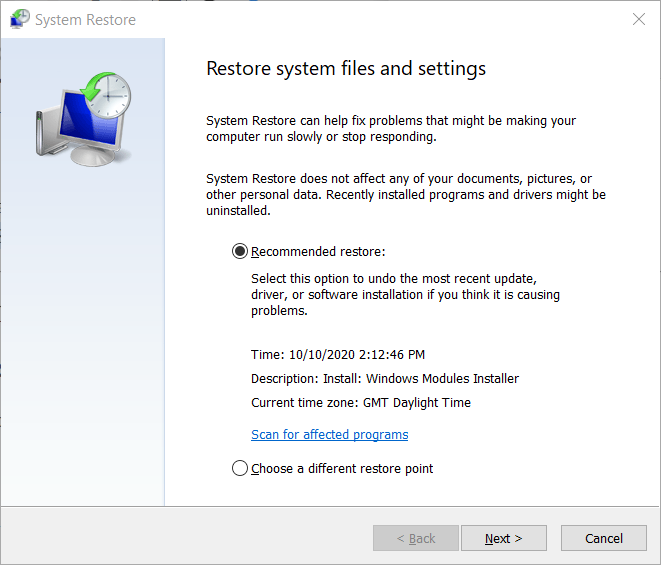
  1. Press the Windows (left of Alt) and R keyboard keys simultaneously to open Run.
  2. You can open System Restore by entering this command and pressing Enter: rstrui
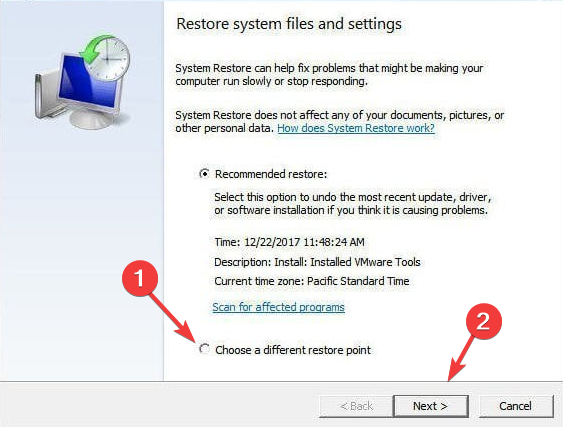
  3. Click the Choose a different restore point option if System Restore recommends a restoration point.
    System Restore apisetschema dll
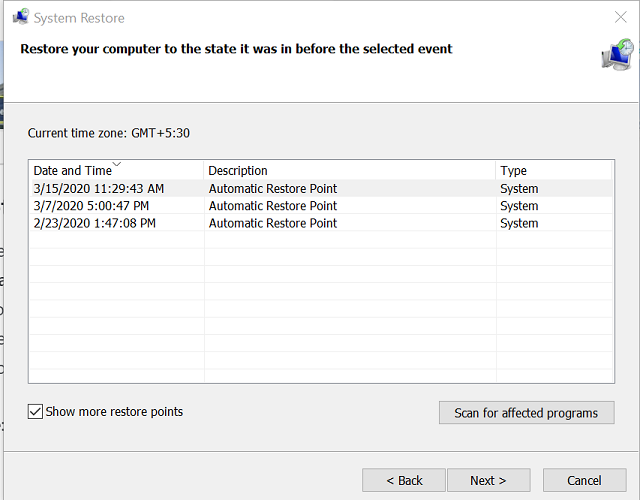
  4. Click Next to open the restore point list.
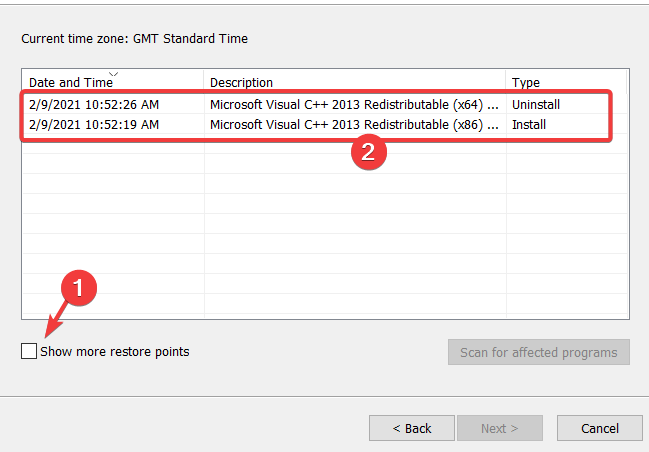
  5. If System Restore doesn’t show you a full list, click the Show more restore points checkbox.
    The Show more restore points option apisetschema dll
  6. Now choose to restore Windows to a date that predates the apisetschema.dll error on your PC. Alternatively, just select the oldest restore point available.
  7. Select the Next option to proceed.
  8. Then you’ll need to click Finish to confirm your restore point and start the Windows rollback.

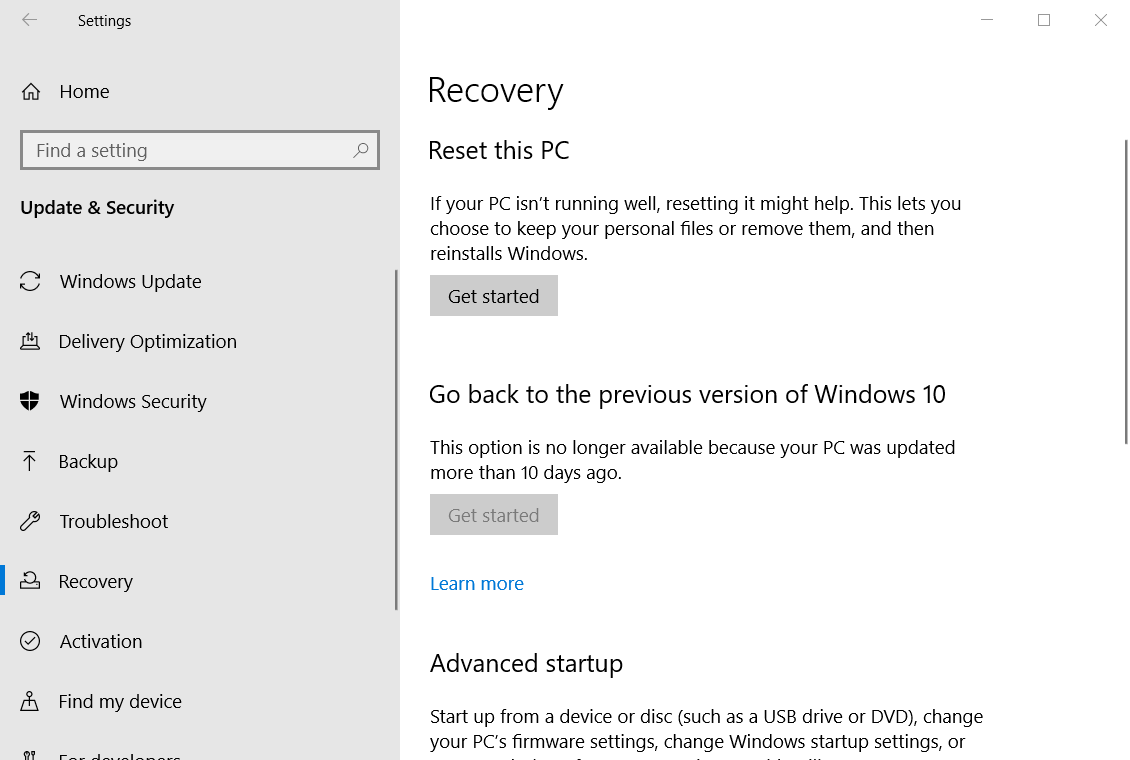
Note: Selected system restore points delete software installed after their dates. To check what software you’ll need to reinstall for a chosen restore point, click the Scan for affected programs button on the System Restore window.

6. Reset Windows 10 with Reset this PC

  1. Open Windows 10’s search tool.
  2. Type the keyword reset in the search utility’s text box.
  3. Click Reset this PC to open recovery options.
    Get started button apisetschema dll
  4. Press the Get started button to open the Reset this PC window in the snapshot directly below.
    The Reset this PC utility apisetschema dll
  5. Select the Keep my files option.
  6. Press the Next and Reset buttons to confirm.

Note: Although your user files will be retained, resetting Windows 10 as outlined above will remove all third-party software installed on your PC.

The resolutions above will usually fix the apisetschema.dll missing error.

You can also try manually downloading a new apisetschema.dll from a DLL file website. However, make sure you obtain the file from a reputable DLL site and scan it with antivirus software.

Microsoft Teams add keyboard shortcut for “Raise Hand” feature during Meetings

A couple of weeks ago, we reported that Microsoft is planning to introduce a new feature in Teams that would allow users to raise their hand with a keyboard shortcut during meetings. The feature has begun rolling out for users running the desktop app of Teams on Windows and was spotted by Twitter user Selena Caamano.

The “Raise your hand” option was introduced to the Teams desktop client back in May 2020. It allows a participant to quickly get the attention of the presenter or organizer during a meeting. When a user clicks this icon, a notification lets the meeting presenters know that the participant wants to unmute in order to contribute to the conversation.

The option can be accessed by hovering over the “Reactions and Raise hand” flyout. However, some users have complained that this feature isn’t particularly accessible, especially for people with disabilities. With this update, the company has now made it easier for users to use this functionality in the app.

Microsoft Teams users can now use the keyboard shortcut (Ctrl + Shift + K) to trigger the raise hand command quickly. The same combination can be used for lowering the raised hand. The keyboard shortcut support is available in version 1.4.00.2879.

Unfortunately, this update isn’t yet available for the Teams Mac client, but this should change soon. The company is also planning to bring this capability to the Web app, too. In case you missed it, Microsoft Teams has recently added meeting reactions, allowing users to choose from four live reactions to express themselves during a meeting.

How to watch Netflix Japan & Best Netflix VPN for Japan

Netflix Japan is one of the biggest Netflix libraries in the world, with over 500 exclusive Japanese movies and TV series. If you are living or traveling outside of Japan and wish to watch Netflix Japan, you need a reliable VPN service.

On the other hand, if you’re in Japan, you’re missing out of Netflix content, too. We all know that the United States has the biggest Netflix library (+1200 TV shows and +4600 movies). But Netflix Japan users can only access a small part of the US library.

So, if you’re currently in Japan and want unrestricted access to Netflix, including the US and UK libraries, you need the best Netflix VPN for Japan. For example, you can watch Star Trek: Discovery on Netflix with a VPN by connecting to VPN server in Japan.

How do I watch Netflix Japan with a VPN?

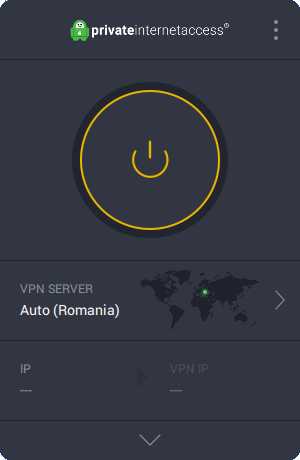
  1. Download Private Internet Access
  2. Install PIA on your PC and launch it afterward
  3. In the main window, click VPN ServerThe main window of Private Internet Access
  4. Type Japan in the Search box and select JapanSearch for Japan in the PIA server list
  5. Click the large power button to connect to the Japan VPN serverPIA is connected to a Japan server
  6. Open your browser and go to Netflix (see the best quality browsers for Netflix)
  7. You can now access the Netflix Japan libraryNetflix shows the top 3 titles in Japan
  8.  

What’s the best Netflix VPN for Japan?

PIA is the best Netflix VPN for Japan users

Created by Kape Technologies, Private Internet Access (PIA) is the best VPN to watch Netflix if you’re in Japan. It’s wrapped in a user-friendly interface and includes over 3,200 servers across 45 countries.

Furthermore, PIA can block ads, trackers, and malware. It features exclusive DNS servers, together with OpenVPN, L2TP/IPSec, P2TP, and SOCKS5 proxy. The VPN service doesn’t capture traffic or request logs.

Here are the best Netflix libraries you can watch in Japan using Private Internet Access:

PIA unlocks Netflix US in Japan
  • Netflix US: +1,500 servers (14 locations)
  • Netflix UK: +180 servers (3 locations)
  • Netflix Canada: +240 servers (3 locations)
  • Netflix Australia: +55 servers (3 locations)

Check out the PIA network whenever you need an accurate VPN server account.

Private Internet Access doesn’t offer a free trial, but all license plans come with a 30-day money-back guarantee.

Private Internet Access

Private Internet Access

Watch exclusive Neflix Japan shows and unlock all Netflix libraries for Japan.
Check priceVisit website

Netflix Japan has some of the coolest Netflix originals made in Japan, such as Good Morning Call, Switched, Erased, Terrace House, and Miss Sherlock.

If you can’t access Japanese titles because your VPN is not working with Netflix, use a more powerful VPN to circumvent this block.

Unfortunately, free VPN apps for Netflix rarely do the trick since they use public VPN servers that are quickly identified and blocked by Netflix. An example is AVG VPN for Netflix, whose servers fail to unlock the streaming service. But it’s not so easy to block VPN traffic with premium apps.

We picked Private Internet Access because it’s the best premium VPN to unblock Netflix, whether you live inside or outside Japan. It has numerous servers and exclusive DNS, an ideal combination to help you unlock any Netflix library.

[wl_navigator]

How to use Hola VPN for Netflix: Does it work?

Hola VPN is popular for Netflix users since it promises to help them access Netflix content that’s normally unavailable. In fact, Hola VPN is specially made to unblock Netflix. However, that doesn’t automatically mean it works.

If you’re interested in using Hola VPN for Netflix, we prepared everything you need to know about it: how to use Hola VPN for Netflix, if it actually works, how safe it is, and what our recommendation is.

What you must know about Hola VPN for Netflix

Hola VPN helps you unblock any website


Hola VPN offers a free and premium plan called Hola VPN PLUS. It has a desktop version that installs a Chromium-based modded browser, which means that it shares the same core features as Google Chrome. But it also has browser extensions for Chrome, Firefox, and Opera.

Since Hola VPN is optimized for Netflix, it enables you to quickly select the preferred Netflix region before you sign into your Netflix account. It makes it equally simple to switch Netflix libraries by region whenever you get bored and want to see what other countries are watching on Netflix.

How to use Hola VPN for Netflix

  1. Install the Hola VPN browser extensionSet up the Hola VPN addon for your web browser
  2. Visit Netflix and select a Netflix region provided by HolaSelect one of the Netflix servers provided by Hola VPN
  3. Sign in with your Netflix account. Enjoy!

Does Hola VPN work with Netflix?

Yes, Hola VPN worked with Netflix in our tests. It successfully unblocked Netflix US and other libraries.

However, it logs you out of Netflix every time you change the region. On top of that, the free version limits Netflix streaming to 1-hour sessions. Also, Hola VPN gets blocked frequently.

Furthermore, you shouldn’t use the desktop version. The modded browser of Hola didn’t work with Netflix because it was outdated. And, unfortunately, you can’t manually update it.

Netflix shows an error in the Hold VPN desktop version


What does this mean? You have to wait until Hola pushes a Chromium update. But if Hola’s browser is always a step behind with the updates, you will always stumble upon this problem.

Is Hola VPN safe?

The free version of Hola VPN hides your IP address and unblocks websites, but it doesn’t encrypt your traffic. It means that Hola Free VPN is not safe for browsing, torrenting, or defeating censorship.

Moreover, Hola Free VPN shares your computer’s idle resources with premium members. It also caps your Netflix streaming to 1-hour sessions. To lift these limitations, you have to purchase Hola VPN PLUS.

How can I unblock Netflix and stay safe?

Private Internet Access helps you unblock Netflix


To unblock Netflix and protect your online identity, we suggest using Private Internet Access (PIA). Made by Kape Technologies, PIA is the best VPN app. You can use it to hide your IP address, encrypt your traffic, as well as unblock streaming services like Netflix.

While Hola VPN PLUS supports 200 locations, PIA gives you access to over 3,200 servers in 45 countries. Private Internet Access doesn’t offer a free version like Hola VPN, but it comes with a 30-day money-back guarantee. It’s also cheaper than Hola VPN PLUS.

What else you need to know about PIA:

  • Works with Netflix, including Netflix US
  • Up to 10 devices can simultaneously connect
  • Compatible with Windows, Mac, Linux, Android, and iOS
  • Browser add-ons for Chrome, Firefox, Opera

PIA

It’s more secure and more affordable than Hola VPN PLUS. Use PIA to unblock Netflix and other streaming services.
Check price Visit website

You can achieve great things with a virtual private network solution, like hiding your IP address, protecting your device from identity theft, and connecting two PCs using a VPN. But few VPN apps work with Netflix, since the company is always looking for ways to block VPN traffic.

Hola VPN works with Netflix, but the free version is very limited and doesn’t keep you safe. Generally, free VPN tools or VPN apps without registration can’t keep you safe on the Internet.

Although you can upgrade to Hola VPN PLUS for better features, we recommend using Private Internet Access because it’s more secure and more affordable. And it works with Netflix, too.

[Solved] Dbgmodel.dll error: dll File Missing / Not Found

A missing DLL file on your Windows 10 device can happen due to various reasons that include accidental deletion of the file or deleted by malware infection.

Anytime you receive a dbgmodel.dll error this is a strong indication that the file is corrupted in some way and some actions are needed immediately in order to fix it.

Also, if you were wondering why Dauntless keeps crashing, as many users have, know that it can also be related to a faulty or missing dbgmodel.dll file.

What is the the dbgmodel.dll file?

A dbgmodel.dll file is associated with Windows Debugger Data Model. The file is used in order to run Windows Debugger Data Model-based applications.

Moreover, video games and or software applications also use the dbgmodel.dll file in order to get access to certain API functionalities.

If you are wondering how to solve dbgmodel.dll not found errors, in this article we will present you all the steps you need to take for a quick and reliable fix of the problem.

How can I solve the dbgmodel.dll file is missing/ not found errors?

1. Restore the dbgmodel.dll file

Before performing any other actions, we would recommend you simply restore the dbgmodel.dll file.

You can do this manually or use a dedicated tool that will perform all the necessary actions without any effort from you.

2. Reinstall the program

One of the easiest approaches to solve the dbgmodel.dll error: DLL file missing / not found is to simply reinstall the associated program.

If you are running a specific software and this is when you see the issue appears, simply reinstall it.

When you perform this action what happens is that you substitute the program’s file, registry entries, and also the dbgmodel.dll file that is required in order to make the program run properly.

3. Scan your device

Is not uncommon for dbgmodel.dll error to happen if there is a virus or malware on your device that can potentially create damage to the file.

Running a simple scan on your device will help you see if this is the cause of the error and will also solve the problem quickly.

We would recommend that you use a dedicated tool in that matter, as this will not only solve the issue quickly but will also avoid causing even more harm to your device.

Malwarebytes is one of the best software you can use to execute the work perfectly. It will scan your device and will also protect it from future harm that can cause other dbgmodel.dll errors.

Malwarebytes

Solve all the dbgmodel.dll issues with this reliable tool and prevent it from causing even more harm to your device in the future.
Free trial Visit Website

4. Perform a system rollback

  1. Type System Restore in the search bar and select the Create a restore point option.
  2. Next, click on the System Restore button.
  3. Select Choose a different restore point and click Next.
  4. Make sure to enter a date for the restore point then click on Next.
  5. If asked enter your password and follow the required steps to choose a restore location.
  6. Finally, reset your device.

5. Update Windows

As Windows 10 updates are prone to happen a few times a month even, this can create dbgmodel.dll errors.

Is possible that some changes in the operating system are not compatible with the old version of the dbgmodel.dll file.

In this case, when you will install the latest Windows 10 this action will also deliver the updated dll file which will solve the existing issue.

Although the dbgmodel.dll is missing error and does not offer many indications on what to do next, as you could see in this article solving the error is actually quite simple.

Please let us know in the comments section below which solution worked best for you or if you have additional recommendations or suggestions.

5 best stereo image viewers & processing software

When trying to create or add 3D effects to photos and videos, one of the methods used is stereo image processing.

However, this isn’t something anyone can achieve easily since you will need two or more cameras and a software tool good enough to handle and then compose the images the right way.

Since stereo image processing is something that is very commonly implemented, we decided to create a list of the best software that you can use in order to pull it off in a high-quality manner.

We chose our entries based on multiple criteria, ranging from how widely spread the software is, to how easy it is to use it for the task of stereo image processing.


What are the best software tools for stereo image processing?

Adobe Photoshop

There isn’t a person alive that does image or video editing that doesn’t know about Adobe Photoshop.

This software tool is perfectly created for handling all manner of photo editings, and the layer and powerful mask support also makes it an ideal tool for stereo image processing.

The wide assortment of tools makes it perfectly capable of performing this task, although there isn’t a dedicated tool for this unless you use plug-ins.

Nonetheless, if you do decide on purchasing Adobe Photoshop, you can make use of its tools and features for all manner of different projects, not just stereo image processing.

The program is raster-based, so if you want to work with very large projects, you better make sure the image is scaled appropriately, or else pixelations will appear.

More so, you can try it before you buy it, and a Trial account will give you access to all Adobe products for a period of 7 days.

Here are some of Adobe Photoshop’s main features:

  • Full compatibility with other Adobe products
  • Its popularity means that guides and tutorials can be easily found
  • You can benefit from a free 7-day trial’
  • Extensive plug-in support
  • Great for stereo image processing, and other great image manipulation tools.
Adobe Photoshop

Adobe Photoshop

The industry-leading software for photo editing, is an ideal tool to use for stereo image processing.
Free trialVisit website

Adobe Illustrator

Adobe Illustrator is just like Adobe Photoshop in many ways, the main difference being that it is vector-based, and not raster-based.

This means that images that are used and created through it can be enlarged and expanded indefinitely without any loss in image quality

This will allow you to not only handle stereoscopic image processing, but you can also make it so that your projects can be printed in sizes no other image editors could handle.

Just like Photoshop, if you do decide on going with Adobe Illustrator, you can first try it for a period of 7 days before you buy it.

Here are some of Adobe Illustrator’s main features:

  • High-quality vector-based image support
  • Fully compatible with all other Adobe products
  • Popularity makes finding online guides easy
  • You can try it for 7 days before you buy it
  • Used world-wide
Adobe Illustrator

Adobe Illustrator

Yet another great software from Adobe that allows you to successfully handle stereoscopic image processing.
Free trialVisit website

Inkscape

Inkscape is yet another vector-based image editing tool, and you can use it to perform stereo image processing easily.

Admittedly, this will require a bit of improvisation, since its toolset does not contain anything specific for this task.

Nonetheless, if you follow a few online tutorials, you’ll realize that the program is very good at manipulating stereo images nonetheless.

Besides, Inkscape is completely free and open-source, so you can download it any time you want, and you can modify it to your heart’s content if you feel like it.

Here are some of  Inkscape’s main features:

  • Free to download and use
  • Completely open-source
  • Quite popular despite not being a premium product
  • Toolset comparable to that of premium-class tools
  • Very light on your system’s resources

⇒ Download Inkscape


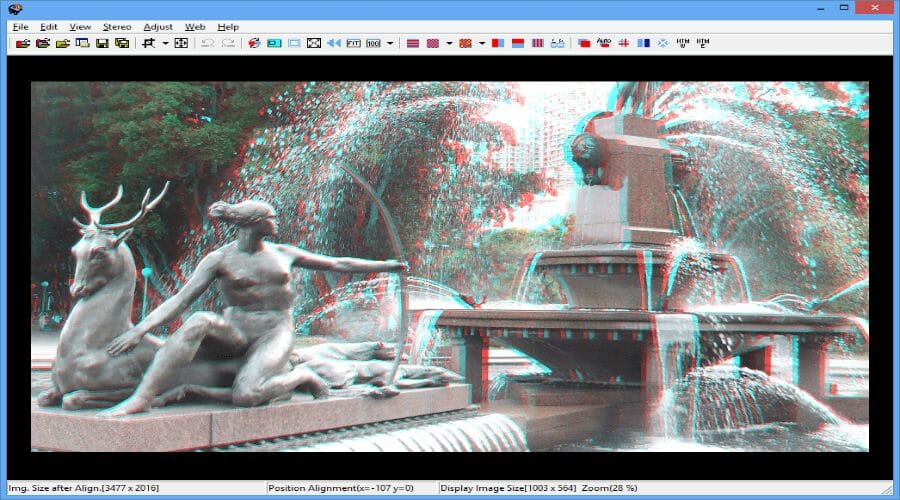
StereoPhoto Maker

If you find the entire concept of stereo image processing to be a bit too complicated, then a tool that is dedicated mainly for this purpose is probably what you need the most.

StereoPhoto Maker is the epitome of what it means to be a simplistic program, and the process of handling stereo photography is incredibly easy.

The program is free, and it is frequently updated. More so, it is also available for the macOS, so cross-platform support is a bonus feature.

Despite its lesser popularity compared to other entries on our list, this tool does feature plenty of online tutorials, so getting around it will be easy.

Here are some of StereoPhoto Maker’s main features:

  • Free to download and use
  • Get frequent updates
  • Popular enough that video guides are easy to find
  • Can automatically batch-align hundreds of images
  • Extremely lightweight from a PC resource point of view

⇒ Download StereoPhoto Maker


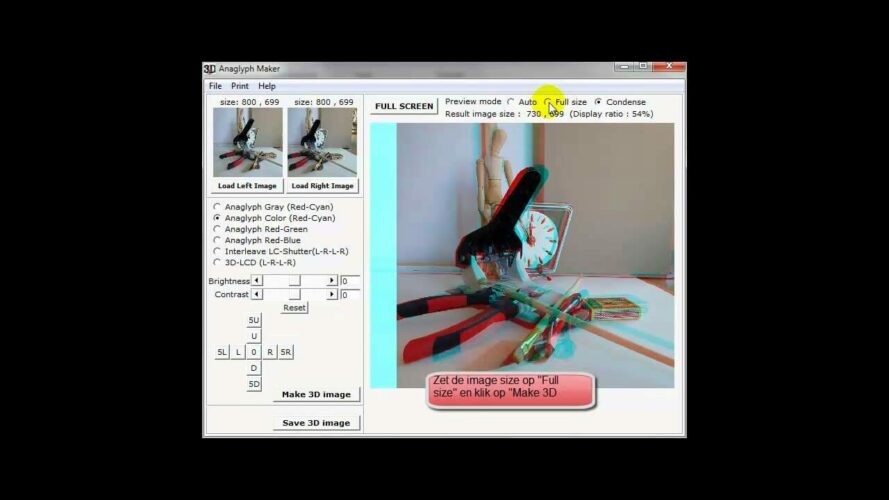
3D Anaglyph Maker

The name says it all about this tool, as 3D Anaglyph Maker is a lightweight software application specifically designed toa dd a 3D anaglyph effect to any photo you own.

The program is completely free and can be used to create stereo images, featuring several configuration tools to generate anaglyph using BMP and JPEG images.

Performing this task is quite easy, as all you need to do is load the image into the program, select a few adjustments, and then you’re done.

Besides the anaglyph effect, you can also adjust minor image settings, such as color, contrast, and luminosity.

Here are some of 3D Anaglyph Maker’s main features:

  • Completely free
  • Easy-to-use
  • Allows minor image editing
  • Lightweight
  • Can handle both BMP and JPEG images

⇒ Download 3D Anaglyph Maker


Creating stereoscopic images is a great way of making old-fashioned 3D effects, and they are still quite popular today.

While some of the entries son our list are not specifically designed for stereo image processing, their expanded toolset allows you to do the job nonetheless, sometimes with even greater effect.


[Solved] intellaptopgaming.dll missing System Error

A corrupted application or even the existence of malware or virus on your device can cause the intellaptopgaming.dll missing system error.

The intellaptopgaming.dll is an essential file of your Windows 10 operating system, which makes it crucial for it to work properly in order to not affect other important applications.

What happens when dll files are missing?

The intellaptopgaming.dll and all DLL files for that matter are essential components and they ensure that all Windows programs operate properly.

Whenever there is an issue with the intellaptopgaming.dll you will surely see how it will impact the associated software to stop working.

We will guide you in this article through the exact steps you need to follow in order to fix the intellaptopgaming.dll, so make sure to keep on reading

How can I fix the intellaptopgaming.dll missing system error?

1. Restore the intellaptopgaming.dll missing file

Before proceeding with trying anything else, our first recommendation is to restore the missing intellaptopgaming.dll file.

In doing this, the best action is to use a dedicated tool that will ensure you won’t perform any other damage to your device.

By using repairing software, you will also be able to detect missing or broken software files. These tools will then automatically find the missing file you need and install it from its verified database with thousands of new system files.

That being said, you can always count on this technology for different PC issues out there regarding system errors, Windows issues, and many more.

2. Update Windows

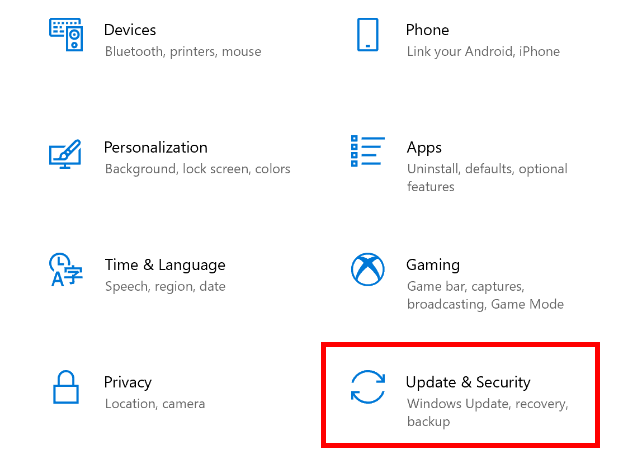
  1. Open Settings by pressing the Windows + I hotkey.
  2. Click Update & Security to open the options page.
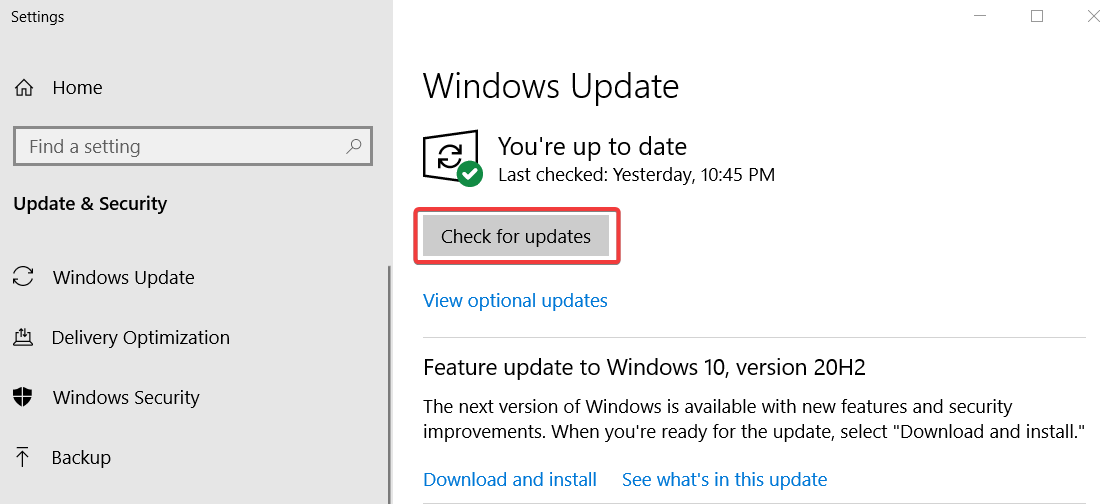
  3. Now, press the Check for updates button to download and install all available patch updates.
  4. Finally, click the Download and Install option for an available feature update.

3. Roll Windows back to a restore point

  1. Press the Windows and X keys at the same time.
  2. Next, select Run on the Win + X menu.
  3. Press the OK button after entering the command: rstrui
  4. Next, click the Choose a different restore point button on the System Restore window that opens.
  5. Click Next to open the list of restore points.
  6. Select the Show more restore points setting.
  7. Next, choose a restore point that is previous to the appearance of the intellaptopgaming.dll error.
  8. Click Next and hit the Finish button to initiate the Windows rollback.

4. Update drivers

Outdated or faulty drivers can be the cause of an intellaptopgaming.dll missing system error.

As with restoring the file, you can update the drivers manually or, you can use a dedicated tool that will allow you to do this automatically.

In using third-party software, such as Outbyte Driver Updater, you will ensure a clean and error-free update of the drivers, thanks to the built-in library of the software available.

Moreover, this way you have the certainty of installing the right driver version and avoid system problems caused by the wrong drivers.

You can as well add extra security and backup your drivers to benefit from a restore point in case something unexpected happens with any driver.

The presented solutions are among the quickest and easiest ways to fix the intellaptopgaming.dll missing system error message.

Please share with us in the comments section below which one worked best for you and if you have additional comments and recommendations.

Matte Painting Software: 5 Best to use in 2026

Matte painting also referred to as glass painting is traditionally made with paints or pastels on large sheets of glass. The purpose? Film-making, of course.

Representing landscapes, cityscapes, and complex environments, a matte painting integrates into live-action footage allowing film-makers to create the illusion of seamless locations.

Although traditional matte paintings are still in use, it is no longer a common practice to photograph and scan paintings into a PC

Thanks to the advancements in graphics design, matte painters have gradually moved their skills and artwork in the digital realm and the effects have never been more astonishing.

Matte painting software allows the artists to express their creativity blending digitally matte-painted textures with computer-generated 3D models and environments, and design visualization effects.

We thought you might want to see what is available on the market in terms of software for matte painting. Without further ado, here are five of our favorite painting programs that you can rely on.


What is the best matte painting software?

Adobe After Effects

Adobe After Effects

When it comes to graphics and visual effects software, there aren’t many tools that can match Adobe After Effects’ remarkable capacities.

One original way in which you can use this incredibly versatile tool is for matte paintings.

Offering features like color grading, image separation, and extensions in 3D space and a camera tracker to emulate realistic motion, you can achieve stunning matte paintings.

Besides the features mentioned above, Adobe After Effects also helps you not get lost in a variety of tools and options by organizing everything smoothly.

Let’s quickly go through its key features:

  • Graphics enhancements (new dropdown menu expression controls, templates that are easier to update in Premiere Pro, etc.)
  • Seamless work with Adobe apps
  • Pixel-perfect selections
  • Easily remove objects from videos (up to 25 percent faster with a third of the memory)
  • Stunning effects (for videos and images with explosive effects, VR videos to drop your audience right into the action)
Adobe After Effects

Adobe After Effects

Easily create astonishing matte art with an incredible amount of tools on offer.
Free trialVisit website

Adobe Photoshop

Adobe-Photoshop

Adobe Photoshop is the pinnacle when it comes to digital painting thanks to its numerous brushes and special effects, not to mention the fact that it gives you complete control over your artwork.

The world’s best imaging and graphic design software boasts an impressive collection of brushes to take your matte painting even further with dazzling effects.

Some of the great effects that you can apply include spray paint or ink wash effect, precise linework shading with pencil, ink, and charcoal brushes, watercolor brushes to splatter effects.

Let’s quickly go through its key features:

  • Play with color and effects using custom or Photoshop preset brushes
  • Your work is automatically saved to the cloud for quick access, no matter where you are
  • Lens Blur to offer a more natural and realistic look when blurring an object in the foreground
  • Improved Content-Aware Fill
  • Object Selection tool (create fast and precise selections by drawing a simple rectangle)
  • Enhanced Transform Warp
Adobe Photoshop

Adobe Photoshop

Use the industry-leading software for image editing, to create astonishing matte works.
Free trialVisit website

Adobe Illustrator

adobe-illustrator

When it comes to the state of the art of painting, Adobe Illustrator is the best software that money can buy.

Matte painting is as easy as a breeze thanks to Illustrator’s user-friendly brush widely appreciated for its accurate results.

Besides ease of use, this software also encompasses all the tools required by professionals to create state-of-the-art works with just a few clicks of your mouse.

The results of using this software will astonish you at every step, being designed specifically to never limit your imagination.

Faster rendering of Drop Shadows, and Feather Effects in preview mode and freeform gradients help you create rich color blends that give your matte artwork that breath-taking effect you were seeking.

Let’s quickly go through its key features:

  • Sketch-based development (you can either draw by hand in Illustrator or import art from Adobe Photoshop)
  • Image Trace (transform your imported sketch into an easily edited vector graphic to refine your work)
  • Real-time drawing and editing
  • Enhanced free distort (modify shapes freely through a bounding box)
  • Improved effects (Drop Shadows, Gaussian Blurs, and Feather effects in preview mode)
  • Freeform gradients (create rich color blends that give your objects and artwork a more natural look and feel.
Adobe Illustrator

Adobe Illustrator

Take your matte art creation process to the next level with Illustrator today!
Free trialVisit website

CorelDRAW

pixel painting software

Part of the CorelDRAW Graphics Suite, CorelDRAW is the natural choice for matte painting.

Draw, color, and fill using patterns, textures, color palettes, and color mixers or apply brushstrokes that replicate watercolors, felt markers, and more.

Beyond the effects and options you would normally expect from a powerful software like Corel, what amazes about this software is its capability to adapt to any workflow, indifferent of your expertise level.

Powerful retouching and restoration tools allow you to paint, draw, apply special effects with adjustment filters for greater control, sharpen, blend and blur as well as correct color and tone.

Let’s quickly go through its key features:

  • AI-powered image improvements (AI-powered upsampling and artifact removal features)
  • AI-based effects (experiment with new Art Style effects that leverage artificial intelligence)
  • Effect lens (apply any bitmap effect as a lens to change the appearance of objects beneath it)
  • User-inspired feature improvements (the new Smart Selection tool bring faster, smoother brushes)
CorelDRAW

CorelDRAW

CorelDRAW enables efficient and professional-level matte art to be created from the comfort of your own home.
Free trialVisit website

Graphic Design Studio by Summitsoft

Graphic Design Studio offers an impressive graphic editor perfectly adapted to matte painting.

You can draw or design your very own creations with easy to use pen and pencil tools or add special effects that can take any matte artwork from average to one-of-a-kind.

You can also upload your drawings into the program for further editing and export your work to any platform once you’re done.

Besides having access to a variety of useful options and features, this software ensures that you won’t get lost in the user interface, by neatly categorizing all options into accessible menus and sub-menus.

Let’s quickly go through its key features:

  • Advanced editing tools (to create eye-catching graphics, retouched to the finest detail)
  • Export your graphics to any program, print, or website
  • Enhanced pen and pencil tools (to draw custom shapes and designs)
  • Unique vector manipulation
Graphic Design Studio

Graphic Design Studio

With Graphic Design Studio you can create matte works of art easily, so try it out today.
Free trialVisit website

Matte painting is a widely known VFX technique. It has found a way into the digital world and thanks to dedicated matte painting software it generates even more spectacular results, faster and easier.

This guide provides you with a quick and efficient way for you to make an informed decision, both based on software capabilities and prices.

These recommendations will surely take your creativity to the next level, finding new ground to explore as you go.

Why shouldn’t your artwork benefit from the perks of digitalization? Have you already tried one of the tools from our list? If so, let us know your thoughts in the comments section below.


Fashion Design Software: 5 Best to use in 2026

If you’re into fashion design, it is essential to utilize fashion design software in order to turn your ideas into tangible results.

Nostalgics might find that the digital era has taken its toll on creativity, but as far as we see it, they could not be more wrong. Using a tool instead of pens does not take the charm out of your sketches.

If anything, it helps to create promotable models faster and easier by automating fashion design, markers, patterns, and production planning.

Integrating drawing, vector graphics, CAD software, and even ERP software, these solutions are meant to streamline the processes and take a weight off fashion designers’ shoulders.

The tools allow them to focus on what is really important, the product itself instead of wrapping their heads around productivity or manufacturing related issues.

Taking your samples into the digital space means accurate processes, error-proof garment manufacturing and rapid decision making across the organization.

That being said, how to pick your weapon of choice or in this case, fashion design software? We have highlighted the top picks for you below.


What is the best fashion and apparel design software?

Adobe Illustrator

Adobe Illustrator_best fashion and apparel design software

Adobe Illustrator enables you to create stunning clothing designs with easy access to amazing tools, including images, colors, filters, textures and much more.

Get any effect you want by applying layers and filters to your textile designs and create unique patterns seamlessly with tile, rotating and scaling graphics as needed.

Save your artwork to the Creative Cloud Library to have it at hand whenever and apply your textiles to a fashion sketch or croquis that you can make yourself or pick one from the pattern library.

Let’s quickly go through its key features:

  • Fashion Design (professional tools that allow you to obtain any effect)
  • CAD Tools
  • Fashion Illustrations
  • Pattern Layout / Print / Cut (create unique patterns seamlessly)
  • Presentation Tools
  • Color Matching (with enhanced functionalities)
  • Creative Cloud Library (to keep all your precious artwork at hand at all times)
Adobe Illustrator

Adobe Illustrator

Create amazing clothing design with the industry-leading software for fashion design, Adobe Illustrator.
Free trialVisit website

CorelDRAW

CorelDRAW Graphics Suite 2020

From manufacturing to engineering, CorelDRAW Graphics Suite is enjoyed by diverse designers, industries, and businesses worldwide and the apparel and textile industry makes no exception.

CorelDRAW is the most popular vector design software in the professional fashion design industry, with many fashion designers using it to create their designs.

Whether you’re into embroidery, direct-to-garment printing or apparel, CorelDRAW has all the tools you need to produce and output designs for the fashion industry.

Let’s quickly go through its key features:

  • Shape drawing tools and shaping options ( ellipse, polygon, rectangle, weld, trim, etc.)
  • Vector illustration and layout
  • Image editing and pixel-based design program
  • CorelDRAW app (online vector illustration and graphic design in the web browser)
  • PowerTRACE (AI-powered bitmap-to-vector tracing included in the CorelDRAW app)
CorelDRAW

CorelDRAW

Create amazing fashion design with an AI-powered software with shape drawing tools and shaping options.
Free trialVisit website

C-DESIGN Fashion

C-DESIGN Fashion accompanies you throughout the clothing creation process. It not only allows you to create fashion, but also takes care of the development lifecycle from design to production.

With a complete and intuitive user interface, professional features and enhancements, it is definitely one of the most advanced fashion design software on the market.

C-DESIGN takes on the complete development process using clear and specific technical files to include materials information, measurement chart, color matching, labeling and much more.

Let’s quickly go through its key features:

  • Fashion Illustrations
  • Color Matching (advanced features and enhancements)
  • Fabric Matching (advanced features and enhancements)
  • Technical files creation (to include materials information, measurement chart and many others)
  • Design Tools (latest generation design tools available)
  • Technical drawing tools
  • Import your drawings

⇒ Get C-DESIGN


PatternSmith

PatternSmith is an award-winning software for textile pattern creation and management that provides apparel businesses with templates, 2D or 3D drafting, editing, and nesting solutions.

Intuitive and easy to use, PatternSmith features industry-leading capabilities making it simple to execute patterns of all types thanks to embedded help files tutorials.

Specifically built for textile patterns,  the tool enables you to create, manage, and nest patterns, import files from other systems and export files to your cutting machine.

Let’s quickly go through its key features:

  • Full 2D CAD pattern drafting and editing (geometric creation tools, textile-specific entities like notches, seams, anchors and editing tools with previews)
  • Automated pattern clean-up
  • Custom add-ons
  • Keep all patterns in an organized project file
  • File Import / Export
  • Streamlined Order Processing
  • Material Library

⇒ Get PatternSmith


TUKATECH

TUKATECH covers the digital fashion design industry with two amazing products TUKAcad and TUKA3D that fit manufacturers and designers of any size.

The best part is that it includes audio and video tutorials for every tool in its portfolio, thus ensuring easy usage and maximizing results.

TUKAcad is an innovative apparel design software with which you can create advanced patterns, grading, and markers to streamline your production process.

Let’s quickly go through its key features:

  • Pattern-making and grading (multiple-size and angle grading for curved contours)
  • Integration of artwork and logos
  • Block libraries with master grading
  • Automatic grading update with pattern changes
  • Marker making (manual or automatic)
  • Edit or alter patterns while making markers

If that did not cover it, take a look at TUKA3D.

As the manufacturer puts it, this software is meant to design, develop and deliver and it allows you to create life-like digital collections, eliminating the need for physical samples.

Let’s quickly go through its key features:

  • Real-life virtual fit sessions
  • 3D virtual sampling in 5 visual ways (stretch, warp, weft, pressure, and x-ray)
  • Channels for fabric color, transparency, shine, and texture
  • Integration with graphic design applications
  • Fabric and trims library

⇒ Get TUKATECH


Each one of the products above has the potential to bring your fashion design skills to the next level by eliminating fastidious aspects of your work like production planning or manufacturing.

The advantage of using such software is that you can focus your efforts and your creativity on what matters the most: astonishing fashion collections.

Plus, you can do so, without ever touching a pencil. Let us know what best suits your pattern creation needs via the comments section below.


3D Animation Software for PC: 7 Best Apps in 2026

Computer animation is the process of generating animated images by using computer graphics. The concept of computer animation is the digital successor of the stop motion techniques using 3D models and frame to frame animation of 2D illustrations.

In order to create an animated movie, the illusion of movement is developed, and an image is displayed on the computer screen and repeatedly replaced by the new image that is similar to it and so on.

This same technique is achieved by television and also by motion pictures.

The computer animation can be developed with a computer and with the help of animation software. The animation will make everything alive by showing its movement and 3D animation will create an image that looks real to anyone who is viewing it.

It is not an easy task to make artificial objects look real by their motion. The motion of an object is a very difficult and very complex task. Fortunately, animation software can make it much easier.

All that being said, we present you with some of the coolest animation programs for your Windows PC.

What is the best 3D animation software for Windows 10?

 RatingFree/Paid2D&3D supportedKeyframe timelineMotion CaptureBeginner’s support
Adobe Creative Cloud4.7Paid(has trial)YesYesYesYes
Blender4FreeYesYesYesYes
Cinema 4D Studio4.5Paid(has trial)YesYesYesNo
Aurora 3D Animation maker4.5PaidYesYesNoYes
Autodesk Maya4Paid(has trial)YesYesYesYes
Mixamo3.5Paid (free sign up)YesYesNoYes

Adobe Creative Cloud

3d animation software

Adobe Creative Cloud is a whole packaged solution for your 3D creation needs. Although the full suite might seem hard to handle, at first sight, Adobe made sure that the learning process gets aided by tons of tutorials along with a simple to use and flexible interface.

To create a high-quality 3D animation you will need a couple of products from Adobe, such as Adobe Animate CC, Adobe Illustrator and, Adobe Character Animator. 

That’s why it makes sense to subscribe to Creative Cloud – with a single subscription, you get access to other apps that can handle anything involved in video editing as well as static graphic design.

Adobe Animate lets you create depth in animation by setting up the distance between layers across frames and also by rotating the object across the plane of the screen.

With Adobe Character Animator you can define facial features, body parts, and joint motions that contribute to a more lifelike visual effect.

You can also link the above-mentioned characteristics to your keyboard, mouse, or camera for a faster work process.

Adobe Illustrator will make the base of your project by designing stunning 3d characters based on perspective grids and layer grouping. You can also group parts for a smooth synchronization process.

Adobe Creative Cloud

Adobe Creative Cloud

After trying Creative Cloud you won’t even think about alternative tools. Your 3D animations will just look stunning!
Free trialVisit website

Daz3D Studio

daz3d studio scene window

Daz3D is a powerful tool to create animations and scenes by manipulating model presets. It allows you to use human, vehicle, animal, and object models.

You only have to choose your models, choose the accessories you want, and start creating digital animation scenes.

You have to know from the start that you cannot create your own models but there are so many features in morphing and detailing models that you won’t even feel the difference between Daz3D and 3D modeling software.

Even if the models are ‘lifeless’ at a first glance, just put into the scene the right details and it will be an artistic masterpiece.

While Daz3D is not the best software for newbies, it is not hard to assimilate and to get used to its features and possibilities.

Besides, you can find a bunch of tutorials on Youtube that will assist you in getting familiar with this 3D animation generator. After a few days of tutorials and you will become a future 3D professional animator!

For more advanced users we have good news: you can use the models from Daz3D in Photoshop and ZBrush to customize 3D figures. You can use this feature for free by downloading free plugins like GoZ.

⇒ Get Daz3D Studio

Autodesk Maya

Autodesk Maya is one of the best 3D animation software out there. Using this software, you will be able to create and develop 3D scenes, games, people, and movies.

The software has some cool features that are not complicated and that makes the program perfect for modeling, animating, and coloring.

You can use Arnold RenderView to view scene changes in real-time, including lighting, materials, and camera.

You can also create complex procedural effects and animations with instanced objects, and you will be able to make high-level animation edits with a nondestructive, nonlinear, clip-based editor.

The intuitive brush-based grooming tools give you greater control and accuracy for styling and posing hair and fur.

The developers have recently added a bunch of new features to the software. The speed enhancements will make your scenes work much faster, and now you can create ocean surfaces with waves.

You can also quickly render and manage complex scenes and generate templates for the setup of a shot for easy re-use. You are now able to fine-tune your characters and the animation more easily and quickly.

With the software, you can create branding, title sequences, flying logos, and more projects that require text. You can also import and or copy/paste SVG files into the program.

The mirror enhancements and the tool symmetry improvements will make symmetrical modeling much easier, and the sculpt and shape models are now more artistic and intuitive.

Users can accelerate their performance with the interactive workflow.

Maya allows you to work in a higher-fidelity, and higher-performance environment to edit assets and images in a short time.

You can buy the Autodesk Maya animation software from Autodesk. There is also a 30-day free trial available.

⇒ Get Autodesk Maya

Blender

Blender is an open-source 3D creation suite. It supports the entirety of the 3D pipeline including rigging, modeling, simulation, animation, composition and motion tracking, video editing, and game creation.

This is a public project, and it is made by hundreds of people from all over the world, by professionals and hobbyists, studios and individual artists, students, scientists, animators, VFX experts, game artists, and so on.

Blender features a built-in powerful straight path tracer engine called Cycles that offers fantastic realistic rendering: CPU and GPU rendering, real-time viewport preview, VR rendering support, PBR shaders, and HDR lighting support.

Blender features a vast array of modeling tools that make transforming, creating, and editing your models very easy.

Blender includes also a production-ready camera and object tracking that will allow you to import footage, track it, mask areas, and see the camera movements live in your 3D scene.

Due to its various qualities, Blender is used for various short films, advertisements, feature movies, and TV series.

With the help of the software, you can now draw 2D in 3D, and drawing straight in a 3D viewport makes lots of sense and it opens unsurpassed workflow freedom for storyboarders and 2D artists.

Blender has a flexible Python-controlled interface, and the layout, size, fonts, and colors can be adjusted very easily. You can use hundreds of add-ons by the community, or you can create your very own by using Blender’s Python API.

You can also subscribe to Blender Cloud for a monthly fee and you will get 100+ hours of high-quality training, all the tutorials and the open movies, and exclusive production insight and walkthroughs.

⇒ Get Blender

Cinema 4D Studio

Cinema 4D Studio is another top animation software that you can use to easily create character rigs and advanced character animation with numerous tools.

Cinema 4D is very easy to learn, and it’s also compelling. It really is the perfect package for all 3D artists out there who want to achieve breathtaking results as fast as possible and hassle-free.

All beginners and seasoned professionals will be able to take advantage of the program’s vast range of tools and features to achieve amazing results.

The software’s reliability will make the perfect app for demanding fast-paced 3D production and a range of attractively priced software packages is available to fit every need an artist has.

You can get started with the software straightforward and quickly to create cool results. The software’s intuitive and simple interface makes it very easy for beginners to jump right into the middle of the software and take control.

It never stops to amaze professional users as well, and the many tutorials and the global community are essential for bringing beginners to a pro-level of use.

All the program’s new functions work intuitively, and they are exactly what users need. The Cinema 4D’s layout can also be easily customized to precisely fit a user’s needs.

The program’s stability is great, and all the new features and functions are tested before they are released.

The developers release free service packs on a regular basis, and these will optimize the software and let the creators respond to changes in drivers and operating systems as quickly as possible.

Staying flexible for last-minute changes is important no matter which project you’re working on.

Cinema 4D offers numerous options for working non-destructively: parametric modeling, procedural shaders, textures, and more.

And the Cinema 4D Take System lets you save and manage multiple versions of a scene in a single file!

⇒ Get Cinema 4D

Aurora 3D Animation Maker

Aurora 3D Animation Maker is among the best animation software, and it features an extensive range of functions.

The software will allow users to create eye-catching 3D animations that will transform your logos or your text into original and awesome creations.

You will get the opportunity to control all aspects of your animation, including the speed of playback, the animation’s length, and more.

You can create your own movie title animations for the web and your movies in minutes. You don’t even need mastery over the basics of 3D Design.

Aurora offers 3000+ symbols, 60+ additional TrueType fonts, 80+ object style, 200+ 3D object templates, among others.

Using Aurora 3D animation software you can get the best results. You should know that web design is more than just choosing the right layout and graphics.

You will need eye-popping visuals that will capture and hold your audience’s attention. And Aurora 3D Animation Maker allows you to create awesome 3D animations that will take your logos and your texts as well to the very next level.

The software will allow you to create limitless special animation effects and you will be able to go as far as your creativity allows you to work.

Just imagine how it would be to apply particle effects to simulate fireworks, smoke, snow, flame, or the emptiness of space.

Or use motion effects like Linear, Quad, Cubic, and Quit to add choreography like bounce and twists.

When you are absolutely pleased with your final result, Aurora 3D Animation Maker makes it easy to incorporate your animation into your website, giving you the options to export as Video, Flash, animated GIF, or as a sequence of images.

Aurora 3D Animation Maker is one of the best cool 3D text, logo animation, 3D video title maker tools.

⇒ Get Aurora 3D Animation Maker

Mixamo

mixamo 3D animation

You may not have heard of Mixamo up until now, but we’re sure that ‘Adobe’ rings a bell for you. Mixamo is a niche 3D animation software that’s part of the Adobe family.

If you’re looking for a reliable tool to create animated 3D characters, then Mixamo is the right choice for you. The best part is that there is no 3D knowledge required to use this software.

Mixamo offers a huge animation library that you can choose from. There is no need to animate each and every step that your character takes, for instance. Simply go to Mixamo’s store and get the right animation for your needs.

If we were to use just two words to describe Mixamo, those would be ‘time efficiency’.

Simply use a few markers and the tool will instantly calculate skinning weights, adjust bones, and other visual characteristics.

⇒ Get Mixamo

While the first tools are really powerful and extremely versatile, the last one on your list, Mixamo is a great niche animation tool that you can use to create 3D character animation.

If you have any other questions about these products, or maybe you’re aware of another good alternative to them, feel free to share in the comments section below.

How to easily play AIFF files on Windows [Guide]

If you are trying to play an AIFF file on Windows Media Player and get an error message saying that says the file is not compatible.

Media Files that end with AIFF file extension is an Audio Interchangeable File Format files and known to cause this error on Windows computers.

But there are ways to play them and you can learn how to do it here.

What are the AIFF media files?

The audio files with AIFF extension are different from your common MP3 audio format as these files are uncompressed.

While the AIFF format helps in retaining high-quality audio, the file size tends to go over 10 MB for every minute of audio.

Your Windows Media Player is capable of running the AIFF Files. Other media players that are capable of running the AIFF files are Apple iTunes, VLC, Media Player Classic, etc.

To play any .aiff files on Windows 10, you only need to double-click on the audio file and Windows Media Player should be able to play it without any issues.


How to Play AIFF files on Windows 10?

1. Adobe Audition (recommended)

adobe audition

Adobe Audition is a professional tool for video and audio creators who want to take their recordings to the next level.

It seamlessly integrates with other Creative Cloud apps, and it is regarded as the industry’s leading audio cleanup and restoration tool.

It also goes without saying that it supports all audio formats and will allow you to easily play AIFF files on Windows 10. If you’re serious about the audio quality of your content, Adobe Audition is the place to start.

You can easily record, edit and apply effects to your audio clips and then import them into other software such as Premiere Pro.

Some features you can use with Adobe Audition are Waveform or Multitrack view; you can add audio effects to recordings, or presets for easy edits. Also, the batch processing and the non-destructive effects are available.

Adobe Audition

Adobe Audition

Adobe Audition helps you to easily play AIFF files on Windows, so be sure to give it a try!
Free trialVisit website

2. VLC Media Player

Play Aiff Files with VLC Player
  1. To make sure the problem is not due to Windows Media Player, download VLC Player from the official website if you don’t have it already. Install VLC media player.
  2. After the installation is over, right-click on the .aiff audio file and select Open with.
  3. From the list of apps select VLC Player.
  4. VLC Player should be able to play AIFF files in Windows 10 without any issues.

How to Convert AIFF Files to MP3?

Conver Aiff File using iTunes
  1. Launch iTunes on your computer.
  2. Drag and drop the file onto iTunes.
  3. Right-click on the File and select Convert > Create MP3 Version.
  4. Apart from MP3, you can convert the file to better formats like FLAC, AAC,  AC3, M4R, etc using a free file converter like DVDVideoSoft Free Studio.
  5. Once the file is converted, try to open it in Windows Media Player to check if it is not corrupted.

We hope that these recommendations from our list were helpful. For more suggestions, please access the comments section below.

6 Best Compositing Software to Use in 2026

Building a career as a content creator is no longer an impossible goal nowadays. The software you use to create videos can make the difference between a newbie content creator that will not last long and one that will gain traction and popularity.

Visual effects are a decisive factor when it comes to videos, especially those posted on social media. Even a simple filter can change the game.

For example, imagine what kind of content a fully-fledged video editing software with motion-tracking can provide you. The quality of the recorded software will be perfect for editing.

If you want to make your videos more dynamic and surprise viewers, we are here to help you out. Well, getting your hands on some great compositing software isn’t optional.

Professionals use compositing in film production to combine images from multiple sources in a single frame. The results speak for themselves.

As always, we are focusing on well-developed programs that provide many tools ready to assist you in making engaging HD videos. Don’t hesitate to check out the list below.

What is compositing?

Source: Compozitive

The process referred to as compositing is a technique that combines visual elements from separate sources into single images.

Such techniques are often used when creating scenes in live-action movies or TV shows and are called chroma keys, blue screen, green screen, and many other names.

The chroma key effect can be achieved by using physical green/blue screens in the background, then processing those with special green screen software.

Nowadays, most compositing is done through digital image manipulation, but things used to be different. Pre-digital compositing goes back to the late 19th century, while some are still in use today.

What’s the best compositing software to try out?

Adobe After Effects

This is a top-end digital visual effect, motion graphics, and one of the best compositing software solutions aimed at professionals.

If your wish is to create and refine immersive videos, you may as well stop your searches here.

Adobe After Effects has a special ever-growing effects pack giving you access to more transitions, motion graphics, and visual effects than most other services do.

Among the positive things about this program is that it lets you edit virtual reality or 360 videos using the VR Comp Editor and its amazing compositing tools.

Moreover, you may create virtual reality environments using the app’s tool aptly named Create VR Environment.

Through this feature, setting up the composition, cinematography, and other essential aspects of making a great 360/VR video is easier than you’ve imagined.

You also get rotoscoping features to open up endless possibilities for adding impressive visual effects to your videos and that’s not all.

Professional-level list of key features:

  • Helpful start screen
  • Intuitive VR Comp Editor and explosive effects in VR videos
  • Auto-saved work in Adobe Team Projects for a continuous workflow even while on the go
  • Set anything in motion with keyframes or expressions that will intensify the sensation of movement in your footage
  • Can be used on both Mac and Windows computers
Adobe After Effects

Adobe After Effects

Create immersive outstanding visuals with a professional tool that provides tons of features.
Free trialVisit website

Wondershare FilmoraPro

Wondershare FilmoraPro provides an extended suite of video editing and it is considered a perfect option for those who are specialists in the domain.

If you’re just starting out with video editing, or perhaps you need a simple program to slightly edit videos, this software has everything you need.

Having full access to the entire functionality of this tool once you purchase a license is a joy! You will be greeted by tutorials and descriptive text that will teach everything about the tools.

Just imagine that you have more than 300 stunning effects for different niches and you may transfer your final videos directly to any popular portable device, upload them to YouTube or burn them to DVD in no time.

That’s your chance to transform boring and dull everyday videos into unrecognizable pieces of art and raise the bar.

Windershare FilmoraPro will accelerate the editing process to help tell a story in your own way.

The software doesn’t limit itself only to editing videos. It can also sync the audio, compress it, reduce background noise levels, apply audio transitions, and much more.

You can adjust light levels thanks to the light leaks, lens flares, and glows. More so, mask unwanted parts of the video with preset or custom shapes.

With this multi-purpose editing tool, you won’t need another third-party software. What are you waiting for? Express your cinematic flair.

Besides developing FilmoraPro, Wondershire created other awesome software and even took their time to create browser-based tools.

Key features you may enjoy from Wondershare FilmoraPro:

  • Extremely intuitive user interface
  • Basic features such as trim, crop and rotate are all included for your videos
  • You may export and share to a huge selection of formats and social media sites
  • Audio ducking fades your music so your dialogue stands out
  • Apply color correction to multiple clips at once to save time
Wondershare FilmoraPro

Wondershare FilmoraPro

Get your hands on an impressive video editor that comes with hundreds of effects and other great features.
Try it nowVisit website

Nuke

Nuke is an interactive solution for video compositing. The software lets you create more content faster than ever before and enjoy enhanced flexibility in all your creative tasks.

To be more precise, both 2D and 3D compositing are included, along with some amazing Editorial options.

Nuke has a fundamental ecosystem of tools that impacts the industry at an international level, reaching studios large and small.

Additionally, to Nuke, the company also created NukeX, Nuke Studio, Nuke Indie, Hiero, and HieroPlayer.

All of these formidable tools tackle high-end compositing, offering VFX coverage through tutorials. Since HieroPlayer is freely included with Nuke, you also can review your work on the desktop.

2D compositing features include a Nodal toolset, Rotoscoping, and Deep image compositing so that the viewers can always feel immersed in what they’re watching.

Nuke was also used to create blockbuster tv shows thanks to its flexibility and hefty toolset that helps entire teams create the best quality content.

The software underwent a thorough evaluation by the Netflix Technology Alliance to ensure it met the technical requirements needed for the post-production and delivery of the Netflix Originals series.

Precisely, Nuke is responsible for the awesome CGI in the popular TV show, Game of Thrones. That’s right. The dragons, the Night King, and all the other special effects were created only by using Nuke.

The incredible list of key features delivering film-grade results includes:

  • User-friendly, stable UI
  • 3D compositing options enable you to work in an intuitive 3D environment
  • Access to technical support
  • 3D camera tracker included

⇒ Get Nuke

Nuke Non-commercial

Next is in the list is a free version of Nuke that runs outside the regular licensing model. This software is meant for personal, educational, and other non-commercial use.

In spite of that, it offers most of the features of the commercial version of Nuke, which makes it a video compositing software that is great for beginners who are eager to learn more about editing.

It is free software available for non-commercial, great for compositing, editing, or adding finishing touches to a product.

This version of the original program doesn’t place watermarks on the videos either, which is a big plus.

We don’t recommend Nuke non-commercial to professionals who are looking for fully-fledged compositing software, since this version is beneficial for those who wish to learn to edit.

Instead, professionals should check out Nuke, which was also mentioned in the article. Output resolution is though limited to HD (1920 x 1080) and the 2D format support is disabled for MPEG4 and h264.

Unfortunately, there is no support for third-party plug-ins. Only those who ship with Nuke are supported by the software.

Additionally, the Data storage is encrypted so you won’t be able to access commercial-use Nuke files from the non-commercial version.

Although the tool is a bit limited, it’s your own chance to explore it and its industry-leading editing tools.

Nuke Non-commercial key features:

  • A choice of different VFX tools is at your disposal
  • You may manage color grading with ease
  • Nuke StudioTimeline environment lets you create Nuke Comps, add soft effects, and export your project
  • In-application help from the Support team
  • Special forum dedicated to Nuke Non-commercial users

⇒ Get Nuke Non-commercial

Helius Composite

try out Helius Composite

Helius Composite is another great choice when looking for an application based on compositing and visual effects tools.

Even if it is a 32-bit application, be sure that it will install and run in a 64-bit environment as well.

Do note from the start that if other tools are recommended to high-end artists, this one is ideal for students and teachers. Only applications that use a valid school domain address are accepted.

Having an expansive database of composite materials, the tool will simulate material behavior or compound components.

The built-in solvers make it so u don’t need to have secondary finite element analysis to analyze the characteristics of the materials faster.

Compute strength margins for components through specific laminates that will help create bolt pattern designs.

You can also build custom woven fabric materials. All you need to compute lamina properties is to select a fabric type and base.

The different broad good-type materials that can be built are Random Continuous Mat, Woven Fabric, and Stiched Fabric.

Laminate layer compositions can also be used to calculate first-play strength failure, stiffness, and the progressive failure of a structure.

Some Helius Composite key features you’ll most likely appreciate:

  • It features a full High Dynamic Range pipeline
  • Easy-to-use graphical interface
  • Next-generation 3D compositing
  • High-performance interaction at extremely high resolutions and advanced rendering

⇒ Get Helius Composite

AVS Video Editor

AVS4YOU offers the ultimate multimedia pack covering a video converter, editor, and remaker in one single bundle.

Produce audio, videos, and other spectacular content without having any limitations or restraints to your creativity!

The software is compatible with all key video formats and supports any file size, so uploading 4K or even 8K videos or clips shouldn’t be a problem.

Since AVS Video Editor supports a variety of formats and HD videos, you can save your work in MP4, DVD, AVI, MOV, VOB, WMV, MKV, WEBM, etc.

The video and audio editing processes are sped up by the hardware acceleration feature that utilizes your GPU’s video cache to yield the best results.

More so, AVS Video Editor lets beginners and professionals turn basic recorded videos into pieces of art. Users have access to basic editing options such as trim, crop, join, etc.

Additionally, the editor gives you access to more professional-oriented features such as transitions, image effects, filters, edit chroma key, slow motion, and PC screen capturing.

Since AVS Video Editor is part of a bundle, let’s talk briefly about some of the other apps you will be getting alongside it.

The Video ReMaker can transfer video from camcorders and video cameras or create DVD and Blu-ray menus and discs.

Preview your edited videos or simply watch movies/TV shows or listen to your favorite music in your free time with the AVS4YOU media player, which supports all popular file formats.

You can also view images as a slideshow, create personal playlists, or take screenshots of important moments while watching videos.

Let’s take a look at the product’s main features:

  • Cut, split, and join as many videos as you want
  • Fix shaky footage with video stabilisation
  • Chroma key will change your background
  • Make vivid slideshows
  • Process HD video resolutions
  • Edit and save videos in all major formats
  • Hardware acceleration for faster editing

AVS Video

AVS Video Editor is part of the multimedia family bundle, putting together all the necessary tools to create, edit, and share content.
Check price Visit website

Compositing software and live-action movies

The most common usage of compositing software is adding CGI to TV shows or movies. Generally, people use these apps to create scenery that wouldn’t normally be in the recording.

In order to take advantage of compositing software, you need some special requirements. First of all, a green screen, blue screen, or something similar is necessary when you record unedited videos.

Obviously, the second step is to download or buy the actual tool with its assets. Lastly, you need patience and inspiration.

Preparing the subject for a green screen

When recording footage using a green screen, you should take into consideration some important aspects.

The screen needs to be lit first, followed by the other objects in the frame. One of the common mistakes made by people who use chroma keys is lighting the subject and the green screen as one.

Additionally, any object that is green will be considered part of the green screen by the software, so make sure you take all objects with that color out of the frame.

Why are we telling you all of these? Because, although compositing software is revolutionary and can make wonders, the raw, unedited footage also plays a crucial role in the making of a video.

Keep in mind that some videos require certain codecs in order to view them. If you want to see the finished product or even preview it, we suggest checking out this article about video codec packs for Windows 10.

If you were looking for high-quality compositing software, you came to the right place. These tools should be perfect for you. Don’t hesitate to let us know what you chose in the comments section below.

Video Optimizer Software: 8 Best We Tested in 2026

Video optimizers are software that enable users to optimize video playback for specific devices, social media websites, video-sharing apps, and YouTube.

Some users might call them video converters, while others might say that they’re media file compression software. A video optimizer is both, as it enables users to compress videos by converting them to other formats.

For example, you might need to utilize video optimization software to add a few videos to your own website or YouTube. Large video files can slow down webpages considerably, which has an impact on search engine optimization.

Larger files take longer to upload and might also eclipse max file sizes for instant-messaging apps such as WhatsApp.

Thus, we need to compress video files to optimize them for playback on websites and share them via instant messaging and social media channels.

Furthermore, large video files hog storage space on most devices, but all the more so on phones and tablets.

So a video optimizer will provide you with the tools and settings required to convert and compress videos. They’ll usually include conversion settings for things like frame rate, bitrate, and resolution to configure the output file with.

The best video optimization software also provide a variety of preset device formats for users to select. These are some of the best video optimizer software for Windows.


What’s the best video optimizer for a Windows 10 PC?

Adobe Premiere Pro

Adobe Premiere Pro is the best video editing software that you can use to create amazing videos and optimize them for YouTube, websites, and other video platforms.

This powerful tool lets you edit any type of footage, from standard video format to 8K videos and even VR videos. Premiere Pro can handle anything you’ll throw at it.

Adobe Premiere Pro packs a series of handy features that optimize your videos for different web platforms. For example, the Auto Reframe feature automatically optimizes your videos for social media so as to always keep the content in frame irrespective of the size or format used.

There’s also HDR10 metadata support that optimizes HDR content so as to look perfect on HDR displays.

Key Premiere Pro features include:

  • Seamless integration with other Adobe products such as Photoshop, After Effects, Adobe Audition, and Adobe Stock, and other third-party extensions.
  • Built-in Premiere Rush integration to film, edit and share your videos on whatever device you want.
  • Project locking when editing to prevent other users from editing content and avoid conflicts.
  • A flexible production panel to divide complex workflows into smaller chunks for improved productivity and efficiency.
Adobe Premiere Pro

Adobe Premiere Pro

Optimize your videos with the industry-leading video editing software for social sharing, TV, and film.
Free trialVisit website

Any Video Converter

Any Video Converter (AVC) is a video optimization software that’s compatible with a wide variety of video formats and packs in more multimedia tools than most alternatives. You can convert and compress videos with either AVC Ultimate or AVC Free, which is the freeware version.

The Ultimate version includes extra tools for DVD conversion and video recording along with DVD menu templates.

Both versions are compatible with Windows XP to Windows 10 and Mac platforms. They enable users to convert clips to a good number of output video formats, such as MPG, WMV, AVI, 3GP, FLV, DivX, F4V, and others.

AVC users can select numerous preset device profiles to optimize videos for playback on iPhones, iPads, Samsung Galaxies, Sony Xperias, Windows mobiles, Blackberry phones, and other mobile devices.

Unlike some of the alternatives, AVG includes editing options with which users can adjust contrast and saturation, crop clips, extract audio and add special effects to videos.

The Ultimate version also boasts super quick conversion speeds and includes some handy additional tools for downloading online clips and burning videos to blank DVDs. AVC even provides video and DVD playback options on its Video Player tab.

Any Video Converter

Any Video Converter

Convert and optimize any video format you have on your disk. This amazing software will help you out.
Check priceVisit website

Ashampoo Video Optimizer Pro

The first optimizer software that we want to show you is Ashampoo Video Optimizer Pro. This tool allows you to adjust standard video settings including video quality, colors, and contrast.

Of course, you can also change other video settings such as white balance, brightness, saturation, and shadows.

This tool is also great if you’re working with shaky videos that are recorded without a tripod because it has an advanced video stabilization feature available.

Noise removal feature is also present, and it will automatically detect and fix noise in your videos while providing you with crisp and clear videos.

The application also supports standard video editing features such as cropping and rotation, but you can also apply slow motion effects to your videos.

You can even speed up your clips and make impressive time-lapse videos with ease. The application supports various text and visual effects, and if you want, you can also add various metadata to your videos.

Regarding compatibility, this tool supports all common codecs, so you should be able to open any type of video file.

As for the supported resolutions, the application can handle any resolution and it fully supports HD, 2K, and 4K videos.

Overall, Ashampoo Video Optimizer Pro offers great features, and it’s quite simple to use due to its friendly interface.

Beneath the sleek interface, there’s a powerful video optimizer software that will be perfect for both amateur and professional users alike.

Overview:

  • Ability to adjust video quality, contrast, brightness, saturation, and shadows
  • Support for video stabilization and noise removal
  • Ability to create slow-motion and time-lapse videos
  • Support for all major video formats and 4K resolution
  • Batch processing
  • A sleek and simple user interface
Ashampoo Optimizer

Ashampoo Optimizer

The effective solution to enhance the quality of your videos. Stabilize shaky footage, optimize contrasts and colors of your clips.
Check priceVisit website

Prism Video Converter

The Prism Video Converter Software is a lightweight and reliable video optimizer. The software needs just 859 KB of hard drive space, but it still packs in all the essential tools and options for optimizing videos.

This is certainly among the best freeware video optimization packages. You can run the program on Windows platforms from XP to 10 and Mac OS X 10.5 or higher.

Prism Video Converter can convert any video with a DirectShow codec to alternative formats. There are 28 output file formats to select from along with additional preset mobile device and console profiles.

The software includes an encoder and video options with which users can adjust the bitrate, resize, and reduce the frame rate for the output file. PVC users can adjust the video color settings, add subtitles to clips, and enable watermarks.

Add DVD is another handy option the software includes that enables you to directly convert DVD to a video file format. In addition, PVC also includes a Share button users can press to upload files directly to video websites, cloud storage, and social media sites.

⇒ Download Prism


Pavtube Video DVD Converter Ultimate

Pavtube Video DVD Converter Ultimate is both video optimizer and DVD ripper software. The software works with a paid subscription, but there’s also an unregistered version you can try out.

Note, however, that the trial version adds a watermark to videos. You can run the software on Windows platforms from XP up.

Pavtube Video DVD Converter Ultimate is a straightforward video optimizer to utilize with an intuitive UI design. The software converts clips to the vast majority of common and high-definition video formats.

Pavtube Video DVD Converter enables users to optimize videos for various tablets, phones, game consoles, and digital media players by selecting preset device profiles. Users can adjust the resolution, frame rate, bitrate, and codec settings for each device profile.

The software includes an editor with which you can crop, trim out frames, add watermarks to clips, and add effects to videos.

The software’s DVD ripper tool also comes in handy when you need to rip video content from the disc to optimize it for playback on other devices.

⇒ Download Pavtube


HandBrake

HandBrake is another of the best open-source video optimization utilities for Windows platforms from Windows 7 to Windows 10, Linux Ubuntu, and Mac OS X.

The software is a decent choice for video encoding as it includes lots of advanced settings to configure the output with.

HandBrake supports the vast majority of input video file formats, but the software restricts you to convert to either MP4 or MKV.

Thus, it doesn’t provide the widest choice of output file formats; but HandBrake still includes more output settings than most alternatives.

HandBrake users can configure output files’ picture resolution, display size, frame rate, video codecs, video filters, audio bitrate, and more besides.

The software makes up for its limited file output choice with a plethora of preset device profiles to choose from, and they include Gmail presets so that you can share compressed videos via email.

Furthermore, HandBrake users can also batch convert multiple videos to alternative formats and rip their own video content from Blu-ray Disc and DVD.

⇒ Download HandBrake


Format Factory

If you need to convert video to file formats other than MP4 or MKV, Format Factory is a good freeware alternative to HandBrake. Format Factory enables users to convert videos, audio, and image files to various formats.

Format Factory users can convert their videos to the MP4, 3GP, AVI, WMV, FLV, SWF, and MPG file formats.

The software’s users can also select to convert files to numerous mobile presets optimized for playback on Apple, Android, Microsoft, Nokia, and Sony devices. To compress videos, you can adjust the video and audio stream settings included in Format Factory.

Aside from its video optimizer utility, Format Factory also includes few other handy multimedia tools that you might not find in other alternatives.

For example, the software includes joining options with which you can merge media files together. Users can also utilize FF to convert video DVDs and music CDs to file formats.

⇒ Download Format Factory


Freemake Video Converter

The Freemake website boasts that Freemake Video Converter has been the #1 online video converter for eight years. A counter on the site highlights that the software has about 93 million users to date.

FVC is freeware software that you can run on Windows platforms from Vista to 10. However, the unregistered version adds a Freemake logo to the output video.

Freemake Video Converter includes all the tools you’ll need for video optimization. It enables you to convert most video files to MP4, AVI, MPEG, WMV, 3GP, FLV, Blu-ray, and DVD formats.

The software provides device presets for various phones, tablets, and consoles. Users can configure those presets, or set up their own, with the preset editor and select to size up or down the output files’ display resolutions.

Freemake includes editing options with which you can cut, merge, and rotate clips before conversion. FVC users can download online clips from YouTube and other video and social media sites and upload their videos, photos, and MP3s directly to YouTube. You can also rip video content from unprotected DVDs with the software.

⇒ Download Freemake Video Converter


So those are some of the best video optimizer software for converting and compressing multimedia files. They’ll certainly come in handy if you need to optimize videos for playback on mobile devices or websites.

Even if you don’t, converting video files to more compressed formats with those software can save quite a bit of hard drive space.


FIX: iTunes SyncServer.dll is missing

If you accidentally deleted SyncServer.dll from your Windows 10 computer you’ll probably get RegSvr32 error every time you turn on your computer.

Restoring this DLL file will solve your problem, and we’ll show you how to do that manually and by using third-party software in just a few easy steps.

We have to mention that the SyncServer.dll is part of the iTunes program and without it, the app will trigger an error.

How can I fix the iTunes SyncServer.dll is missing error?

1. Reinstall iTunes

  1. Type control panel in Windows search and click Control Panel from the results.
  2. Click on Programs and Features.
  3. Select iTunes and click Uninstall.
  4. Restart the computer.
  5. Download the latest iTunes setup file for Windows from Apple’s website and install it on your computer.
  6. Let the iTunes install and then check the functionality.

This method is tested and it works fine but it’s a little bit time-consuming and it requires a little bit of skill. However, the iTunes SyncServer.dll is missing error can be fixed a lot easier.

We are talking about specialized software that not only will solve this DLL issue but will also optimize your system to an optimal running state.

Since SyncServer.dll comes with iTunes software, the simplest solution for this problem is to reinstall iTunes.

Uninstalling and then installing iTunes again will hopefully get this DLL file back and you’ll be able to boot your Windows normally.

2. Copy SyncServer.dll from another computer

  1. On another computer, go to Start, type the following paths in the search tab and press Enter:
    • C:\Windows\System32
    • C:\Windows\SysWOW64
    • The first is for 32-bit systems and the second is for 64-bit systems.
  2. A folder will pop up on the search menu.
  3. Double-click on the folder to open it, and you will see a lot of DLL files.
  4. Drag the SyncServer.dll file into an external memory device.
  5. Copy the same DLL file onto the same location in the second computer.
  6. Press the Windows key + R to start Run.
  7. Type regsvr32 SyncServer.dll and hit Enter to start the command (This action will register the DLL on the computer).
  8. Close the open windows and folders and reboot your computer.

This is a little bit unusual solution, but it could work in case reinstalling iTunes didn’t.

If you have another computer, you can transfer SyncServer.dll from it to your current machine, or you can do the same thing with your friend’s computer.

Whatever you do, don’t download the SyncServer.dll from a random website. The file could be harmful to your PC and if that happens, you will need a strong malware removing solution.

That would be all, if you have any comments or suggestions you would like to share with us, reach for the comments section below.

How to use flowchart templates with Adobe Illustrator

Flowcharts are a great way of conveying information to the public in a modern and concise way.

They need to be well-designed in order to draw a reader’s attention but created in such a way that the focus goes on the information that is transmitted.

Adobe Illustrator comes with a large gallery of flowchart templates which you can pick from as they are, customize, or just start a totally new one based on the template


How do I use Adobe Illustrator’s flowchart templates?

1. What is Adobe Illustrator?

Adobe Illustrator is a vector-based graphic design tool that was first developed for the macOS.

However, popular demand made it so that the program managed to make its way onto the Windows PC platform as well, and it is now supported on Windows 10, too.

The product is world-standard in graphic design, but that doesn’t mean that it is necessarily premium and exclusive.

On the contrary, you can try Adobe Illustrator for free for up to 7 days before choosing whether to buy a full license or not.

Adobe Illustrator

Adobe Illustrator is one of the best vector-based graphic design tool on the market and that is why it’s also used by professionals.
Free trial Visit website

2. What are Adobe Illustrator templates?

Templates can be perceived as semi-finished products that you only need to fill out with your own personal details, thus allowing you to create new documents that share common settings and design elements.

For example, if you want to create several flowcharts that look and feel the same, but are different, then you can create a template with the desired size, settings, and print options.

You can also include symbols for common design elements, like logos, as well as certain sets of color swatches, brushes, and graphic styles.


3. Start with New From Template

  1. Choose File, and then select New From Template.
  2. Choose File and go to New.
    • In the New Document dialog box, click Templates.
  3. When you are in the Welcome screen, select From Template in the Create New list.
    • In the New From Template dialog box, find and select a template that you wish to use as a basis, and click New.

Illustrator comes with a variety of templates included in its library. These include templates for brochures, labels, certificates, postcards, flowcharts, websites, and more.

Besides the one included with the base program, templates can also be downloaded separately from Adobe’s websites, but you can also try user-created content as well.

When you use the New From Template command, Illustrator creates a new document with identical content and document settings as the template but leaves the original template file untouched.

When trying to create a new project starting from a pre-existent Adobe flowchart template, do one of the following:


There are other software tools that can help you with creating flowcharts, and some of them even come with a few good templates as well.

However, Adobe Illustrator proved to be the best when it came to designing every last detail.

More so, no other third-party tool can match its template library so there’s little chance your flowcharts will ever look similar to anyone else’s.

Microsoft Surface Pro 7+ First Impressions: Spec upgrades are underrated

For a period of time tech journalism derided Apple for a seeming deluge of spec bump improvements to its Macs over the years. Year after year Apple would update its Mac lineup with the latest Intel chip, bump the number of transistors it listed on its slide shows and seemingly called it day. To the chagrin of reviewers and tech enthusiasts, it felt like Apple was being stingy with the impressively massive hardware changes the industry craved as yearly identifiers of “new & improved.”

Now that I have my hands on the Surface Pro 7+ I can see the logic behind simply tweaking the processor and shipping a relatively identical product, in fact, it may be one of the smartest decisions Microsoft’s done for its Surface lineup in a couple of years.

Late last week, Microsoft was kind enough to send OnMSFT a review unit of its latest Surface Pro, the Surface Pro 7+. Microsoft’s latest 2-in-1 is practically identical to the Surface Pro 7 that came out the year before and holistically the same as the previous four versions. However, during what can euphemistically be summed up as an unconventional year for the world, Microsoft unconventionally rolled out its follow-up to the Surface Pro 7. Normally released during the Fall, Microsoft released the Surface Pro 7+ in mid-winter with only a refreshed Intel 11th generation chip and a hardware tweak to make swapping SSD easier.

Pxl 20210213 215016821


With about a week’s worth of time under my belt, I can say my first impressions of the Pro+ are rather glowing. The Pro+ feels faster, and the battery life is noticeably improved. I have yet to really test the LTE on the device, which may hamper battery life, but other reviewers are seeing no noticeable difference in battery performance during their testing.

Microsoft and Intel have made some claims about graphical performance improvements but I haven’t opened any of my old CAD projects to test that just yet, but simply moving windows around the OS and animations feel more fluid.

I can note that the device does seem to get hotter much quicker than my last experience with a Surface Pro which was back in 2017, so I’m not sure if the device legacy in between the two is known for that.

The only other in-your-face change is the new access panel for the SSD. I don’t have the tools to open that hatch yet, they’re on order from Amazon, but it’s a cool feature for enterprises to quickly swap devices without having to clear an entire device beforehand.

Pxl 20210213 215332160.portrait

As I just mentioned, it seems Microsoft’s Surface Pro 7+ is an enterprise play only for the moment. Rumors have it that the consumer-grade version of the Surface Pro 8 may need to wait as long as next year to see that release. If the rumors hold true, I think it’s an unfortunate business decision on Microsoft’s part because so far, I think they have a solid winner on their hands.

If Microsoft would simply release this version to consumers it wouldn’t need to test new firmware (something that’s constantly plagued Surface devices), it can squeeze performance out of the latest Intel chip which appears to be a solid improvement, and while dated, the iconic design is still a favorite among buyers. Last quarter, Microsoft reported that its Surface line passed the $2 billion dollar revenue marker and if it spent the remainder of this year milking their R&D investments from the last 4 years, they could easily cross that marker during what will undoubtedly be a soft year for PC sales. At least that’s my armchair Tim Cook strategy.

4 best VPNs for Germany for privacy, streaming & speed

Even if you live in one of the most developed countries in the world, where everything seems to work perfectly, computer privacy is often under attack.

For this reason, precisely, it becomes very important to know what the best VPNs for Germany are.

Why should I use a VPN in Germany?

Without a doubt, there are many reasons why you should install a reliable VPN tool while in Germany. Here are some of the main advantages to using a software solution.

  • Watch YouTube without annoying blocks

In Germany, some YouTube content is blocked. For example, you open a video of your favorite song on YouTube but you run into the annoying message:

Sorry, this video is not available in your country.

So, if you’re leaving for Germany, get ready, this message (in German) will appear to you very often. Videos available and visible in other countries are sometimes blocked in Germany due to access restrictions.

  • Safely download data and files

Network and Internet control and censorship is sometimes used in Germany. Neighboring Switzerland is not far behind either.

In Germany, it is forbidden to download files covered by copyright. German providers are not only slowing down the file download but also analyzing the traffic.

This traffic analysis allows them to inform the competent authorities in case of suspicious downloads.

Thanks to this article, you can then safely download files and bypass any geographical block.

  • Watch Sky Go and access Netflix

Another reason to use VPN in Germany is Soccer! Thanks to a good VPN, you’ll be able to access the Internet from a different virtual location. In this manner, you can watch your favorite soccer games in Germany.

You will not miss the best games and sporting events. Moreover, the Netflix catalog varies from one country to another.

If you’re in Germany but you do not speak German, Netflix really does not give you much. With an adequate selection of the best VPN to use in Germany, you can access the complete Netflix catalog of the country of your choice.

How do I unlock YouTube through a VPN in Germany?

Install one of the best VPNs for Germany and you’ll be able to navigate with a different geolocation address. In this manner, you’ll access YouTube as if you were comfortably seated on your parents’ couch in another part of the world.

Germany is a beautiful country with many opportunities but also some online limitations and restrictions. Thanks to virtual private networks, you can bypass these limitations and protect your privacy.

What are the best VPNs to use in Germany?

To help you out, we’re going to look at 3 top providers that are reliable and can deliver. Here’s the range of benefits you’ll be reaching:

  • Fast internet connections.
  • Affordable subscription fee.
  • Strong encryption & privacy policies.
  • Wide range of servers in Germany and beyond.
  • Reputation as a reliable service provider with a proven track record.

Private Internet Access (Recommended)

Private Internet Access

Like any other country in the world, Germany has its own set of laws when it comes to geo-restrictions. For example, torrenting is forbidden in the country, so a VPN that can enable this feature is what will take the top spot on our list.

That being said, Private Internet Access is most definitely the solution that you should try when trying to bypass geo-restrictions in Germany.

Developed by Kape Technologies, this VPN service has around 3300 servers in 46 countries around the world, allowing complete coverage and a wide selection of faux identities to choose from.

Of course, the main feature that makes Private Internet Acess perfect for the job is the fact that it enables P2P support, which is the basis for torrenting.

Of course, when torrenting you also want to make sure that you will remain undetected, and that the download and upload speeds are decent.

These are both things that you don’t have to worry about anymore since the security level is assured by military-grade encryption, to the point where not even your ISP will know what you are doing.

As for the speed, you should know that you have unlimited bandwidth, and the high number of servers means you can choose that one that will benefit you most anyways.

Here are some of the perks of using Private Internet Access in Germany:

  • PPTP, OpenVPN and L2TP/IPSec technology
  • You are provided with a secure VPN account
  • It is extremely easy to set up and use.
  • Block ads, trackers, and malware
  • Your traffic will not be logged
  • Unlimited bandwidth
  • P2P support

Private Internet Access

Keep your browsing habits private with this amazing VPN, now at a discounted price for a limited time only!
Check price Visit website

CyberGhost VPN

CyberGhost VPN has a large selection of servers, making it the best option for online anonymity. The service features thousands of server locations worldwide and protects your data with 128-bit encryption technology.

However, by becoming a premium member,  you can enjoy top-notch 256-bit encryption. The installation is simple, but if you encounter any difficulties, a guide is available on CyberGhost’s website.

The variety proposed by CyberGhost VPN is not comparable with any of the services examined so far. Its servers are located in 17 countries worldwide, including the United States, Russia, Romania, Germany, and Switzerland.

The wide selection of servers allows you to have maximum anonymity when surfing the Internet. If a server were to turn off (a rather unlikely event), you can choose between other servers, ensuring continuity of the connection.

The service is also available on Apple and Android, with the ability to navigate safely even with smartphones and tablets. Unfortunately, the proxy does not work for multiple devices if you are a free user.

To get all the benefits of this service you must be a premium or premium plus subscriber.

The premium subscription has something more to offer.

As a premium member, there will be no bandwidth restrictions. If you are using the free service, the maximum rate will be 1 M per second and the rules for using your internet provider’s data will be applied!

This proxy service is easy to install and guarantees anonymous browsing with good data protection. Technical support is of excellent quality, the forum and blog keep up to date with the latest news.

Given these premises, it is really appropriate to carry out a test with CyberGhost VPN.

Cyberghost offers three levels of service: free, premium, and premium plus. Payments for registration can be monthly or yearly.

They allow you to remove the ads, present in the free version, and provide additional features. The premium plus option has all the features of the premium. In addition, it allows the user to connect 5 devices and not just 1.

CyberGhost VPN

CyberGhost VPN can protect your privacy and secure your connection and works great even in Germany.
Check price Visit website

NordVPN

NordVPN is one of the important names in the VPN market. If you need an easy-to-use, fast, highly reliable VPN to protect your sensitive data and solve connection problems, this is the tool to use.

What kind of problems are we talking about? For instance, to access the Netflix USA library, NordVPN is certainly one of the providers to be taken into consideration.

NordVPN is based in Panama, a paradise not only for tourists but also for privacy. The Panama government does not require VPN providers to store information about users.

So NordVPN does not keep any records of your activity on the Internet. There is absolutely no trace of what you have done online or the websites you have visited.

The WiFiSec feature is one of the most interesting tools you can use thanks to NordVPN. Public or free WiFi networks are notoriously very dangerous. As a general rule, you should never connect to a public or free WiFi hotspot.

However, the NordVPN WiFiSec feature detects when you connect to an unsecured WiFi network and automatically enables VPN protection.

You can set WiFiSec to automatically connect and activate automatically whenever you connect to secure and non-secure networks.

The Adblocker feature will make your Internet experience safer and more enjoyable. NordVPn Adblocker has a CyberSec feature that blocks dangerous websites and allows users to avoid annoying ads.

NordVPN offers 3 season tickets to choose from. Regardless of the type of subscription, the features are always the same.

As is customary in the VPN market, which determines the price difference is only the duration of the subscription. Naturally, the greater the duration of the subscription, the greater the benefits in terms of savings will be.

NordVPN

Looking for a VPN that will serve you well even in Germany? Check out NordVPN.
Check price Visit website

IPVanish

IP Vanish

IPVanish is a VPN provider based in the United States, with a particularly high reputation. In fact, the company is the only one to offer a Tier-1 VPN service.

It also owns and manages over 325 servers, located in 60 countries, with over 40,000 different IP addresses available.

IPVanish is a security product that guarantees online privacy by protecting users from unwanted espionage, hacking and other dangerous threats.

In addition, it can unlock websites and other online content usually limited by the geographical region.

IPVanish says not to save any logs. As with all VPN companies, there is no way to verify this, but, in our opinion, IPVanish is reliable.

How IPVanish works

The IPVanish VPN service allows users to browse online in a secure environment. When a user activates his or her VPN connection, IPVanish opens an encrypted tunnel through which all data can pass.

This process prevents access to information on your traffic and activities by any third party (ISPs, governmental organizations, office servers, etc.).

With this type of system, all data transmitted to and from your computer will be safe and secure. Your location will also be hidden.

In fact, IPVanish replaces the visible IP address online with one of its dynamic IP addresses on its extensive server network.

This system also allows you to bypass local restrictions that are implemented in your area because local servers will not be able to see which websites or online applications you are using with your VPN connection.

Therefore, it will not be possible to block any type of request or browsing activity.

IPVanish

IPVanish can really make your IPVanish, even in Germany. Try it out now!
Check price Visit website

Pick your favorite VPN

Now you have a good idea of the best VPN providers to turn to if you’re in search of a reliable VPN connection.

We welcome your comments on how your experience was with these providers if you tried them out. We’ll be glad to respond to any questions you might have.

FIX: This Document Is Trying to Access PDF Error

Here you are, staring at that bold This document is trying to access PDF error message once again, with the usual options to Allow, Block, and Cancel.

We can only imagine what you must be thinking of, but the easiest way – Allow – doesn’t always work.

If it does function, it only leads to another pop up window and no actual result. However, you do need to remind yourself that clicking Allow isn’t necessarily the wisest thing to do.

Malicious websites are created with one target in mind: to silently gather data and transfer harmful content.

That’s why Acrobat and Adobe step in to display a warning message when a PDF attempts to connect to an Internet site.

Various forums have threads on this topic, so you’re not alone in this mess. In today’s article, we’re about to explore some of the best methods to deal with such security warnings. Better late than never, right?

How can I fix This document is trying to access PDF error?

1. Change default PDF software to Adobe Reader/Acrobat

PDF Handler default option
  1. Open Adobe Acrobat Reader.
  2. Go to Edit, and select Preferences.
  3. Under Application Startup, click on the button Select Default PDF Handler.
  4. Click on the drop-down box and select Adobe Reader.
  5. Up next, click on Apply.
  6. Click OK to exit out the dialogs.

If you do not possess the Reader, considering installing it for free by following the link below.

Adobe Acrobat Reader

Adobe Reader enables you to view and print PDF files and get rid of any other warning message.
Free trial Visit Website

2. Specify the default behavior for PDF access to websites

  1. Open Acrobat. Edit menu Preferences
  2. Navigate to Edit menu, and select Preferences (Windows) or to Acrobat/Adobe Reader, and select Preferences (macOS).
  3. Choose Trust manager.
  4. Go to Internet Access from PDF files outside the browser, and select Change Settings.
  5. Now, check-mark Allow PDF to access all websites.

3. Change Internet access default behavior for a specific website

  1. Open Acrobat. Acrobat Pro DC Preferences
  2. Choose Edit, and select Preferences (Windows) or directly Acrobat/Adobe Reader, and go to Preferences (macOS).
  3. From the categories on the left, choose Trust manager.
  4. Click Change Settings.
  5. Choose the option to Add a website.
  6. Then, type its URL in the Host Name text box.
  7. Click Allow.

Some users describe trying the suggested solutions above just to be stuck with the same security warning message when accessing a specific website.

Alternatively, you may try changing Internet access default behavior from PDF files for the website in cause as well. Hope this helped.

This document is trying to access PDF message can create many problems for average users wanting a reliable PDF experience. We’ve been working on this with real progress thanks to the previously described solutions.

If you have any other questions or suggestions, don’t hesitate to leave them in the comments section below, and we’ll be sure to check them out.

Photo Keywording Software: 7 Best to Use in 2026

Are you looking for accurate keywords for your stock photos? Do you want to improve your photos‘ searchability on stock sites? This article is exclusively designed for you.

In this guide, we are going to be bringing you some of the best photo keywording software, any of which can be employed to generate keywords for your images and consequently improve their search results online.

All creative artists (photographers, graphic designers, and so on) want one thing: RECOGNITION. And the best way to get this is to get their work out there and make it accessible to as many people as possible.

To do this, keywording your artworks (photos, videos, graphics, etc.) and exporting them to the web is the way to go.

While photo upload/export could be a stroll in the park, the preceding process (keywording) could be highly engaging. In fact, many photographers end up spending more time on keywording than they actually spend on taking shots.

Hence, to facilitate photo keywording, save time, and improve productivity, keywording tools were invented. And we will be bringing you seven of the best photo keywording software out there.


What are the best photo keywording software tools?

Adobe Photoshop

Adobe Photoshop keywording tool

Just when you thought that Adobe might have missed something from its robust creative suite, the Stock Contributor portal makes its entry.

If you’re a Photoshop aficionado and much of your image editing magic is powered by the best imaging and design software, you will be pleased to know that this offers you a great tool to make your content easy to find with the right keywords.

The Stock Contributor allows you to review and reorder keywords for accuracy, delete irrelevant keywords, or edit them while the intelligent auto-keyword tool memorizes your editing preferences to improve your future experiences.

Let’s quickly look at its key features:

  • Auto-keyword feature for easy and fast keywording (up to 25 automatic keywords suggestions)
  • Click and drag function to move your keyword up or down
  • Select and affect multiple images (for indexing similar assets)
  • Erase and refresh auto-keywords options
  • Copy and paste function (distributes keywords to different fields if you use an external text file and more)
  • CSV files to track and upload your keywords
Adobe Photoshop

Adobe Photoshop

Adobe provides with a fully compatible tool that will help make your content easy to find with the right keywords, so try it out now!
Free trialVisit website

Adobe Stock

Adobe Stock

The almighty Adobe Stock is more than a collection of stunning high-resolution, royalty-free images.

The app is also used as a keywording tool that allows you to get as much recognition for your photos as you want thanks to the right keywords.

All you need to do is upload your image to the Contributor portal, fill in the file type, category, and language you’re using for your title and keywords, then type in a brief title of up to 70 characters that sounds natural when spoken.

The tool will take over and generate the most suitable keywords for a powerful impact on the web.

Let’s quickly look at its key features:

  • Indexing panel
  • Examples of effective titles
  • Machine learning-based auto-keywording feature
  • Click and drag to remove or rearrange keywords
  • Multiple keywords selection
  • Automatically translate keywords for other countries and languages

⇒ Get Adobe Stock


Lightroom Keywords

Lightroom Keywords best photo keywording software

Lightroom-Keywords is a photo keywording software, specially designed to run on Adobe Lightroom.

The software is exclusively used as a Lightroom plug-in, to generate keywords for images that are refined, edited, recolored, or manipulated by Lightroom.

It offers a swift keywording procedure, which typically takes minutes or even seconds.

Basically, it offers you the flexibility of running all your photographic workflow on Lightroom from taking shots, to editing, keywording, and uploading on stock sites.

It is an essential time and money-saving tool, which, if used as appropriate, would improve your operational efficiency and overall productivity.

Lightroom-Keywords typically runs on customizable AI technology, which automatically generates accurate keywords for stock photos.

Other key features of the software include CSV conversion, multi-format support, support for Lightroom 5 (and above), keyword preview, auto-suggest, YouTube tutorial (how-to guide), free trial, and more.

Lightroom-Keywords services are offered on a credit basis. The number of credits purchased determines the number of photos you can keyword and export to stock sites.

⇒ Get Lightroom-Keywords


Xpiks

Xpiks best photo keywording software

Xpiks is arguably the best photo keywording software, which is widely used by many creative artists to keyword and upload their photos, videos, and/or vectors on stock sites.

The software is cross-compatible with Windows, Linux, and Mac operating systems.

Xpiks offers you an intuitive interface, designed to speed up your workflow and get your images on microstock with the most suitable keywords. Essentially, you are able to save valuable time, while also improving productivity.

The unique feature of Xpiks is probably the File Transfer Protocol (FTP) setup, which facilitates file uploading after a suitable keyword has been generated by the software.

With this, you don’t have to export to another software before you can get your photographs on stock sites.

Furthermore, Xpiks offers a set of photo editing tools, which allow you to put final touches or modifications to your photos before uploading them online.

Other key features of Xpiks include keywords suggestion, multi-format video & image file support (MP4, JPEG, PNG, TIFF, and so on), keyword autocomplete, spelling check, auto-correction, translator (multilingual support), and many more.

Xpiks is offered to all and sundry at absolutely no charge, as the software is being financed by donations from all over the world.

⇒ Get Xpiks


KeywordsReady

KeywordsReady best photo keywording software

KeywordsReady is a photo keywording software, designed to facilitate keywords generation for stock photos, and improve their rankings on stock sites.

It is a cloud-based software; hence, it is not platform-dependent. This means that it can be used on Windows, Linux, Mac, and even mobile platforms.

As such, it is the ultimate photo keywording software for a good number of photographers across the globe.

This software is very easy to use, requiring you to only drag & drop photos on the site, and the software automatically generates keywords for the uploaded photos.

To upload photos on the software, you are afforded the flexibility of selecting images directly from your device or simply attach direct URL links (to the images). Either way, the software will generate suitable keywords for you within seconds.

Furthermore, KeywordsReady features the latest in artificial intelligence, with a powerful AI-enhanced image recognition tool. Other features include autosuggestion, Chrome extension, video guide, online support, APIs, intuitive interface, and many more.

KeywordsReady is free web-based software. However, you’ll have to sign up on the website to create an account, before you can enjoy the full features it offers.

⇒ Get KeywordsReady


EasyResource – Keywording & Metadata

EasyResource - Keywording & Metadata best photo keywording software

EasyResource is another prominent photo keywording service provider out there. It offers keywording services to photographers and graphic designers, and also facilitates photo and video upload/export to prominent stock sites like Alamy and Getty.

Metadata is often overlooked when preparing keywords; however, it is an essential aspect of keywording. And EasyResource provides you a durable avenue to use the service.

This ensures your photos are properly keyworded and ranked on the hosting stock websites, thereby making them accessible to more people.

Other keywording & metadata features of EasyResource include creative keywording, weighted keywords, auto-tagging, translation, keyword cleansing, auto-tagging, keyword captions, keyword description, and more.

EasyResource’s keywording & metadata services are offered by custom pricing. To get the solution, contact their sales team.


MyKeyworder

MyKeyworder best photo keywording software

MyKeyworder is a photo keywording software, widely used by thousands of photographers and graphic designers to generate suitable keywords for their photos/designs.

It houses flexible support for macOS computers and modern Windows PC.

This software is very easy to use; keywording a photo is as simple as importing a photo, generating keywords, and saving the generated keywords on the photo.

It is especially suitable for users with Adobe Lightroom, as its design makes it flexible enough to integrate and work in sync with Lightroom.

This way, you can easily keyword any photo that is processed and/or edited by Lightroom, and upload it directly to stock sites.

Other features of MyKeyworder include: AI-optimized keyword search and image recognition, Shutterstock optimizer, Google APIs, grammar highlighting (and correction), batch mode, thumbnail adjustment, alphabetical keyword order, copy-paste field, and more.

MyKeyworder is a free program, financed with user donations from all over the world. The free package, however, comes with limited features.

And to unlock the full package, you’ll have to make a subscription (make a donation of $10 or more).

⇒ Get MyKeyworder


Photo keywording software is an essential tool in photography today, especially if you are a stock photographer. With accurate keywords, your stock photos would be near-invincible on the web.

Keywording tools can help you generate concise keywords for your photos, and save you quality time, money, and efforts in the process.

So if you are looking to improve your rankings on stock sites, give these tools a try and share your impressions with us via the comments section below.


5 best VPNs for Thailand to access restricted web resources

You may be wondering why a VPN is needed in Thailand. Well, Thailand has always been a wonderful country for tourism or even business.

However ever since the military set in a few years ago, there has been an intense crackdown on Internet use. This may result in being unable to access social media or geo-location sites.

Also, Thailand has intensified its computer-related laws to give the government extra control over Internet access. To have the freedom to access all sites, you need a VPN to give you secure access.

A VPN masks your IP address by changing it to another country’s IP address; hence, your location is being spoofed to appear as if you are logging in from another country.

In addition, VPNs also help you to browse anonymously without any fear of third-party accessing your information.

Since the government crackdown is intense, you would definitely need a VPN to secure your VoIP calls and video chats.

If your VPN is blocked in Thailand, it is possible you did not note important features before using that particular VPN service.

Before going for any VPN, do note the following characteristics:

  • Strong encryption: to keep your data private from ISPs, government tracking, and snoopers.
  • Killswitch feature: this feature is essential because it prevents accidental leakage of unencrypted data to your ISP if your VPN service suffers problems. Without a kill switch, your VPN service is not secured.
  • Stealth mode: this enables silent and complete anonymous browsing. This is important because the main reason people use a VPN is to view (illegal) contents. Hence, the stealth mode would secure your system from any potential government tracker.

Meanwhile, these features are important in countries that crackdown against VPNs such as Thailand.

Since many VPN services are blocked by the Thai government, we have gone ahead and analyzed 5 of the best VPN services for accessing any content in Thailand.

Best VPN software to use in Thailand

Private Internet Access (recommended)

download PIA

Our top VPN choice for accessing restricted web resources in Thailand is no other than Private Internet Access.

If your wish is to keep your network super speedy and secure, there’s no doubt that this Kape Technologies solution is excellent.

Even if you’re a newbie, PIA is straightforward to use. You don’t need to turn into an IT expert to set up your VPN and make your future connections more secure.

Firstly, the default setting protects your connection with AES 128-bit encryption. This algorithm is secure on its own.

However, feel free to customize your encryption algorithm and protocols with ease. You may also select your authentication and data encryption.

Private Internet Access has numerous servers in a wide range of countries which means you can dial your IP address into 46 countries around the world.

Plus, its 30-day money-back guarantee is just what you need if the service doesn’t live up to your expectations.

Here’s the list of key features Private Internet Access brings to the table:

  • If streaming is your concern, it unblocks Netflix, HBO Go, and more without any fuss
  • It offers unlimited bandwidth
  • It’s got a super-effective automatic kill switch to re-enforce security
  • Reduces gaming latency with consistently high speeds
  • Minimalistic apps for Windows, Mac, Android, iOS, Linux, and more
Private Internet Access

Private Internet Access

Private Internet Access is the best VPN solution to use in Thailand. Now available at a major discount!
$2.69/mo. Buy it now

CyberGhost

get CyberGhost

CyberGhost is a widely used VPN in regions which are not VPN-friendly. With over 6400 servers worldwide, CyberGhost is an efficient VPN service provider to use in Thailand.

Some of its features include no bandwidth limit with 256-AES bit encryption technology.

Users’ information is kept secure with its DNS and IP leak protection while it also offers good browsing speeds when connected to their servers. Hence, you do not need to worry about your VPN being blocked in Thailand.

In addition, CyberGhost is cross-platform compatible with Windows, Linux, Mac, and Android versions available.

You can take advantage of the 30-day money-back guarantee to test their services before deciding to purchase their product.

CyberGhost VPN

CyberGhost VPN

Want to unblock Thailand's geo-restrictions? Check out CyberGhost VPN.
$2.75/mo. Buy it now

IPVanish

enjoy IPVanish

IPVanish has been in the VPN market for a while and provides excellent VPN features. The software offers many servers in strategic locations worldwide.

The StackPath, LLC VPN service encrypts the user’s data connection with a 256 encryption technology and reroutes users’ connection through their servers to increase privacy.

You also get kill switch and DNS leak protection feature which means your information is not leaked out to the Thai government.

The servers also give decent speed which is ideal if you access streaming websites.

Also, IPVanish is an excellent VPN service for Thailand and offers a 30-day money-back guarantee for any of its plans.

IPVanish

IPVanish

IPVanish can protect your privacy and unblock geo-restrictions in Thailand without effort.
$3.33/mo. Buy it now

VyprVPN

grab VyprVPNDeveloped by Golden Frog GmbH, VyprVPN offers comprehensive VPN features at an affordable price.

Your connections are passed through their servers and are encrypted with military-grade encryption.

Using this VPN eliminates any chances of your information being detected by the government or your ISP.

Also, VyprVPN has a stealth mode that ensures complete anonymous access to blocked content. You can easily access geo-blocked websites like Netflix and BBC services using this VPN.

The servers have fast connection speed and are excellent for streaming, gaming, and downloading content.

VyprVPN is excellent to use in Thailand as it offers all the services needed to unblock the government censored online services.

VyprVPN

VyprVPN

Looking for a VPN to unblock geo-restrictions in Thailand? Try VyprVPN.
$1.66/mo. Buy it now

ExpressVPN

grab ExpressVPN

ExpressVPN has consistently been among the vest VPN available for Thailand. They excel in offering full VPN features as well as excellent customer support.

With servers in over 90 countries, users have plenty of choices to suit their geography needs.

This Express VPN International Ltd. VPN has one of the best security protocols where users’ data traffic is encrypted with 256-bit encryption.

Your information is kept private as the VPN masks your IP address with their making it difficult for government agencies to identify your location.

The kill switch and DNS leak protection ensure that your online activity is kept private from hackers, snoop, and your ISP.

Their customer service is reliable, with quick and valuable feedback given to users with problems or questions about the VPN.

ExpressVPN comes with a 30-day money-back guarantee on all their products with the basic plan starting at $10 a month billed annually.

ExpressVPN

ExpressVPN

ExpressVPN can protect your privacy and unblock geo-restrictions in Thailand in no time.
$8.32/mo. Buy it now

All the VPN listed above are excellent for Windows users if your current VPN is blocked in Thailand, but we recommend Private Internet Access since it provides a total package from speed and privacy to that money-back guarantee.

Have you used any of the VPNs we mentioned above in Thailand? Feel free to share your experience with us by commenting below.

How to fix the Camtasia 9 black screen errors in Windows 10/11

Camtasia is a video-recording software that you can record screencast videos Windows with.

However, some users have stated on TechSmith forums that they see a black screen when they playback recorded output in Camtasia.

Thus, the recorded Camtasia video previews are blank. This is how you can fix Camtasia 9’s black screen video previews in Windows.

How can I fix the Camtasia black screen issues?

  1. Select the Use software-only mode Hardware Acceleration Option
  2. Turn Off Antivirus Software
  3. Update the Camtasia Software
  4. Use an alternative video editing software
  5. Check the Canvas Dimensions

1. Select the Use software-only mode hardware acceleration option

  1. Open the Camtasia 9 window.
  2. Click the Edit menu, and select Preferences to open the window shown directly below.
  3. Select the Advanced tab on the Preferences window.
  4. Then click the Hardware Acceleration drop-down menu and select Use software-only mode.
  5. Click the OK button to close the Preferences window.
  6. Then restart the Camtasia 9 software.

Numerous Camtasia users have confirmed that the Use software-only mode option fixes the software’s black screen previews.

As such, the black screen error is often due to Camtasia’s hardware acceleration settings.

2. Turn off your antivirus software

  1. Right-click the Start button to open the menu shown below.
  2. Select Task Manager to open that utility’s window.
  3. Select the Start-up tab shown directly below.
  4. Choose the antivirus utilities listed on the Start-up tab, and press the Disable button.
  5. Then close Task Manager, open the Start menu and select to restart Windows.
  6. To ensure there is no other software conflicting with Camtasia, you can also deselect the Load startup items option on the System Configuration window.
  7. To open the System Configuration window, press the Windows key + R hotkey, enter msconfig in Run, and click OK.
  8. Click the Selective startup radio button on the General tab if it’s not already selected.
  9. Then deselect the Load startup items checkbox.
  10. Press the Apply button.
  11. Click the OK button to close the window.
  12. Press the Restart button on the confirmation window to reboot Windows.

Camtasia’s black screen error can also be due to third-party antivirus utilities. The antivirus software can block the software’s recording utility.

Trusteer Rapport, Zone Alarm, Webroot, and Anti-Key Logger are a few of the utilities that TechSmith confirms can conflict with Camtasia.

So you should certainly at least disable that software, and any other antivirus utilities, you have run alongside Camtasia.

You can often turn off antivirus software by selecting a disable option on their system tray context menus. Alternatively, you can remove the antivirus software from the system startup.

That will ensure they don’t automatically run when Windows start.

3. Update the Camtasia software

Some Camtasia users have stated that updating the software fixed the black screen error for them. This page lists updates that have fixed various Camtasia bugs.

To check for Camtasia updates, click the Help menu at the top of the software’s window. Then you can select a Check for Updates option.

Check out this amazing guide to quickly learn how to record your screen in Windows 10 with the built-in tool.

4. Use an alternative video editing software

As unlikely as it may sound, the very first step in fixing Camtasia-related issues is to try different software.

In fact, this is first a simple method of testing that the recorded content plays back fine on software other than the affected one.

A great alternative to Camtasia is Adobe Premiere, which is also the industry-leading video editing software that allows you to record and process footage in any format, from 8K to VR.

One of its key features is the Intelligent reframing by Adobe Sensei (optimize footage framing whether it’s square, vertical, 16:9, or in 4K resolution).

It also has the Lumetri Color tools to make easy and accurate color grading selections, and the Essential Sound panel to improve audio content and accelerate audio mixing.

⇒ Get Adobe Premiere Pro

5. Check the canvas dimensions

Also note that what appears to be a black screen preview might just be a tiny, invisible canvas.

One Camtasia user stated: It turned out the issue for me was that my Project Dimensions had somehow gotten set from 1,920 x 1,080 to 2 x 1. As such, it might also be worth checking your canvas dimension settings.

To do that, click the Magnification drop-down menu at the top of the canvas and select Project Settings. Then select a more standard 1,920 x 1,080 dimension for the canvas from the Canvas Dimensions menu.

Alternatively, you can enter custom values for the canvas in the width and height fields. Press the Apply button to adjust the canvas.

Those resolutions will probably fix the black screen error in Camtasia so that you can playback recorded output.

Note, however, that there are also quite a few alternative freeware software you can record videos with, starting with Adobe Premiere Pro. Check out our software guide to discover further details for the best Windows 10 video-recording programs.

Let us know what worked for you in the comments section below.

How to fix corrupted GoPro video files

GoPro Hero cameras are versatile cameras for action video recording and photography that enable users to capture footage from a wide variety of angles.

Nevertheless, GoPro videos, which are typically MP4s, can get corrupted when a connection between SD card and camera is unexpectedly lost.

For example, video footage might get corrupted if the GoPro camera runs out of batteries when recording. Here are a few potential fixes for corrupted GoPlay MP4 videos.


How can I repair corrupted GoPro videos on Windows 10?

1. Use Adobe Premiere Pro

Your MP4 footage might also get corrupted in lights of the tool you are currently using to view and edit your videos. If such is the case, updating your gear to a truly pro one could be a gratifying solution that brings extra perks too.

Import your files MP3, MP4, and AVCHD (MTS) files in your project using Adobe Premiere Pro, the industry-leading video editing software that allows you to reprocess footage in any format, from 8K to VR.
As always, Adobe products are delivered with step-by-step, interactive tutorials, so you won’t need to worry about investing more resources in a special formation course.

One of its key features is the seamless integration with other apps and services to streamline your workflow (Photoshop, After Effects, Adobe Audition, and Adobe Stock or hundreds of third-party extensions).

It also has an integrated Premiere Rush feature (an all-in-one app that works across all devices), and the Auto Reframe to optimize footage for social media with intelligent reframing powered.

Adobe Premiere Pro

Adobe Premiere Pro

This tool provides native file support, and it integrates seamlessly with all the third-party apps you might need to edit your videos.
Free trialVisit website

2. Fix corrupted files with GoPro SOS

GoPro cameras index videos for playback as you record them. If the video suddenly stops recording unexpectedly, you’ll be left with a corrupted file that isn’t fully indexed.

GoPro cameras include an SOS signal with which users can repair corrupted files. To fix videos with SOS, insert the SD card that includes the corrupted video in the GoPro camera.

Turn on the camera. The camera might then display an SOS signal, bicycle, or + repair icon on its LCD to highlight that it detected a corrupted file.

If so, press any camera button when you see the repair icons or SOS signal to initiate a corrupted file repair; and wait until the camera stops blinking red.


2. Check out Fix.video

  1. Open the Fix.video page in your browser.
  2. Then copy the corrupted video from the GoPro storage card to your desktop or laptop.
  3. Click the Upload your broken video button to select the corrupted file.
  4. Press the Open button on the Open window.
  5. Fix.video will then show you a preview of the repaired video file when fixed. You can press the play button to play back a preview.
  6. Then click the Full Fixed Video option.
  7. A PayPal transfer is required to download a fixed video. Press the Continue button to make that transfer.
  8. Thereafter, you can click a download button to save the full video.

If GoPro SOS doesn’t fix the clip, check out the Fix.video web app. That’s a web app that repairs corrupted or truncated MP4 and MOV files recorded with GoPro cameras and other models.


3. Fix corrupted GoPro clips with the Video Repair software

There are numerous video repair software you can utilize to fix GoPro MP4 footage. Stellar Phoenix Video Repair is one package that fixes various video file formats, such as MP4, MOV, F4V, and M4V.

The full version is available for a standard price. You can check if the software will fix your corrupt video by clicking the Free Download button to try out the demo.

⇒ Get Stellar Phoenix Video Repair


Those are a few resolutions that will probably fix corrupted GoPro MP4s, so you can play them in media players. Remember, however, that a video isn’t necessarily always corrupted if a media player doesn’t play it.

You might need to adjust some software settings or add a codec pack instead. This post provides resolutions for fixing media software that doesn’t play MP4 clips.


X3daudio1_7.dll was not Found: Fix This Error With 6 Methods

Windows has myriad DLL (Dynamic Link Library) system files. The x3daudio1_7.dll is a DirectX DLL file some games and multimedia software need. A few users have reported an error message, x3daudio1_7.dll was not found when opening some software.
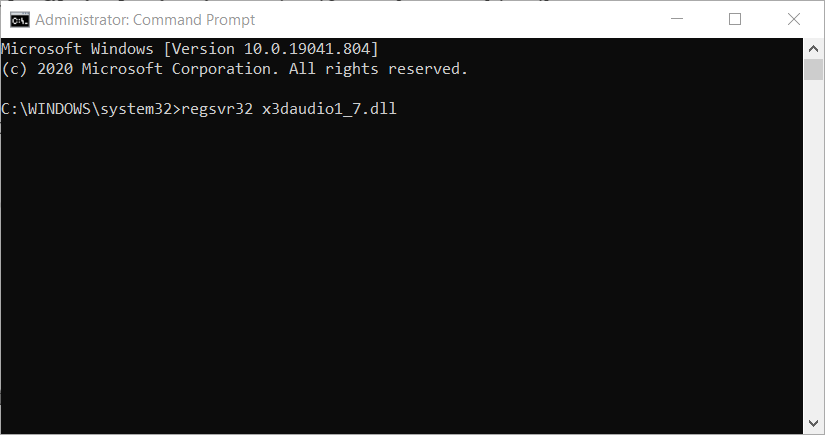
The software won’t usually start because x3daudio1_7.dll was not found. So, you can’t ignore the error message if you want to utilize software that requires that DLL file. There are numerous potential resolutions for fixing it, and we explore them in this article.

Why am I getting x3daudio1_7.dll was not found?

We have figured that a few things may cause the error. At the top of the list are the following:

  • Corrupt system files – These are a massive problem in computers and are known to cause many dll-related issues.
  • Wrong X3DAudio library version – If the game or application requires a different version from what you have, you will get a missing dll notice.
  • System requirements – For some users, it is a problem where the computer does not meet the minimum system requirements to use the application.

However, it would not matter what the cause is because you can fix the problem using the solutions we proffer.

What is X3DAudio1_7 dll?

It is a file that comes with the DirectX suite of software. It is an integrated part of this collection and helps manage graphic programs, videos, and game tasks. This component is integral to how the Windows 10 operating system handles some applications.

Let us now explore what you may do when it is missing.

How can I fix the code execution cannot proceed because x3daudio1_7 DLL was not found error?

1. Run an SFC scan

  1. Press Windows + R, type cmd, then press the Ctrl + Shift + Enter hotkey to open an elevated Command Prompt window.
  2. Type the script below and hit Enter: DISM.exe /Online /Cleanup-image /Restorehealth
  3. After that, type in this System File Checker command and hit Enter: sfc /scannow
    Sfc /scannow command x3daudio1_7.dll is missing
  4. When the SFC scan is finished, restart your PC if the scan outcome confirms Window Resource Protection has repaired files.

2. Restore Windows DLL files with third-party software

The x3daudio1_7.dll is missing, an error means that the file is deleted or damaged. You can restore Windows DLL files with dedicated tools.

For example, you can use a system repair utility that can fix many Windows-related errors, such as missing DLL or BSOD (Blue Screen of Death) issues.

Although you can manually download a fresh x3daudio1_7.dll from DLL file websites, a dedicated tool provides a quicker and more straightforward resolution.

It scans your whole machine and detects any system file issues, and with the help of its database, it replaces any faulty or missing files with fresh, well-functioning ones.

Such tools can also help you clean your PC by automatically detecting useless files such as temporary files, duplicates, etc. Plus, it is also able to fix specific files damaged by malware.

3. Reinstall software the x3daudio1_7.dll error arises for

  1. Press Windows + R, type appwiz.cpl, and hit Enter.
    x3daudio1_7.dll was not found
  2. Select the software that displays the x3daudio1_7.dll error message on the program list.
    The Programs and Feature applet x3daudio1_7.dll is missing
  3. Click the Uninstall button for the selected software (and Yes on confirmation prompts).
    x3daudio1_7.dll was not found
  4. Restart your PC before reinstalling the software.
  5. Then reinstall the uninstalled software with a downloaded installer file or DVD installation disc.

4. Update Windows

  1. Open Settings by pressing the Windows + I hotkey.
  2. Select Update & Security to open the Settings tab.
  3. Click on Check for updates.
    x3daudio1_7.dll was not found
  4. If a new build version is available, click the Download and install option for the latest feature update.

5. Copy the x3daudio1_7.dll from another PC

5.1 Finding the file

  1. First, turn on a PC to copy an x3daudio1_7.dll form. That PC must have the same Windows platform and 32 or 64-bit system architecture as the one you need to fix the x3daudio1_7.dll error on.
  2. Open the search tool with the Windows + S hotkey.
  3. Type x3daudio1_7.dll in the search box to find that file, then click the Open file location option.
  4. Then insert a USB drive into your PC.
  5. Right-click the x3daudio1_7.dll and select Copy.

5.2 Transferring the file

  1. Open a folder on your USB drive within File Explorer.
  2. Right-click within a folder on your USB stick to select the Paste option.
  3. After that, turn on the PC where you need to fix the x3daudio1_7.dll error.
  4. Insert the USB drive that includes the x3daudio1_7.dll into the PC you must copy it to.
  5. After that, open one of these folders (the first for 64-bit and the second for 32-bit systems) to copy the x3daudio1_7.dll to:
    C:\Windows\System32\
    C:\Windows\SysWOW64\
  6. Right-click within the folder you will copy the file to and select Paste.
  7. Select the Replace the file in the destination option if a Replace or Skip Files window opens.
    Replace or Skip Files window x3daudio1_7.dll is missing
  8. Open the Command Prompt as outlined for the second resolution.
  9. Enter this command in the Prompt’s window and press Enter: regsvr32 x3daudio1_7.dll
    The regsvr32 command x3daudio1_7.dll is missing
  10. Restart Windows after registering the DLL file.

6. Restore Windows to a previous date

  1. Open Run’s window with the Windows + R keyboard shortcut.
  2. Type this command in the Open box and press Enter: rstrui
  3. Click the Choose a different restore point option and Next.
    x3daudio1_7.dll was not found
  4. If System Restore doesn’t display a complete list of restore points, select the Show more restore points option, then select a restore point date that will restore Windows to a time when there wasn’t an x3daudio1_7.dll issue on your PC.
  5. Click Next to continue.
  6. Select the Finish option to initiate the system restoration.

Restoring Windows will delete software installed after a selected restore point date. So, don’t be surprised if some software disappears after restoring Windows.

You can check what software a selected restore point removes by clicking Scan for affected programs in System Restore.

The resolutions above will probably be enough to fix any issues if x3daudio1_7.dll was not found for most users.

If you still need another fix, try reinstalling or resetting Windows as a last resort. You can reset Windows 10 and 8 as our Factory reset guide outlines.

We hope this has been helpful. Please leave us your comments below in the comments section.

How to Use Rdmin VPN For Mineraft: Server Hosting Explained

Setting up a LAN server for Minecraft with Radmin VPN opens up a world of cooperative gameplay and adventure. Today, we’ll guide you through all the steps necessary for a smooth setup. We also have some troubleshooting tips if you encounter any issues.

Whether you’re building epic structures or exploring vast landscapes, the guidelines below will help.

How to use Radmin VPN for Minecraft?

  1. Download Radmin VPN from the official website
  2. Install Radmin VPN on the computer that will act as hostRadmin VPN installation
  3. Click the Create Network button in Radmin VPN’s main windowMain screen Radmin VPN
  4. Choose a name for your network and configure a password (minimum 6 characters)Create Radmin VPN network
  5. Click the Create button
  6. Tell your friends the name of the network and the password

How to host a Minecraft LAN server?

  1. Launch Minecraft on the host PC
  2. Click SingleplayerSingleplayer Minecraft
  3. Select Create New WorldMinecraft creating new world
  4. Customize your world
  5. Click the Create New World button once moreMinecraft world customization
  6. Once your world loads press the Esc key on your keyboard
  7. Select Open to Lan from the game menuMinecraft opening world to LAN
  8. Customize your LAN game
  9. Click Start LAN WorldStarting LAN game Minecraft
  10. Note down the 5-digit port number (your friends will need it to connect)LAN game port number Minecraft

How to join a Minecraft LAN server?

  1. Launch the Radmin VPN client on your PC
  2. Hit + on your keyboard or click the Join Network buttonJoin network menu Radmin VPN
  3. Make sure you’re in the Private Network tab
  4. Type the name of the server and its passwordJoining a network on Radmin VPN
  5. Click Join
  6. Note the IP of the host networkHost IP Radmin VPN
  7. Launch Minecraft on your PC
  8. Click MultiplayerMultiplayer mode Minecraft
  9. Select Add Server (or Direct connect)Add Minecraft server
  10. Choose a name for the server
  11. Type the IP and Port numbers in the Server Address field (it should look like in the picture below)Server details Minecraft
  12. Click Done

Can’t host game servers with Radmin VPN

If Radmin VPN is not working, you can try resetting your network, allowing it through the firewall and double-checking your Minecraft server setup.

If all else fails, you can also try using another VPN that’s just as good for hosting Minecraft servers.

Radmin VPN alternative for game server hosting

Private Internet Access (PIA) is a good alternative. It supports port forwarding, which is crucial for server hosting. It offers reliable performance with low latency, making it suitable for gaming

Moreover, the service also offers dedicated IP (at an extra cost).

Its strong privacy features and affordability make it a solid choice if you need to configure port settings for your Minecraft server.

Is Radmin VPN safe?

Yes, Radmin VPN is safe and legit. It provides secure connections and is designed for private networking. However, always make sure to use the latest version and only install from the official website.

Yes, using a VPN for gaming is generally legal. It provides a secure and effective way of connecting with your friends and protecting your data.

However, always check the specific game’s terms of use and the laws in your country. Places like China and Russia heavily restrict VPN usage. Additionally, games like Fortnite and PUBG restrict VPN usage to prevent cheating.

Play Minecraft on LAN with Radmin VPN

To wrap it up, creating a public Minecraft server is not always a sure hit. There are some situations when making your server public is simply not possible, but that shouldn’t put you off.

You can use the workaround we’ve described above to create a VPN for you and your friends. Once you’re connected, Minecraft will see you as if you’re connected to the same physical network and allow you to host and join LAN servers in no time.

Microsoft Store to host free “For You, By You” virtual event for educators on March 4

The Microsoft Store has announced a free virtual event for educators on March 4. Titled “For You, By You: A How-to Event Series for Educators to Supercharge Classroom Engagement,” the 90-minute event should provide useful resources for teachers in what remains a challenging time for educators. The virtual event will also feature various special guests including Microsoft Education’s Director of Marketing Mark Sparvell as well as Life is Good Playmakers Founder Steve Gross.

Kahoot!, a global learning platform will also be presenting a session to showcase how educators can leverage Kahoot!’s integration with Microsoft Teams to connect and engage with students. Another session will be dedicated to Flipgrid, a video-based social learning platform app that Microsoft acquired a couple of years ago.

The virtual event will kick off at 2PM PT on March 4, and Microsoft also promised “a few surprise celebrity appearances.” Interested educators can register now on this page, though be aware that space will given on a first come first serve basis.